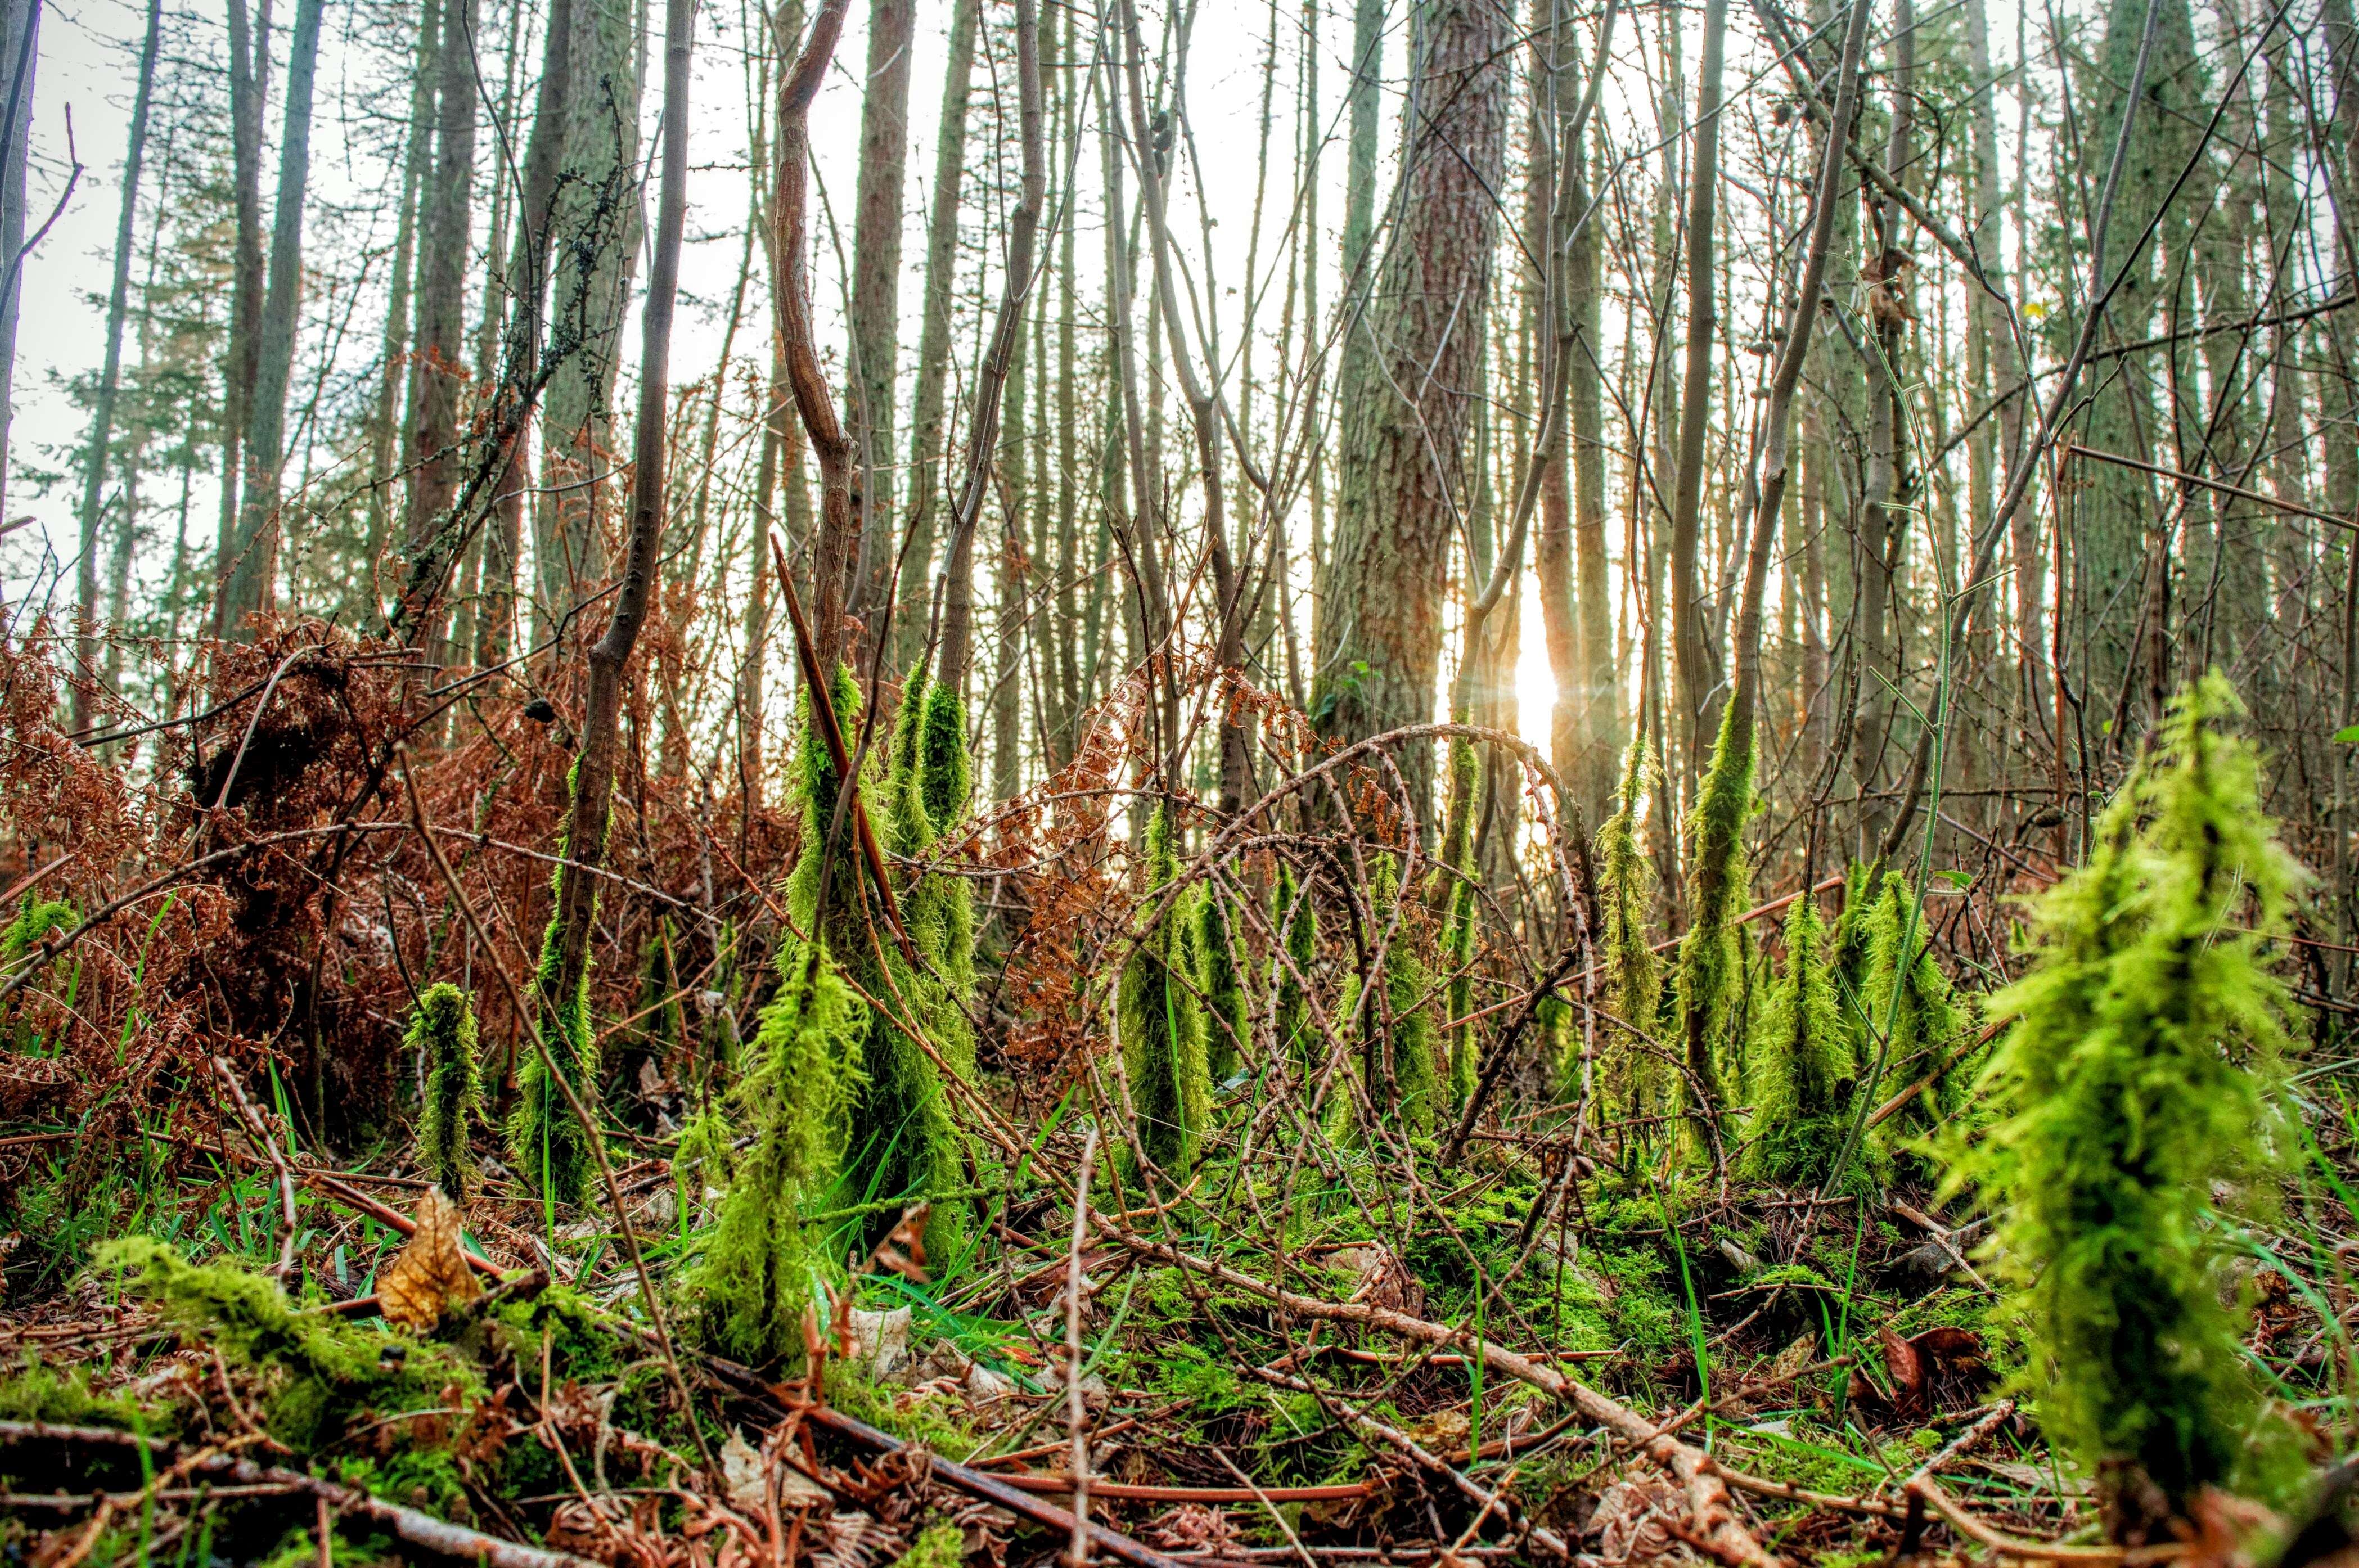
This week found me working hard for my pictures. With much of nature dormant at the moment in the woods (plenty going on on the peripheries though) my stroll through my local woods this weekend was slow and quiet.
This scene came up on me and kind of reflects the still magical place the woods seem to be at the moment.
Winter Woodland Wonders
I took plenty of pictures however this one reminded me that you do not need to look far for an excellent scene to capture even when you think nothing is going on.
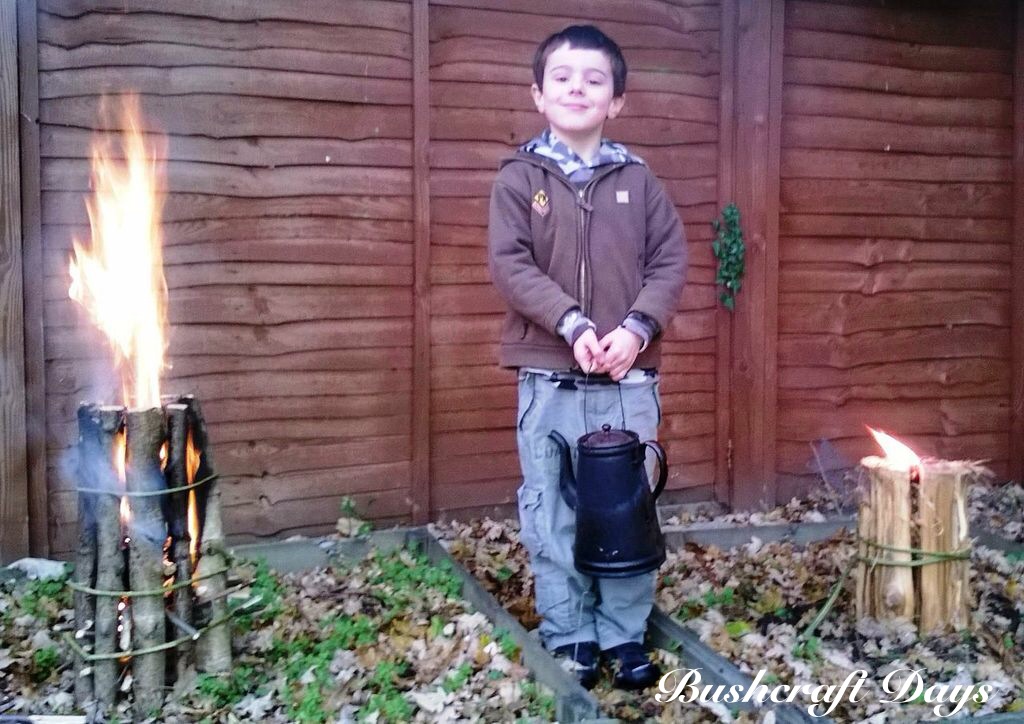
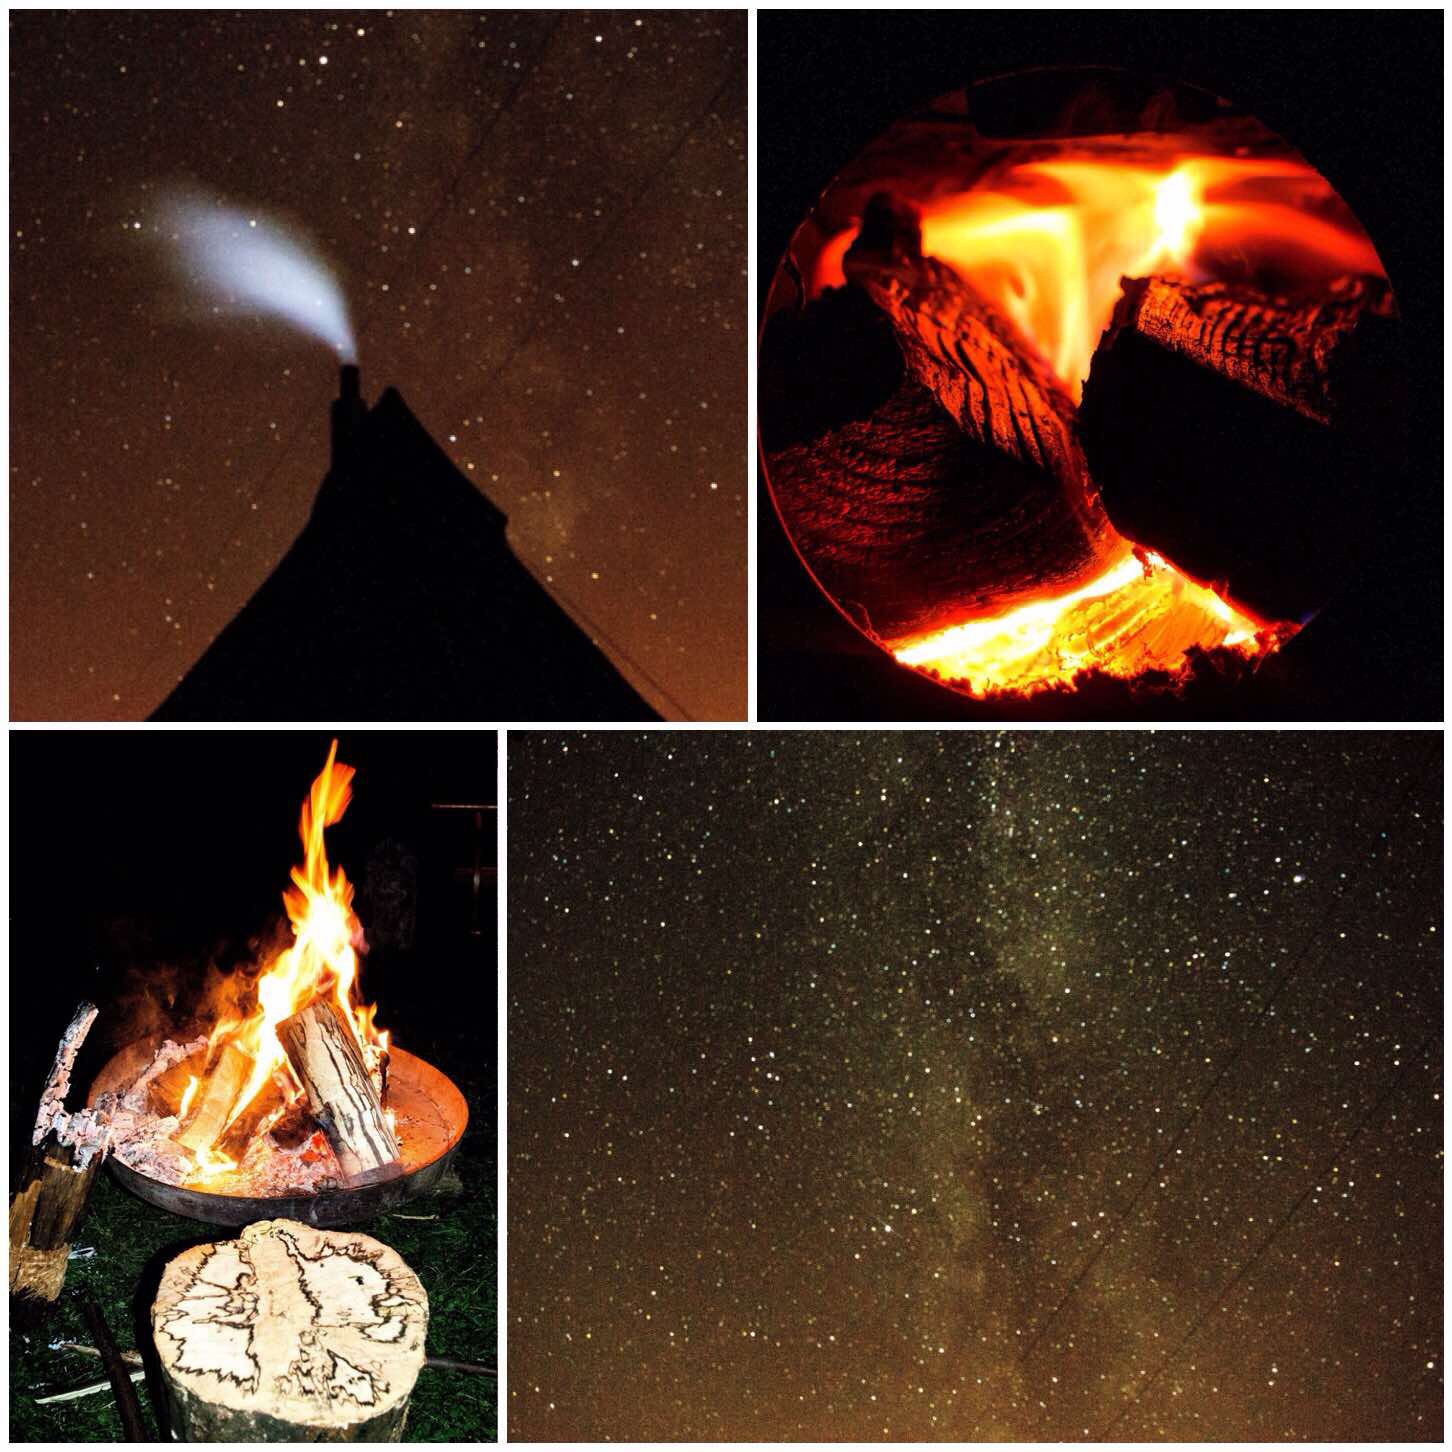
It has been a dream of mine to one day head on over to Scandinavia to practise my bushcraft skills, particularly in winter time. Time and money have so far not allowed me to do that however that has not stopped me from researching some of the ways of lighting fires in the snow or wet conditions.
I have seen many a Scandinavian (sometimes referred to as Swedish candles though Finnish seems the origin for many ) candle at bushcraft meets that have been carved using a chainsaw however I do not own one. My research showed me that chainsaws were not required and there are many other ways to light a fire in the snow or on wet ground other than candles, such as long fires and log rocket stoves.
This post brings together all my posts over the last couple of years on this subject. You will find if you click on the title for each section it will bring you to a more detailed post on making these fires.
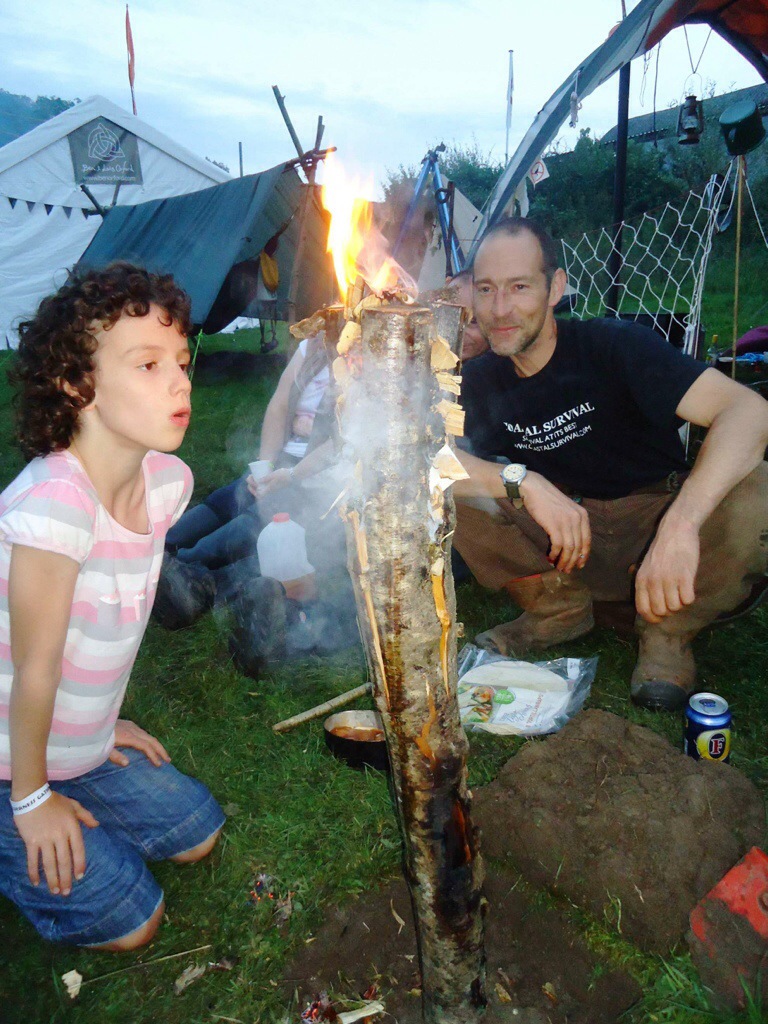
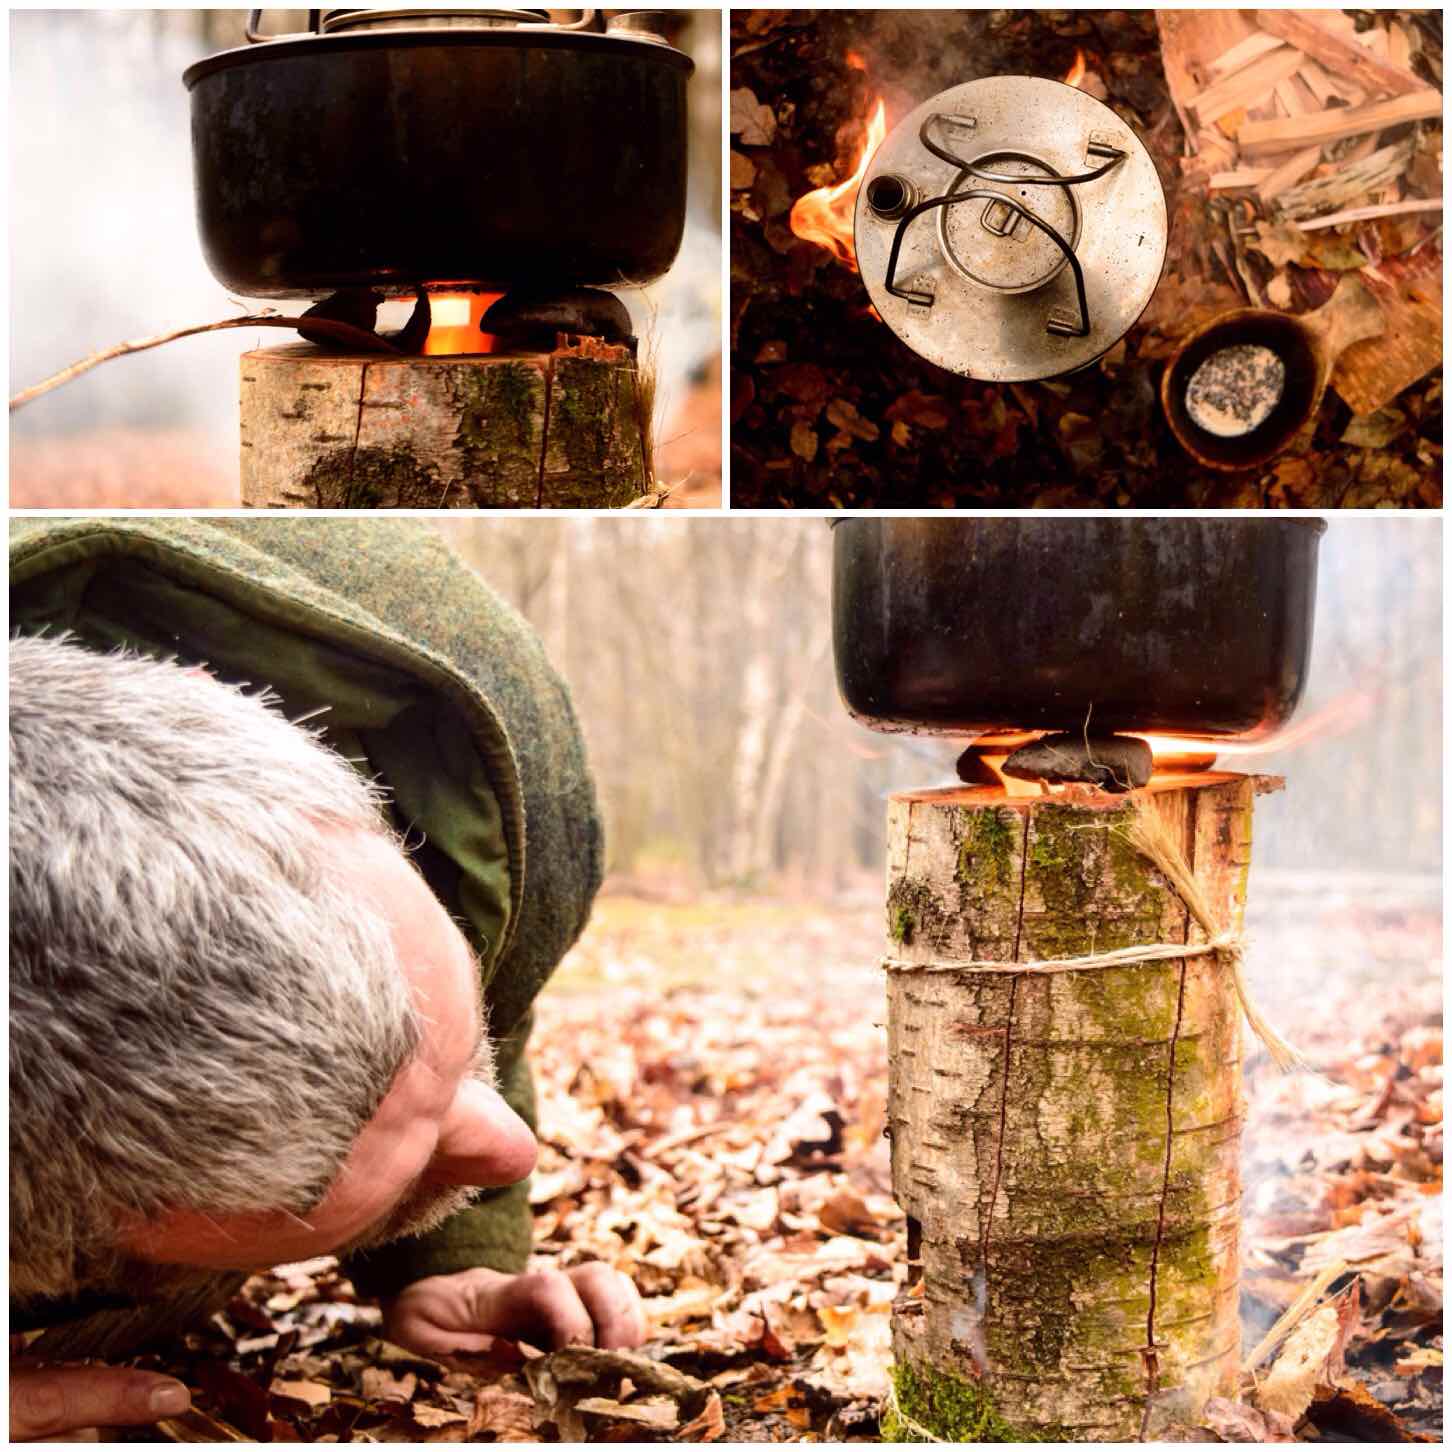
Trawling You Tube one evening a few years ago I came across a video titled the Log Stove from Hobbexp. Up until that point I thought to make a candle you needed a chainsaw. Hobbexp showed me that you could make a perfectly good candle with just an axe and some kindling.
The one below was made using a birch log and stuffed with birch bark and spruce resin (and a couple of battoned-down pieces of green wood to keep the splits open). These candles can burn for a good couple of hours, are easy to set up and look great. I have no idea how many I have made over the last couple of years.
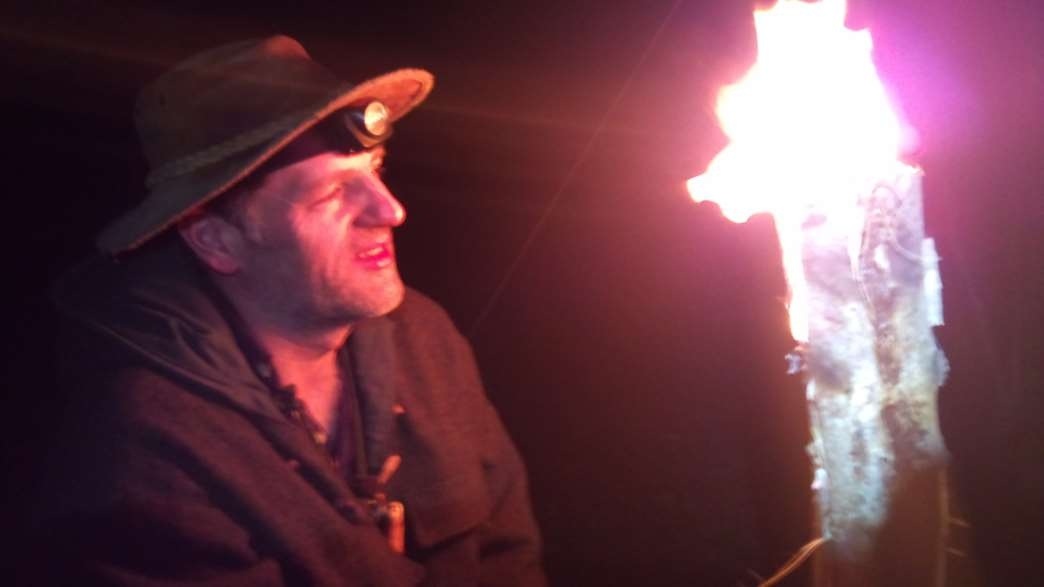
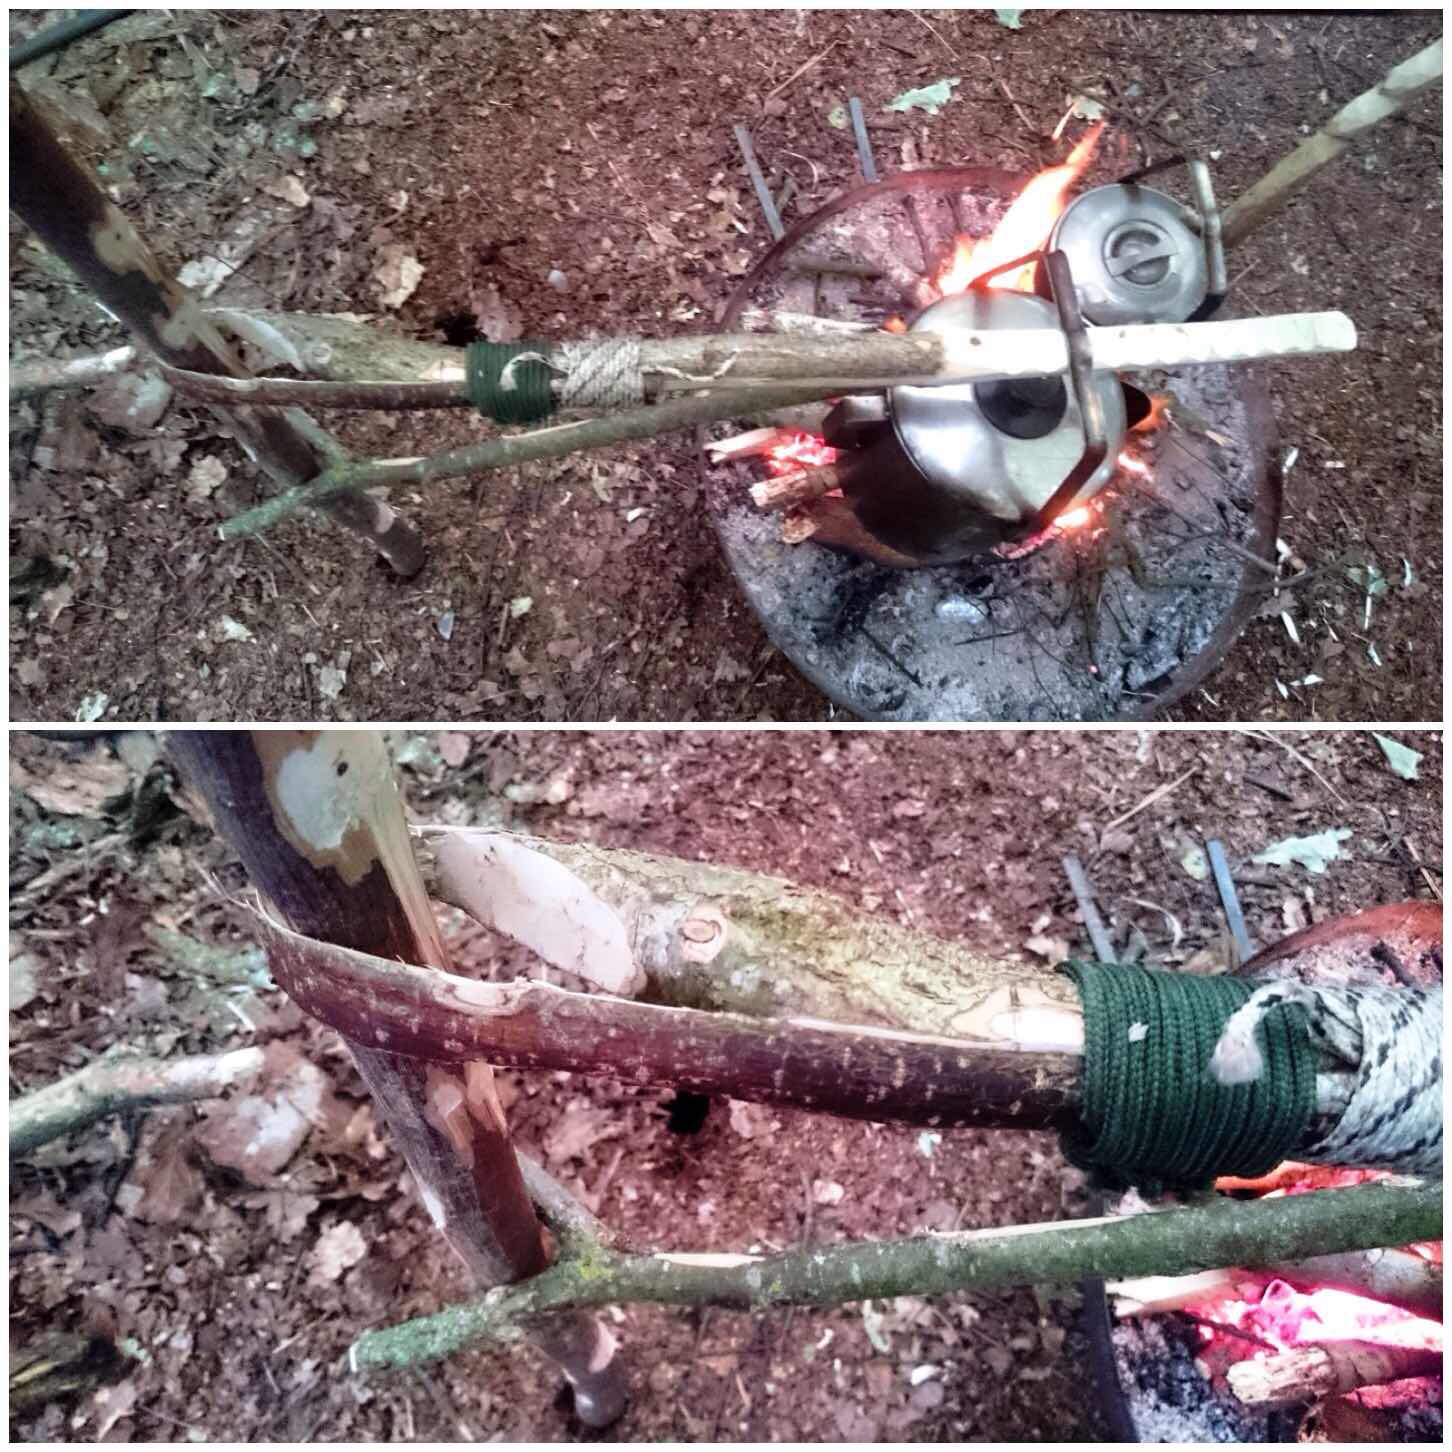
I got another idea for a candle during my research once again from You Tube from ‘bushcraftmyway’ titled the swedish torch/stove – my way. I liked this stove as it could be made from damp wood (ideal in the UK).
I tied some seasoned but damp birch rods together with bramble strips and willow bark then stuffed in tiny pieces of kindling and Vaseline-coated cotton wool. I decided to use the Vaseline and cotton wool so as to give the damp wood a chance to dry out.
After a bit of tender care the wood started to dry out and I easily managed to boil a kettle on it. This is an excellent way to get a fire going in damp/wet conditions. The remains of the candle after it had burnt down provided me with a great bed of coals to maintain a more traditional firelay.
All this research led me to compare this rod style of candle with the more commonly split log candle. I set up the rod candle this time with very dry rods and split a spruce log with my axe into a number of wedges.
I tied them all together with natural cordage and lit them. The rod candle took off very quickly as it was stuffed full of very fine kindling however the split log candle lasted longer as it took longer to fully get going.
Again I managed to easily boil a kettle on both of these candles. Both are simple and easy to make.
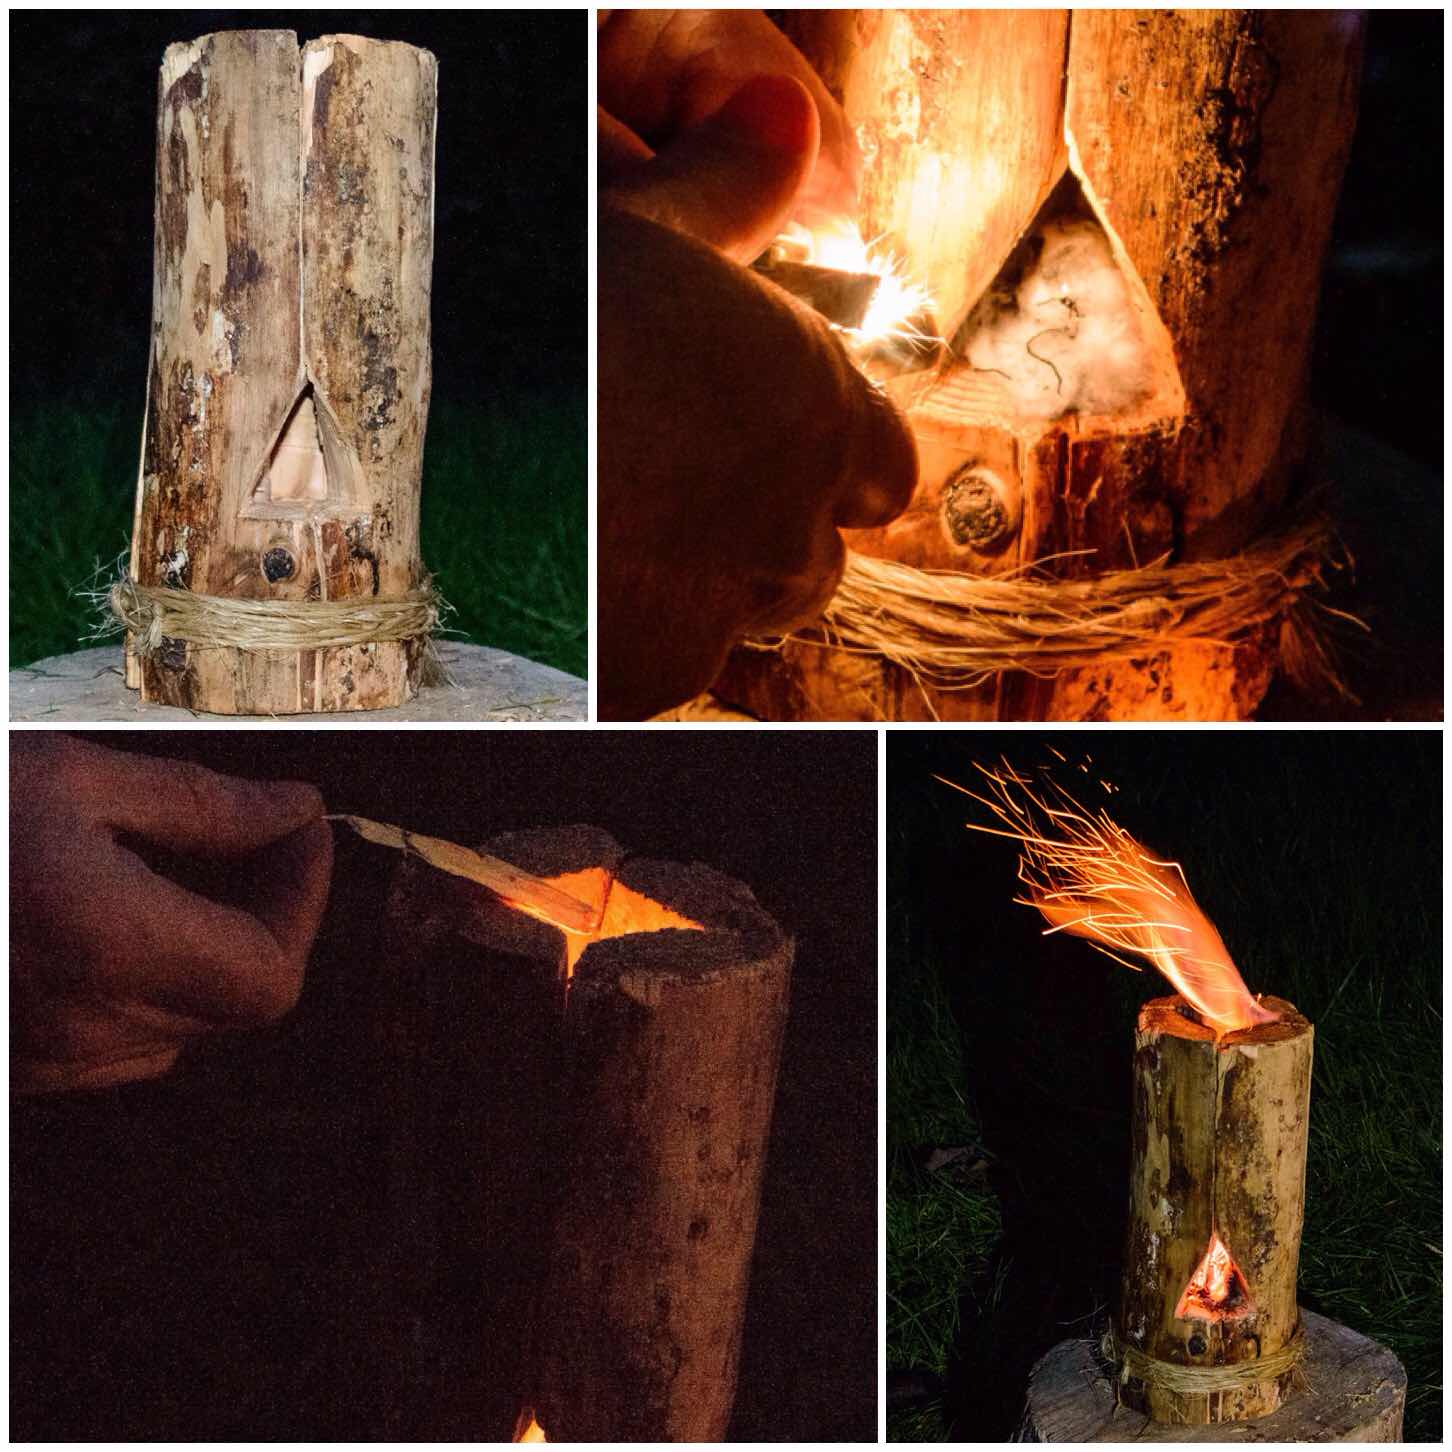
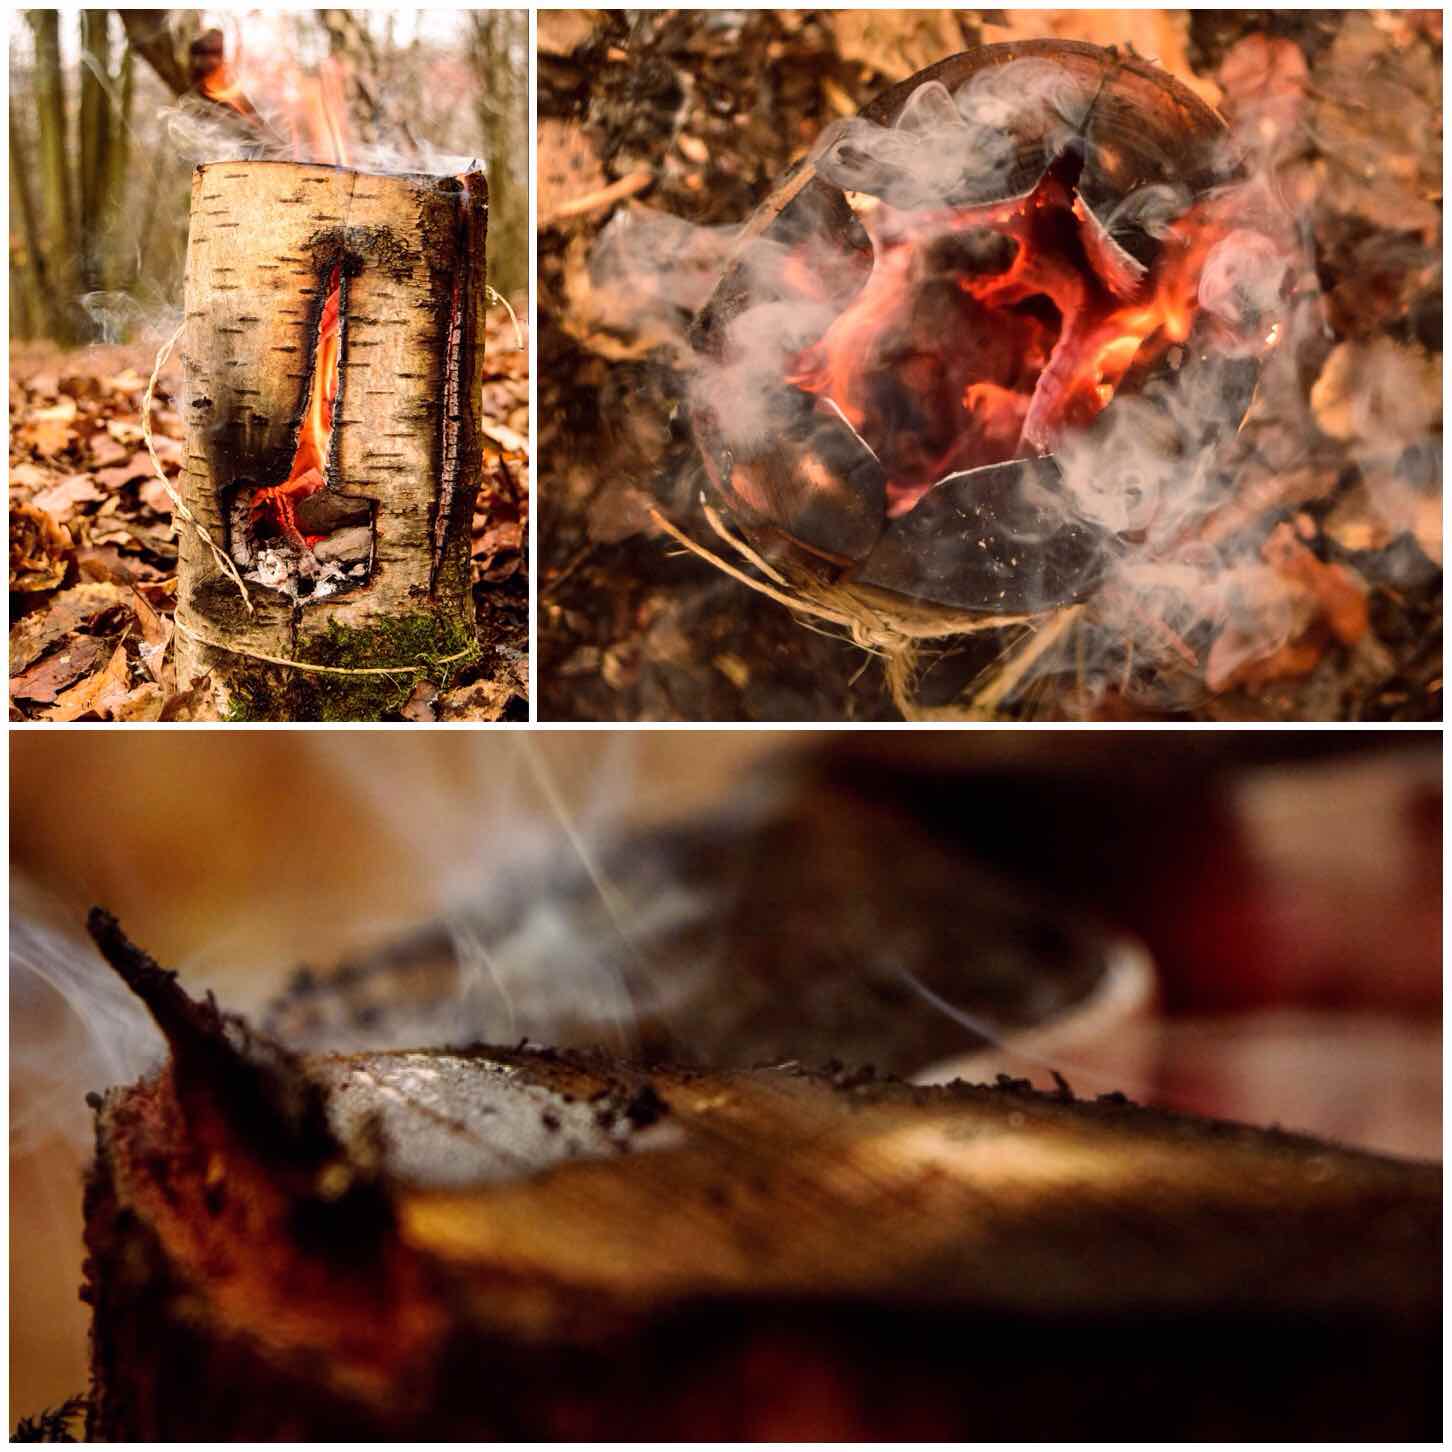
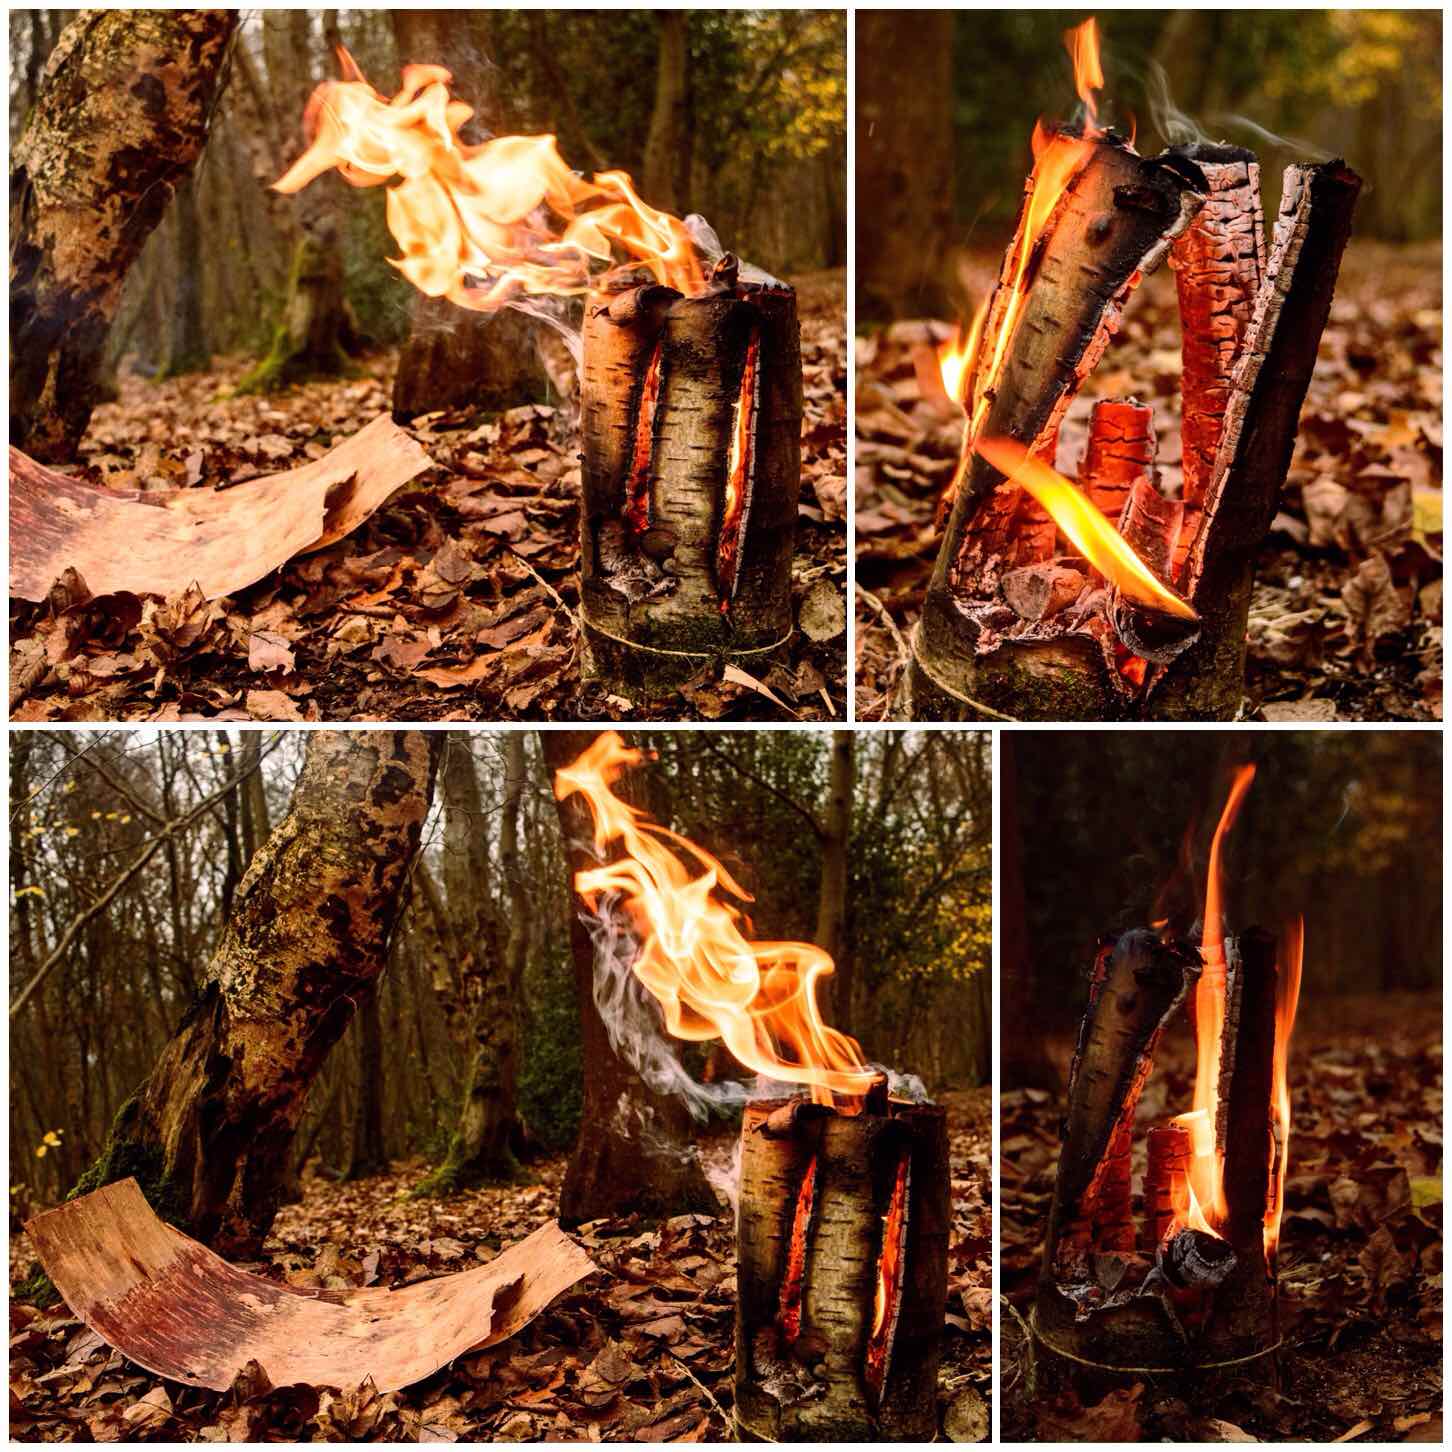
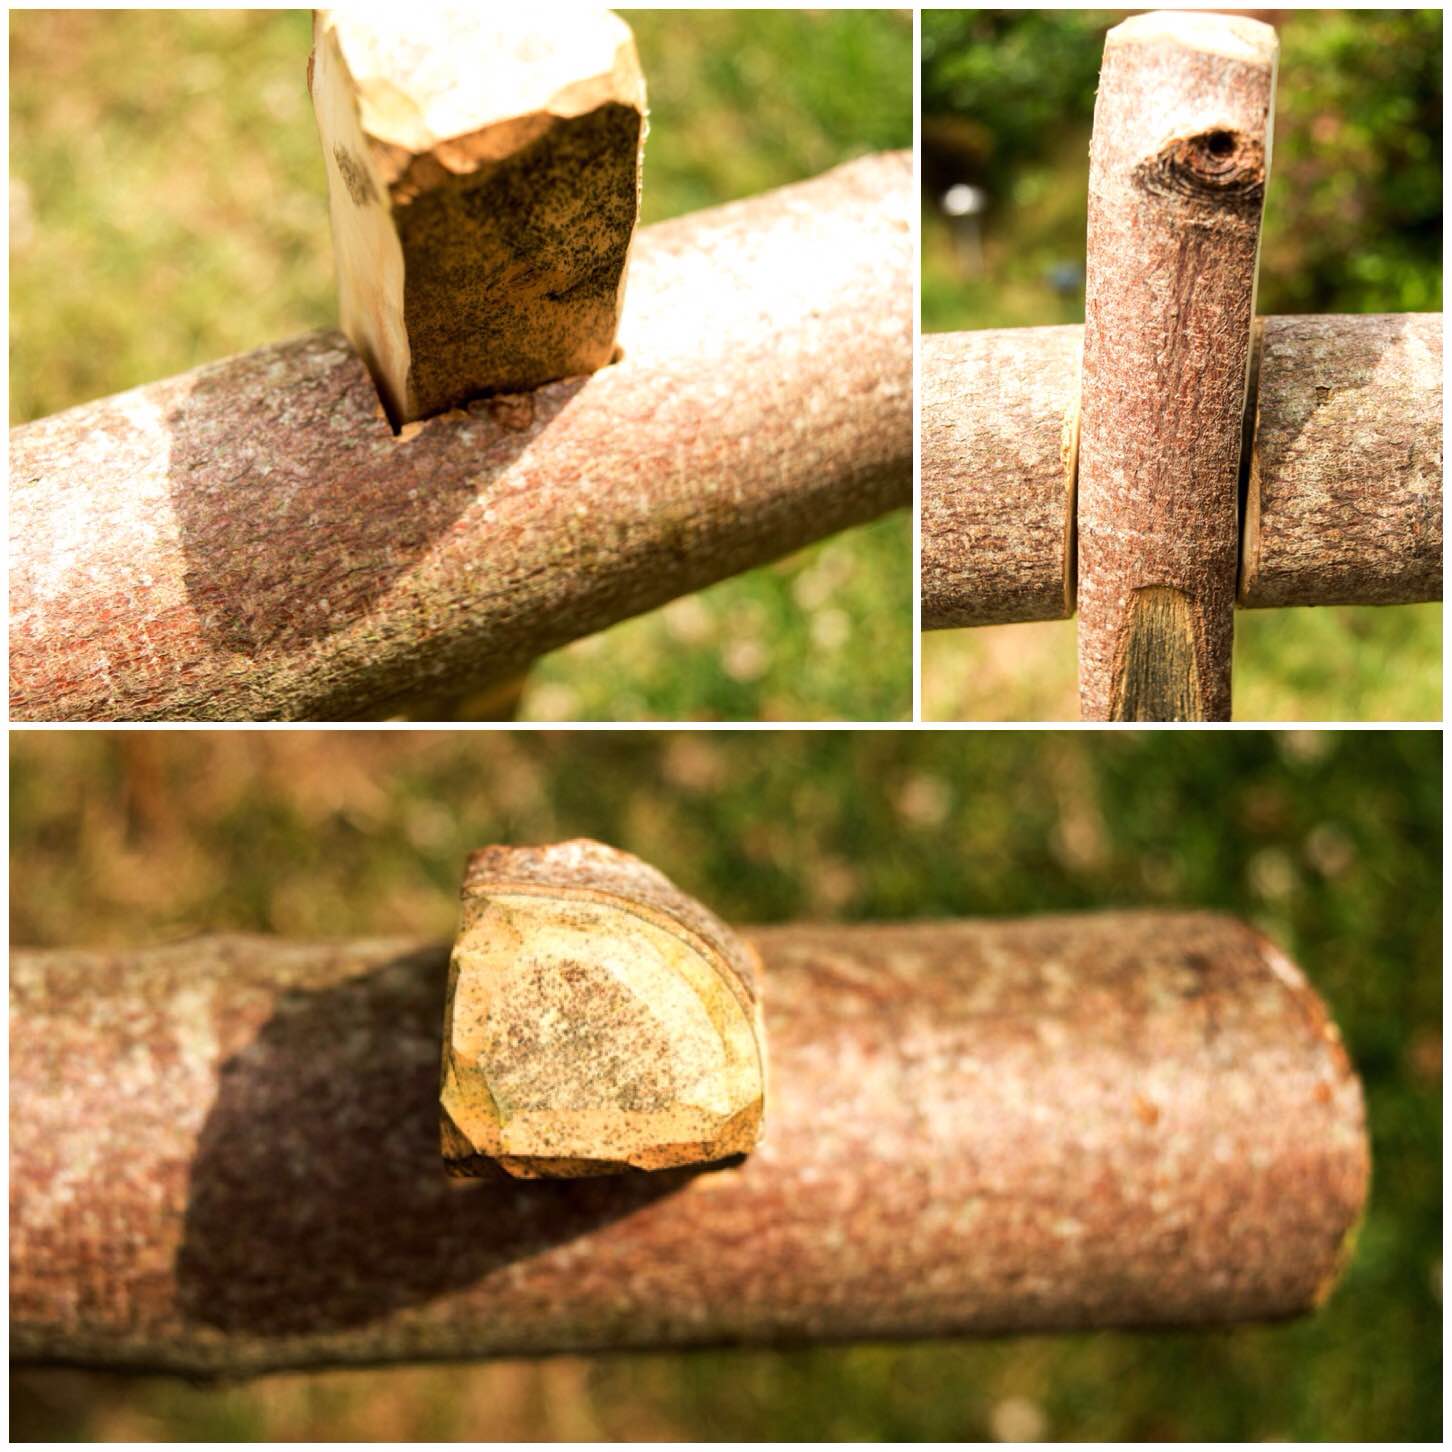
The idea for this one came from Perkele’s Blog Spot but the post is no longer available. I think this candle is regarded by many as the original Finnish Candle.
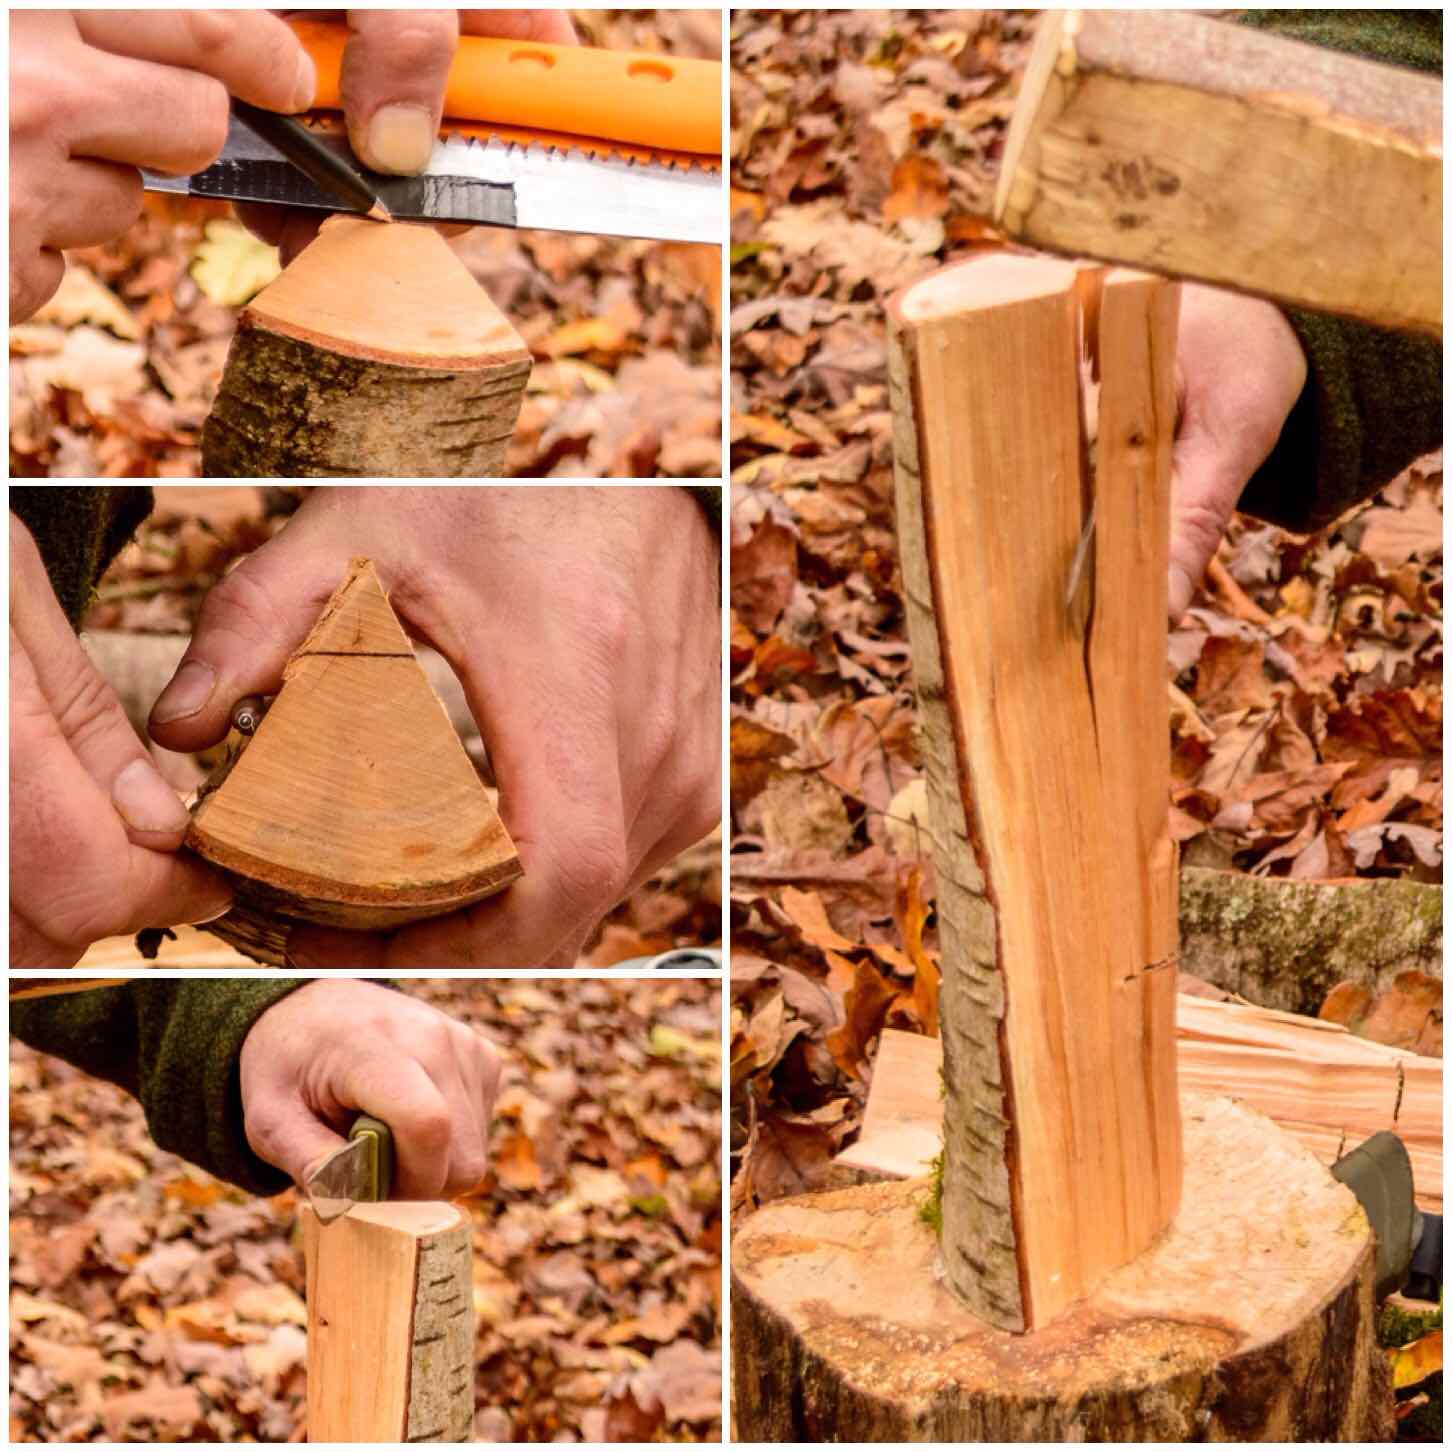
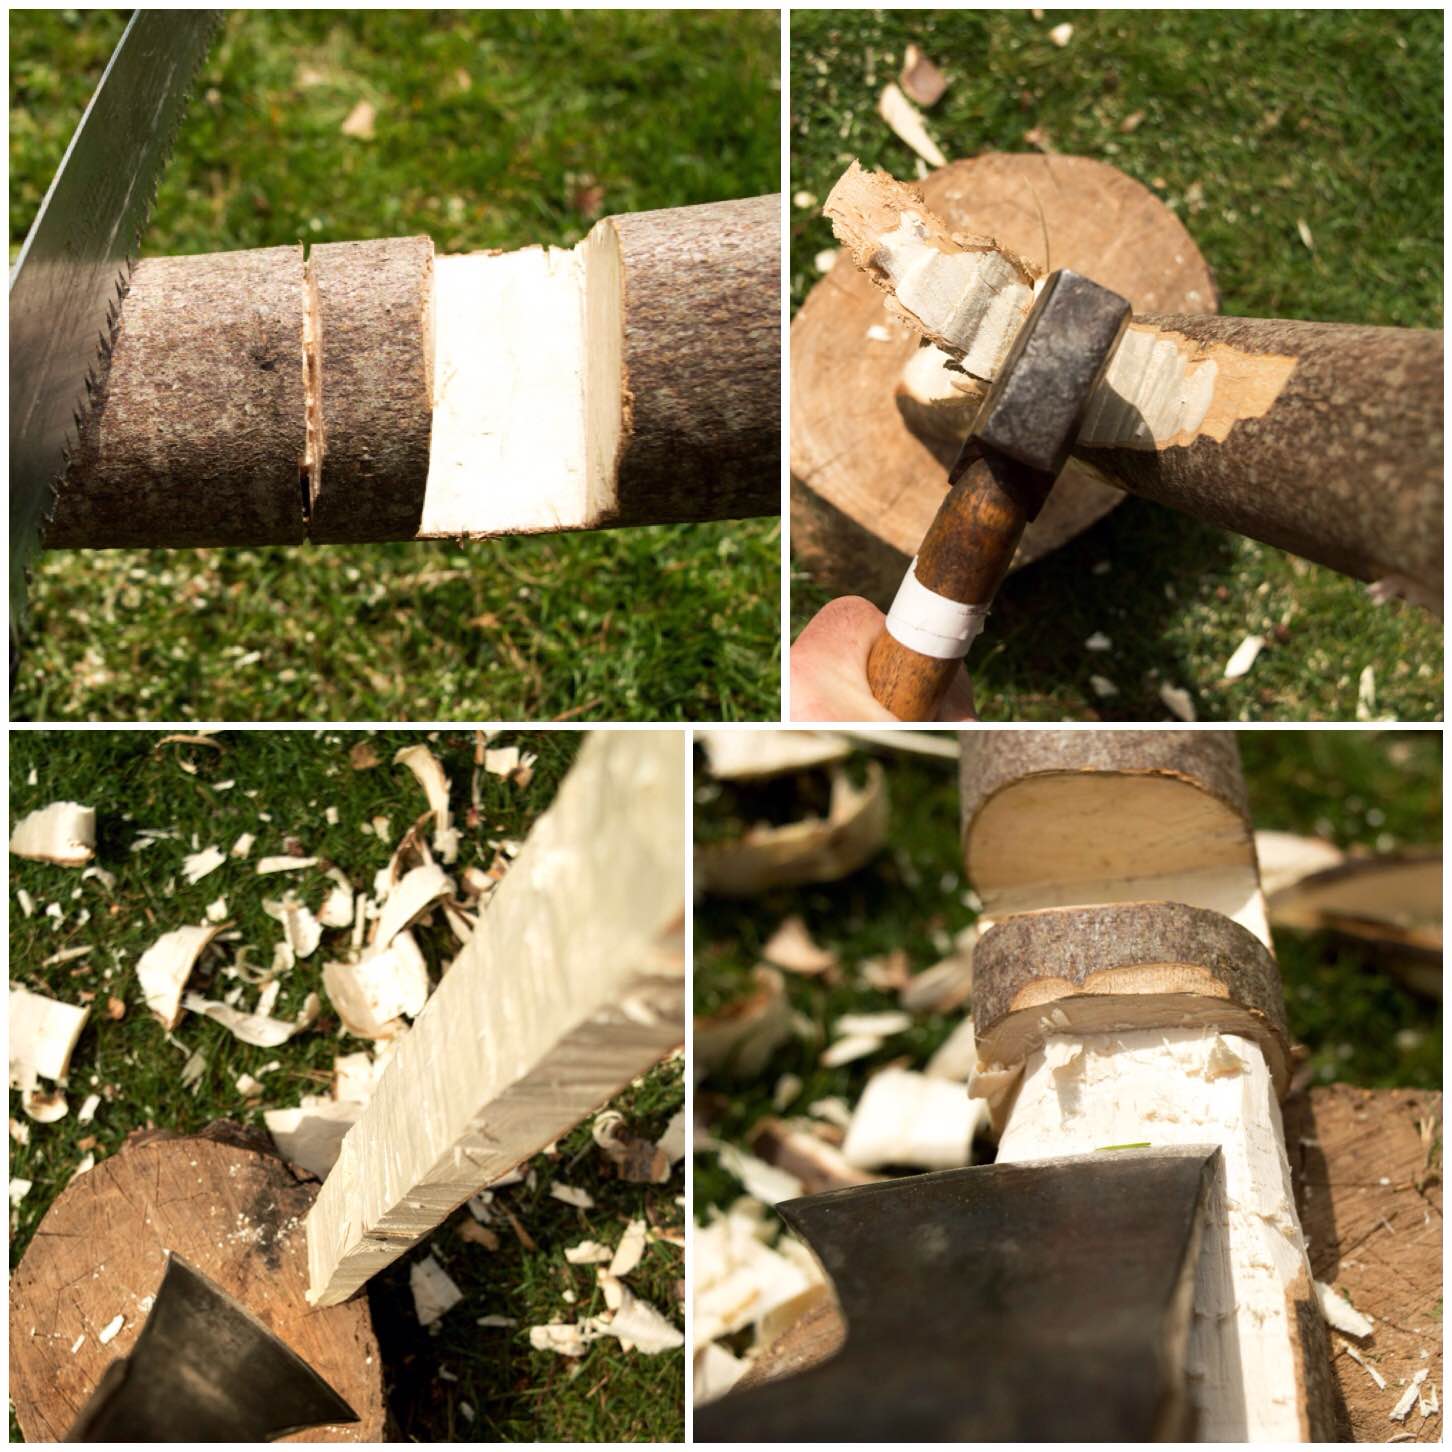
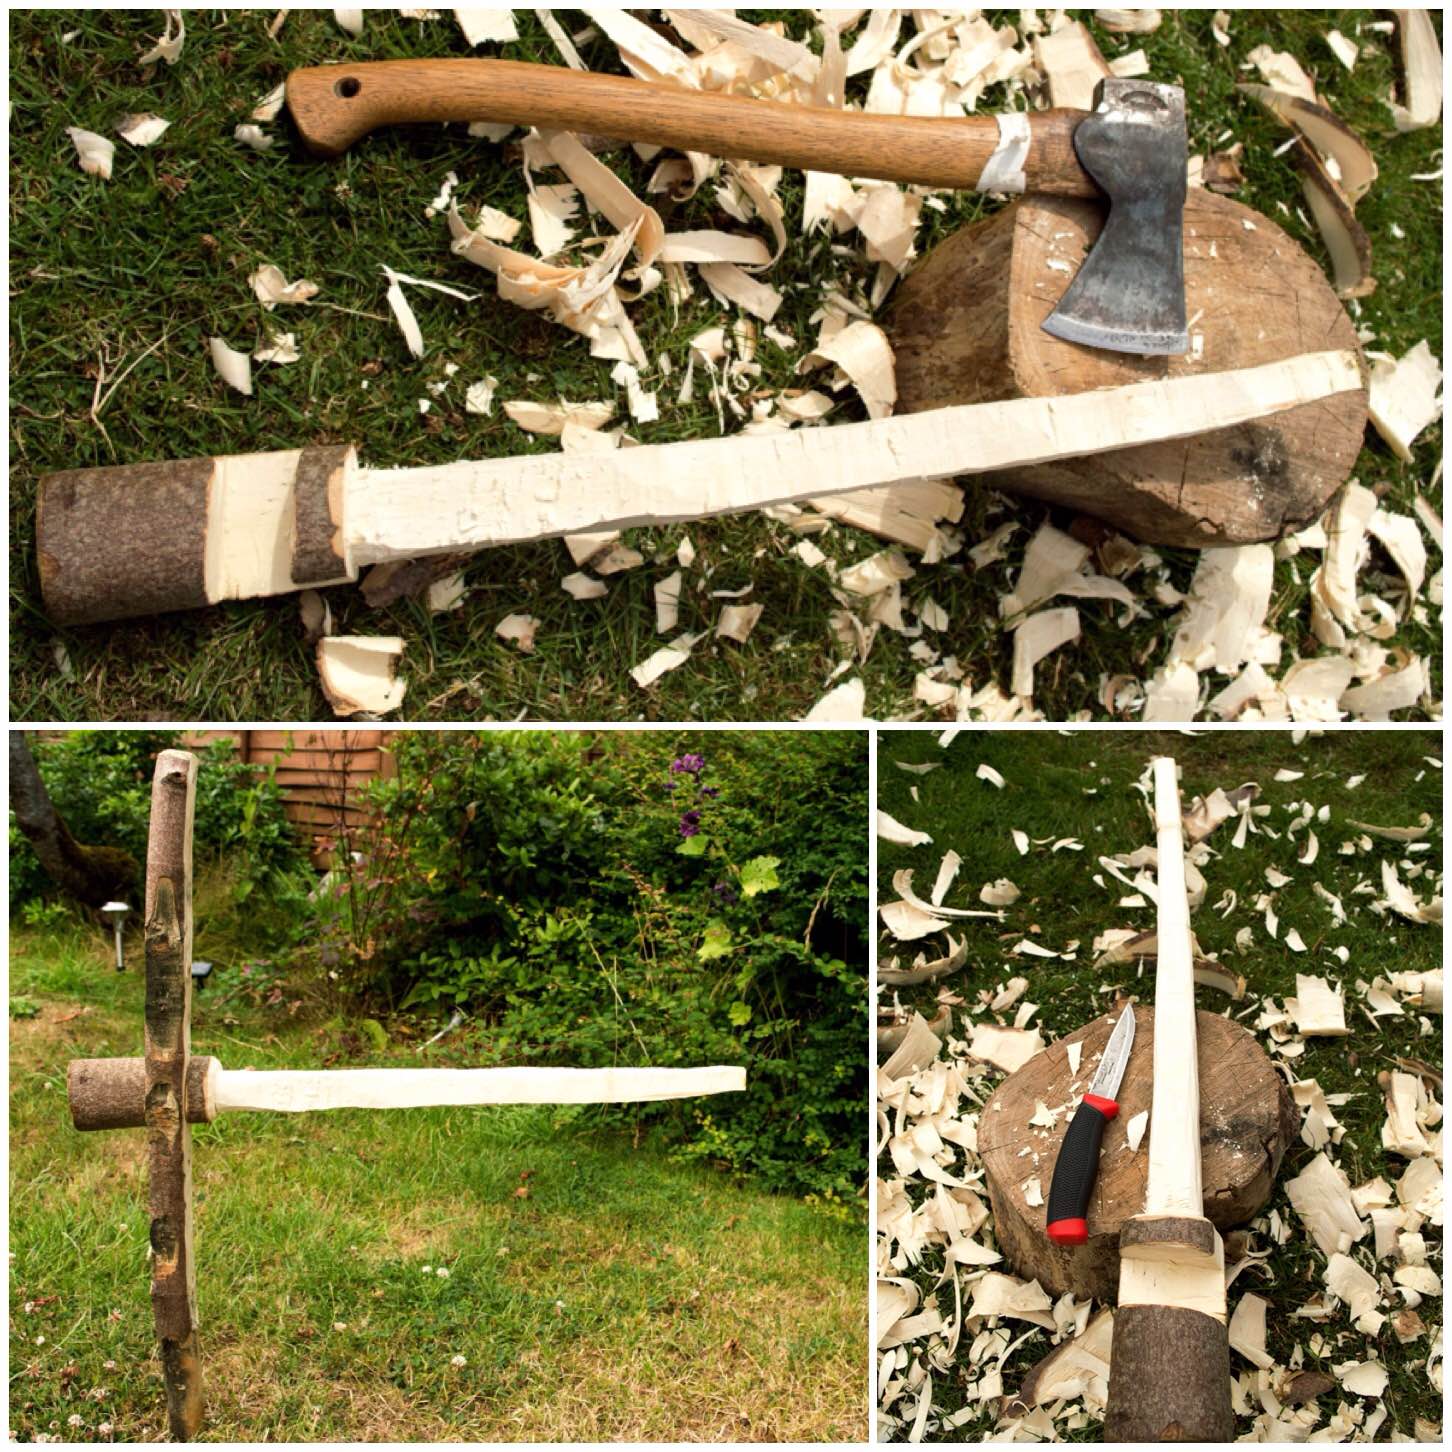
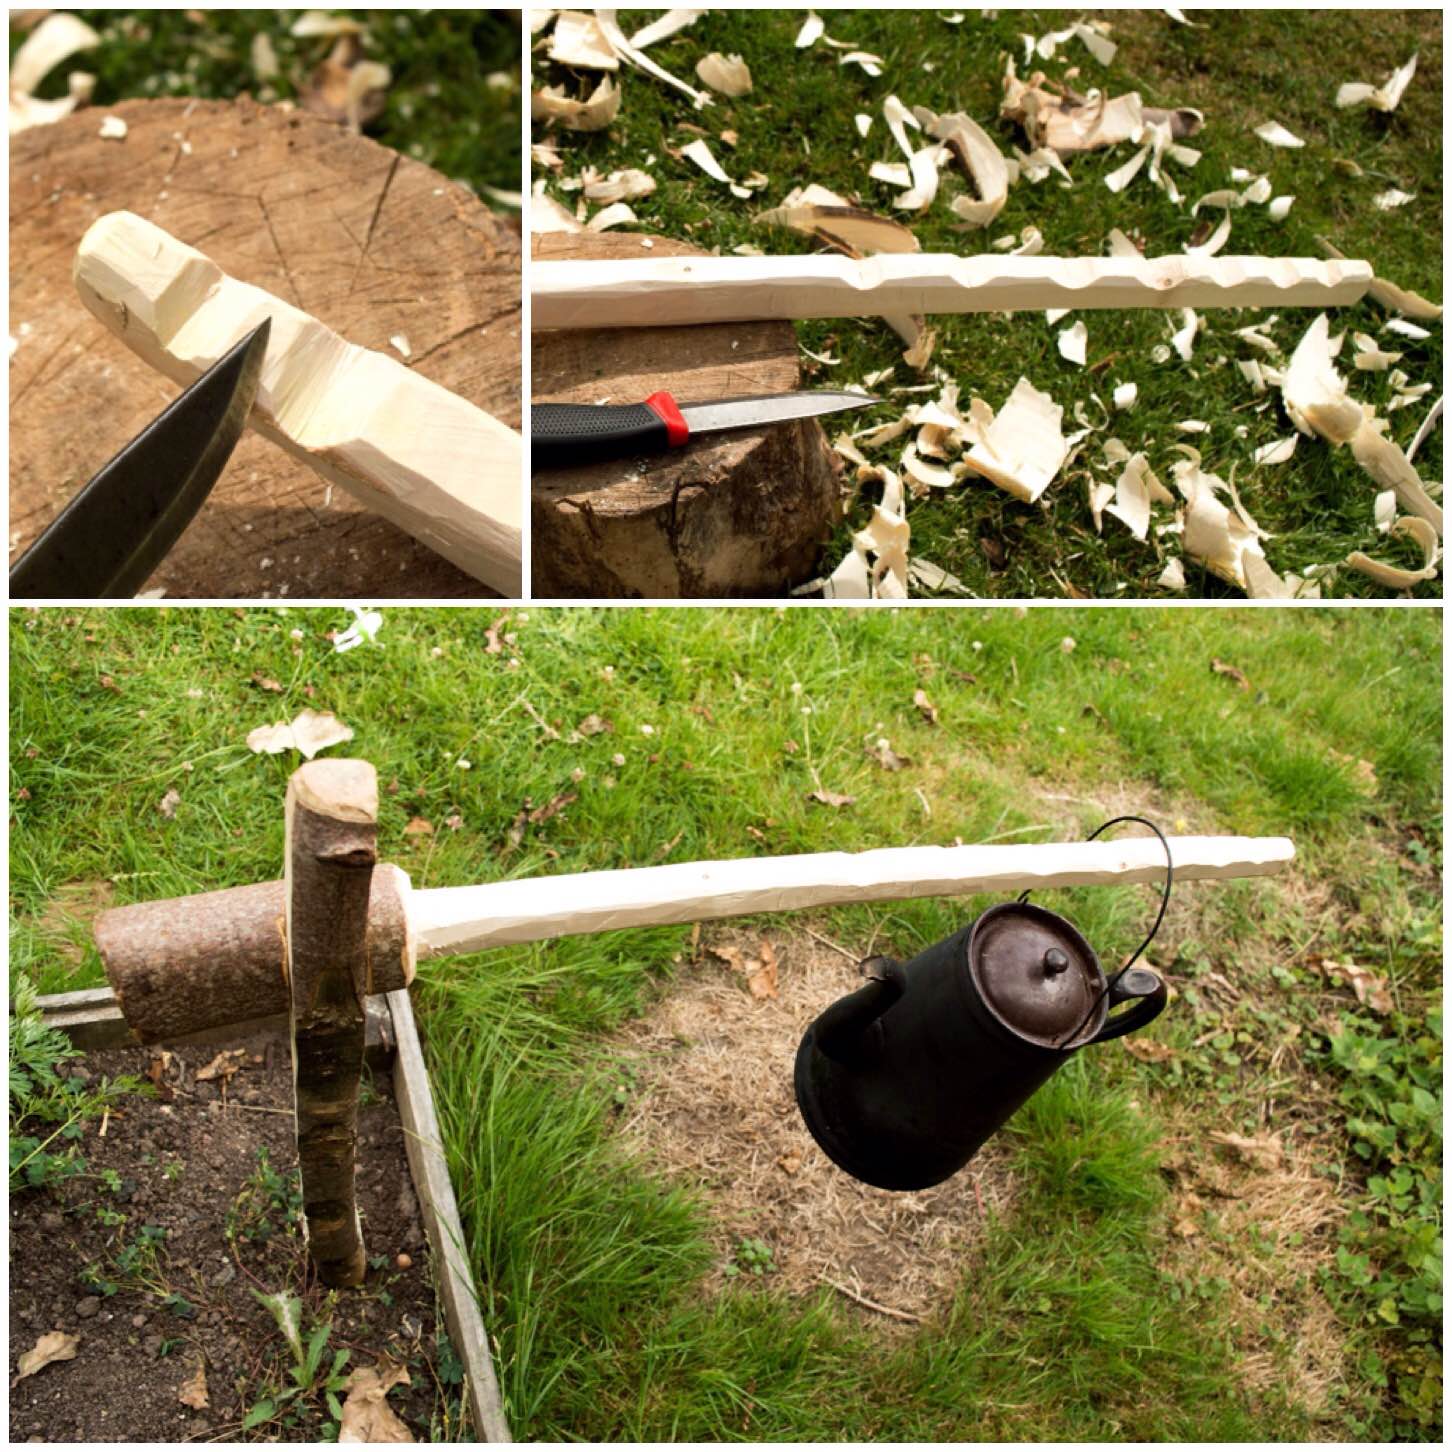
A log is split from top to bottom and pieces from the central core are then axed out to act as kindling. Lots of cuts are made into the inner faces of the candle to give the flames plenty of surface area to catch onto.
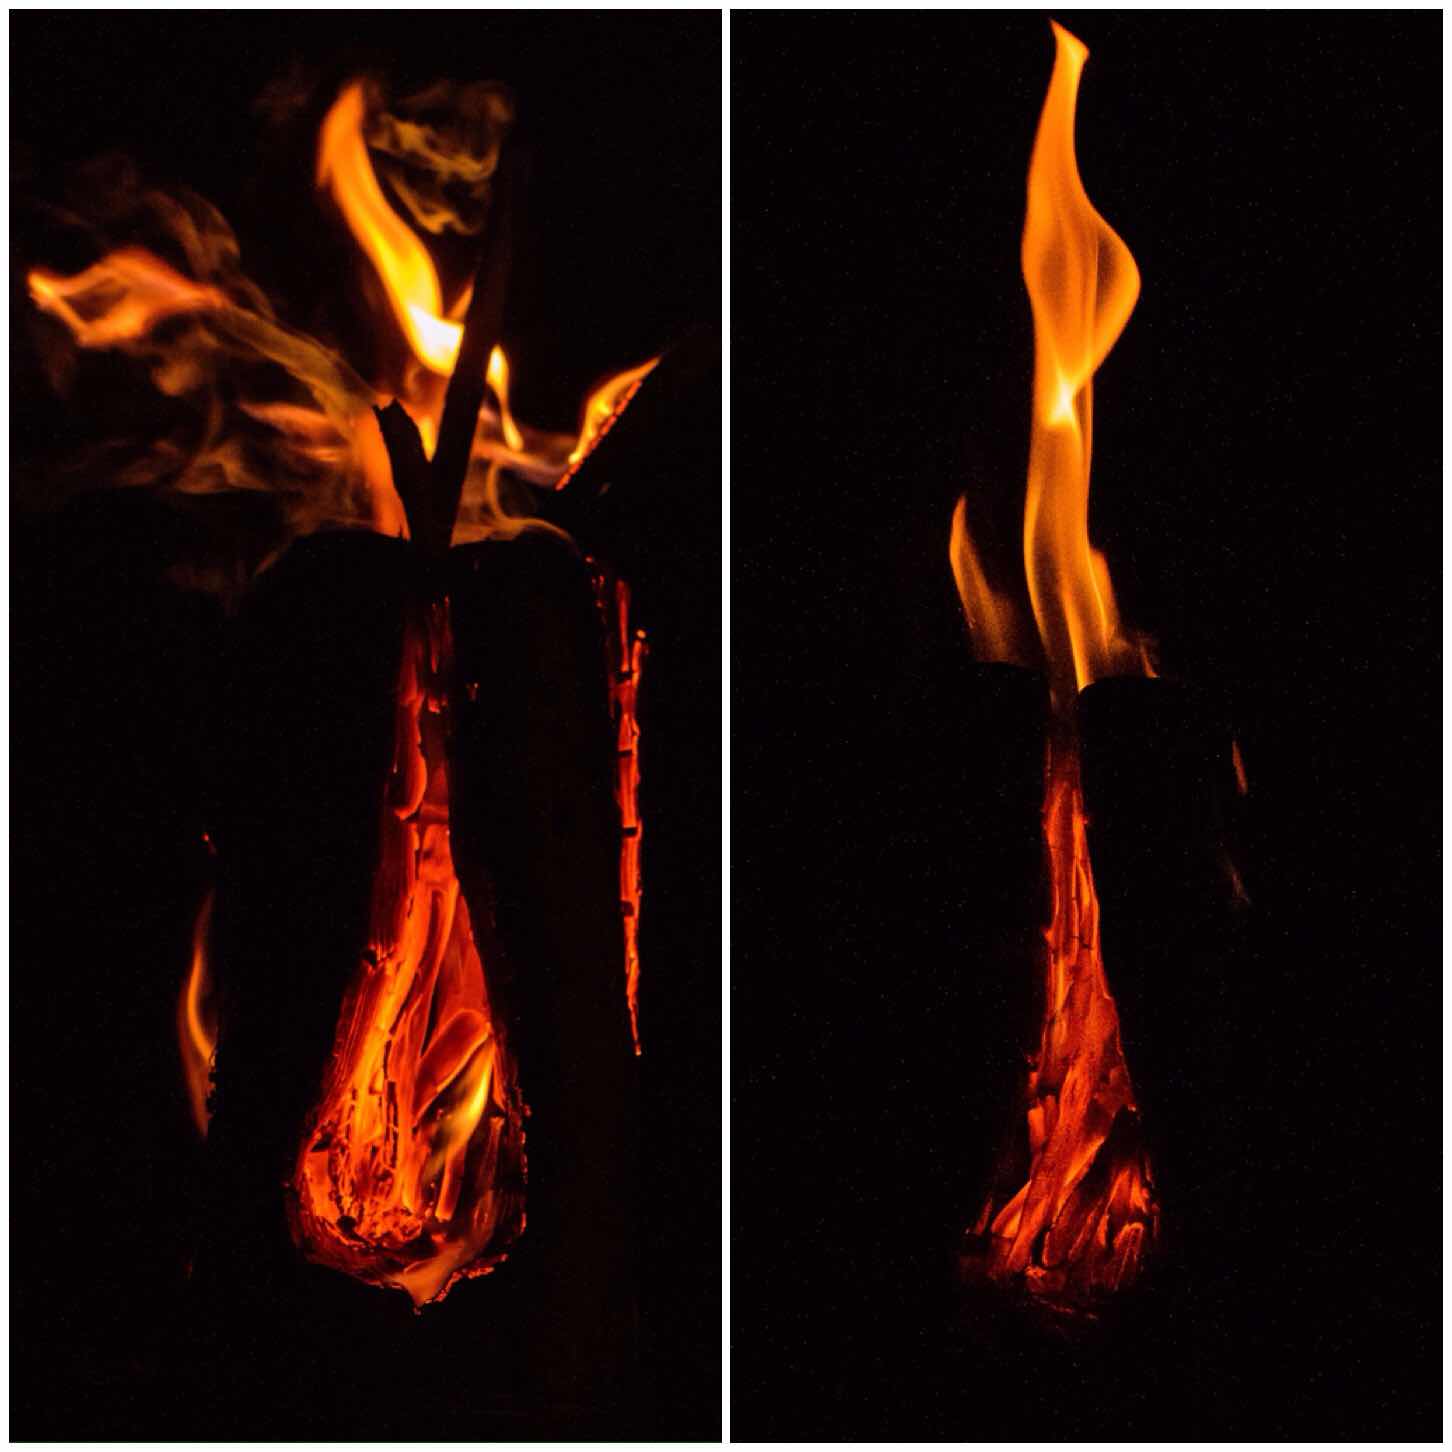
It took me a while to get the flames self sustaining, but once they’d caught the candle worked well. It looked precarious as the two pieces of wood are not lashed together but they stayed upright till the end.
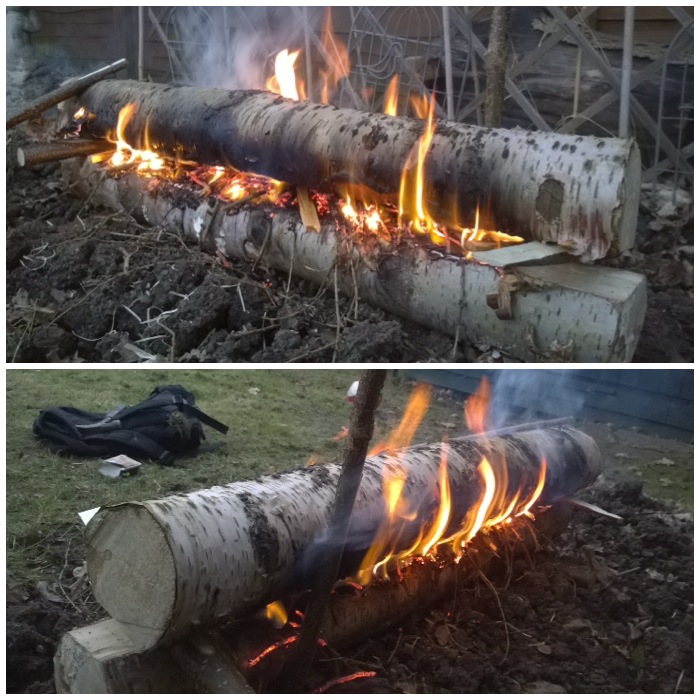
The Rakovalkea Gap fire hails from Finland and I was taught a similar method by my friend Kevin Warrington (Laplanders Natural Lore) back in 2007. I came across the term Rakovalkea around about 2011 after seeing pictures of this fire being made by the Finnish army on the internet.
This is a scaled-down model I made however it was fully functioning and its set up makes for a long burn time with easy adjustment to increase or decrease the flames. This has proved to be the most most popular post on my website.
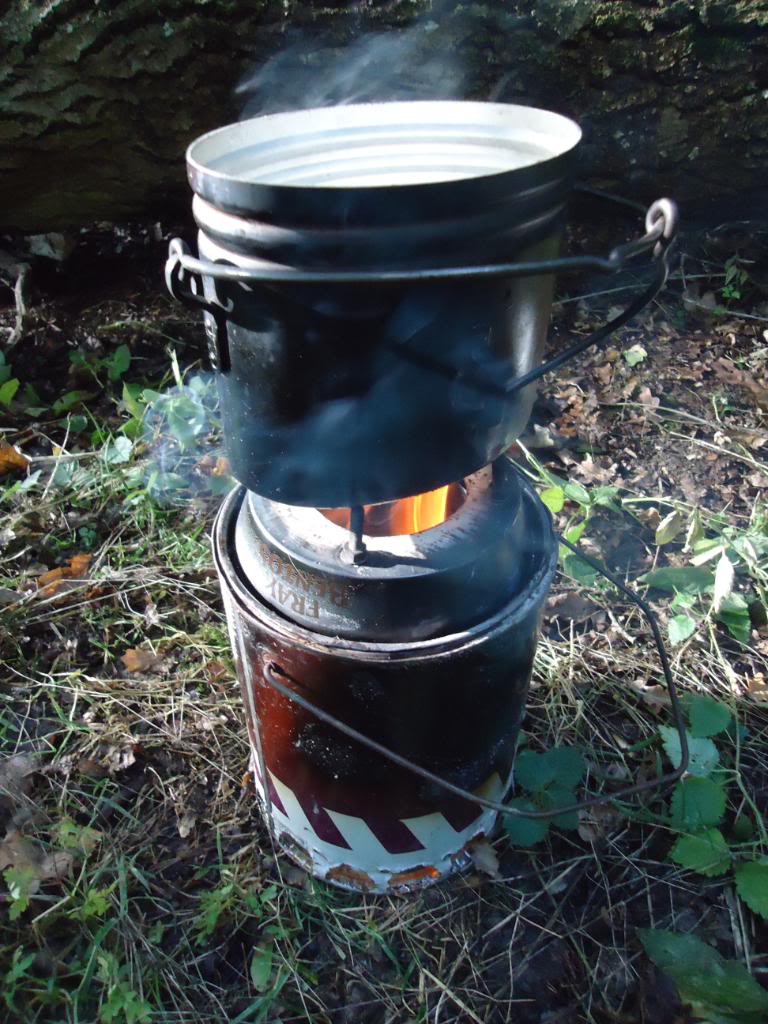
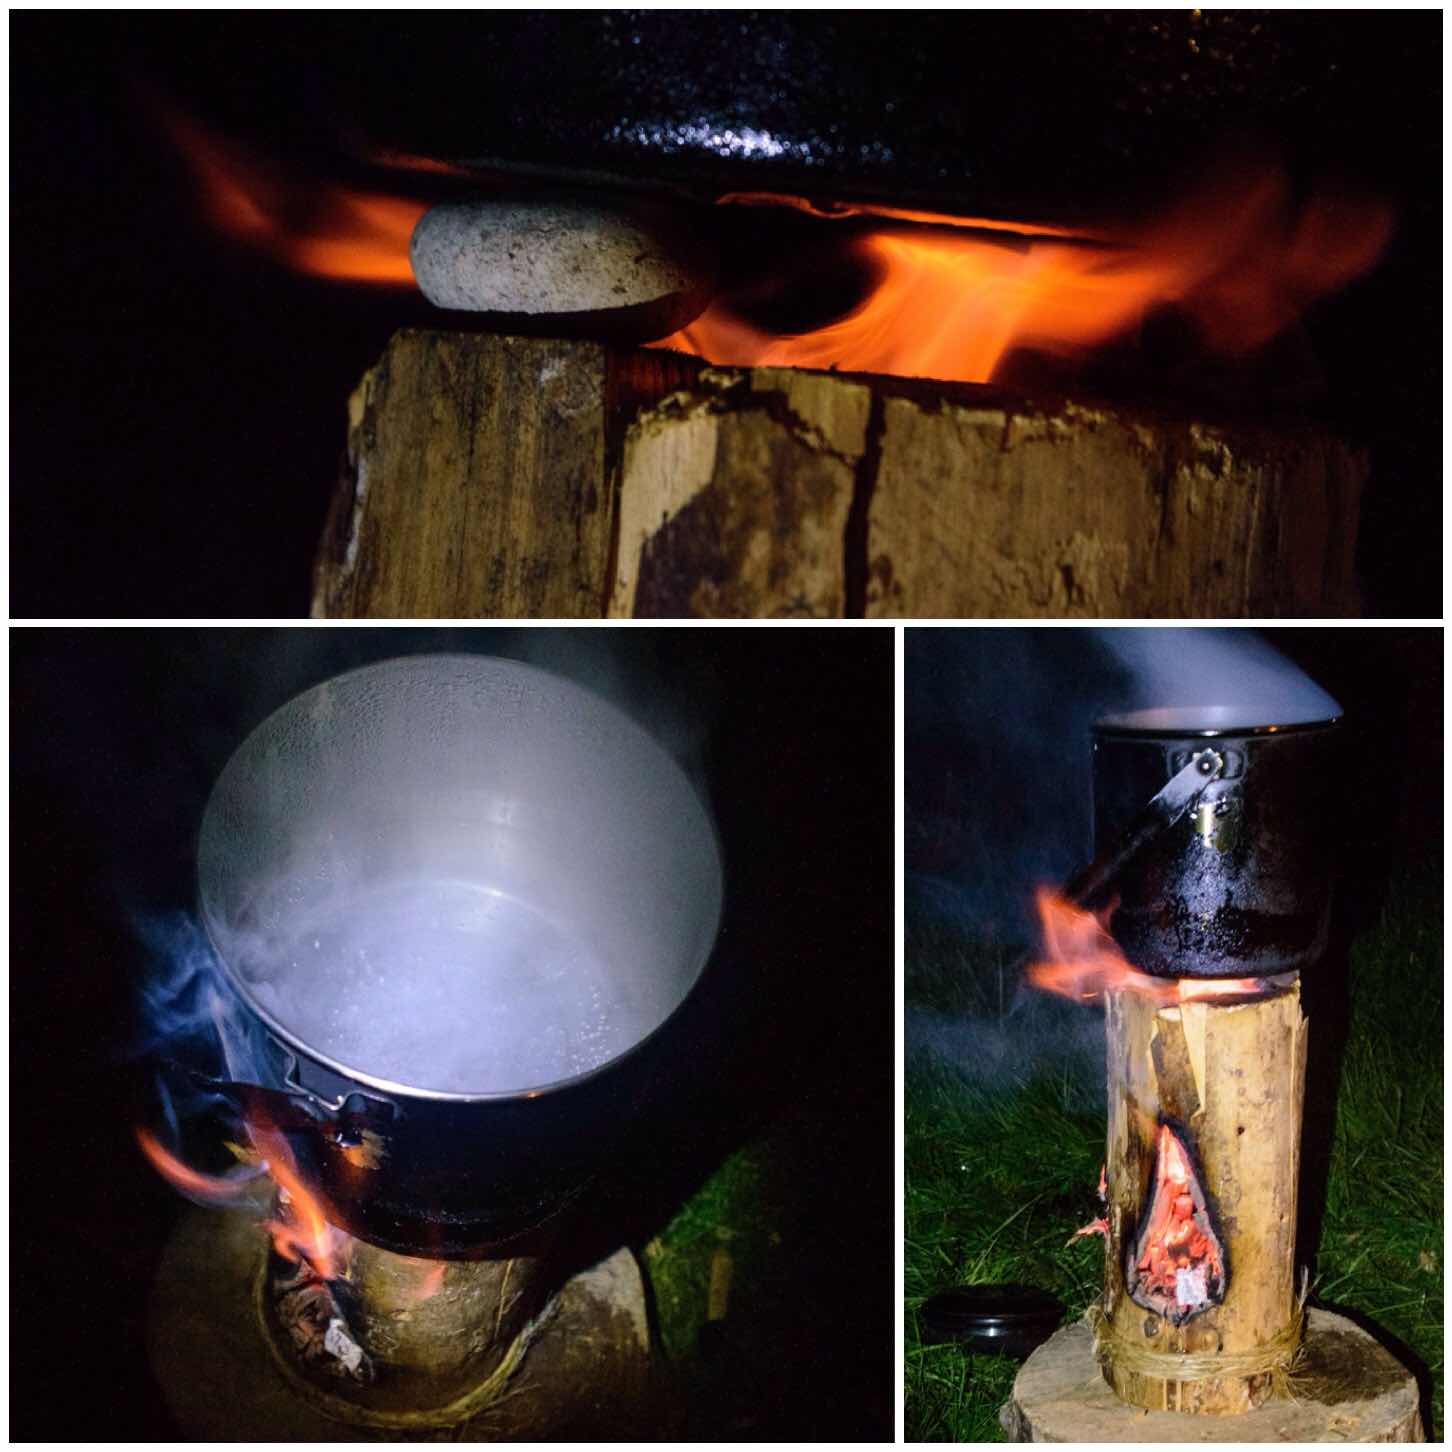
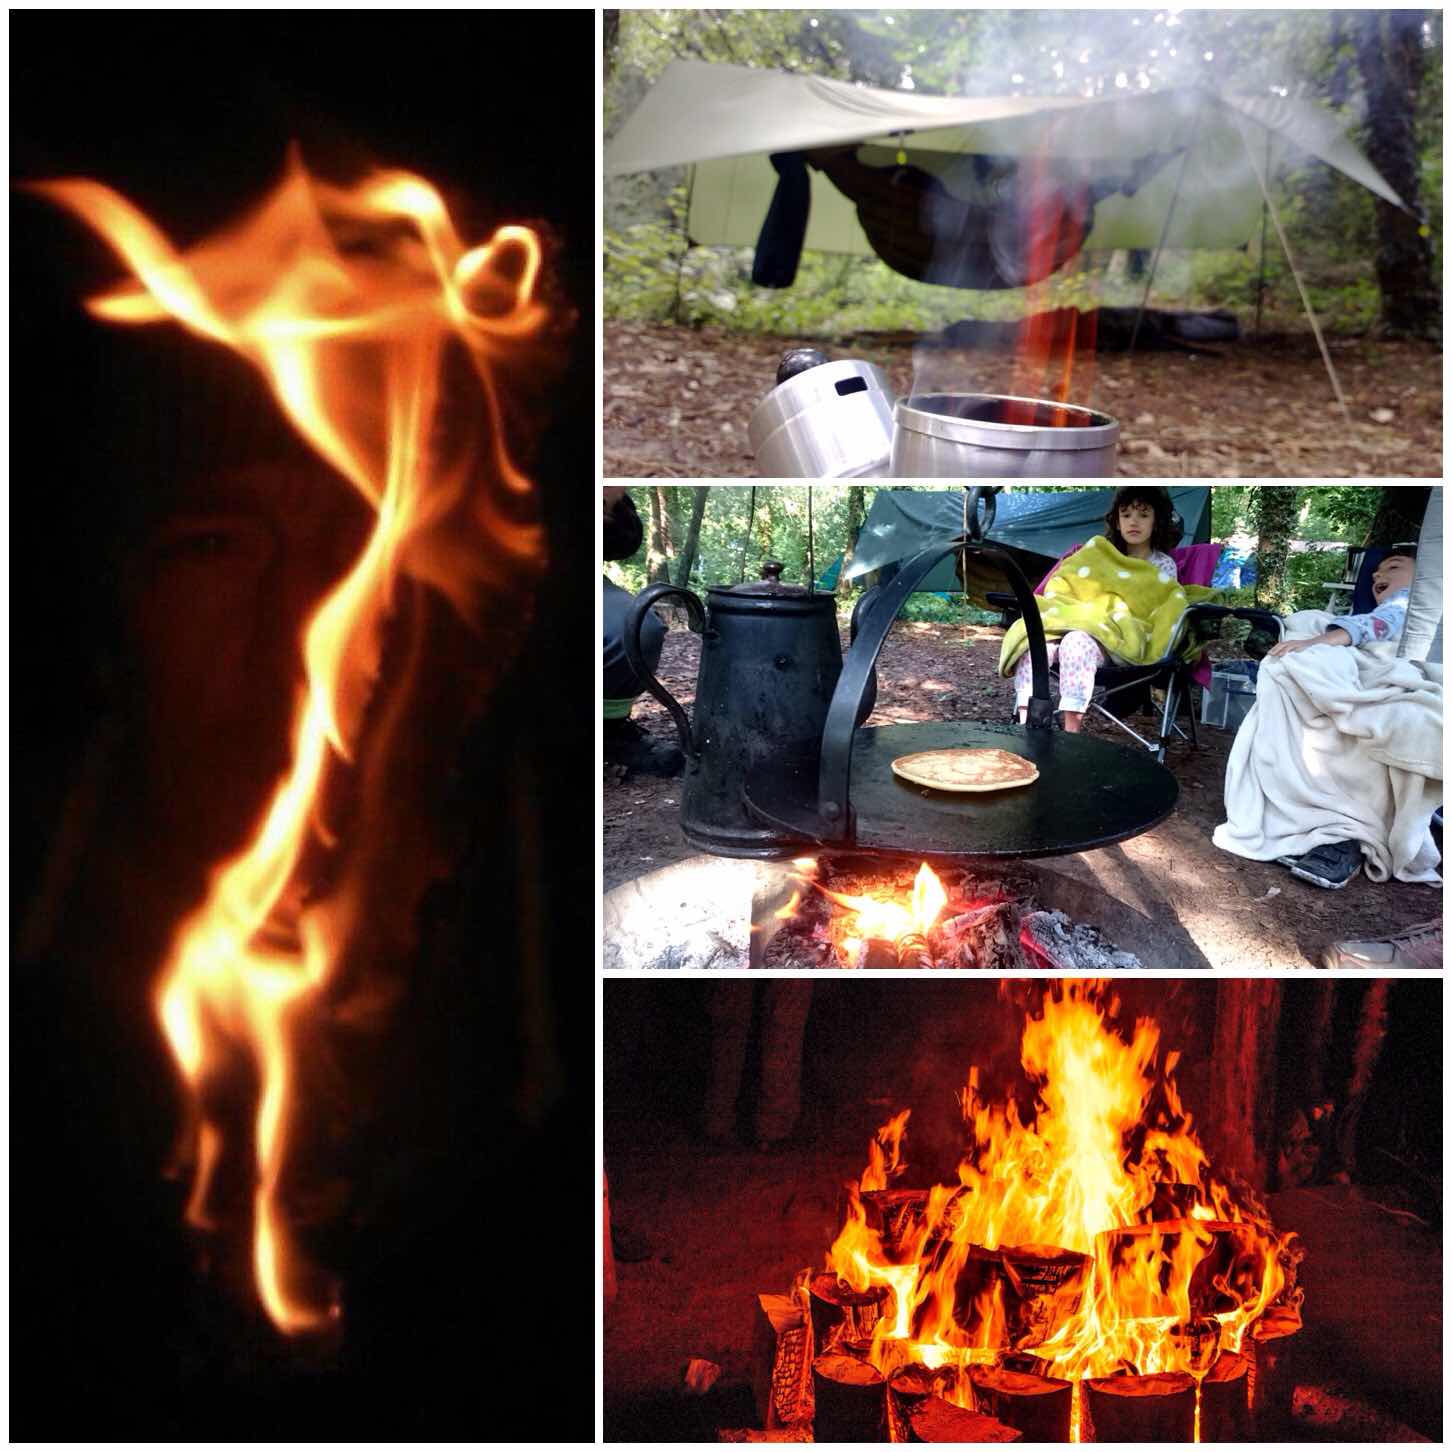
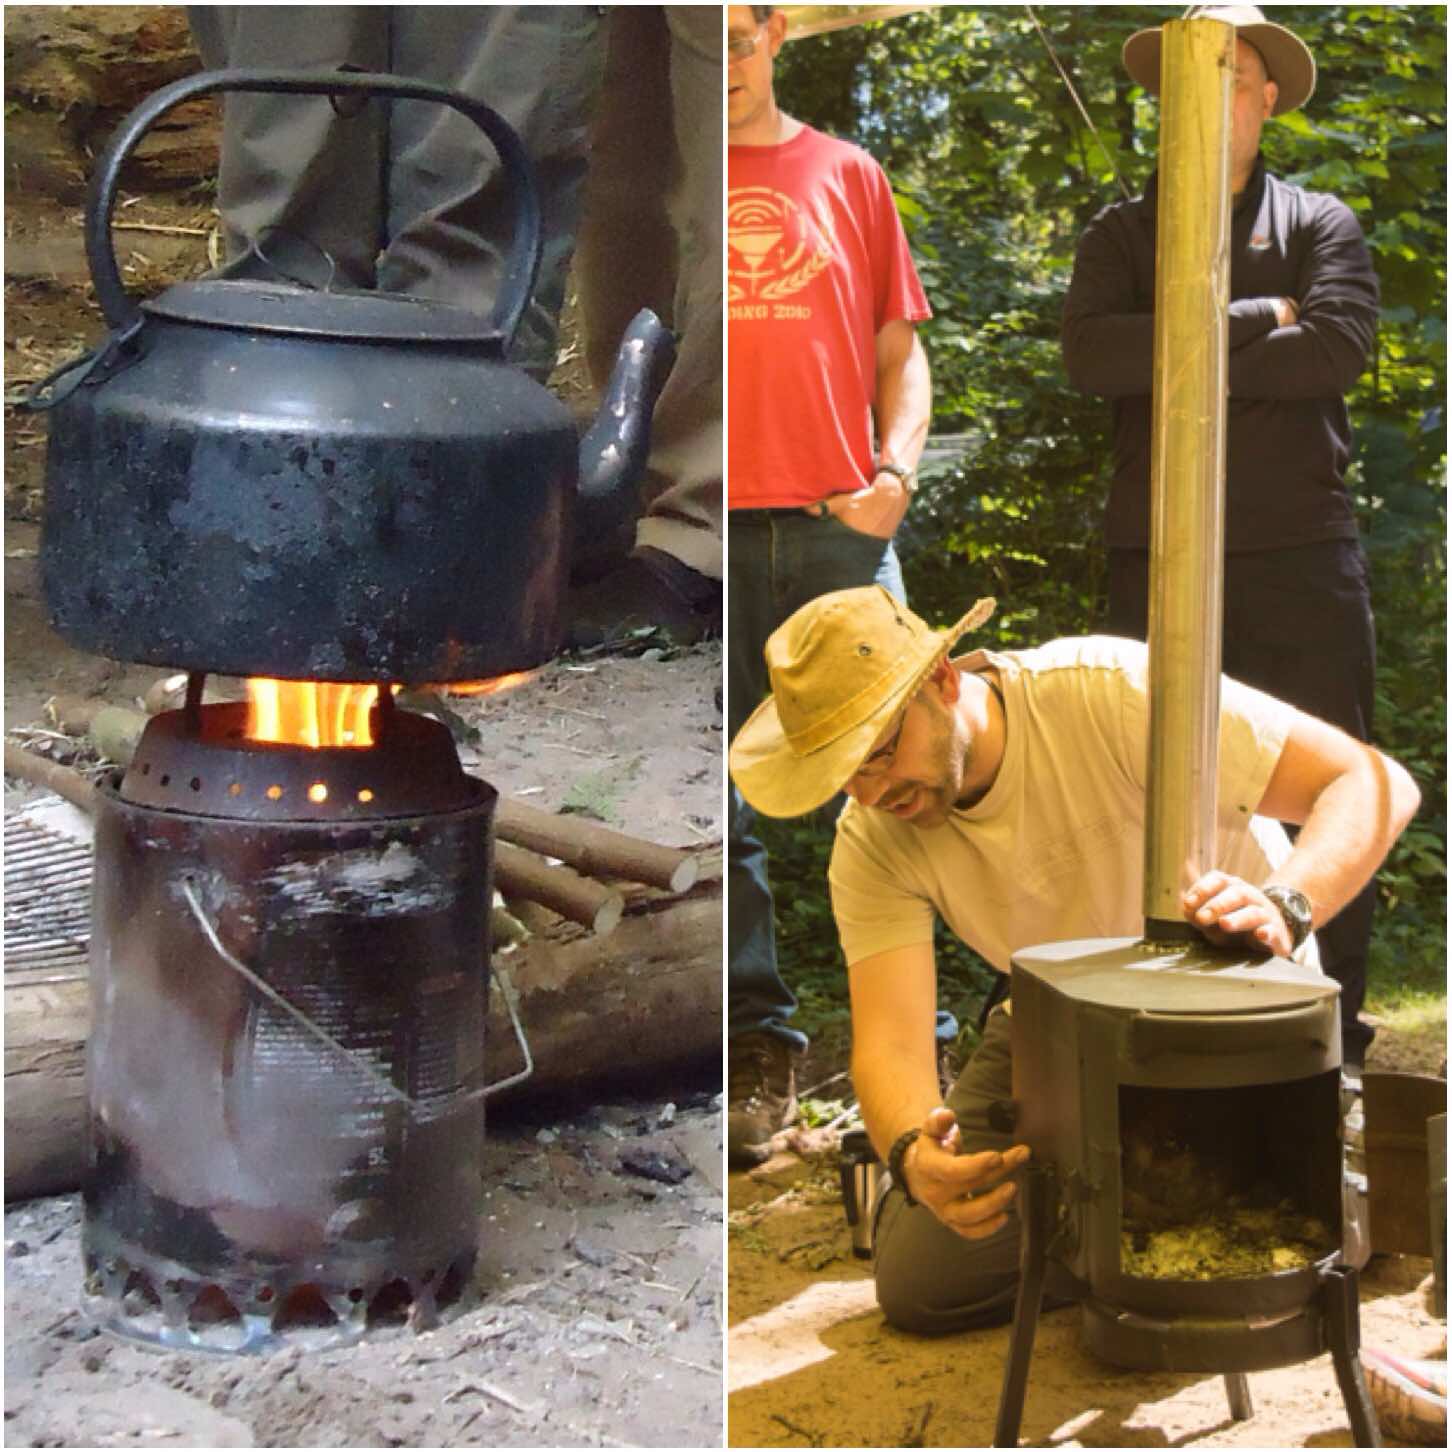
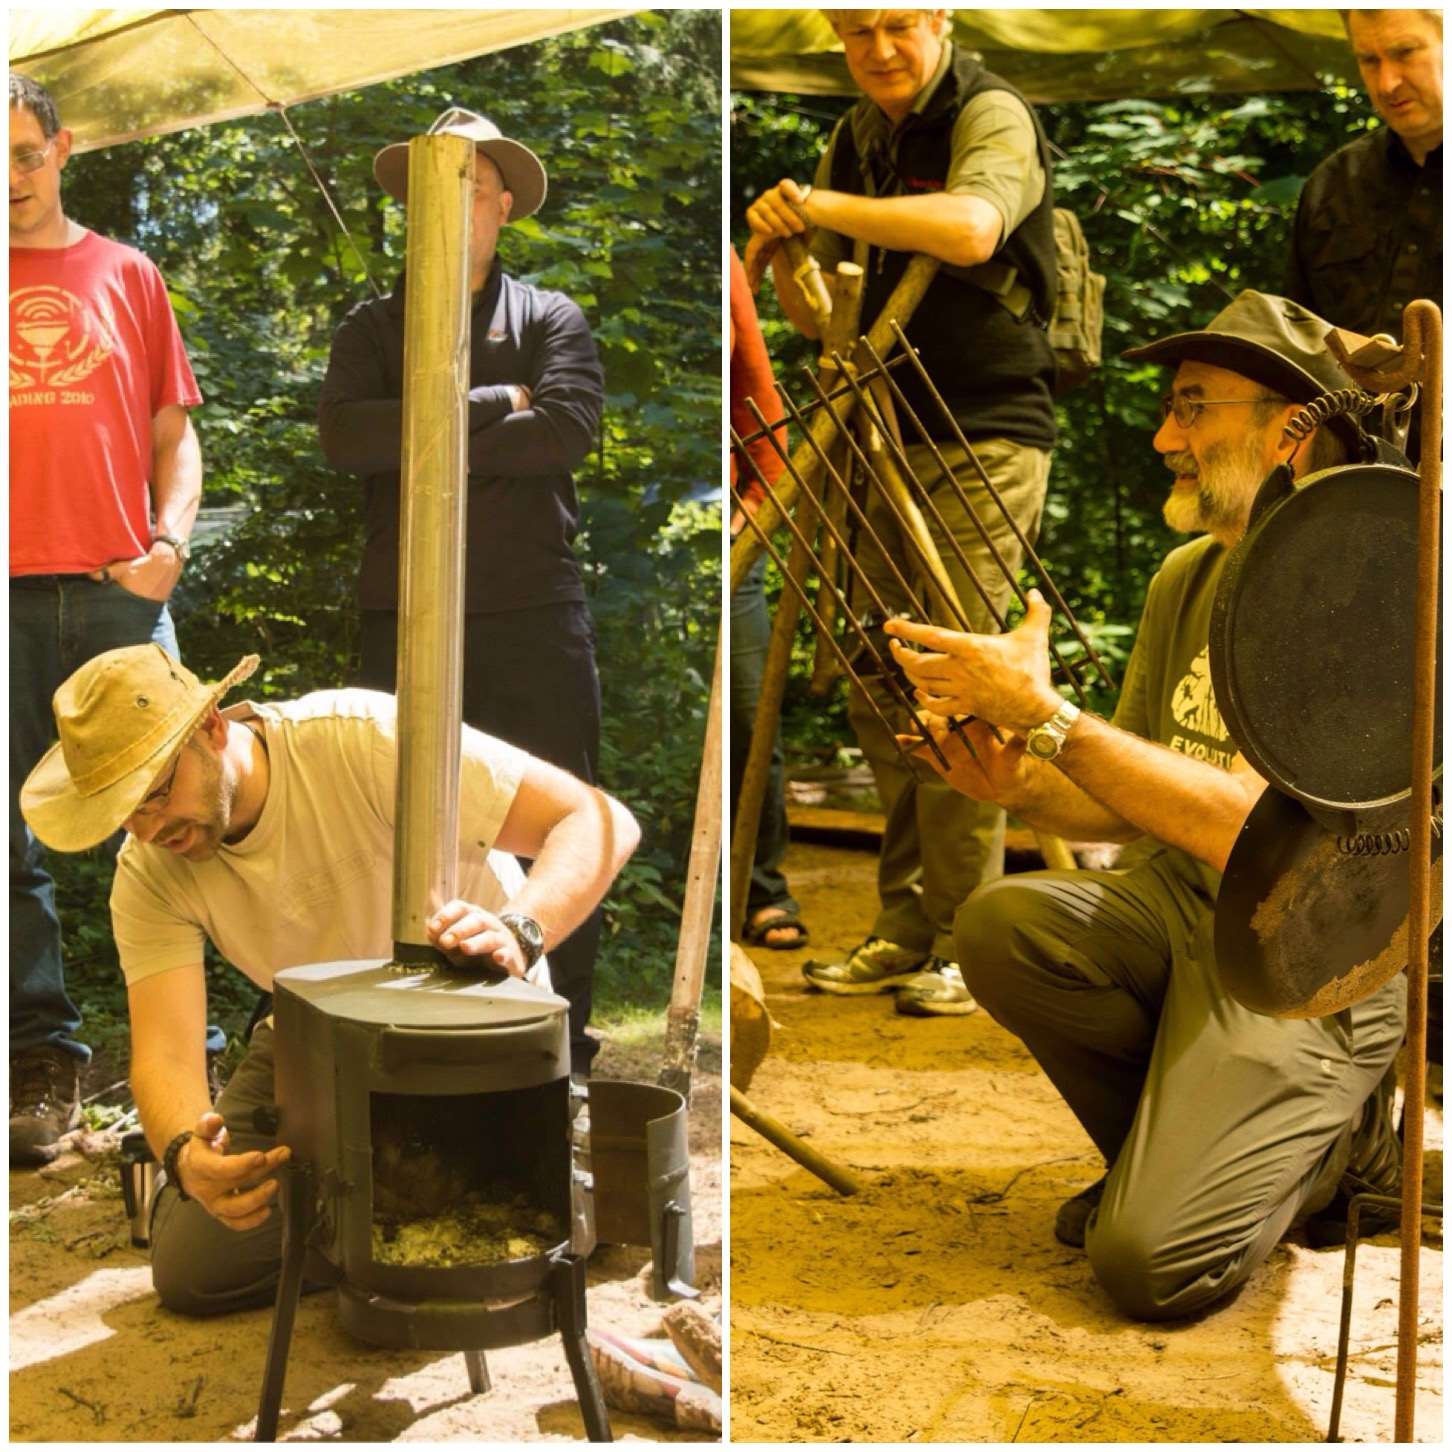
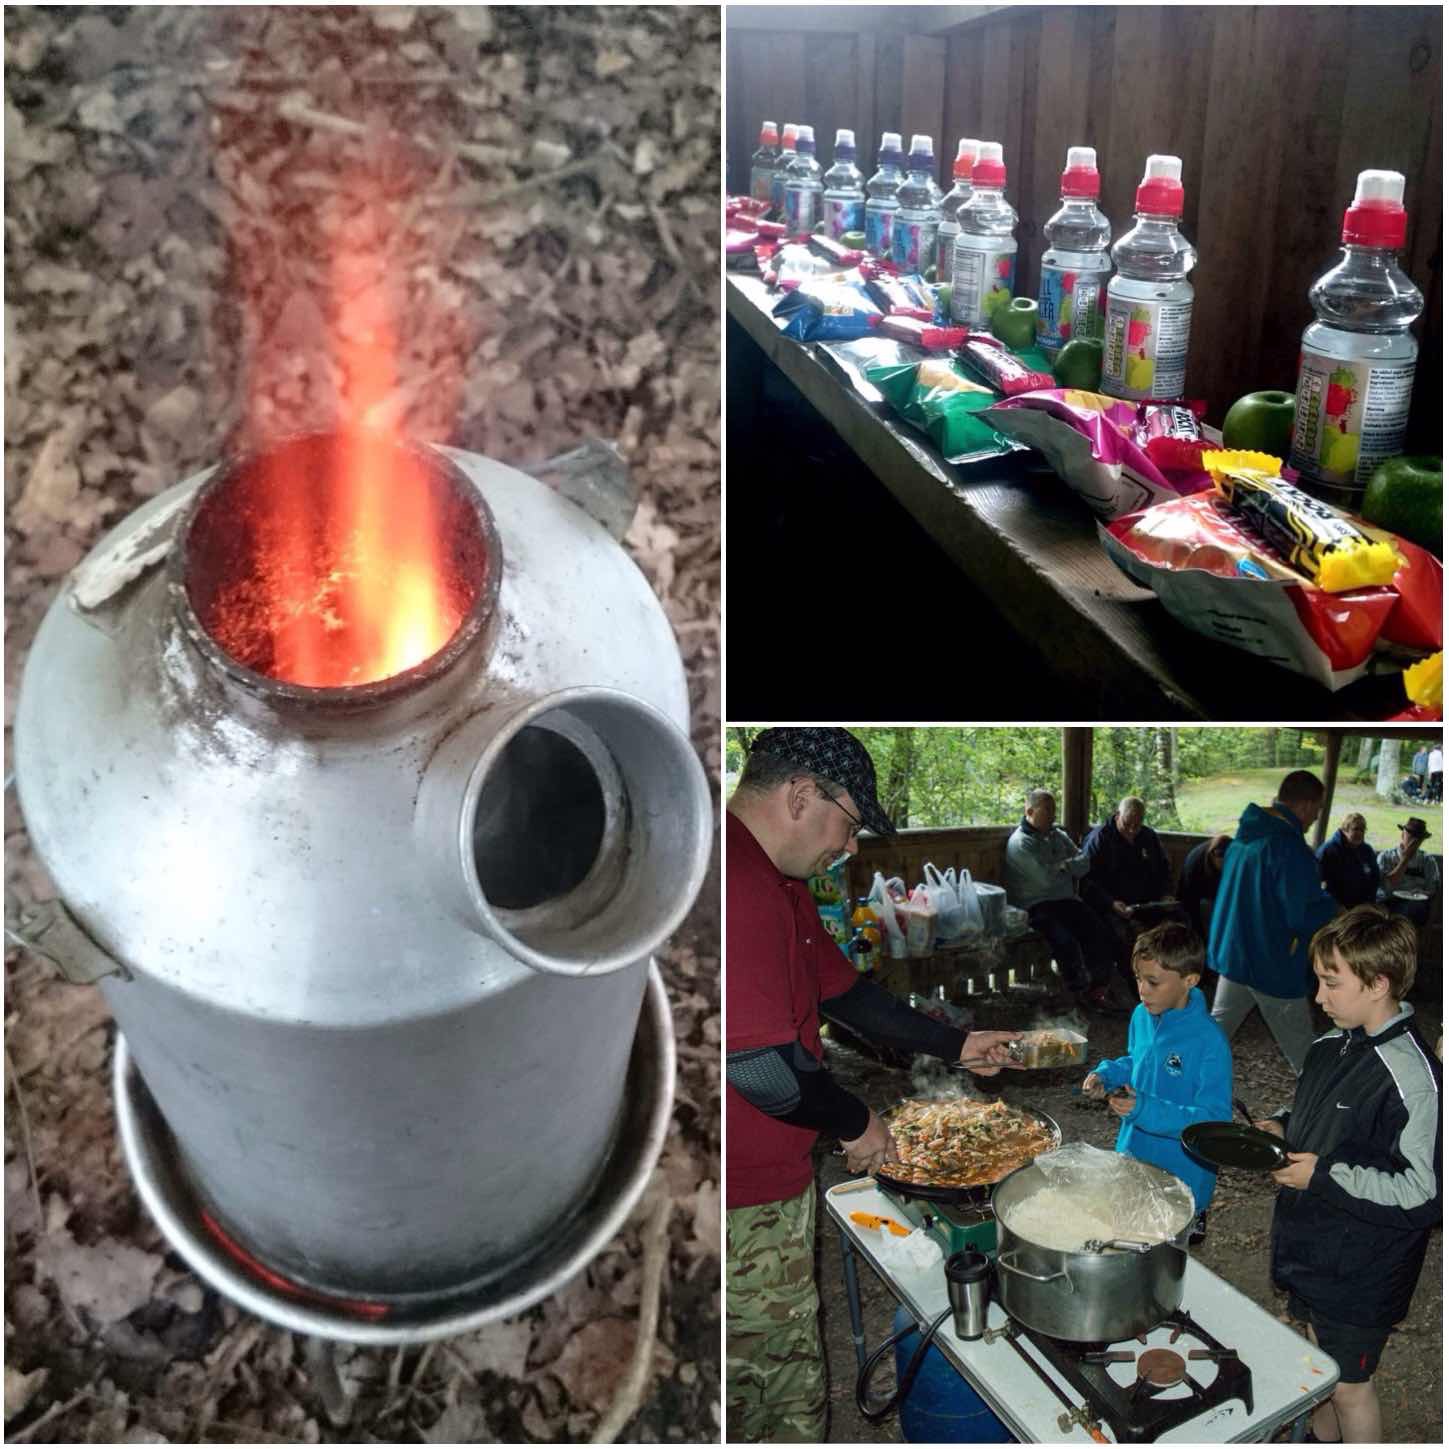
I decided to include this little fella as it is excellent for cooking in damp or wintry conditions. It is a wood gas stove and burns very efficiently. I was shown this by my friend Ian Woodham back in 2011 at the Bushcraft UKBushmoot. As soon as I got home I made one up and documented it on my blog.
I made this out of a metal paint pot, a large dog food tin, a Fray Bentos pie tin and a few bits and bobs. It works a treat and needs very little fuel to keep it going. I like to use dry seasoned pine/spruce/larch cones in the stove as they burn for a good length of time.
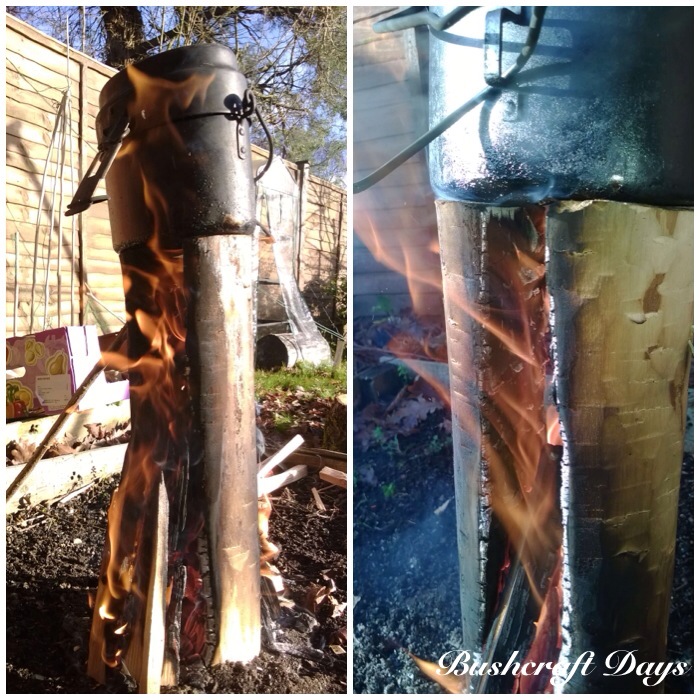
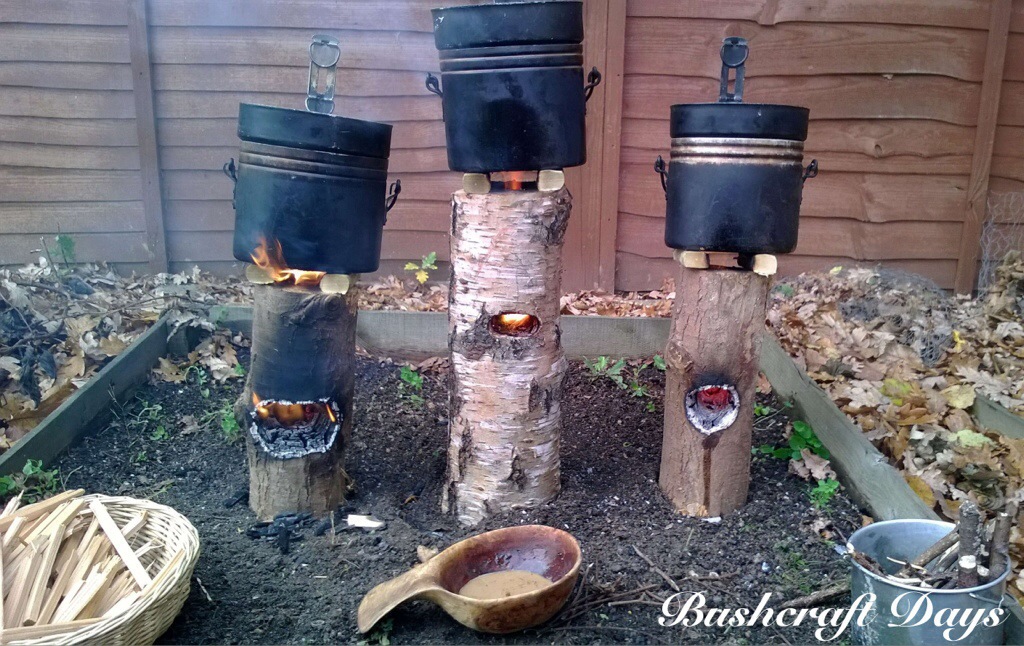
The next type of candle I came across was what has been termed the log rocket stove. I spotted a video by James Hookway and soon set to work in my workshop creating 3 stoves from different woods.
Log rocket stoves really intrigued me as they require very little kindling to keep them going (the damper the log the more kindling you require).
Have a look at the original post here to see how they compared.
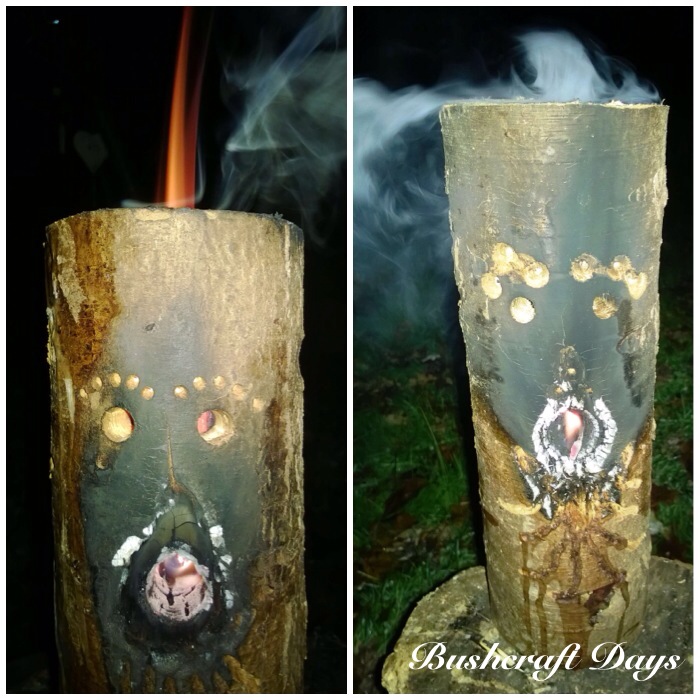
Now the kids love this stove – whenever you are having a barbie in the garden or if you are having a family camp make one or two of these up.
The principles are the same as the log rocket in the previous post except for the faces you can carve on them. Once they get going the faces really light up. They are perfectly able to be used as a normal log rocket stove for cooking or boiling but have the extra appeal factor of the face. A good video on this is the one made by Marcels Workshop.
Log rocket stoves have always appealed to me as a woodsman however when I am lightweight camping I do not fancy carrying around pre-prepared ones. Recently on Facebook Paul Hasling posted an article on making one with an axe and saw with no need for a drill. One of the other Scout leaders posted up a step by step guide on making one but it is in Spanish – the pictures though speak for themselves – Rocket Stove de Madeira.
I was instantly attracted to this method however when I was next out in the woods I could only find damp logs. To overcome this I split the log into six pieces and added Raappanan tuli cuts inside the chimney. This damp log rocket stove took slightly longer to get going as the internal wood slowly dried but once it was going there was no stopping it.
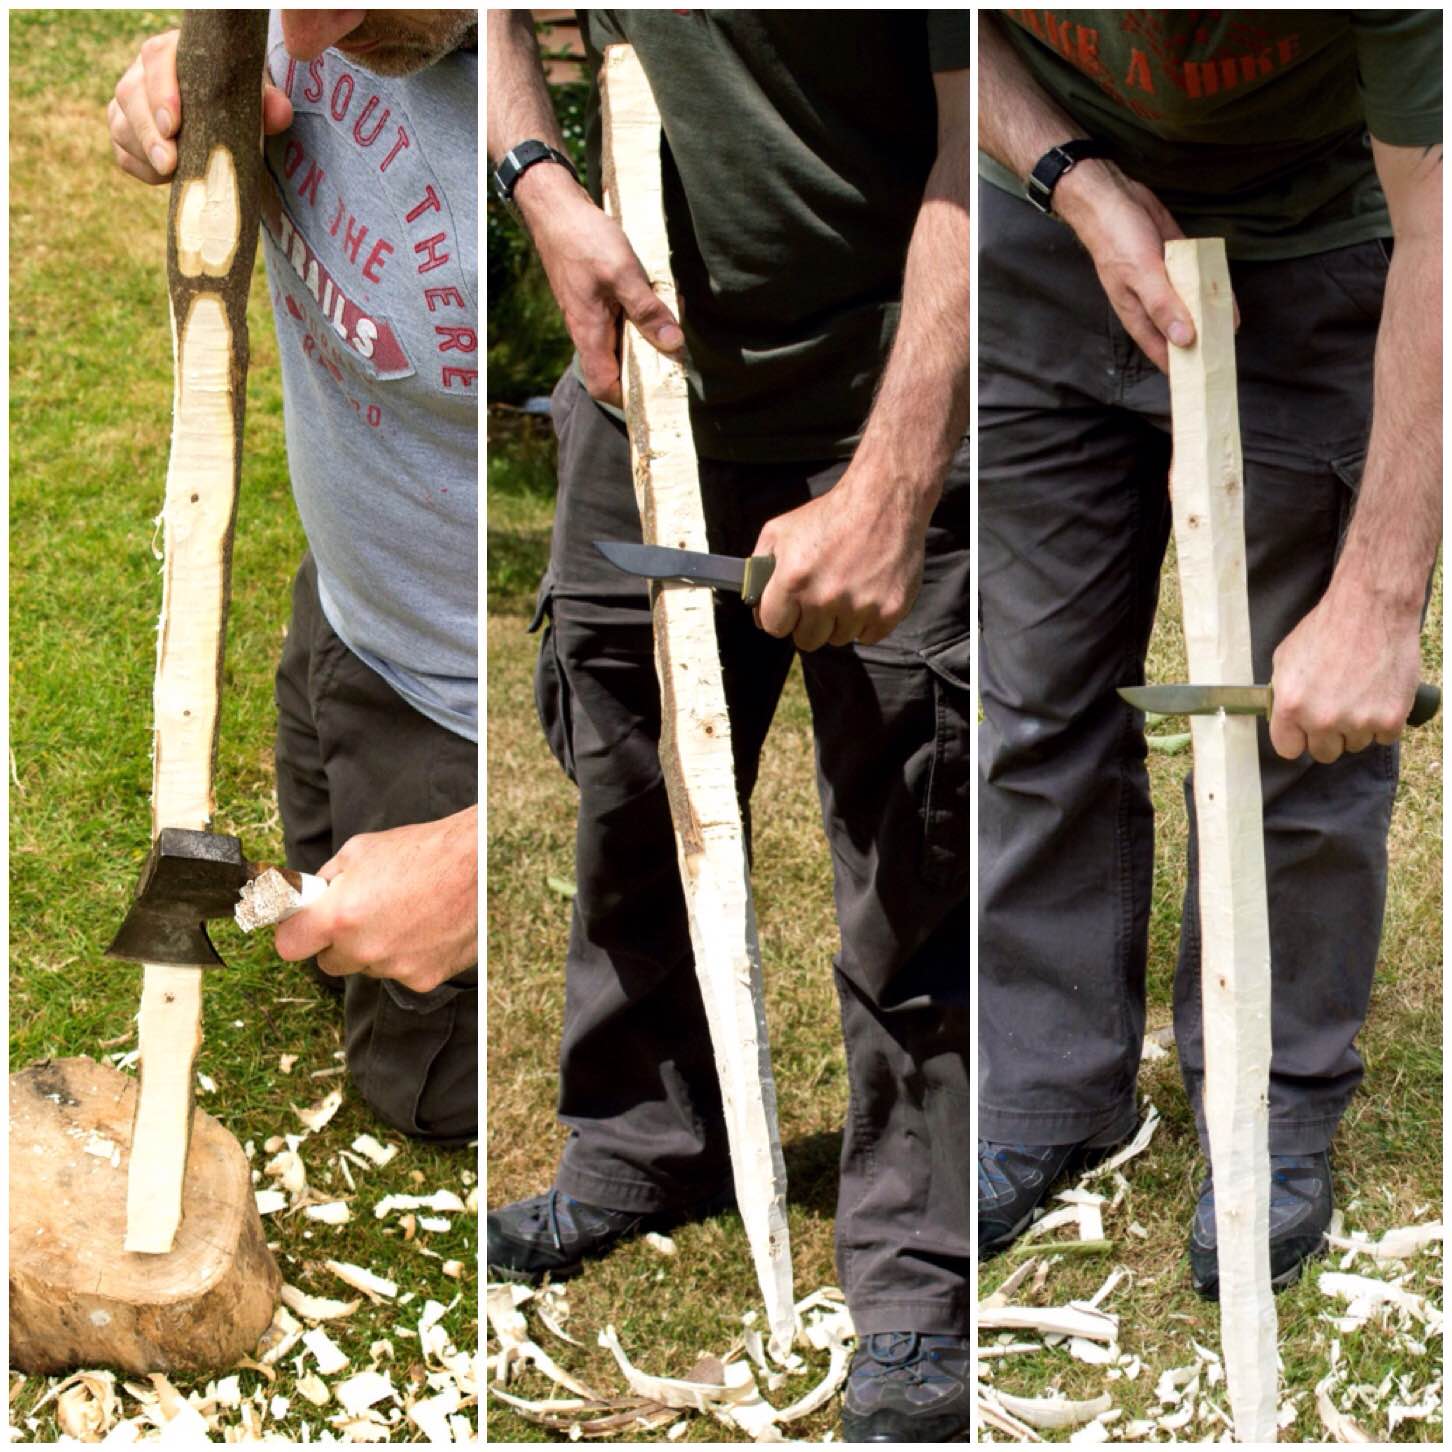
The final post in this series came to me one evening when I was wondering how I could operate in the woods without an axe. I figured it was worth a go trying to make a log rocket stove with just my Mora knife (I did use a small saw to trim the log).
With some battoning and the use of a wooden wedge I was able to split a decent sized log and fashion a perfectly good log rocket stove.
This exercise really is an excellent way to test out your knife skills.
Log Rocket using a Knife
Is the story over on candles, long fires and log rocket stoves? – I think not. I will continue to research this intriguing subject and if you have any ideas that I could try out to add to this library of knowledge I would really appreciate hearing from you.
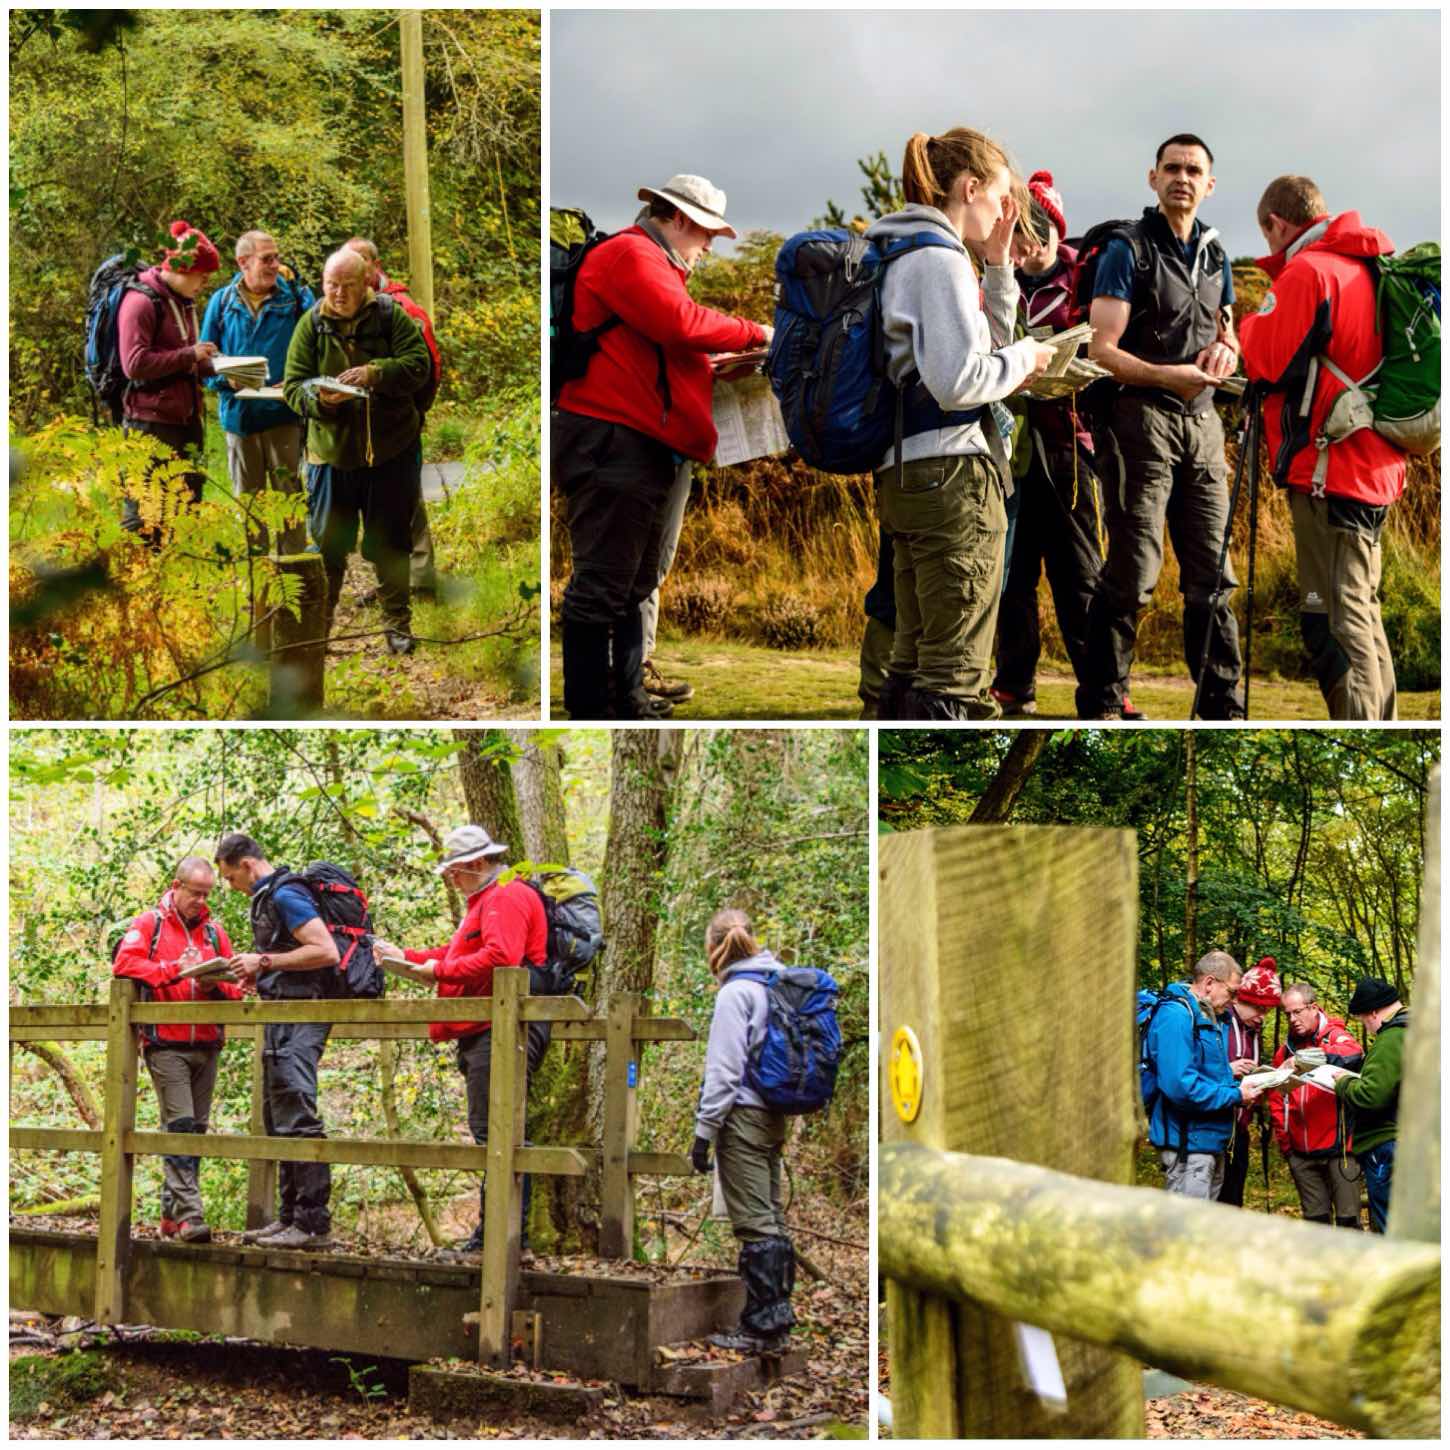
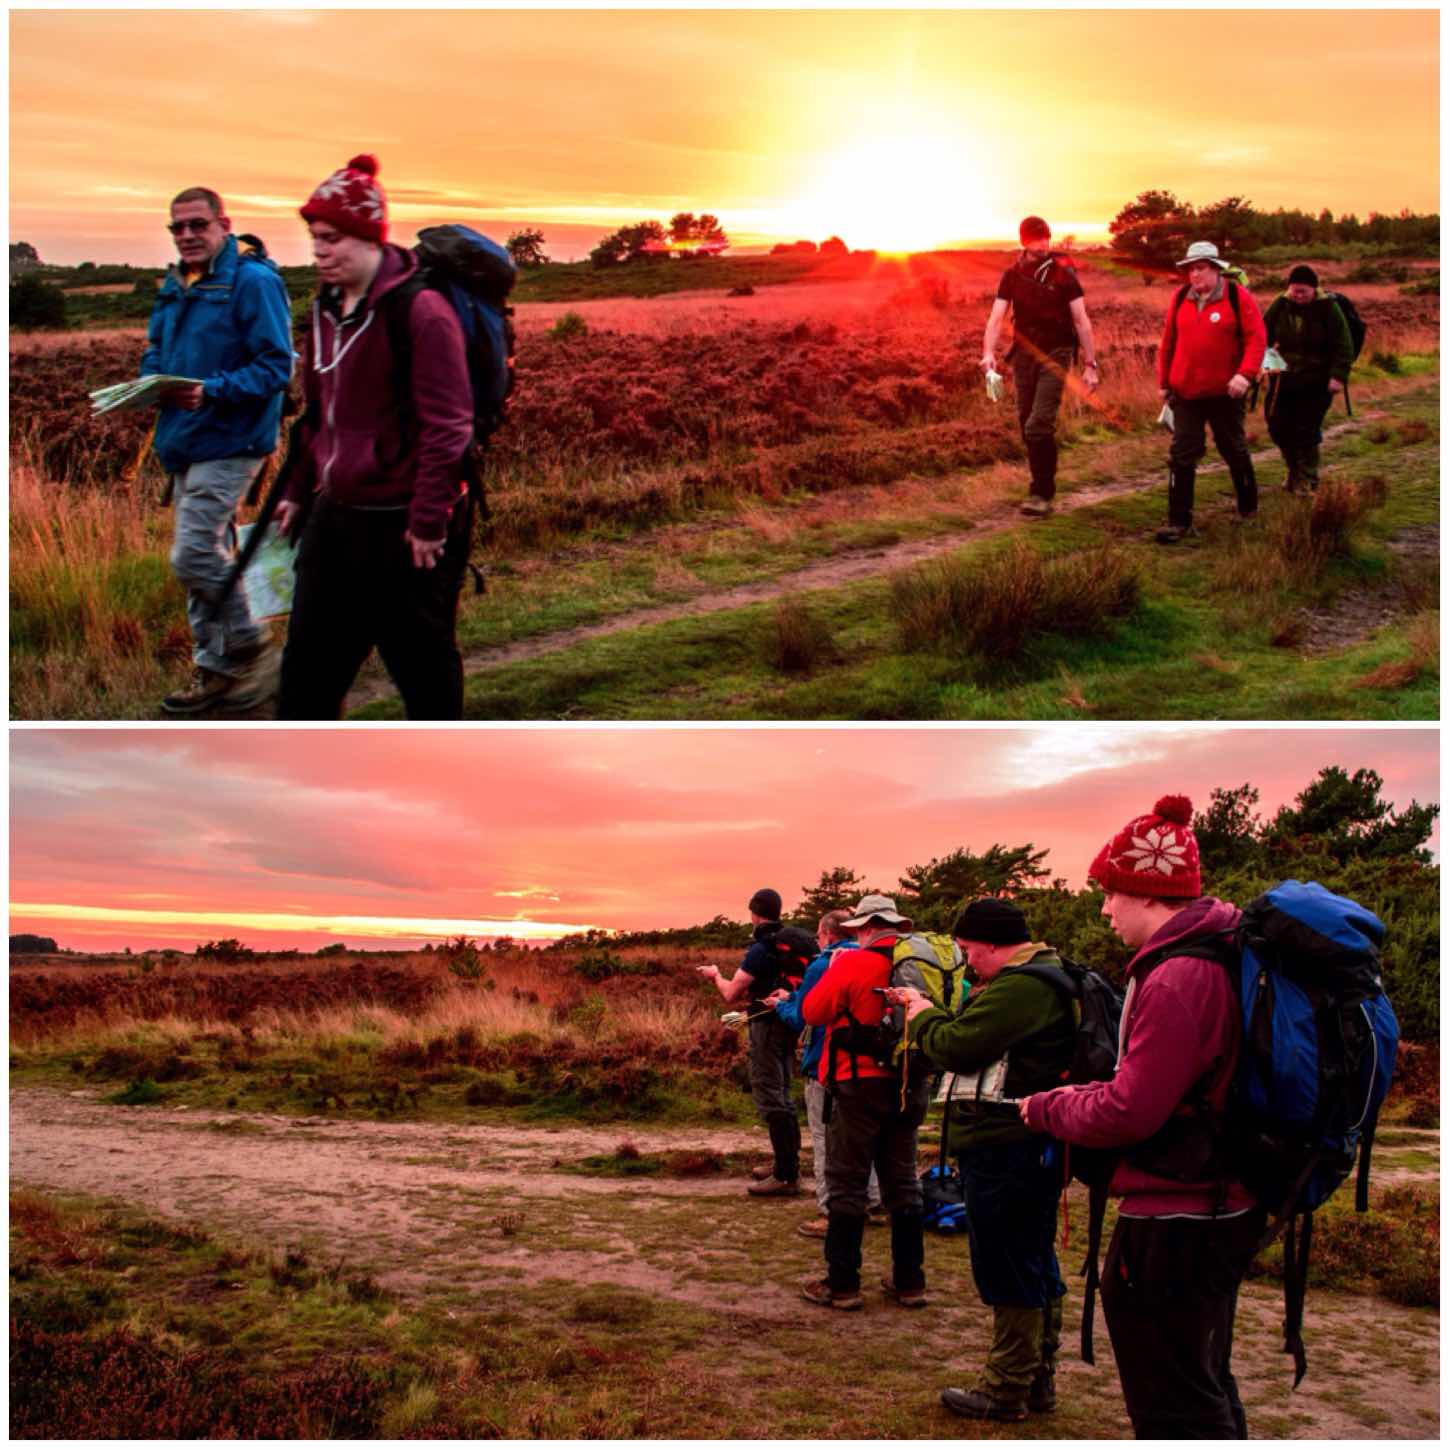
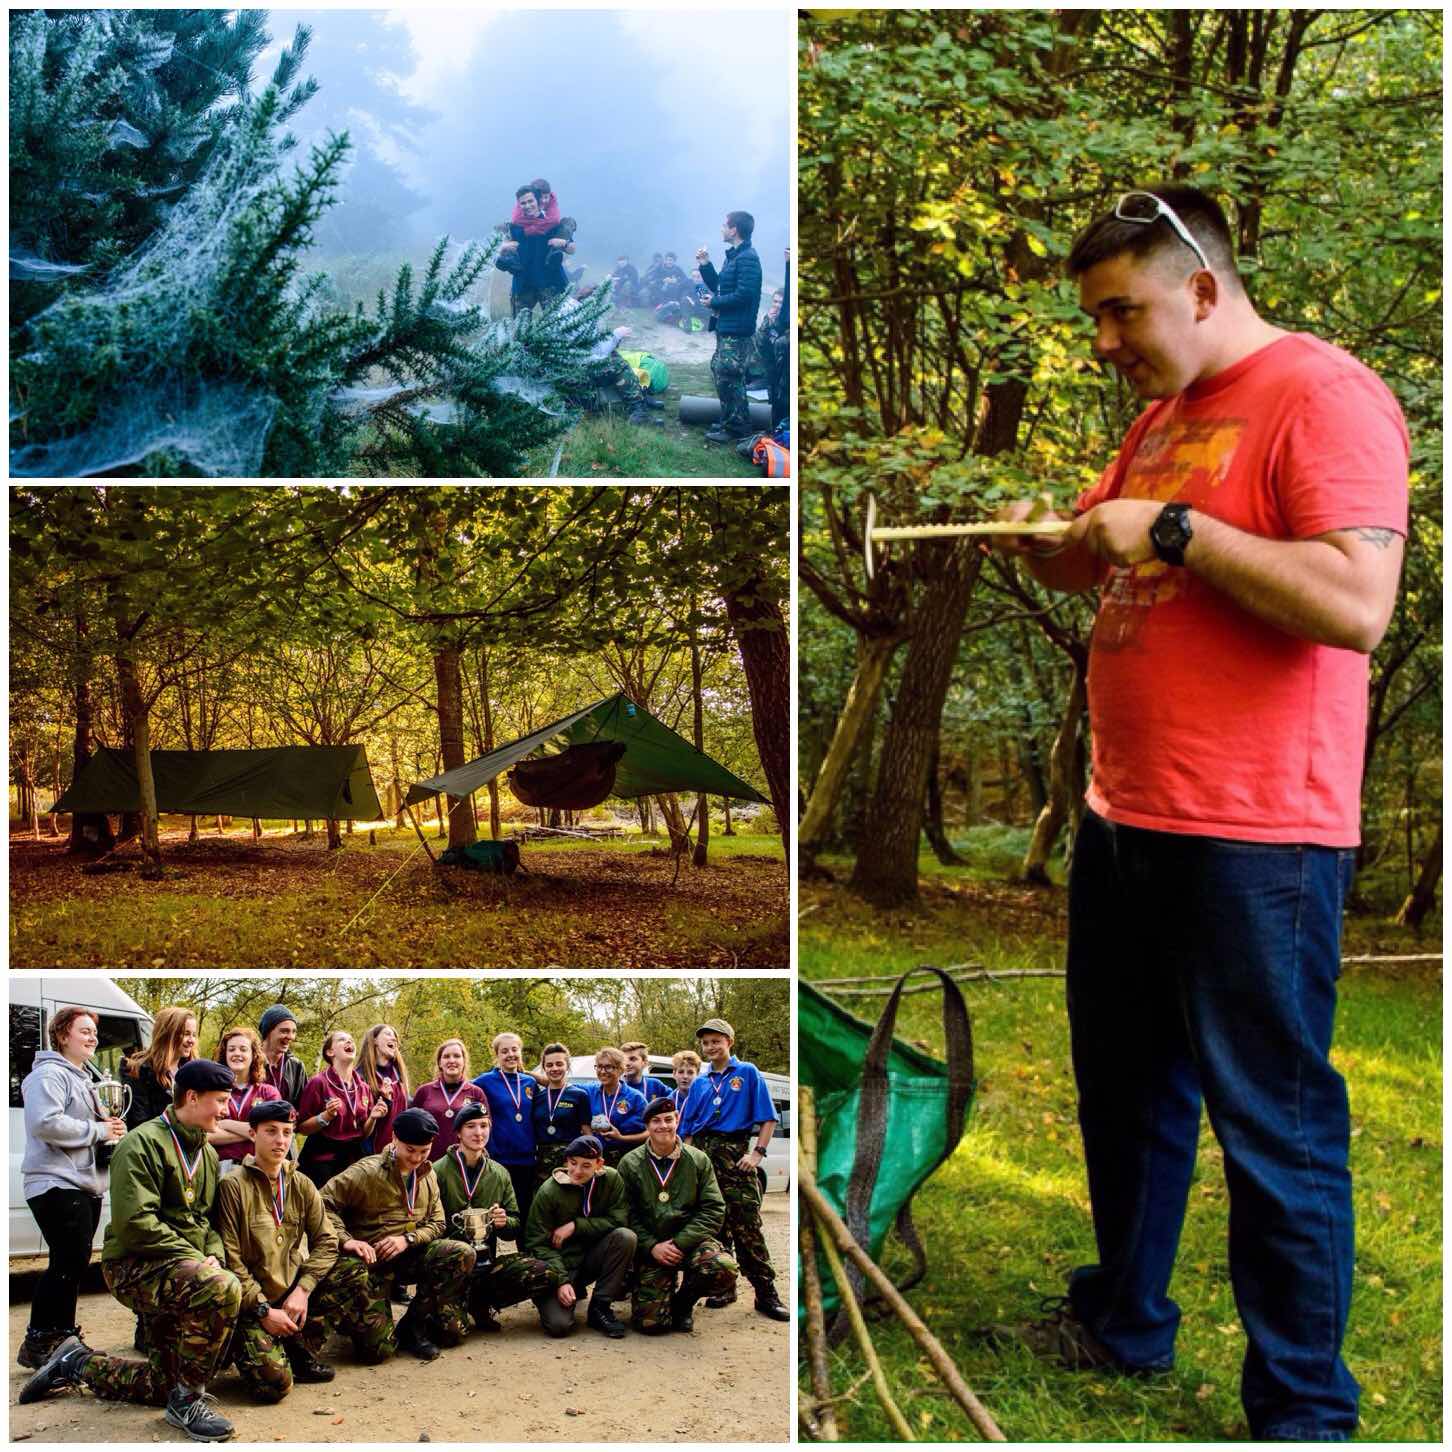
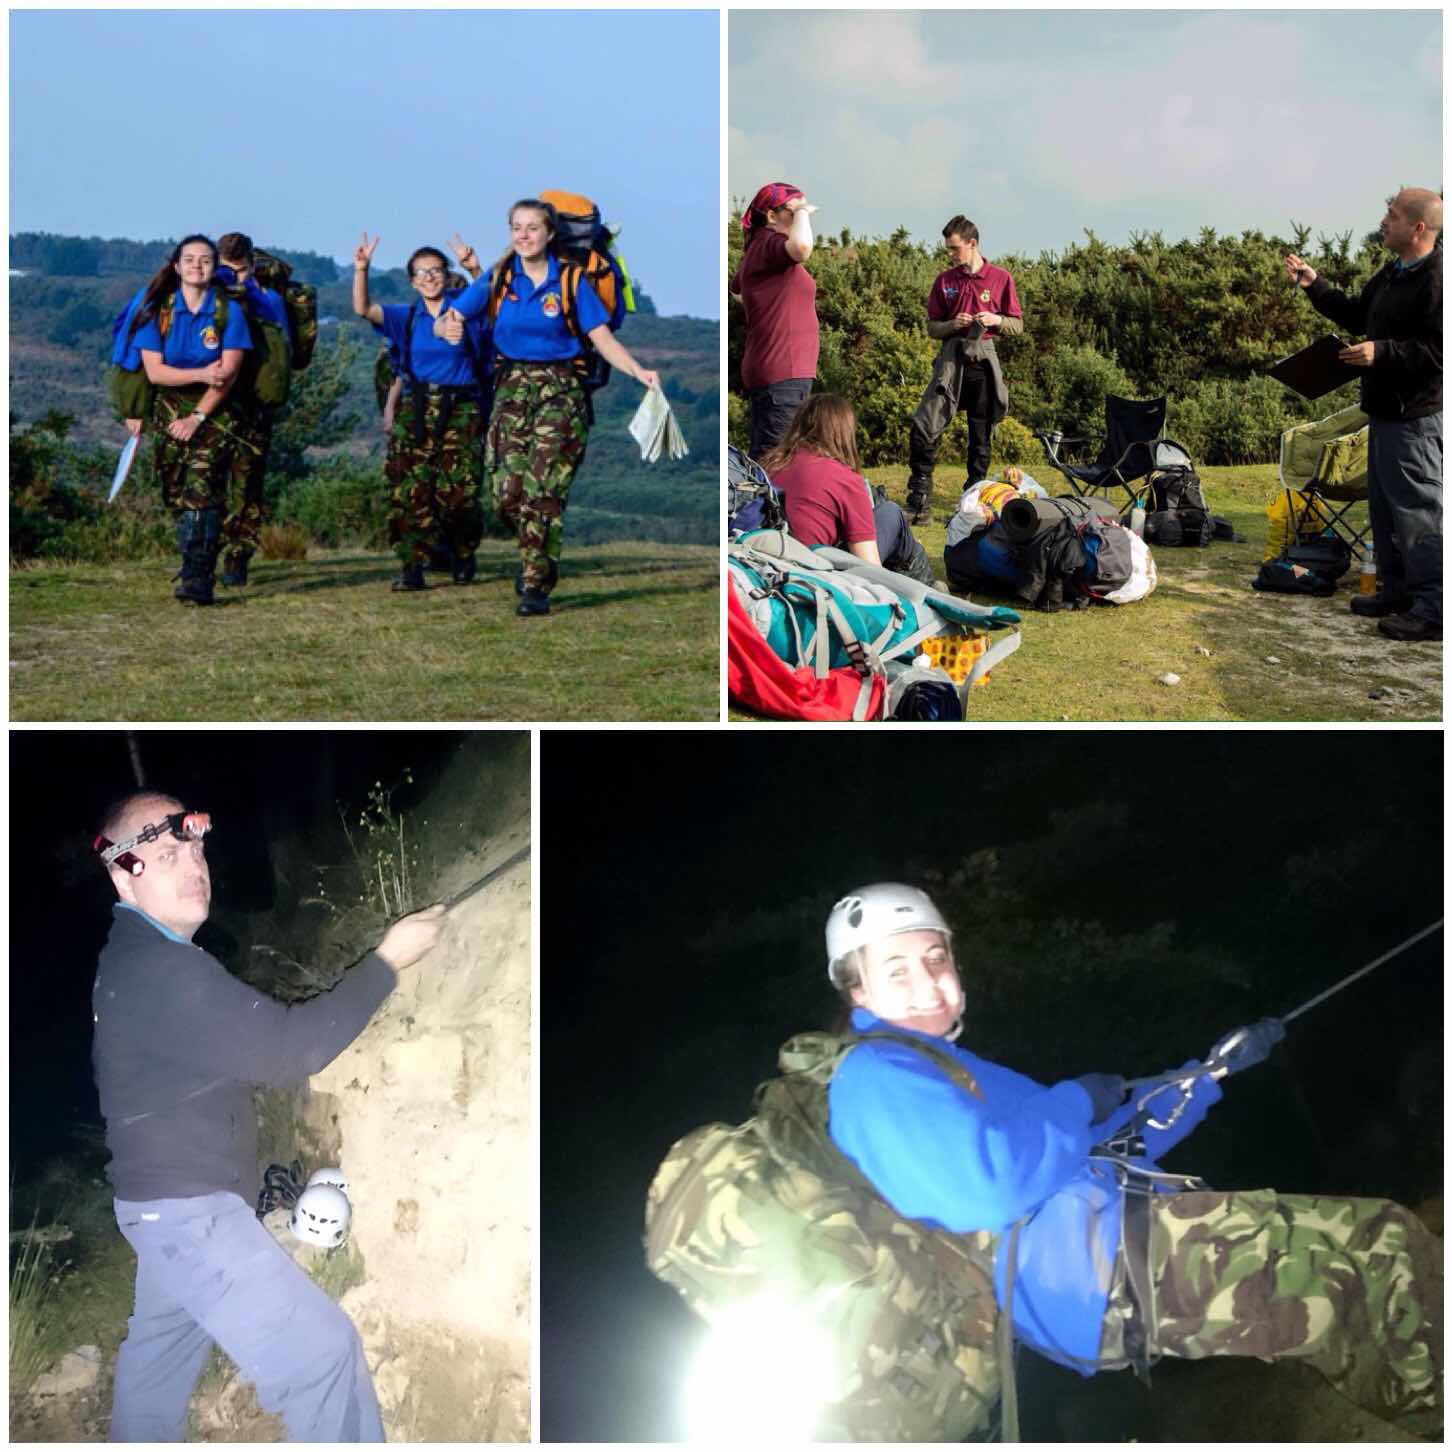
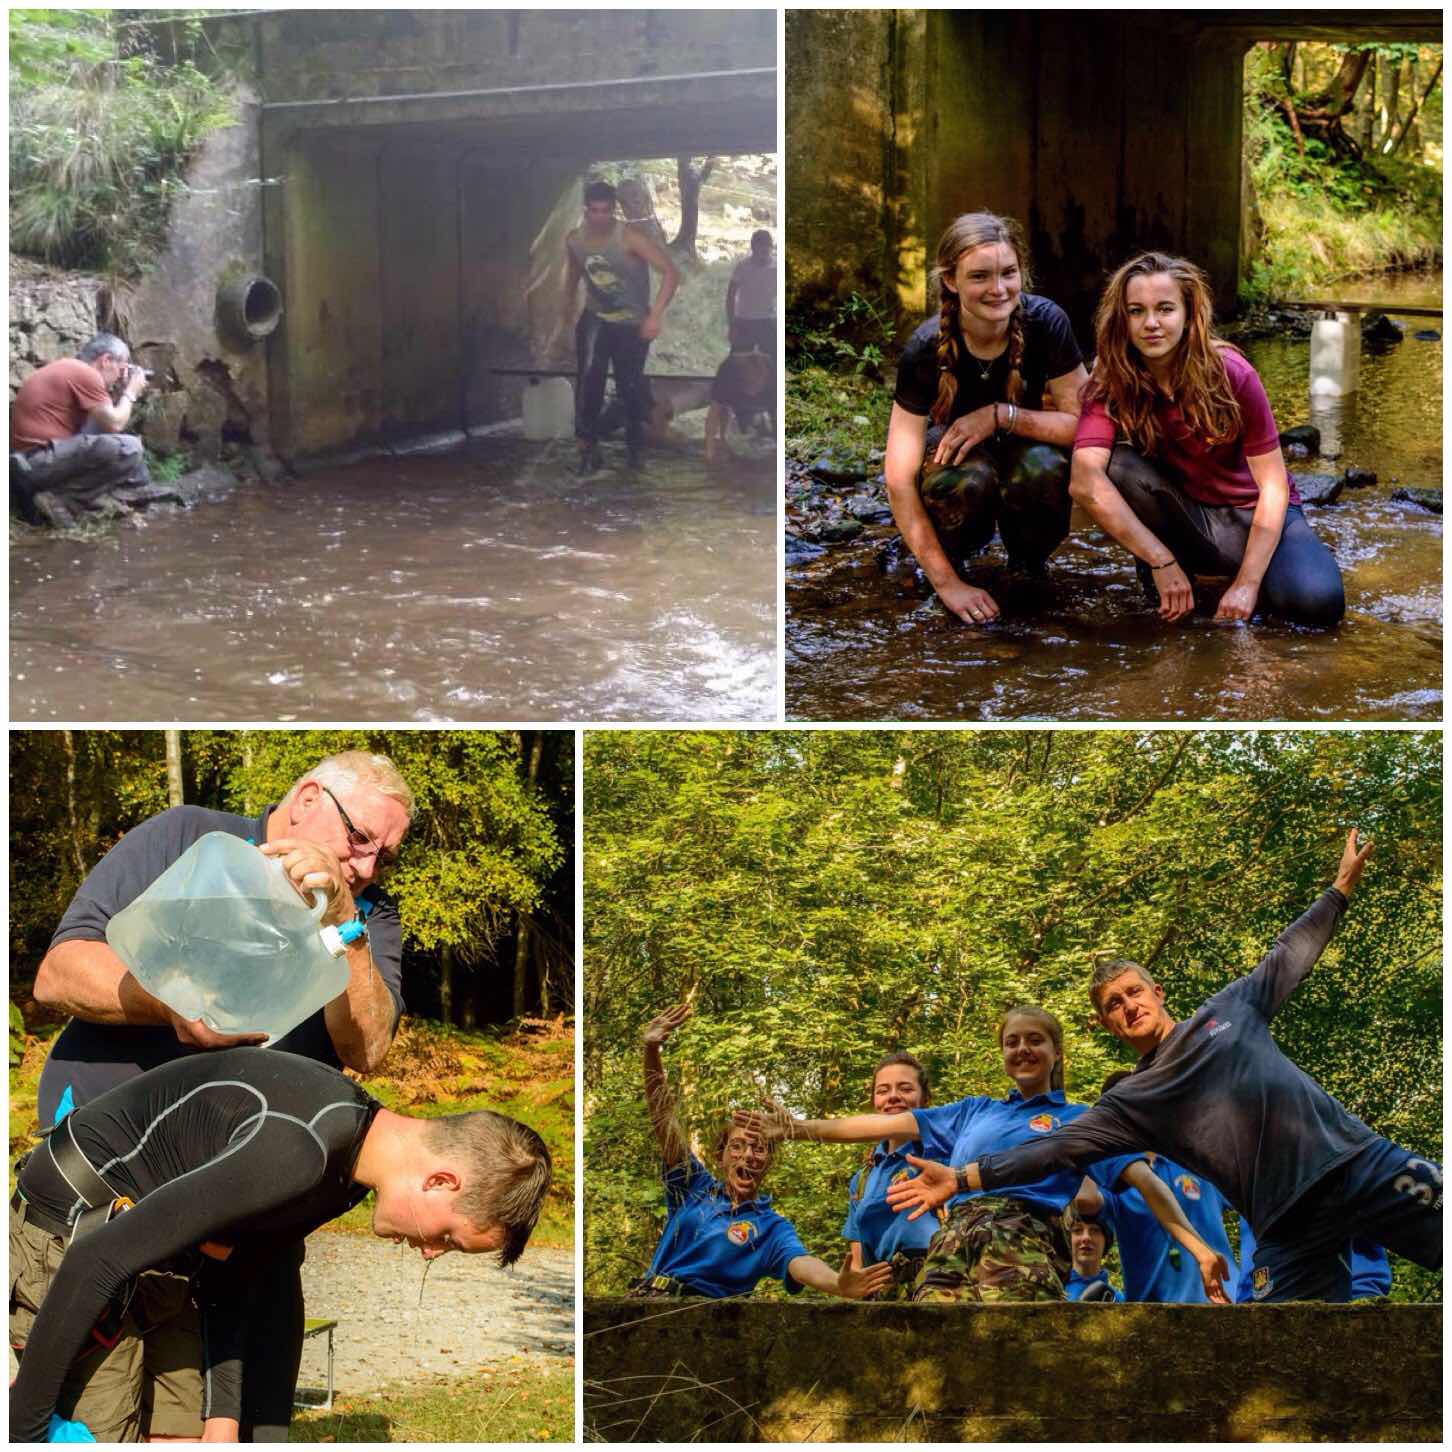
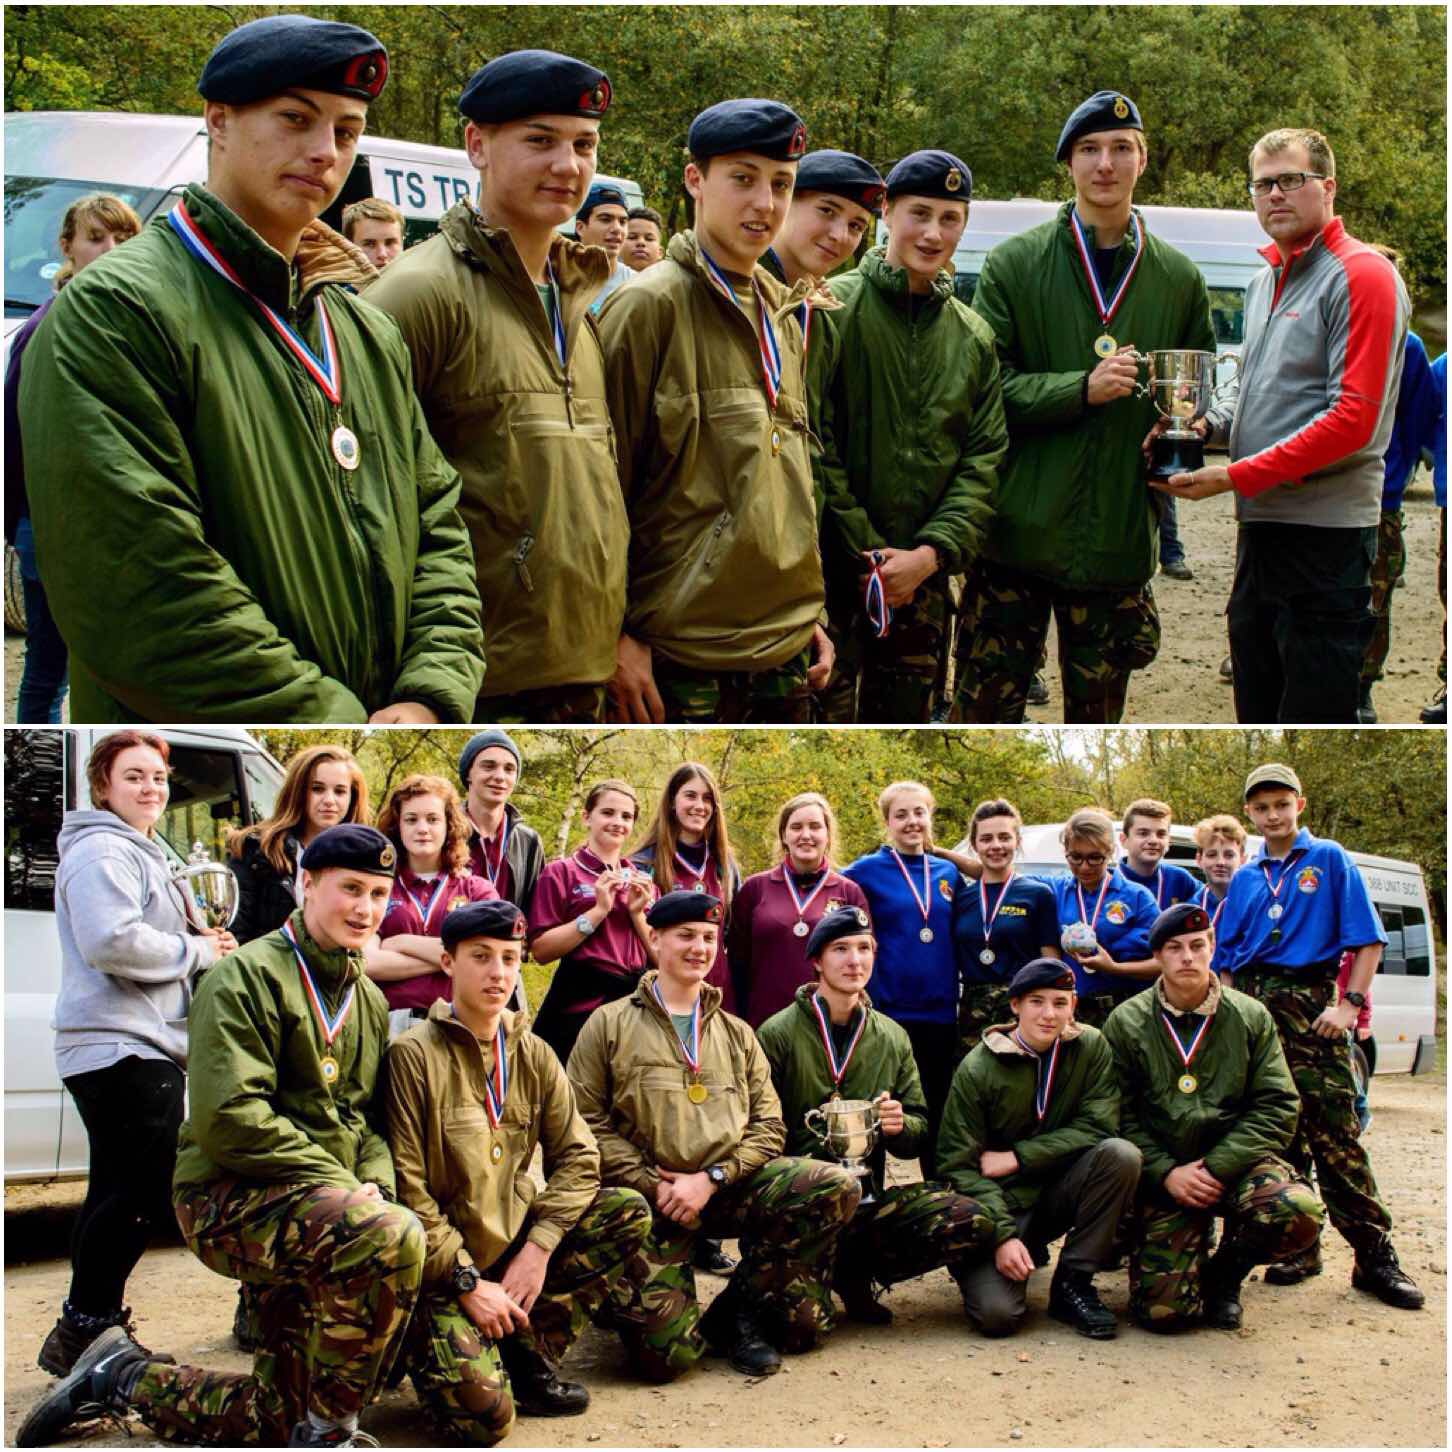
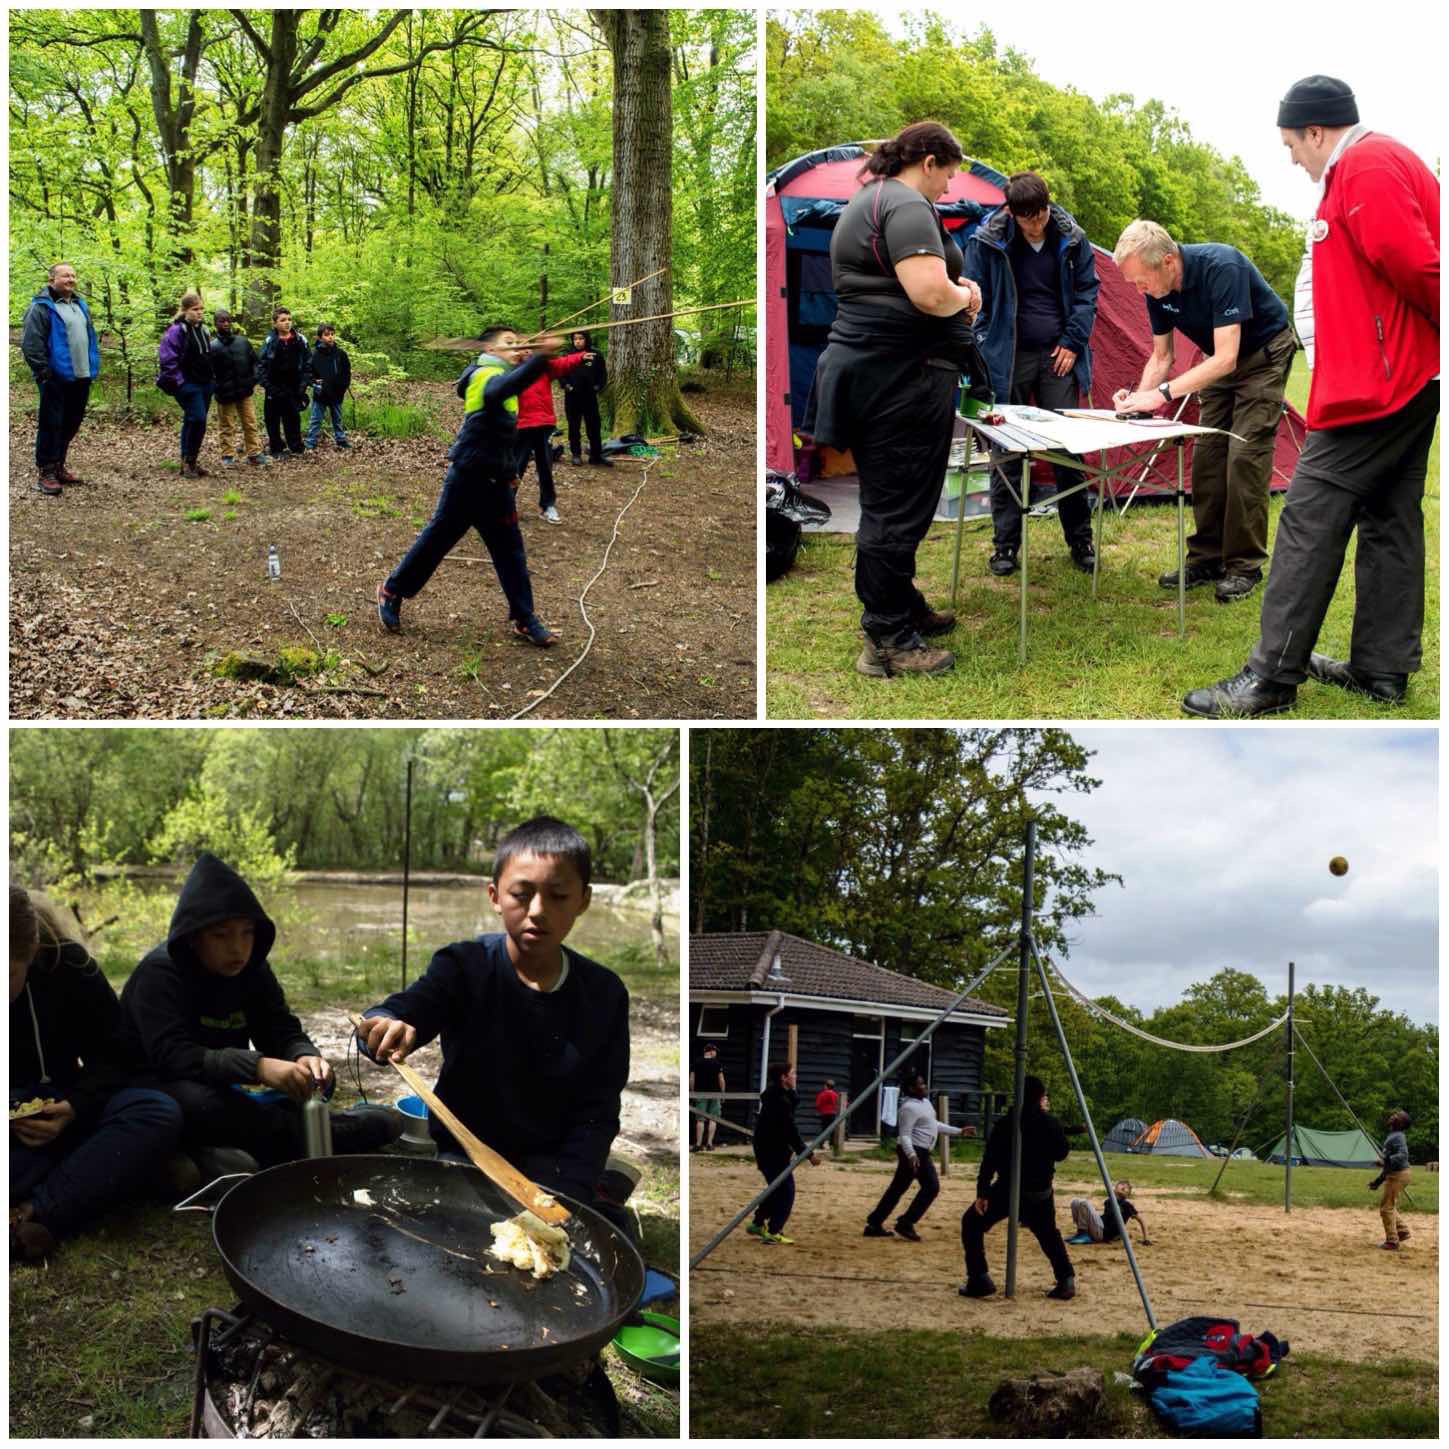
On a cold but dry weekend last October Sea Cadet staff and cadets assembled in beautiful Ashdown Forest for the finale of the Basic Expedition Leader (BEL) course. This was a weekend of assessments for the staff and a weekend of learning for the cadets.
The BEL Assessment weekend
The BEL award is a nationally recognised qualification in outdoor leadership and comes under the banner of the Sports Leader UK Award. The trainee instructors have to attend three weekends of training and put in many more hours’ work on their leadership and navigation skills.
For the assessment we brought in an independent assessor who had never worked with the students before and we also had another observer from the Sports Leader organisation along to see that we ran the course to the correct standards.
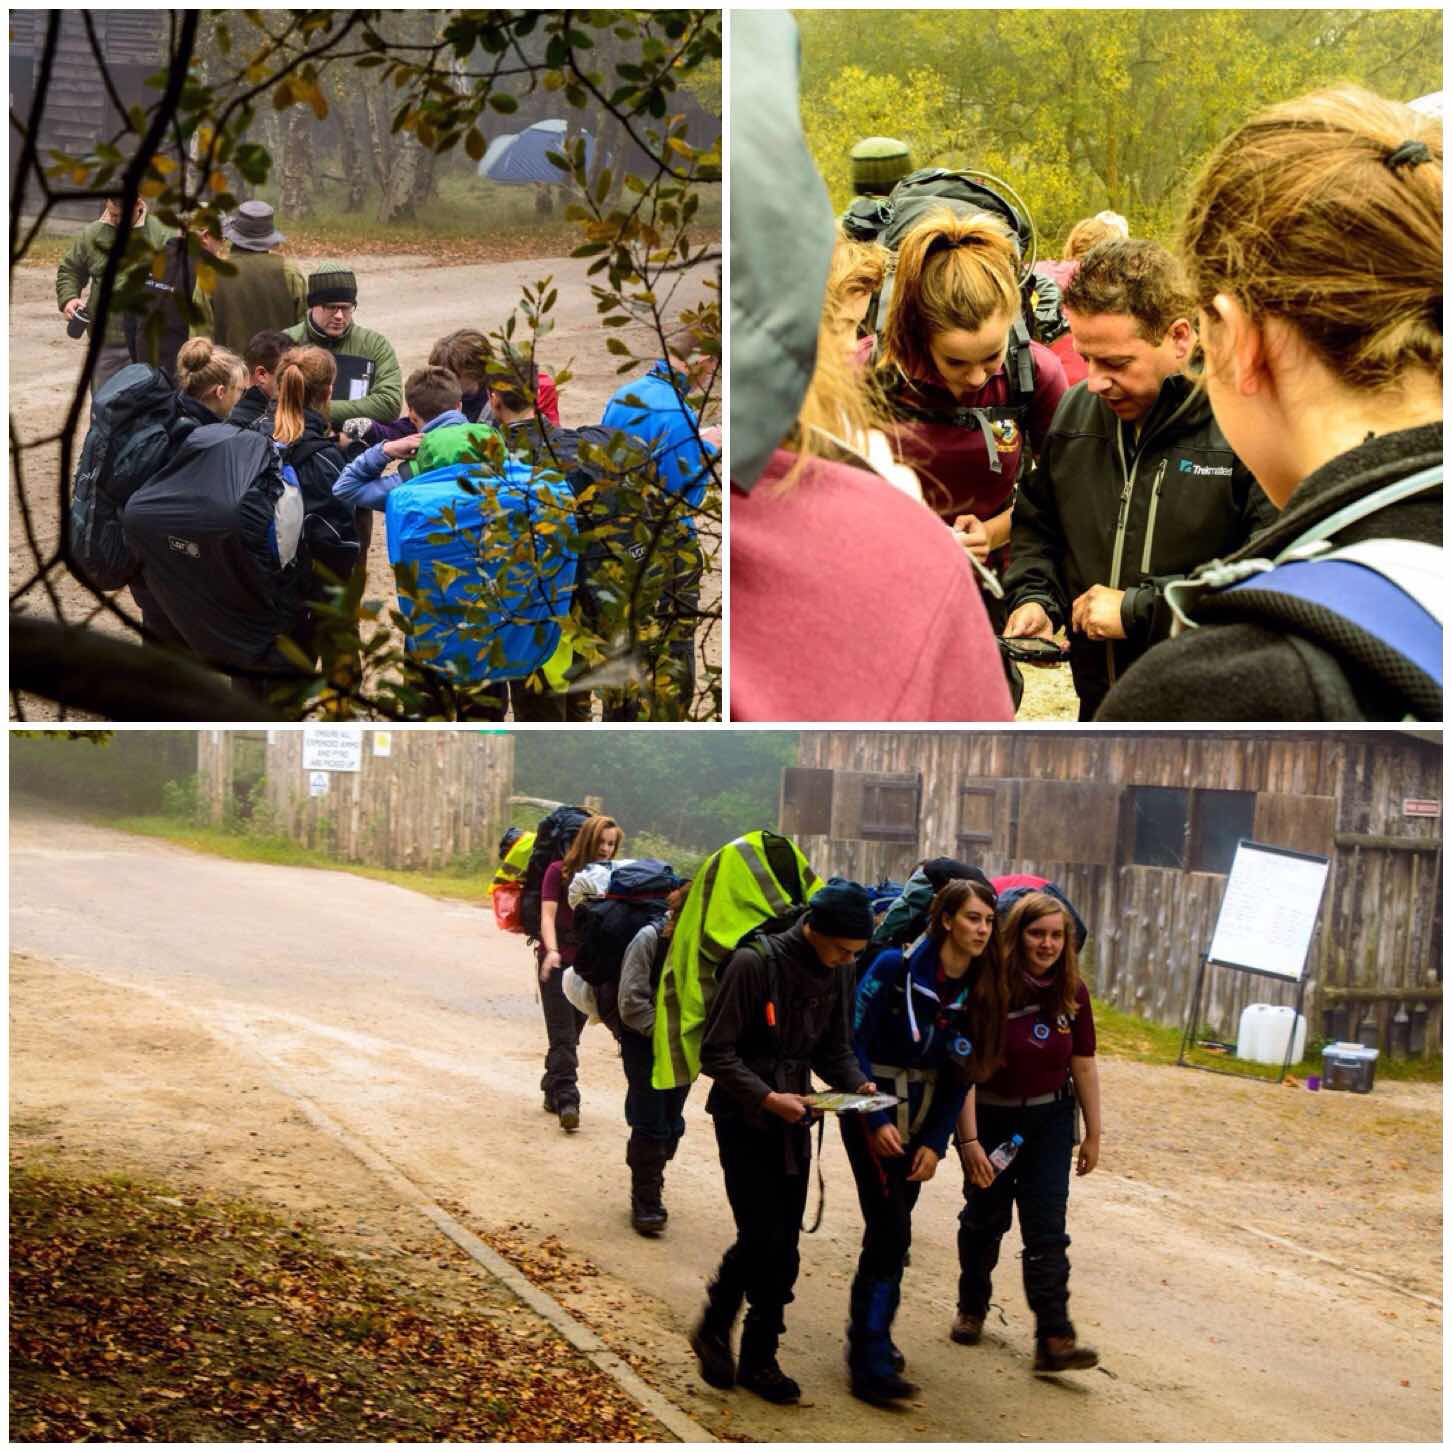
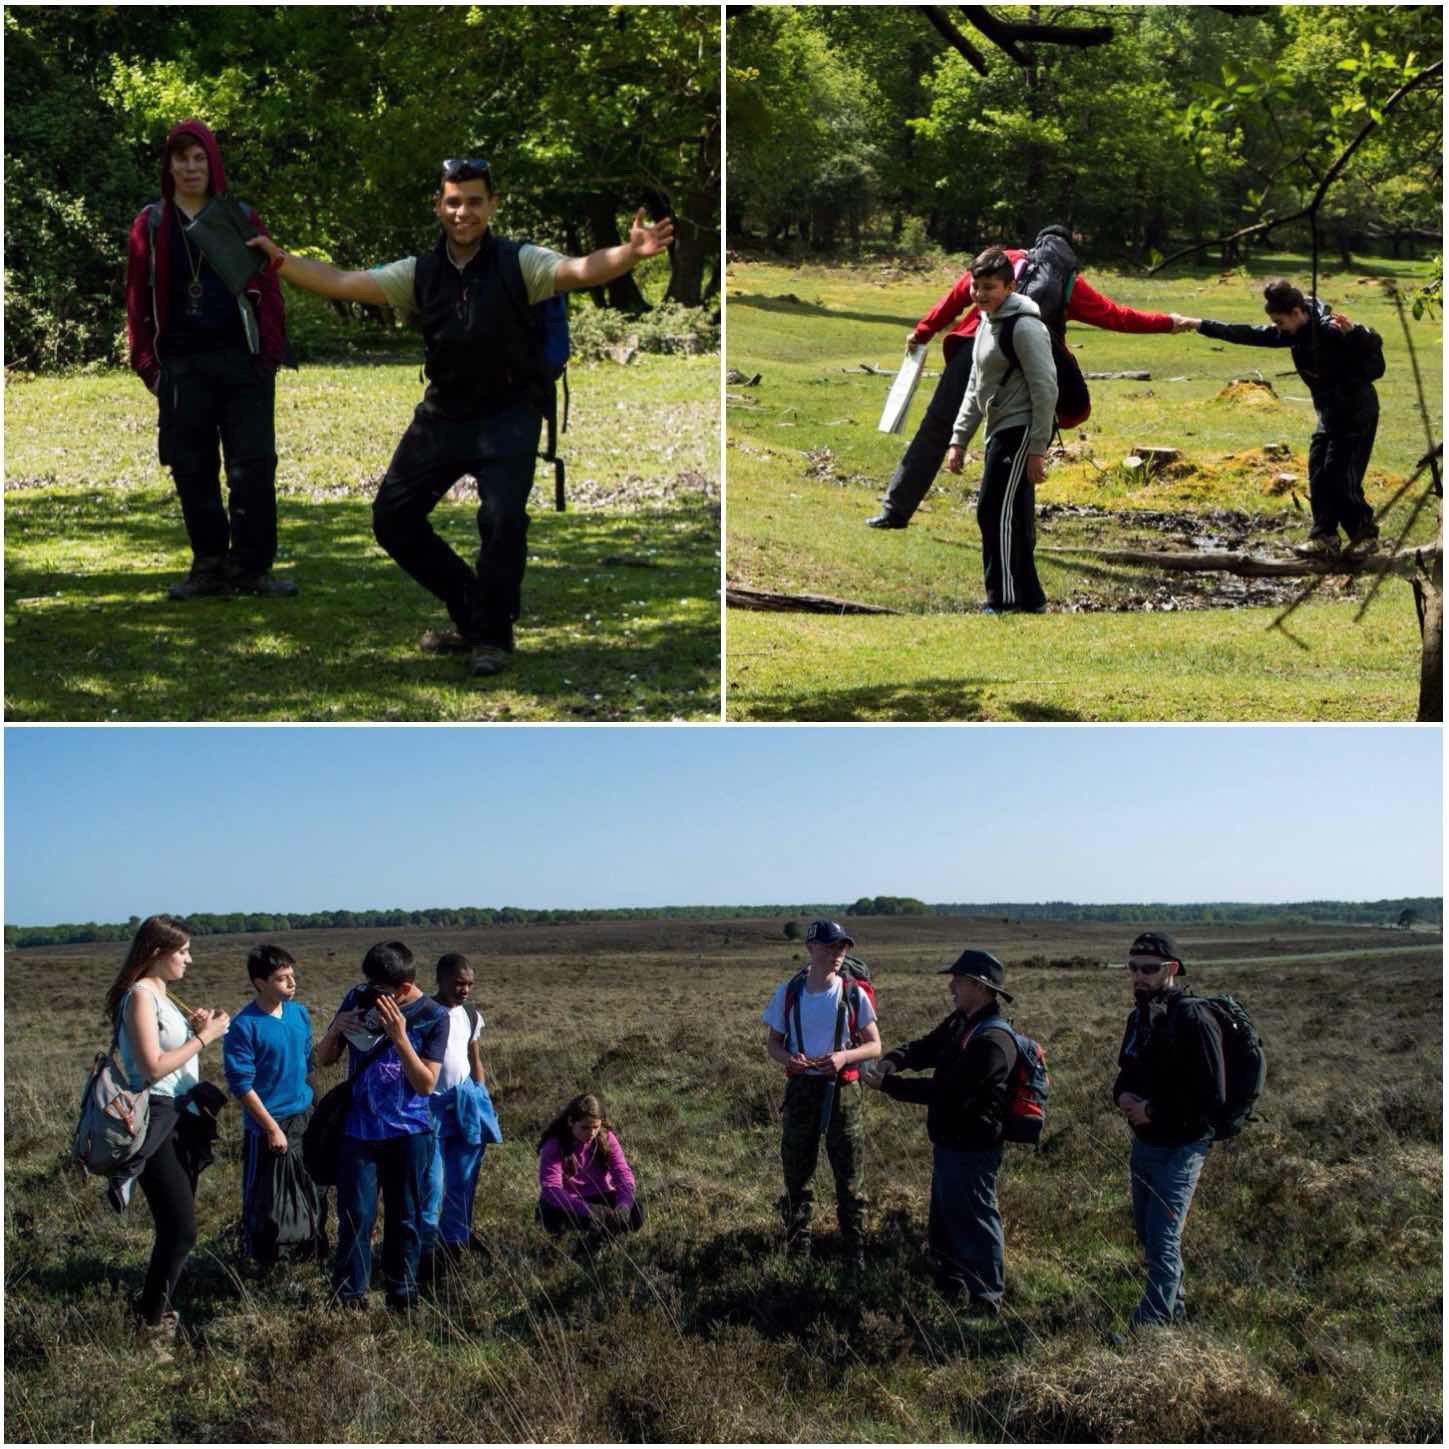
Much of the weekend was spent observing the students’ navigational skills as these have to be to a high standard. Not only do they need to know how to use a map and compass they need to be proficient in teaching others this skill.
Assessing the core skill of navigation
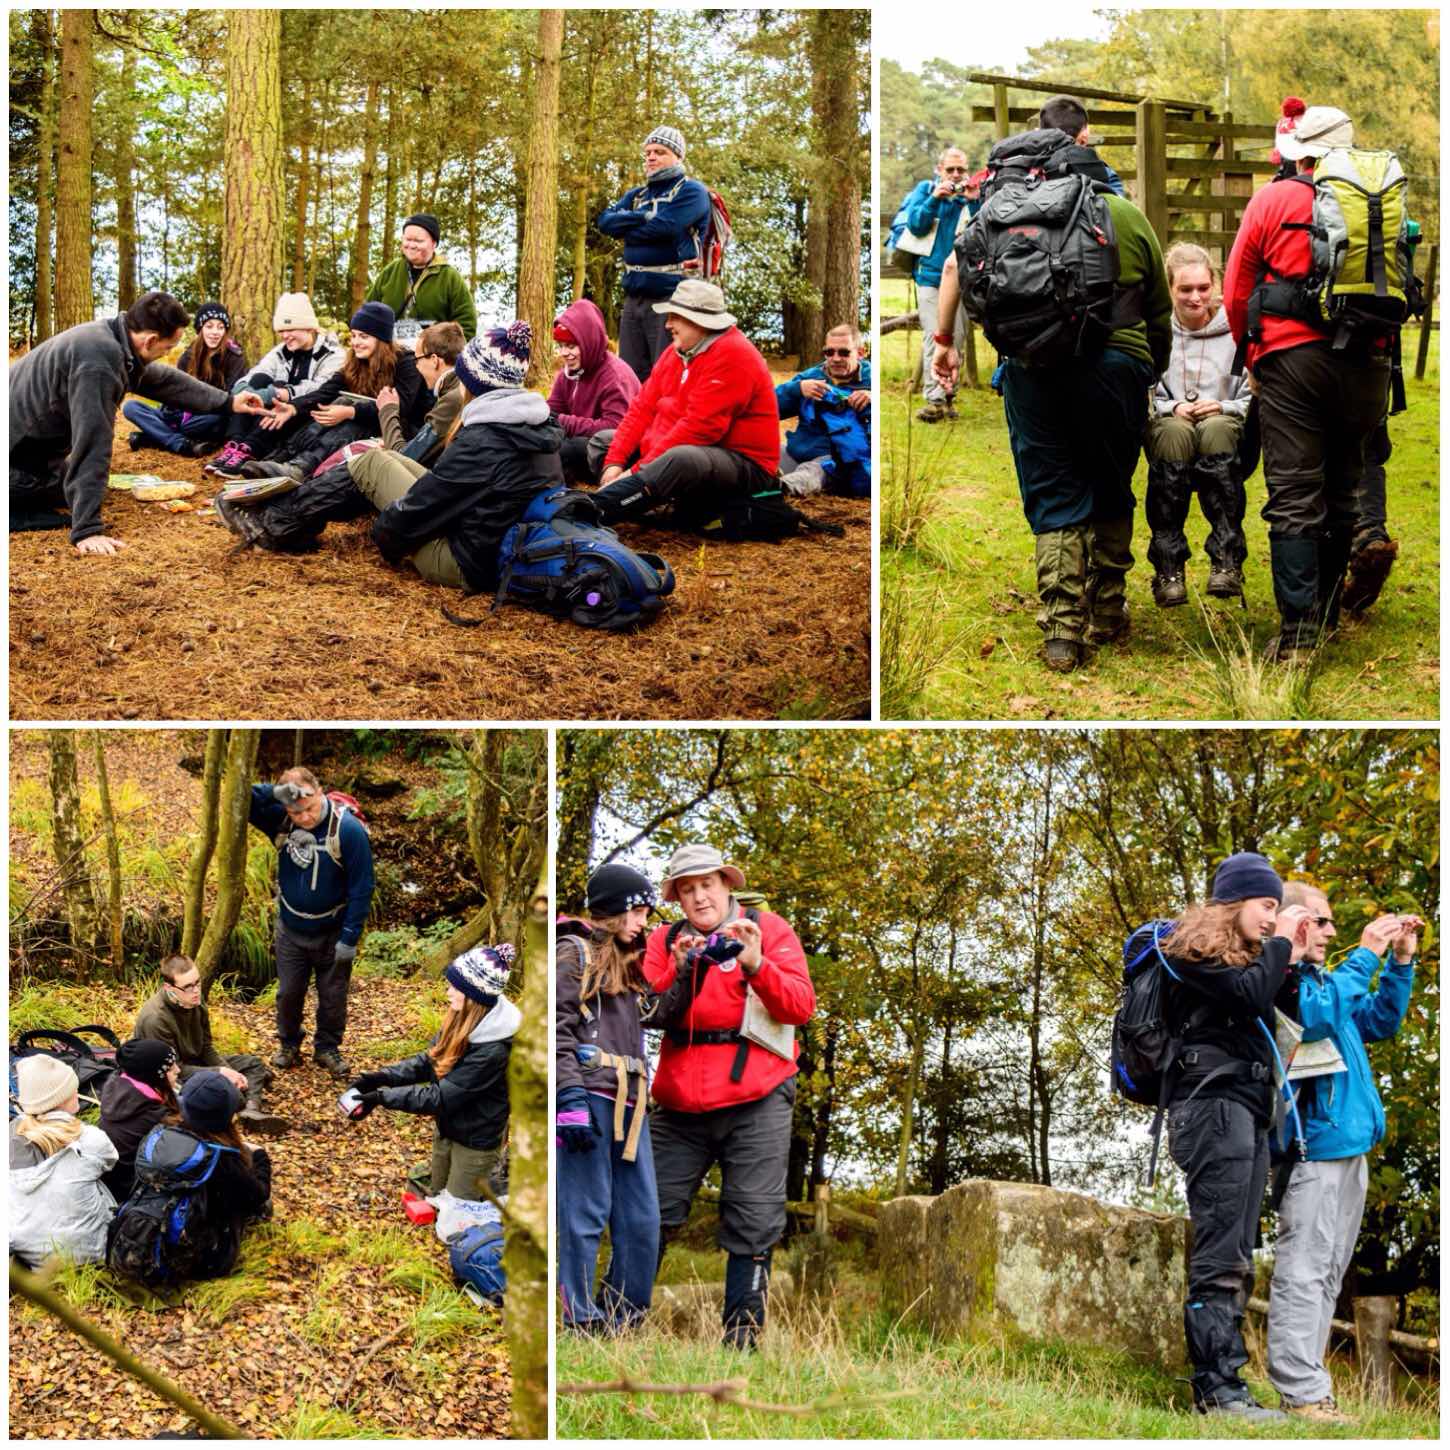
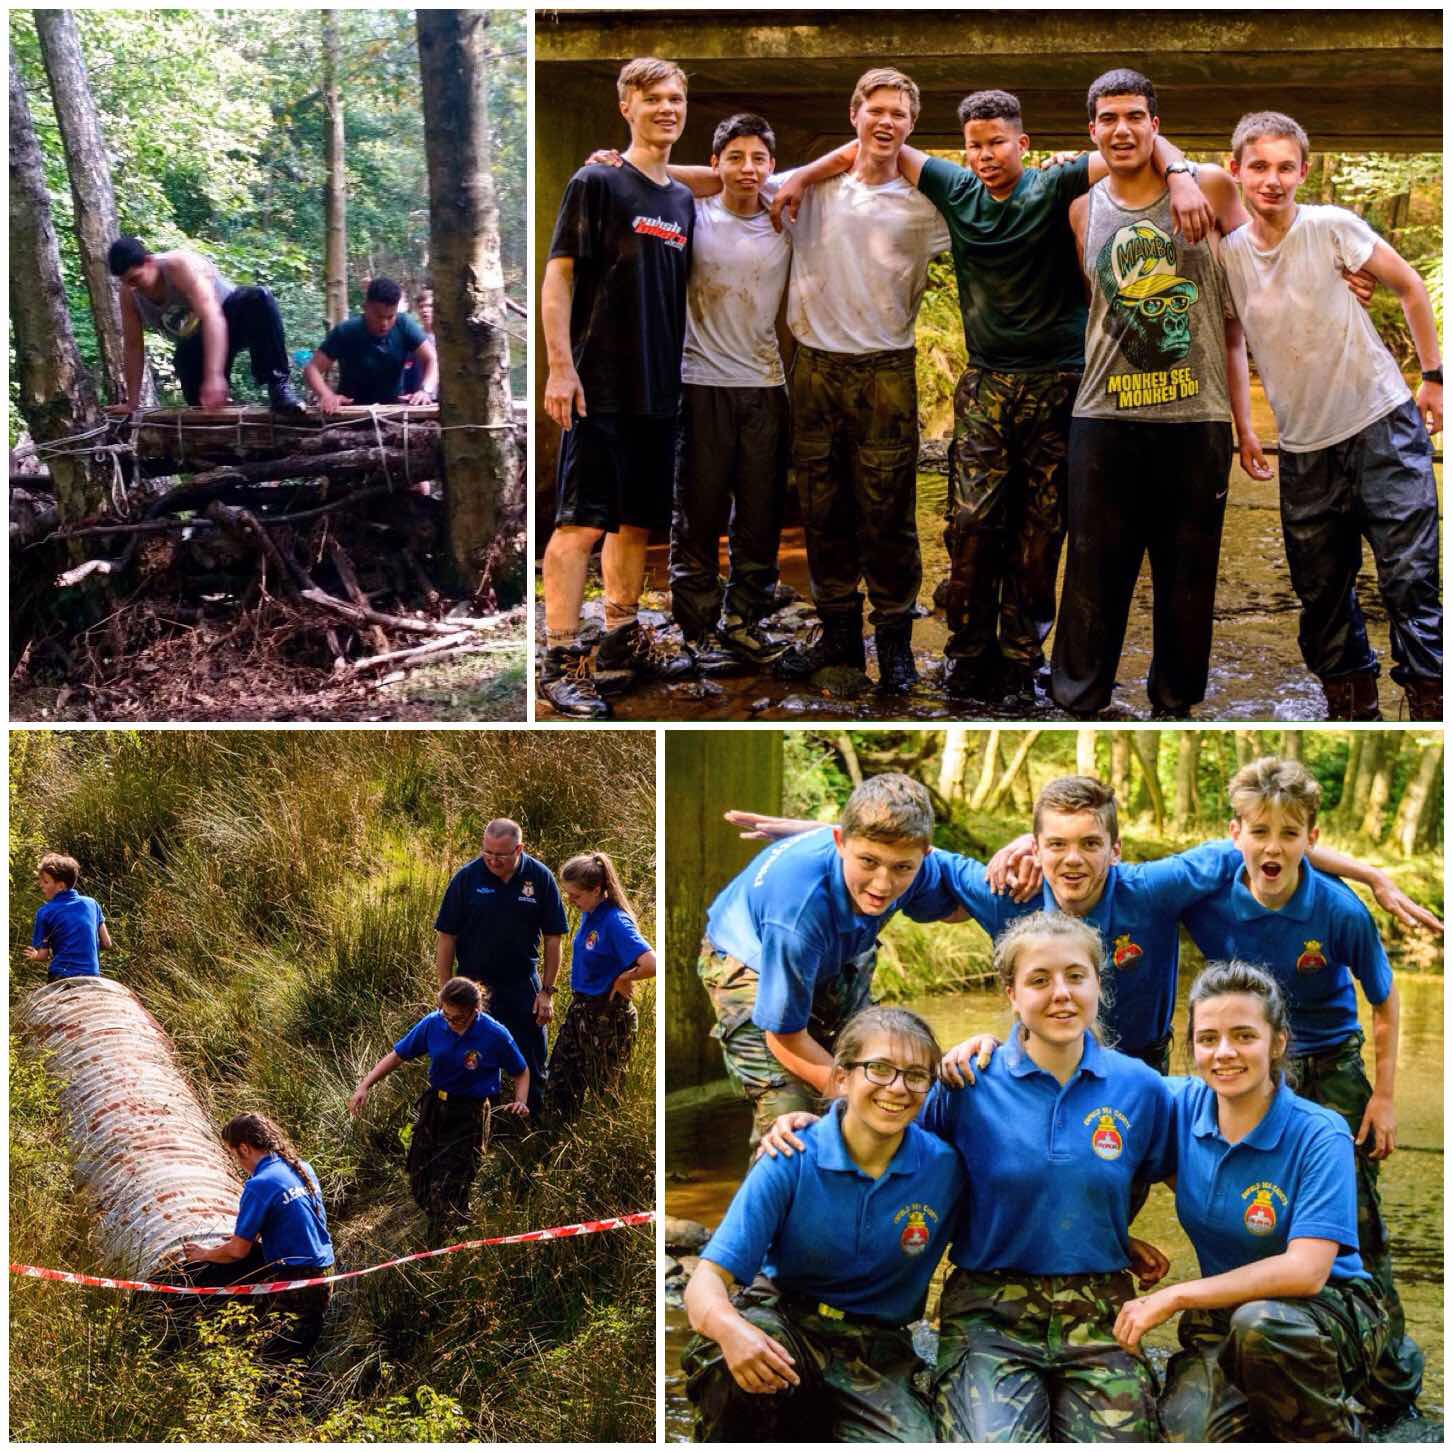
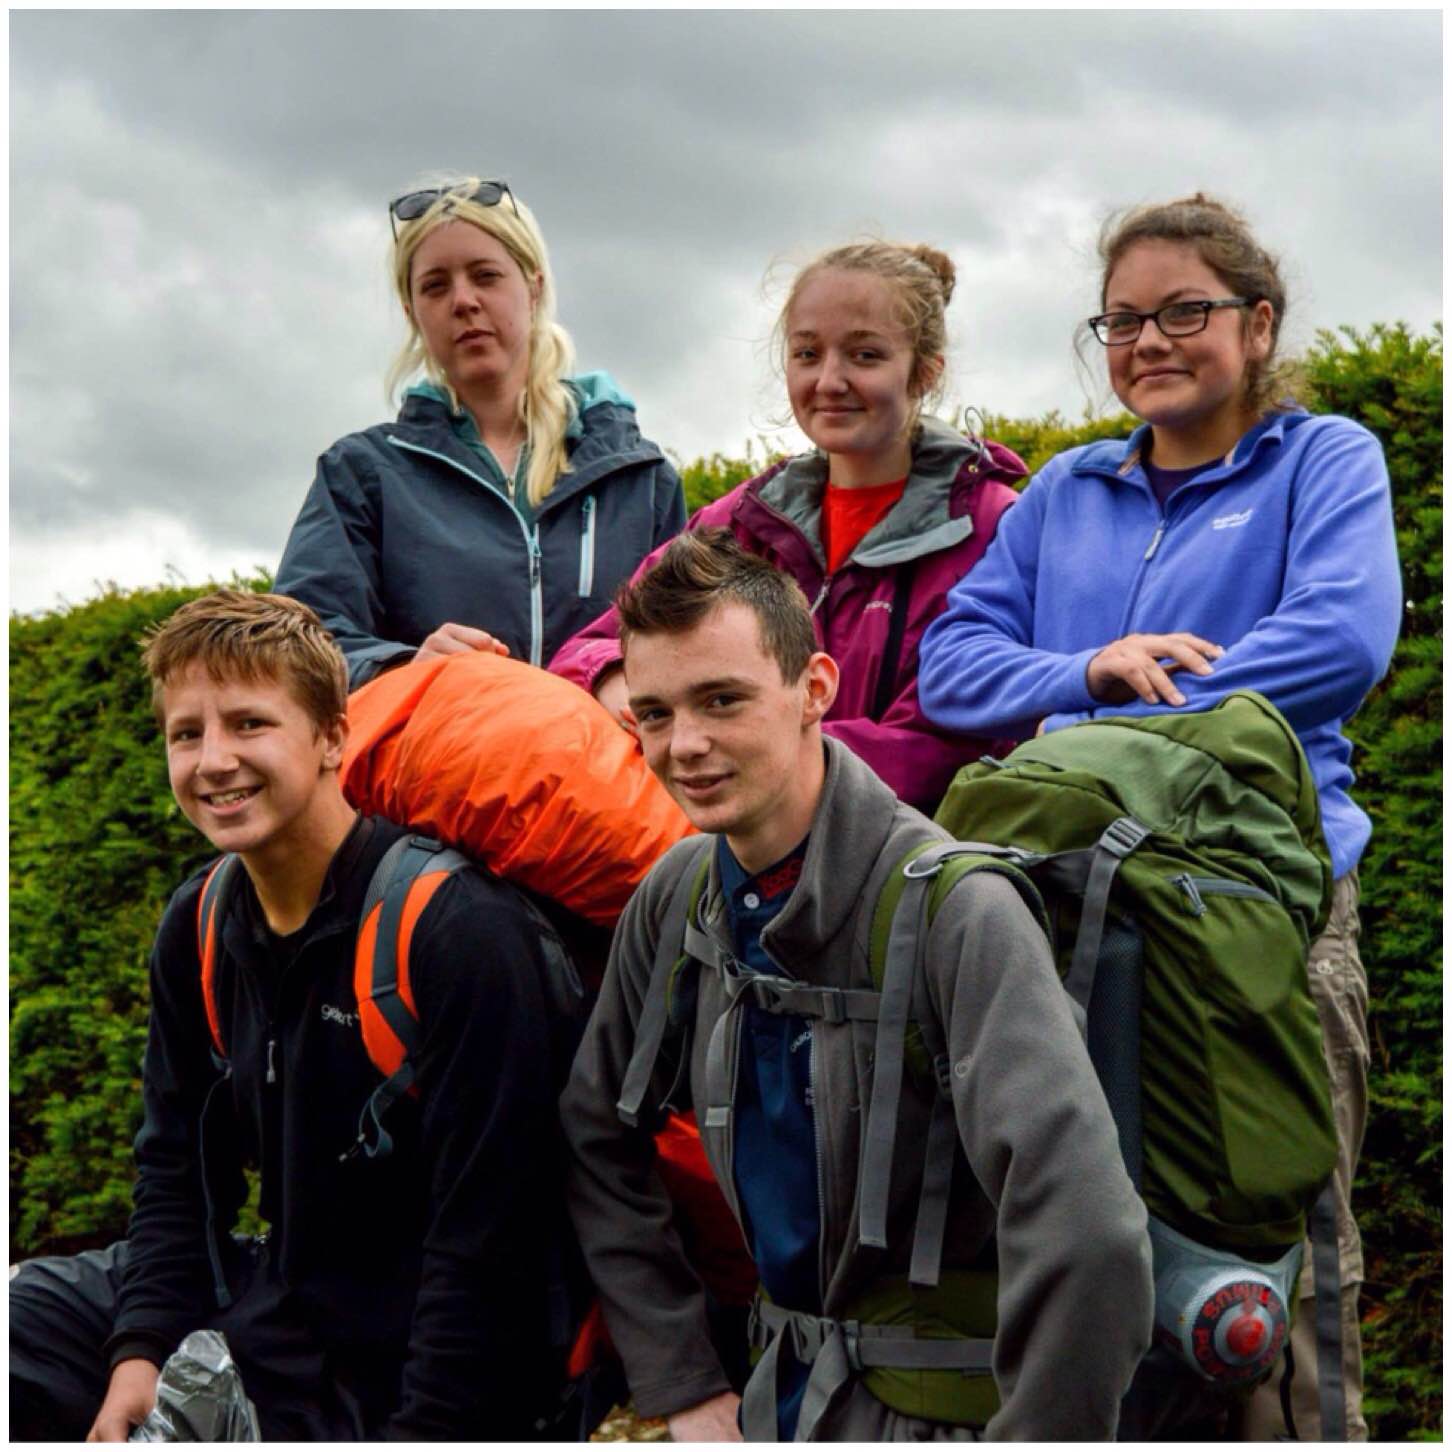
Interspersed with the navigation tasks the students had to give lectures and run classes in different subjects to each other and the cadets. We were very lucky on the weekend to have a keen bunch along from Sunbury and Walton Sea Cadets. This made the assessment much more realistic and was a good reminder to the students as to why they were looking to gain the qualification.
Lots of classes and one to one tuition
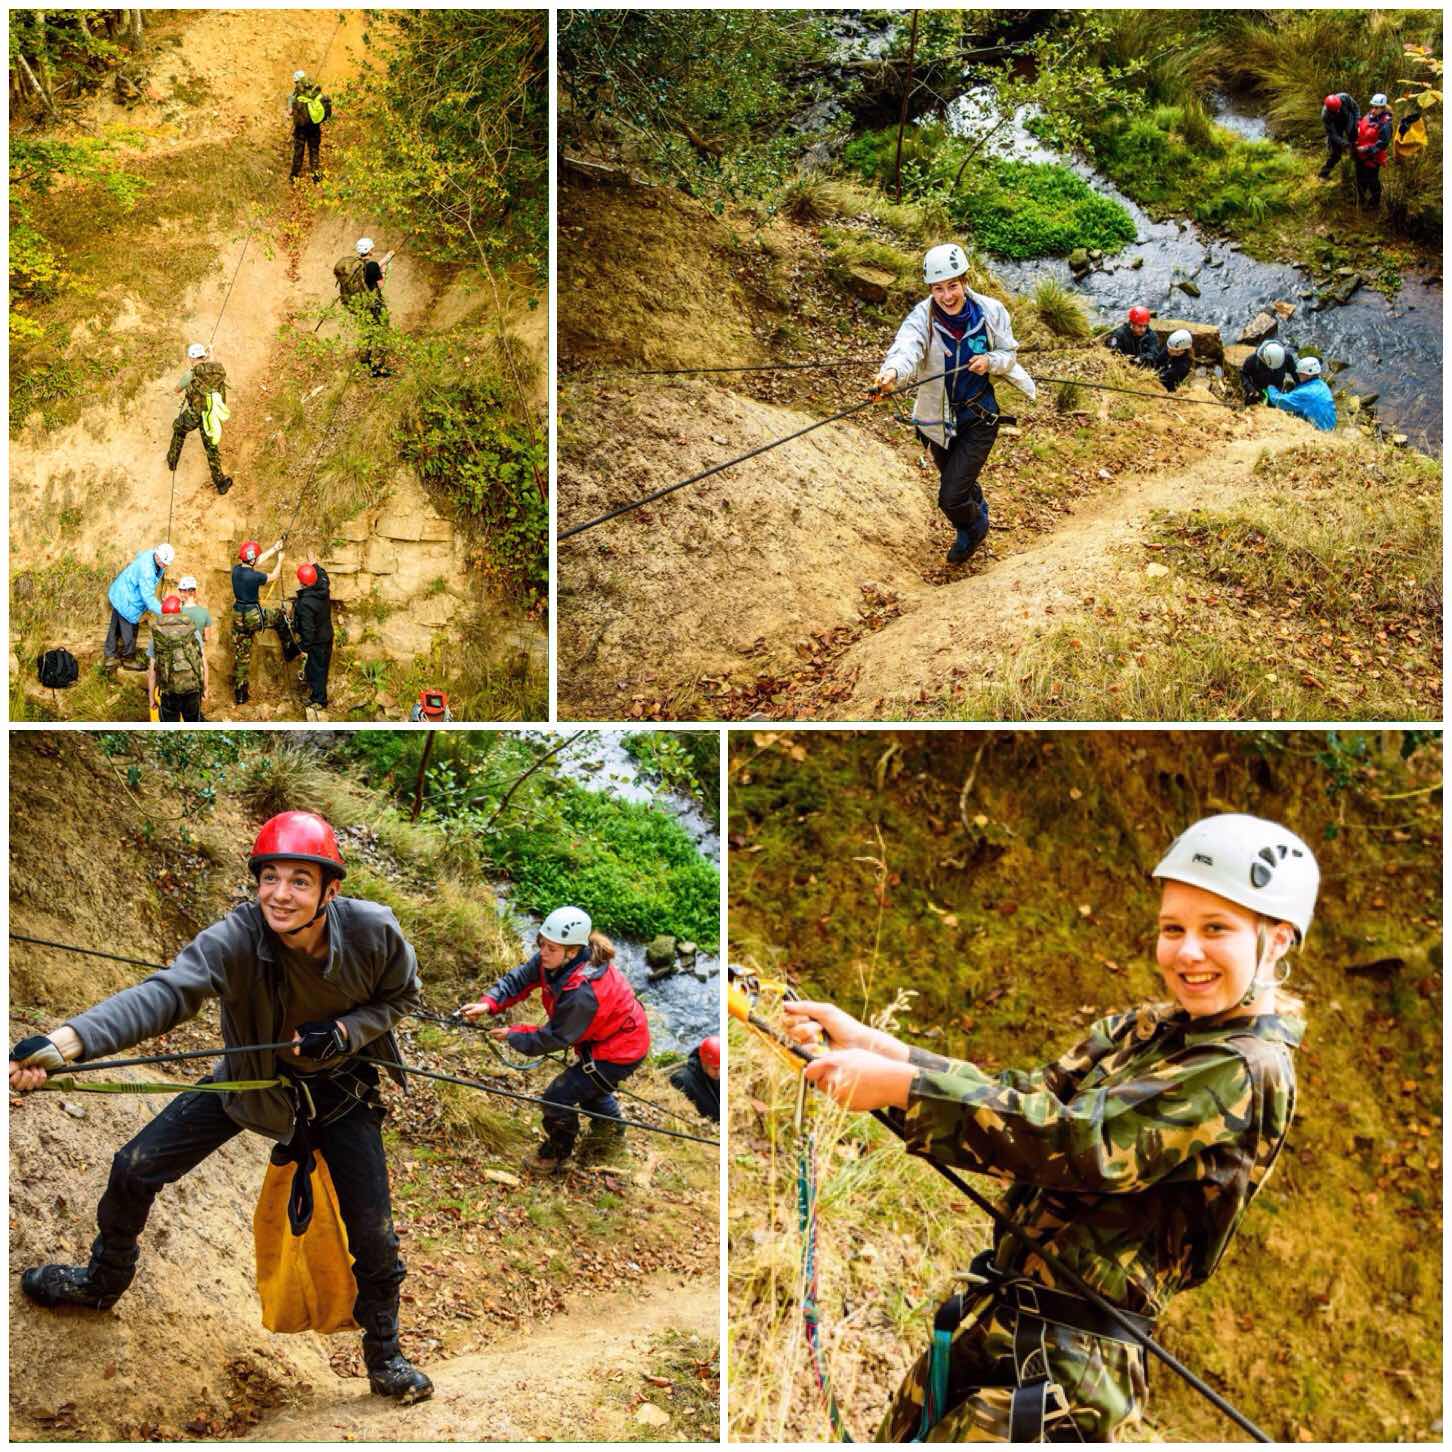
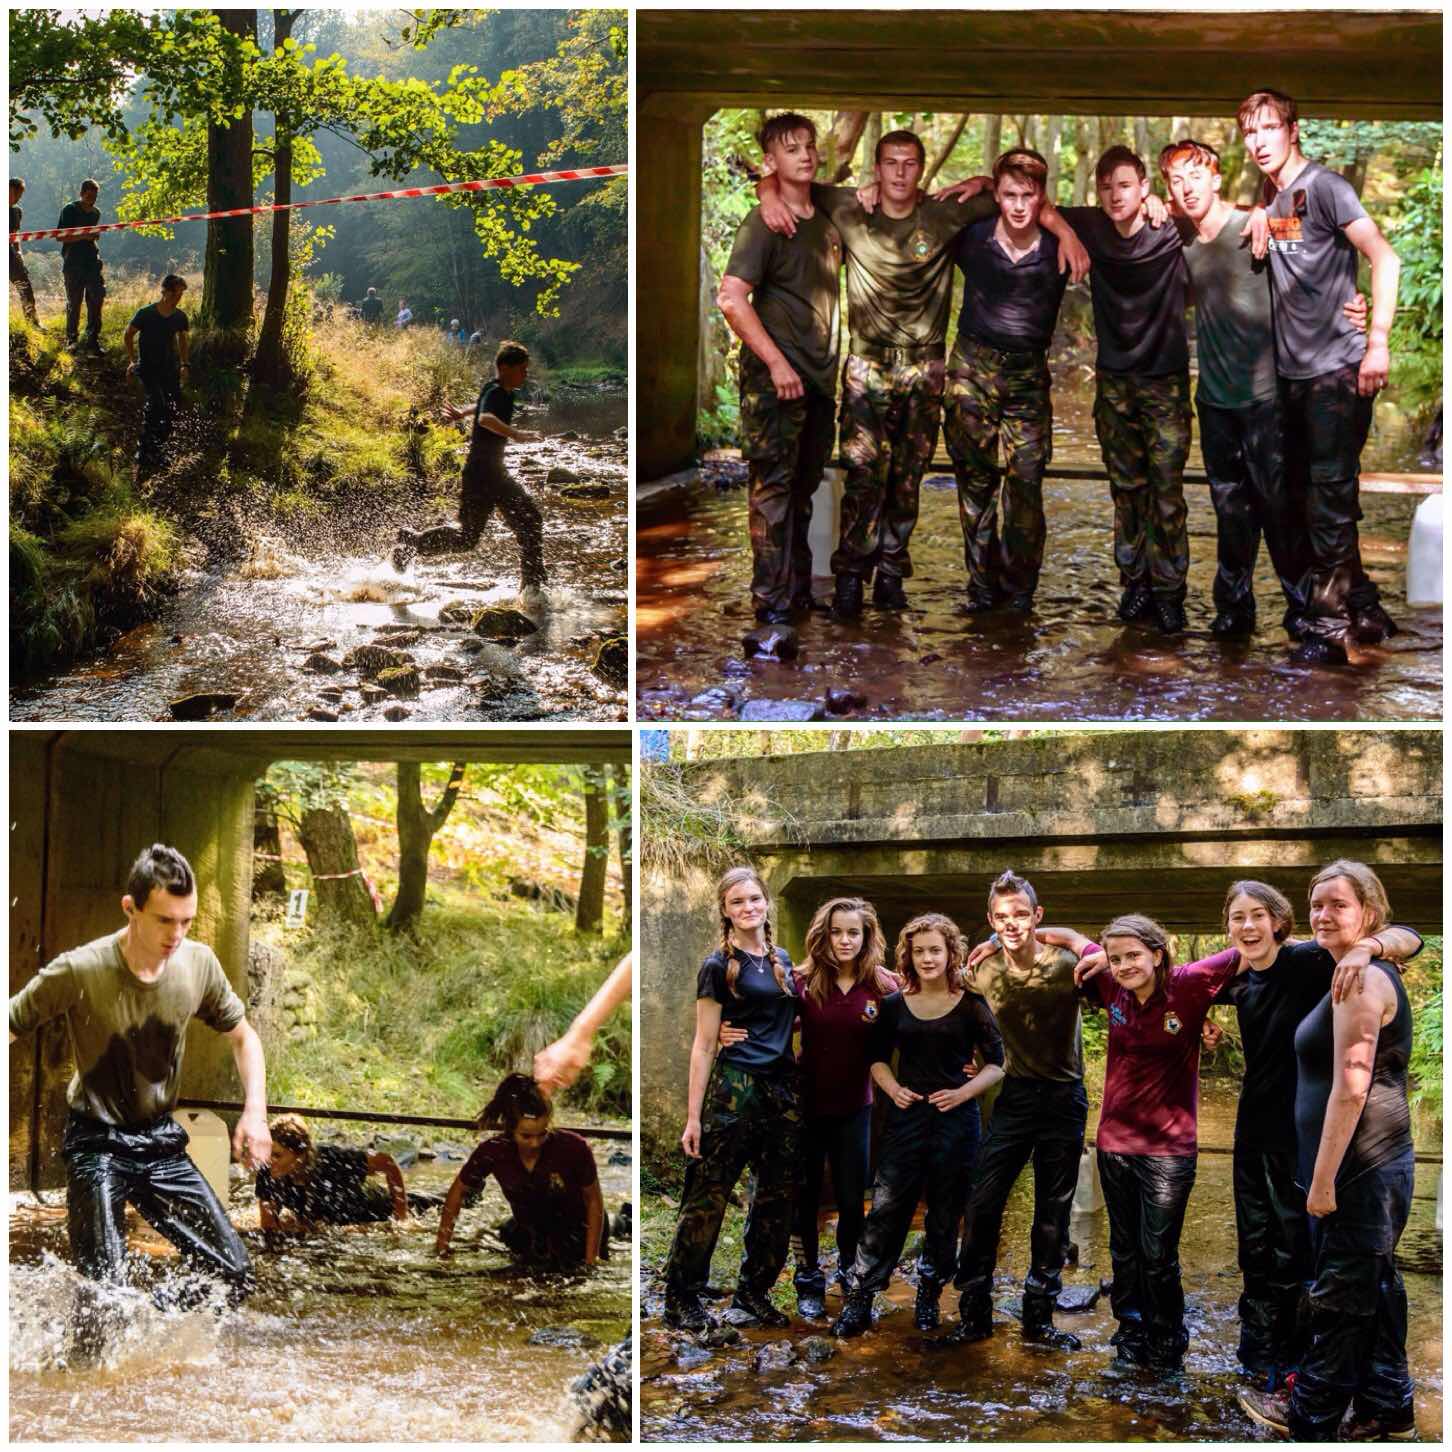
It is not all about navigation and leadership though. The assessment also tests the students on their knowledge of group management, risk assessing, camping, clothing/kit and the environment.
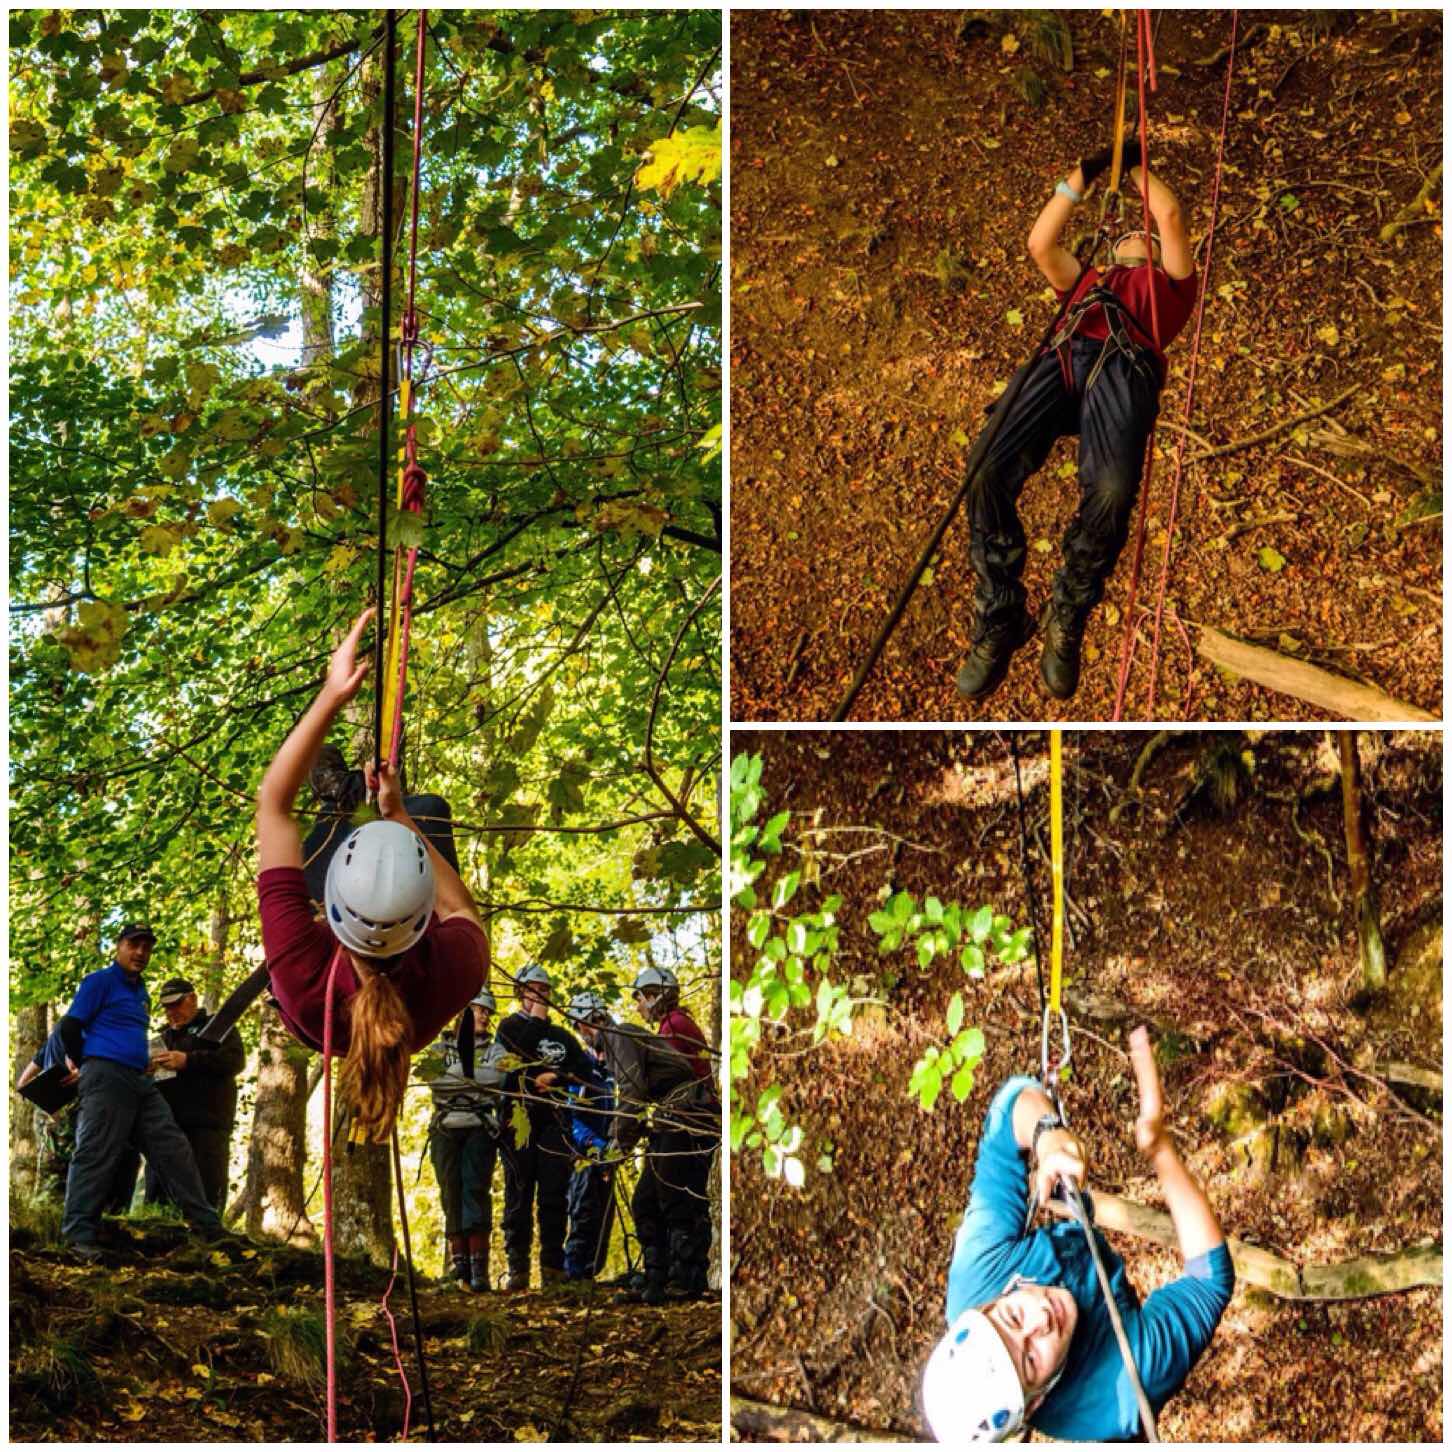
It is all well and good to be able to read a map and teach that skill but being an Adventure Leader is about a whole lot more. It is about being comfortable and knowledgeable in the environment you find yourself in, and having the skills to make the learning experience for the cadets as varied, enjoyable and stretching as possible. This has to be done in a safe manner however the instructor must stretch the students enough so that they feel that adventurous spirit that draws us outdoors in the first place.
Exploring the environment
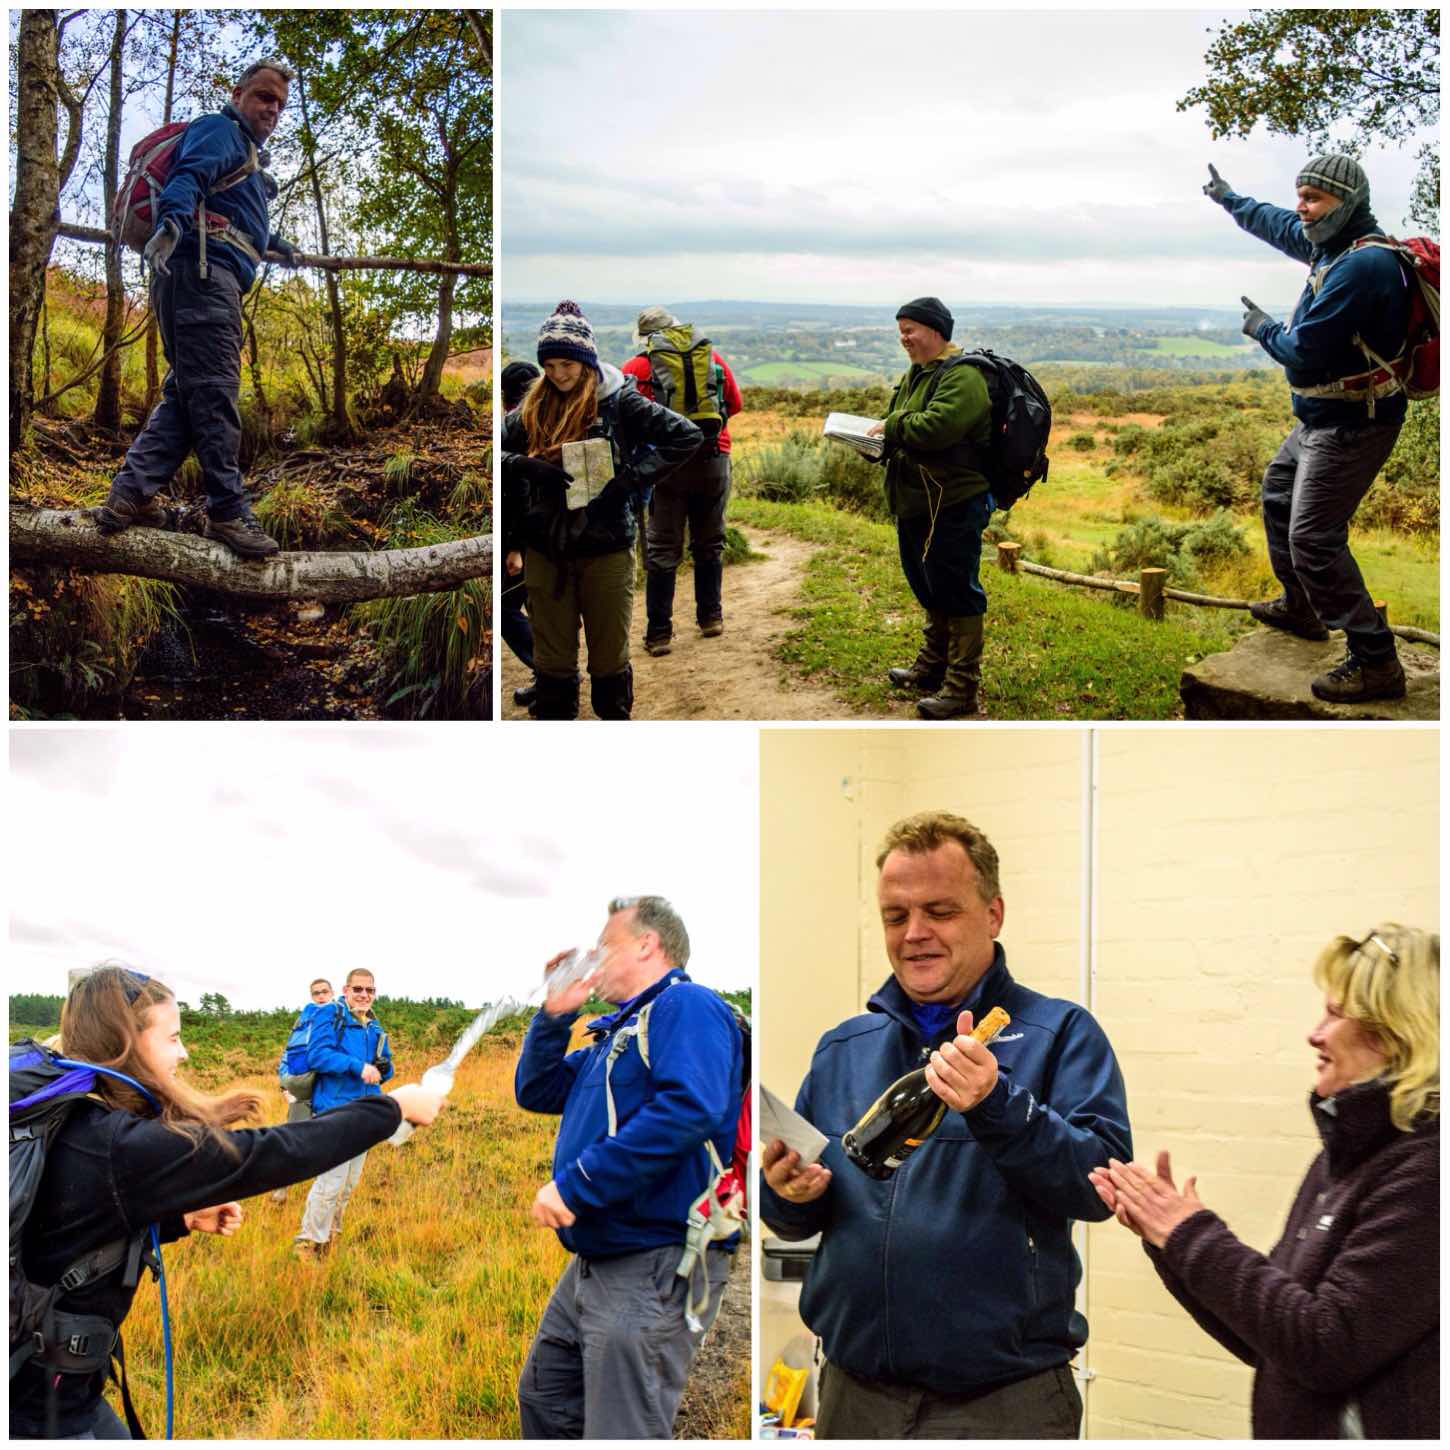
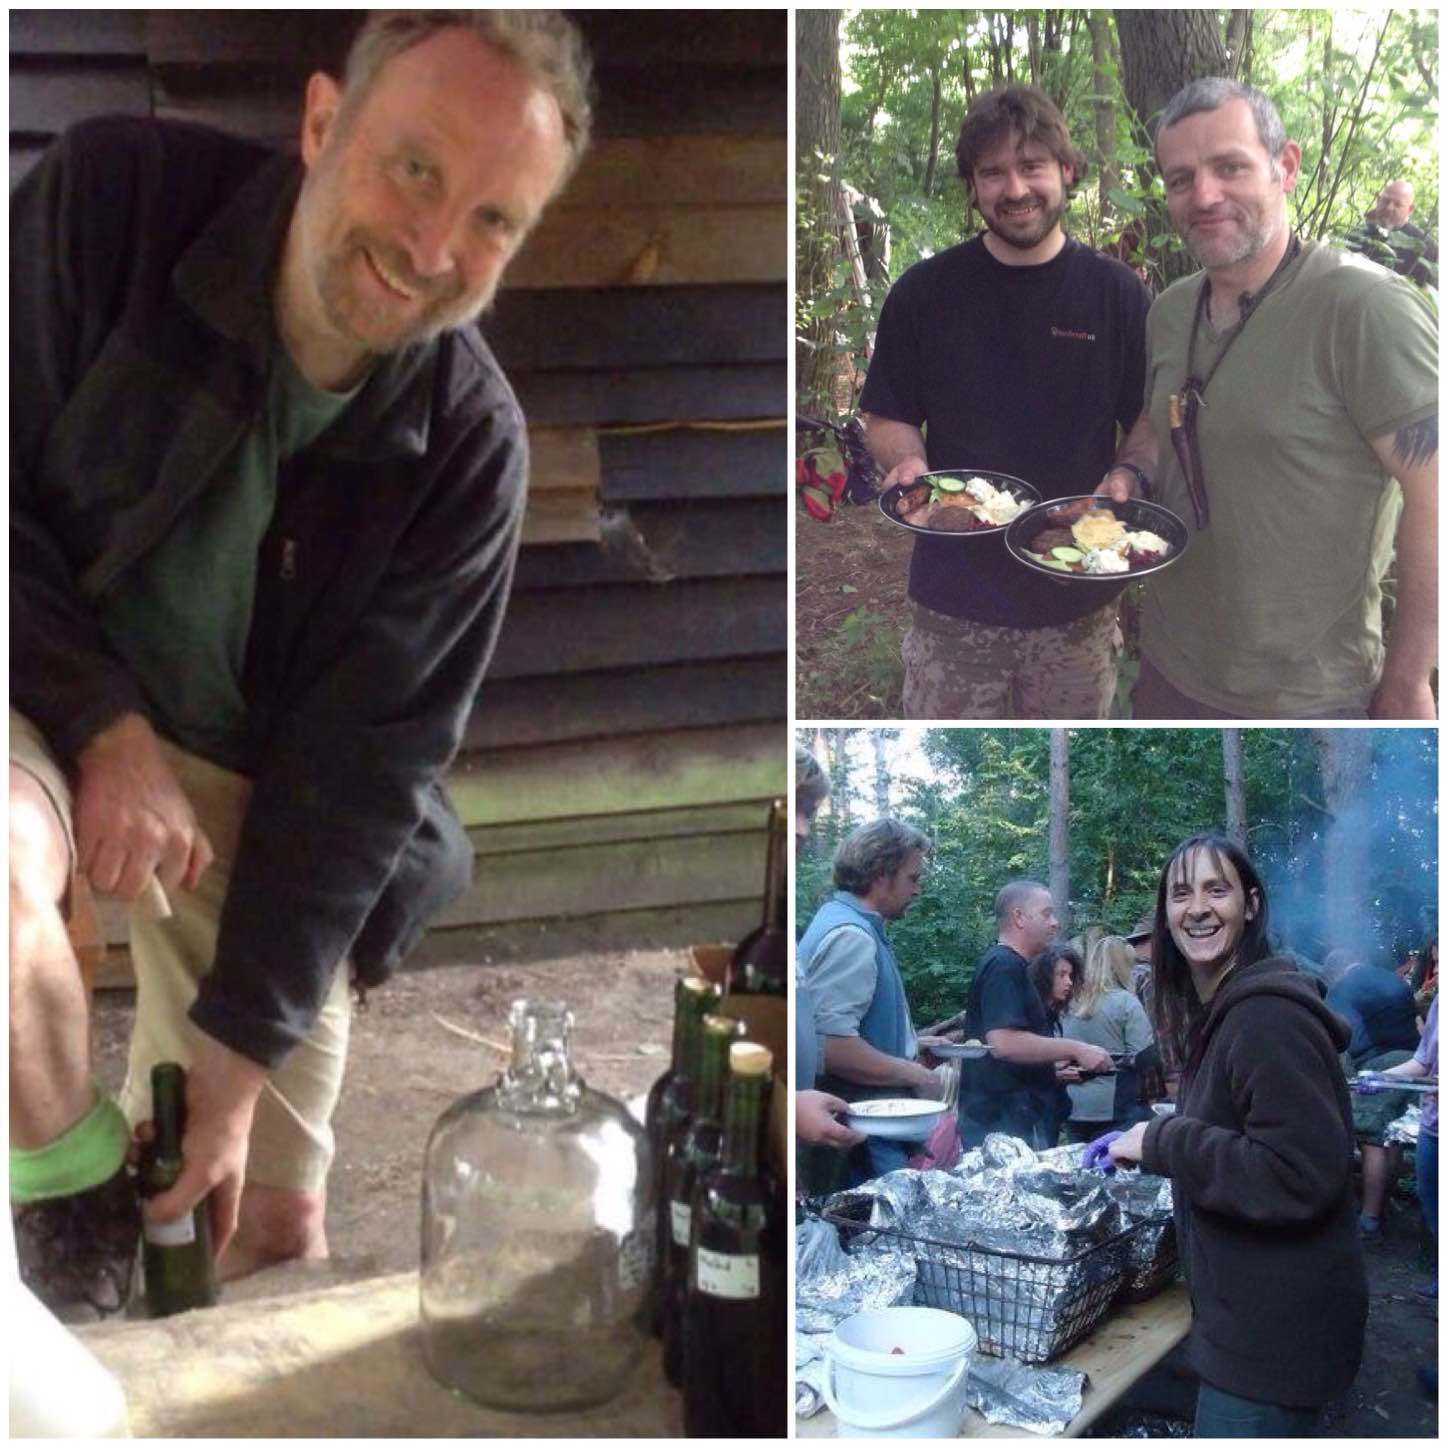
We had a number of staff along for the weekend who have decades of experience in the outdoor environment including Perry Symes (International Mountain Leader), Duncan Boar (International Mountain Leader) and our very own John Kelly (Hill and Moorland Leader).
John was on our very first course as a BEL student in 2010 and has since gained his Hill and Moorland Leaders award. John takes over running the BEL course from me this year and has the same sense of adventure but far better administrative skills than me so organising future courses should be a doddle for him.
The champagne picture on the bottom right was when he was presented the bottle on the news of his recent engagement to Samantha and the soaking was from his daughter who he had teased just a bit too much.
The one and only JK
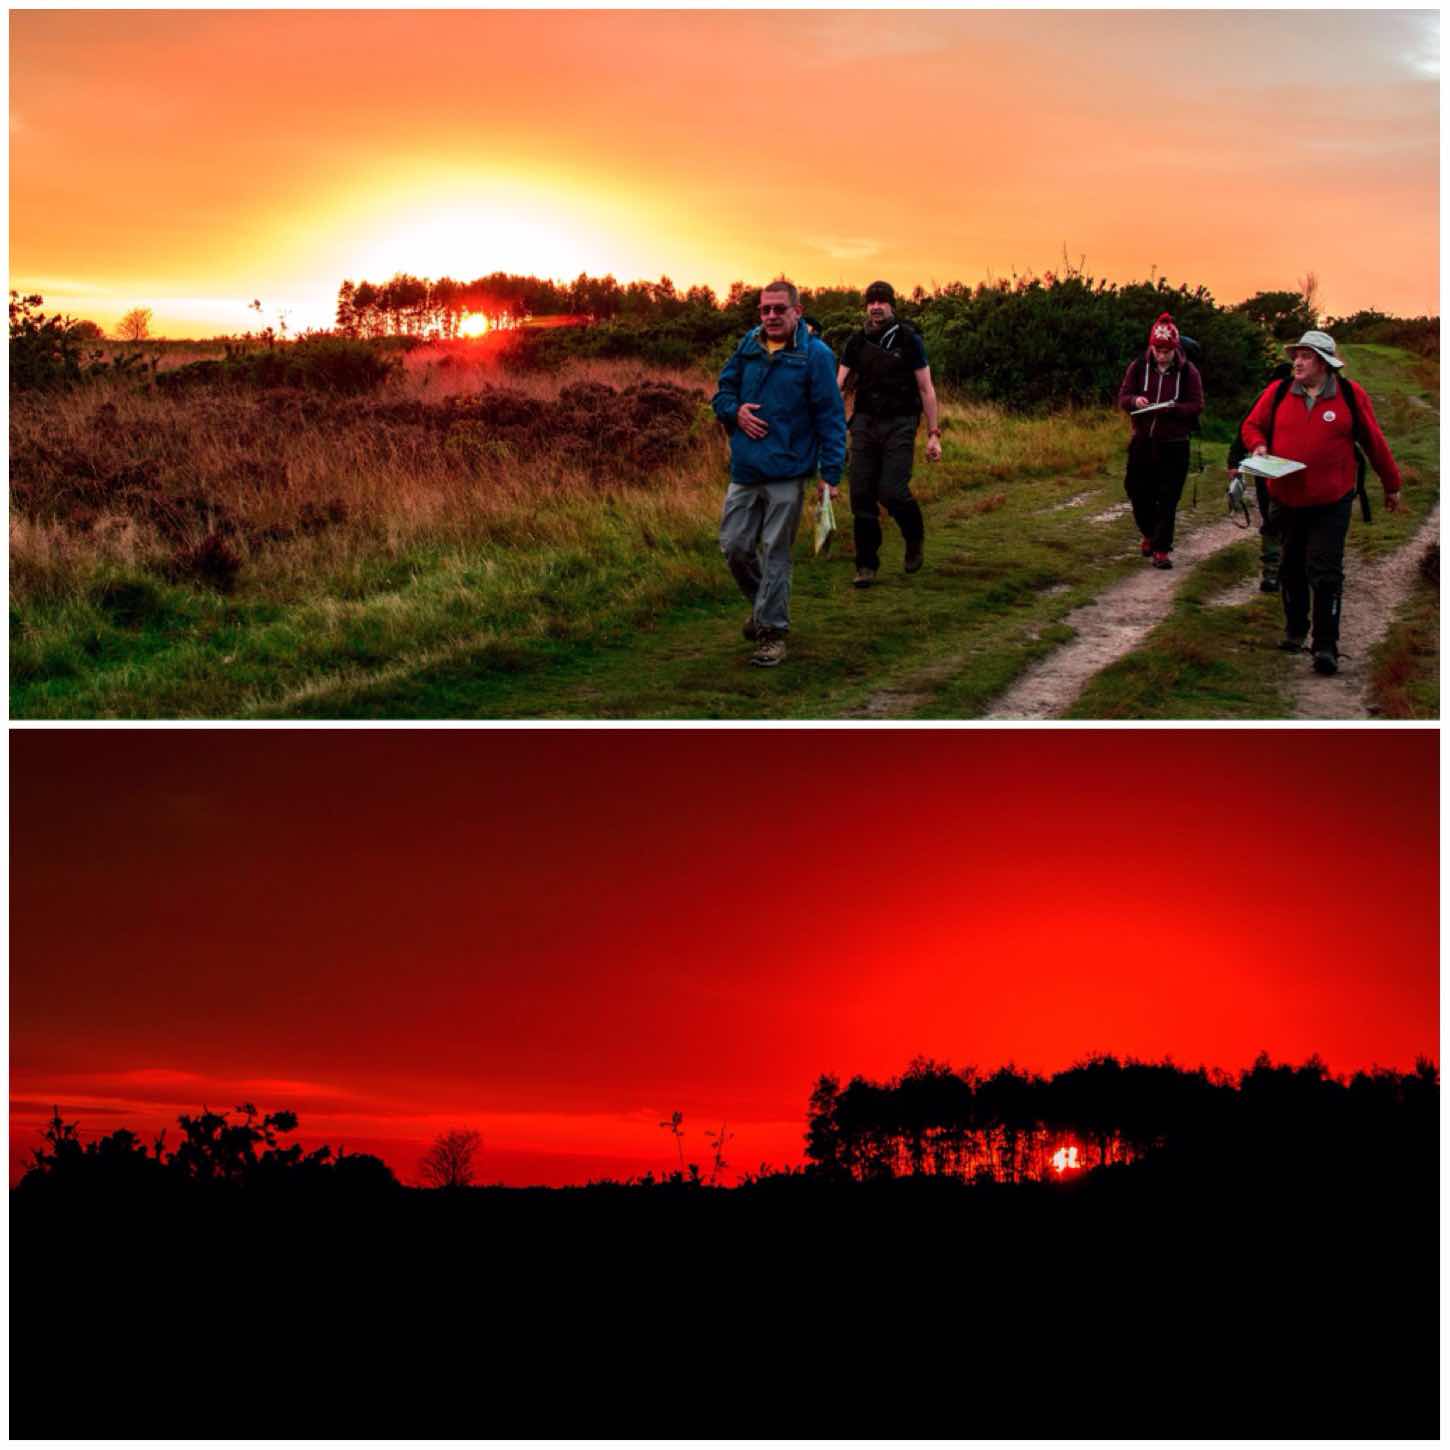
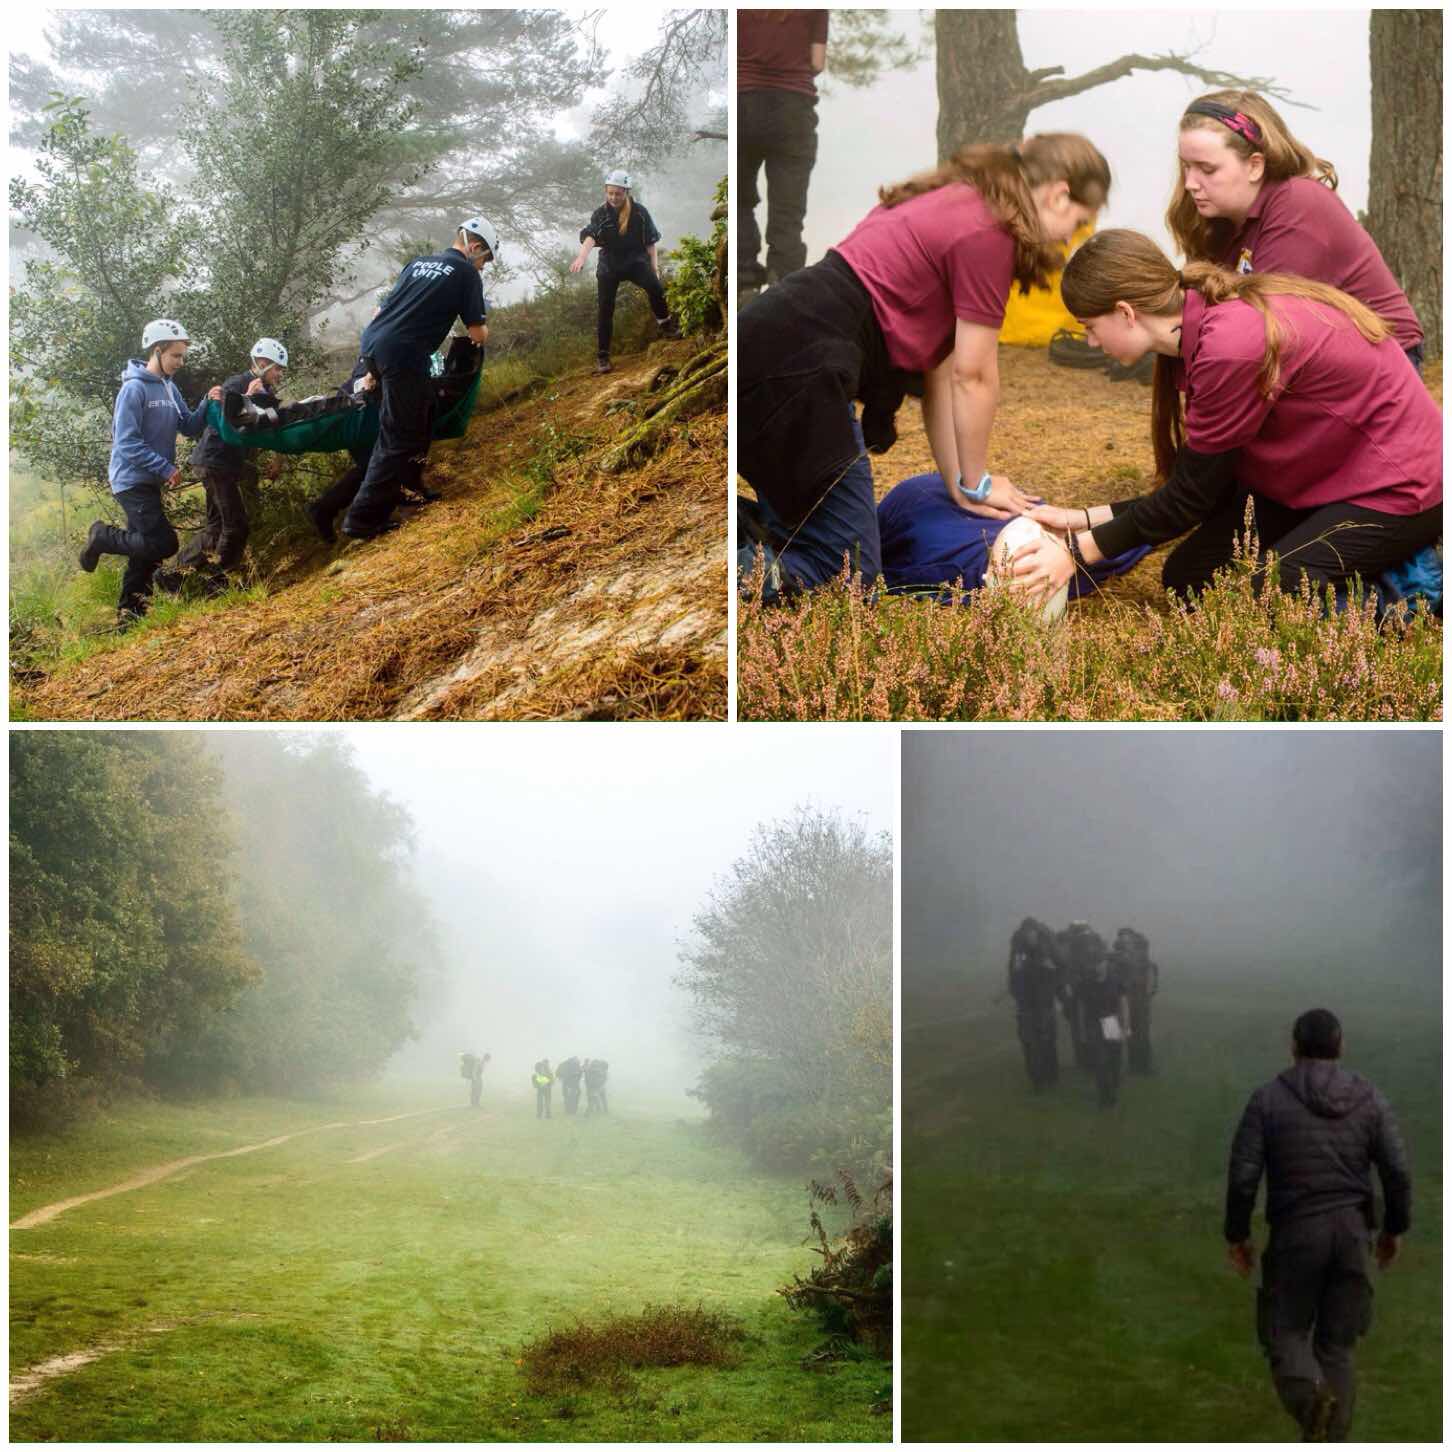
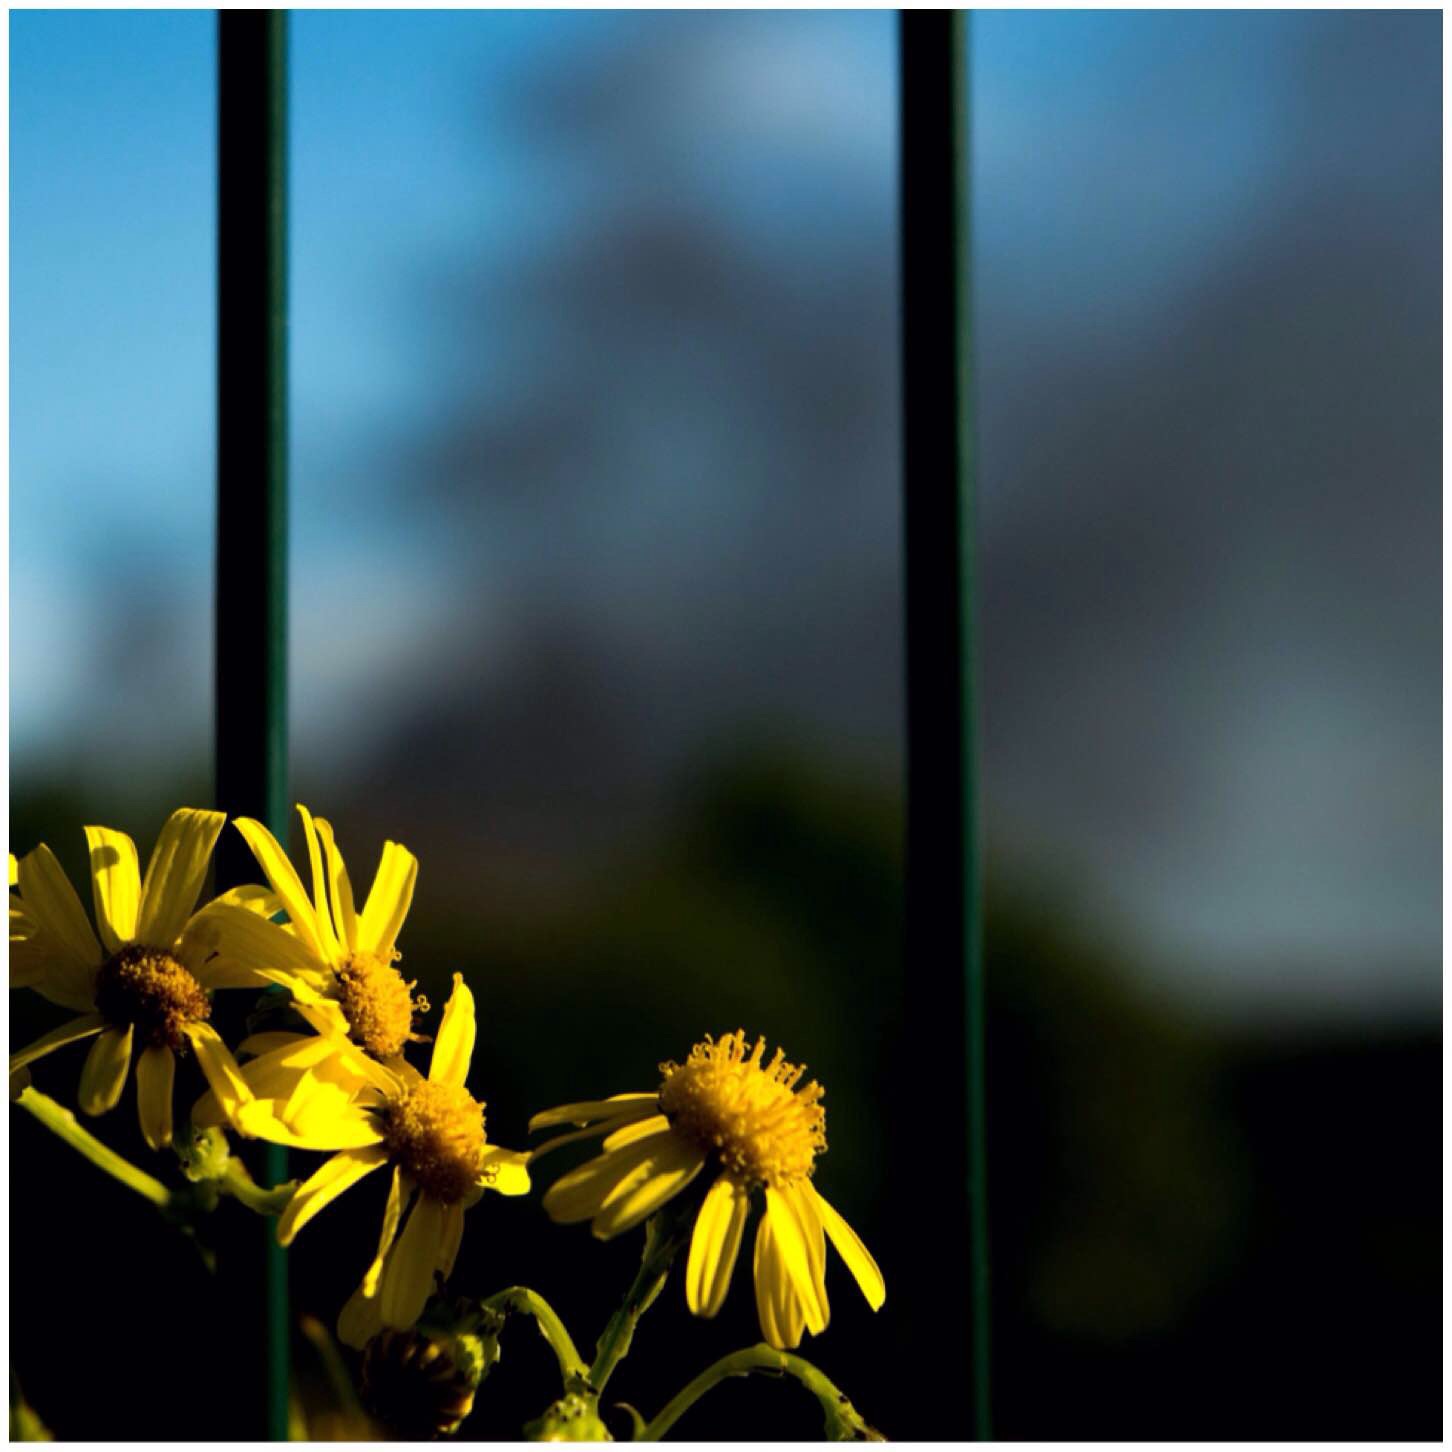
One thing about this weekend was the beautiful evenings as the sun set over the Forest. The students were a bit too caught up in their navigational assessments to really appreciate them but I sure did.
Evening Nav
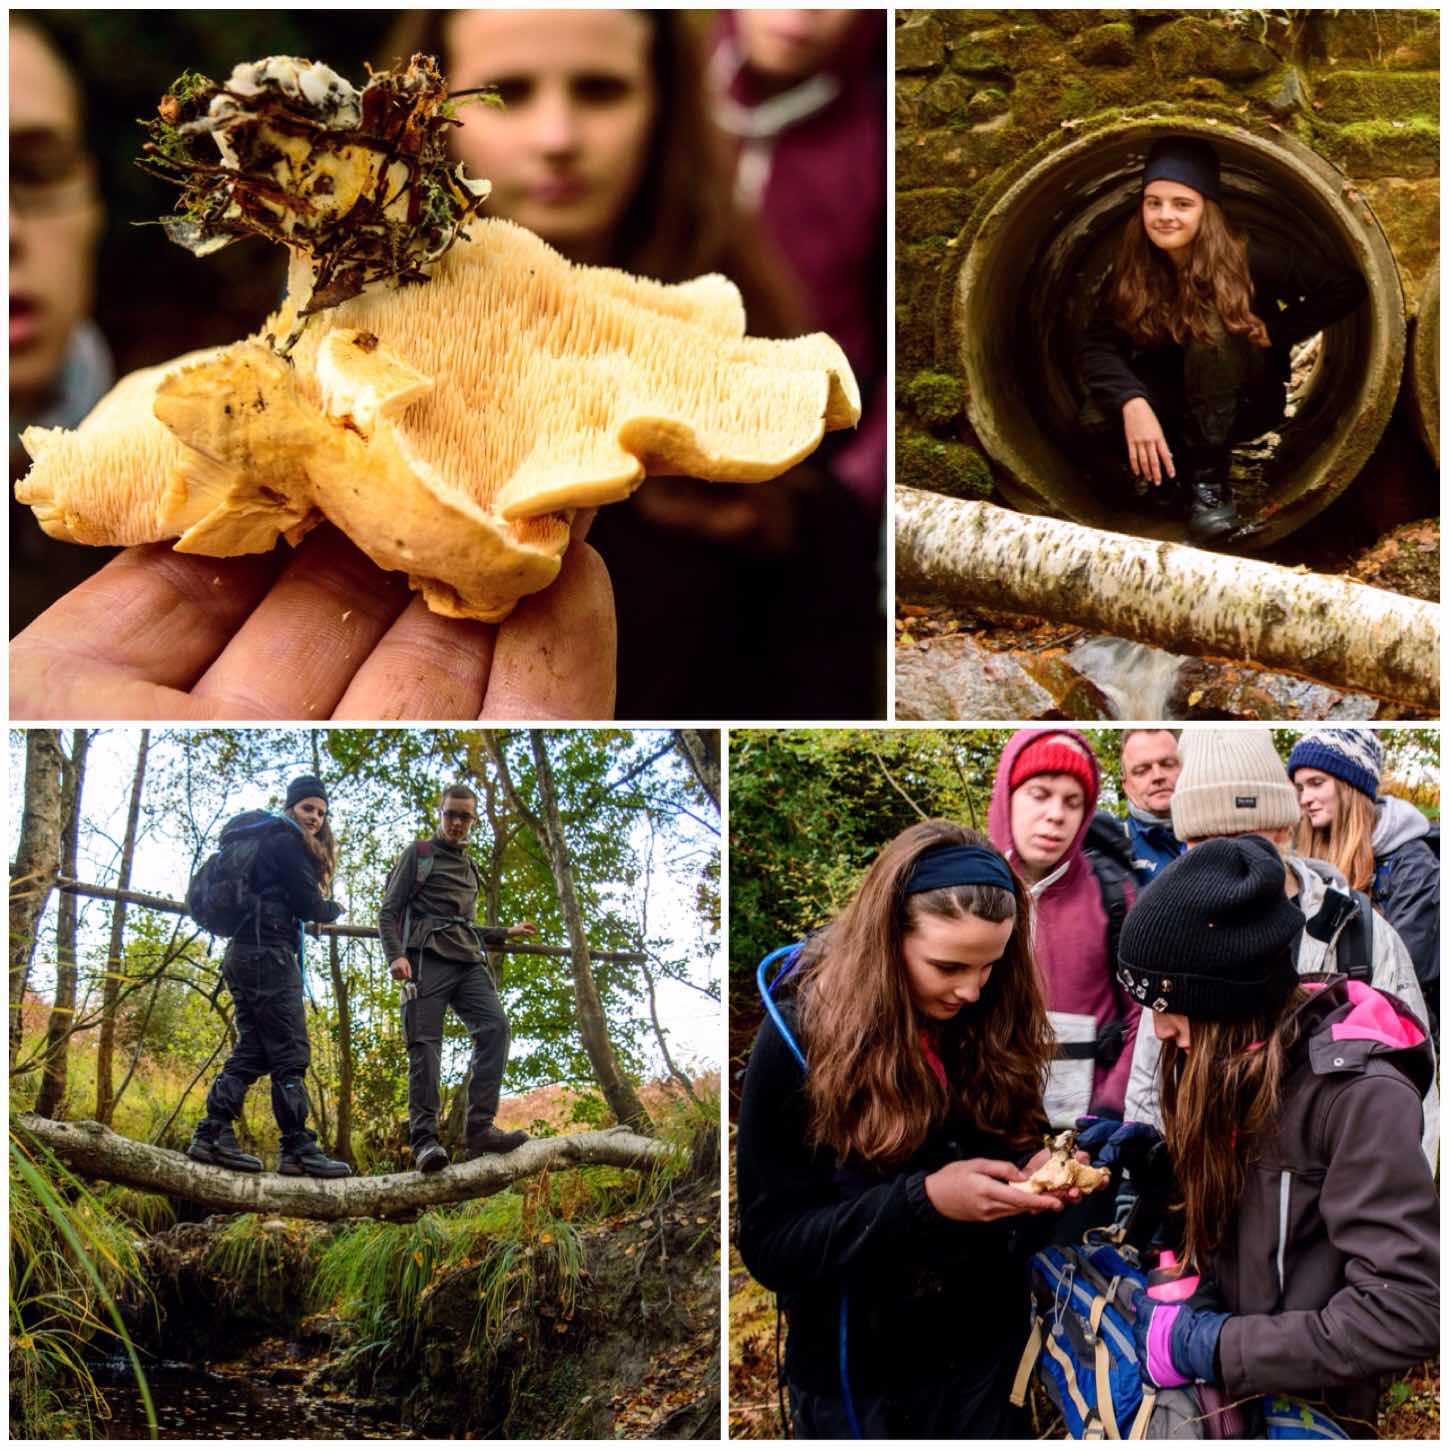
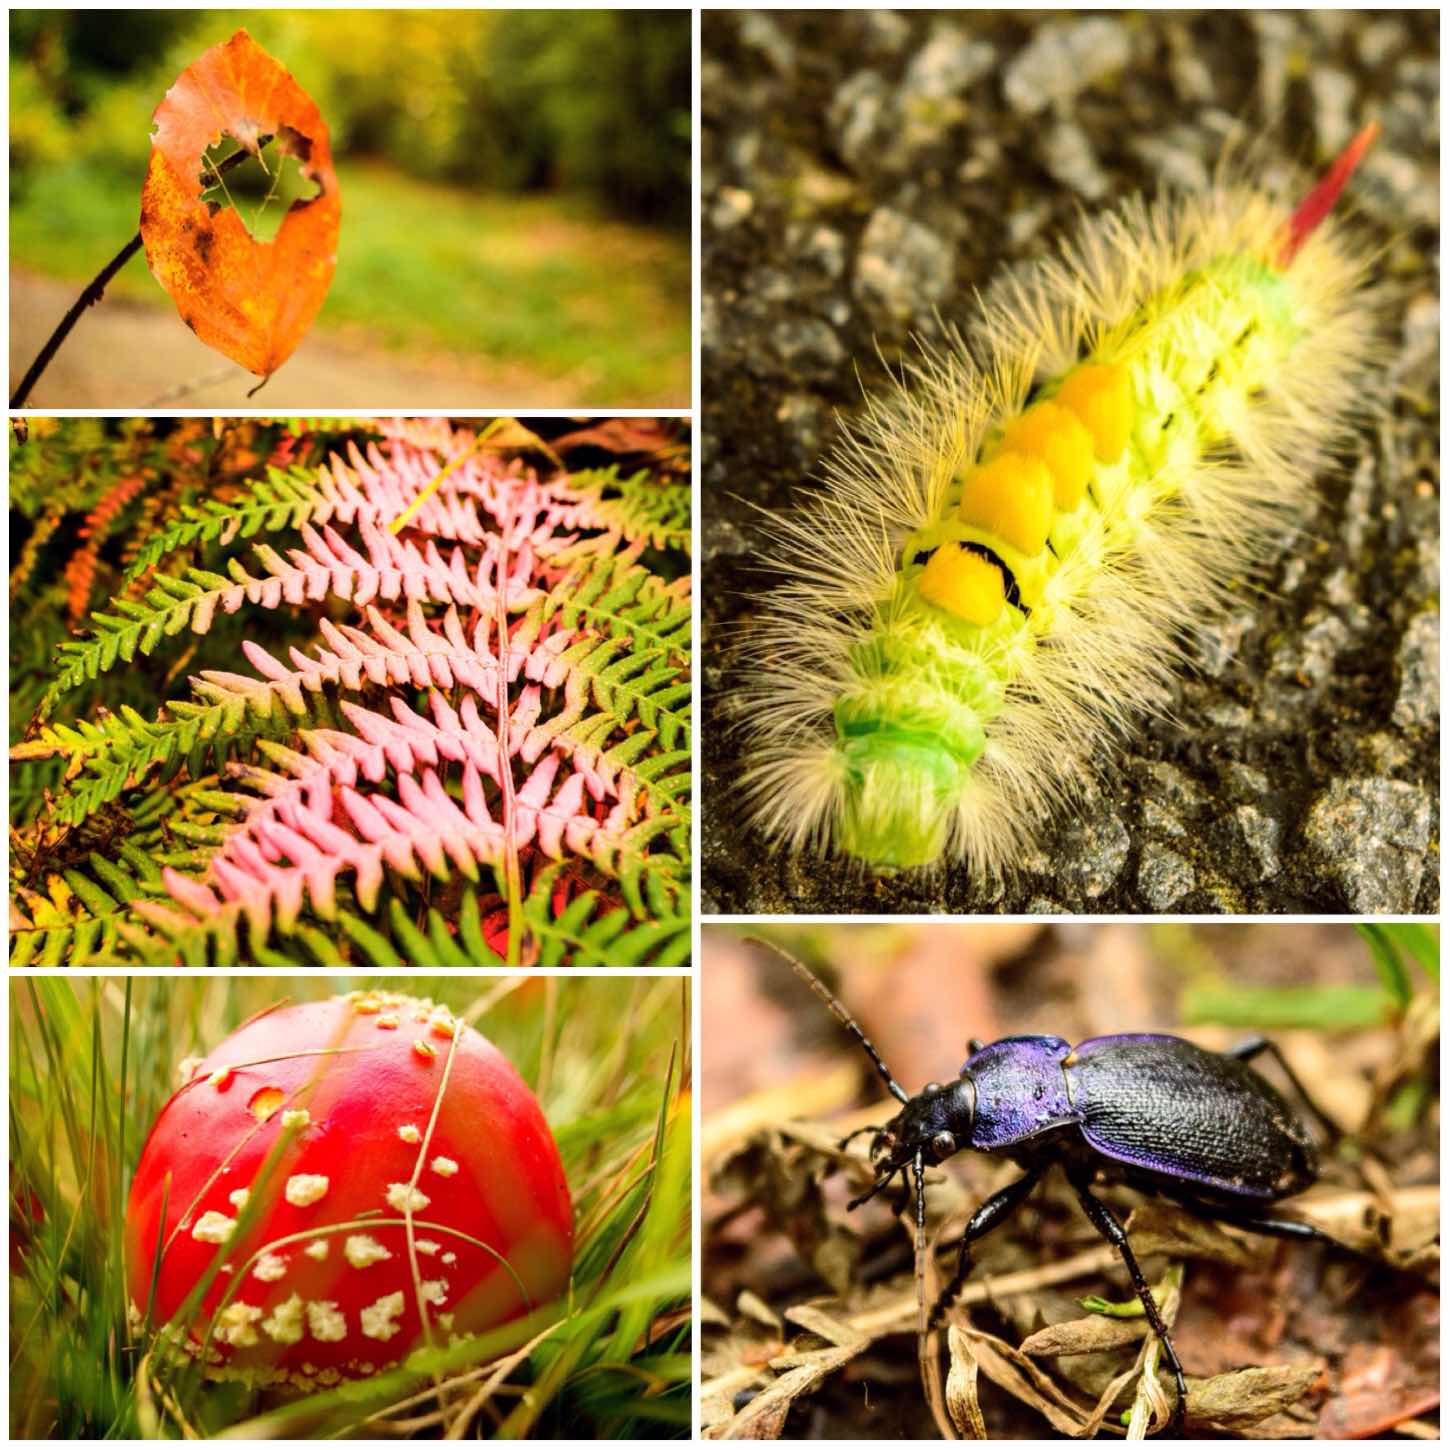
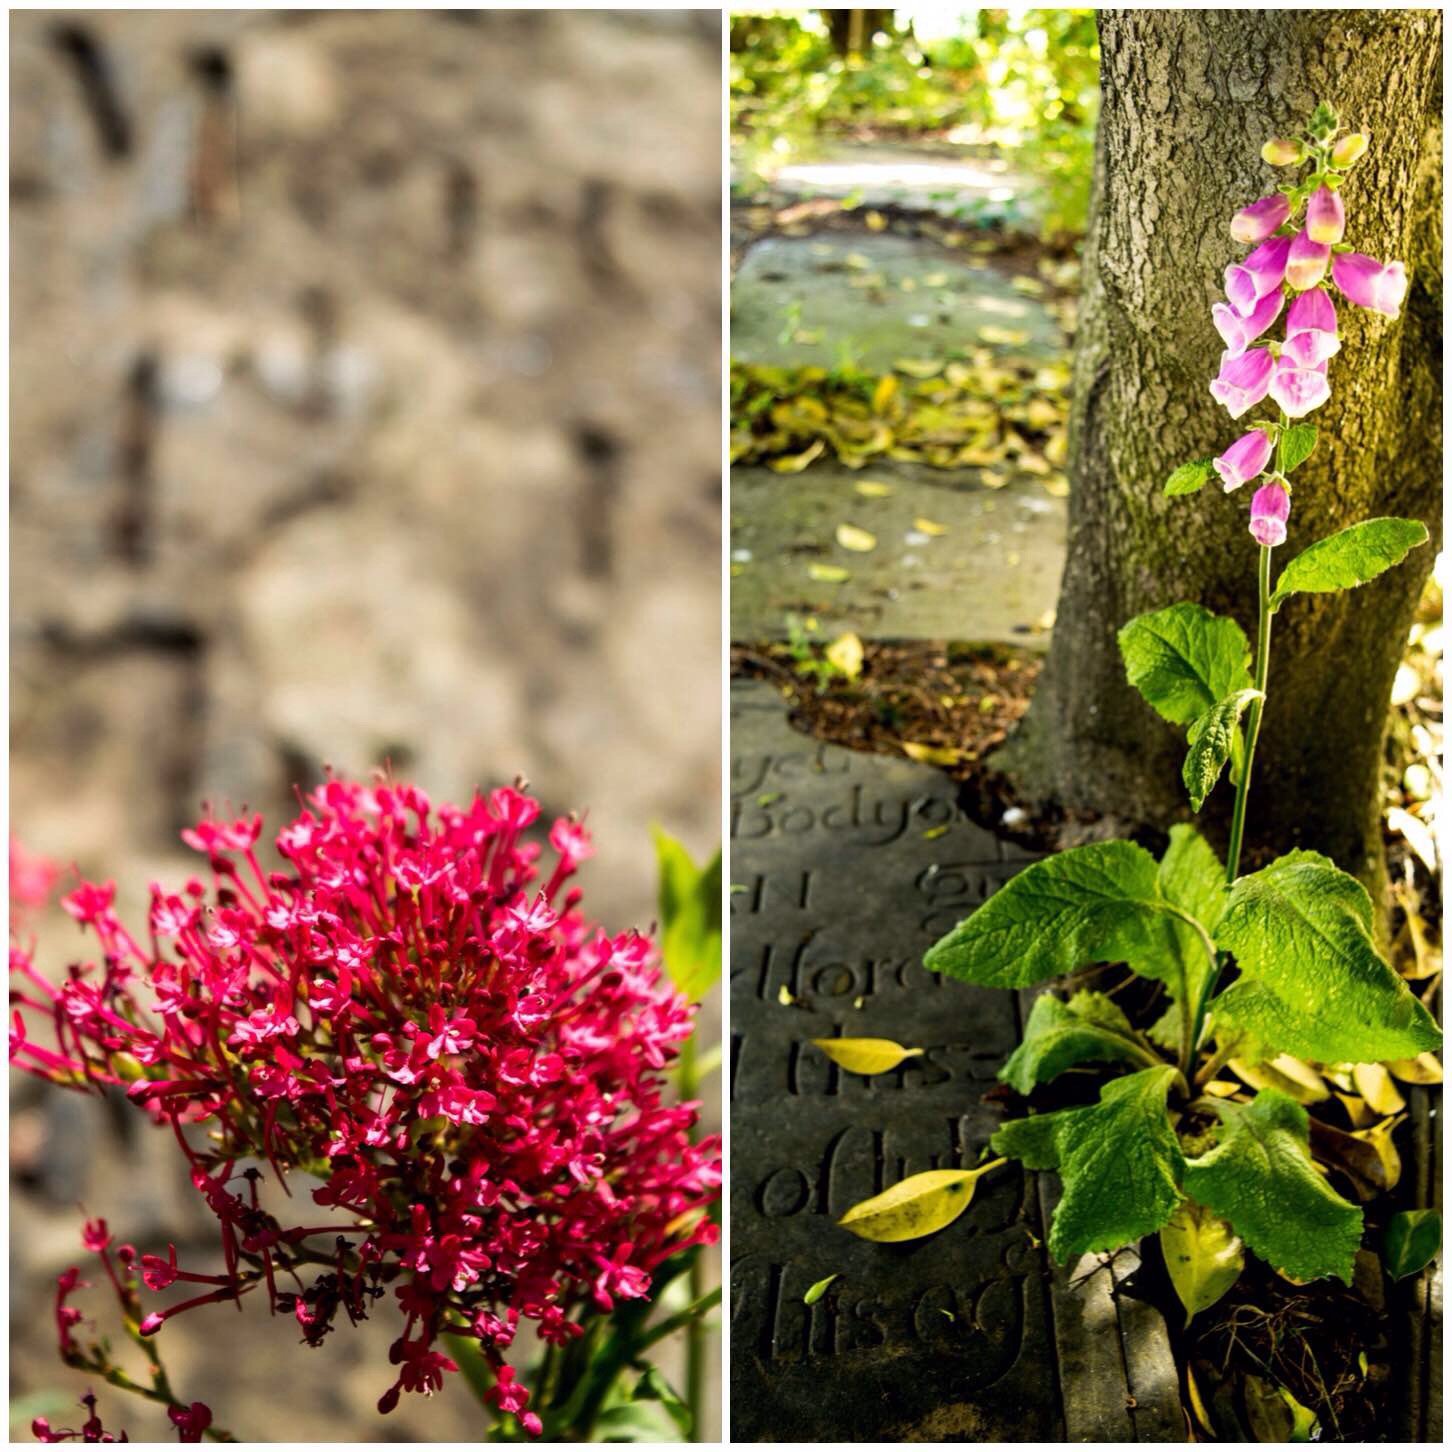
Along the way I did spot some lovely colours in the environment around me. I do not expect the students to be expert in identifying plants, fungi, animals or insects but I do expect them to be able to name some trees, flowers and have a basic knowledge of the history of the area they are working in.
Having this basic knowledge allows them to come across as a well-rounded Adventure Leader to their students and means more fulfilling and educational walks.
The colours of Autumn
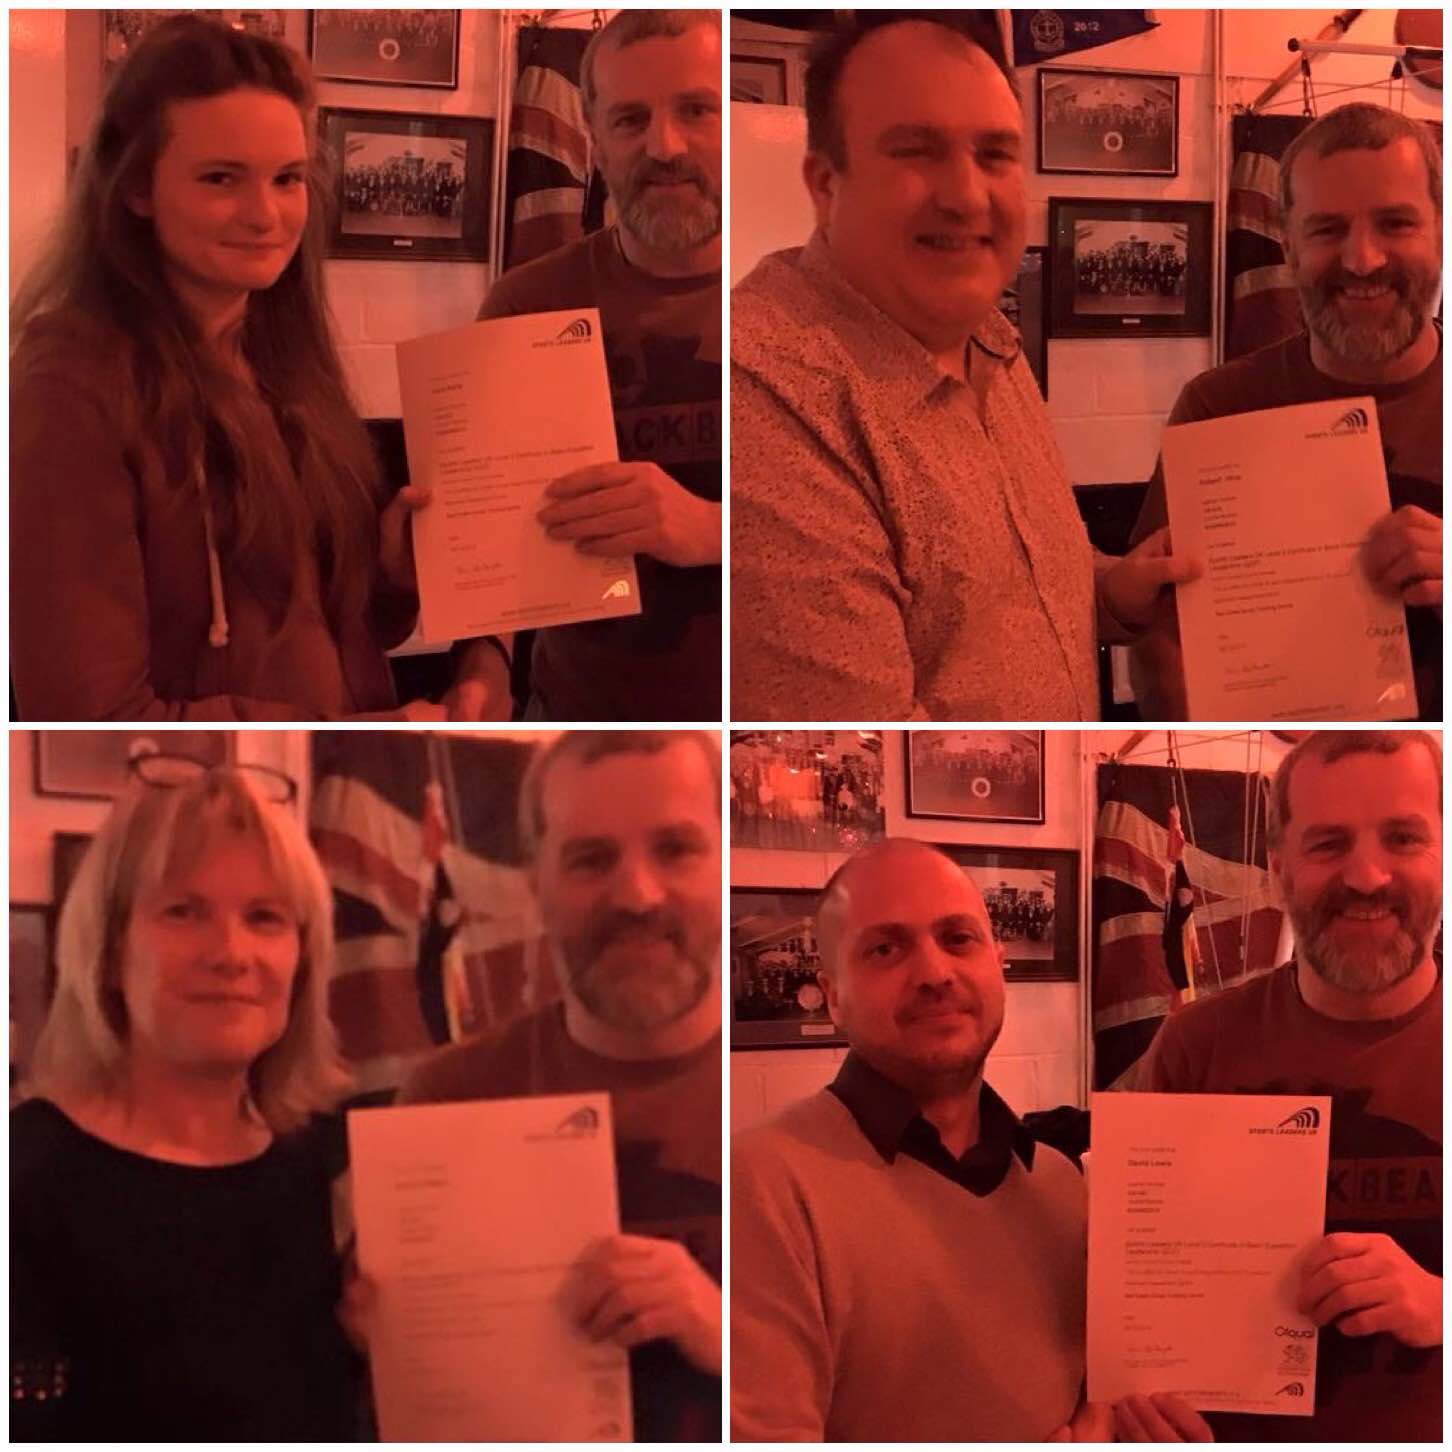
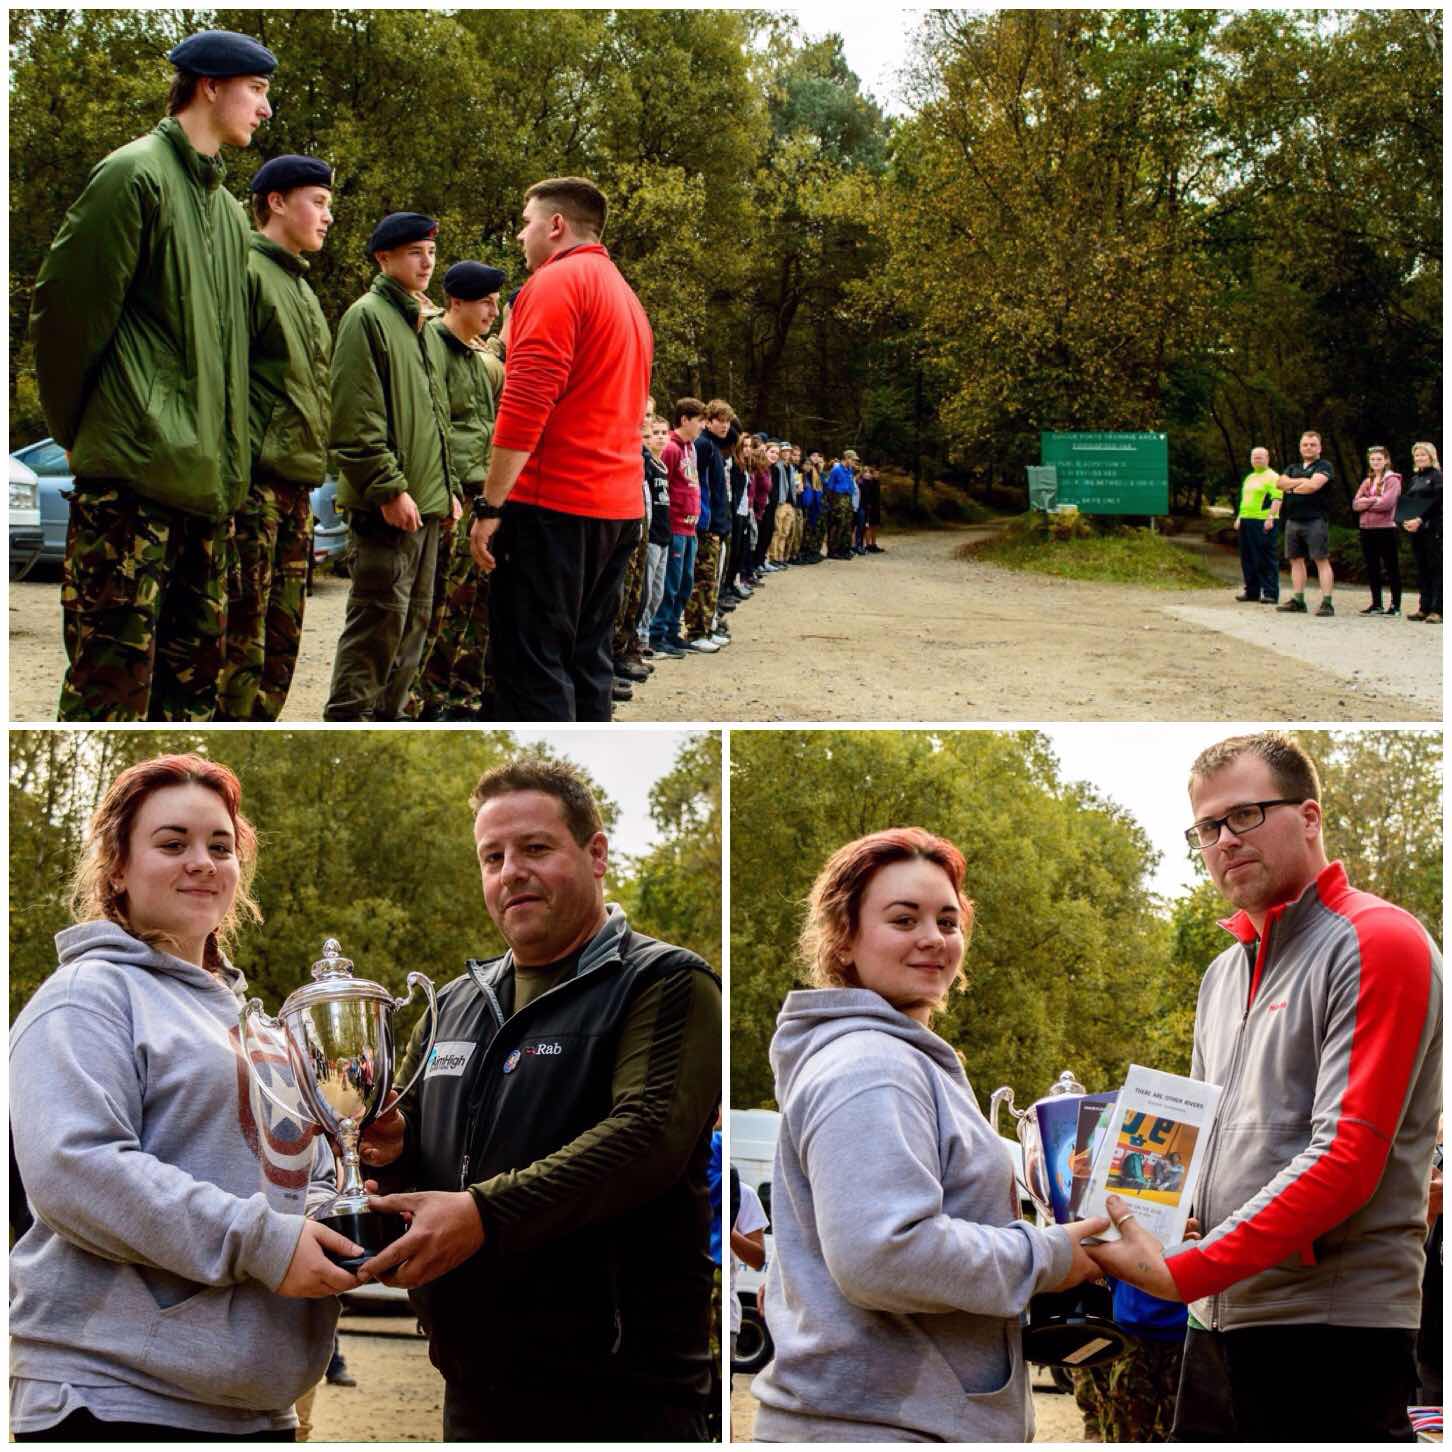
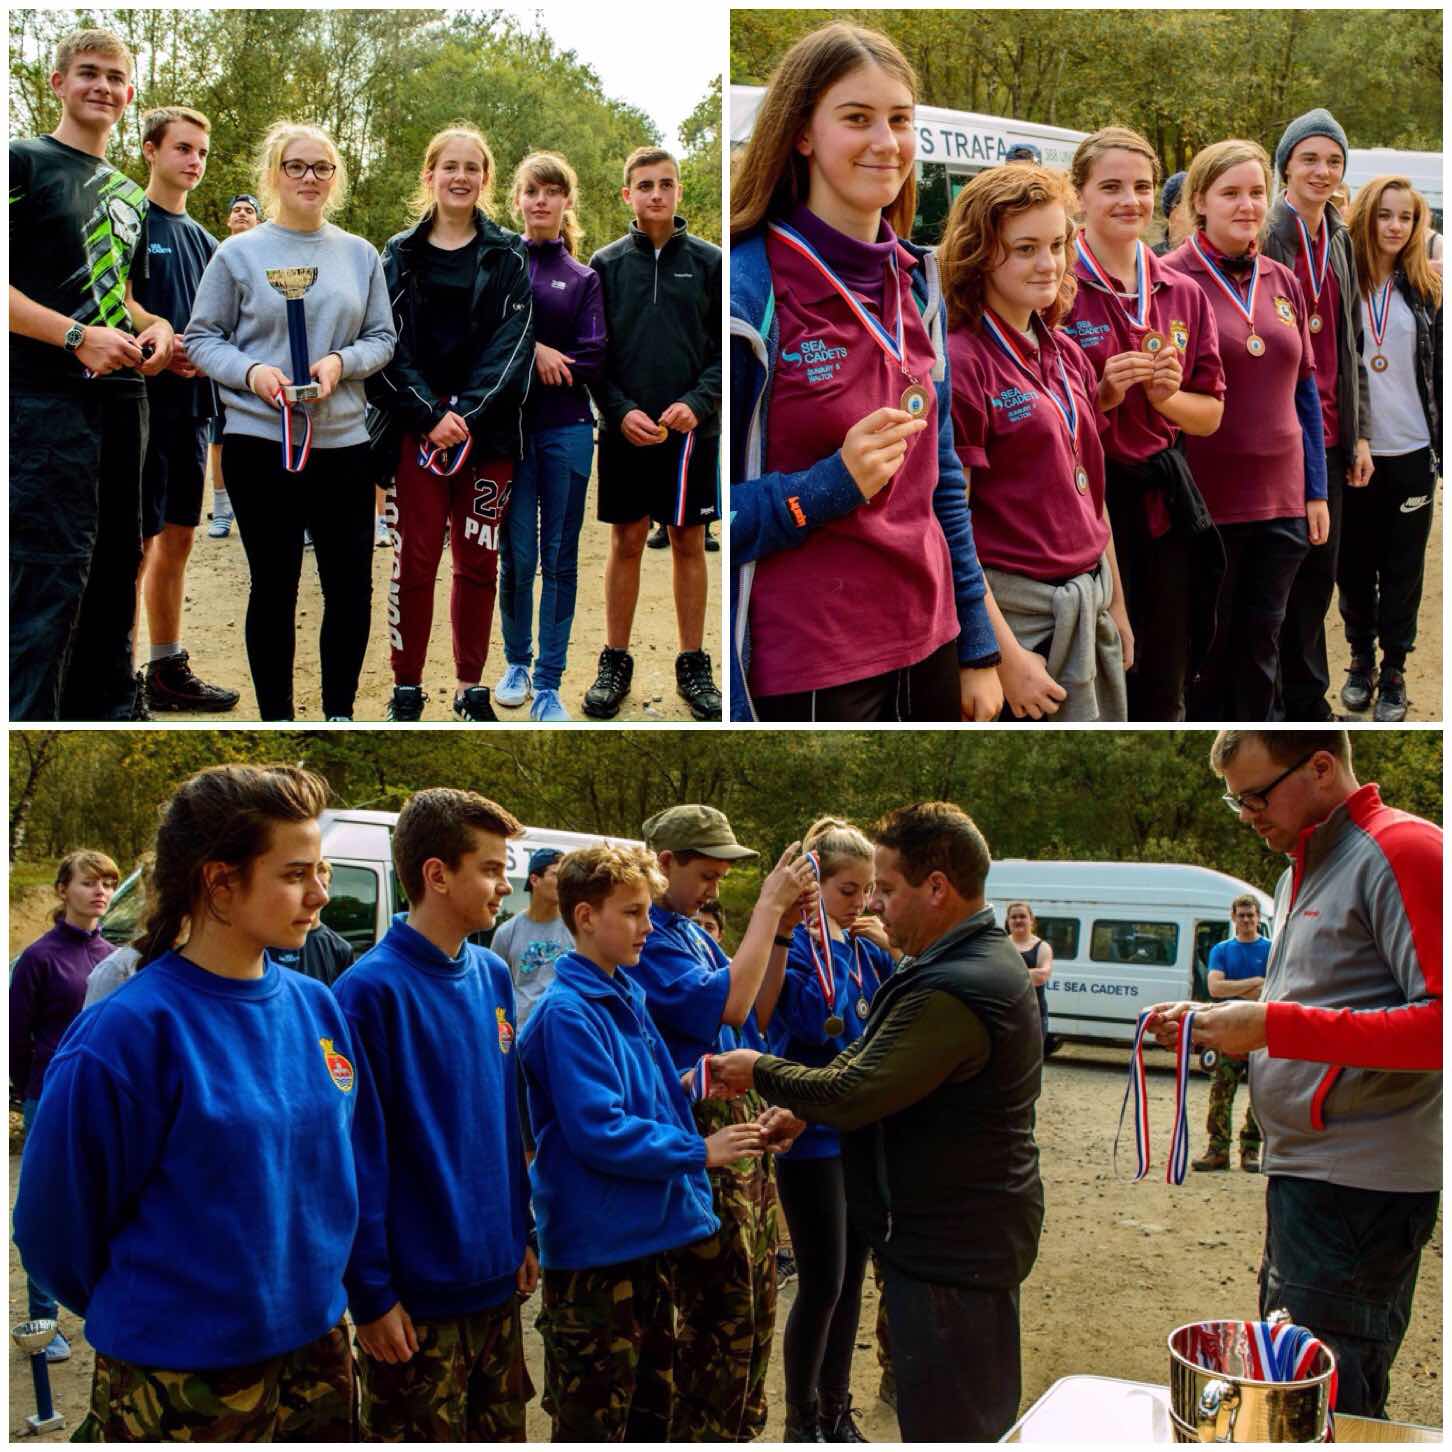
So after a lot of hard work over about 6 weekends the majority of the students reached the standard of Level 3 Basic Expedition Leader Award from Sports Leader UK. A number of the students received their certificates at the Walton and Sunbury Sea Cadet Unit recently.
There are a few more who just need to finish their final assignment and then they can be awarded their certificates.
Certificate Ceremony
I am looking forward to helping out once again in the BEL course this year as an instructor and assessor but thankfully JK is taking the reins in terms of organising it allowing me to do more of what I like – Getting out and Adventuring.
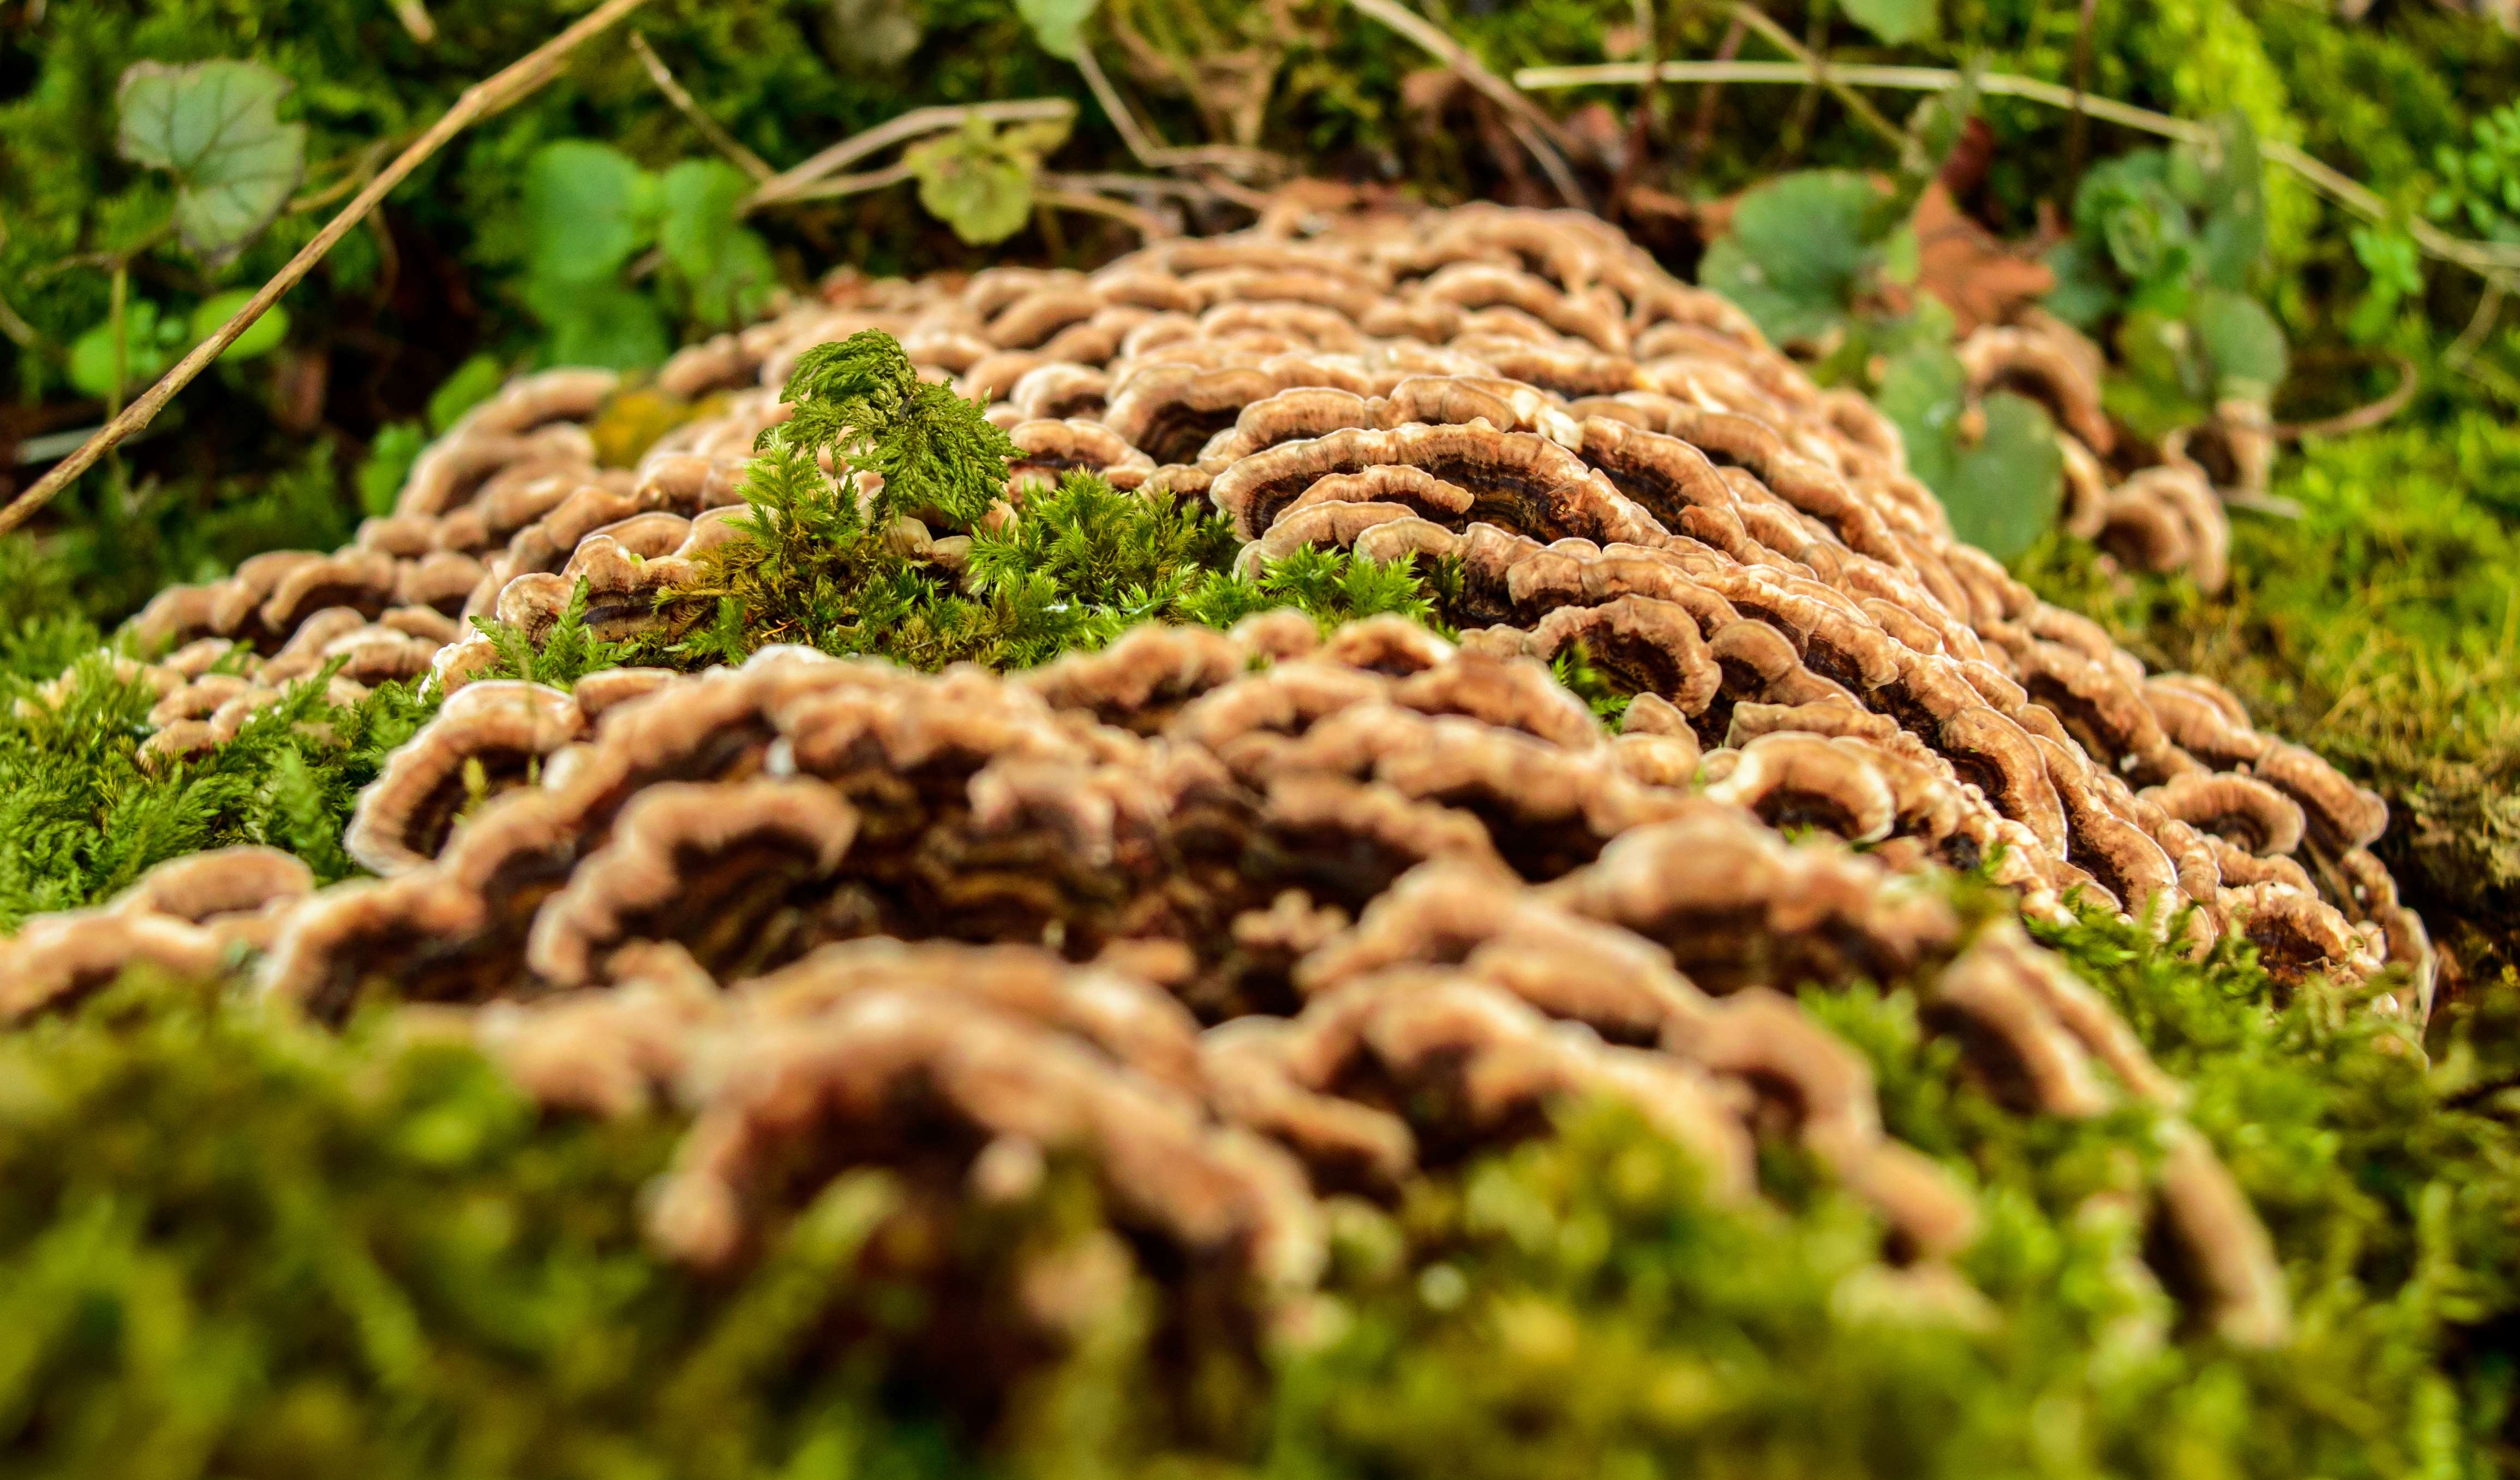
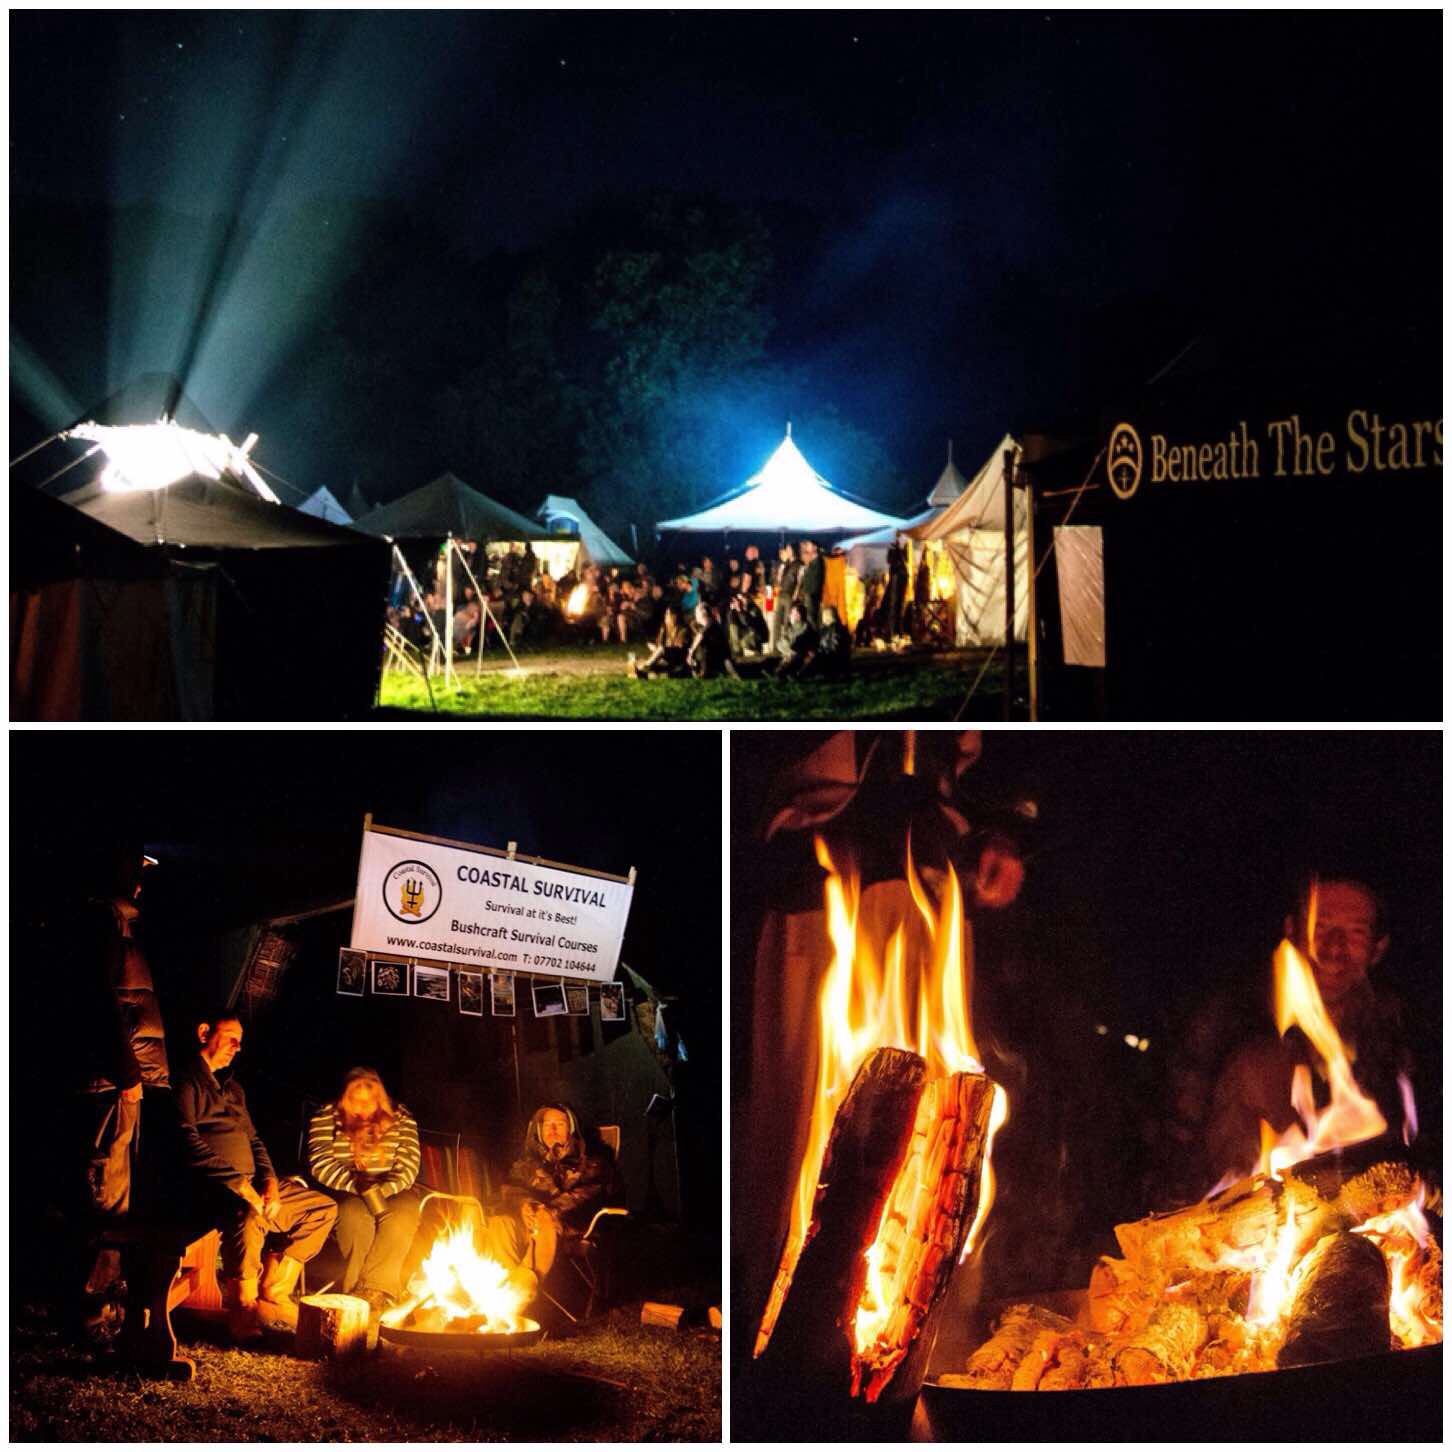
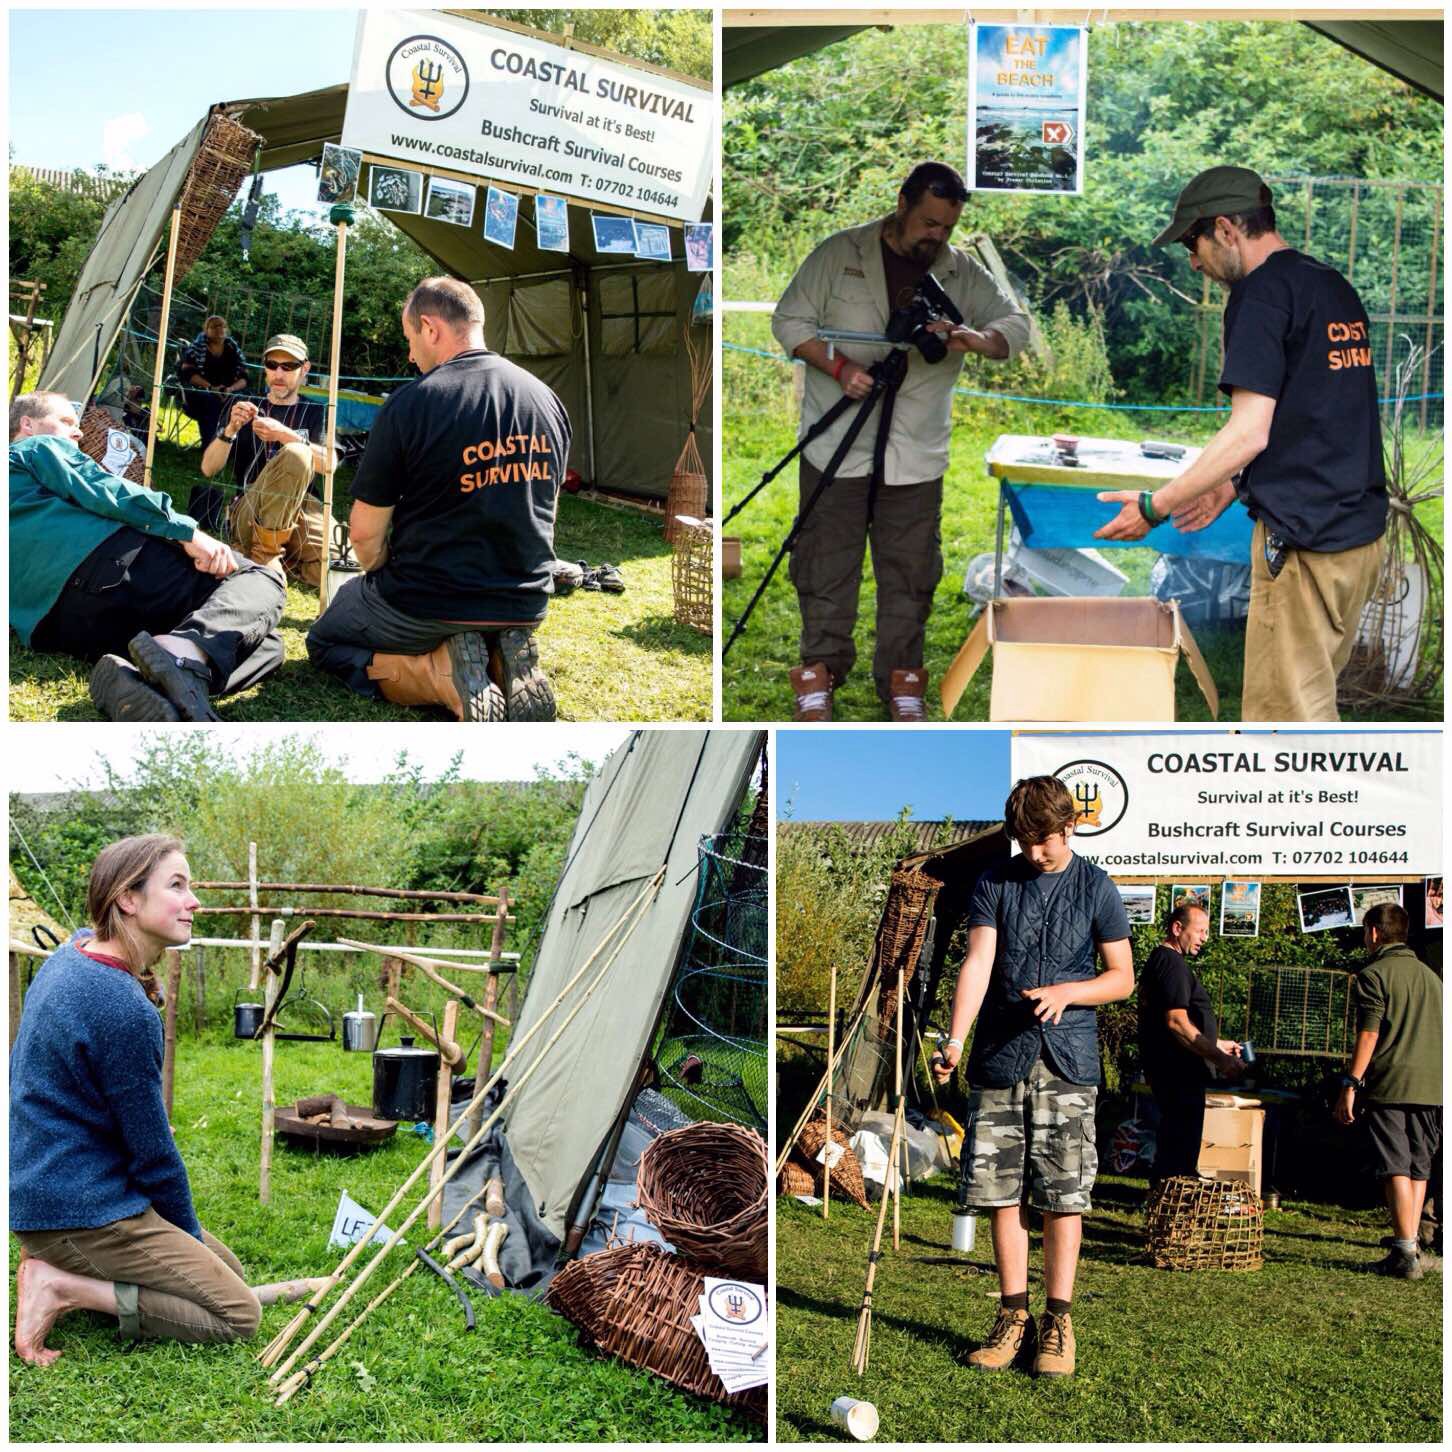
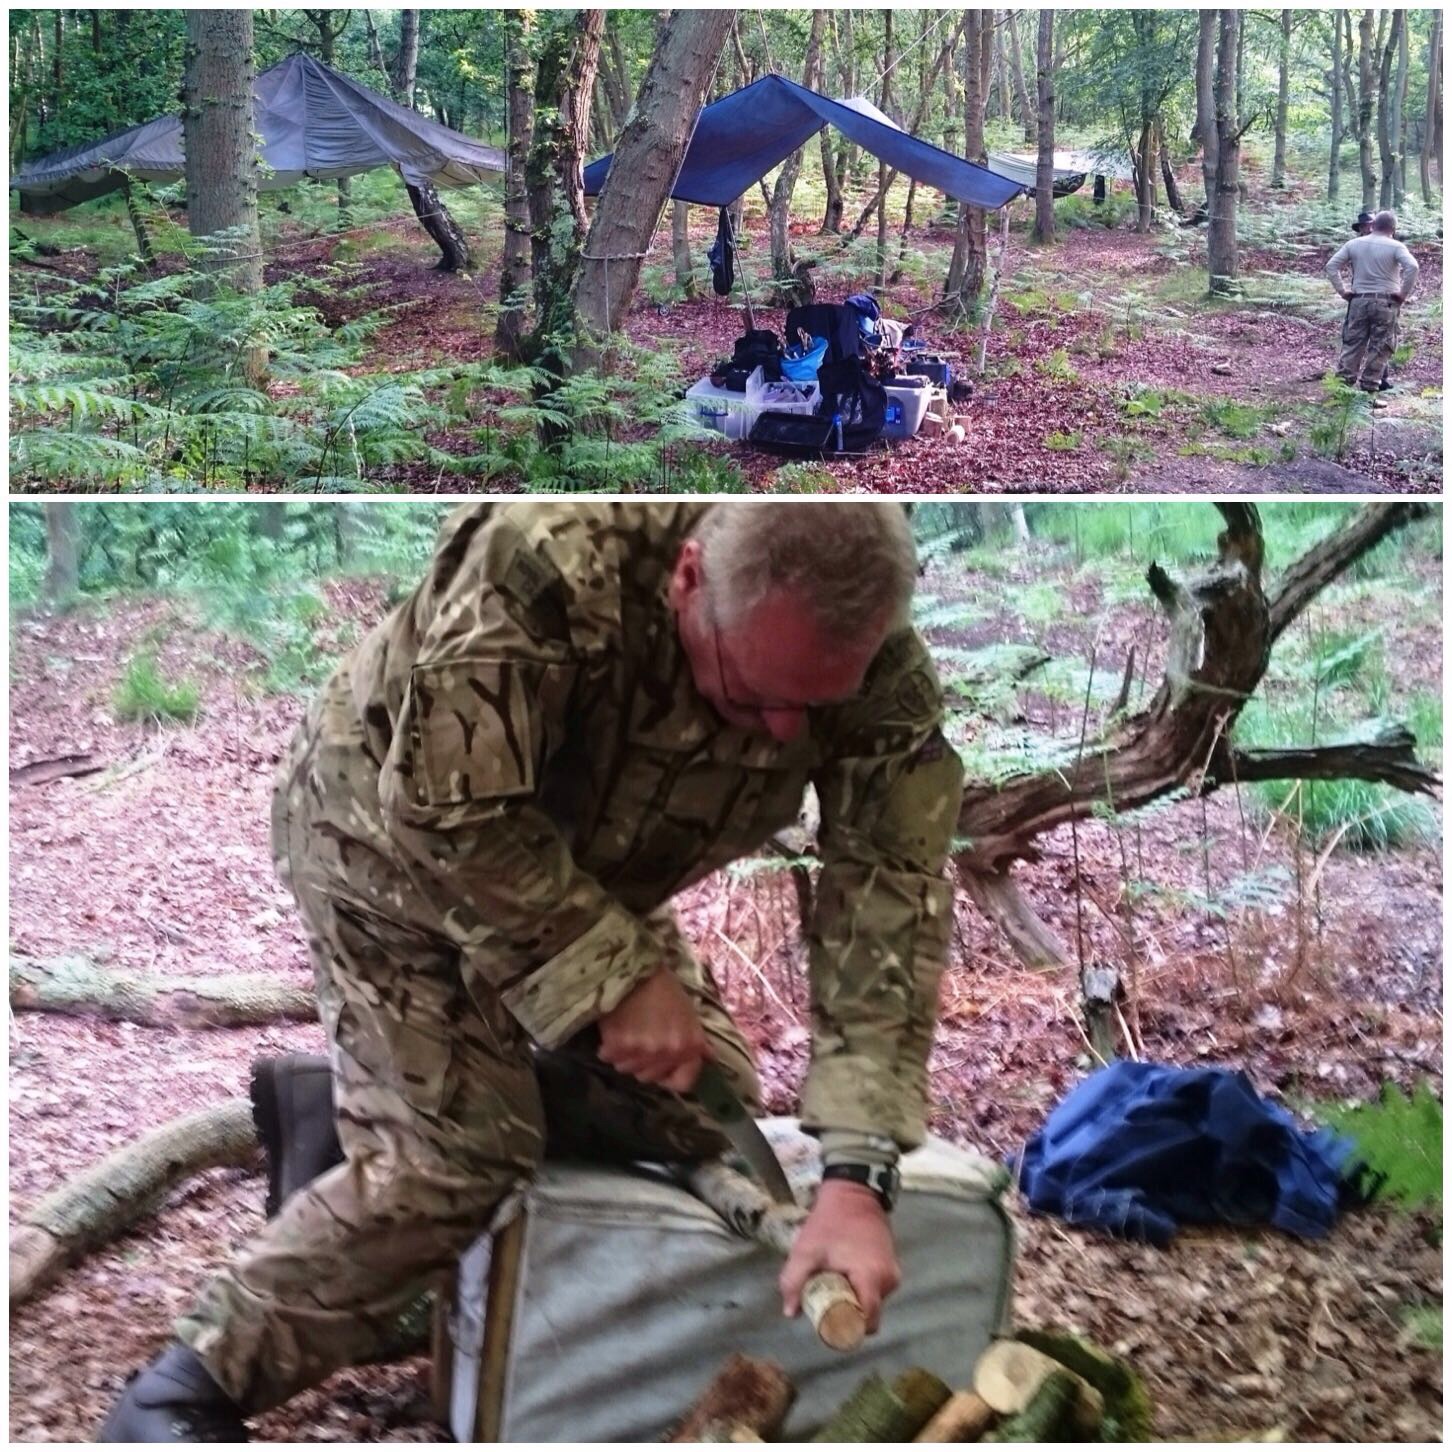
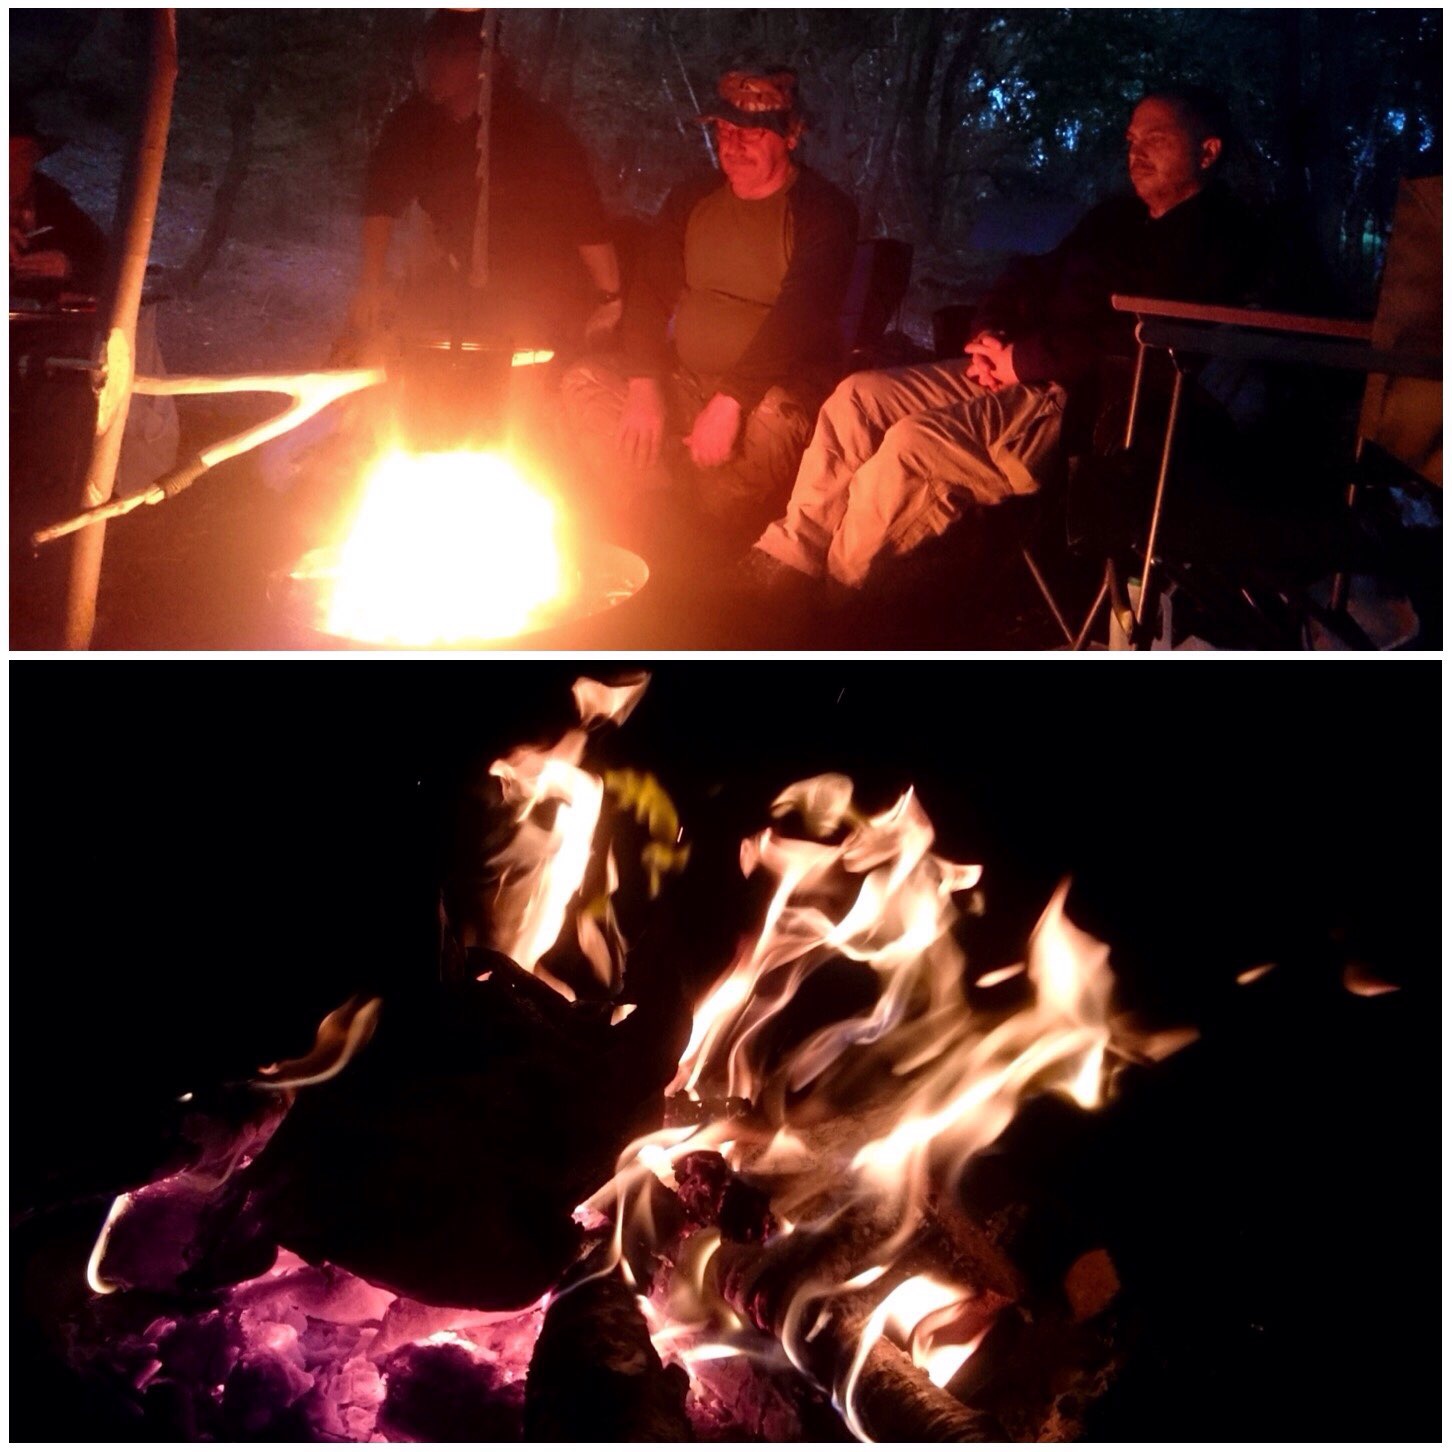
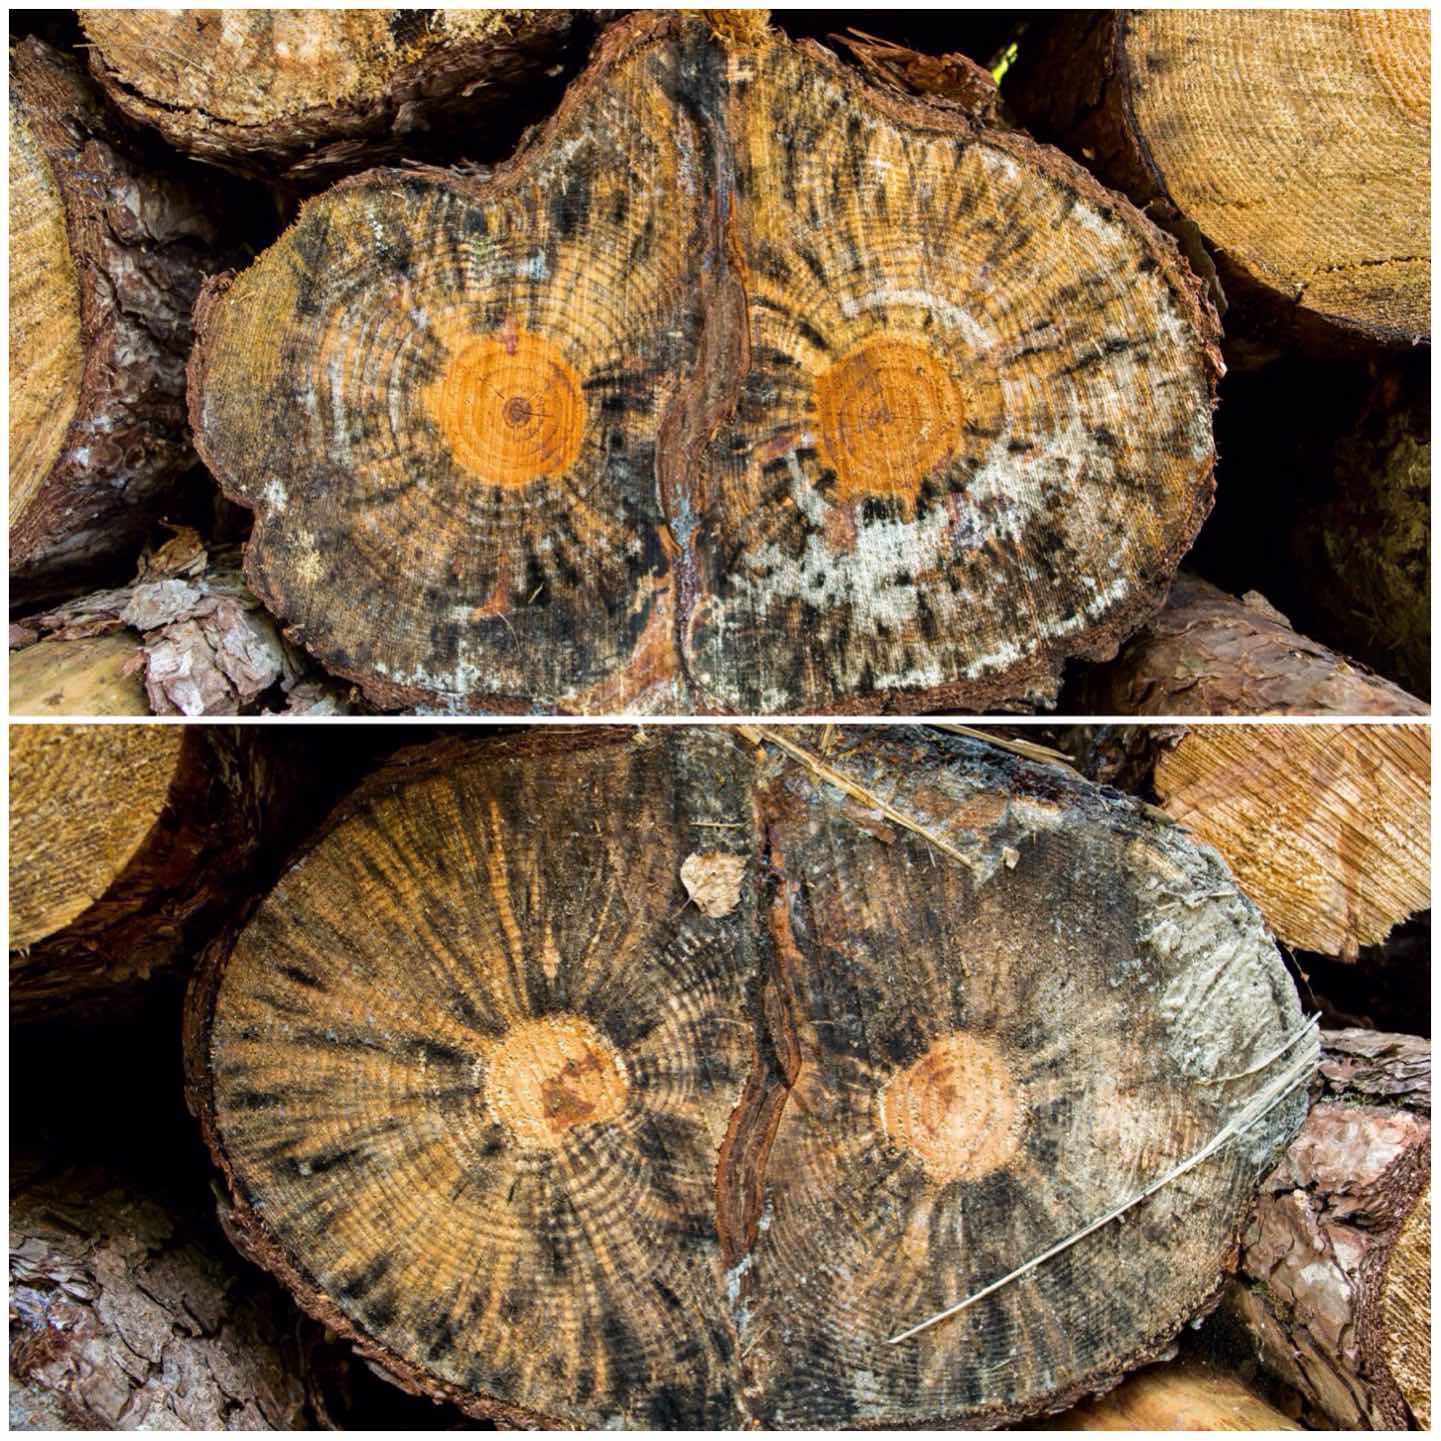
Last weekend I ended up in Dorset visiting my friend Fraser Christian from Coastal Survival. It was a stormy weekend but thankfully the wind dropped enough on the Saturday evening to allow me to sleep in my hammock.
On the Sunday morning not long after I got up I spotted this waterfall effect of Turkey Tail fungus on an old stump and was quite taken with them from a top down view – kinda glistened in the early morning sunshine.
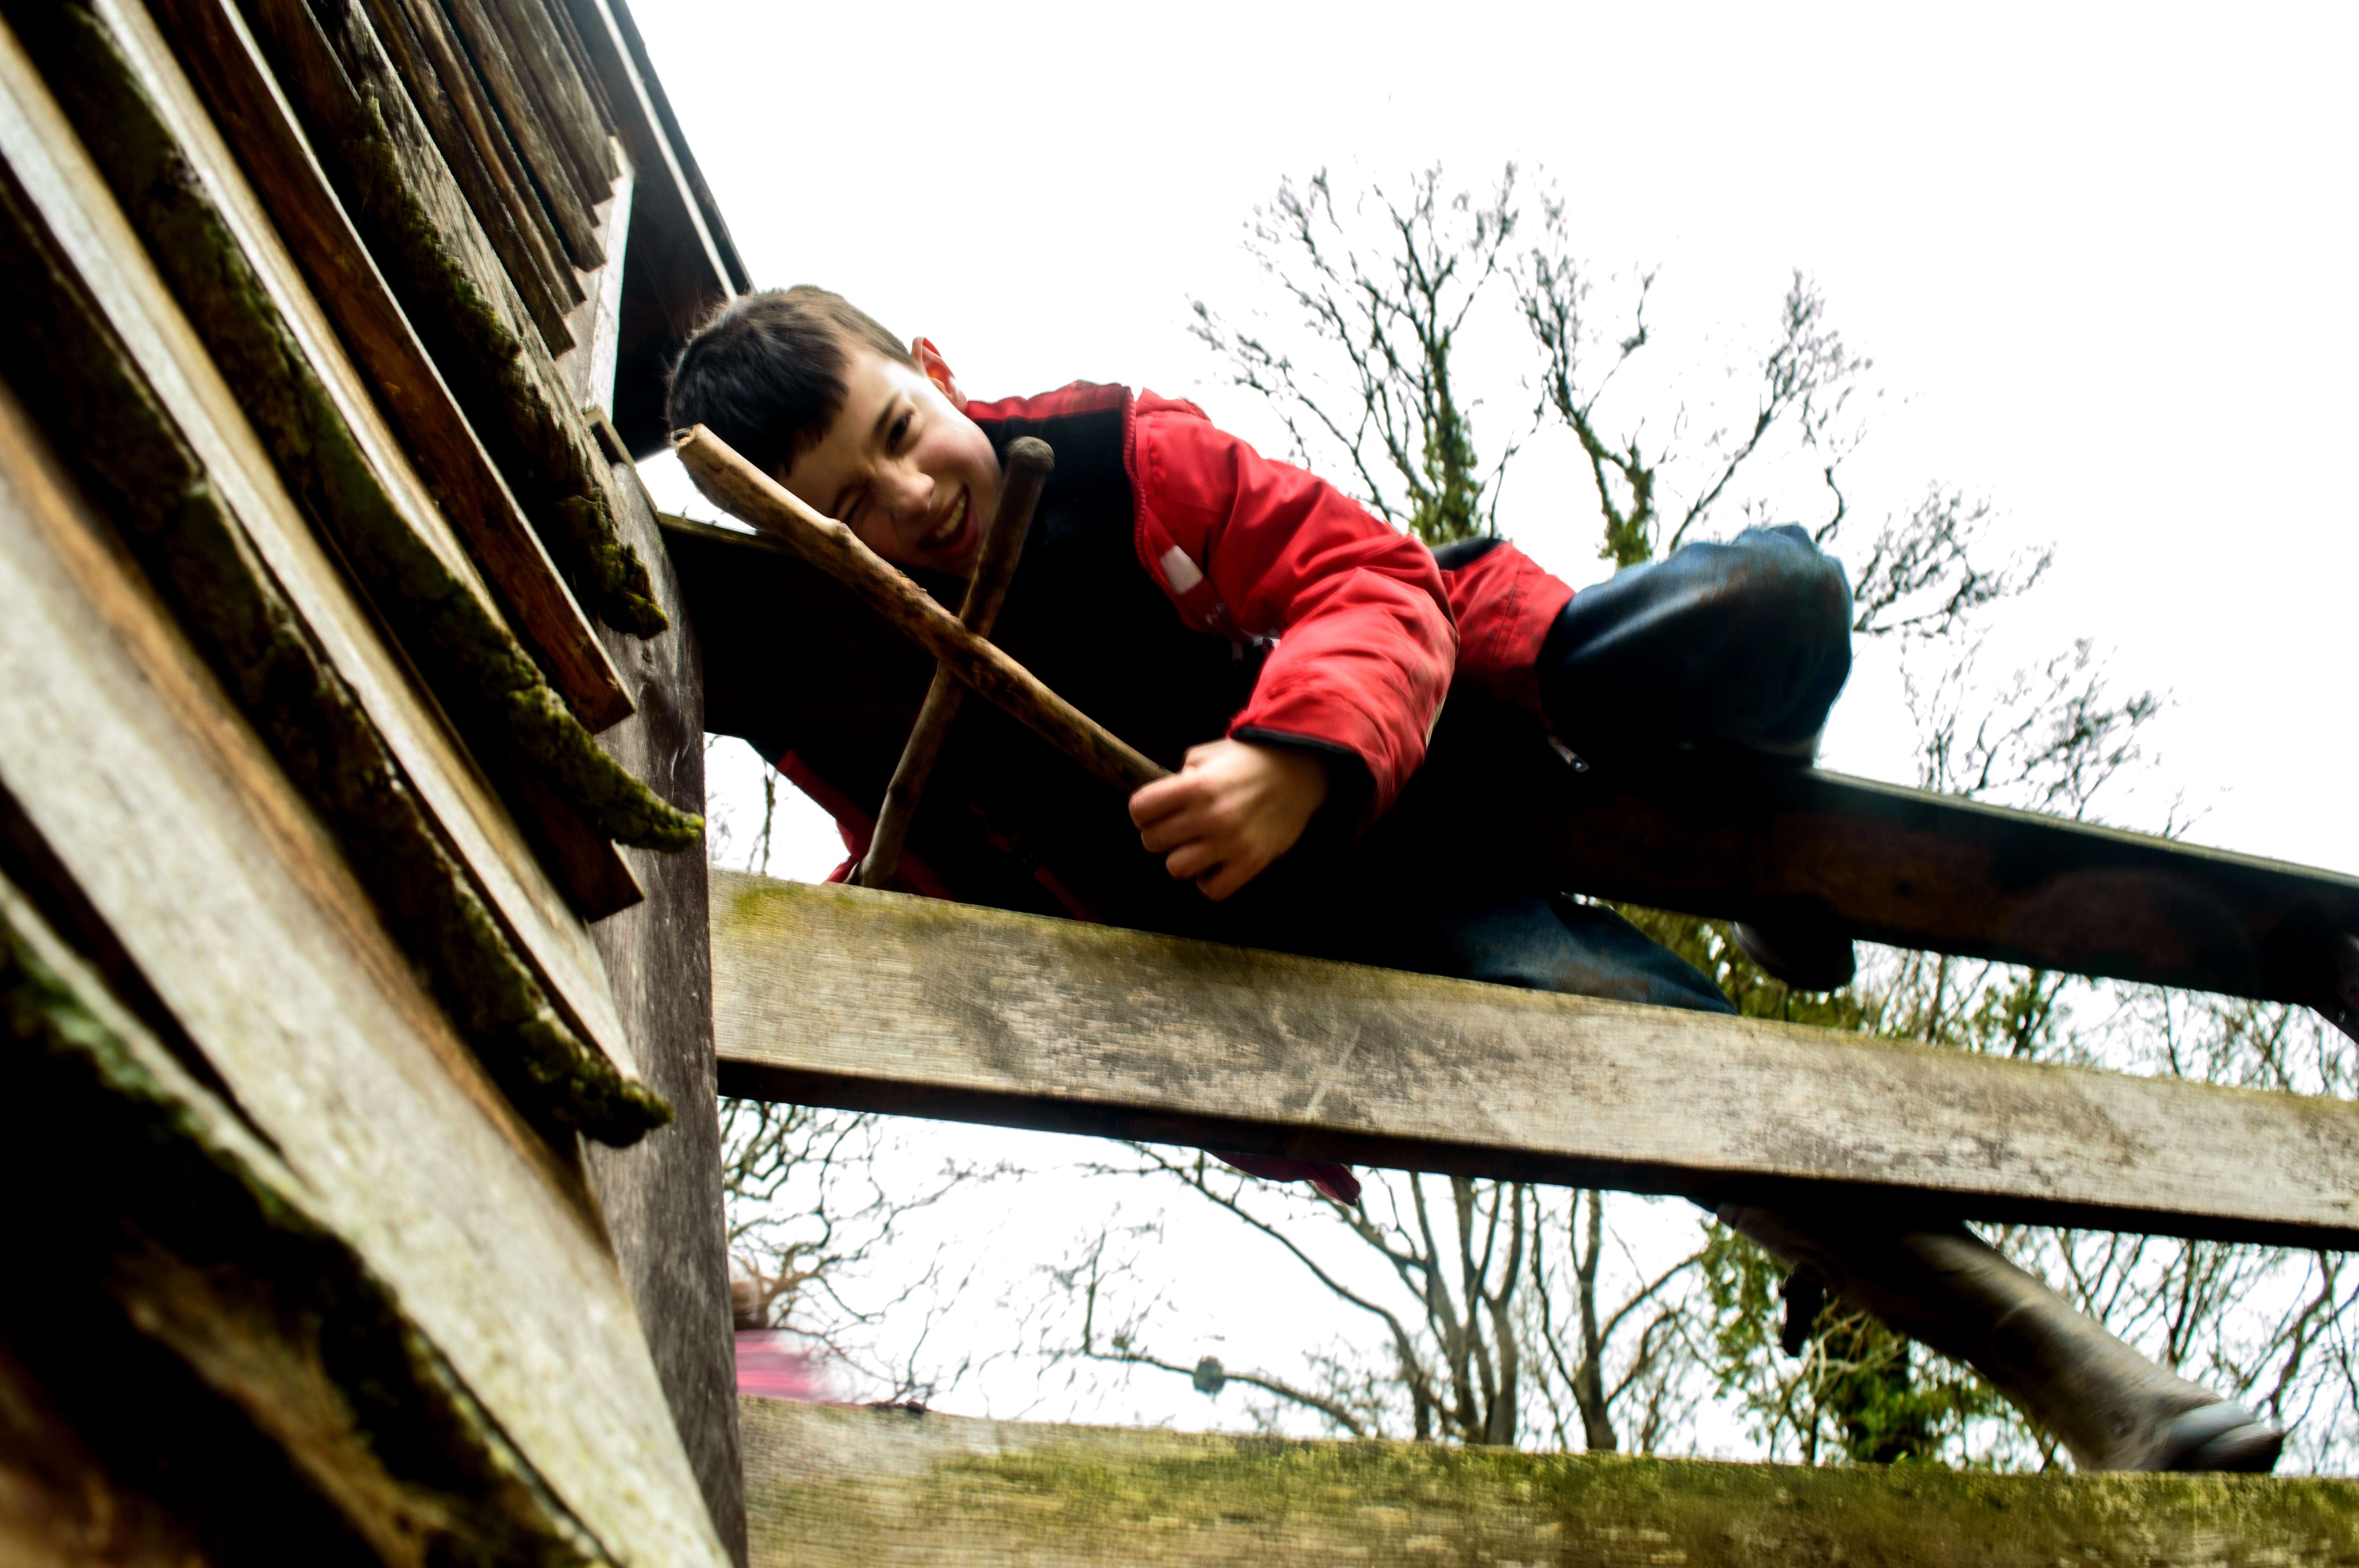
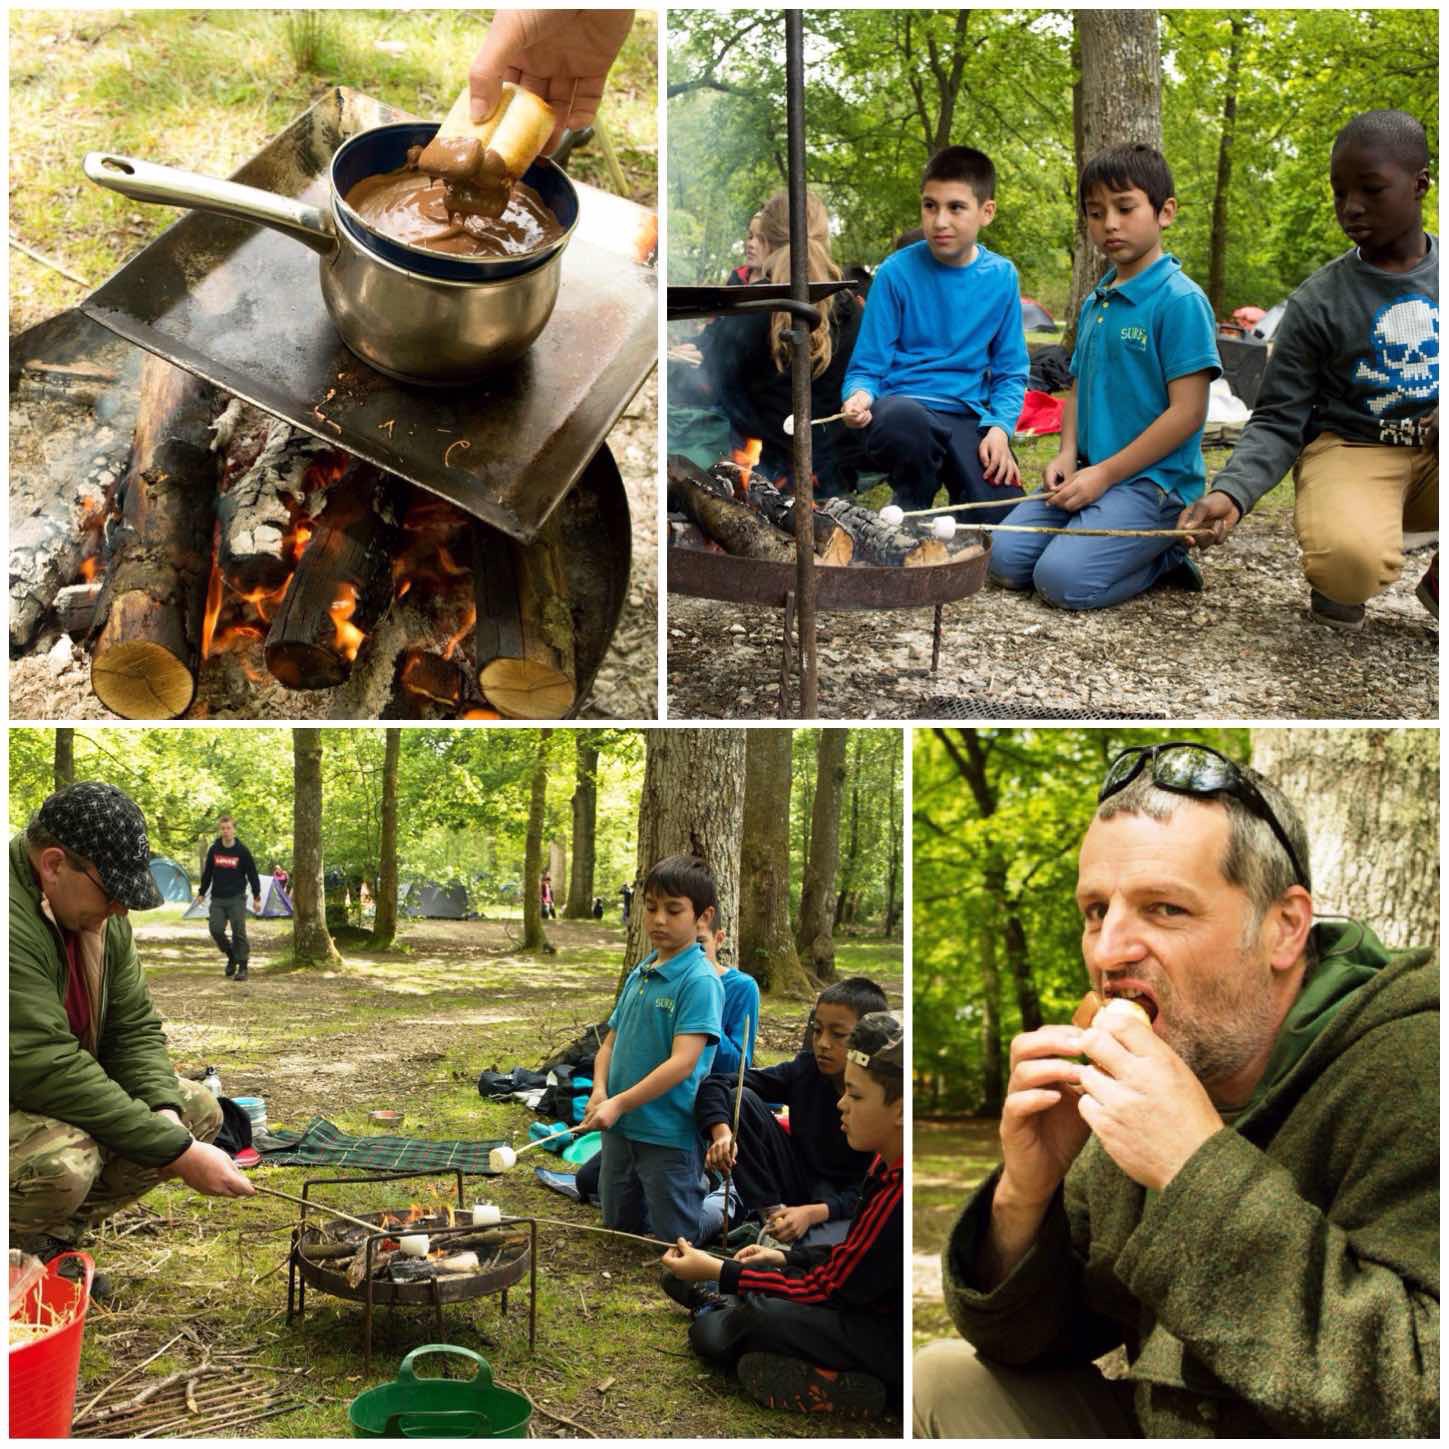
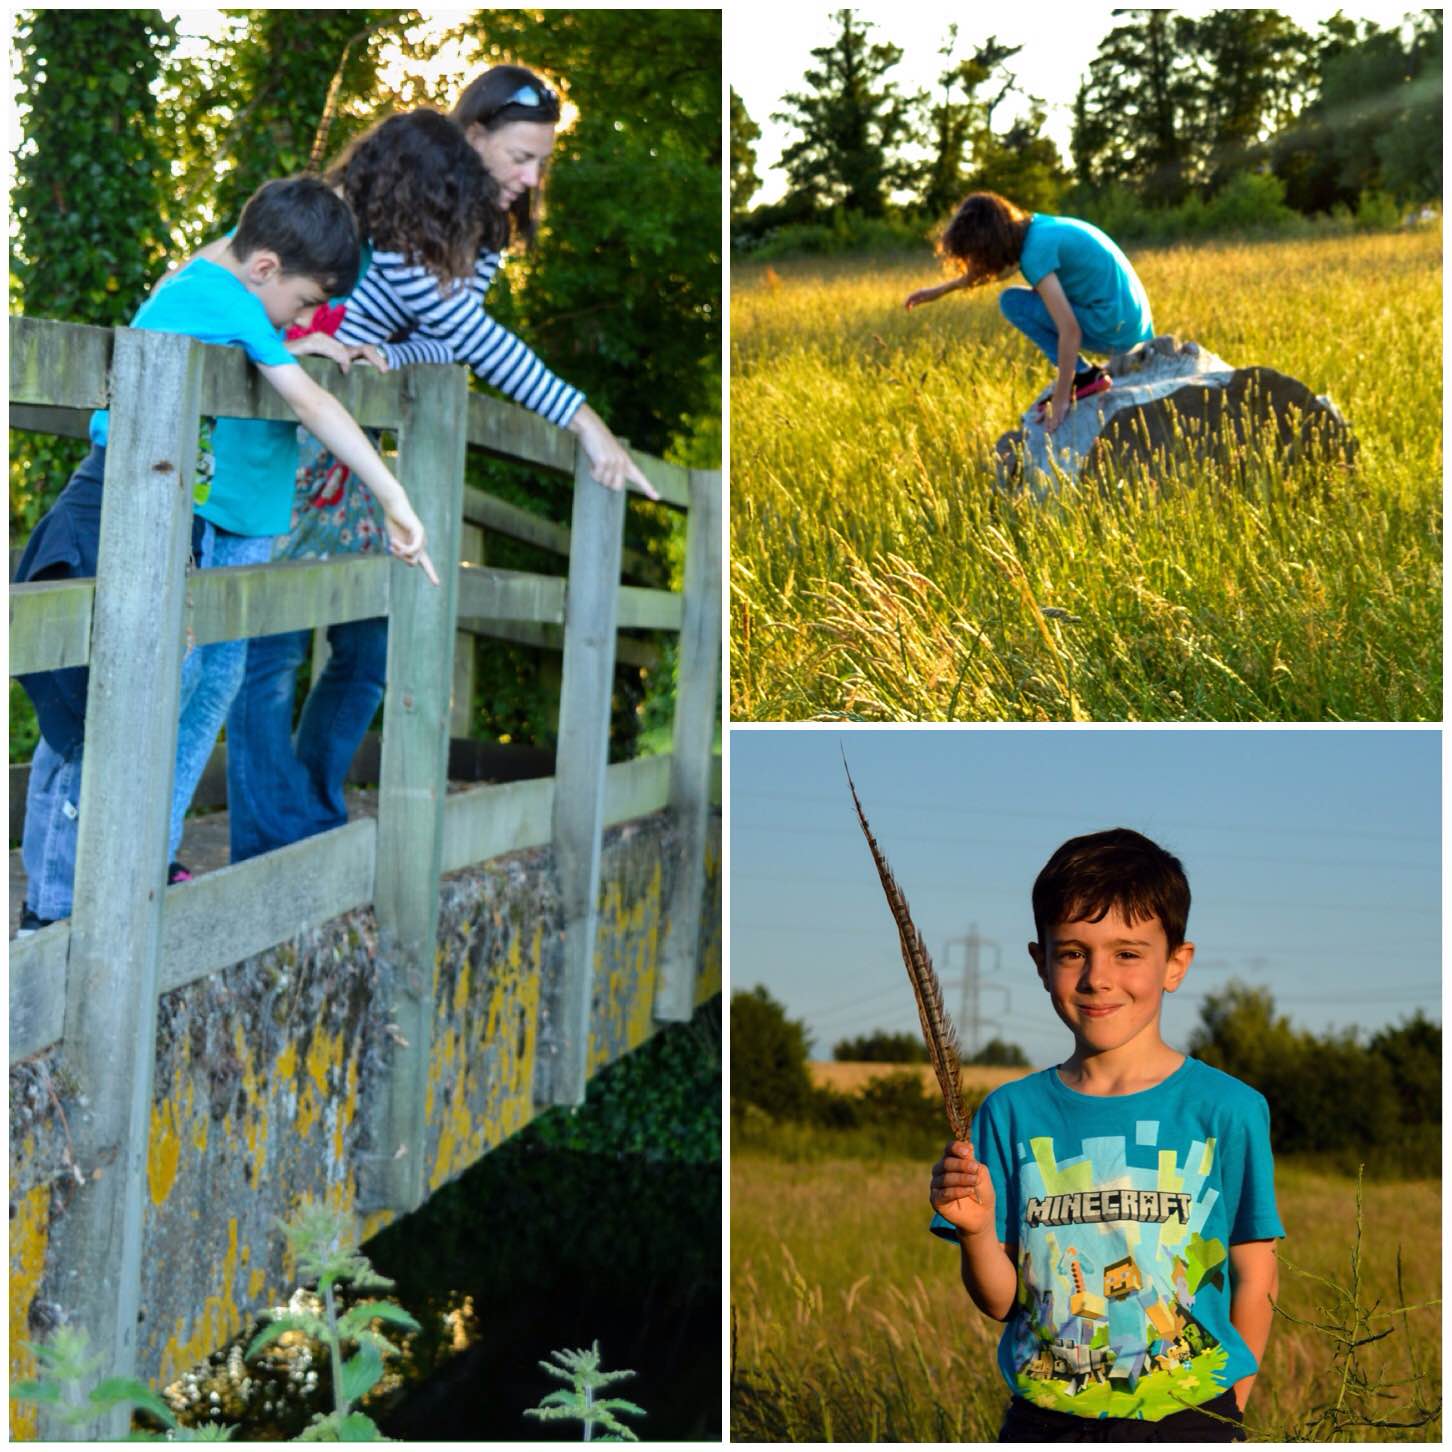
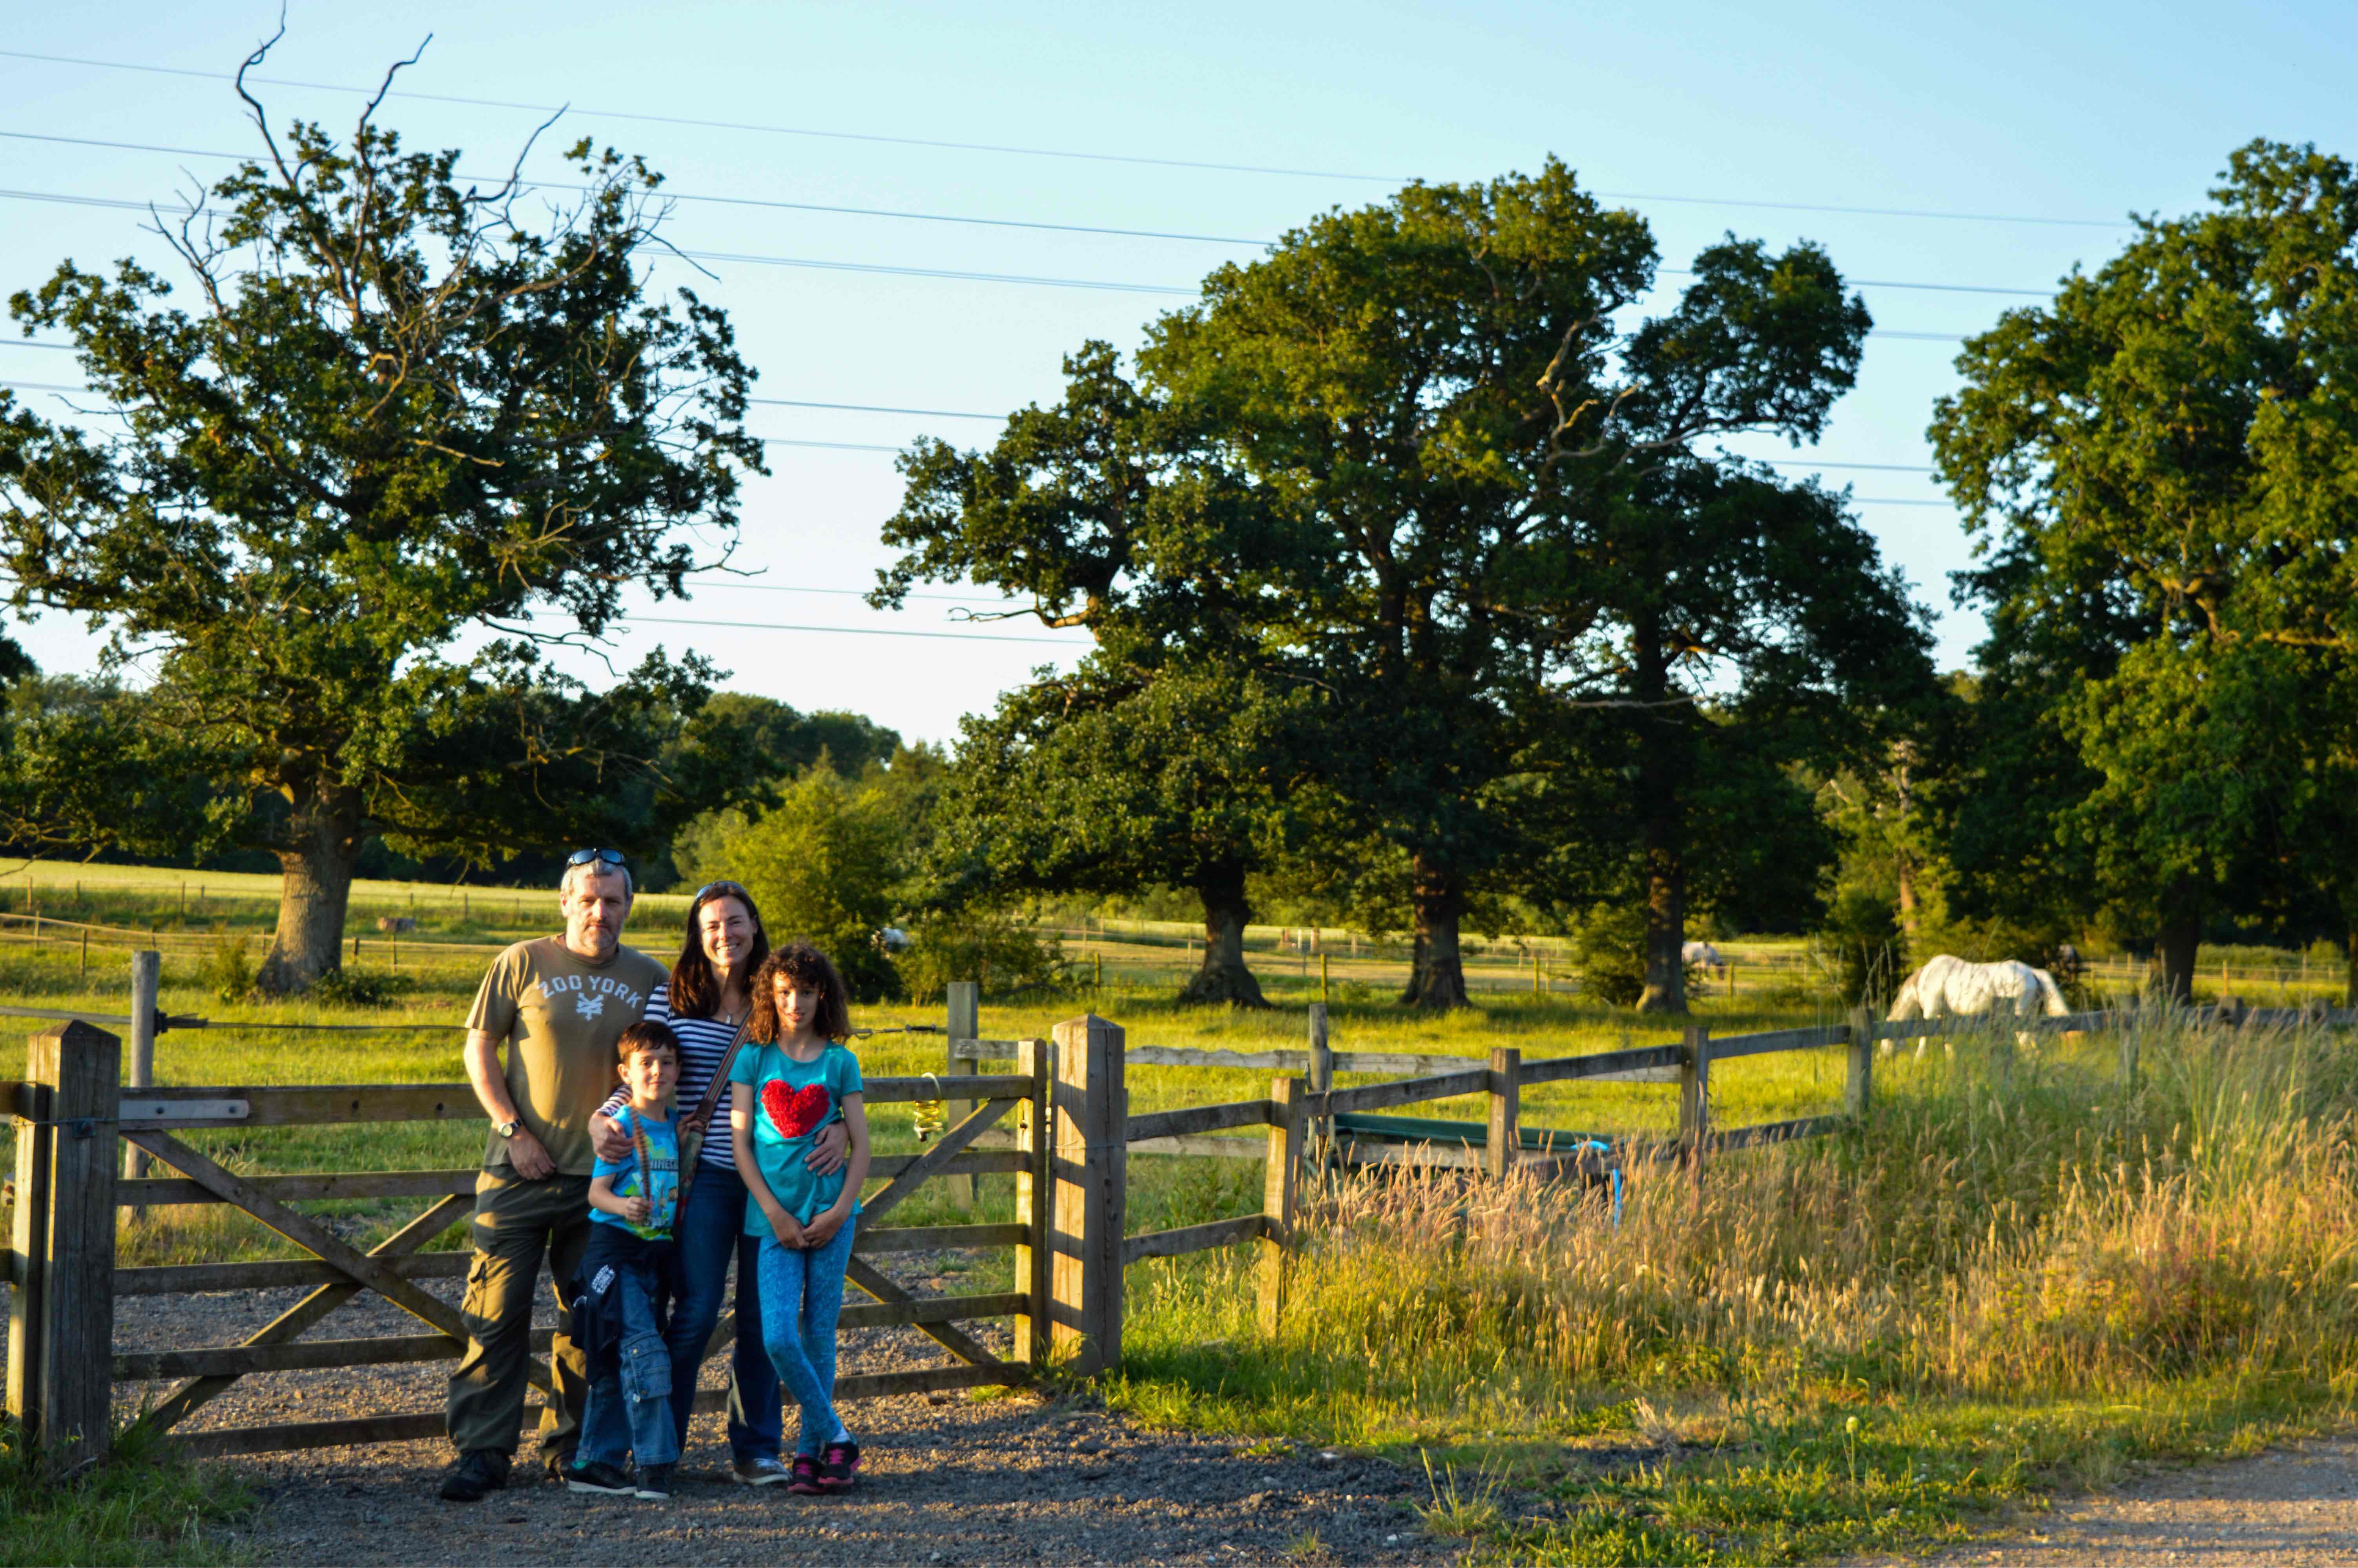
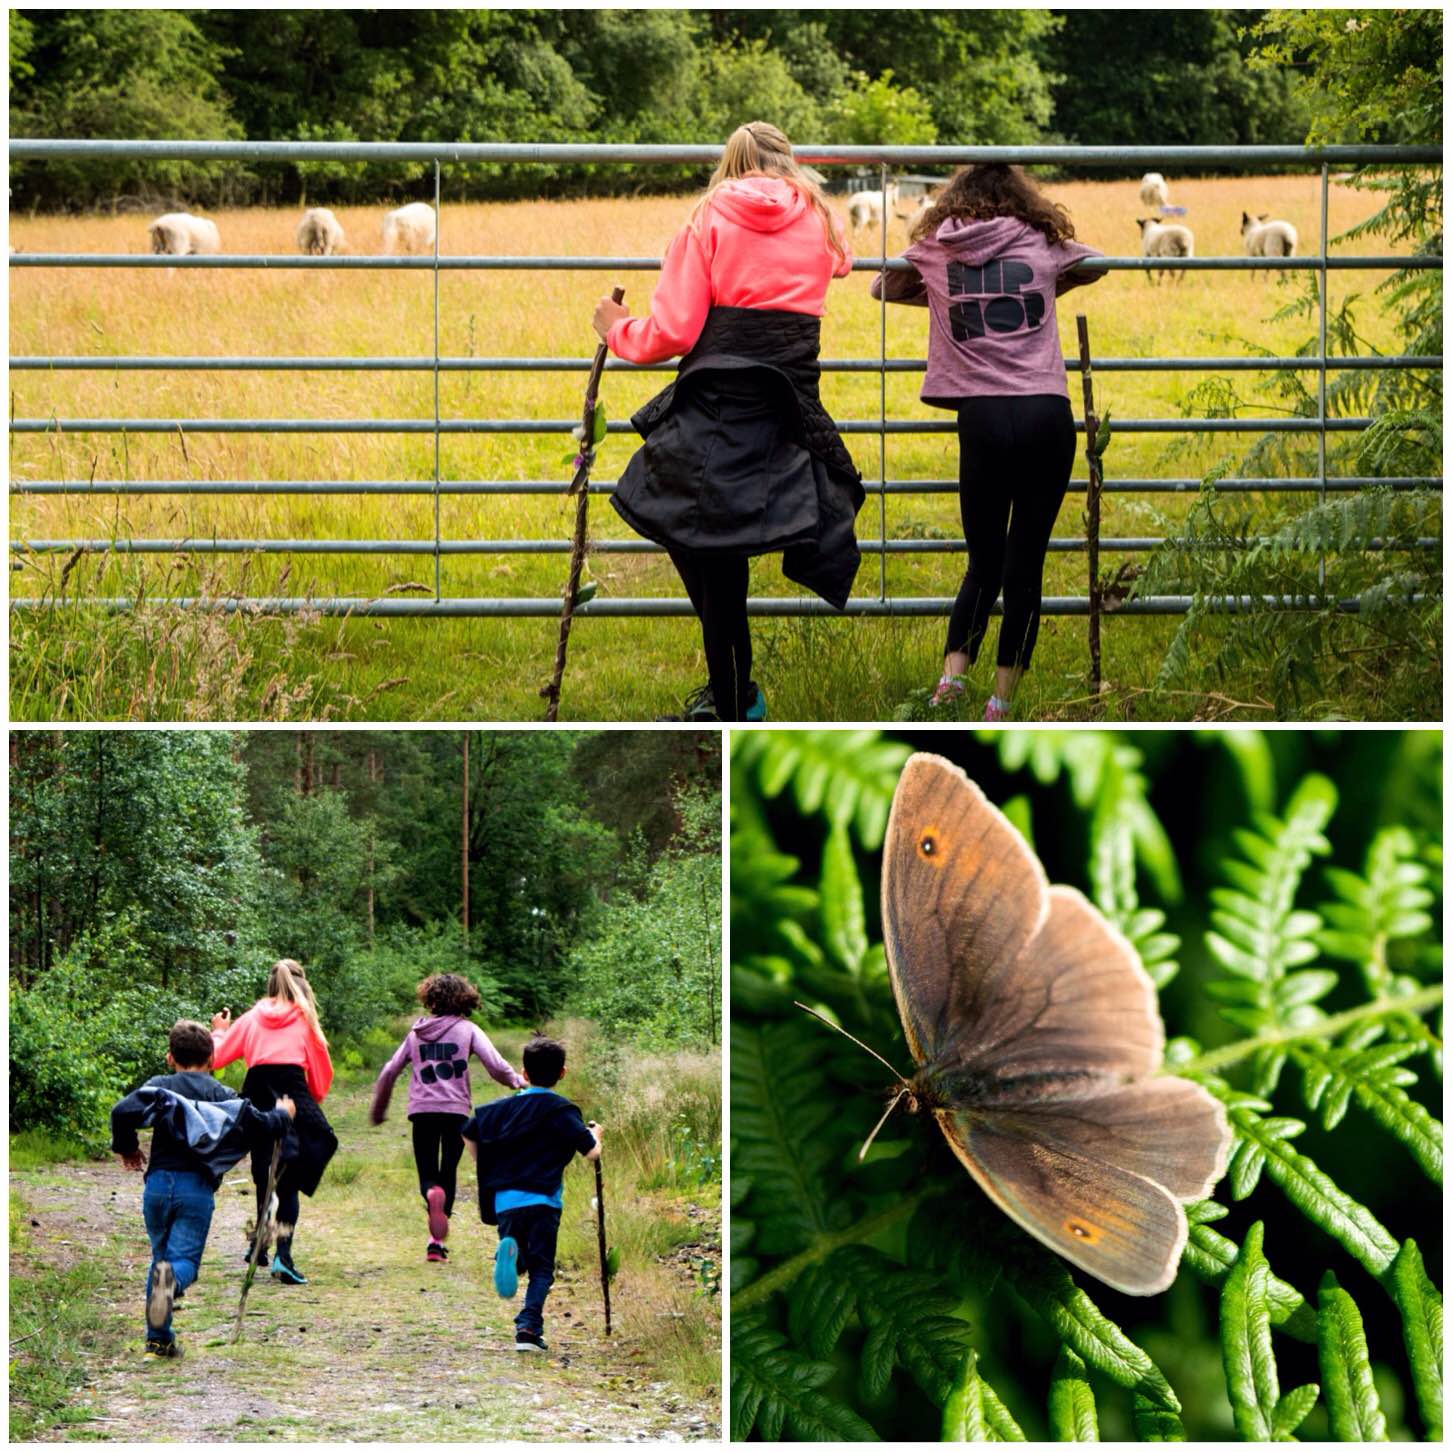
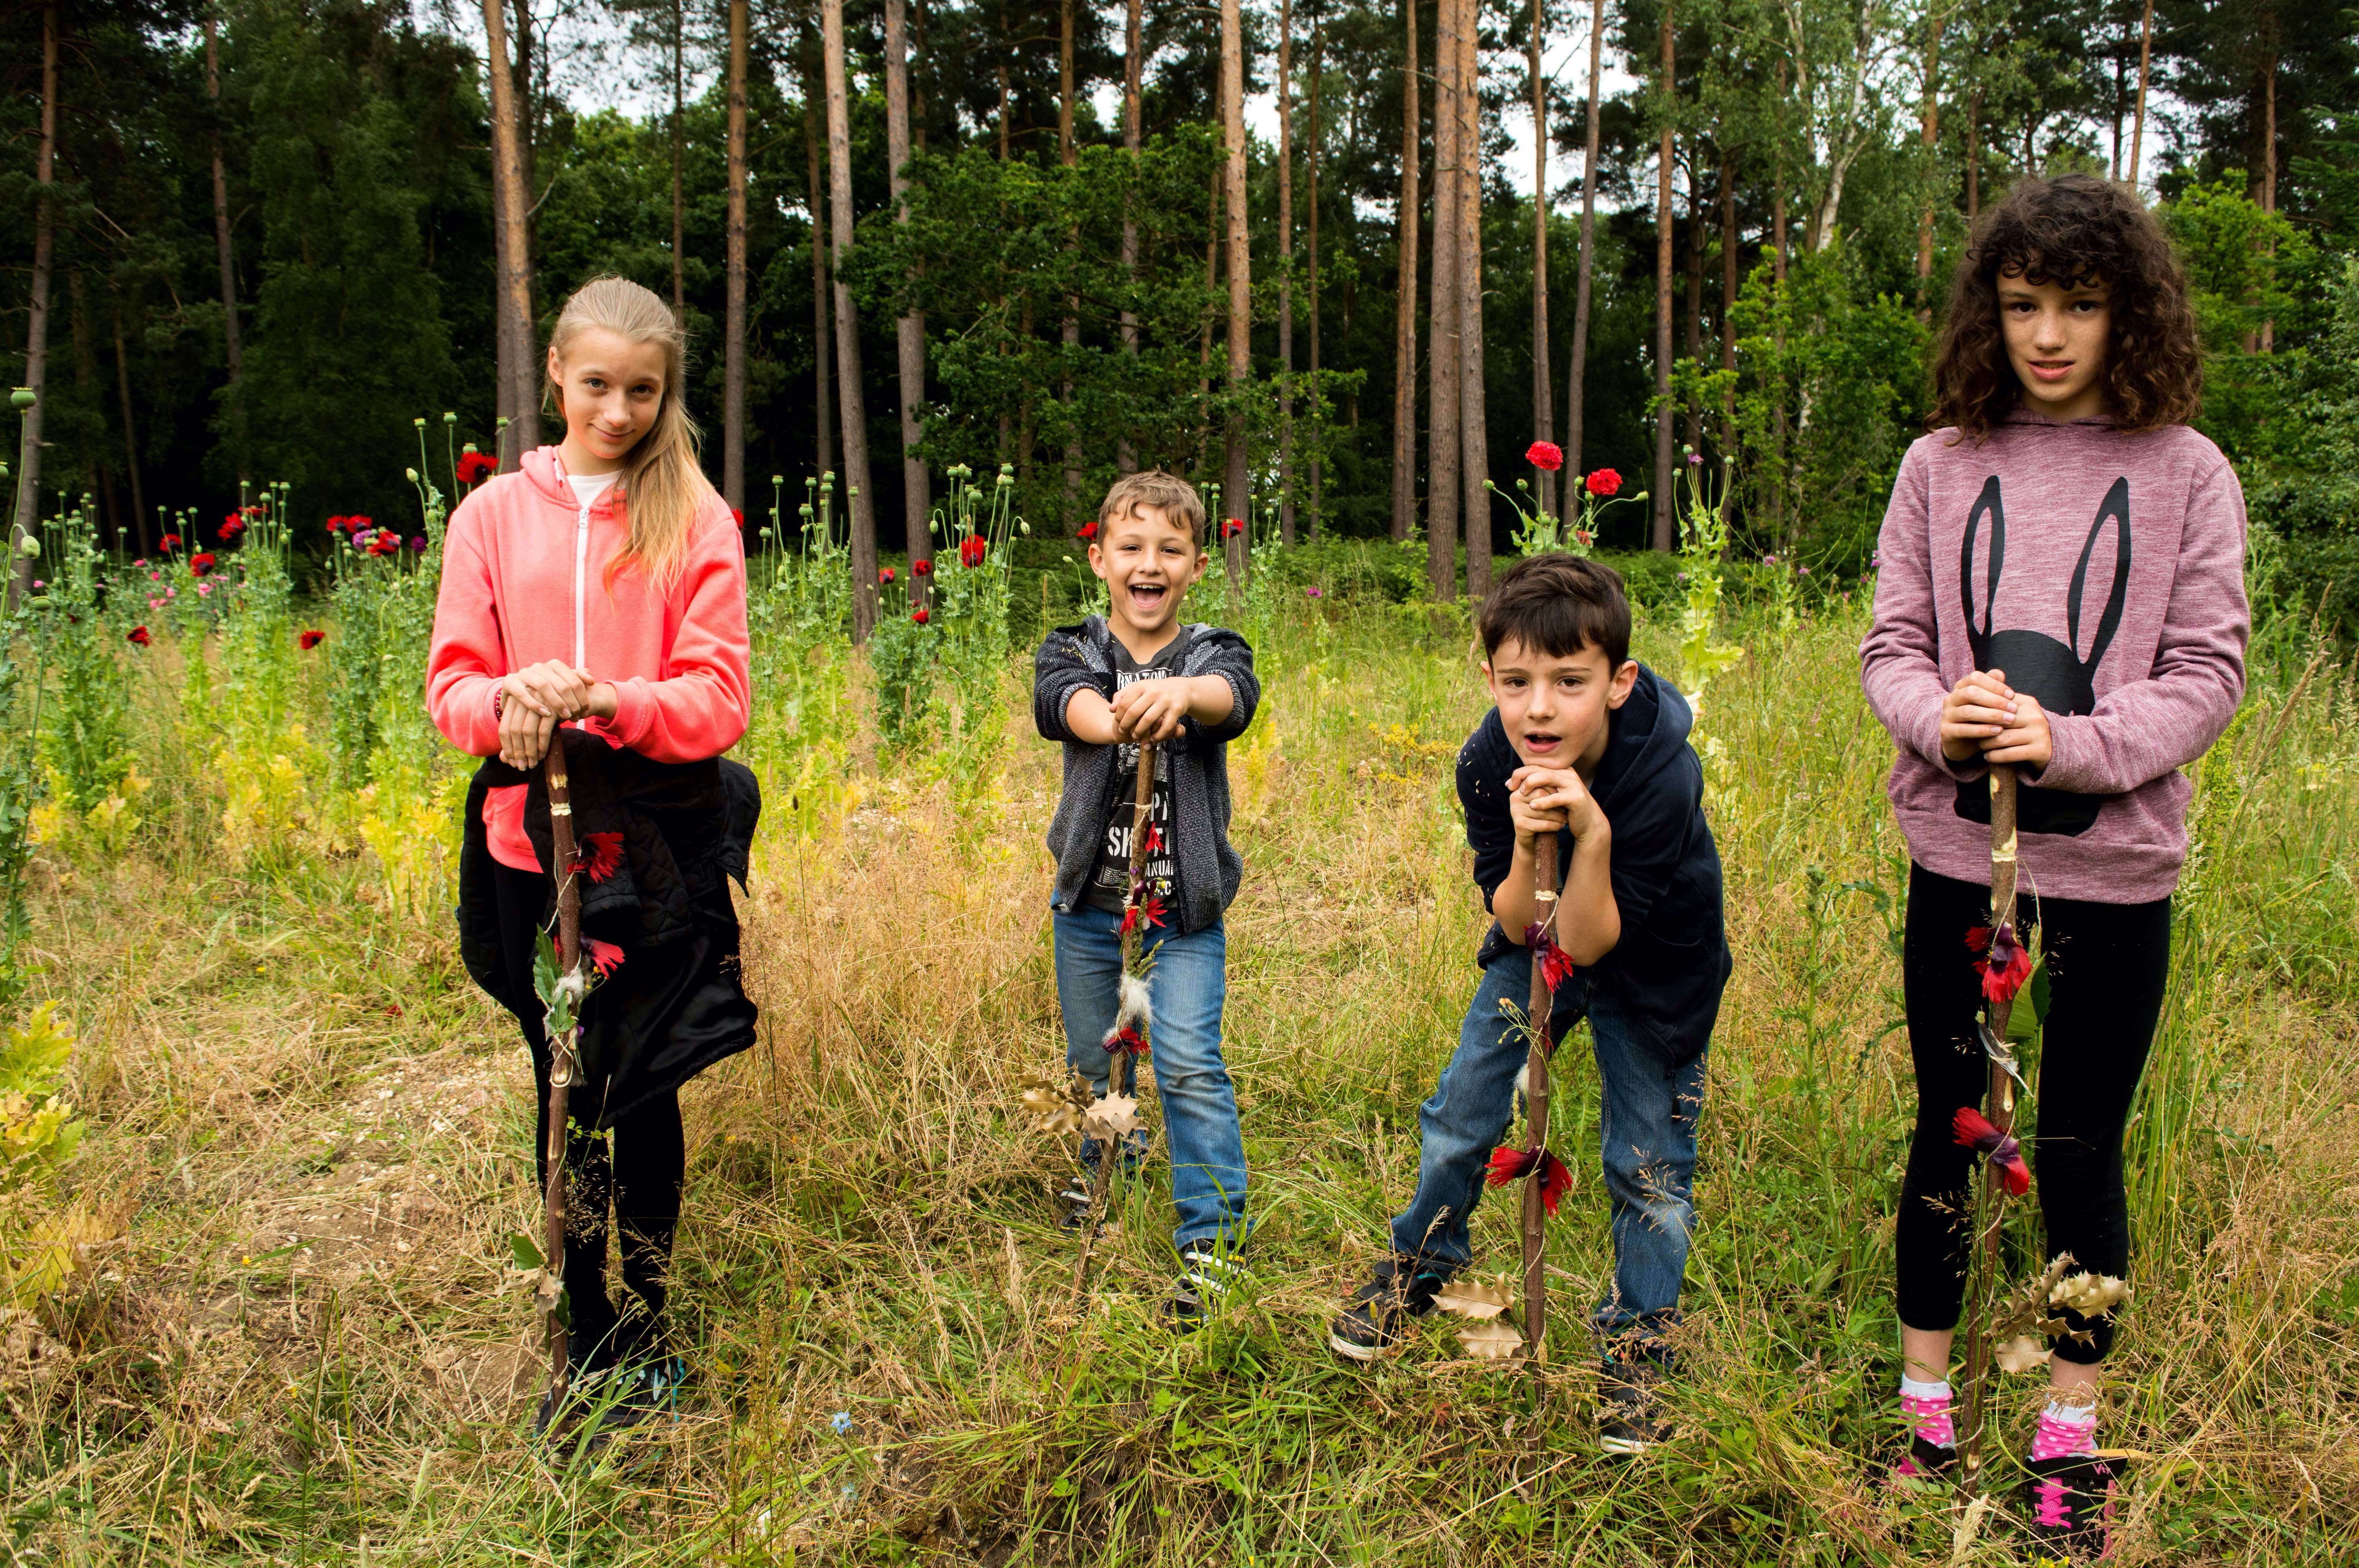
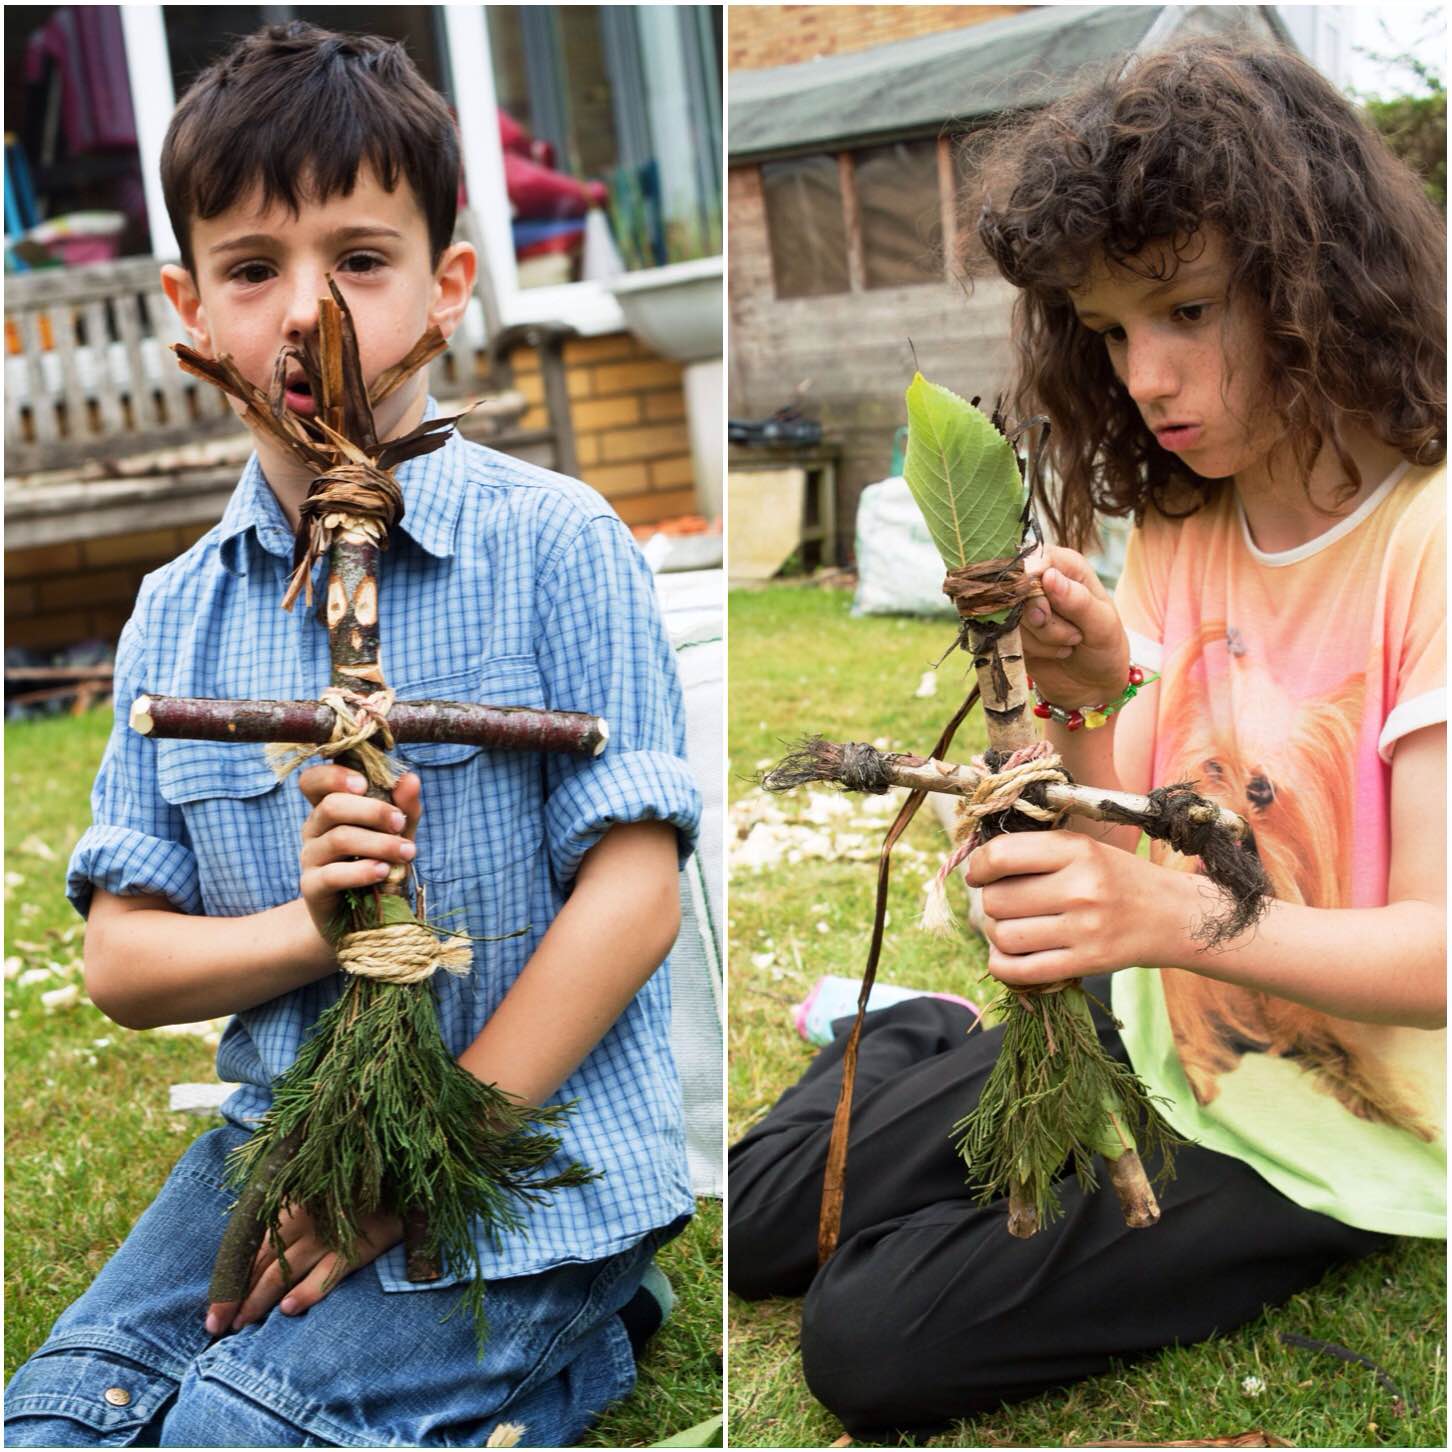
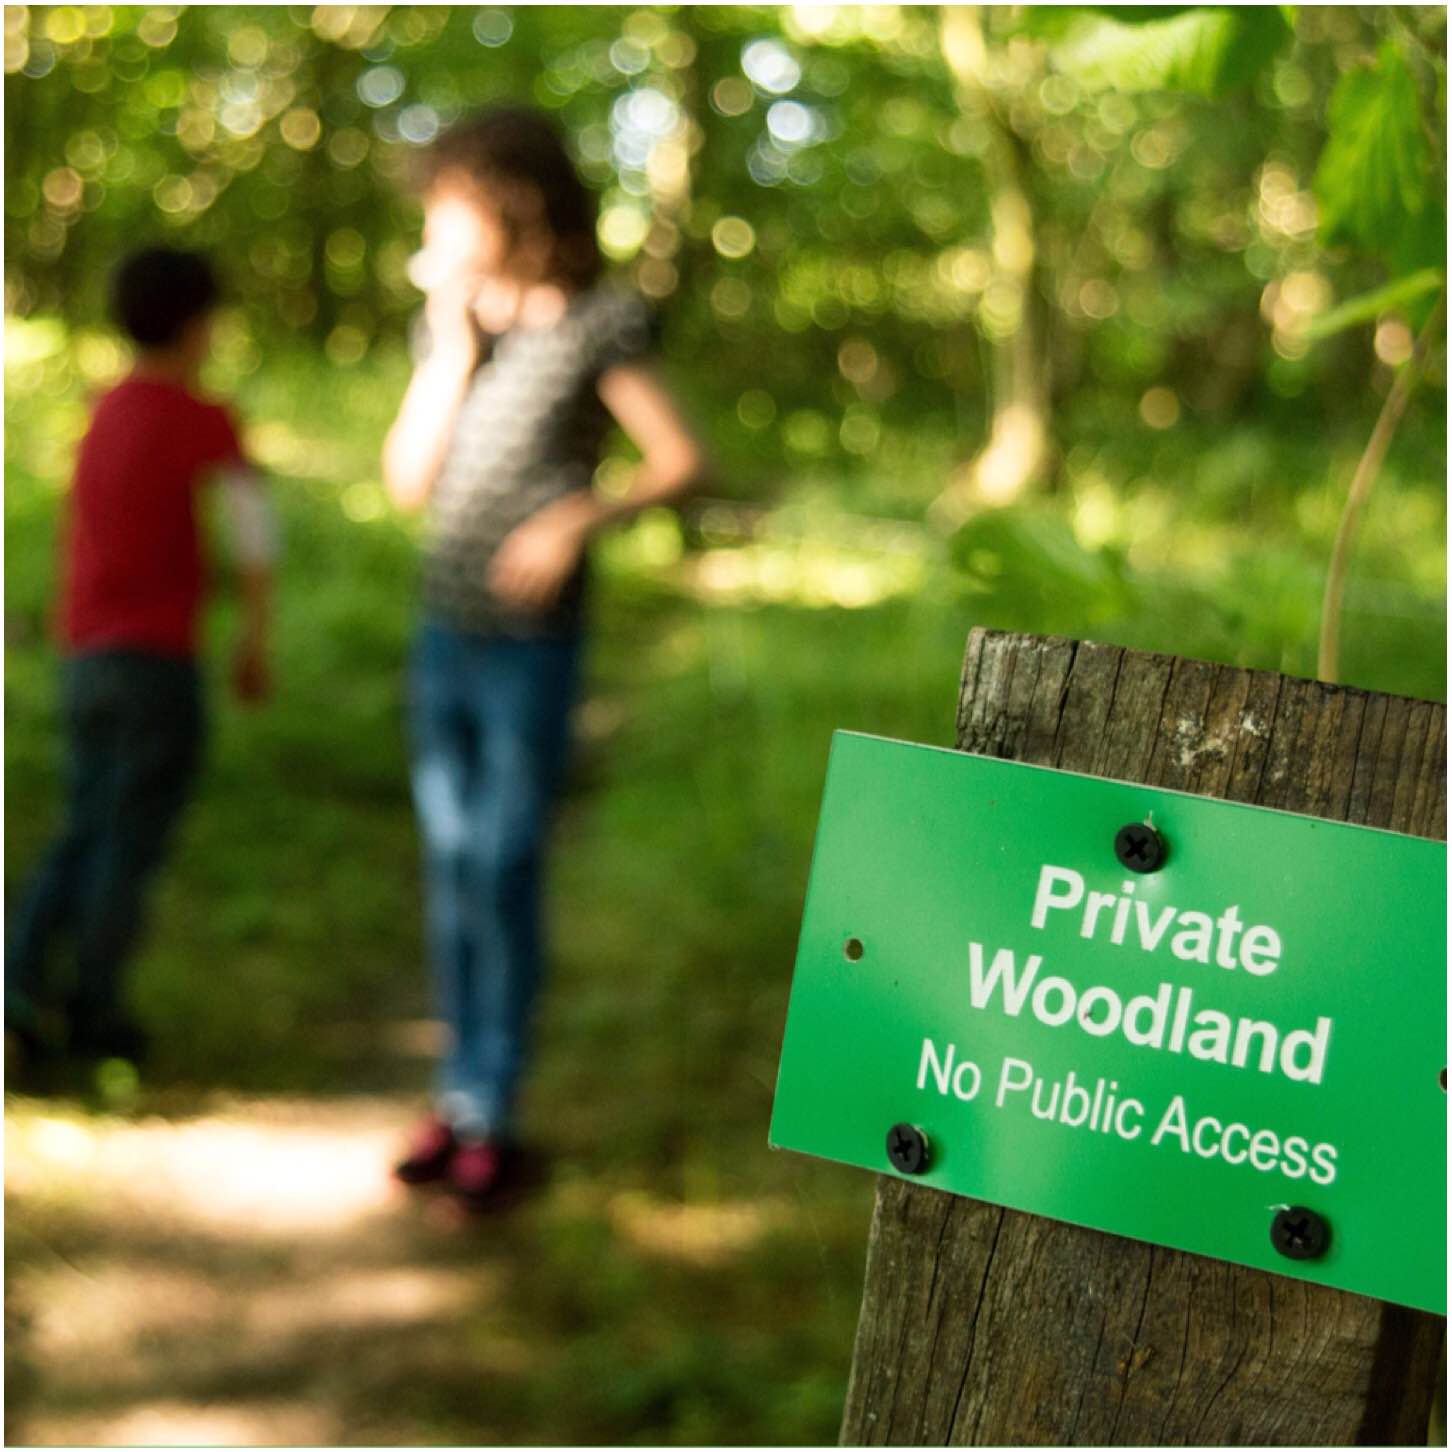
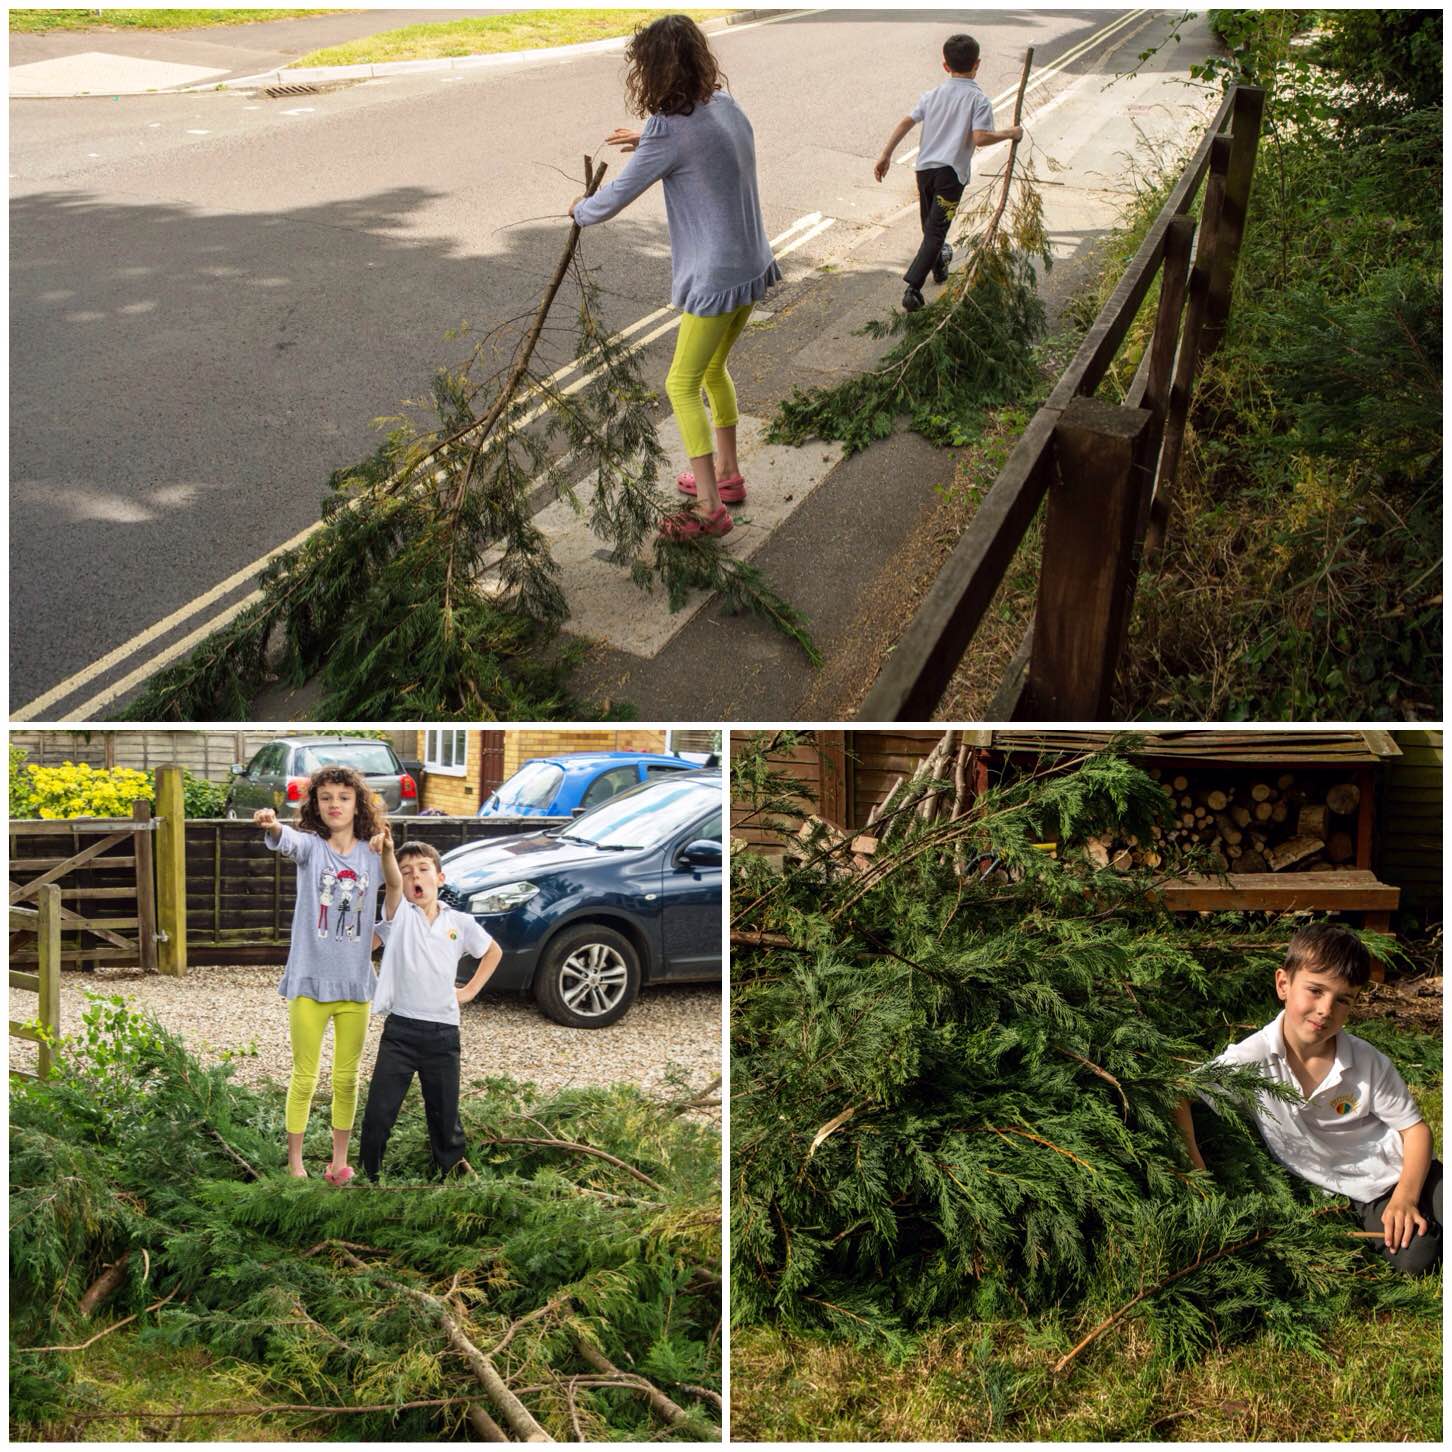
Today found me out and about with my family at The Vyne National Trust Property near Bramley in Hampshire. The day started wet and overcast but we still managed to get out and get muddy.
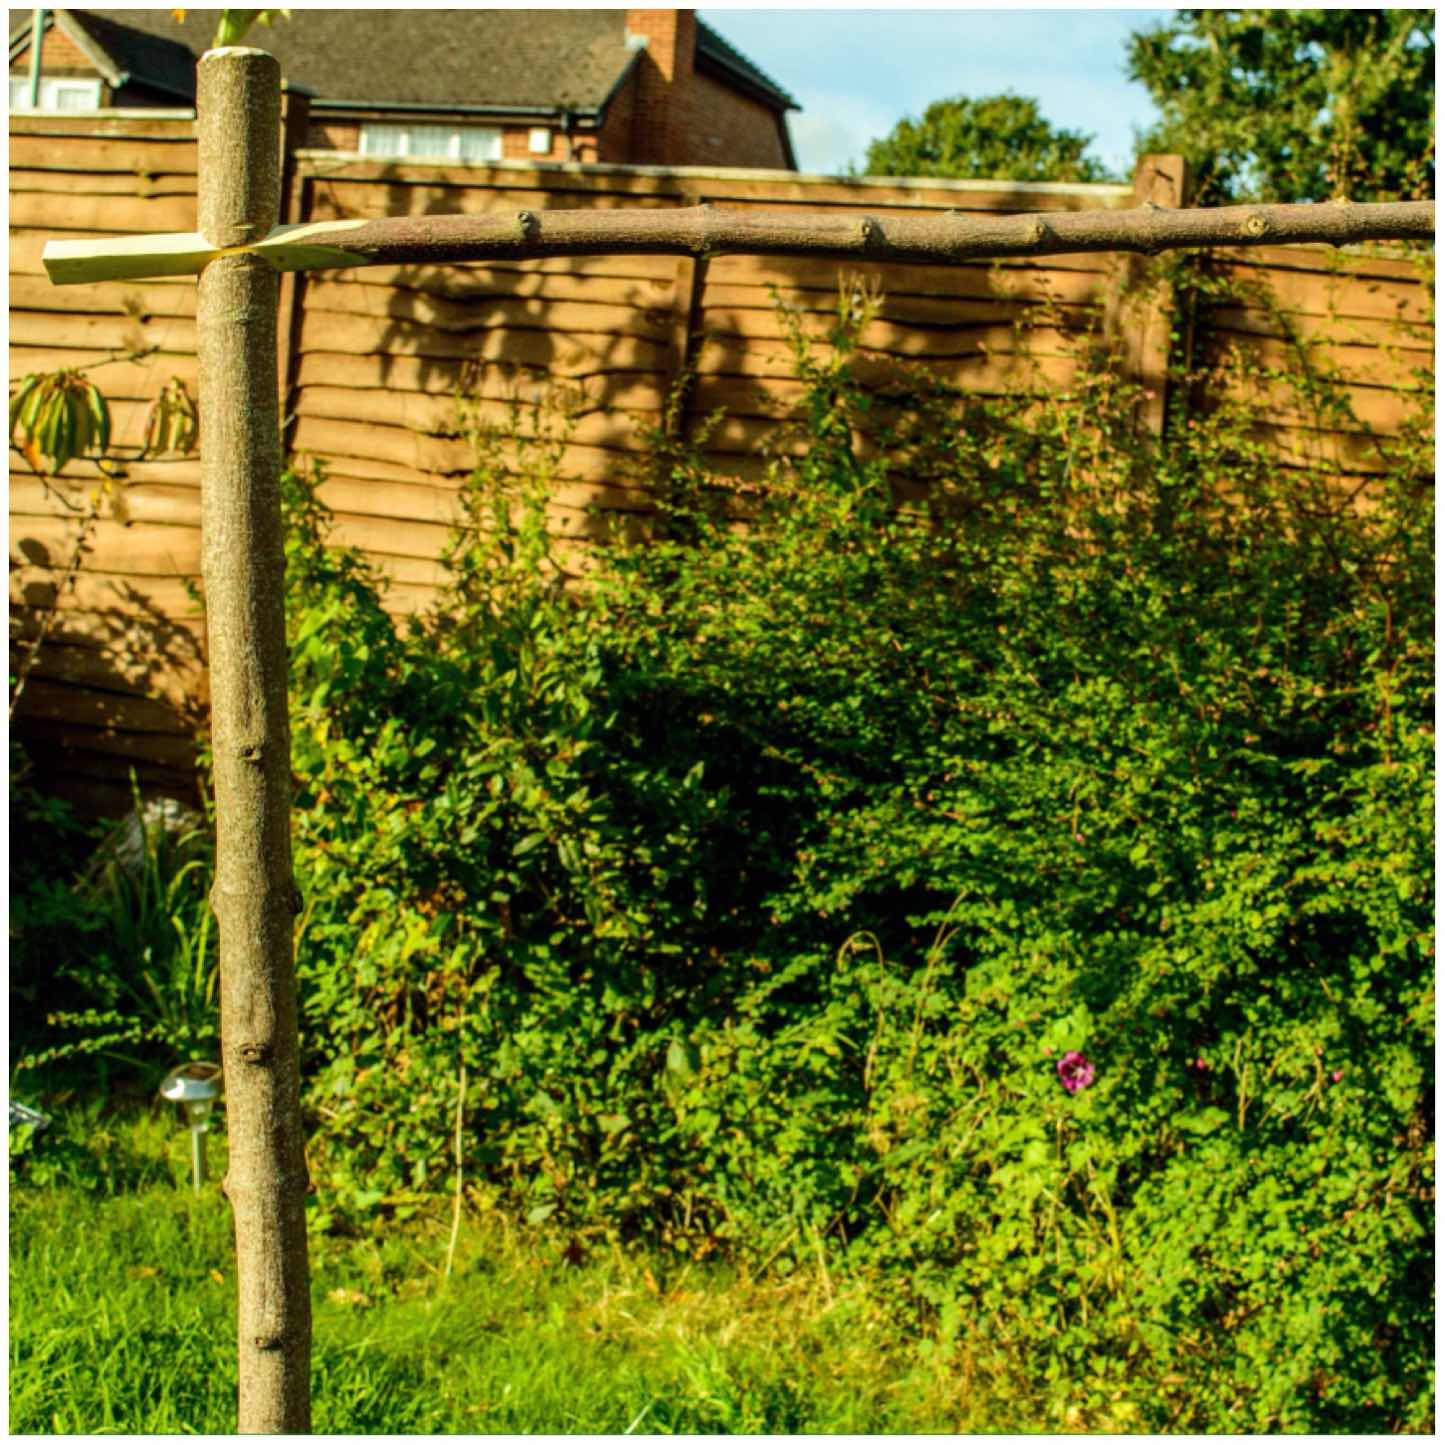
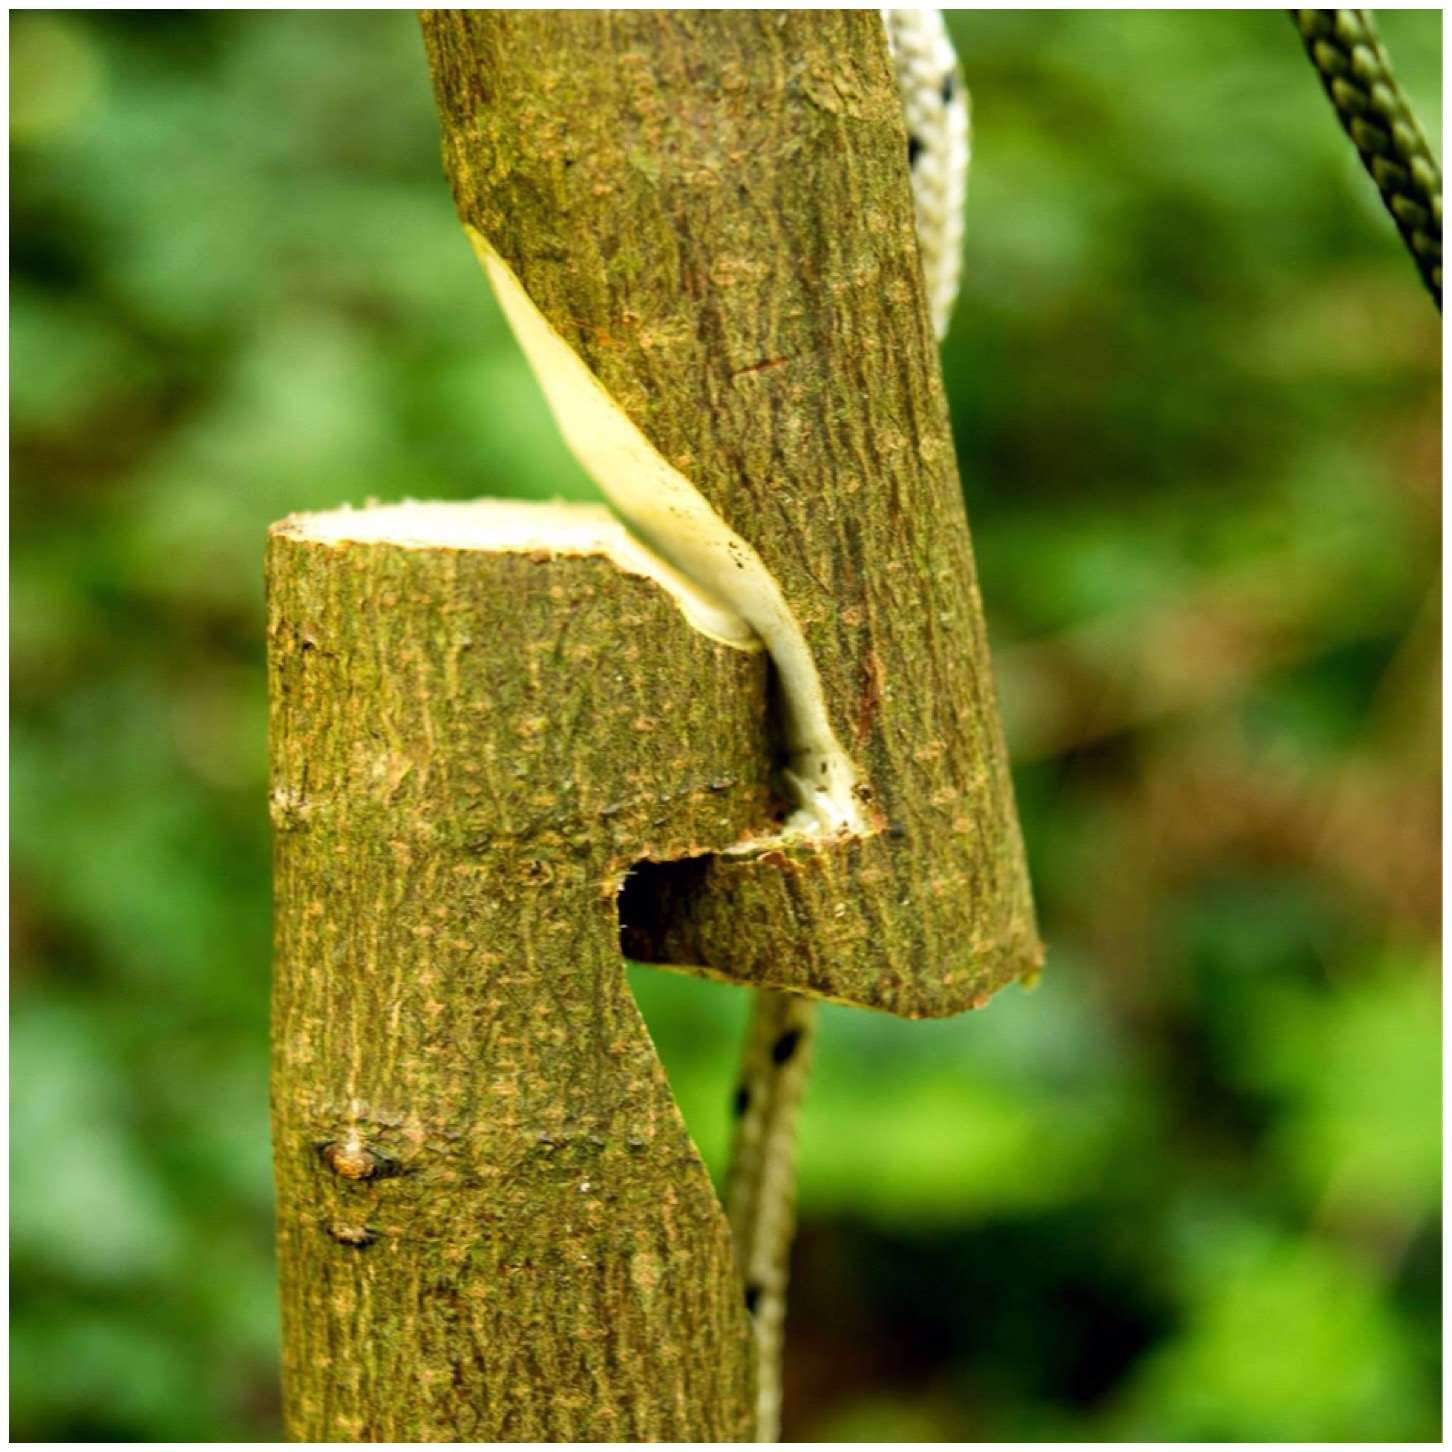
Stick Fun
I took lots of pictures but this one of my son managing to have fun with just a couple of sticks on an old wooden fence really put a smile on my face. He likes his X Box but thankfully likes to get muddy just as much.
This is my 200th post on my Bushcraft Days blog and I have had fun writing every one – Looking forward to the next 200.
Thank you to everyone who follows my little adventures.
One night recently I just could not get to sleep and my thoughts wandered onto the subject of log rocket stoves. Having written on the subject a few times with the Damp Log Rocket and the Fire Face Candles it struck me that I always used large tools such as axes or drills to make them.
This post is about making a Log Rocket Stove with only my knife (a small pruning saw was used to trim the log). I wanted to see if I could easily produce a stove without having to rely on my axe.
Log Rocket Stove – Without an axe
I like log rocket stoves as they can be made quickly, work well on wet or snowy ground, produce their own kindling and come with a ready made platform for your pot. Once the stove has done its job the collapsing embers make a good start point for a bigger fire.
Set Up
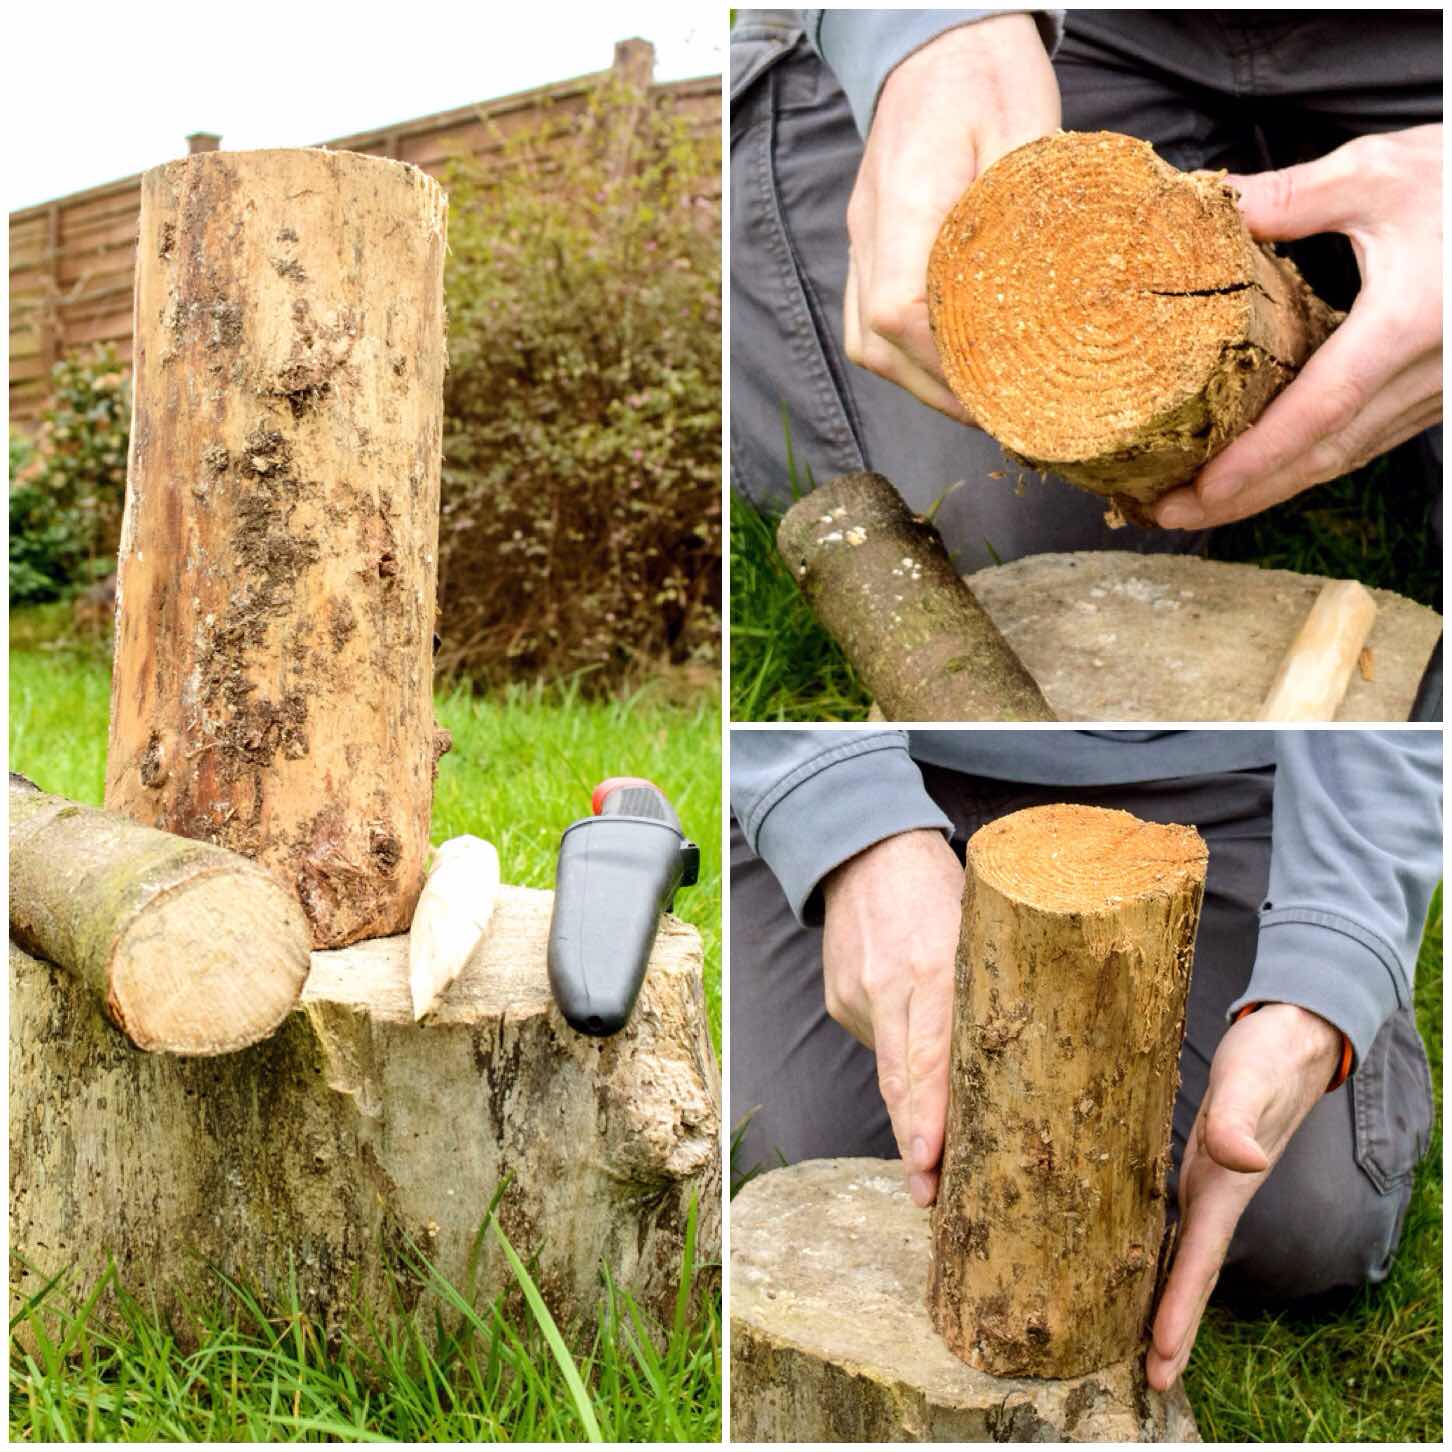
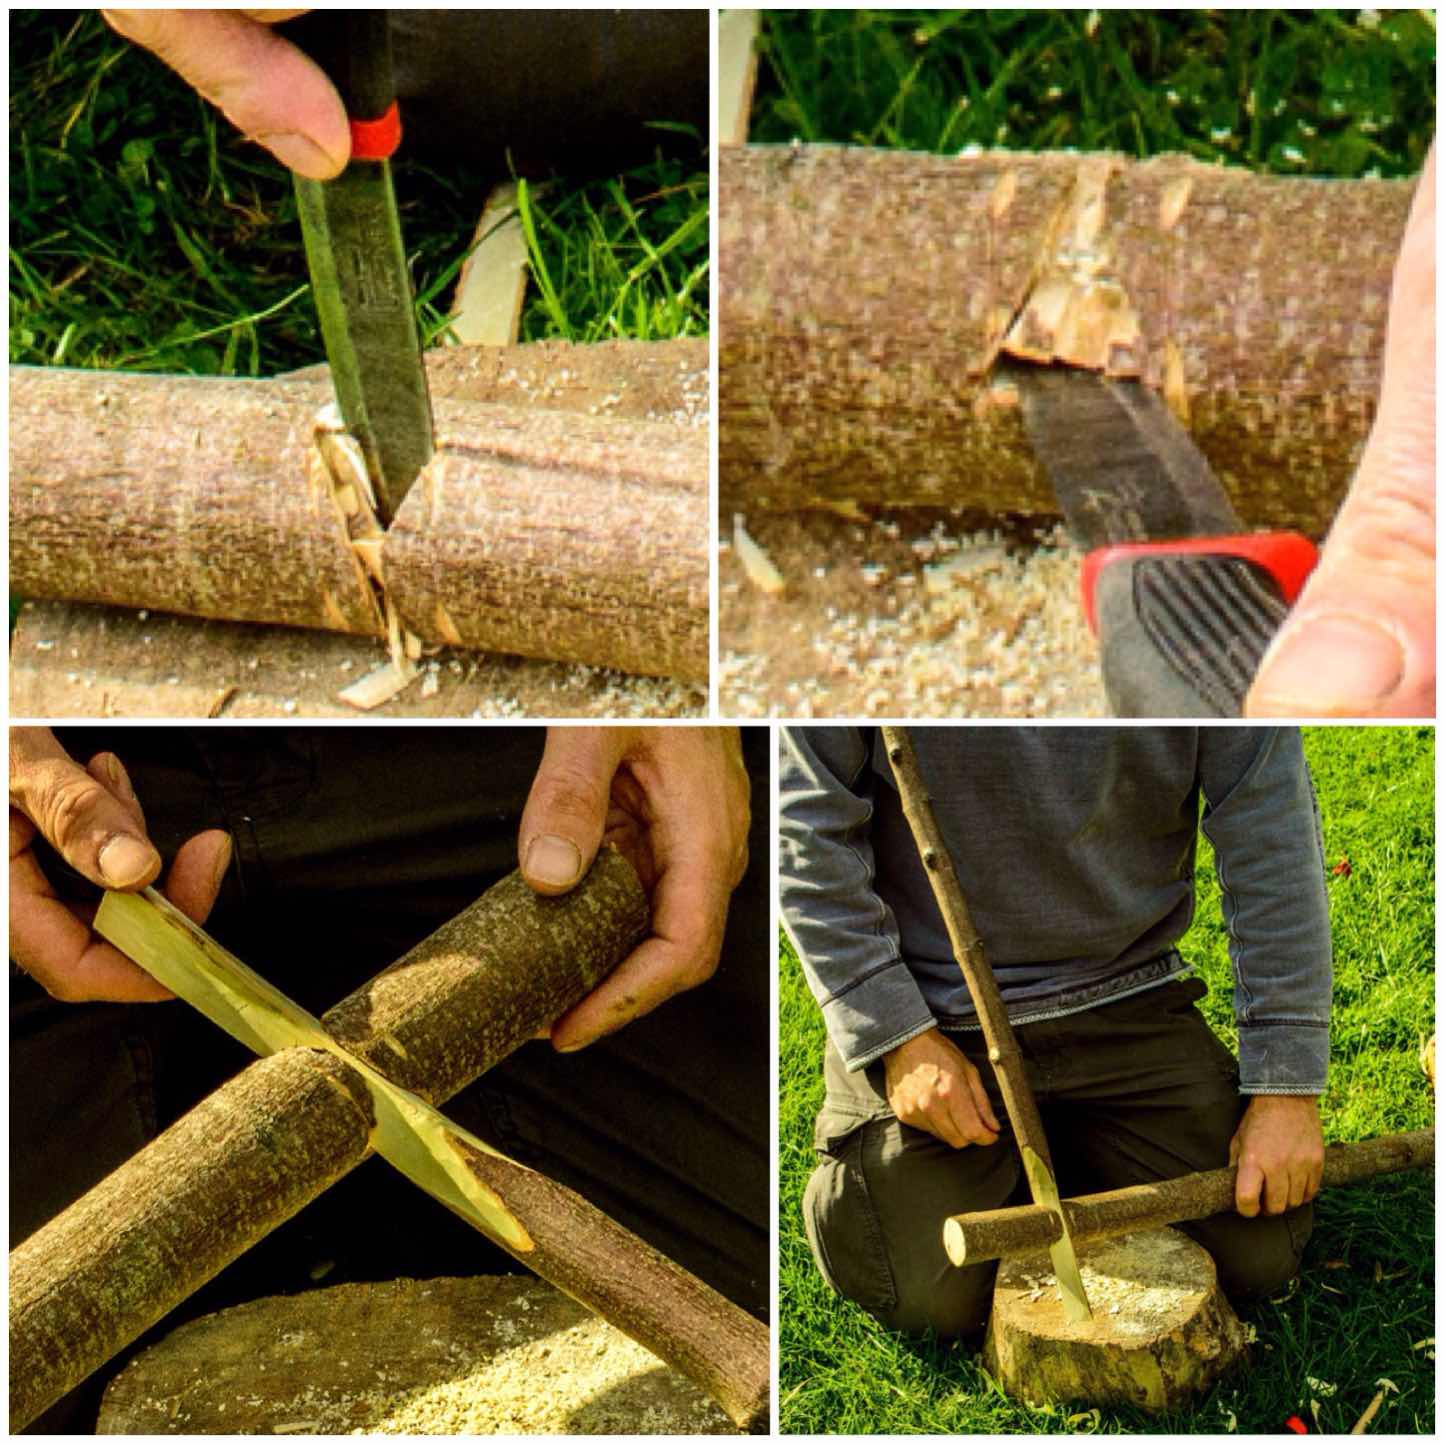
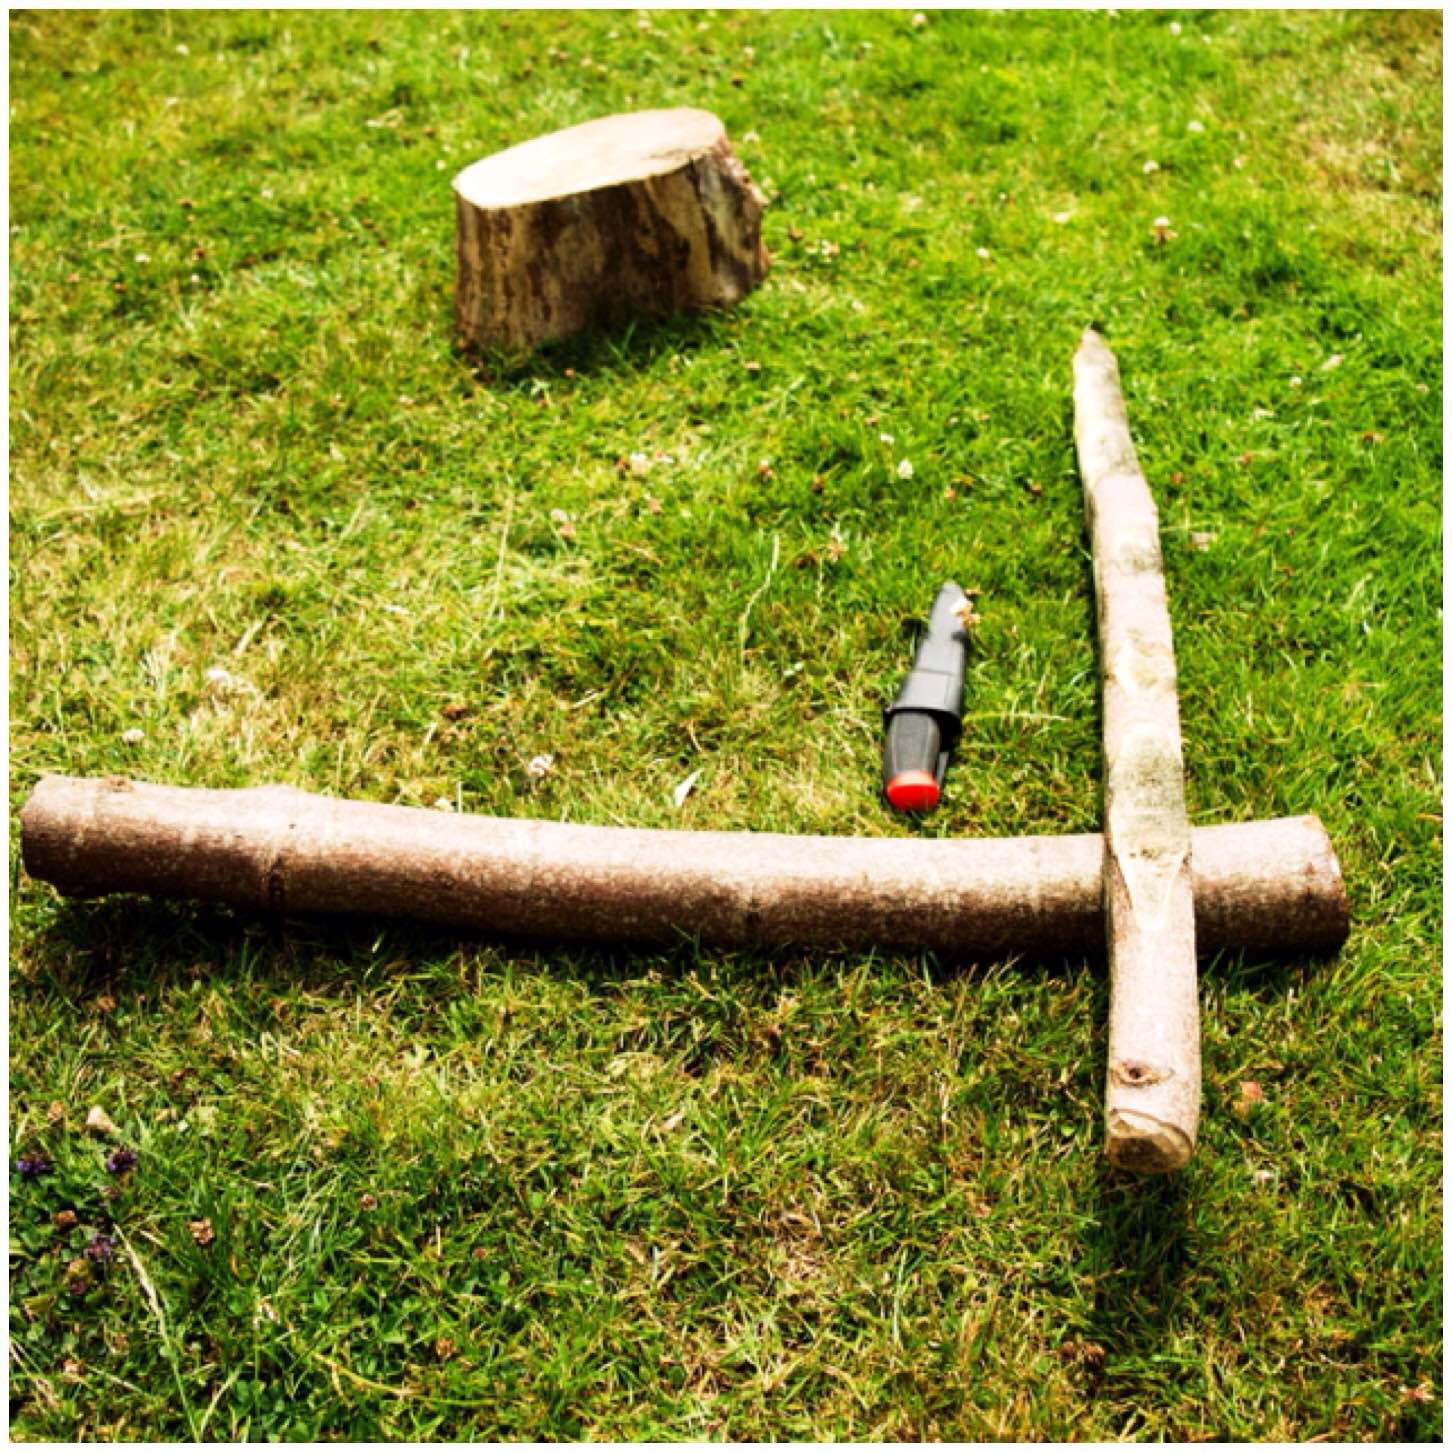
I chose a seasoned piece of spruce wood from my log pile which had a diameter slightly larger than the blade on my Mora knife (do not be tempted to use a log much smaller than this as you will end up with a very small cooking surface) . I also used a larger round of wood as a work surface, carved myself a small wedge to help with splitting the wood and had a offcut of wood ready to batton with.
Spruce log and a stable work surface
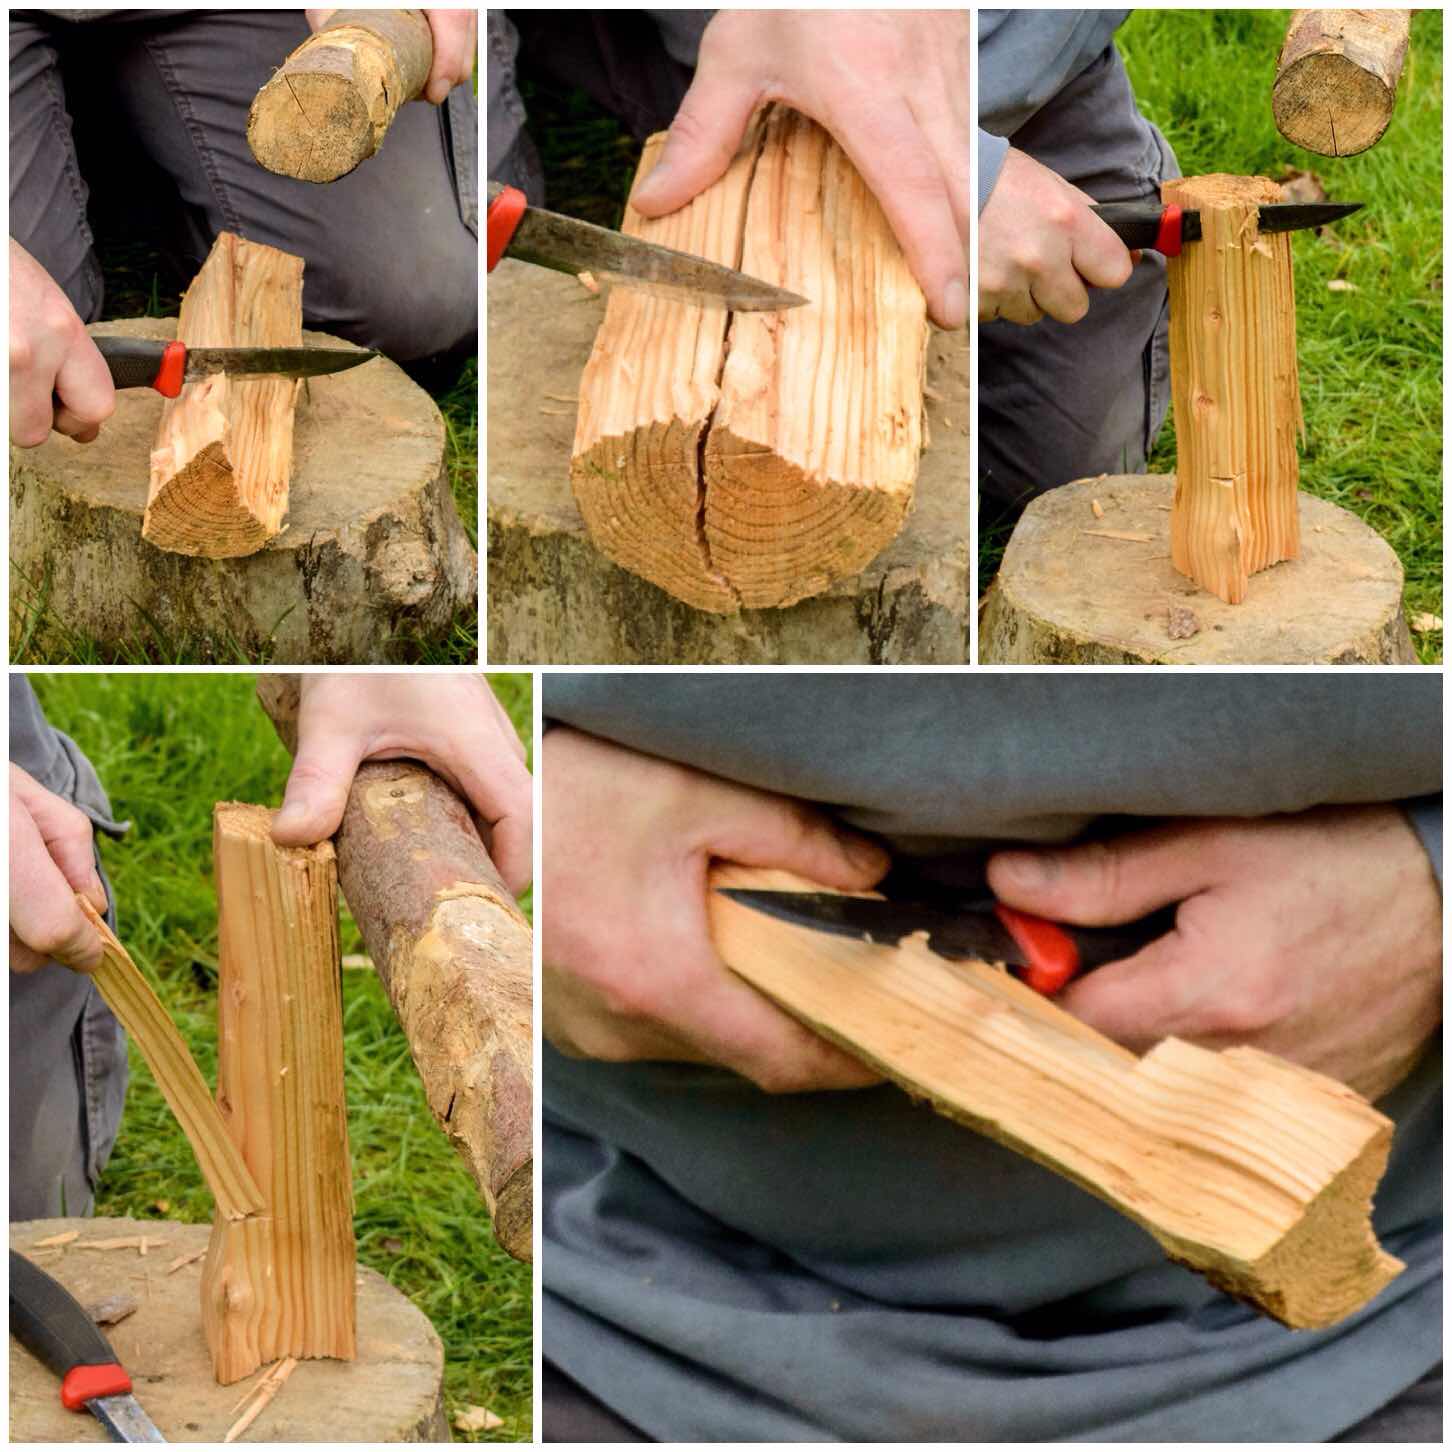
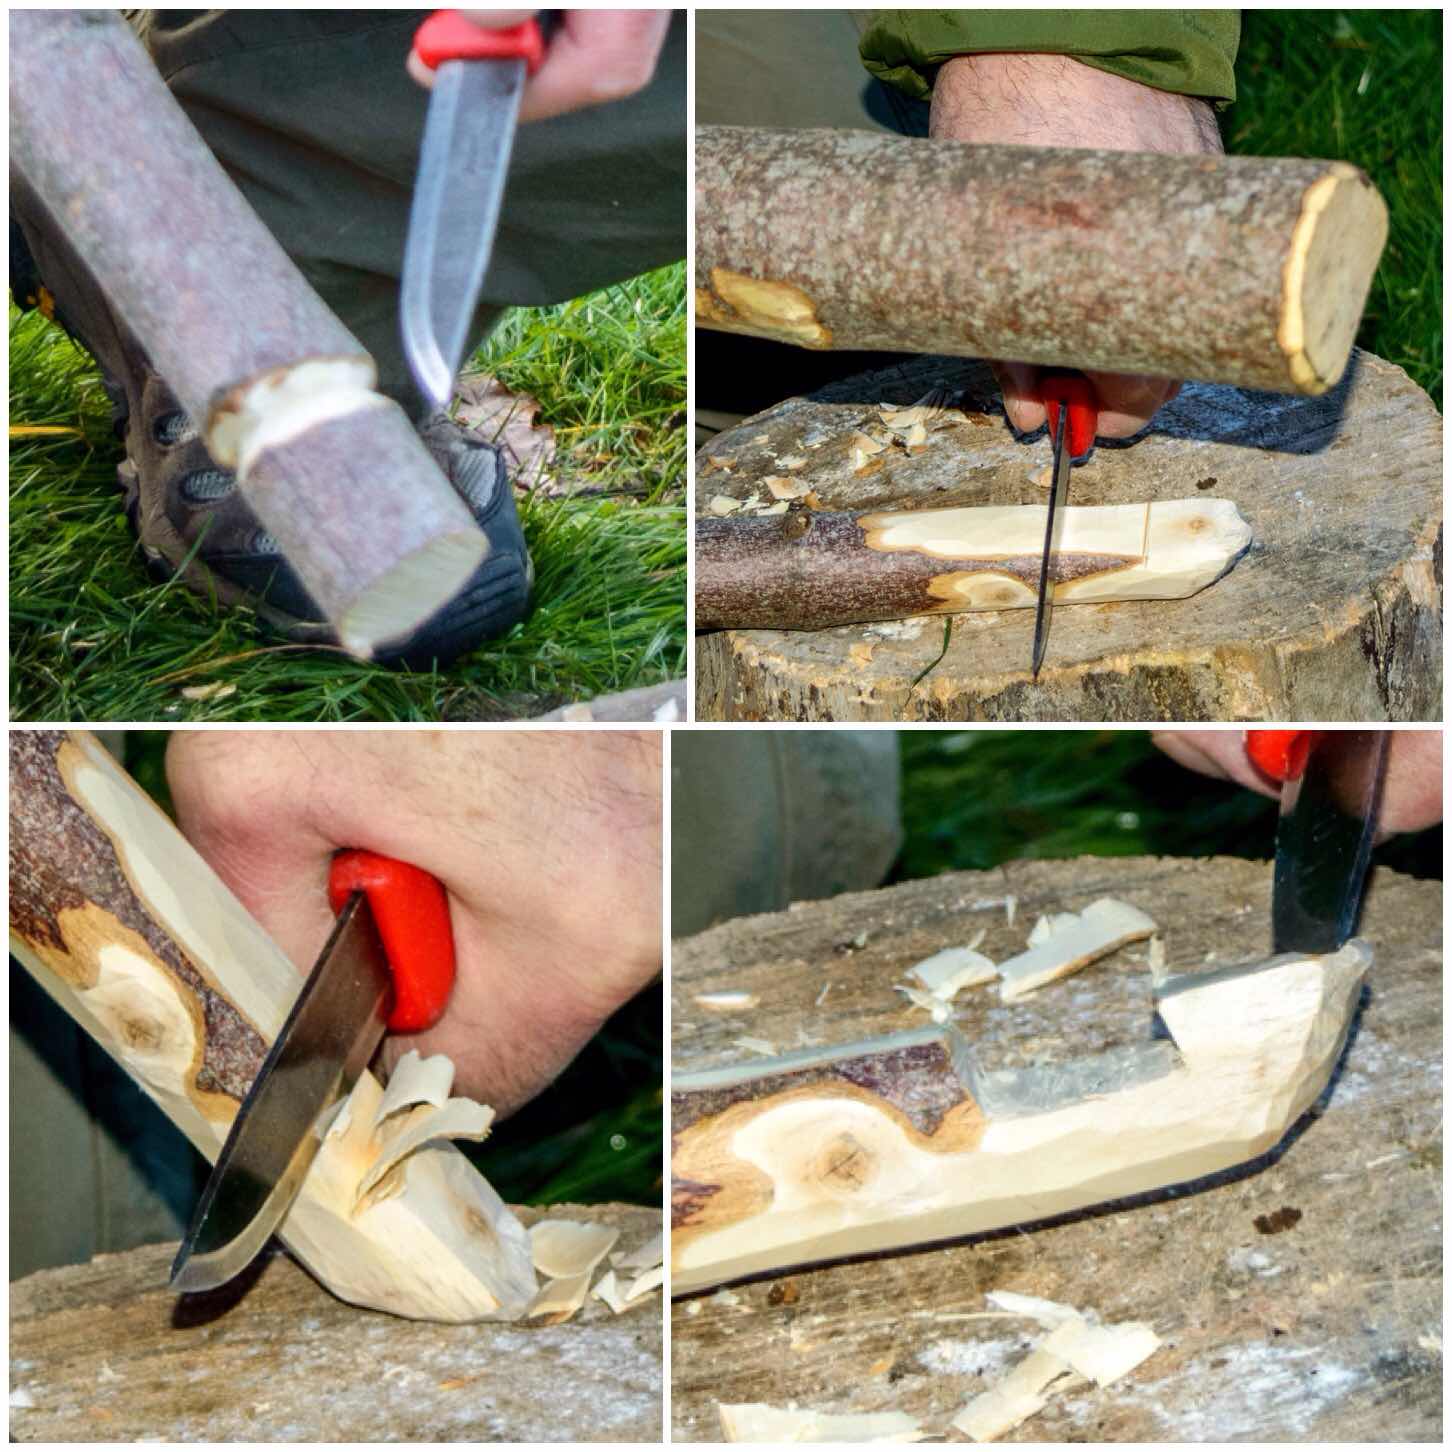
Splitting
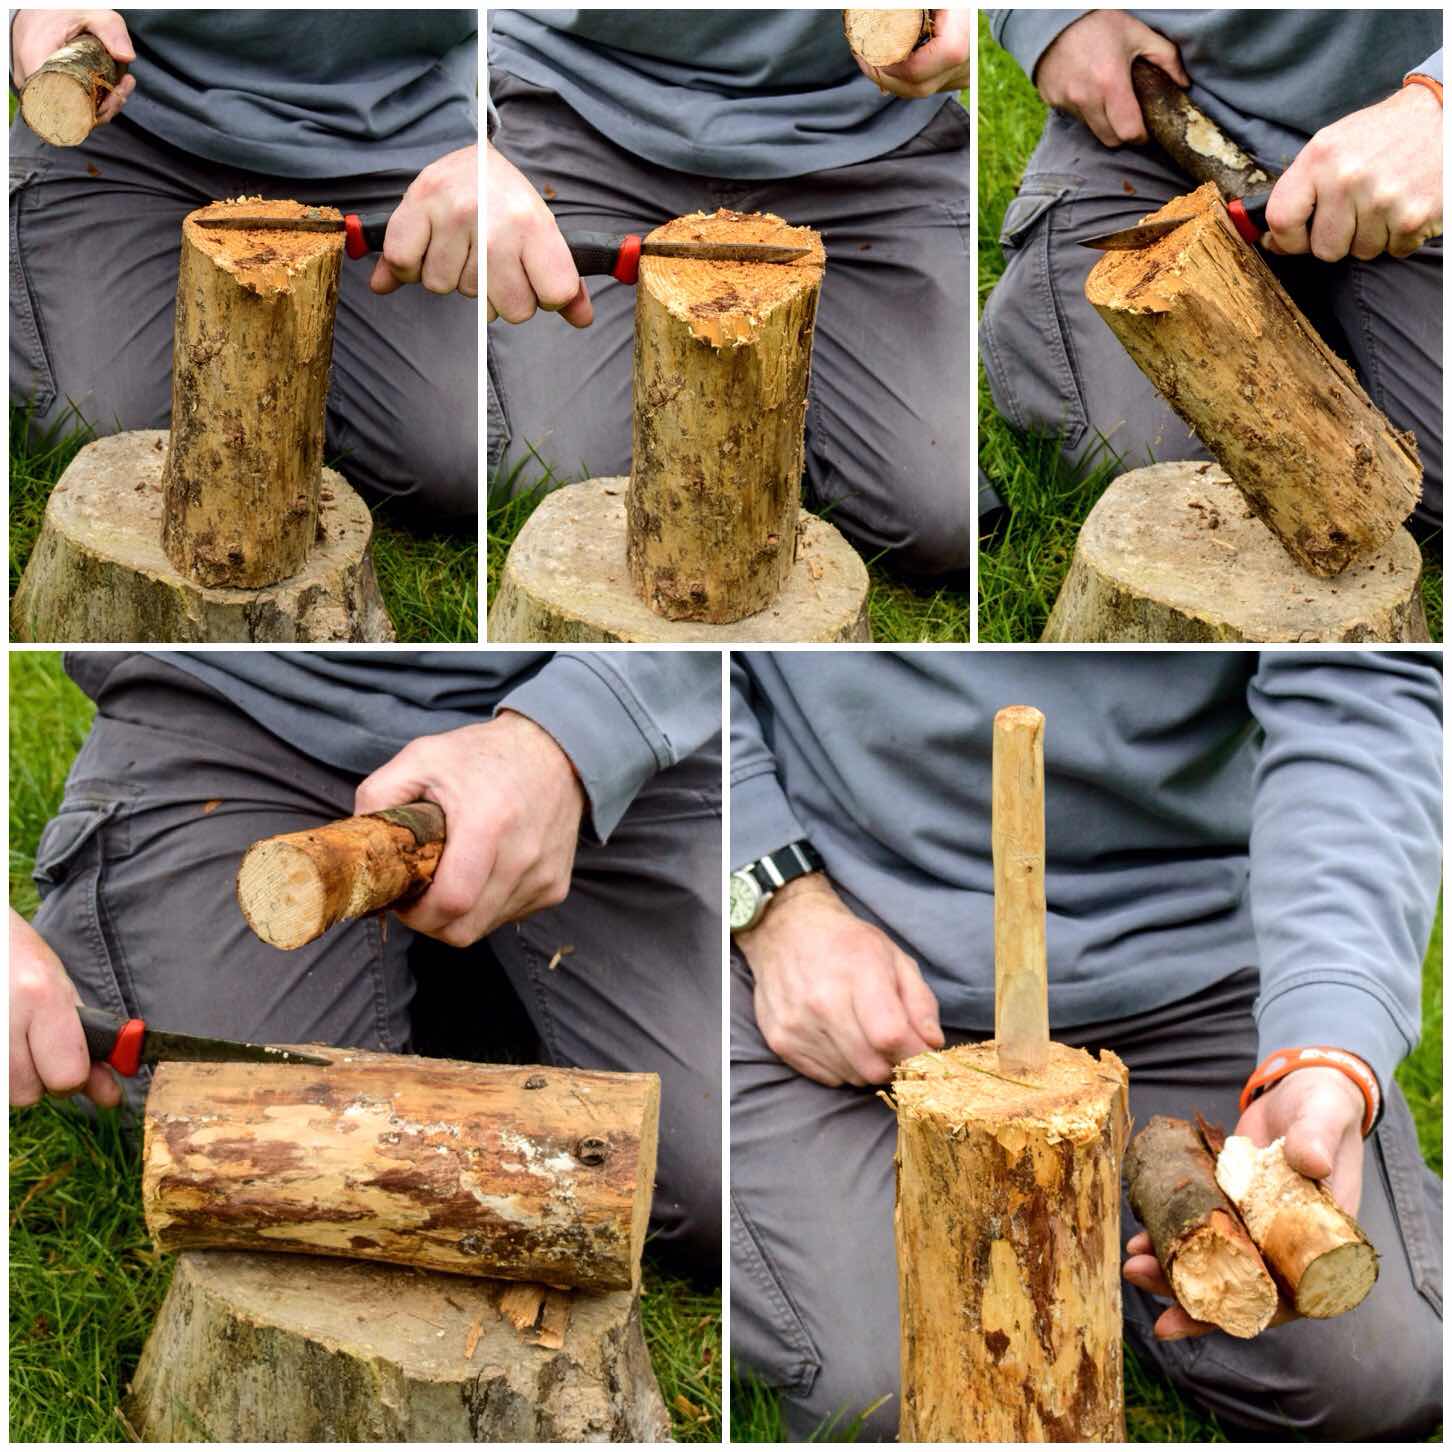
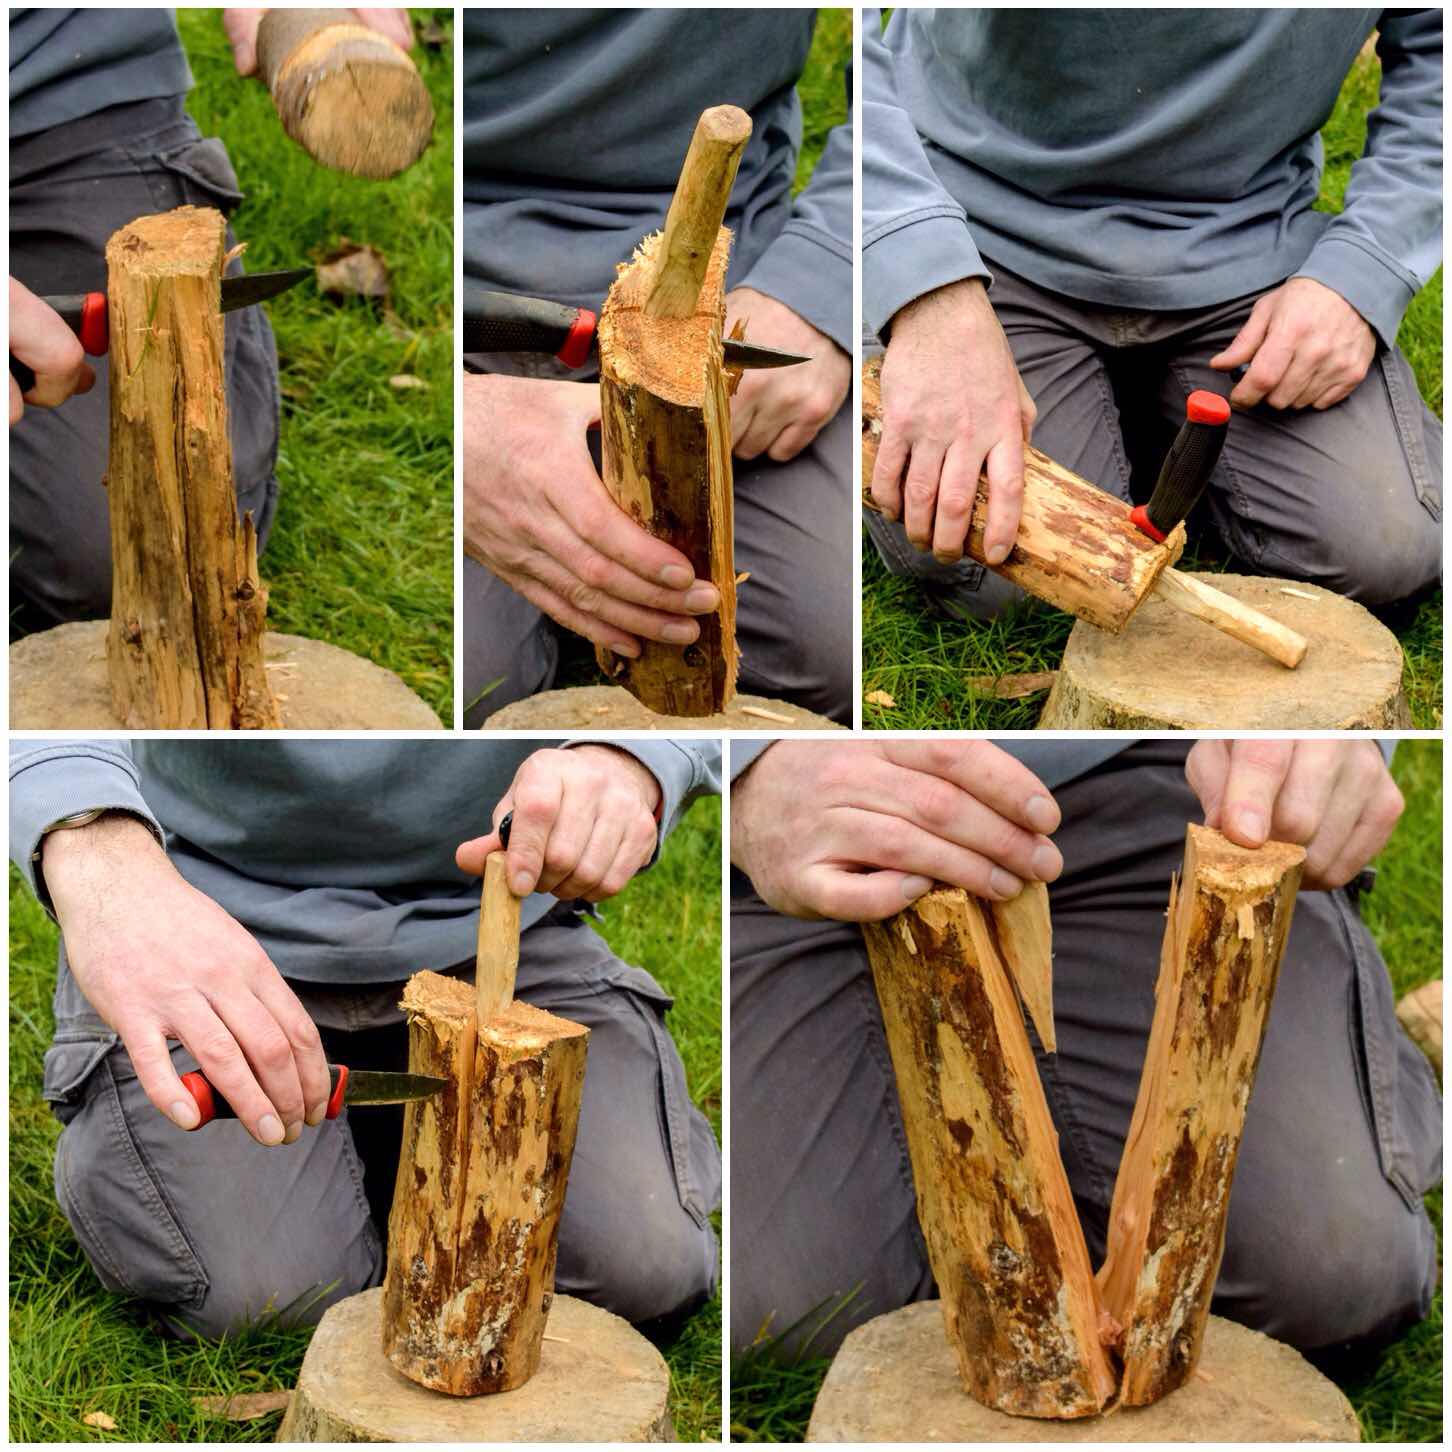
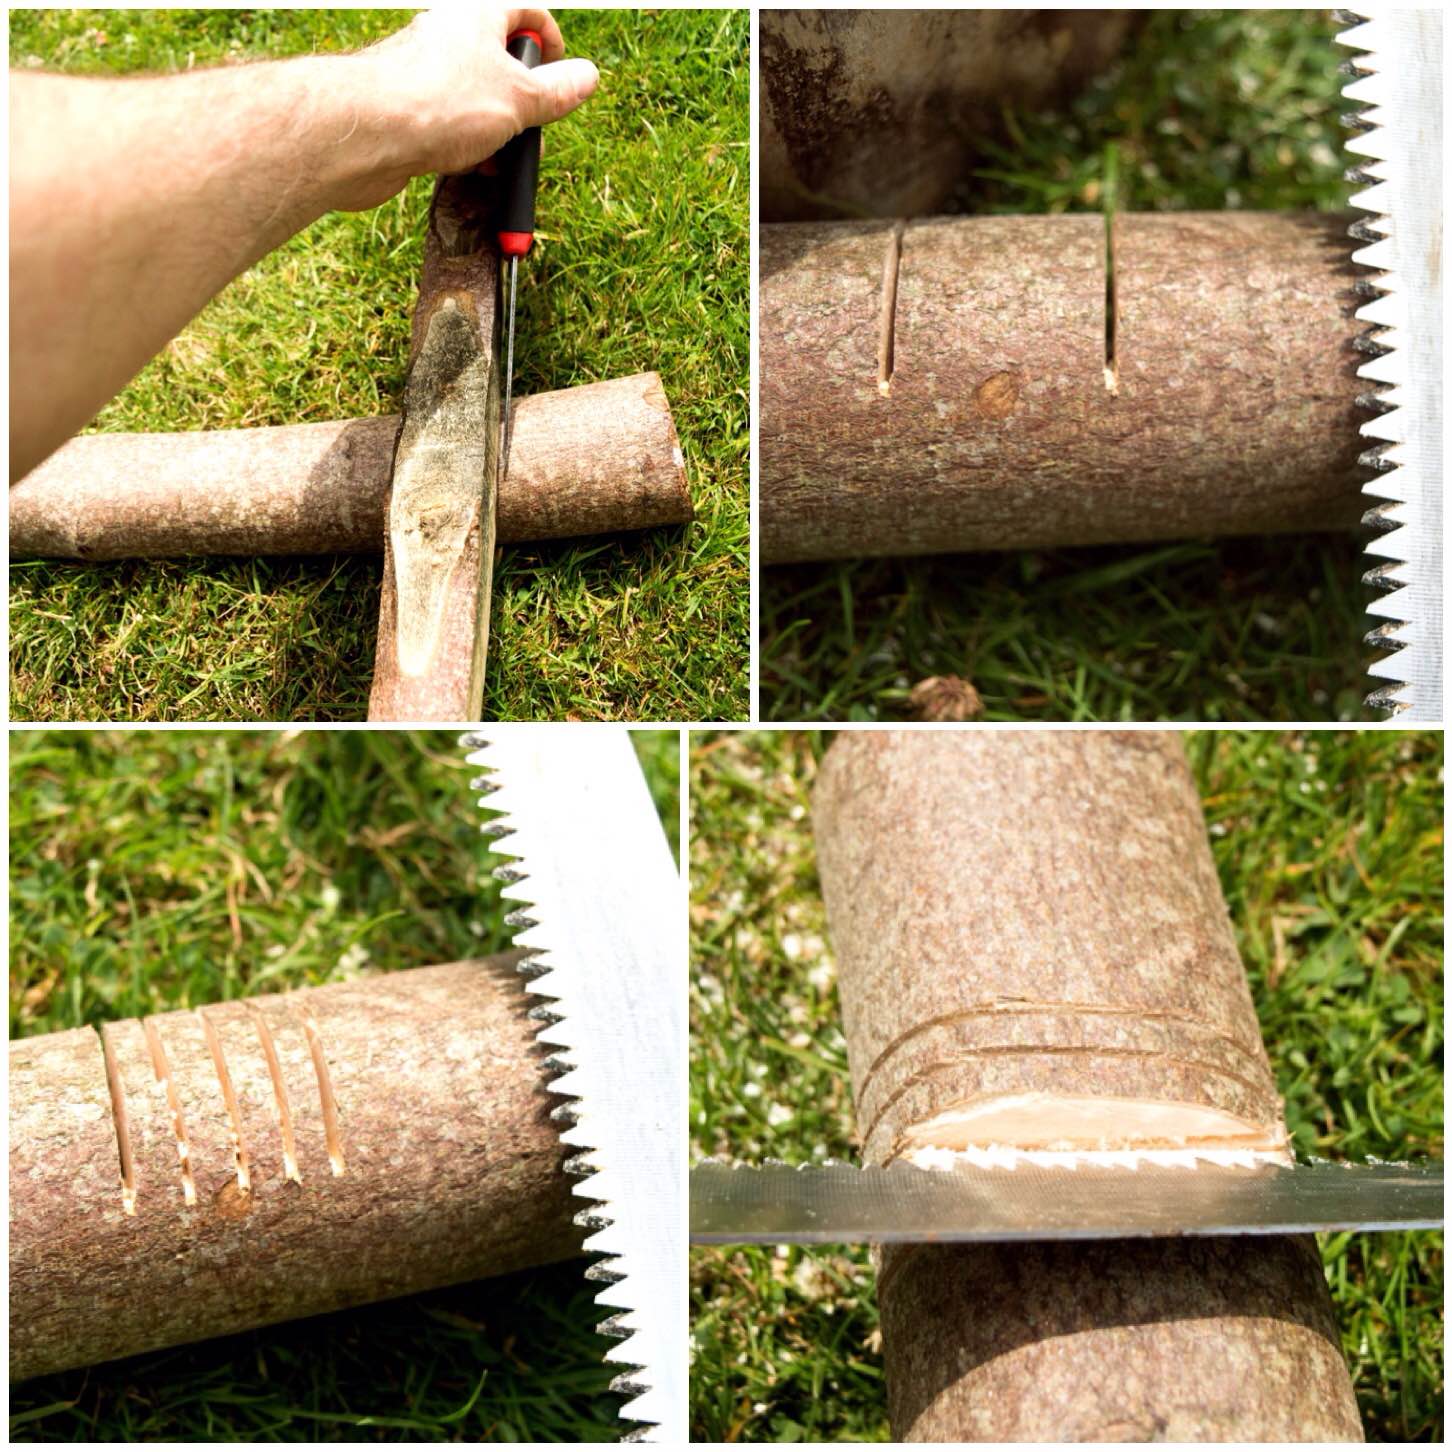
I started with my knife first and battoned it into the log (note that the knife blade is at 90 degrees to my body for safety). My aim at first was to create a split as deep as I could with the knife all around the middle of the log to create a weak point in it. The knife was smaller than the log so I could only batton it in a couple of centimetres.
Once I had my point of weakness battoned in all around the log I inserted the wedge into the split at the top and battoned that in as well to try and increase the split some more (upon reflection I think two wedges would have helped). It was at this point my batton decided to snap on me.
Batton out a split as much as you can with your knife
I went off and got a bigger piece of wood to act as a batton and soon had the log split right down the line off weakness. This line I created with my knife will help you to keep an even split on the log when you have twists and knots in your log as I had with this piece of spruce.
Use a wedge to split the log
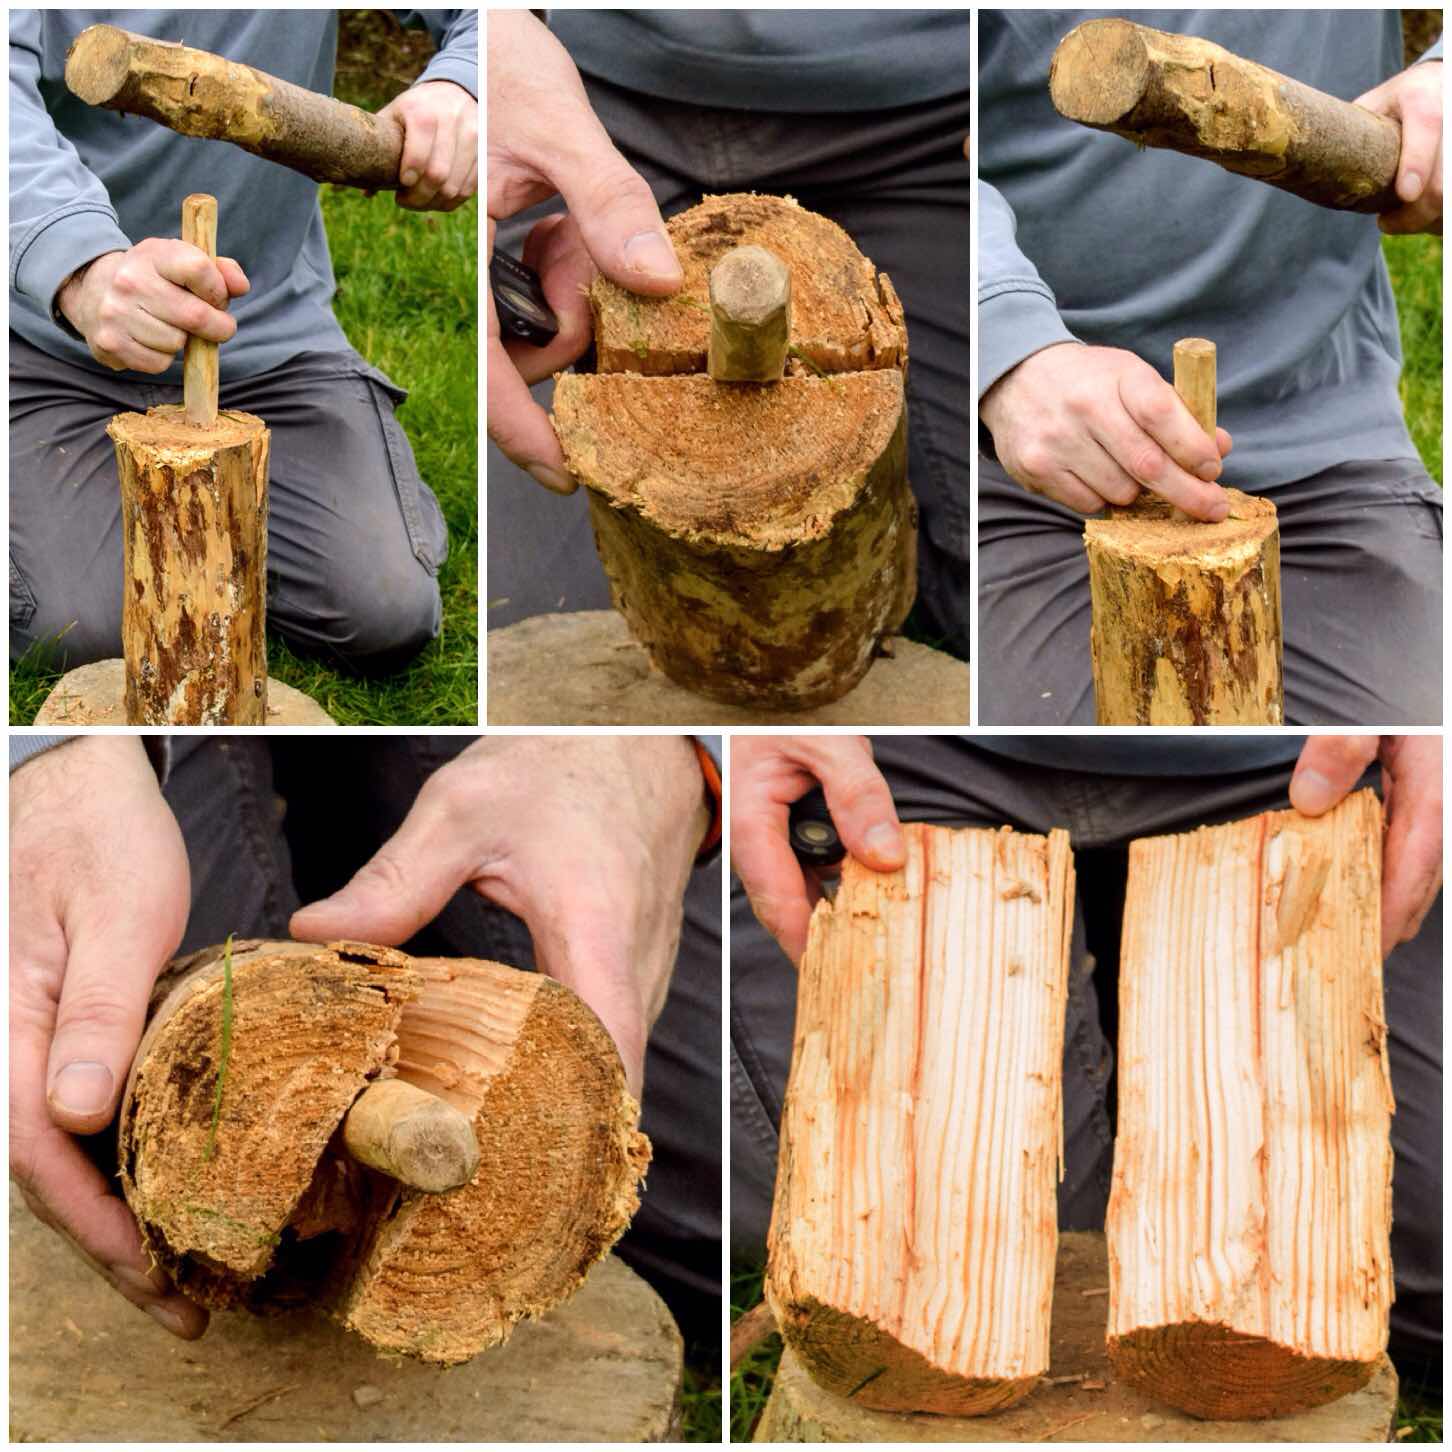
I repeated the process on each split so I ended up with four roughly even sized pieces of wood.
Safety
One thing to be aware is that as you batton down on the wedge is that it will go slightly out of line at times. If this happens just tap the end of the wedge against the work surface until it lines up. This is much safer than trying to drag it back in line with your hands as it is very easy cut yourself on the knife tip.
As the split widens the knife blade will come loose. Let it drop away and only pull it out when it it is completely free. Do not be tempted to force it out as this is another time when injuries happen.
Quarter the log by battoning with your knife and using the wedge
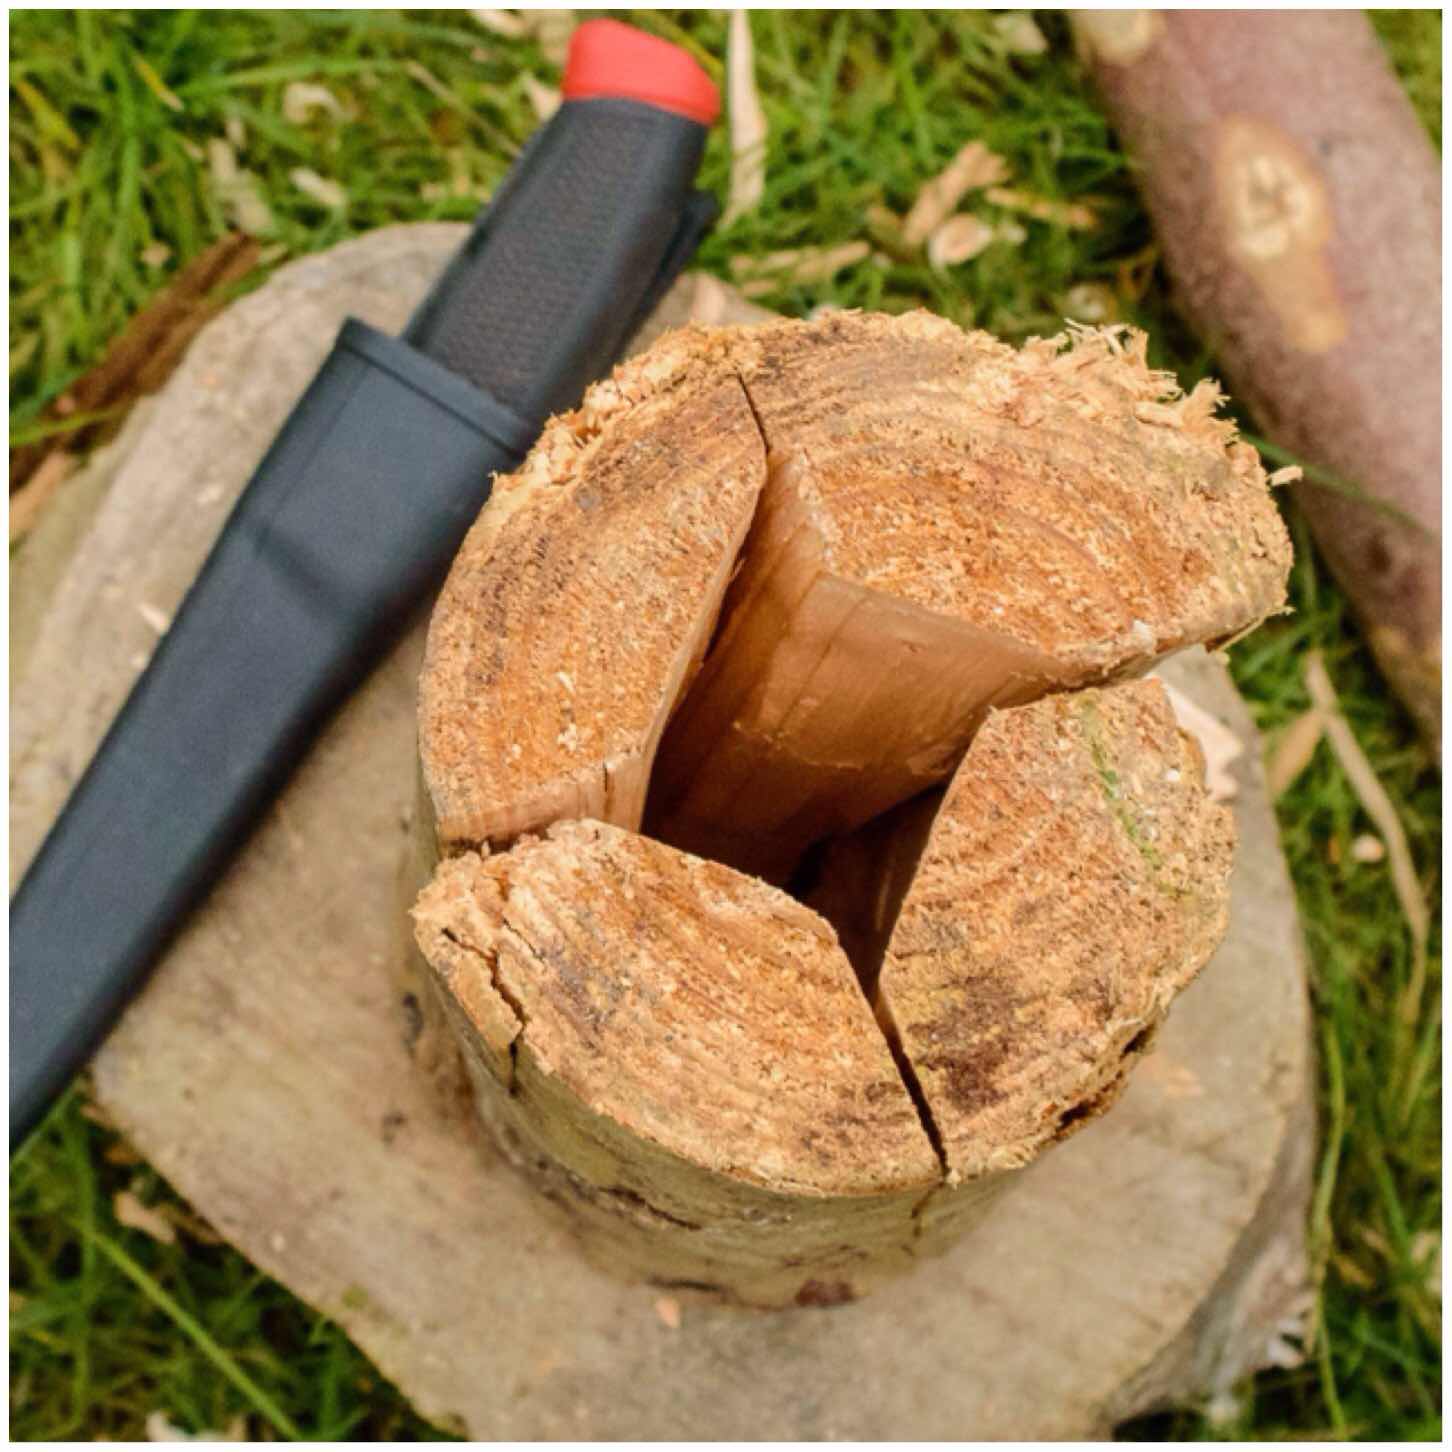
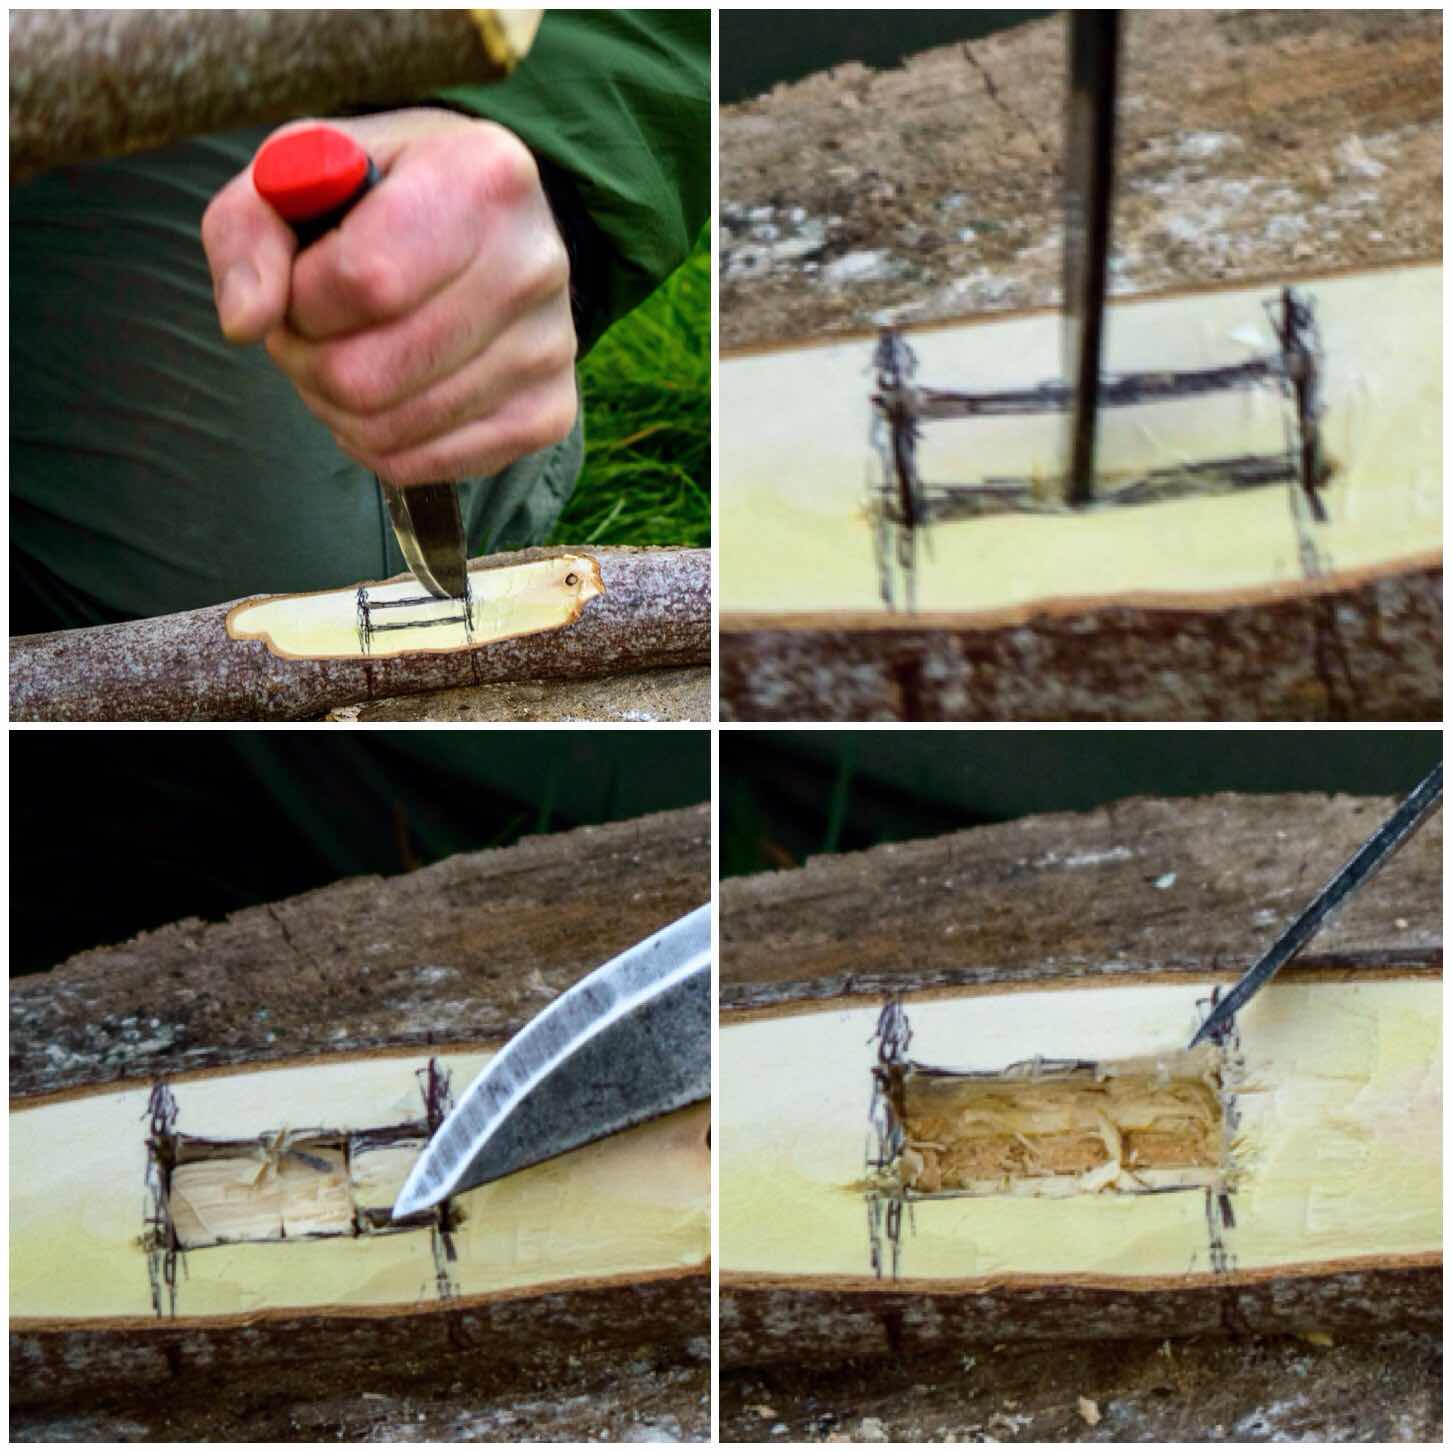
The Chimney
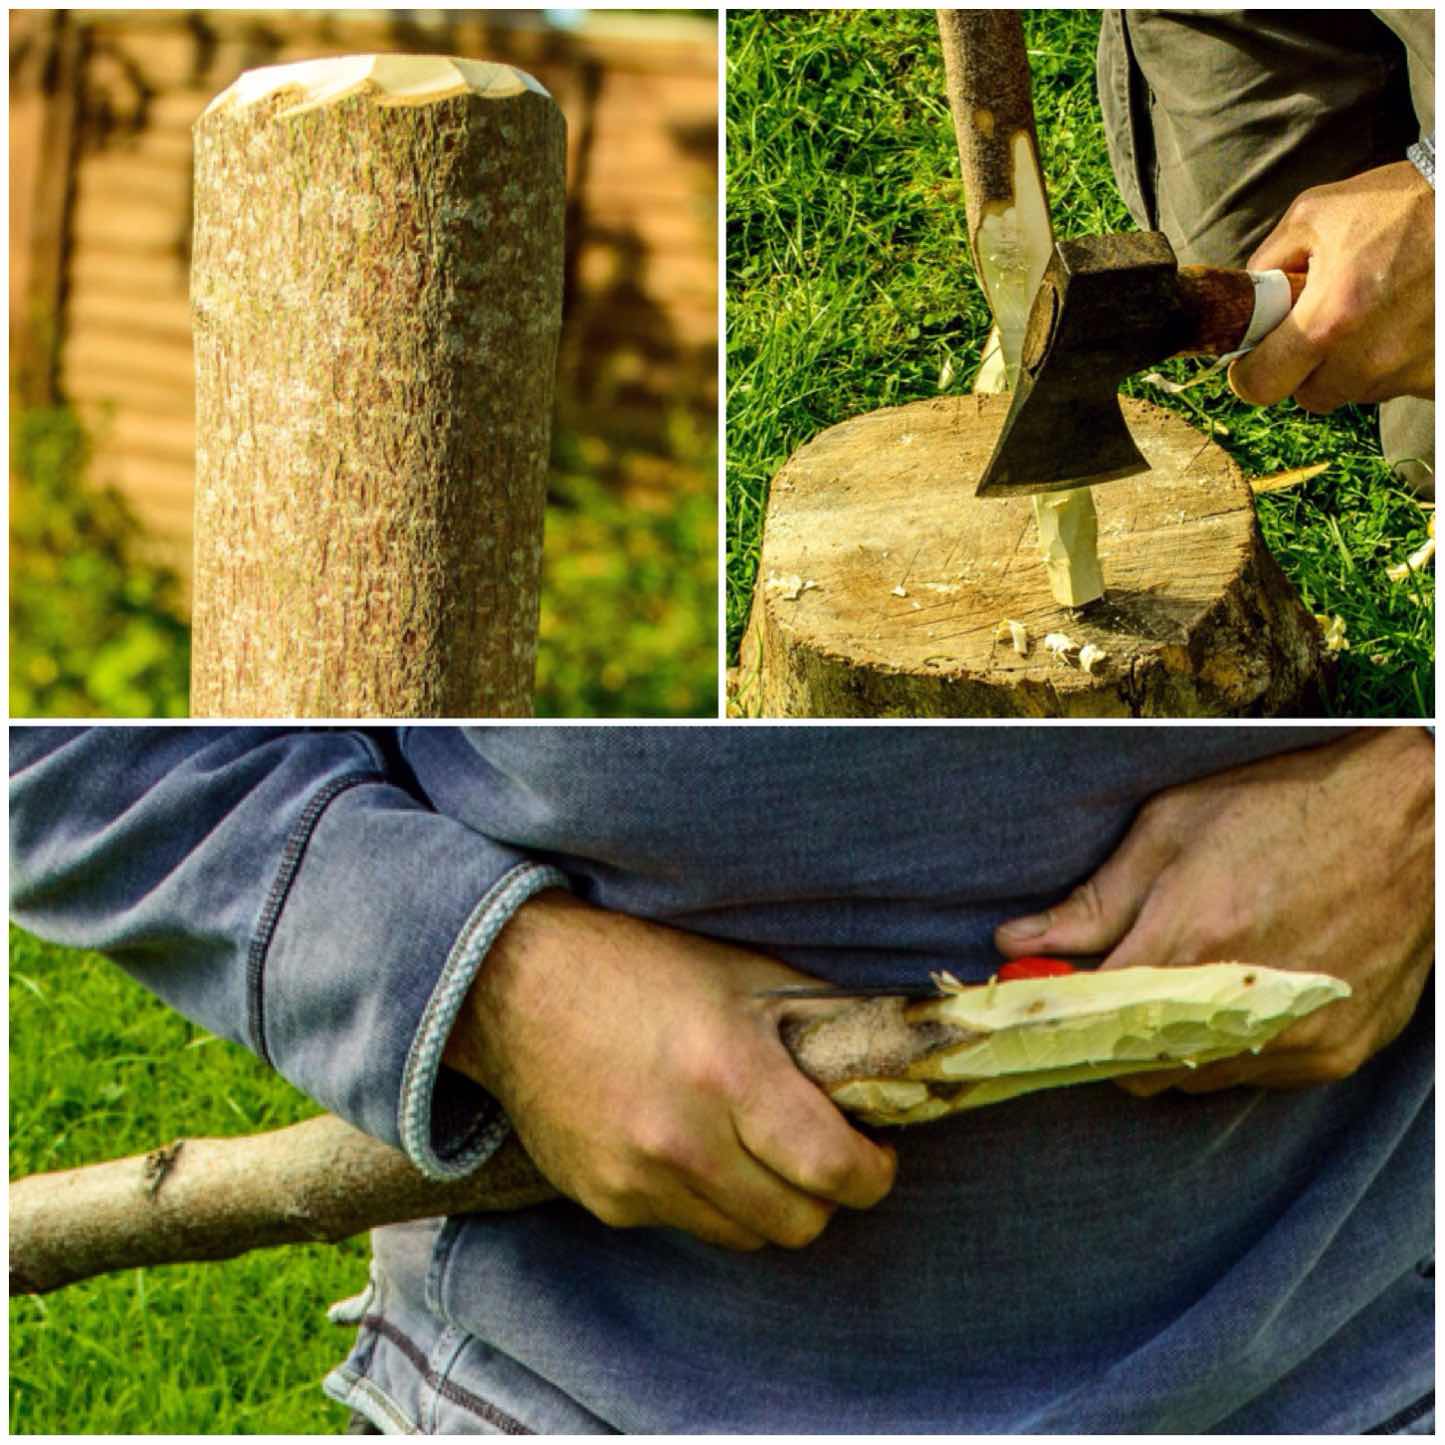
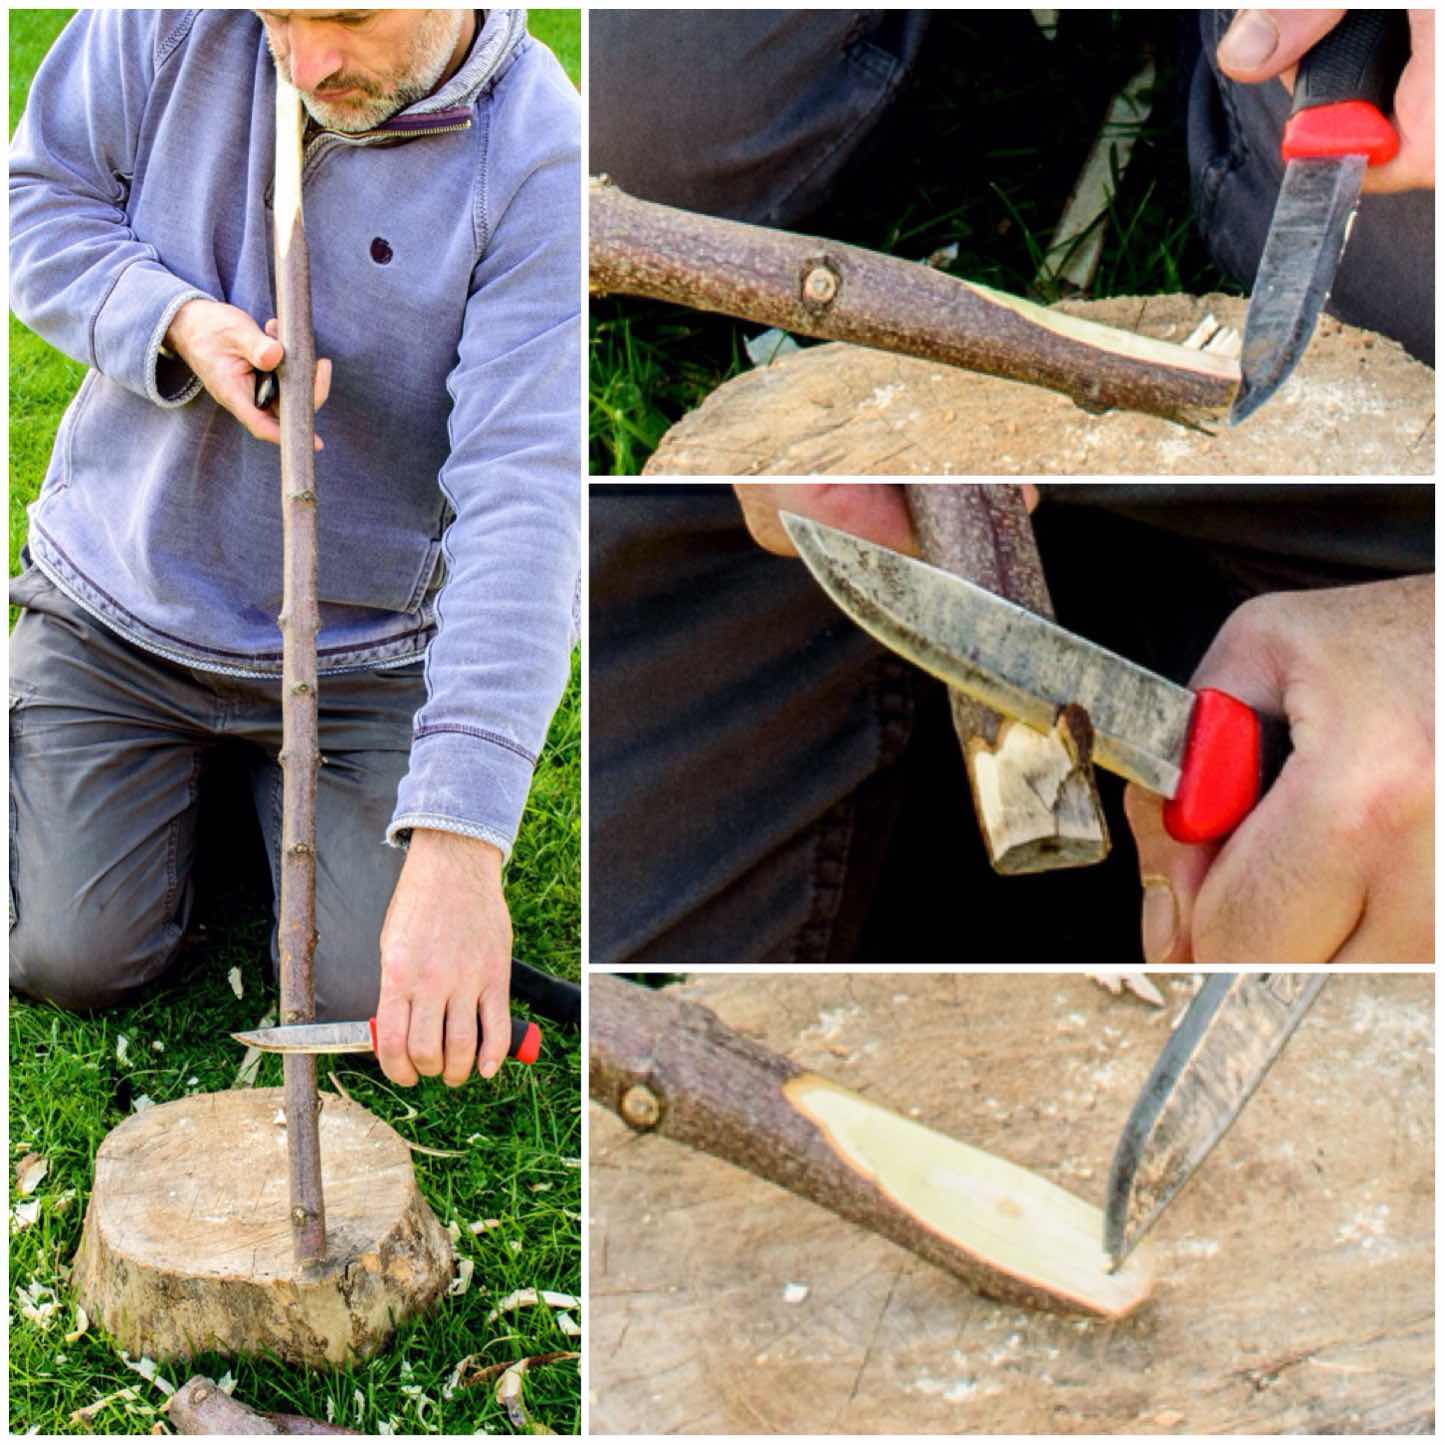
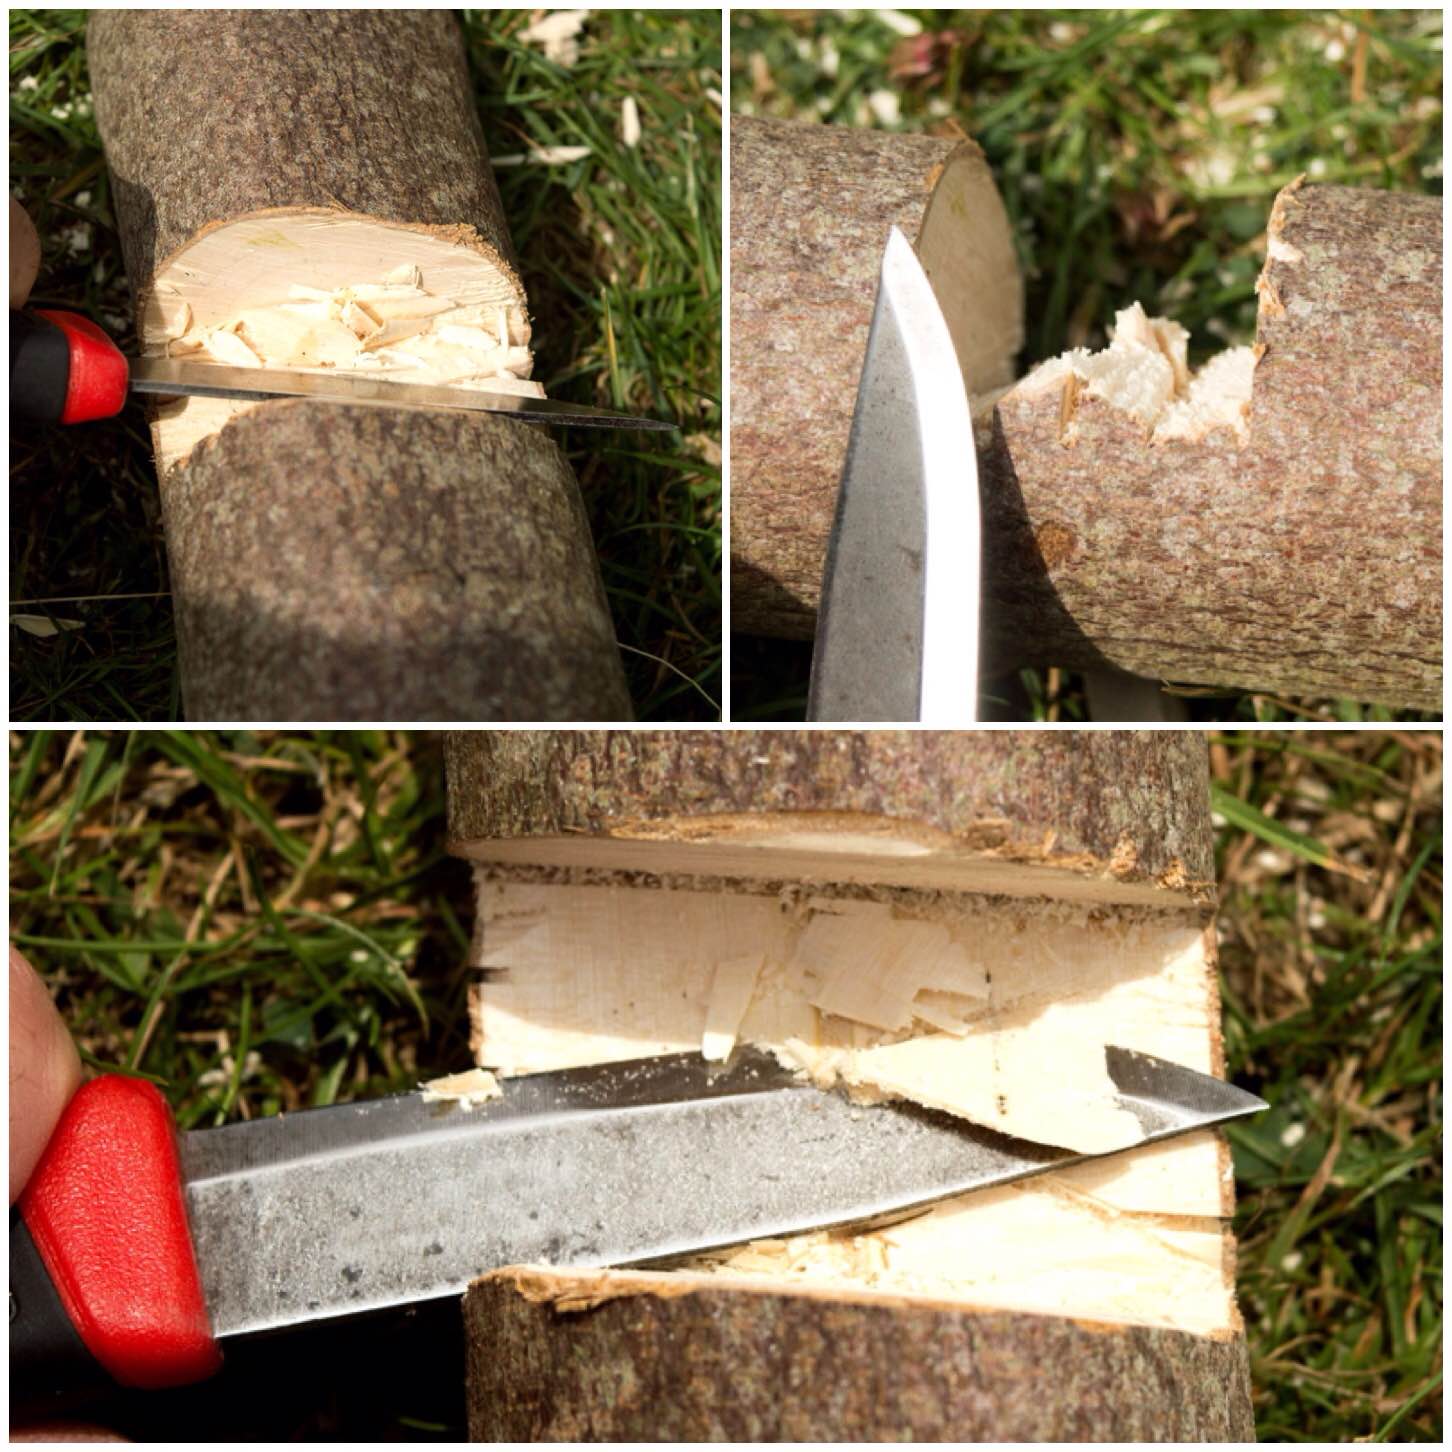
The stove requires a chimney and it is very easy to carve one out. About a third of the way from what will be the bottom of the stove I battoned my knife into centre ridge of one of the quarters of wood. I then used this a a marker to drive in stop cuts on all the other three pieces of wood.
Then from the what would become the top of the stove I battoned off the centre ridge of wood down to the stop cut. I then used my knife as normal to carve off some more excess wood so that part of the chimney looked fairly even. Once the first was completed I repeated the process on all the other pieces.
Keep all the offcuts and shavings as they will be needed to fire up the stove.
Batton out the core to form the chimney
From the top, looking down, your stove should look similar to the picture below. I have no idea how wide a chimney should be but I generally tend to take a couple of centimetres off each quarter.
The Chimney
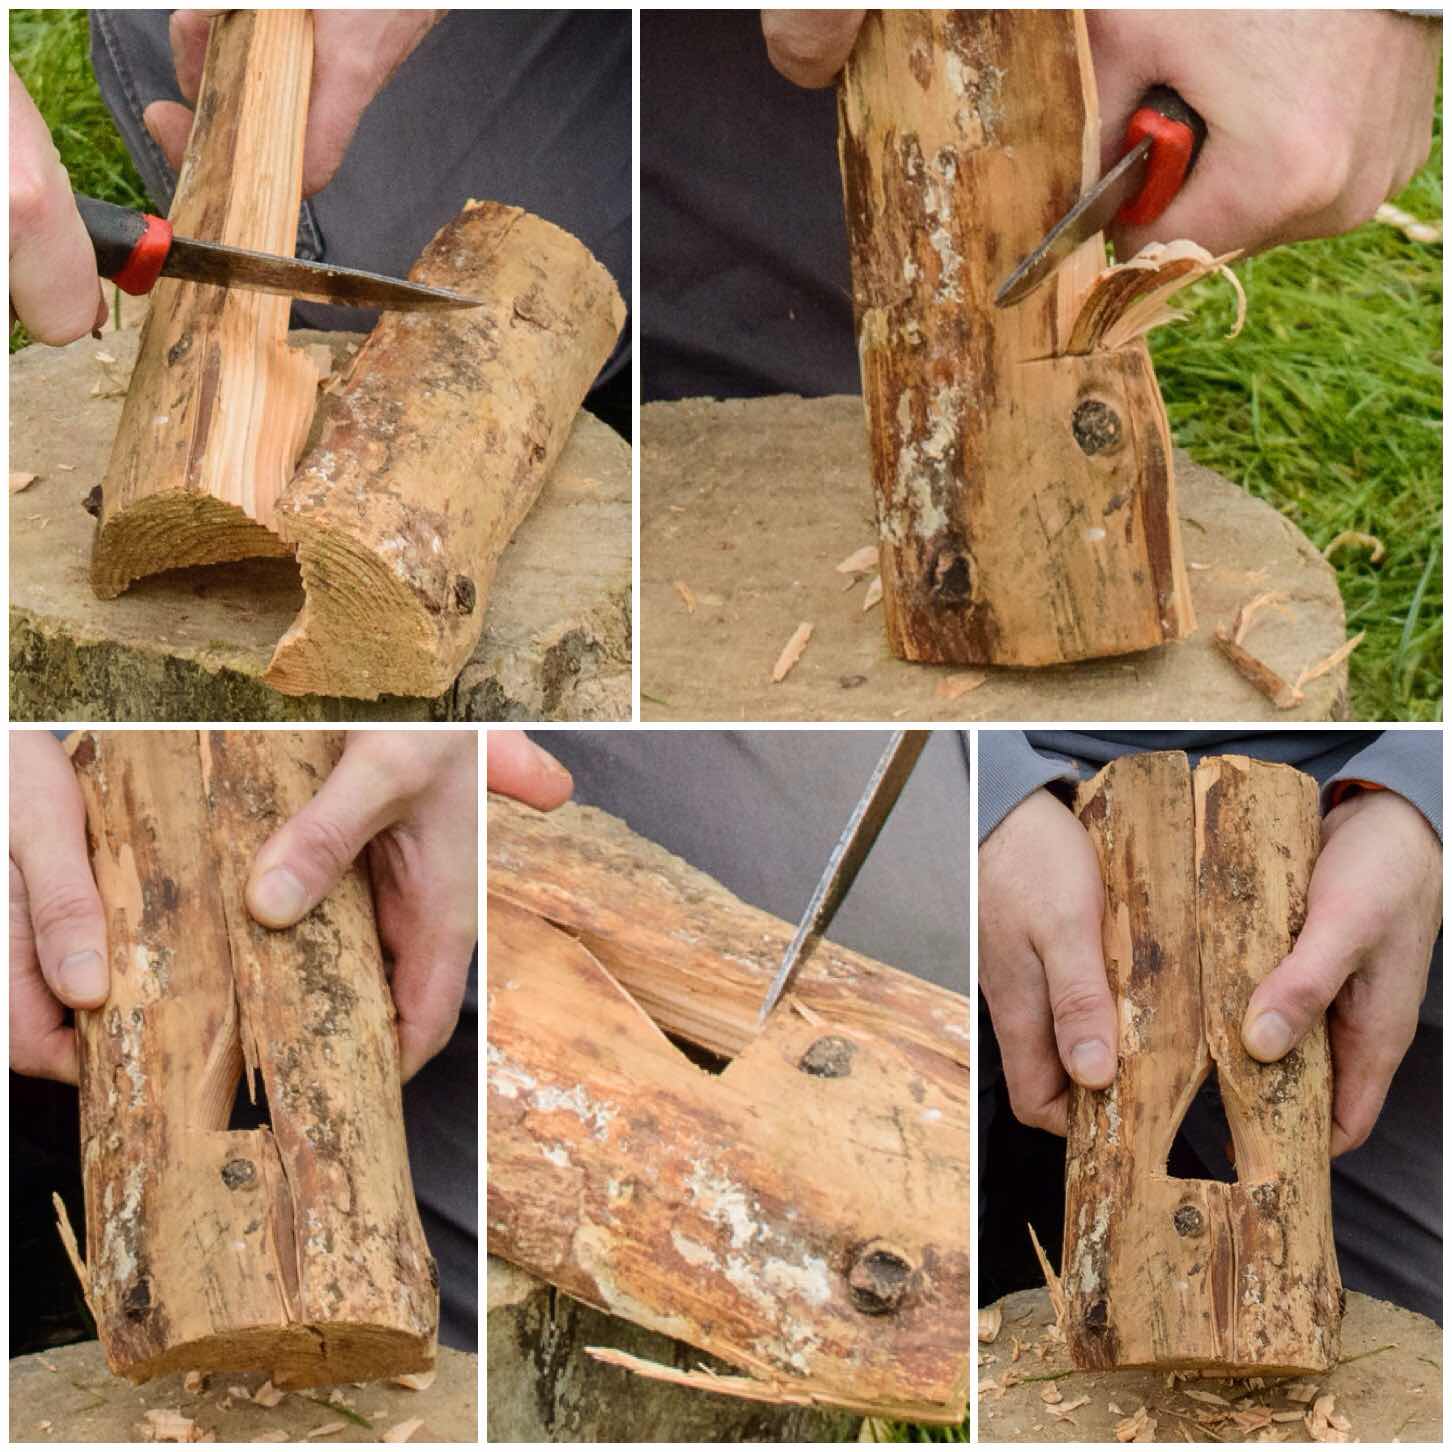
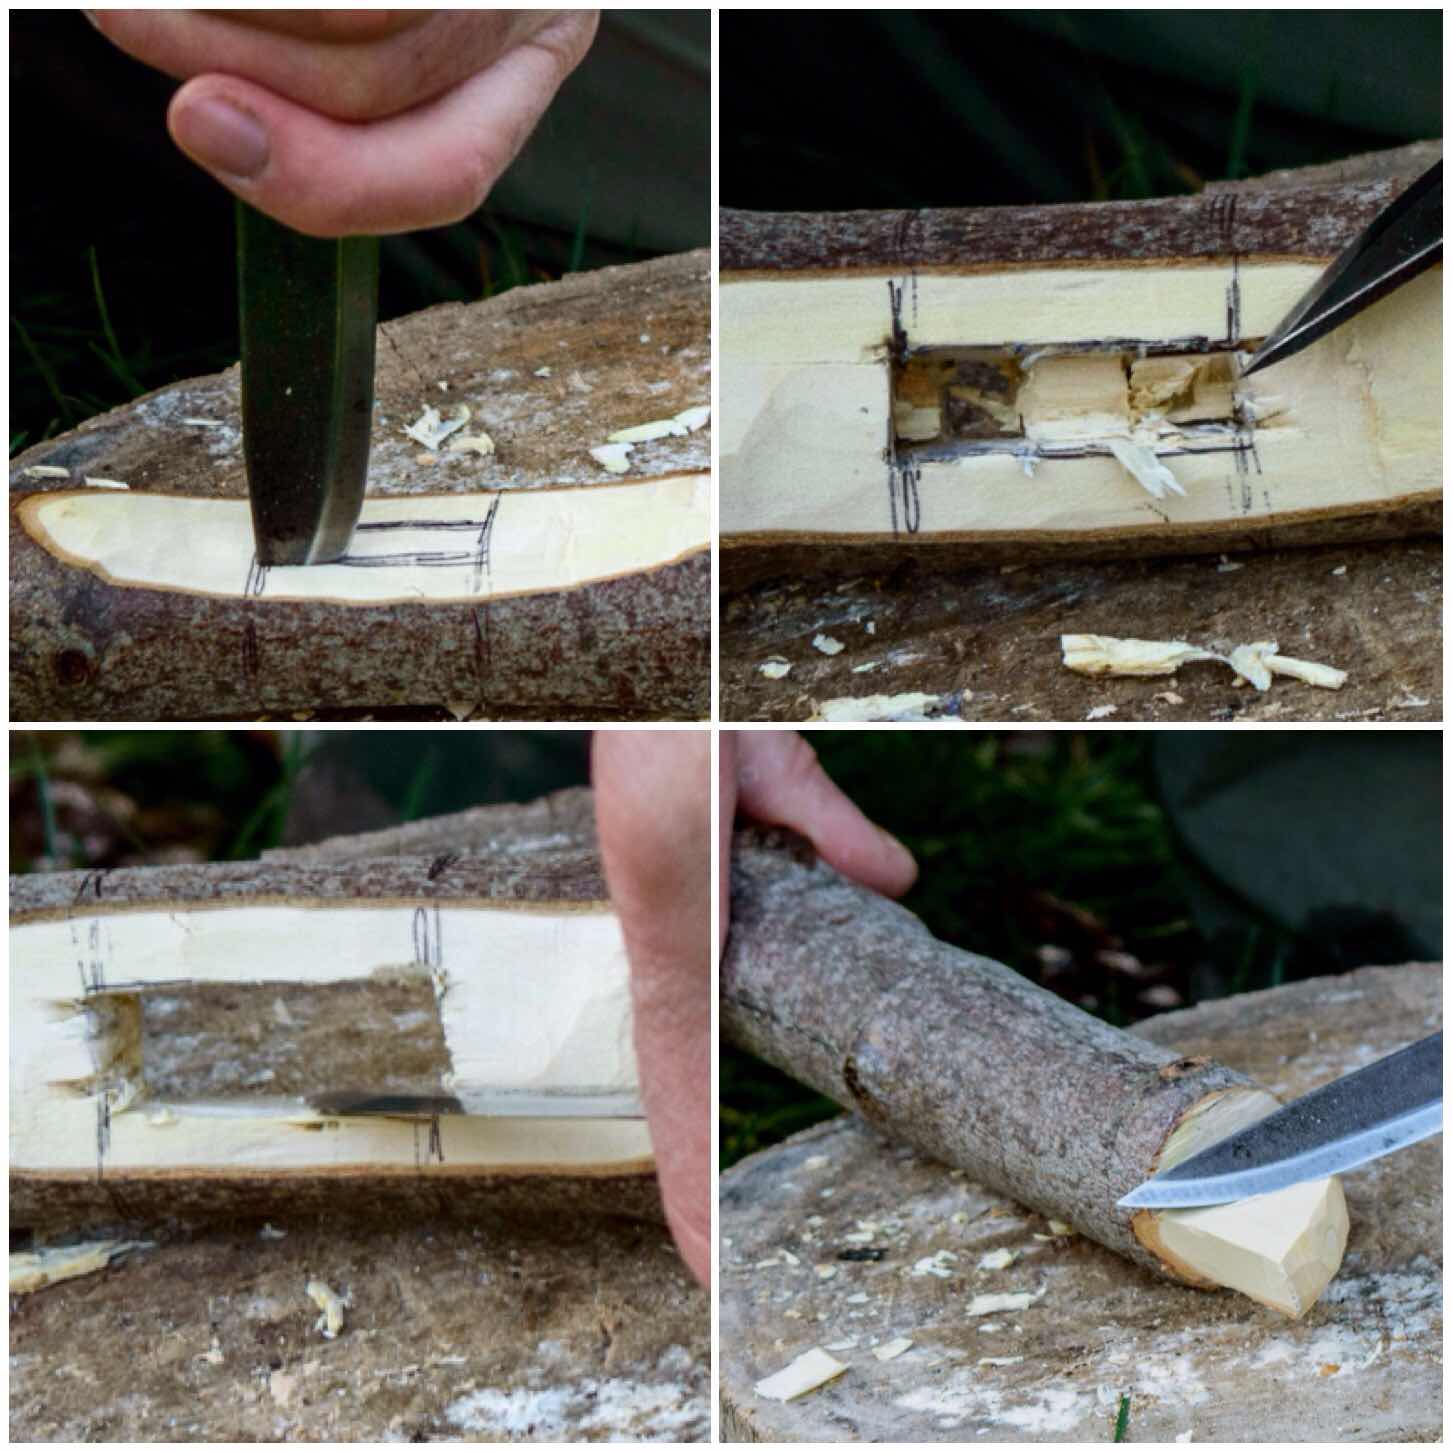
The Firebox
Once the chimney is finished select two of the quarters that fit together and just at the base of the chimney on each quarter carve out a half triangle on each quarter.
I put a stop cut in first and then carved off the excess wood down to the stop cut. The whole just needs to be big enough to let air in and allow you to add slivers of wood into the fire.
Make sure your cuts are opposite each other so that when you fit the two quarters together again you form a triangle.
I used to carve out a square shape with my saw and an axe in the past but a fellow bushcrafter called Takeshi Mizumoto showed me this method by just using a knife – so much easier.
Carve out a triangular fire box
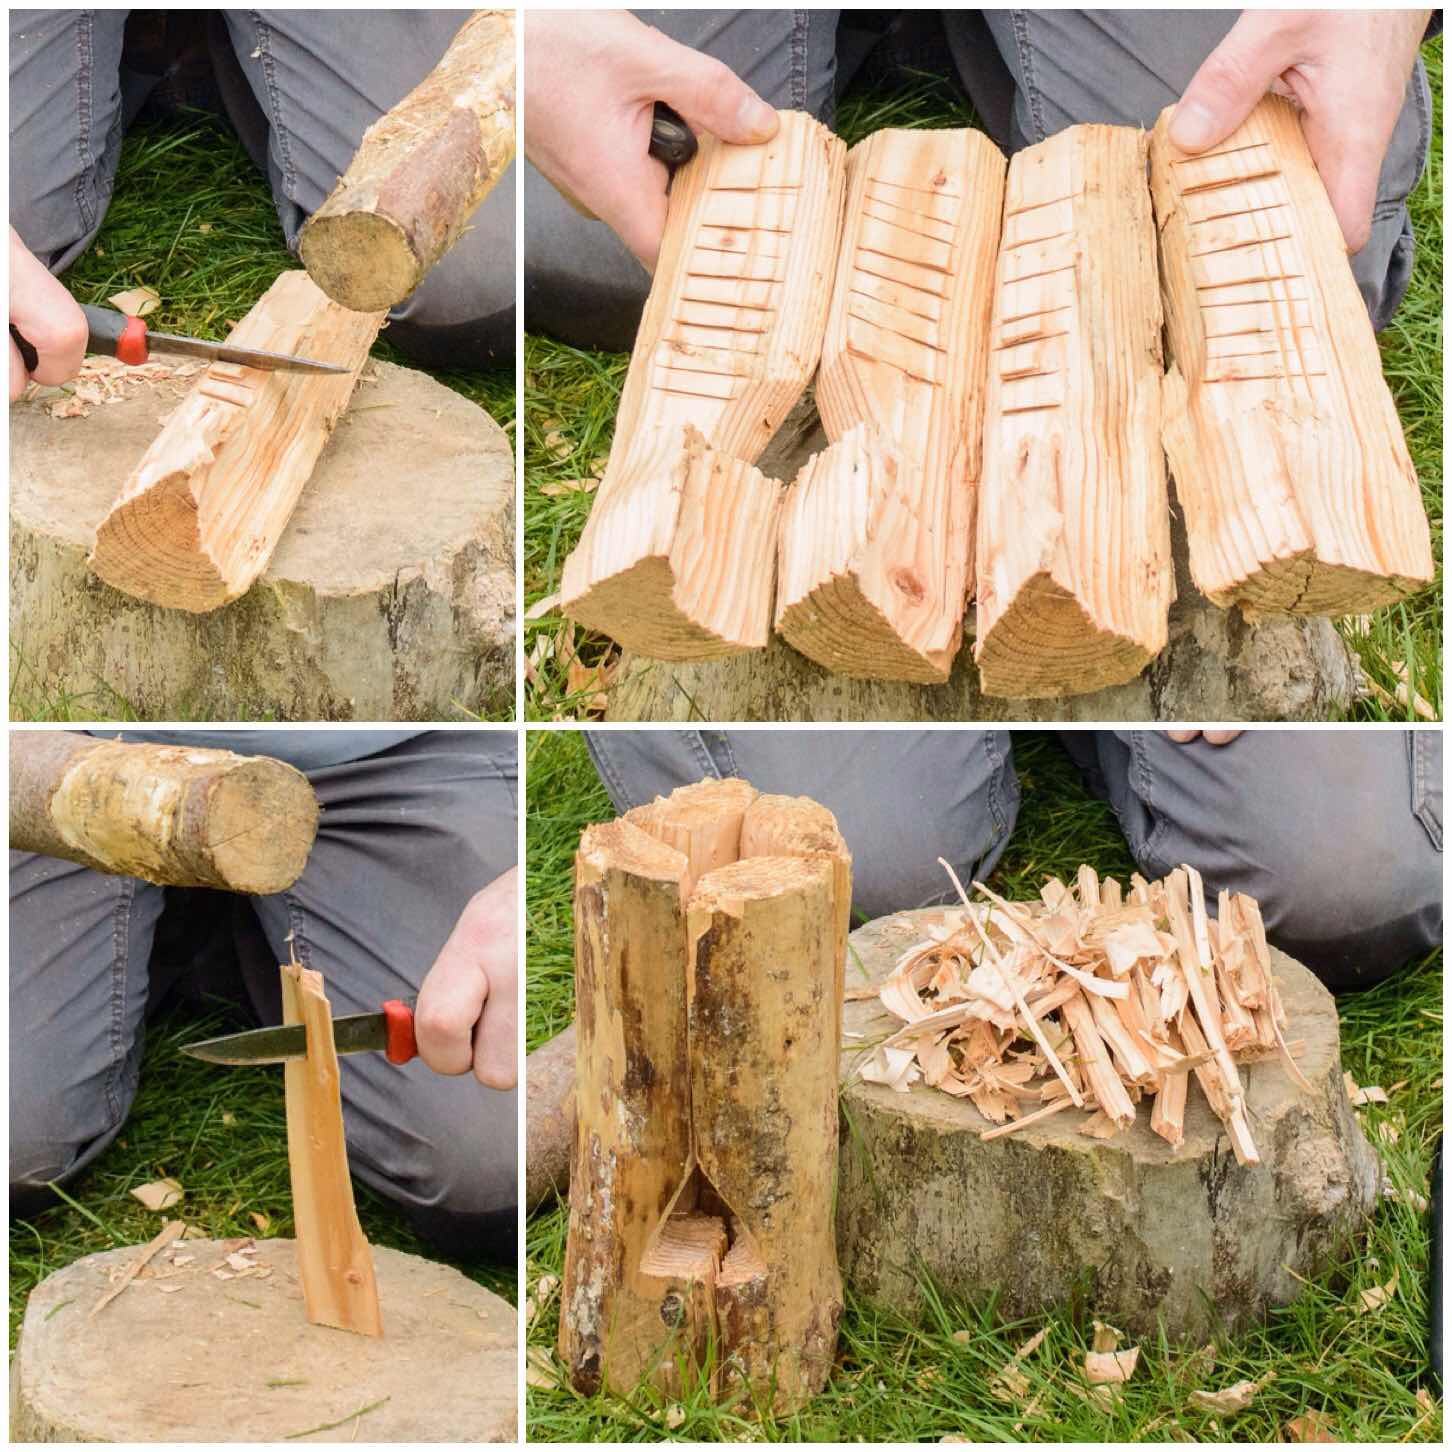
Raappanan tuli cuts
I like to increase the surface area of the inside of my chimney so as to give the initial flame from my tinder something to grab onto.
This is a technique from Finland and you can read more about it here in my post on the Raappanan tuli candle. To make the cuts place each quarter on the work surface and gently batton in cuts to the inside of the chimney. Ensure that the cuts are made so that the small split you create is travelling towards the top of the stove.
Finally collect up all the wood shavings you have created and split the larger off cut pieces down to nice small kindling.
Creating extra surface area and kindling
Firing the stove up
I found some old twine, thoroughly soaked it in water and then used it to tie the quarters together near the bottom.
To light the stove I used a firesteel to light some cotton wool smeared in vaseline. This gives me a burn time off about 5 minutes and as I always carry a supply in my rucksack am happy to use it. A more natural method that I like is to use birchbark and small lumps of spruce resin.
Once the cotton wool was well lit I added a few small pieces of wood in via the top of the chimney. At this stage it is important not to add too much kindling as this may block of the flow of air from the firebox to the top of the chimney. Also make sure your fingertips are not directly over the top of the chimney as you drop in the slivers of wood. Even at this early stage the heat is intense enough to cause injury.
Firing up
Three pebbles
I popped three flattish pebbles on the rim of the stove to act as a platform for my pot. As this is a small stove you need to keep a close eye on your pot as the water boils or the food cooks so that it does not accidentally fall over. I had this happen once before as I had left the handle of my pot up. The handle snapped back down eventually causing the pot to fall off the log.
All was well with this set up and after about 10 minutes of good heat my water was boiling. if you do not have pebbles to hand I find that 3 pieces of green wood work well instead.
Three stones and a pot
Afterwards as I was drinking my coffee the stove really came alive with some wonderful flames.
I really enjoyed making this small log rocket stove as it showed me that with a little ingenuity you can make do without an axe. It can be difficult but it is doable and a great way to test your personal skills.
Week 3 has been a bit of a downer for myself. I found myself working long hours up in Scotland (indoors) and at the weekend I retired myself to bed with a severe bit of man flu.
So it was a rare week that I did not take a single picture. I had a look at a few I had taken the week before and this one cheered me up no end.
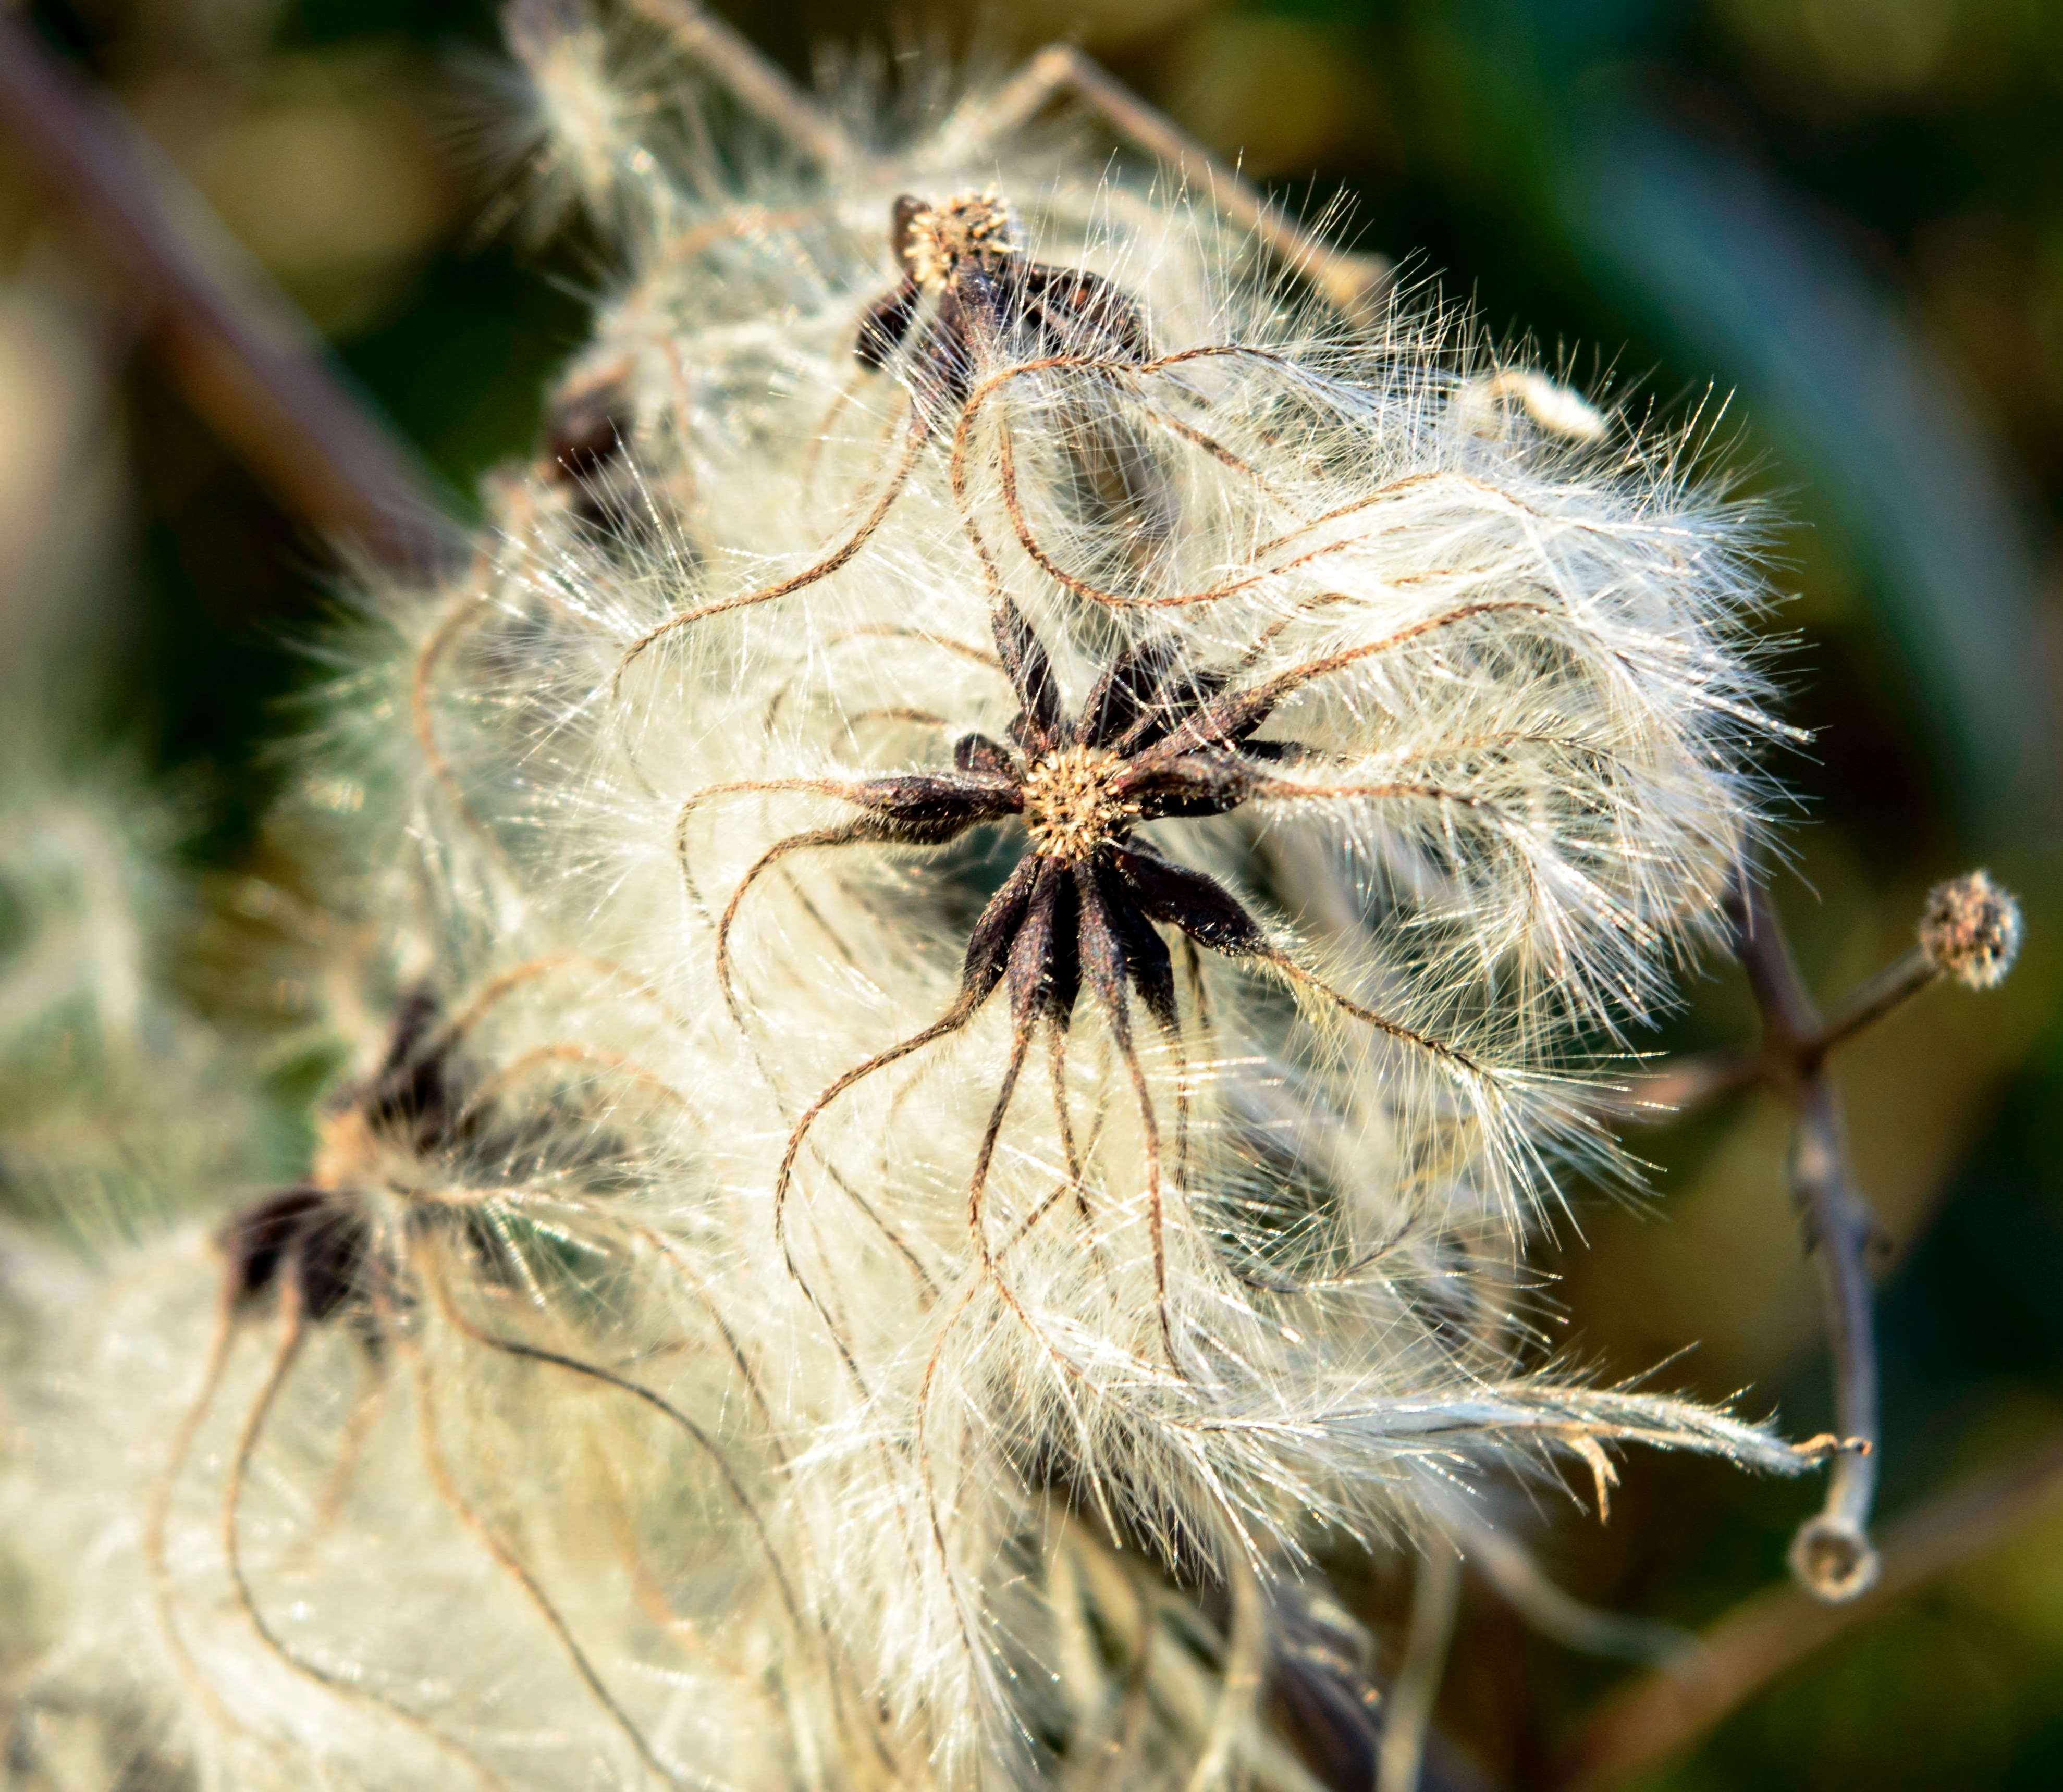
We pass it by every day without a second glance but with the right light and looking close enough the beautiful seed head of the clematis can be quite enchanting.
Clematis seed head – beautiful and handy
And as a bushcrafter a handful of them always end up in my pocket to be added to my tinder bag.
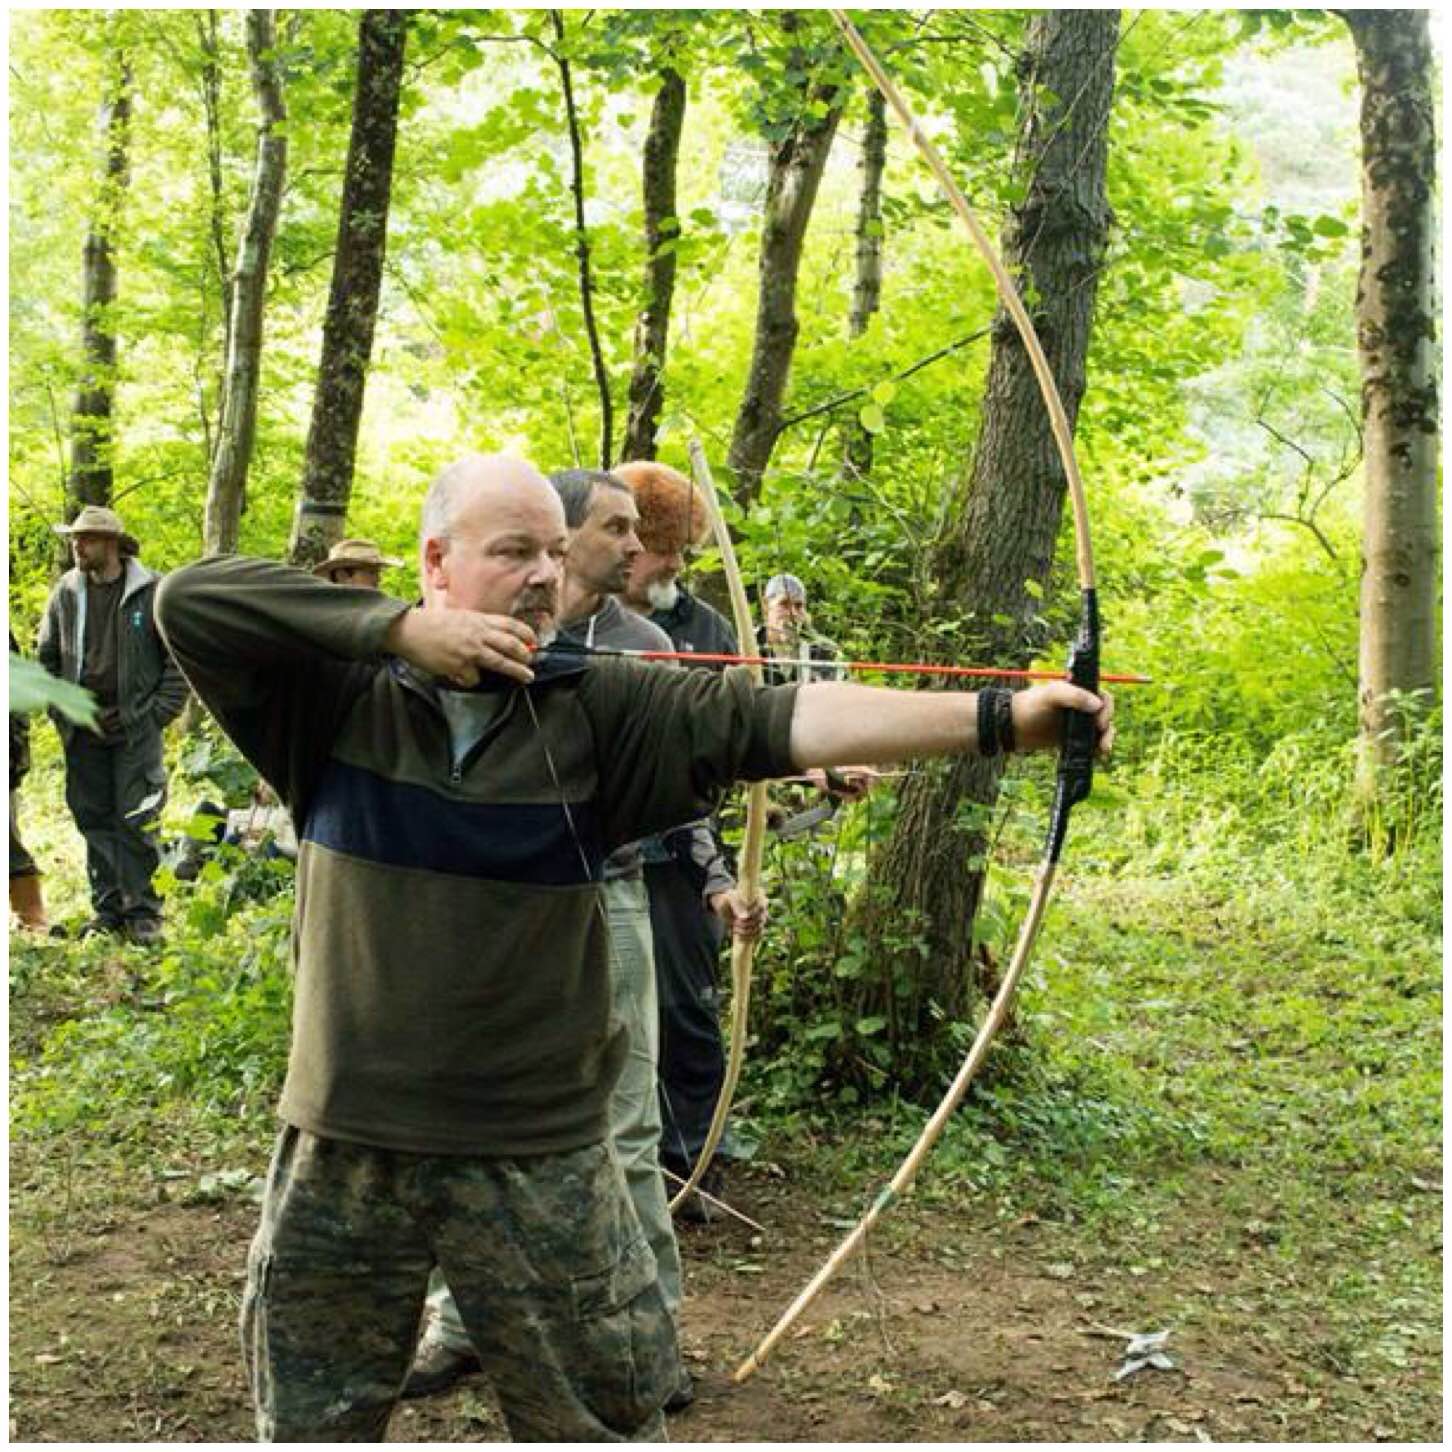
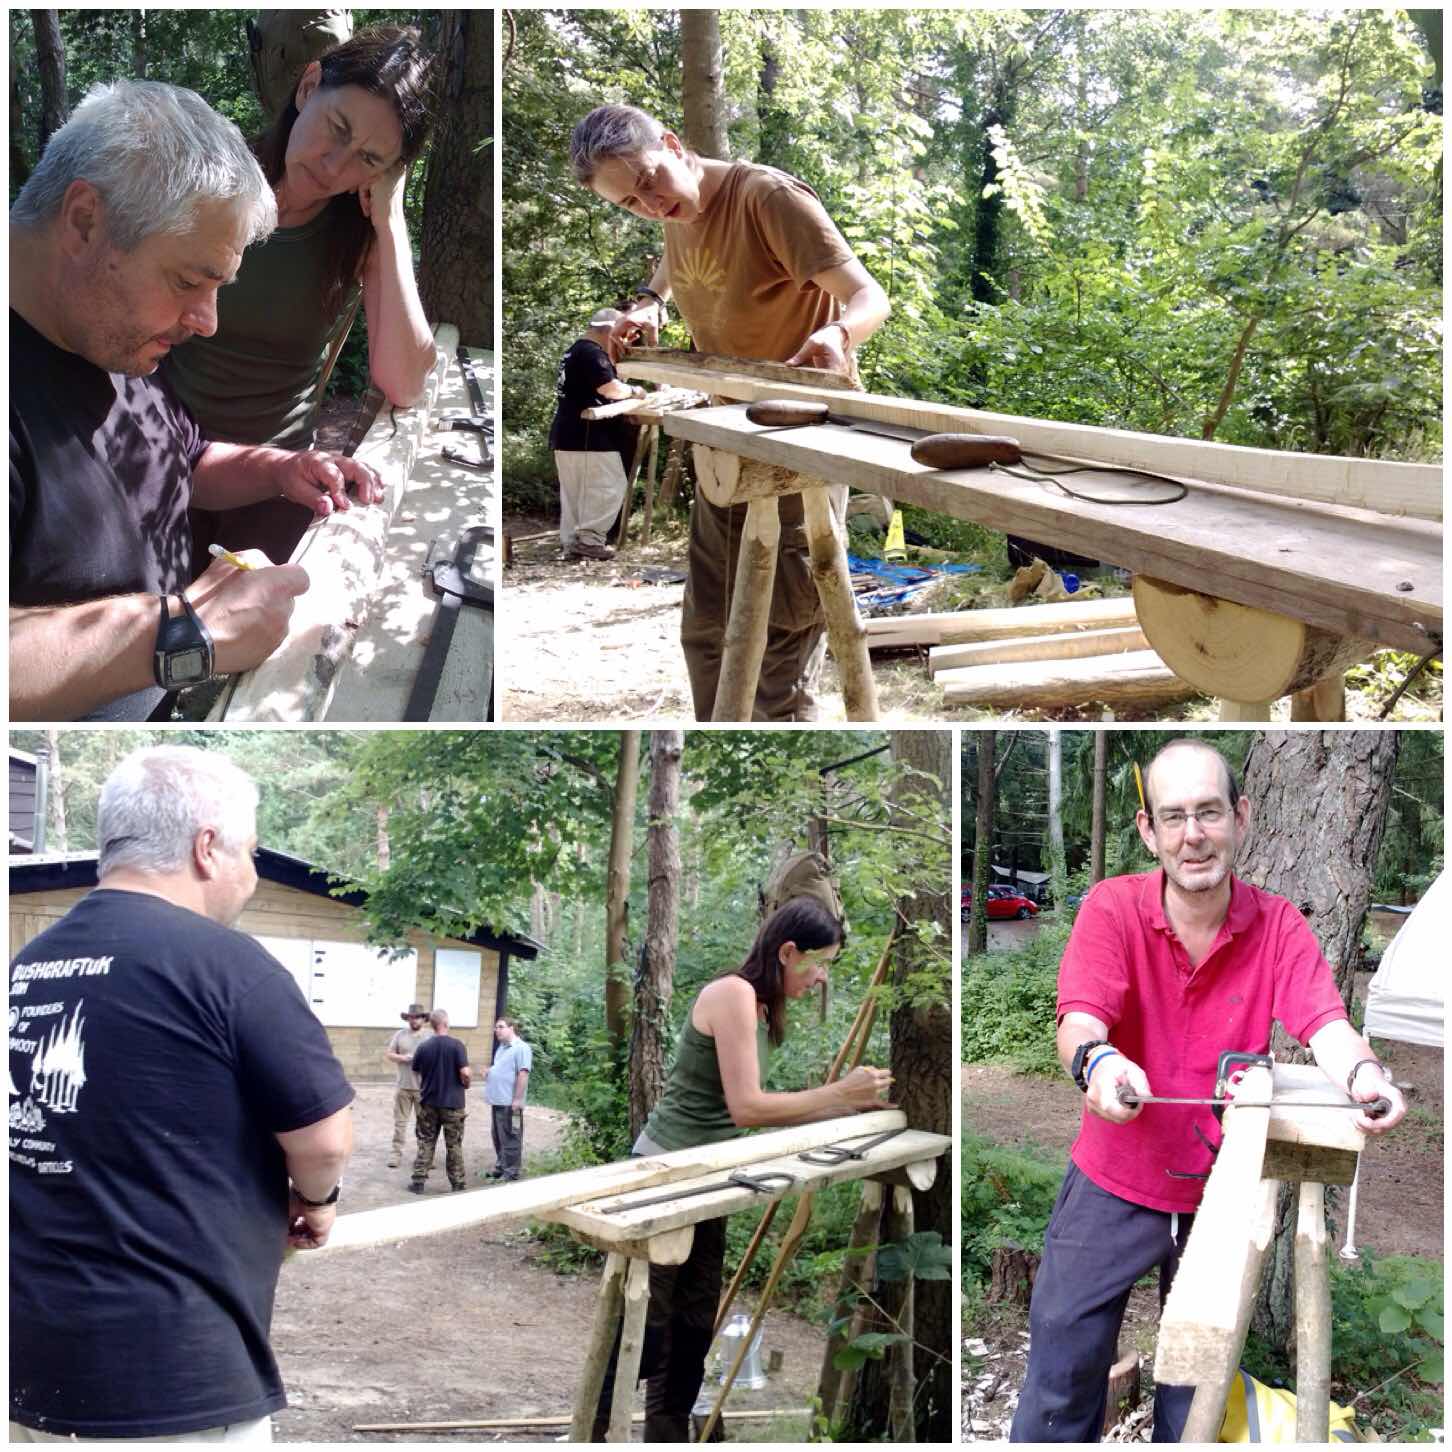
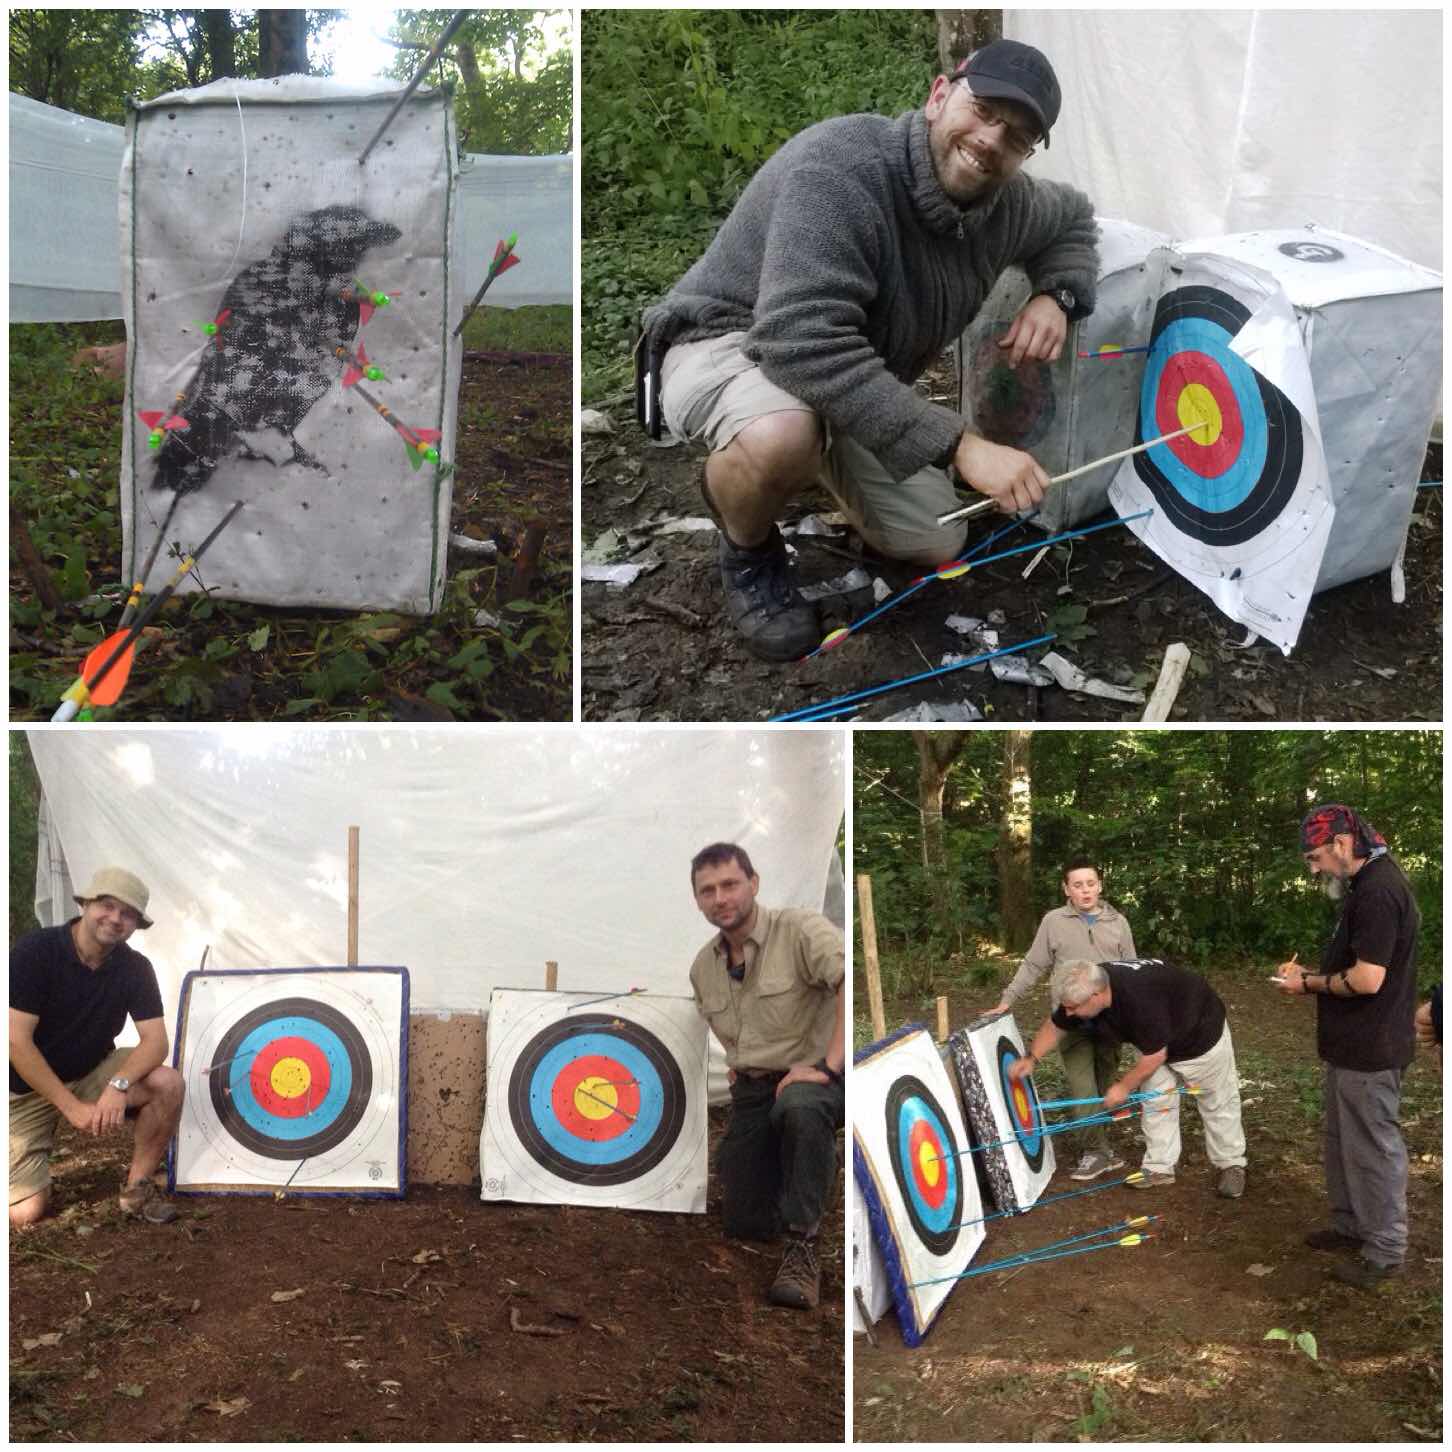
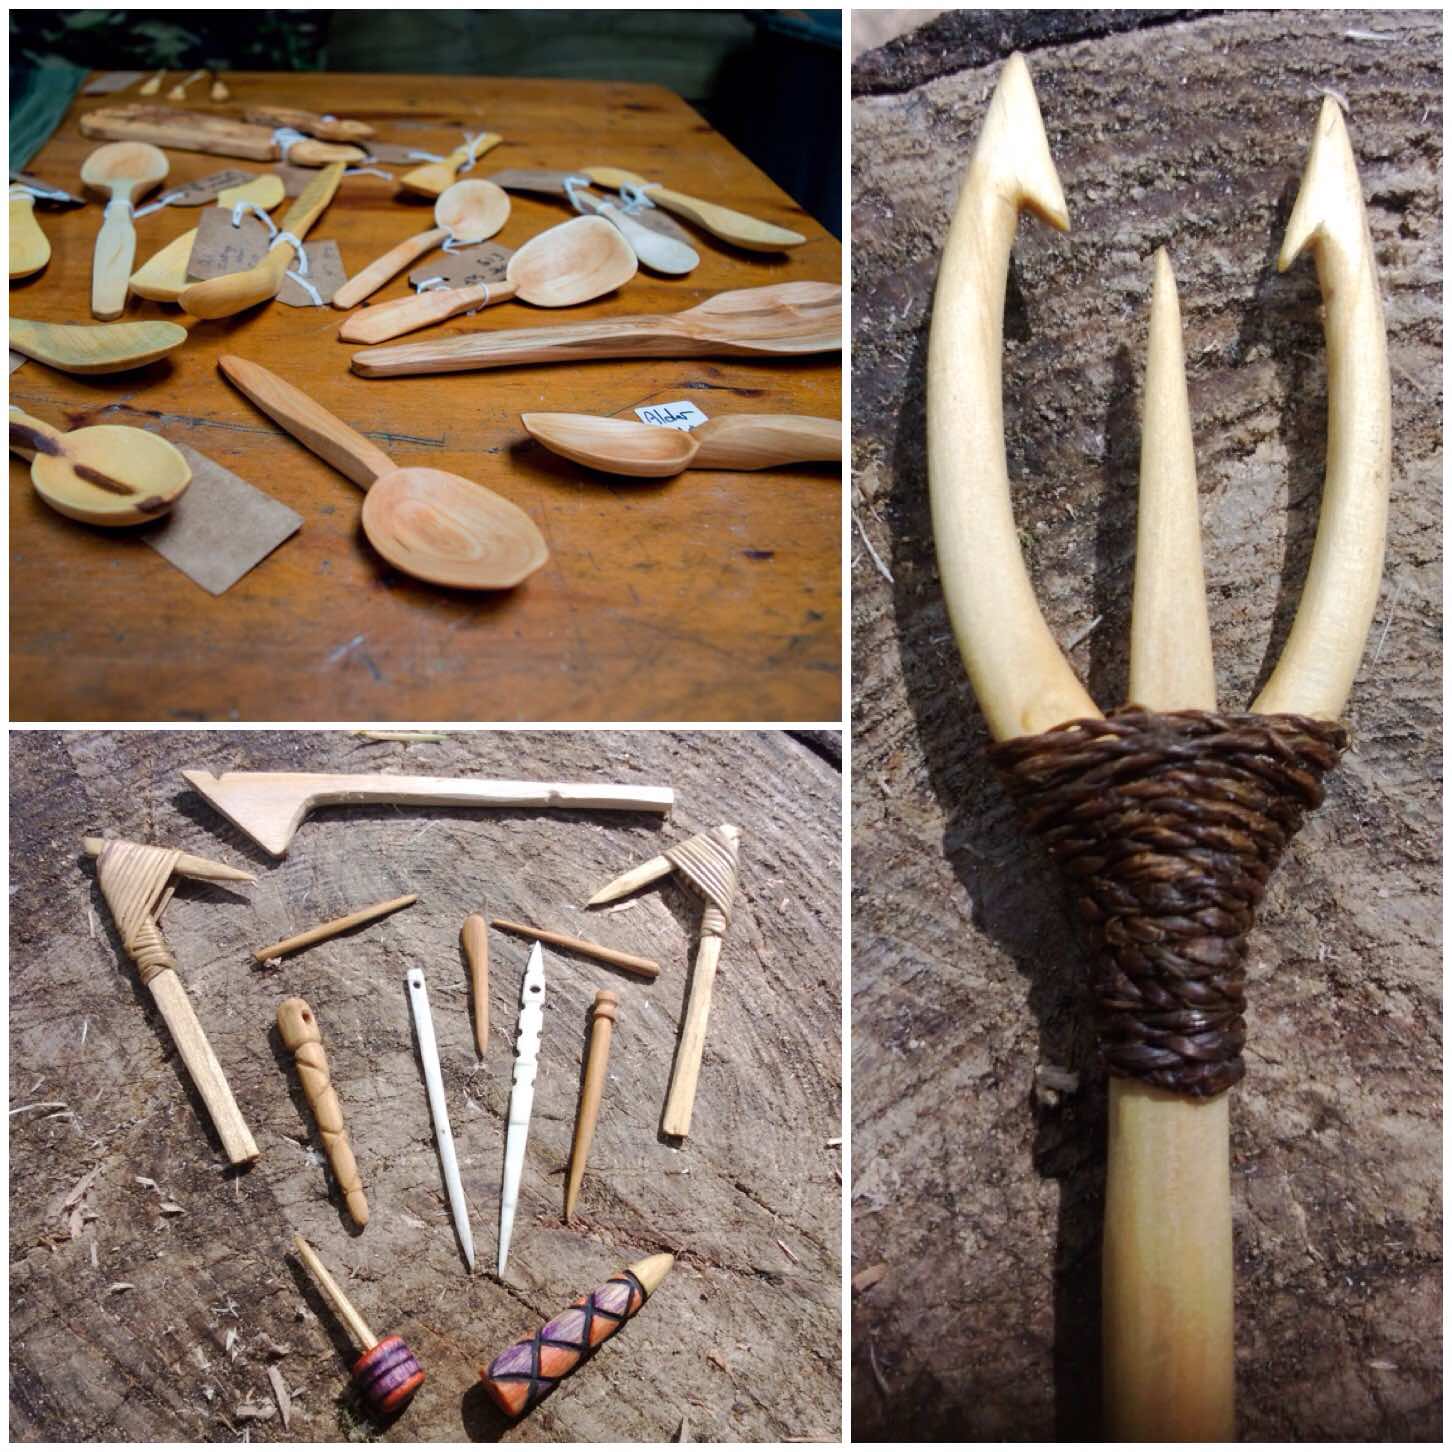
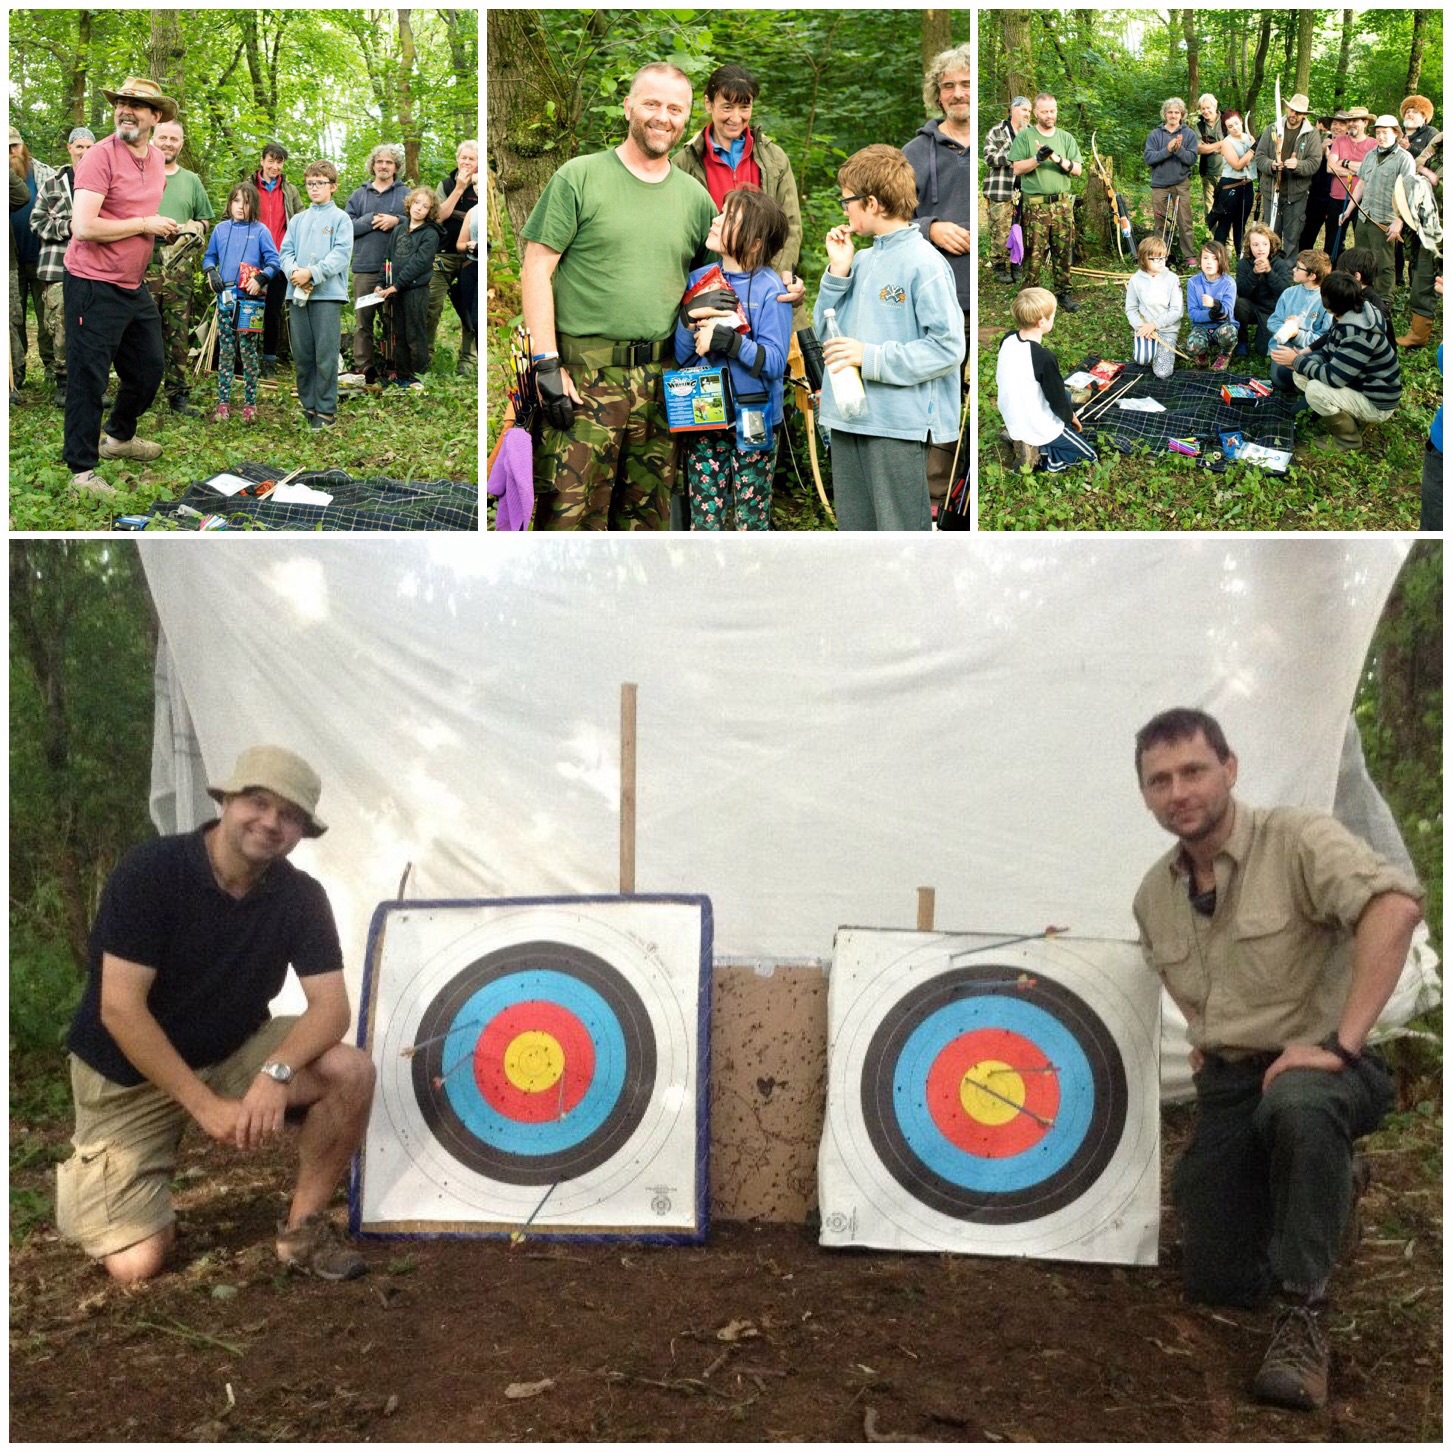
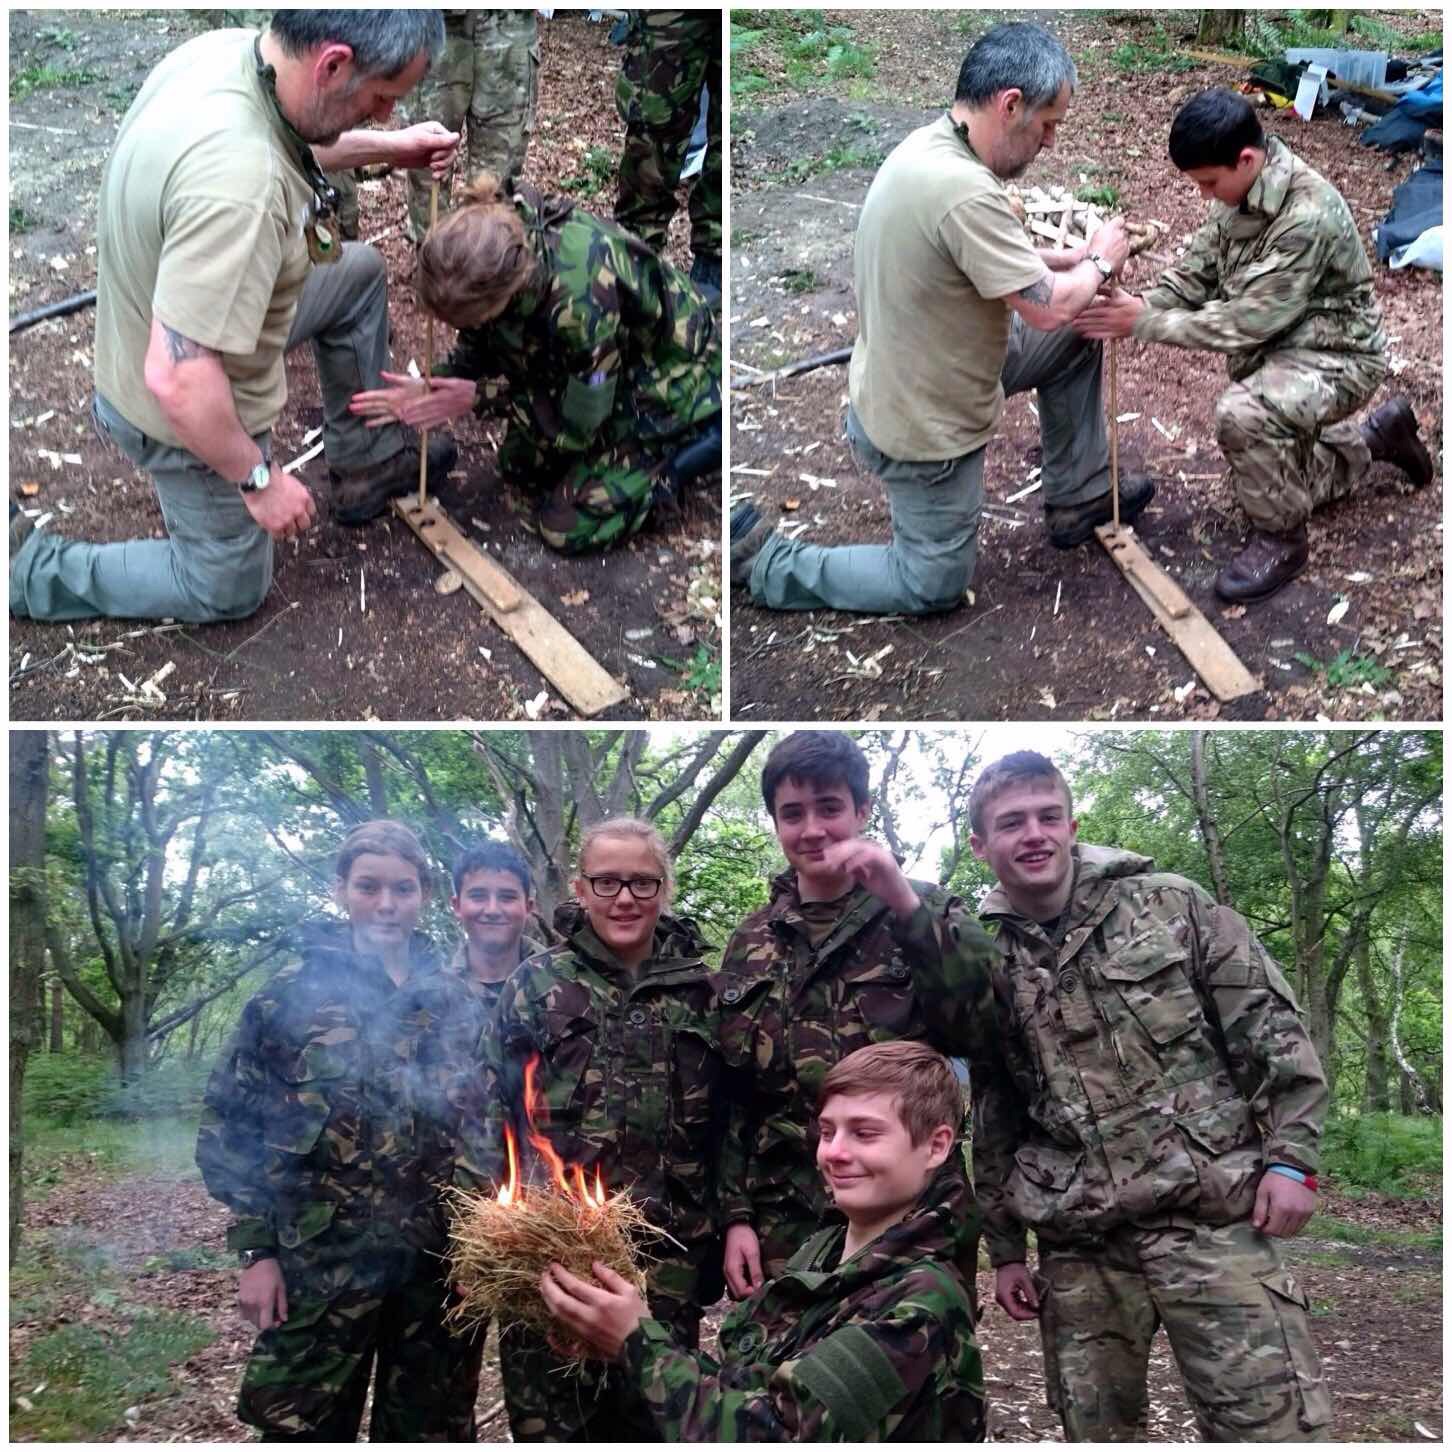
It has been 8 or 9 years now since I started making my own bows and Atlatls. In that time I have enjoyed making a number of different types and have brought them all together in this post. I am no expert in making them however I do like to carve them.
If you want to know how to make any of these tools just click on the title for each section to see a detailed How To…. guide on making them. This post will concentrate on my thoughts on them through my own personal use and that of my students.
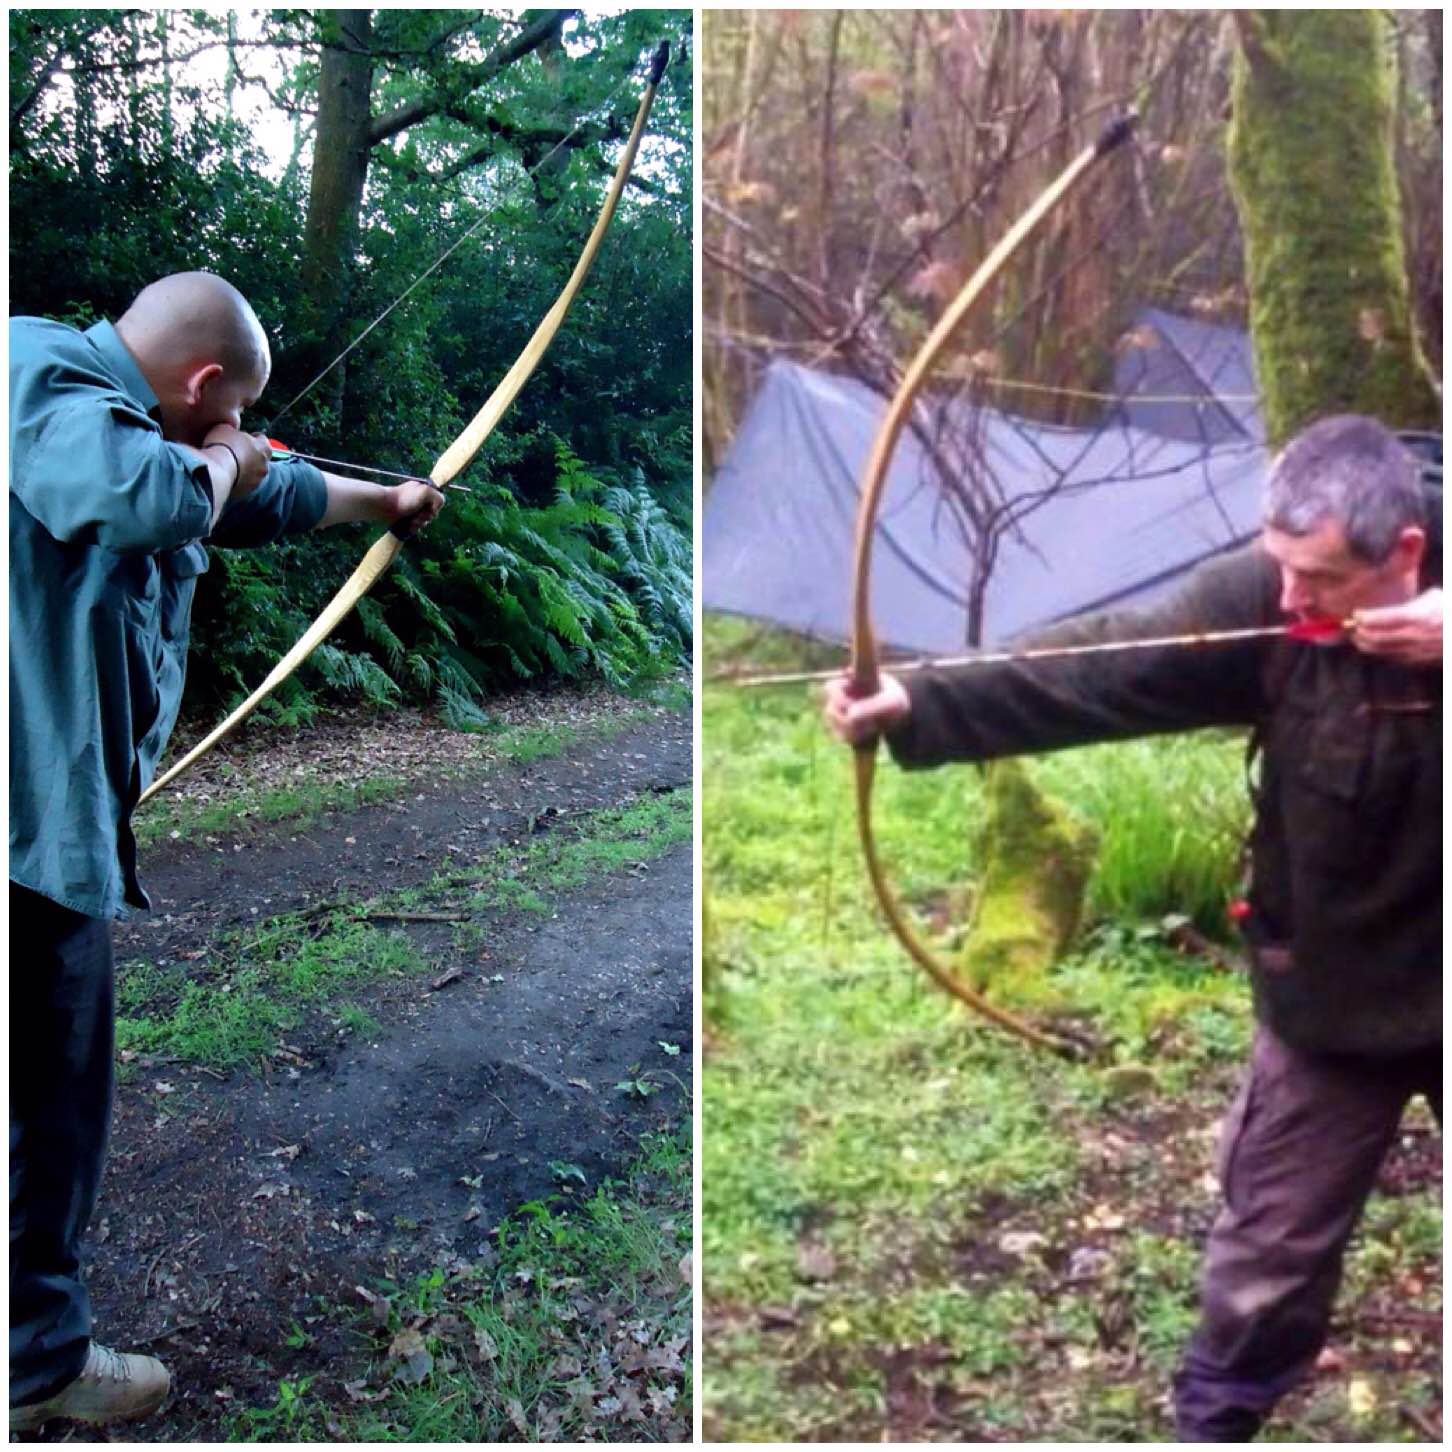
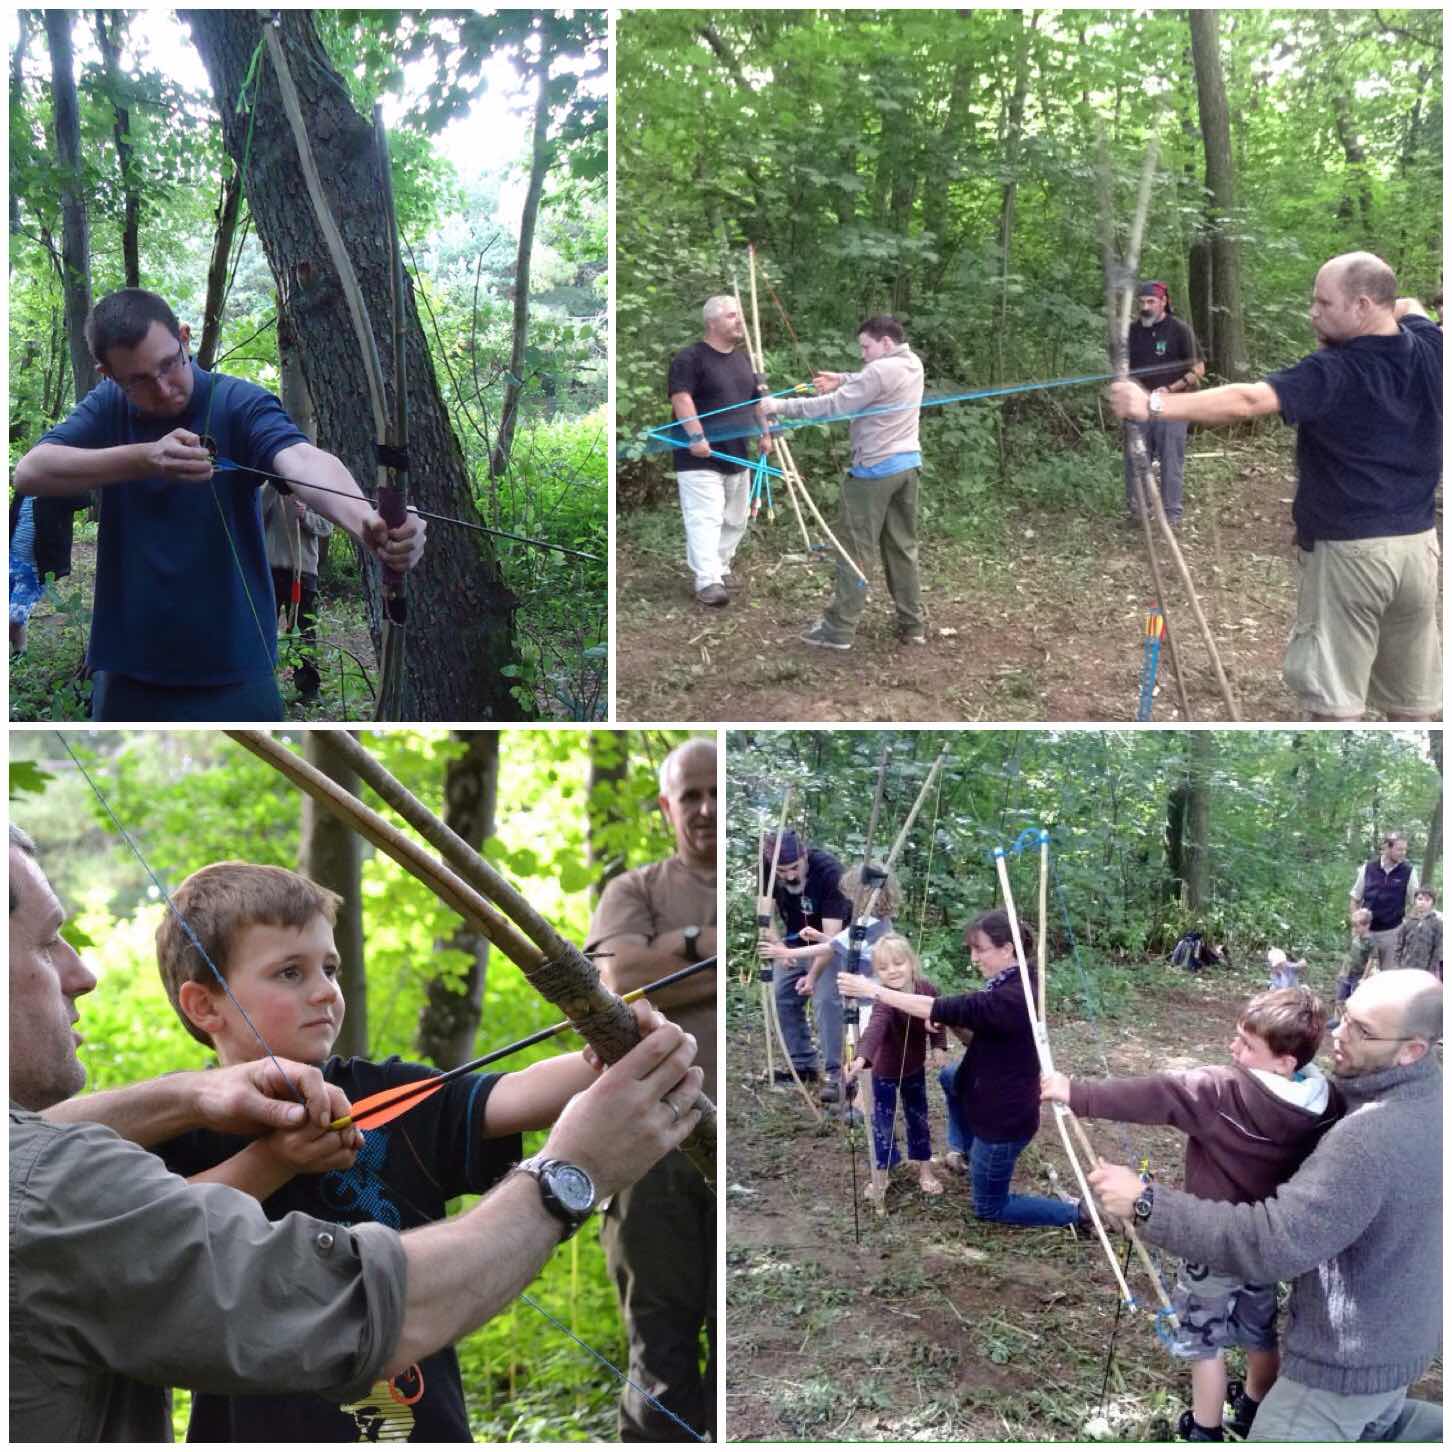
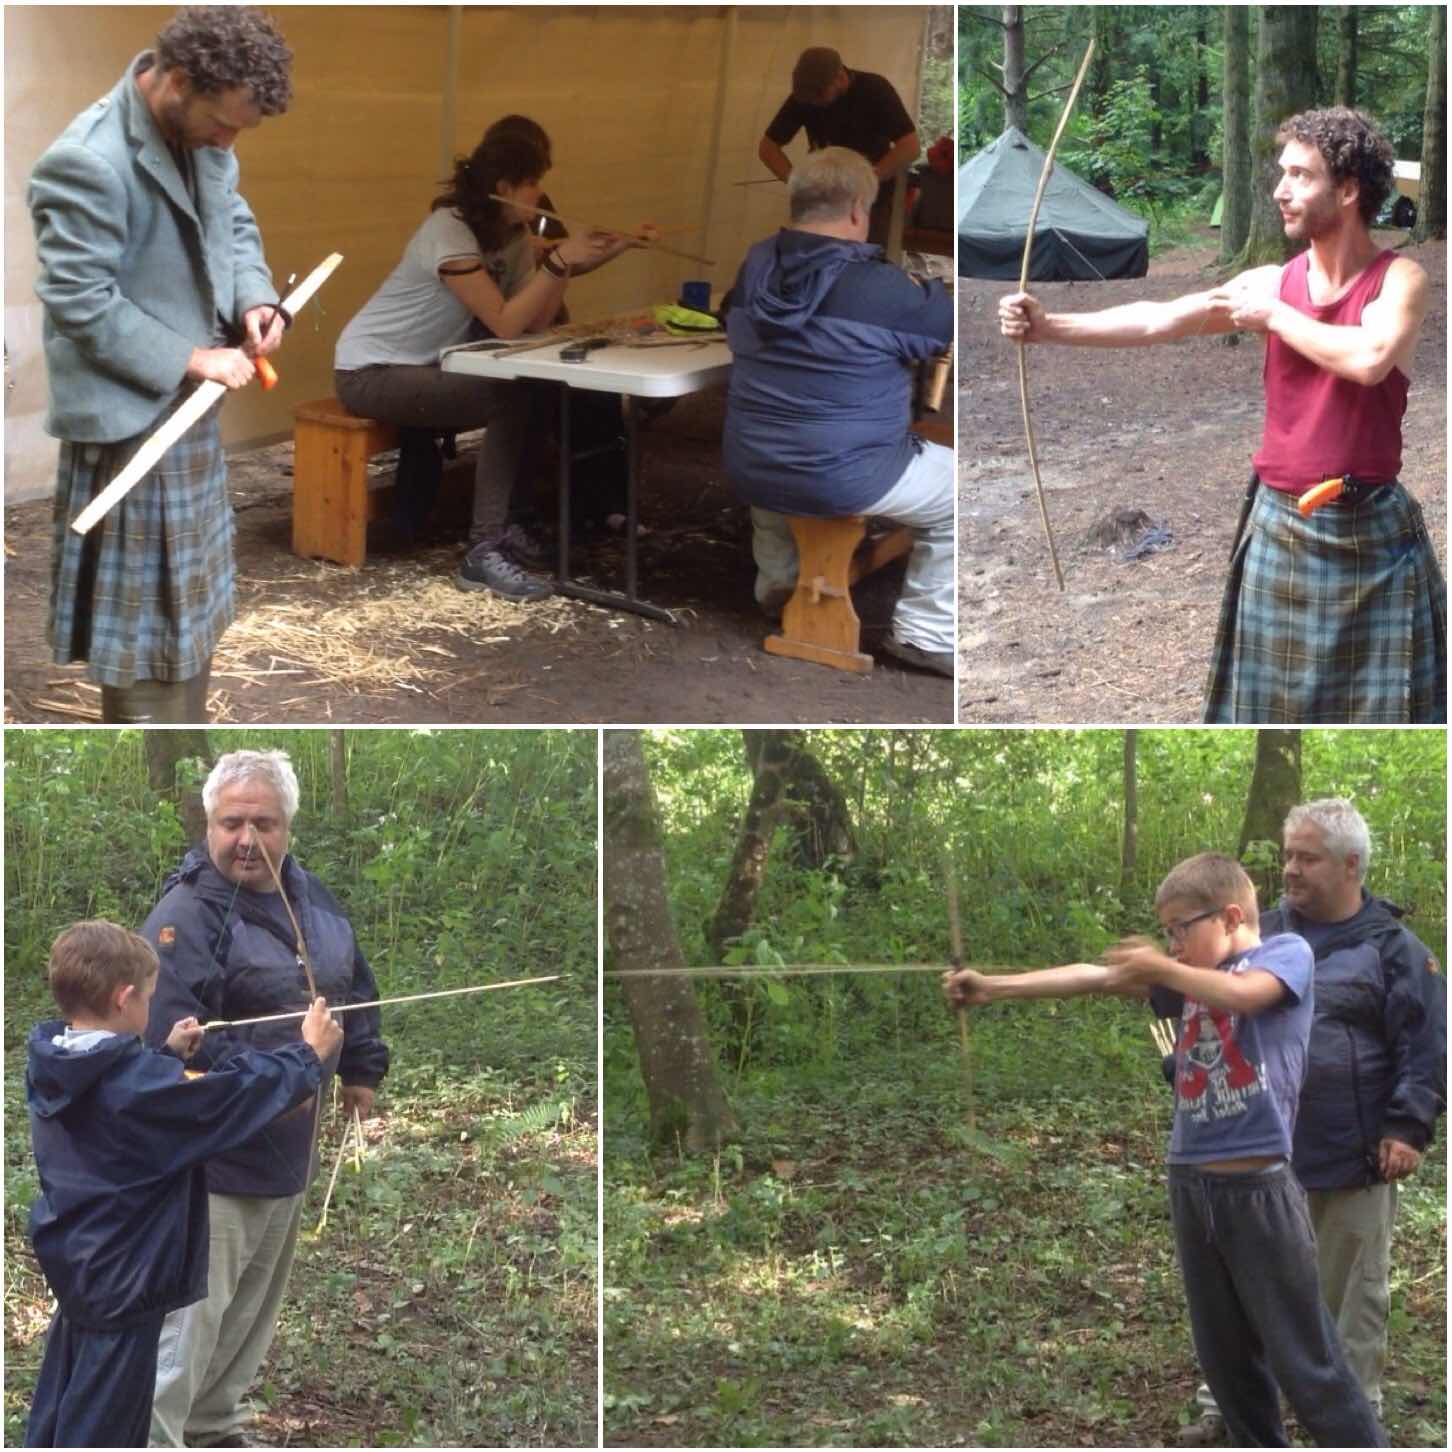
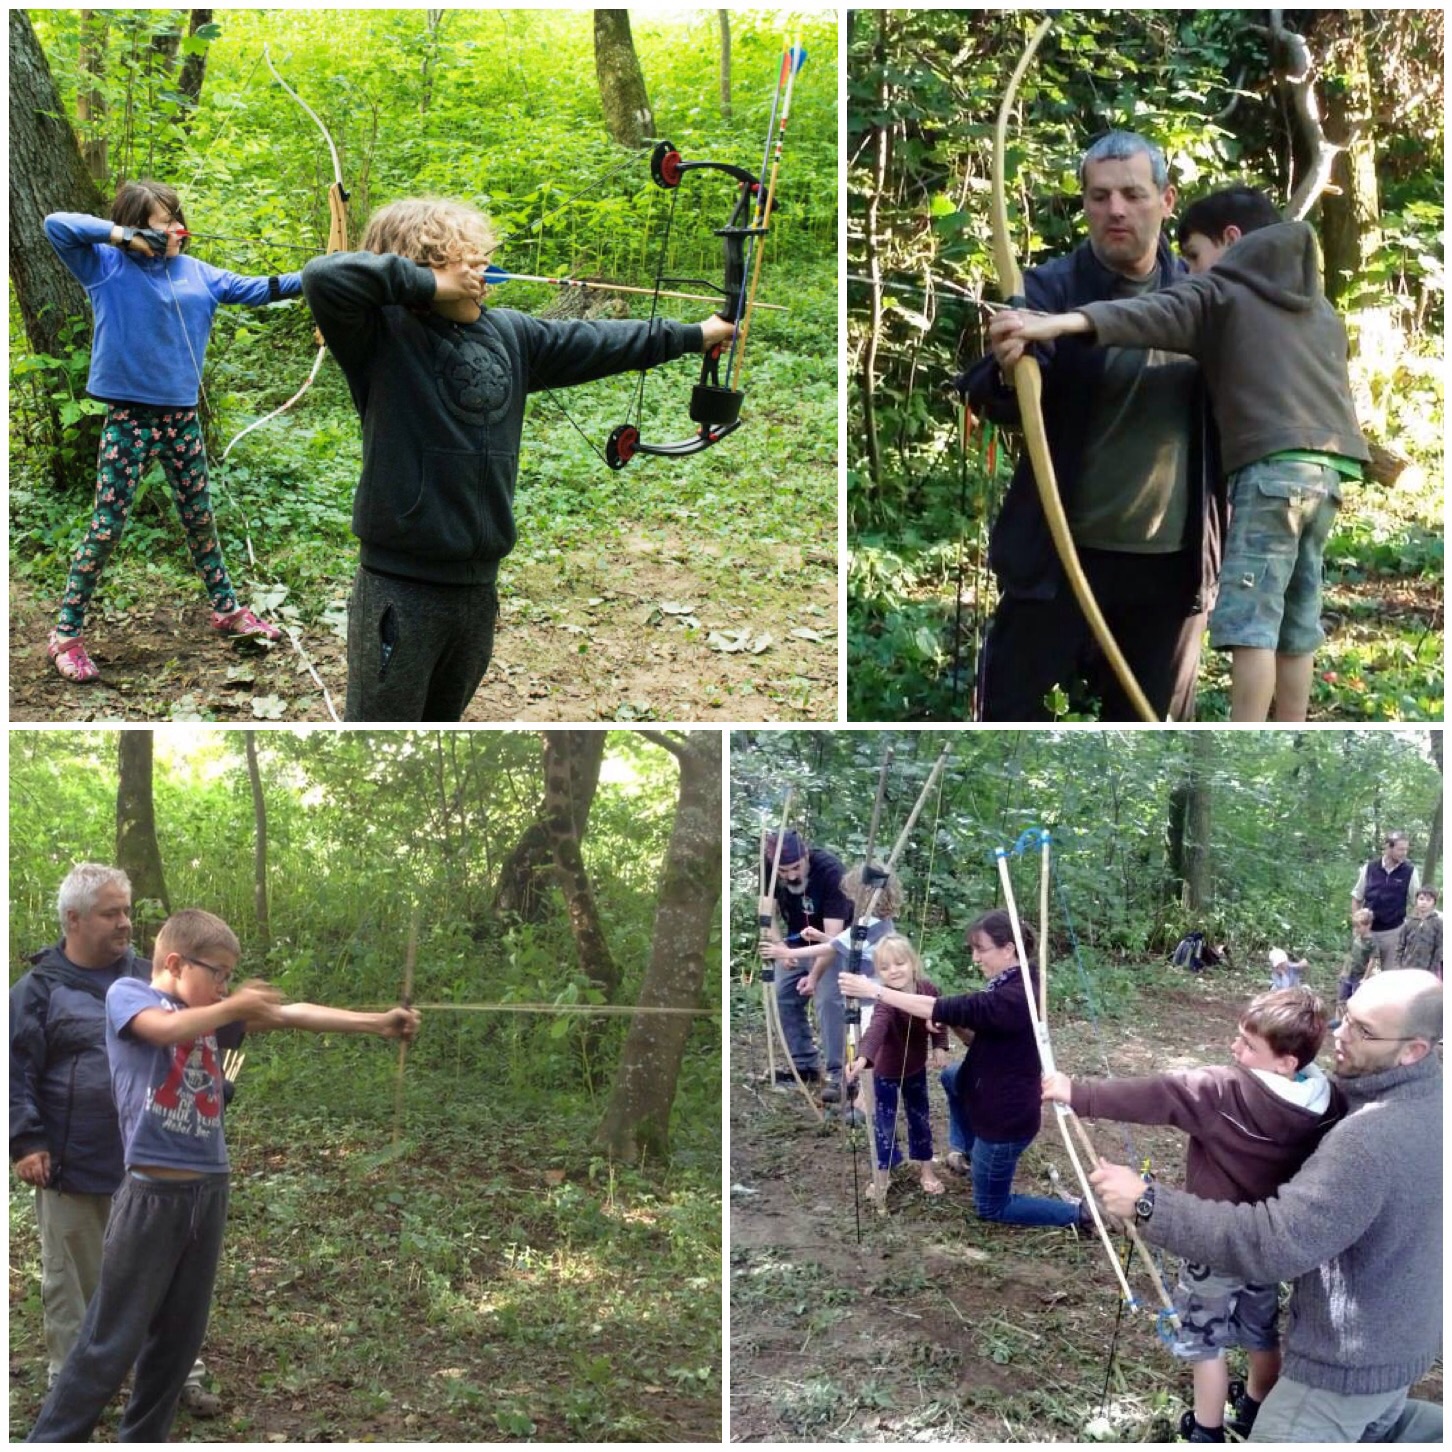
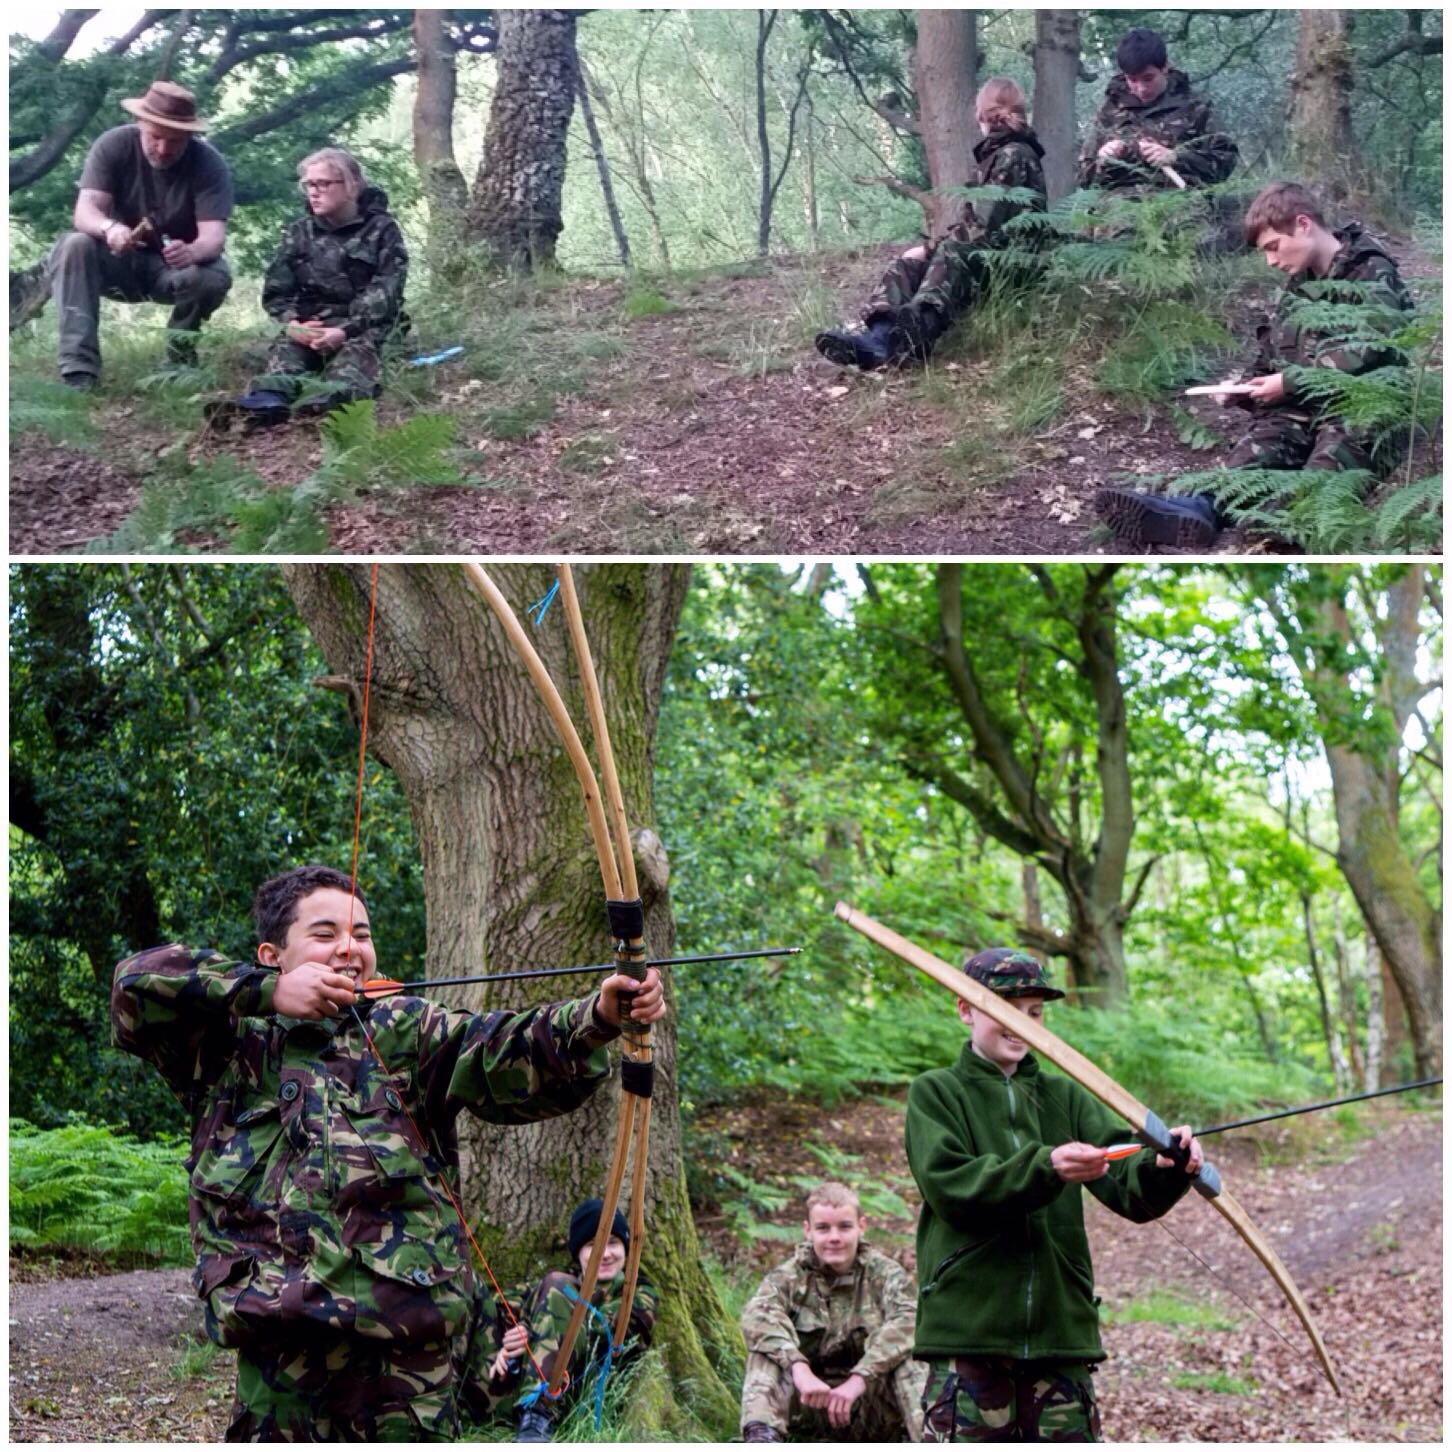
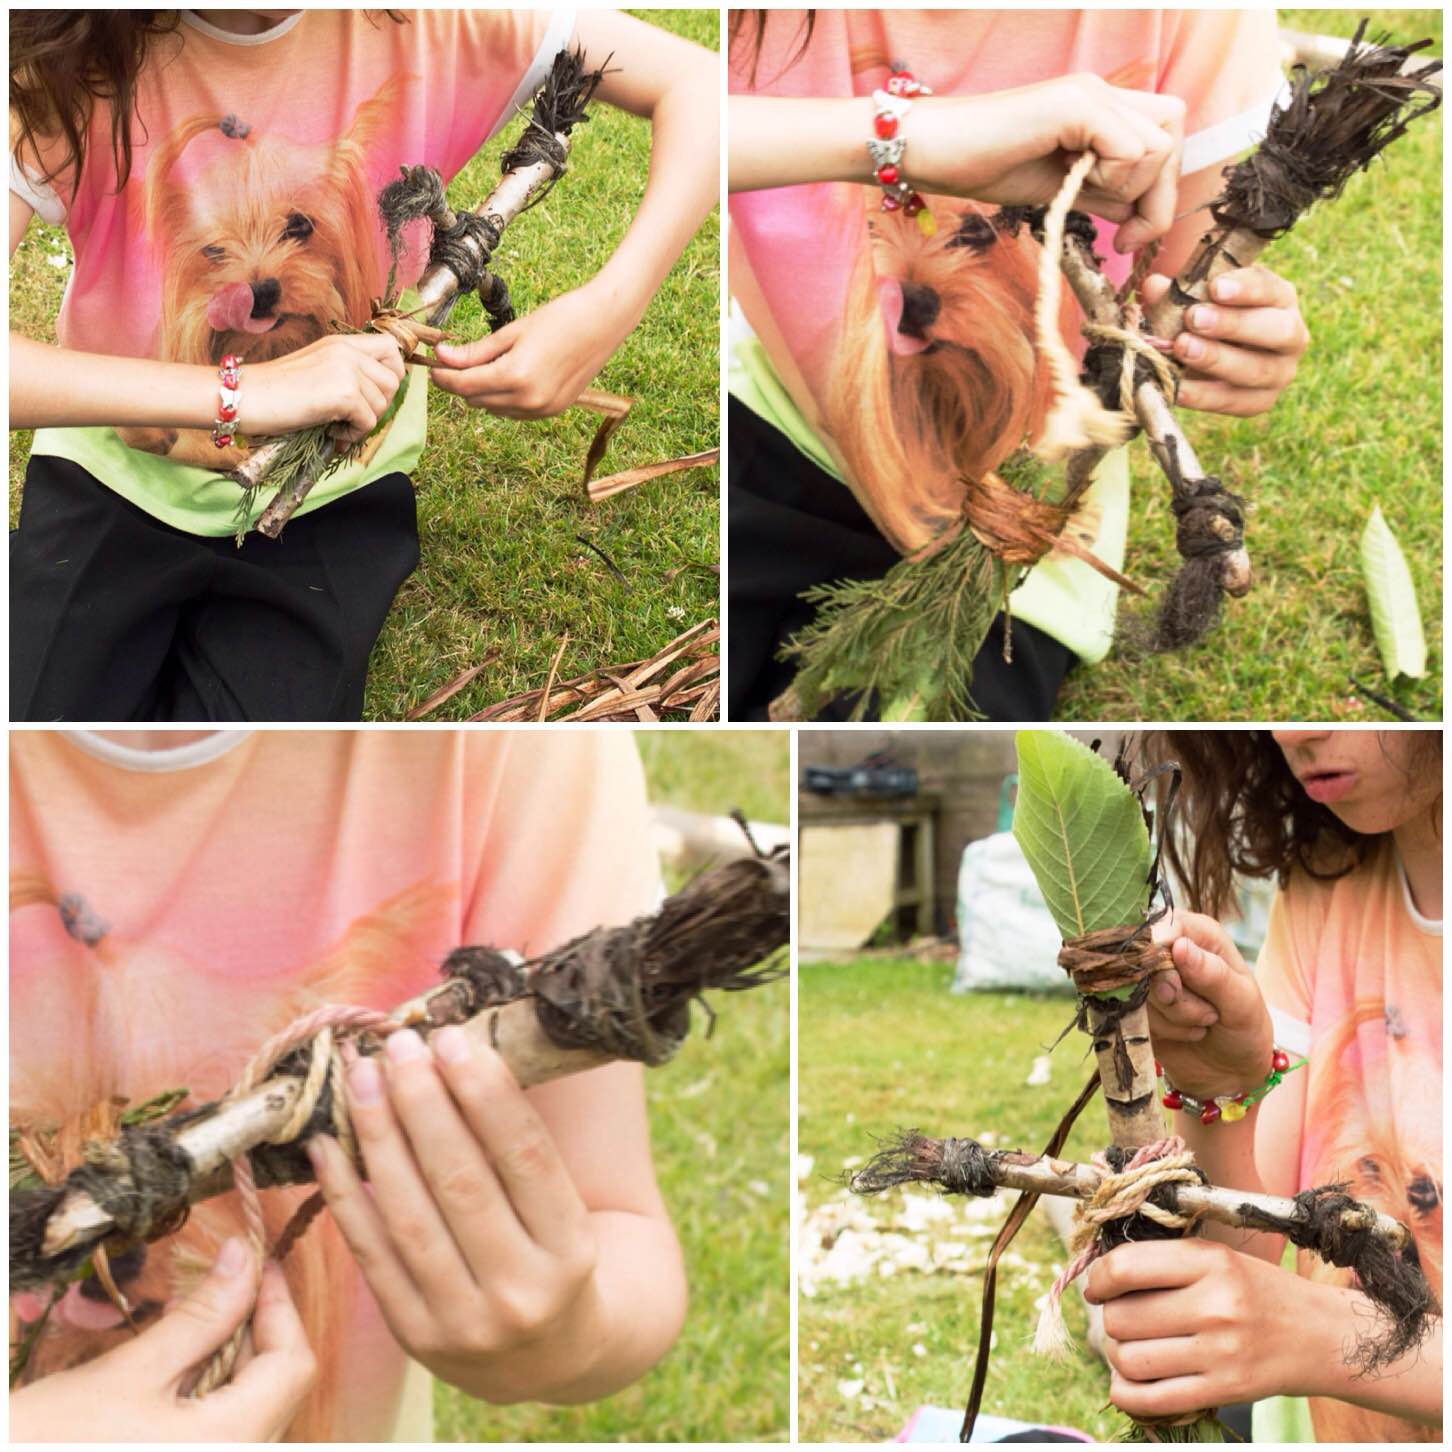
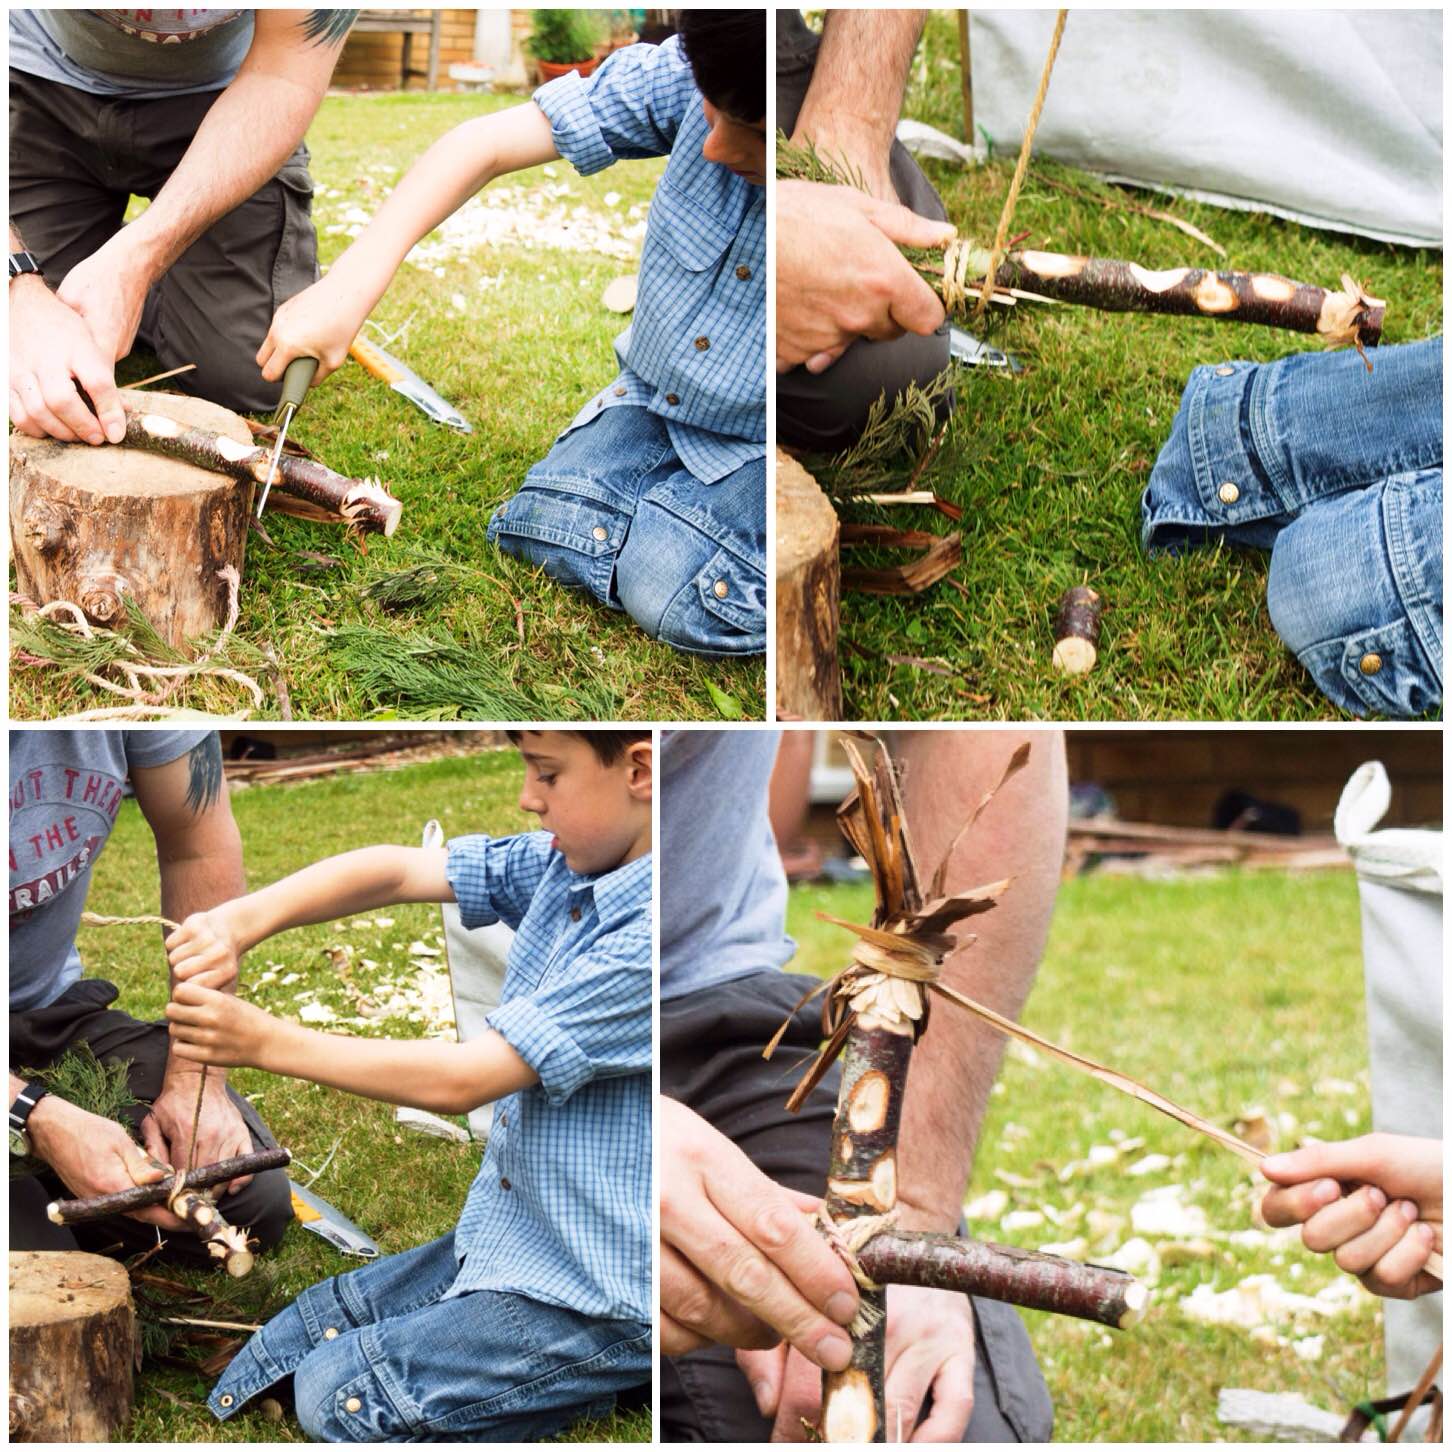
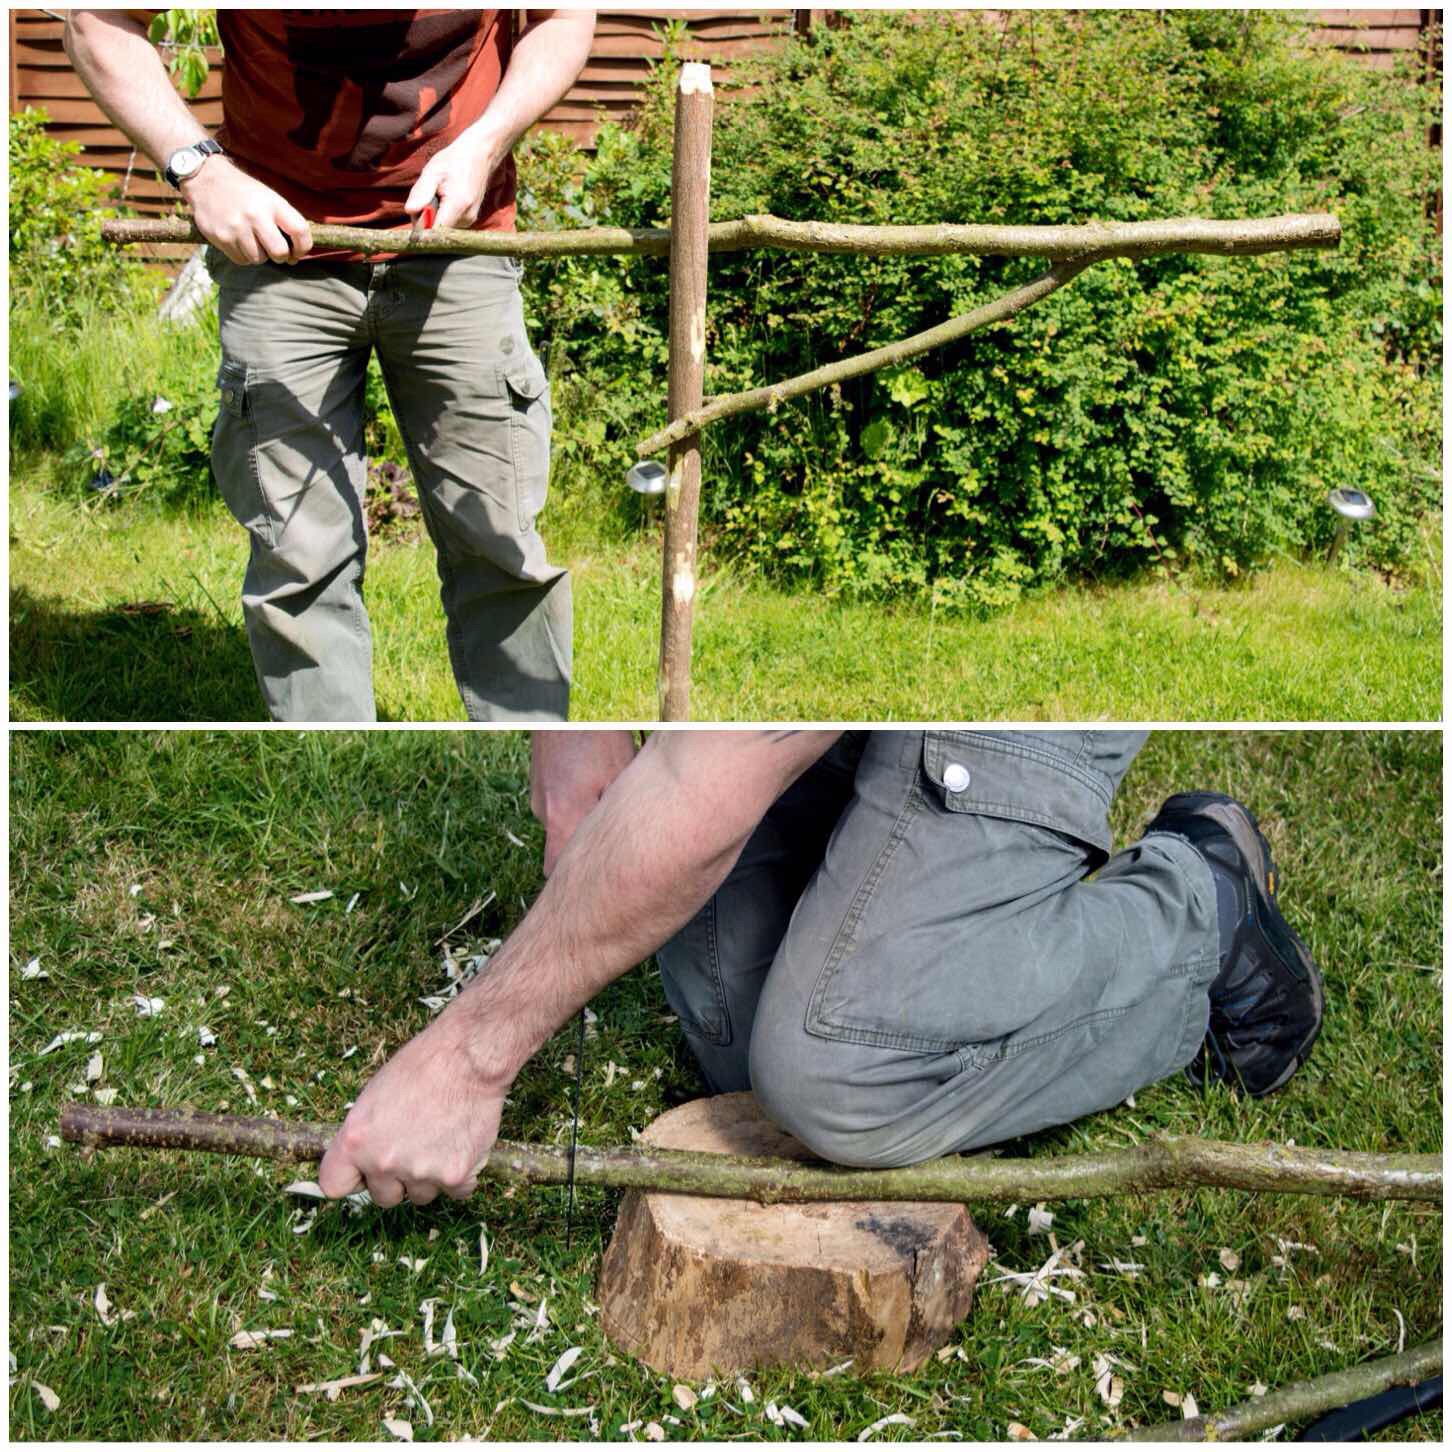
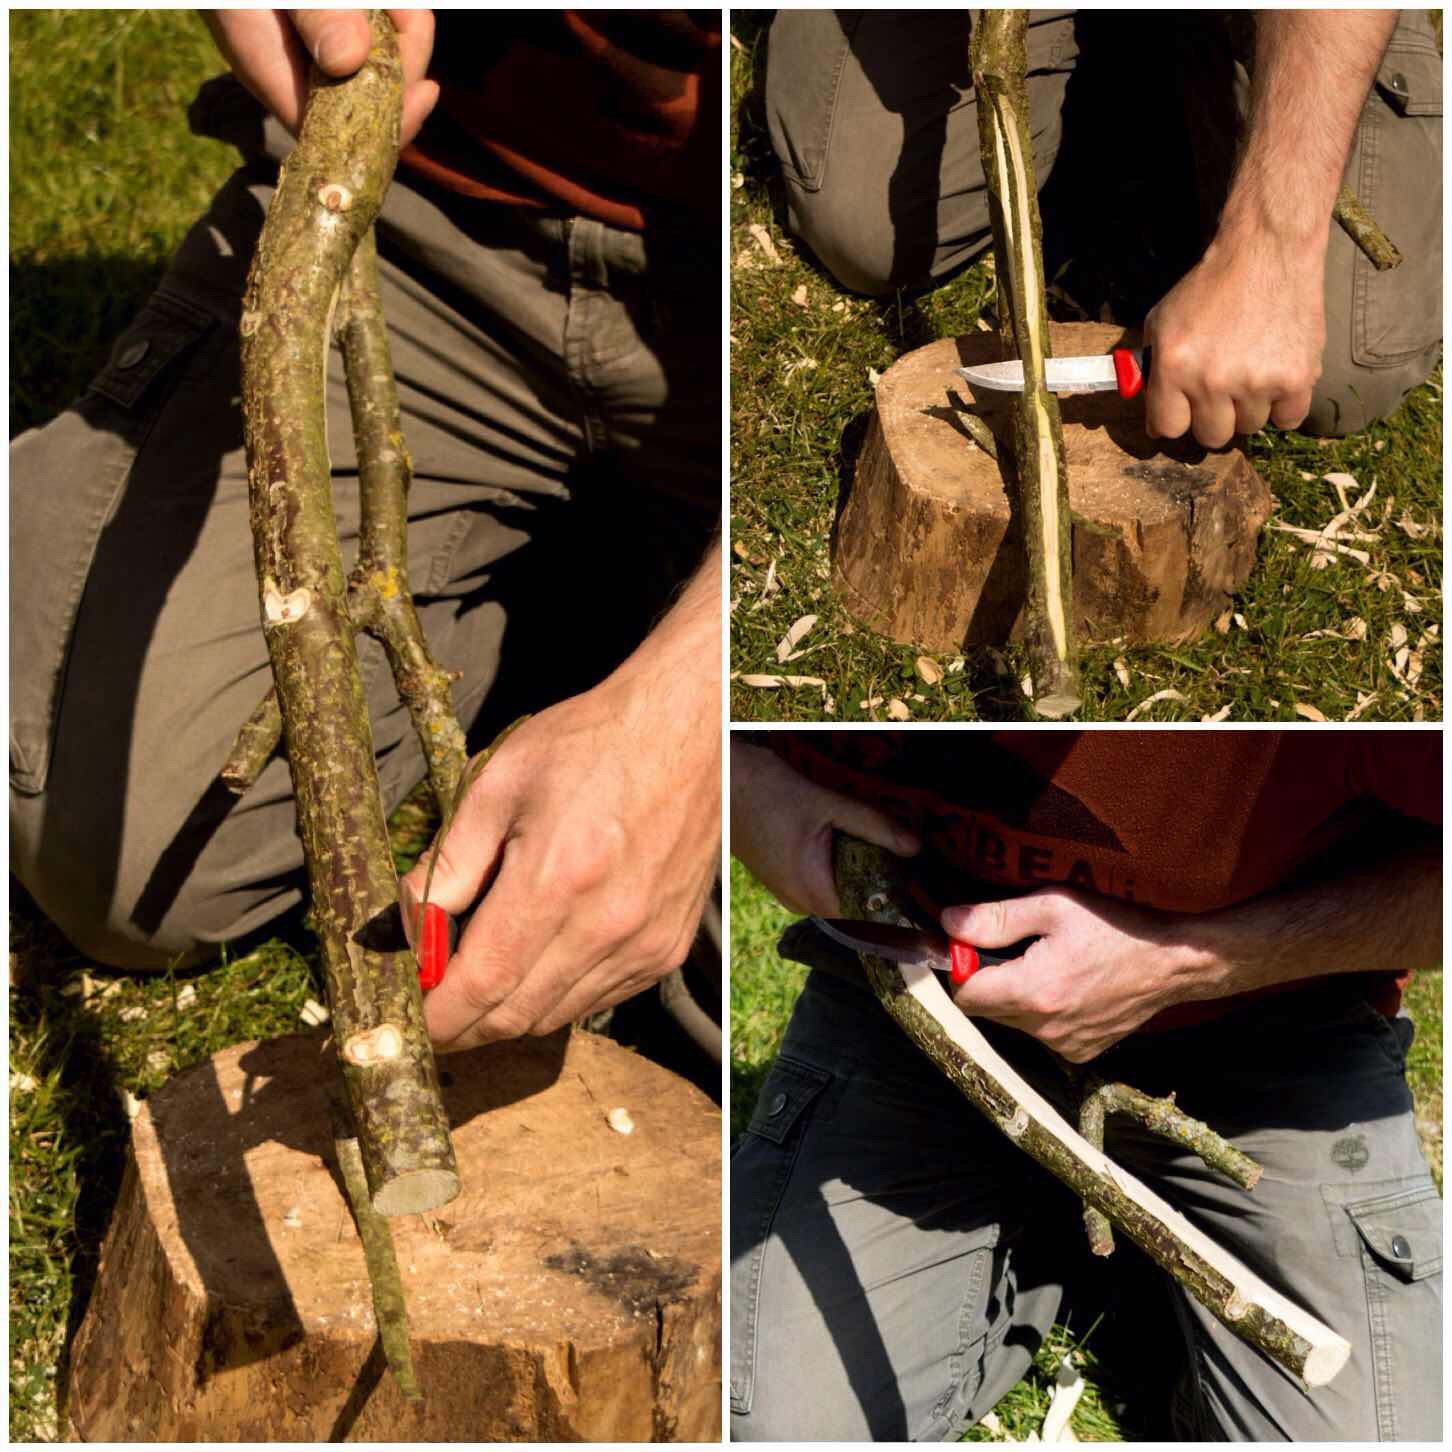
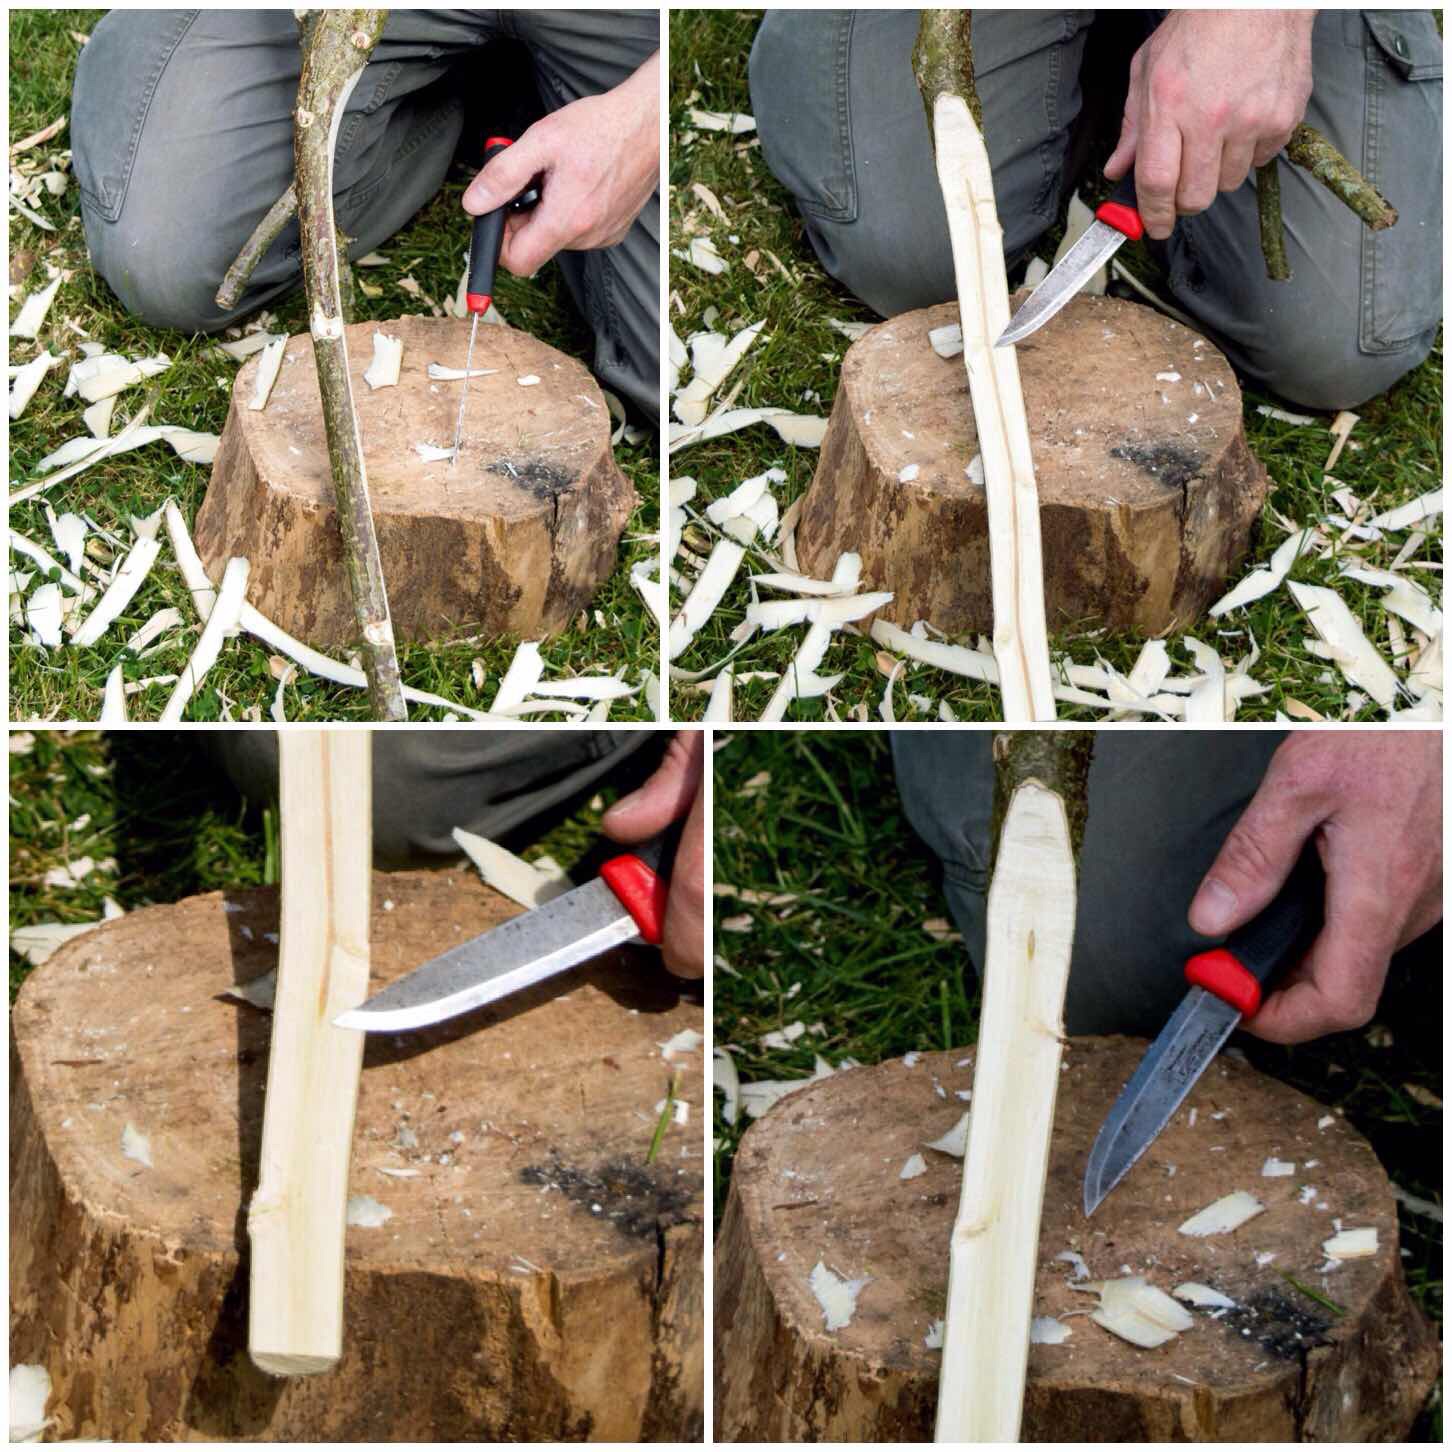
I have probably made at least a dozen of these quick bows and taught many students to make them since 2009. They take no more than a couple of hours to make and are quite powerful for green wood bows. I normally use two hazel or ash rods taped together to make them.
I learnt how to make them after watching a You Tube video by Mark Emery (Sussex Woodsman) who is an expert woodsman.
Father & Son Bow
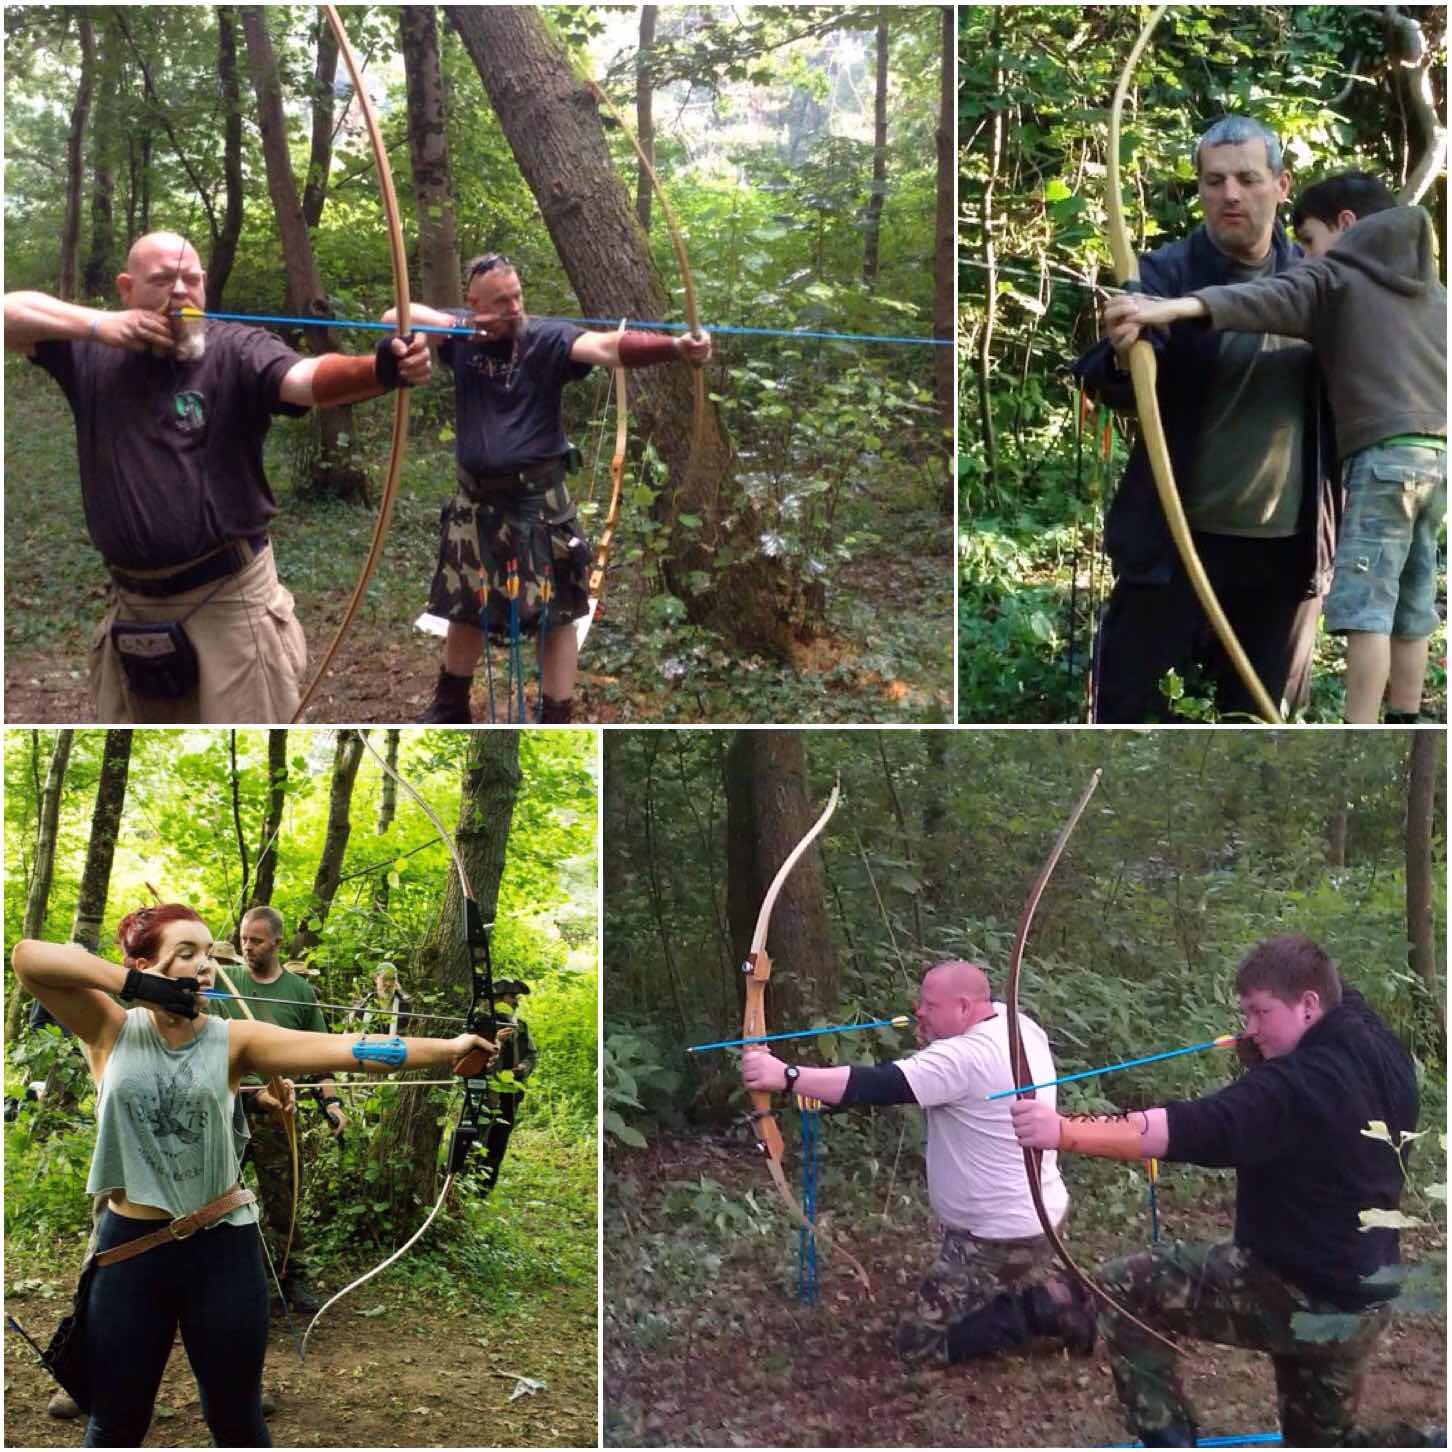
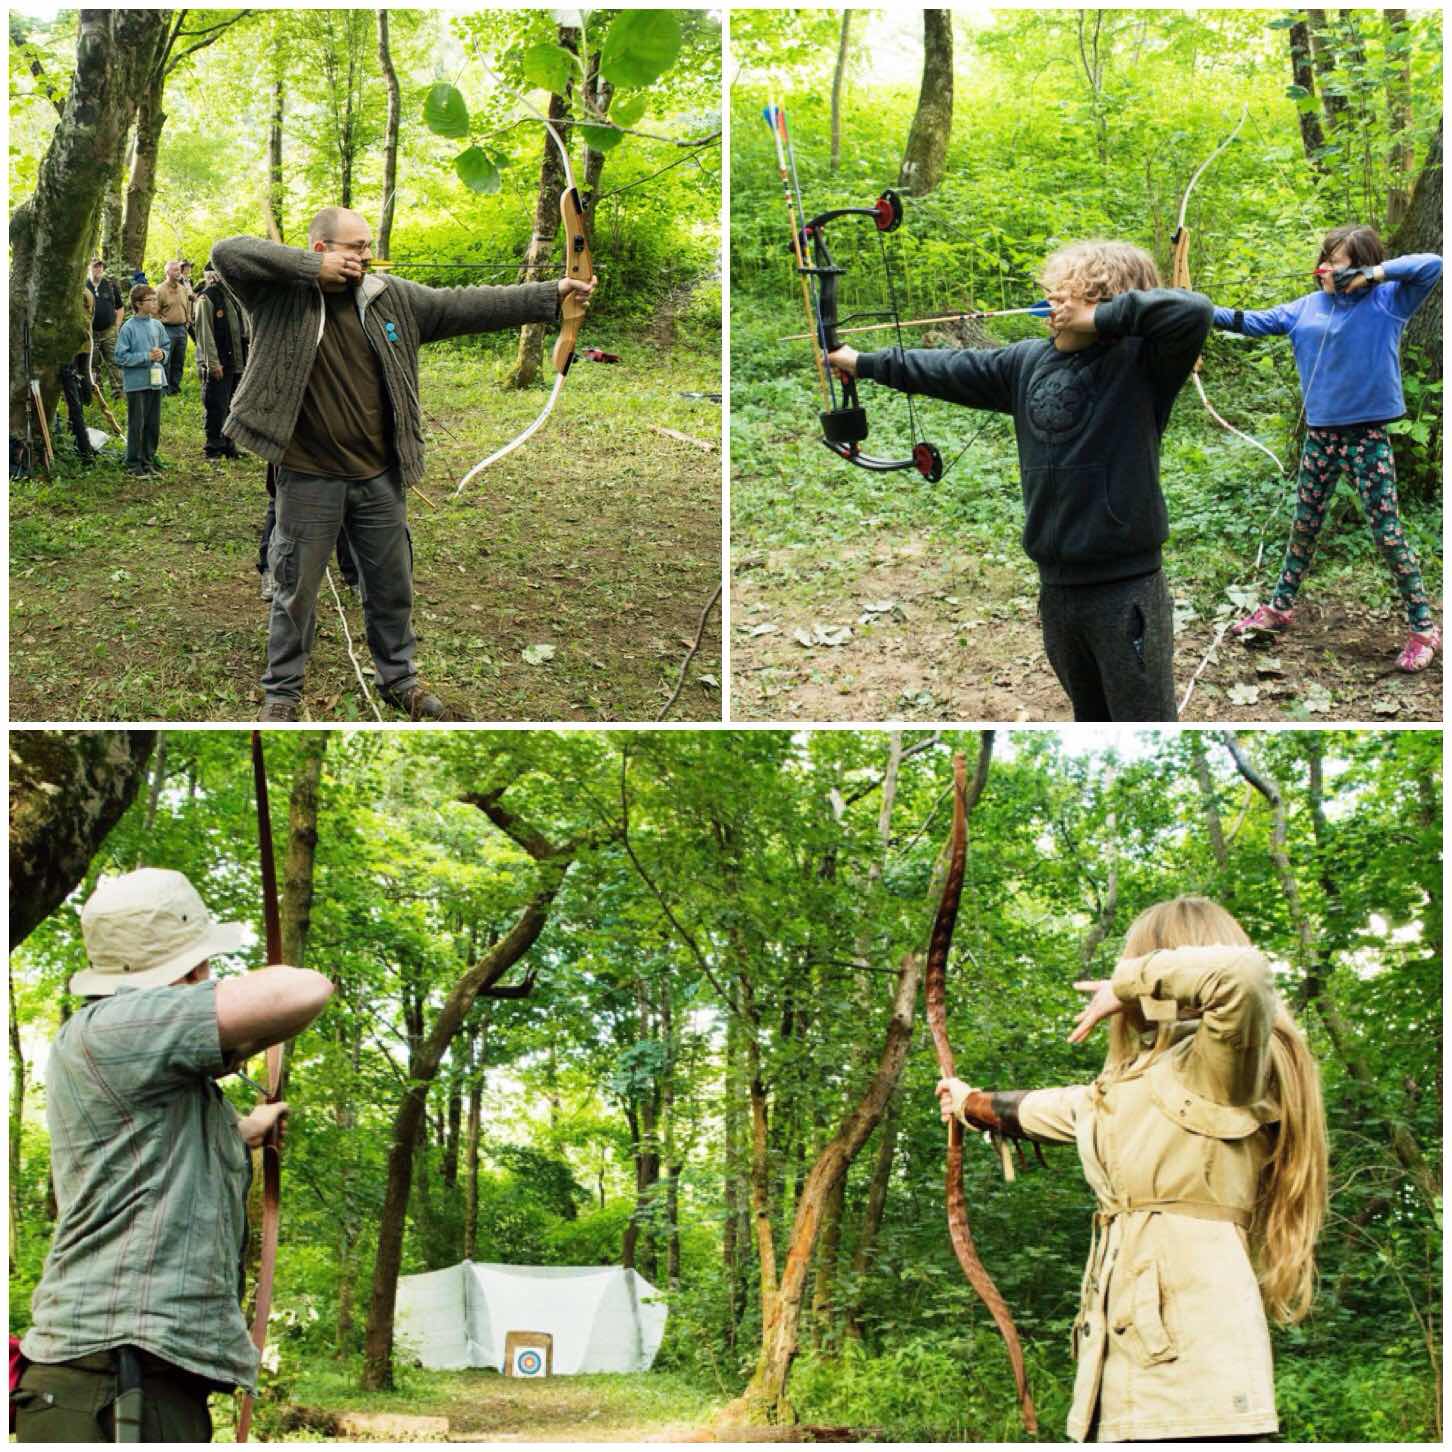
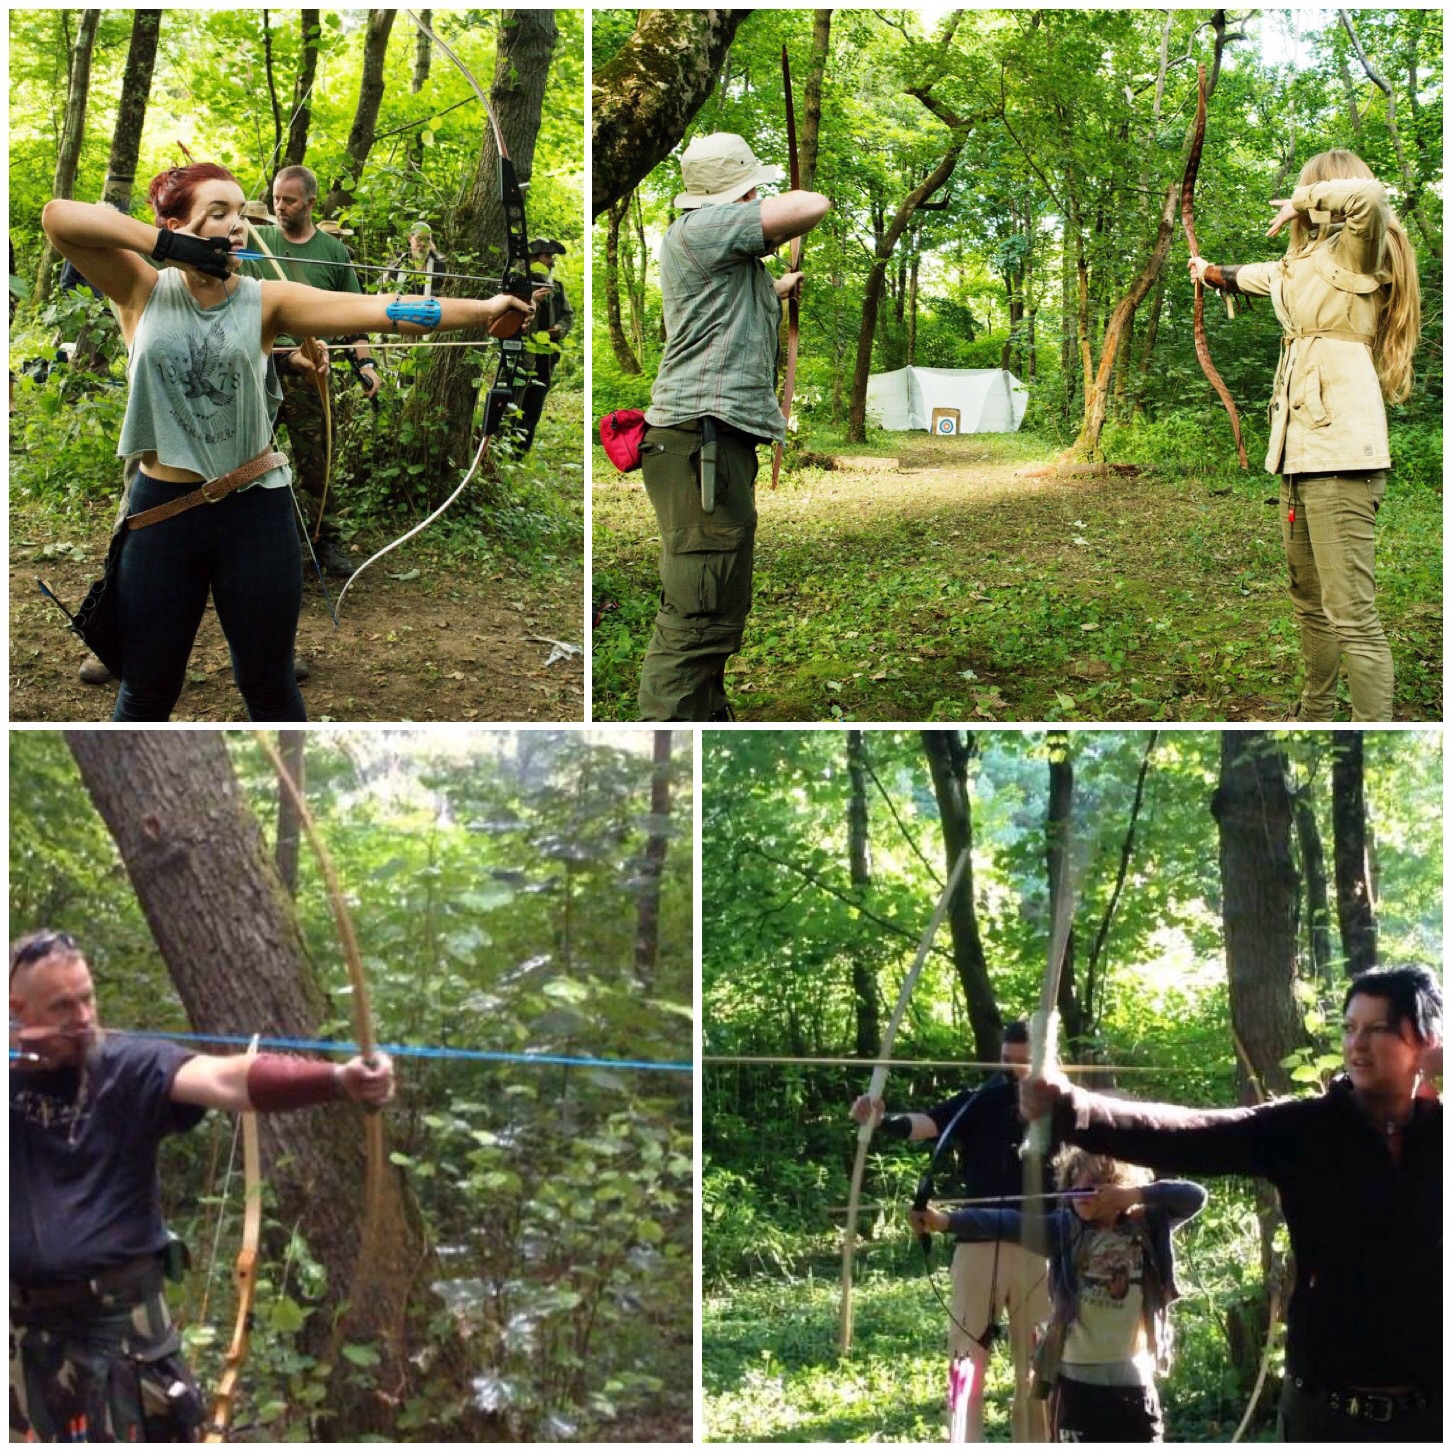
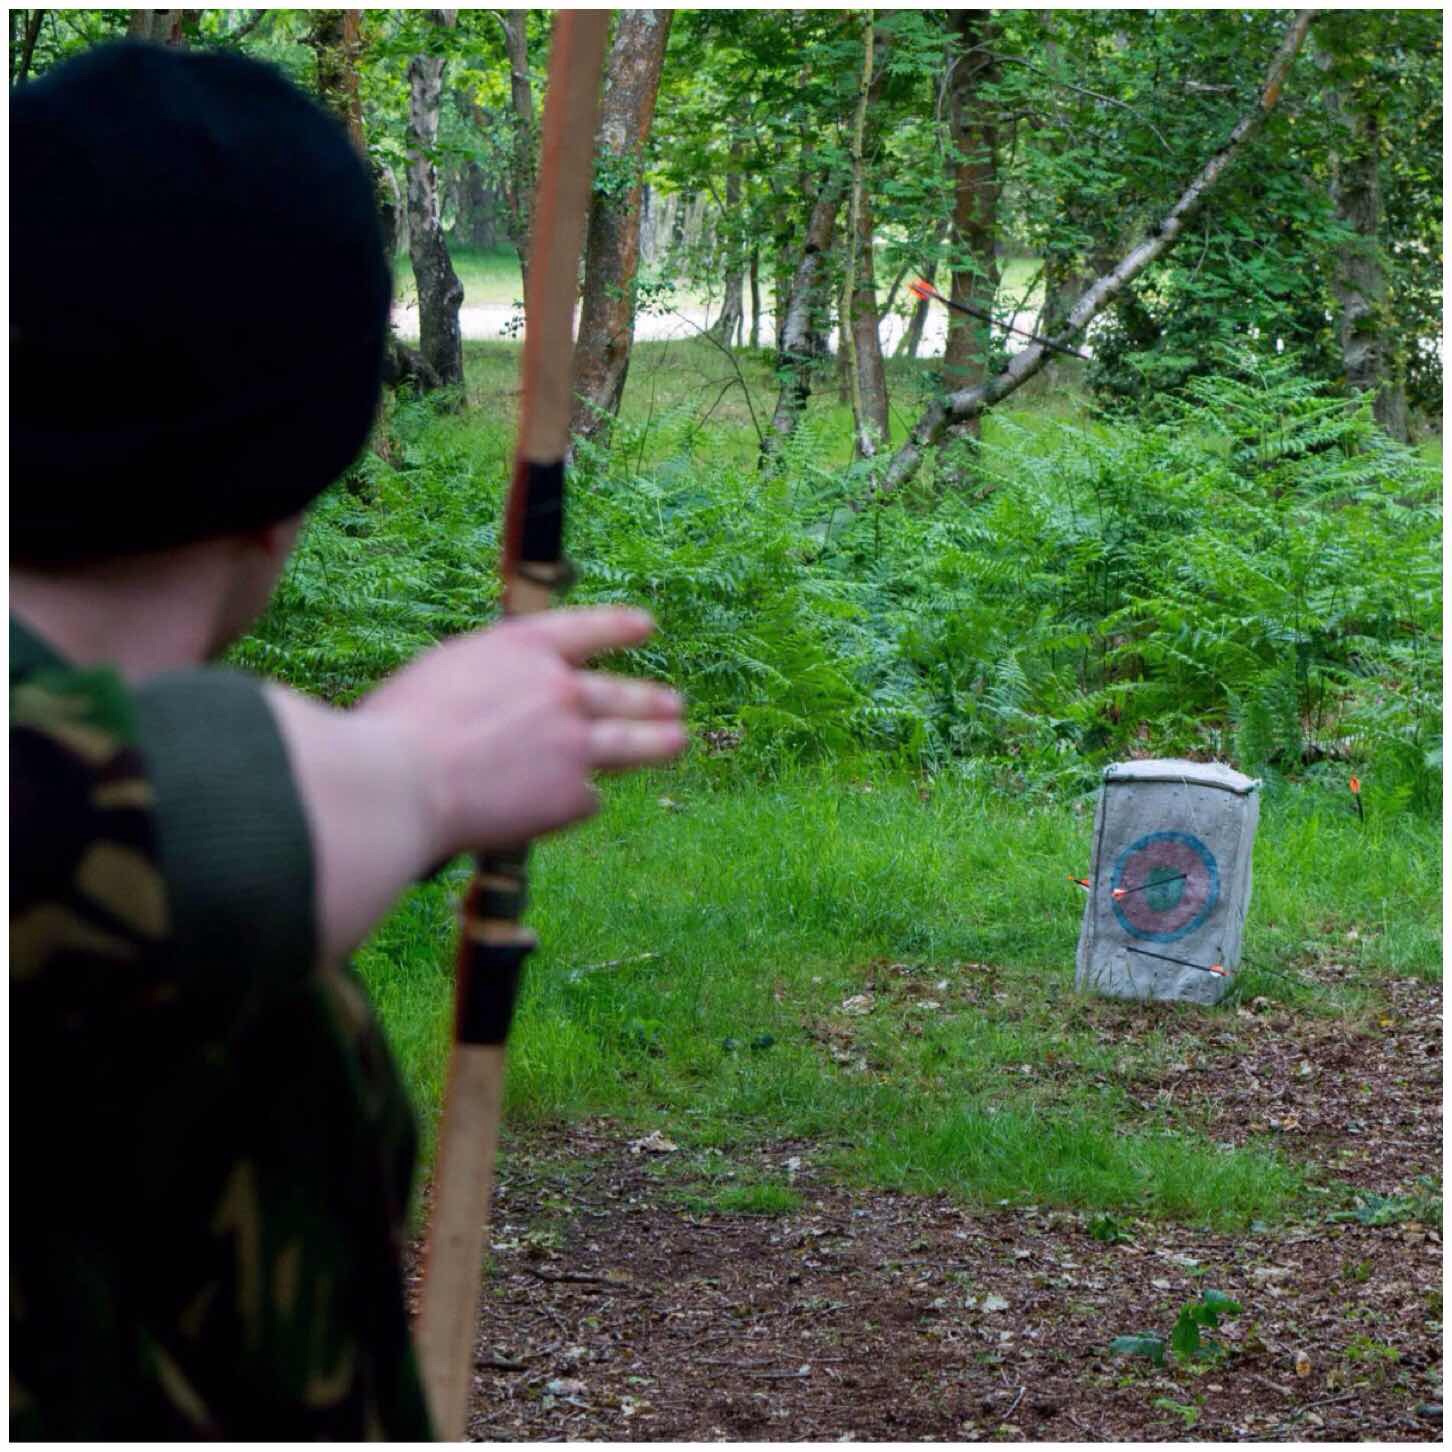
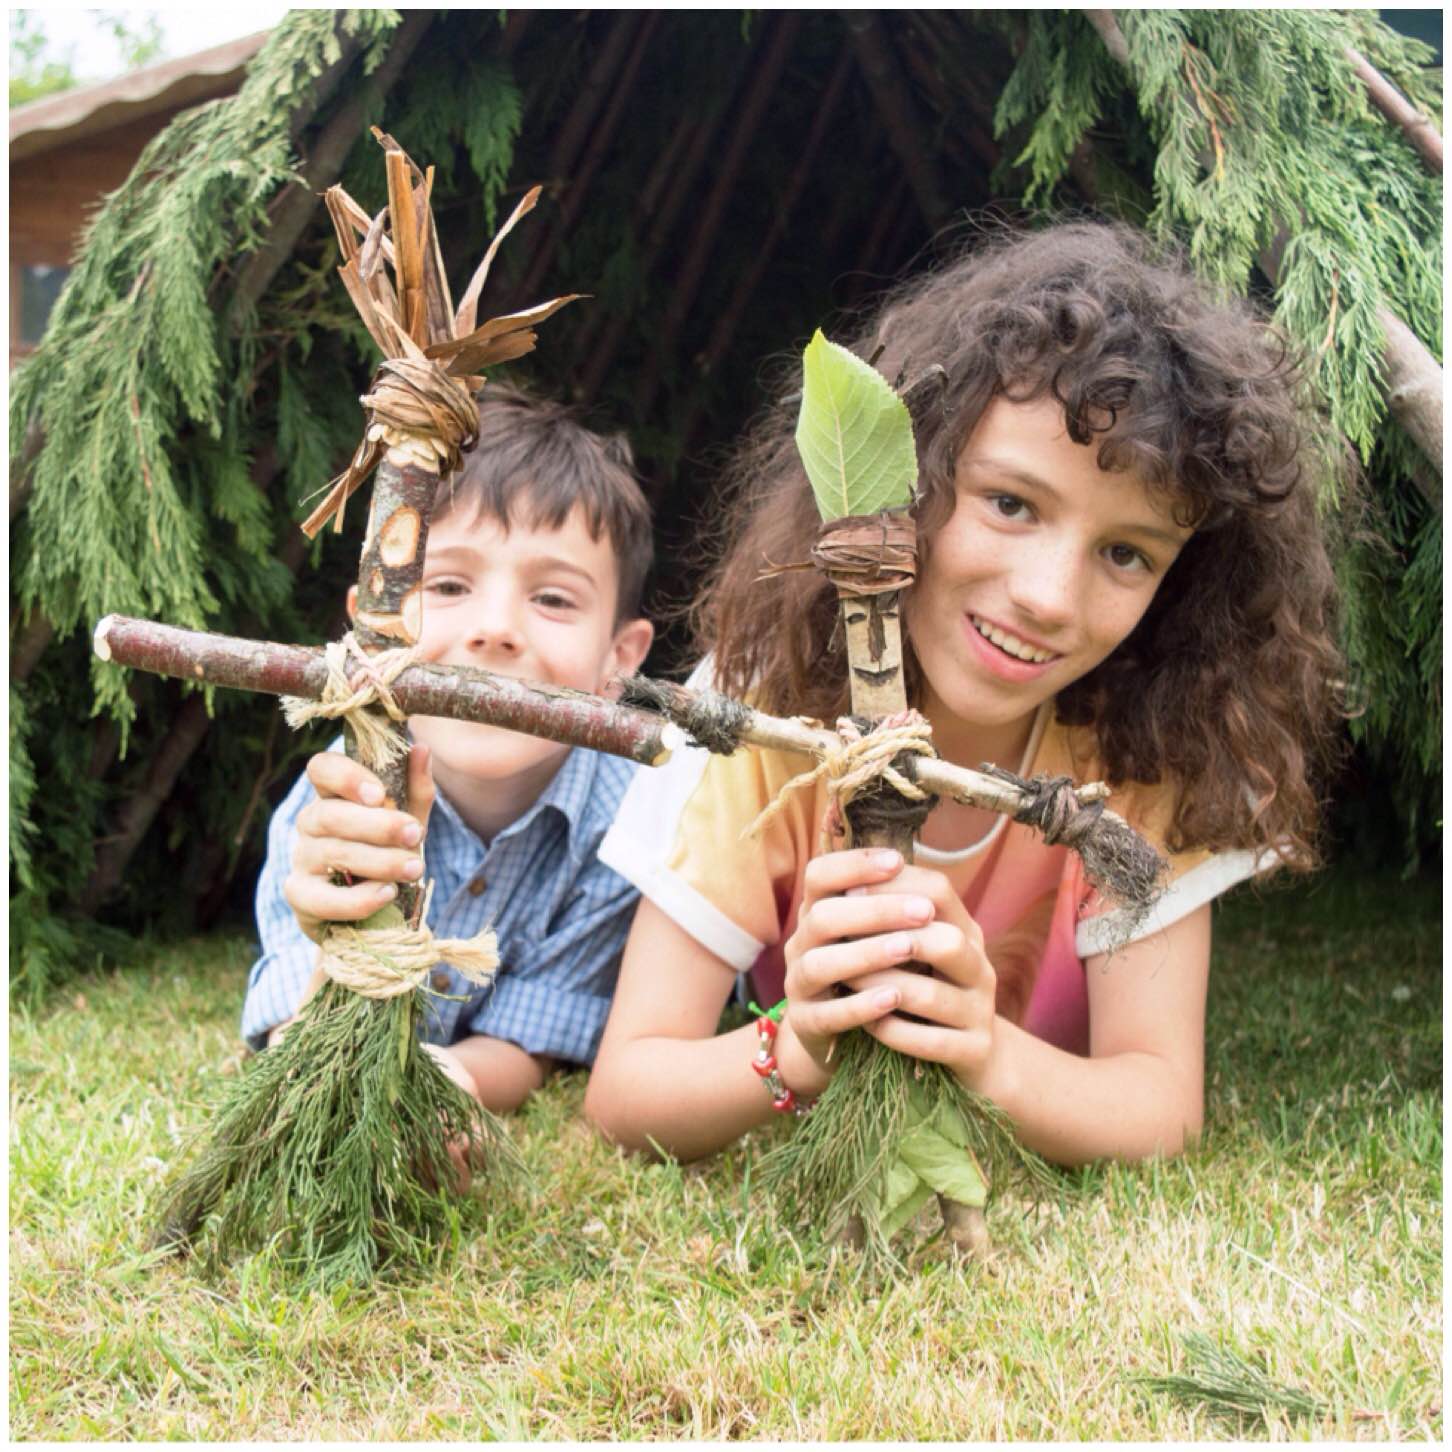
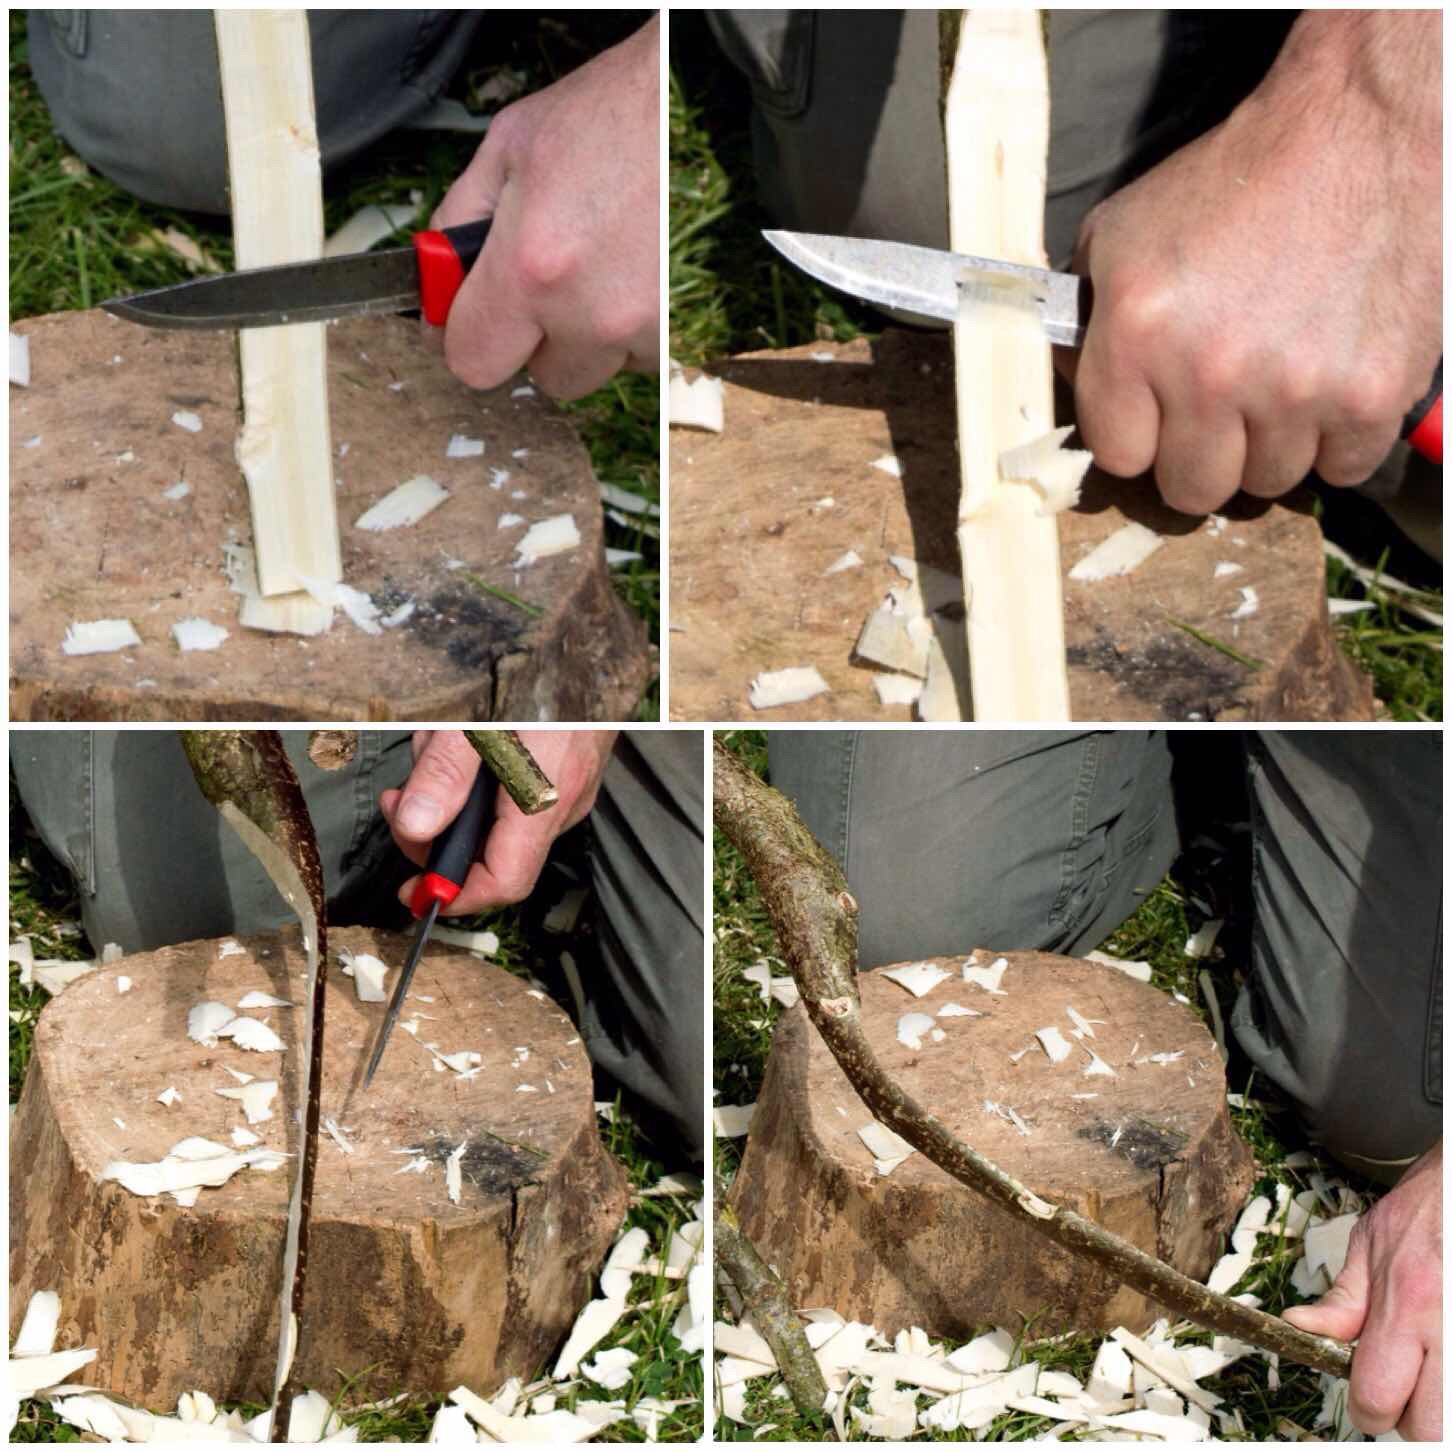
The bow themselves are very light in terms of poundage (20 to 30lbs in draw weight) but on a high arc I can generally get them to shoot an arrow 60 to 70 metres. I usually shoot them on short ranges of less than 20 metres in the woods.
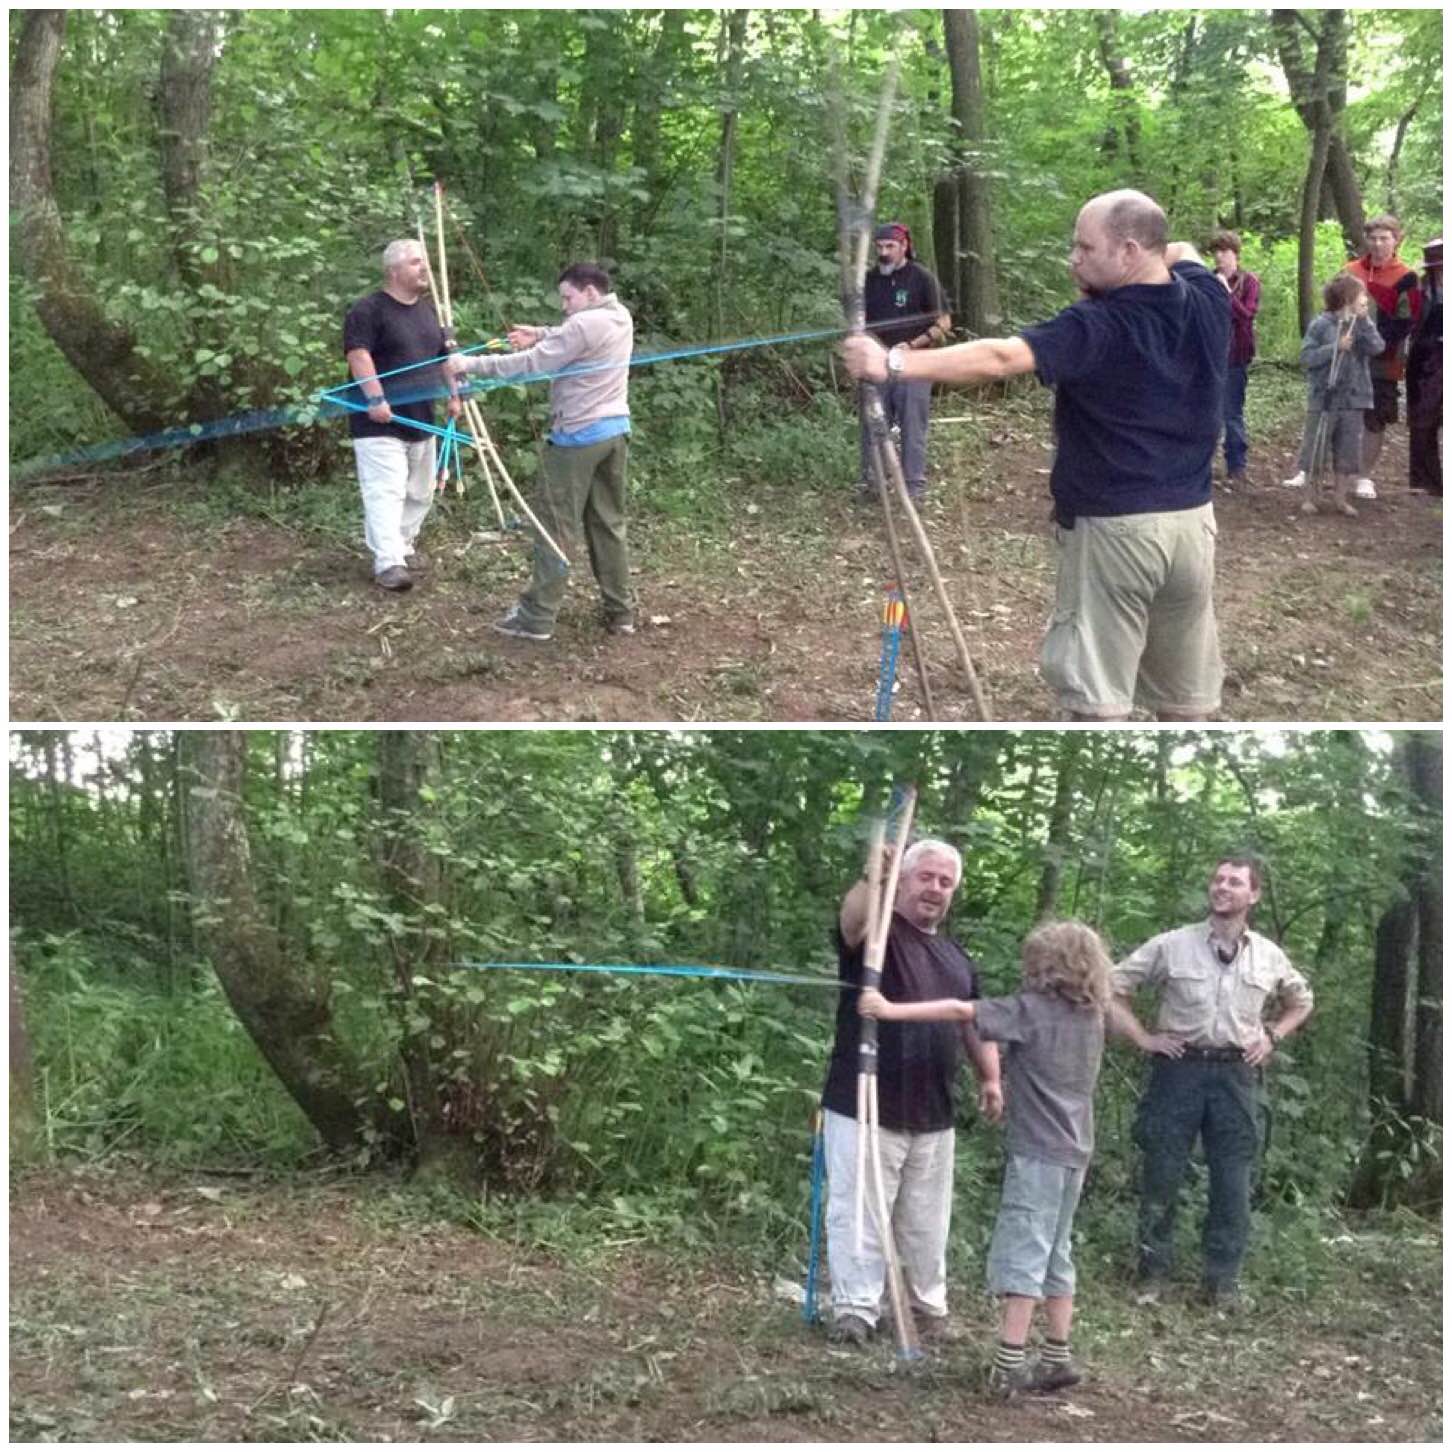
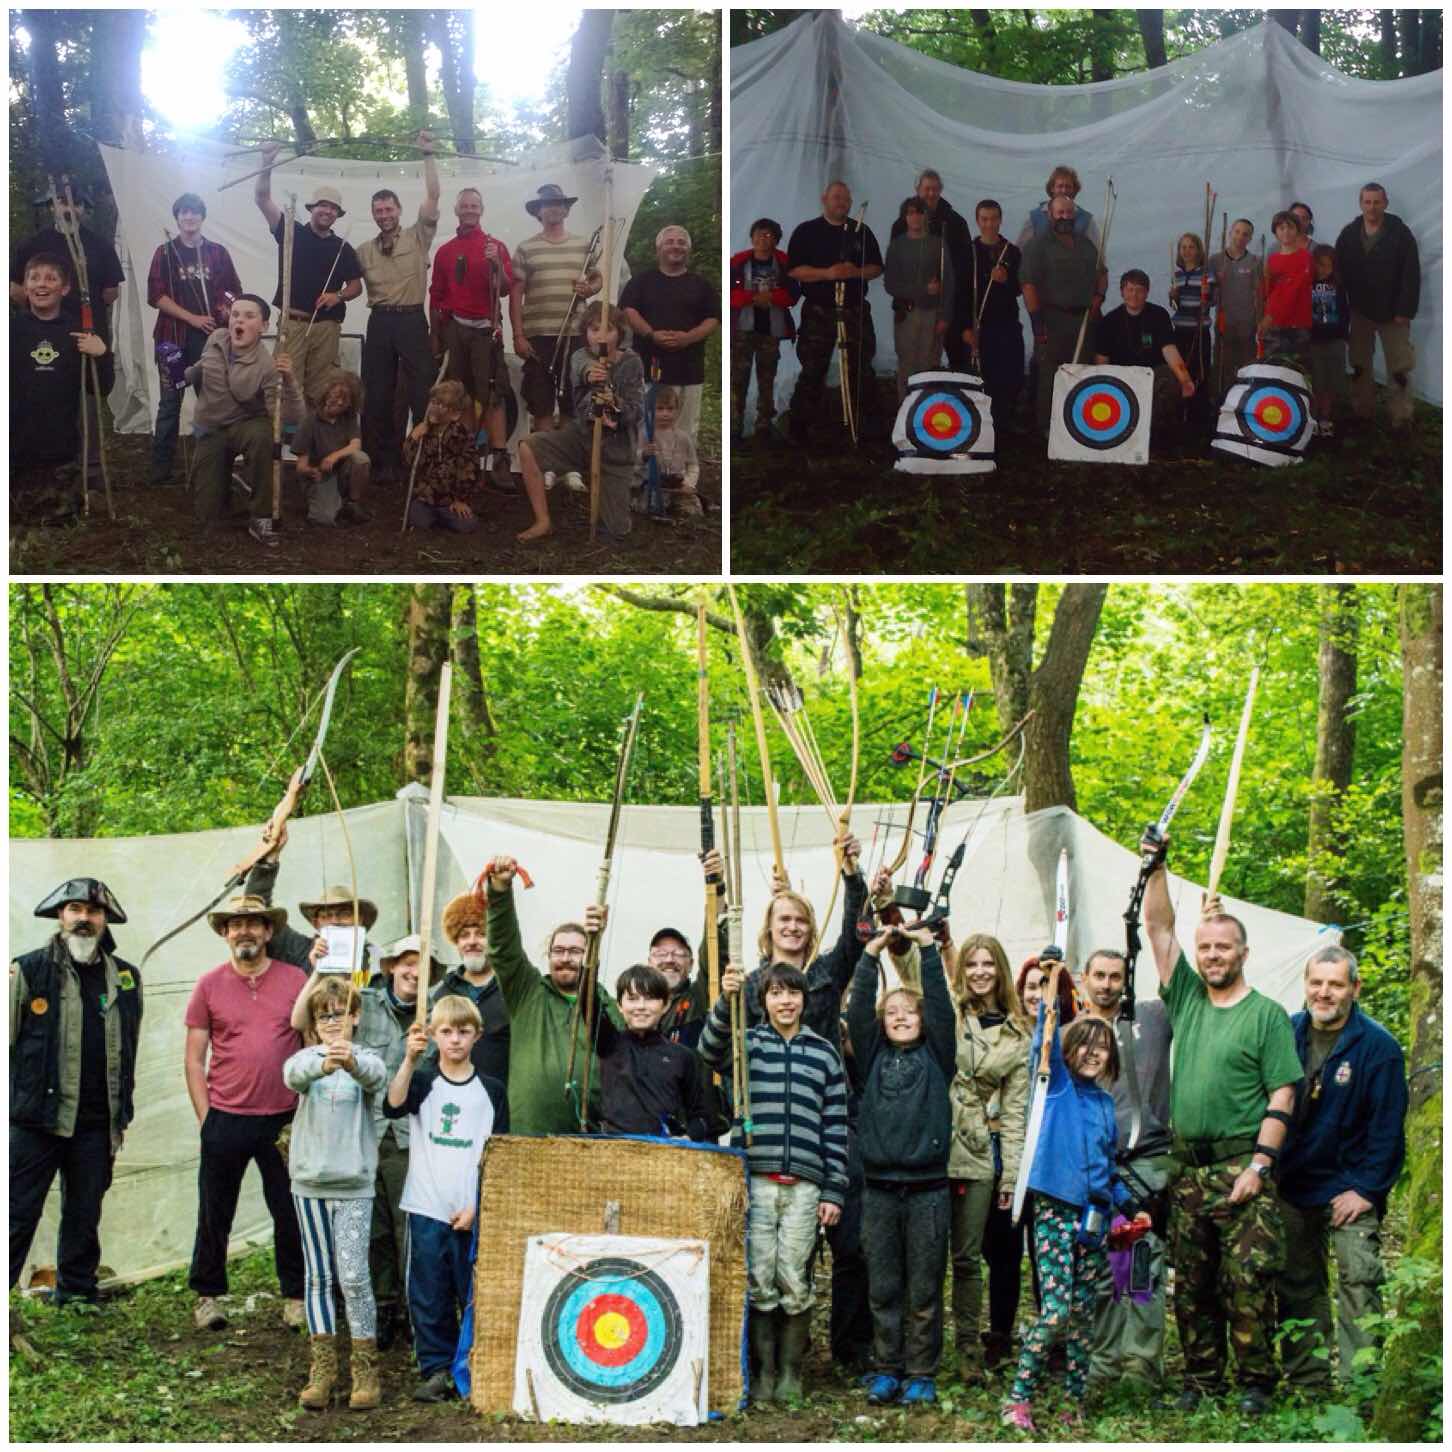
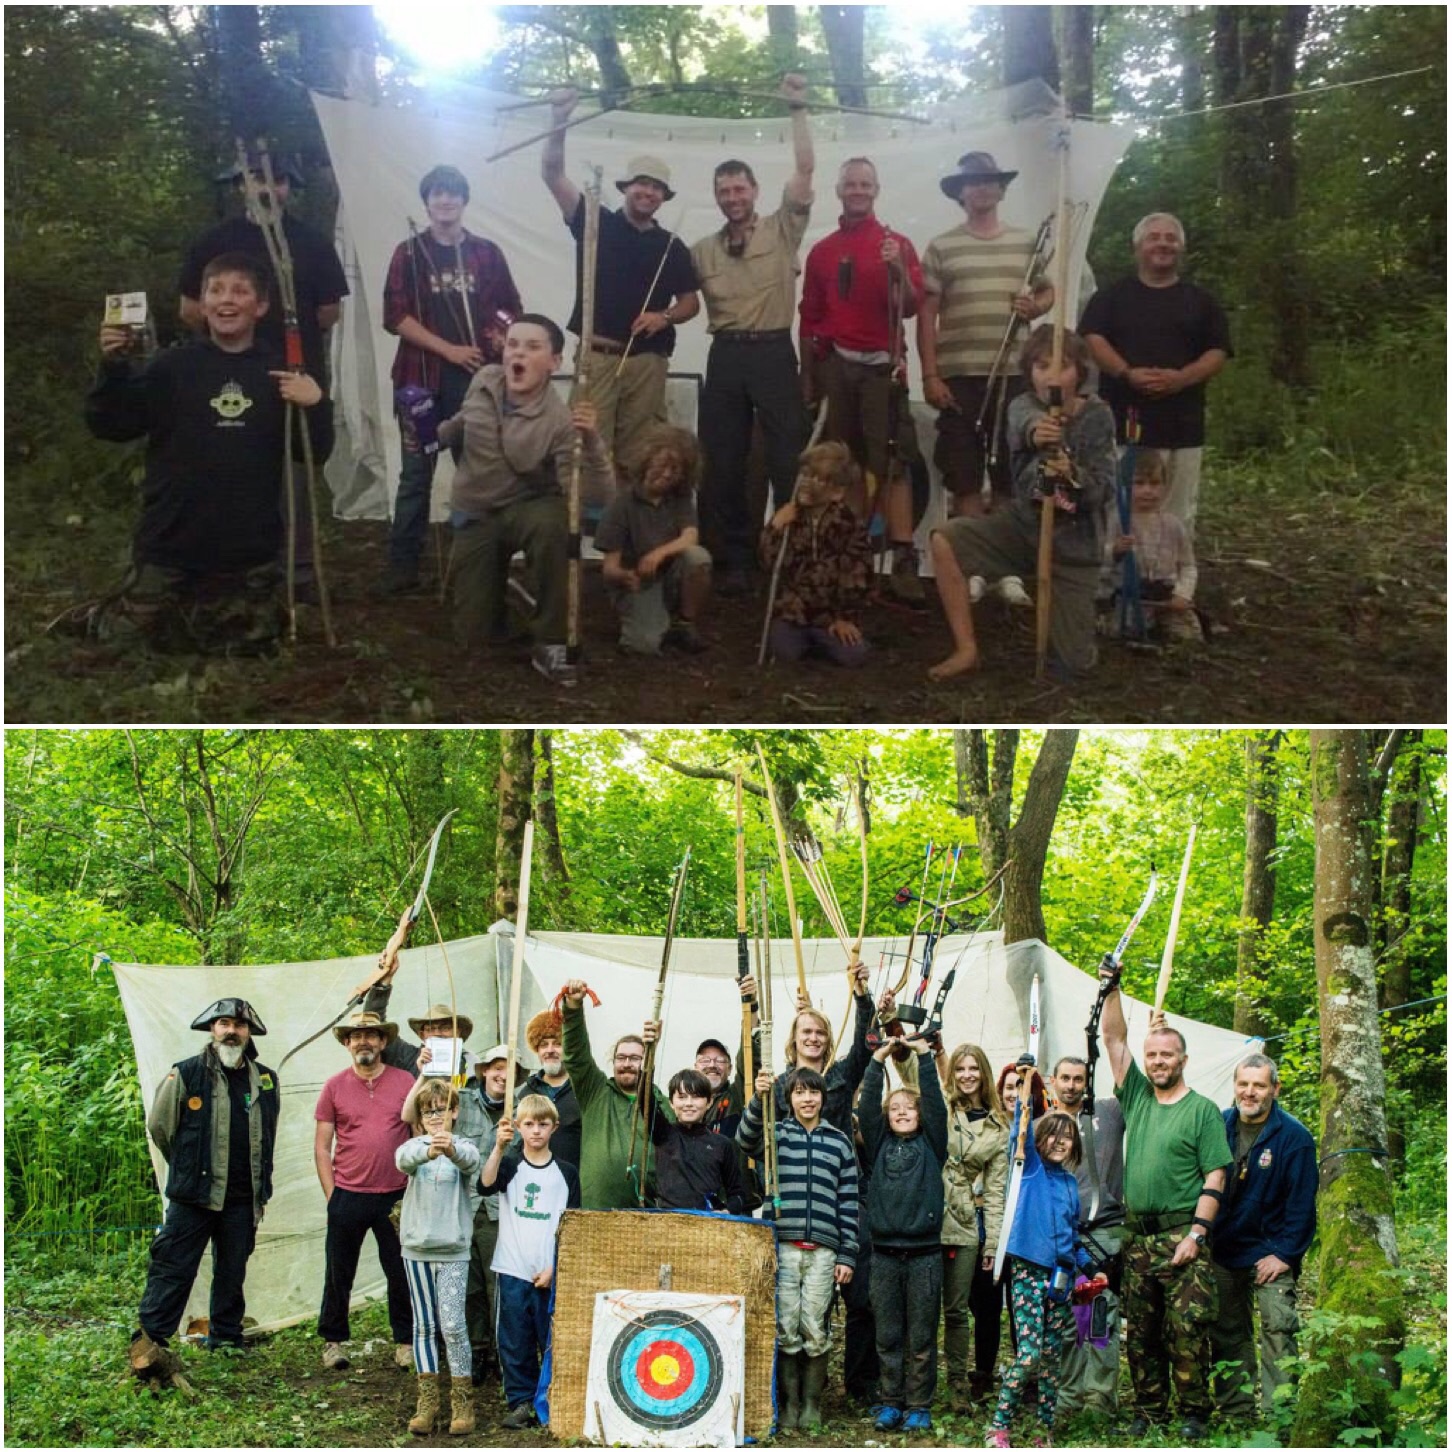
These have proven a massive hit at the Bushcraft UK Bushmoot and there has been a class run on them since 2009 with folks of all ages making them. I particularly like to see a family making one and then coming down to the range of an evening to shoot. I still have ones I made all these years ago and they still shoot well.
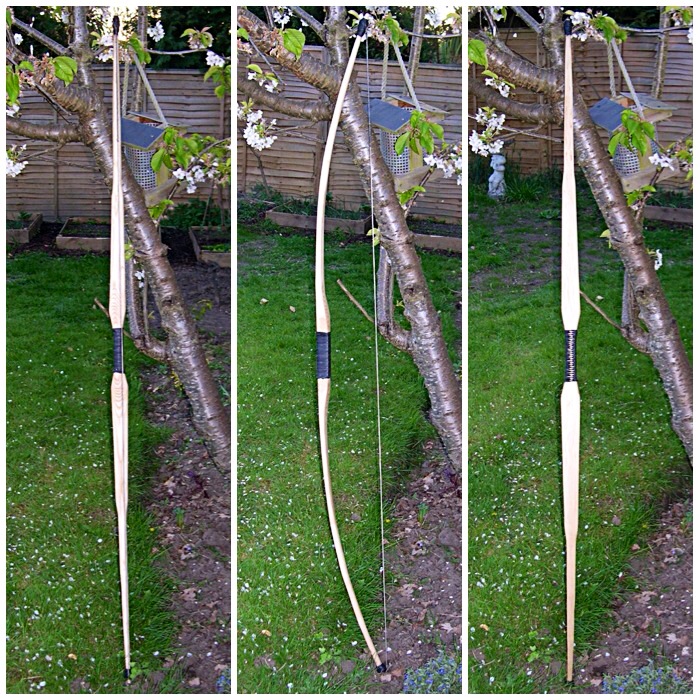
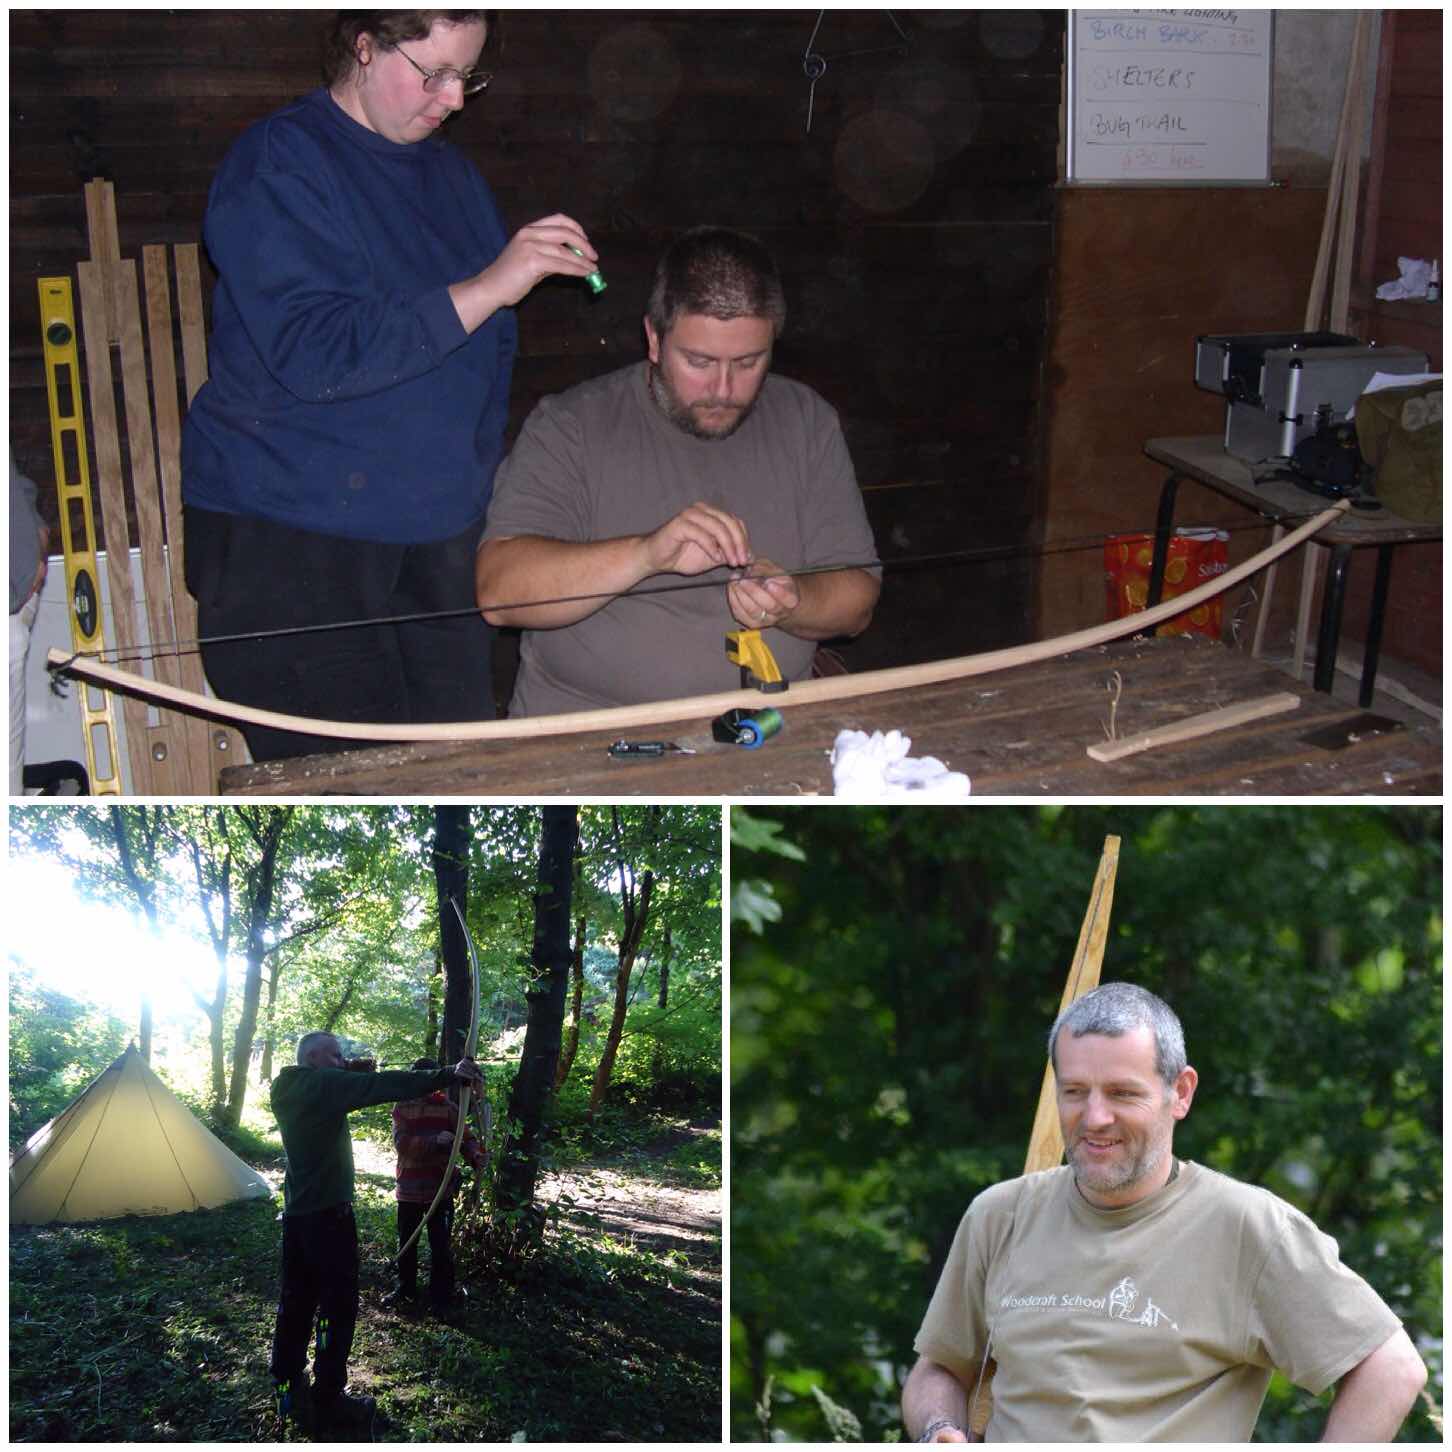
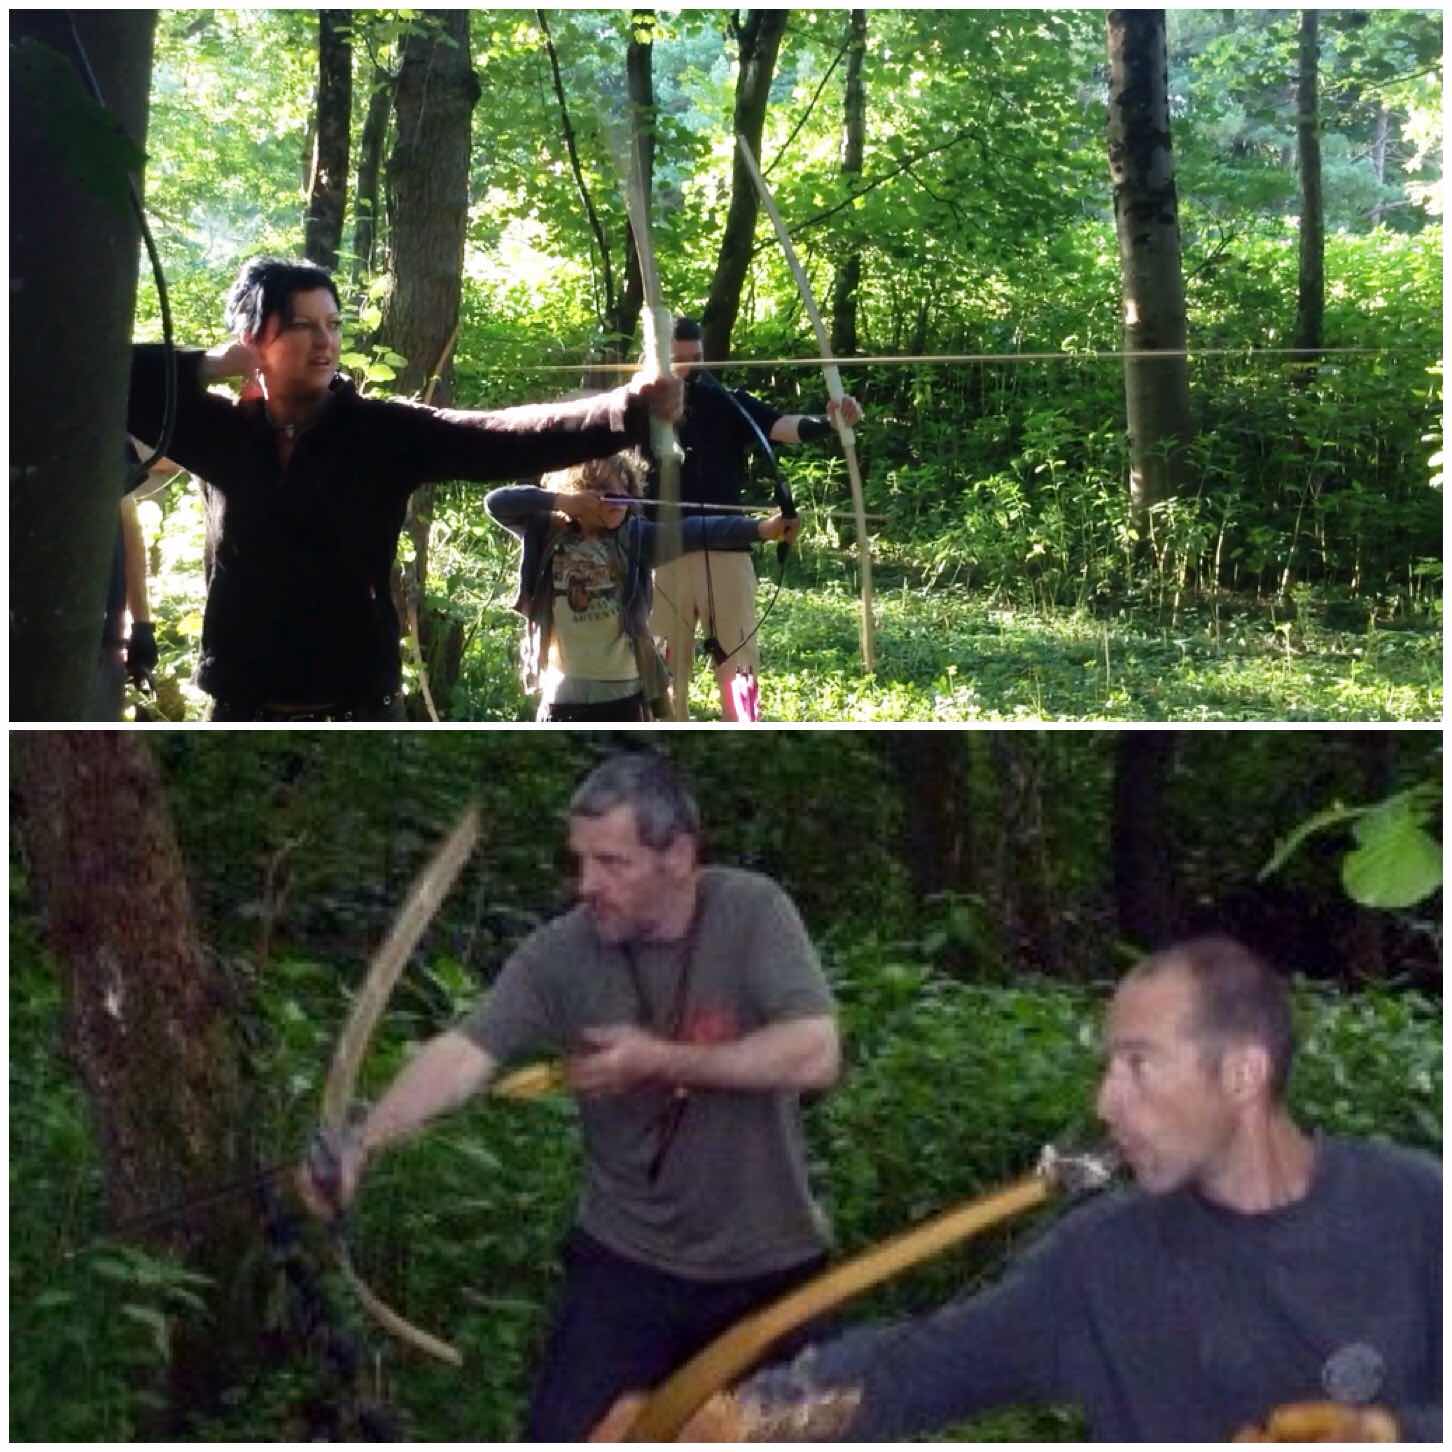
This was the very first bow I made back in 2008 on a Bushcraft Instructors course with John Rhyder of Woodcraft School.
As a group we felled an ash tree , split it into staves and carved our own bows. We did this over two weekends with a month in-between so allowing the stave to season before the tillering process. The ash flatbow has to be made wider than it is deeper due to its deep rings however if it is tillered well it will still shoot fast.
Ash Flatbow
This bow comes in at about 40 lbs in draw weight and has a tendency to ‘twat’ the inside of your forearm so a arm guard is a must.
I give this bow mostly to adults to shoot because of its draw weight but with a good eye and a steady hand she can be very accurate. I started shooting right handed as that is how I was taught to shoot a rifle many years ago however my friend Charlie Brookes suggested one day to try left handed shooting and suddenly I started to hit the target. I am left handed and left eye dominant but the muscle memory from using a rifle made it difficult to shoot left handed at first – however with a lot of practice that has gone, so I am now happy to shoot with either hand.
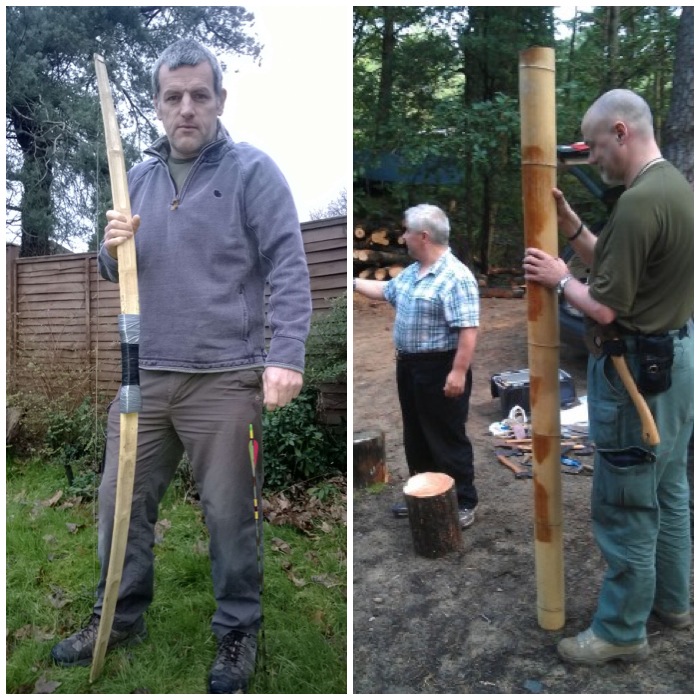
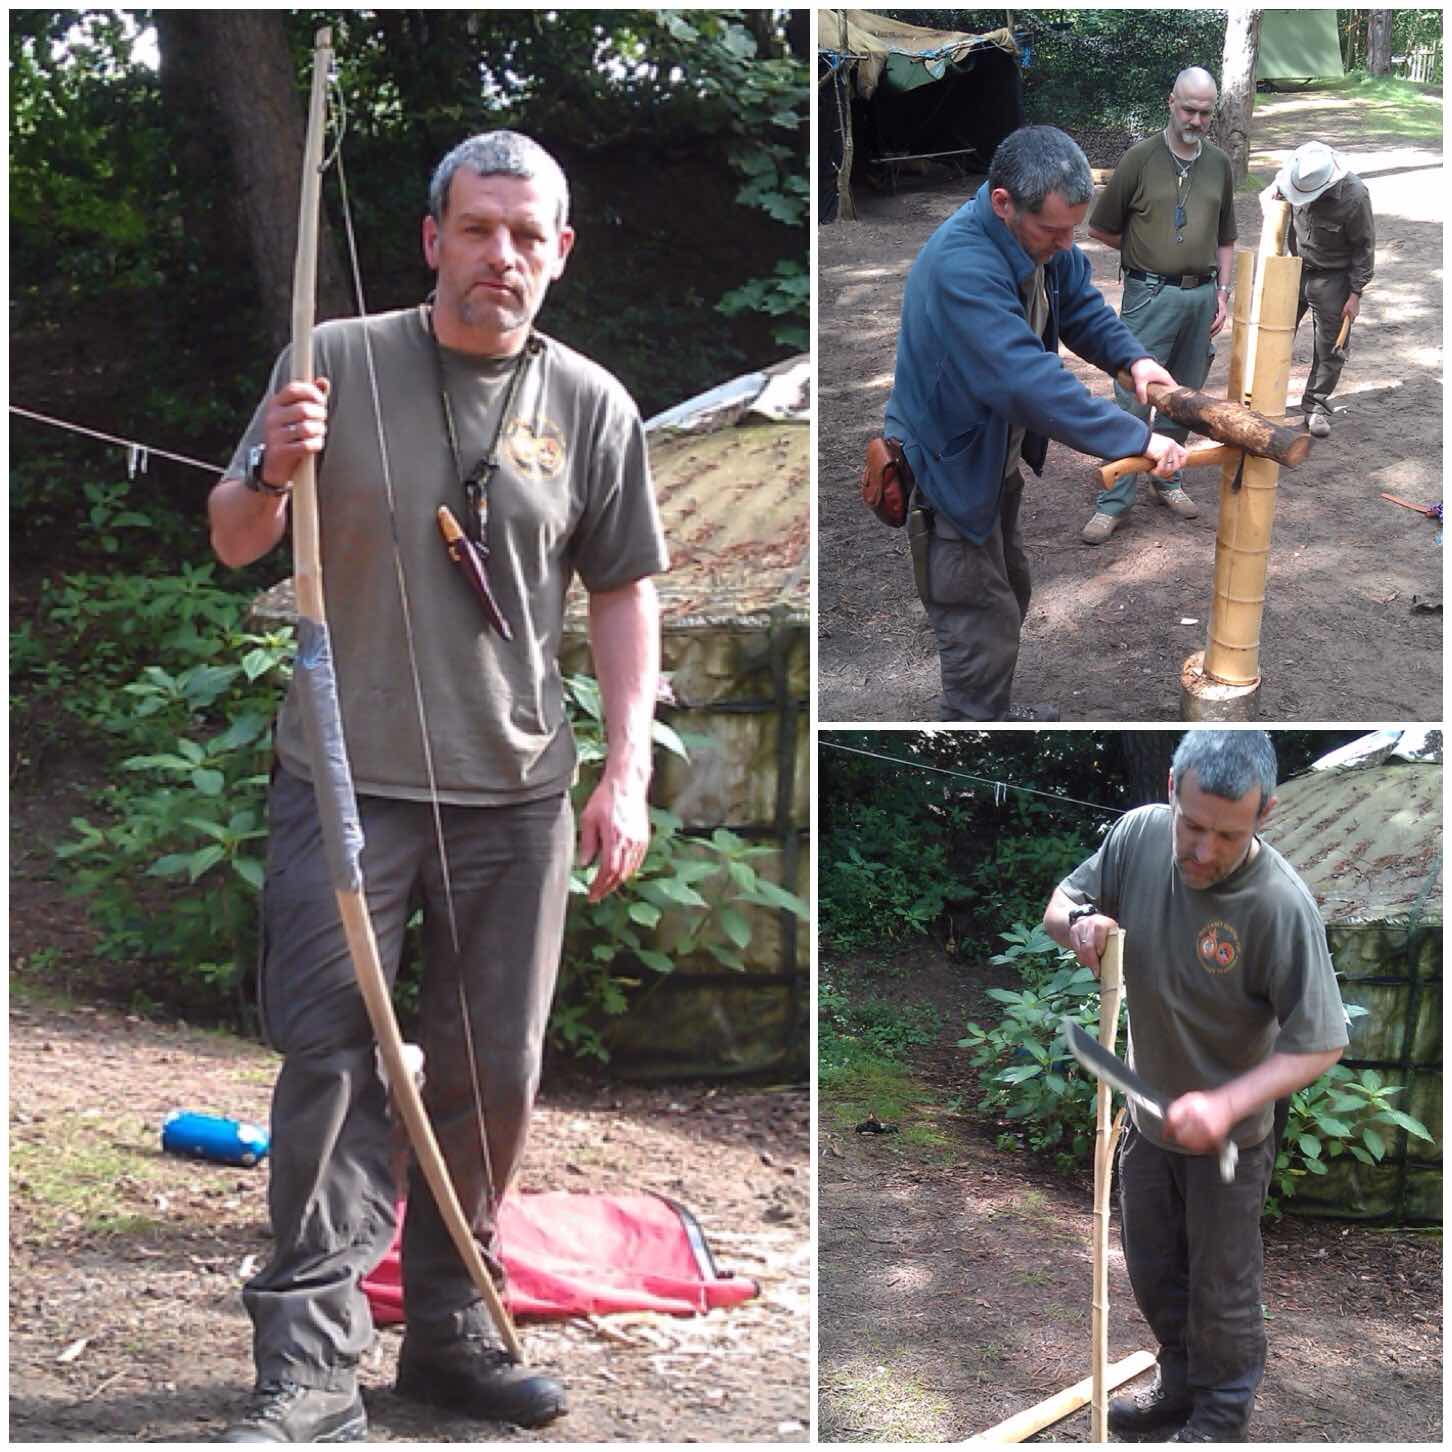
I made this bow about four years ago at the BCUK Bushmoot and was taught by Wayne Jones (Forest Knights). It is similar to the ash bow in that it is wider than it is deeper however it is made out of two pieces of bamboo (the HowTo…. goes into detail of why two pieces are used).
Bhutanese Bow
Traditionally the two pieces would be joined together with wooden pins and strapping but on the day all we had was tape. In the courses Wayne runs nowadays he uses the pins and strapping.
It is quite a light bow (about 30lbs in draw weight) however it has the advantage of being made very quickly (a couple of hours in competent hands).
Bhutanese Bow
Another unusual feature of this bow is that the hard outer shell of the bamboo becomes the Belly (the part of the bow facing you when shooting) of the bow and the softer inner part of the bamboo becomes the Back of the bow (the part of the bow facing away from you when shooting). I am told that this is to do with the characteristics of the bamboo – because it is a grass technically and not wood.
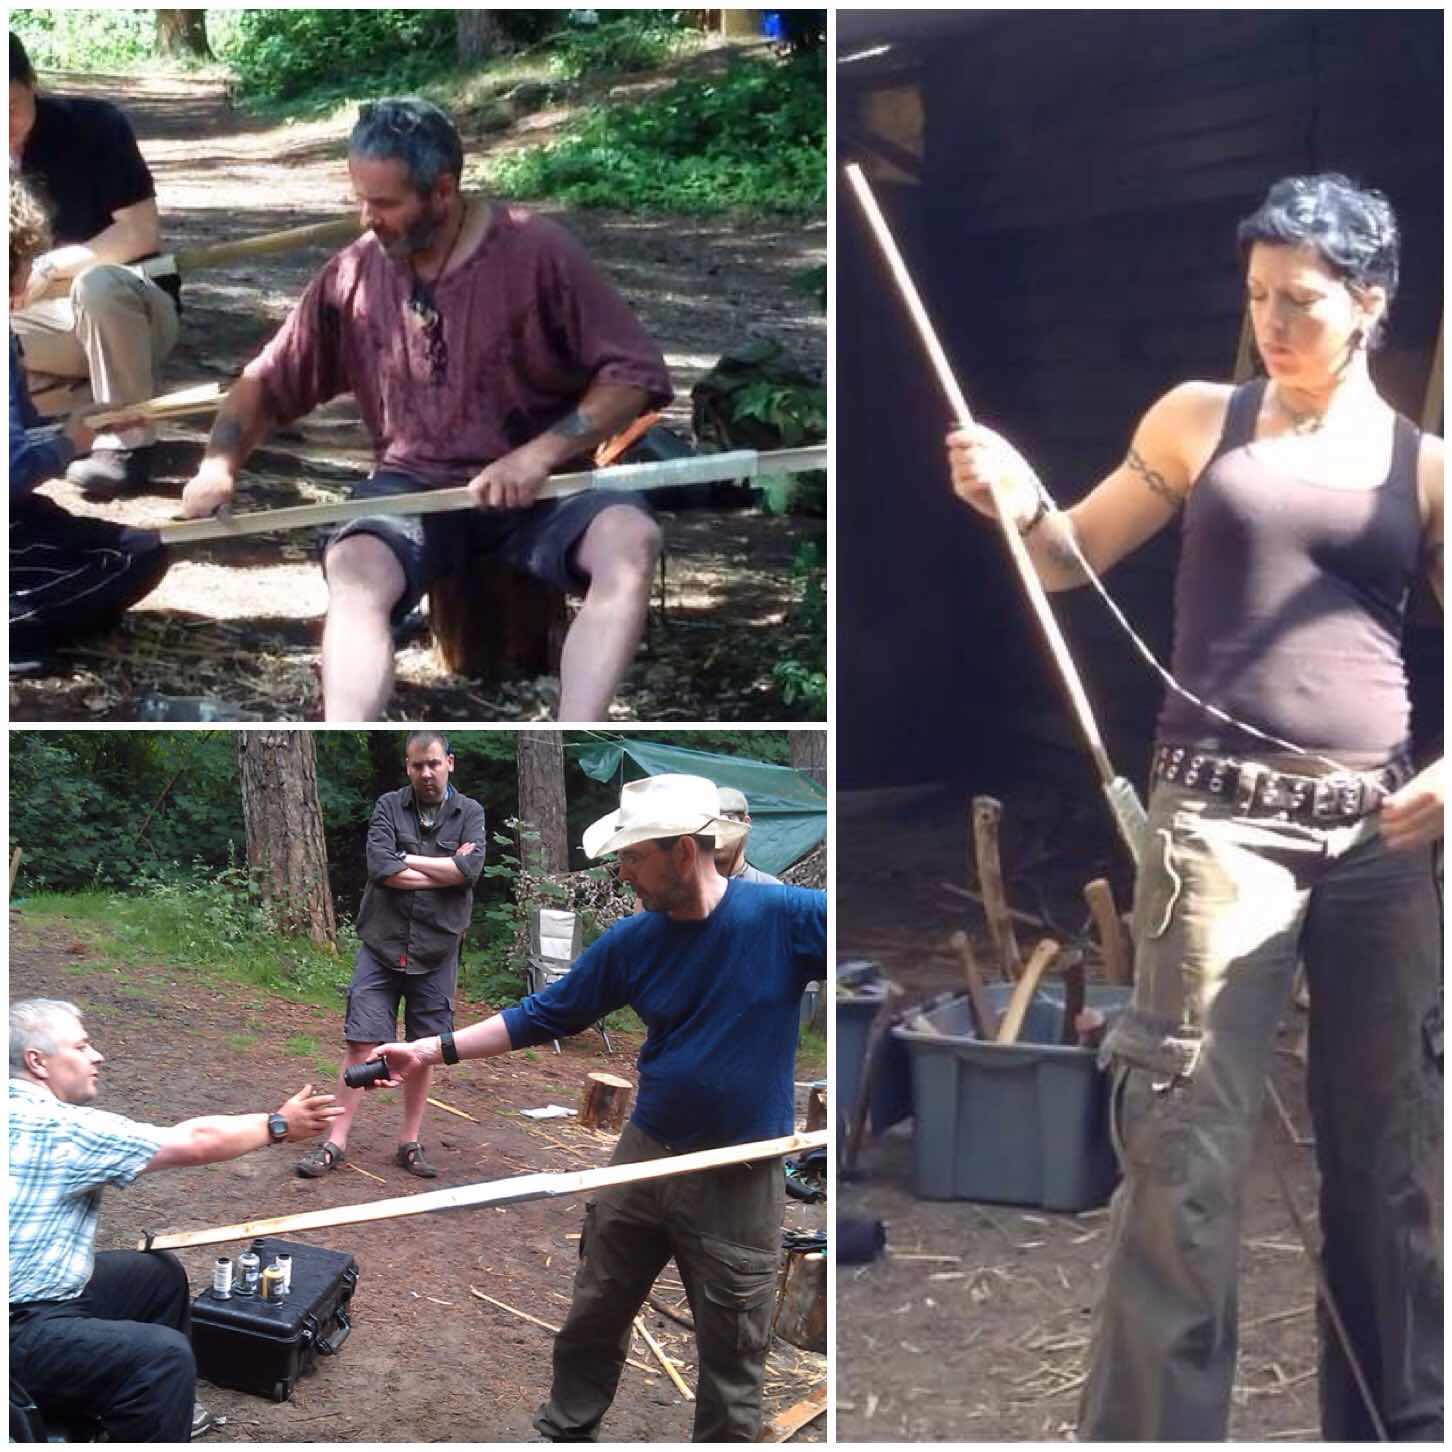
This is my favourite bow. I carved it while doing a Primitive Technology course at Woodcraft School.
I carved the bow based on the dimensions of the ones found in the peat bogs at Holmegaard in Denmark. The bow has the lower parts of its limbs shaped wider than they are deeper much like the ash flatbow. The upper parts of the limbs are more ‘D’ shaped so making them stiffer but thinner than the lower parts of the limbs.
Holmegaard Bow
This unusual shape works well with ash as it is not a particularly strong wood for thin bows. The wide lower limbs give it strength while the thinner and stiffer ‘D’sectioned tips allow the limbs to shoot forward at a very fast speed so making it an excellent hunting bow where you get fairly close to your prey..
Holmegaard Bow
I also decided to make the nocks out of rawhide and spruce pitch rather than carving them in. I did this as some Holmegaard bows have been found with no nocks carved into them. Whether they had bone nocks attached or rawhide as I experimented with will probably never be known but they work well.
This bow is a favourite amongst the children I teach as they can draw it easy. Personally I just love the shape of the bow and it shoots well for me,
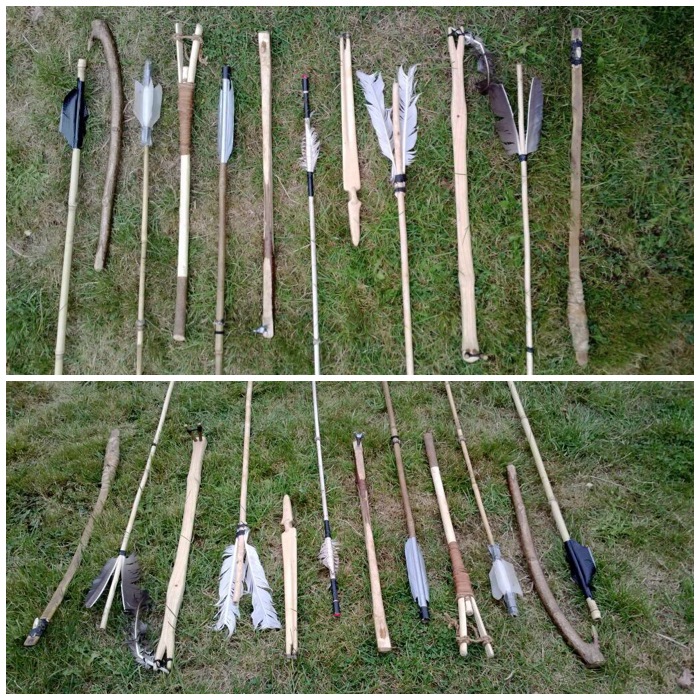
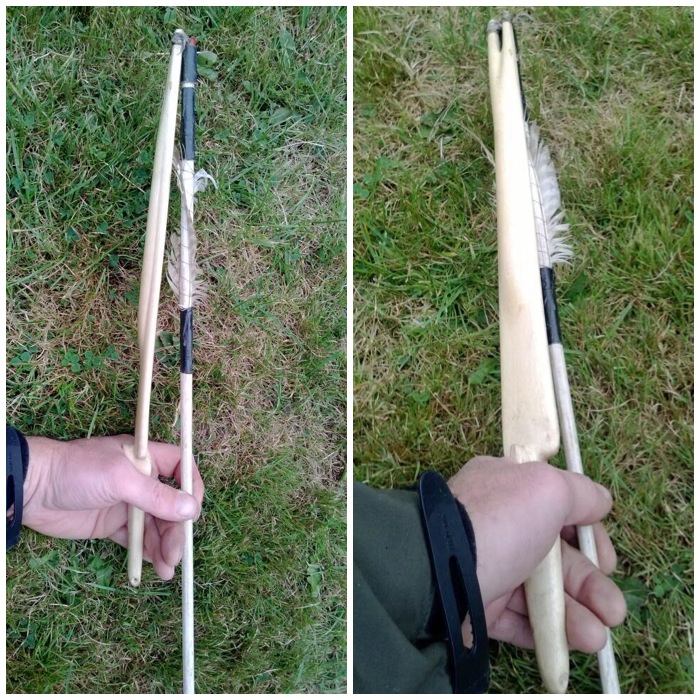
I have written a number of posts on these little devices. When asked about them by children I teach I liken them to these modern ball throwing devices dog walkers use nowadays. So if you imagine replacing the ball with a spear (technically called a dart) you will get the idea.
My Atlatl Set
The set is made up of two parts – the Atlatl (the throwing device) as shown below and a dart (seen above). My post on the Atlatl goes into detail on the history of them and the different designs you can find.
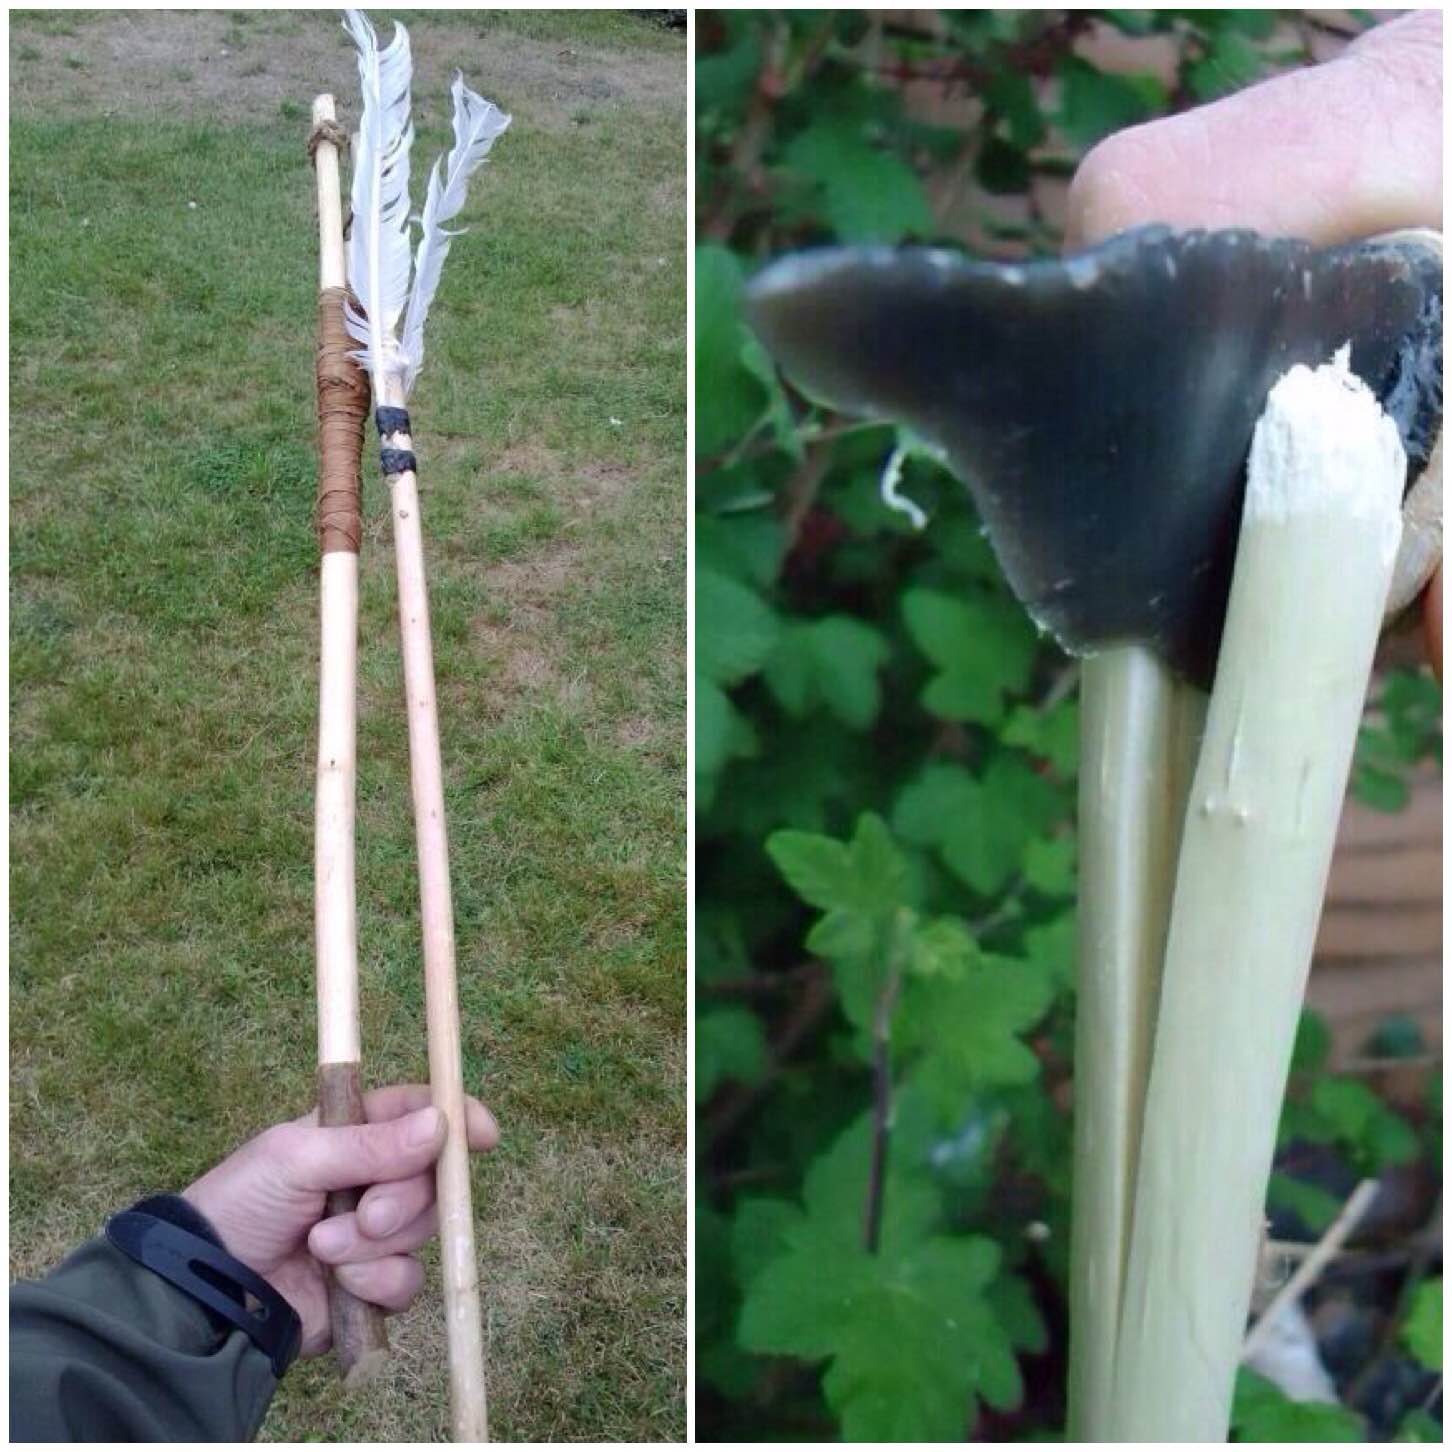
The ones below are very simple ones. The left hand one has been carved from a hazel rod and the one on the right is from a piece of yew with an antler tip attached by sinew and spruce pitch.
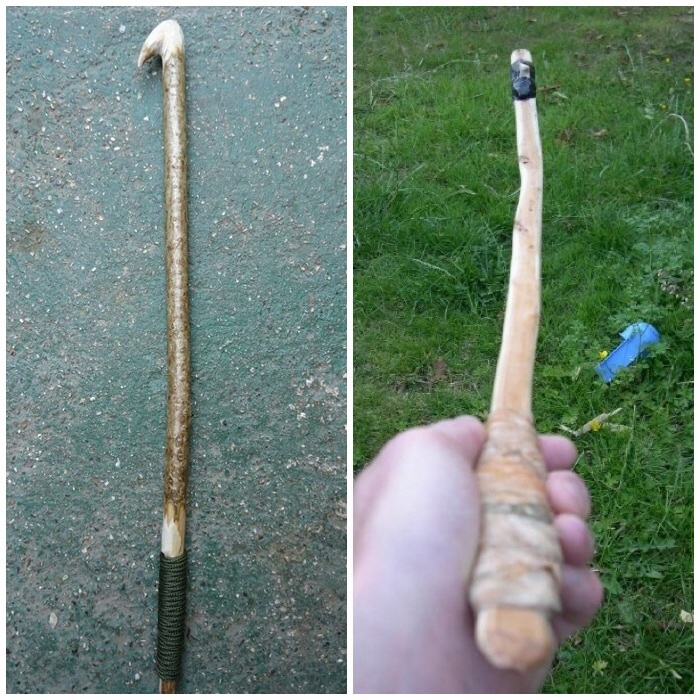
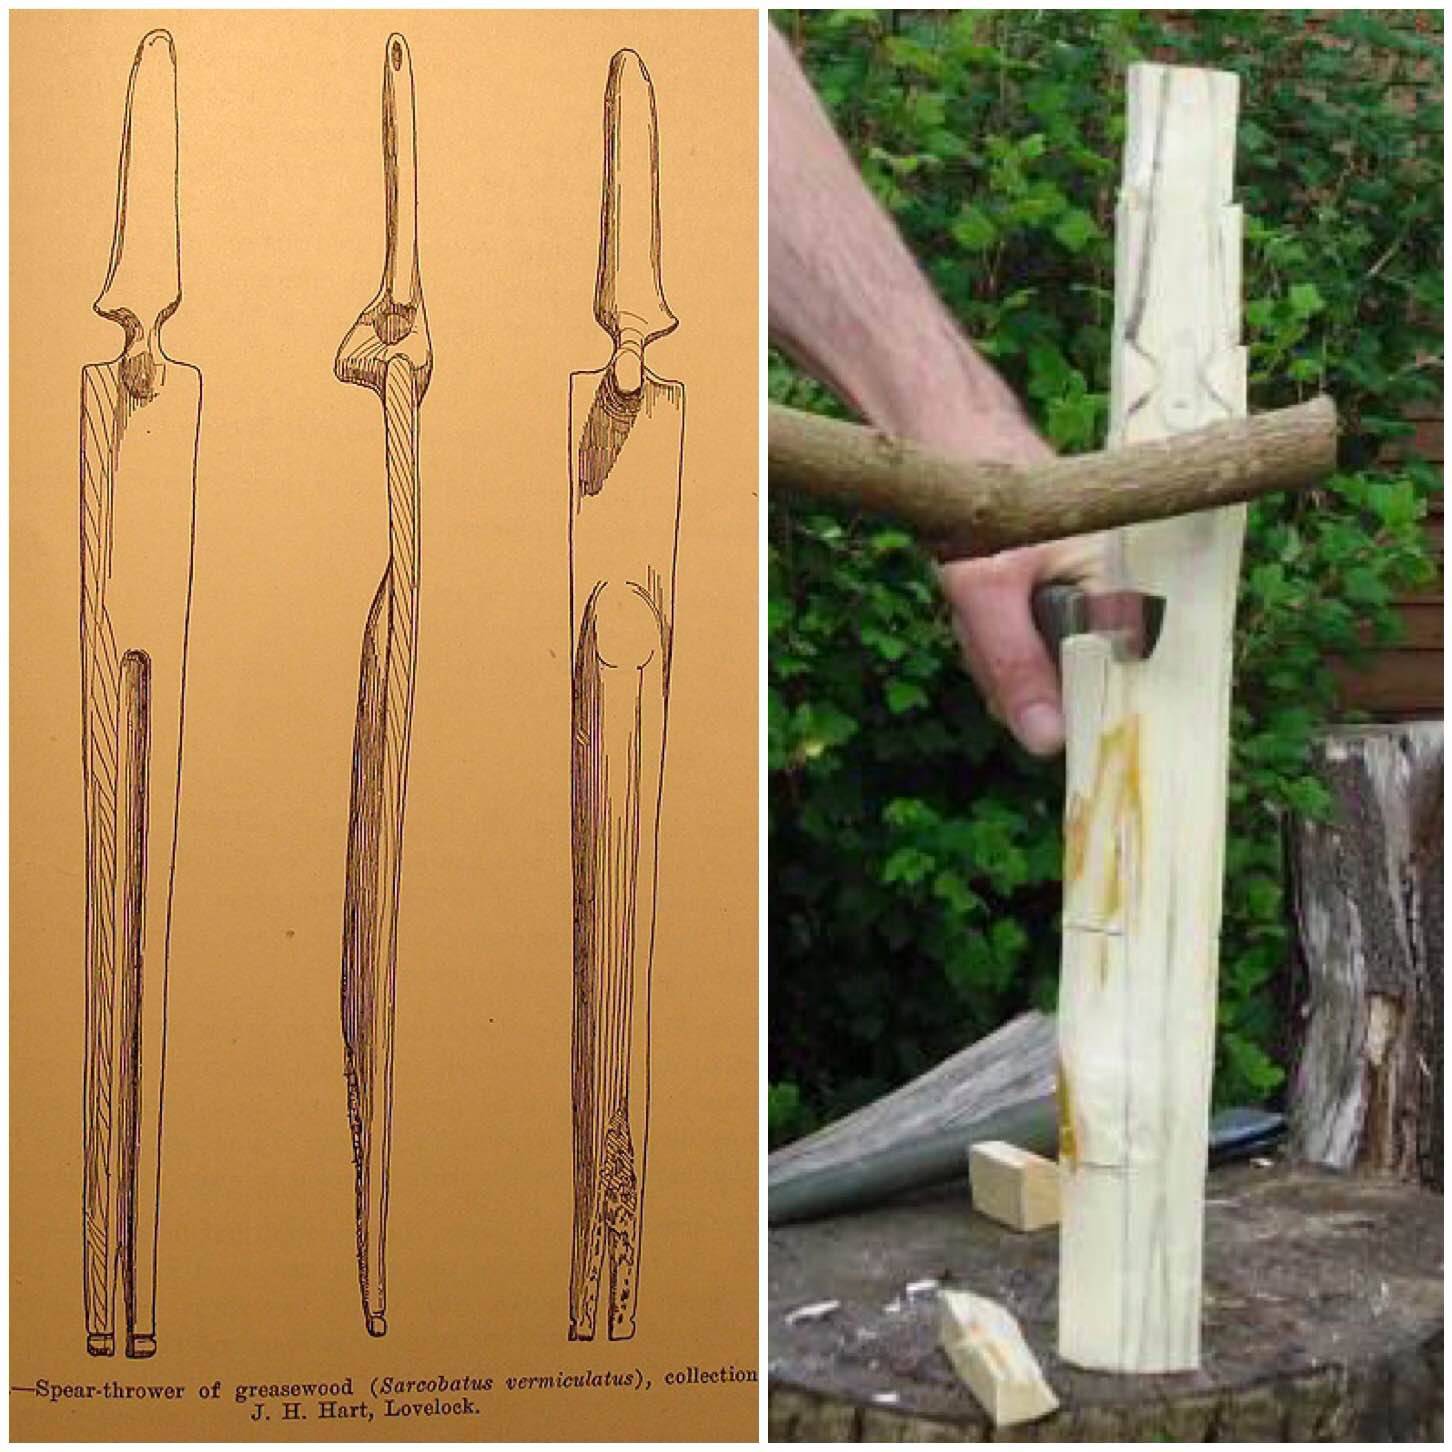
I have tried to make a number of different Atlatls over the years and a favourite of mine is called the Lovelock Cave Atlatl (named after where it was found in the USA). I came across some drawings of this Atlatl on the web and set about making one.
Lovelock Caver Atlatl
It was thought to have had a bone or wooden point at the end to attach the dart to it but I experimented with just cordage. This seems to work quite well however there is no archaeological records that this adaptation was ever used.
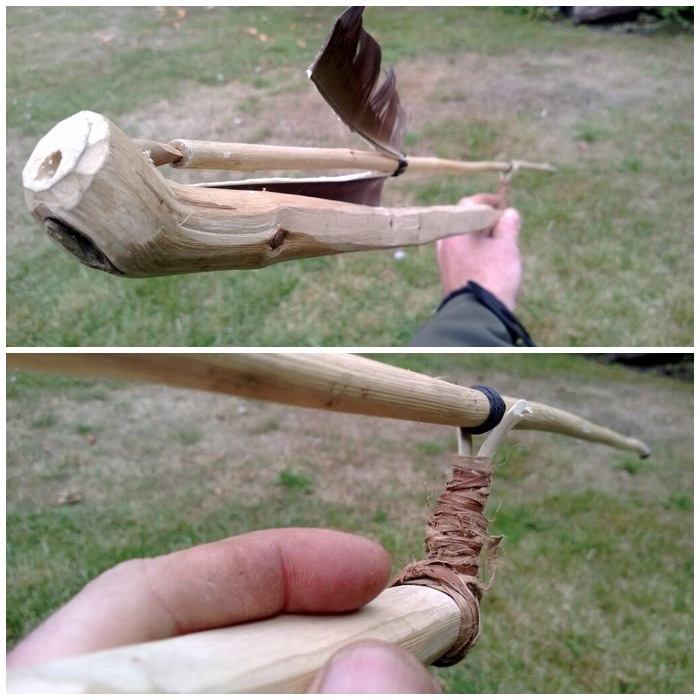
I set myself a challenge a while back to produce a split stick Atlatl from just one piece of willow and limited myself to just my primitive tools.
I scraped and carved the wood with my flint knife and used the bark as cordage. It turned out to be quite a nifty little Atlatl in the end.
One Stick Atlatl
Atlatl with a Rest
I carved this Atlatl after reading about hunters in Arctic environments using this type of Atlatl. The rest allows the hunter to wear a glove while waiting to shoot the dart. The dart has a piece of cordage wrapped tightly around it that is pushed up against the rest so fixing the dart in place. With a quick flick the dart is away with no ill effect on its flight.
Atlatl with a Rest
Thats it for me on bows and Atlatls (unless I make some more).
So begins a New Year and I was considering where my photography would take me this year. After a long hard thought (about 10 minutes really) I came to the conclusion my photography could go wherever it liked.
So I plan to have a post once a week with what I consider my best or most interesting picture.
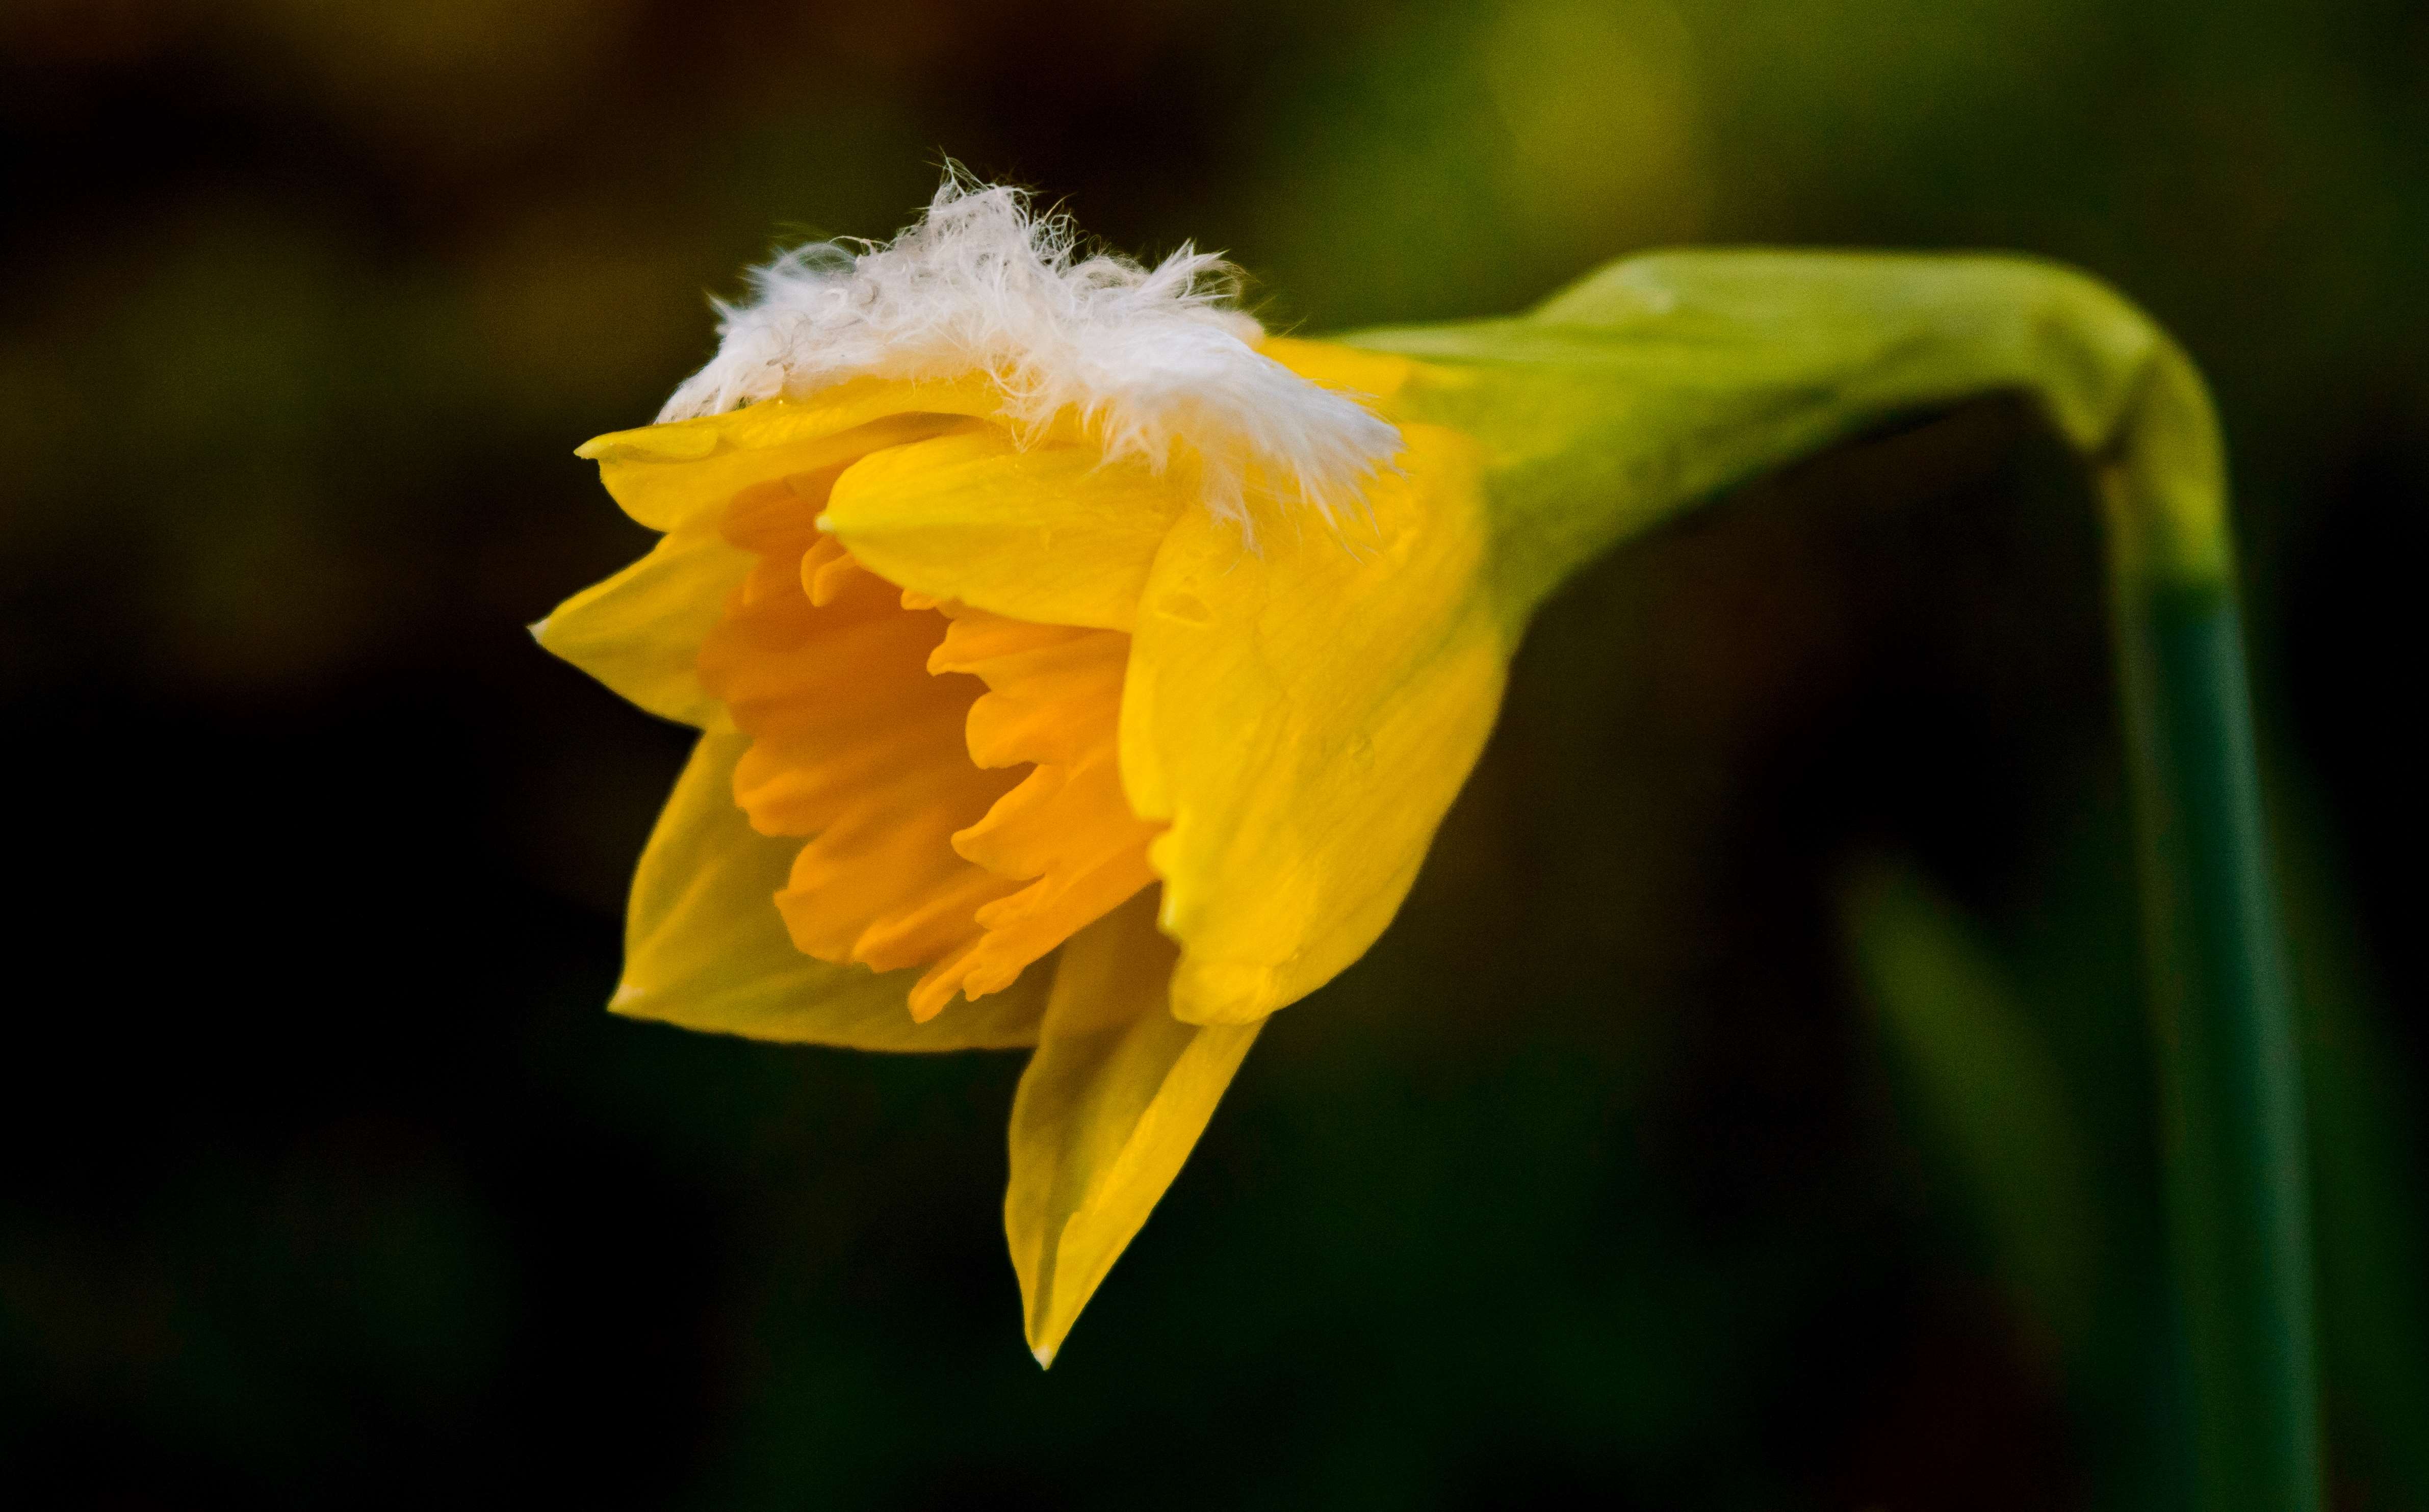
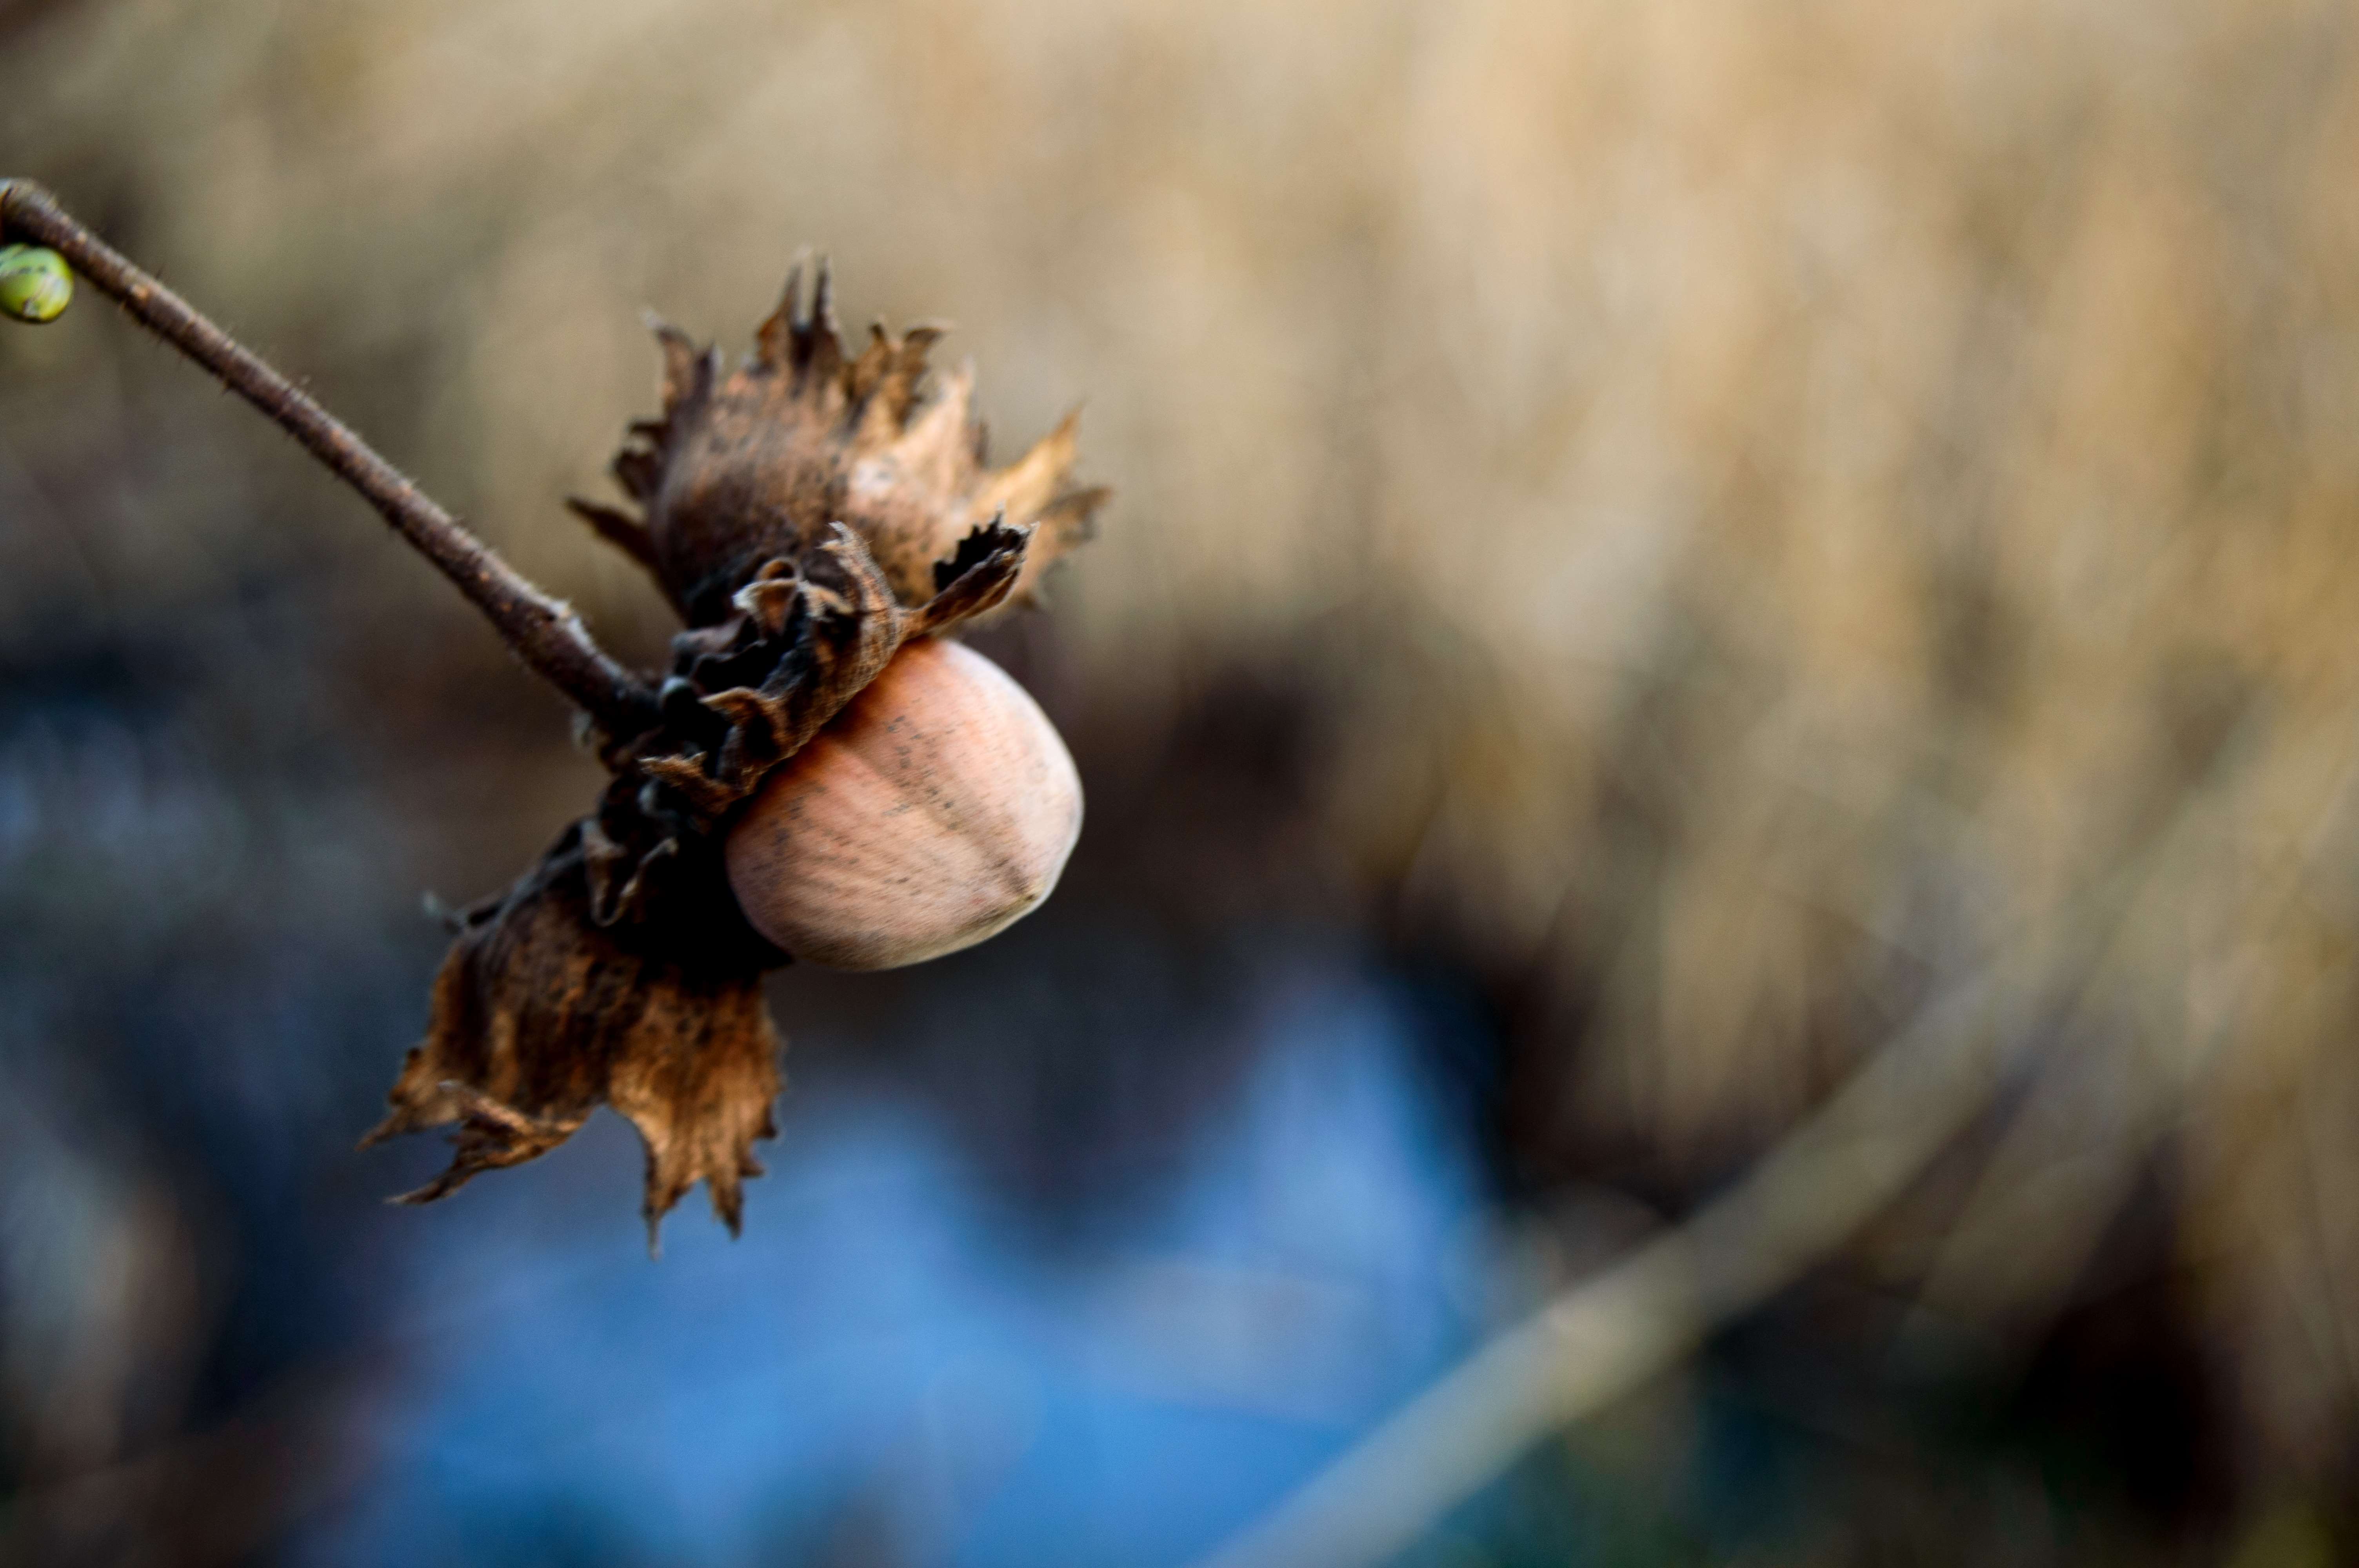
On New Year’s Eve I took a bimble around our village and was seeing lots of signs of spring (a bit early if you ask me) when I spotted this leftover morsel from last year.
Forgotten hazelnut
Normally the squirrels beat me to these little nibbles so I was surprised to see some still left over from last year’s crop. This hazel tree was overhanging a reedmace-covered pond so maybe it proved too precarious a perch for the little fellas.
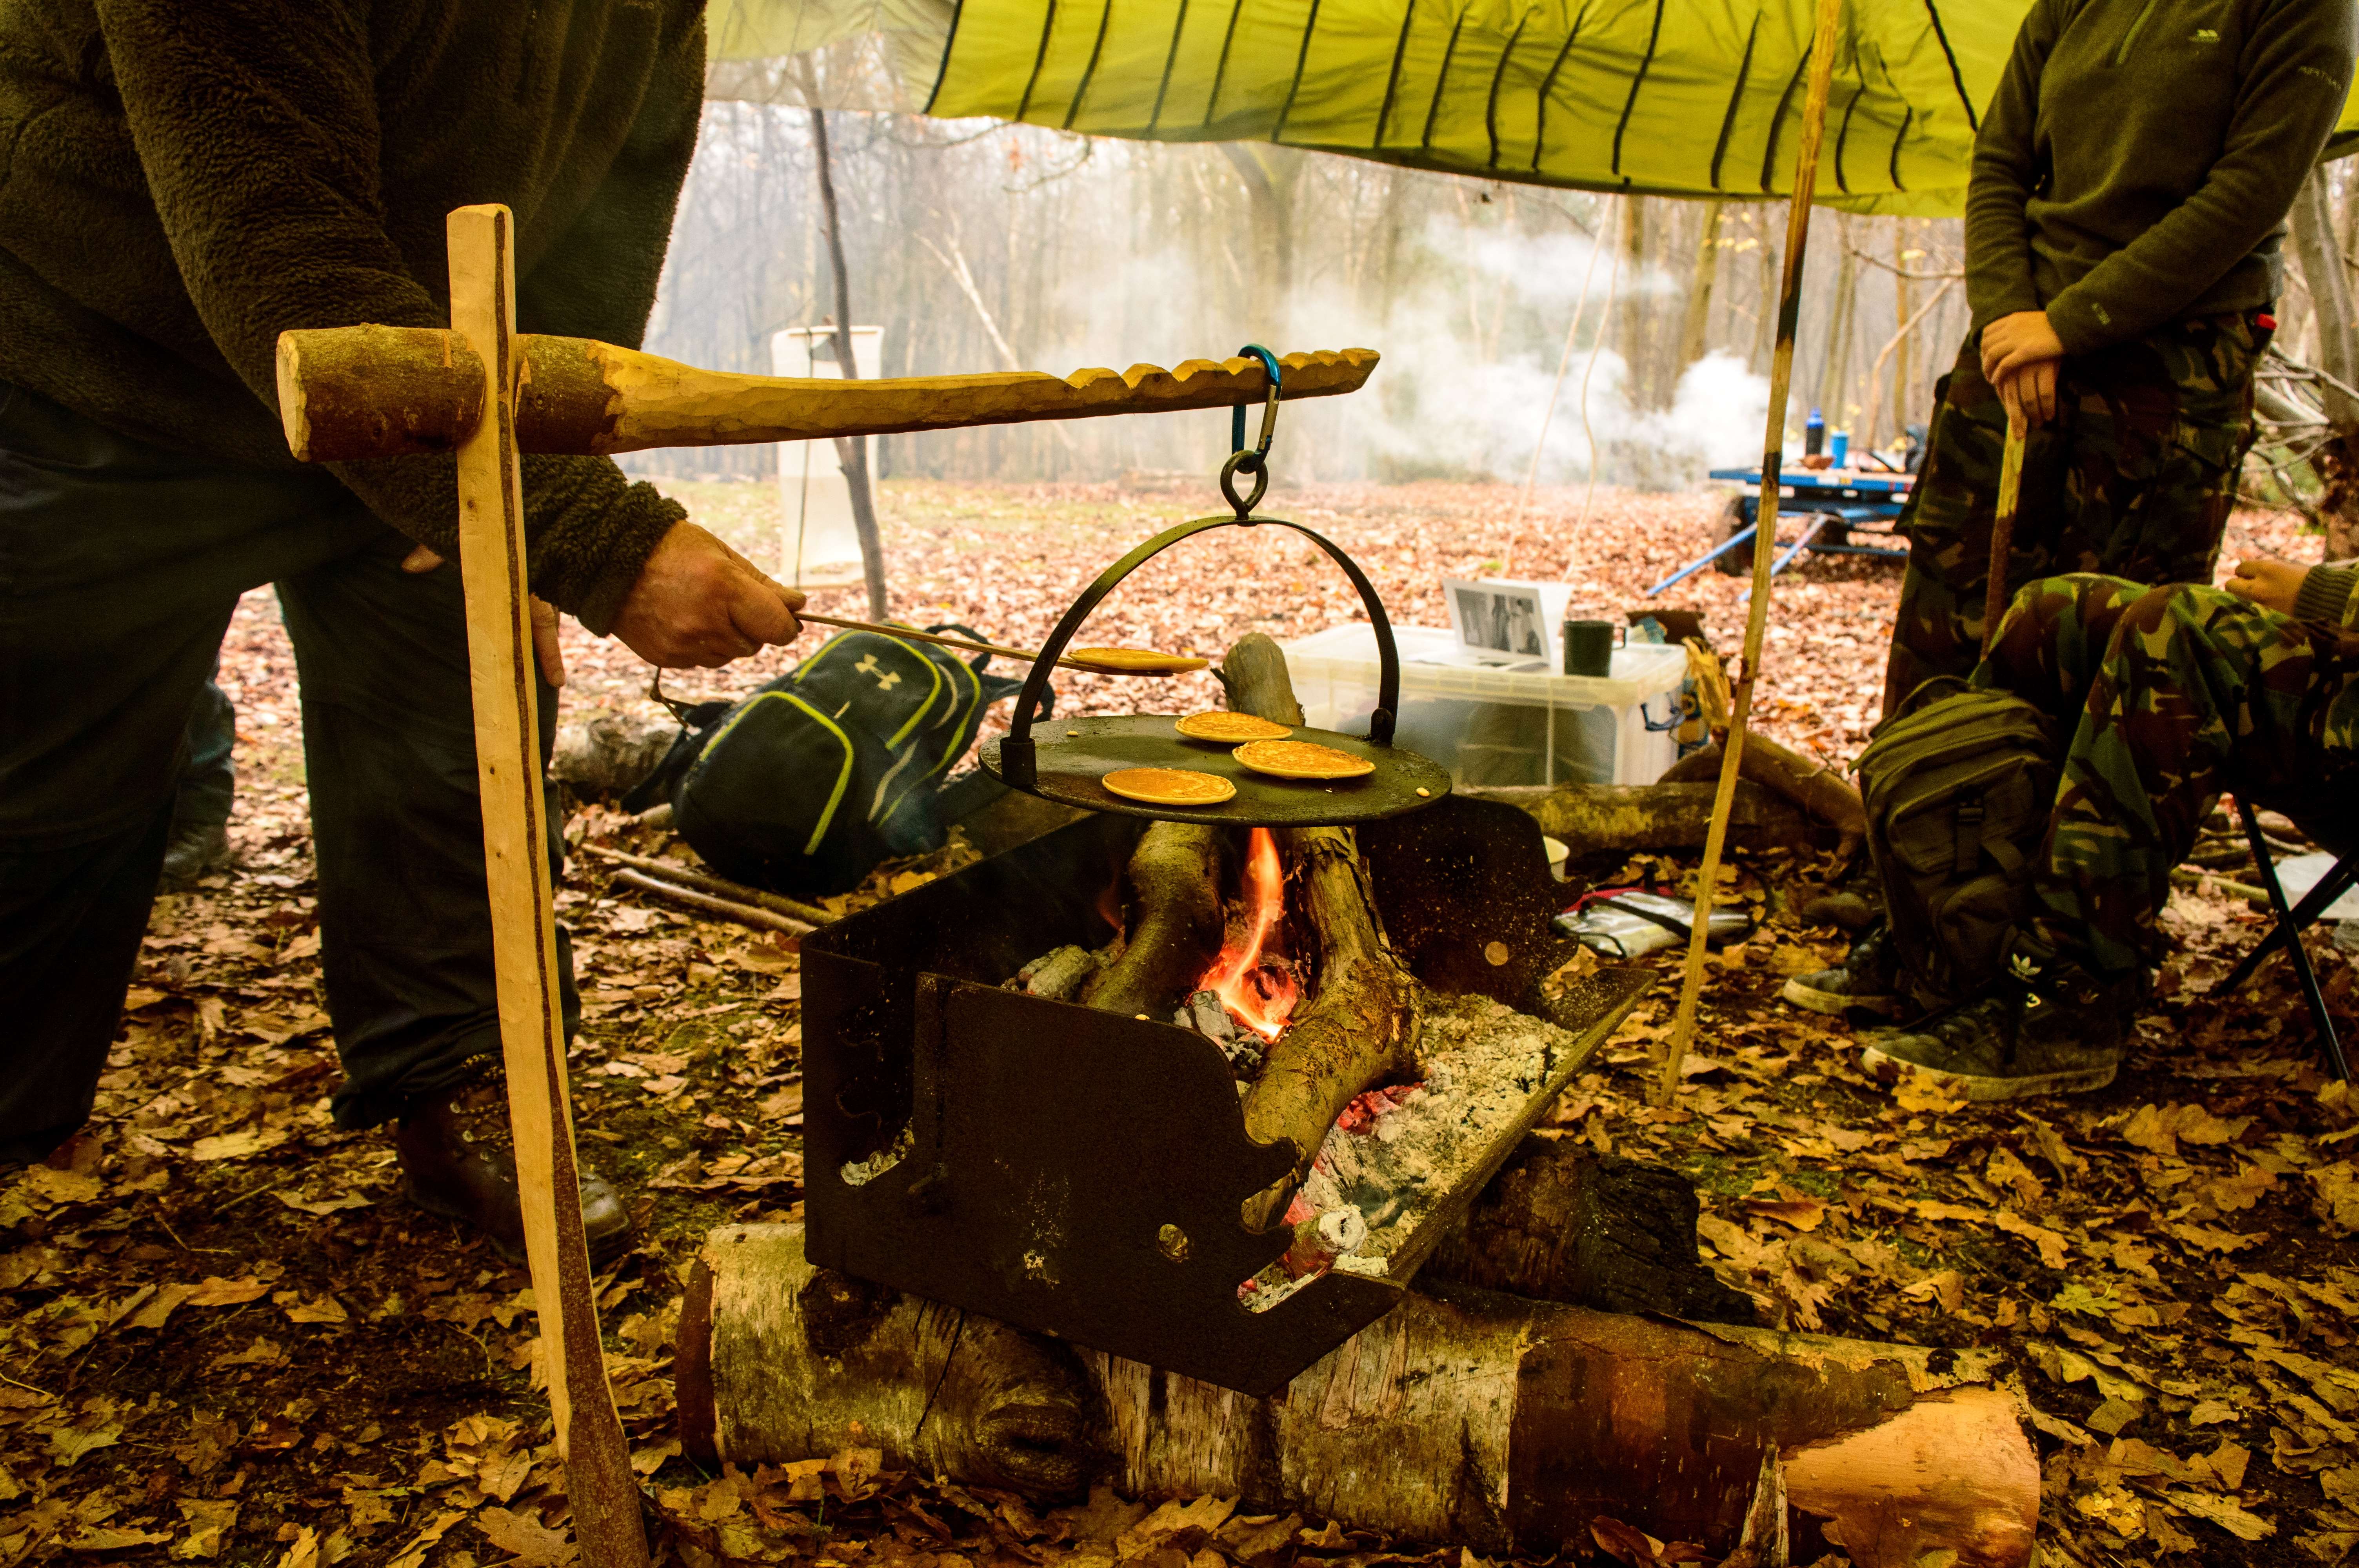
I had a great time constructing contraptions to use around the campfire last year so I thought a little summary post of them all was in order.
This post is not about how to construct any of the contraptions themselves (I will link to the relevant How To…. guides in the title of each section) but my personal thoughts on them. I appreciate campfire gadgets are not for everyone and they may be seen as overcomplicating the cooking process however I think they are great fun to construct.
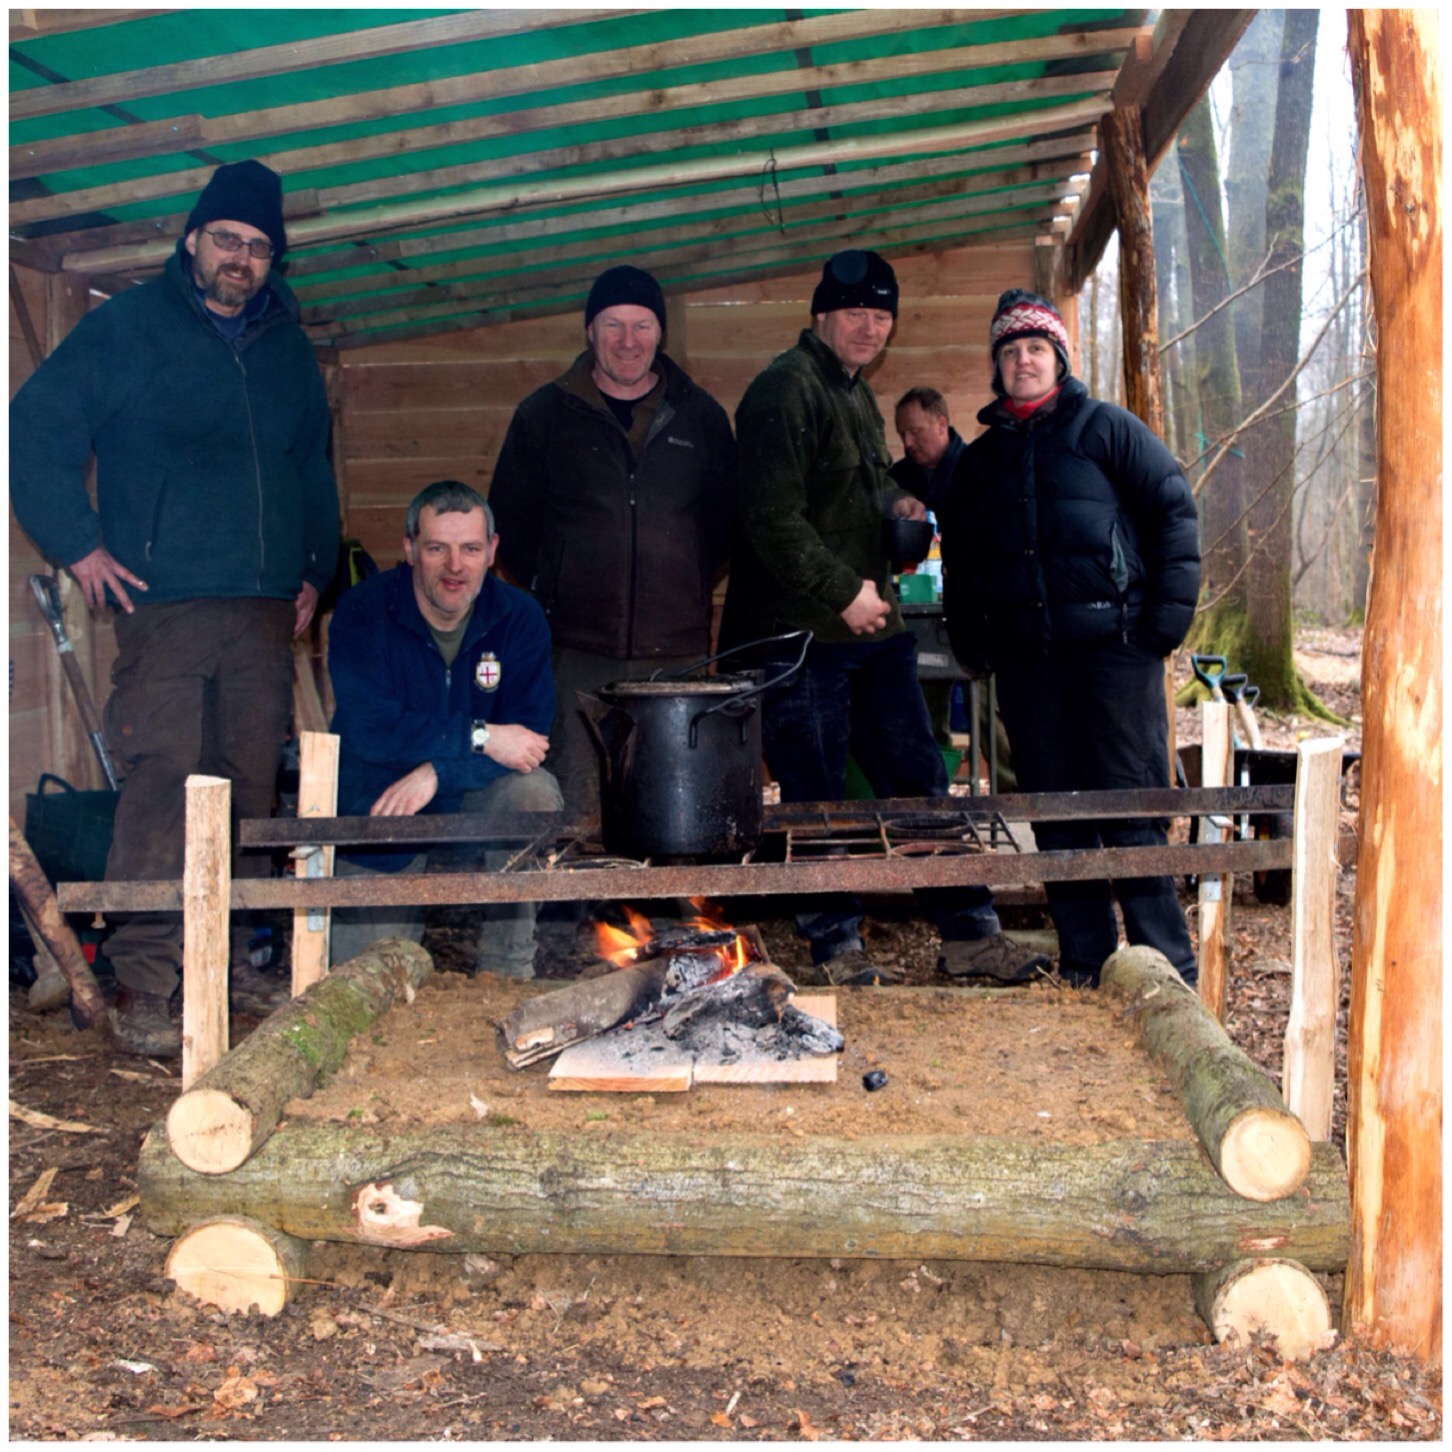
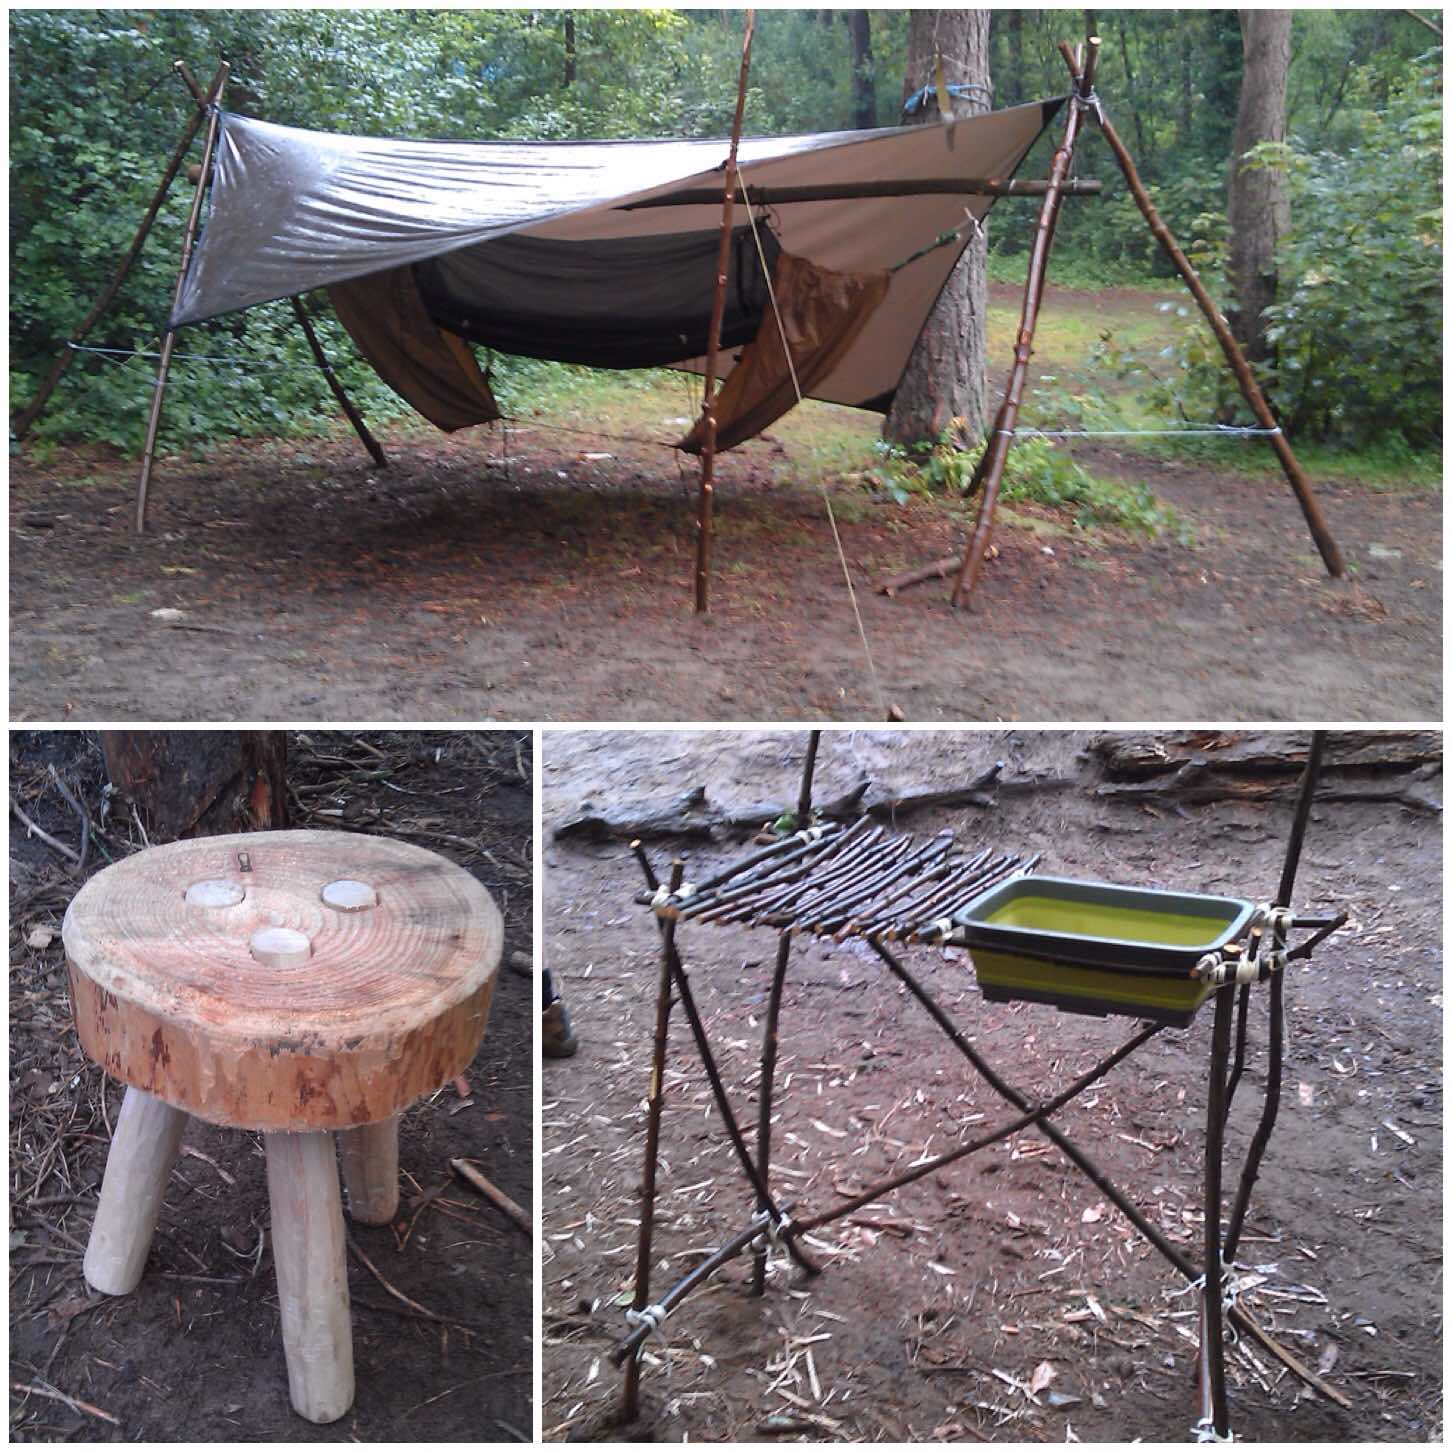
Raised Firepit/platform
Before building any gadgets it is good to have an actual fire. I was asked to help build a raised firepit/platform by my friend John Rhyder at the Woodcraft School training area. John wanted a dedicated area for his students to cook on without having to bend down too far.
After a lot of discussion with his wife Caron we opted for a rectangular shape instead of a square. Caron argued that this shape would give a large cooking area but would be safer than a square, as the students would not have to stretch too far to reach the centre of the fire. This is an ideal construction for a fixed-base camp, with plenty of room to cook on and to sit around.
Raised Firepit
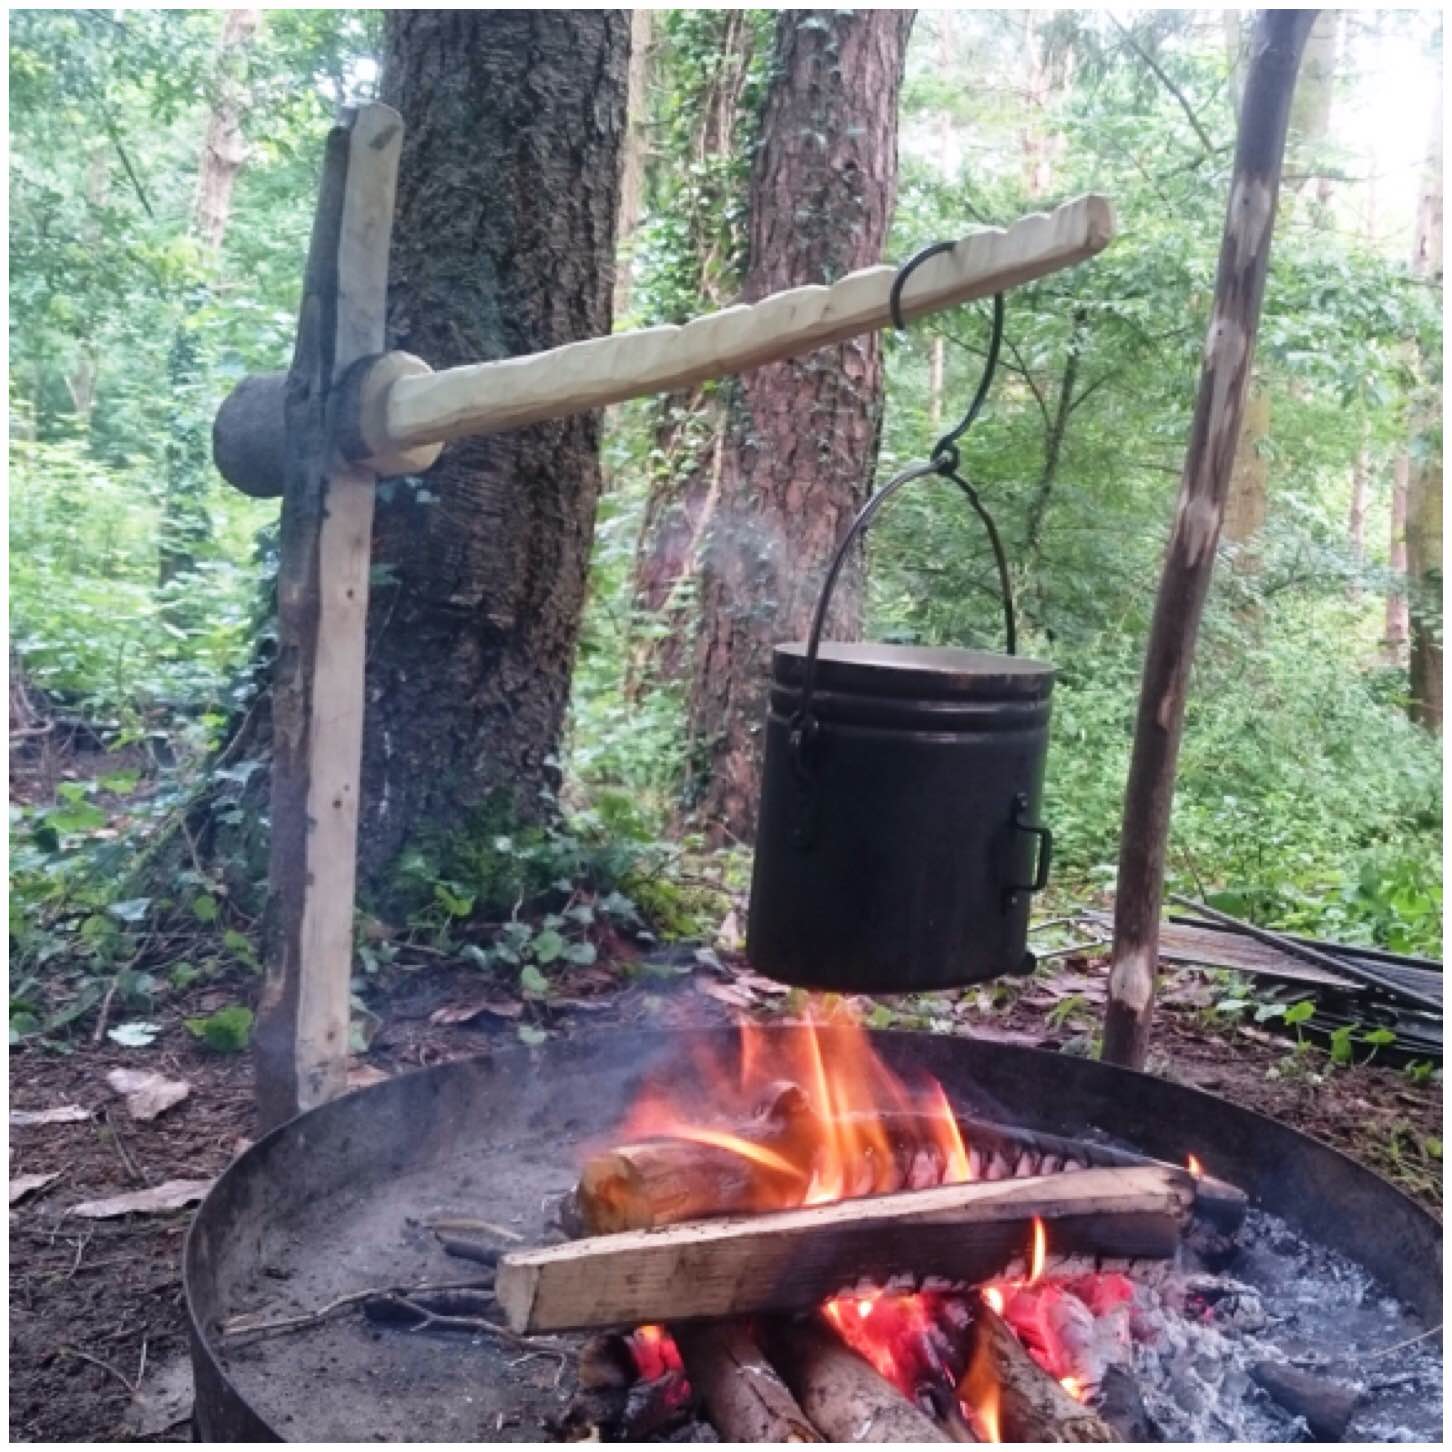
Collapsible pot hanger
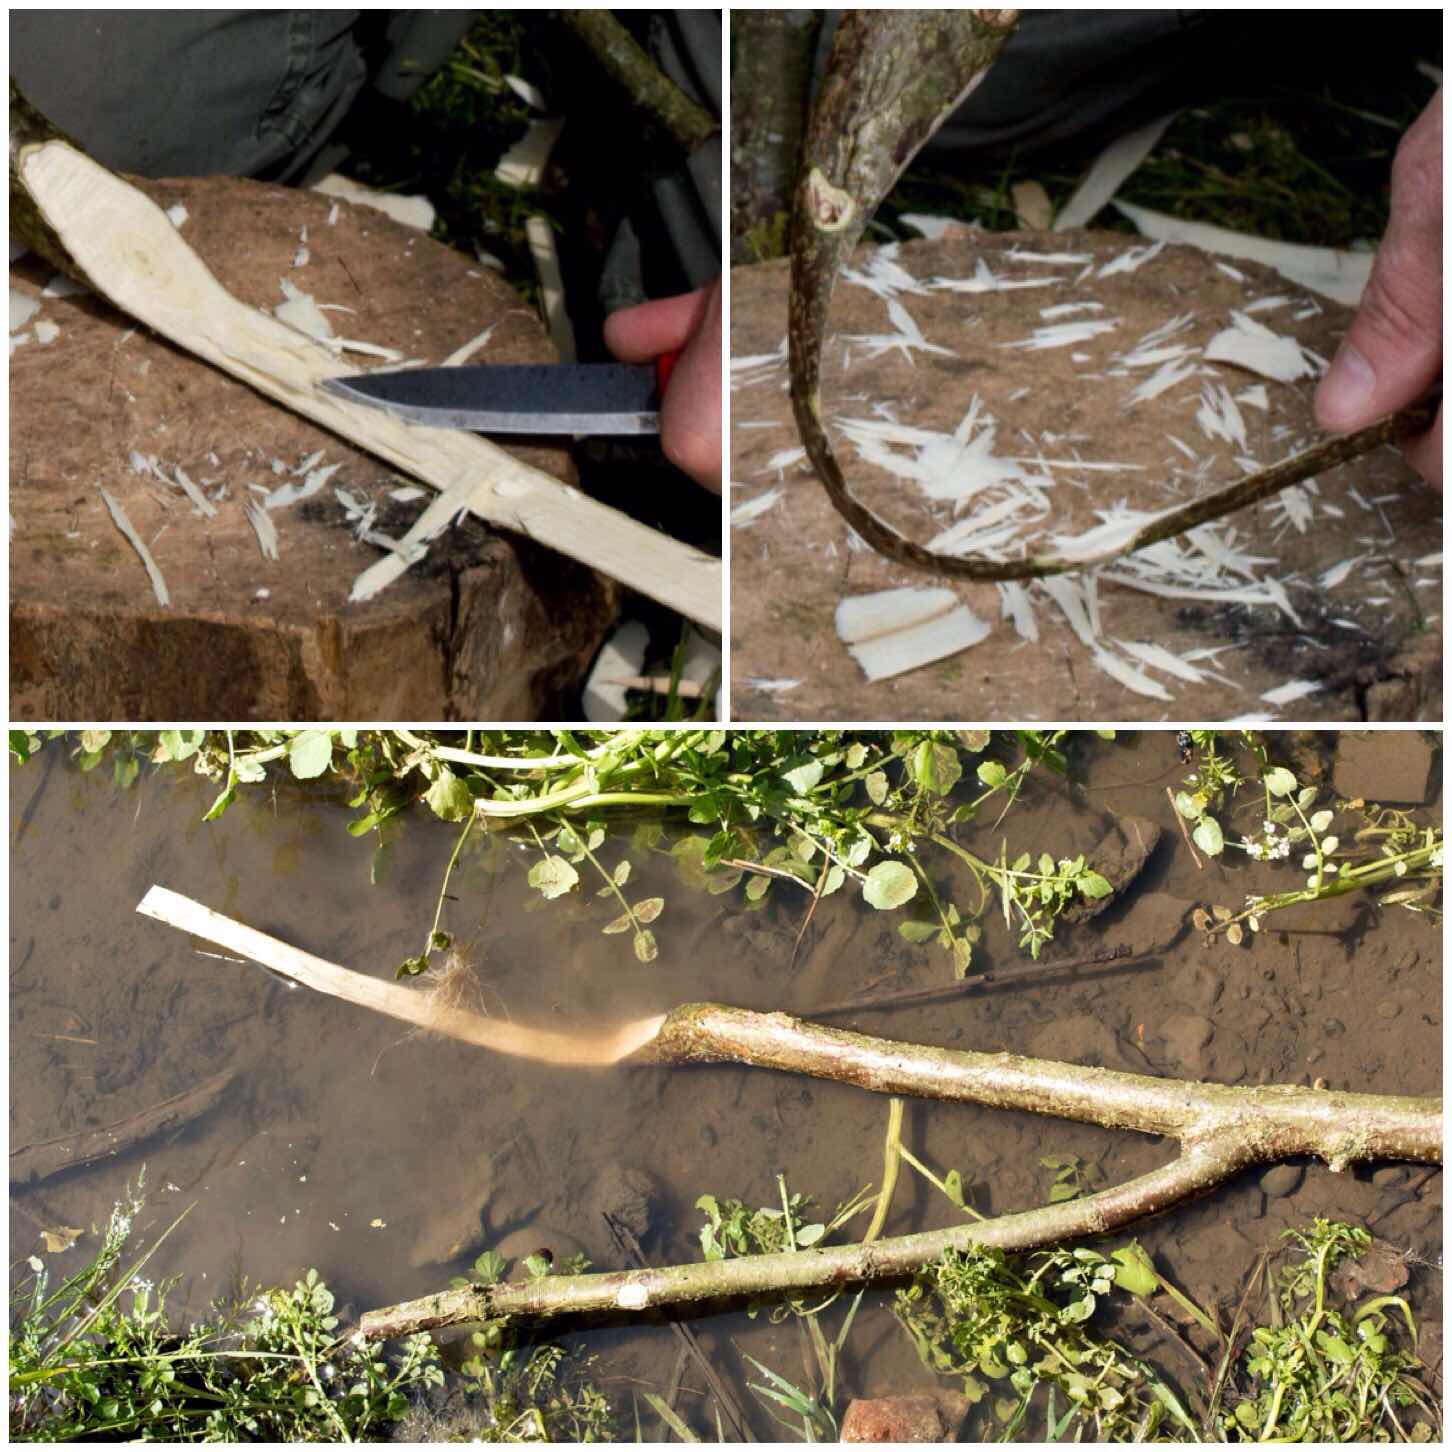
I love little wooden contraptions and these little collapsible pot hangers are ideal for the lightweight bushcrafter. They can be made in numerous different ways and are easily broken down to be stored inside your pot. One of the things I like about carving them is that the joints that hold them together are generally simple but need to be carved perfectly if the hanger is to take the weight of a heavy pot without coming apart.
Collapsible pot hook
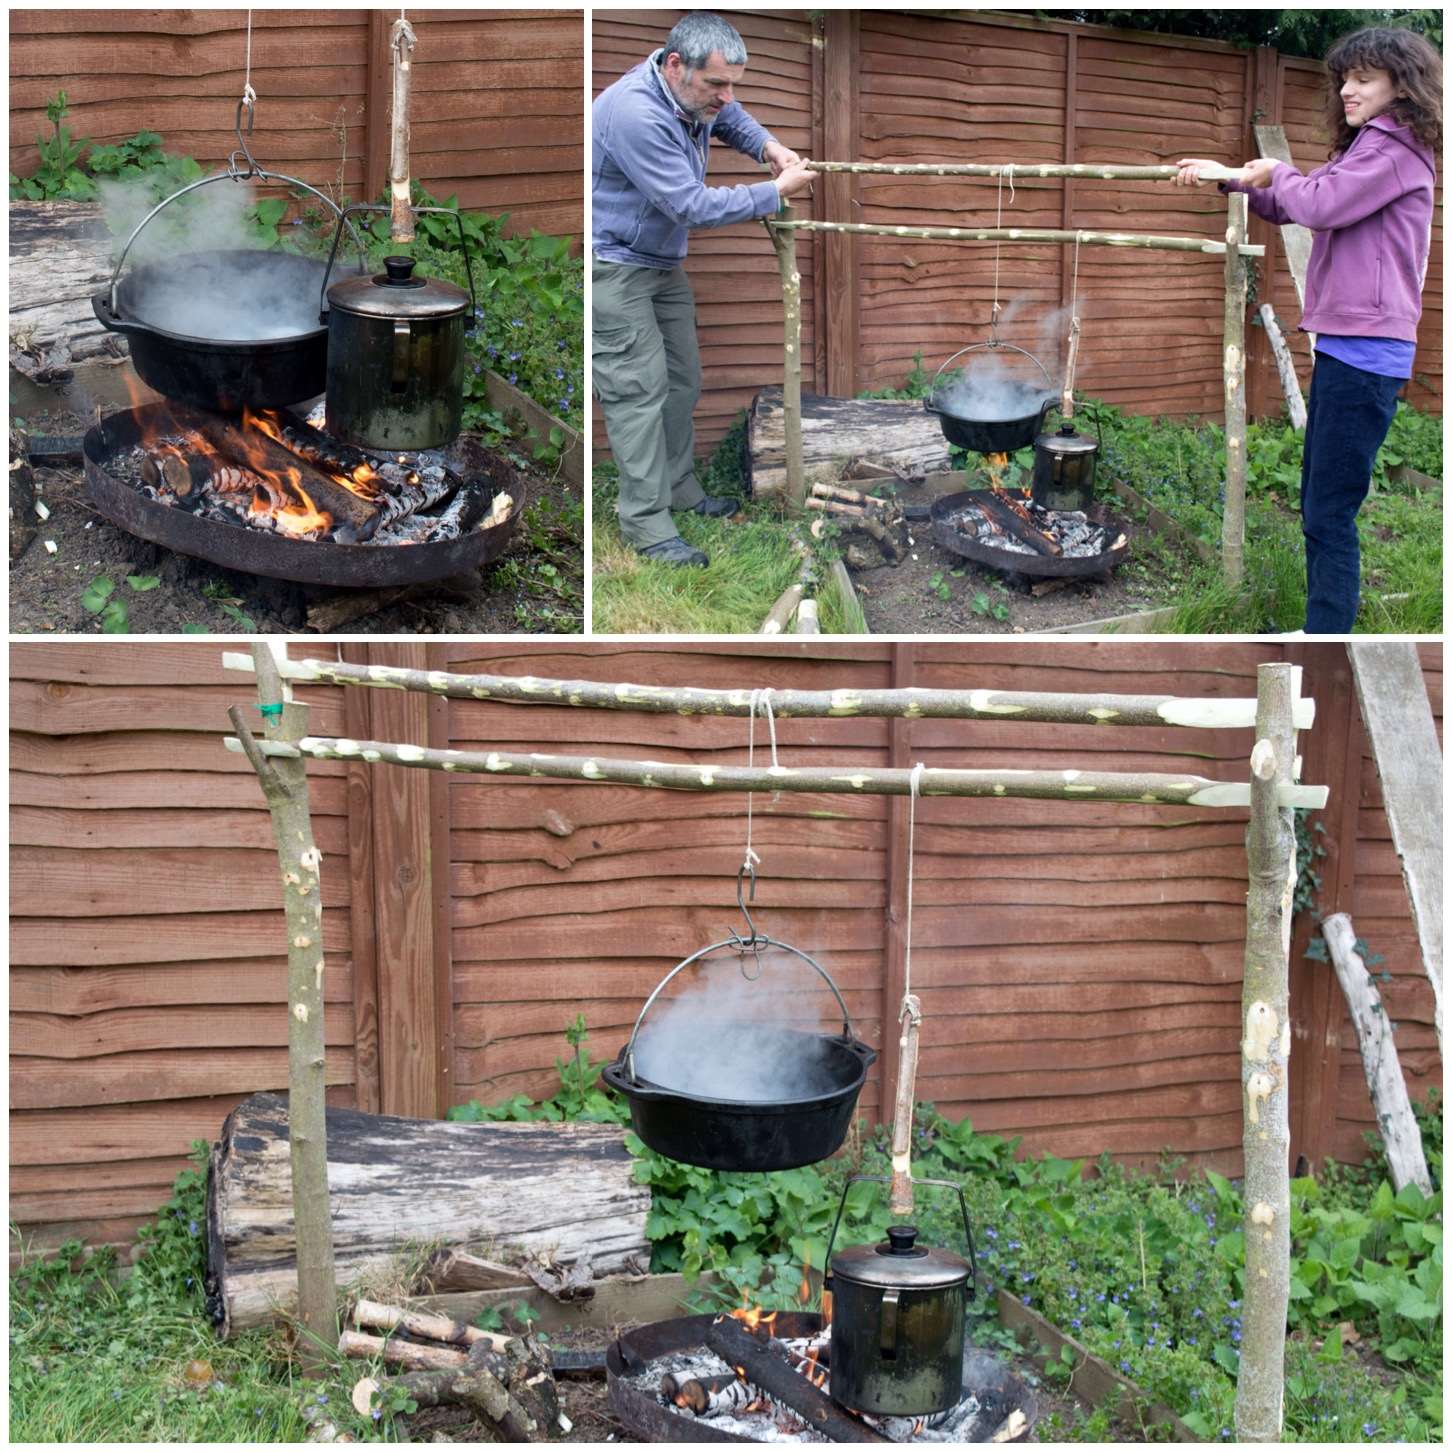
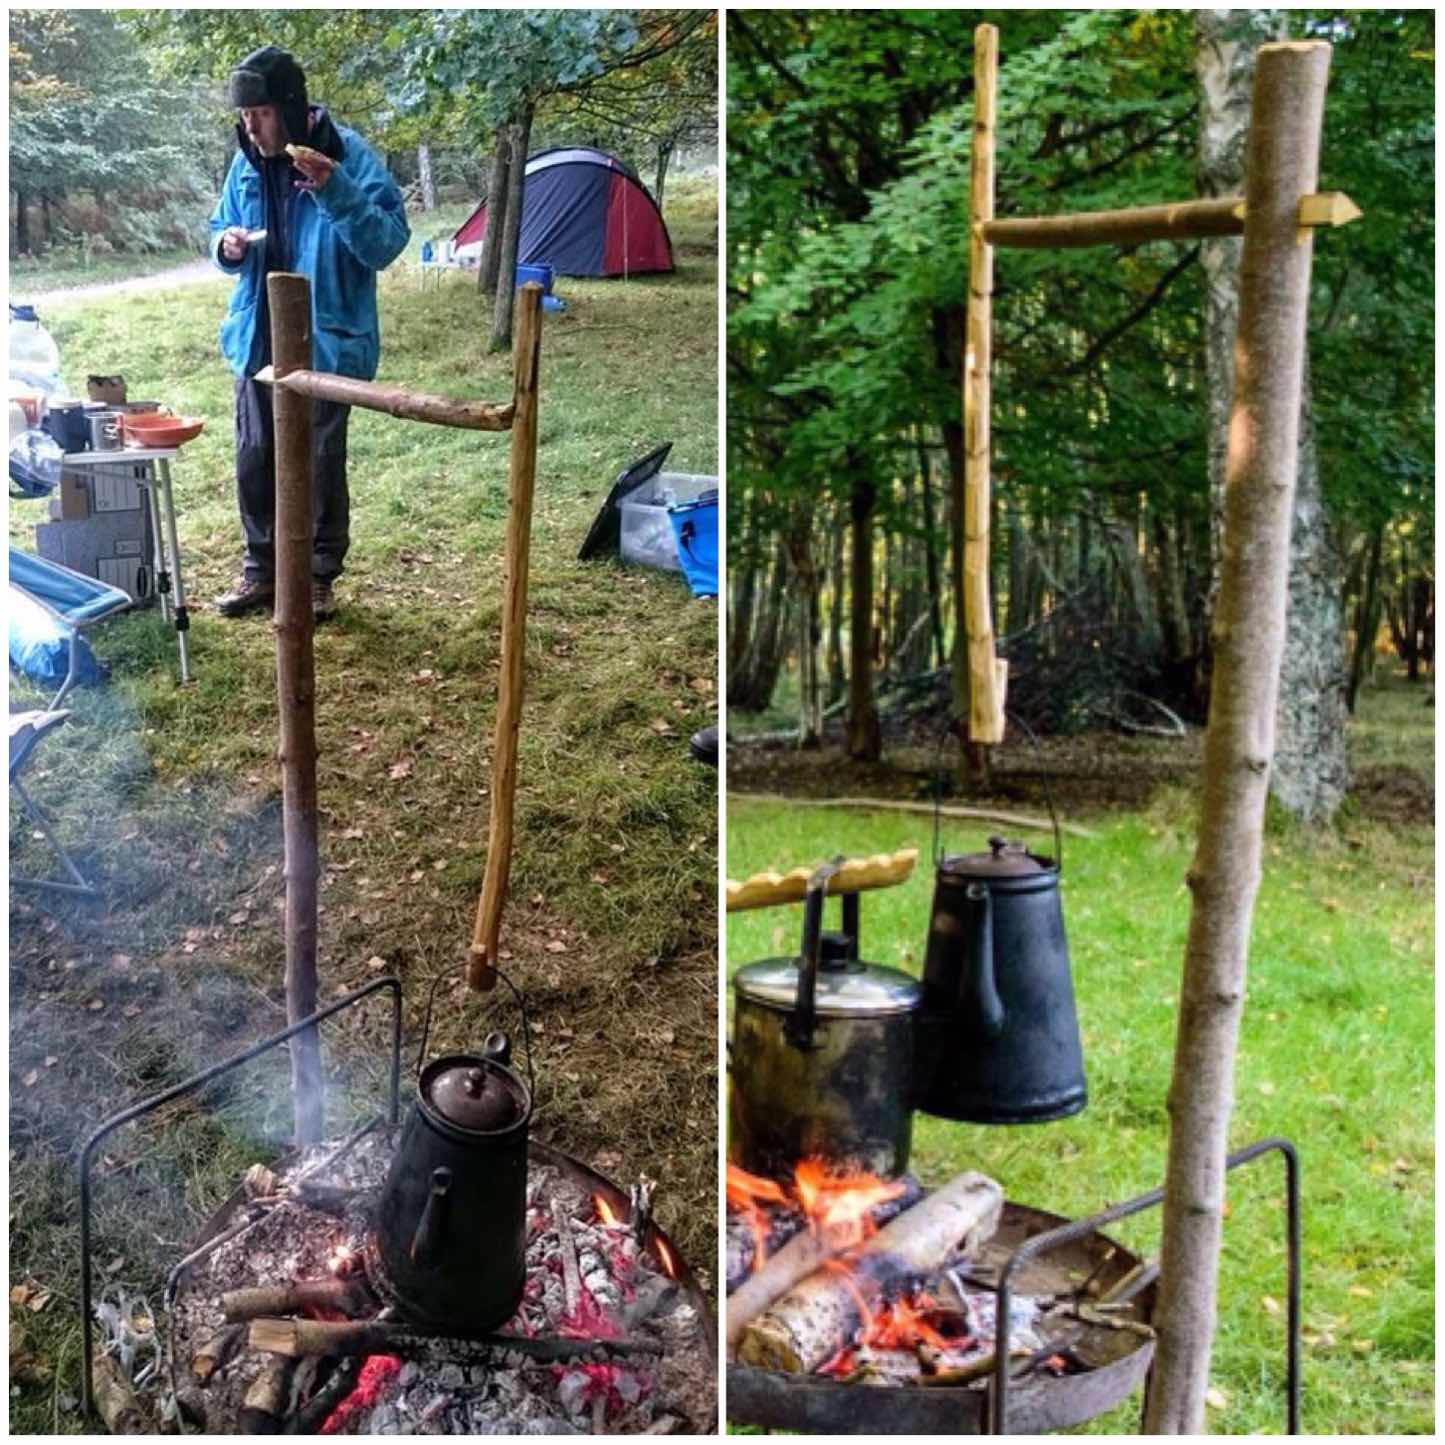
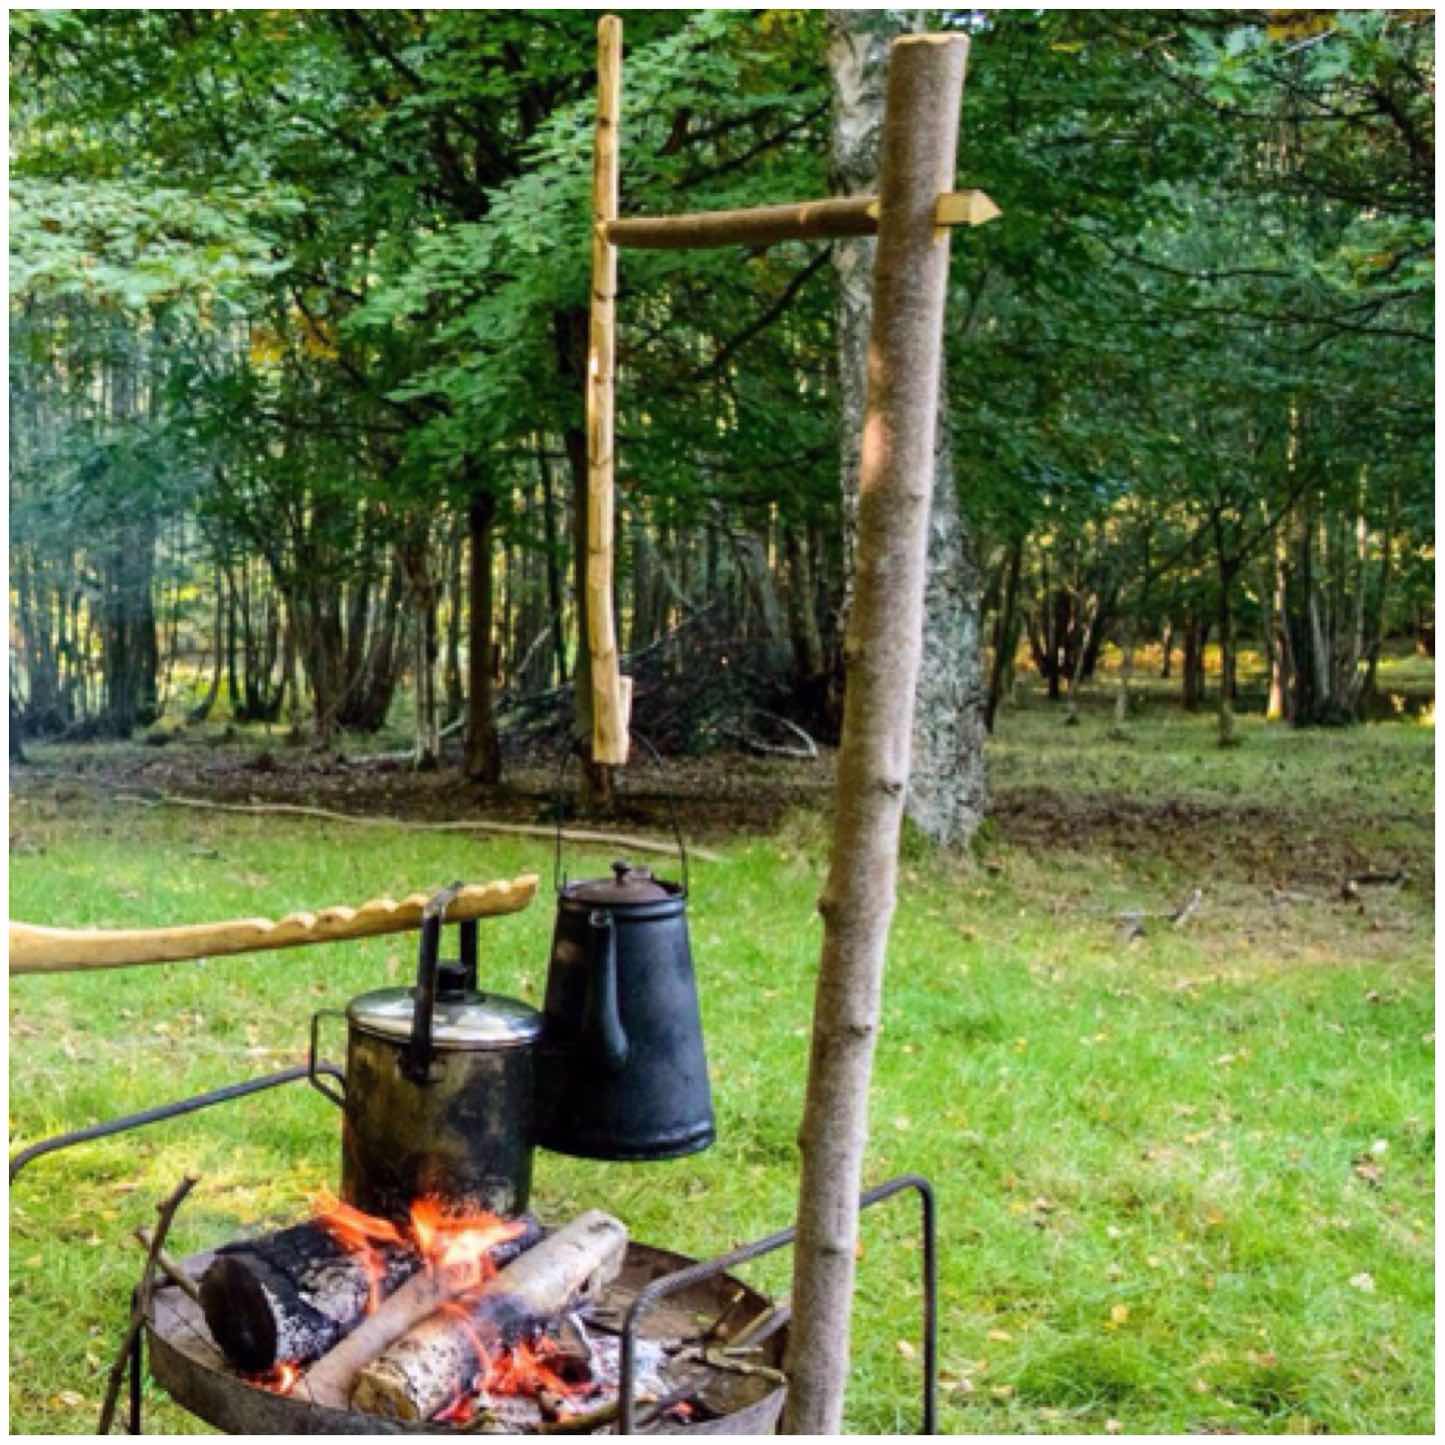
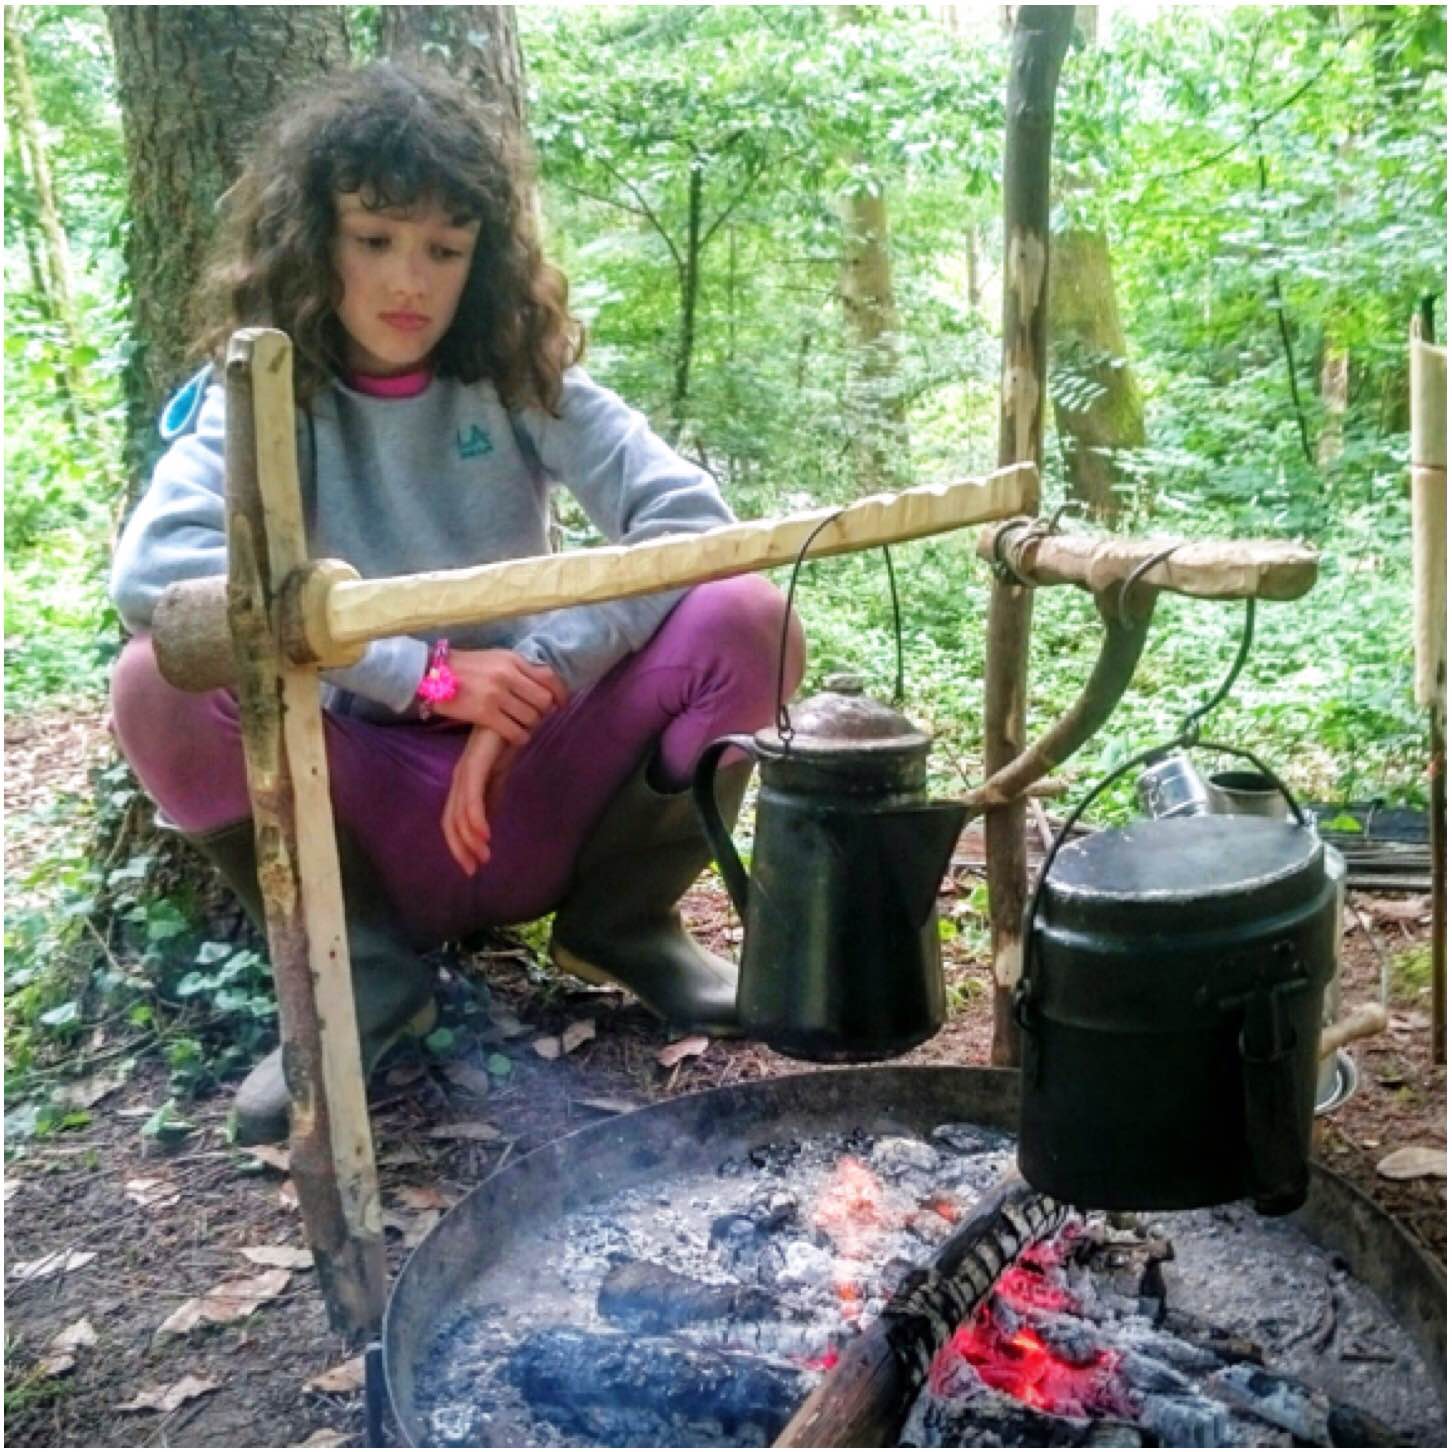
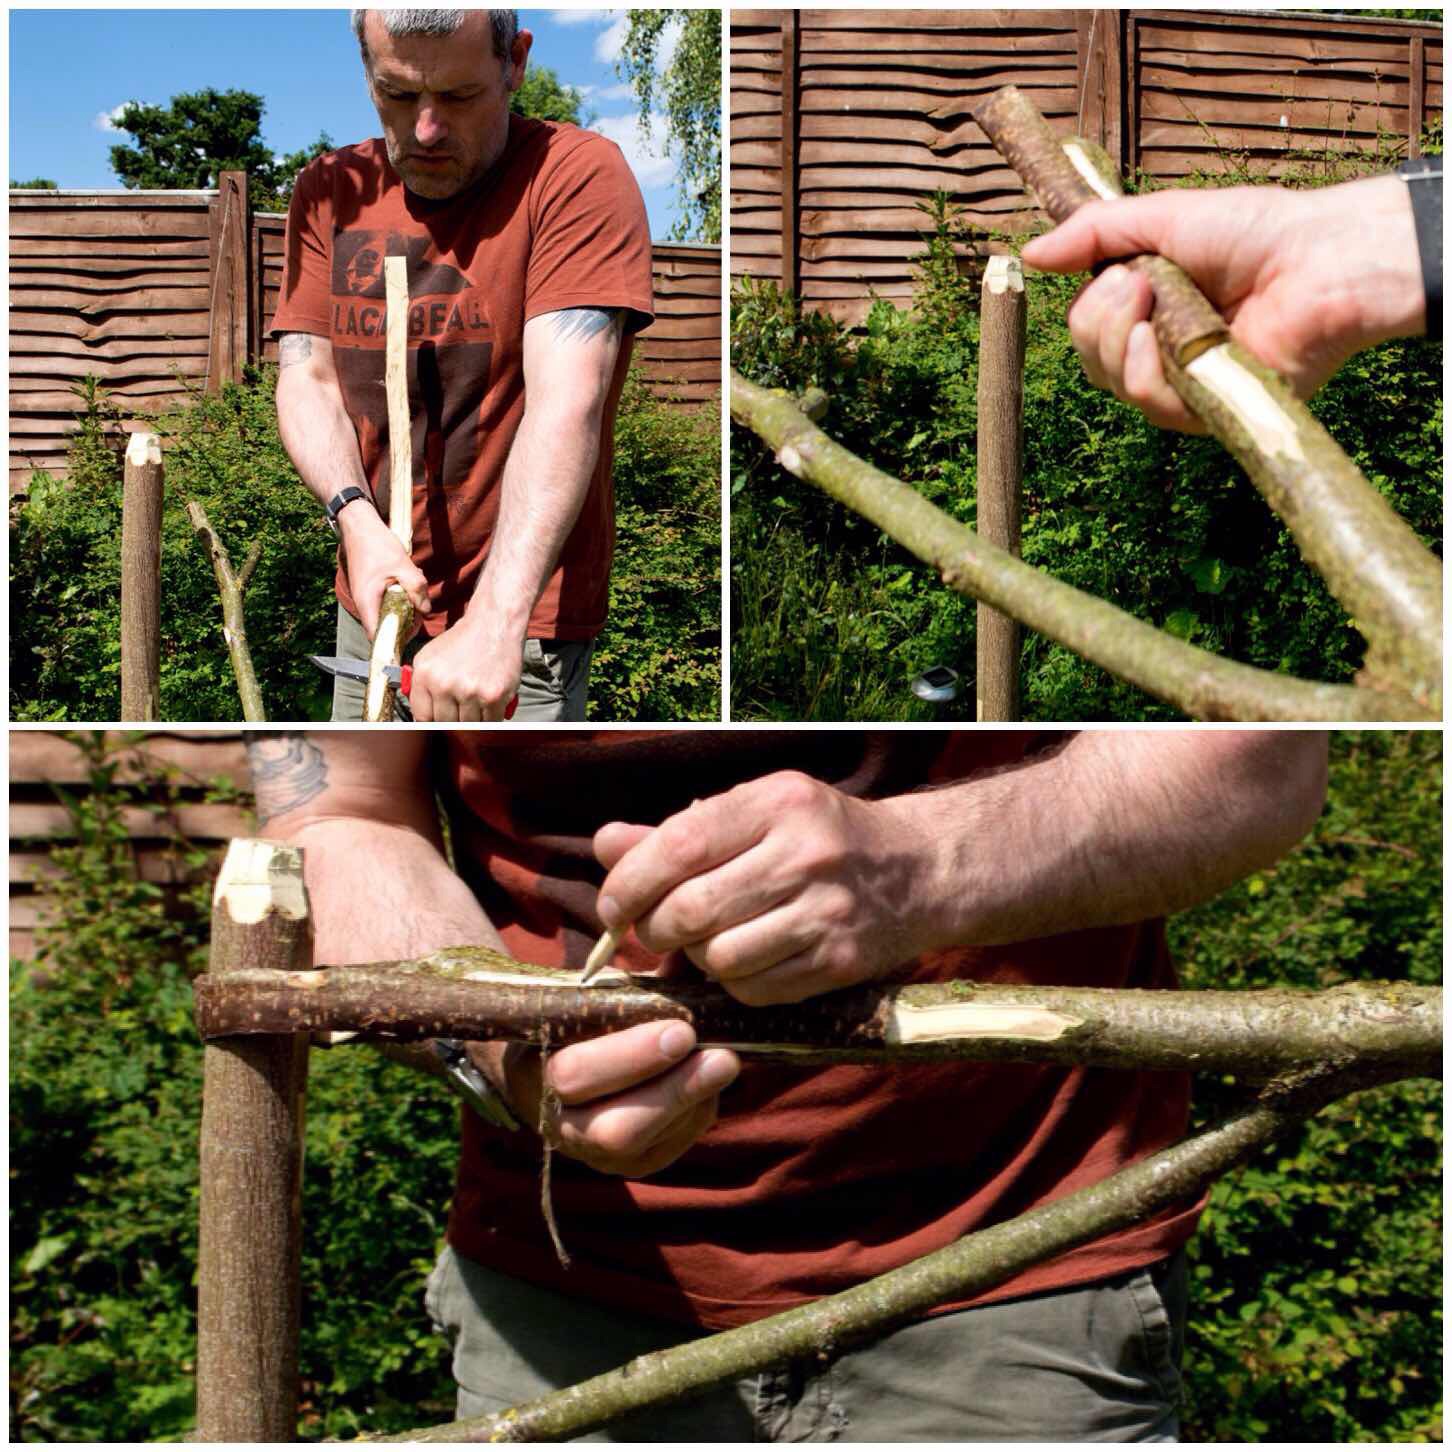
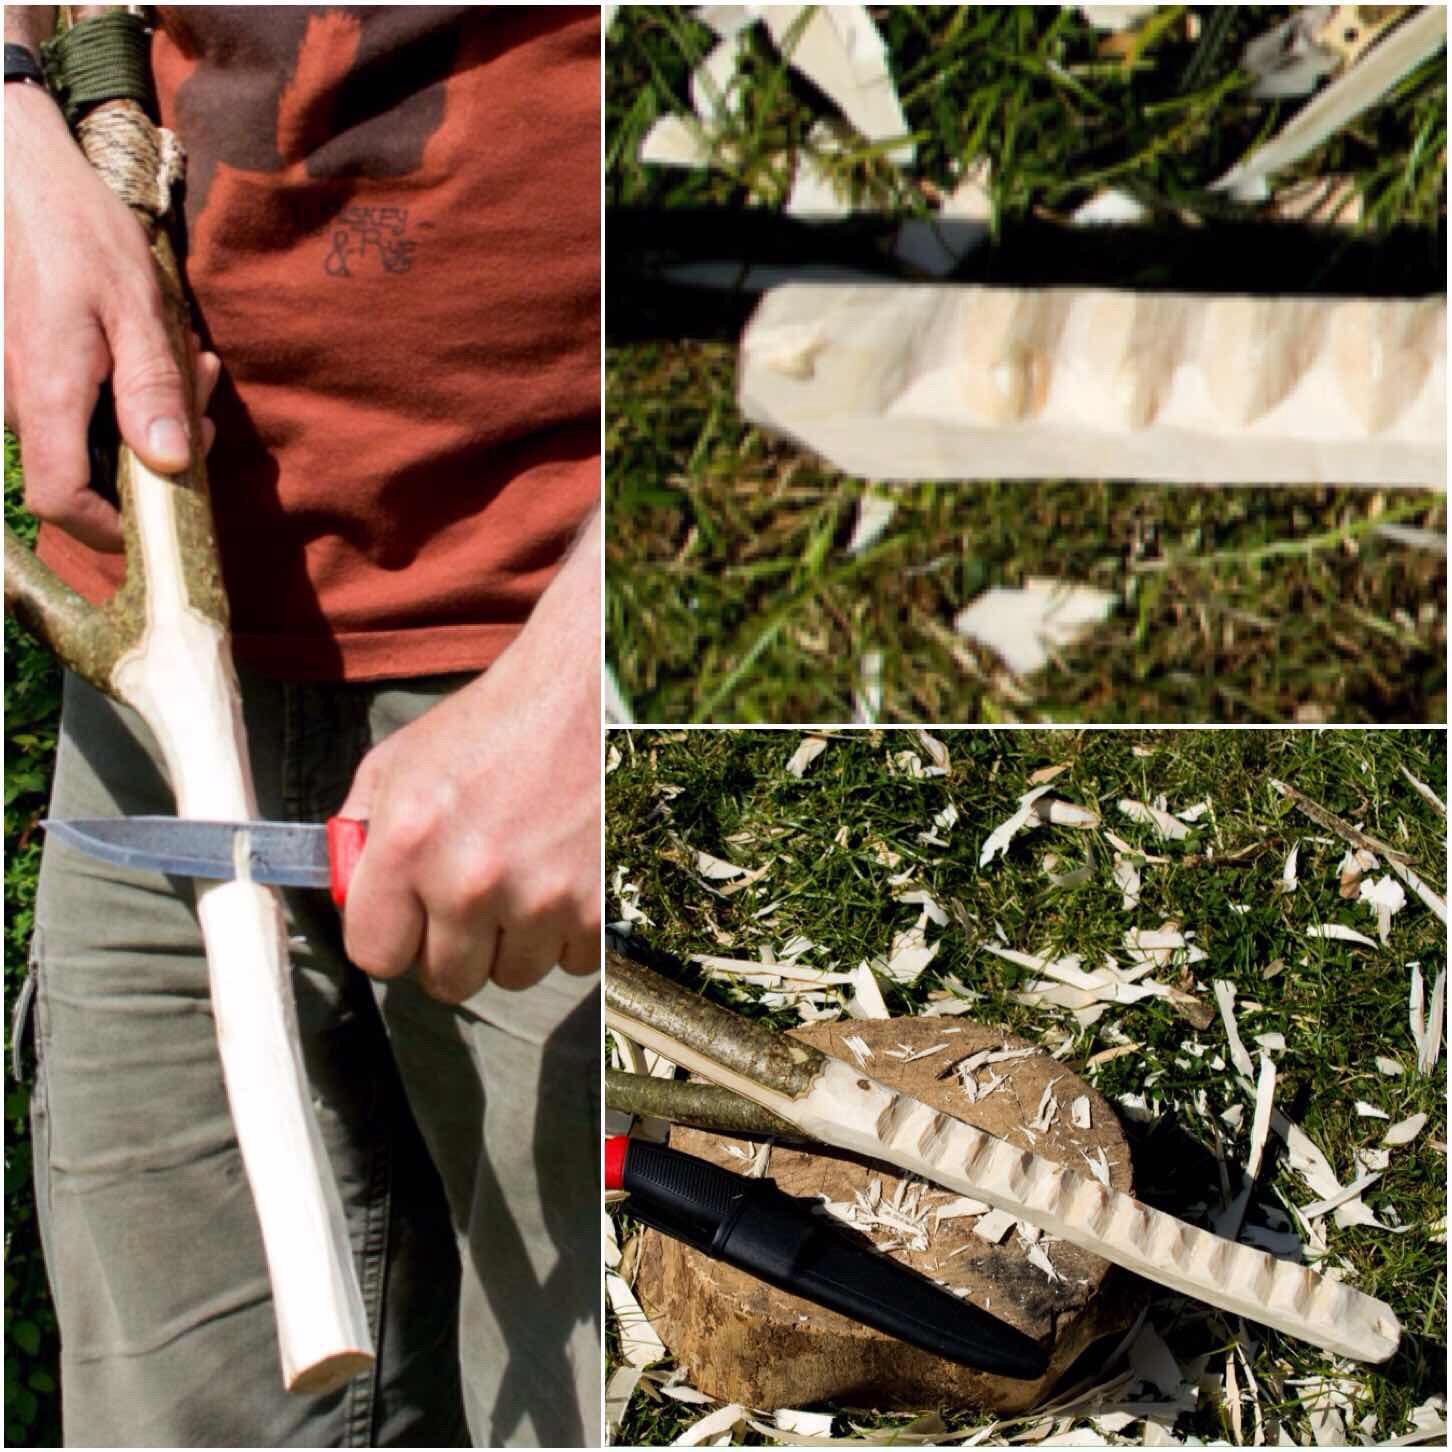
Wagon/Waugan Stick or Burtonsville Rig
This is an excellent cooking rig for bushcraft beginners to learn. It has lots of different parts and requires a number of different knife cuts to produce the hanger and the hanging poles. I have heard this set up called many different names from Waygon or Waugan stick and Mors Kochanski refers to it as the Burtonsville rig. All have their own stories behind them however the common factor is that it a very easy set up and offers the bushcrafter a wide range of cooking heights.
Wagon/Waugan Stick or Burtonsville Rig
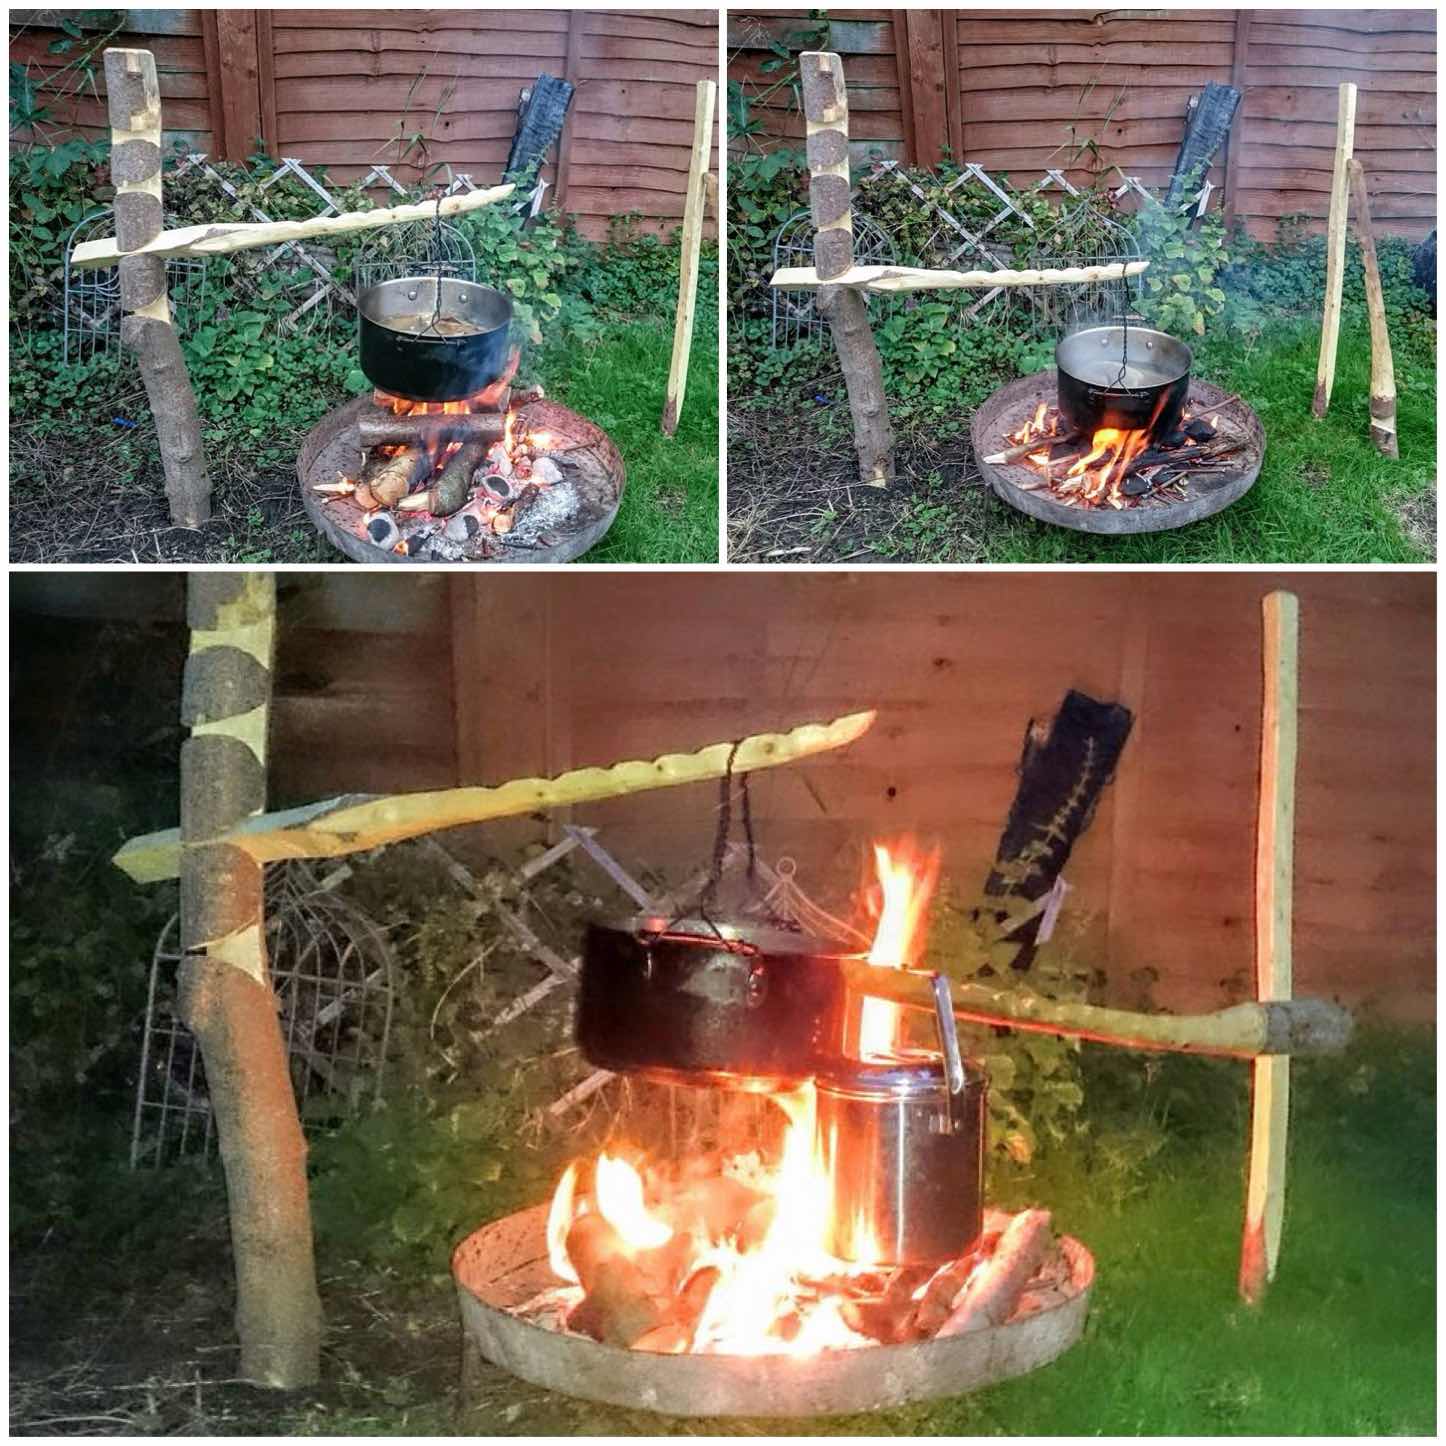
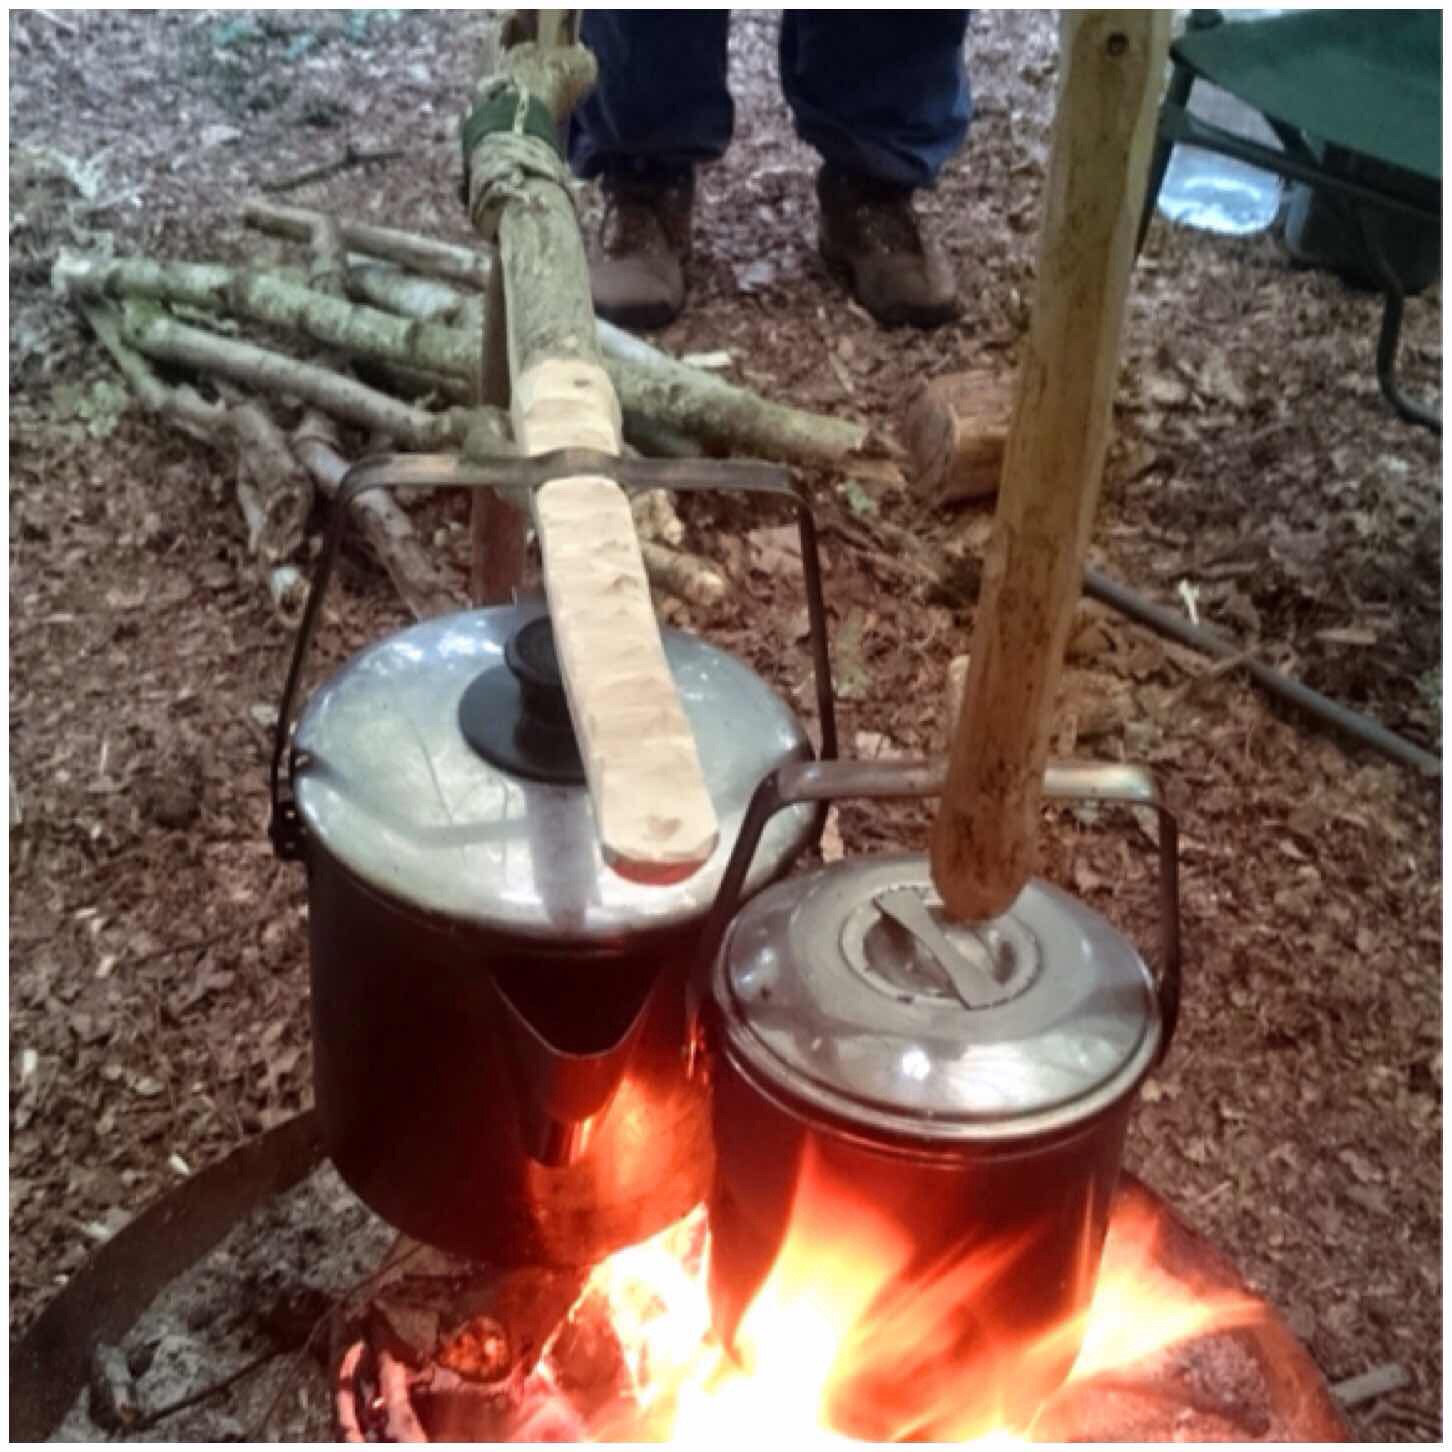
Double French Windlass
The Double French Windlass is a cracking cooking rig. I was taught this by my friend Steve ‘Mesquite’ Harral at the Bushcraft UK Bushmoot a number of years ago. I used it at this year’s Bushmoot for two weeks and it allowed me to cook with a number of different pots at one time with the ability to have them all at different cooking heights.
Double French Windlass
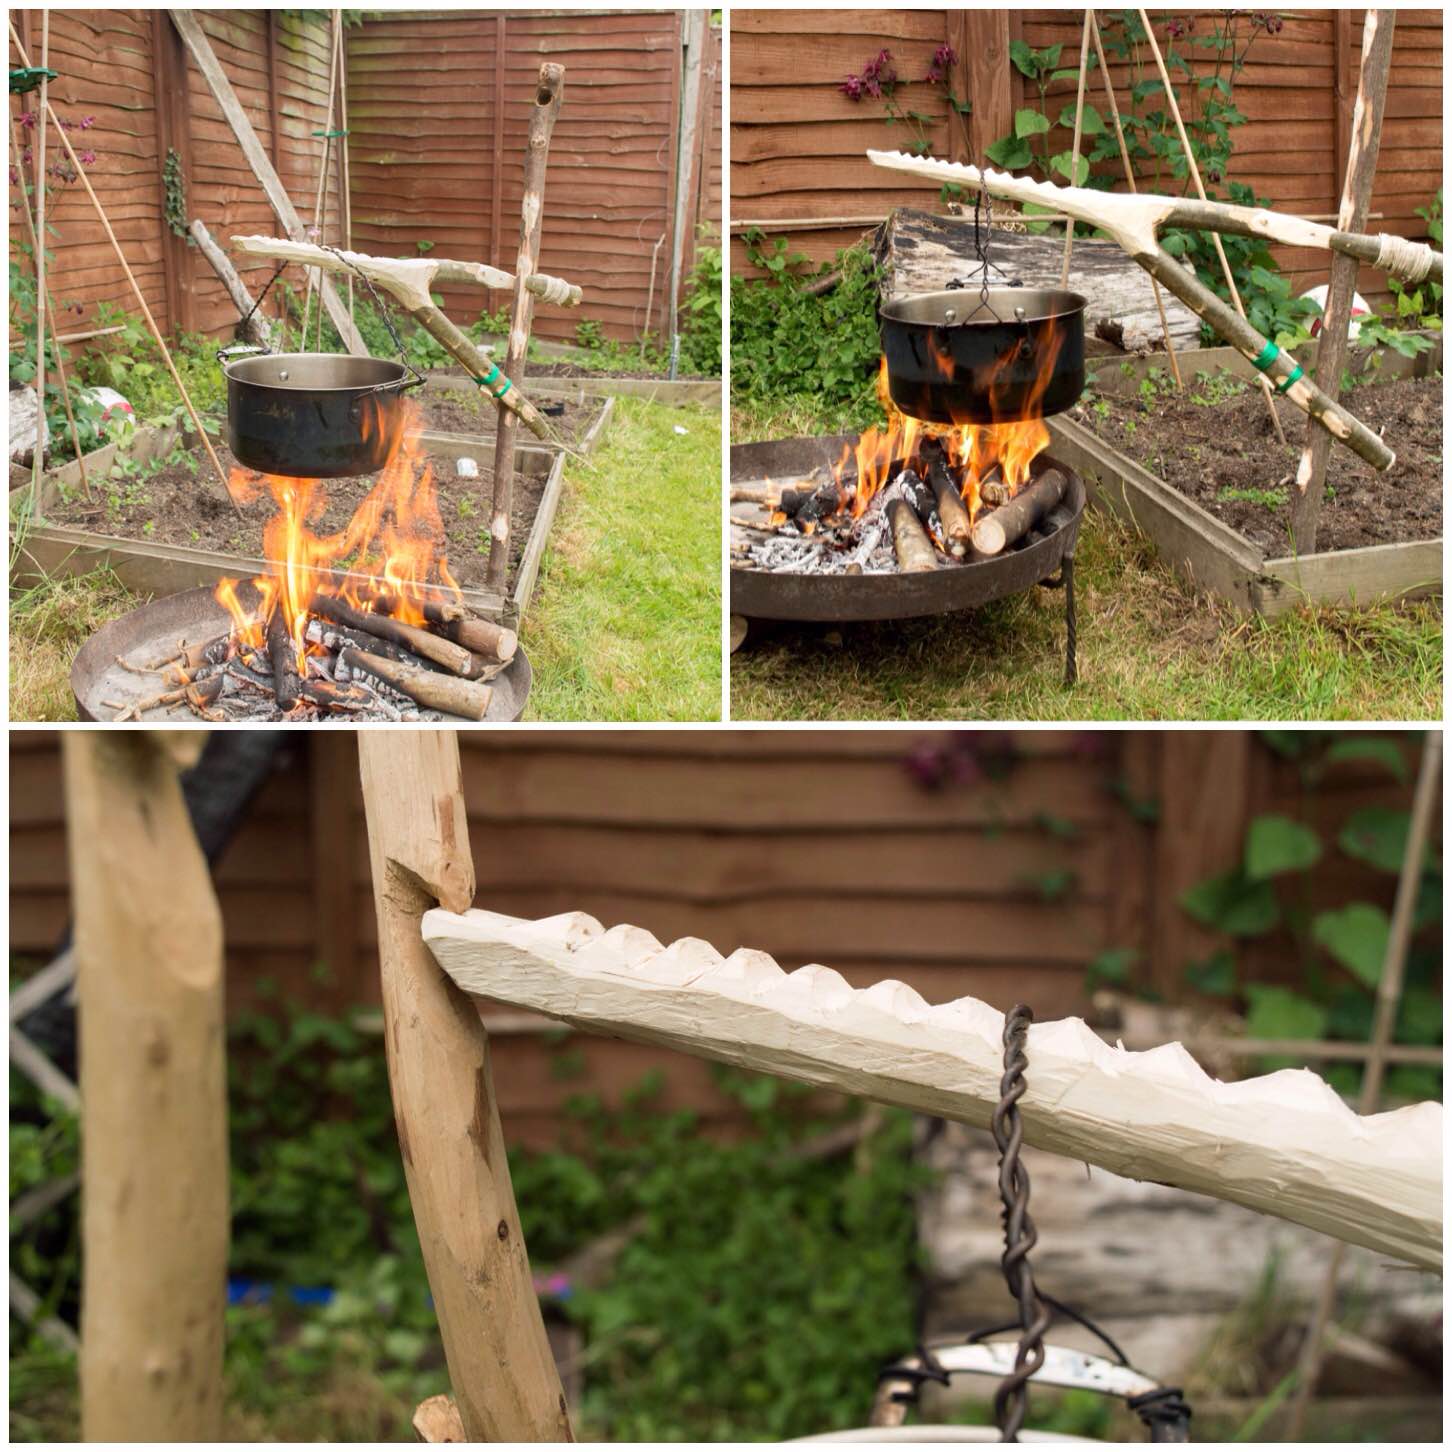
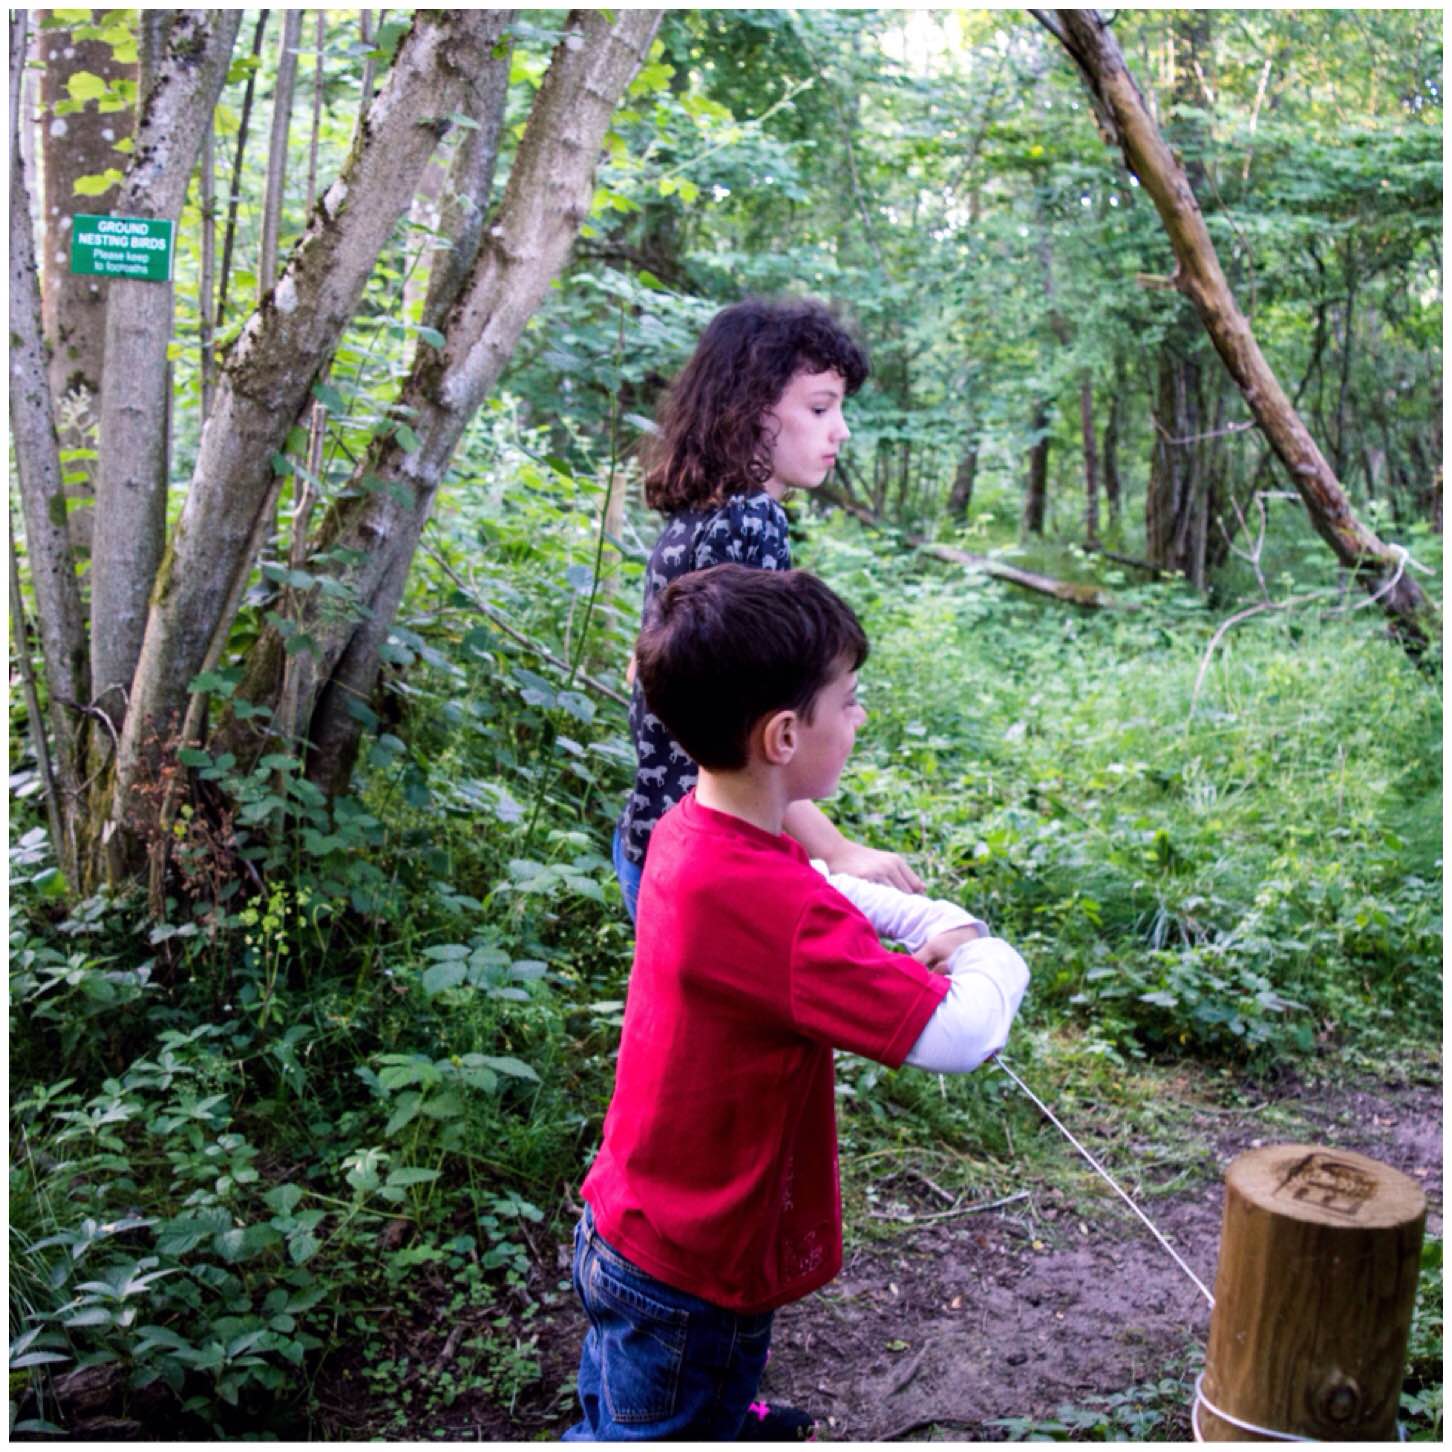
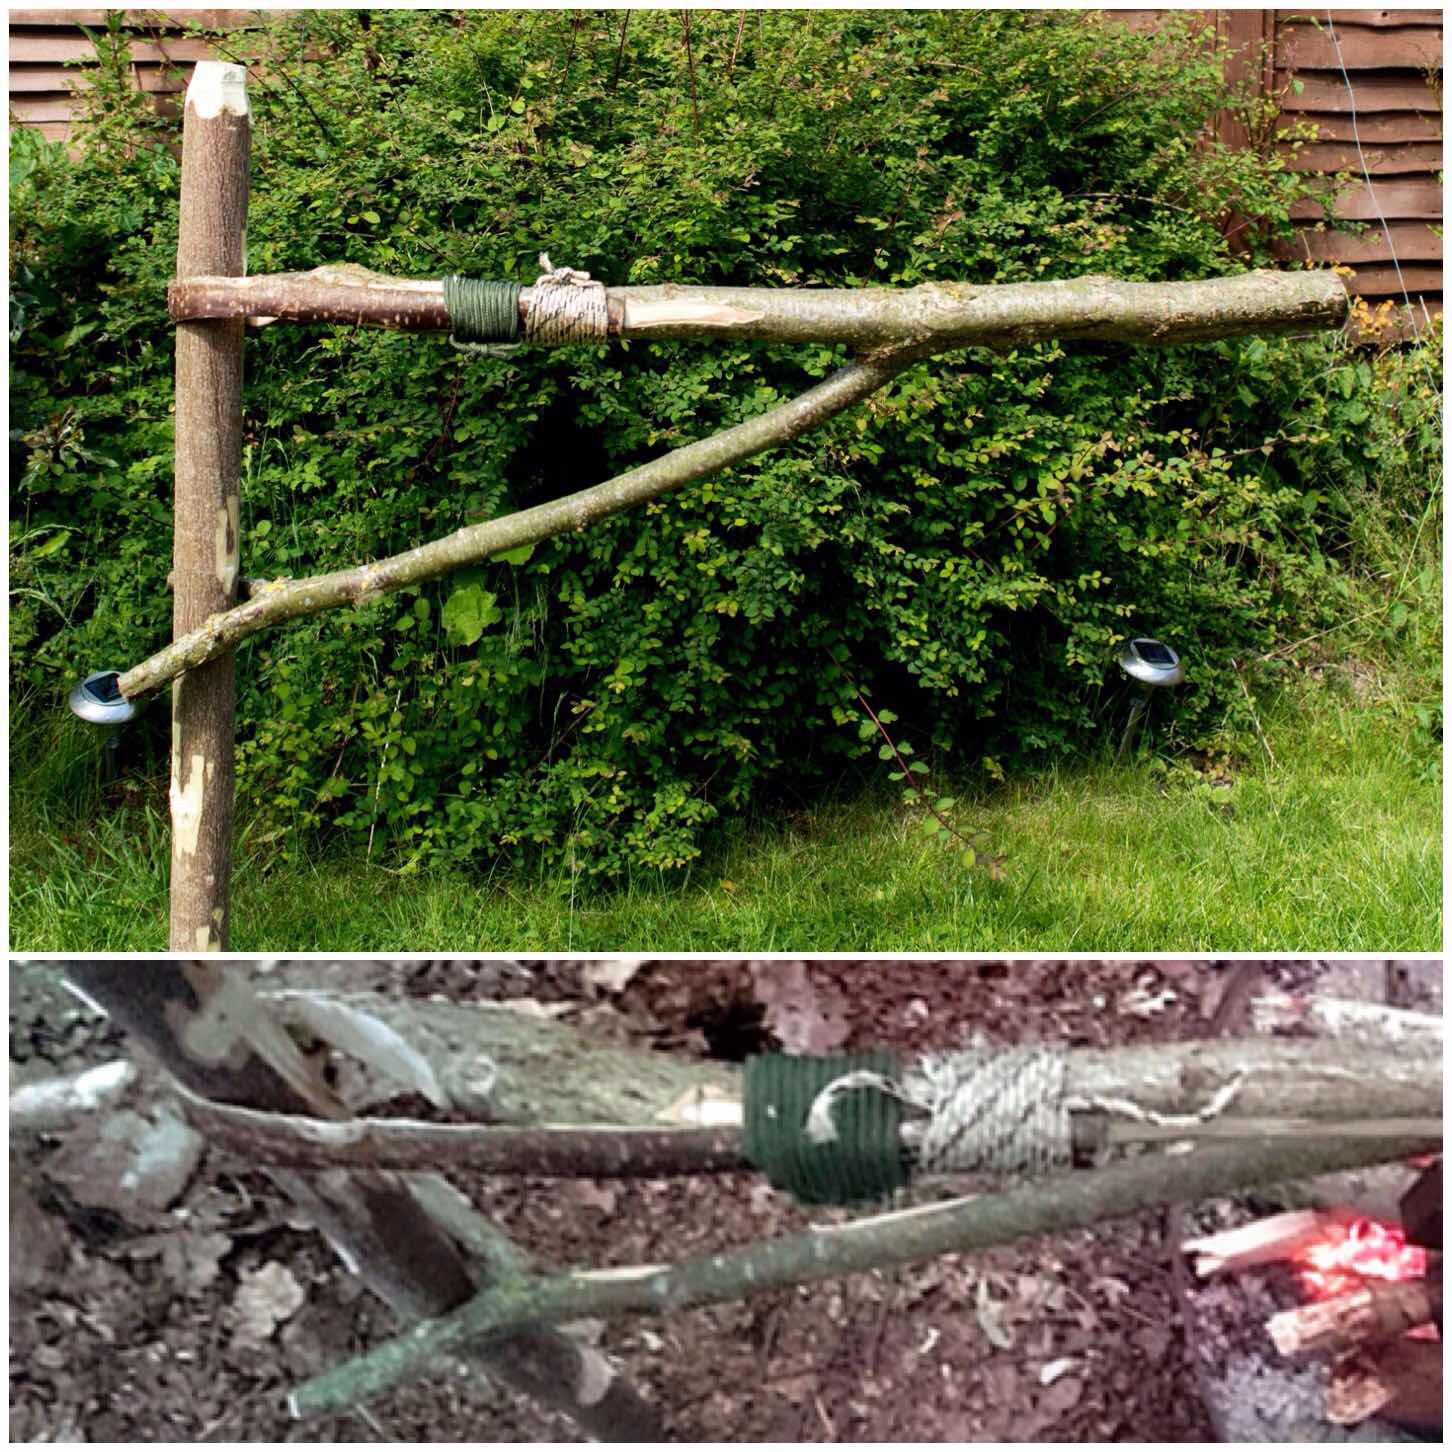
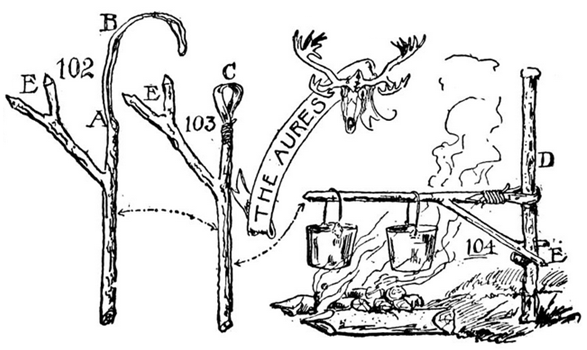
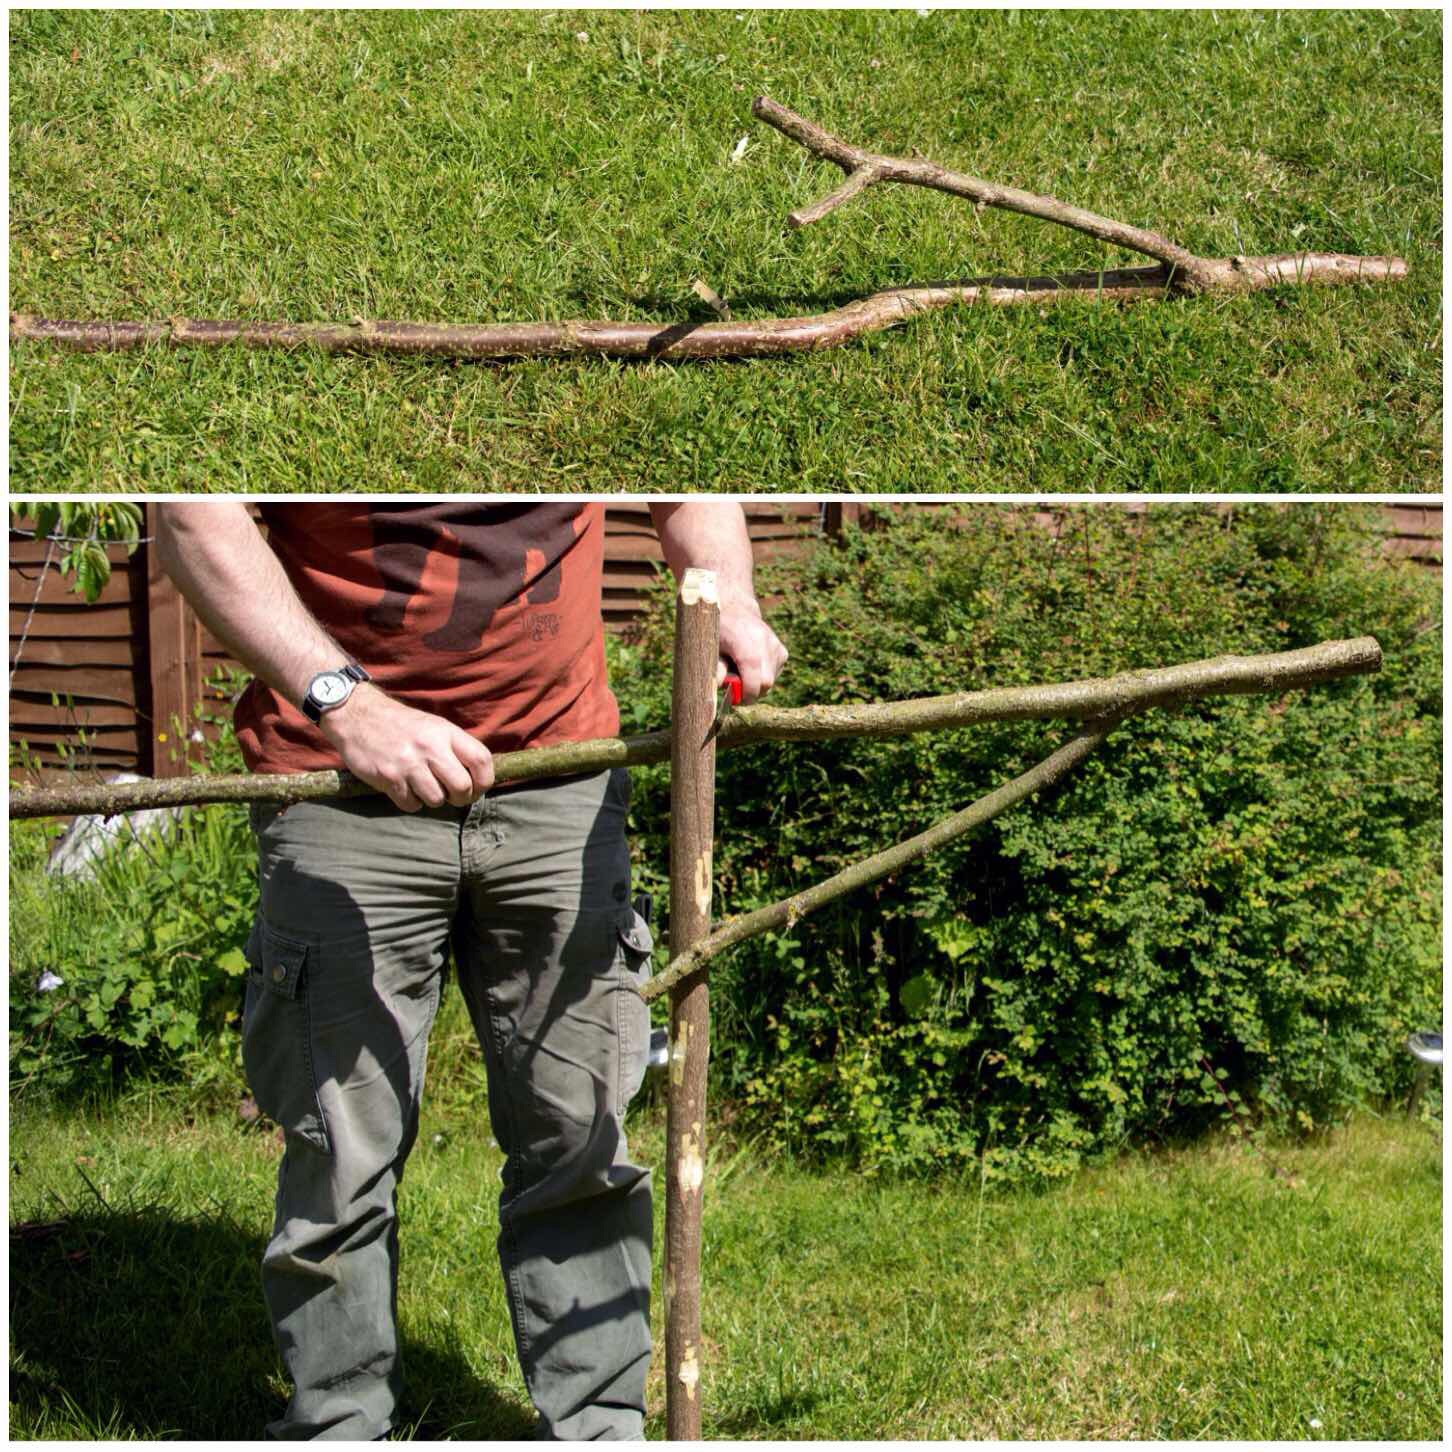
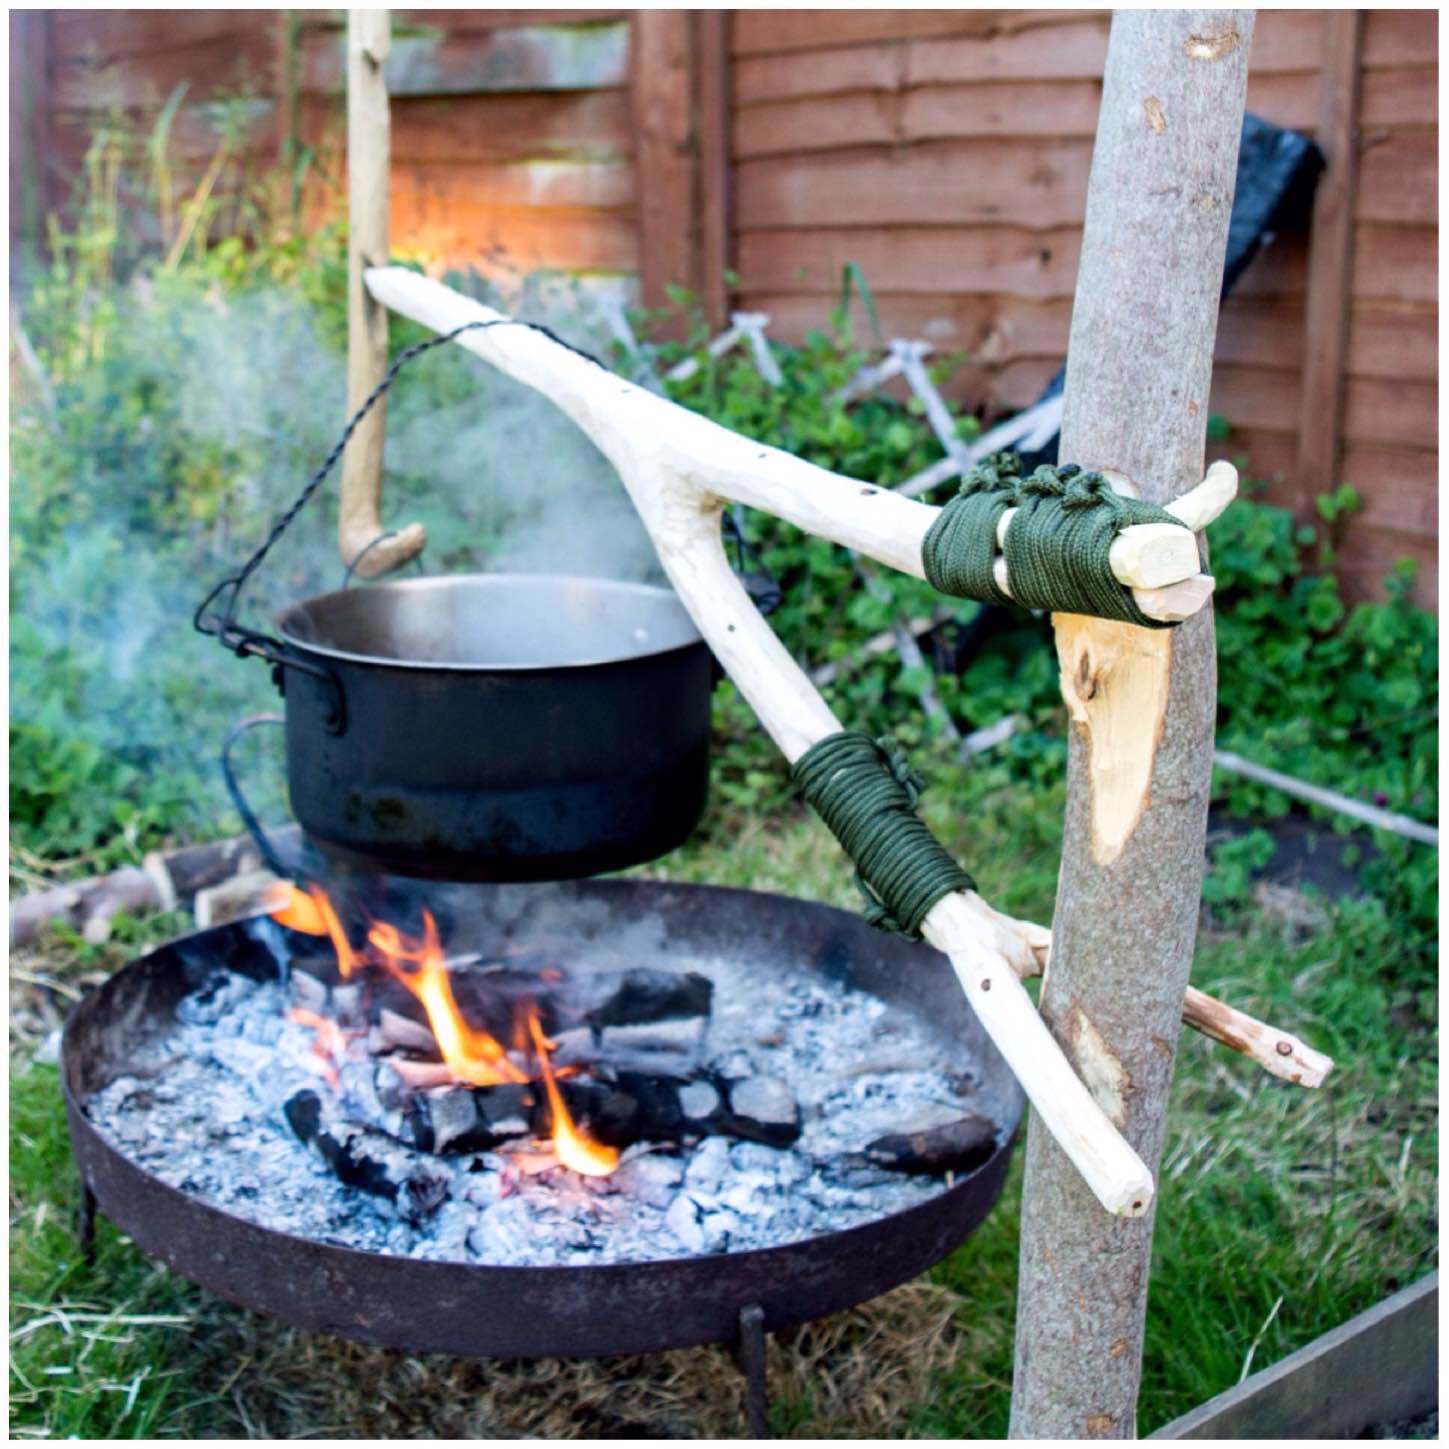
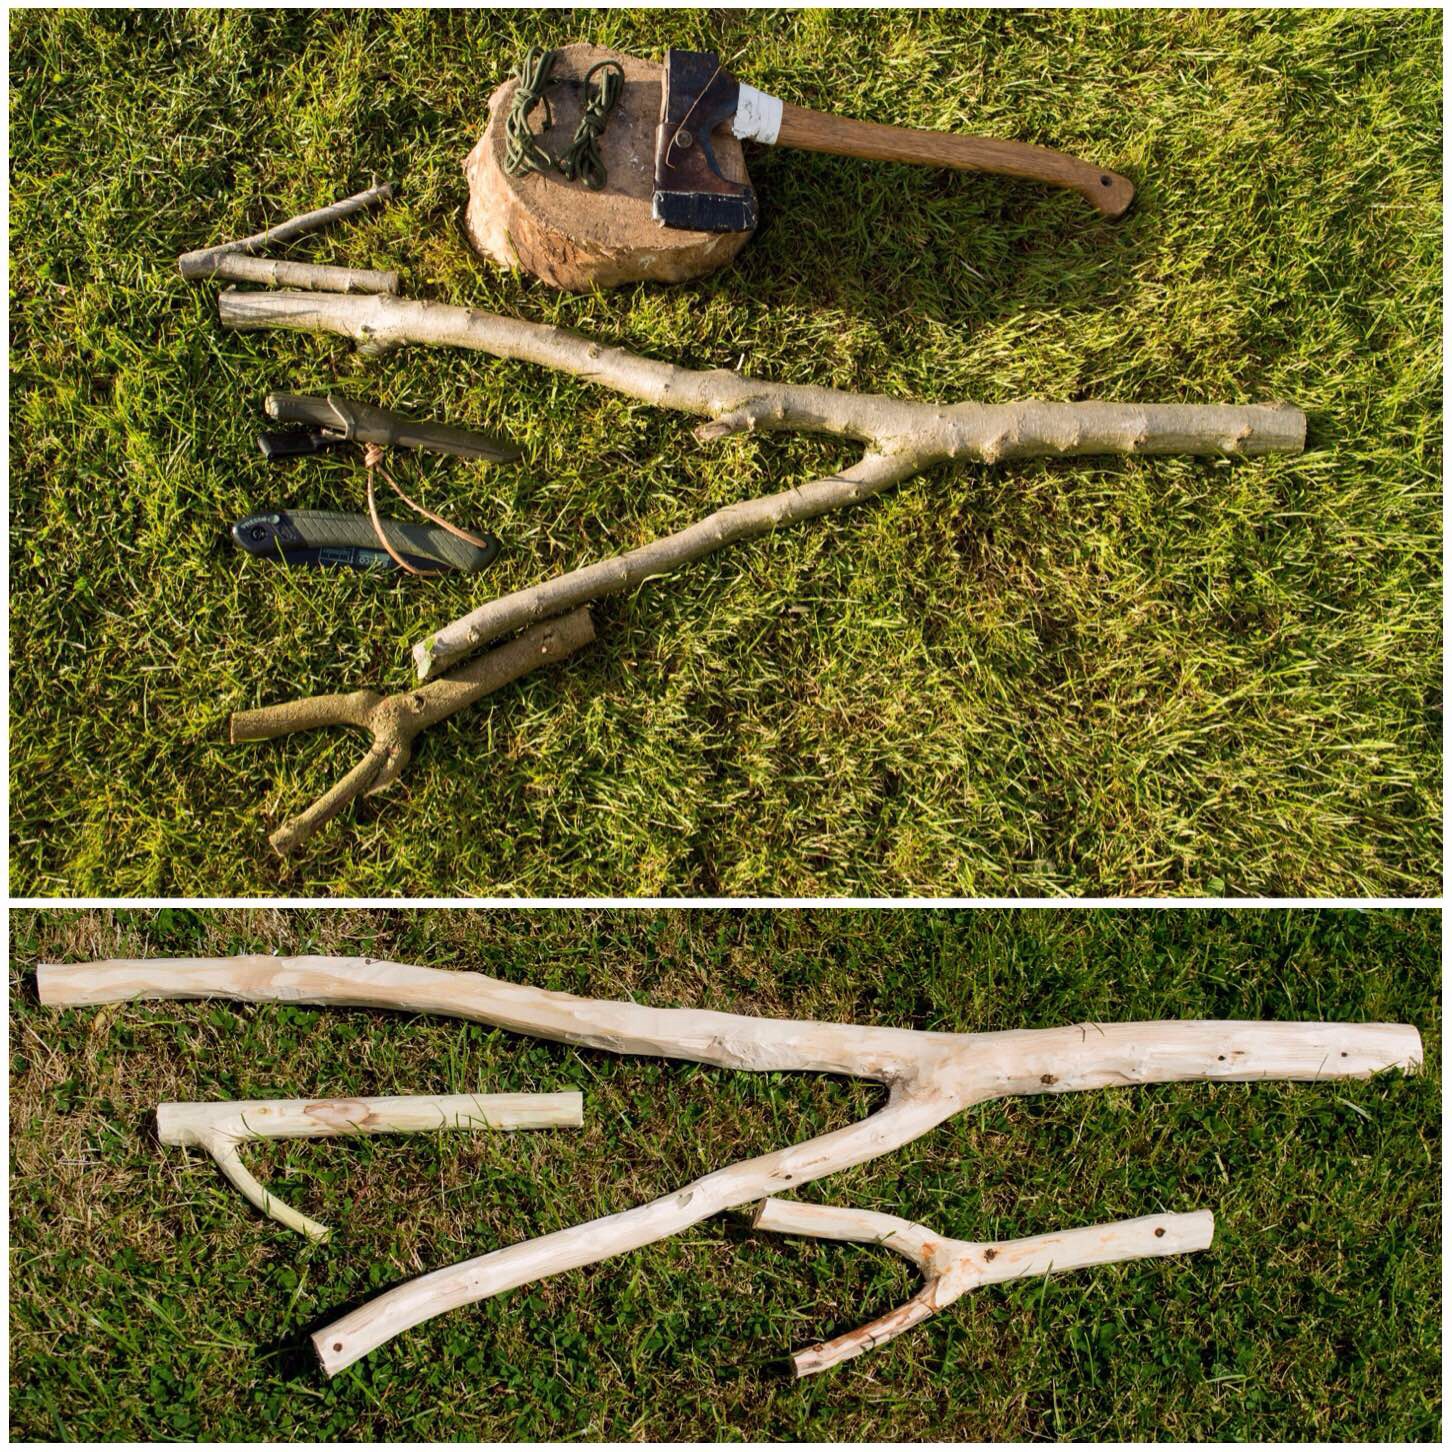
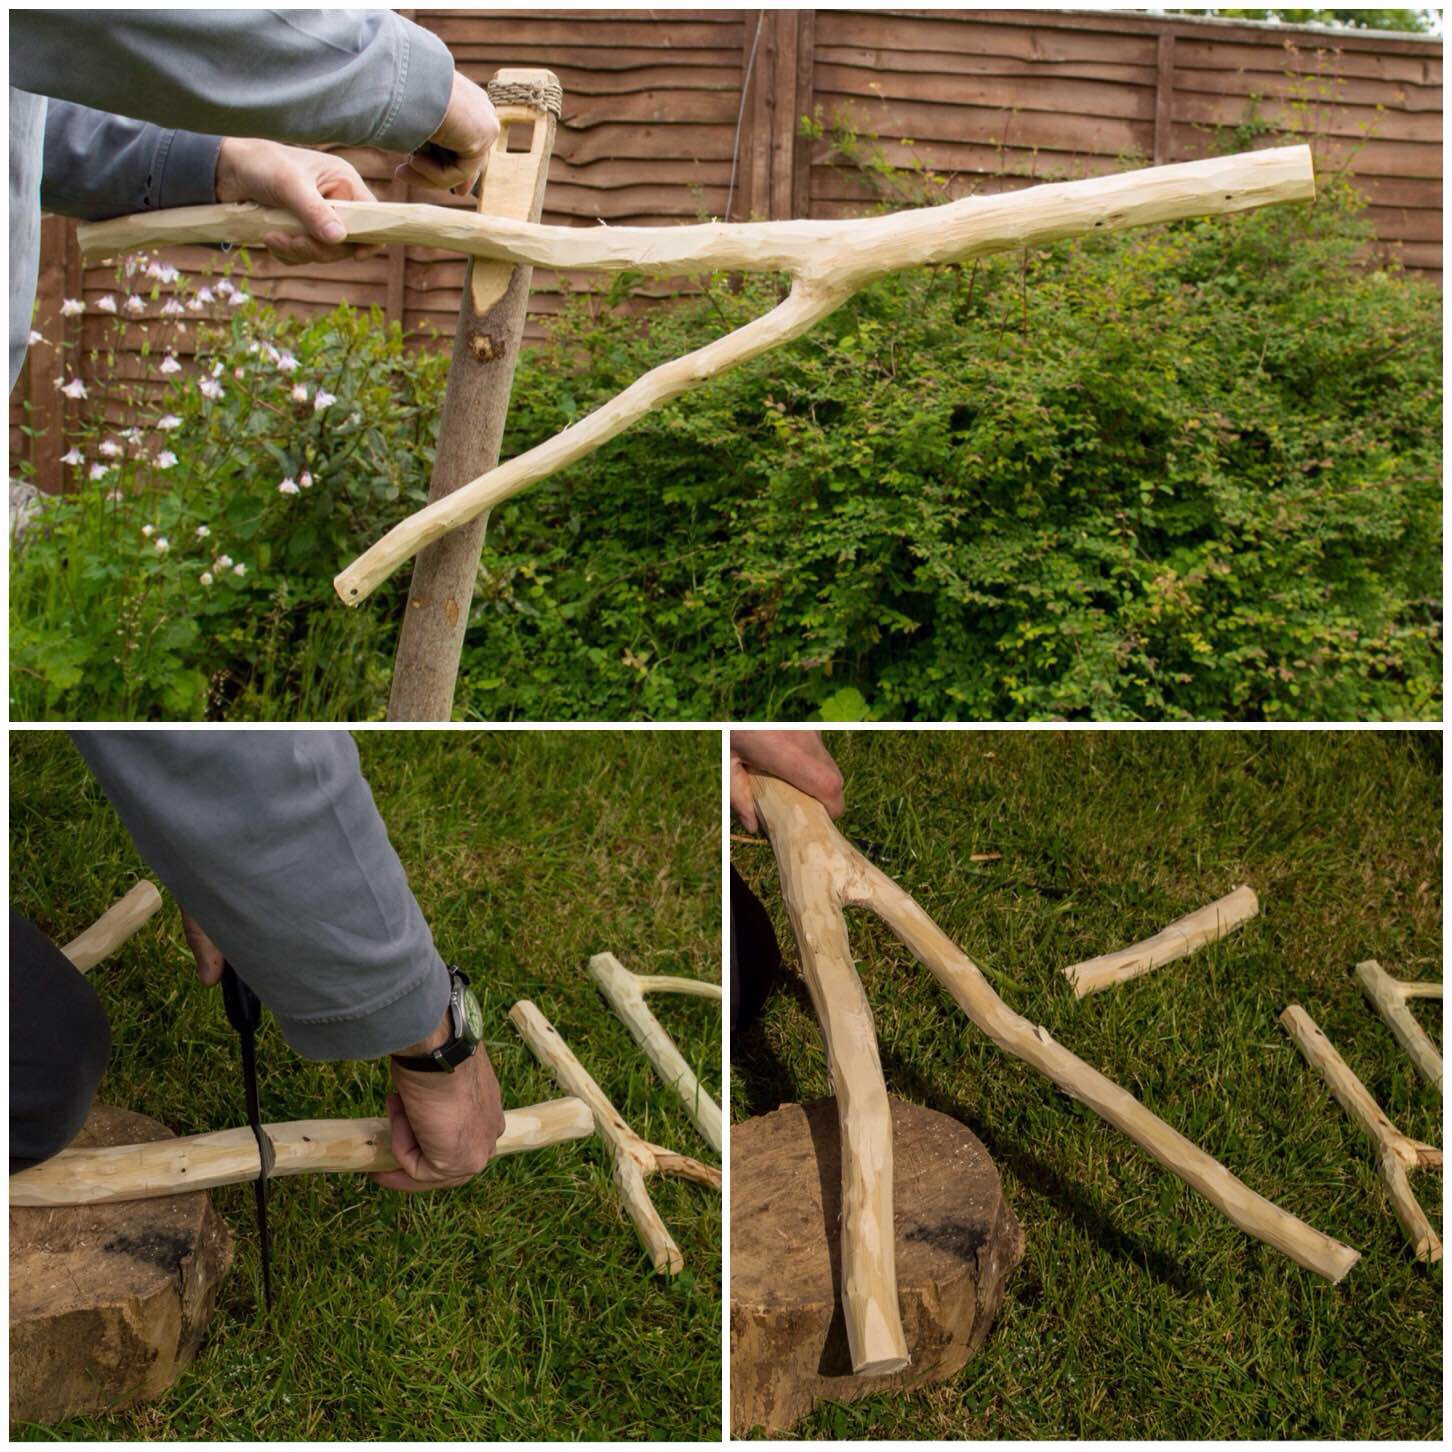
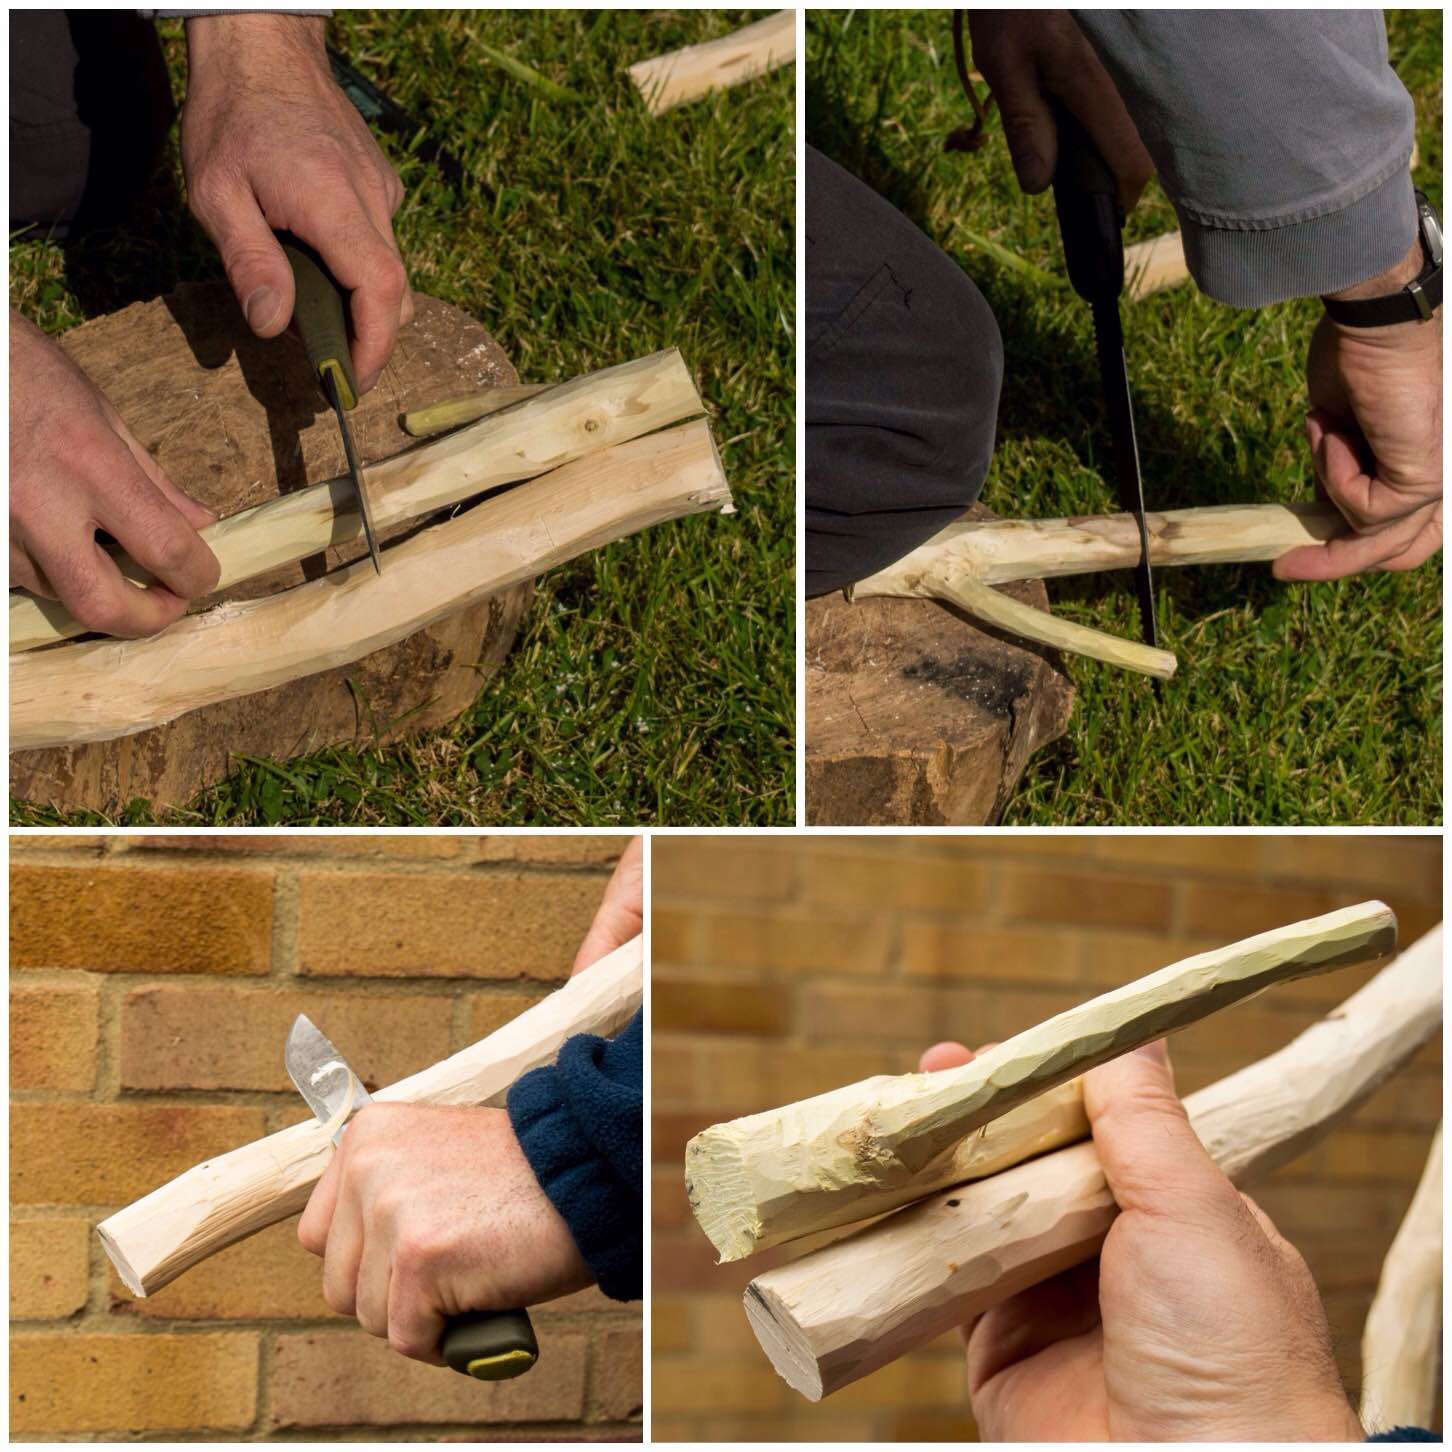
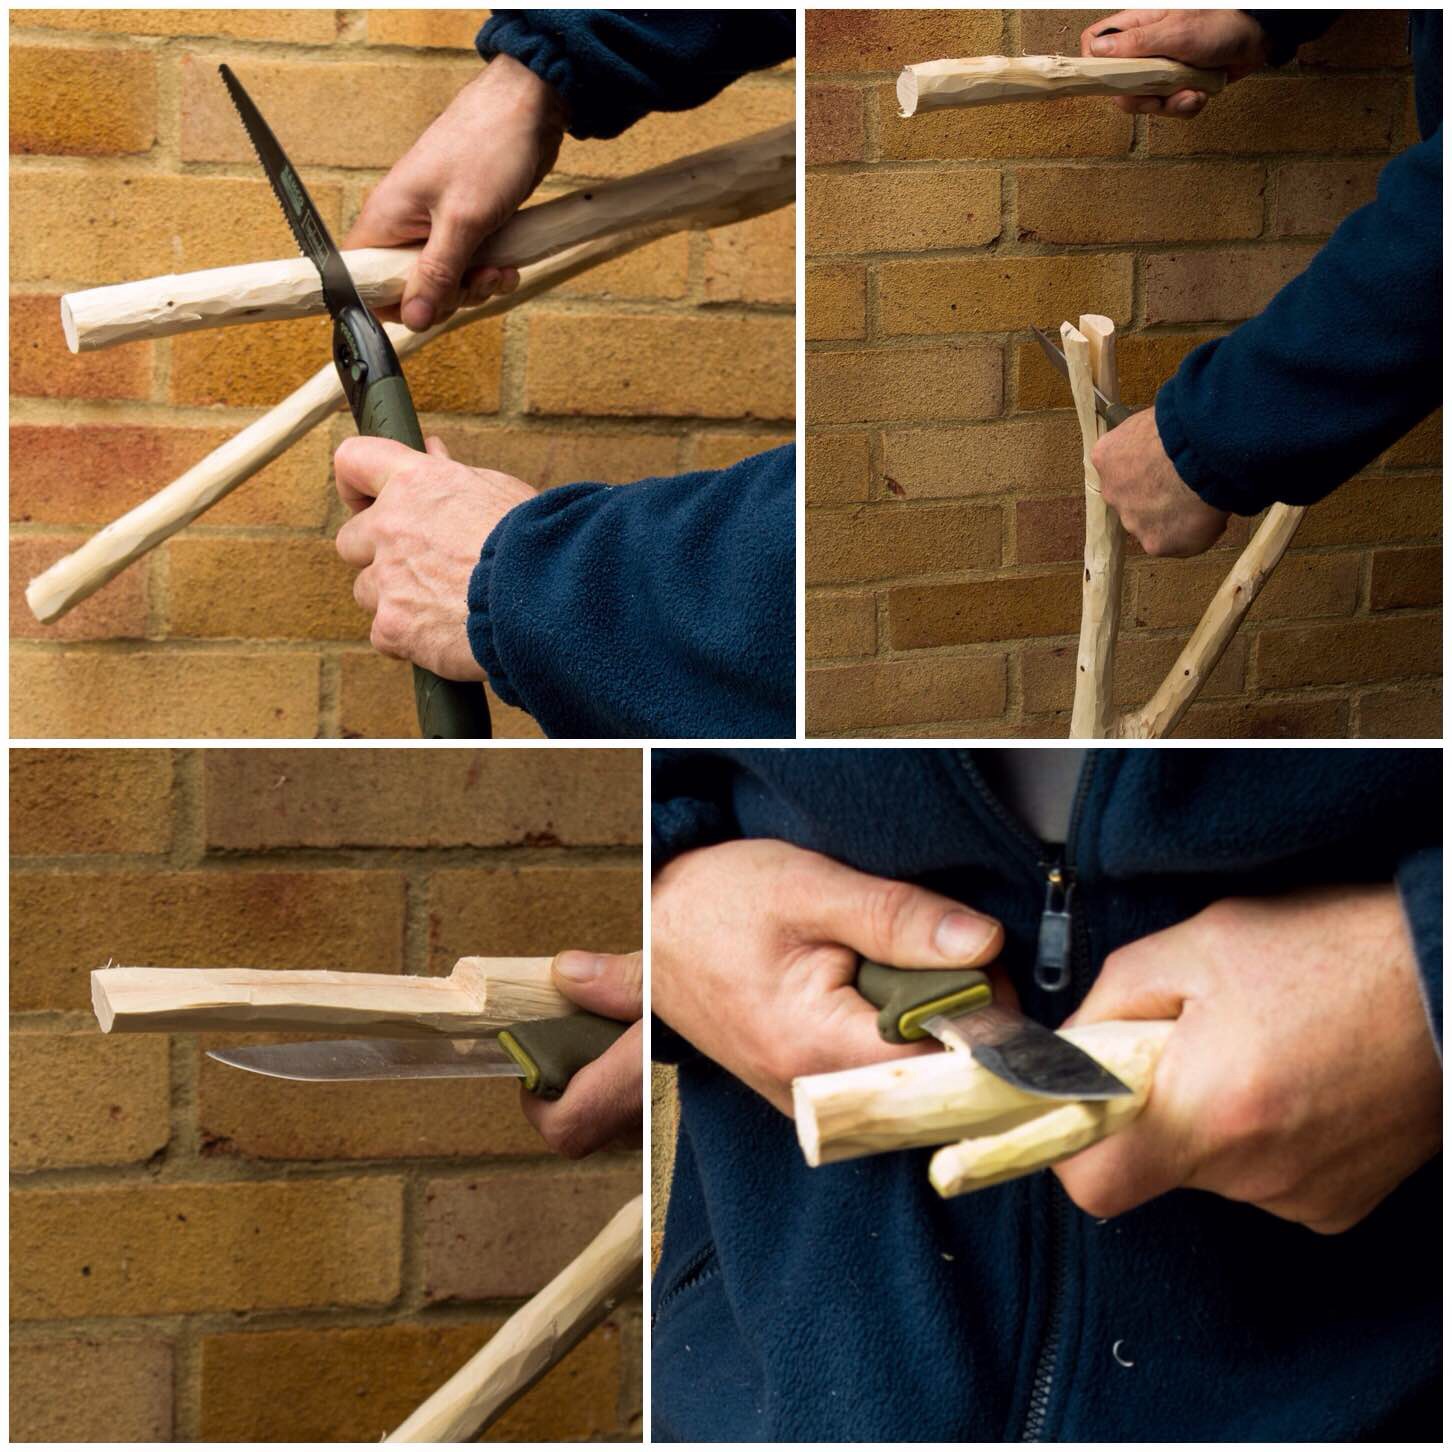
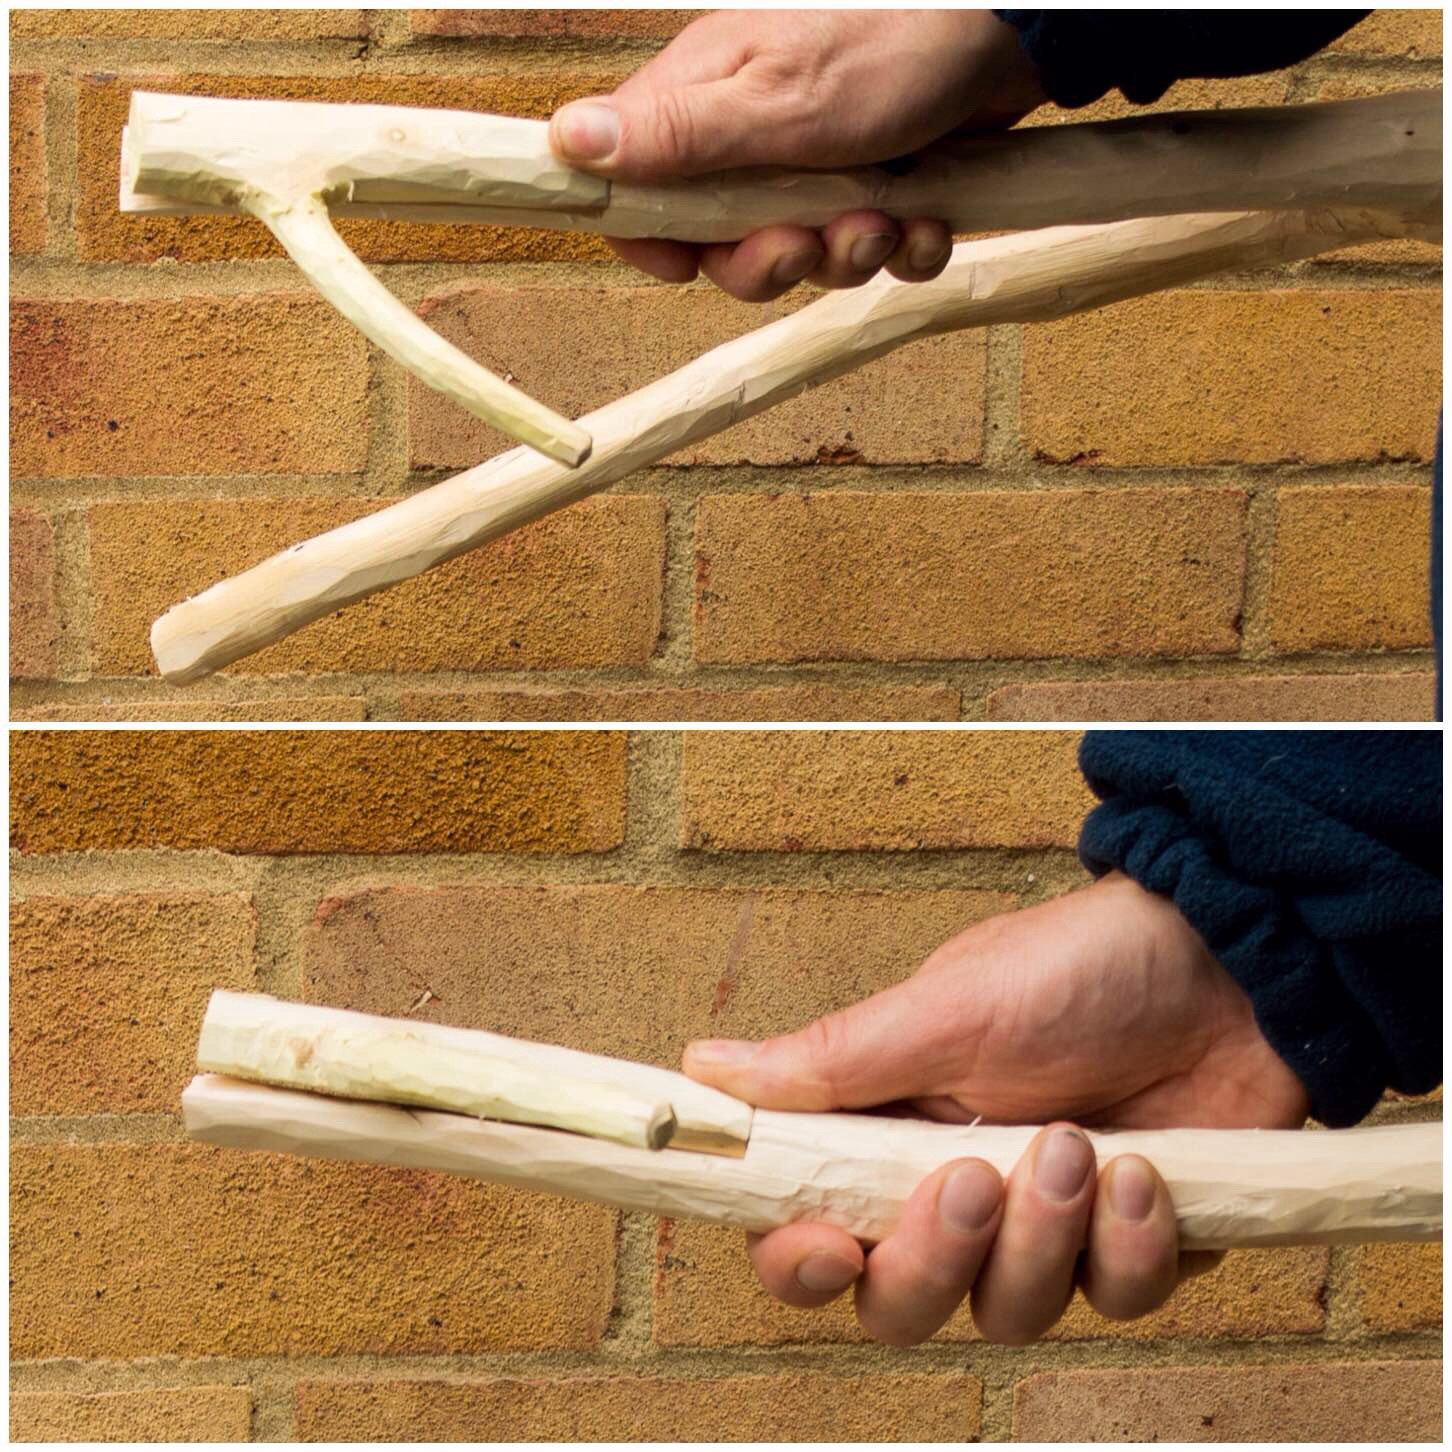
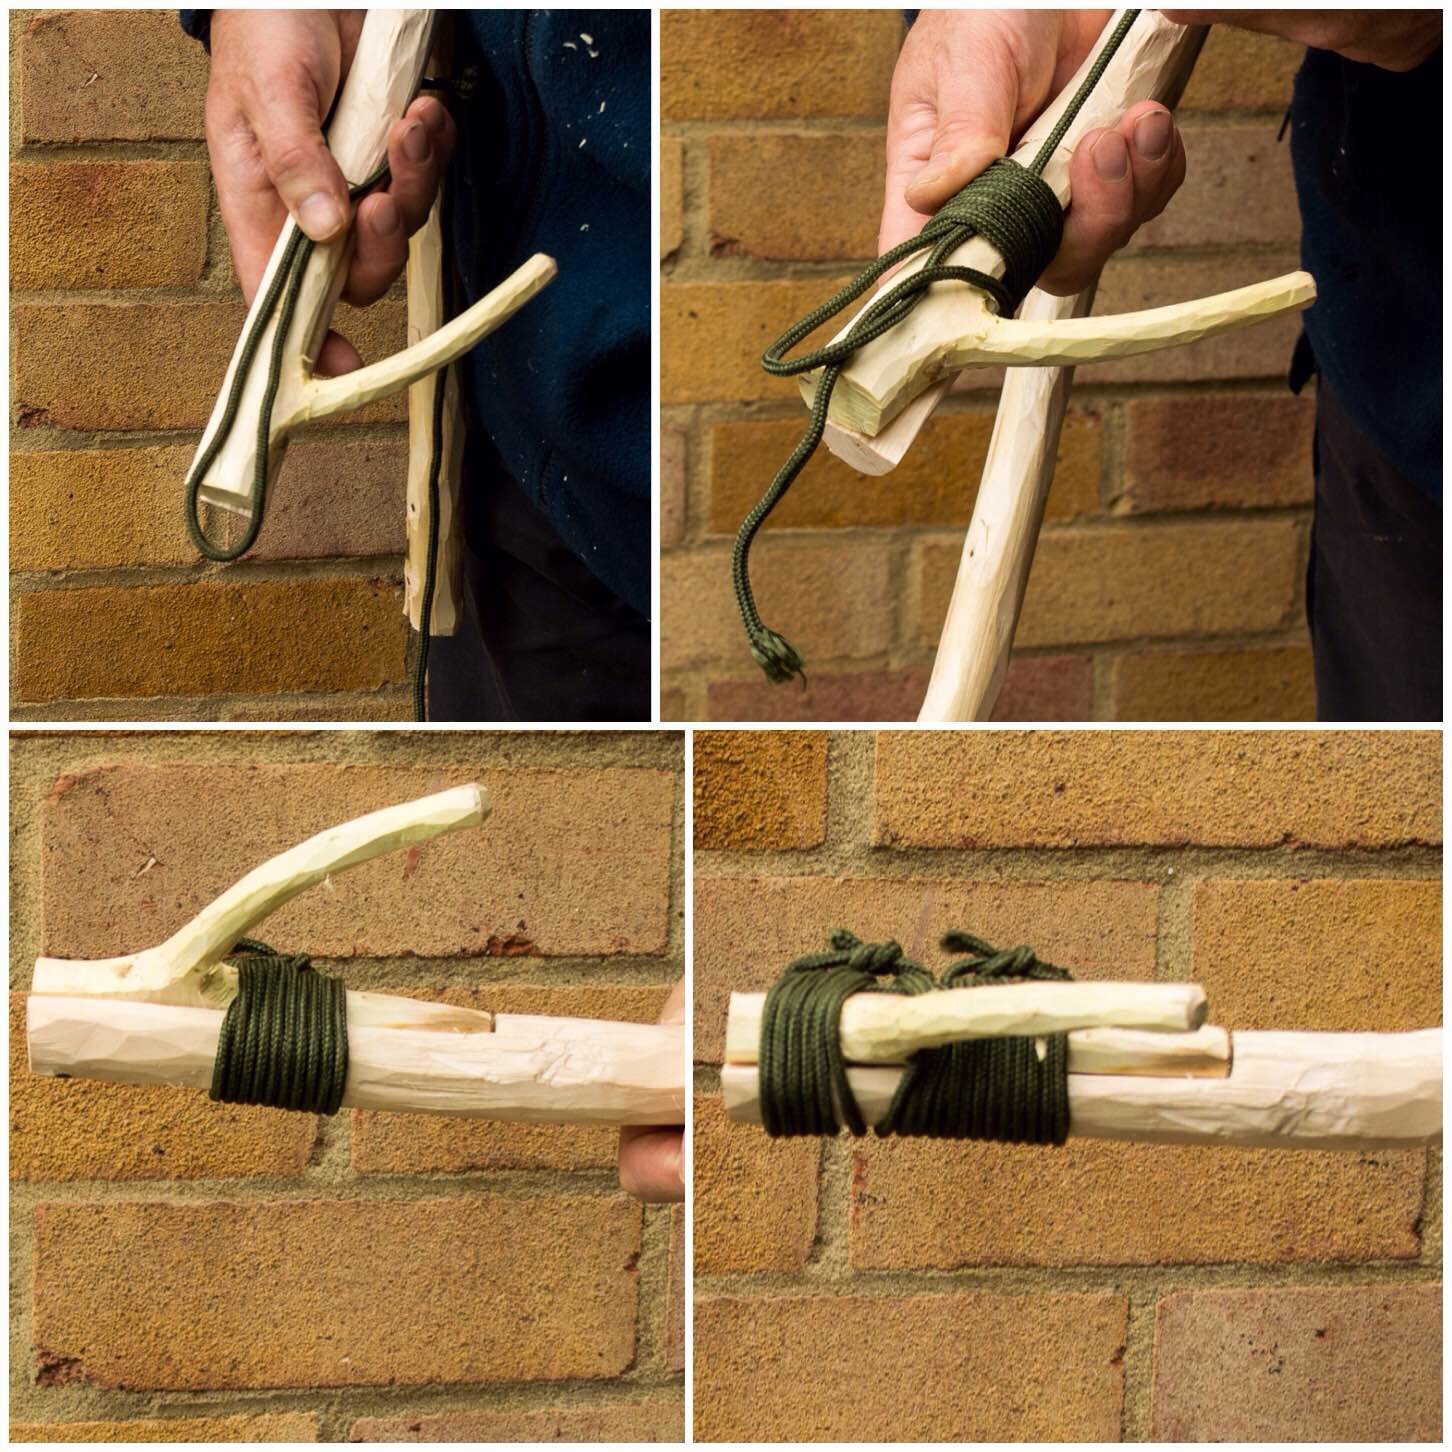
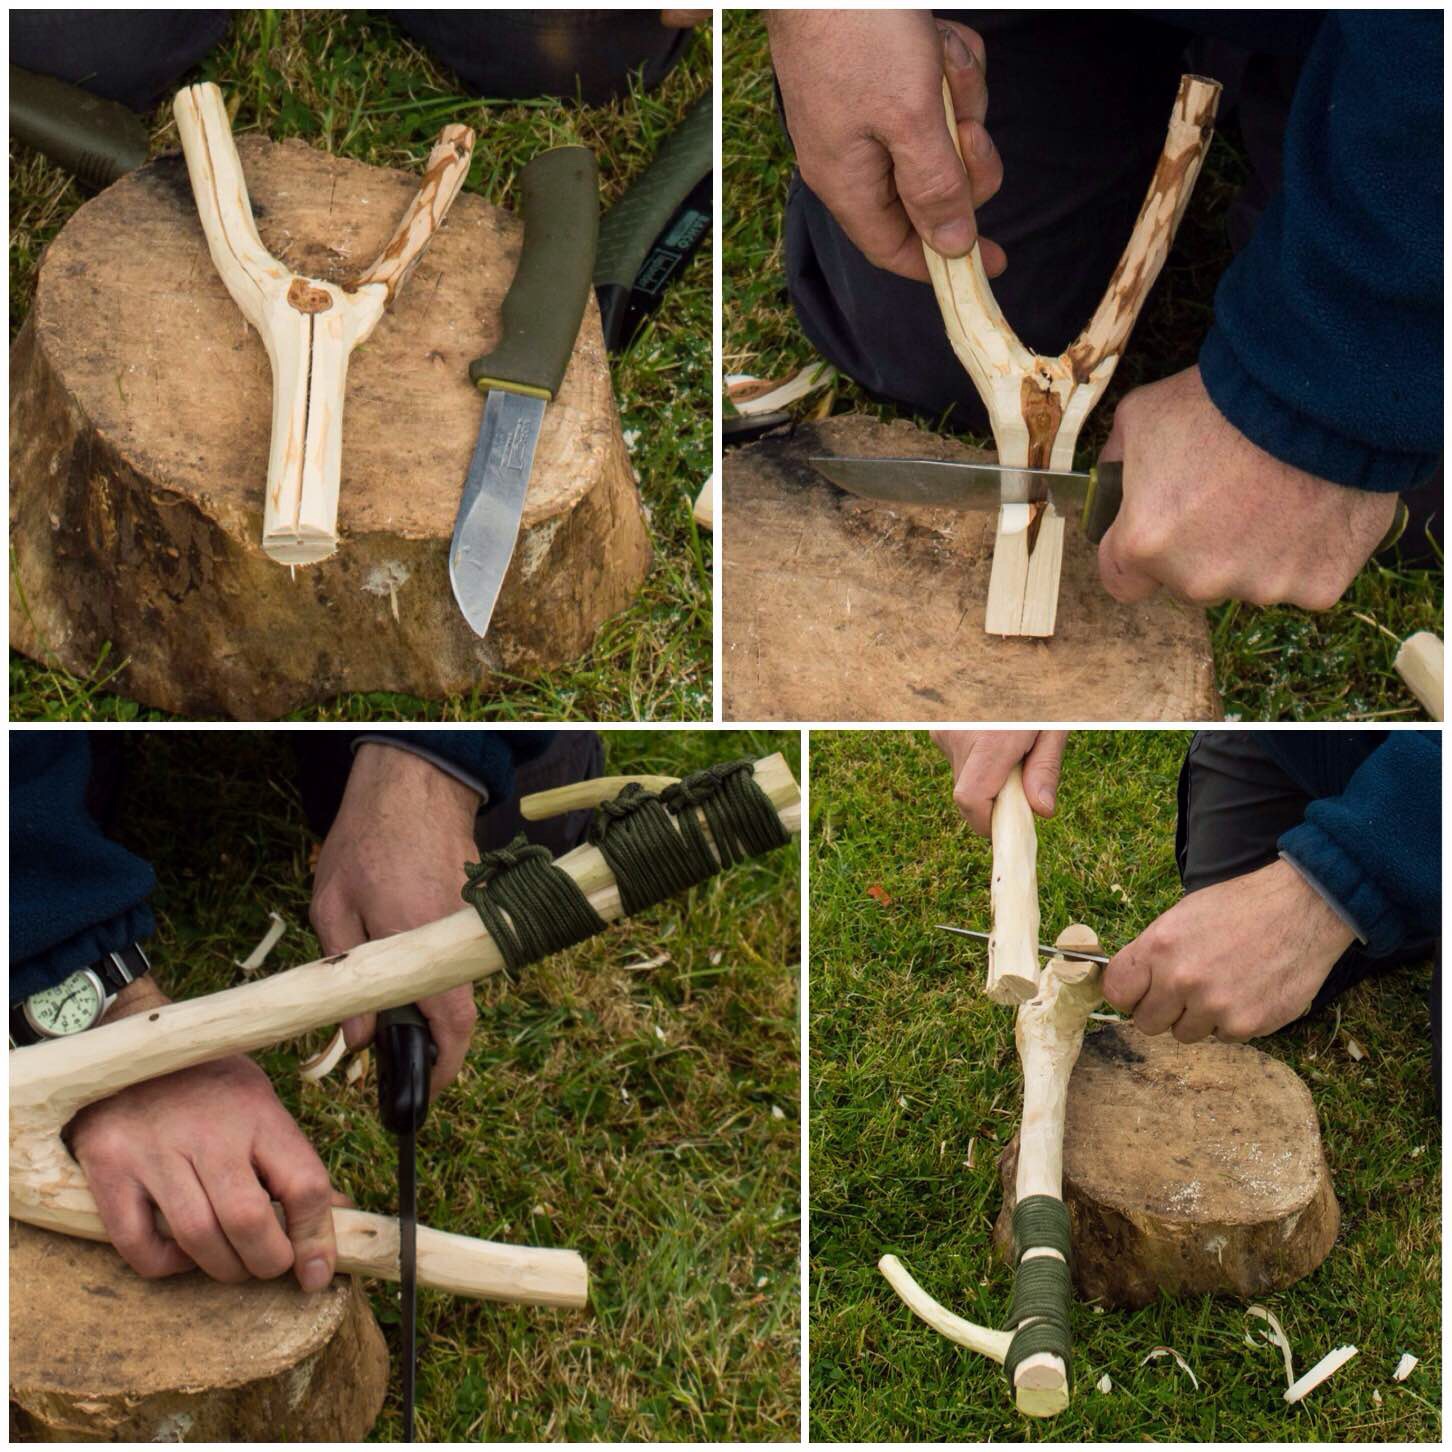
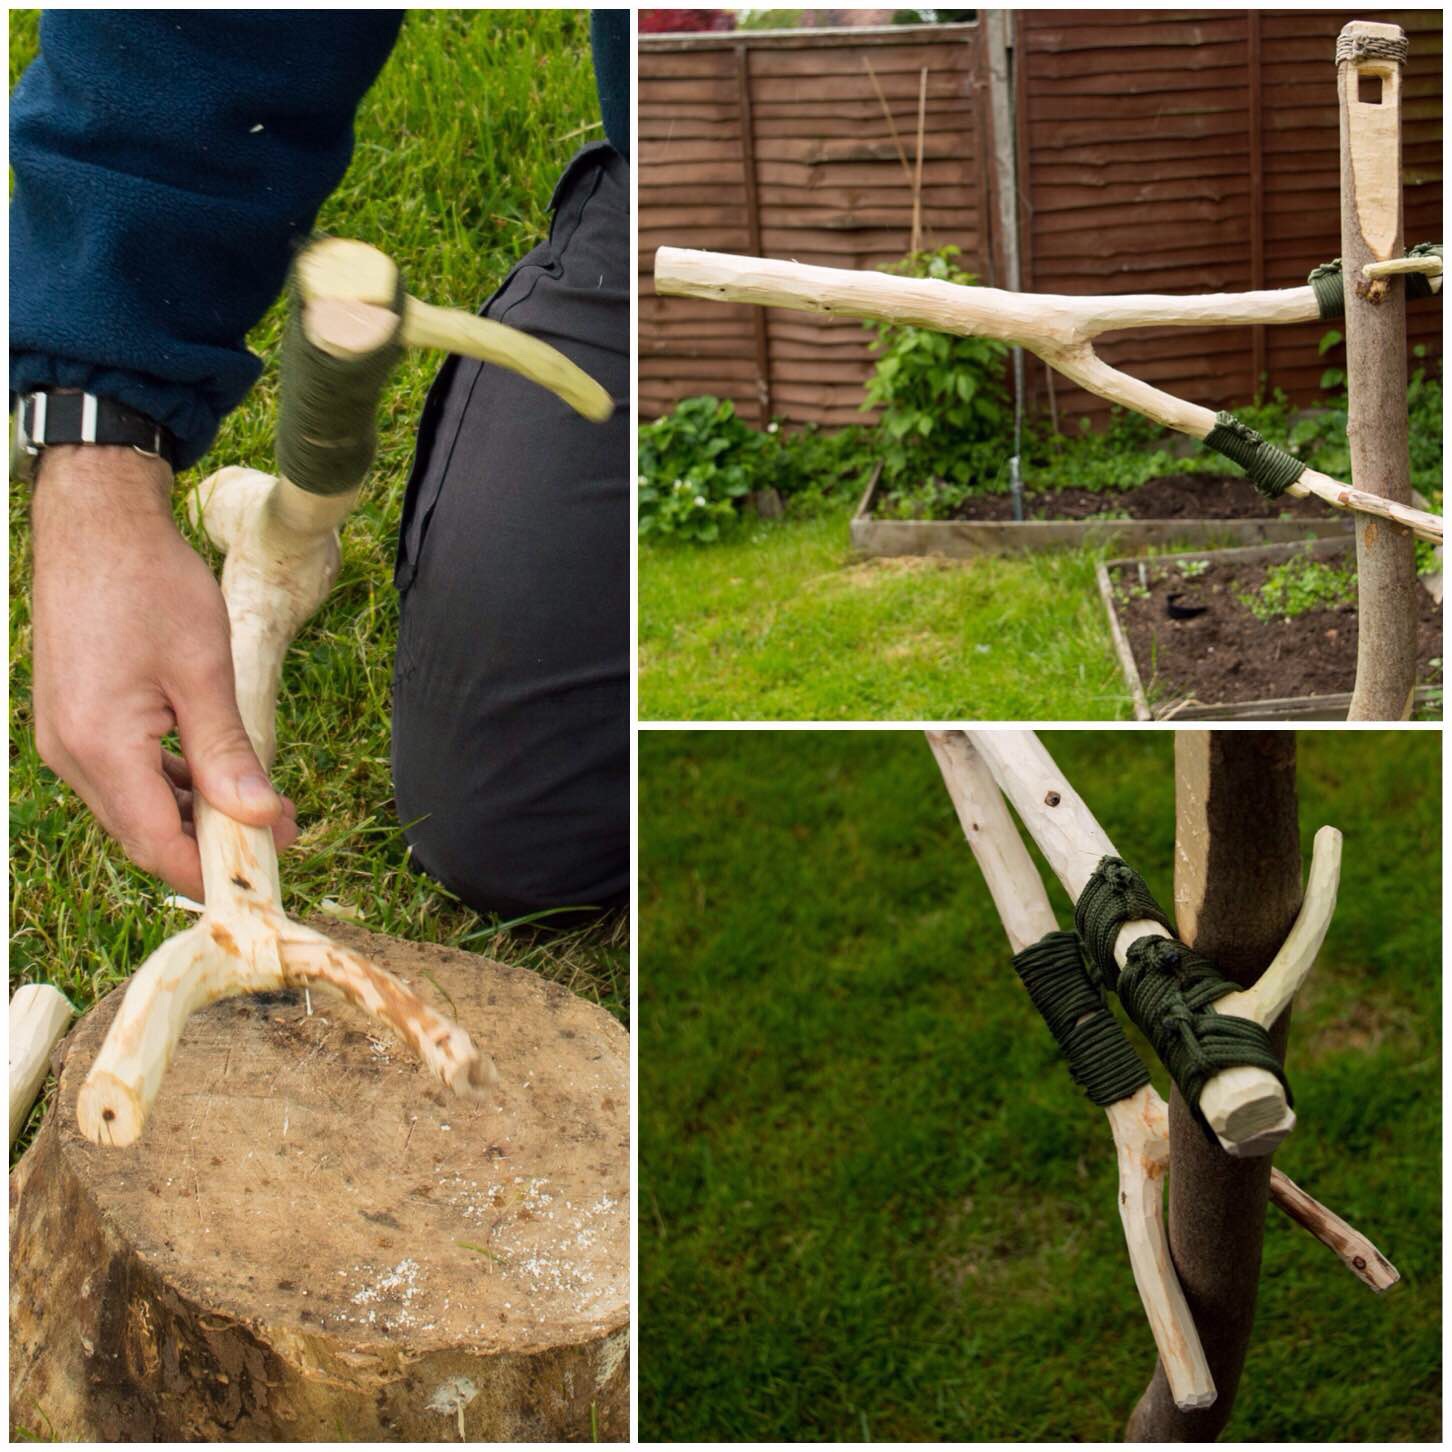
Single Fork Aures
I read in the Wildwood Wisdom book of a type of adjustable crane first documented in the early 20th century by a Scout Master called Victor Aures. It is a simple device however it is reliant on finding a branch with a specific set of smaller branches off it. I discovered a variation on this crane a number of years ago that required only a single fork in the branch and after a bit of splitting and splicing you have a fully adjustable crane.
Single Fork Aures Crane
Gibbet Aures Crane
This variation on the Aures crane does not rely on splitting the wood but on the addition of other branches so that the whole thing hangs off your upright pole. It is easy to find all the parts which is probably why this is the version of the Aures cranes I most commonly see around campfires.
Gibbet Aures Crane
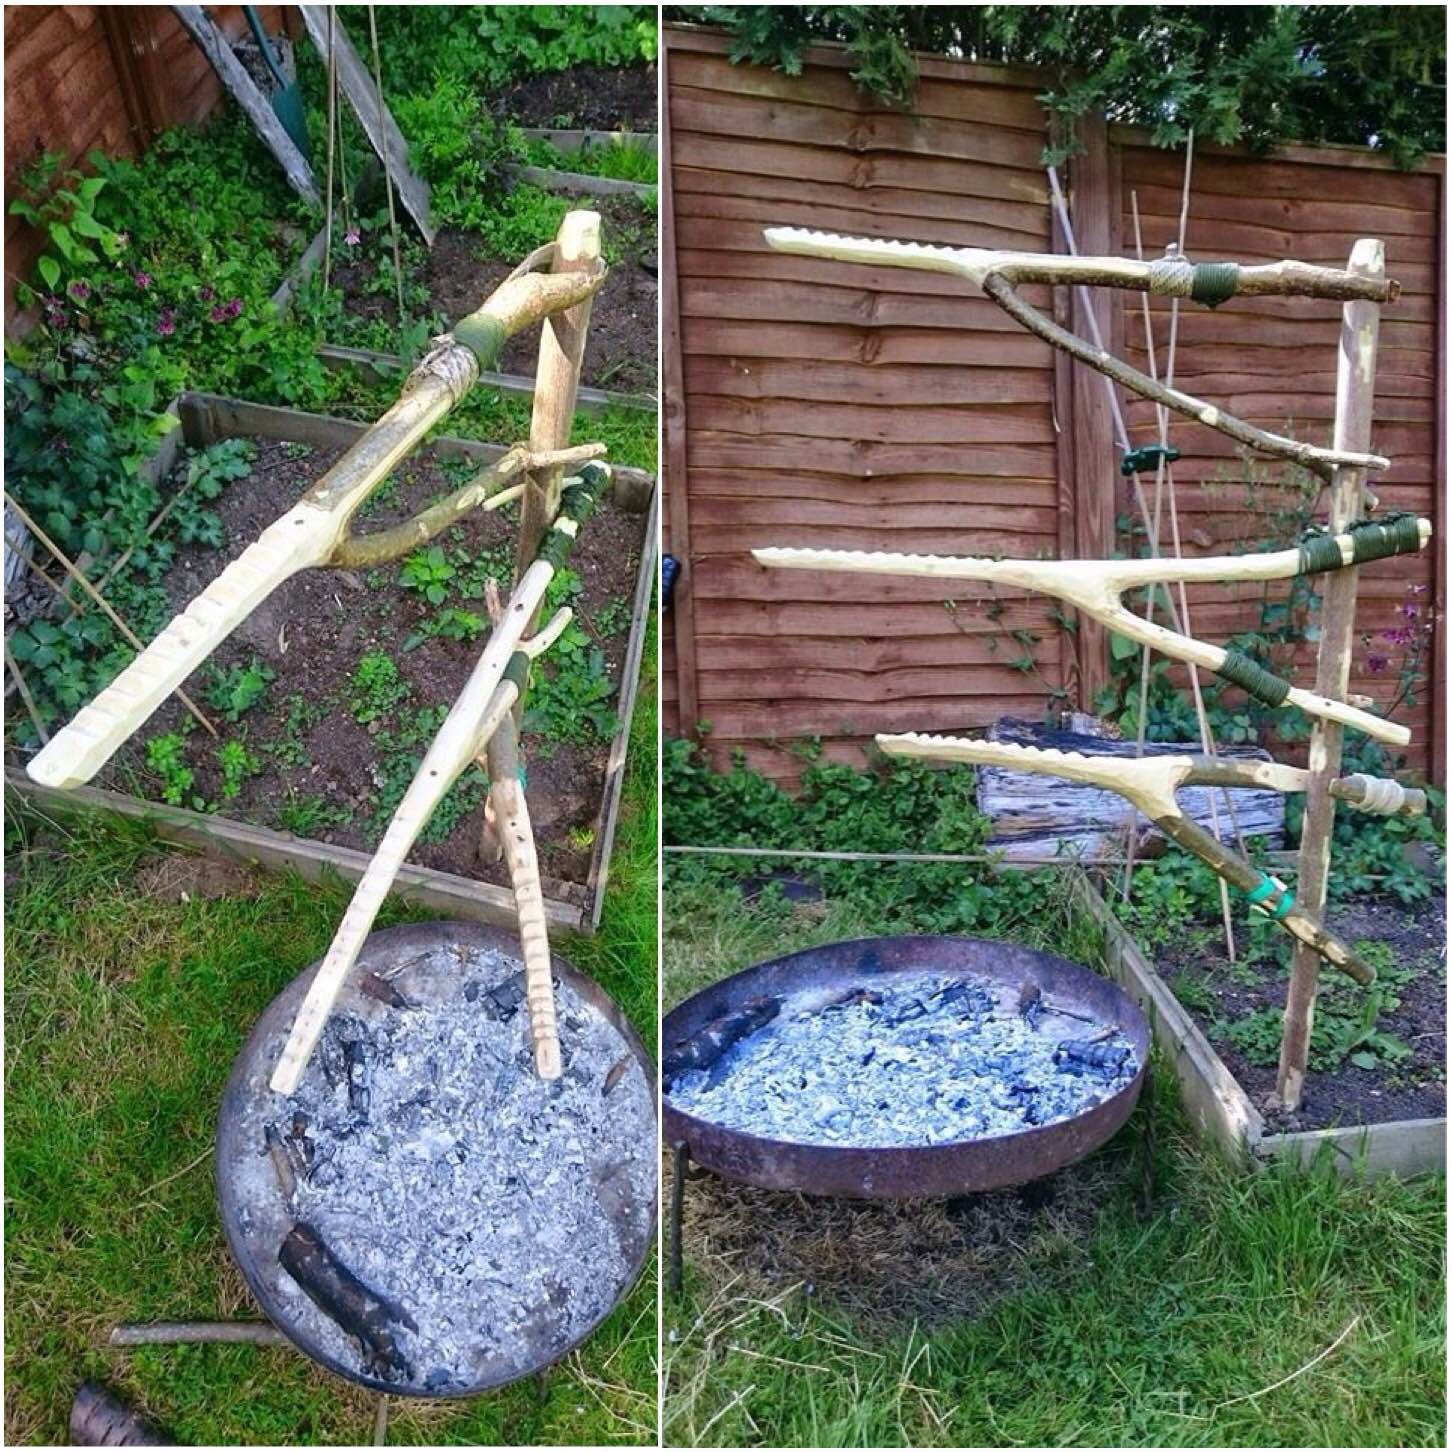
Classic Aures Crane
It took me a long time to find the perfect combination of branches for this crane. I have never seen another one before except as a drawing in the Wildwood Wisdom book. The hardest part in making this crane is the thinning of the wood to create the loop. It is a real challenge but also very enjoyable and satisfying.
Classic Aures Crane
The Three Cranes
I really liked making these cranes and would encourage you to have a go at them if you like campfire projects. They are not for you if you prefer simply to put your pot on the fire, but if you like to tinker and experiment, have a go.
The Three Aures Cranes
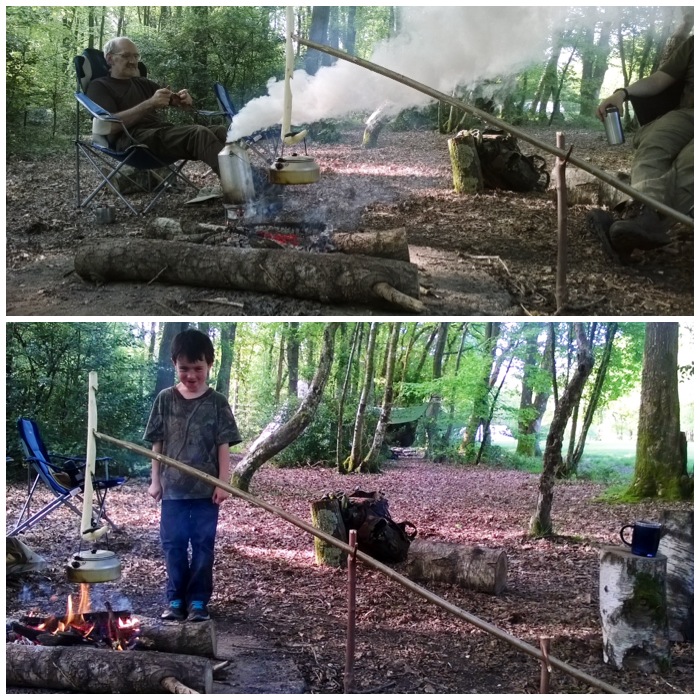
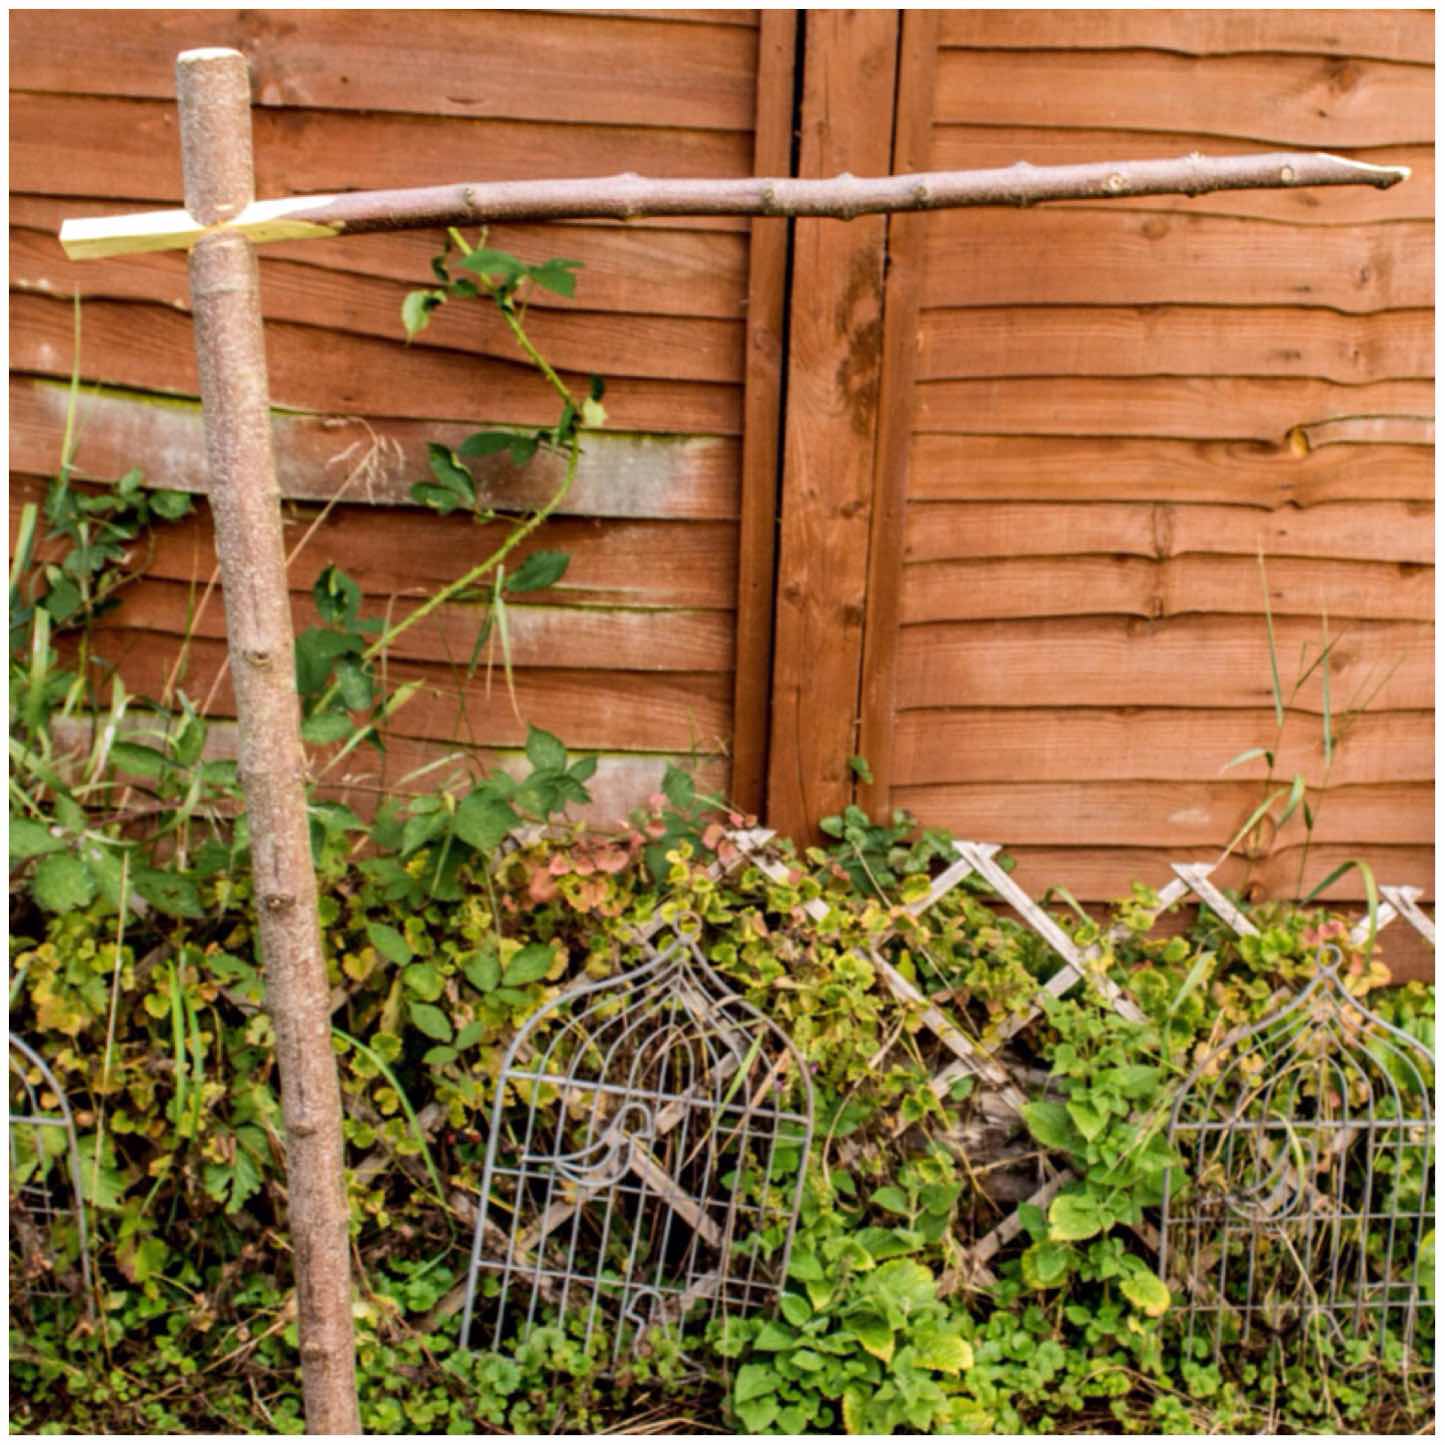
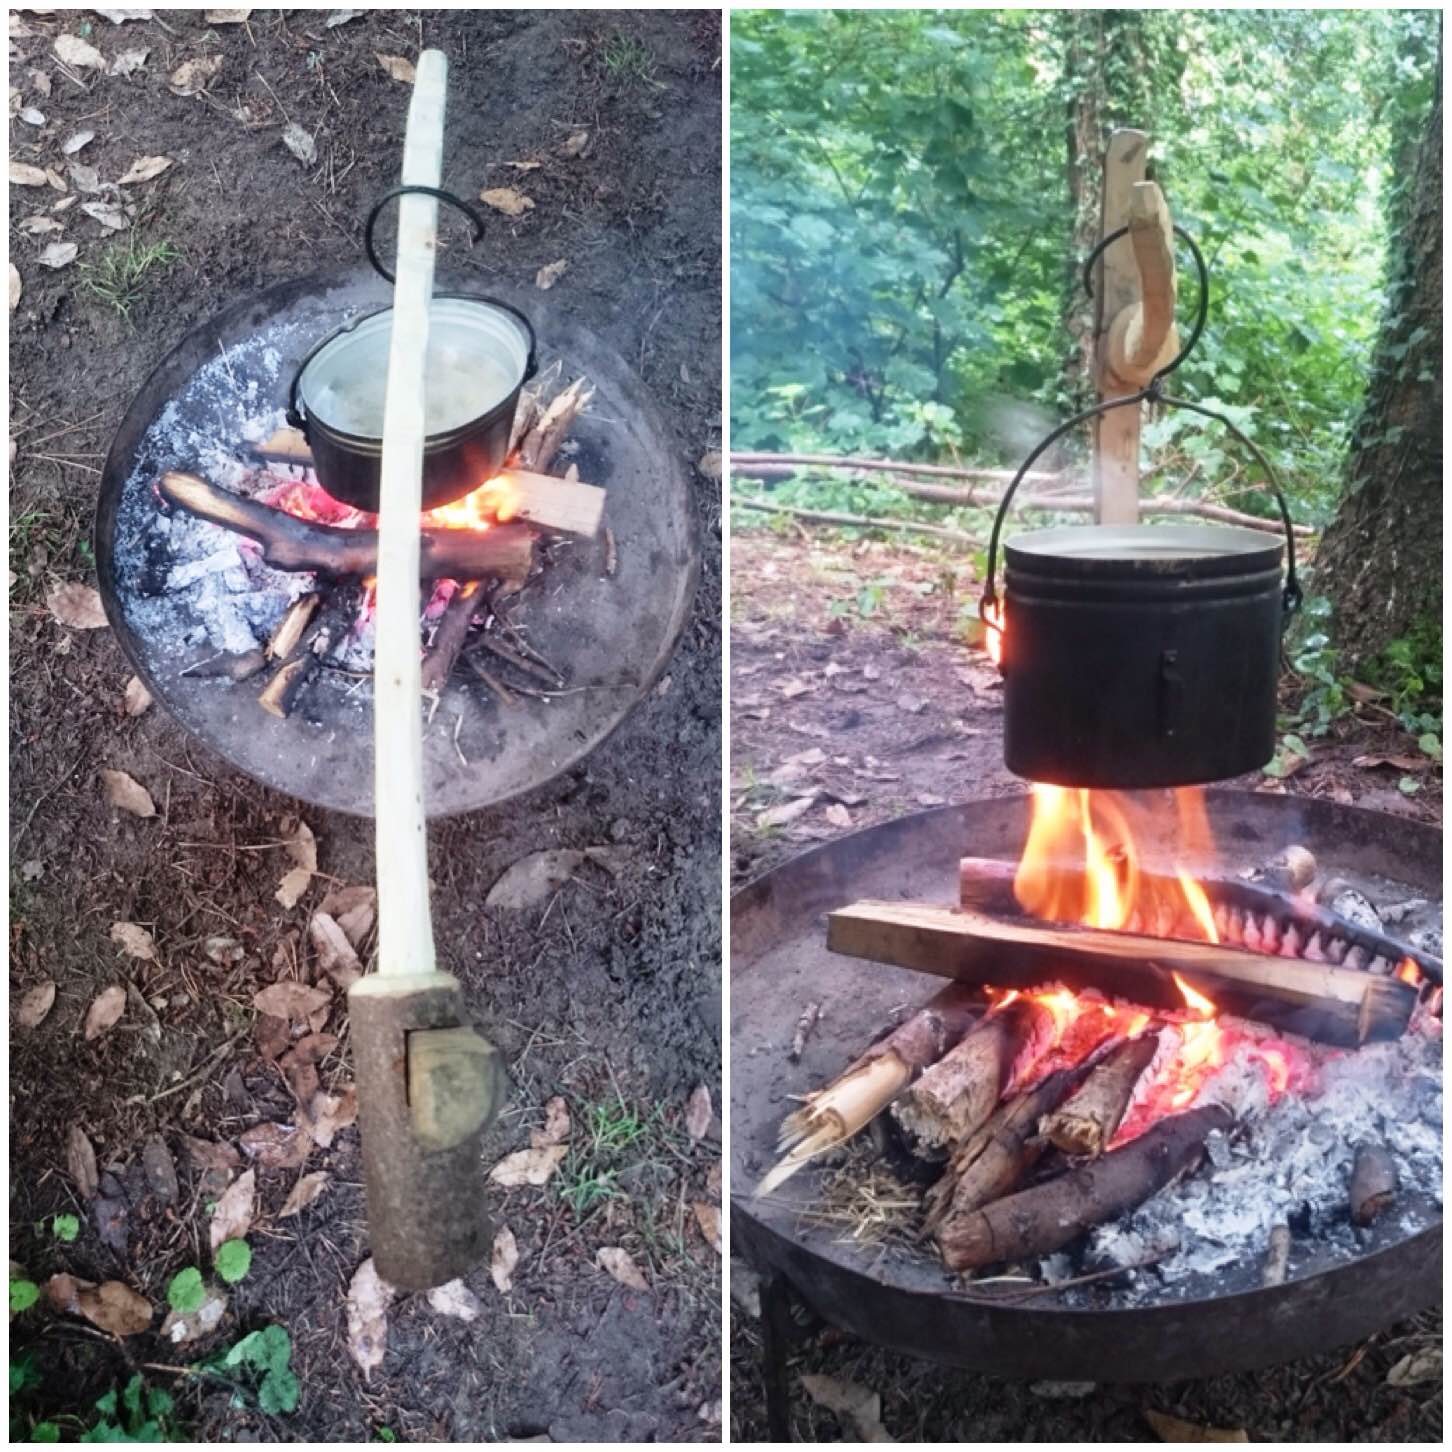
Notched Crane
The idea for this crane came to me a number of years ago while making myself up a little squirrel cooker from some metal rods. I have cut the notch out using an auger in the past but nowadays I usually just use my knife. I like this set up as you can make your crane out of one pole. With the addition of an adjustable pot hanger you have a crane that offers a variety of cooking heights without having a bulky tripod set up over the fire.
The Notched Crane
Simple Dovetail Crane
I got this idea from a Scouting page a number of years ago and it is very simple and quick to carve. The part that takes the longest to make is the adjustable pot hanger. I would recommend if you decide to experiment with making these cranes that you start with this one as the dovetail notch is so easy to cut out.
Simple Dovetail Crane
Lap Joint Crane
Still sticking with the single pole theme, another easy crane to make is the Lap Joint crane. The main thing to remember is to make sure that the squared-off fit of the upright is consistent along its length with the notch in the arm.
Once weight (eg a pot) is applied to the end of the arm, everything locks together. I have found that this crane works best when the pot is hung off the very end of the arm. I have experimented with hanging the pot half way along the arm only to find it all collapses. It is a good and simple crane to make – treat this one with respect, though.
Lap Joint Crane
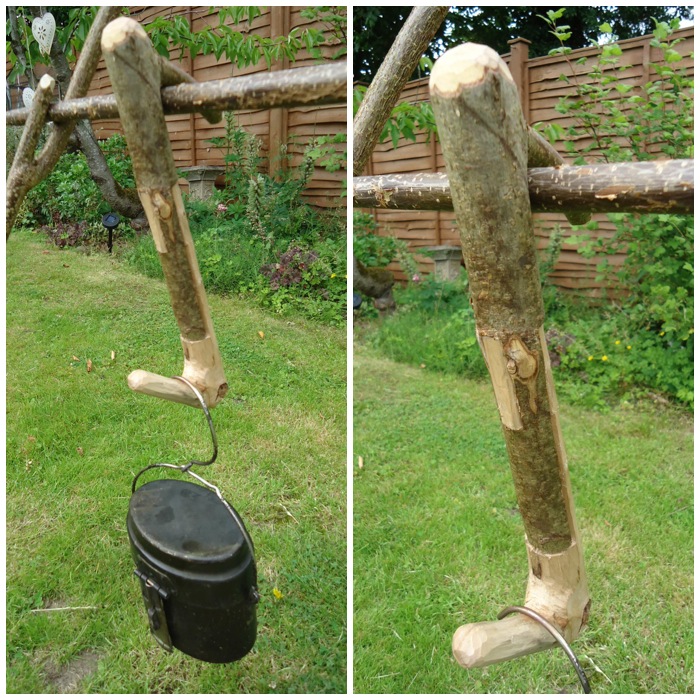
Dovetail Crane
This is my all-time favourite crane. With the dovetail notch the arm cannot fall off (unlike the Lap Joint crane) and it offers a wide variety of heights to choose from when cooking. The arm is very easy to adjust even when there is a pot attached and will take you no more than an hour to carve.
Dovetail Crane
Heavy Duty Crane
This one came about from an article I spotted in a Scouting site. Some of the Dutch Oven pans I use can be extremley heavy. This crane offers a number of different cooking heights and will not bend in the slightest even with the heaviest pot attached (well, the heaviest I have, at least). I have though learned to take the pot off the arm with this one before changing the height.
Heavy Duty Crane
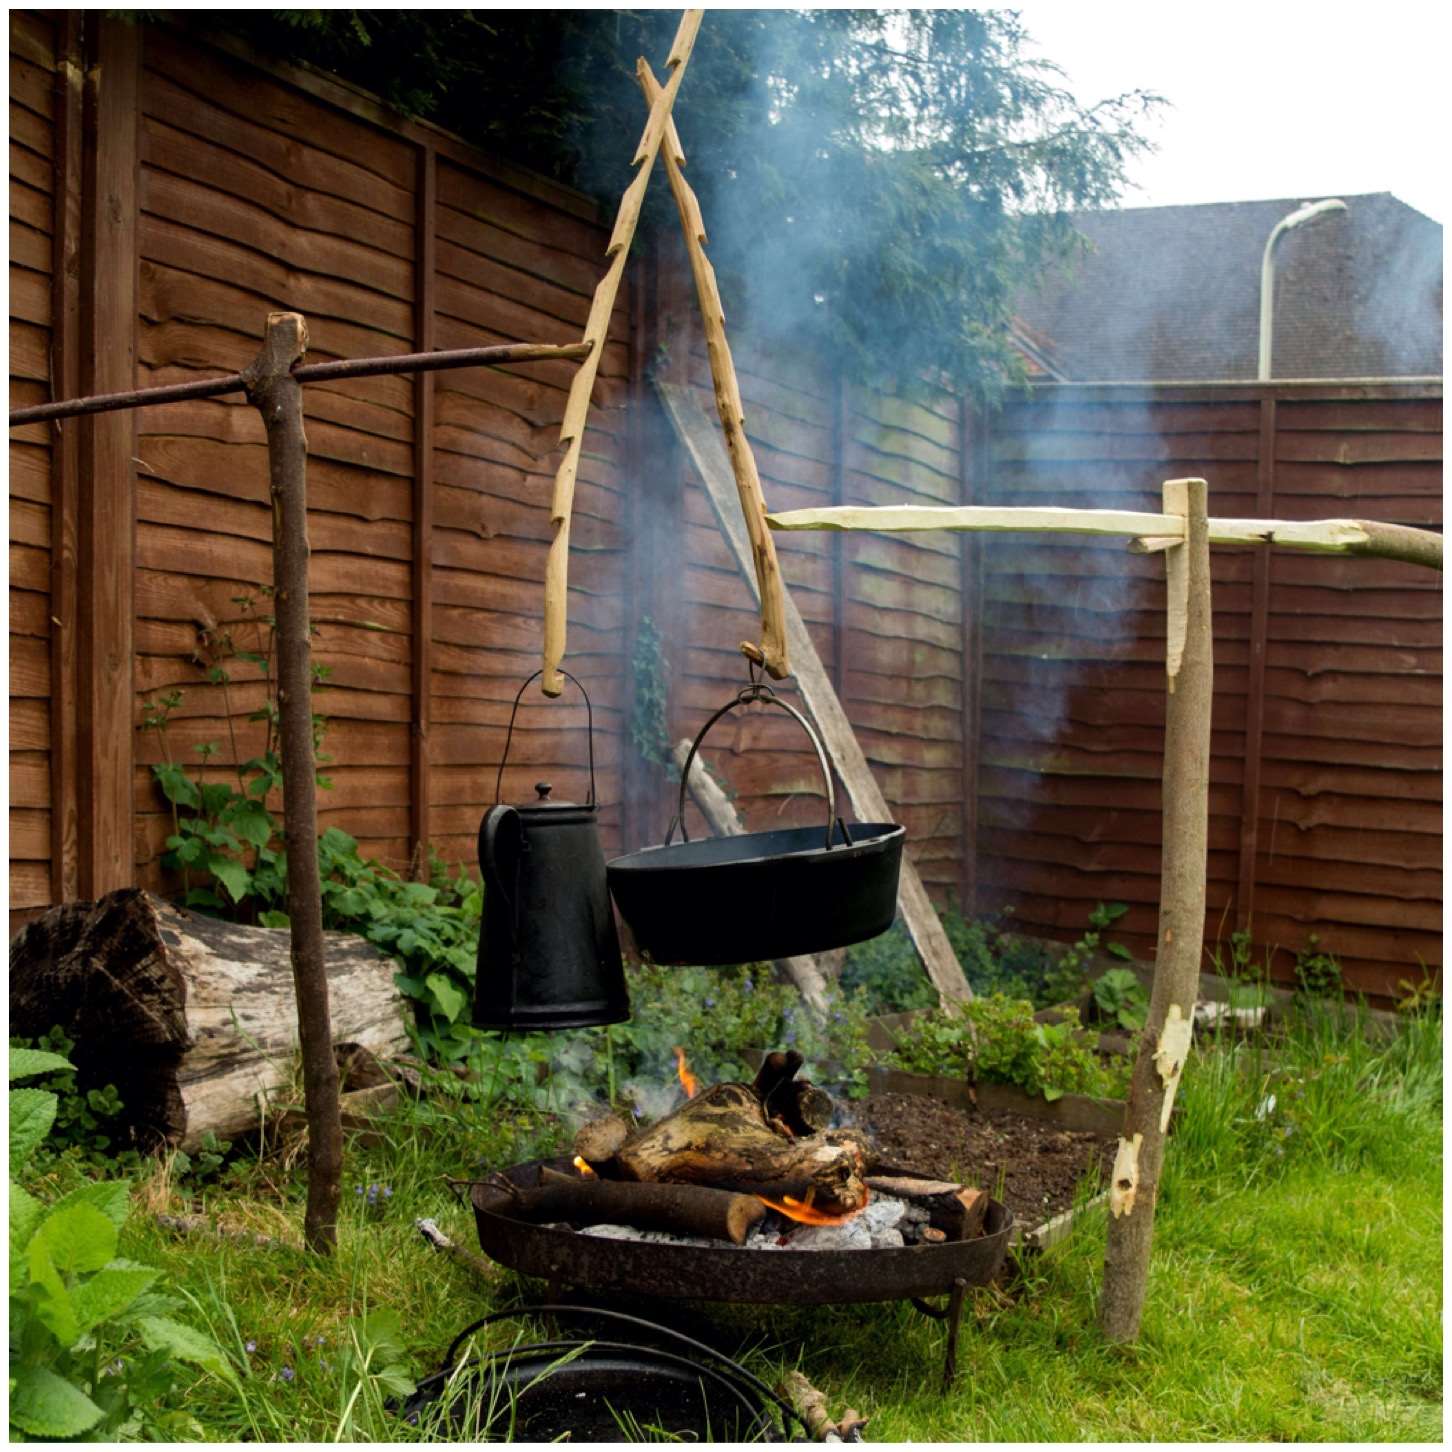
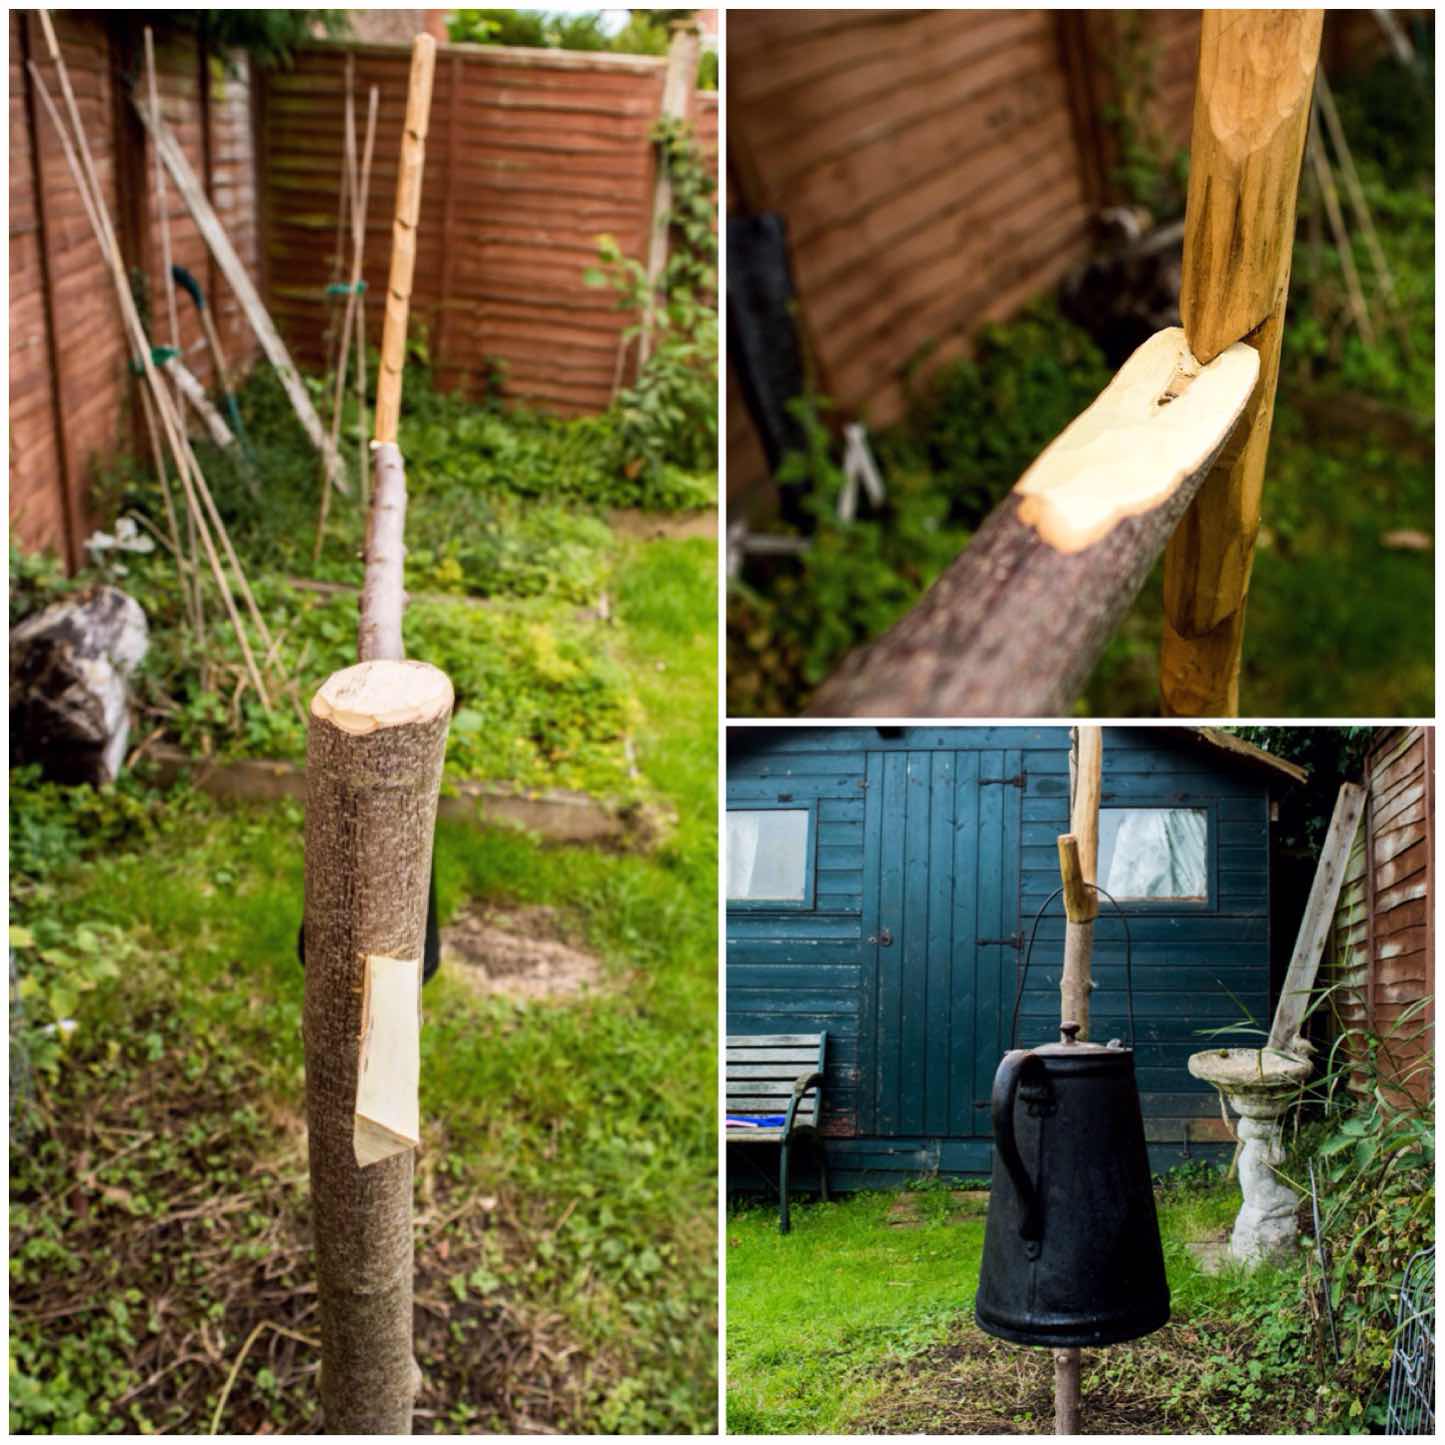
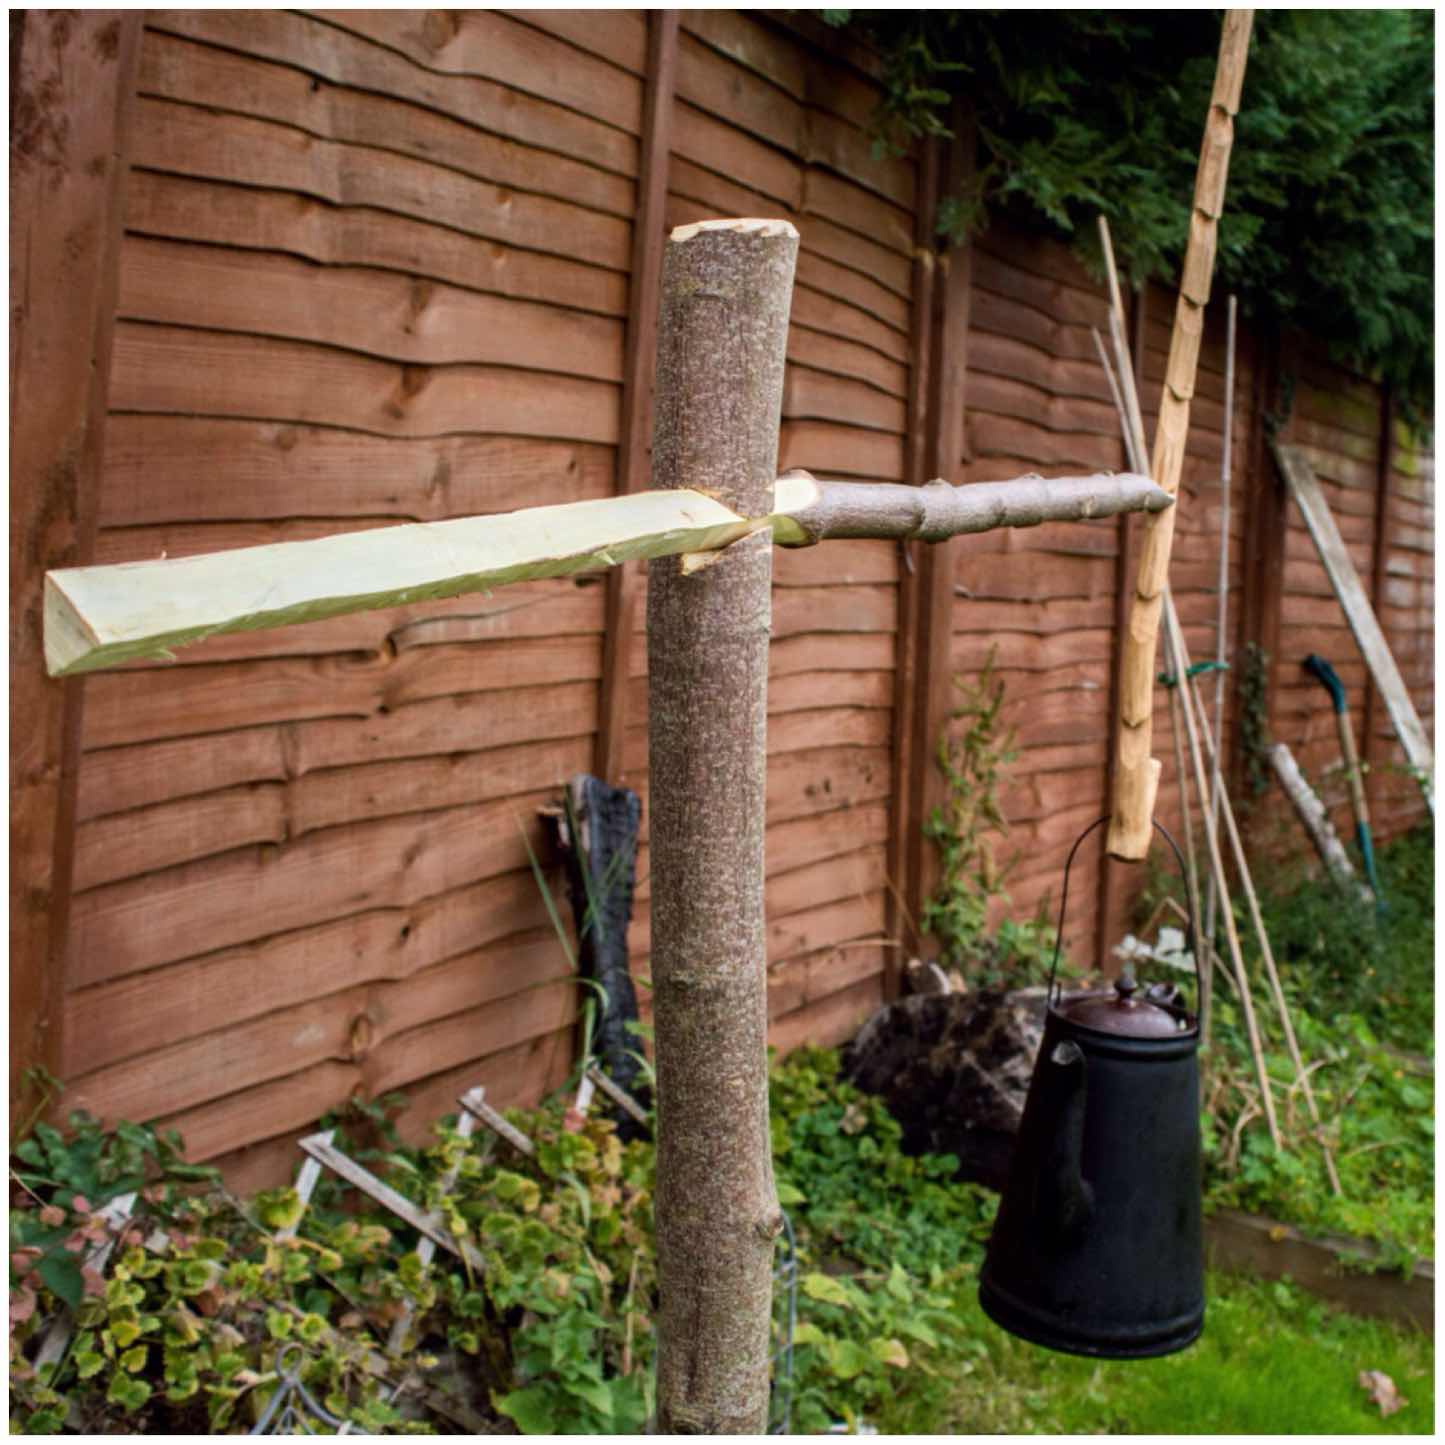
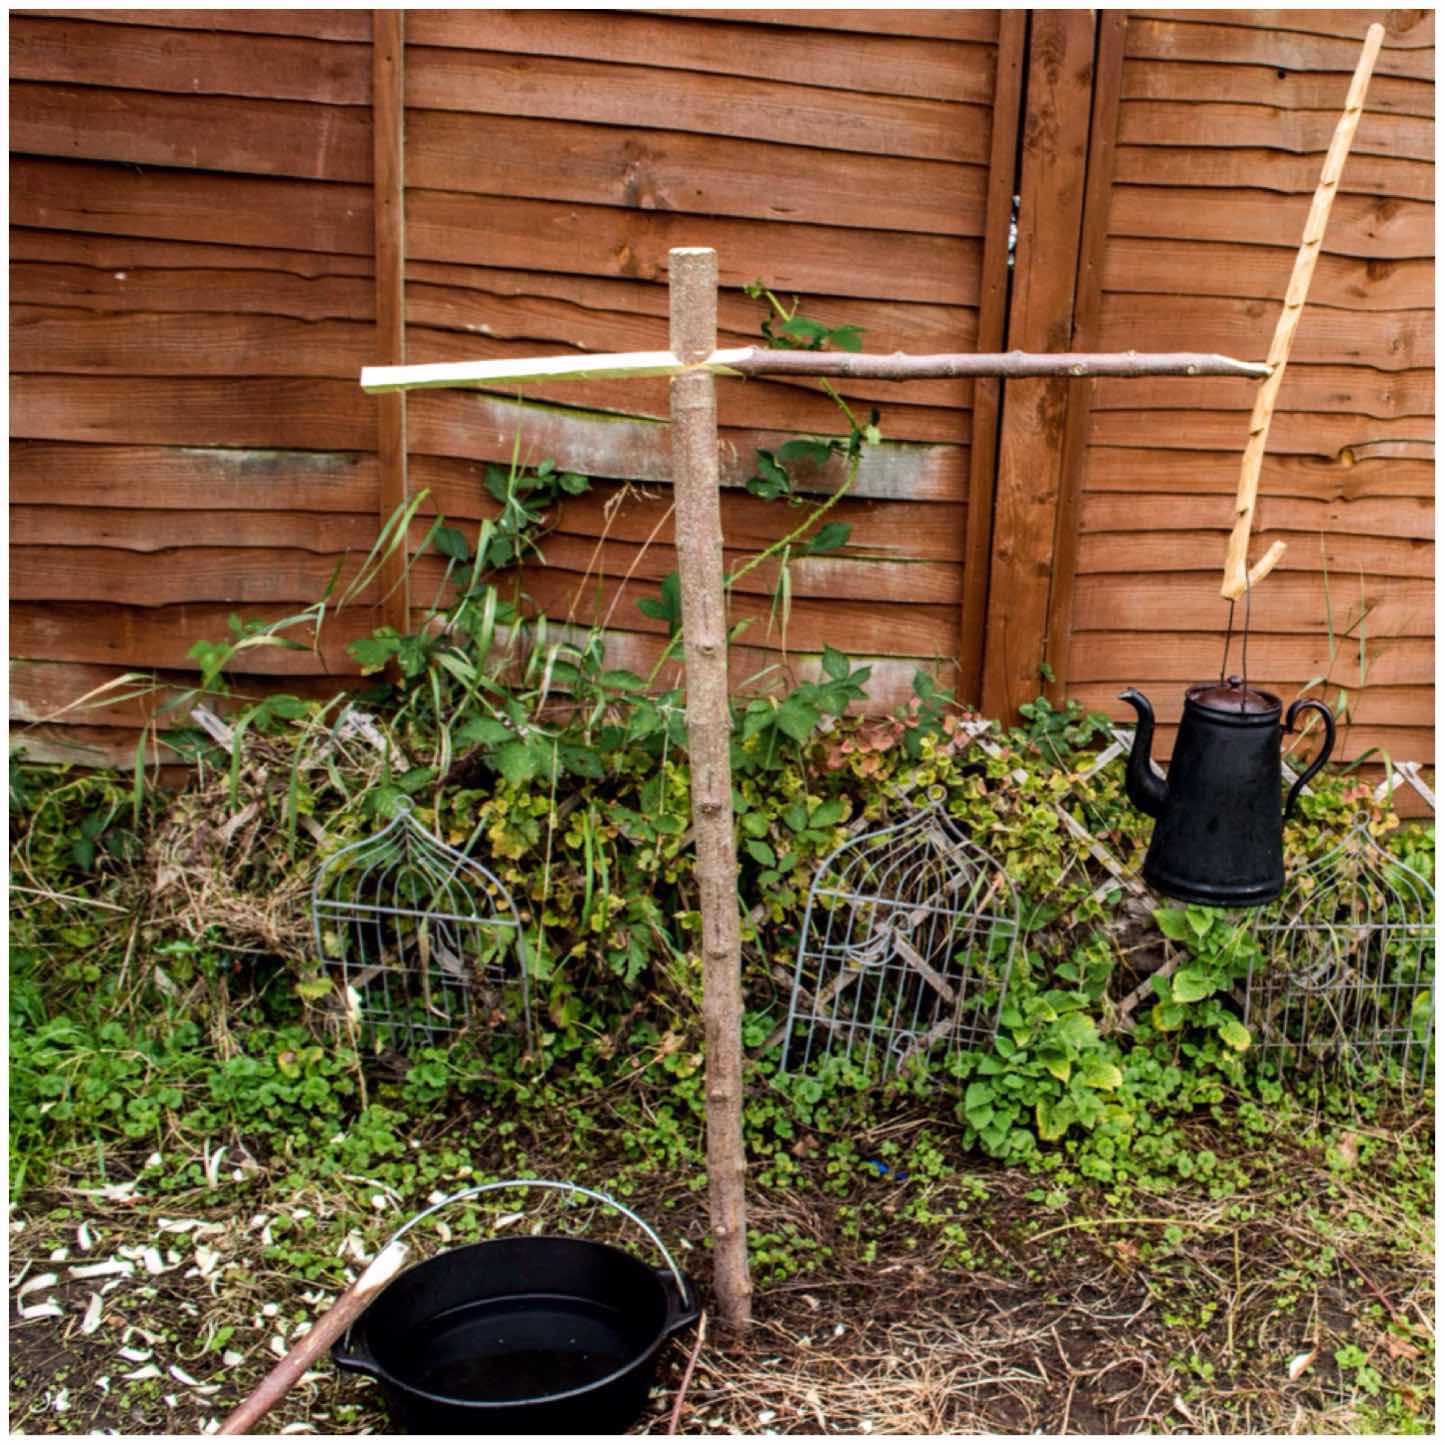
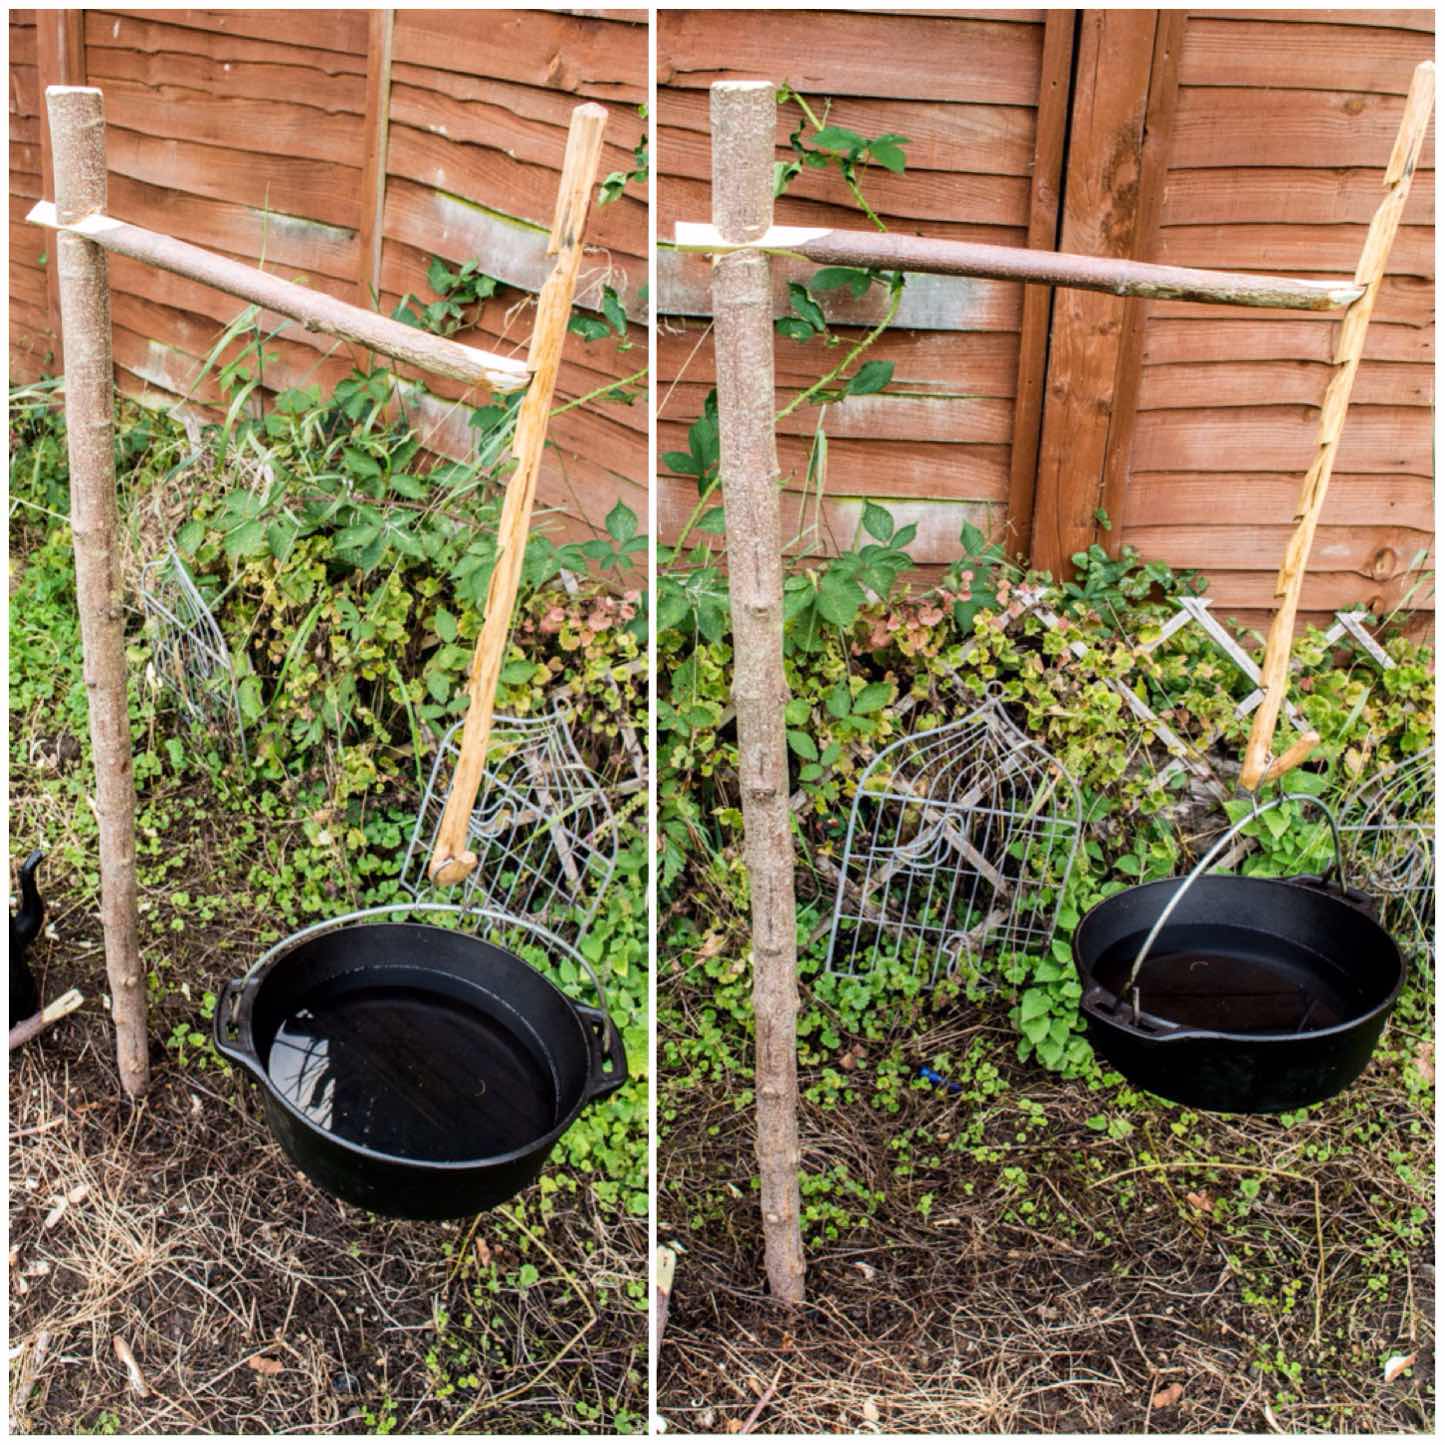
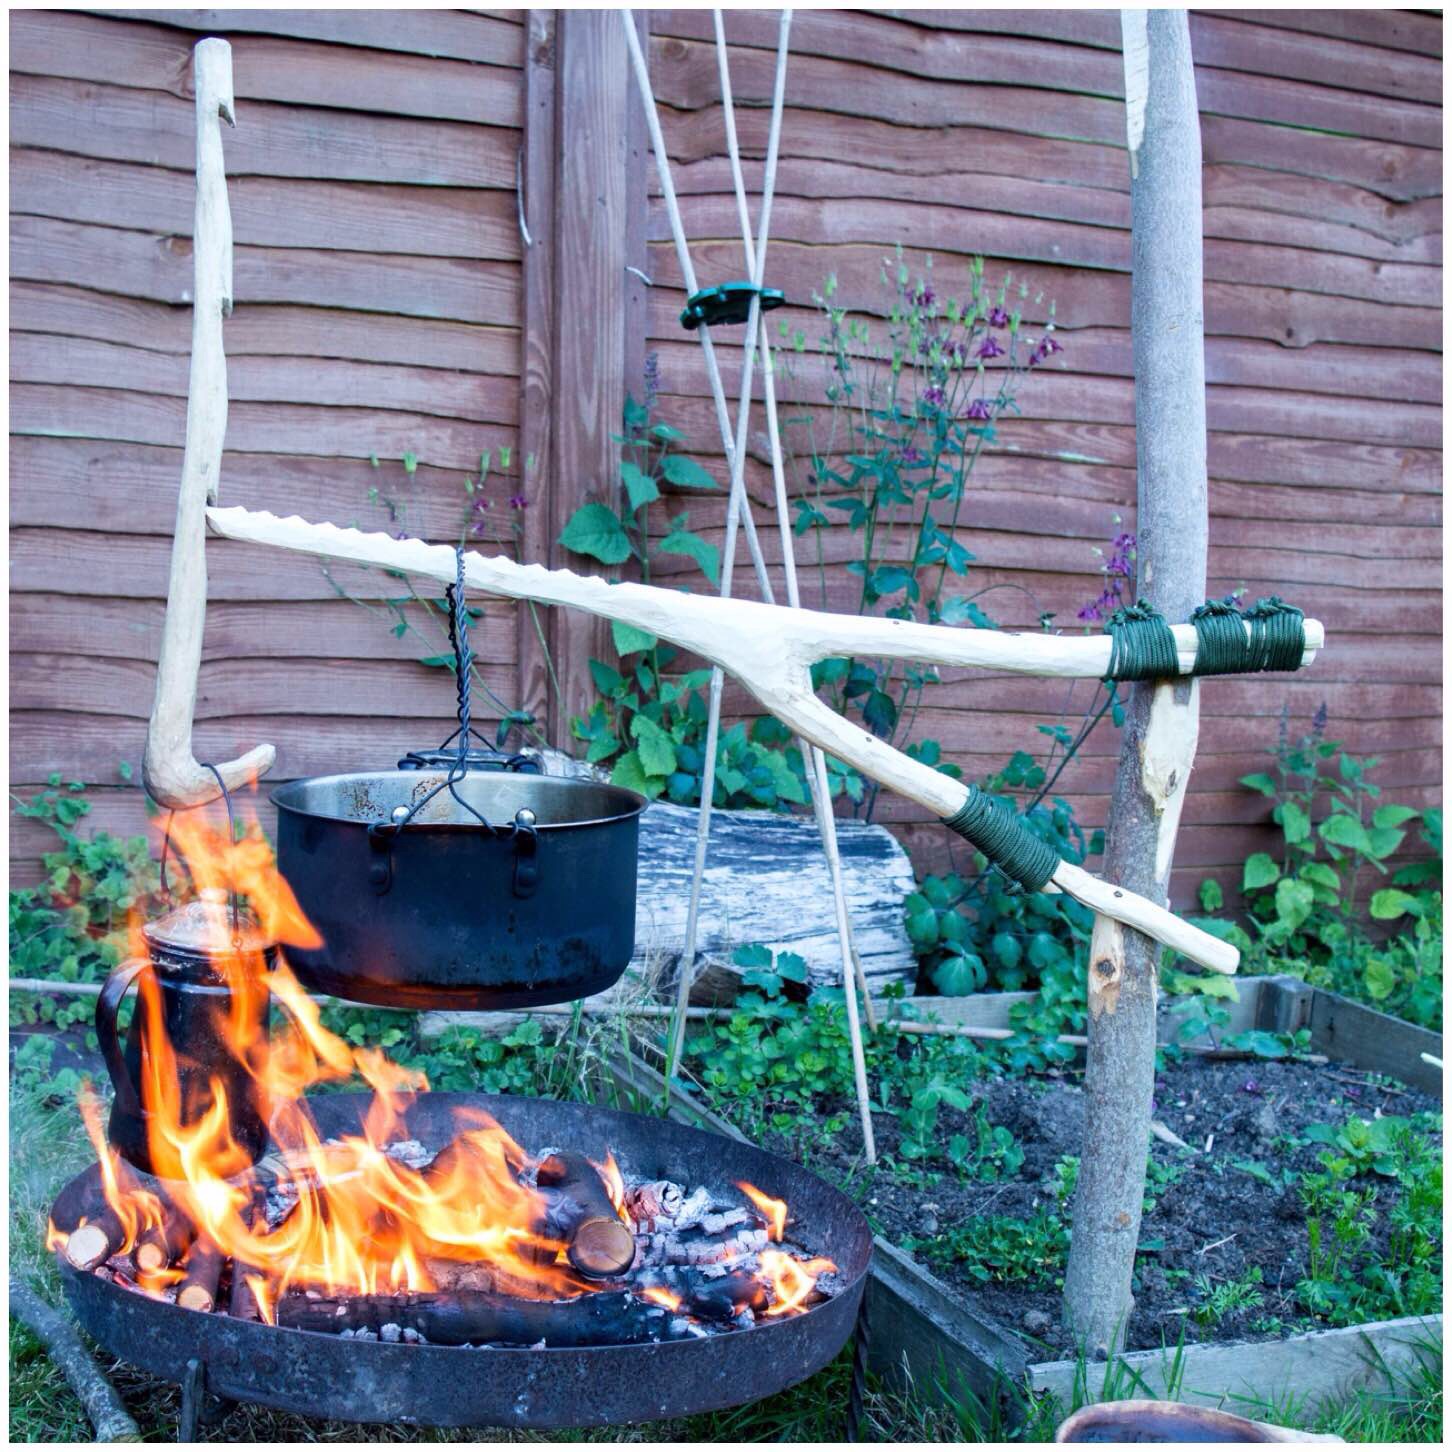
Mortice and Tenon Crane
This was the last crane I worked on last year and the one that is the most technical, I think. The joint is a simple tenon and mortice set up however there were a lot of angles to consider (I have discussed then in the article) and the string I used to adjust the height could possibly do with further development. It is however an excellent crane with lots of movement up and down and side to side.
The Mortice and Tenon Crane
In time I hope to add a few more How To’s…. to this series as I find the whole subject of campfire contraptions so fascinating.
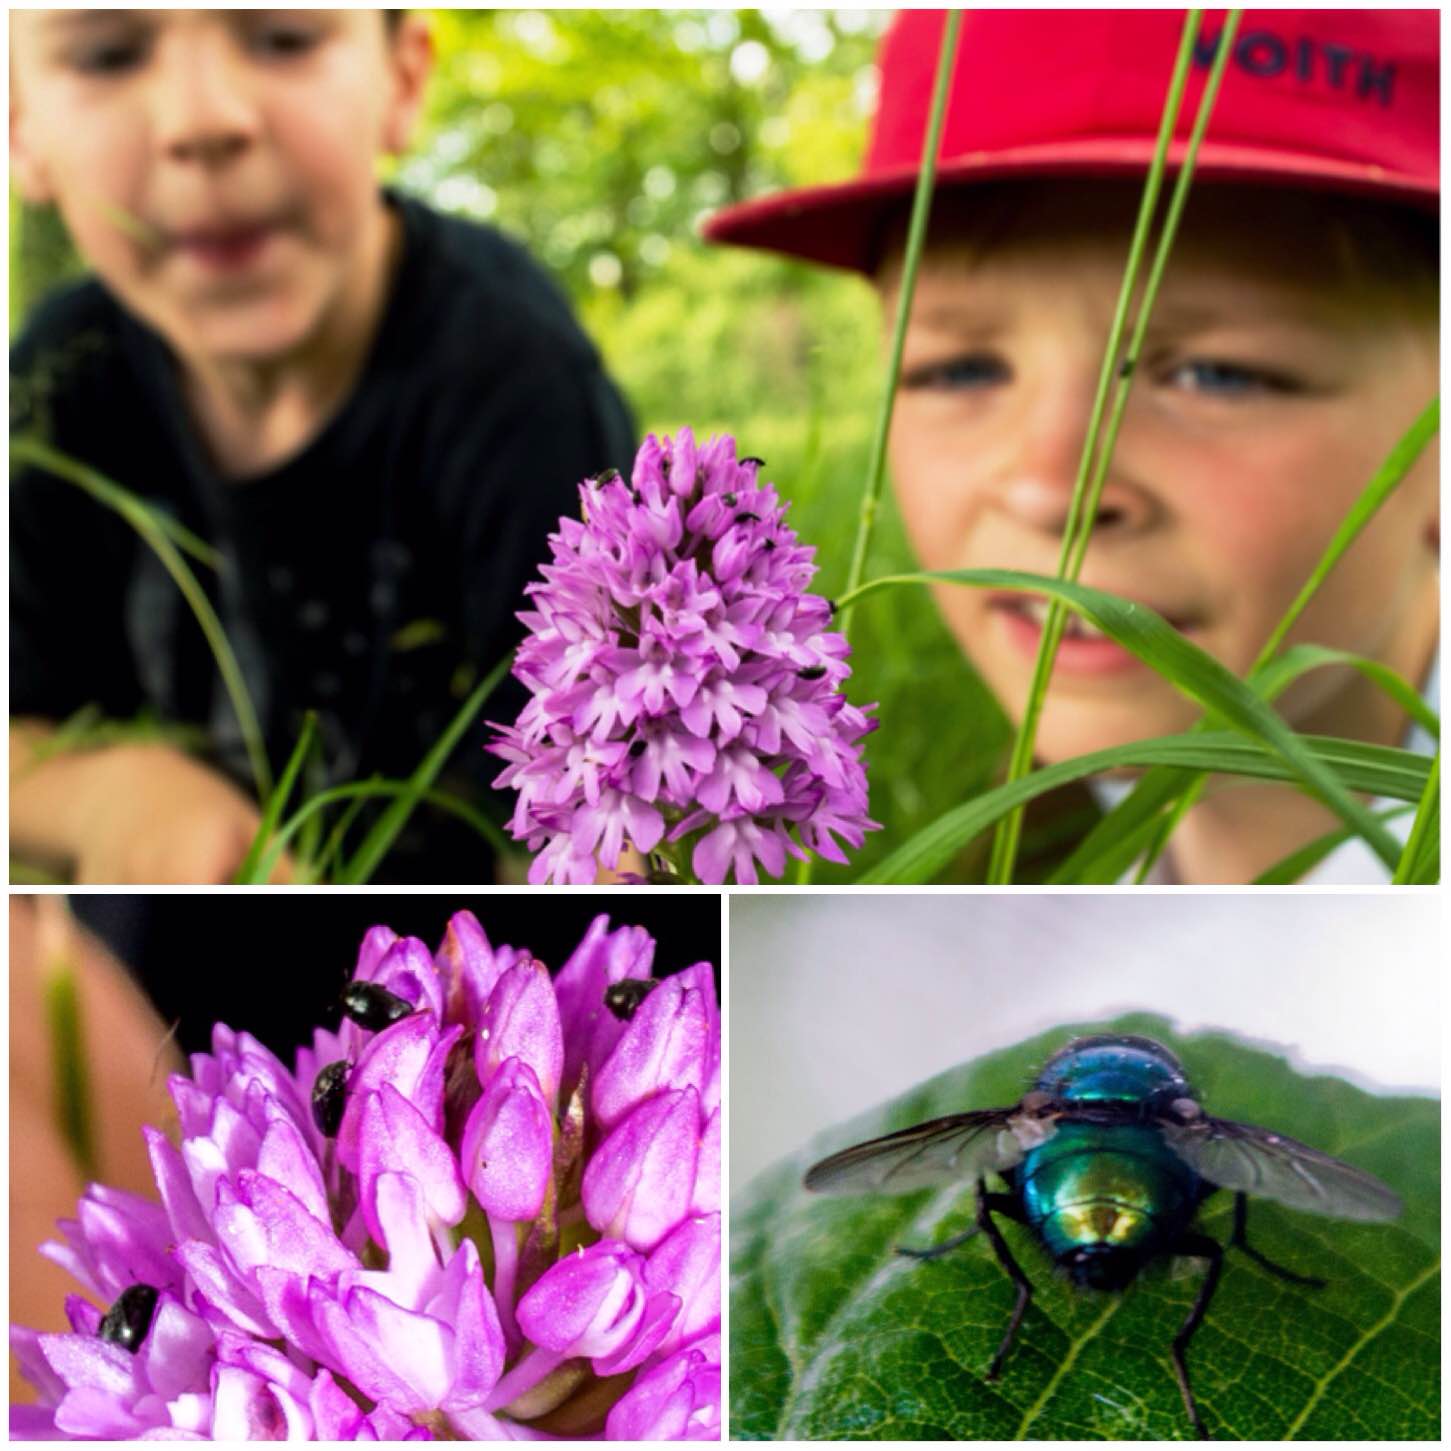
This year I have had real fun trying to capture just a little bit of the nature I see around me when out and about on my adventures. I have had a look through some of the nature pictures I have taken this year selected the ones I have fond memories off.
Plants and Fungi
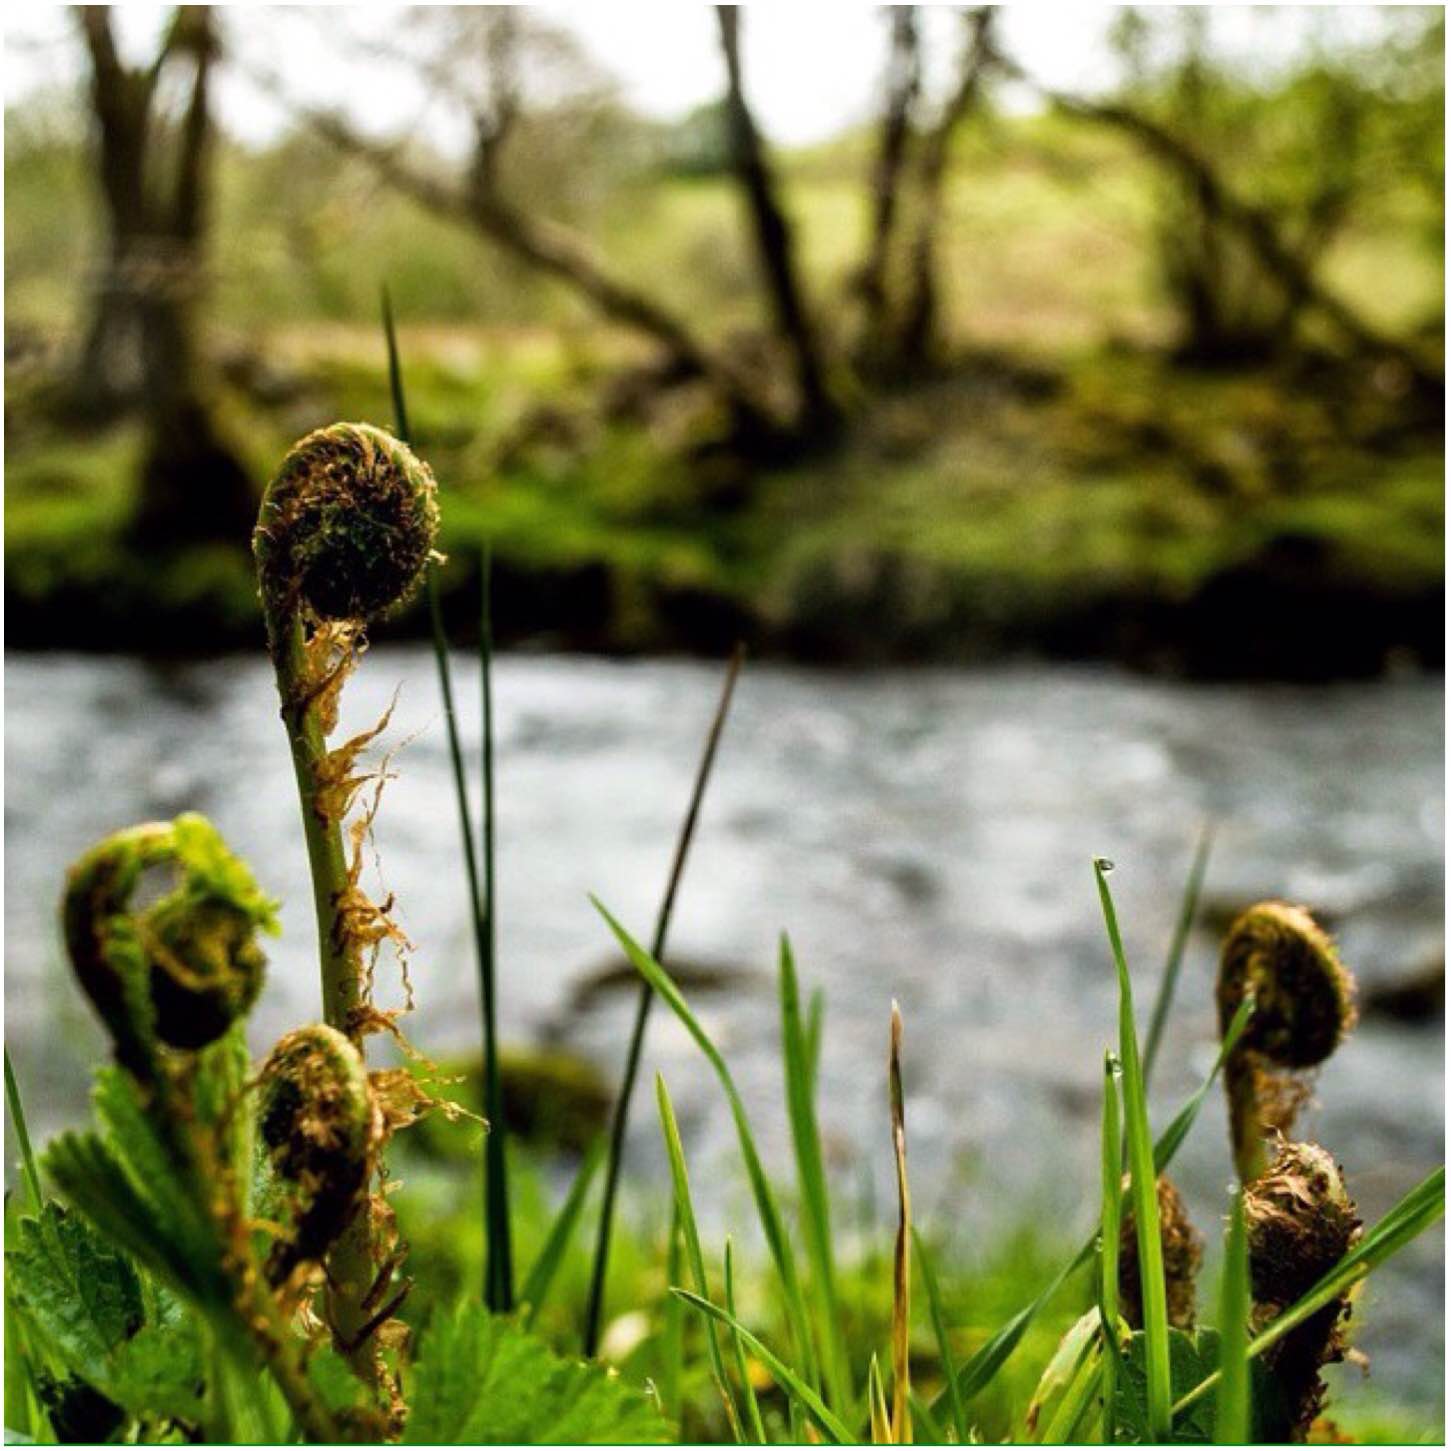
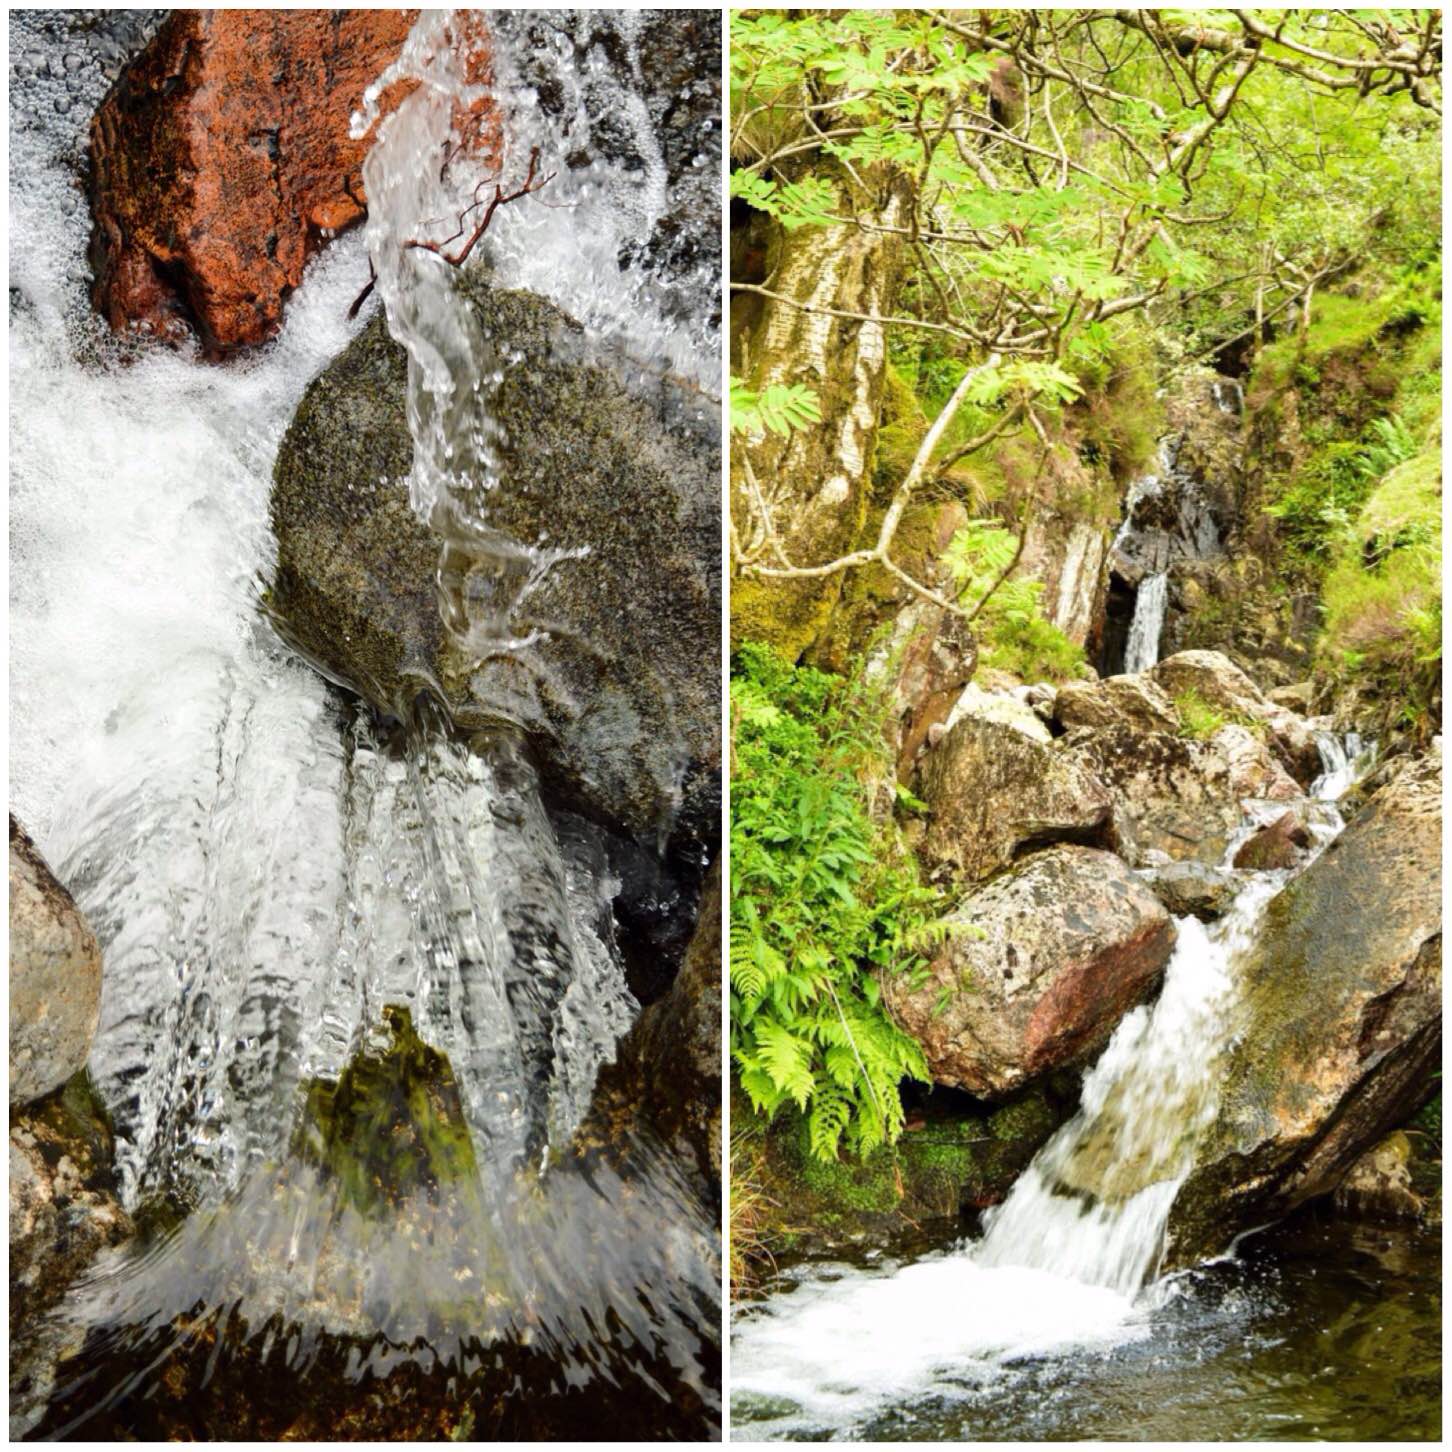
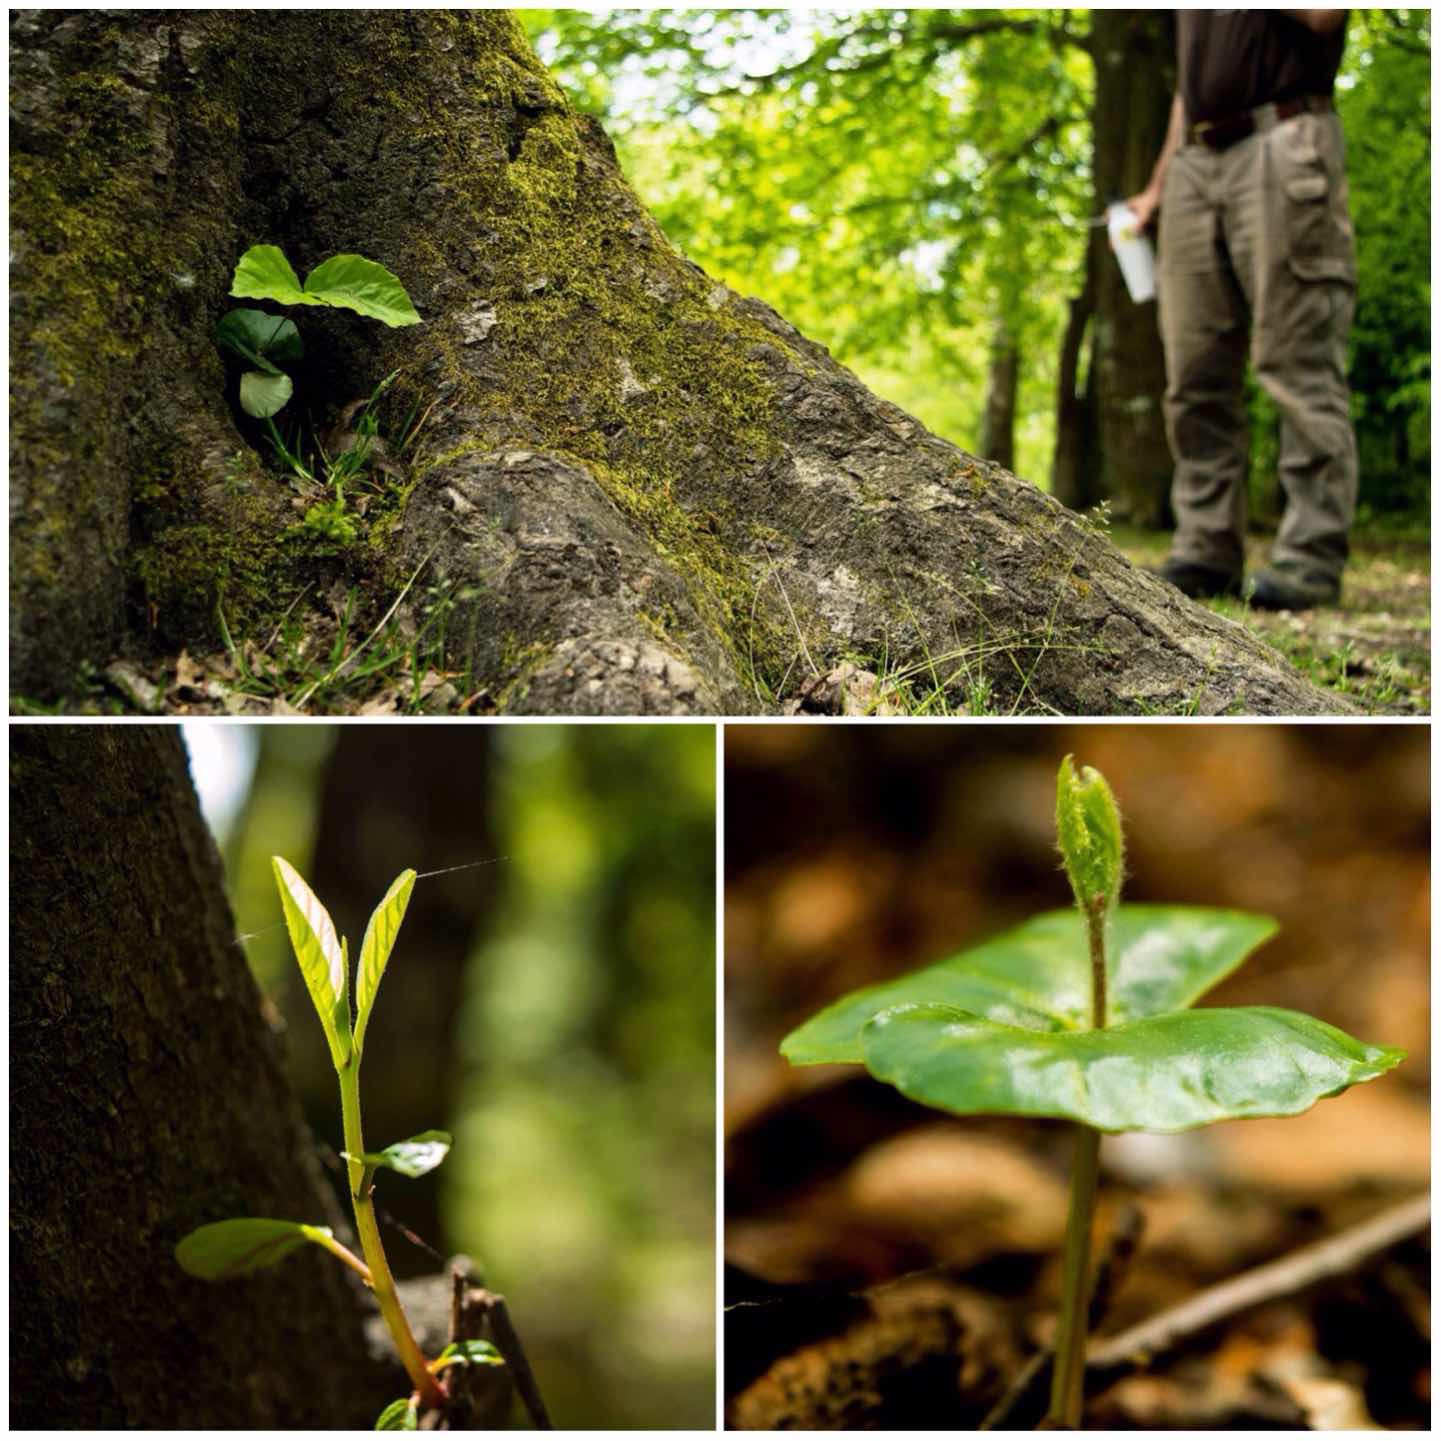
I went to the Brecon Beacons in the Spring with a few of my friends from Crisis and while walking along the banks of the Afon Mellte river near Ystradfellte I was struck by all the spring flowers emerging but it was something else that really caught my eye.
I initially walked passed these emerging Fern Fiddleheads. I stopped myself as I realised that they would make for a cracking shot if I got down low. I am glad I went back as they are quite magical looking when you get down low (I did have some passers-by step around me as I lay in the path).
Spring Shoots
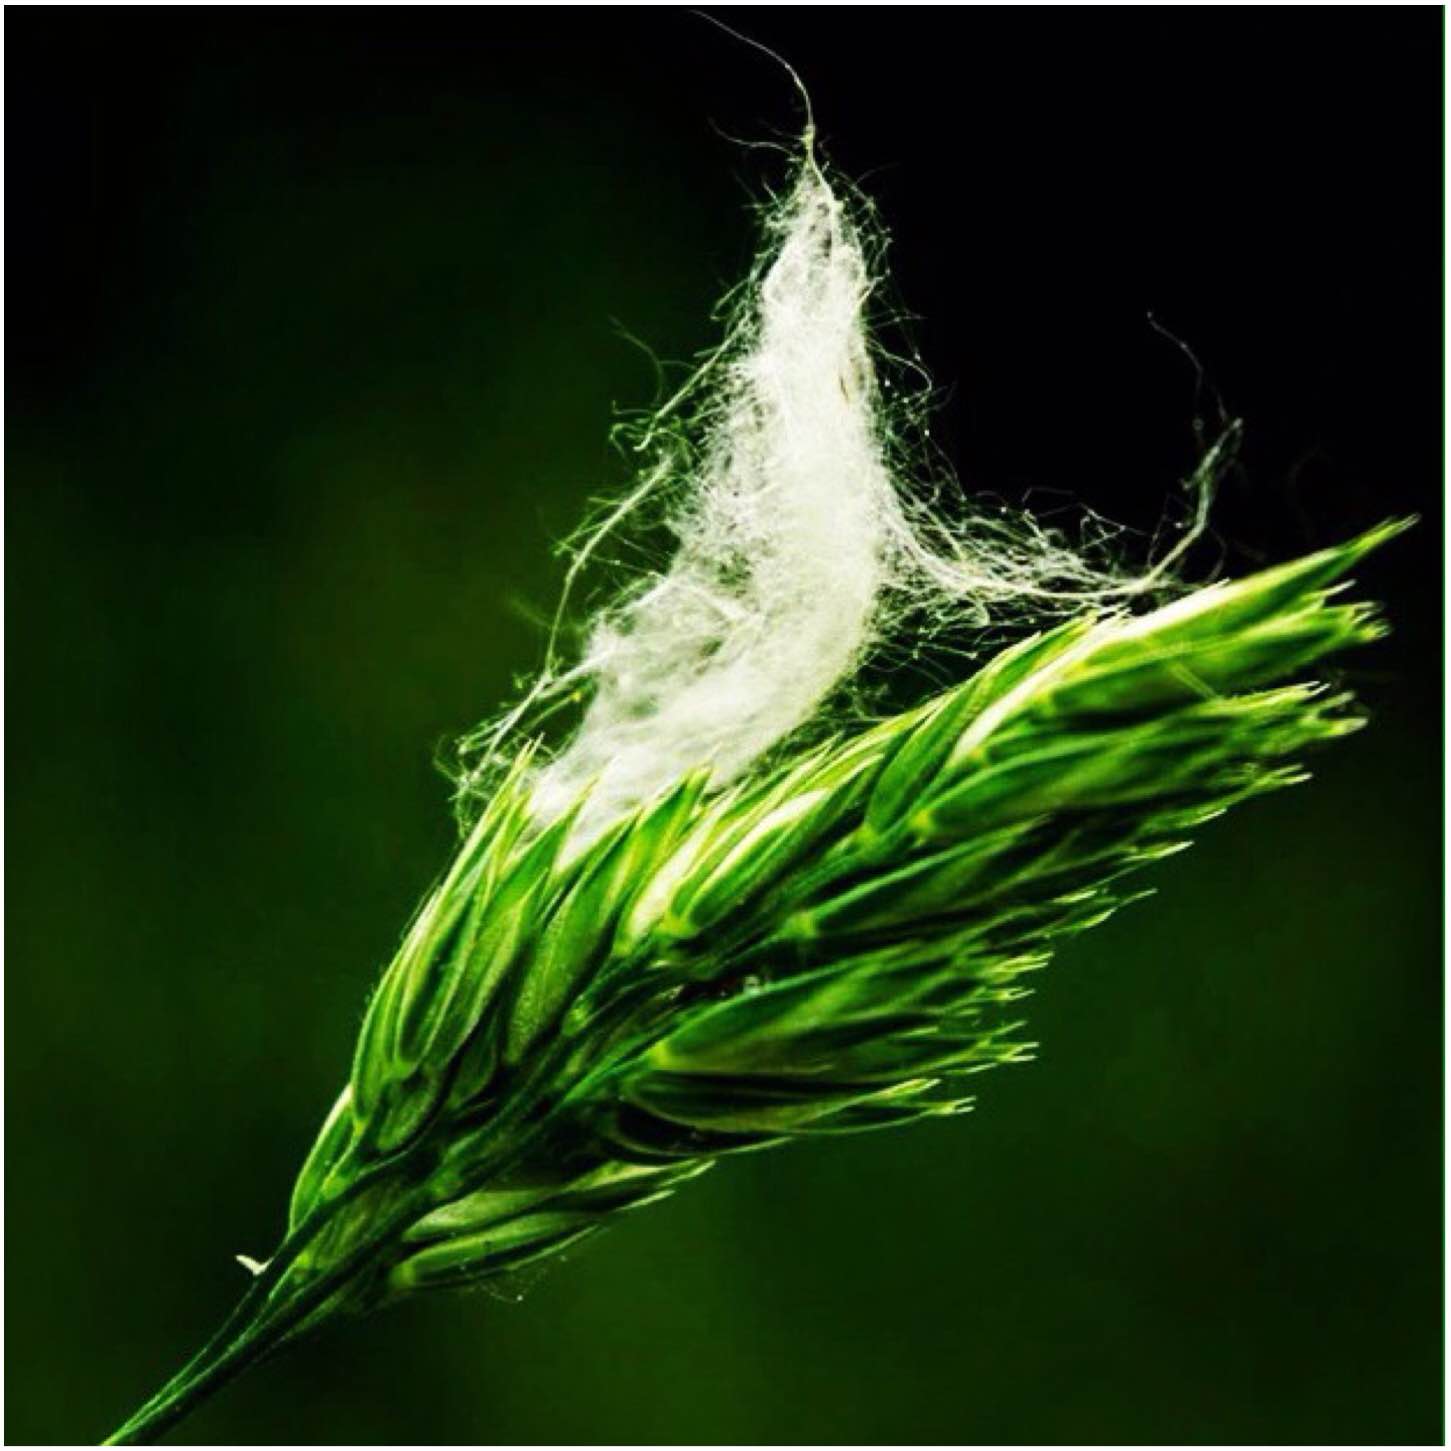
I often take a bimble around my village photographing wild flowers and rarely do I pay much attention to the mass of wheat being grown in all the fields.
I was though stopped in my tracks by this dainty little picture. It was not until I got the picture up on the computer did I realise how beautiful it would look. These are two pieces of nature that you would not normally pay the slightest bit of attention to however when they come together they end up looking like a painting.
Spike Seat
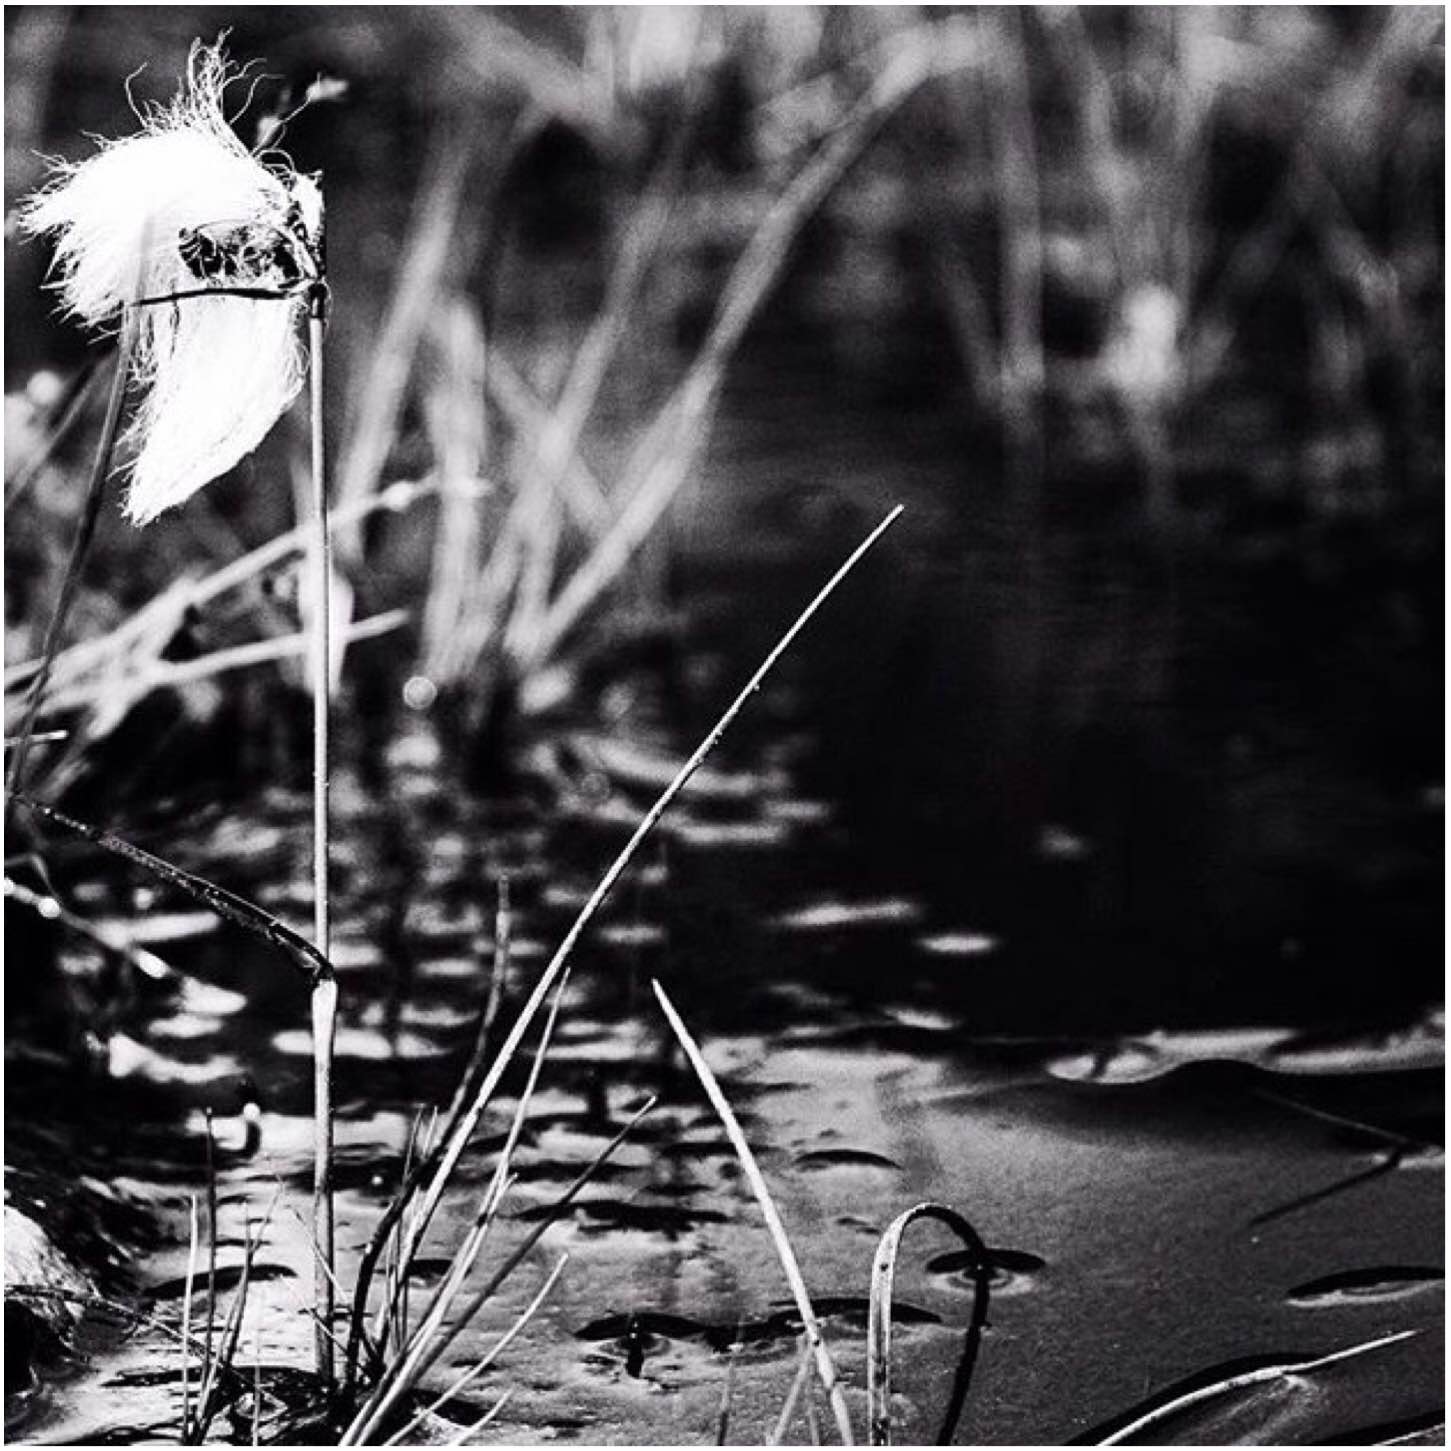
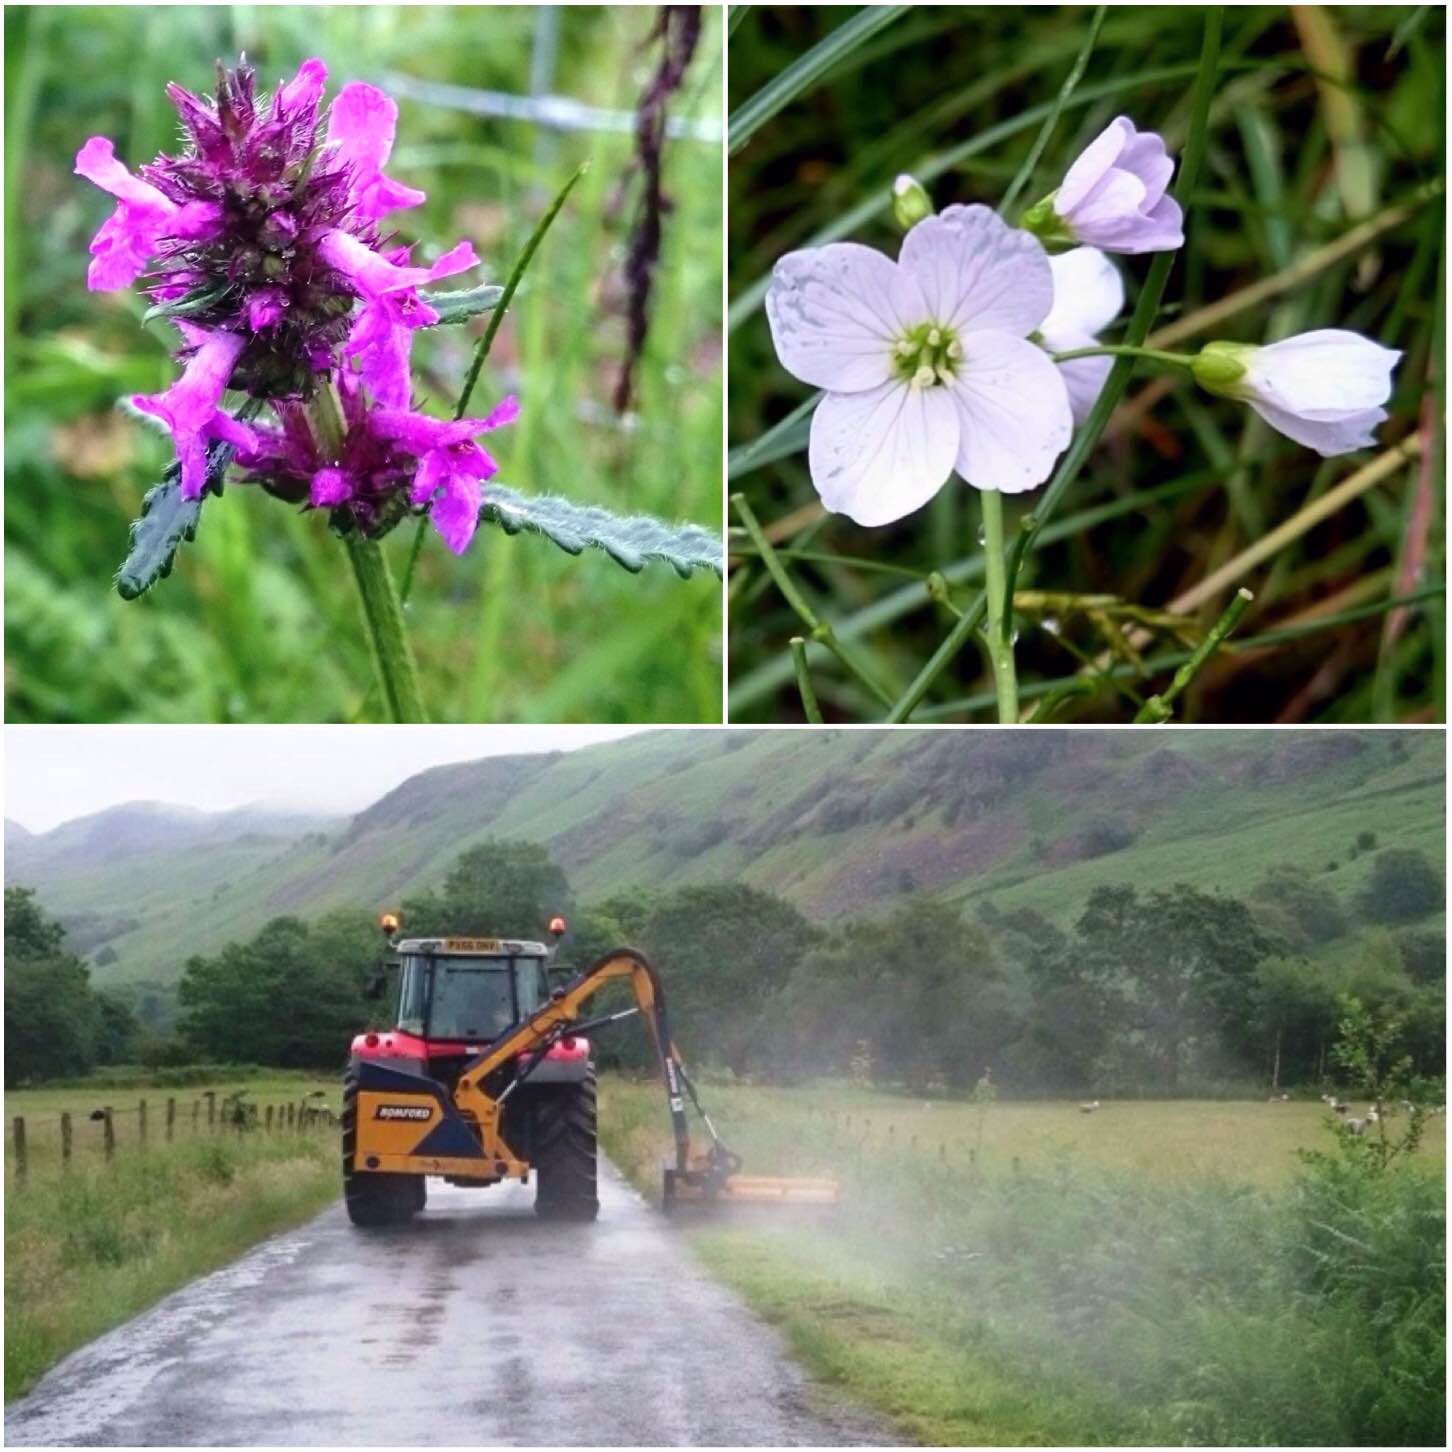
I have dabbled a bit in Black and White photography this year and felt that this shot of some Cotton Grass lent well to that style.
I was really struggling to find some interesting shots while up in the Lake District this year and so ended up lying face down in a bog to get this shot. Well worth it though in my opinion.
Moorland Flag
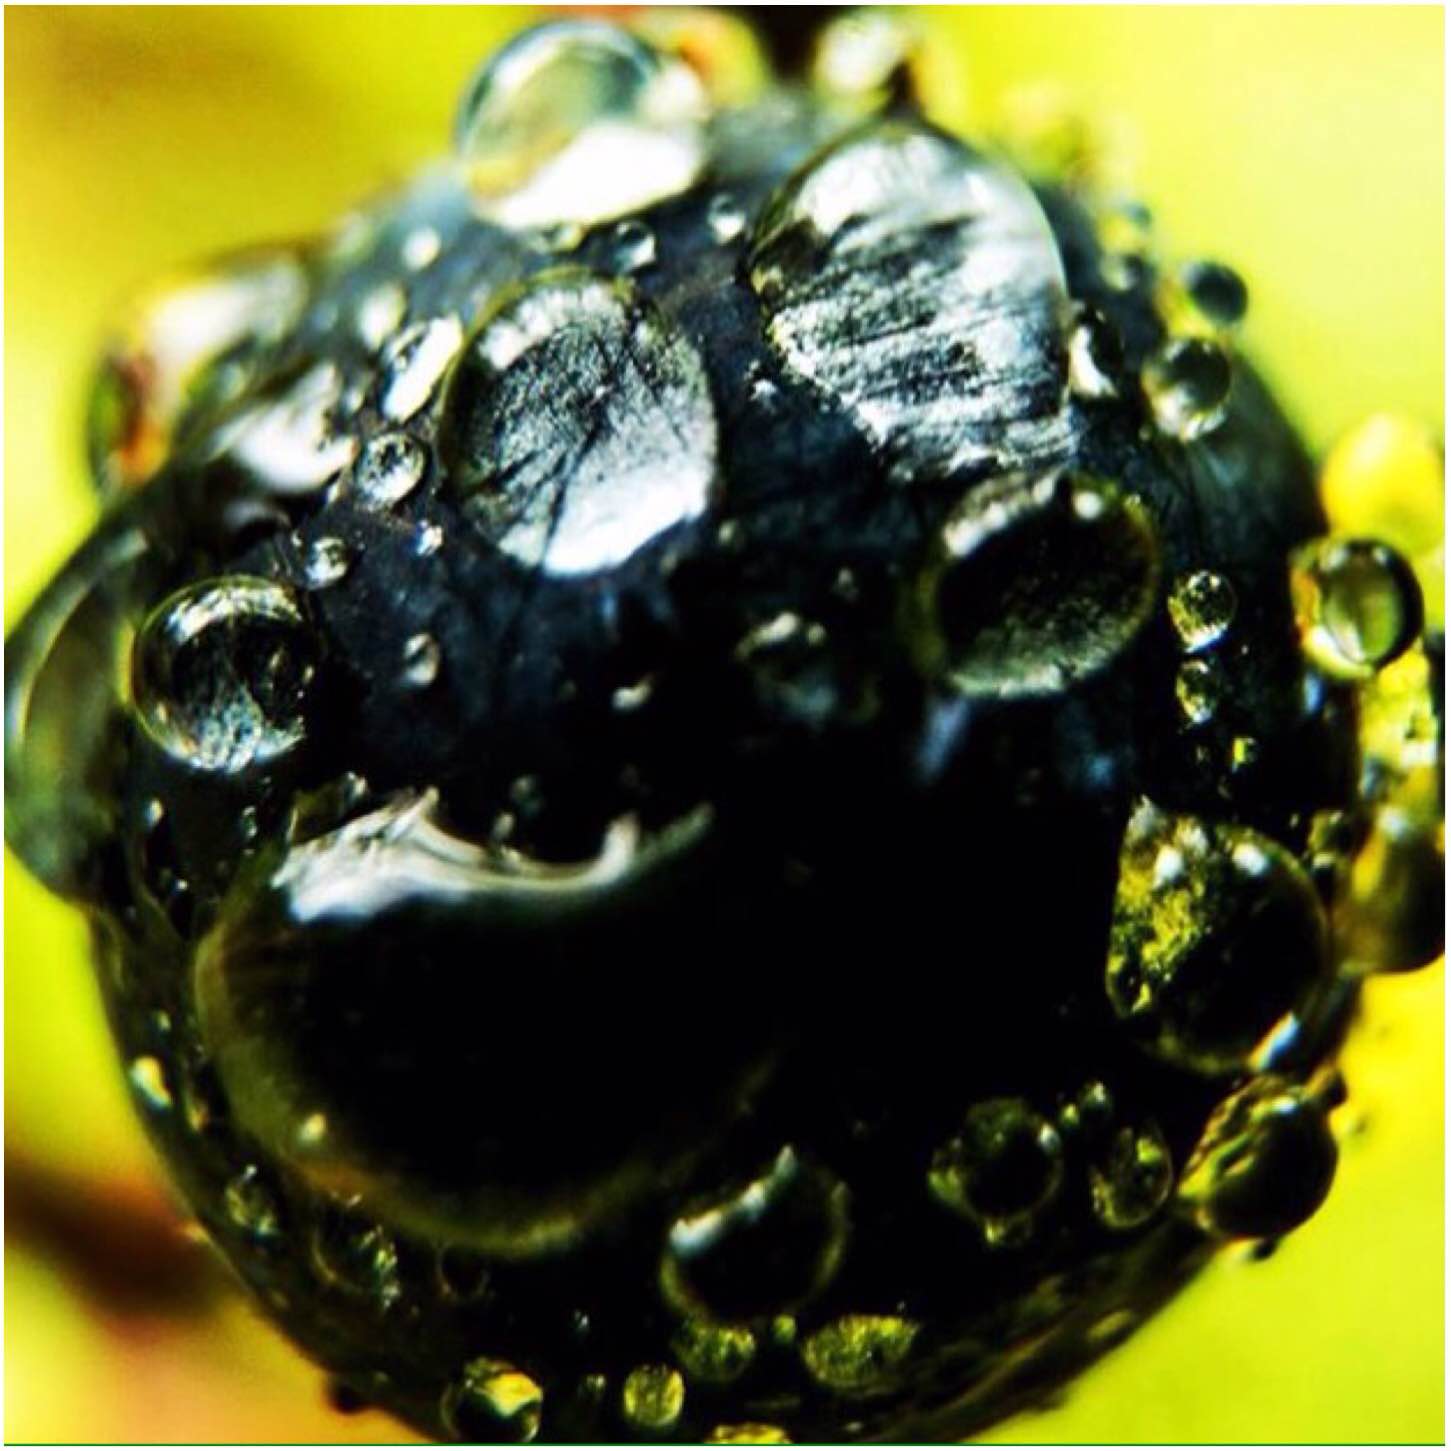
I really love to explore the art of Macro photography and have now got a couple of tripods and lens to help me with this.
While in France on a wet morning I was walking with my friends Simon and Rick and came across these Damson Berries. Problem was I did not bring my tripod along with me. I must of taken about 50 pictures of this berry and this was the only one that was properly in focus.
A real fluke but one I am glad I persevered with.
Damp Damson
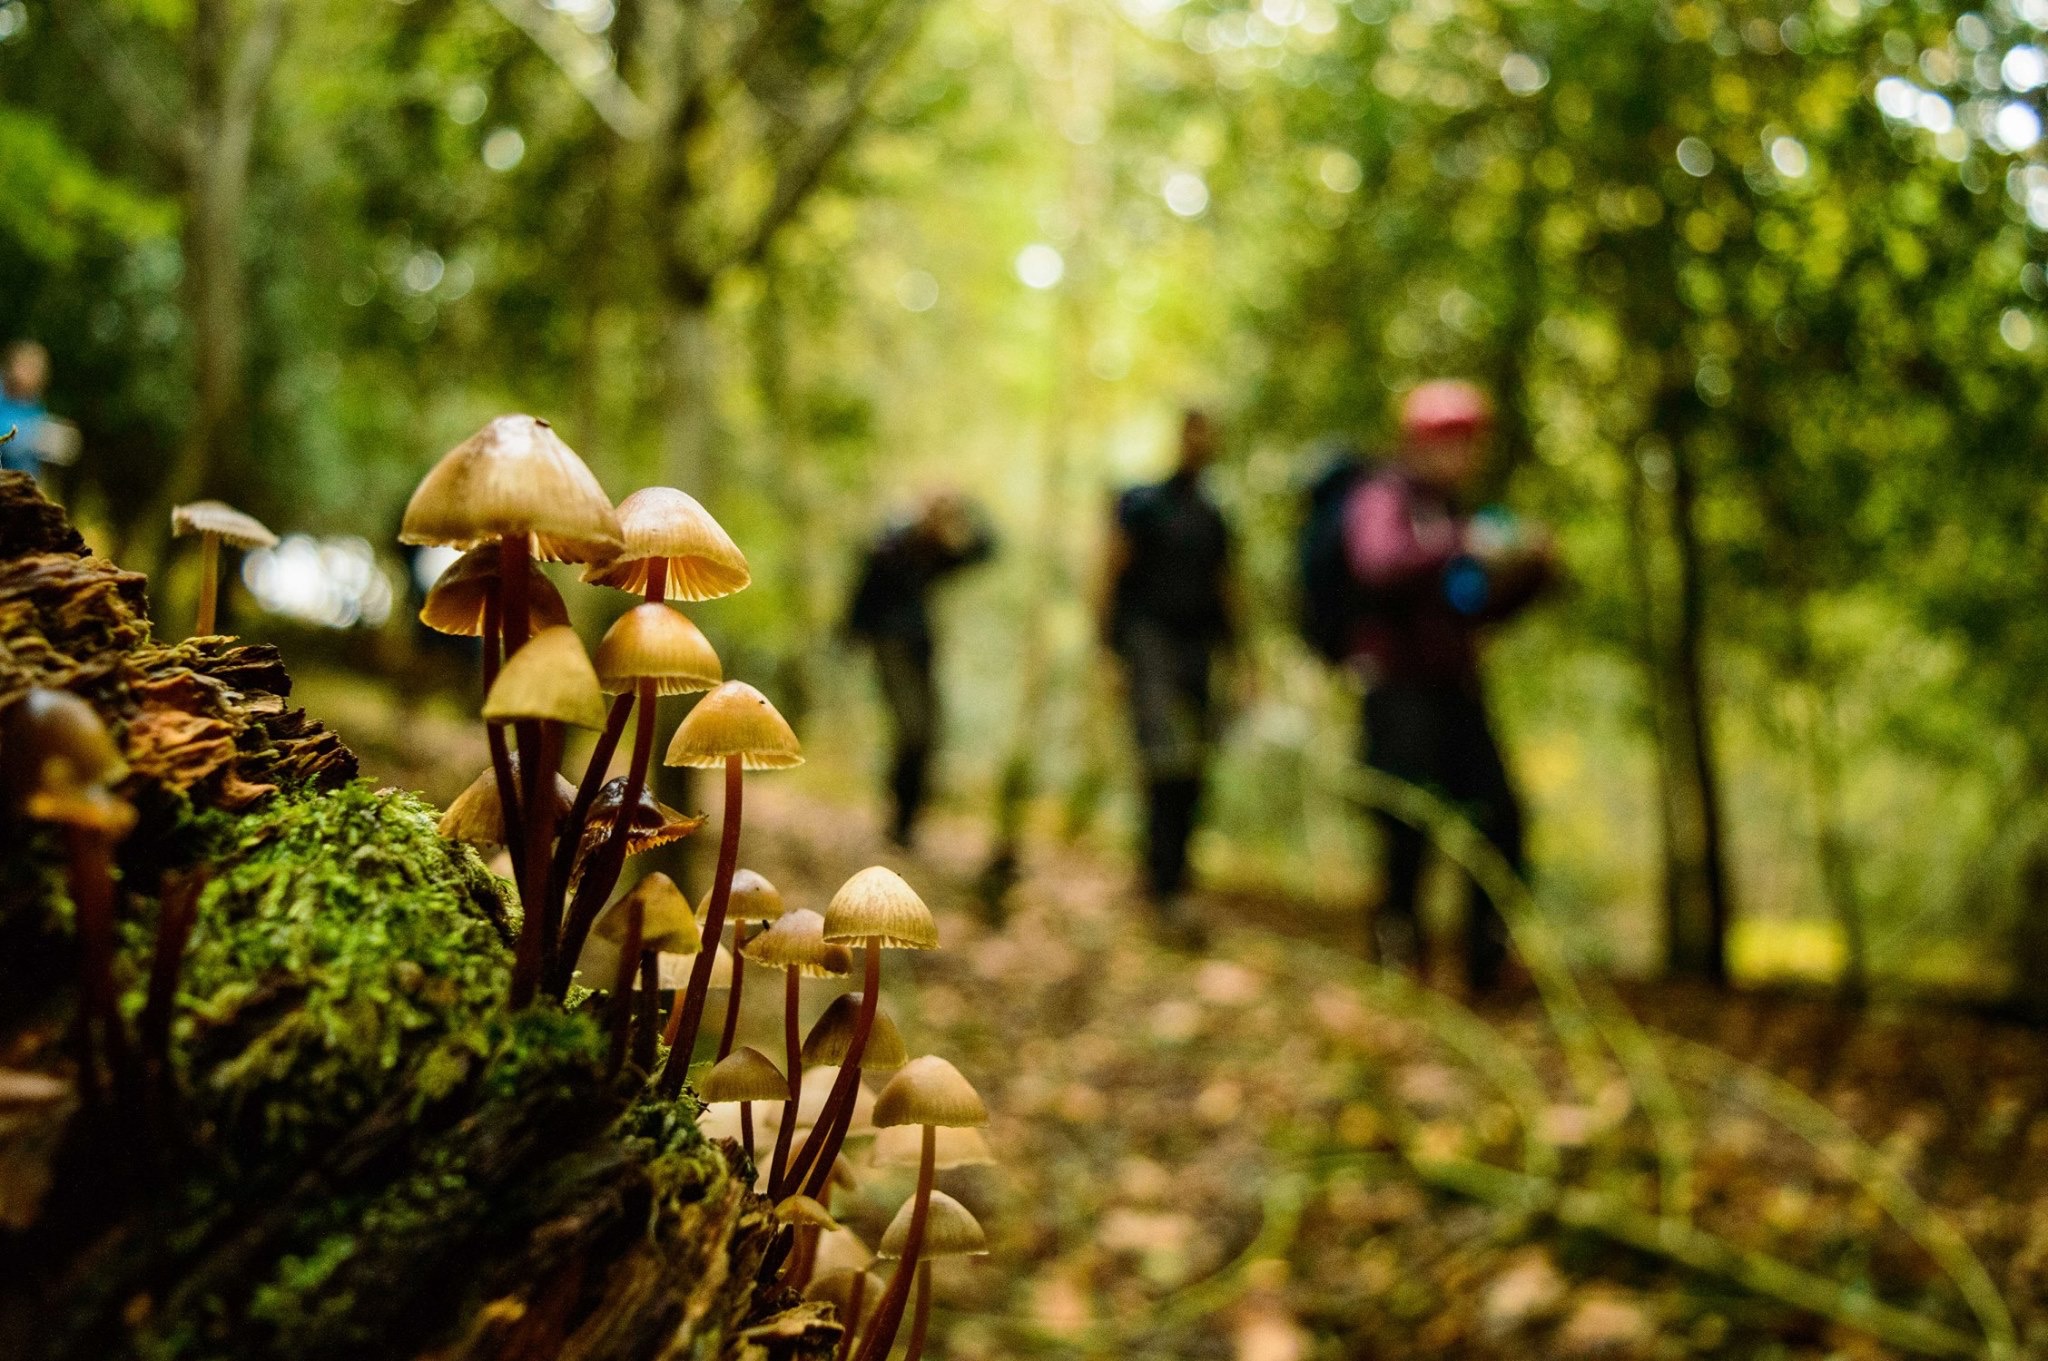
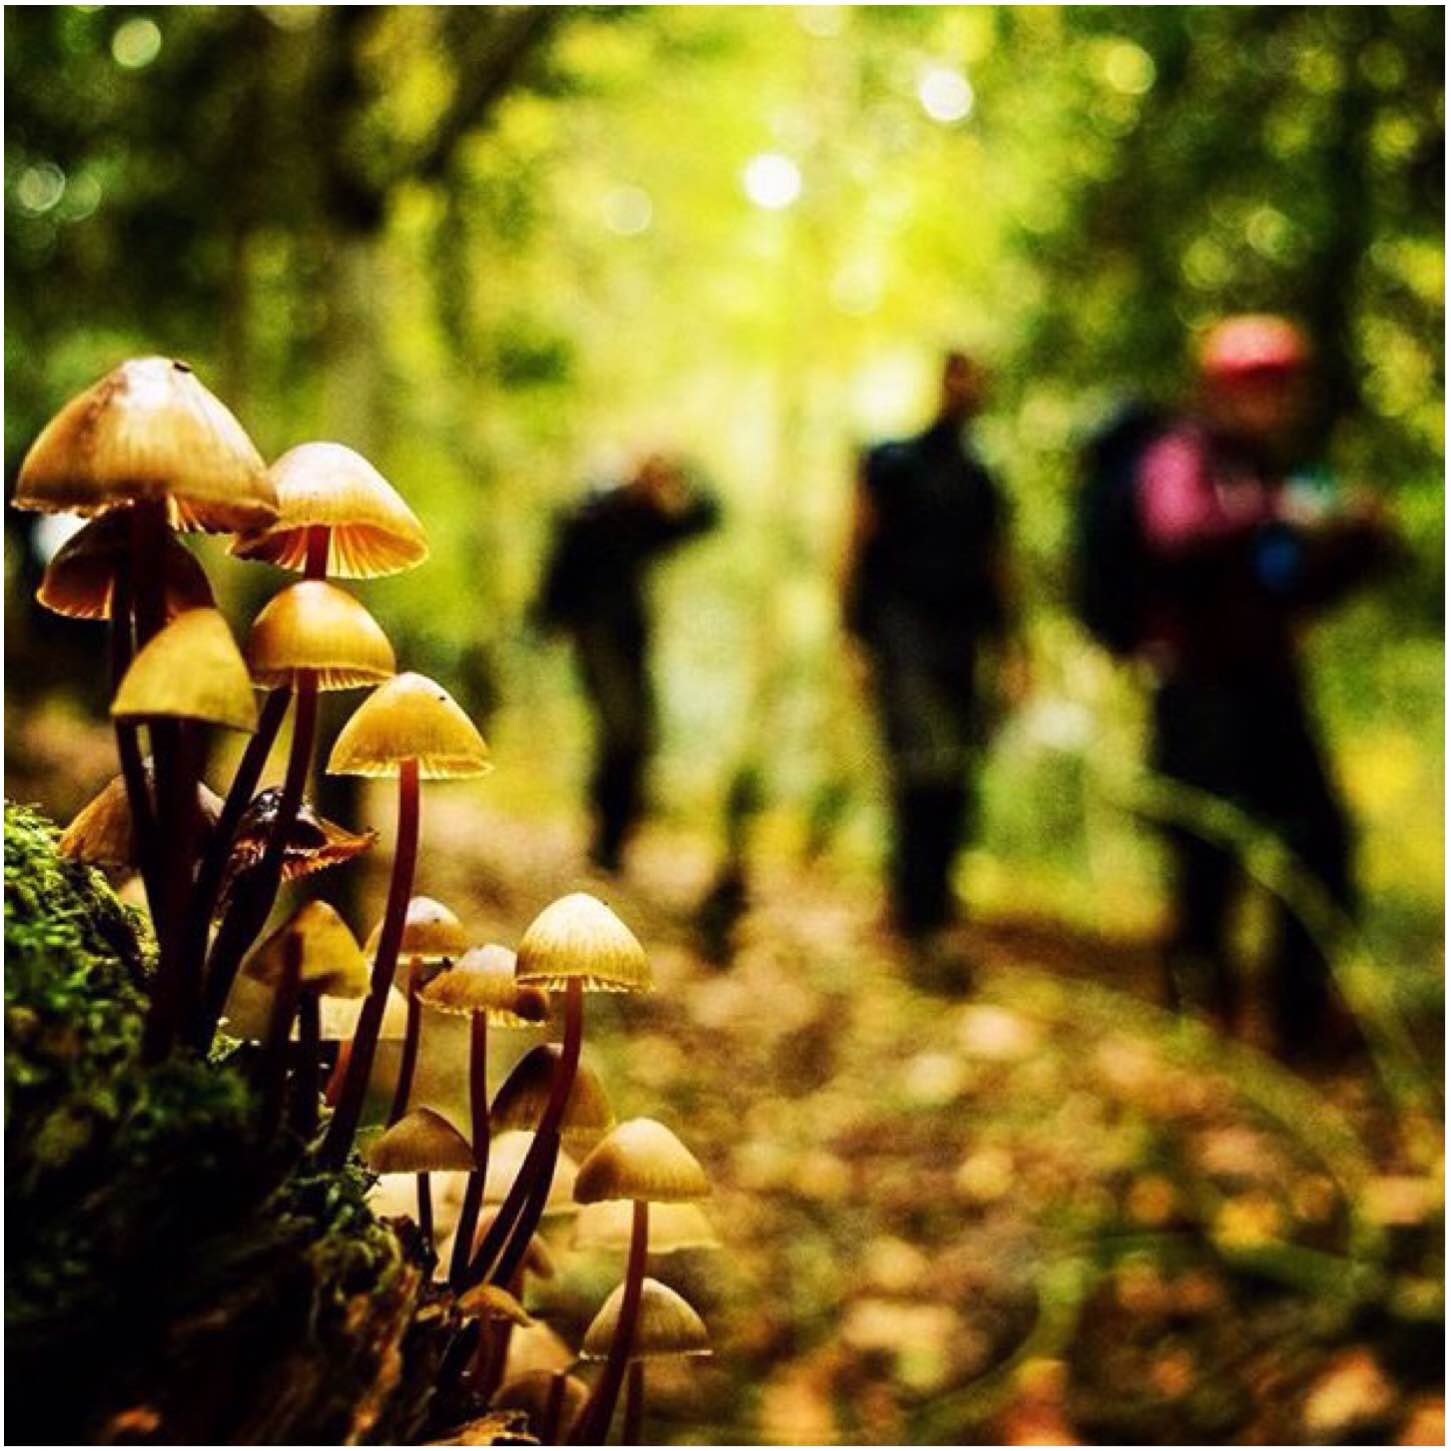
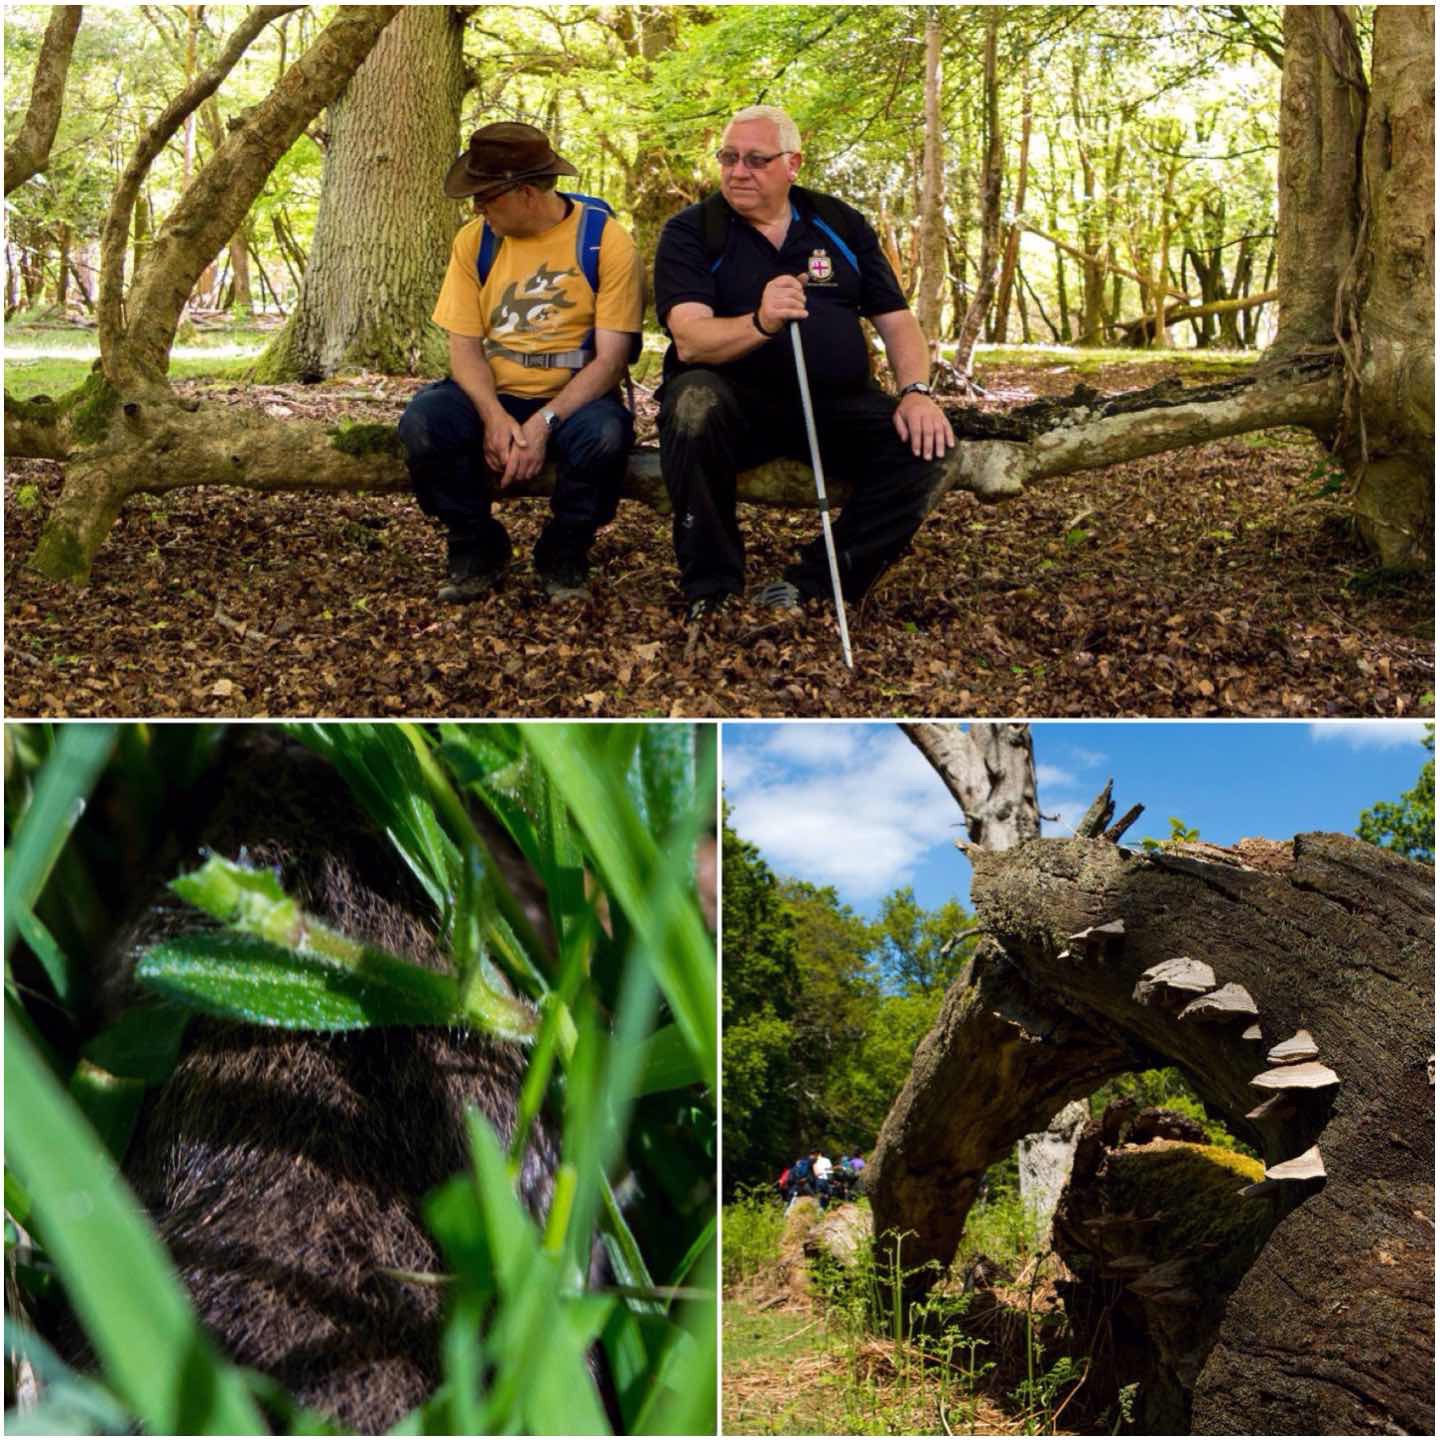
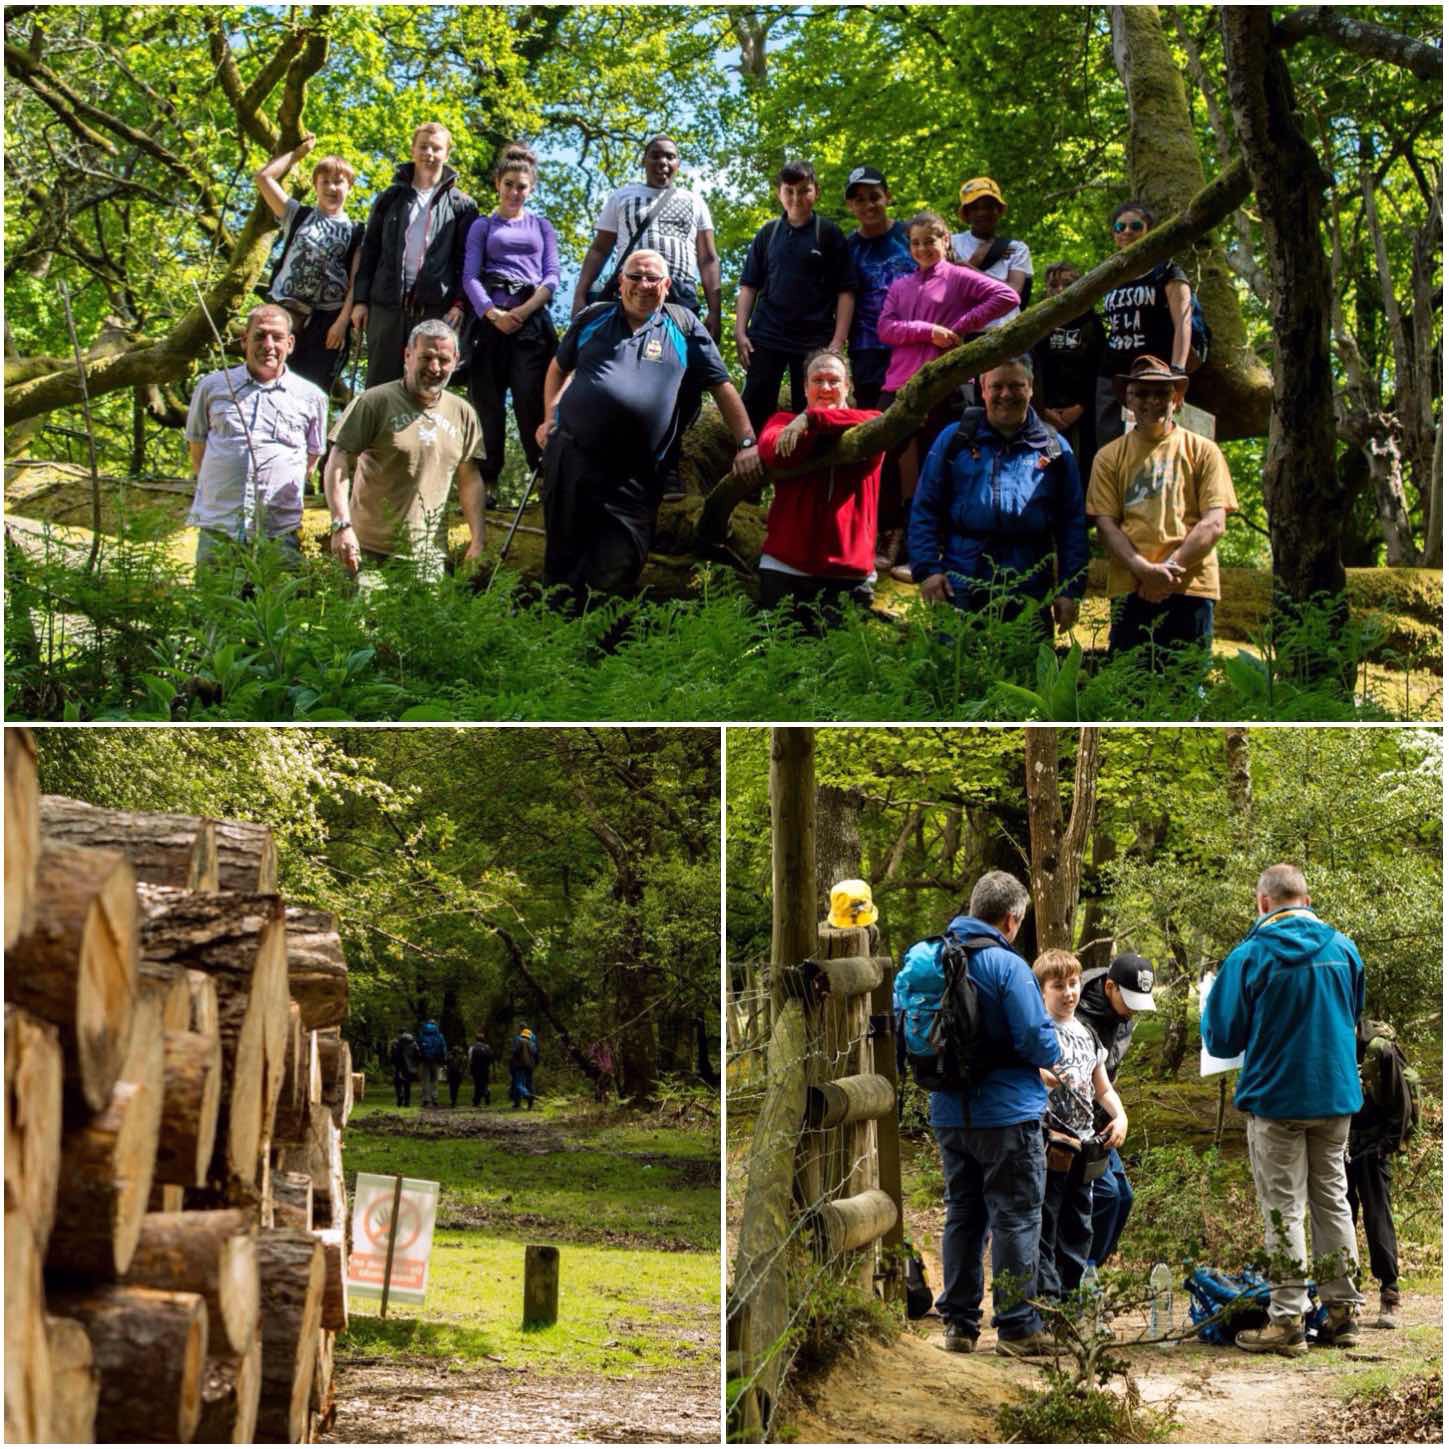
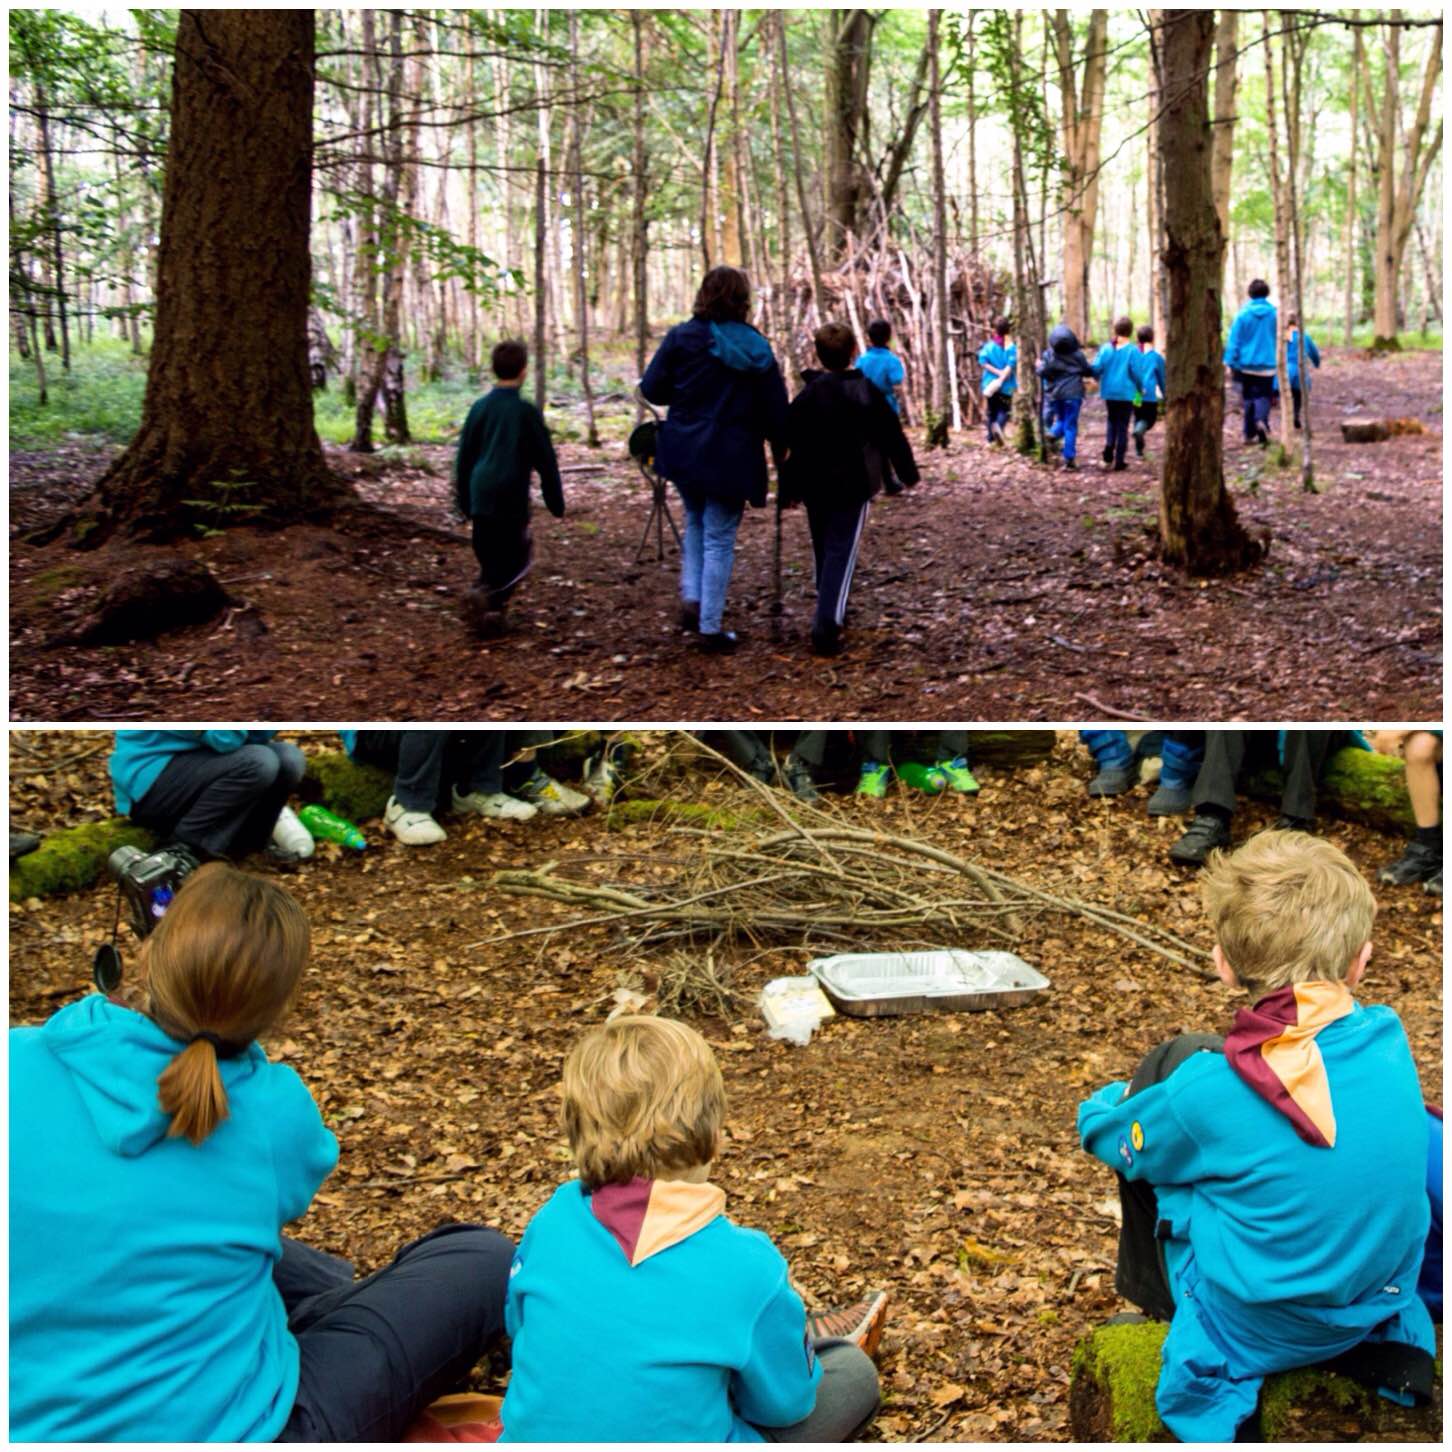
We had a busy time running a Basic Expedition Leadership course for Sea Cadet instructors this year. While waiting for them to appear out of the woods on a navigation exercise I decided to try out an experiment.
I positioned myself by a fallen log and focussed on some fungus on the log. As the guys passed by I took the shot and I think I can say the experiment worked pretty well.
A Walk in the Woods
Insects
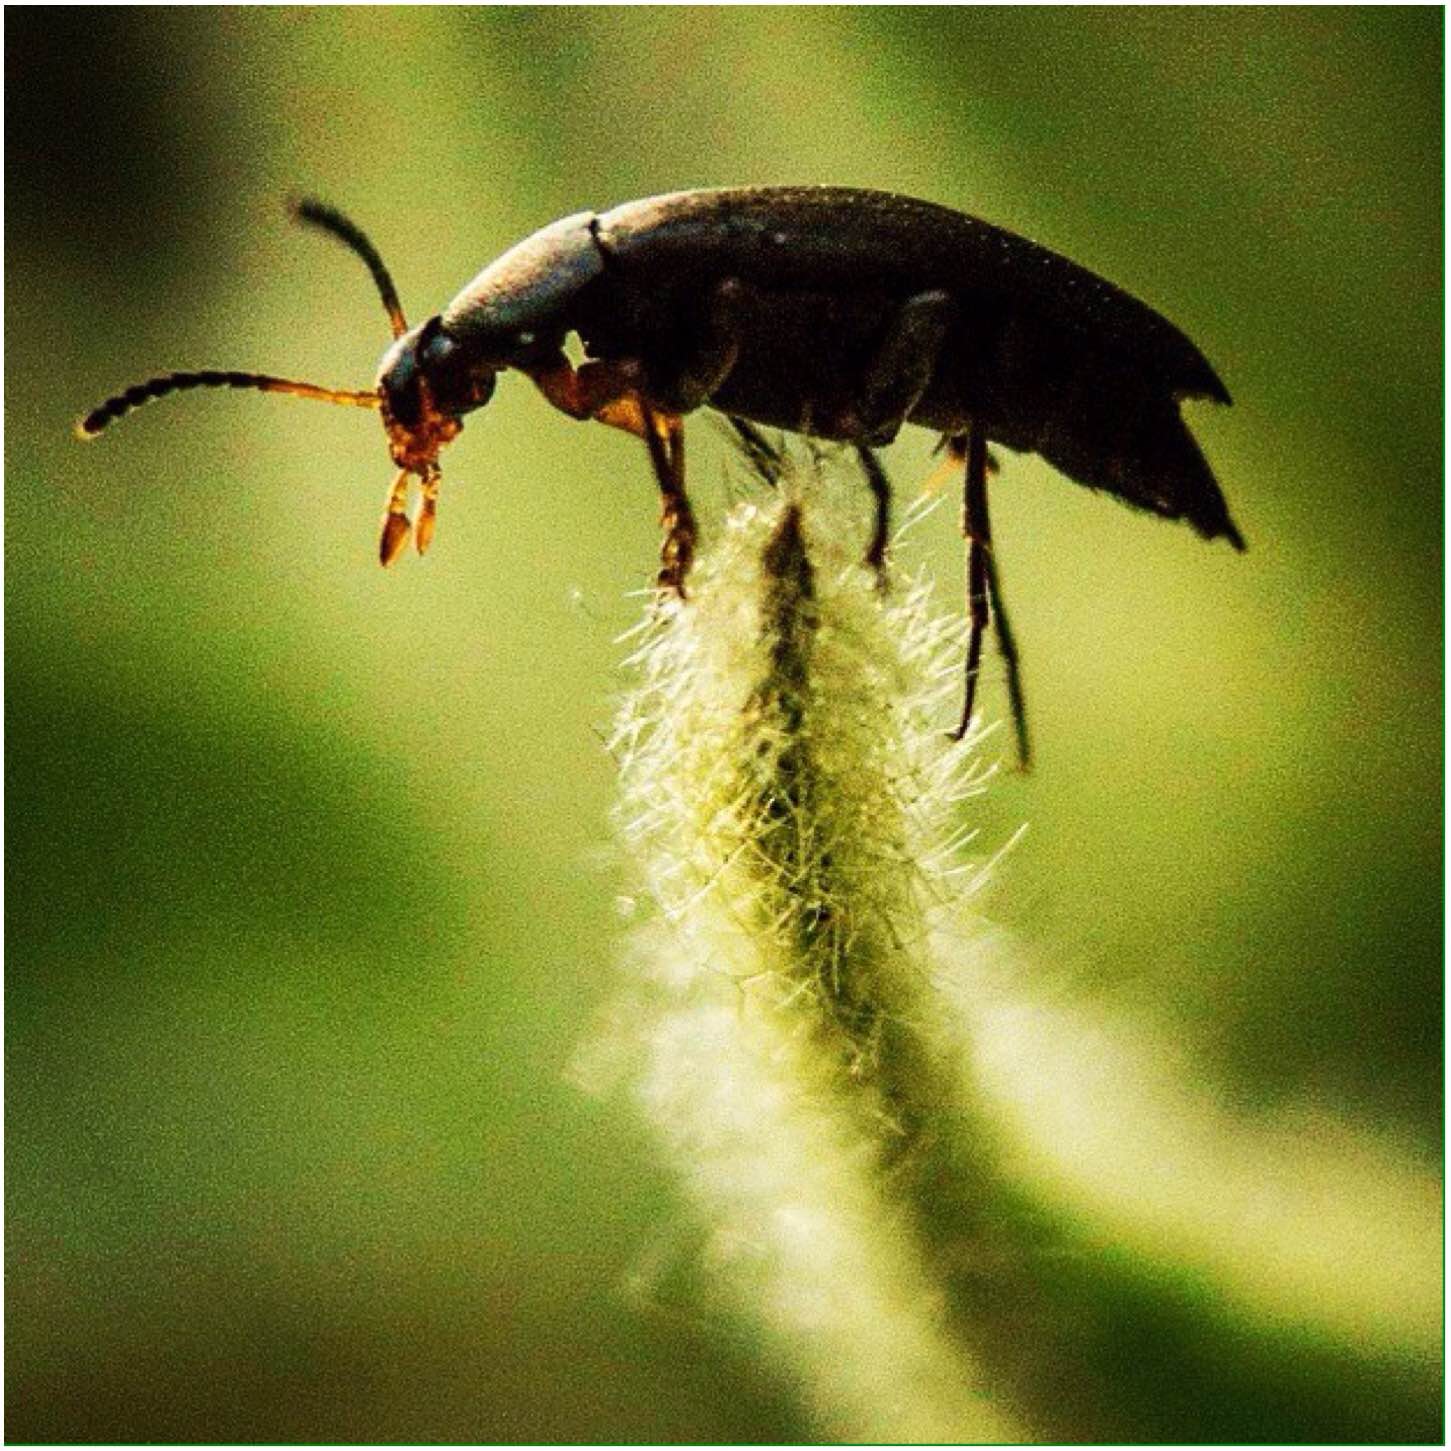
I cannot remember where I took this picture but I do remember seeing this little guy perched on the upturned tip of a succulent leaf. I took the shot as I could make out through the lens that his legs were resting not on the leaf but on the hairs protruding from it.
I sat watching him for about 5 minutes and he did not move once – it was as if he was on some sort of guard duty.
Keeping Watch
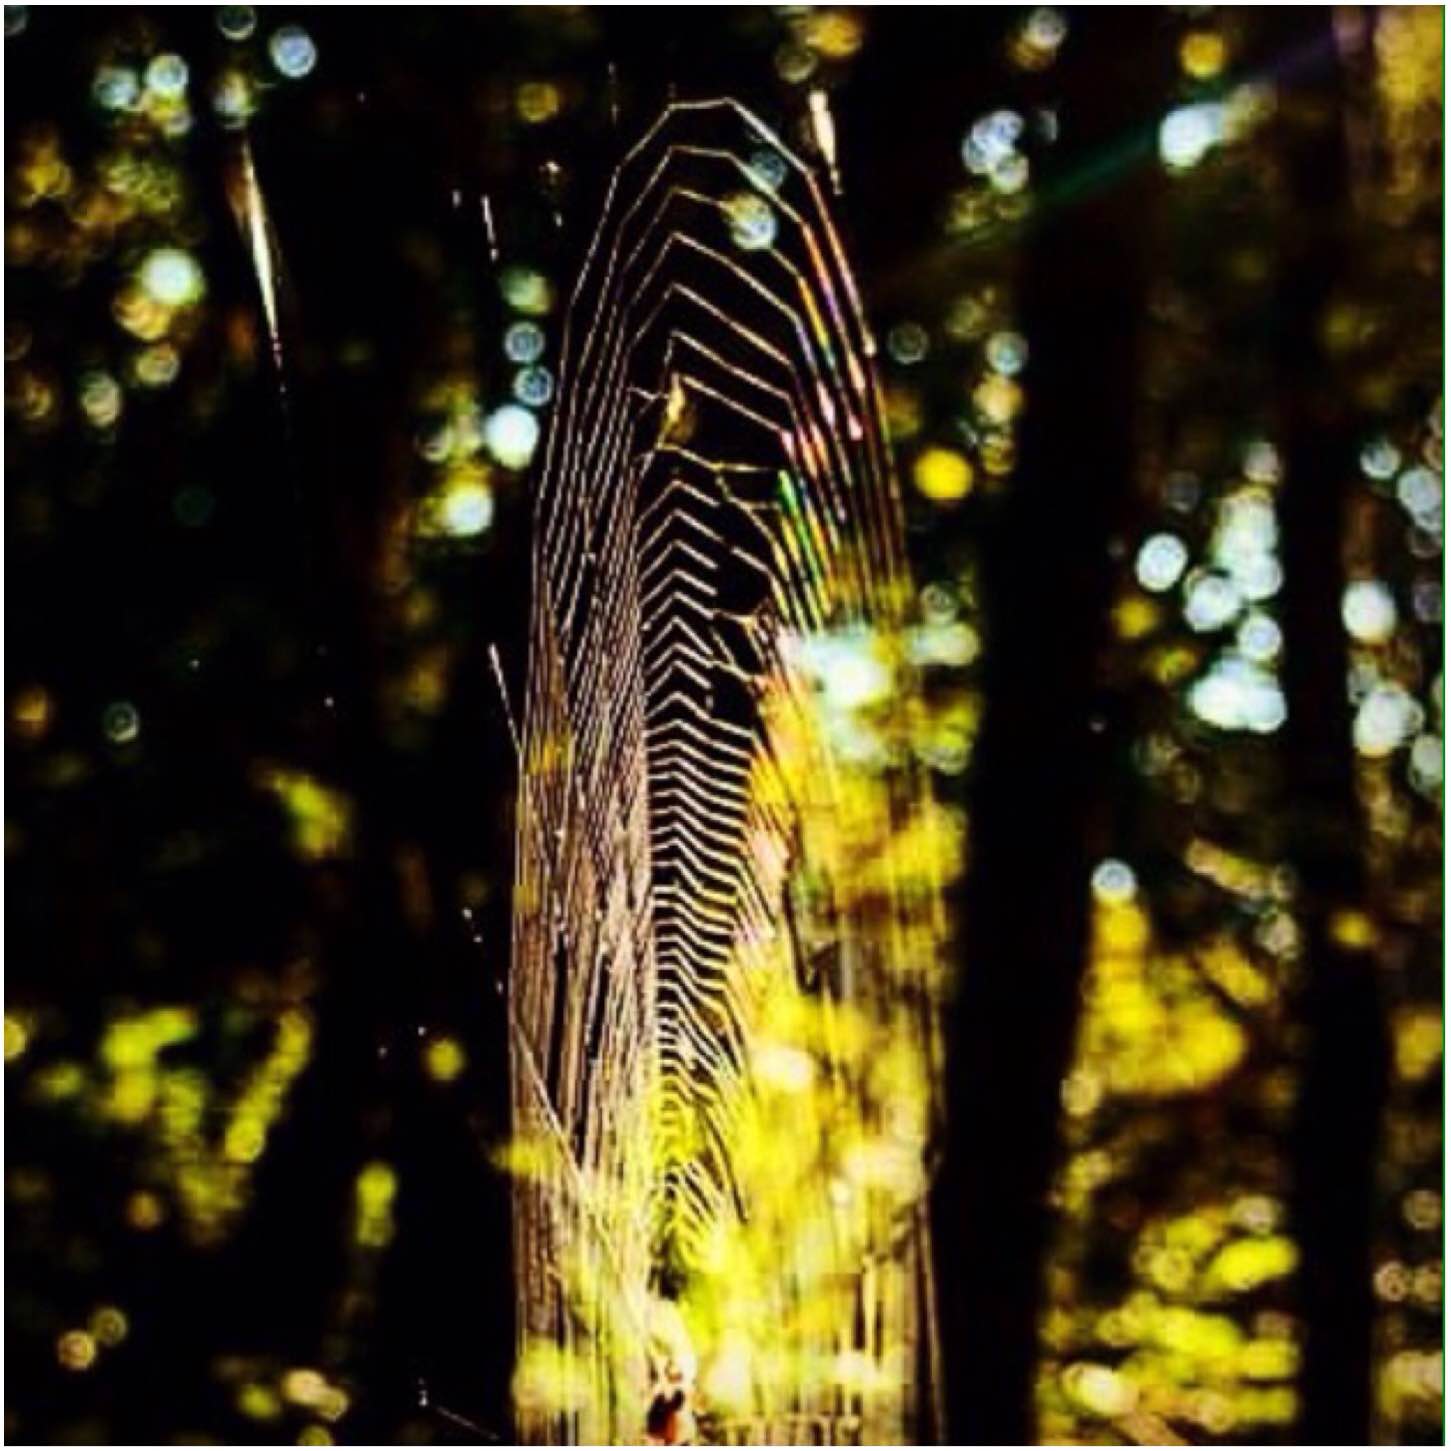
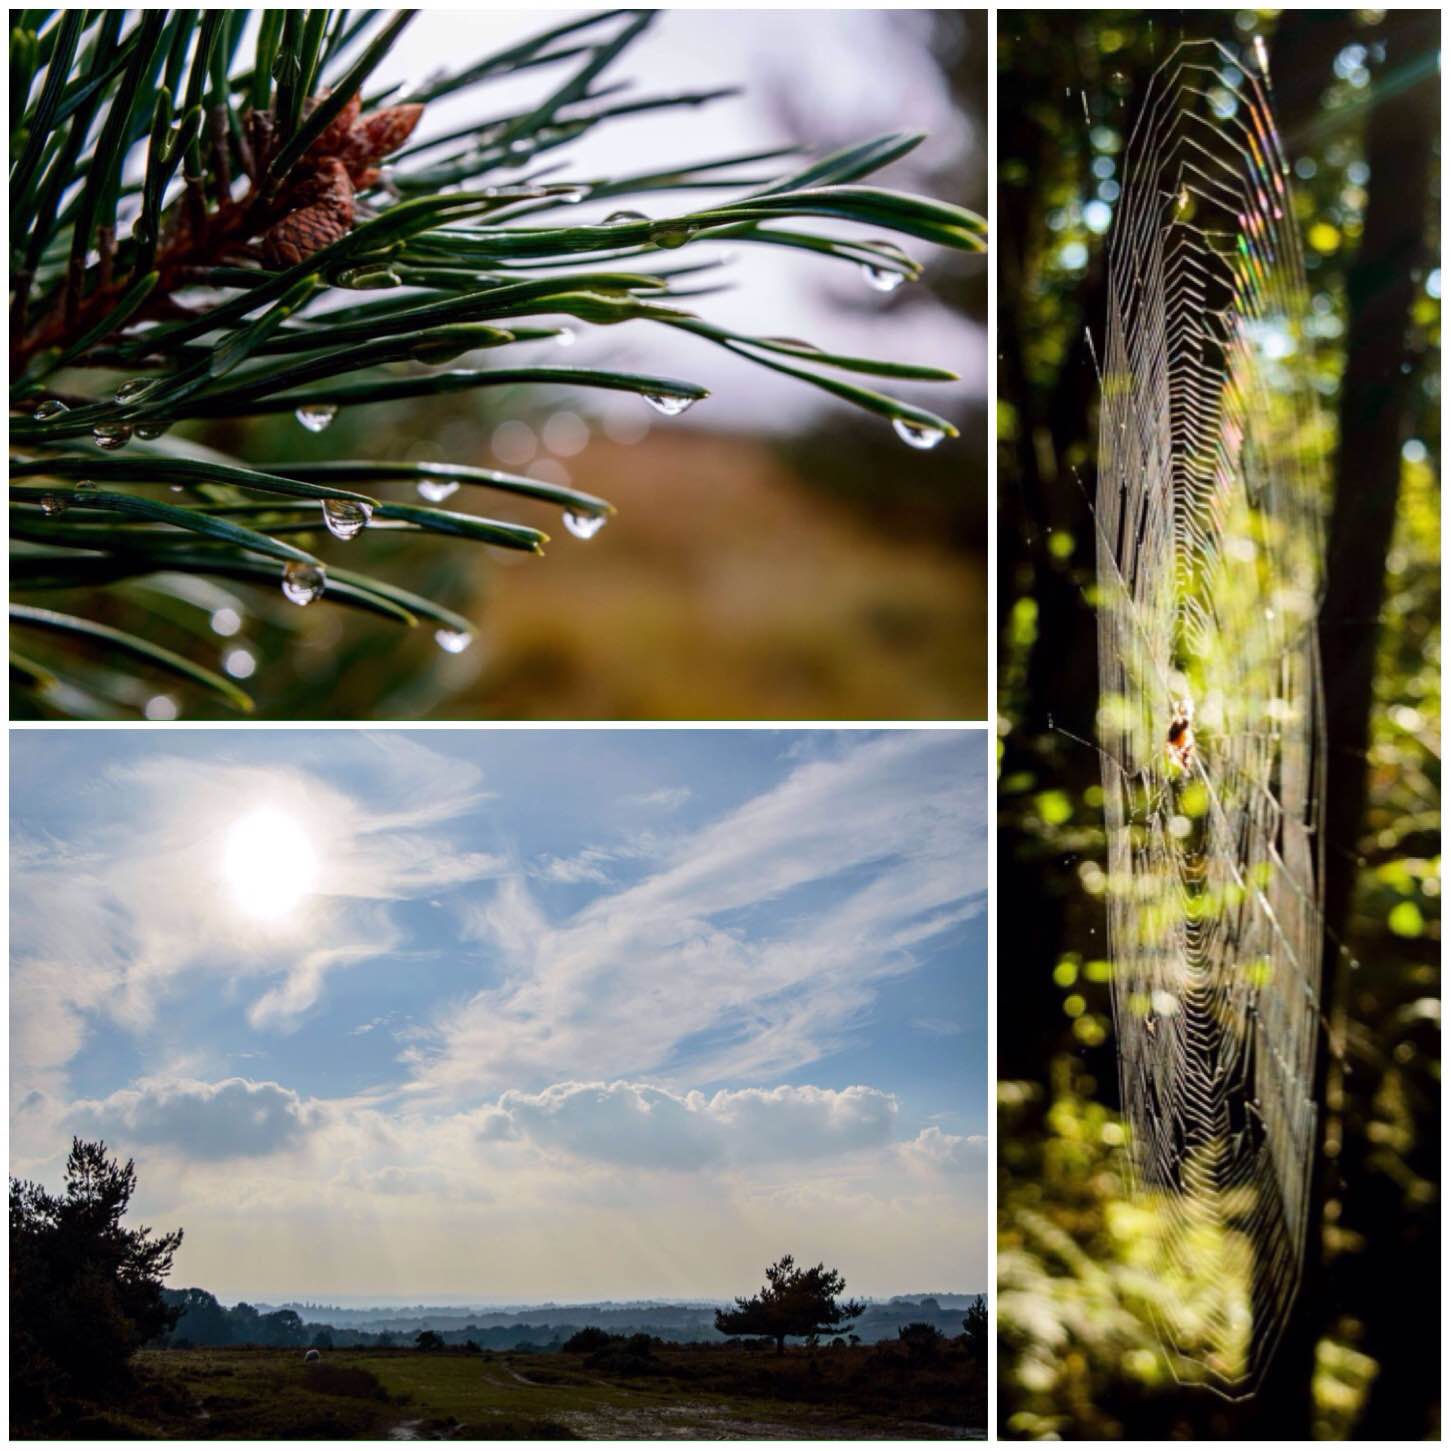
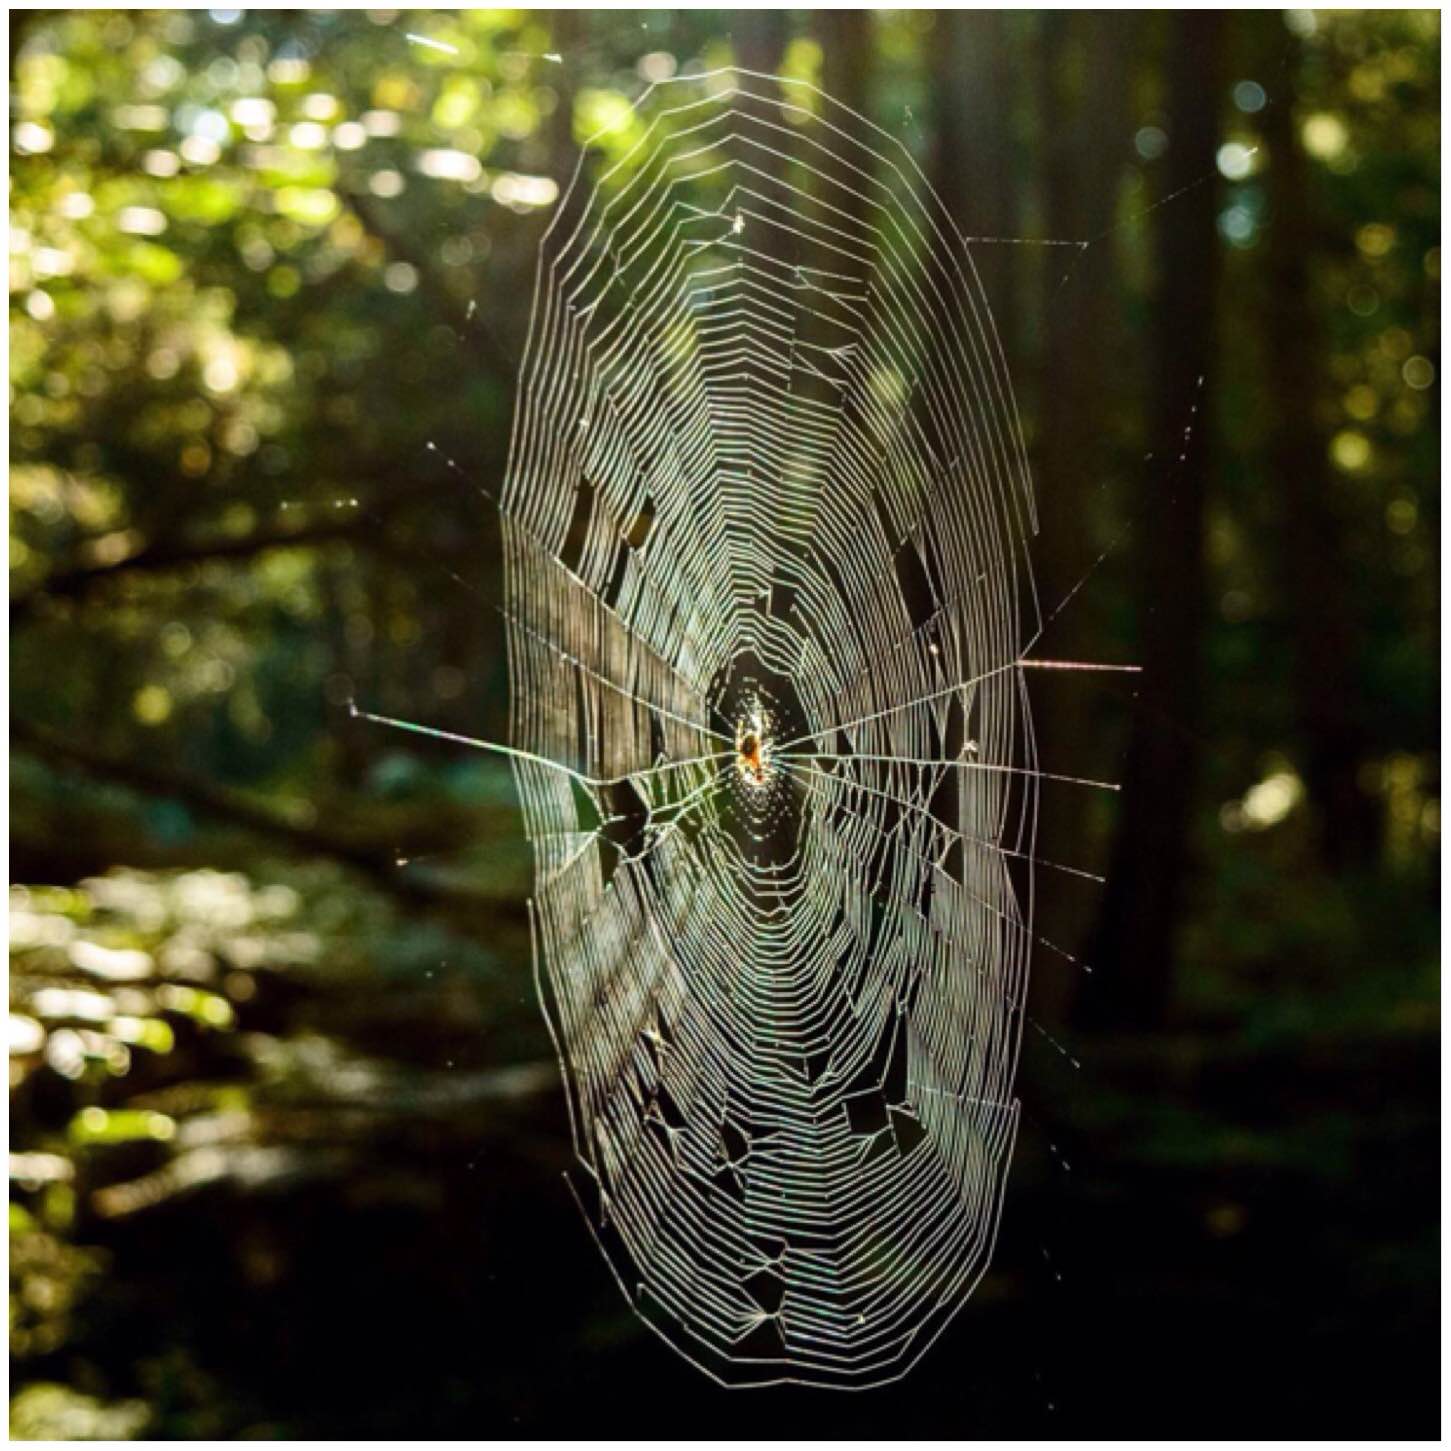
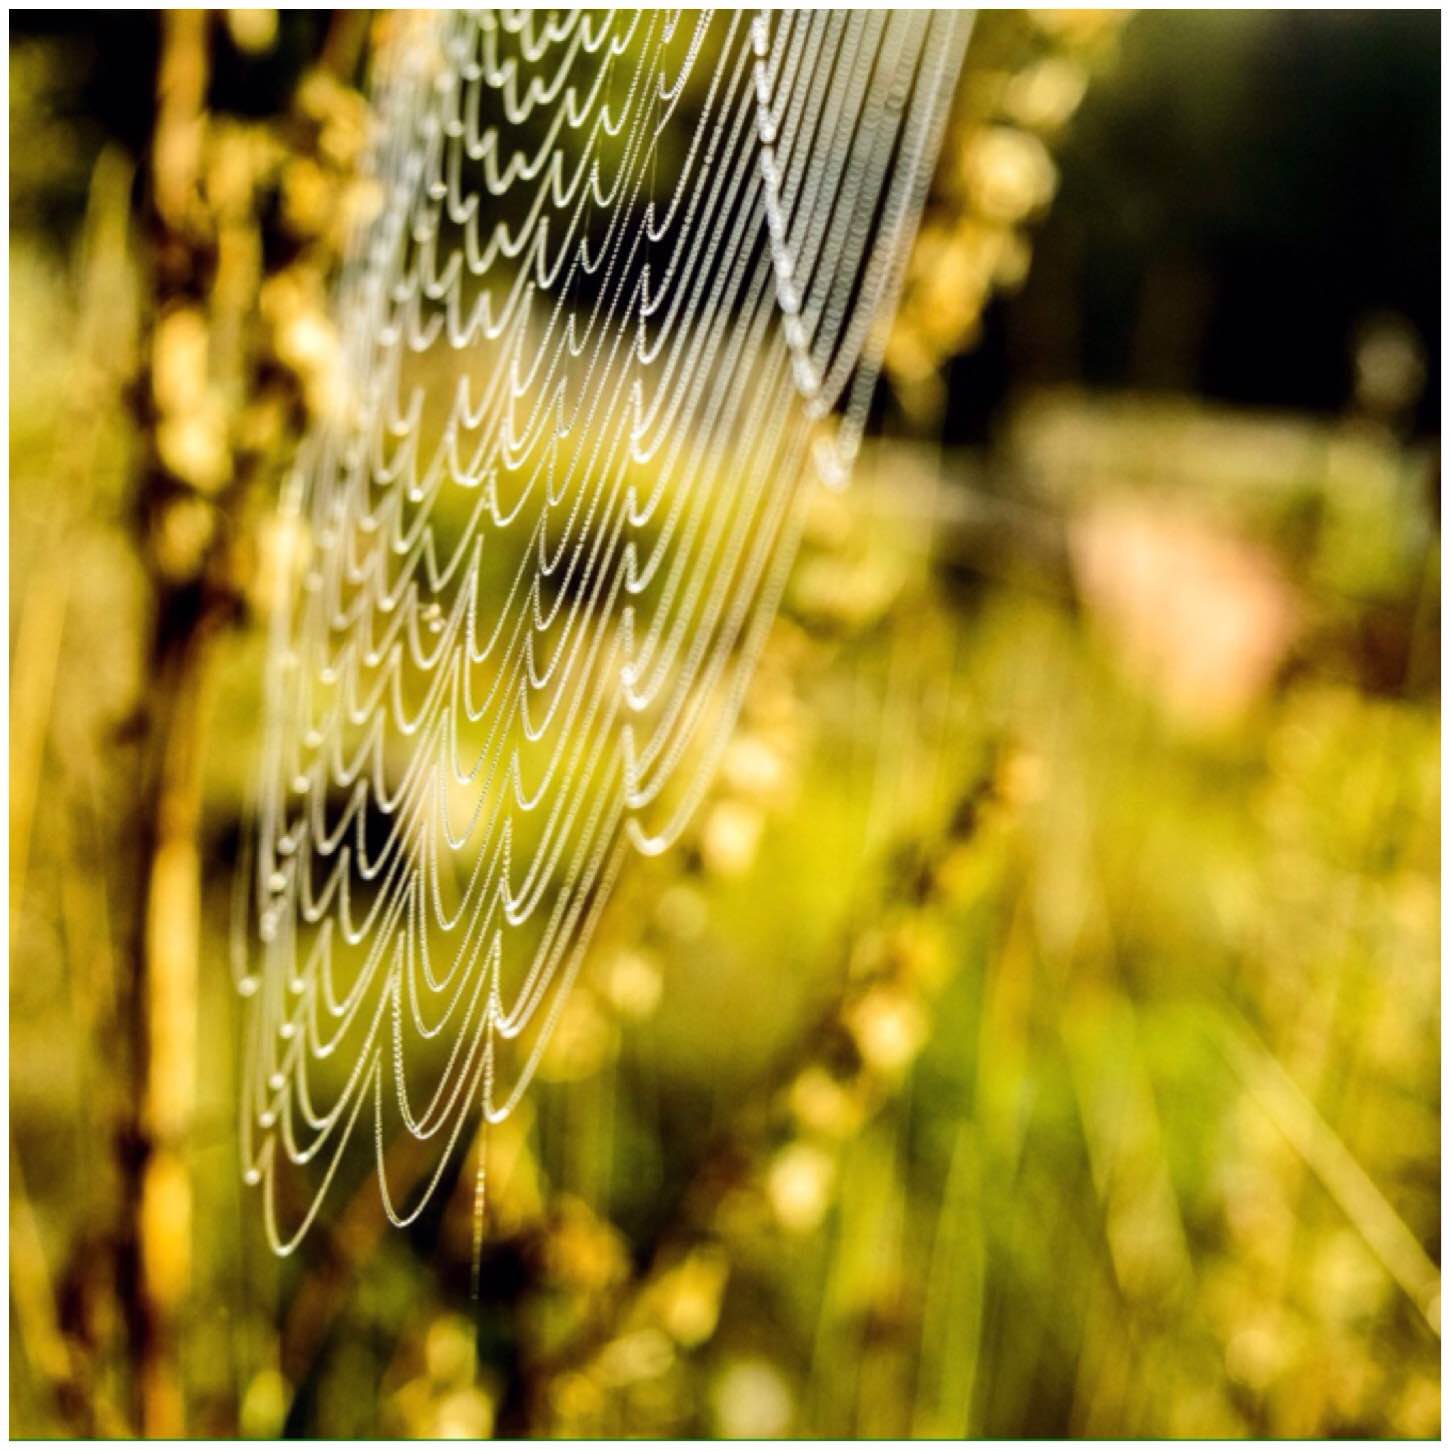
For some reason this year spiders webs have been out in force. While in the Ashdown Forest my friend Charlie spotted this amazing web that was strung between two trees. The trees were about 20 feet apart and when photographed from an angle a rainbow appeared in it.
I did not see this at the time of taking the picture but had it pointed out to me by my wife Alison and my friend Eleanor. Kind of took me back a bit as I did not see it at all – maybe it is just a camera thing.
Rainbow Web
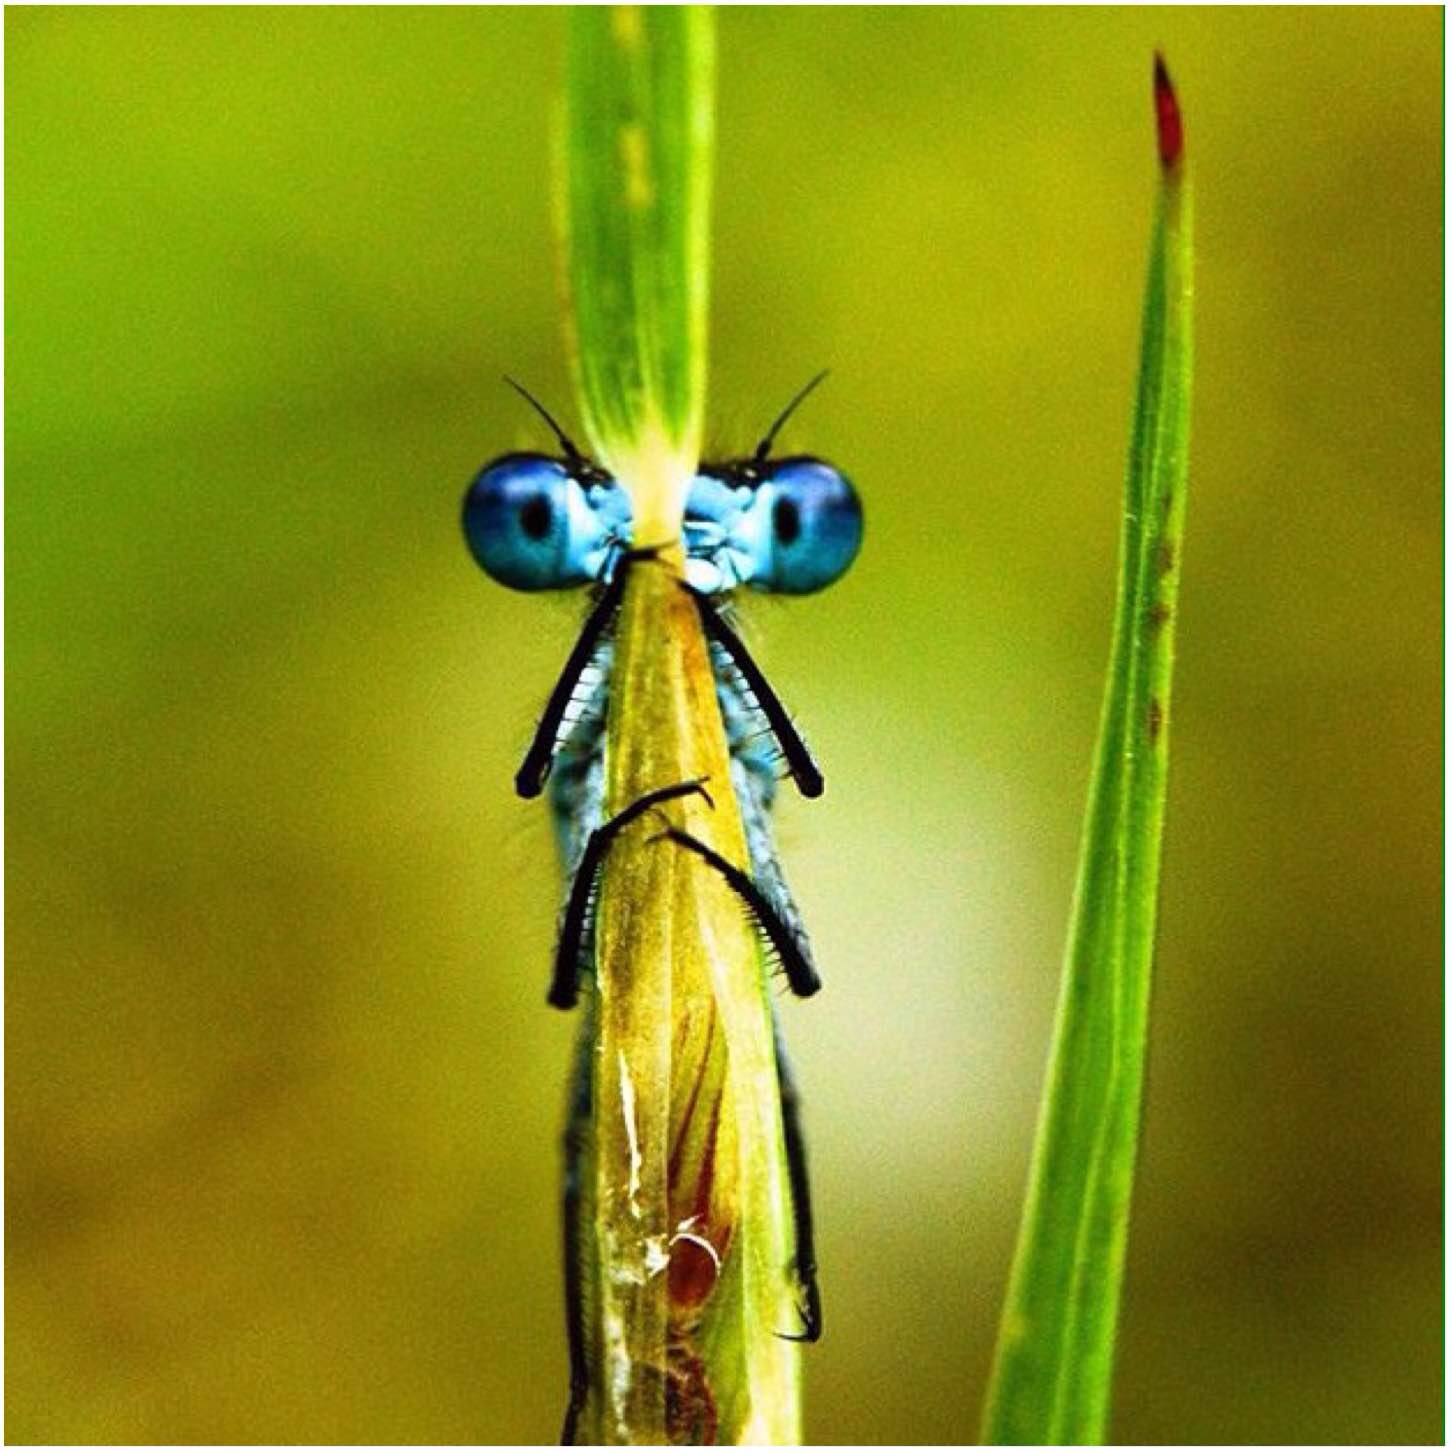
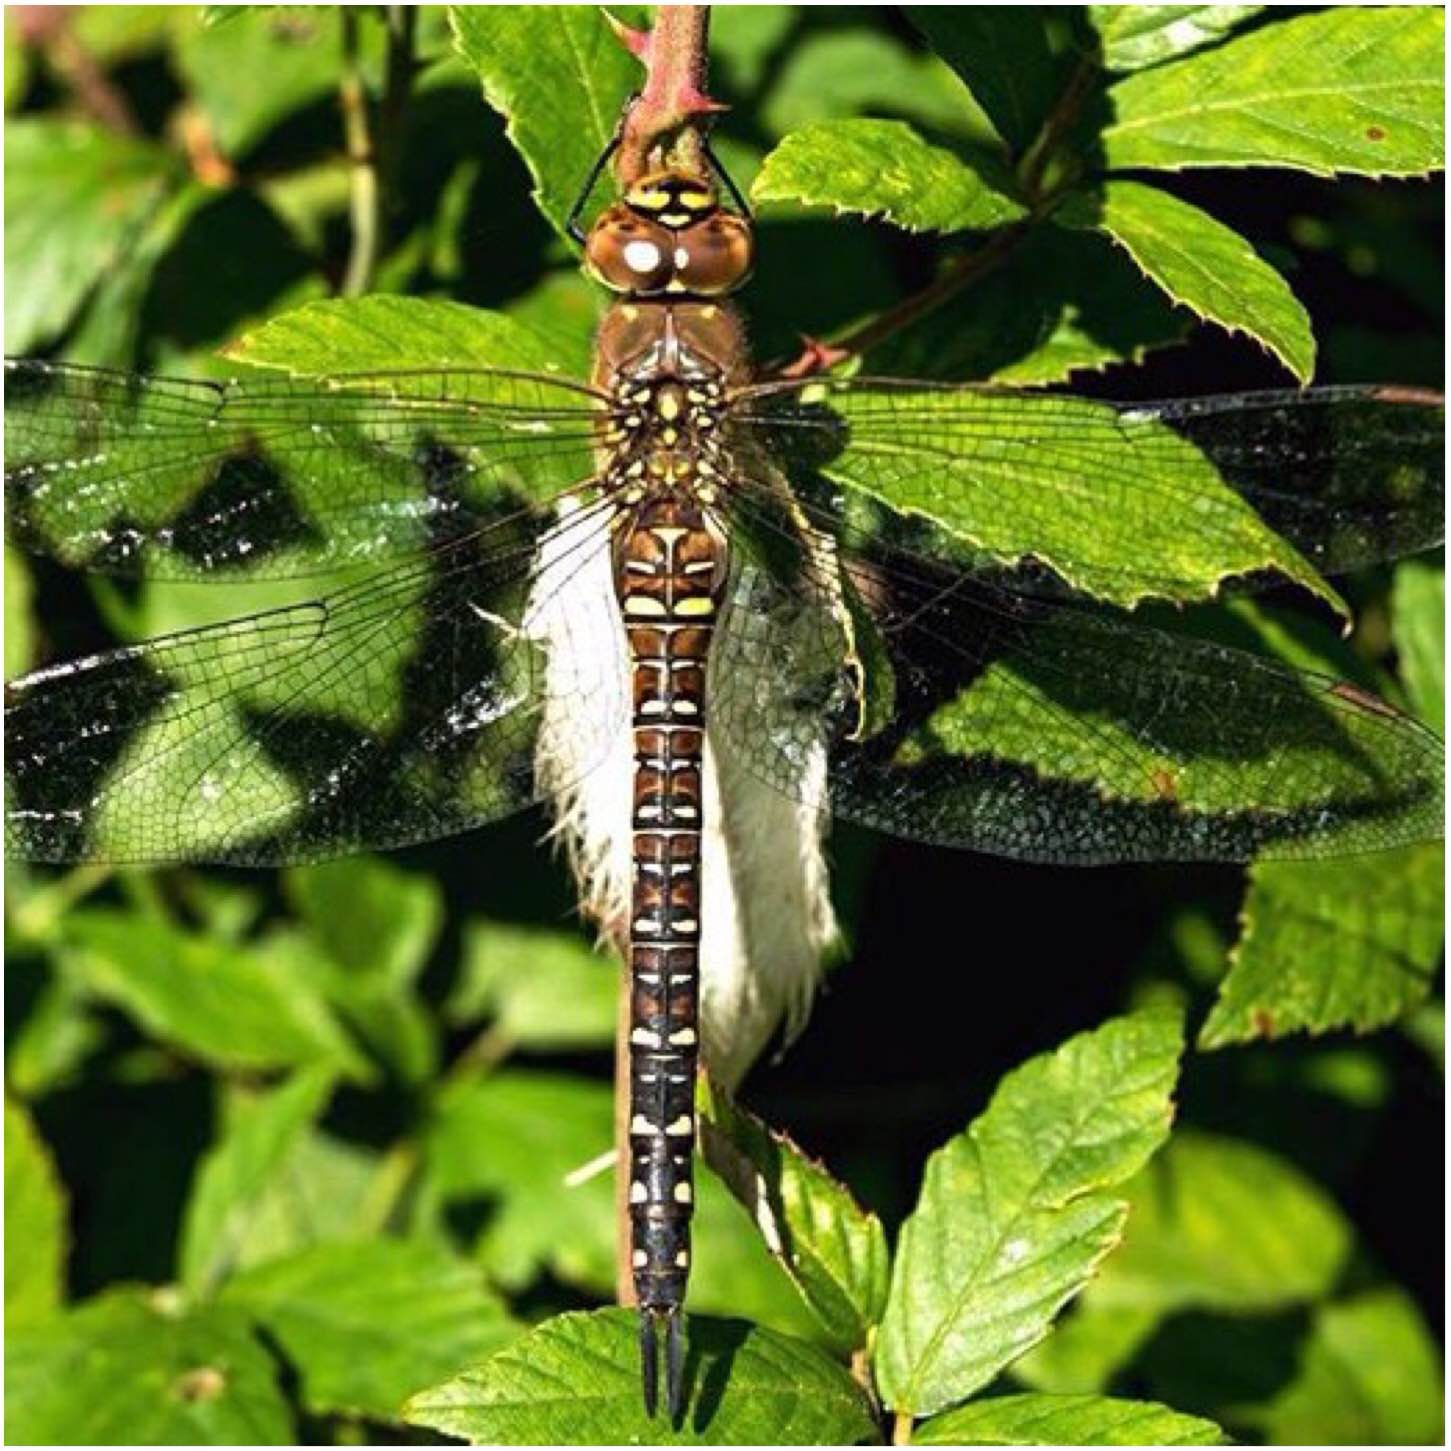
My daughter spotted this little Dragonfly resting up at our local Church when I was running a Bushcraft stand at the church open day.
She came running up to tell me but I was teaching bowdrill and had to tell her to wait. I thought he would have been gone by the time I walked over but thankfully he was still there. Looking closely I could see why – he was sitting comfortably on a little downy bed sunning himself.
Downy Bed
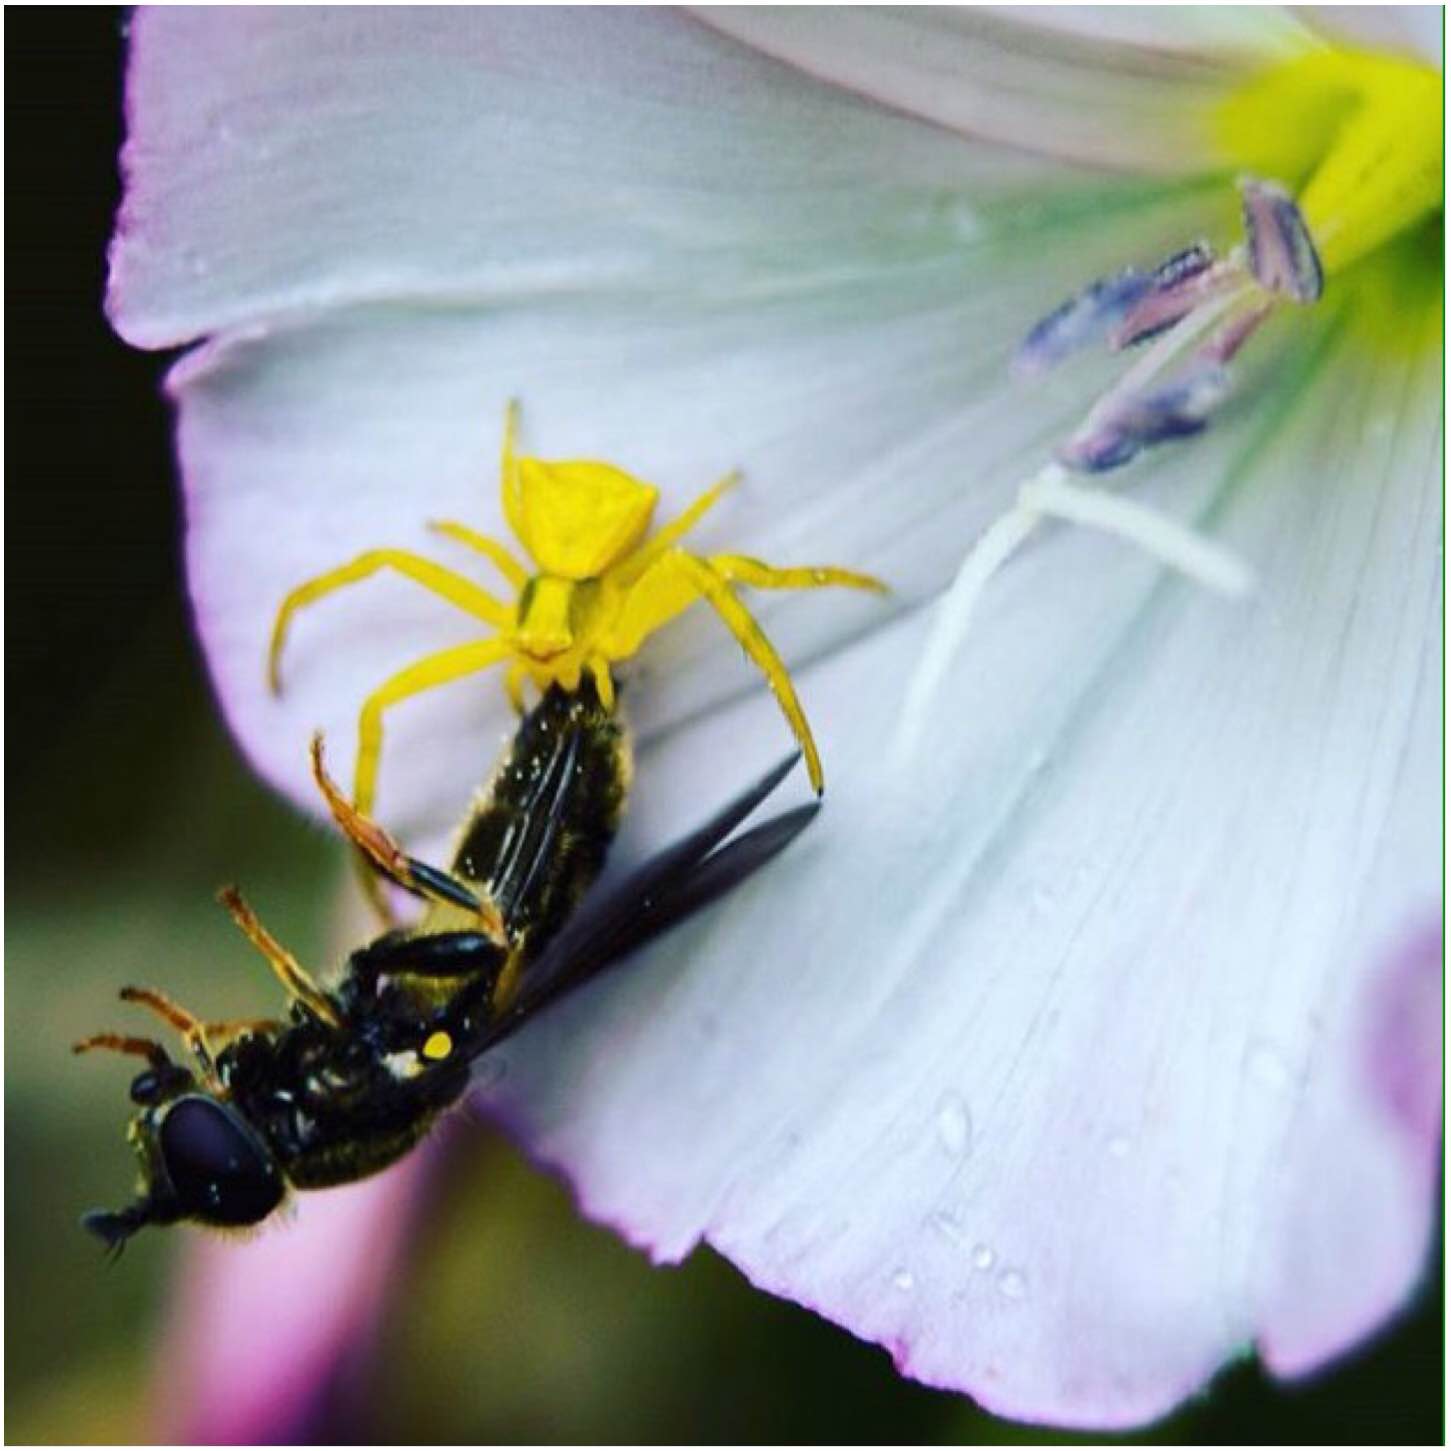
This is another one of these pictures that you take and only realise something was happening afterwards. It was taken in Southern France on an unidentified flower. I had spotted the small spider but that was all.
Later when processing the picture in Lightroom I saw that he had caught and immobilised a small wasp. I wish I had spent more time watching what was going on but at least the spider got his lunch.
Lunch Time
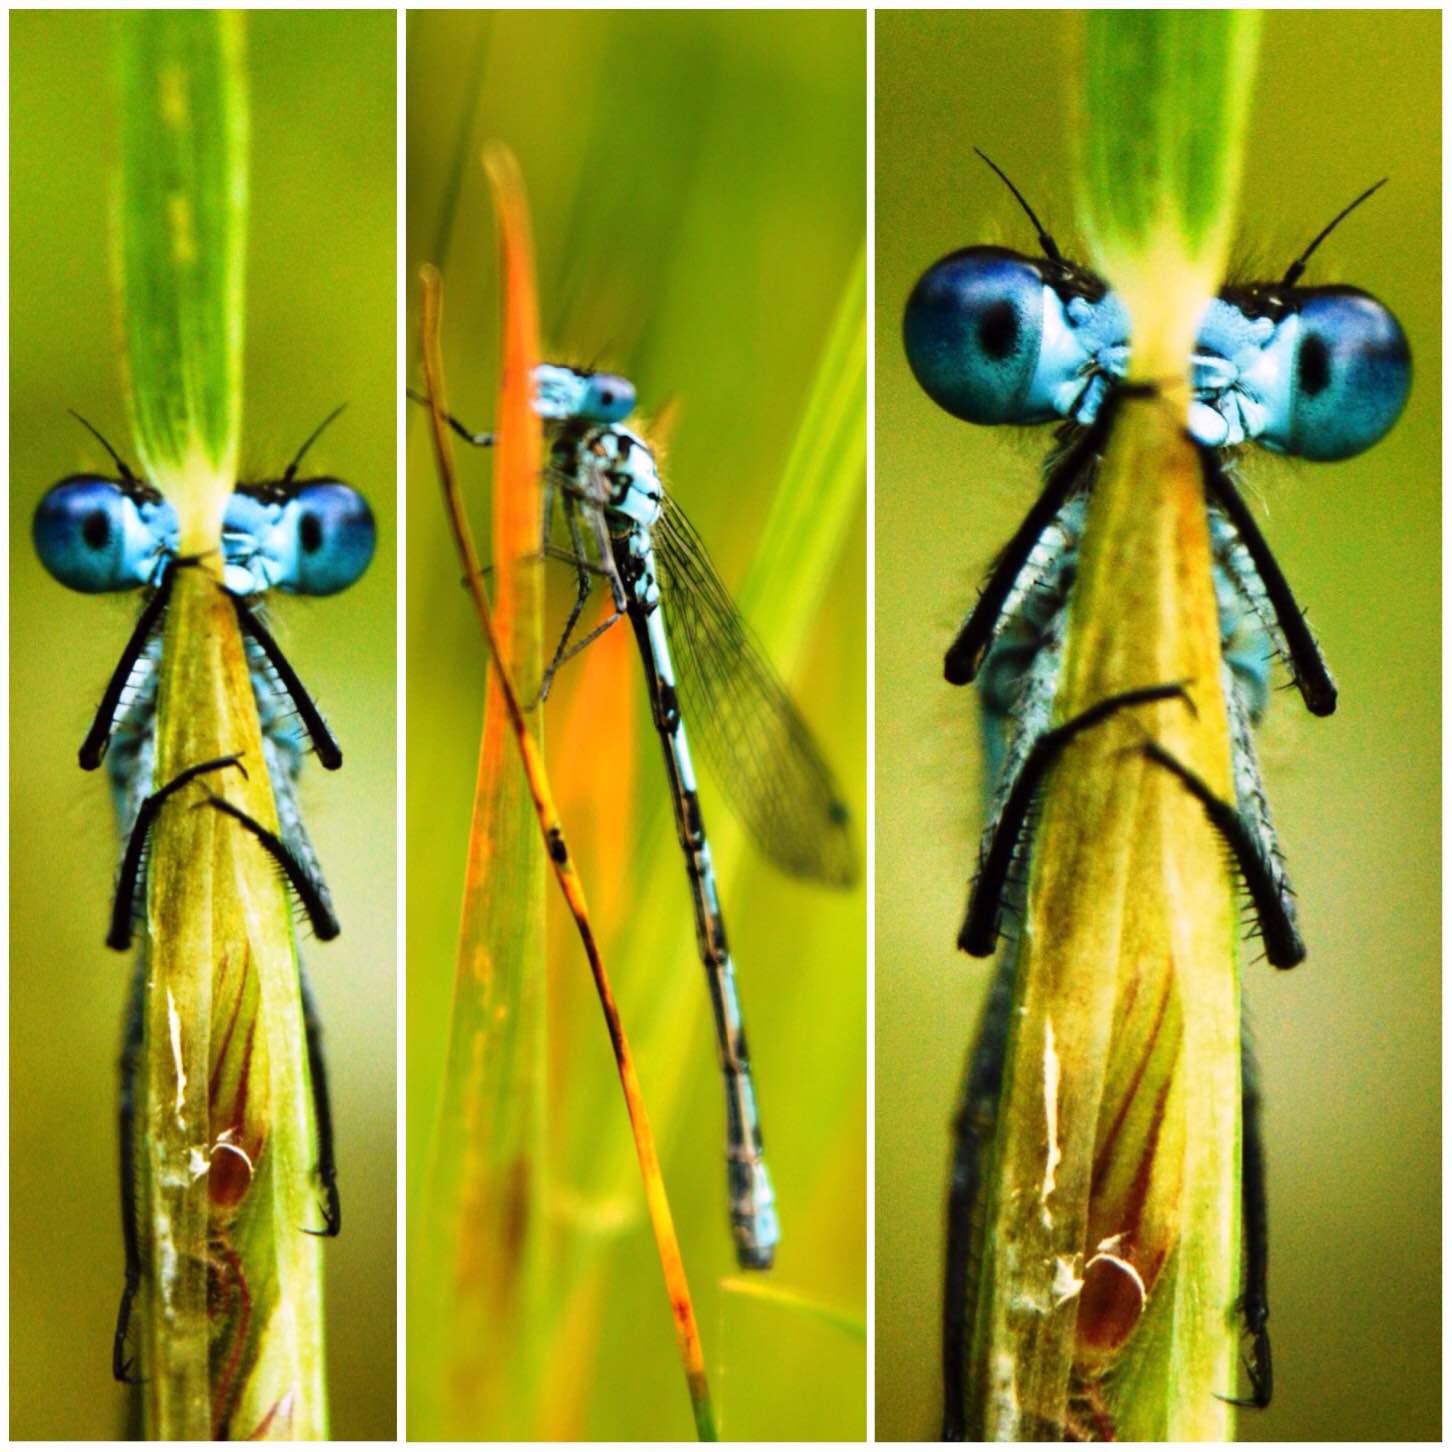
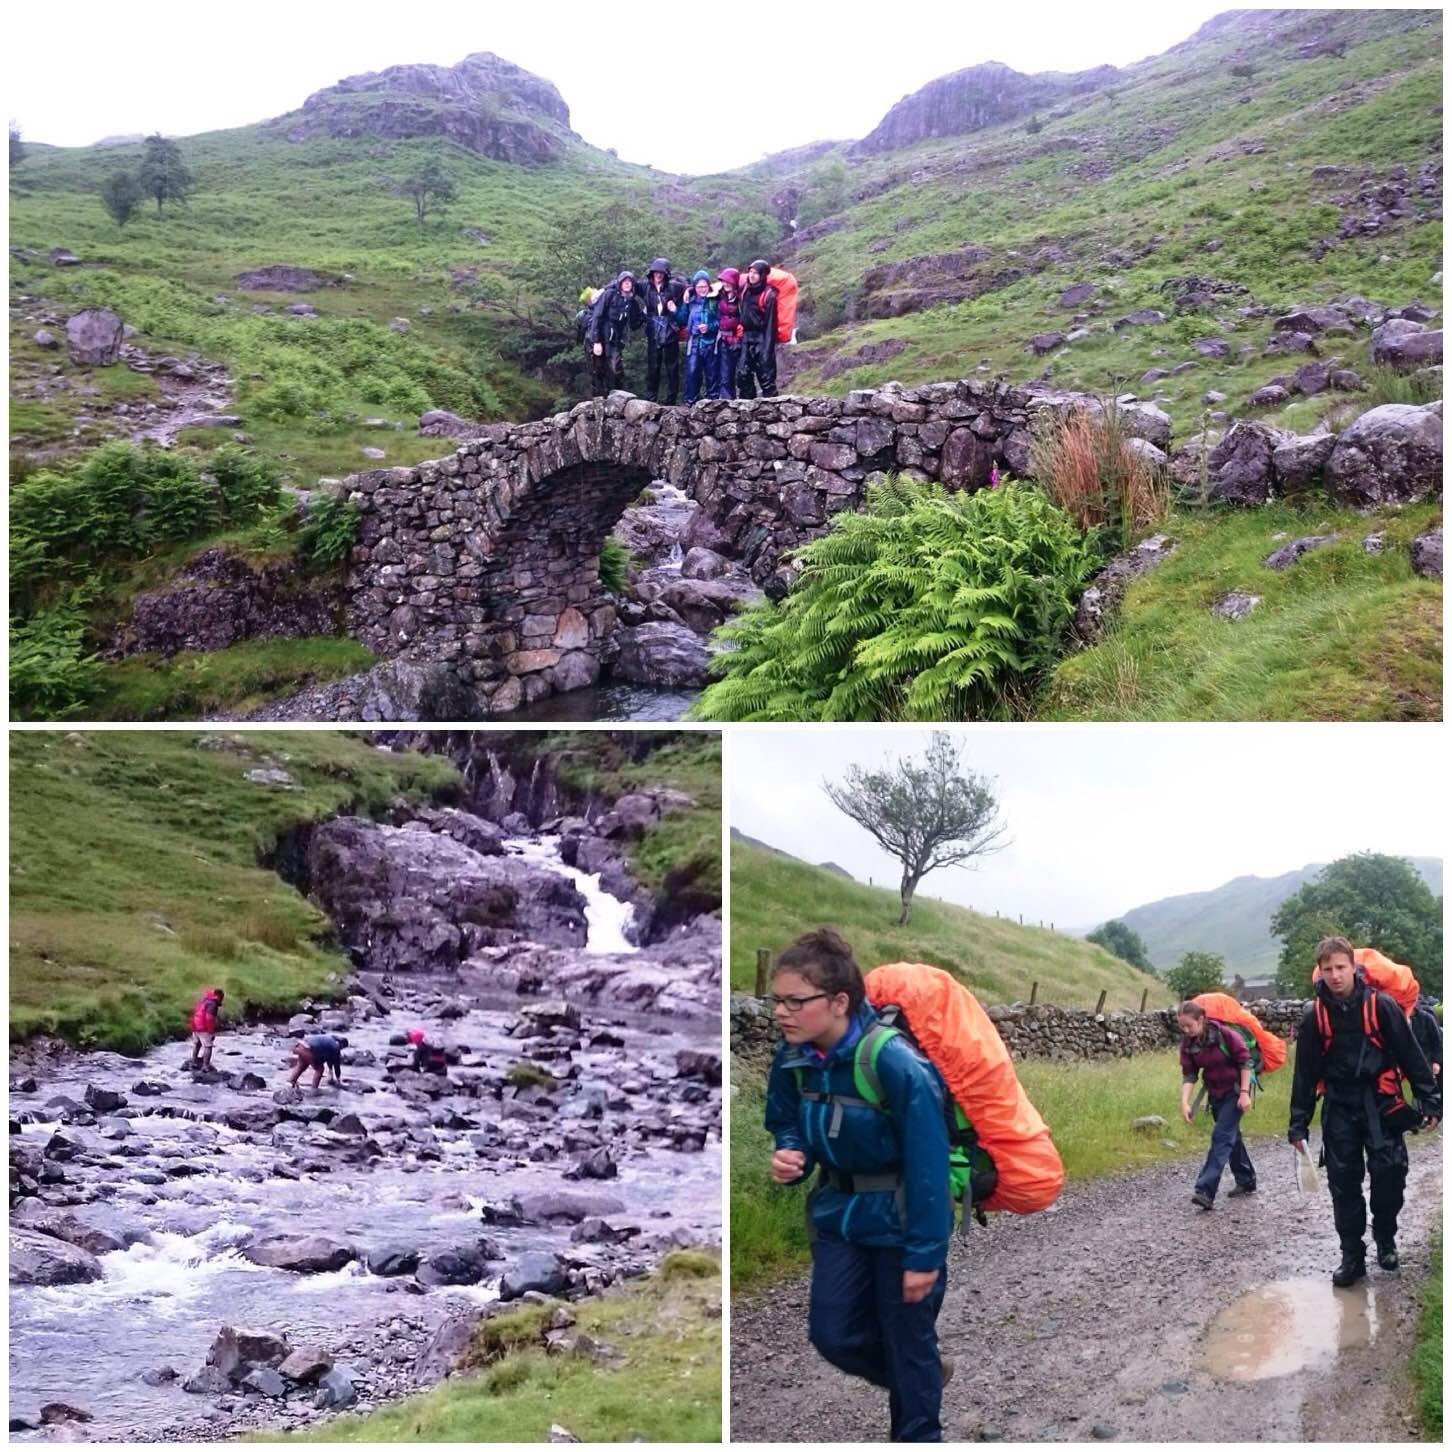
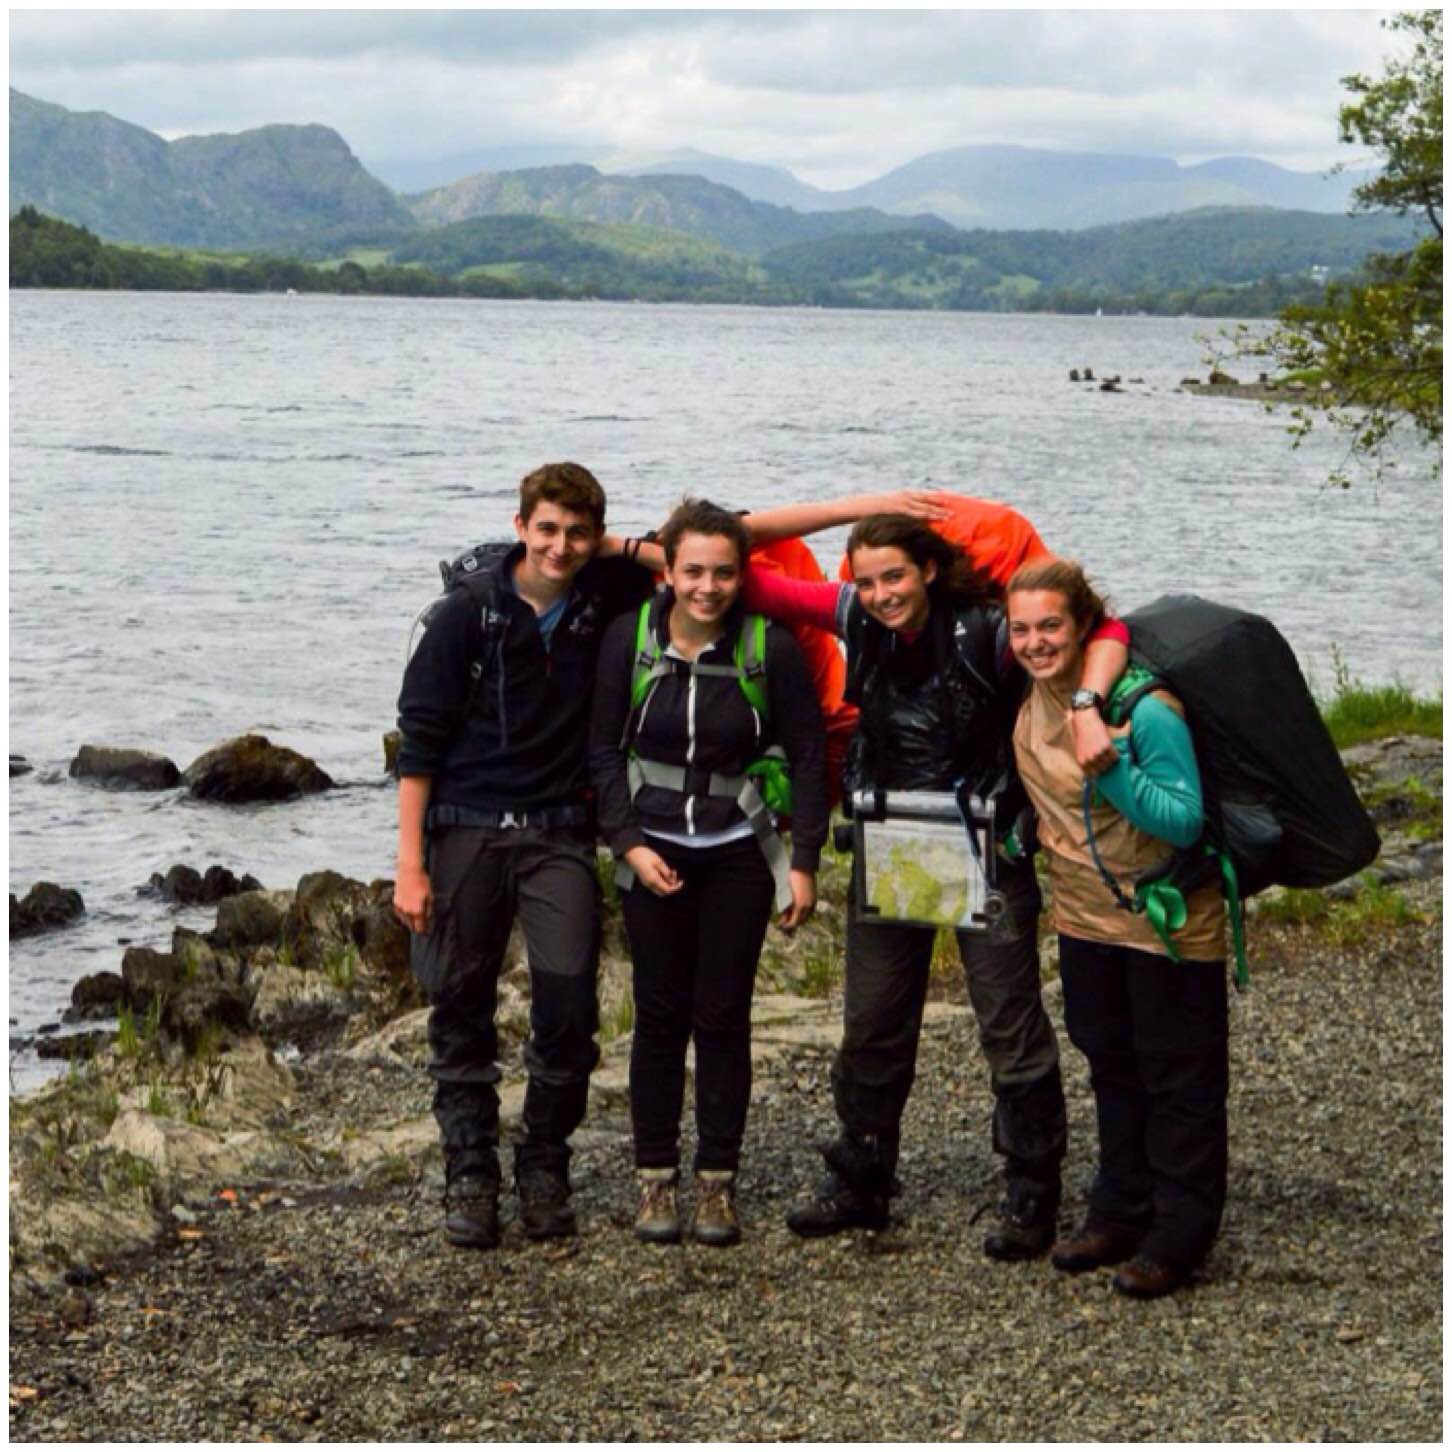
This has to be my favourite nature picture of the year. It was taken by the banks of Coniston Water in the Lake District while assessing a Gold DofE Expedition.
I was waiting for the teams to appear at a check point when I started stalking Damselflies – probably looked a bit of an idiot ;-). I used my extension rings to get a bit closer and this little chap was not fazed by me at all (unlike most of the others who soon flew off).
Got My Eye on You
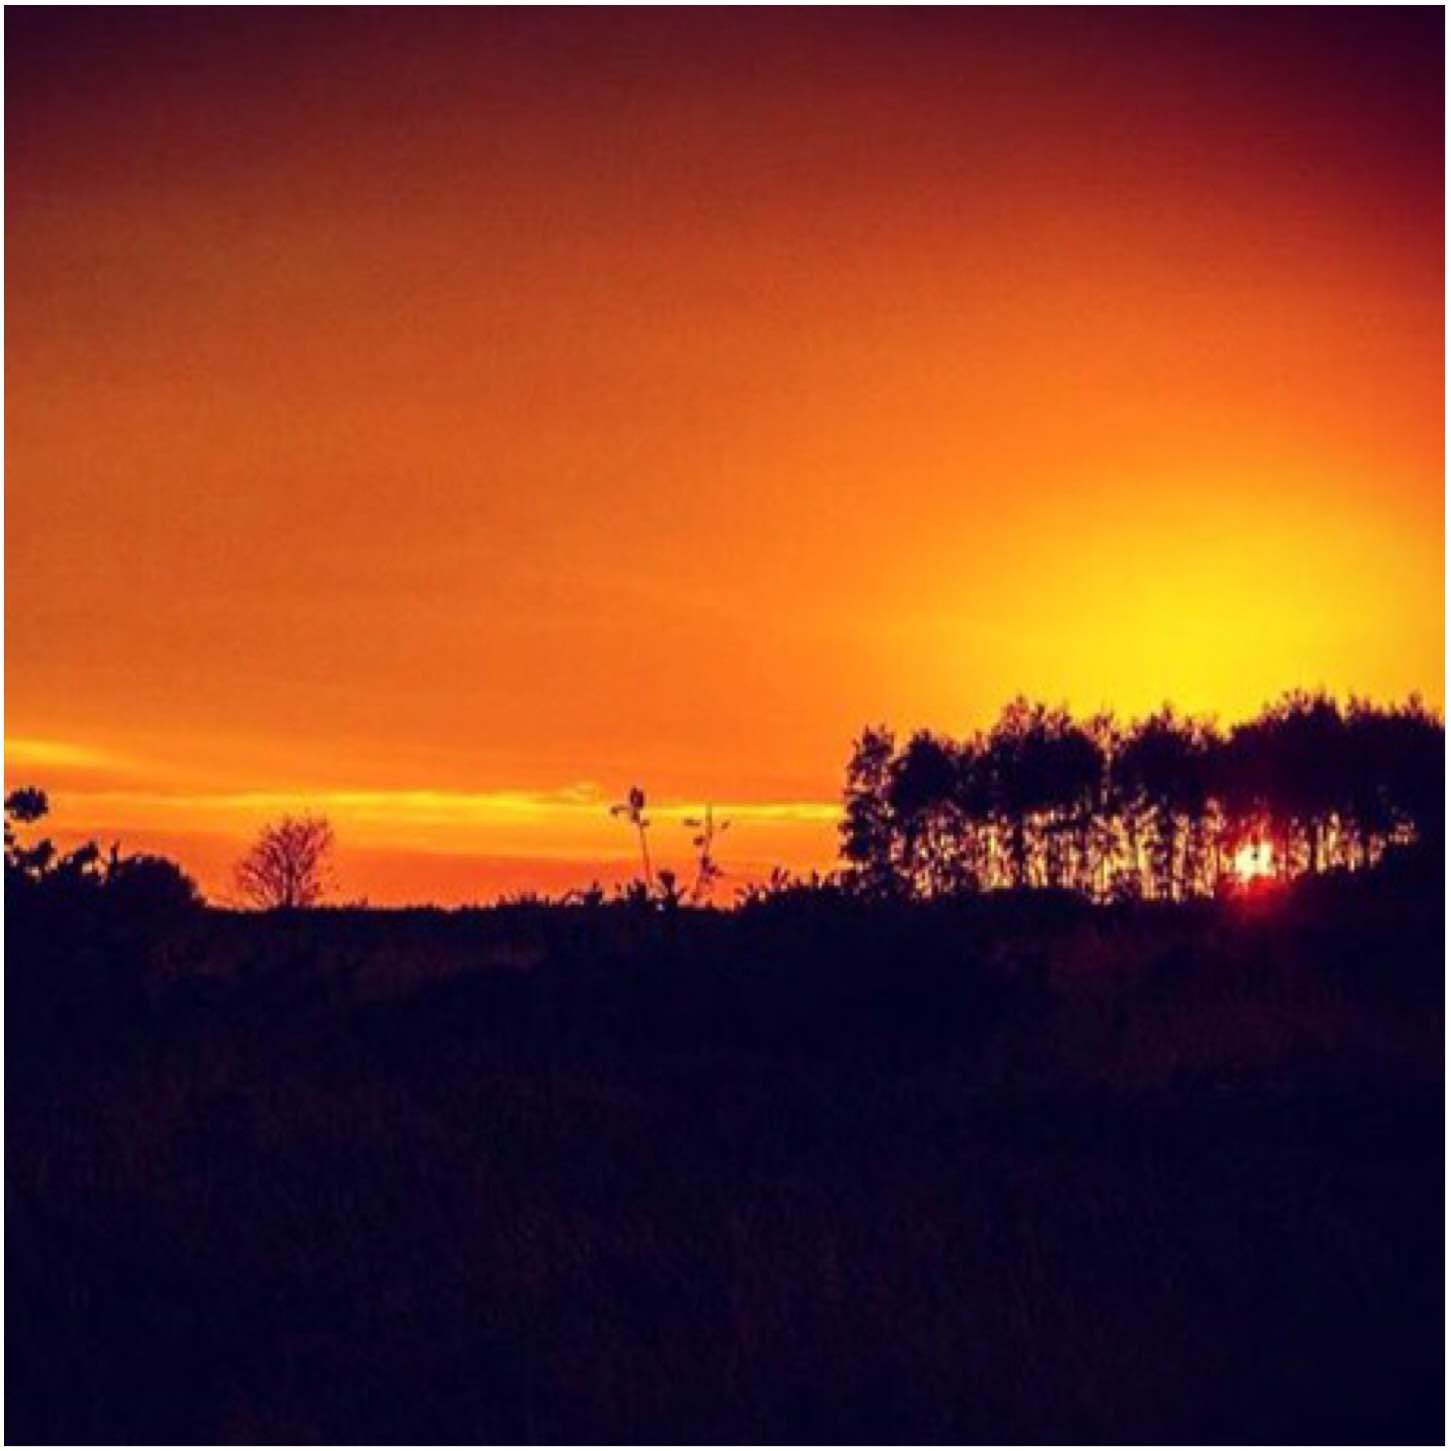
Thats it for my nature memories so I will finish up with this rather nice sunset taken off Kings Standing in the Ashdown Forest. I have really enjoyed capturing nature images over the year and will no doubt be out and about looking for more beautiful and unusual images next year.
Farewell Sunset
My last post in this series will be on the Memorable Moments I have had in the last year in the world of Bushcraft.
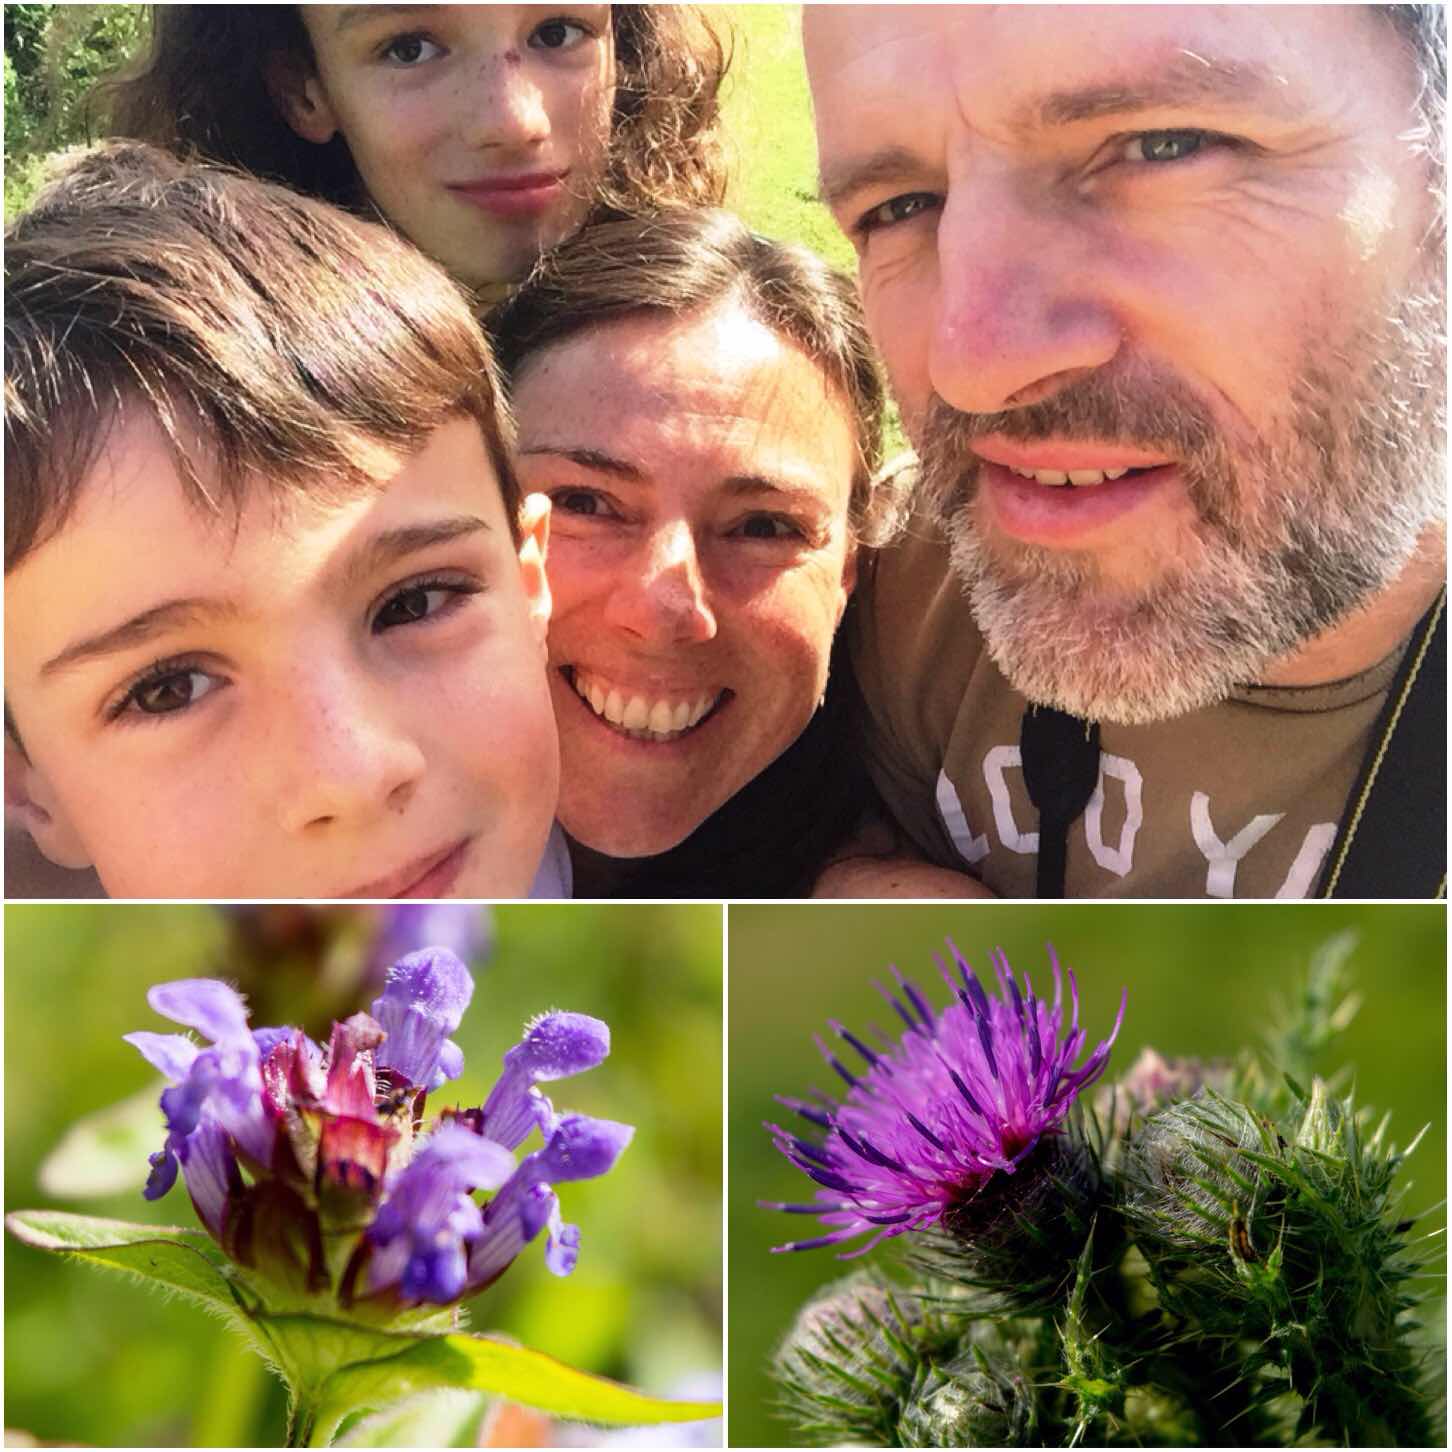
Carrying on with the Memorable Moments theme I thought a post on my favourite family pictures of the year was due. Each of the 12 pictures I have chosen have some special memories for me.
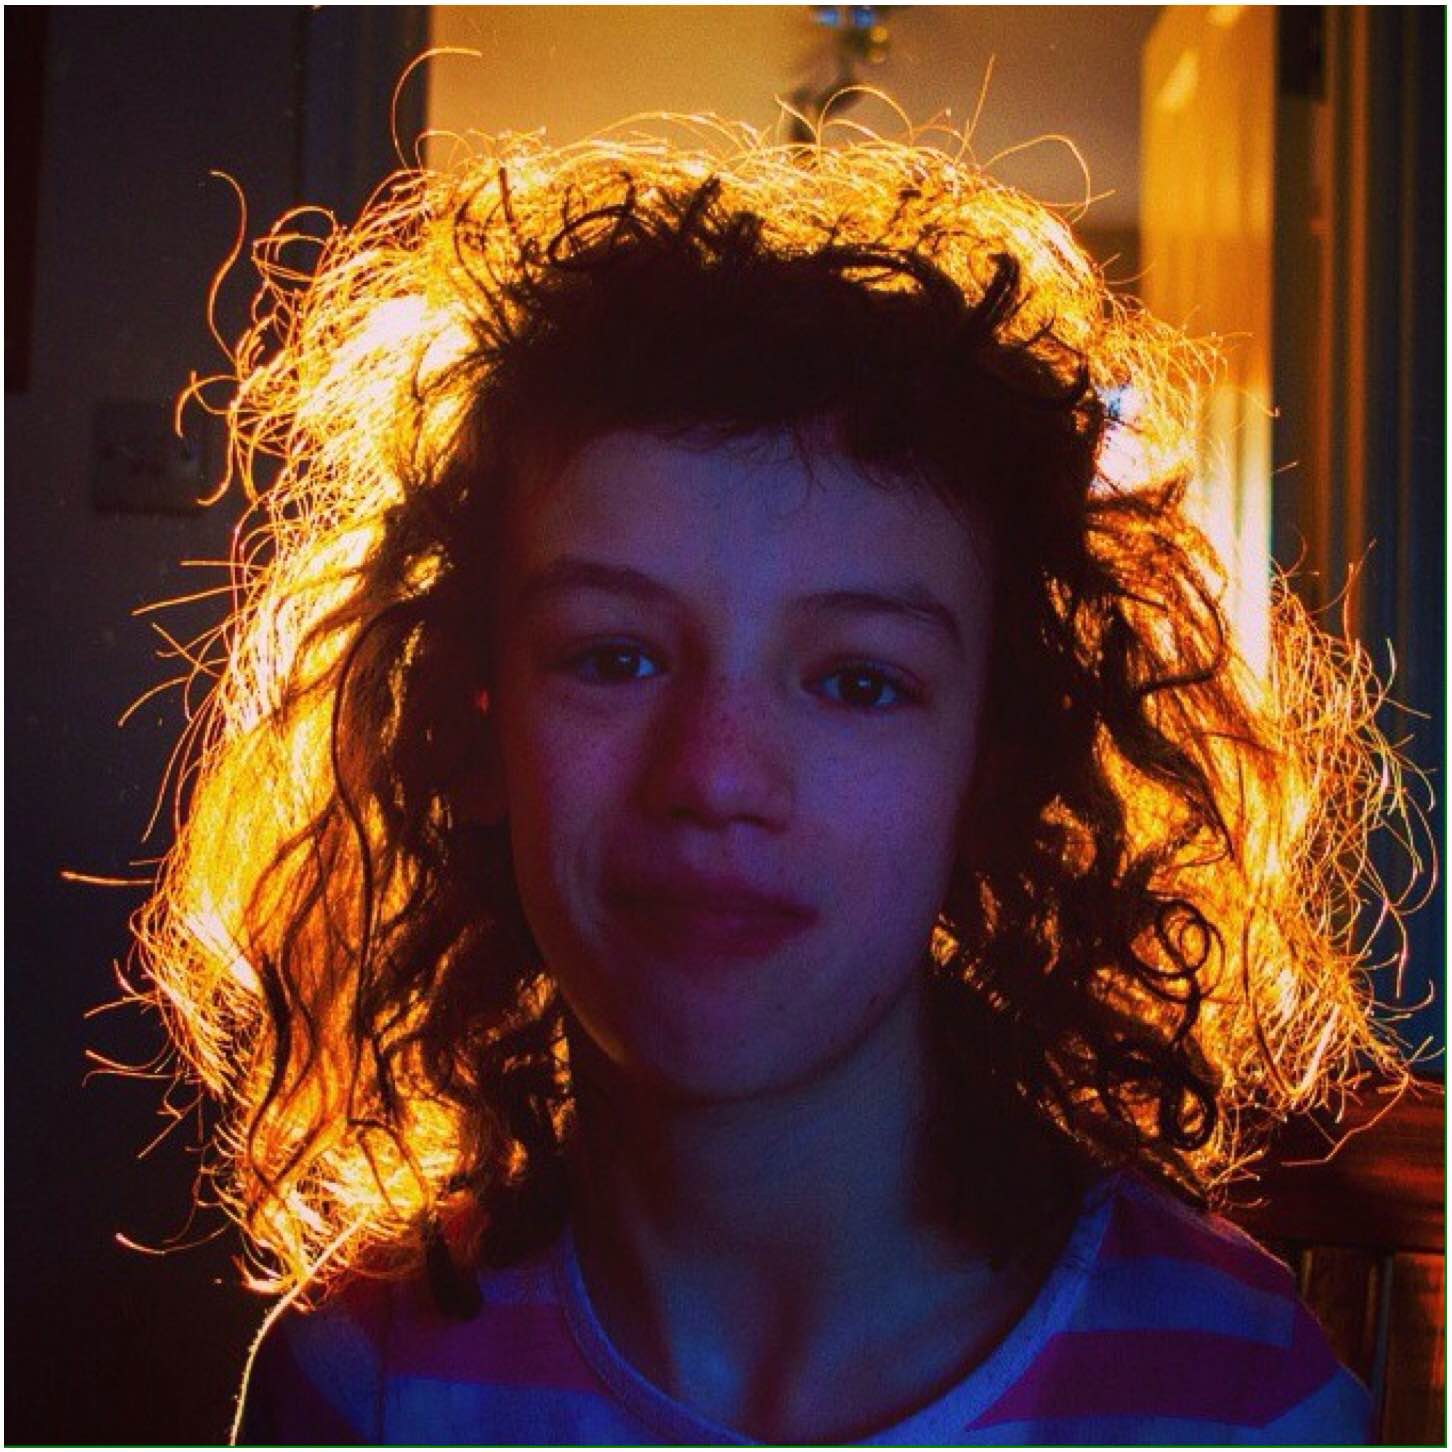
Starting off with my beautiful daughter Catherine who has the most amazingly curly hair. I captured this picture early in the year of her backlit by the morning sun. The moment caught individual strands of hair framing her perfectly.
Mad Catherine Hair
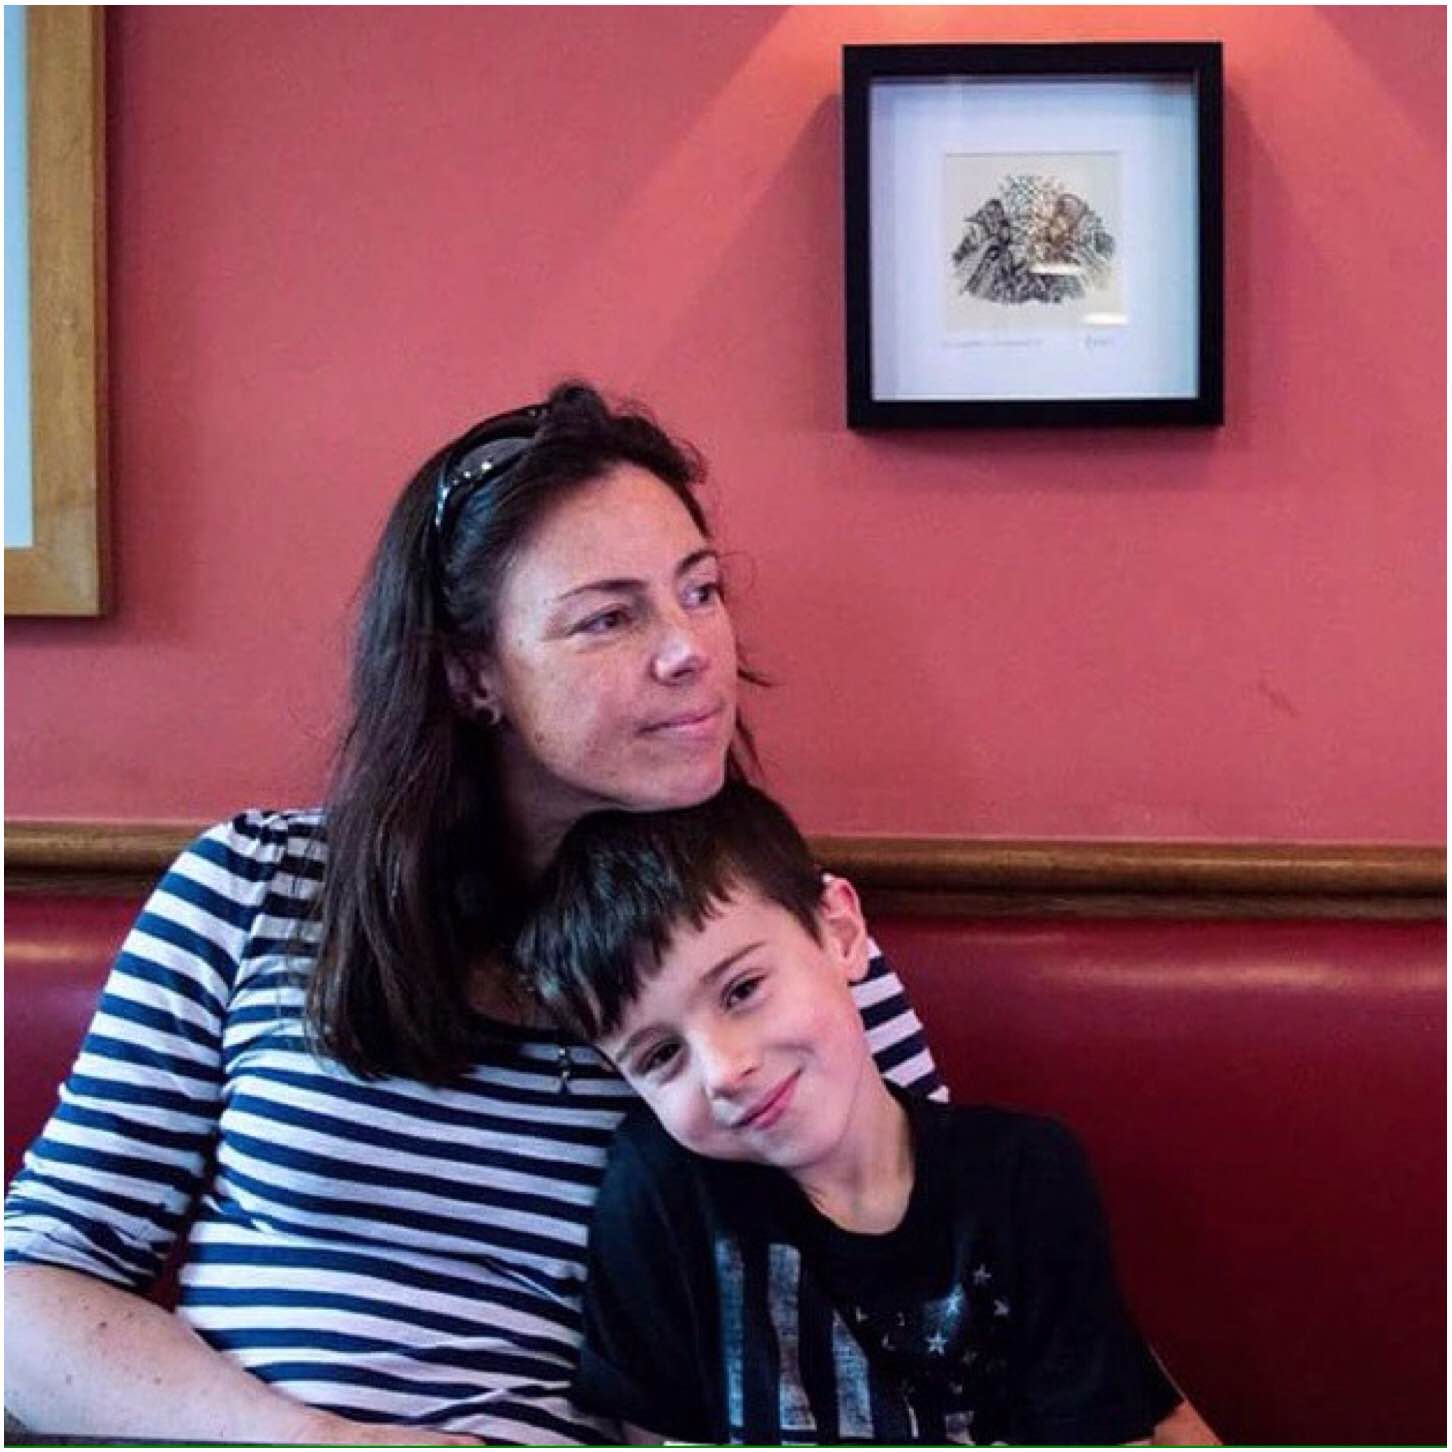
We had a lovely day trip to Winchester in the spring. While we were relaxing in one of these small cafe’s you find in the Medieval backstreets I caught Alison looking perfectly relaxed with a cheeky little Finlay snuggled up to her – quite a beautiful moment you could say.
I Love my Mother
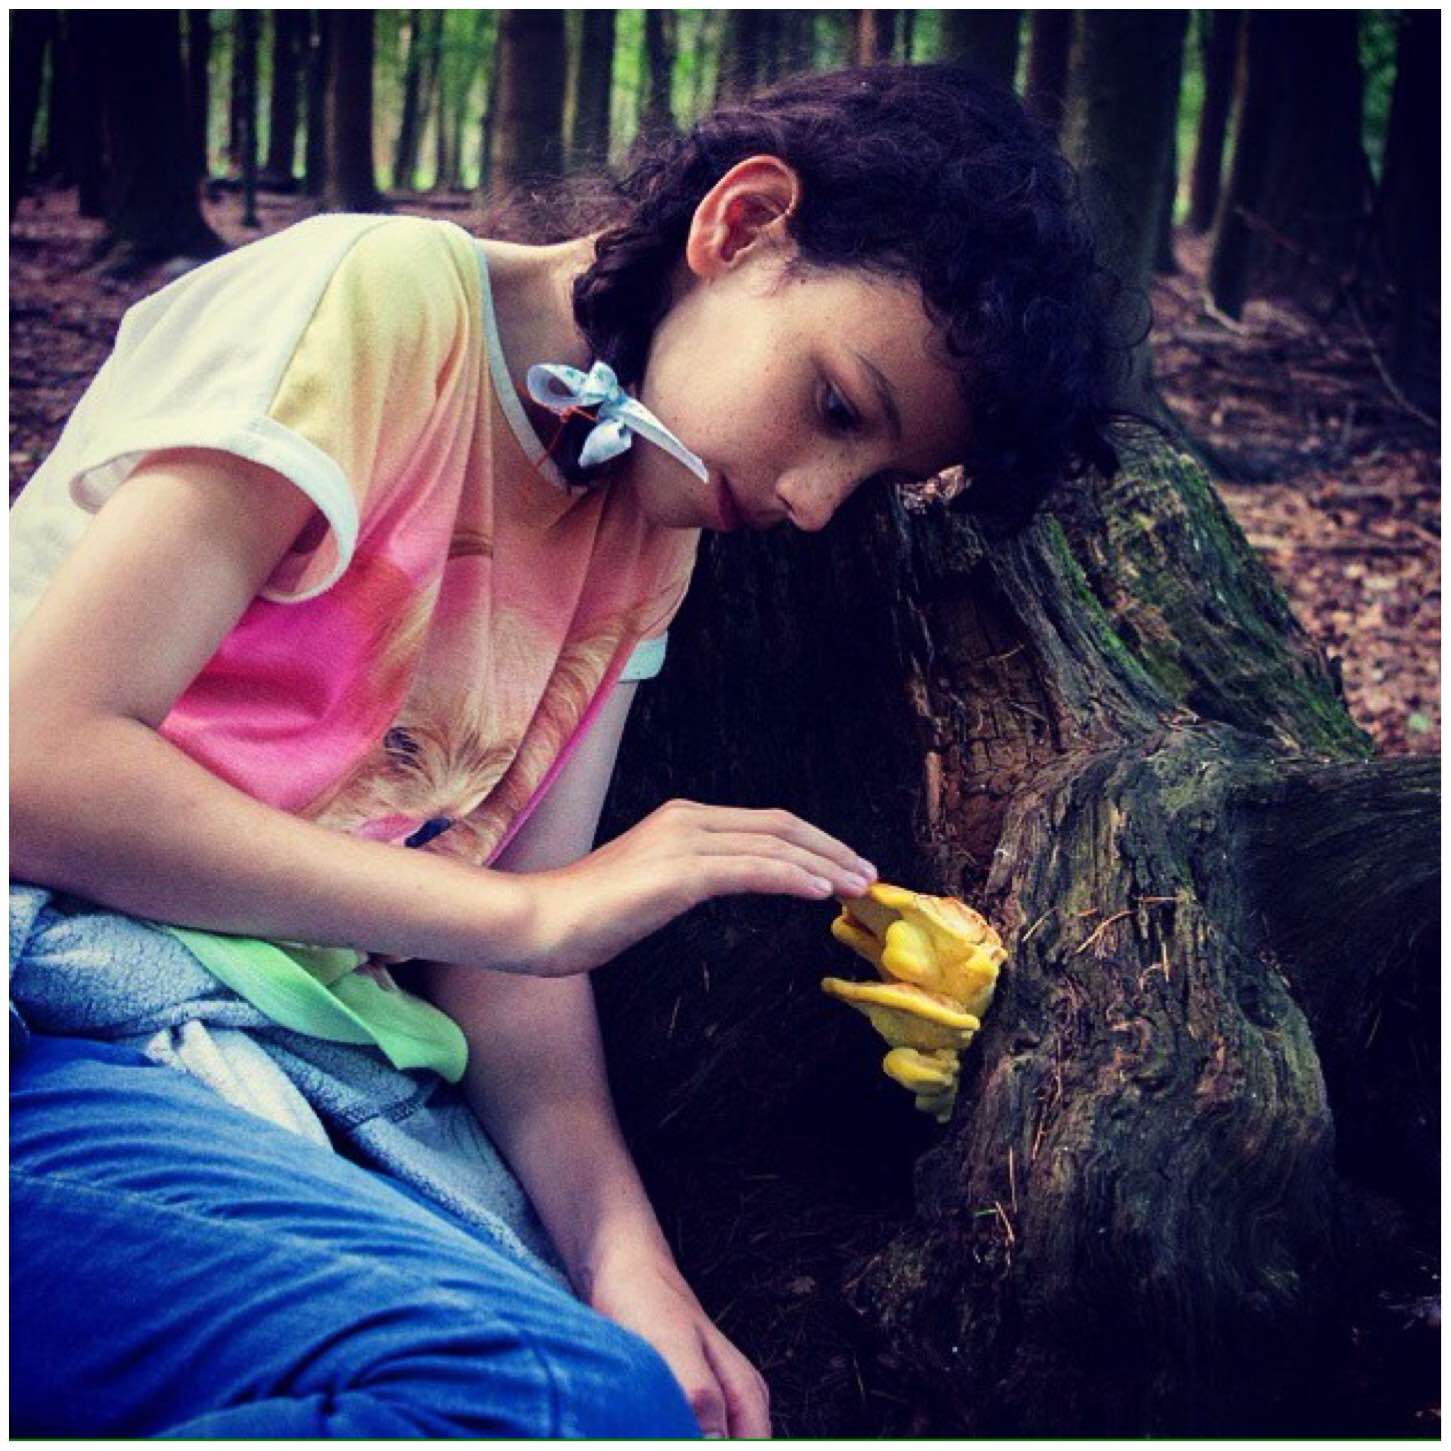
One of my favourite pastimes is to head out for a Bimble around our village of Bramley. I spend a lot of time photographing what I find. Catherine spotted some Chicken of the Woods fungus one day and was really taken with its colour.
The resulting picture taken in such a dark coniferous woodland I found both striking and beautiful.
Bramley Bimbles
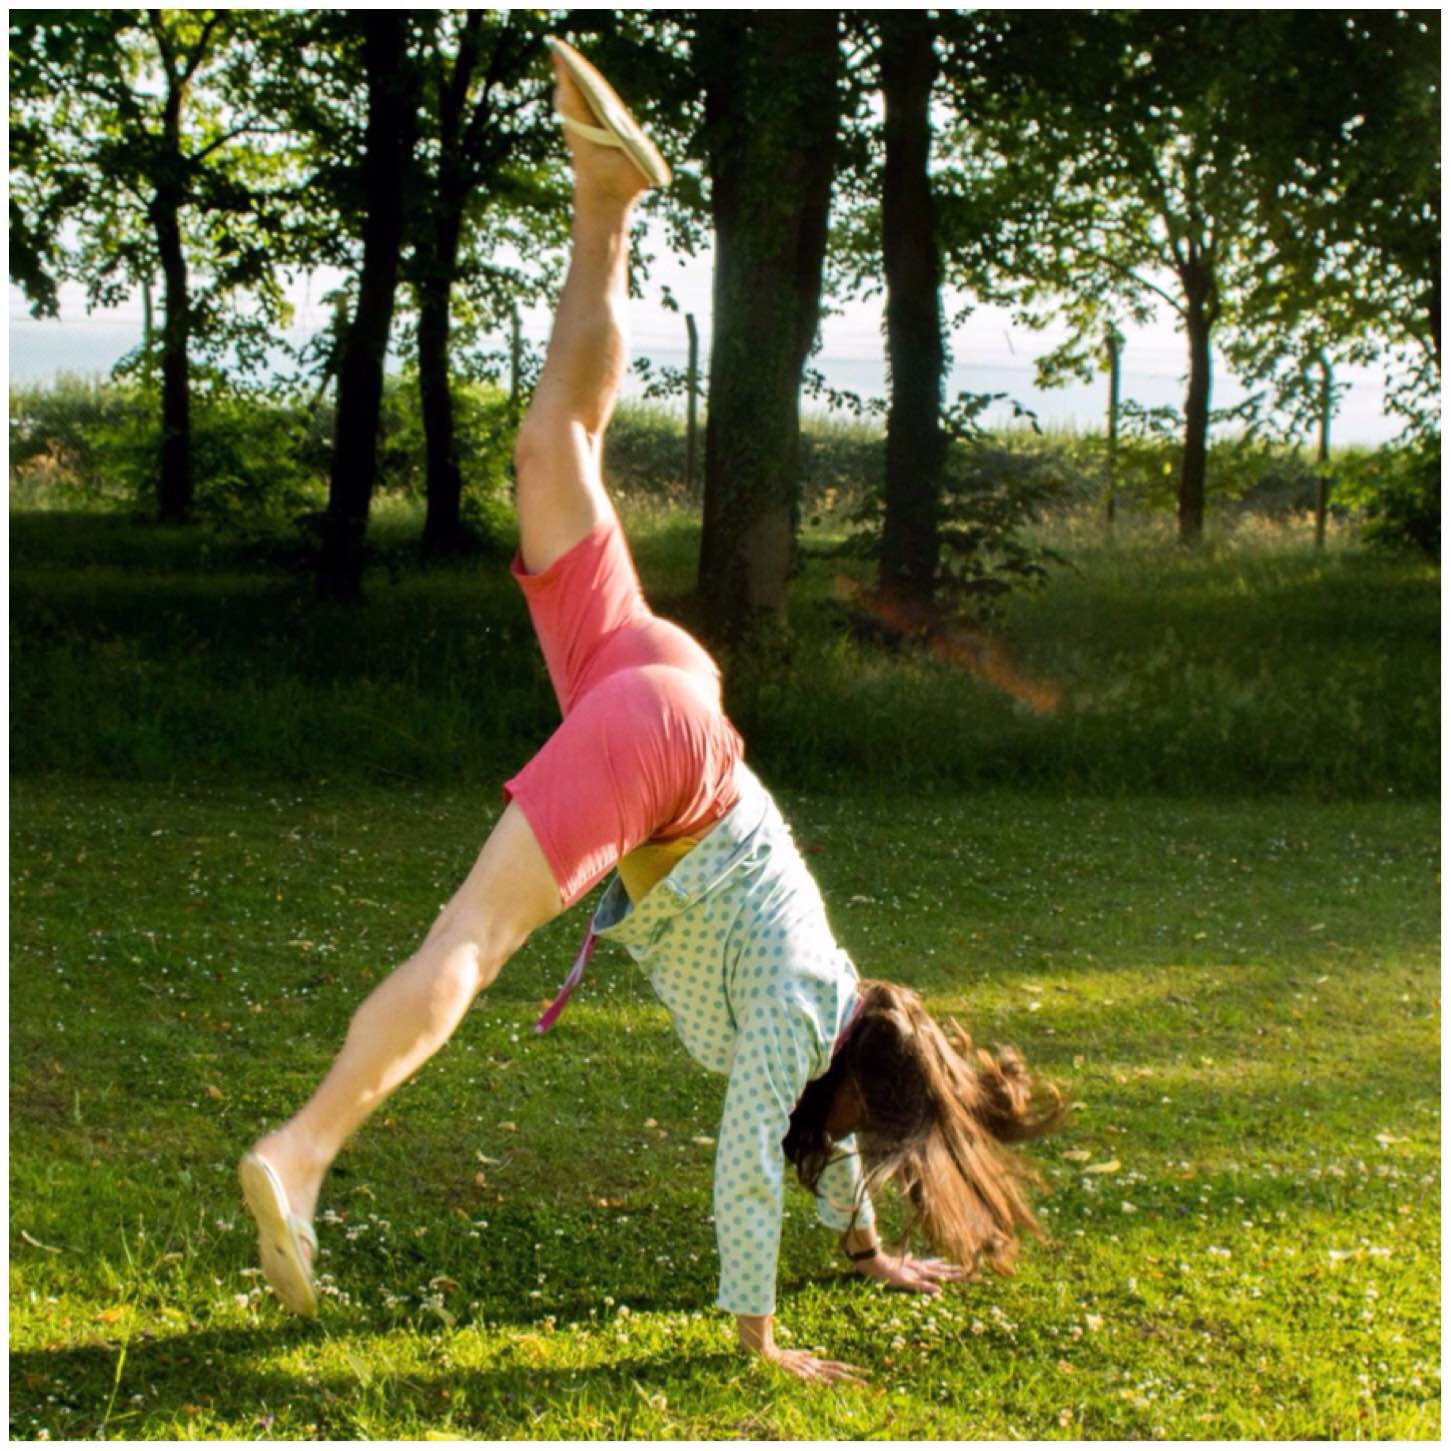
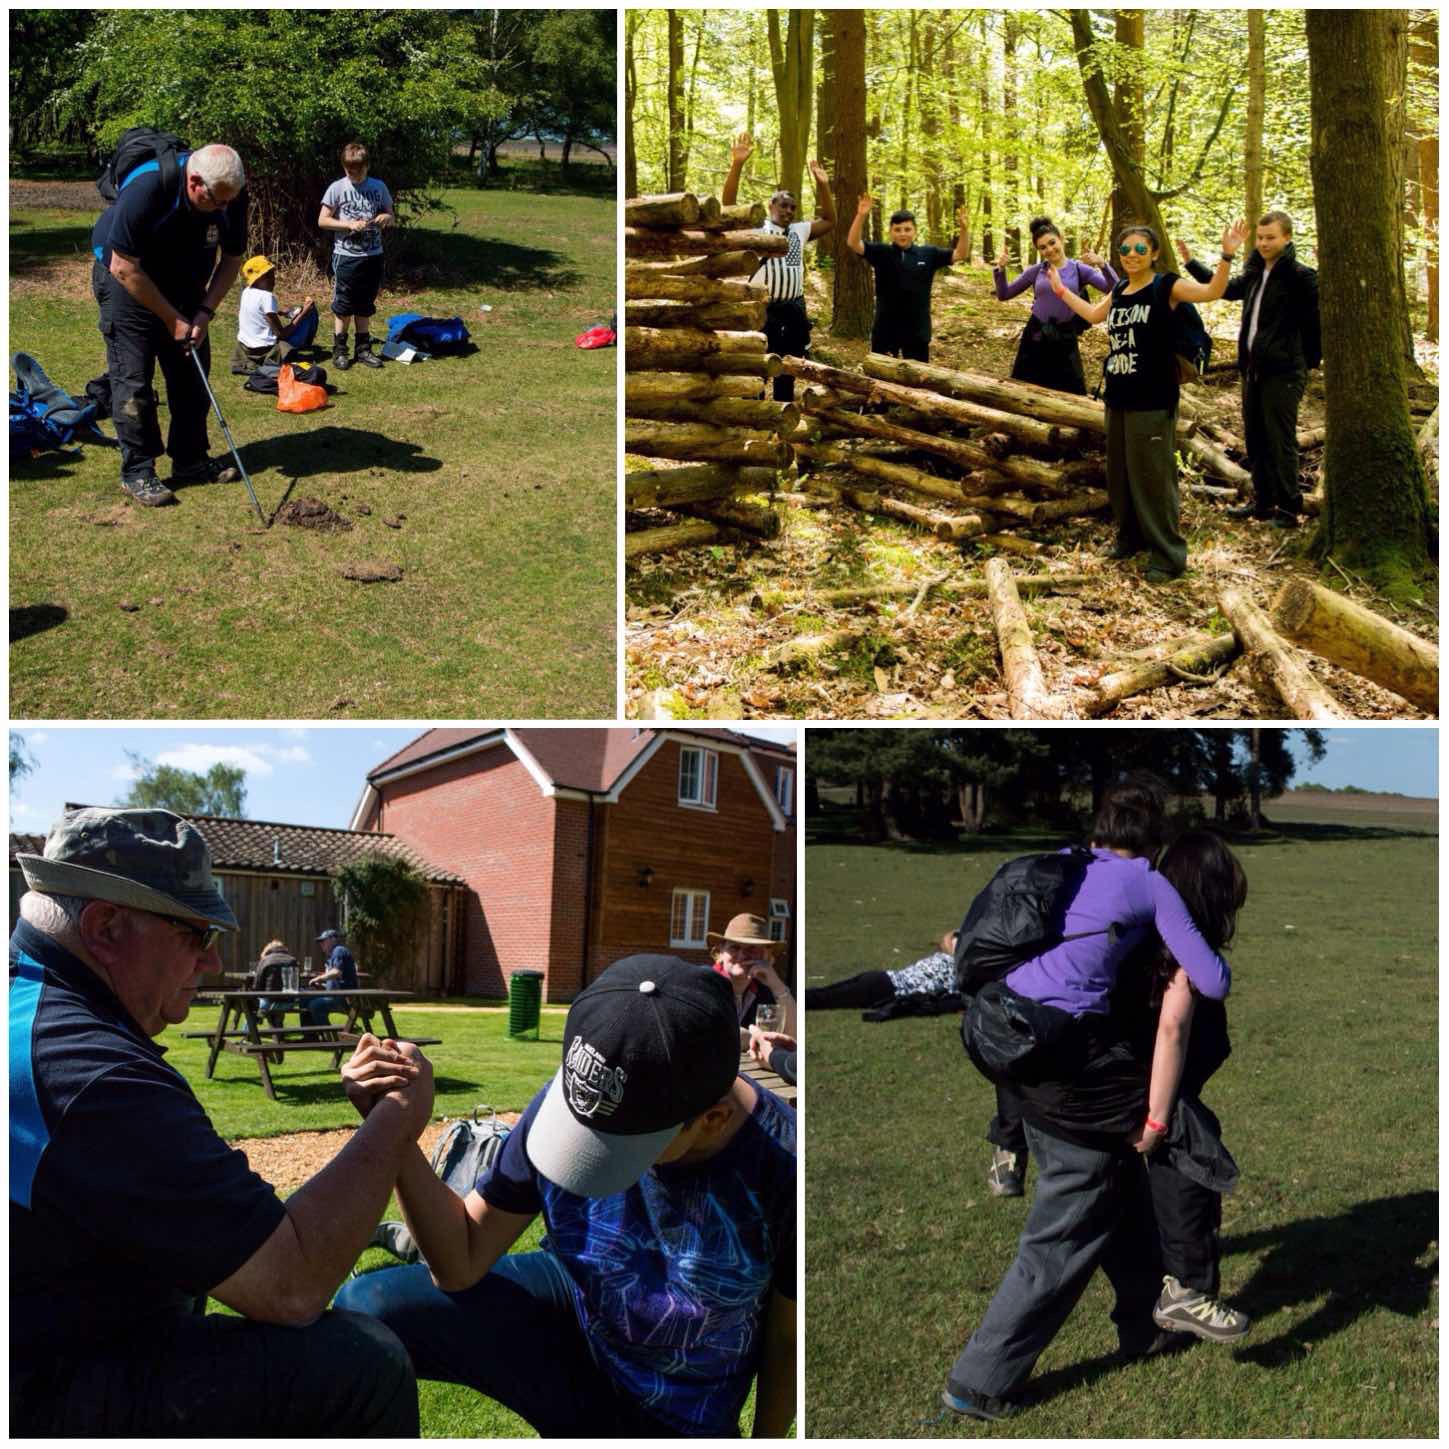
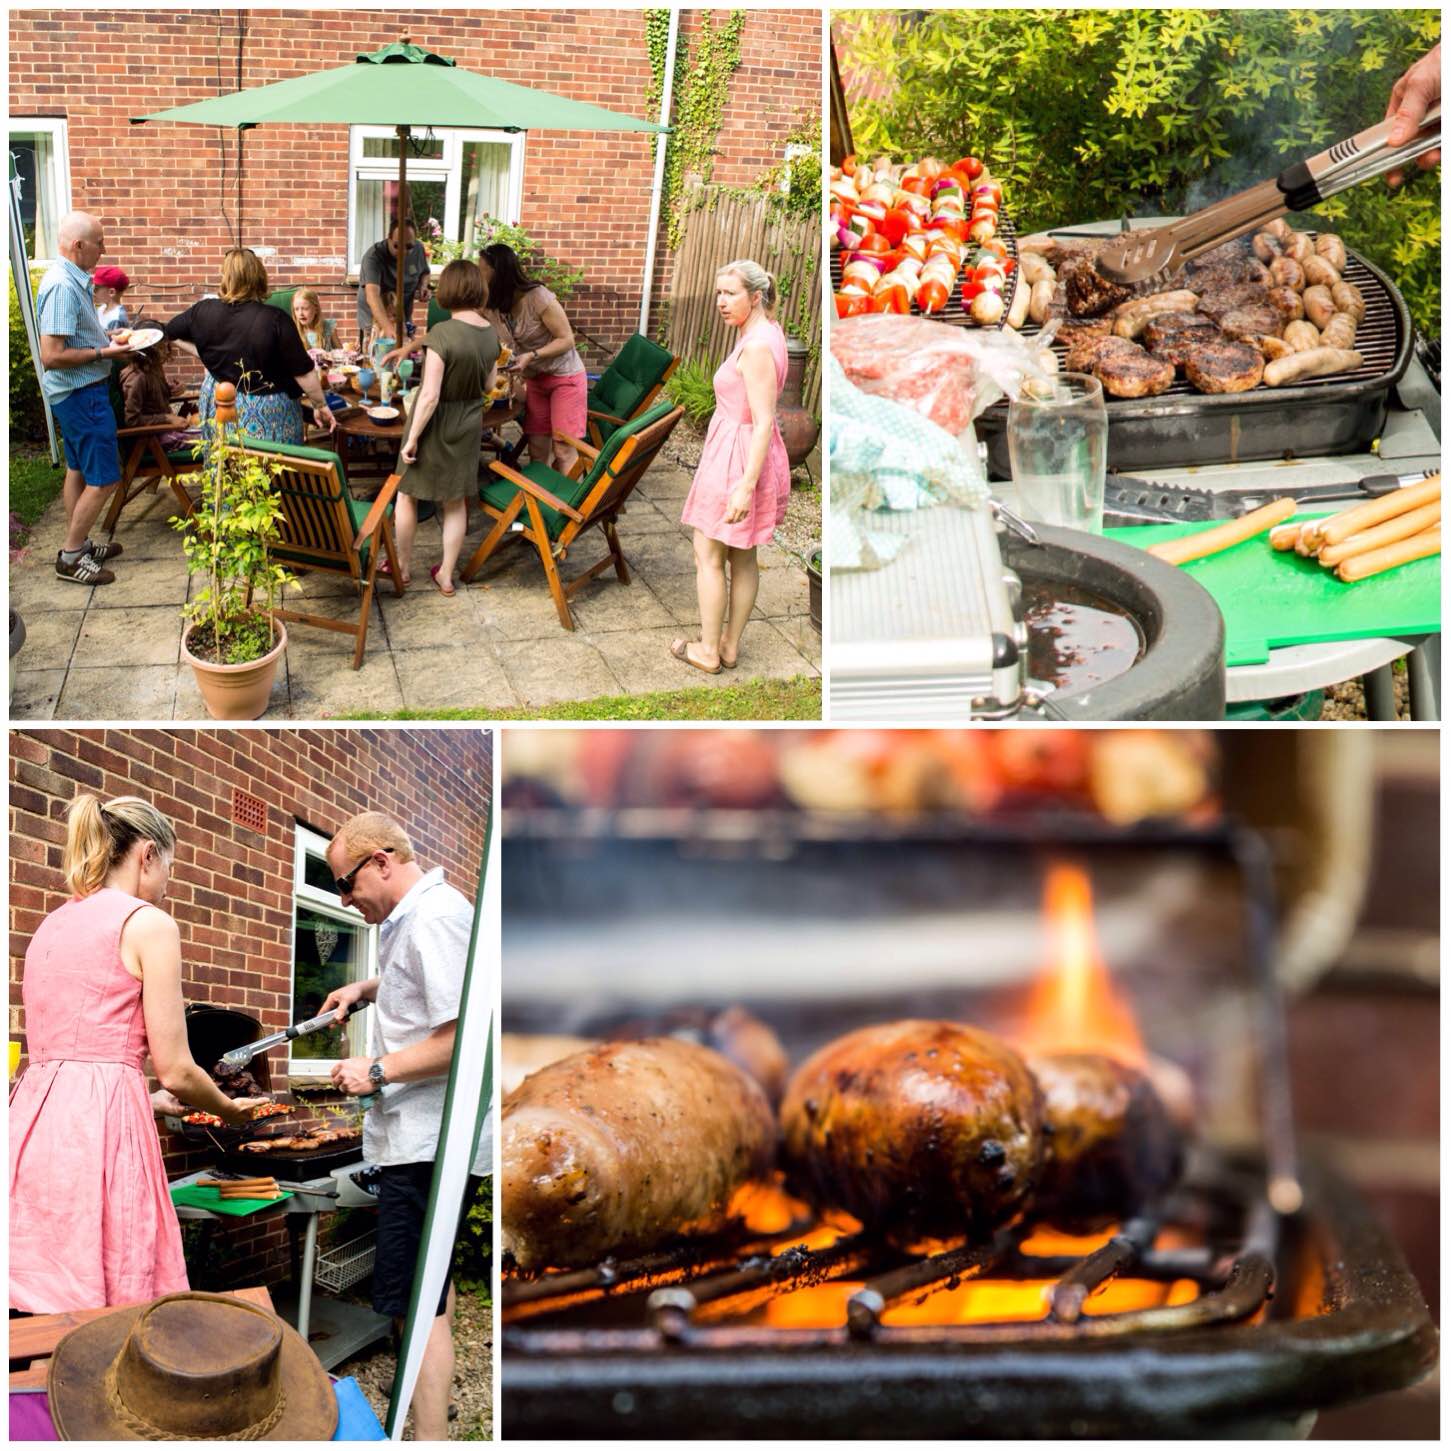
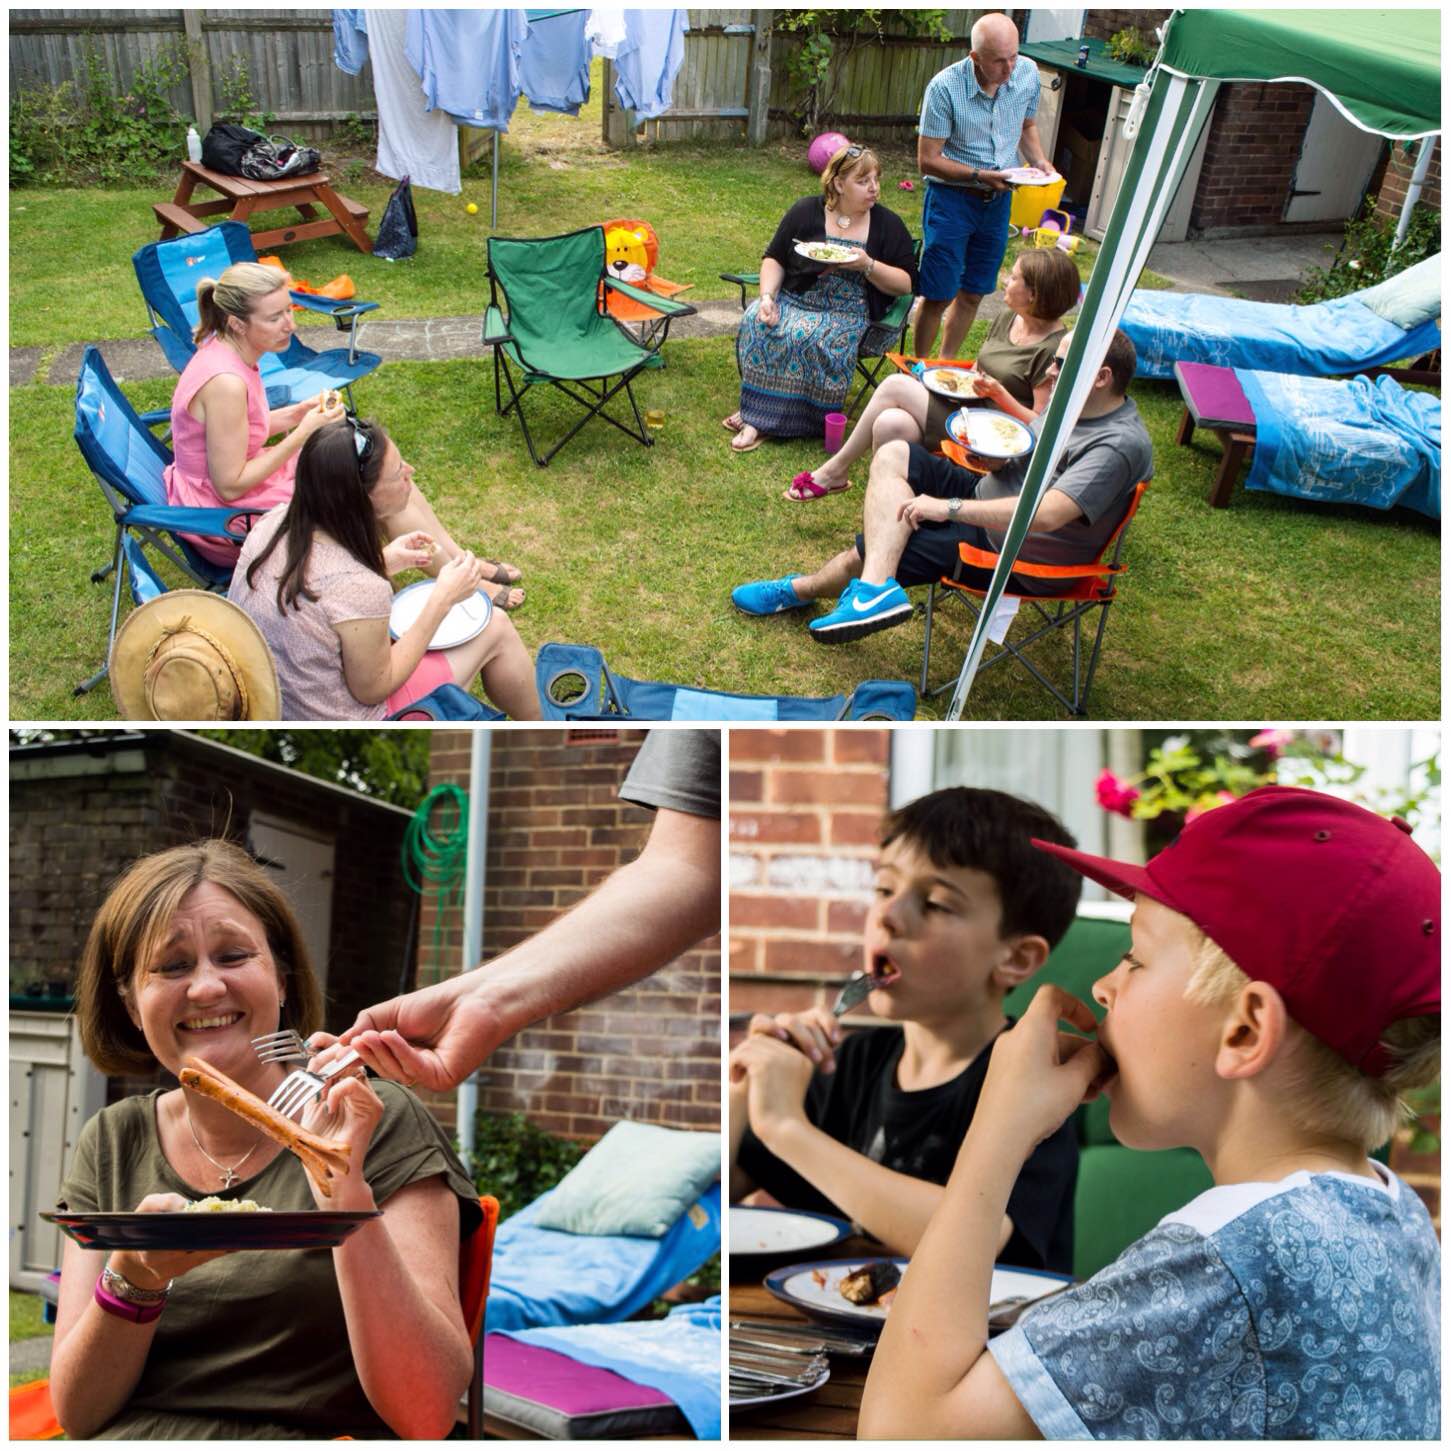
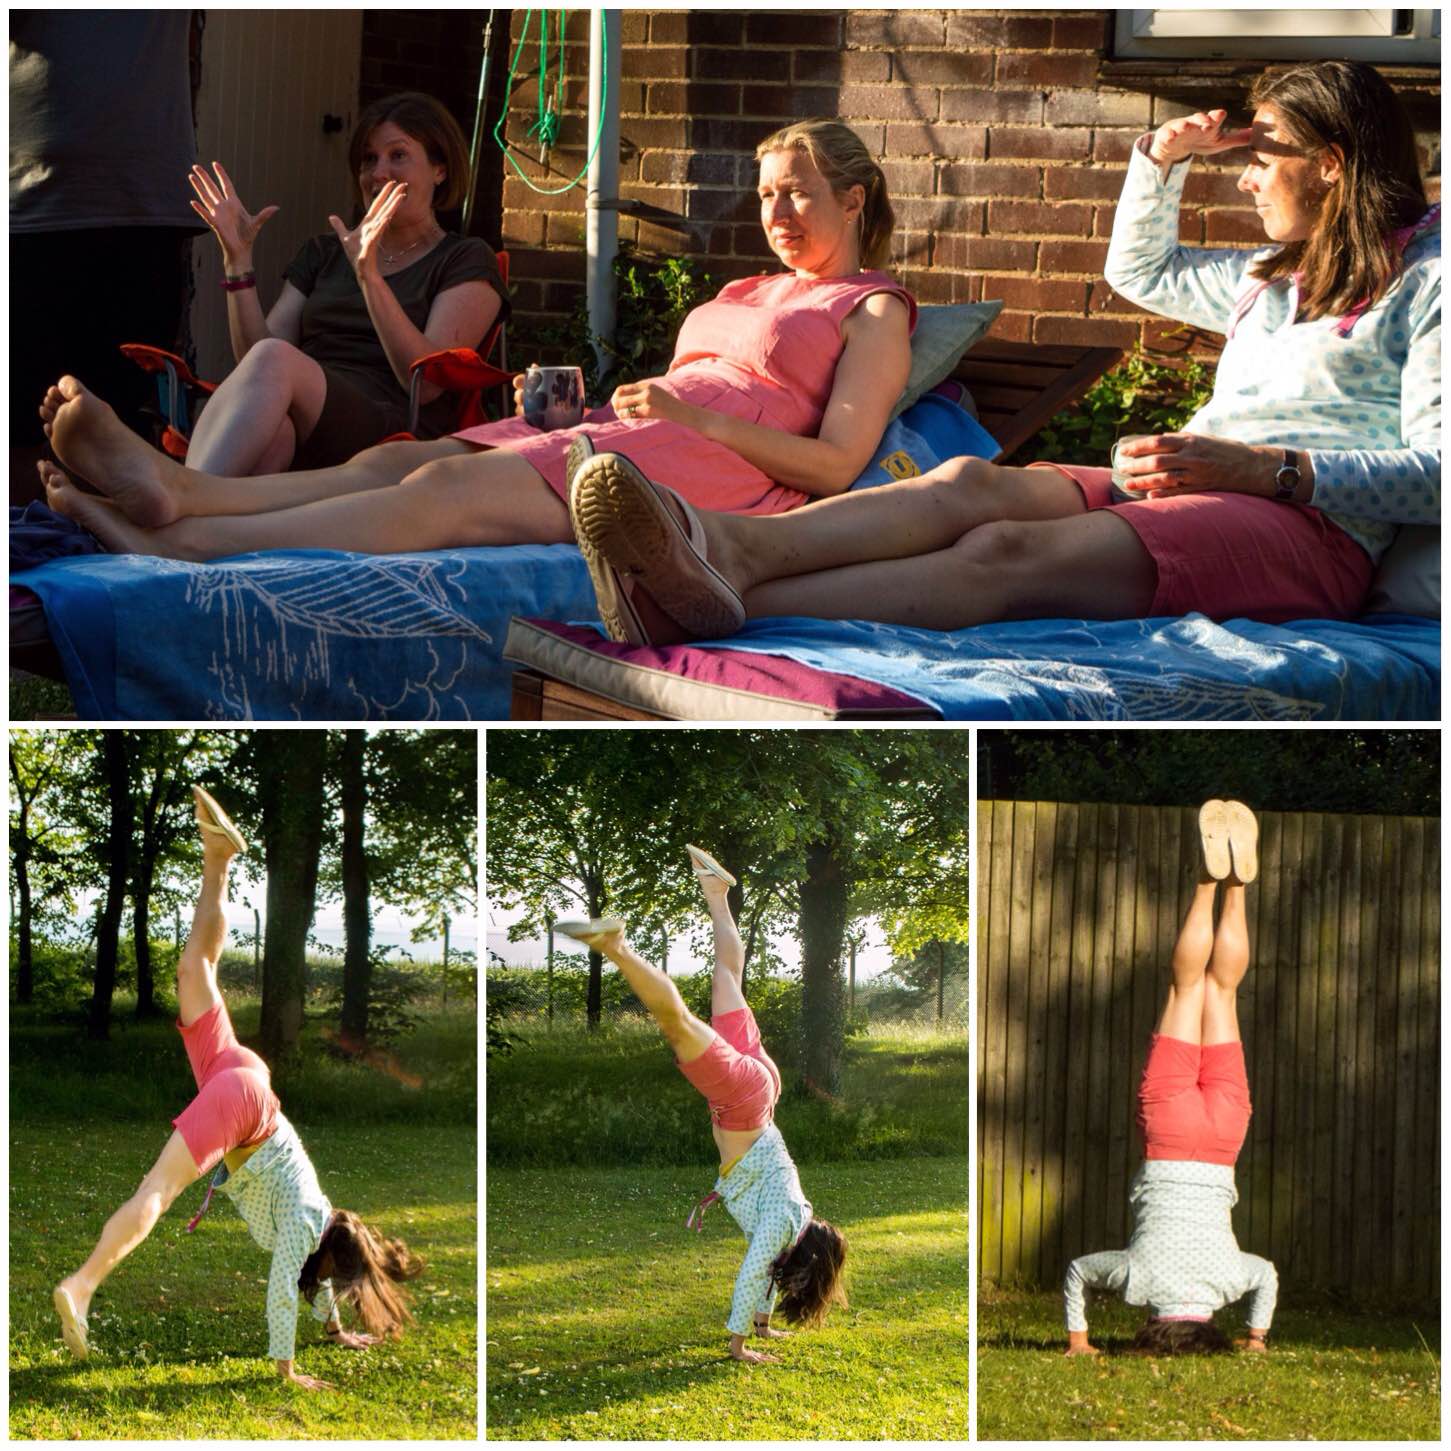
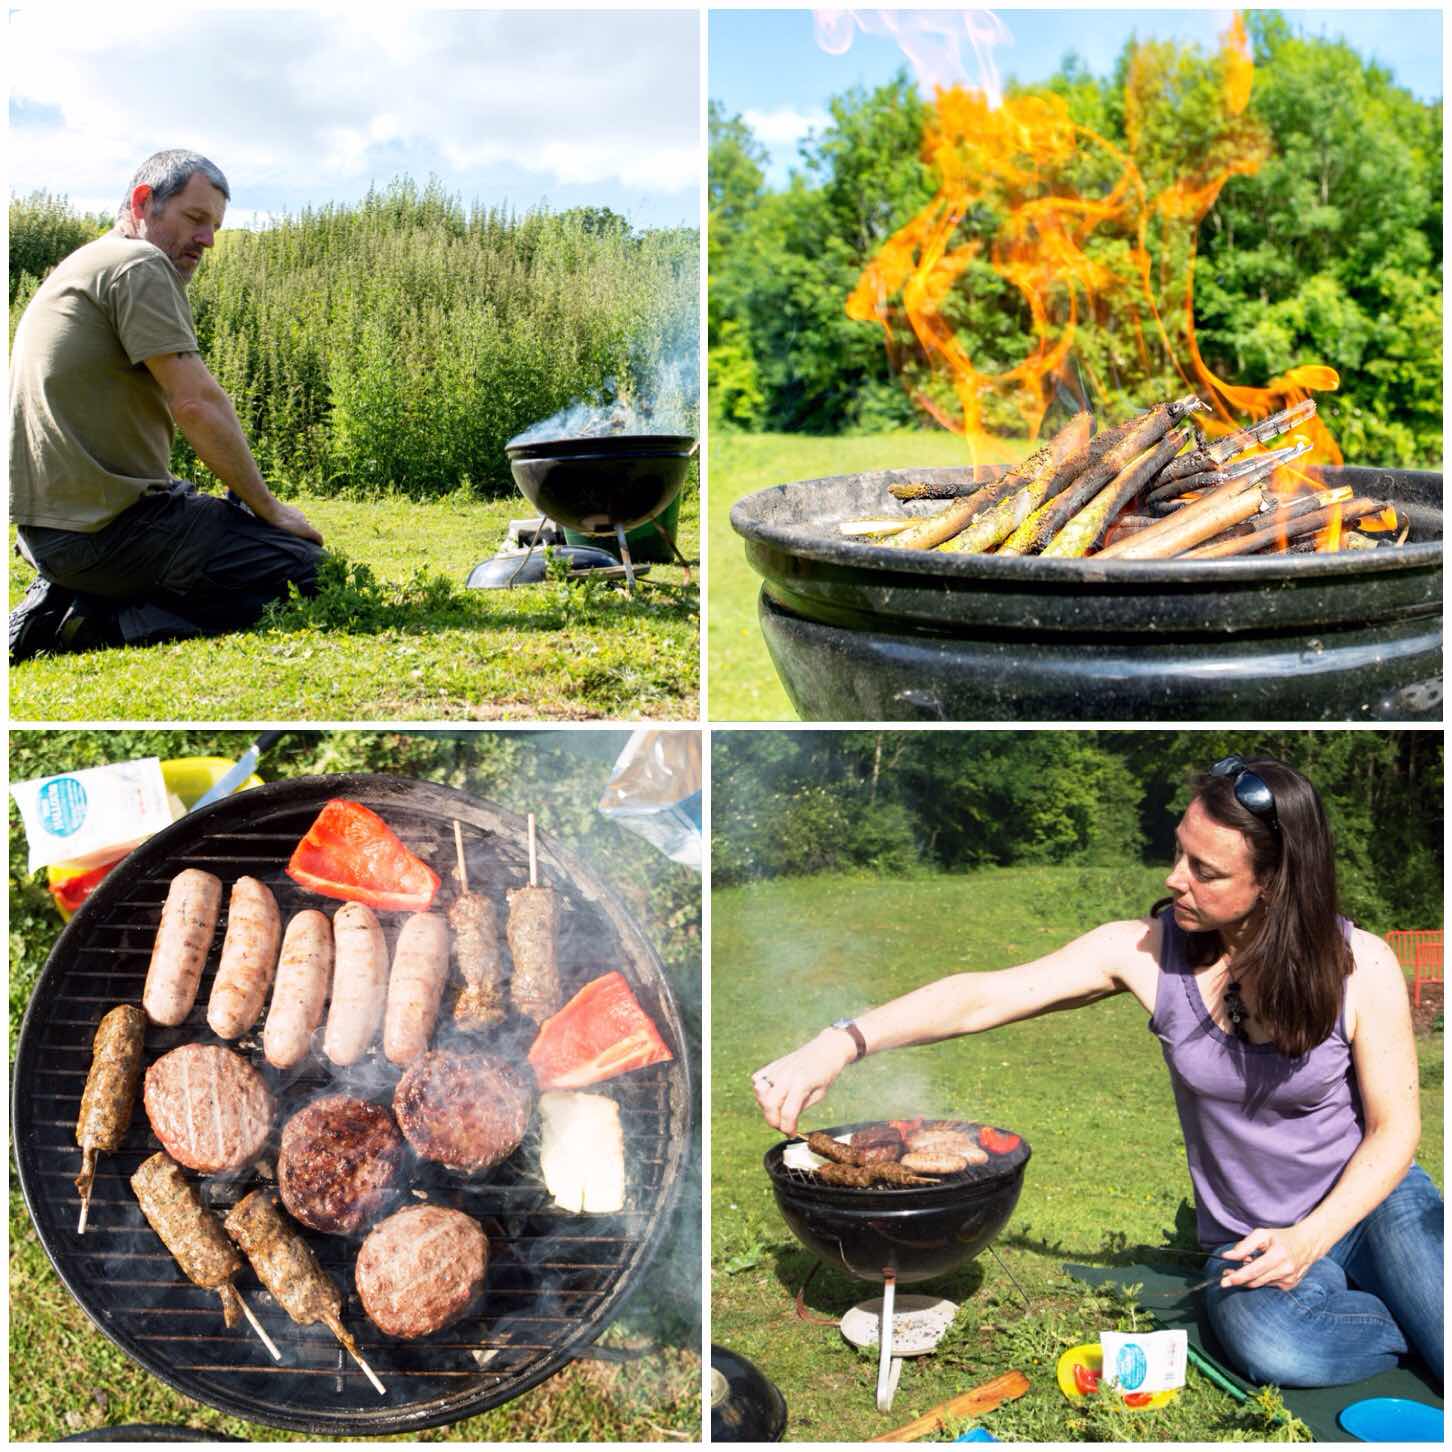
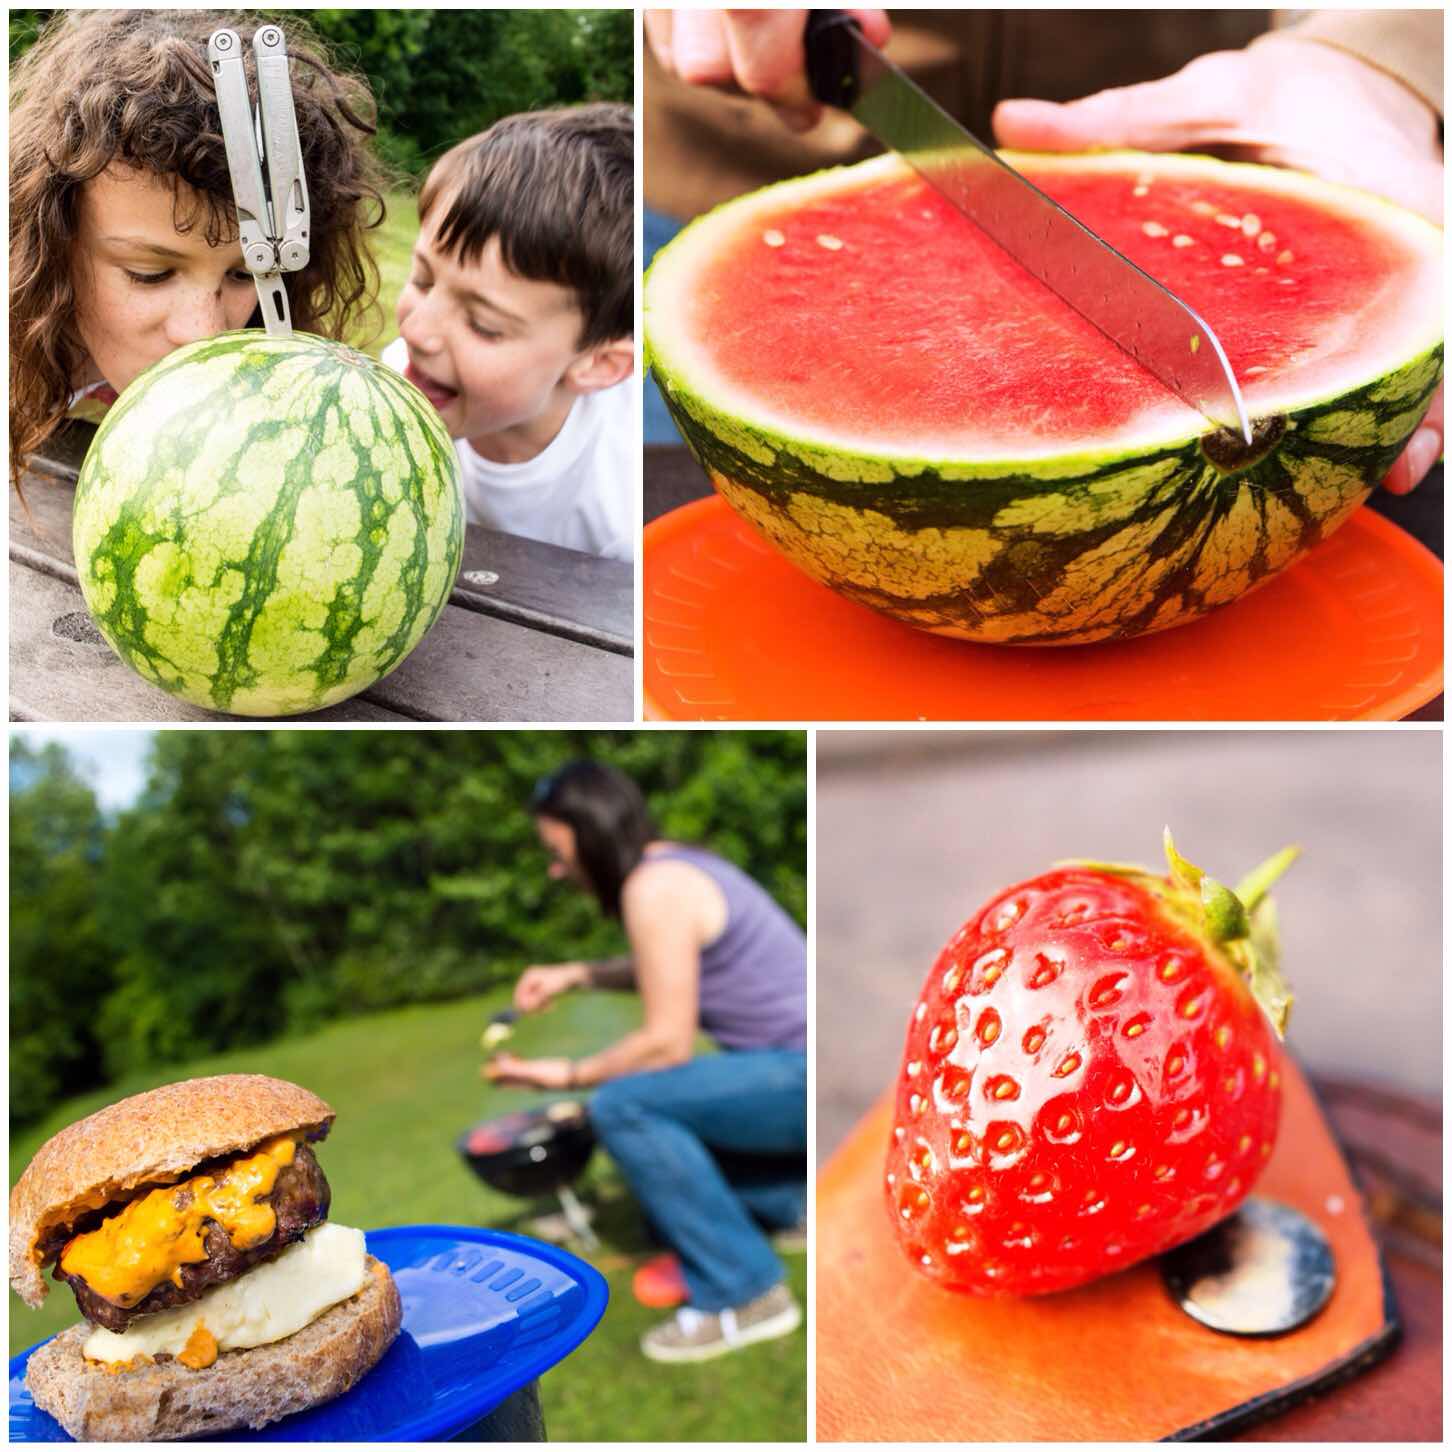
A moment of joy is how I would describe this picture. We were visiting our friends Tracey and Neil on an RAF base one day and after a lovely barbie Alison decided it was time for for some gymnastics with the kids.
This picture reminded me to always be on the lookout for the unexpected – excellent style by the way Alison.
Taking a Turn
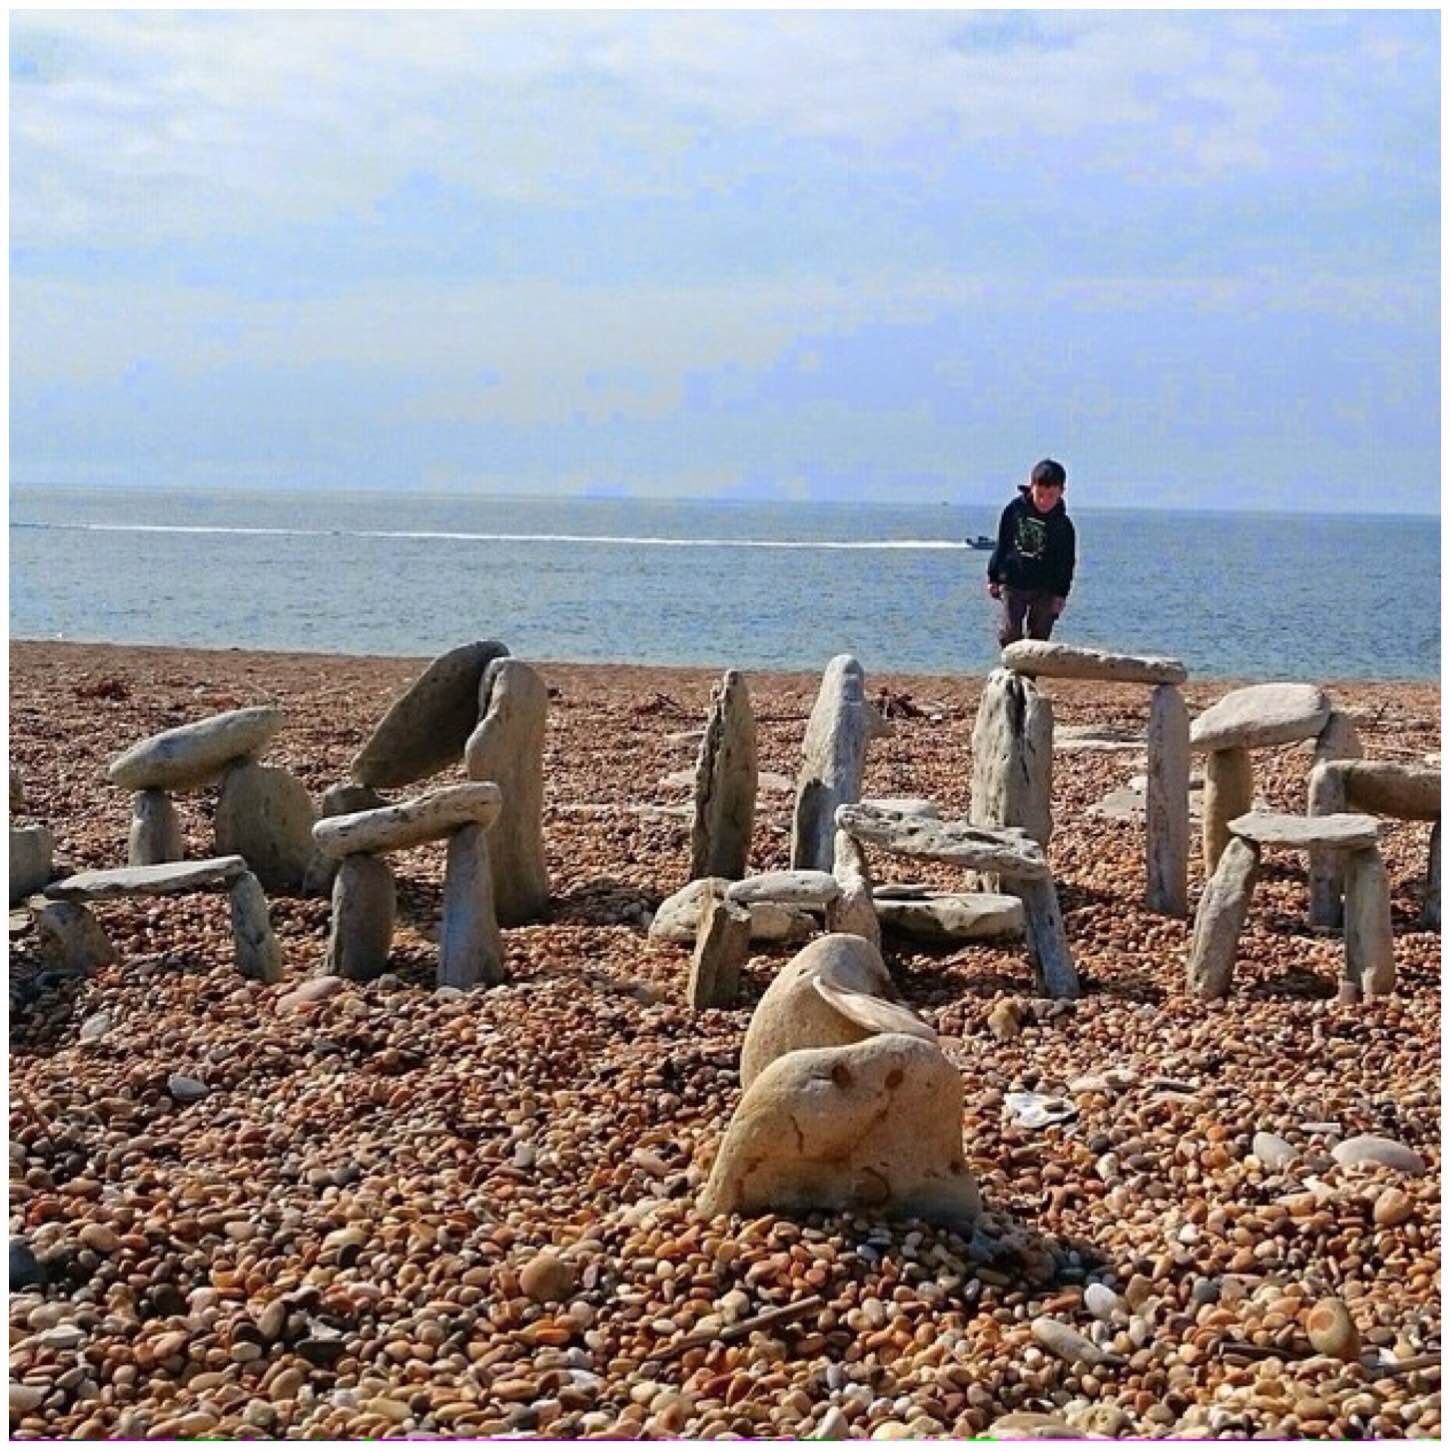
While visiting our friend Fraser from Coastal Survival we spent an afternoon on Chesil beach in Dorset. Someone had decided to build themselves a mini Stonehenge on the beach. Myself and the kids were very taken with it and it made for some great pictures.
Once I got down low to the mini monument the whole look of it changed transforming it into a picture I wanted to keep.
Mini Stonehenge
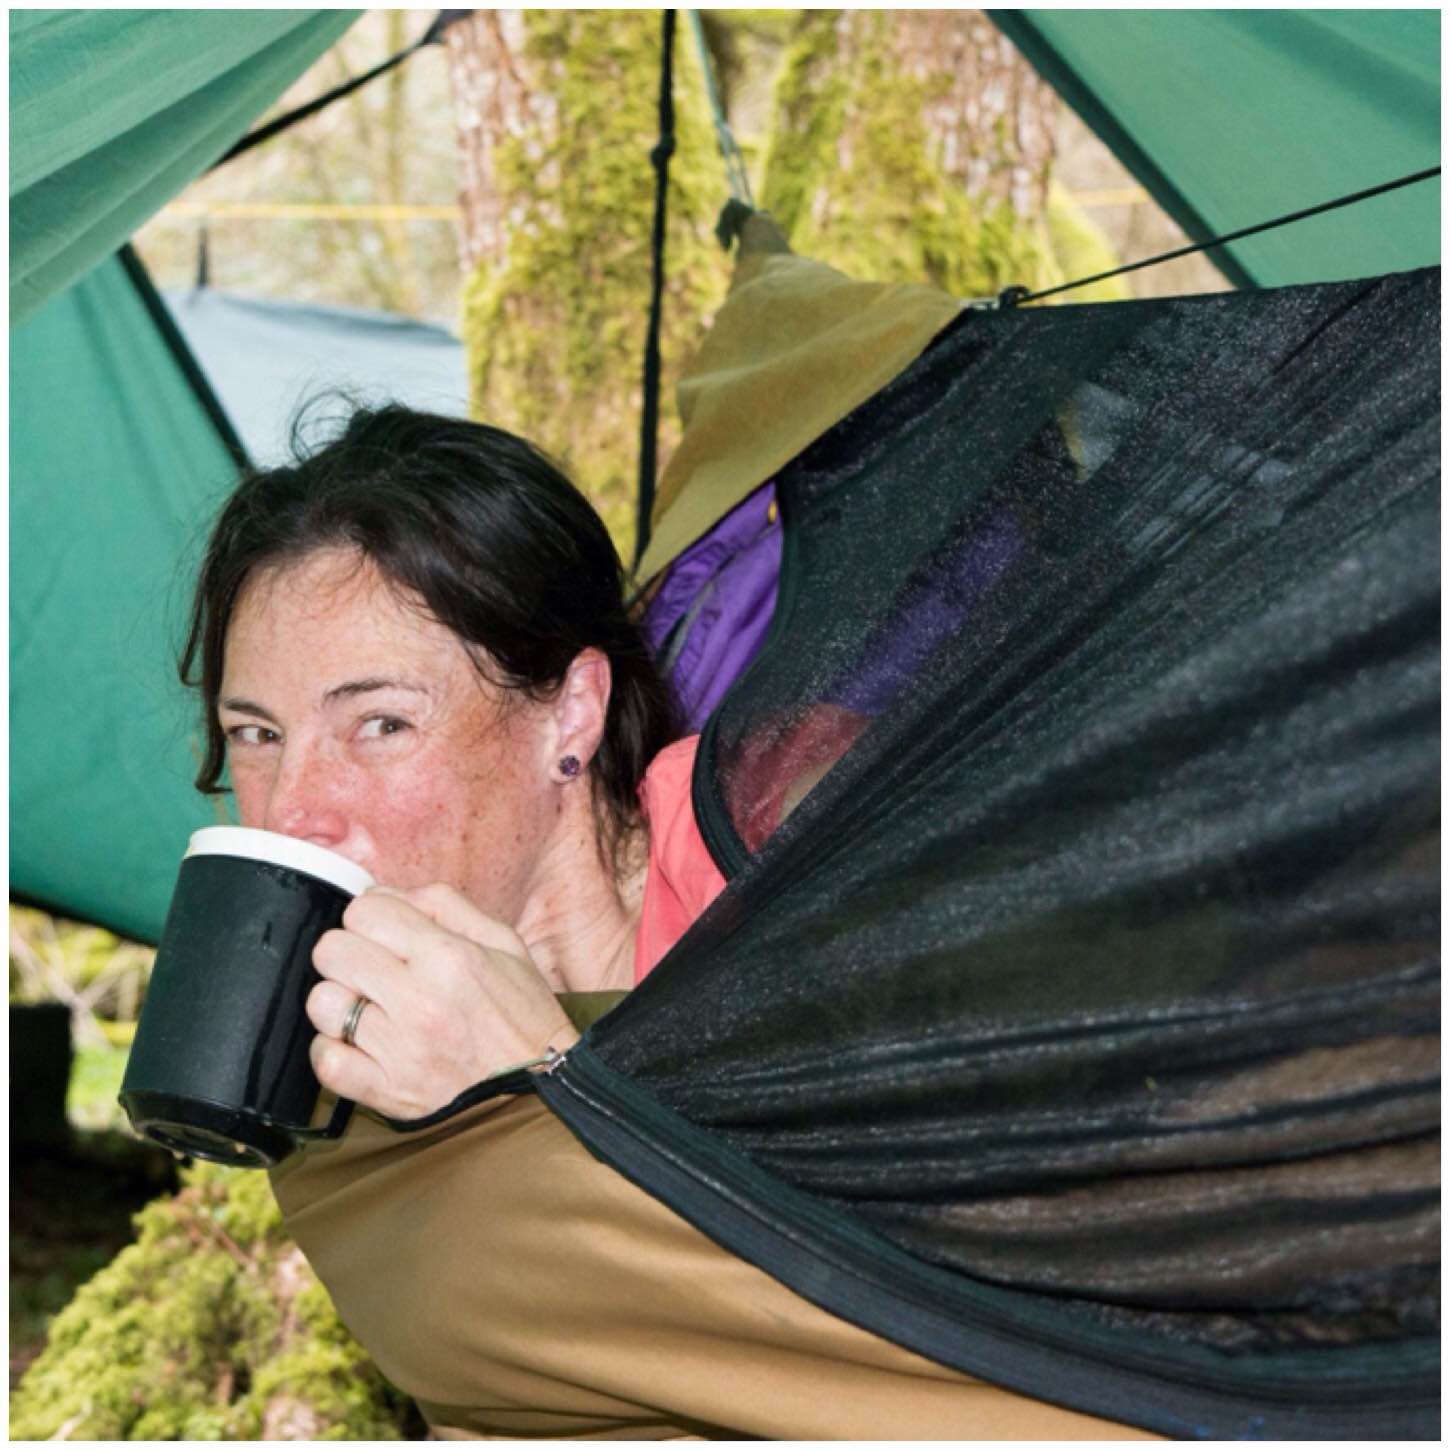
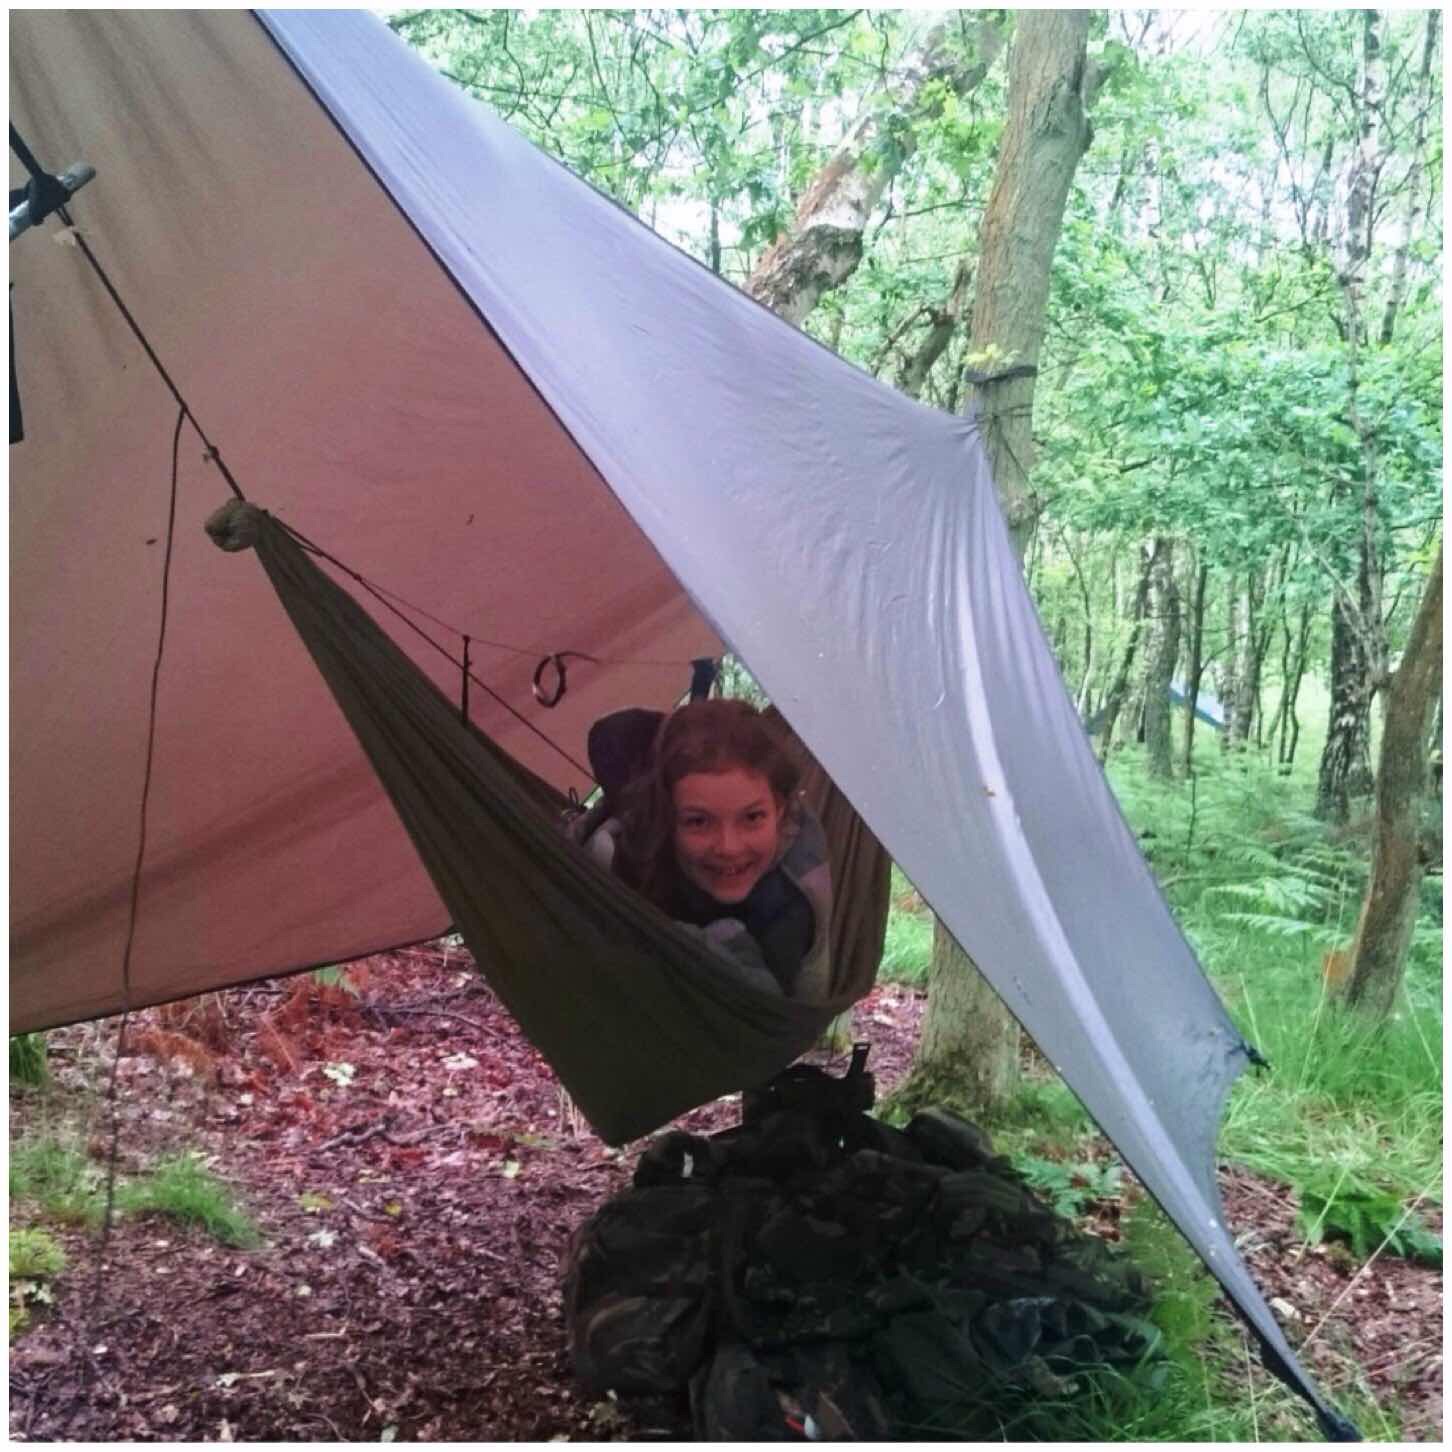
When we go camping as a family we can mostly be found sleeping in hammocks. Alison insists though that before she gets up that a cup of coffee is produced. It is a bit of a tradition now this coffee business but one I am happy to maintain – needless to say Alison is in full agreement with me.
Quality Hammock Time
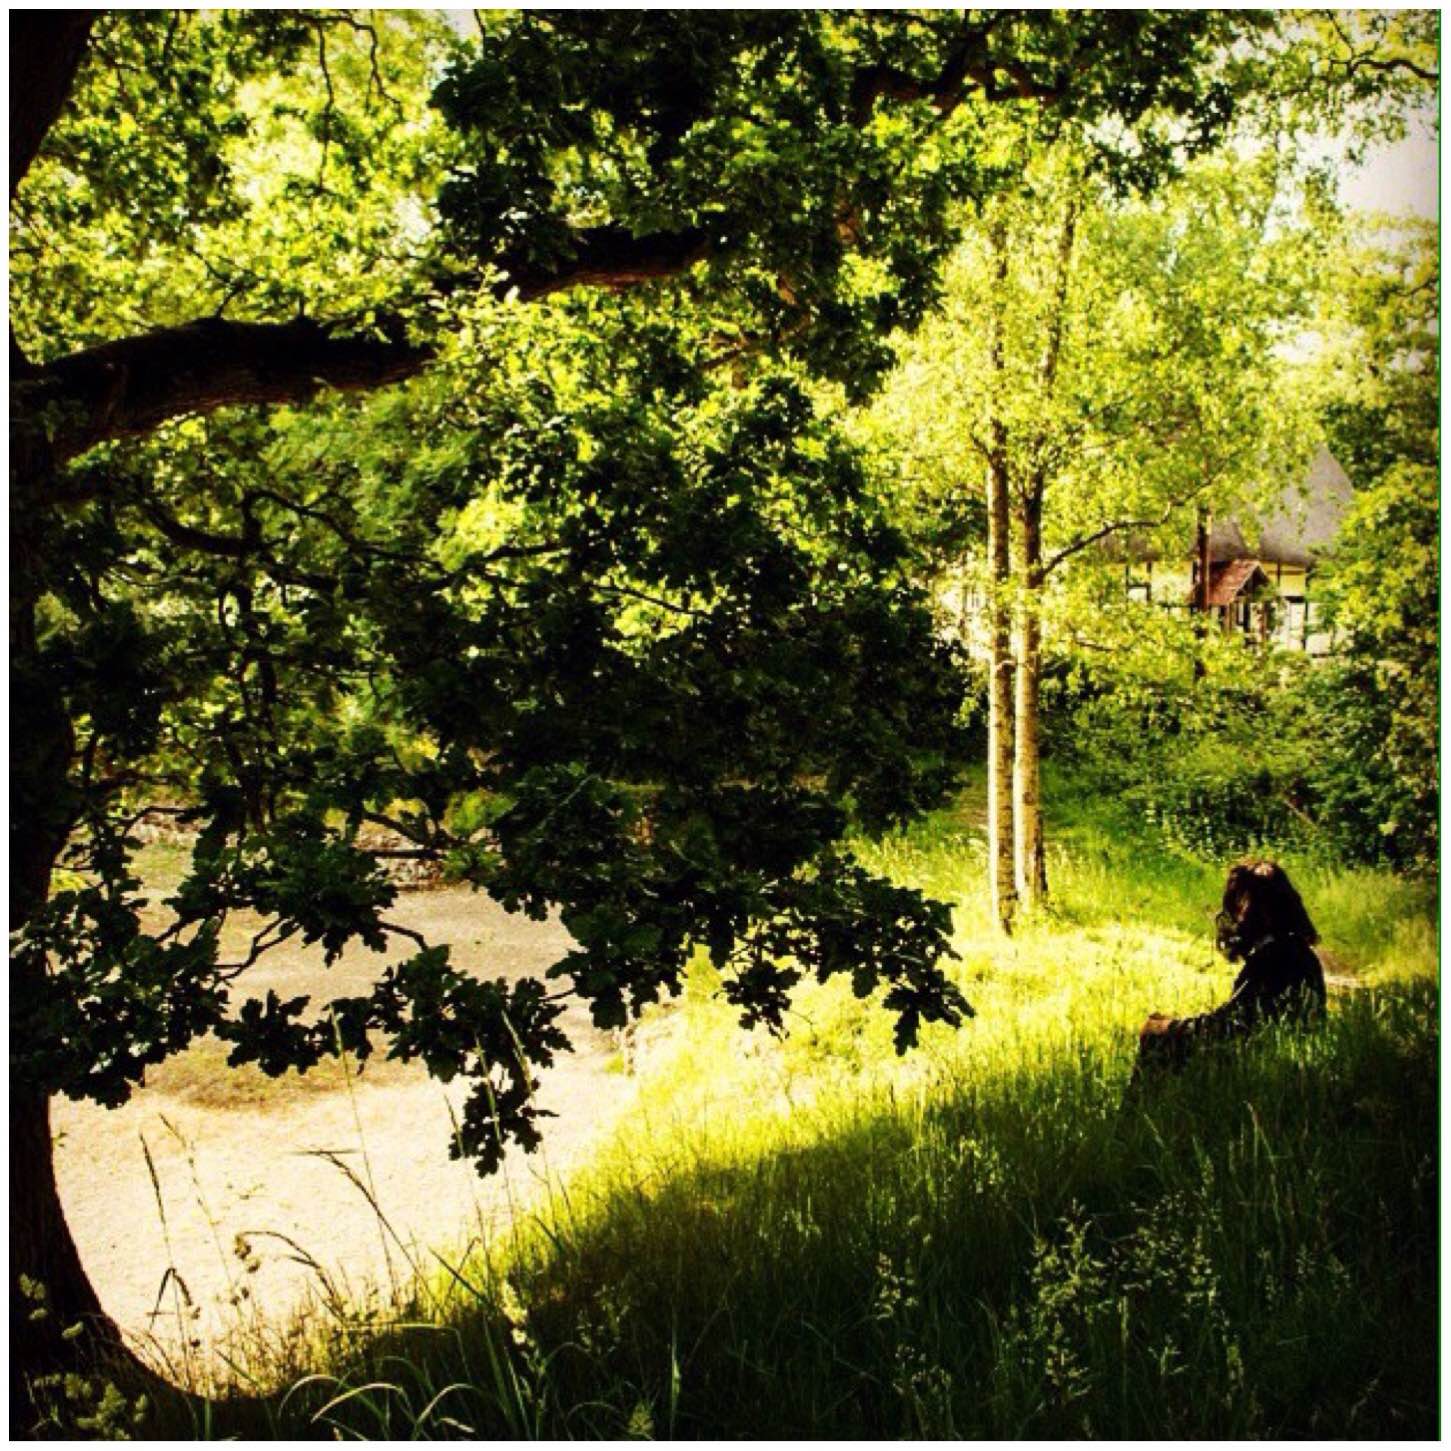
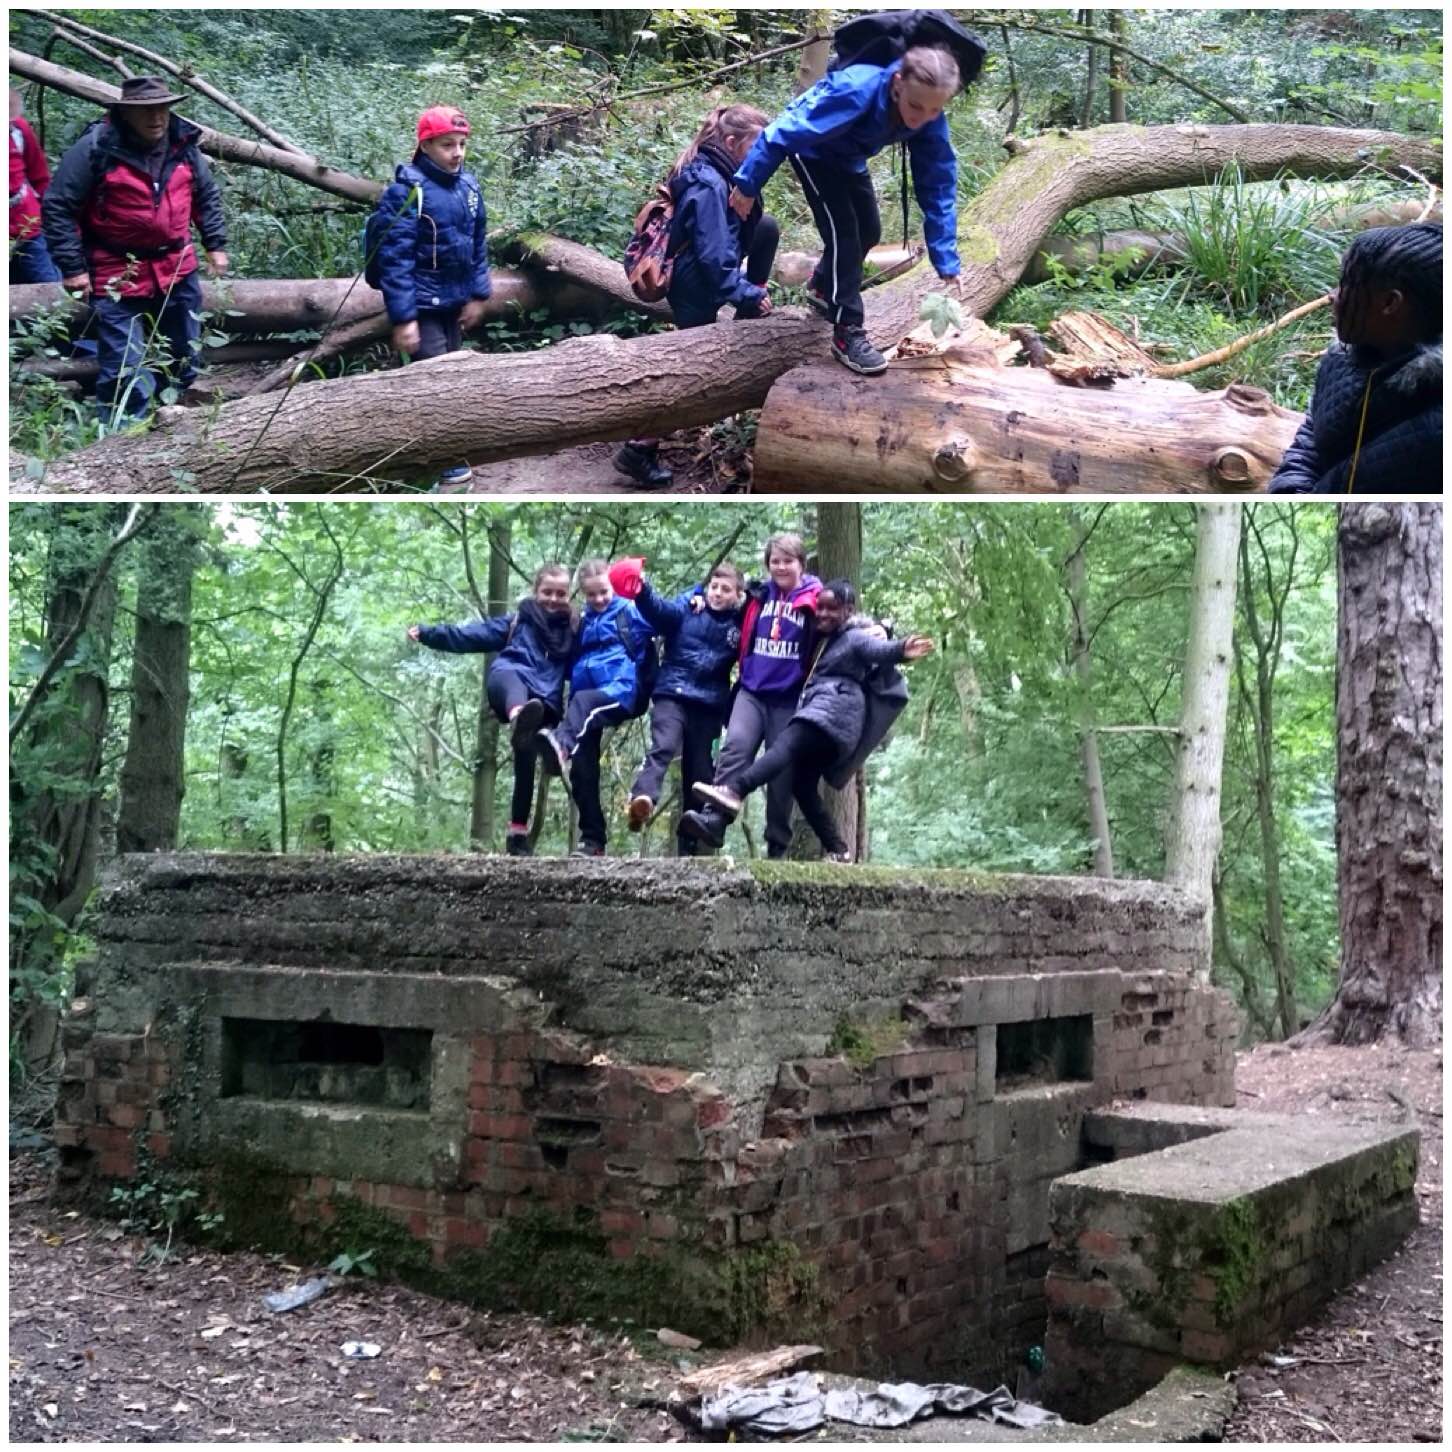
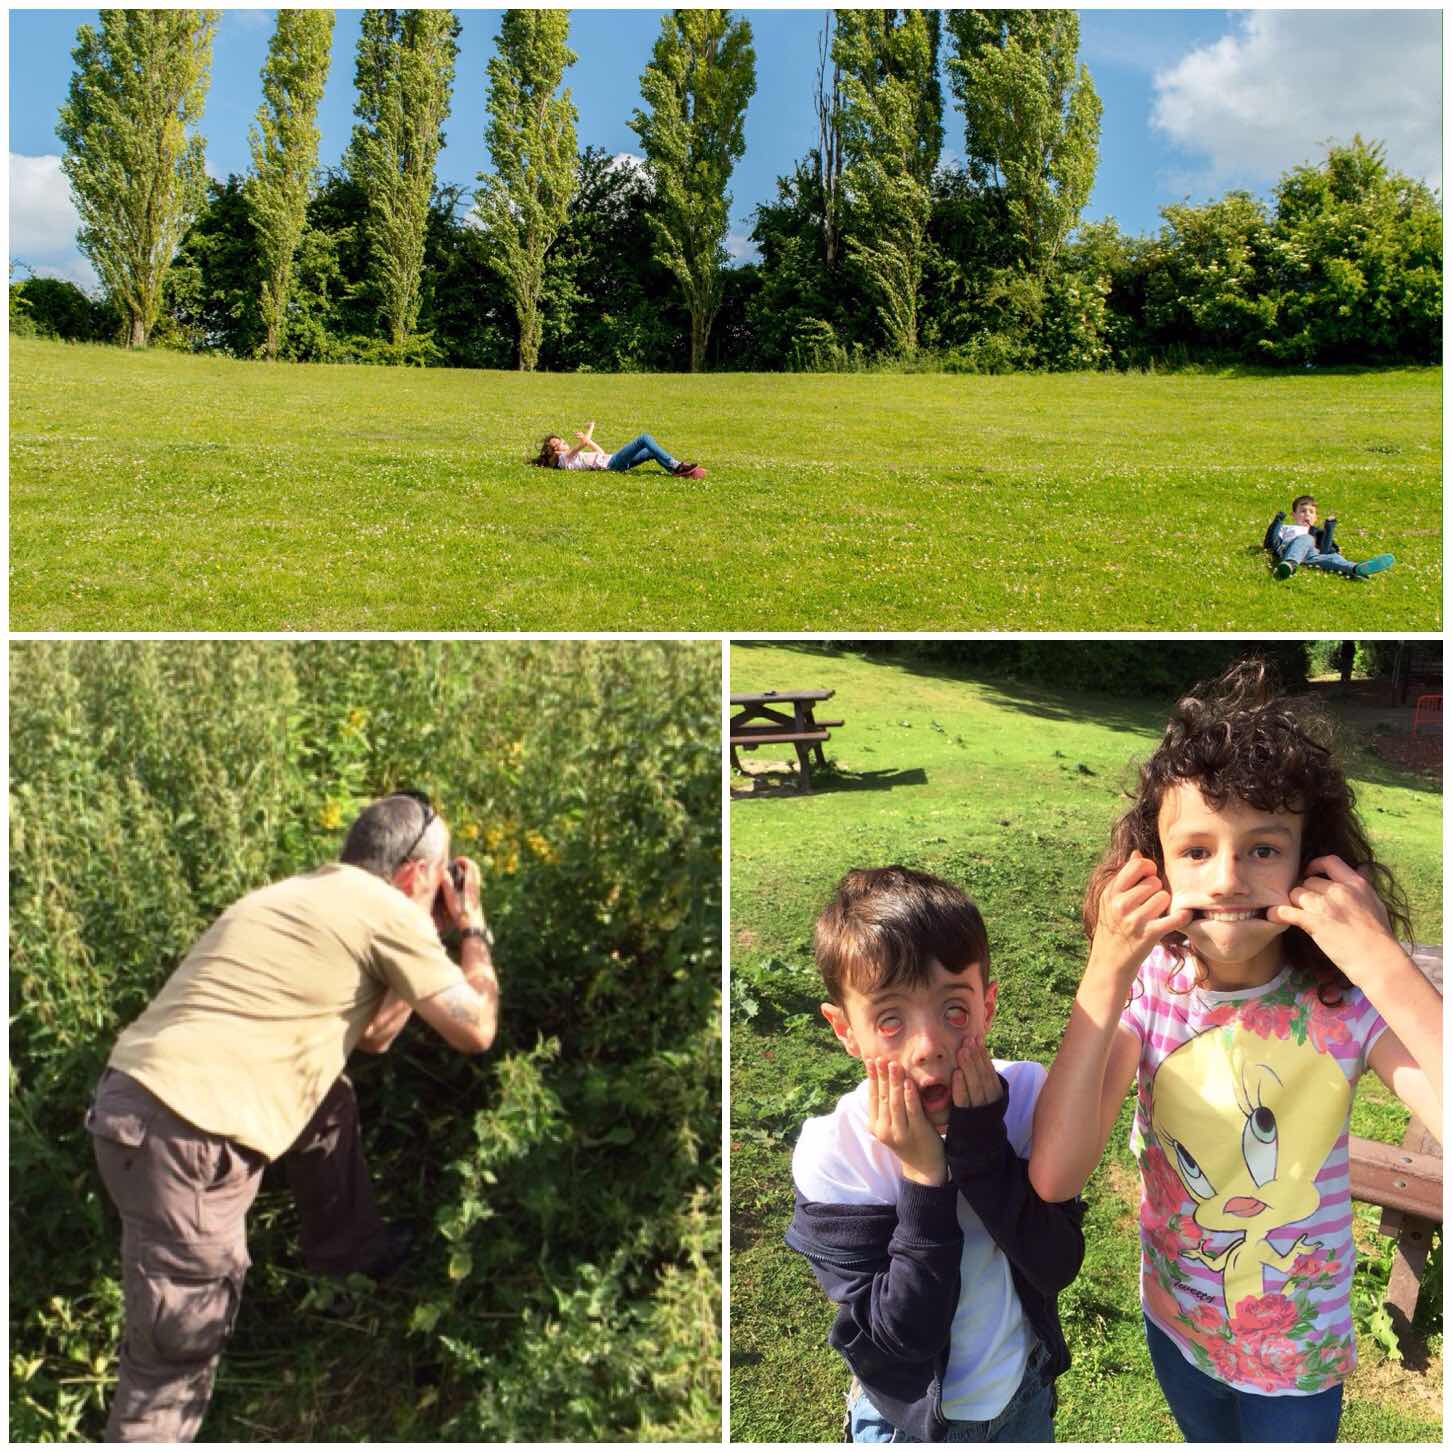
Last June I took part in the 30 Days of Wildness organised by the Wildlife Trust. I blogged about my nature adventures for 30 days. On one of these little adventures I was exploring the ruins of the Roman amphitheatre at Silchester with my daughter Catherine.
We stopped for a rest and Catherine spotted a beautiful thatched cottage through the trees. She sat there and told me later that she had found her ideal home. To me this picture is like a painting and I can sit and look at it for a long time without getting bored.
30 Days of Wildness
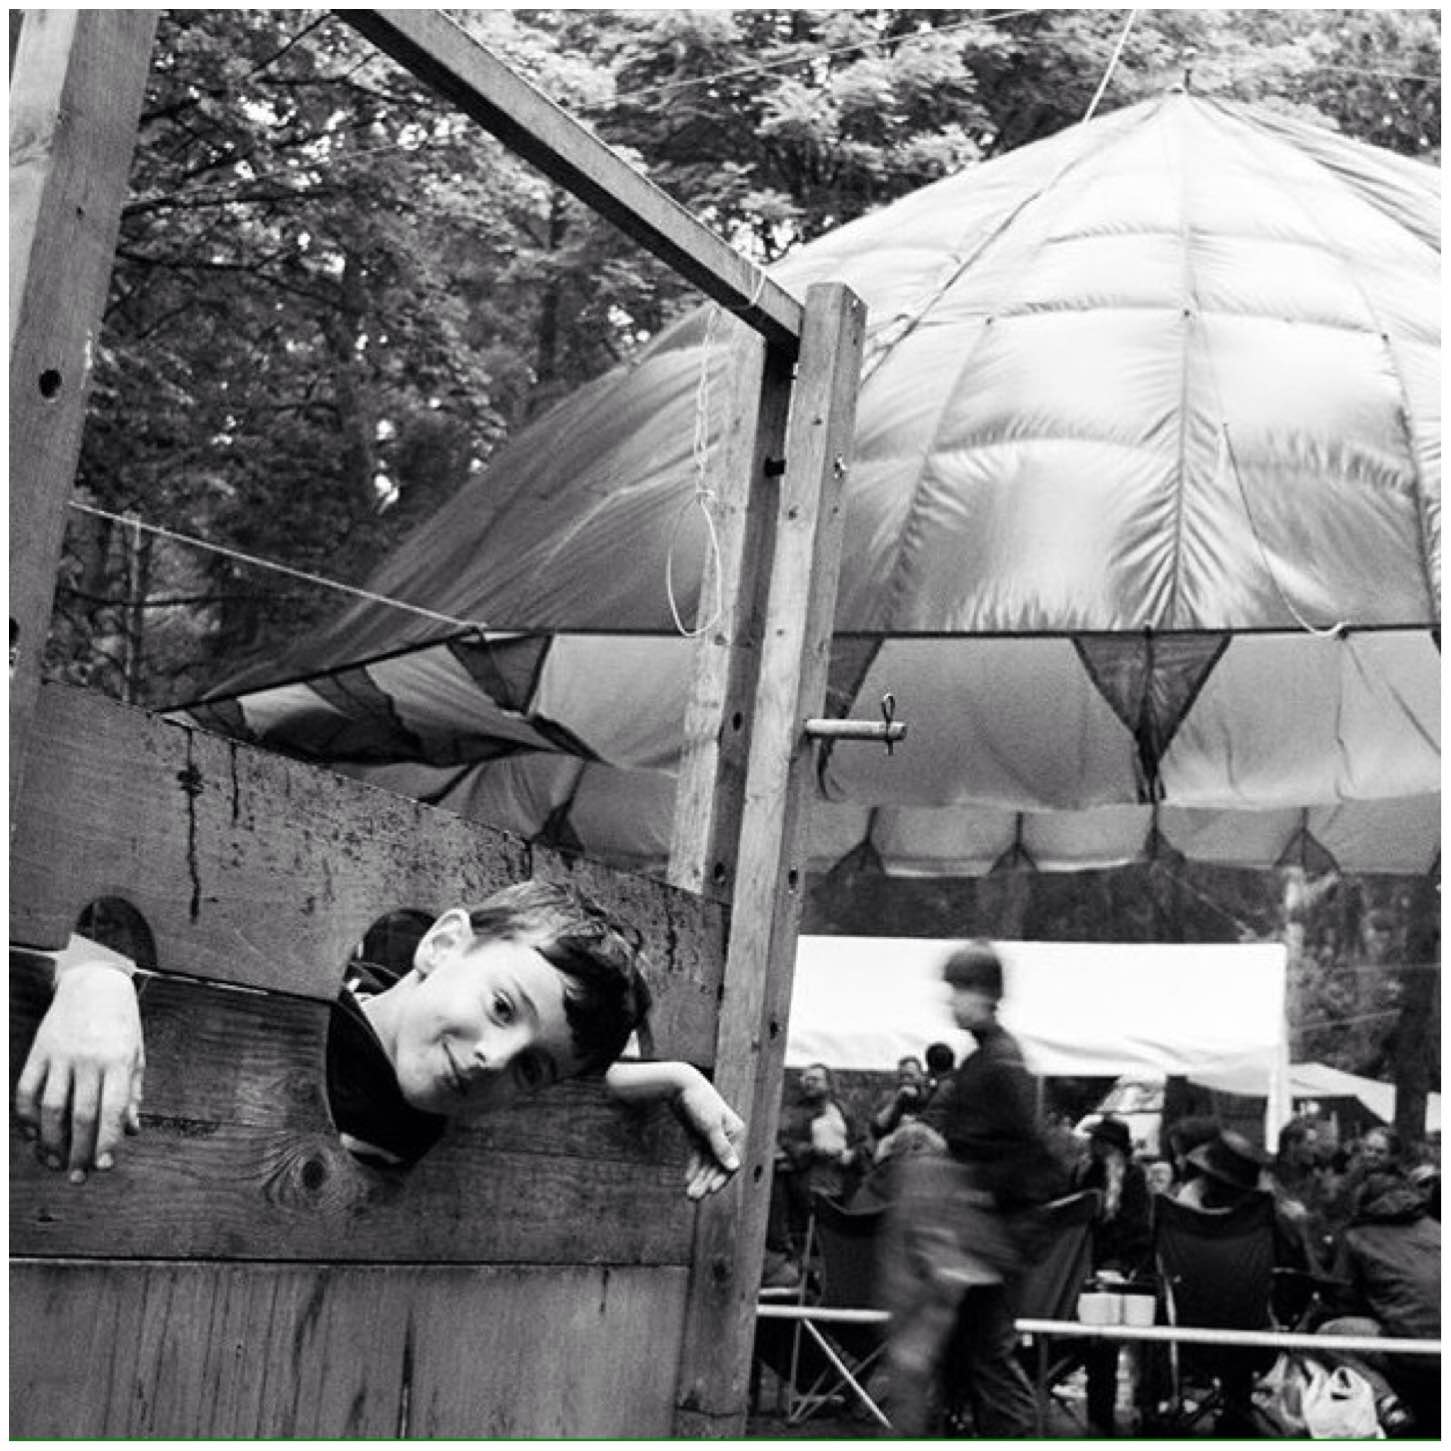
As memorable moments go there are plenty to be found at the BCUK Bushmoot. We go every year and it is a great location for families.
I caught my son Finlay mucking about with some stocks ( they belong to the Live Action Role Players who use the site as well) and as I took the picture the parachute set up beside it suddenly puffed up with the wind. Not your typical outdoorsy picture but one I felt lent to a bit of B & W manipulation.
Moot Time
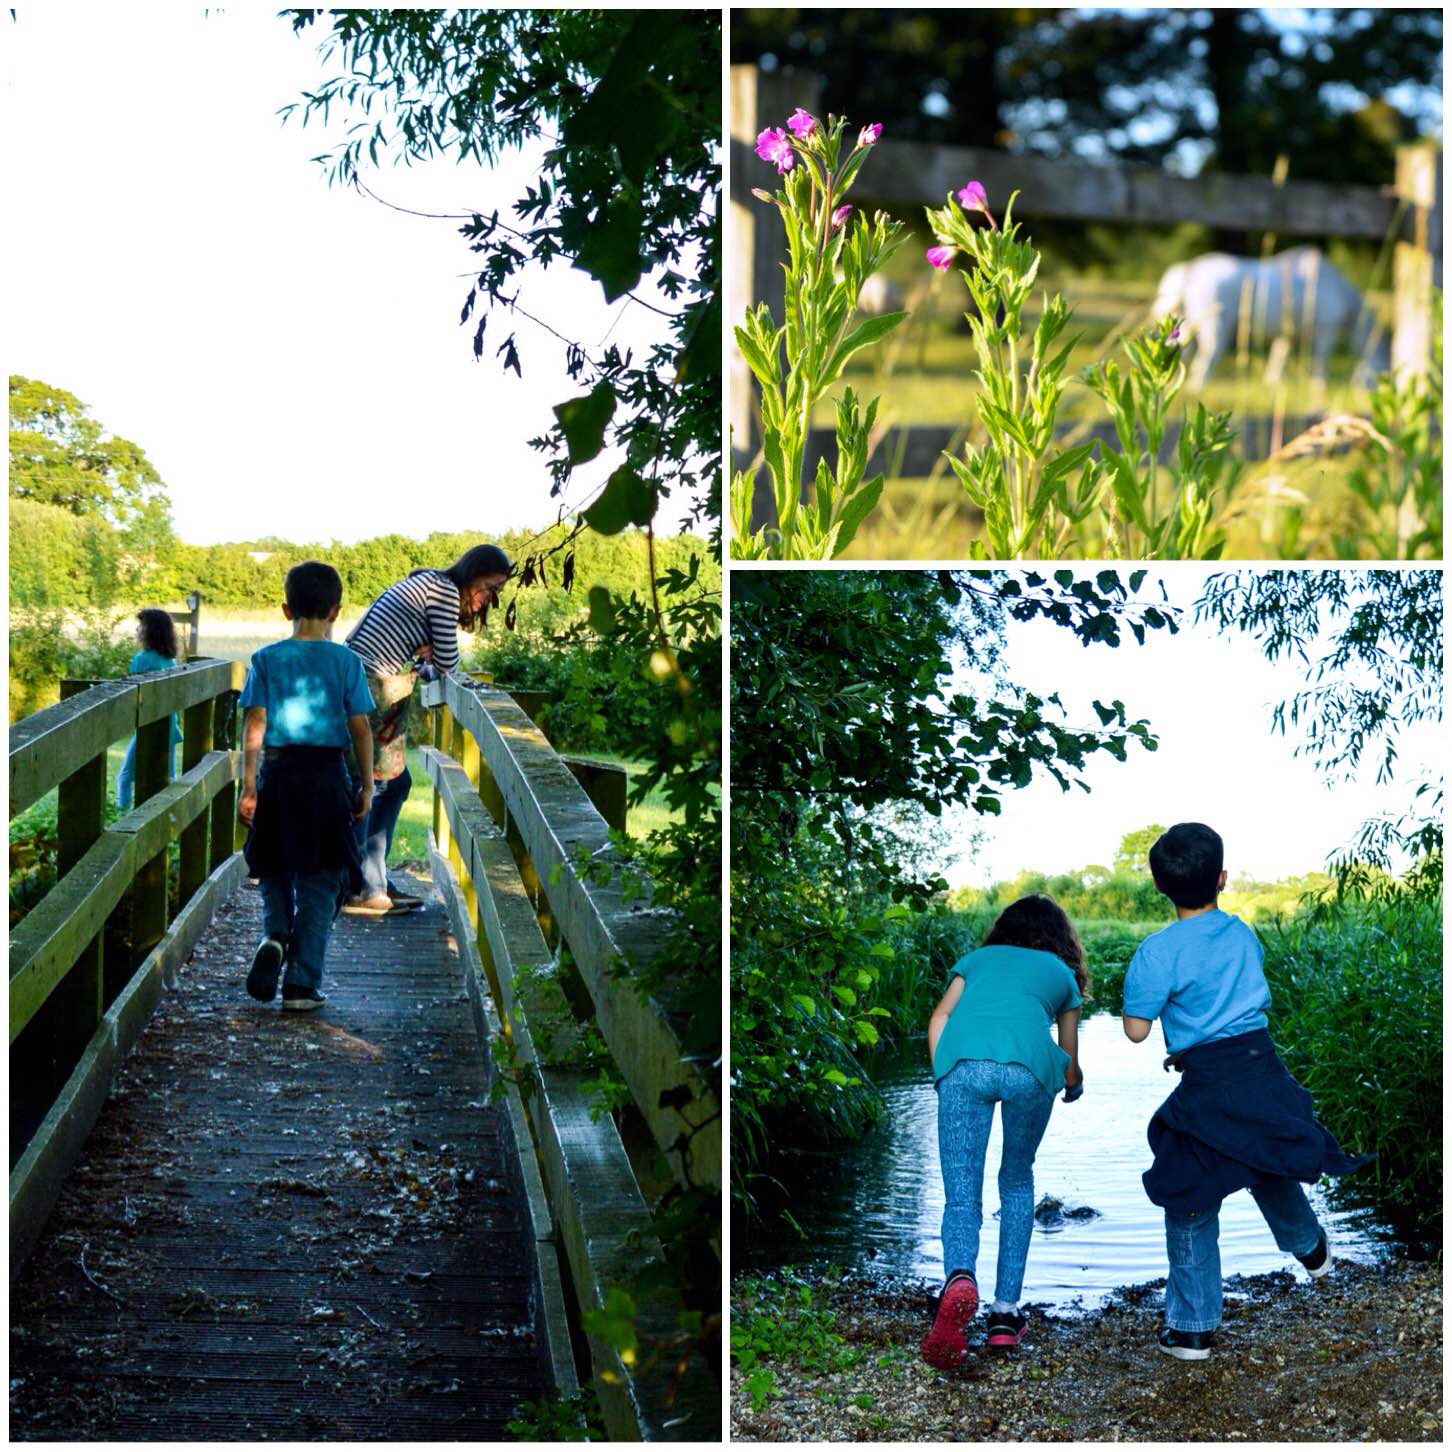
I took a lot of pictures while on holiday in France this year of some really beautiful places however it is this simple picture that sticks with me.
We were walking through a small industrial estate to get to a river walk when I grabbed this picture of the kids walking along holding hands. A little moment in time so easily missed you could say.
Brother and Sister
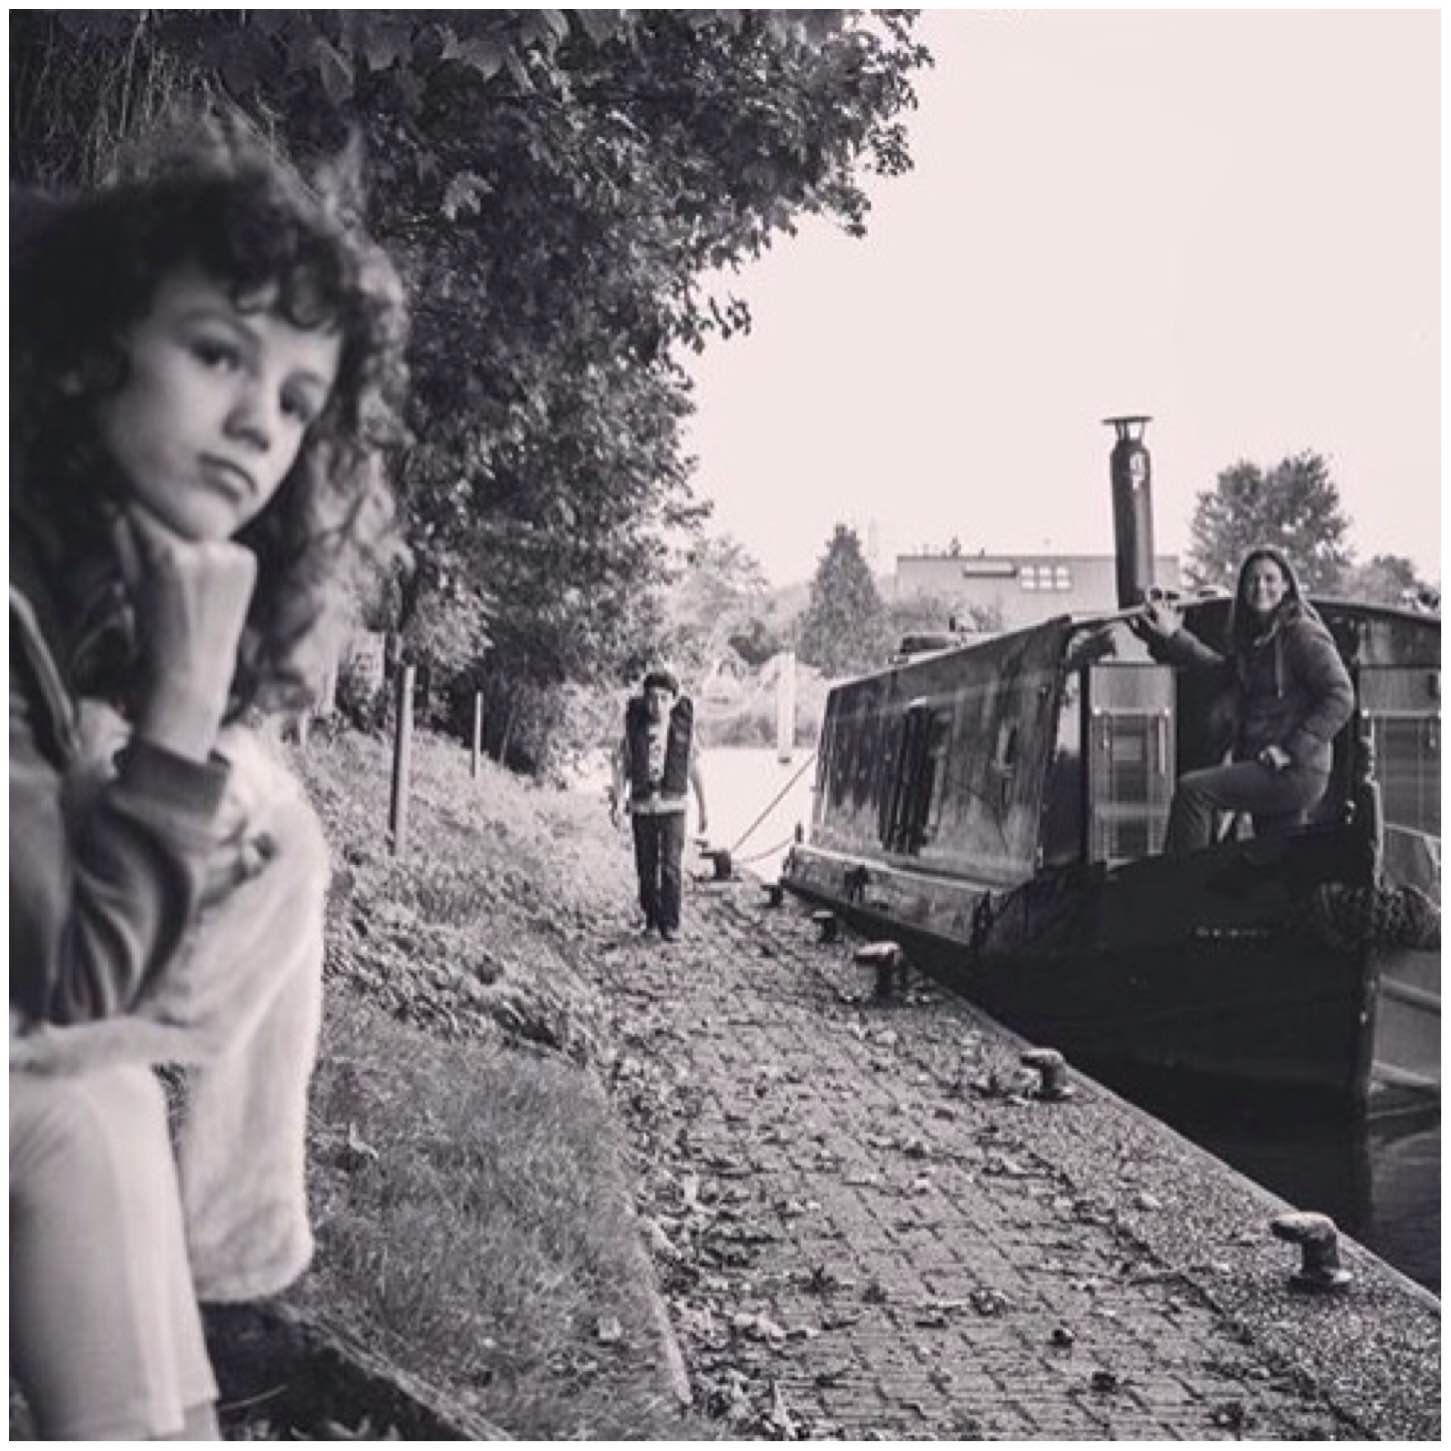
My friend Paul Kelly runs his own canal boat hire company called Thames Boat Training and I have been out twice this year to photograph his boats for his web site. On the last trip we moored up waiting for a lock to open when I snapped this little moment in time. I like the picture for its feeling of depth and sheer peace.
Reflections afloat
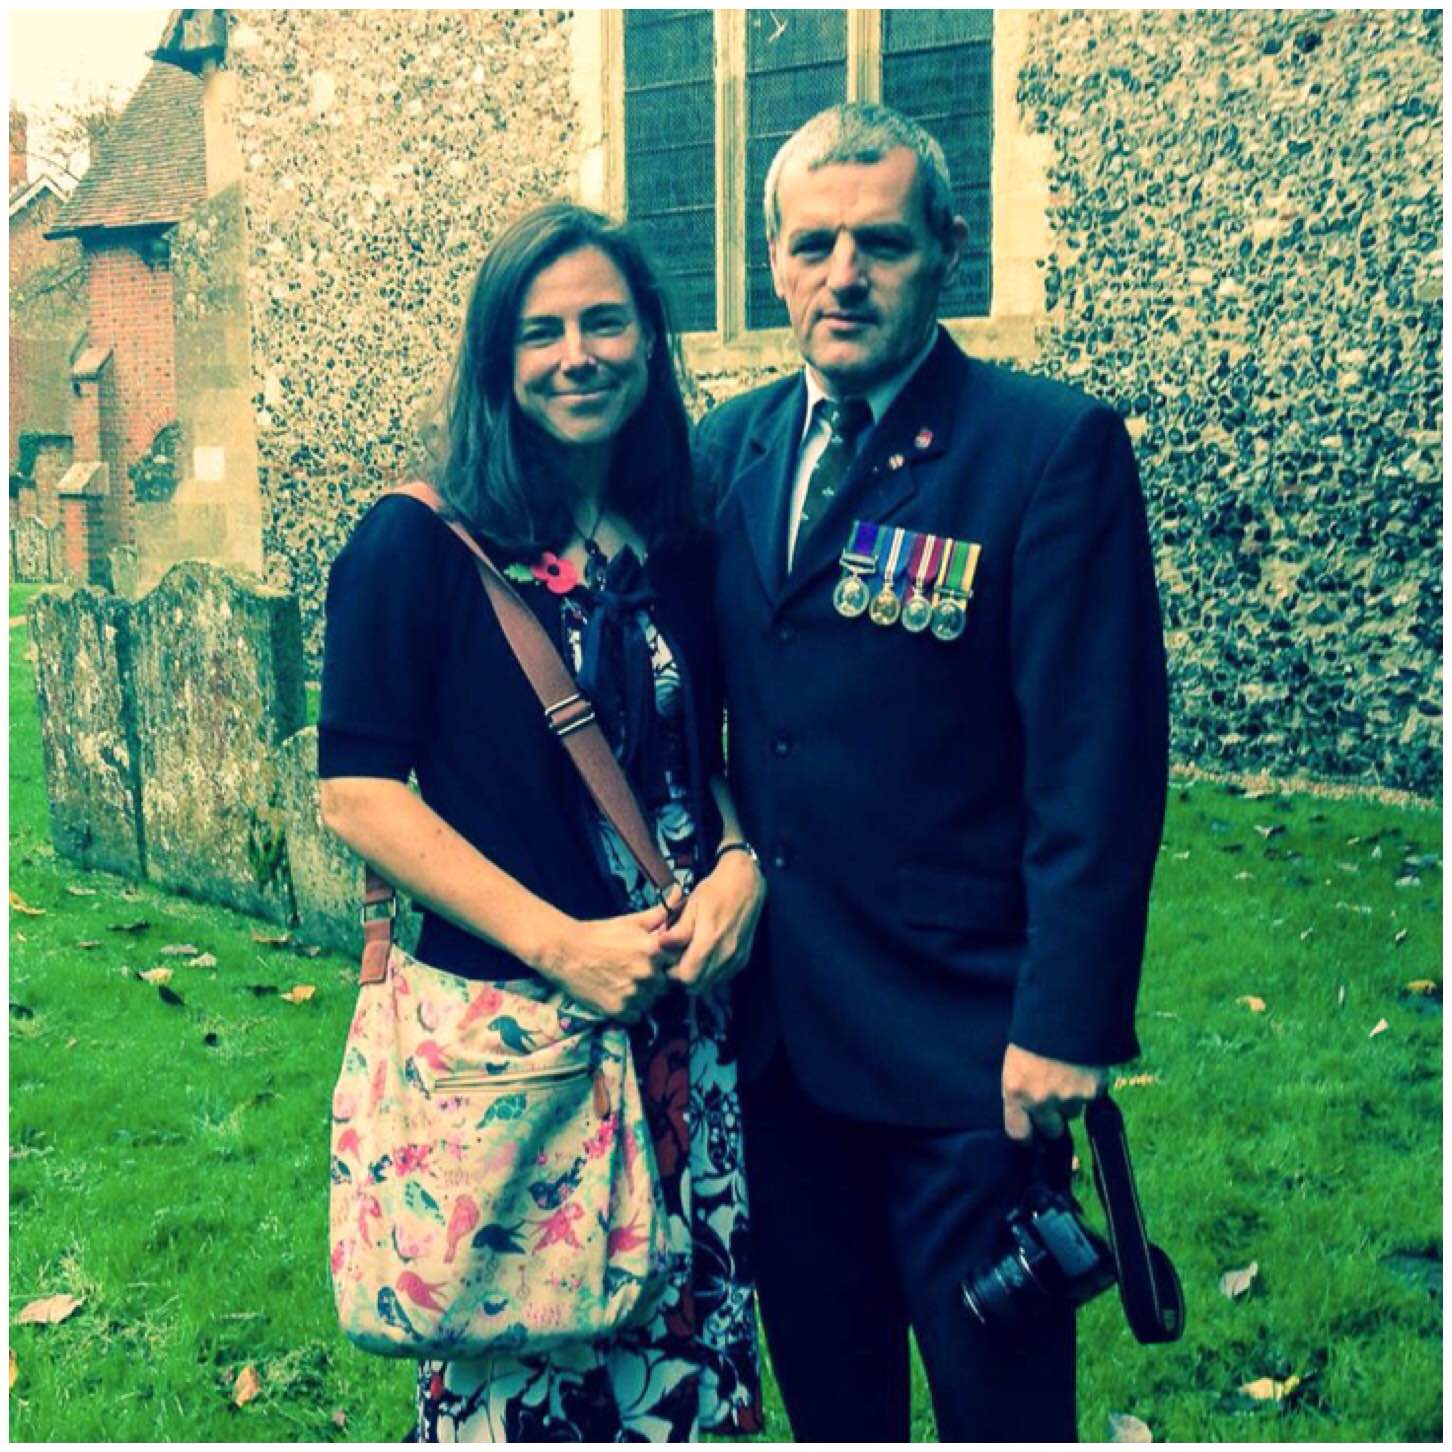
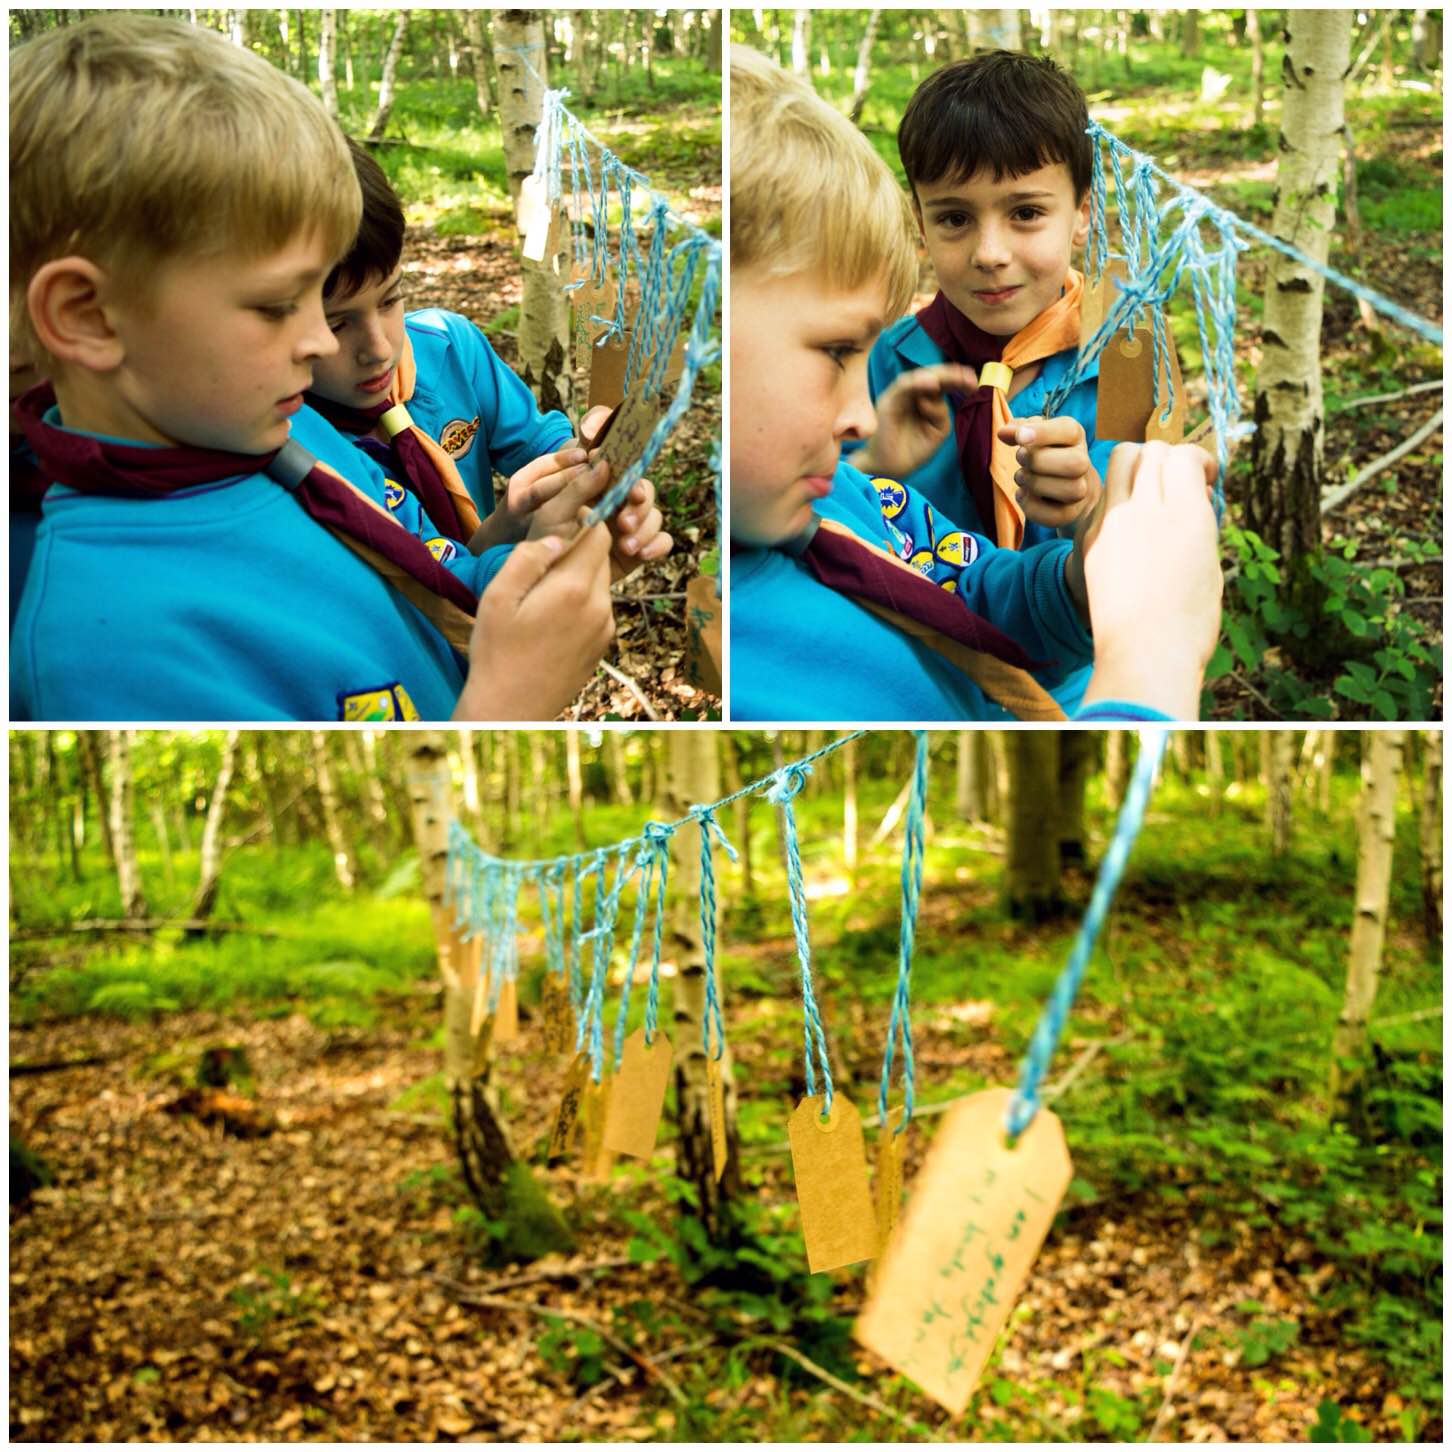
Remembrance Sunday was a lovely day in Bramley. After the service I took some group shots of all the Scouts, Cubs and Beavers however my daughter Catherine wanted to take some pictures with her iPhone.
I think Catherine has an eye for photography and I am keen for her to explore this talent of hers. Catherine took this slightly dark picture of Alison and myself with one of these Instagram filters you can load onto your iPhone. Not often anyone gets what I think is a good picture of me and I think Catherine did well here – As for Alison, well – she always looks good 🙂
Remembrance
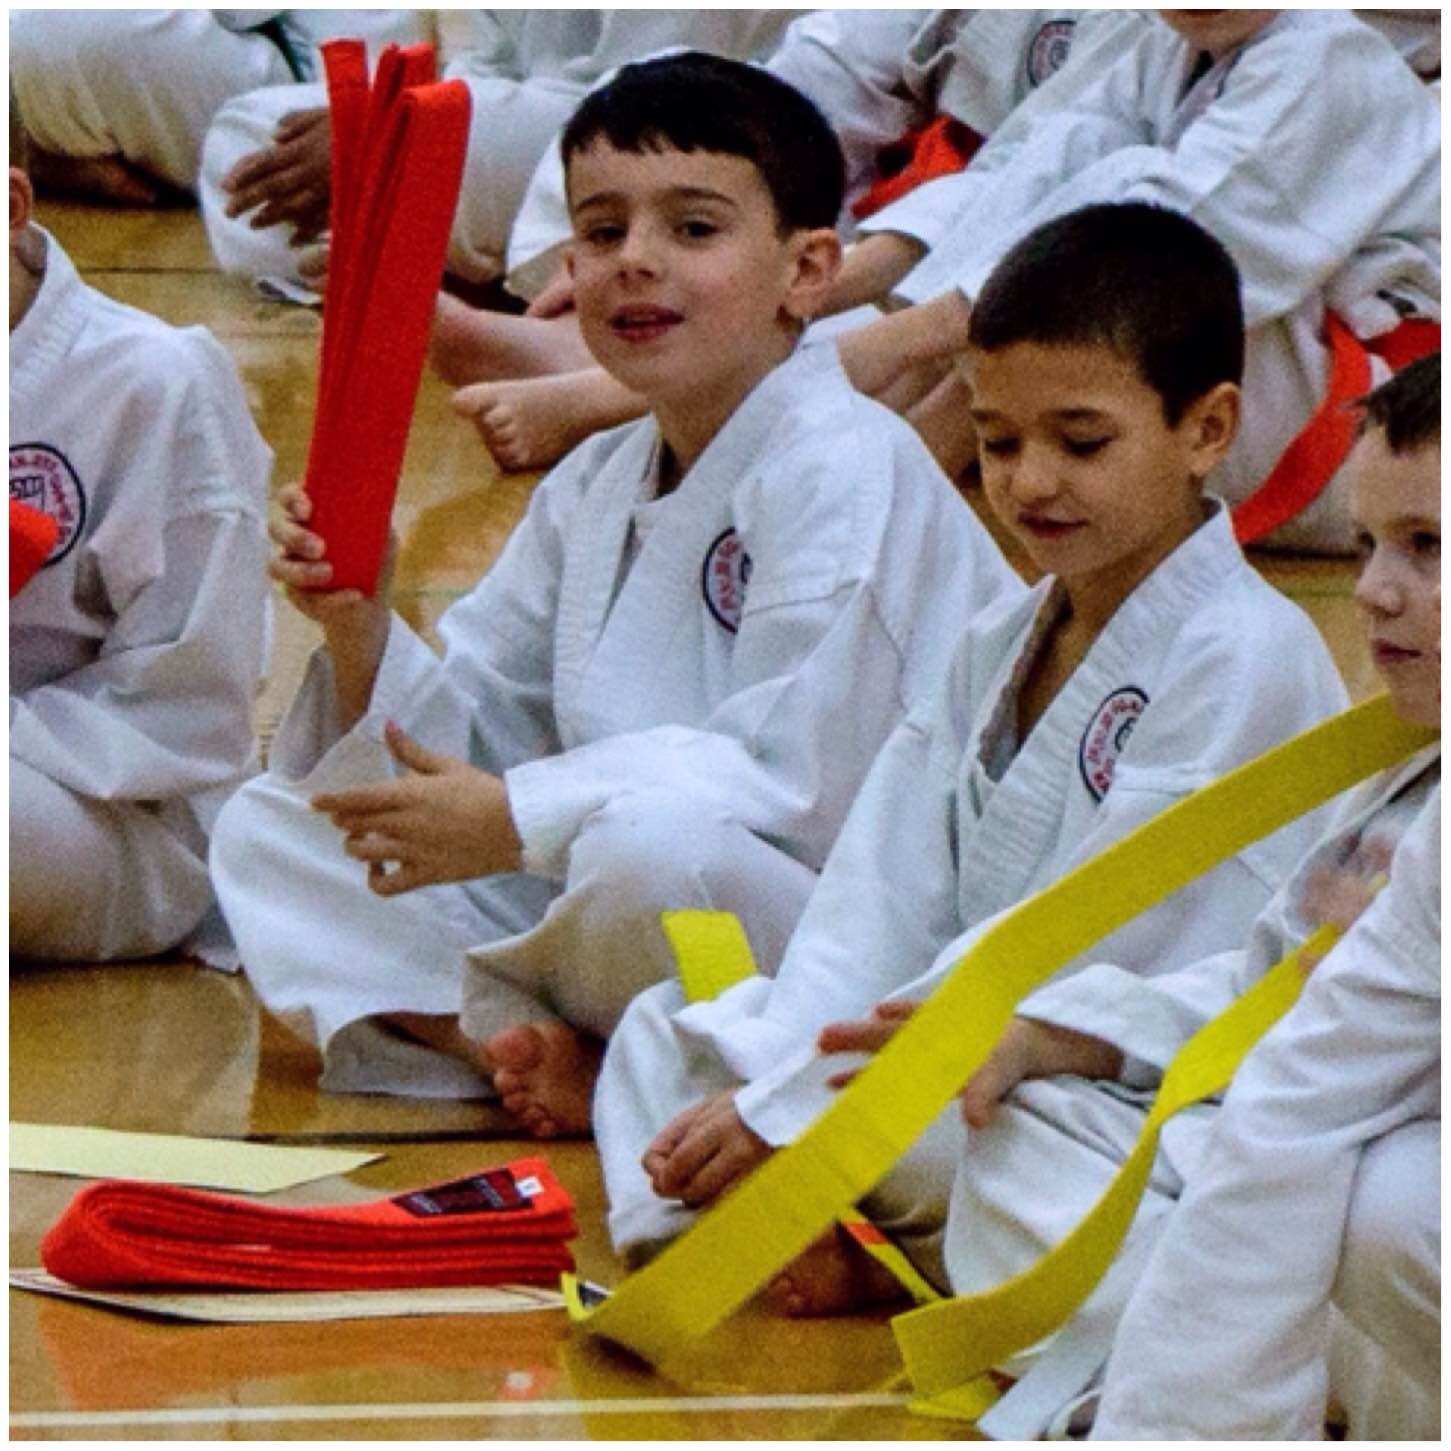
I started with Catherine so I will finish with Finlay. He has been keen on Karate now for a year now and I was very proud to watch him recently get his Orange belt. Finlay is only 7 and can be as mischievous as any other young lad however when he applies himself to something he can show some excellent self discipline – so well done son.
Orange Moment
The next instalment in the Memorable Moments series will be on some of the nature photography I have taken this last year.
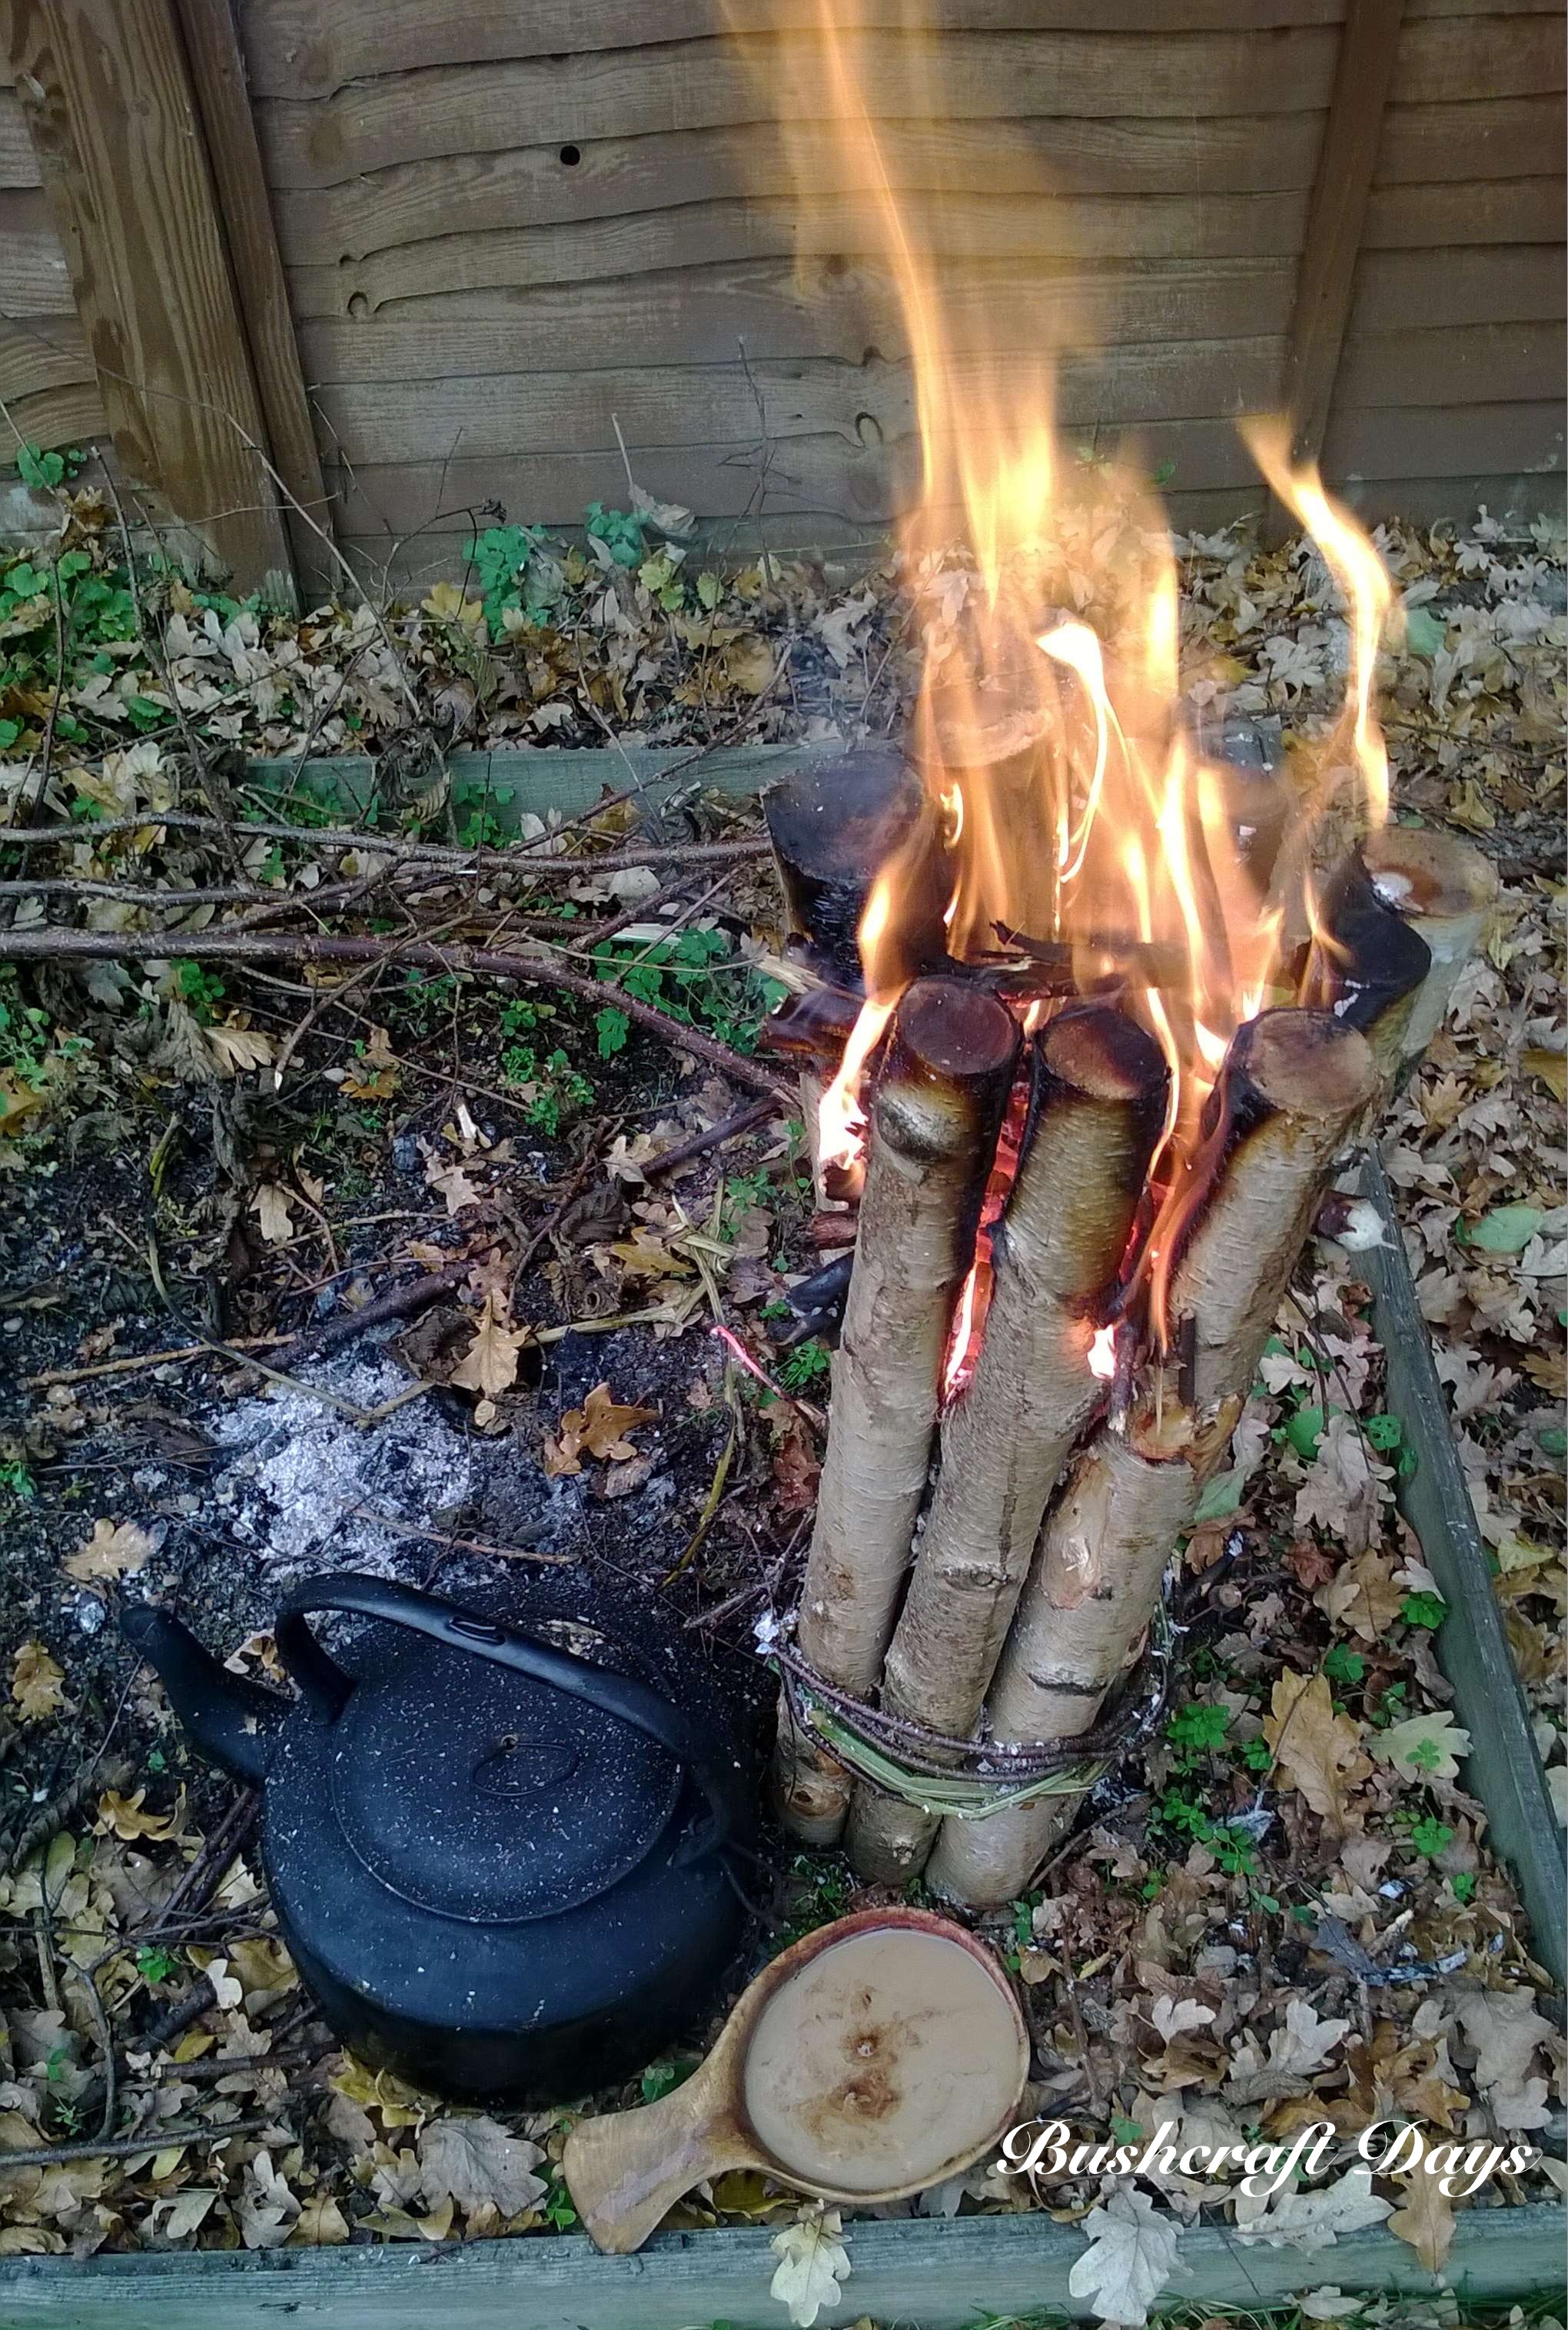
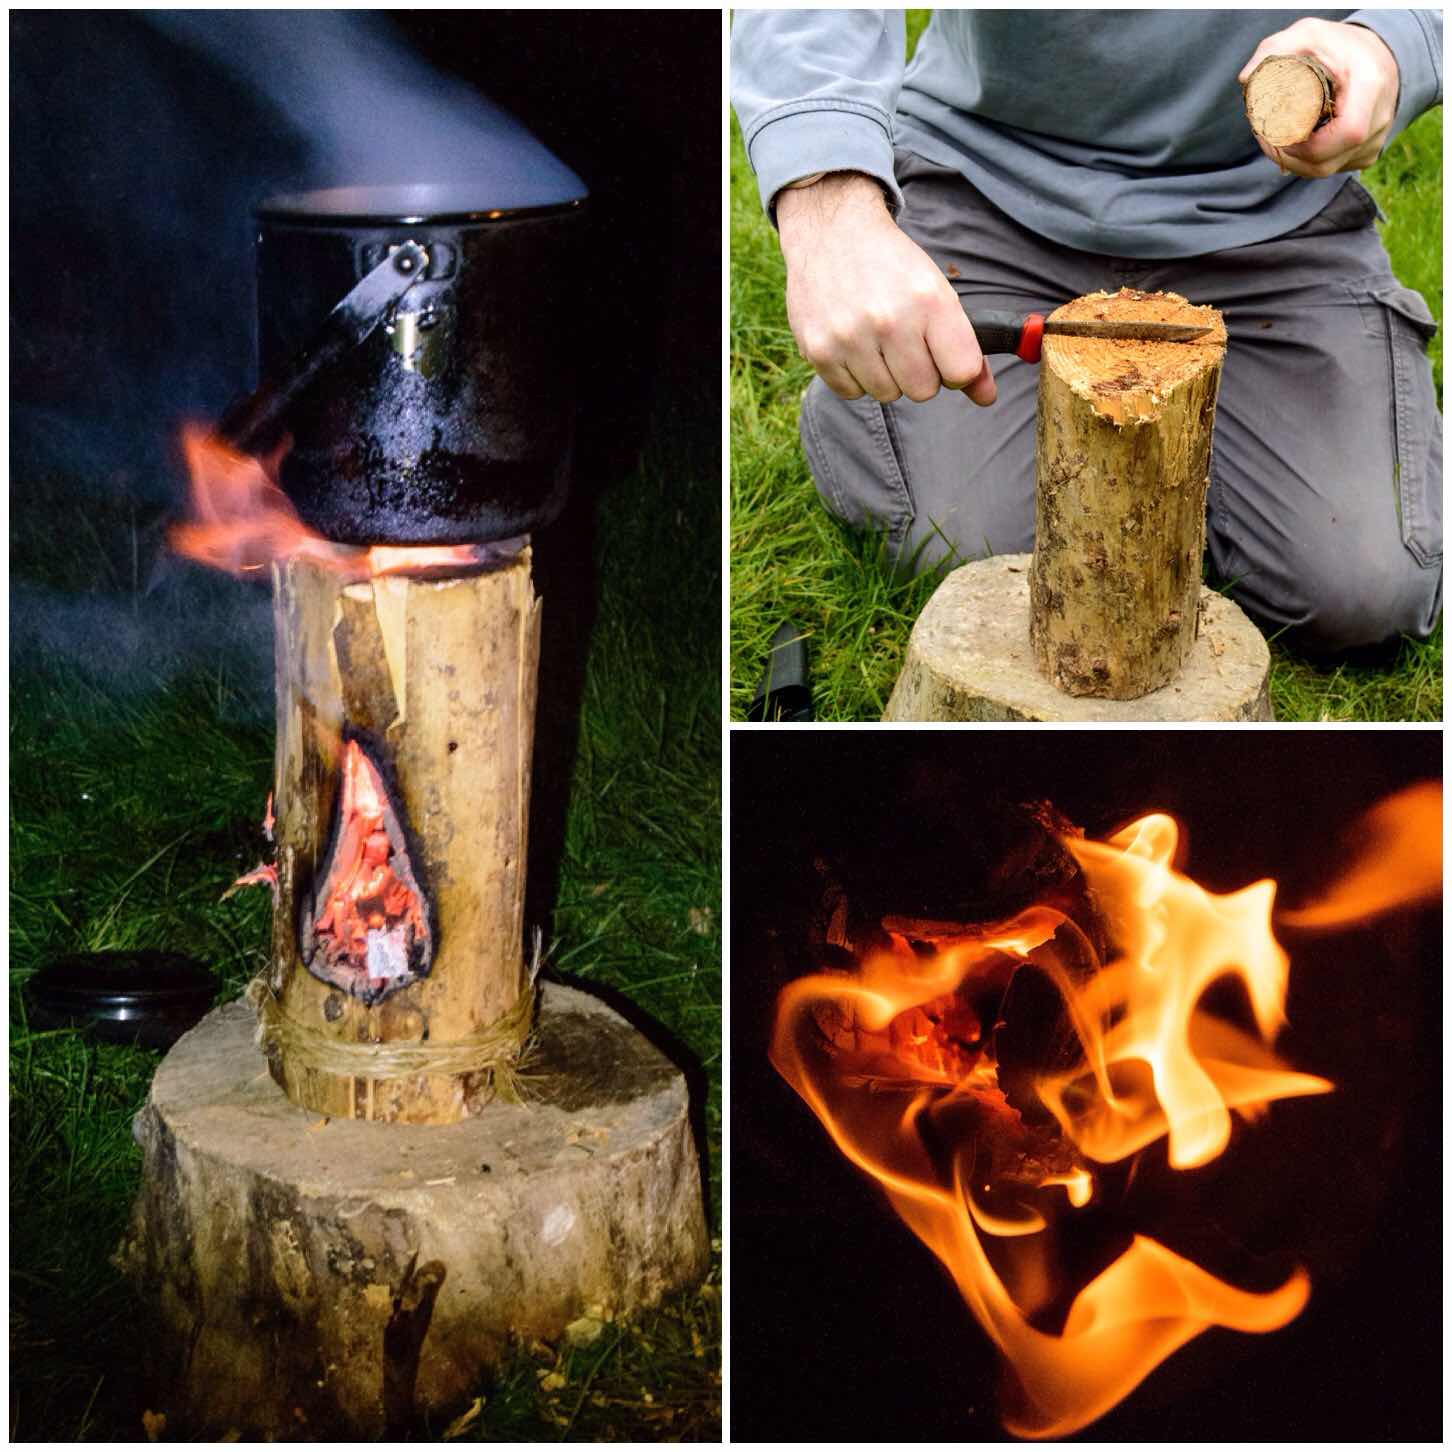
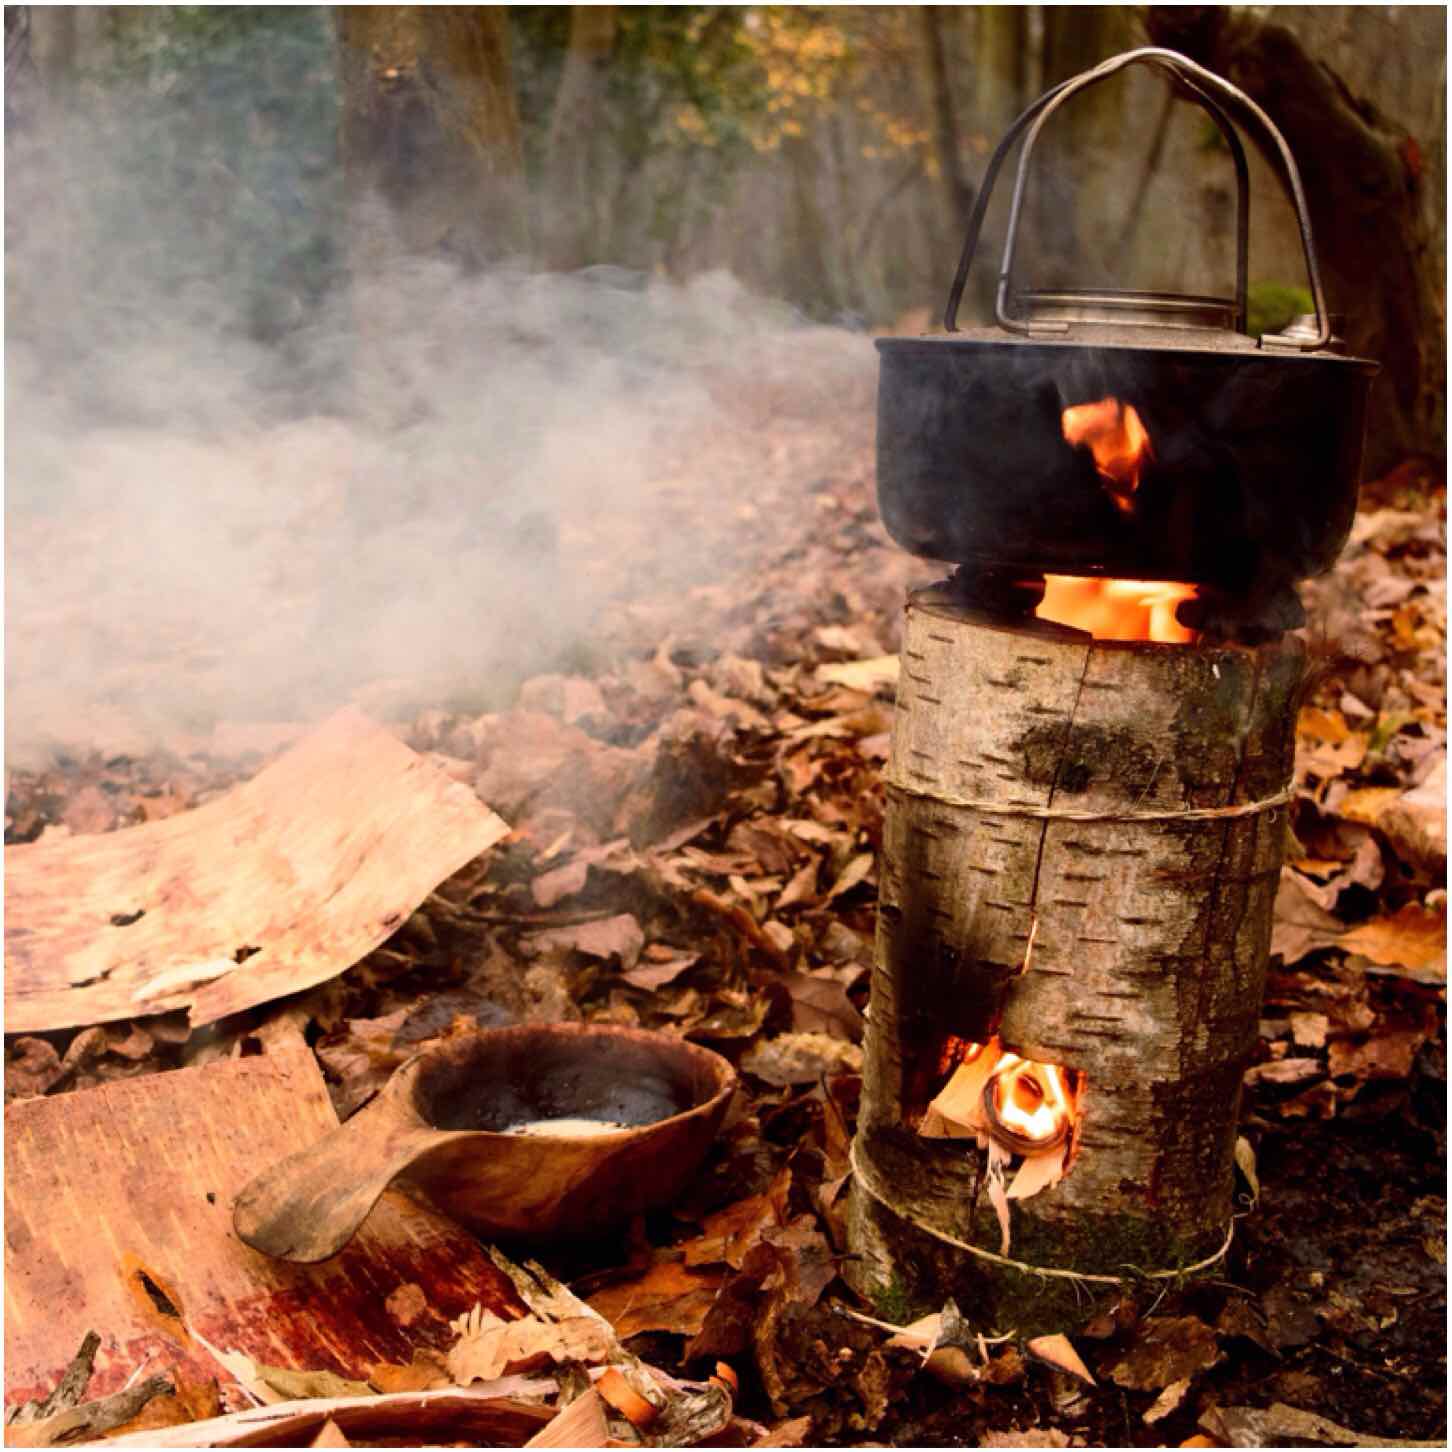
When the weather is inclement and the ground is really wet then the option of making a rocket stove needs to be considered.
This How To…. sets out the steps I took on a wet and windy December morning to make a Damp Wood Log Rocket Stove with only the tools I normally carry in my rucksack.
The damp wood log rocket
I have dabbled with making different types of Finnish Candles for cooking on and they are excellent for when the ground is wet. Over the years I have also experimented with making Log Rocket stoves but restricted my activities to the workshop as I used drills to make them.
I recently stumbled on an idea on Facebook from the 1st Facebook Scout Group by Paul Hasling. This is the first time I have seen a log rocket stove done without the use of drills so I was instantly taken with the idea. Another Scout instructor José Xavier put Paul’s pictures together into a quick helpcard called the Rocket Stove de Madeira. This is a very simple design where a log is split four ways, a chimney and firetray are carved out and it is all put back together again with string. I will certainly be showing my Sea Cadets how to make one.
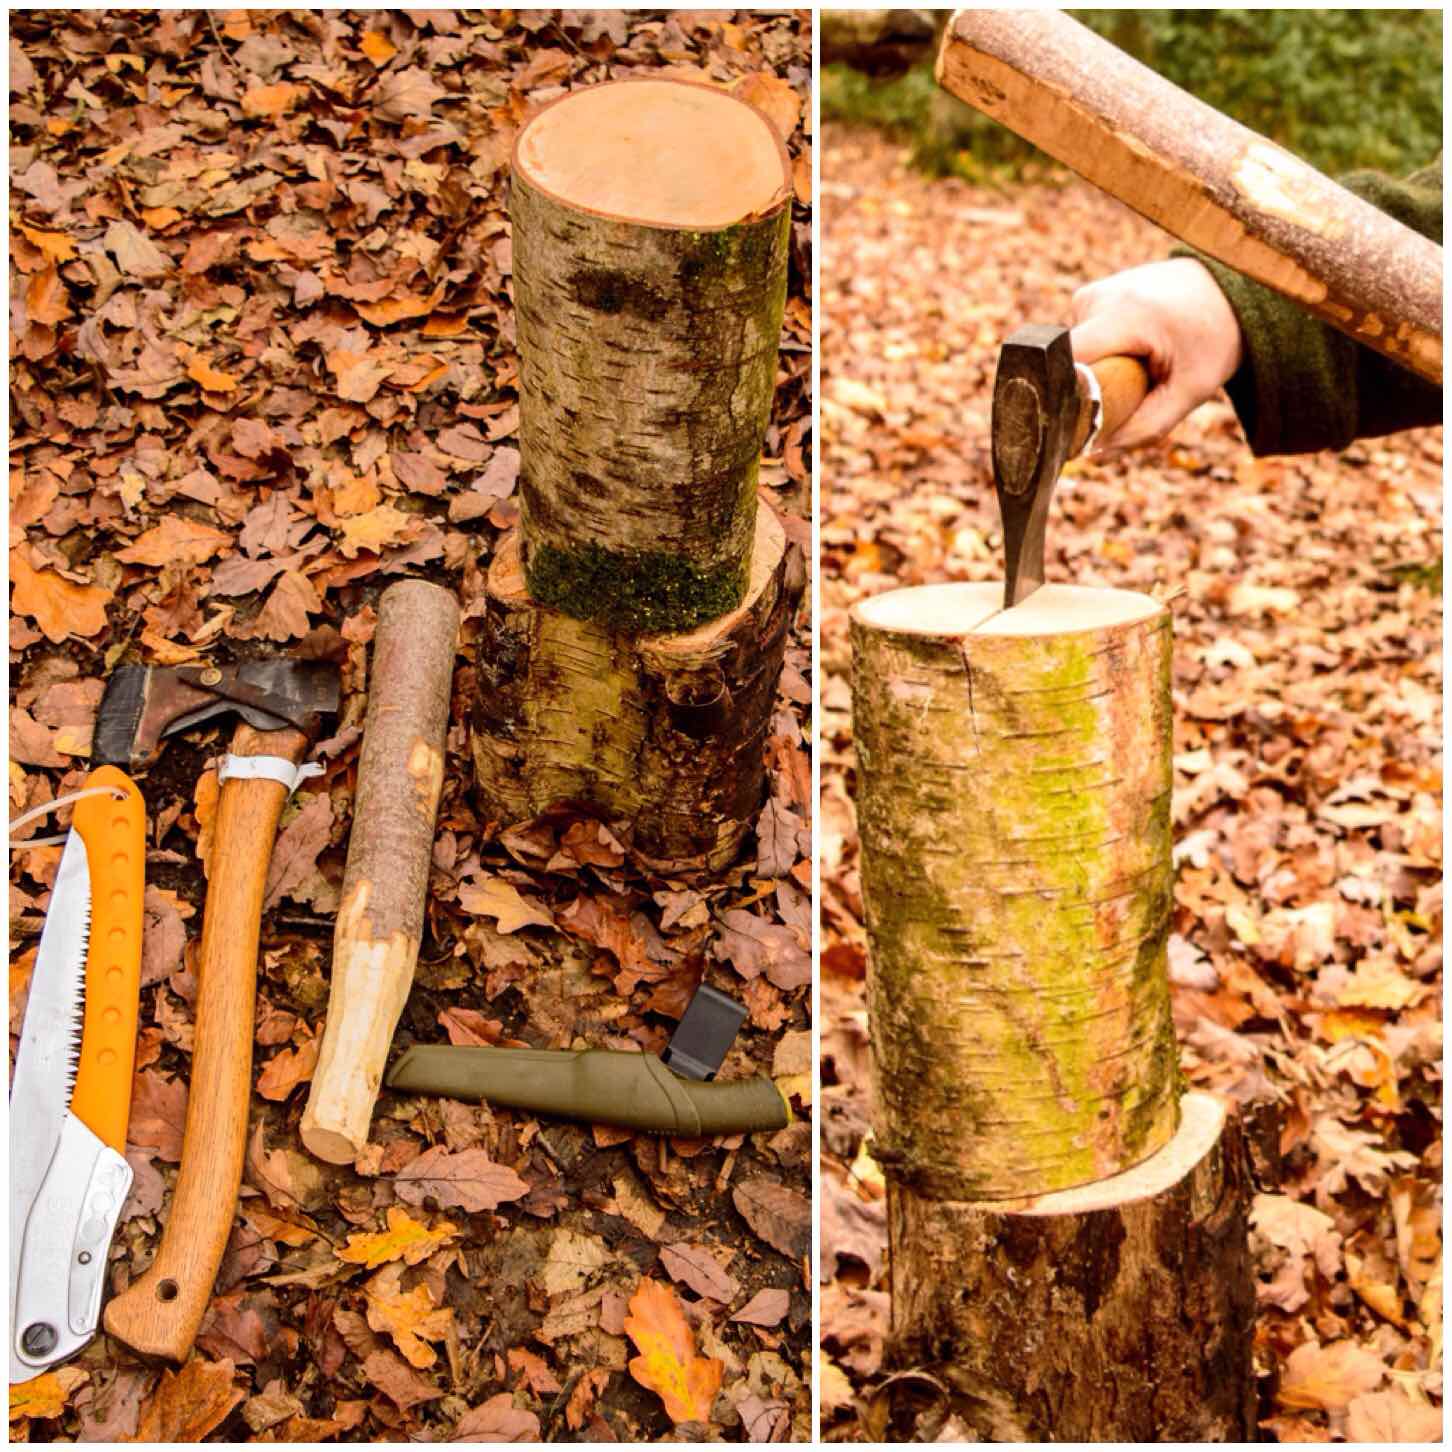
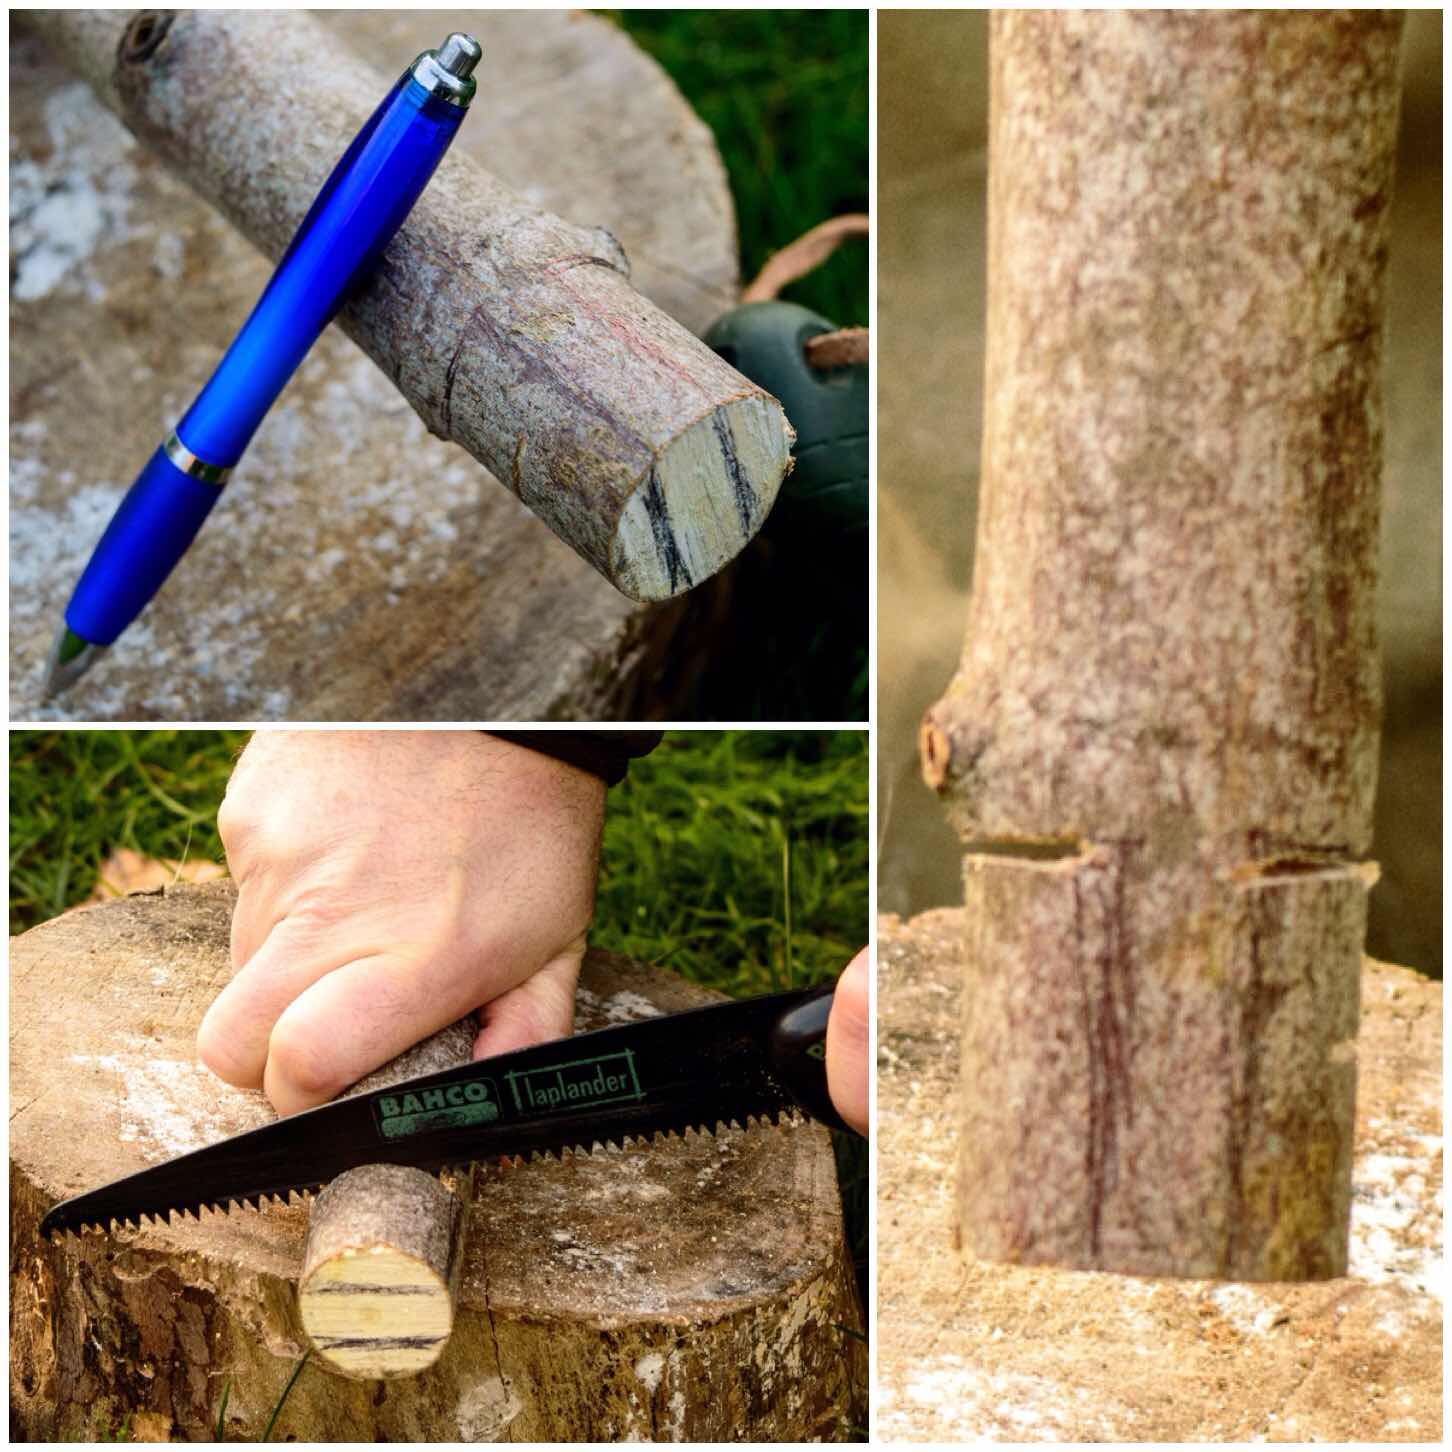
First though I wanted to make one when out in the woods with only what was to hand. It being December, there was nothing that was bone dry so I found a dead Birch and cut a section off. It was still damp to the touch, however it had been dead for over a year so it was slightly seasoned.
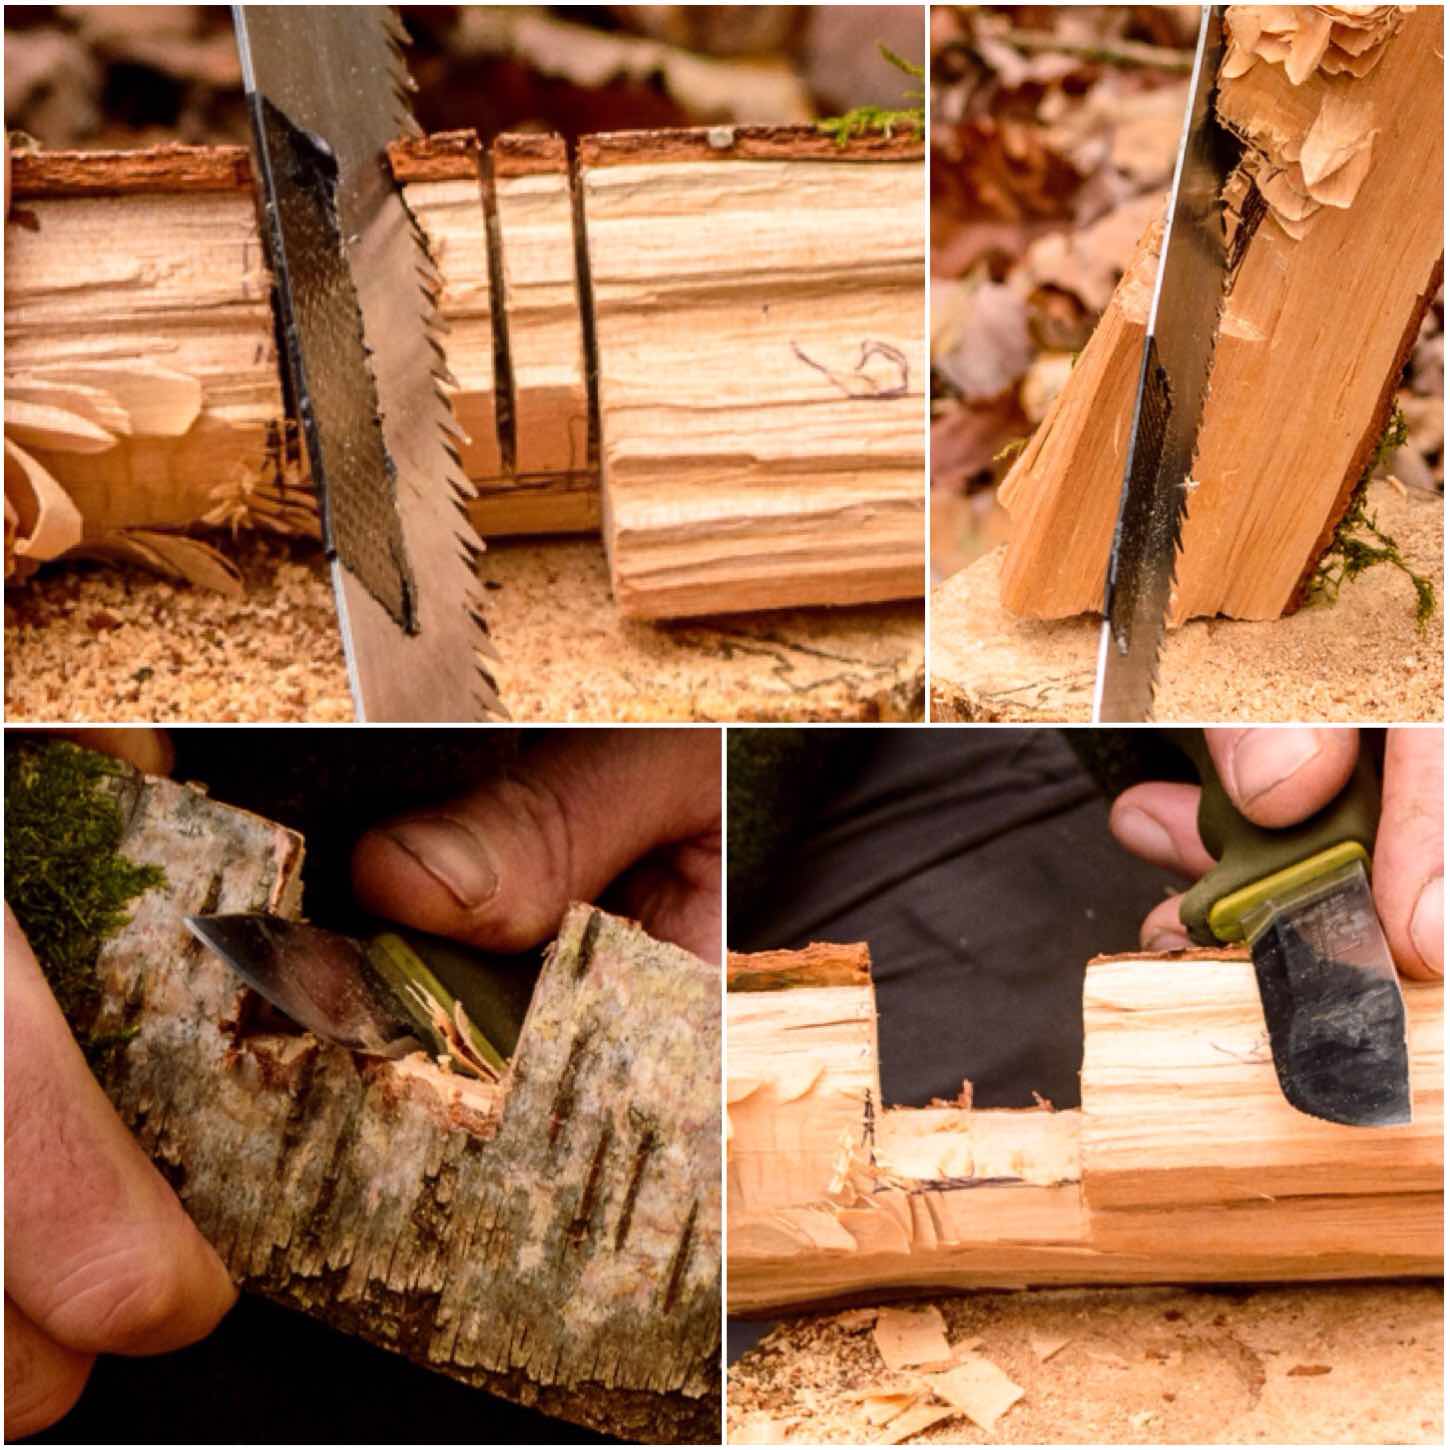
Splitting
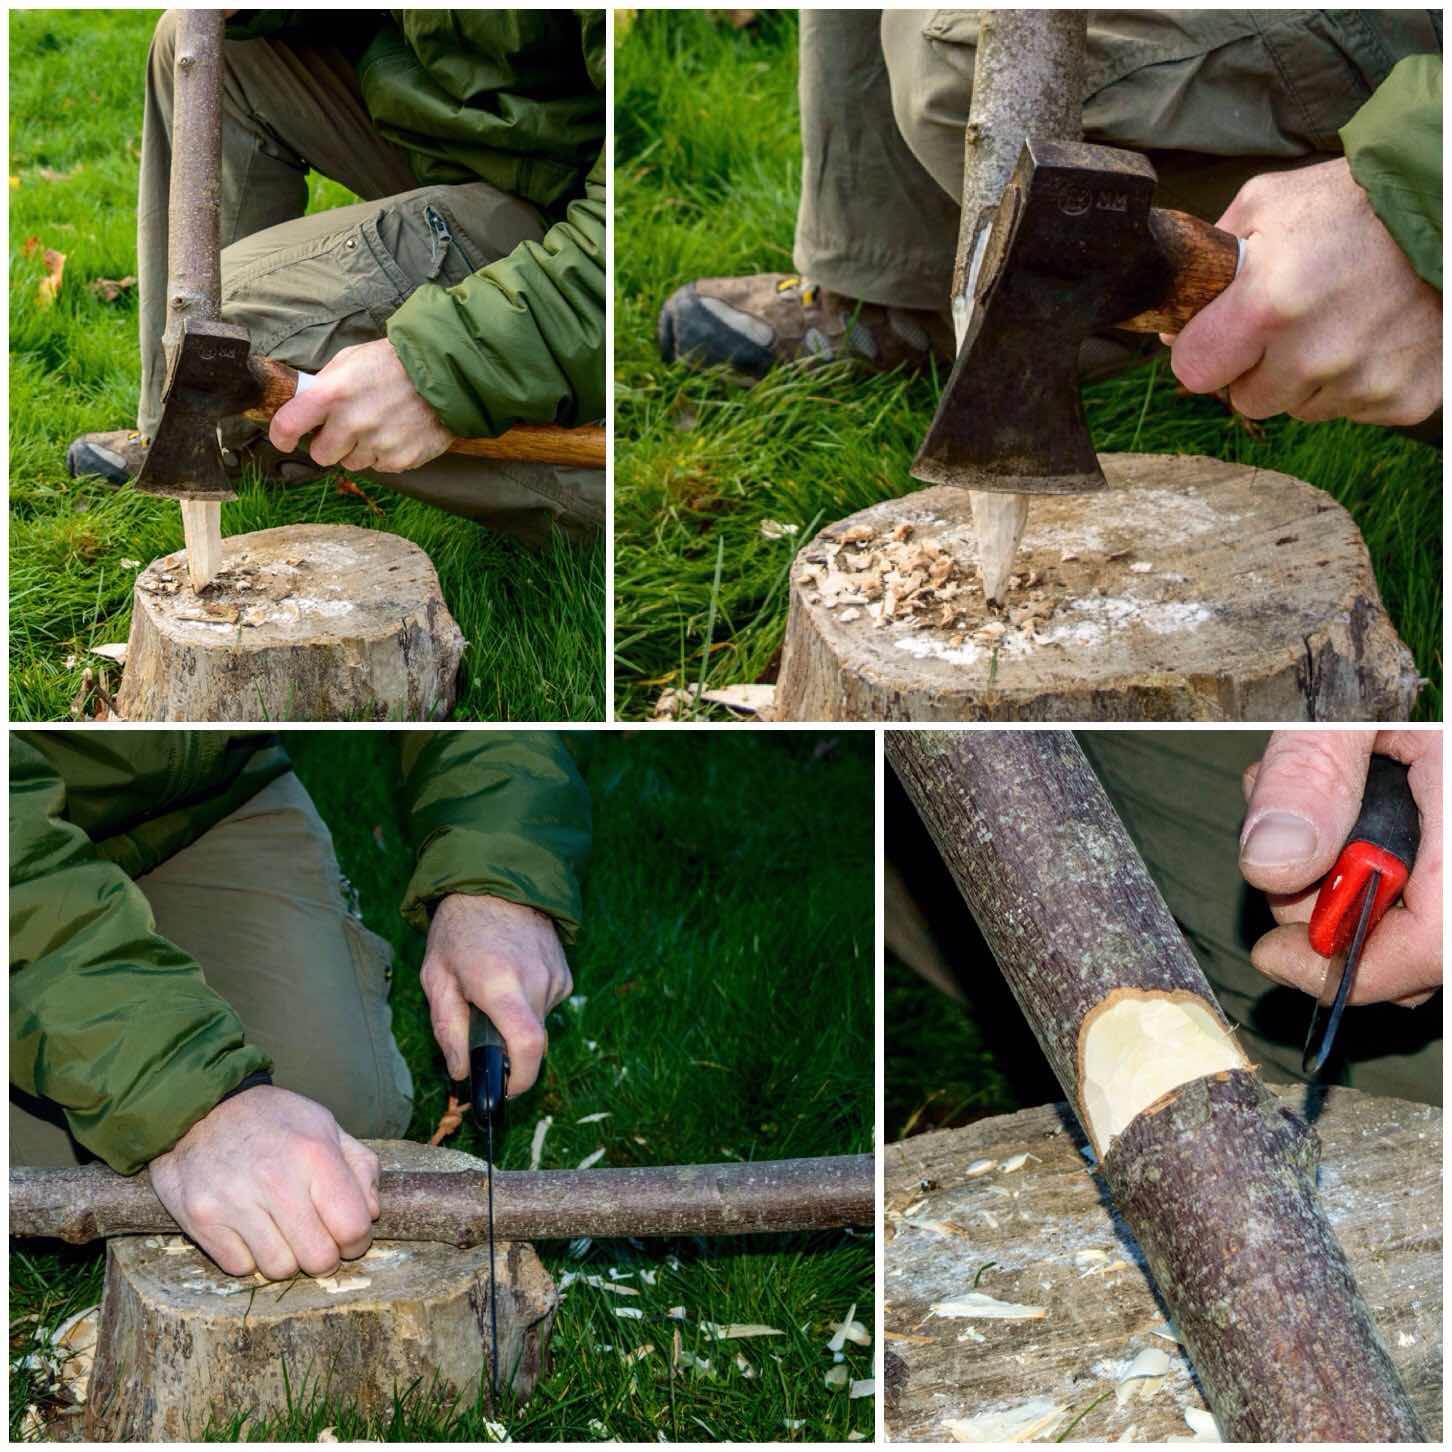
For the job I had my knife, saw, axe and a pen. Using another round of wood I split the log in half by battoning it with my axe (keep the blade of the axe at 90 degrees to your body when you do this).
Tools and battoning
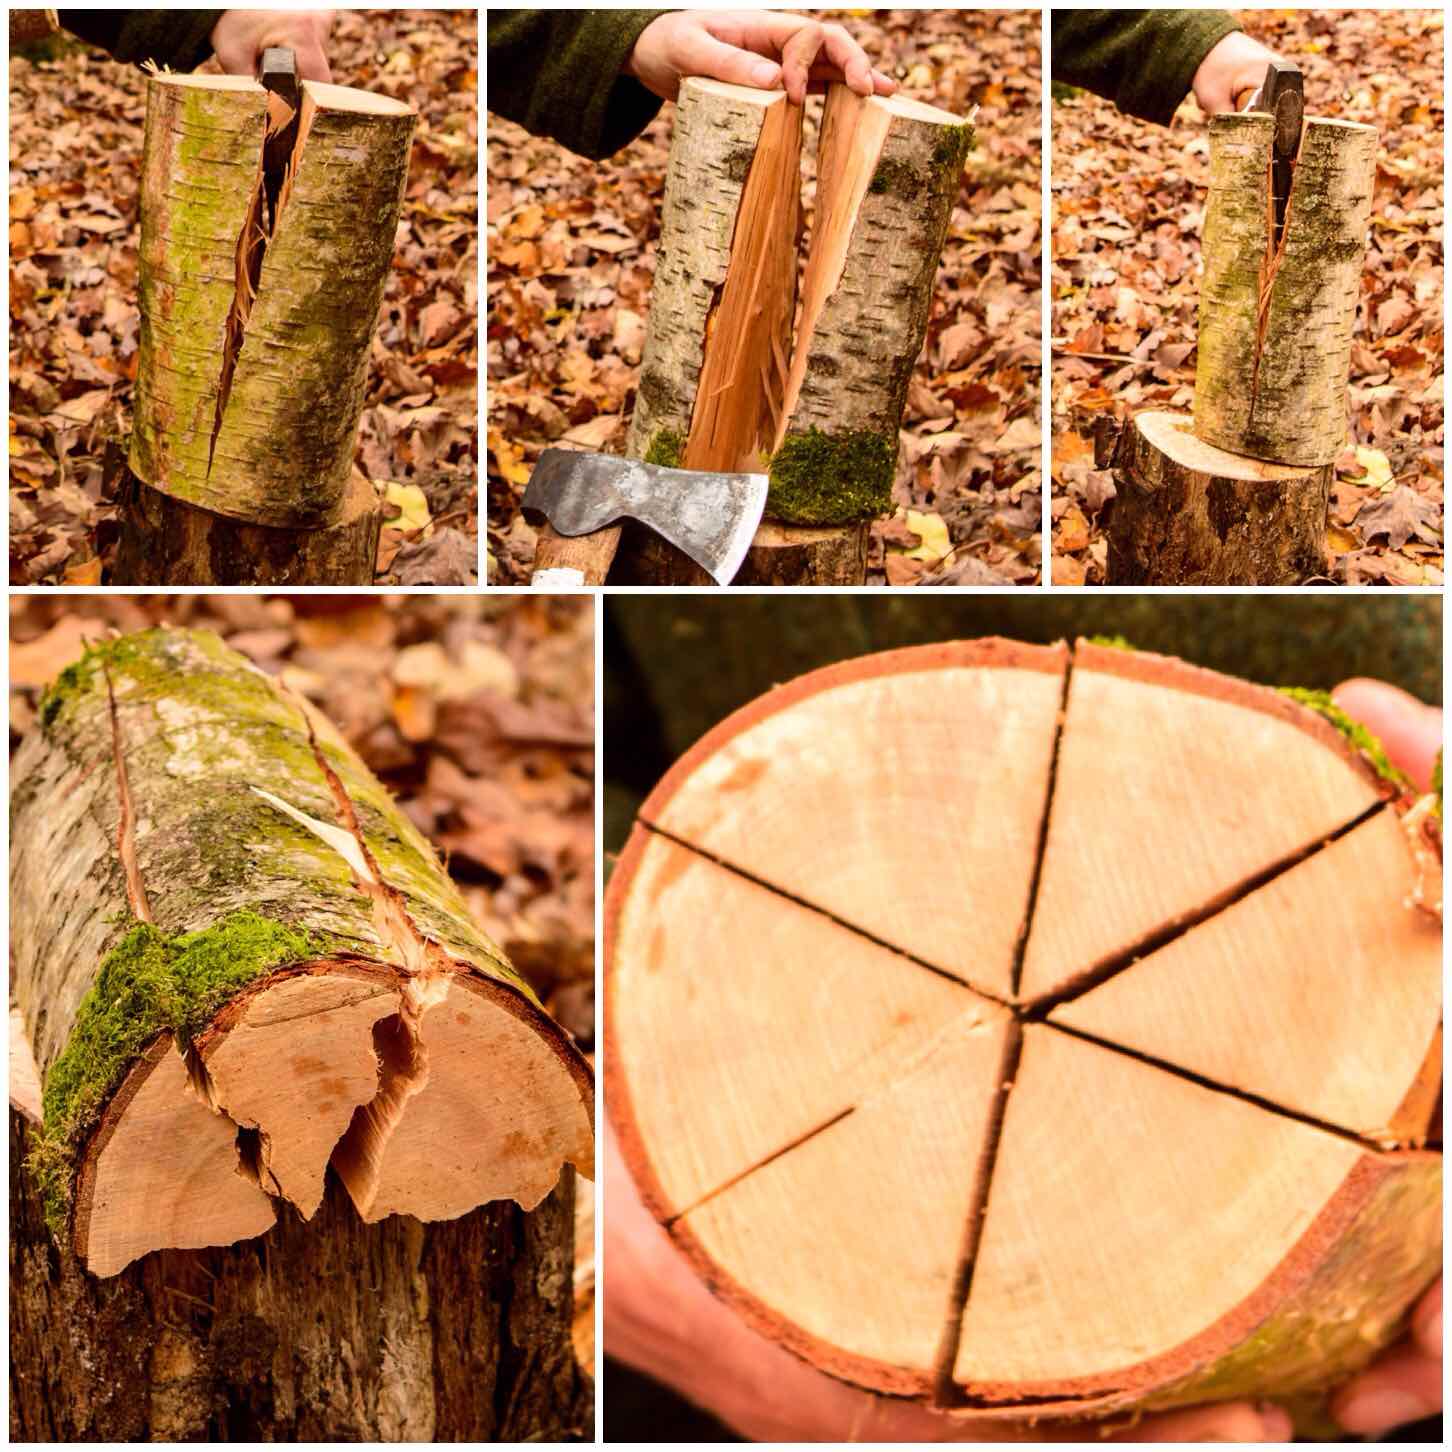
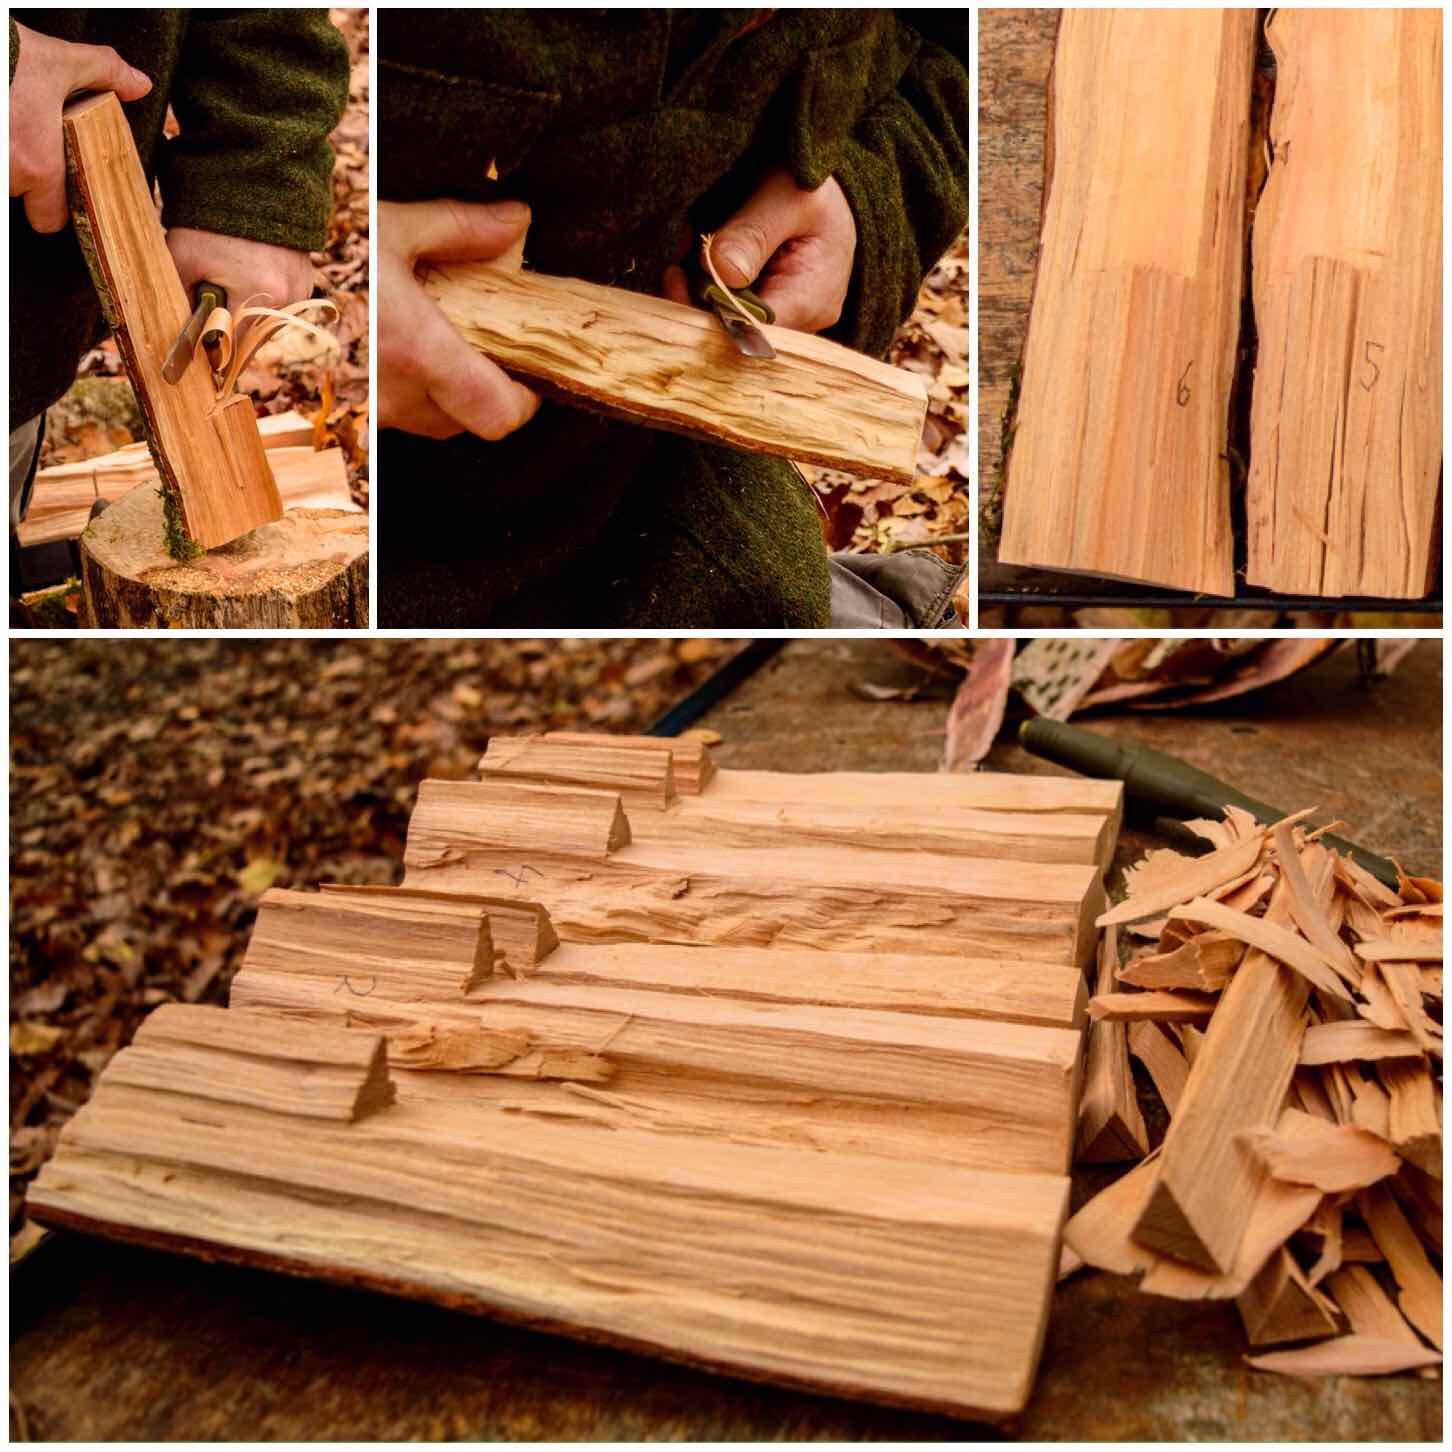
After splitting the log in half I split each half into three even sections. With very dry wood you only need halve the halves again to make four sections however my wood was damp so I wanted to produce as much surface area as possible which is why I opted for six sections.
The splits
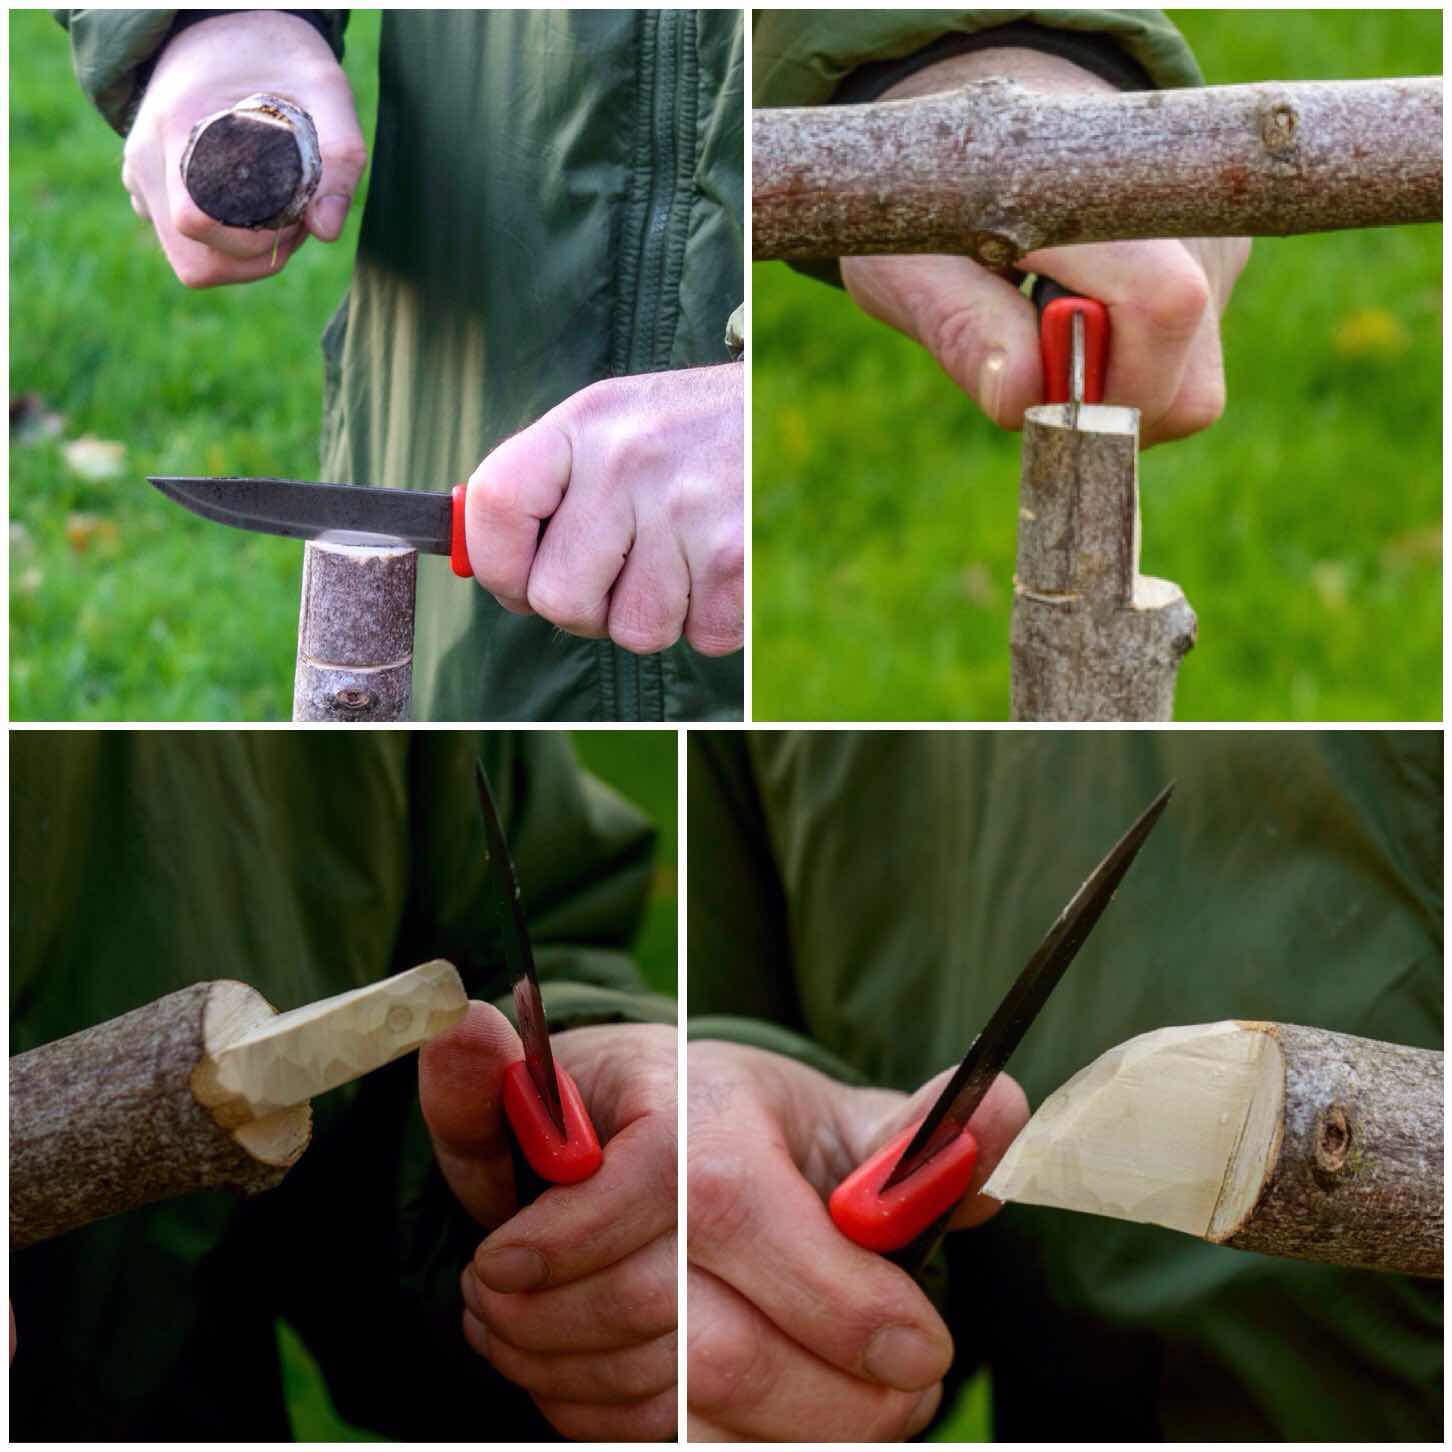
Stop Cuts
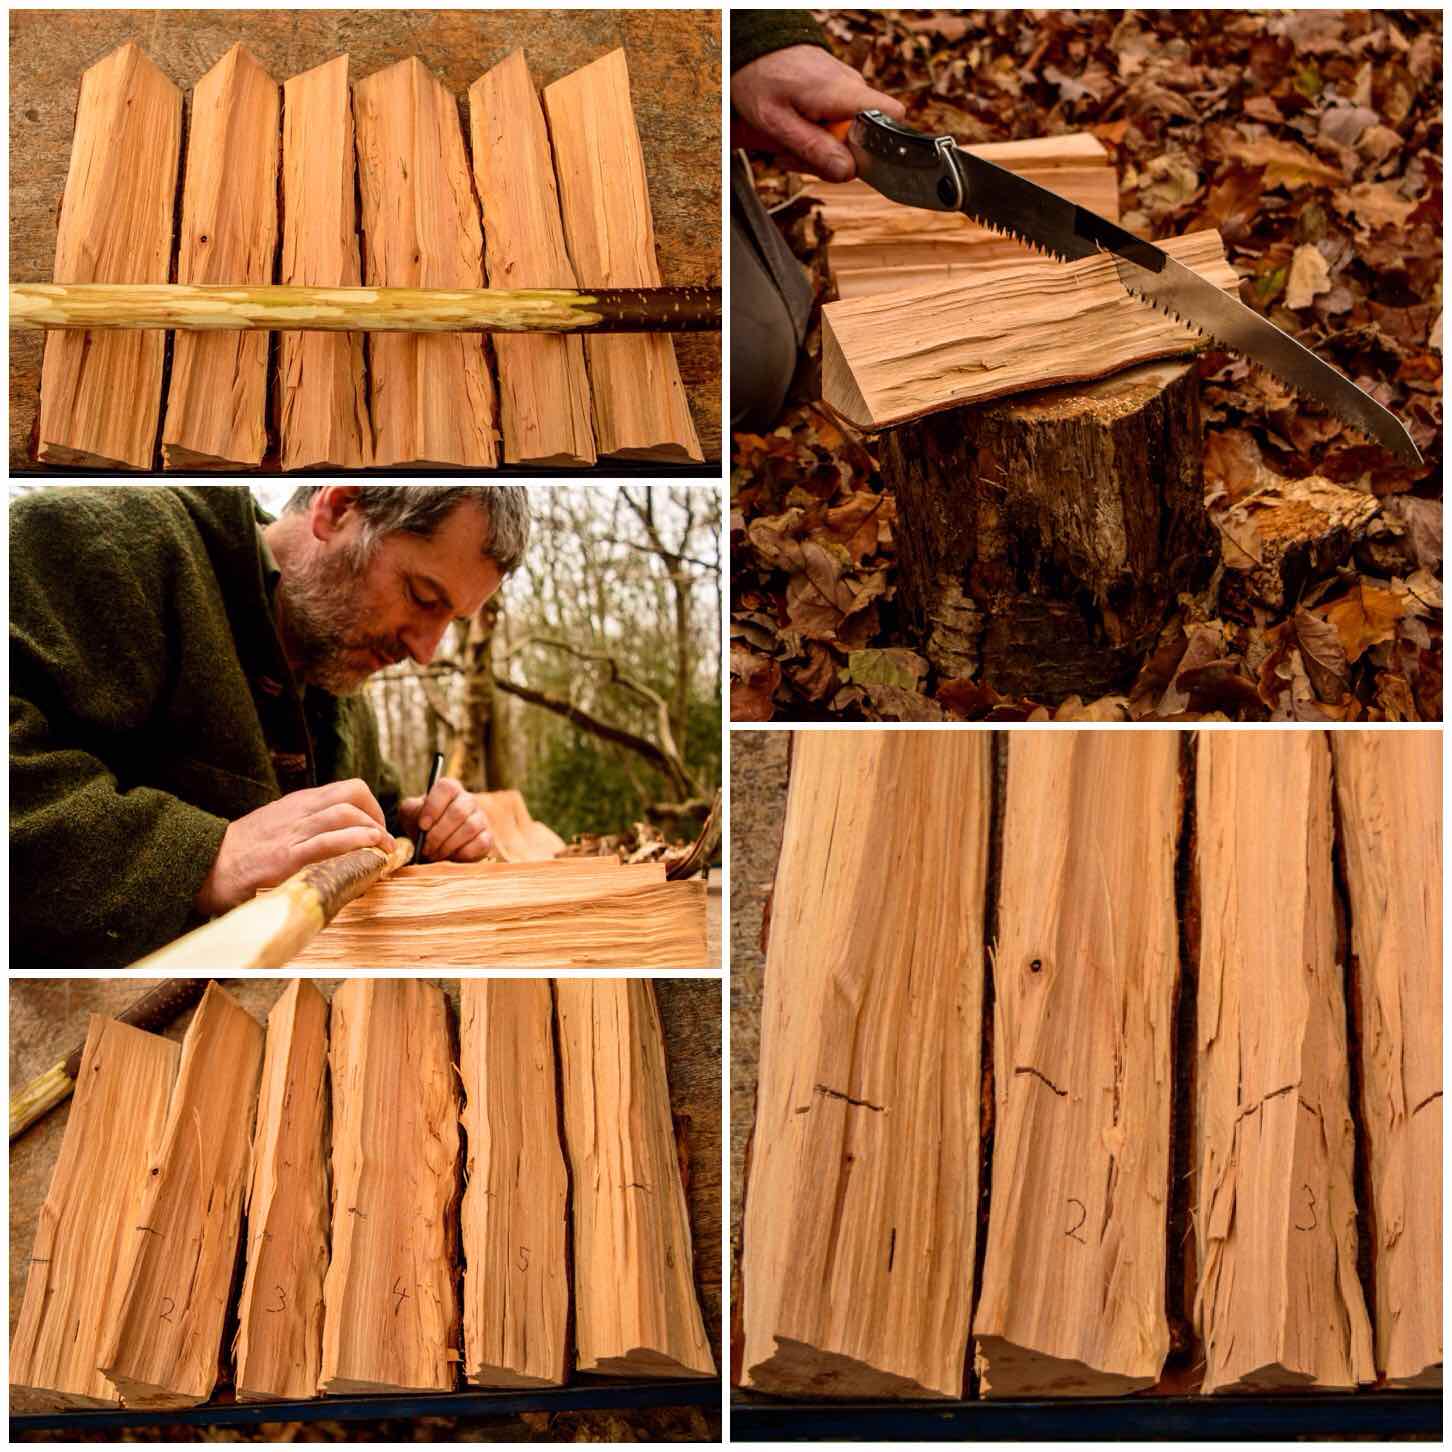
Using a stick and a pen I marked a line on each section about a quarter of the way from the bottom and also numbered each section. These marks were put in so that I could cut in stop cuts so to make it easy for me to cut out the chimney section.
My friend Keith Coleman suggested using tape as a depth gauge for this and it worked a treat, with each stop cut ending up the same depth.
Stop cuts
Creating the Chimney
Using the tape as a gauge again I marked a line at the top of each split section and then, using my knife, battoned off the excess wood.
The stop cuts help as the split does not travel all the way to the bottom and so creates a lintel that the fire will sit in.
Battoning out the chimney
After a little bit of whittling with my knife each segment had the wood removed so that the chimney would be formed when it was all put back together.
It is important to keep all the shavings and little chunks of wood from this process as it can be used as kindling for the stove.
Trimming the chimney
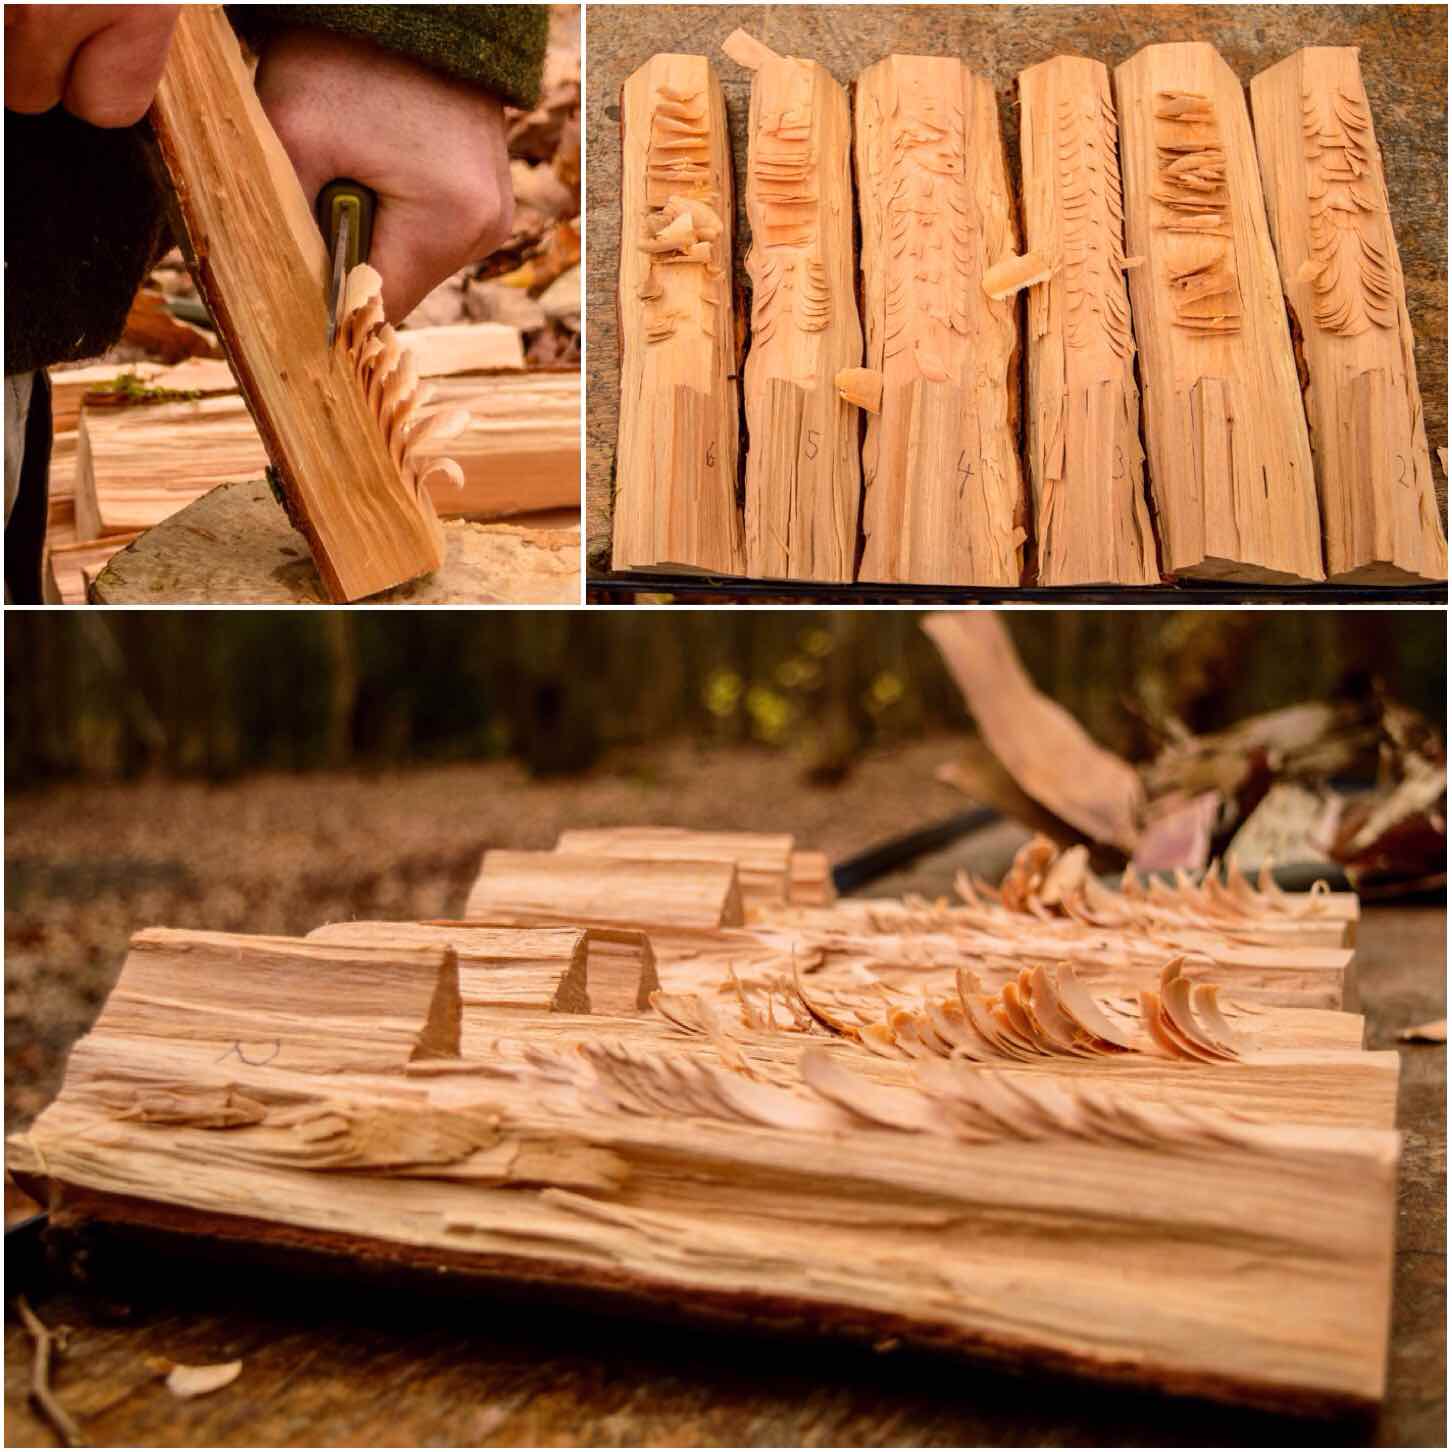
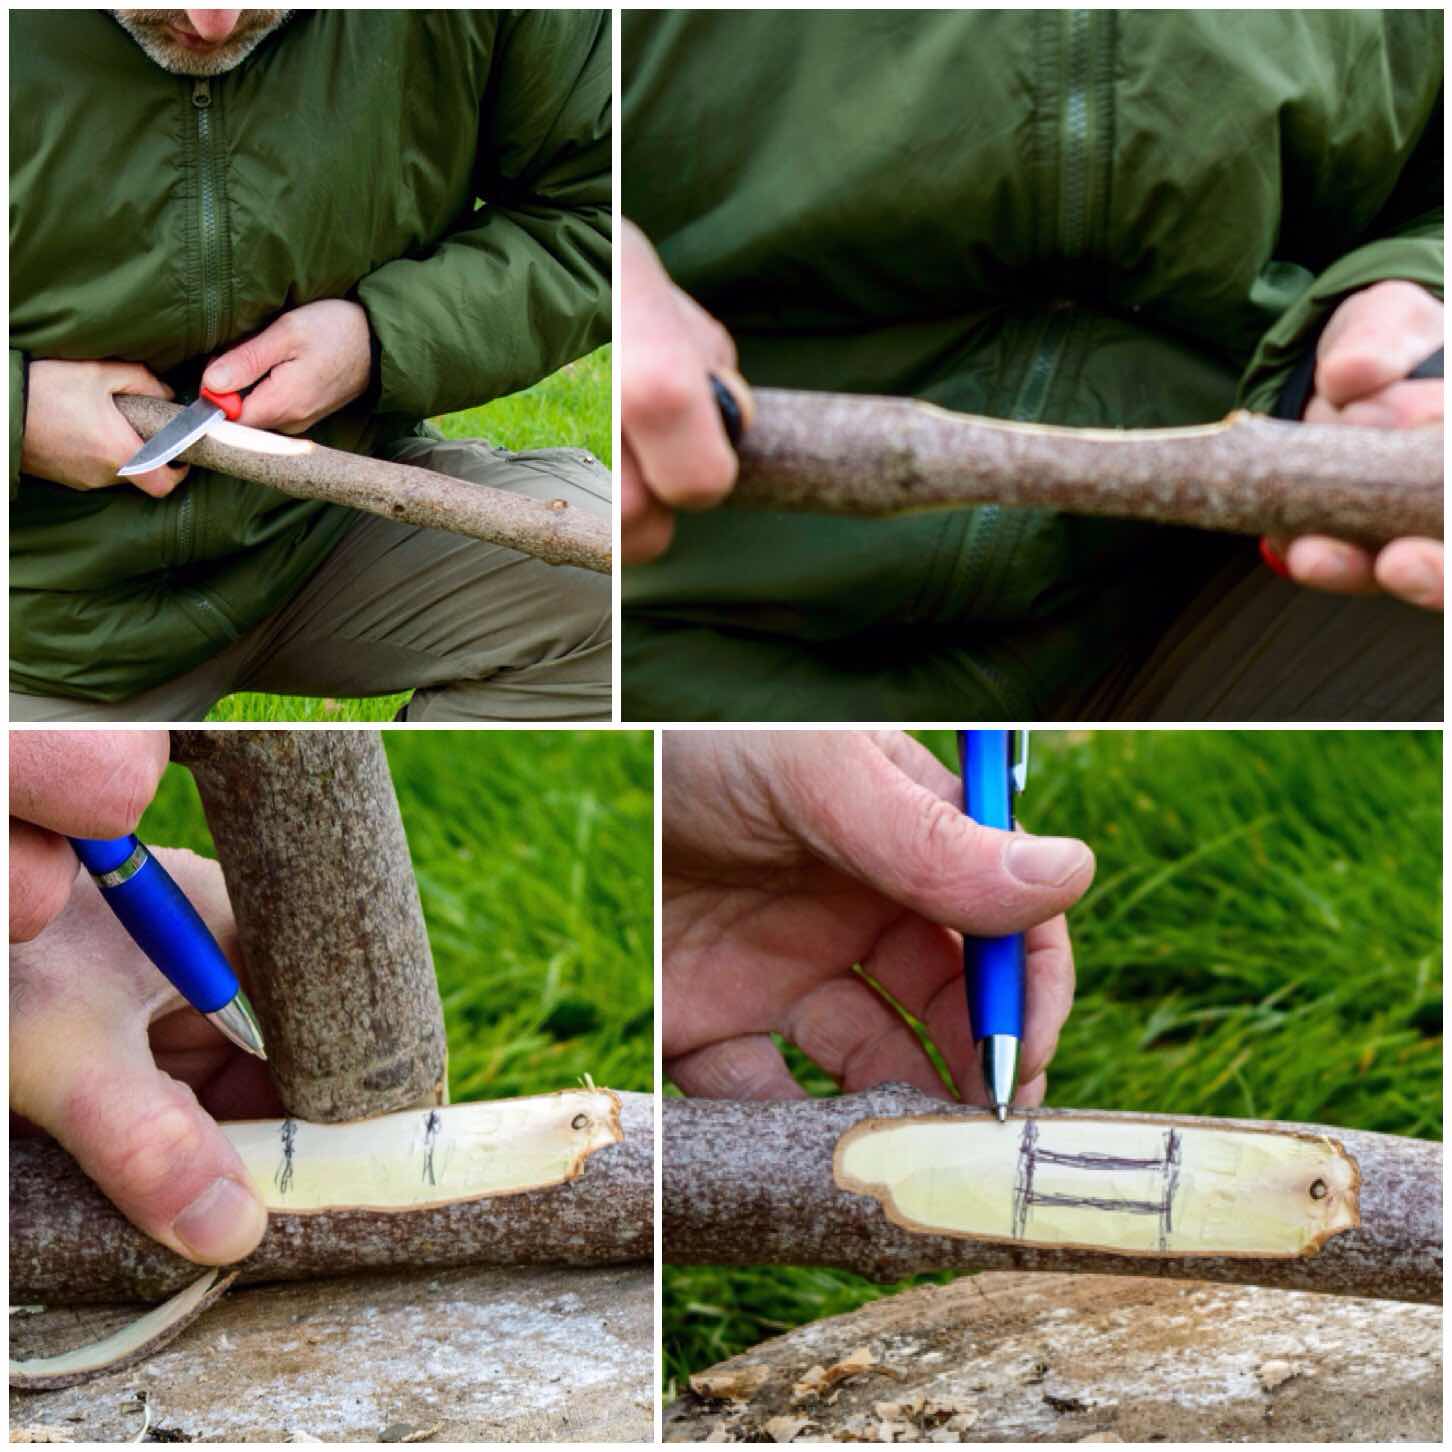
The Raappanan Tuli style
Now the secret of making damp wood burn is to produce as much surface area as possible for the flame to catch. I learnt this from researching and making the Finnish Raappanan Tuli candle.
On the inside of each segment cut as many burrs as you can so that the flame from your kindling has something to catch onto. I tried out different types of cuts here and some were easier to carve than others – your wood will soon tell you what works well.
The Raappanan Tuli style
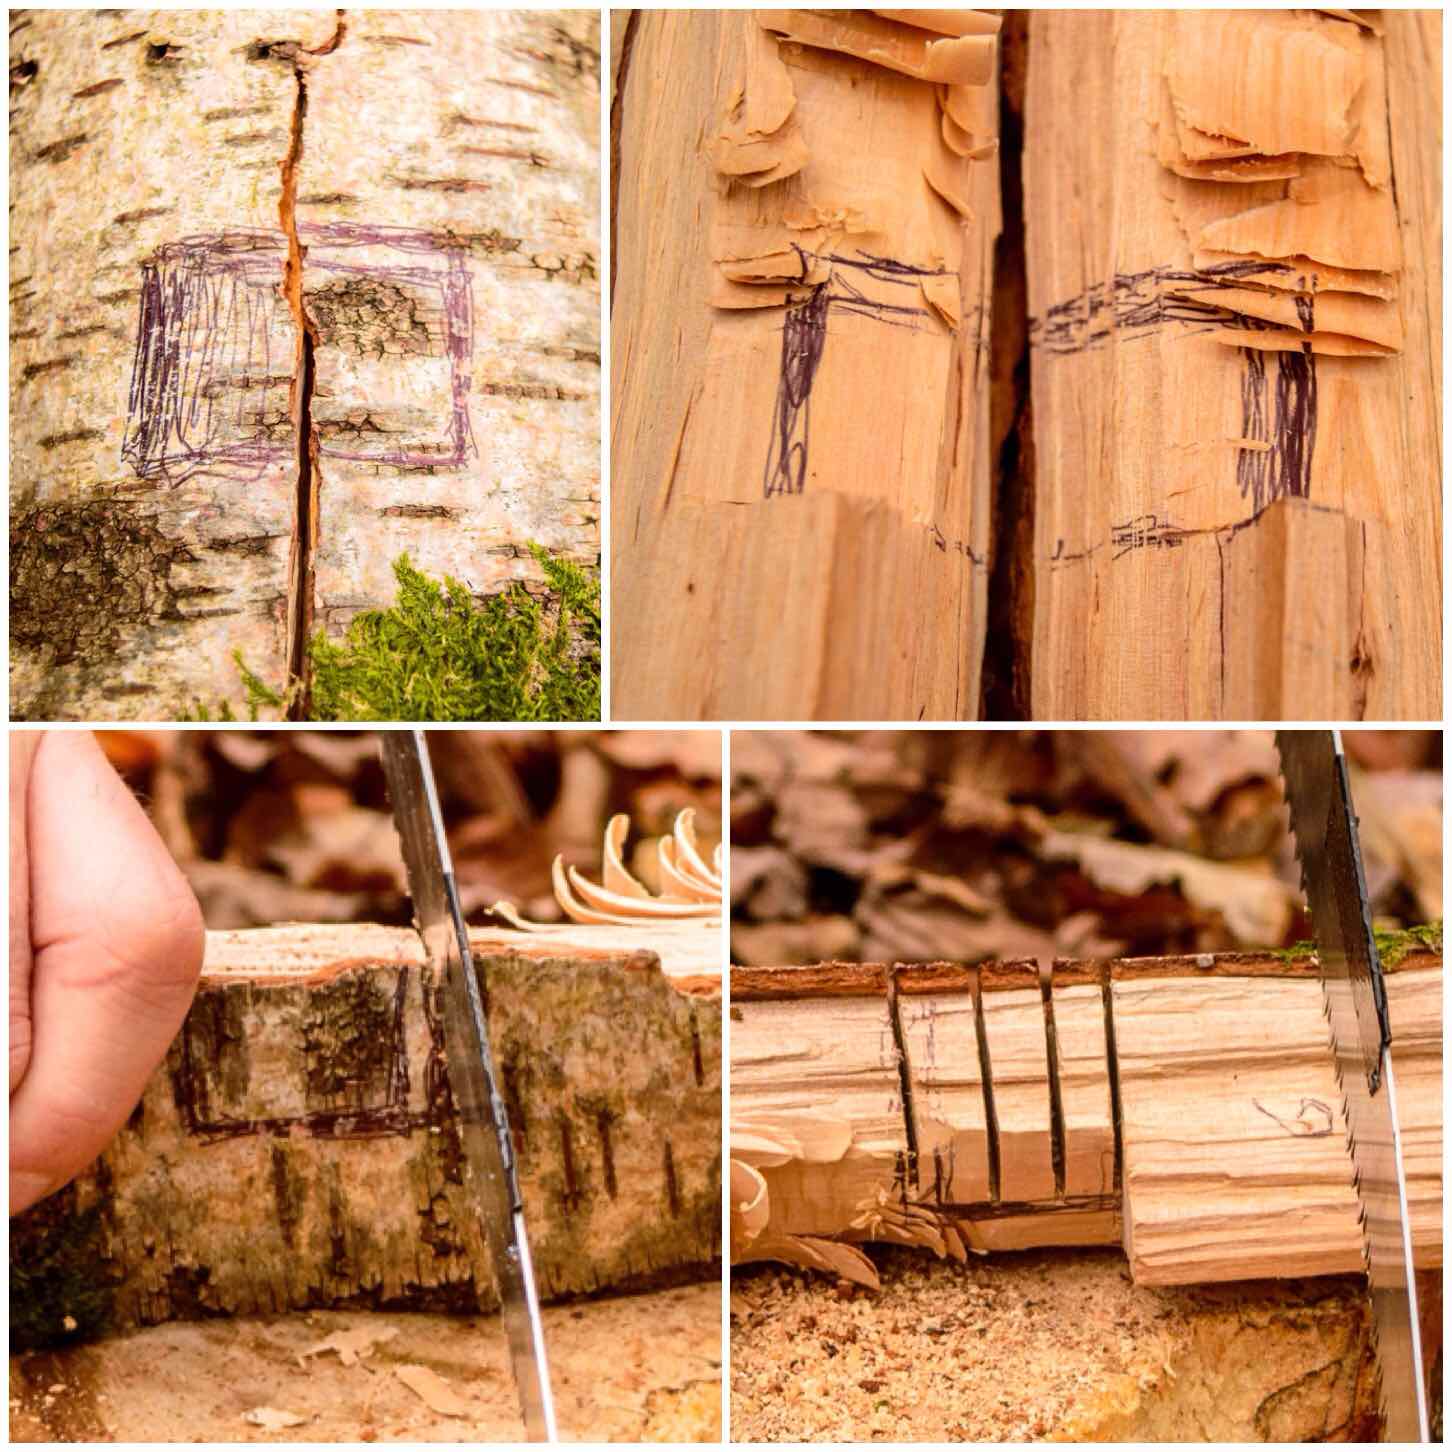
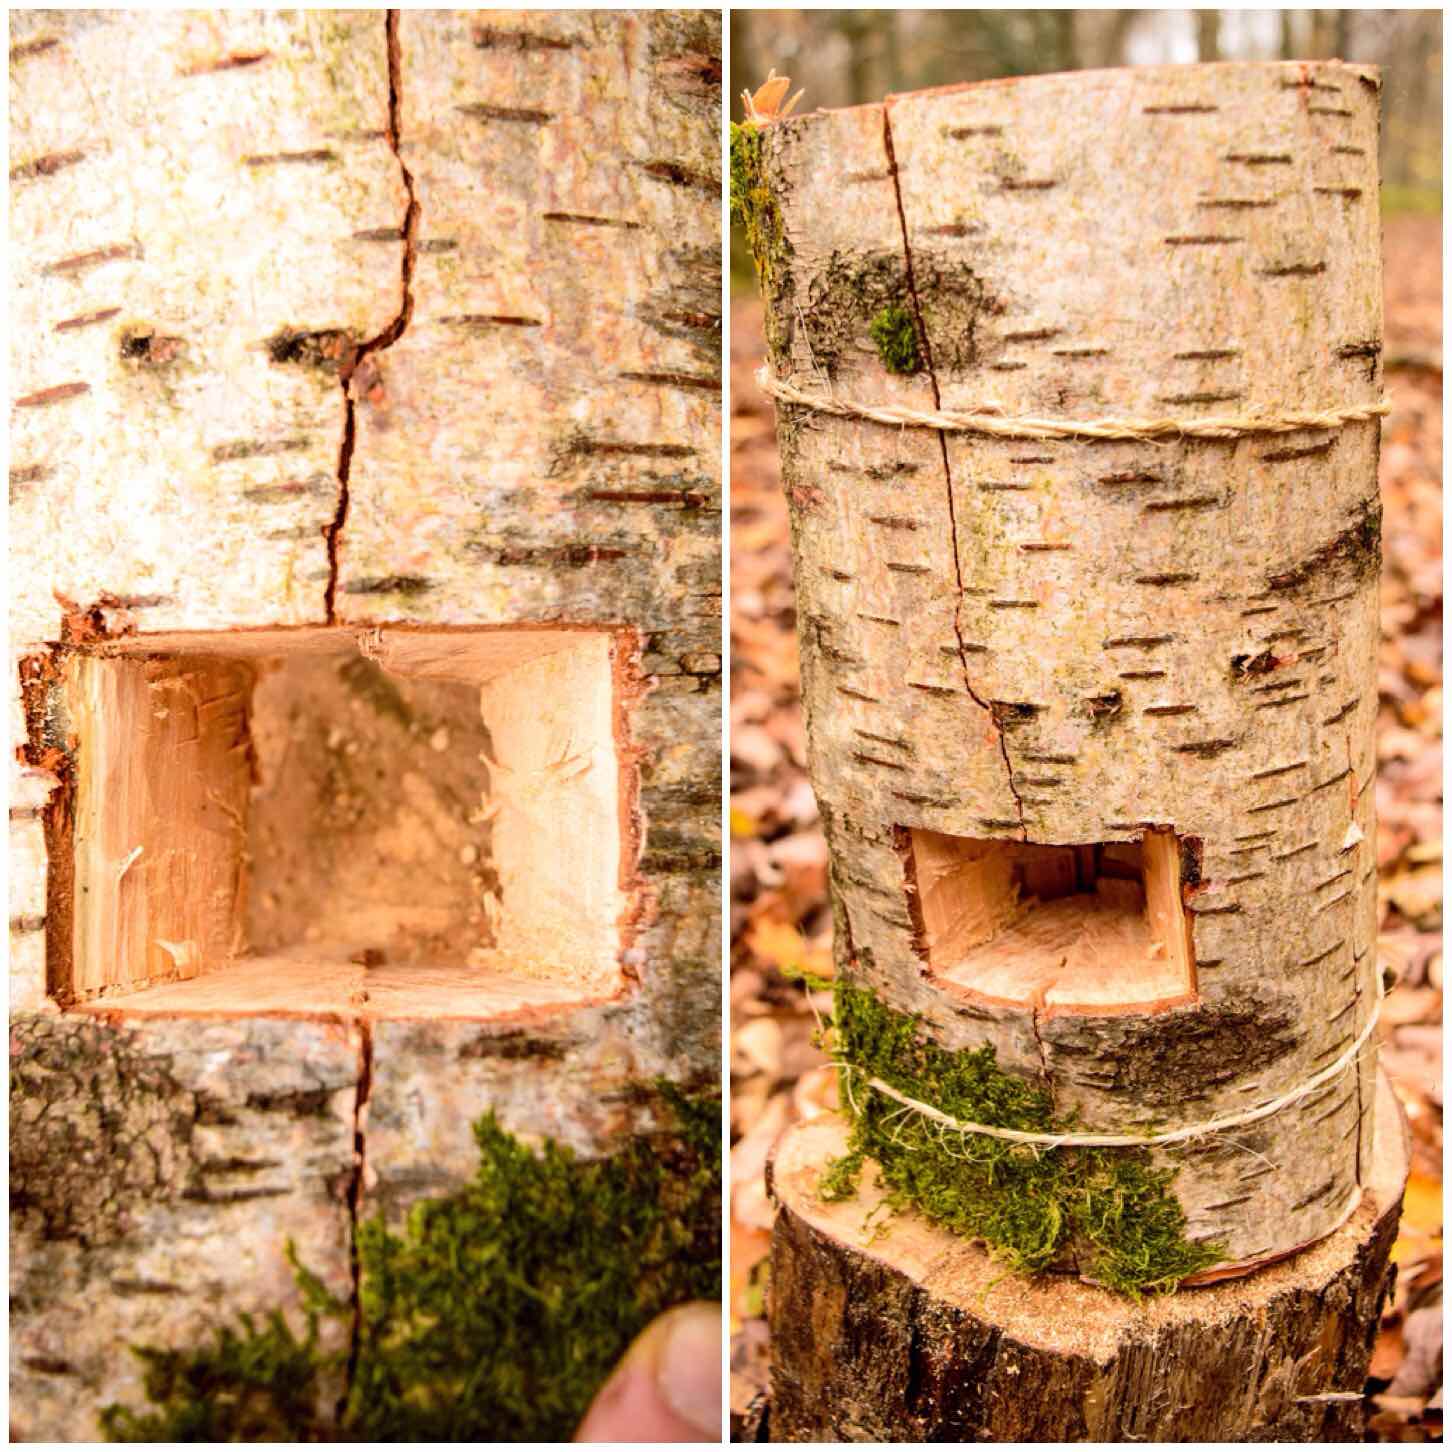
The Firebox
Next up is the opening for the firebox. I selected two segments that fit together (having them numbered really helped here) and marked out with a pen two rectangular areas just above the sill I’d created. I made sure the marking went all the way round to the other side of each segment.
I then used a saw to cut into the wood in the shaded area. Do as many cuts as you can as this makes it easier to remove this waste wood.
Carving the firebox – stage 1
I then used my saw at an angle to cut out the wood and finished the job off with my knife.
Carving the firebox – stage 2
When finished the idea is that you want an access point big enough to put your kindling into the firebox area at the bottom of the chimney.
I found some old sisal string tied to a tree and used that to tie everything back together. It was pretty damp anyway and I hoped that would last longer than the copious amounts of paracord I tend to carry around with me. I think some thin wire would be the ideal thing to use though.
Firebox and all wrapped up
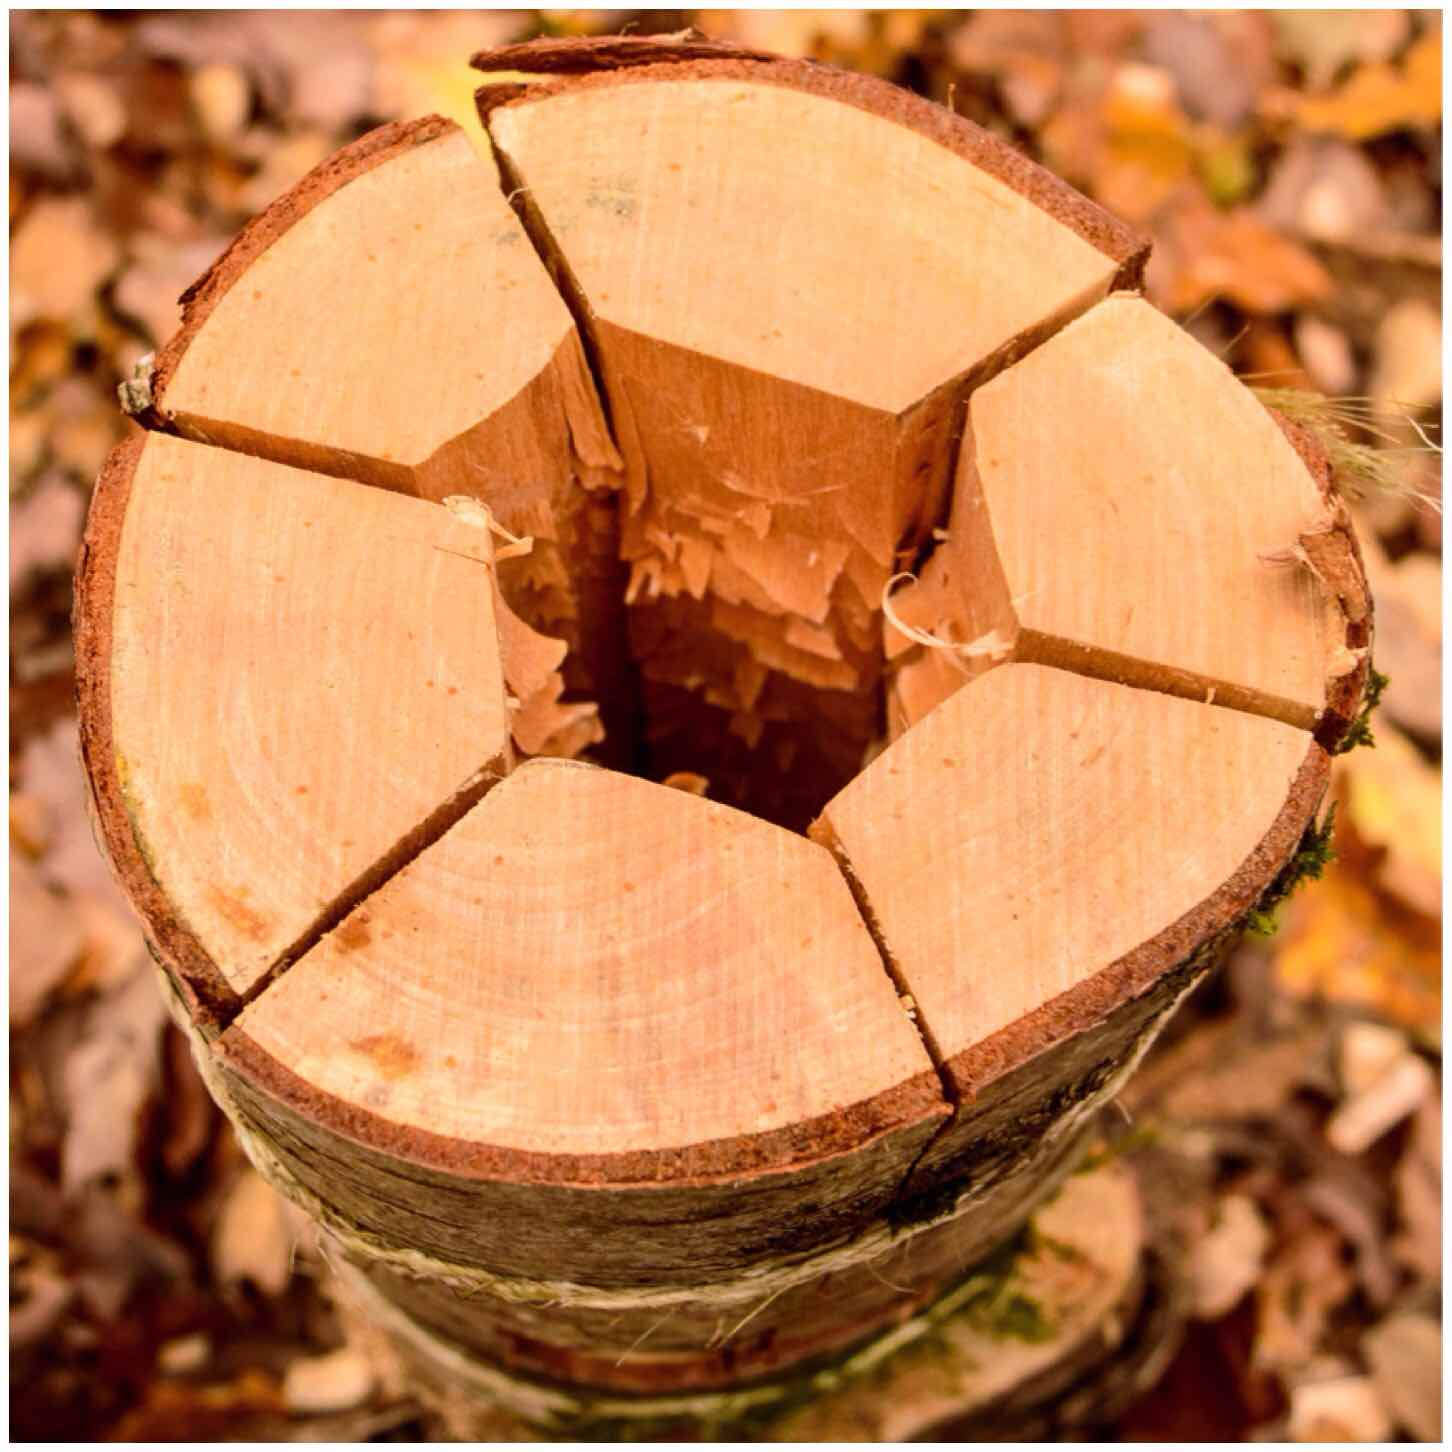
From the top you can see how wide the chimney was. I have no idea what would be the optimal size to have so you may need to experiment for yourself.
The chimney
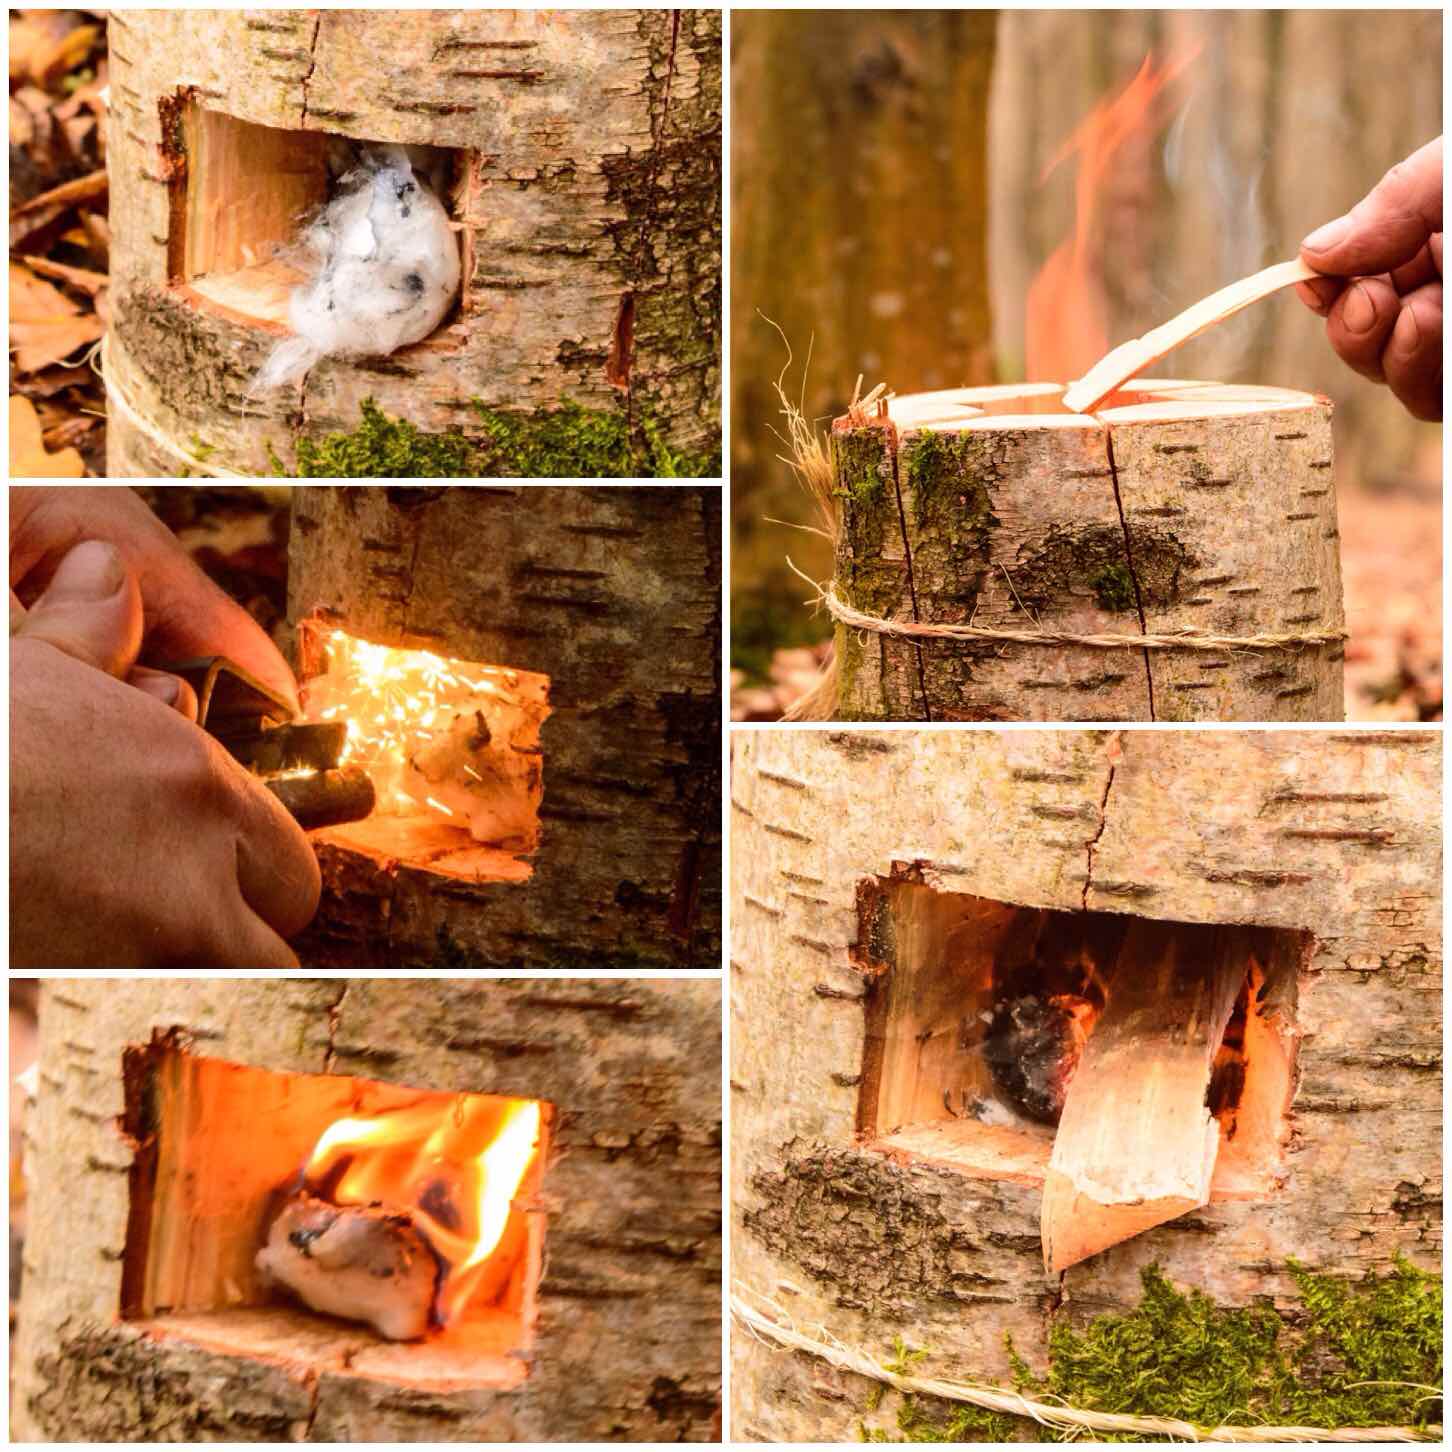
Firing Up
As the wood was so damp I decided to go for the sure-fire method of lighting the stove up – good old cotton wool and Vaseline. This worked well however I needed to use 4 Vaseline-coated cotton wool balls to maintain the fire.
I have used shredded birch bark mixed with spruce resin on a number of occasions to light Finnish candles before but I didn’t have the time to collect the resin this time.
Once the fire had started I added tinder/kindling down through the chimney and in through the firebox. The main thing at this stage is to not over-fill the firebox but allow the airflow to be maintained. It means about 10 minutes of work but the damp wood inside the chimney area will dry out and the overall heat of the fire will increase.
Firing up
Maintaining the Fire
I placed three pebbles on the top of the stove for the kettle to sit on securely.
The gap created by the pebbles also allows you to drop tinder/kindling down the chimney. I like to use strips of birch bark here as it is so pliable and flammable.
If the wind is low or changes direction you may need to get down low and blow directly into the firebox to keep the fire going. Once the wood has dried out a bit you will not need to do this so much.
Maintaining the heat
I gave the stove about 10 minutes before putting the kettle on and then in about 15 minutes the kettle was boiling. Not as fast as modern stoves but for what is in effect a wet log not bad.
Waiting for the kettle to boil
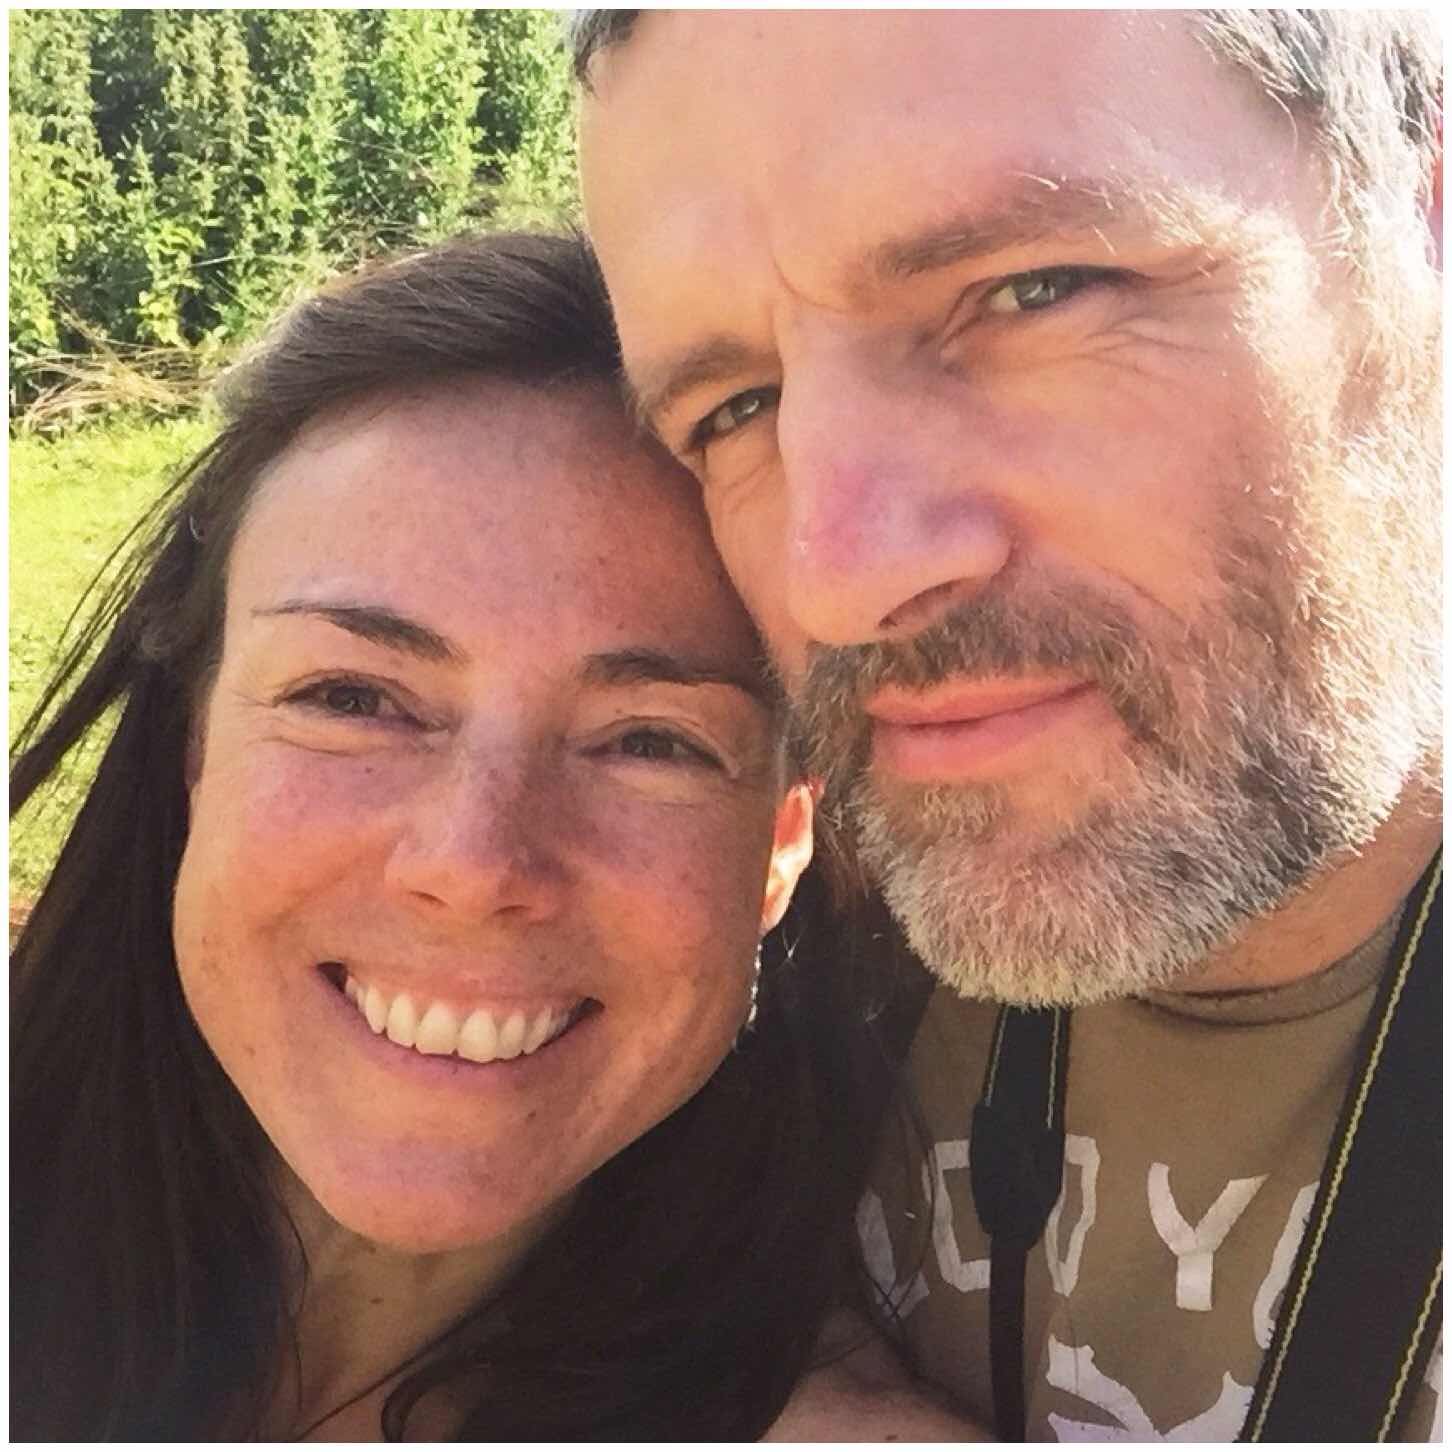
I have to thank Jess Edwards for a number of these pictures at the end. Jess is a great photographer and keen bushcrafter so it was great to concentrate for once on the tinkering and leave the photography aspect in someone else’s capable hands.
Brew time
Observations
Once the coffee was made I was able to have a good look at what was happening with the stove. As I looked closely I could see the moisture in the wood boiling off. If you look in the bottom picture you can see the water boiling away on the surface.
Drying off
The stove kept going for another hour before I had to put it out as we were leaving.
Overall I was very impressed with this Log Rocket stove with the Raappanan Tuli twist and I will be using it again on my courses.
A glorious farewell
Thanks again to the Scouts for documenting this stove – I hope you like my little twist on it?
I tend to put what I think are interesting photographs I have taken up on my Instagram account and as I was looking through it tonight certain ones caught my eye and brought back some good memories.
Memorable Moments will be a short series of themed posts of pictures that I enjoy looking at time and again.
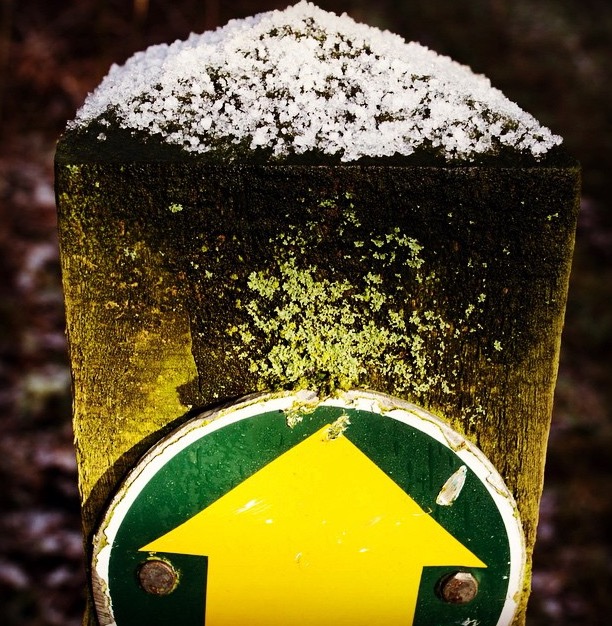
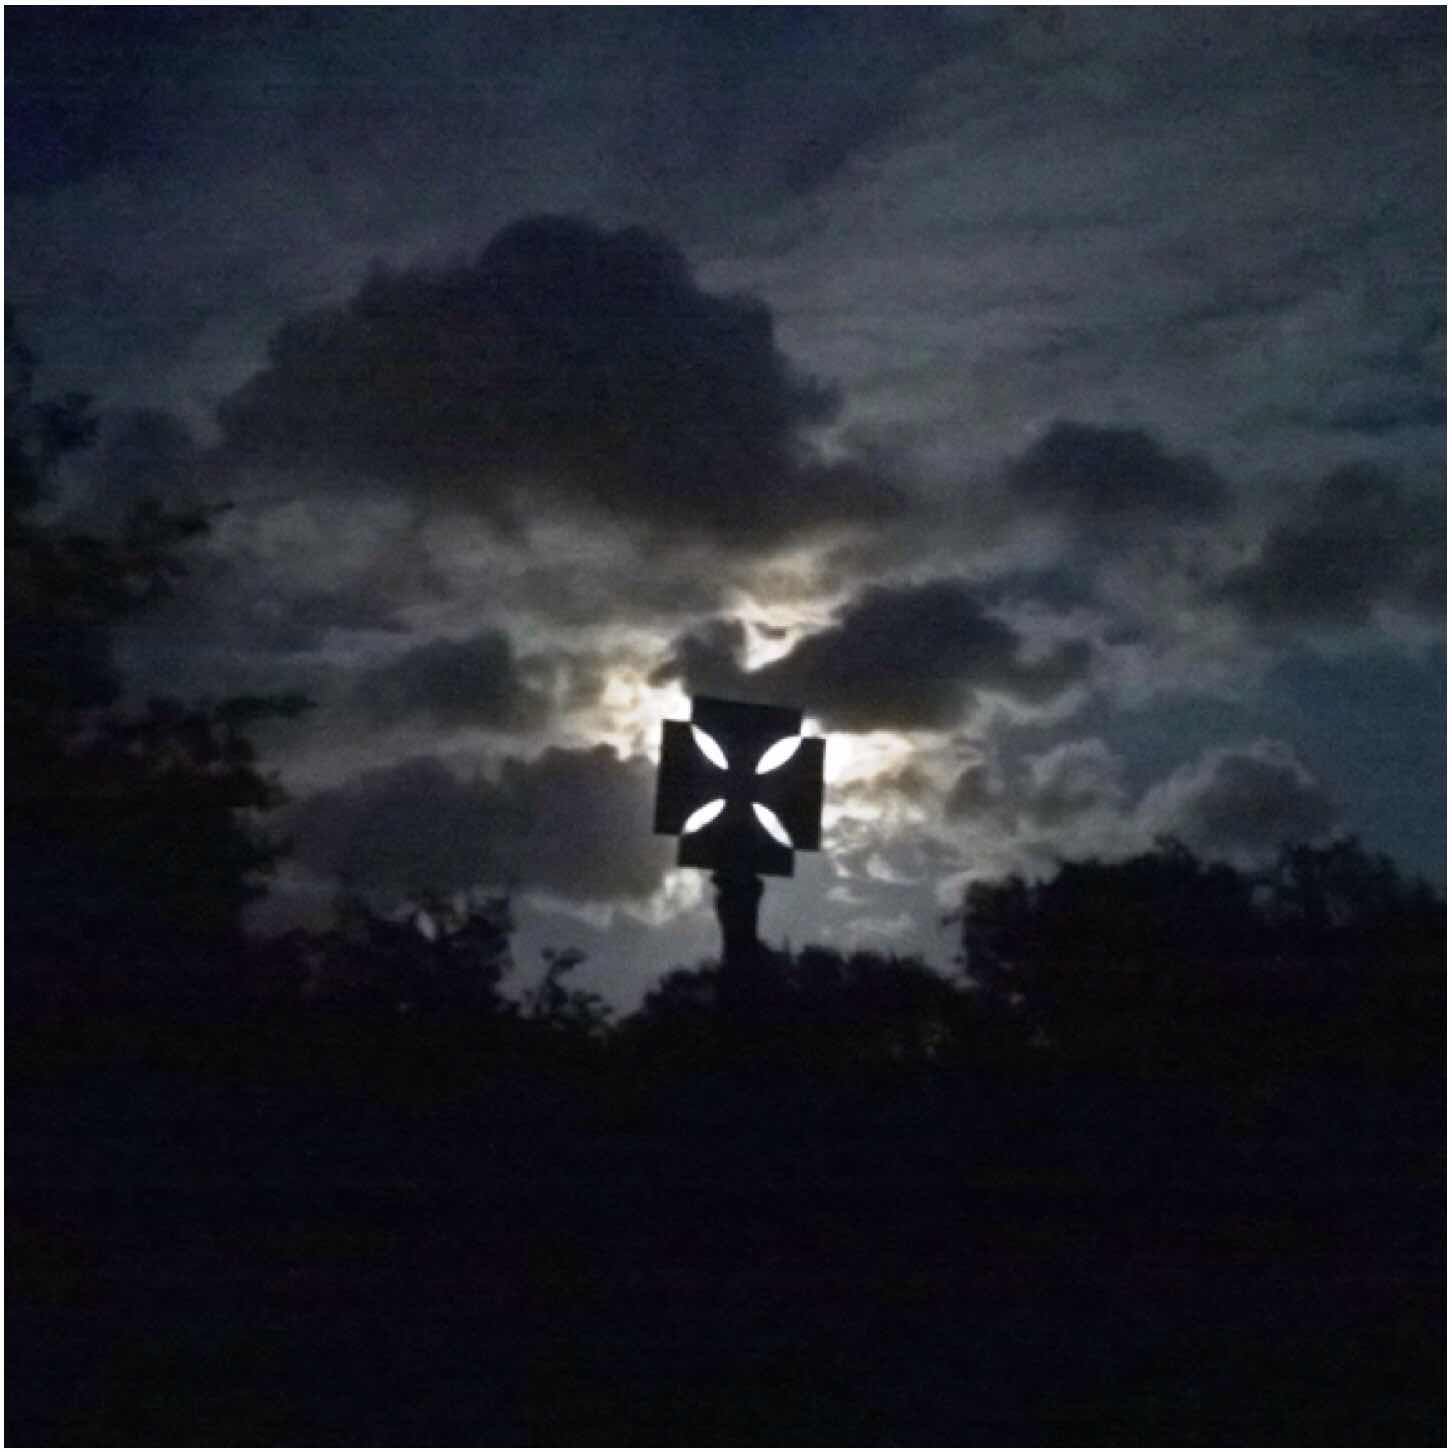
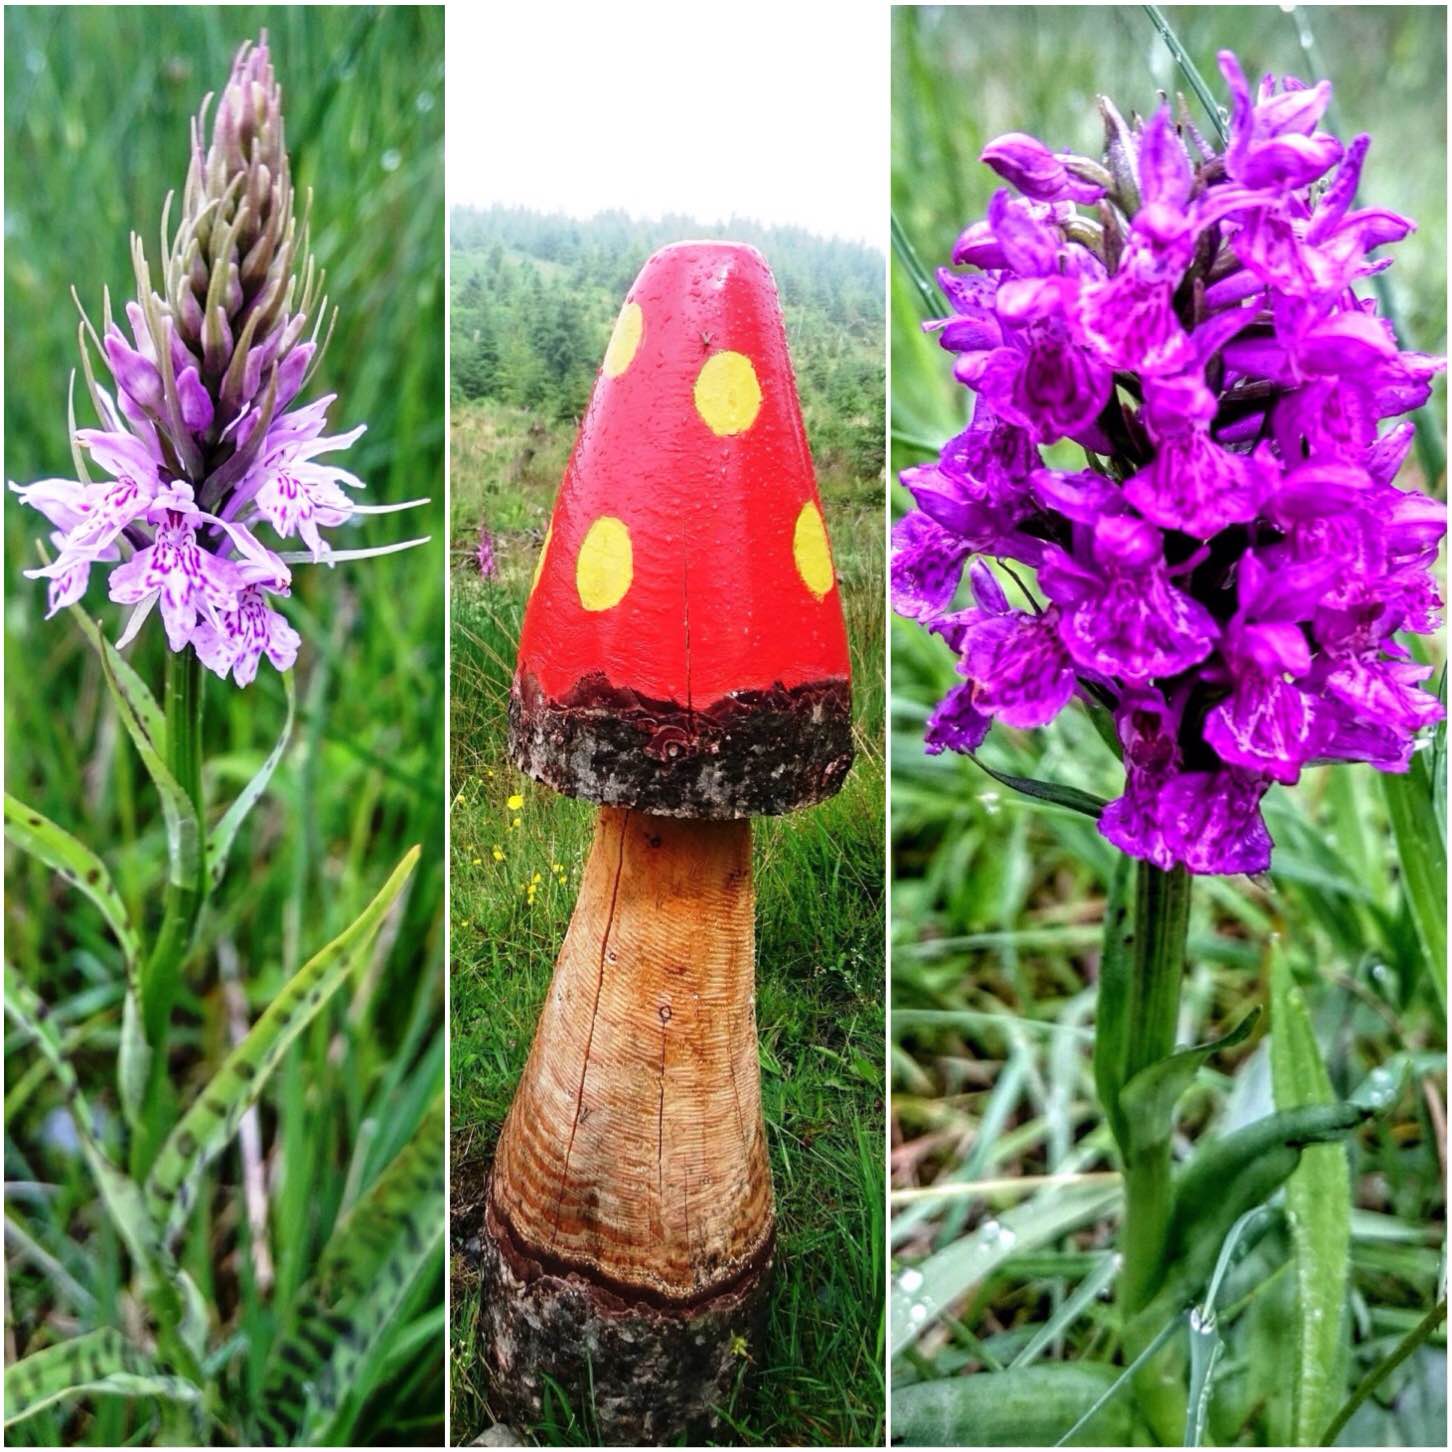
Starting with last winter I was strolling along a path in North Wales and was struck by the simple beauty of this footpath marker – reminded me of a sugared bun.
Marking the way
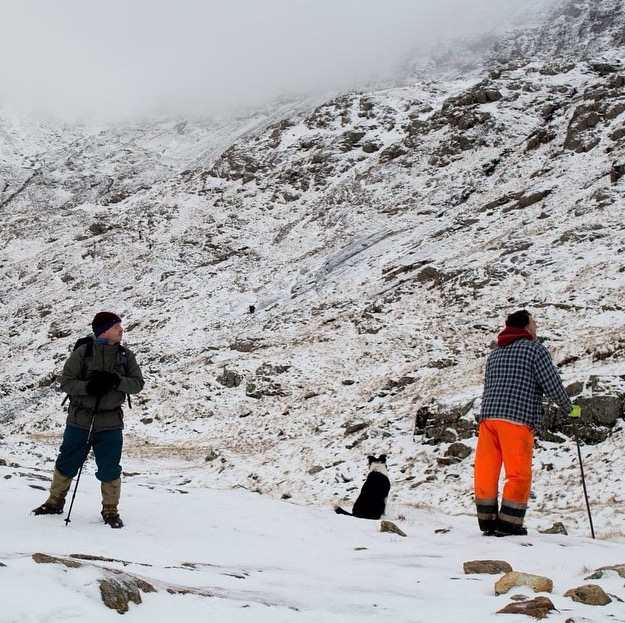
While walking with a group of Sea Cadet friends below the summit of Snowdon a shepherd appeared out of the mist and stood by us. He did not look at us or speak to us. He just stopped, surveyed the land around him, spotted his sheep and was then off – quite a surreal moment where I instantly was reminded that one persons playground is another persons workplace.
Work and play
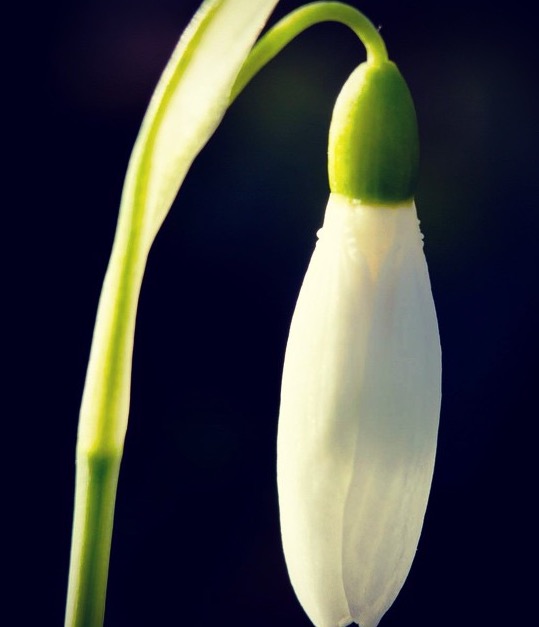
Late January brought the Snowdrops out and as I was practising my macro photography I was soon out and about looking at these beautiful flowers.
I somehow managed to catch this one in the right light and our local magazine thought it good enough to make the cover page in last February’s issue.
Simple beauty
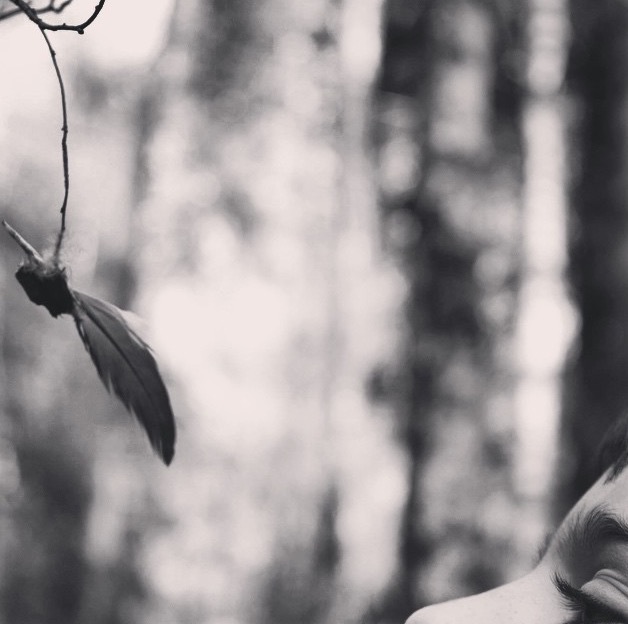
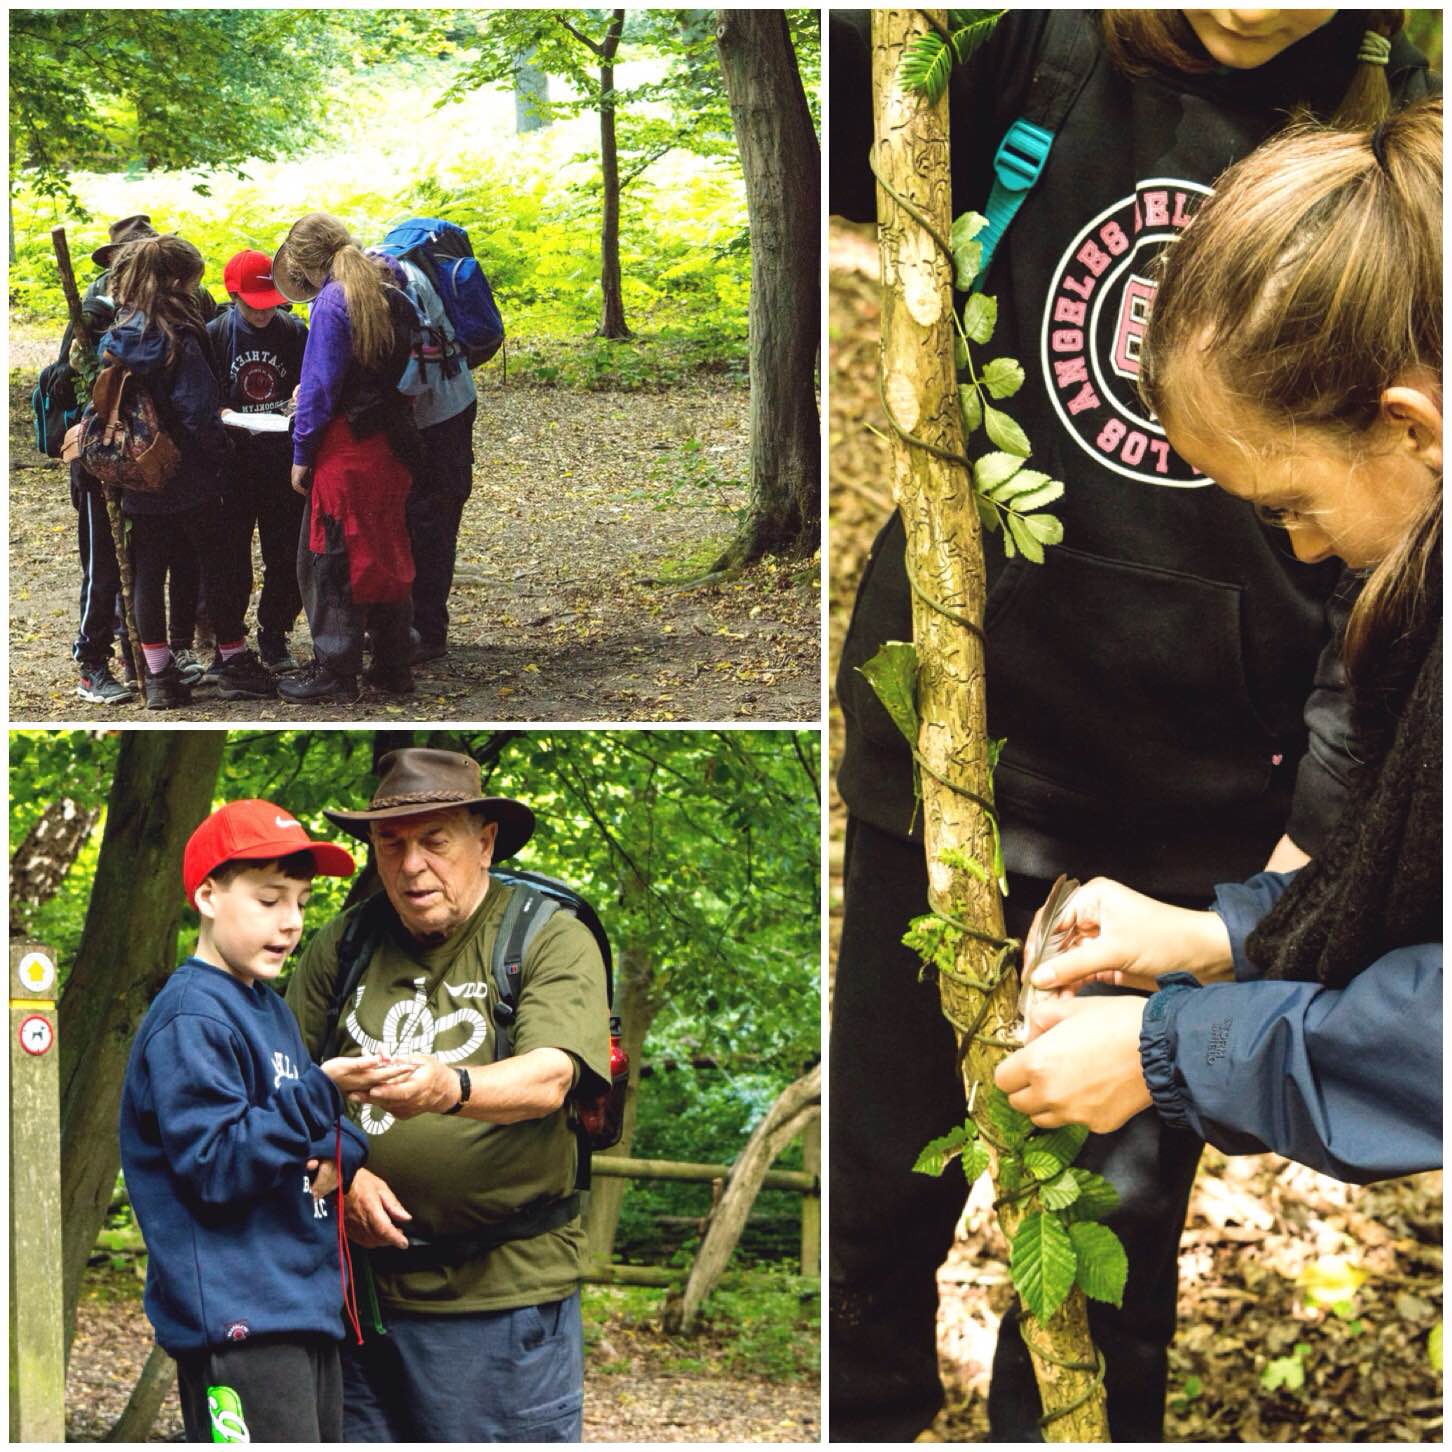
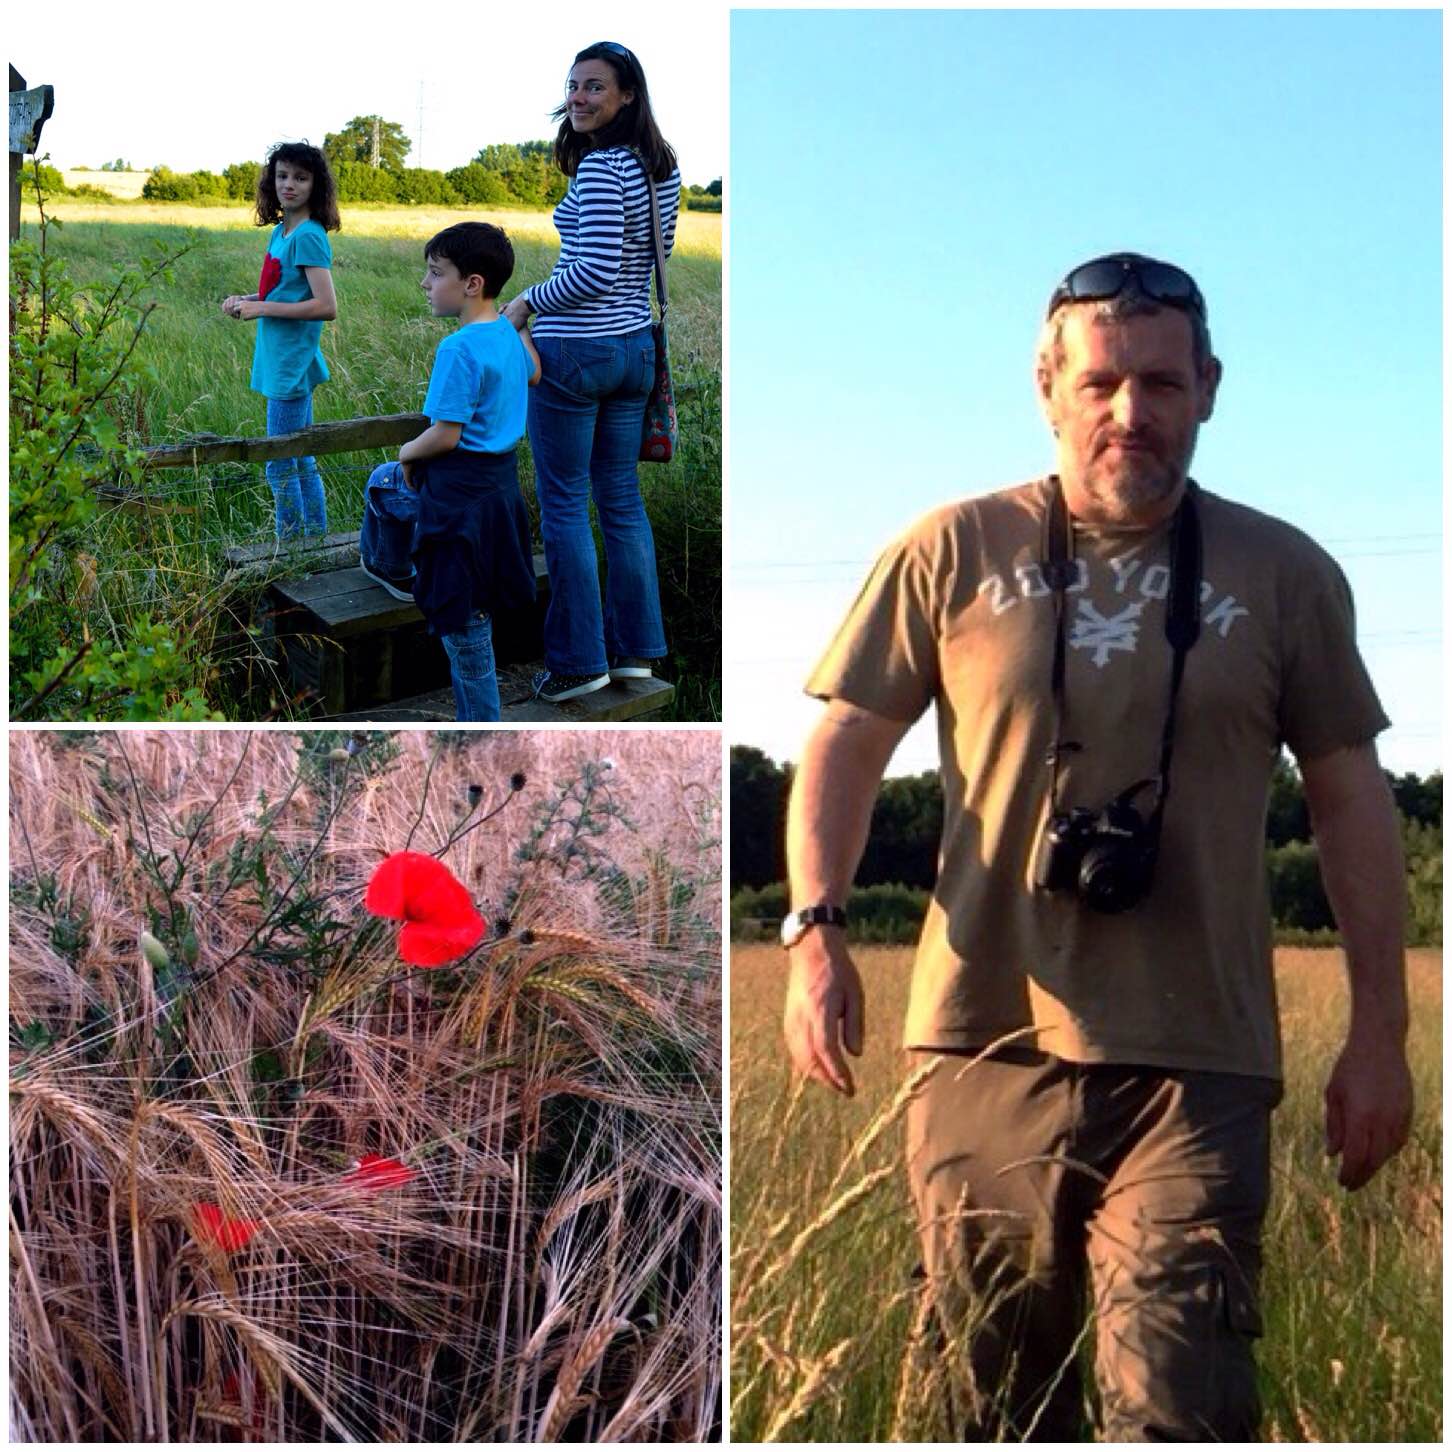
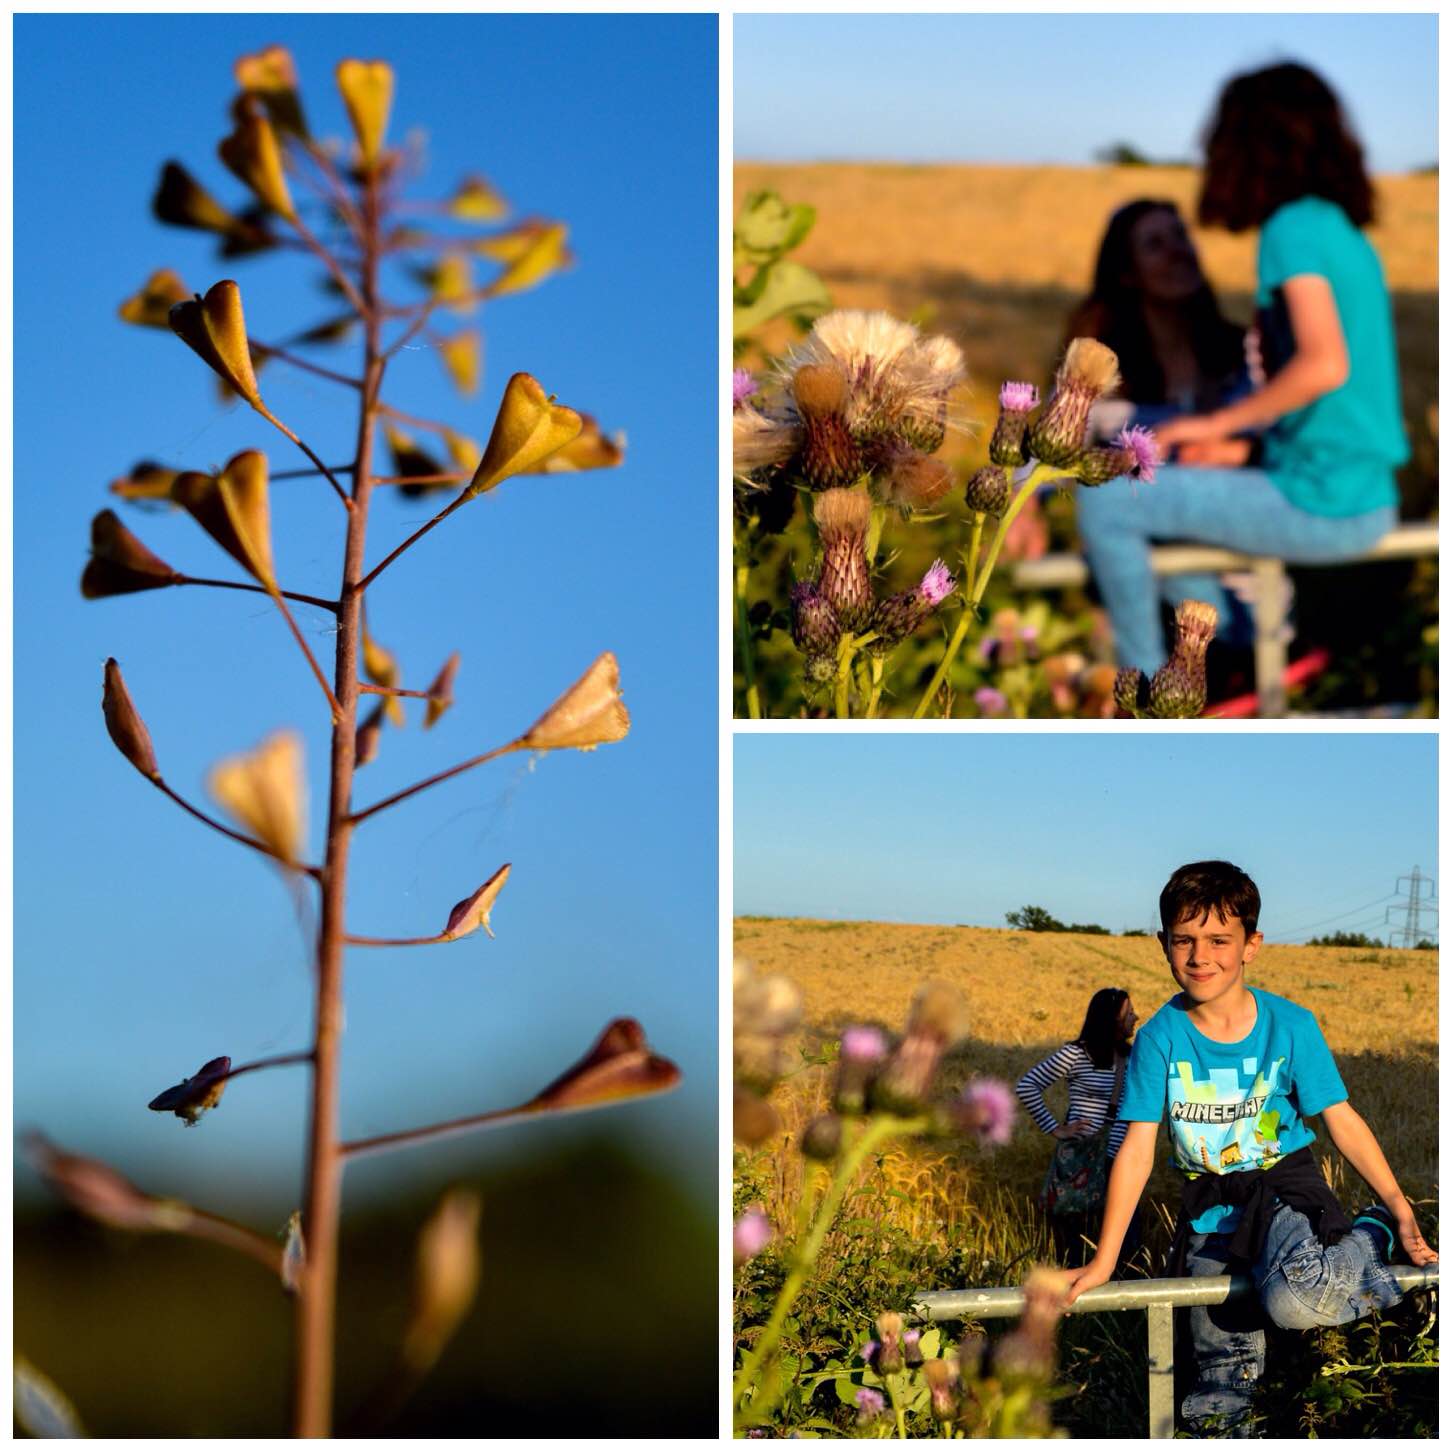
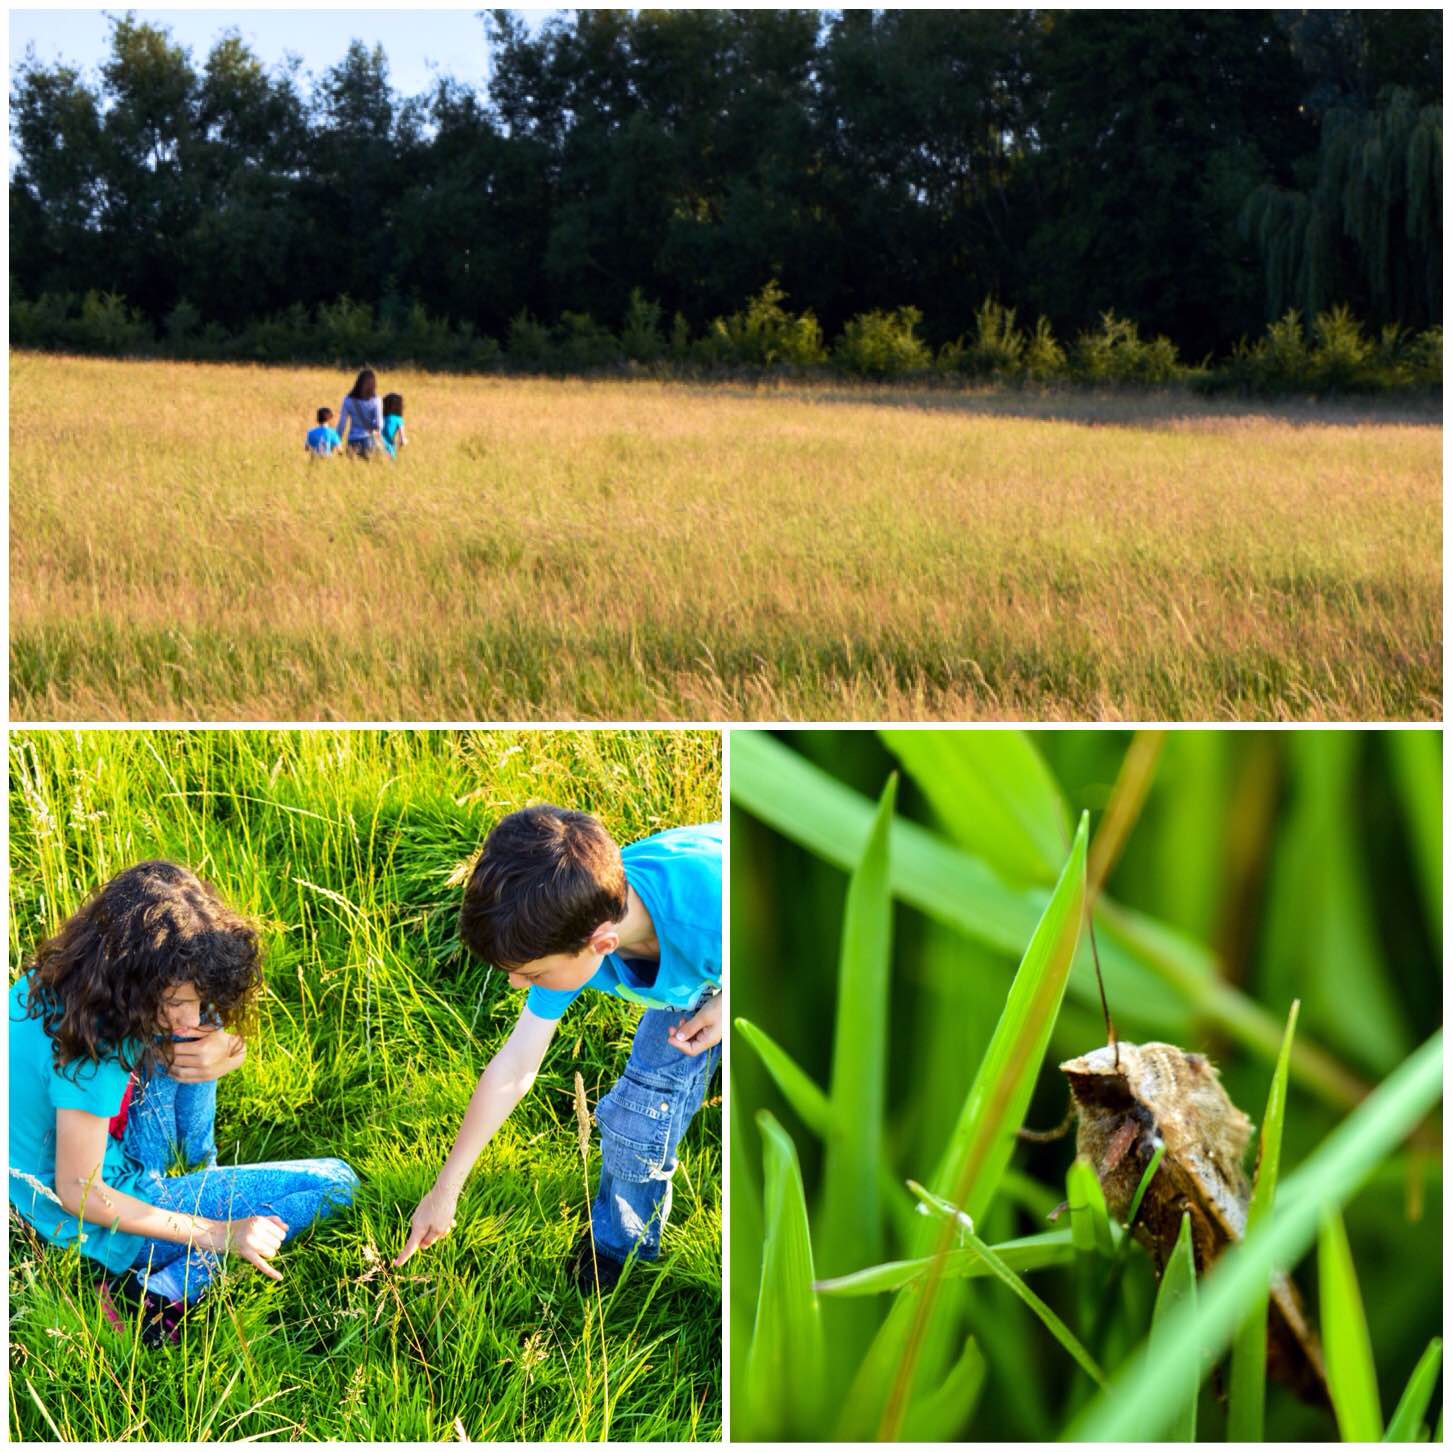
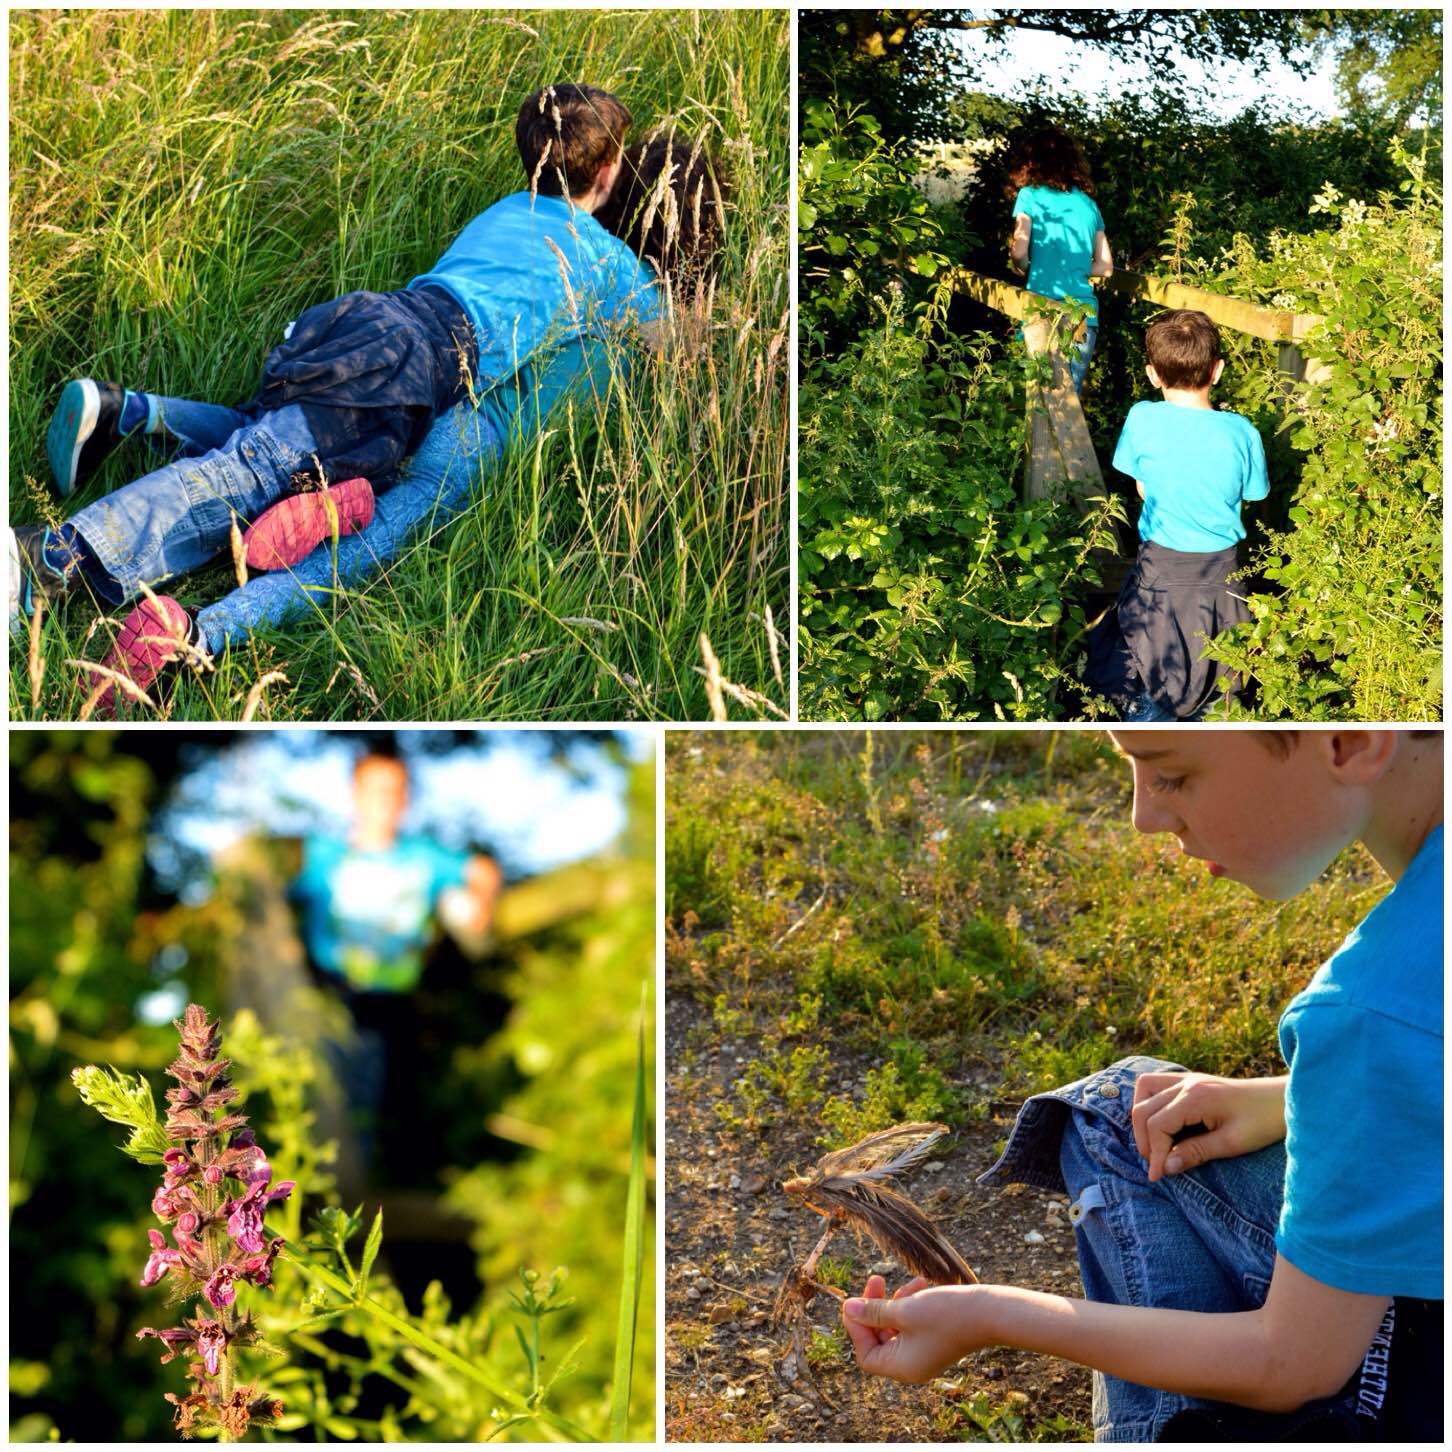
I love taking my kids out into the woods to explore and we have some great adventures. My son Finlay though was stopped in his tracks by a simple feather that was caught up on a branch.
I came along to see what he had found and snapped this little pic of him admiring some simple beauty in nature.
An eye on nature
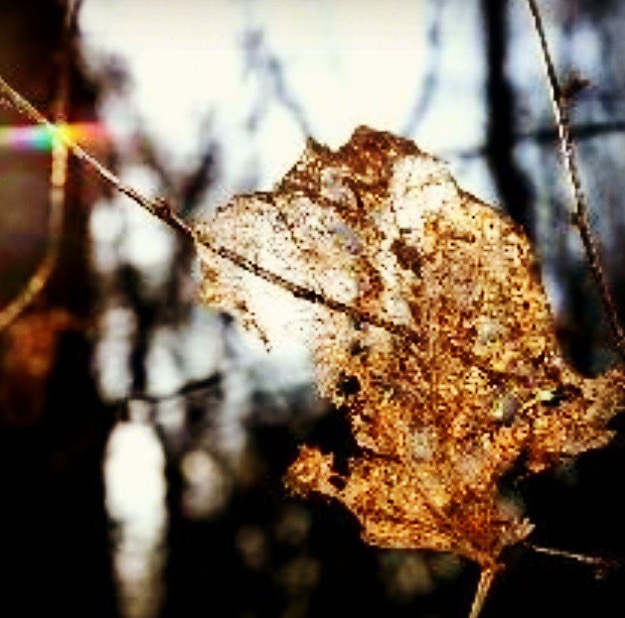
My final picture in this winter theme is staged I am afraid. I was walking along in the woods looking for an interesting shot when I spotted this rather skeletal leaf on the ground.
I was so taken with it that I picked it up for a closer look and inadvertantly looked at it with the sun in the background – so in no time it was hanging off a branch for what I think is a pretty good pic.
Winter skeletons
Thats it for the Winter Memorable Moments however there will be a few more soon.
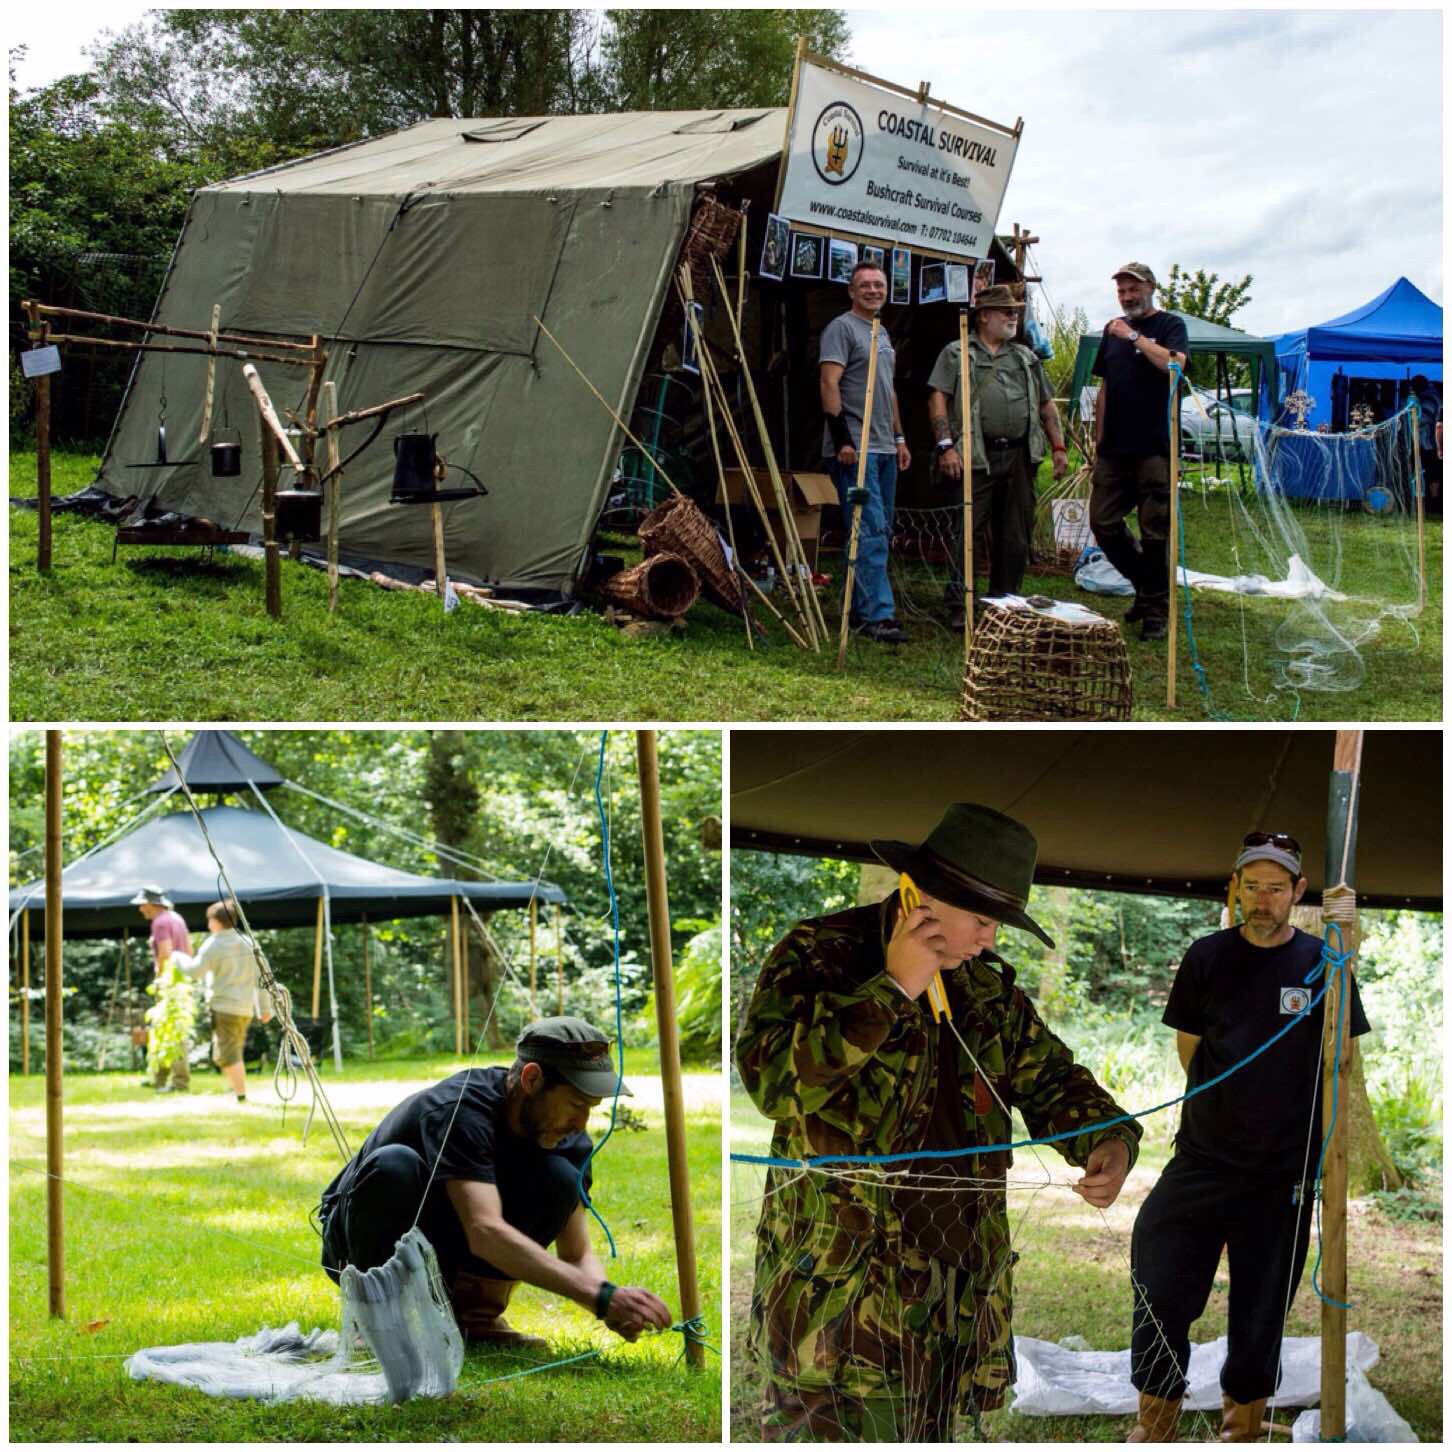
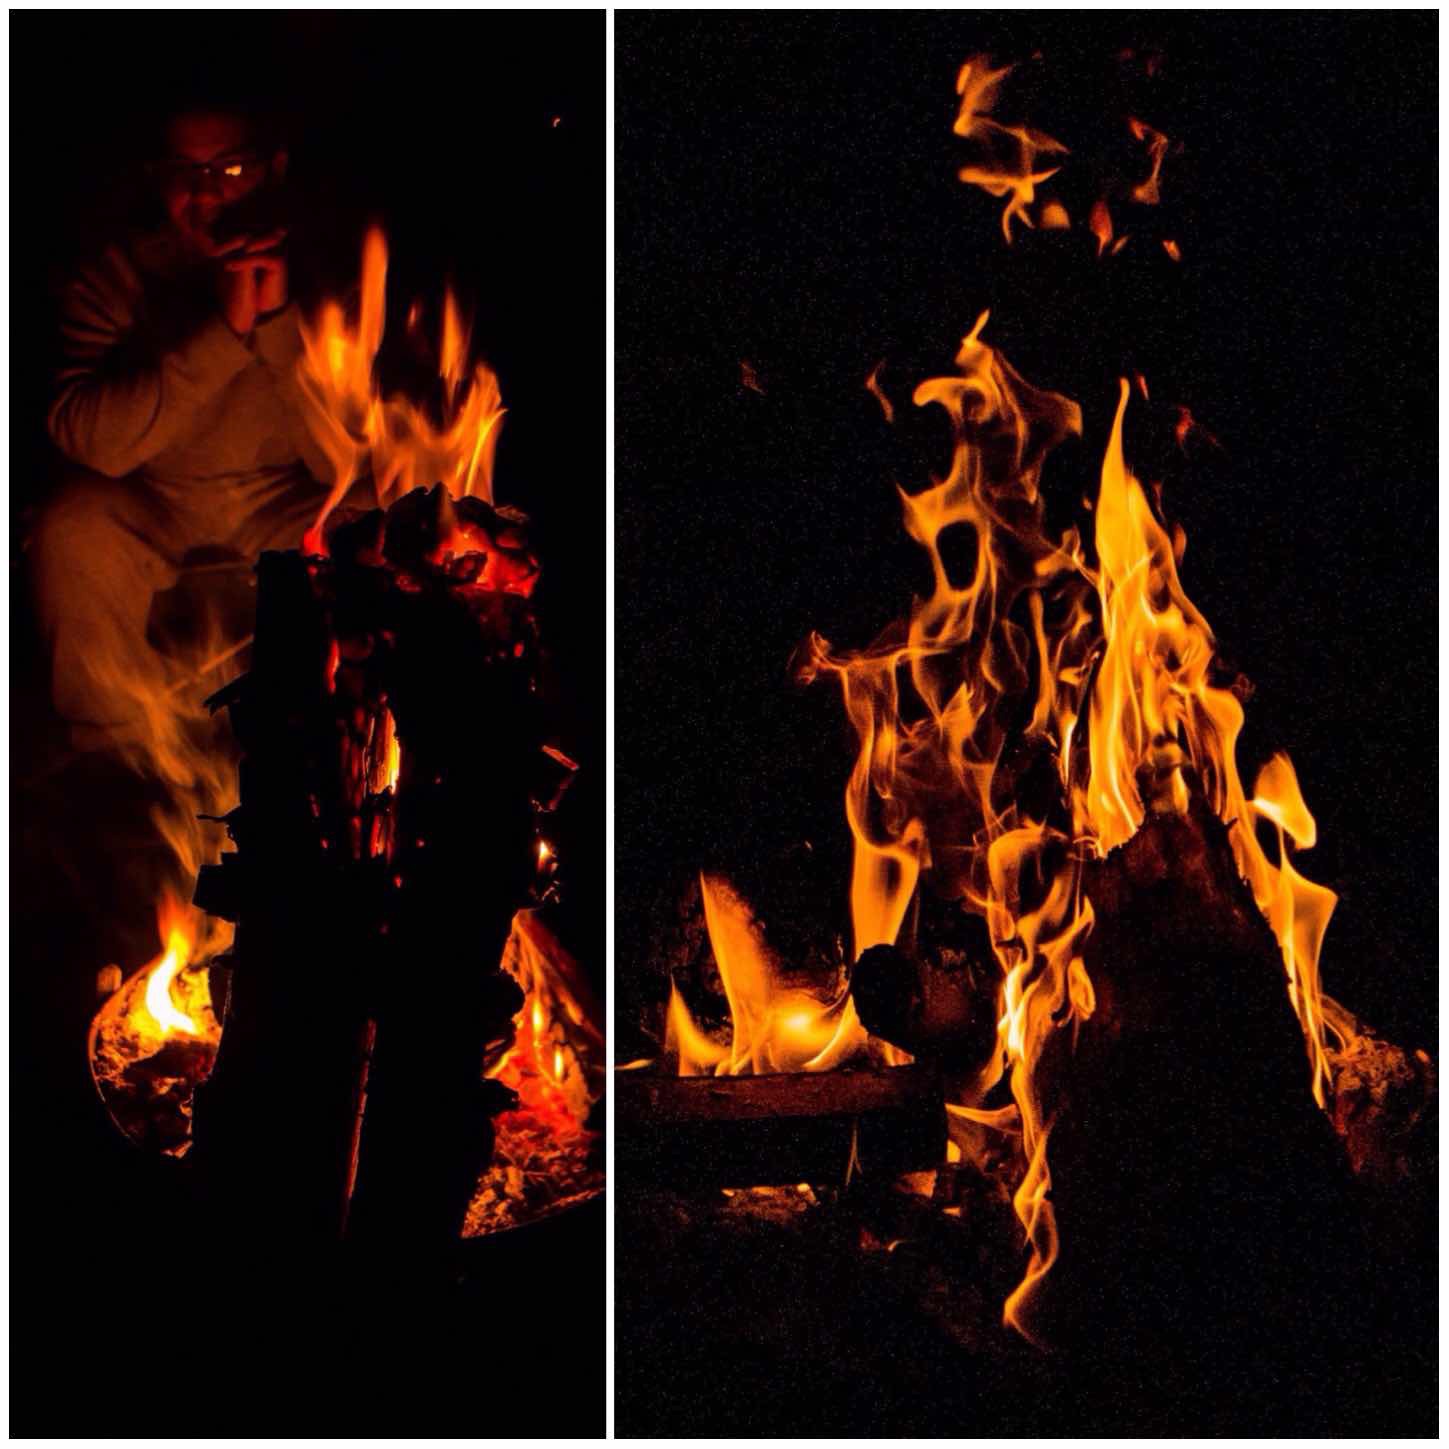
The Moot will have something for you – be that firesteels, bowdrills, handrills, pumpdrills, bamboo fire saws or the secret art of lighting fire from damp tinder
Many many years ago I stumbled upon a website called Bushcraft UK and realised that there were many folk out there just like me, struggling to get to grips with all the different ways of making fire.
The results on the site only took me so far so I was even happier when I spotted a thread on the Bushmoot. This was the second Bushmoot way back in 2005.
Since then I have discovered many different ways of making fire when out and about. This post is about just some of the ways we make fire at the BCUK Bushmoot.
Bushmoot Fire
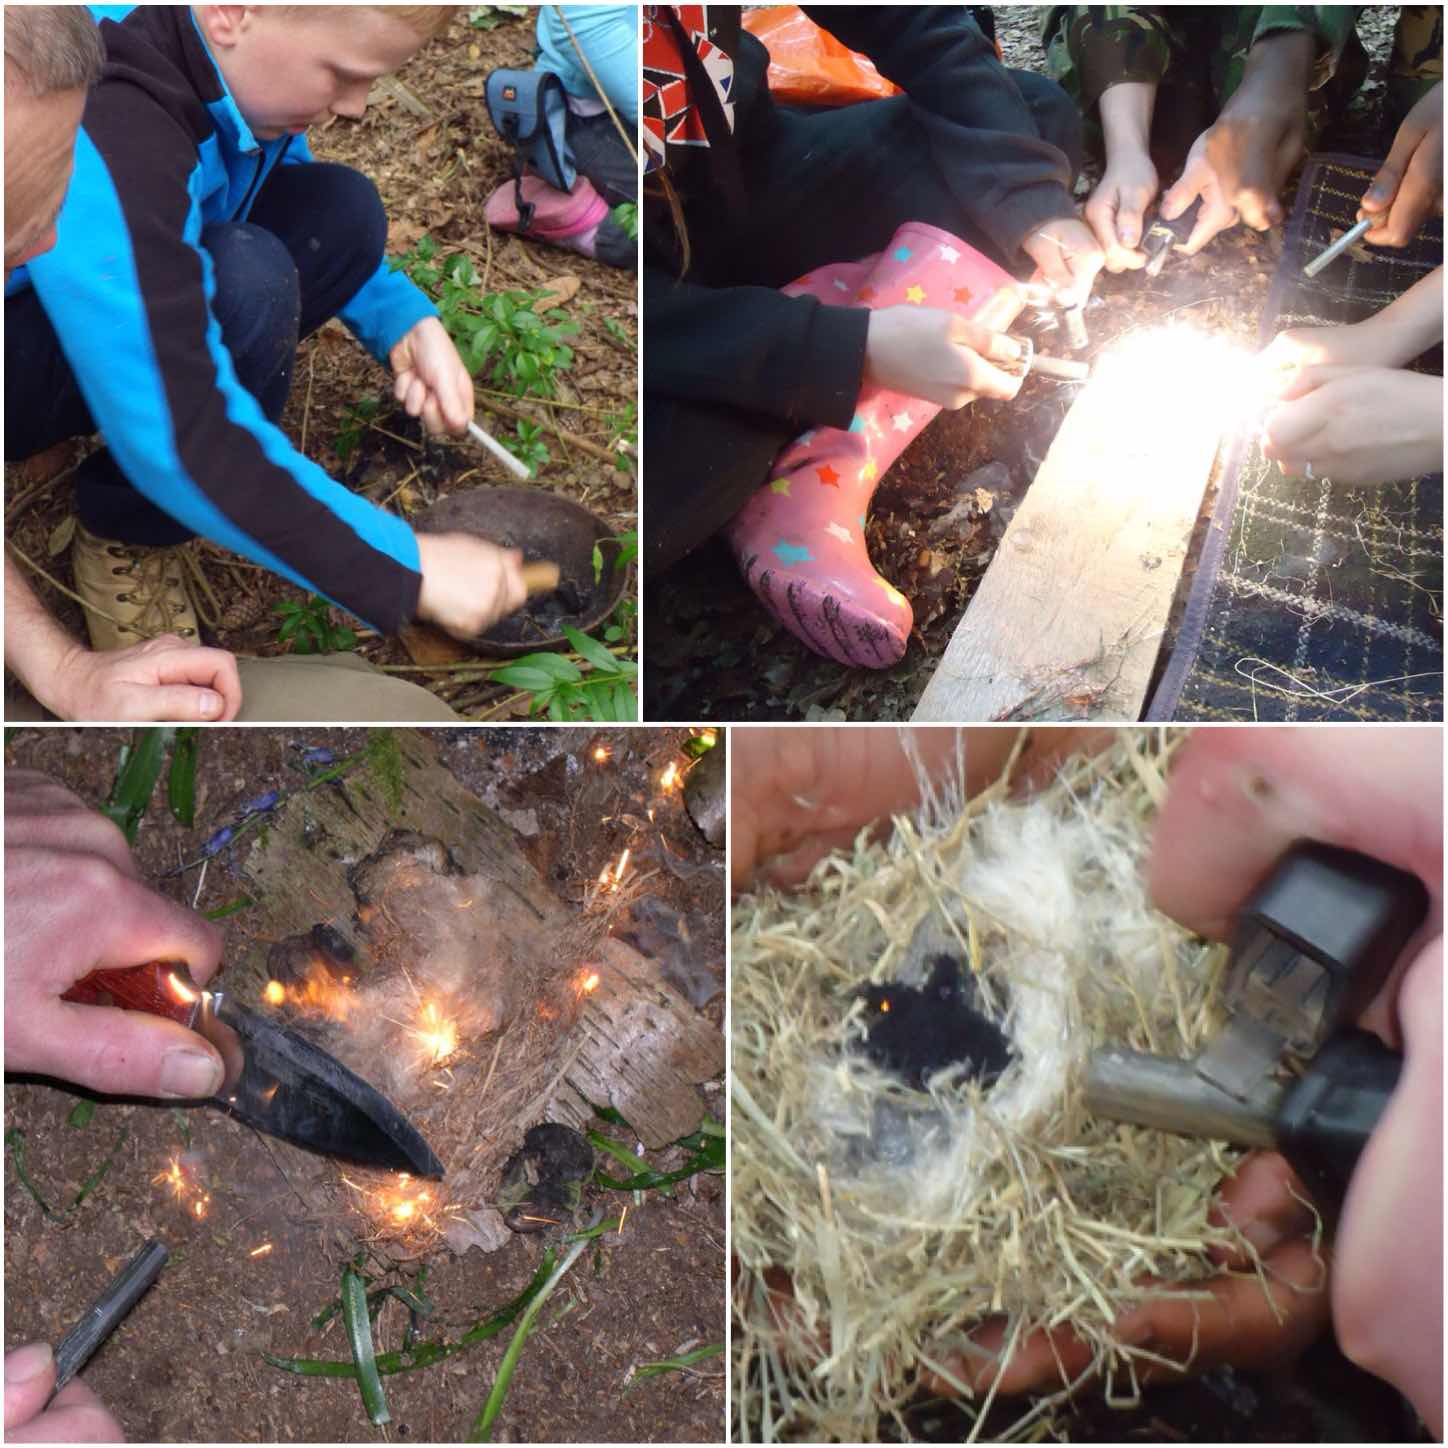
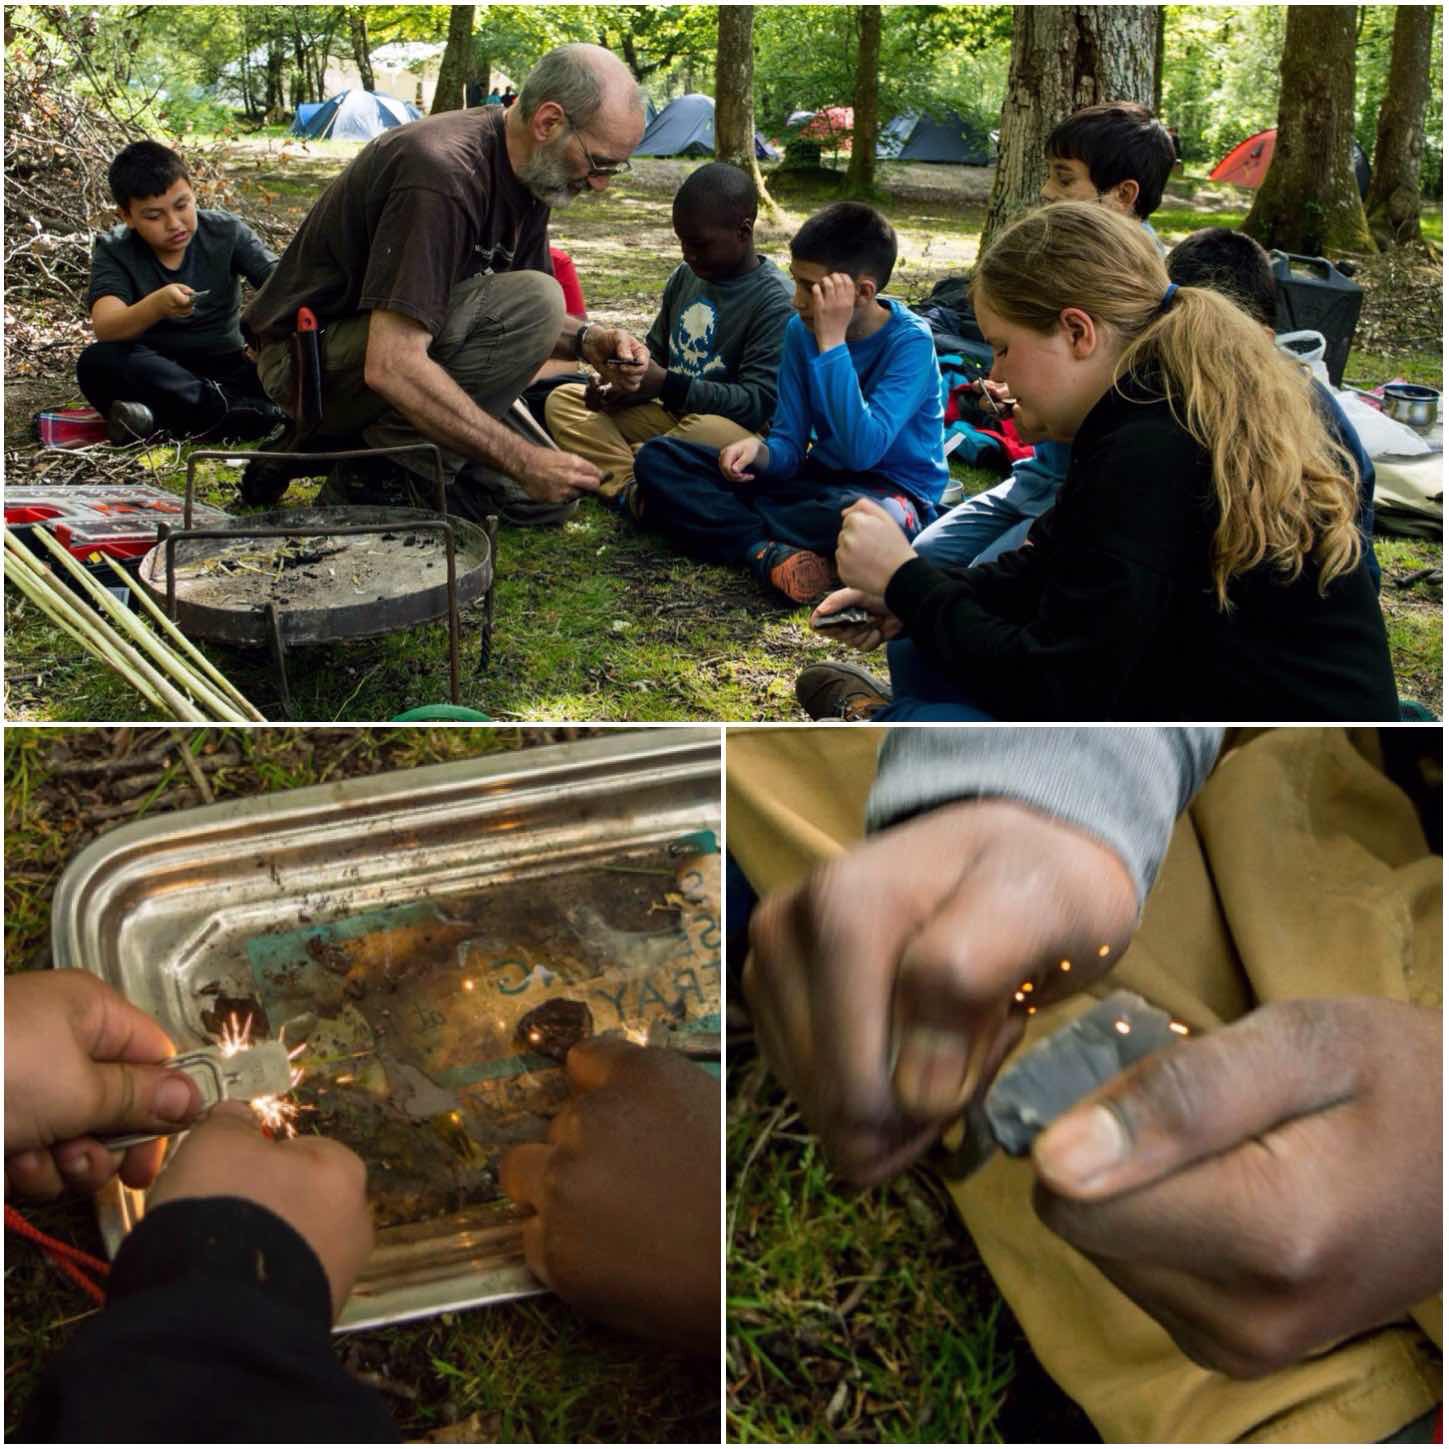
Firesteels
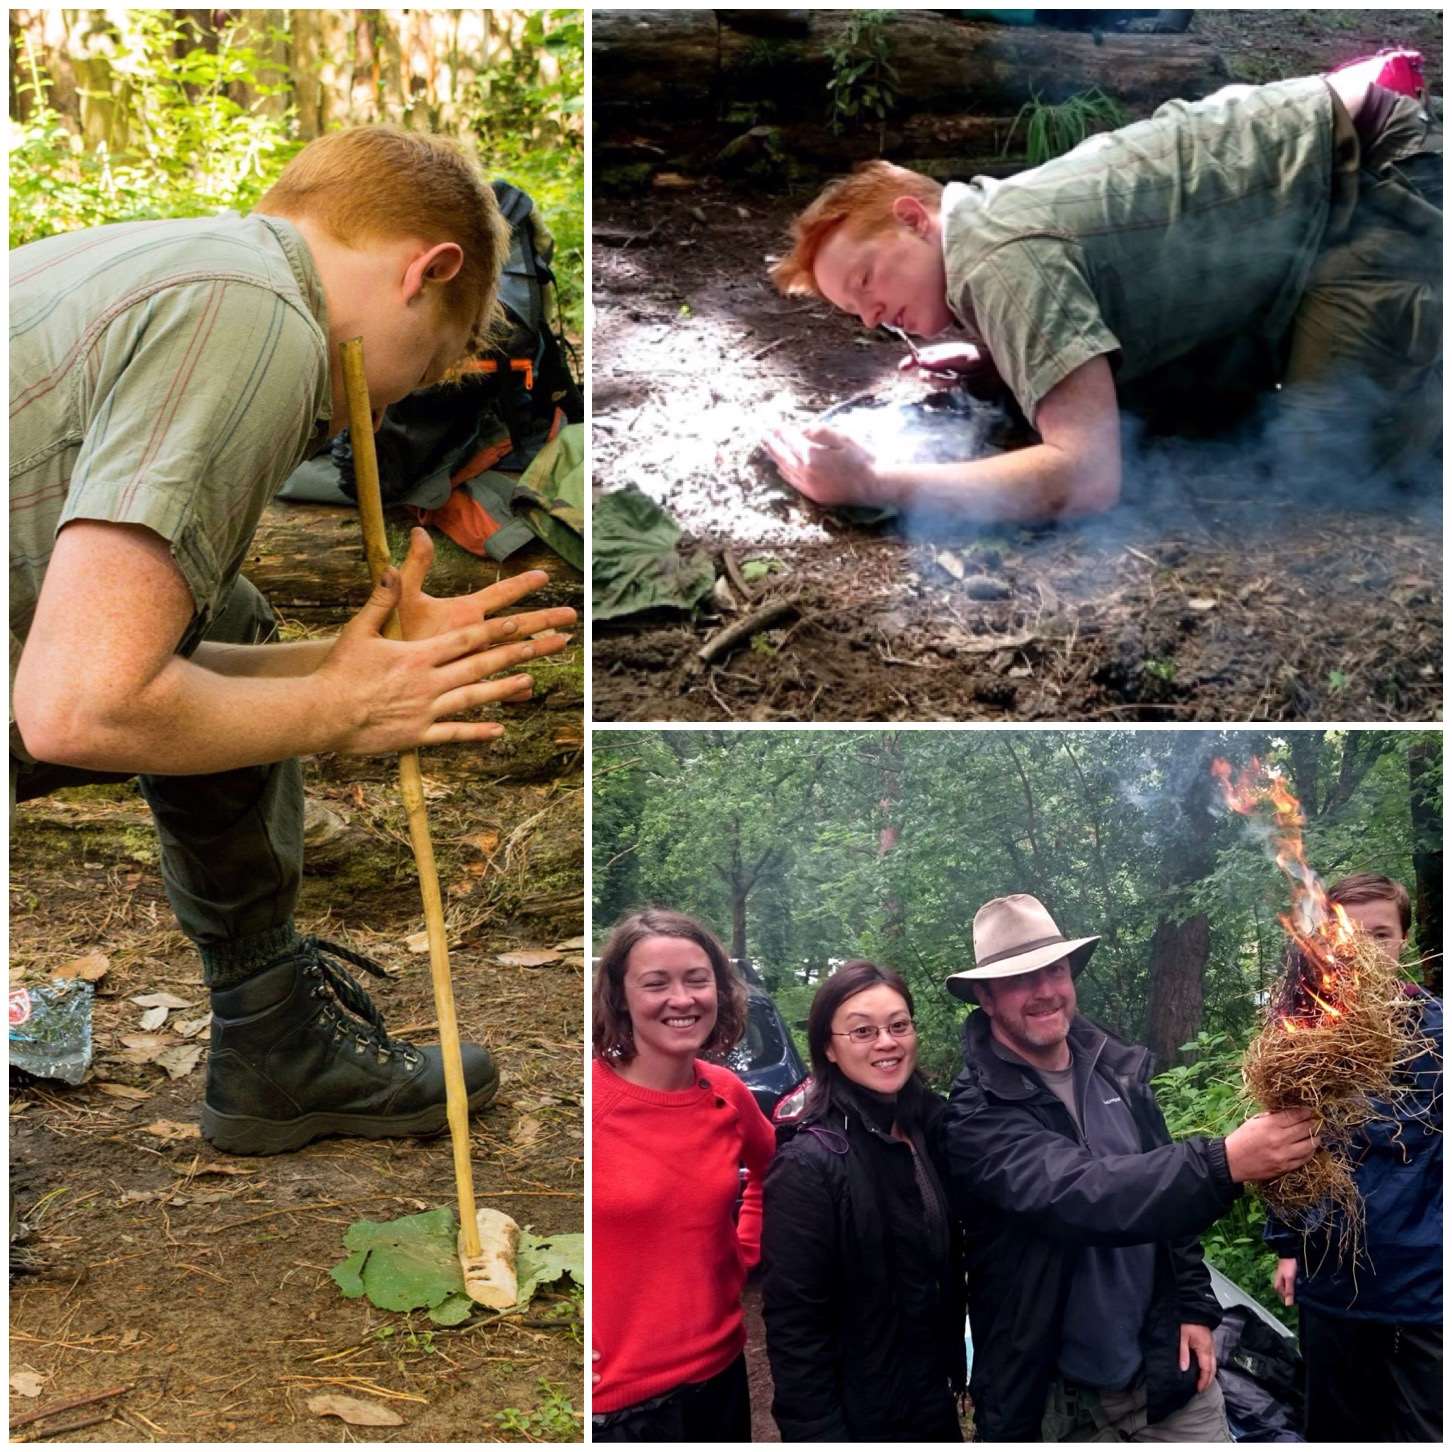
One of the most common methods a bushcrafter will use to light a fire is a Firesteel, so there are plenty of people willing to share with you how they use theirs and explain what tinders they use.
We have included the use of Firesteels into our ‘Starter Course‘ at the Moot. They are easy to use and the kids love them. When teaching very young kids (pre school) I liken them to creating Fairy lights and this seems to catch the children’s imagination.
The first person to teach me to use a Firesteel properly at the Moot was Kevin Warrington (Laplander’s Natural Lore Blog) and after I attended his bowdrill class he asked me to come back and assist him with fire-making the next year. We have been good friends ever since and I have to thank Kevin for getting me started on the road to instructing others in the world of bushcraft.
Fairy Lights
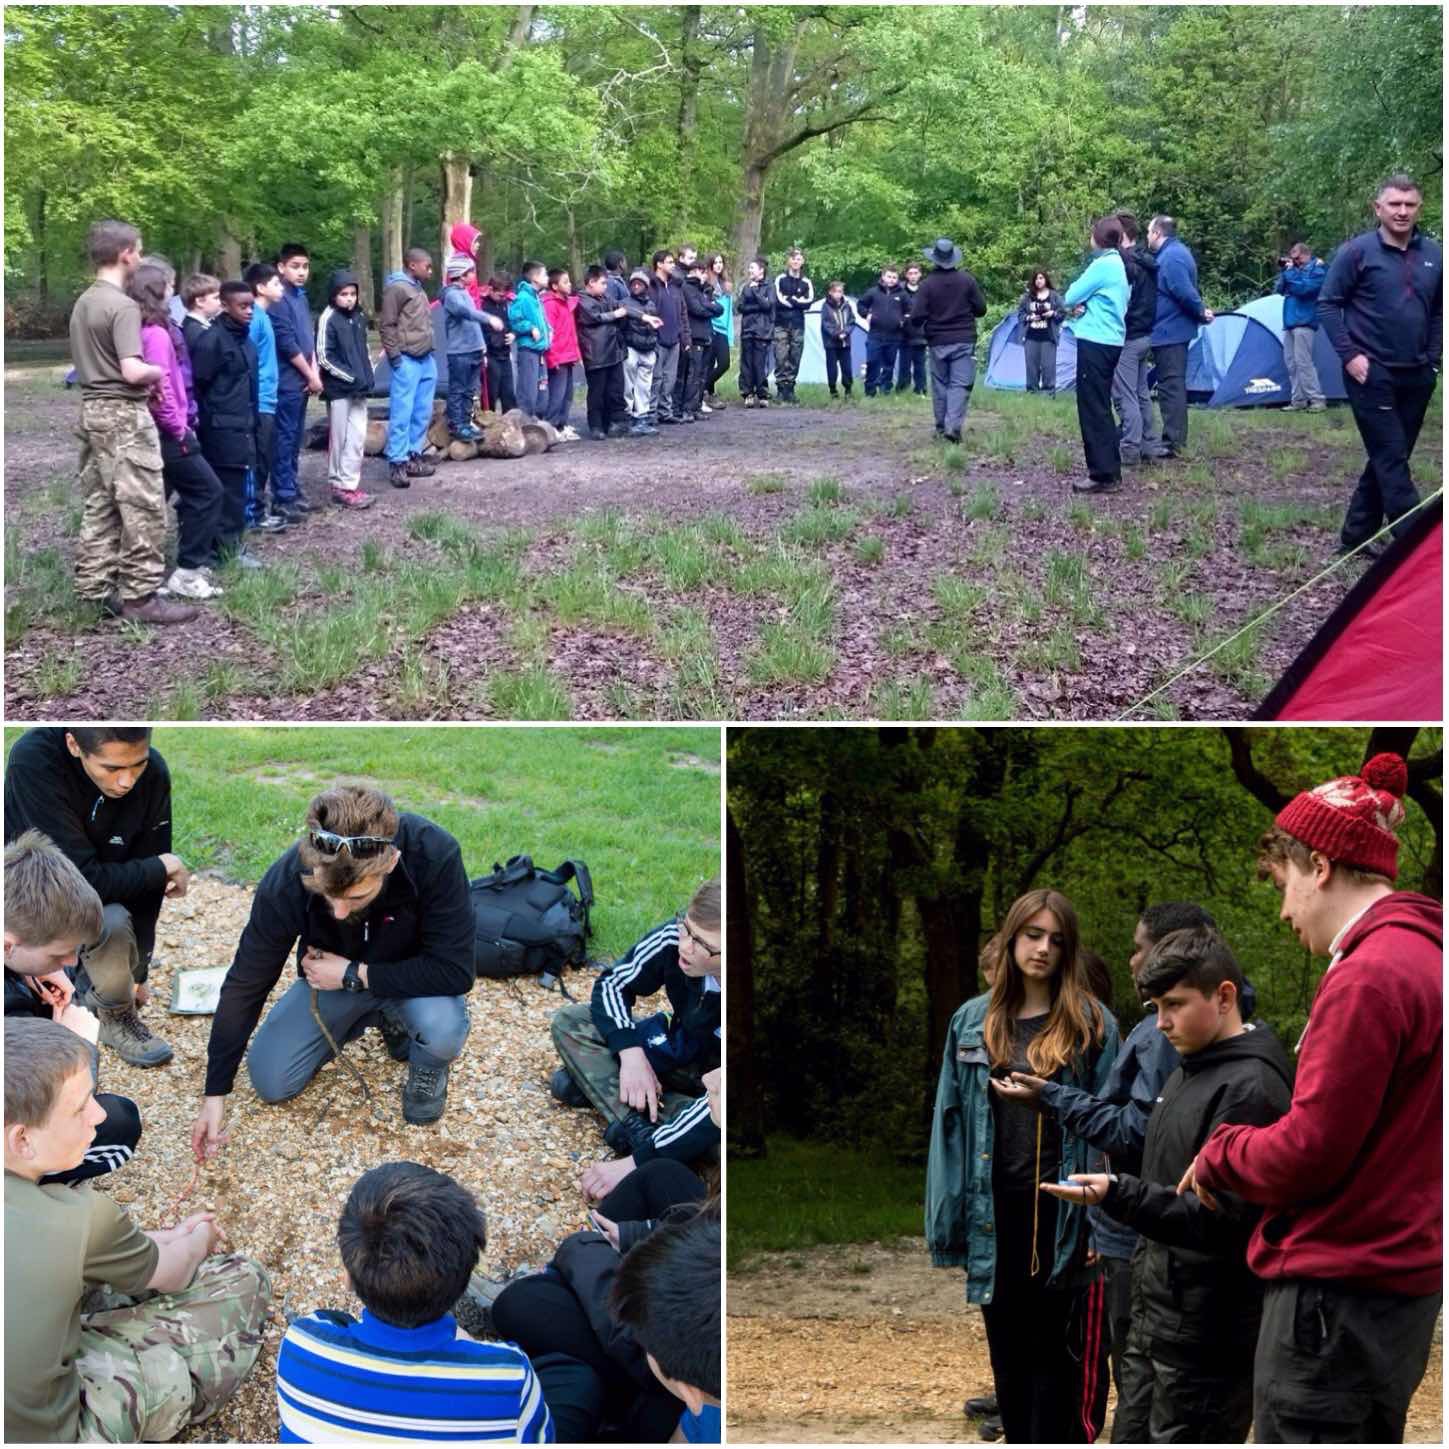
The Starter Course
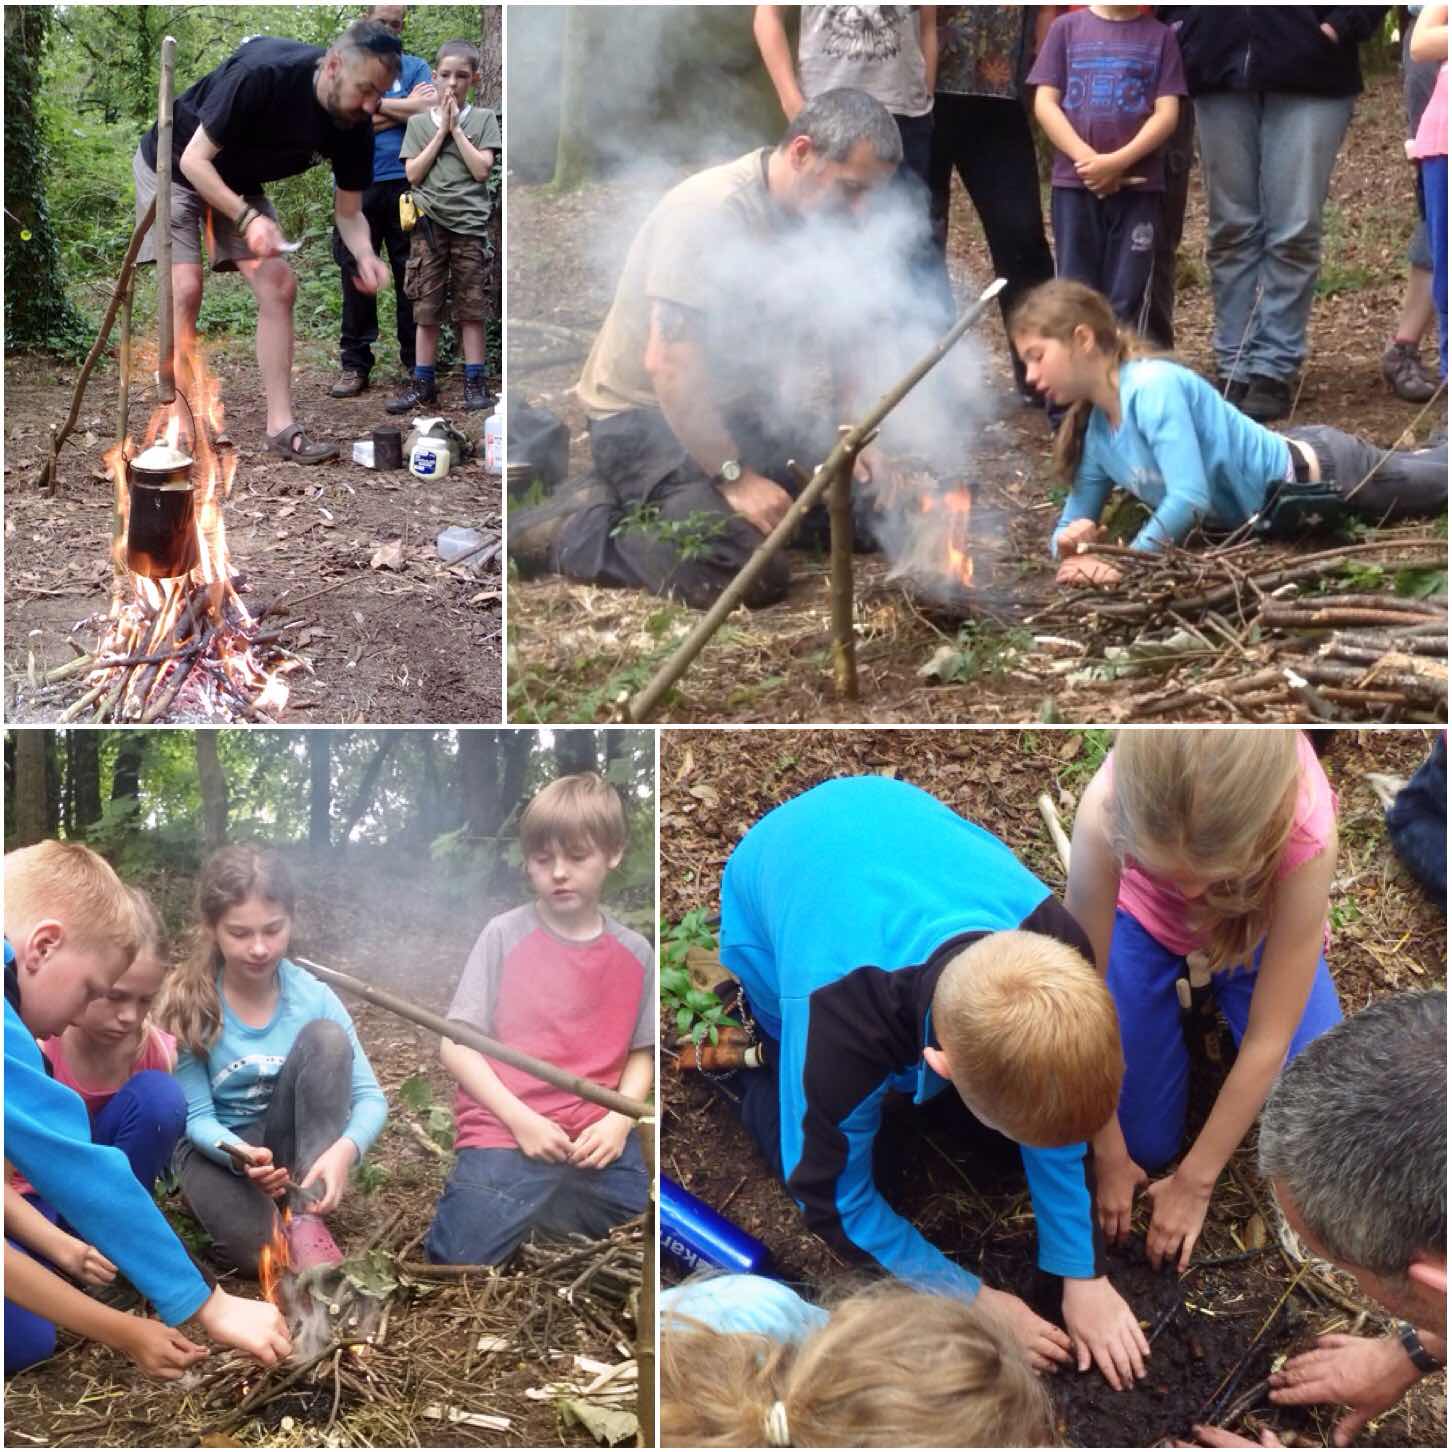
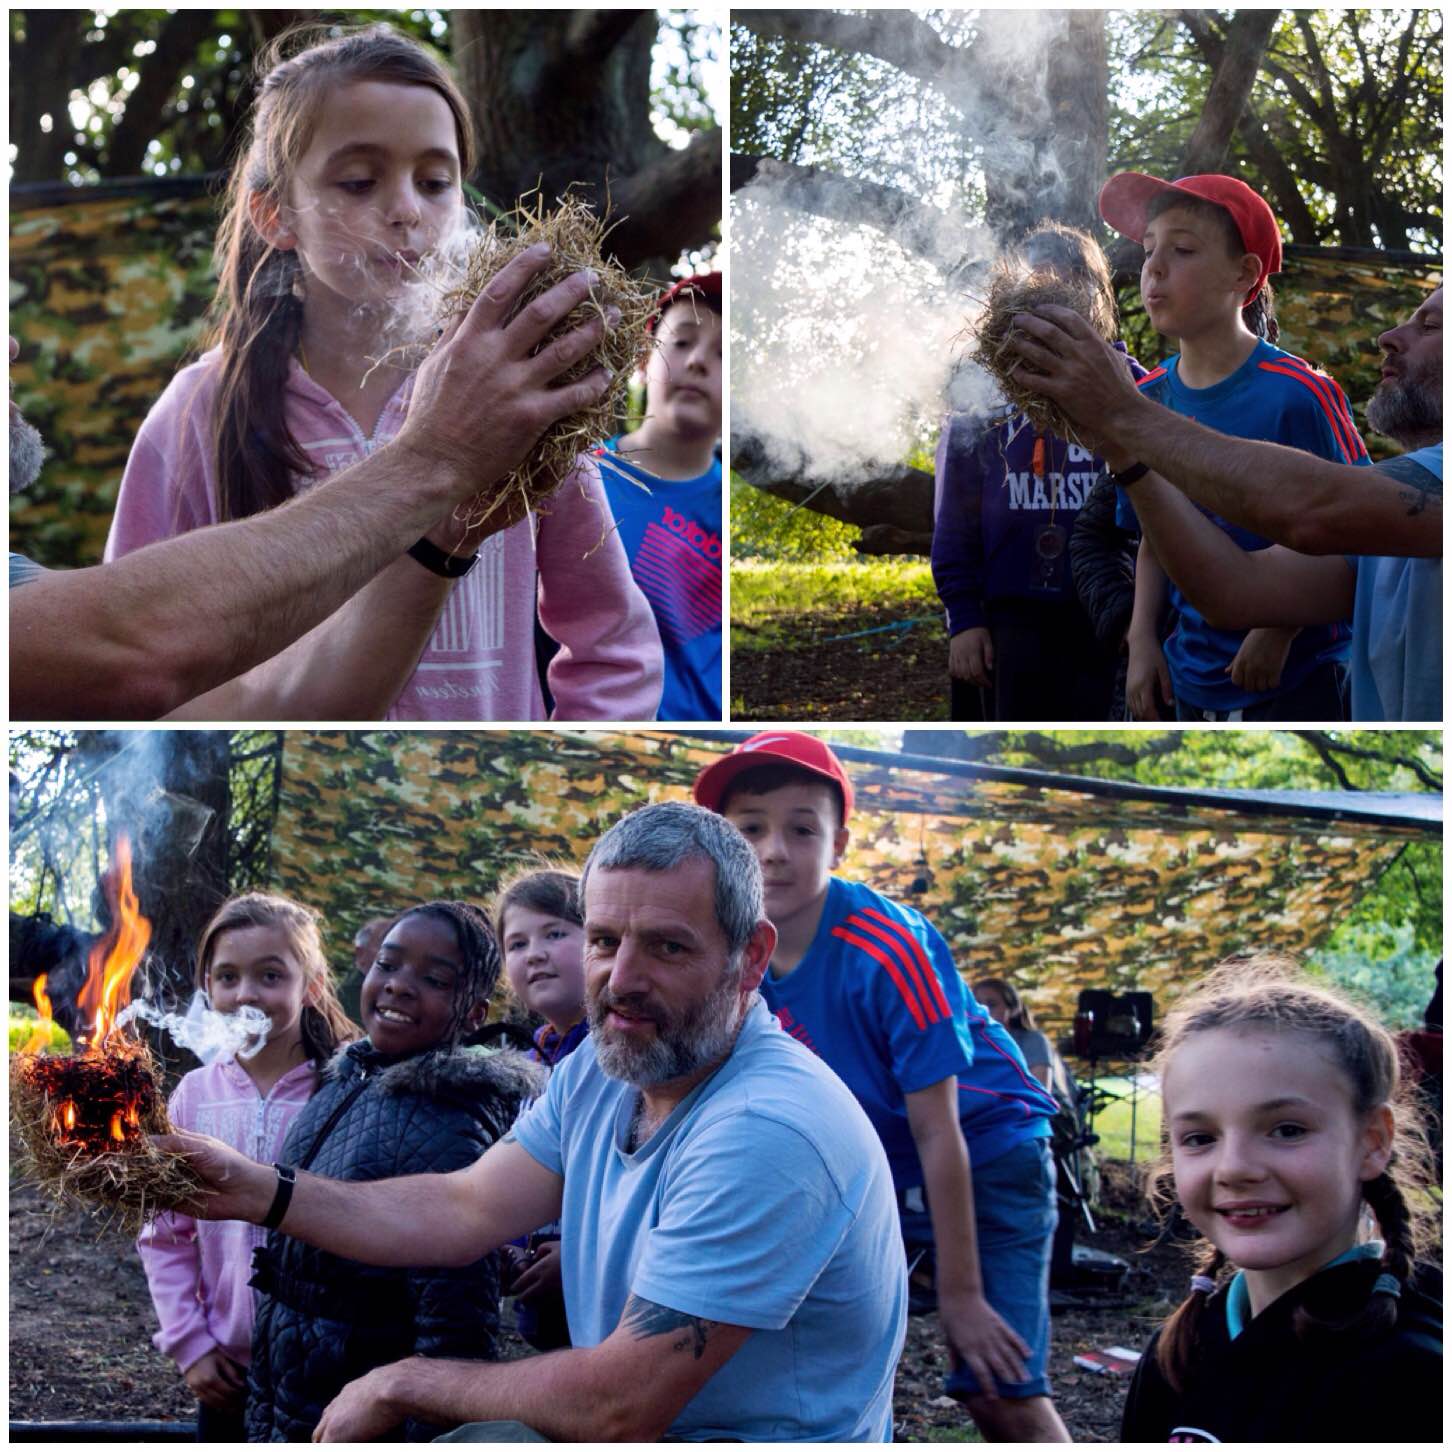
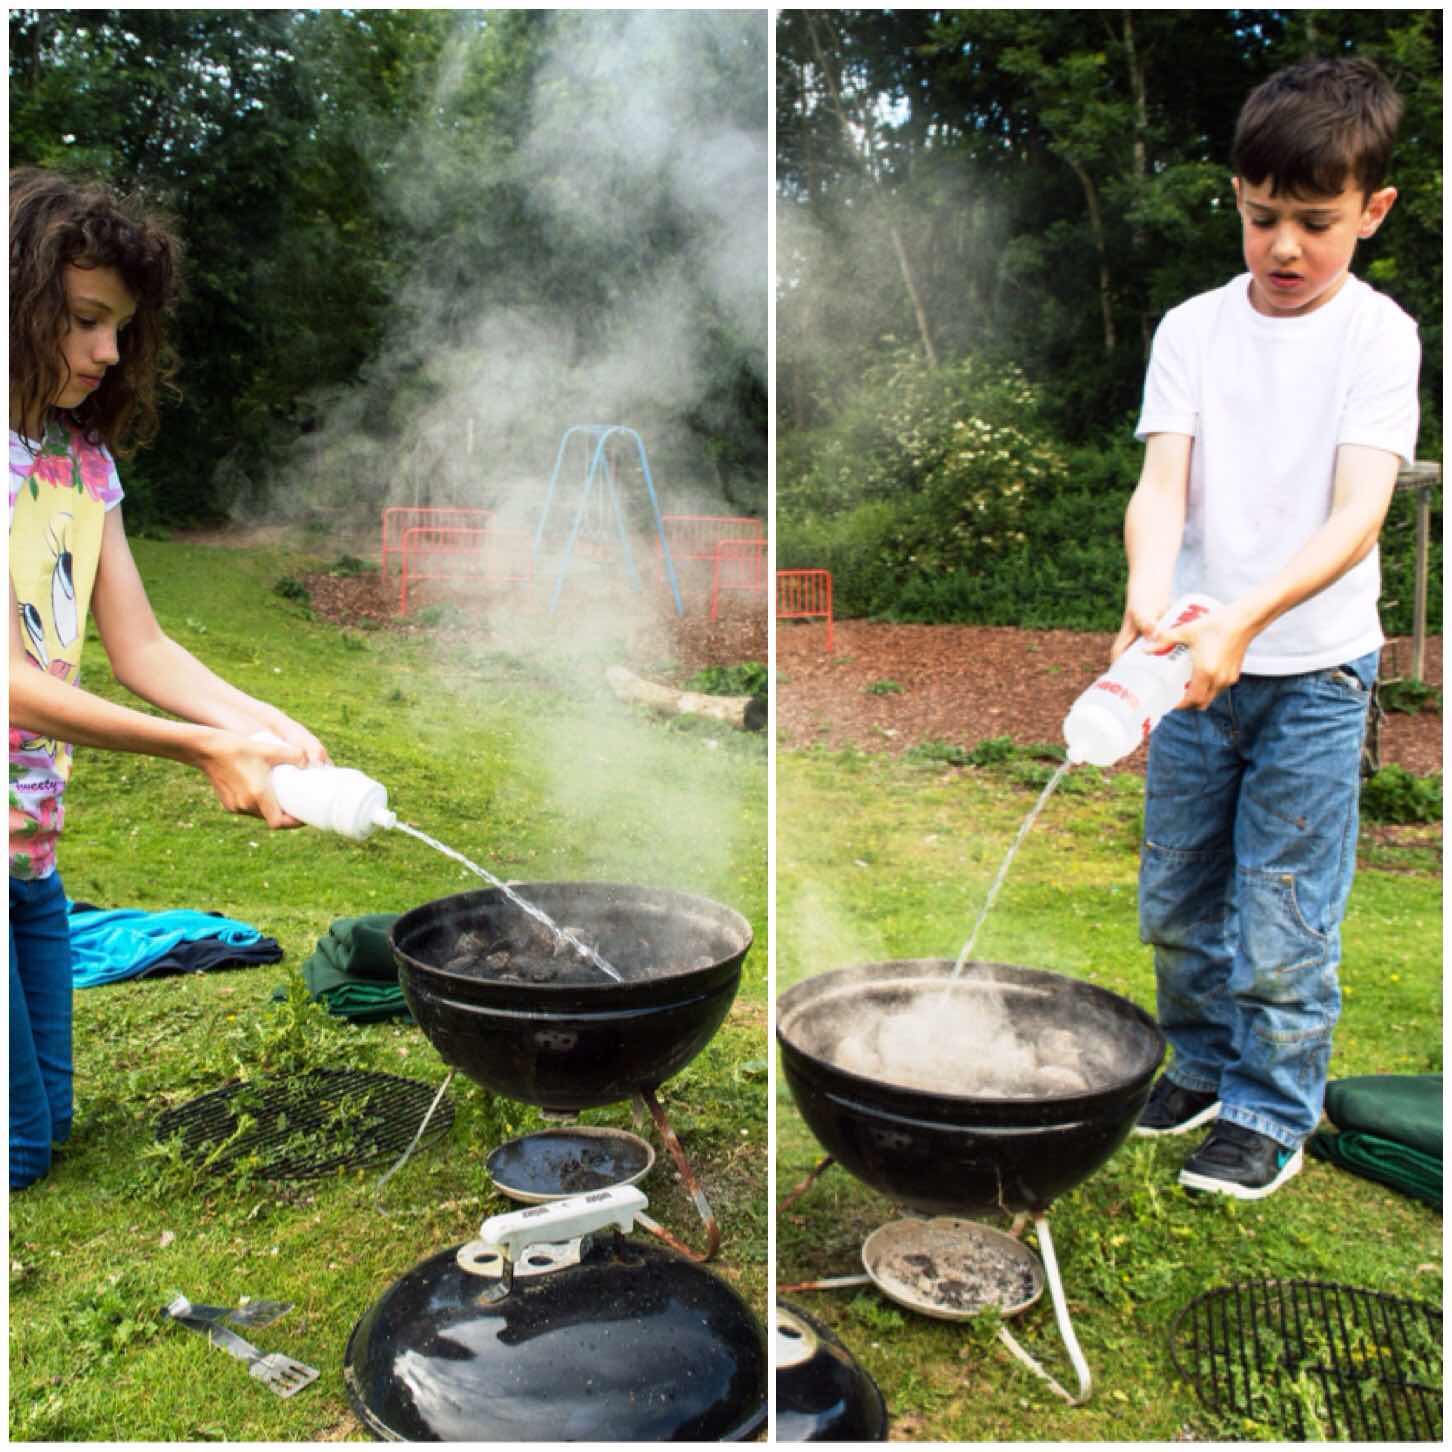
The Starter course at the Moot is not just about lighting a fire, it is also about making anyone preparing and maintaining a fire, and just as importantly it is about putting a fire out safely.
It is great to see a whole family come together to learn how to work as a team to get all the resources they need for their fire and to coax that initial burst of heat into a well-established fire.
Creating a Fire
Pump Drills
From time to time some of the instructors will bring along some of their pump drills or other similar training aids. The pump drills prove a great hit with all the kids and once they get the hang of the system they soon have them spinning madly away as they attempt to produce some smoke.
These drills were supplied a couple of years ago by Perry McGee of the National Tracking School.
Fire Drills
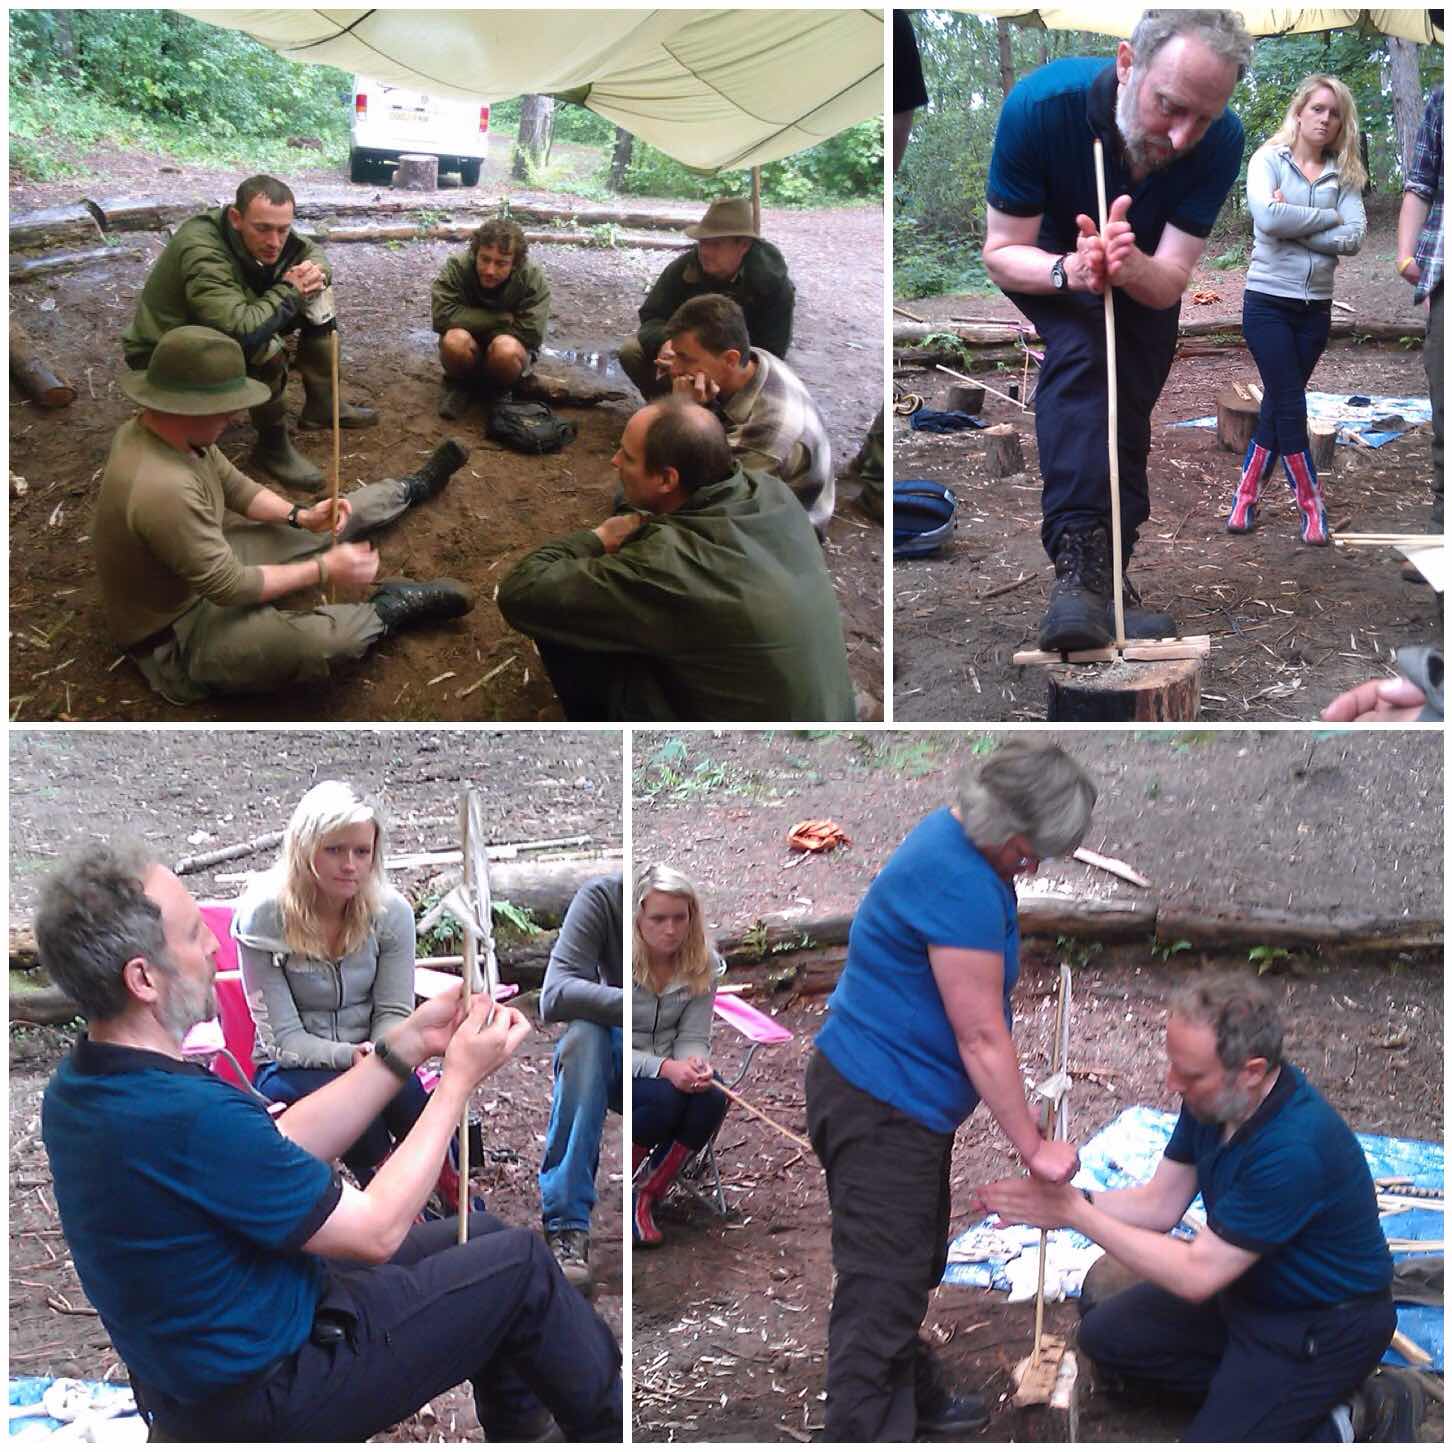
Bowdrill
A favourite of mine over the years has to be the bowdrill. I have lost count of the number of people I have helped master this skill at the Moot. One of the reasons I love teaching this skill is that there are so many factors to take into account when bowing you can easily lose a whole day when teaching it.
Recently a number of other instructors like Mark Oriel have stepped forward to teach this skill enabling me to focus on other areas to develop myself.
Bushmoot Bowdrill – Pictures courtesy of Ian Woodham
Bowdrill Methods
While teaching bowdrill I use two methods. One is with a single wrap of cord around the drill piece and the other is with multiple wraps (the Egyptian method).
The single wrap is easy to set up however it puts a lot of strain on the cord and if the drill and the bearing block become separated the drill piece tends to ping off to the side.
The Egyptian method relies on multiple wraps, it takes longer to set up and can be more difficult to control. It does though have the advantage of not putting so much strain on the cord and the drill does not ping off to the side when it becomes detached from the bearing block.
Single twist and Egyptian
Here is the bowdrill in action using the single wrap method.
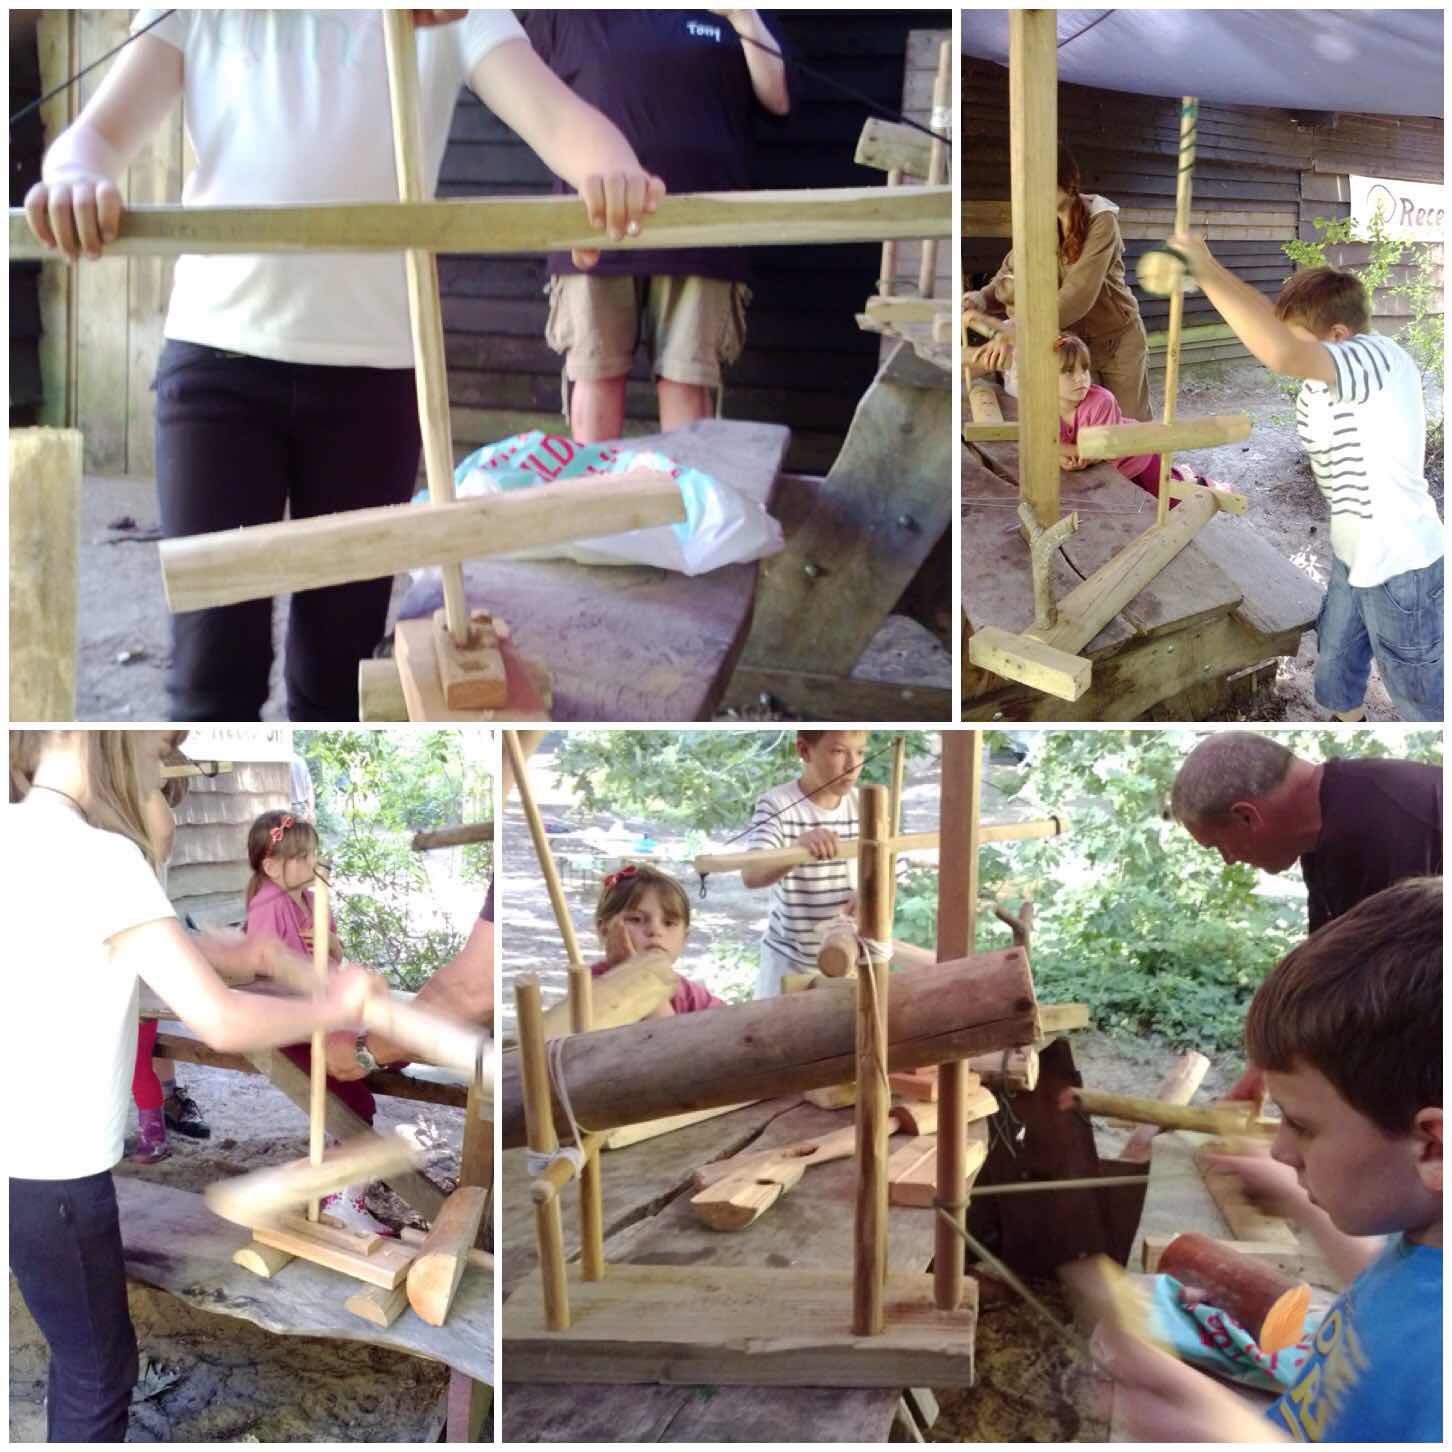
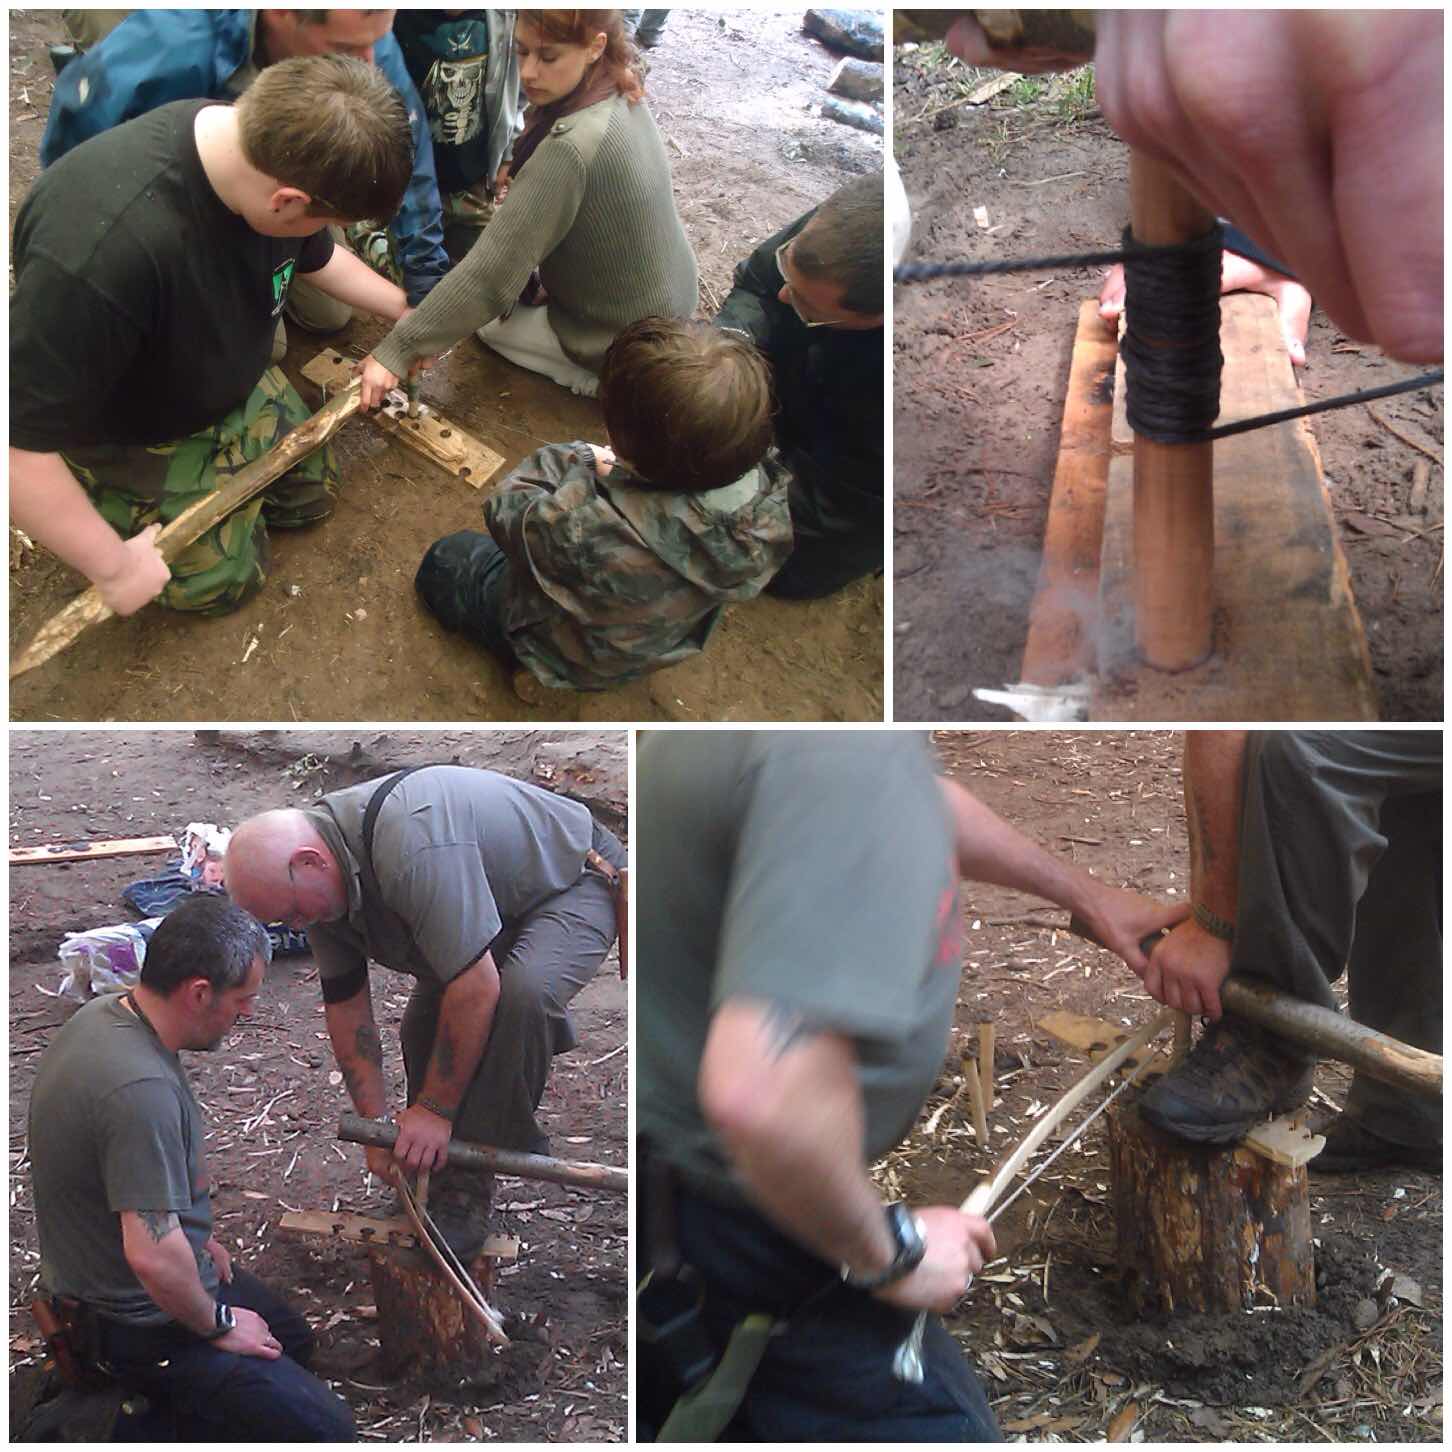
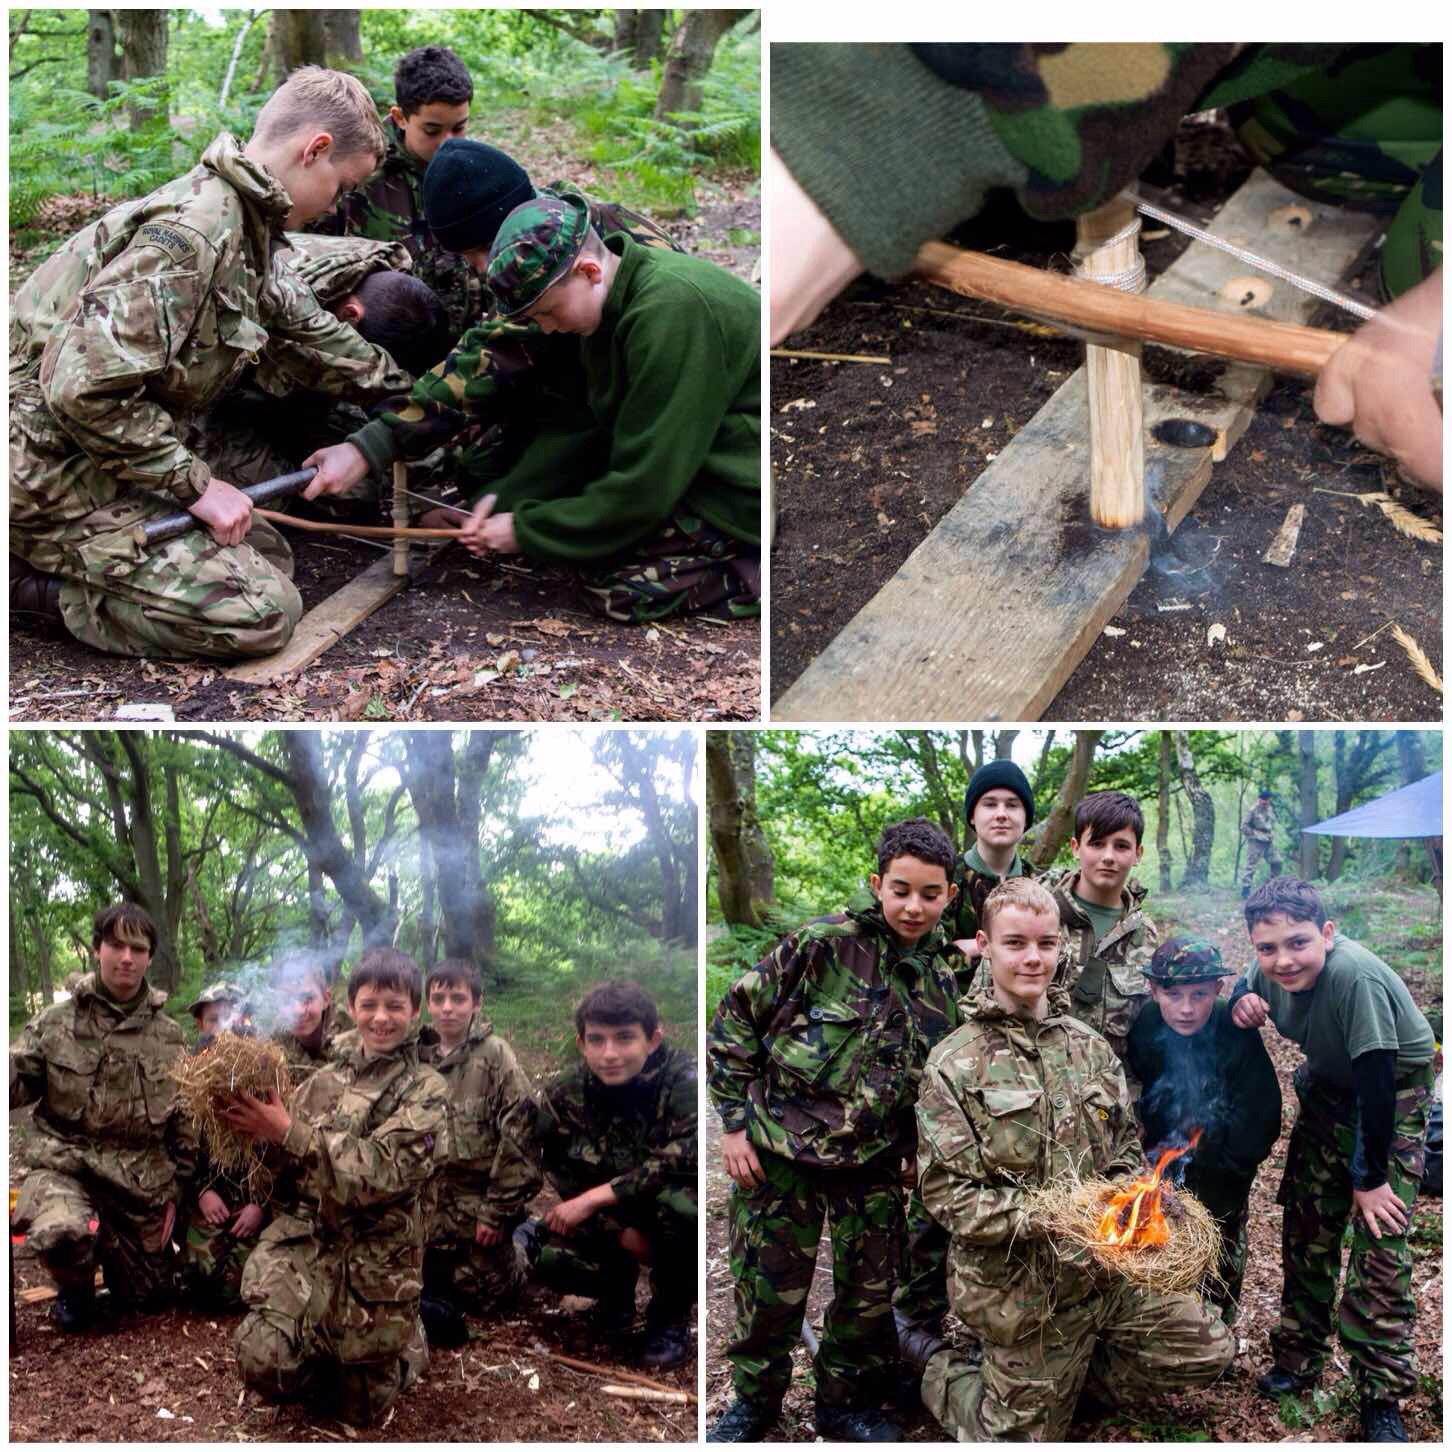
Group Bowdrills
As we get a lot of children at the Moot and from time to time someone carrying an injury you need to devise other strategies for bowdrilling. Historically I believe bowdrilling was a communal affair as it requires a lot less effort from individuals to get fire when they work together.
I set up Group Bowdrill sessions for families where a couple of people can hold a large bearing block in place and a couple of others can push the bow back and forth to generate the heat required (approx 425 degrees Celsius) to produce an ember. This method usually results in a massive ember, which increases the chance of getting a flame.
Another method is to use the large bearing block with the bowyer holding one end as a bearing block with the other end dug into the ground. In the bottom two pictures you can see that Dave is also using a ’round’ of wood to raise the hearthboard making the act of bowing easier.
Teamwork
I made a short video of a bow in action with the Egyptian method at the Moot a couple of years ago. This was to show how easy it was to create an ember using this method with two people on the bow.
Handrills
A Master fire maker who has been coming to the moot for years now is Richard (Rich59 on BCUK) and what he doesn’t know about firemaking is not worth bothering about. He is an expert with the handrill and regularly brings along a range of woods such as Elder, Teasel, Buddlia, Mullein and Reedmace for students to try out.
Richard is a keen experimenter and will try out different techniques like attaching cord to the drill to see if that technique makes life easier for people.
Handrill
This is my short video on using a handrill.
Bamboo Firesaw
This year Richard experimented with Bamboo Fire Saws. He managed to get some spare bamboo from Wayne Jones of Forest Knights (Wayne was making Bhutenese bows) and we soon had a pile prepped up around our camp.
I did not get to see Richards class as I was running one myself but the reports were all positive with successful fires being made, Maybe next year I will make time to see his class.
Bamboo Fire – Bottom picture courtesy of Andy McDonald Photography
Dry Tinder
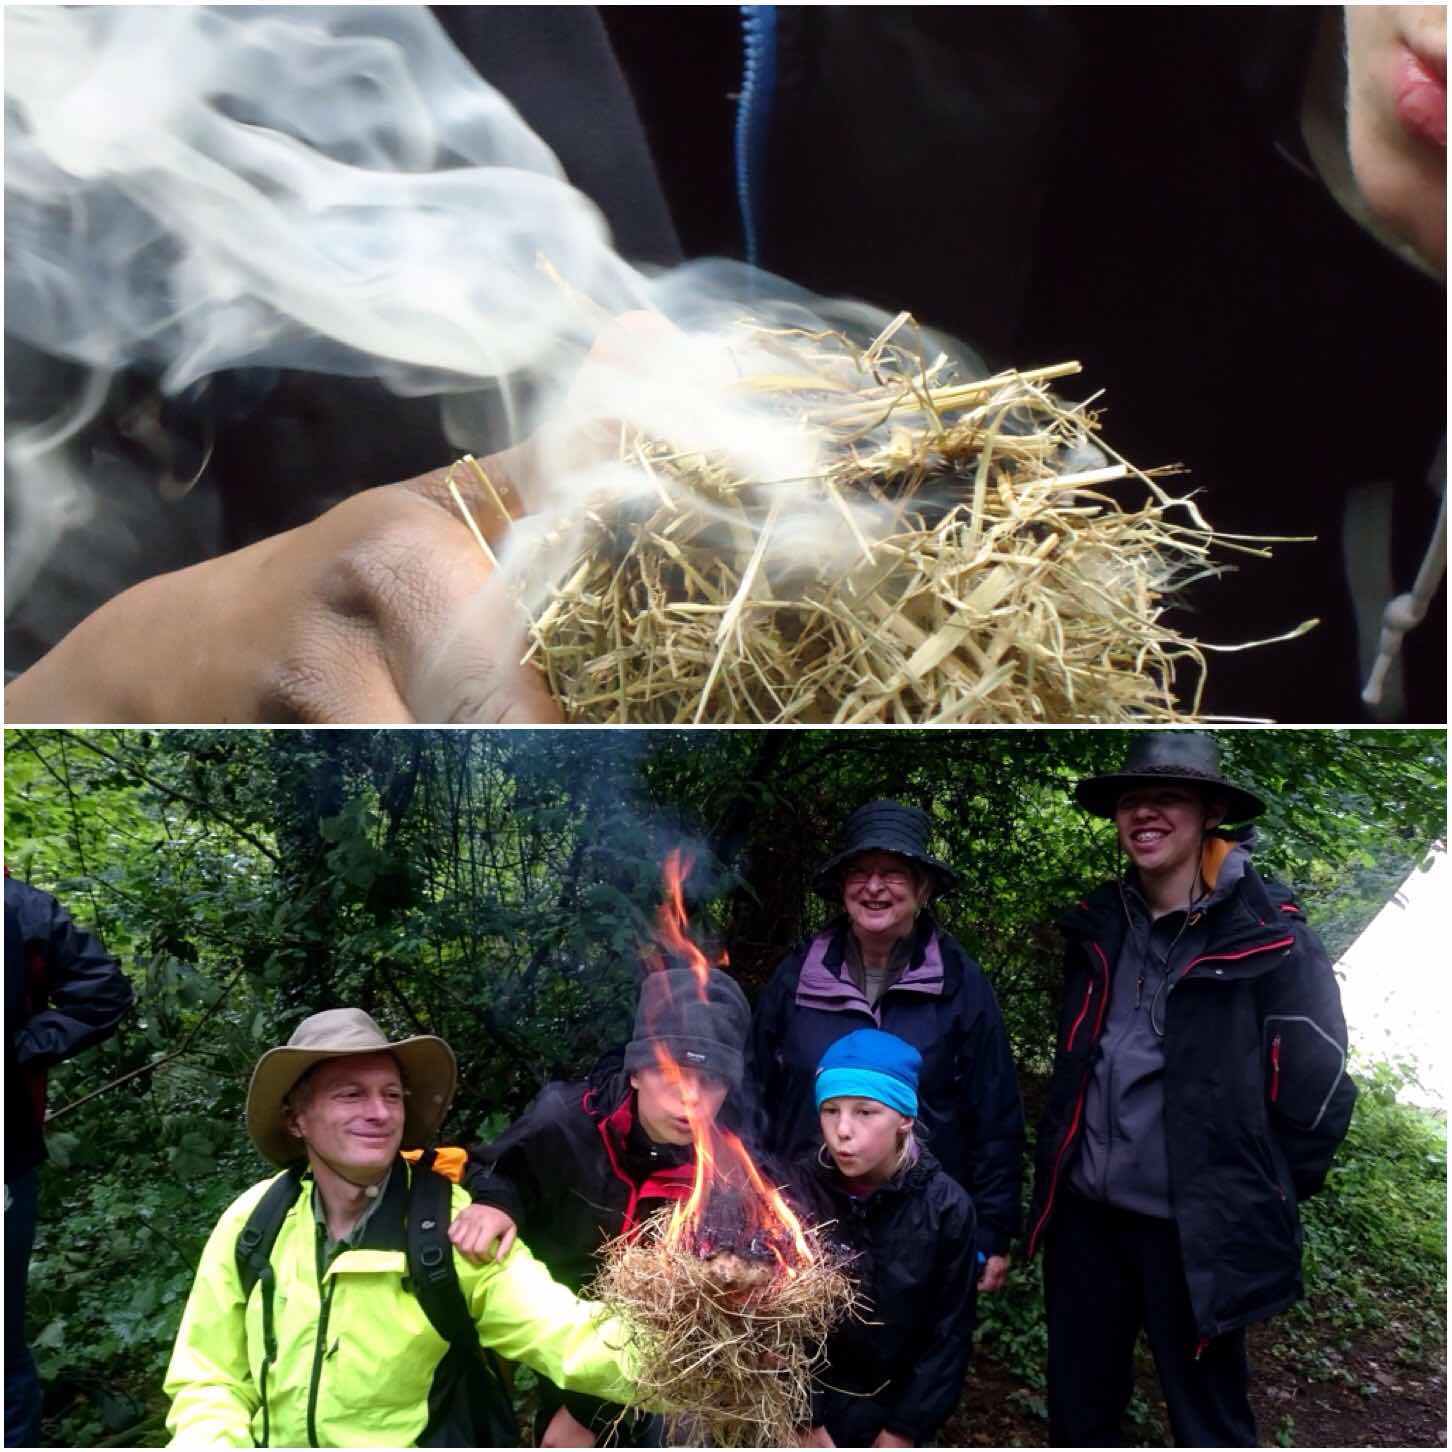
Once you have your ember created (however you do that) it is time to coax that very fragile bundle of hot dust into a fully formed ember and – with the use of whatever tinder you have at hand – to get that much sought-after flame.
It is at this stage that you can see students’ faces transform from concentration into sheer joy – one of the reasons why I love this subject.
Flamage
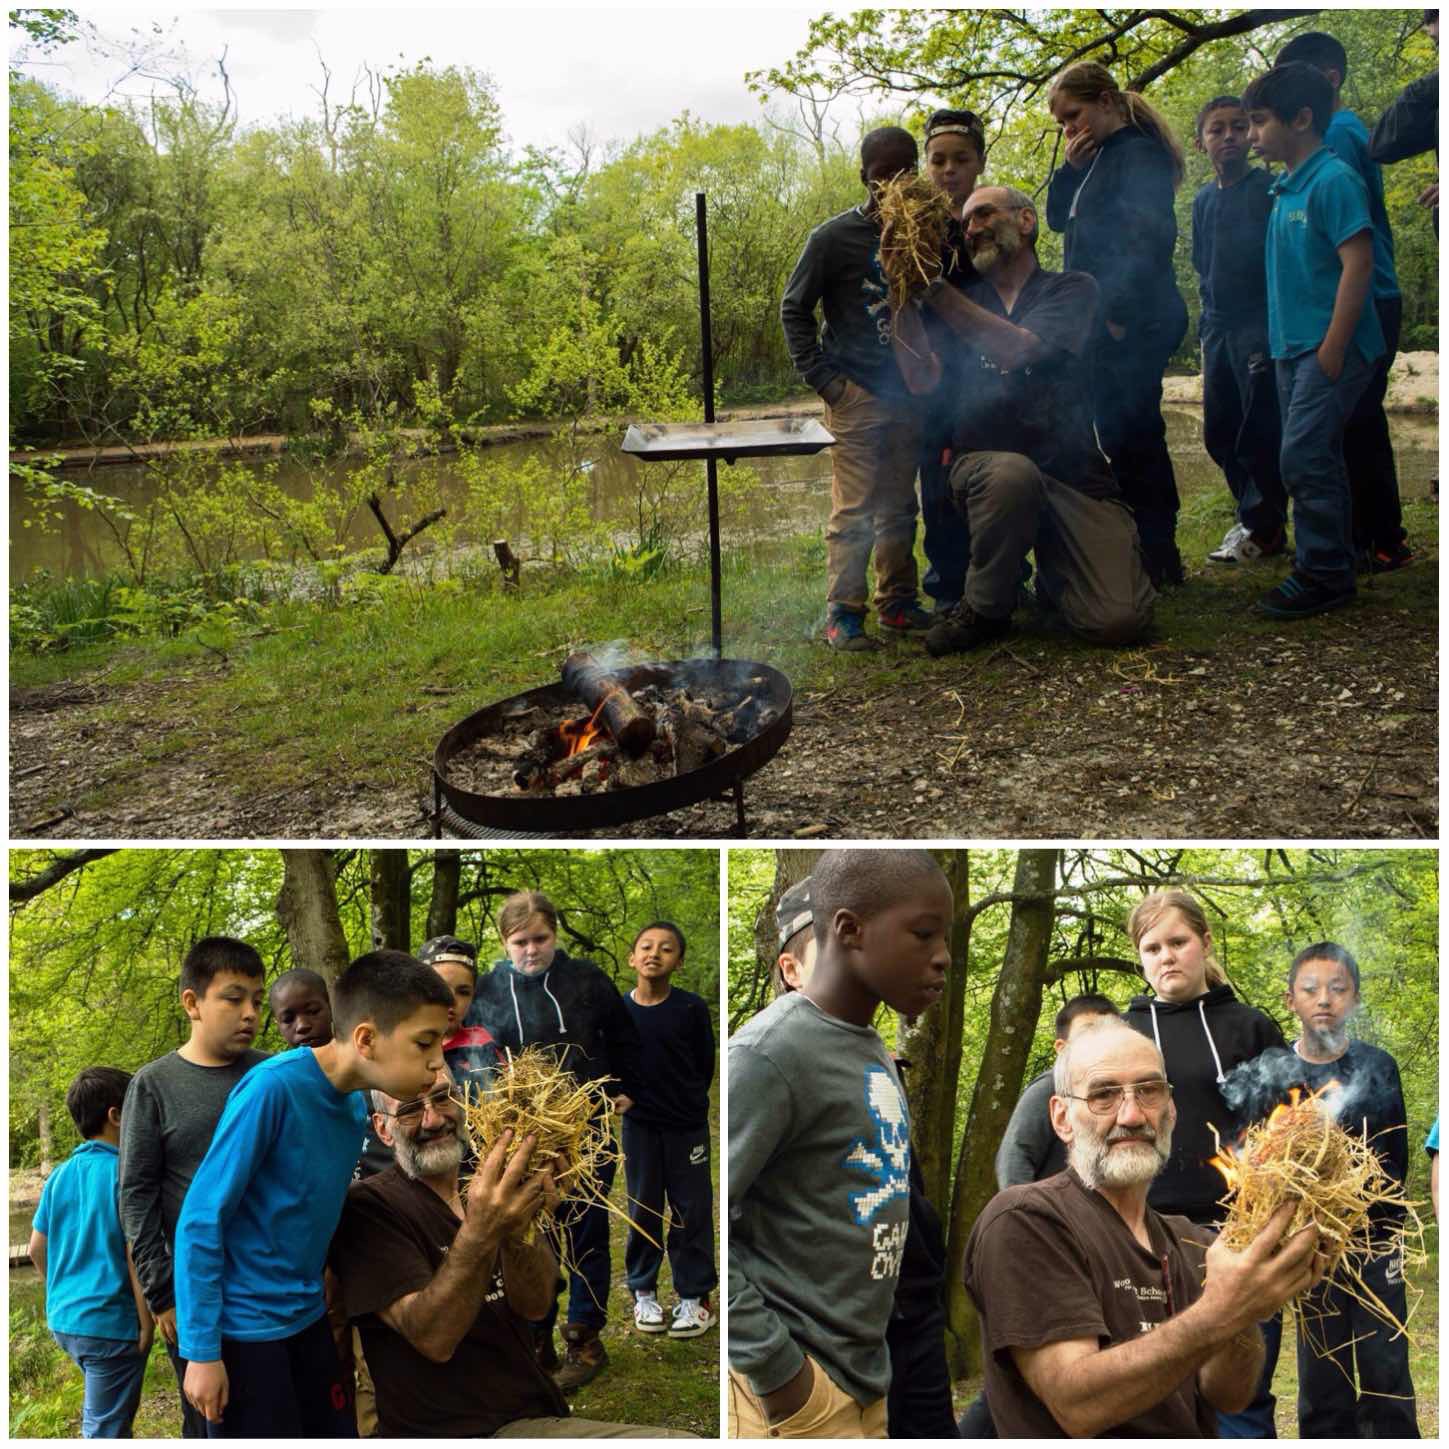
Damp Tinder
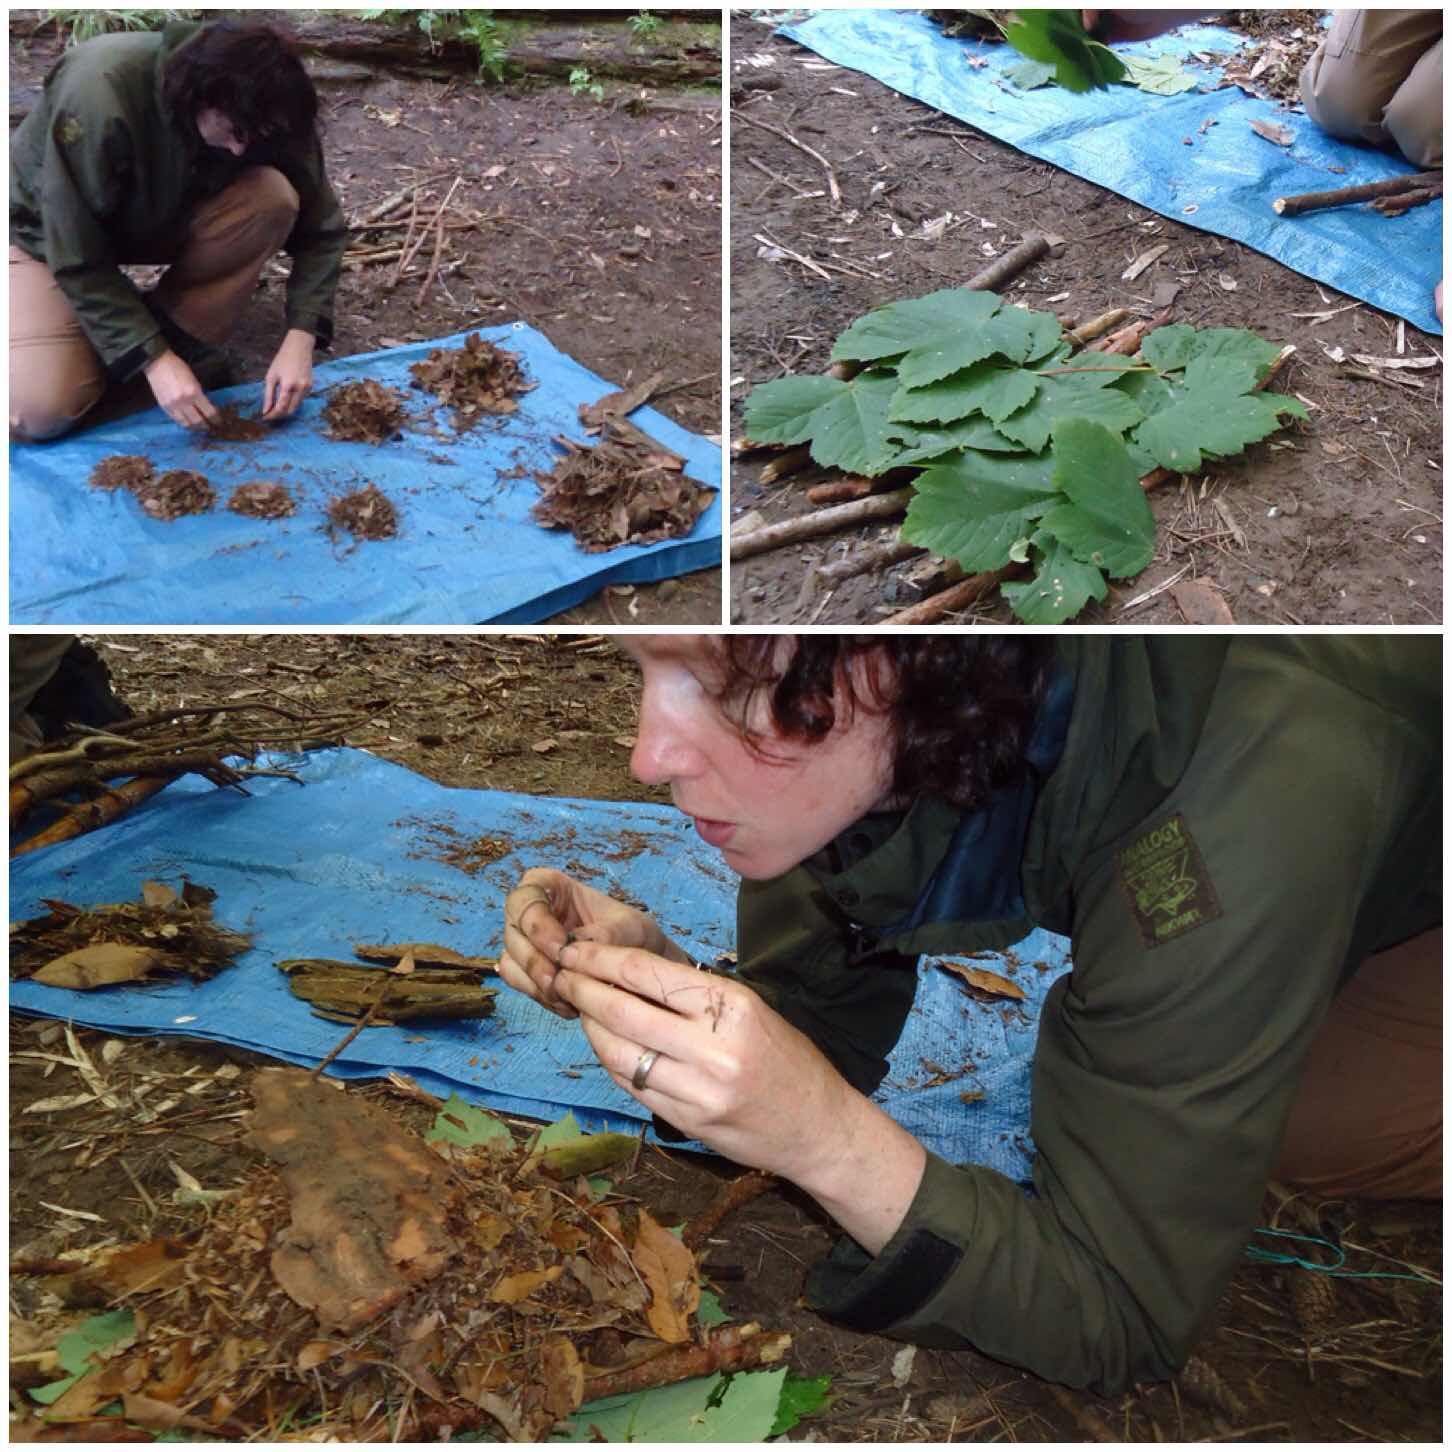
Normally you try and find the driest tinder possible to turn your ember into a flame, however Richard turned that idea upside down a few years ago. We had a chat one evening around the fire and he explained his idea to me: dimply that it was possible to walk off into the woods and pick up damp dead leaves and process them in a certain way to make tinder to start a fire.
After collecting a pile of damp leaves (take the driest ones from the top of the leaf debris) start to break them up by rubbing them vigorously. Collect the flaked pieces and grade them from minute up to piles of the skeletal remains of the leaves.
From this make a small pile wjth the finest flakes in the centre of your pile.
Damp Tinder fires – Prep
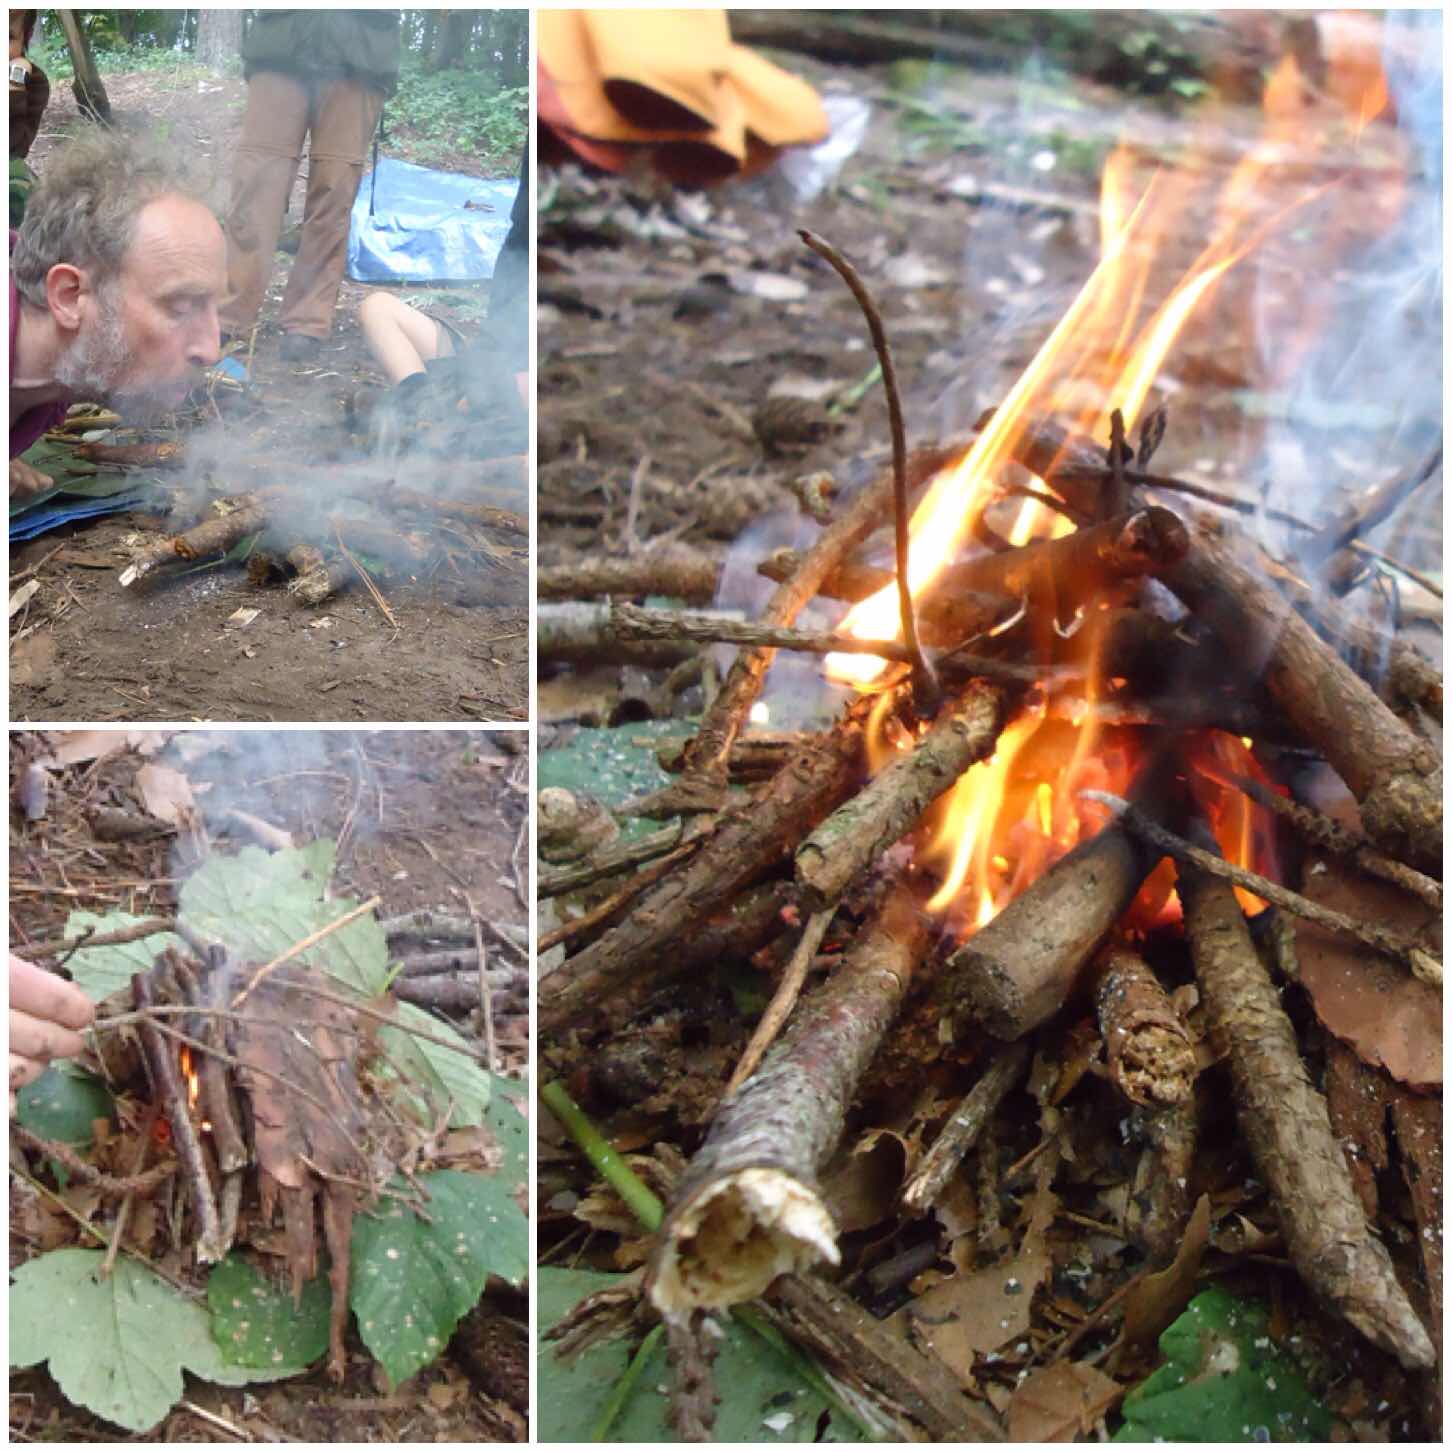
Make a small hole in the side of your pile to the centre and pop an ember (create that in whatever way you wish) and start to blow gently into the ember.
The trick is to do this slowly so that you create an ever-expanding dry area. If necessary you can place some green leaves or bark over the top to trap all the broken debris and stop it all blowing away. After about 10 to 20 minutes you usually get flame. Just shows you should always persevere with your fire.
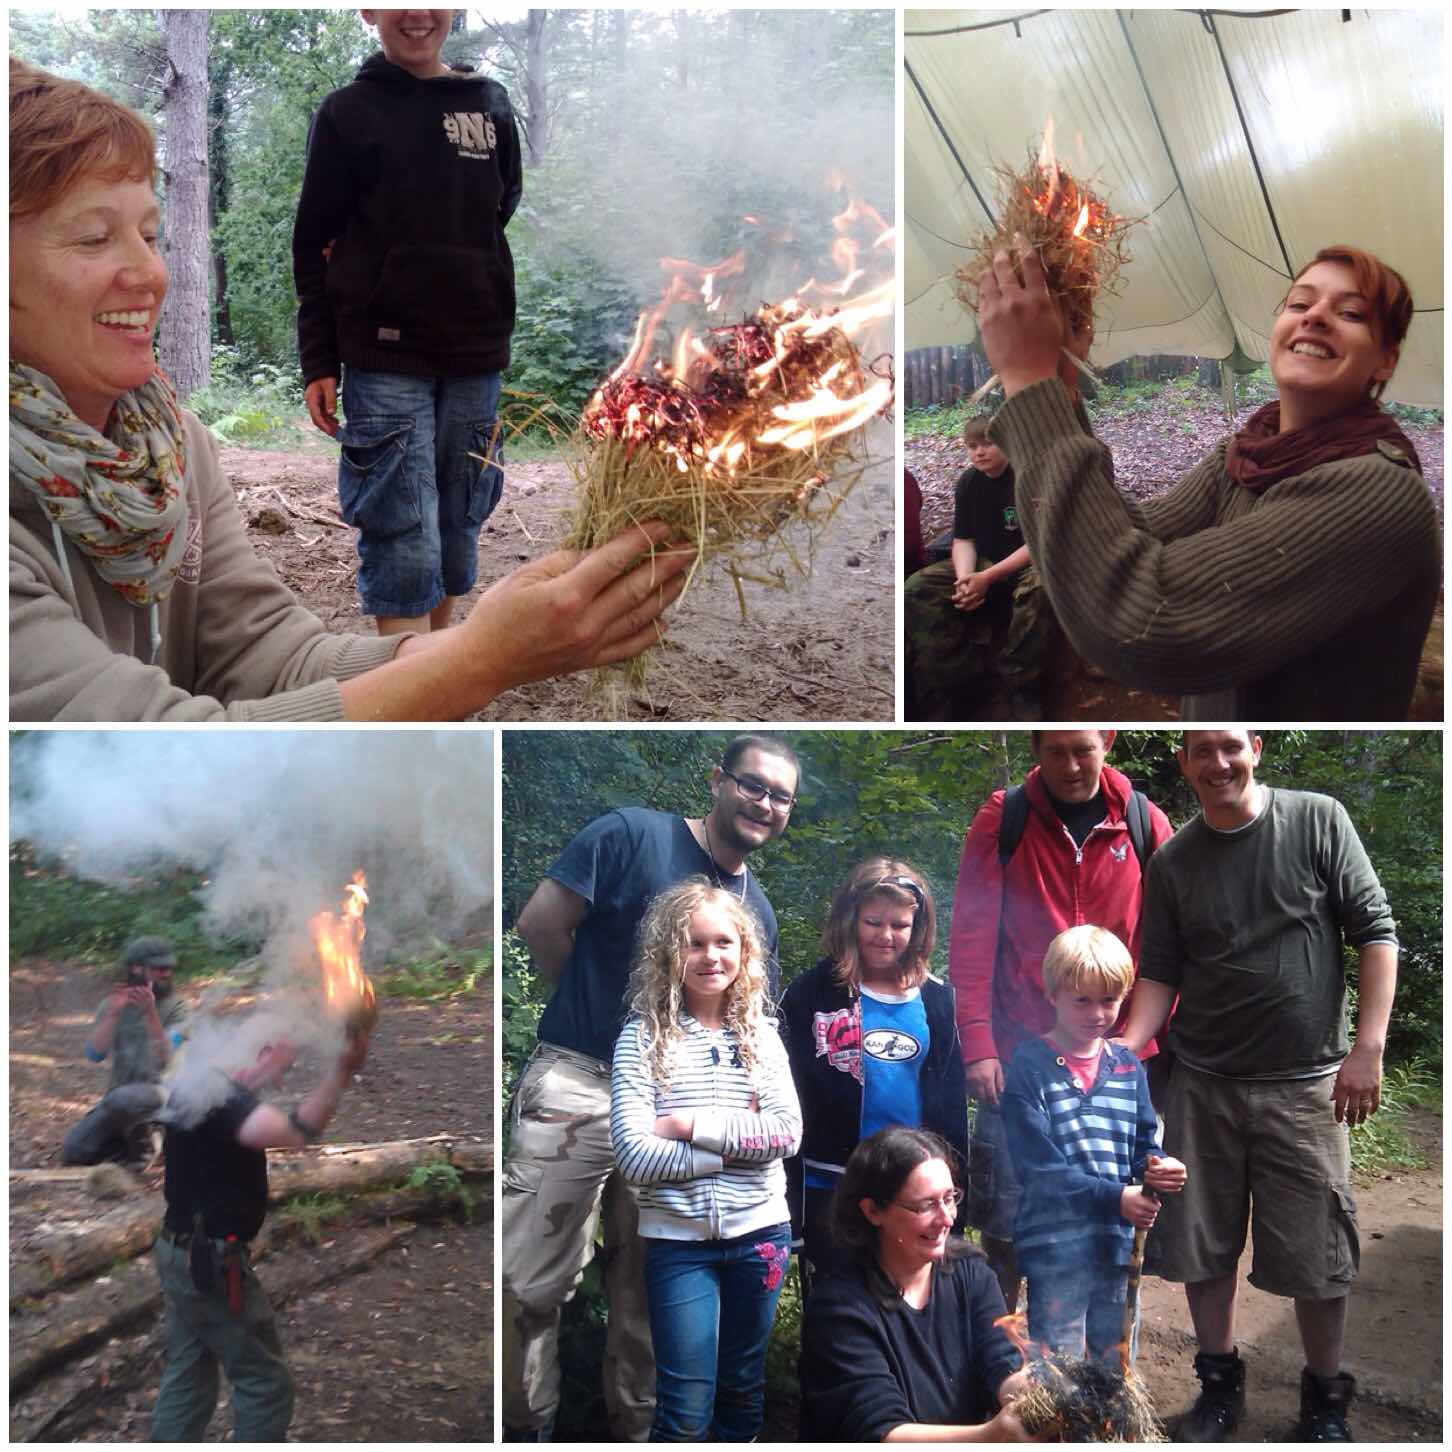
Damp Tinder Fires – Flammage
Challenging Yourself
Whether you are a novice to fire making or an expert looking for a new challenge the Moot will have something for you – be that firesteels, bowdrills, handrills, pumpdrills, bamboo fire saws or the secret art of lighting fire from damp tinder.
In this digital/technology dominated world we live in today I always try and make time to keep an eye on what Mother Nature is up to around me – obviously with a camera about my person 🙂
One place where I can really immerse myself back into nature is every year at the Bushcraft UK Bushmoot for a couple of weeks. This post will concentrate on some of the different ways we at the Moot interact with nature.
Bushmoot Nature
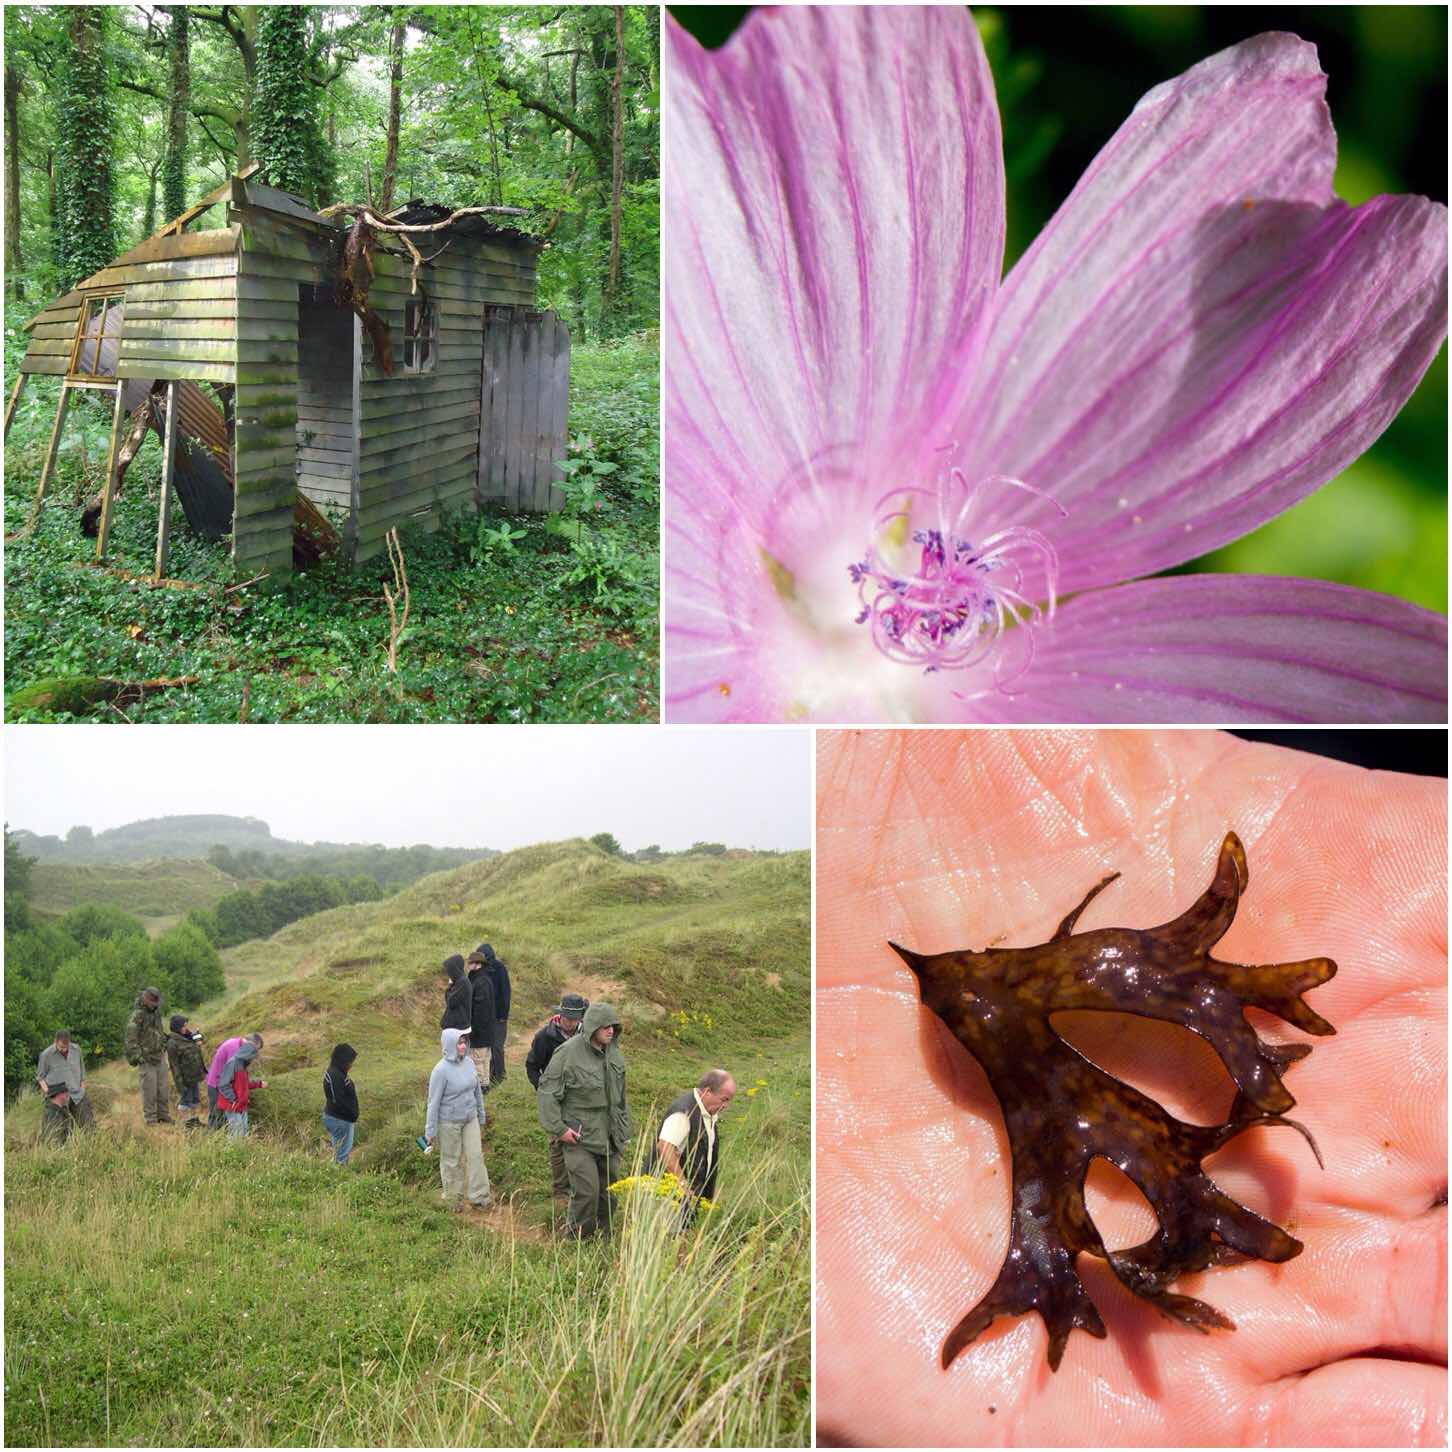
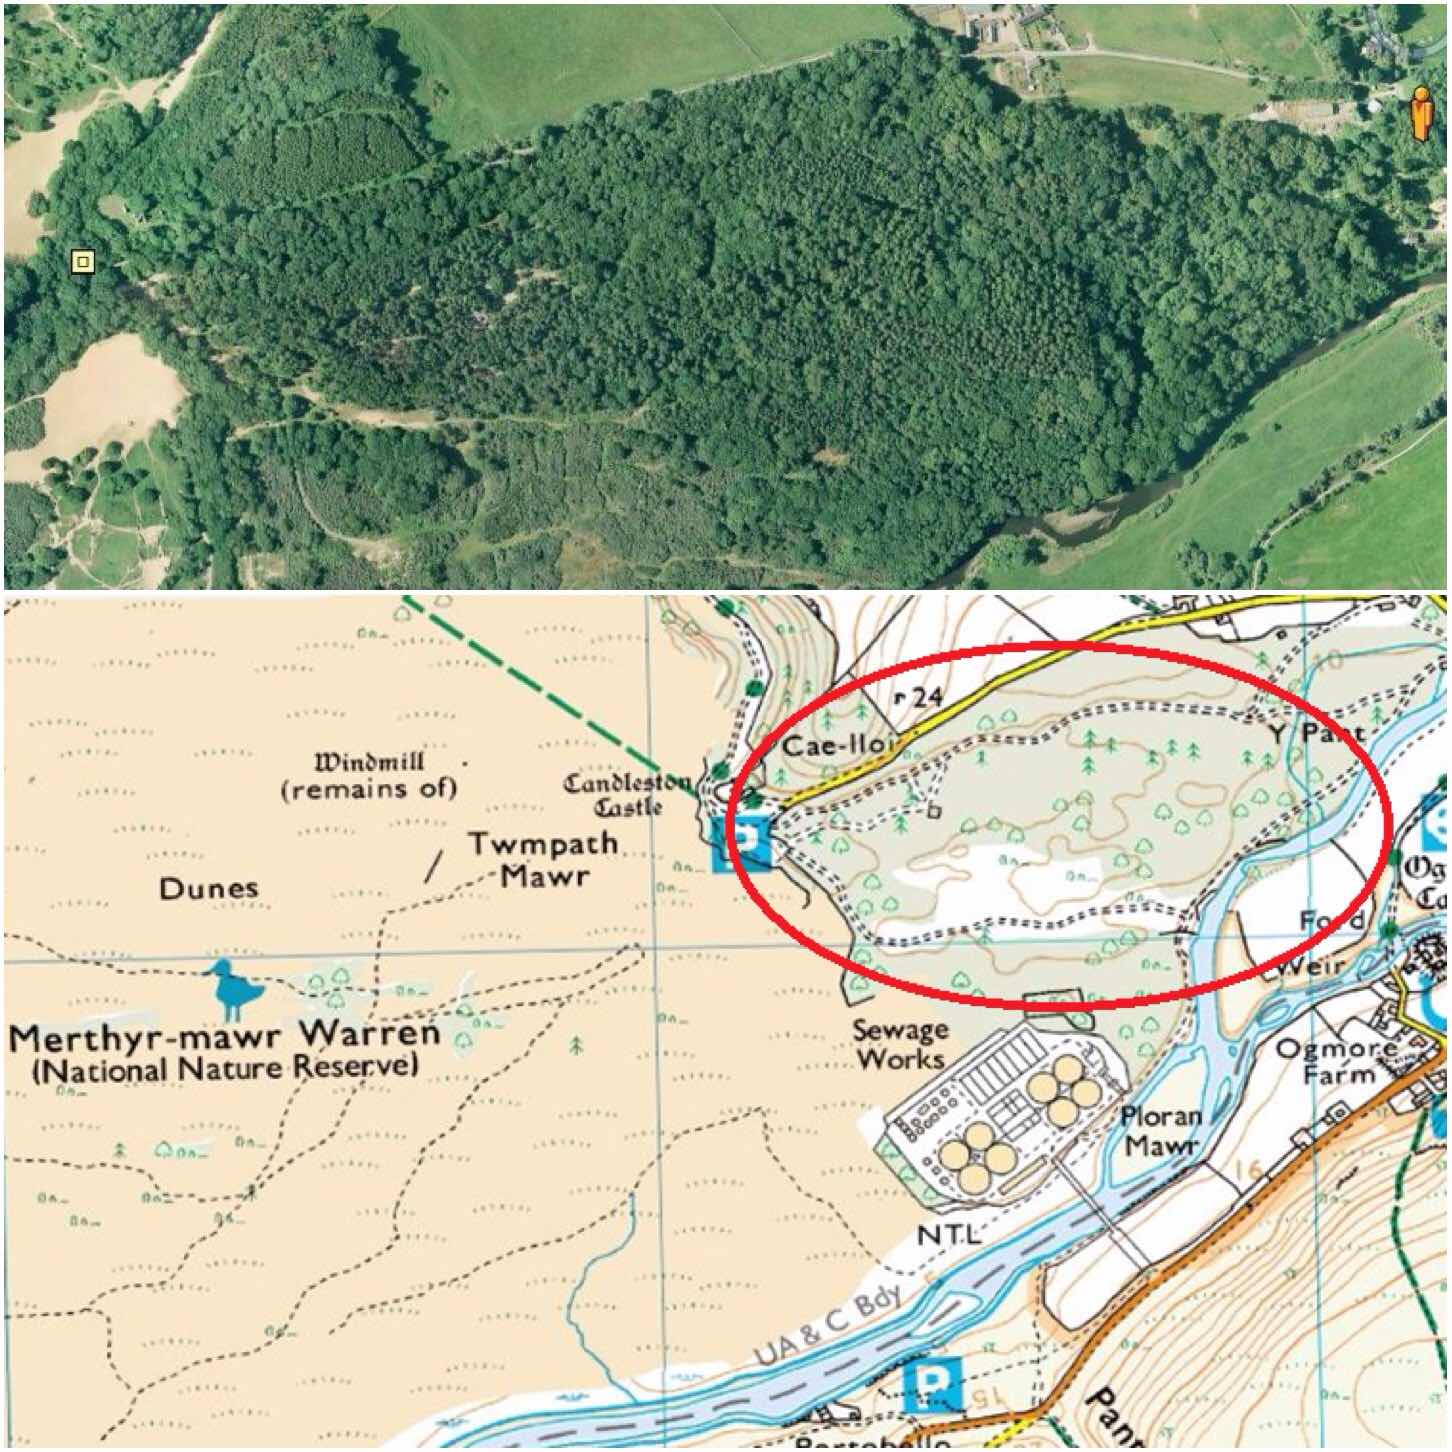
The Moot is located in a wood on the edge of the National Nature Reserve at Merthyr Mawr Warren in South Wales. Merthyr Mawr Warren is I am told the site of the second largest sand dunes in Europe.
The wood we use is on the edge of these dunes and was heavily planted with a variety of plants/trees after the Second World War by the local estate owners to help stabilise the dunes.
The Playground
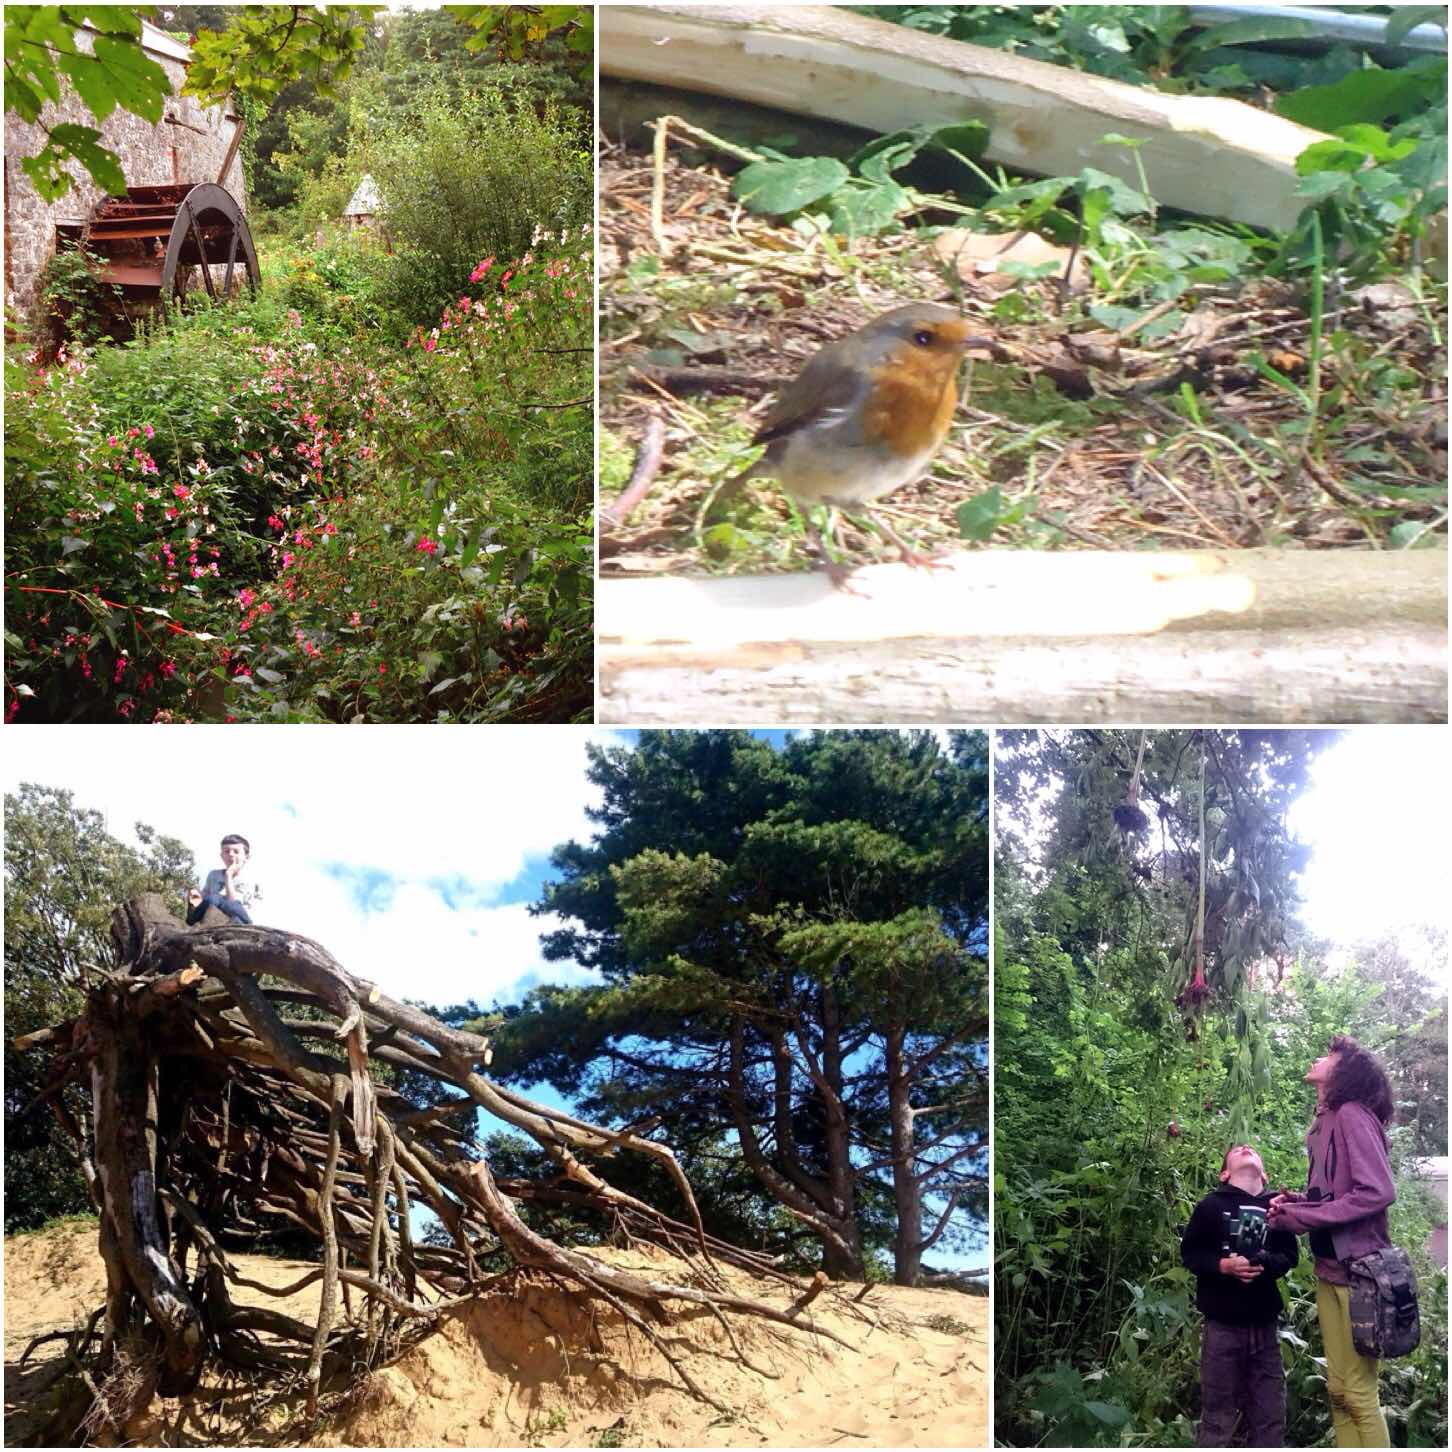
I like to take a walk around the site as often as possible while I am at the Moot to see what I can spot. One of my favourite spots was this little old water wheel at the edge of the site. It is a most beautiful and quiet spot to sit and observe nature.
I have a little Robin (Ok I am sure there are different ones every few years) who comes to visit me at my camp. This little fella is not shy and is always on the lookout for scraps.
My kids make this site their playground and interact with nature all the time, from climbing strange looking tree roots to making their own art by throwing Himalayan Balsam up into trees so that they hang down (quite a weird site passing these trees). As we are continually clearing back the Balsam I do not mind them doing this.
Variety
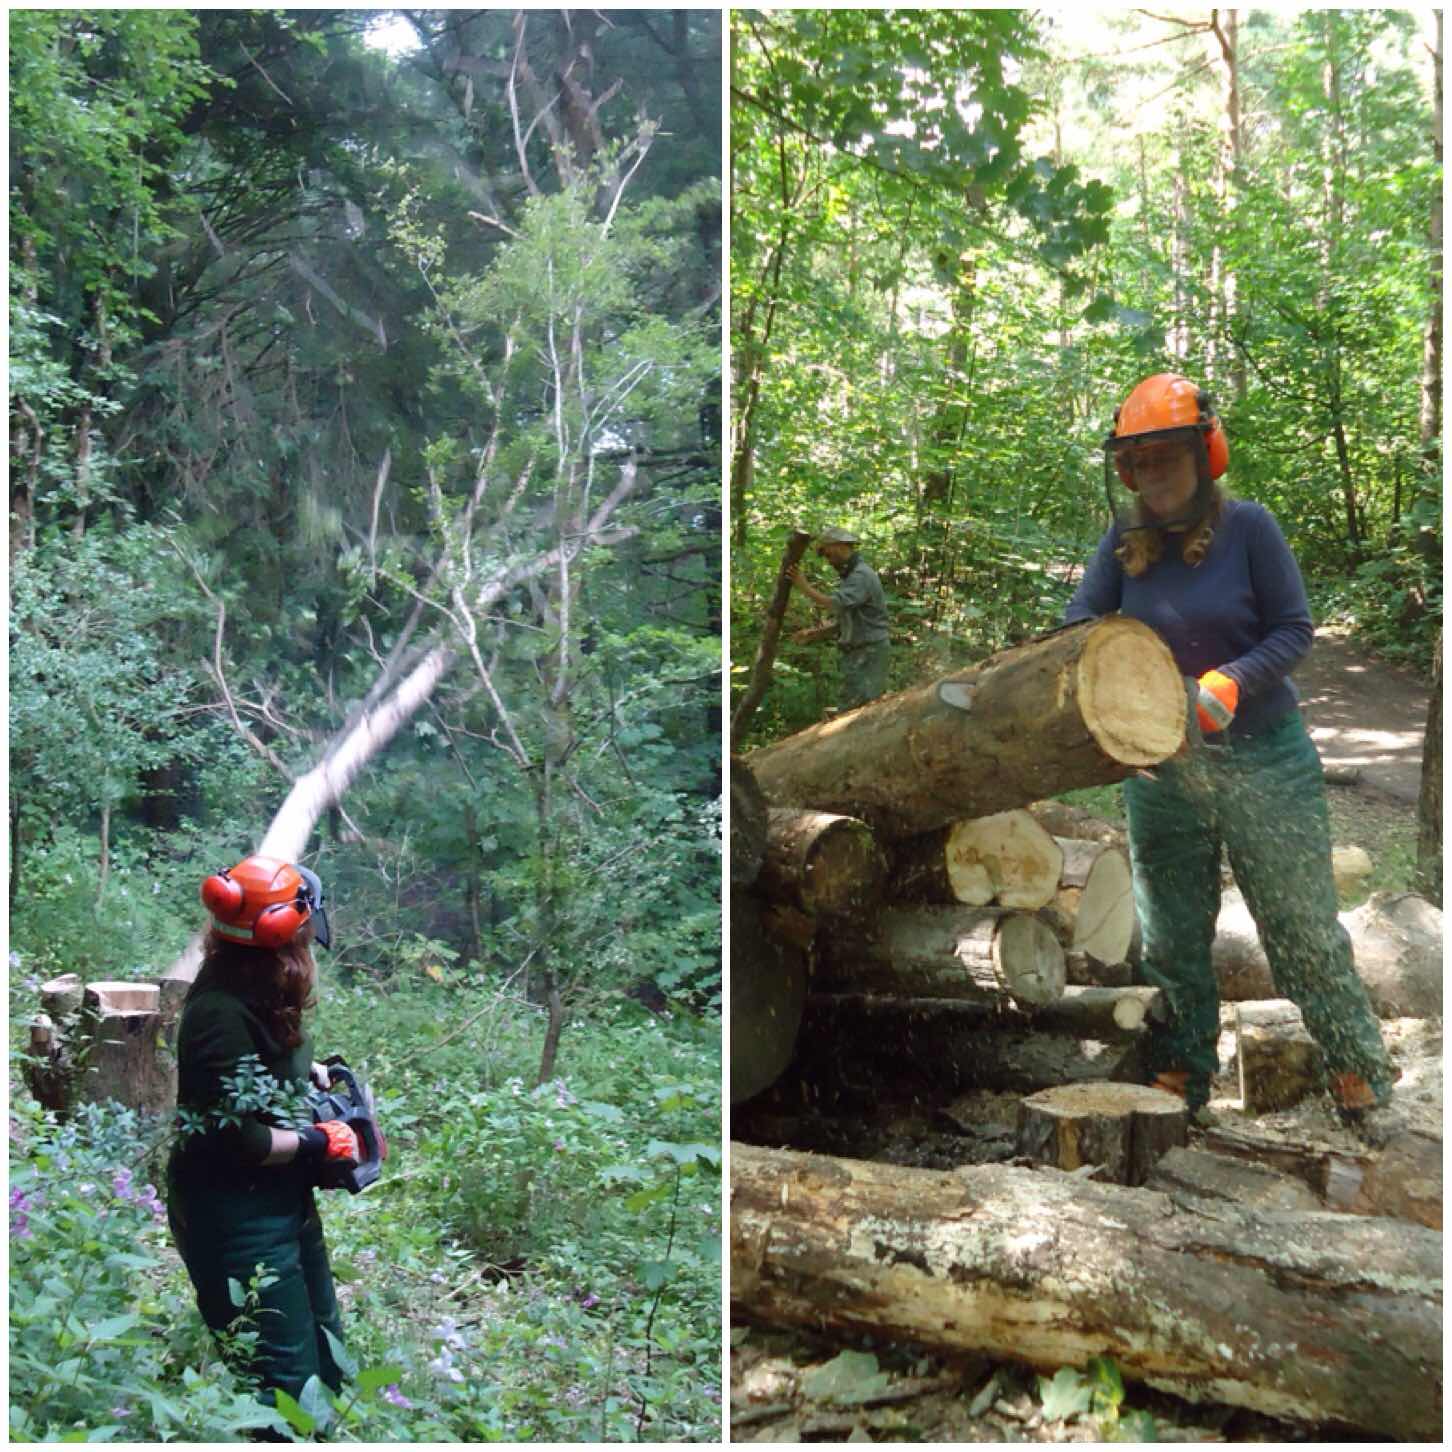
As bushcrafters we try and minimise the impact we have on the site. For firewood we have an agreement with the local estate to buy in timber from them so as to not strip out the local wood for firewood.
Occasionally with the agreement of the estate we will take out a tree or two that has become a danger to those camping in the woods.
We have been coming to the site for over ten years and this policy of minimal impact has meant that the site remains a place of real natural diversity.
Keeping the balance
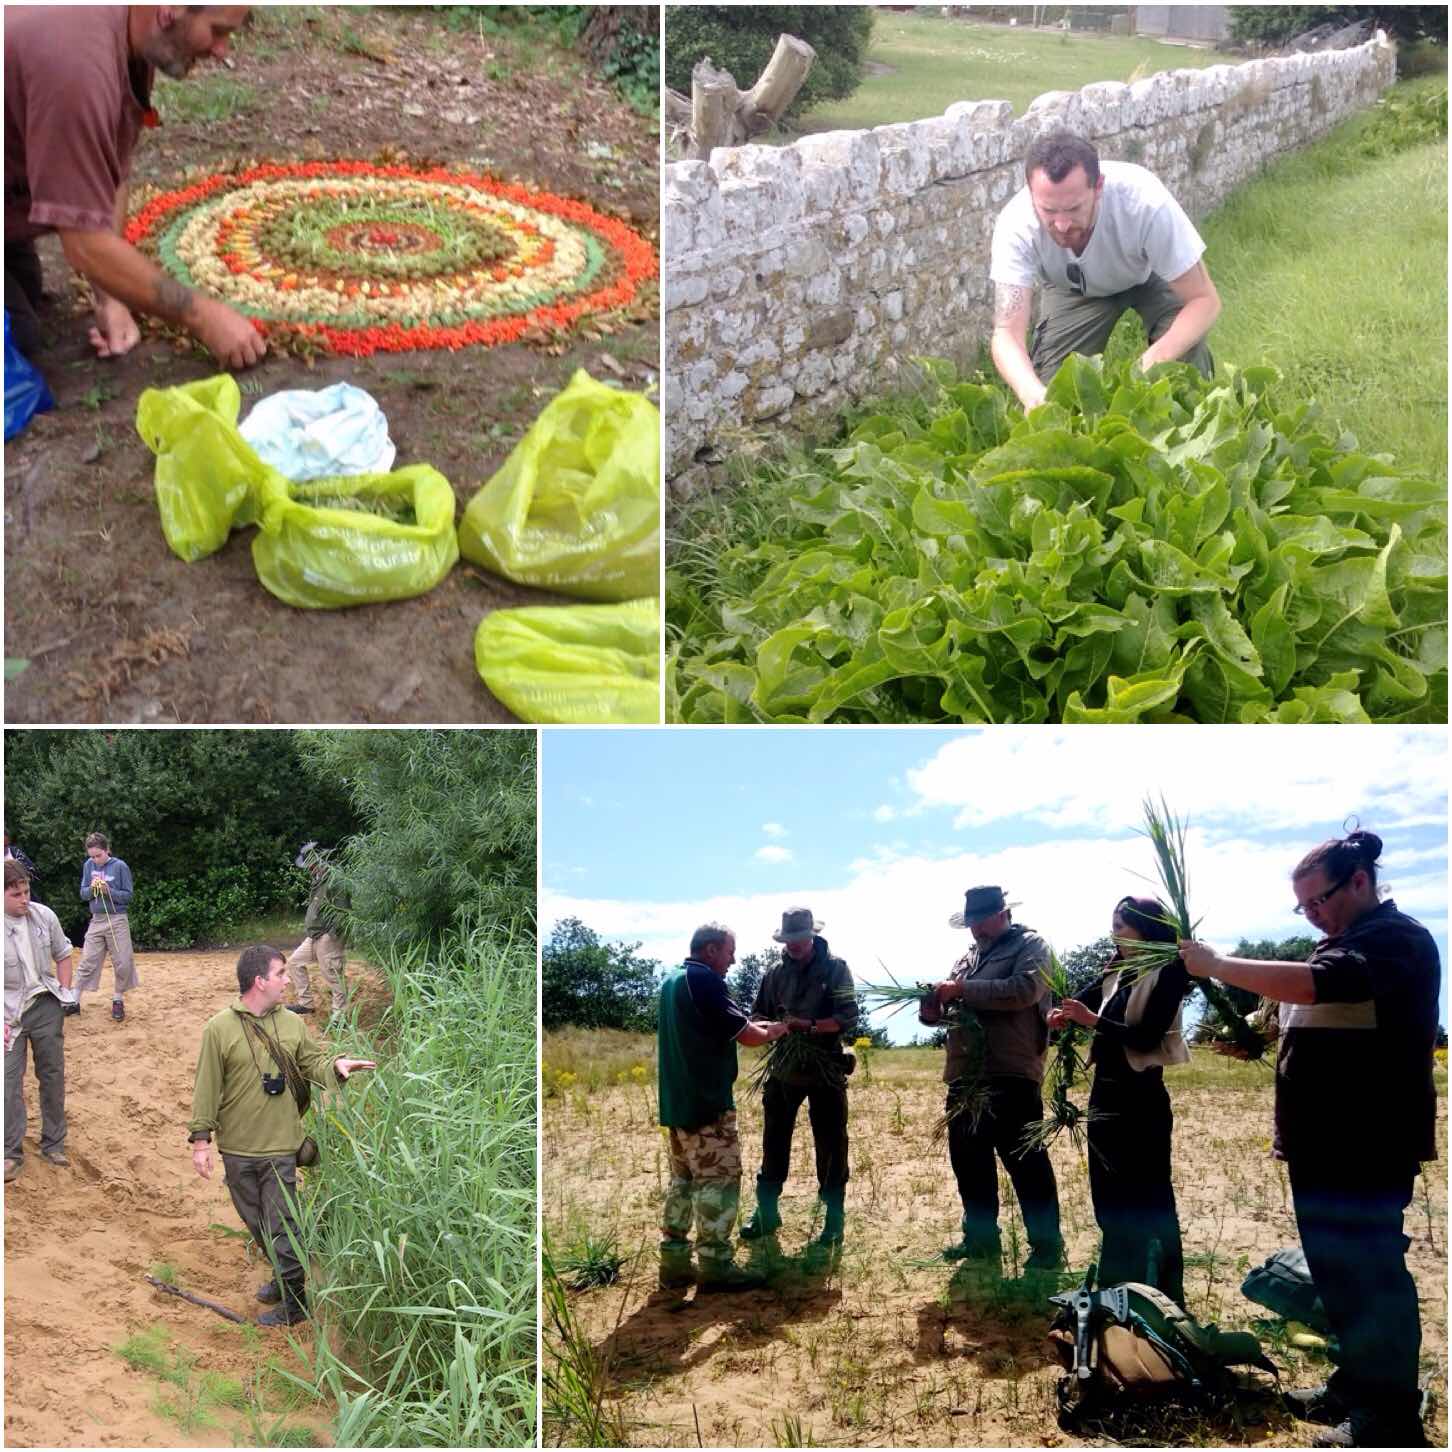
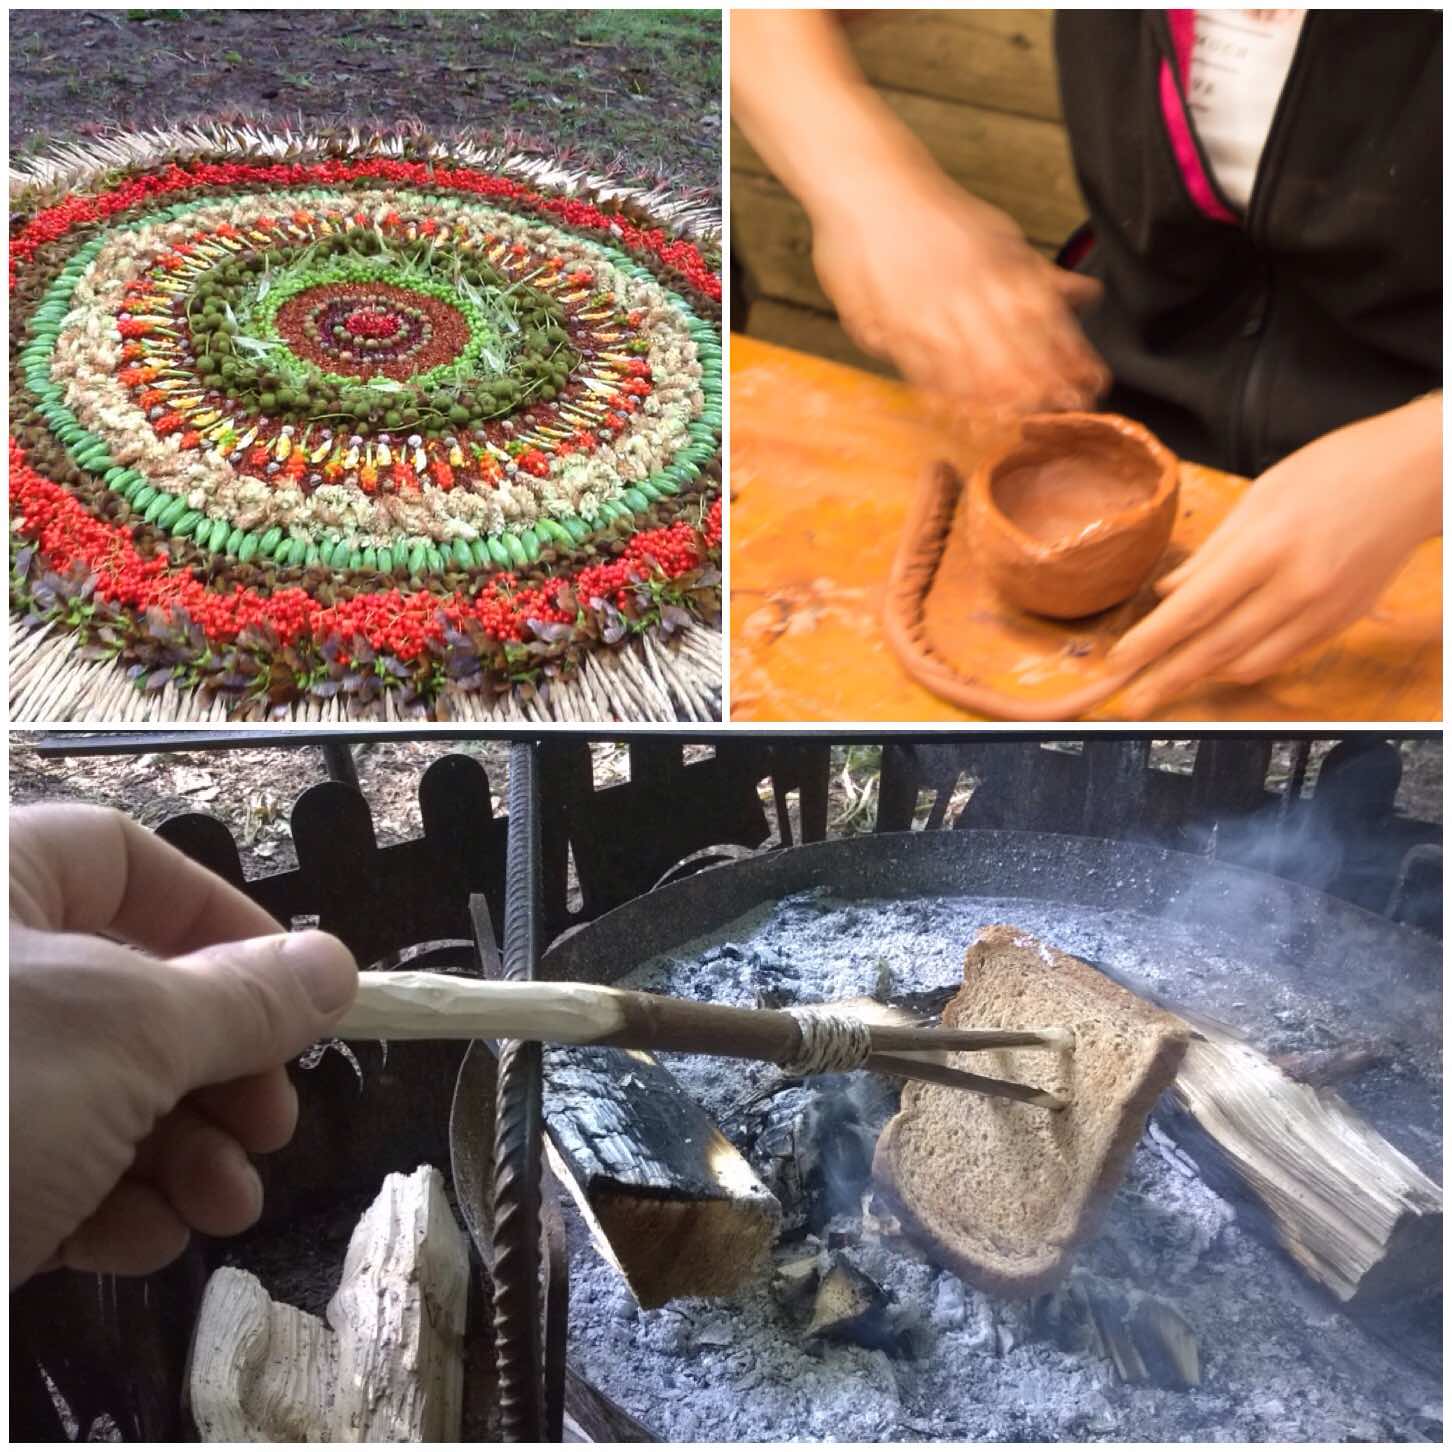
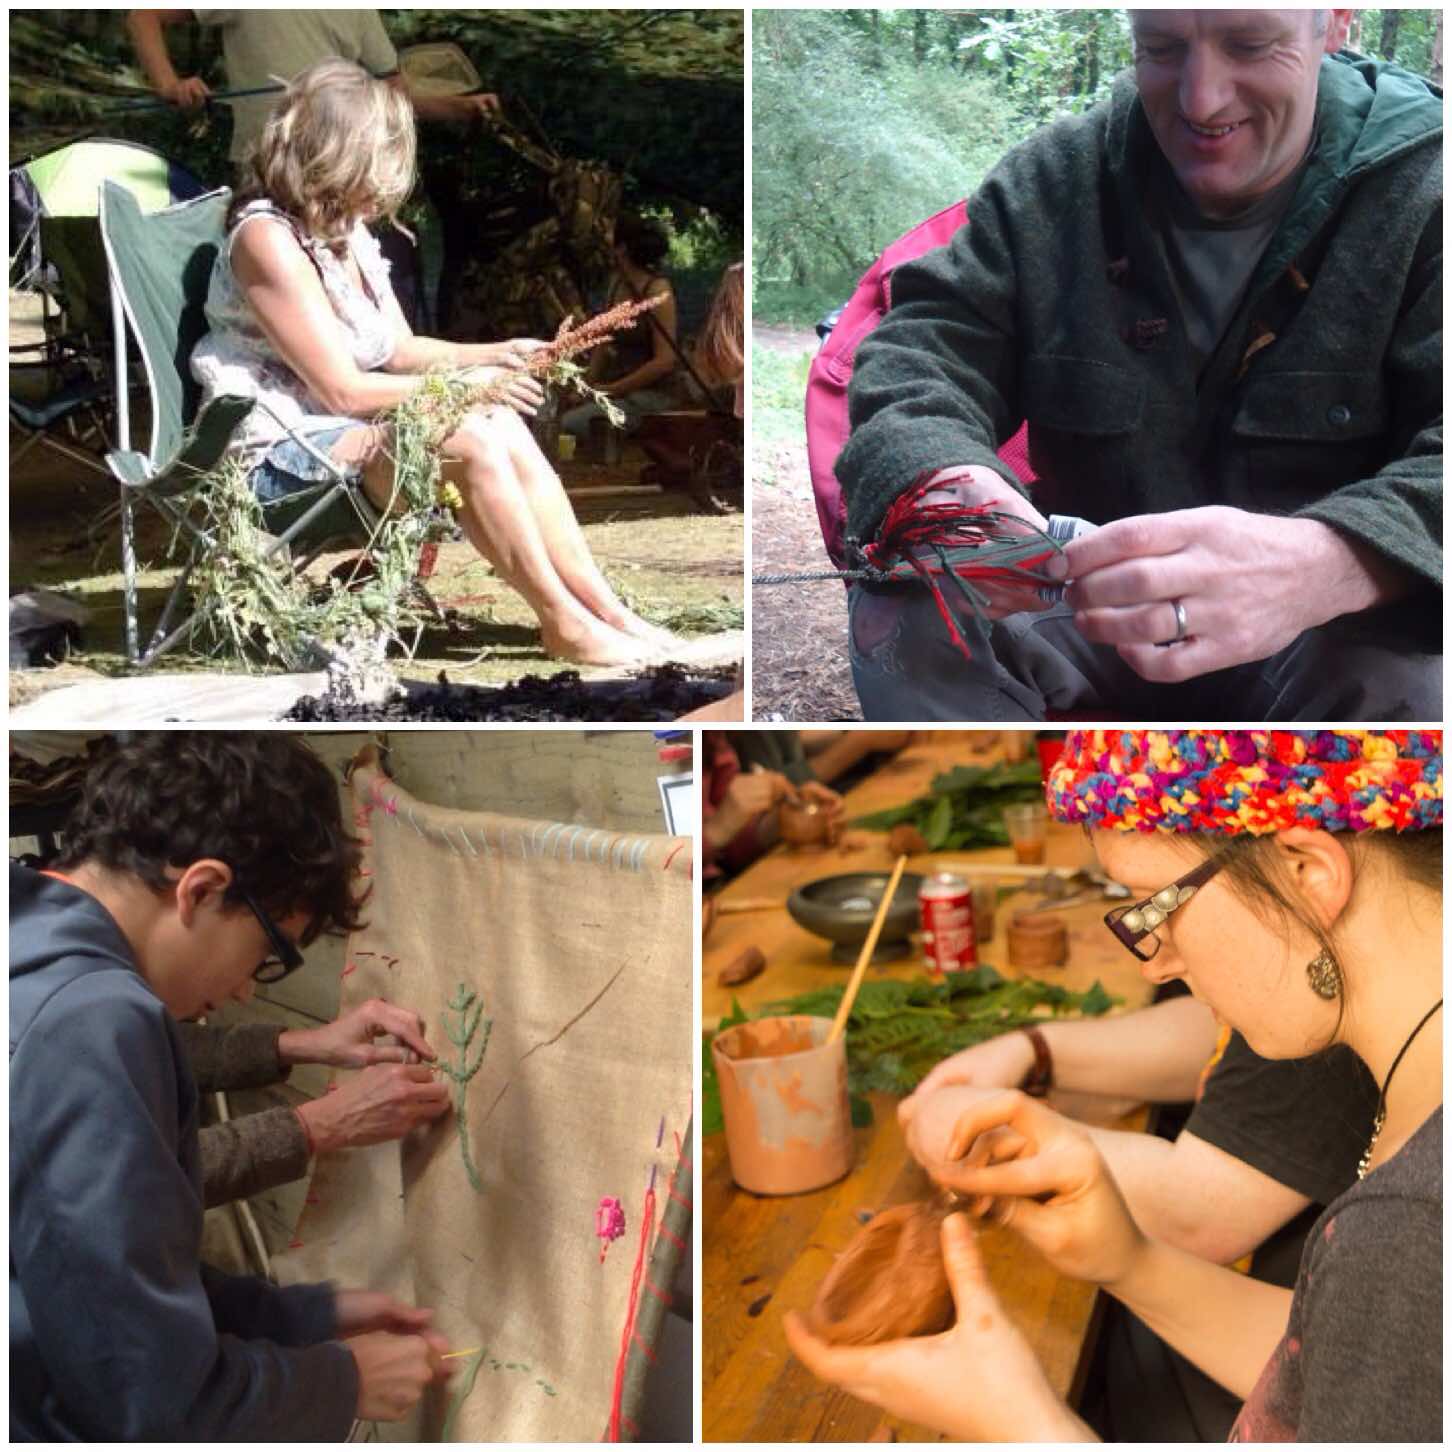
A key attraction that the Moot has is of a place of learning. We have many highly experienced instructors that come along each year to teach. This can range from creating natural art, foraging for edible plants, understanding how everything interacts and using natures raw materials to make useful items.
Great instruction
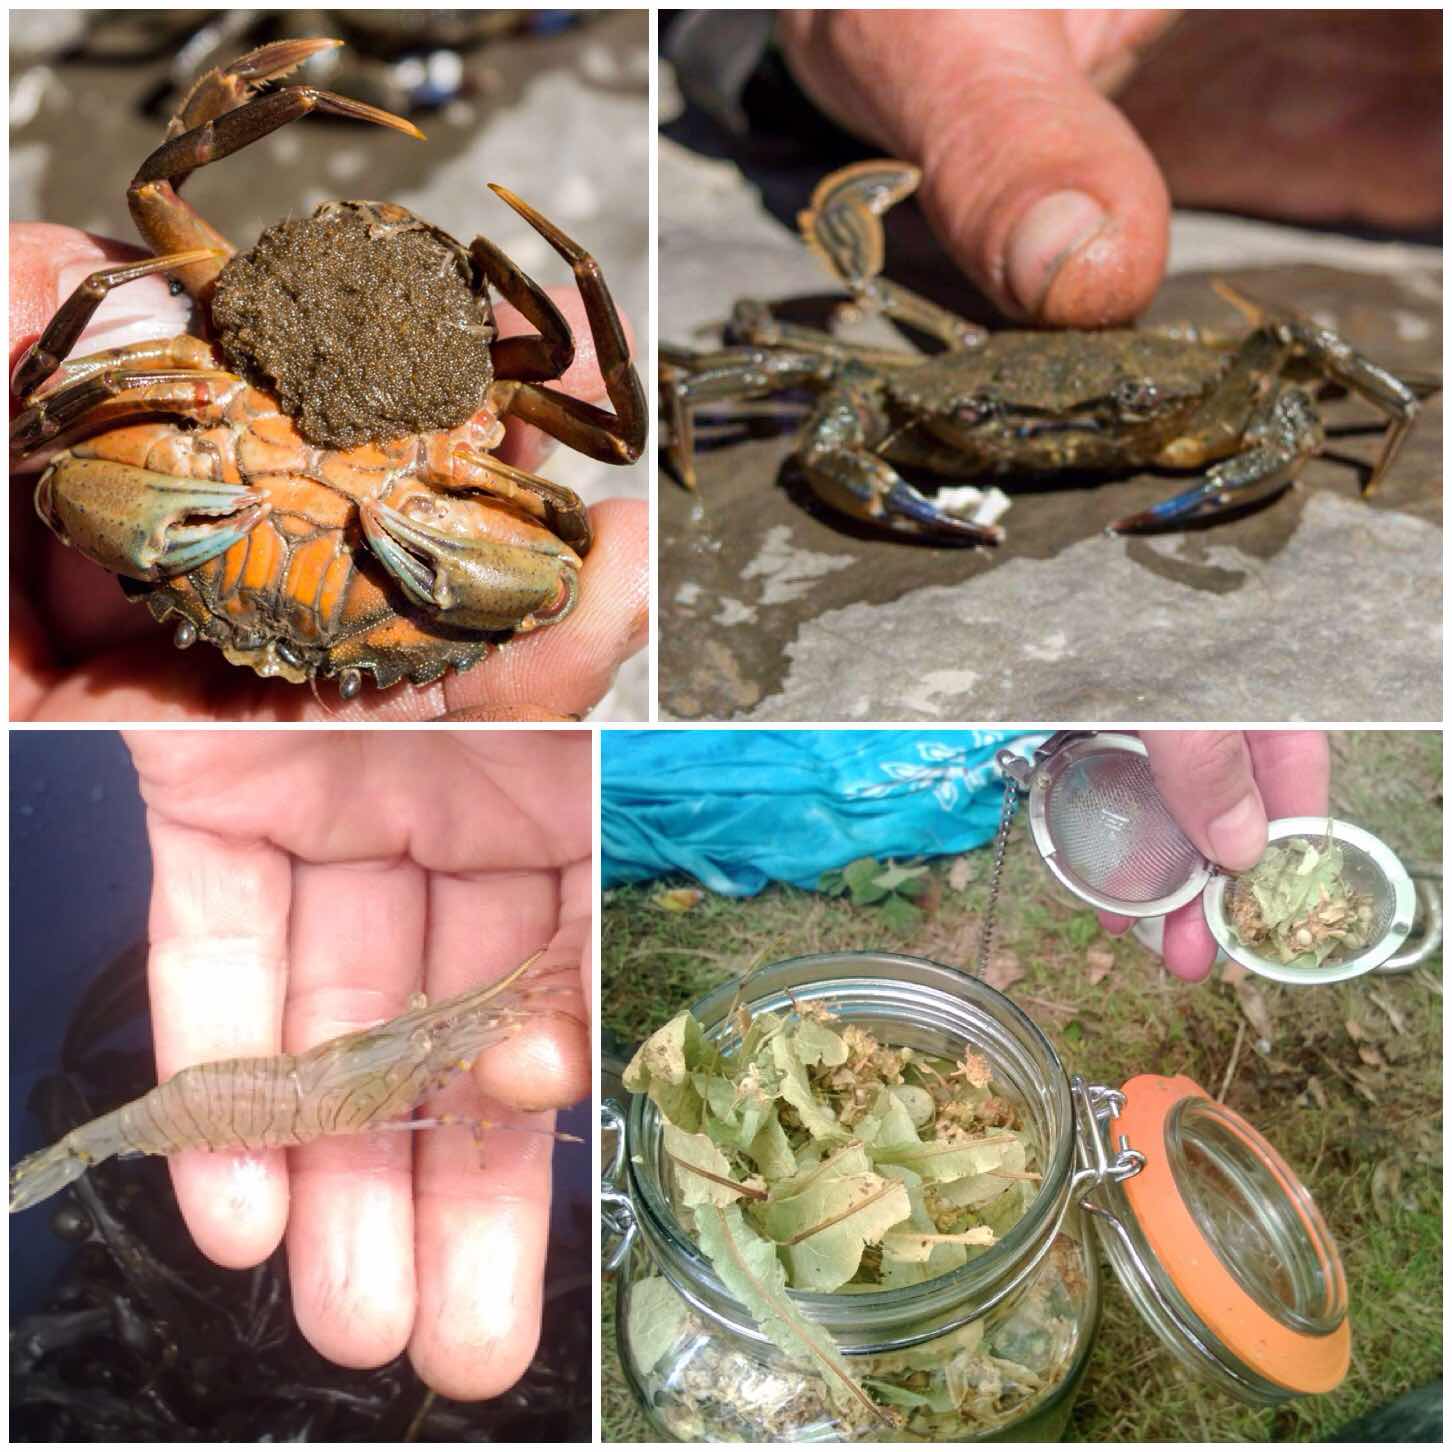
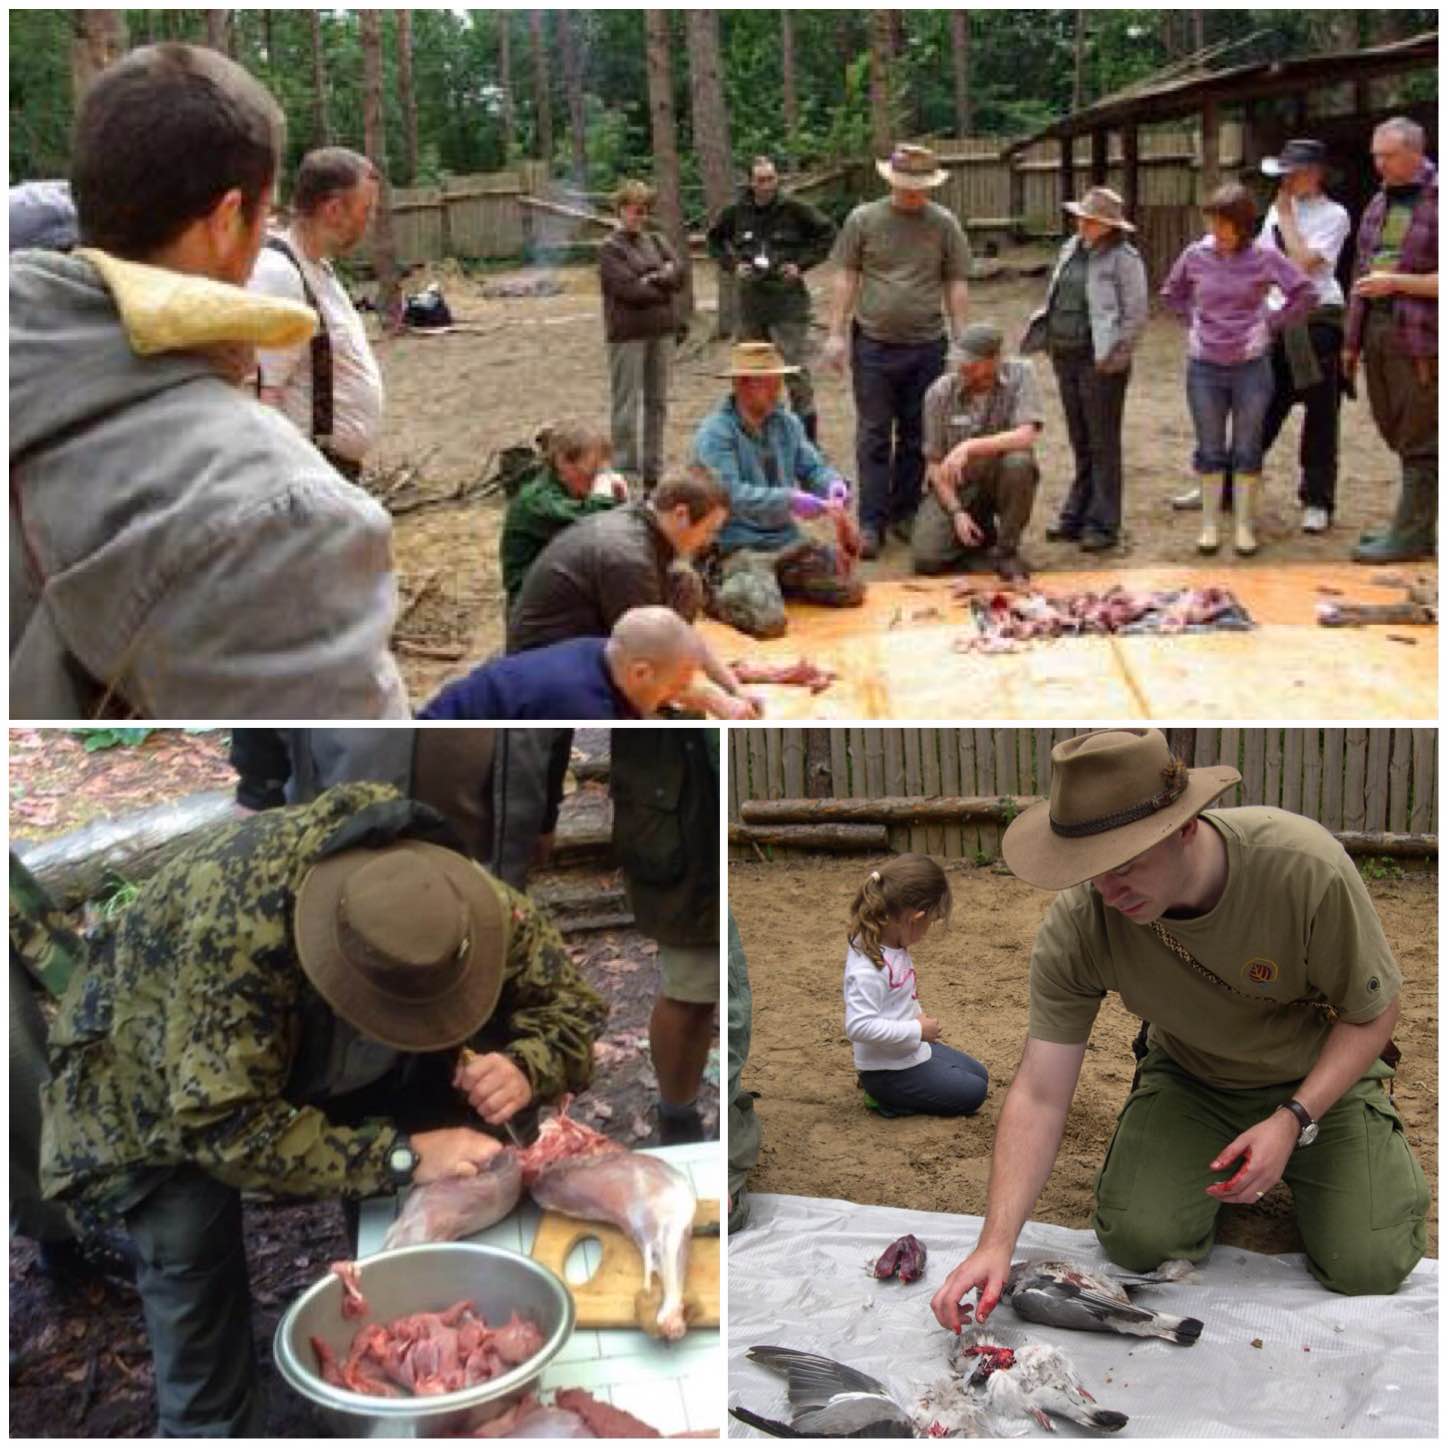
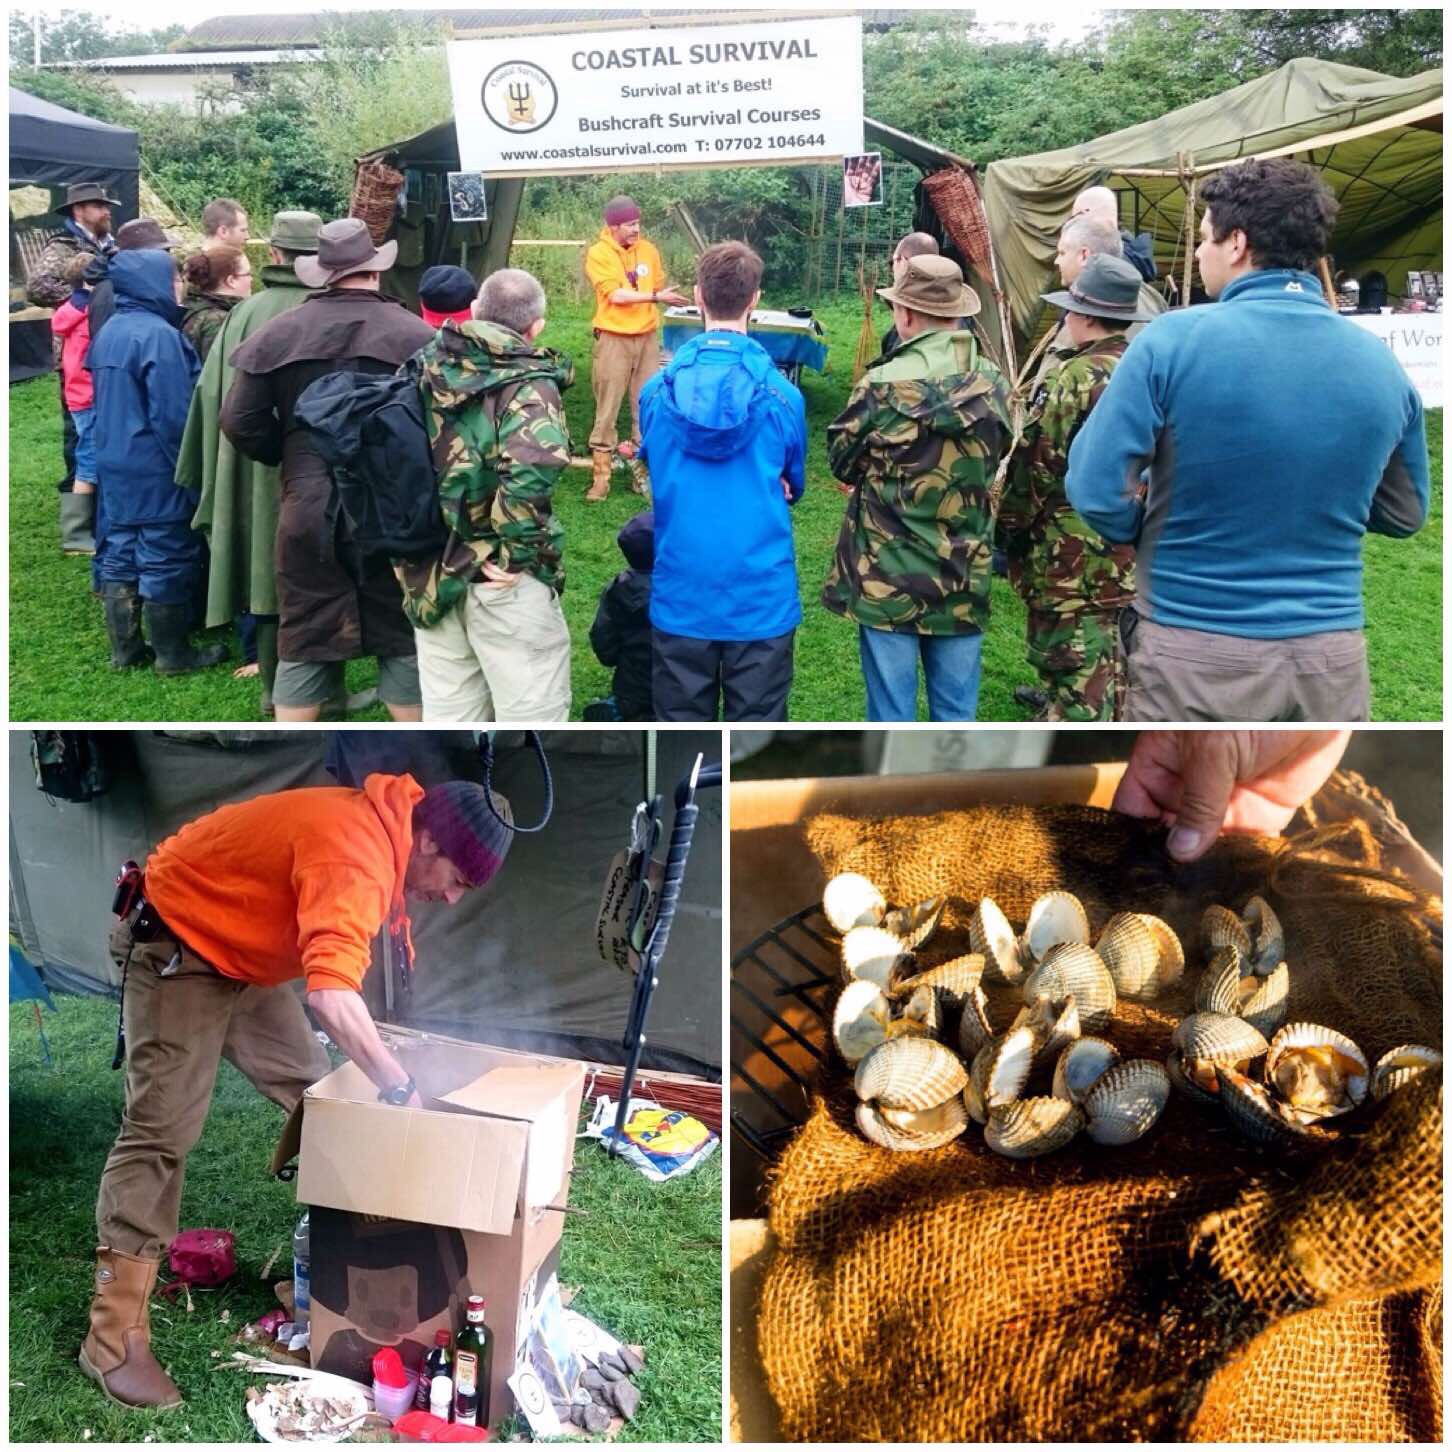
Part of all this learning is to know when to forage and when not to forage. In a class with Fraser from Coastal Survival this year we foraged on the coastline. We looked at many of the crabs that could be found in the rock pools and returned the many smaller ones or ones carrying eggs to where we found them. There were plenty of big crabs and shrimps though to harvest for the pot.
We also forage for lots of plants that make great teas.
To forage or not to forage
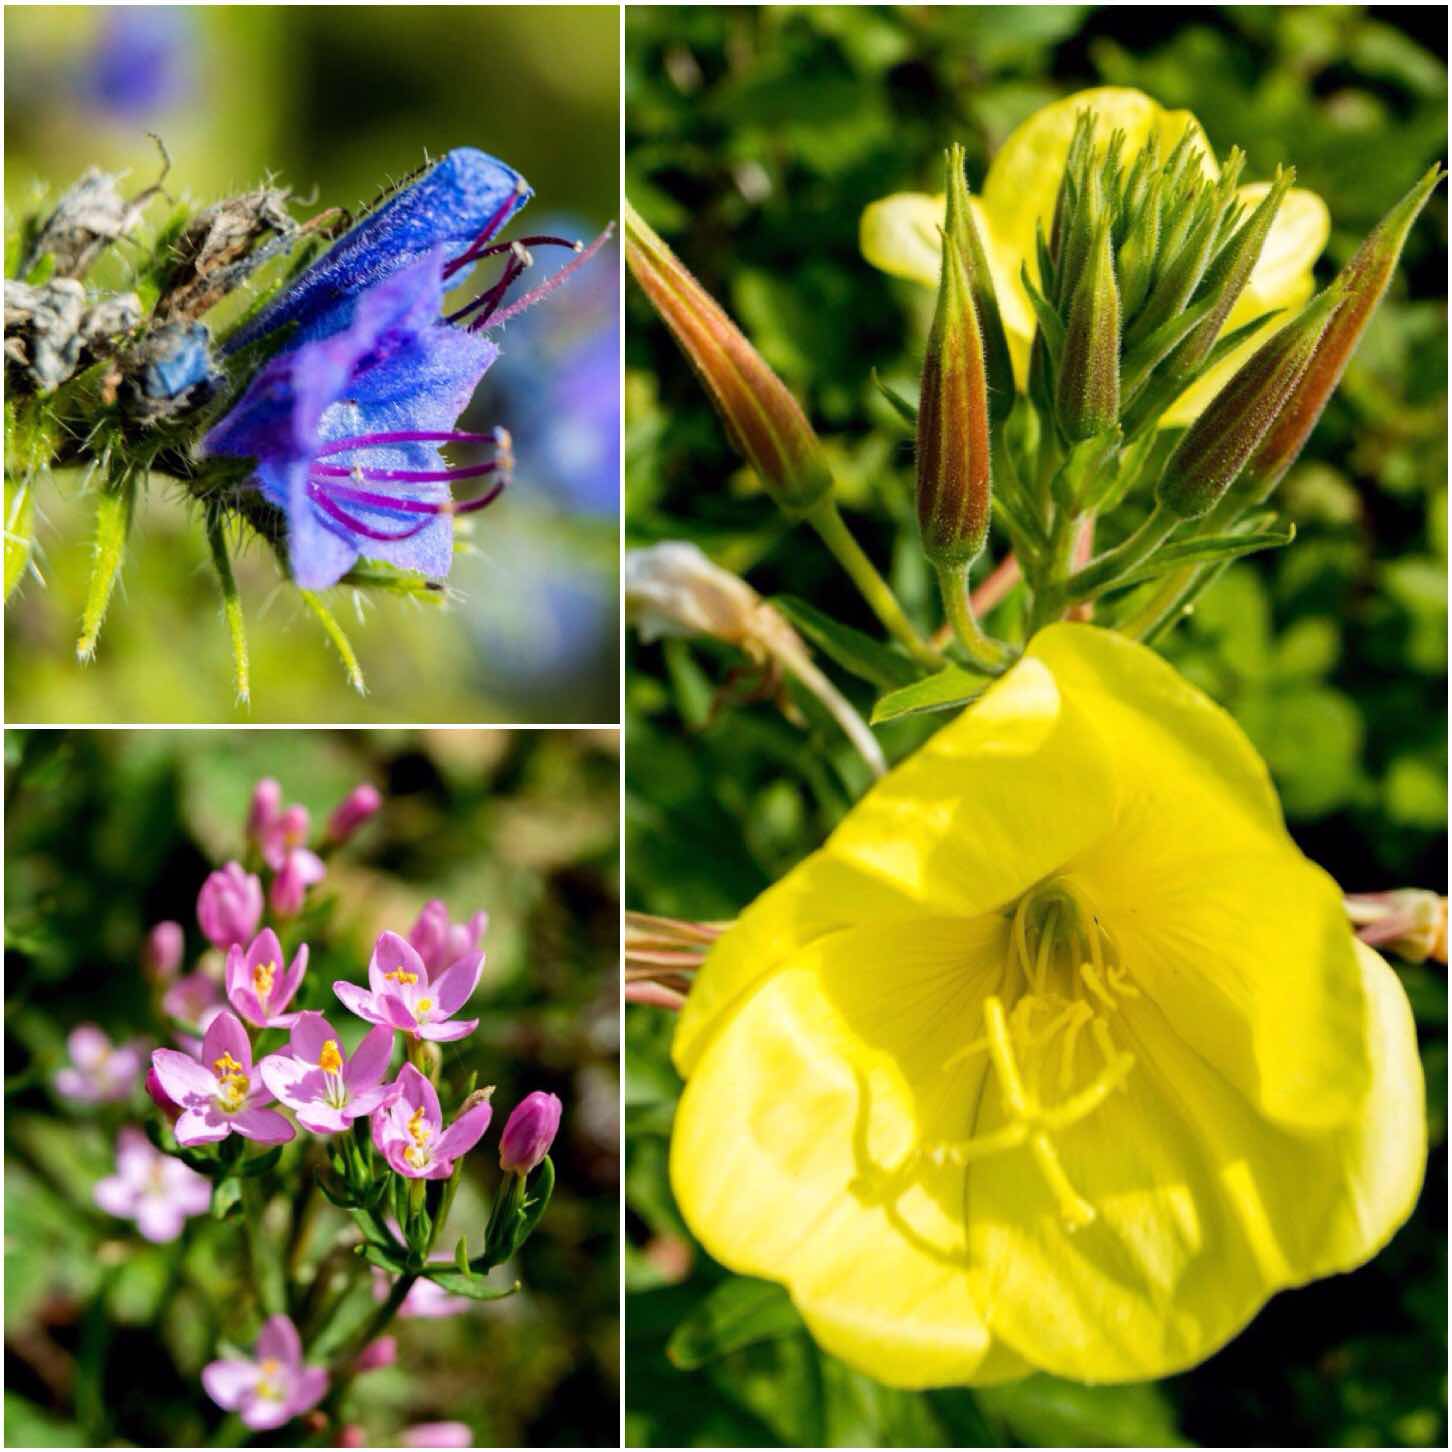
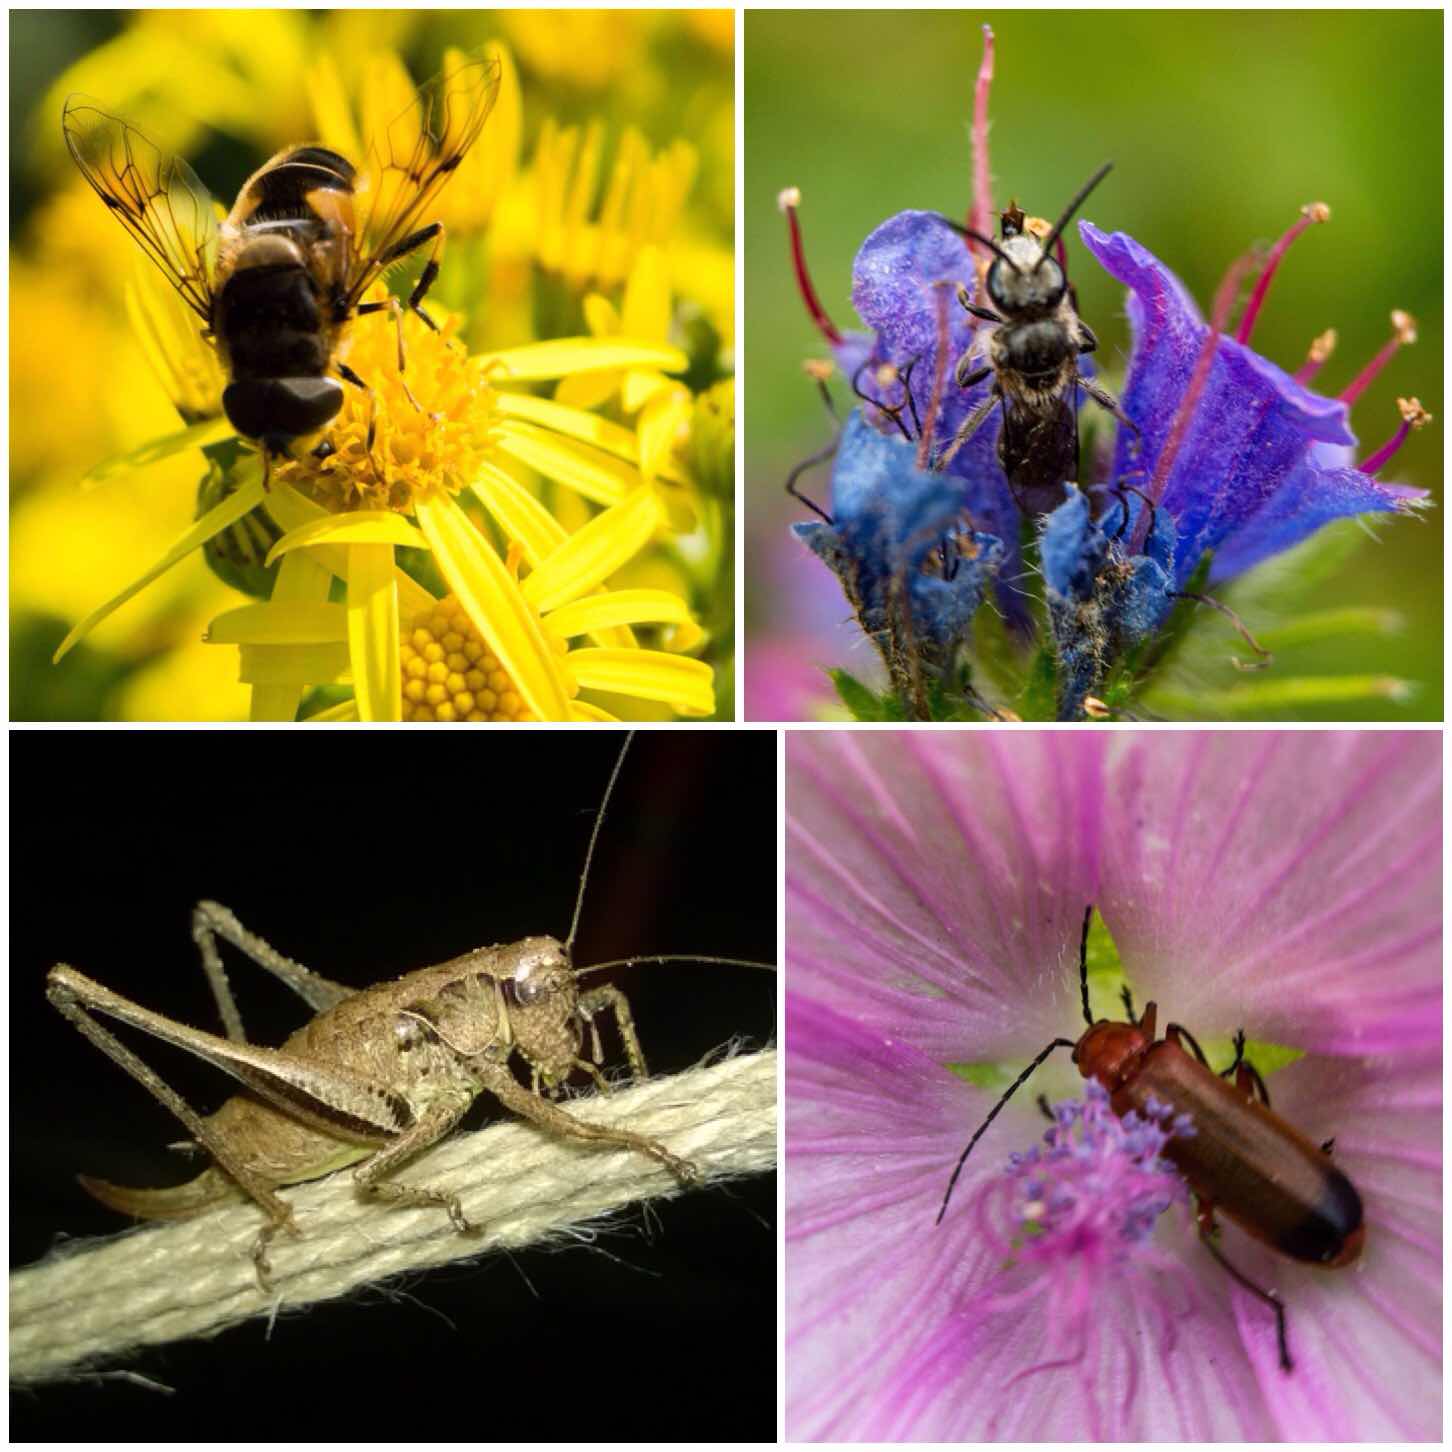
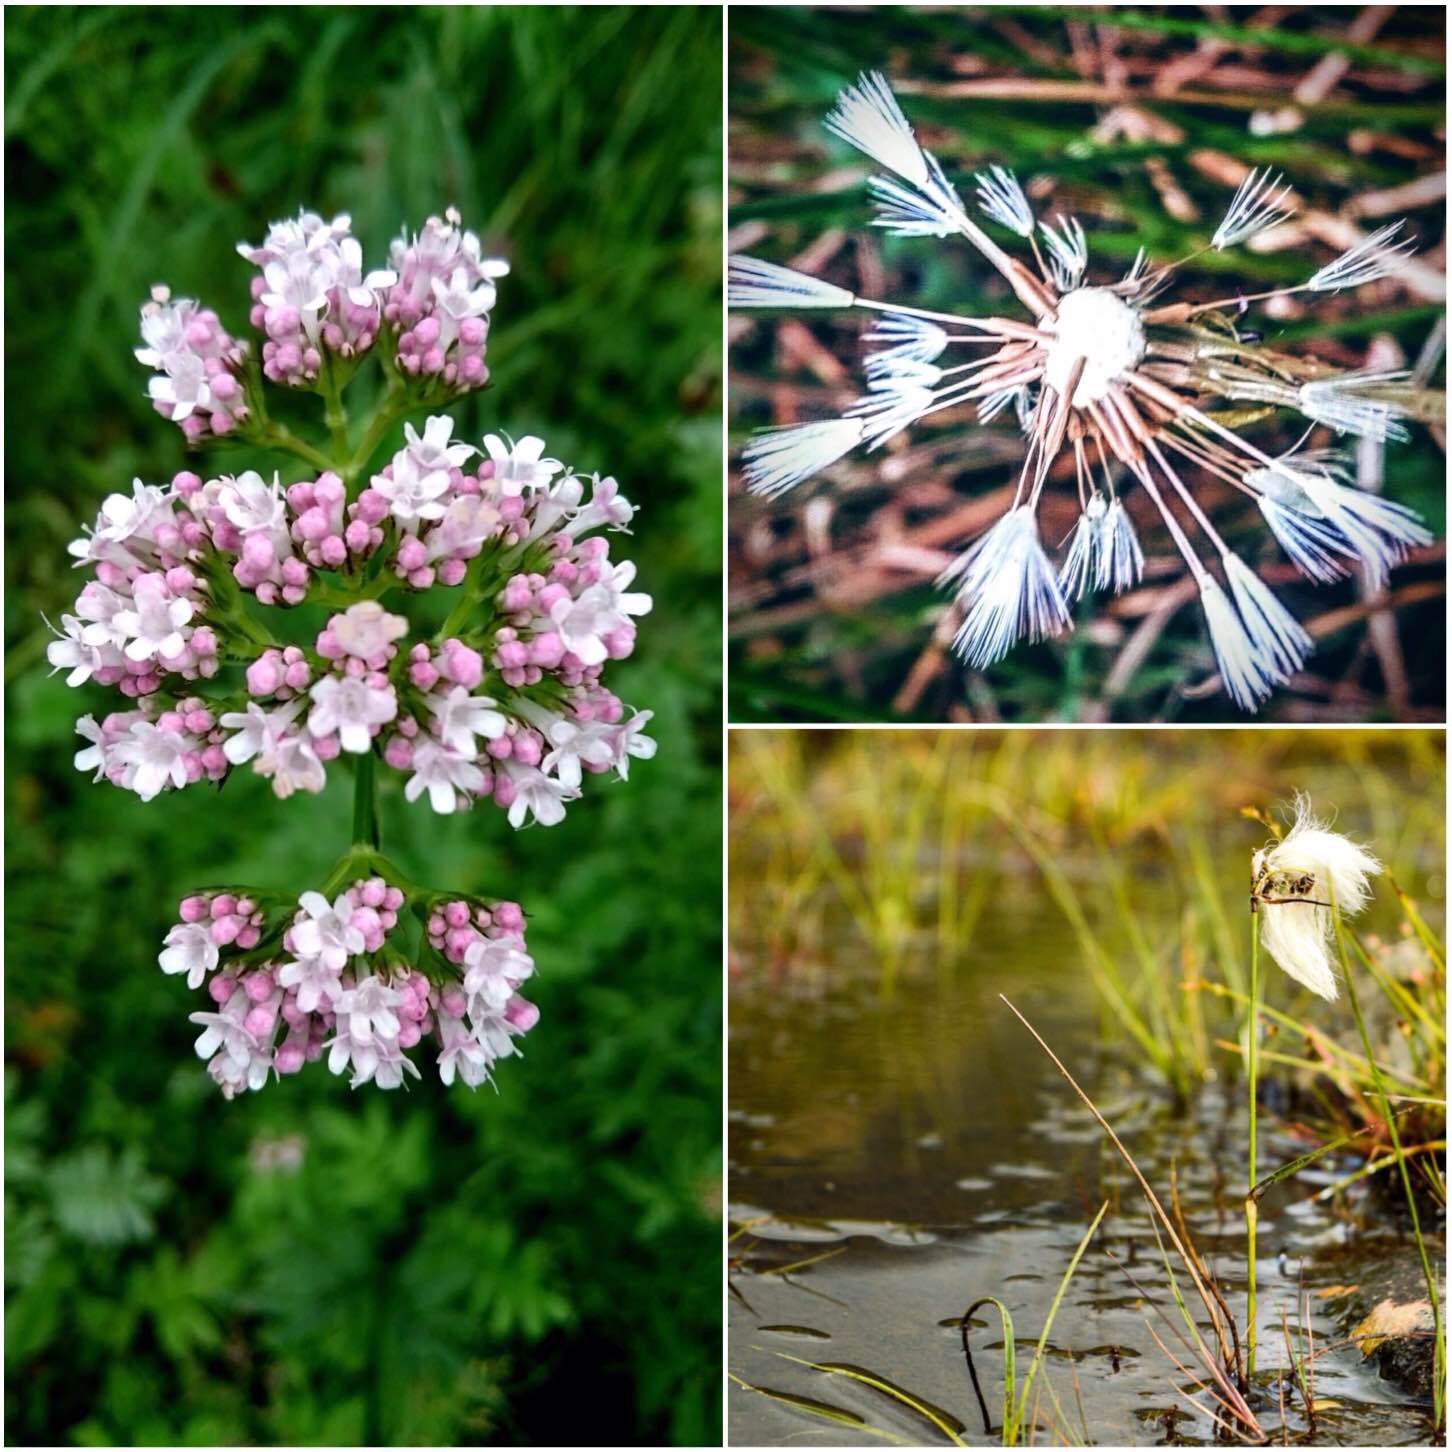
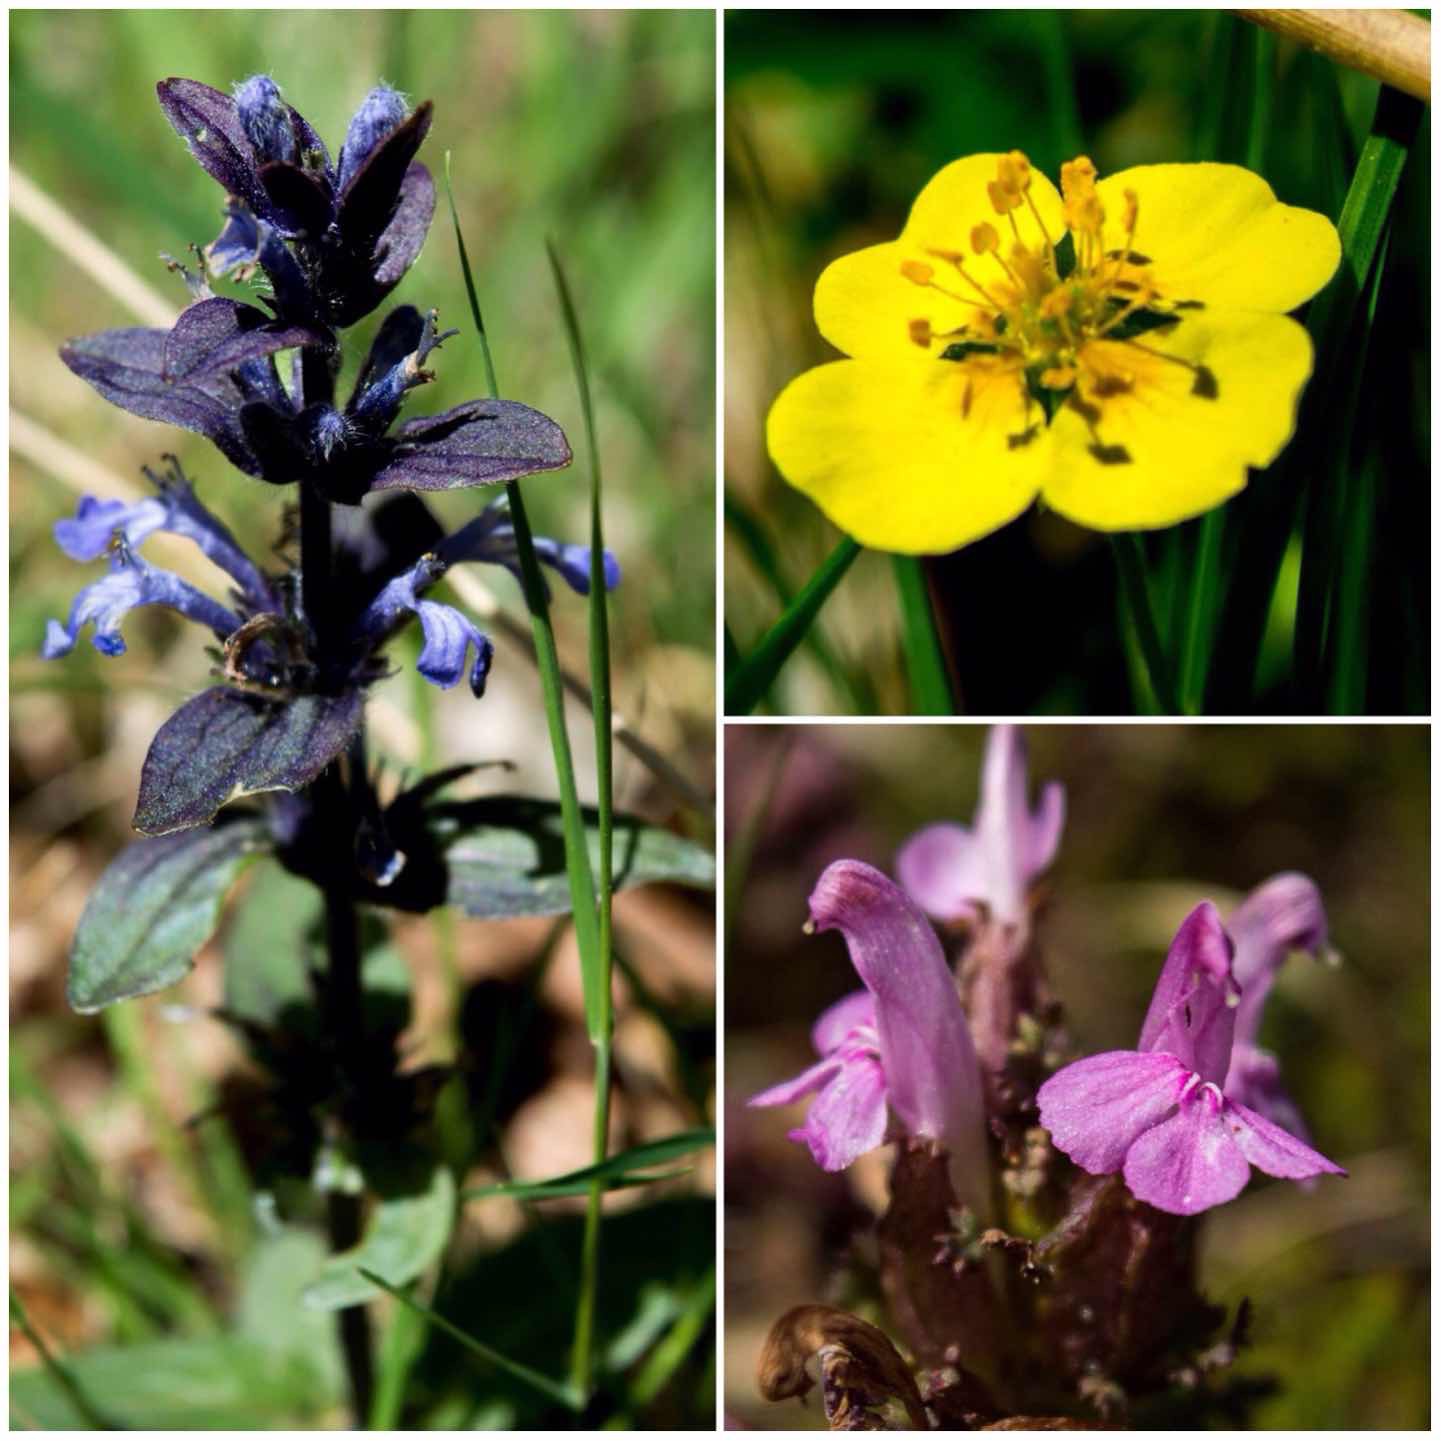
If you like wild flowers then the Moot is a place to go to see them. Take a wander along the edge of the wood by the dunes and you will spot some real beauties like the Vipers Bugloss, Evening Primrose and the Common Centaury.
Stunning flowers
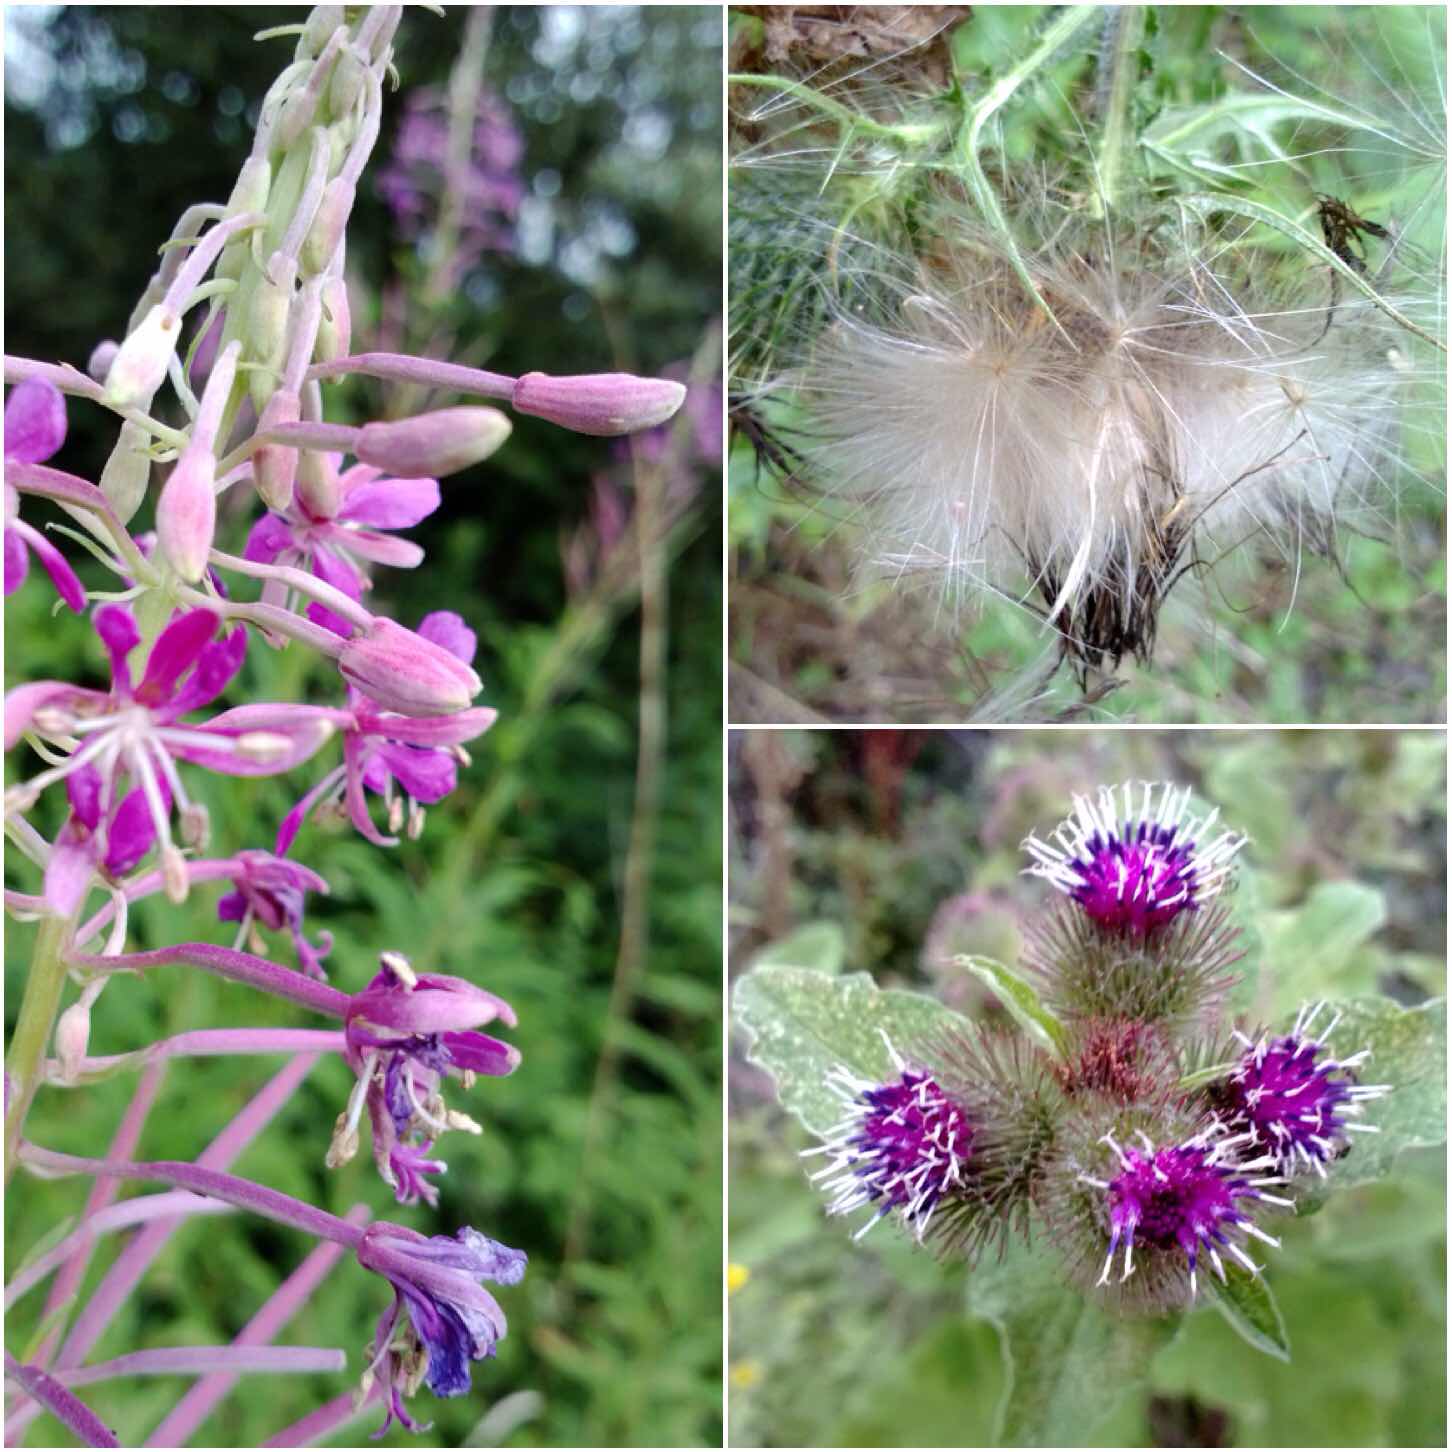
Bushcrafters like to forage plants that they find useful and there are plenty of plants to be found here like the Rosebay Willowherb, Thistles and Burdock.
They are beautiful in their own right when in flower but it is for their uses that I look for them.
Willowherb is known as Fireweed or Bombweed and Paul Kirtley has written an excellent piece on this plant – Rosebay Willowherb: Taking The Pith
Thistles come in many varieties and I like to collect the downy seed heads for use as an ember extender. A good source of information on this plant can be found on the Eat The Weeds site – Thistle: It’s That Spine of Year
The final picture you can see at the bottom right is the bushcrafters old favourite – Burdock. As well as having an edible root at the end of its first year I collect the second year stalks to make hangers for my kit. I wrote a post on this last year – How To…. Make a Simple Burdock Hanger
Bushcrafters plants
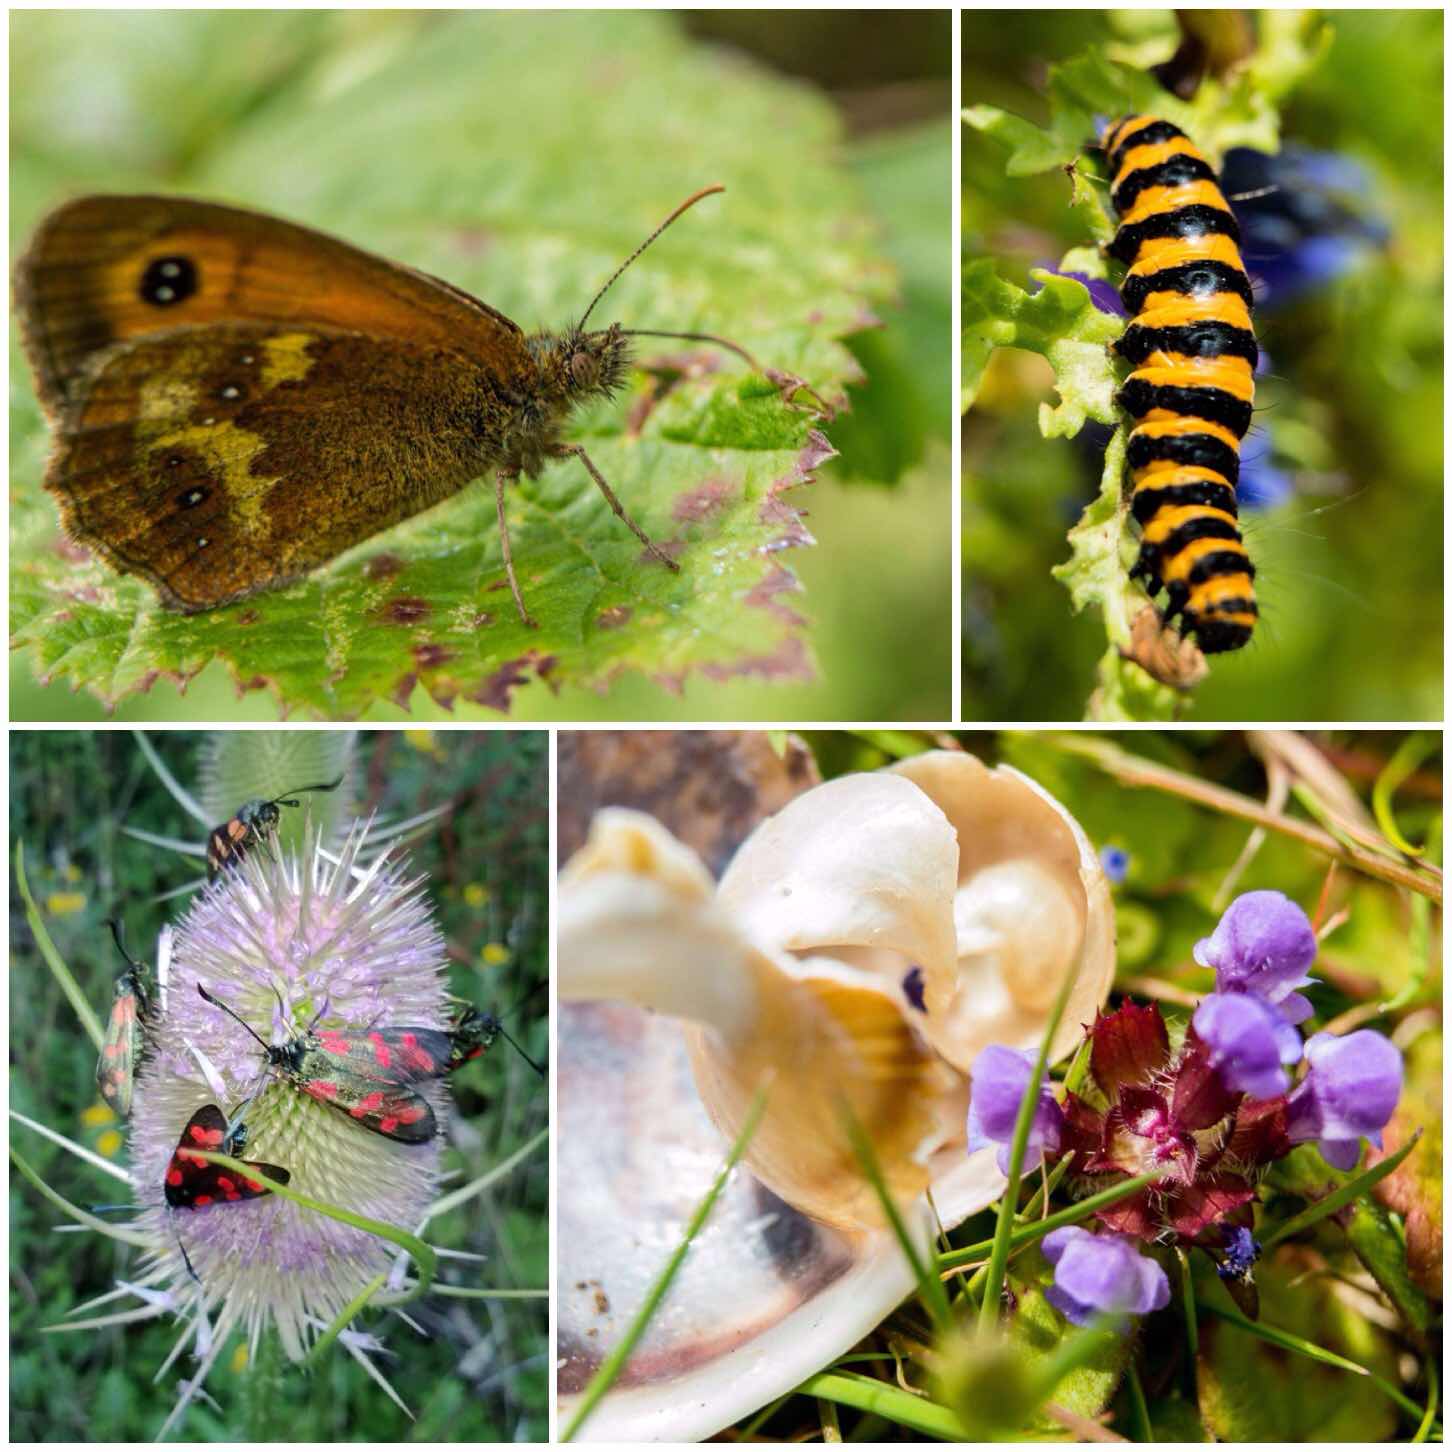
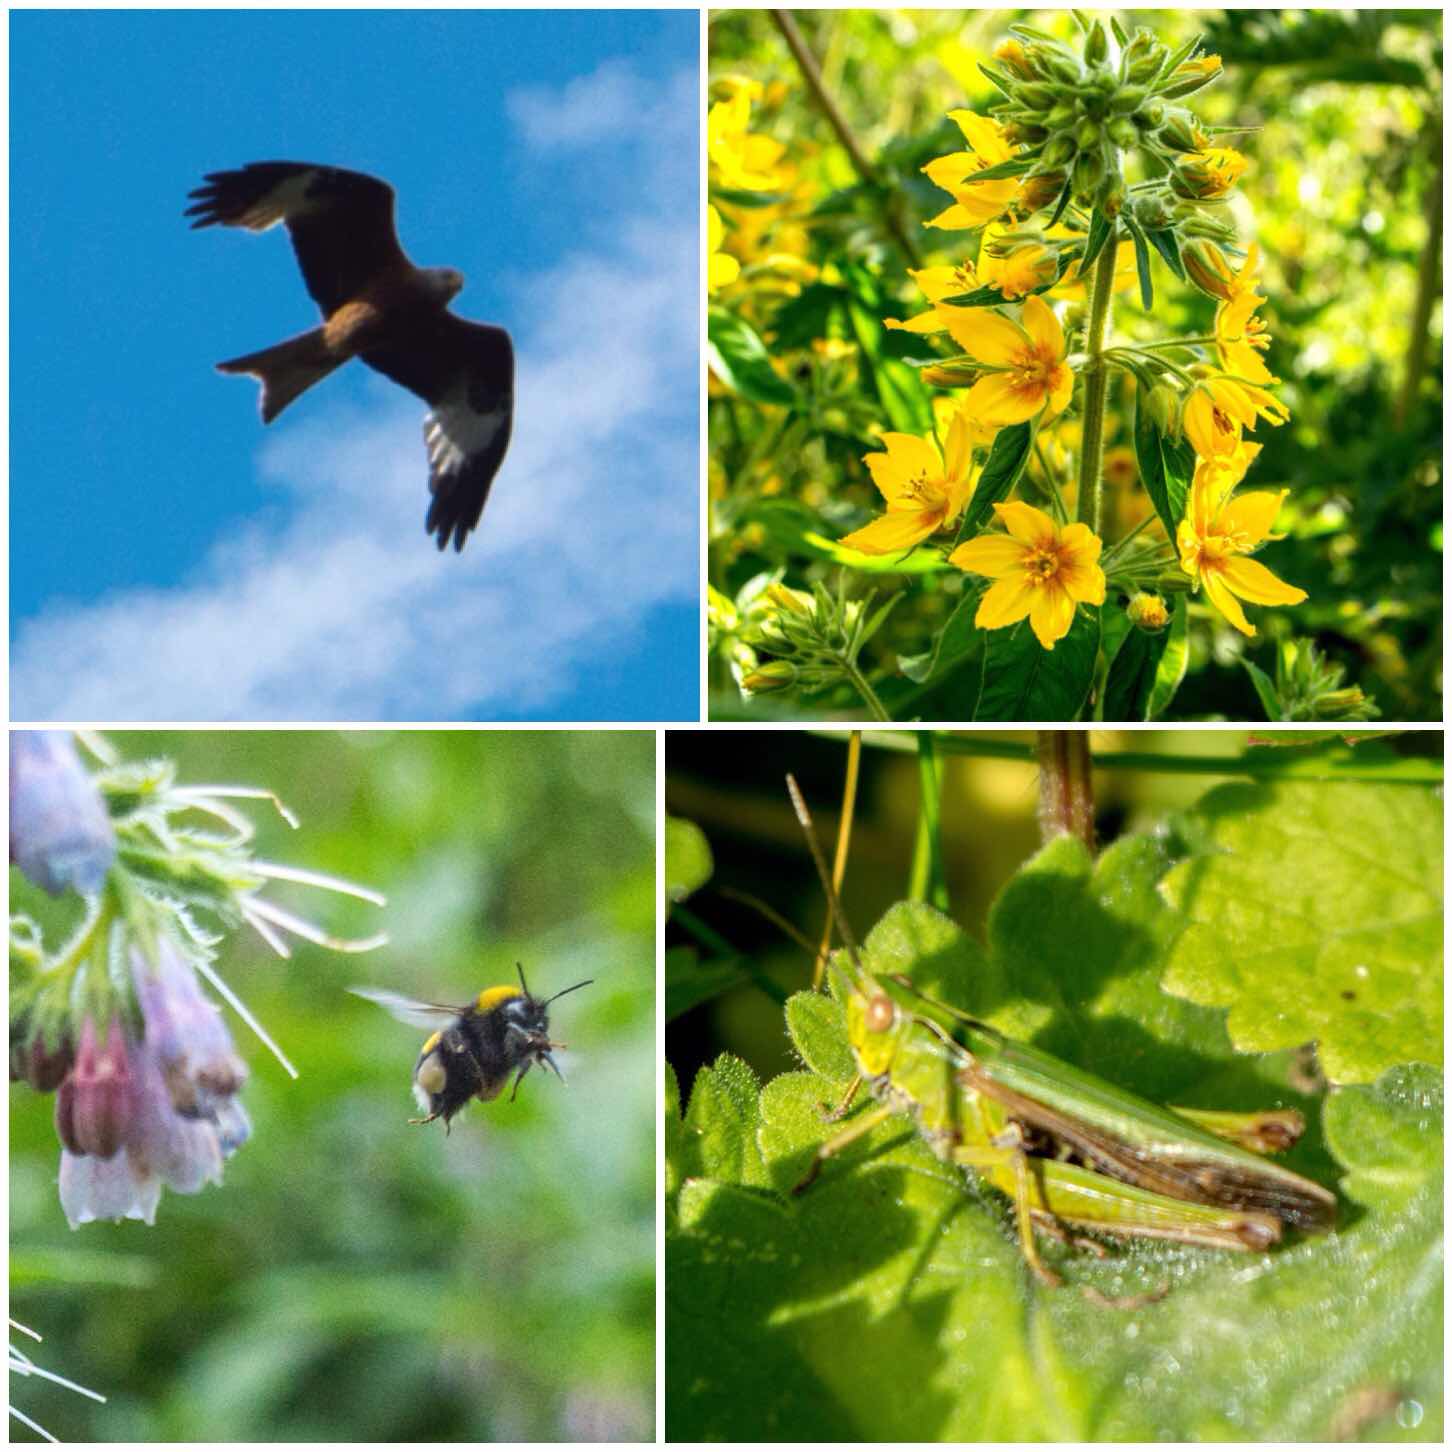
I like to do a bit of Macro photography from time to time and there is plenty of scope to do this at the Moot with plants and insects. Below are just some of the shots I have taken there recently showing the cycle of life.
Below you can see the lovely stripes of the Cinnabar caterpillar, the delicate features of what I think is a Meadow Brown Butterfly sunning itself, the busy life of the feeding Six Spotted Burnett to the beauty of a discarded snail shell.
The Cycle of Life
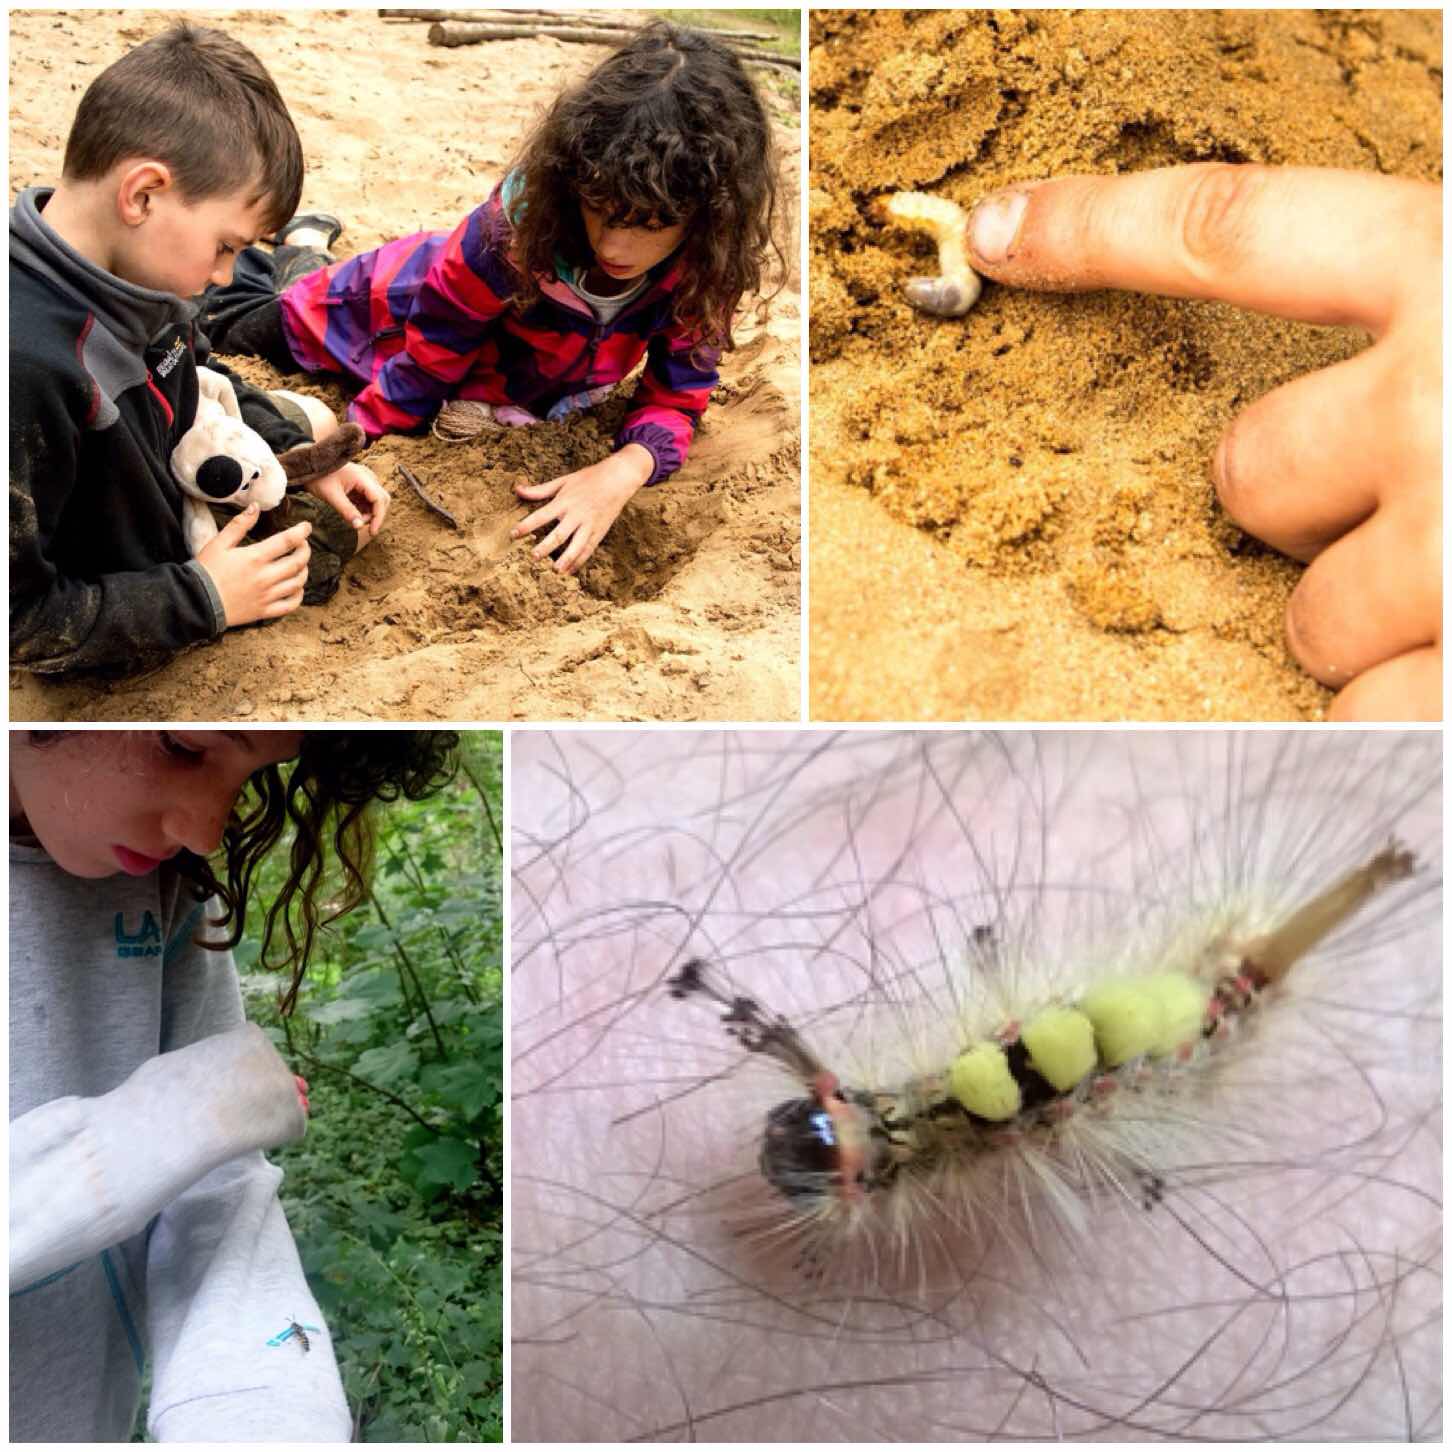
Children and adults can be put off by insects however with a little bit of play and observation you can soon learn to live alongside insects.
My daughter had a real dislike of wasps before coming to the Moot but now is quite intrigued by them. The caterpillar you can see in the bottom picture dropped onto my friends arm one day. He was quite beautiful to look at but thankfully not poisonous in any way.
Observing
I love to photograph insects and they come in many forms at Merthyr Mawr.
A Bugs Life
A skill I learnt a couple of years ago from Perry McGee of the National Tracking School was the art of Dowsing. Perry taught me this in minutes and I was able to located water sources and even follow a buried hose. I do not know how this really works but it is a force of nature that intrigues me.
Unseen Nature
Whatever interests you about watching or interacting with nature the Moot is a place to do that.
I love to photograph what I see and I have found a great place to do that at the Moot.
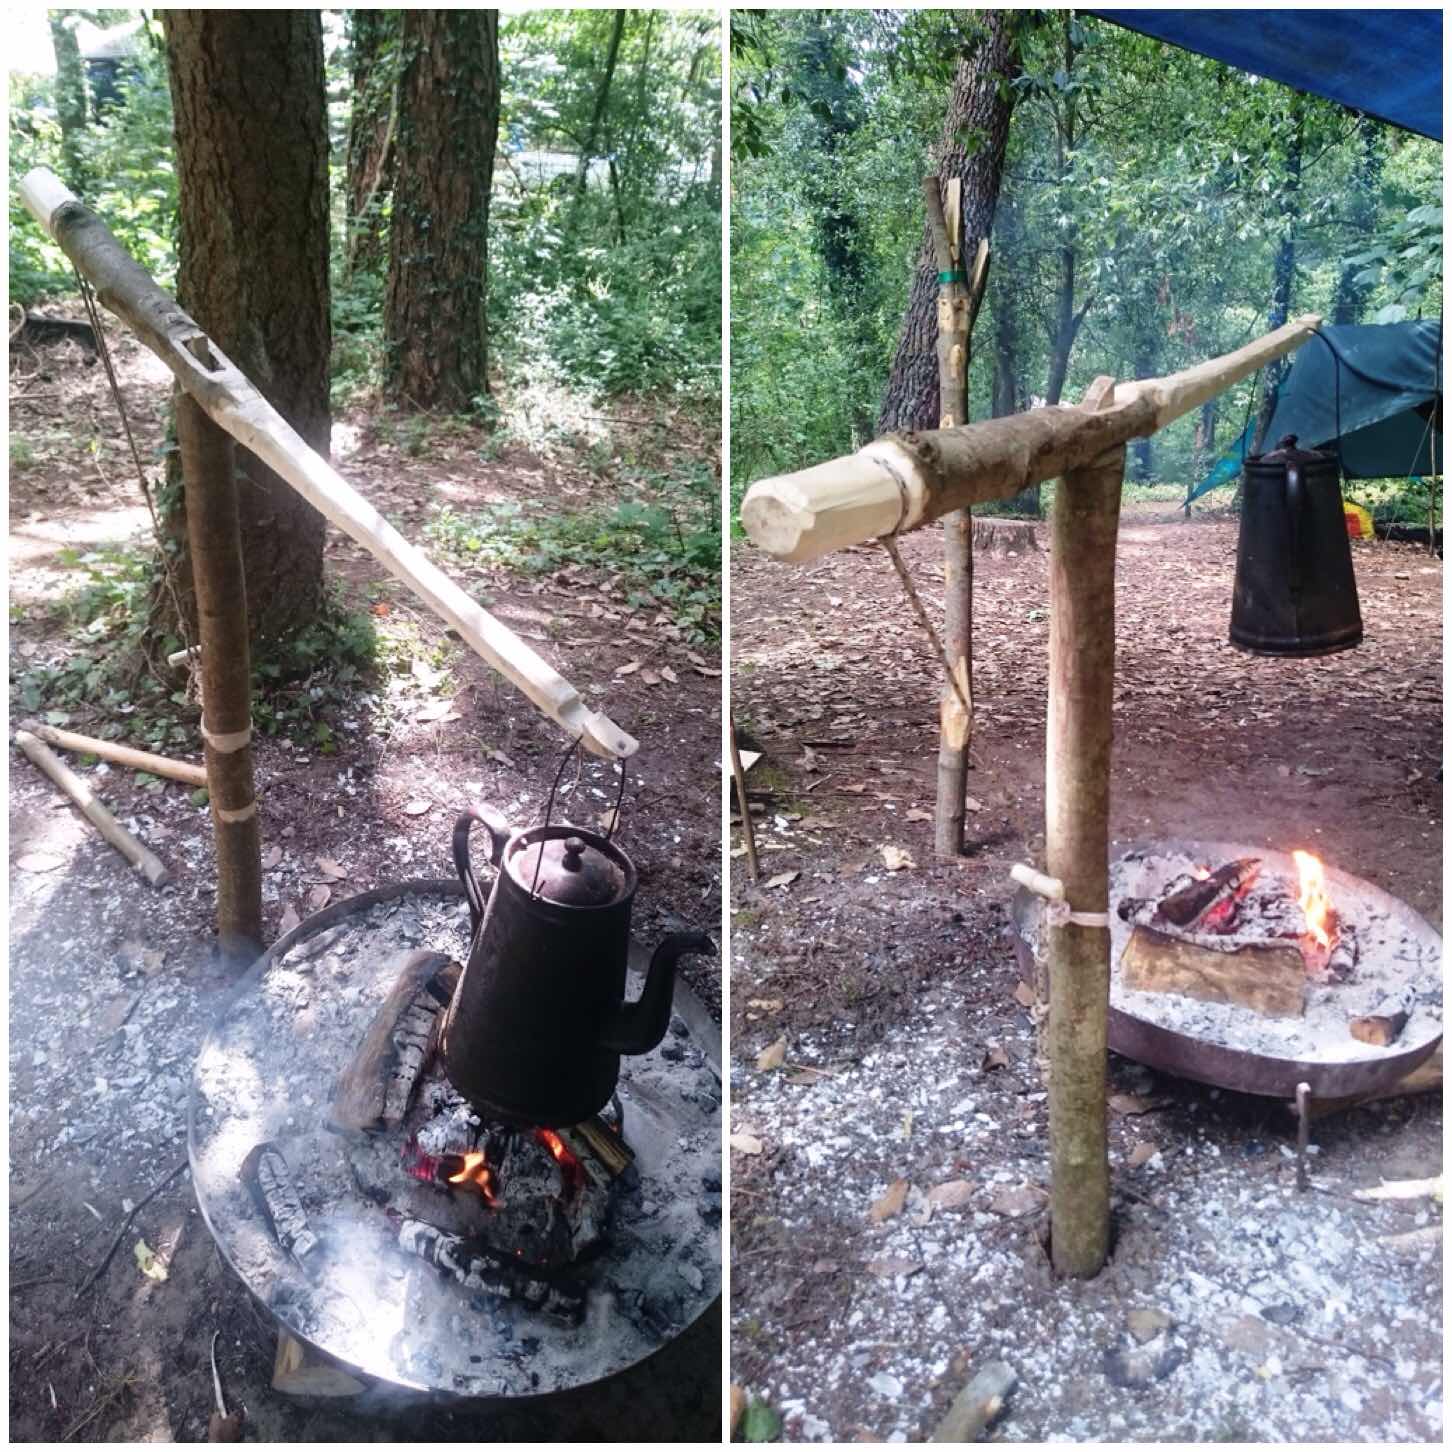
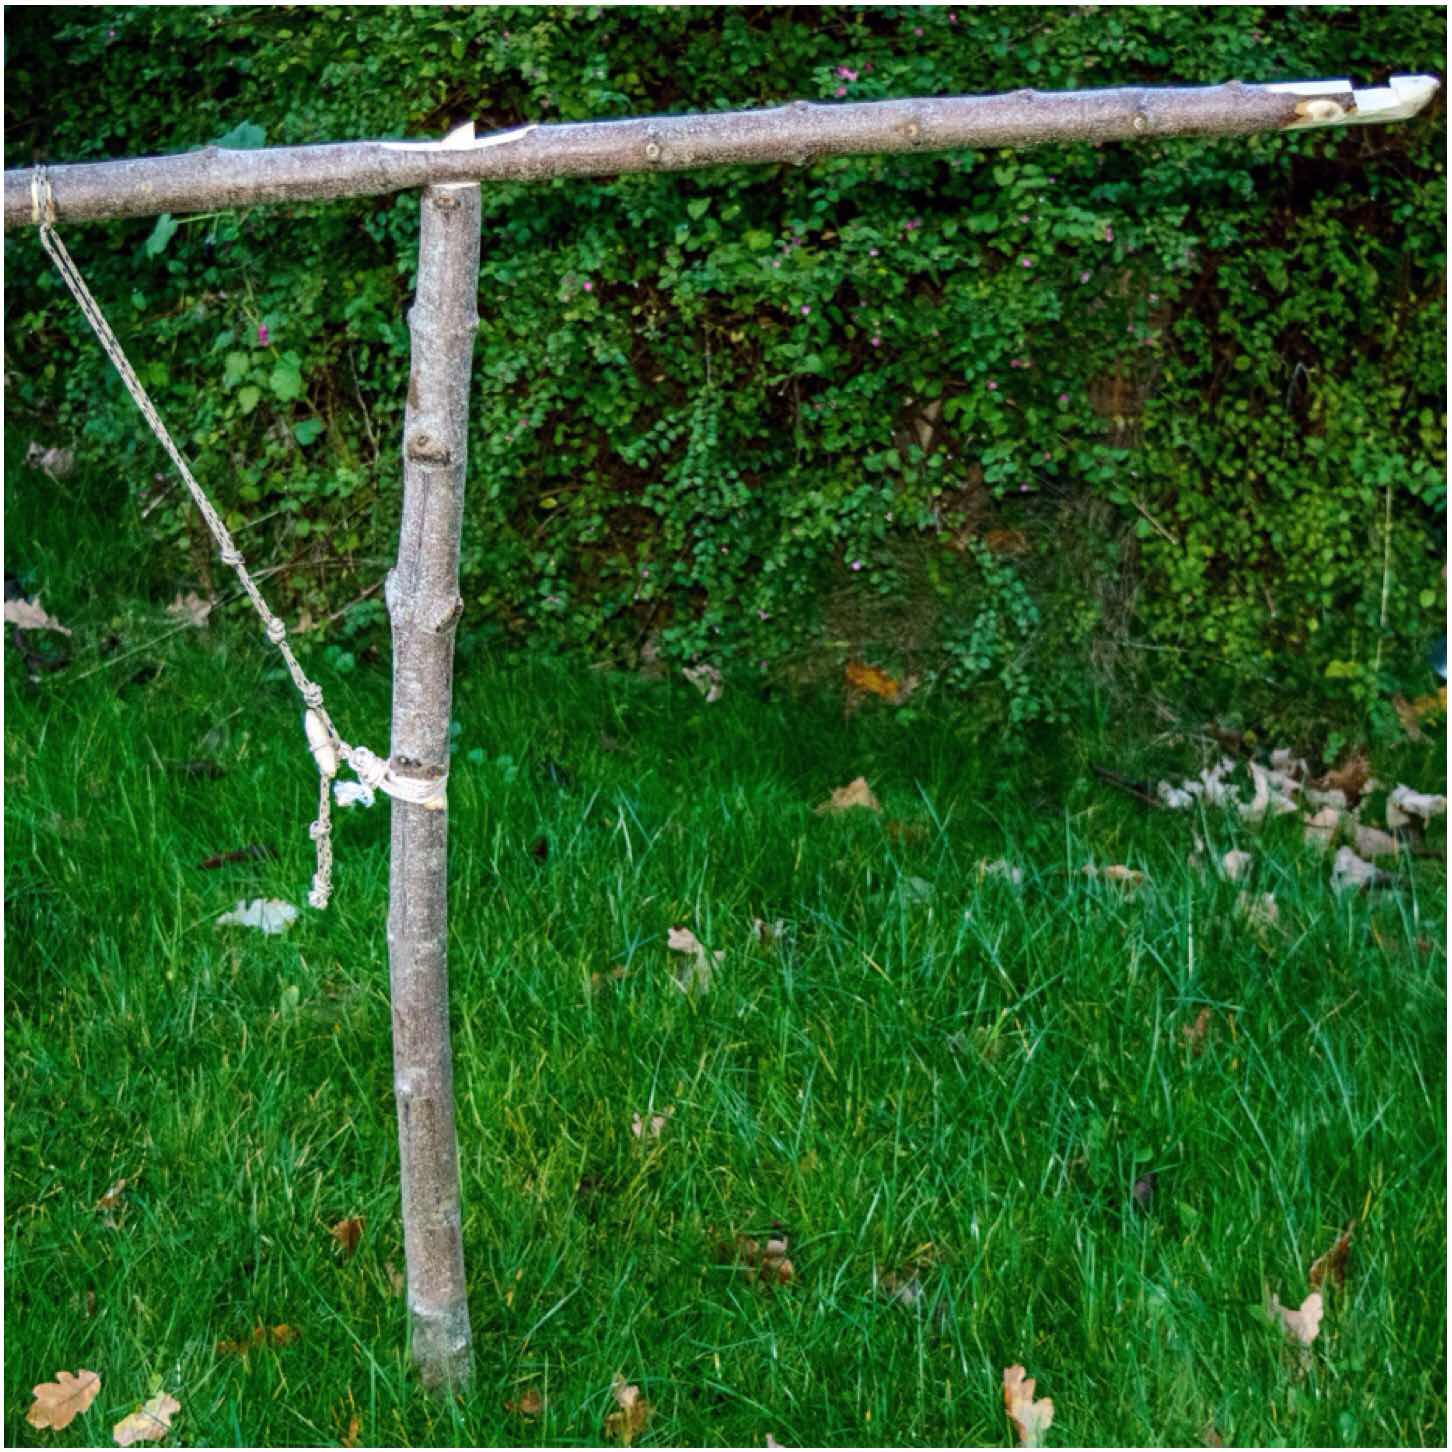
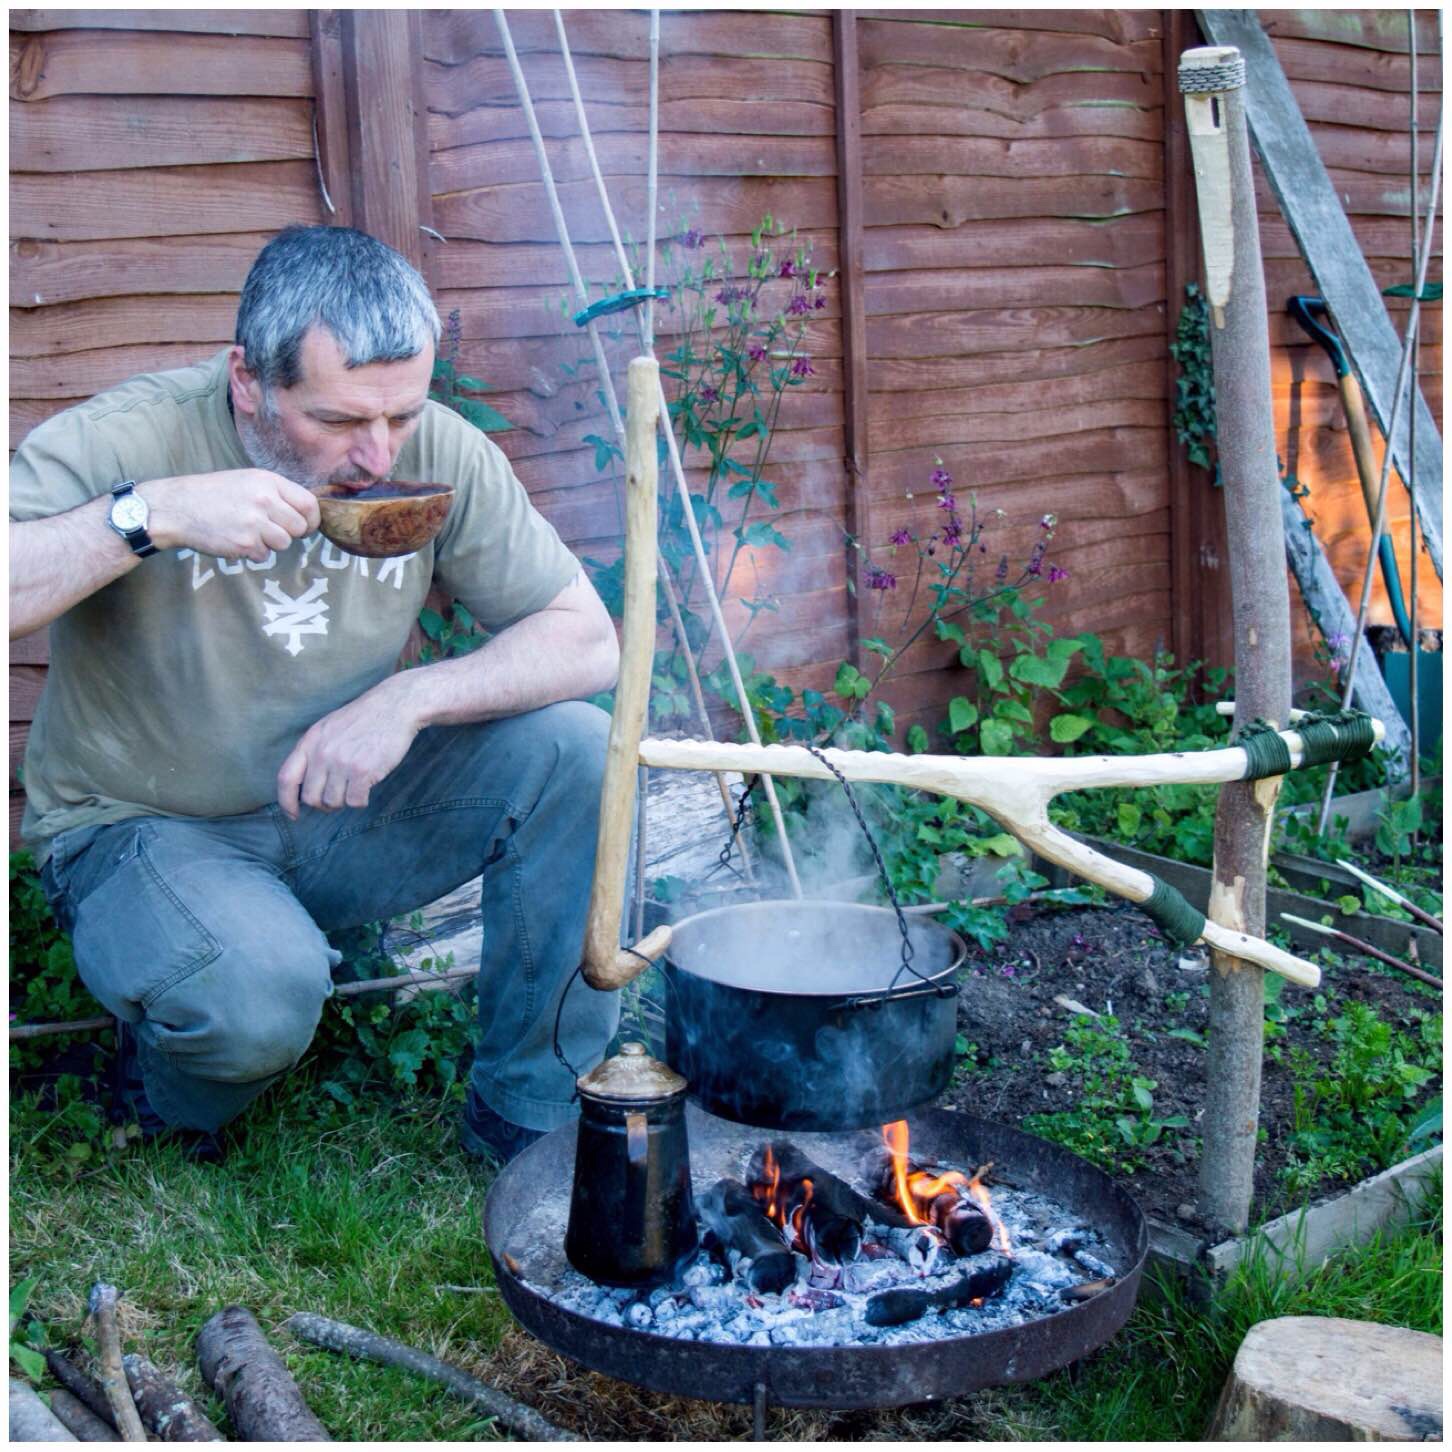
Let me introduce you to what I call the Mortise and Tenon Campfire Crane. This is a crane I made up at the the BCUK Bushmoot this Summer.
The idea came about as usual in a discussion around the fire with my good friends Charlie Brookes and Ian Woodham.
As you can see the arm of the crane can be set high or low (and ranges in between) and if set up correctly the upright can be easily rotated to swing your pot away from the fire.
Mortise and Tenon Crane
I would classify this one as more Pioneering than my usual constructions as it relies on some string to work. It is one for the long term camp however if you were on an overnighter with a couple of hours spare it would make a good project for an evening.
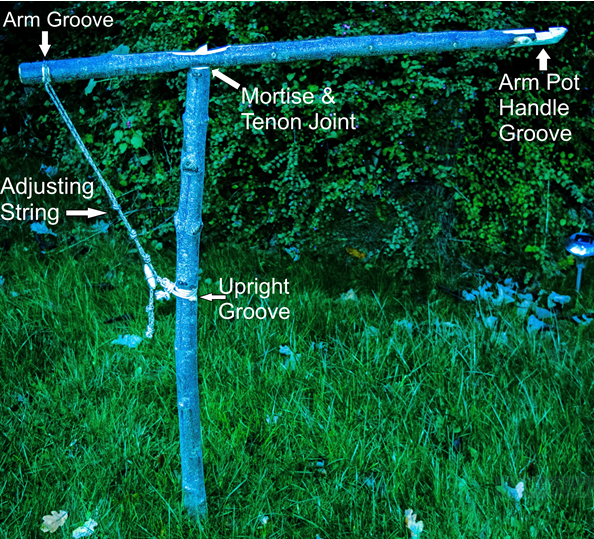
I will be describing the construction of the crane as I go through the post however I thought it would be helpful to have a completed picture of the crane marked up with the relevant work areas for you. Please refer back to this overview at any stage.
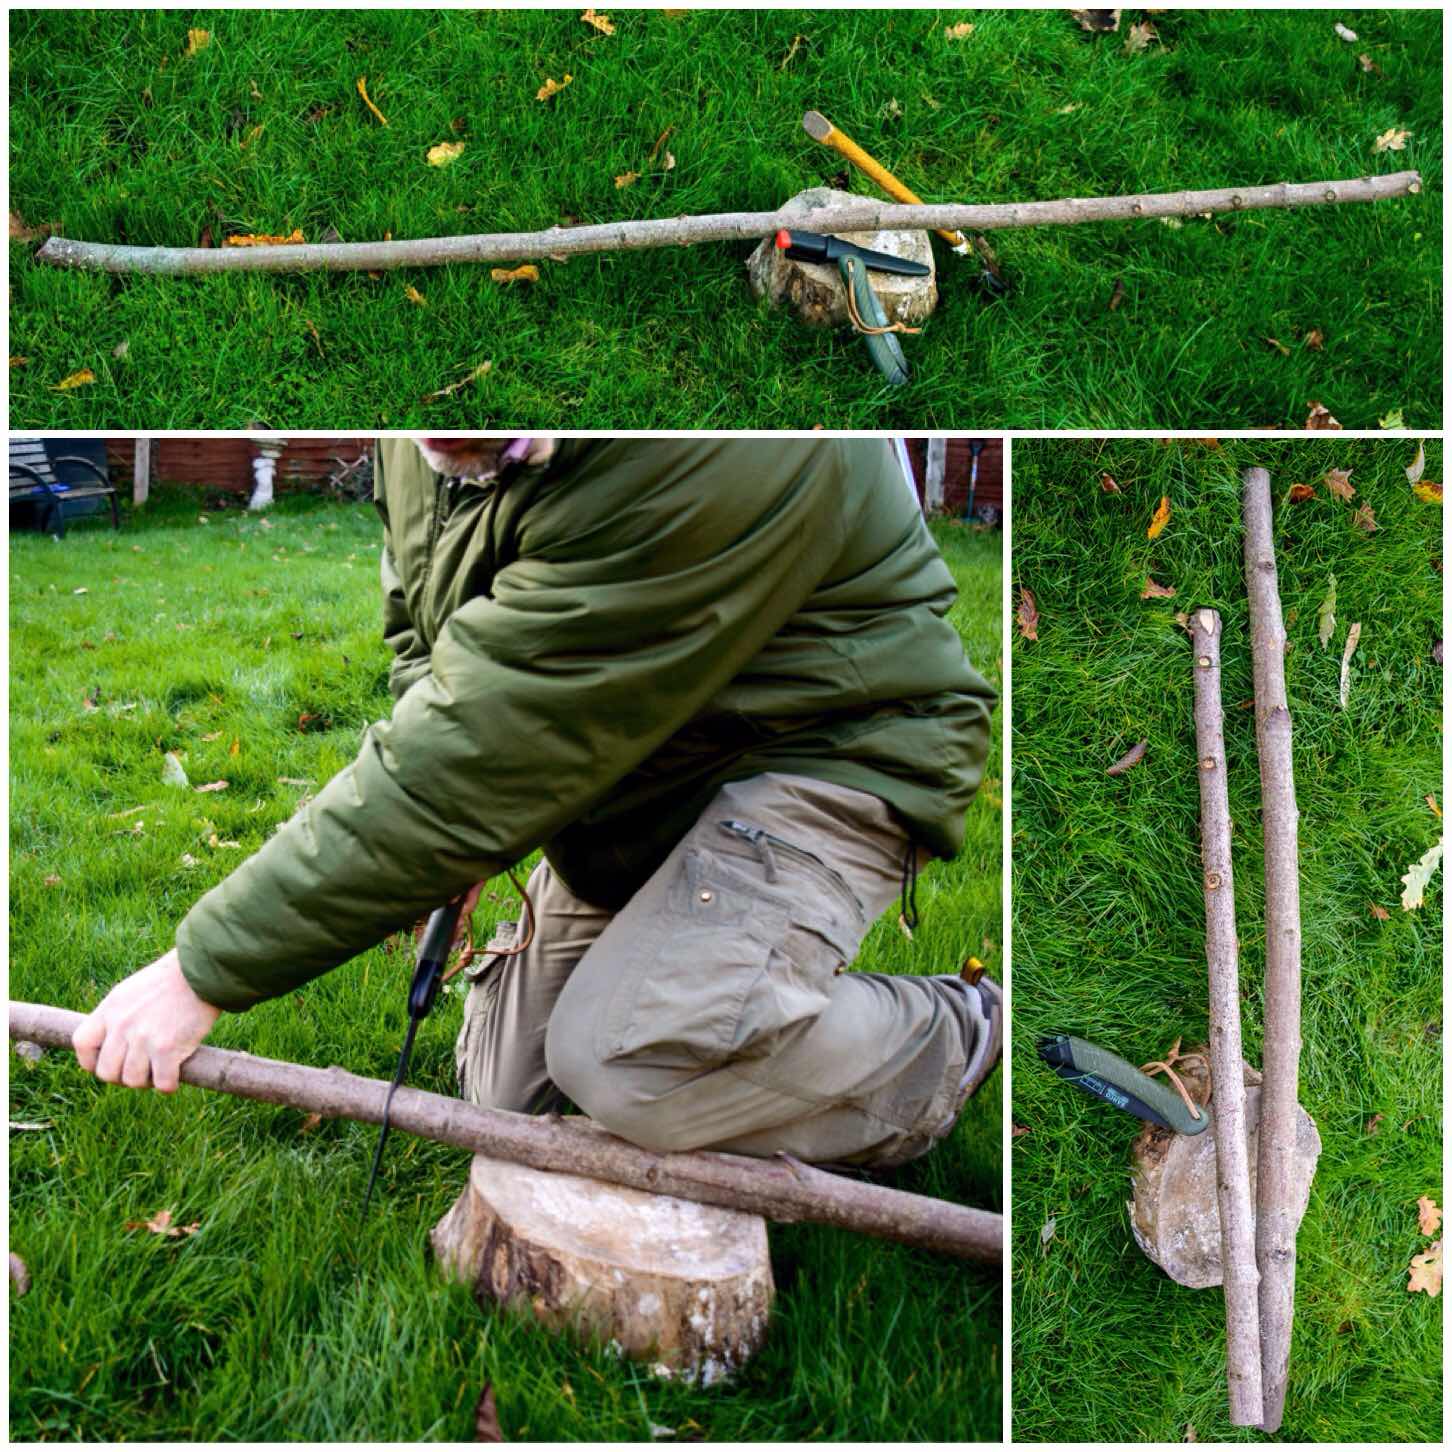
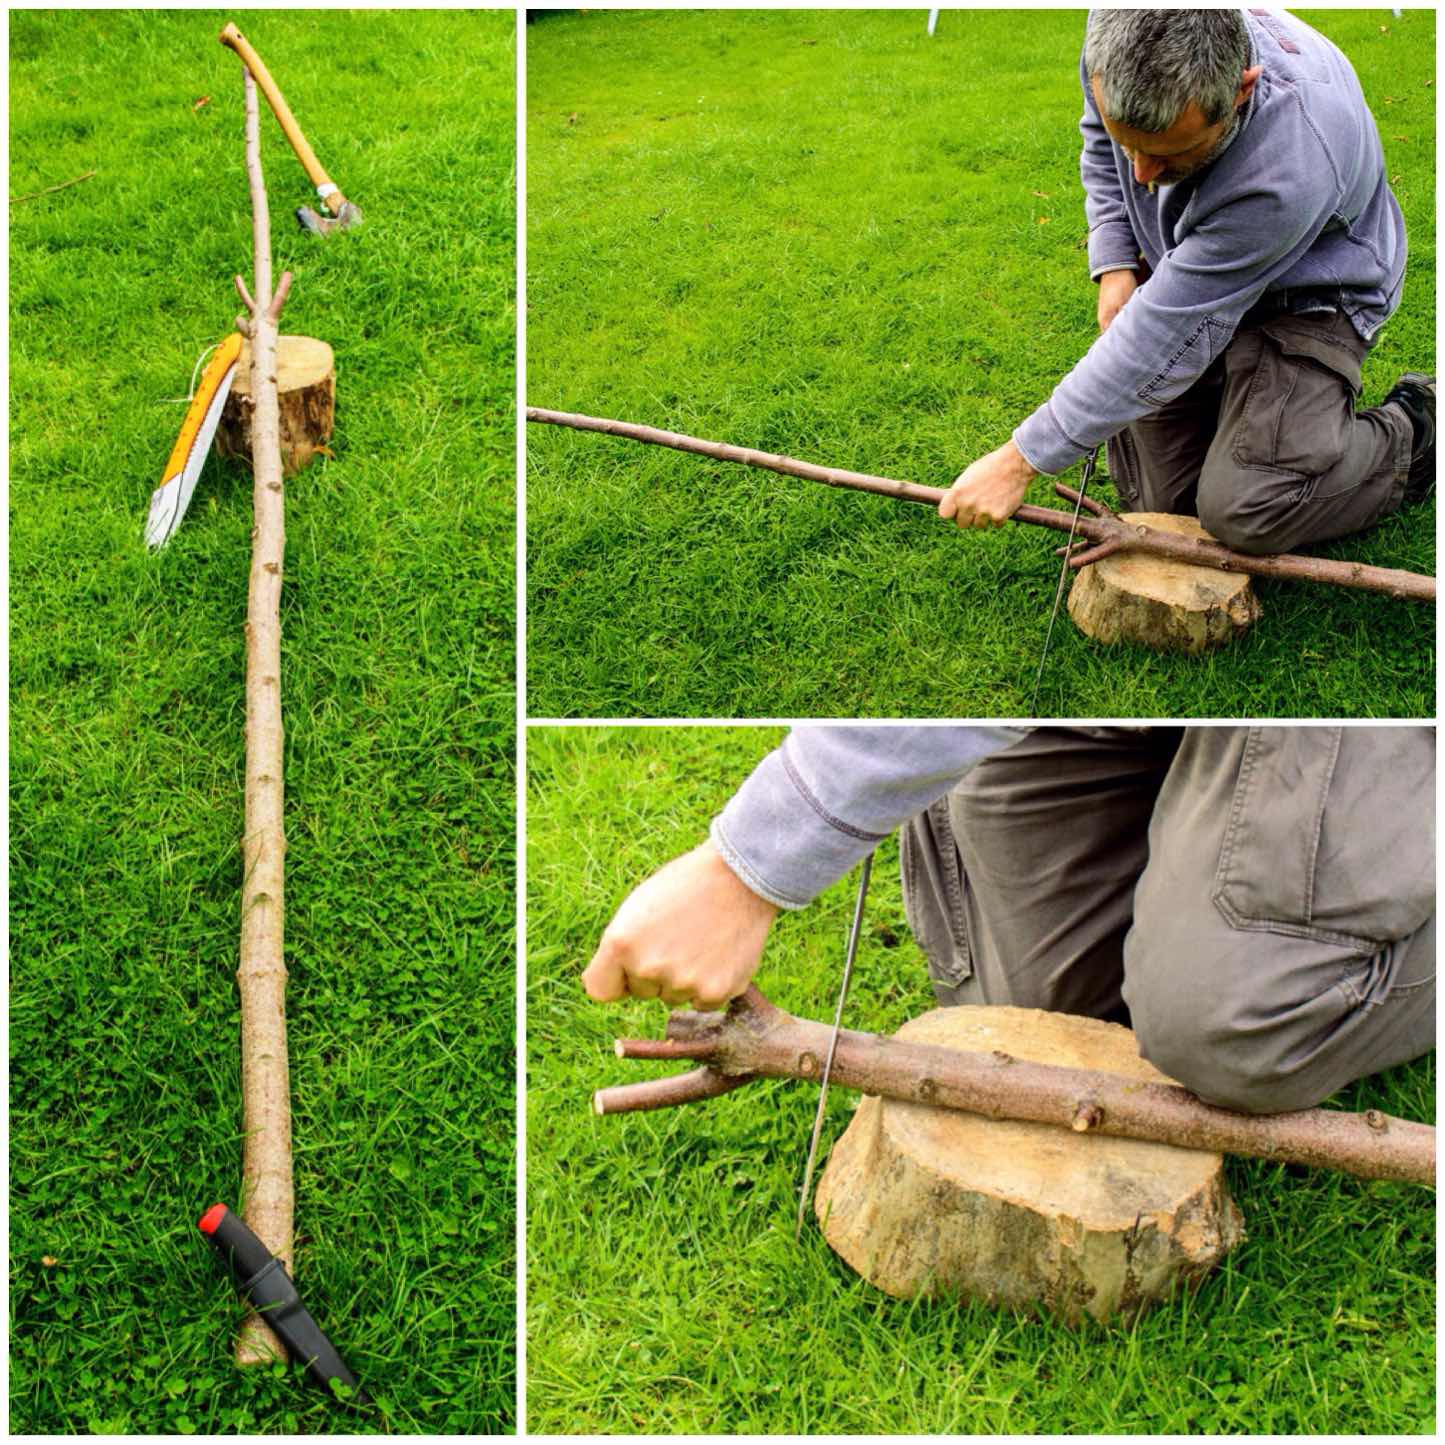
My tools for the job included my knife, a small saw and and axe but you may find having a pen or pencil to hand will be useful.
I took a rod of Sycamore (fairly well seasoned) and sawed it in two. In the picture you can see I have left the thicker end longer than the thinner end. The thicker pole will become the upright and the thinner pole will become the arm.
The Makings
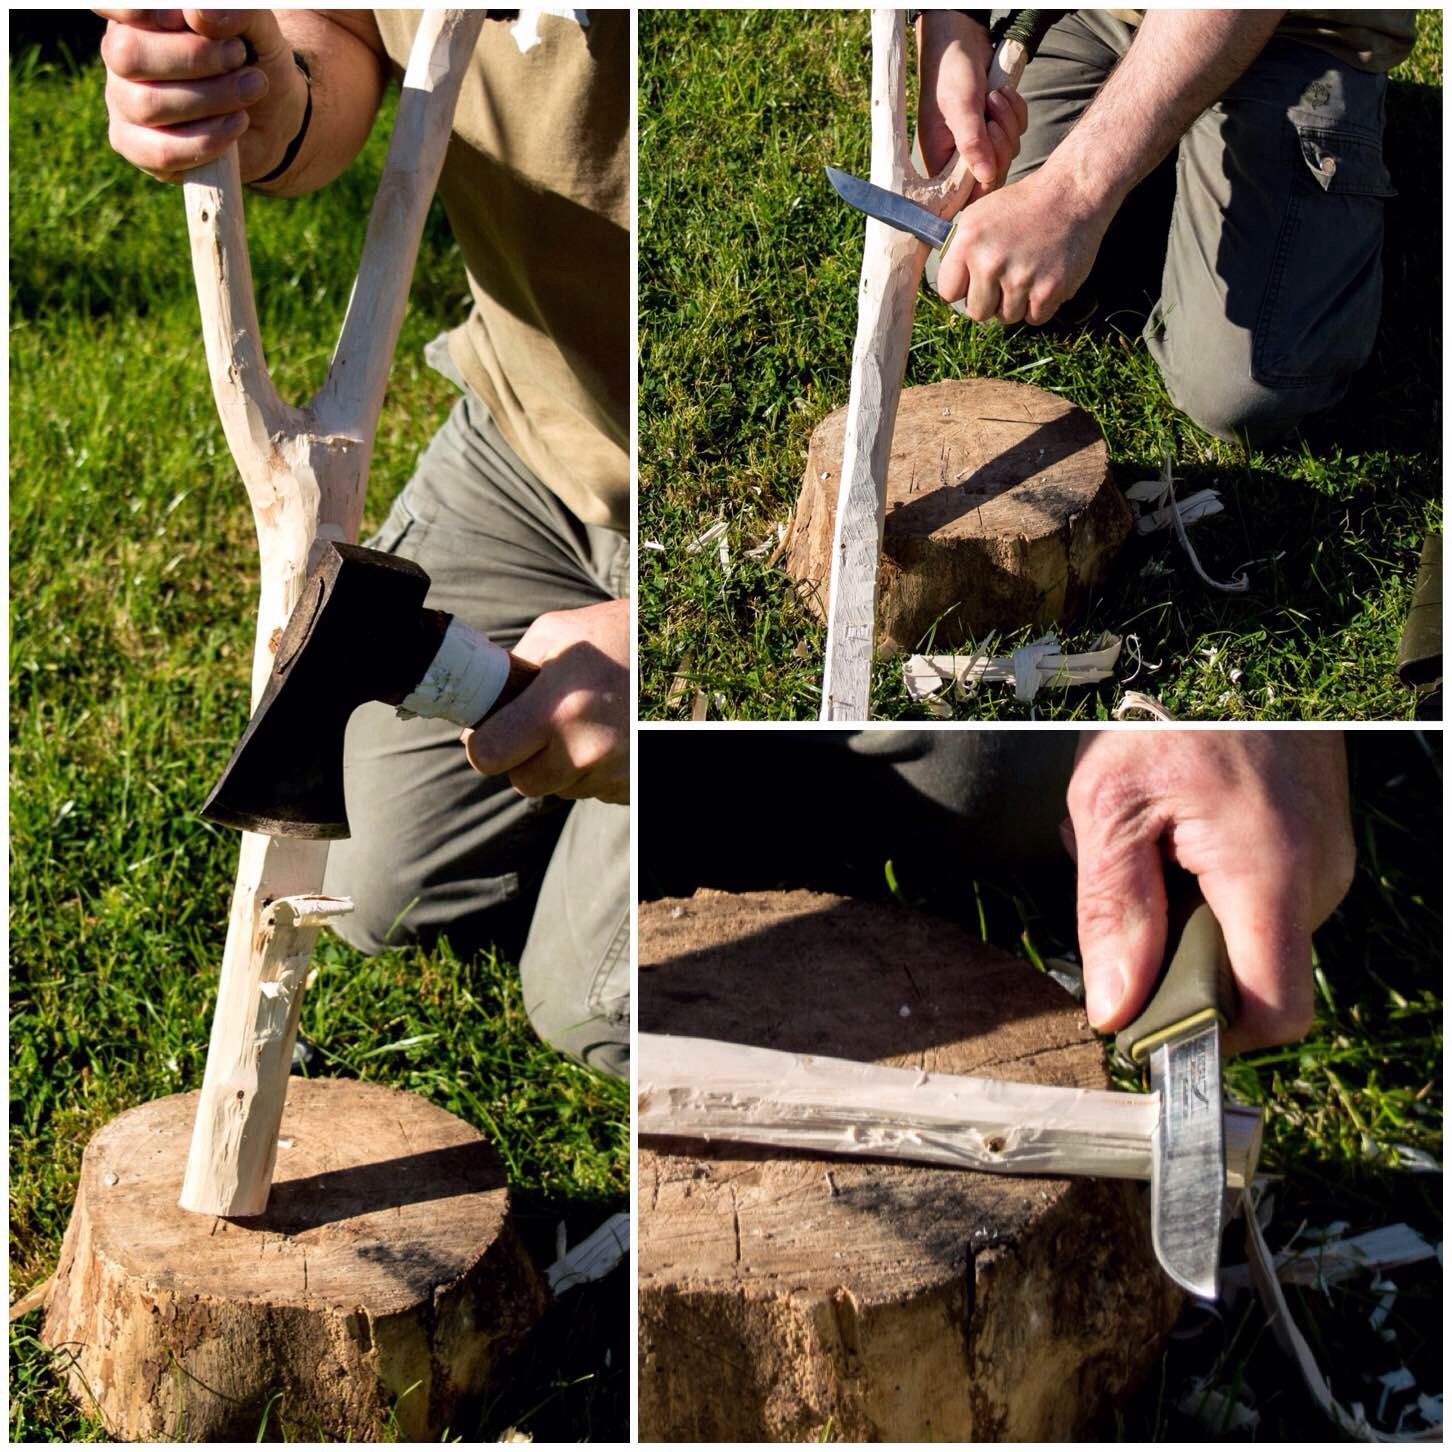
Carving the Upright
On the thinner end of the thick pole that was to be the upright I marked out the shape of the Tenon tongue and then cut two stop cuts into the side of the pole.
The stop cuts are put in to so that when I batton the waste wood off the split does not run on down the upright.
Creating the Tenon Tongue – Stop Cuts
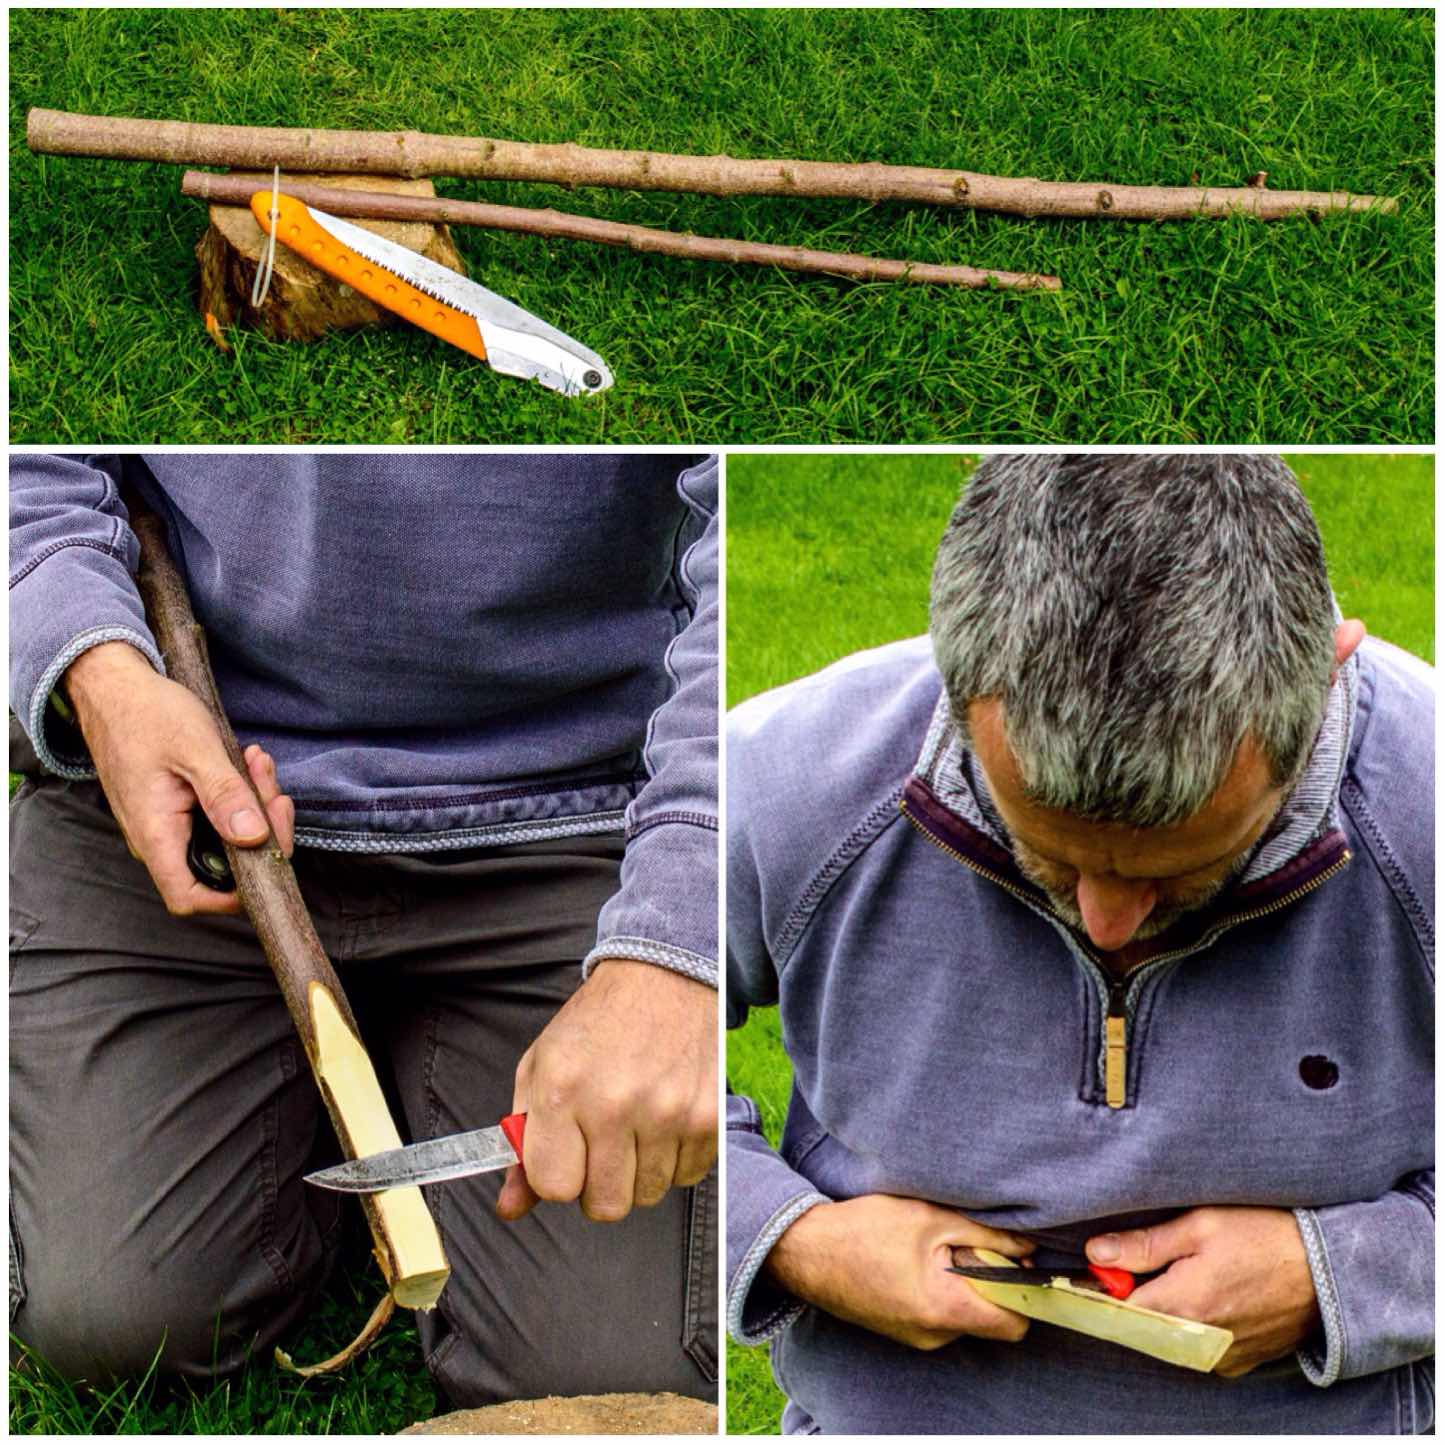
I used my knife to batton off the waste wood (make sure your knife blade is at 90 degrees to your body when you do this).
Once I had the Tenon tongue shape split out I carved one side of it into a curve. This is important to allow the arm of the crane to be raised up and down.
Creating the Tenon tongue – batton and carve
To finish the upright I axed out a point at the bottom and about half way down it I carved a small wedge-shaped recess. This wedge-shaped recess needs to be on the opposite side of the curve to the Tenon tongue.
The recess does not need to be that deep, just enough to allow some string to catch in it.
Little extras on the upright
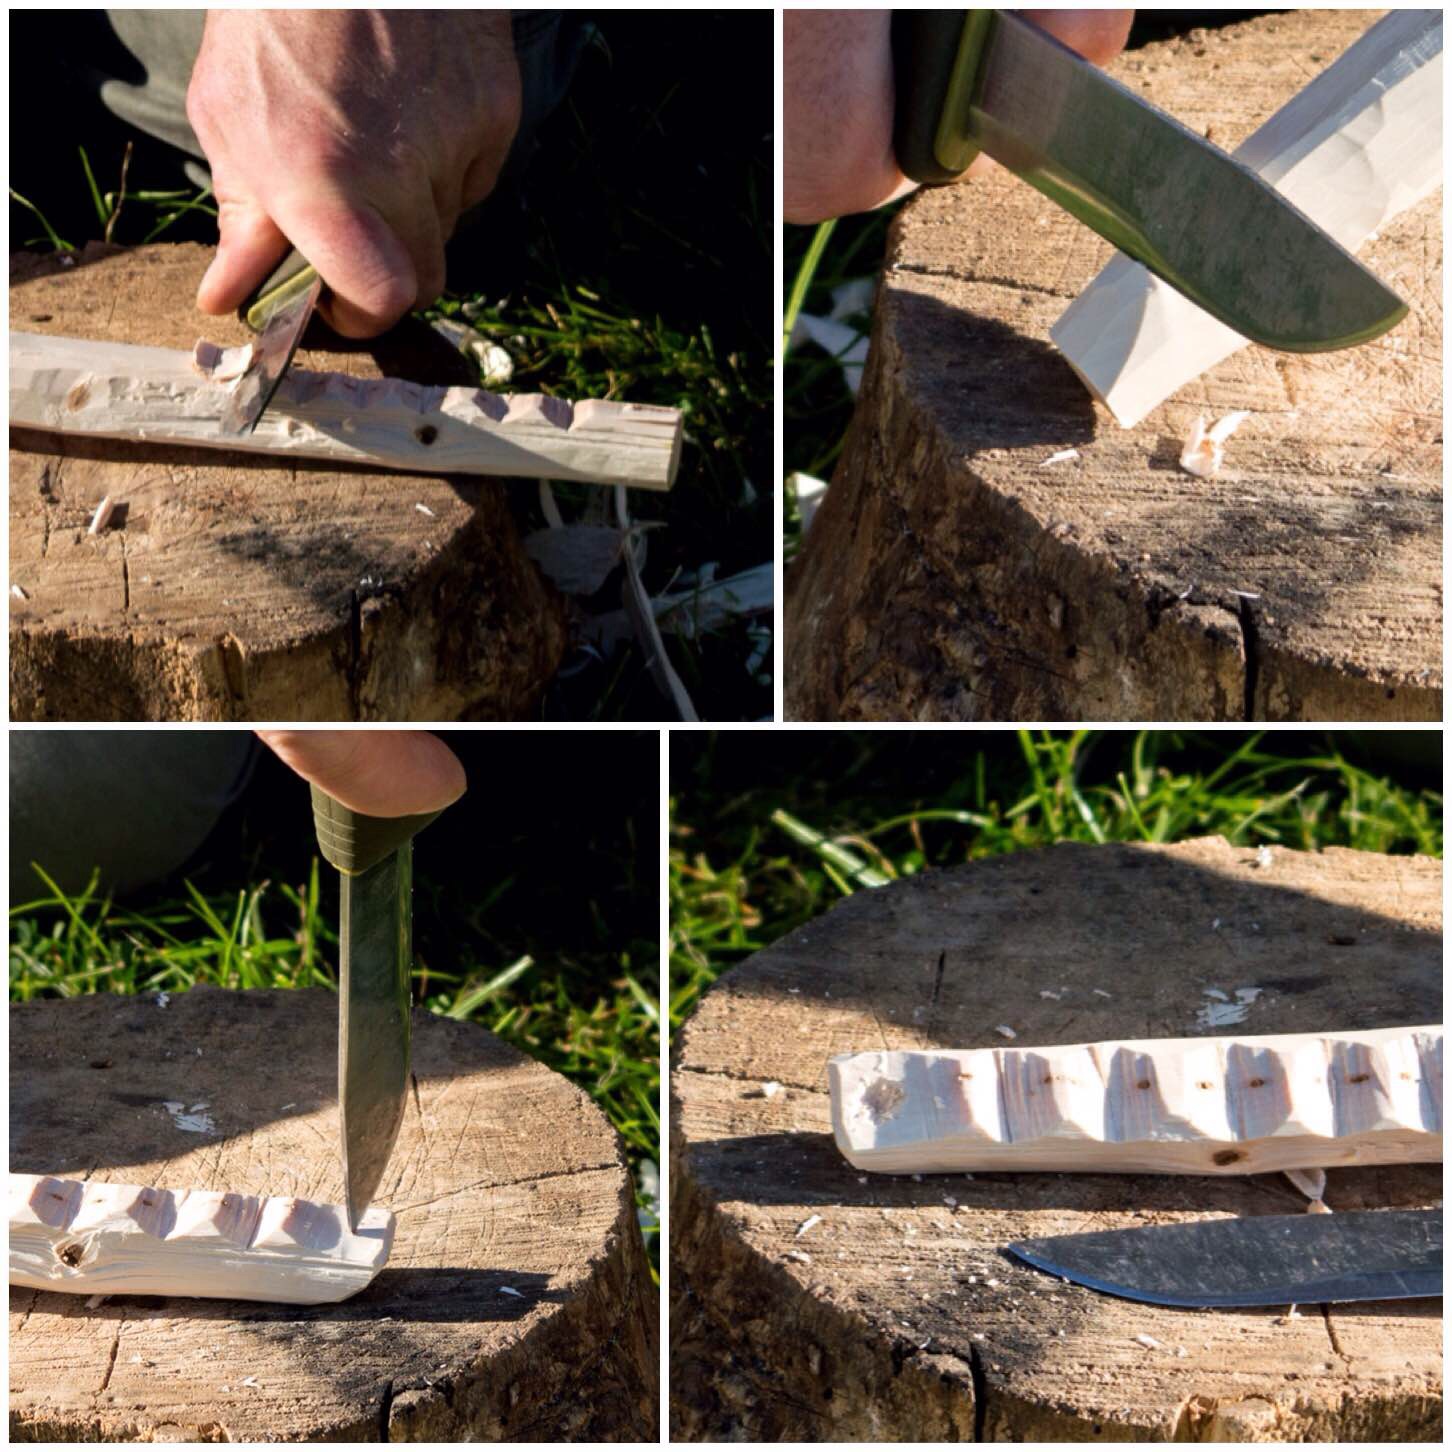
Carving the Arm
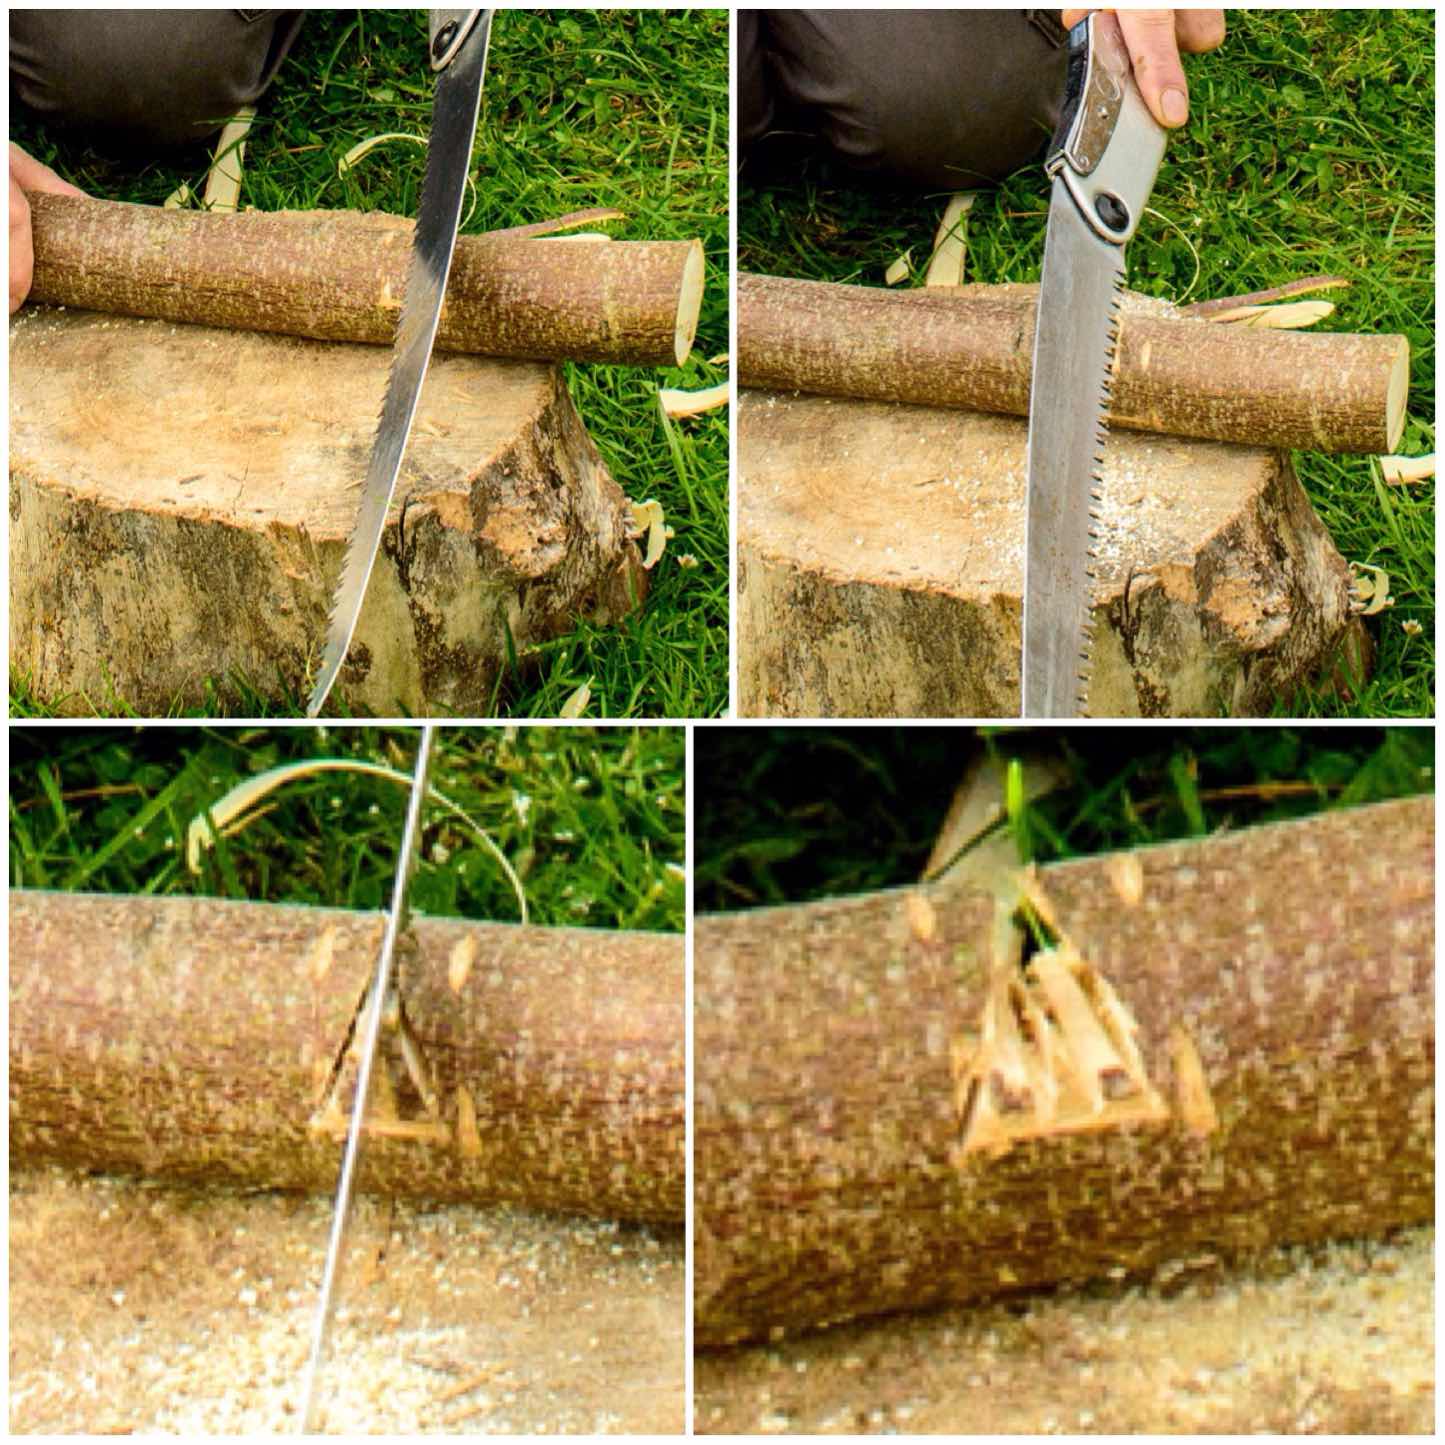
About a third of the way along from the thicker end of the arm flatten the wood with your knife on opposite sides. This gives you a decent working surface to carve out your Mortise hole.
In the bottom left picture you can see how I used the top of the upright to help me gauge how big to make the Mortise hole. Mark out your Mortise hole with a pen or pencil (mark out both sides of the arm).
Flattening the arm and marking out the Mortise hole
I used my knife and a piece of waste wood as a batton to cut out the Mortise hole. I took my time here so I would not split the wood along the length of the arm.
Once I got about half way down the depth of the Mortise hole I started on the other side.
Creating the Mortise hole – First Side
As I use the tip of my knife for this work I always ensure the work piece is secured on a flat surface. I have seen the after effects of a knife going through someone’s hand and it is not a pretty sight I can assure you.
Soon I had my Mortise hole cut through and tidied up. As I did not want to make the Mortise hole too large I tested out the Tenon tongue in it and trimmed the tongue down slightly so that it would fit in the Mortise hole easily.
Creating the Mortise hole – Second side
The Tenon tongue when fitted should sit slightly proud. You will probably find you will make lots of little adjustments here as you test the action of your crane at this stage.
Testing the joint
To finish the arm off I carved a groove near the thick end of the arm (for the string to grip), chamfered the thick end to tidy it up and cut out a groove at the thin end of the arm for attaching a pot handle (I will show this in detail in a further picture).
Finishing the arm
The Mortise and Tenon Crane
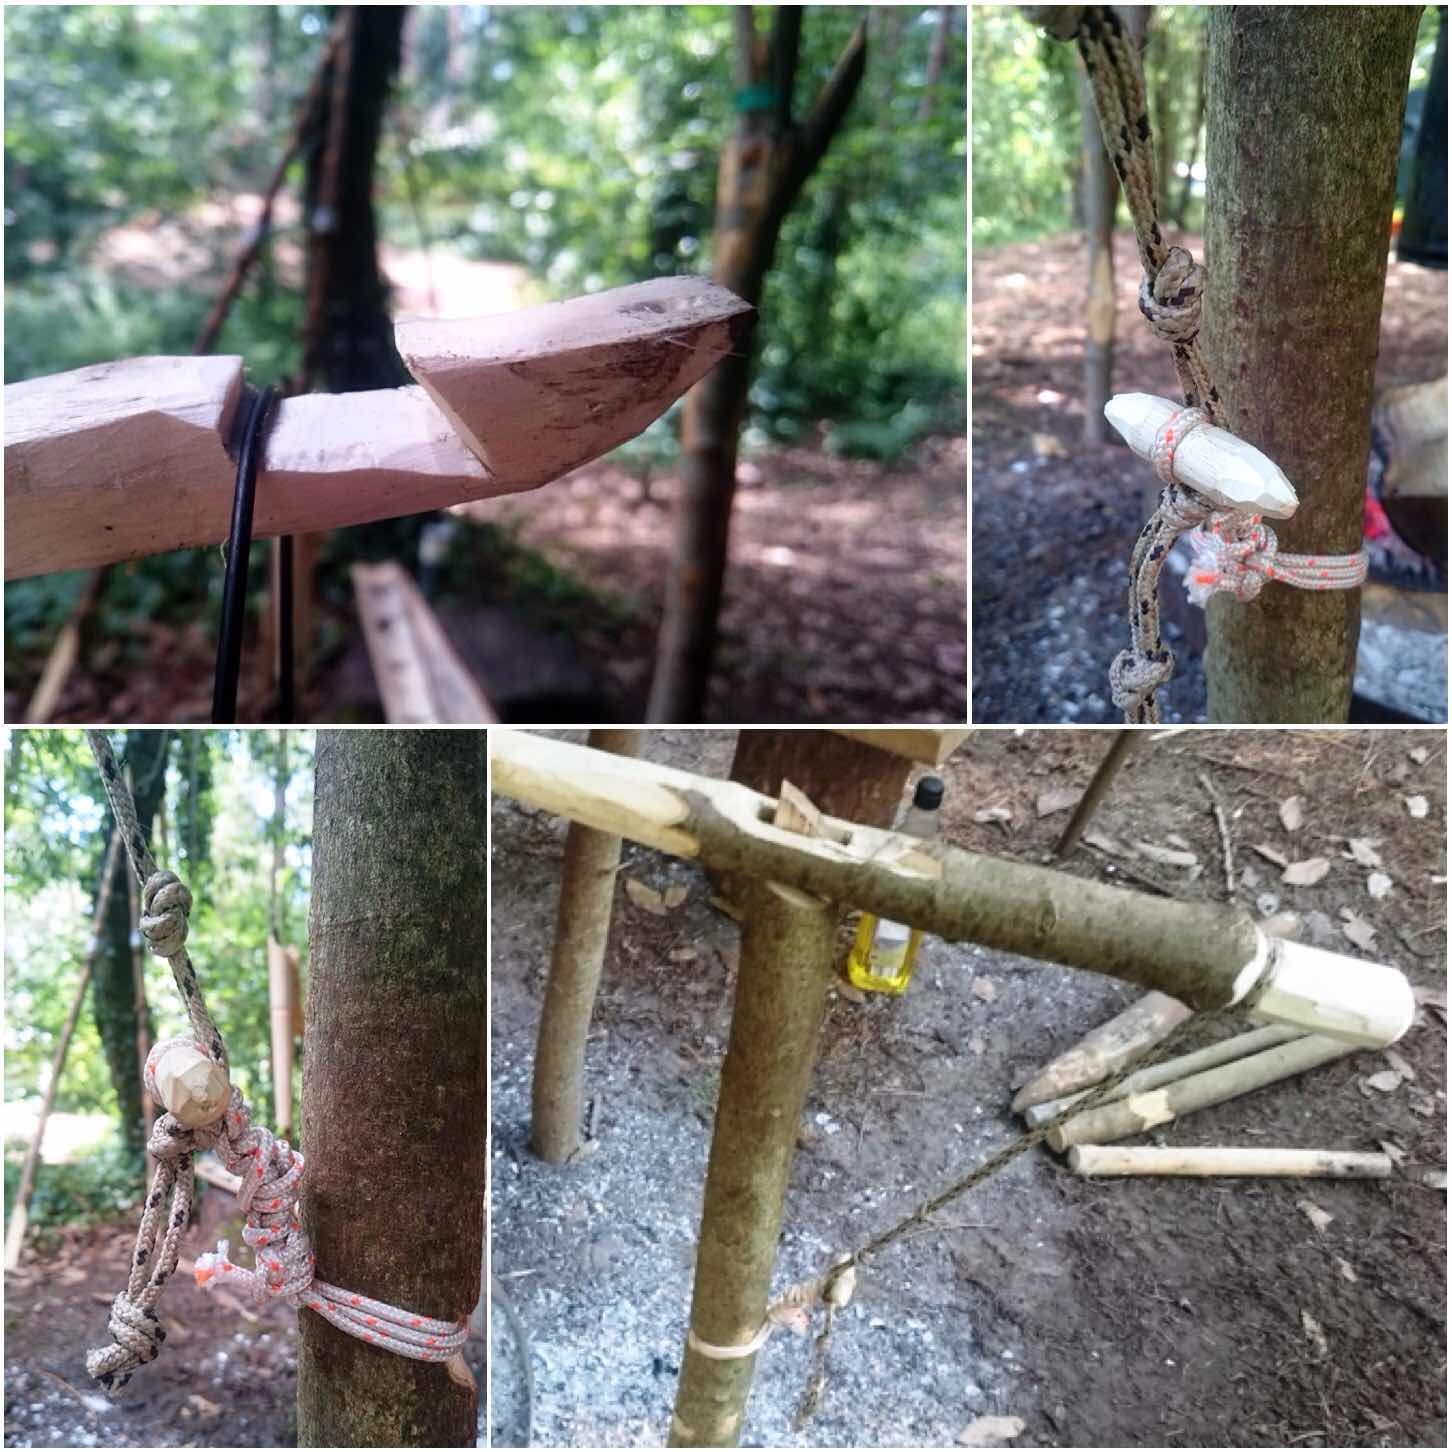
I spent a long time working out a way of making the arm fully adjustable with just the usual items in my rucksack. After discussing this with Ian and Charlie I opted for a simple system with string and a wooden toggle.
Below you can see that the upright and the arm are connected by string and a toggle on the left hand side.
In Profile
I tied off some doubled-up string to the arm groove and knotted it along its length with some simple overhand knots. This produced lots of little loops the toggle could fit into.
I attached a toggle to the upright groove and inserted the toggle into one of the loops in the string from the arm. Depending on what loop I put the toggle into I could adjust the height of any pot hanging off the other end of the arm.
The groove for the pot handle I made with a backstop and a slightly angled forward section. This shape allows the pot to remain secure when the arm is either raised or lowered.
In detail
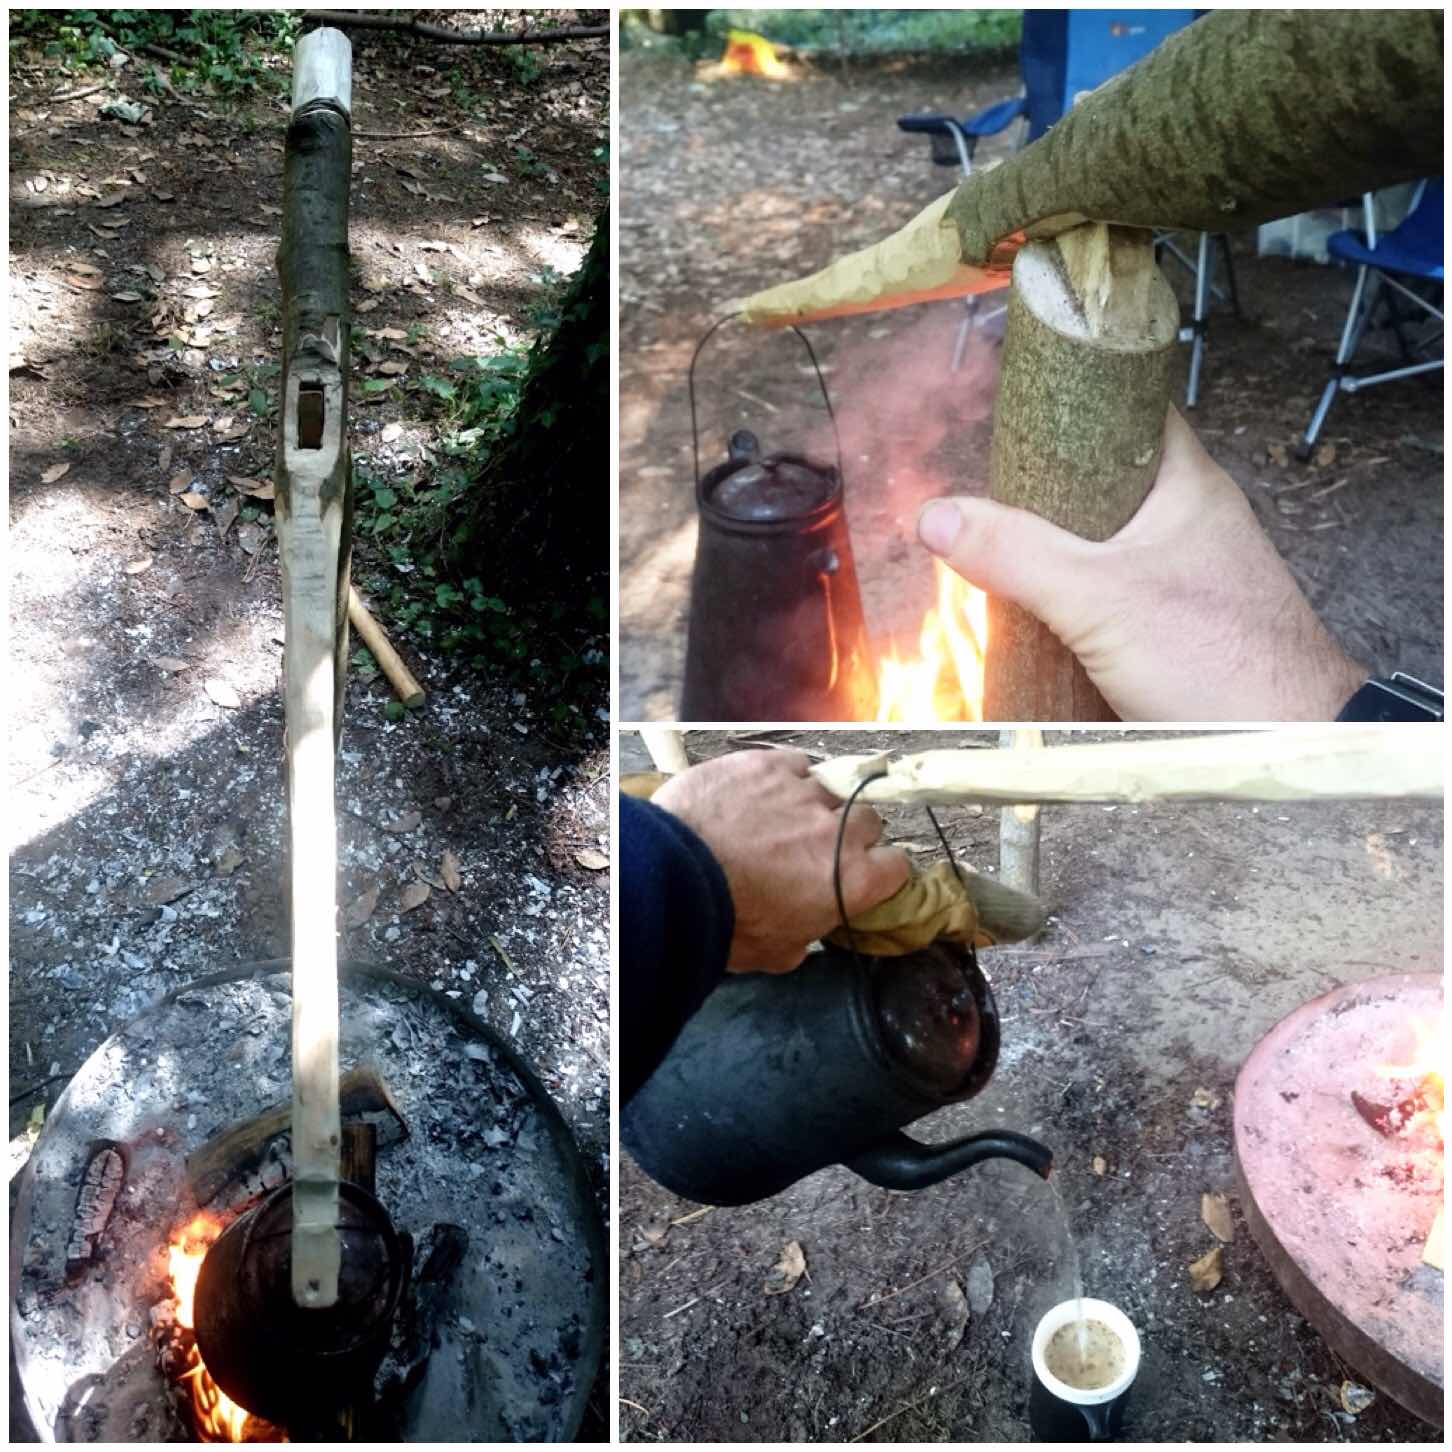
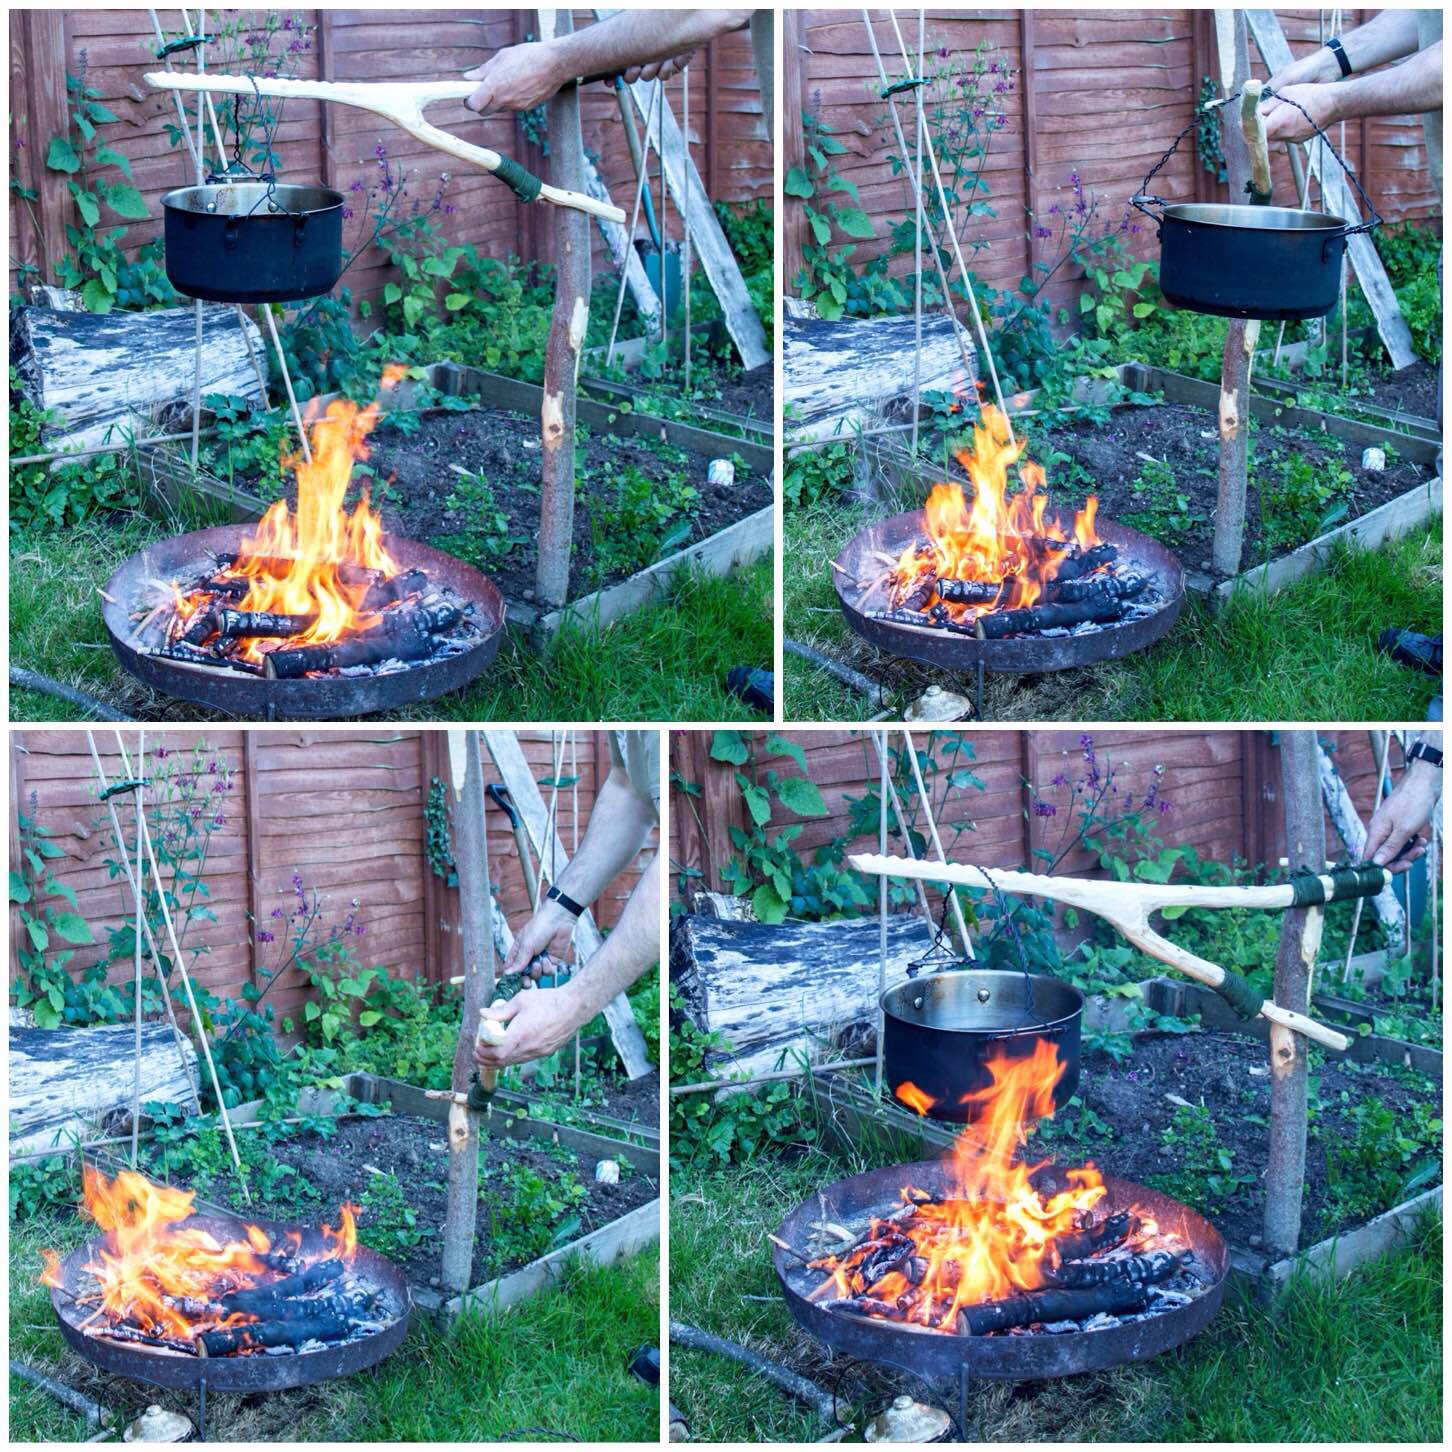
To insert the upright I had a separate pole to act as a pile driver. I hammered this into the ground first and then inserted the upright into the hole I’d created.
The upright can then be rotated quite easily to move your pot off the fire. I found that I could pour water from the kettle while it was still attached to the arm as the handle sat snugly in the angled section of the pot handle groove.
In use
I like this crane for the challenges it set me and the fact that I could overcome them with just the kit I would normally carry.
I plan to re-visit the string set up as there must be a simpler method to keep the arm securley attached while giving me the ability to adjust its height.
Feel free to suggest an alternative method for this but remember it needs to be created with what you would normally expect to carry in your rucksack or about your person while out in the woods.
Up and Down
This will be (for the moment at least) the last How To…. on building campfire cranes however I have really enjoyed exploring this very diverse and little documented area of Bushcraft.
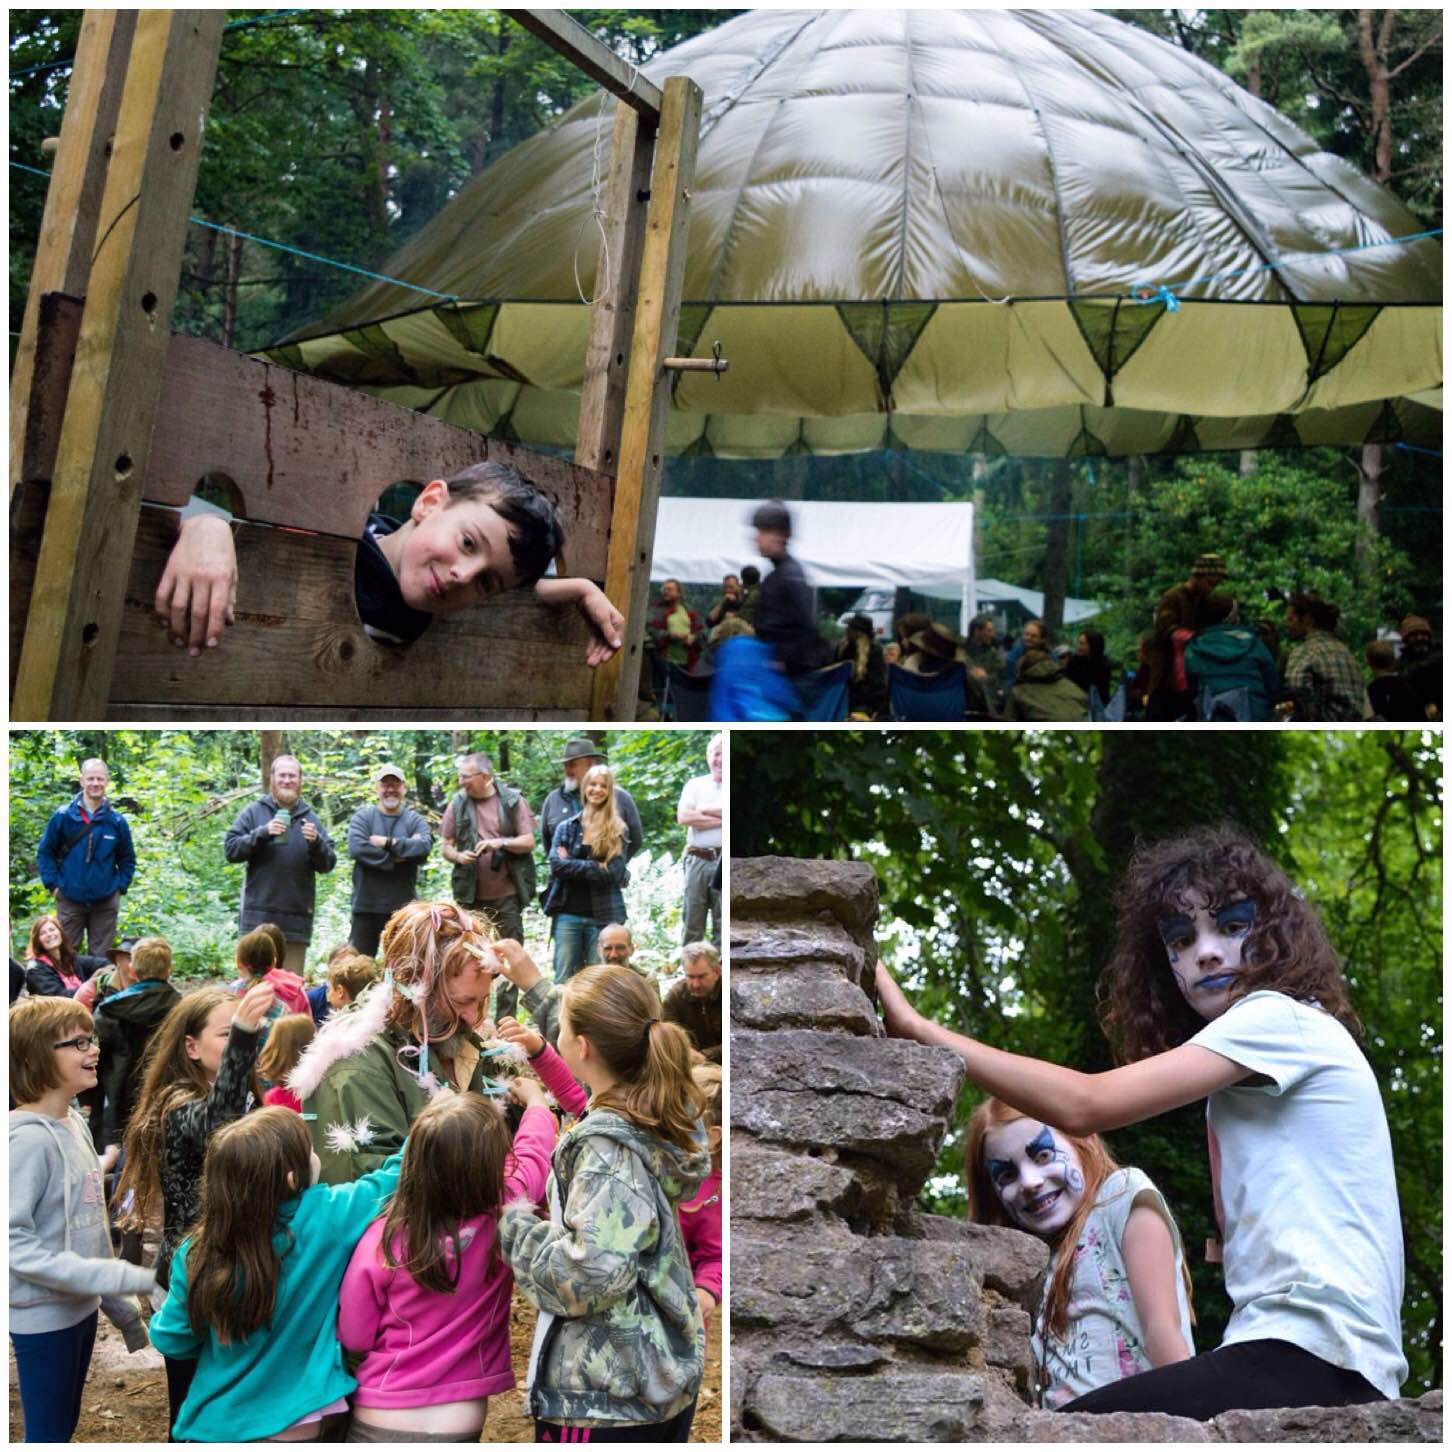
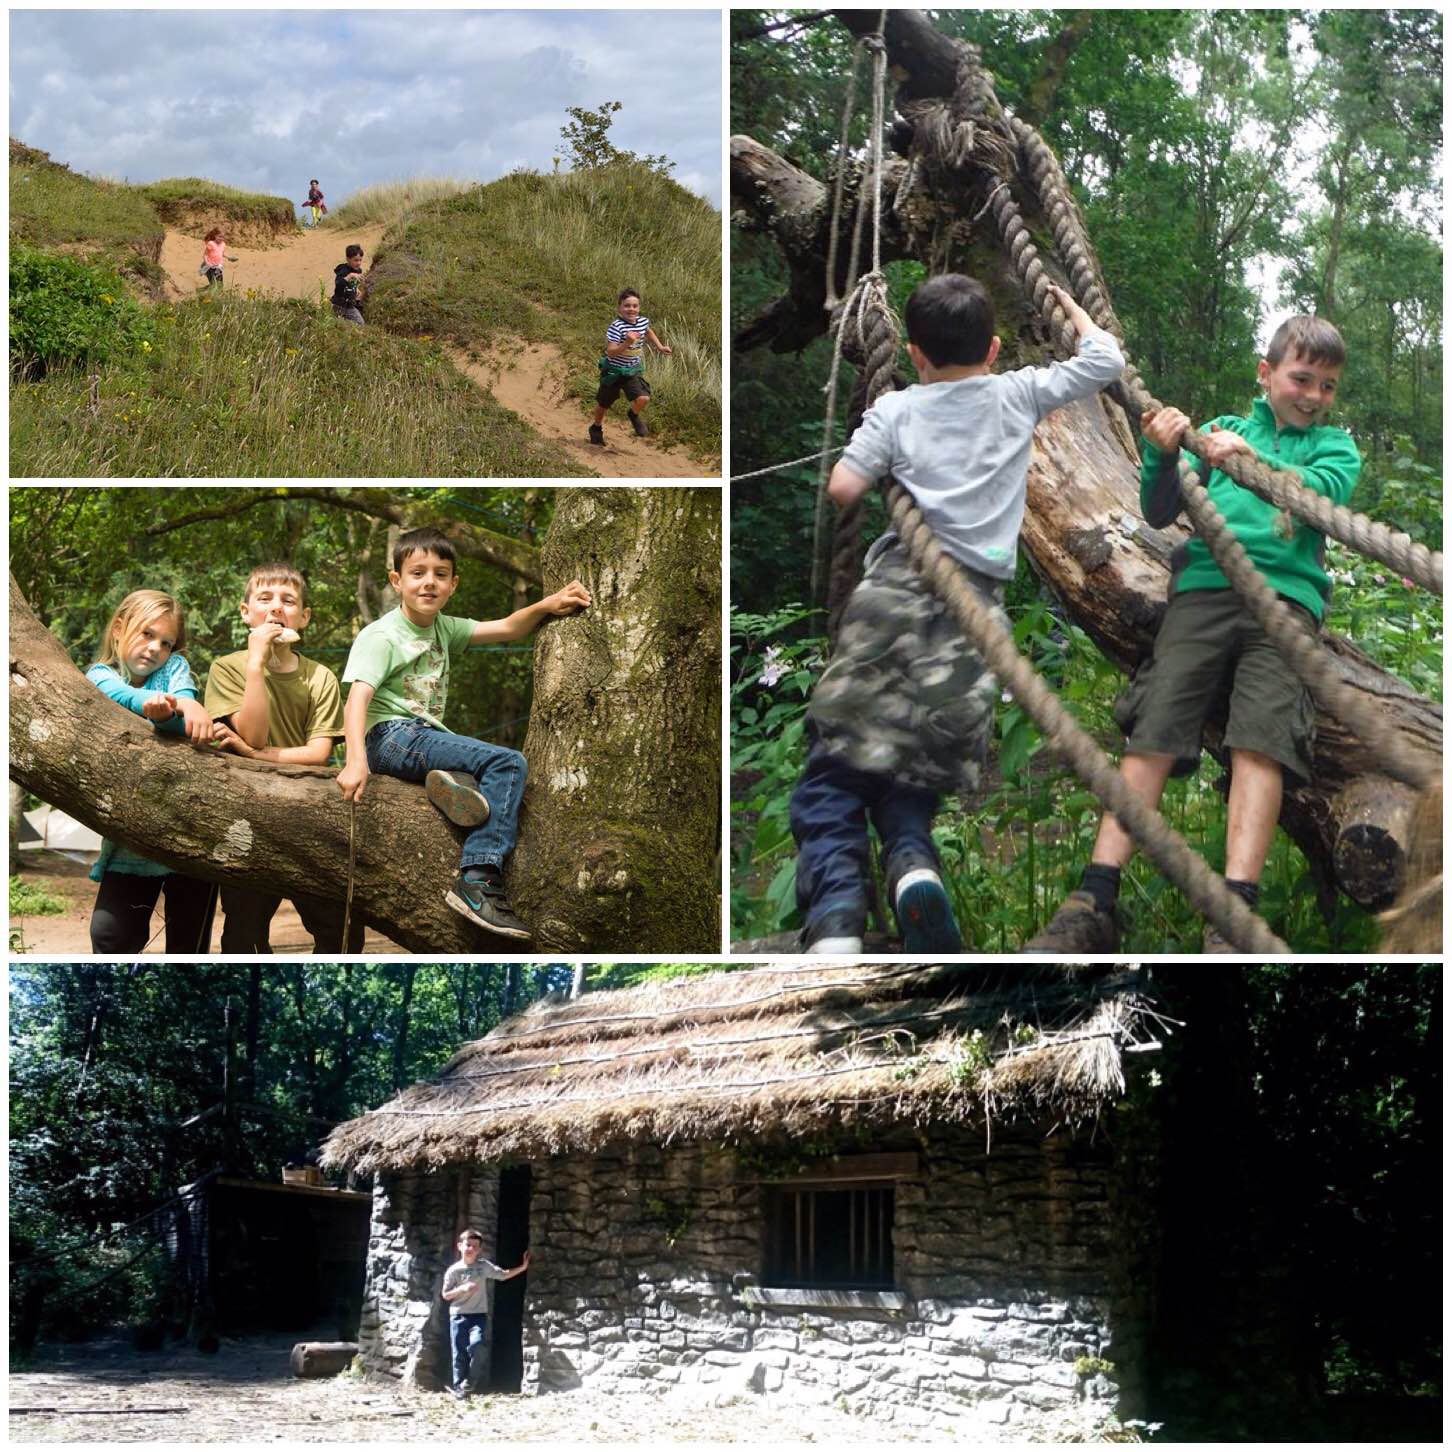
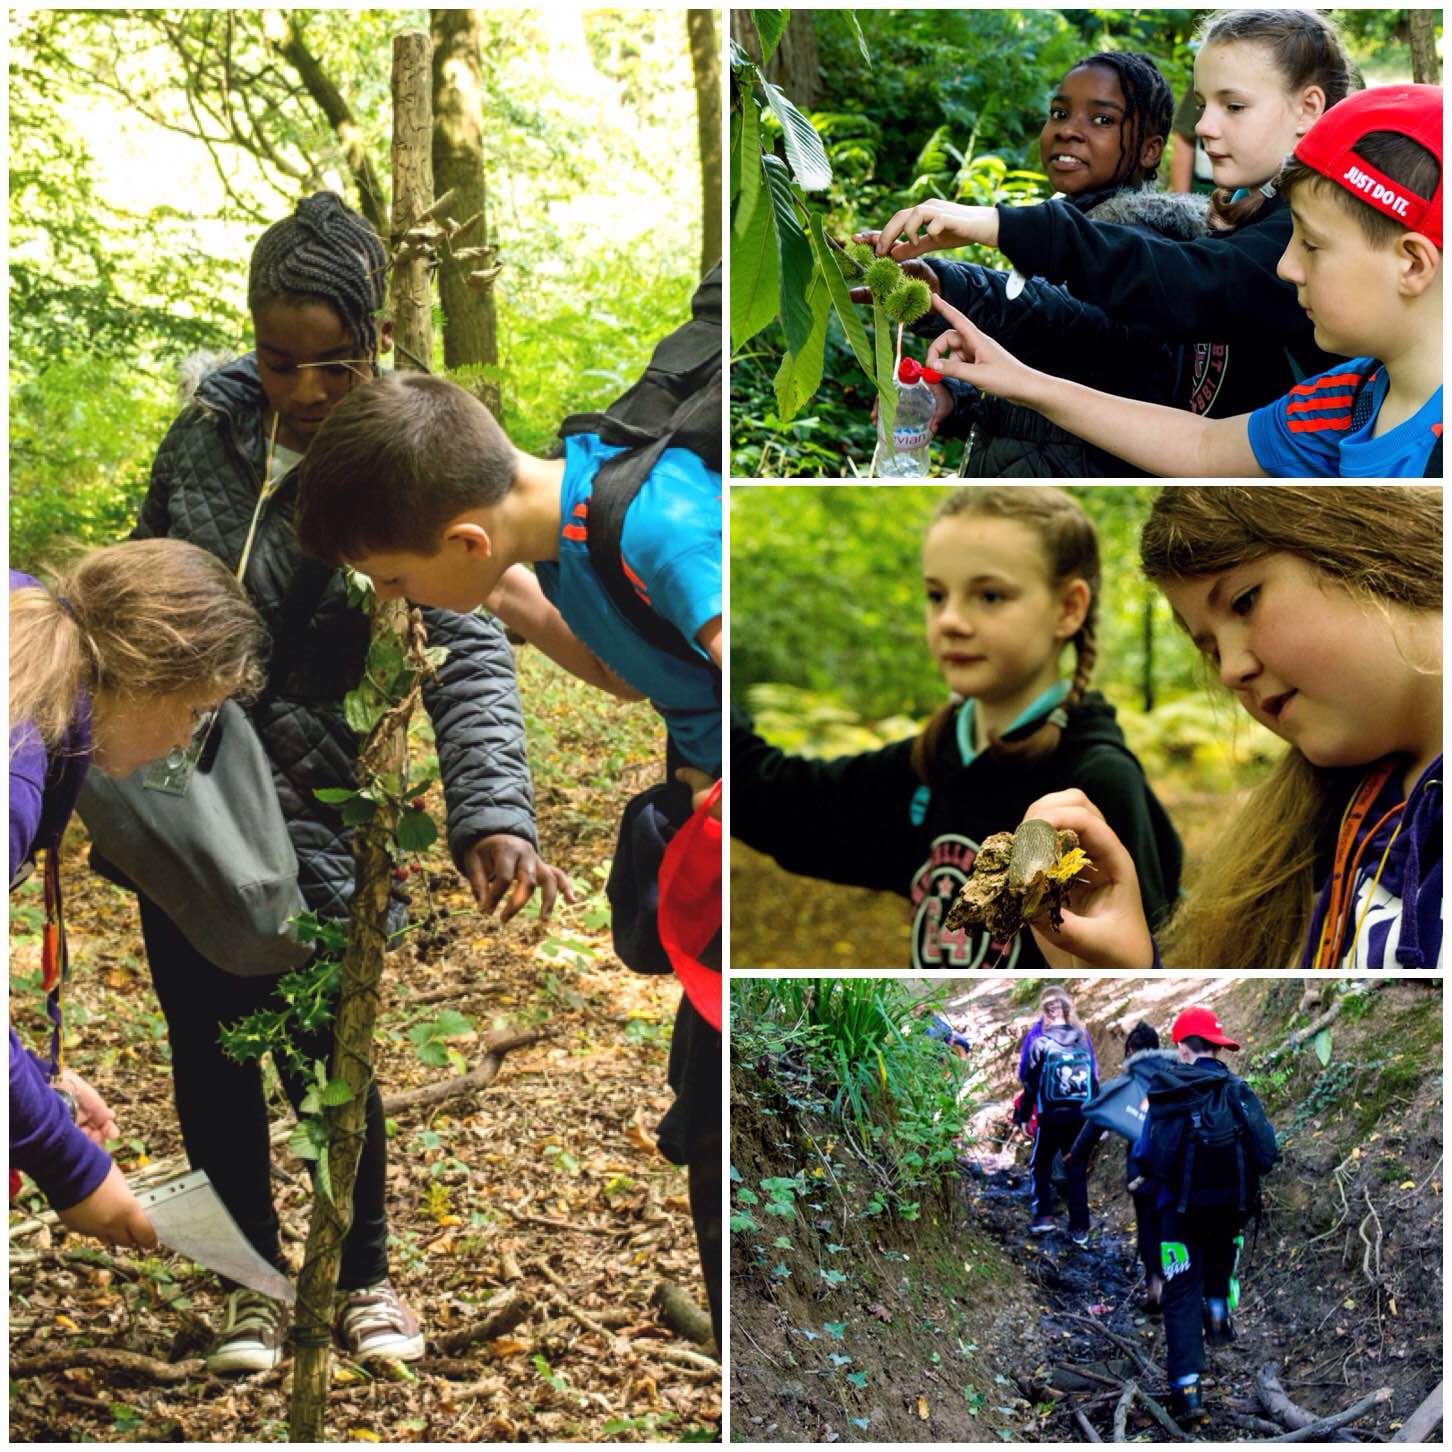
One thing that the BCUK Bushmoot is renowned for is its kid friendly environment. The Moot provides a massive playground for both structured (by lessons) and unstructured learning (through play).
As I grew up as a kid on the Isle of Lewis I would head on out in the morning to find adventure and return home when my stomach demanded attention. As I live in a village now that has busy roads running through it the Moot is one of the few places I know of that I am happy for my kids to go out and make their own adventures as I once did.
Bushmoot Fun
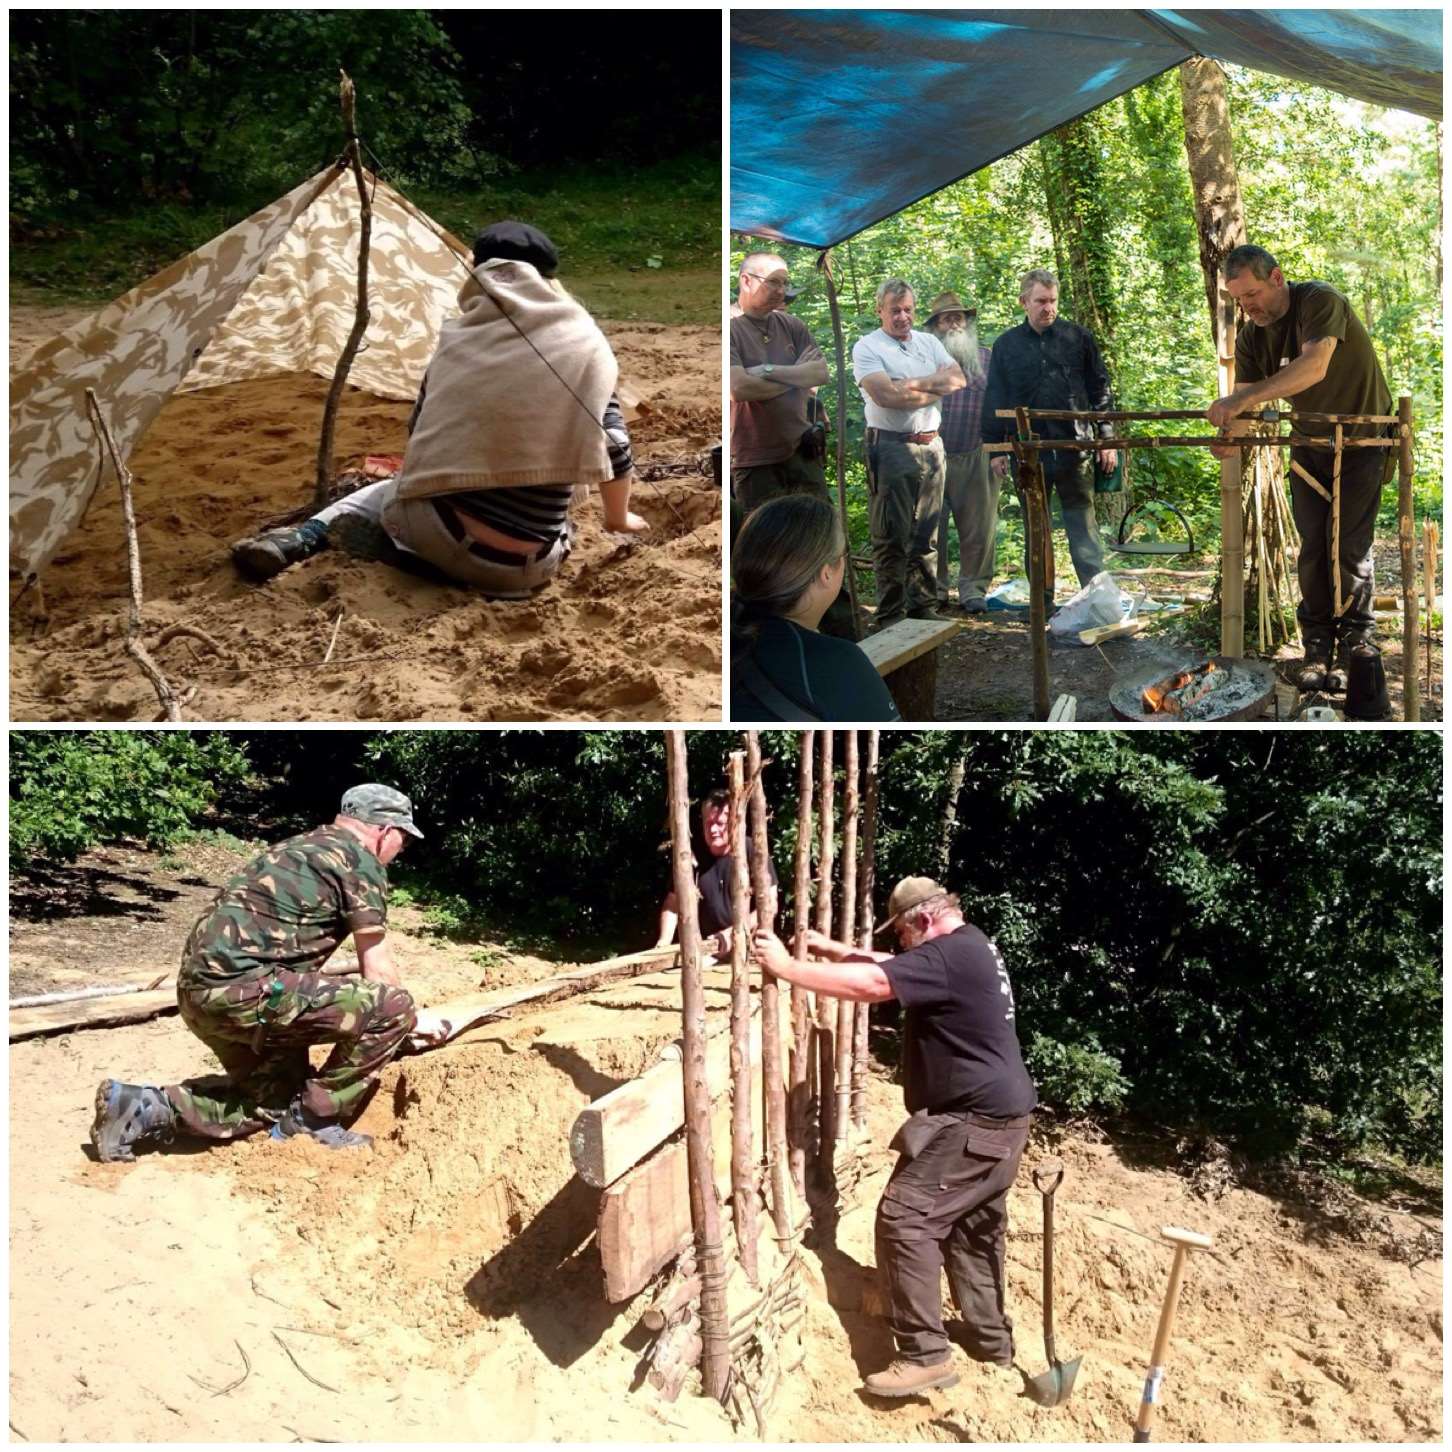
We stress that parents are responsible for their children however we encourage a sense of adventure. I let my kids run off and play within the main area of the Moot site and under adult supervision on the massive expanse of the sand dunes of Merthyr Mawr.
There are plenty of woods, dunes, trees and buildings to explore in the area around the Moot to satisfy the sense of adventure in any kid.
Adventuring
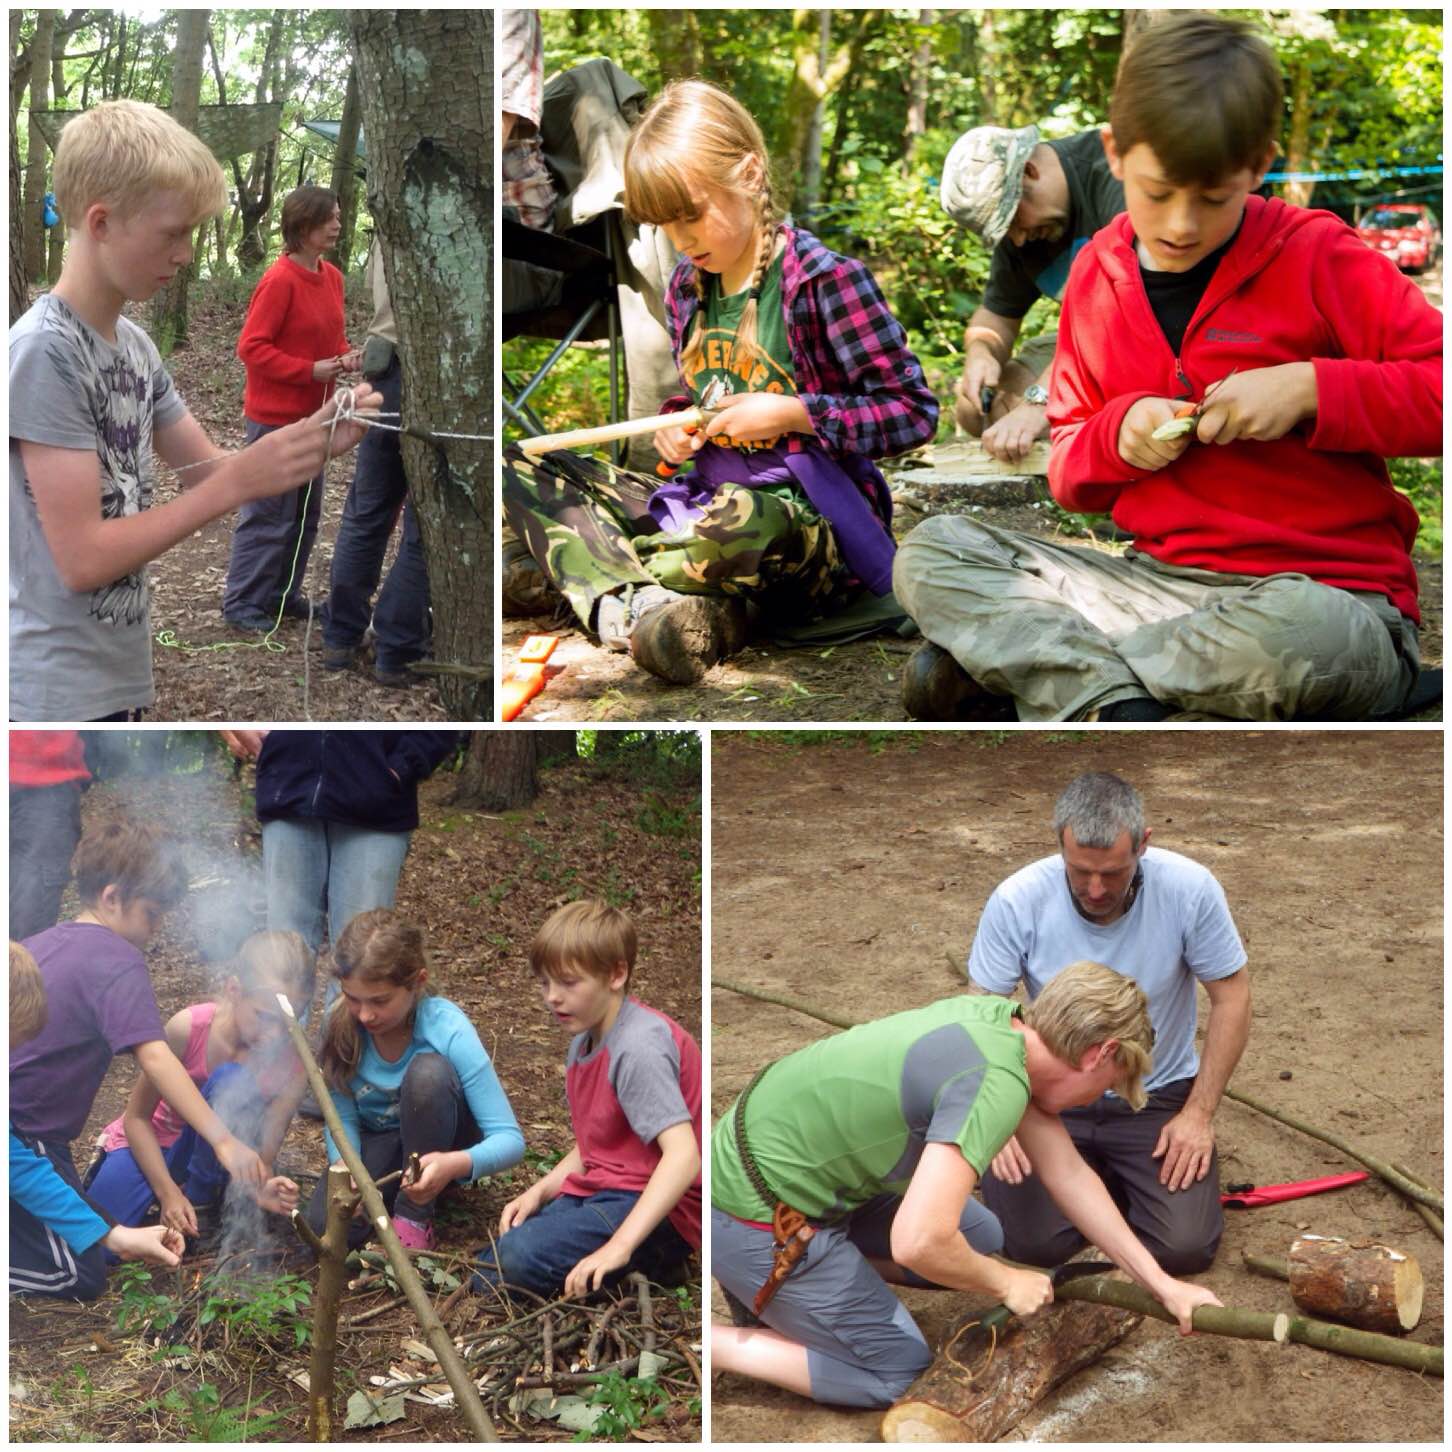
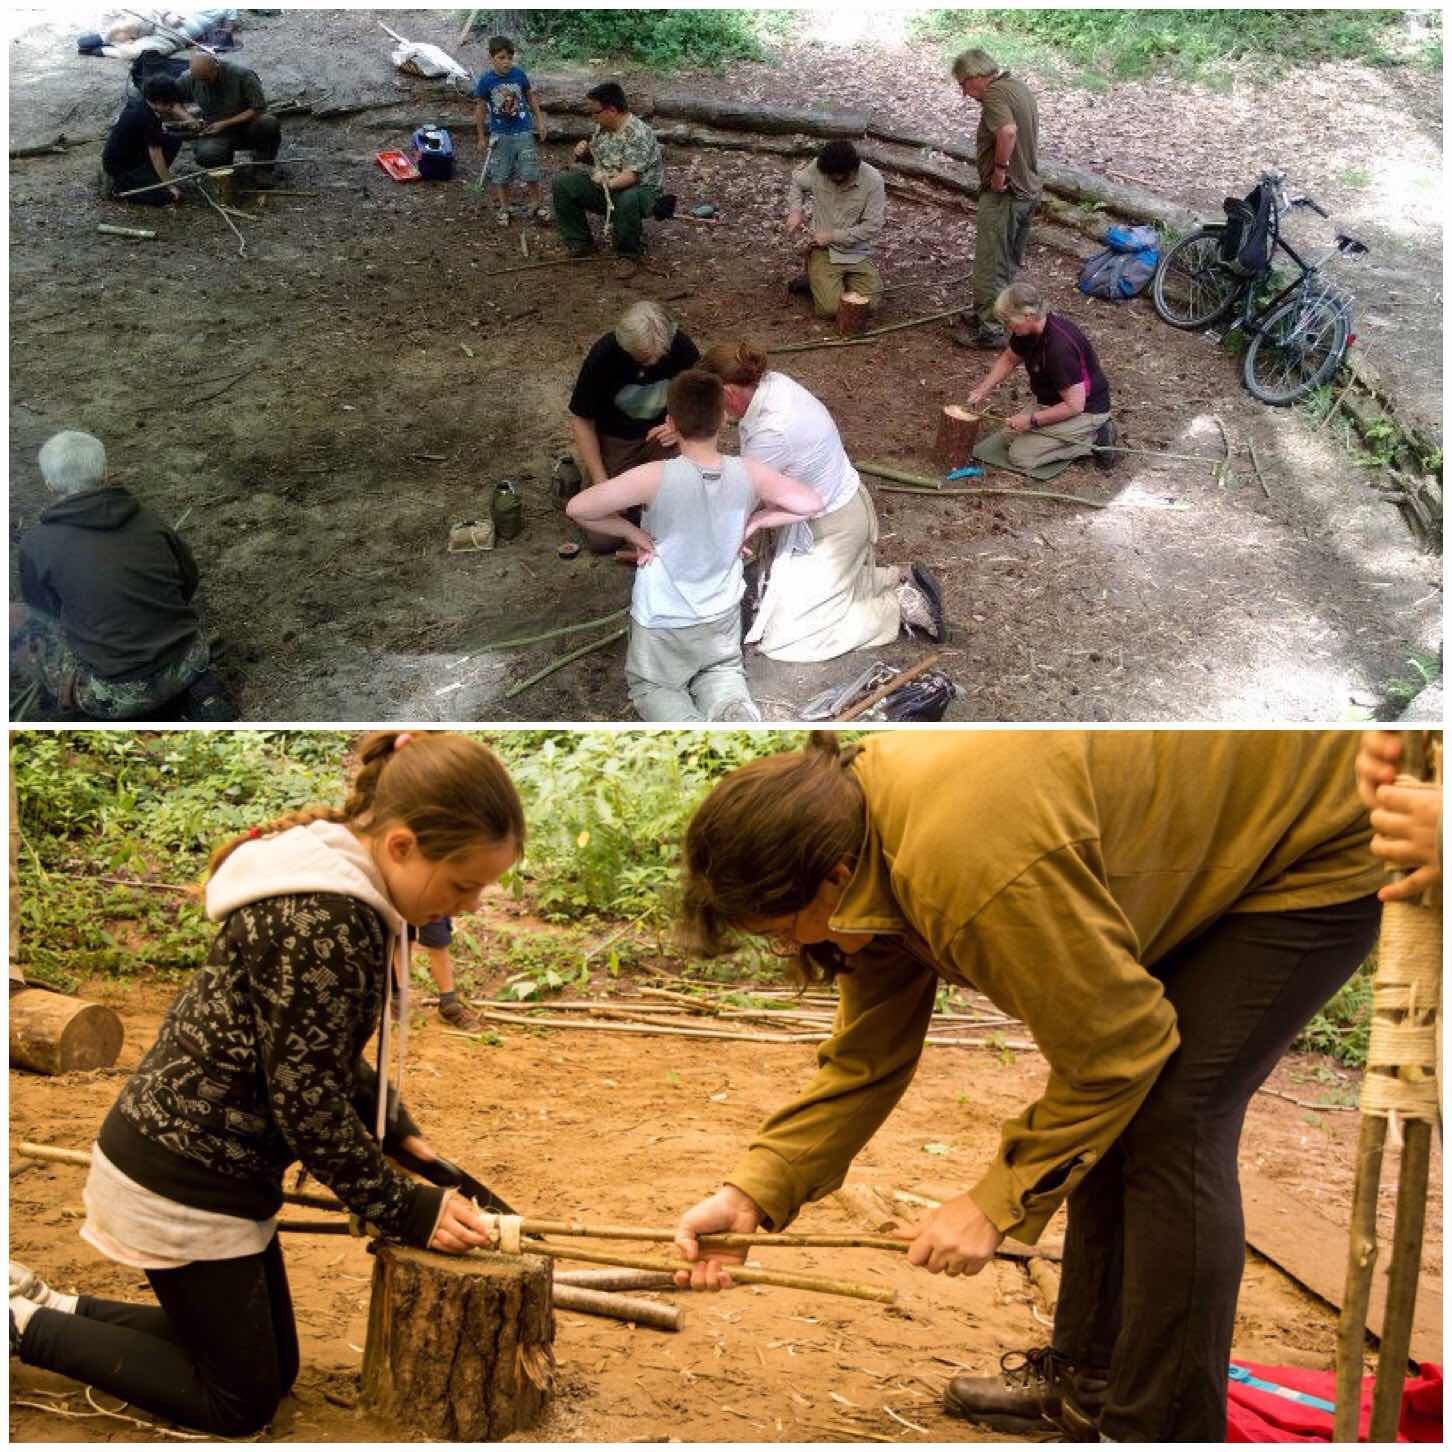
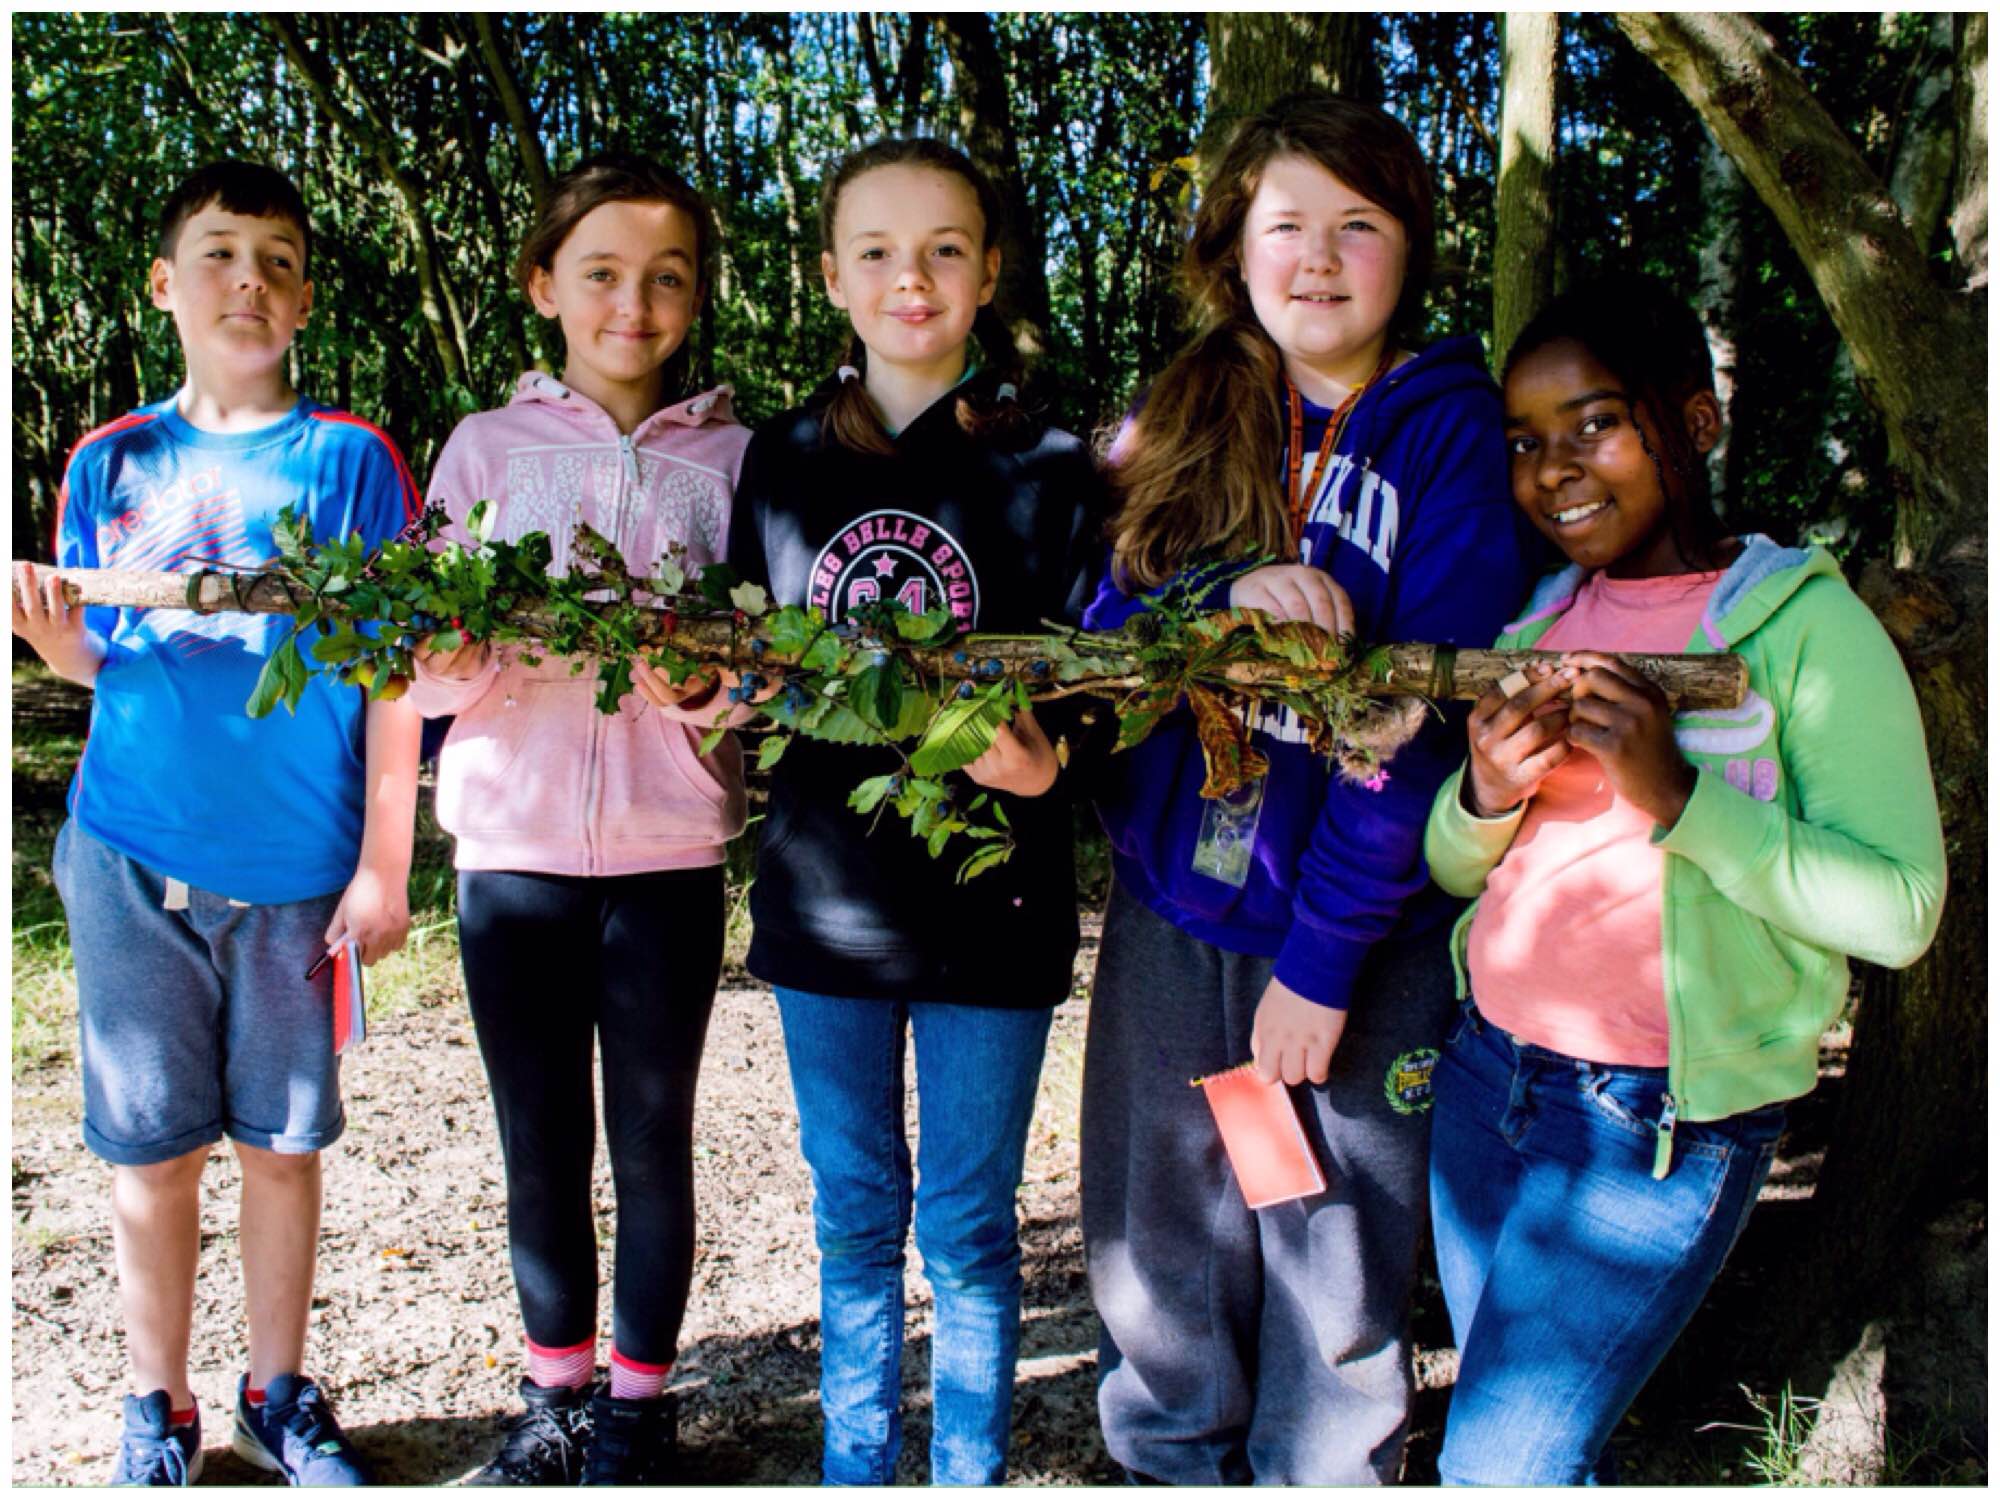
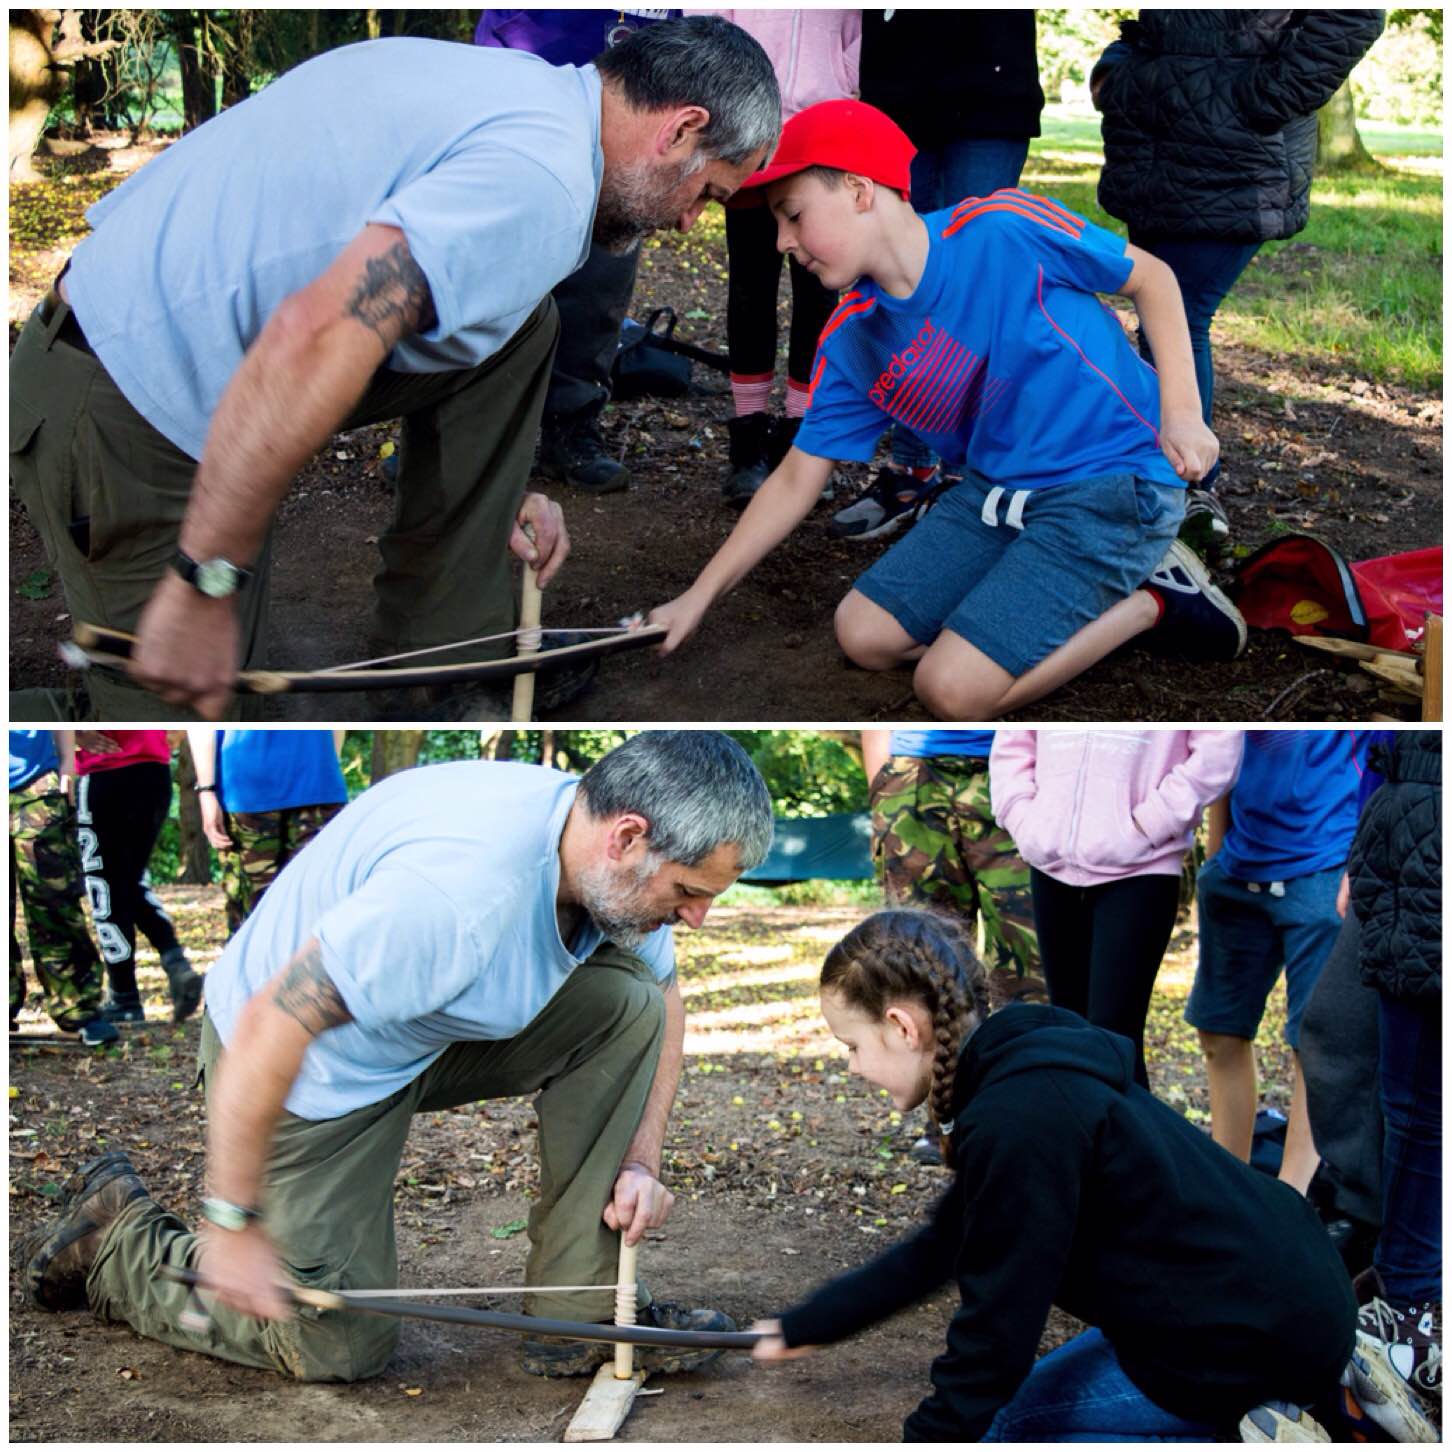
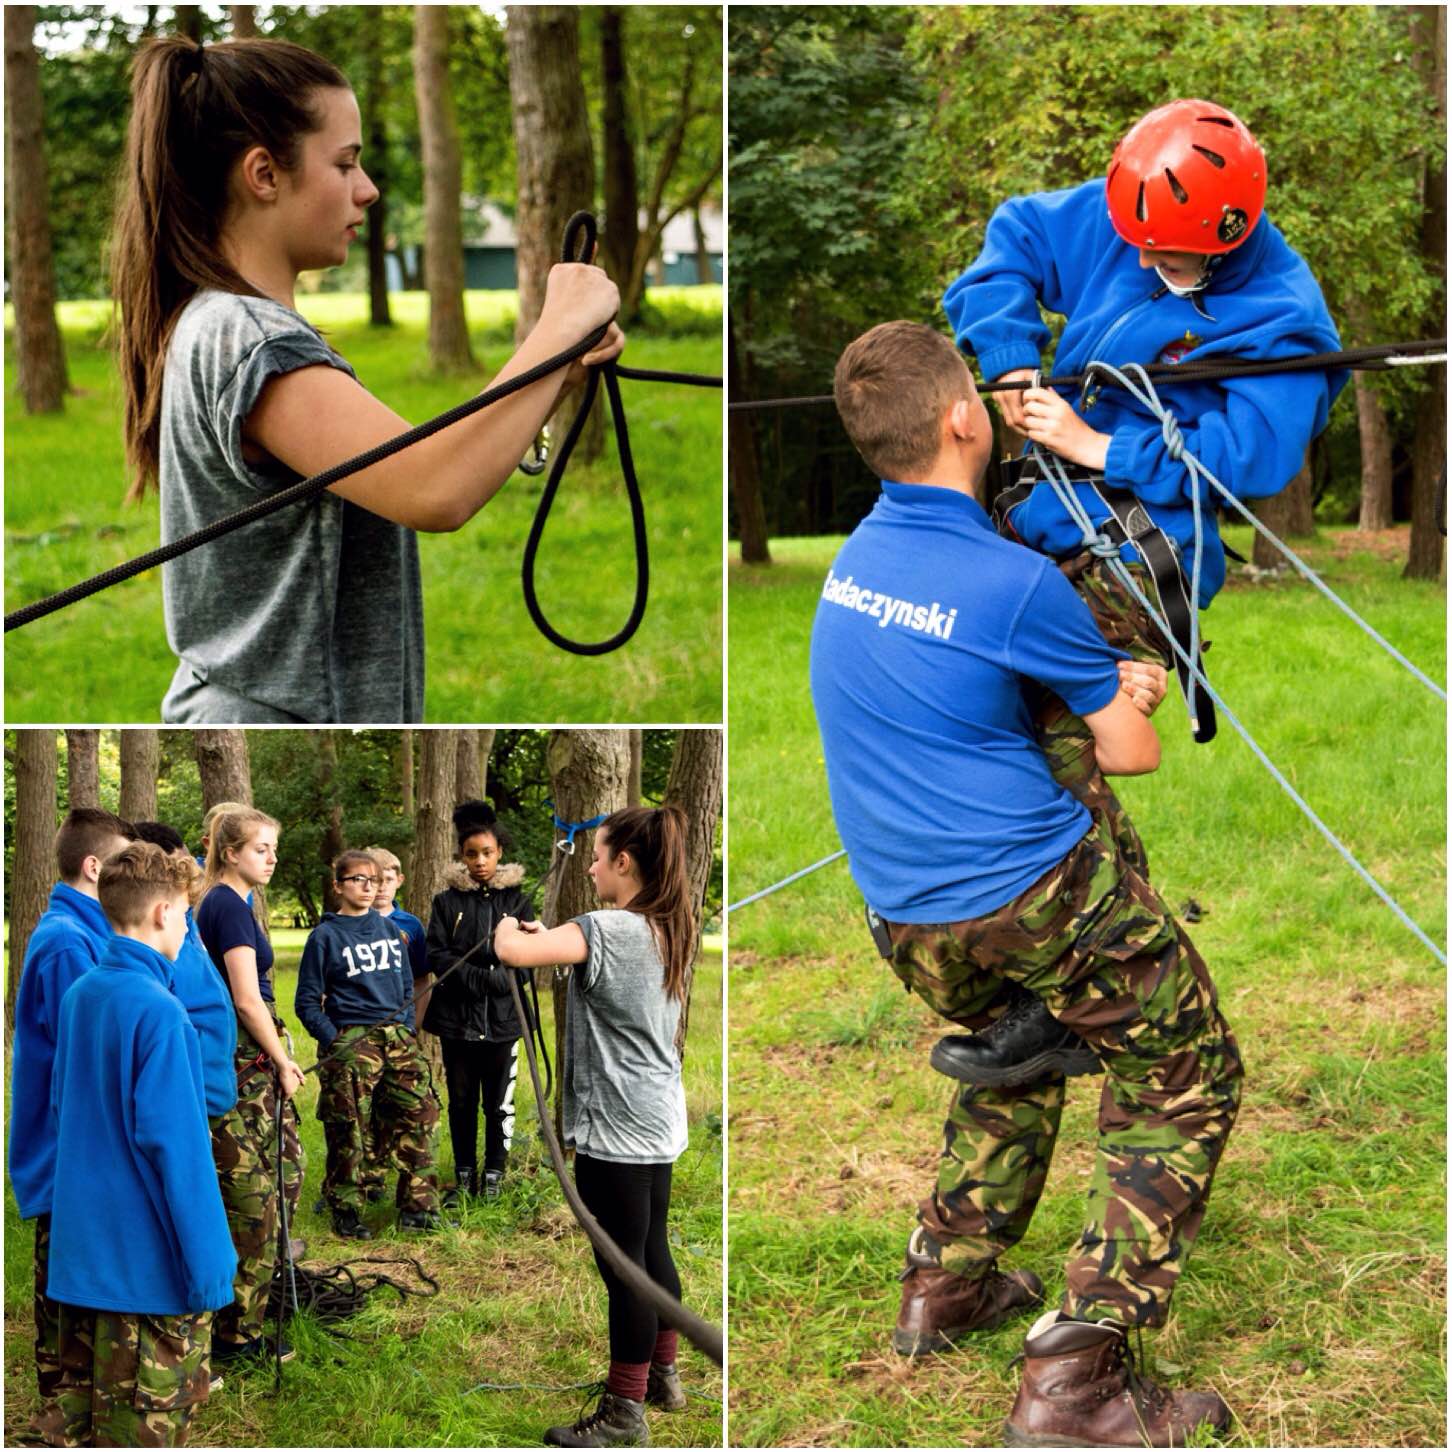
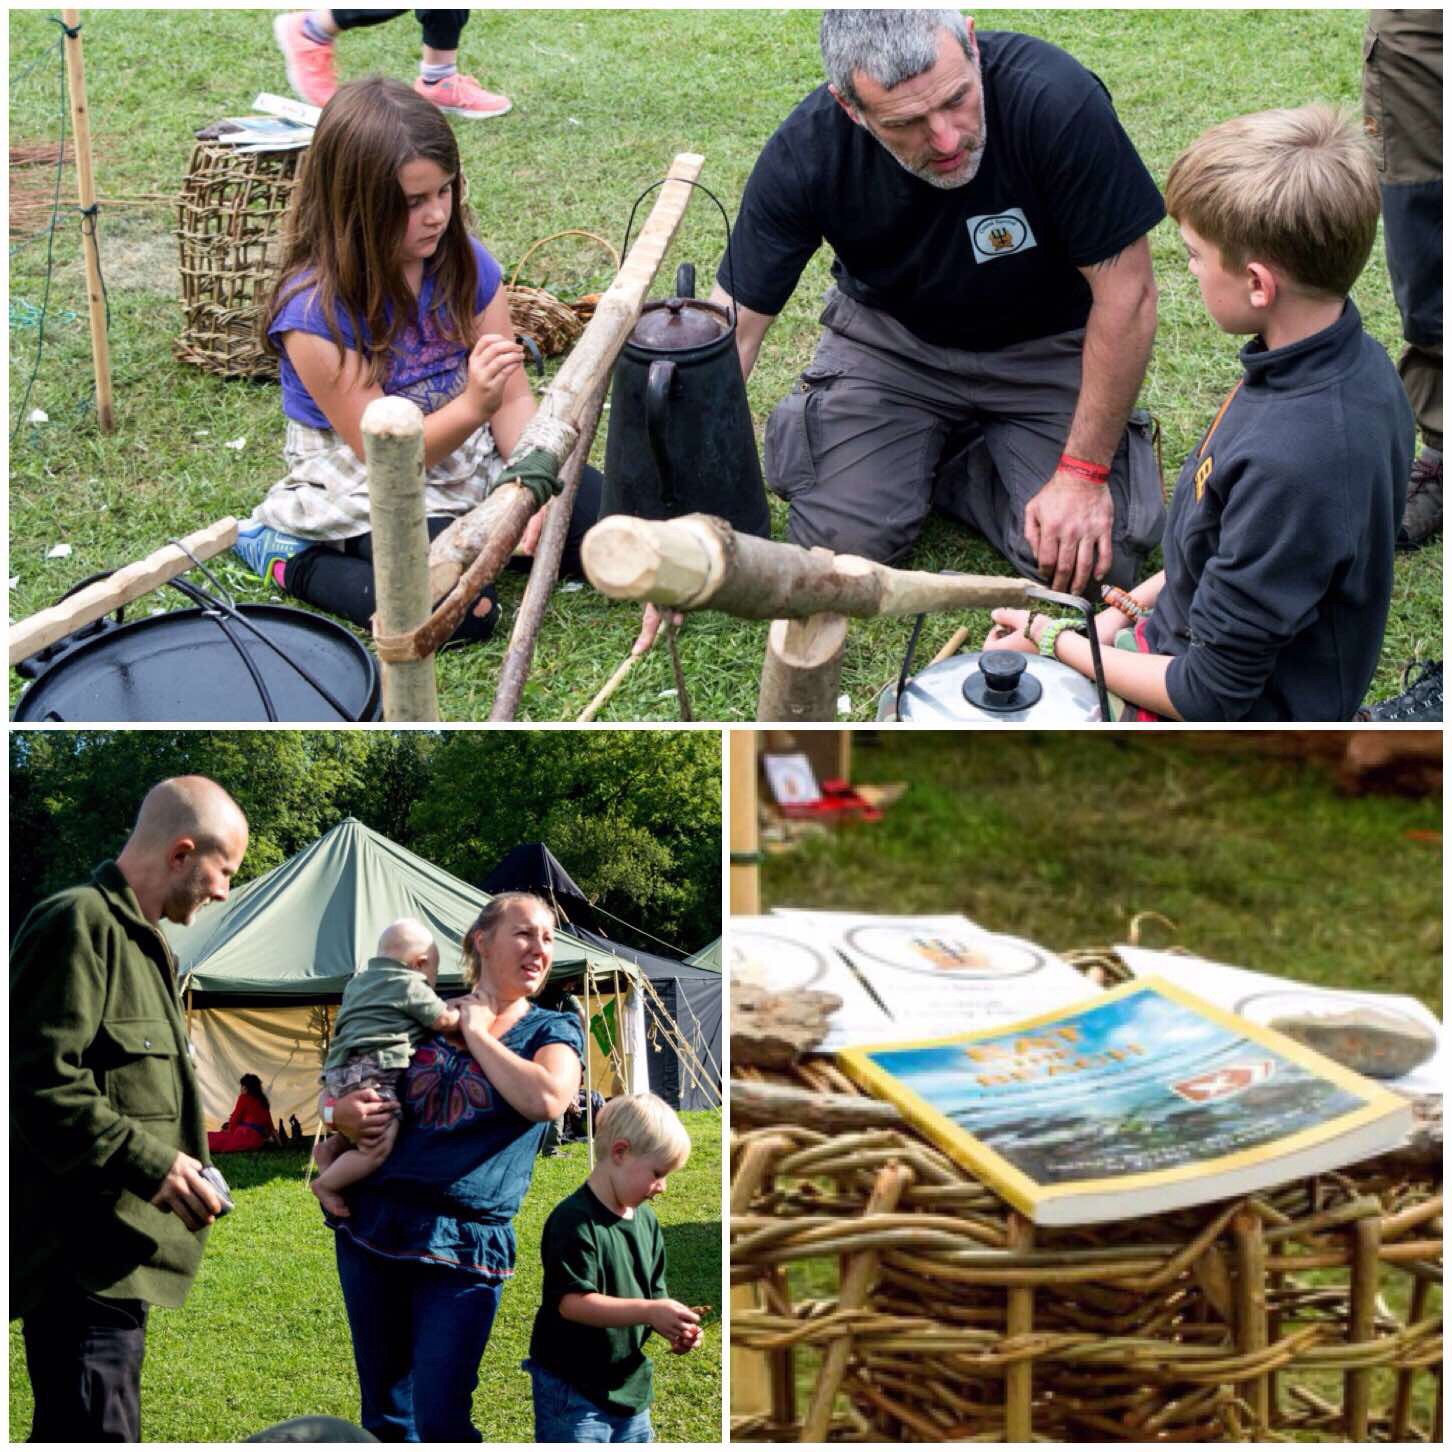
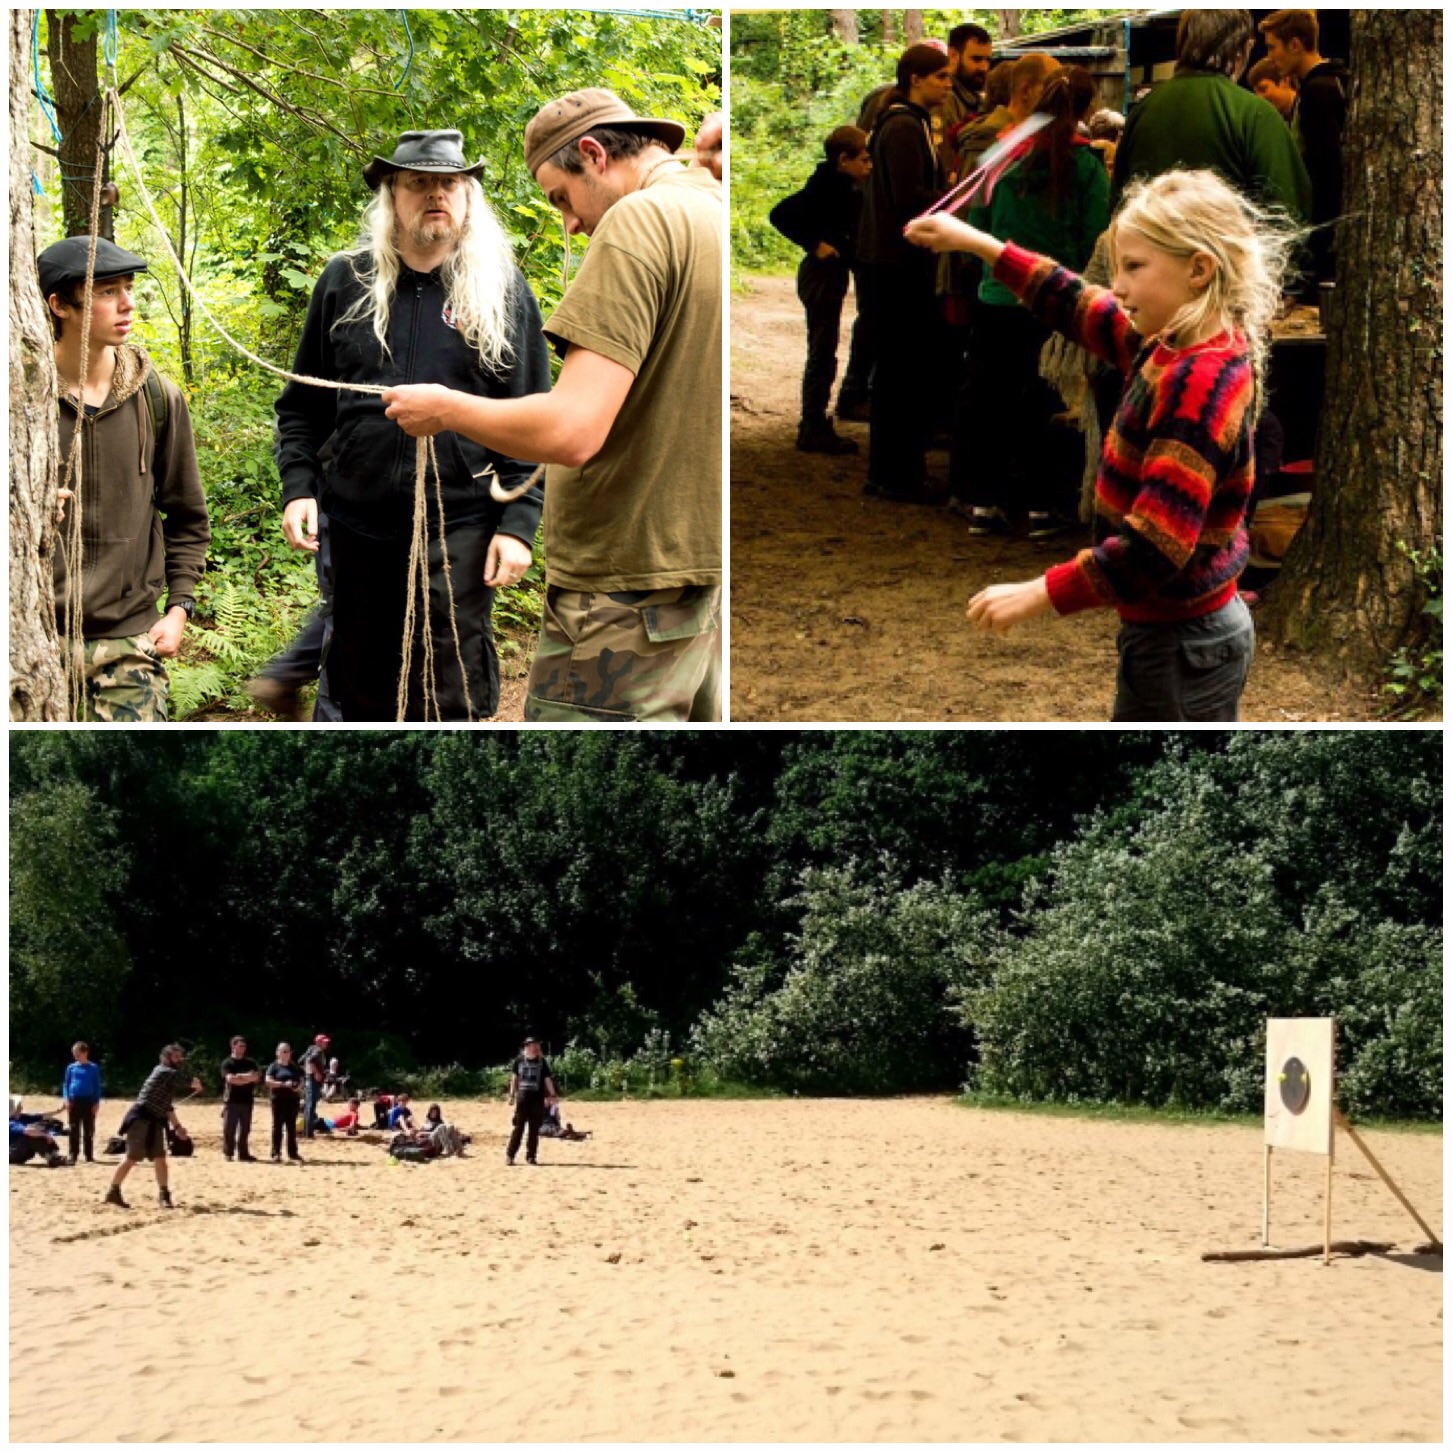
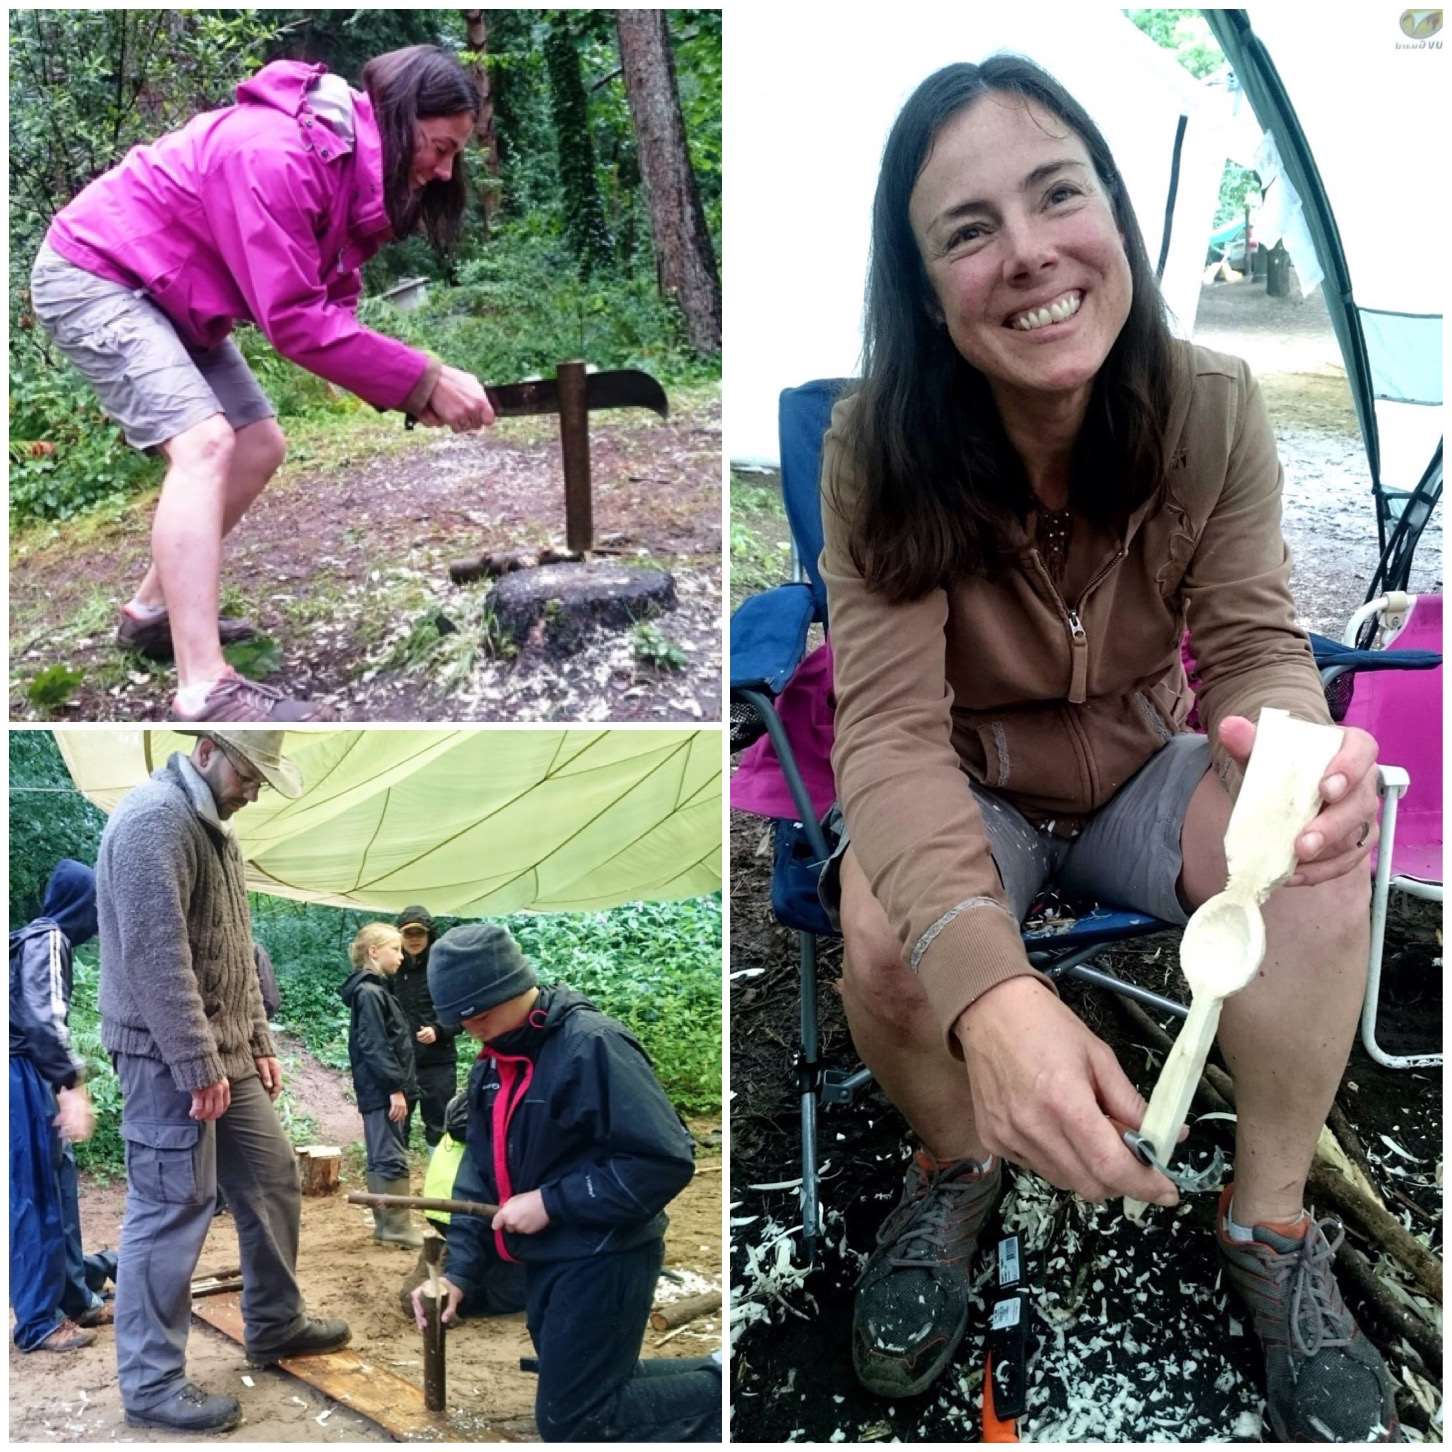
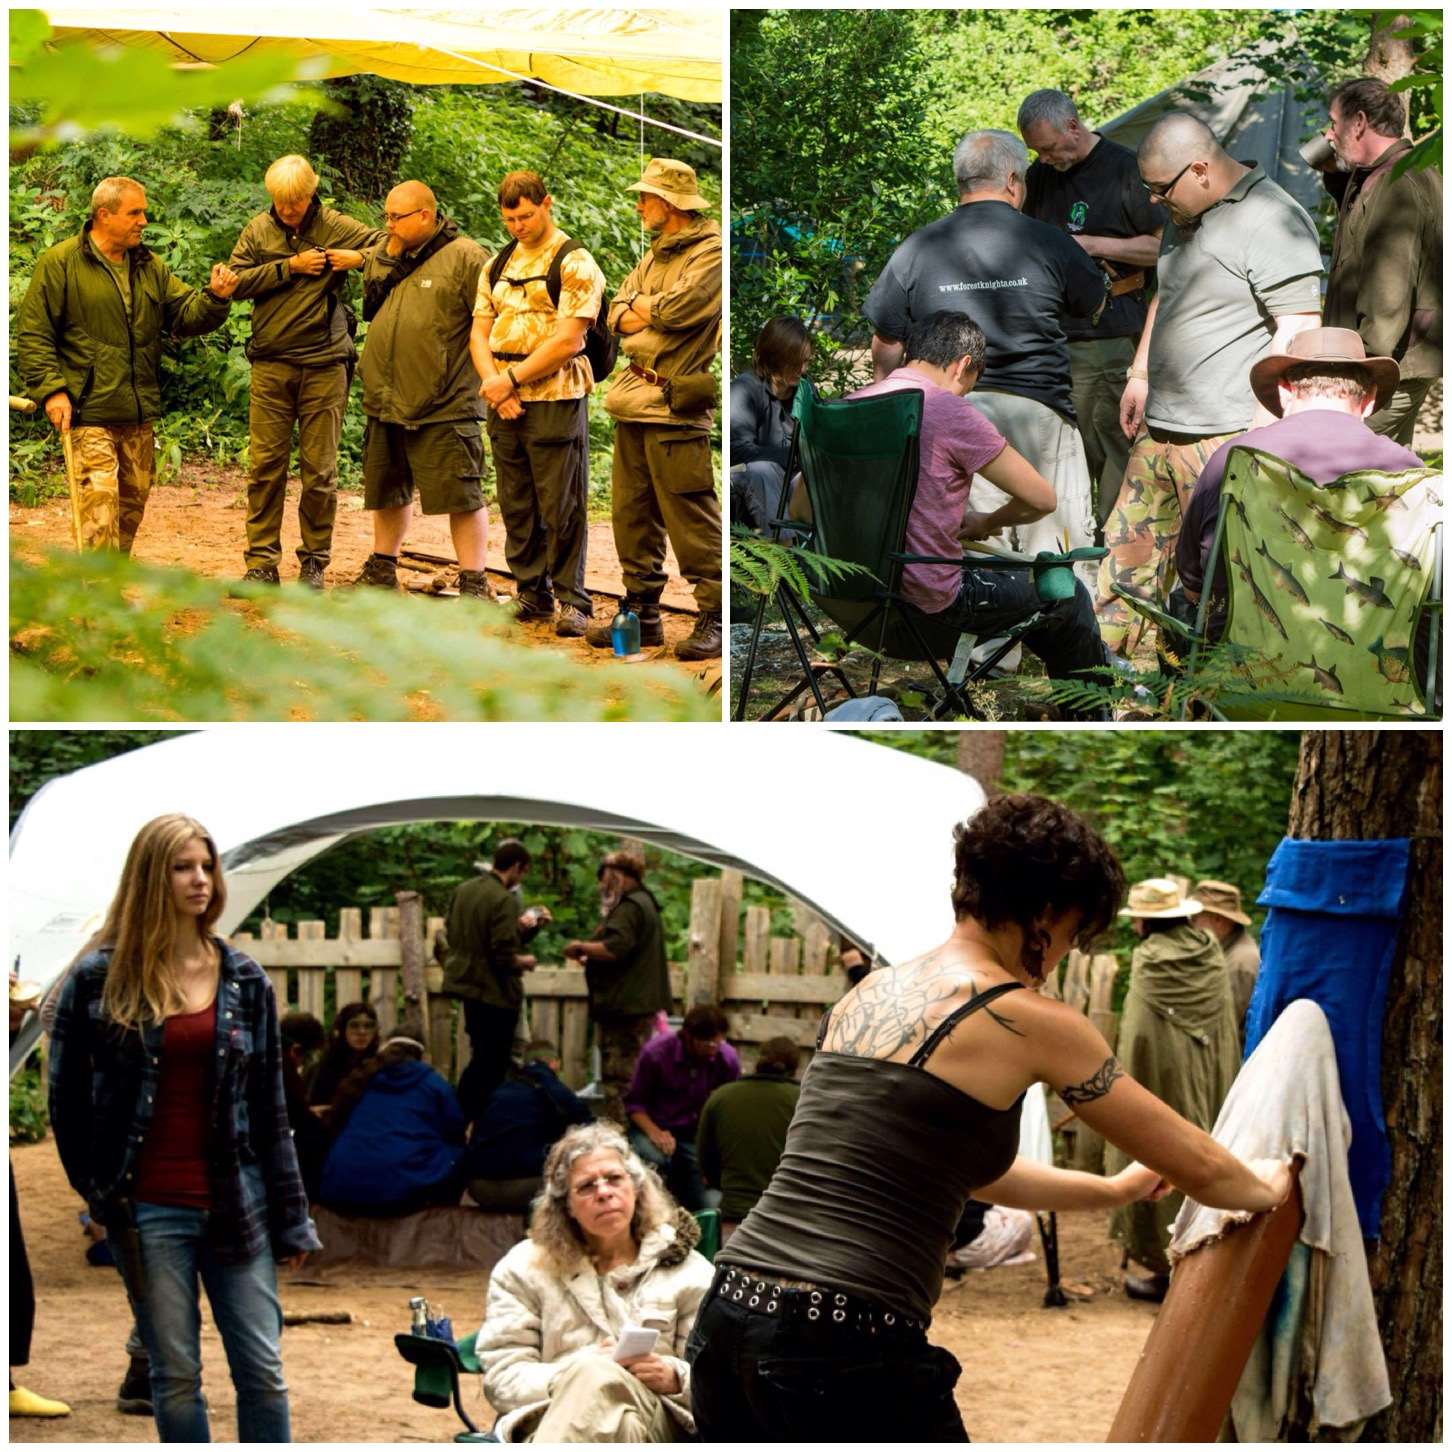
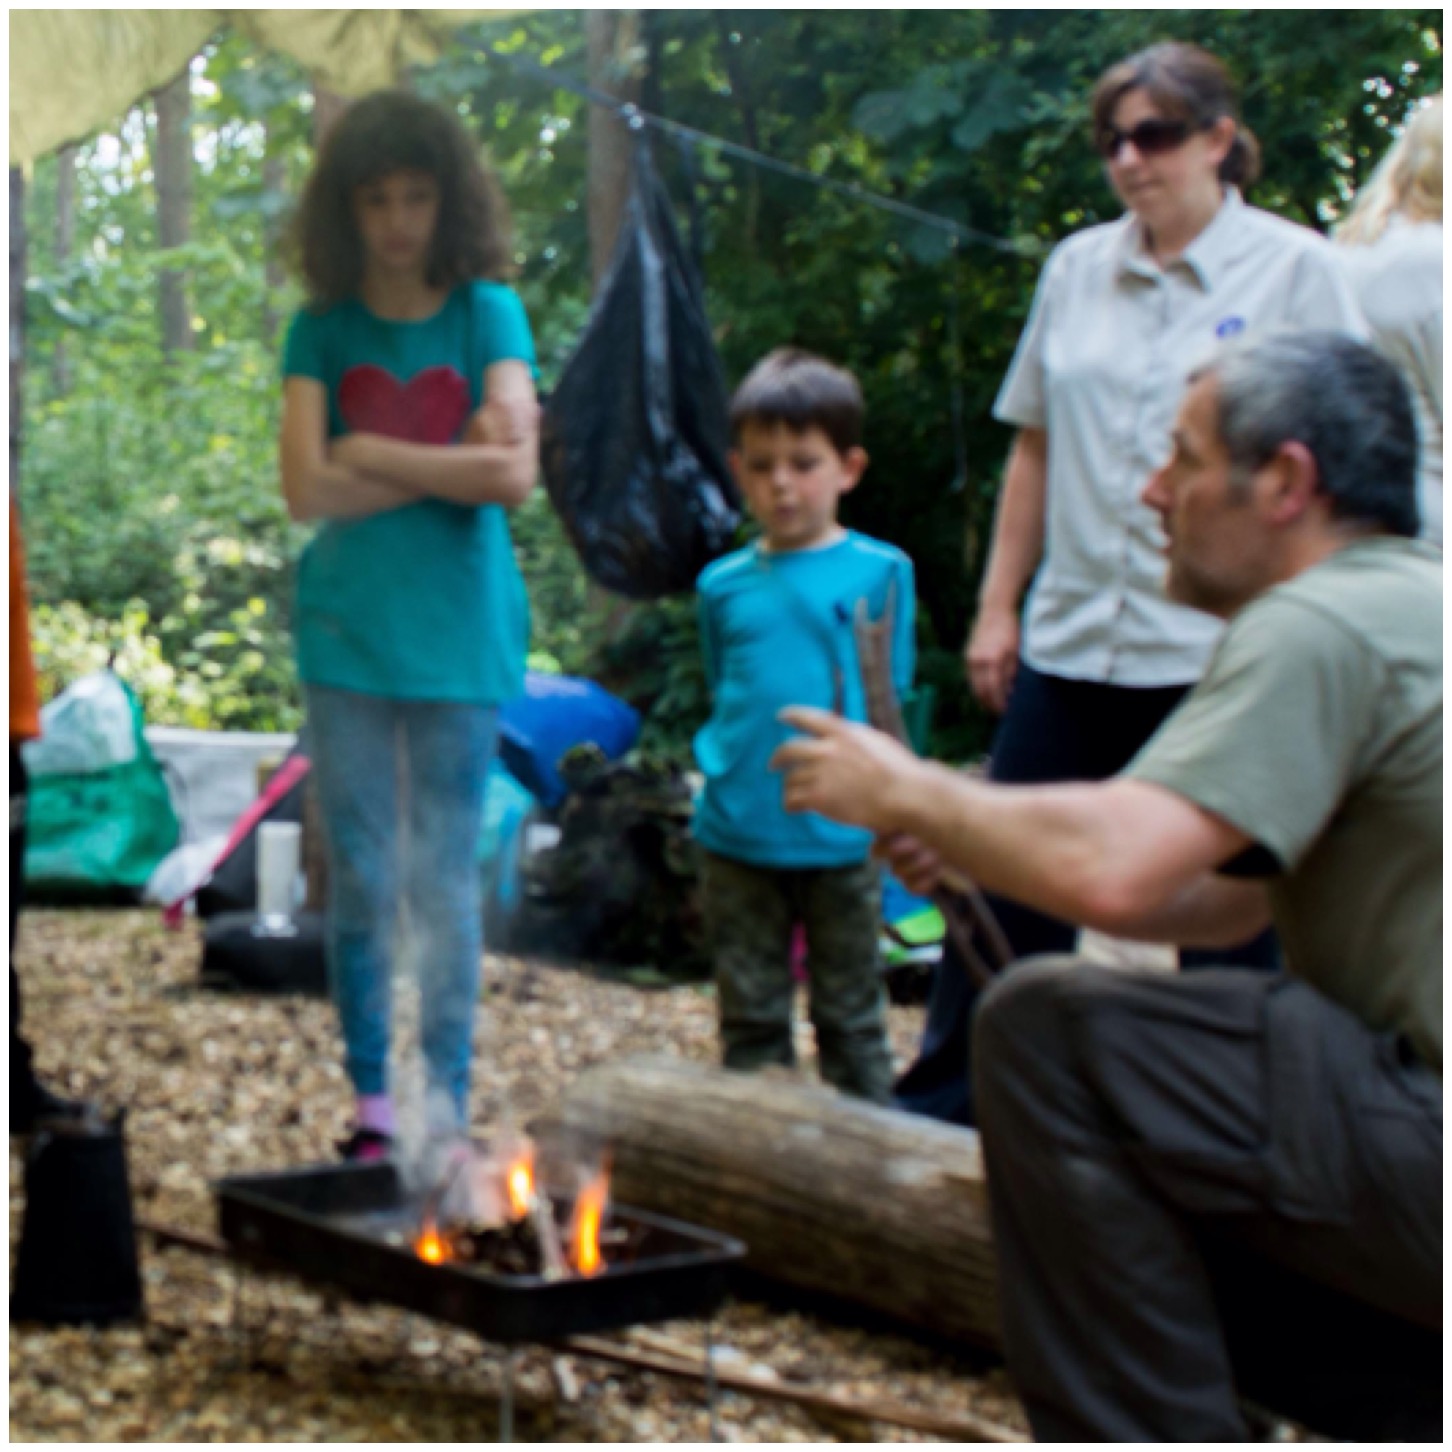
There are workshops specifically for the kids and other workshops where they learn alongside adults. Kids are encouraged to attend the Starter Course we run for anyone new to bushcraft or looking to work on their basic skills.
These basic skills include learning about knots, fire lighting, carving and safely using a saw (to name just a few). Wherever possible I like to get the kids learning these skills alongside their parents so that they can work together later as a family. Kids under 16 are allowed to use knives and saws however they must be under the supervision of an adult when they are using them or carrying them.
Key skills
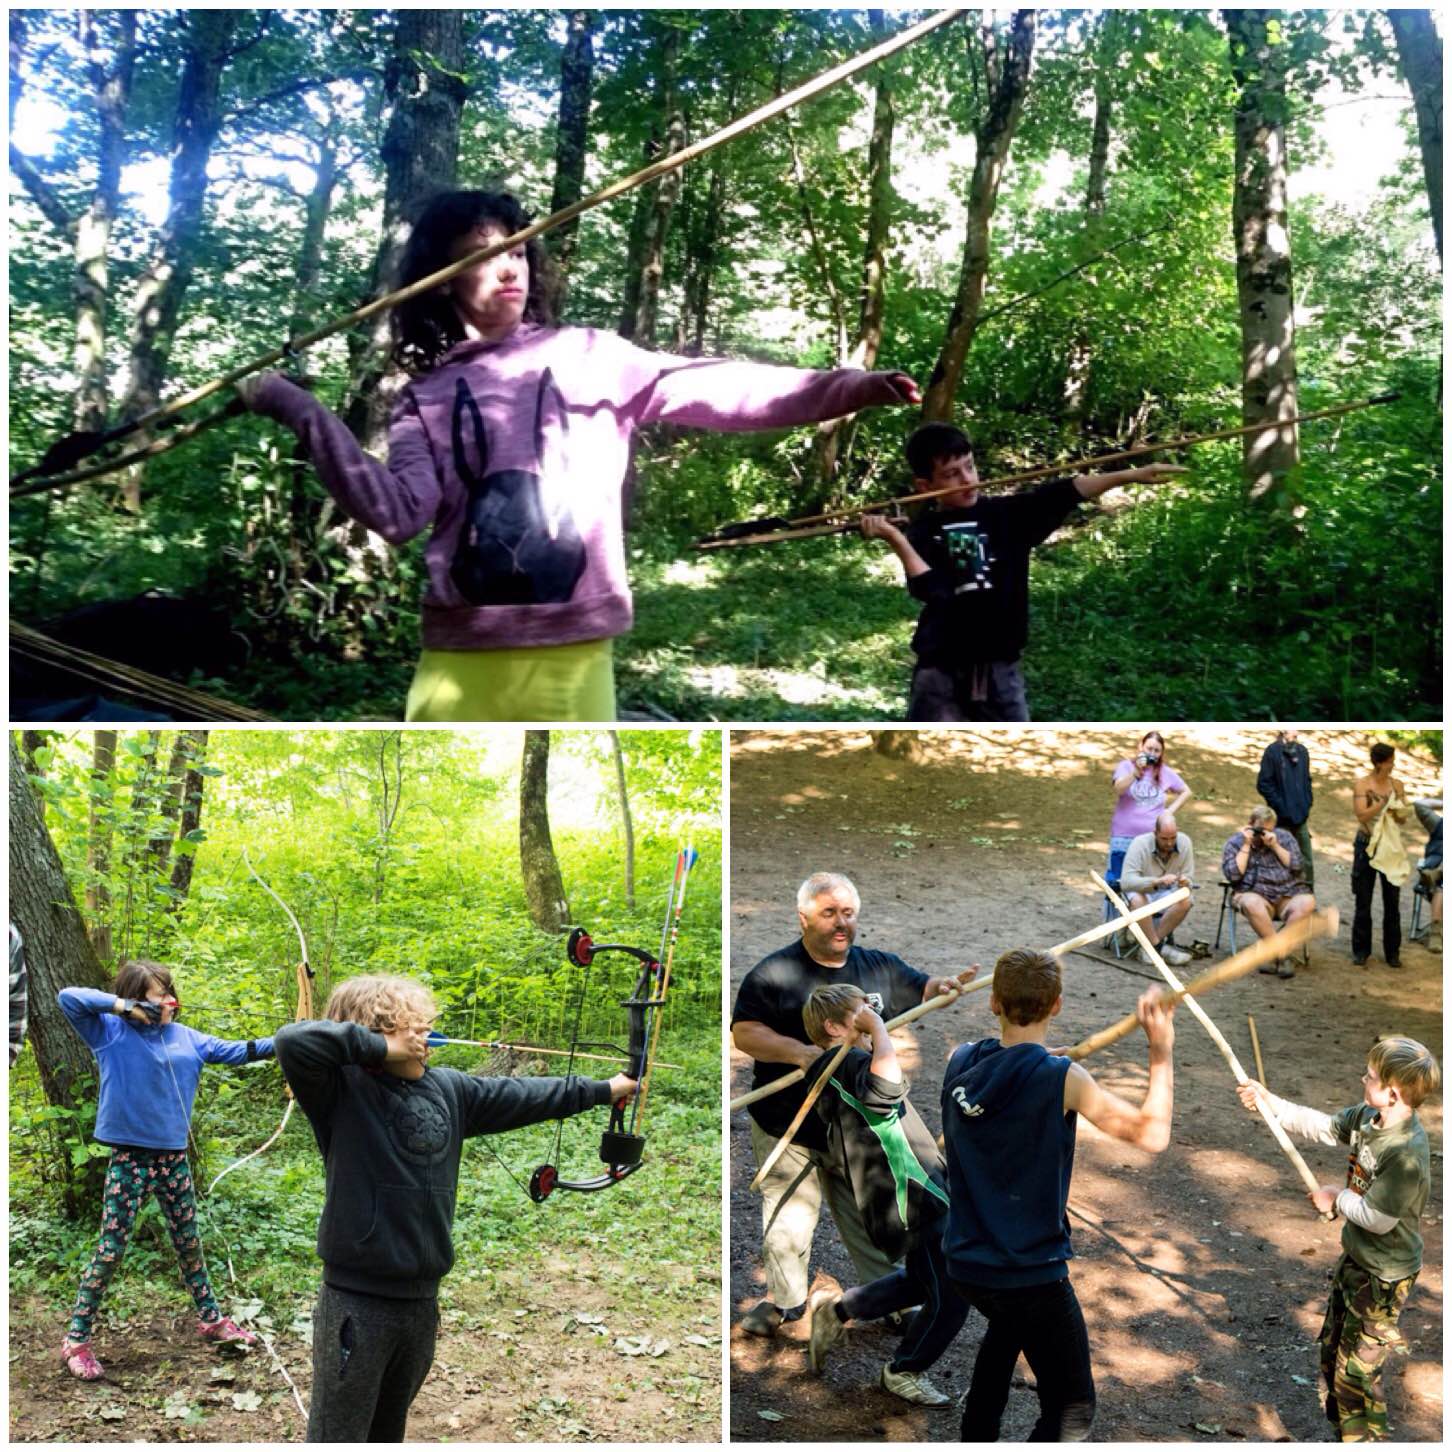
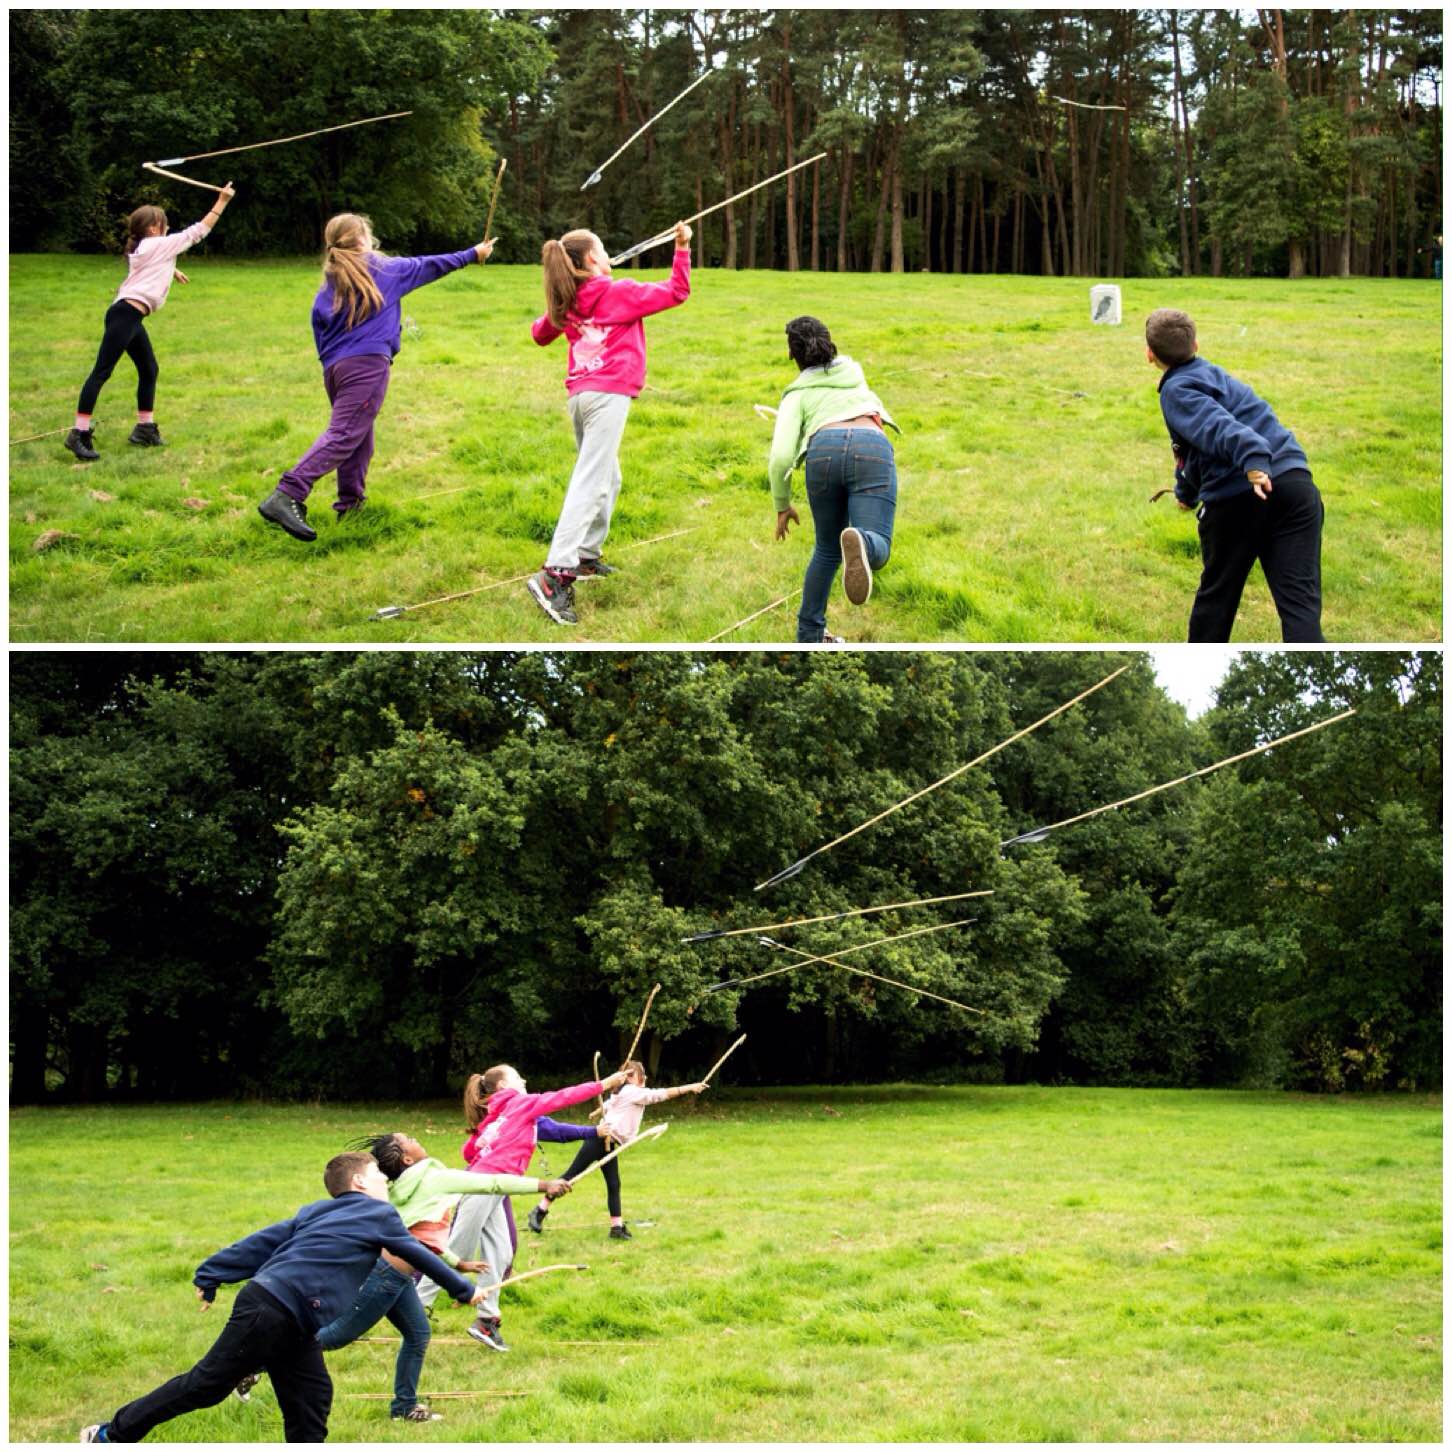
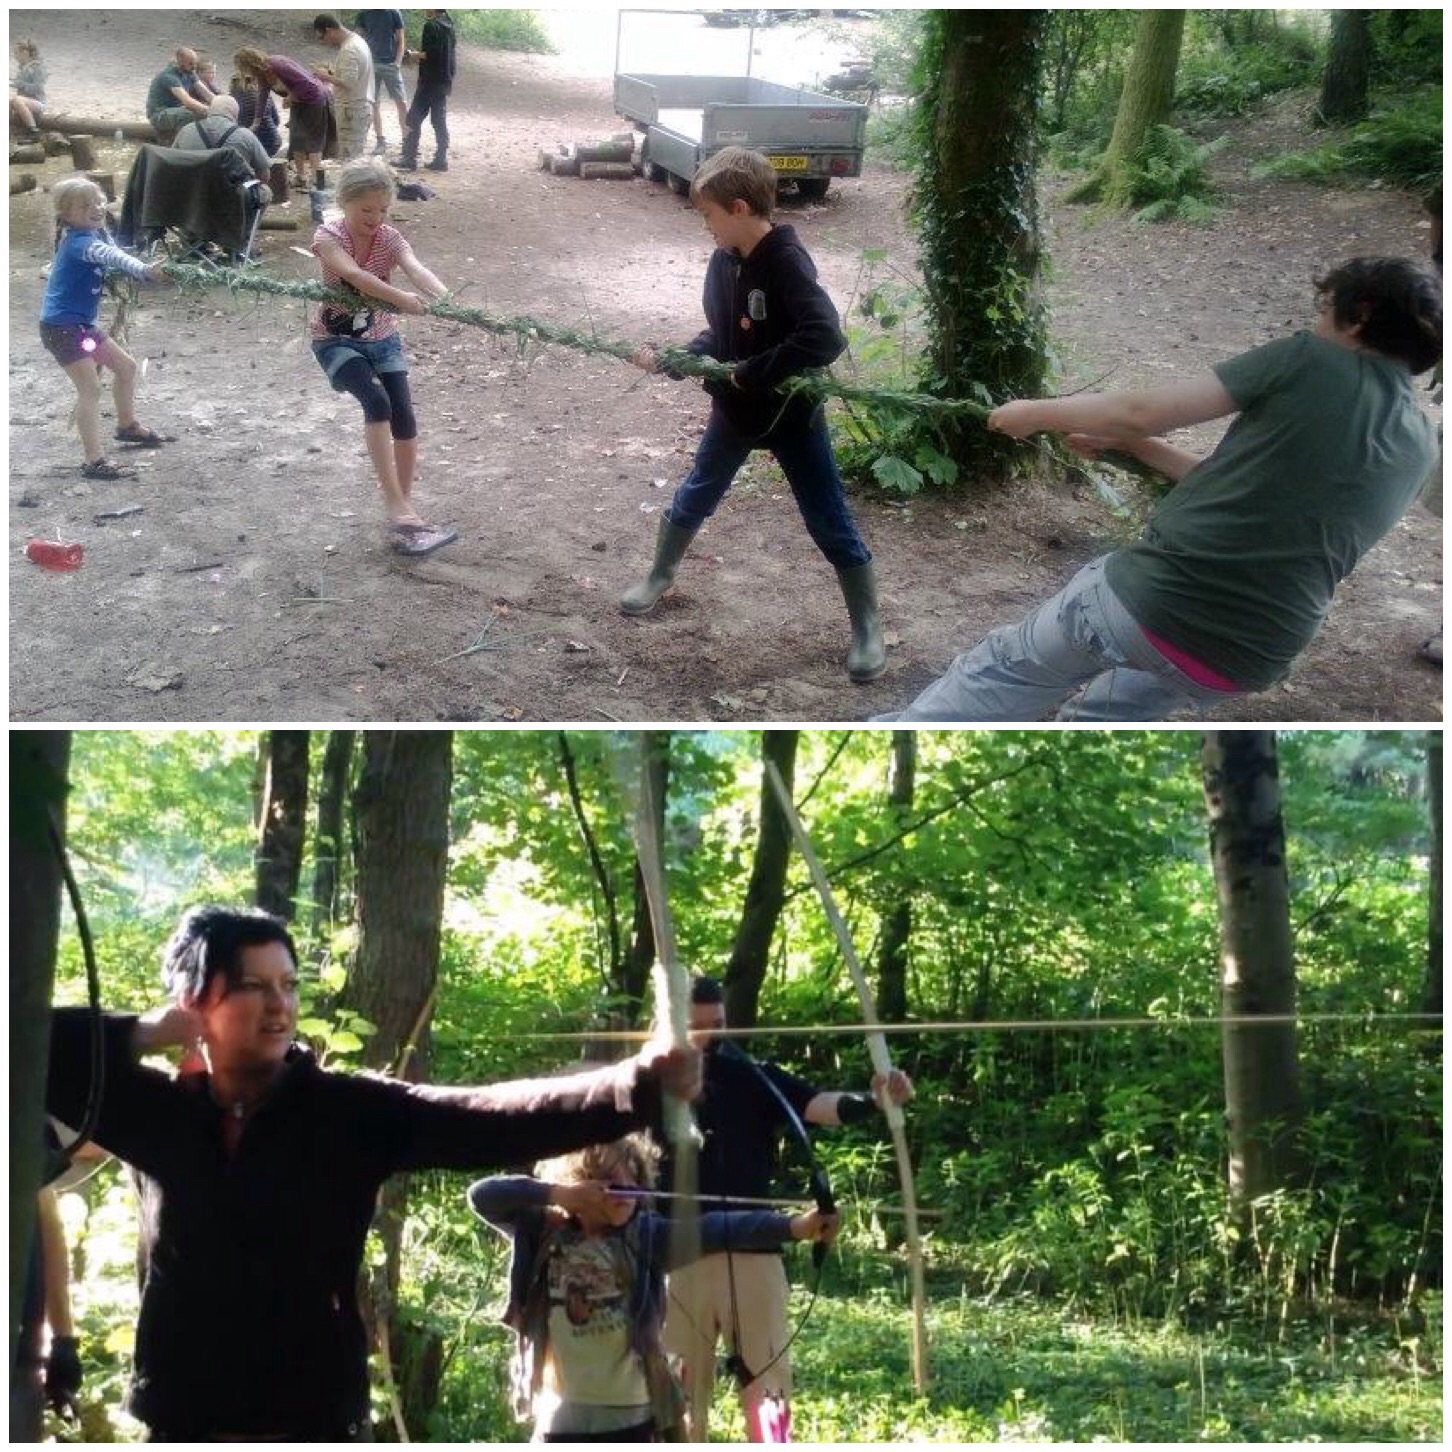
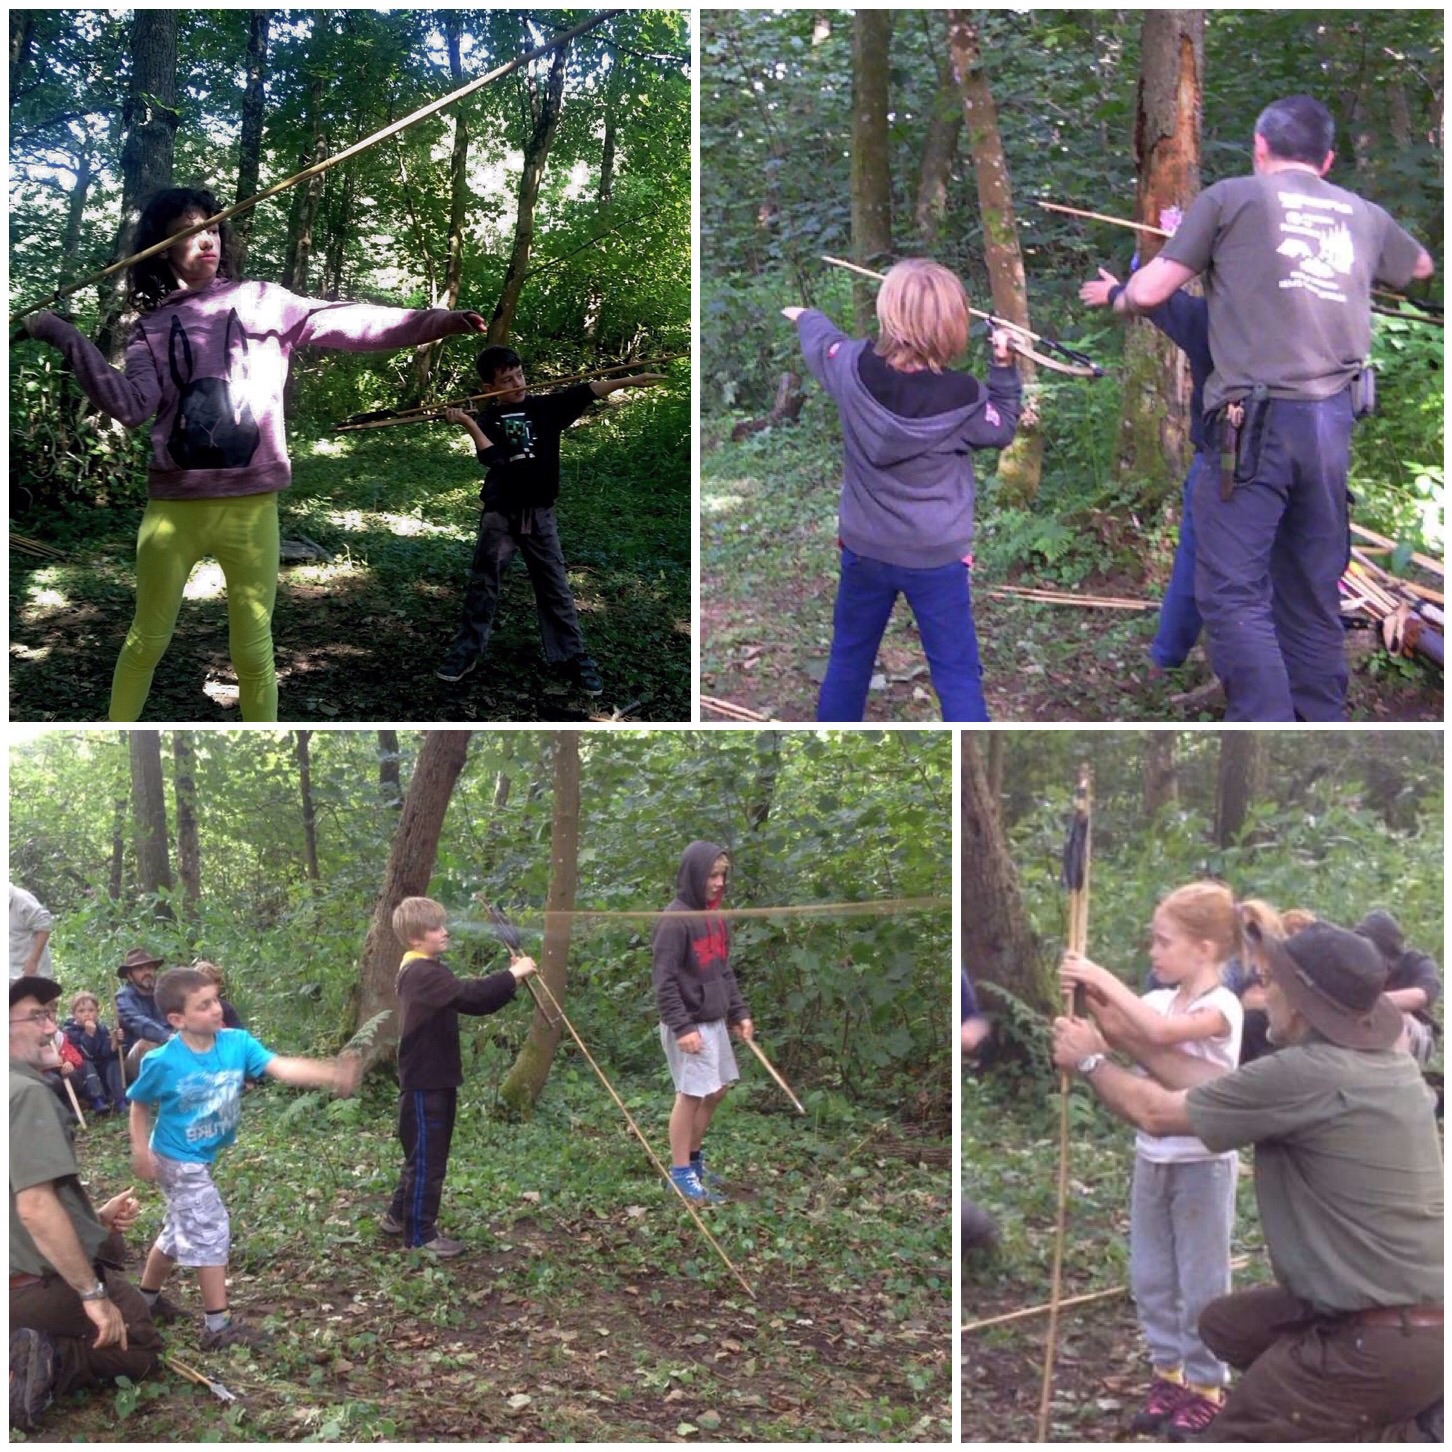
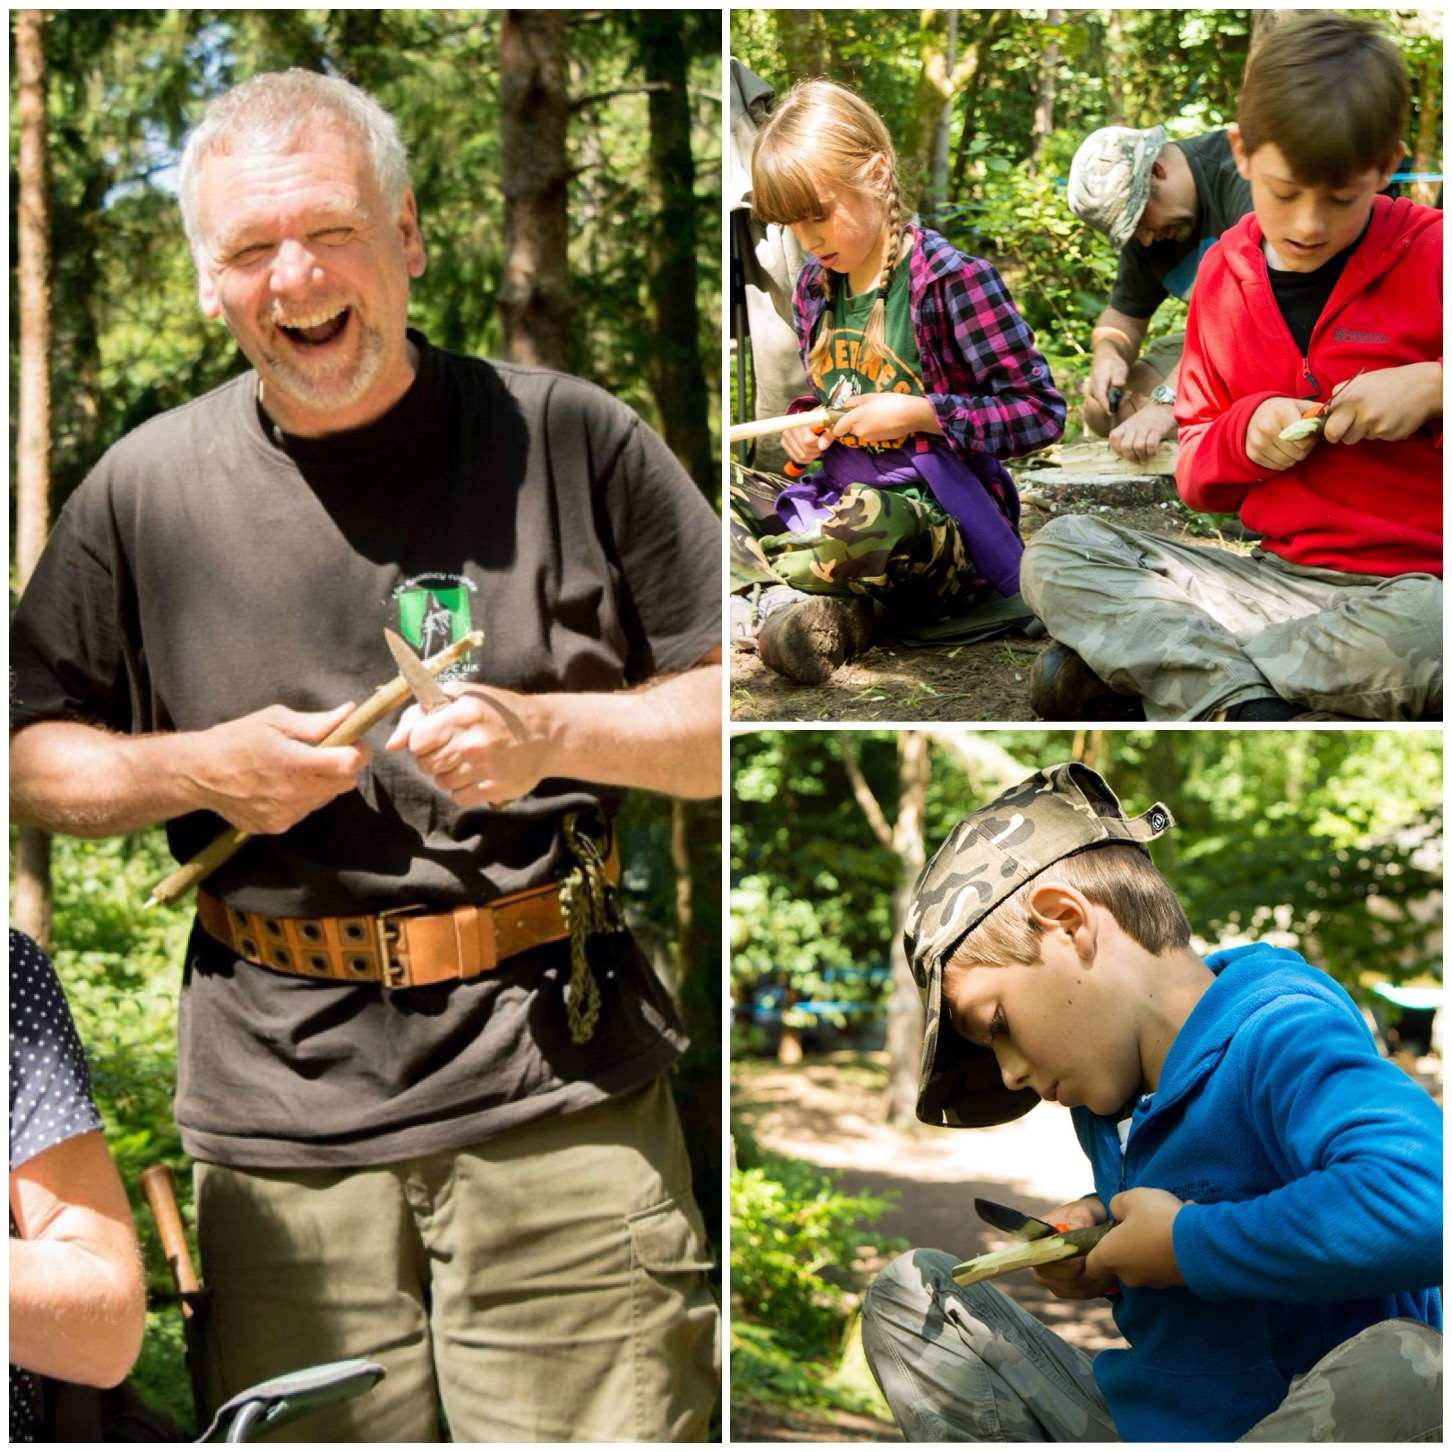
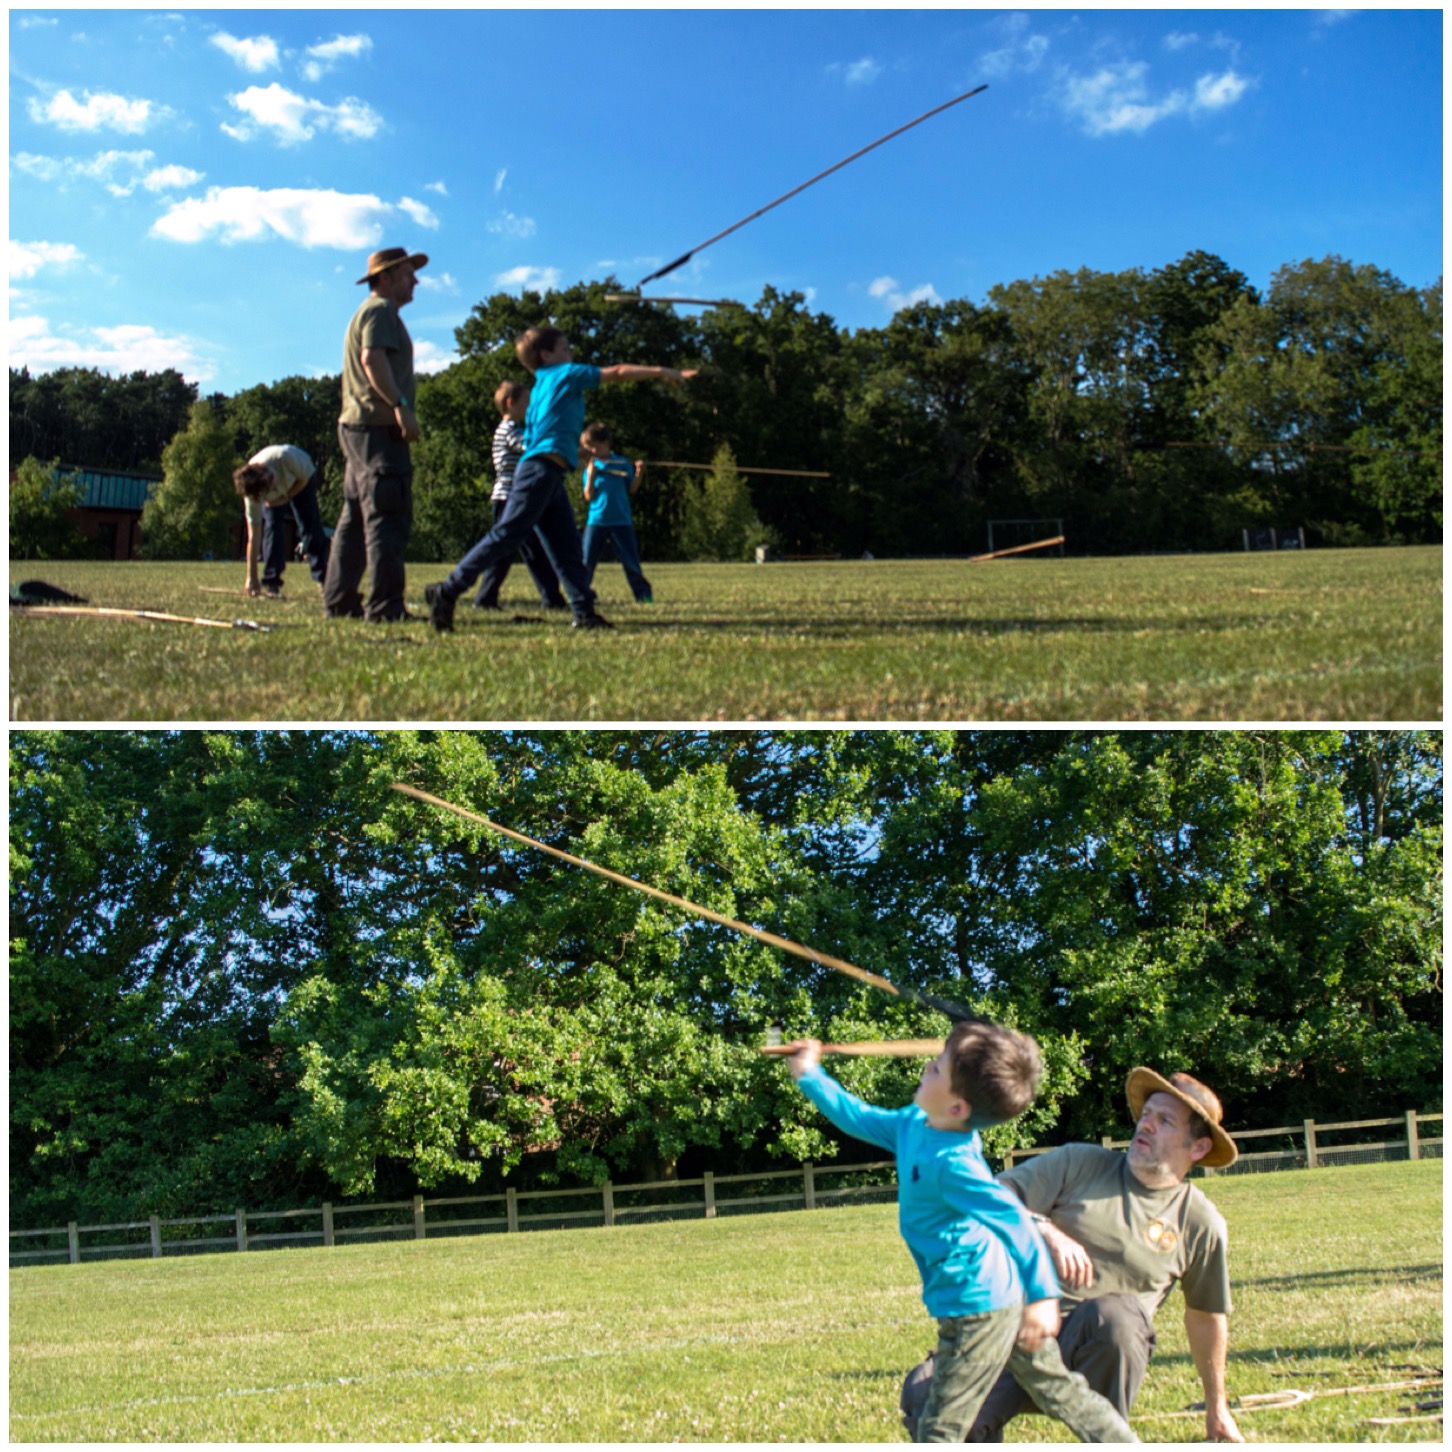
Even in this digital age of the xBox and the Playstation kids are always attracted to sticks, be that the Atlatl, bows or staffs. I like to think that the classes we teach kids bring some of that make believe digital world to life without any of the violence or gore. We always teach the kids to treat these tools with respect and only to use them when permitted.
Historical learning
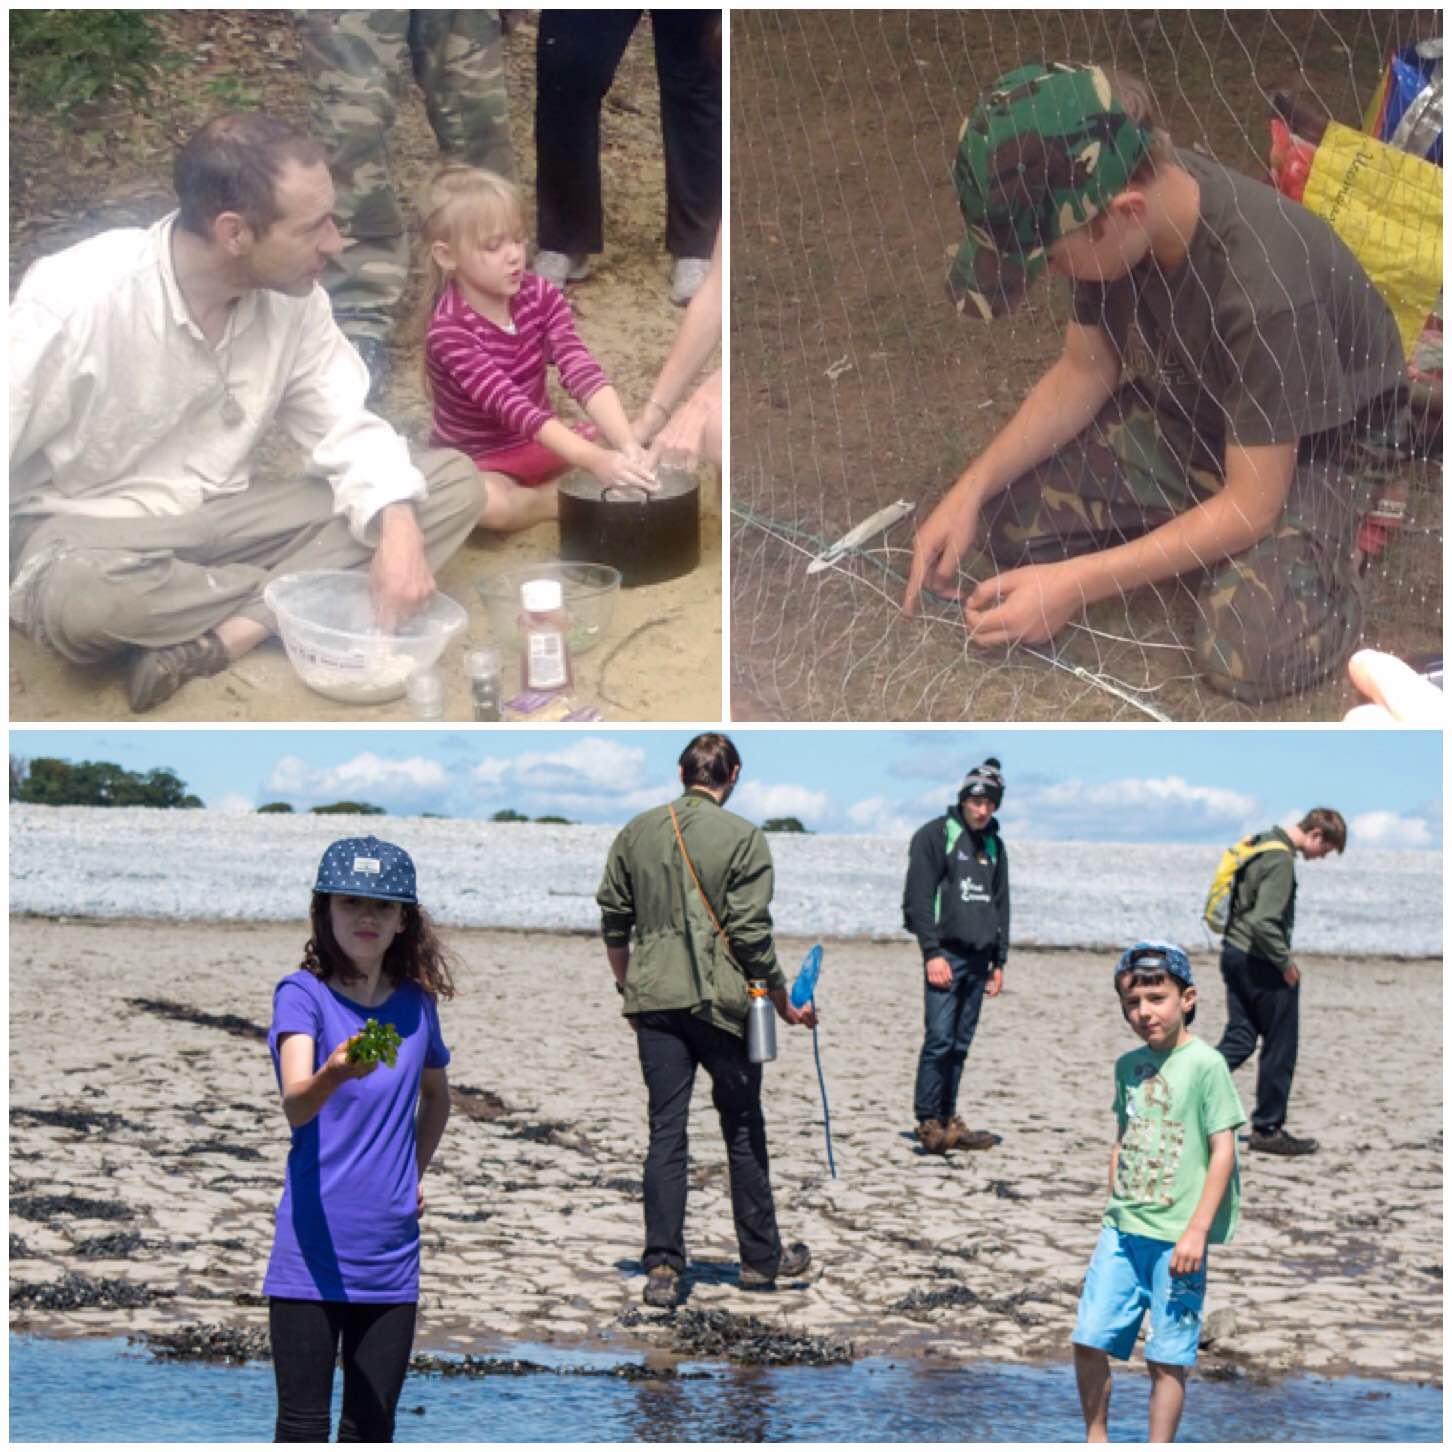
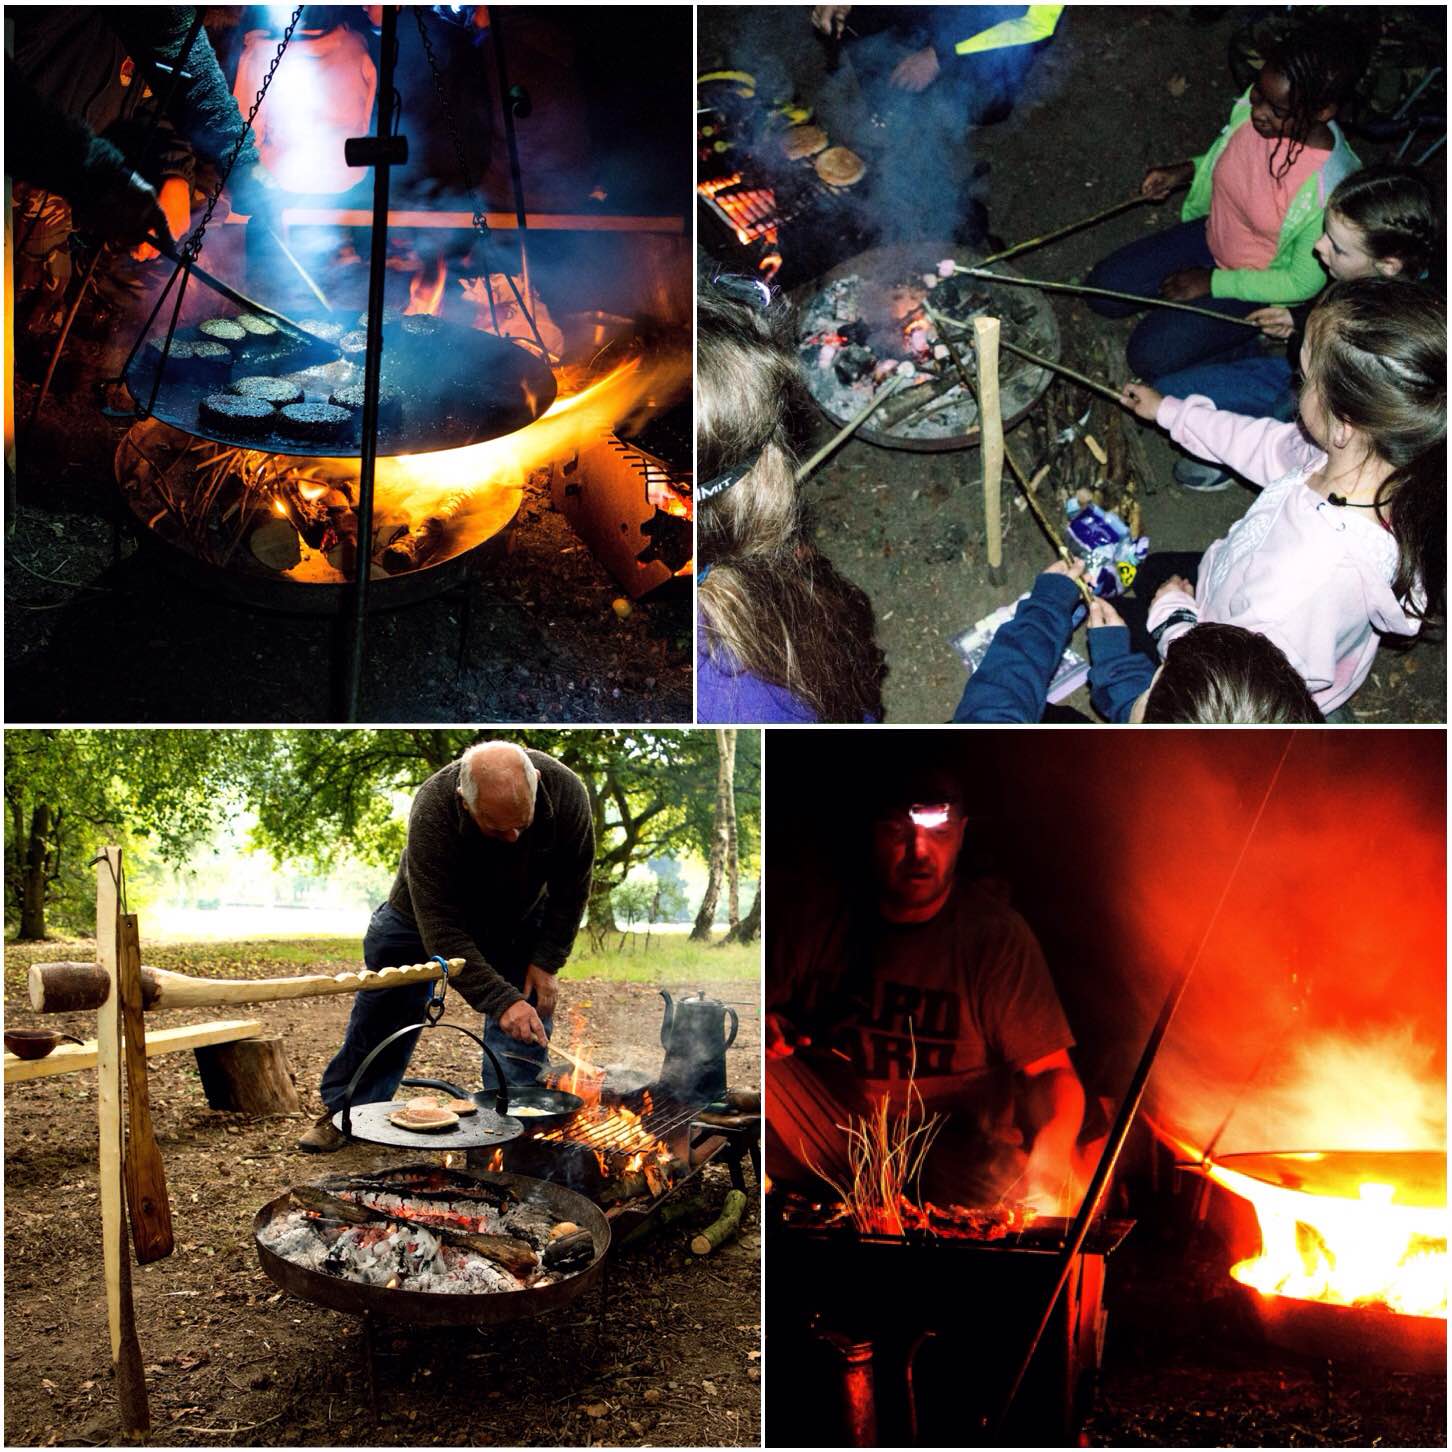
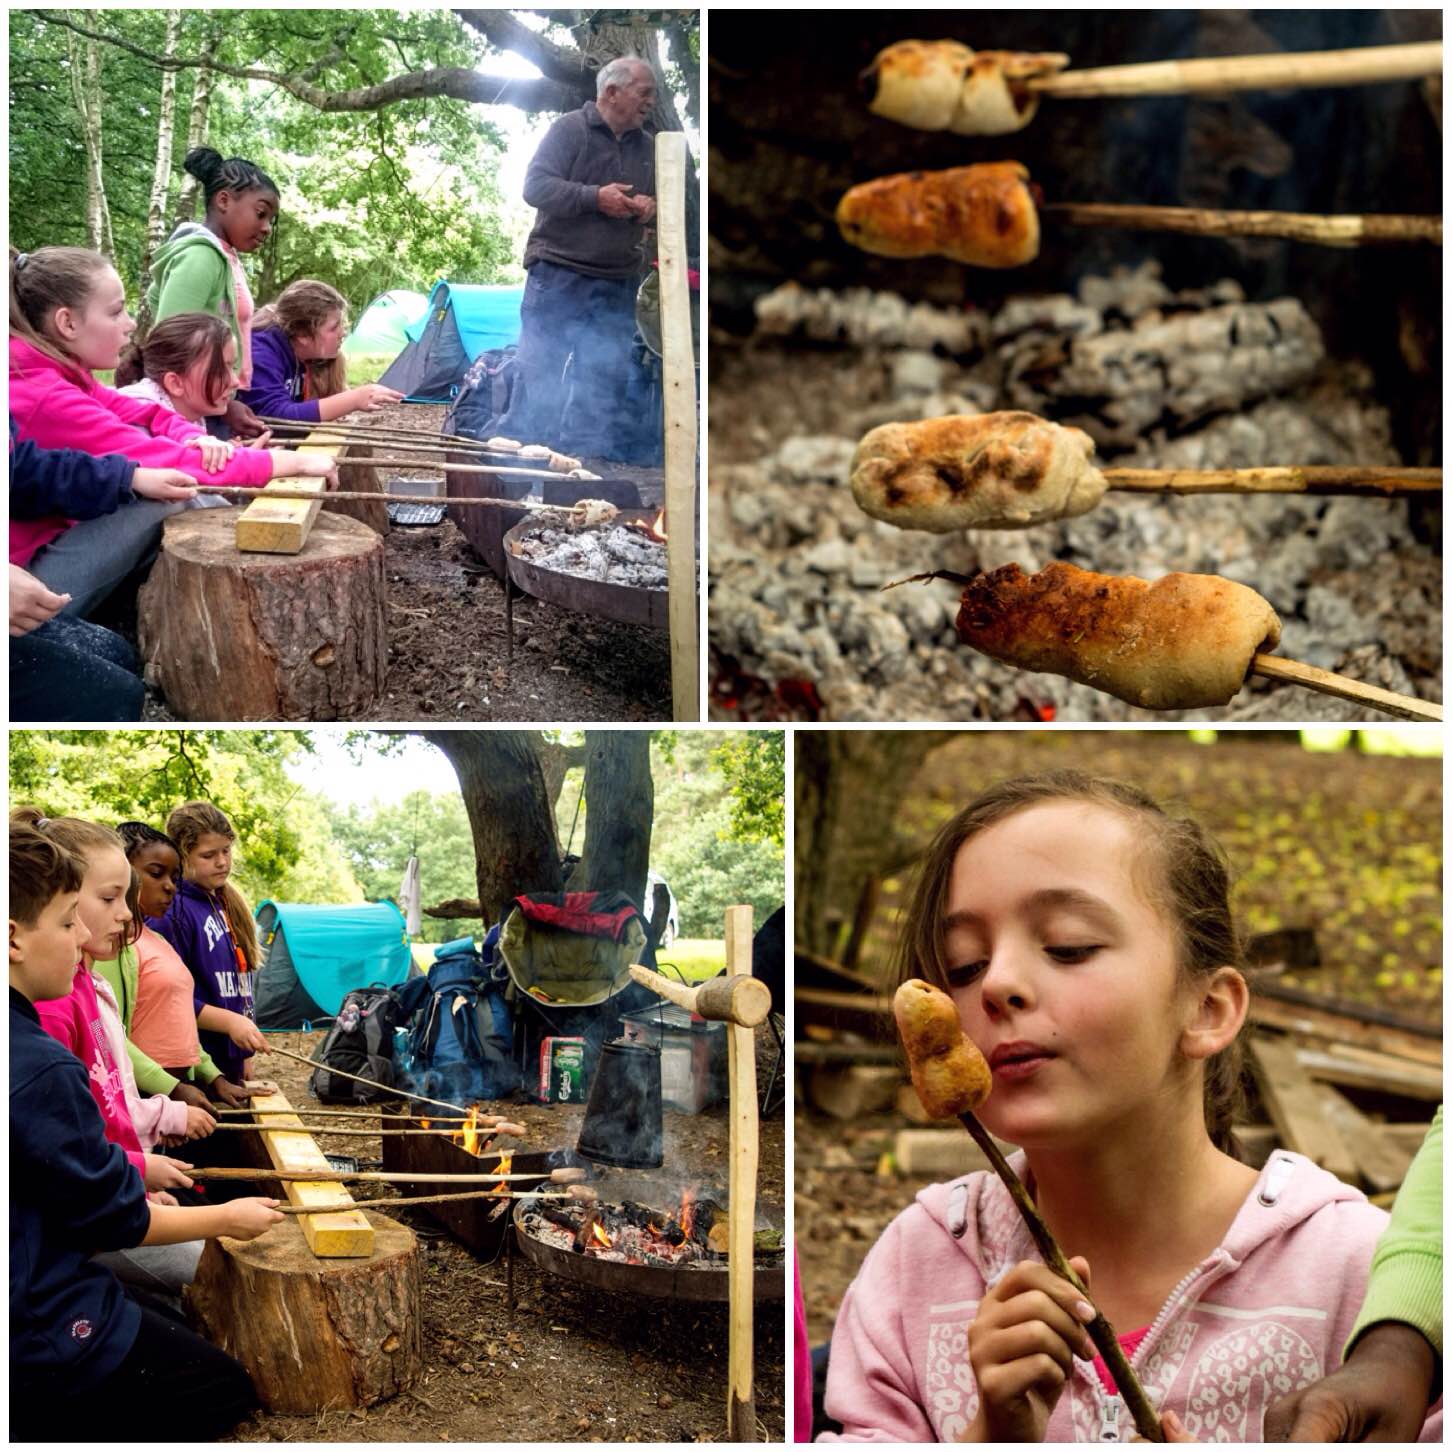
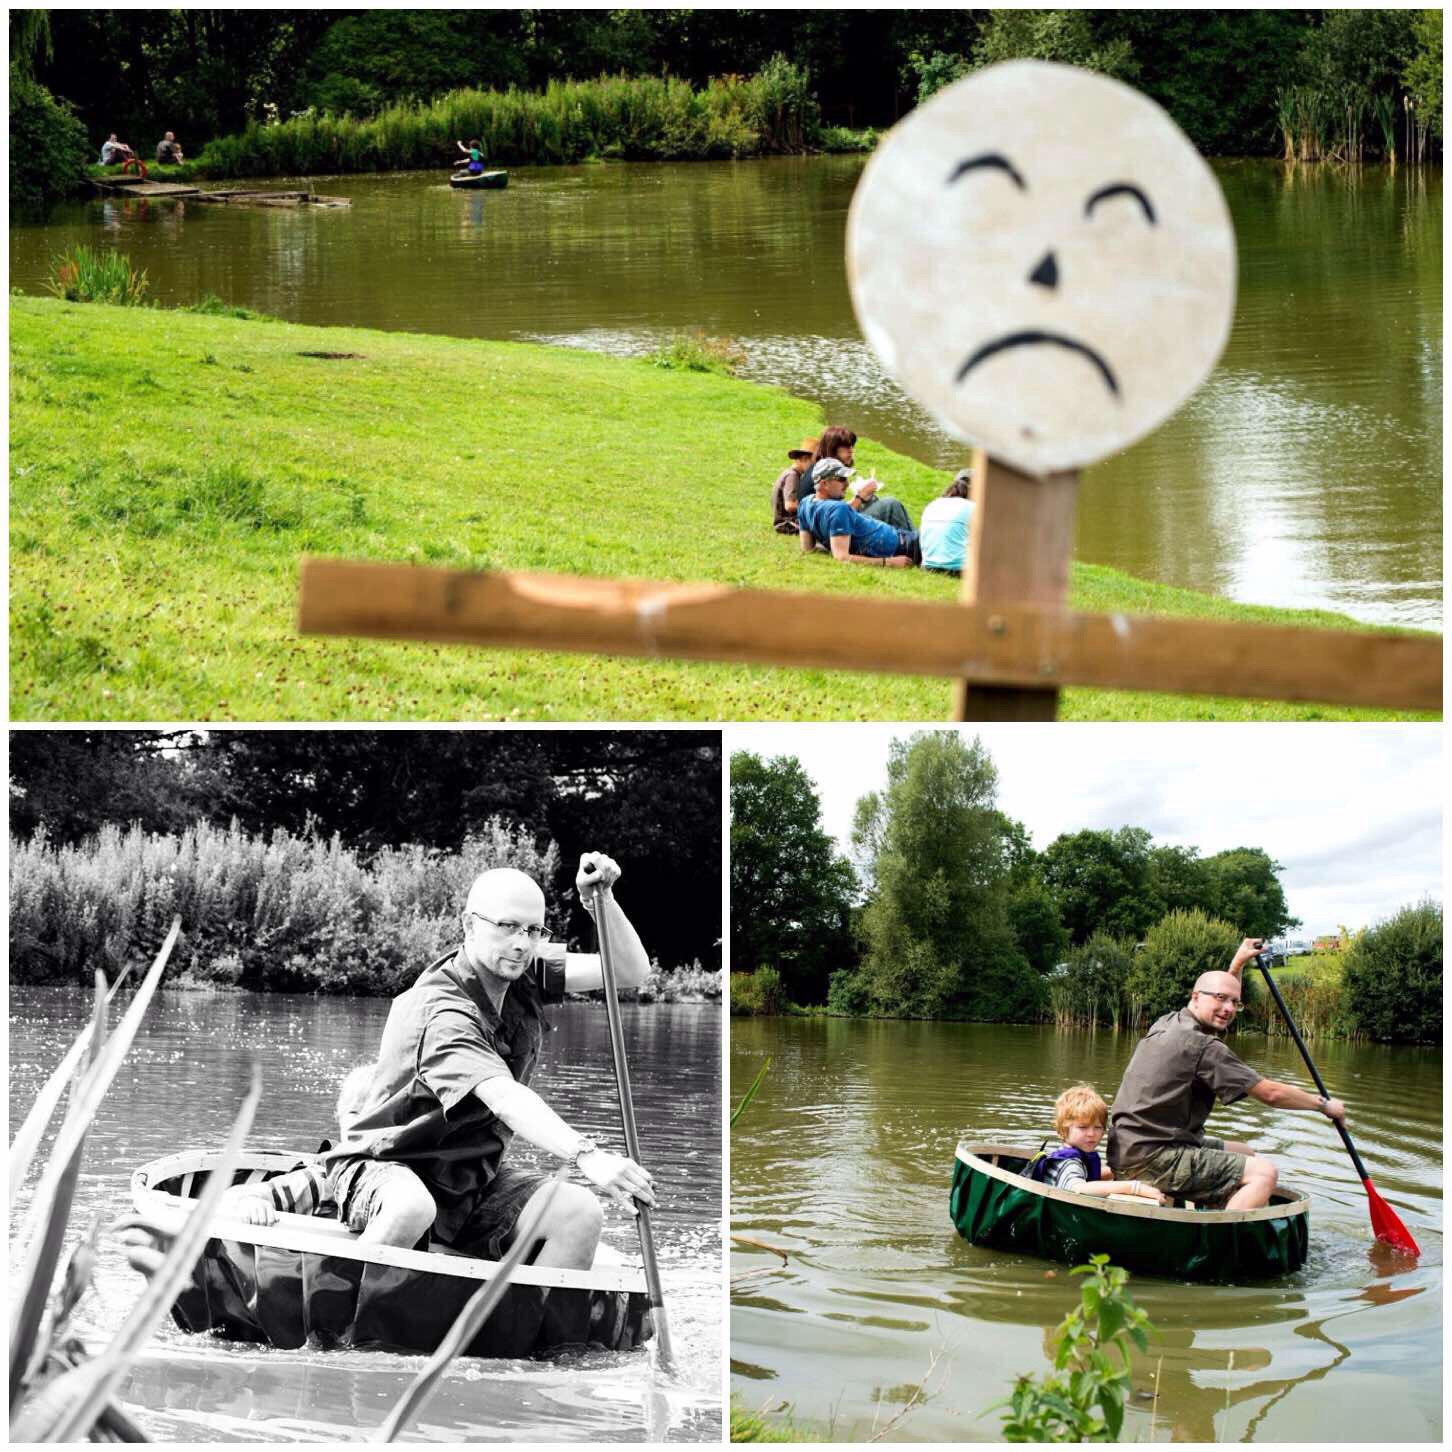
My good friend Fraser Christian of Coastal Survival has been coming to the Moot for a number of years now. Fraser is always keen to teach kids in his classes. Some of his courses include campfire baking, net making, coastal foraging and survival training.
Fun with Fraser
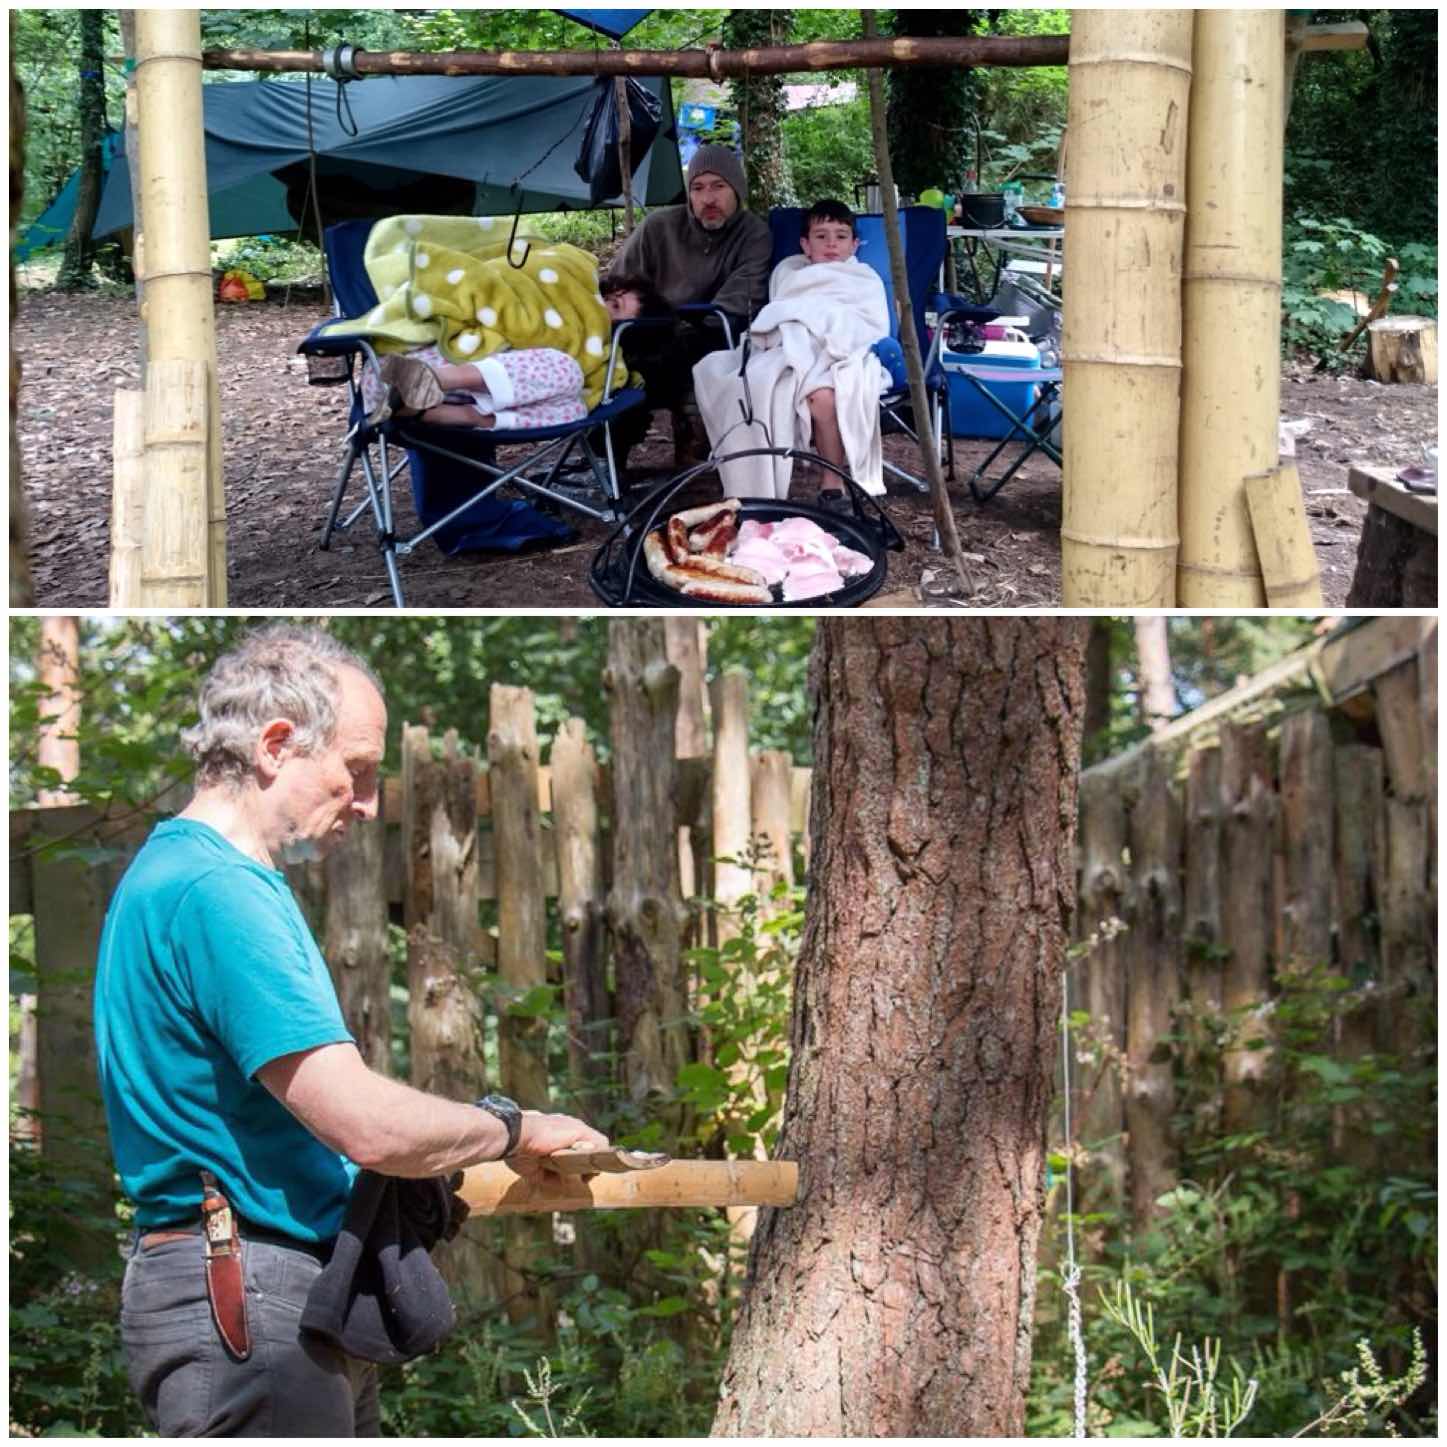
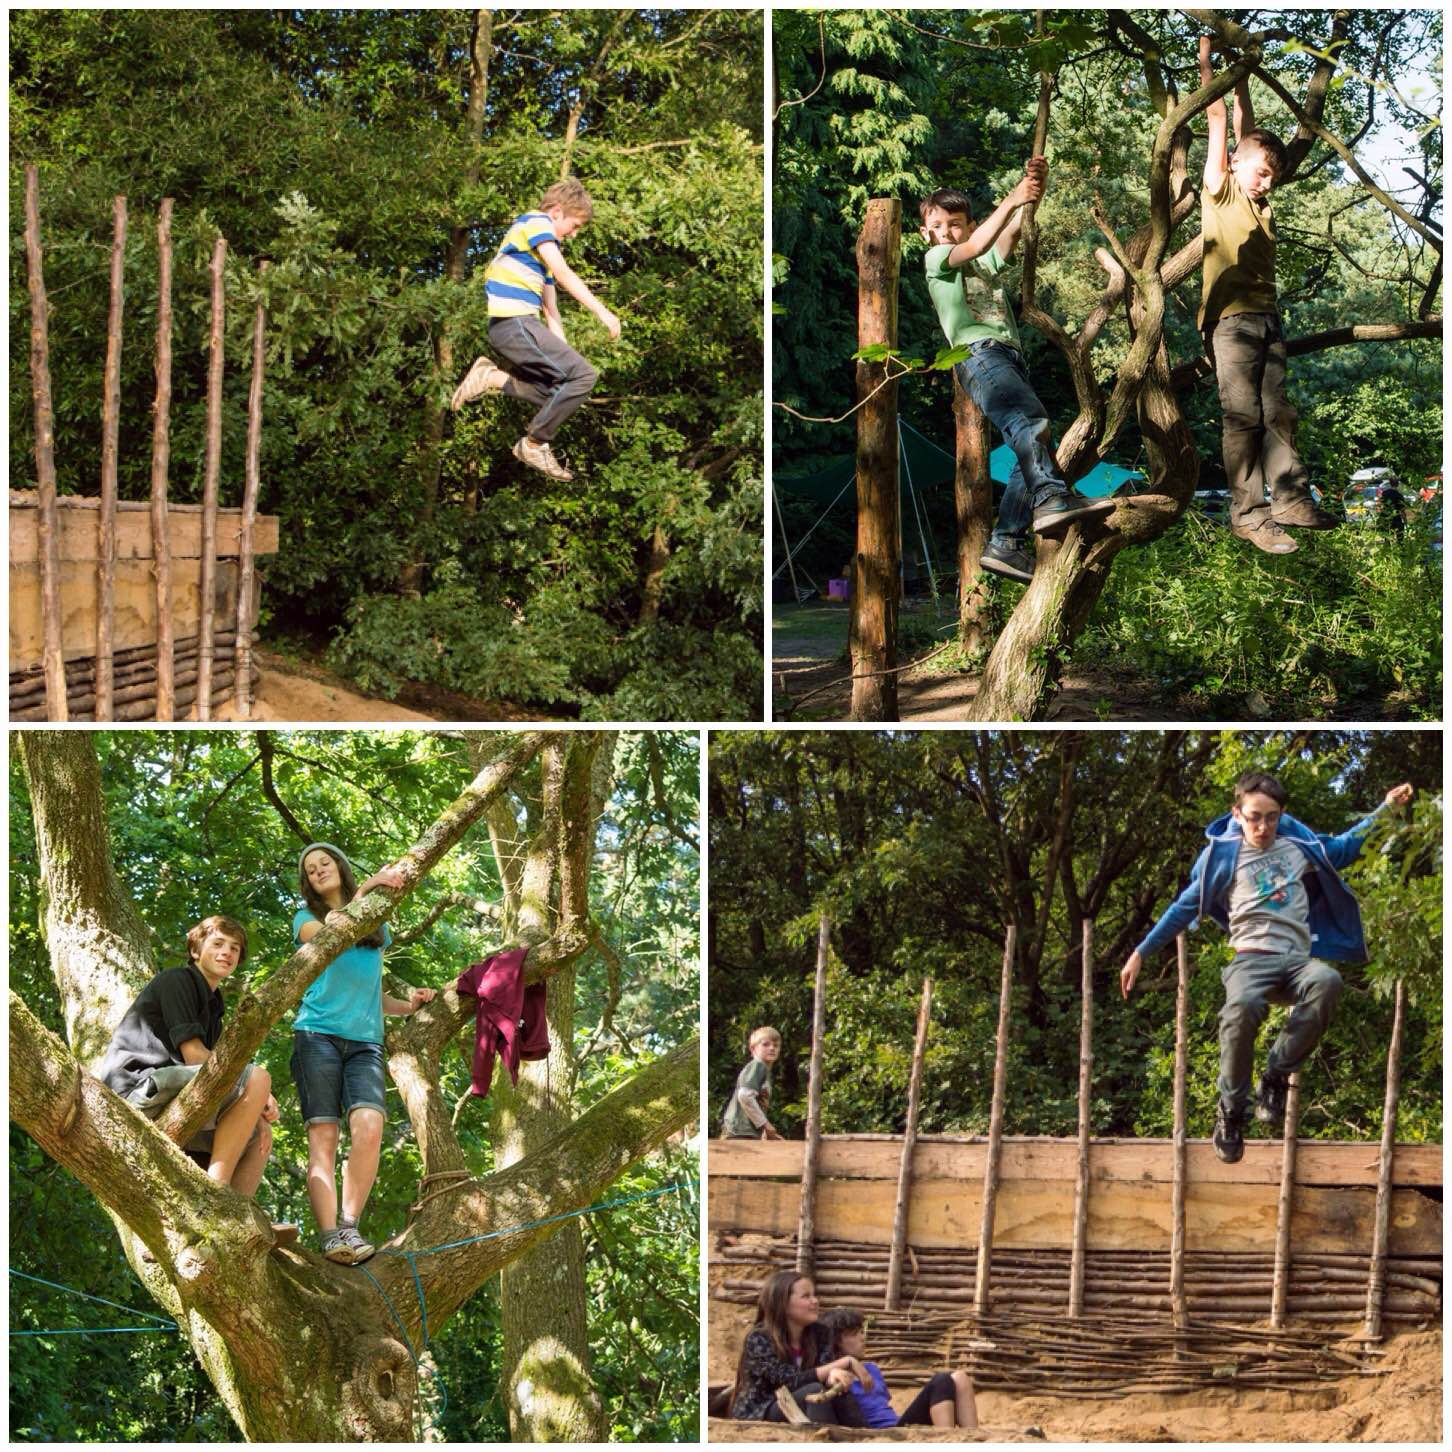
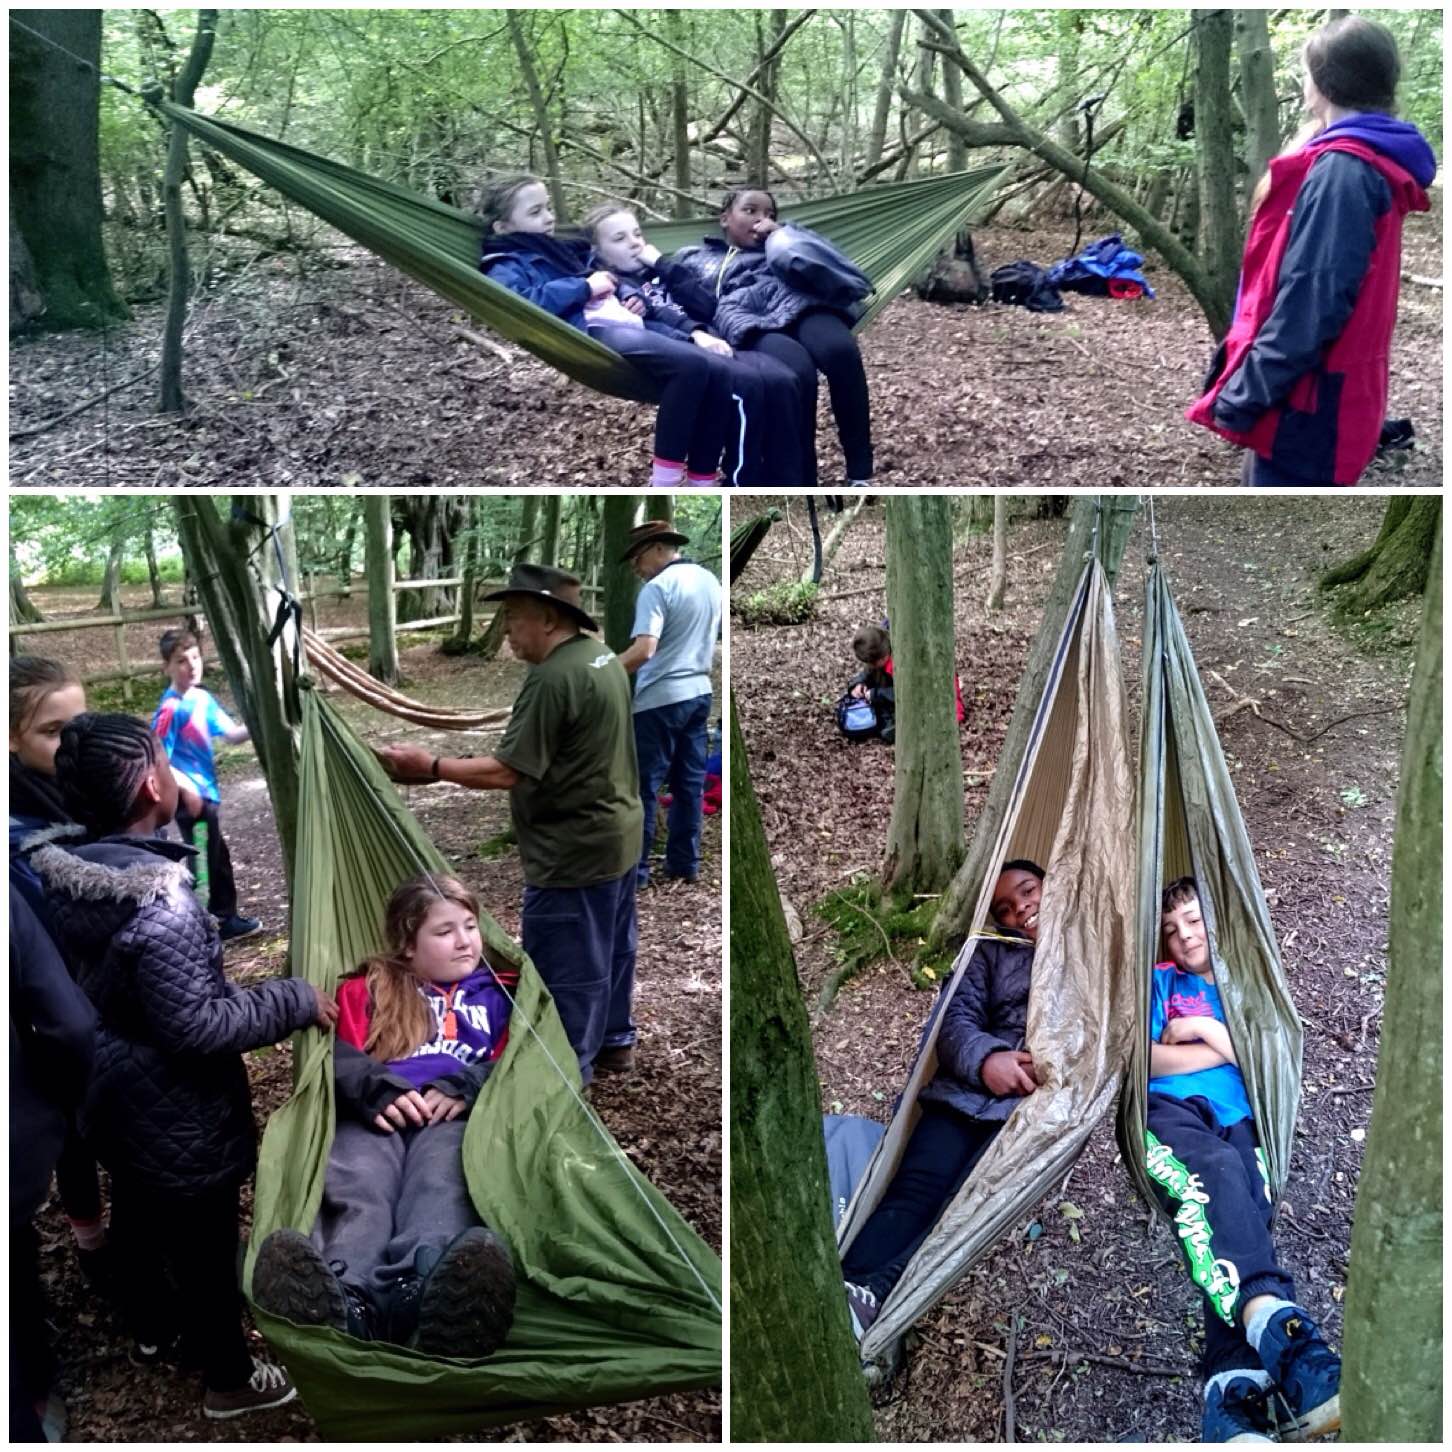
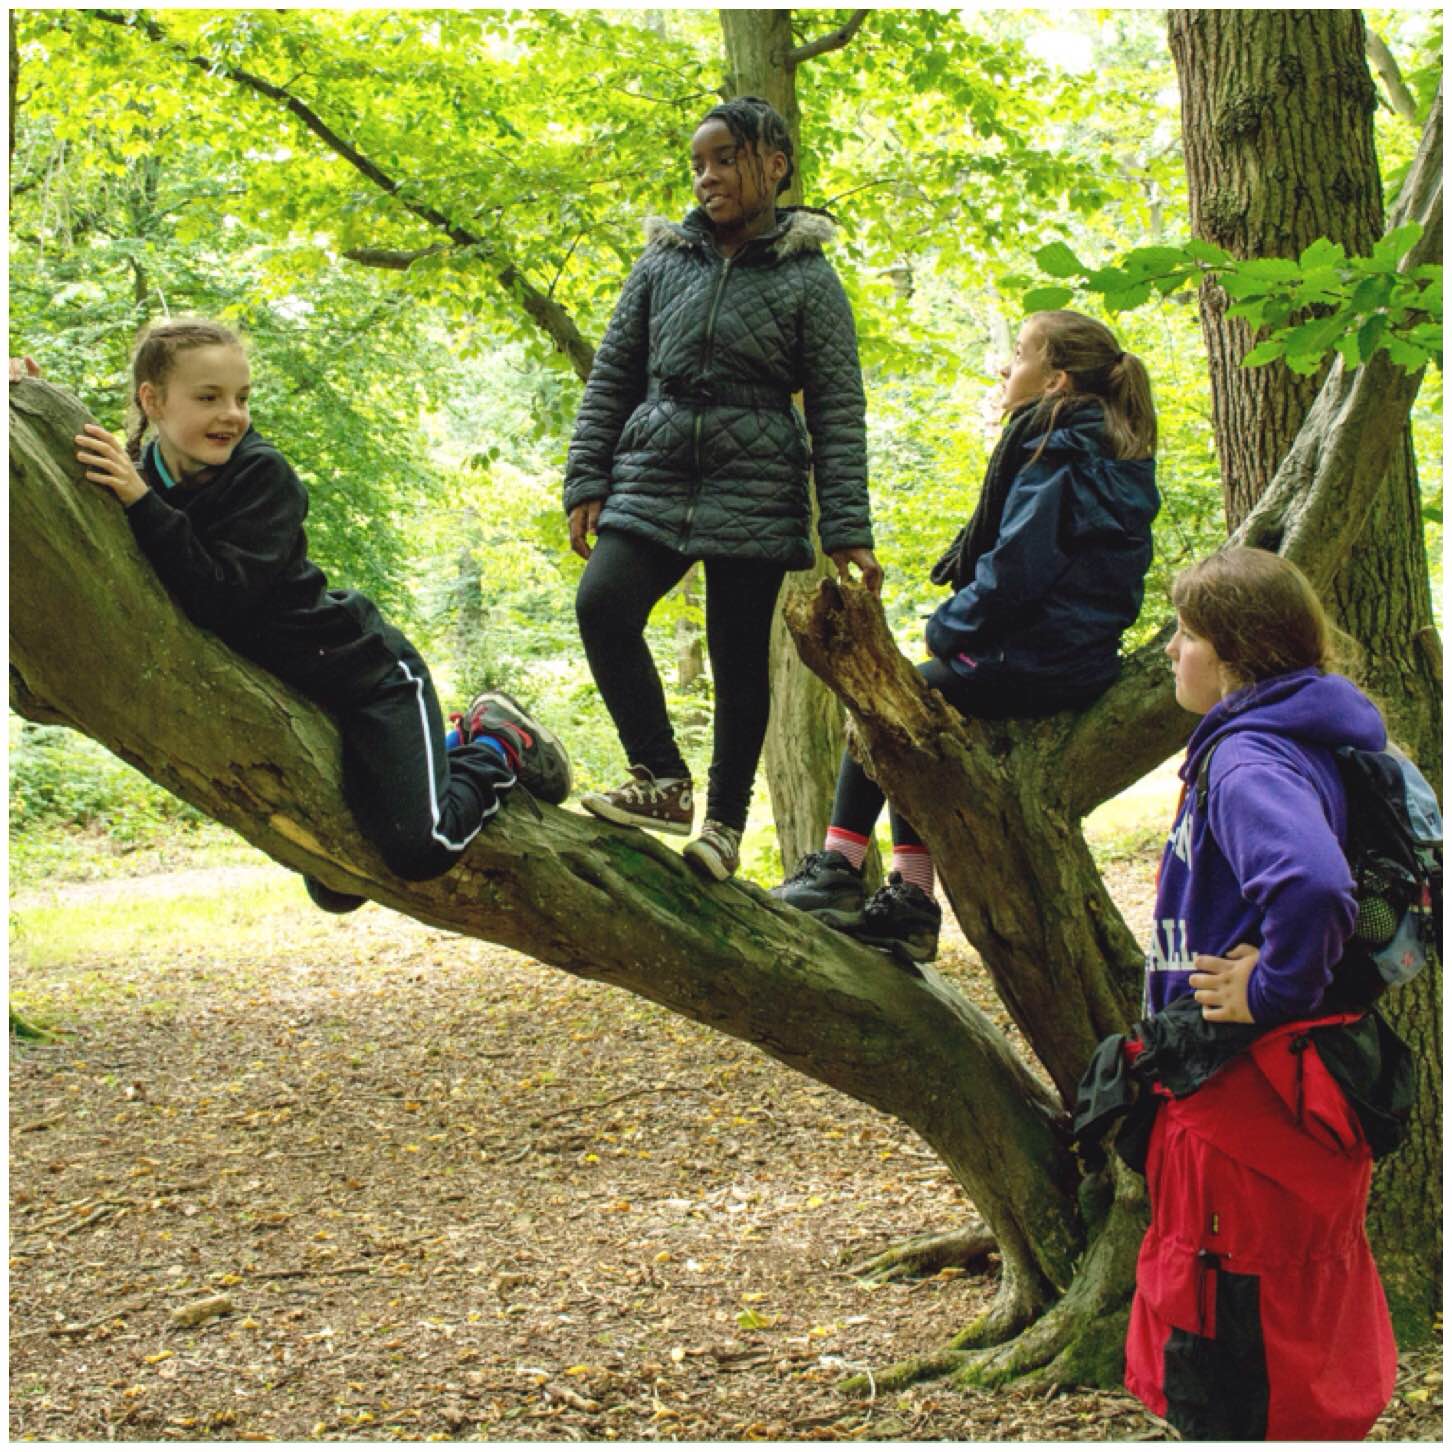
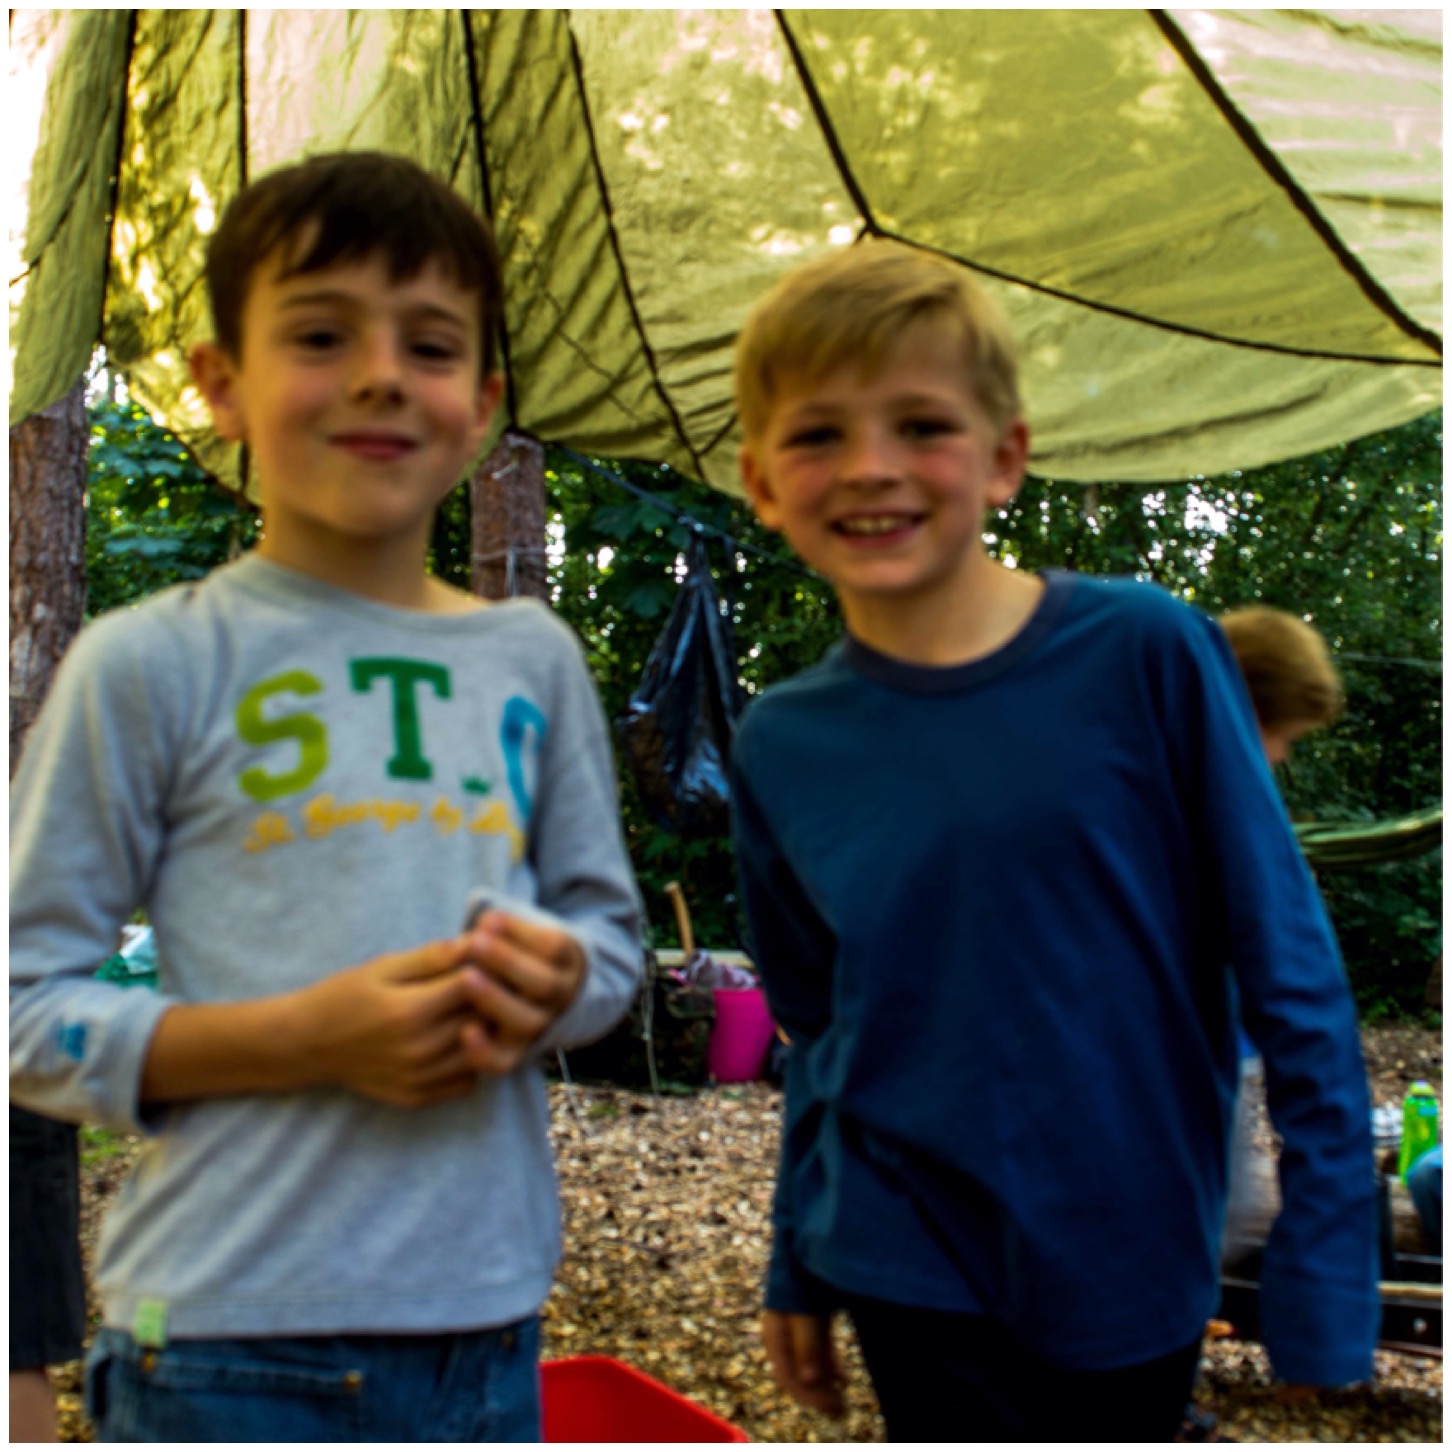
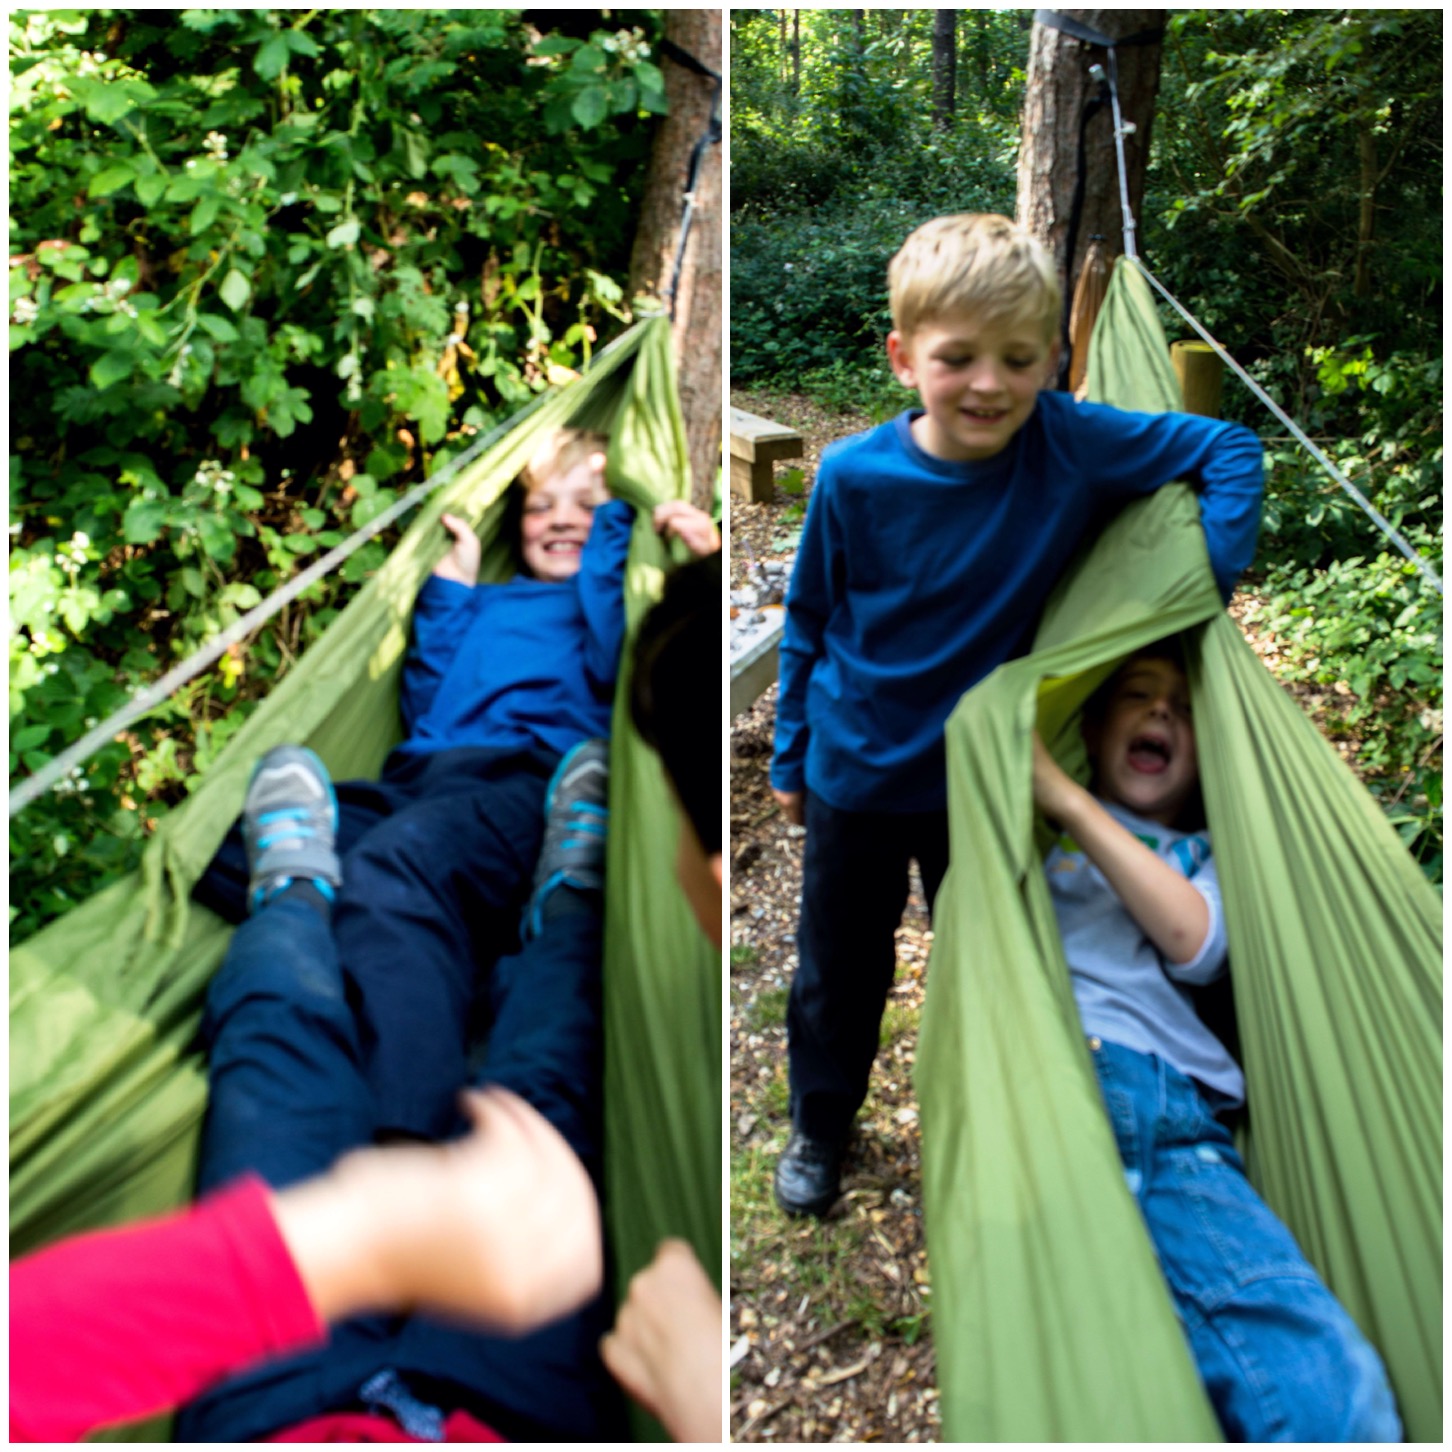
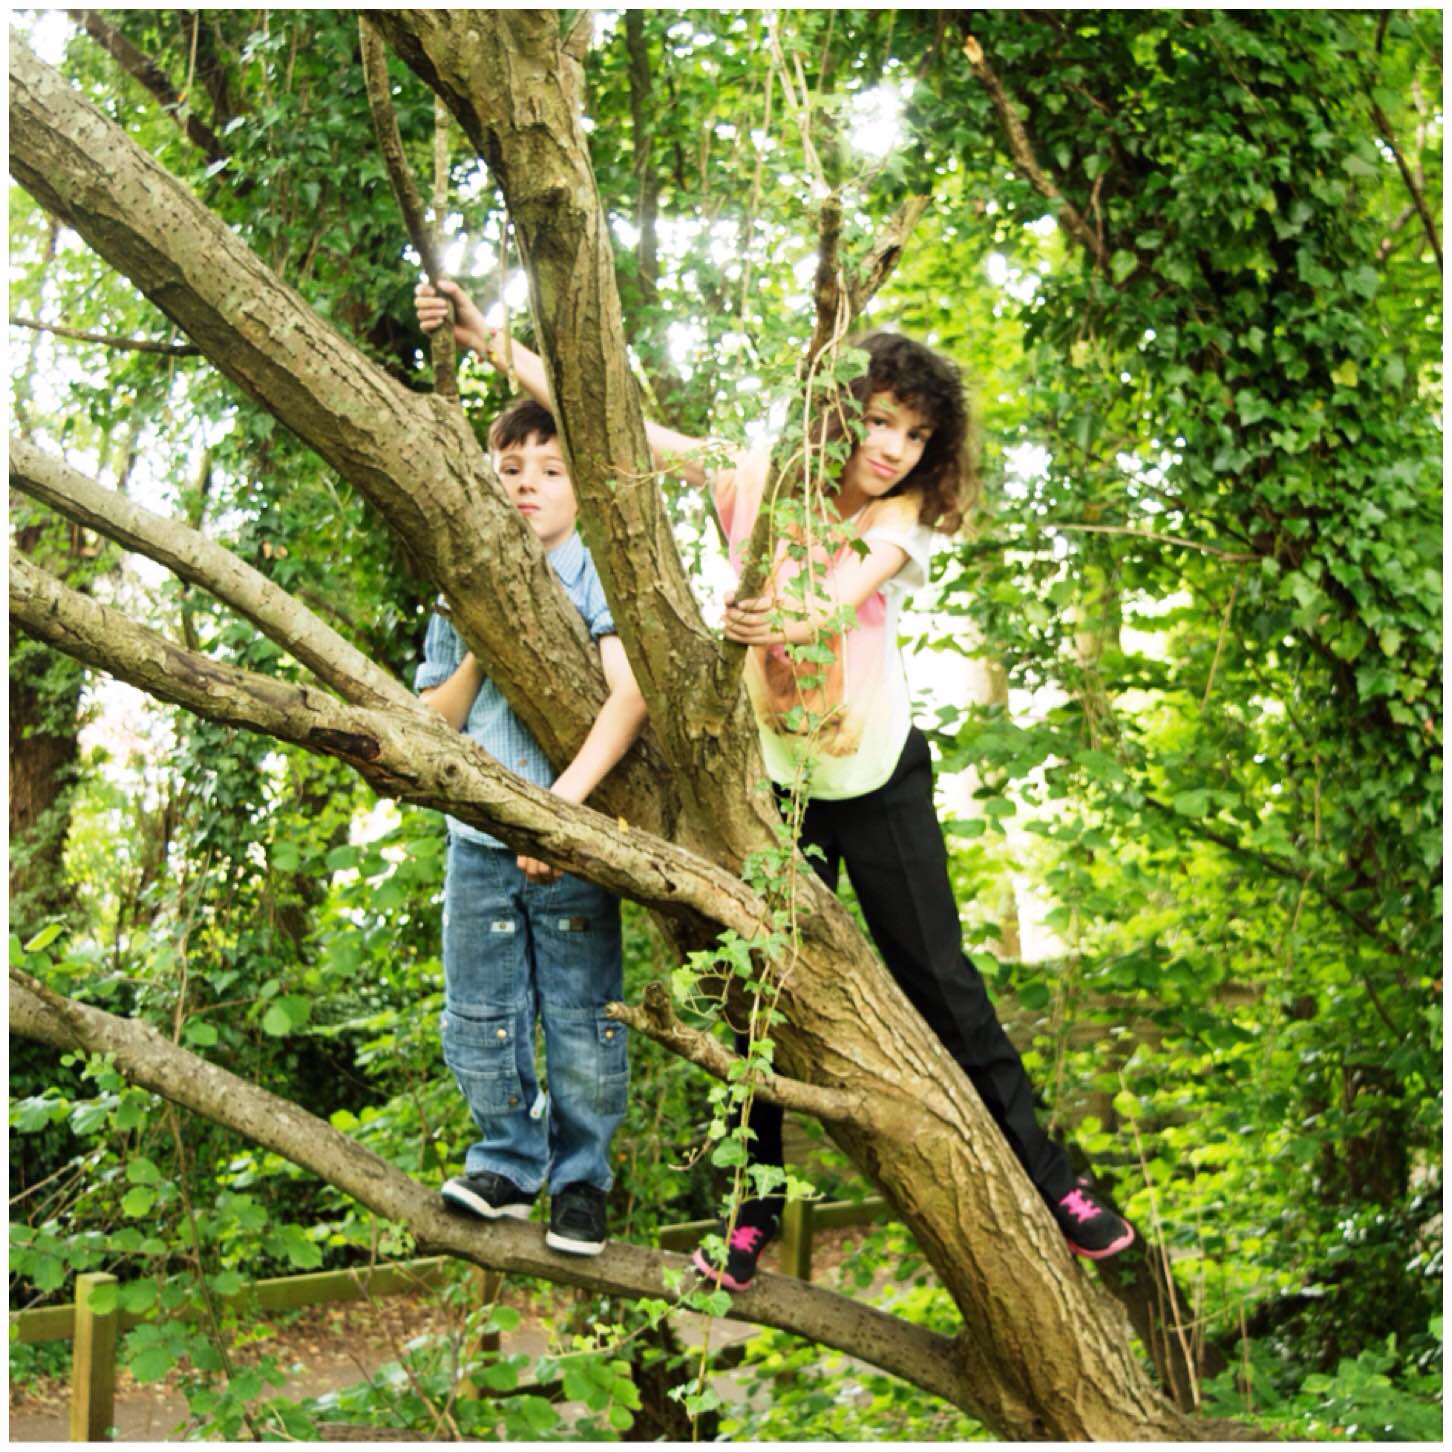
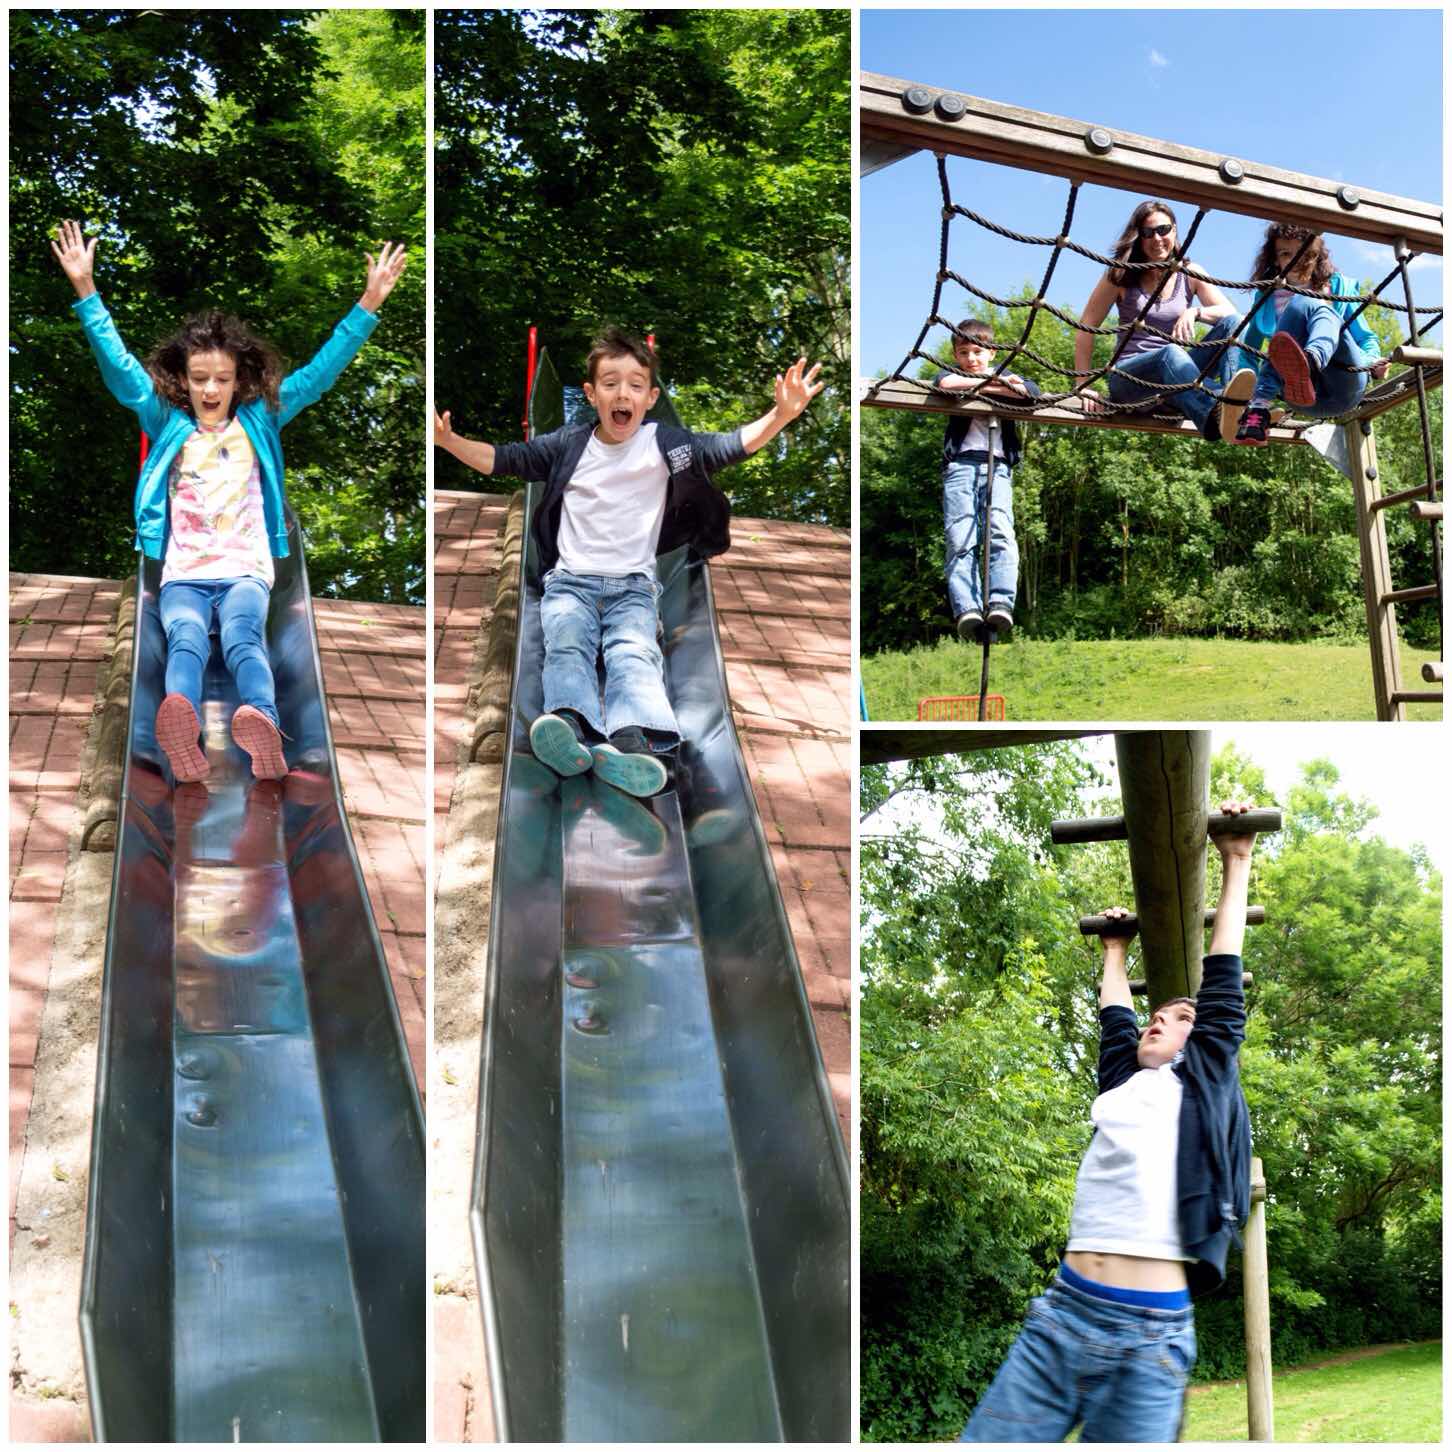
One thing I love about the Moot is that it is situated on sand dunes that have over the years become a woodland. This makes for an amazing place to launch yourself of heights or climb trees. Natures own playground you could say.
Hanging Out
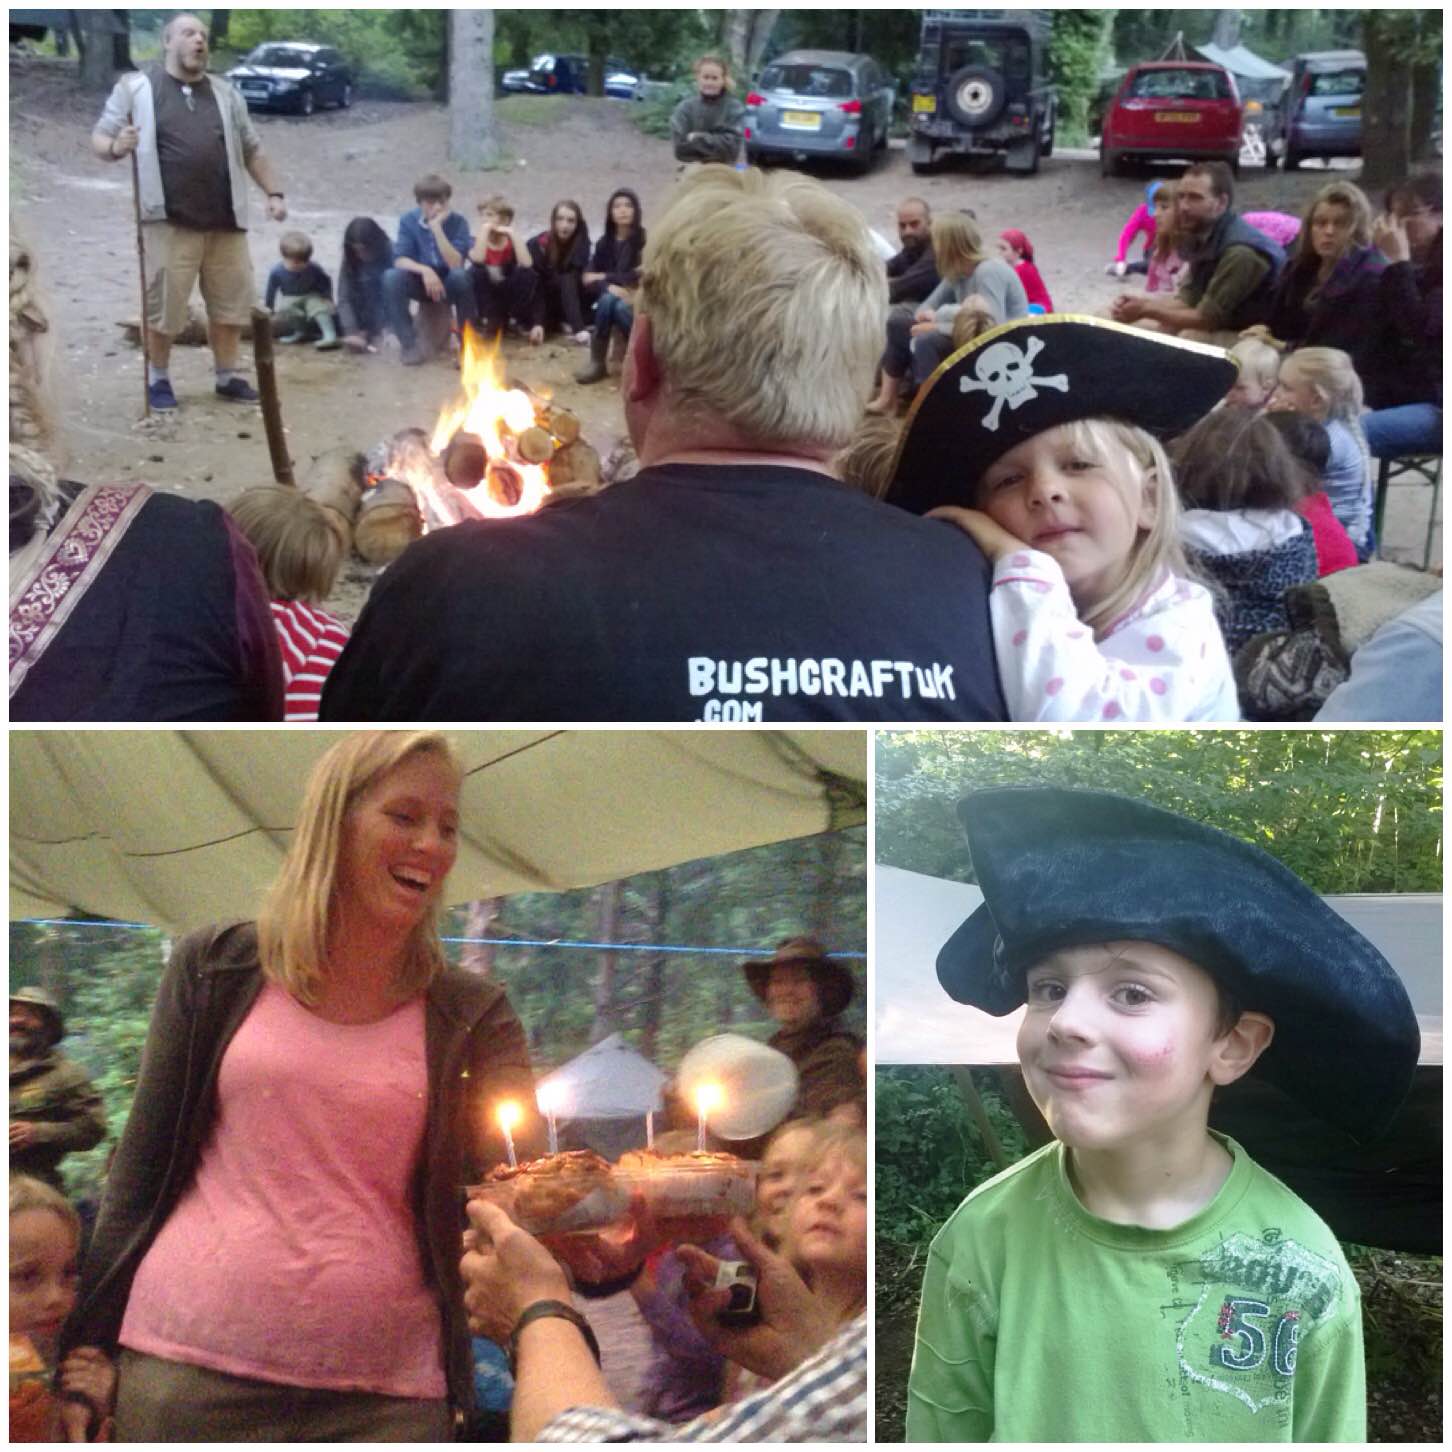
There are lots of activities aimed primarily at the kids from treasure hunts with our resident Pirates under the leadership of Cap’n Badger, to craft courses and games.
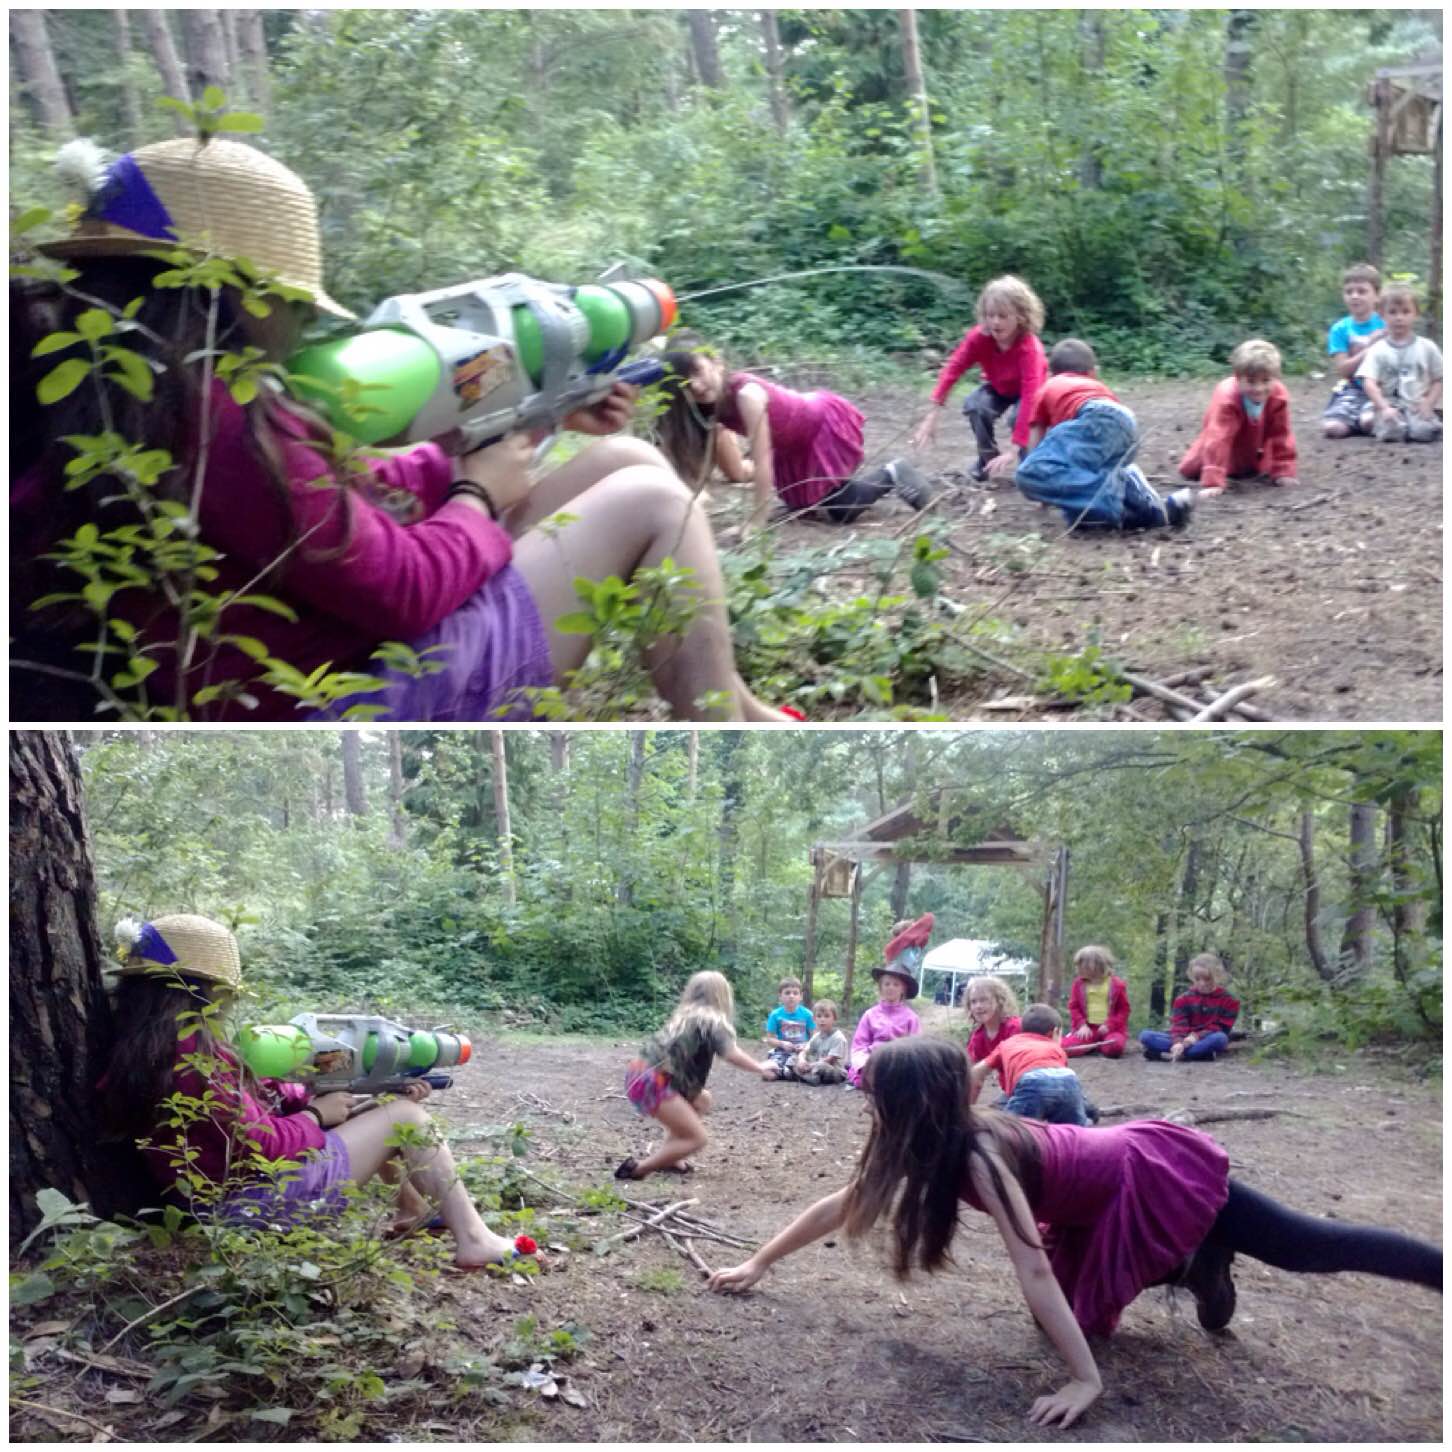
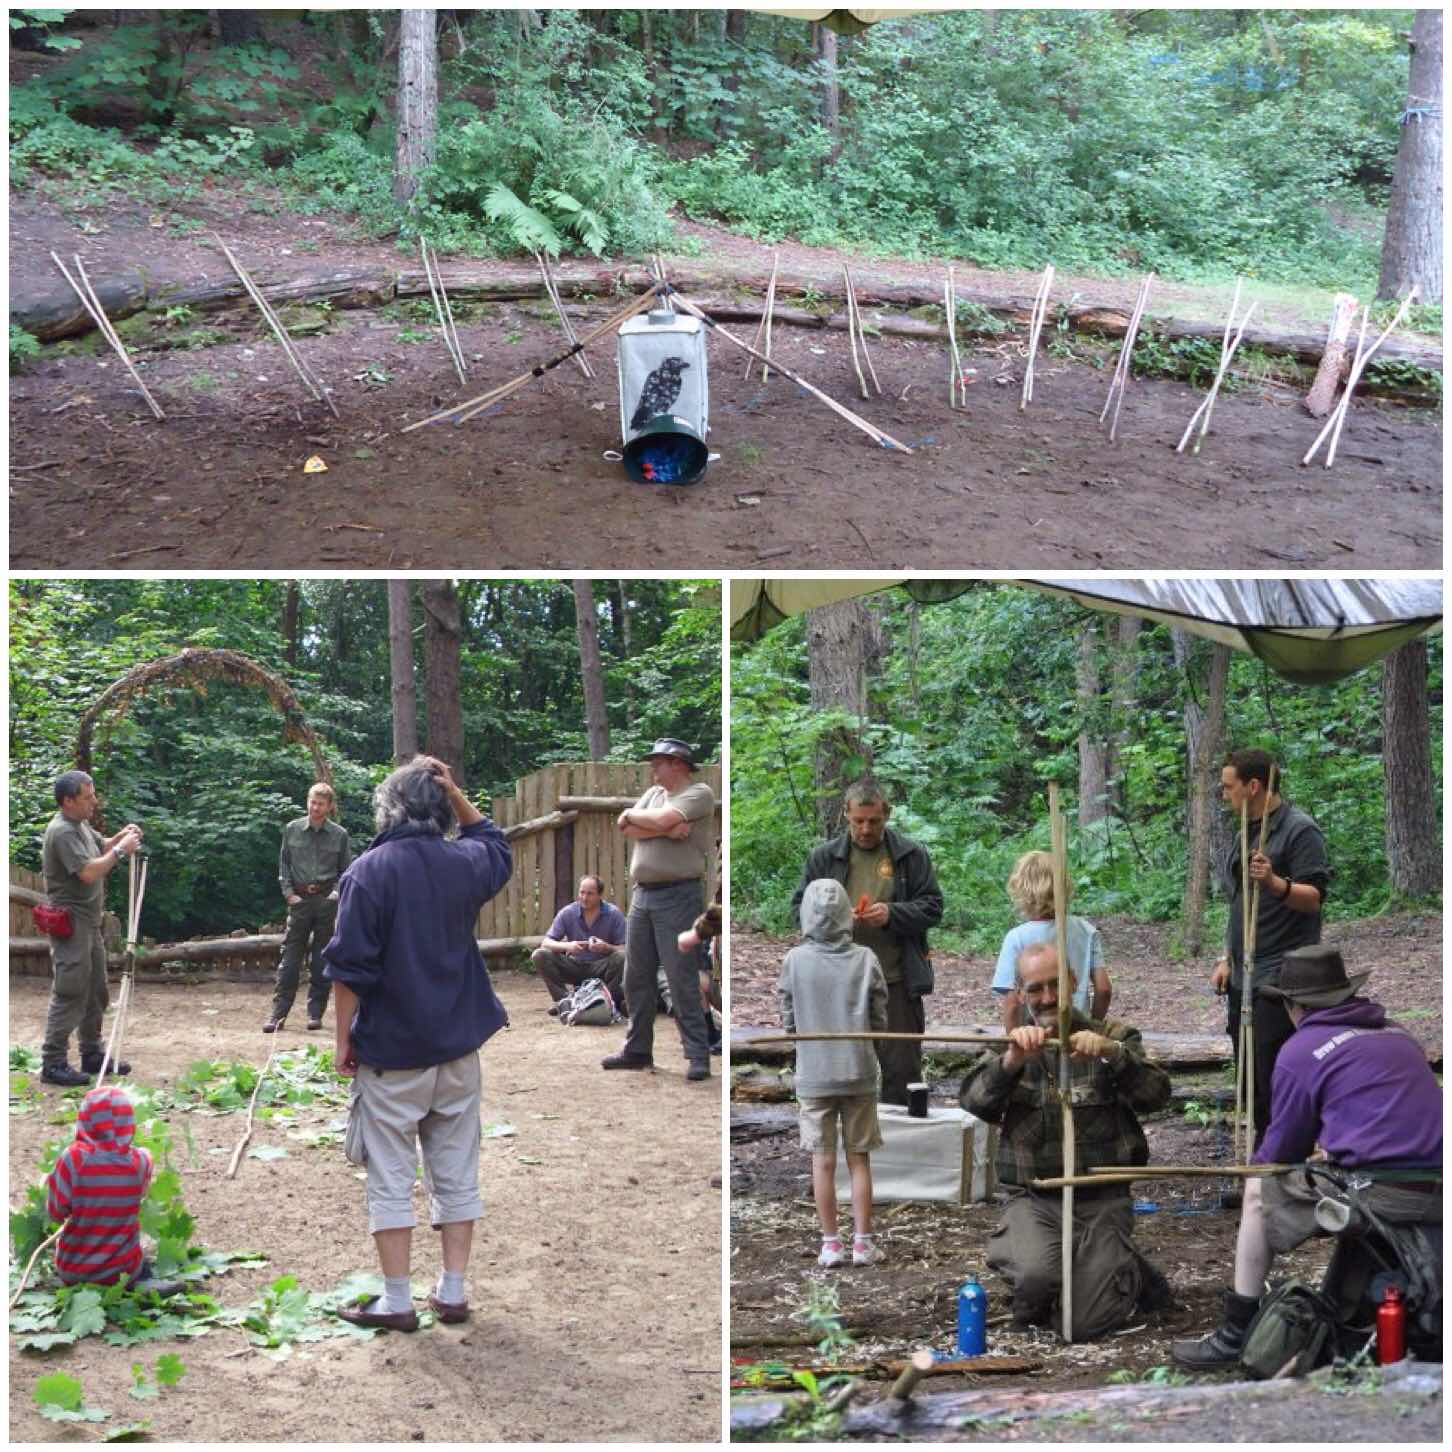
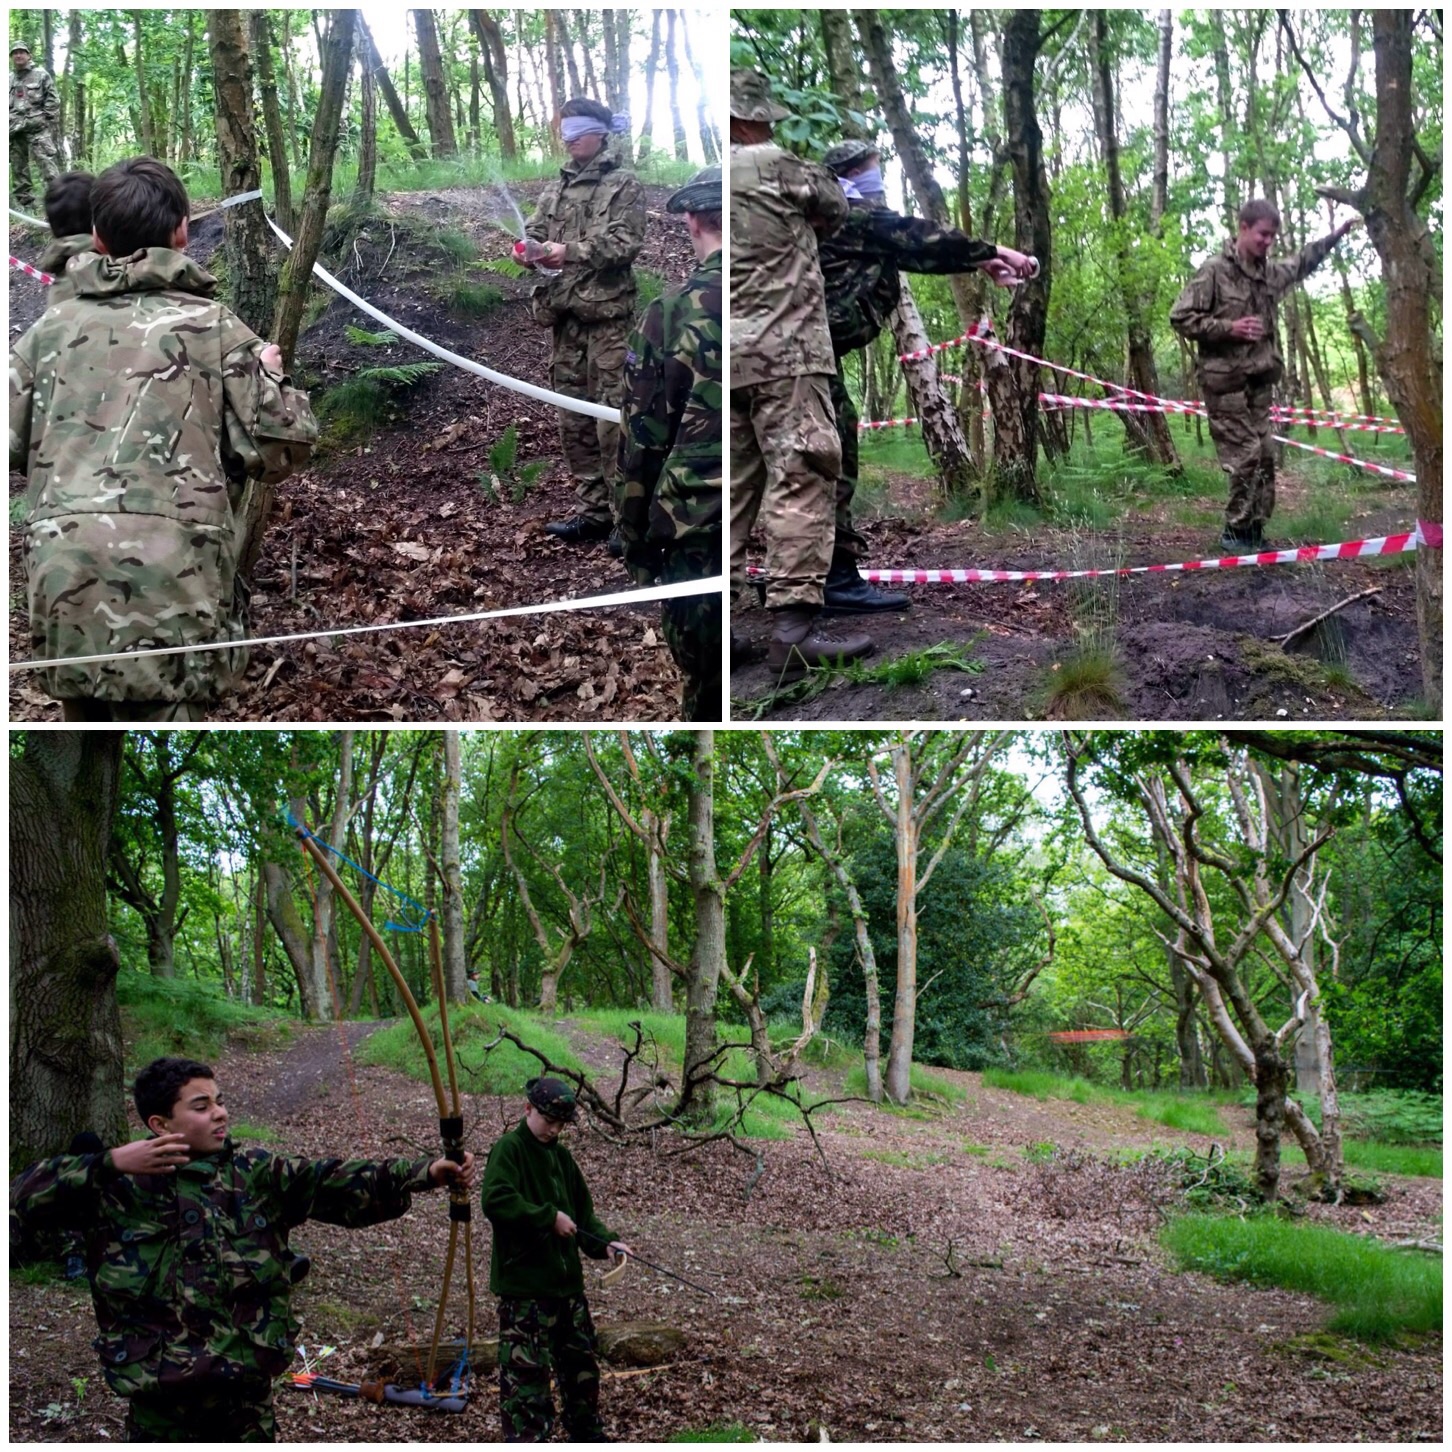
One of the games I run from time to time is a stalking game. Below you can see the kids trying to leopard crawl up to get some sticks without being soaked. This is a great game to teach kids all about their senses and in particular about staying quiet in order to see more wildlife around them.
Games
For many a year now we have had story telling sessions around the fire of an evening for the kids (and adults too). Womble is a great story teller and keeps the kids captivated with his interactive stories.
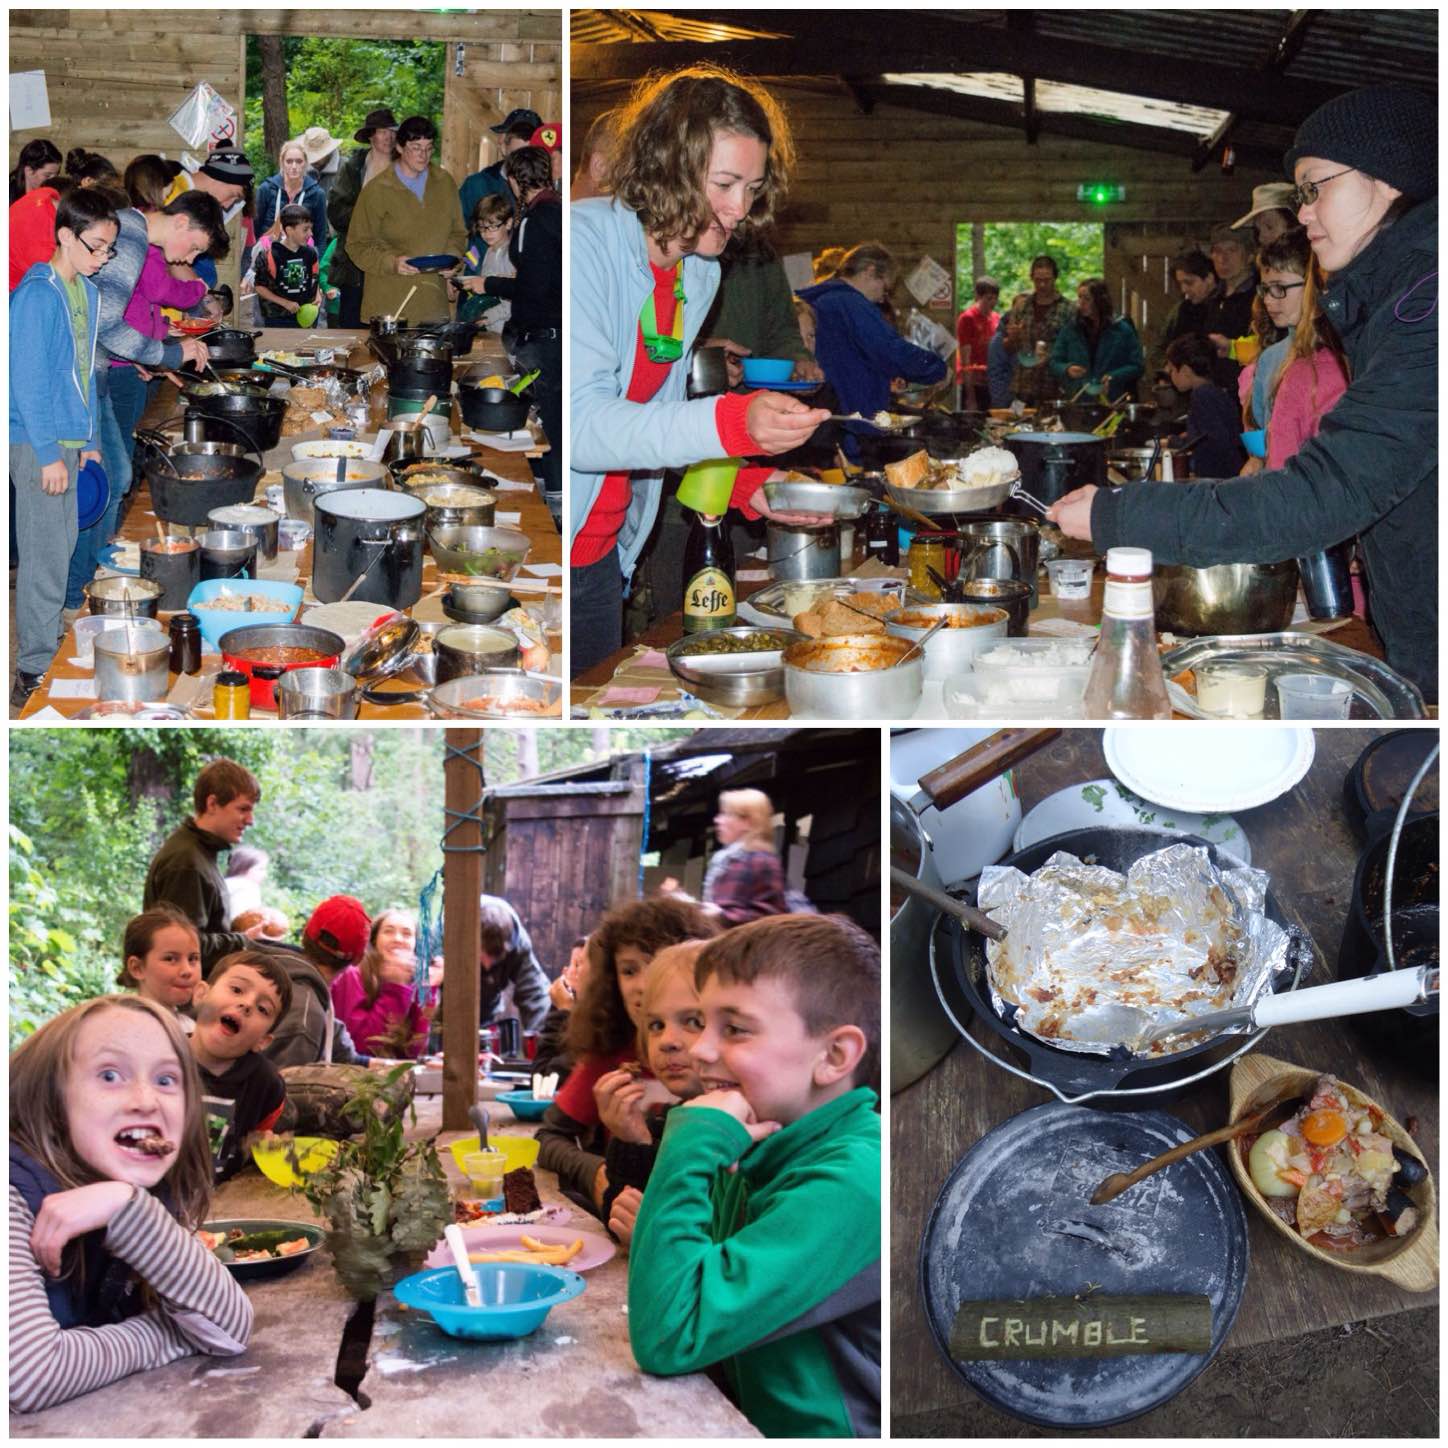
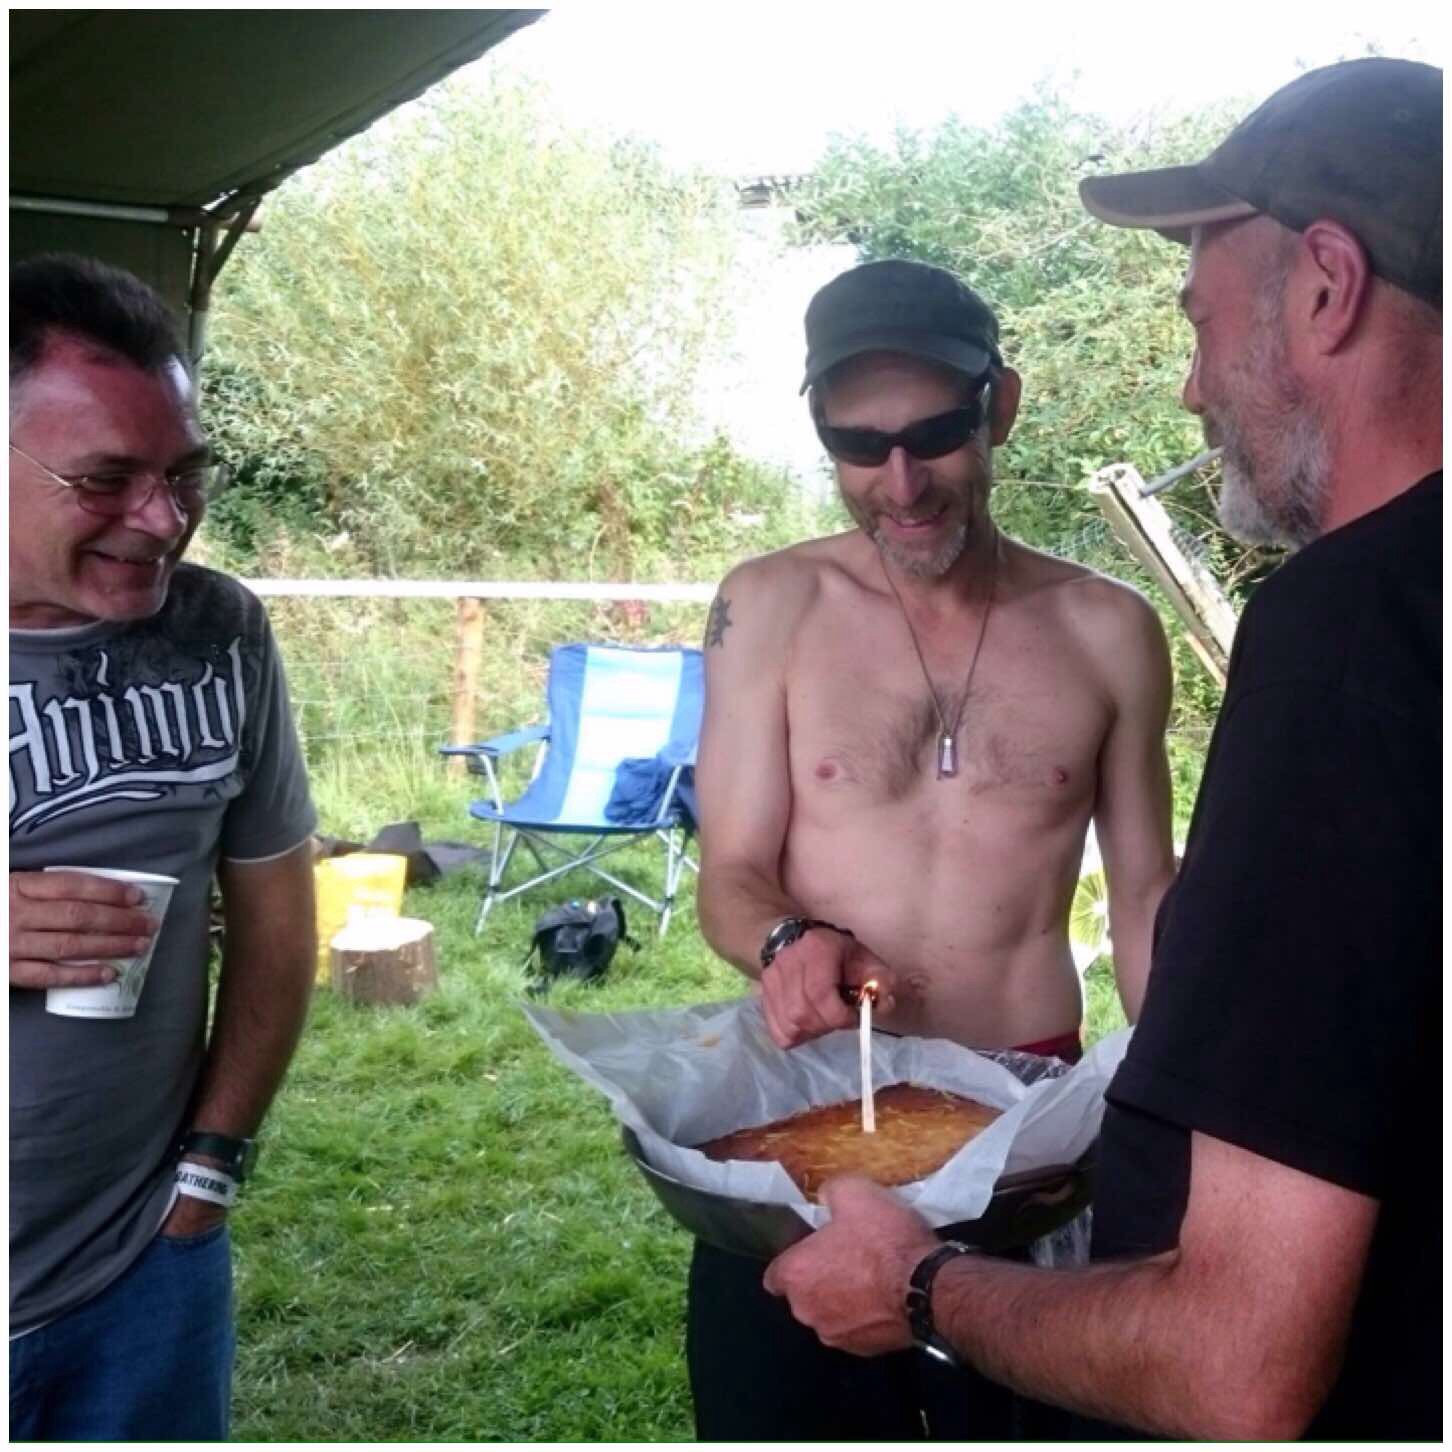
The Moot organiser is Tony Bristow and depending on the dates of the Moot his birthday sometimes falls during it. It usually is a time to bake a cake and dish it out. Needless to say Tony gets a little piece however there are many hungry little ones looking for their share 🙂
Stories, Cakes and Pirates
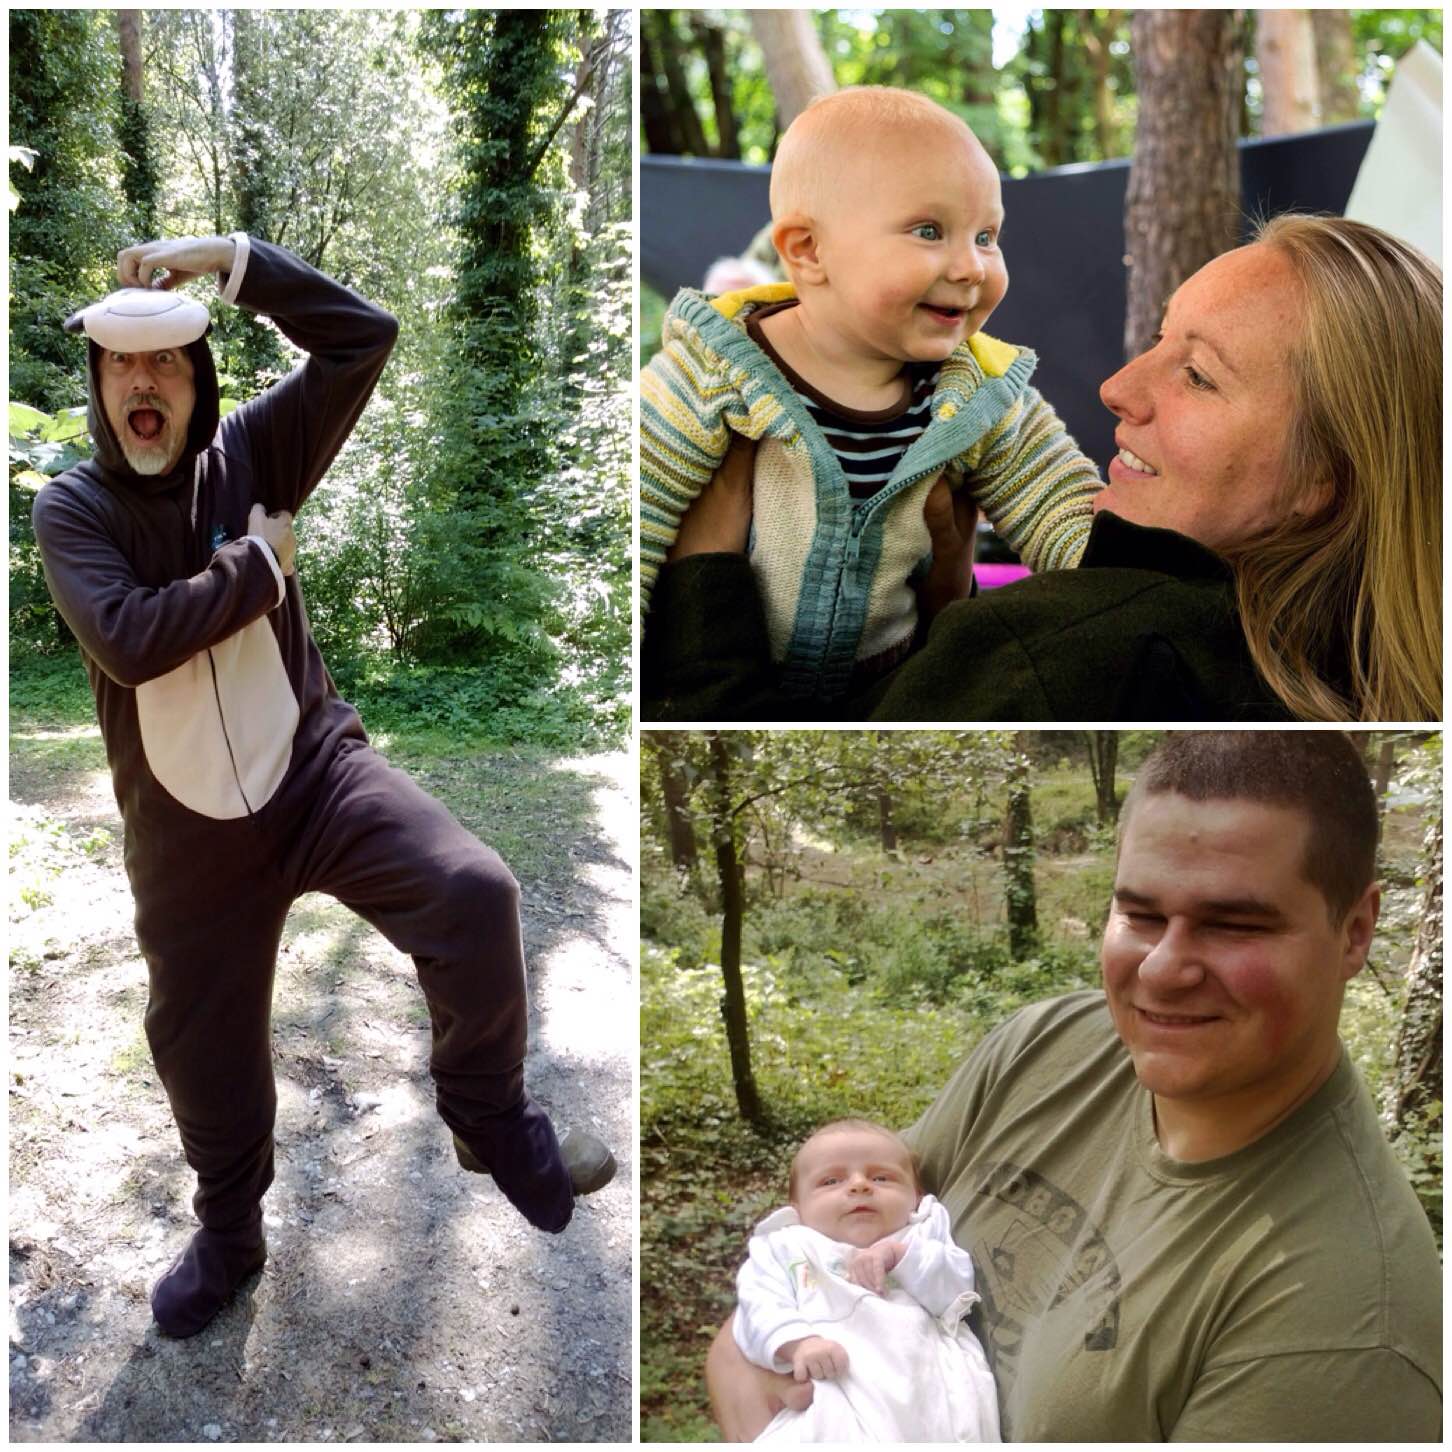
The Moot is for kids of all ages be that young at heart (yes I mean you Spikey) or taking their first steps out in the adventure of life. My kids love coming along to see their ‘Moot friends’ and I hope they will continue to do so for years to come.
Kids – Young and not so young
Looking at the BCUK forum I see that there is talk already about organising activities for the kids for next year.
A big part of any Moot is food and at the BCUK Bushmoot it comes in all forms.
Looking back over the pictures I have taken I was quite staggered at the range of food you can find at the Moot. I cannot profess to being any sort of cook (I prefer to build cooking constructions) however I appreciate good food when I see and smell it.
Food – Glorious Fod
Many years ago at the Moot I would help out with teaching how to butcher rabbits and pigeons so that they were ready for the pot. Many of the instructors at the Moot will do these classes and each year you are bound to find a class going on somewhere preparing some meat stuffs for the pot.
I leave the butchering of Deer and such like to some of the members more competent in this field though I could quite happily run a class if I had to.
Food Prep Skills
Up until a few years ago at every Moot we had a Hangi – an underground oven. A large pit would be dug in the sand and it would be lined with non porous stones (to avoid stones exploding). A large fire would be lit above it and kept going for a few hours.
Once the fire died down pre-prepared food parcels would be placed on the hot stones and covered in sand and hessian to slowly cook.
This is a great group cooking method and we had many a fine meal out of the Hangi
The Hangi
The Hangi has not been run for a few years as it has been superceded by Ponnassing. We try to buy in some salmon or other similar large fish and cook them as you see below over an open fire.
In the picture below at the top right you can see some Dutch Ovens that Neil was using to cook some food. Neil creates such an intense fire that the pots with regular turning can be used as cooking vessels without being on the actual embers at all.
The Ponnassing did not happen this year because of difficulties in getting fish however I hope it will be back on the menu next year. All the fish when it is cooked is added to the group meal.
Ponnasing and Dutch Oven Cooking
About five years ago we introduced to the group meal some Dutch Oven food. Many of the members of the Moot cook a meal in a Dutch Oven (or similar type of pot) and bring it along to the group meal. Each dish is clearly marked with its ingredients so we do not get any allergy issues.
The queue for this meal is massive with everyone looking to get a taste of something new. I am always amazed at what people can produce over an open fire – a real banquet is produced each year.
The Group Meal
Baking is something I love to do around the campfire. At the Moot it happens all over the place.
The baking classes can be over subscribed so we usually have a number of instructors running classes. Everything is covered from simple twizzle stick bread, dampers, loaves, rolls and even cakes (cheers Ian Woodham for the cakes).
I love the look on someone’s face when they open up a pot and look upon their first loaf baked over an open fire – about as magical as when you create your first flame from a bowdrill. My friend David Willis (Bushcraft with David Willis) ran the class you can see in the picture below and it was enjoyed immensely by everyone.
Beautiful Baking
As I said I do not do much cooking at the Moot and that is because I am rather spoiled by certain friends. For example my friend Fraser Christian (Coastal Survival) is a top rate chef and loves to cook.
Fraser likes to forage on land and sea for his food and then to cook rather amazing meals. I have no wish to upset that routine so I am happy to help out in the gathering and cooking process with the ultimate aim of getting a fantastic meal.
Fraser’s Kitchen (my second home)
For many years at the Moot I would come along on my own and so would keep my own cooking fairly simple (whenever I could not cadge a meal off someone else). Over the last couple of years my family have started to come along so I have to start to think about cooking a bit more.
I am not bad at a good breakfast however thankfully my wife Alison is an excellent cook so I am not stretched too far 🙂
My Kitchen
Looking at my pictures I came across these ones from my friend Mark Oriel who is a butcher by trade. One year he managed to spit roast a whole pig which went down a treat with everyone.
He also ran an excellent class building a smocker in the woods so as to preserve different meats.
Master Butcher – Mark Oriel
One thing I have learned coming to the Moot is that Bushcrafters do not generally tend to go hungry – quite the opposite could be said in truth.
Mega Meals
To make all this happen you need people with different skills. We come together and share these skills to make some truly memorable meals in what many others may say is an inhospitable environment – we just call it home.
It is all about people
There are many other classes going on in terms of cooking and foraging so the best way to see what is on offer is to come along to the Moot. Next year it will be at the beginning of August on the coast at Merthyr Mawr in South Wales.
My trip to Ashdown Forest at the beginning of October with the Sea Cadets for Chosin Cup proved to be a stunning time for Mother Nature.
Not only were the trees looking at their best in terms of colour and the landscape shots proved pretty spectacular too, it was the spiders that caught my attention.
For the first time ever I managed to capture a rainbow in a web. My friend Eleanor spotted this phenomenon in the picture you can see below on the right. I had never heard of this before so it came as a real surprise to see all the colours in the picture.
The beautiful Ashdown Forest
I was having a mooch around the forest in the military training area when my friend Charlie pointed out this beauty of a web. It was suspended at least 10 foot on either side from the trees. Quite a feat of engineering in my opinion.
We were lucky to pass by it just when the sun was at the right angle to frame it.
A floating web
On the Saturday morning Charlie and myself were wandering the forest looking for the teams that were out navigating when we came across this blanket of webs.
All the gorse bushes were covered in a mat of webs. Many off them were from the spider mite (Tetranychus lintearius). This little fella is numerous in numbers and seemingly helps in the control of the spread of gorse.
In amongst all the spider mite webs the real spiders also were busy producing beautiful but deadly little traps.
A jungle of webs
My final shot of the weekend was this one of the bottom half of a web. I was struck by how regular everything was however it was the similarities that the strands seemed to have with a pearl necklace that really caught my attention.
Symmetry
I went out to find the cadets on their travels never thinking for one second that I would find all these little treasures.
I had a cracking time photographing this years Chosin Cup competition with London Area Sea Cadets. This is the hardest competition I get involved with every year with the Sea Cadets.
It was a weekend of fun, tears, mist, spiders and Whimmy Diddles (a kids woodland toy) in the Ashdown Forest.
In the picture below you can see a few of the thousands of spiders webs that covered most of the bushes and small trees in the Forest that weekend – quite a stunning spectacle it was too.
The Chosin Cup
A few of us arrived early and set up camp before the arrival of the cadets in the evening. The cadets were dropped off in the Ashdown Forest and had to navigate in the dark to their campsite in Pippingford Park training area.
The walk was not particularly long however they needed to pay very close attention to their navigation so as to not get lost. I spent most of the evening sitting in the middle of the woods waiting to spot the teams coming through. Thankfully nobody got lost this year so the staff got time to sit around the fire and relax later on.
Friday Night
Saturday morning was a time of route planning, kit checking and setting off into the mist. The whole of the Ashdown Forest was covered in a thick blanket of mist so the cadets were briefed to pay particular attention to their micro navigation skills.
Prepping for the Nav Excercise
The route they had to navigate along was interspersed with lots of different check points and at some of these they had to undertake marked tasks. One of the first tests was to do with First Aid where they had to perform CPR and carry out a casualty evacuation.
I toured round most of the stances to ensure the cadets were heading in the correct direction and would sometimes spot them emerging out of the mist. The mist cleared up by lunchtime and thankfully all the teams stayed on course.
First Aid and Mist (bottom right picture courtesy of Charlie Brookes)
I did manage to get my little EDC hammock out a few times at the stances and chill out a bit. Some of these stances included searching for mines (pretend ones I hasten to add) and micro navigation games with string.
Mines and Micro Nav
Eventually before the light faded all the teams were back at camp resting up and preparing for a night navigation exercise.
This night nav consisted of navigating to various checkpoints throughout the training area (we did allow the use of torches) and descending down a steep embankment using abseils.
Meet ups and Night Time Descents
Sunday morning was a busy one for everyone. We had set up a number of timed activities to test all the teams out.
The cadets had to race up a steep embankment using ascending kit. Not an exercise for anyone with a fear of heights but one enjoyed by all the cadets.
Ascending
Each team had to run the Endurance race. This race was set up around the forest crossing a stream a number of times and a few other challenges along the way. Below you can see Bexley unit and Sunbury and Walton unit still looking good after the race.
Endurance – Bexley & Sunbury
Another challenge was to time the cadets getting their whole team across a ravine using a Tyrolean Traverse. The cadets had to devise a strategy of getting everyone across however they were only given one set of pulley equipment, so easier said than done.
The Tyrolean Travesrse
Each team took it in turn to run the Endurance race and as you can see below got thoroughly wet. They may have been tired at the end however by the smiles on their faces they thoroughly enjoyed the experience.
Endurance – Sutton and Merton
In between all this running and climbing a few little moments were captured – most involving water as you can see.
Moments in time (top left picture courtesy of Charlie Brookes)
The Endurance race went on for quite a distance through the woods and under tunnels. All the teams completed the race and enjoyed having their post race picture taken in the river.
Endurance – City and Enfield
Soon it was time to tally up the scores and wait for the results.
There are a variety of cups up for grabs at the Chosin Cup including one for best team leader – The Reg Wheeler trophy. This year it went to Ordinary Cadet Harrison of Sutton unit. She also picked up some extra prizes donated by the adventurer and author Alaister Humphreys.
Declaration and the Best Team Leader
Our Visitors trophy went to Poole unit, third place to Sunbury & Walton unit and second place went to Enfield unit.
Runners Up
First place this year went to Bexley unit. They were a combined unit of Sea Cadets and Royal Marines Cadets. Well done Bexley for winning the competition this year. It was a hard fought competition with only about 8 points between the top two units (top scores were near the 800 mark so 8 points was a tight finish).
The Winners – Bexley
Finally I would like to say thanks to all the staff who helped run this years event, however a special thanks must go to Jacob Leverett who agreed to take on the mammoth task of organising it all.
My annual holiday to the BCUK Bushmoot would not be complete without a bit of bow making and some time down on the range.
About ten years ago I was introduced to bowmaking by my friend Bardster (Paul Bradley). Bardster used to run workshops at the Moot which were always well attended. I then studied under John Rhyder of Woodcraft School and made a number of different bows from Ash Flatbows, Holmegaards and the Father & Son bow.
Bushmoot Archery
The Father & Son Bow
I introduced to the Moot a number of years ago the Father and Son bow (I had learnt this of my friend Mark Emery of Kepis Bushcraft) This is a ‘quickie’ bow to make and comprises two rods (usually hazel) strapped together. The bows take only an hour or two to make if you know what you are doing although they may take up to a day to make if you are new to it all.
I have run quite a few classes over the years at the Moot on the Father & Son bow. As you can see in the pictures below they were large classes.
The Father & Son bow
Nowadays Chris Pryke runs this class and it is well attended each year. The bows if made properly can last you years. I still have and use my first one which is over 6 years old now.
In new hands
I have had hours and hours of fun making and using these bows over the years. They are cheap to make, very accurate with practice (normally I shoot them between 10 and 20 metres) and will shoot on a high arc about 60 to 70 metres.
Father & Son Bow in action
The Bhutanese Bow
One of our long-term members is Wayne Jones of Forest Knights bushcraft school. Wayne is an expert bowyer and taught me a few years ago to make a Bhutanese bow. This type of bow is made of a large piece of bamboo and relatively quick to make (about half a day I think it took me)
The Bhutanese Bow
The bow is constructed of two separate pieces of bamboo joined in the centre. The join can be with, tape, cord or with pins.
Building the Bhutanese bow
Most folk who start one of these bows can be found down on the range in the evening.
We started the range at the Moot about six years ago. it is well away from all the camping areas surrounded by wooded sand dunes. There are two Bhutanese bows in the top picture below in action and I am holding one in the bottom picture below.
Bhutanese bows in action
Traditional Bows
Wayne sometimes runs workshops similar to the ones Bardster did in the past making more traditional style flatbows. I hope to one day make time to study under Wayne as it has been a few years since I have made an Ash Flatbow.
Classic bows
The Mini Bow
The final type of bow that is produced at the Moot is the Mini bow. Wayne uses the large pieces of bamboo he brings along for the Bhutanese bows to also make these very small Mini bows. The kids absolutely (and a few adults) love them.
They do not take long to make and are small enough to be made as one piece.
The Mini bow
Different Bows
On the range you will see a wide variety of bows in action from the traditional (top two have my Ash Flatbow and my Holmegaard in use.
Below them are some of the modern bows people bring along to the Moot. Some are very powerful and come with all manner of attachments. When it comes to the competition we hold we do not mind what type of bow you use as long as it does not have extras such as stabilisers, sights or gears attached.
Old and new
I am always intrigued with the different bows that appear and was particularly interested in the Mongol style bow Lisa had brought along as I had never seen one before (bottom right).
Bows in all sizes
Each evening during the Moot (and sometimes during the day) a few of us troop down to the range for a shoot. Running the range is usually Cap’n Badger, Paul Pomfrey, Ian Woodham and myself.
We try and balance the time between teaching novices and letting the ‘Old and Bold’ have time to keep their eye in. After a full days teaching bushcraft having to do this can initially feel like a chore to me however once I have shot in a few arrows it can be quite relaxing, especially after a very busy day.
Hard contests
Competition day happens usually in the second week of the Moot and it gets very competitive. We normally run two competitions, one for the kids and one for the adults. They have to shoot at different ranges and are closely marked by the referees as there are usually some very good prizes up for grabs.
Over the years
Afterwards when all the scores have been tallied up the thing I really like about this time down on the range is how good natured everyone is.
The winners get first dibs at the prizes (everyone brings a prize for the pot with a few extras donated) however everybody walks away with a prize at the end.
Having fun
I have been to many different types of bushcraft shows, courses and meetings over the years but it is only at the BCUK Bushmoot that I see such a wide range of archery on display.
Sometimes in your life a little trip comes along that really lifts your spirits. This happened to me last September when my good friend Dave Lewis invited me along to a camp he had organised for Enfield Sea Cadet unit. The camp was at Tolmers Activity Centre near Potters Bar (just North of London) and turned out to be a quite magical weekend.
Dave was leading a training session for his older cadets for the upcoming Chosin Cup competition and he wanted me to work with his Junior cadets on their campcraft skills. After setting up camp I spotted a load of folks heading down to a small pond so I decided to follow on and see what was afoot.
As I approached the pond I could hear a story being told about the ‘Lady in the Lake’ and all of a sudden the skies lit up. As I was just approaching the pond at that time I managed to get these two cracking shots of the fireworks going off.
Friday fireworks and our playground
In the morning I took the cadets with some other staff members out towards Northaw Great Wood (a local nature reserve). Along the way we had to scramble over some tricky terrain but managed to have a bit of fun when we found an old World War 2 Pillbox.
Scramble and a dance
Once we got into the woods we found a lovely spot by a dried out stream to try out our hammocks. The Juniors had never tried hammocks before but soon got into the ‘Swing’ of things.
Chillaxing
Our task on the weekend was to introduce the Juniors to basic Adventure Training skills such as using the map and compass, and to get an understanding of their natural surroundings.
So as we were learning to use the map and compass we carried a Journey stick with us. This stick had string and elastic bands wrapped around it so that we could add different items we found along the way to it.
The aim of the Journey stick was to ensure that the Juniors kept a good look out for different plants and objects so that they could add some of them to the stick and so tell a story of their journey when they had finished at the end of the day.
Green module learning
In amongst all this learning we took time out to climb the odd tree or two and just relax (the staff just tended to relax though).
In touch with nature
We spotted many different types of flaura and fauna on our travels and played a little naming game on the way. I got the Juniors to spot different trees and name them something they all agreed on – so the Sycamore became the Star tree, the Ash tree was named the Centipede and so on. They would walk through the woods shouting “There’s a Star tree” or “There’s another Centipede”.
At the end of the day I gave them a chart so that they could figure out their given names. This method I find works well as I find that kids learn best when they are having fun along the way.
Journey stick stuff
When we got back to camp we had a very full Journey stick with no two items the same. The Juniors really worked hard to finish the stick and each took it in turn to walk with it.
The Journey stick
Back at camp we had a very busy campfire on the go with some great food being prepared by Alan and Dave Lewis. On the Saturday night we had a barbie and marshmallows, and each morning Alan cooked a fantastic breakfast with some lovely pancakes.
Bust campfire
On the Saturday I had taught the Juniors how to light a fire using Firesteels so on the Sunday they all helped me to get an ember using the bowdrill. Each junior took part and we soon had a great big glowing ember.
One Junior said that he had watched the recent programme by a ‘well known survivalist’ where it had taken the contestants two days to get a fire going so he was over the moon to get an ember in just a couple of minutes.
Team bowdrill
Once the ember was stable we popped it into a tinder bundle and everyone took it in turn to blow it into flame.
I think the smiles on their faces kind of say it all about the experience they just had.
Flammage
Once we got the fire going properly Alan Lewis took the juniors on a cookery class. He got them to cook sausages over the fire and then to make up a bread mix. The bread mixture was then wrapped around the cooked sausages and in no time they all had their own hand made sausage rolls.
Morning cooking
While the Juniors were cooking their sausage rolls I wandered over to where Dave was working with his older cadets. They were practising some ropework to set up a retrievable rope system for crossing a river. All this was in preparation for the forthcoming Chosin Cup competition in early October.
Older cadets practising for Chosin Cup
To finish the course off for the Juniors I set up the Atlatl range on an open slope. It was not long before they got a hang of this primitive hunting technique and were soon landing darts on the targets.
An Atlatl finish
I finished the weekend still feeling as fresh as I started. It is not often I can say that about Sea Cadet weekends (I usually need a day or two to get over them) but the juniors were so keen to learn and were a real bright and keen bunch that I look forward to being invited again next year.
My search to find and document as many different campfire cranes brought me to this simple type of dovetail crane. I first came across this idea from a blog post by Ken Cole Jr on the Scout Pioneering site. I expanded on their idea with adding an adjustable pot hanger to the crane.
It is similar in concept to the Cooking Crane I documented previously except that the socket on the upright is created by cutting into the side of it instead of through the middle of the upright. This leads to a far quicker construction time.
Simple Dovetail Crane
I also like these vertical campfire cranes as there is little for people to trip up on around the campfire and like my previous post on the adjustable dovetail crane this simpler version is built using just a single pole.
Trimming
I used a sycamore pole on I had on hand trimmed it into two pieces using my folding saw.
One pole trimmed to size
The larger pole you can see below was destined to be the upright and the thinner piece was to be the cranes arm.
The arm
I started work on the arm first carving a triangular end on one side. I took my time here to make all the sides even in shape.
Carving the triangular bed of the arm
Once the arm had the correct shape carved out I used it as a template to mark out the dovetail socket I would cut into the upright.
The upright
It is worth the time doing this as you want to produce a socket that the arm will fit into snugly.
Using the arm to score out the shape of the socket
Once the shape had been marked out with my knife I used my saw to cut into the upright, one on each side and then a couple of cuts through the middle.
Roughing out the socket
I used my knife then to carve out all the loose excess wood and to smooth all the sides out.
I continually kept trying to insert the triangulated end of the arm to see if it would fit. As I wanted to keep as much wood on the arm I just used my knife to keep carving of more wood from the socket area on the upright to enlarge it. Eventually the arm was able to be inserted into the socket and released without too much force but still fitted snugly.
Finishing with the knife
To finish the upright I chamfered the top so that it would not split when I hammered it into the ground and carved a strong point on the other end.
Chamfering and pointing the upright
I hammered the upright and checked to make sure all the angles looked good. I like to have my crane uprights to have a little lean away from the fire but not too much as this could cause the arm to swing when it had a heavy load.
Checking the angles
Hanging the pot hanger
The arm needs a little flat platform carved on the end with a little dimple in it the pot hanger to balance on. I have explained in a previous post on carving an adjustable pot hanger on how to make one of these.
Just make sure that you carve the flat platform on the correct plane in relation to how the arm fits into the upright – I used the triangular end as a guide for this.
Carving the pot hanger end of the arm
You can see in the picture below the end of the arm has a slightly flattened surface and a slightly curved surface underneath it.
Completed
If your pole is long enough you could carve your pot hanger from it. In this case I had plenty on hand so just used one I had made before.
Testing
You can see in the picture below how the pot hanger sits on the tip of the arm in the little dimple. It looks very fragile but it can hold a lot of weight if everything is carved properly.
Attaching a pot hanger
I decided to shorten the arm of the crane as it bent a bit with the weight of the full kettle so rather than cut the end with the dimple I just extended the triangulated area of the arm so that it could be adjusted easily(I did trim the back of the arm later).
Shortened arm
I was quite happy with the arm being this length for the weight of the full kettle.
I also brought out one of my Dutch Ovens and filled it with water to test out the crane. I decided though to carve another shorted arm so that it would stand up to the extra weight better.
A full kettle – little bend in the arm
This shorter arm did bend a little bit but it did not break. Just to make sure I left the pot hanging off the crane for two days without any problems.
Shorter arm for a heavy pot – more pronounced bend but still workable
I took the crane to a Sea Cadet camp last weekend and it was used all weekend to keep the kettle on the go. There were a lot of staff around the campfire most of the time but due to its minimal footprint the crane did not get in anyone’s way.
Kettles on
I really like this crane for various reasons, these being it is simple, quick to make, tidy and strong.
If you have never made a crane before I recommend this type as one to experiment with.
For ten years now I have been going to the BCUK Bushmoot and I have had great fun learning new crafts, making some amazing constructions and occasionally dabbling in a bit of art.
Craft, art and constructions
This post cannot do justice to the wide variety of crafts, constructions and artistic endeavours that are undertaken however I have trawled through my picture library to try my best.
One of the most talented carvers who attends the moot regularly is Dean Allen. Dean makes beautiful spoons (particularly Welsh Spoons) and some fine primitive crafts as well.
Carving craft from Dean
Hands are always busy doing something at the Moot – twisting grass rope, weaving beautiful tablet bands, embroidering flags and constructing clay pots – to name just a few activities.
I have attended the classes with Perry McGee on grass rope making and tablet weaving with Susannah Parsons. Both classes were hugely enjoyable as these instructors are experts in their craft.
Hands on with it all
I have dabbled in animal hide work from scraping to tanning, and I know it is hard work (see my earlier blog How To….Make Buckskin from a Deer Hide). Theresa Kamper however makes it look so easy. She studied everything to do with working with animal hides for her PhD and is fantastically knowledgeable on the subject of everything we regard as ‘Primitive Skills’, and is happy to share that knowledge at the Moot.
Primitive skills craft from Theresa
Basket- and lobster-pot making is very popular at the Moot. Our regular instructor on this is Julie Wagstaff from the Welsh Willow Works.
I have never had the time to do one of Jules’s classes however everyone I have spoken with has really learned a lot from her. Jules has a really patient nature and a very creative pair of hands.
Basket making
One day of the Moot is set aside as Traders Day. The Moot is not a particularly commercial event for traders however we do have a small shop open most days with a bring and buy stand.
On Traders Day many of the members set up a stand to sell their ‘wares’. Some of this is second hand, others have brand new bought-in goods, and a few sell their own creations. Some of these items like the baskets and the leather work you can see below are highly crafted and intricate.
Traders day
A post on craft cannot be complete without mentioning Mr Dave Budd. Dave is a master craftsman when it comes to metalwork, Using only the most rudimentary (but highly suited to the job) equipment he runs his own forge for us every year.
Dave makes excellent knives and other woodland working tools. My daughter Catherine enjoys being the ‘Pump Monkey’ – keeping the pump going to heat the forge. Dave also donated this year a beautiful knife and a bodkin arrow point as prizes for the archery competition.
Dave Budd iron craft
Another metalworker who is starting to experiment with this material is my Bushmoot neighbour Ian Woodham. A few years ago Ian showed a class I was running how he built a gas wood-burning stove out of a paint can. I was so impressed with it that I made one myself and wrote a tutorial on it – How To….Build a Wood Gas Stove.
This year Ian brought along a new stove he had built out of two gas bottles. The stove had a burner on one side and an oven on the other and I can confirm it did make excellent pizzas and cakes. Since then he has built another one which I am hopefully going to be trying out soon (as soon as I can figure out how to transport it from Yorkshire to Hampshire).
Cooking construction from Ian
We have had a number of leatherwork instructors over the years however Eric Methven has been teaching this art at the Moot the longest. Eric can turn his hand to most things when it comes to working with leather from water bottles, tankards and sheaths to the likes of beautiful arm guards for archery (we got one of these guards as a prize for the archery competition one year).
Our good friend Drew passed away a few years ago and he was a keen student of Eric’s. I still remember clearly Drew coming up to my camp to show me the new sheath he had just made for his Leatherman multitool.
Leather craft from Eric
No Moot would be complete without some spoon carving. Our expert carver is Dean however quite a few of us lend a hand with this class. It is great to see all the kids learning to carve their first spoon (and adults too – that is my wife Alison with her first spoon below).
My first spoon at the Moot (way back in 2005) was quickly constructed from birch bark. It did not take long to make but it did impress me.
Spoonage
I ran a competition one year where everyone was tasked with constructing something for a bushcraft camp. There were many entries and you can see three below.
I loved the little stool and the washing rack, which had a lot of love and care put into its construction. My entry was this freestanding hammock stand (no land anchors were needed) .
Camp constructions
A couple of other construction projects have been around the theme of cooking. Tim Neobard built this fantastic pizza oven out of clay and straw last year. It baked some excellent pizzas (sadly some idiots smashed it up after the Moot finished).
Happily the oven was re-built by Neil this year using bricks as a skeleton so hopefully it will last for a few years.
My project this year has been on building campfire cranes and I tested out my Lap Joint crane at the Moot. It is a very simple device made out of one pole and I am happy to say it passed with flying colours. Since then I have been busy building other cranes with as many variations as I can think of.
Fireside constructions
One thing you can be guaranteed about at the Moot is being astonished by the numerous things you can do with string, be that Dream Catchers, crochet or making whoopie slings.
We also had David Colter making Balearic slings out of string at the Moot and running a competition with them. Most bushcrafters are quite happy at the Moot to show you what they think are the best knots to use in any given situation.
String craft
A very quiet craftsman is our very own Cap’n Badger. He uses a fine saw to carve bone and antler into beautiful pendants. You can see a couple of his designs in the picture below.
The pendant on the bottom right is the one he carved for me a few years ago. The design was very intricate (a Royal Marine dagger and parachute wings). Badger also made some more pendants this year and donated them to the archery competition where they were quickly snapped up by the competitors.
Fine bone craft from Cap’n Badger
Now it is not all hard graft when it comes to the Moot. Last year my friend Richard brought along a number of his bottles of white elderberry wine. I managed to get a private tasting session and I was very impressed with the quality of the wine that he had produced.
Richard has managed to cultivate his own ‘orchard’ of elder trees that produce white elderberries. This has taken him years to do and it has paid off for him with some excellent wine.
I think though that the most beautiful sight you will come across at the Moot must be the fantastic mosaics of plants made by Keith Beaney (Keith refers to them as Land Art and you can see why clearly). Keith will spend hours producing these wonderful spectacles for us to marvel at. Many of the children head off to collect materials, inspired by his creations, and leave their own mosaics dotted around the woods.
Liquid art from Richard and plant art from Keith
I could have added lots more on this subject but I have to end somewhere.
I am looking forward to next year when I can practice some of these arts and crafts again and learn new ones.
Last August found me back at the Wilderness Gathering with my good friends Fraser Christian (from Coastal Survival), Stephen Herries, Danny Stocks and Si Parker.
I have been going to the Gathering so long now that I feel part of the furniture (I did miss the very first one) but I would not miss it for the world.
Coastal Survival at the Wilderness Gathering
Work kept me busy this year so I did not get down to West Knoyle until the Friday so the guys had set everything up before I arrived. I also met Danny’s wife Lorna for the first time this year.
The Friday for me was a relaxed affair setting up my tent and catching up with old friends. That evening found us all relaxing to the music and light show from the band area.
Great evenings
Throughout the whole weekend we would spend time weaving a willow trap for catching crabs and lobsters. This was harder than it looked and I must admit that Danny did the majority of the weaving.
Lots of craft
Last year Fraser had a cold smoker set up on his stand and this year he decided on setting up a hot smoker made out of a cardboard box.
It is called a hot smoker as the small smudge fire that generates the smoke is inside the box as opposed to the cold smoker that has the smudge fire located outside of the box.
Hot smoking
Due to an algal bloom along the Sputh West coast of the UK we could not get fish for smoking however Fraser did get some delicious cockles from Scotland that he smoked. After smoking the cockles Fraser explained how he further preserved them using either oils or vinegar.
The class he ran from the stand was well attended and I did not manage to get a taste of the cockles before they were all eaten by an appreciative audience.
Tasty treats
Being the Coastal Survival stand we spent time demonstrating net making and Fraser managed to get himself filmed by what looked like a very professional looking film maker. I do not know who he was but he did look the part and Fraser being a bit of an extrovert loved it.
A busy stand
The whole weekend was very busy however I did manage to get out and see the rest of the Gathering a few times.
Across from us I found Jason demonstrating his bow drill skills and getting the kids to join in with him. It was also great to catch up with Pablo, JP, Hannah and Richard from the Woodlife Trails team across the way from our stand.
I had a great chat with Jon Mac (of Spooncarvingfirsteps fame) and was really chuffed to be allowed to handle many of the new knives he and Chris Grant are jointly working on. Jon has since gotten married since I spoke with him to Sarah so I want to extend my congratulations to them both now.
While I was on the stand my friend David Willis asked if I could take some pictures of his baking class. David had a busy time demonstrating and teaching folk to bake bread over an open fire. The good thing about being his photographer was that I got to test all the bread.
Friends
Saturday night was another night of great music and catching up with friends and the light show was again very impressive.
Great music
I spent quite a bit of time taking many pictures of the flames of our fire and was rewarded with these cracking Fire Faces. I can see one howler in the left hand picture and at least three faces in the right hand picture.
How many can you see?
Fire Faces – How many can you see?
Later that evening I spent some time with Martin Burkinshaw learning the art of low light level photography. Martin gave me some great tips and let me try out his tripod to capture the picture of the Milky Way you can see below.
Lowlight photography
Sunday found me catching up with our friends Rich and Dave. Rich had recently broken his wrist however that did not stop him getting out and about, though he did take a bit of flak for his nice new black armband.
Lots of net making
I spotted some movement on the lake on the Sunday afternoon and managed to get these great snaps of this father and son combo out for a cruise on their newly crafted coracle.
Caravel spotting
I did not get out to see as much of the Gathering as I did last year when I managed to film much of it however I had a great time teaching lots of kids how to make fishing spears and chatting with our neighbours Sonni and Angela.
This year has also been a good year for Fraser’s book Eat the Beach as we managed to sell quite a few copies for him over the weekend.
Keeping busy
To finish up we got given a lovely Lemon Drizzle cake for free by the kitchen staff at the Gathering and somehow it ended up as a birthday cake for our own Stephen Herries. I have no idea how old he is but he was happy anyway :-).
Birthday treat
Another year over for the Wilderness Gathering however I hope it is nowhere near my last one.
The BCUK Bushmoot is about sharing knowledge however one thing it does bring out in me is my competitive spirit. That may be through making a tug of war rope out of grass through to the serious competitiveness of the archery range.
Competition time
This sharing of knowledge may come about in many ways such as workshops, one to one sessions, presentations and competitions. This post is focussed on the many competitive activities we undertake over the two weeks of the Bushmoot.
The first picture I shared was of the grass tug of war we undertook under the watchful eye of Perry McGee from the National Tracking School. Perry showed us how to quickly gather grass, twist it, create rope and most importantly how to have fun with what we created.
Catapult
One of the activities that attracted participants from all age ranges was the catapult. The catapult is a tool for all ages I think – sometimes we were aiming for accuracy and sometimes aiming just for the fun of it 🙂
Cattie time
The Sling
My friend David Colter has introduced the sling and in particular the Balearic style of sling. The throwers all made their own slings from string and leather and it attracted participants of all age groups.
David has run classes on this for a number of years and he had a great time running a competition on the sand dunes this year. The sling throws the projectile at very high speed so I think they used tennis balls for safety’s sake.
Next year David is making this official by running the Balearic slinging world championship event at the Bushmoot.
The Slingshot
Atlatl
One of my favourite events is the Atlatl. This again is a very ancient art and was (and still is in certain parts of the world) used as a hunting tool.
I have lots of different types of Atlatl throwers and darts however I use unsharpened bamboo canes for training. I use Atlatl throwers with rest attachments for the kids to use (they can be difficult to hold) and spend many an hour with my friend Charlie Brookes on the range teaching them to throw.
This is a particularly popular activity for kids of all ages (most adults at the Bushmoot come under this category as well) as the appeal of throwing Atlatl darts down range can be quite addictive.
The Atlatl
Axe/Spade throwing
We run an axe and spade throwing range as well ( more difficult than it looks) and it provokes stiff competition. I have not done this to any great degree (though I hope to throw more next year) but it does make for great viewing and photography.
I noticed the guys were throwing next to Cap’n Badger’s white tarp and positioned myself to try and capture the axes and spades in flight. Needles to say I had my lens well zoomed in and the shutter speed really fast.
Axe/Spade throwing
I think Cap’n Badger was trying to tell me here what he thought of Phil’s throwing technique 😉
Cap’n Badger
Archery
Each year we (that is usually Cap’n Badger, Paul Pomfrey and myself) run the archery range for an hour or two in the evening. This allows anyone who wants time to get in a bit of practice.
We run lots of classes for the kids offering tuition or time for parents to teach their own kids. For many who come to the Bushmoot this is the first time they have ever shot a bow.
Many of the bows are made on site including the Bhutenese bows (with Wayne Jones) and the Father and Son bows by Chris Pryke (I used to make these at the Bushmoot as well).
Little ones archery
The archery range is situated well away from the main camping area in the centre of a beautiful copse. The range is managed well by a core team and there is plenty of time to practise before the competition.
We have a competition for the kids and one for the adults. Everyone who enters brings a present along and we also have prizes donated by others so the so the spirit of competitiveness can be quite fierce.
Big ones archery
Usually we have three rounds of shots at different distances and the judges make sure everything is tallied up correctly.
Keeping an eye on things
The award ceremony is always great fun (especially as the scores are read out) and everyone walks away with at least one prize.
As the years have gone by and the competition has become a normal part of the Bushmoot many people look forward to this event so that they can walk away as champion.
Prizes
The Bushmoot is a great place to learn however it is also a great place to come and test yourself against others, be that making grass rope the quickest through to being crowned archery champ for 2016 – who knows it could be you 🙂
While I was writing my post on the Single Fork Aures crane I got a message from a Bushcraft USA member called Alukban about another type of campfire crane, which was made out of a single piece of wood and looked quite straightforward to carve.
The connection between the arm and the upright is a type of Lap Joint. It is easy to adjust and can take the weight of a decent-sized pot.
Lap Joint Crane
Trimming
I had some sycamore lying around, about a metre and a half long. I trimmed the fork off the end as it was not needed and then cut the pole into two further pieces.
In the picture below all the wood to the left of the folding saw became the arm and the rest became the upright for the crane.
Single Pole
The upright
I squared off three of the sides of the upright along two thirds of its length and formed a point on the bottom third.
I took my time doing this so that it was as even and as smooth as possible along its length where it was squared.
Square the top – Round the bottom
Once I was happy with the upright I moved onto the arm. The whole crane works on the principle that the weight of a pot hanging on it will create enough friction to hold the arm against the upright.
Line up to Mark up
The arm
I used the upright as a guide to measuring where I need to cut out the lap joint on the arm (I measured it so that the lap joint would be very tight initially). I did not make this a 90 degree angle but about 100 degrees, so that the tip of the arm would be pointing slightly upwards.
Once I had marked the width on the arm I cut some stop cuts to half the depth of the arm and then added some more to make it easier to carve out.
I also used my saw to carve out some of the excess wood from the joint area.
Stop cuts and Sawing out
Once I had taken out most of the excess wood with the saw I used my knife to remove the rest and make it all smooth.
Trim with a knife
I locked the two pieces together and started to move the arm up and down the upright. This allowed me to spot rough areas still on the upright and then I was able to easily trim that wood off with my knife.
Continually check the fit
Once I was happy that the arm could move easily up and down the upright I trimmed of loads of excess wood from the arm to make it easier to attach a pot.
I put a stop cut about a quarter of the depth of the arm all the way around it to protect the wood around the lap joint.
Trim the limb
You can see the general shape of the arm appearing now. I likened it to the shape of an old-style naval cutlass.
The arm
In use
I added a few ridges along the length of the arm to hold pots securely and then started trying it out.
Carve the notches
I used this crane for two weeks at the Bushcraft UK Bushmoot in South Wales over the summer and was quite impressed with it. It holds pots well under tension but it needs to be treated with respect when moving the pot up and down.
I found that the crane works best with the pot hanging from near the end of the arm. If you move the pot closer to the upright along the arm it has a tendency to slip.
It is all in the friction
I will be making a variation of this style over the next few days with more of a dovetail joint so that the arm cannot come off so easily.
A great crane
I like this crane due to its simplicity so give it a go.
The Bushmoot(referred to generally as the Moot) is an annual event here in the UK and for many years now has taken place at Merthyr Mawr in South Wales. The name Bushmoot comes from the word Bushcraft (as popularised by Richard Graves and Mors Kochanski) and the Saxon word Moot (used to describe a gathering of people).
I like the Moot as it is a gathering of like-minded people with a multitude of skills to share with each other. Not only can kids run free and have fun but so can the adults and I am a firm believer in learning through fun .
Fun learning
I am writing 10 blog posts on the Moot this year and this first one is on the theme of Learning. I tried to write just one post however I really struggled to choose just a few pictures out of the many hundreds I took. My wife Alison suggested a number of short blog posts on different themes from the Moot and so here we are.
A couple of well-attended courses nowadays are the Startercourse (a full breakdown of the course can be seen here on the BCUK site) and the Spoon carving course run by Dean Allen. Alison and our kids did the spoon carving course this year with Dean and carved their very first spoons.
The basics
I managed to fit in a few courses this year and did a cracking traps course with Perry McGee.
The Moot is usually run over 2 weeks with a core 5 days in the middle where many short courses (2 hrs to 1 day) such as fire making, bow making, spoon carving, tarpology, knife safety, axe work, net making, cordage making, bread making, foraging, atlatl making and knotwork, to name just a few, are run.
There are other longer courses run either side of the core days (with an additional fee) such as an accredited First Aid course, Bhutenese bow making, coastal survival, tracking and lobster pot making with willow.
Fine detail
Many of the courses are based on using different materials, from basket making, pottery, sling making to learning about different knots.
I enjoyed running the ‘show and tell’ workshop on campfire cooking constructions and observing the father and son bows being made.
Working with wood
One of the things I love about the Moot is the sharing of knowledge such as how a stove was constructed or that Ikea make good quality drying racks that double up as brilliant cooking grills.
A bit of metal
A favourite of mine is the art of fire making. At the Moot you can learn about making fire with firesteels (old and modern), bowdrill, handrill, with damp tinder, pump drills and in many other ways.
Flamage
Shelter building is a big subject and is covered well, from simple tarps and debris shelters to large group tarps, permanent constructions and the magical art of tarpology.
Shelter in many forms
There are many other courses to attend at the Moot with new ideas coming up each year. I have found that the Moot has really broadened my knowledge of all things Bushcraft over the years and I expect will continue to do so for many more to come.
While out and about assessing for a Gold DofE expedition last July in the Lake District with the Sea Cadets I spent a lot of time searching out all the beauty that was around me.
This could be natural or man made however when I returned and looked at my pictures I was able to neatly drop them into different categories. These orchids below (Common and Marsh) I categorised with the carved toadstool in the middle as ‘Tall beauty’.
Tall beauty
Sometimes the beauty was totally unexpected, as with the Money tree, the Laughing tree and a hedge carpeted in spiders’ webs.
Weird beauty
The gentle beauty of the Valerian, the Dandelion seed head and the Cotton grass struck me as they ofen live in a very inhospitable environments. They look very fragile however they are designed to withstand much of what nature can throw at them.
Gentle beauty
July is a great time for spotting the Sundews and Butterworts in the marshy places of the lakes. Once you get down close you can easily get drawn into these sticky little fellas.
Deadly beauty
I spent a lot of time crossing or just gazing at the numerous little streams or waterfalls that trip. They can be quite hypnotic and relaxing if you allow yourself the time to relax (there’s lots of waiting around on a DofE trip).
Fast beauty
One day I was wandering along the road admiring the betony and the Cuckoo flowers when a tractor came along and mowed the whole lot down ( I appreciate that this is a working landscape – I am the tourist here and I remember that fact) – they were gone in a blink of an eye.
Thankfully many of the farmers in the Lakes encourage wild flowers in their fields these days so there was still plenty to see and for the insects to visit.
Disappearing beauty
There were plenty of reds around, such as the Foxglove and the English Stonecrop (not sure about the little fella on the bottom right). Had to take these pictures from weird angles, often involving climbing rocky outcrops.
Red beauty
The Bog Asphodels and yellow Poppies were simply stunning. I do not see these plants in many other places and they were carpeting whole areas up in the Lakes.
I had to jump on a number of occasions to avoid squashing frogs however they do like to play dead if they are spotted, allowing you the chance to really get up close to them.
Yellow beauty
My favourite pictures of the trip was of this little Damselfly. Simply stunning.
Blue beauty
I had fun with my macro lens extensions (especially with the rather grumpy little fella on the bottom left – I think I was in his personal space by the look in his eye).
Bug beauty
Lastly some fleeting beauty – the geese on Coniston Water and a deer and an owl in the woods
Fleeting beauty
Keep your eyes open on your next trip out and you will see different beauty all around.
The beginning of July found me in the Lake District with Sea Cadets from the London and Southern Areas helping to run a Gold and Silver Duke of Edinburgh (DofE) expedition. I was working with John Kelly, Carol O’Brien and Chris Bonfield.
My main roles were to act as an assessor for the Gold Expedition and as the Mountain Safety Officer. It was a very hard trip for the cadets and staff with the terrain and the atrocious weather however as you can see in the picture below of the Silver team finishing that these slight irritations did not dampen their spirits at all.
DofE with the Sea Cadets
Day 1 – Saturday 4th July 2015: Hawkshead to the NT Campsite at Great Langdale
Initially the Gold group were to set off from Grazedale on the Furness Fells however due to road works on the way the minibus could not get through (the Silver team was being assessed by Carol and Chris and were on a different route). The group set off instead in good spirits on a wet morning (though it became increasingly dry and warm throughout the day) to the west of Hawkshead and headed up to Hawkshead Moor.
I gave the team two checkpoints that I would meet them at. These were at Tarn Hows and Little Langdale. There route was initially uphill through Forestry Commission land, over Hawkshead Hill to Tarn Hows. From there they navigated on clear footpaths over to Little Langdale and then north to Chapel Stile.
I spent my day paralleling their route and staying high where possible. I took the time to do a lot of nature photography as well and will post these pictures up as a separate post.
Day 1 with the Gold team
I observed the group taking pictures and notes around the slate mines along the way as part of their project for the expedition.
The group were in good spirit and made good time throughout the day returning to the campsite at Great Langdale following the path alongside Great Langdale Beck.
Project work and relaxation time
In between all the walking I took out time to feed some ducks, show the cadets some great hammock seats (from UK Hammocks) and to just enjoy the views.
A bit of diversity
Day 2:Sunday July 5th 2015,Great Langdale – Dalegarth Campsite.
Using their 1:25,000 OS Map & route card the group set off west into the Oxendale valley along farm tracks. The weather was fine initially however as the day wore on it slowly deteriorated with thick low lying cloud and drizzle. I had set them 3 checkpoints I would meet them as they would be walking up to the Three Tarns below Bow Fell. I met the group at Hell Gill on the ascent, at the Three Tarns (700m) on the saddle below Bow Fell and at Lingcove Bridge over the Lingcove Beck.
Up to the Three Tarns the group were walking on clear paths and they took their time on the ascent however they worked well and always kept together. I had good views of the group on the ascent as the cloud cover at this stage had not dropped. I could see that each member of the group took it in turns to either use the map and compass and also take it in turn to select what ground to navigate over to avoid rocky or boggy areas.
Day 2 with the Gold team
One of the group informed me she was feeling slightly unwell at the Three Tarns and was worried about carrying on. After a good lunch and rest though she felt better and was happy to carry on. The weather started to deteriorate and the path became very faint before disappearing. The group worked on compass bearings and I kept a slightly closer eye on them from the surrounding hillsides at this stage. They navigated well around some particularly rocky and boggy terrain down to Lingcove Bridge in the rain and poor visibility.
Up onto 3 Tarn Pass
After the team left Lingcove Bridge (below) I spotted three guys trying to cross another stream. The crazy thing was they were dressed in trainers and jeans. Madness when they could have gone back the way they came.
The team then navigated on the path SW alongside the River ESK to the base of the Hardknott pass and then along the path on the valley floor to Dalegarth campsite. I spoke with the team when they arrived and they told me that they err’d slightly along the path in the Eskdale valley but managed to re-locate themselves before going too far.
The team arrived very wet and tired at the campsite but still in good spirits after a very trying days walk
A wet day
Day 3: Monday July 6th 2015, Dalegarth Campsite – Conniston Hall Campsite.
This was a very challenging day for the group with a lot of ascent and poor weather. Initially the day started overcast however it deteriorated to low lying cloud and persistent rain until evening.
From Dalegarth they set off SE around Crook and Green Crags (400m). I met the group at lunchtime at High Tongue near Seathwaite. The group found the mornings leg navigationally very challenging however they took their time and managed to locate the checkpoint. The local forest had been felled recently making navigation very challenging however they made good use of high points to spot landmarks they could identify.
Day 3 – Waiting
Eventually after much sitting around (fairly common in the assessing world) everyone started to appear with the Silvers first.
I spotted the Golds as they were making their way over the stepping stones.
Silver and Gold appear
After a good rest I left them and headed up onto the slopes at Walna Scar to observe them. This is where the low lying cloud came down and the rain started. I observed though that the team took a wrong turning at the base of Long House Gill and were heading up towards the Old Man of Coniston. I did intercept them before going too far and got them to work out where they were heading and soon they were going up over Walna Scar (600m) towards Coniston. Two of the group were suffering from foot injuries so I observed that they were travelling very slow but steadily. The visibility became very limited and I moved in closer to the group to ensure that they stayed on the right track.
With good navigation they found my checkpoints along the Walna Scar road and were soon down into Conniston. The weather was atrocious however the team spirit was great with everyone helping to keep their spirits up by singing and keeping to a steady pace.
The campsite was on the edge of Conniston water and very basic and open to the elements. Everyone was wet however they soon had their tents up and dinner on. I left them tired but in high spirits.
Another wet day but good spirits
Day 4: Tuesday July 7th 2015, Conniston Hall Campsite – Grizedale
The final day was much better in terms of the weather. It was clear, cloudy and there was little wind. The team set of early from Conniston following the footpaths to the head of Conniston Water at Monk Coniston.
The Silver team successfully navigated to the finish point and were delighted to have made it.
Silvers finished
The Gold team navigated up through the woods onto Monk Coniston Moor as well however due to the many tracks in this area the team err’d slightly but managed to make their way to Grizedale on time for a revised pick up there.
Even though this was one of the better days they were tired and some carried injuries they stayed positive and carried on. I observed them helping each other and this allowed them all to finish as a happy team.
Gold finished
Both teams faced many trials throughout the expedition, from injuries, navigational errors, poor weather and some very tough terrain. They could so easily have given up with any of these trials however they chose to work through each one and came through well at the end.
Catch up time again – I ran a bushcraft course with my colleagues Charlie, Dave, Cliff and Alan for the Southern Area Royal Marines Cadets last June in the military training area around Aldershot here in the UK.
This is an excellent area with lots of woodland to roam around and learn about the art of bushcraft.
A great bushie weekend
I wrote three short articles about this weekend back in June for the Wildlife Trusts 30 day Challenge I undertook however this is the full report on the weekend now.
Set up took most of the Friday and we were joined by a number of the Royal Marines staff so it did not take too long.
Setting up the HQ
I wanted the cadets to experience sleeping in hammocks so brought a dozen or so along. They took a while to set up but it was worth it in the end.
A dozen tarps and hammocks to put up
The cadets arrived in the evening and after a safety briefing, some supper and a stroll it was time to bed down for the night.
Some cadets were in the hammocks and some under their tarps on the ground. It was a wet night however everybody was mostly dry in the morning.
Bedding down
We ran a number of classes starting with building different types of shelters, and looking at how the tarps and hammocks were set up.
Shelter building
The camp chores such as gathering wood and getting fires going were soon under way. At this stage we taught the cadets how to use firesteels to light their fires.
I had also brought a number of cooking rigs for them to try out. The one in the bottom picture is the Double French Windlass rig and is one of my favourites.
Setting up the cookhouse
I wanted the cadets to feel comfortable so we spent quite a lot of time setting up different apparatus for cooking such as this Broiling rig or just taking time to chill out (bottom left).
One rule I had made at the very beginning was that unless there was an emergency there was to be no running. Quite hard for Marine Cadets to do I know however the feel of the weekend was to be one of a relaxed atmosphere.
Learning the art of Broiling and doing nothing
So relaxed that magically some cup cakes appeared in Dave’s lap.
Charlie had a good time ponnasing some trout around the fire and it tasted equally as good as it looked cooking.
Taste comes in many forms
We spent quite a while learning about knife safety, battoning and carving. Then later in the evening Dave and Cliff ran a stalking game and Atlatl range.
Knife work, stalking and Atlatl
Once the cadets were bedded down the staff relaxed around the woodland TV to plan the next day out (and have a cupcake or two).
Some Woodland TV
I think you can tell by the happy smile on this cadets face that the hammocks were a success.
Morning all
Our resident master chef Alan soon had breakfast organised with plenty of sausages and bread on the go.
Brekkie time
Classes began again soon after and I ran the group bowdrill sessions. Every team that did this got an ember and successfully blew it to flame. No mean feat considering how damp everything was.
Group Bowdrill
We tried out the handrill however without success. The cadets and myself gave it our best shot but the conditions were not with us for this one so we went back to using the bowdrill.
Having a go at Handrill
Some groups also carried on with carving their butter knives. Some ended up as pointy sticks (teenagers tend to do this for some reason) however we did get a number of very nicely shaped and functioning wooden knives carved in the end.
More knife work and archery
Cliff ran another stalking game involving water pistols however they all failed to work so improvised with squeezy bottles instead (worked a treat so I will be using them in the future).
I had also brought along a number of Father and Son survival bows for the cadets to use on a short range and they were soon happily pinging the arrows down range.
Stalking and archery to finish
We had to pack up on the Sunday lunchtime so it was over before we knew it however it was a great weekend.
My aim was to show the cadets how to make themselves comfortable in the outdoors and to have fun so that when they went back out again to practice their field craft skills they would have a wider and better understanding of the nature around them.
On my trip to the New Forest last May with the Sea Cadets there were a few unusual and beautiful sights to be found.
Many of the wildflowers in the New Forest get cropped back by all the animals grazing but looking closely I found some lovely Bugle, Tormentil and Lousewort.
Cool Colours
I spotted a log pile of conifer wood and a number of the trunks were made up of two trunks merged together. Quite a weird sight to see what looked like weird robotic eyes looking out at you as you passed by.
Tree Eyes
While walking around we came across two Holly trees that were joined together by a horizontal trunk. It made for the perfect seat.
Also I spotted what looked like a small vole rummaging around in the grass (bottom left). He spotted me and played dead so letting me get up real close.
And as usual there were plenty of bracket fungus to be seen across the whole forest.
Micro and Macro
Since it was May there were plenty of seedlings around. There were plenty of Beech seedlings on the ground but I did spot one snuggled into a hollow at the base of an Oak tree. It looked lovely however not a good place in the long term I think.
We had great weather all weekend at Ferny Crofts campsite and as well as running the usual camping courses for the cadets we managed to fit in some Basic Expedition Leader (BEL) and Duke of Edinburgh (DofE) training.
A great weekend
The gentleman you can see playing golf with some pony poo is Chief Petty Officer Paul Townsend of City of London Sea Cadets. Paul has managed this weekend for a number of years now and it is one of the main weekends in the units diaries.
We had a great time navigating in the woods, playing woodland Jenga with logs, arm wrestling or just helping each other along.
Serious Fun
The temperature was well into the late 20,s so some of the cadets took it upon themselves to cool things down.
Silly Fun
We met up with the BEL staff monitoring the DofE groups along the way, helped each other and learnt a thing or two from the staff.
Learning and Safety
One of the things I like about this weekend is that we get excellent cooking from our very own RAF chef Simon. Simon has the uncanny knack of taking a few basic ingredients and turning them into a delightful meal.
Good food
In the evening I lit a Finnish candle and I managed to get some amazing Fire Faces from it. How many can you spot?
Woodland TV
The Sunday is a day of stances. The BEL students ran a variety of classes such as camping kit, compass work, food and first aid.
Sunday Stances
Charlie had a great morning teaching the cadets how to use both modern and traditional firesteels.
Fire steels – Modern and Old
In no time he had them blowing tinder bundles into flame.
Flammage
Once the fire was going well Simon had the cadets making the best Shmores (melted marshmallows and biscuits) you could imagine. I managed to get myself a decent sized one eventually.
Shmores
There were a lot more activities going on incling the Atlatl being run by the DON Lt Cdr Mark Macey (I am sure Mark is a secret bushcrafter at heart), running the DofE, campfire cooking and volleyball.
A busy morning
While we were doing all this a group of cadets with Paul were performing an honour guard at Boldre church for the HMS Hood Remembrance Service.
I have never gotten to this service as I have always been running the camp activities but every year I love to see the pictures of the guard.
HMS Hood Service
That was the end of another great weekend so here is to another great one next year.
Day 30 of the 30 Day Challenge has arrived for me and a lovely day it was spent walking by the River Loddon here in Hampshire with my family.
We decided to head off down some of the tracks Alison uses to run along and explore them in a bit more detail. There were plenty of beautiful horses grazing in their paddocks along the way and a perfect bridge for Pooh sticks.
Pooh Sticks and horses
I was particularly glad to be at home for this final day and to spend it with Alison, Catherine and Finlay just having fun outside with nature.
Riverside fun
We soon headed out onto the fields as there were lots of private property signs discouraging us from going further along the river. There was though plenty to find in the fields and the hedgerows such as these Poppies Alison found in the wheat..
Across the fields
I spotted the tiny little Shepherds Purse plant along the path and there were beautiful thistles growing in the hedges.
Styles and Shepherds Purse
The path took us across a field and Catherine spotted herself a little moth hidden in the grass. There were butterflies flitting about everywhere but too fast for me to photograph.
Zooming in
There was plenty of more exploring to be had both in the grass and the hedgerows. I spotted some lovely Woundwort by a bridge and Finlay got himself part of wing from a recently killed bird.
Fun and Finds
As it was a school night we could not stay long so it was soon time to go home. We got in one more set of Pooh Sticks, climbed a few logs and Finlay got himself a large Pheasant feather.
Heading Home
That is it for me for the 30 Day Challenge. It has been a challenge to make time every day for nature however it has been well worth it – a real tonic you could say.
Finish up
The Wildlife Trusts no doubt will run this again next year but in the meantime the next project is Random Days of Wildness. I can work with that I think.
Thanks for following me on this journey over the last 30 days.
Day 29 of the 30 Day Challenge was I am afraid the hardest day of them all so far.
I was in class all day followed by an evening of delayed train travel (I am still on the train as I write this).
I managed to get this nice shot of some Meadowsweet on the canal side at Shipley as I left the office to head home.
Fleeting Wildness
Today has reminded me of how lucky I have been to manage to squeeze time in each day to do this challenge over the last month. I was desperate to get some more pictures but the battery in my camera gave out (switched itself on in my bag somehow) on the way home that I forgot that part of the challenge was just to get out and about to appreciate nature – even if that was just for a few minutes.
Looking at the canal picture I think I managed that even if it was just for a minute in my otherwise busy working day.
Day 28 of the 30 Day Challenge has found me up in Bradford. I am here for one night only and I am right in the city centre.
After a quick check on Google Maps I decided to have a mooch around the gardens of Bradford Cathedral. The Cathedral has a garden that is a real oasis of peace and beauty in this very built up area.
Bradford cathedral – An oasis of nature in the city
As soon as I walked up the steps into the garden I spotted some lovely Ivy Leaved Toadflax clinging to the wall. I love this little flower as it will grow in places where other flowers fear to tread.
As I walked to the end of the wall there was a building with this rather spectacular bike in the window. It had been decorated with all things nature – it even had a nest on the handlebars – quite a site.
Natural and man made nature
There were many wild and domestic flowers around the Cathedral but the Red Valerian and the Foxglove got my attention.
The whole area around one side of the Cathedral was paved in gravestones and they made quite a contrast to the vibrant colours of these flowers – Life and death you could say.
Life and Death
As I left the Cathedral I spotted smoke on the horizon so I set off to investigate.
Dark Skies
I came to a bridge over the railway and was confronted with this. The trains were going right through the smoke and by the smell I can only guess that a dump full of tyres had somehow been set alight.
Quite a contrast to the quiet beauty of the Cathedral.
Bright Day – Dark Skies
I did not know what I would find when I went out for my Bradford Bimble but I am glad I did.
Day 27 of the 30 Day Challenge found me running a survival session for our local Beaver group – the 2nd Bramley Beaver Scouts. My son is a Beaver so I was more than happy to run this.
I can only publish a few pictures due to the Scout policy on this and must apologise about the quality of the pictures as I had left the focus on manual instead of auto.
I set up a scenario where the Beavers were lost in the woods and in trying to find out where they were, they found a ‘supposed’ aircraft crash site. Everything they found at the site such as a discarded parachute was put to use.
In no time they had the chute up to offer them some protection from the sun.
Rigging the chute
Once the chute was up the Beavers went out to collect wood and tinder for their fire (all strategically placed for speed as we only had an hour and a half for the whole event).
The Beavers lit the fires (we made two) using firesteels and we set up a cooking rig to boil water in a couple of kettles (a brew for the staff).
Getting the fire ready
I had set up a load of hammocks around the crash site for the Beavers to try out. I took ten at a time on the firelighting while the other ten were told to conserve their energy and rest up in the hammocks. I had no arguments on this from any of them.
Hammock time
Once the fires were going we set off to do two other activities. I asked Amber (aka Kiwi) if she could run a drum stalk. This is where the Beavers are blindfolded and they have to walk towards the sound of the drum and touch the drummers forehead. All the Beavers managed this. It is a good game for teaching them the importance of using all their senses and not just their sight.
Getting the tea on
The other activity was the Atlatl. They had a great time pinging Atlatl darts down the range to finish off.
Some Atlatl time
I had a great time with this event and by the smiles on the Beavers faces afterwards I think they did too.
Finlay and Catherine had their friends Lisa and Finlay ‘D’ around for the afternoon. I took them out to the woods near Silchester and we brought along some Story Sticks. I have heard them called Journey Sticks but their job is to tell a story of a journey.
I had made them a Story Stick each with twine and elastic bands wrapped around them. As we went for a walk we started to find interesting and colourful stuff to attach to the sticks so that they could at the end recall their journey.
We started off next to some of the most beautiful poppies I have ever seen.
Off we go
As the kids went off finding stuff I took a closer look at the flowers. The inside of the Poppy flower seemed quite psychedelic with all its strong colours.
Beauty
We had a great time munching on Bilberries, scrambling on fallen trees, finding what looked like very fine sheep fleece and just watching the pond.
Finds and fun
We took a break at the pond to have a snack and take in the view. The boys wanted to be zipped up in the hammock and the girls took the opportunity to tickle them without fear of retaliation.
Chilling
On the way back we took time to gather more finds for the sticks, watch the sheep and flowers, and to just run.
Heading back
Our completed Story Sticks ready to take home – quite beautiful.
Story Sticks finished
Next time you go for a walk remember your Story Stick.
Day 25 of the 30 Day Challenge brought us to RAF Benson. Our friends Tracey and Scott invited us around for a barbecue today – quite apt being it is Armed Forces day here in the UK.
The weather was perfect for me with a nice mix of clouds and sunshine (I am dreading next weeks heatwave when it comes). Tracey and Neil put on a great spread and just as I was getting comfy with a beer in my hand there was an almighty racket of squealing from the kids……..
Barbie on the Base
It turned out that one of the lads William had found himself a large spider and was showing him to the rest of the kids. They were showing their appreciation by quite vocal squealing.
Also up above a couple of Red Kites were checking us out for a chance opportunity to get some food and my friend Paul pointed out some Ladybird larvae to me that was sitting on a leaf.
Initial spots
Soon the food was all ready and it was time to tuck in. While I was chomping away I decided to carry on the theme of bug spotting so took off afterwards with Finlay and William to see what we could find on the base.
Tucking in
There is not much dead wood lying around on the base so we really had to look hard to find bugs but they were there.
We spotted some Lime Nail Galls standing proud. On some leaves there was only one but on others you could find twenty or so.
Sheltering from the sun under an Ivy leaf we found a snail and on the Blue Iris (at least that’s what I think it is) there were loads of little black aphids.
Lots of spots
The spot of the evening was the pyramidal orchid covered in aphids. We found this lone plant in the long grass but no others.
I took the picture of the Bluebottle just because of the lovely colours it radiated from itself.
Bugs galore
When we got back the ladies were stretched out enjoying a chat but were being press ganged by the kids to do some handstands.
Alison I must admit can do an excellent cartwheel and headstand – nice one.
Legs galore
This was a lovely way to spend Armed Forces Day, in good company, in good weather and with some excellent bugs as well.
Day 24 of the 30 Days Challenge found us back out in the woods – not for pictures of plants or animals but to collect some wood – some very special and magical wood.
A couple of years ago my good friend Mad Dave Delaney at the BCUK Bushmoot introduced me to the Fire Spirit. These little fellas are supposed to be created so that they can be burnt on the campfire and a then a wish is made upon them.
My kids love them but refuse to burn them (even for a wish). Catherine has had one now for a couple of years and it needed a make over but Finlay needed a new one altogether.
Fire Spirits
We looked firstly for a branch with a good fork (these will be the legs) in it, trimmed it and another straight piece for the arms. Once both were trimmed we headed back home to assemble everything.
Selecting the right wood & a bit of sawing
Needless to say we could not go to the woods without climbing a tree or two 🙂
You gotta climb
We found lots of leaves in the garden to dress the Fire Spirits. We used hemp cord and damp reed leaves to bind everything together.
Catherine’s Fire Spirit was just a bit loose on the bindings so with a new dress and some fresh cord she was ready to go again.
Refurbishing Catherine’s old Fire Spirit
Finlay helped me to carve a face on his Fire Spirit (the first time I have given him a knife) and then it was a case of dressing his Fire Spirit and attaching the arms.
It started out so well with the kids wanting to go on a bimble with their scooters. We decided to visit our favourite woods at the Frith.
A scooting Bimble tonight
The Frith is an ancient woodland with a massive electrical substation in the middle of it so we can only wander around the edge.
At the far end though there is a small copse off to the side with permissive paths through it (sign posted saying keep to the paths because of ground nesting birds). When we got there tonight, though, the landowner had put up a fence over all the access points and posted signs saying it was now closed to the public.
I have really enjoyed this small oasis over the years and cannot understand why the landowner has done this.
A sad sight – our local woodland has been closed off
We soldiered on though and headed on around the Frith to a place where there is a lovely pond. I ended up carrying the scooters but it was worth it.
Moved on to the pond
I spotted my first Meadowsweet of the year – a real plant of the summer.
First Meadowsweet of the year for me
There was plenty of life around the pond. As the kids had a snack I got down to the serious job of stalking the dragonflies 😉
Catherine spotted the little cricket on the bench she had been sitting on.
Lots of activity
We headed off towards home saying one last goodbye to our old paths on the way.
A last look
It was a lovely bimble but a sad one none the less.
The final part of the Aures Crane Trilogy – The Classic.
I call this one the Classic as it is the design laid out in the book Camp-Lore and Woodcraft. The author Daniel Beard called it a rustic crane fashioned along similar lines as the iron cranes found commonly over 100 years ago over open fireplaces.
The crane is named after Victor Aures, a Scout Master from Buffalo, NY. I found a good article on this from an issue of the Boy’s Life from 1915.
The Classic Aures Campfire Crane
You do not see the classic crane often since it requires a specific configuration of angles on the forks and it’s all too easy to cut through the thin layer of bark and sap wood needed to form the loop on one end.
The Aures – Picture from Camp-Lore and Woodcraft
Measuring
I stumbled upon a good piece of hazel recently with a strong main fork and the necessary secondary fork at right angles to the main one.
The basic parts & measuring up
I had a good pole that I was going to use as the upright and measured the top limb for trimming. I estimated with my eye the amount of wood I would need on the top limb to form the loop (I call this section the tail before it is formed into a loop).
Trimming the excess
Trimming
After sawing off the excess I started the slow process of removing all the excess wood on the tail. It is easy to remove the wood at first but try and remove it evenly as you work.
Removing the excess wood from the wrap
I tend to work from the end of the tail and work up the crane towards the fork. This helps in reducing the chance of chunking through the wood and destroying the crane.
In the pictures below I have worked my way down to the pith and then just passed it. I forced myself at this stage to take my time and work methodically.
Important to trim evenly from bottom to top
Eventually I could make the wood bend slightly (it was only a couple of centimetres wide now). I scared myself when the bark cracked but that is OK – it is the sapwood that needs to bend.
When bending down the wood do it slowly and do not try and force it.
Trimming and flexing
I finally had just a thin piece of sap wood left that could be bent a bit more but not fully. To help this process along I used the tip area of my knife to cut out some more of the wood without making it any thinner than a couple of centimetres.
To help the bending process I left the crane in a stream to soak up some water. If you have the tools to steam bend wood the job would be much easier.
Last few scrapes and softening
Once the tail was very pliable I flattened an area where the tail would be whipped to the crane then marked the tail and the main body of the crane with a pencil so that I retained the size of loop I wanted while I whipped it.
Prepping for some whipping
Whipping
In the book Camp-Lore and Woodcraft, Beard’s drawing shows the tail being tied off with strips of bark. I will use bark when the crane has fully seasoned (it will shrink in the process) but for now I whipped it with some old paracord. I whipped it twice with different cord as that is what I had to hand.
Whipping the wrap
The loop should be big enough for your upright and positioned so that when the crane is hung on it and braced on the fork, the pot arm is level and pointing slightly upwards.
Hangs well
The Pot Arm
I then went to work on the pot arm, carving out little notches so that I could adjust the position of the pot easily along its length.
I also put my usual dimple on the end for hanging another adjustable pot hanger off it.
Carving the pot arm
I took the crane out on a Bushcraft course with the Royal Marine’s Cadets and it was soon in action.
In use alongside another pot hanger
It is very easy to move the crane up and down with light pots (I advise removing heavy a pot from the crane before adjusting the height then replacing it).
The crane also swings easily away from the fire. If you do not trust the loop to hold a heavy pot, you can back it up with a loop of cord.
From above
The Three
I really enjoyed making these three Aures Cranes and hope to see a few more over fires at Bushcraft meets in the future.
All three versions – Classic, Gibbet and the Single Fork
That is it for me on the Aures Crane (I am sure you can come up with some more variations on this), however in the course of my research I discovered a Single Pole Crane – that is next on the list.
Day 22 of the 30 Day Challenge and I am in London until late this evening. I am meeting up with the Grumpy Old Men’s Club for a social hour or two so I thought it best to get out for a wander at lunchtime to see what nature has to offer in the city.
There is a lot of nature in the centre of London but what struck me is that we do seem to like everything neat and lined up nicely. I know nature generally does not like straight lines though like the flowers on the right it can lend to to it at times – so why do we insist on keeping everything neat and straight?
Neat Lines
I took a wander over to Regent’s Park On my Bimble and everywhere the gardeners had been it was all neat, tidy and lined up (with the occasional twirling hedge).
All for ease of maintenance I suppose however if you look closely at areas where nature was left alone you start to see more curves and waves.
Lines and curves
I like bindweed as a flower and also as a plant that is a hardy survivor however in Regent’s Park the gardeners see it as a killer and they try to get rid of it.
it was also nice to see that the gardeners had left many old fallen trunks around for the insects. I found lots of insects, fungi and other wild plants living or growing on them. It was nice to see the randomness of nature here as opposed to the well structured areas all around them.
Nature doing what nature does best
The poplar seeds were floating around and being blown away by the gardeners with their large machines but I managed to find one pile in the crook of a tree that had not been tidied away – all tangled and lying around as they fell.
Randomness
I did though spot a fair few natural straight lines with the likes of these young birch trees (accepted they had been planted but they were very straight at this stage in their life) and the drooping heads of the pendulous sedge.
Lines in nature
In amongst all this I did see nature getting on with its daily business, be it this bush enveloping the bridge, the bugs feeding on the flowers or the ducks nesting quietly on the ponds.
Getting on with life
On the way back to the office I passed the Faculy of Public Health and they have a small garden outside (behind very big bars) dedicated to poisonous plants. I wil go back there with my digital camera to zoom in on more of the plants later but I was able to photograph these plaques for Ivy – never knew Ivy had been used to prevent hangovers – relevant as I am off to meet the Grumpy Old Men’s club tonight 🙂
Who knew – Ivy has been used to prevent hangovers
Regent’s Park is a beautiful place to visit however the beauty is not all in the straight lines and stunning borders – for me it is in these little pockets of un-managed nature left behind by the gardeners.
I had to trim a rather overgrown Leylandii in our front garden and I voluntold the kids into helping me. They had to tell me if anyone was coming (the branches hung over the pavement) and transport the cuttings back into the garden.
Once that was sorted we started the laborious job of breaking of the branches so that they could be used for thatch for the den they were building.
Trimming the Leylandii
Then it was a case of dragging all the cuttings into the back garden (It was just Catherine and myself at this stage as Finlay had headed off to Karate).
Once we got all the cuttings in the back garden Catherine and I leant some of the bigger branches against the frame to catch the cuttings (pointing upwards). The we started to weave in the cuttings (pointing downwards) to thatch it.
Gathering and set up
There were plenty of holes in the thatch so Catherine went inside and would stick her little hand out where she could see sunlight. It was then my job to thatch it.
Checking for holes
We laid a lot of sticks on the outside to hold all the thatch in place in case the wind gets up.
Finlay was back after 8 pm just in time to finish it off with a few extra additions
Final touches
I think they have a proper little den to play in now for the next few days.
They had decided for tonights activities to visit Morgaston Woods near The Vyne National Trust property to explore the area, discuss the idea of self reflection and of course – toast a marshmallow or three.
I tagged along as an interested parent and also to meet the boys as I will be working with them next week.
Reflection at Morgaston Wood
The Beavers split up into about five different groups and chatted about what they themselves felt they had to be thankful for in life. Once they had decided they wrote their thoughts on a tag and hung them of a line to swing in the breeze.
I found the whole process quite relaxing, fun and crucially quite mentally stimulating – I too had to take part 🙂
Messages in the wind
A fire was lit in a tray and I managed to catch the initial flare as all the kindling went up – made for quite a flame. The flames soon died down and after a little while (a story was read about pigs and poo – laughed too much to understand what it was all about) everyone got on with the serious business of marshmallow toasting.
Marshmallow time
There was time for a bit of daft fun in the lean too shelters while we were heading home.
The lock up
As we drove Finlay’s friend William home we spotted some Poppies growing on the roadside – could not pass up the opportunity for one more picture.
A Poppy find on the way home
I liked tonight as I did not have to think about what to do and the Beavers were an excellent and well behaved bunch.
I am looking forward to working with them next Monday with a spot of survival training.
This is the second of my blog posts on the Aures campfire crane trilogy. I call it the Gibbet crane based on a pot hook I found mentioned in the book Camp-lore and Woodcraft. The crane does look a bit like a traditional gibbet but the name apparently refers to the overlapping joints used in its construction rather than its likeness to an instrument of execution.
This is a great project for the longer-term camp or if you want a bit of practice carving joints and whipping.
The Gibbet Aures Crane
As usual the tools for making the crane are to be found in most bushcrafters’ backpacks – a knife, saw and axe. I saw this crane set up many years ago at a camp however I have seen little written up about it in books or online.
I found one piece of wood with a strong fork and a smaller catapult-shaped fork (bottom left below) and I cut a limb with a branch coming out (top left below).
The first job I did was to strip off all the bark from all the pieces.
Tools and basic parts
I placed the large fork up against the pole it would hang off to measure where I needed to trim each limb. To do that I just used my knife to mark the limbs. The top limb needs to be marked to the left of the pole (as you see in the picture below) and the bottom limb needs to be marked to the right of the pole as you see it below.
Carving the top limb
To begin with I trimmed the top limb at its mark with my saw, leaving the bottom one for the moment.
Measuring and trimming the top limb
I laid the small hook beside the end of the top limb so that the hook was pointing towards the big fork and marked where I wanted to trim it. I did not want to leave it too big – just big enough to be whipped to the big fork.
Measuring and trimming the top hook
I wanted the joint to be strong so I put a stop cut into the top of the upper limb so I could cut out a lap joint (also known as a Gib joint).
I then battoned off the excess so I was left with one half of the lap joint, then I trimmed the bottom of the small hook flat to fit snugly against it.
Cutting out the Gib cut on the top limb and hook
Not a perfect fit but good enough.
Putting them together
I then used paracord to whip the two together, on both sides of the hook. I left excess string tied in a knot as the wood was green. As it dries out the wood will shrink and I will have to redo the whipping.
Whipping The Gib joint
Carving the bottom limb
I flattened the upright of the ‘Y’ piece and split out a Gib joint on the lower limb. You have to make sure all the cuts are done on the correct planes so that the hanger will fit on the upright pole without twisting.
Cutting the Gib joint on the bottom limb and fork
After a bit of whipping it was time to set it up and make sure it worked correctly. In the bottom right picture you can see clearly how it all comes together.
Fitting and splicing
Carving the pot arm
I have a particular way of carving the hanging arm (you be as creative as you like). I axe out the basic shape I want, trim it smooth with my knife and cut in lots of grooves along the upper part to allow the pot to be hung on various areas of its length.
Carving the pot arm
Once all the grooves are cut I tend to put a dimple in the end so I can attach an adjustable pot hook. This allows me to hang two or three pots from the crane.
Finishing touches
Using the Crane
This sequence of shots shows the method I use for adjusting the height of the crane when it has a heavy pot attached to it. I swing the crane away from the fire, remove the pot, adjust the height of the crane, attach the pot again and swing it back over the fire.
With light pots you do not need to remove the pot but just lift the crane slightly so it detaches from the upright and then just move it up and down.
In use
In this picture you can see how the arm works with an adjustable pot hook attached to the end of the crane arm.
It looks precarious but with the usual level of care you take around any fire I have found this system works well.
Added adjustable pot hook
Dinner could be in one pot and the kettle on the other leaving plenty of room to sit comfortably around the fire without having lots of uprights protruding out (which can be a problem with other campfire cooking rigs).
Works a treat
I took the set up out on a recent bushcraft course I was running to show some colleagues and set it up with a fixed crane. All in all it worked a treat.
For Fathers Day my main request to the family was that we did something together but outdoors for the 30 Day Challenge.
Alison suggested a barbecue at the Lime Pits nature area near Basingstoke. As soon as we arrived the kids were all over the playground equipment – I do include Alison in this 🙂
Lime Pits Park
It was great to spend time together in a place that holds so much beauty if you look closely.
I found that this is a great place for Self heal and Thistles – Lovely purples.
Family and Nature – Fathers Day request
We had a Red Kite hovering over us for a while, lots of bees in amongst the comfrey and crickets galore. I had to struggle through some nettles to get to my prize find of the day – Large Yellow Loosestrife – a beautiful flower.
Life in the park
Now the barbie could have been a bit of a nightmare. I had set it all up and lit it but it did not take. After a bit of a re-think plan B was to raid the first aid kit for a couple of dressings, found my lip balm (vaseline based) and added a few ash twigs.
A quick strike from the firesteel and up she went.
Then it was over to Alison for the cooking – I know barbies are supposed to be a male preserve but it was Fathers Day 🙂
Barbie time
There was plenty of time to run through the woods or roll down hills or in my case struggle through nettles to get the picture of the Loosestrife.
All having fun
The food was cooked to perfection by Alison on the barbie and there was plenty of fruit afterwards to enjoy – I did manage a couple of beers along the way as well 🙂
Great food
Soon it was time to go home so out came the water bottles for a quick hose down to put out the barbie. The kids for some reason insisted on doing this themselves. I was left with the messy job of mixing it all together to make sure it was properly out.
Time to cool things down
As a final note I must say thank you to Catherine and Finlay for being such great kids today and to Alison for making Fathers Day such fun.