How To… Carve a Kuksa

I came across a fallen hornbeam tree one day while teaching my Sea Cadets some map reading. Attached to it was a burl that produced this beautifully swirled kuksa cup.

Photo 09-02-2015 14 52 19
My kuksa

Before I could drink out of my new kuksa I had to sort the small matter of carving it. As I explained in my previous How To… on Carving a Small Noggin cup the name kuksa (also known as kåsa in Sweden) is probably not the correct term for the cup as it was not carved in a Scandinavian country by the Sami peoples. Also it was not carved out of a birch burl but I like the word kuksa and it was carved out of a hornbeam burl at least.

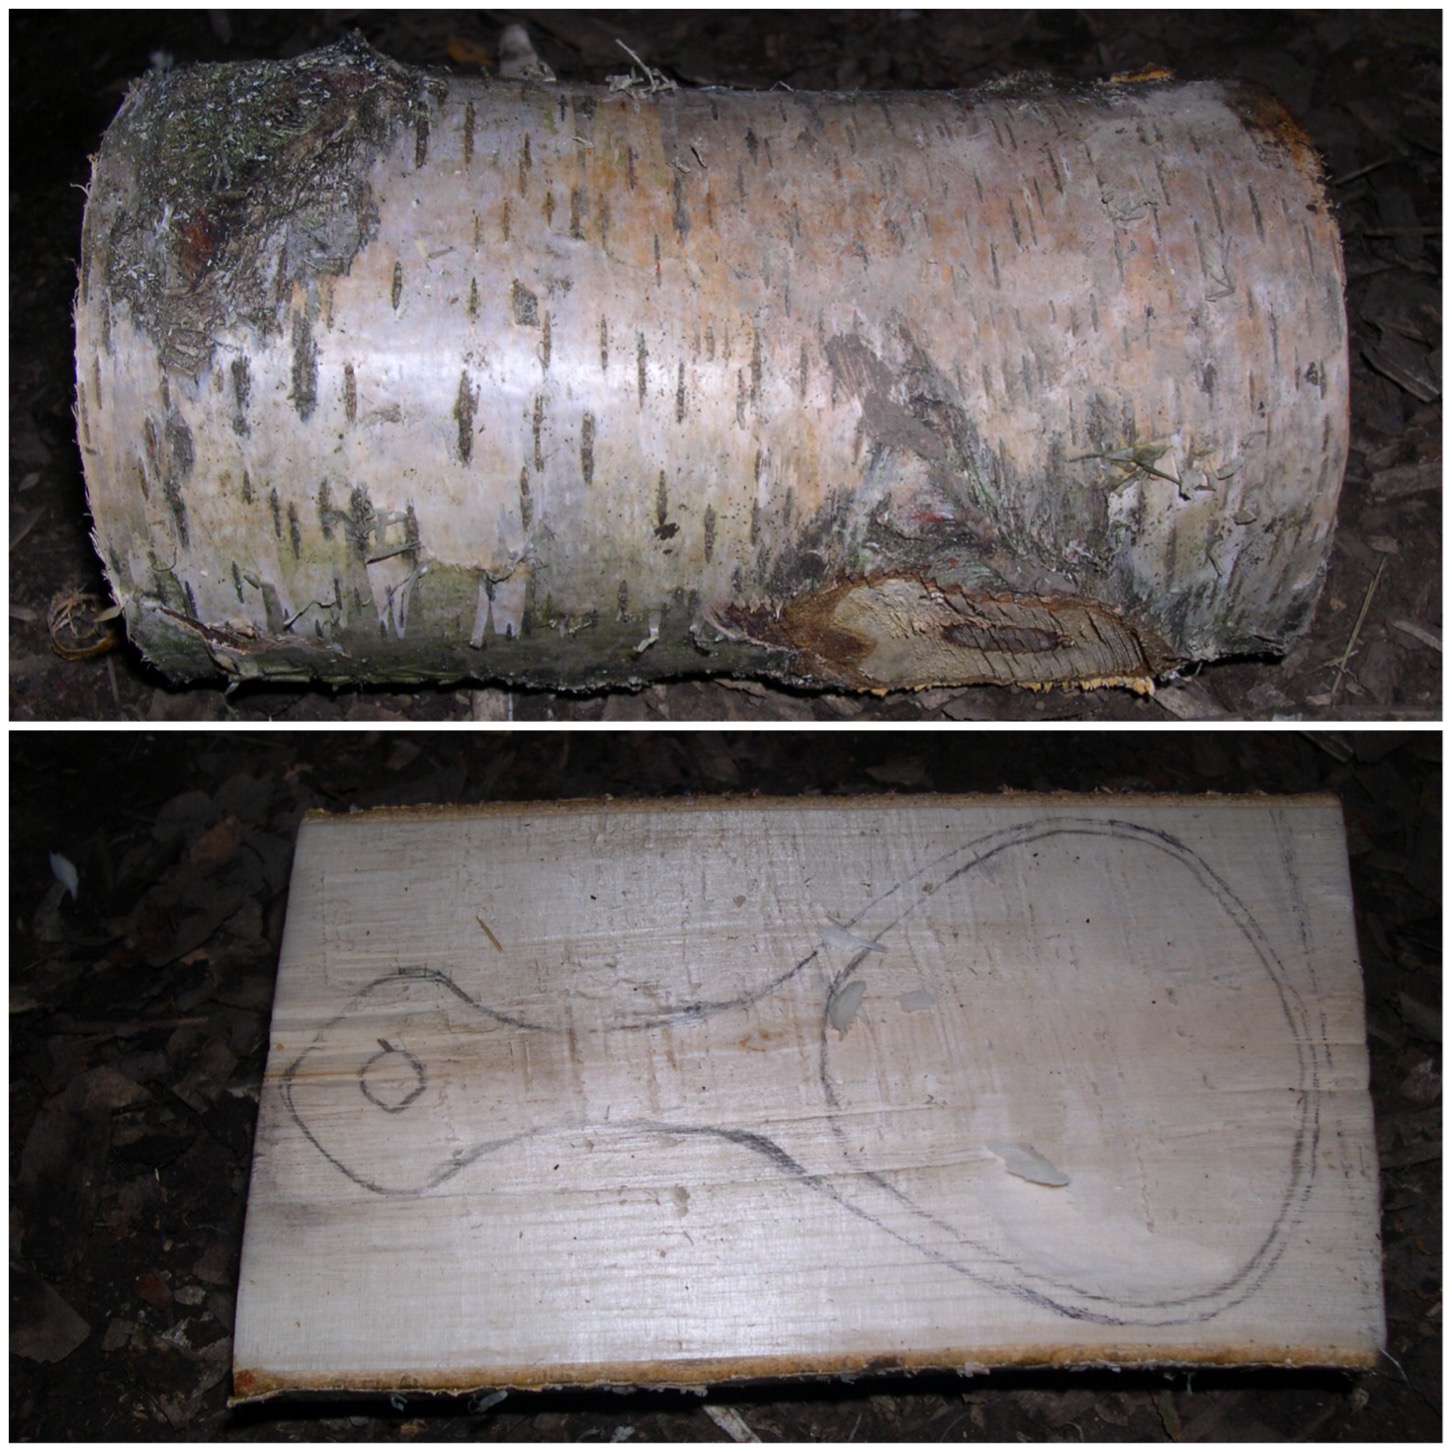
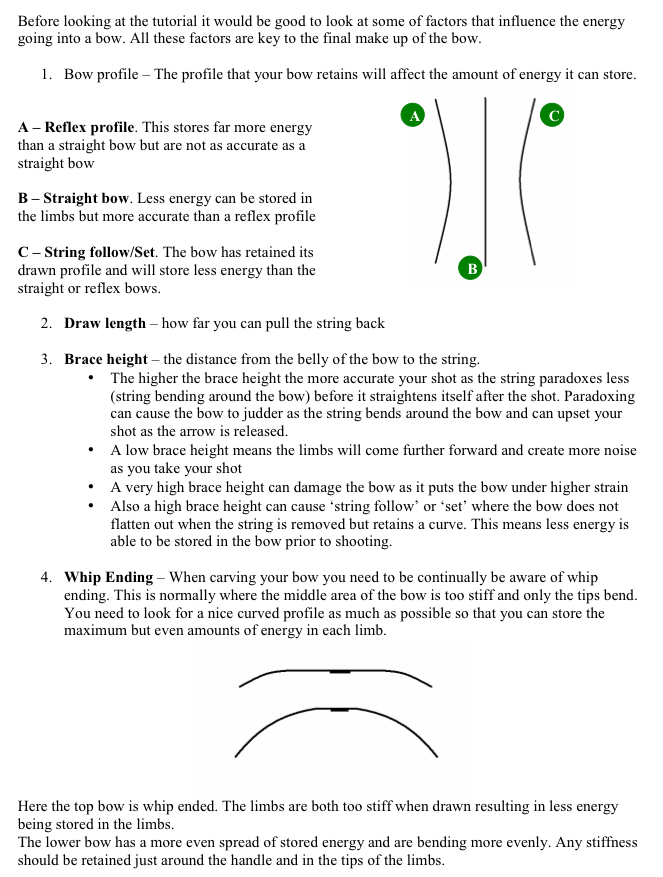
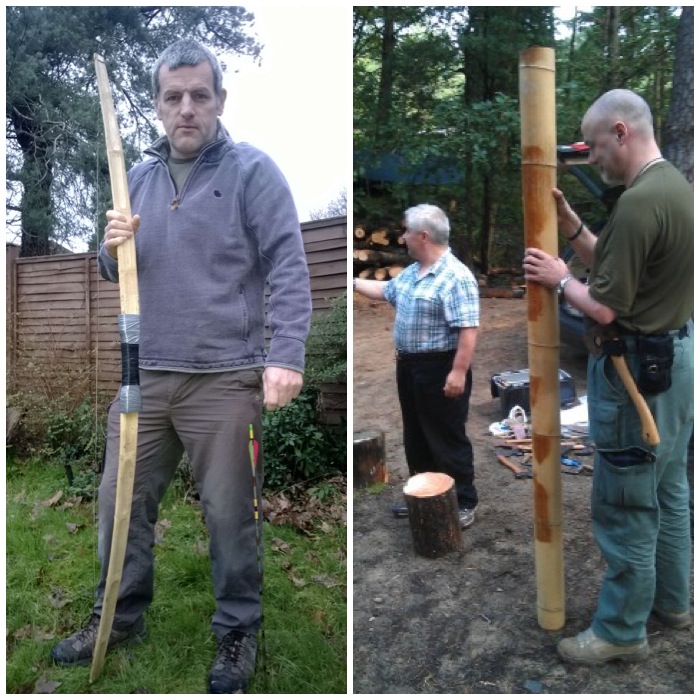
After cutting the burl section from the fallen tree I left it to season for 3 years in a cold but dry area (my garage).

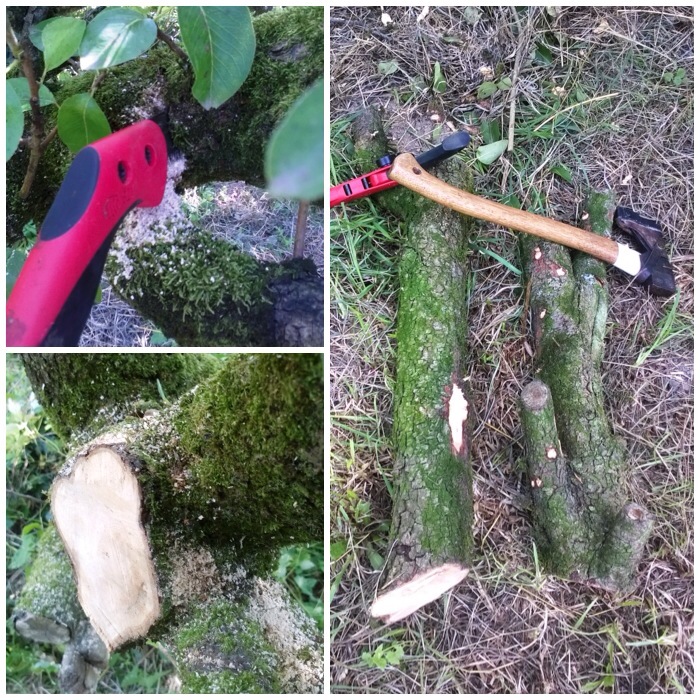
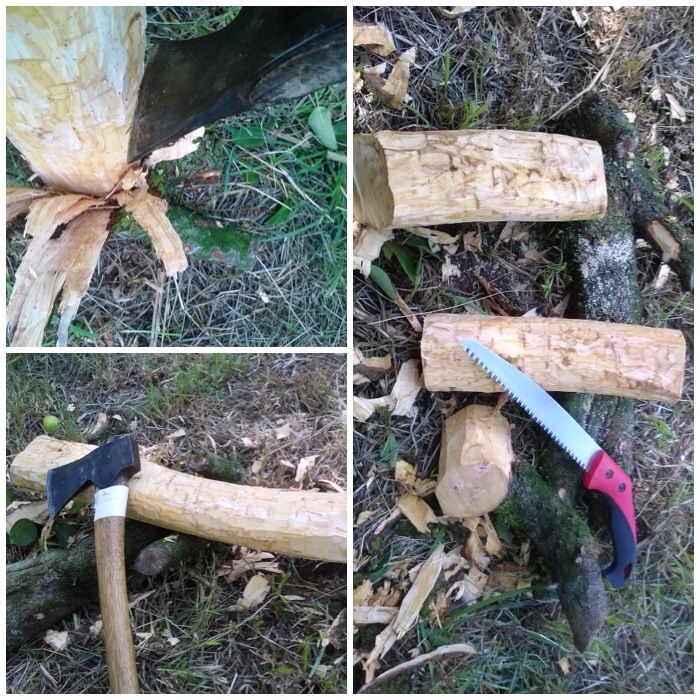
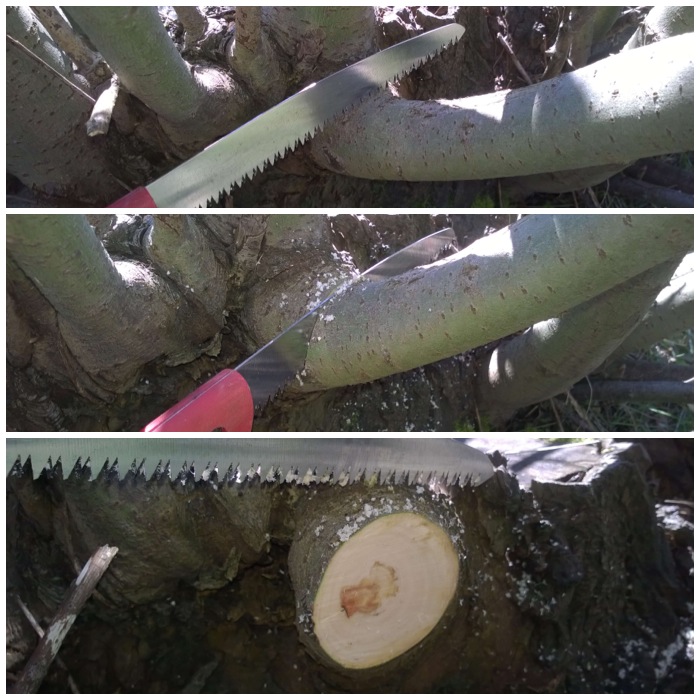
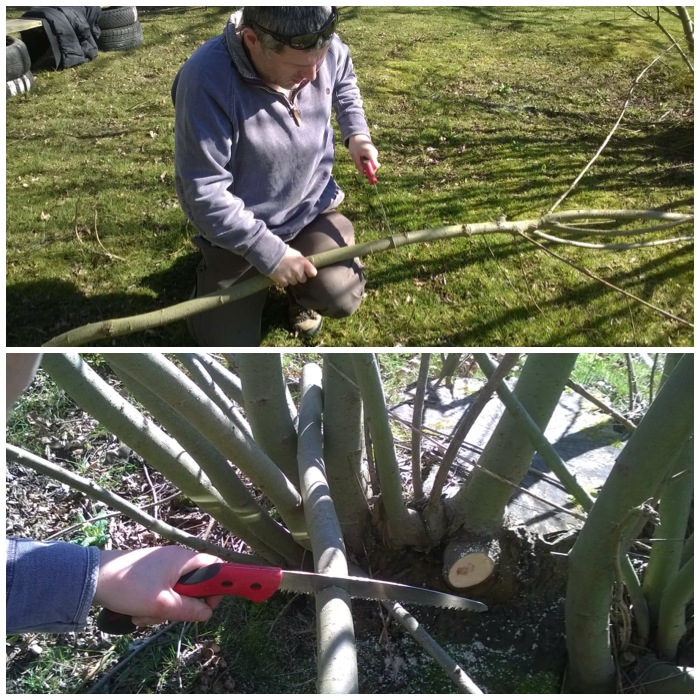
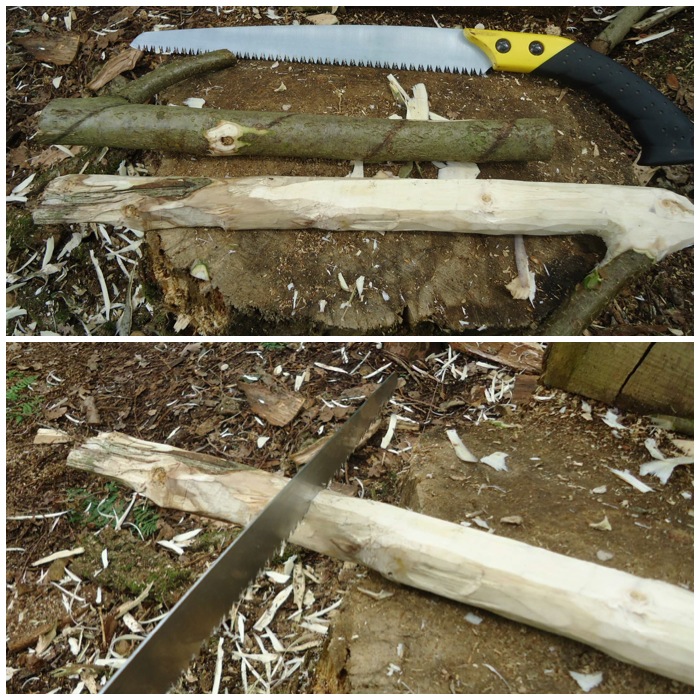
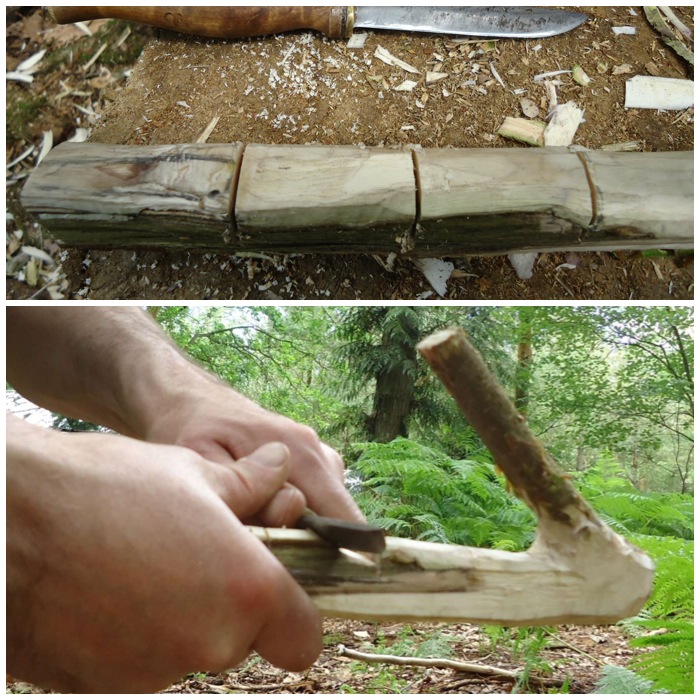
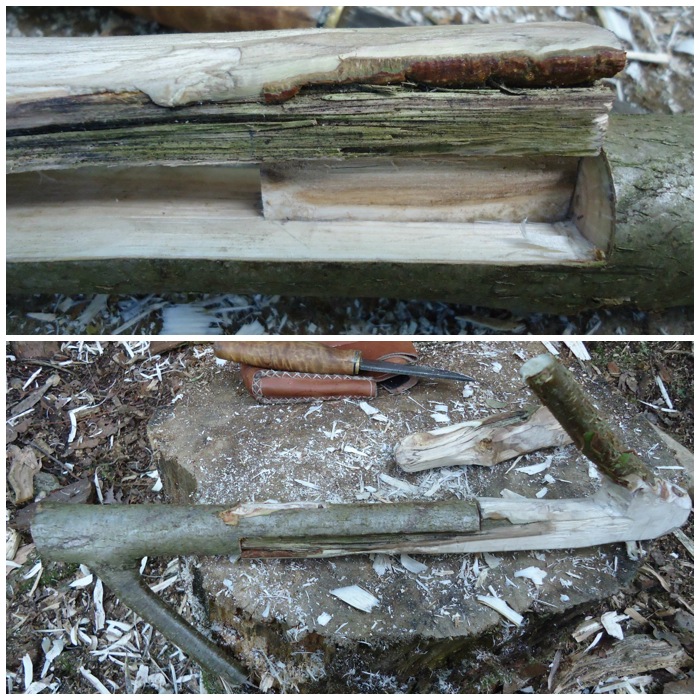
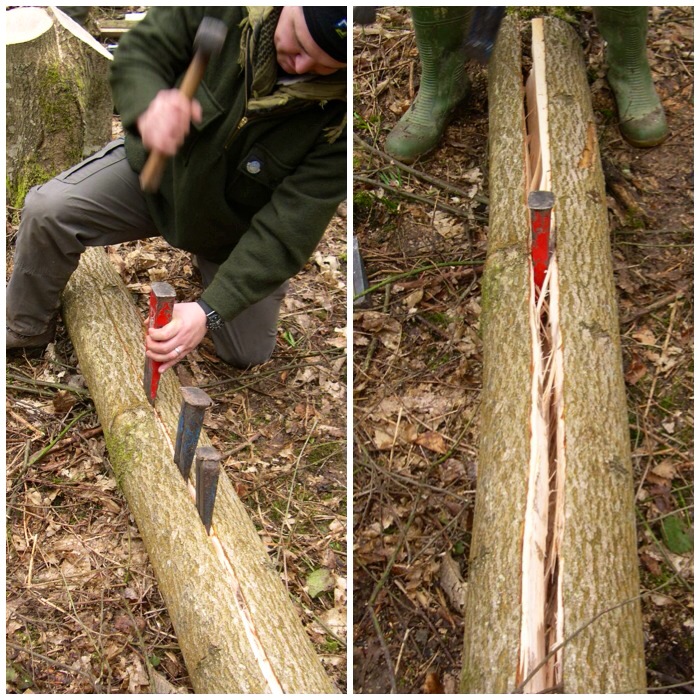
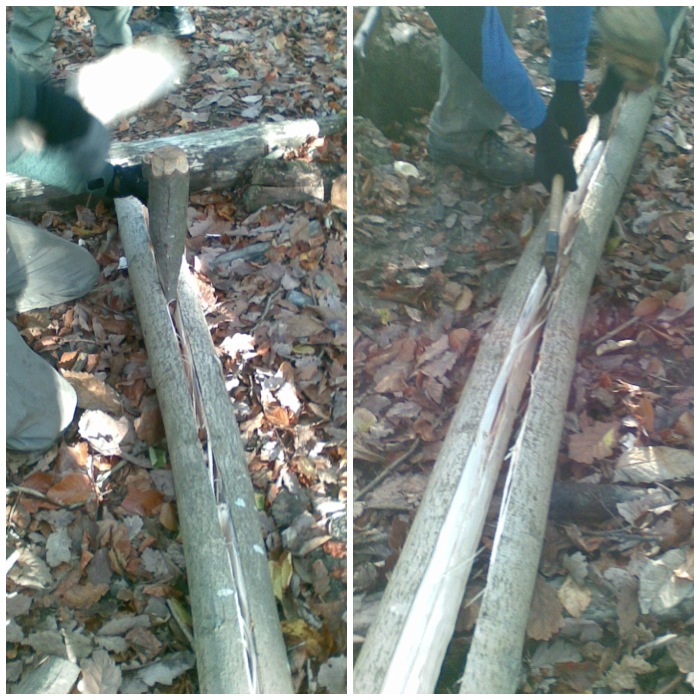
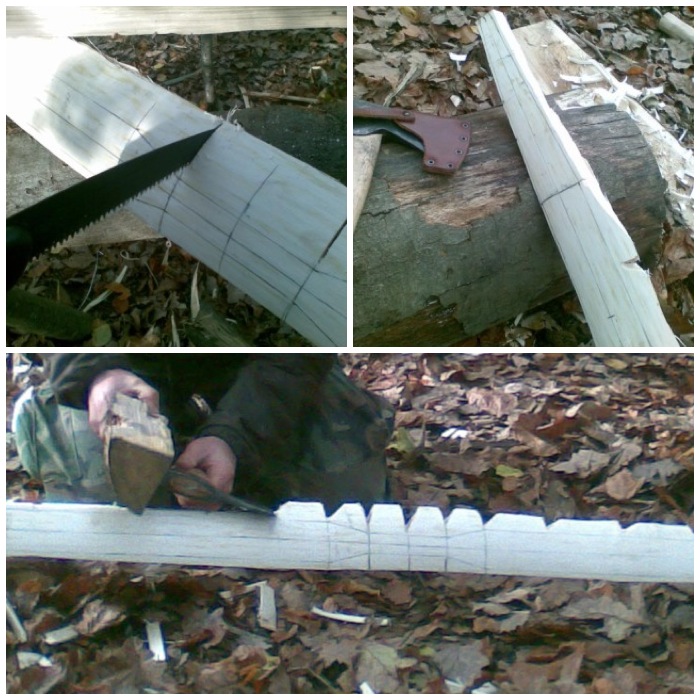
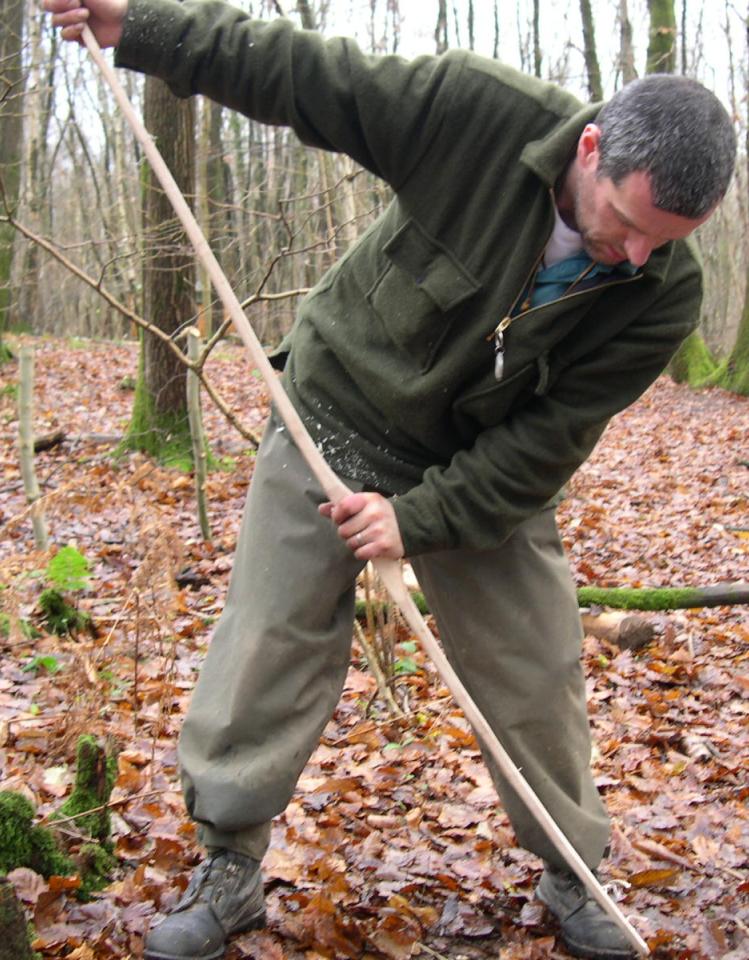
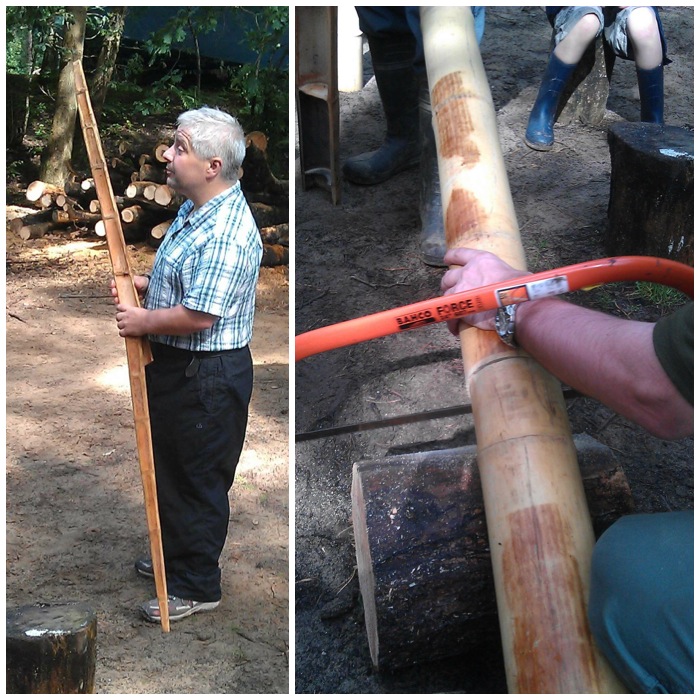
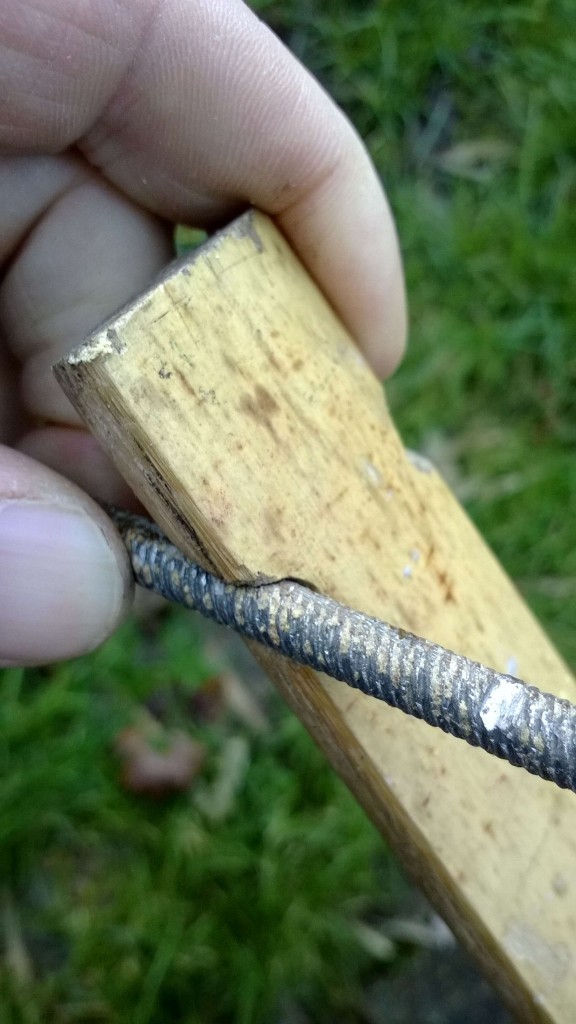
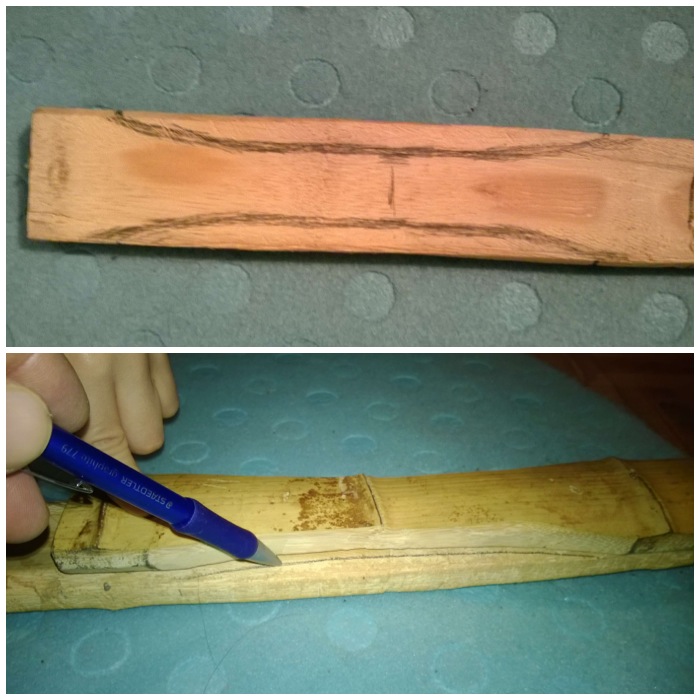
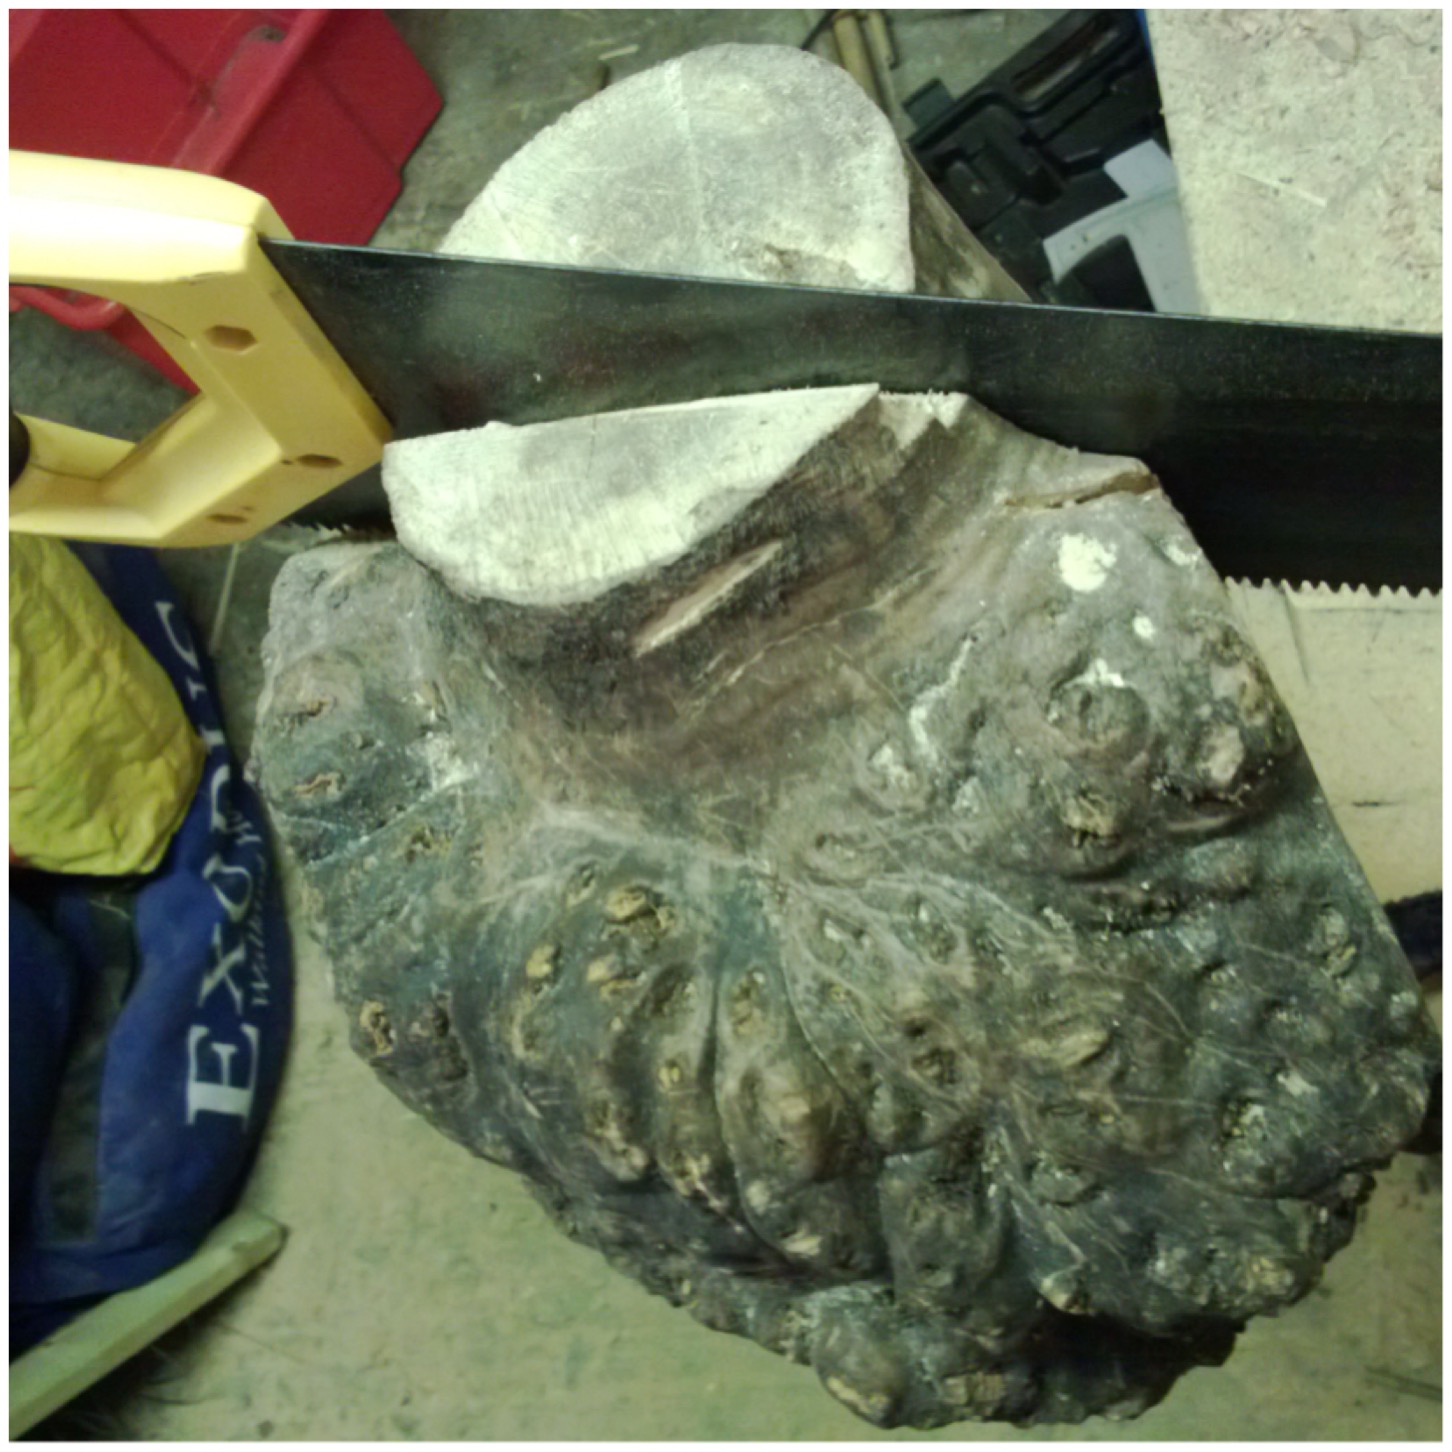
I wanted to create a kuksa that had the swirl of the burl wood and the clean lines of the heart wood. I started trying to saw down the length of the heartwood but that proved too difficult for my hand saw.

Photo 09-02-2015 14 32 46
Hornbeam Burl

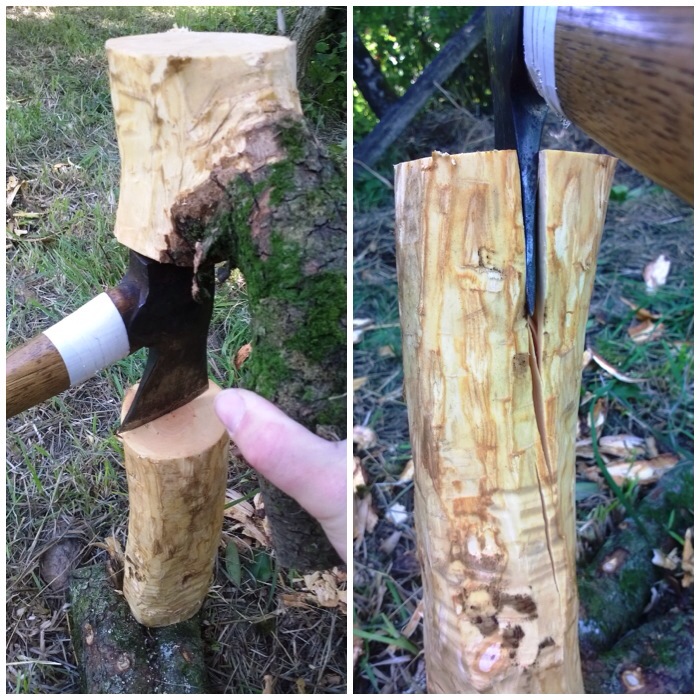
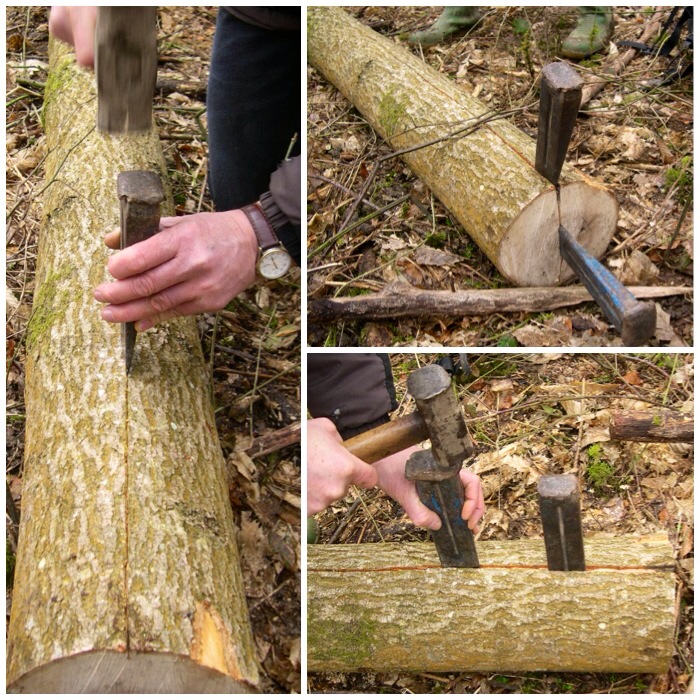
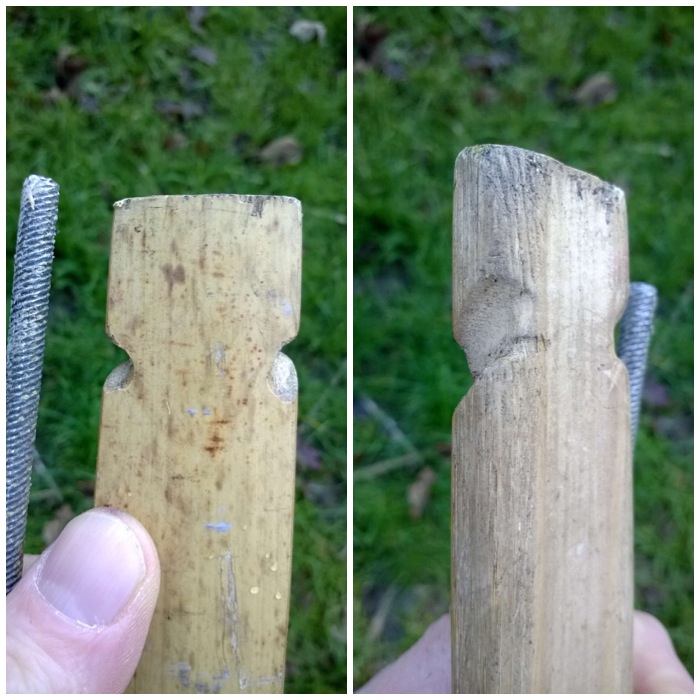
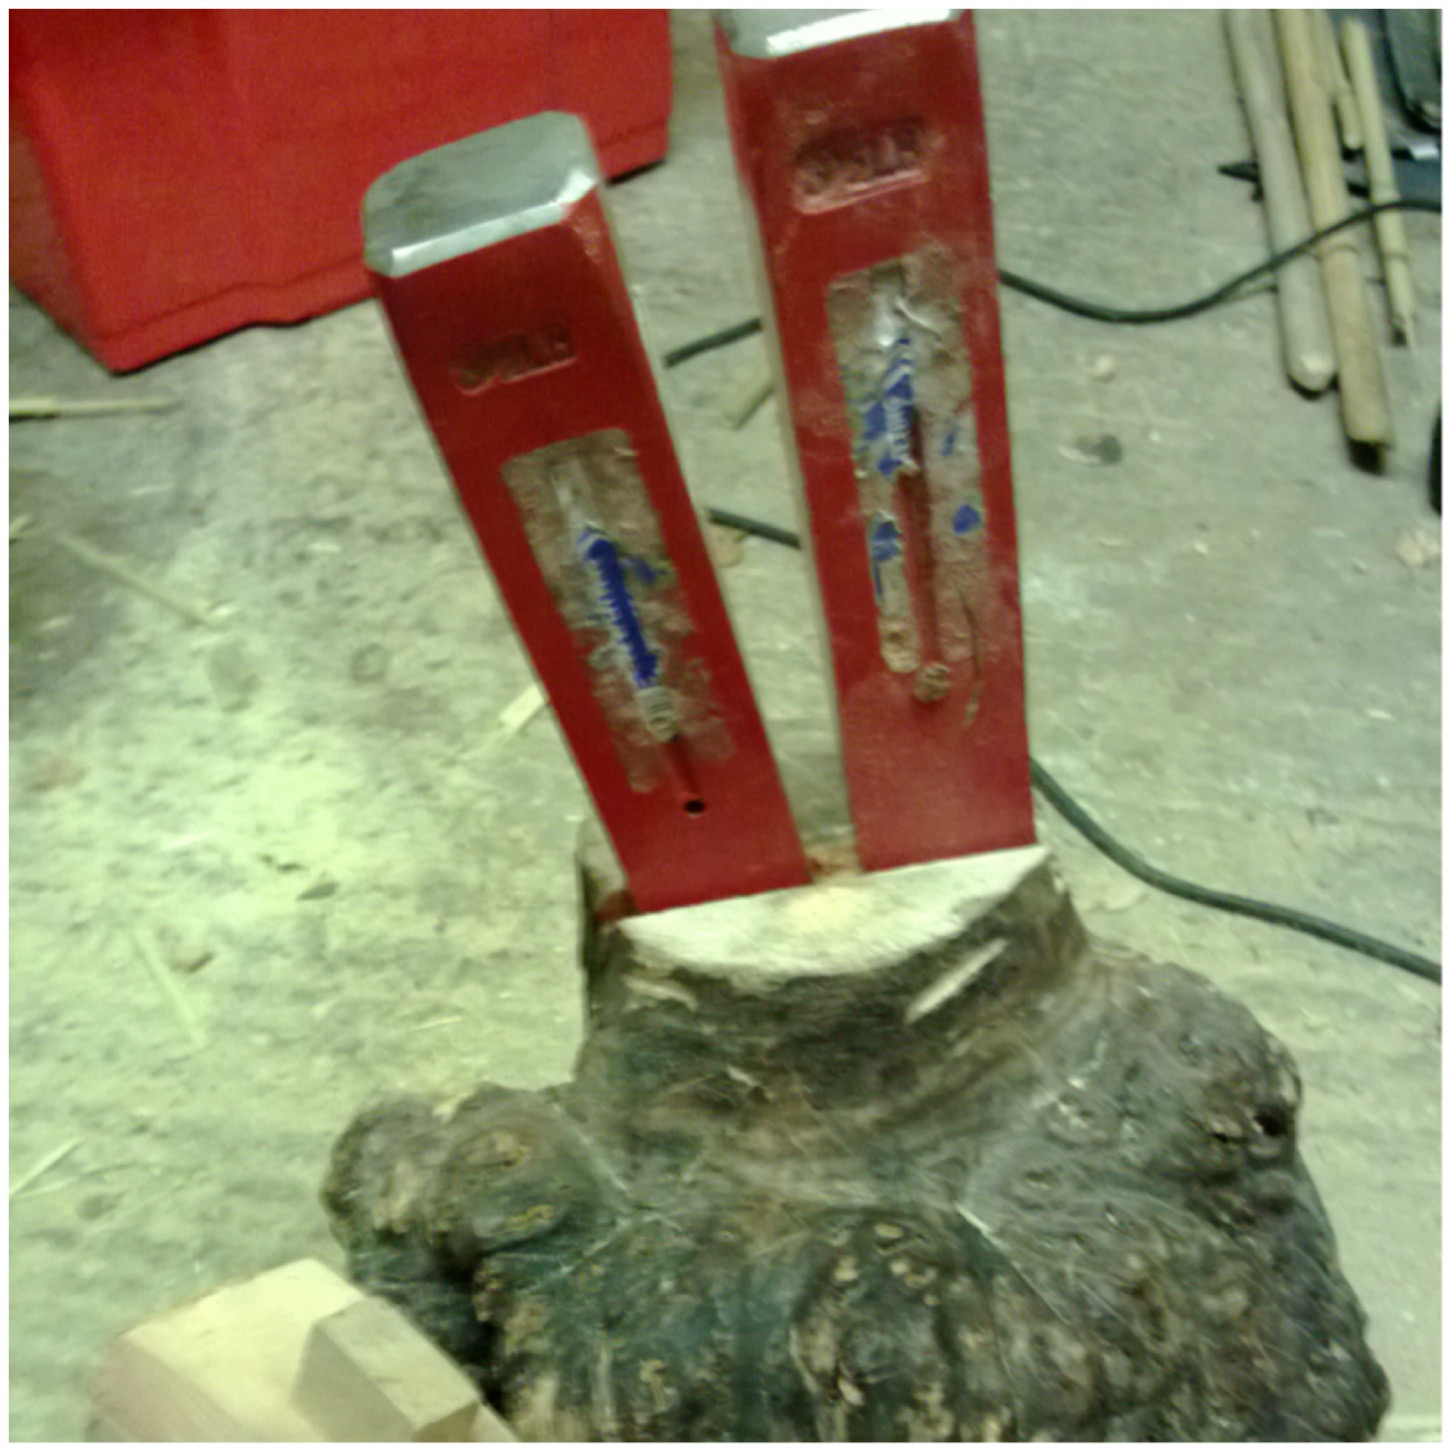
In the end I inserted two of my log splitting wedges into the saw cut and hammered down on them with a wooden mallet.

Photo 09-02-2015 14 32 58
Splitting out

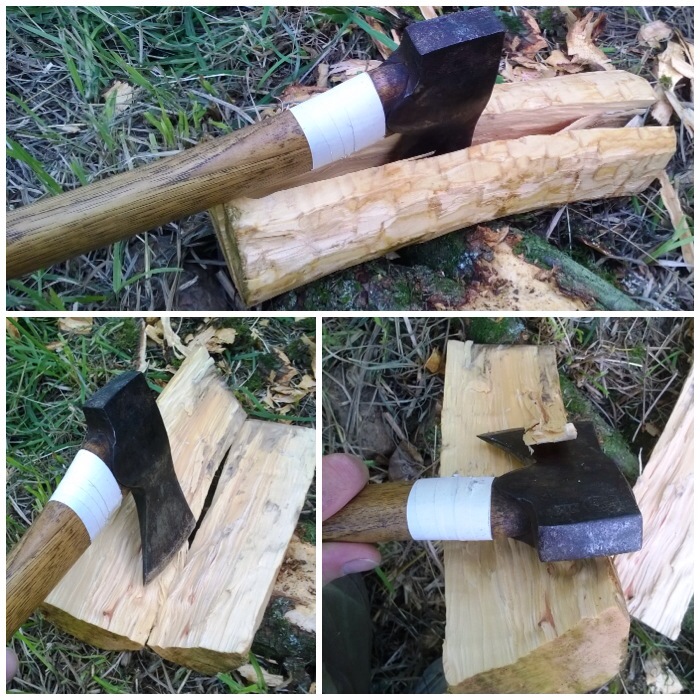
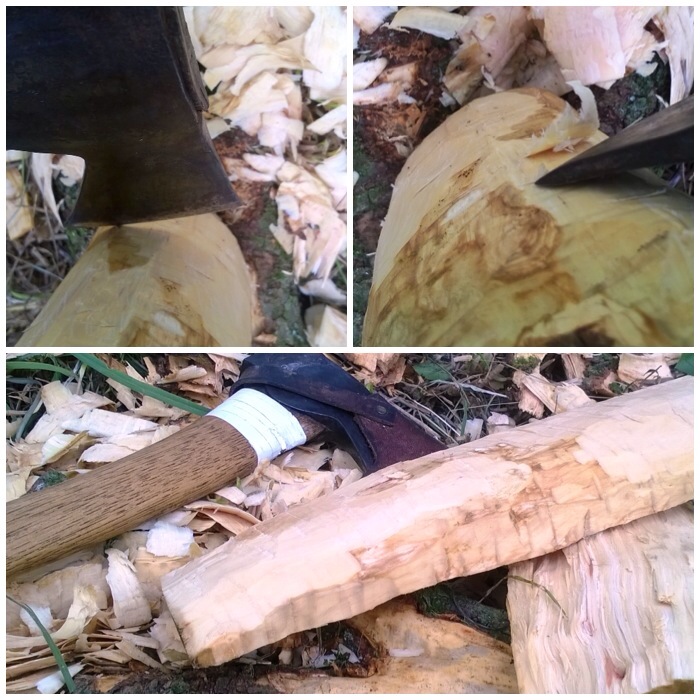
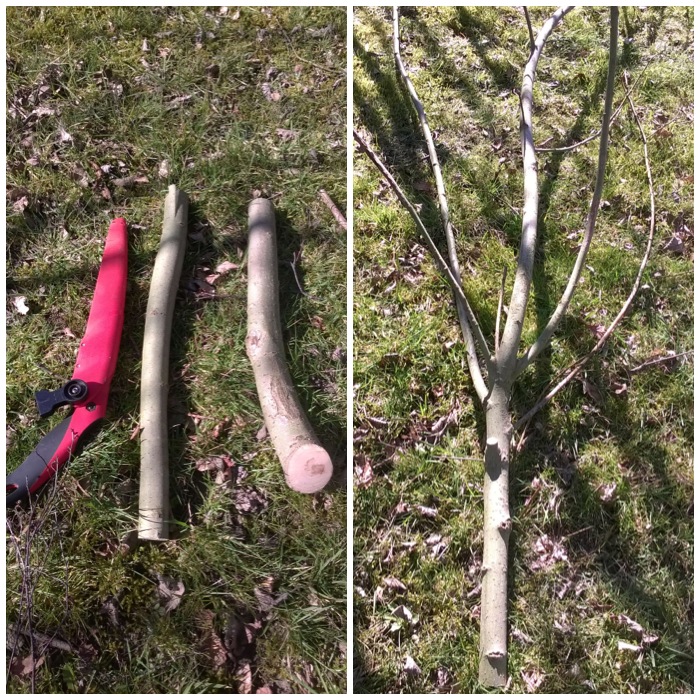
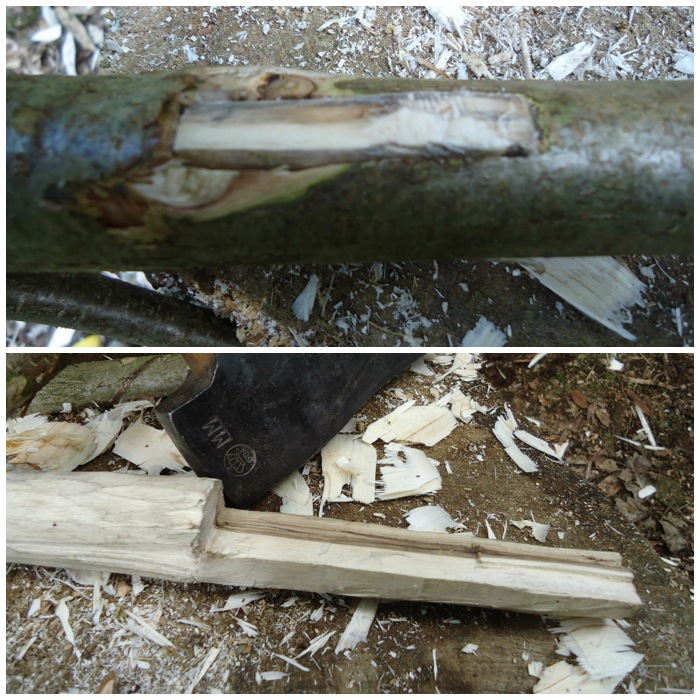
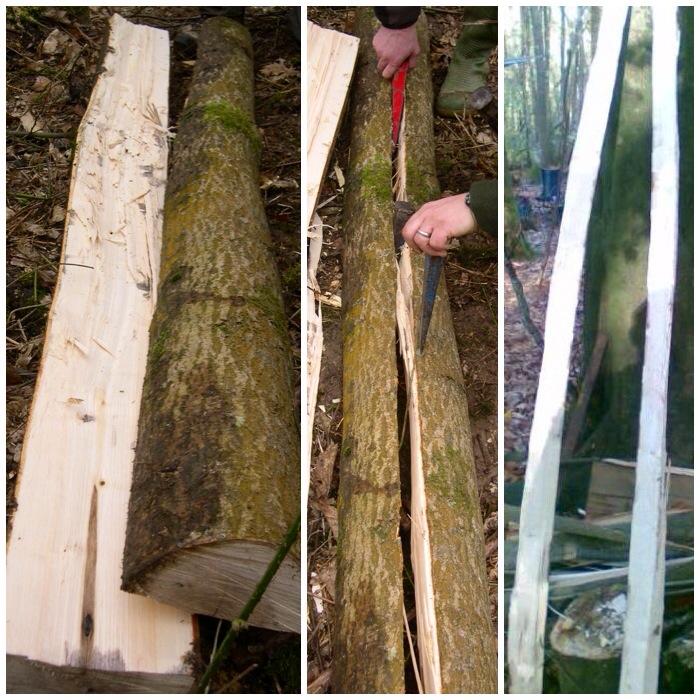
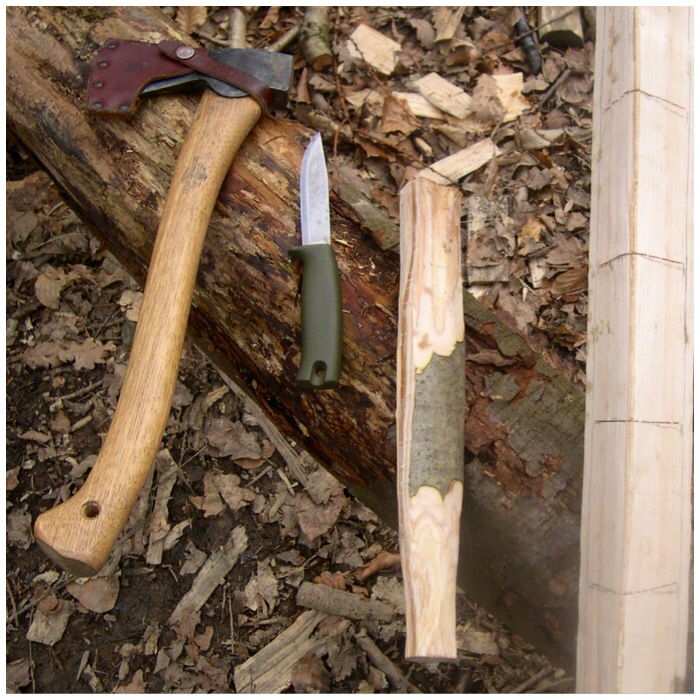
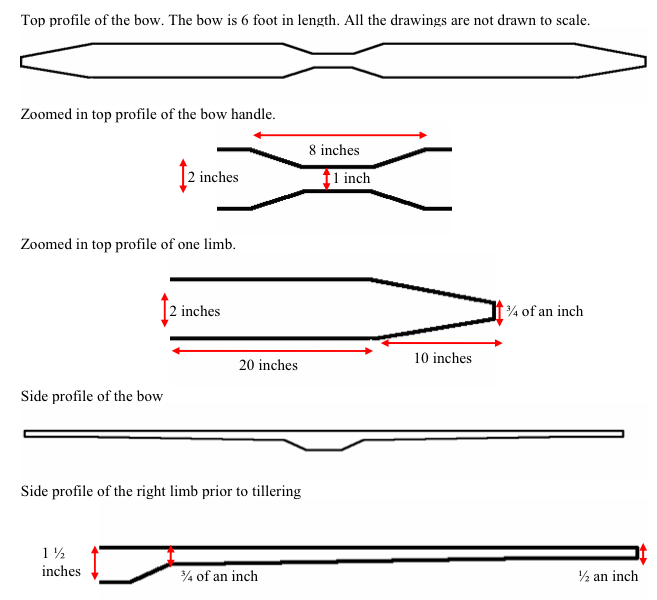
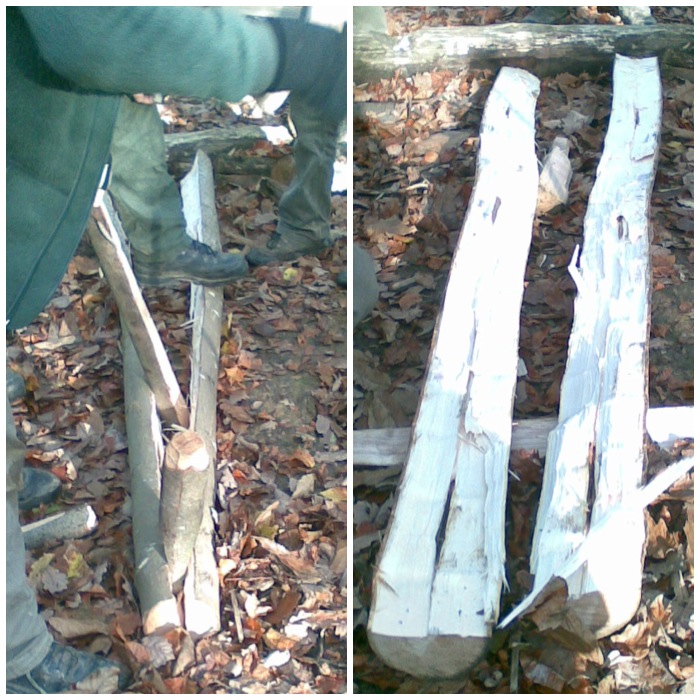
Thankfully they split cleanly leaving me a fairly smooth surface to start axing out the shape of the kuksa.

Photo 09-02-2015 14 33 19
Dark wood of the burl

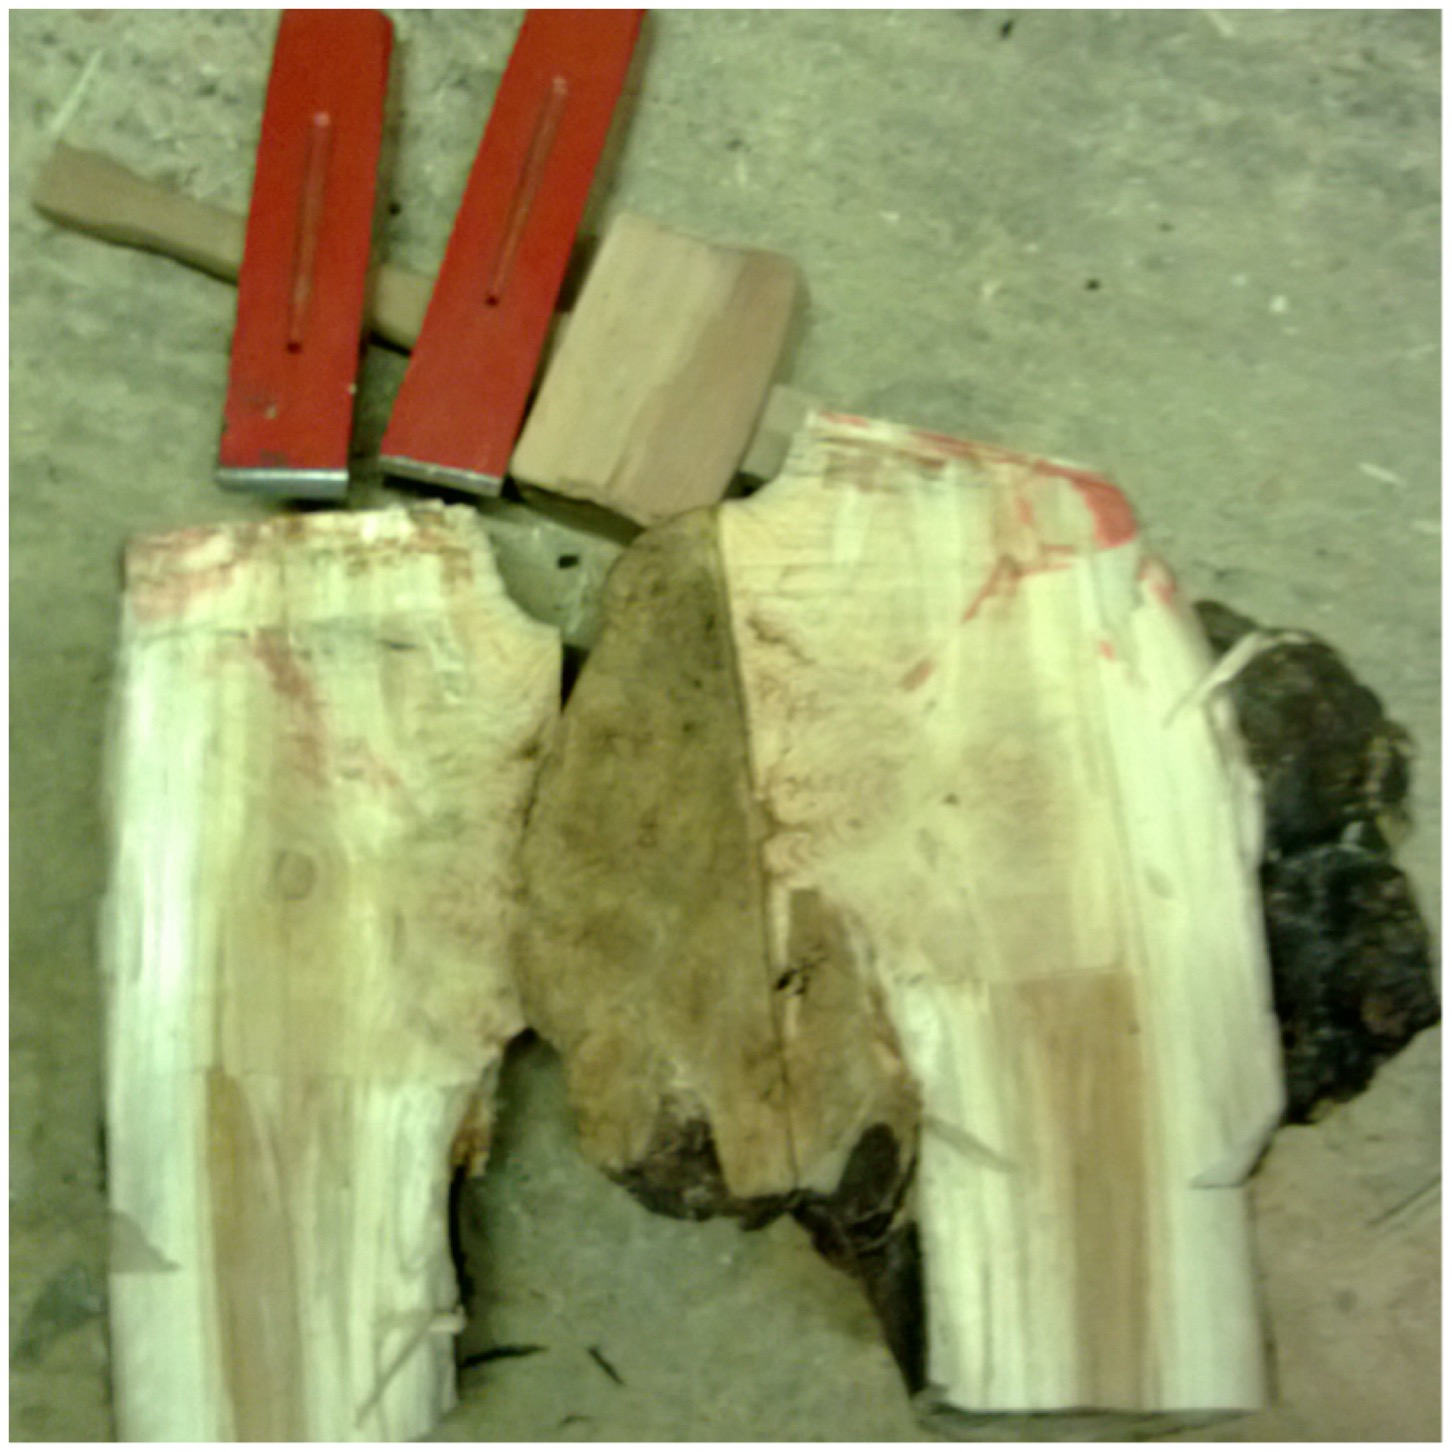
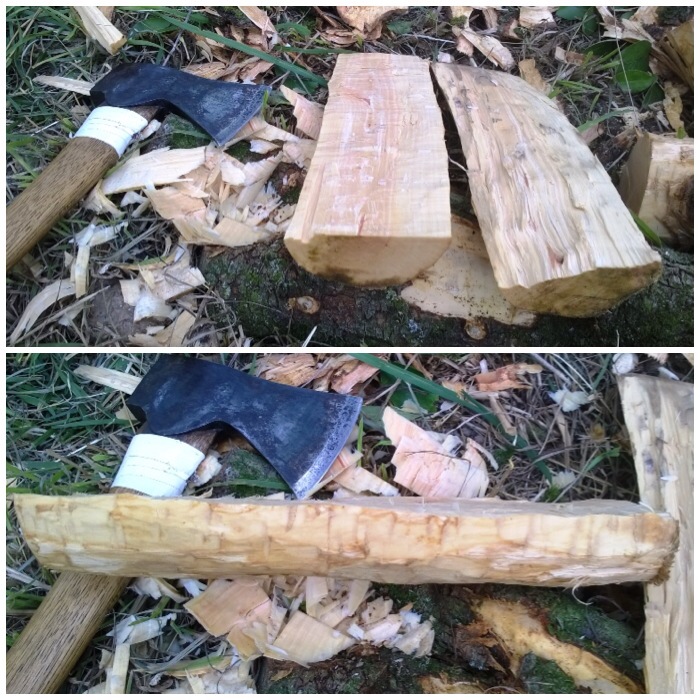
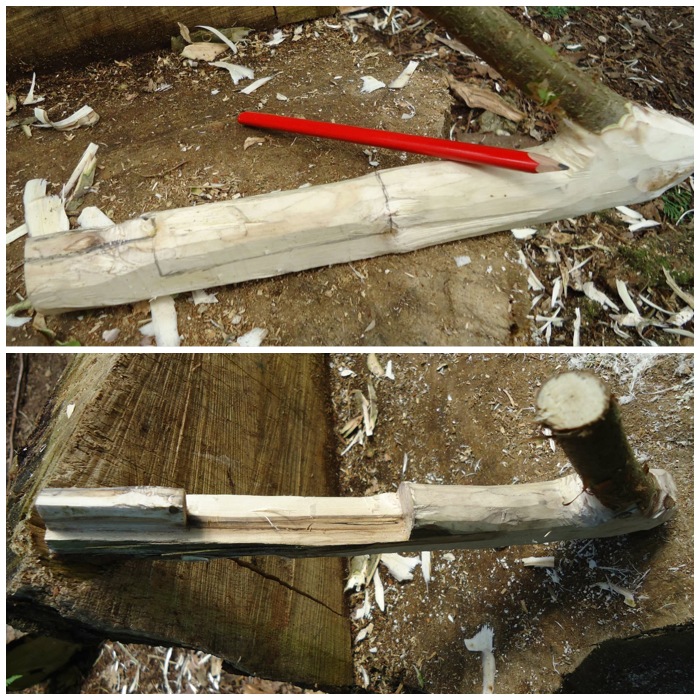
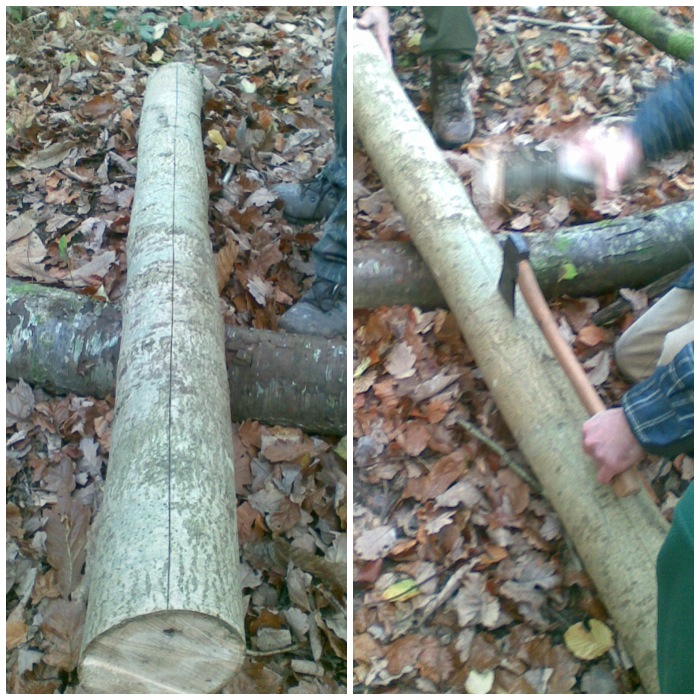
The heartwood was well seasoned and required quite a bit of axe work to get it down to the level I wanted.

Photo 09-02-2015 14 33 30
Axing out the blank

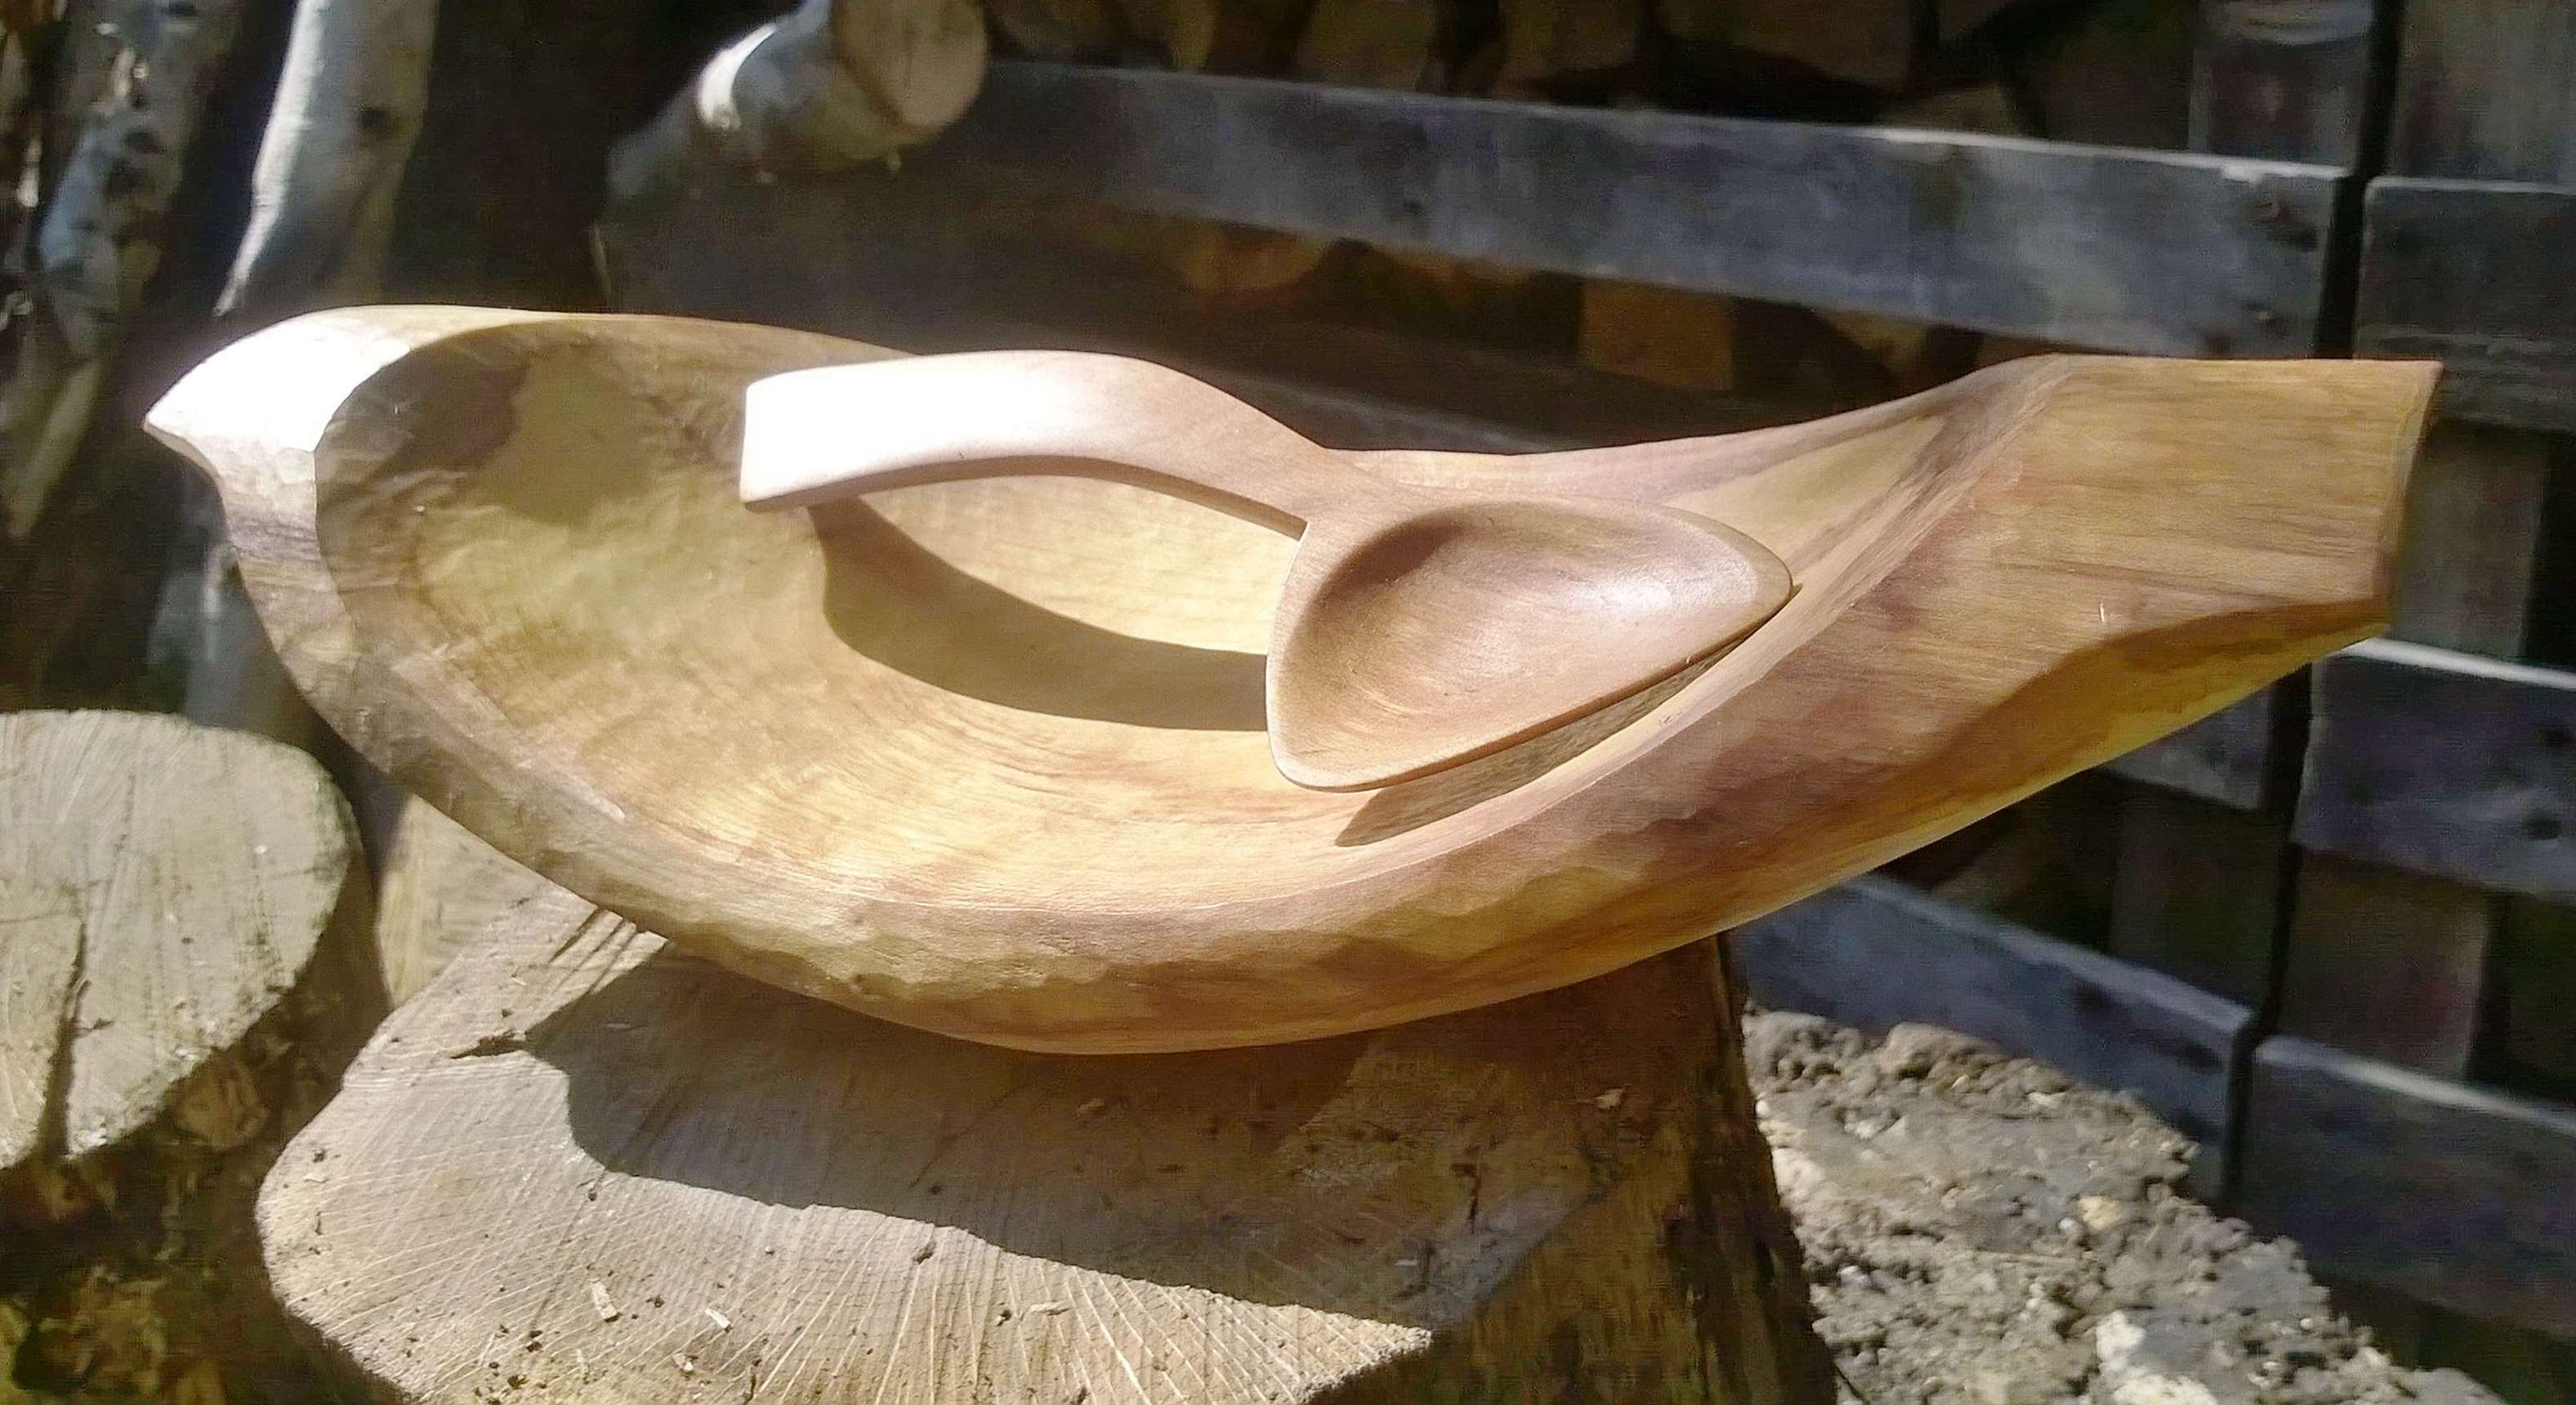
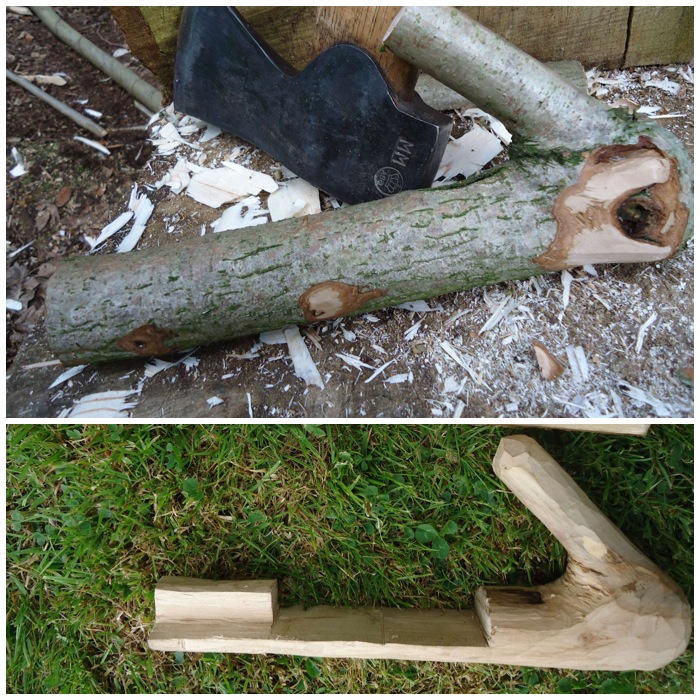
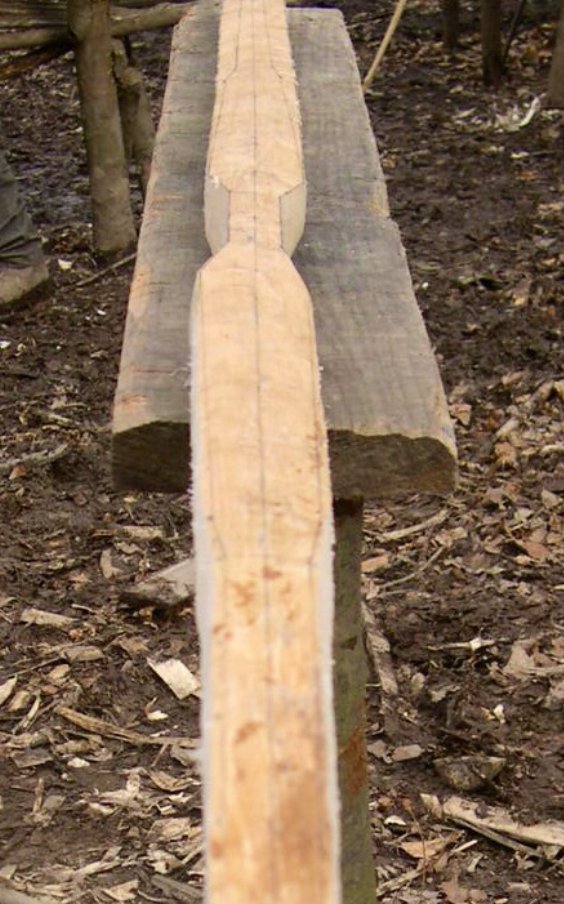
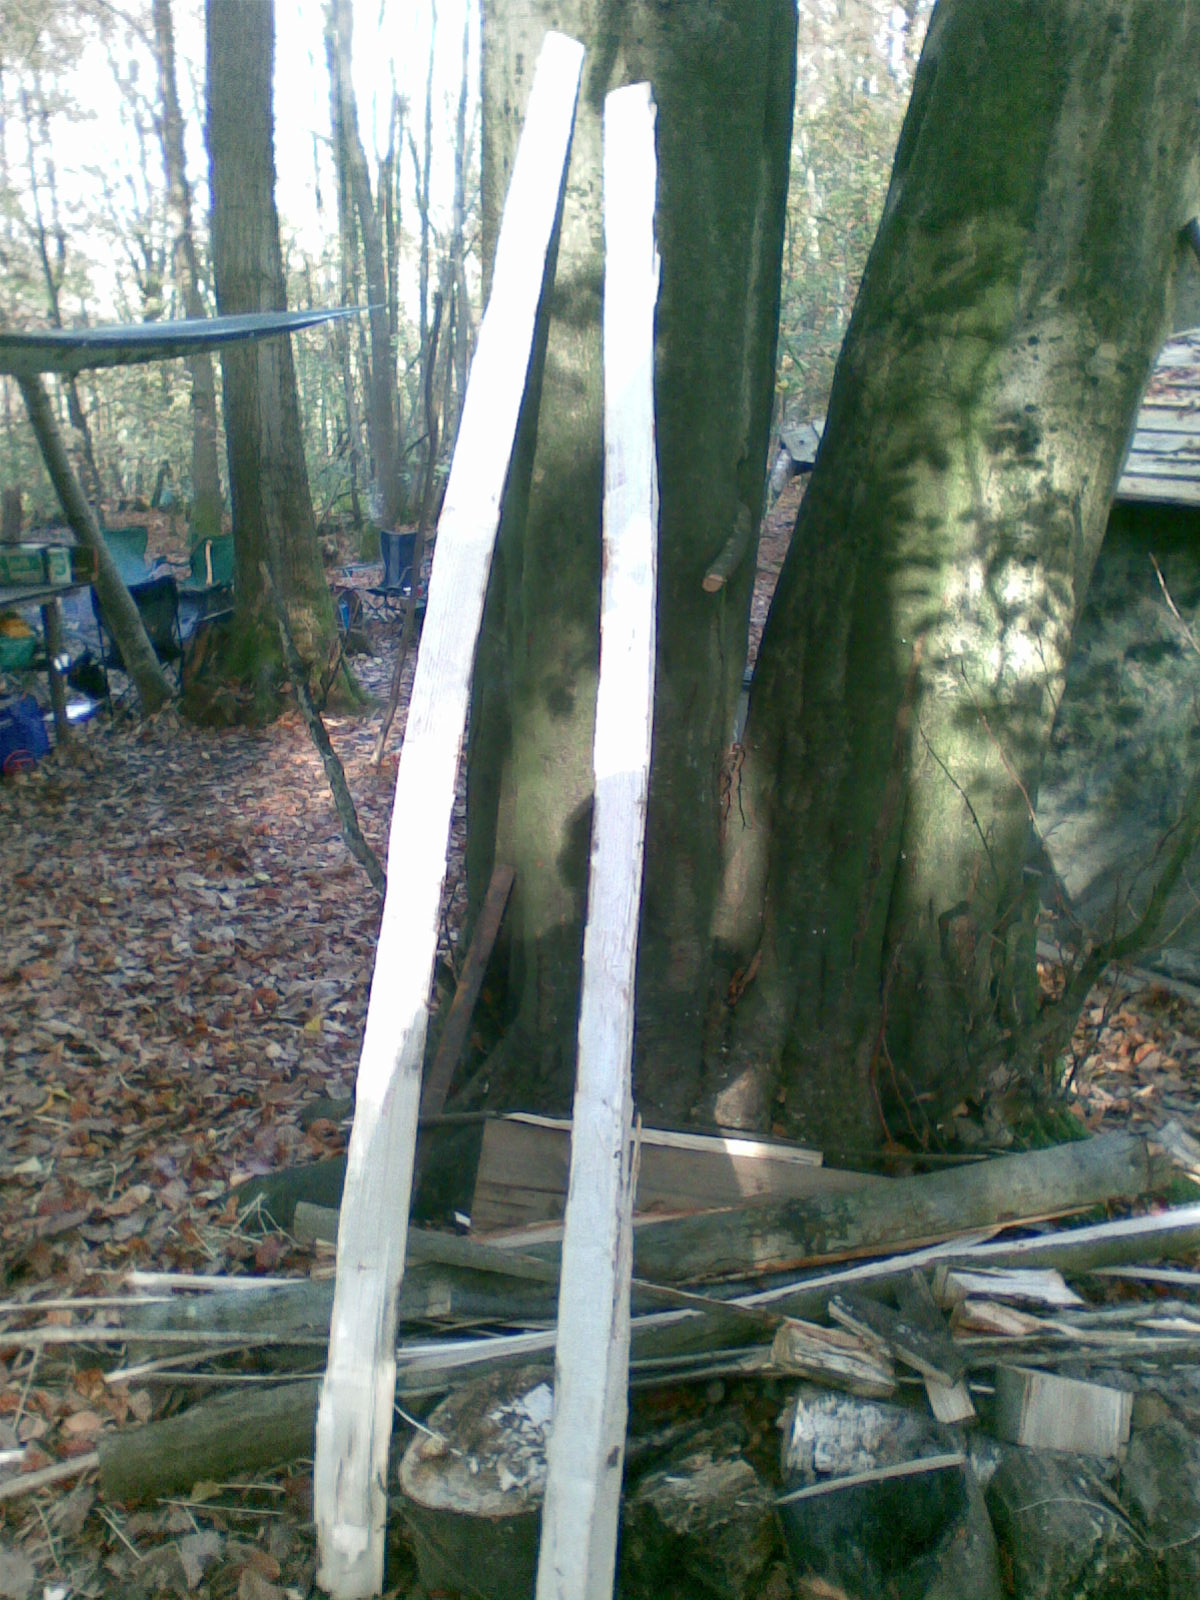
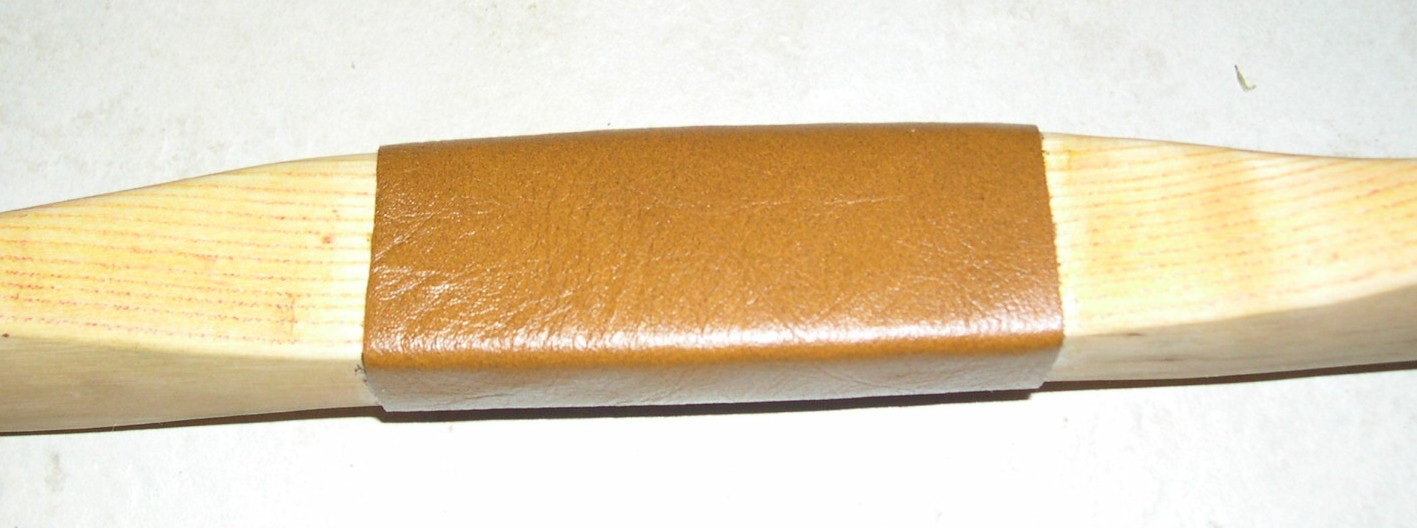
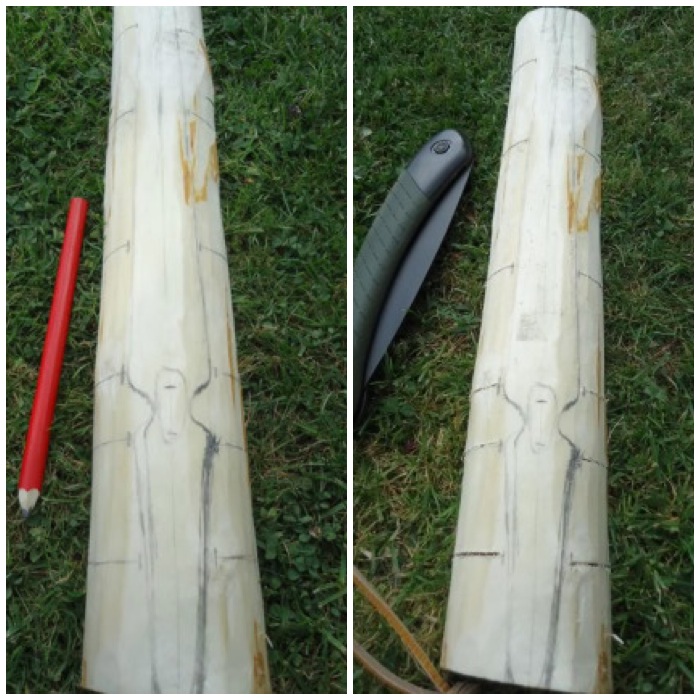
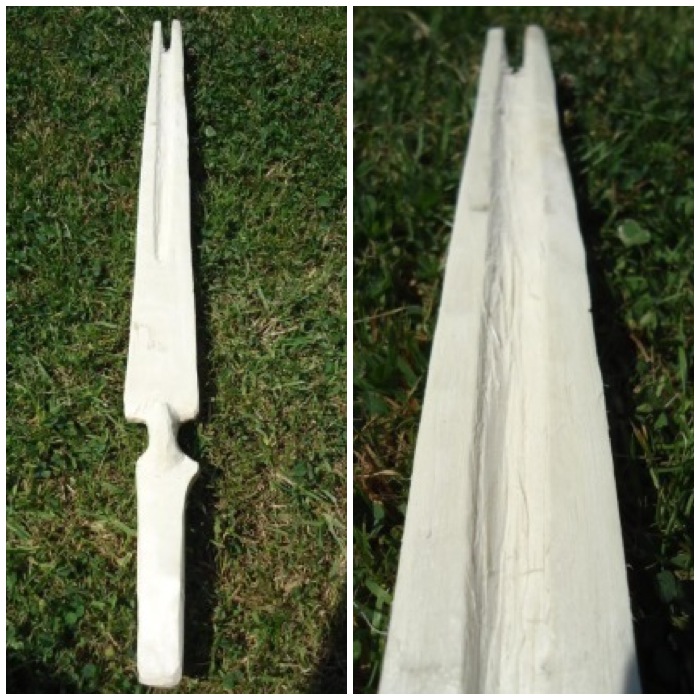
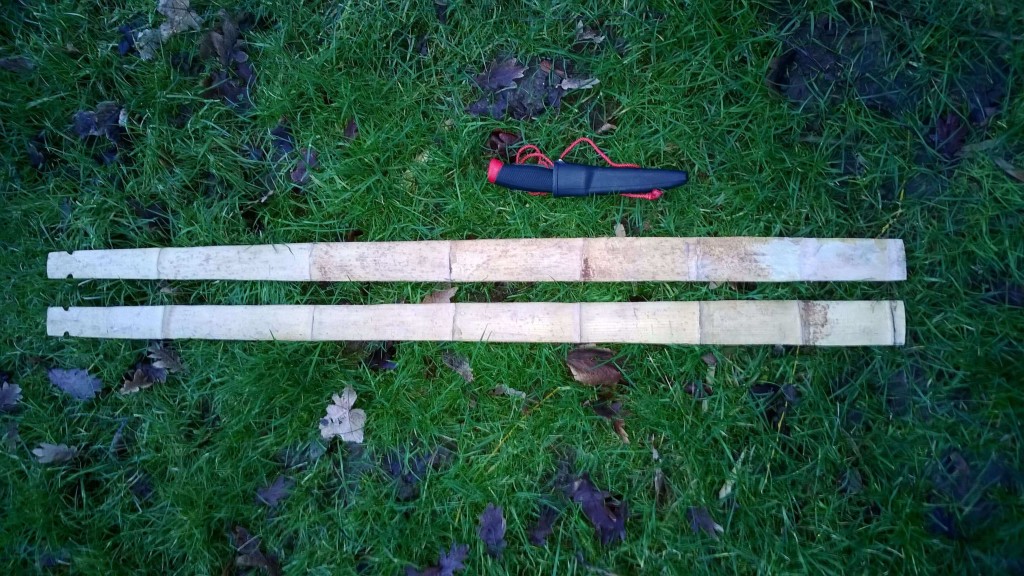
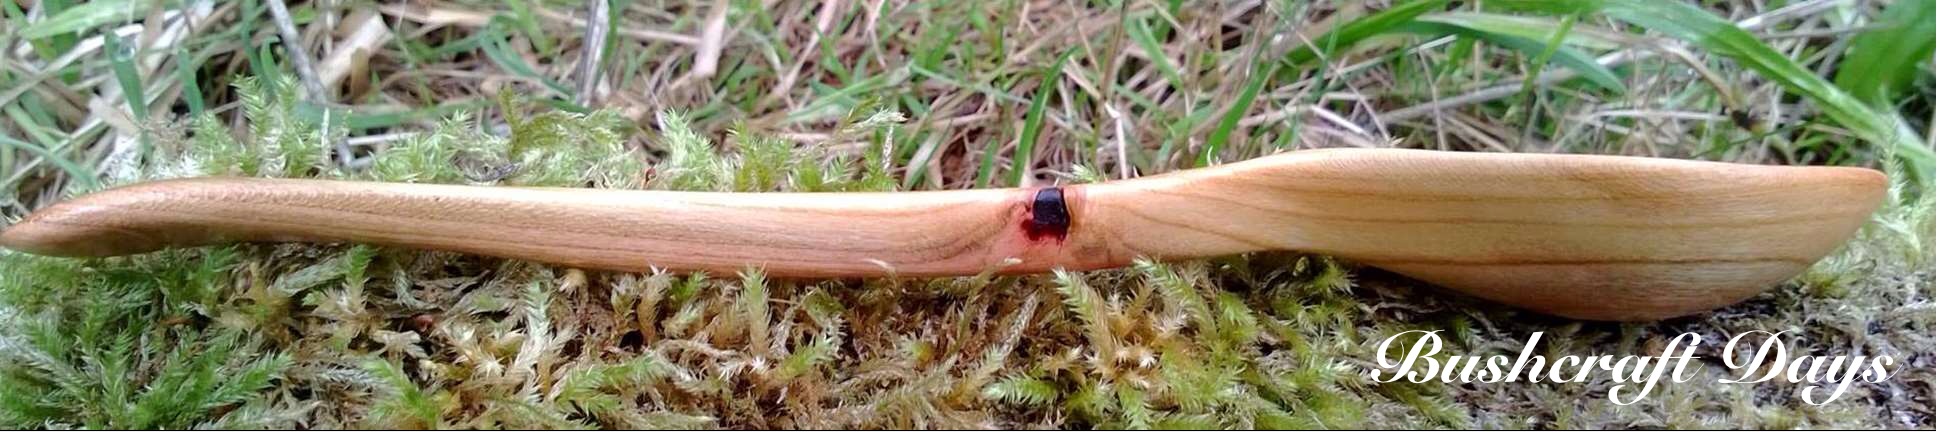
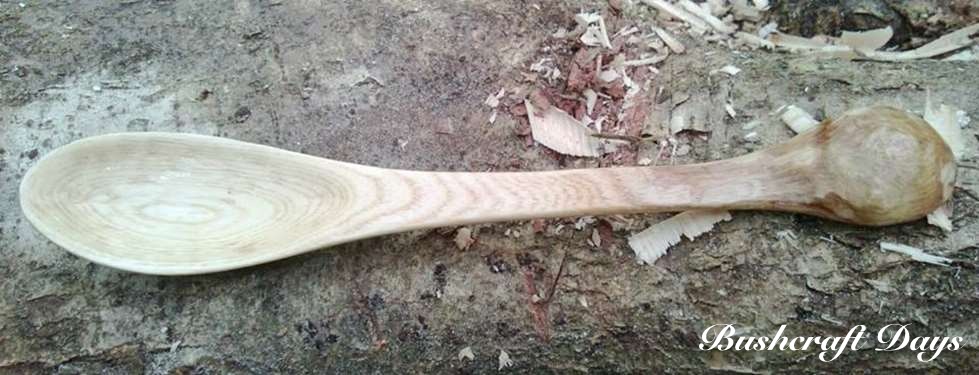
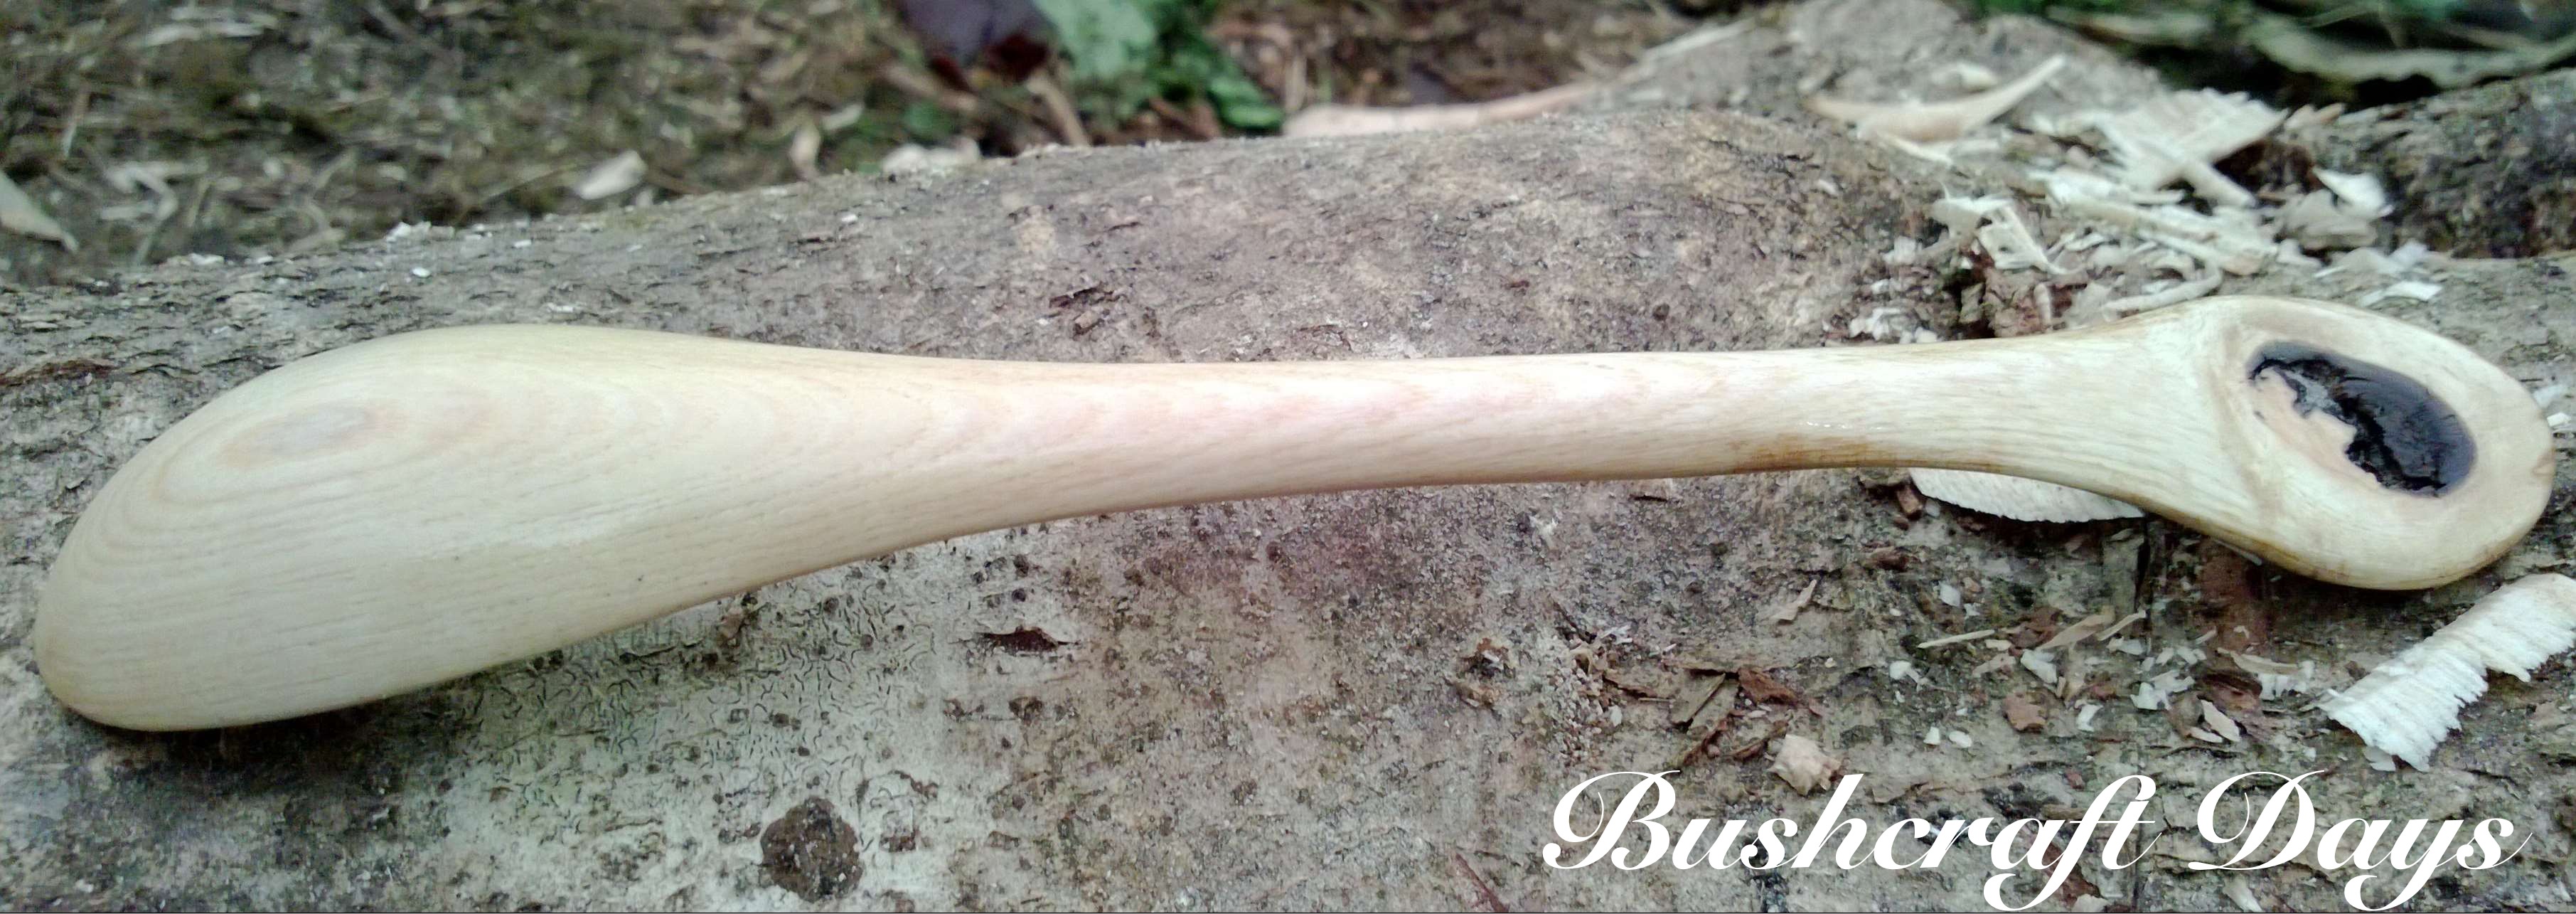
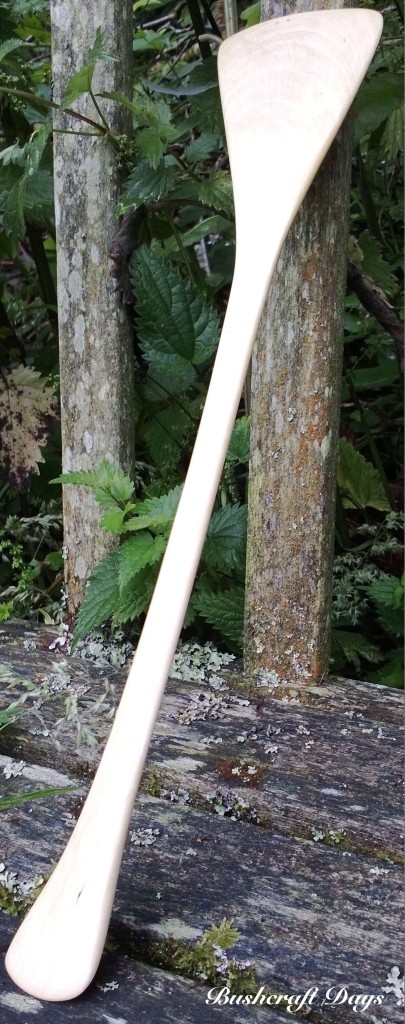
I stopped axing out the top of the kuksa when I started to reach the burl wood but kept the heartwood for the handle. I was inspired by Jon Mac with his kuksa handle in the style of an otter’s tail and felt that the heartwood would prove a stronger option to the burl wood.

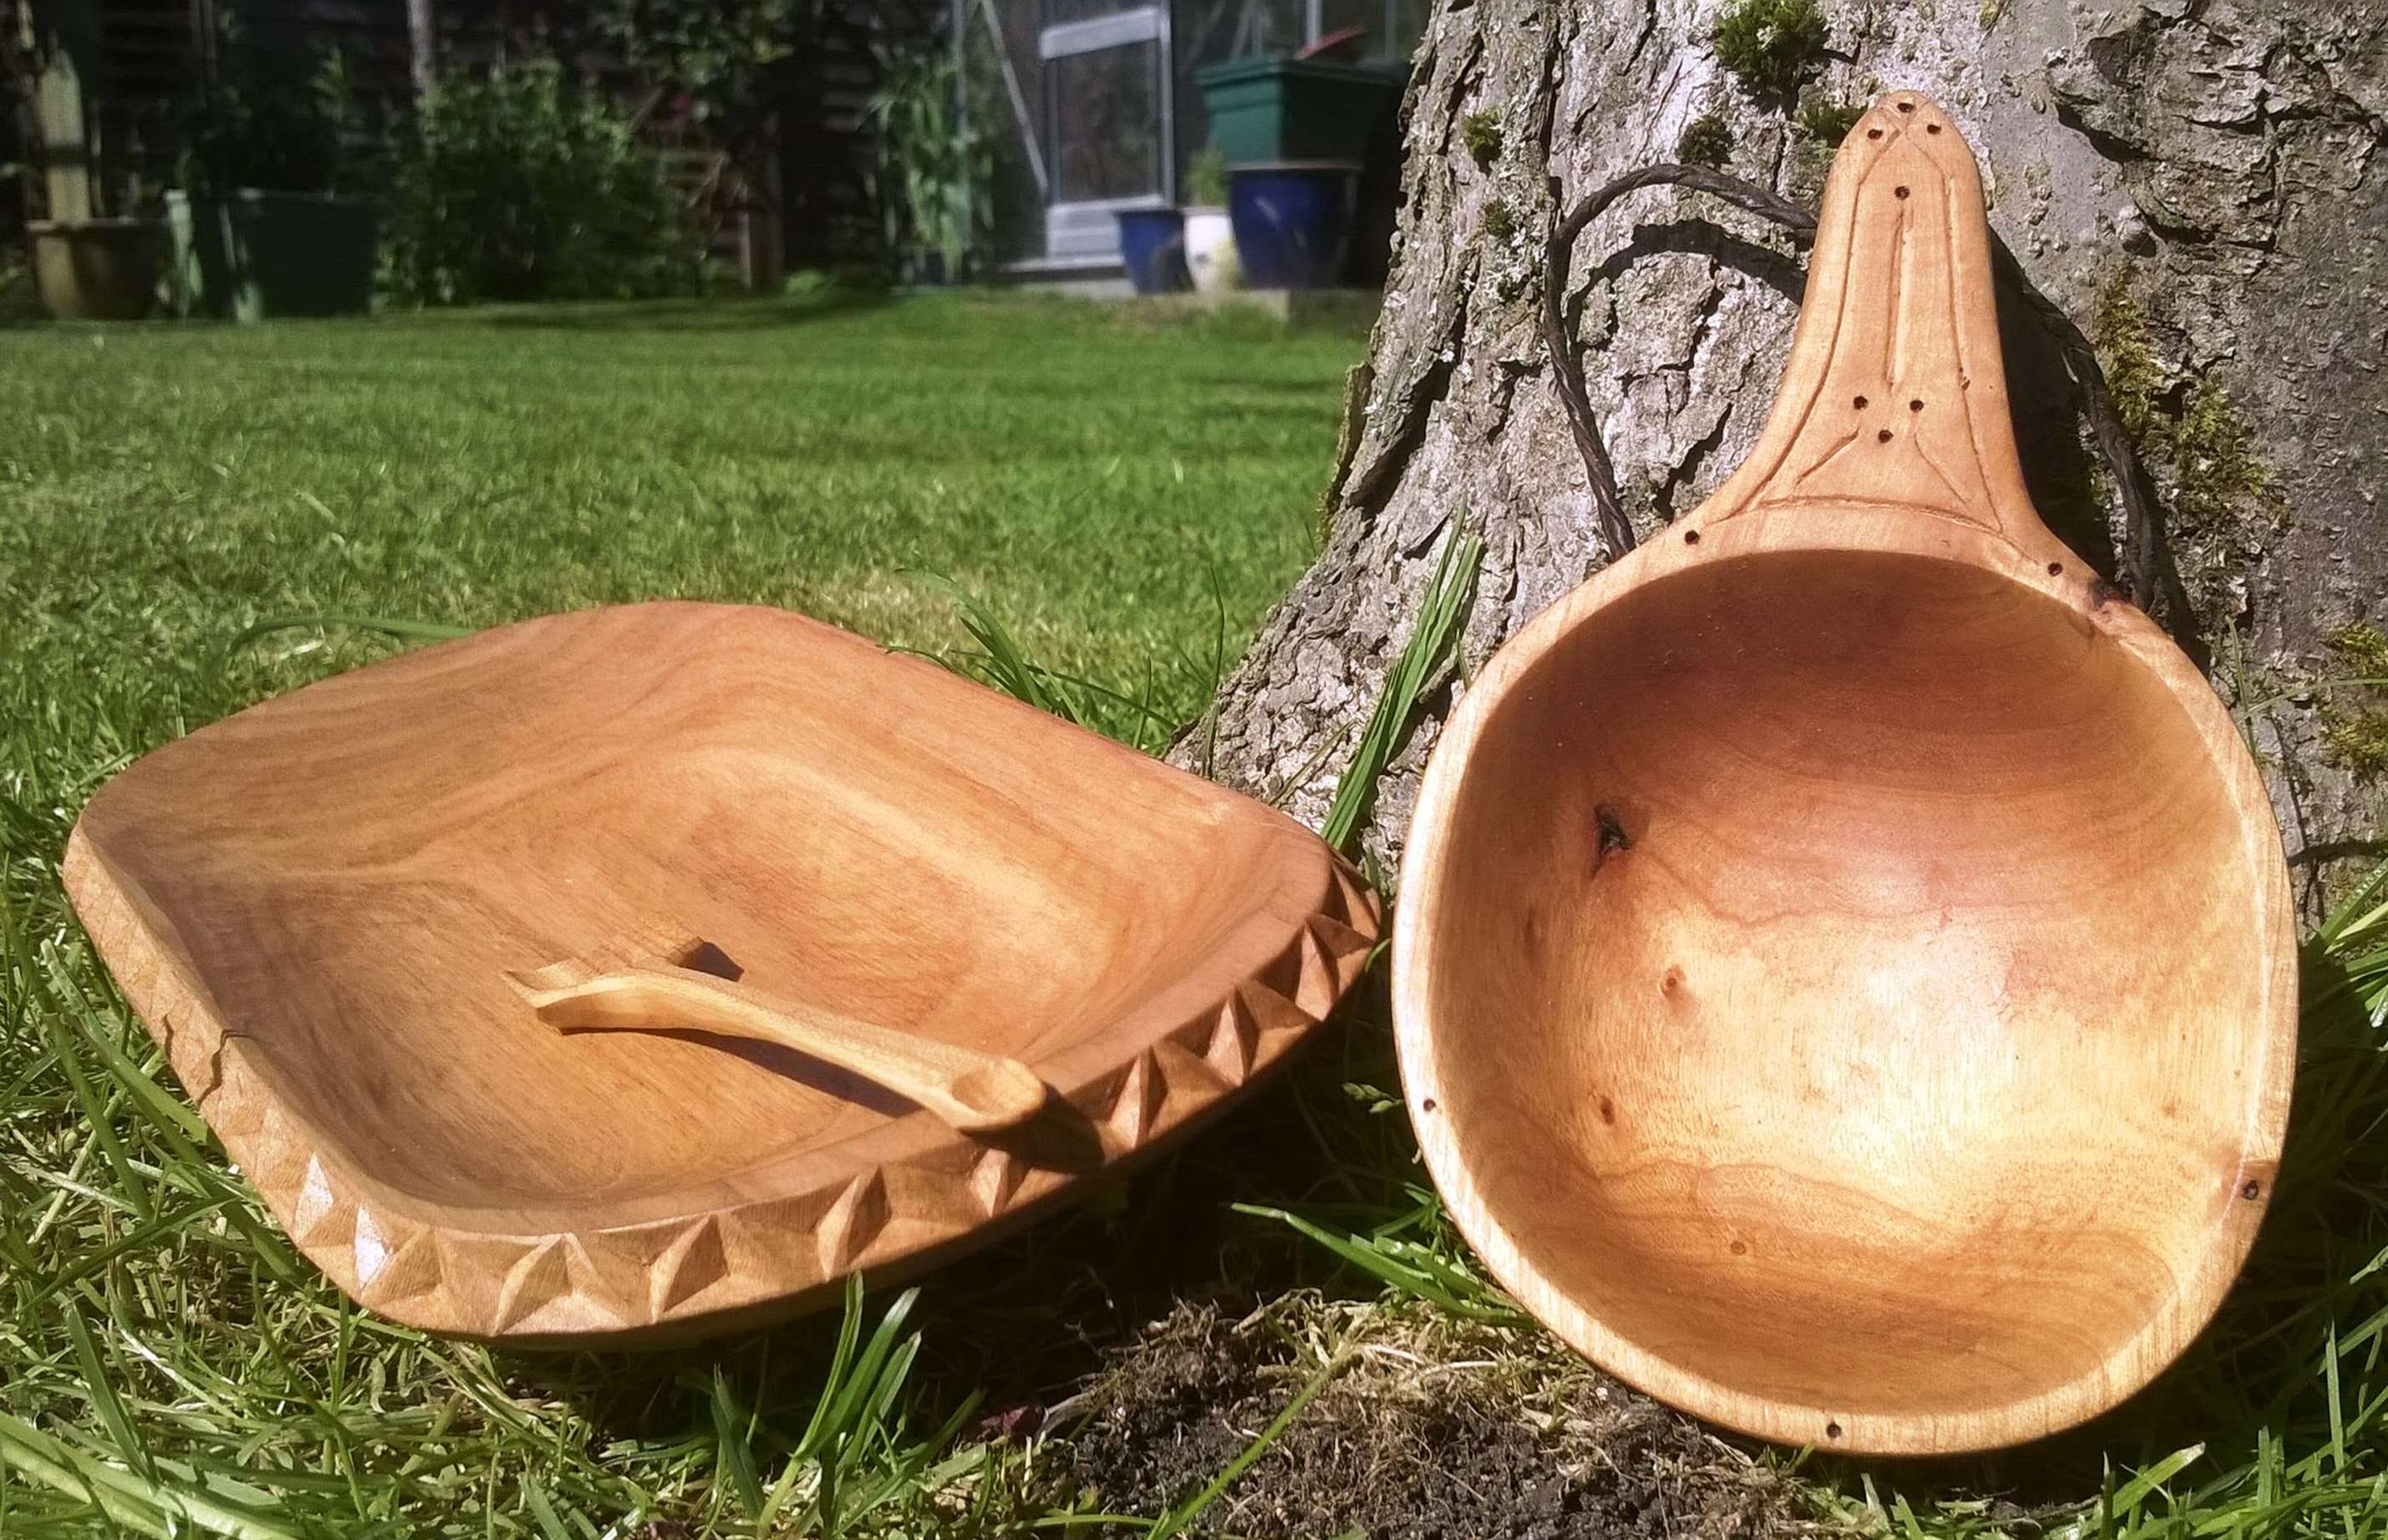
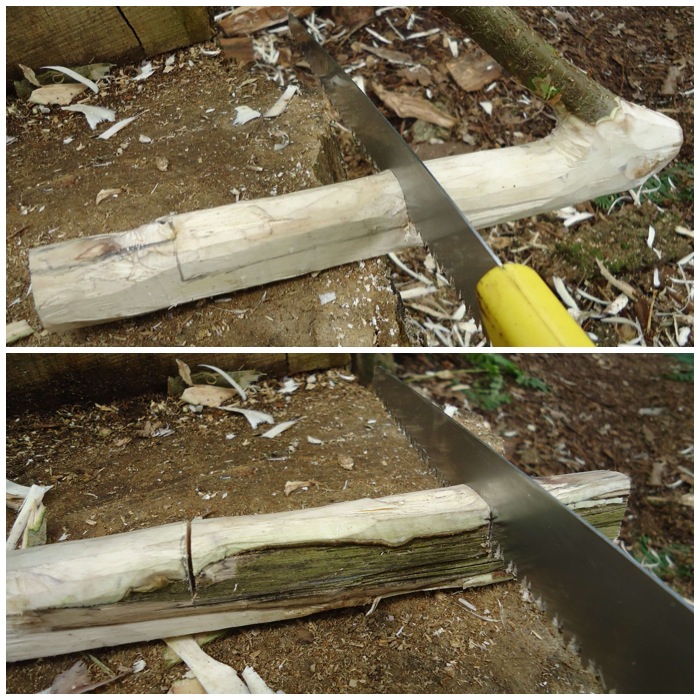
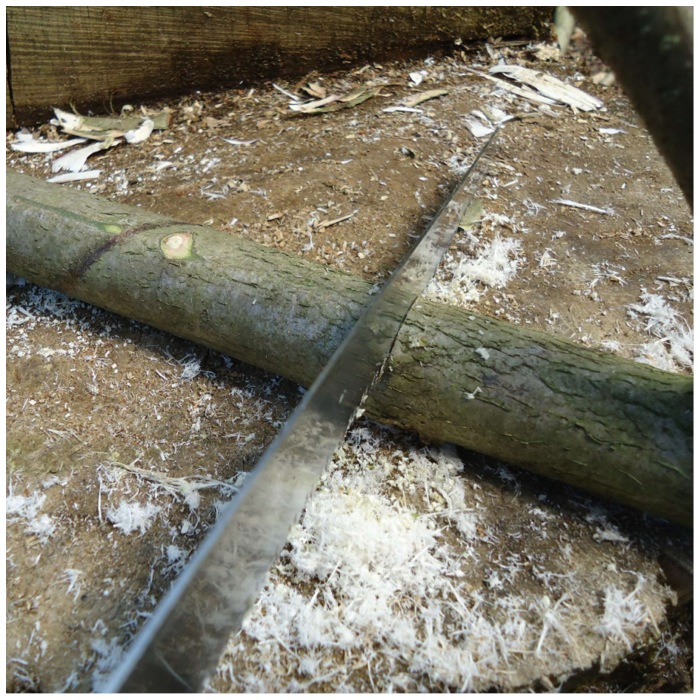
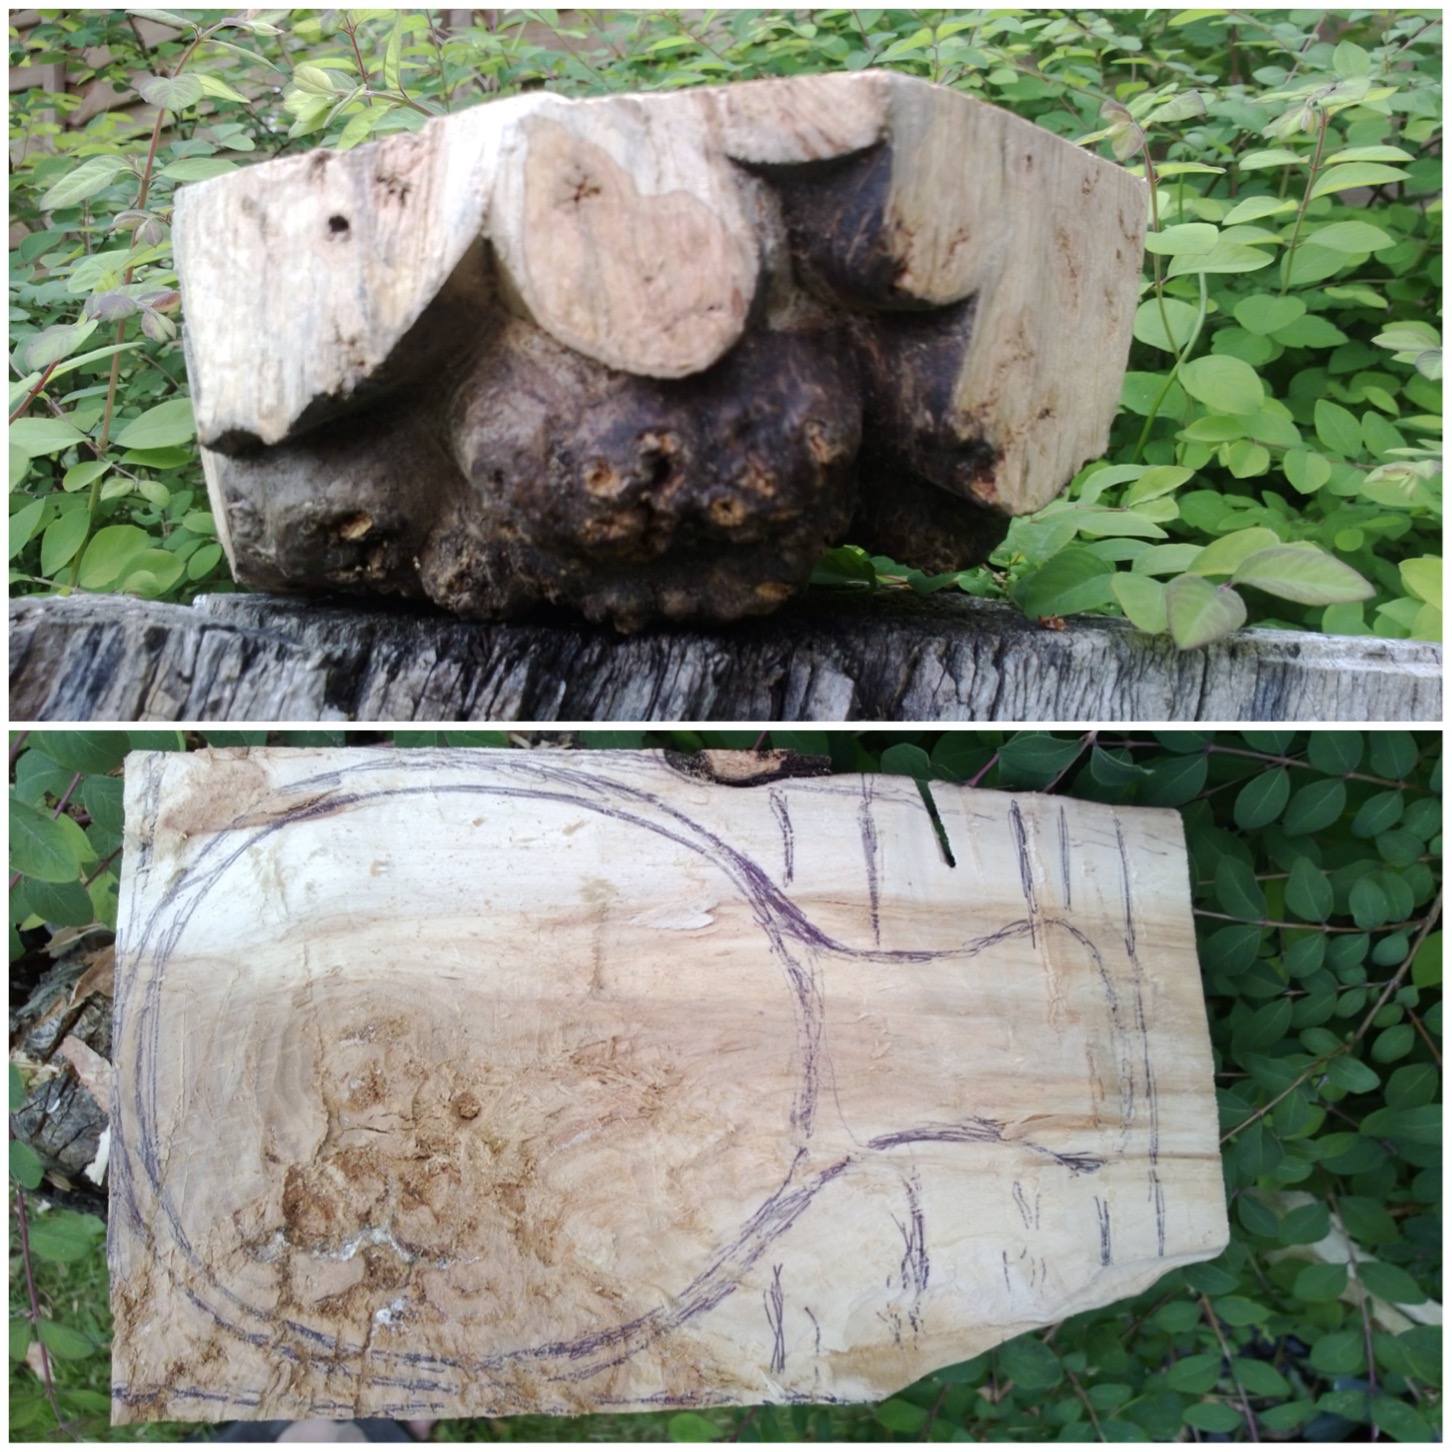
I drew out my general shape and used my saw again to cut off the excess on the sides. All the excess burl was carved later into either a quaich or a bowl.

Photo 09-02-2015 14 35 31
Making most of the burl

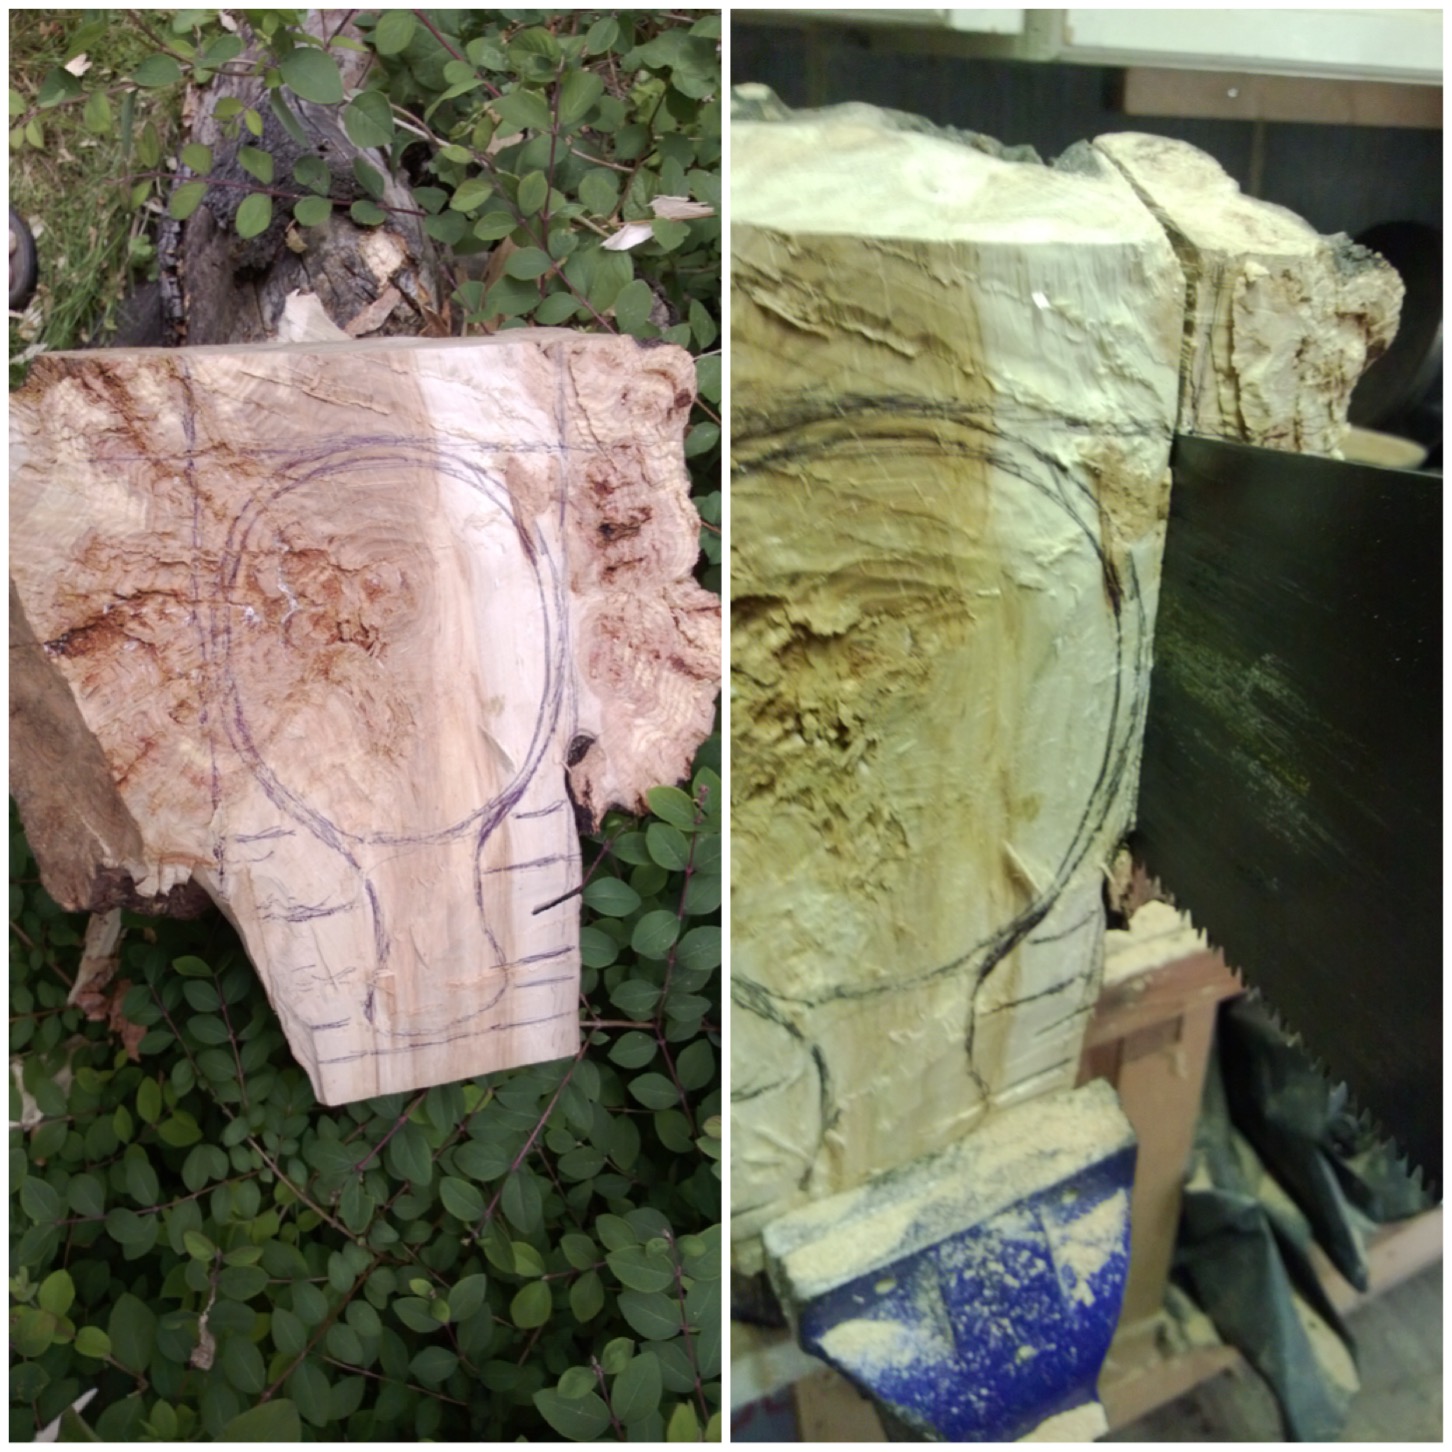
The burl was of a very good depth and even though there were some deep fissures I knew for once I would get a decent sized cup out of it.

Photo 09-02-2015 14 36 07
Ready to carve the bowl

I did not take any pictures of me carving the bowl or shaping the kuksa as I was too busy carving and there was no one around to photograph for me.

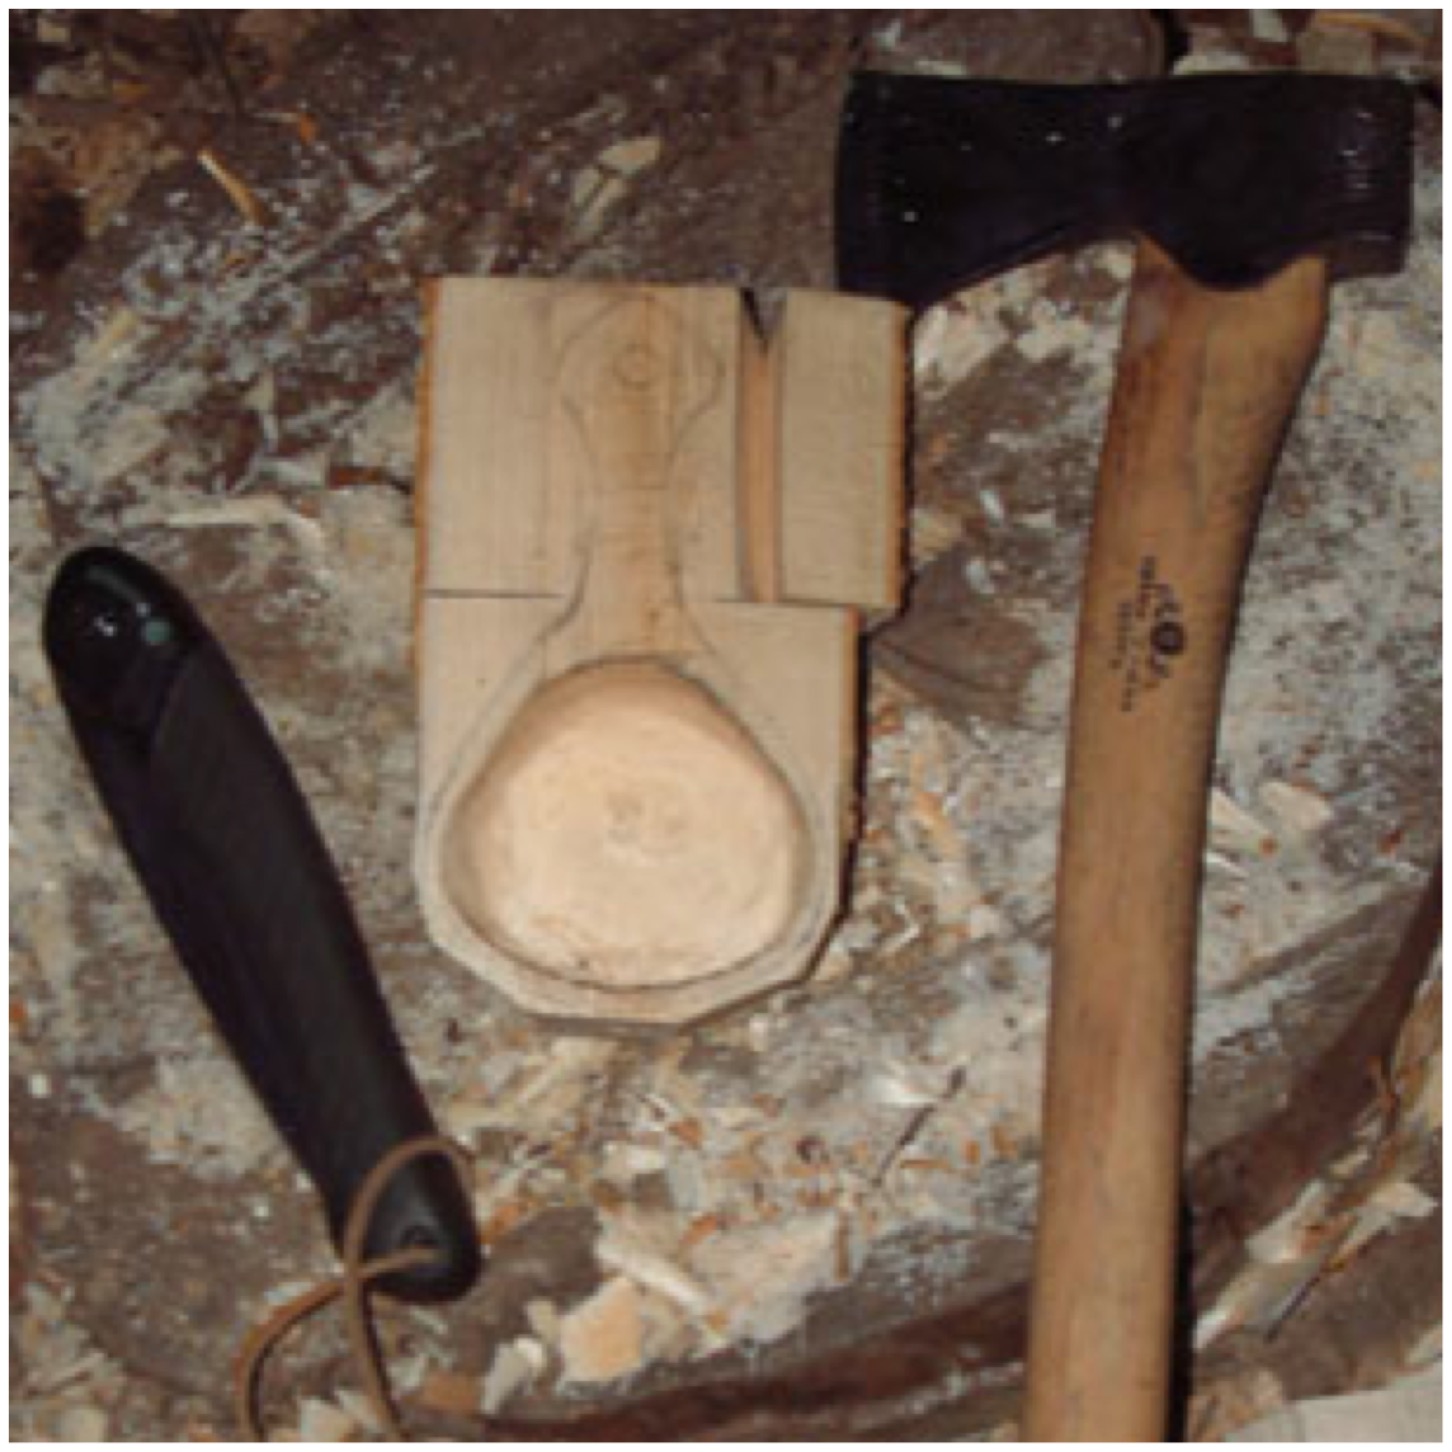
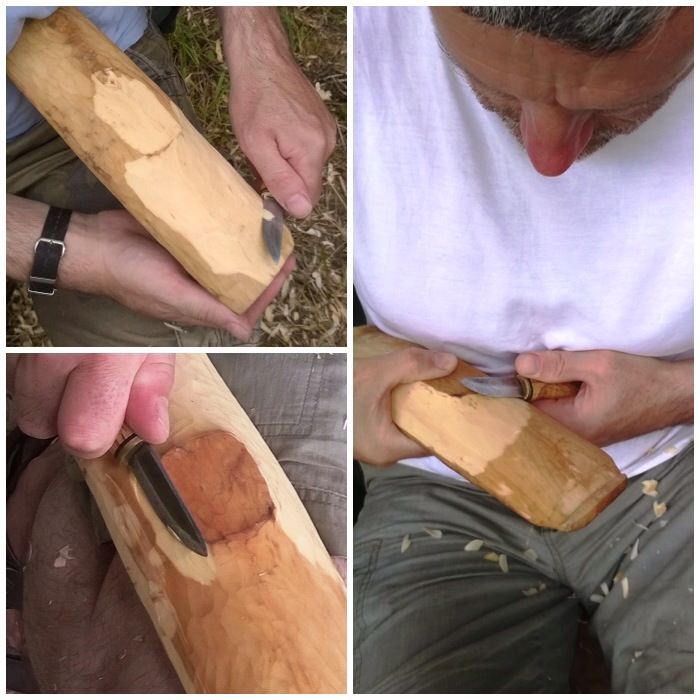
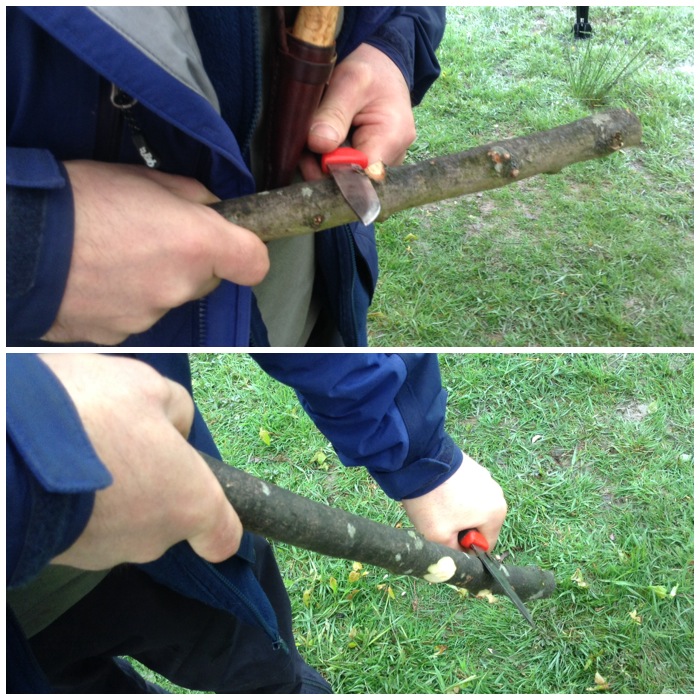
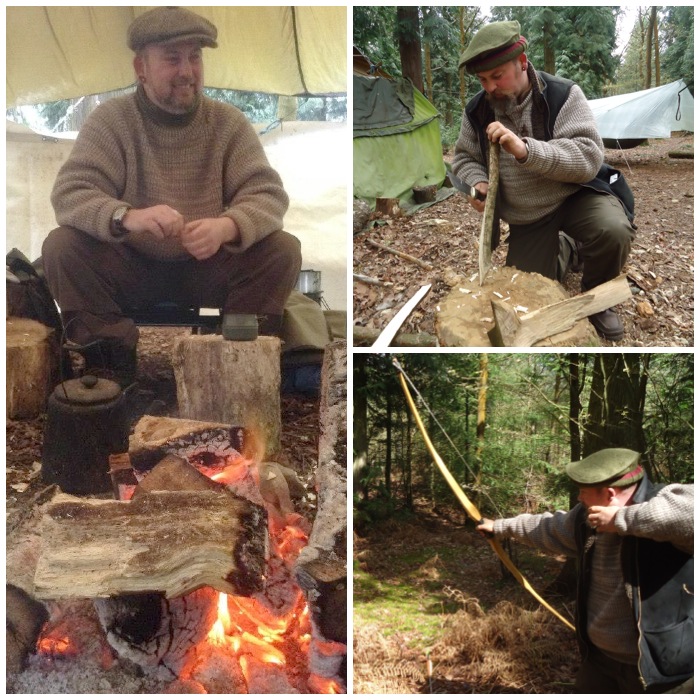
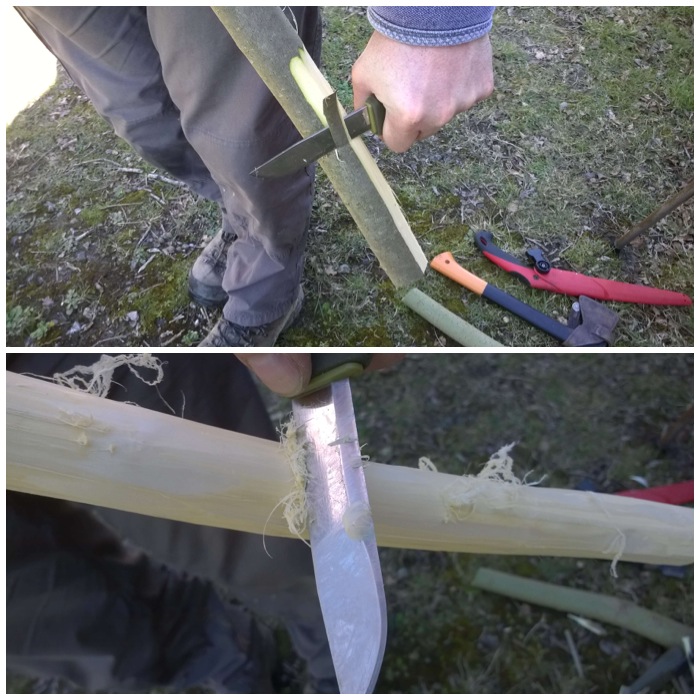
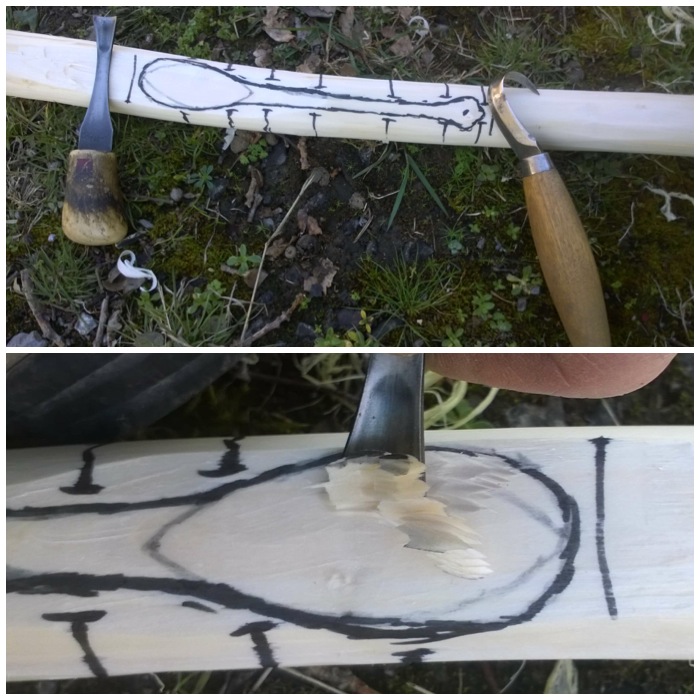
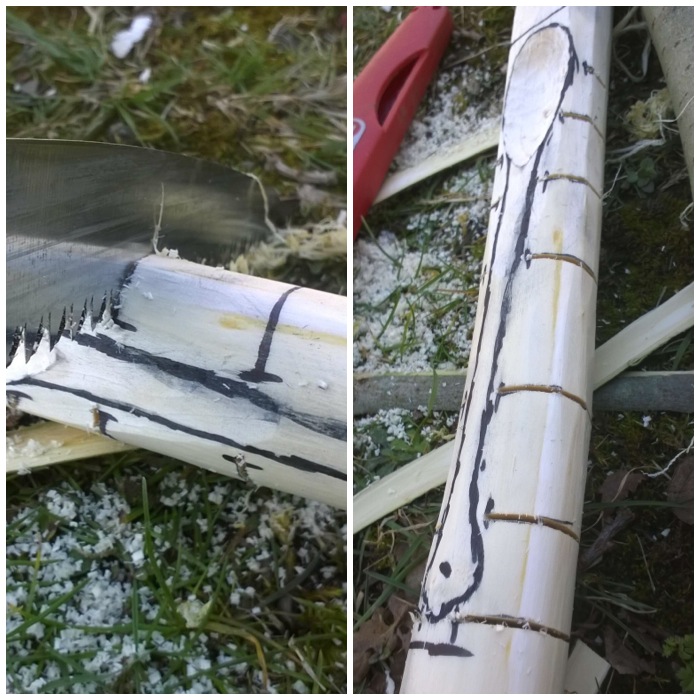
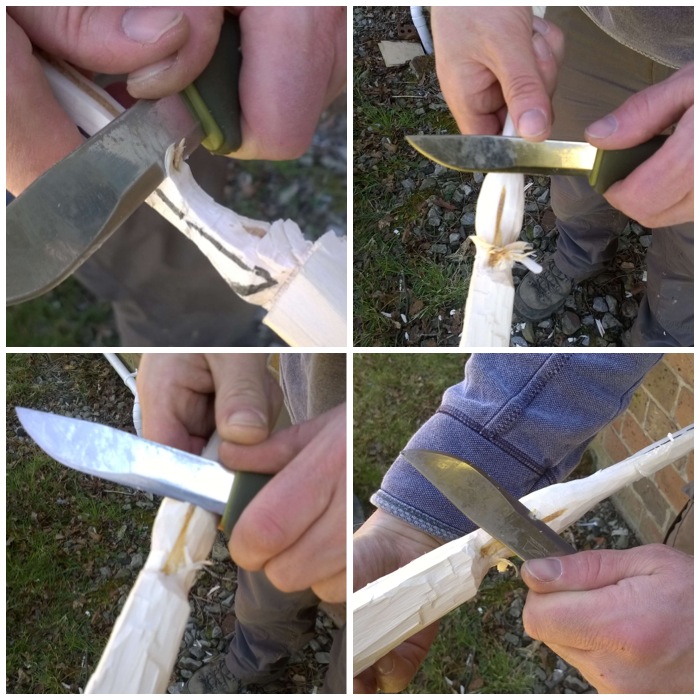
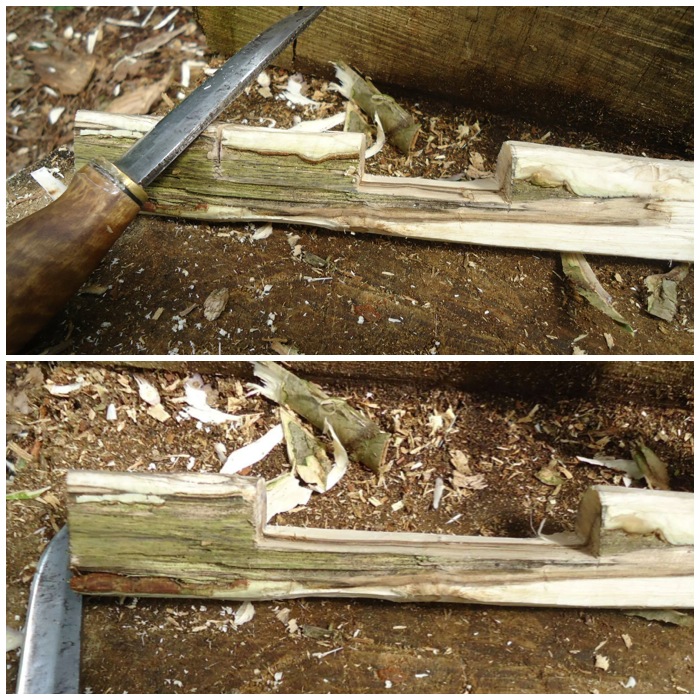
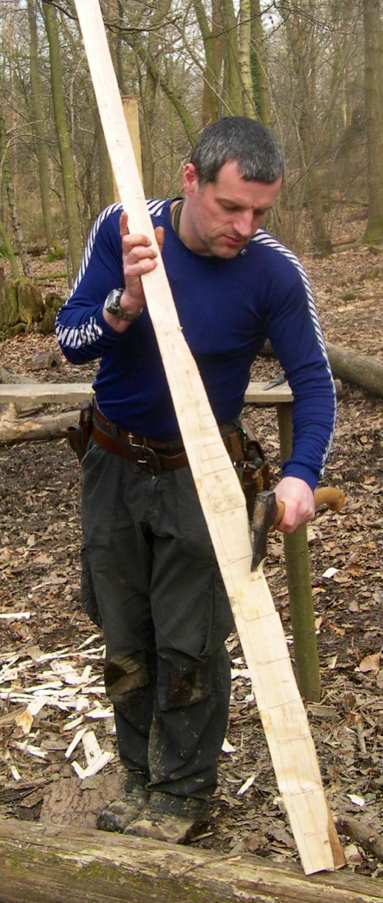
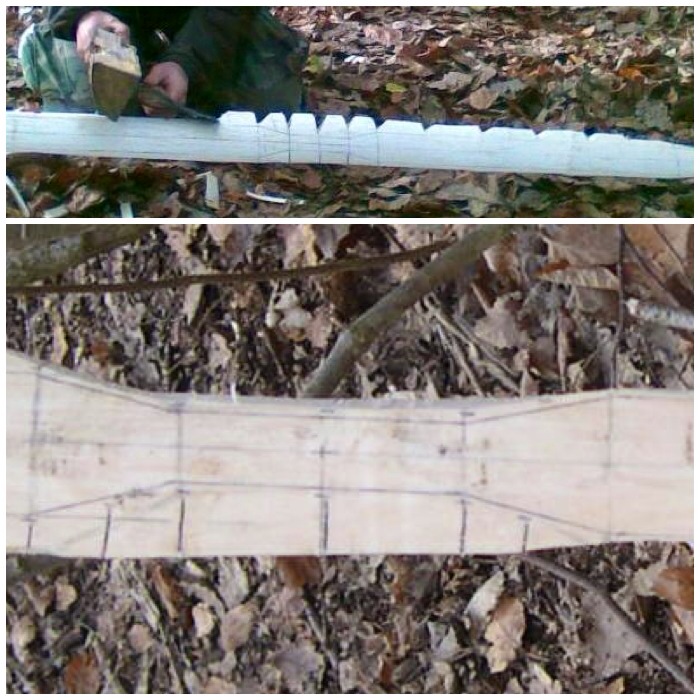
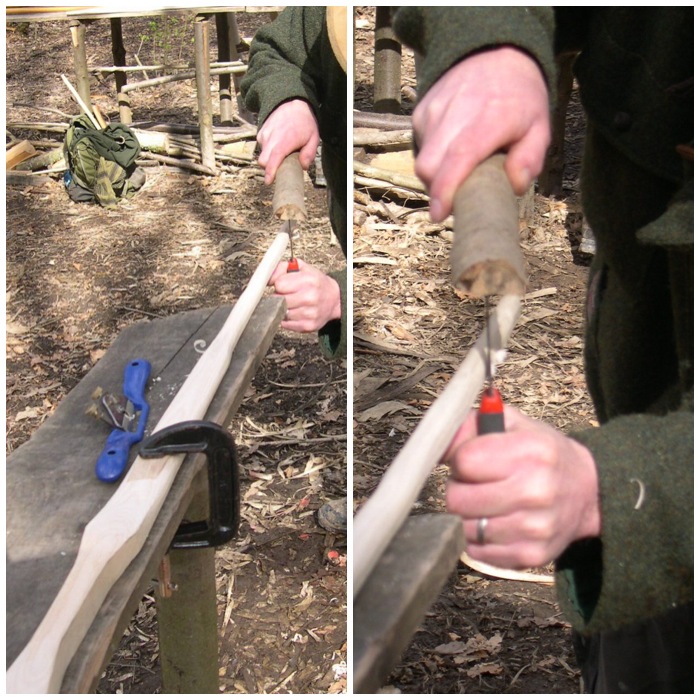
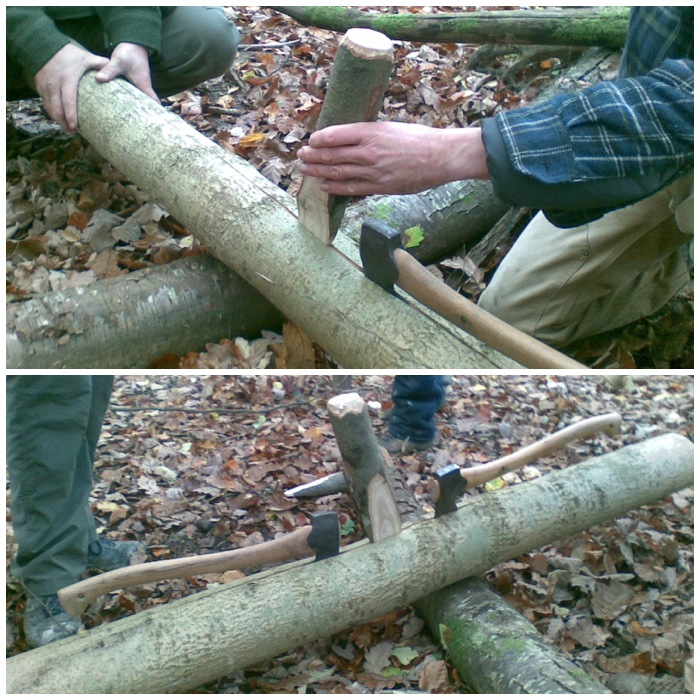
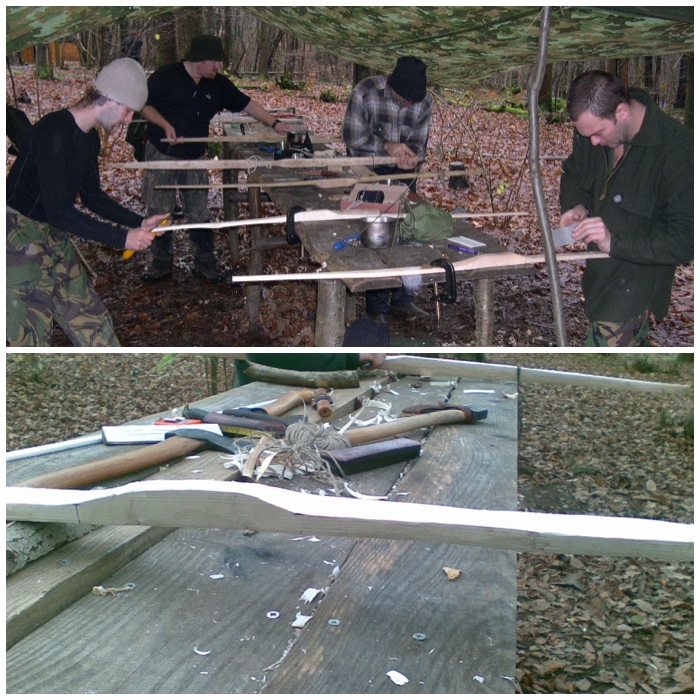
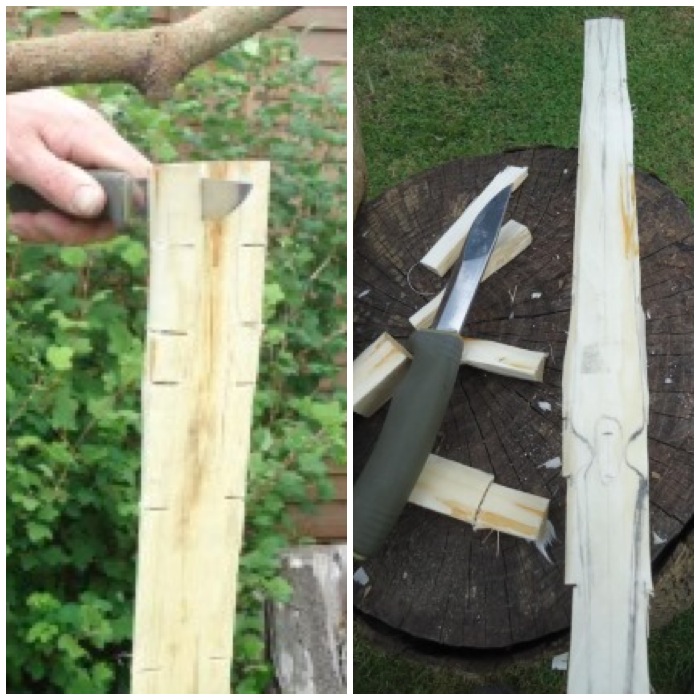
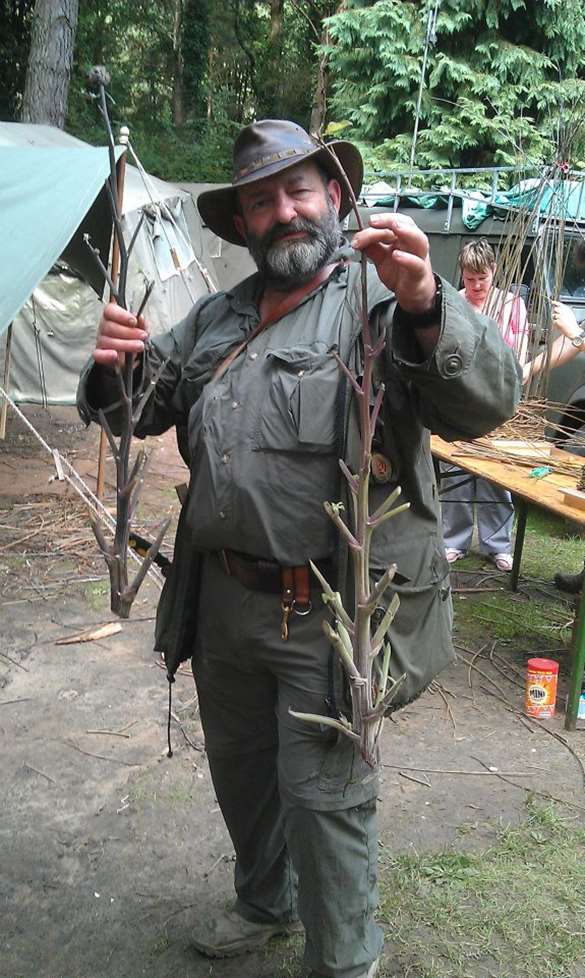
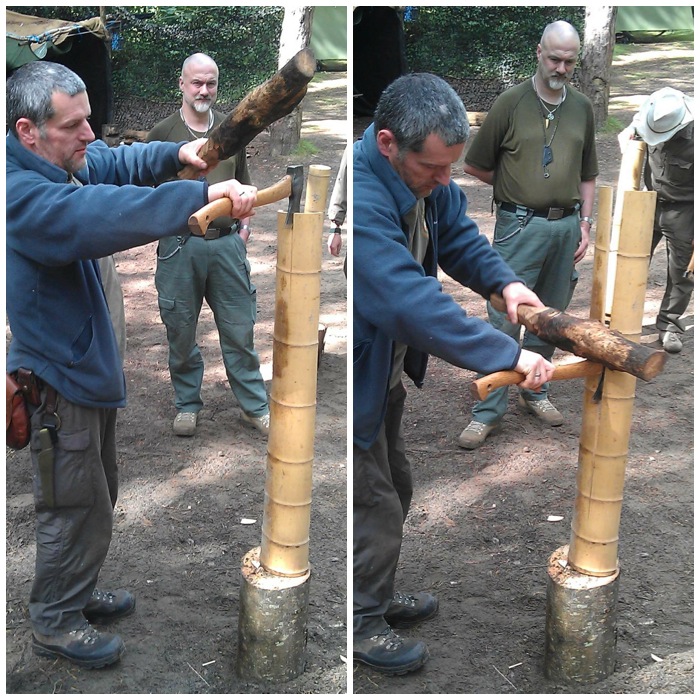
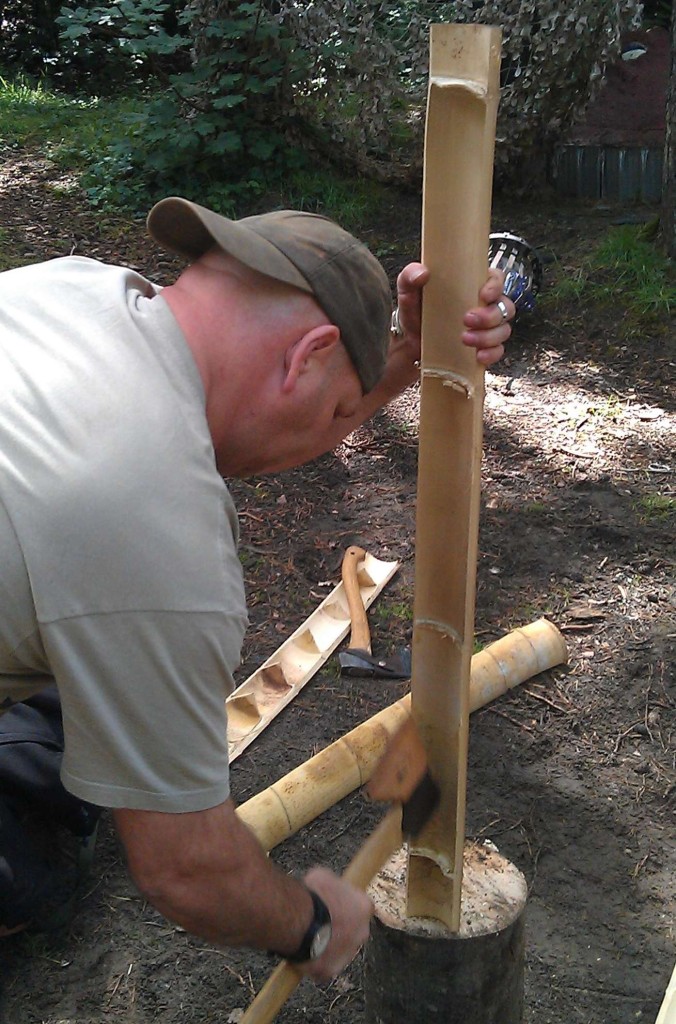
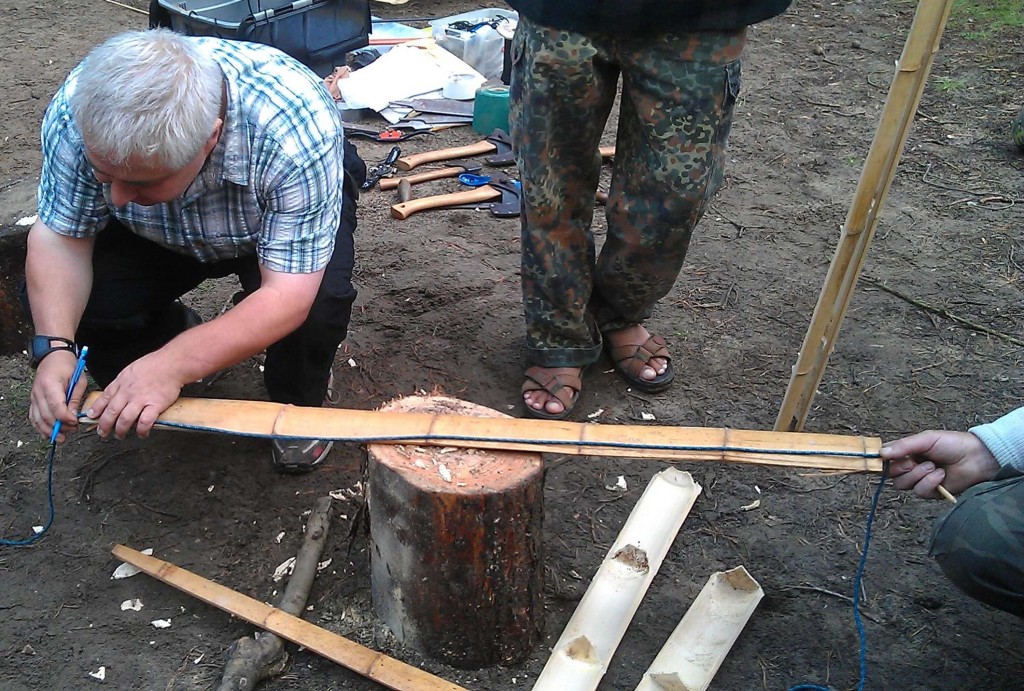
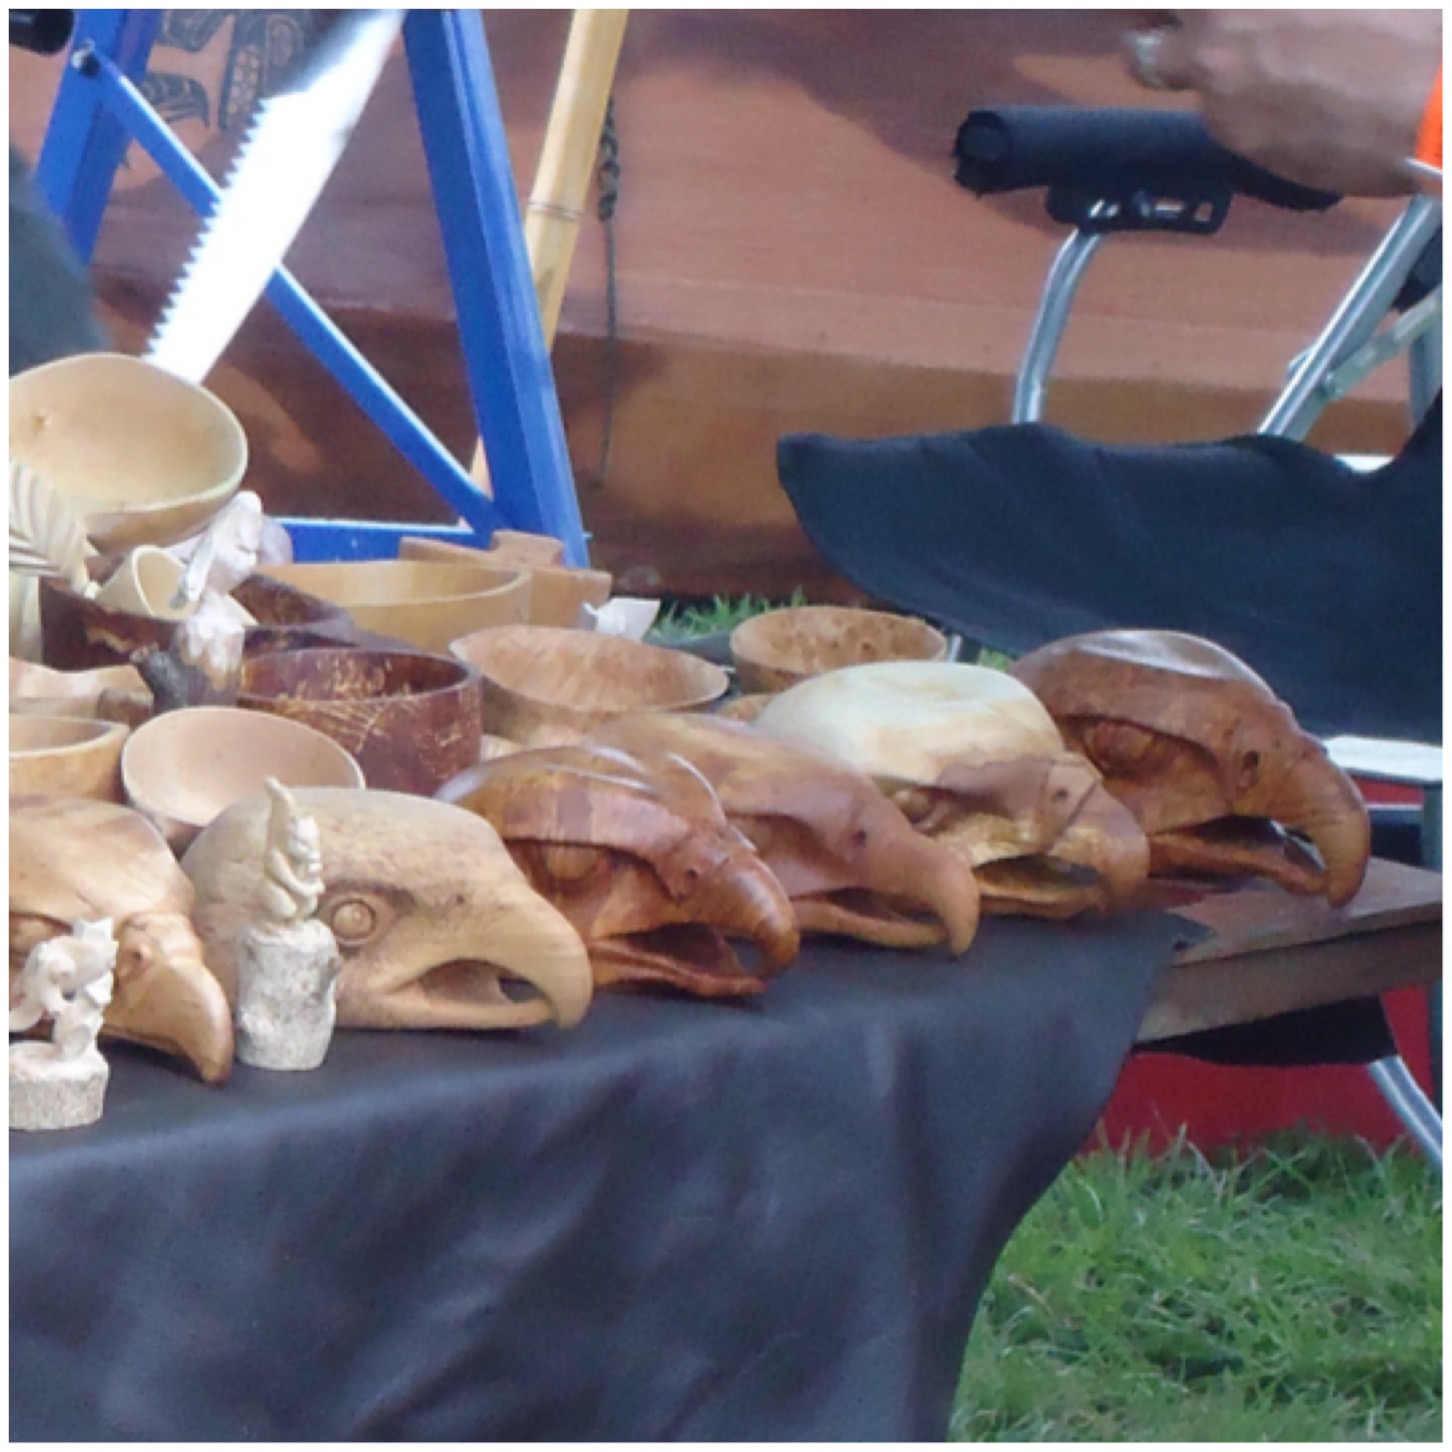
I looked in my archive though and came across these pictures of the master craftsman John Arthur from the Woodlife Makers Guild at the 2011 Wilderness Gathering demonstrating how to quickly blank out a kuksa.

Photo 11-02-2015 21 47 46
John Arthur – Master Wood Worker

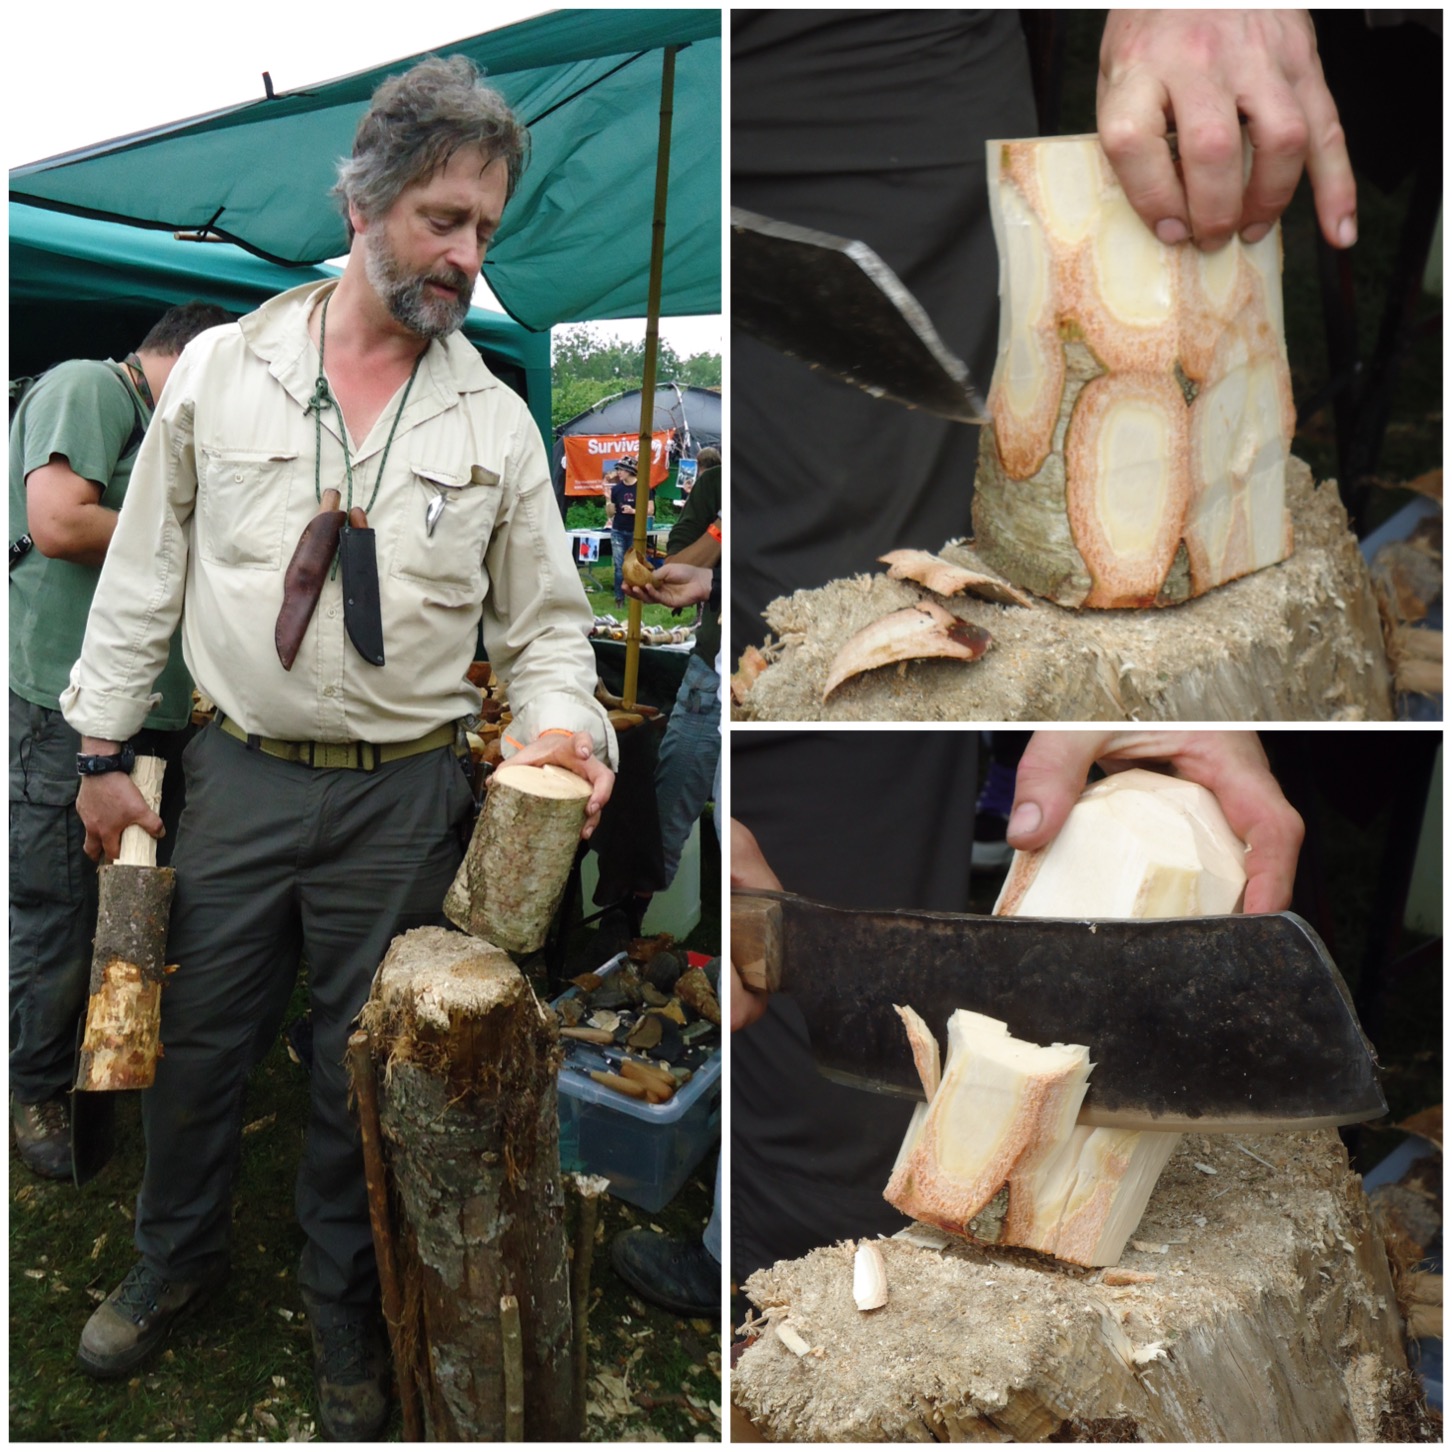
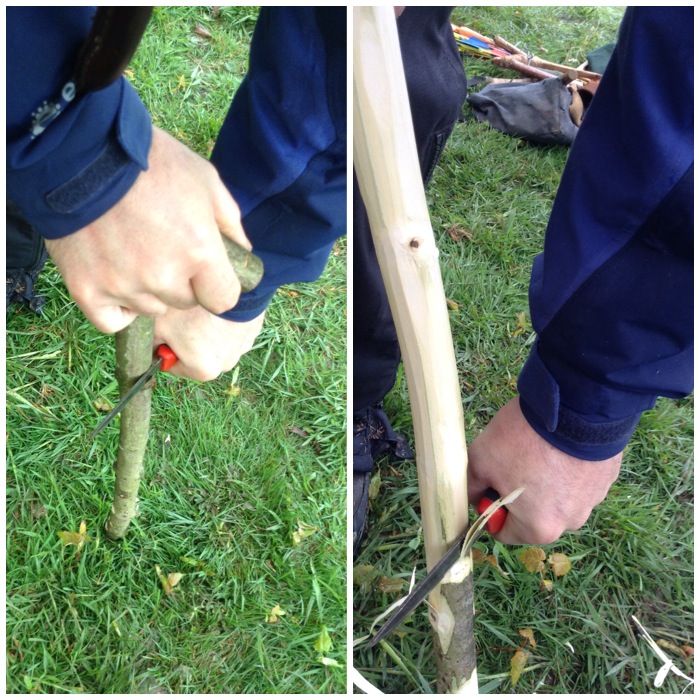
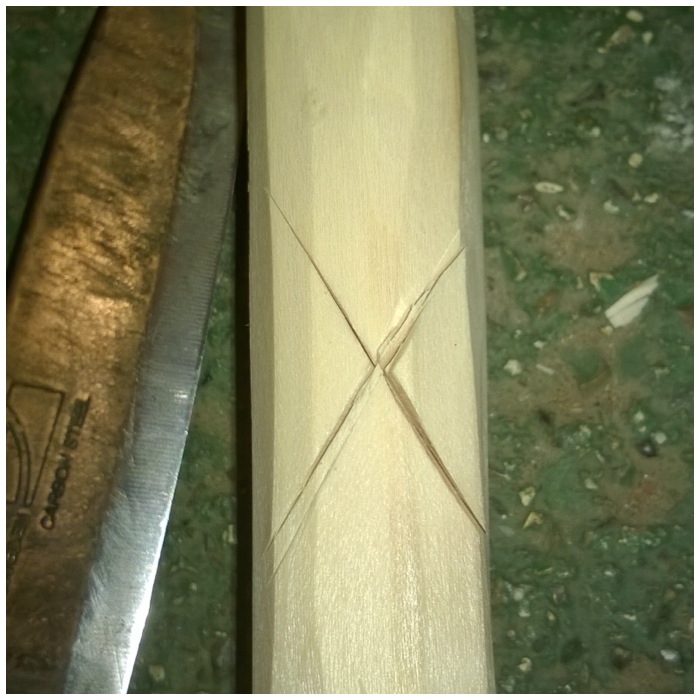
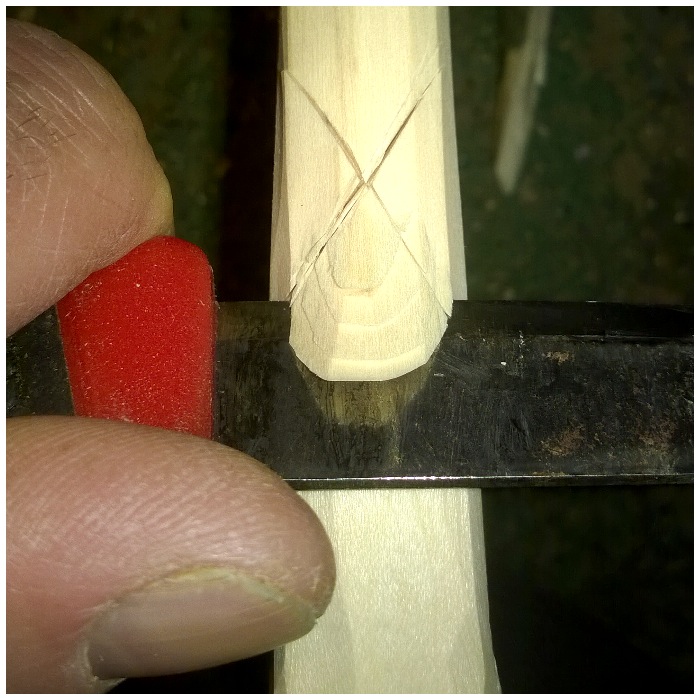
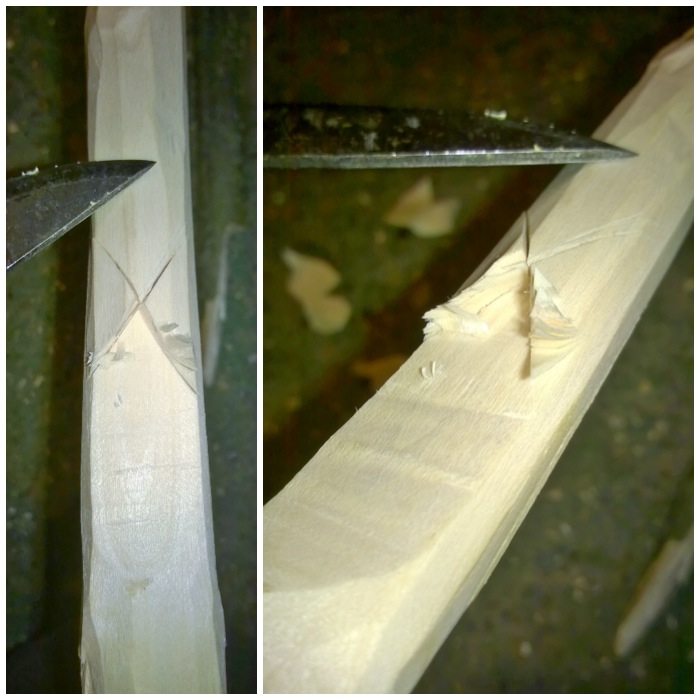
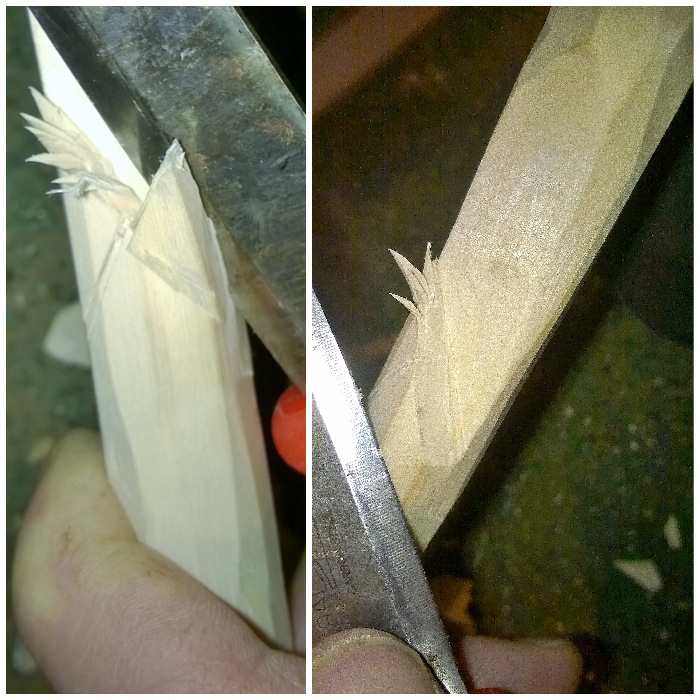
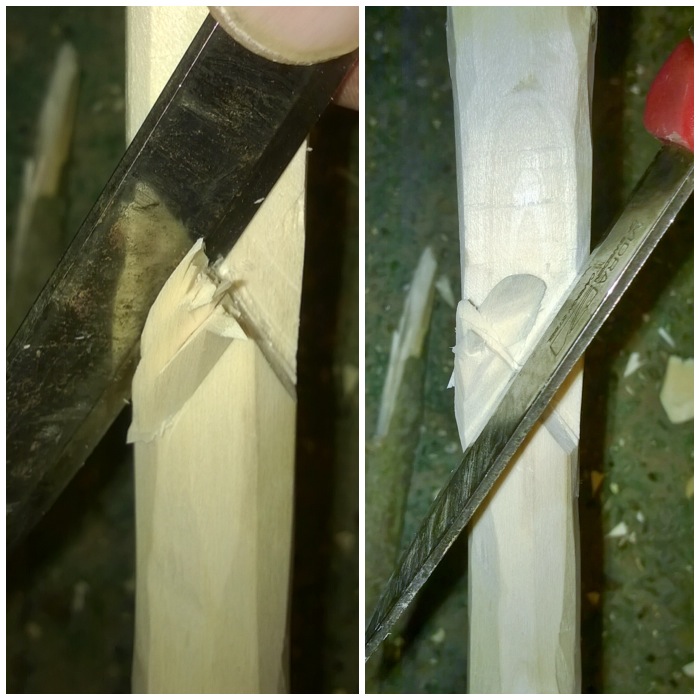
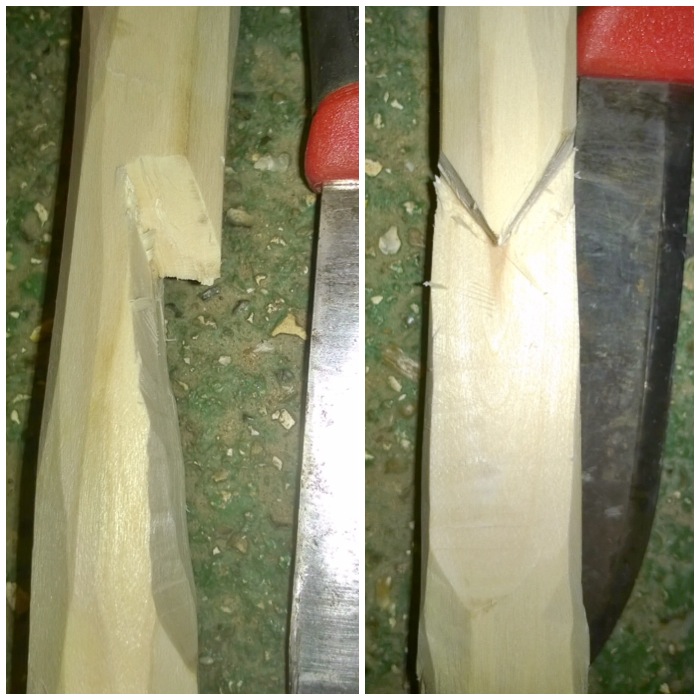
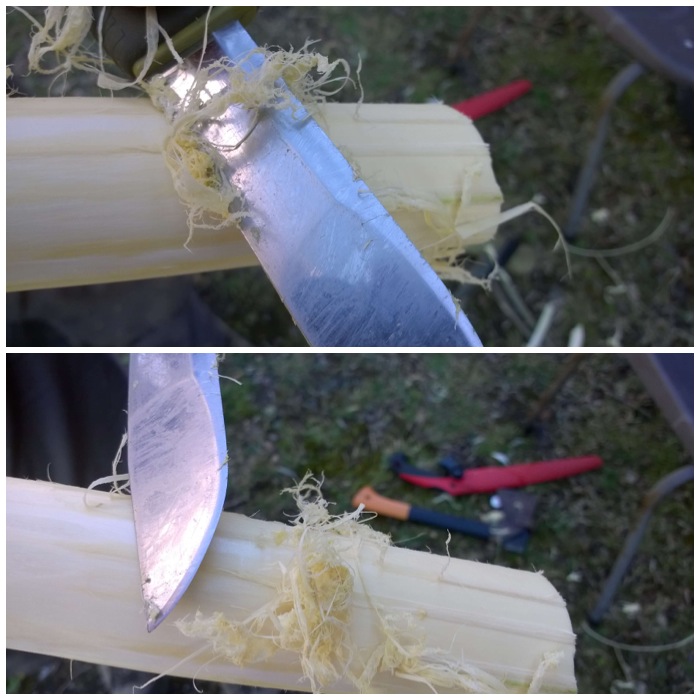
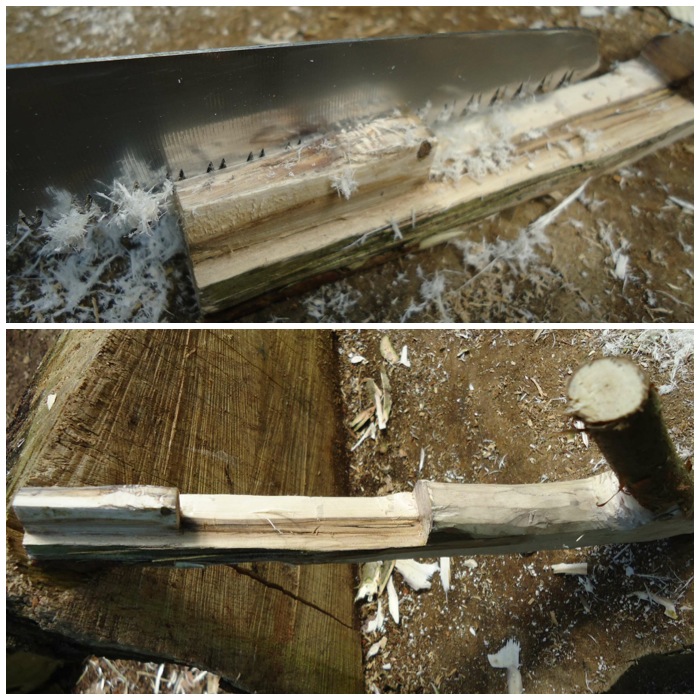
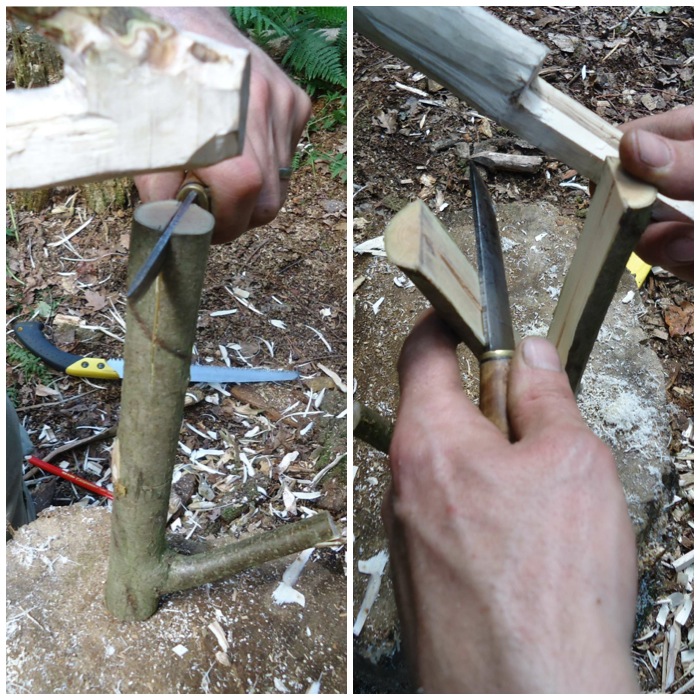
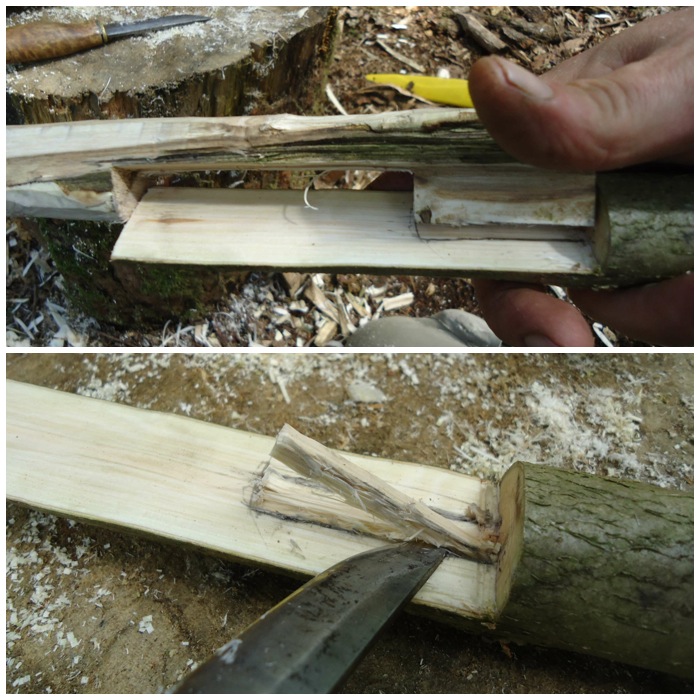
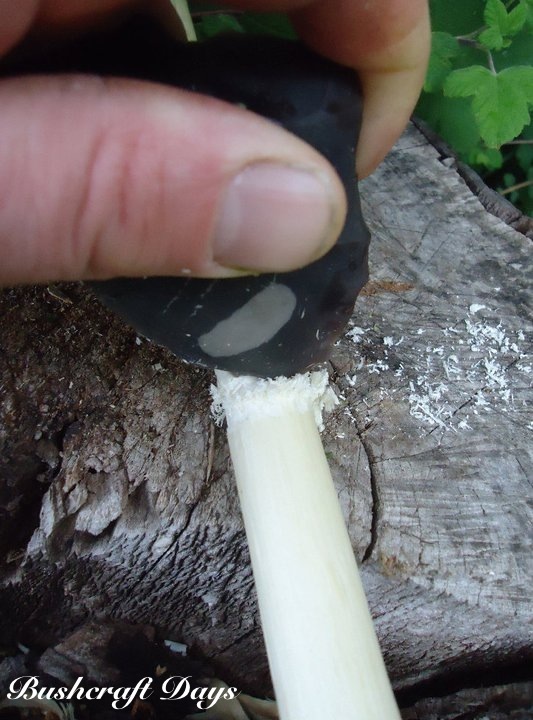
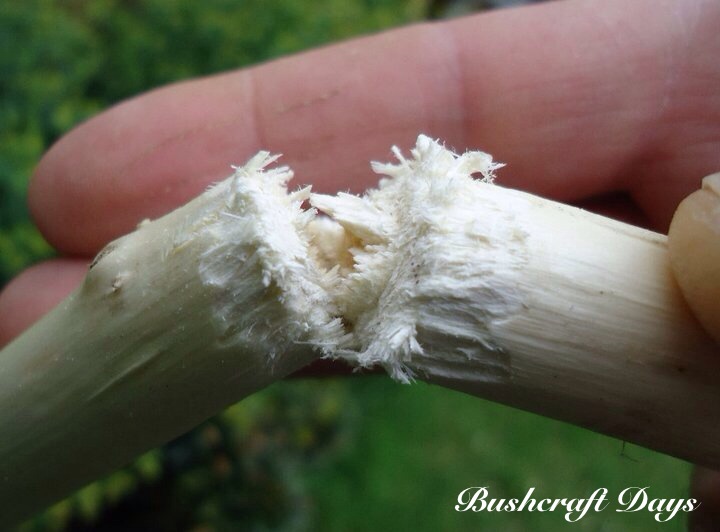
After chopping out the basic shape, John used a saw to put some stop cuts in. Stop cuts allow you to remove wood from specific areas without any split running off into wood you want to keep (in this case the area that will become the bowl).

Photo 11-02-2015 21 48 35
Stop cuts and blanking out the cup

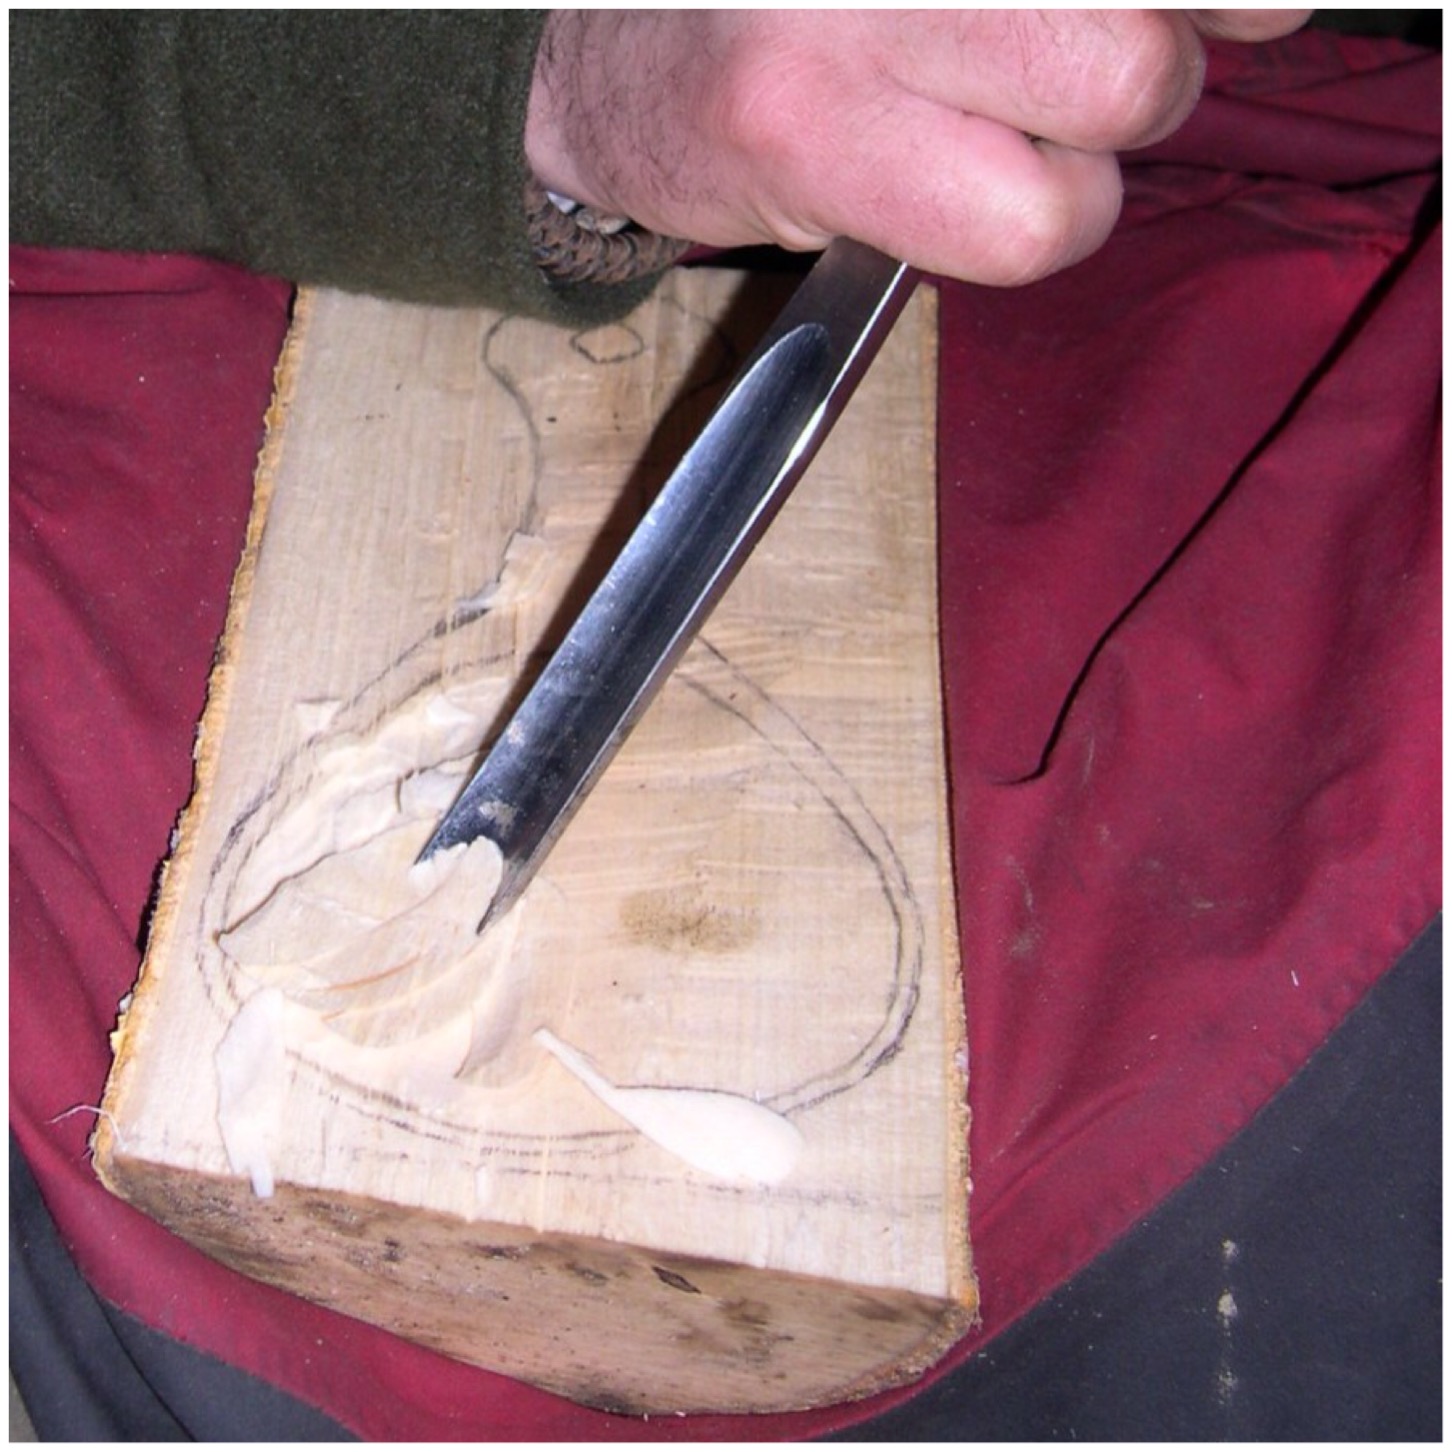
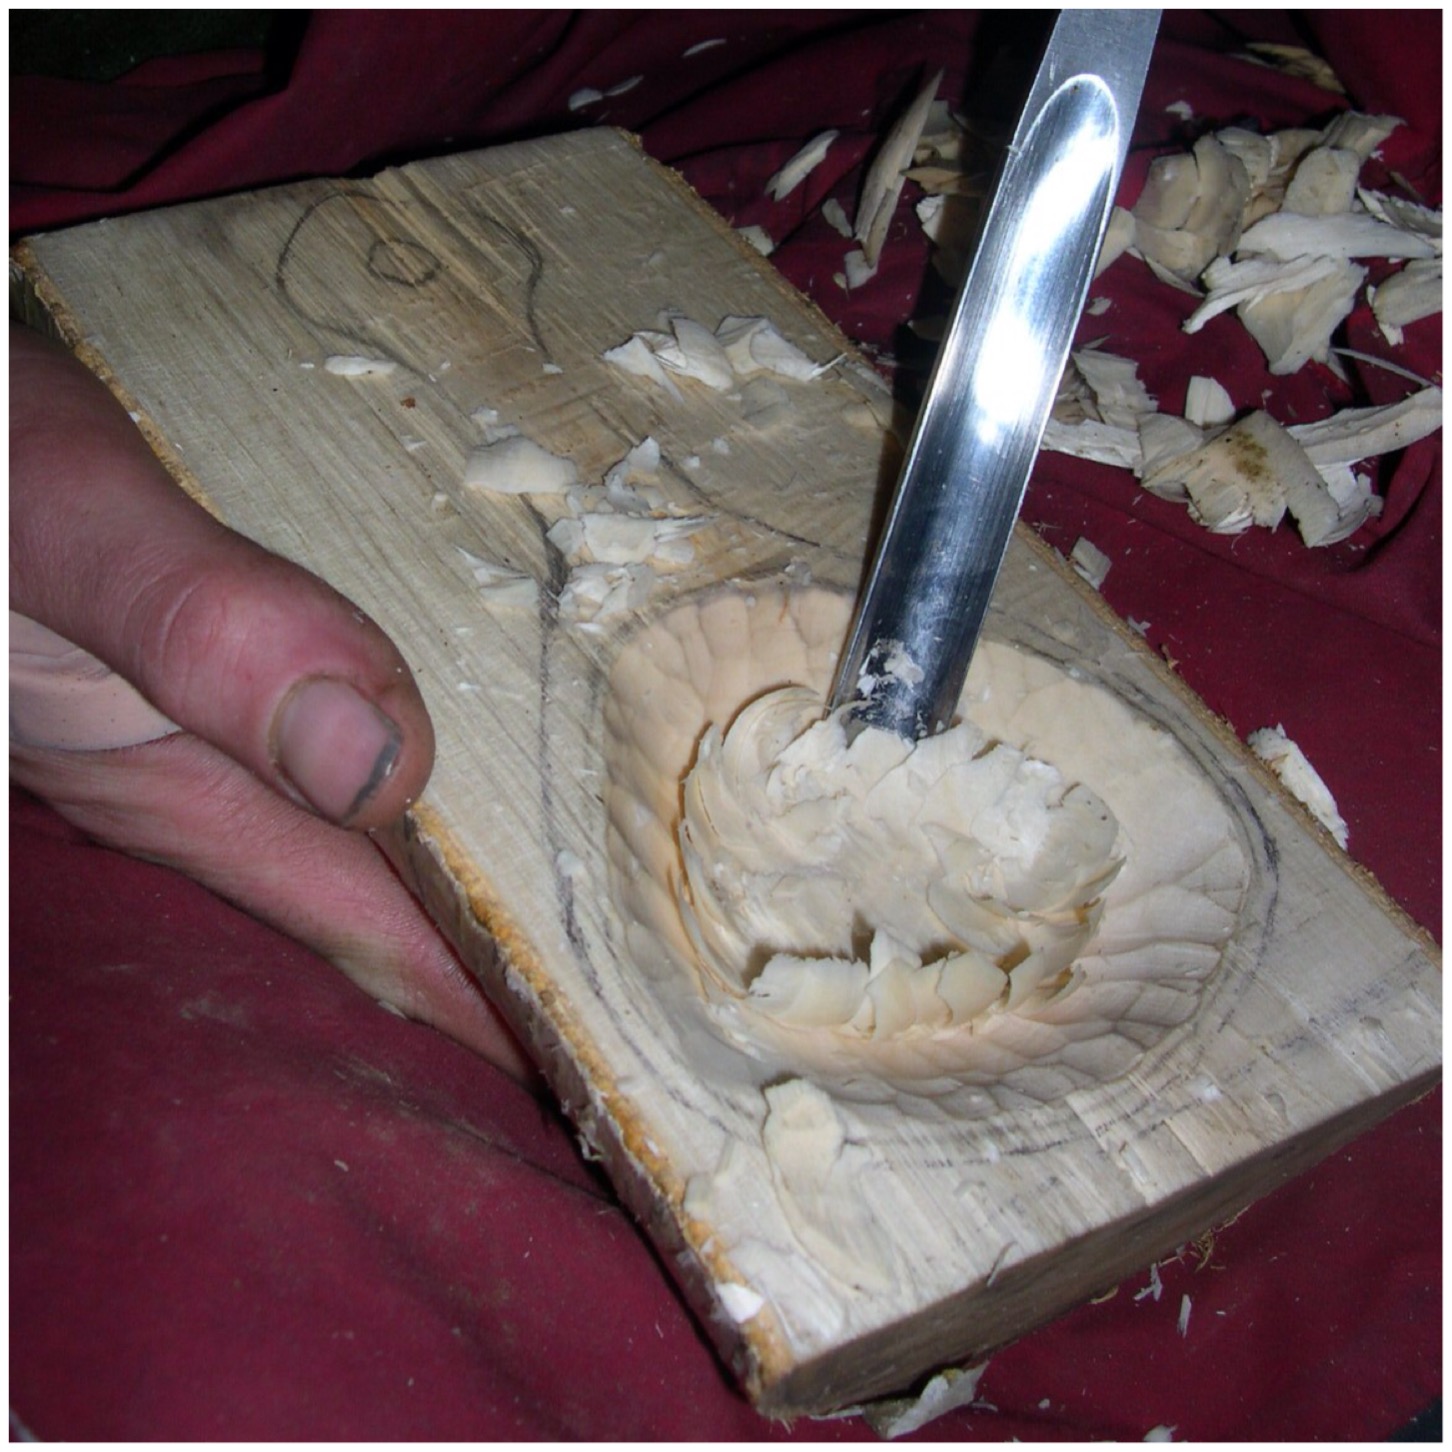
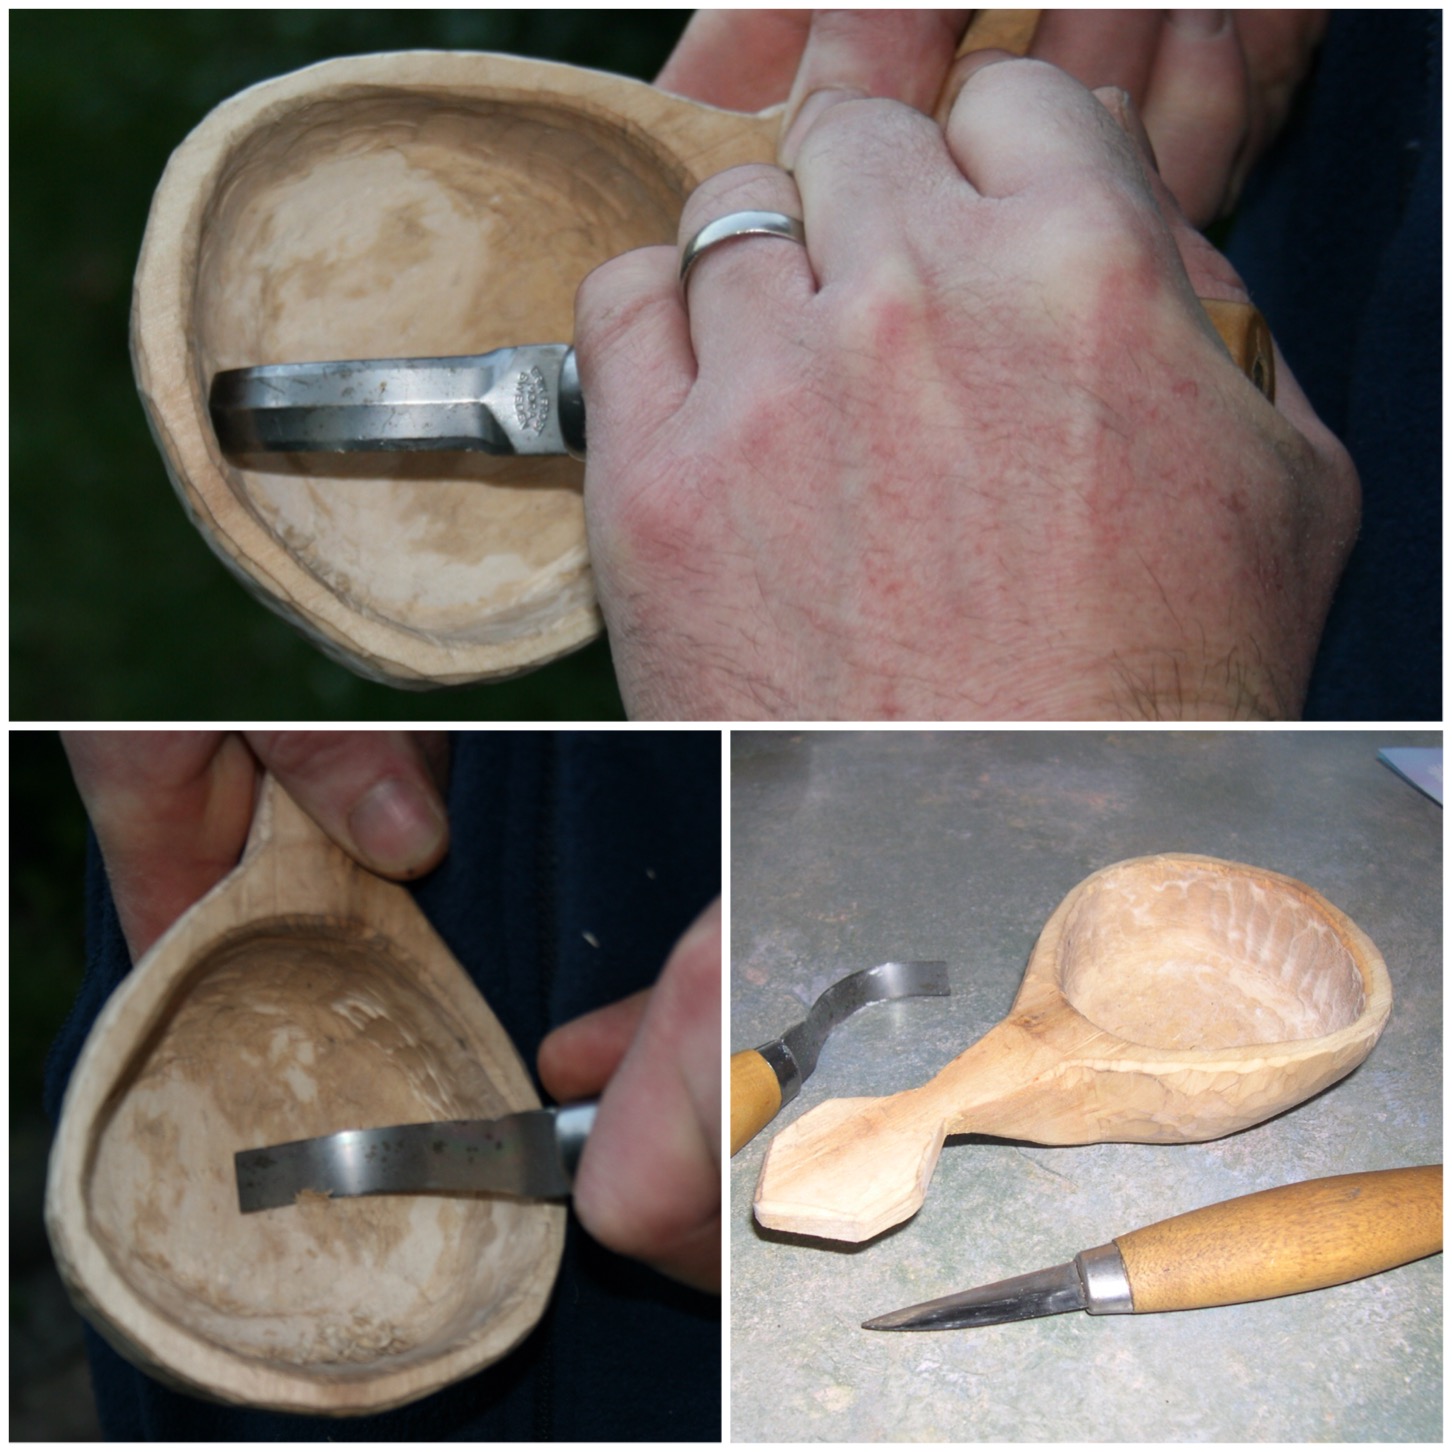
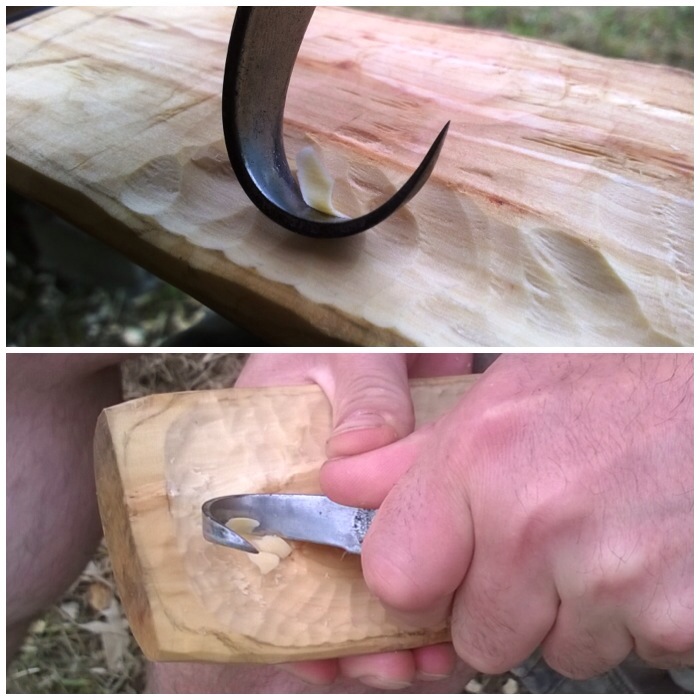
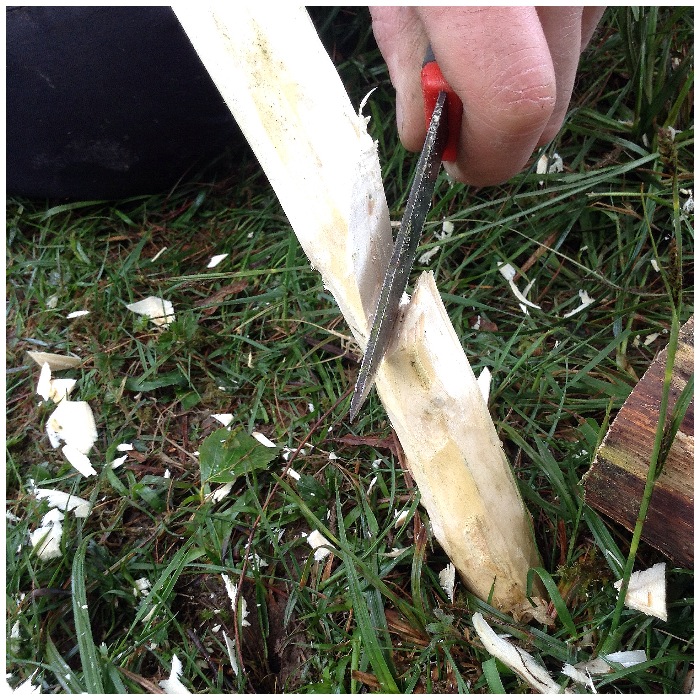
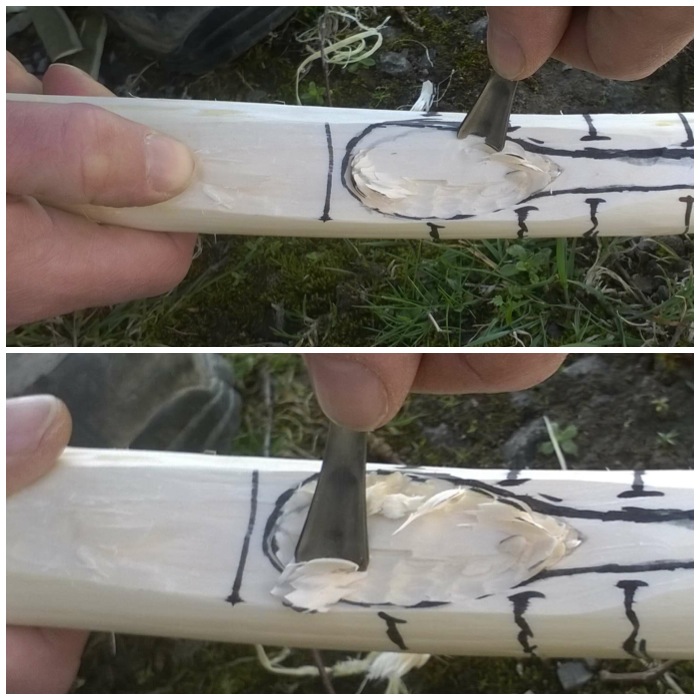
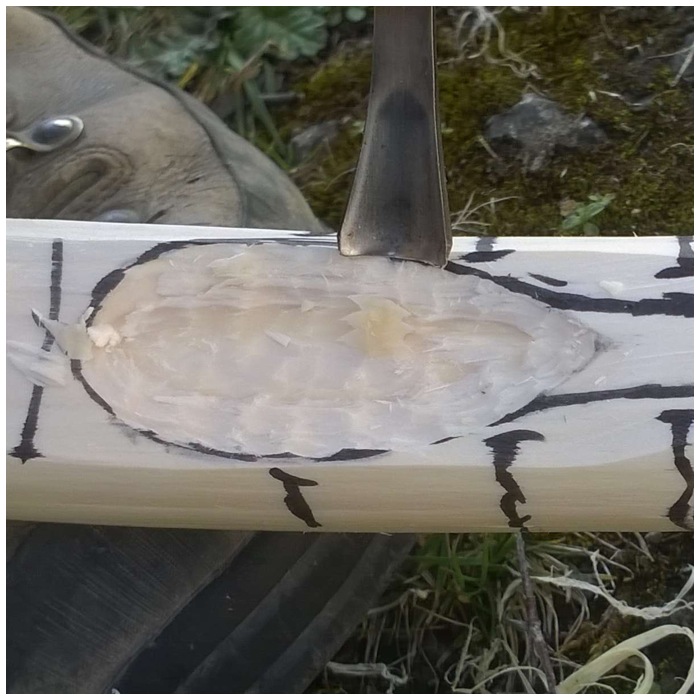
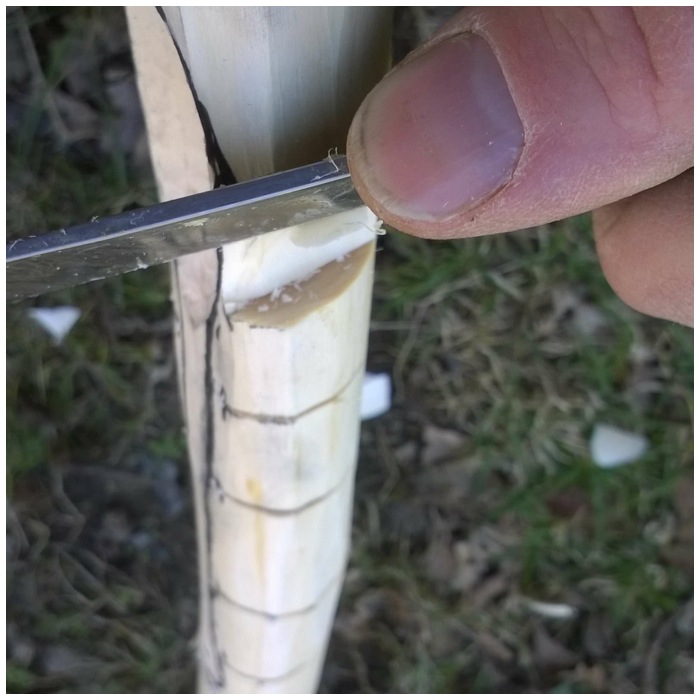
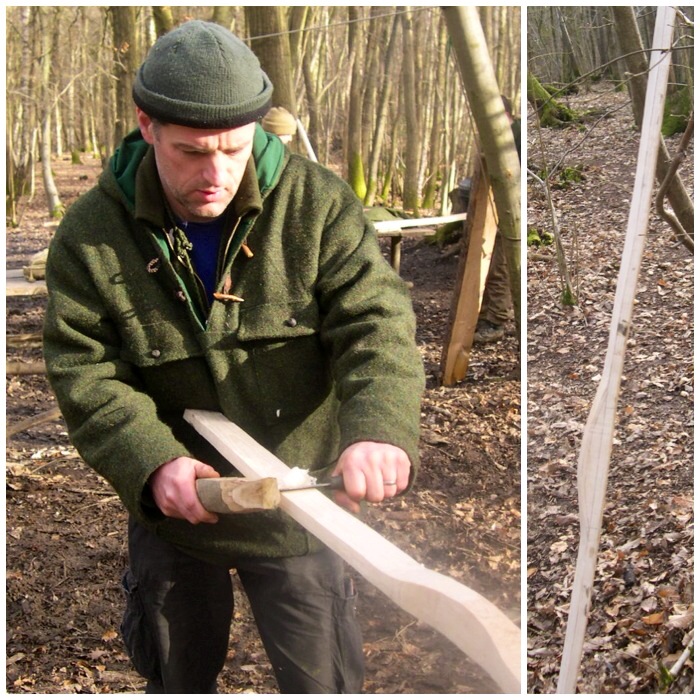
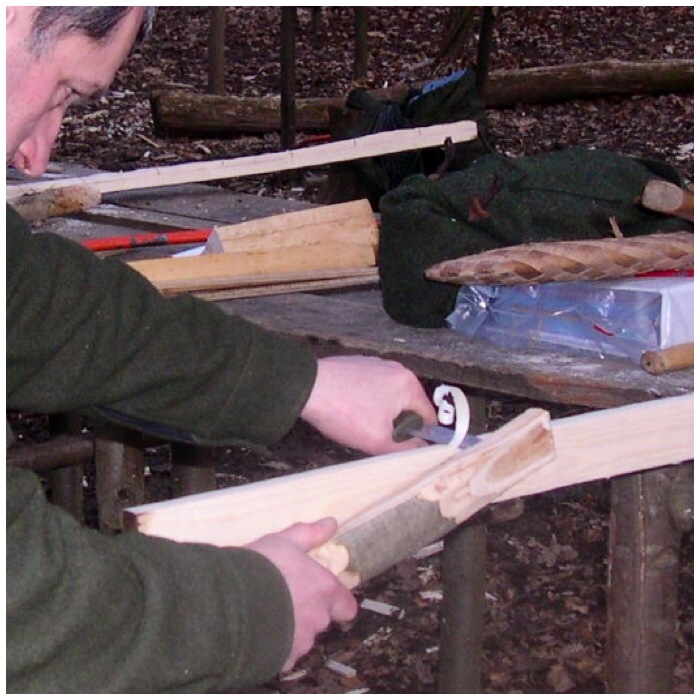
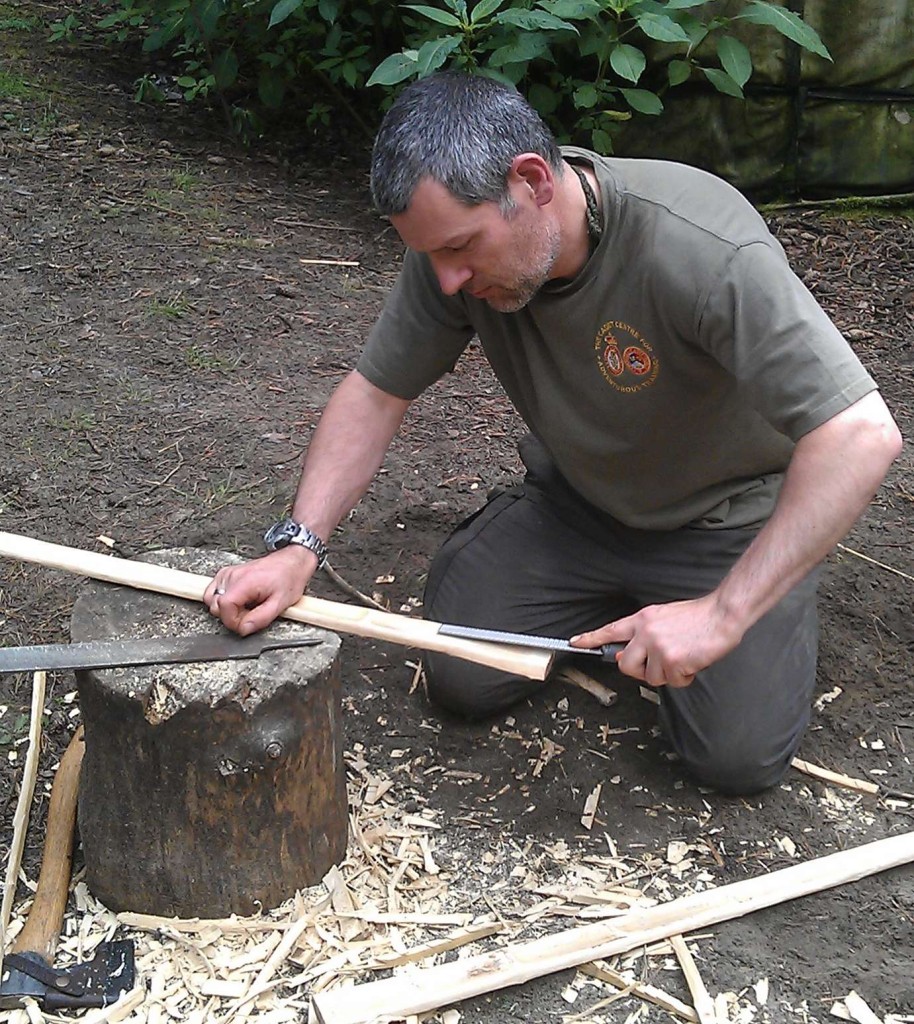
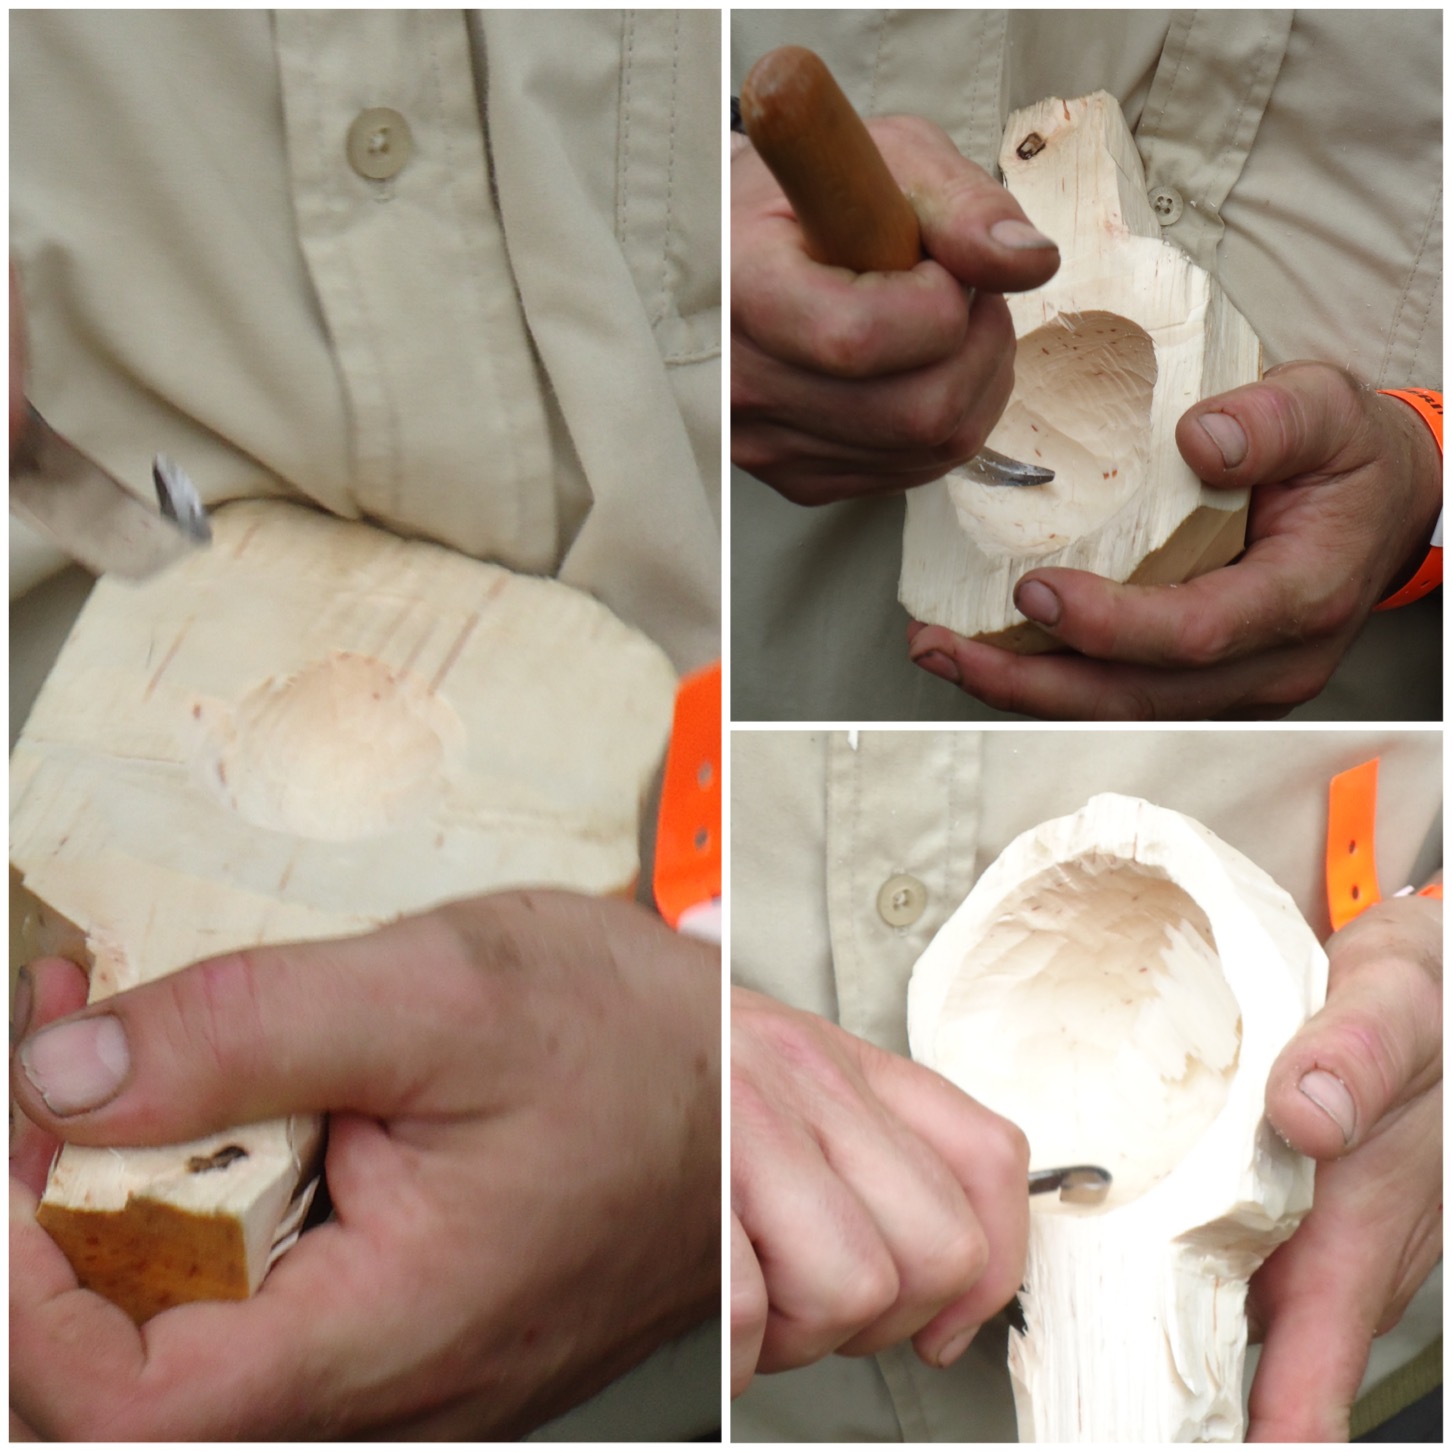
Once John had the basic shape he used his crook knife to carve out the bowl. He kept the knife in his right hand and continually turned the kuksa to carve out the bowl.

Photo 11-02-2015 21 50 44
Carving the bowl

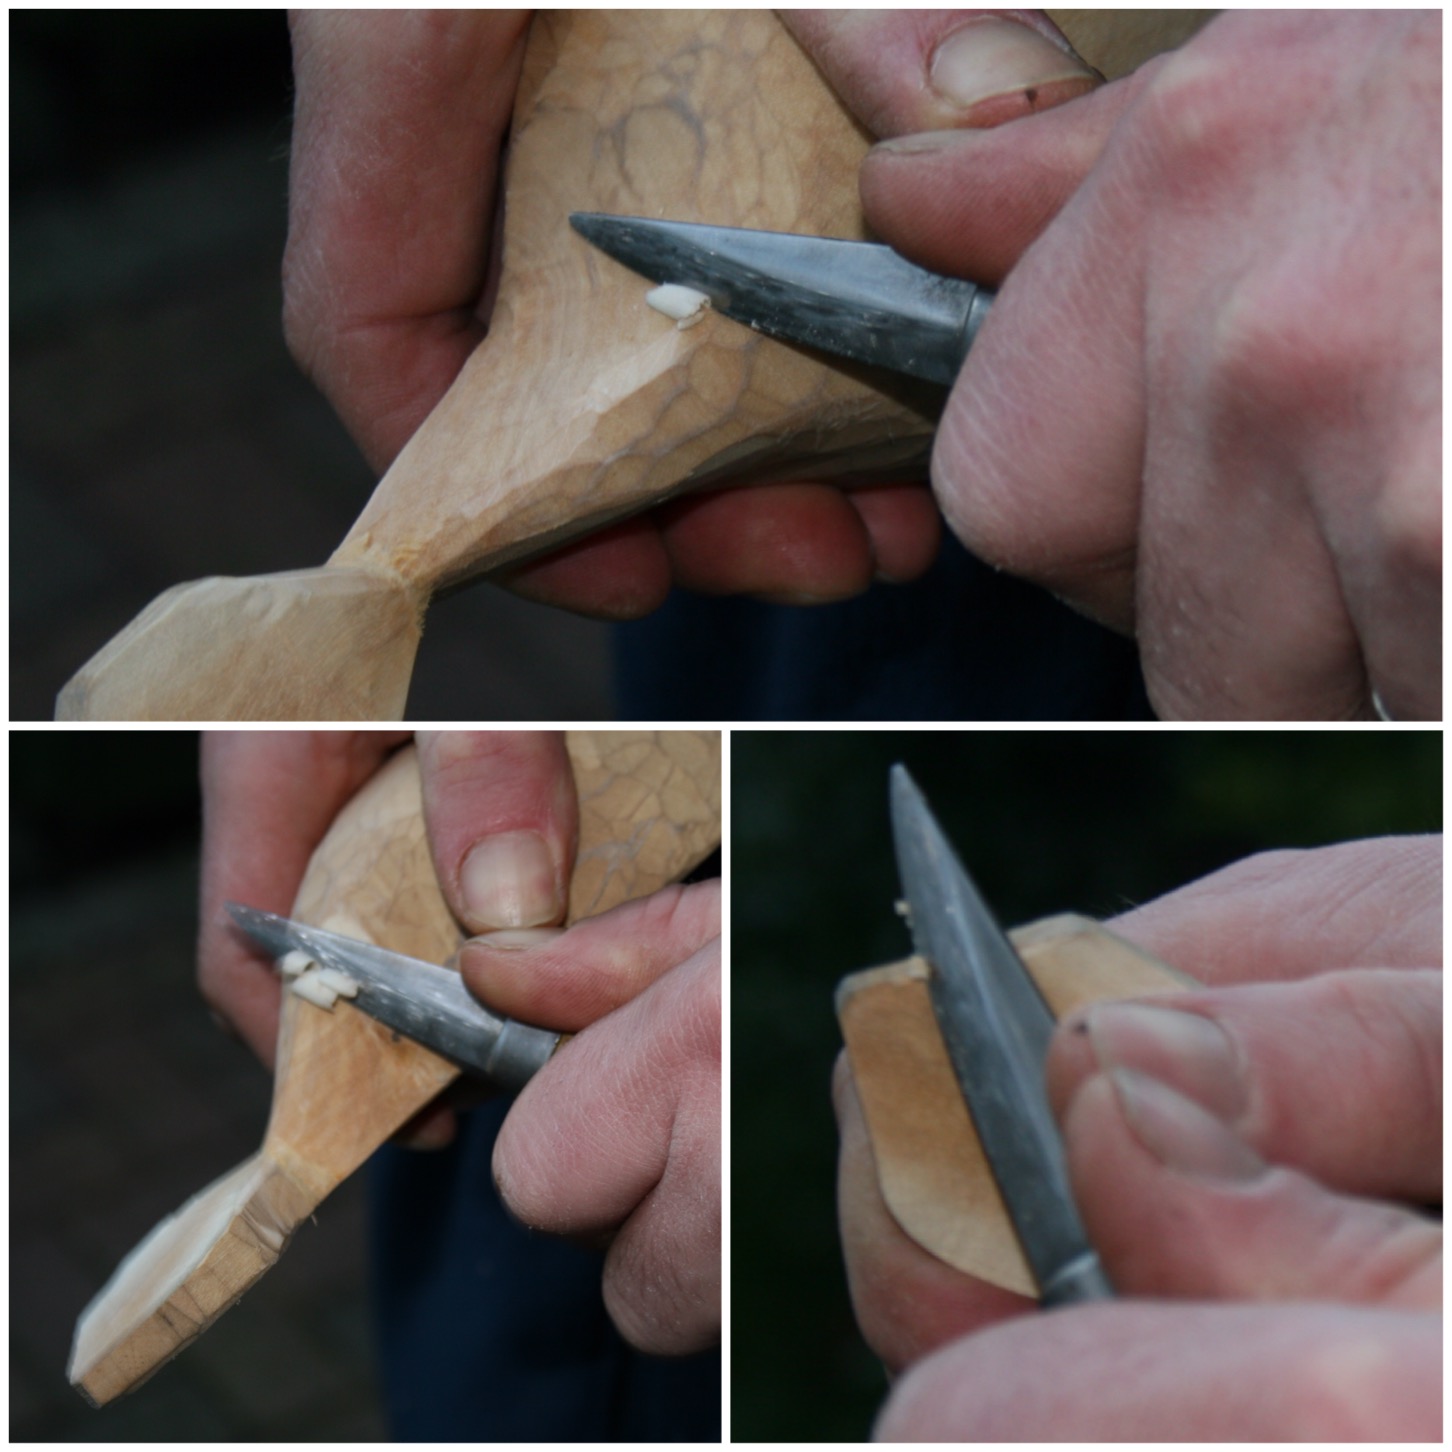
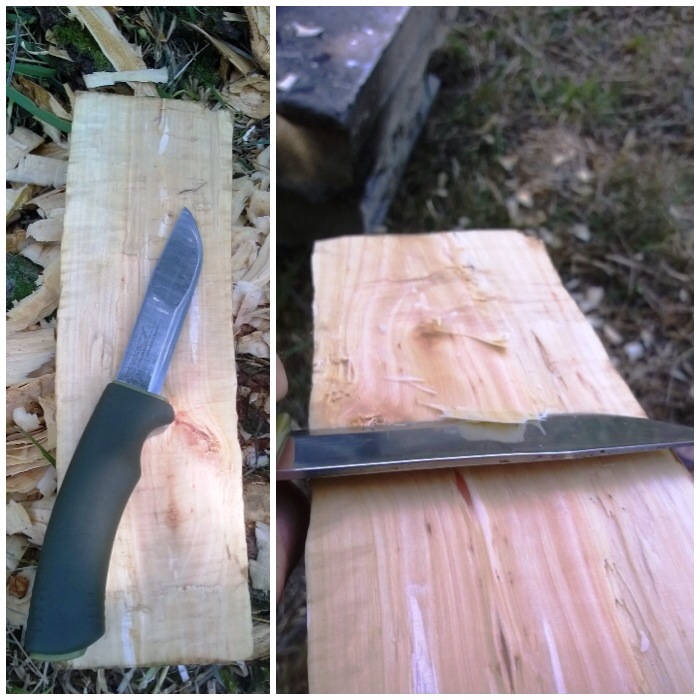
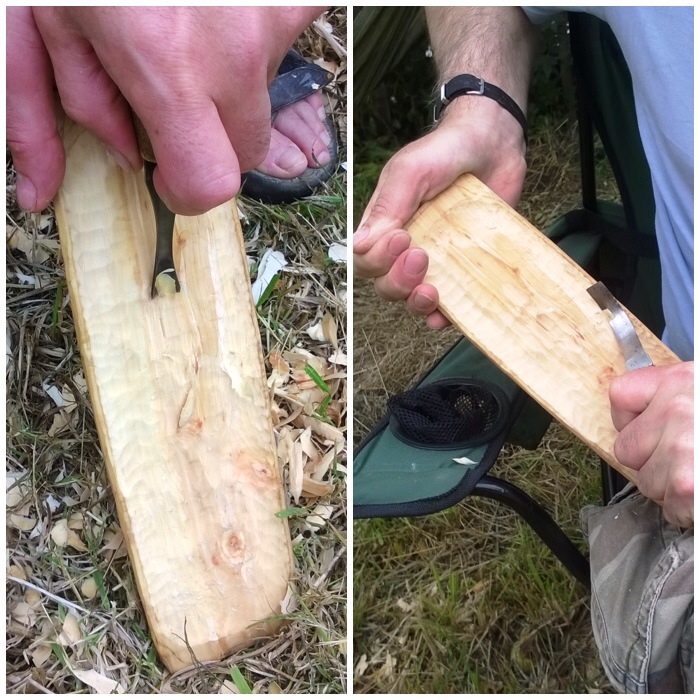
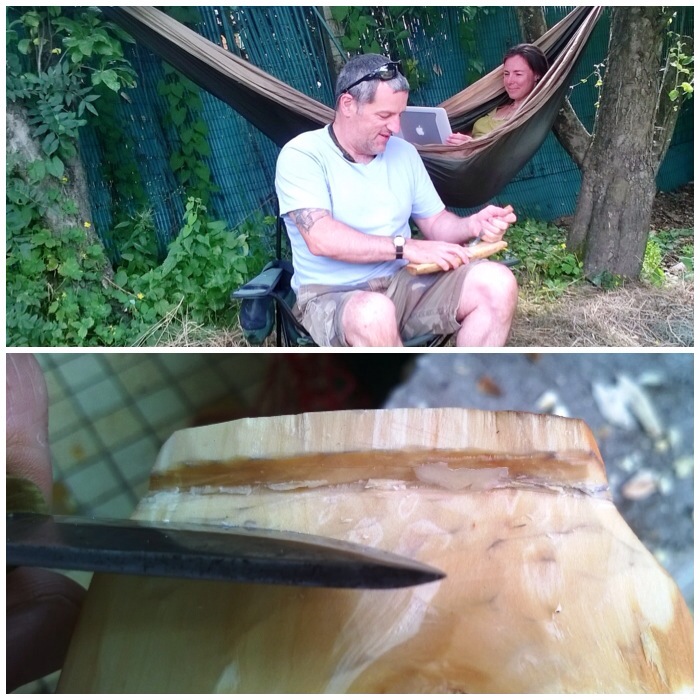
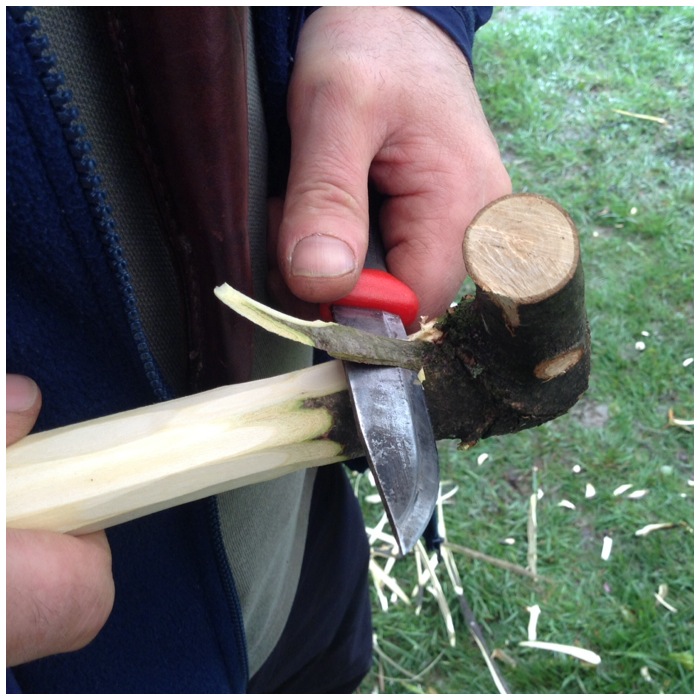
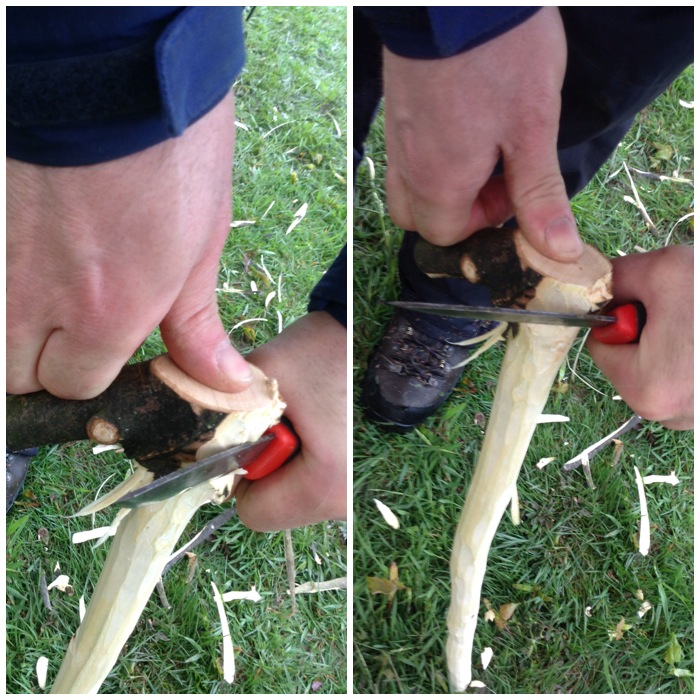
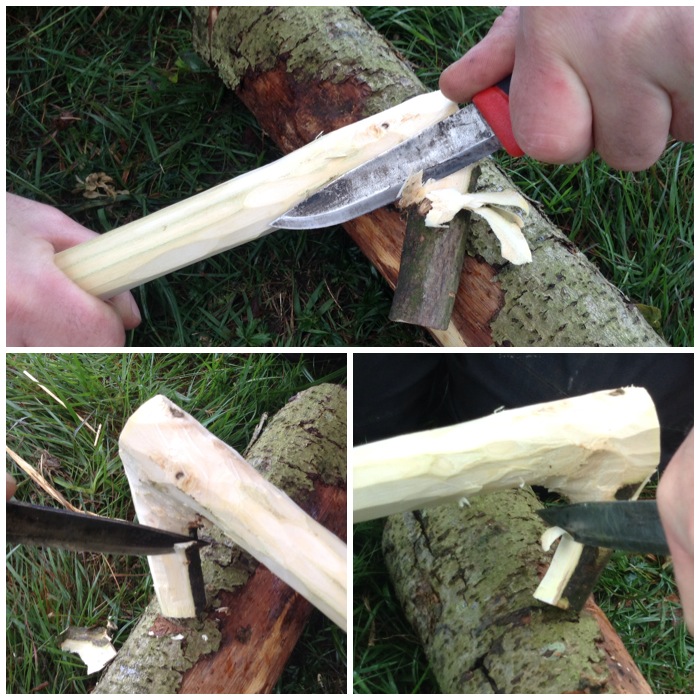
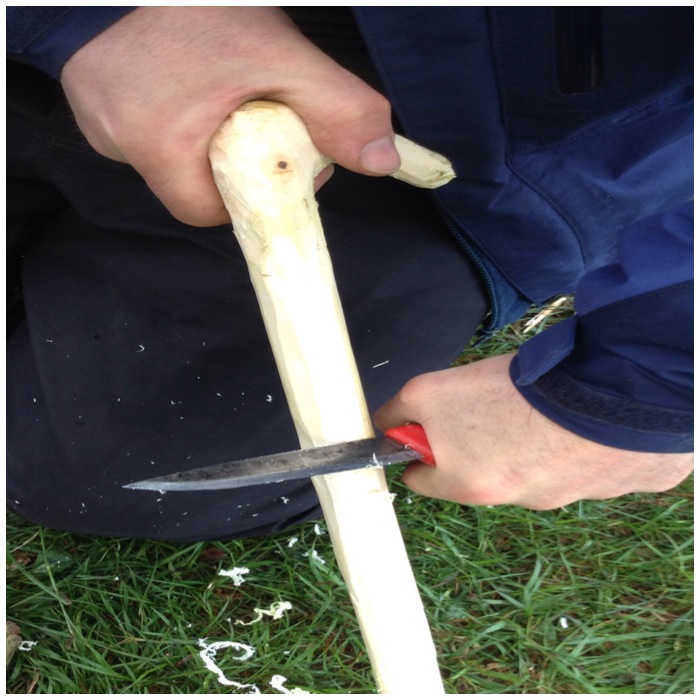
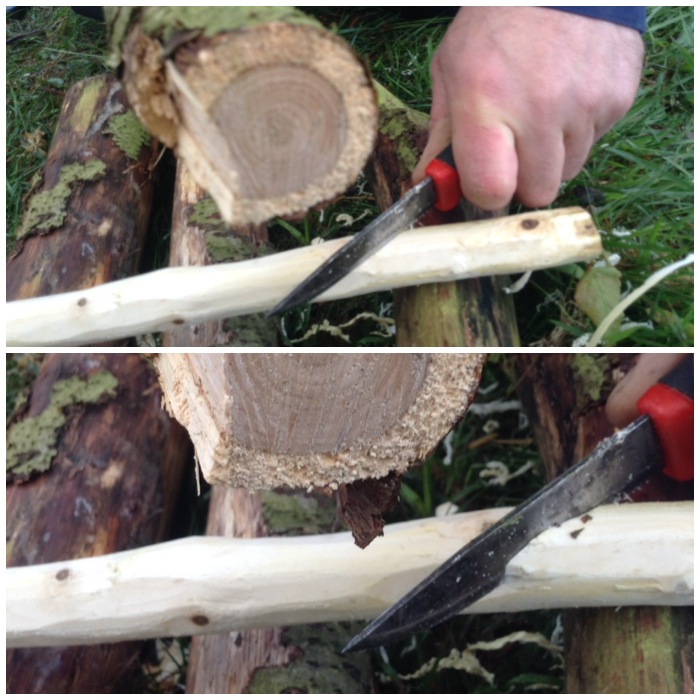
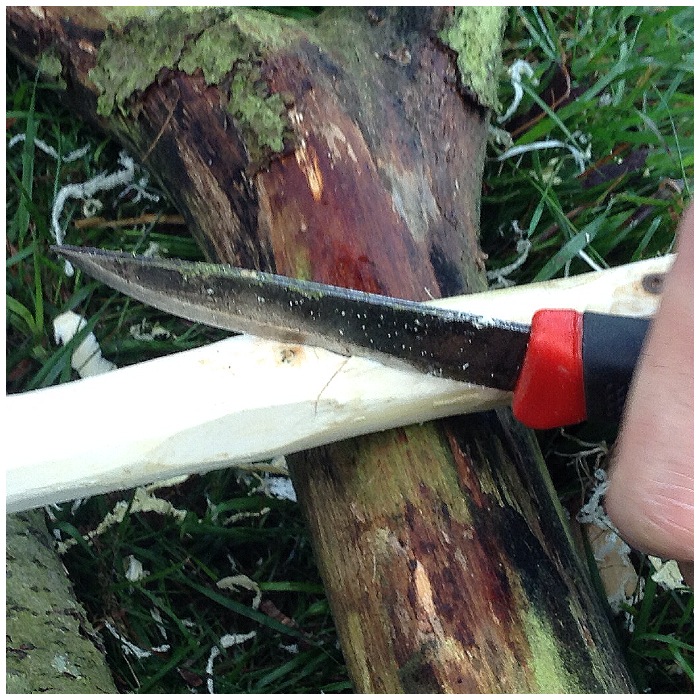
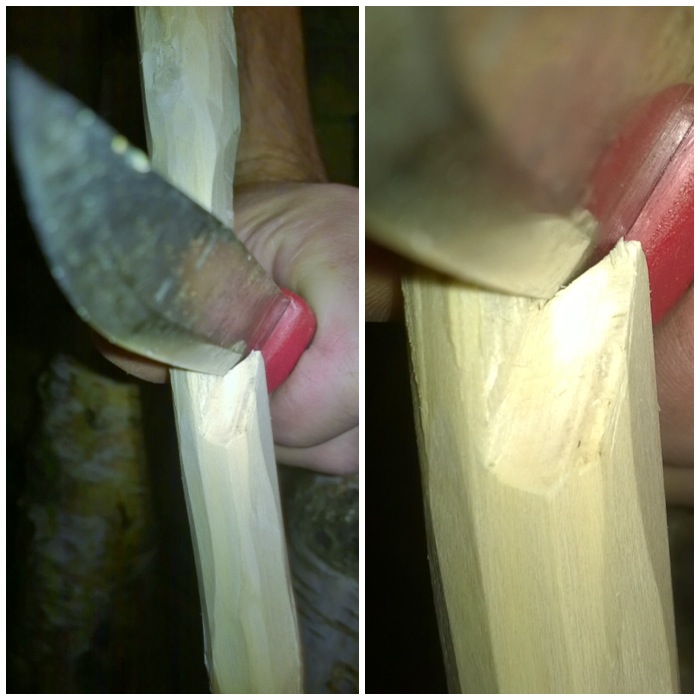
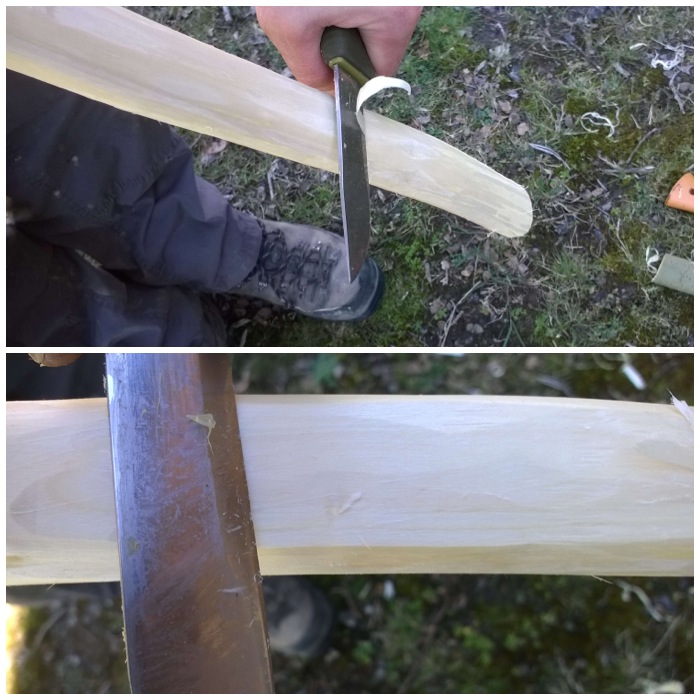
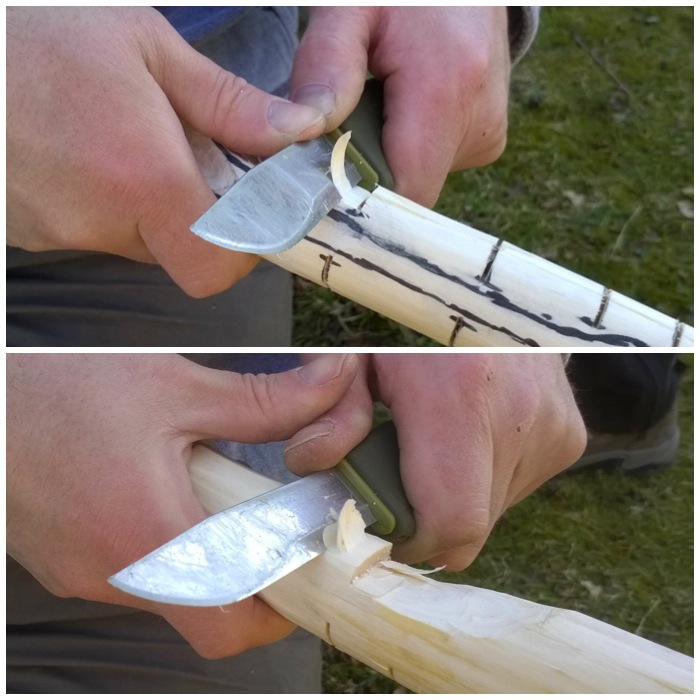
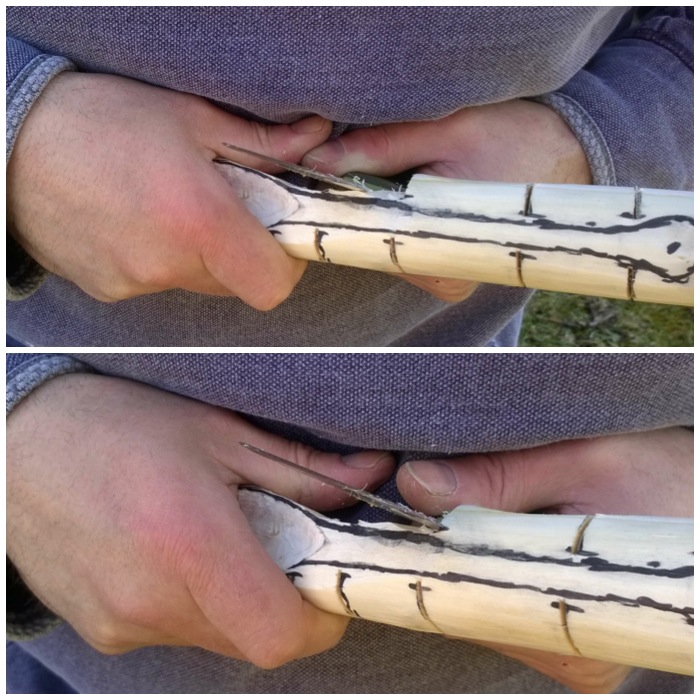
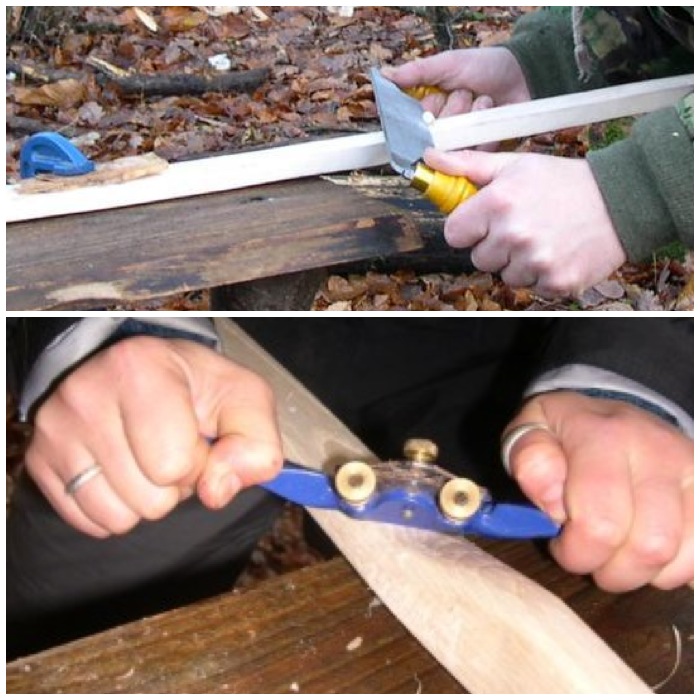
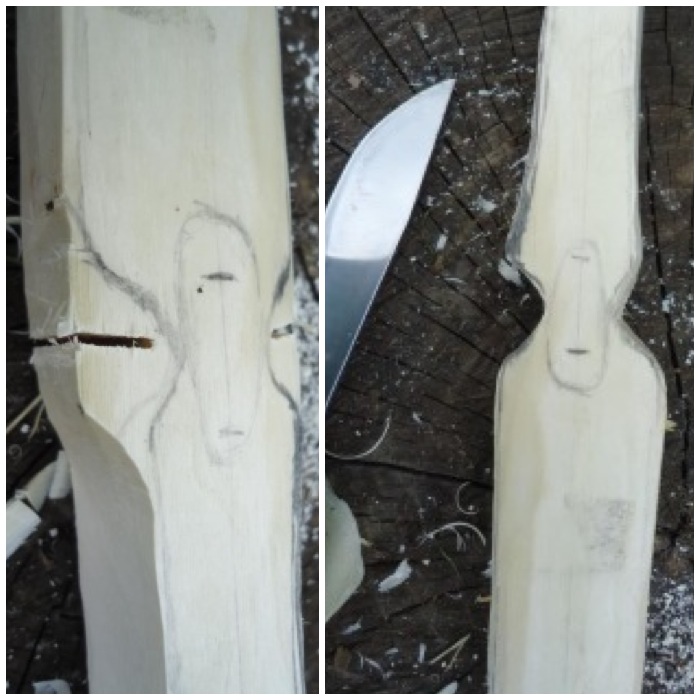
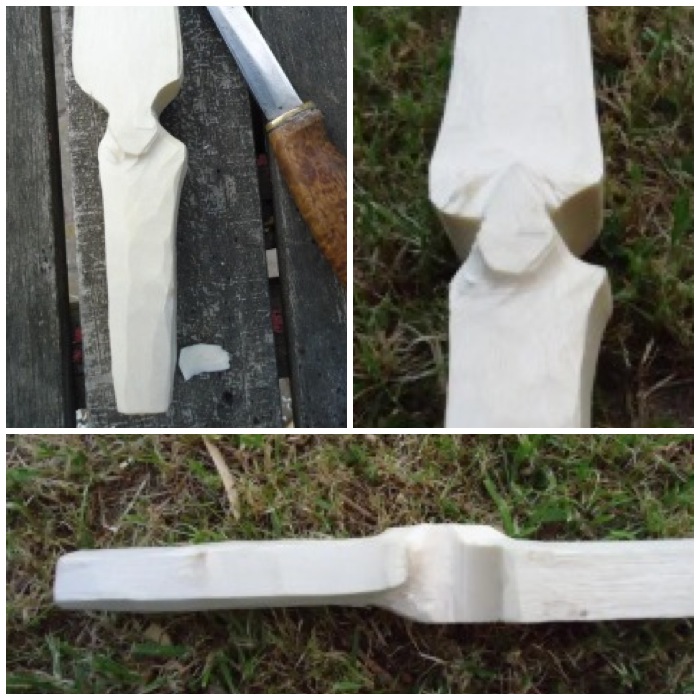
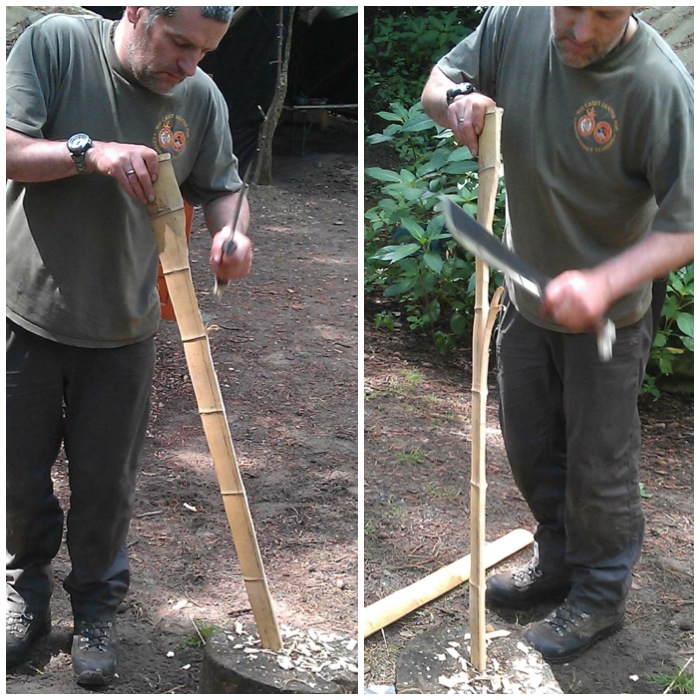
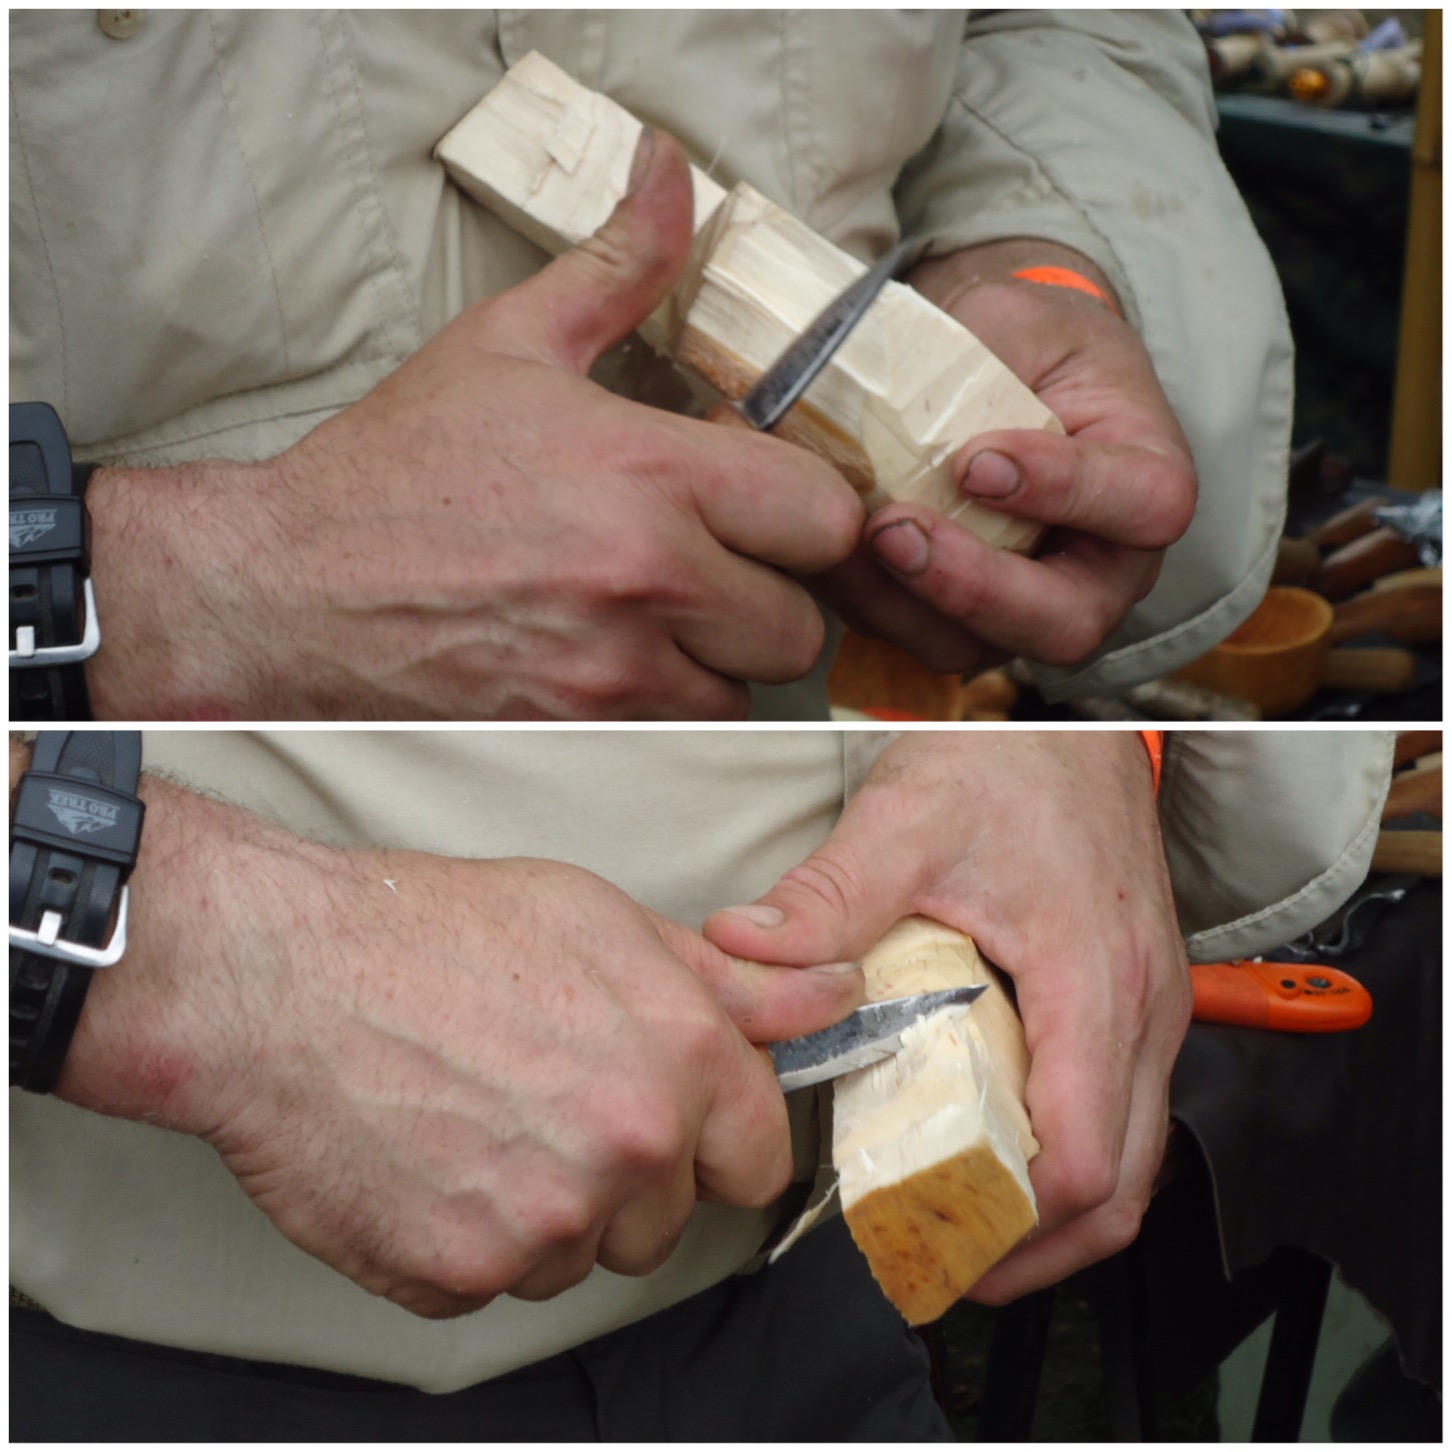
Finally he used a small knife to shape the outside of the kuksa. He used a number of cutting styles cutting towards himself and away from himself but he was always in full control of the knife and soon had the basic shape of the kuksa made.

As this was green wood he then explained he would let it dry slowly over a number of weeks before finishing it off.

Photo 11-02-2015 21 51 28
Deft knife work

Here are some of John’s finished kuksas on display at the Gathering. With this level of detail you can see why he is a master craftsman.

Photo 11-02-2015 21 57 20
John’s creations

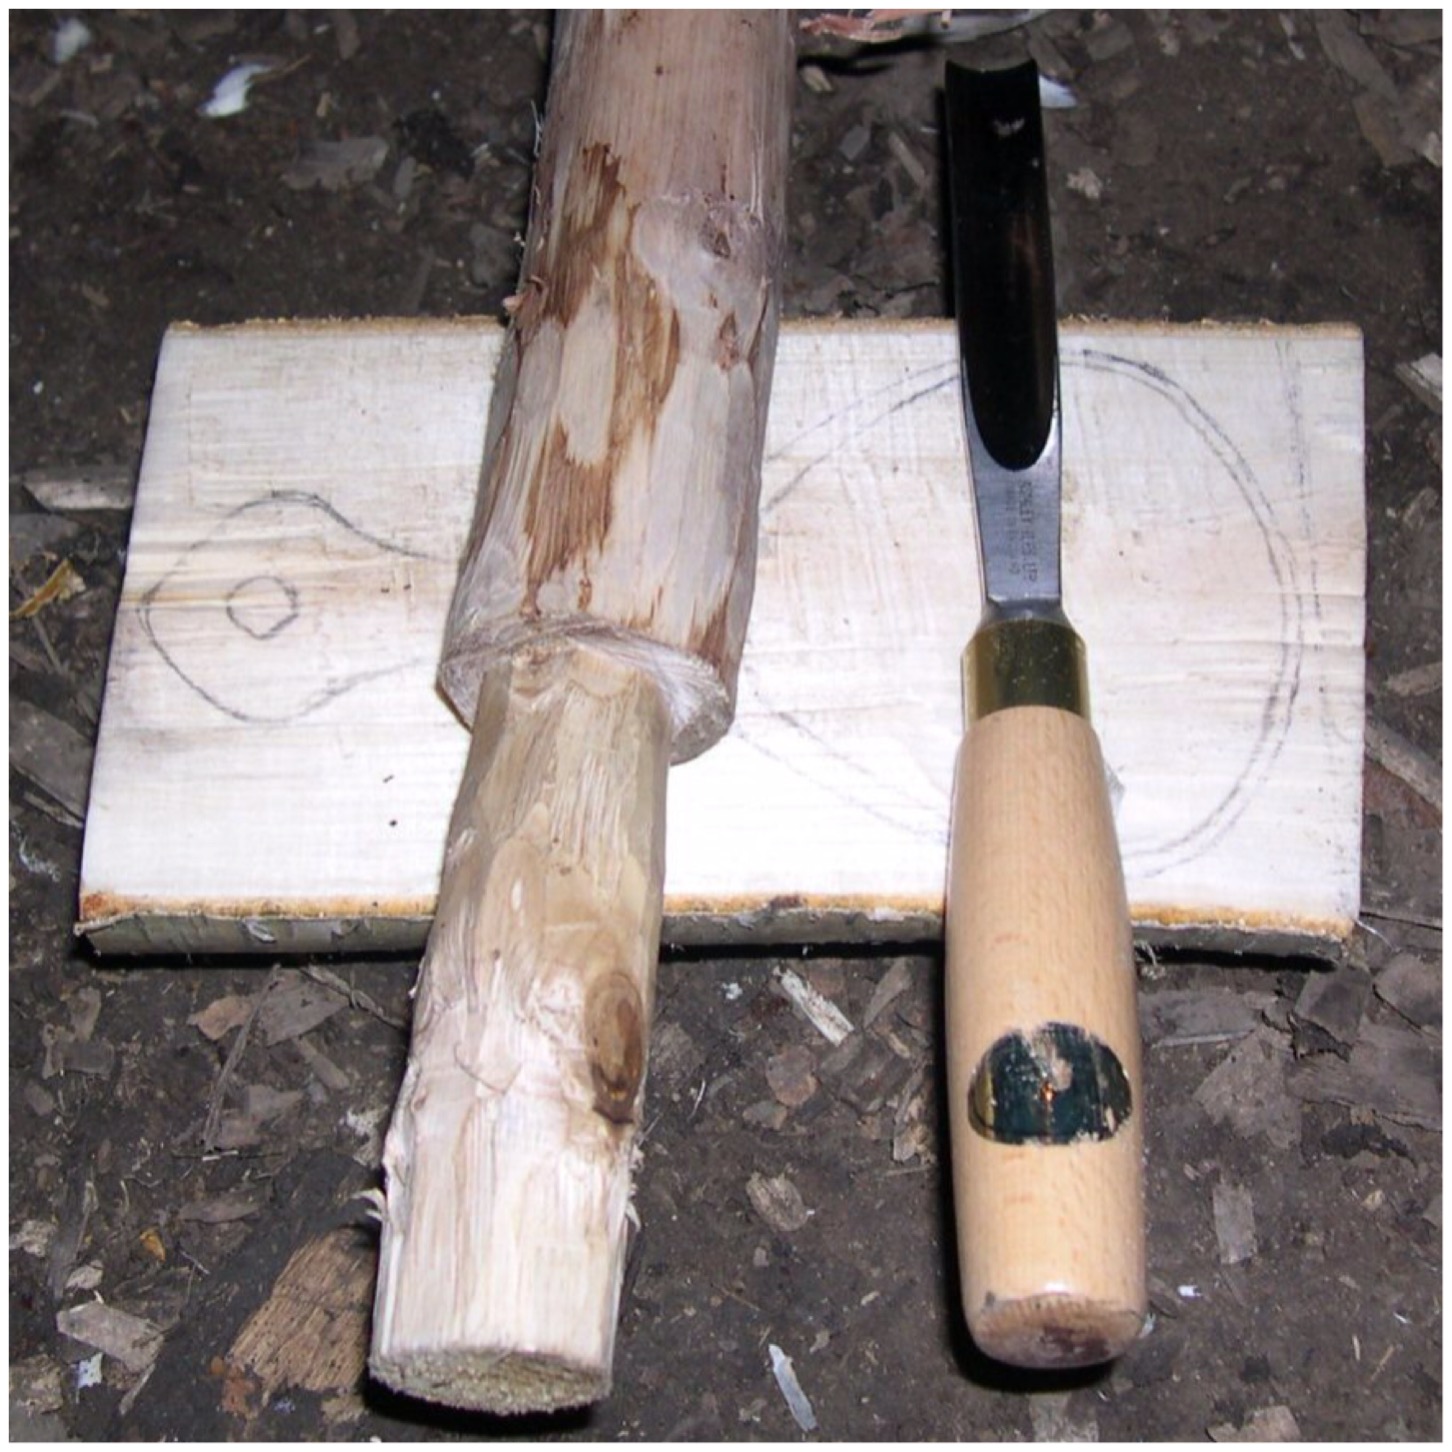
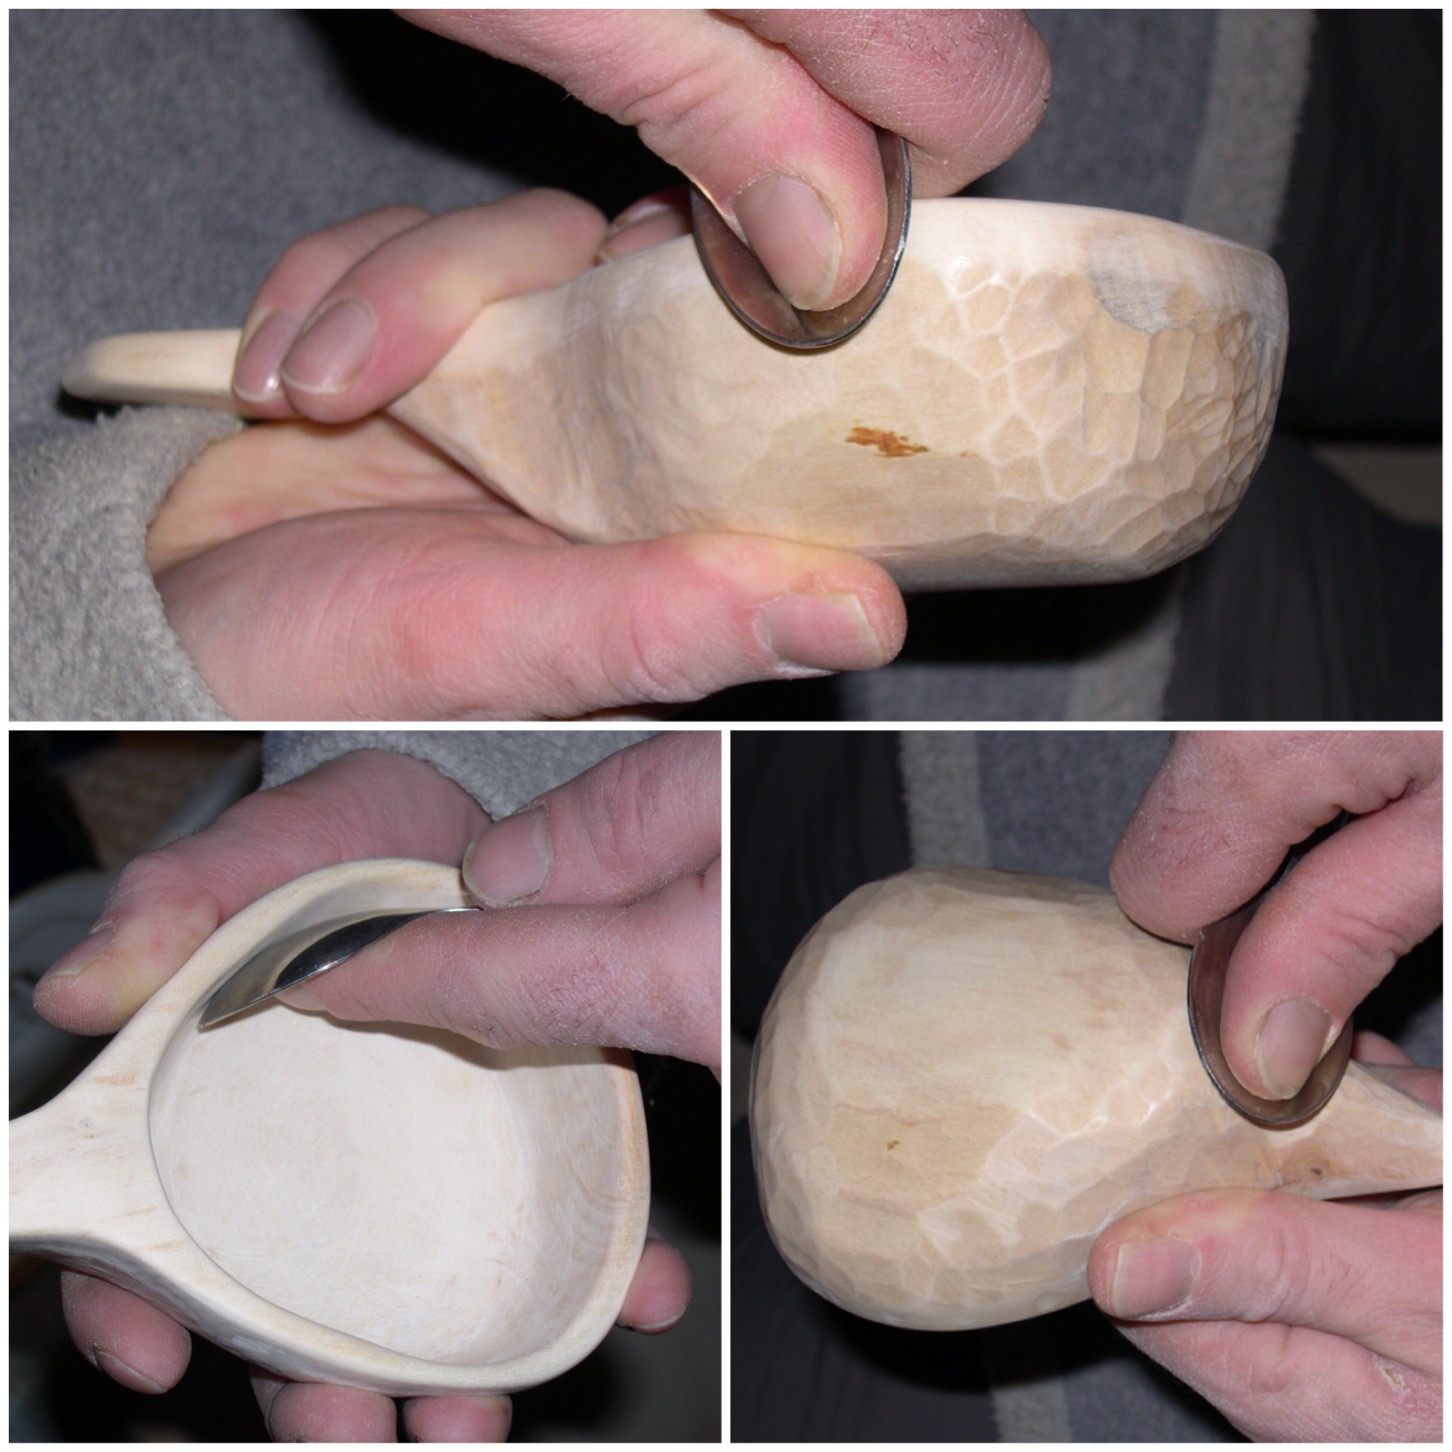
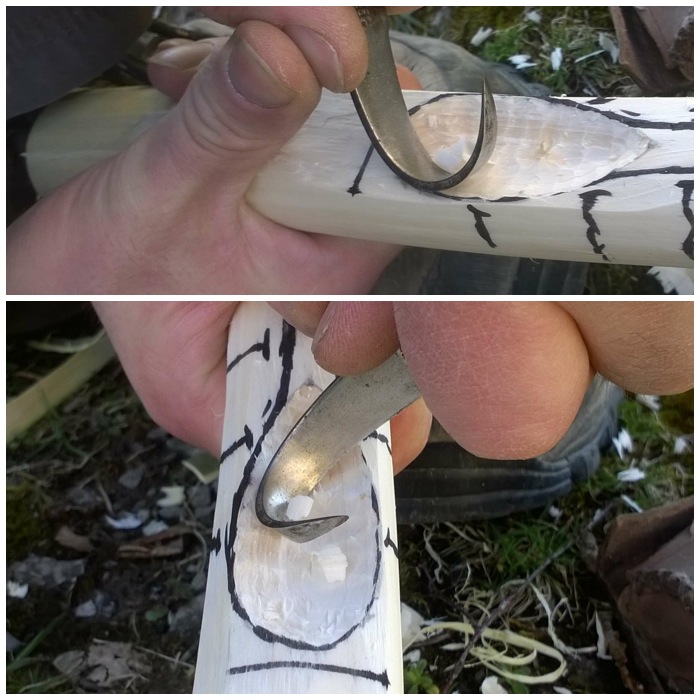
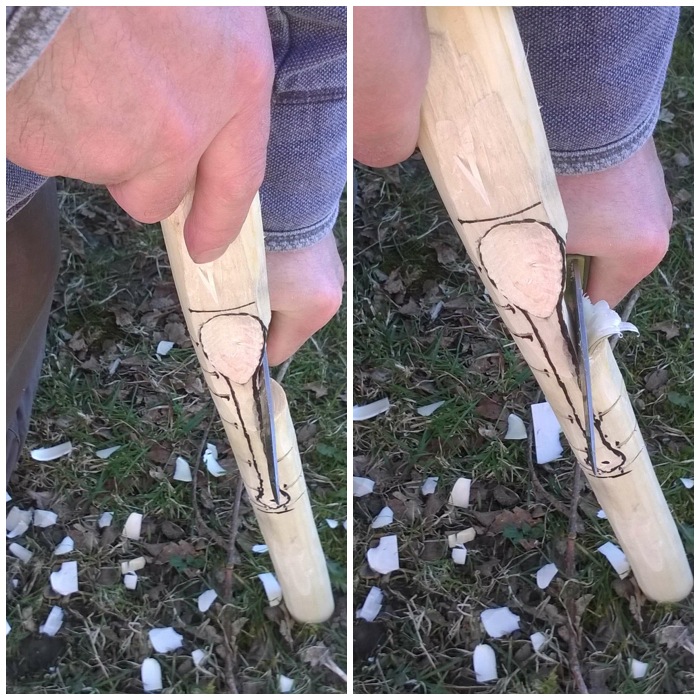
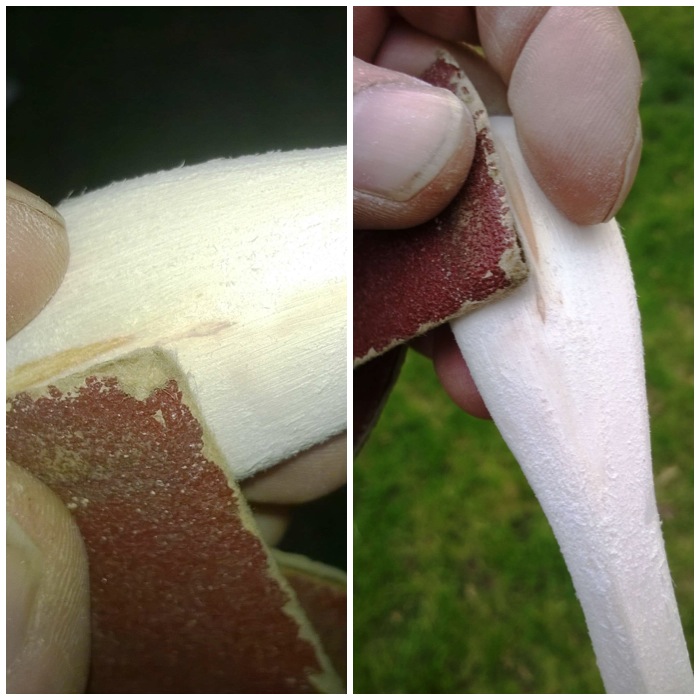
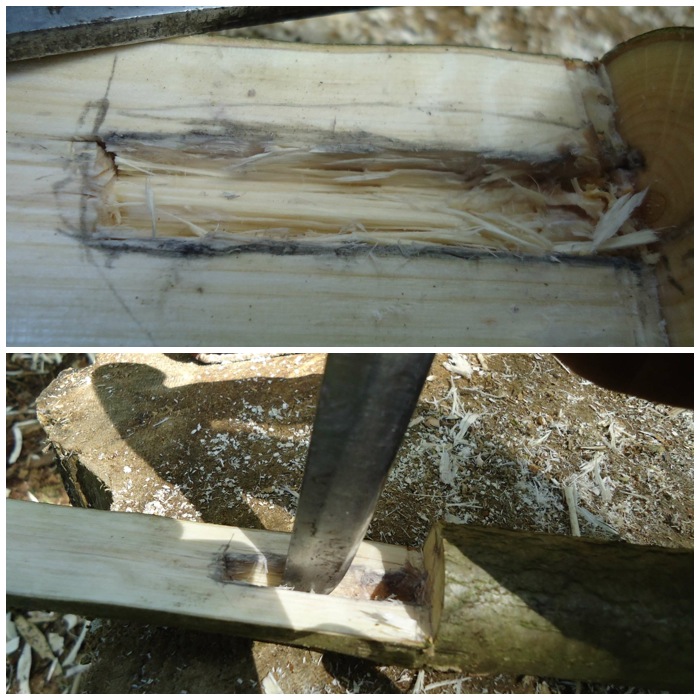
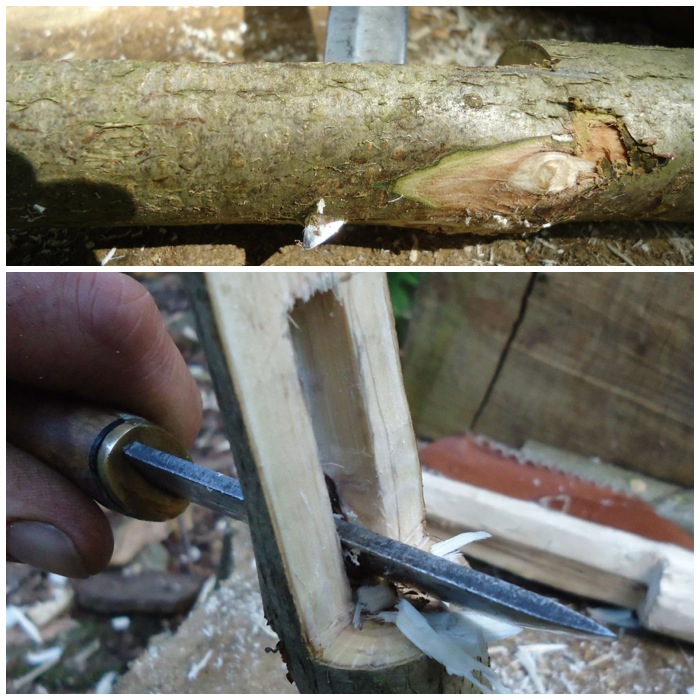
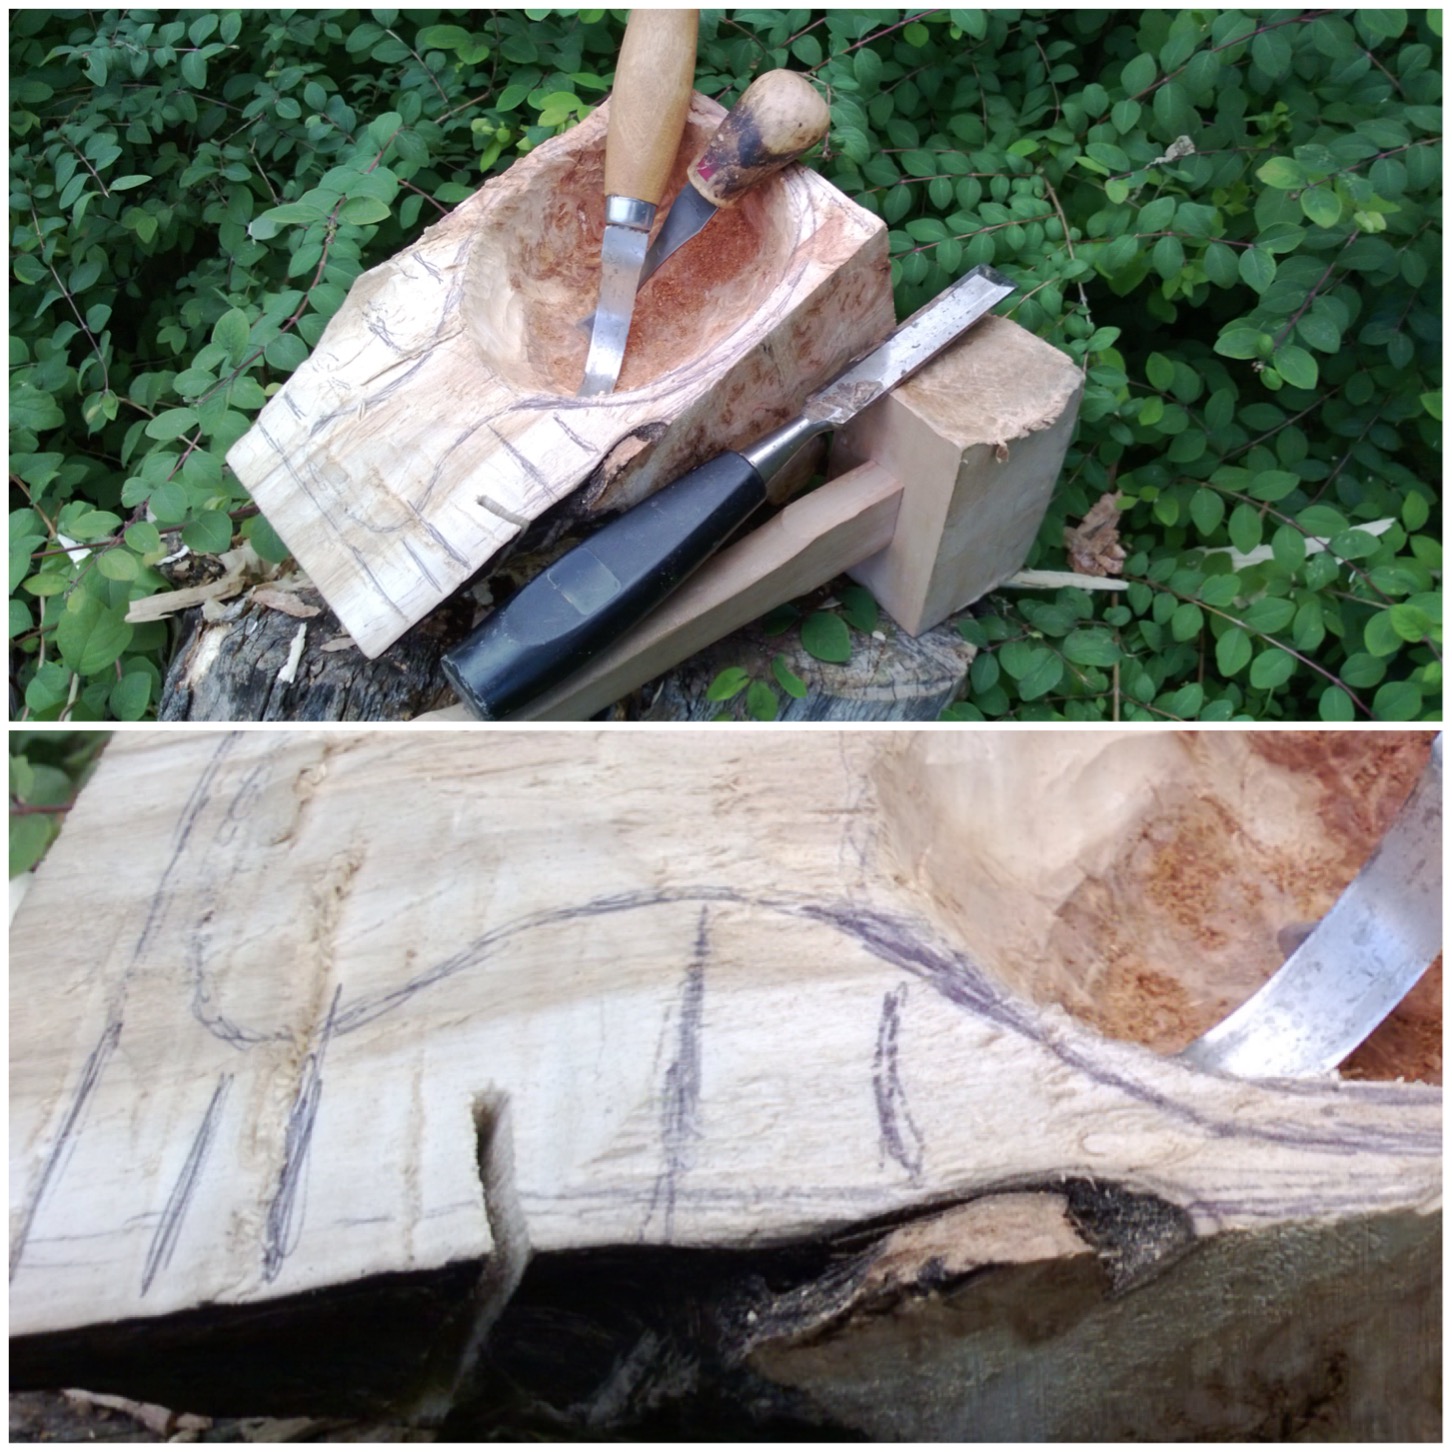
Back to my kuksa – the burl wood of the bowl came out very easily with a chisel and my crook knife.

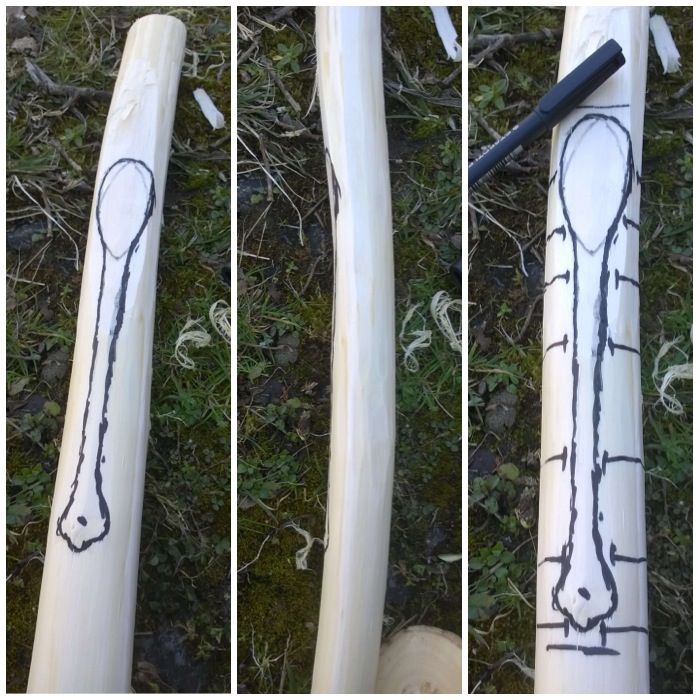
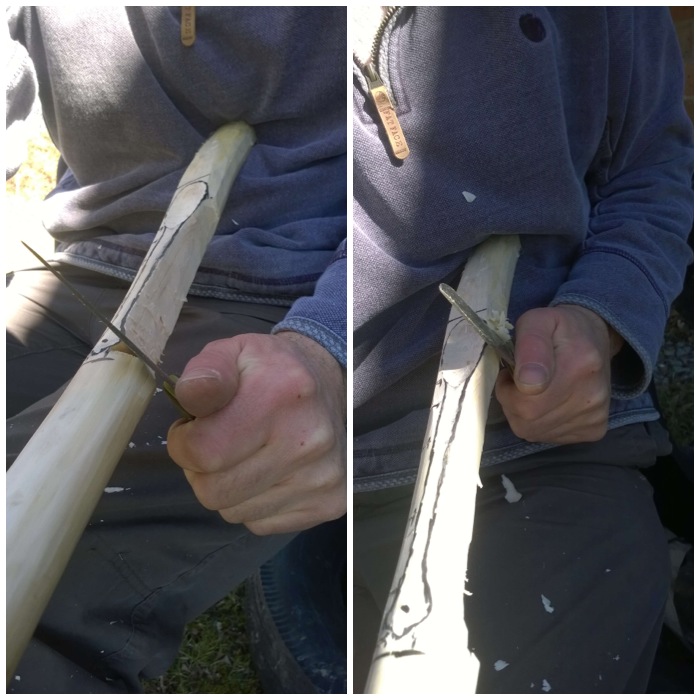
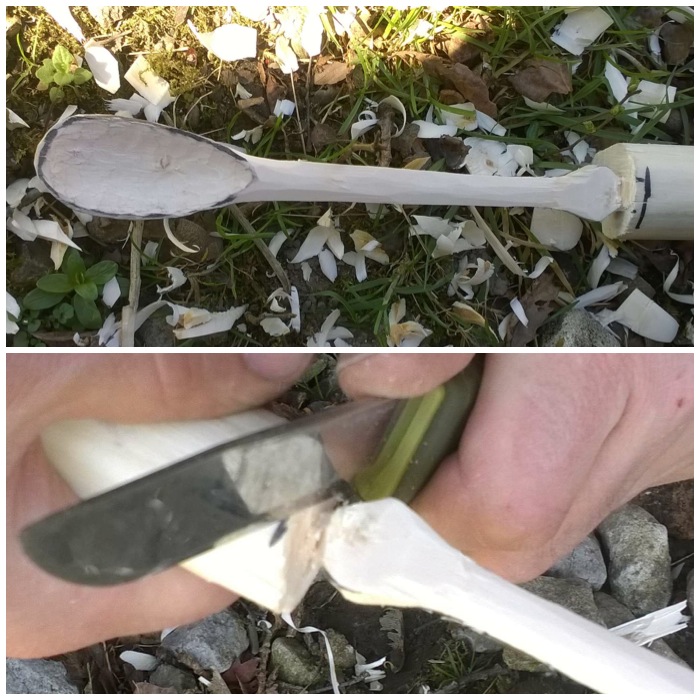
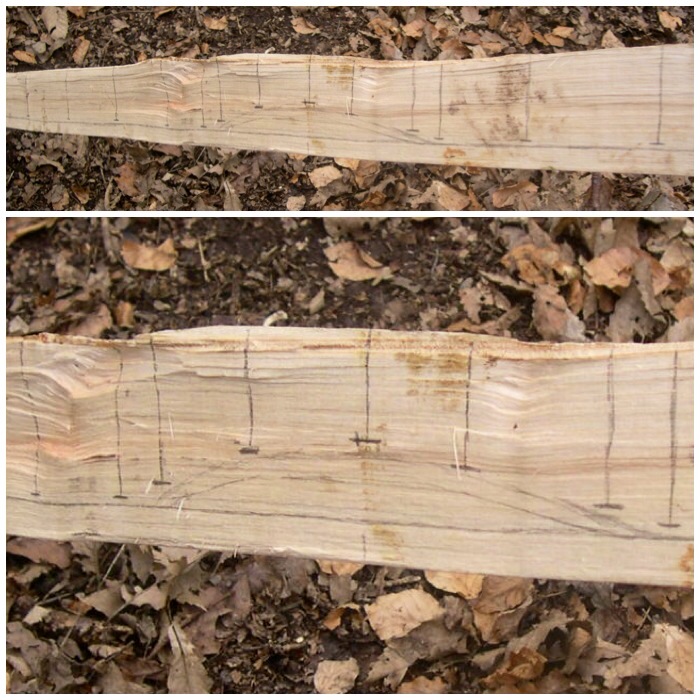
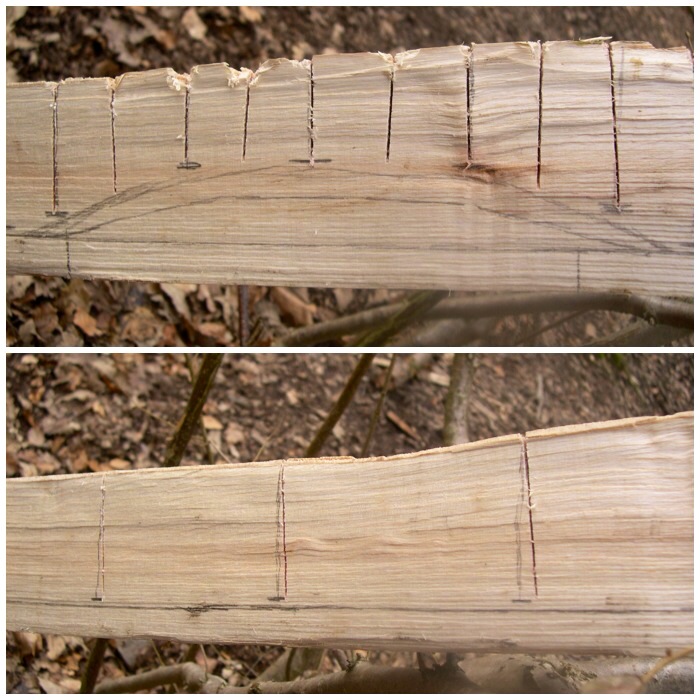
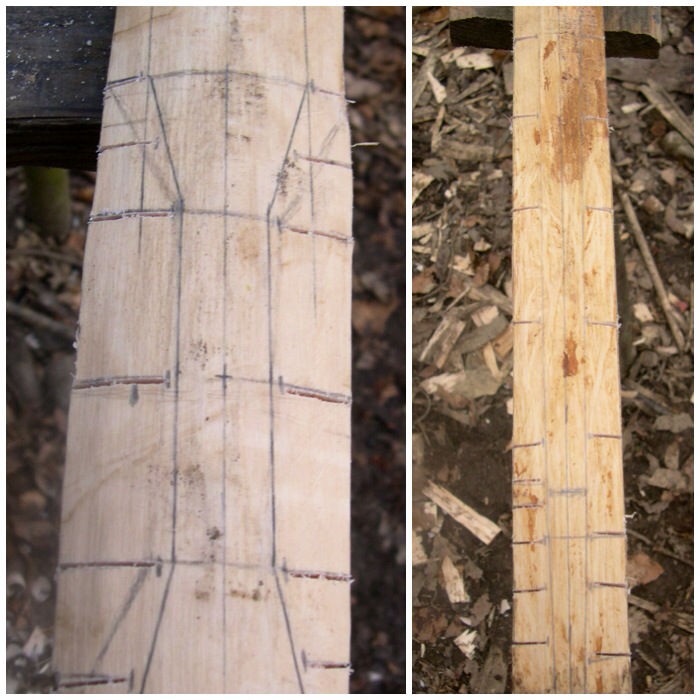
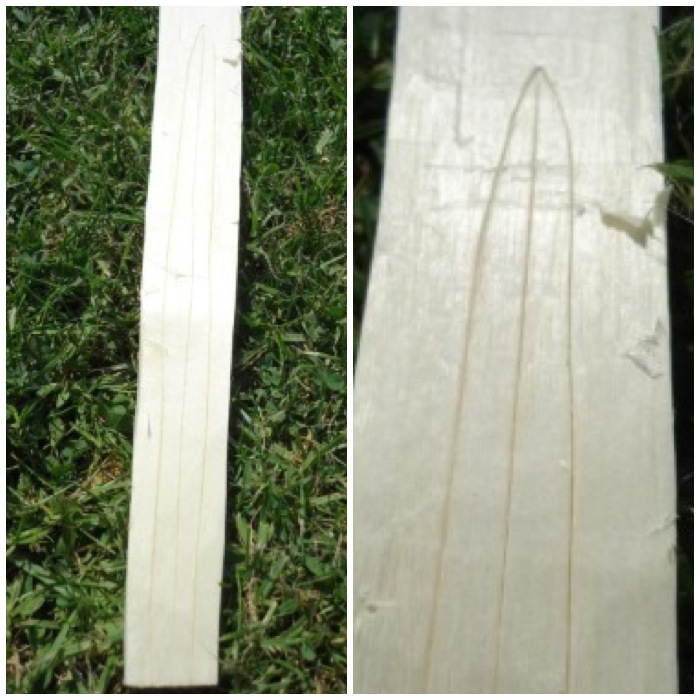
I put lots of stop cuts into the sides of the blank so as to help get rid of the excess here in a controlled way (you can see all the pencil marks where I was to put them). I really took my time here to get rid of the excess wood and not damage the bowl.

Photo 09-02-2015 14 39 13
Stop cuts

The whole process of removing the burl wood took quite a while as the outer bark was very hard and the burl wood underneath the bark because of its curving nature was very soft in places and very hard in others.

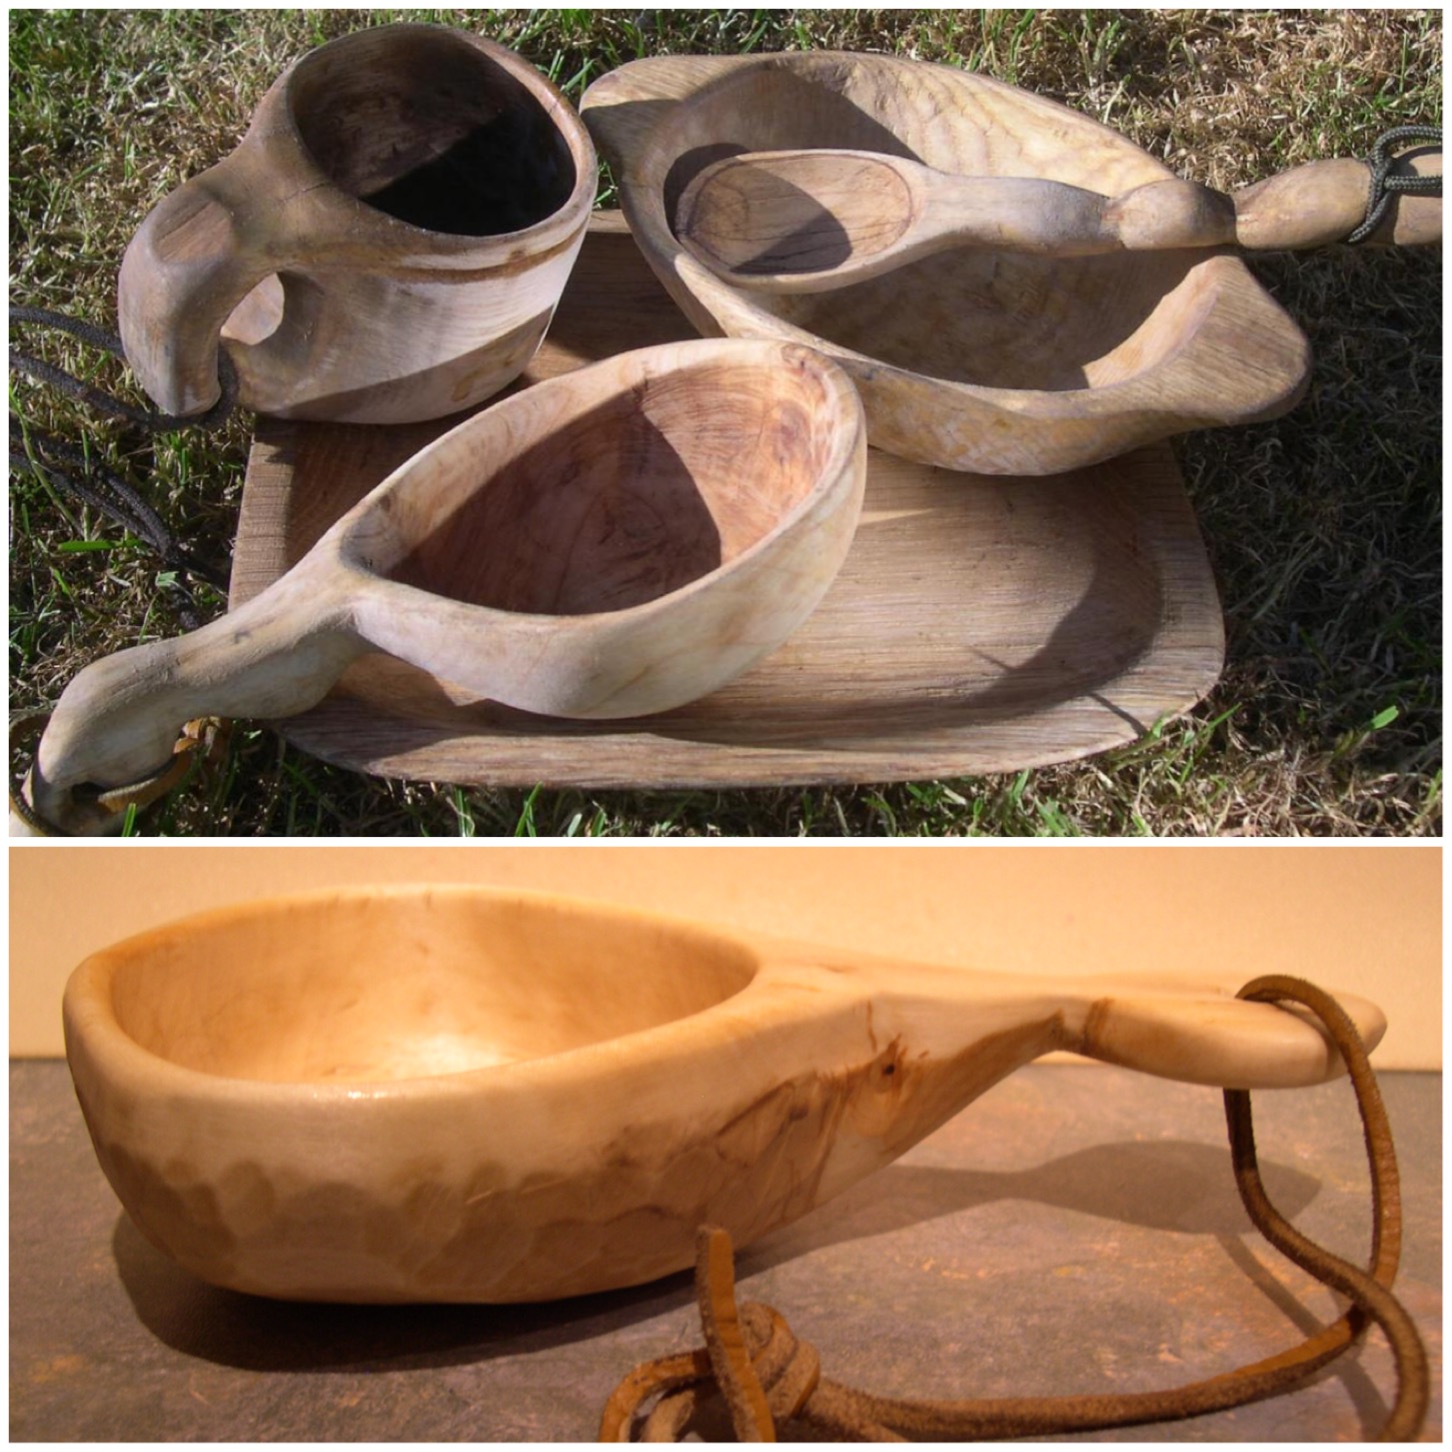
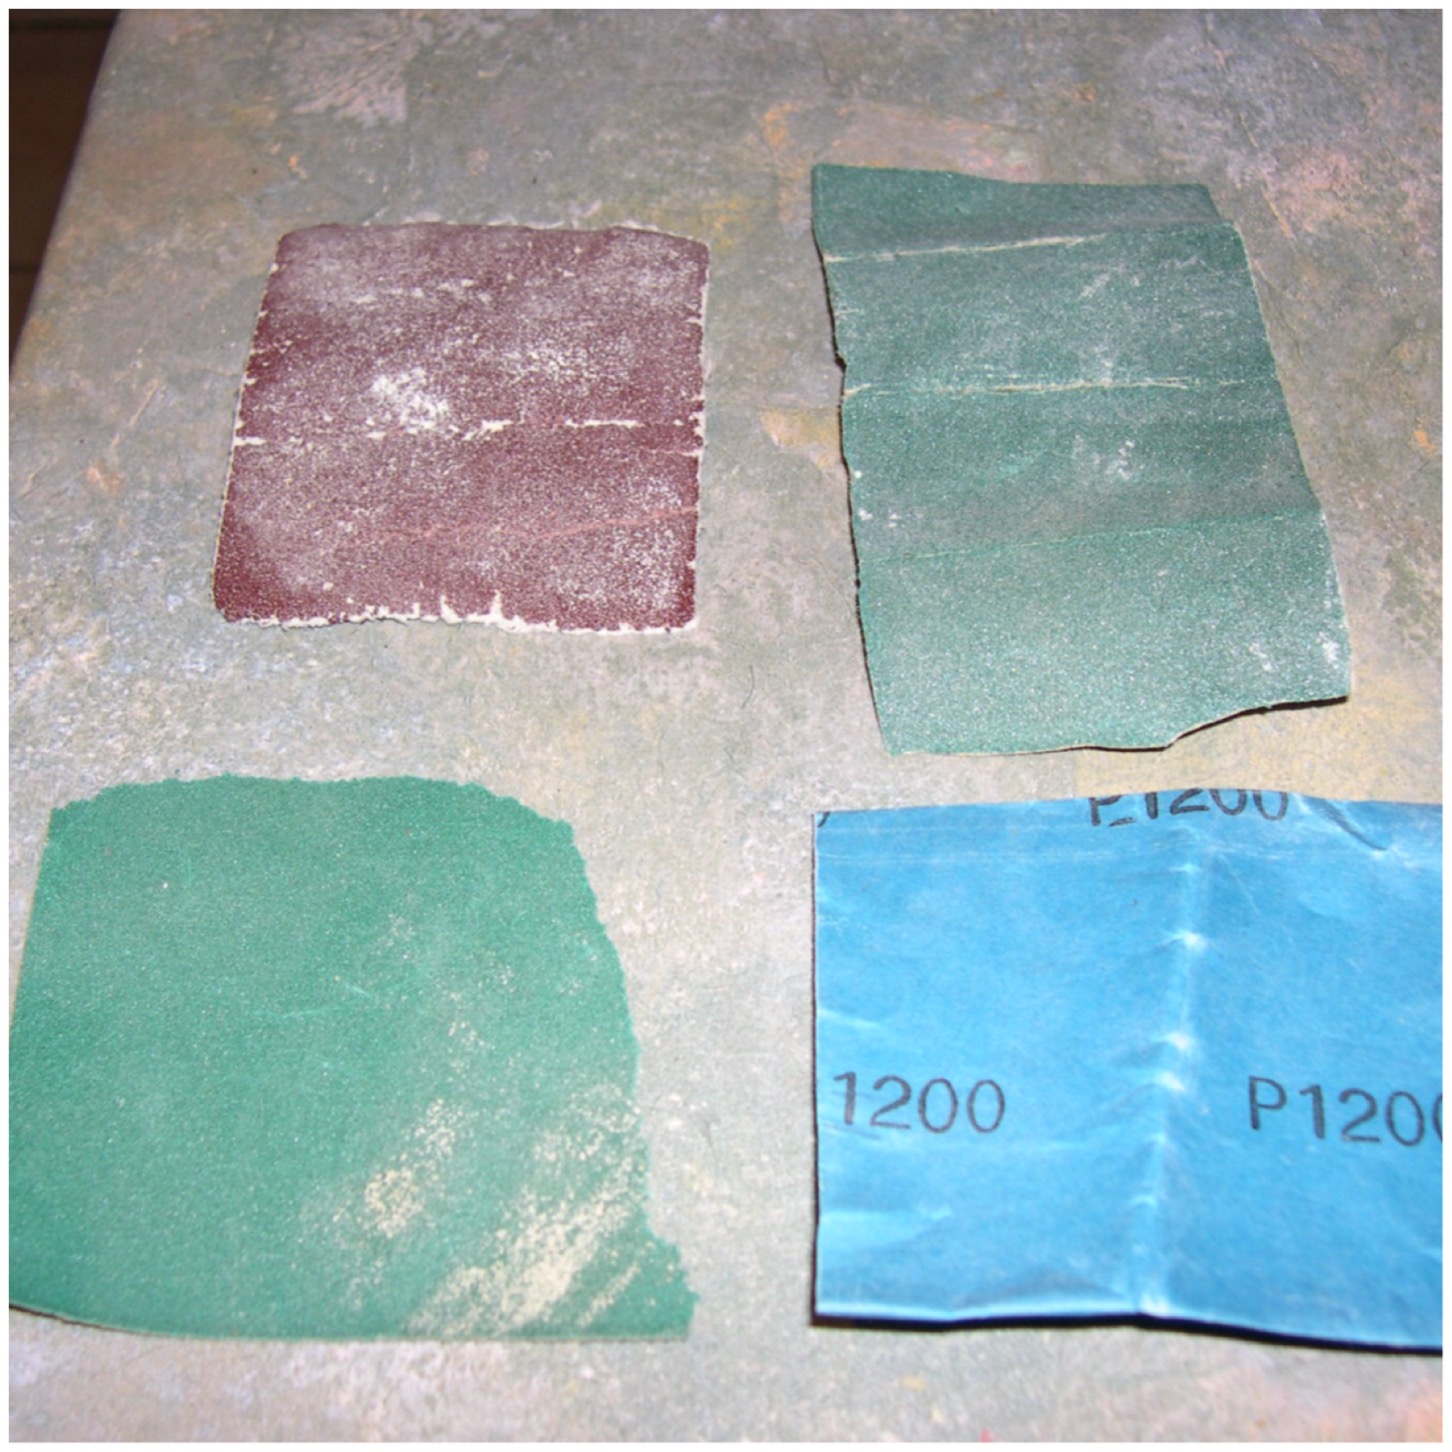
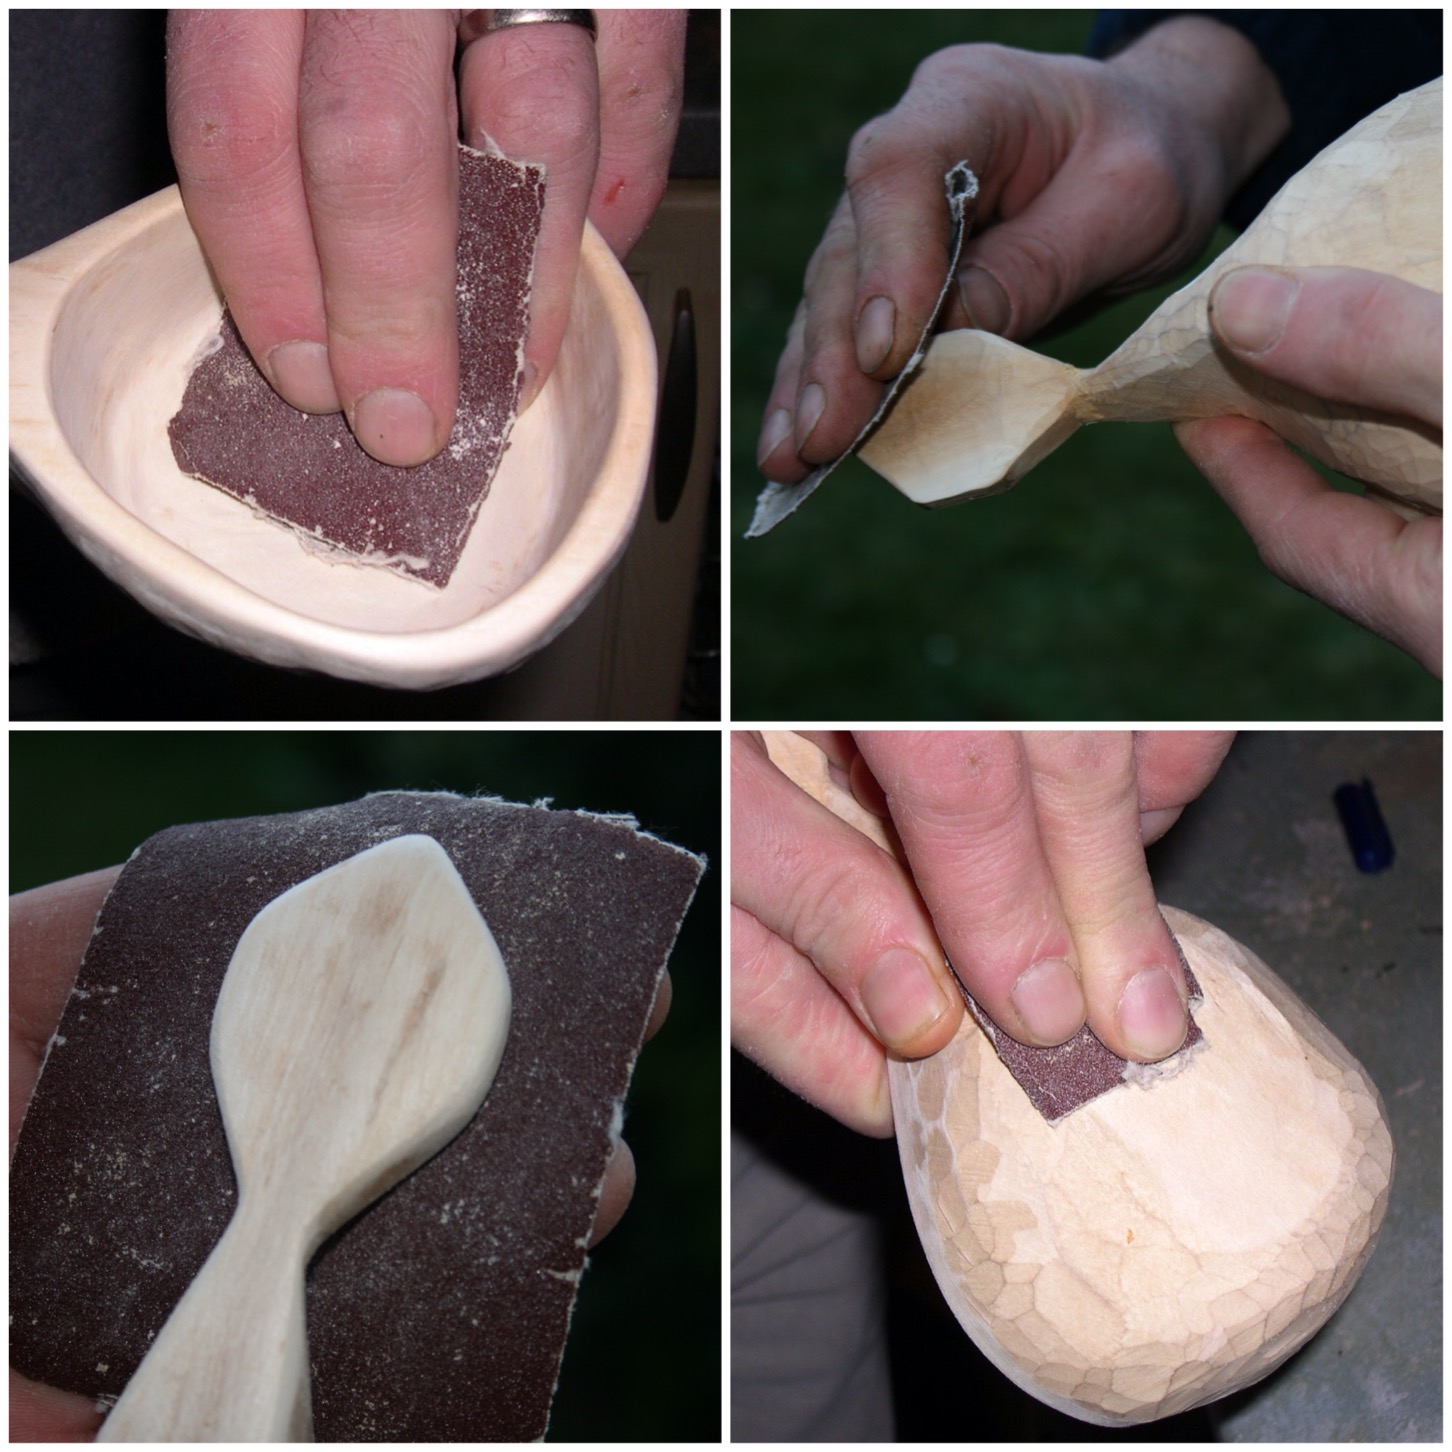
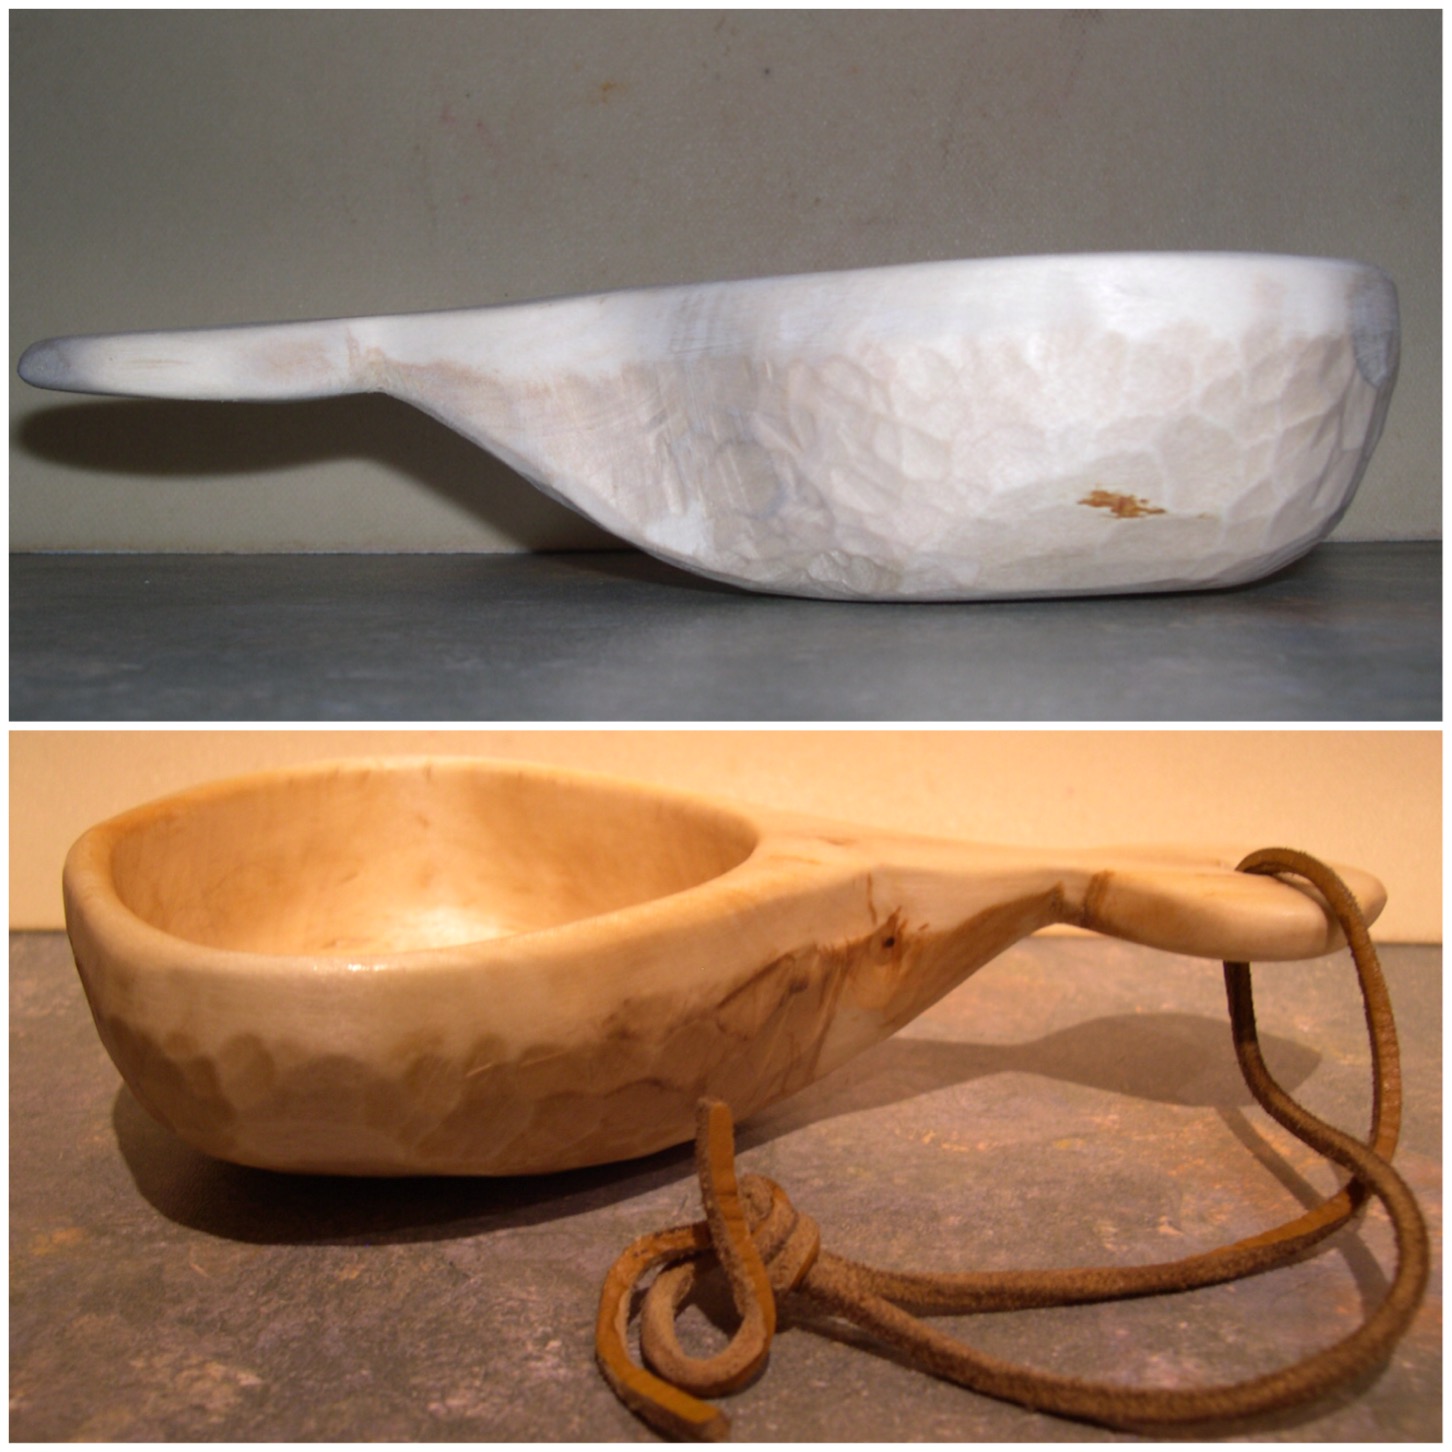
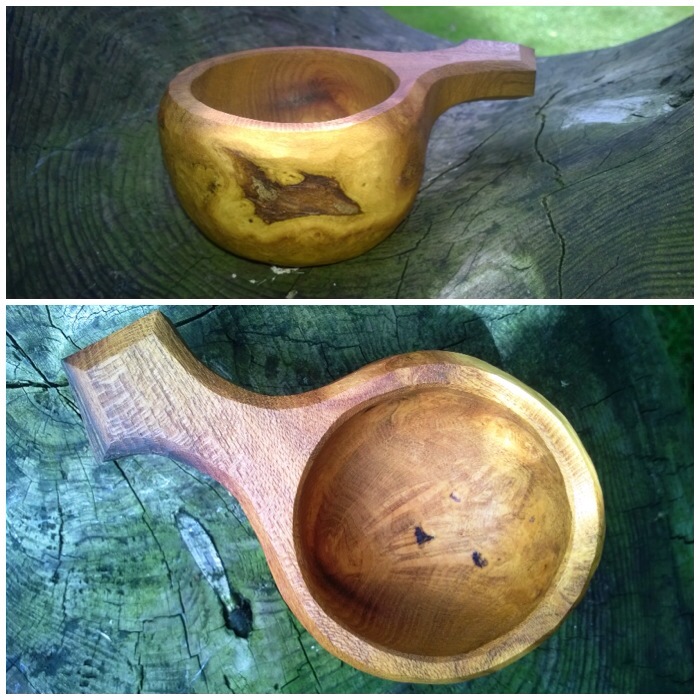
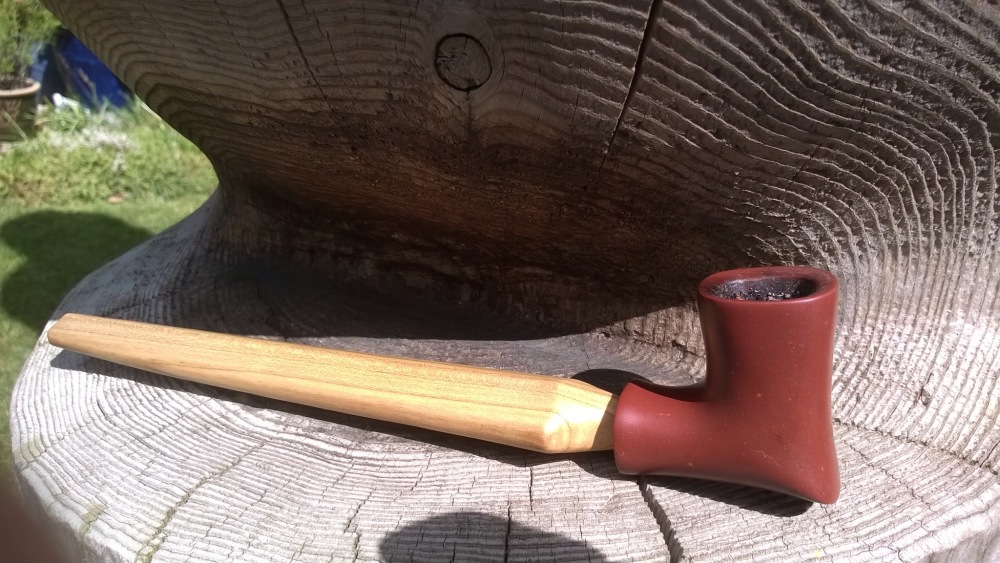
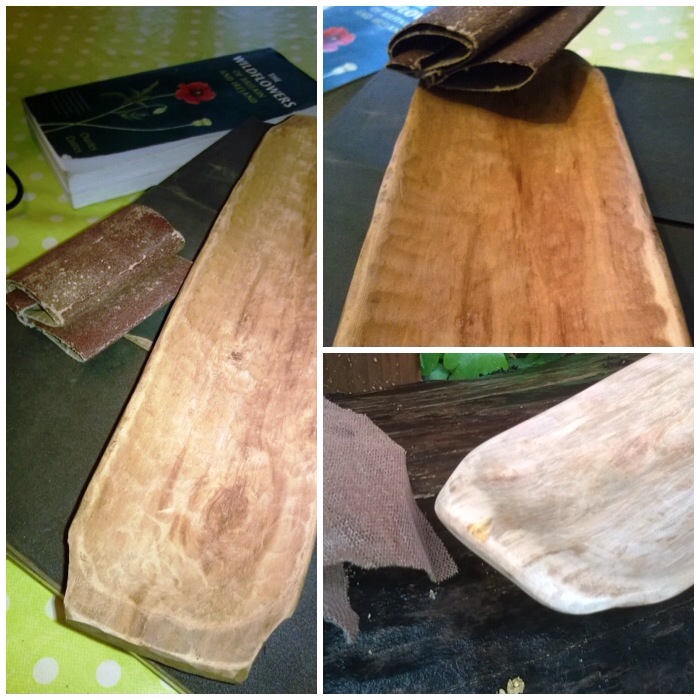
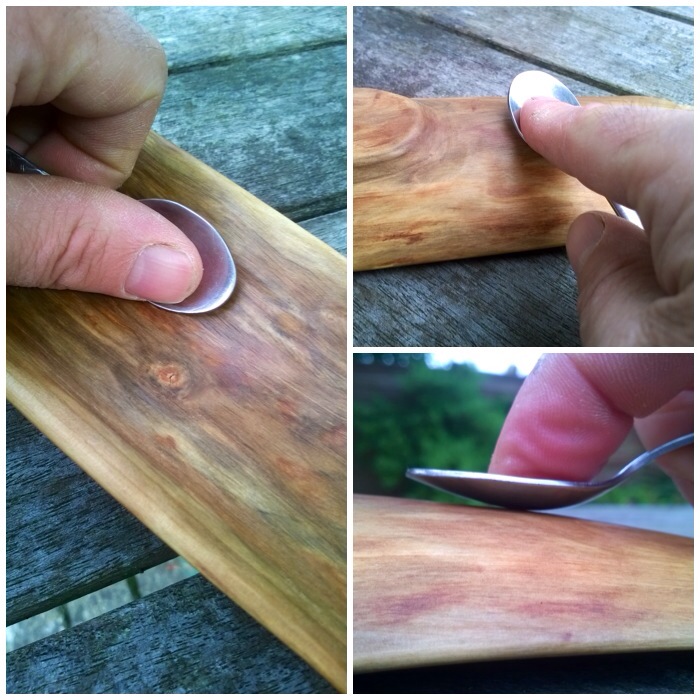
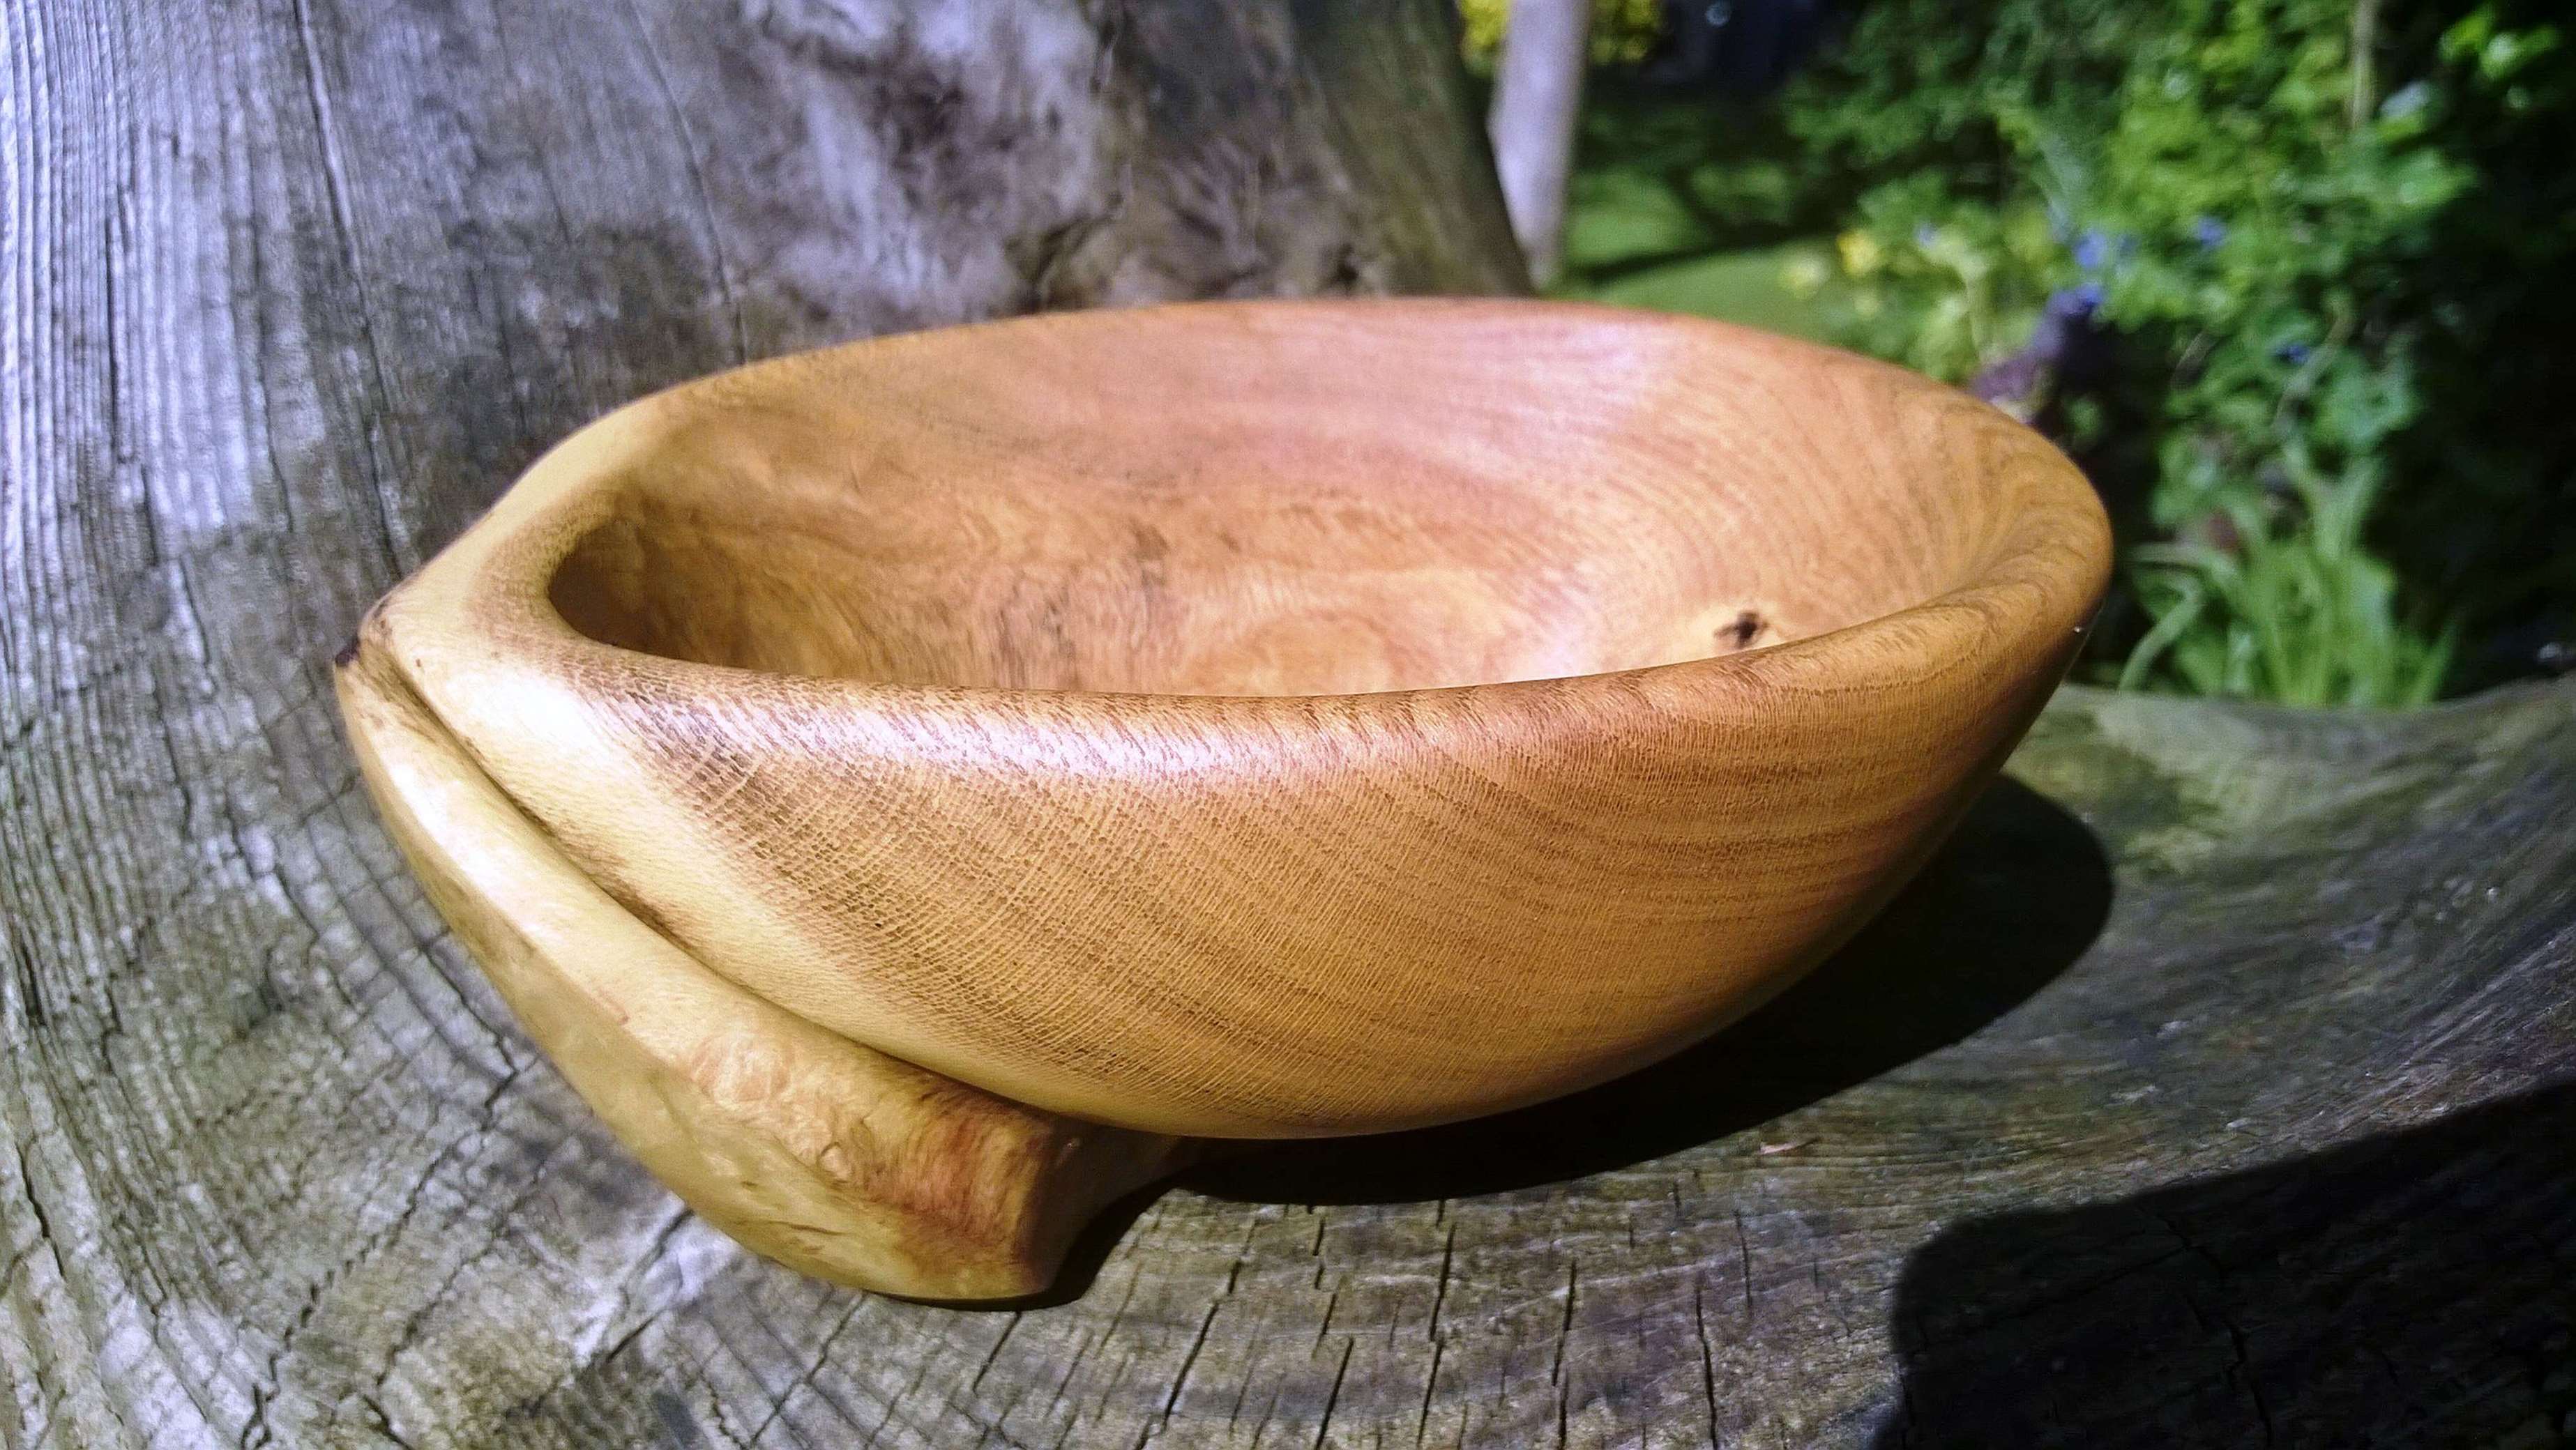
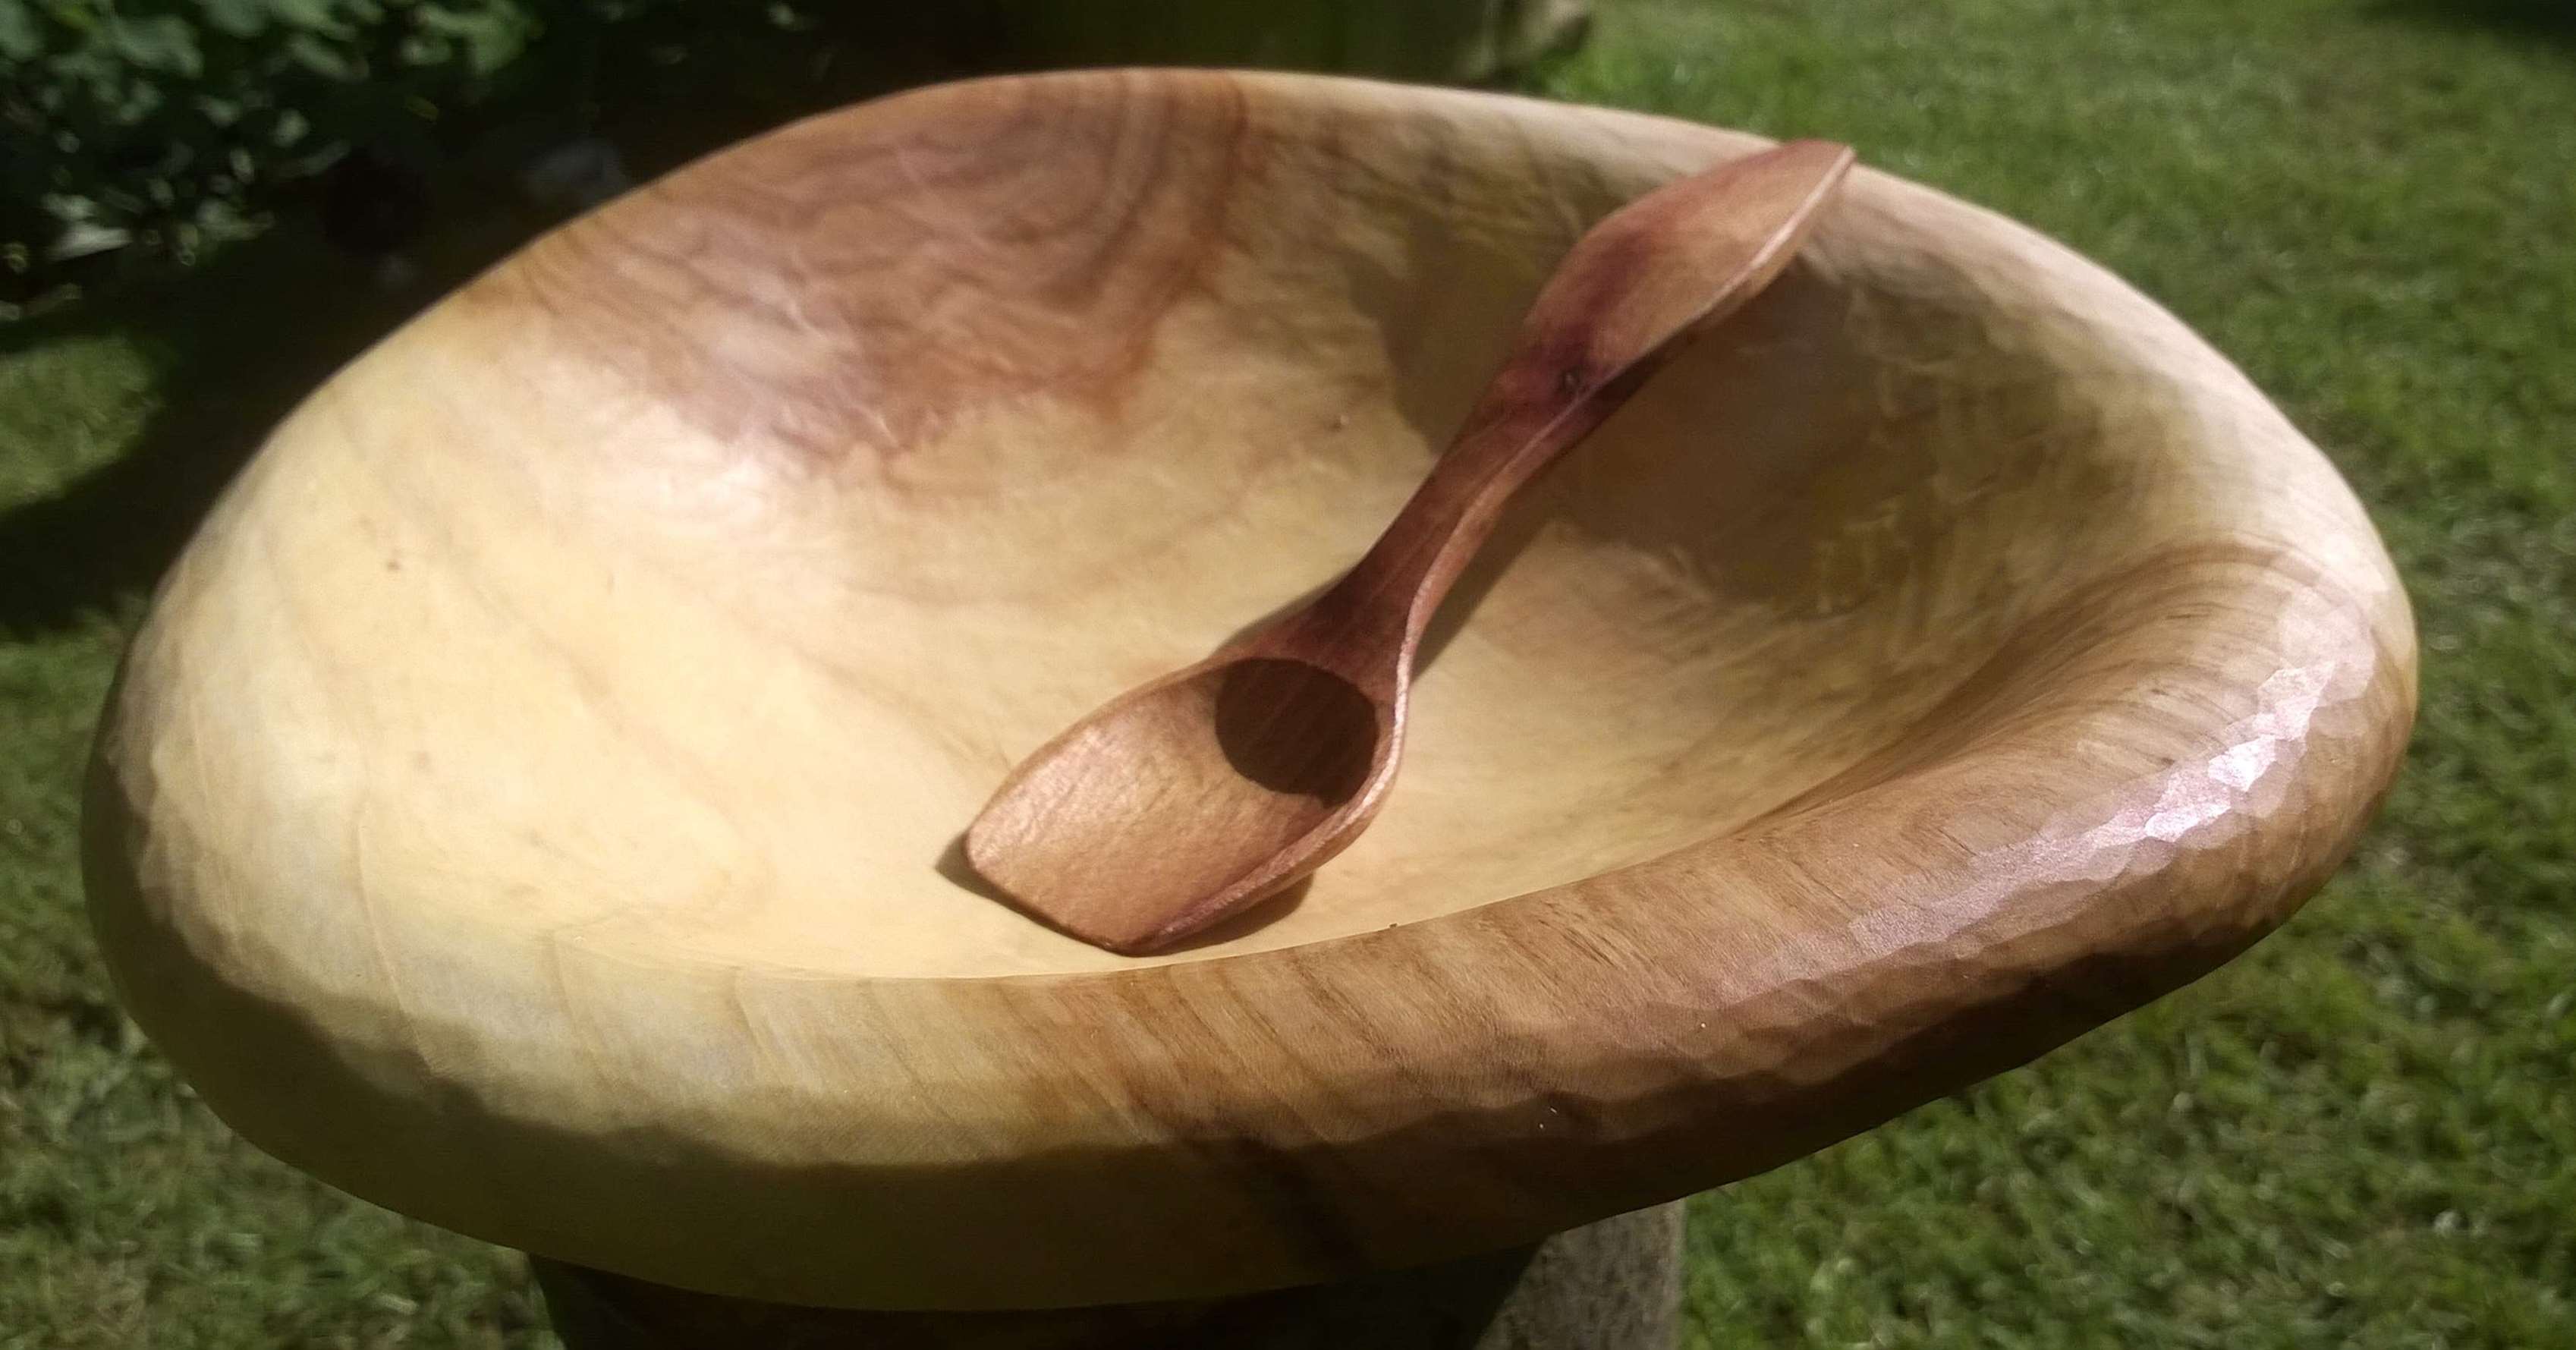
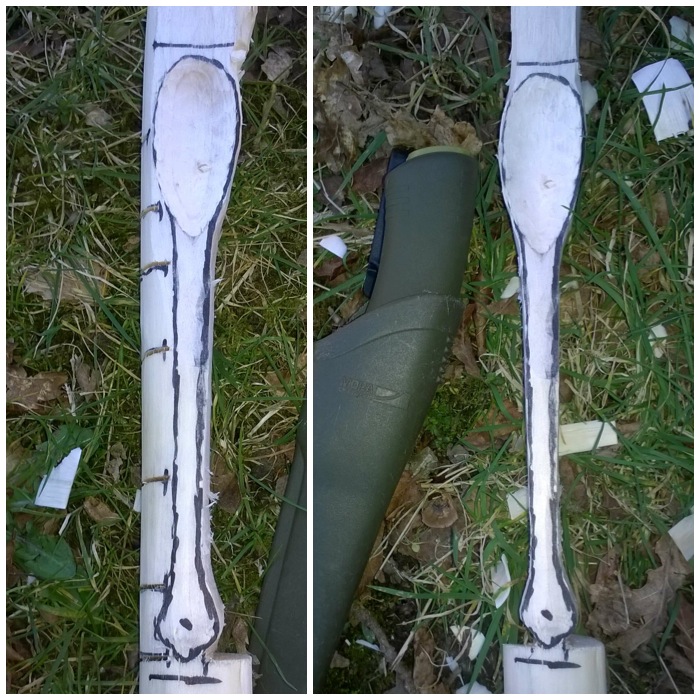
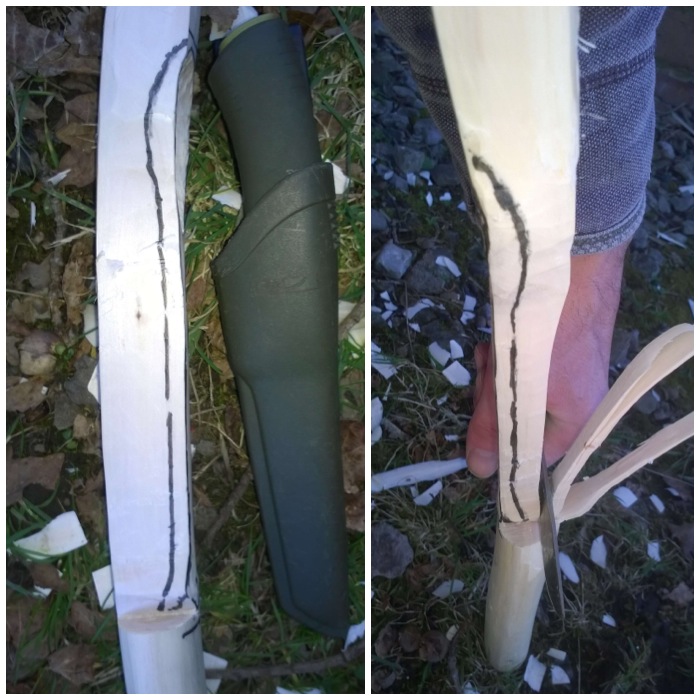
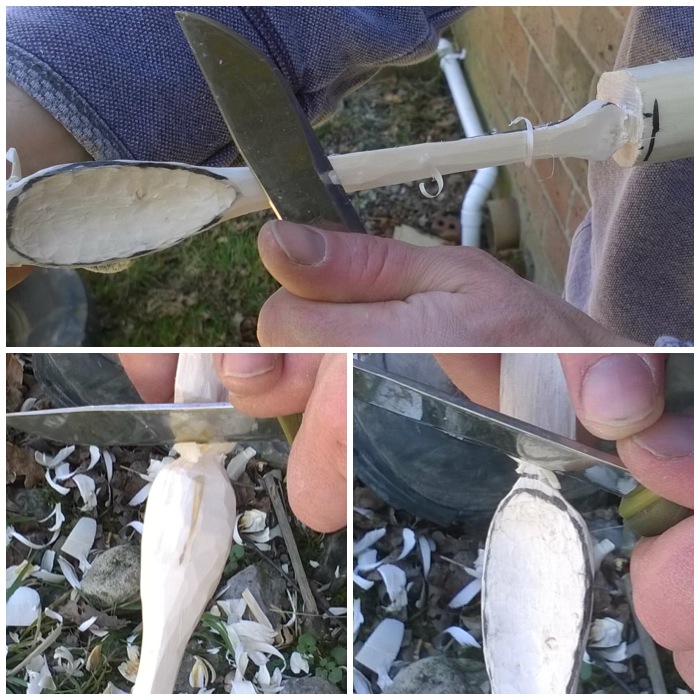
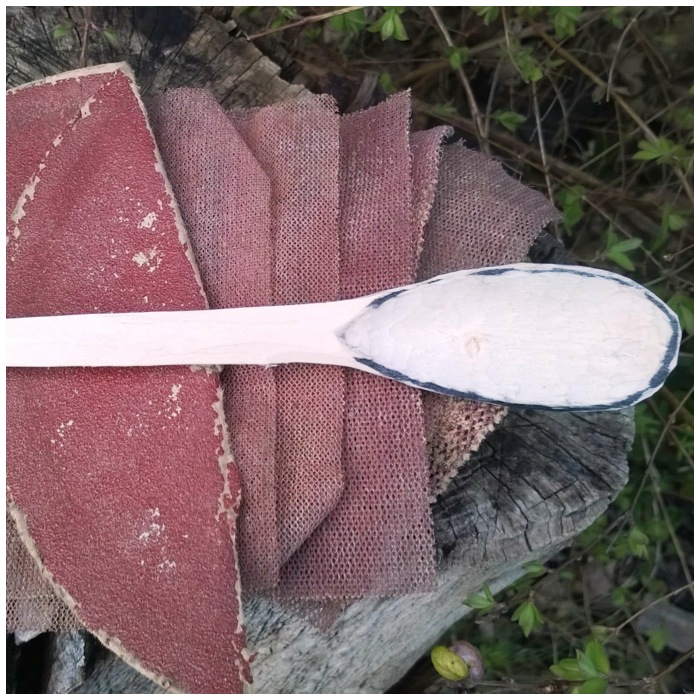
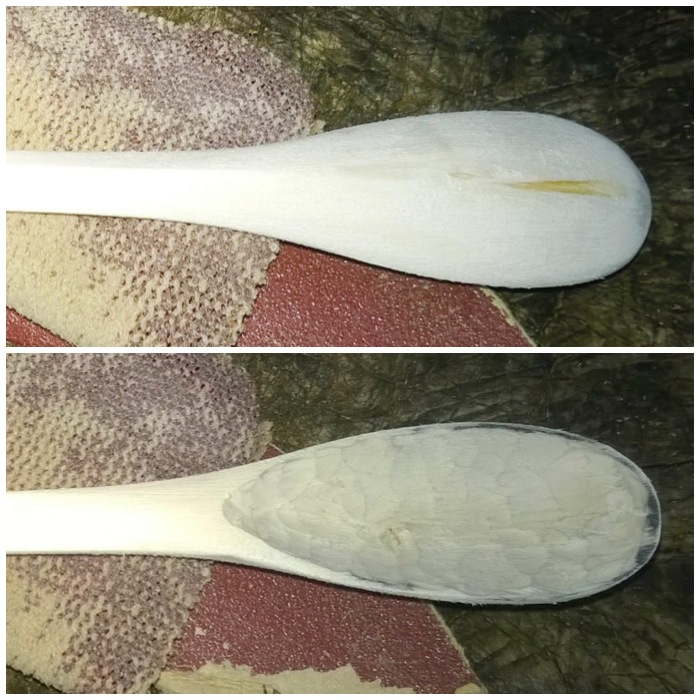
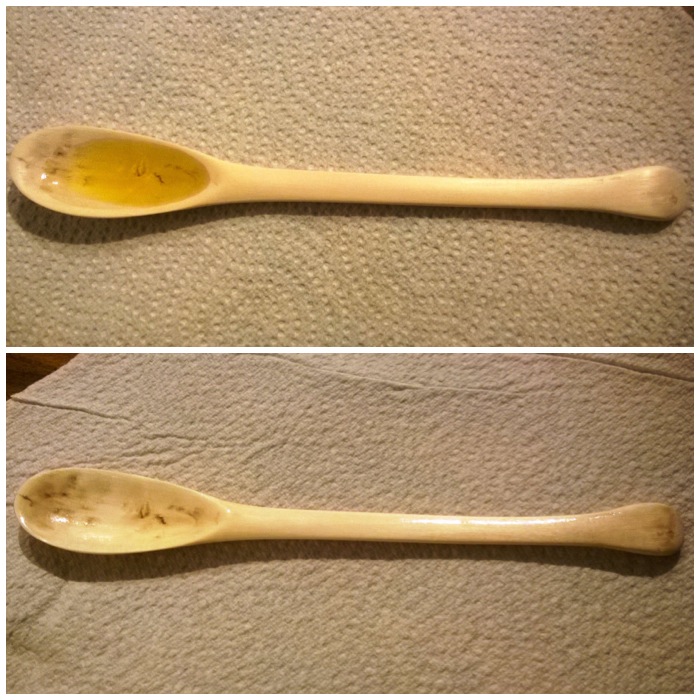
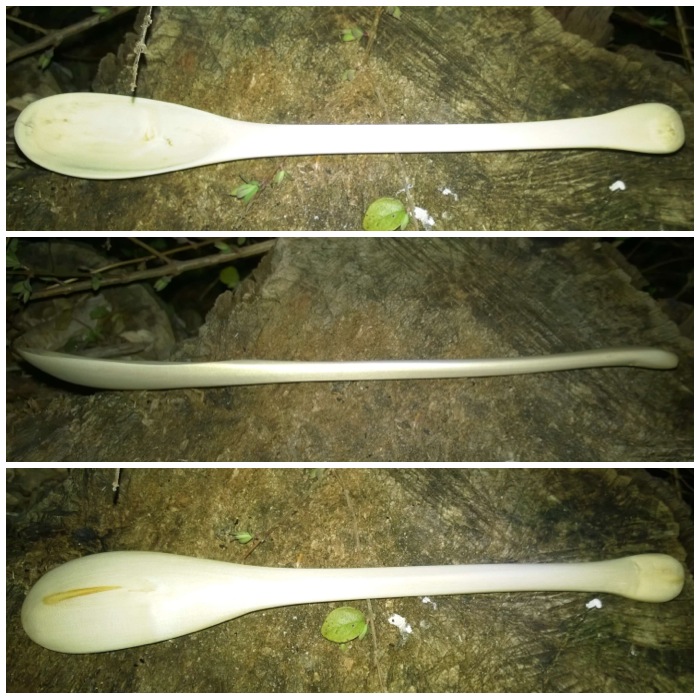
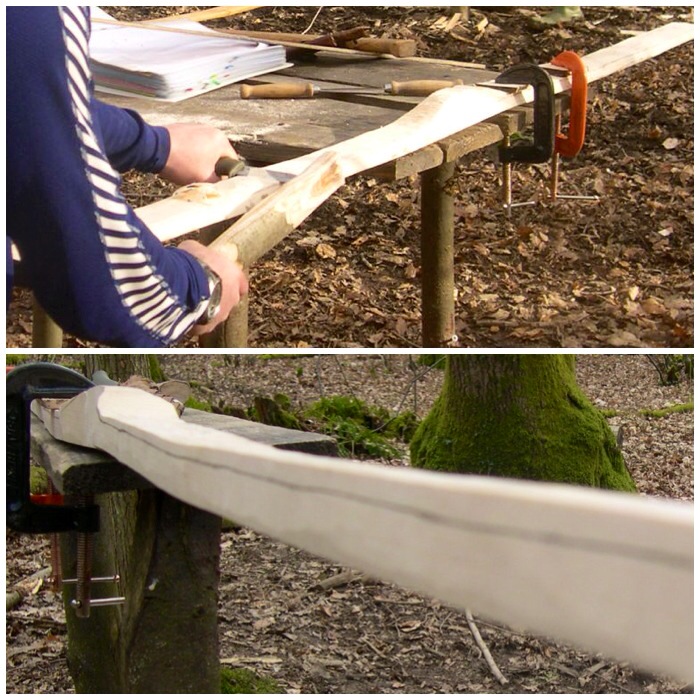
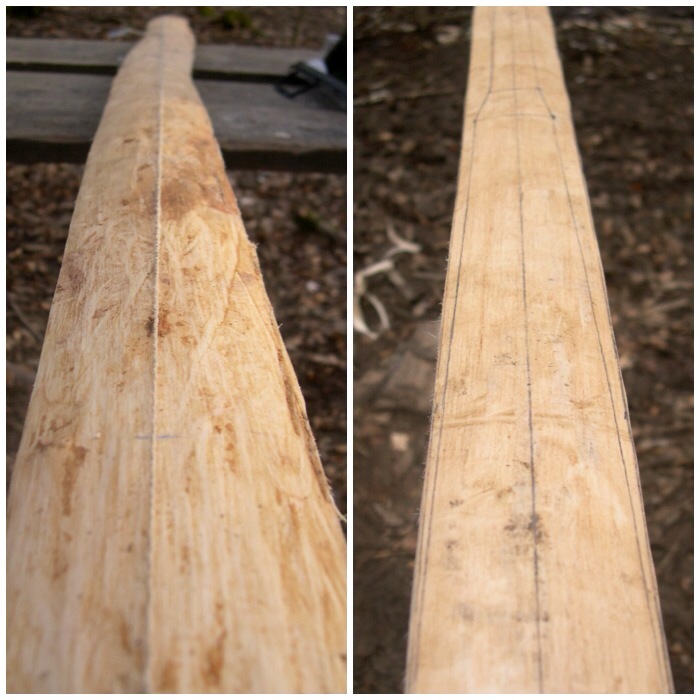
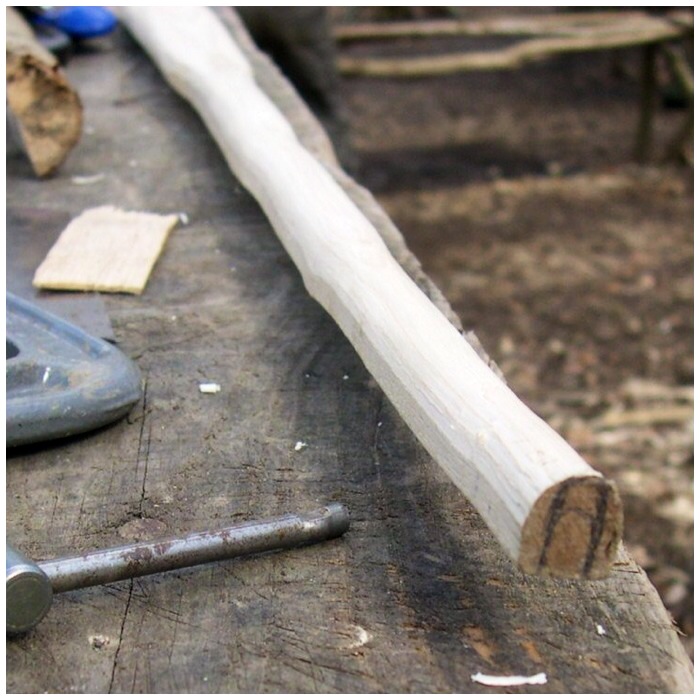
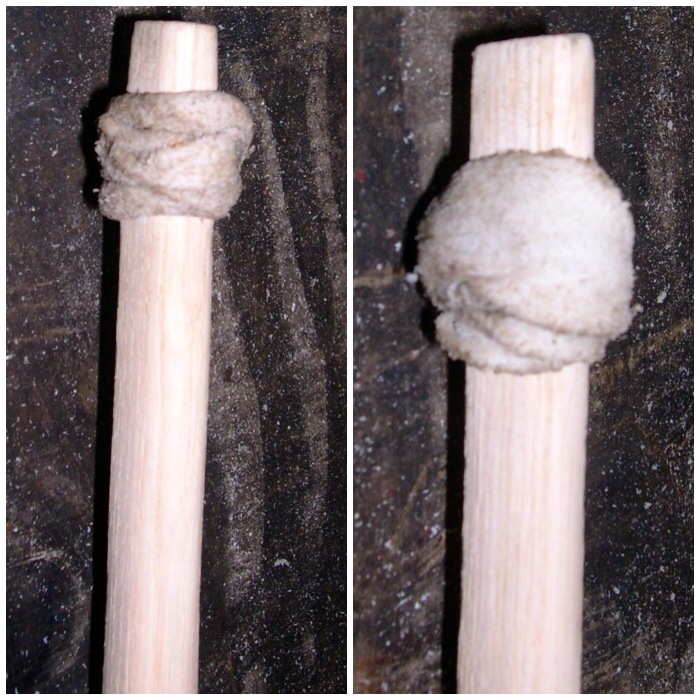
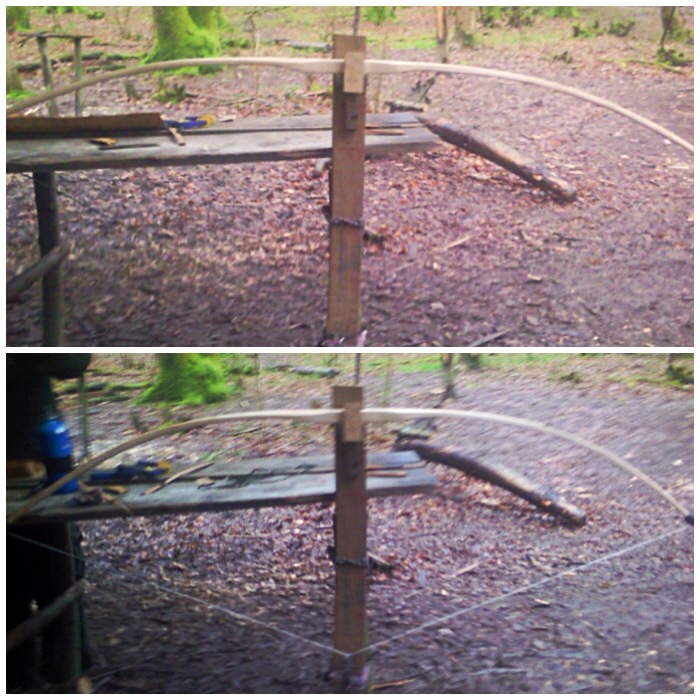
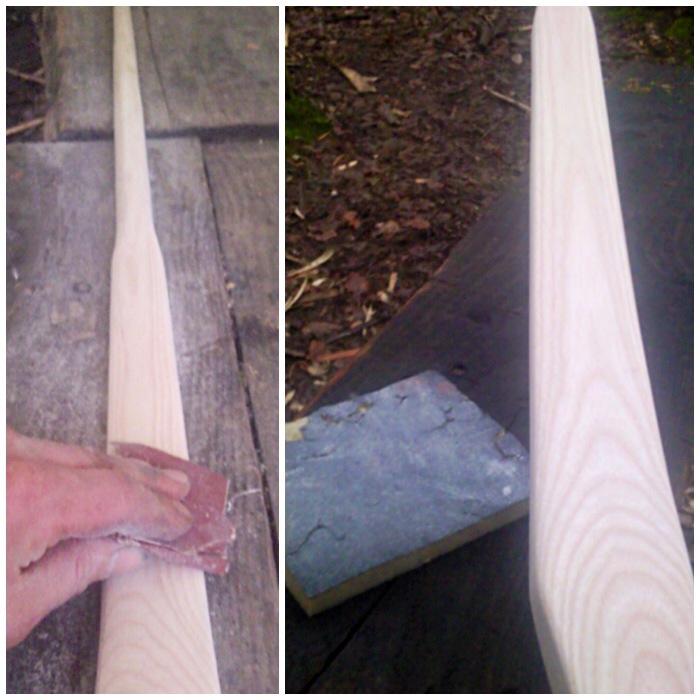
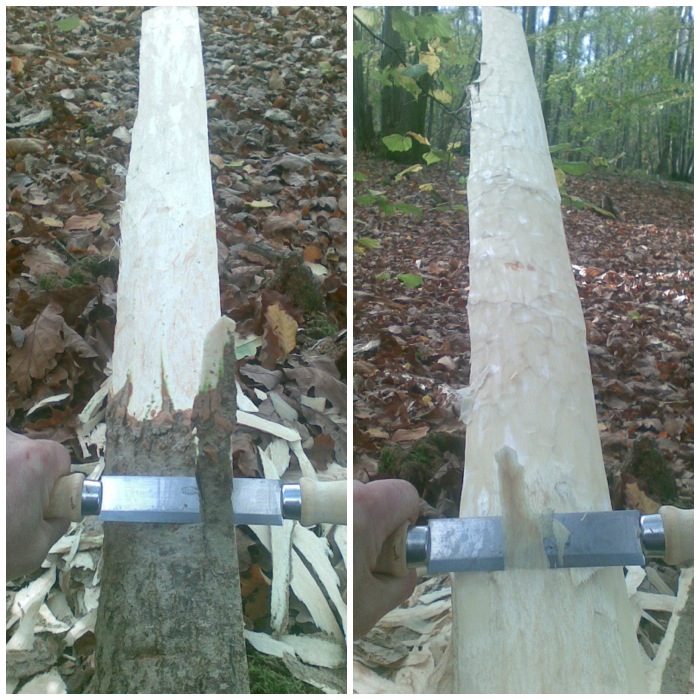
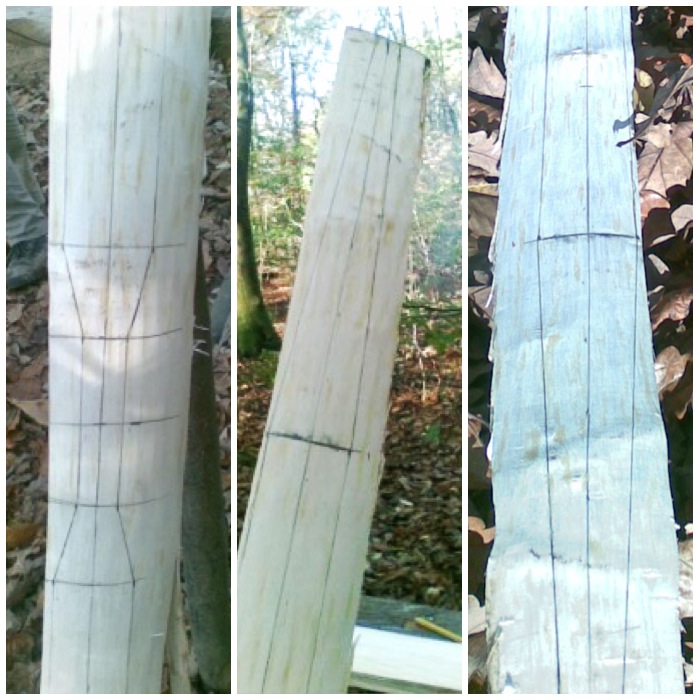
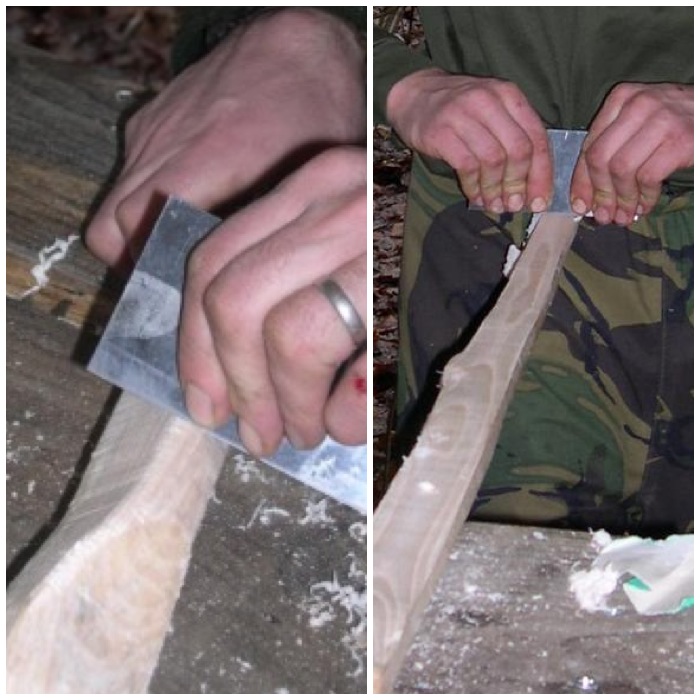
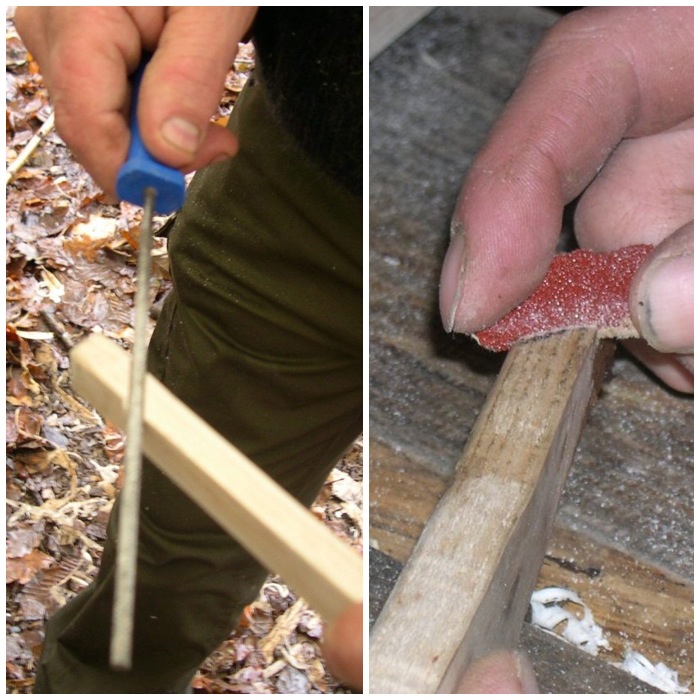
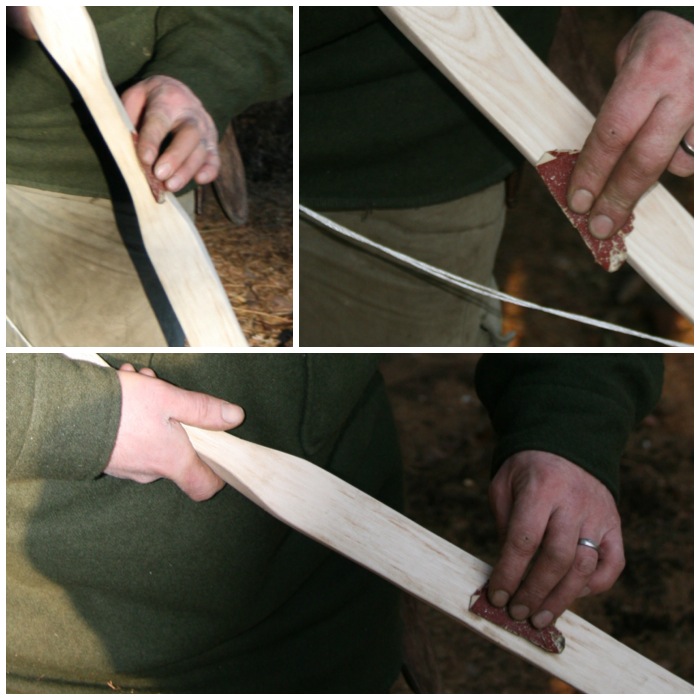
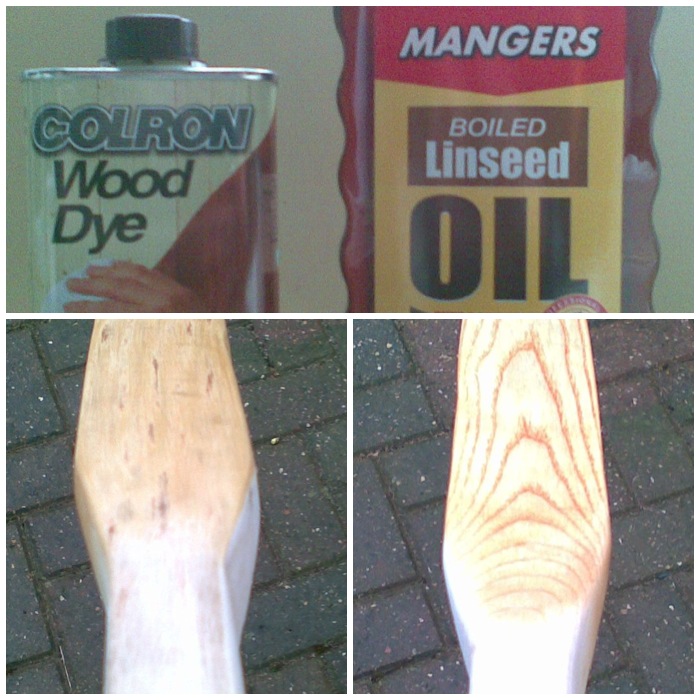
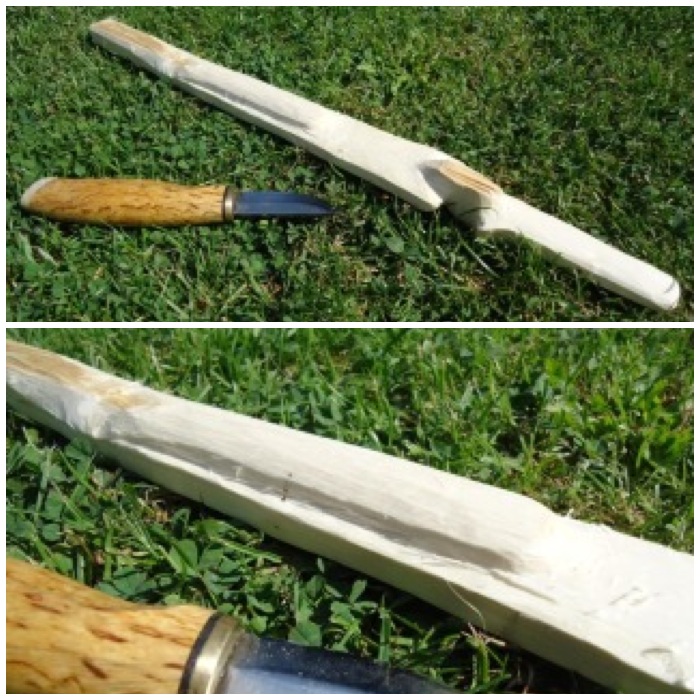
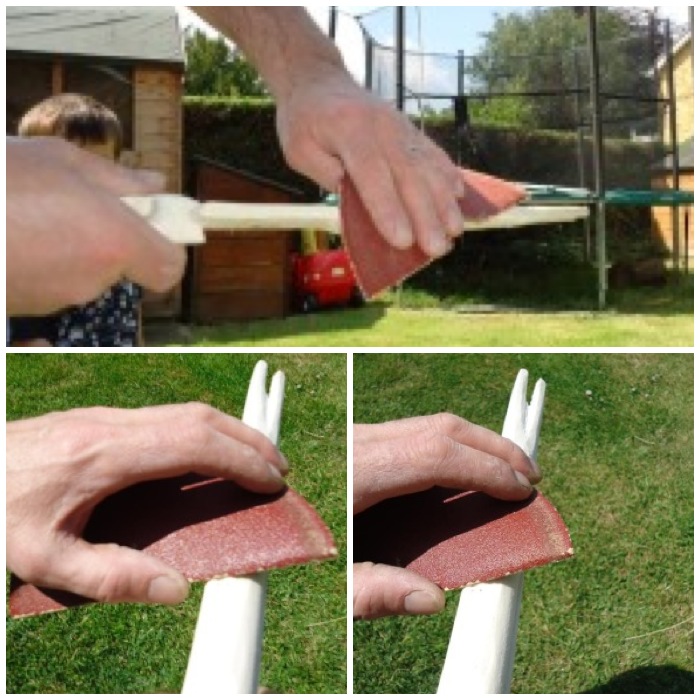
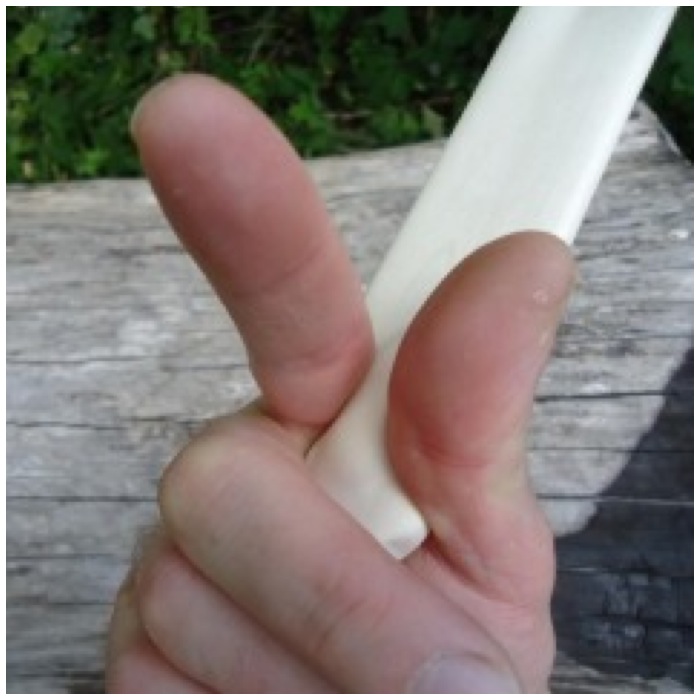
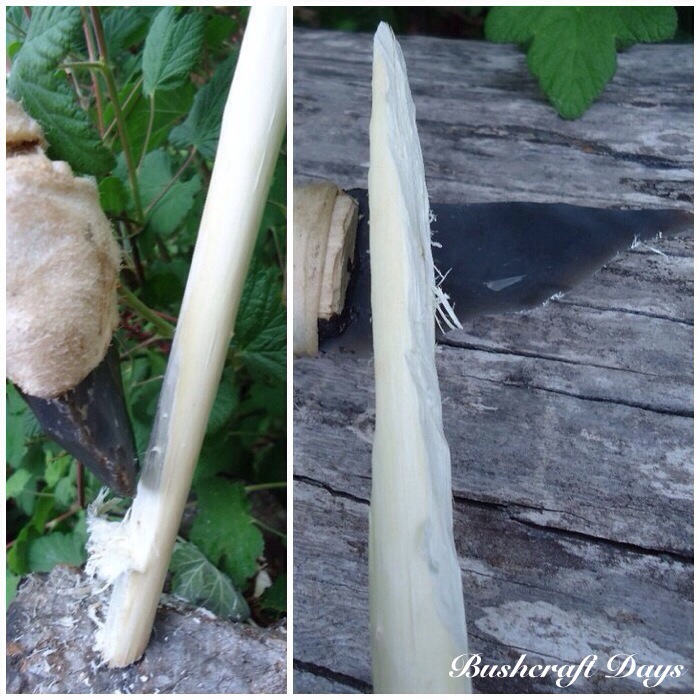
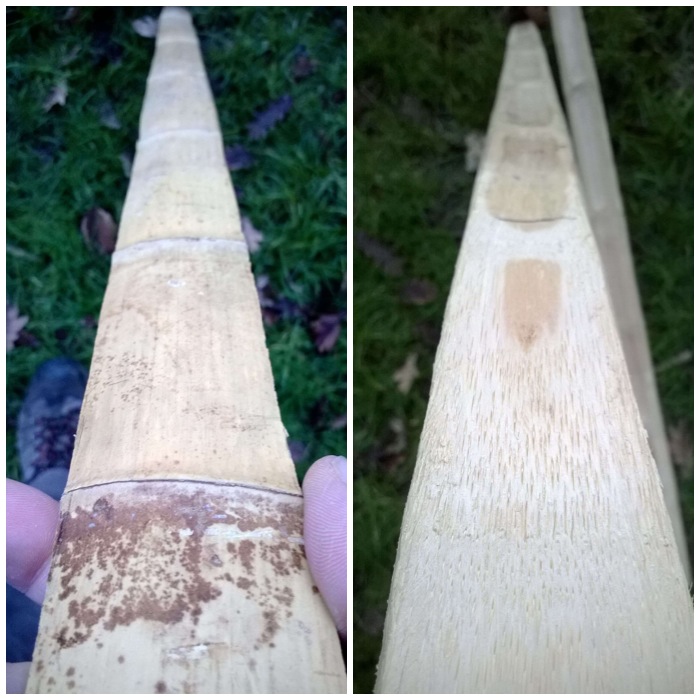
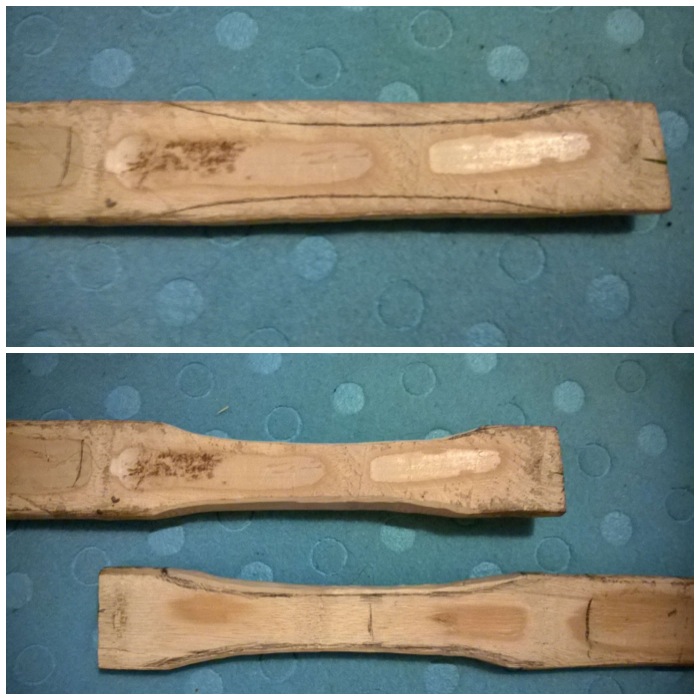
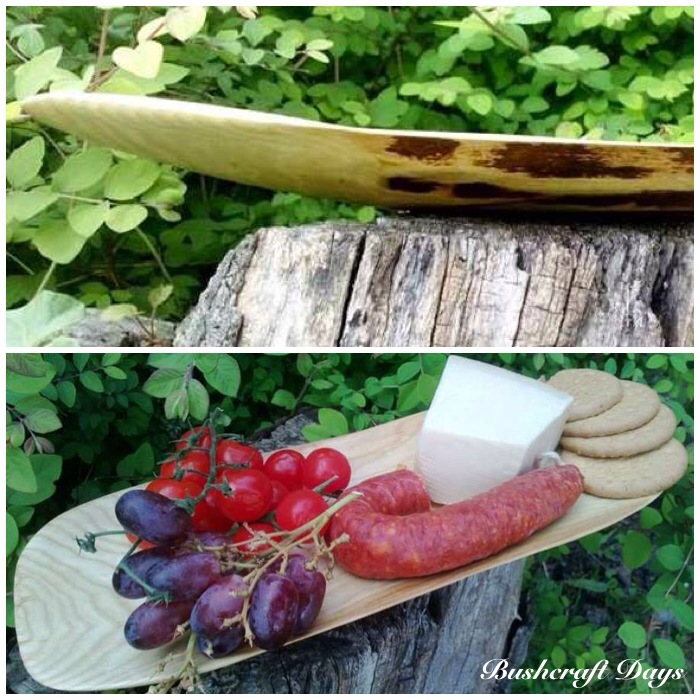
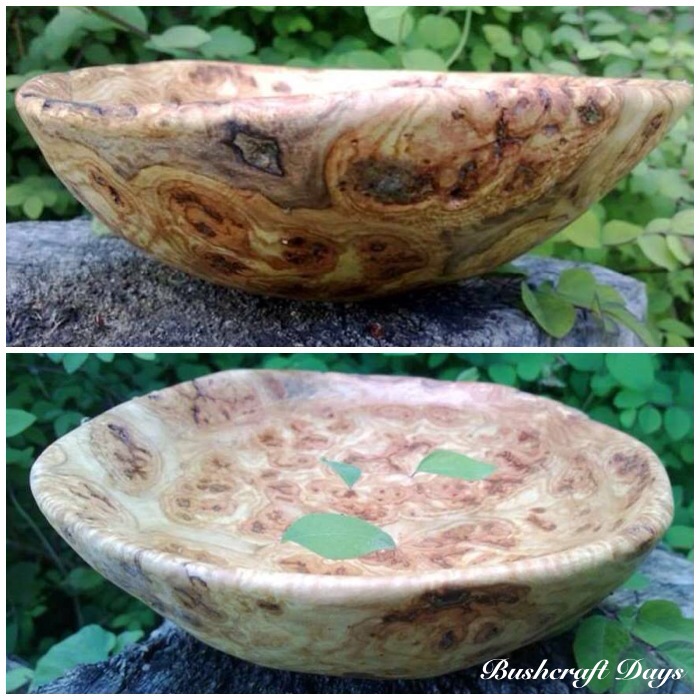
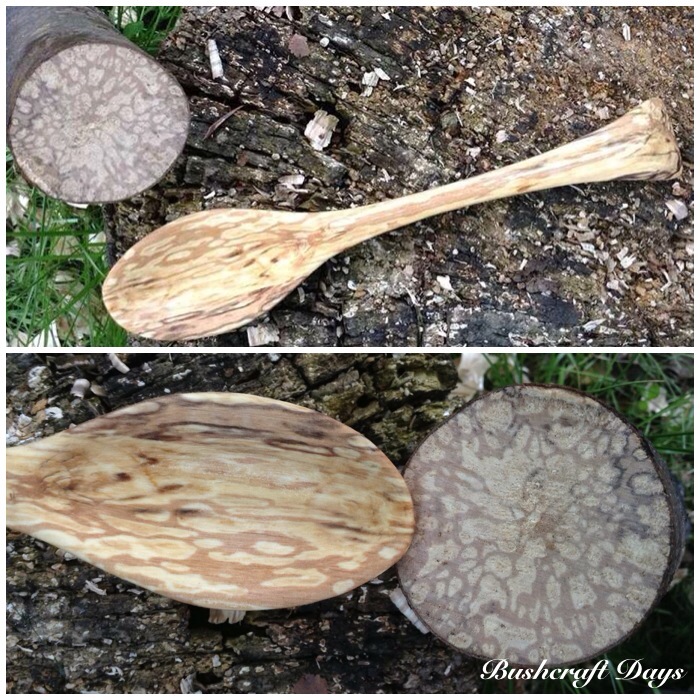
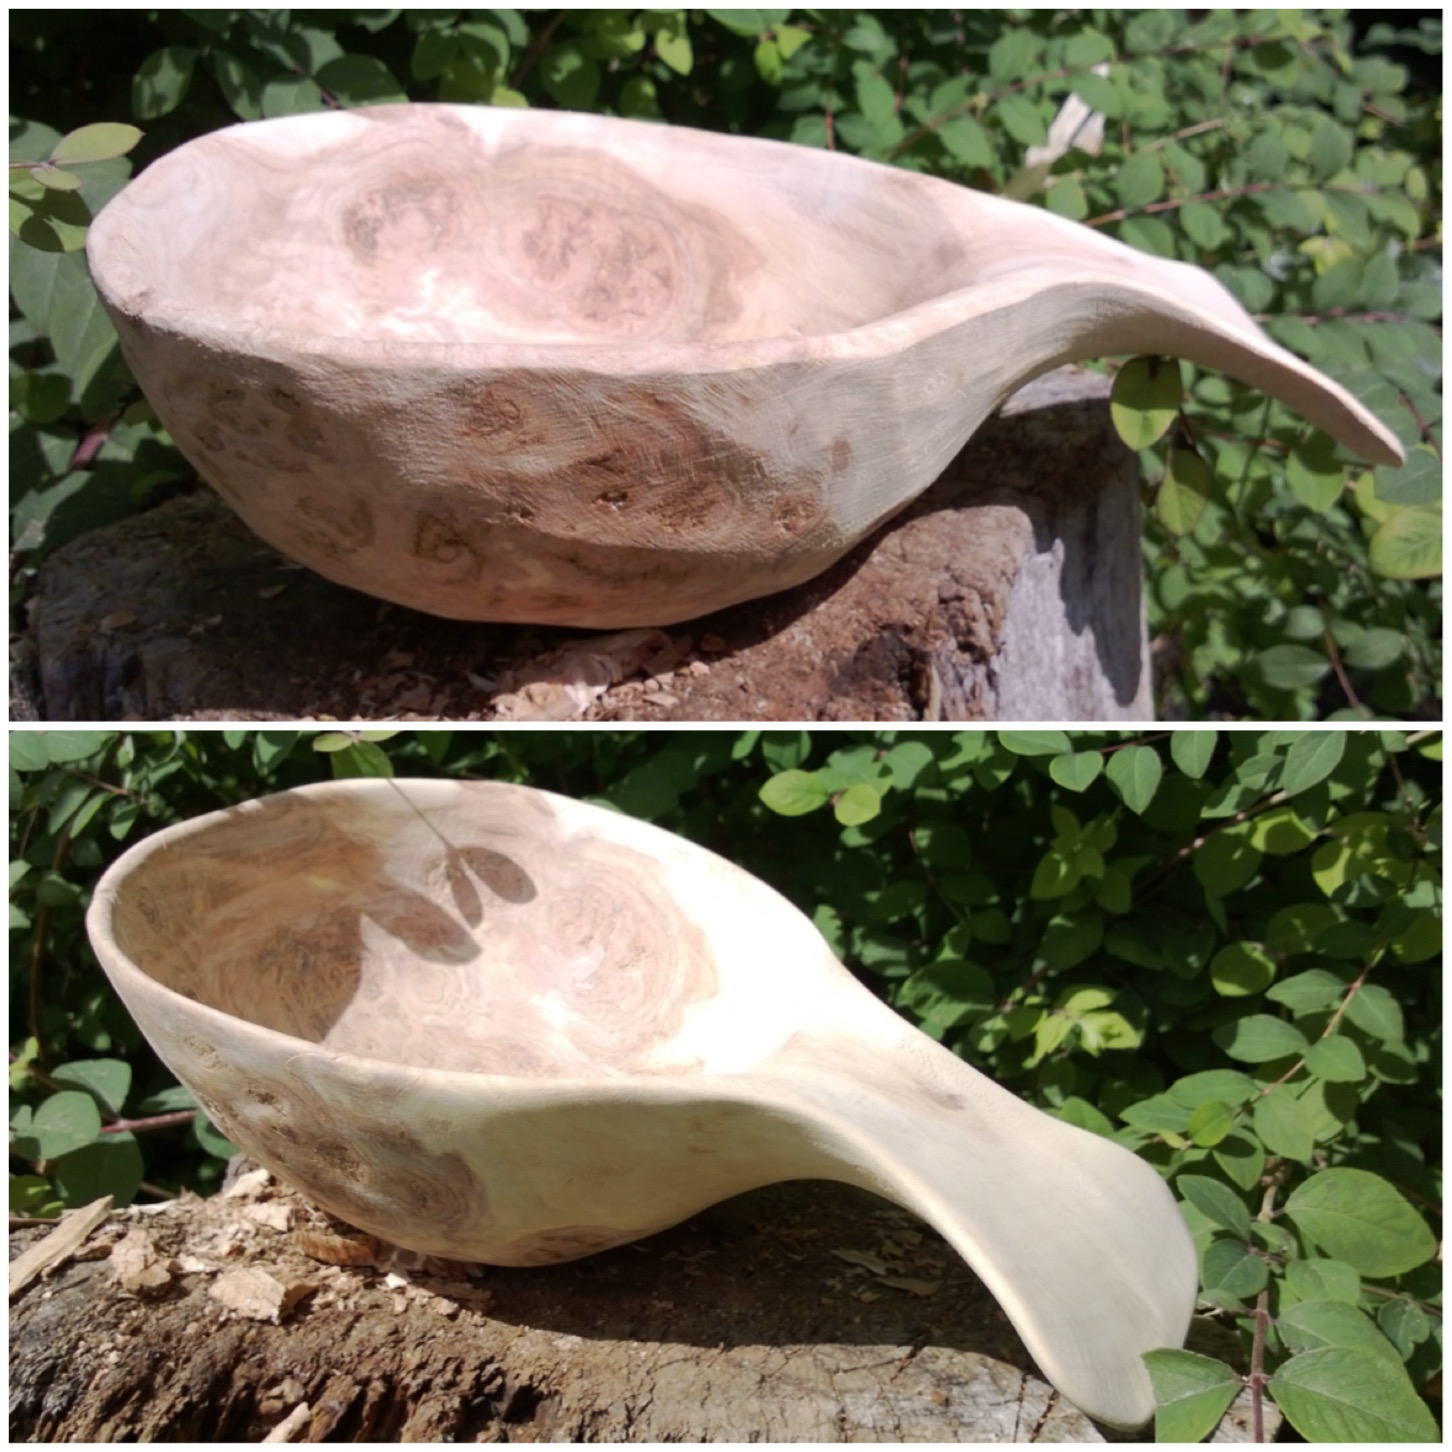
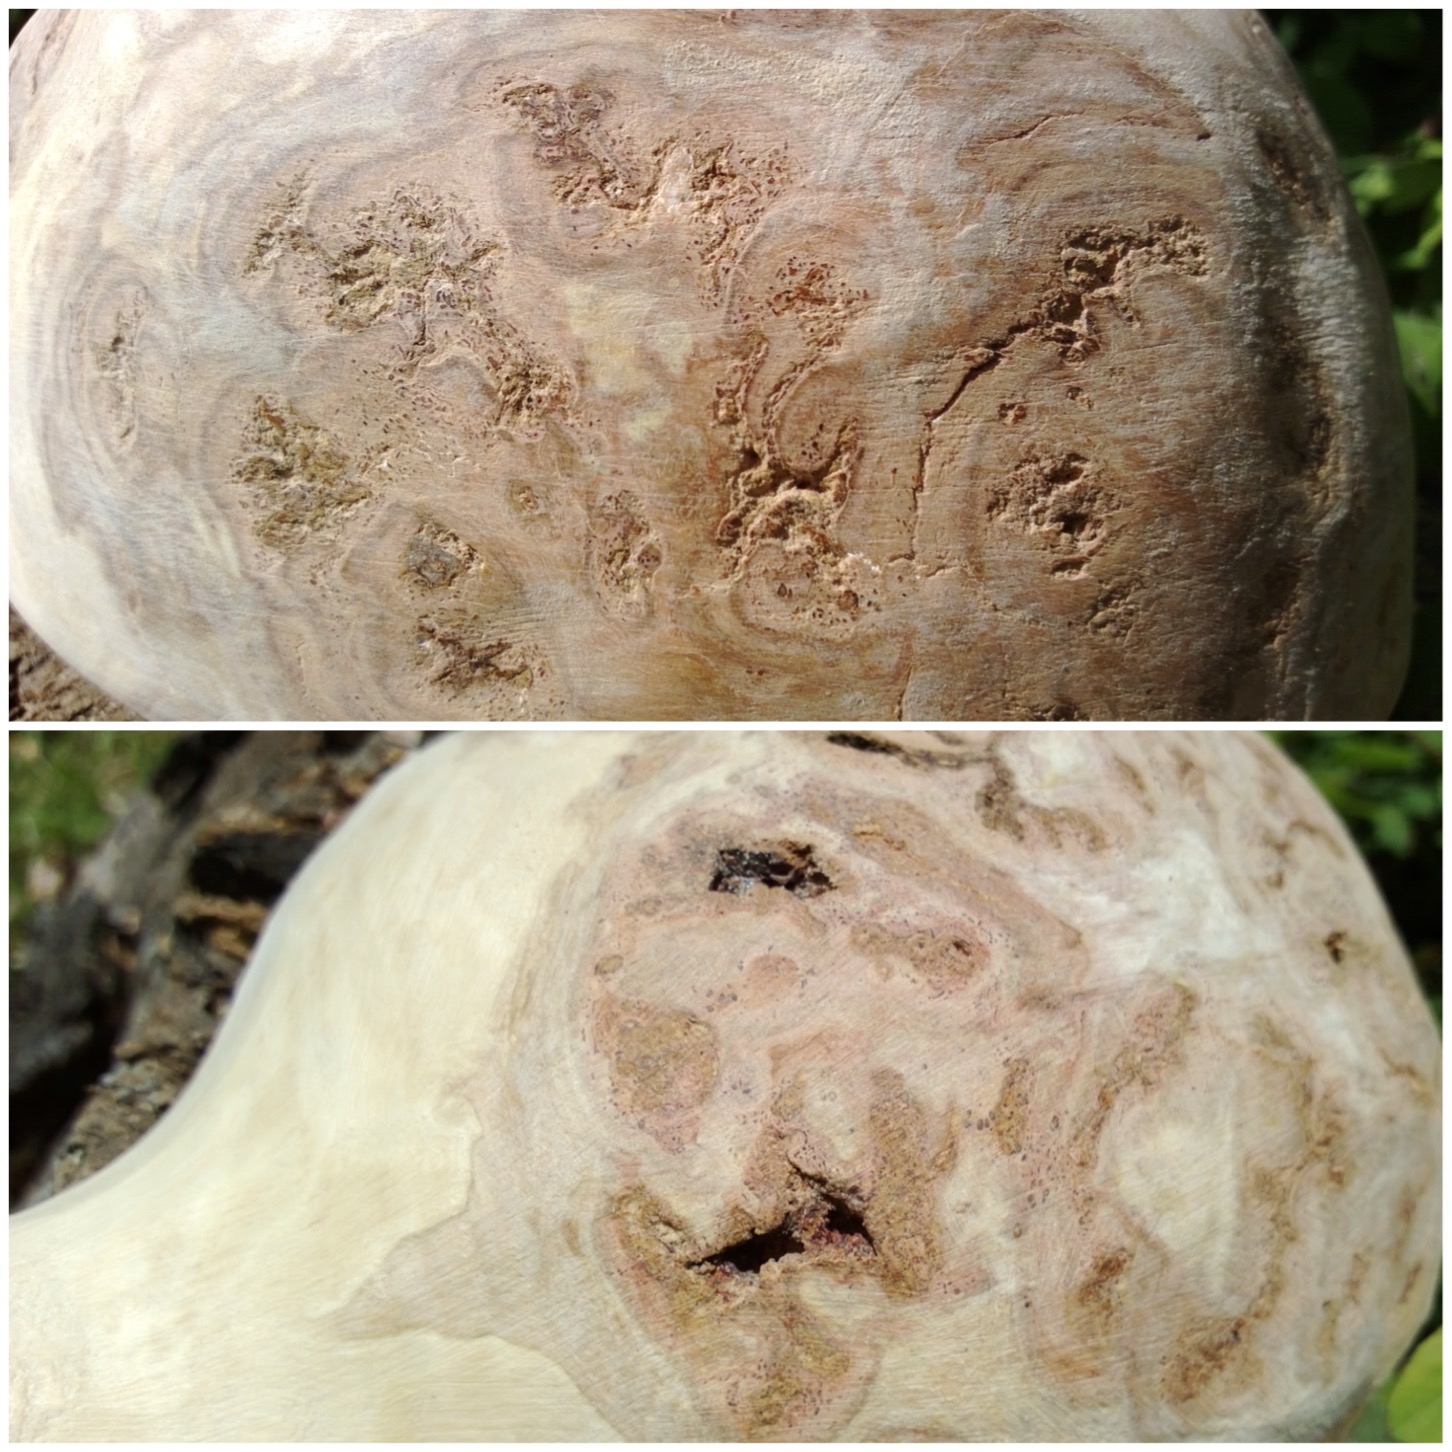
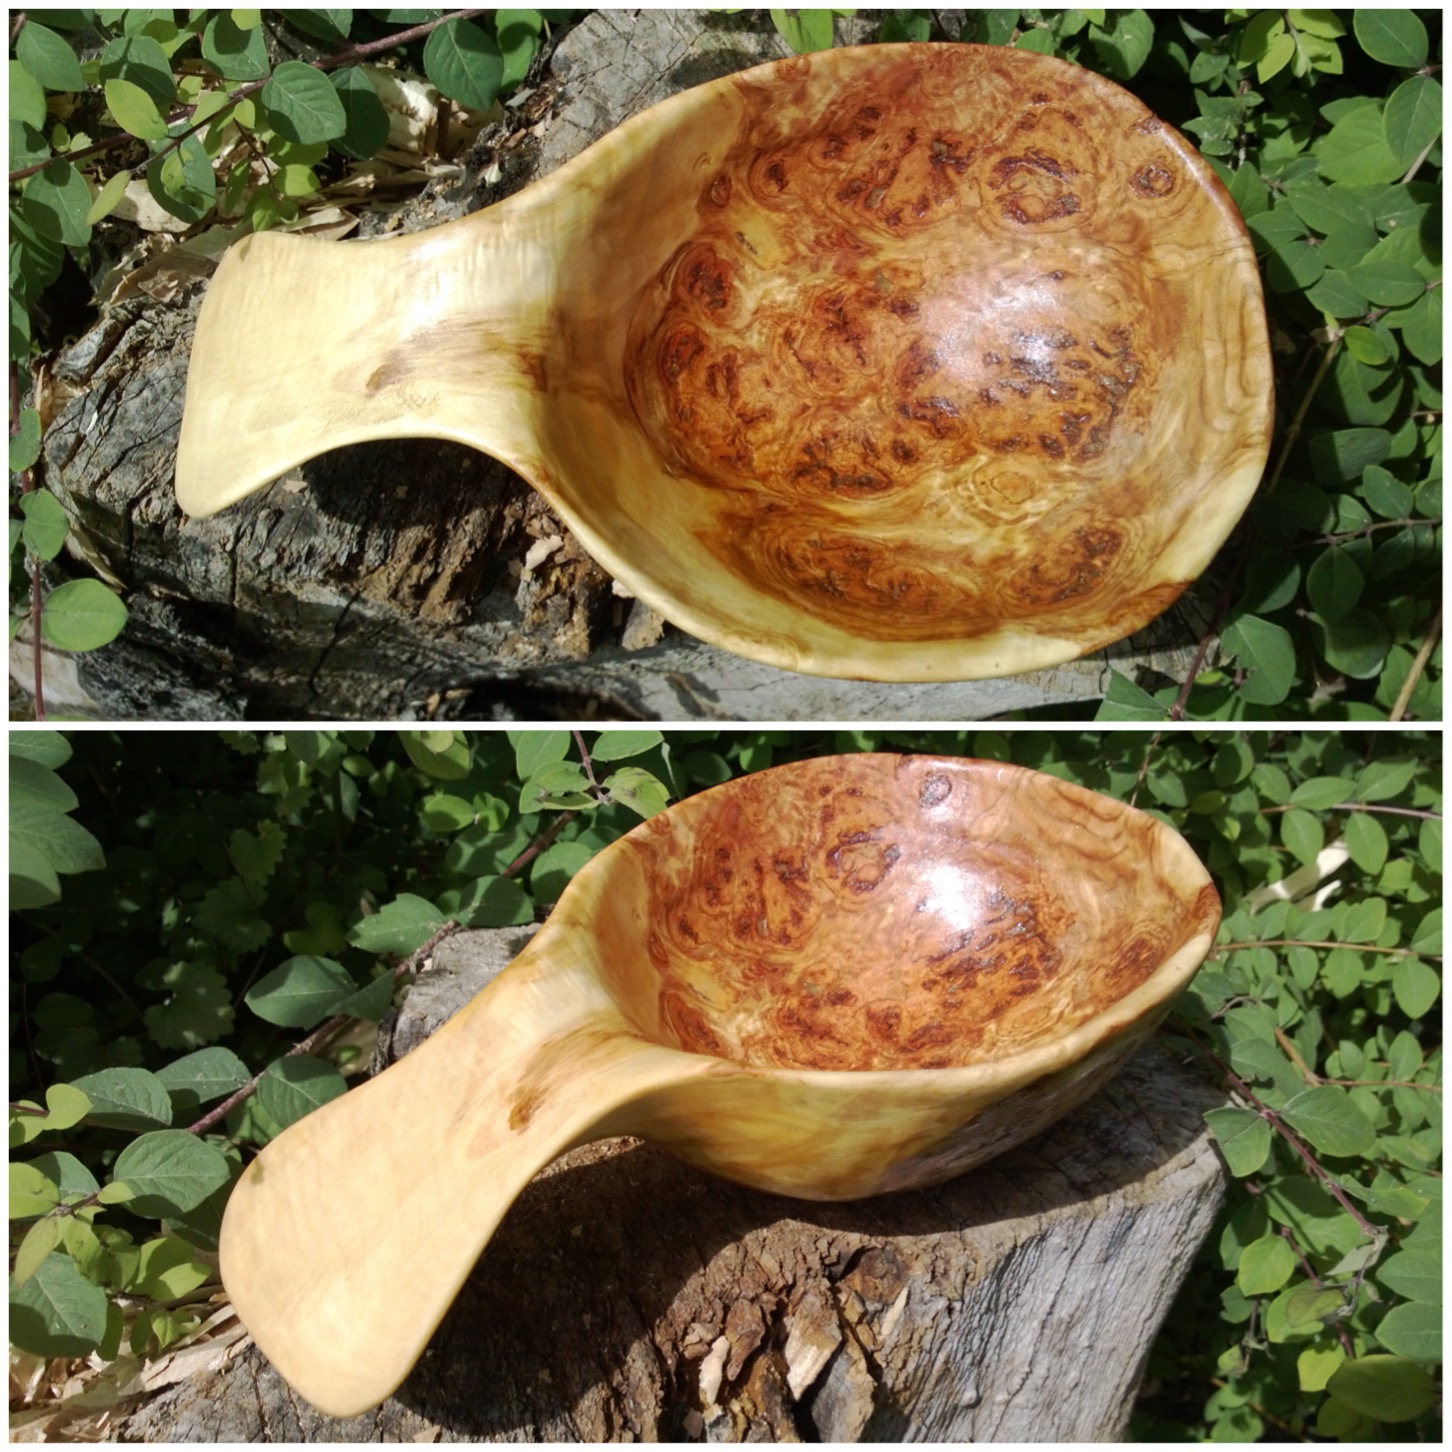
When I had formed it into the shape you see in the top picture (below) I started using different grades of sandpaper, working up from very rough to very fine, until it reached the smoothness you see in the bottom picture.

Photo 09-02-2015 14 39 39
Carving the Kuksa shape

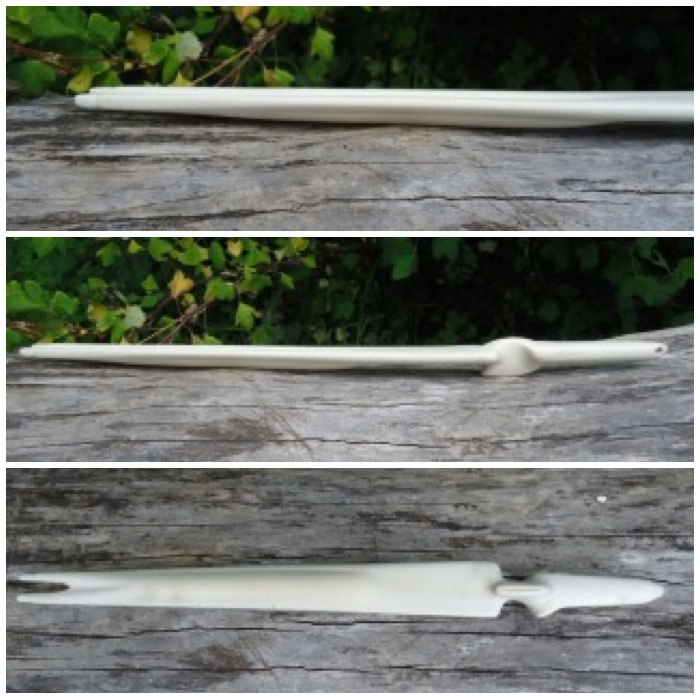
The inside of the bowl was very stable, smooth and did not contain any holes.

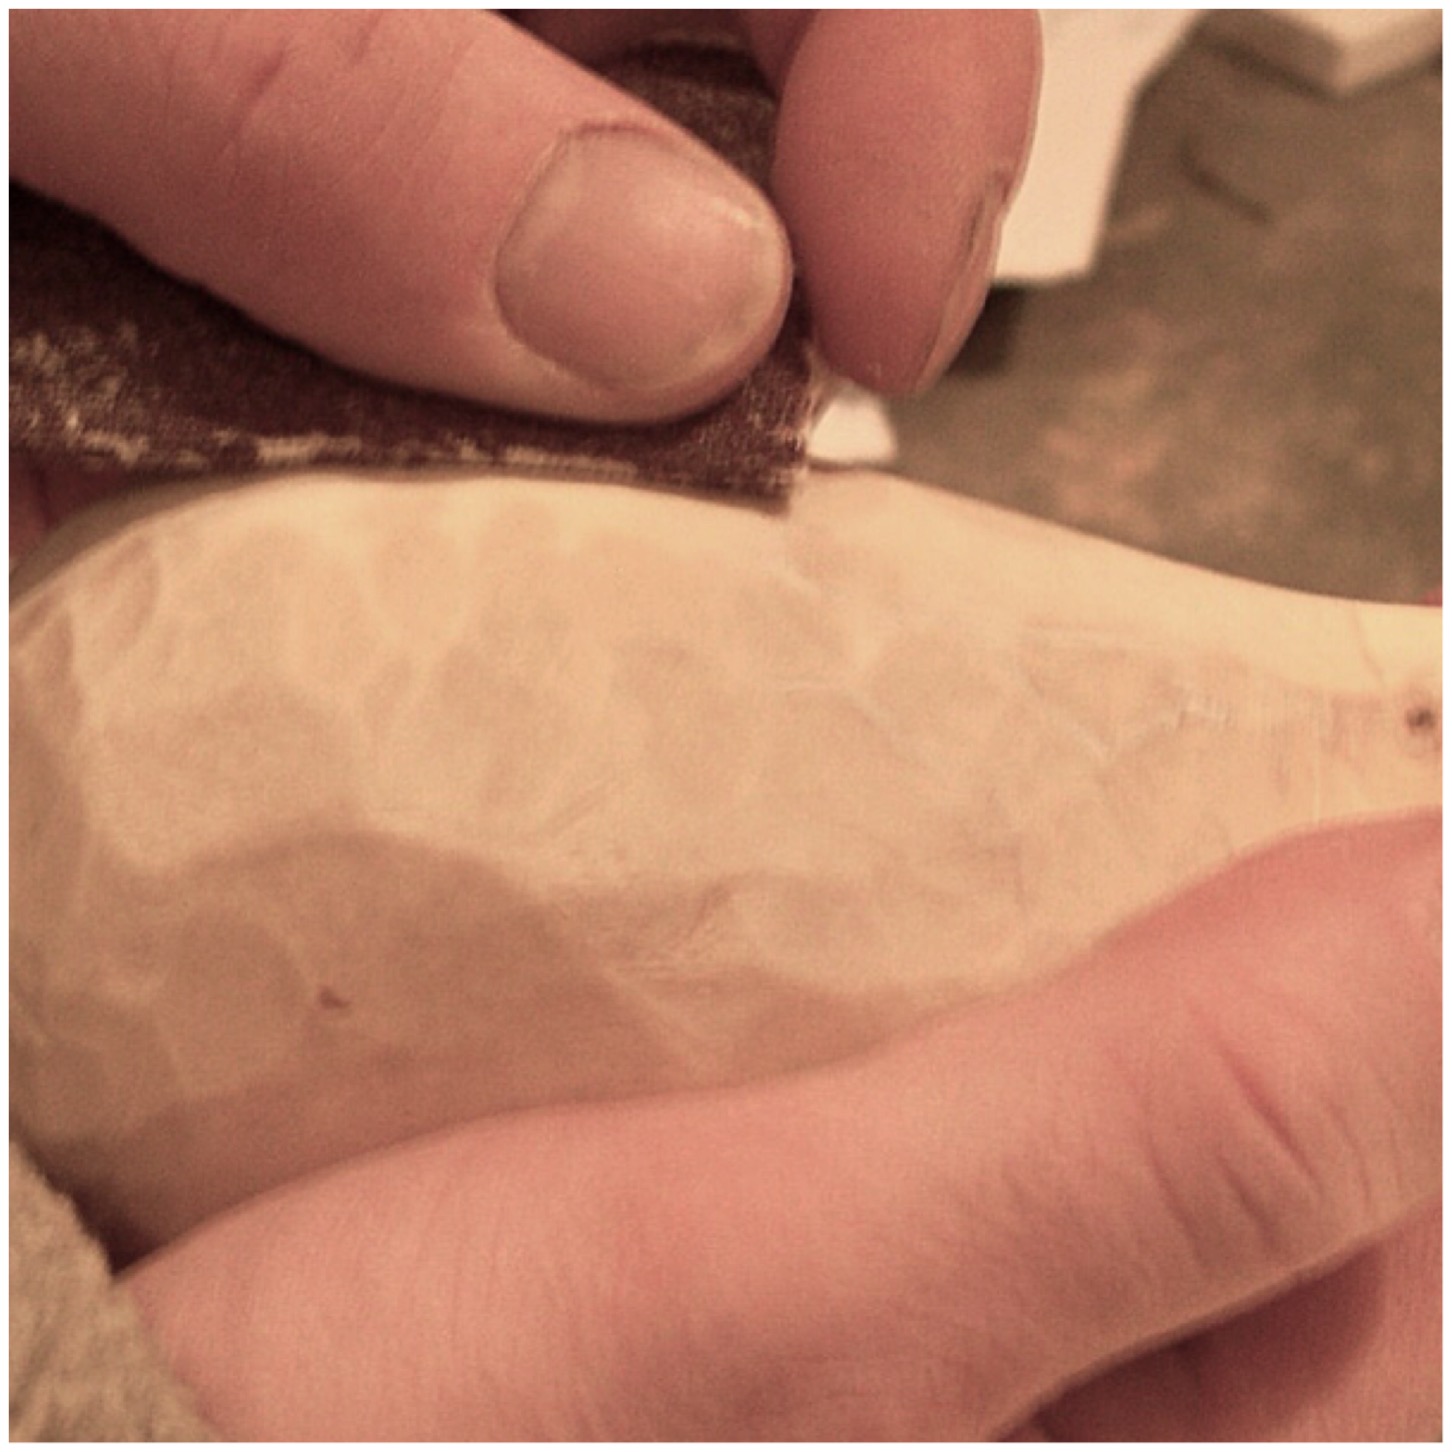
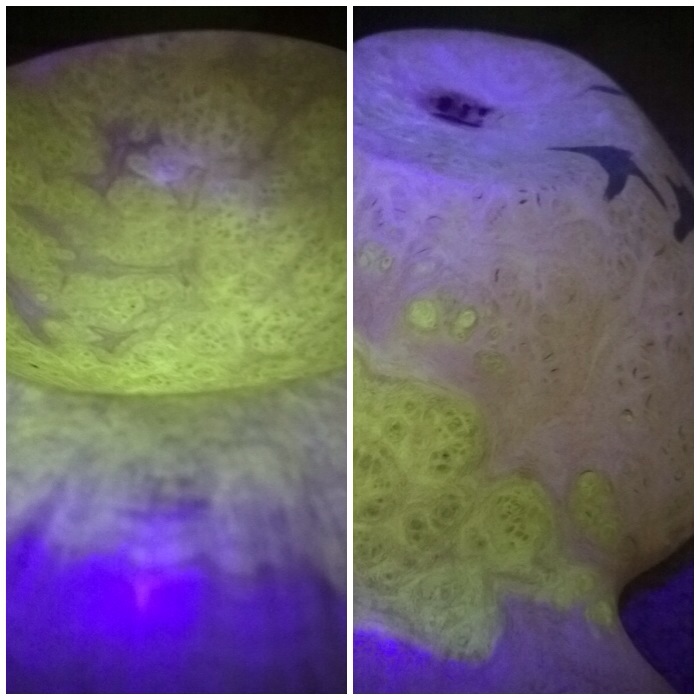
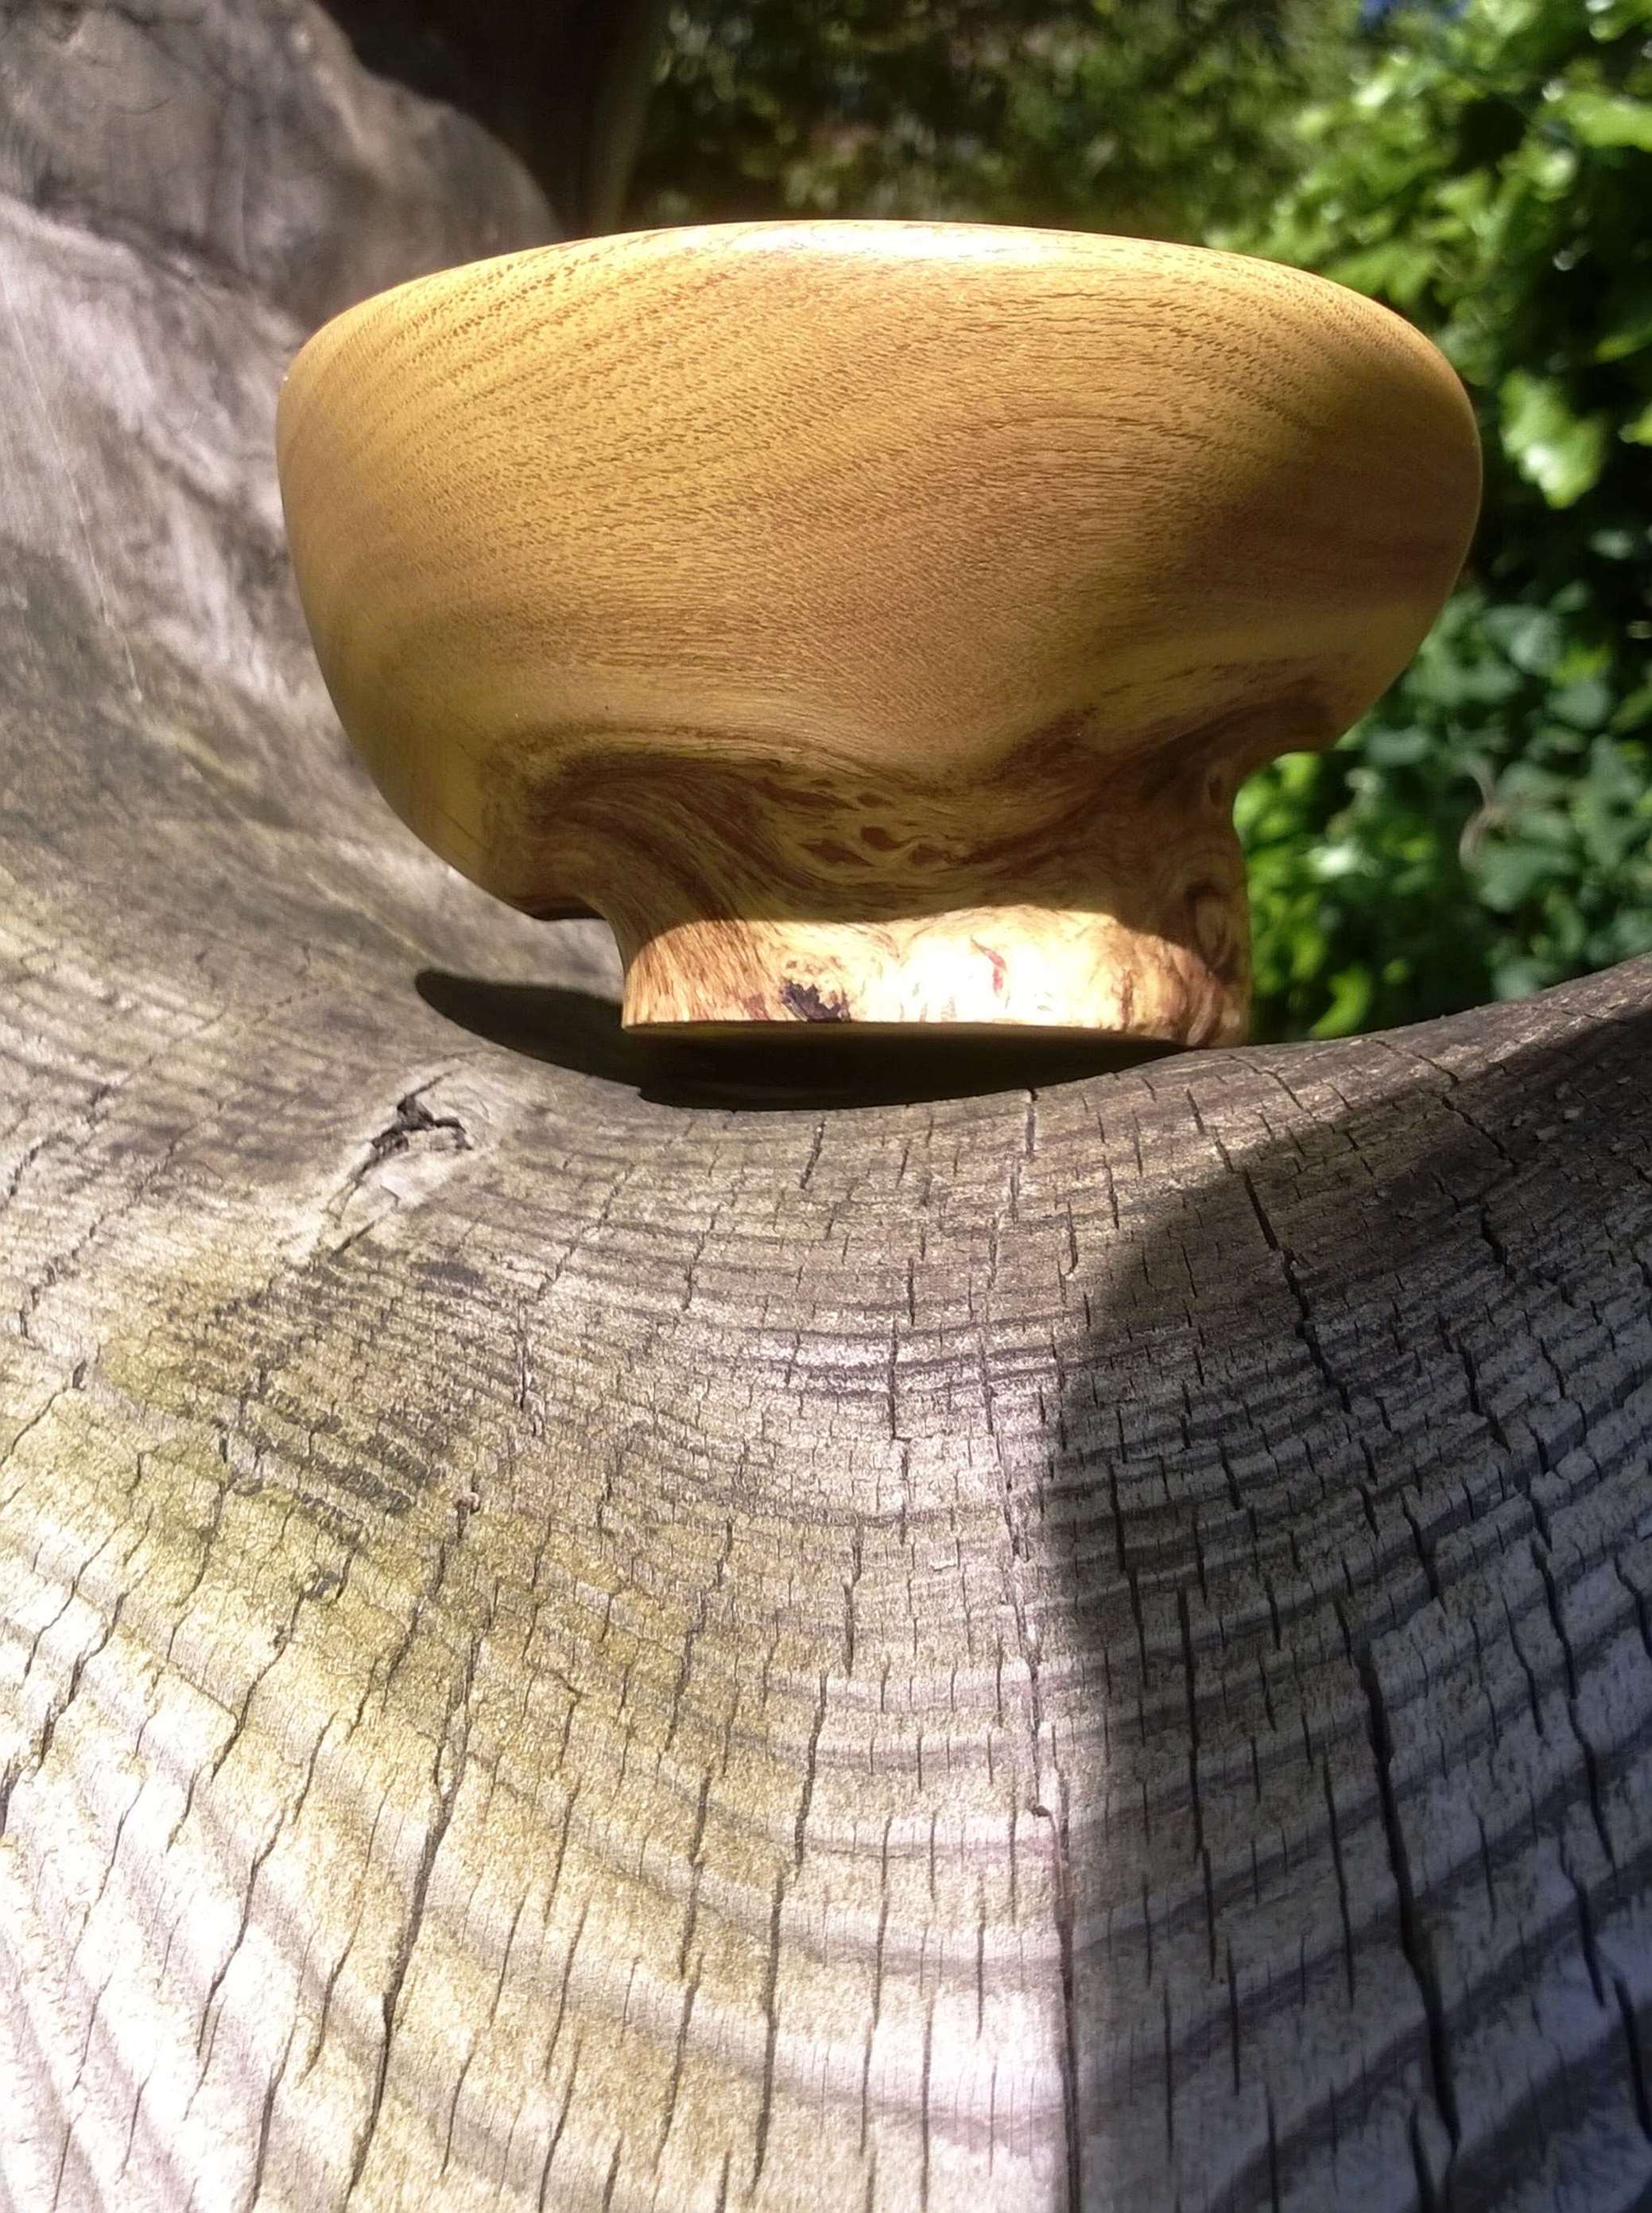
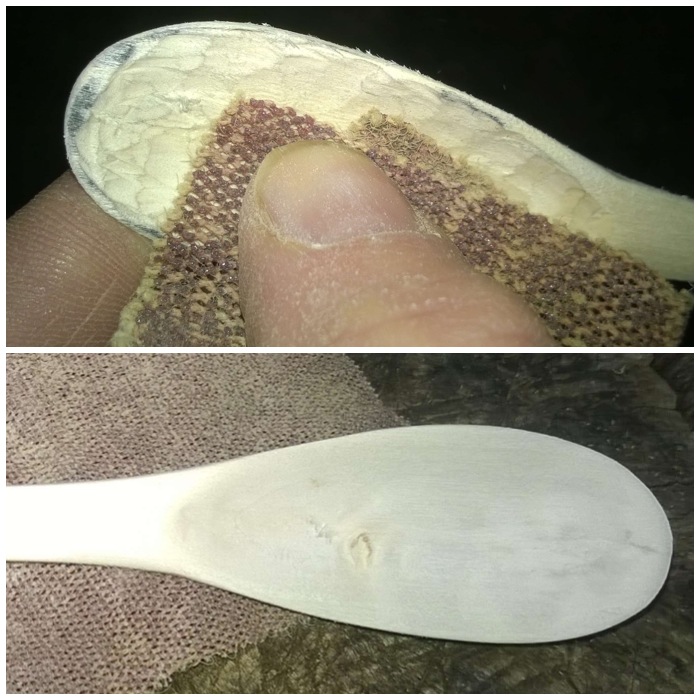
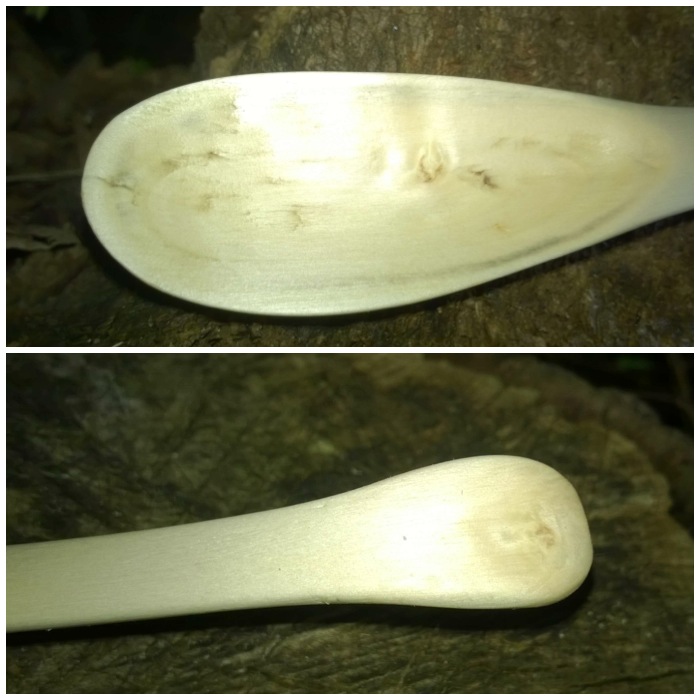
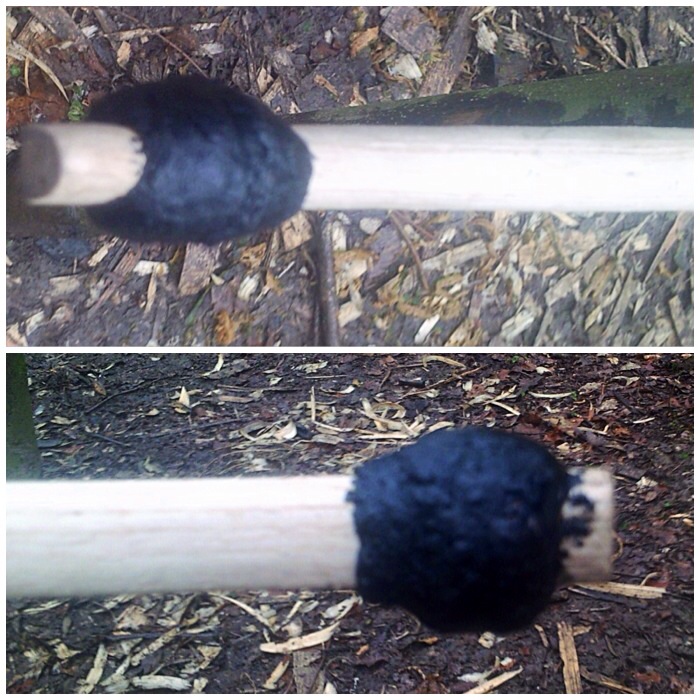
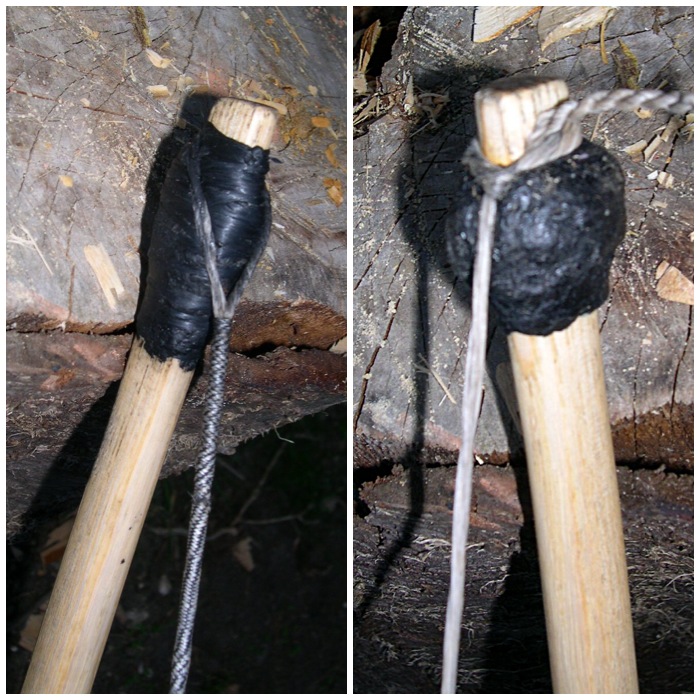
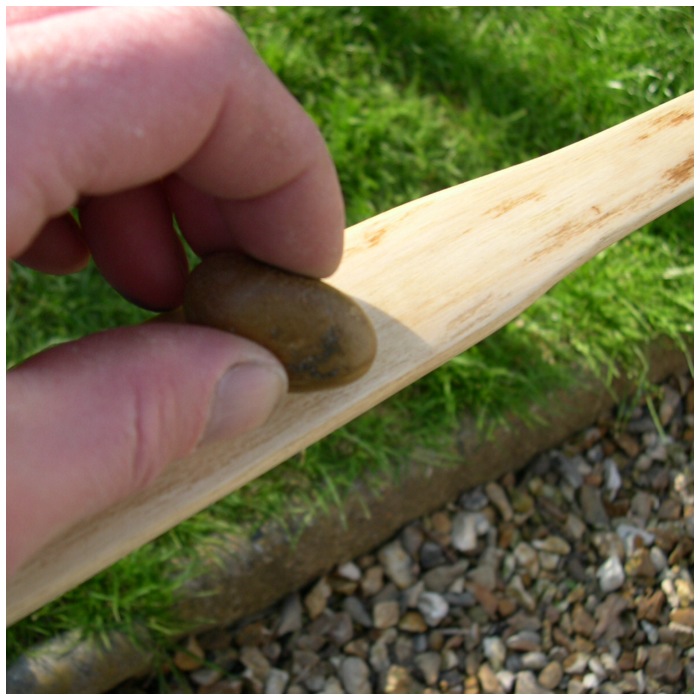
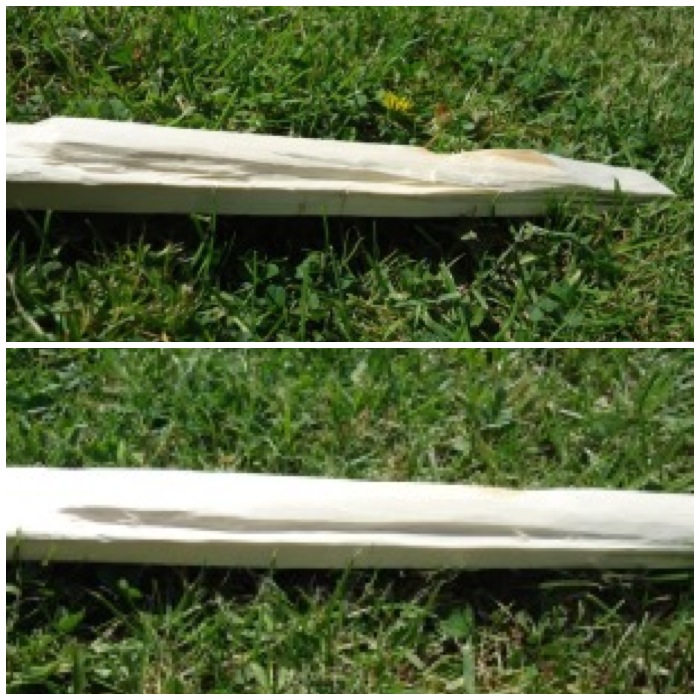
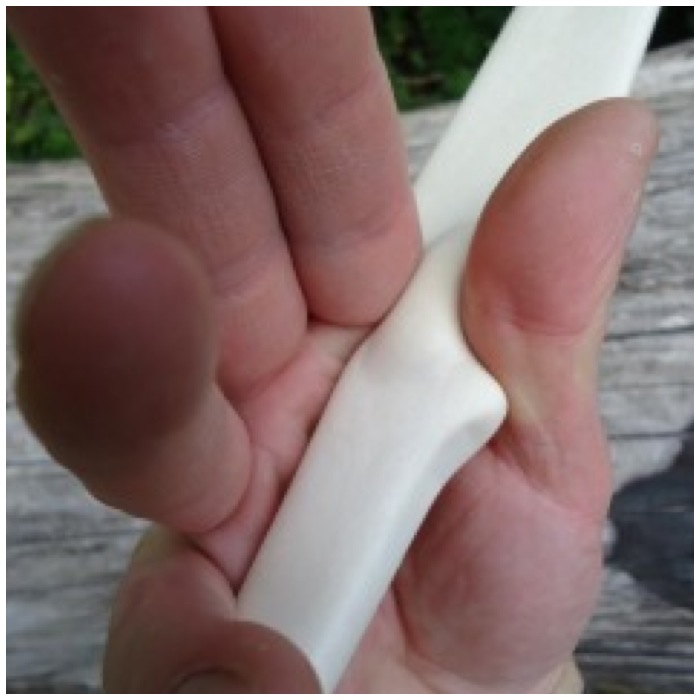
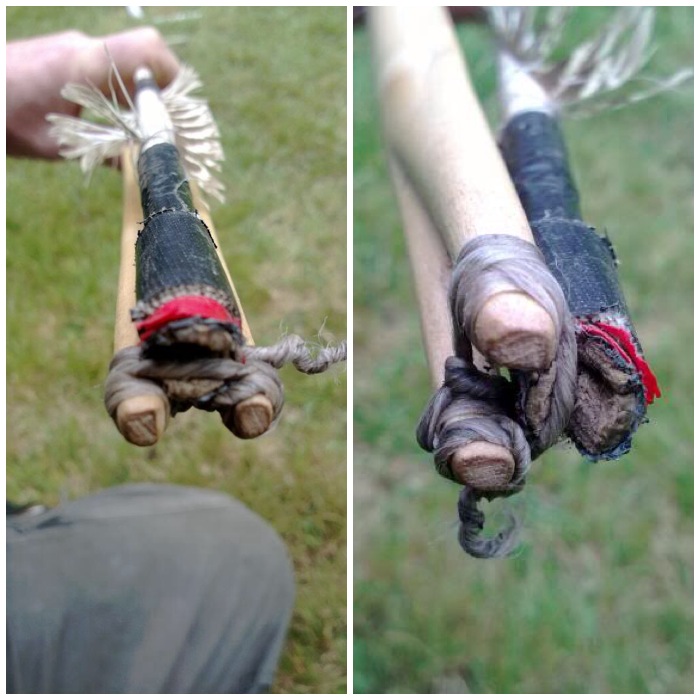
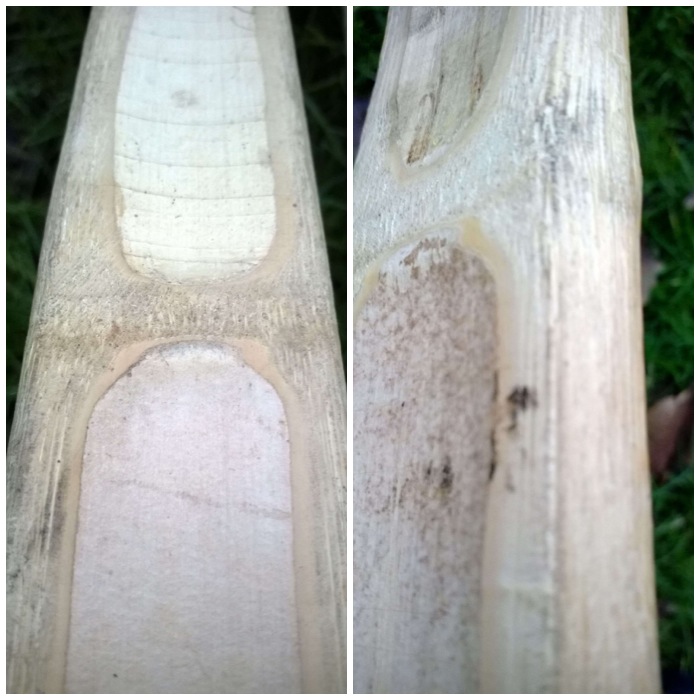
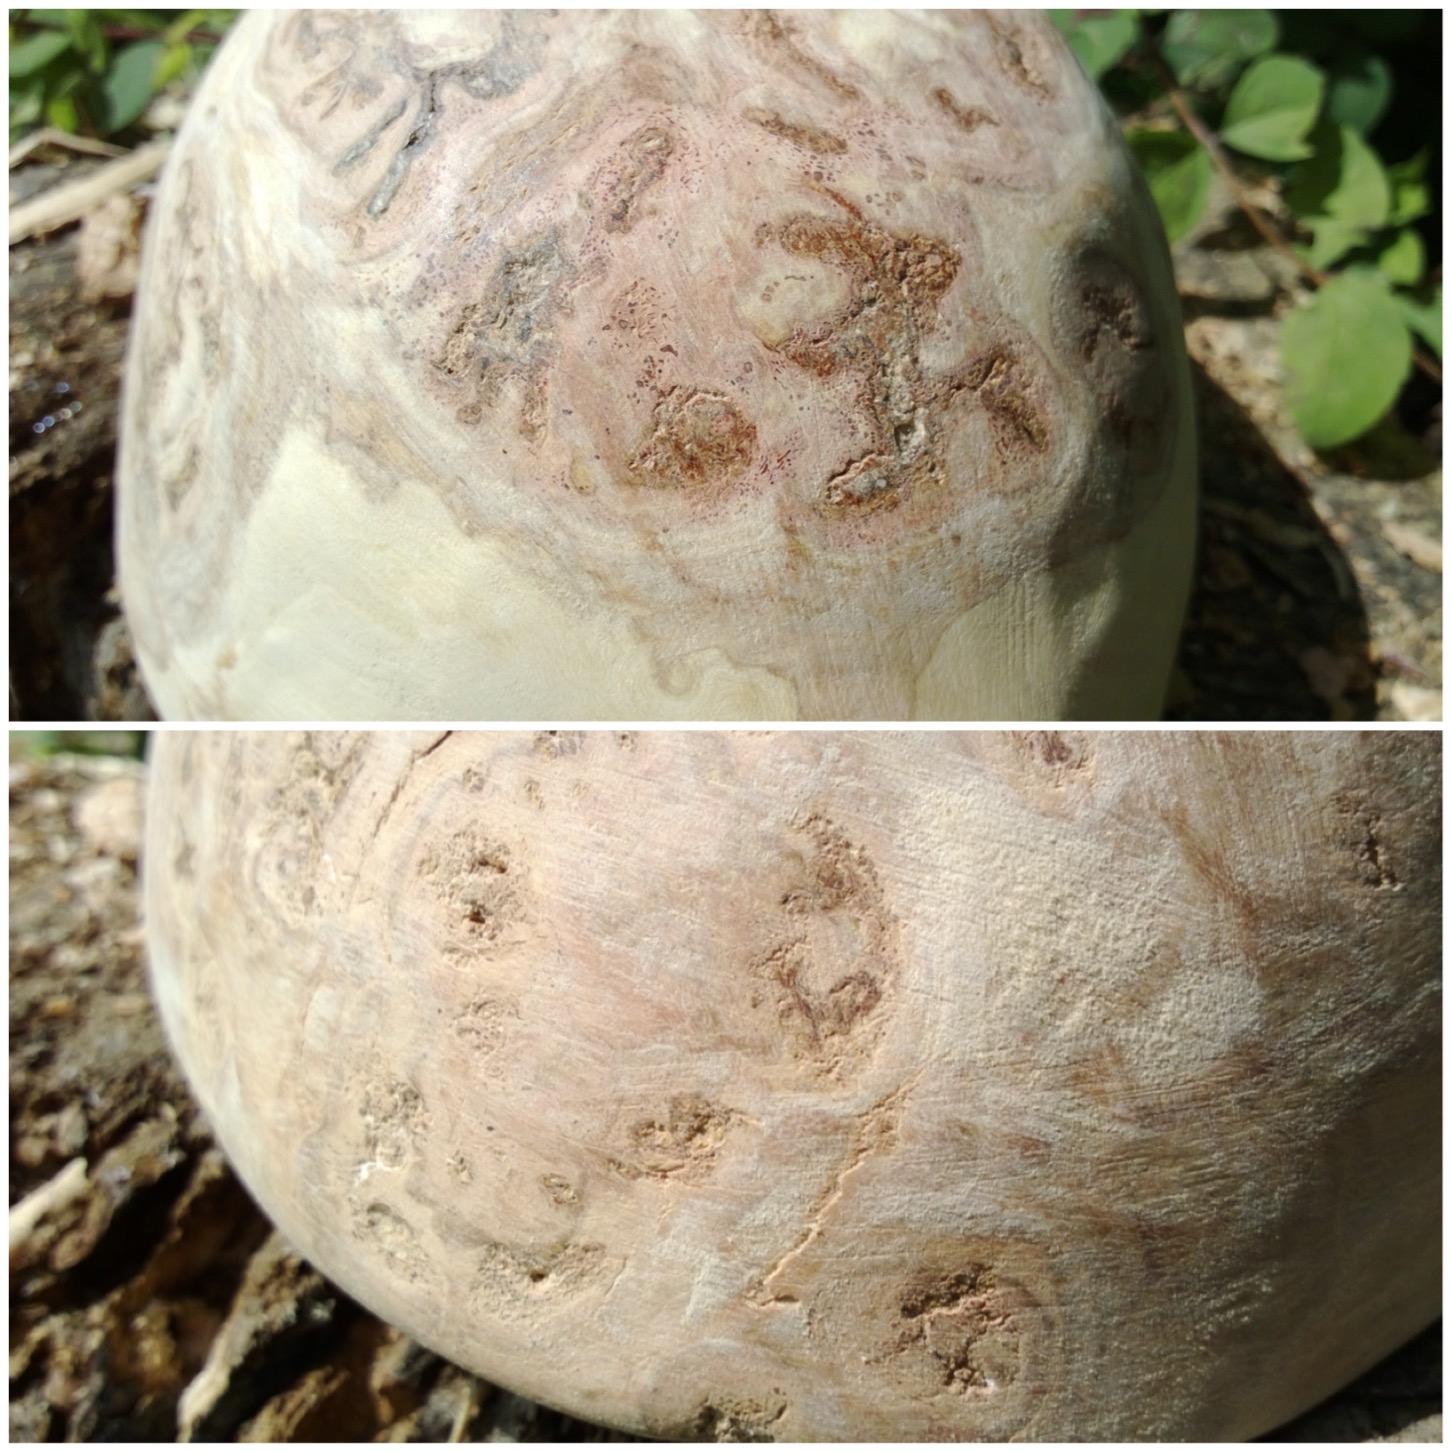
The underside was a different matter with small holes in a number of places.

Photo 09-02-2015 14 43 24
Smooth bowl but imperfect base

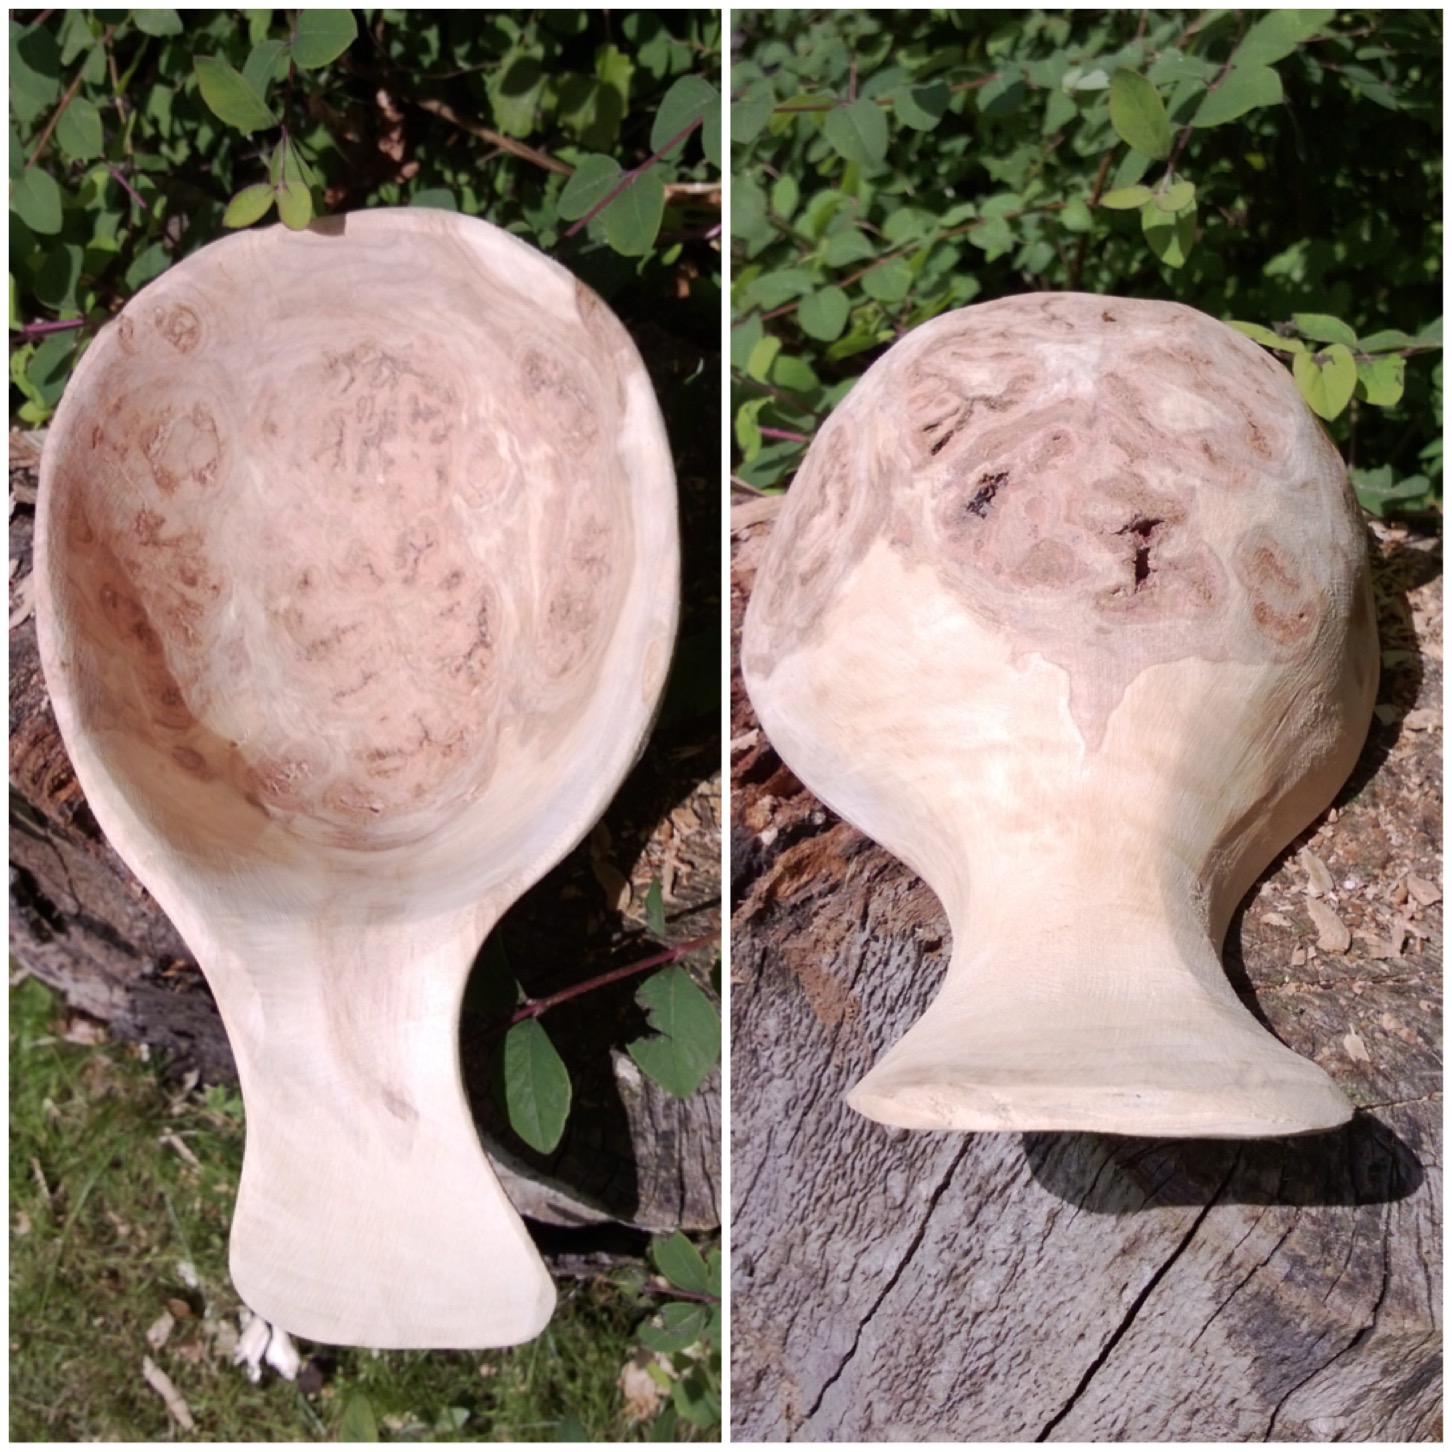
In the up close pictures below you can see that they were fairly deep. I felt I needed to fill these holes to prevent any leakages (never a good thing when you are desperate for a brew).

Photo 09-02-2015 14 43 59
Holes – big and small

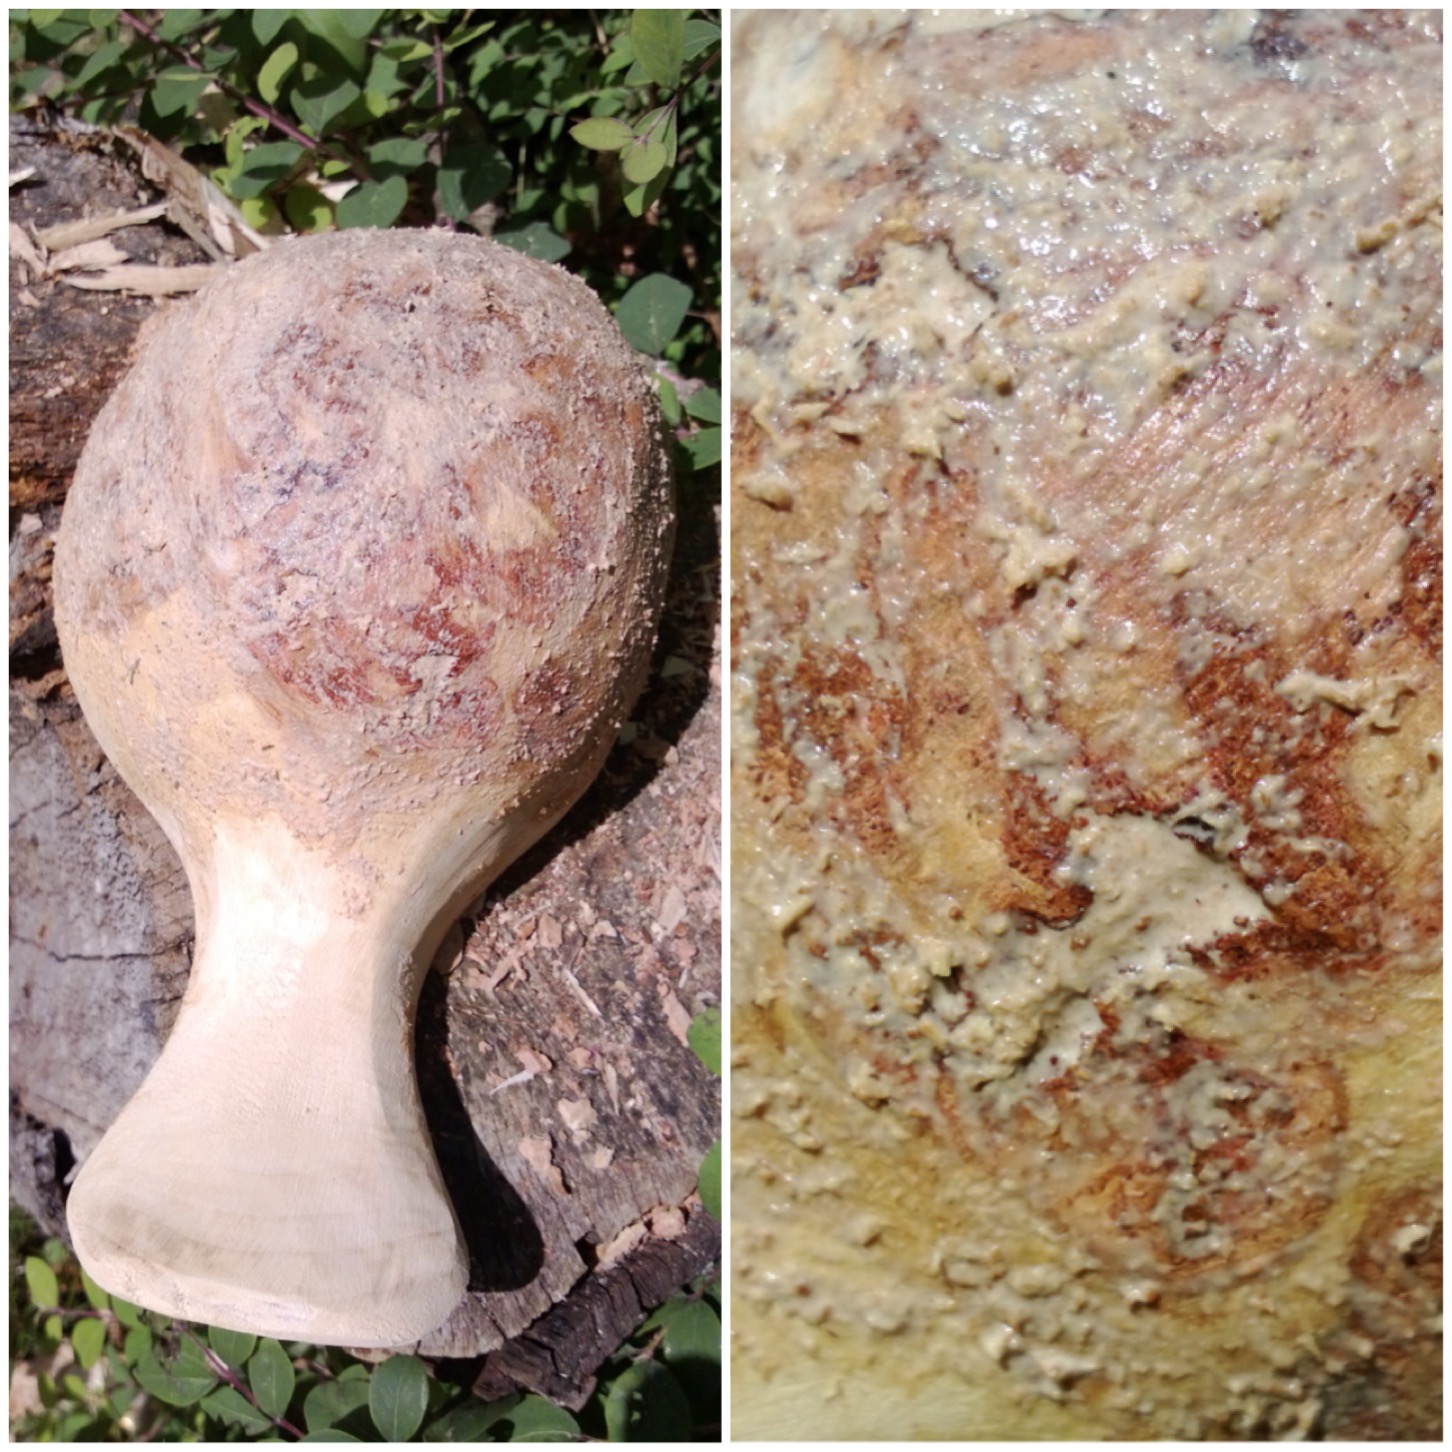
To fill the holes I used a mixture of wood glue and sawdust from the sanding as a kind of filler. I rubbed the mixture all over the underside of the bowl, allowed it to dry, sanded it and repeated the process again. This all took a couple of days to allow for the drying process.

Photo 09-02-2015 14 45 37
Wood glue and shavings on the base

There was still some roughness left over even after the sanding but I felt that went with the character of the kuksa.

Photo 09-02-2015 14 46 19
Drying and sanding

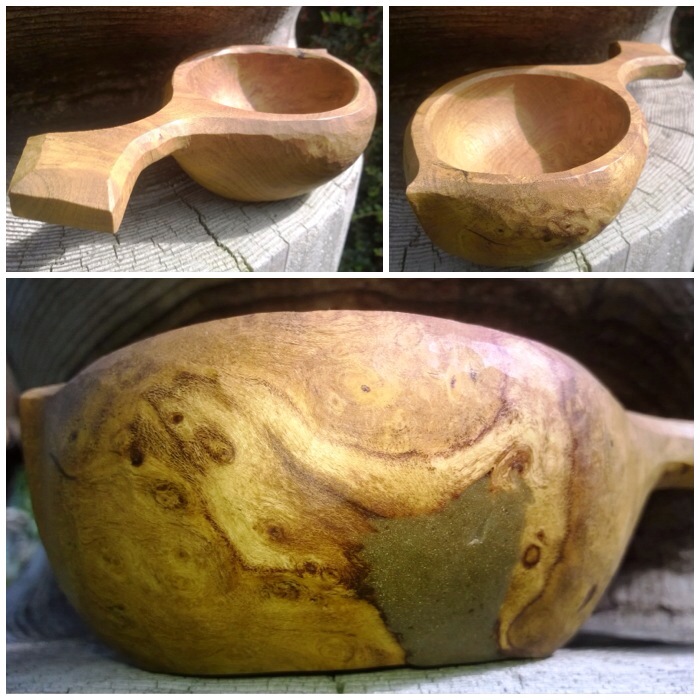
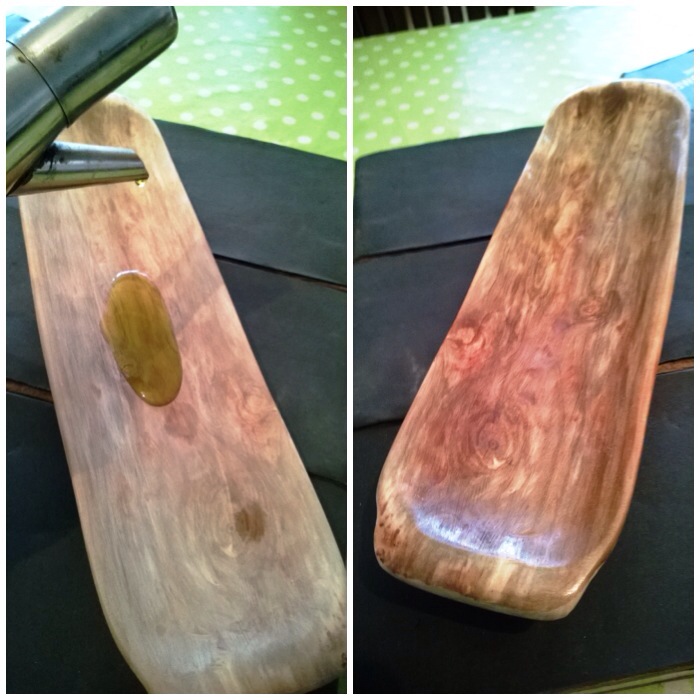
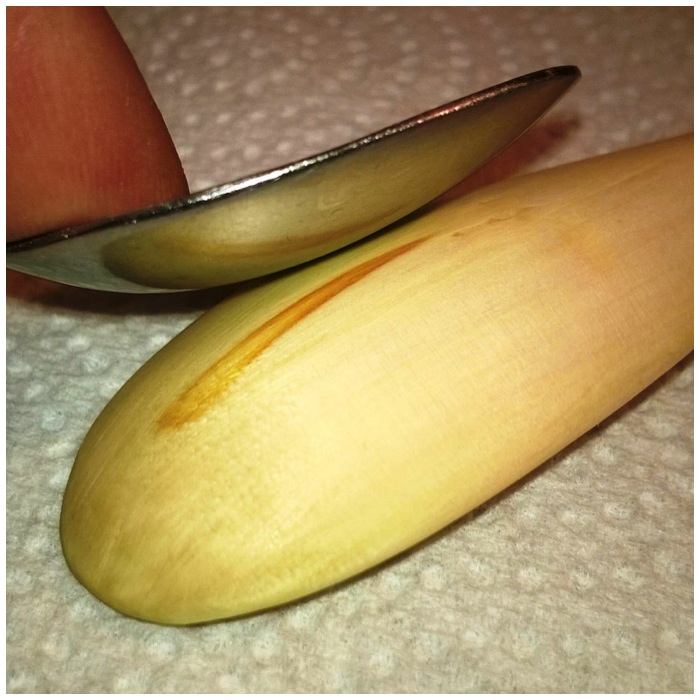
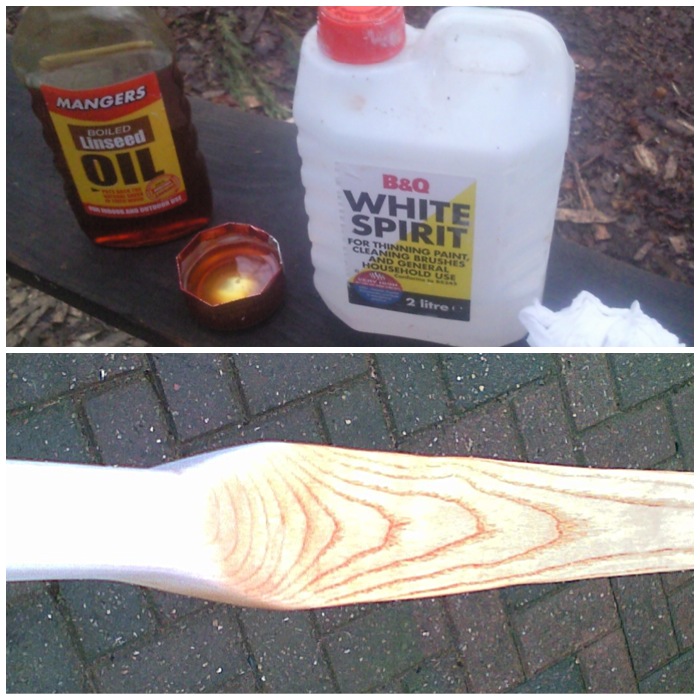
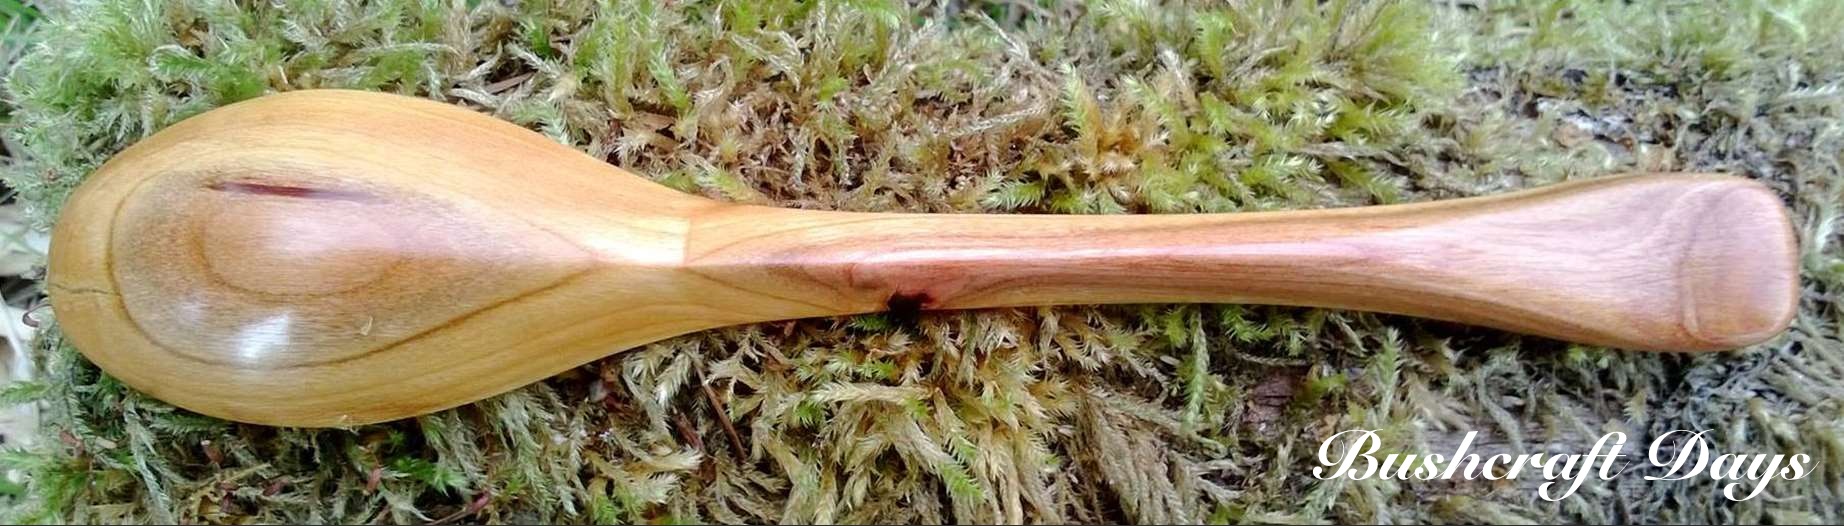
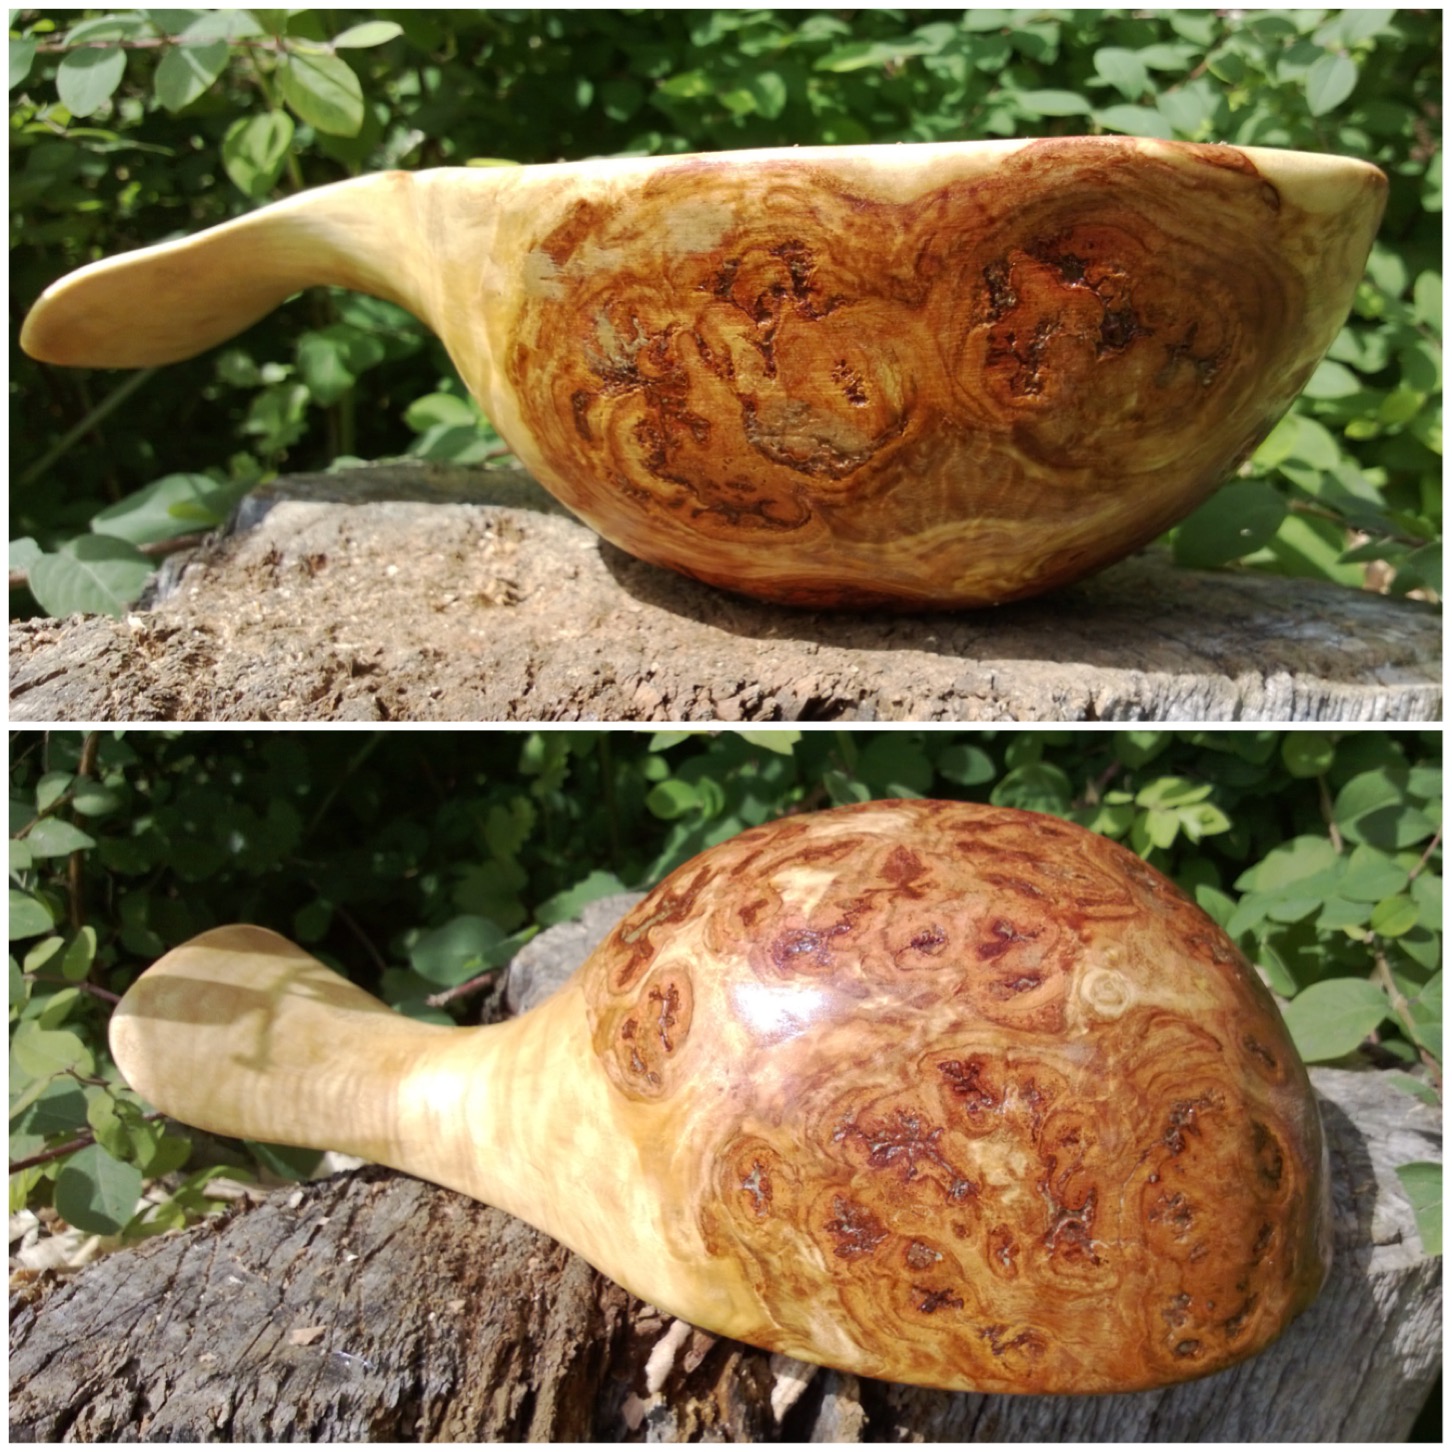
To seal the cup I melted beeswax and poured it over the cup. I then re-melted the beeswax with a hairdryer so that as much of it as possible would soak into the burl wood to fill all the pores. I repeated this a number of times, covering the whole cup until no more beeswax would soak into the wood.

Photo 09-02-2015 14 46 46
Beeswax filler

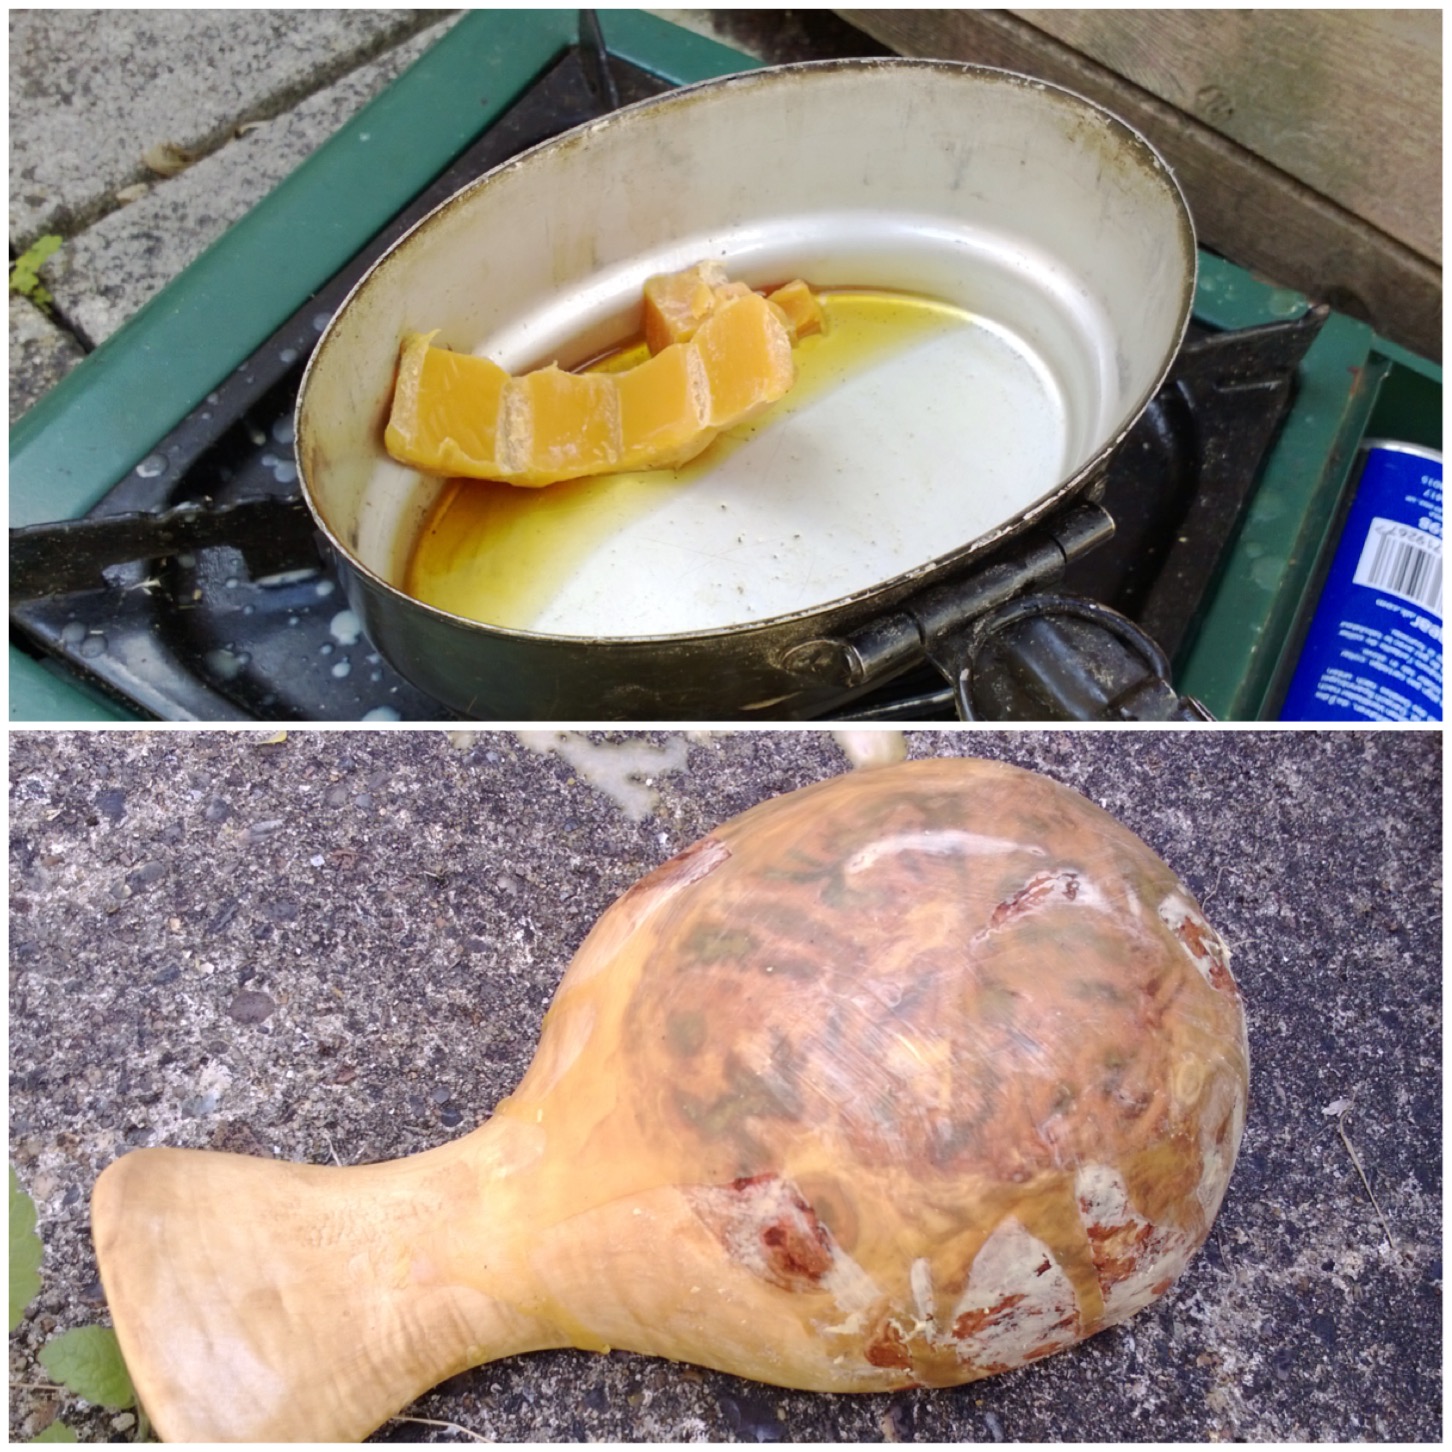
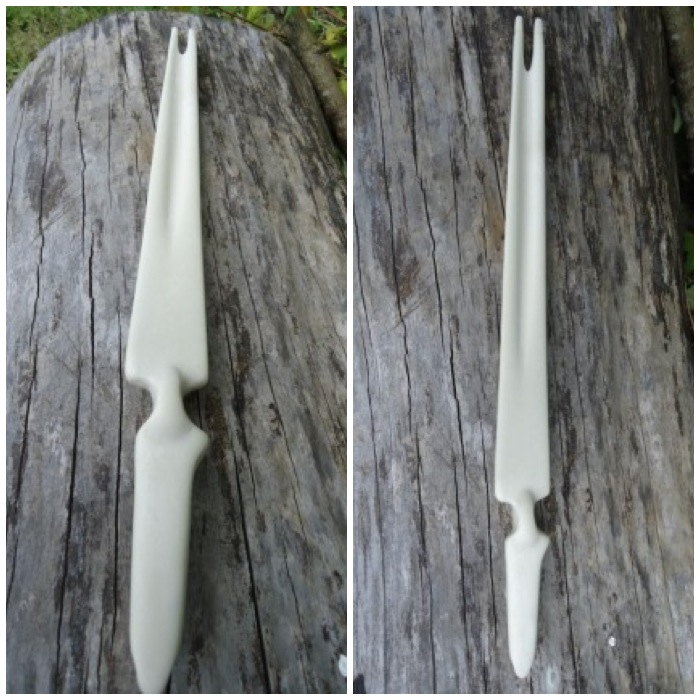
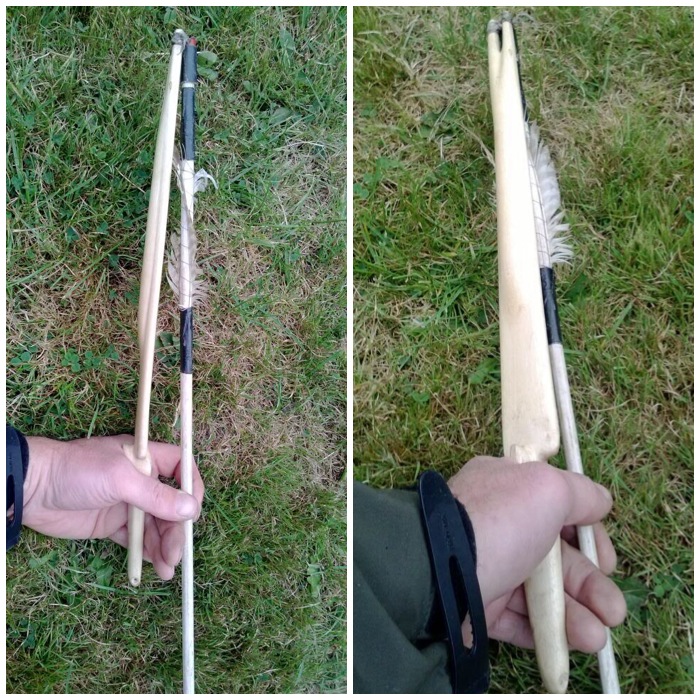
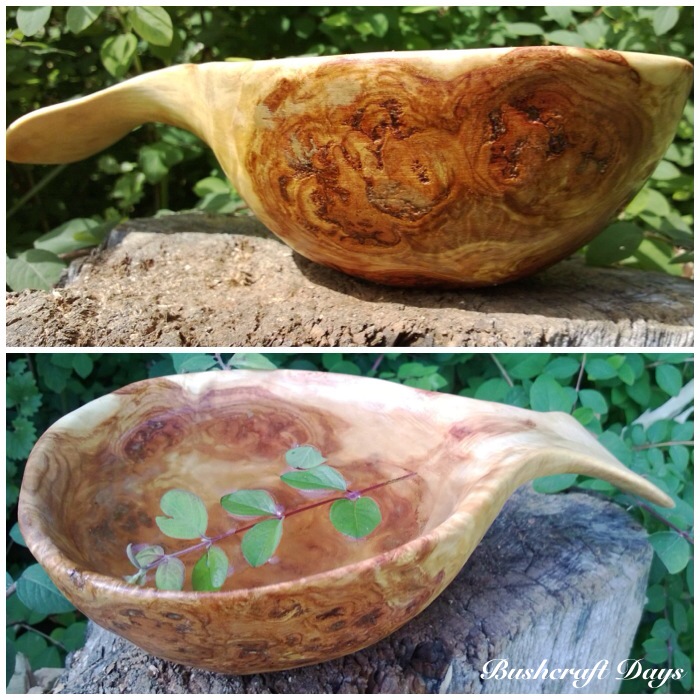
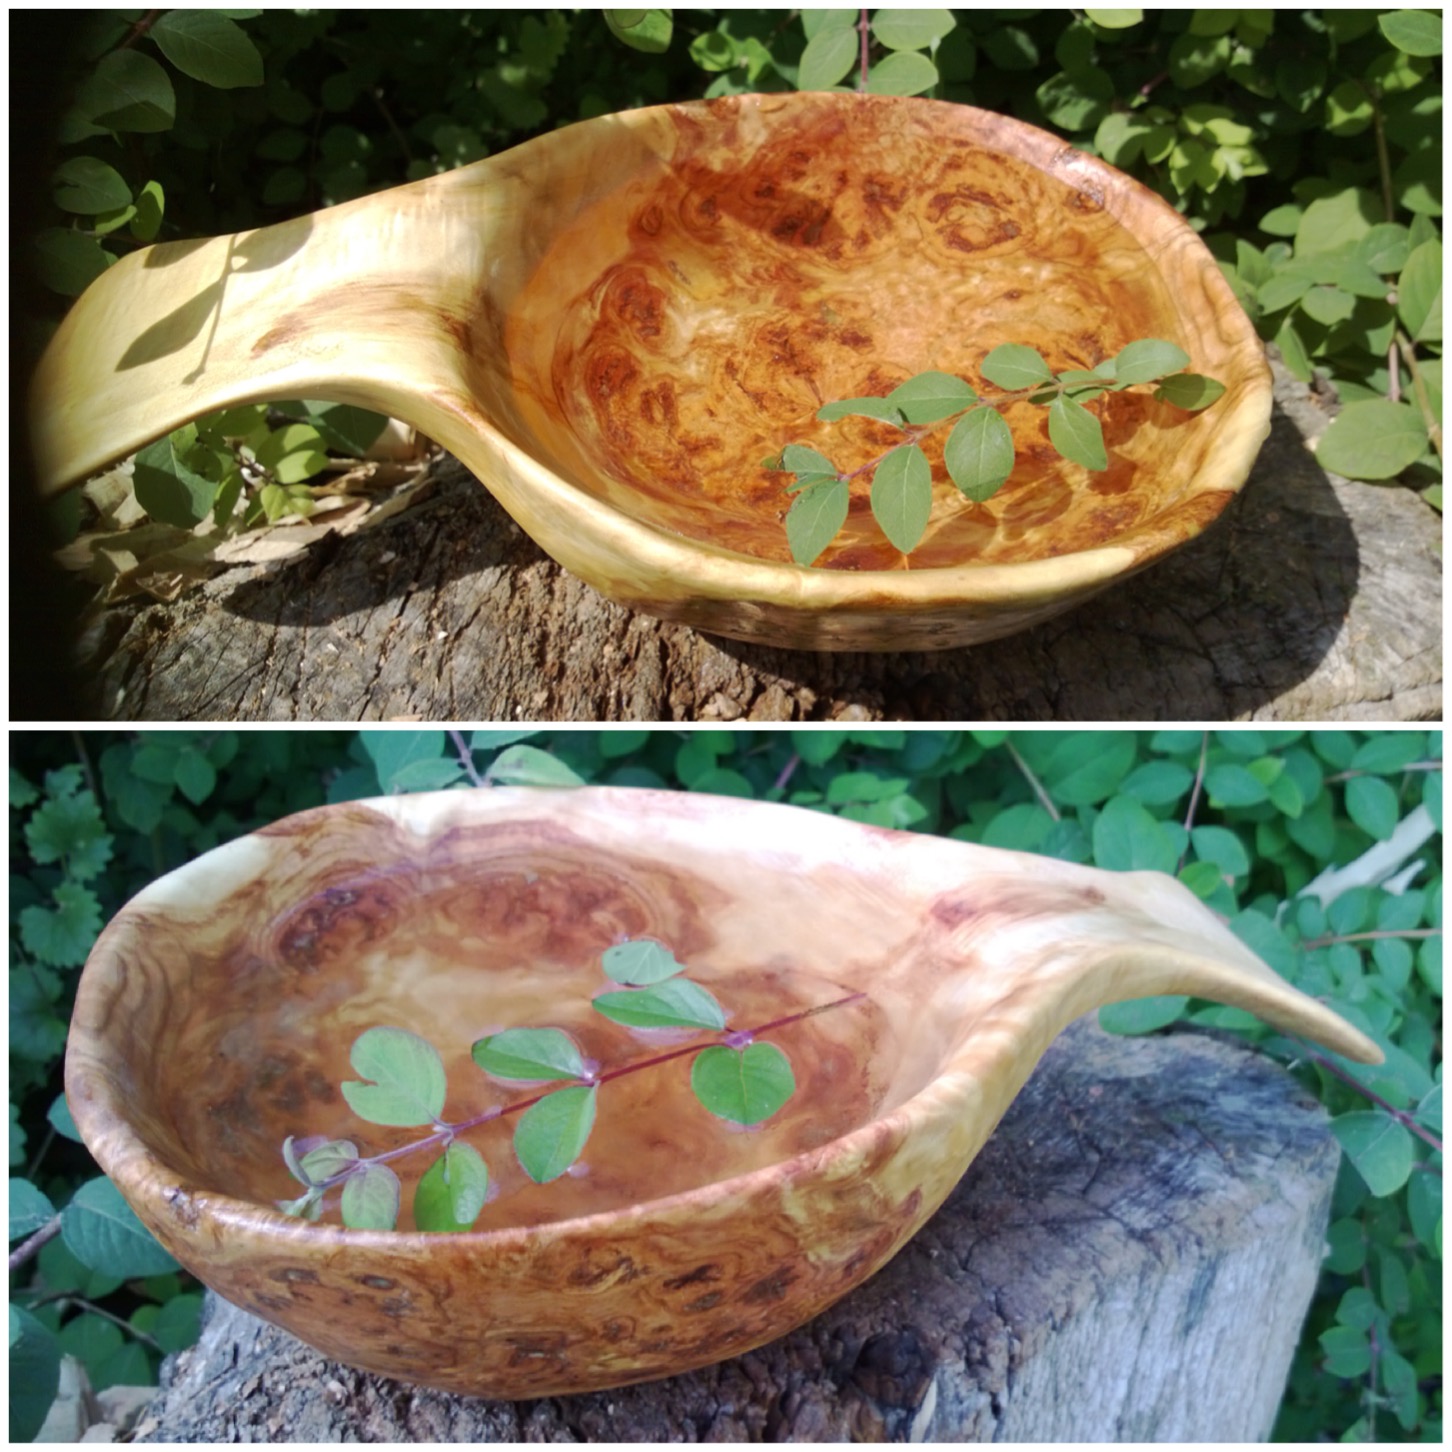
The beeswax did what the sanding alone never could; it smoothed out the wood and gave it a lovely shine as well. The swirls of the burl wood really stood out after this process.

Photo 09-02-2015 14 52 19
Beautiful swirls on the sides

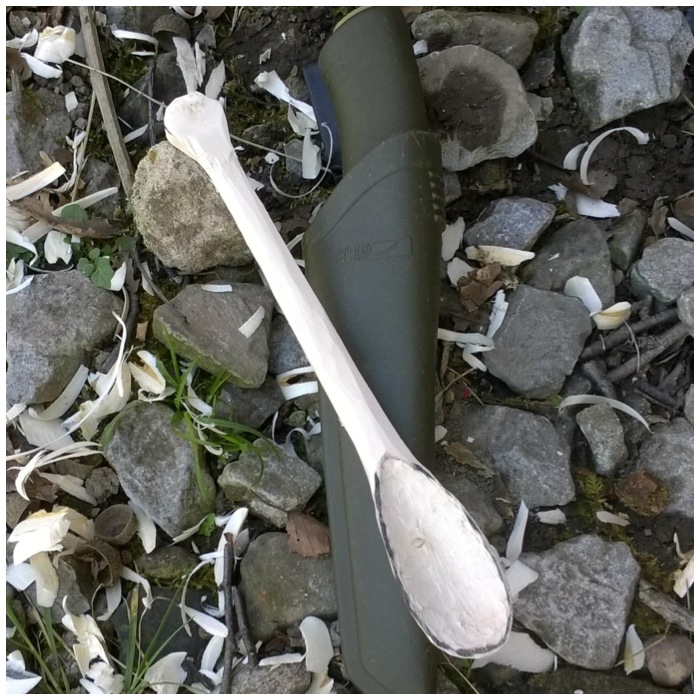
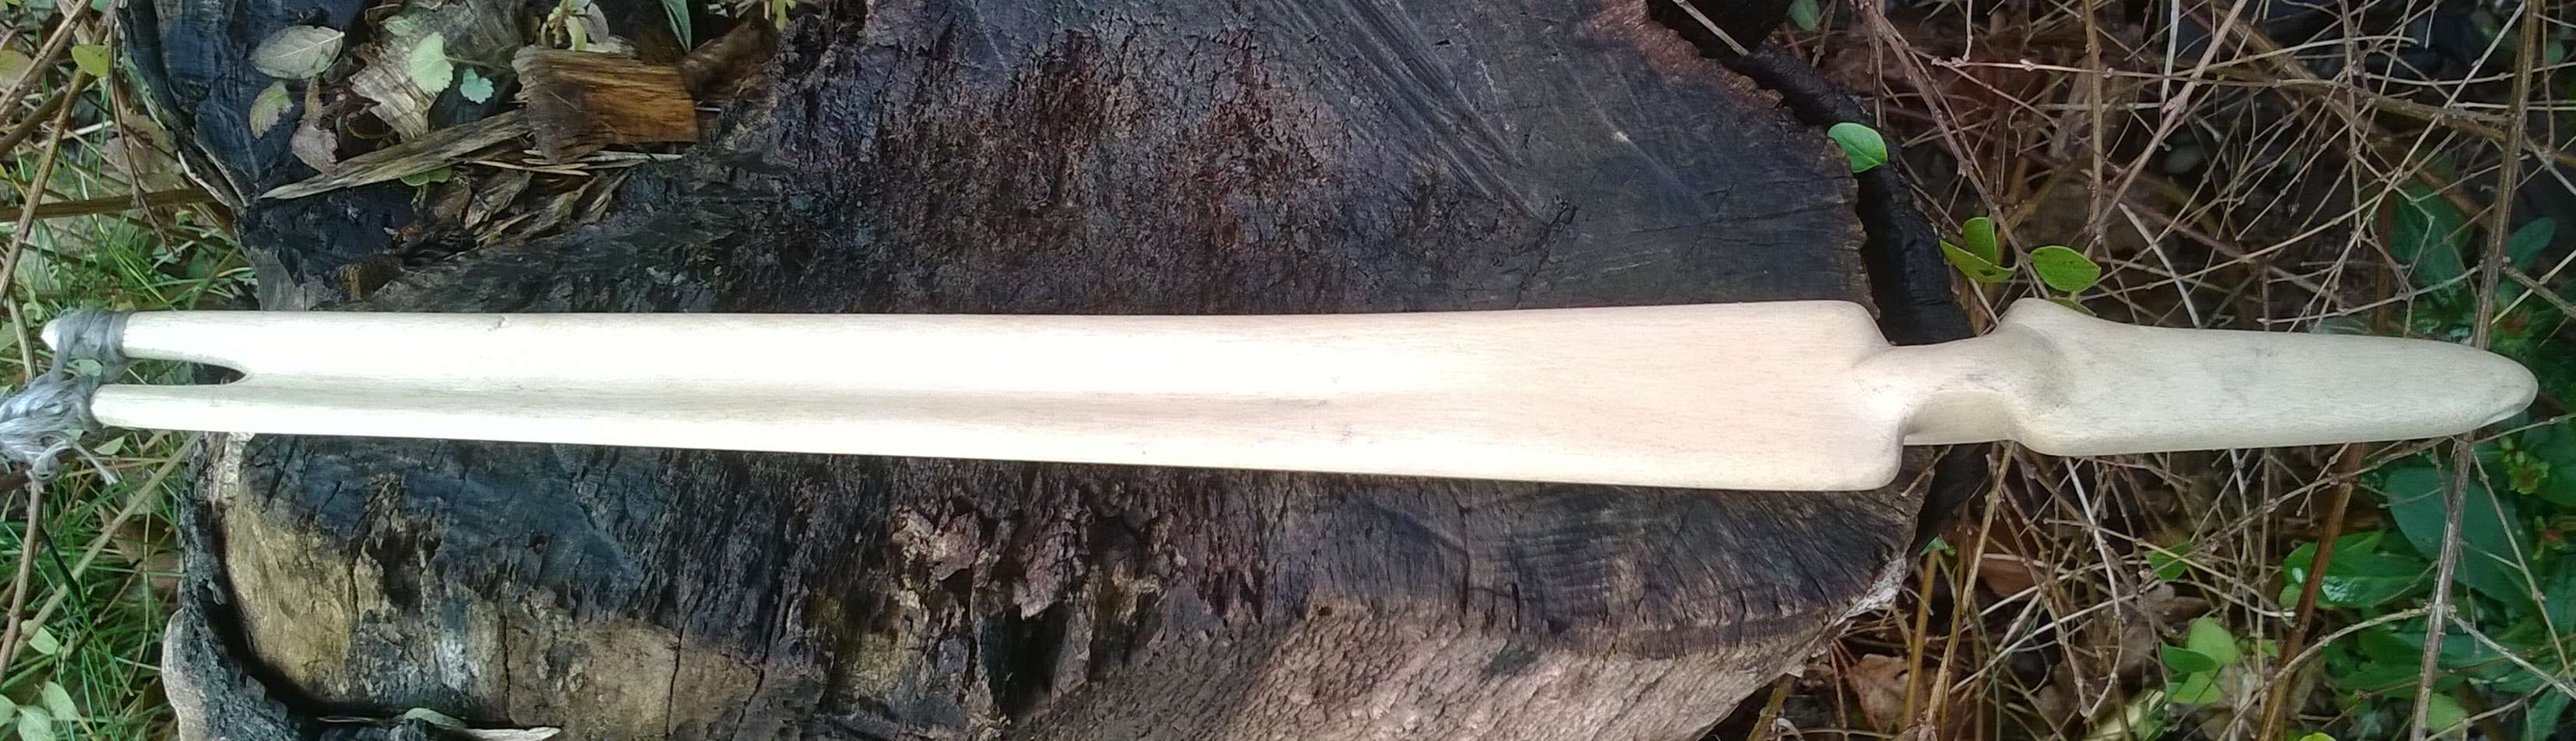
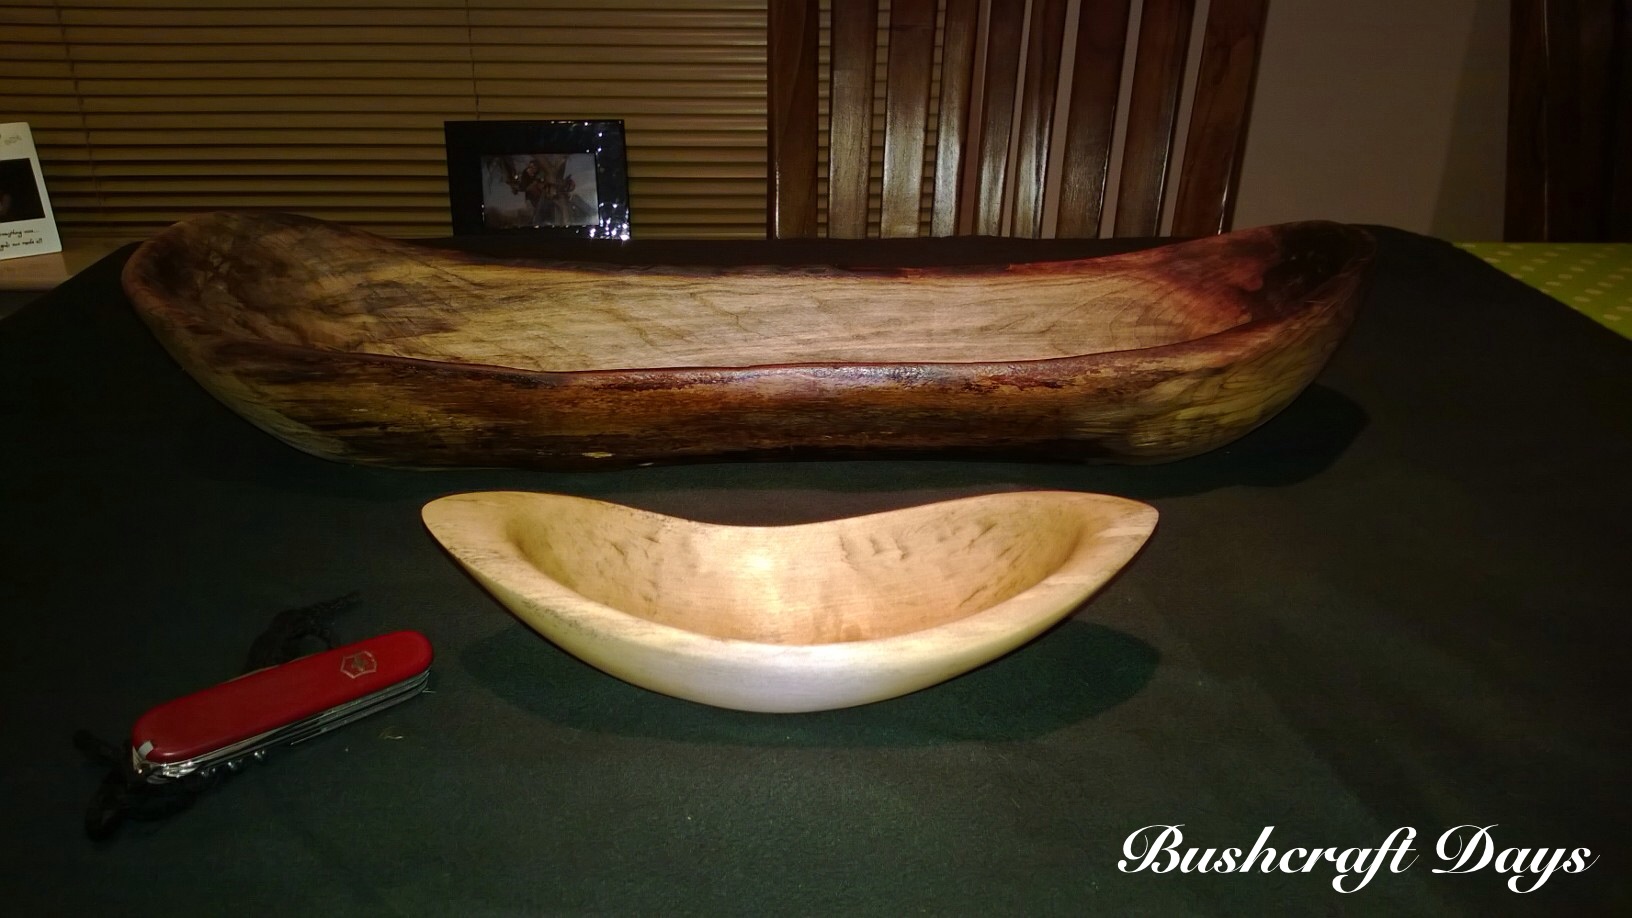
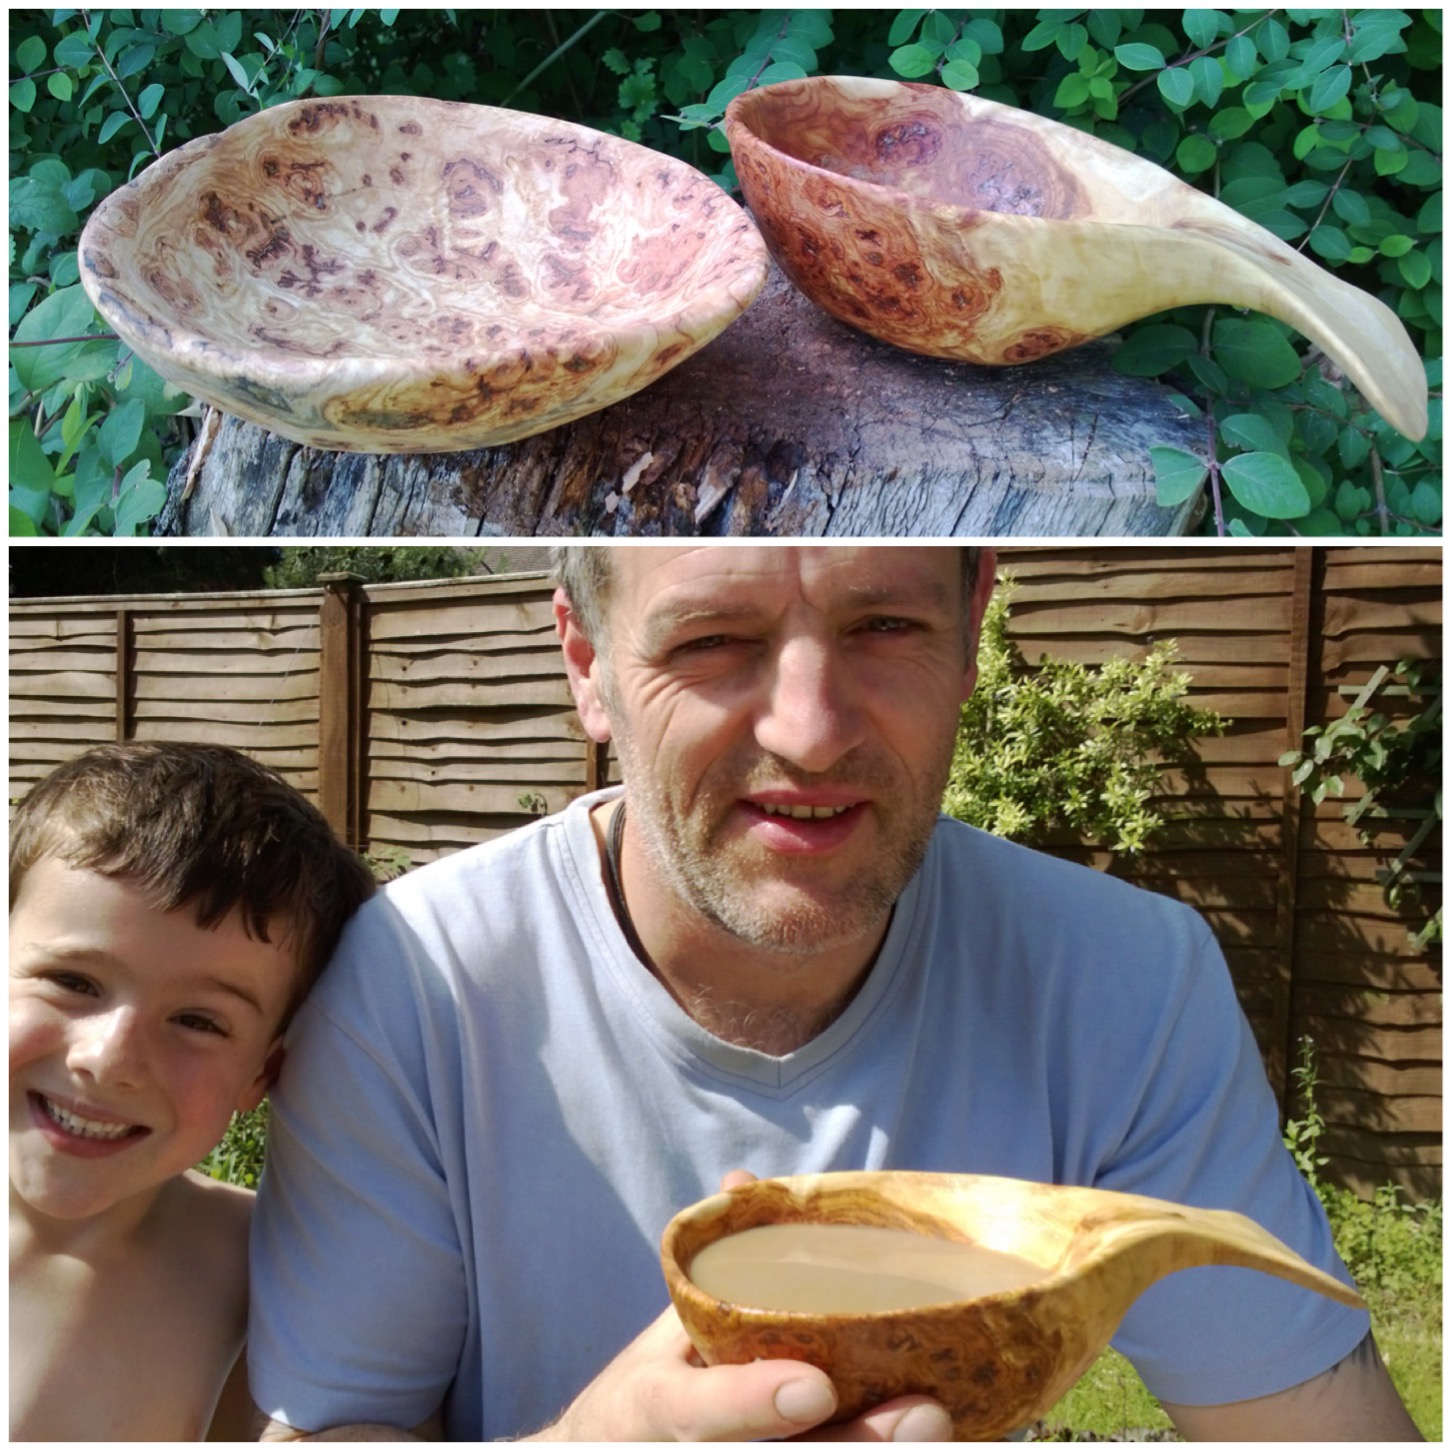
I particularly liked the contrast of the burl wood of the bowl with the heartwood of the handle. This is what I was hoping for and was very pleased with the outcome.

Photo 09-02-2015 14 52 39
Contrasts – heart wood and burl wood

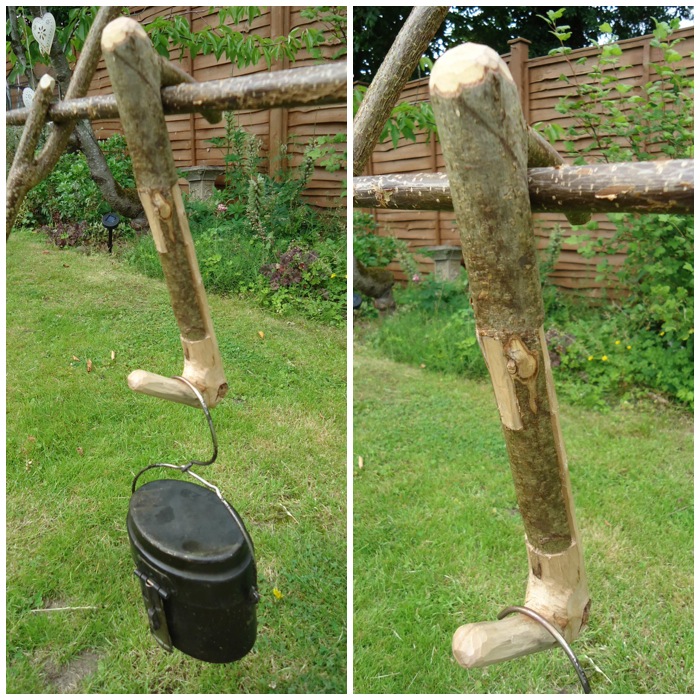
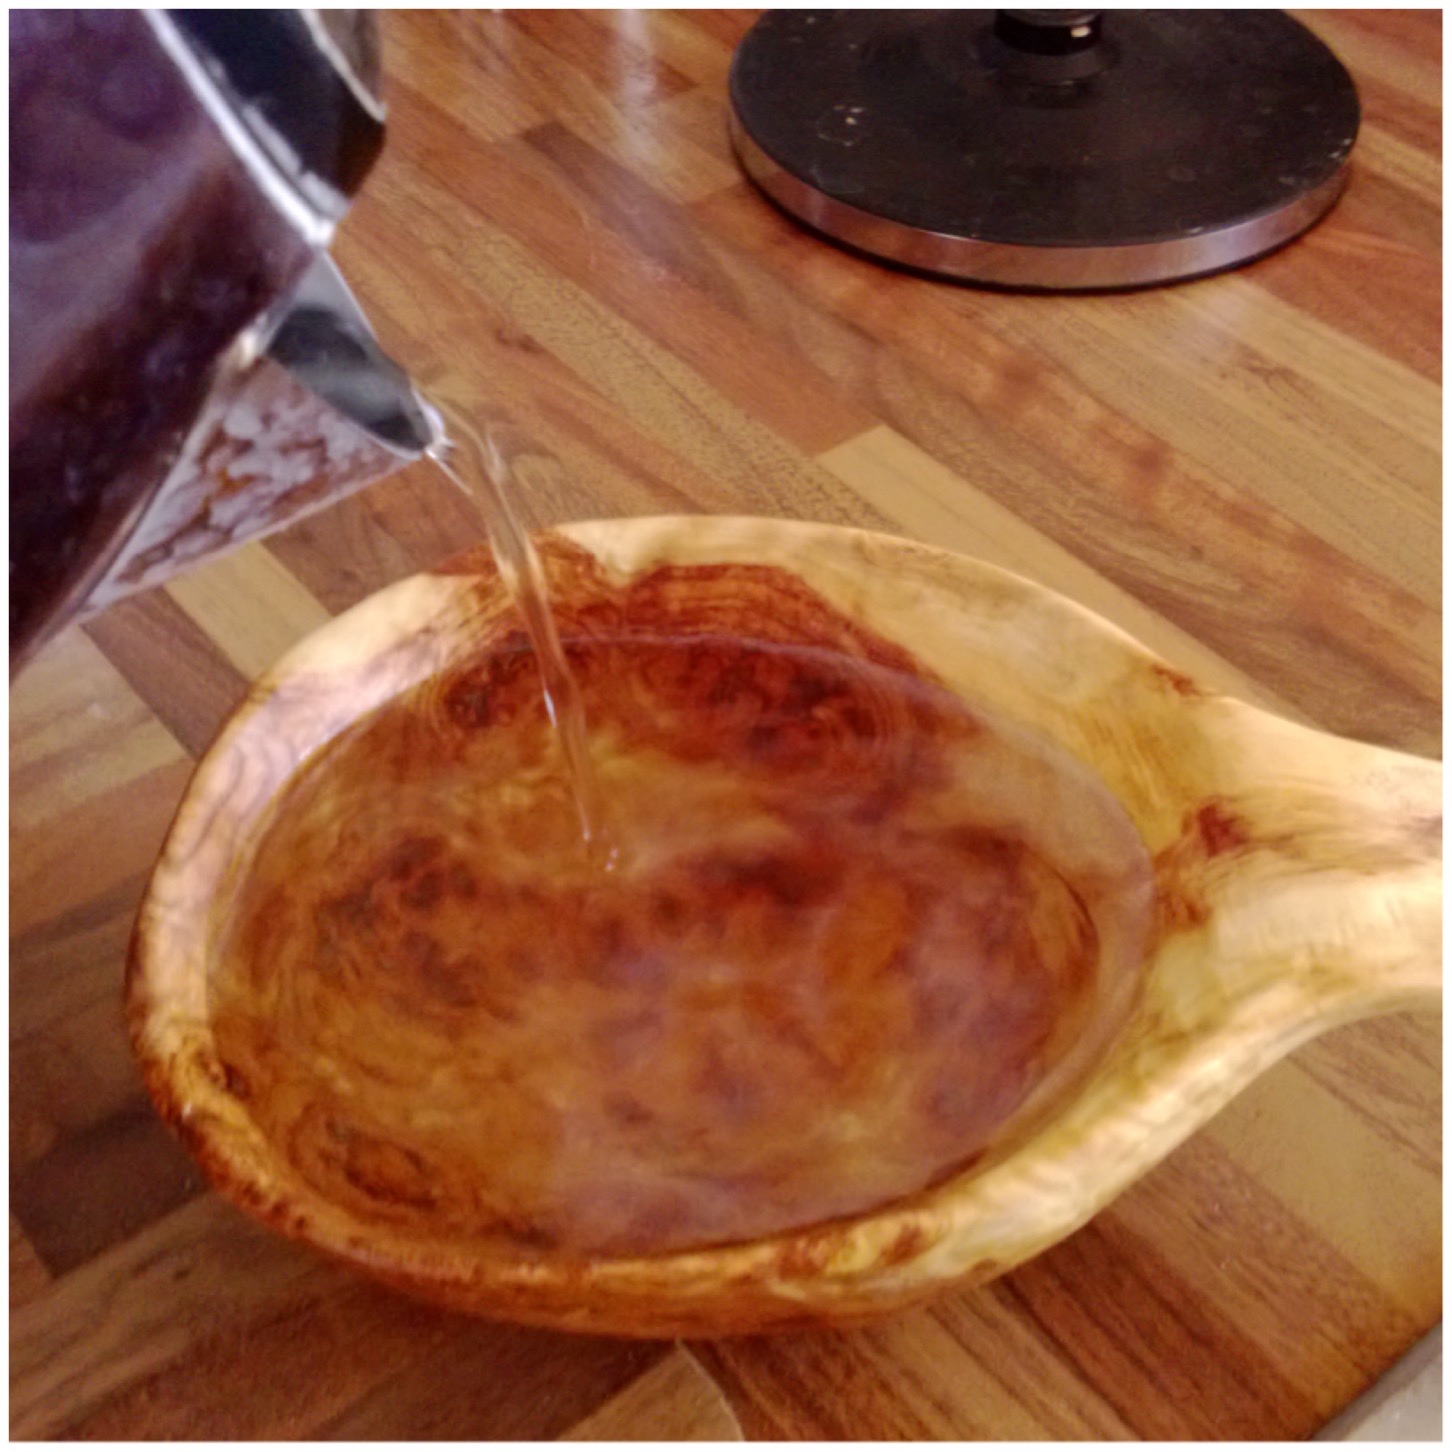
Next up was to test out the waterproofness of the cup. To begin with I poured cold water into the cup and let it stand for an hour. Thankfully there were no leaks.

Photo 09-02-2015 14 53 31
Waterproofing test – cold water

Then it was time to add hot water. I started with warm water and in stages moved up until I was pouring just-boiled water into the kuksa. I was fairly happy that there would be no leakages now.

Photo 09-02-2015 14 54 53
Waterproof test – hot water

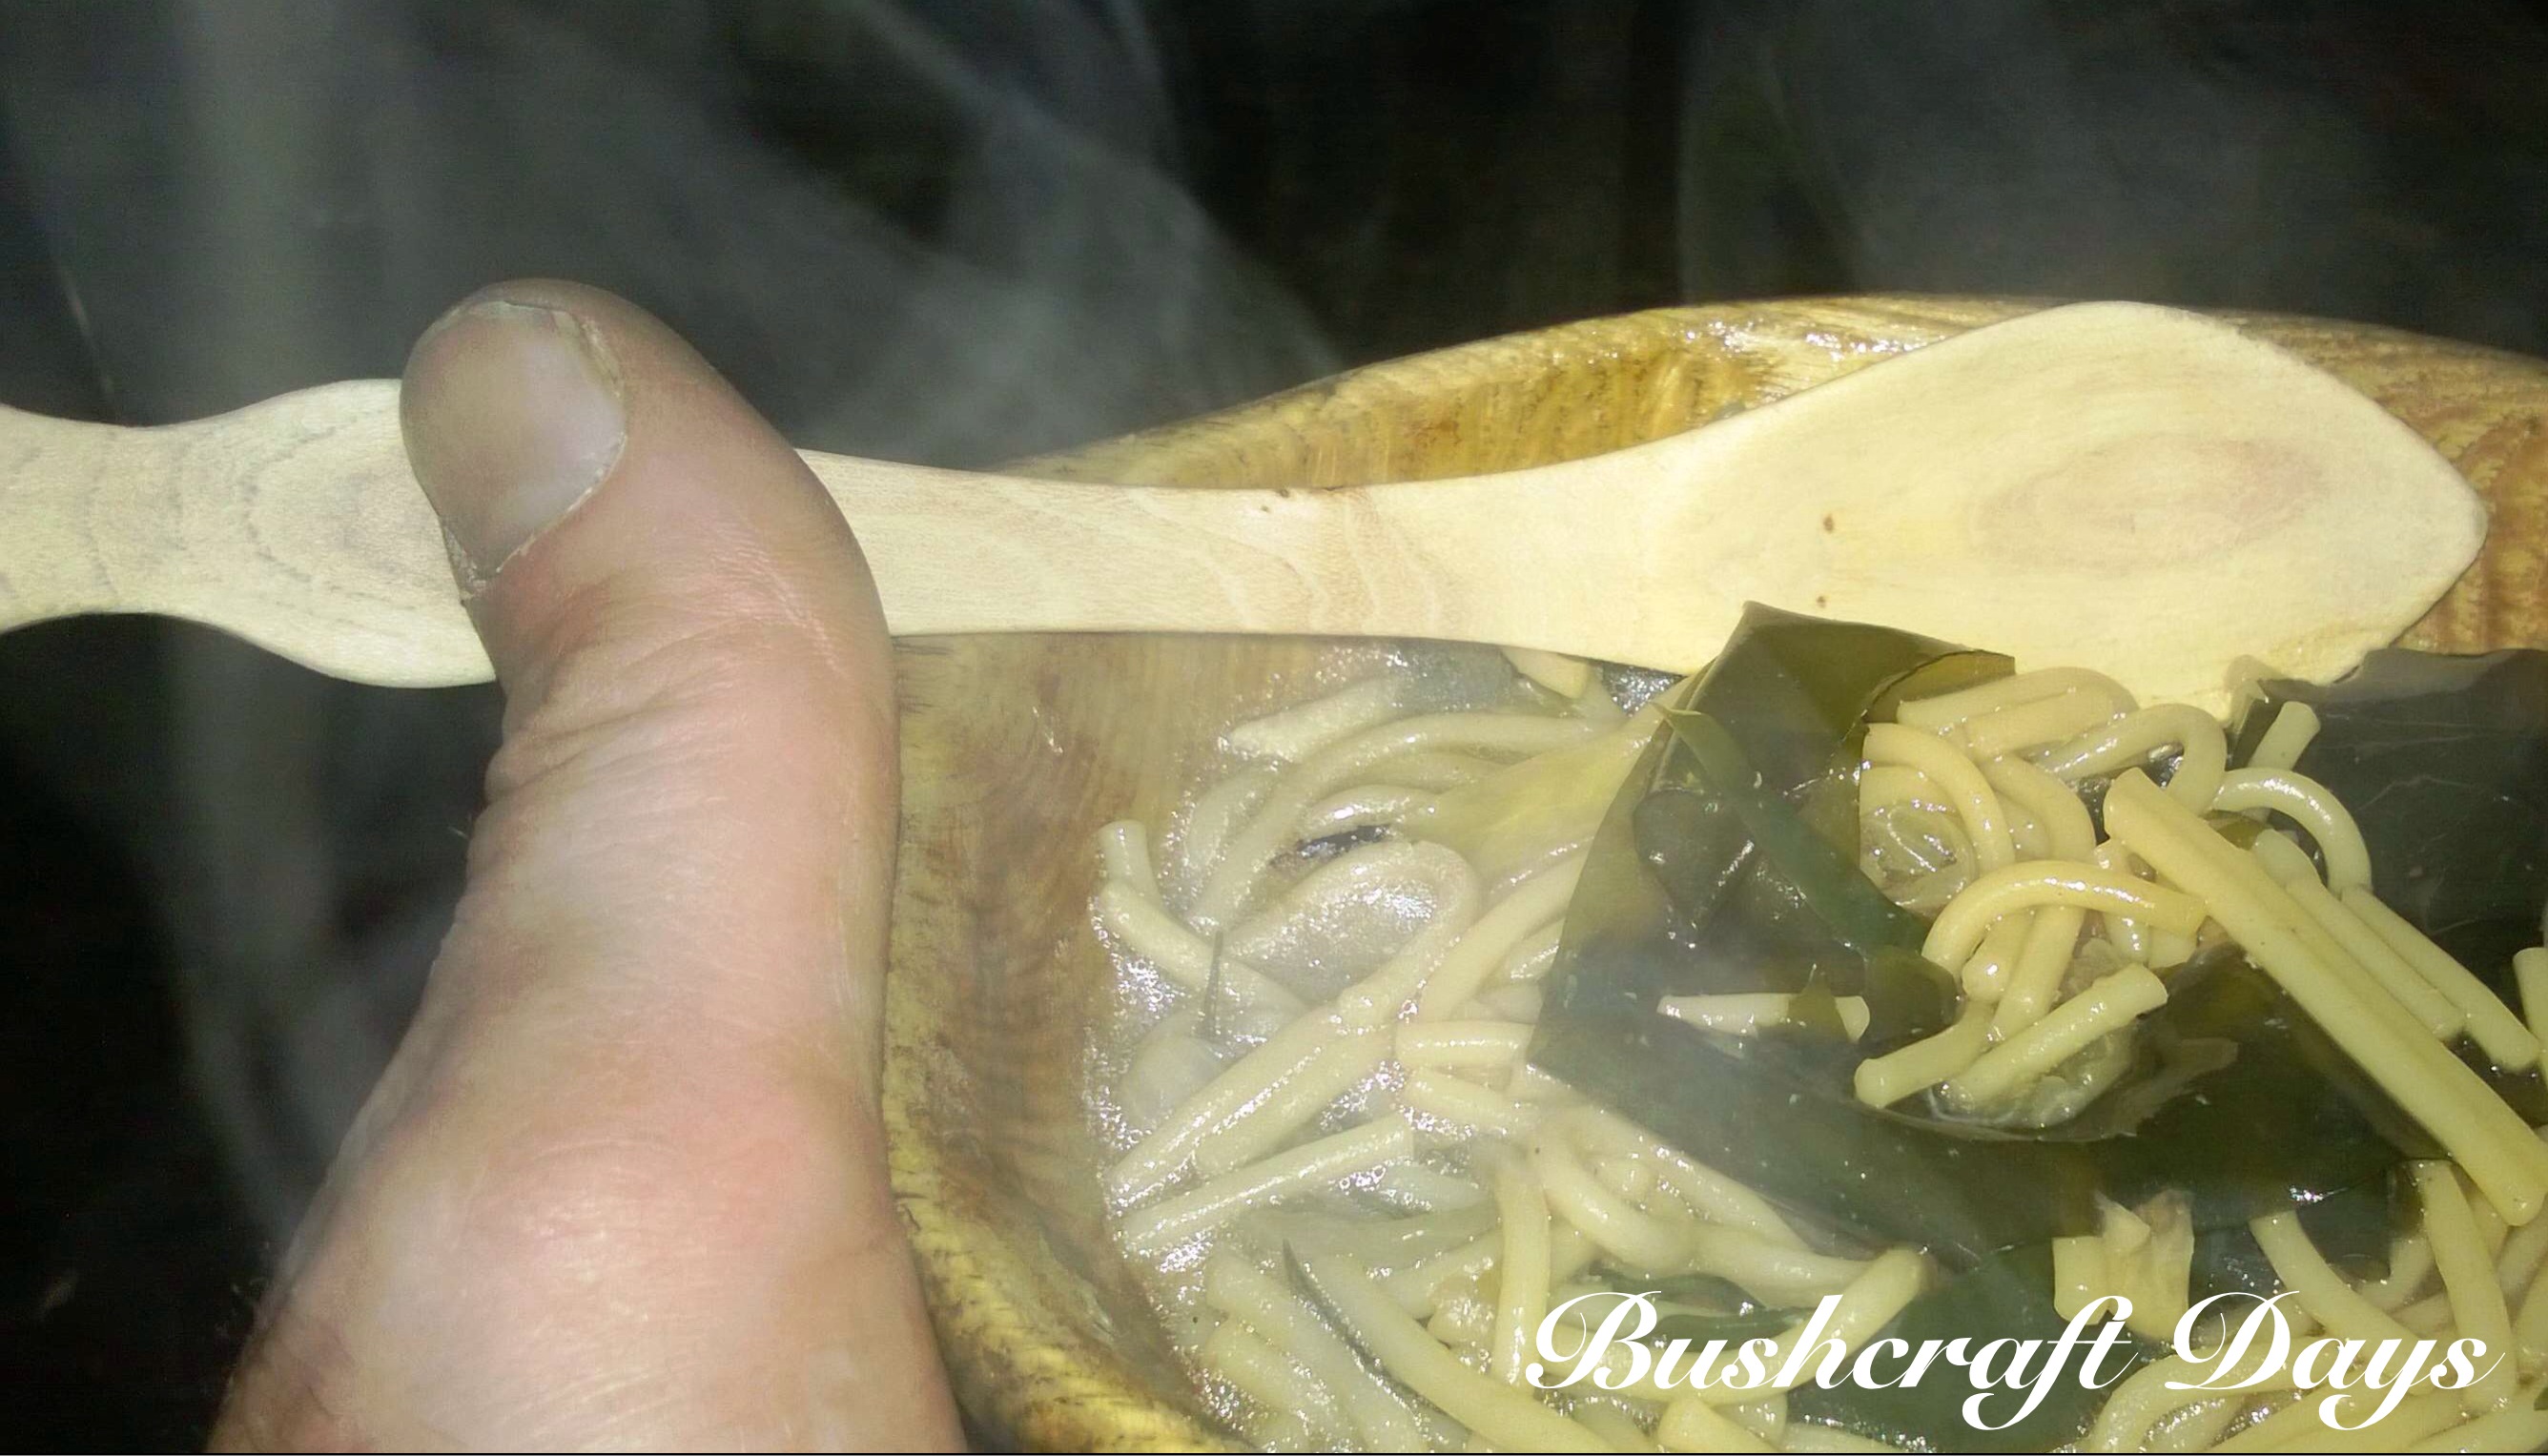
Next up was to see how a brew tasted with all that beeswax in the wood. I poured myself a coffee and could taste nothing of the beeswax. I think the boiling water helped with removing any excess beeswax.

Photo 09-02-2015 14 55 48
Taste test 1 – Coffee

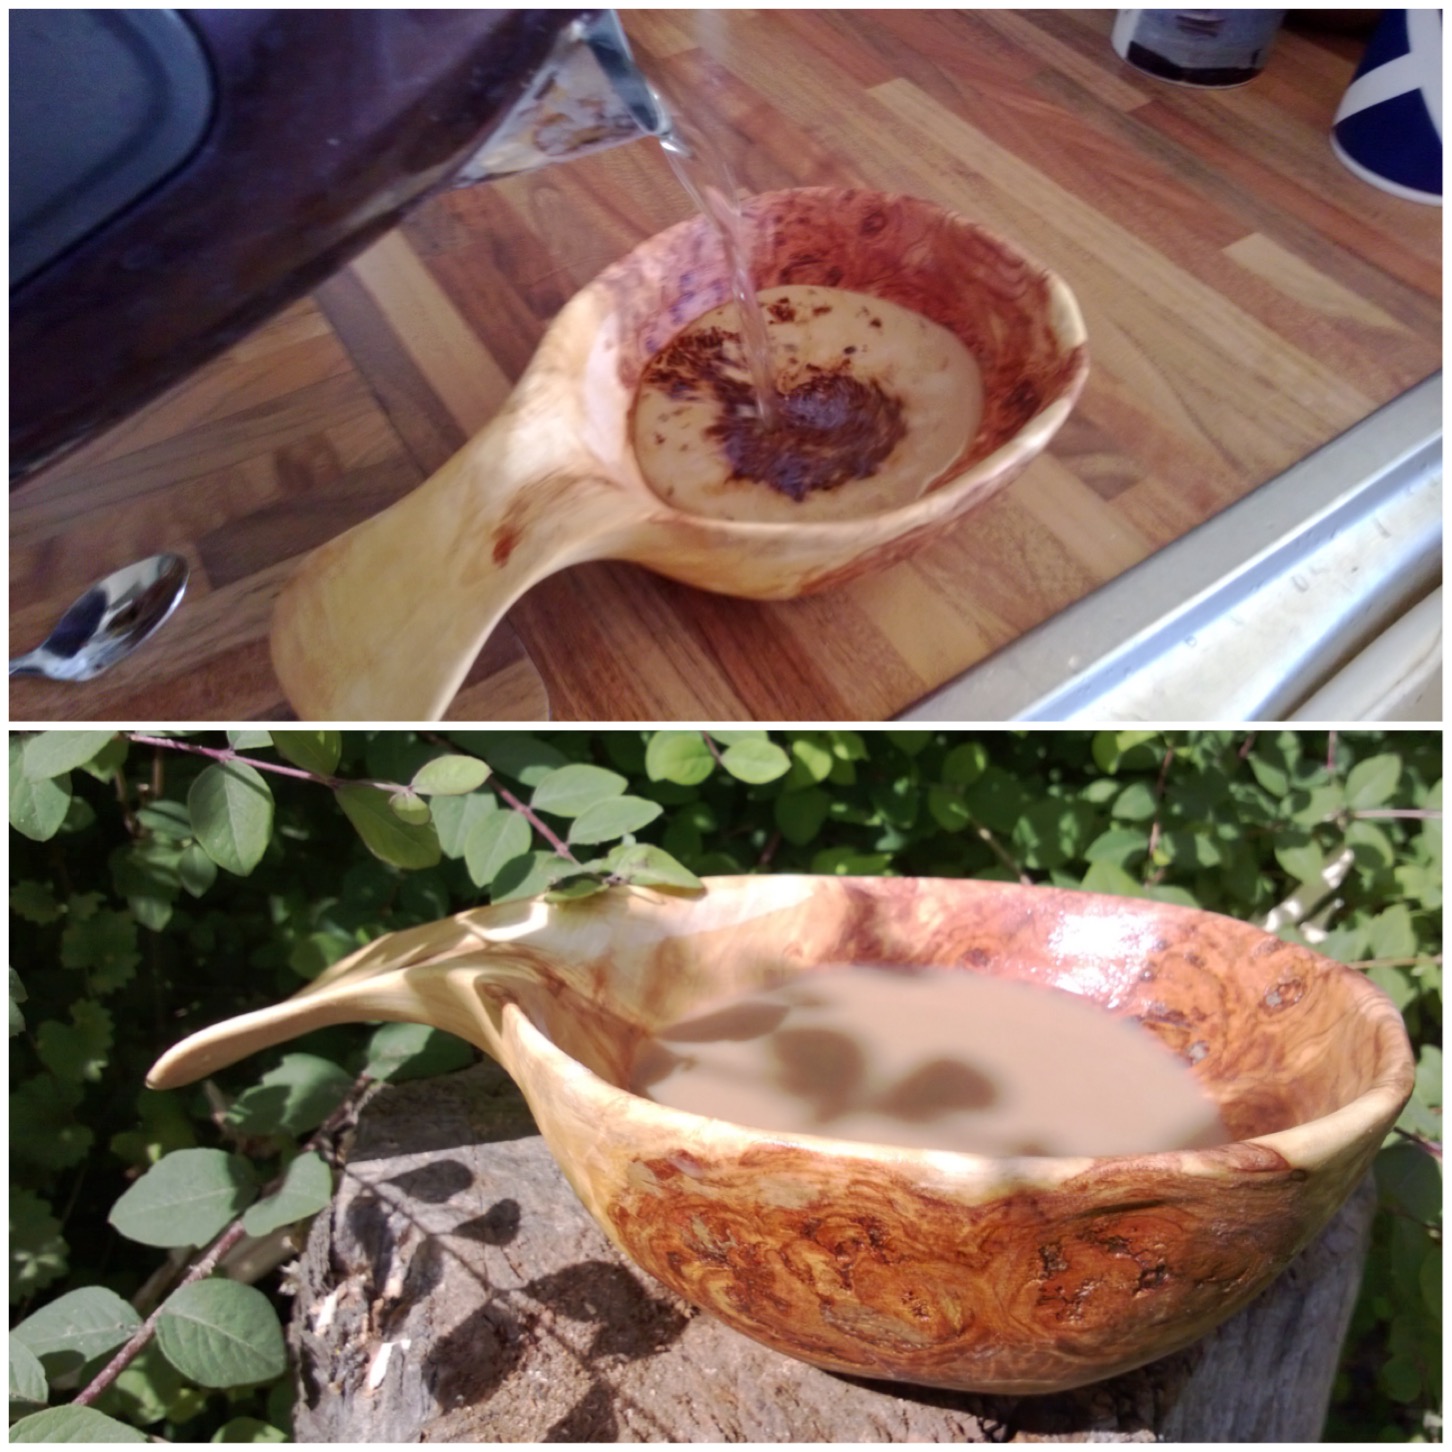
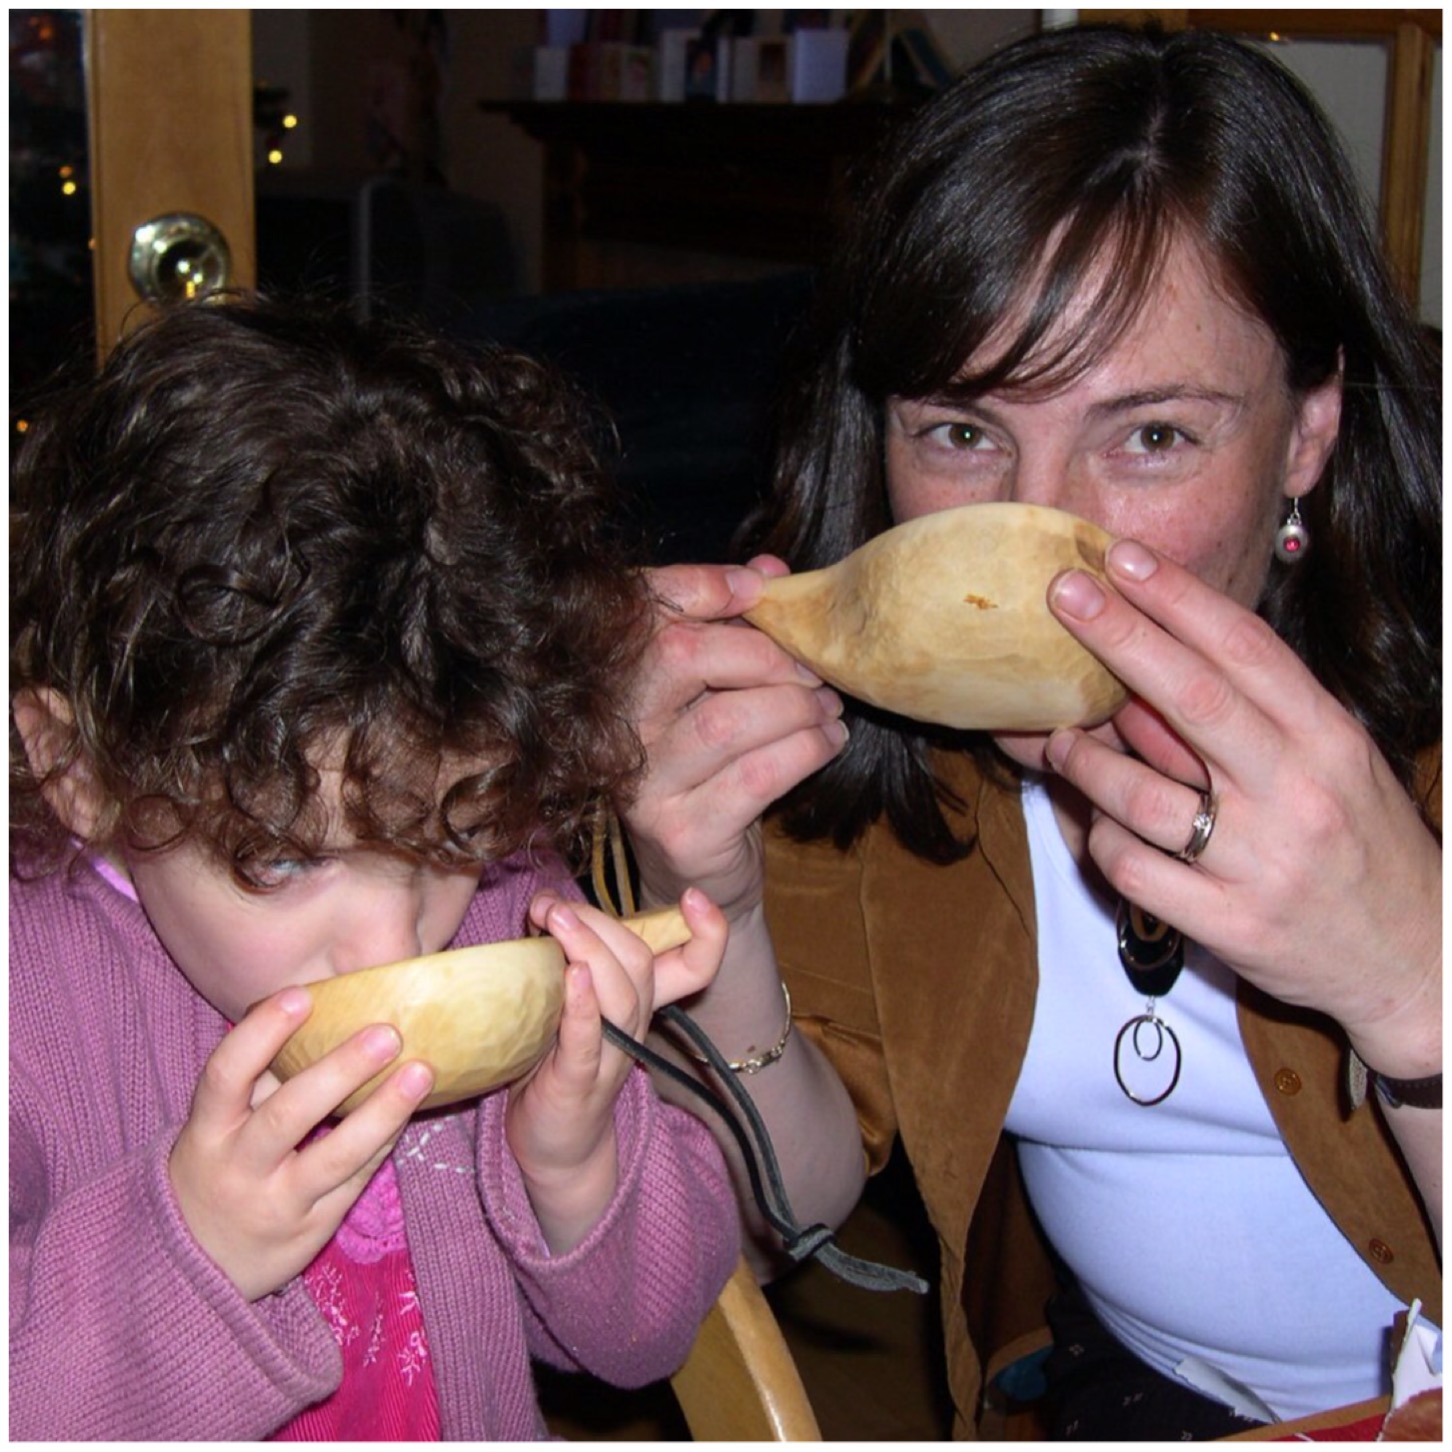
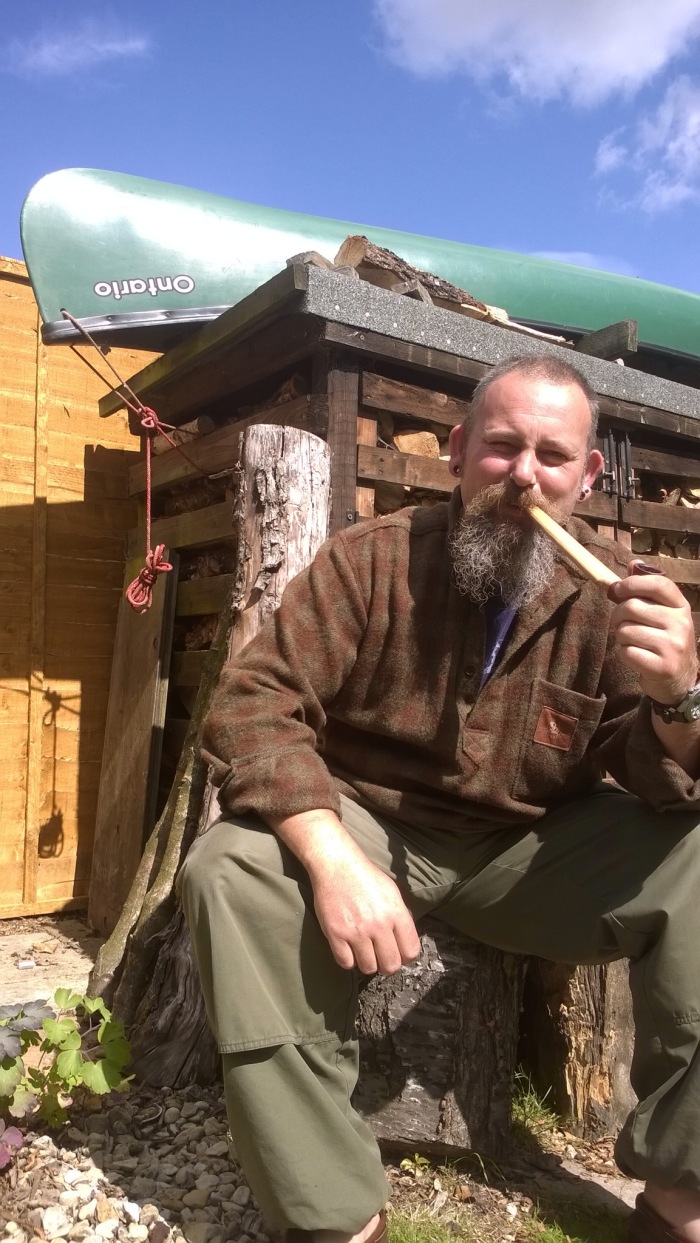
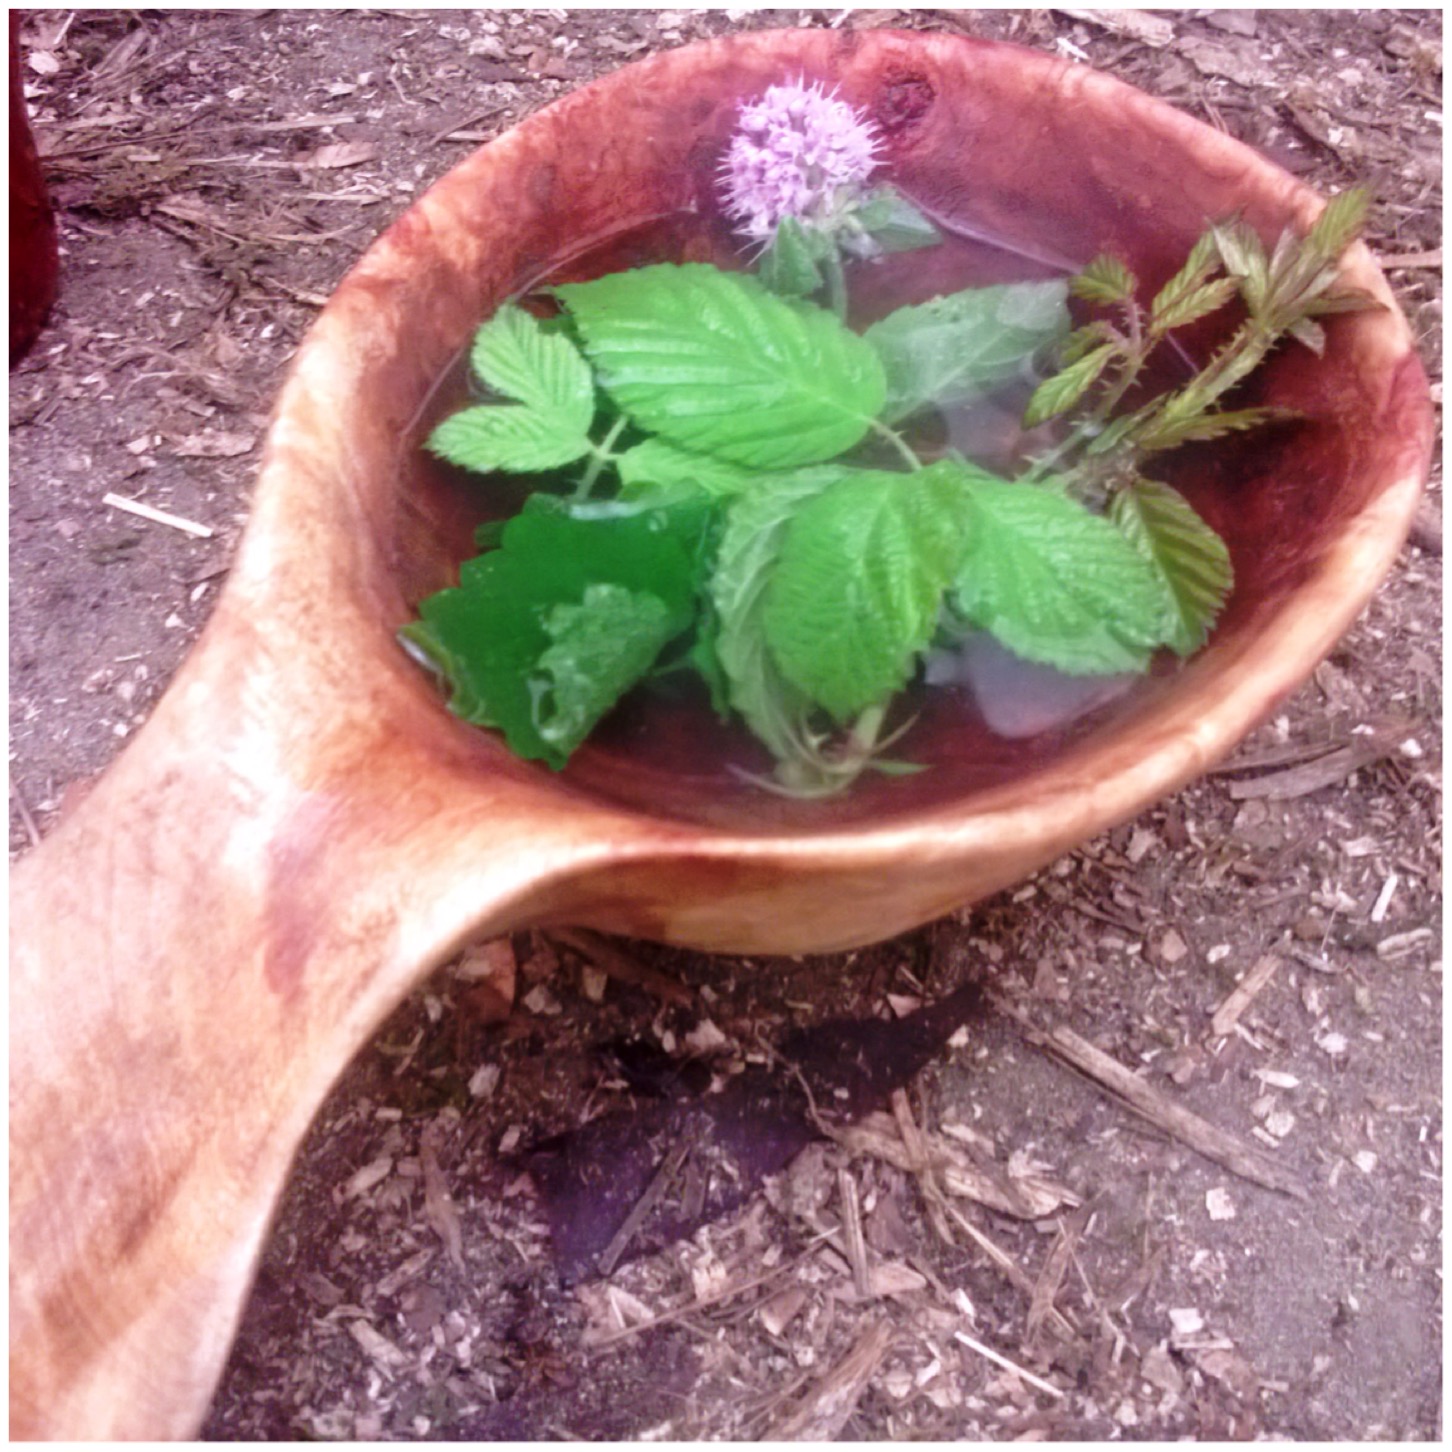
A final test was at my friend Fraser’s place (of Coastal Survival) when he made me a beautiful cup of mint and blackberry tea.

Photo 09-02-2015 14 56 17
Taste test 2 – Herbal tea

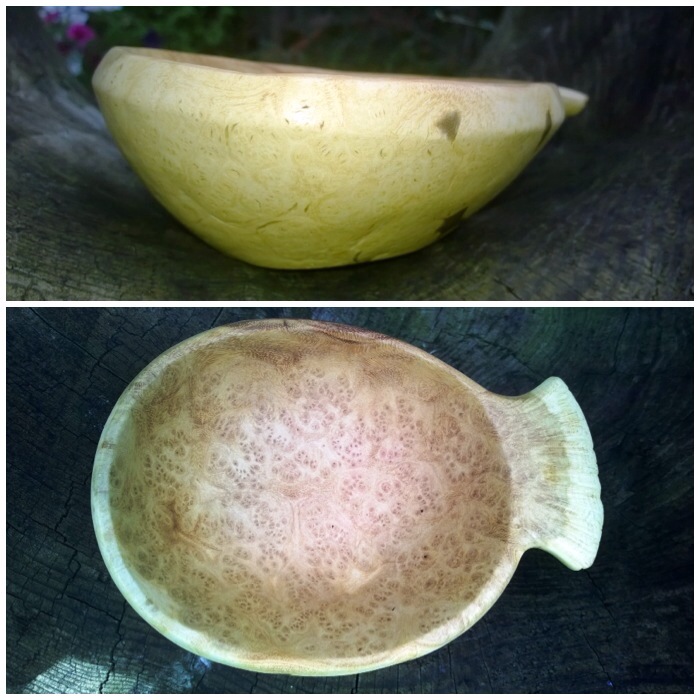
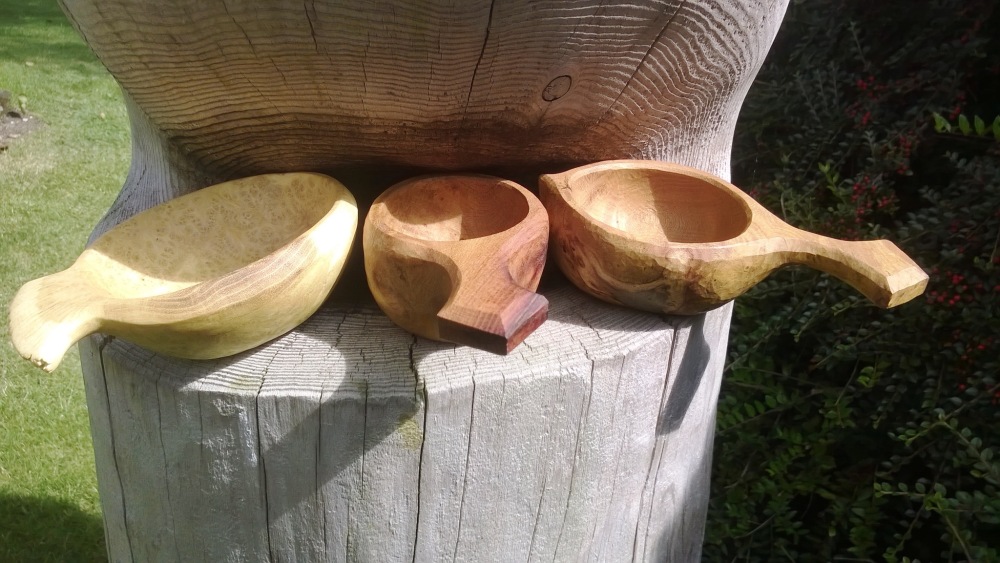
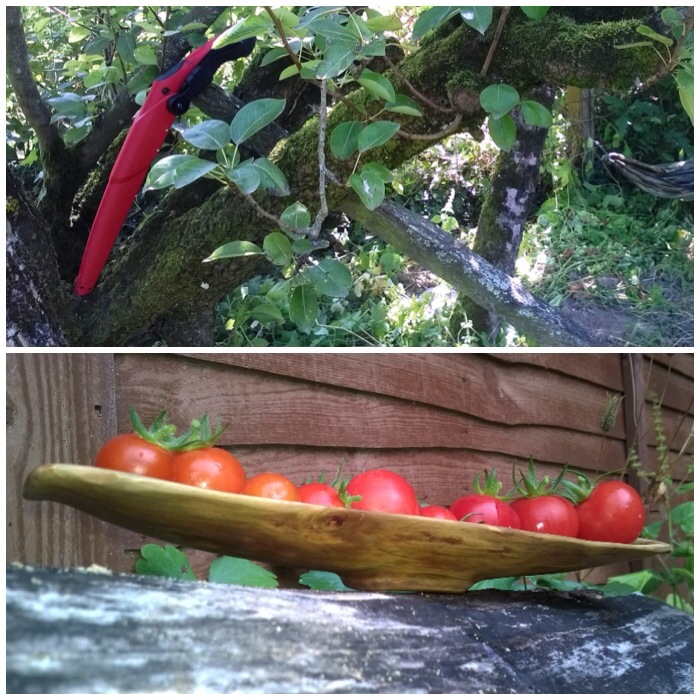
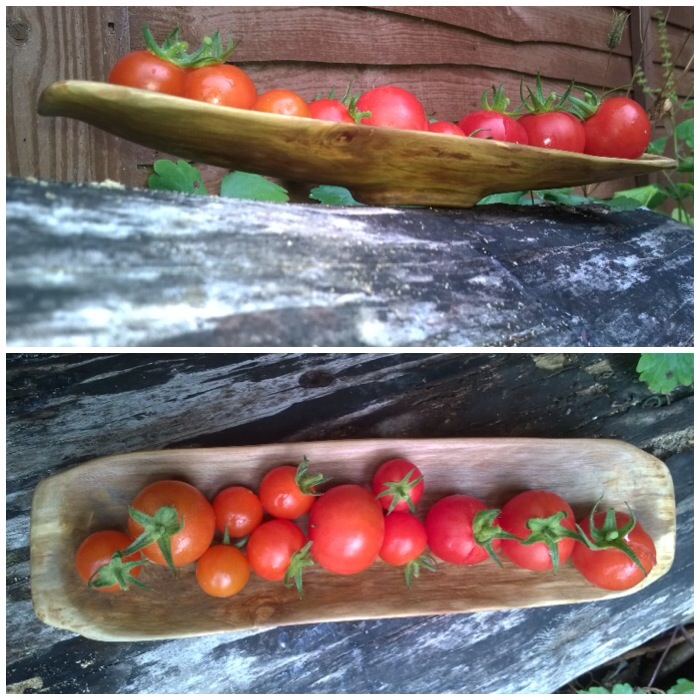
I used more of the burl to make a bowl to go with the cup and it too turned out quite beautifully (in my opinion at least!).

Photo 09-02-2015 14 57 43
The set and another brew

Cheers

George

How To… Carve a Small Noggin Cup

This is a How To… of a small wooden cup called a noggin (also known as noigin in Irish and noigean in Gaelic) I made as a Christmas stocking filler for my wife Alison.

Alison had always wanted a one carved for her so I thought it was time to get on with it. These cups were traditionally made out of burls (I will cover this in more detail in my next How To…) however I did not have one available at the time and used silver birch wood instead.

Noggin carving is a skill that has been practiced for millennia but due to modern industrial practices it is now something generally limited to green woodworkers, bowl turners and bushcrafters. These are a few of my carvings, all utilitarian and nothing fancy. The cup at the bottom is the one I made for this How To…

Photo 05-02-2015 19 43 02
Carvings

Wood selection and splitting

For this noggin I selected a green piece of silver birch that had no crack lines starting on either end. The log had a few knots in it but looked quite easy to carve.

I split the log on a stump with my axe and drew out the basic shape of the noggin with a pencil. My intention was to carve a shallow flat-bottomed noggin with steep sides as the log was not that big.

Photo 05-02-2015 19 44 20
Beginnings – splitting the log and drawing

Tools & the bowl

As the sides were to be steep I opted to use a curved wood chisel and a mawl. I carved out the bowl first for various reasons:

    • To locate any cracks deep in the bowl area quickly
    • Working with the whole piece makes it more stable
    • There is less chance of the side of the bowl cracking
Photo 05-02-2015 19 45 26
Mawl and curved wood chisel for the bowl

Carving the bowl

To begin with I worked my way around the edge of the bowl taking out small chippings. I tapped the chisel with the mawl quite gently at this stage. The work piece was placed on my lap with 3 thick layers protecting my legs – two jackets and a small day sack.

I positioned the log so that the chisel was always pointing away from me. A work bench with a vice would have been safer but not available at the time (we were working in the winter in a small roundhouse).

Photo 05-02-2015 19 46 47
Fine work to begin with on the bowl

Going Deeper

Once the initial edge area was carved out I was able to use more force with the chisel. By this time I did not need to use the mawl but cut into the wood by just pressing down with force on the chisel. This seemed to work quicker than using the mawl all the time.

Working my way around the bowl I was able to take out a lot of wood rapidly until I had the basic shape roughed out.

Photo 05-02-2015 19 47 01
Chunking out the bowl

Axing out the basic shape

Once the bowl was created I axed out the basic shape of the noggin. I used the saw to make ‘stop cuts’ first though so that when I was using the axe I did not cut out areas of wood that formed part of the cup.

I did this work on a stump placed on the floor. The work piece was always well in front of me so that the follow through from any slippage (from the axe) went to the side of me.

Here you can see the two stop cuts created by the saw coming in at either side of the work piece. I then used the axe to cut out the areas of wood I did not require.

Photo 05-02-2015 19 47 28
Stop cuts and axe work

Carving with the Sloyd knife

After using the axe to blank out the basic shape of the noggin I then switched to using my Mora Sloyd knife. This small knife is ideal for more detailed, controlled carving.

I was able to carve in a very controlled and safe fashion with my thumbs pressing on the back of the blade. Even though the cuts were always small it did not take long for me to fine tune the shape as the blade itself was very sharp and the wood was green.

Photo 05-02-2015 19 48 53
Knife work

The crook knife

When I had the outside of the noggin ready for sanding I decided to use the crook knife on the inside of the bowl.

This was to take out as many of the small ridges produced by the chisel as possible and also to try and flatten out the bottom of the bowl some more. The crook knife enabled me to smooth out a lot of the ridges that the Sloyd could not reach.

After finishing with the bowl I left the noggin in a paper bag to dry slowly over a two-week period as it is easier to sand down dry wood.

Photo 05-02-2015 19 49 32
Finishing the bowl with the crook knife

Sanding the Noggin

I used a variety of different sandpapers on the noggin including:

  • Top left – 80 grit
  • Top right – 150 grit
  • Bottom left – 320 grit
  • Bottom right – 1200 grit
Photo 05-02-2015 19 49 57
The sandpapers used

I started with the coarsest, 80 grit, ensuring I covered the whole noggin and that all the edges were rounded off. The bottom of the noggin did take a considerable period of time to roughly sand (I should probably have done more knife work) but I wanted to create a small flat area so that it would be stable when set down with liquid in it.

I did not sand the whole of the noggin smooth as I wanted to leave some of the tool marks showing but I did give the rim of the cup an extra bit of sanding as I wanted that bit particularly smooth.

Photo 05-02-2015 19 52 29
Sanding


I really focused on making the rim smooth as I wanted that smoothness to contrast with the tool marks on the lower area.

Once I had finished with the 80 grit I worked my way up through the other sandpaper slowly smoothing the noggin down until I reached the finest, 1200 grit.

Photo 05-02-2015 19 54 21
Smoothing the rim

Boning the noggin

After sanding I oiled the noggin lightly (I used vegetable oil as that was all that was available) then used the back of a spoon to really smooth the surface. This is known as boning and as well as smoothing the surface it helps to seal the oil into the wood (a small rounded pebble works just as well).

Photo 05-02-2015 19 55 30

Boning

This whole process took a couple of hours and I added more oil as I went along. I find boning quite therapuetic, and it leaves a beautifully smooth satiny finish.

Lastly I carved a hole in the handle, fixed a leather loop and oiled the noggin once again.

Photo 05-02-2015 20 03 14
Before and after oiling

Lovely carvings for lovely ladies (although sadly Alison couldn’t christen hers with a dram of whisky on Christmas Day: she was pregnant with our son Finlay, who was born just a couple of weeks later!).

Photo 05-02-2015 20 03 35
Finished stocking fillers

Cheers

George

Carving Contrasts

I like to think I can carve the odd decent spoon, bowl or cup from time to time but I know my skill level is only fair to middling as I do not spend enough time practising the art, but I do have a number of good friends who are absolute expert carvers and from whom I can get inspiration.

Mark Beer is one of them. He is an excellent all-round woodsman and carver and on a recent visit to his place I was quite taken aback by his latest creations. As usual I insisted on taking loads of pictures of his work and when he explained the fluorescent properties of Robinia (False Accacia) wood the photographer in me became quite excited.

The cup on the left is carved from Robinia and the other two are from mulberry.

IMG_3137-0.JPG
Robinia and mulberry make for beautiful carvings

The cups were carved from burls found on the trees so you can see lots of swirls in the wood. The robinia under normal light is a light cream colour that contrasts well with the darker parts caused by the haphazard growth of the burl.

IMG_3156.JPG
Robinia under natural light

Under an ultraviolet light (I made an impromptu studio in his closet) the wood is transformed into a magical range of colours. I was as usual only taking pictures with my phone but I think you can really see the green, yellow and purple coming through.

IMG_3154.JPG
Robinia under infrared light

And up very close – quite psychedelic really.

IMG_3155.JPG
Robinia up close

The smallest of the cups was made from Mulberry. I find carving small cups quite difficult as you need to carve deep but have so much less wood to hold while carving. This small cup is simple in its design but because of the growth of the burl is rather beautiful with shades of light and dark.

IMG_3158.JPG
Mini Mulberry

The third cup also made out of mulberry has a larger bowl with a pointed tip. The inside of the bowl was finished using his knife only with very fine cuts to make it smooth but the outside still had the tool marks clearly showing. These tool marks blended in well with the swirls of the burl.

IMG_3159.JPG
All angles and curves

In terms of function these cups perform the exact same job but in terms of form each is a unique piece of beautiful art.

IMG_3150-1.JPG
Contrasts

Mark had also purchased pipestone (catlinite) to make a Traditional Ceremonial Elbow Pipe and carved and shaped the bowl himself. The pipestone is only allowed to be quarried by members of recognised Native American Tribes. The wood Mark used for the stem was cherry.

IMG_3151.JPG
A pipestone elbow pipe with a carved cherry stem

The man himself.

Mark the Carver
Mark the Carver

Thanks for letting me look at your latest work Mark, and allowing me to photograph these beautiful pieces.

Cheers

George

How To…. Carve a Pretty Pear Platter

While we were on holiday in France at my friend Rick’s cottage he was telling me about some of the trees in his garden. He has an old, gnarly pear tree currently propped up by sticks as it was blown over in a storm a few years ago. It still bears fruit, but only on one side.

Rick agreed that I could trim a branch off the non-fruiting side as that would take some of the weight off the side that was being supported. I like to carve fruit woods when they are green as the wood is easy to remove.

IMG_2845-1.JPG
Before and after

I cut the limb off very close to the trunk so as to minimise the chance of infection damaging the tree. I made a single cut as the branch was easy to support as I cut it. Also the cut was made as close to the Collar as possible so as to give the tree the best chance to heal itself.

IMG_2846-0.JPG
De-limbing

The bark was easy to strip off with my axe – being very careful where my fingers were at all times – and then I used my saw to cut it down further so I had a piece I was happy to carve.

IMG_2847-0.JPG
De-barking and trimming to size

One piece of the branch made a perfect hammer for battoning my work piece in two. I make sure that the blade of the axe is 90 degrees to my body so that if it slips the edge of the axe swings away from me.

This piece did not split evenly as the wood was quite twisted with its age.

IMG_2848-0.JPG
Battoning

To make the split more even, I put the work piece on its side and split it further. A slower method but more controlled I think.

IMG_2849.JPG
Splitting out

After splitting I cut out some wood from one of the halves to give it a flatter look.

IMG_2850.JPG
Flattening

I used my axe to take of some of the excess wood around what would be the bottom of the platter. As the shape was going to be a shallow curve I did not put any stop cuts in but just chipped away, starting from the ends and chasing the wood back to the centre.

IMG_2851.JPG
Axing out the back

To finish the flattening of the top part of the platter I finished with the axe and moved onto my knife.

IMG_2852.JPG
Final flatten with the knife

Once the work piece was as flat as I wanted I drew the shape of the bowl area and used my crook knife to start removing the wood from this area. As the wood was very green this excess was removed very easily.

IMG_2853.JPG
Using the crook knife

I also used my palm gauge and my bowl knife in this process. These are the only bowl-carving knives I have and I switch between them depending on what the wood is saying to me as I try and carve it out.

These tools make a real difference to carving the bowl area but are ones you really need to practise with a lot to be as safe and efficient as possible with when using them.

IMG_2854-0.JPG
Palm gauge and bowl knife

Once I was happy with the amount of wood removed from the bowl area, I moved onto the back. I like to take my time when working on this area as it is all too easy to cut out large chunks of wood and suddenly reveal a great big hole in the bowl. I use a variety of cuts: brake cuts towards me, small pressure cuts using my thumbs and powerful but small chest lever cuts to name just three. With all cuts, the main thing to remember is that you must always be aware where the blade will end up if the knife slips.

IMG_2855.JPG
Different knife cuts

I had a lovely time over a couple of evenings working on this carving – this is what I call relaxing.

IMG_2760.JPG
Relaxation and fine work

I had kept a lot of the chippings from the carving and when I had removed enough wood I put the platter and lots of the chippings into a plastic bag and kept it in my garage (a nice cool area) for a month to slowly dry out. I added some water to the chippings every few days for the first week to keep them and the platter slightly damp.

This slow drying process allows the whole of the platter to dry in a much more even manner. The platter would potentially crack if the outside dried at a much faster rate than the inside (caused by pressure differences).

IMG_2856.JPG
Roughed-out platter

After a month of drying I used different grades of sandpaper from rough to very smooth to get rid of most of the lumps and bumps.

IMG_2857.JPG
Sanding

I coated the platter with 3 layers of olive oil (allowing each coat to dry fully before applying the next).

IMG_2858-1.JPG
Oiling

Then over a couple of nights I used the back of a spoon to rub the surface of the platter so that it became silky smooth (known as boning). Sometimes you get a very shiny surface doing this but I think that this wood may need to season for a bit longer as although it became beautifully smooth it stayed a bit dull.

The fibres of the wood may raise up again over the next few weeks but a light sanding and boning will soon have it smooth again.

IMG_2859-0.JPG
Boning

This is my 99th blog post and I am glad it was about something  I was very happy to carve. The platter is destined to go back to France as a present to Rick for letting us use his cottage for what was a very lovely holiday – Brittany Adventures.

IMG_2860.JPG
Finished platter

Cheers

George

How To…. Carve and Use an Adjustable Pot Hanger

The main benefit is – is that the tea gets made

I was trimming an ash tree in my garden recently with my friend Paul and I managed to save a few pieces for Atlatls and pot hangers.

I have previously shown you how to carve a collapsible pot hanger so that it can fit into a pot when not in use but on a lot of occasions I just whittle one when I need one.

The type of pot hanger I am talking about is shown below hanging off a ‘Wagon/Waugan Stick’ (pronounced waygone or worgan – I hear different variations on this from different people) campfire  set up. The pot hook is adjustable in that the pot is easily raised or lowered by using the different hooks on the pot hanger.

Photo 22-05-2014 00 36 16
A simple pot hook

I started off with a piece of ash that had a fork in it at a good angle (to form a hook) and finished up with something that allowed me to be able to quickly or slowly cook/boil something.

On the right you can see the finished pot hanger in action. To help stop any confusion I will refer to the large hook holding the small kettle as the ‘pot hook’ and the small hooks as the ‘adjusting hooks’.

Photo 22-05-2014 00 26 15
Before and After

To begin with I trimmed off all the knobbly pieces using powerful chest lever and locked arm cuts. See my How To…. on knife Safety for more information on these types of cuts.

Photo 15-05-2014 15 30 23
Powerful cuts

I then trimmed the bark off using a powerful shoulder cut. I had the work piece placed on the ground here off to one side so as to brace it and to work safely.

Photo 15-05-2014 15 31 31
Braced

To strip the bark around the hook area I used a gentle chest lever grip.

Photo 15-05-2014 15 35 09
Fine cuts

The bottom of the pot hanger was more difficult to trim as I had not left any excess wood to hold on to. The main thing I needed to consider here was keeping my eye on where my thumb was  on the hand holding the pot hanger.

Photo 15-05-2014 15 36 33
Work safely near the ends

As I needed to use the point area of the blade to trim around the hook I kept the pot hook resting on a small log so that if the knife slipped it would hit the ground. My friend Charlie showed me how to use the knife and the curve of the pot hook to create a fulcrum, making the stripping of the bark safer. I tried to photograph this but they did not turn out well.

Photo 15-05-2014 15 39 40
De-barking the hook area

I also rounded the bottom of the pot hanger and then used the back of my knife to strip off the remnants of the inner bark.

Photo 15-05-2014 15 47 07
De-barking with the back of the knife

To make the adjusting hooks I used a batton (a large stick) to carve a cross into the wood – an X cut. I placed my X cuts in line with the pot hook as much as possible. After a couple of good smacks with the batton the knife had cut well into the wood.

Photo 15-05-2014 15 48 08
Batton in the first X cut

I then repeated the process for the other part of the X cut.

Photo 15-05-2014 15 49 57
Then the second X cut

A simple X cut – this cut makes the carving of the adjusting hook much easier.

Photo 21-05-2014 15 37 08
The X cut

So that the pot hanger can hang properly you must remove the wood at the bottom of the X cut first (the bottom being the quarter of the X cut closest to the pot hook).

I use very fine cuts here and the original X cut acts as a stopper point so that you only cut away the wood that you need to.

Photo 21-05-2014 15 38 45
Fine cuts

I normally remove a small area of wood just below the point of what will become the adjustable hook.

Photo 21-05-2014 15 42 08
Remove the bottom of the X first (nearest the hook)

Once I’d removed the wood from the lower quarter I then removed the wood from one of the side quarters.

Photo 21-05-2014 15 45 36
Remove the sides of the X

Then I removed the wood from the other side quarter leaving only the top quarter to act as the adjustable hook.

Photo 21-05-2014 15 47 12
Deepen the sides of the X

I kept carving down until I had exposed enough of the wood that I could carve out the final part of the adjustable hook.

Photo 21-05-2014 15 48 47
Ready for the undercut

The final part I needed to do was to make an undercut below the point of the upper quarter. I kept reducing the wood until a nice point appeared.

Photo 21-05-2014 15 51 16
Fine cuts again on the point

You can really see that undercut appearing in the picture below now. For safety I kept the pot hanger braced on the ground (a stump works as well) while I was carving it out.

For this pot hook I carved a further 2 hanging hooks along its length.

Photo 15-05-2014 15 51 59
Carve deep but safely

This is the final rough shape you are looking for. Any further carving or sanding would be purely for decoration only.

Photo 22-05-2014 09 42 42
A good point

This pot hanger is particularly suited to the Wagon set up – Wagon (‘way gone’) coming as far as I know from the old tale that if you leave this set up standing when you leave your camp, it points the way for the naughty wood spirits to follow you 🙂

Photo 22-05-2014 00 49 44
Side view of the Way Gone  set up

The hanging hooks attach to the Wagon stick by sitting in a small dimple on the end of it. In this set up I also used a forked stick to give the Wagon height and a smaller (Dead Man’s Finger) stick at the bottom of it to counterbalance everything.

Photo 22-05-2014 00 21 59
In detail

The whole set up is very easy to adjust for a fast or slow boil/cook.

Photo 22-05-2014 00 19 01
Adjustable height

This is a great project for any bushcrafter to keep their hand in with simple carving techniques. It looks very simple at first but there are some tricky cuts that if you are not careful can cause a nick or two but the main benefit is – that the tea gets made.

Photo 17-05-2014 17 49 15
Brew time

Cheers

George

Meet Mark Beer

Meet my friend Mark Beer – a good friend and excellent craftsman.

Photo 05-05-2014 16 10 31
Mark Beer – Top Craftsman & Good Friend

Mark has been a woodsman all his life and I met him about 8 years ago. I like to carve and since Mark has such skill in wood carving I always keep an eye on what he is producing so as to help develop my own skills.

I plan to spend some time with him this summer and pictorially document him creating one of his bowls at his wood carving studio.

971019_151707128366457_1238520788_n
Bowl carving

In the meantime here are some pictures of just a few of the carvings he has done over the years.

Photo 03-05-2014 15 48 12
Mulberry Cup
Photo 03-05-2014 15 48 27
Mulberry Cup
Photo 03-05-2014 15 49 02
Spalted beech bowl with curved cherry spoon
Photo 03-05-2014 15 50 29
Large cherry bowl with mulberry spoon
Photo 03-05-2014 15 51 32
Chip carved cherry dish with cherry snuff spoon and birch cup

Cheers

George

How To…. Carve a Simple Spoon: the double-handle technique

This How To…. illustrates some simple steps to carve a small spoon you can easily make when you are out and about.

WP_20140318_035
A simple spoon

I was training on campcraft in Crowborough (Ashdown Forest in the UK) recently and in between classes decided to carve this simple spoon. A nearby willow tree had been felled a few years ago and lots of shoots had re-grown from the stump.

Photo 17-03-2014 09 35 59
Local Willow

I selected a shoot and sawed it off near its base. Cutting the limb cleanly at the base will allow the tree to heal itself quickly and send out a replacement shoot the following year.

Photo 17-03-2014 09 36 47
Cut right back

I selected the limb because of its curves, which  help in making a strong spoon. I trimmed the limb in a safe position and used the live limbs as a vice to do the final sawing.

Photo 17-03-2014 09 37 55
Trimmed safely

I took two pieces to make a couple of spoons and then trimmed off a couple of the smaller shoots from the top.

Photo 17-03-2014 09 38 57
The spoons-to-be

These smaller pieces I re-planted around the base of the tree by pushing them into the ground, as willow has the ability to re-grow from these shoots.

Photo 17-03-2014 09 40 10
Re-planting

The next job was to strip off the outer and inner barks. I tried to strip the bark off in one piece but as the sap had not yet risen it was very difficult to do. If the bark had peeled off easily I could have made some nice cordage from it.

I used the back of my knife to scrape off the remnants of the inner bark to get right down to the wood.

Photo 17-03-2014 09 41 14
Taking off the outer bark

This inner bark does clog up on the back of the blade so you have to continually scrape it off. The whole process of stripping the bark took about 5 minutes.

Photo 17-03-2014 09 41 46
Removing the inner bark

I flattened out the area of wood that would make the bowl of the spoon to give myself a little bit more area to work with.

Photo 17-03-2014 09 43 15
Creating a working surface

I like to draw out my spoon leaving areas of waste wood at each end as these act as handles when carving. Also, I prefer to carve the spoon from the top down as this cuts through many different rings thereby making the spoon stronger. I also mark out at this stage all the stop cuts I will need. (The technique of leaving handles to work with was taught to me by my good friend Mark Beer a few years ago and I find they are particularly useful when you are teaching novices.)

Photo 17-03-2014 09 44 45
Drawing out the spoon

I like to carve the bowl of the spoon first. To do this job I usually use a palm gouge (on the left) and a crook knife (on the right).

Photo 17-03-2014 09 47 45
The bowl tools

I use the palm gouge first, tracking around the edge of the bowl to cut out the waste. Having the two handles in the wood means I can use the same hand to do this (I am left-handed). They also allow me to keep my other hand well away from the sharp edge of the gouge.

Photo 17-03-2014 09 48 51
The palm gouge

The gouge makes short work of the waste wood but it does not leave a smooth surface.

Photo 17-03-2014 09 49 26
Rough bowl

To smooth the bowl out a bit more I usually switch to the crook knife. I find that the crook knife helps to accentuate the curve of the bowl more than the gouge does. With both tools I always try and cut across the grain of the wood but this is not always possible near the ends so I need to be extra careful there not to lose wood on the edges.

Photo 17-03-2014 09 50 23
Smoothing out the bowl with the crook knife

After the bowl is roughed out I saw all the stop cuts. These stop cuts help to stop splits occurring in the wood as I carve the rest of the waste wood away.

Photo 17-03-2014 09 52 06
Creating the stop cuts

Stop cuts are particularly important when carving around the bowl; they act like small breaking points for the knife edge, stopping splits occurring.

Photo 17-03-2014 09 59 04
Removing the waste

I take my time at this stage and make small cuts to remove each piece of waste wood between the stop cuts. In these two pictures I am using my thumbs on the back of the blade to apply pressure. You can push either with both thumbs on the back of the blade or with one thumb on top of the other.

Photo 17-03-2014 09 59 56
Thumb pressure

When I am on a straight section like the handle I tend to use the chest lever grip. This is a very controlled and powerful cut. I have my hands tight against me and use my chest muscles to push my hands apart. This pushes the knife edge into the wood in small, controlled but powerful cuts.

Photo 17-03-2014 10 01 26
Chest lever grip

Another cut that can be used here is the shoulder cut. With the work piece off to your side and the bottom of it on a log or on the ground (if the handle at the bottom is long enough), keep your arm locked straight and push down with your shoulder muscles to cut into the excess wood. You can cut big or very fine pieces with this technique.

Photo 17-03-2014 10 02 09
Shoulder power cut

I learnt this technique from Mors Kochanski when he was over in the UK at the BCUK Bushmoot a few years ago. I pushed one end of the work piece (perfect when you have these handles on each end) and then, using the knife like a draw knife, cut slivers of wood towards me. This is one of the few cuts where the blade comes towards you. The key to this technique is to keep the arm that is holding the work piece bent and well away from the knife tip. Also the arm that is holding the knife is clamped against my side which stops any big movements. If my knife were to slip with this technique the blade would actually only move a few centimeters.

Photo 17-03-2014 10 02 54
Mors Kochanski style

Using these techniques I quickly removed the waste wood around the spoon.

Photo 17-03-2014 10 04 29
Top plane cut out

I then marked out the side of the spoon and started to remove the waste wood using the shoulder cut. I could have put stop cuts in at this stage but decided not to as there was not much curve to the spoon on this plane.

Photo 17-03-2014 10 13 28
Side plane

Finishing the tail and the bowl requires a lot of fine work. You have to find how the grain of the wood is flowing and just chip away at it with small cuts to form your final shape.

Photo 17-03-2014 10 16 44
Fine work

After some final work on the handle of the spoon I slowly carved around the tip of the bowl to remove one of the working handles. Take your time with this so that you get down to the last few fibres of wood before twisting the handle off. Any big cuts here can damage the bowl.

Photo 17-03-2014 10 18 33
Trimming the handle and removing one handle

I then repeated the whole process at the other end to remove the other working handle.

Photo 17-03-2014 10 20 50
Removing the other handle

The wood was green so full of moisture. Normally I would dry the wood slowly for a few weeks before sanding it down. Sanding green wood can be hard work and no matter how smooth you get it you will need to repeat the process in a few days as small fibres of wood will start to rise up again, giving the spoon a furry texture.

I accept that when making these spoons as I normally want to use it straight away. Ideally I should have used a piece of seasoned wood so that this would not happen but you sometimes have to use what is available. I left the spoon to dry out for a couple of days before sanding it down.

Photo 17-03-2014 10 21 07
A blanked out spoon

I used sandpaper of different grades and luckily have some cloth sandpaper that works well when sanding the bowl out.

Photo 18-03-2014 20 14 10
Sandpapers

I used the rough sandpaper first and you can see in these pictures how the fibres of the wood are being ripped out here rather than being sanded smooth. All the sandpaper is doing at this stage is flattening out the tool marks.

Photo 18-03-2014 20 14 42
Rough first

Eventually the spoon started to take on a more smooth appearance. The bottom picture shows the bowl untouched but the handle is now smoother.

Photo 18-03-2014 20 15 29
Taking shape

The cloth sandpaper is ideal for getting into the bowl and smoothing it out. I like this sandpaper as it does not break apart in the bowl as traditional paper-backed sandpaper tends to.

Photo 18-03-2014 20 16 19
Smoothing the bowl

After sanding the spoon down using a mixture of grades from rough to very fine (about a half hour’s work) I added some oil to the spoon. I generally use vegetable oil as that is what I usually have in my cooking kit when out in the woods.

After the first coating had soaked in I applied a second coating and left the spoon to dry out.

Photo 18-03-2014 20 17 05
First oiling

I like to add a finishing touch by boning the spoon. You can do this with the back of a spoon, a rounded pebble or with  a rounded piece of bone. I rub the spoon with the rounded surface in a circular motion covering the whole of the surface area of the spoon. I normally do this for an hour or so as this seals the fibres of the wood down and adds a beautiful shine to the spoon.

Photo 18-03-2014 20 17 32
Boning

This spoon will need to be re-sanded, oiled and boned again in a few weeks as the fibres rise up as it dries out. You can see that the bowl is not perfectly smooth and there are slight imperfections in it. Hopefully these will disappear with that second sanding but for now it is a spoon I can use.

Photo 18-03-2014 20 18 30 (HDR)
Imperfections but a working spoon

The different profiles of the spoon.

Photo 18-03-2014 20 19 42
Profiles

Ready to go.

WP_20140318_035
Ready to do its job

Have a go and try out some of these different cutting techniques.

Cheers

George

How To…. Carve a Collapsible Pot Hanger

When I first started venturing into the world of bushcraft I got into carving spoons and bowdrill sets. It’s like a rite of passage with most bushcrafters to crack these skills. As time went on I began to explore the world of pot hangers and eventually these little devilish collapsible pot hangers.

This post will take you through the steps I went through to make a mortise-and-tenon collapsible pot hanger. I have included a couple of other types and links to show you how they are made or used. As you can see in the picture on the left, one of the hooks is pointing down and one is pointing upwards. This set up makes for a great pot hanger but sadly you don’t find many trees with this configuration of branches.

Photo 13-03-2014 07 11 43
Mortise and Tenon Pot Hanger

Here are the three different types of pot hangers I will discuss here, from left to right: the wedge hanger, the dovetail hanger and the mortise-and-tenon hanger.

Photo 13-03-2014 08 33 44
The trio

The wedge hanger

I call this the wedge hanger as the two pieces are kept in place by a single wedge of wood in the middle. There are a lot of angles to take into account with this hanger and as with all of the hangers in this post I would advise you to make it out of dead standing wood. If you were to use green wood you might find that the pieces do not fit together any more as it dries out. I found a good tutorial on making this hanger on the Bearclaw Bushcraft site.

Photo 13-03-2014 08 11 30
Wedge Pot Hanger

The dovetail hanger

This hanger replaces the wedge with a dovetail joint in the middle. I found it surprisingly easy to carve. The trick is to make the joint snug but not too tight. You want just enough friction between the two pieces to hold it all together but still be easy enough to pop apart when you are finished with it. A good video by GJohnridge11 on You Tube shows this hanger but I am afraid not how it is carved.

Photo 13-03-2014 08 10 27
Dovetail Pot Hanger

All the hangers so far have hooks pointing in opposite directions and on opposite sides. I have had discussions with fellow bushcrafters on this and some argue that a pot may slip off if the hooks are on opposite sides. I have made a few hangers now with hooks on opposite sides and on the same side as in the picture below. As of yet I personally have not had problems with either method.

WP_20140313_007
Wedge Pot hanger with both hooks on the same side

The reason I like these hangers is that they are easy to store and carry with you. Once broken apart they fit inside your pot or kettle snugly.

WP_20140313_001
Neatly stowed away

Mortise-and-tenon hanger

I found two dead pieces of wood of similar widths with good strong branches leading off them. After stripping the bark off one I noticed there was a fungal infection inside it. I decided to try using it anyway as the wood still felt strong. I left the bark on the other piece of wood as it had attractive honeysuckle markings going around it.

I trimmed the bottom piece so it was the same length as the top piece.

Photo 13-03-2014 07 13 00
Trimming to size

The tenon limb

Using a pencil I  marked out all the areas of wood I was going to cut out. (I should have shaded the areas of wood I would be cutting out  with my pencil for the camera, see the bottom picture for how this limb will finally look.) This limb is called the tenon limb.

Photo 13-03-2014 07 34 55
Mark out the shape of the tenon

I used a small hand saw to make some stop cuts on the pencil marks. These stop cuts are particularly useful when you start carving with your knife to stop any splits running off into areas of wood you want to keep.

Photo 13-03-2014 07 37 30
Stop Cuts – Part 1

The stop cuts done, I used my knife to start carving the excess wood away. I used small cuts all the time, my thumbs on the back of the knife for fine control. This is a great activity to do while sitting around the campfire where you can relax and take your time.

Photo 13-03-2014 07 15 33
Stop Cuts – Part 2

Once you get one block out it is time to take out the next block of excess wood. I am keeping the wood that is under the blade and removing the wood directly to the right of it.

Photo 13-03-2014 07 16 11
Forming the tenon – Part 1

Finally I used my saw to cut out the tenon at the end of the piece of wood. This is a small rectangular piece of wood at the end of the limb as you can see in the bottom picture.

Photo 13-03-2014 07 17 45
The finished tenon

The mortise limb

I cut a stop cut into the mortise limb where I had measured that the tenon limb would fit snugly against it. You have to judge this by using the tenon limb as a measuring stick and saw to a depth that will make the limbs fit together well.

Photo 13-03-2014 07 41 34
Mark a stop cut

Once the stop cut is in place you can easily batton the excess wood out with your knife. I am using the tenon limb as a hammer at this stage.

Photo 13-03-2014 07 39 34
Batton out the waste wood

You can see in the top picture that the two pieces fit well together now so I marked out the area of the joint I needed to cut out on the mortise limb. I used the protruding rectangle of wood on the tenon limb to mark out the corresponding section of wood I needed to carve out of the mortise limb.

Once marked out I used the tip of my knife to start carving out the rectangular hole I needed to make in the mortise limb.

Photo 13-03-2014 07 43 36
Draw out the mortise

Again this was a piece of carving I took my time with. I placed the mortise limb on a work surface rather than holding it in my hand, where any slip of the blade could have meant a nasty cut.

Photo 13-03-2014 07 44 00
Carve out the mortise

Eventually I worked my way through the limb and carved out a rough rectangular shape.

Photo 13-03-2014 07 44 35
Form a neat rectangle

If you have taken your time and not cut outside of the pencil markings the fit of the Tenon and the Mortise should be snug. If it is too tight make some cuts where you feel there is resistance and keep trying to see if both pieces will fit together.

Photo 13-03-2014 07 45 16
The fit should be snug but not overly tight

Eventually both pieces fitted well together but disaster struck for me here. I was showing the hanger to a friend and was explaining it is very strong on the vertical plane, ie when holding a pot, but very weak on any other plane, ie if you twist this hanger it will break.

Just as I was explaining this my friend did indeed twist the hanger as he tried to pull it apart and the tenon joint simply snapped. The fact that the tenon had some rot in it did not help but I had tried it out earlier and it did take the weight of a heavy Dutch Oven. To separate the limbs you need to push on the rectangular tenon so it pops out of the mortise slot: do NOT twist!

Photo 13-03-2014 08 05 37
A trimmed but flawed tenon

Still, it didn’t take long to make up another tenon limb to fit the original mortise limb.

Photo 13-03-2014 08 06 43
Tenon Mark 2

All that was left to do was tidy up the hooks, put the limbs together and hang a pot.

Photo 13-03-2014 08 07 34
Mortise-and-tenon hanger in use

I can’t remember where I came across this hanger (somewhere on the internet)  so if anyone knows where this hanger originated please drop me a message. Even though it looks complex to begin with, once you get working on it it is easy enough to do and a joy to craft as long as you take your time with the fiddlier saw and knife tip bits.

Photo 13-03-2014 08 08 15
Closed and open

I filled this Dutch Oven with water and got my two little helpers to show you how strong this hanger can be.

WP_20140313_002
One very strong pot hanger

Some other sites on the wedge hanger you might find interesting:

Mid West Bushcraft

Bushcraft UK 1

Bushcraft UK 2

Mark Emery

Southwest Indiana Bushcraft Bill

Cheers

George

How To…. Carve a Holmegaard Bow

The second bow I ever carved was a Holmegaard-style bow made out of ash. The bow on which I based my replica was found in a peat bog in the Holmegaard area of Denmark in the 1940s and is thought to be over 9000 years old. I made this bow while studying at John Rhyder’s Woodcraft School doing a Primitive Technology course. The wood that was available to us at the time for bowmaking was ash but the original bow found in Holmegaard was made of elm. The bow is a mixture of styles with the limbs that have a flatbow shape for half their length and ‘D’ sectioned like a longbow on the limb tips.

The Holmegaard
The Holmegaard

I really like this bow as it is very light in terms of draw weight but fast and whippy when it shoots owing to its ‘D’ sectioned tips. I have included in my previous post on Carving an Ash Flatbow explanations on different bow terminology and the differences between flatbows and longbows. Below are the rough dimensions I made my bow to – I tried to replicate the dimensions of the original bow as much as possible.

Photo 03-03-2014 06 45 26
Holmegaard dimensions

An ash tree had recently been felled and a section of the trunk cut down to just over 6 foot. I scored a line in the bark with a wedge down to the wood to help with guiding the split of the log. Note that the wedge is positioned to one side of the person scoring the line. This maintains a safe position for the worker. I then drove a wedge into the scored line to start the split at one end of the log (upper wedge in the top right picture). A second wedge was driven in at the base of the log to further split the log (lower wedge). Putting in the second wedge loosened the first wedge so I pulled it out and drove it in further down the line to widen the split.

Photo 03-03-2014 06 49 11
Start of split

I just kept repeating this process of ‘leap frogging’ the wedges, and the scored line helped greatly with controlling the direction of the split.

Photo 03-03-2014 06 49 52
First complete split

Once the log had been split I kept repeating the process again and again until all the staves were split out.

Photo 03-03-2014 06 52 19
Finished staves

Using a wooden wedge I shaved off the bark of the stave. I was very careful to remove only the outer and inner bark and not to touch any of the wood. The wood found just under the bark is the most flexible part of the bow and will form the back of the bow. Apart from light sanding this area of the bow will not be touched.

Photo 03-03-2014 06 54 33
De-barking with a wedge

This is the side profile of the stave (top picture). The side profile has been roughly drawn out leaving plenty of room for error. A close up of the handle area can be seen in the bottom picture and the vertical lines are for the stop cuts.

Photo 03-03-2014 06 59 43
Side profile

These stop cuts help greatly when getting rid of the excess wood. As the excess wood is cut out, the stop cuts prevent splits from travelling down the length of the bow. The top picture shows the area around the handle ready to be cut out and the bottom picture shows one of the limbs ready for work.

Photo 03-03-2014 06 56 25
Stop cuts

Some of the tools that are used to take off the excess wood: the axe for the start of the process and a knife and batton to finish it off.

Photo 03-03-2014 07 04 24
Tools for initial shaping

Keeping the stave off to one side of me and resting on a log, I trimmed the excess wood off. As the stave was off to one side I was in a safe position to work with the axe. If the axe had slipped its follow-through path would have been to my side.

Photo 03-03-2014 19 12 43
Axing out

The tool on the left is a draw knife and can be used to finely trim the bow shape. If you do not have a draw knife you can embed the tip of a knife into a piece of wood to act as a second handle and use it as a draw knife. If you choose this method make sure that the piece of wood is on a secure flat surface before pushing the tip into it – never hold the piece of wood in your hand while you do this.

Photo 03-03-2014 07 04 44
Professional and impromptu draw knives

I clamped the bow securely to a workbench and then could easily start to use the draw knife. Here you can see the impromptu method in action; it works surprisingly well if your knife is sharp enough. It does not take long to work your way down to the line.

Photo 03-03-2014 07 03 44
Using the draw knife

A lot of the time I braced the tip of the bow against my stomach as I removed the excess wood. As I worked towards the tip I repositioned the bow on the workbench so that it was held securely without needing to brace it. You can see the side profile of the bow emerging on the picture of the stave propped up against the tree on the right.

Photo 03-03-2014 07 30 57
Side profile blanked out

The next stage was to mark out the top profile of the bow. I used a string to mark out a centre line down the length of the stave (picture on left). Then using my measurements (shown at the beginning) I marked out the shape of the bow (picture on right).

Photo 03-03-2014 07 08 05
Marking out the top profile

The picture on the left is the handle area I drew out and the one on the right is of one of the limbs. Both now have stop cuts sawn in to help with chopping out the bow shape.

Photo 03-03-2014 07 19 26
Stop cuts in place

I enlarged some of the stop cuts to make sure that no split would travel very far. I find that jamming one end of the bow against a tree helps with the axing-out process and that it can be done in a much more controlled, safe manner so that the axe blade can never swing into me. It’s important too to use the axe in a safe and controlled manner. In the bottom picture you can start to see the handle shape appearing.

Photo 03-03-2014 07 23 28
Axing out the top profile

As well as taking off a lot of wood quickly, the draw knife method is useful for taking off fine shavings as you get down close to the line.

Photo 03-03-2014 07 24 12
Draw knife on the top profile

The top profile slowly started to appear as I finely carved the excess wood down to the line.

Photo 03-03-2014 19 12 56
Top profile getting there

The draw knife was very easy to use as the angle of the limb changed from a Flatbow (near the handle) to a more ‘D’ shaped Longbow limb near the tips.

Photo 03-03-2014 07 27 03
The Holmegaard shape is appearing

The ‘D’ sectioned shape of the tips soon started to appear. It was at this stage I decided to let the wood season for a month before doing any more work.

Photo 03-03-2014 16 33 51
Limb tip needing trimming

I seasoned the wood for one week in my garage and for three weeks in a cool spot in my house. This allowed the wood to season enough to start the fine work. During this seasoning process I tied the bow into a frame to induce some reflex into it.

Seasoning
Tied back to keep the shape while drying

One month later it was time to finish the bow. I started work on the tips of the bow so that they would have more of a ‘D’ section shape to them. Making the tips smaller meant there would be less weight in them, allowing them to move forward faster when shooting an arrow. Using my knife as a draw knife I was able to finely carve the shape of the ‘D’ section on each limb. As the tip of the knife is firmly embedded into a piece of wood it is very safe to use and highly manoeuverable.

Photo 03-03-2014 16 31 01
Fine draw knife work

On each tip I came right down to the line but not past it with the draw knife.

Photo 03-03-2014 16 34 14
Limb tip finished

Up to this point I had tested the bow’s flexibility by floor-tillering it. This involves pushing down on the limb and checking to see if I was getting a nice curve or if there were areas of stiffness.

Photo 03-03-2014 06 27 54
Lots of hand tillering

To take off excess wood from areas of stiffness I used a metal cabinet scraper. The scraper only takes off minute pieces of wood and is ideal for this part of the process. I carried on this process of scraping and floor tillering until I got a fairly good curve on both limbs.

Photo 03-03-2014 16 41 35
Time for the cabinet scraper

Before using the tillering pole to finely check the curvature, I had to add knocks to the bow. Some Holmegaard bows have been found without knocks carved into them and it is thought that they may have had bone-tipped knocks added, or some sort of wrap on each limb as a knock. I decided as an experiment to make a knock from some material wrapped around the tips of the limbs. I first tried cordage made from western red cedar bark, but I found that this did not grip the wood firmly enough and kept slipping.

Photo 03-03-2014 16 31 44
Failed cordage knocks

Next I tried rawhide, soaking it in hot water and then wrapping strips onto each end. This took about one and a half days to harden but allowed me to string the bow.

Photo 03-03-2014 16 32 20
Successful sinew knocks

I coated the rawhide in pine pitch to waterproof it so it would not soften and slip if it got wet.

Photo 03-03-2014 16 38 27
Rawhide knocks covered in pine pitch

I just used some strong nylon string at first as a bowstring before starting the tillering process, tying on one end of the string with an overhand loop and the other end with a timber hitch. The string was just tied loosely, with no brace height. This picture is from when making my ash flatbow but the principle was exactly the same. Dick Baugh wrote a good article on tillering on the Primitive Ways website that is worth a read.

Photo 03-03-2014 19 13 31
Tillering string

I then placed the bow on the tiller and in increments slowly bent it to view the curve on each limb. The pictures are of the bow during the tillering process. After viewing it each time I would return to the workbench to scrape wood from areas of stiffness using the cabinet scraper or spoke shave. Also I would raise the brace height a little by shortening the bow string to see how the bow reacted under pressure when braced. This whole process ensures you get a good even curve on each limb and also trains the bow to bend properly.

Photo 03-03-2014 16 47 53
Tillering followed by scraping

This picture was taken at the end of the tillering process with a 4 inch brace height: I was happy to take my first shot now.

Photo 10-04-2009 13 52 43
Ready to shoot

Having seen a few bows in my time still fail (split) at this point, I only drew back on the string about two thirds of my normal draw length for this first shot.

Photo 10-04-2009 14 17 14
First shot

I then set about making my proper bowstring, which consisted of a Flemish twist on one end, a timber hitch on the other and serving the bowstring. Two good sites on this are Sam Harper’s site Poor Folk Bows for the string making and the Archery Talk forum for serving the string.

Photo 03-03-2014 17 13 15
Flemish twist and timber hitch

I used various grades of sandpaper to sand the bow down to get rid of any marks and sharp edges.

Photo 03-03-2014 16 56 14
Hours of sanding

To protect the bow I stained the wood slightly. Then I applied a mixture of boiled linseed oil and white spirits (50/50 at first). After this had dried I reapplied more oil, but with less white spirits each time until by the end I was applying just oil.

Photo 03-03-2014 17 09 24 (HDR)
Coats of linseed oil and white spirits

The next stage was to bone the wood by rubbing the whole bow with a small smooth pebble. This helps to close the fibres, making the bow very smooth, and also helps to lock in the oil. The whole process of boning can take a few hours but leaves a very smooth and shiny finish.

Photo 03-03-2014 17 10 45
Boning with a pebble

Lastly I wrapped on a small leather handle secured with a little glue. I thought about stitching one on but felt the seams might be too uncomfortable when holding it.

Photo 03-03-2014 17 16 02
Leather handle

The completed bow showing the belly, side profile and the back..

Photo 03-03-2014 17 17 42
One bow I am very proud of

I am so glad that the rawhide knocks worked so well on this bow as they were something of an experiment. I don’t know if the size of the knocks slows the limbs down when shooting, but she does shoot fast.

This bow is particularly liked by youngsters as it is so easy to draw but still shoots fast. I managed to capture this arrow just after it had been released by the Holmegaard bow.

Airborne arrow
Airborne arrow from the Holmegaard

Cheers

George

How To…. Carve an Ash Flatbow

Building a bow – from a log to a beautiful bow

I carved this Ash Flatbow back in 2008 while I was on my Bushcraft Instructors course with Woodcraft School and has since been used by scores of my Sea Cadets, and many of my friends and family. The two instructors who taught me to make this bow were John Rhyder (head instructor at Woodcraft School) and Nick McMillen (now of the Field Farm Project). Both of them as well as being professional outdoorsmen are top bowyers.

Photo 25-02-2014 17 25 00
An Ash Flatbow about to have its first shoot

This How To…. is designed to lay out all the main steps I undertook to make this bow and if you have reasonable woodworking skills then it will aid you in building a bow for yourself. If you think your skills are a bit rusty then I advise that you attend a bow-making course. In addition to John and Nick who still offer courses I can recommend Wayne Jones of Forest Knights School, Paul Bradley from The Bushcraft Magazine (though I’m not sure if he runs courses anymore) and Will Lord as excellent bowyers to learn from.

I made some drawings on my initial write-up in 2008 and thought it easiest to take some screen grabs of this bow theory for this blog.

Bow theory, terminology and scale

So the first question is – What is a bow?

Photo 19-02-2014 20 50 56
So what is a bow

Some bow terminology for you to remember as I will be mentioning some of this in the post:

Photo 19-02-2014 20 50 10
Some bow terminology

Not to scale, but these are the dimensions I mapped out for my bow:

Photo 19-02-2014 20 50 30
My bows dimensions

Splitting out staves

The ash tree was felled by the course instructor, John Ryder.

We scored a line down the length of the log, all the way through the bark and just into the sap wood, using an axe. This helps with guiding the split of the log.

We then drove an axe into the scored lined to start the split.

Note that the axe is at 90 degrees to the person hammering it in. This maintains a safe position for the worker.

Photo 25-02-2014 16 19 29
Splitting out the staves – Step 1

The first axe is followed by a wedge and another axe to widen the split.

The scored line helped greatly with controlling the split.

Photo 25-02-2014 16 21 21
Splitting out the staves – Step 2

As other wedges are driven deeper into the split the previous ones can be removed to be used again.

An axe can also be used to cut the wood fibres not split by the wedges.

Photo 24-02-2014 16 40 26
Splitting out the staves – Step 3

Once the log has been split the process is repeated again and again until you have the staves you require.

Photo 25-02-2014 16 25 11
Splitting out the staves – Step 4

Here are two staves ready for shaping.

Photo 25-02-2014 15 21 55
Split Staves

Shaping the bow

Using a draw knife I shaved off the bark of the stave. I was very careful only to remove the outer and inner bark and not touch any of the wood.

The sap wood found just under the bark is the most flexible and will form the Back of the bow. Apart from light sanding, this area of the bow is left untouched. All of the work on shaping the bow will be done on the sides and on the Belly (the part of the bow facing your belly when shooting).

Photo 25-02-2014 16 22 48
Trimming off the bark

Using a string I marked out a centre line down the length of the stave.

I then drew onto the stave the shape of my bow (using the measurements shown at the beginning of this post).

The first picture is the handle area and the other two are of the limbs.

Photo 24-02-2014 16 37 21
Marking out the bow

I then sawed stop cuts all along the stave: as a piece of wood is cut out with the axe the stop cuts stop a split running through the whole bow, meaning you only cut out the wood you want to remove.

Here you can see the stop cuts. Note too how the bow is wedged against a tree and resting on a stump and the axe is in front of me and at 90 degrees away from my body for safety.

Photo 24-02-2014 16 34 13
Stop cuts and axing out

Once the top profile is cut out the side profile is next.

Using stop cuts again I roughed out the stave until I got the basic shape of the bow. The drawing below shows the shape of the side profile (I didn’t take a picture of this I am afraid).

Side profile
Side profile

A finished blank stave ready to be seasoned for a while.

Photo 25-02-2014 15 25 35
Blanked out bow ready to season a bit

At this point I left the bow to season for a month: one week in my garage and then three weeks in a cool spot in my house.

This allowed the wood to season enough to start the fine work.

In the pictures below the bows are clamped down for the fine work.
A clear picture of the bow’s rough profile can be seen in the bottom picture.

Photo 25-02-2014 16 57 14
Clamped out bows ready for fine work

To begin with I used a draw knife and then moved onto a spoke shave.

Having the bow clamped allowed me to use these tools safely and with precision. I took the pictures so the hands you see aren’t mine: the top picture is Phil Brown of Badger Bushcraft using the draw knife and the bottom picture is Mollie Butters of the Field Farm Project using the spoke shave.

Photo 25-02-2014 16 57 48
Draw Knife and Spoke Shave

For very fine shaving I used a cabinet scraper. With all of these tools I only worked on the belly and the sides of the bow working down to the tips of each limb. I was looking to get a neat taper effect from the handle to the tips as shown in the plan in the picture on the bows dimensions.

Photo 25-02-2014 16 58 52
Cabinet scraper taking off minute amounts

Tillering

Throughout this fine work I tested the bow’s flexibility by floor tillering it.

This involves pushing down on each limb to test its flexibility (check out this thread on the Primitive Archer site on floor tillering).

I was looking for an even flexibility in each limb.

Photo 25-02-2014 16 48 36
Hand Tillering to begin with

Once floor tillering couldn’t tell me any more I needed to move to the tiller stand, so I carved out the knocks on each limb to hold the string using a round wood file.

The knock needs to be at an angle of 45 degrees and deep enough so that the string doesn’t slip off.

Finally I sanded the knock so that the edges would not abrade the string.

Photo 25-02-2014 17 00 39
Carve you Knocks

I just used some strong nylon string at first.

One end of the string is tied on with an Overhand loop and the other end with a Timber hitch.

20140226-140359.jpg
Tillering bow string

At this stage the bow was not put under any tension by the string. This was so that I could train the bow to bend incrementally by using the upright tiller. Putting the bow under too much tension would lead quite quickly to it snapping or cracking.

Dick Baugh wrote a good article on tillering on the Primitive Ways website that is worth a read.

Photo 25-02-2014 17 02 05
Ready for the Tiller Bar – No Brace Height

I then placed the bow on the tiller post and in increments slowly bent it, carefully watching the curve on each limb.

Photo 25-02-2014 17 16 33
First Tiller

The following pictures are of the bow during the tillering process. After viewing it each time I would return to the workbench to scrape wood from areas of stiffness using the cabinet scraper or spoke shave. The close up pictures show in detail the top and bottom of the tiller when set up.

Photo 25-02-2014 17 31 58
Further Tillers

The shape of the limbs can be viewed easily on the tiller: here I could see that the right hand limb was still stiff and needed working on.

Photo 25-02-2014 15 29 46
Left limb is good – right limb a bit stiff

The next stage involves shortening the bow string so as to raise the brace height (the height of the string above the handle when the bow is strung up) then testing the bow on slowly increasing brace heights on the tiller. To do this you have to unstring the bow (at this stage that simply means sliding the loop off the knocks and loosening the Timber hitch) and adjust the Timber hitch to shorten the string.

To re-string the bow after the Timber hitch has been adjusted and re tightened, hold the bow with the bottom limb (the one with the Timber hitch) trapped against your instep of your foot. Have the back of the bow facing you and with your left hand (if you are right handed) firmly hold the handle, then with your right hand slide the loop back up to the knock.

The first brace height I set the bow at was very low (the string touching the handle) as I only shortened the string by about an inch. A good site explaining how to string a bow can be found on the Archery Library website.

Photo 25-02-2014 17 32 42
Bow Braced very slightly (string just tensioned)

A two inch brace

Photo 25-02-2014 17 33 14
A 2 inch brace

Tillering by hand with a two inch brace

Photo 25-02-2014 17 24 26
Checking the feel of the bow as I went on – Still a 2 inch brace

Final brace about six inches. Tillering now complete with evenly curved limbs

Photo 25-02-2014 17 35 42
Six inch brace

After a bit of tuition from Scott it was time to take my first shot and I even managed to hit the target.

Photo 25-02-2014 17 25 00
Preparing for the first shot

I did not pull a full draw on the first shot in case the bow split.

Photo 25-02-2014 17 37 13
Arrow away

In the picture below you can see one that did not make it: Charlie’s bow had developed a hinge in one limb that gave under tension.

I think he took it in his stride.

Photo 25-02-2014 17 26 00
One that did not make it – Charlie took it well

String making

The next stage is to make the string for your bow.

Traditionally natural materials such as sinew, rawhide, plant fibres (nettle) or linen were used but we used modern materials for our bows. As modern string such as Dacron B-50 (50lb) is non biodegradable there is less chance of the string breaking, which means less chance of your bow breaking.

To make the string we used a plank with a clamp at either end, at a distance from each other of 18 inches longer than your bow length. Tie one end of the string to a clamp and run the string around the other clamp, then around the first one again. Keep doing this for five more cycles.

String making set up

Cut the string at each clamp and you should be left with two sets of five strings.
Then follow the steps in Sam Harper’s site Poor Folk Bows to make a Flemish string. I did not document this step but he has a good tutorial on making the loop, twisting the string together and making the timber hitch at the other end.

Stringing up
Stringing up

The new string is attached by sliding the loop over one end down past the knocks and attached at the other end with a Timber hitch. You need to adjust the Timber hitch so that the string length is the correct length for the brace height you want. When you have the string set at the correct length, restring the bow and clamp it to a workbench.

The string now needs to be ‘served’ in the centre of the bow where the arrow will be knocked. The Archery Talk forum has a good thread on serving a bow string. Have a look, as my pictures on this part of the process are not the best.

Photo 25-02-2014 17 46 57
Bow clamped ready to serve the string

The serving of the string is basically a whipping to keep the individual pieces of string that are loosely wrapped around each other together and provide a firm area to knock into your arrow. I also served the top of the string near my loop to stop it unraveling. The little device you see in the pictures is known as a Serving Jig. After finishing serving the string I put some superglue at the end to keep it in place

Photo 25-02-2014 17 51 38
Serving the string

The finished loop needs to be wide enough to slip off the knocks but small enough to grip them when in place. In the picture on the left below you can see that it has been served for about 12 cms right up to the loop. The bottom limb just needs a timber hitch, though I did twist the end as if making cordage to keep it neat.

Finished bow string
Finished bow string

Final touches

The bow was now ready for some final sanding and oiling.

Photo 25-02-2014 17 47 32
Ready for the final touches

Using various grades of sandpaper, I sanded the bow down to get rid of any marks and sharp edges.

Photo 25-02-2014 17 54 47
Lots of sanding

To protect the bow I stained the wood slightly then applied a mixture of boiled linseed oil and white spirits (50/50 at first). After this had dried I reapplied more oil, but with less white spirits each time until finally I just applied oil.

Photo 25-02-2014 18 01 11
Oiling and staining

Lastly, I glued on a small leather handle. I thought about stitching one on but wanted to keep the clean line of the flat leather.

Photo 25-02-2014 15 26 16
Simple leather handle glued on

The completed bow.

Photo 25-02-2014 17 59 23
One Finished Ash Flatbow

This bow has been used by scores of my Sea Cadets over the last six years and still shoots as sweet as the day I finished her.

I enjoyed making this bow, it was my first but it was definitely not my last.

Cheers

George

How To…. Carve a Lovelock Cave Atlatl

One of my favourite Atlatls is the Lovelock Cave Atlatl. I made this Atlatl a few years ago using modern tools including a Mora knife, a small carving knive, a flex gouge chisel and sandpaper.

WP_20140211_002
My reproduction Lovelock Cave Atlatl – Top Profile
WP_20140211_008
My reproduction Lovelock Cave Atlatl – Side Profile

The original Atlatl was found in a cave over a century ago but was soon lost; thankfully, though, not before someone had made a detailed drawing of it. Lovelock Cave was previously known as the Sunset Guano Cave, the Horseshoe Cave and Loud Site 18. A good paper on the archaeological digs on the site was written by Phoebe. A. Hearst from the Museum of Anthropology (University of California Berkeley).

Lovelock-cave06
Lovelock Cave – Humboldt Sink USA

A copy of the drawing is shown below: I found this in a post by Mike Richardson on the Split Stick Atlatl, who also writes that the original was 17 inches long. I reproduced the Atlatl as closely to the drawing as I could.

It has a fork at the rear and the drawing shows a small groove around each prong. I have read that this was where a small piece of carved wood or bone known as a spur was attached as a point to hold the Atlatl. I decided though to see if the Atlatl would work with just some cordage wrapped around it. There is no historical evidence that this was done but it does work well. A good comparison of both attachment types on this Atlatl can be read in the PaleoPlanet forum here. A further project for me on this Atlatl is to make a spur for it.

fork_atlatl7
Drawing 1

Knowing that the original was 17 inches long, I made a best guess at the other dimensions. The original Atlatl that was lost was made of Greasewood (Sarcobatus vermiculatus) but as this wood is not available in the UK I opted to use a piece of Siver Birch (Betulus pendula) as I had some available and it is easy to carve. The wood I had ready was only 16 1/2 inches long (422 mm to be exact) so using that as a starter and the drawing as a guide I scaled up all the other dimensions as shown below.

Dimensions of my reproduction

This was a beautiful Atlatl to carve as the finished lines are very smooth and pleasing to the eye. The top picture (below)  is a close up of the handle of my reproduction. The final shape gives a surprisingly good grip even when smoothed down.

Photo 10-02-2014 13 34 32
A beautiful slim design

I split my log down to a rectangular shape and then using my dimensions drew out the shape of the Atlatl. After that I marked stop cuts along the whole length of the Atlatl and cut into them with my saw, finishing a couple of millimeters from the outline. These are useful to have in place to stop any splits from running off down the length of the Atlatl when you carve it.

Photo 10-02-2014 13 29 54
Draw out the profile and place stop cuts

I battoned out the rough profile first using only my knife and a small branch as a hammer. I did the battoning with the work piece placed on a log in front of me. I kept the blade of the knife at 90 degrees to my body as I hit it so that if the knife slipped it would swing away from my body. See my post on Knife Safety Tips for more detail on this.

Photo 10-02-2014 13 36 29
Batton off the excess

Then using my knife I trimmed the excess wood down to the line, keeping the work piece well in front of me to avoid any potential cuts from the knife if it slipped.

Photo 10-02-2014 13 37 40
Tidy up the profile with a knife

Using two more stop cuts I carved out the thumb and forefinger grip area.

Photo 10-02-2014 13 43 00
Carve out the thumb and forefinger grip

Then it was a case of roughly carving the handle area down to a size comfortable for my hand. I also started to carve out the protruding areas above  and below the thumb and forefinger grip area.

Photo 10-02-2014 13 45 57
Roughly carve out the handle shape

I worked on the bottom of the tail next, carving a flat area near the handle and then carving out an elongated bowl shape to the tail. No need to worry too much about perfection at this stage as the sanding will produce the final shape.

Photo 10-02-2014 13 48 08
Roughly carve out the underside of the tail

I tapered the tail area all the way to the end making a flat section of the final 8 cms (this will form the prong).

Photo 10-02-2014 13 48 55
Taper the carving all the way to the end of the tail

On the top of the tail I marked out with my knife tip a 1 cm wide by 23 cm long spear shape that would form the bowl for the dart to rest in.

Photo 10-02-2014 13 51 21
Mark out the top slot for the dart to rest in

I used a Flex Cut Gouge for carving the bowl area and my small carving knife for carving the prongs. This is the really tricky area of carving – you have to be particularly careful as it is very easy for the knife to slip.

Photo 10-02-2014 13 52 05
Roughly carve out the slot for the dart to rest in and carve the fork out at the end

Once I’d carved the basic shape I used various sandpapers from about 40 grit to about 1000 grit to smooth everything.

Photo 10-02-2014 13 54 15
Sand the whole Atlatl down using rough paper working up to very fine grades

Before I added the false sinew to the tail I oiled the Atlatl a couple of times and then boned it with a small pebble. Using a small pebble to rub the Atlatl wood down for a couple of hours smooths the wood fibres down and traps the oil in the wood. The whole process of boning really gives a smooth finish.

Photo 10-02-2014 13 55 59
Add any oils (I used vegetable oil) and bone it smooth with a small pebble

The finished profiles of the Atlatl.

Photo 10-02-2014 13 57 20
Tail, side and bottom profiles

The handle has a very unusual shape but gives you a fantastic grip.

Photo 10-02-2014 13 59 26
Handle profiles

It is easy to flick with an open grip as the thumb and forefinger grooves keep the Atlatl fixed in the correct position in a throw.

Photo 10-02-2014 14 01 48
Works with an open grip

As I carved the handle to fit my palm it makes for a very comfortable closed grip.

Photo 10-02-2014 14 02 05
Works with a closed grip

After carving little notches around each prong I wrapped false sinew to the tail using a Constrictor knot. I kept it fairly tight but you may wish to experiment here. As I said earlier there is nothing in the archaeological record to prove this method was used but after experimenting with other Atlatls like the Split Stick method I see no reason why it could not have been used if a point was not available.

The problem with cordage however is that when you are in the act of throwing a dart, various forces are exerted on it. As you release the dart will flex/bend, and the cordage may cause the tail of the dart (fixed in place by the cordage) to go out of line with the point of the dart, thus decreasing accuracy. Having a point at the rear of the Atlatl holding the tail of the dart in place allows the tail to rotate with the point as it flexes during a throw, maintaining the dart’s accuracy. Chris from Paleoarts explains it well in a post on the Paleoplanet site.  I will be experimenting with attaching a bone or wooden spur to the Atlatl in future.

Photo 22-01-2014 18 03 01
False Sinew wrap at the tail to hold the dart

I am left handed and even though the shape of the handle is designed for a right hander (the slightly protruding piece of the handle to trap the thumb and the smoothed corner to fit in the palm) it is very comfortable still to shoot left handed.

Photo 22-01-2014 18 02 16
Cordage wrap tail – No archaeological record of this

I enjoyed making this Atlatl and shooting it over the last few years. It would be great to see some more of this style being reproduced as there are so few to be found.

Cheers

George

How To…. Make a Simple Burdock Hanger

Historically what would have been used to hang up your clothes and kit up if you lived in an environment where there were very few trees?

On the Isle of Lewis in the Outer Hebrides where I was brought up the stems of the Burdock  (Arctium lappa) plant were used. Lewis is predominantly moorland so the locals had to use whatever resources came to hand.  Burdock is a biennial (a life cycle of two years) plant and in its second year sends up a tall shoot in order to flower and reproduce. It is this stem (which is quite woody) that can be easily trimmed down and used as a hanger.

A keen convert to this was my friend John Fenna (from BCUK) as he does a lot primitive living re enactments (flint tools etc only allowed) and he thought it would be ideal for hanging stuff in his camp.

Photo 03-02-2014 22 33 12
Our Mr Fenna is happy he has a Burdock hanger in the making

I came across a post on this in 2009 on my friend Kevin’s Natural Lore site (written by the guest blogger Freebornjem). The hanger had been spotted by Freebornjem in one of Blackhouses at the museum in Arnol village on the Isle of Lewis. I can remember seeing hangers like this as a small boy but it was not until I read the post on Kevin’s site did I start using one.

I now use a burdock hanger regularly when I am using my tipi or have a base camp set up. I try and find dead standing stems (autumn/early winter) as the hanger is ready for use instantly after trimming. If you use the stem from a live plant it will work for hanging kit but will not be as strong as a dead stem.

Photo 04-02-2014 09 20 17
2nd Year Burdock growth (Arctium Lappa)

Once you have selected your stem, trimmed the leaves and burrs off cut the the branches back so that only about an inch is protruding from the main stem. Make sure you round each hook off as they can be very sharp if left after just a single cut.

Photo 04-02-2014 09 25 01
Branches trimmed and rounded

For this hanger I attached a modern connector (soft shackle prussick) but you can go natural by folding the thin top piece of the stem back and wrapping some cordage around it to form an eye. Kevin’s post covers this method. I use a modern connector now as it will take more weight. I use the hanger in my garage to hold any kit that I regularly use or it can be hung quite easily from a tree.

Photo 04-02-2014 09 23 22
Great for indoors or outdoors

I particularly like this hanger in my tipi as it is easy to hang of the central pole and does not take up any room.

Photo 04-02-2014 09 22 17
Hanging in my tipi

Experiment with how you want to attach the hanger to something. I like the soft shackle prussik as it grips very well and is easy to adjust.

Photo 04-02-2014 08 46 17
Man made connector on this one

The top half of the shackle can be attached to a nail, branch or piece of rope very easily.

Photo 04-02-2014 09 26 49
Soft Shackle Prussik

By pulling the little coloured tab you open the shackle up so making for an easy set up or take down. I will look to post an article in the future on making this type of shackle if anyone would be interested.

Photo 04-02-2014 08 49 21
Soft Shackle Prussik opened up

Freebornjem mentions that the burrs when clumped into a fist sized bundle make a scouring pad. I have not tried that yet but may be worth a go next autumn.

Cheers

George

How To…. Primitive Skills – Build a ‘One Stick – Split Stick Atlatl’

Recently I posted an article titled – Atlatls – What they are and why I love them where I said I would be publishing a couple of How To…. guides on making them. This is the first of these guides on making what I call the One Stick – Split Stick Atlatl.

Photo 30-01-2014 14 15 36
The One Stick – Split Stick Atlatl

As explained in the previous article, an Atlatl is basically a spear-chucking device. Many different types have been made by different societies: there is nothing in the archaeological record (as far as I know) of this type of Atlatl, but then as it’s made completely of organic material there is no surprise there. I decided to investigate this type after researching the Lovelock Cave Atlatl. There is debate over how darts were launched by that Atlatl and whether a point was used or whether a strip of cordage was used.

The One Stick -Split Stick Atlatl I made for this post was done using primitive tools only and a single shoot of goat willow (Salix caprea). I made the Atlatl just to prove to myself I could make one out of a single stick (shaft, wedge and cordage). All you would need to make one using modern tools would be a good sharp knife. The piece of willow I selected was about 1.5 metres long and about the thickness of my thumb. This was far longer than needed but I wanted it this length to get lots of cordage from the bark and to use part of the excess wood as a wedge (needed in making this type of Atlatl).

Photo 30-01-2014 14 11 15
Goat Willow (Salix caprea)

The first thing I did was to cut into the bark all the way around the stick about 12cms from the thickest end, leaving an area of bark slightly larger than my fist. This bark-covered end acts as a handle area.

Photo 30-01-2014 14 11 36
Cut a line through the bark around the stick

I used an old deer rib bone to scrape the dark outer layer of the bark off rest of the stick, leaving the handle untouched. If you leave this on the bark, the cordage you make from it will not of the highest quality.

Photo 30-01-2014 14 12 02
Scrape the outer bark off

After scraping off all the bark I re-cut around the stick just above the handle area to make sure all the inner bark was disconnected from the handle area.

20140130-230800.jpg
Cut again through the inner bark all around the stick

I then cut a line through the inner bark from the handle to the end of the stick to start to open the bark up.

20140130-234042.jpg
Make a cut along the full length of the inner bark

I used my thumbs to peel open the bark. Other tools that make this job easier are a small wooden wedge or the back of your knife blade. In late spring the bark comes off easily so my thumbs were all I needed.

20140130-231031.jpg
Slowly peel the bark off – use a wooden wedge if the bark does not come off easily

Wherever possible try and take the bark off in one piece so you can make long strands for easy cordage making. Do not worry if this does not happen, all it means is that your cordage may take slightly longer to make.

20140130-231049.jpg
Try to get it off in one piece

I wedged the flint knife into a groove in the log and then sliced the bark into strips. I managed to get a good amount of strips out of this one piece of bark. I then left the strips to dry out in the sun. Cordage is best made from rewetted strips of bark as the bark shrinks considerably when it is dried out for the first time.

20140130-234105.jpg
Split the bark into strands

I decided that I wanted my Atlatl to be about 64cms long (fingertip to armpit for me) so I used a piece of flint knapped as a discoidal (curved) knife to saw through the stick. This takes far longer than using a modern knife but I find far more satisfying.

Photo 30-01-2014 14 13 23
Saw/cut a piece of wood from the end of the stick

Keep sawing until you can feel you can snap the wood without splitting it down its length. Once snapped, trim the end of the Atlatl smooth.

Photo 30-01-2014 14 13 54
Primitive cut

The spare piece of wood needs to be trimmed down and cut to size to make a wedge. This will be used to form the split stick part of the Atlatl.

20140130-231118.jpg
Spare piece of wood to make a wedge

I used my flint adze at first to blank out the wedge, making it about 10cms long.

20140130-234150.jpg
Create a wedge

Then I used my flint knife to trim the wedge to its final shape.

20140130-231134.jpg
Trim the wedge

I used my flint knife to split the non-handle end of the Atlatl open. As the knife has a flat spine I just hit the back of the knife to start the split. Be careful to keep the split in the middle of the stick. A piece of cordage should really be tied off on the shaft where you want the split to stop. I forgot to do this but thankfully the split did not travel too far. I made my split 20cms long.

20140131-191815.jpg
Split the end of the Atlatl

I used my discoidal knife to create a small groove around each split limb for the cordage to grip onto.

20140130-231201.jpg
Create a notch on each split

Before inserting the wedge I did tie off the split with some of the dried bark using a constrictor knot.

Photo 30-01-2014 14 14 39
Insert the wedge but with the base of the split tied off.

Afterwards I used more of the bark strips to secure the wedge by wrapping them around it to hold it secure.

20140130-231242.jpg
Split secured

I had plenty of bark left over after this, which was good as I wanted to make some cordage to create a strap to hold the dart in place before launching.

20140130-231218.jpg
Dried-out bark ready to make cordage

I completed a piece of cordage about 50cms long to give me plenty to tie onto the Atlatl. I used a constrictor knot on each split to hold the cord in place. Jonsbushcraft blog has an excellent tutorial on making cordage.

20140130-234215.jpg
Create cordage to attach to the splits

I was very happy with how this Atlatl turned out.

Photo 30-01-2014 14 15 36
Completed One Stick – Split Stick Atlatl ready to go

You can see the dart has a groove instead of a hole at the end. This allows the cordage to hold the dart in place before launching.

Photo 30-01-2014 14 15 53
Dart has a groove instead of a hole

The finger pinch hold is just the same as a normal Atlatl with a point.

Photo 30-01-2014 15 06 15
Simple finger pinch hold

I think the launch with this type of Atlatl feels slightly different but once you get used to it I find the release is as smooth as it is with a normal pointed one.

Photo 30-01-2014 14 16 10
Perfectly good Atlatl

I made this Atlatl purely for the joy of making one with primitive tools and to see if it was possible to produce a hunting tool out of just a single stick.

I have no idea whether hunters in pre-history used this type of Atlatl but I certainly now know they would have found it the easiest thing in the world for them to make.

A good post on some other Other Types of Atlatls: Loop, Fork and Cord was written by Mike Richardson on the Primitiveways website.

Cheers

George

How To…. Build a Bhutanese Bow

Back in August of 2012 at the BCUK Bushmoot I learnt how to make a Bhutanese Bow with Wayne Jones of Forest Knights. As far as I know Wayne is the only instructor in the UK running classes in making this type of bow. I hope he runs another one at this year’s Moot.

Photo 24-01-2014 11 03 28
The Bamboo Bhutanese Bow

This is a quick bow to make when you have an instructor like Wayne to guide you. The bow is made up of two pieces of tapered bamboo joined together in the middle by some sort of cordage or tape around the handle area. I tried to take pictures of all the steps but must admit to missing a few as I got so wrapped up in the whole process. To make up for this I rehandled the bow at home and took some pictures of the missing steps.

I have done a bit of research about this type of bow. It seems that archery is a national sport in Bhutan with many villages in the country running archery competitions. Kids as young as three are taught how to use the bow. Due to the nature of bamboo the outer layer of the bamboo becomes the belly of the bow and the inner part becomes the back: as the outer layer is very hard it will not take the expansion forces exerted as you draw the bow (it will crack), but as it is a grass the inner area (which is fibrous) is more flexible.

Below on the left is a picture of the finished (reworked) bow and on the right Spikey is holding the tube of bamboo we used to make it.

Photo 24-01-2014 11 16 01
The finished article and how we started

Wayne Jones researched the bow for me as well and found this in the Bowyers Bible: ‘Unless the bamboo wall is unusually thick it’s best to overlap two billets at the grip secured by a couple of rivets made of nails or dowels, the grip is then wrapped with rawhide, sinew or even tape. Overlapping stiffens the midbow and increases poundage per bow length. Such bows can be made in minutes. Even though “quickie” bows, they are excellent in every regard.

This design is a good choice for kids’ bows: quick and easy to make, and fairly indestructible.’

Wayne brought a supply of large bamboo to the Moot for us to use. With this type of bow you need to use very large bamboo so that when you split it into quarters you get fairly flat limbs. I do not know the type of bamboo that was used or where Wayne sourced it but I am sure if you were to ask him he would help you.

In the first picture below Wayne is showing us two limbs made from one piece of bamboo he had carved earlier. As bamboo gets thinner as it grows higher you need to make both limbs from the same piece of the column to ensure both limbs are of the same width and thickness.

I cut out a section of tube that was 103 cms long to begin with so that when the two limbs were joined together the bow would be my height. NB I am not 2m 6cms tall, but as the limbs overlap at the handle these measurements produced a bow of my height. You will need to experiment for yourself.

Photo 20-01-2014 16 40 51
Finished limbs and start of the bow

I used an axe to batton out the bamboo into quarters and selected the best two pieces to work with. I made sure when I was battoning that I kept the blade of the axe at 90 degrees to my body. This would ensure that if the axe slipped out of the split it would swing away from me.

Photo 20-01-2014 16 39 33
Battoning out the limbs

Here you can see many of the battoned-out pieces of bamboo ready to be shaped into limbs. You can clearly see the node plates on the inside of each limb, which keep the structure rigid. These need to be knocked off and eventually filed flat.

Photo 20-01-2014 15 12 54

In this picture you can see Mark using the back of his axe to knock off each piece of the node plates.

Photo 20-01-2014 16 31 23
Breaking the node plates

To make full use of each limb it is best to use string to mark out its shape. Allow an extra half centimetre or so so you can finely trim the limb after you have axed the shape out. I made the handle area (thicker end) about 5 cms wide and the tip of the limb (thinner end) about 3 cms wide. Once you have blanked out the first limb you can use this one to mark out the second limb so it is the same shape.

Photo 20-01-2014 16 31 32
Using string to draw the limb shape

Keeping the limb to one side of my body, I experimented first with using an axe to cut the excess off but soon swapped it for a large chopping knife loaned to me by my friend Sargey (Andy Sergeant). This was so sharp with such a good weight behind it that I soon had the first limb blanked out. I then used a smaller knife to trim the limb down to the line I had marked with the string. I used this finished limb to mark out my second limb and repeated the whole process until I had two roughed-out limbs.

Photo 20-01-2014 16 41 39
Shaping the limbs

I used various tools such as my Japanese rasp, a cabinet scraper, a small knife and wood files to smooth out what was left of the node plates and to curve all the edges of the limbs. If you do not smooth off all the edges, you don’t just risk a splinter, there’s a good chance your finished bow will develop a split when you draw it.

Photo 20-01-2014 16 32 35
Smoothing the plates

Take your time smoothing the plates and edges down.

Photo 24-01-2014 10 07 40
Smoothed plates and sides

The outer layer of the bamboo is left untouched and this will become the belly of the bow. The smoothed inner side will become its back.

Photo 24-01-2014 11 08 17
The belly (left) is left untouched – The back (right) is smoothed

I used a rounded file to produce the nocks to hold the bow string. Make sure you get them the right way round.

Photo 23-01-2014 15 48 07
Nocks produced with a round file

Make sure the edges of the nocks are sanded down so there are no sharp edges. A sharp edge will potentially cut your bow string and could cause a split to occur.

Photo 24-01-2014 10 09 02
Lined up neatly and the edges rounded off

When I first built this bow I left the handle area as you see it in the picture below. After shooting the bow I found the handle area just too wide for a comfortable grip.

Photo 23-01-2014 16 37 27
Ready to work the handle area

I marked out one handle so I would lose 1 cm on each side, making the actual handle 3 cms wide. Then with a sharp knife I carved out the excess.

Photo 24-01-2014 10 11 27
Mark your handle area on one limb, trim off the excess and then use the first limb to mark out the second limb

I then used the first carved handle to mark out the second handle and carved that one as well.

Photo 24-01-2014 10 11 48
Trim off the excess from the second limb and you are ready to join them together

To take this picture I got my son Finlay to hold the tape taut and my wife Alison rolled the bow to tape the limbs together.

Photo 23-01-2014 18 00 54
I used help to bind the handle. Keep the tape taut and roll the limbs

This method ensures the limbs stay in the correct position and the tape is put on as firmly as possible. Once I had the limbs secured I taped up the middle of the handle by myself.

Photo 24-01-2014 10 13 57
Secure both ends

I find that the tape does not offer a good grip so I put on a leather handle using a common whipping technique.

Photo 24-01-2014 10 14 49
Finish taping the handle and add any leather for a comfortable handle

Tillering is the process of testing the bow to see if it forms a balanced curve on each limb. Initially we had just a piece of paracord attached to the bow to do this. The tillering stick in the picture allows you to see if the limbs are balanced. If they are not balanced you need to remove a small amount of the inner side of the bamboo using a light rasp or cabinet scraper wherever the limb looks stiffest. This is one part of the process that is very hard to show without taking a whole string of pictures and probably where going on a course and getting one-to-one tuition on it pays dividends. Dick Baugh wrote a good article on tillering on the Primitive Ways website that is worth a read.

Photo 20-01-2014 16 42 58
Tillering

Wayne supplied some Dacron for our bow strings. I twisted one end as you would do to make cordage and used that to make a timber hitch for one end of the bow.

Photo 24-01-2014 10 09 40
Timber hitch

For the other end I created a loop using the Flemish twist method. Sam Harper in his blog Poor Folk Bows has an excellent article including a video on making the Flemish twist and the timber hitch.

Photo 24-01-2014 10 10 26
Flemish twist

The finished bow. This was taken after I had reshaped the handle. I plan to wrap the exposed tape in strips of rawhide to cover them up.

Photo 24-01-2014 08 23 08
Ready to shoot

I like this bow much better now that I have rehandled it as it is far more comfortable to hold. I think some more of the cadets will also want to use it now because of the reduced handle size.

Photo 24-01-2014 11 03 28
Shoots well

A nice shot of the bow in action with an arrow in flight.

Photo 20-01-2014 15 34 03
In action with the cadets – Spot the arrow.

If I could ever source some of this bamboo I would definitely make one or two more. In comparison to my Ash Flatbow and Holmegaard this bow shoots just as well but took only a fraction of the time to make.

If you have further information or links on this type of bow I would love to hear from you.

Cheers

George

Bushcraft Days Carvings – 2013

Carving is my therapy

I do love to sit by a campfire and do a spot of carving. To me it is a very therapeutic pastime but often I don’t get much chance to do it when I’m out running a course. Thankfully though this year I managed to squeeze in a spot of carving on a few trips.

Ash Platter

Early this year I had been helping out at my friends Phil and Philippa’s farm. We were cutting up an old ash tree that had been blown over in the winter gales. I spotted a piece of wood that had been split open down its length and so was fairly easy to carve into a thin platter.

Photo 12-12-2013 22 37 47
Ash platter from a wind blown tree

Pointed Hazel Spoon

This spoon was made when I realised I had come away with no eating utensils for the weekend – but thankfully I had remembered my knife 🙂

Photo 23-08-2013 21 23 26 (1)
Pointed Hazel spoon

Birch Bowls

The large dark bowl was from a piece of birch my friend Stephen found in a hedge at this year’s Wilderness Gathering. The log was partially burnt out and then dumped when no longer required. It was very spalted and rotten in places. I carved out the charcoal with a flint adze and scooped as much of the wood from the bowl as I could with a crook knife.
I left this bowl to dry very slowly over four months. I also painted the ends with gloss paint to try and stop any cracks from happening. So far it seems to be crack free.
The smaller bowl was a demonstration piece I carved at the Kent County Show with Phil Brown of Badger Bushcraft. Again the wood is birch and this one is destined to be a Christmas present.

Photo 07-12-2013 21 44 27
Burnt Birch bowl & a Scooped Birch bowl

Cherry Spoon

I was given a piece of cherry wood by my friend Charlie Brookes earlier this year. On holiday in the summer in Cornwall I decided to pass an evening around the fire carving a spoon for my friend Louise.

Photo 12-12-2013 22 35 47
Cherry Spoon – side view

The wood was very dry but when it was finally sanded, oiled and boned it developed a small crack on the bowl. I was gutted but Louise loved it 🙂

Photo 12-12-2013 22 36 00
Cherry spoon – underside

Quaich

A few years ago I came across a wind blown hornbeam with the most fantastic burl growth on it. The thing filled my rucksack after I had removed it from the tree (I had to give all my kit to the cadets I was with in order to carry the burl myself).
I made a number of items from it this year. This one is a Quaich which to any non-Scottish people I would describe as a communal drinking cup – in particular whisky.

Photo 12-12-2013 22 37 59
Hornbeam Burl Quaich

Knobbly Spoon

I made this spoon in the summer for my friend Jennifer while I was on the Coastal Survival Hunter Gatherer course. I just like the knobbly bit and thought it would make for a good handle.

Photo 12-12-2013 22 36 17
Knobbly spoon (cannot remember the wood type)

The underside of the handle really showed up the gnarled wood.

Photo 24-08-2013 11 45 58
Knobbly spoon – underside

Burl Bowl

Another from the burl. This time I made up a large dinner bowl. It is very rough looking as you have to go with what the wood is saying to you. I gave this bowl away to the parents of a very dear friend of mine who passed away this year as he was a fellow carver.

Photo 12-12-2013 22 40 23
Hornbeam Burl bowl

Spatula

Another implement for my friend Louise. A simple spatula but a pleasure to carve. We had a great holiday this year in Cornwall and camped in the front garden of a Georgian house. The house has been converted to a Youth Hostel and was managed by Louise.

Photo 27-07-2013 08 44 25
Ash spatula

Spalted Spoon

I was sawing up some wood for a campfire this summer and picked up this piece. It had been left in an old fire that had not been cleaned up. The spalting looked too good for the fire so it provided a good hour’s carving for me.

Photo 12-12-2013 22 40 38
Spaltef Hazel spoon

My Noggin

My last piece from the burl was this cup. In Scandinavia a popular name for this type of cup is a Kuksa or Kasa. I prefer the Old English name of Noggin myself.

Photo 12-12-2013 22 40 13
My new Noggin

I am looking forward to the New Year and seeing what different woods I find to carve around the campfire.

Cheers

George