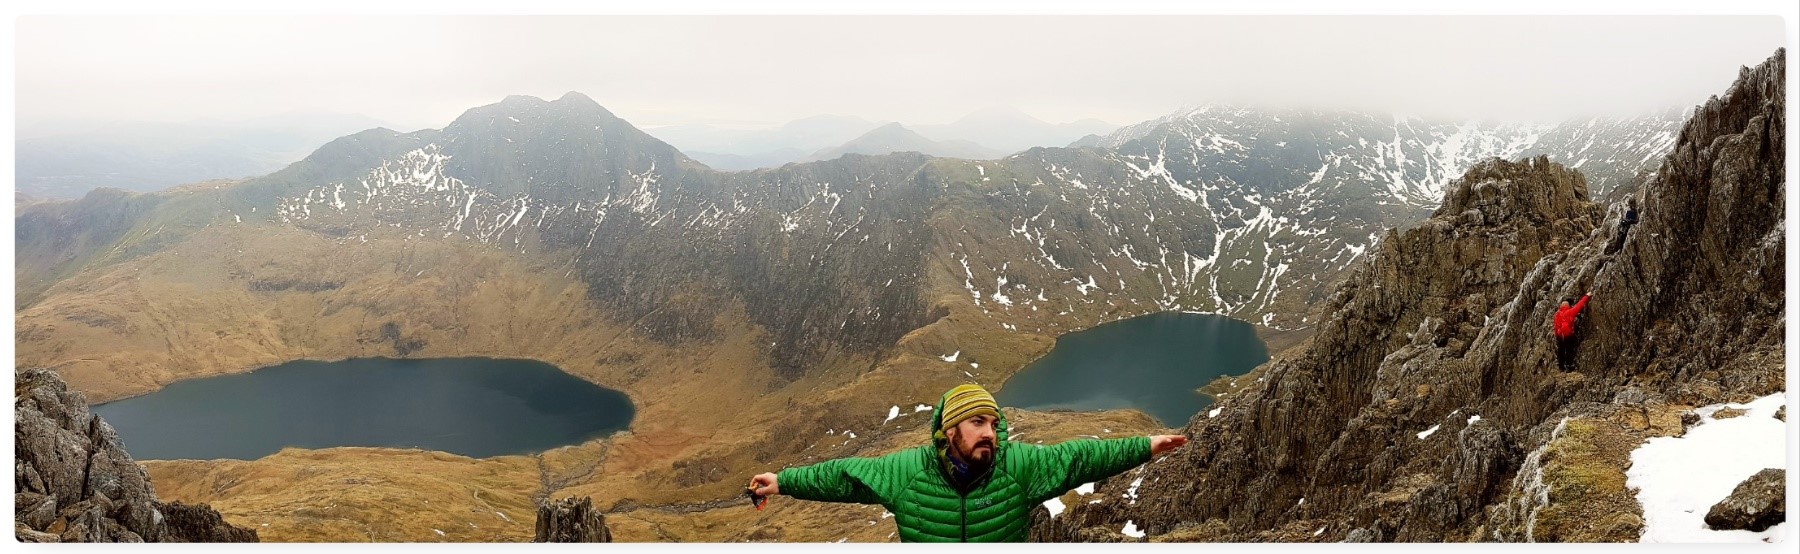
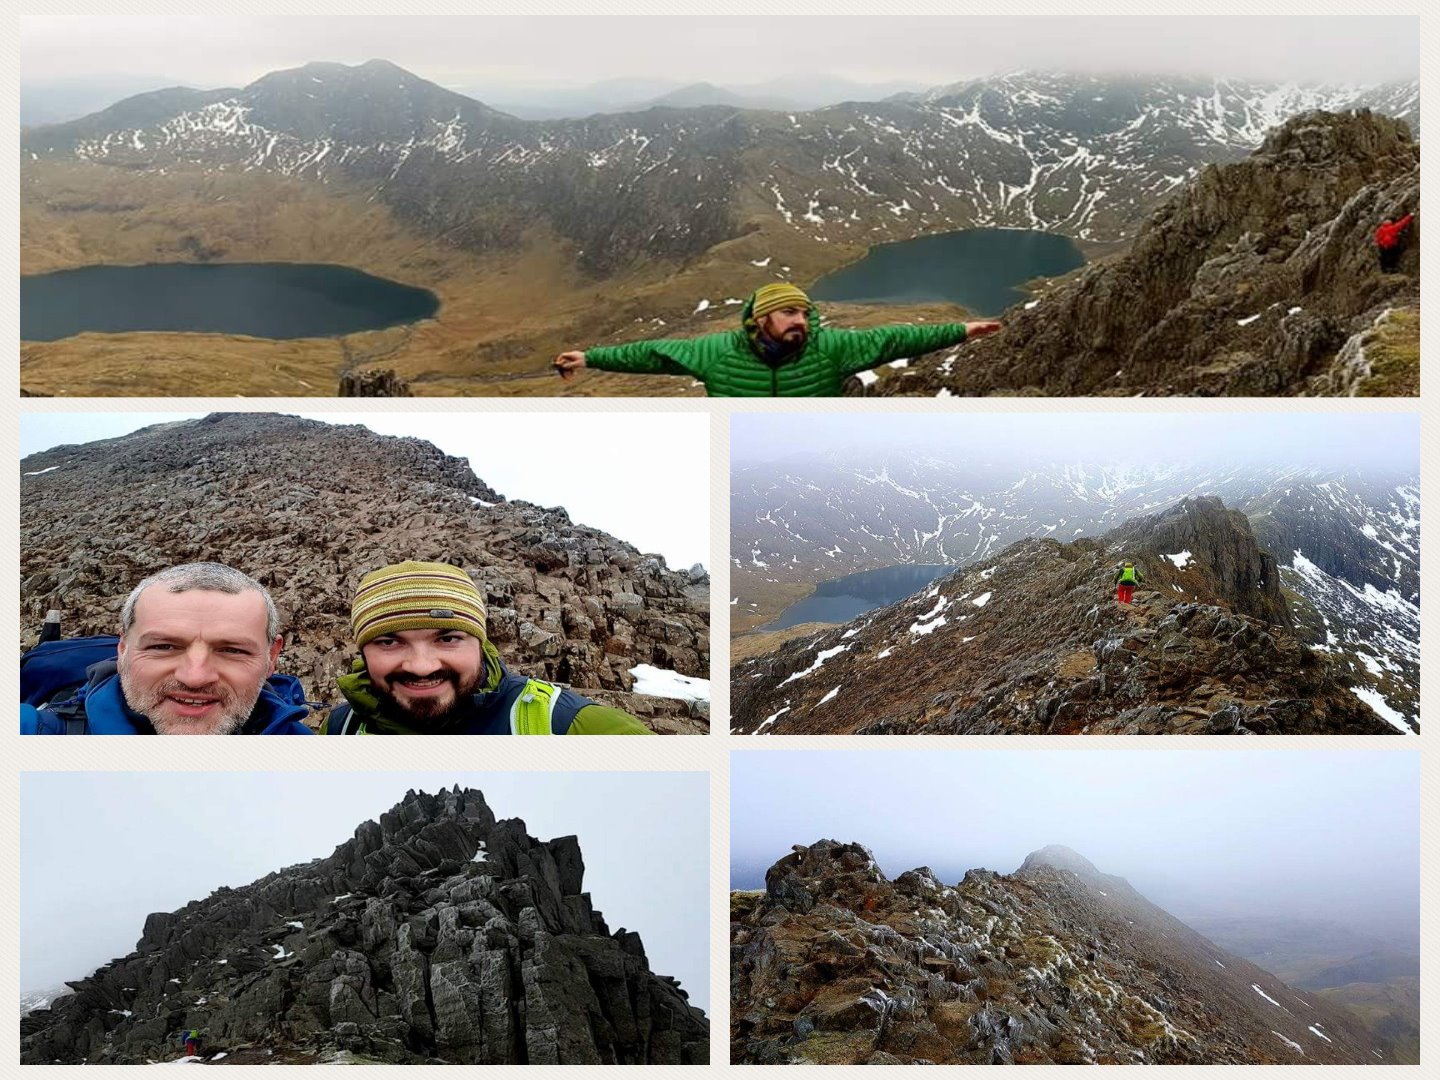
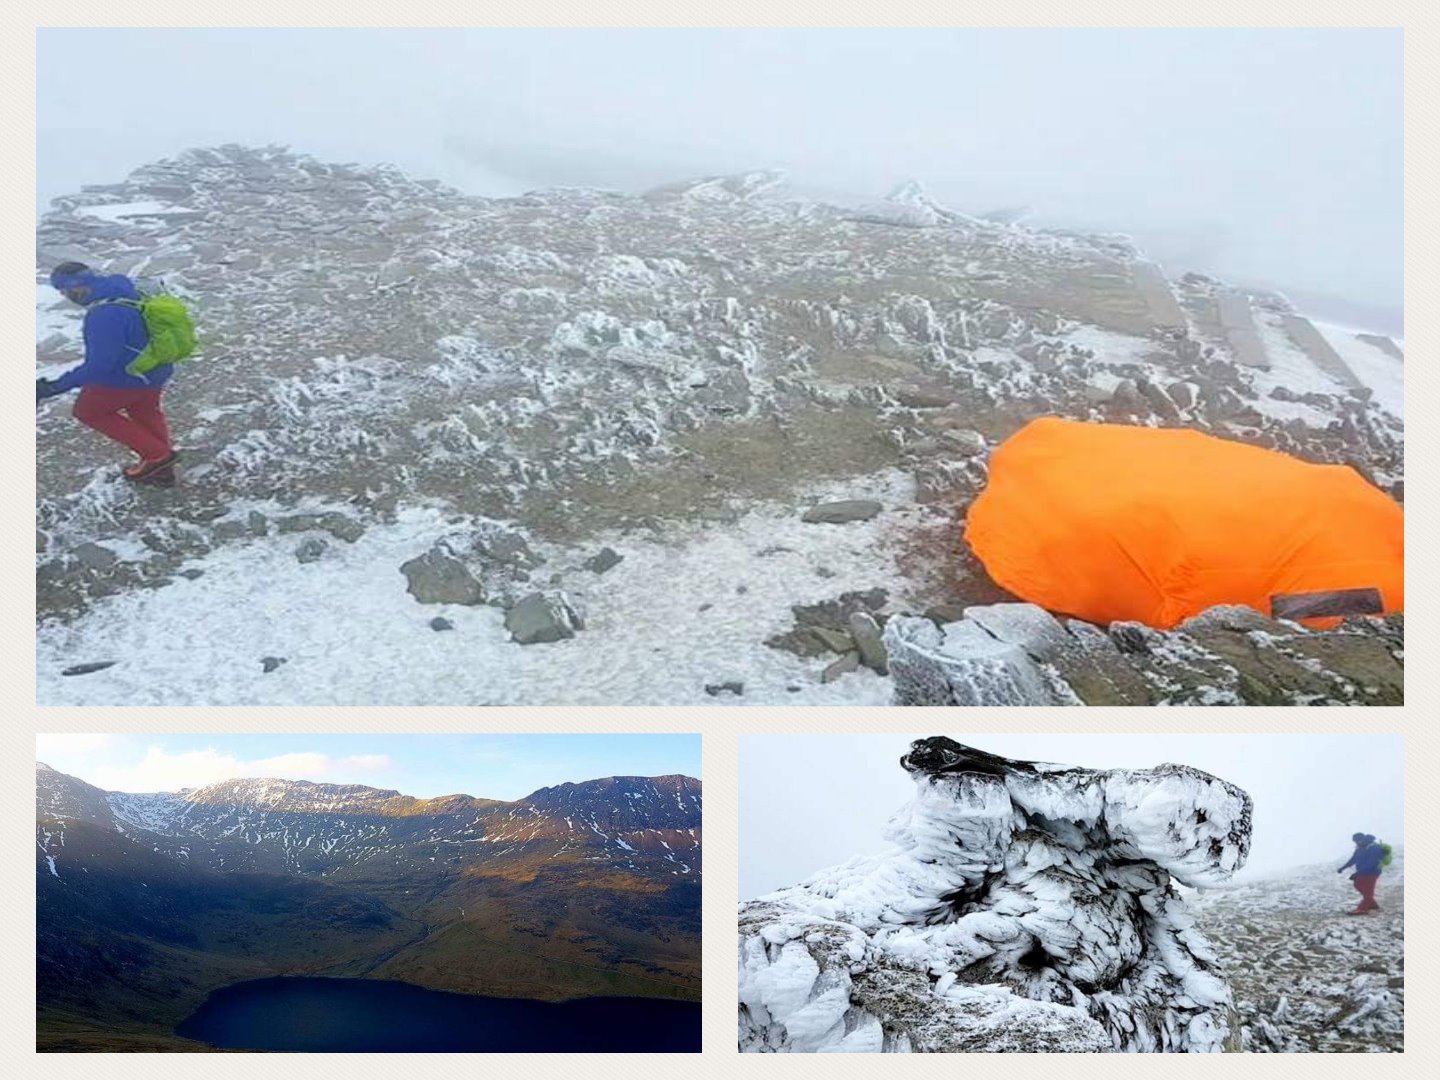
Day 2 of my winter trip to Snowdonia found me with Jacques on the Snowdon Horseshoe. We struck out early with a mind to tackle the horseshoe from the Crib Goch side first.
The day was slightly overcast to begin with and there was a smattering of snow high up.
Crib Goch
As it was early there were few others around as we ascended Crib Goch. The wind was negligible however you had to watch out for the sheet ice.
I do love scrambling along the edge of Crib Goch – especially when you have good vis from it.
We were soon up onto Snowdon itself and as usual (well it is for me) the clag was right down. There was a small group of climbers sheltering in a bothy below the summit and from the laughs they sounded to be having a good time.
Snowdon
After a short break we headed off down the Watkins path before veering off down to West Peak. It was crampon time here as the snow was pretty hard packed here – one of my crampons kept coming loose so I think a new pair are in order.
East and West Peaks
The weather really cleared up for us as we motored over West and East Peaks. The views were spectacular and we were even spotted someone para gliding around East Peak.
The Horseshoe
Coming off the horseshoe I was knackered however I was so glad I took up Jacques offer of a trek round the horseshoe once again. In the right weather and with the right kit it is a cracking day on the mountains.
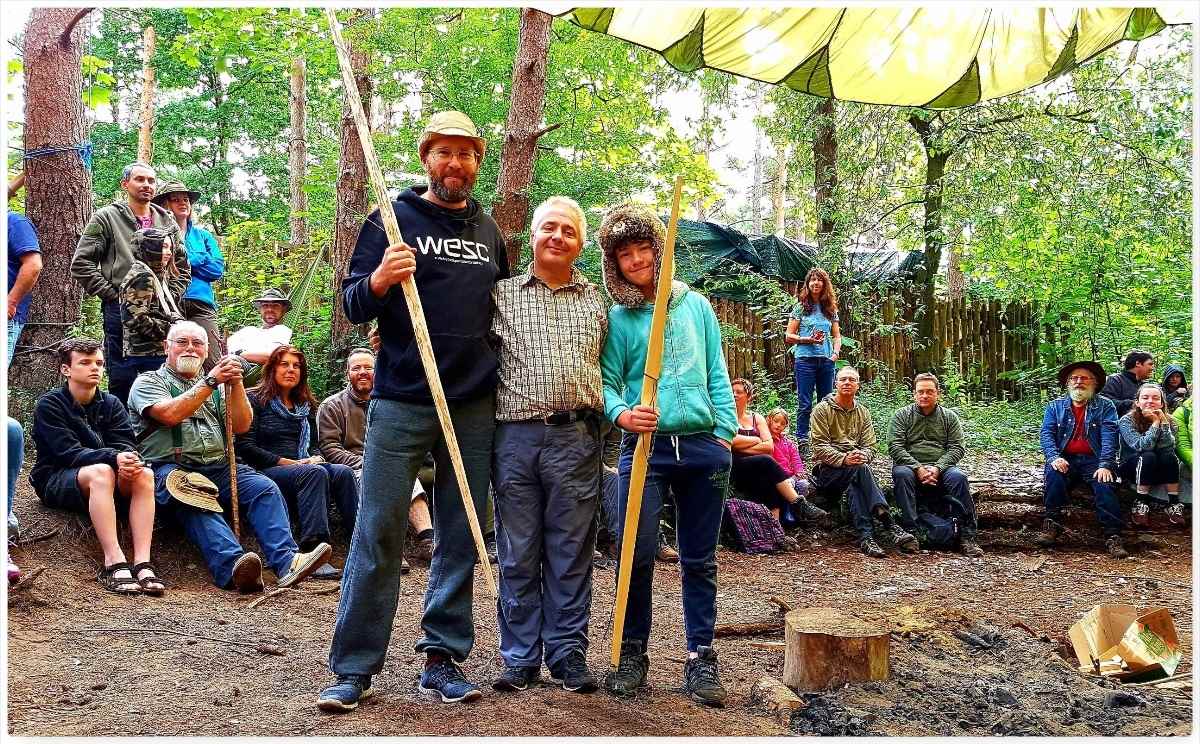
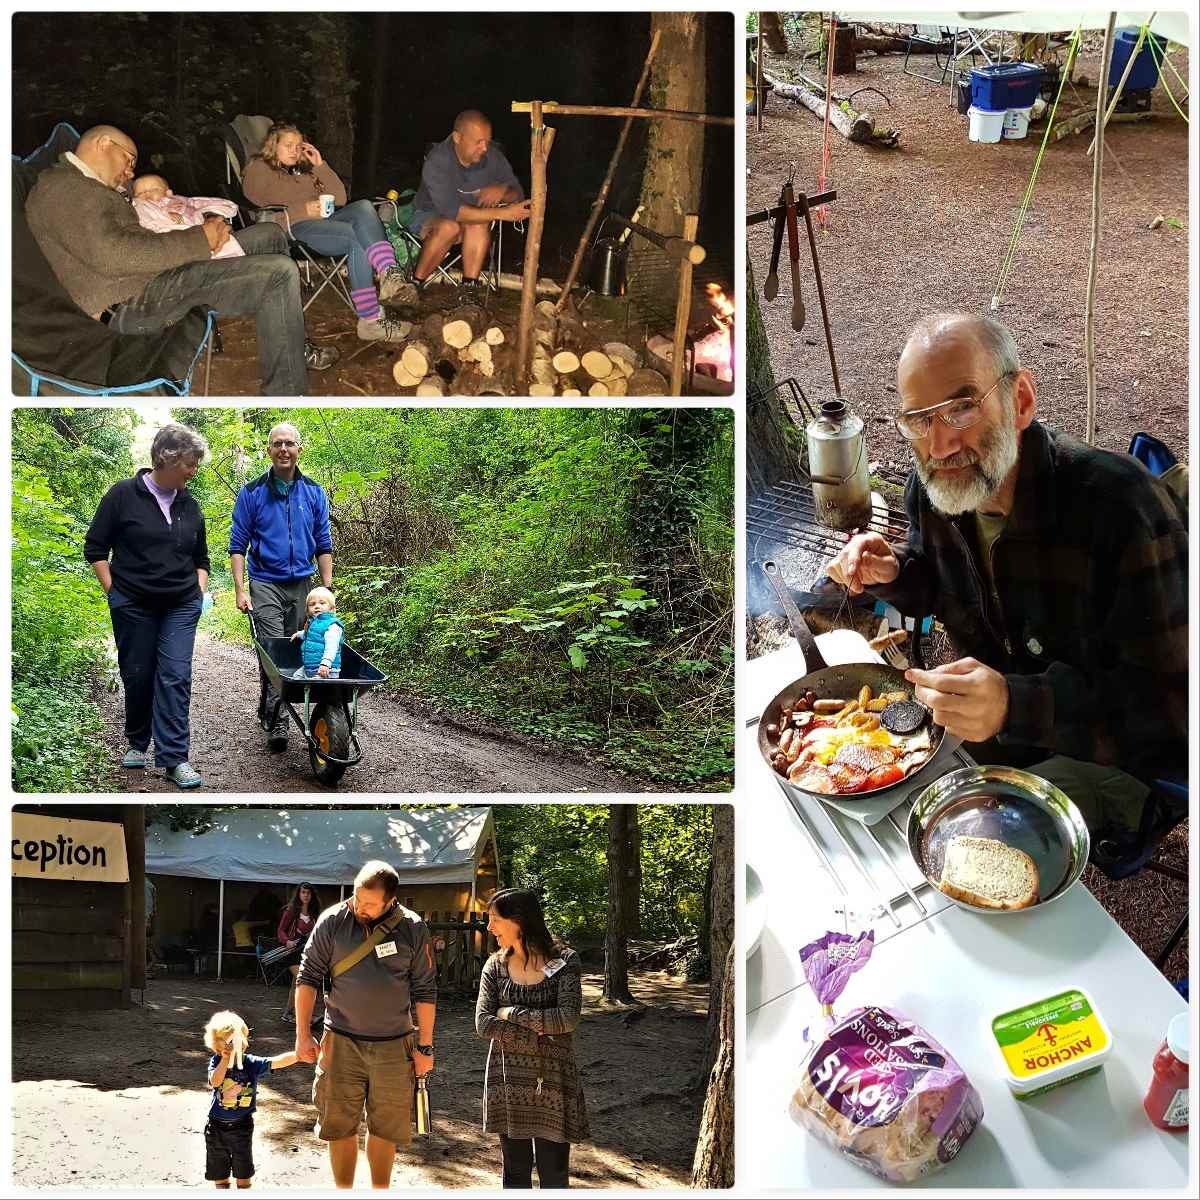
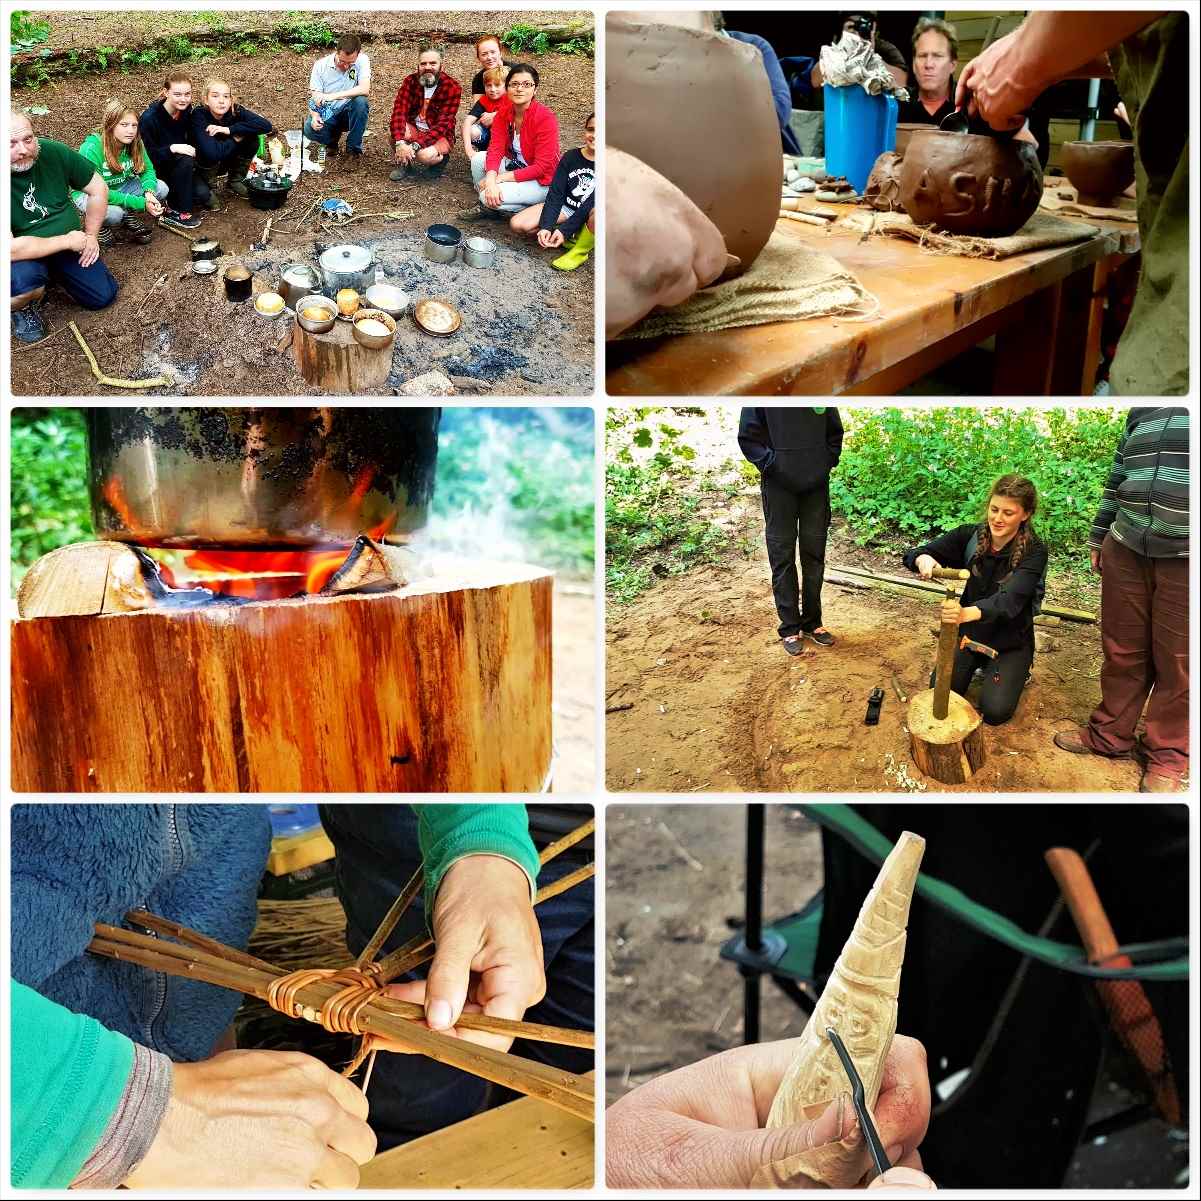
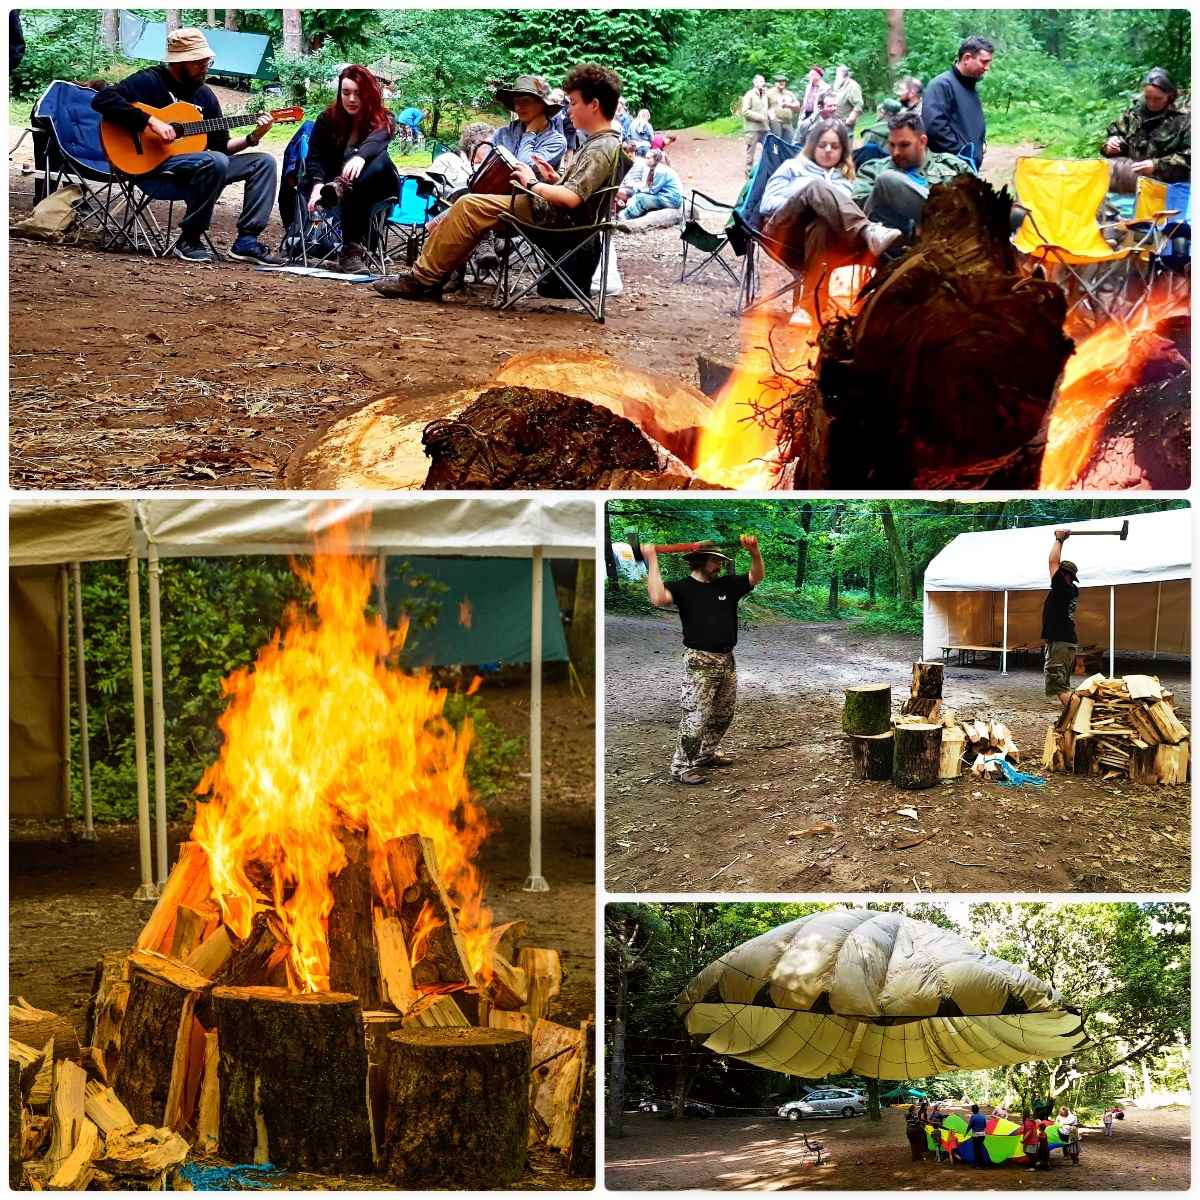
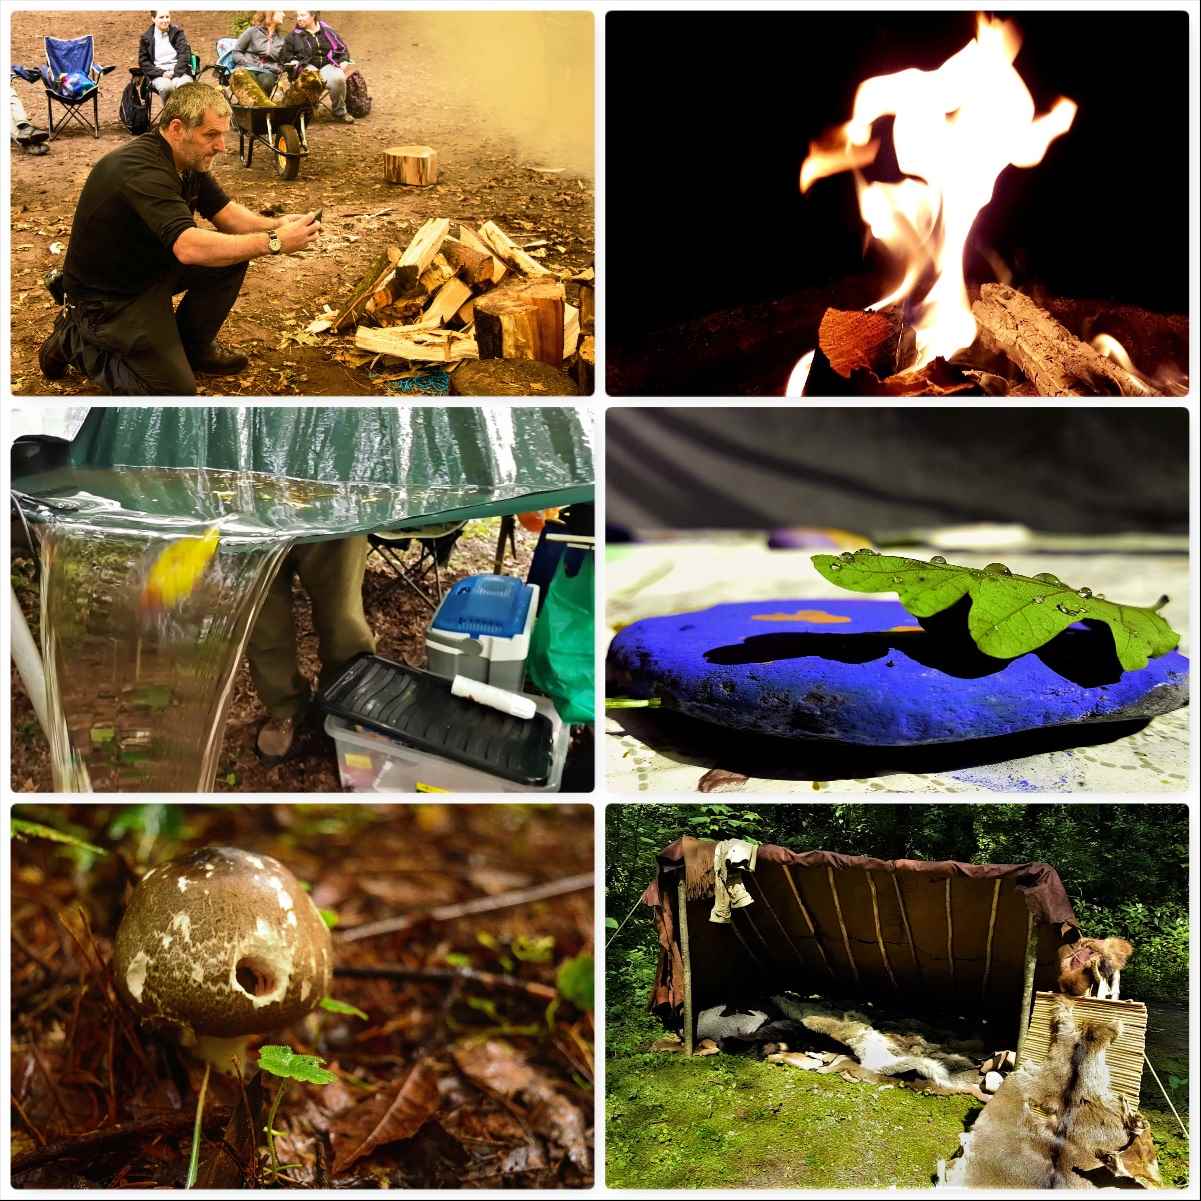
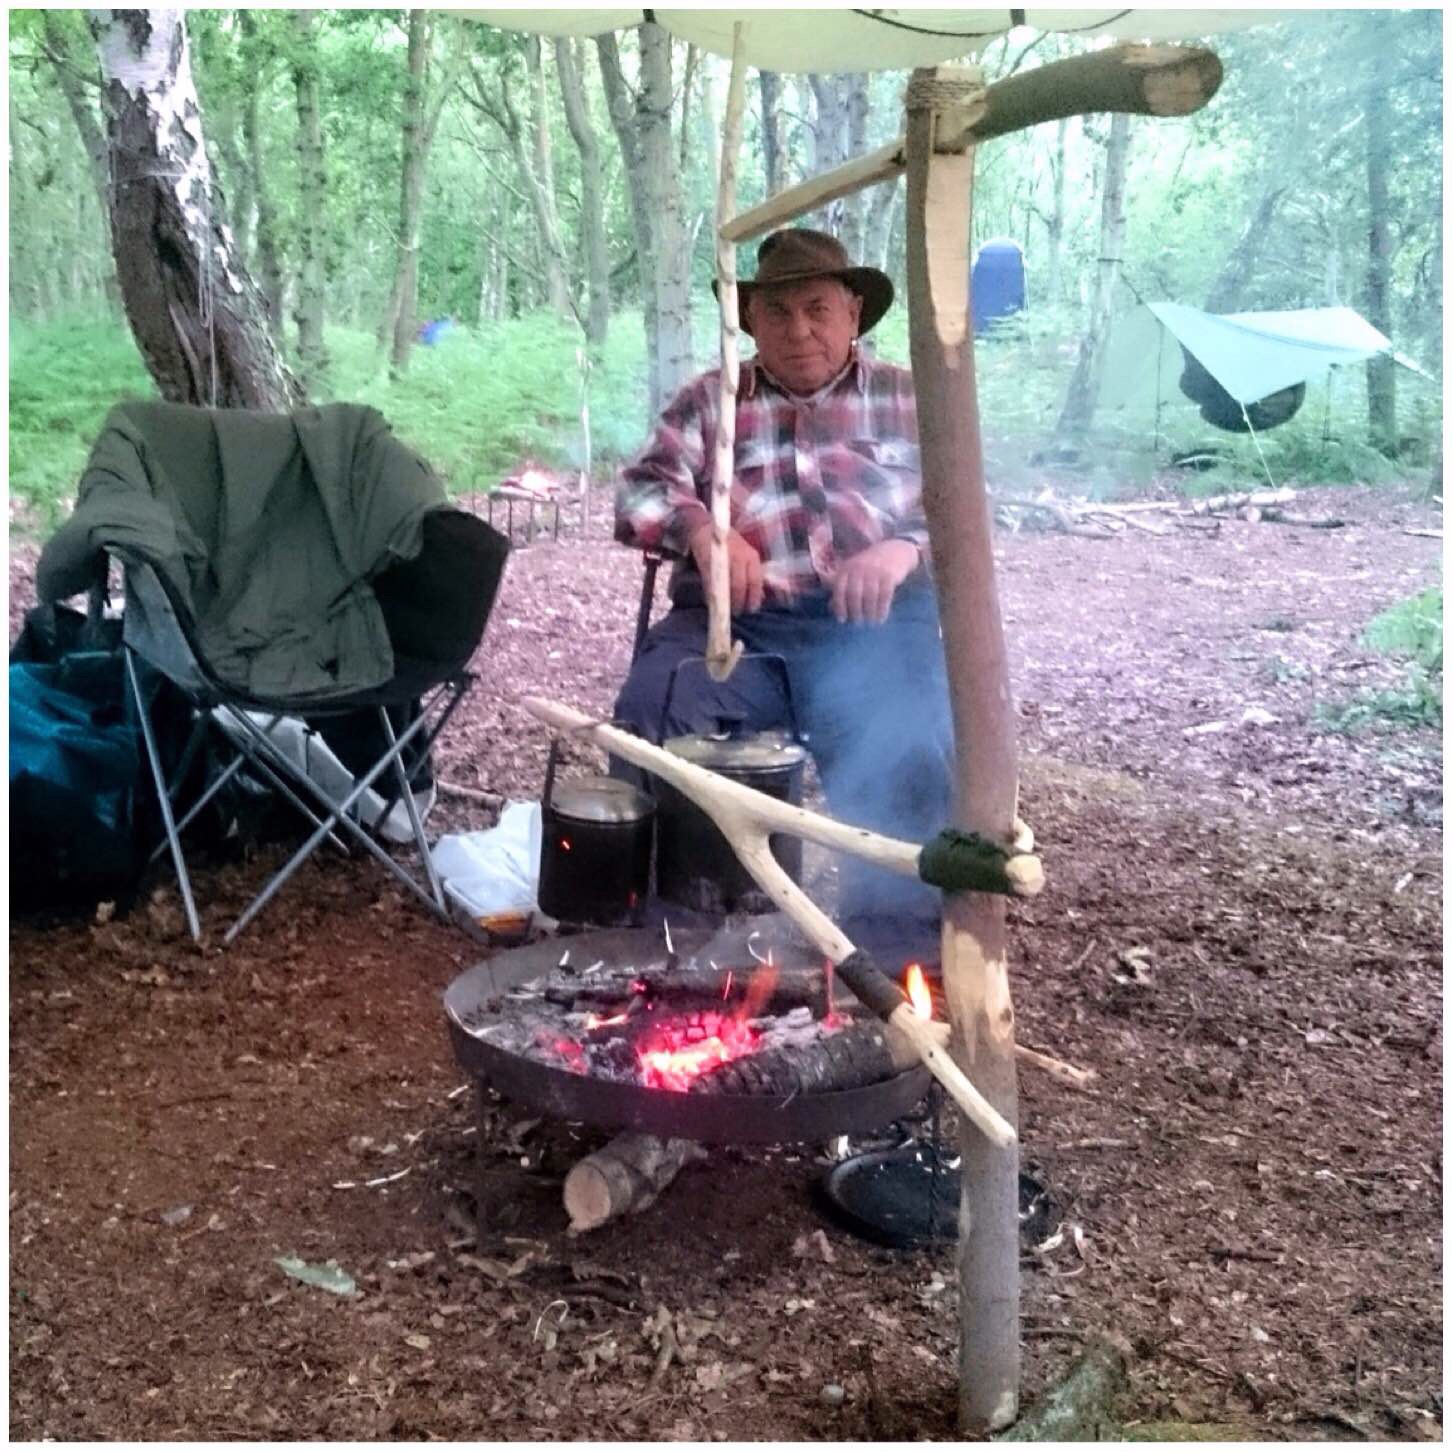
A ‘Brilliant Moot’ is how I would summarise this year’s Bushcraft UK Bushmoot. It was action packed from start to finish for me as I juggled my time between looking after my kids, running workshops and doing a lot of filming.
I will let the pictures and video do most of the talking so will keep the text to a minimum.
Bushmoot 2017
The first few days for us ‘Mods’ (forum moderators) were all about setting up the Bushmoot so that everything was in place for everyone arriving later in the week. We did not rush things as it was a holiday for us as well but over a few days the Bushmoot was soon set up.
Set up
There are some great places to camp at the Bushmoot which makes for stunning photography. The Mods’ corner is great to photograph on a sunny morning.
I have used the same camping spot for a number of years now and even though a year passes between each visit it feels as if I have never been away when I return.
Camp life
Early Workshops
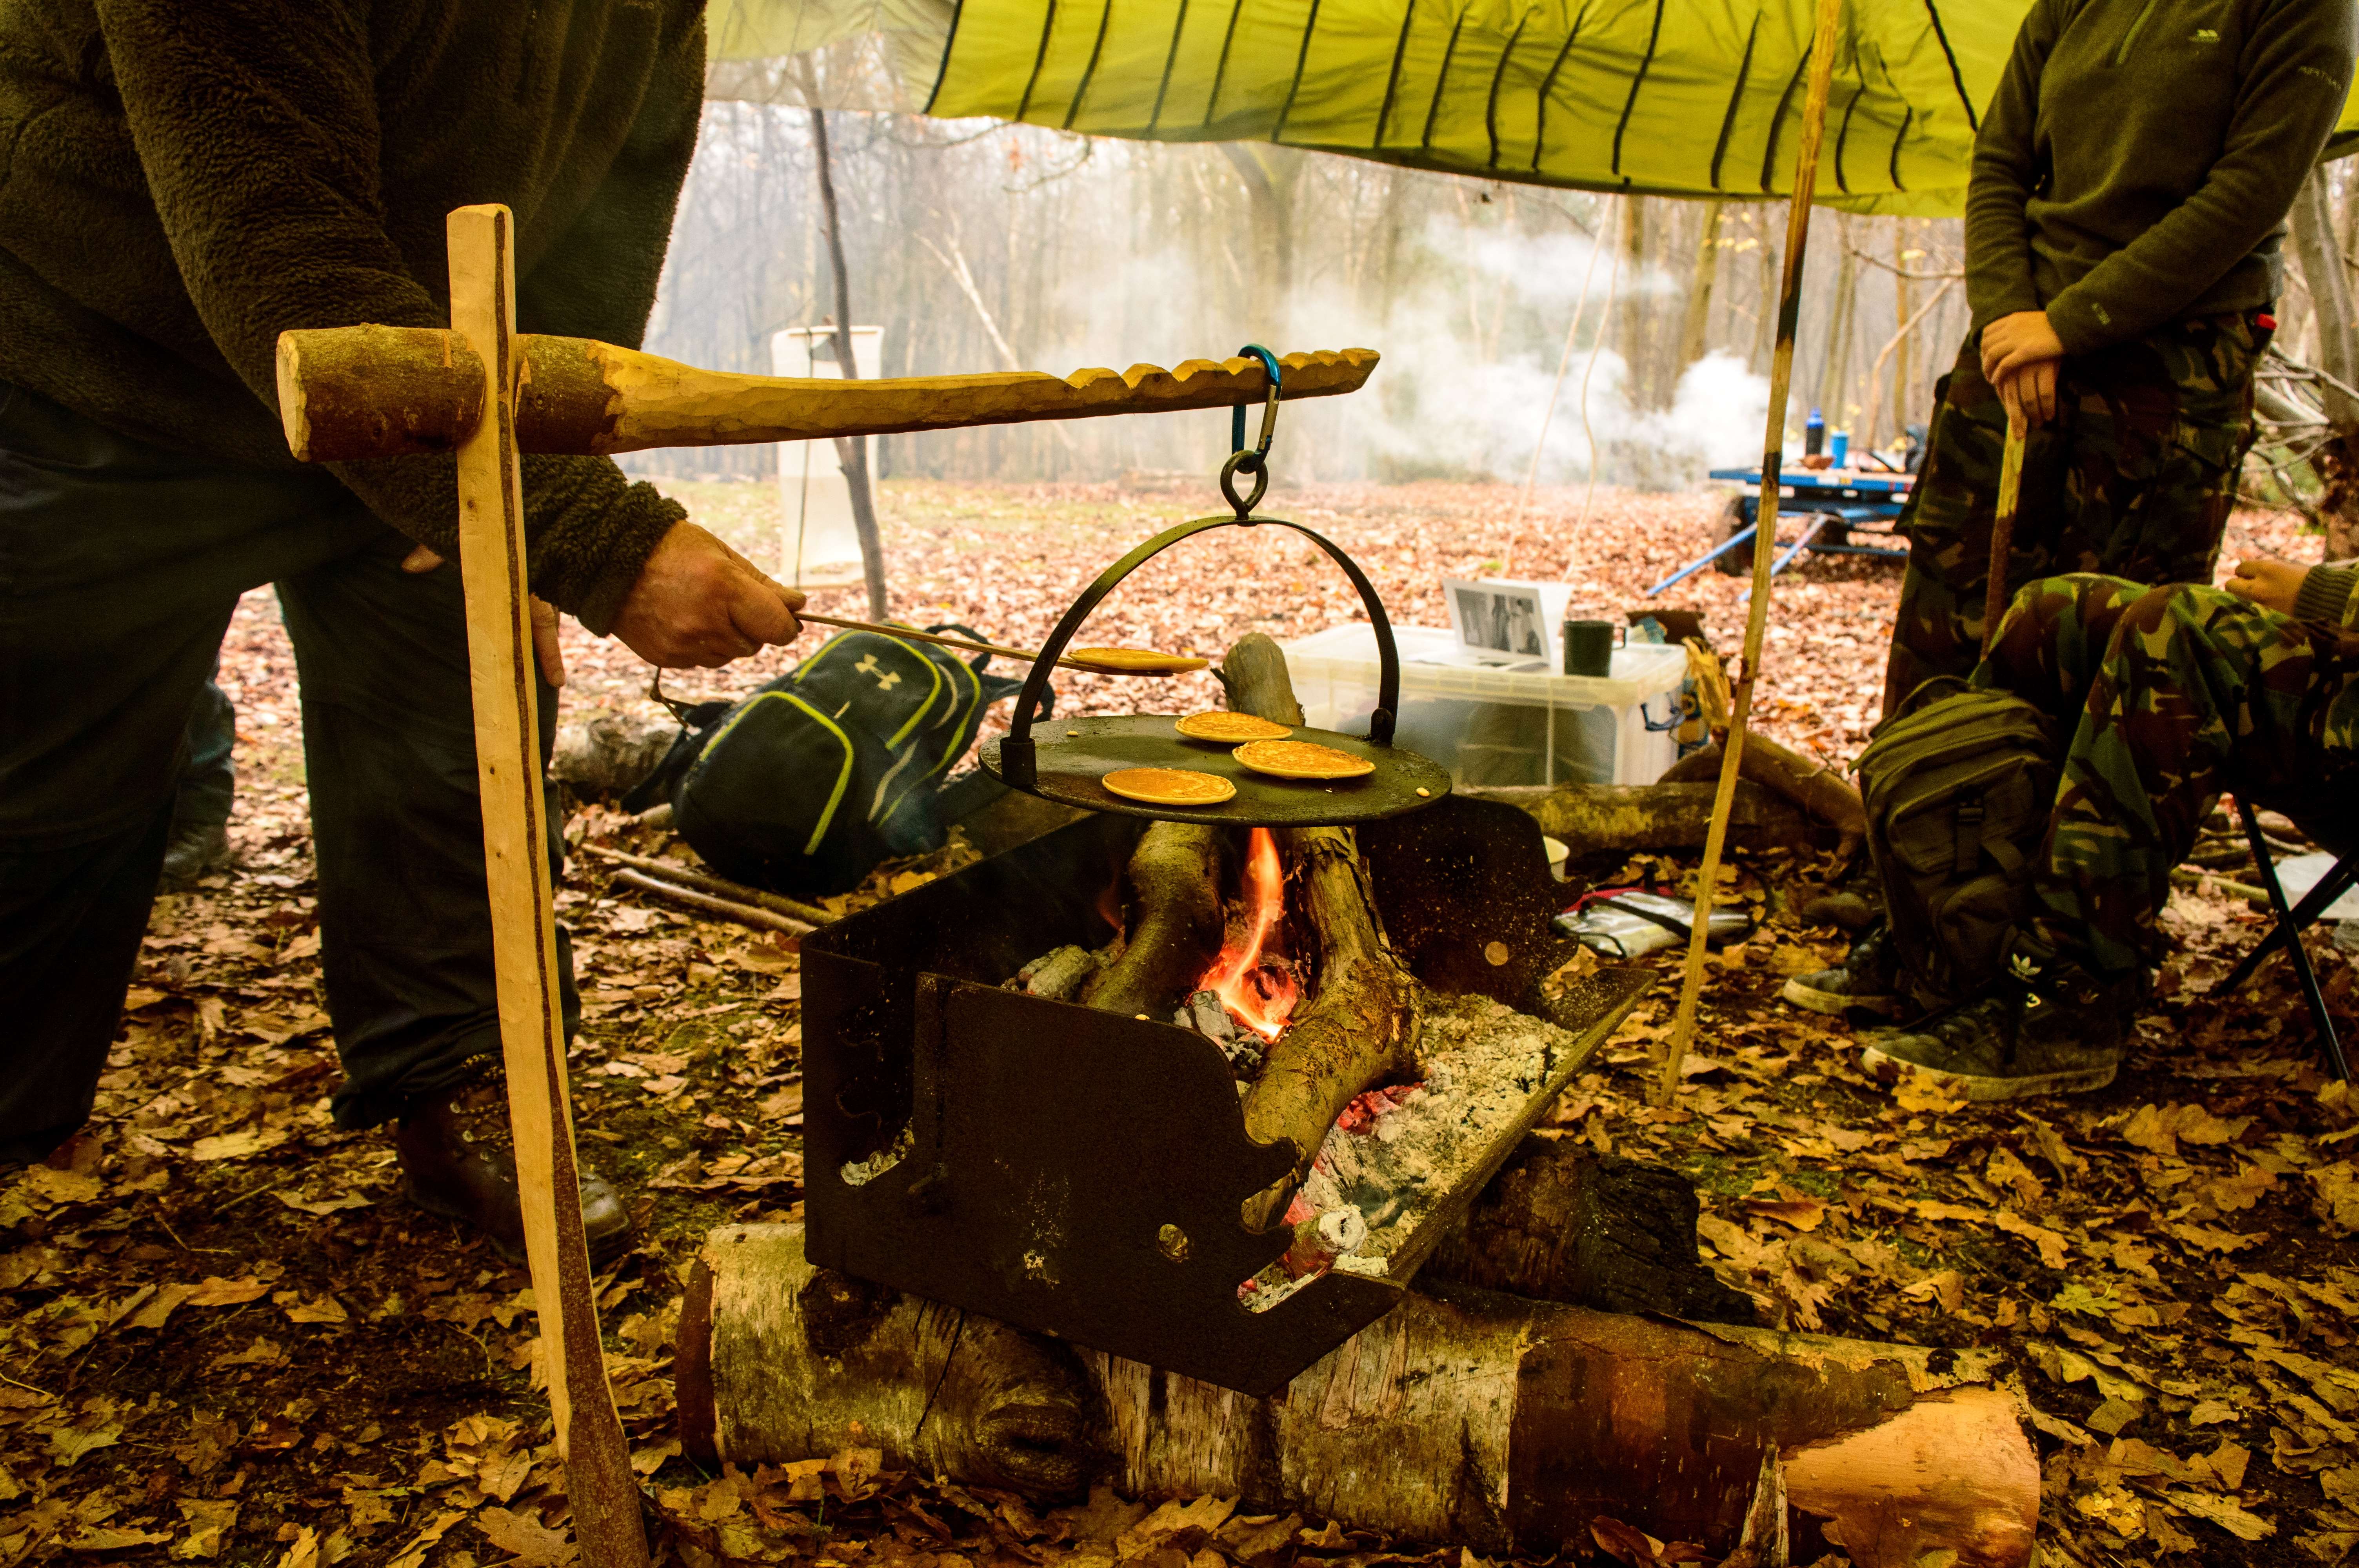
There were a couple of early workshops this year – Open Fire Cooking with Neil and a 48hr Survival Course with Fraser from Coastal Survival. Both courses covered a lot of different areas so my photos are just a snapshot of their content – needless to say on both courses all the students eat well.
Early workshops
Videos
I put a short video together of this early part of the Bushmoot – including a scenario where my son pretends to chop my head off with an Ivy sword 🙂
In amongst all these workshops and general setting up my kids took themselves off exploring. I went with them on one jaunt and they took me to the ‘House of Doom’ (as they referred to it). I think film companies use the site and they had left this massive Gothic barn – quite beautiful but eerie at the same time (the axe was for posing with only by the way).
Exploring
The Bushmoot is all about ‘Family’ as far as I am concerned – this family extends out to all my Bushmoot friends I see time and time again as I return each year.
Friends
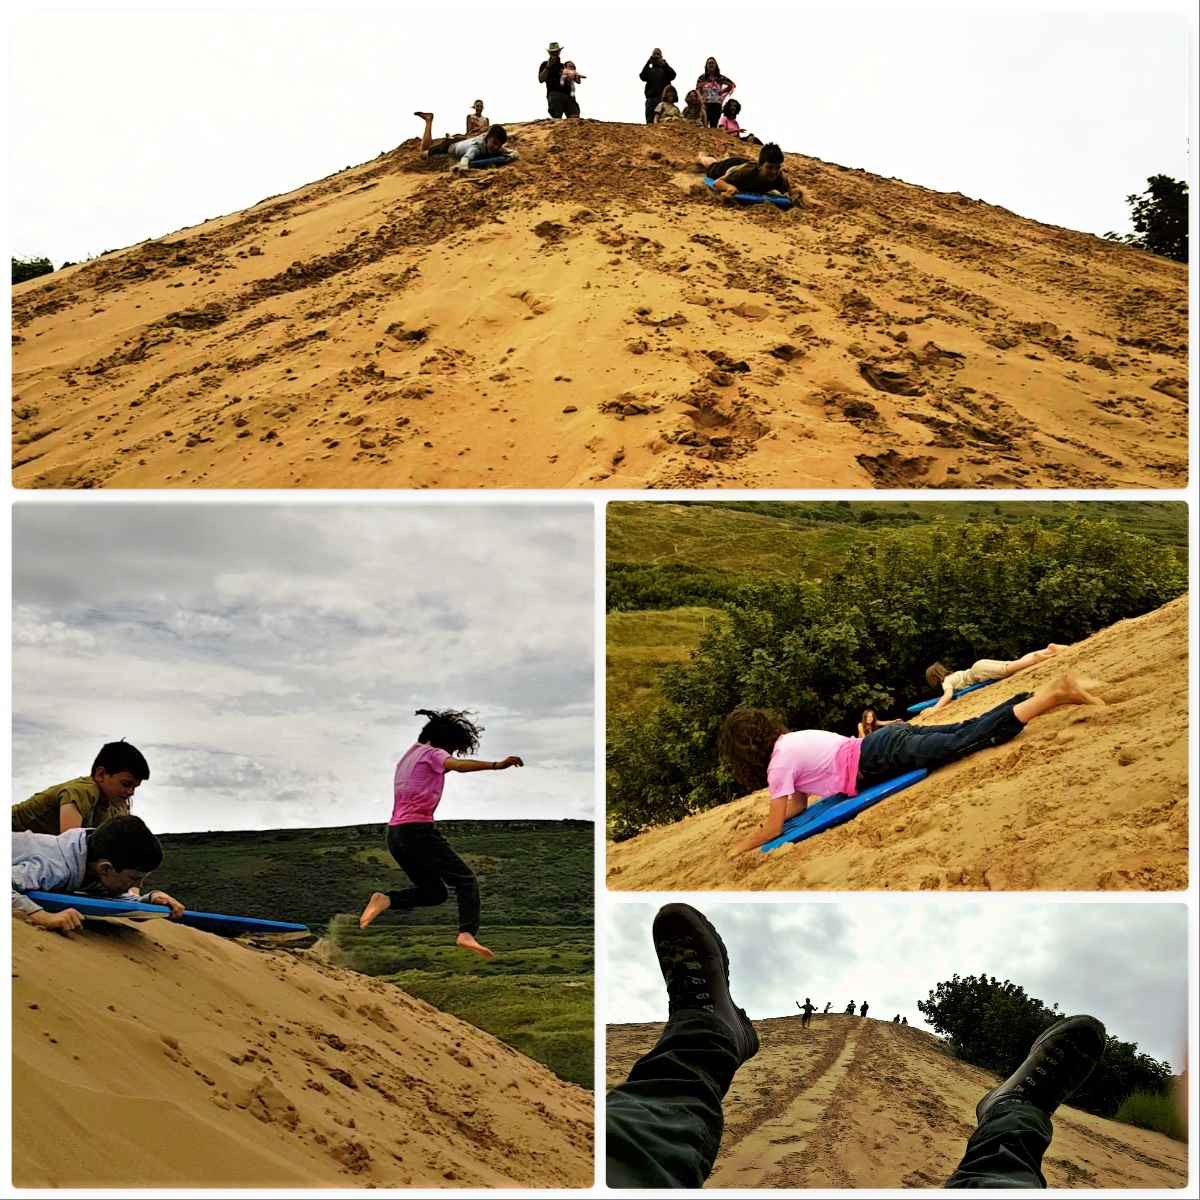
Getting out of the woods one day with my friends Ian, Catherine and Liz (and assorted kids) we went Dune Diving. Merthyr Mawr sand dunes are the second highest dunes in Europe, apparently, and there is one dune in particular that the kids love.
Needless to say I joined the kids as they threw themselves down the dune – great fun even for a 50-year-old kid like me.
Dune riding
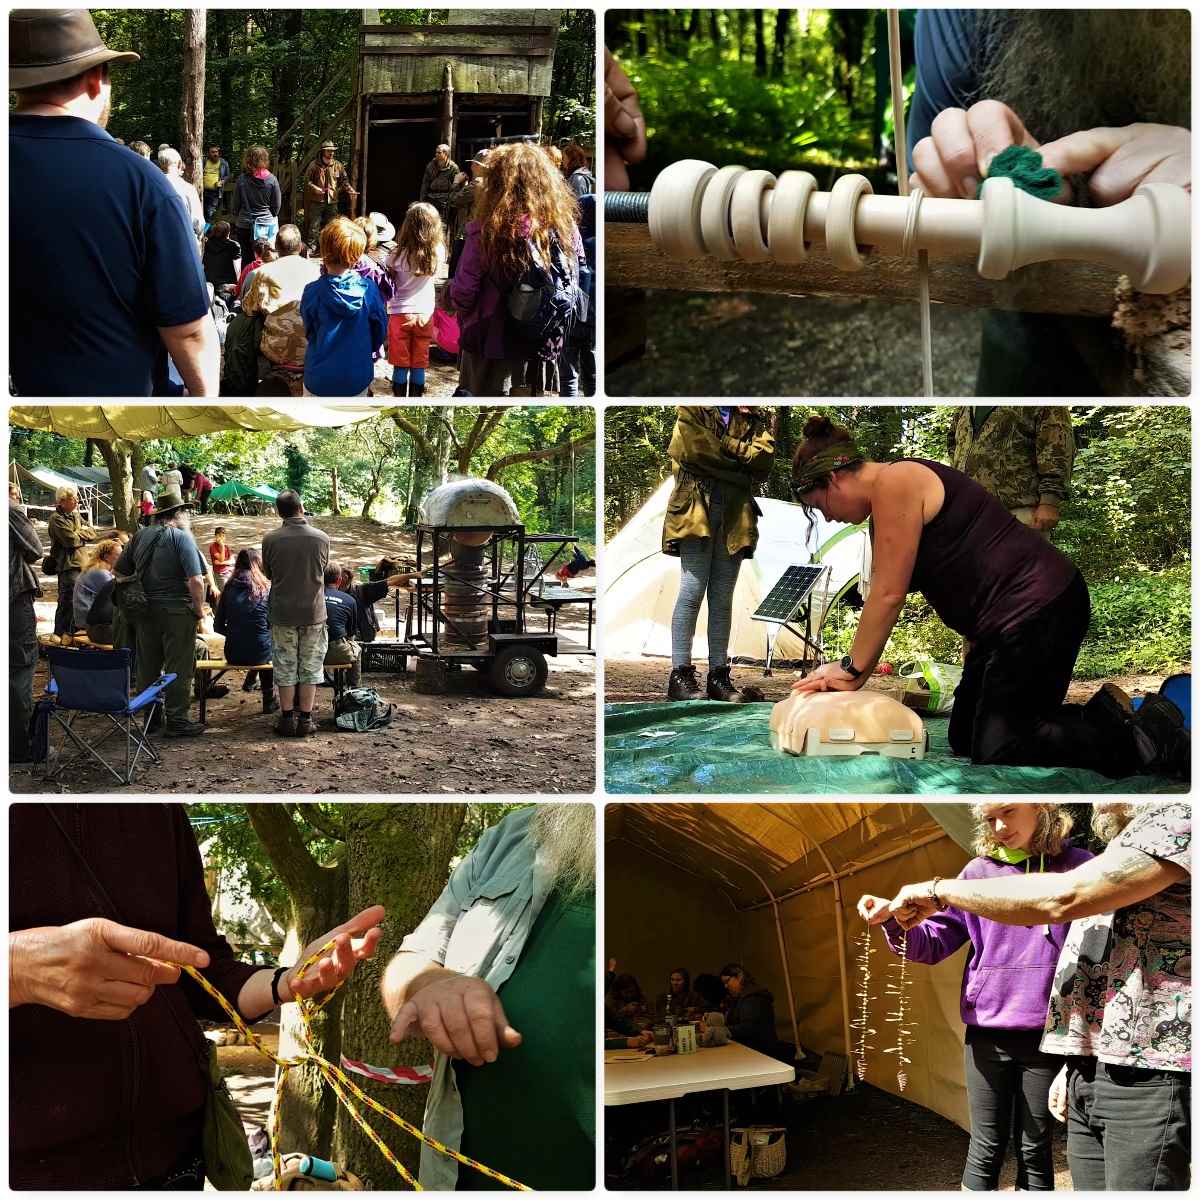
Core Day Workshops
I have no idea how many different workshops we ran this year and I only photographed or filmed a small number of them. We always start with a tool safety presentation (normally three different groups) before starting the main workshops.
Core days – part 1
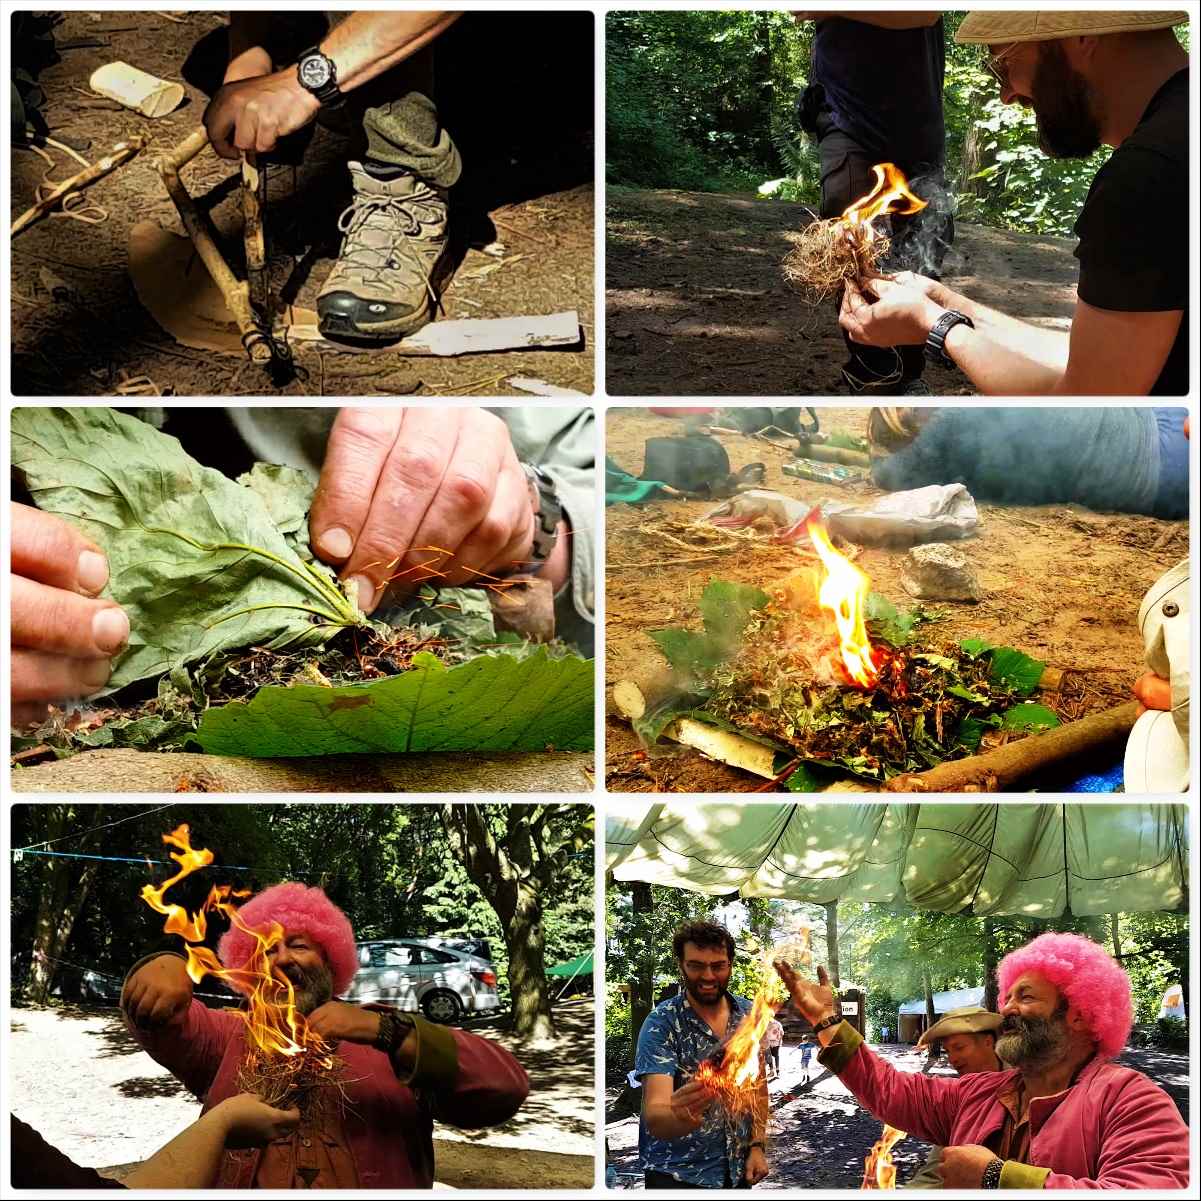
Fire lighting in its many different forms is a staple of the Bushmoot and this year was no different – below are pictures from the bowdrill, the damp tinder and the flint and steel workshops.
Core days – part 2
Other workshops included Baking, Pottery, Rocket Stoves, the Starter Course, Basketry and Wood Spirits (to name just a few).
Core days – part 3
Watch the video to get a feel of the subjects we cover at the Bushmoot.
Bushmoot Life
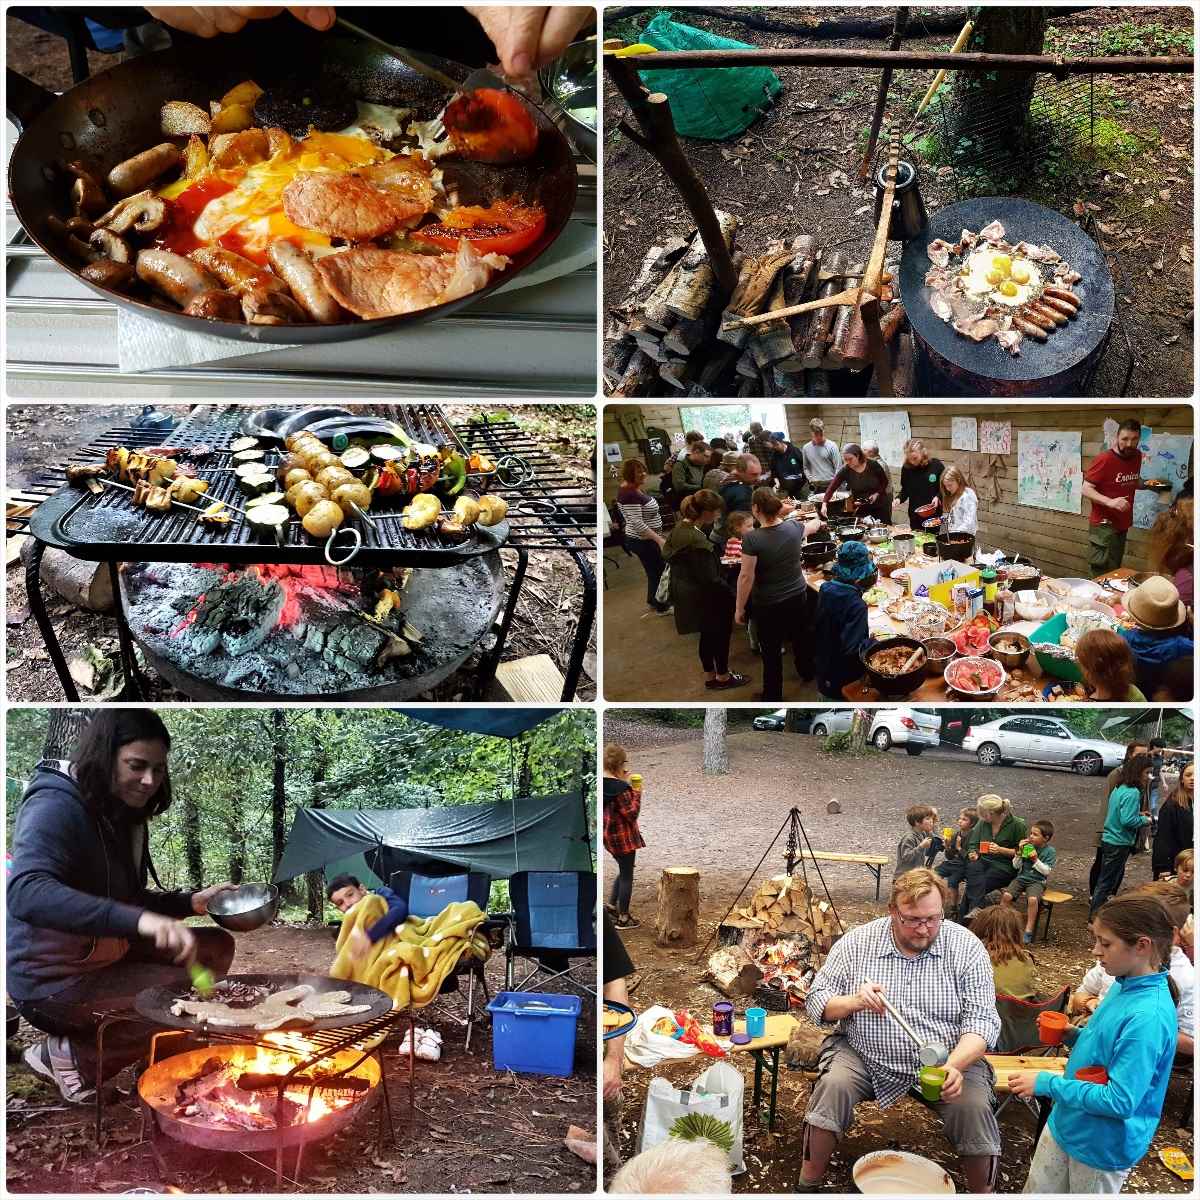
Outside of all these workshops and background work life goes on at the Bushmoot – food I can tell you forms a big part of that life 🙂
I am no great chef (tend to prefer building Campfire Cooking Constructions) but can when needed put something together – thankfully though there are plenty of people around like my wife Alison willing to put together a good spread for the kids and myself. Highlights of the Bushmoot are the Group Meal and the Hot Chocolate evening.
All things food
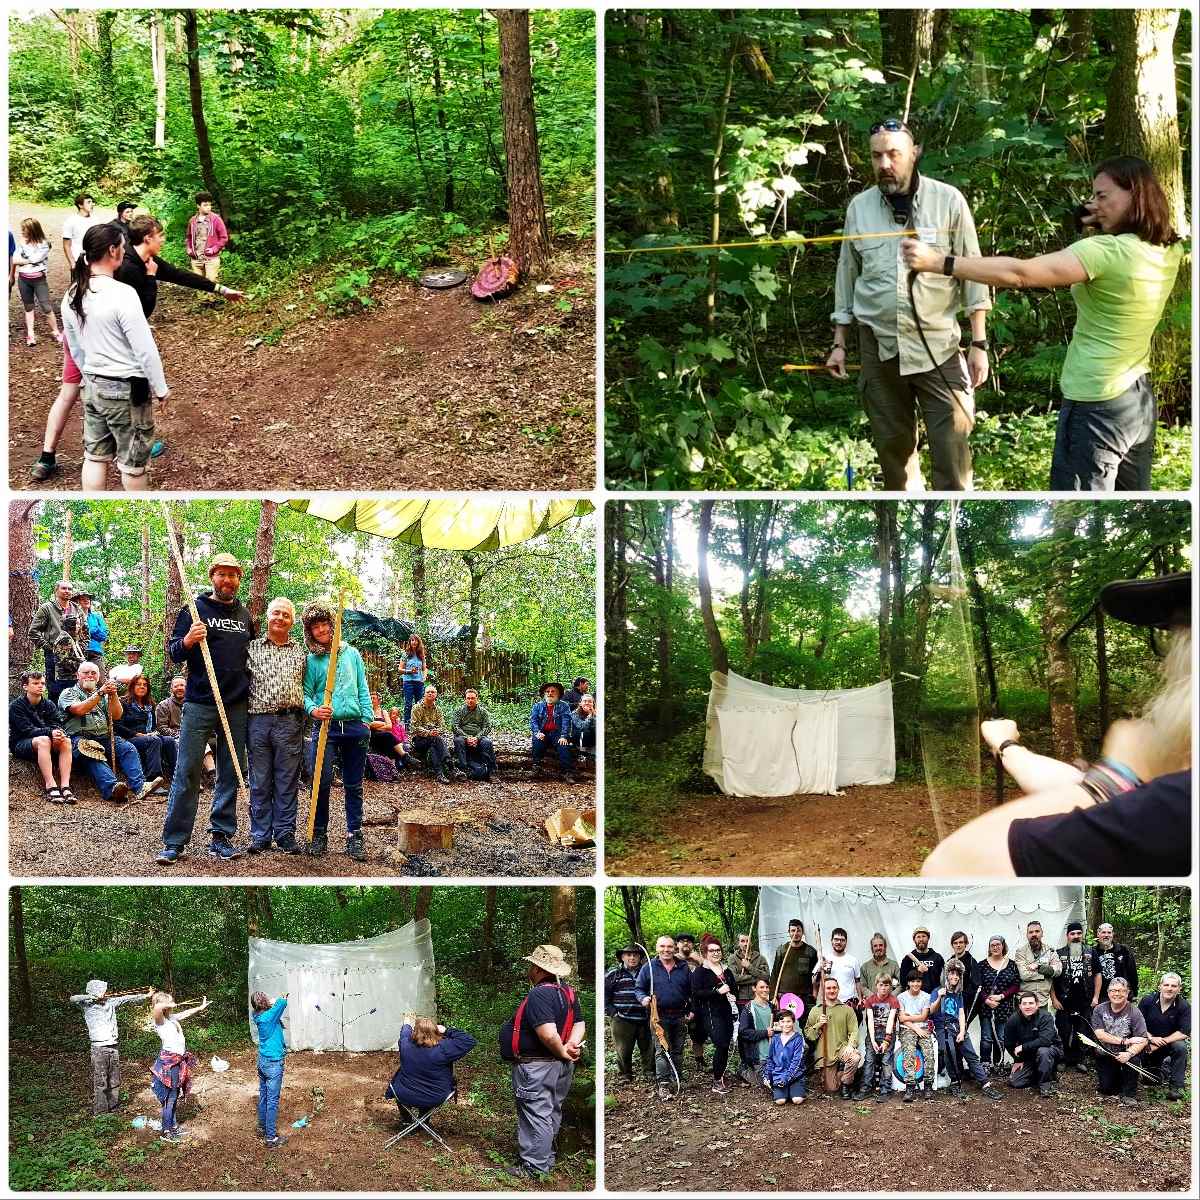
A favourite of mine has always been the archery range. We had another great competition this year. The winners from last year (Marek and Louey) were also presented their made-to-measure bows from Wayne Jones of Forest Knights.
This year we also had a catapult competition run by Steve (Mesquite) Harral and a workshop from David Colter on the Pellet Bow. Around the site we had various smaller ranges for axe, spade and pin throwing.
Down on the range
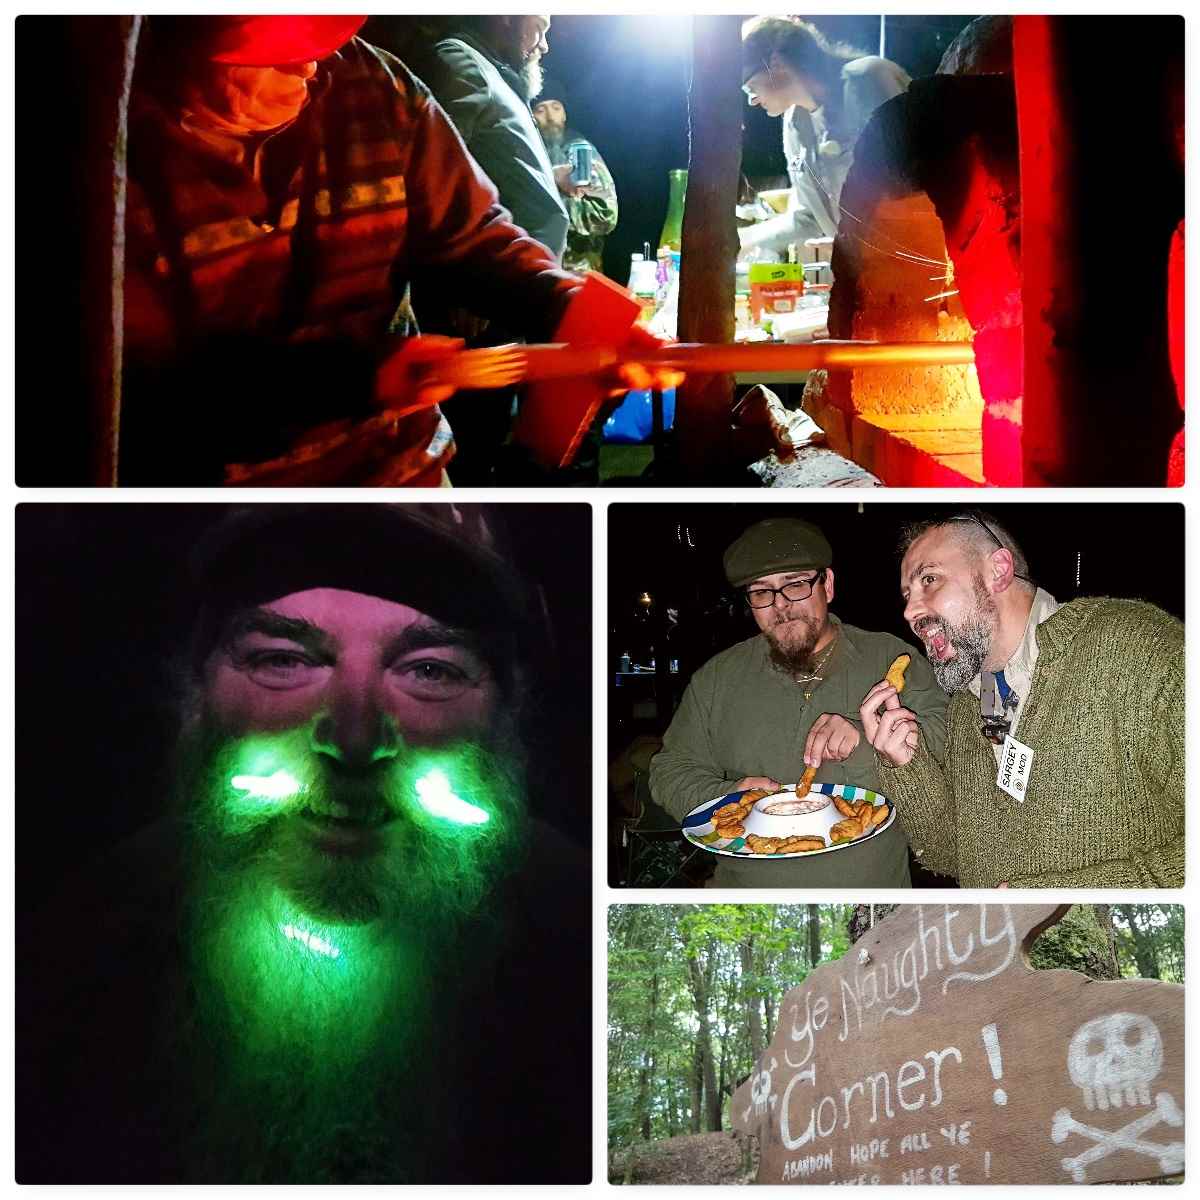
The Naughty Corner
No Bushmoot would be complete without the Naughty Corner and I try to get up to it for an hour or two each evening. This year my friend from the Sea Cadets Alan Lewis joined me at the Bushmoot for the first time and as he is a chef found himself drawn to the pizza oven.
Phil and Magda as usual kept us well fed each evening and Cap’n Badger made sure we were all not too naughty 😉
The Naughty Corner
The Sand Pit
The evening socialising is not restricted to the Naughty Corner – usually for a couple of evenings lots of folk congregate under the big chute by the kids sandpit for a bit of a shindig.
We were supposed to have a band along one evening but for some reason they failed to show up – thankfully Marek and Gemma with some others started their own musical session that lasted well into the evening.
Sandpit evenings
The Main Chute
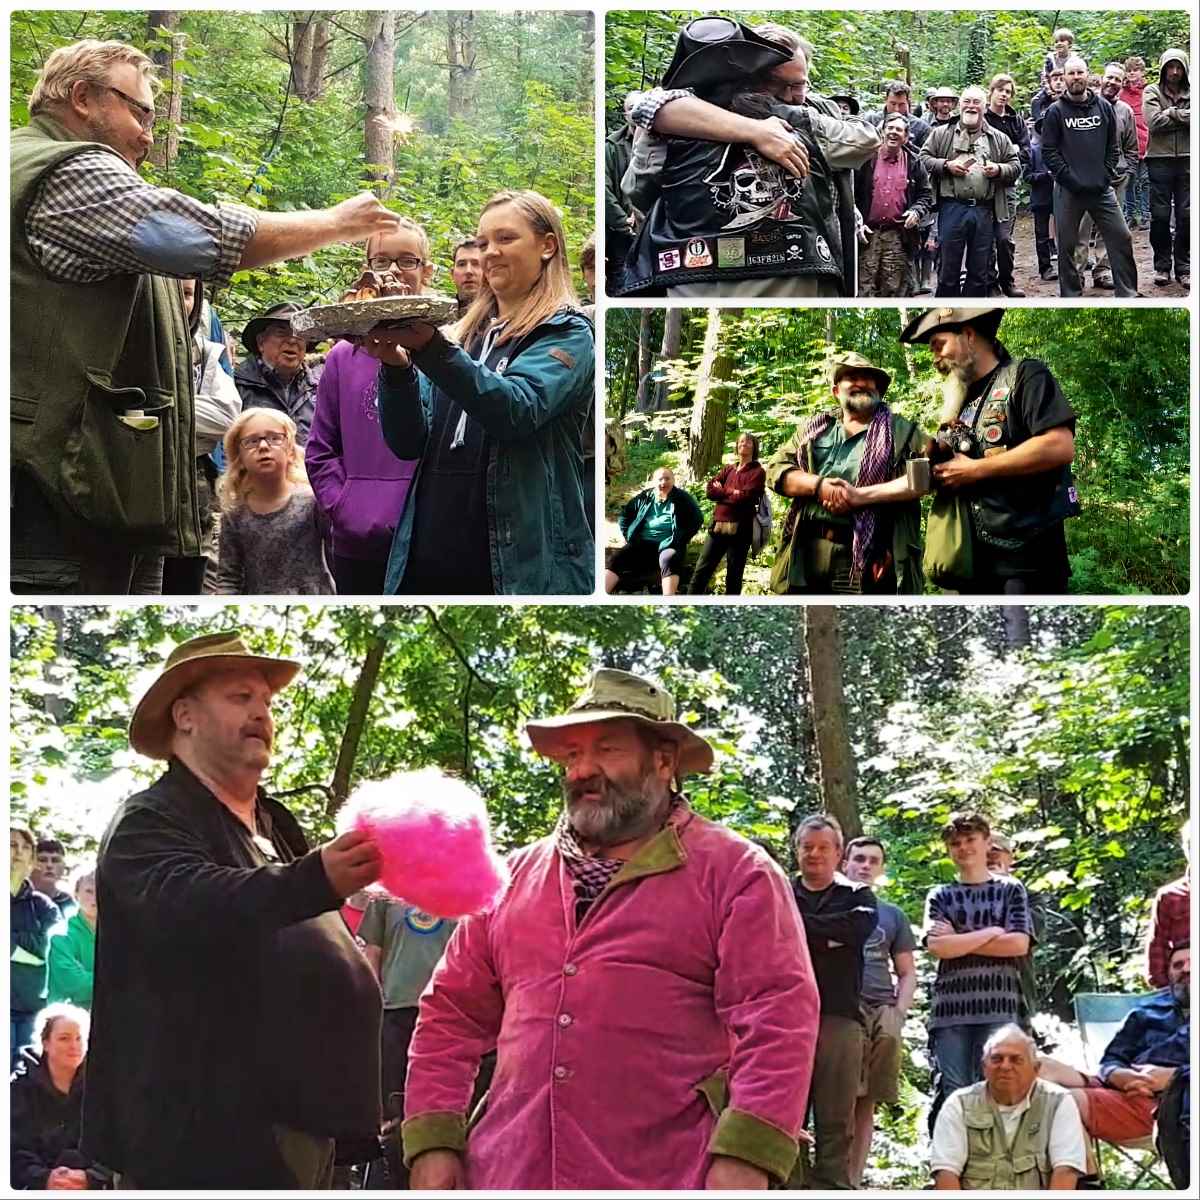
This is where we meet each day, talk about what will be happening, answer questions and celebrate people.
The Bushmoot is run by Tony and Shelly Bristow (along with us volunteer Mods) and as often happens the Bushmoot coincided with Tony’s birthday. We also remembered our dear friend Drew who passed away so tragically at a young age in 2013. We do this by giving each year an engraved Swiss Army Knife to the person we feel has contributed most to the Moot.
Our good friends John Fenna and Steve Harral raise money each year for Cancer charities. Steve gets John to dress up in a different pink outfit each year and we make lots of donations in various ways. Also John has an award he gives out called the John Fenna Award (a Teddy Bear with lots of bushcraft kit) and this year it went to Cap’n Badger for dedicated service to running the Naughty Corner – or undetected crime as I hear 😉
Life under the main chute
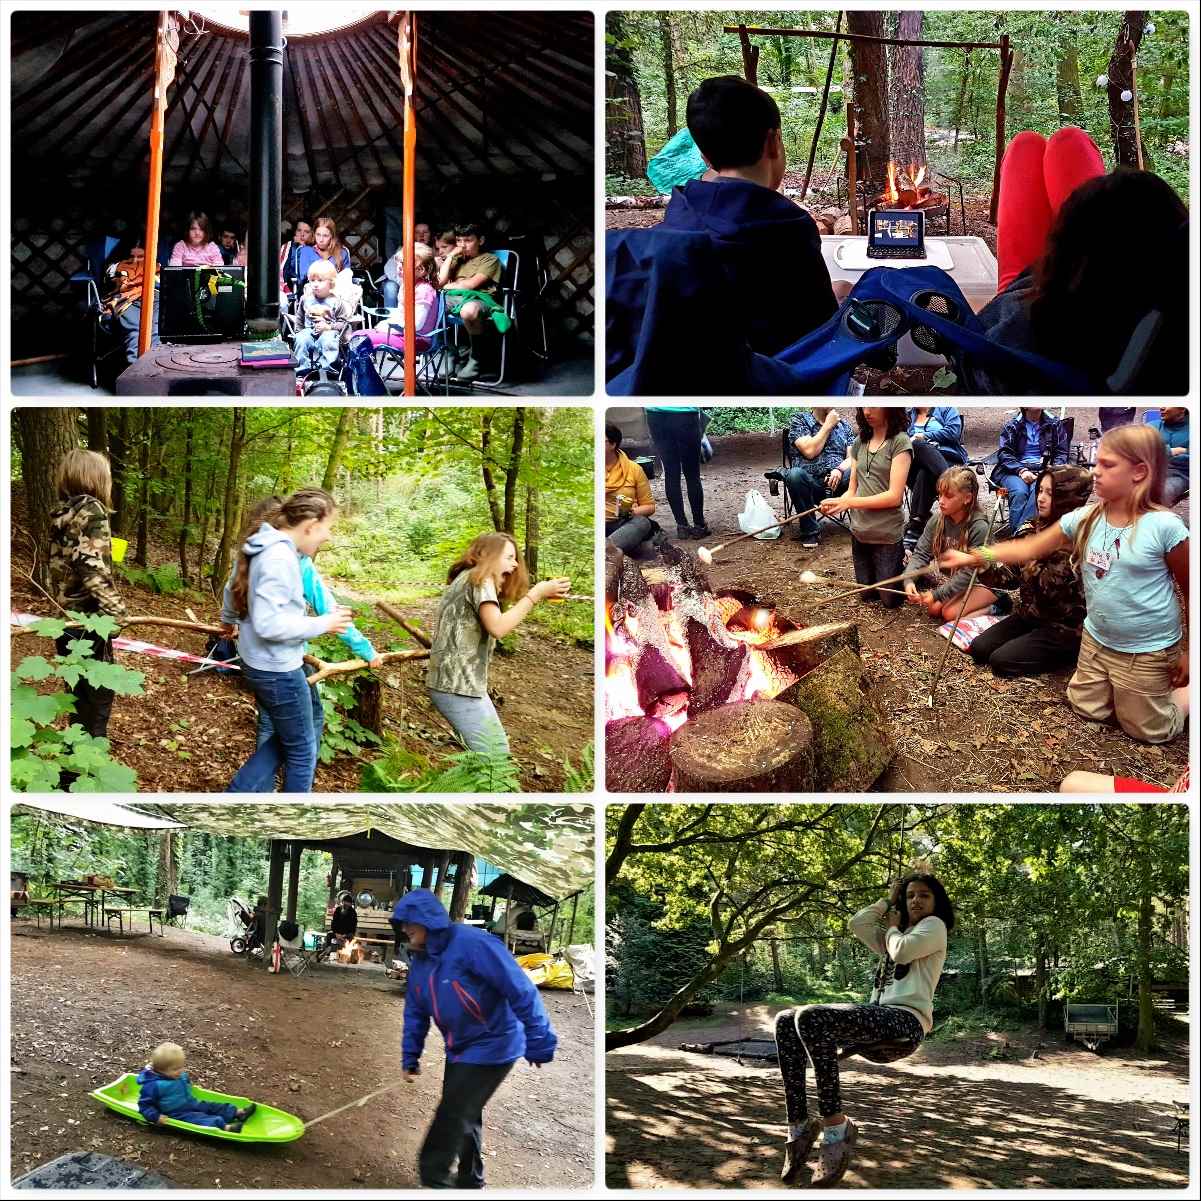
Kids’ Fun
All this talk of fun would not be complete without mention to what we organise for the kids (I mean the young ones here). We are not against technology and I am happy to let my kids watch a movie in the evening by the fire (gives me a breathing space to get on with camp chores).
The Bushmoot is a family friendly place and there are always workshops and games planned in for the kids. When there are no planned activities the whole estate is their playground and it’s great to see my kids roam free as I once did as a kid growing up in the Western Isles.
Kids – old fun and modern fun
My last video on the Bushmoot looks at this ‘Bushmoot Life’.
A Celebration
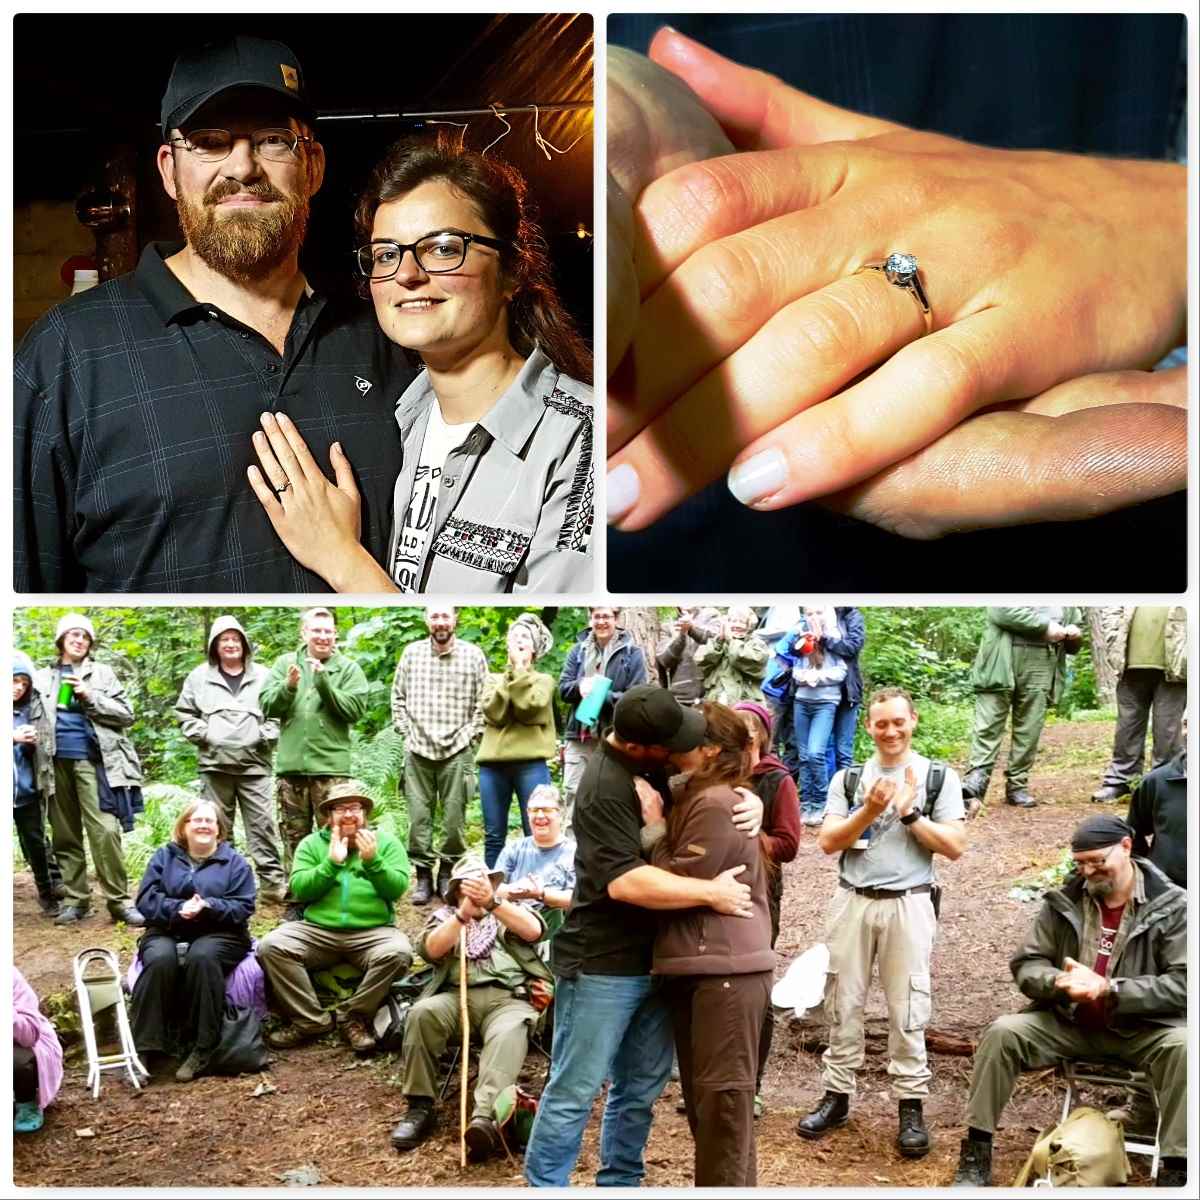
When I popped up to the Naughty Corner one night I got chatting to our chefs Phil and Magda and found out that they had just got engaged – Phil had popped the question to Magda that day down on the beach and she had said yes.
The next day we got Phil and Magda to announce the engagement to everyone under the Main Chute – congratulations guys.
Congratulations
Me
I am mostly to be found behind the camera lens so you do not see many pictures of my silver mop at the Bushmoot. Over the last 10 years I have really embraced photography and am always on the look out for something unusual to snap.
Fire Faces are a favourite of mine – spotted the BFG in one snap I took this year – but there is always something interesting to photograph at the Bushmoot.
Just me
A bit of Magic
This year at the Naughty Corner it was hard to miss the fact that the fire was making a good impression of a Rainbow. It turns out that Cap’n Badger had acquired some Mystical Fire and popped it into the fire. I took a few snaps of the flames and caught a lovely shot that I call ‘The Dancer’.
My kids loved the stuff and so we popped a couple of sachets on our campfire one evening while they watched a movie.
Rainbow flames
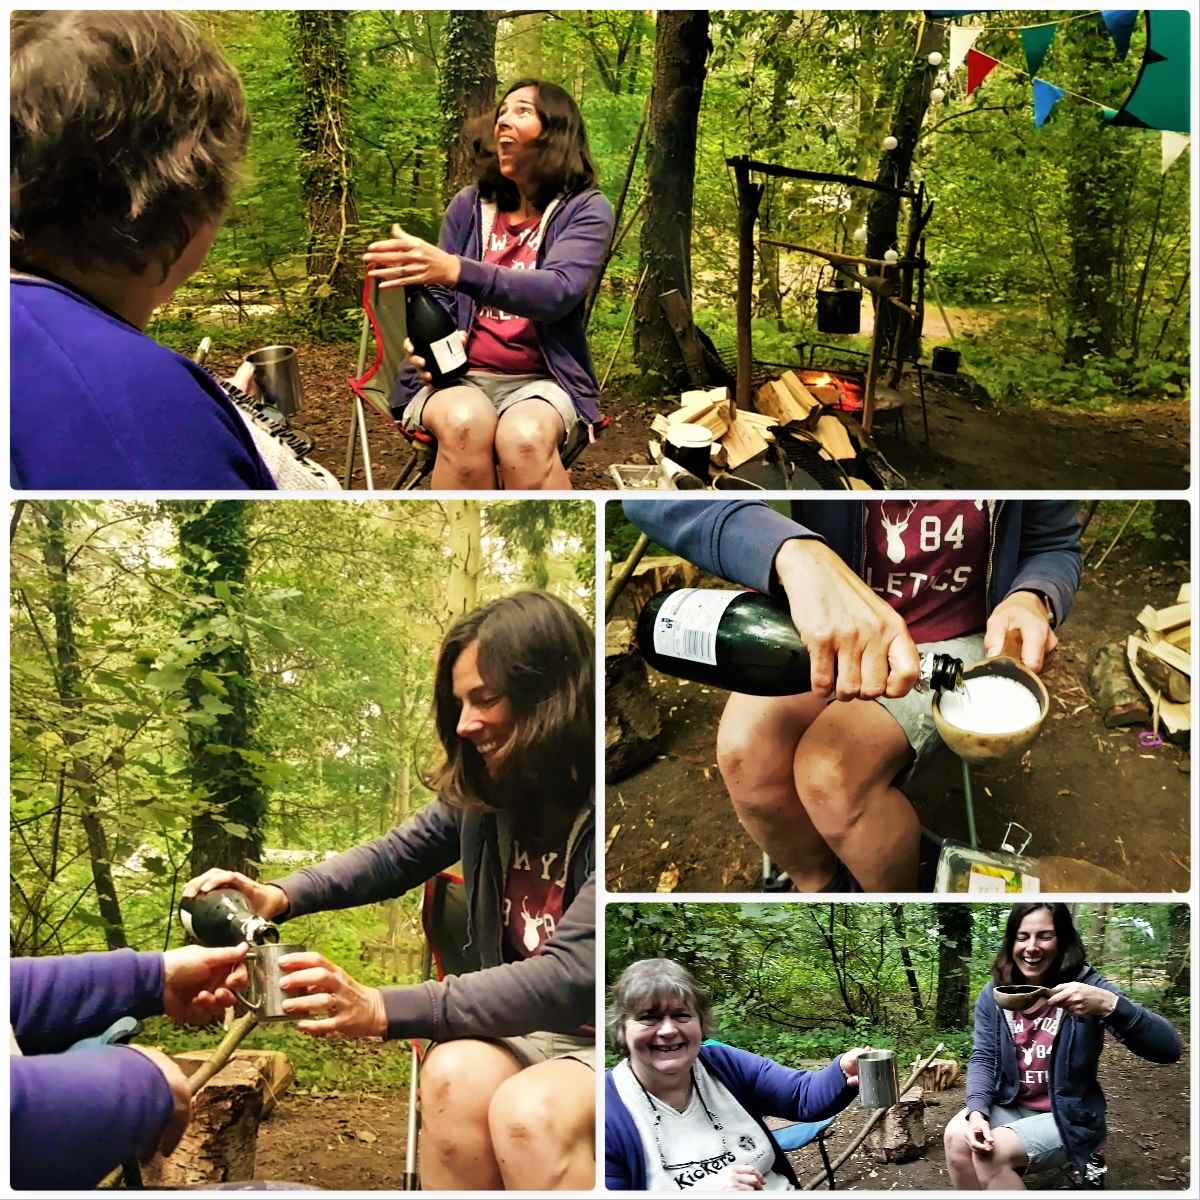
Alison
My wife Alison did not attend the whole of the Bushmoot (she pops back and forth from home over the fortnight) as she runs her own publishing company and this year was focused on finishing the first draft of her own book while we were at the Bushmoot.
Needless to say when Alison returned at the end of the Bushmoot she did so with a bottle of bubbly to celebrate the fact that she had finished her first draft – well done darling 🙂
Congratulations Alison
That is it from me on the subject of the 2017 Bushmoot. Thank you to Tony, Shelly, all the Mods and all the other helpers who organised everything and helped make it such a magical two weeks.
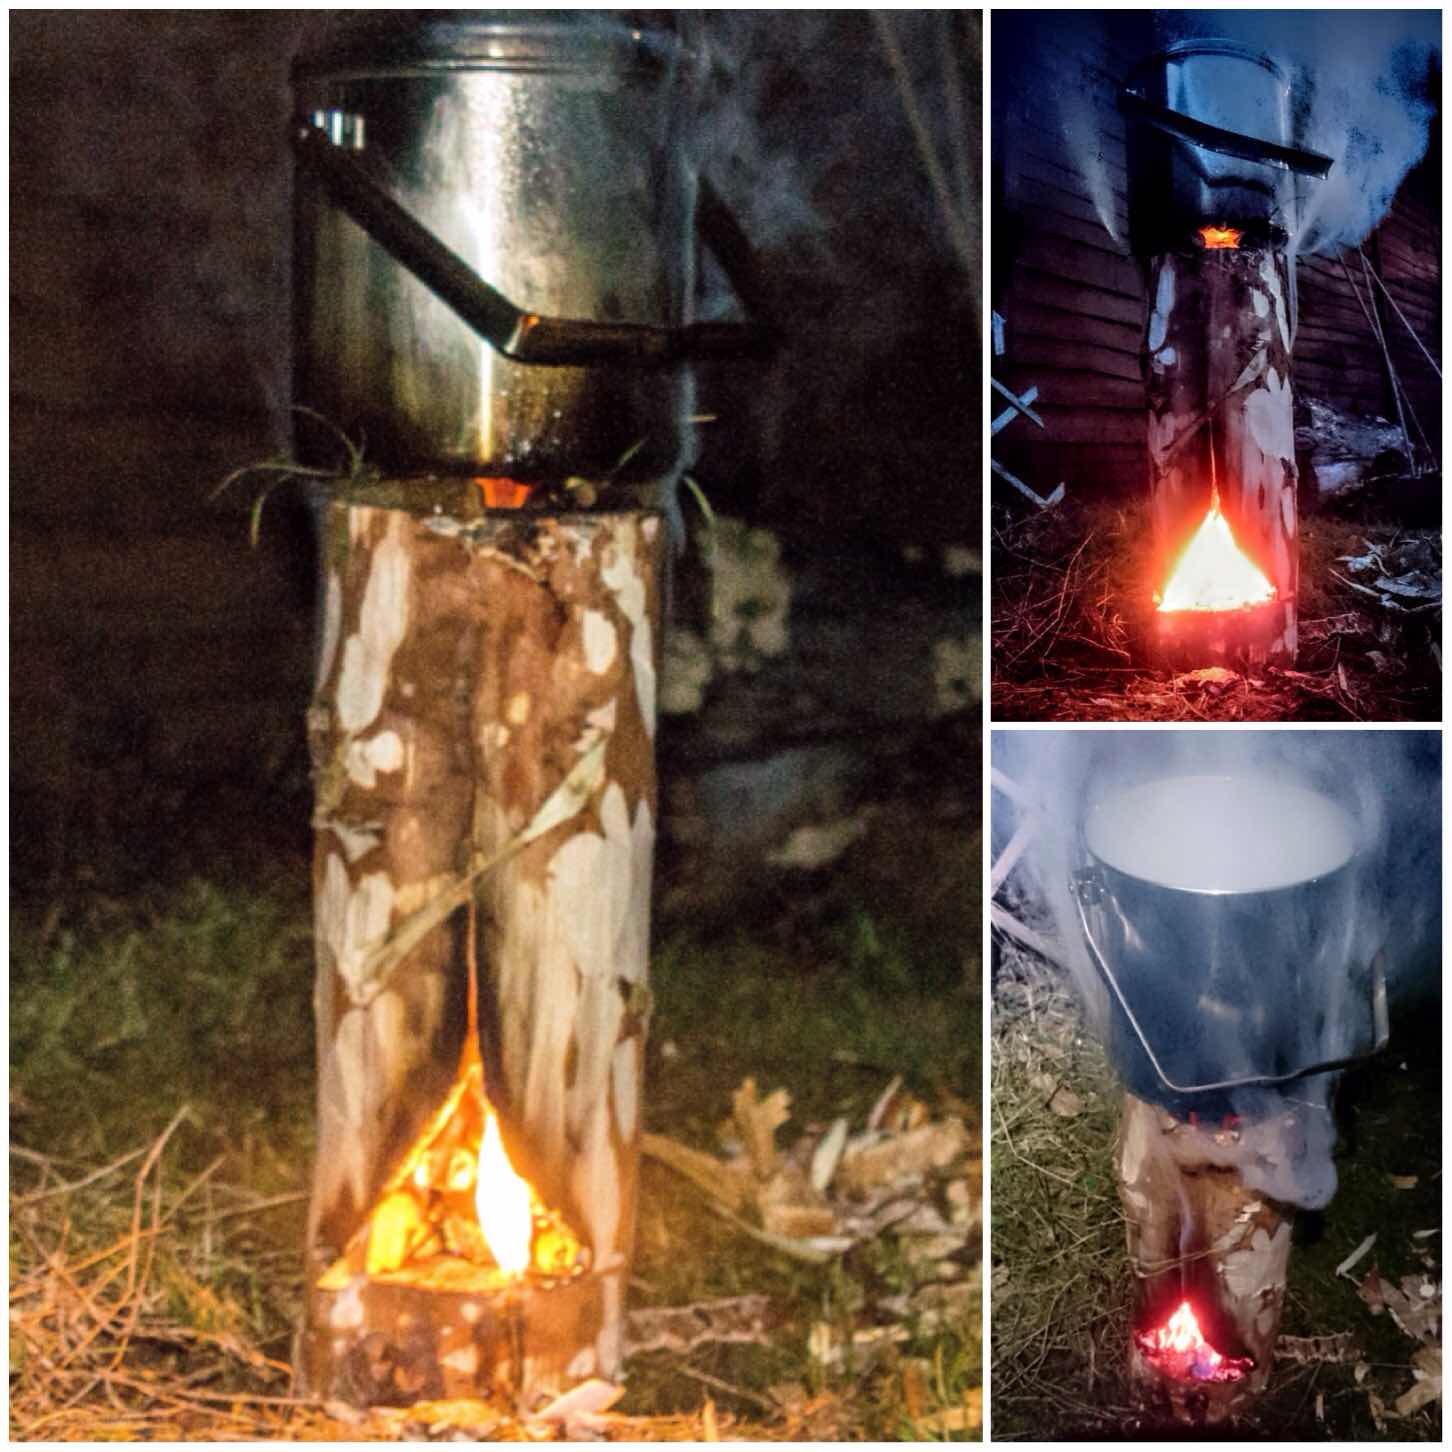
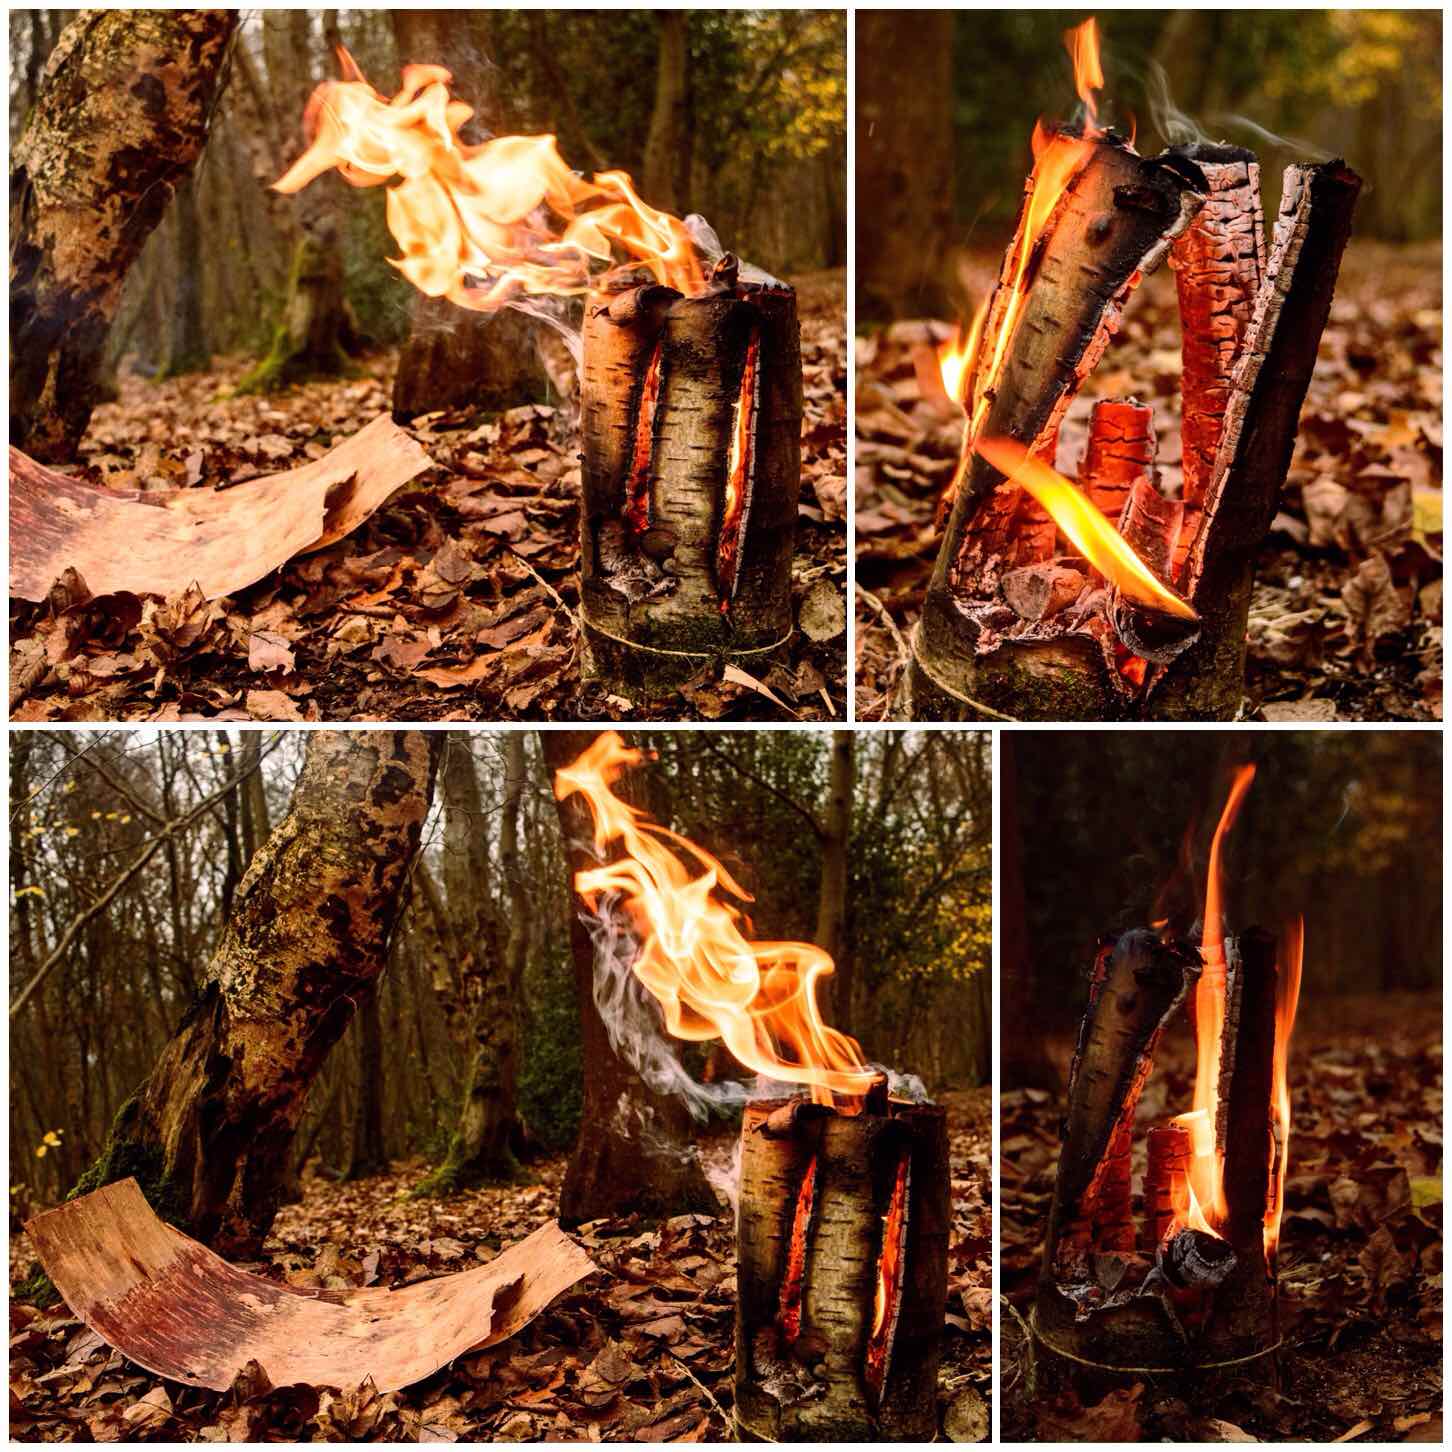
This year at the Wilderness Gathering my friend Des Cattys was showing his love of Log Rocket stoves to visitors. I decided to drop in on one of his sessions to watch how he constructs one. Like Des I am intrigued by these stoves and I am always looking to improve on their construction so watching someone else at work building one is a chance not to be missed.
If you want more detail on making one of these stoves have a look at my How To…. on building a Log Rocket stove. There are many variations on them and I have included some of them on my Bushcraftdays blog in my How To section.
It only seems a short time ago I was havering about making videos – I plucked up the courage eventually to load a video onto YouTube and now here I am on my 100th YouTube video 🙂
In my continuing research into Log Rocket Stoves I came across a Wikipedia page called the Schwedenfeuer and in it details of a type of log rocket stove I had not come across before, with a built-in fire tray and a chimney formed by simply cutting away the inner corner of one section.
Clever though it was, though, this stove still relied on string or wire to tie the sections together. As these stoves have been around for a long time I figured there must be other ways of holding them all together. I thought perhaps that green wood dovetail wedges might do the job, so I set out to test this.
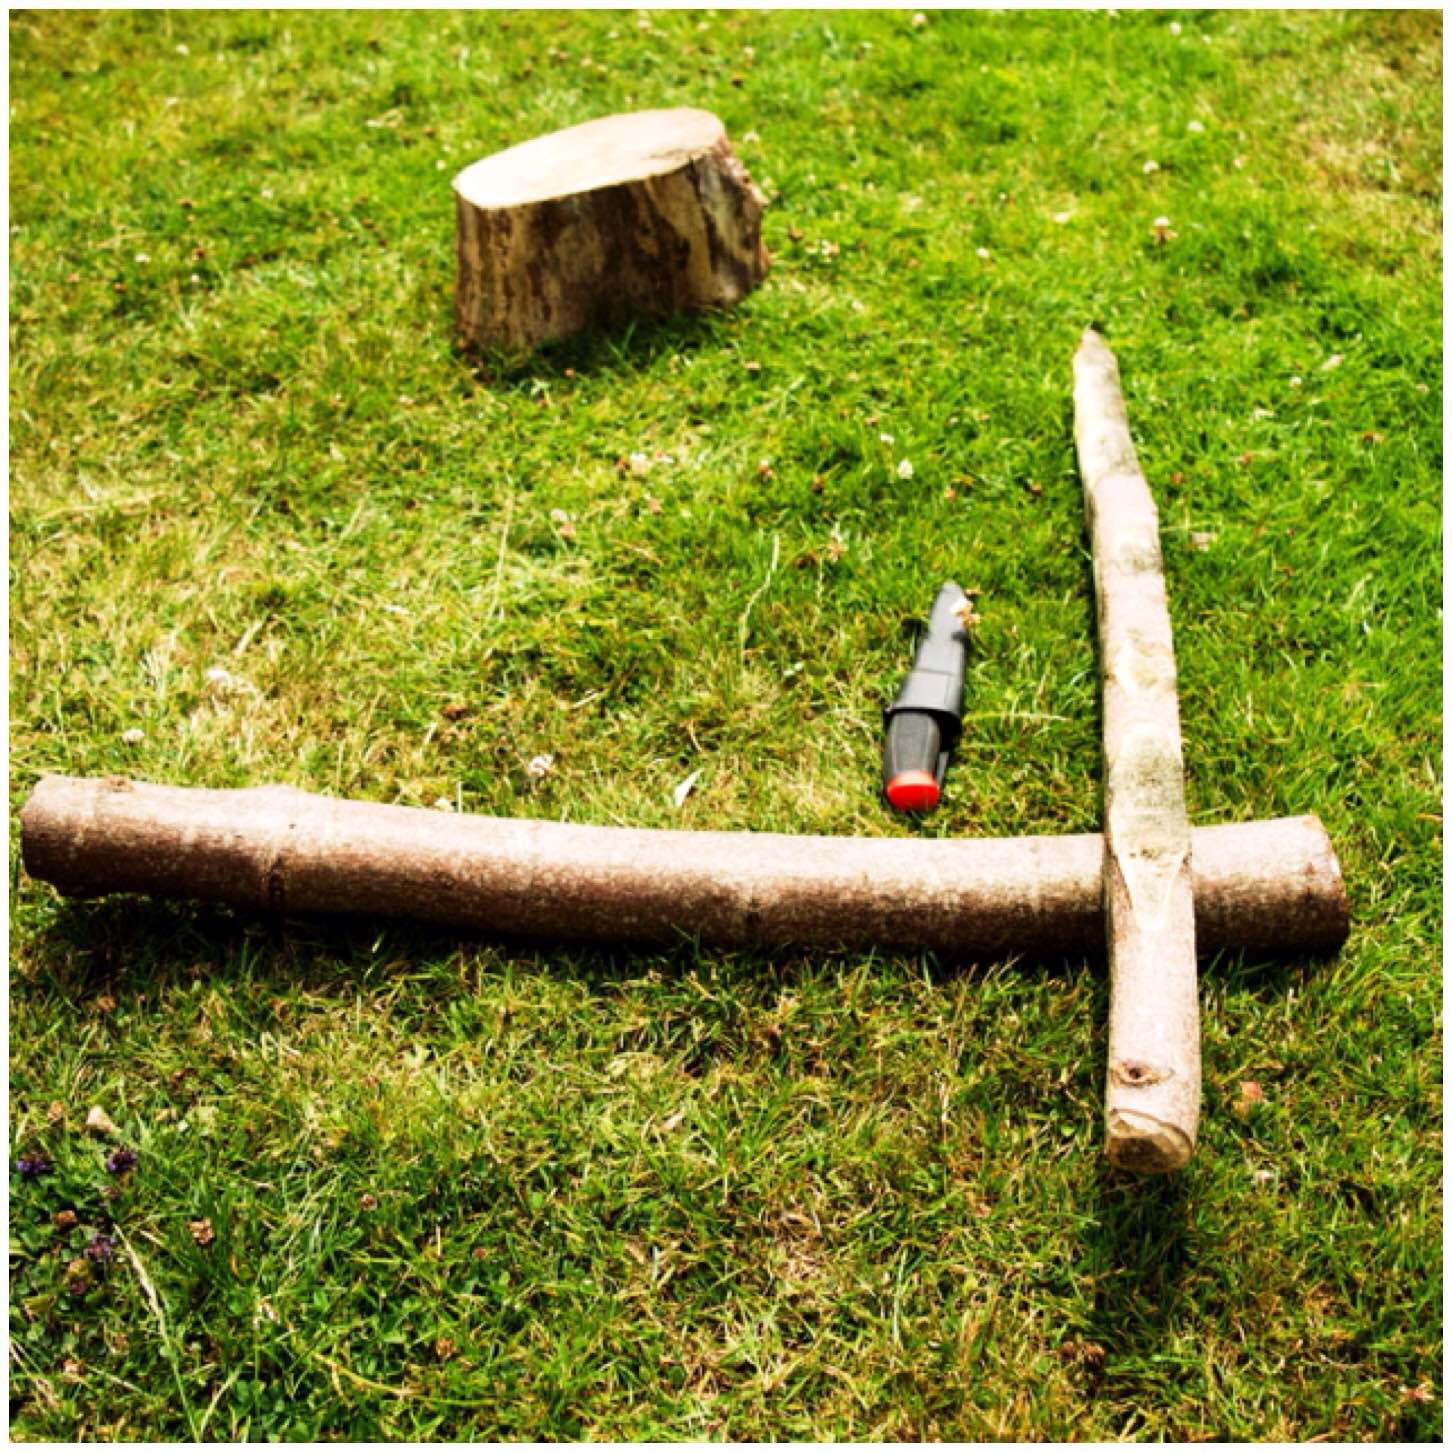
The Dovetail Log Rocket Stove
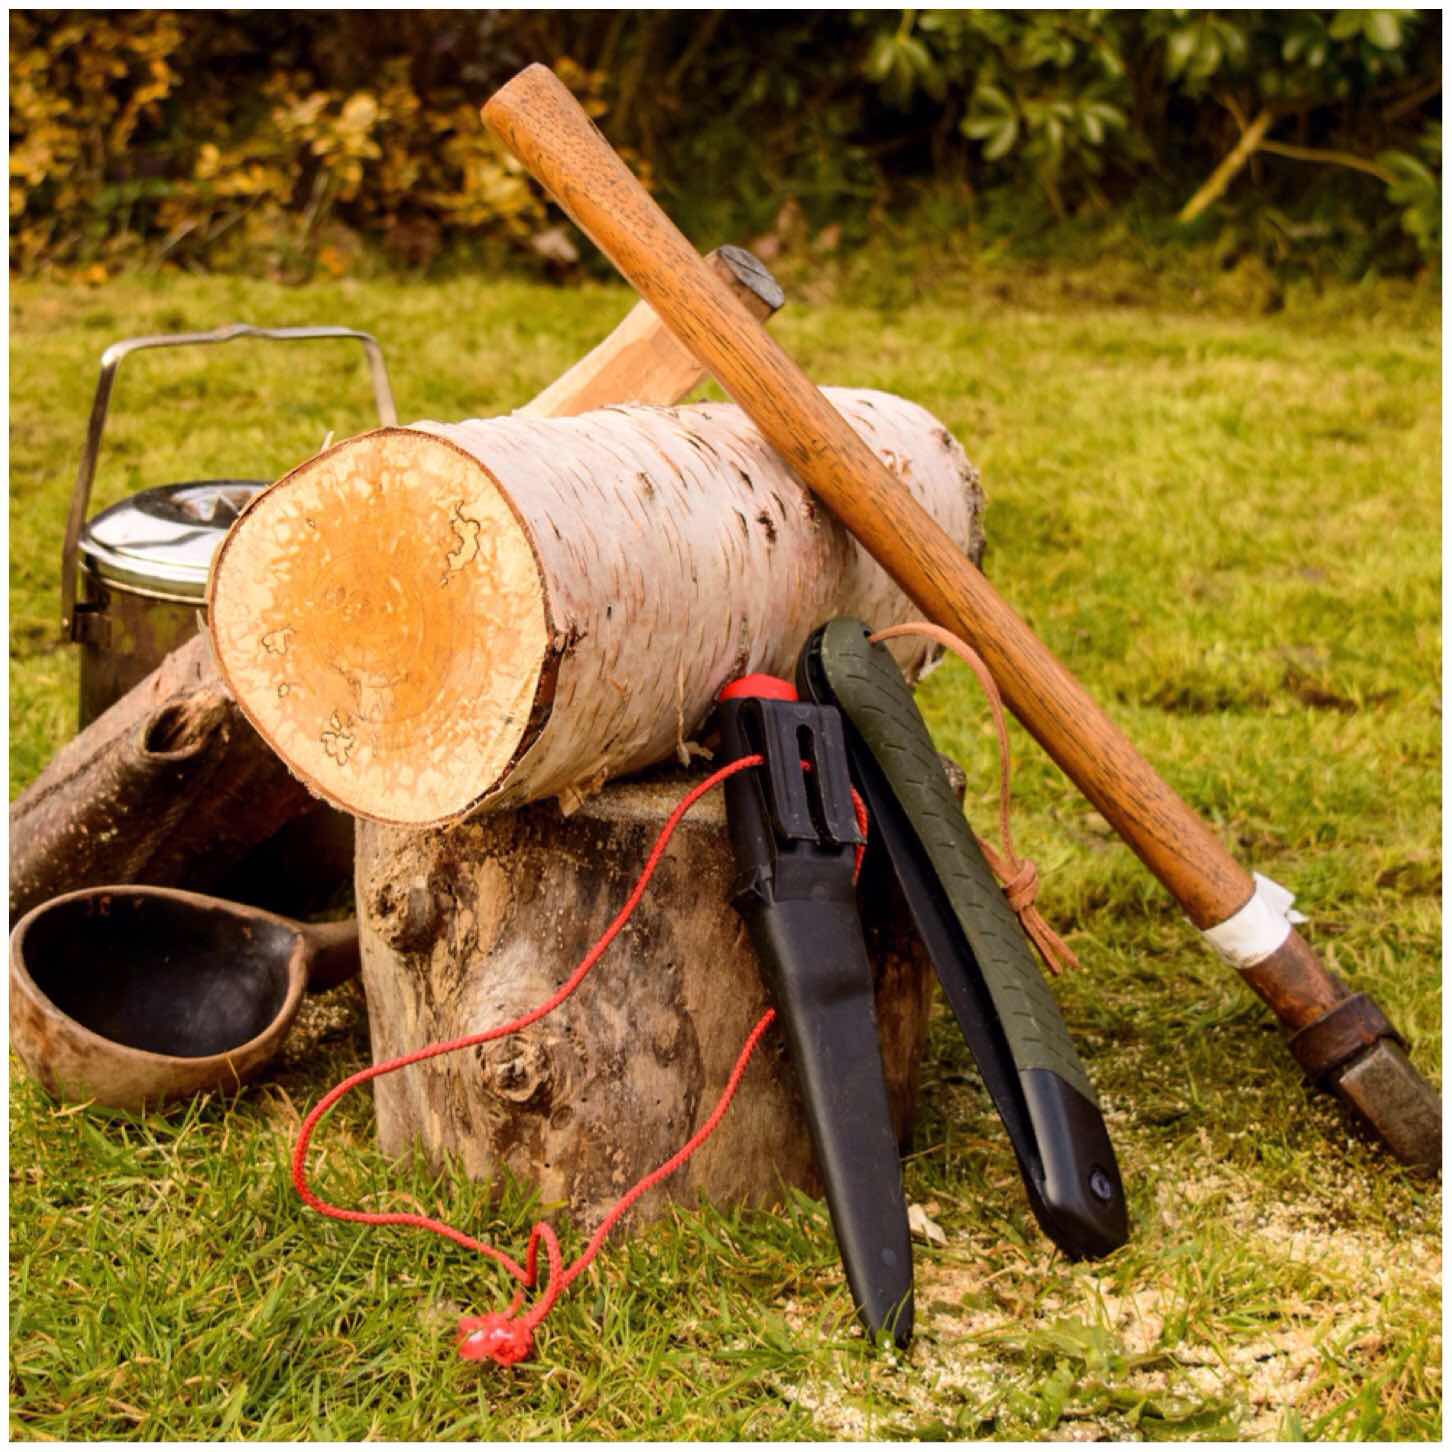
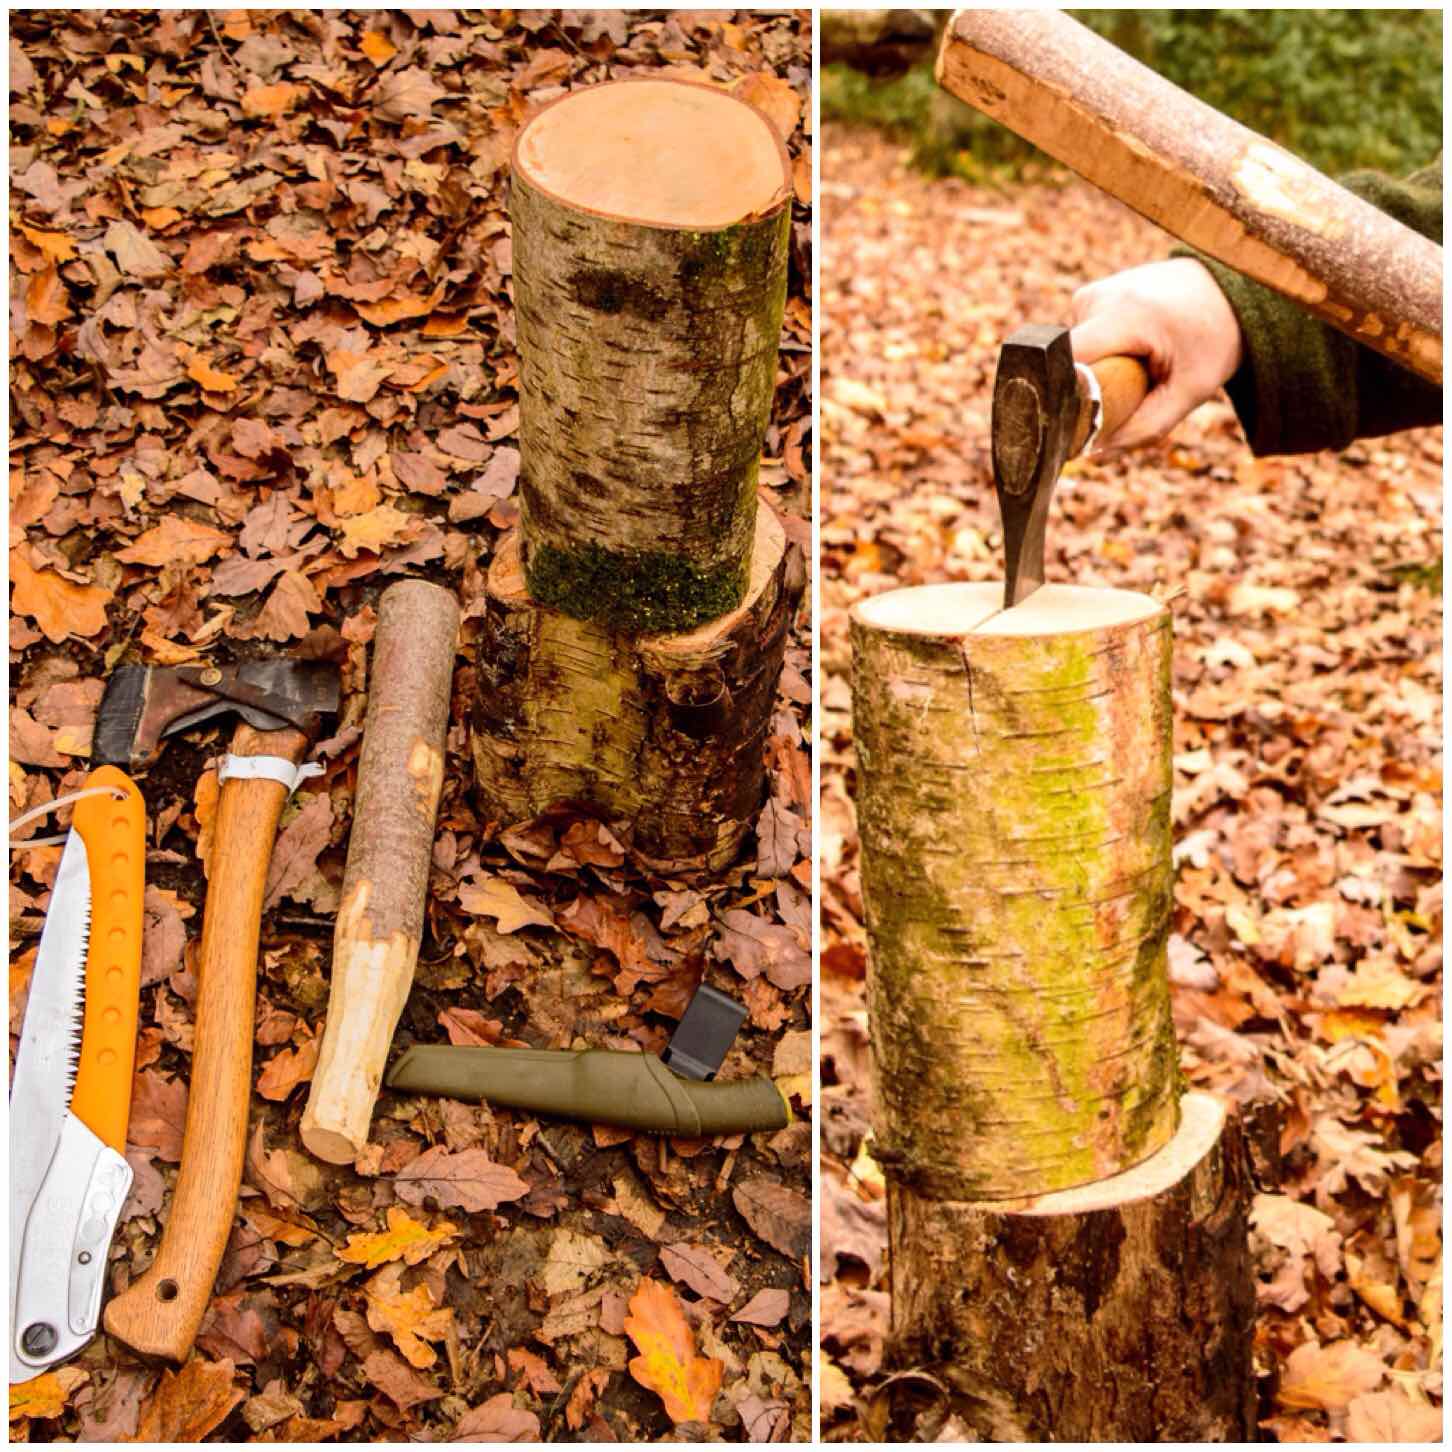
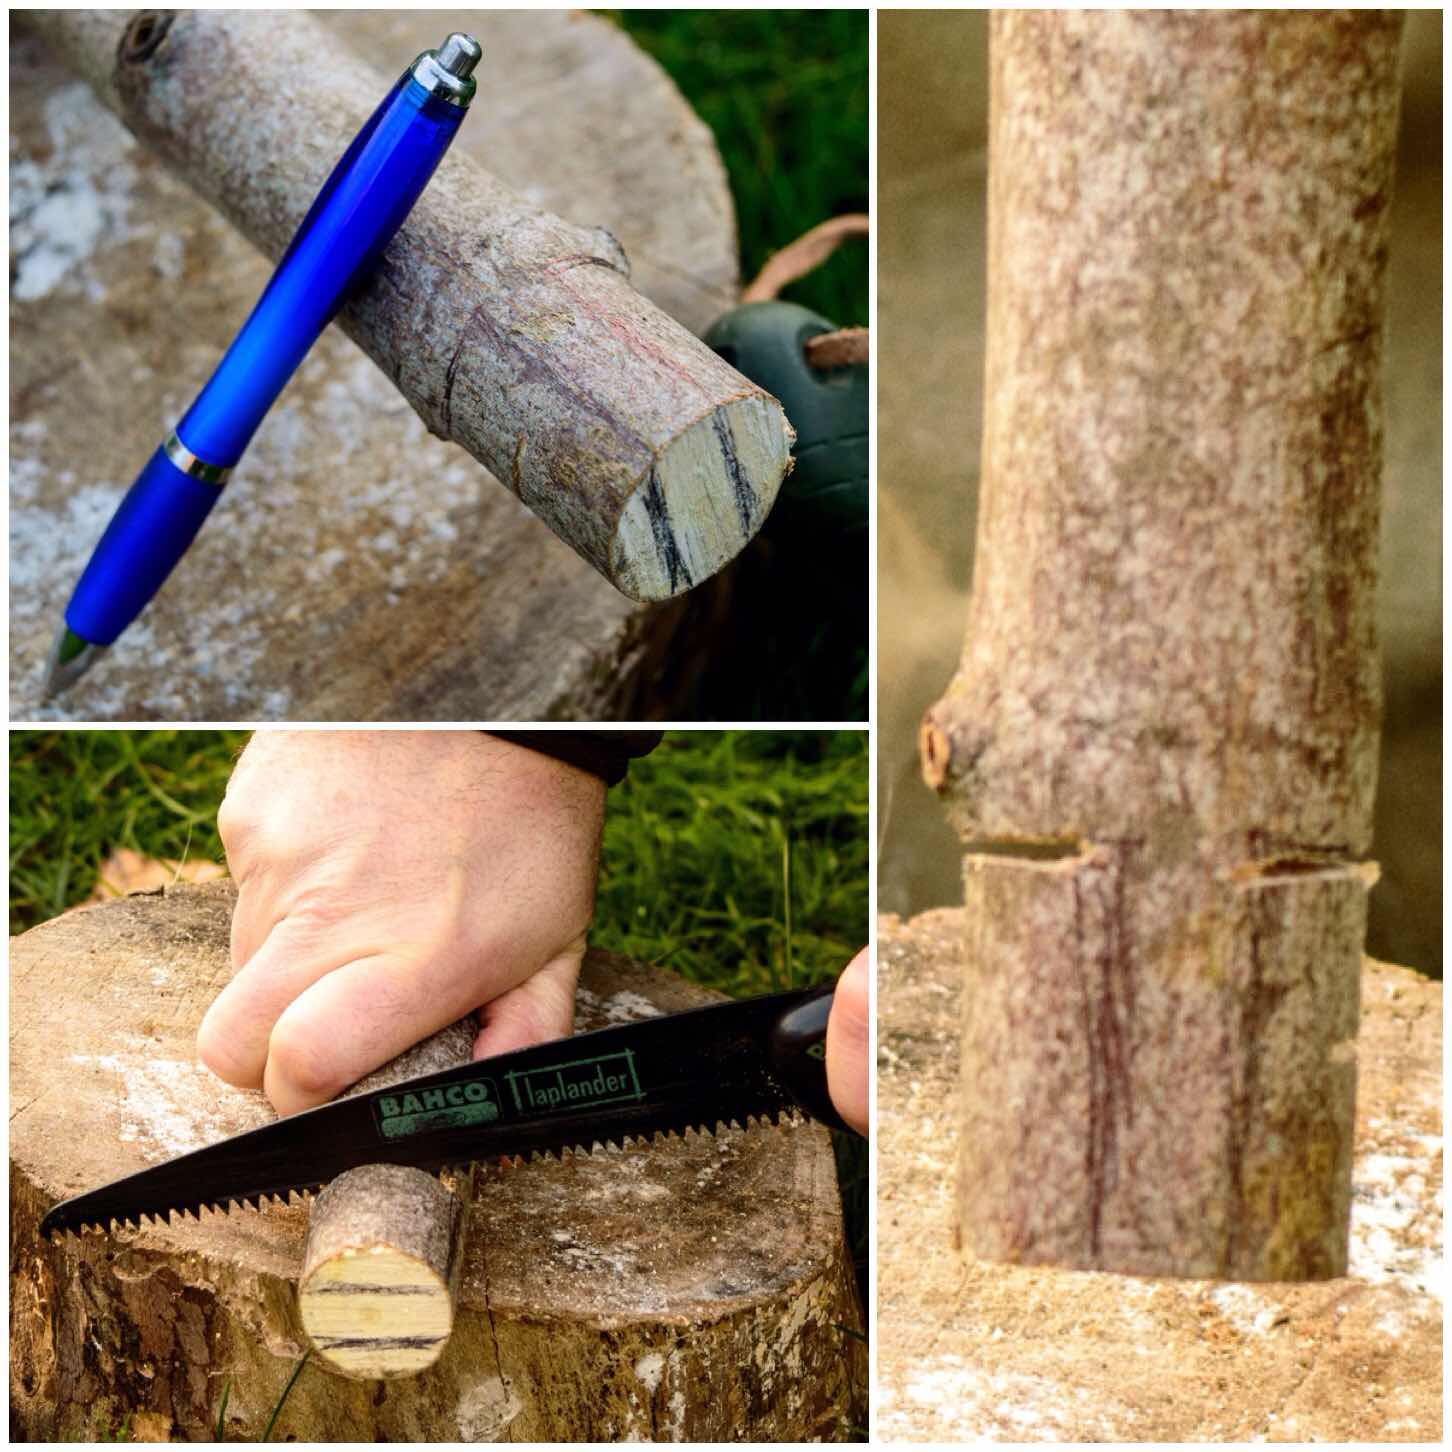
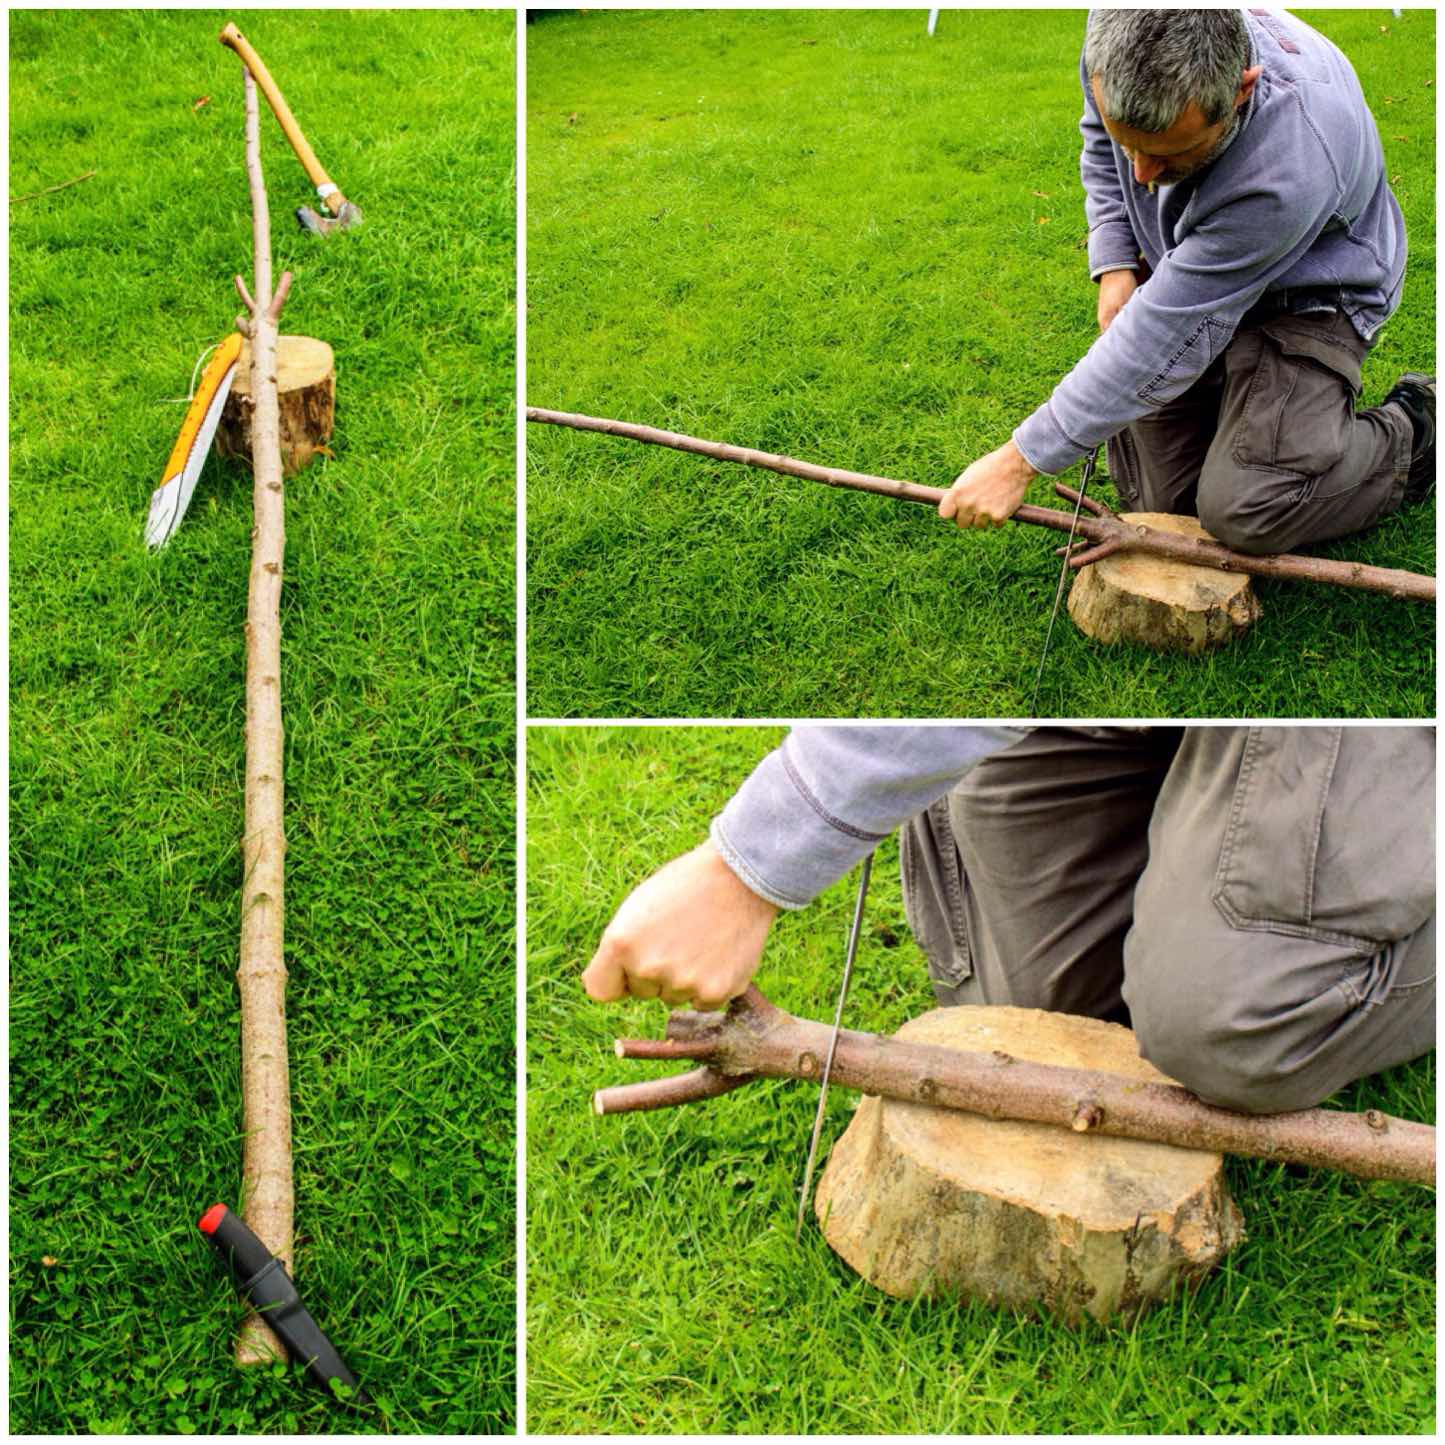
Tools and Material
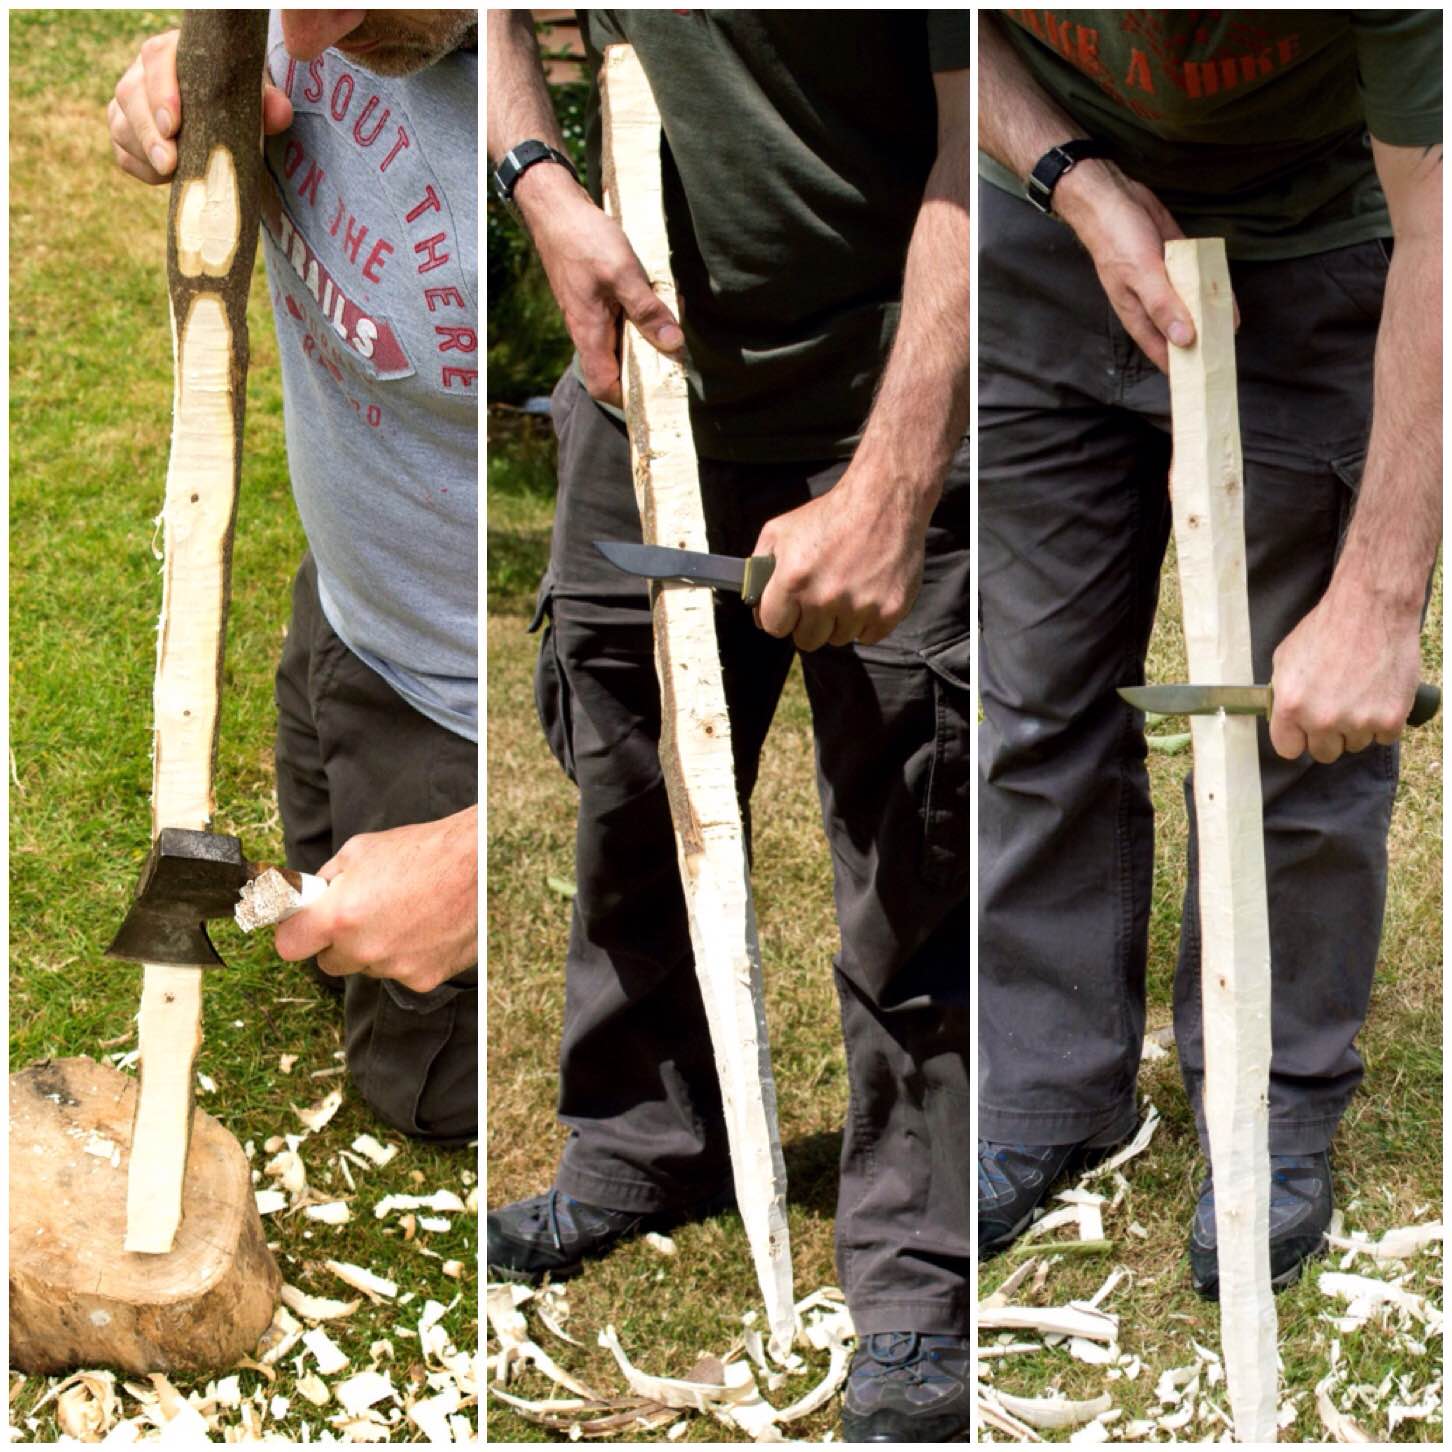
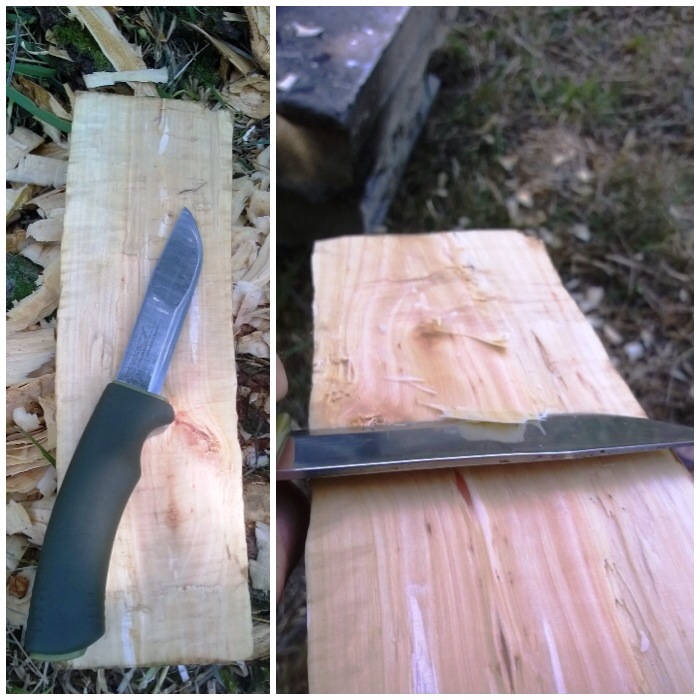
As usual I limited myself to the tools I would usually carry in my backpack, including a knife, saw and axe. A pen or pencil is handy for this project as well.
I’ve had a piece of birch stored in my garage for over a year however it had absorbed moisture over the winter and was fairly damp in its core.
Tools
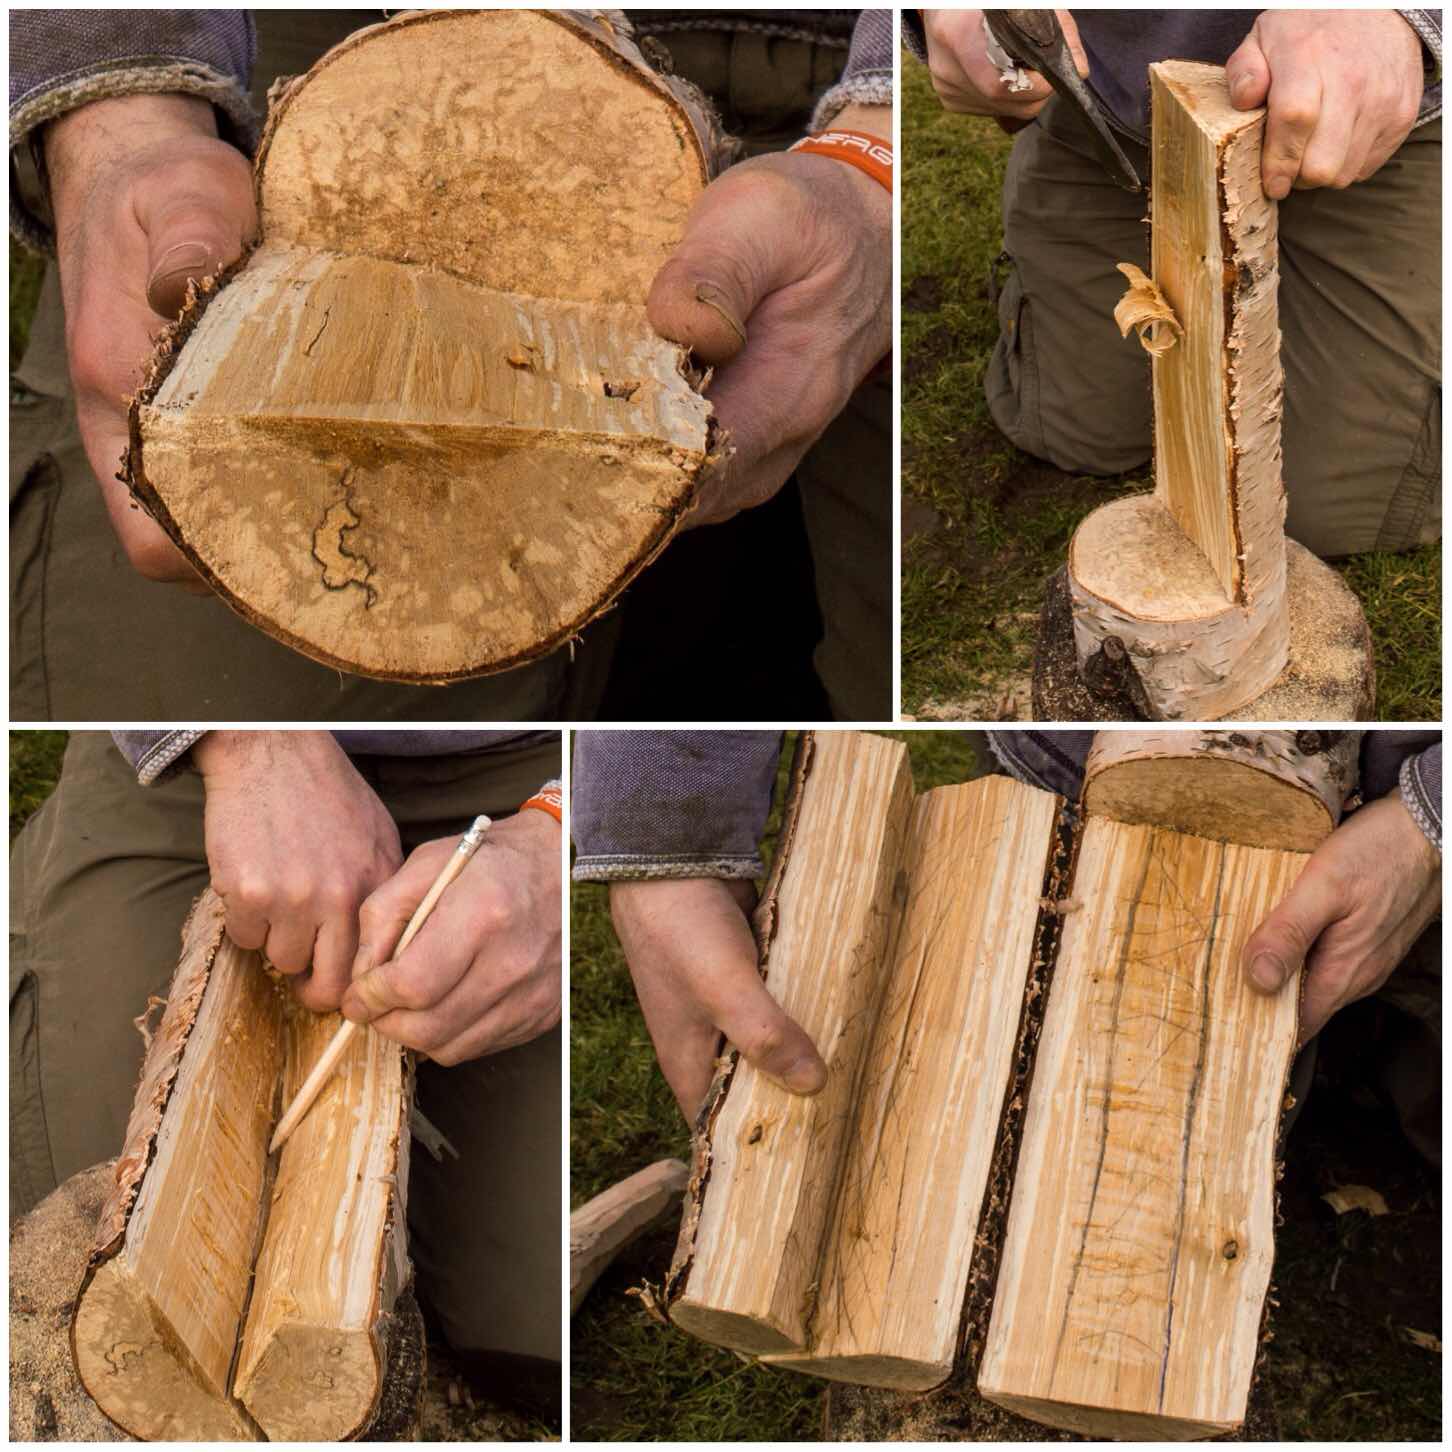
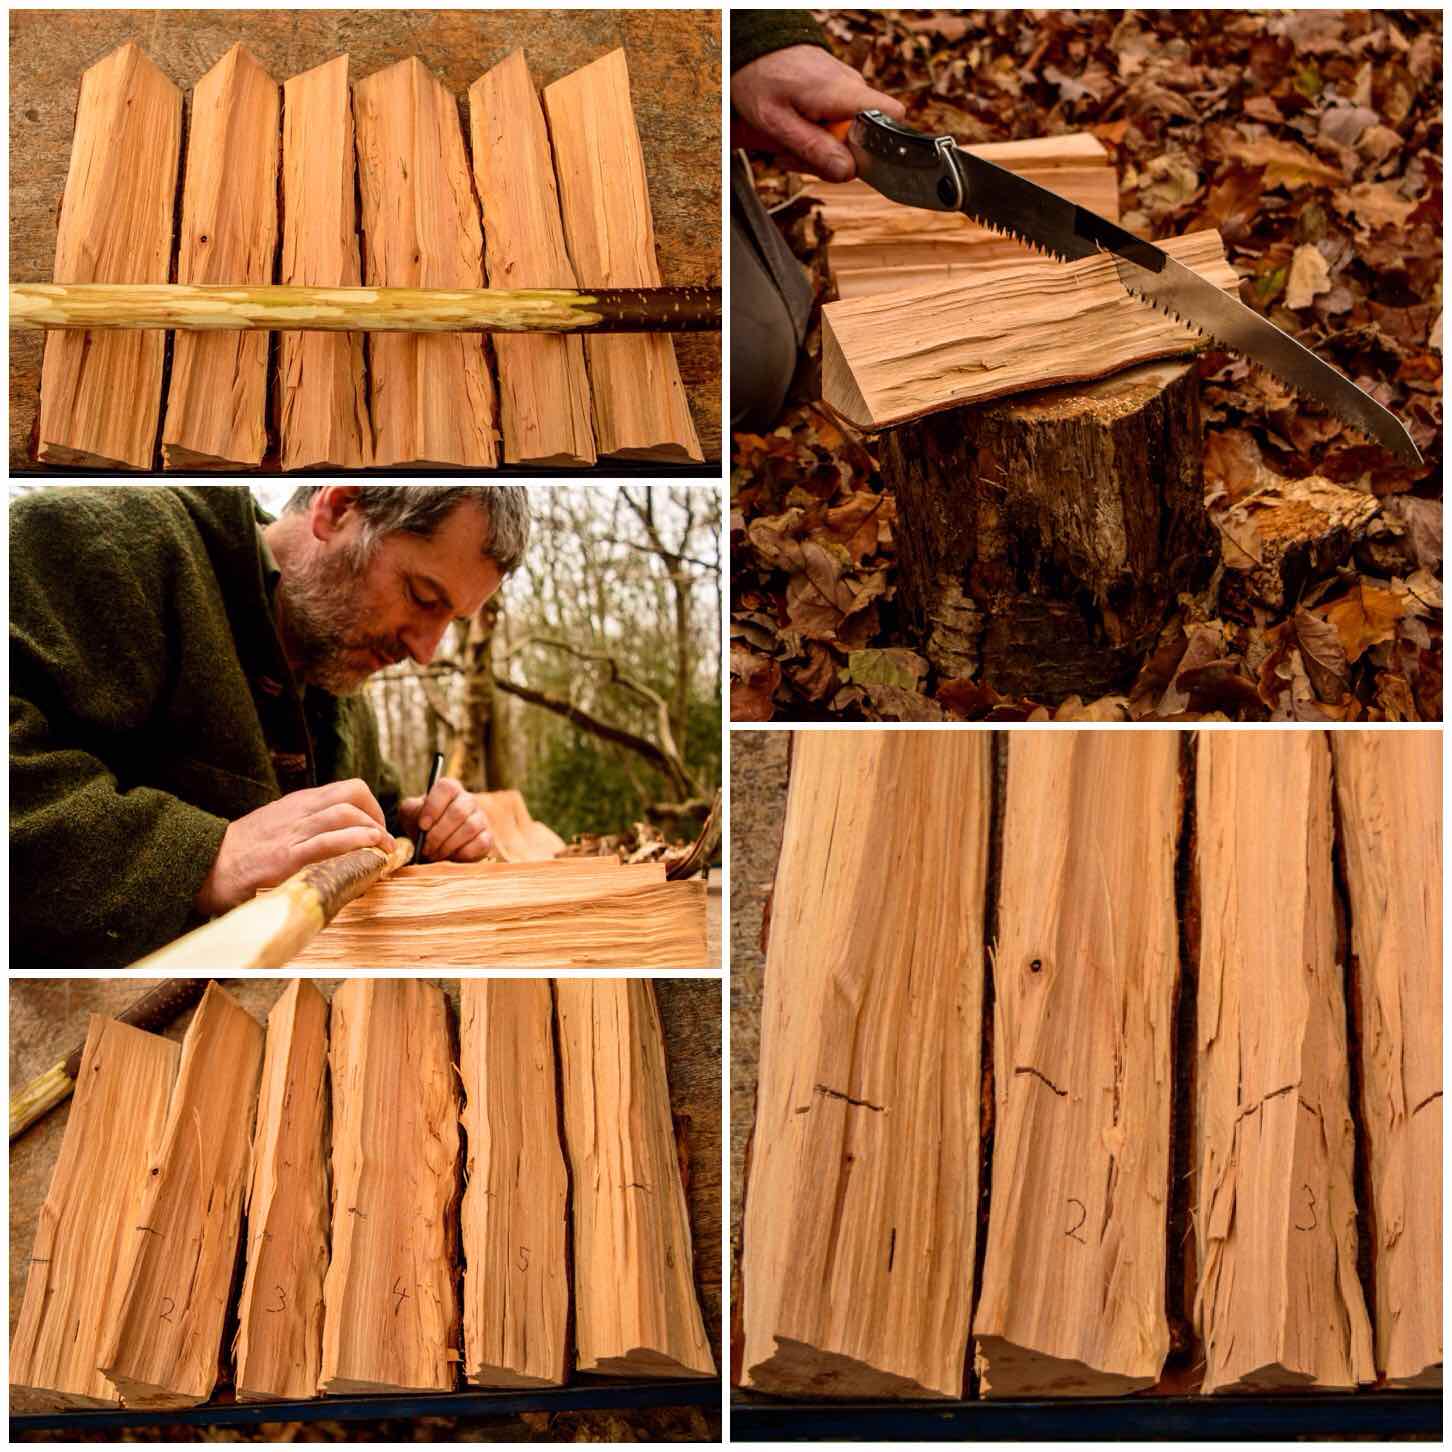
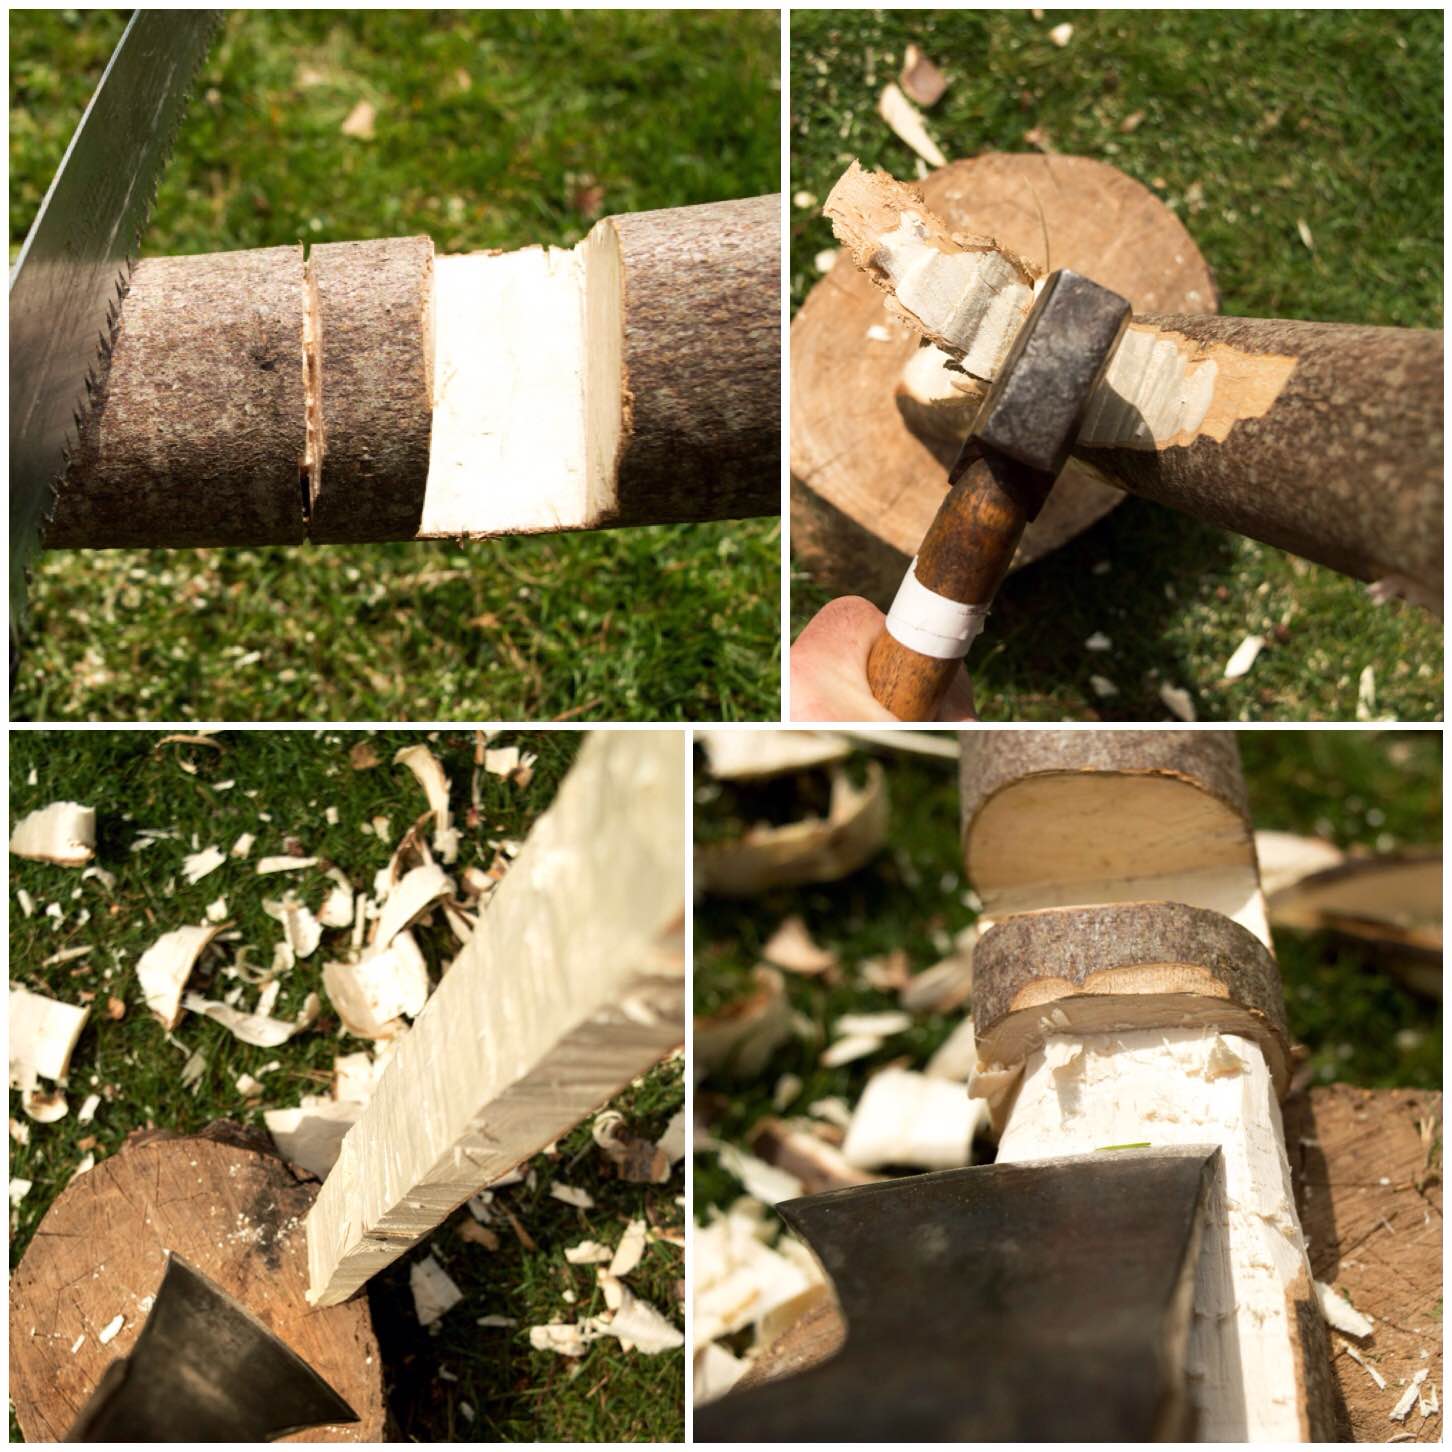
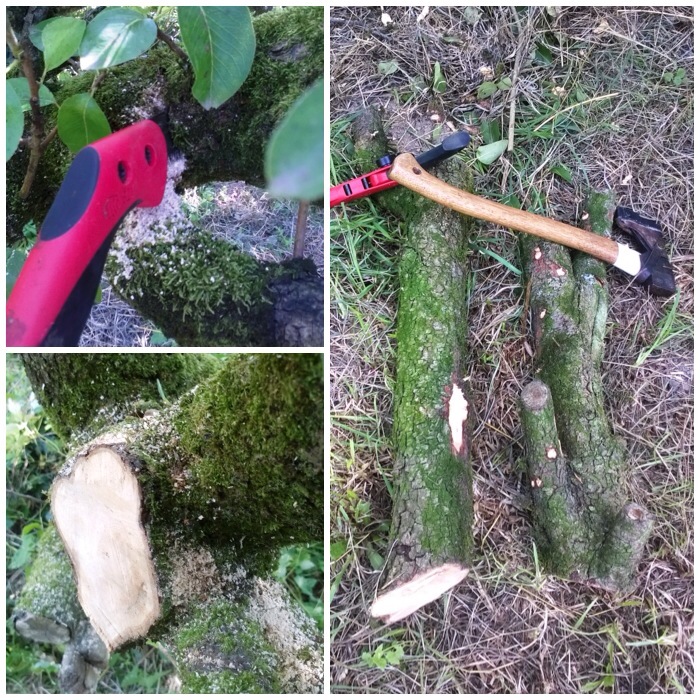
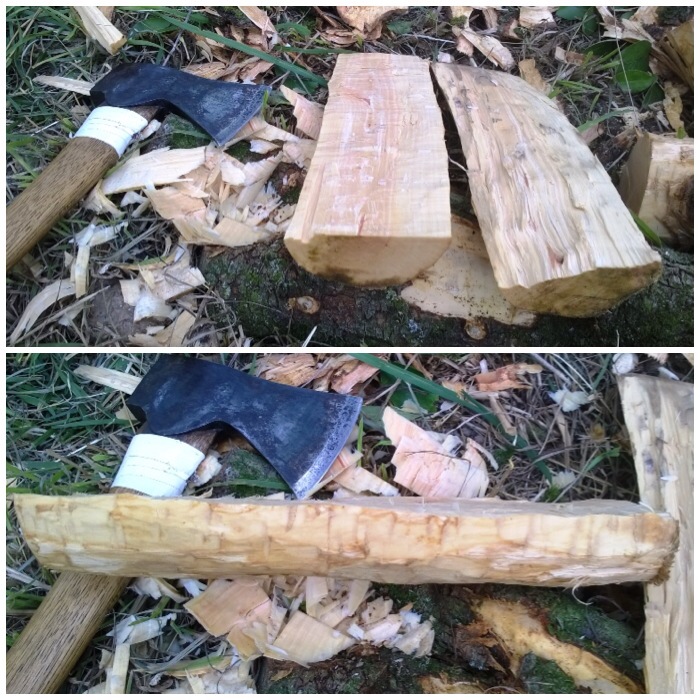
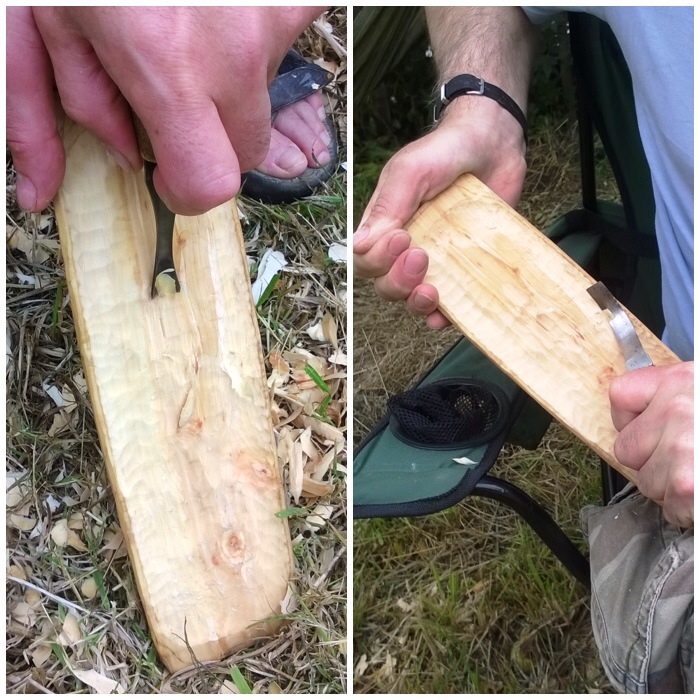
Splitting Out
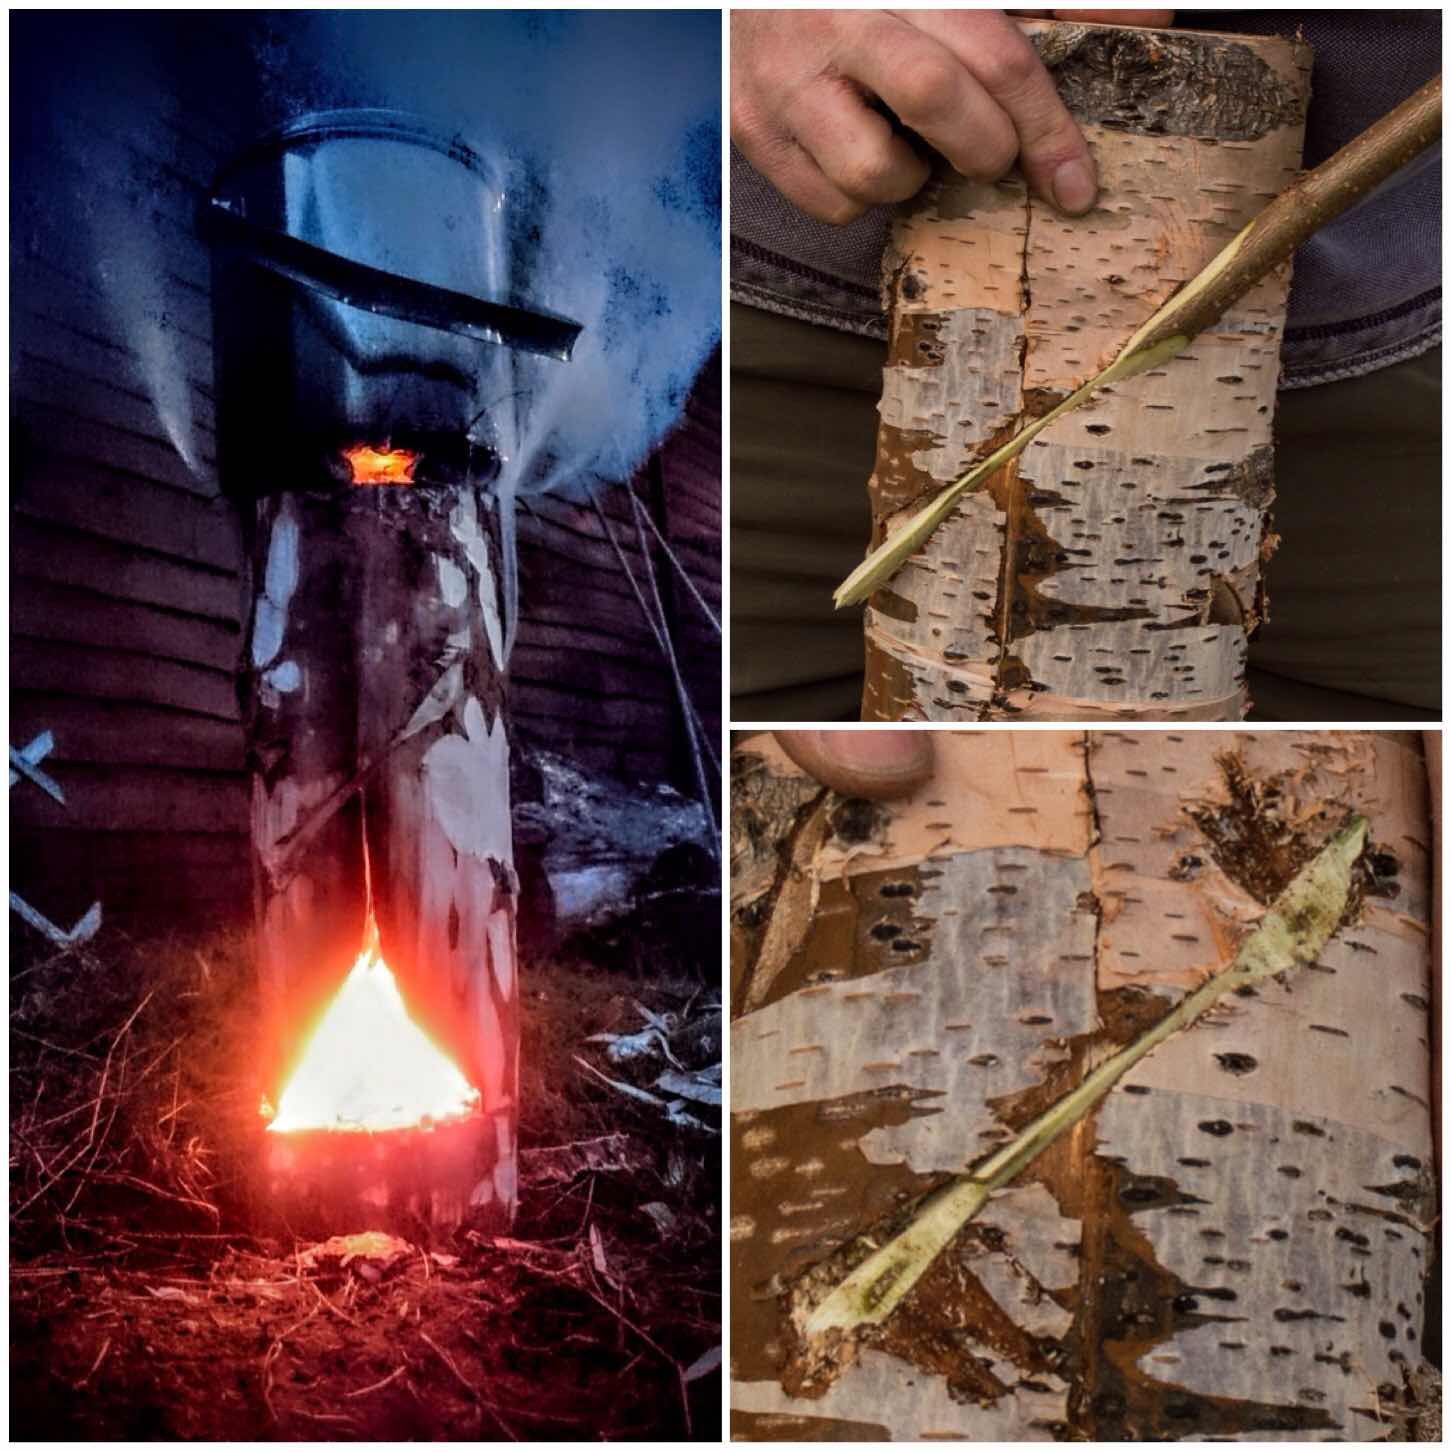
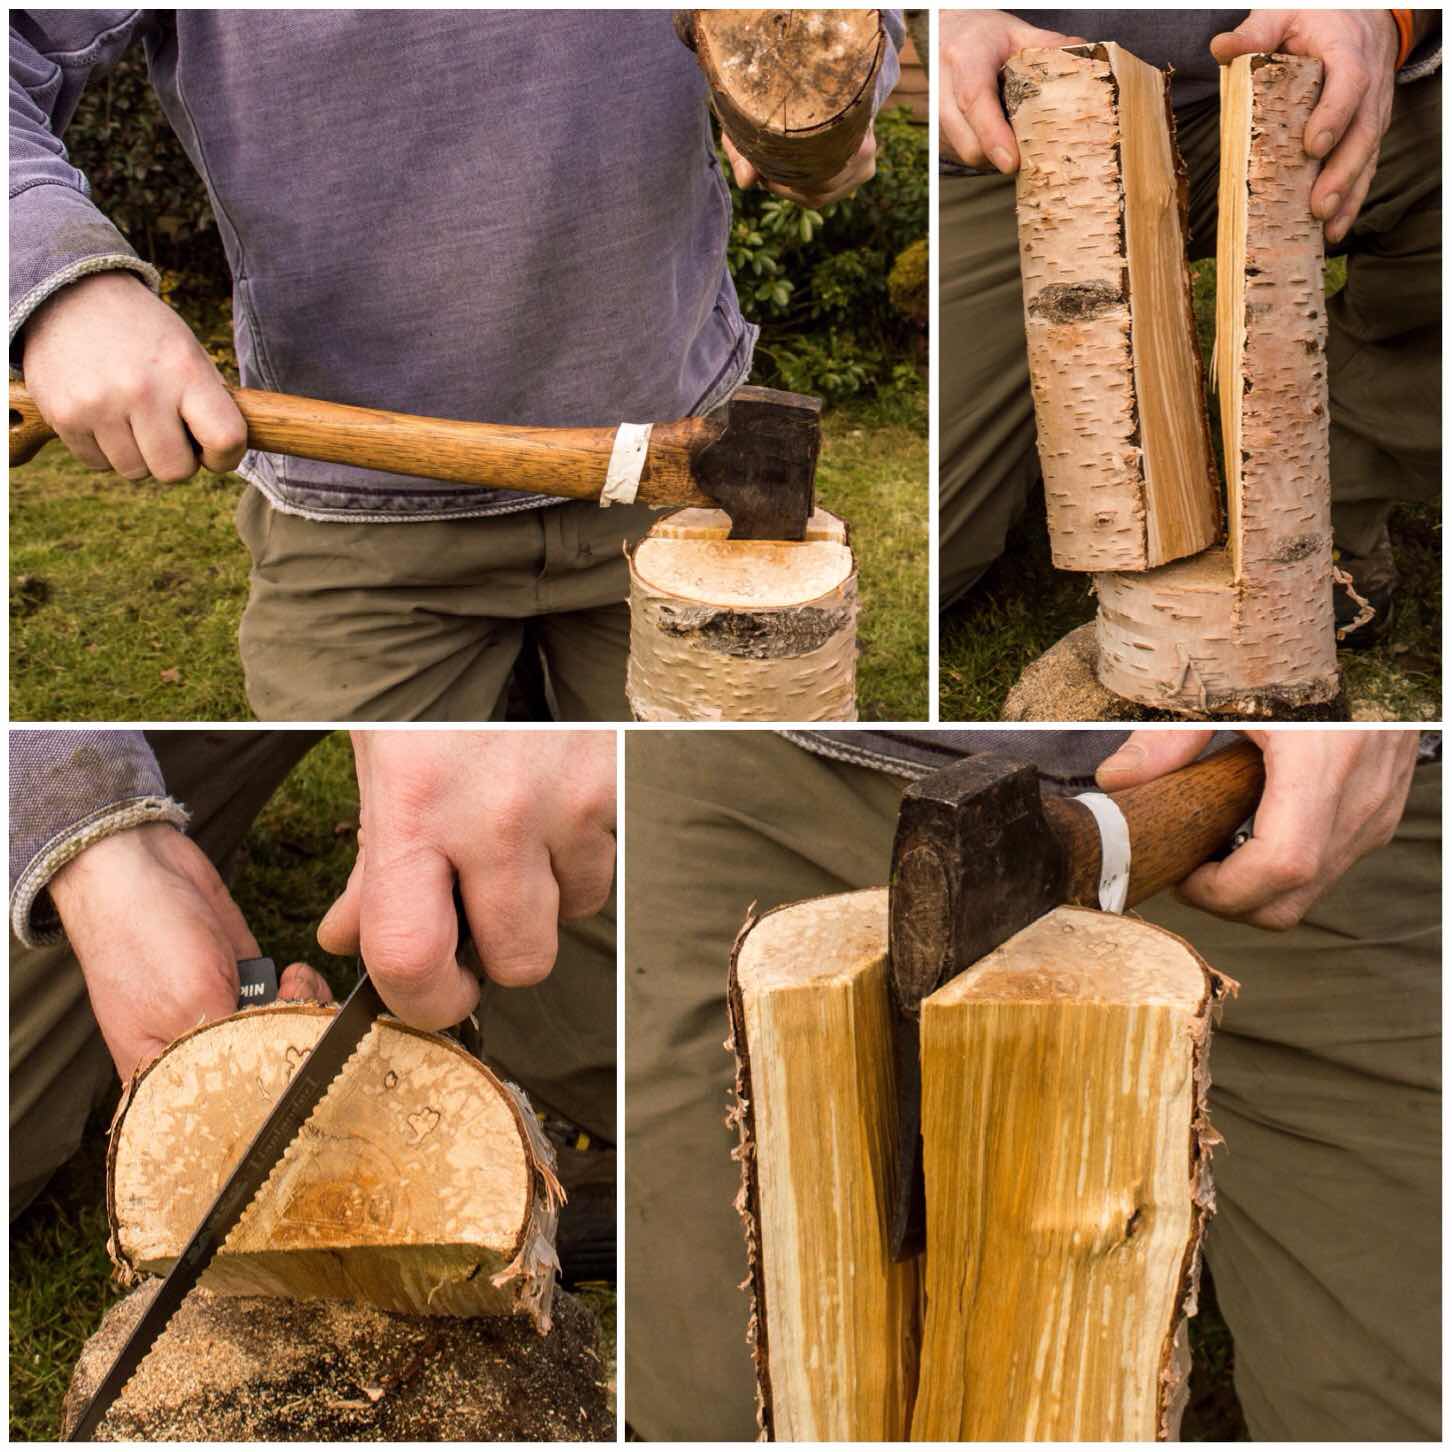
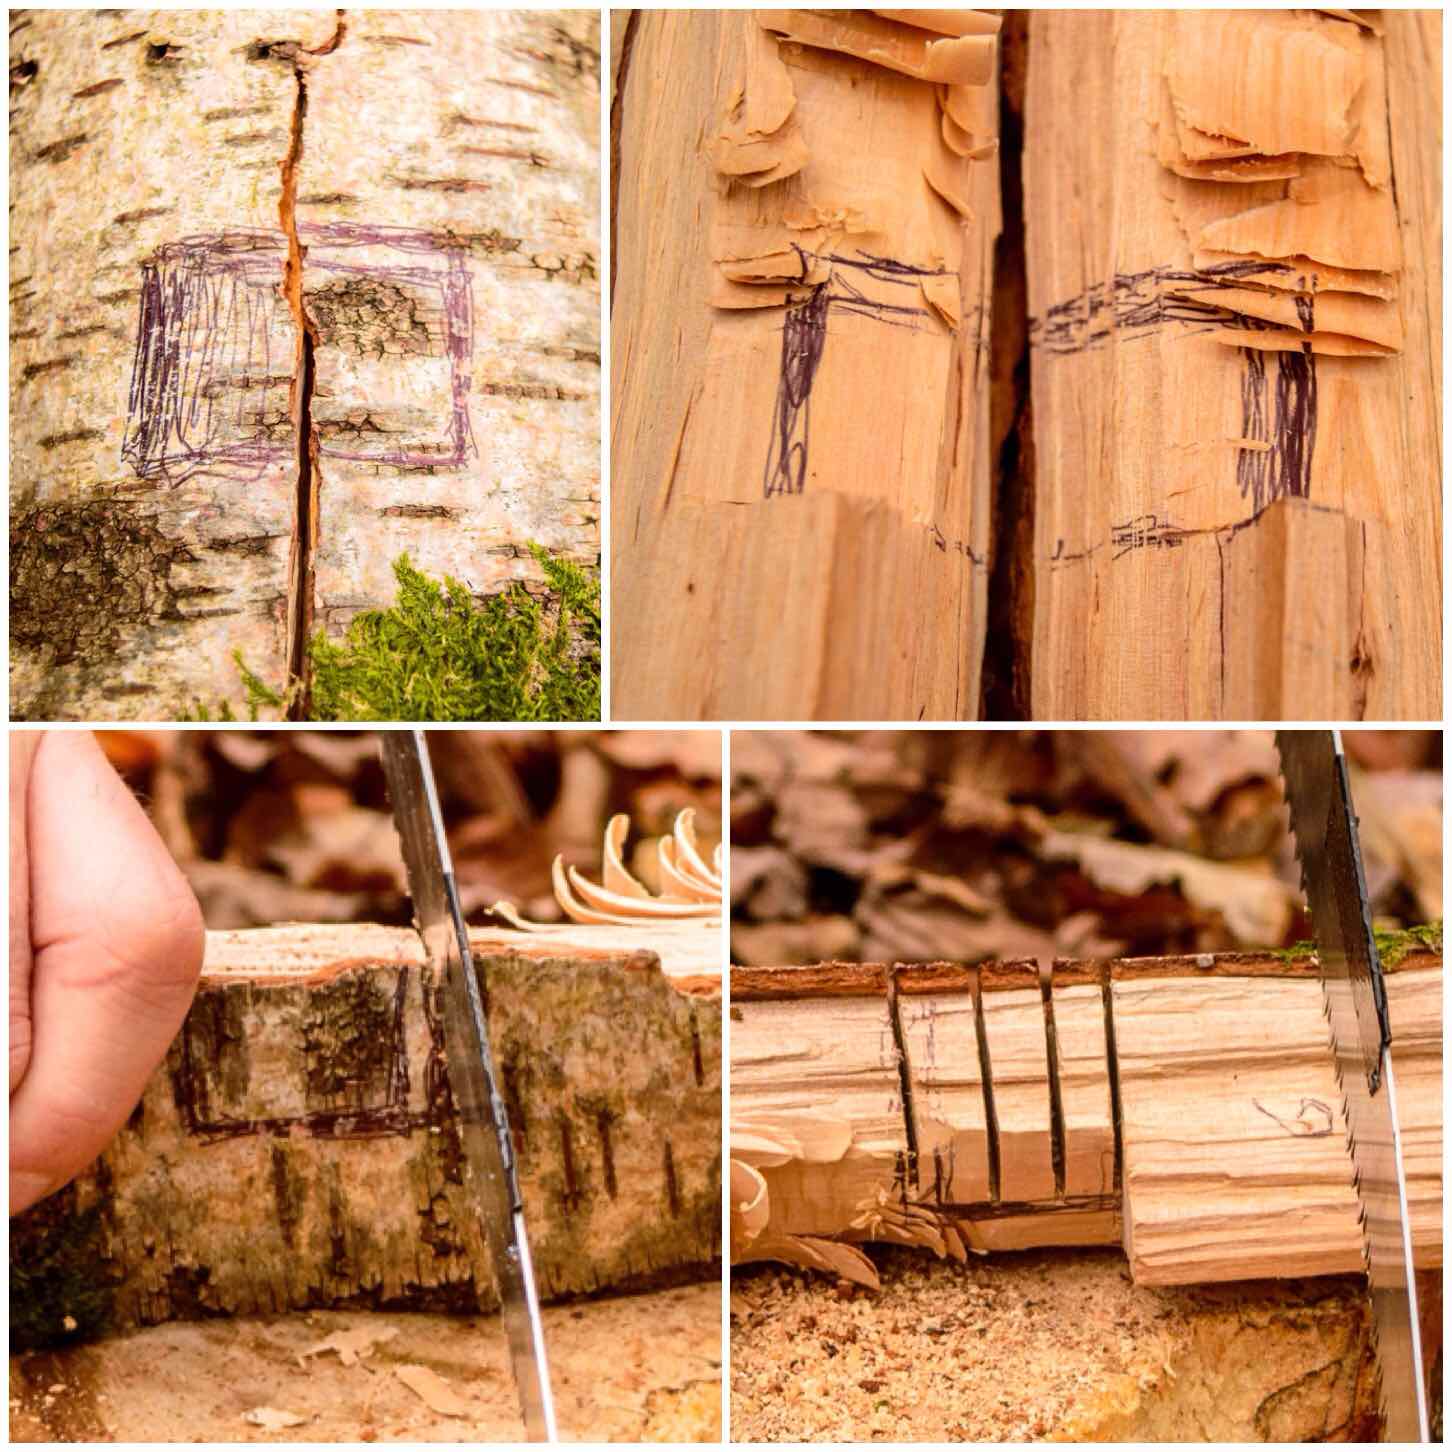
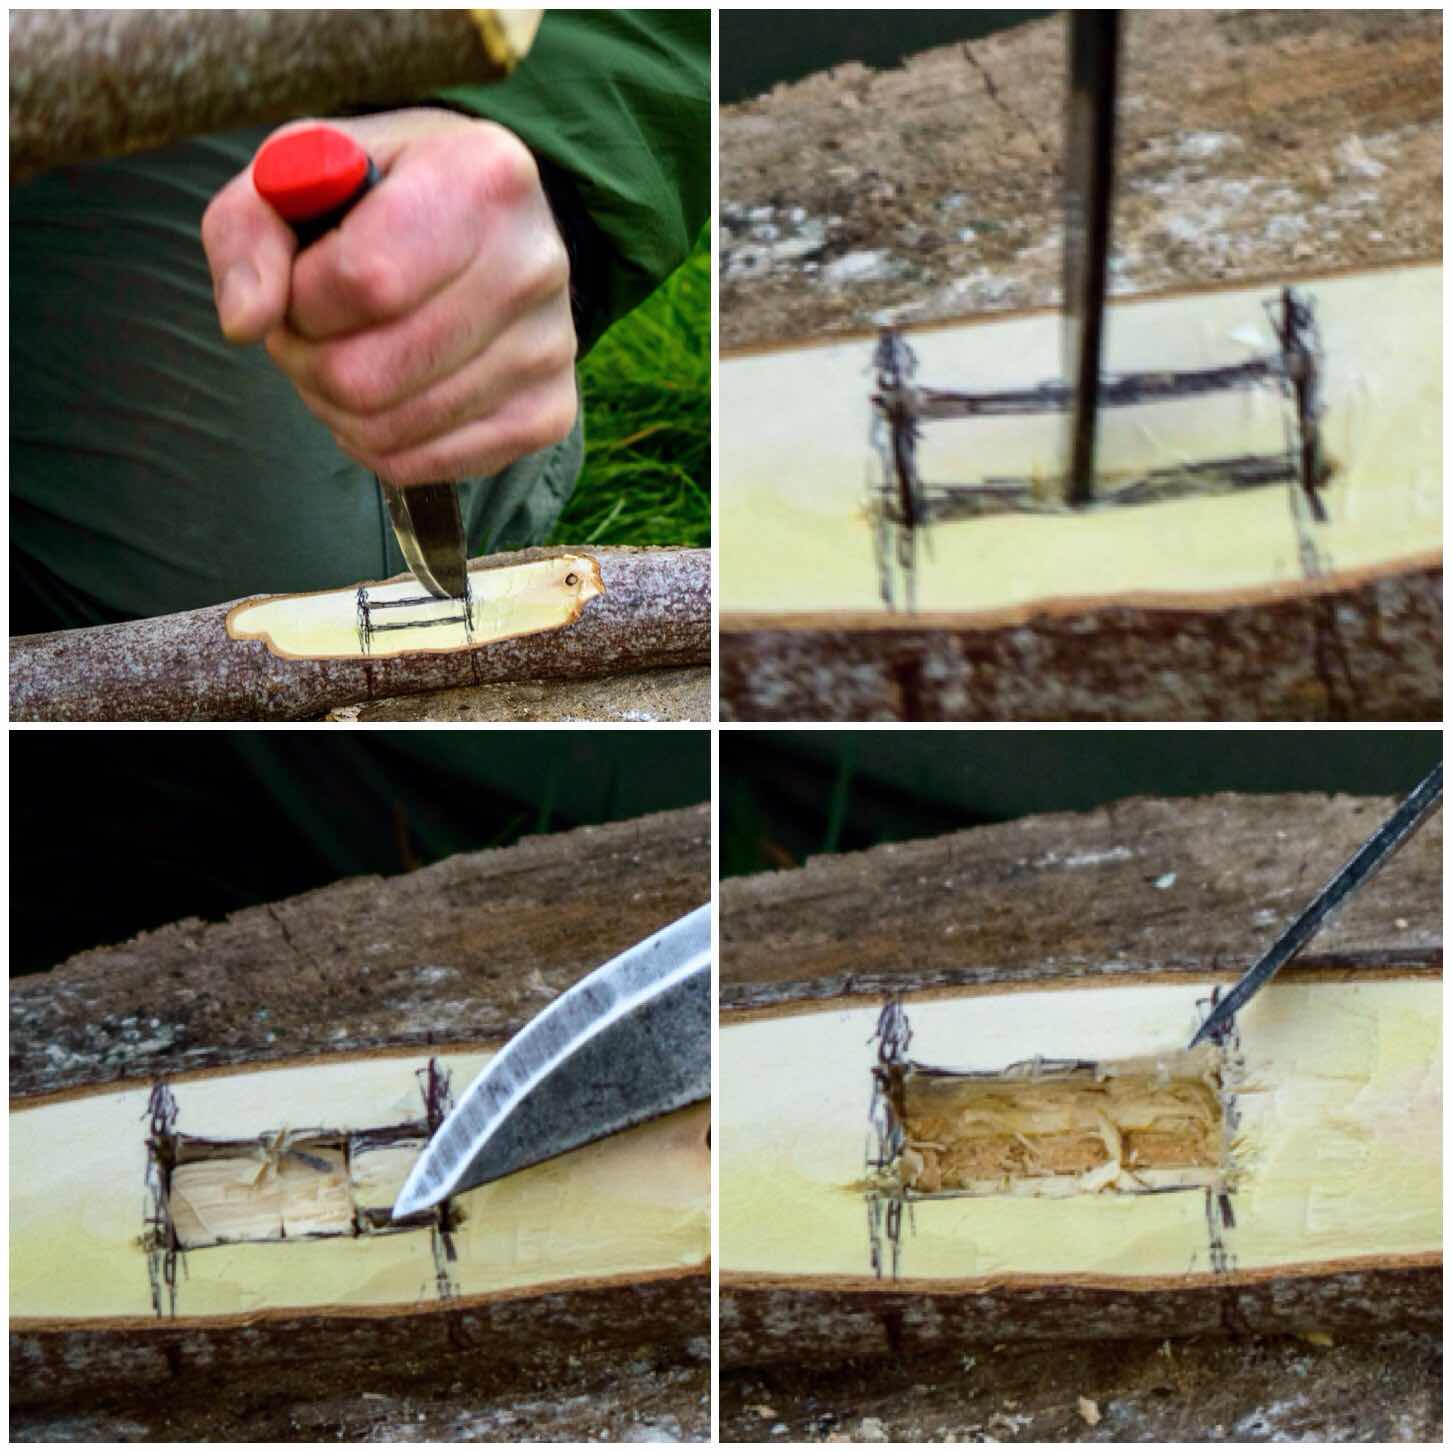
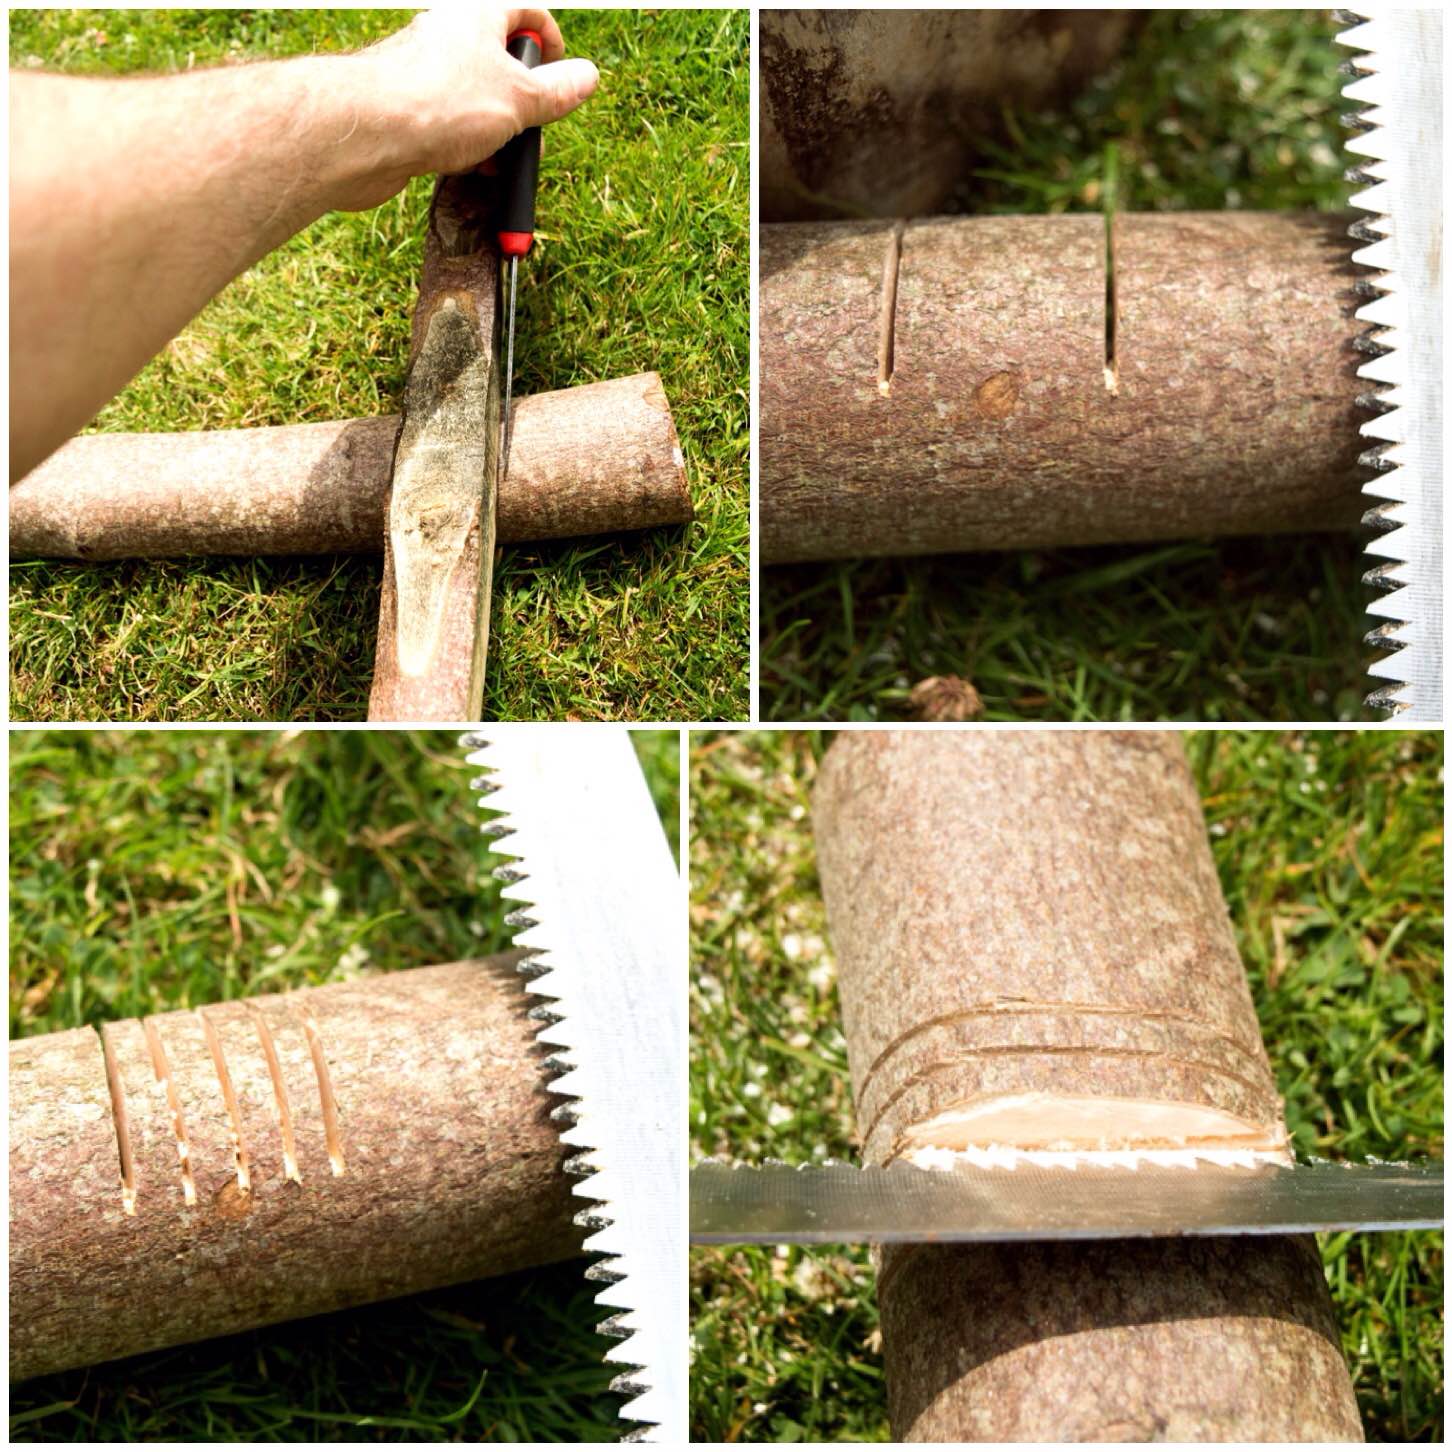
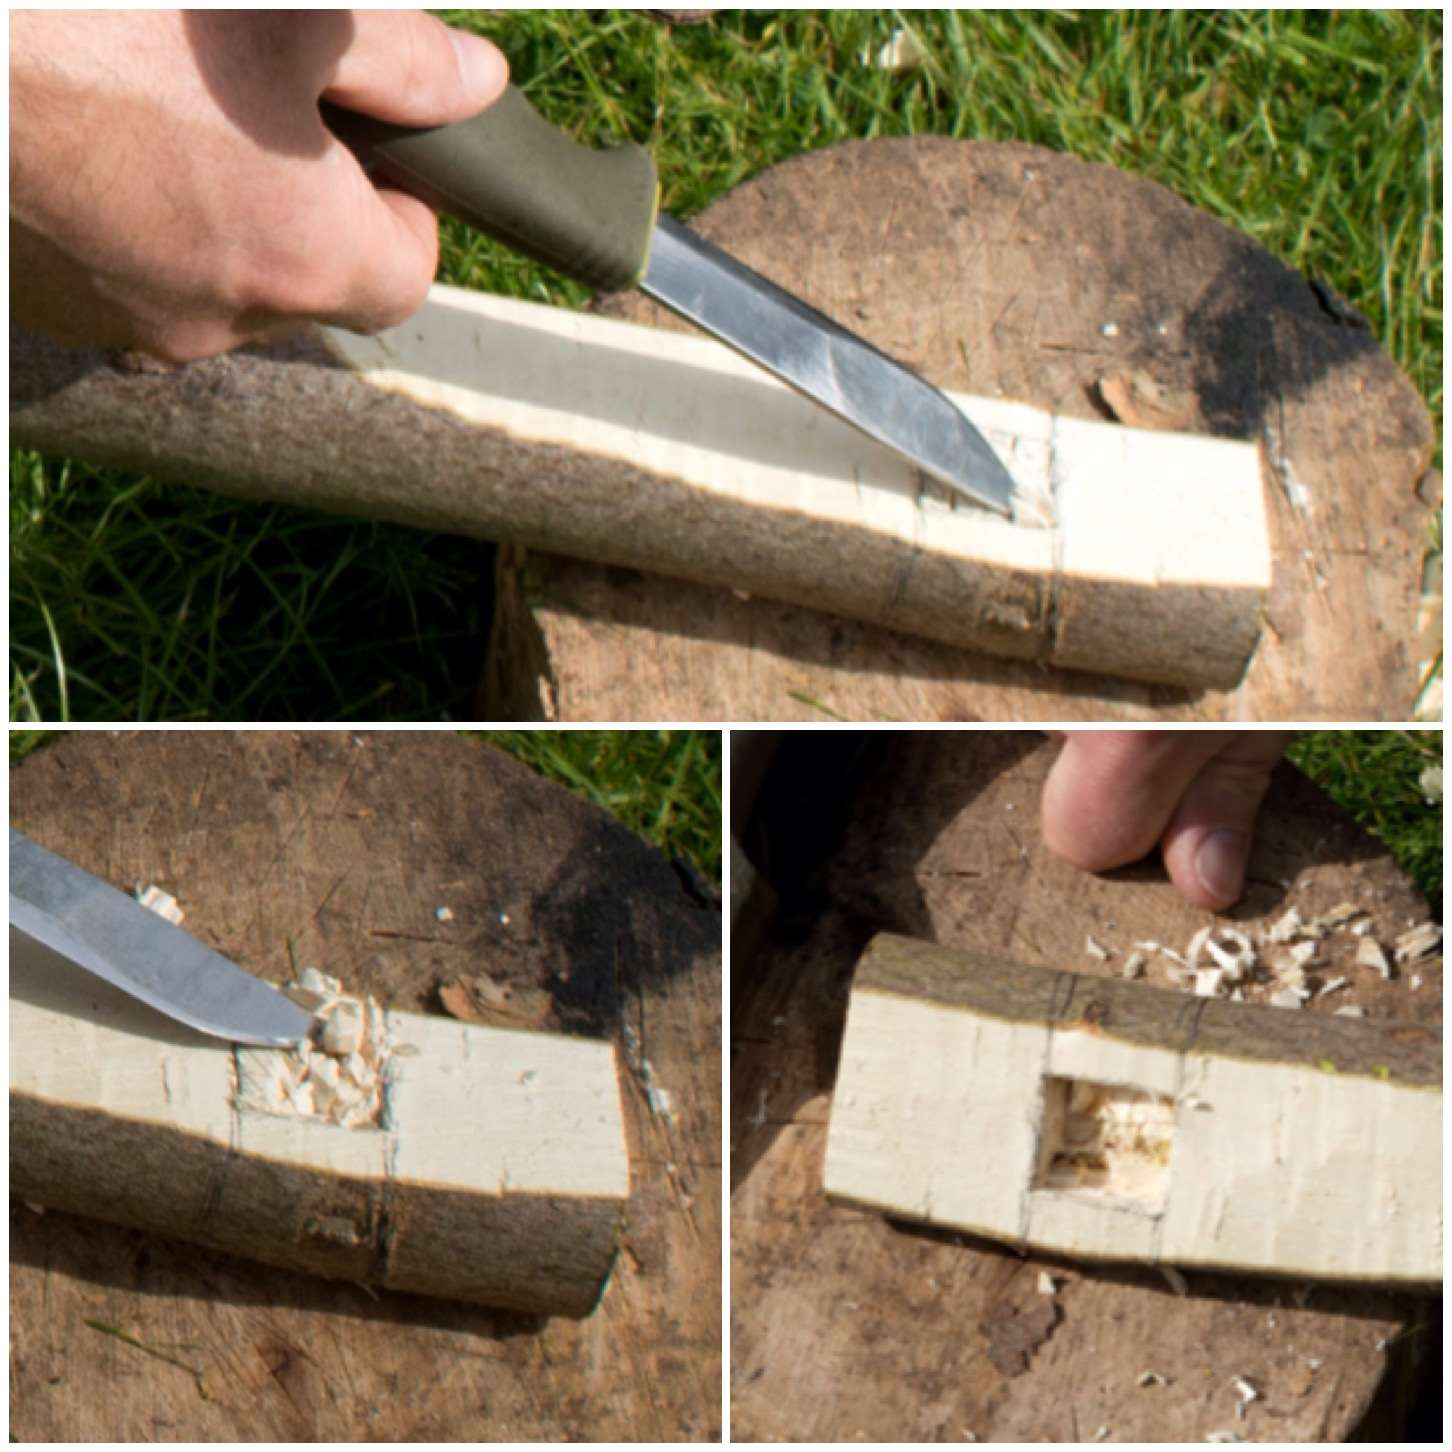
This style of log rocket requires you to put a stop cut into the bottom of the log to about two thirds of its width. You can see in the top left picture below the cut is about 10 to 15 cms from what will be the bottom of the stove.
The top right picture below shoes you how far I put my stop cut into the log. The bottom two pictures show me marking out with my saw the approximate area I would be battoning out.
Bottom cut and marking out
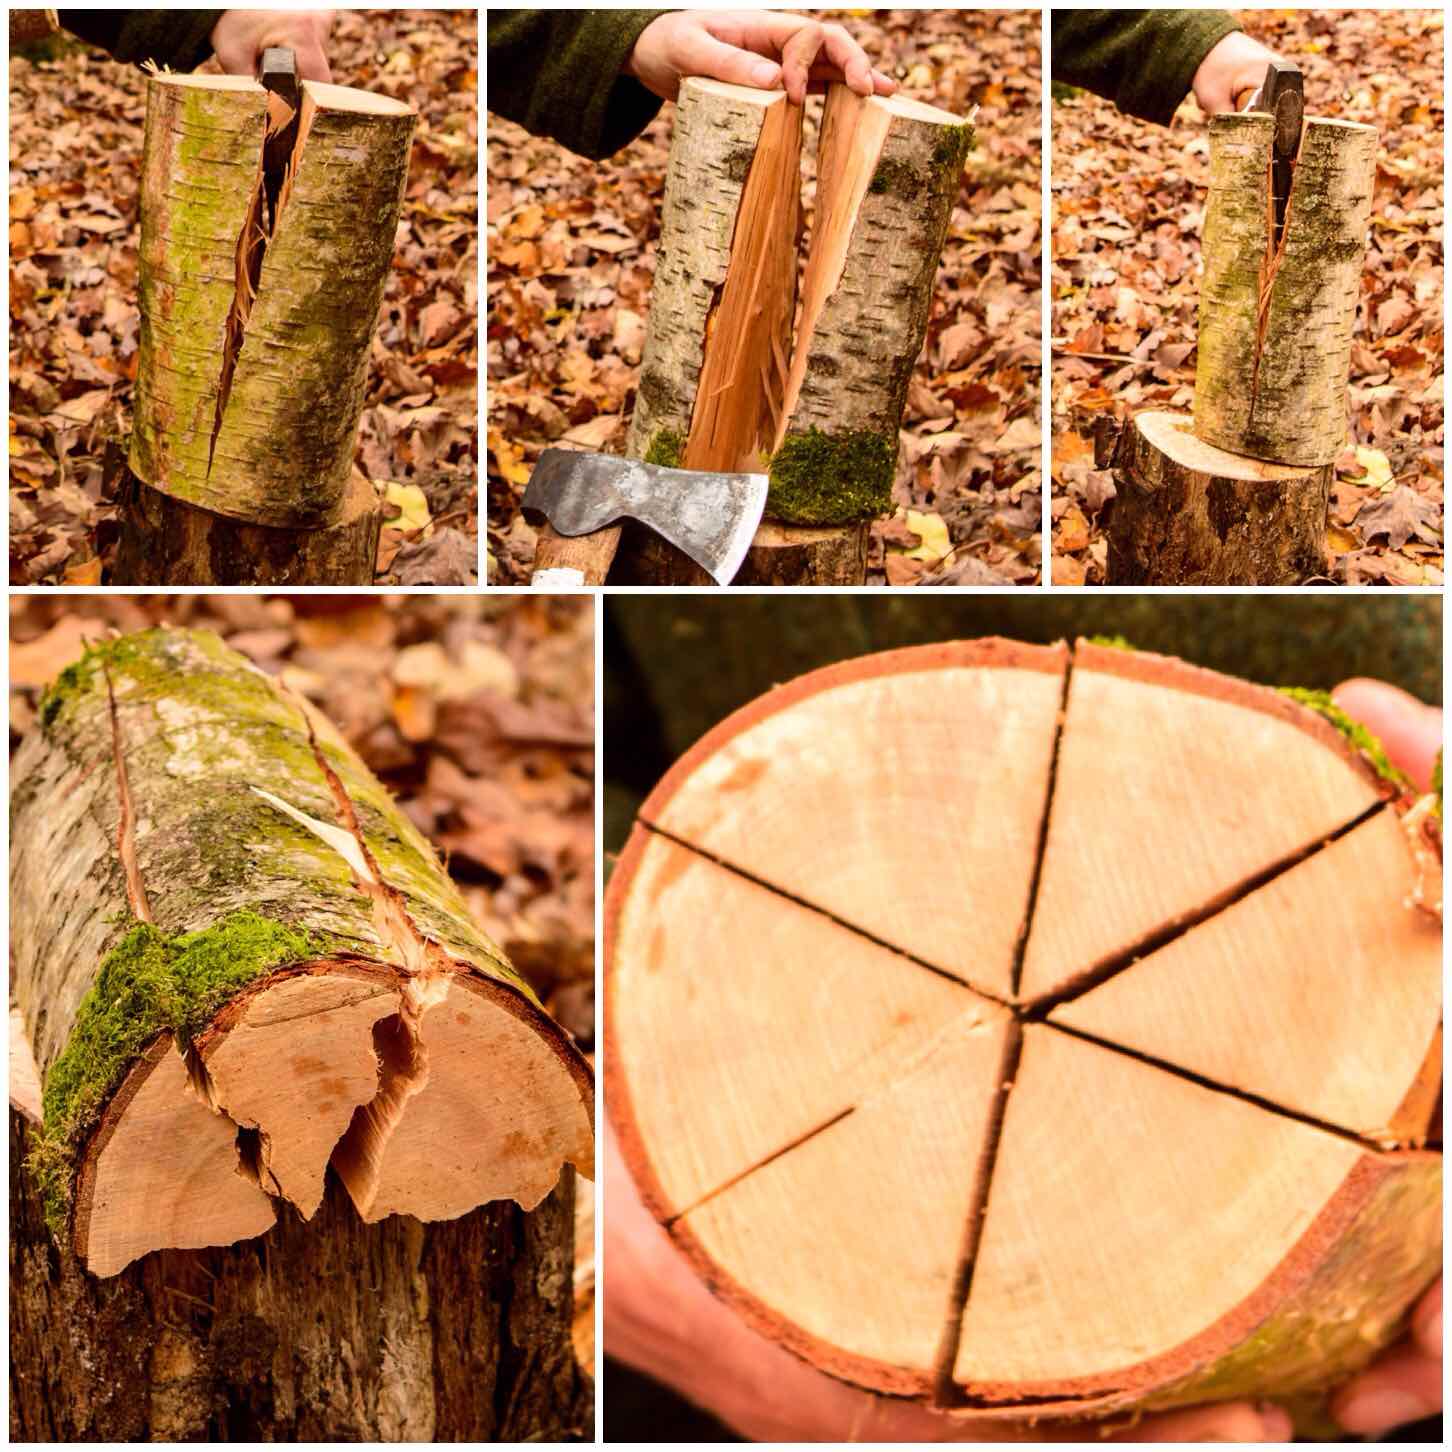
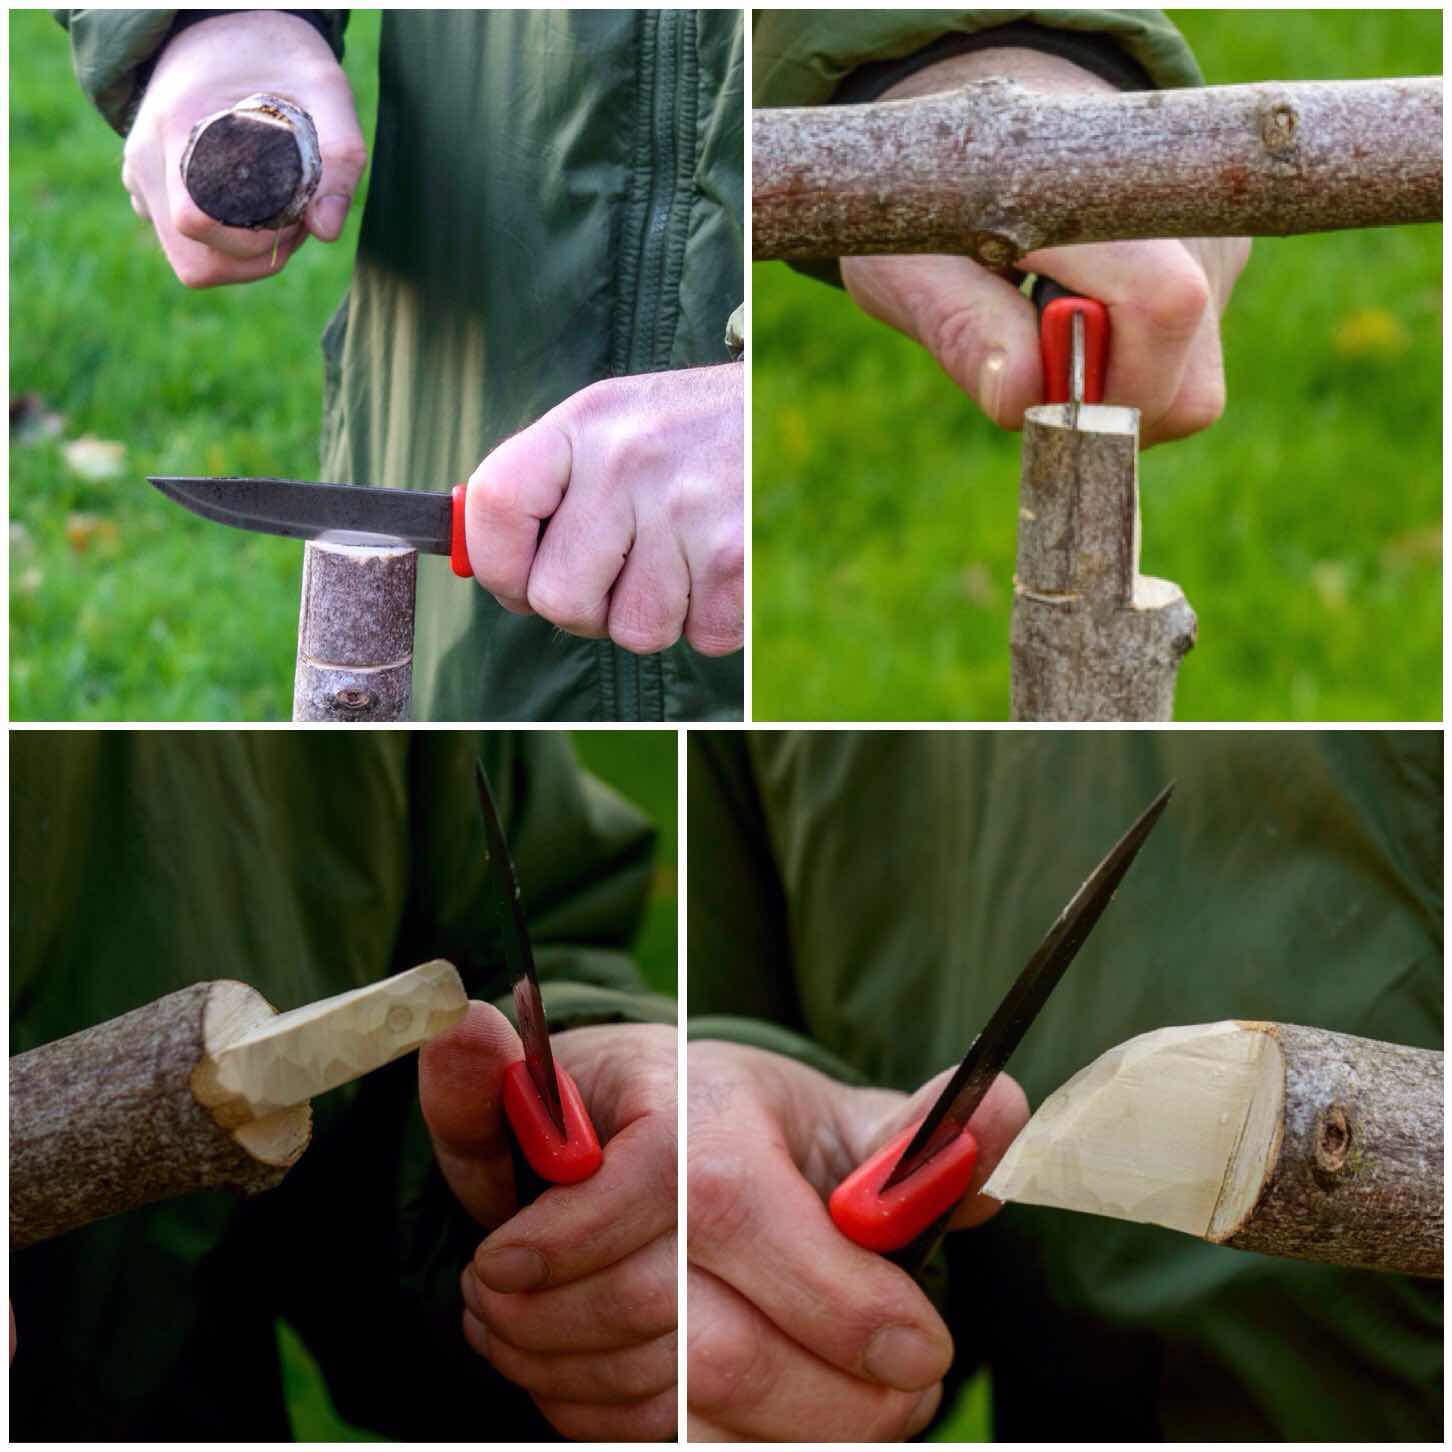
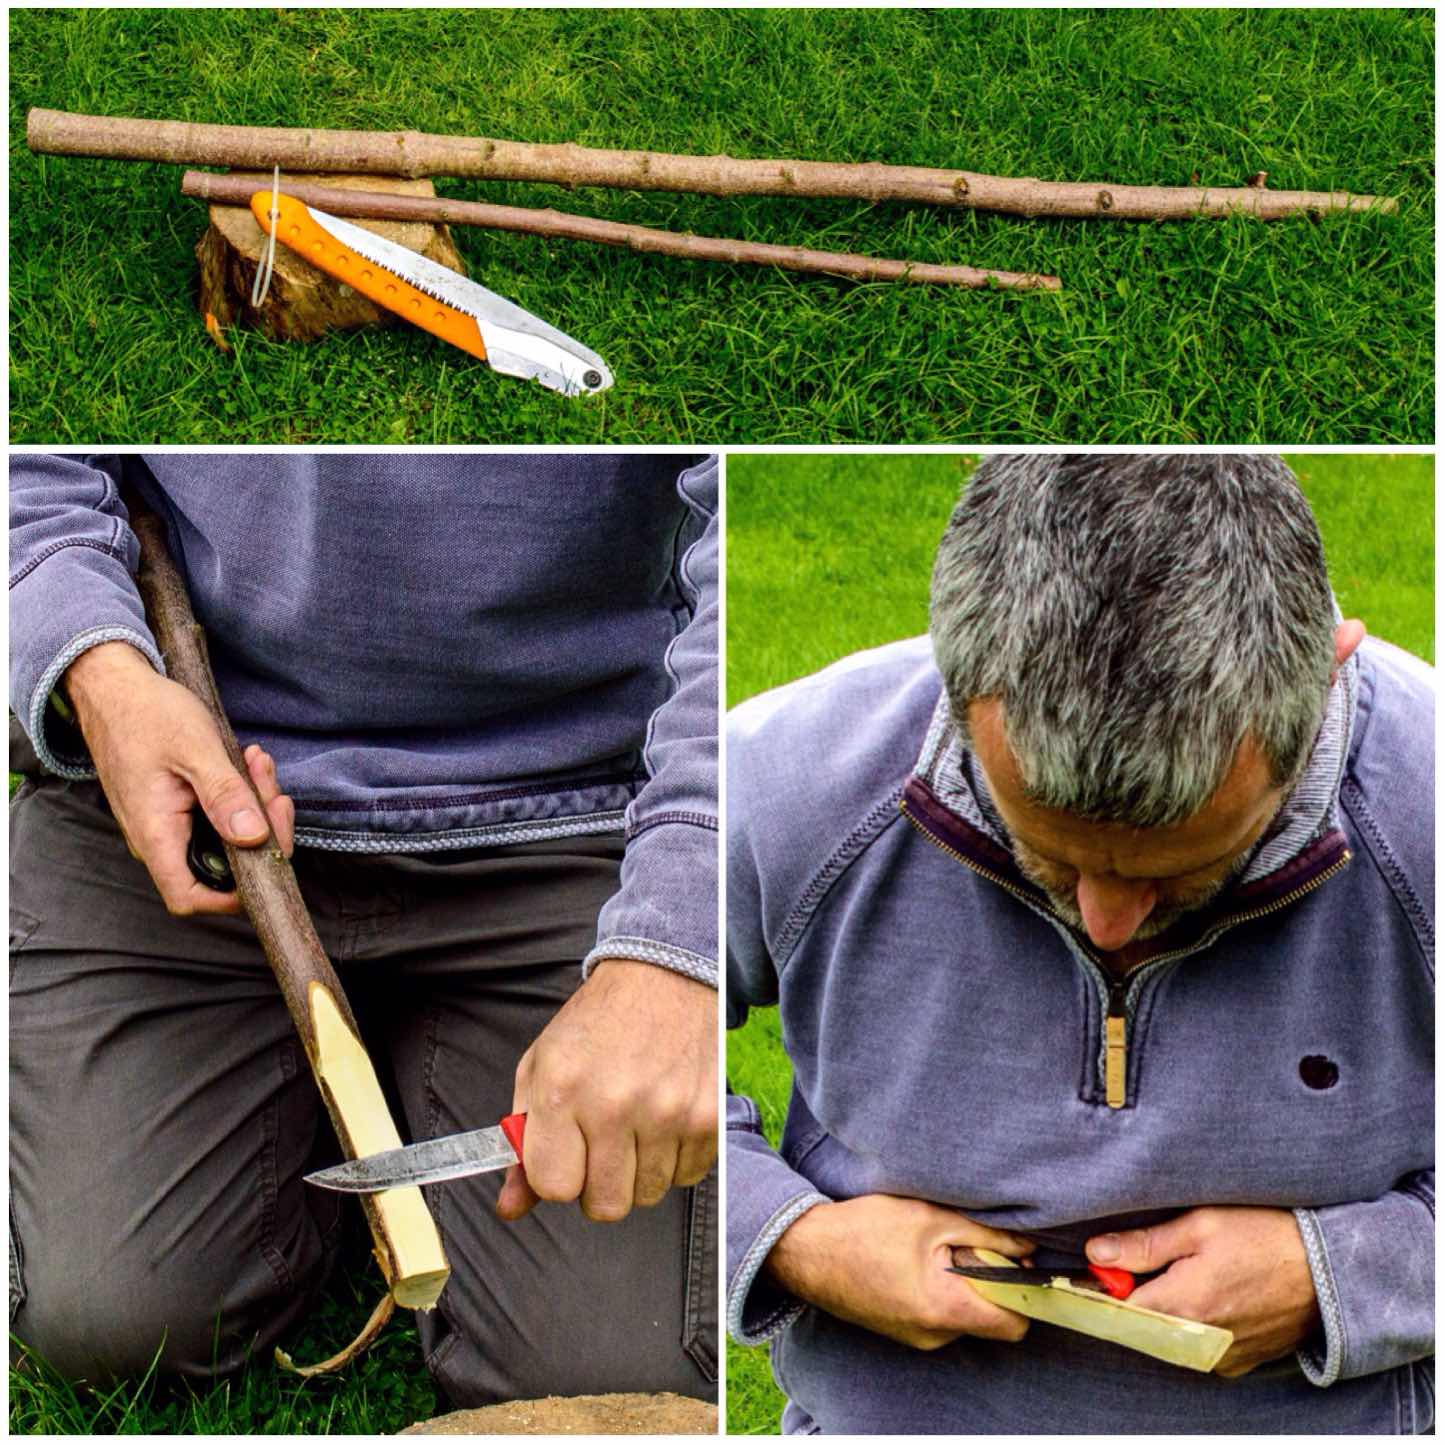
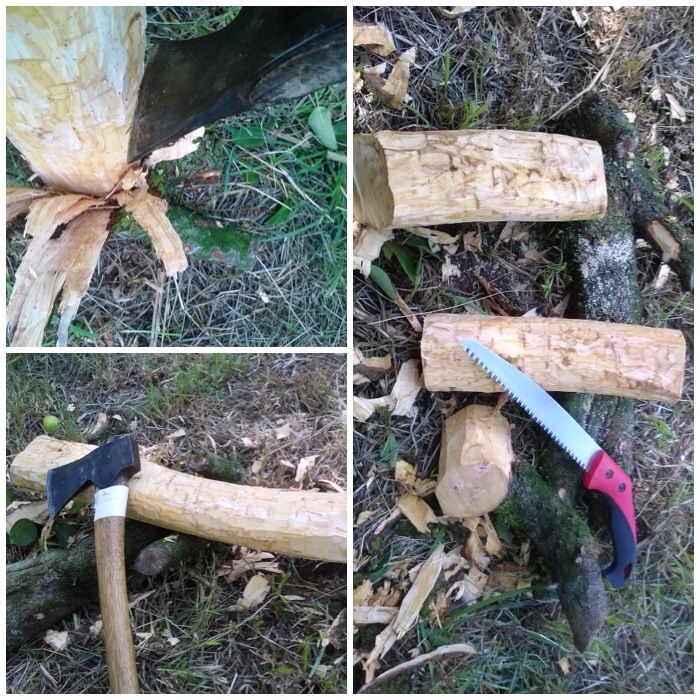
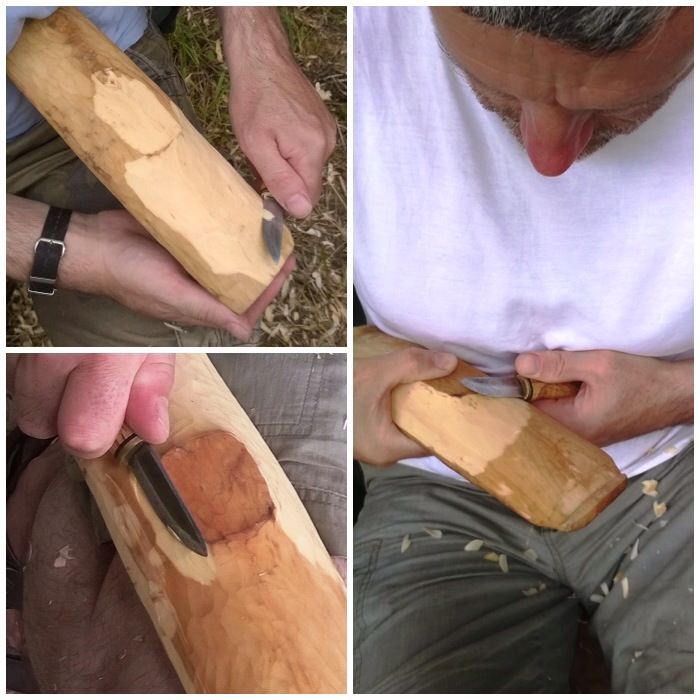
I used my axe and a large piece of wood to batton out the the wood. You can see the shape of the stove at this stage with one segment in an inverted ‘L’ shape (Segment 1) and a smaller piece (Segment 2).
The bottom two photos show me marking out the smaller piece for further splitting. This piece is not split exactly in two as this configuration allows you to form the chimney very quickly.
Splitting
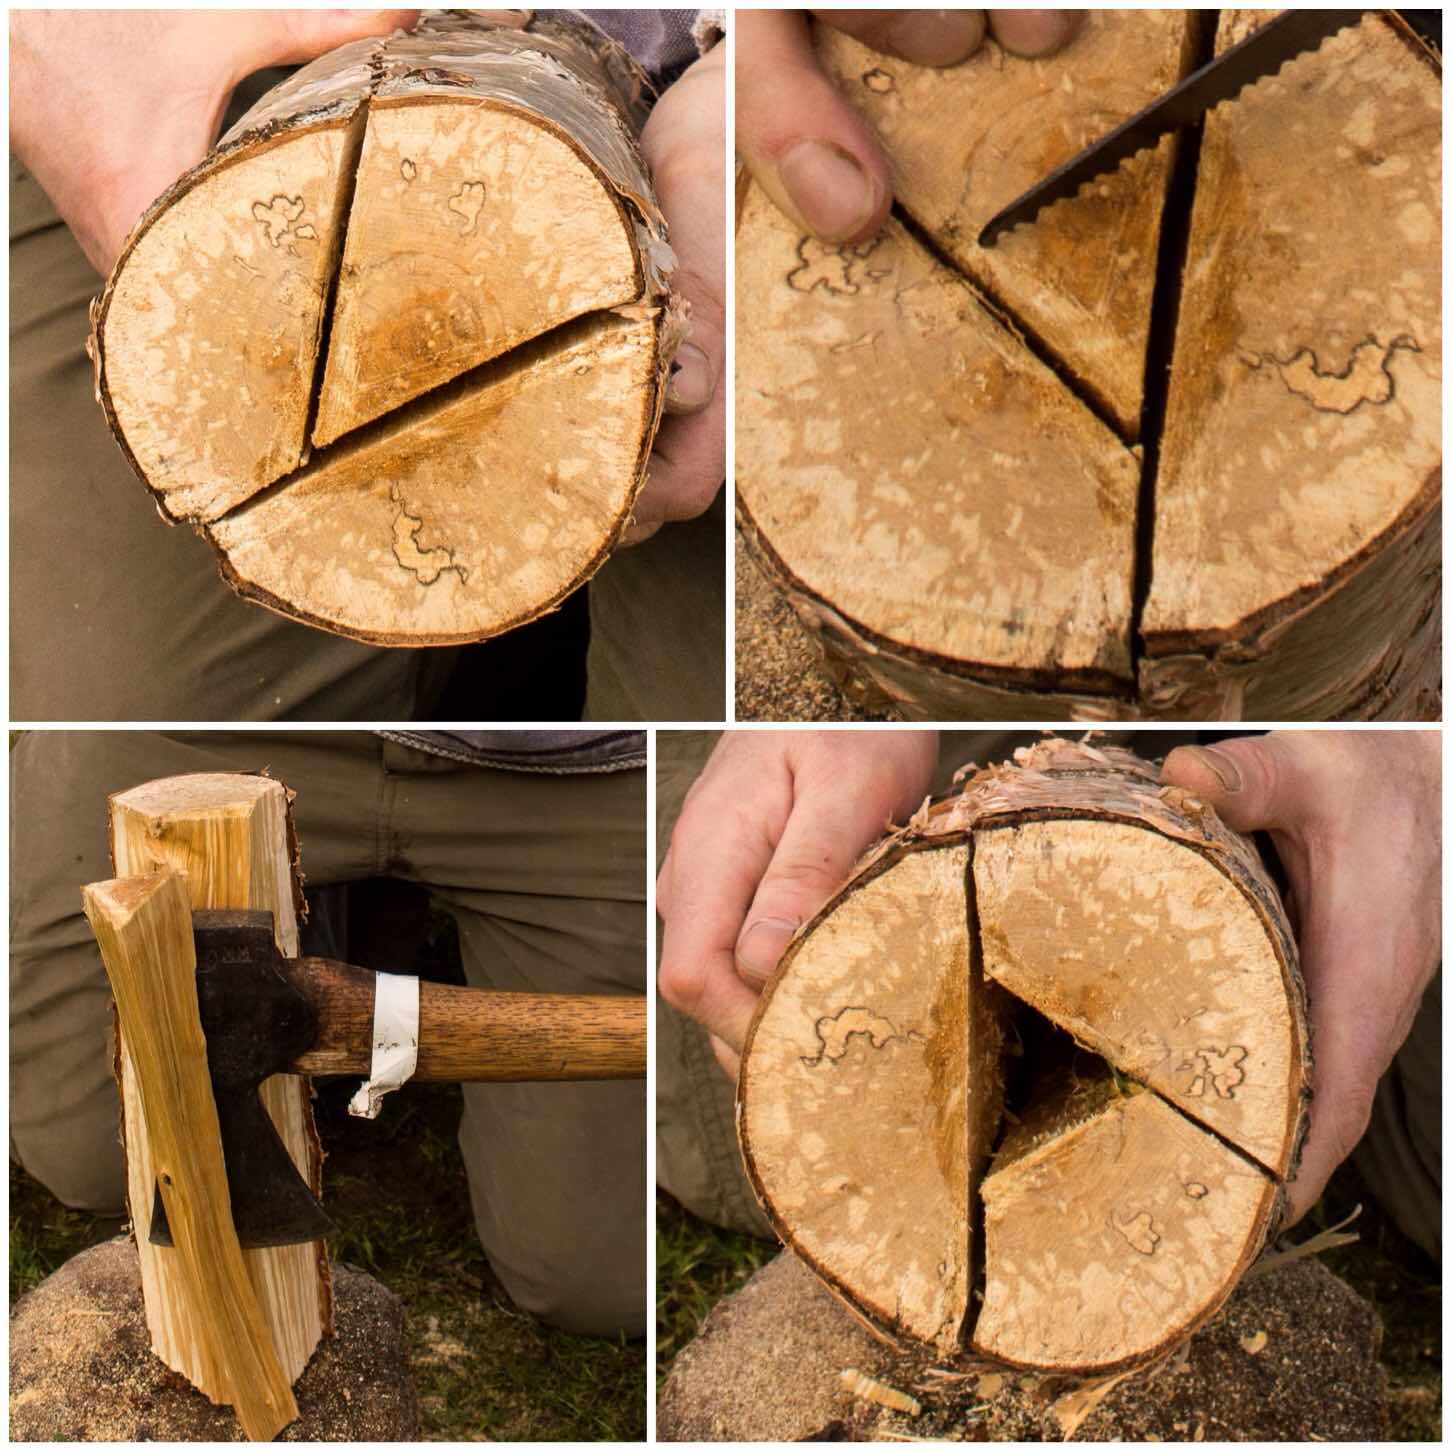
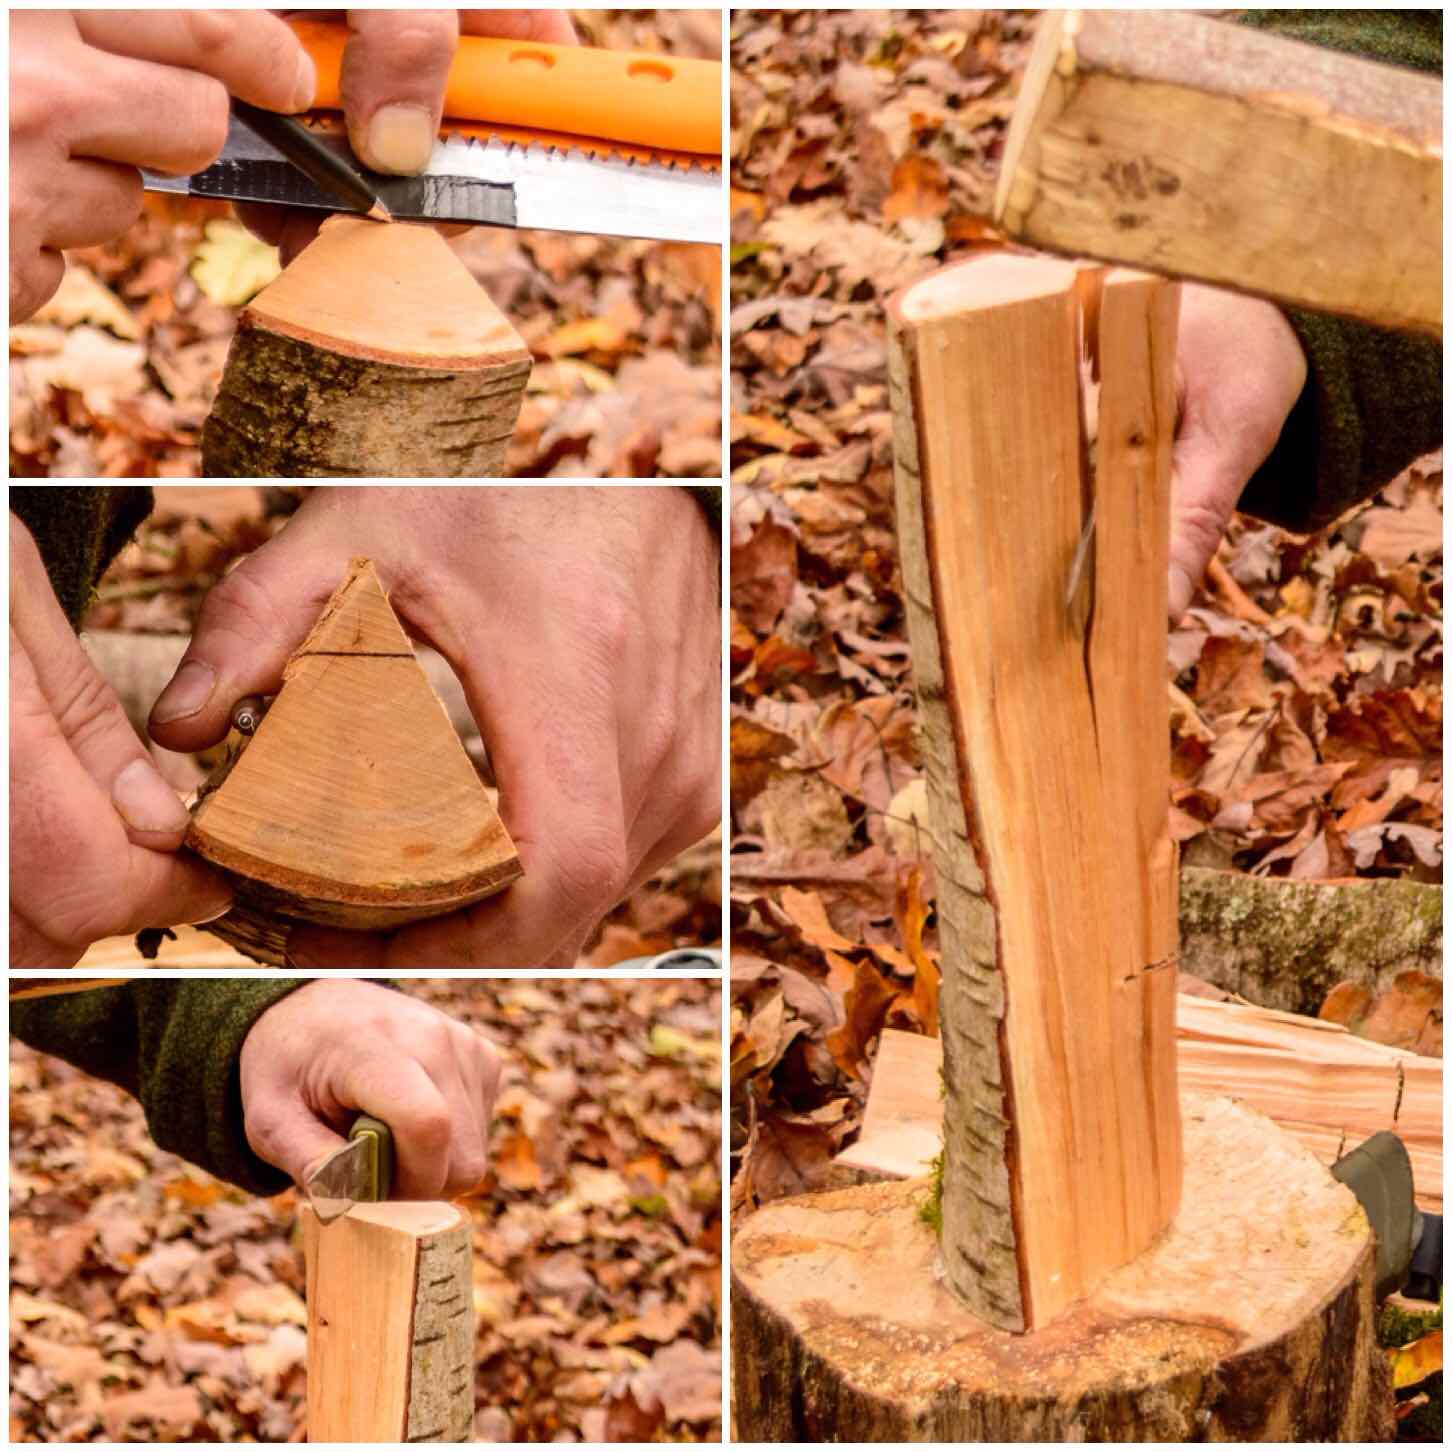
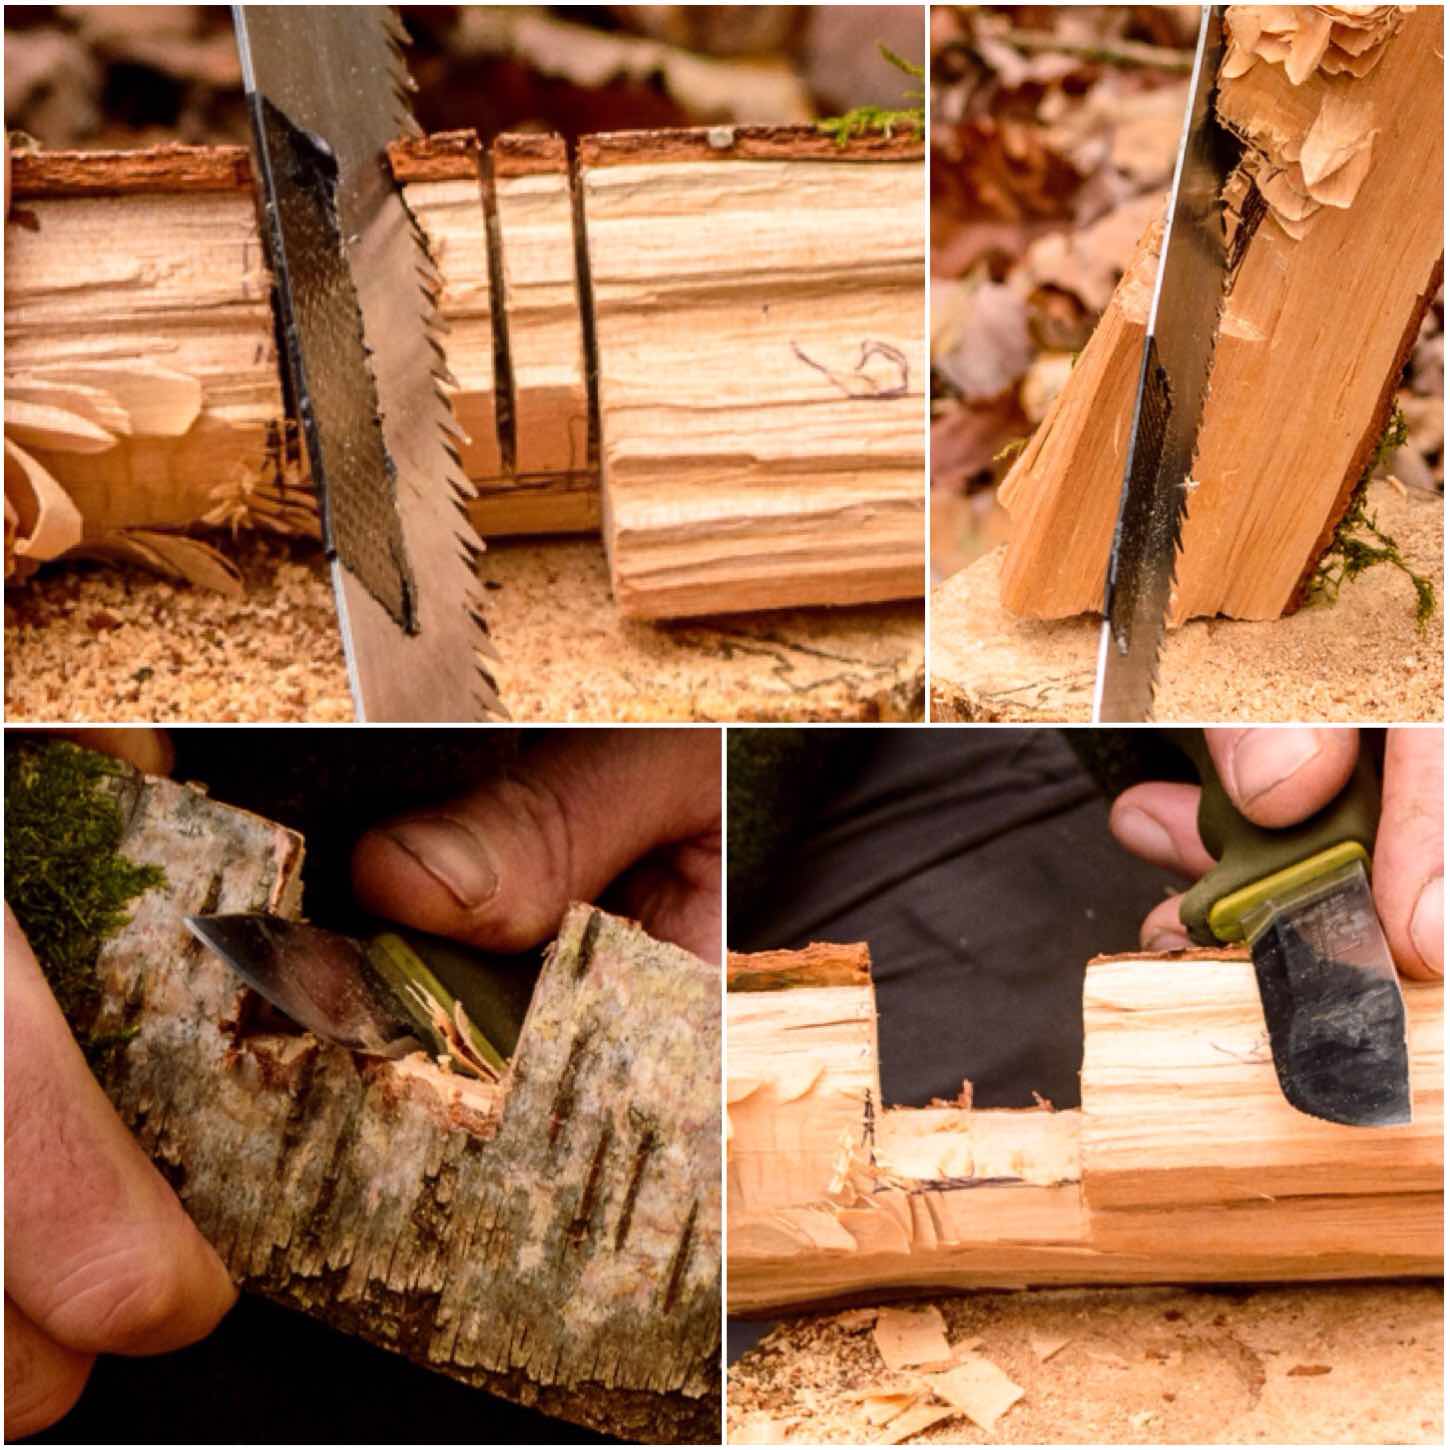
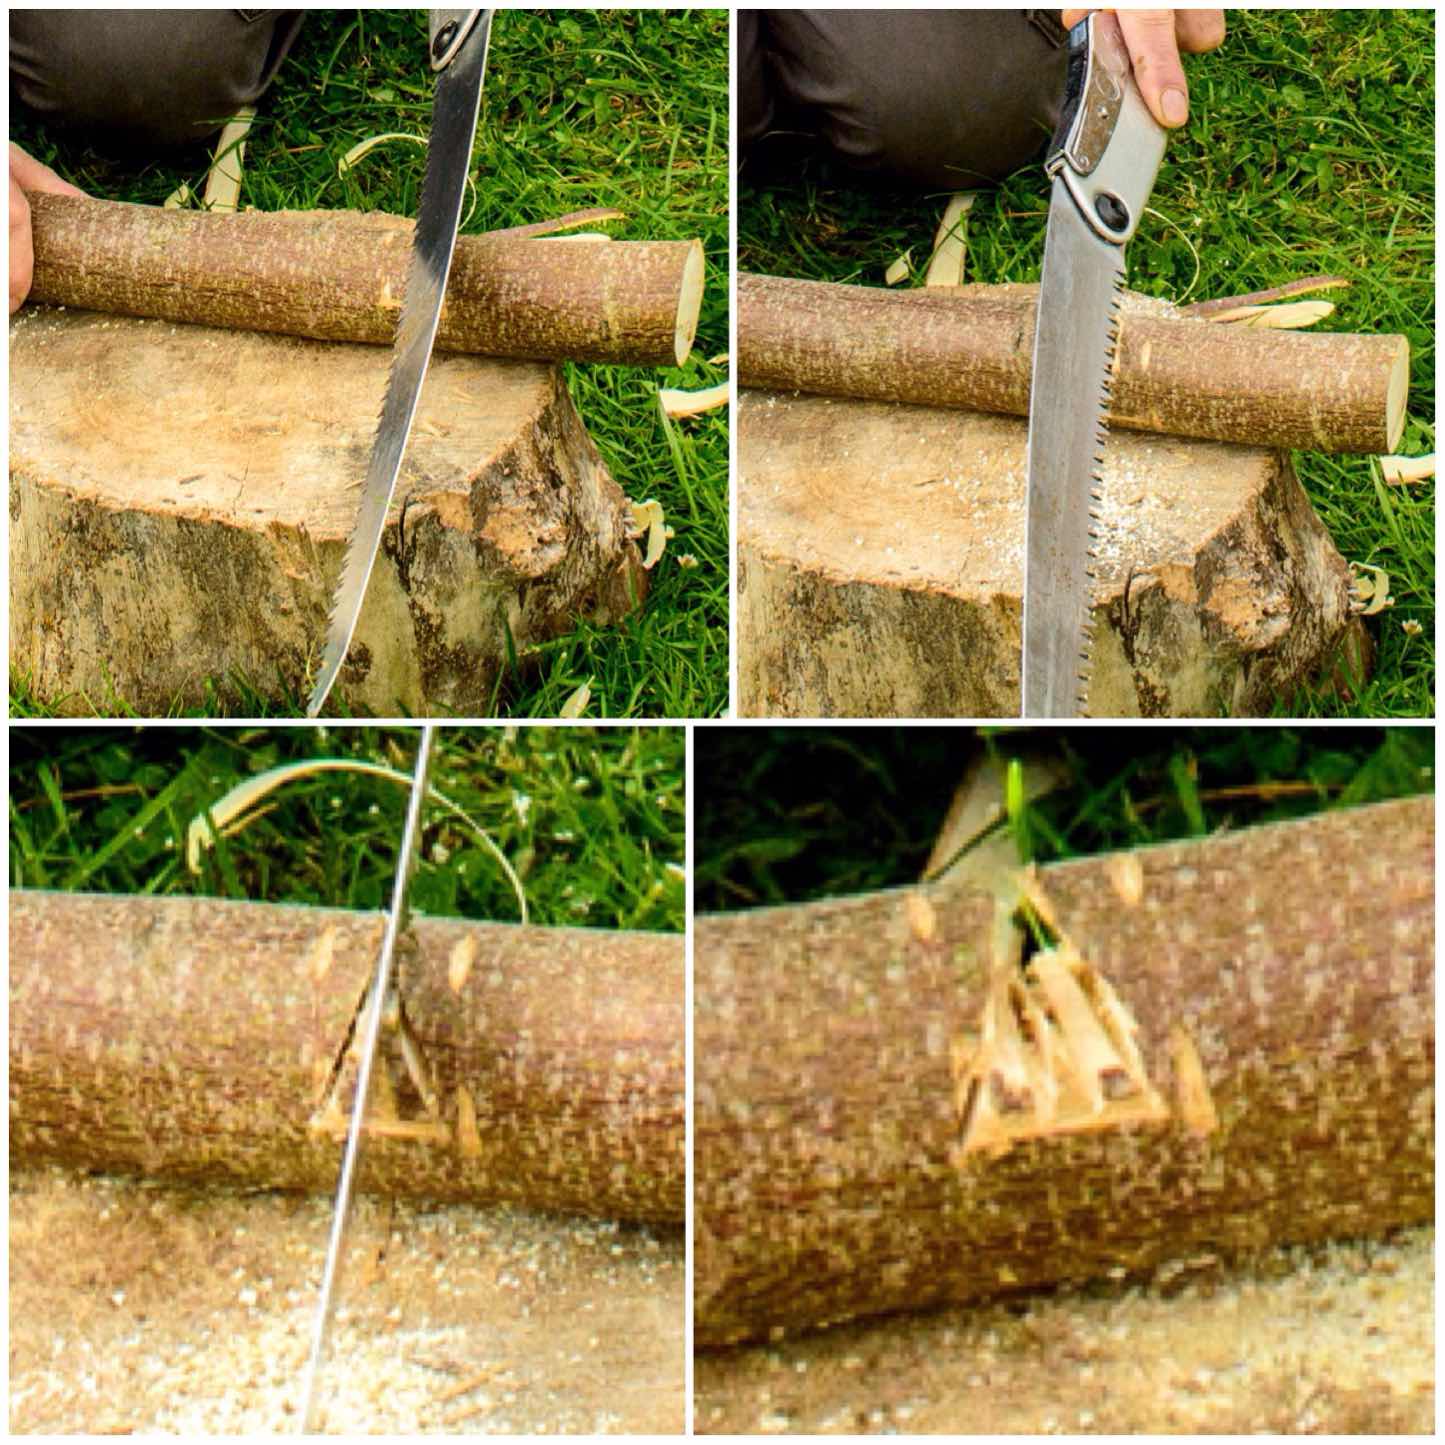
The Chimney
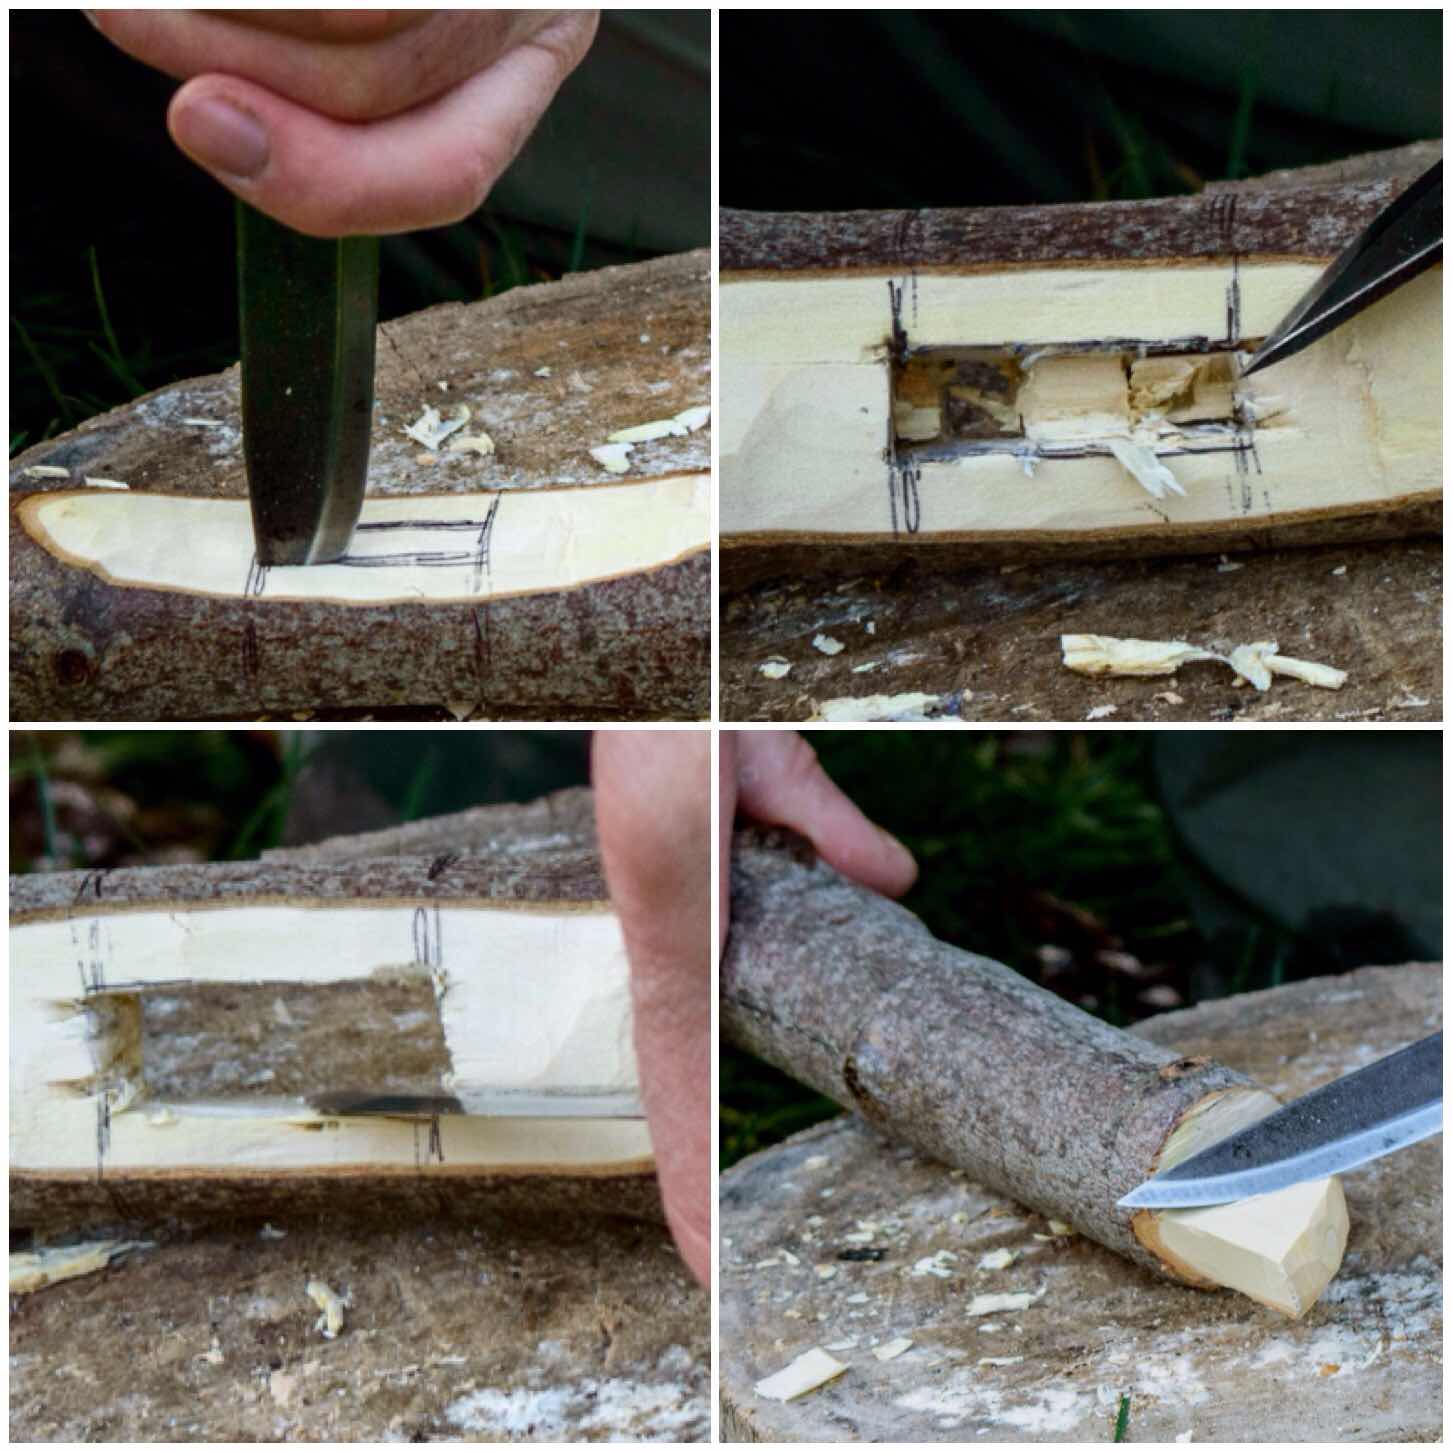
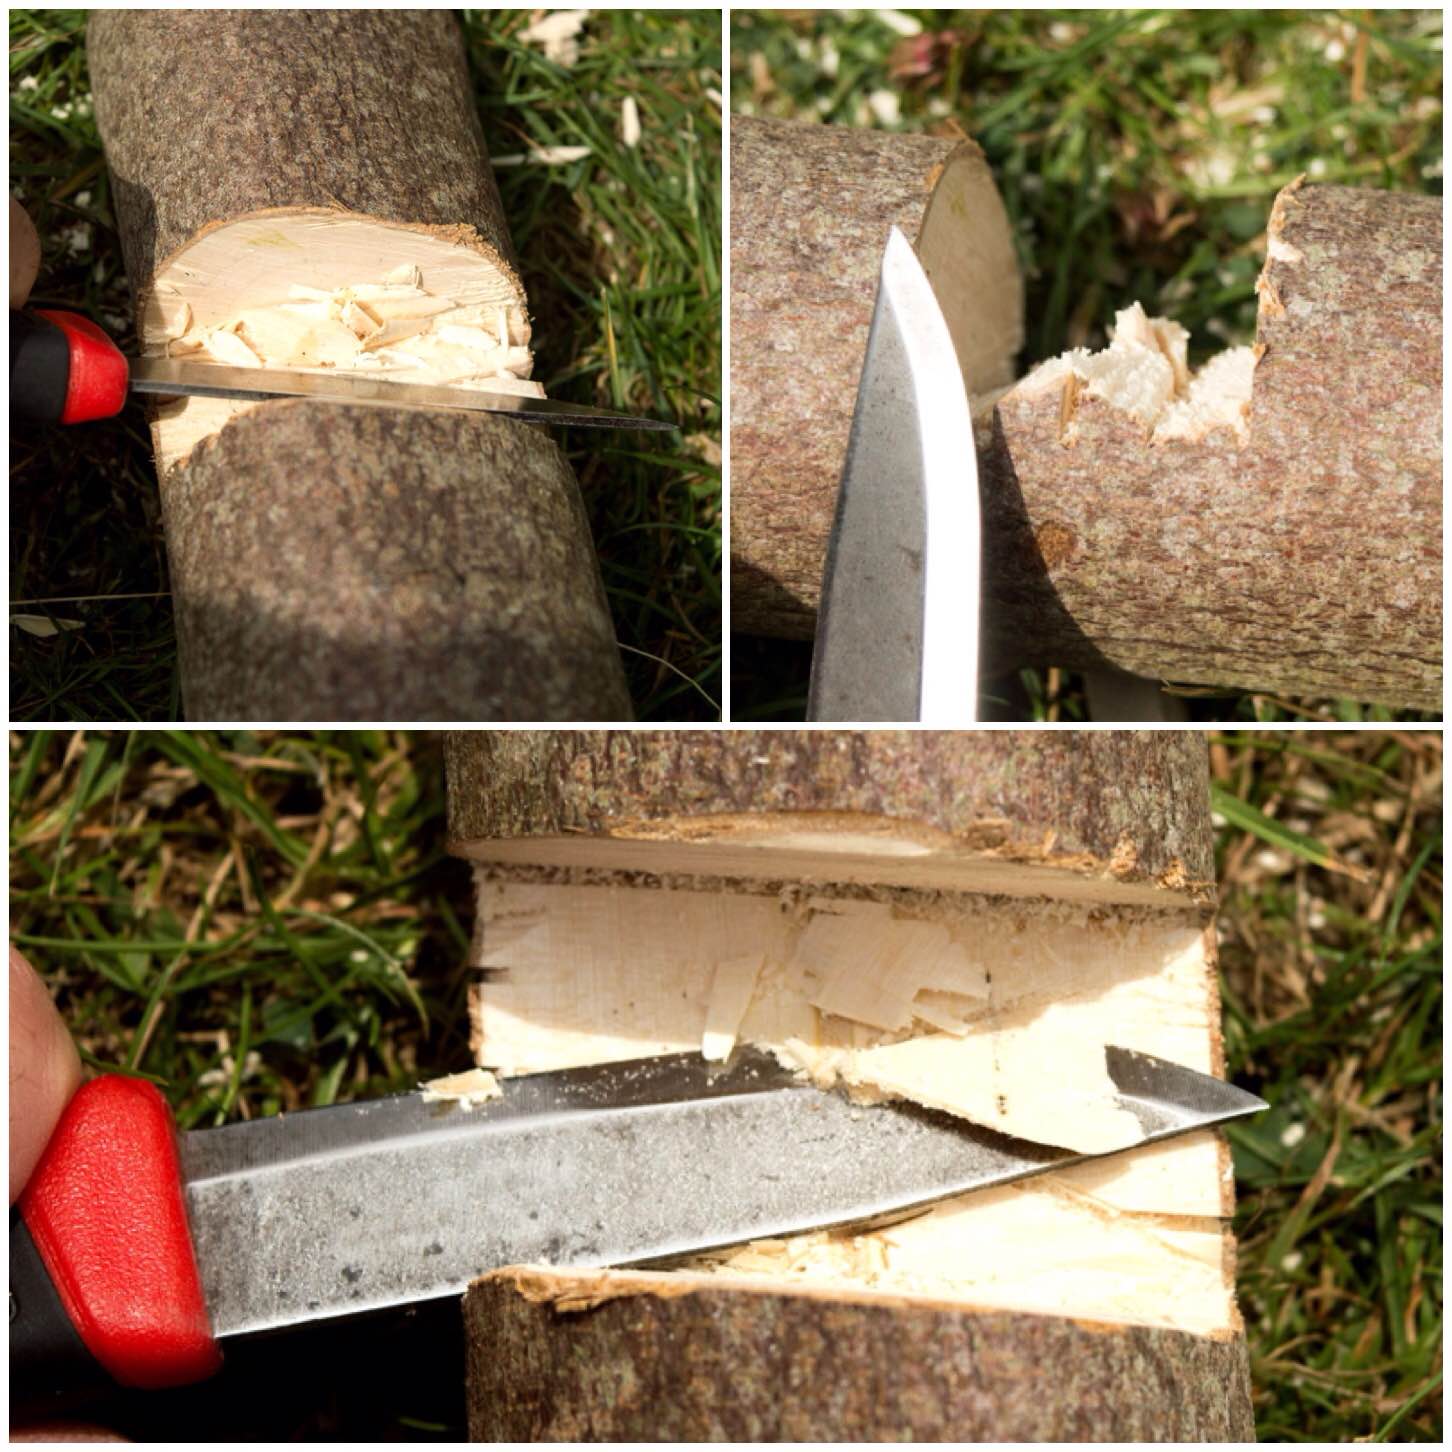
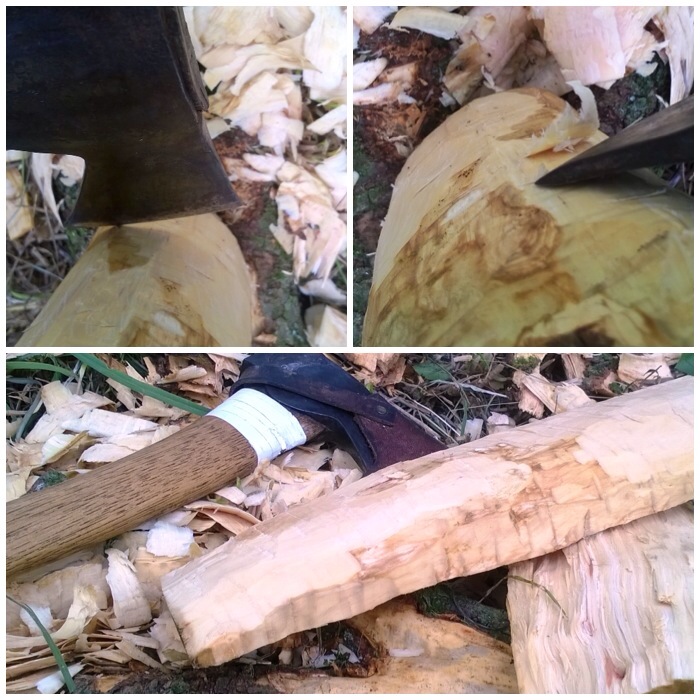
Below you can see the shape of all the pieces when they are put back together . I then battoned off the tip of the larger piece from Segment 2 so that a chimney would be formed. This piece of battoned-out wood I further split into fine pieces to act as kindling for the stove.
The One Cut Chimney
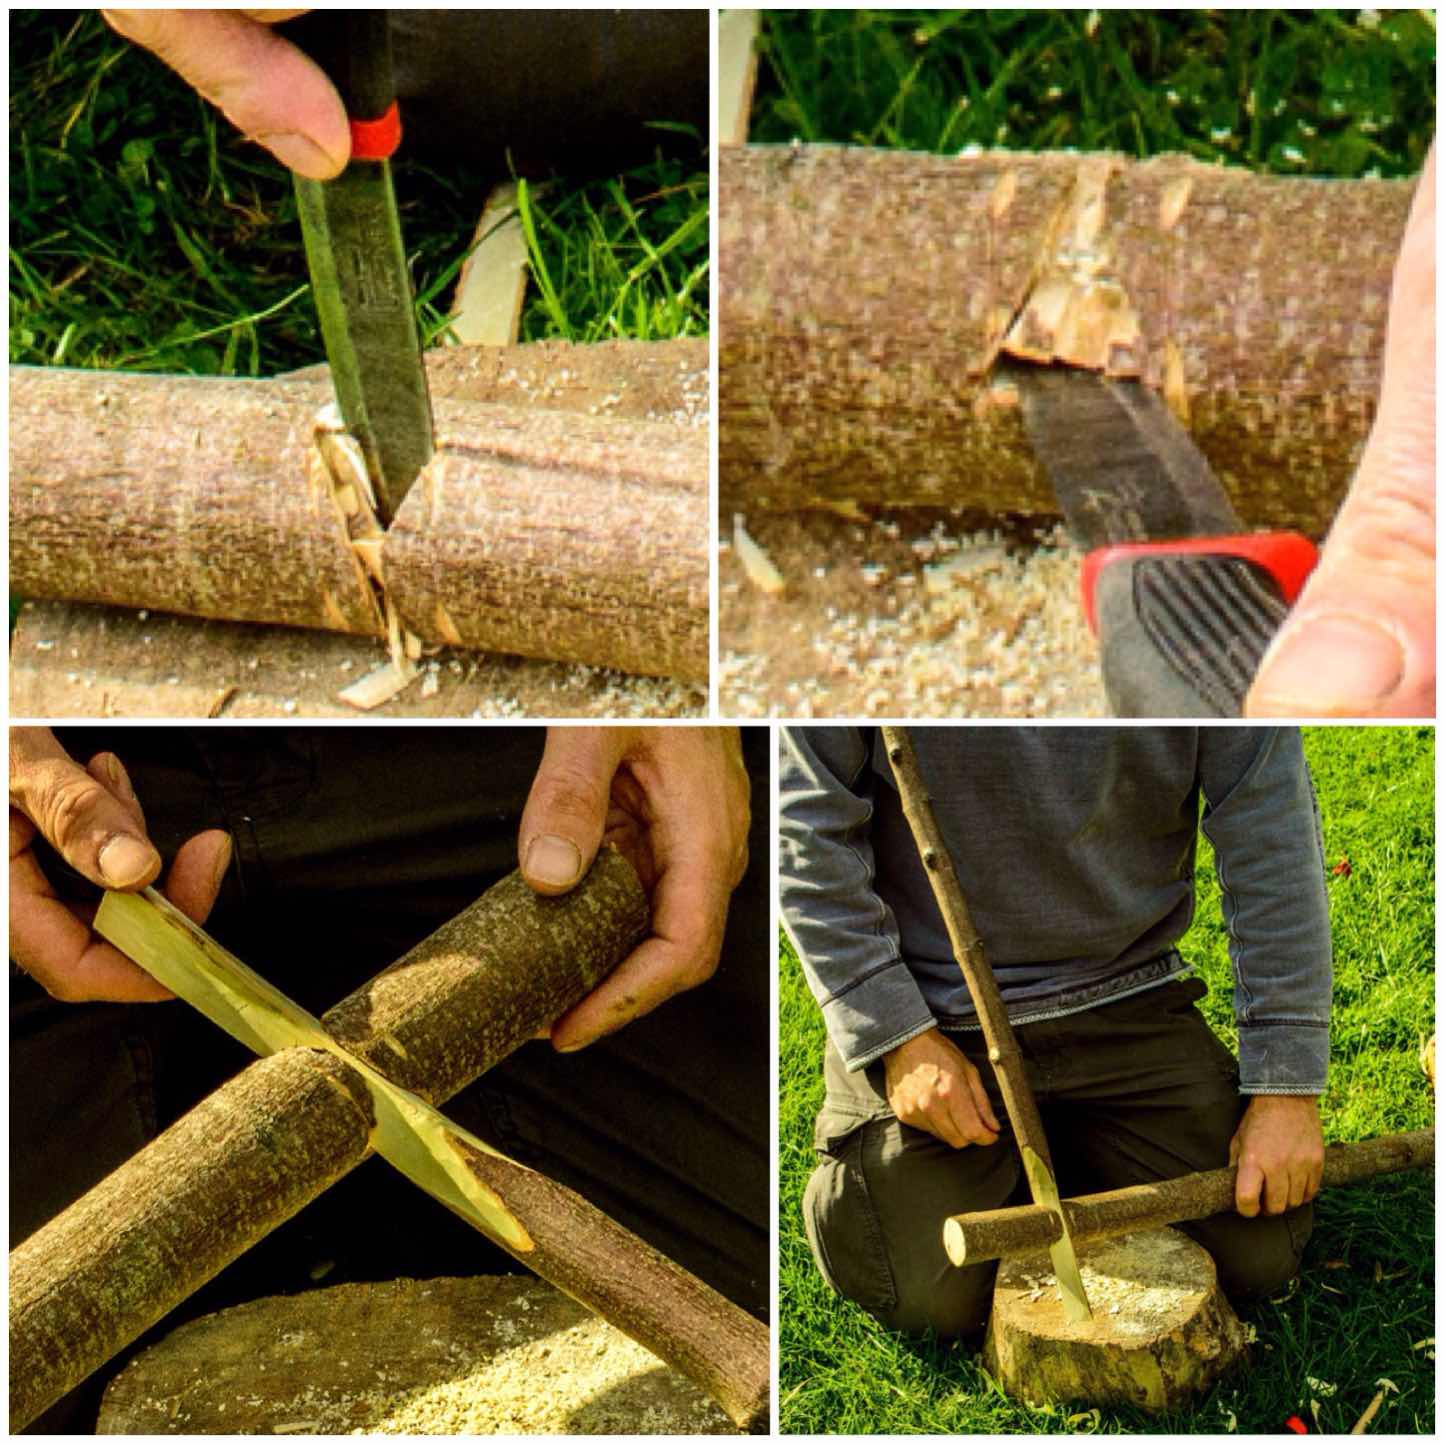
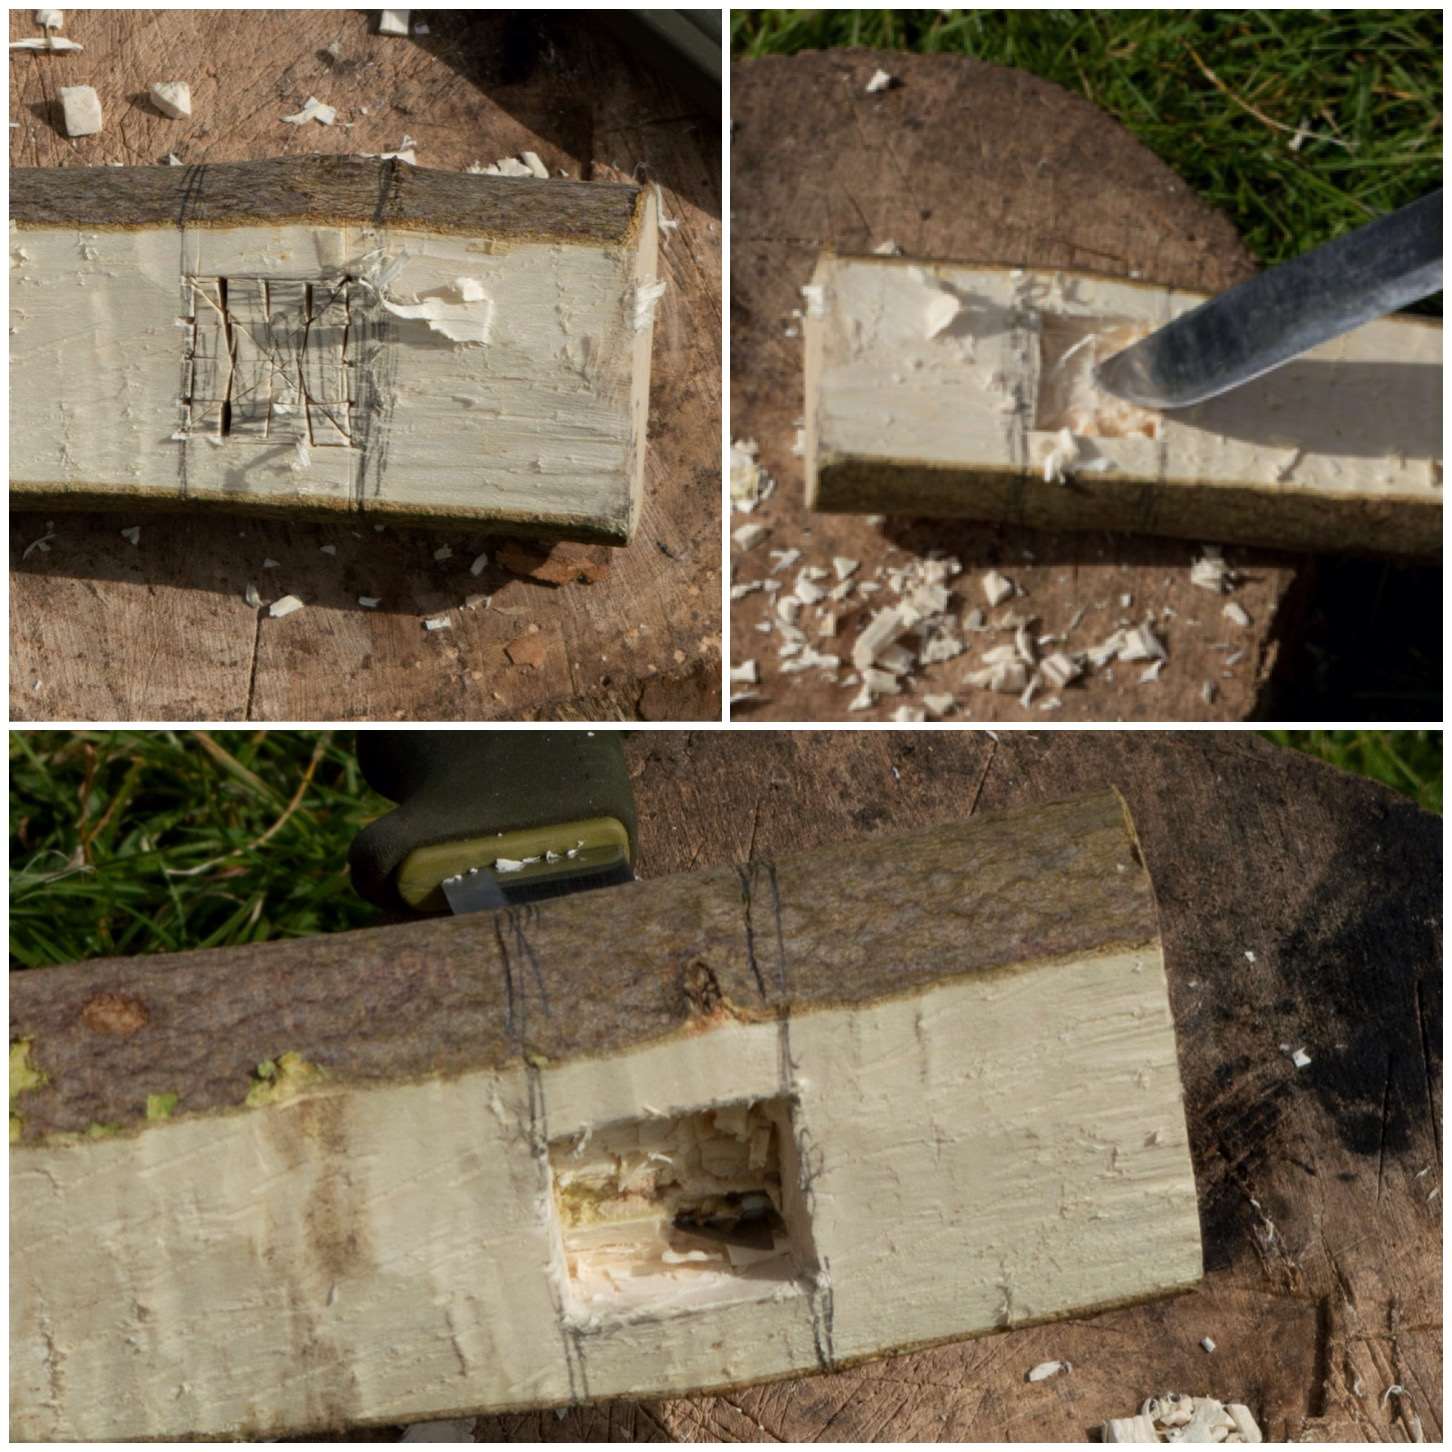
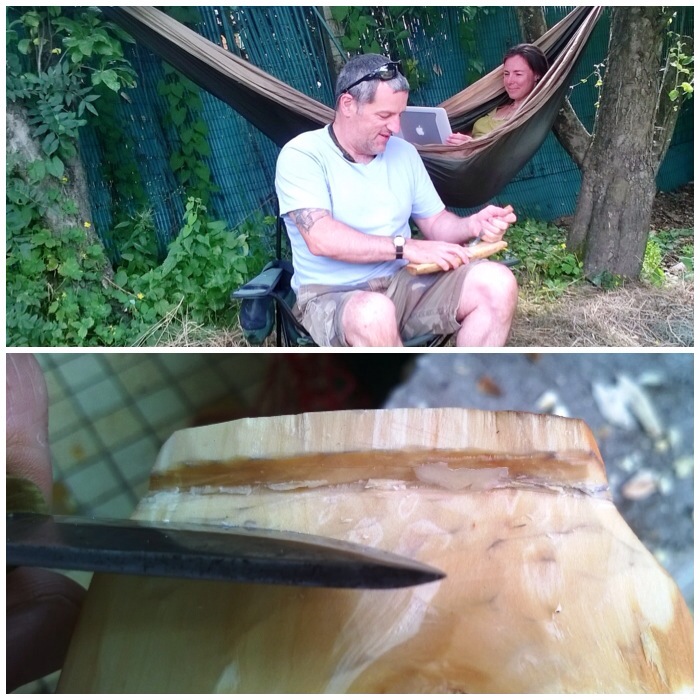
Once I had the chimney battoned out I trimmed off some excess wood from Segment 1 and then used a pencil to mark out the chimney area.
I did this so I could put some Raappanan tuli cuts into the chimney area. It is important to keep the sections of the log rocket that join together as smooth as possible for a good fit so marking out the chimney area ensures I do not cut into the wrong area.
Trimming & Marking out the chimney
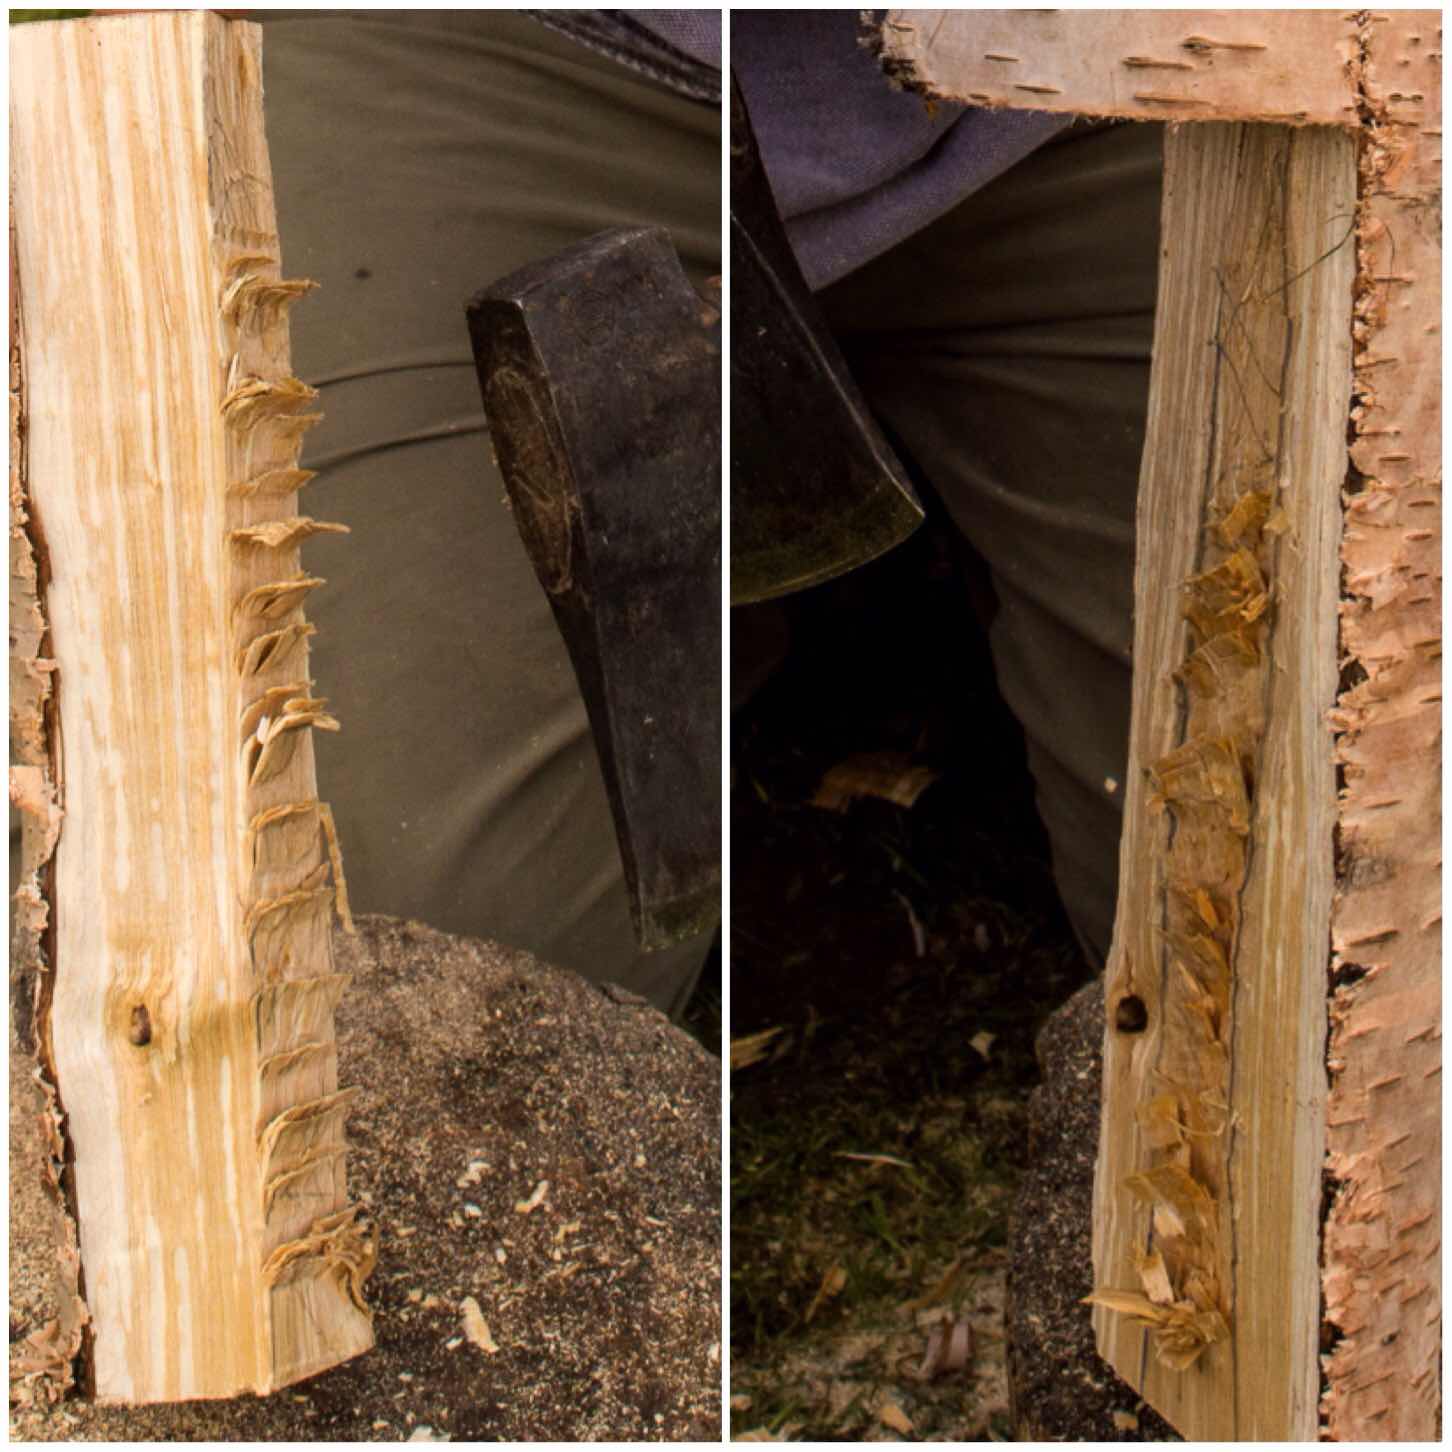
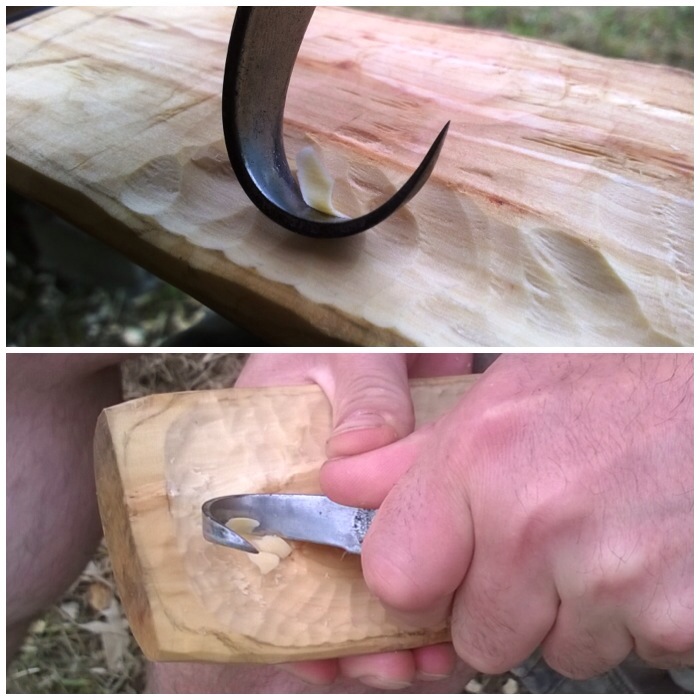
The Raappanan tuli cuts are fairly simple to make with my axe. I just ensured I cut only into the wood in the chimney area and that the cuts were made upwards, towards the top of the chimney.
These cuts are particularly helpful when using damp wood as it offers far more surface area to the initial flame, allowing it to catch more quickly, and also it helps to dry the damp wood out.
Raappanan tuli cuts
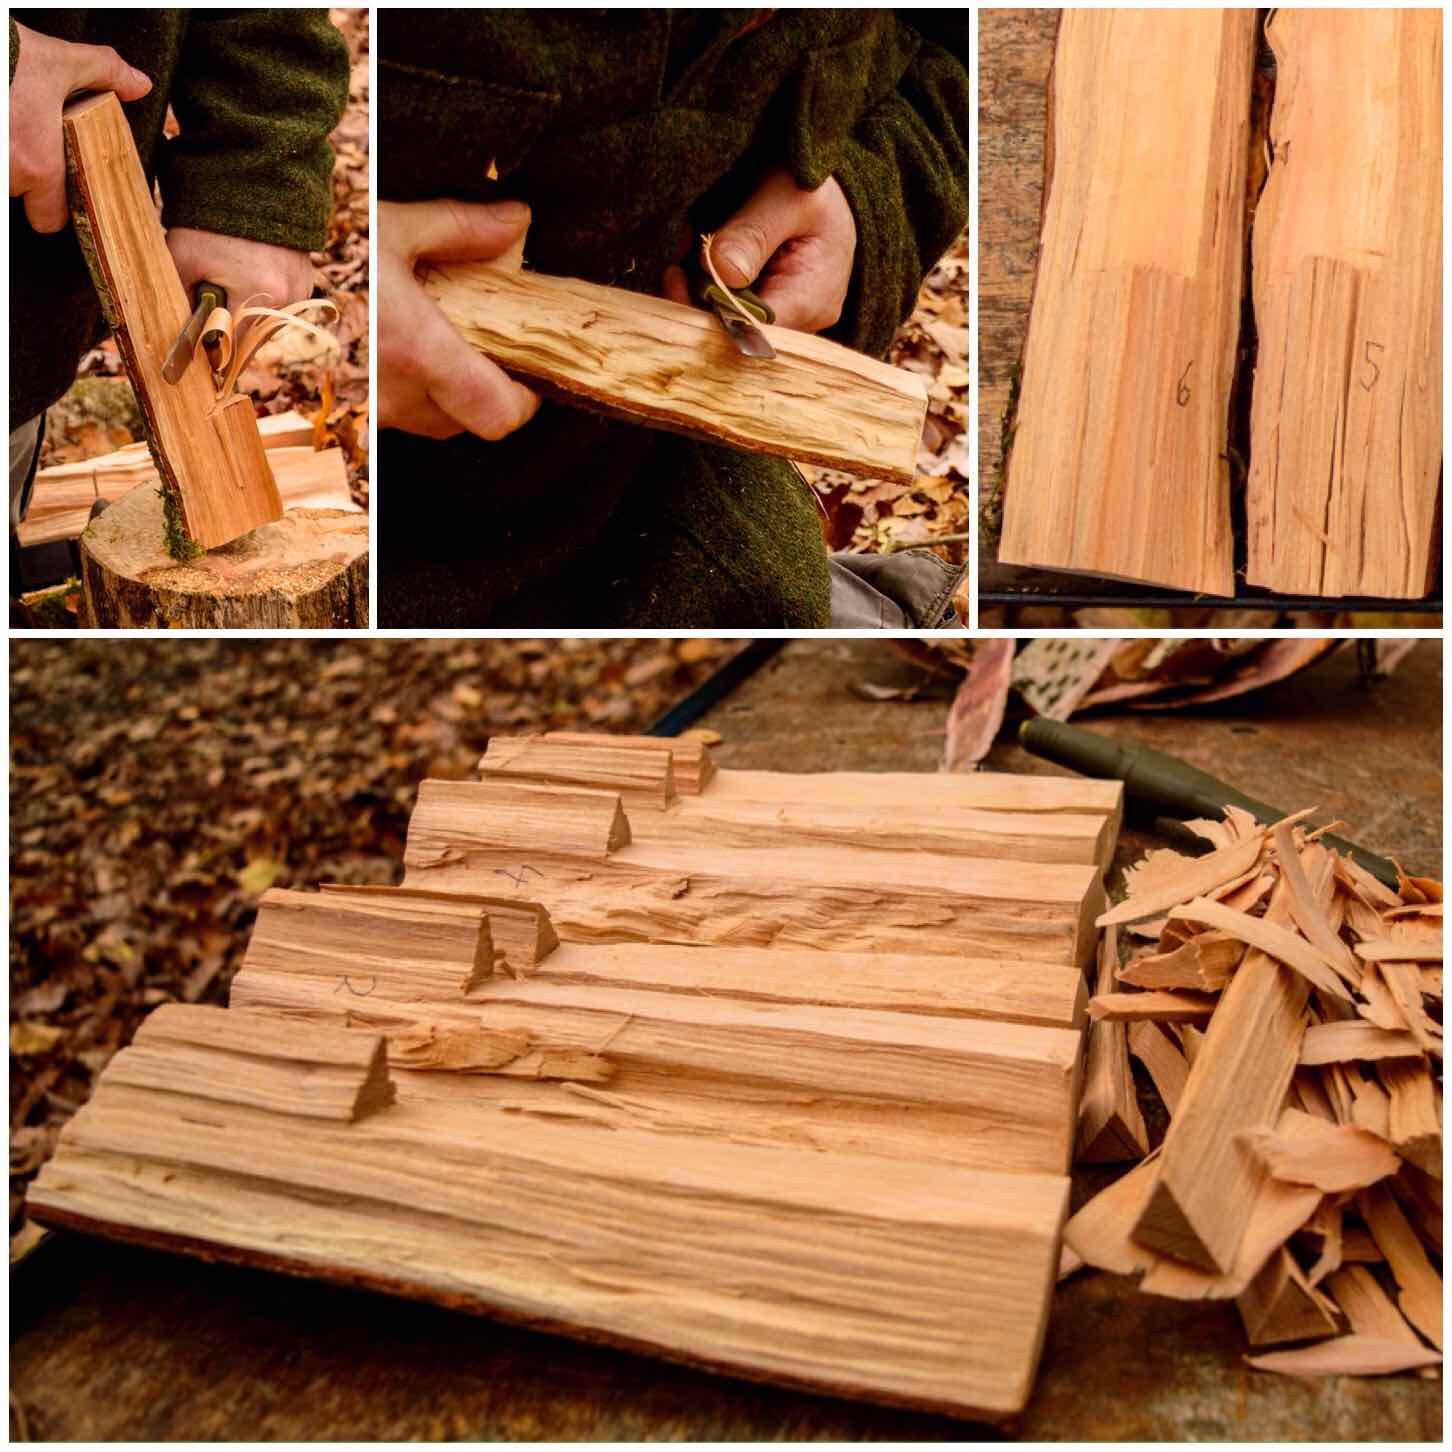
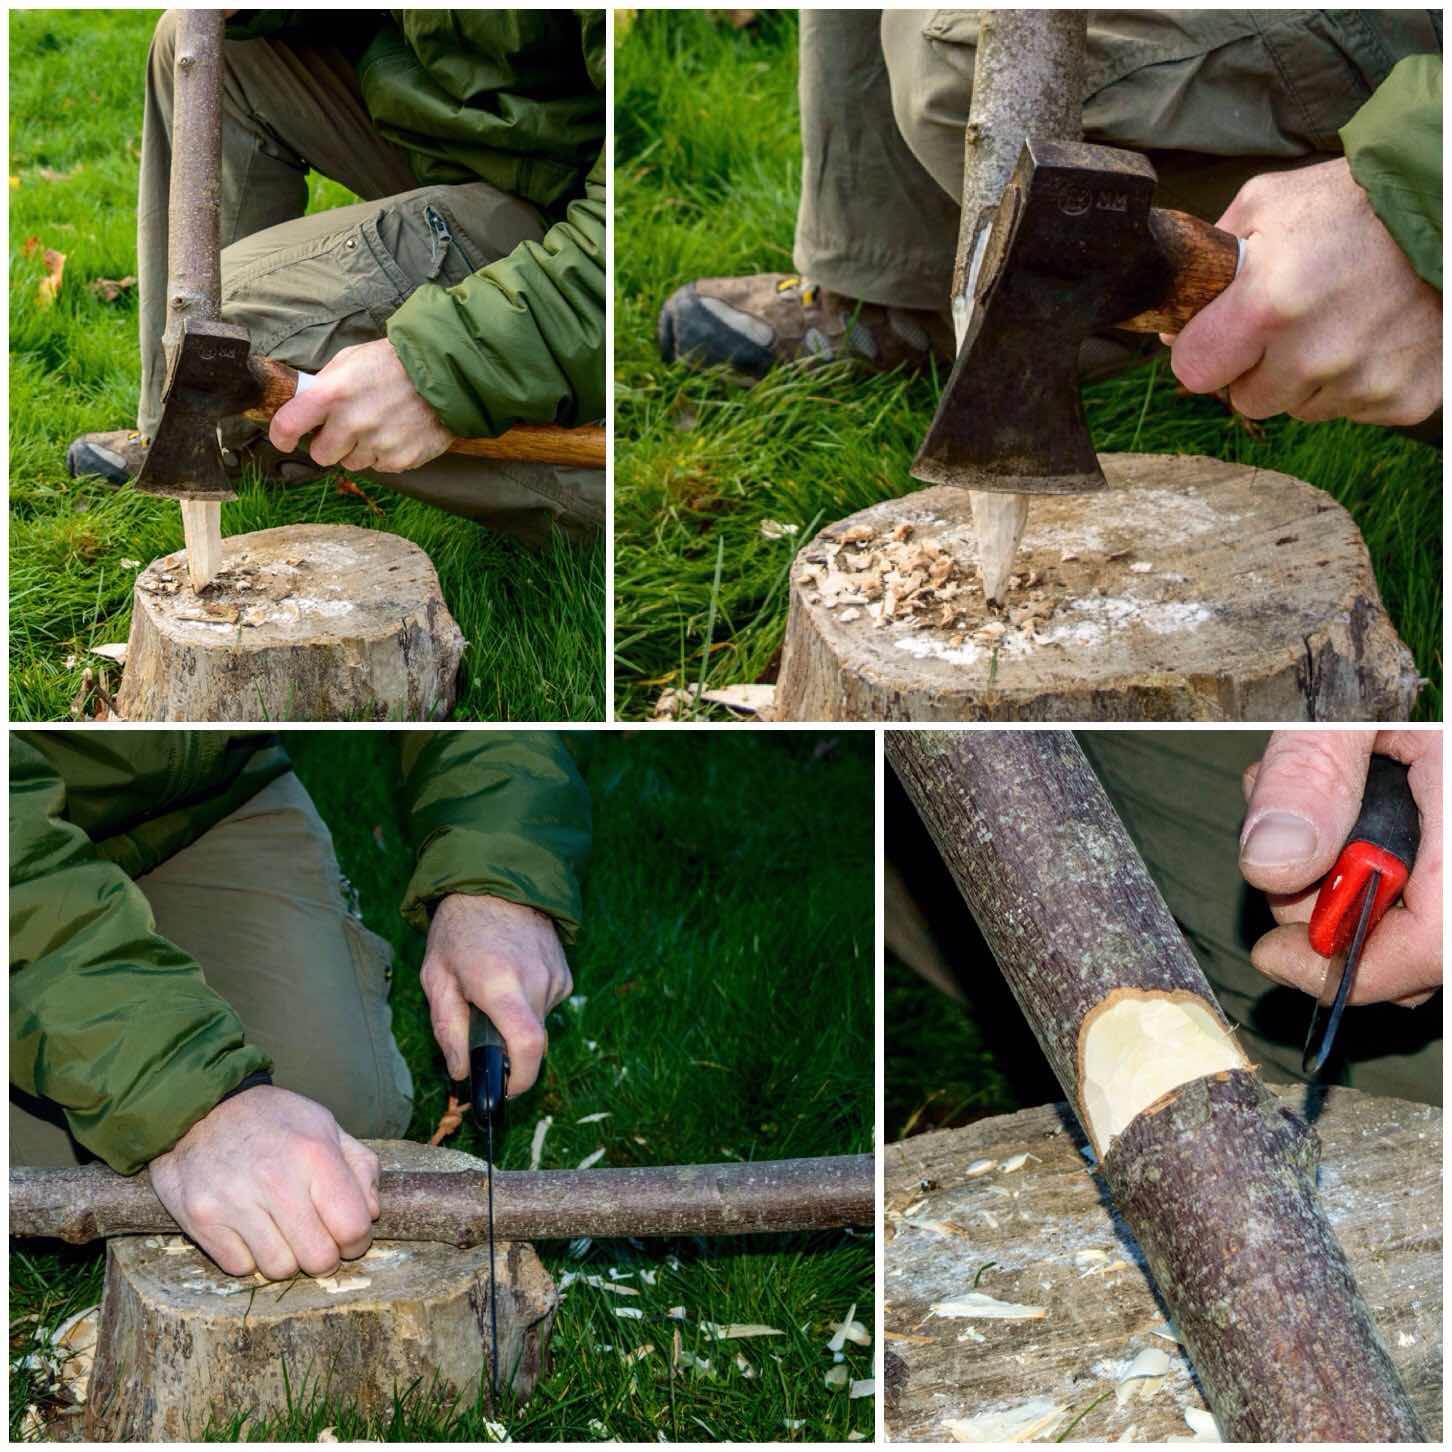
The Firebox
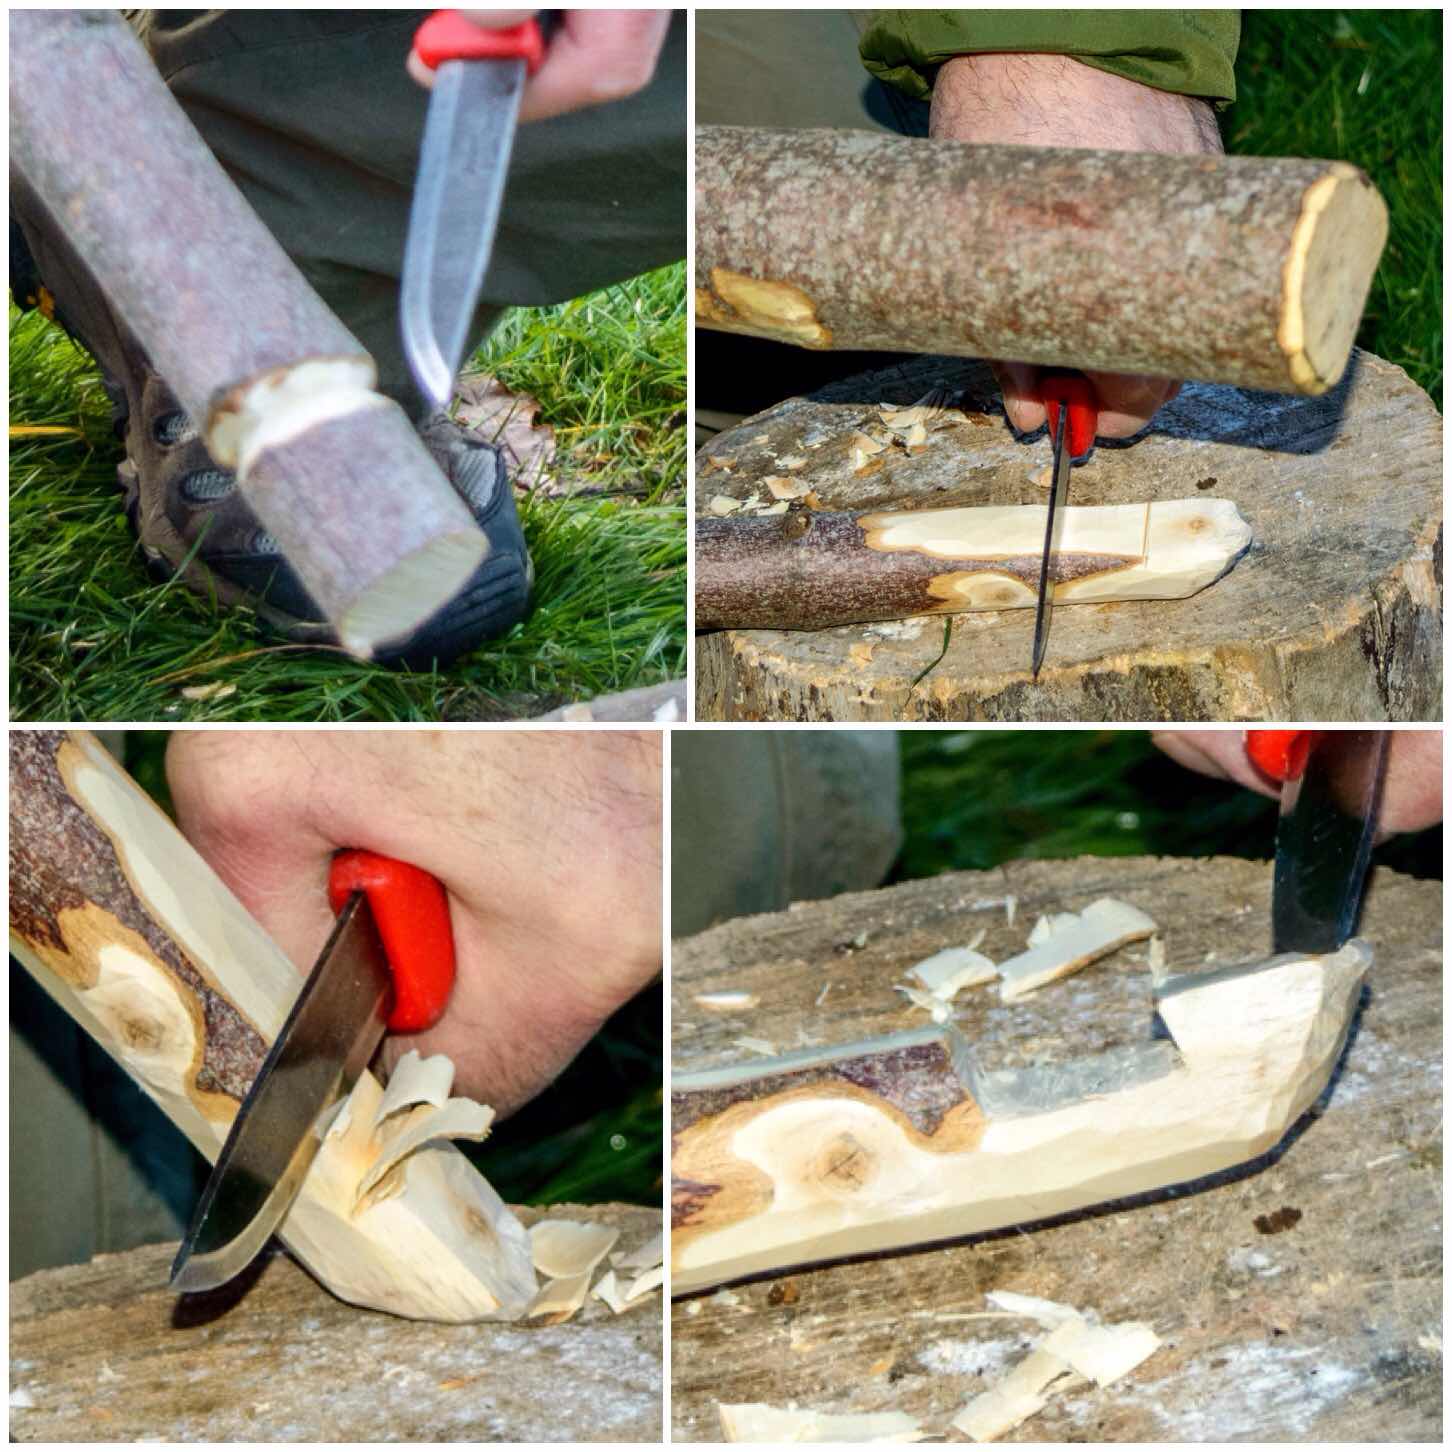
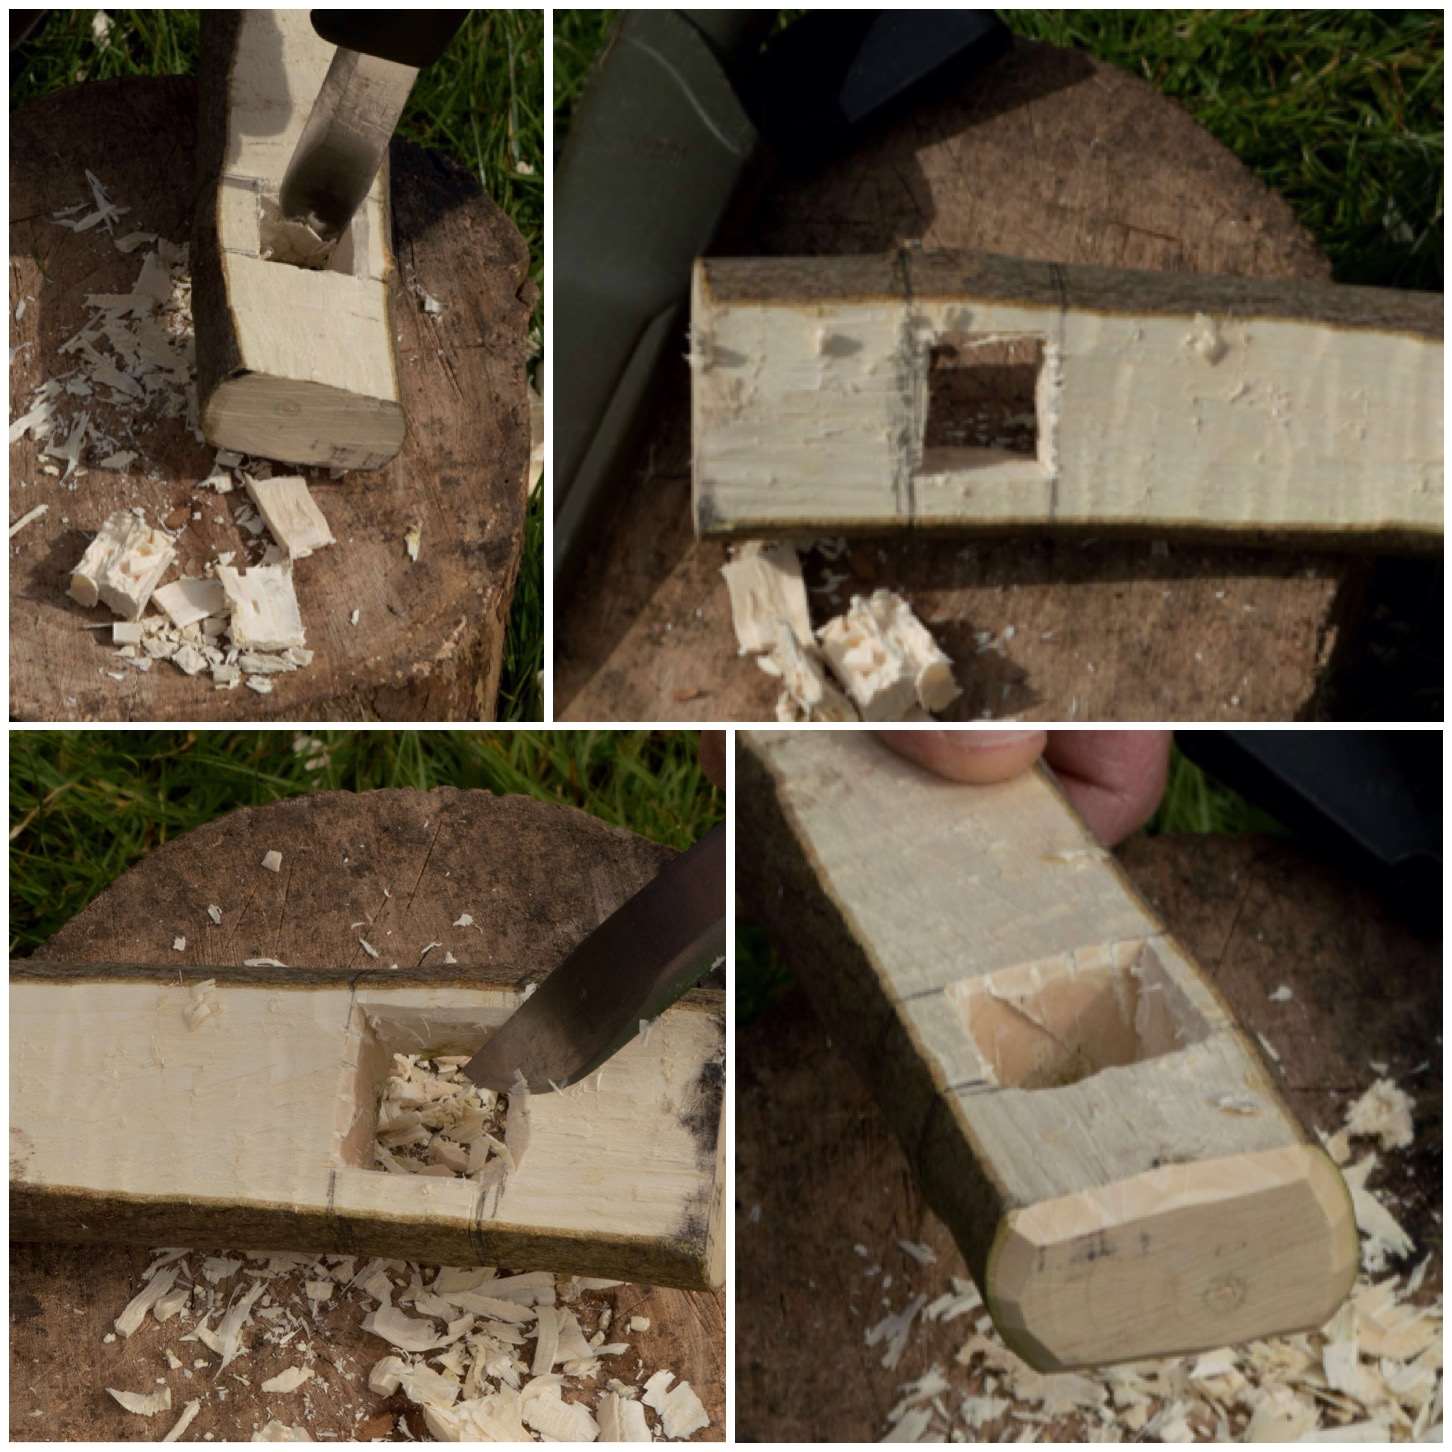
The next stage I worked on was the firebox opening. This can be done in a number of different way however I elected to go for a triangular opening.
I formed the opening by cutting a small triangle at the base of both pieces from Segment 2. I also tapered the inside of the cuts to open the firebox up a bit. I made this firebox slightly larger than normal as the wood was very damp. My thought was that the extra air intake would help to keep the fire going at the start before the insides of the stove became fully lit.
The firebox opening
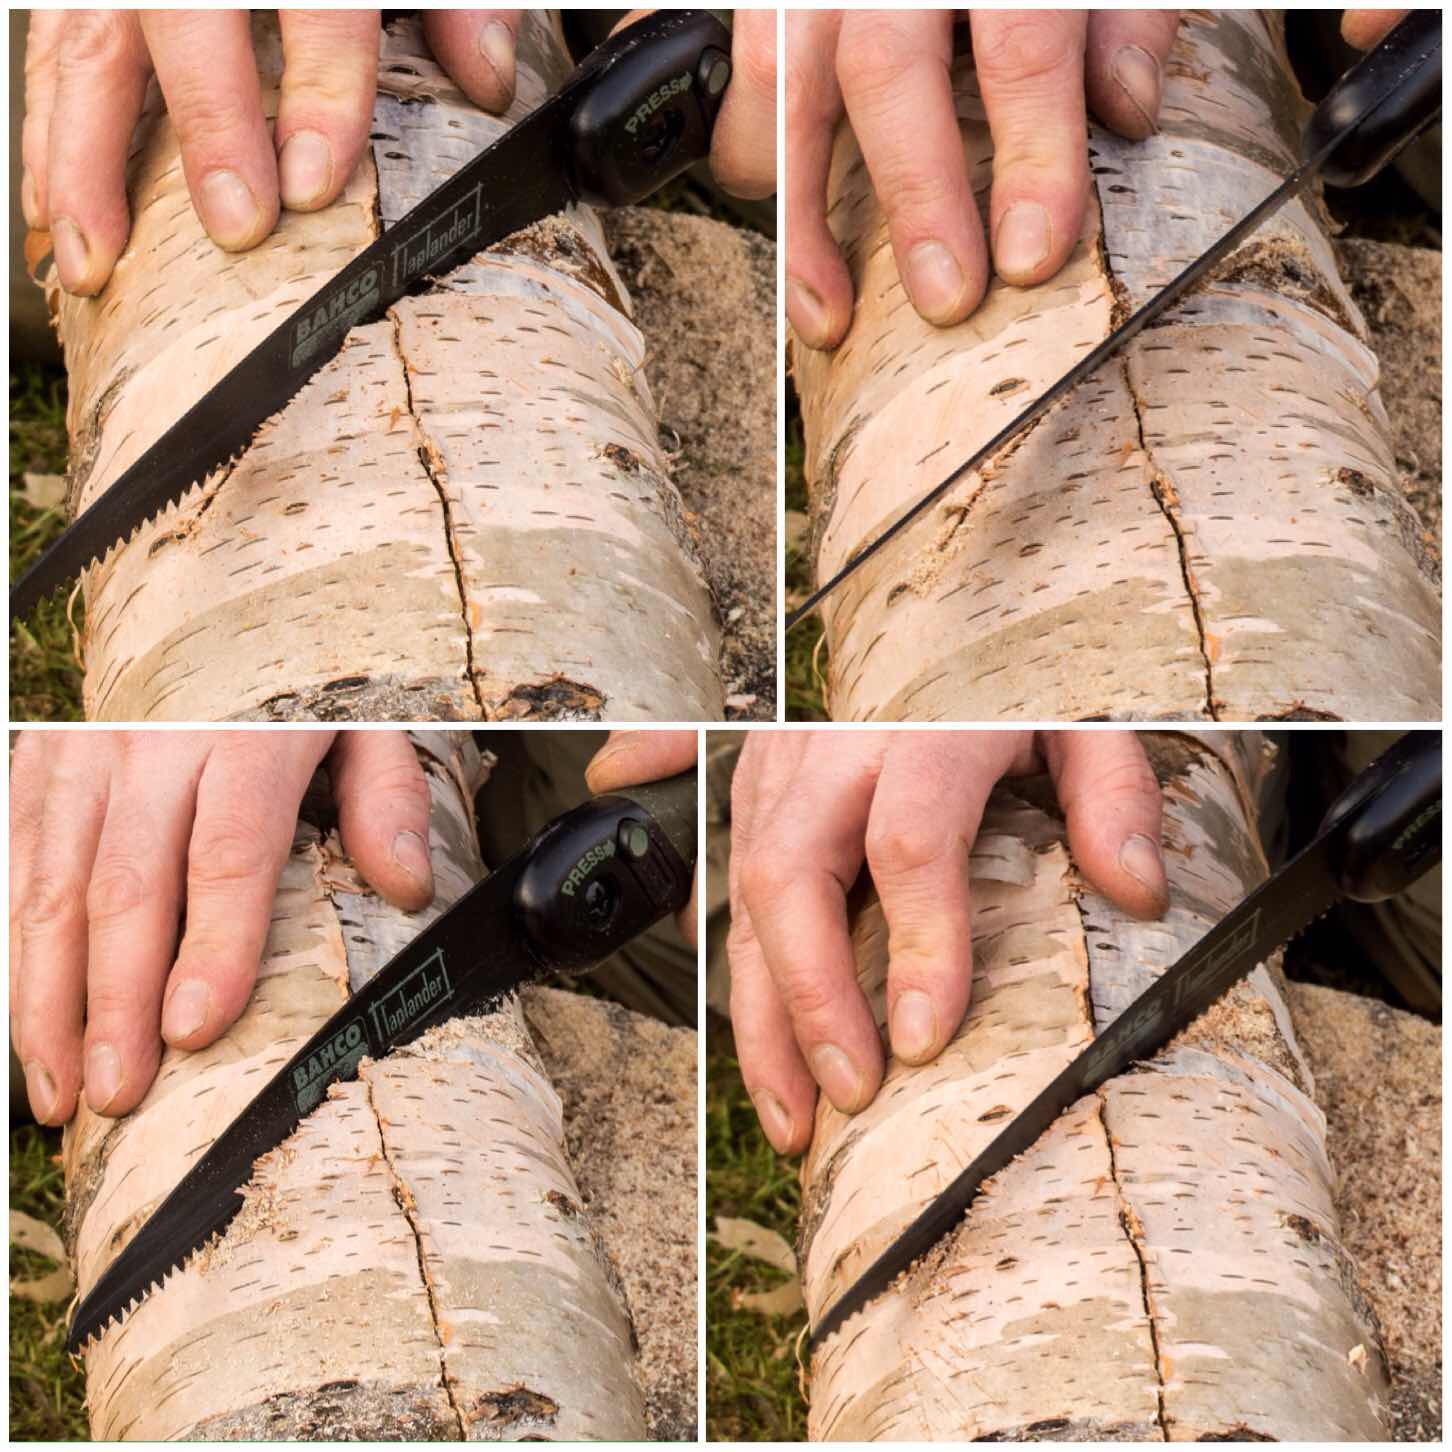
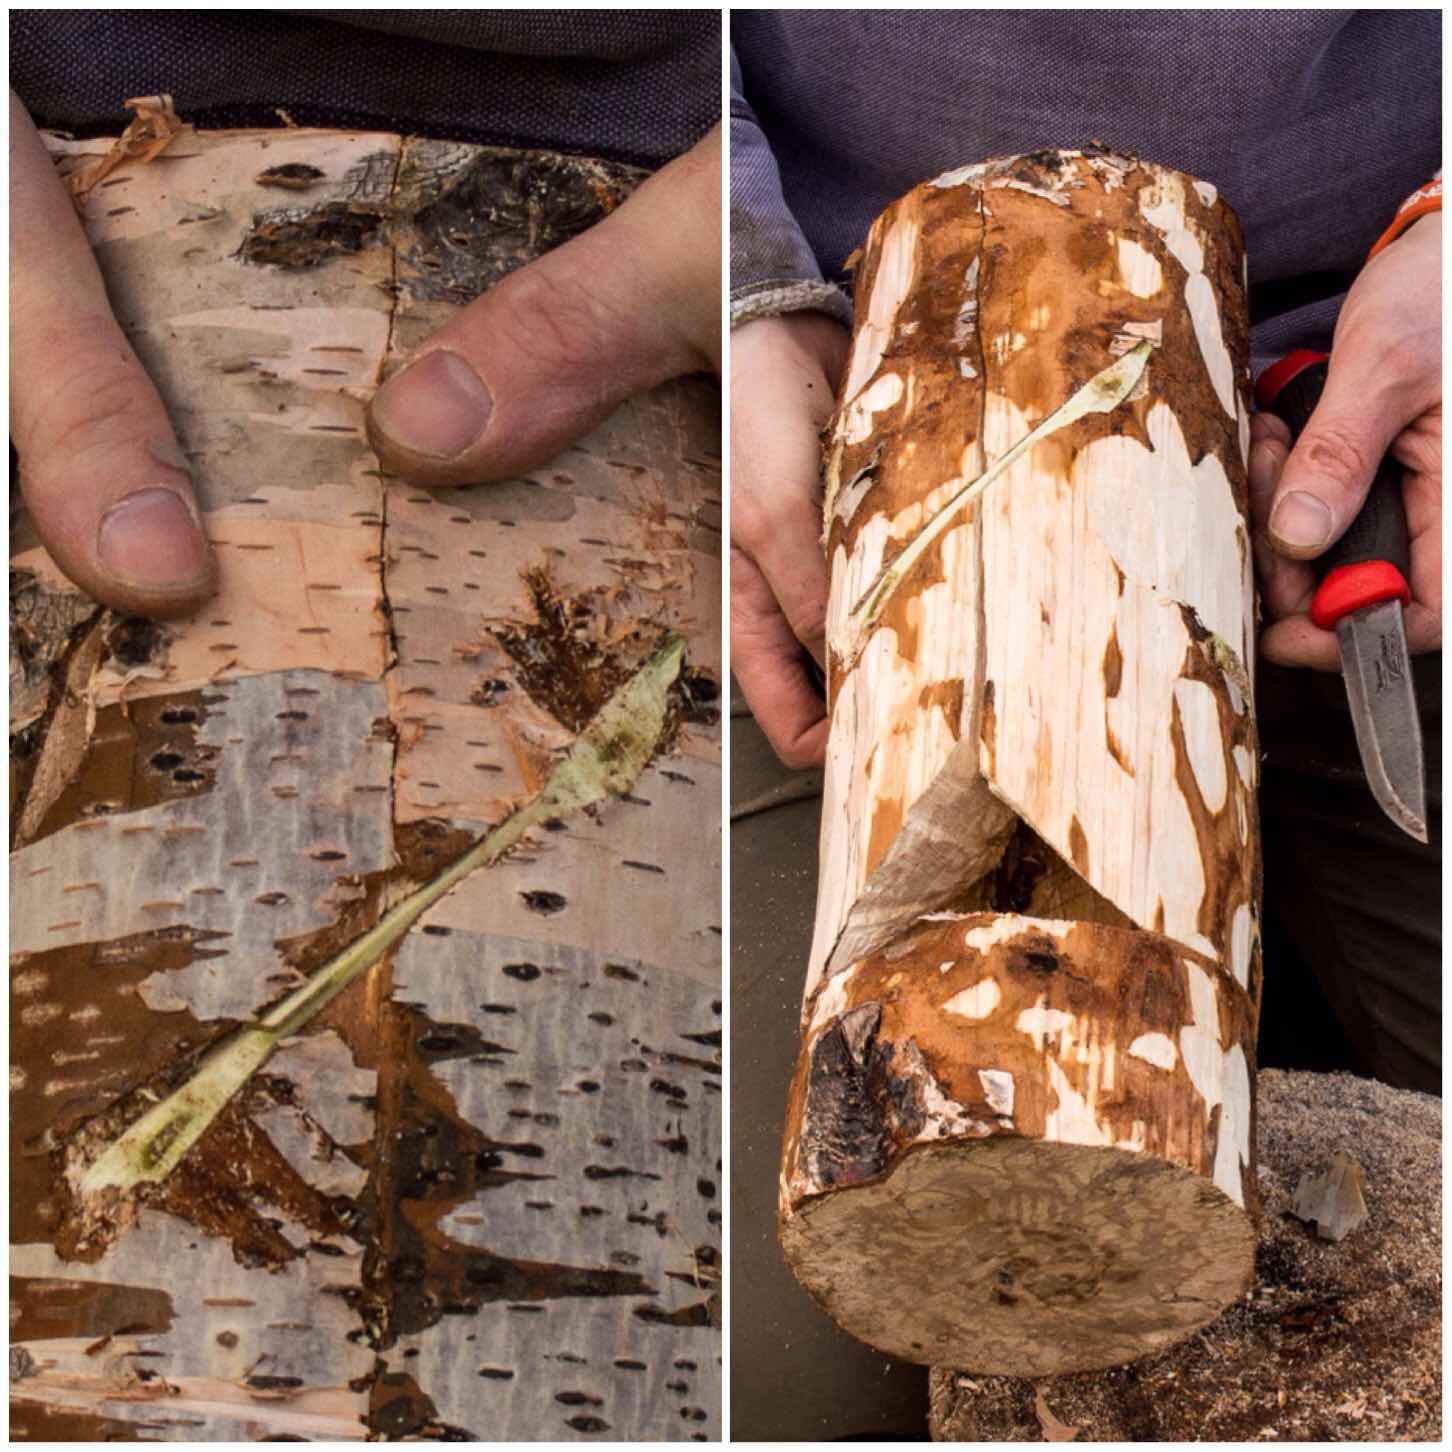
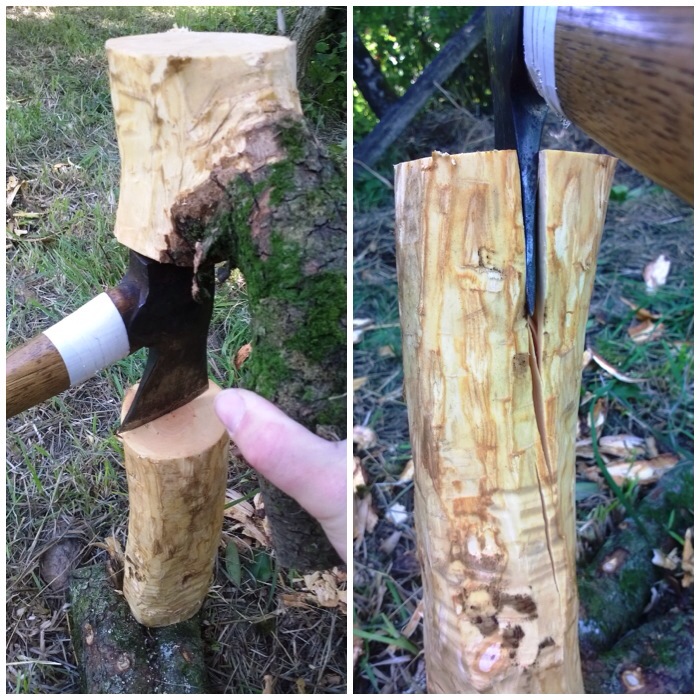
The Dovetail Joints
These joints were a total experiment. I put all the pieces together again and, holding them tightly, sawed a line to the depth of a centimetre across two of the joints. (I recommend you use some string or maybe a belt to hold everything together as you make the cuts – I didn’t and I wished I had.)
I then did the same cut but flared my saw out slightly (about 45 degrees) to the same depth. I then repeated the cut with the saw flared out 45 degrees in the opposite direction to the original cut to the same depth (there will be a picture of the cut further down the post).
Once that was done I used my saw like a rasp to carve out all the excess wood to form what is called the dovetail ‘Tail’.
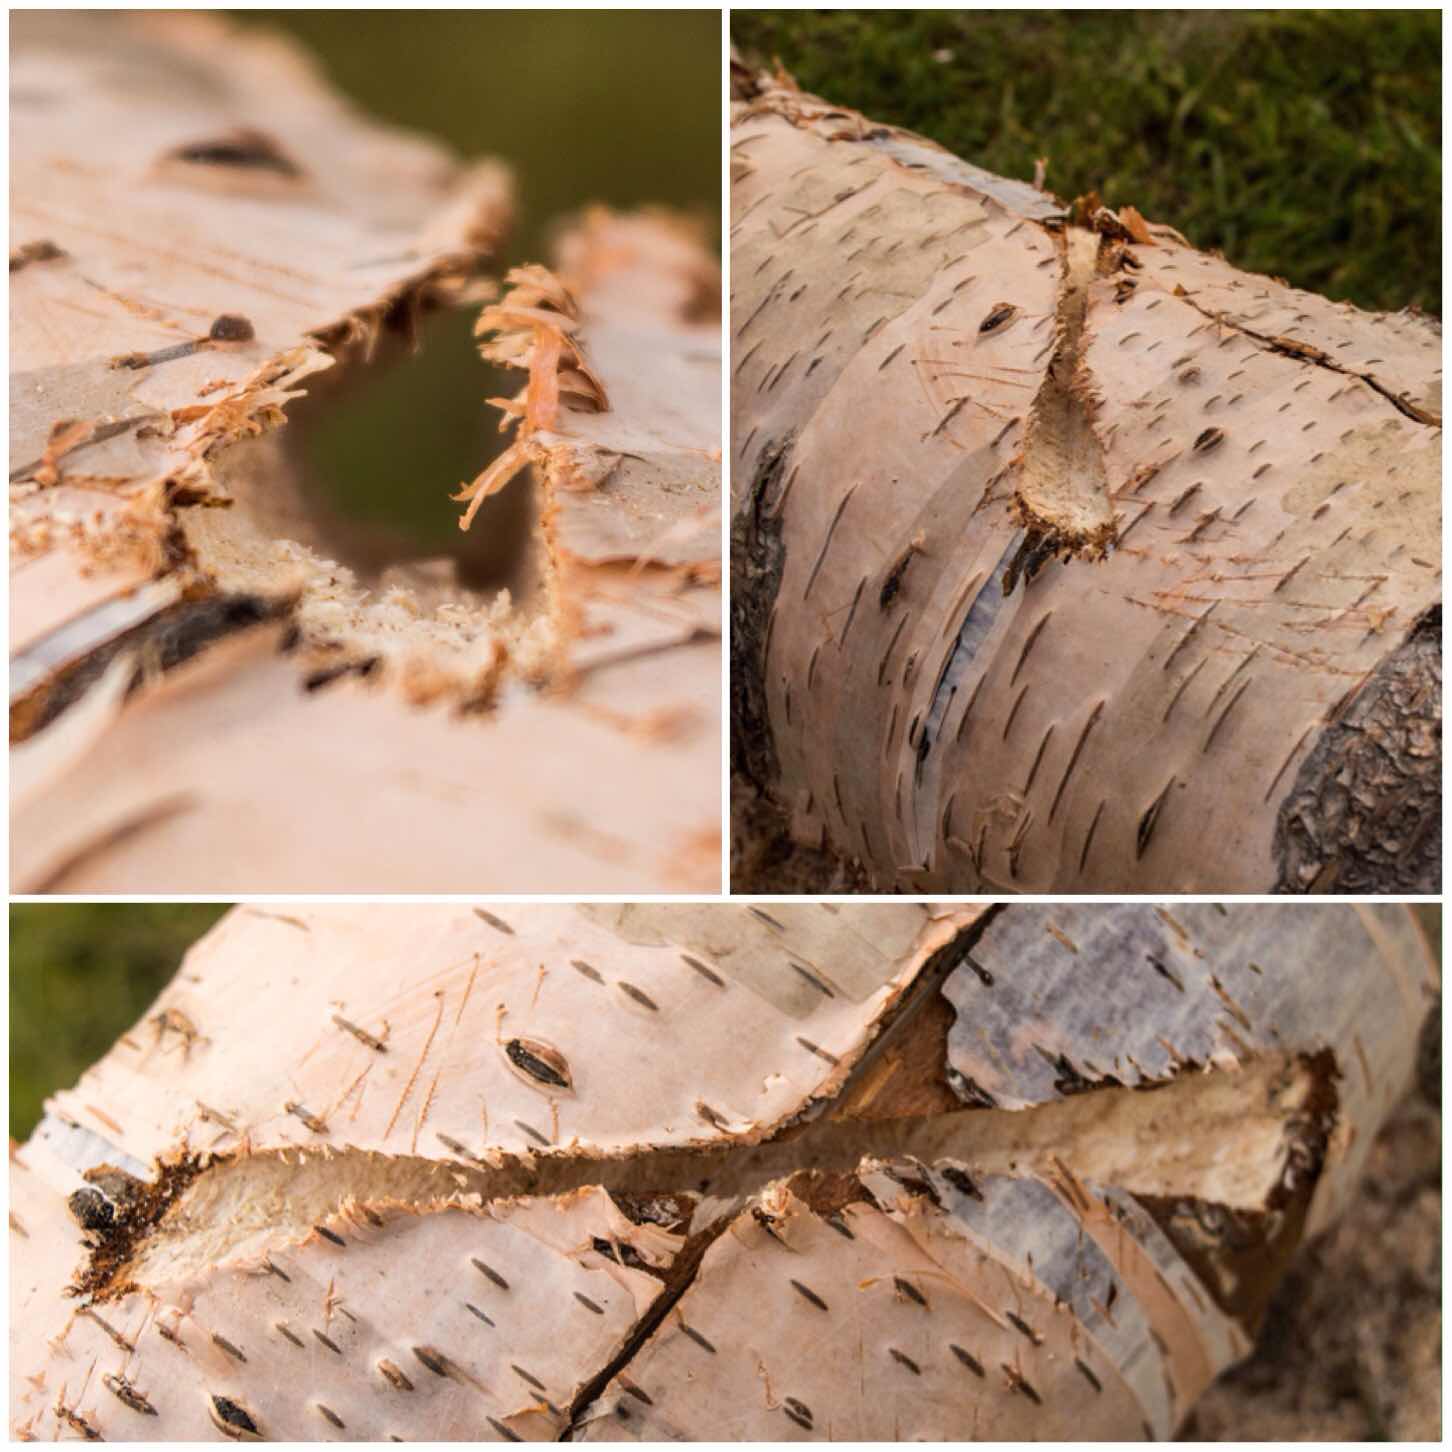
Cutting out the ‘Tails’
Below you can see this ‘Tail’ part of the dovetail joint. It forms what I think of as a bow tie shape when done properly. The important point is to start each cut from the same place, saw to the same depth each time and ensure that the middle of the tail is centred over the split in the segments.
I found that as I had not strapped the segments together I had to really hold them firmly together – this is where you will appreciate your belt or piece of string. Also while sawing these ‘Tails’ in be aware at all times where the saw is in relation to your thumb and forefinger on the hand holding the stove.
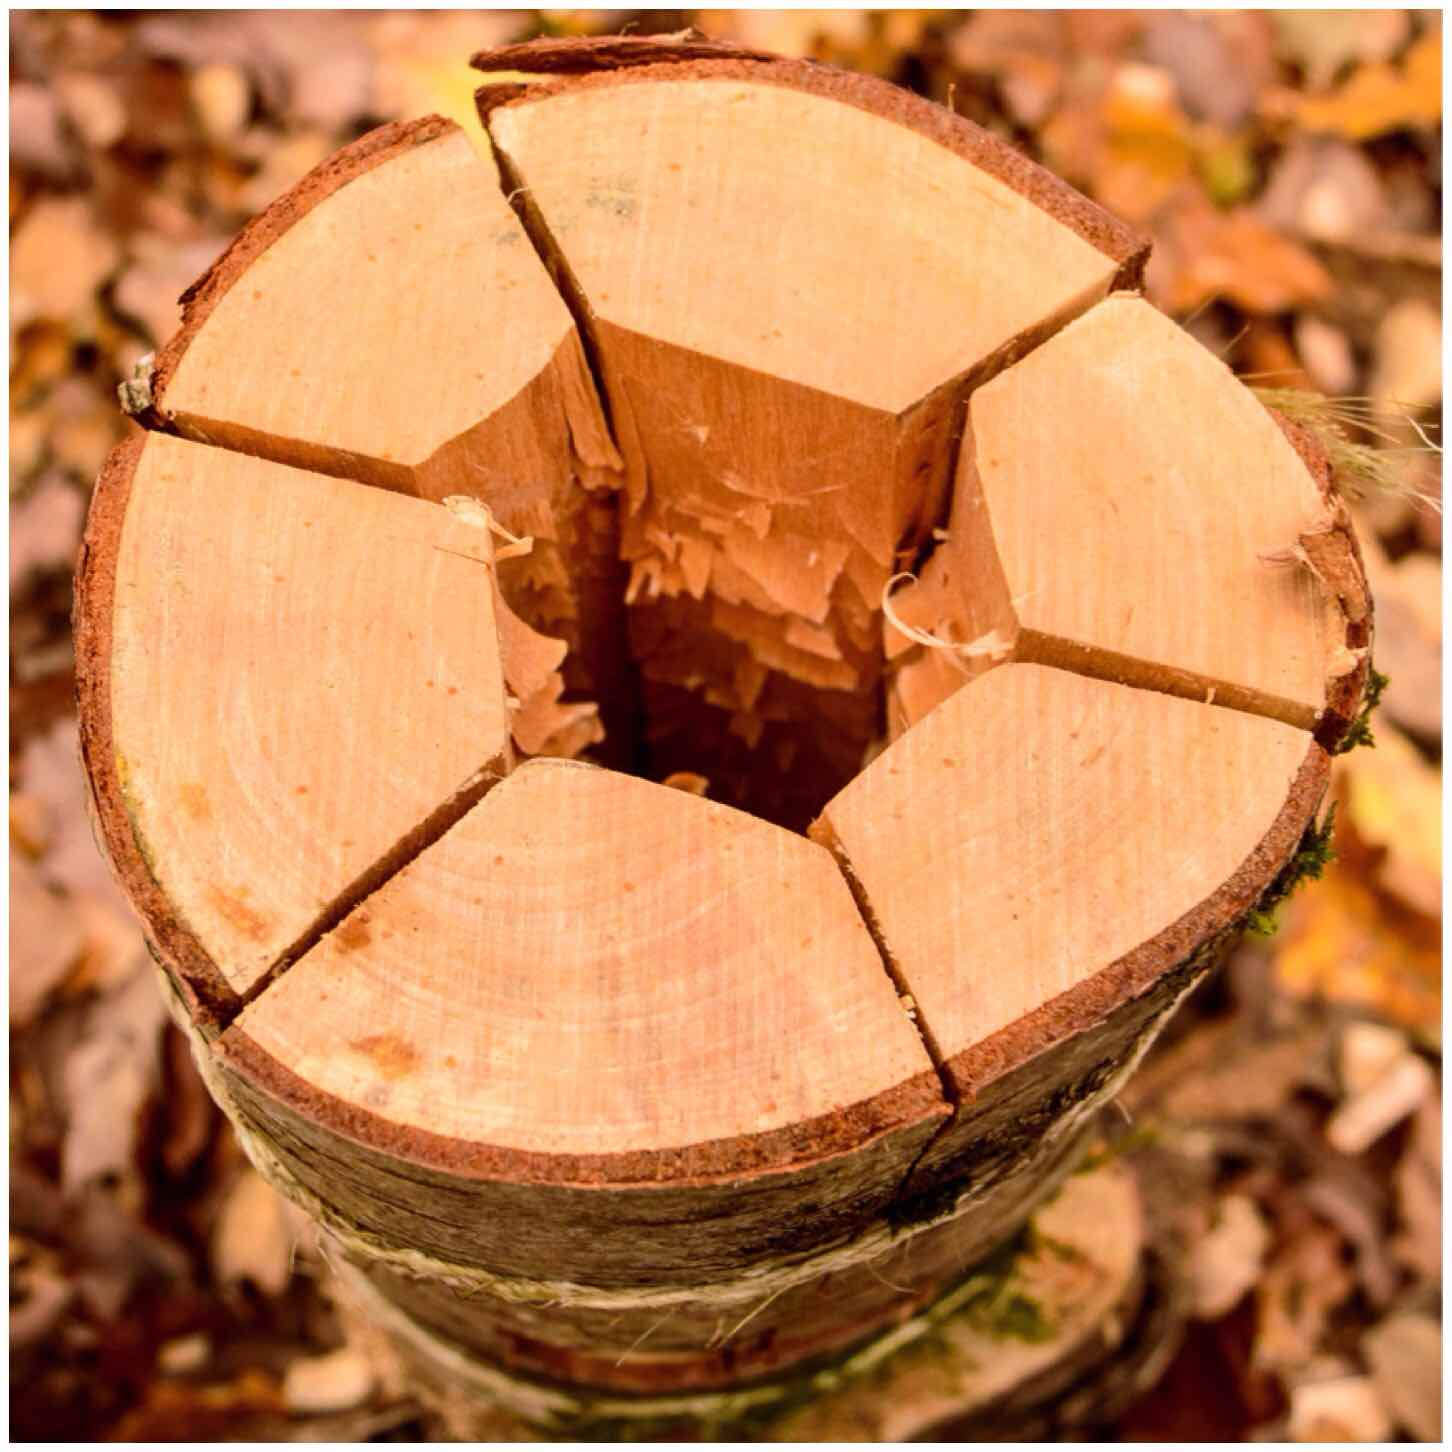
I made three of these tails (one over each split) to hold all the segments together.
The Tails
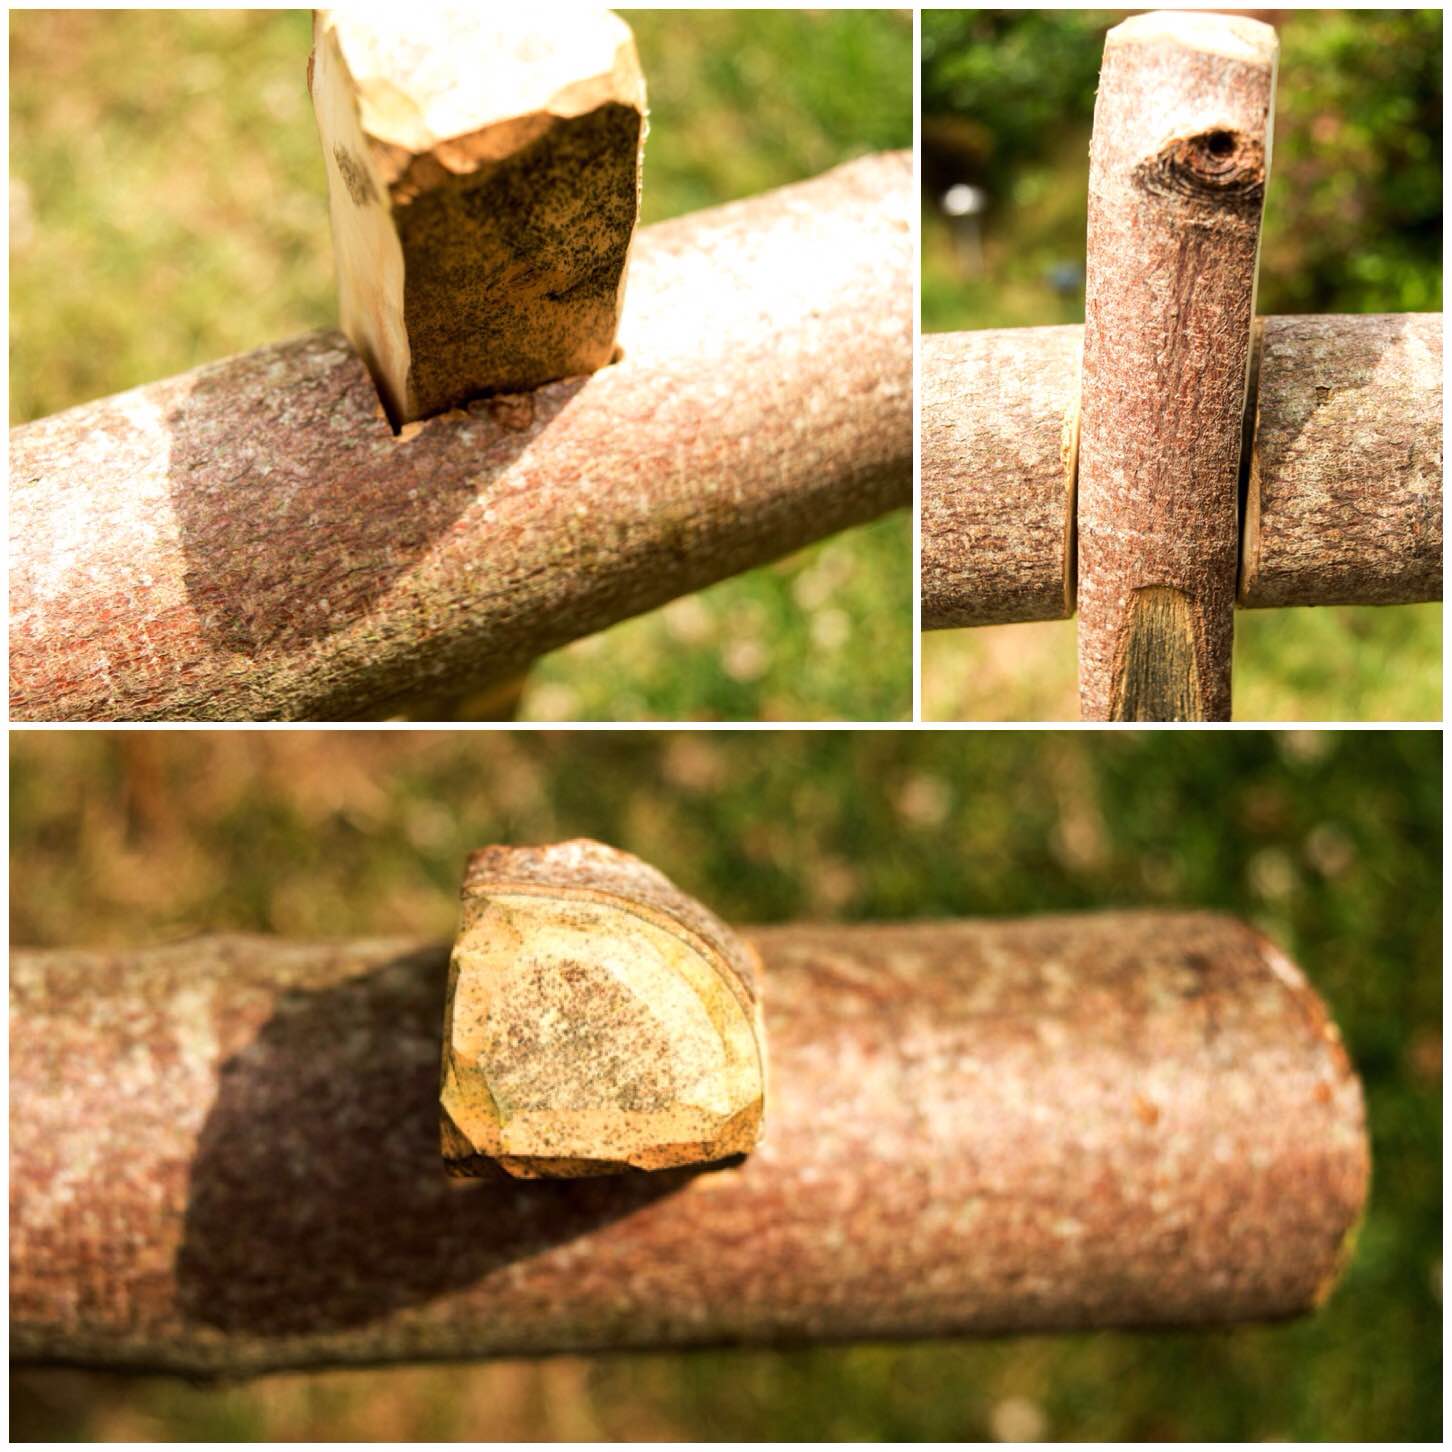
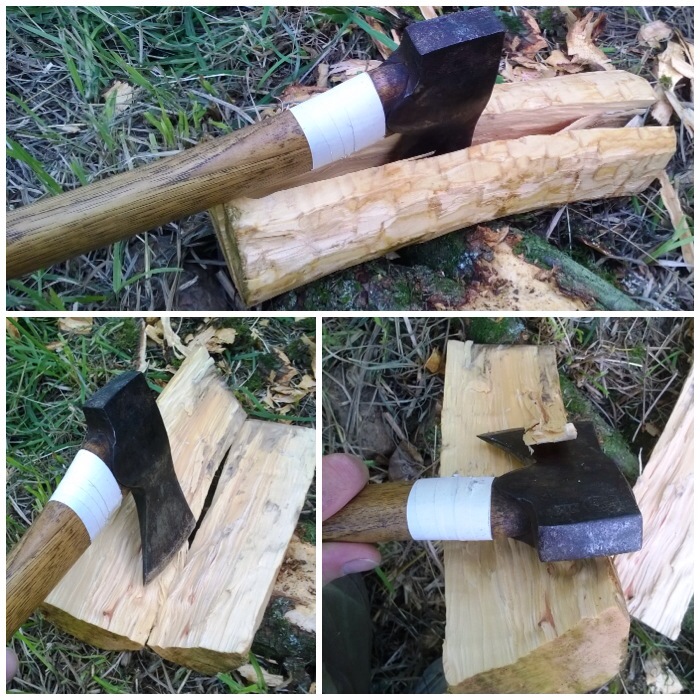
To hold the segments together you need to carve some ‘Pins’ to insert into the ‘Tails’. I used green hazel wood to make the pins and made sure that they were carved into a triangular shape but initially too big for the tail.
Carving in this manner allowed me to insert the pin into the tail and then progressively carve off smaller pieces from the pin until it started to slide in. I also used my large piece of wood to hammer the pins in to ensure a very tight fit.
If you find that your pin is too small just get a fresh piece of green wood and try again. They only take seconds to make. To finish the pins off I trimmed the ends with my saw.
Cutting and inserting the ‘Pins’
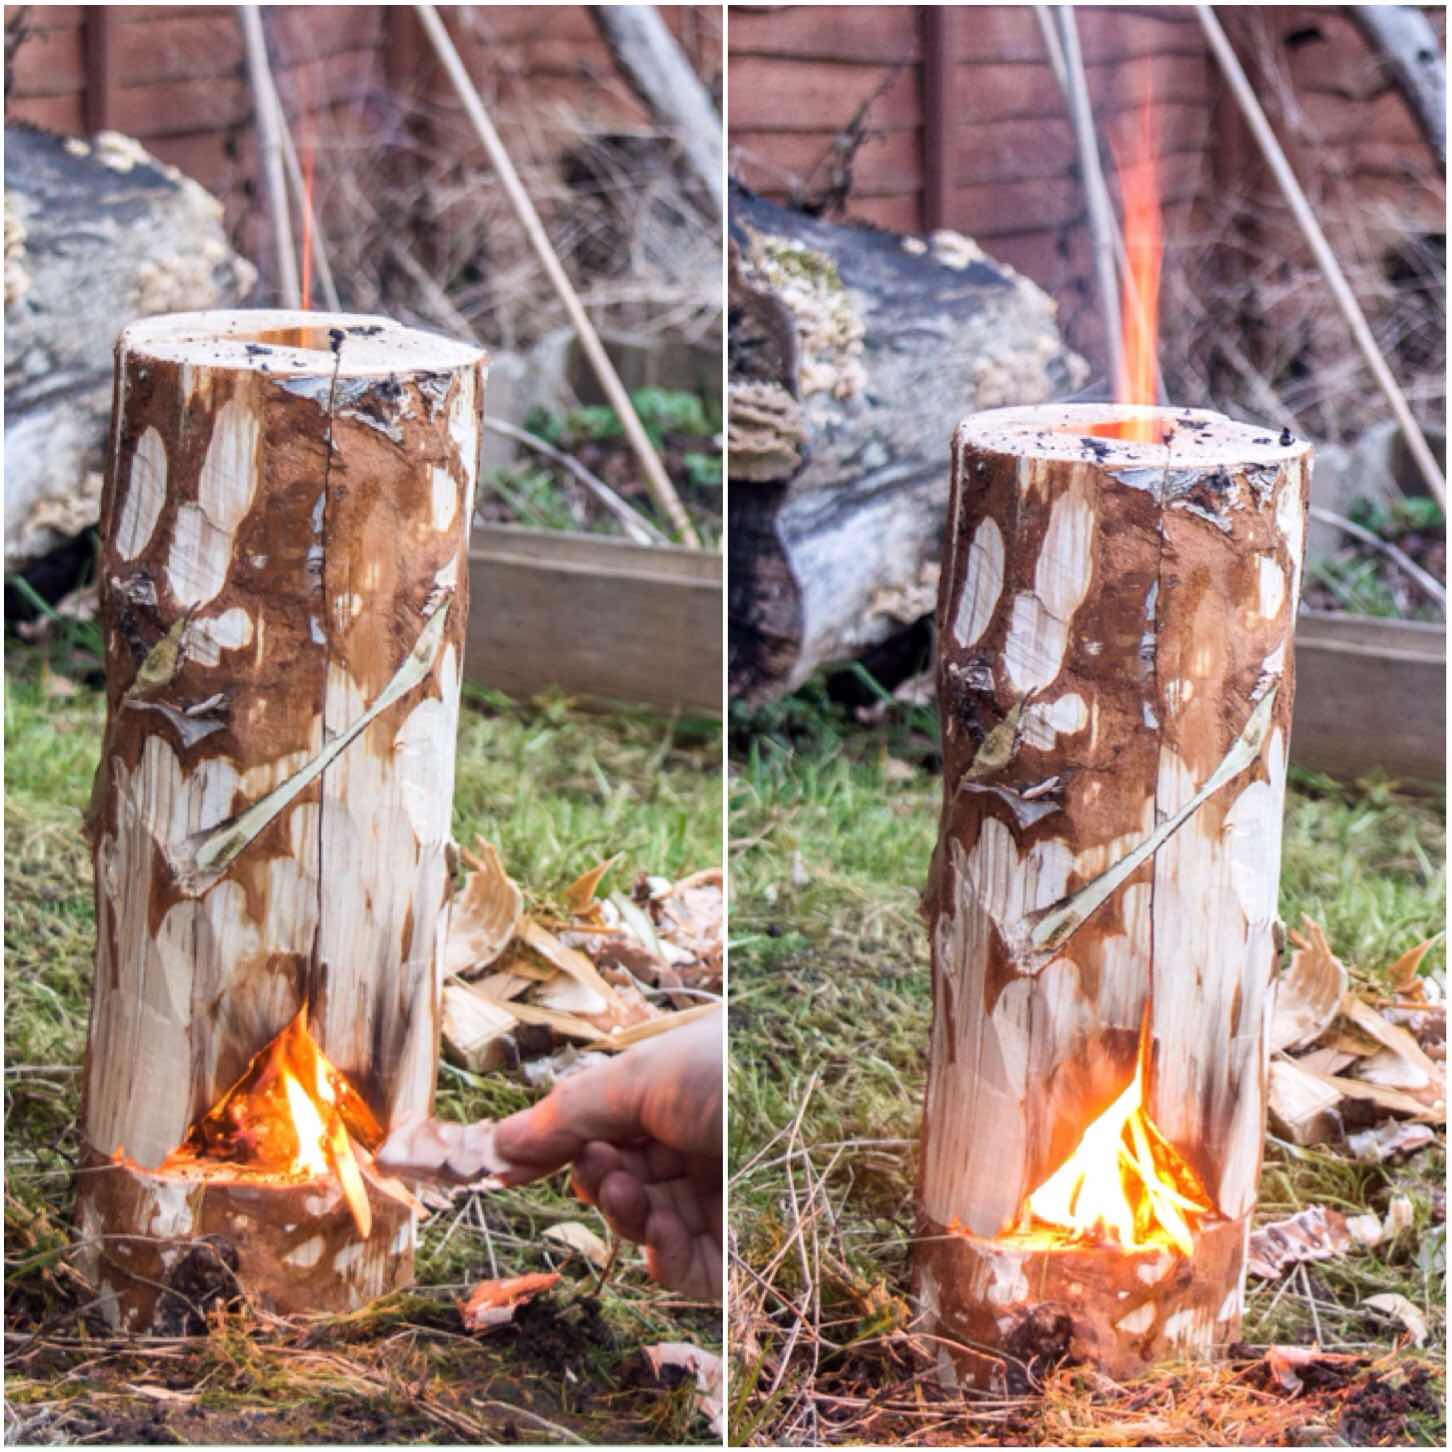
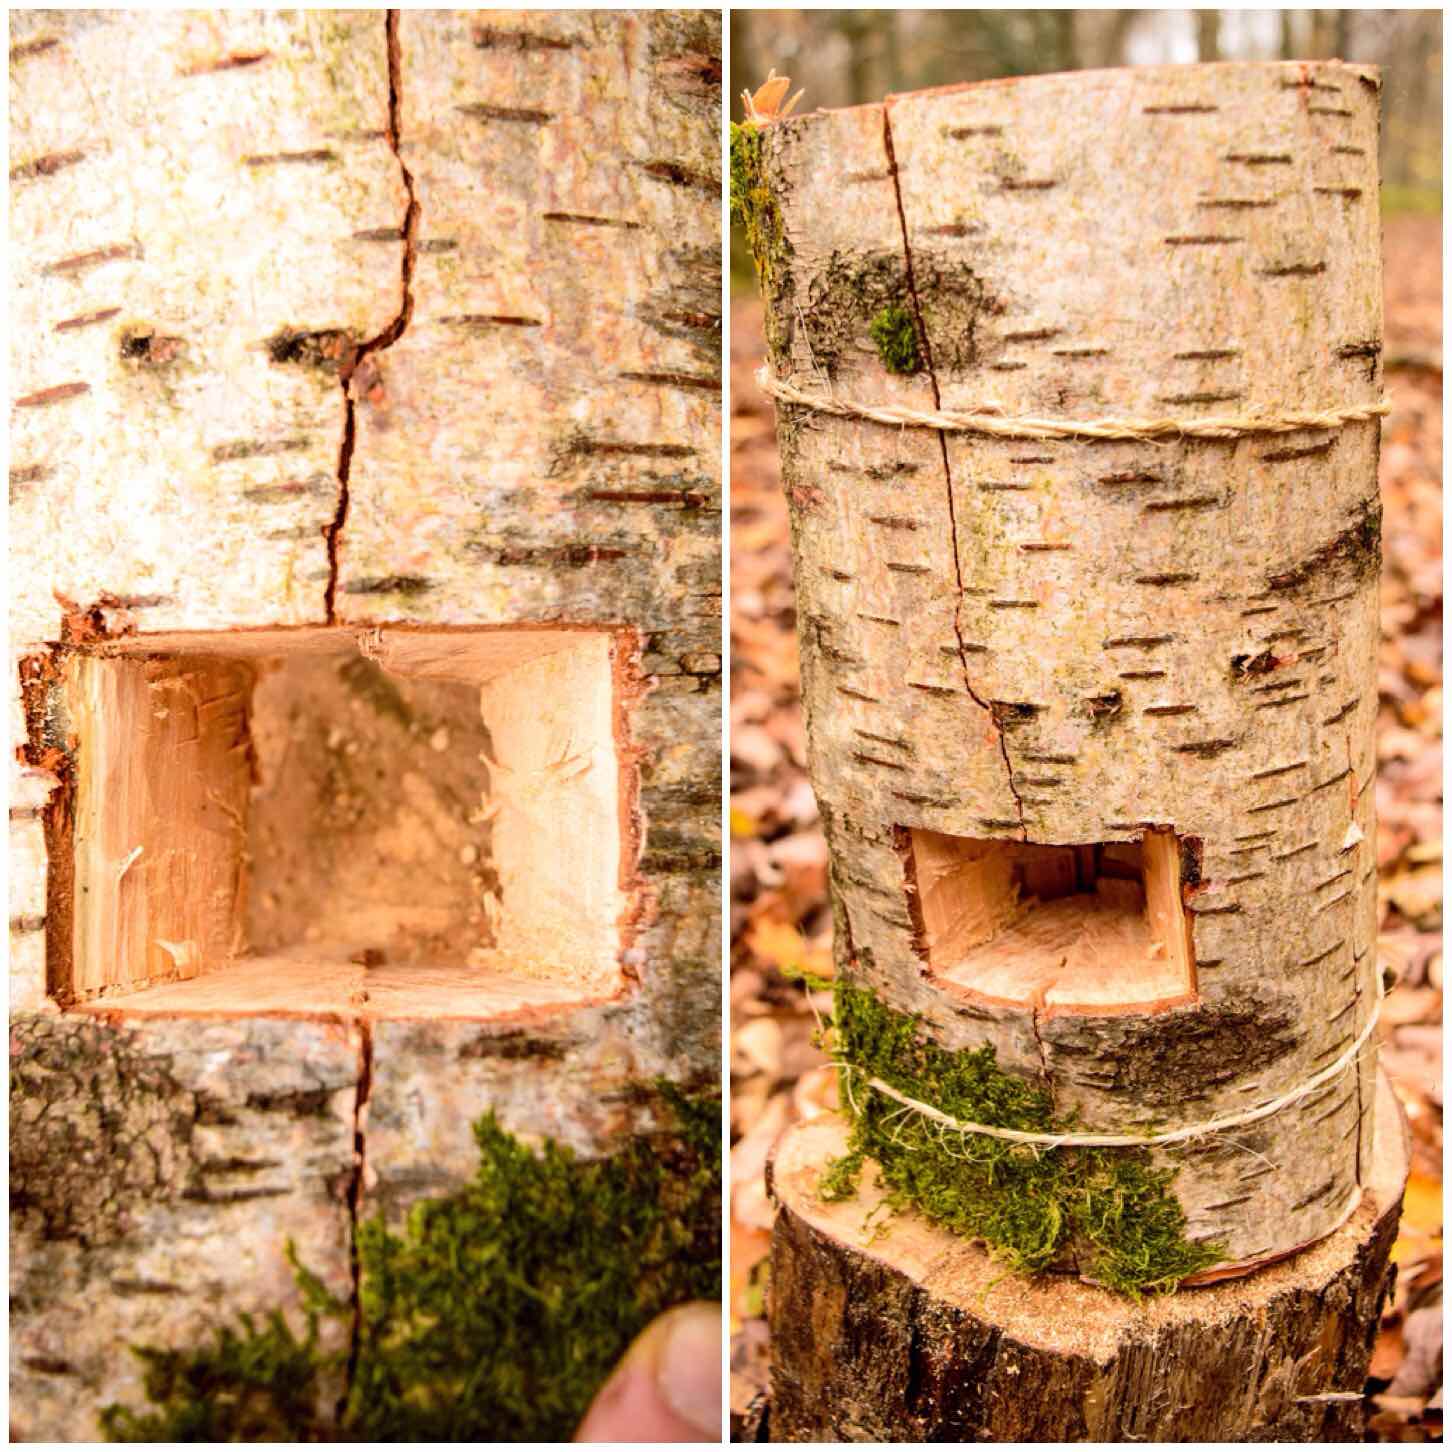
As the bark of the birch tree is very flammable I stripped it all off and kept it to the side to use later as kindling to get the fire started. The dovetail joints if fitted snugly will keep all the segments locked together tightly.
Trimming
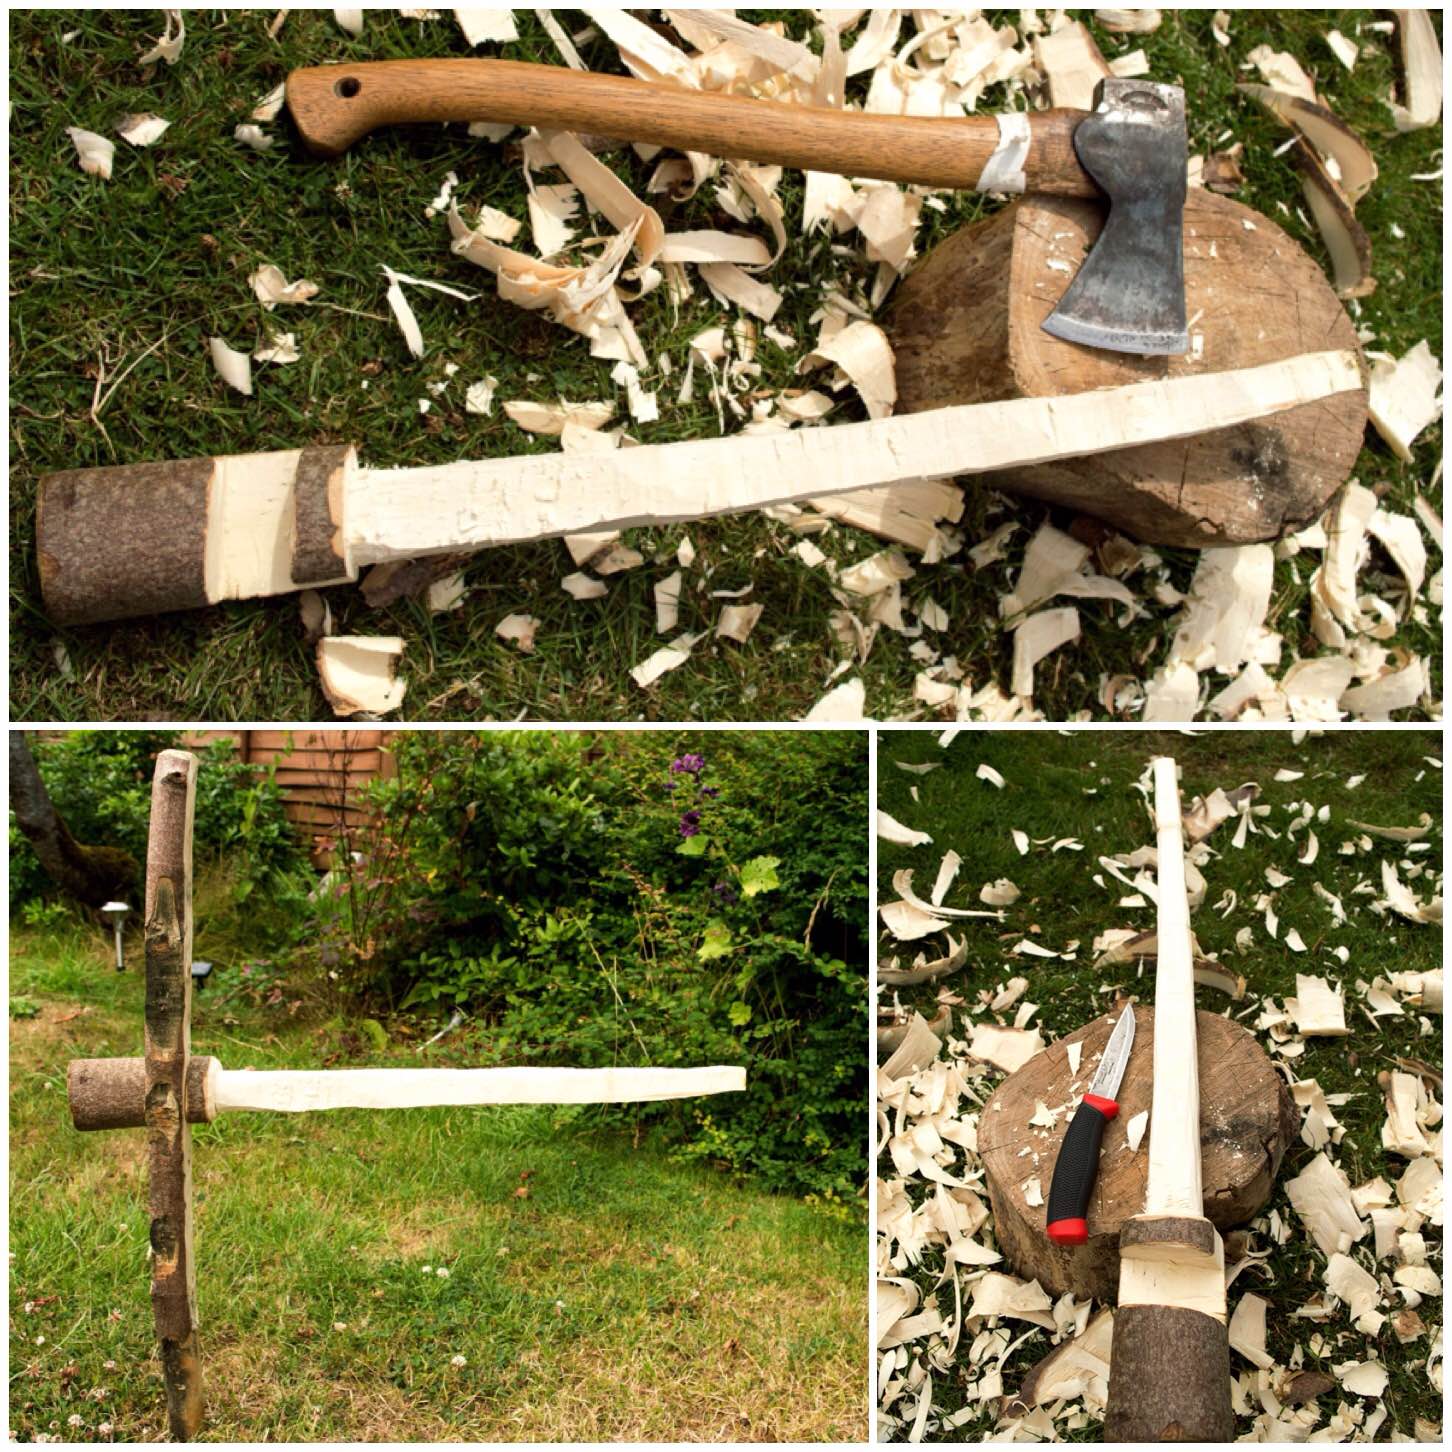
Firing Up
I lit the stove with some Vaseline-soaked cotton wool balls (which I always carry with me) because everything was so damp. The wind was non existent that day so it took me a while to get the stove going well.
Normally these stoves fire up really easily when there’s a little bit of wind to create the rocket effect up through the chimney
Firing up and drying out
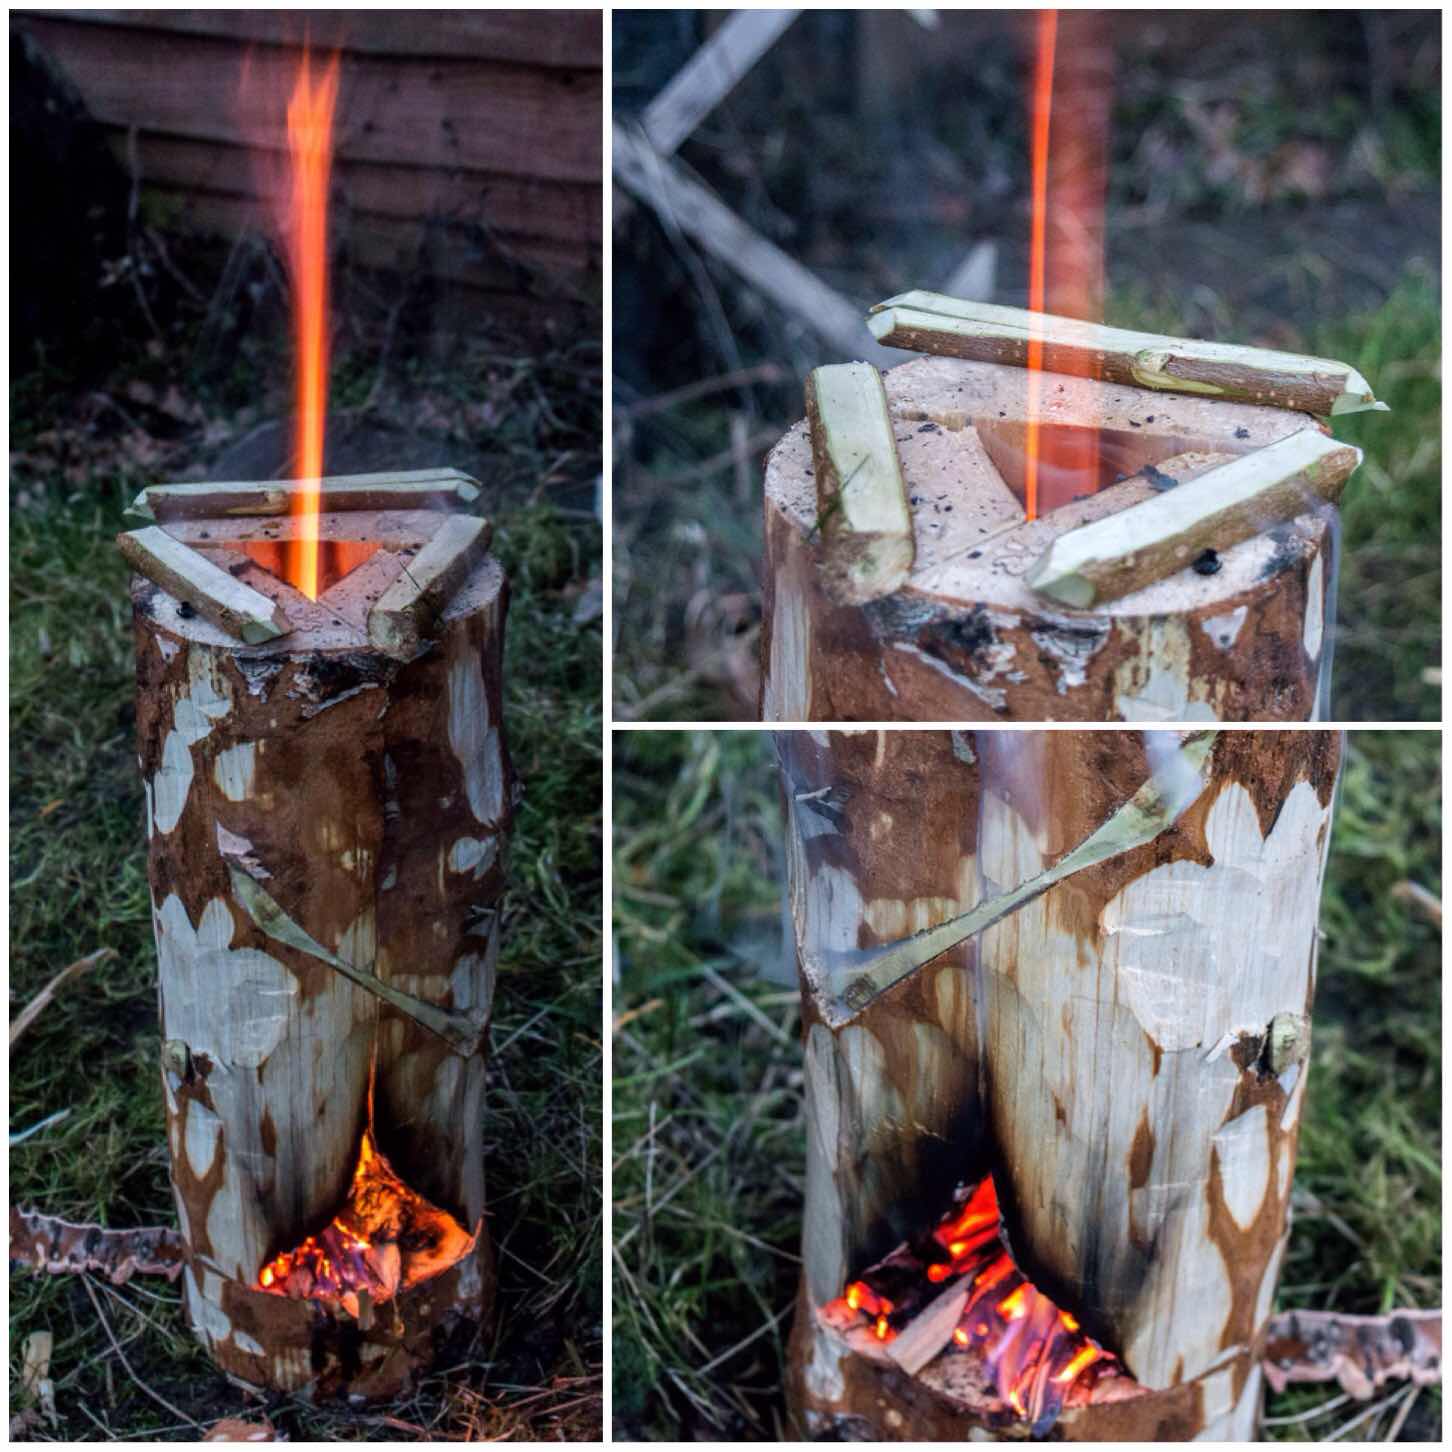
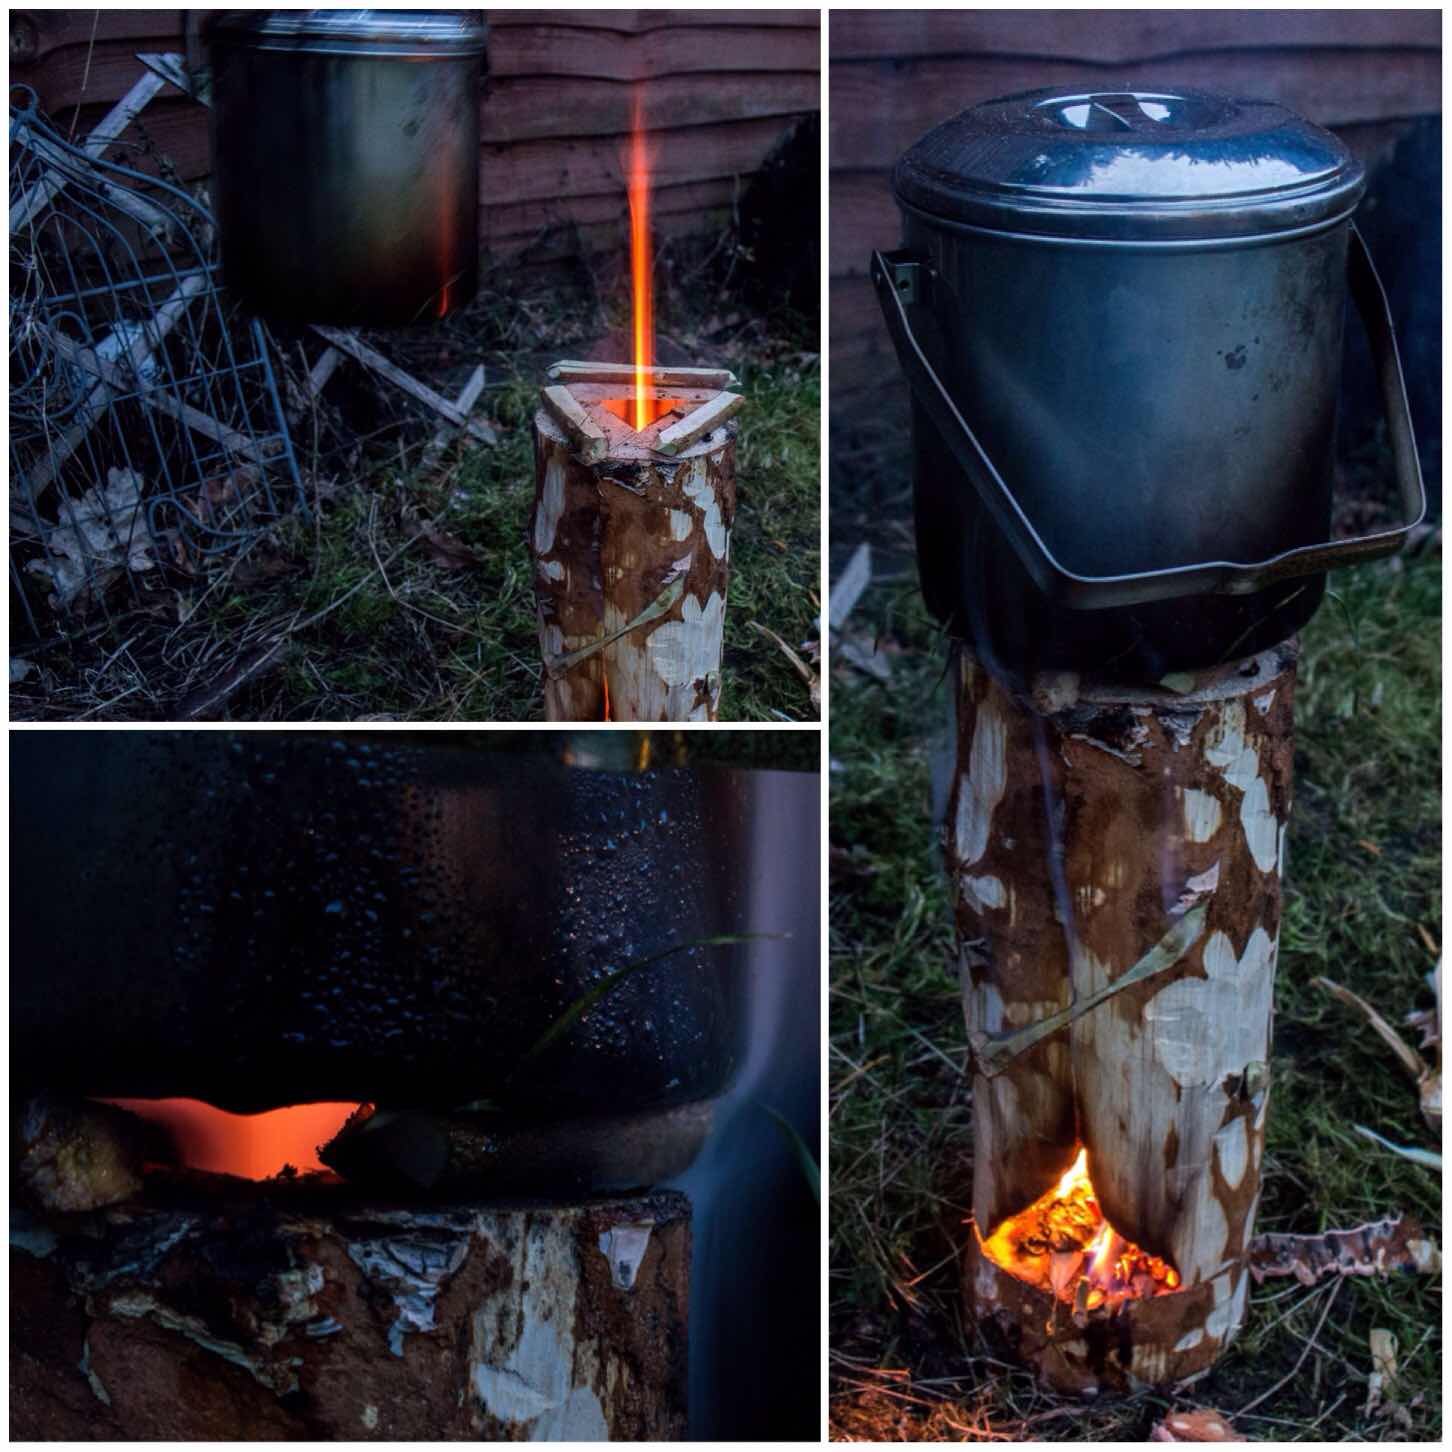
Eventually the rocket effect started and I placed three pieces of green wood onto the top for my pot to sit on. These were fairly thin pieces but would last long enough to boil some water. Have a few pieces spare on standby though if needed.
Green wood pot stand
Once the pot was on (about 10 minutes after initial burn) I needed to keep popping small pieces of wood into the fire box to keep the fire going. If your wood is really dry or resinous (like spruce or pine) you may not need to keep tending the fire as the internal walls of the chimney will probably be well lit.
Now it is a stove
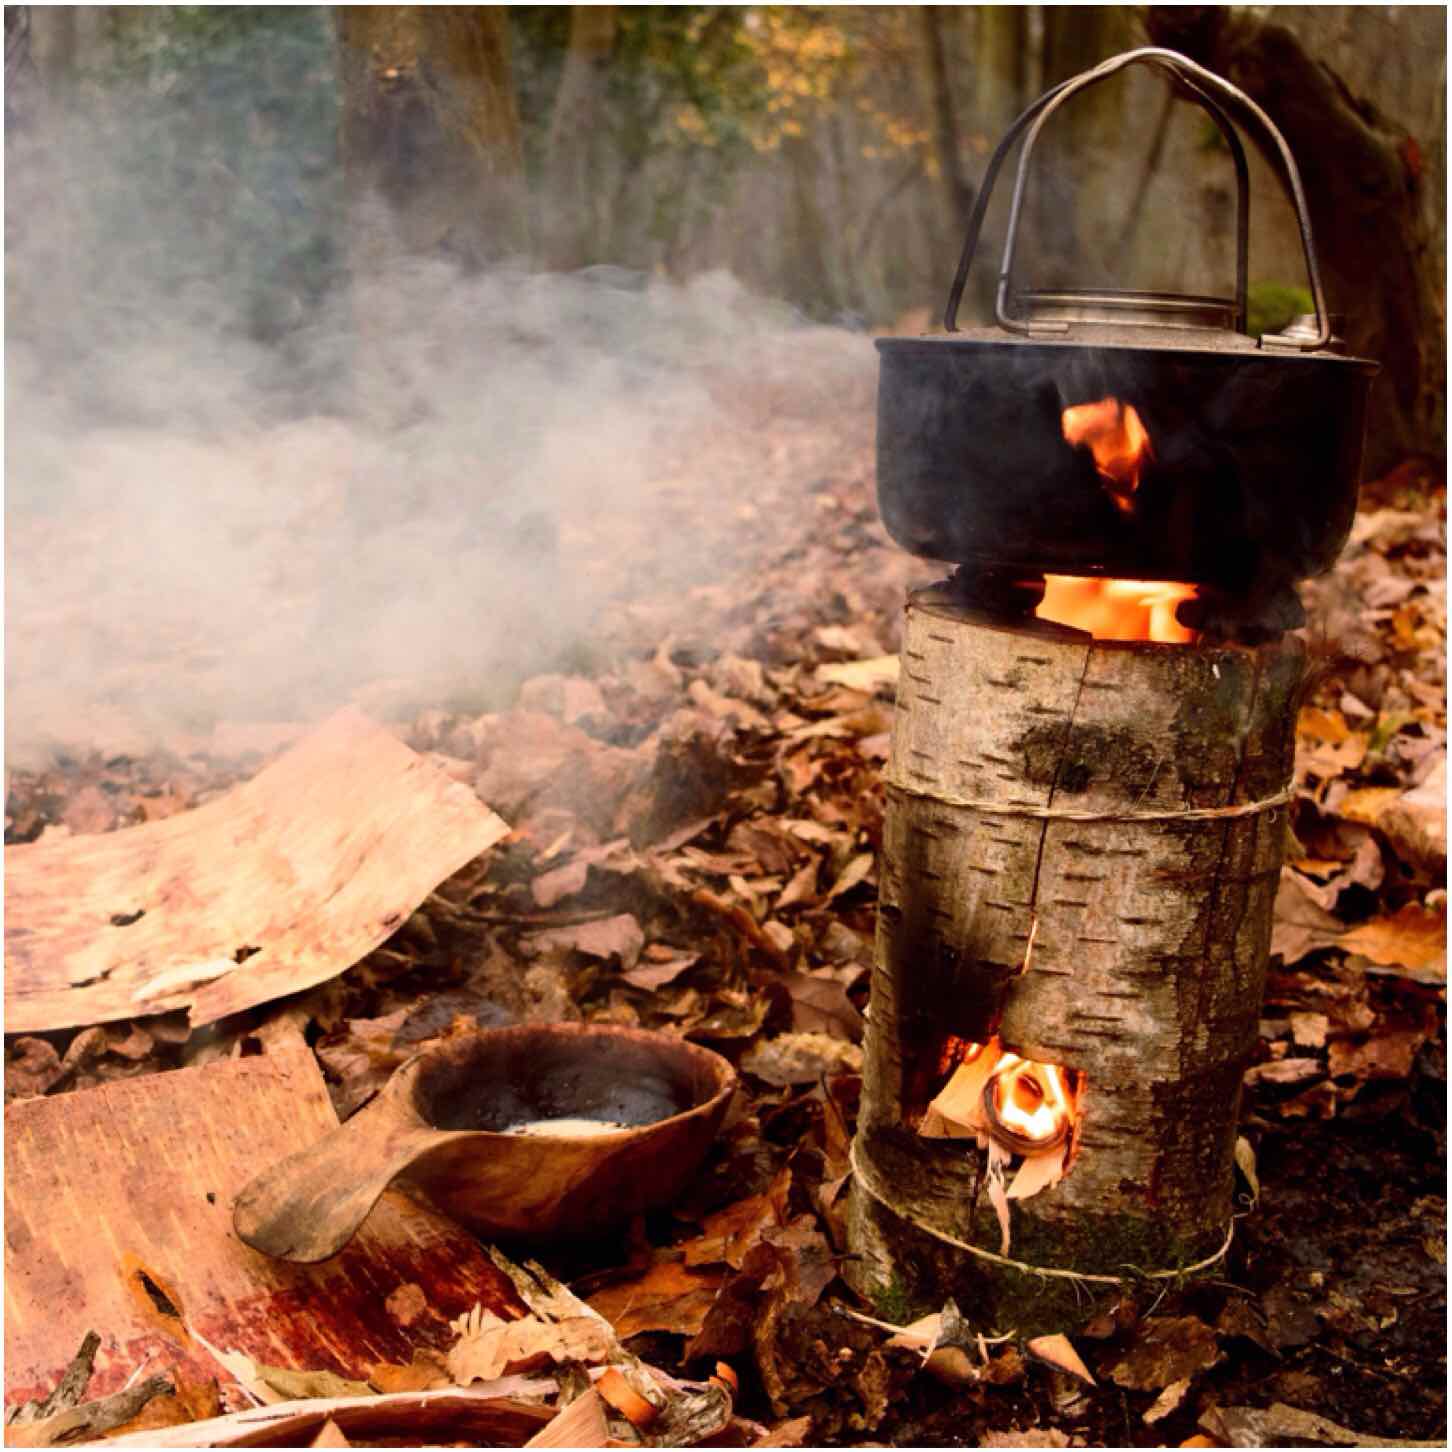
It took me just under 15 minutes to boil this pot of water (enough for approx 3 cups of coffee) and the dovetail joints remained strong throughout.
Roaring
After 45 minutes the first of the joints burnt through however the stove remained standing until it burnt out. Due to the lack of wind the majority of the wood did not burn through.
I made this short video of another Dovetail Log Rocket Stove to show it in action.
I like to experiment with log rocket stoves and this reliance on using string or wire to hold them together (although you can dig the segments of some types directly into soft ground) has always bugged me.
This Schwedenfeuer type of stove lends itself well to the dovetail joints I think, and once you have practised making a couple you will be able to knock together a stove very quickly with just natural materials.
As usual I am open to ideas and suggestions on creating more log rocket stoves and Scandinavian candles. If you have not seen my other posts on this subject have a look at my summary post on this subject titled – Candles, Rockets and Long Fires.
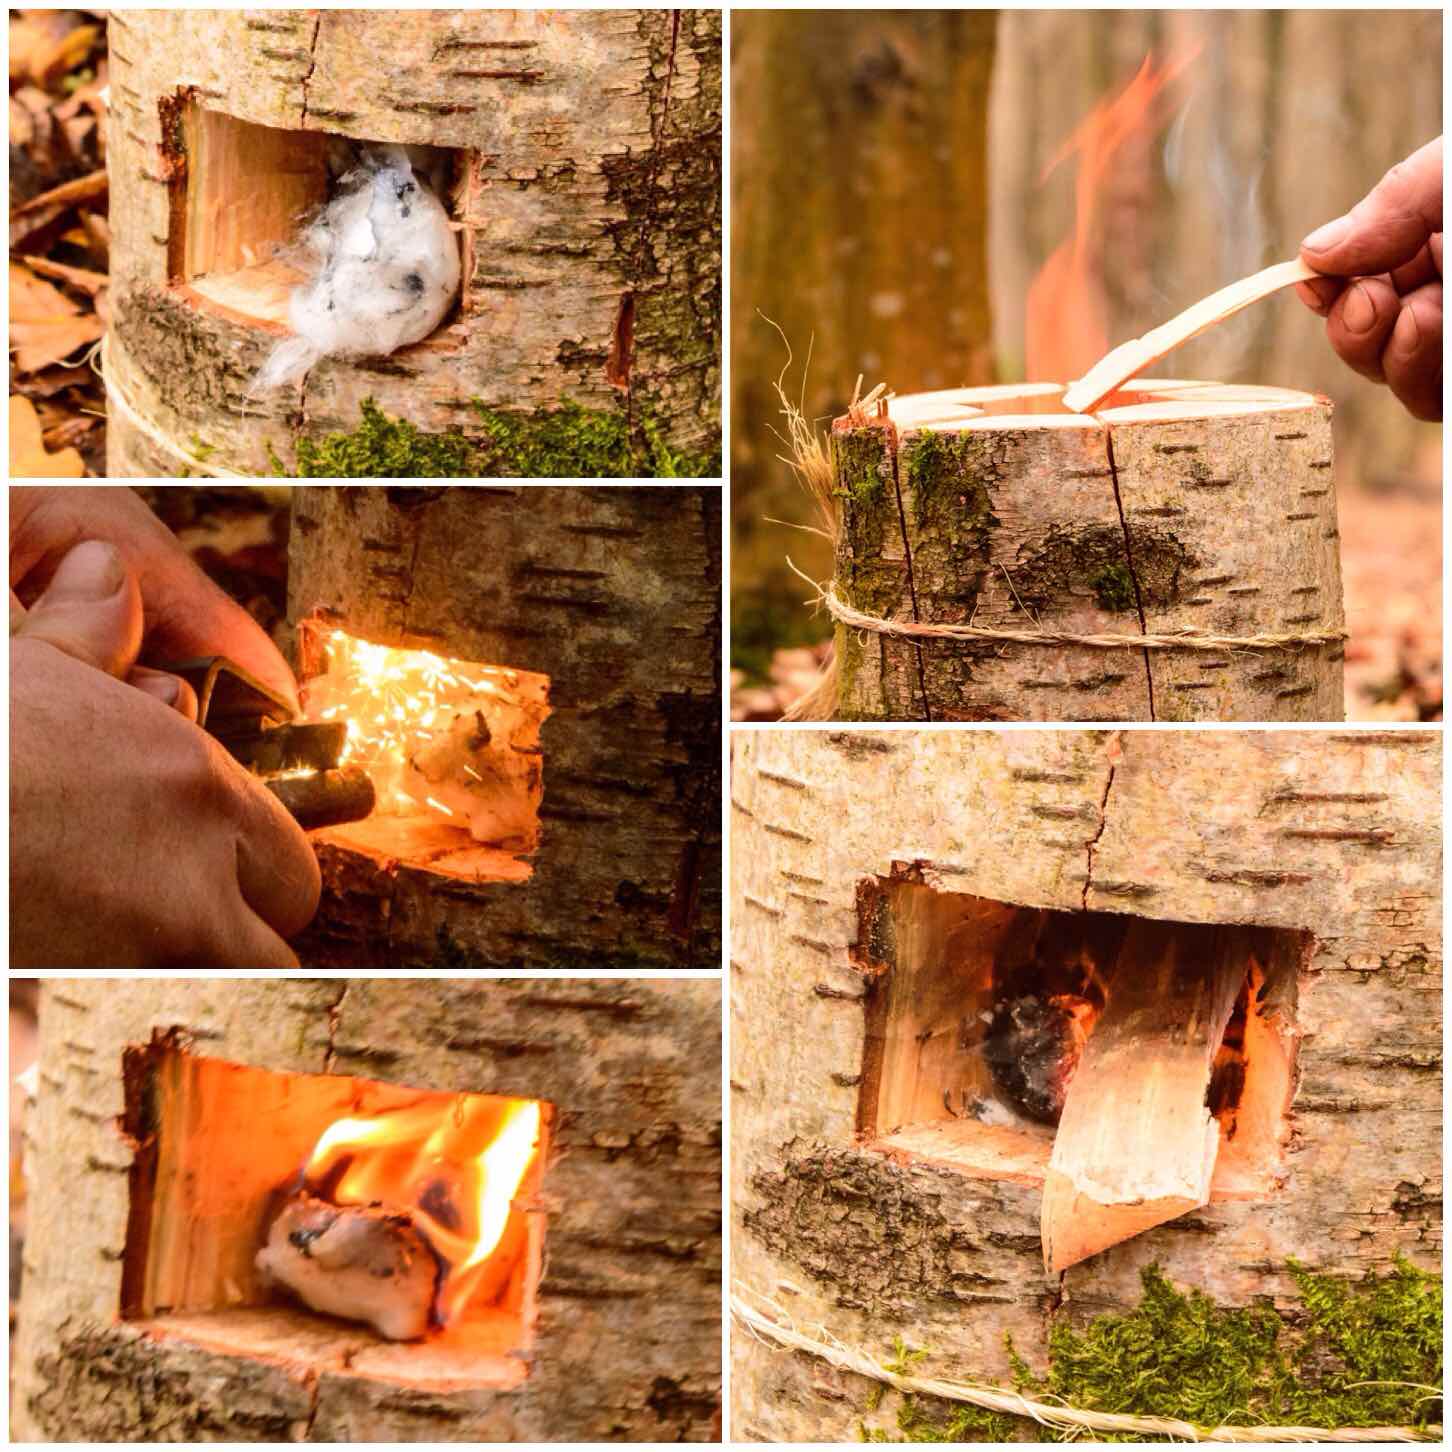
When the weather is inclement and the ground is really wet then the option of making a rocket stove needs to be considered.
This How To…. sets out the steps I took on a wet and windy December morning to make a Damp Wood Log Rocket Stove with only the tools I normally carry in my rucksack.
The damp wood log rocket
I have dabbled with making different types of Finnish Candles for cooking on and they are excellent for when the ground is wet. Over the years I have also experimented with making Log Rocket stoves but restricted my activities to the workshop as I used drills to make them.
I recently stumbled on an idea on Facebook from the 1st Facebook Scout Group by Paul Hasling. This is the first time I have seen a log rocket stove done without the use of drills so I was instantly taken with the idea. Another Scout instructor José Xavier put Paul’s pictures together into a quick helpcard called the Rocket Stove de Madeira. This is a very simple design where a log is split four ways, a chimney and firetray are carved out and it is all put back together again with string. I will certainly be showing my Sea Cadets how to make one.
First though I wanted to make one when out in the woods with only what was to hand. It being December, there was nothing that was bone dry so I found a dead Birch and cut a section off. It was still damp to the touch, however it had been dead for over a year so it was slightly seasoned.
Splitting
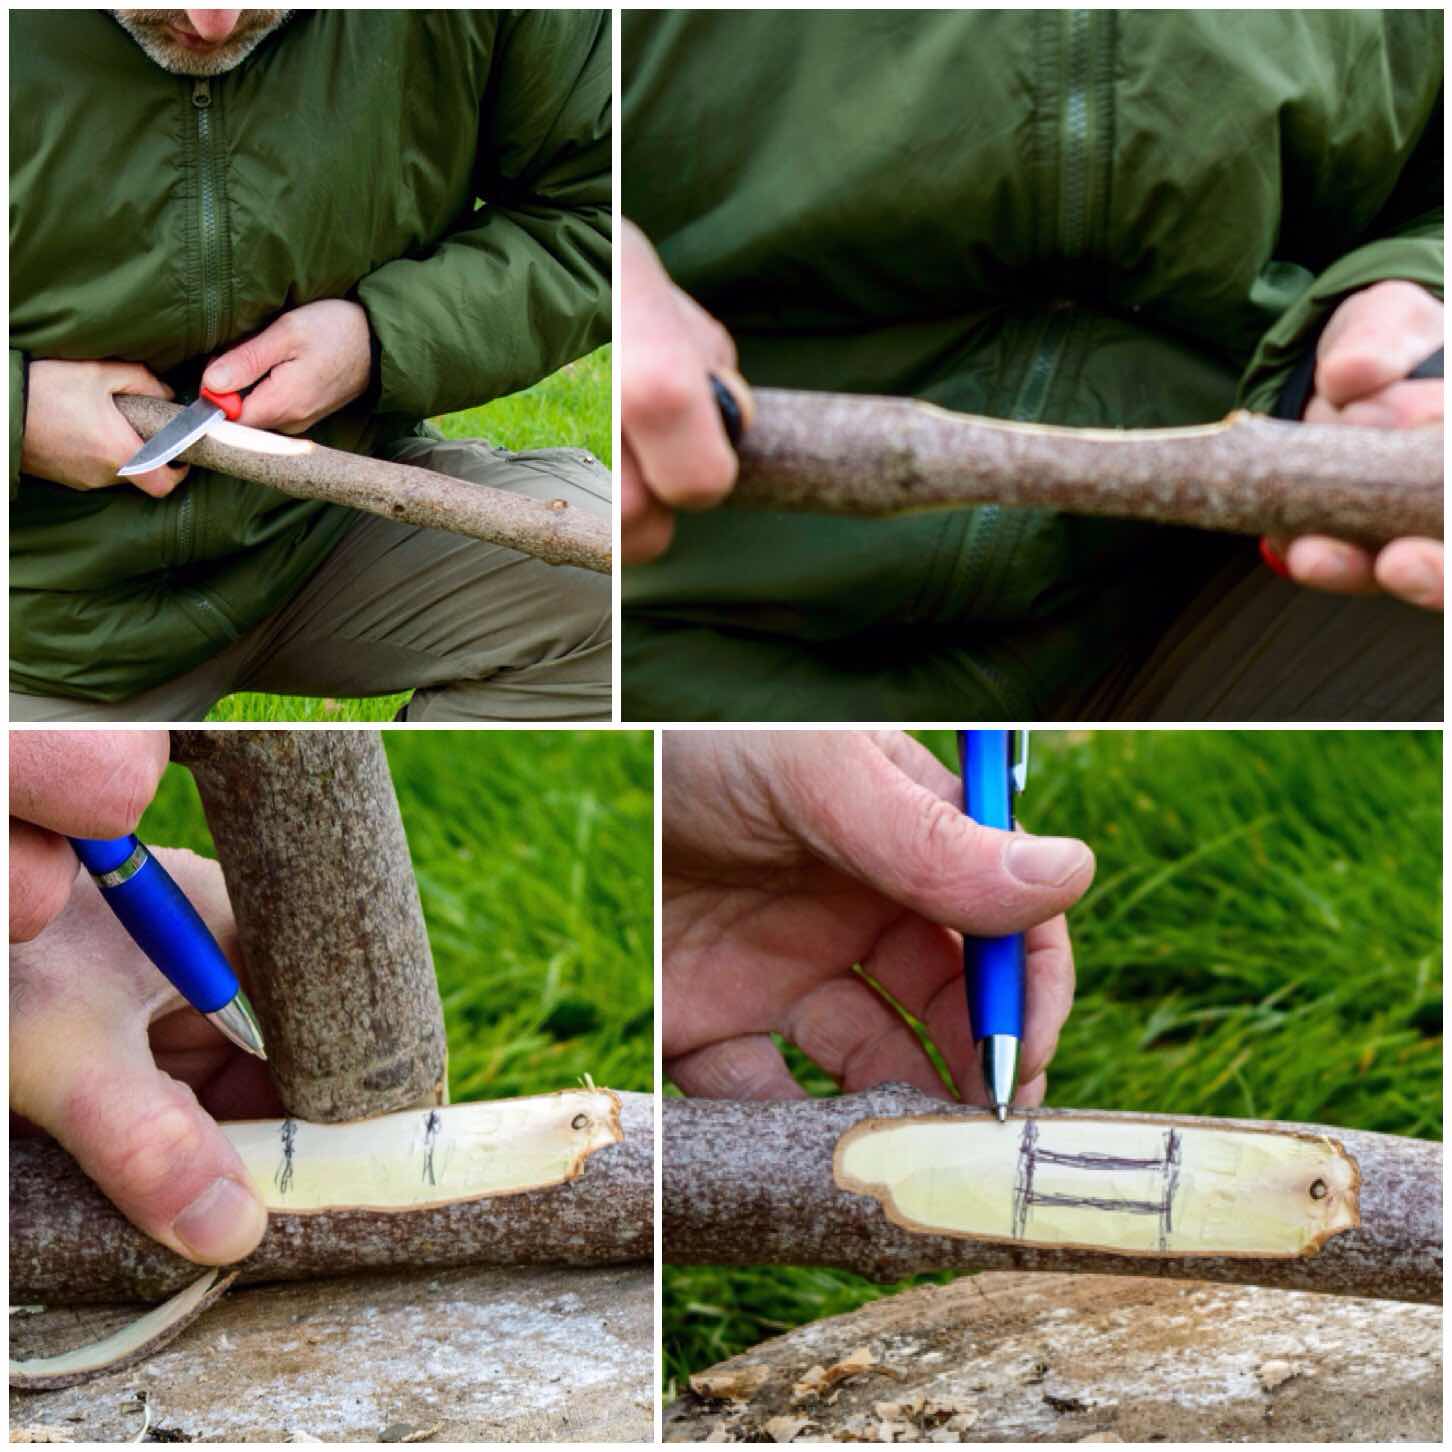
For the job I had my knife, saw, axe and a pen. Using another round of wood I split the log in half by battoning it with my axe (keep the blade of the axe at 90 degrees to your body when you do this).
Tools and battoning
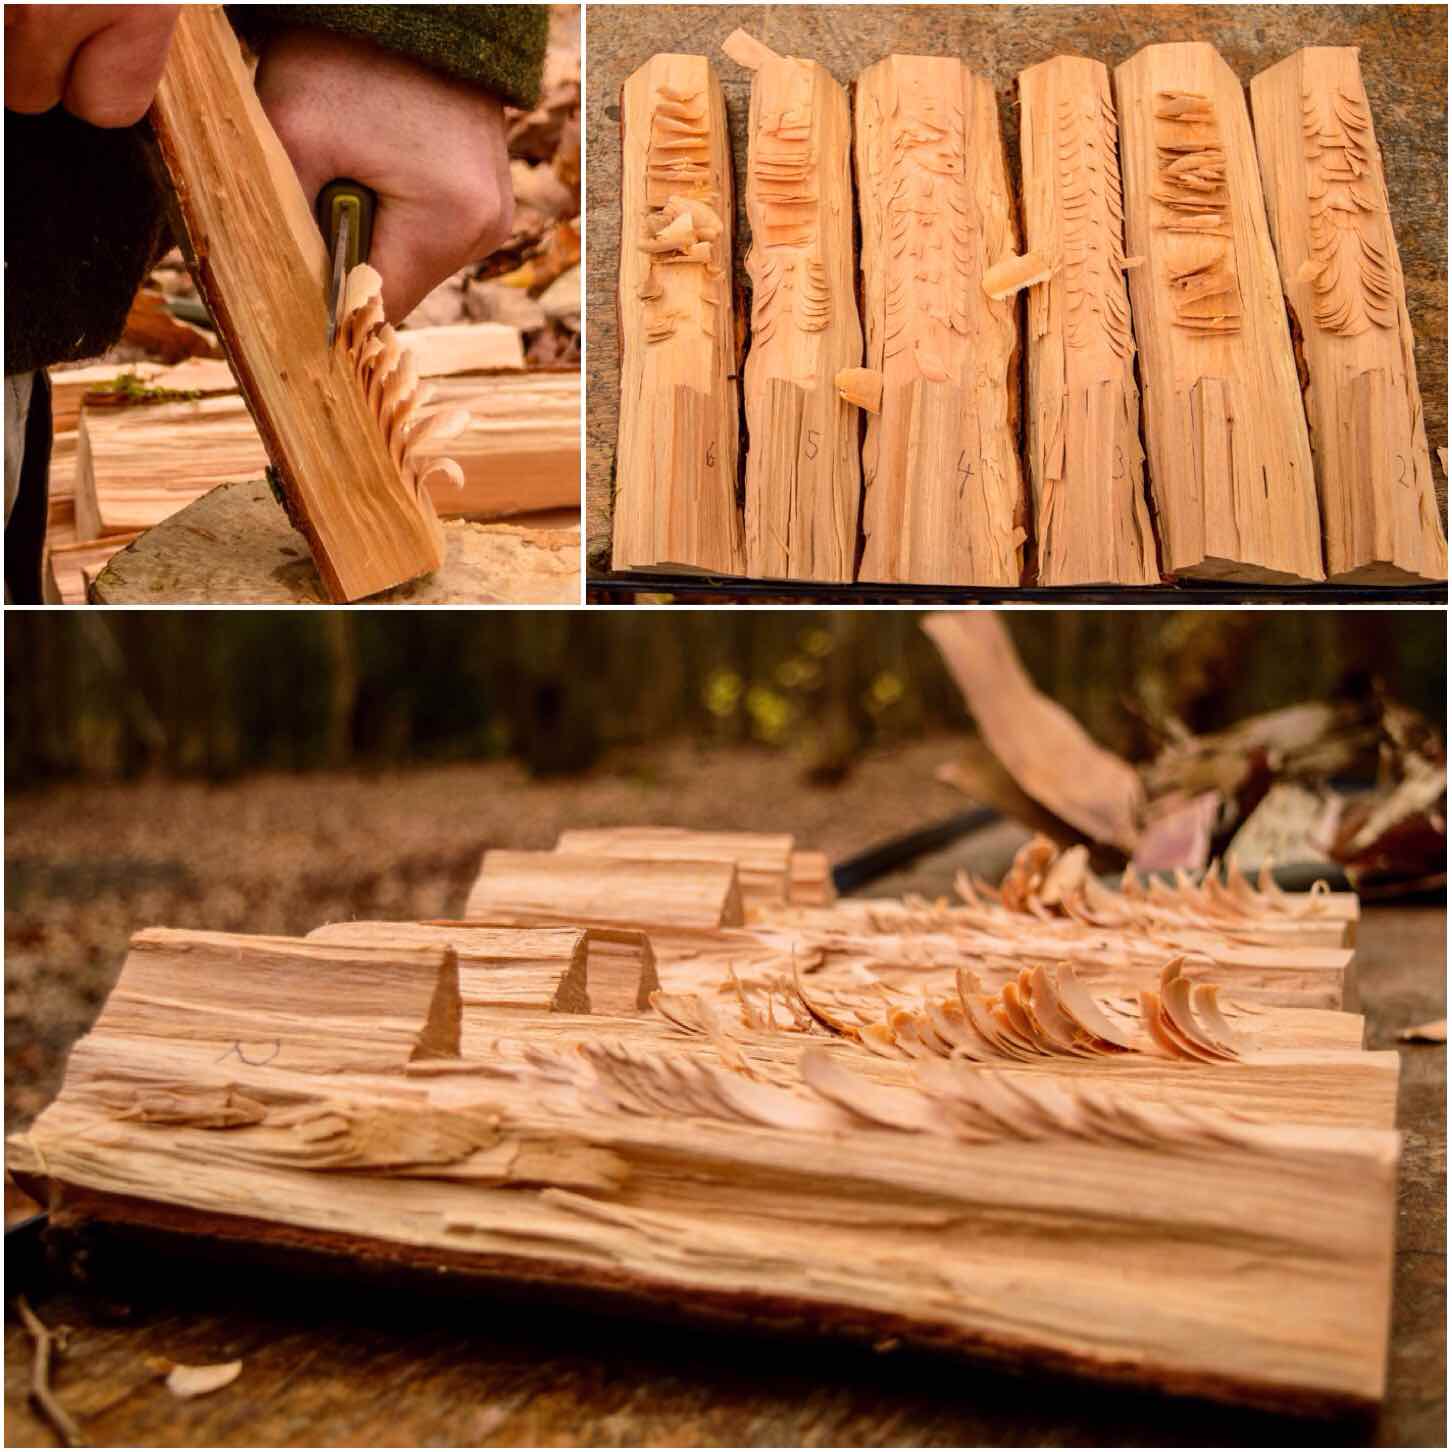
After splitting the log in half I split each half into three even sections. With very dry wood you only need halve the halves again to make four sections however my wood was damp so I wanted to produce as much surface area as possible which is why I opted for six sections.
The splits
Stop Cuts
Using a stick and a pen I marked a line on each section about a quarter of the way from the bottom and also numbered each section. These marks were put in so that I could cut in stop cuts so to make it easy for me to cut out the chimney section.
My friend Keith Coleman suggested using tape as a depth gauge for this and it worked a treat, with each stop cut ending up the same depth.
Stop cuts
Creating the Chimney
Using the tape as a gauge again I marked a line at the top of each split section and then, using my knife, battoned off the excess wood.
The stop cuts help as the split does not travel all the way to the bottom and so creates a lintel that the fire will sit in.
Battoning out the chimney
After a little bit of whittling with my knife each segment had the wood removed so that the chimney would be formed when it was all put back together.
It is important to keep all the shavings and little chunks of wood from this process as it can be used as kindling for the stove.
Trimming the chimney
The Raappanan Tuli style
Now the secret of making damp wood burn is to produce as much surface area as possible for the flame to catch. I learnt this from researching and making the Finnish Raappanan Tuli candle.
On the inside of each segment cut as many burrs as you can so that the flame from your kindling has something to catch onto. I tried out different types of cuts here and some were easier to carve than others – your wood will soon tell you what works well.
The Raappanan Tuli style
The Firebox
Next up is the opening for the firebox. I selected two segments that fit together (having them numbered really helped here) and marked out with a pen two rectangular areas just above the sill I’d created. I made sure the marking went all the way round to the other side of each segment.
I then used a saw to cut into the wood in the shaded area. Do as many cuts as you can as this makes it easier to remove this waste wood.
Carving the firebox – stage 1
I then used my saw at an angle to cut out the wood and finished the job off with my knife.
Carving the firebox – stage 2
When finished the idea is that you want an access point big enough to put your kindling into the firebox area at the bottom of the chimney.
I found some old sisal string tied to a tree and used that to tie everything back together. It was pretty damp anyway and I hoped that would last longer than the copious amounts of paracord I tend to carry around with me. I think some thin wire would be the ideal thing to use though.
Firebox and all wrapped up
From the top you can see how wide the chimney was. I have no idea what would be the optimal size to have so you may need to experiment for yourself.
The chimney
Firing Up
As the wood was so damp I decided to go for the sure-fire method of lighting the stove up – good old cotton wool and Vaseline. This worked well however I needed to use 4 Vaseline-coated cotton wool balls to maintain the fire.
I have used shredded birch bark mixed with spruce resin on a number of occasions to light Finnish candles before but I didn’t have the time to collect the resin this time.
Once the fire had started I added tinder/kindling down through the chimney and in through the firebox. The main thing at this stage is to not over-fill the firebox but allow the airflow to be maintained. It means about 10 minutes of work but the damp wood inside the chimney area will dry out and the overall heat of the fire will increase.
Firing up
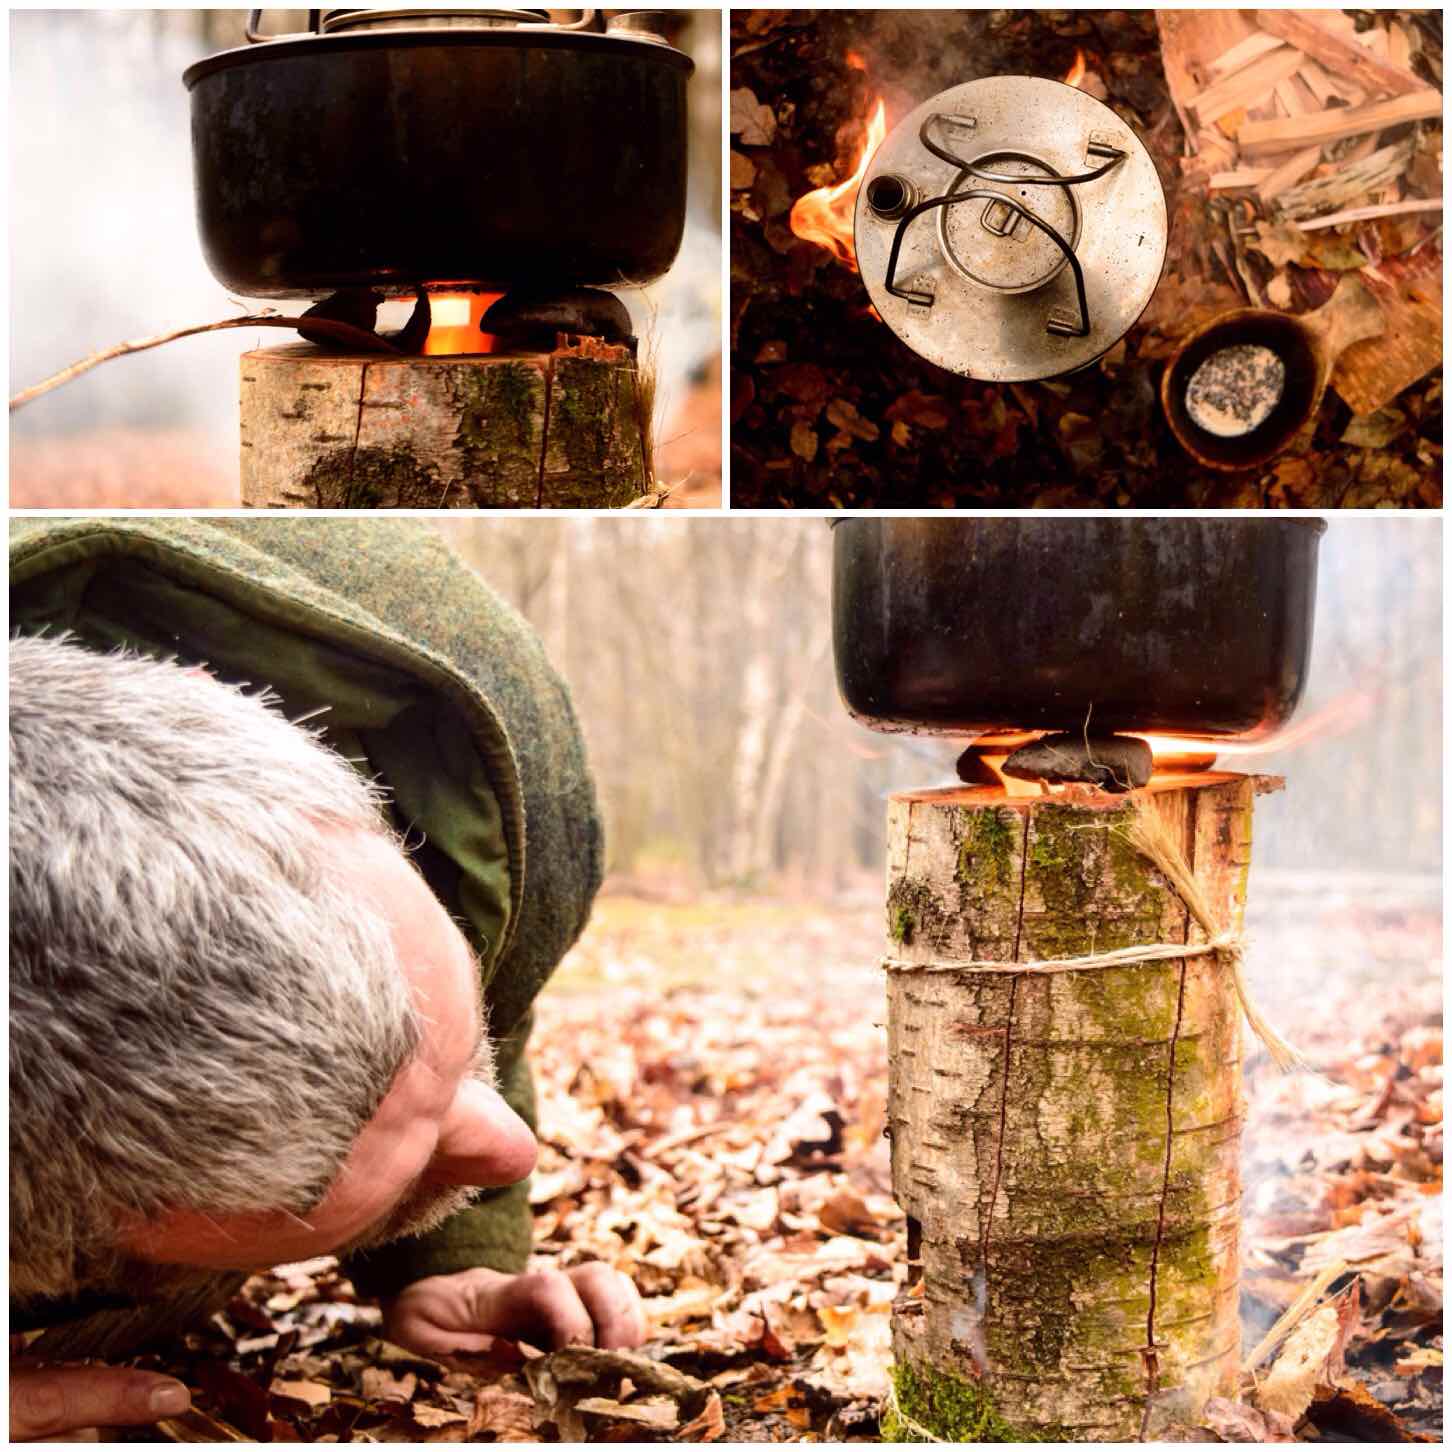
Maintaining the Fire
I placed three pebbles on the top of the stove for the kettle to sit on securely.
The gap created by the pebbles also allows you to drop tinder/kindling down the chimney. I like to use strips of birch bark here as it is so pliable and flammable.
If the wind is low or changes direction you may need to get down low and blow directly into the firebox to keep the fire going. Once the wood has dried out a bit you will not need to do this so much.
Maintaining the heat
I gave the stove about 10 minutes before putting the kettle on and then in about 15 minutes the kettle was boiling. Not as fast as modern stoves but for what is in effect a wet log not bad.
Waiting for the kettle to boil
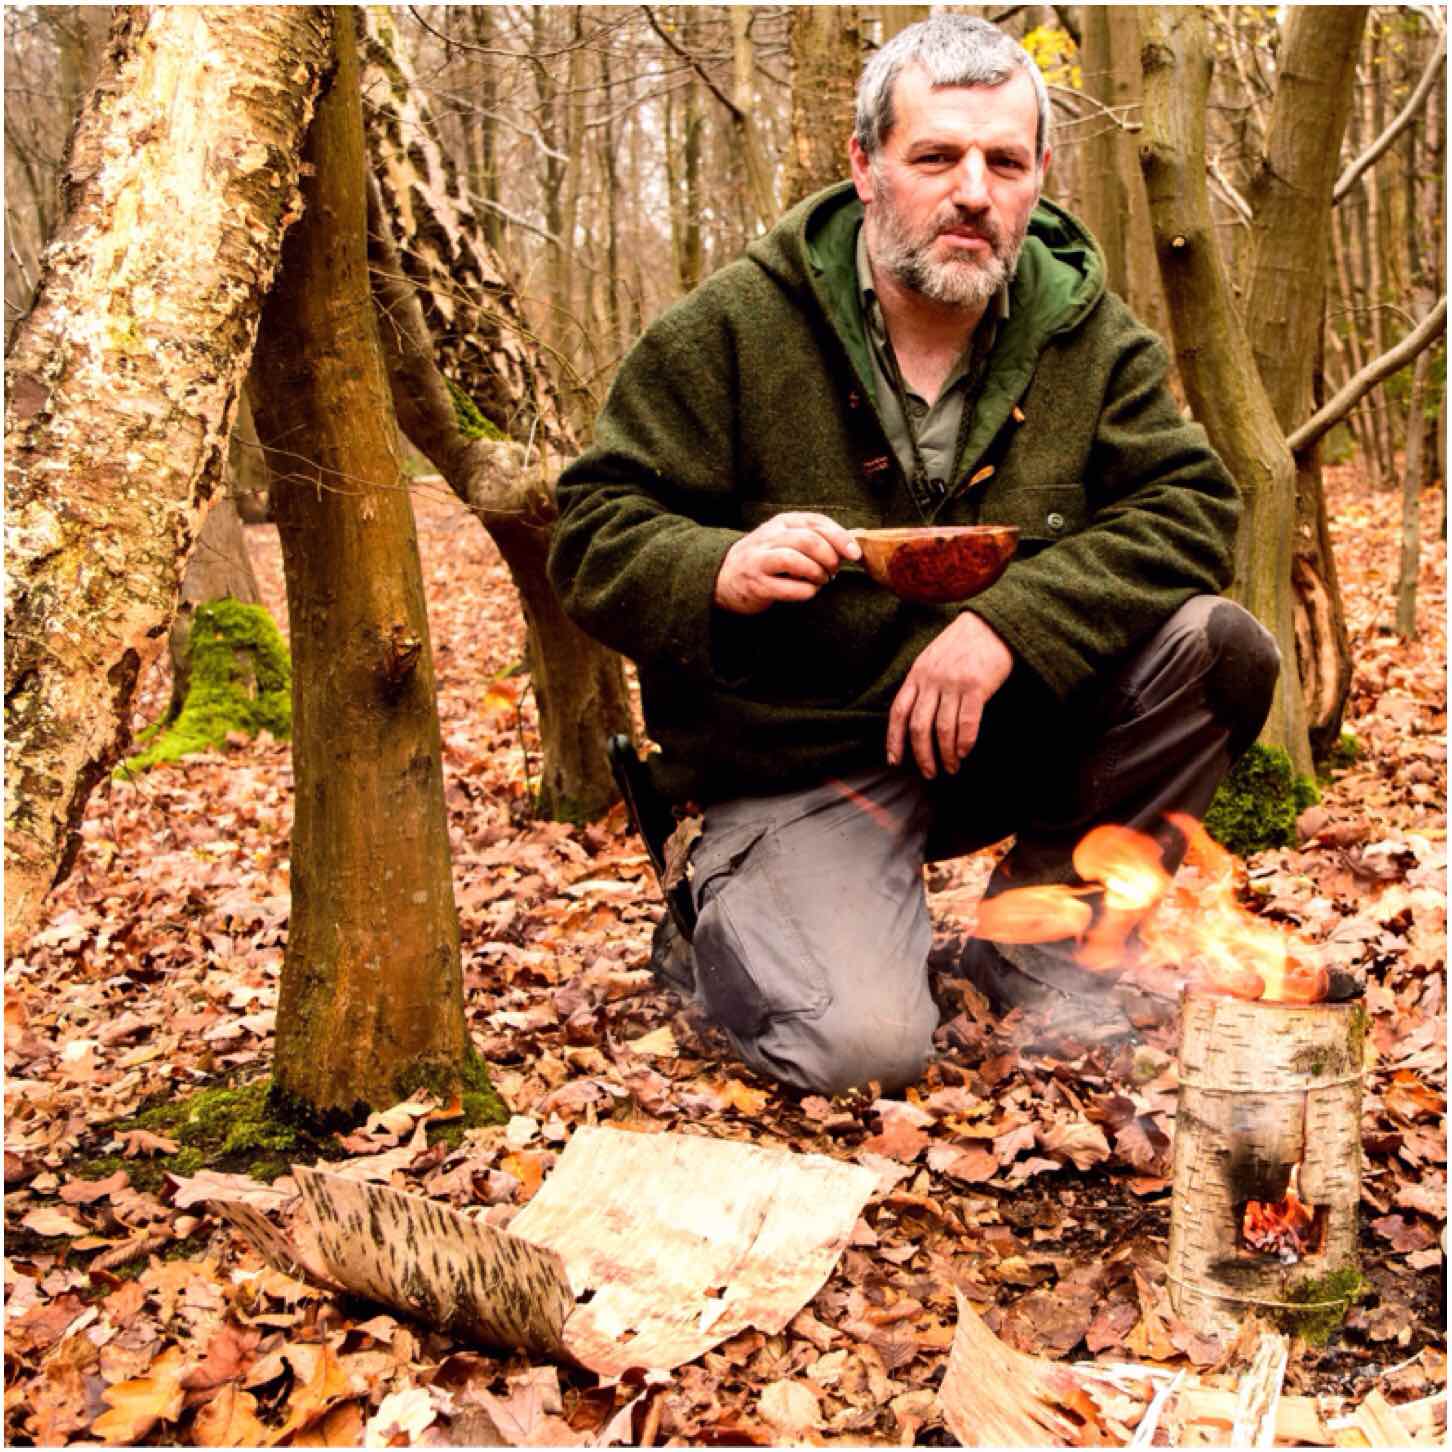
I have to thank Jess Edwards for a number of these pictures at the end. Jess is a great photographer and keen bushcrafter so it was great to concentrate for once on the tinkering and leave the photography aspect in someone else’s capable hands.
Brew time
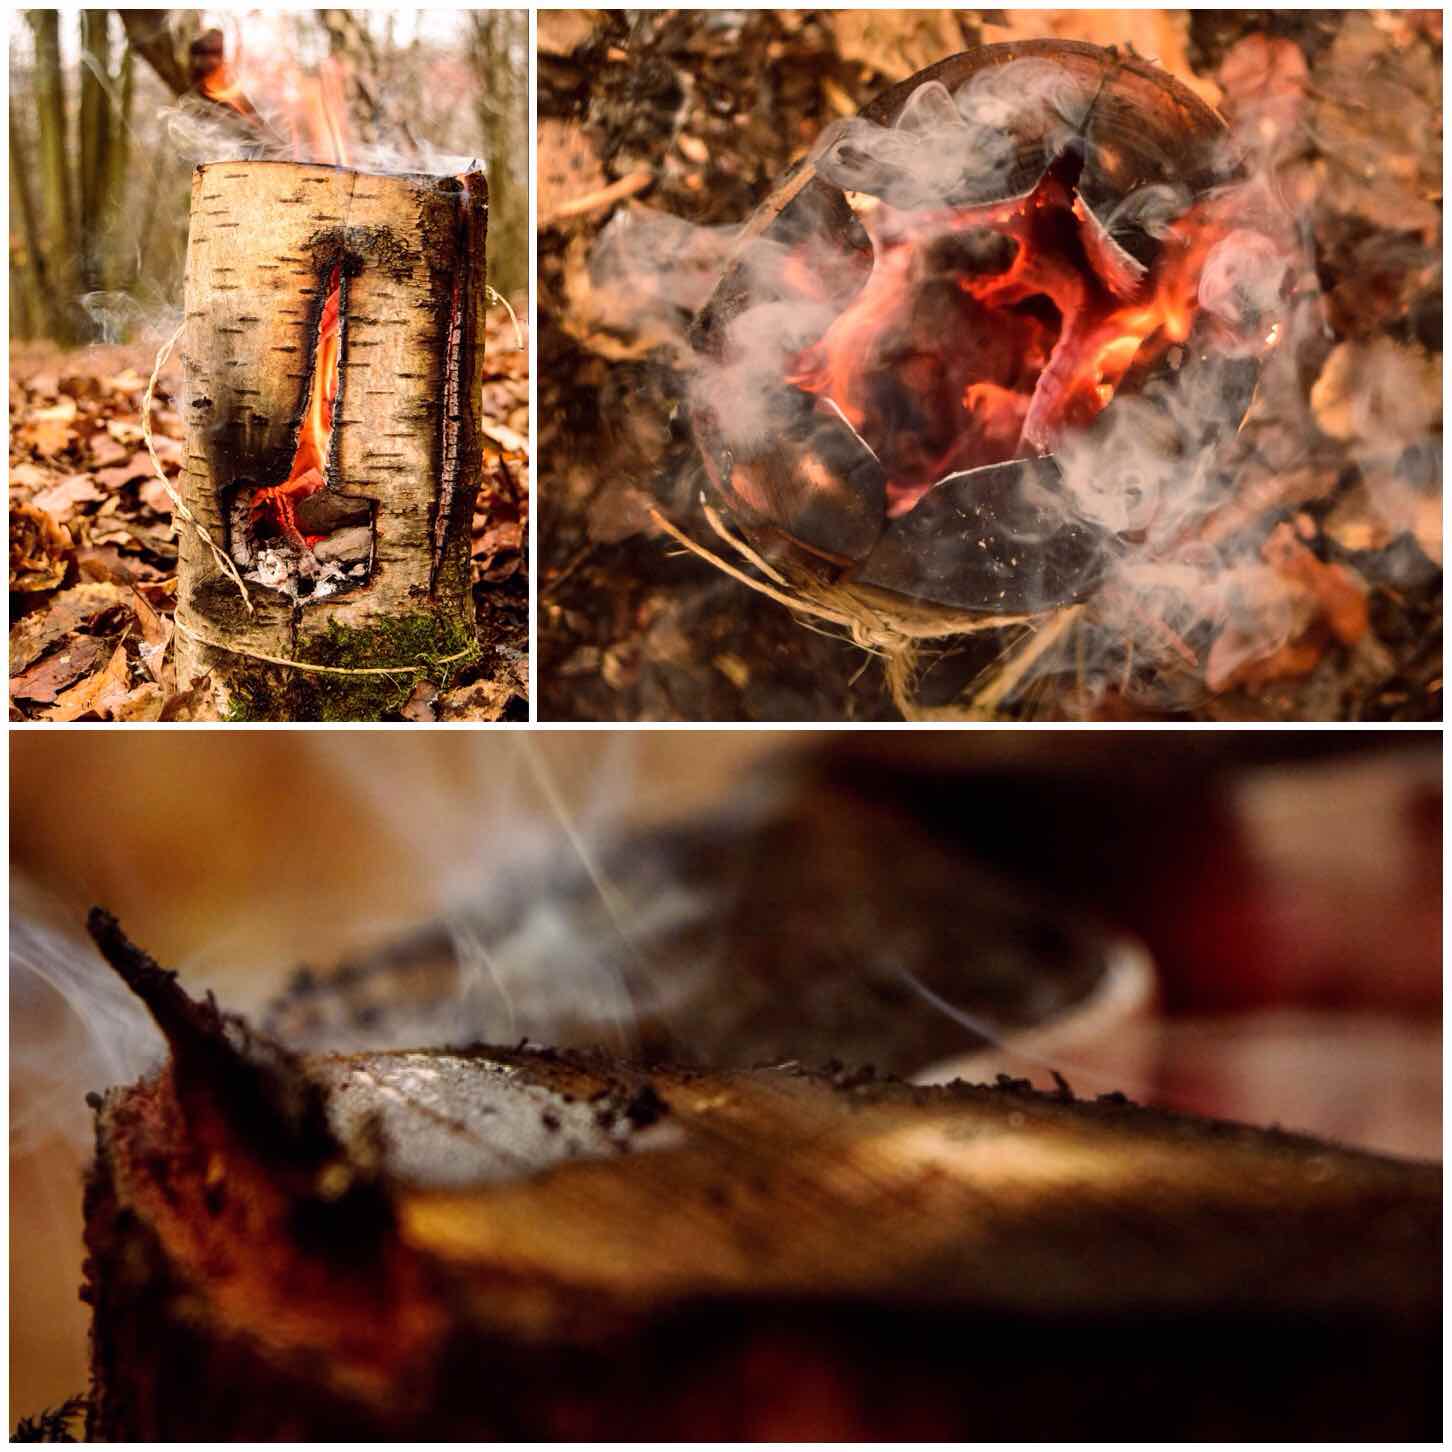
Observations
Once the coffee was made I was able to have a good look at what was happening with the stove. As I looked closely I could see the moisture in the wood boiling off. If you look in the bottom picture you can see the water boiling away on the surface.
Drying off
The stove kept going for another hour before I had to put it out as we were leaving.
Overall I was very impressed with this Log Rocket stove with the Raappanan Tuli twist and I will be using it again on my courses.
A glorious farewell
Thanks again to the Scouts for documenting this stove – I hope you like my little twist on it?
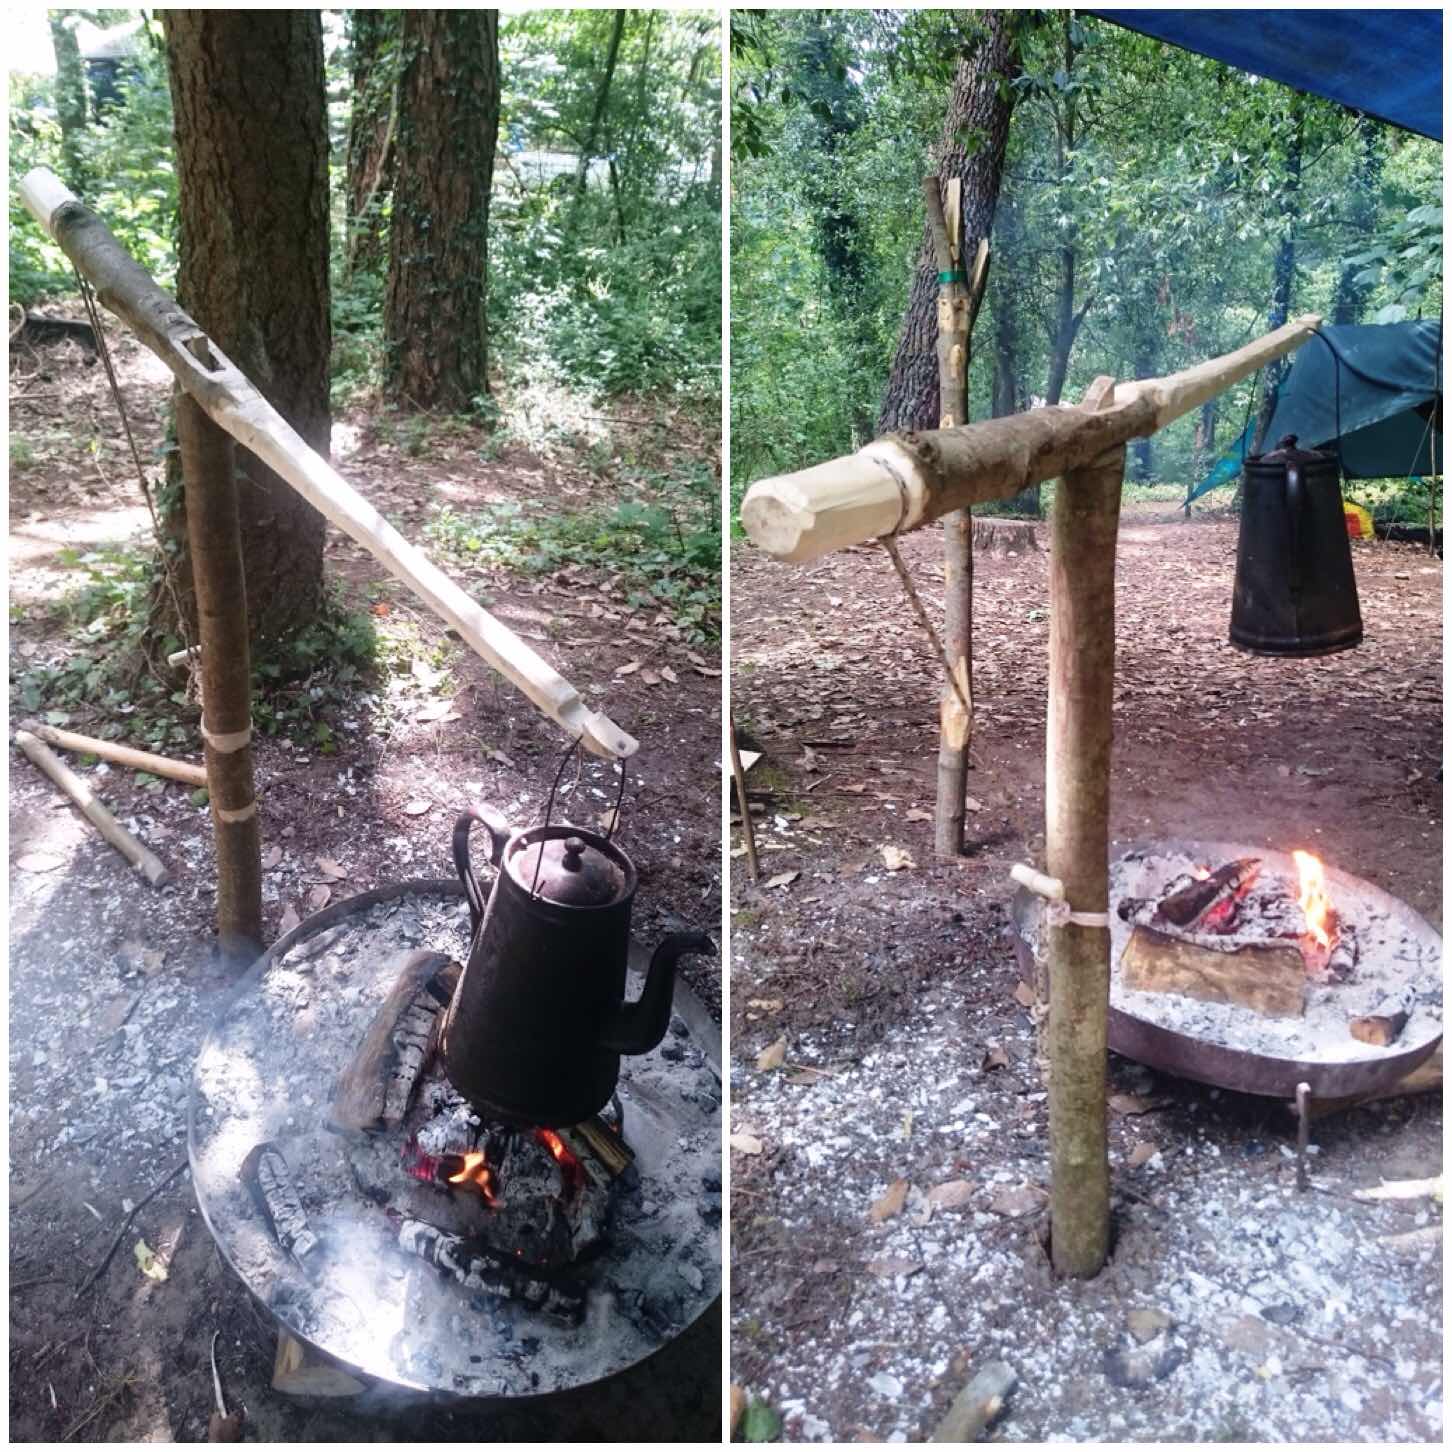
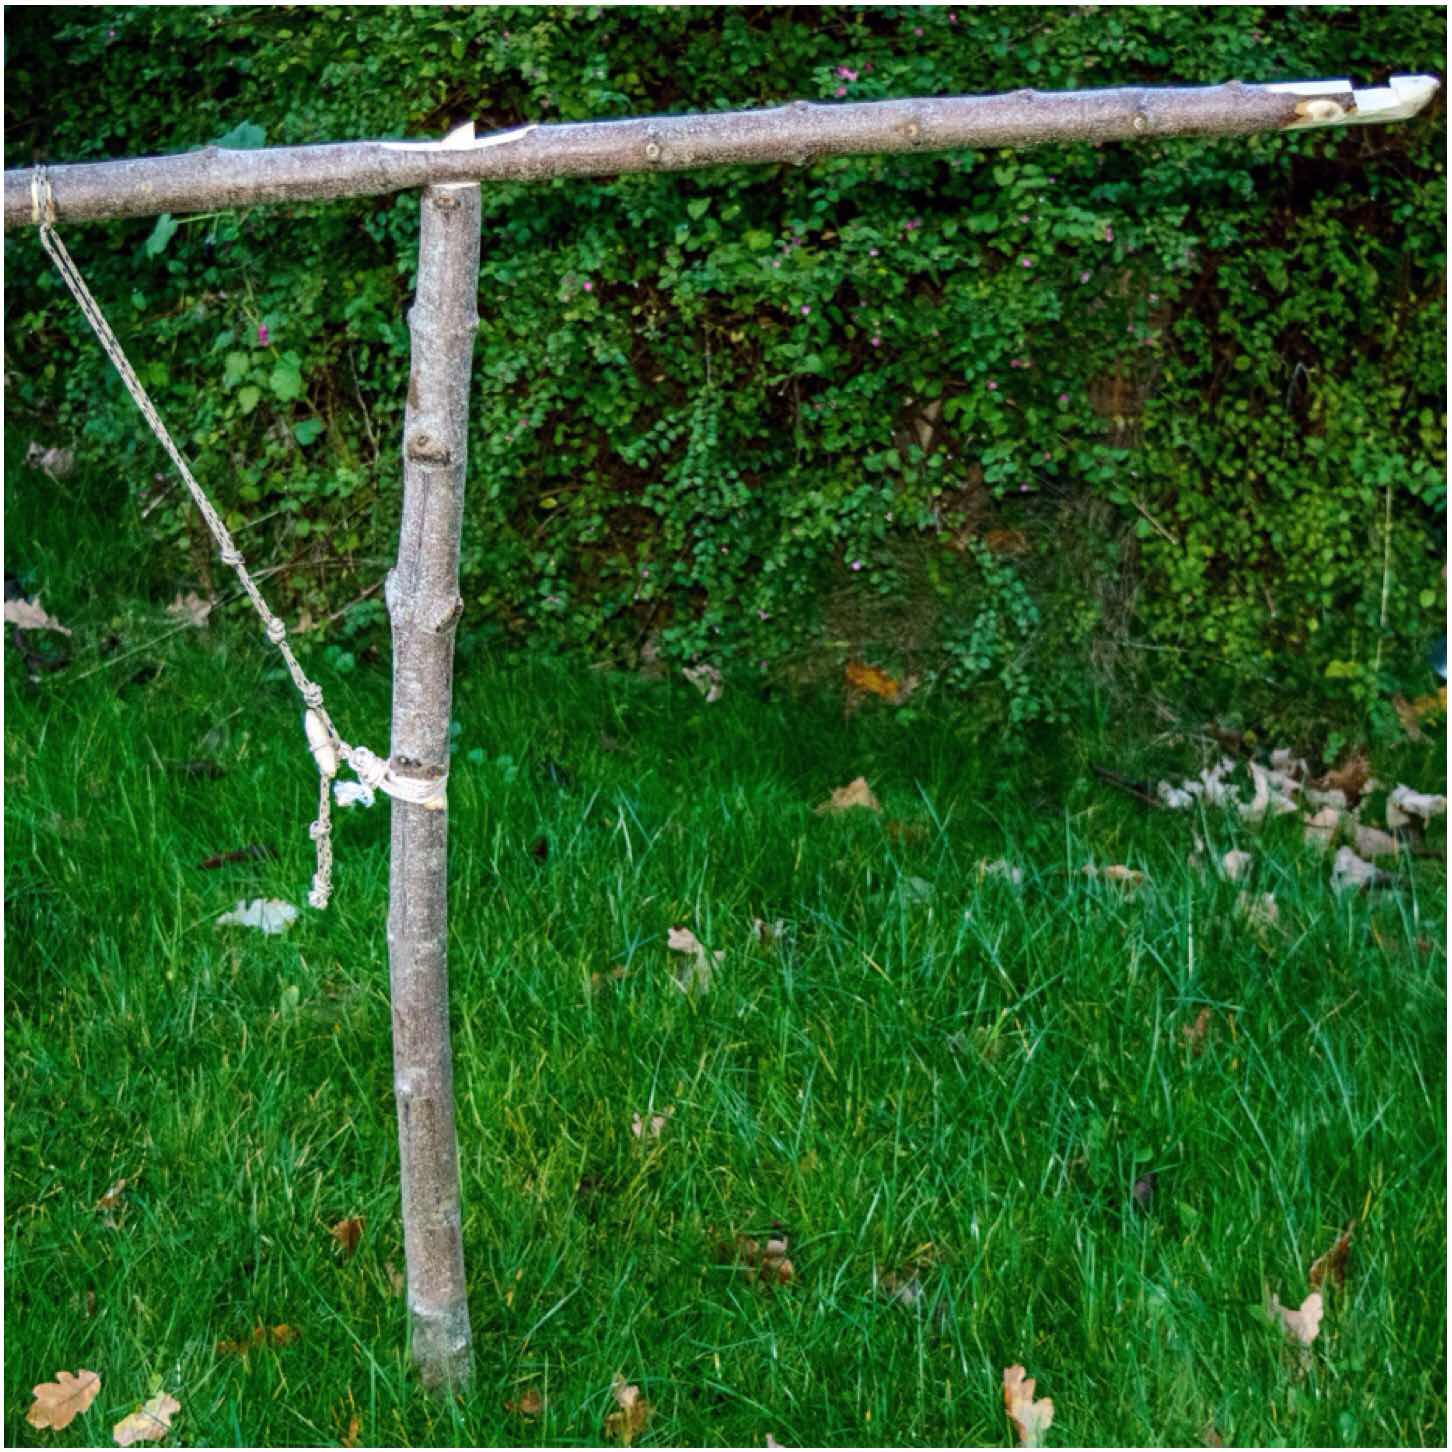
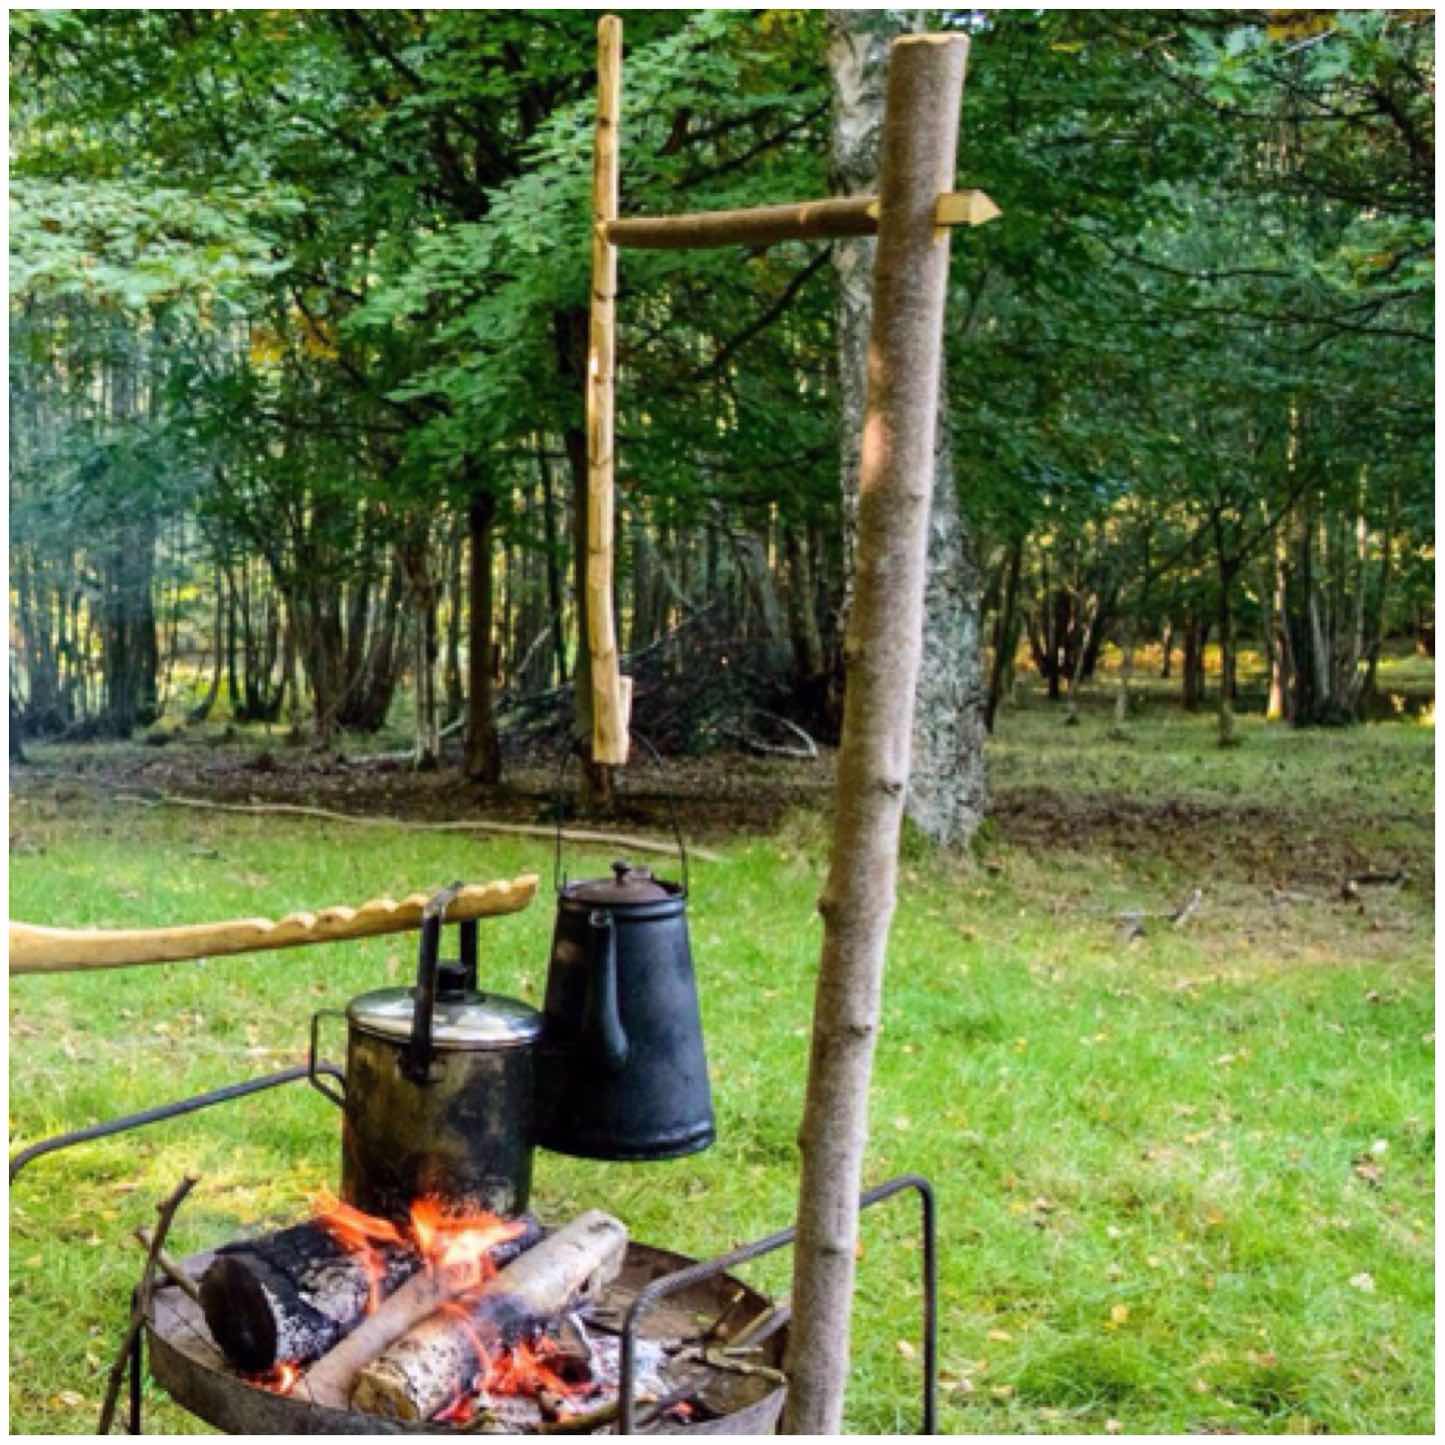
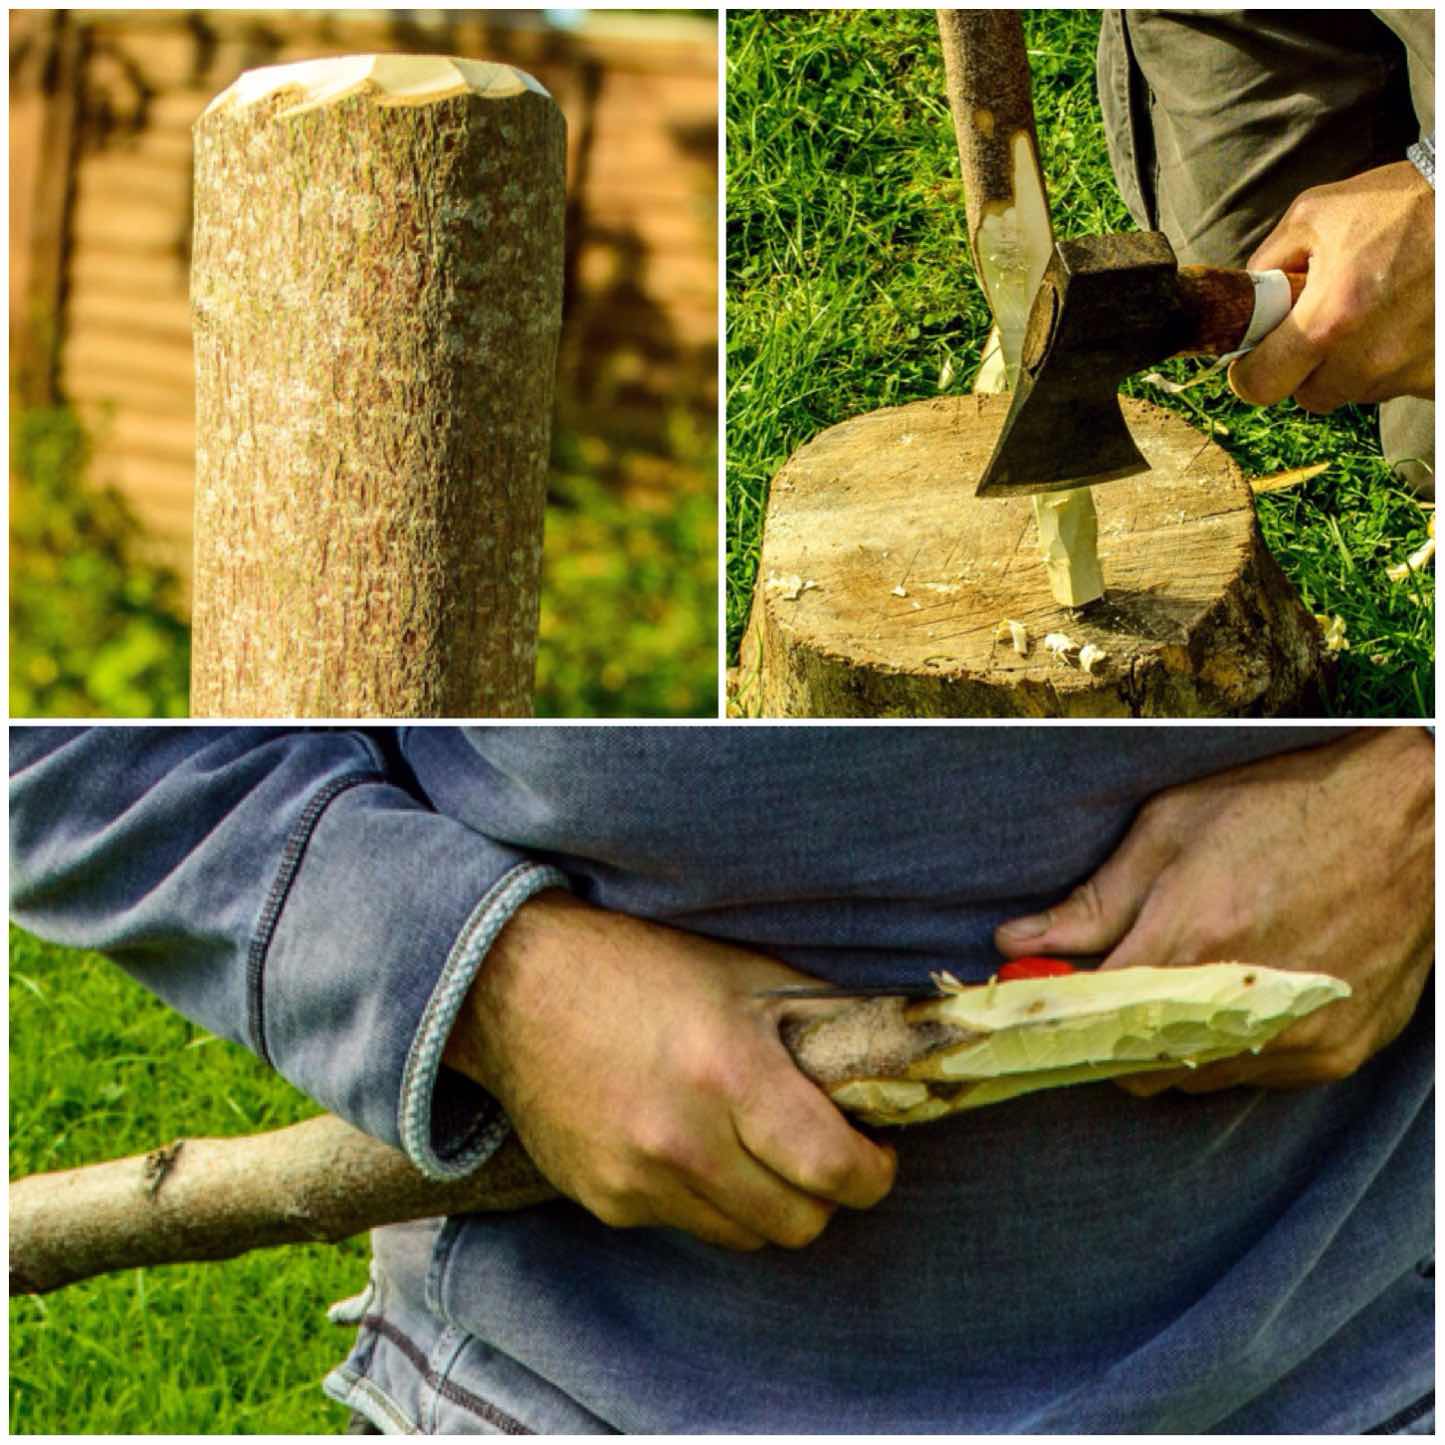
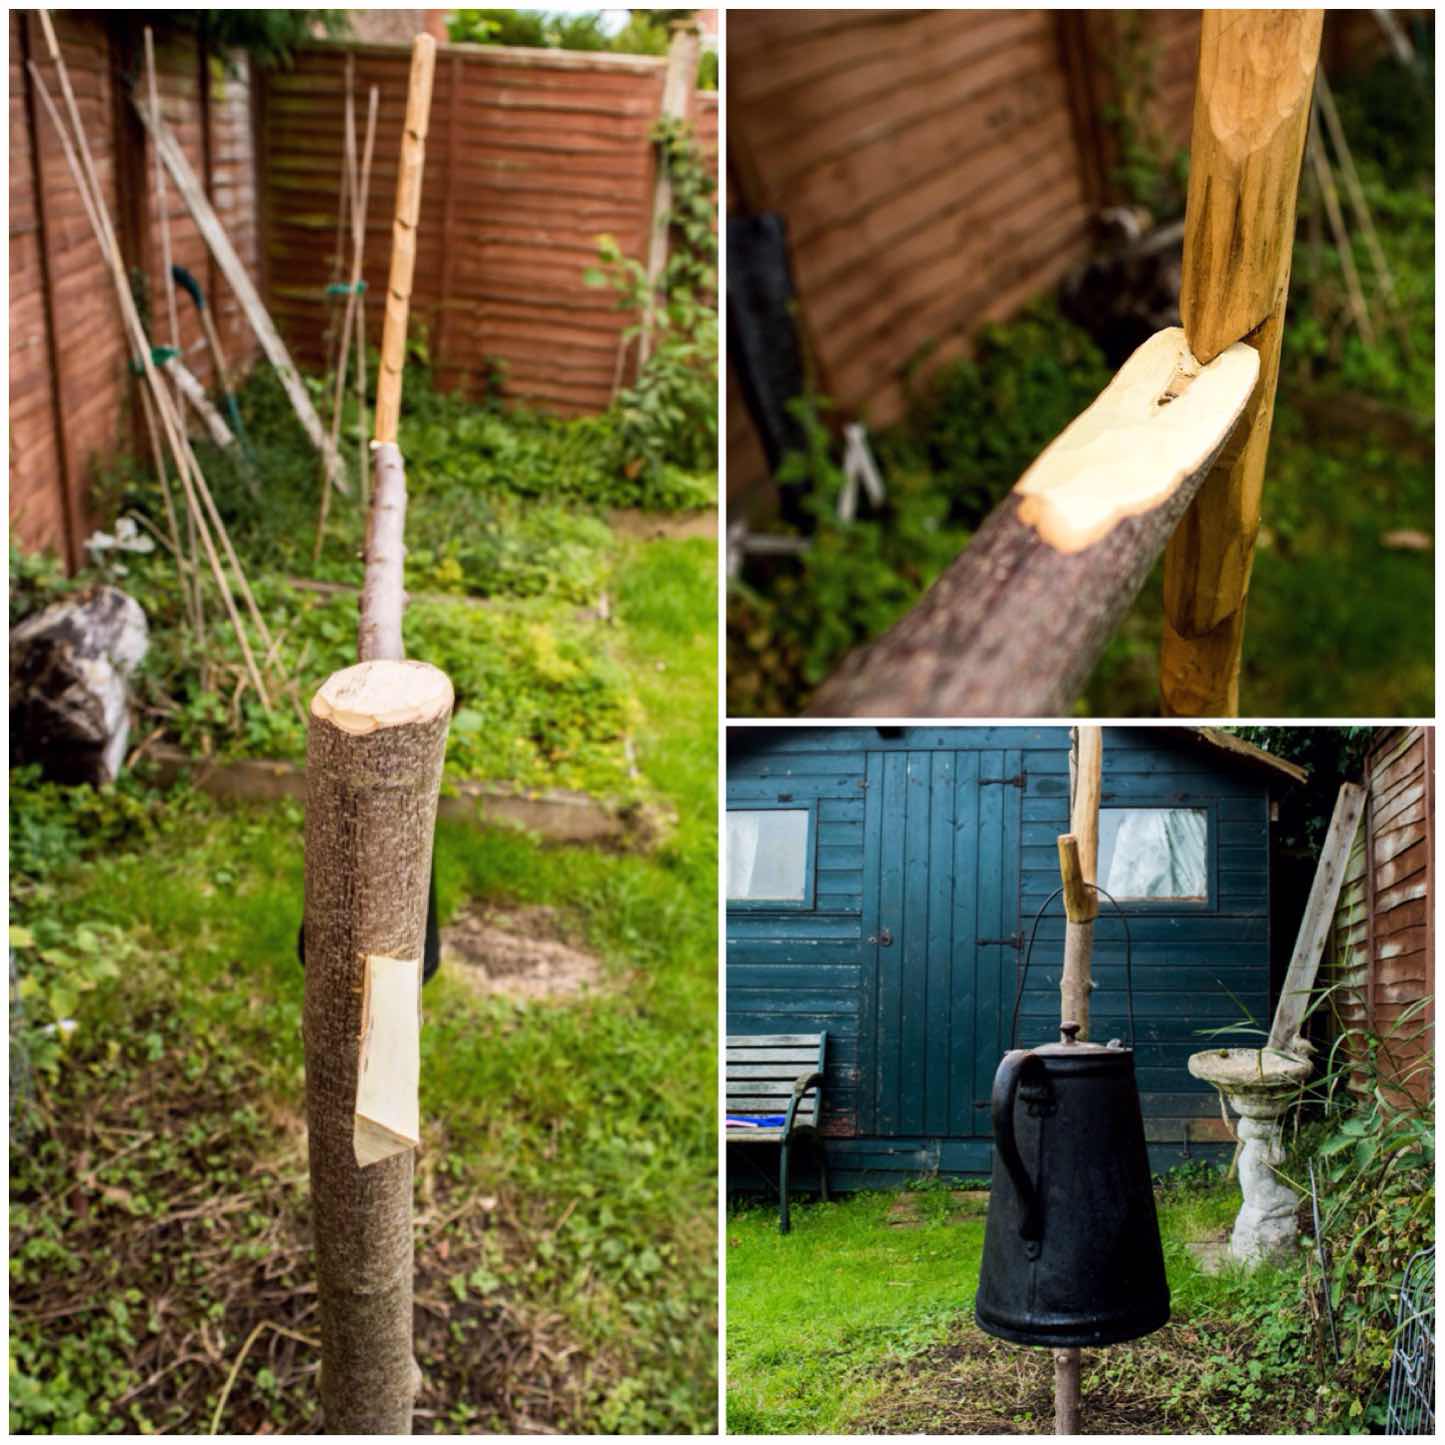
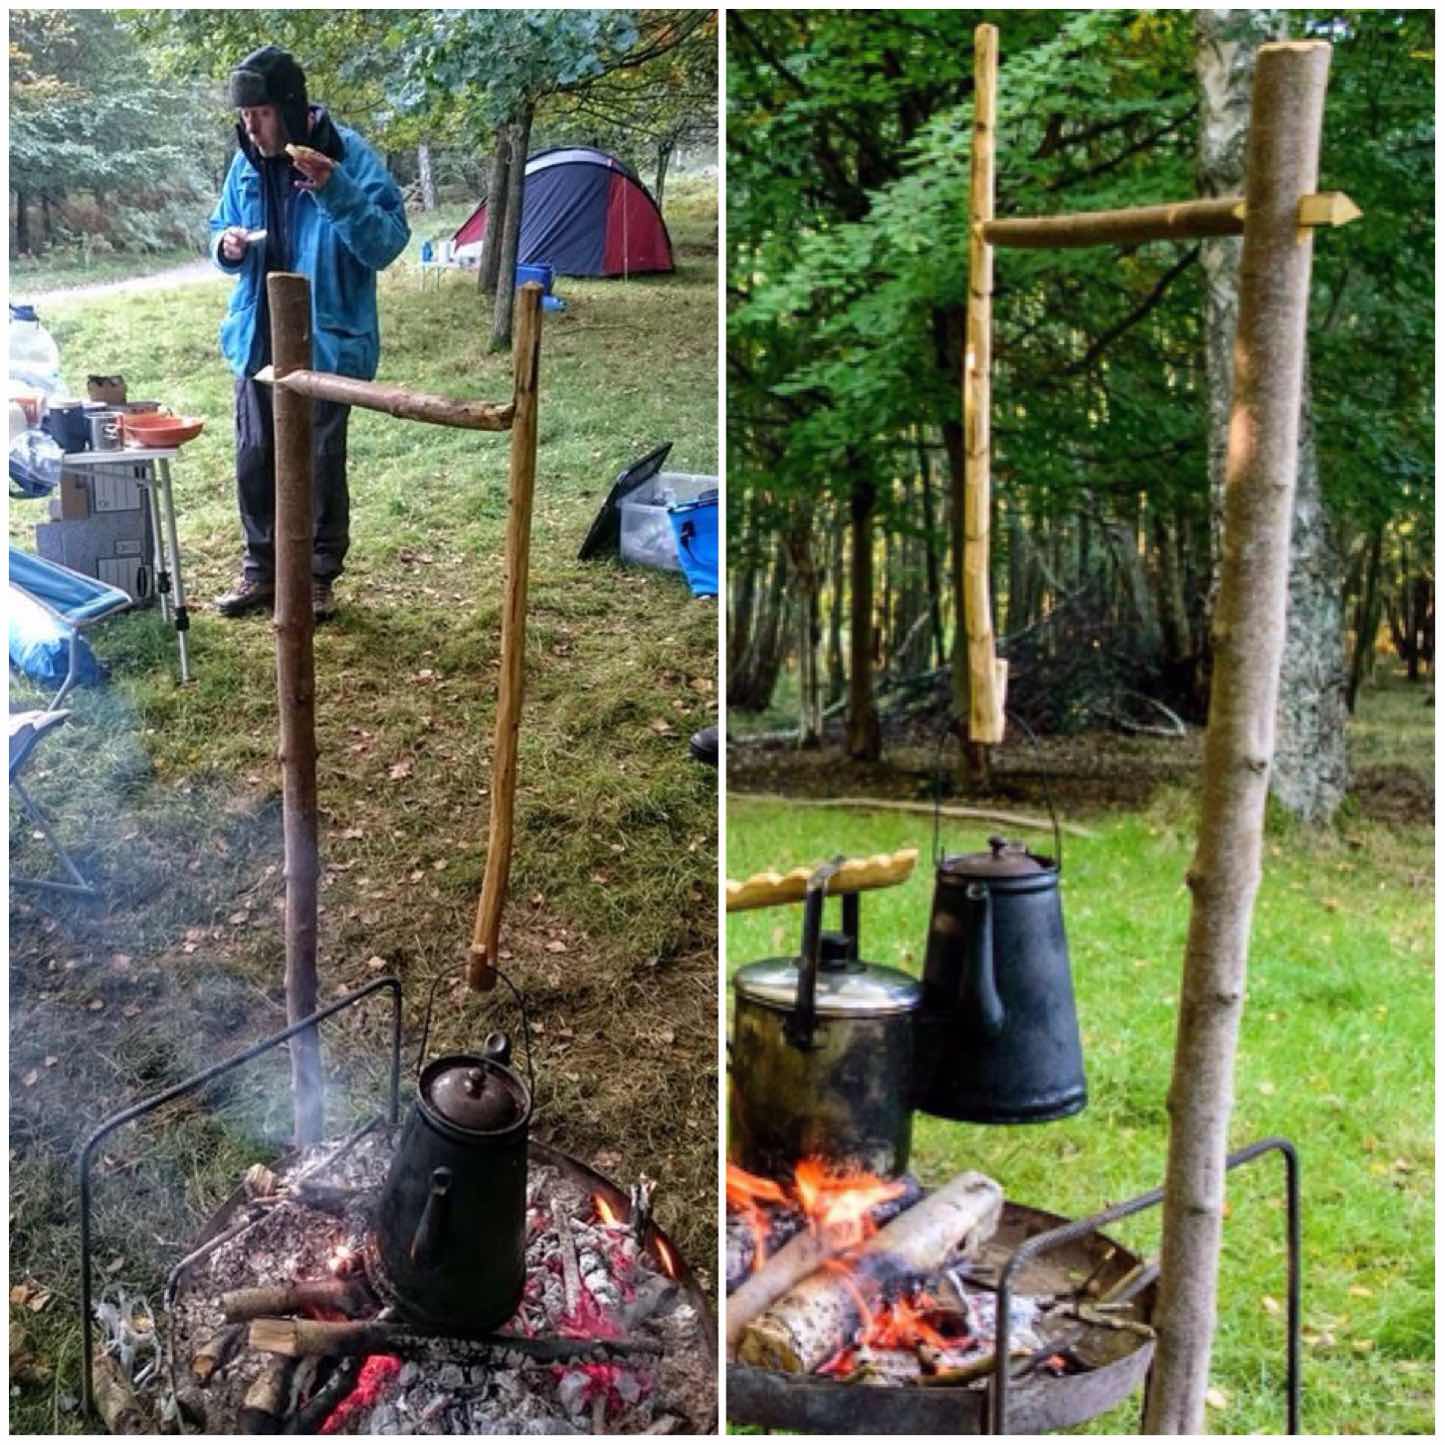
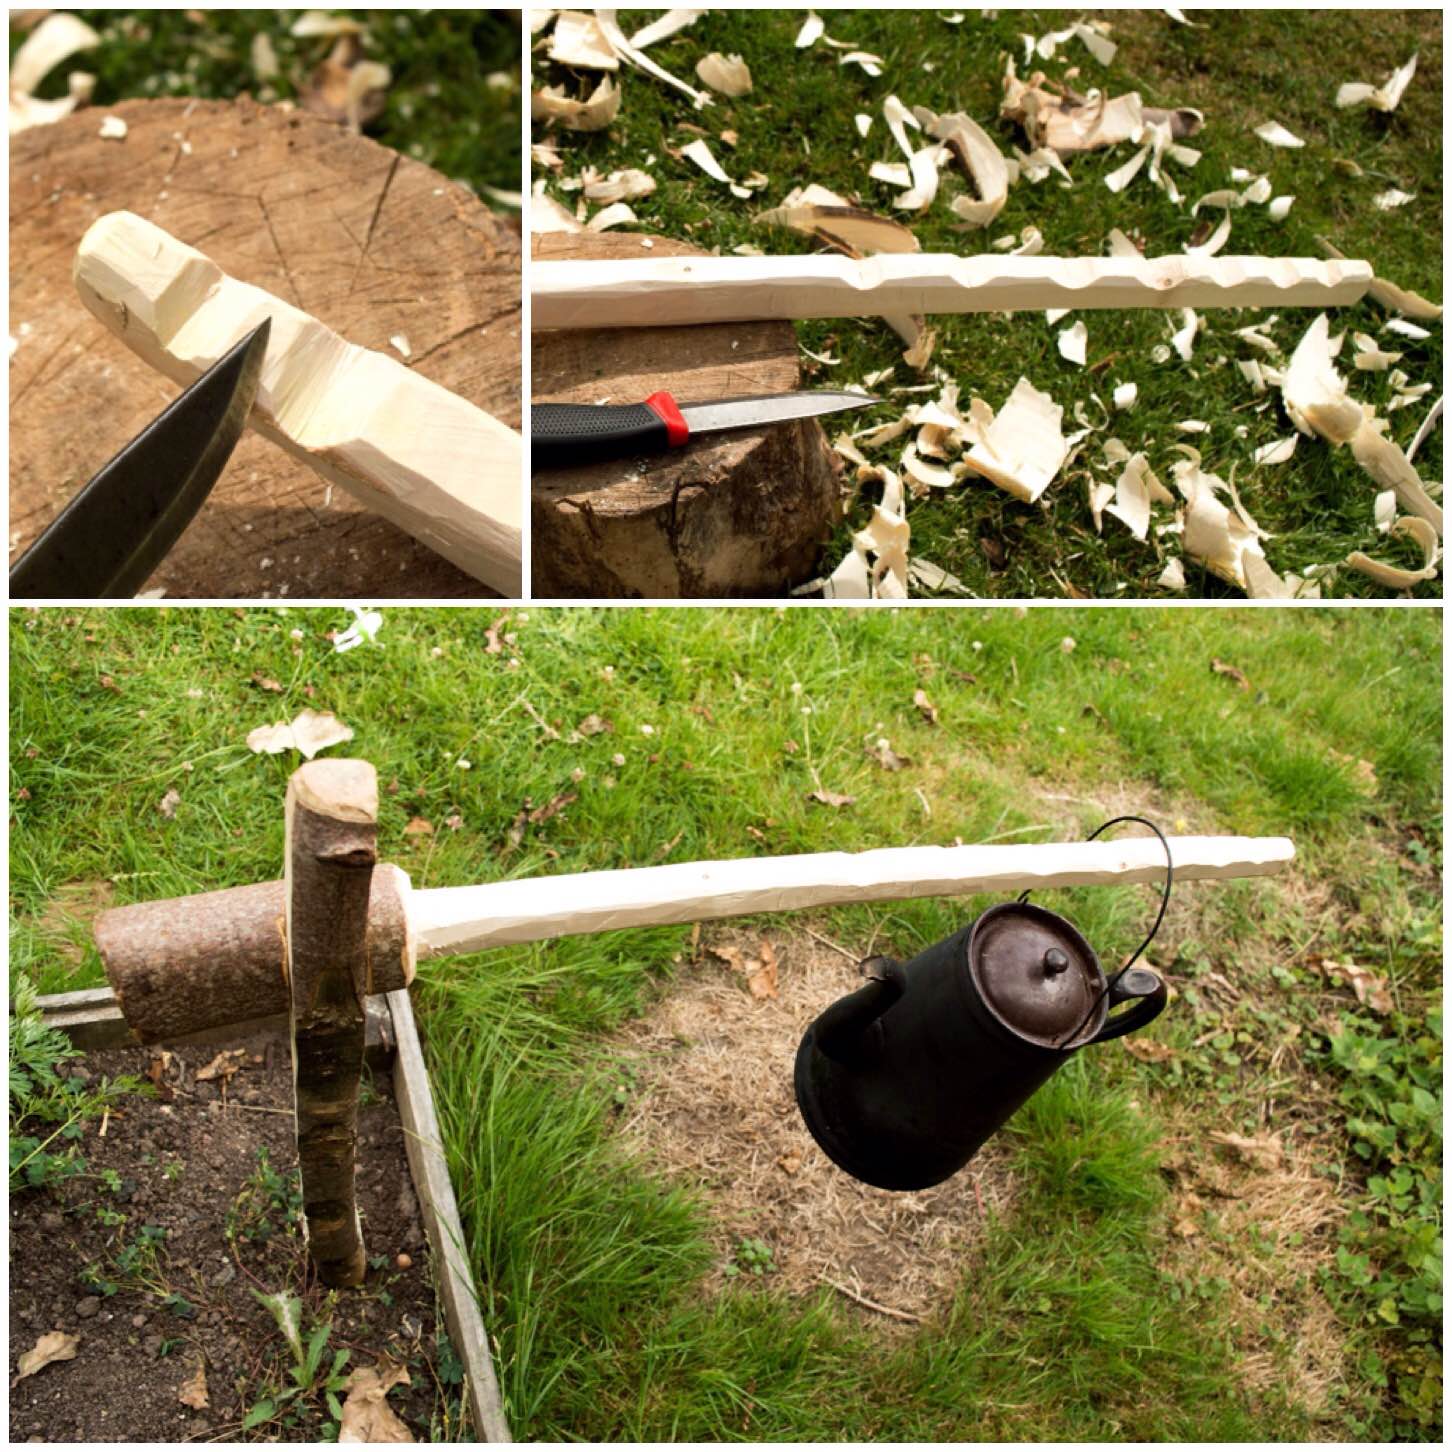
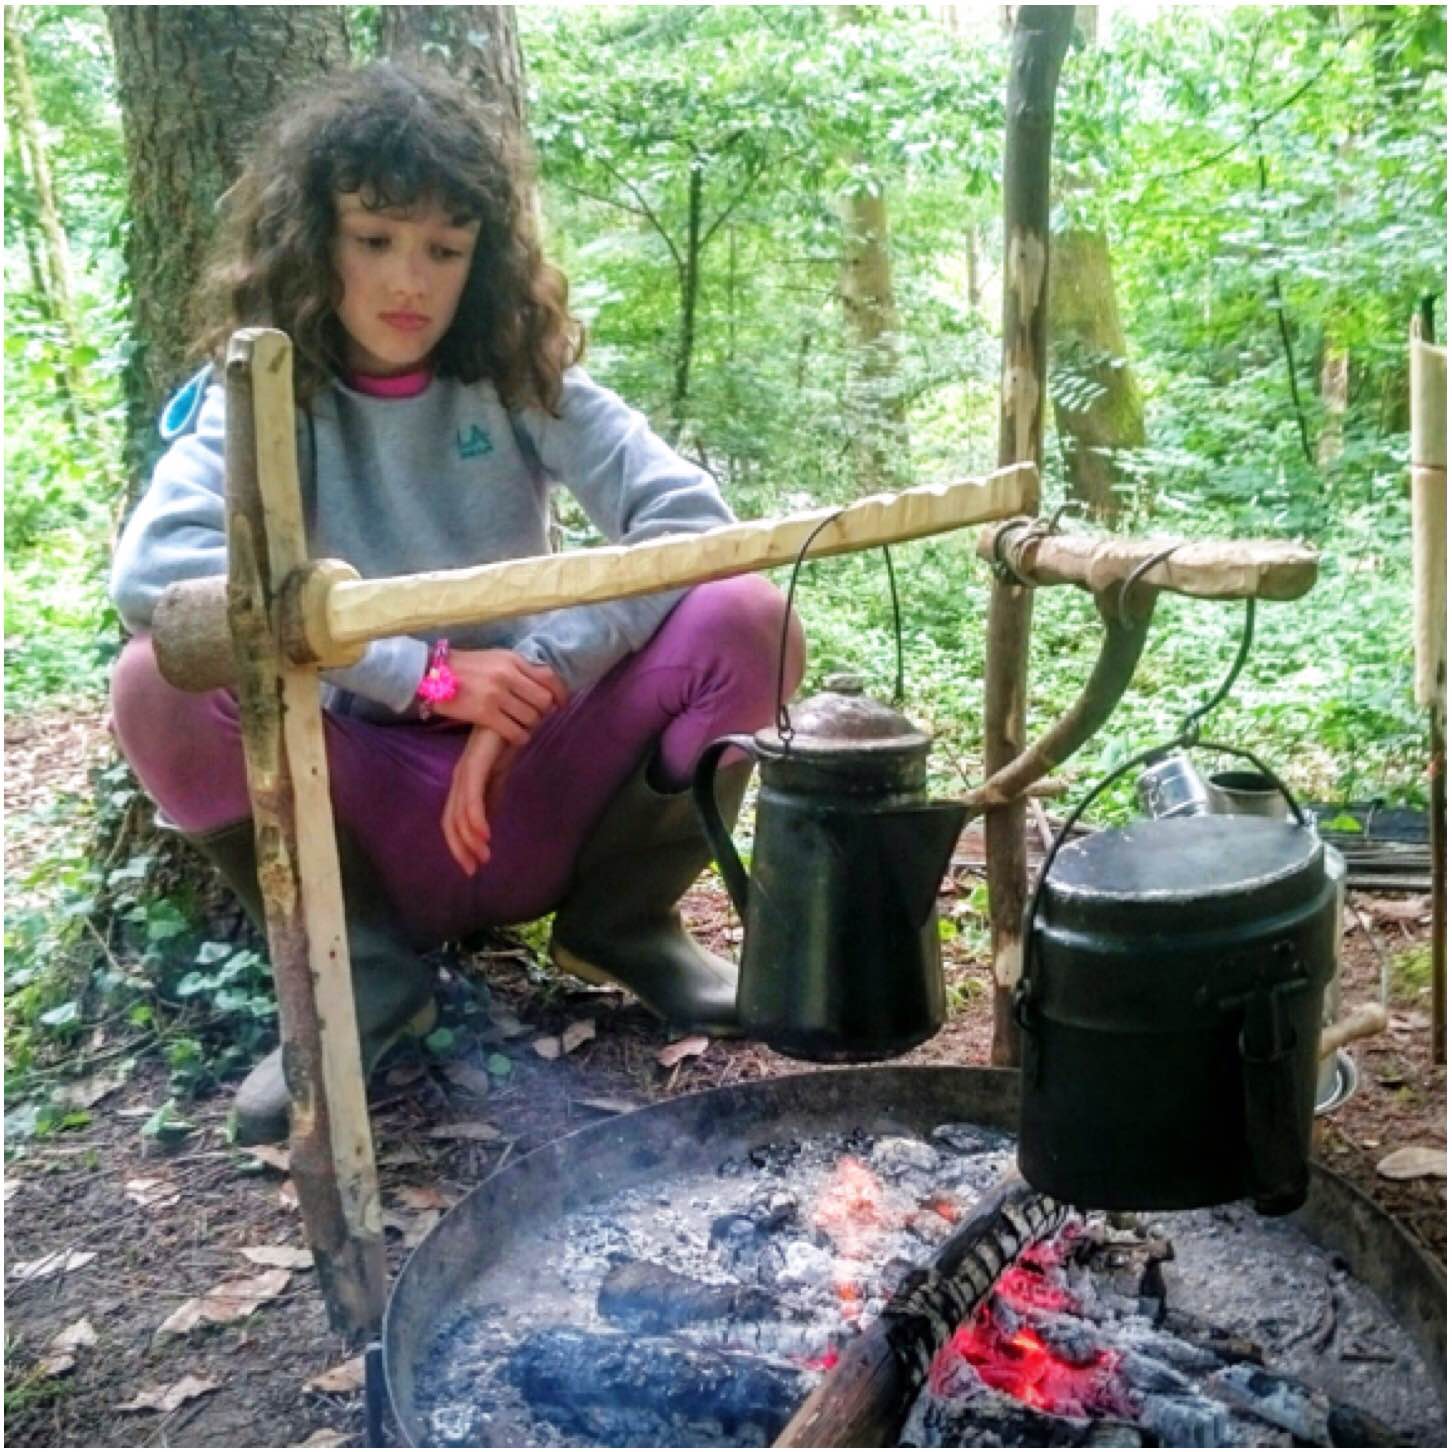
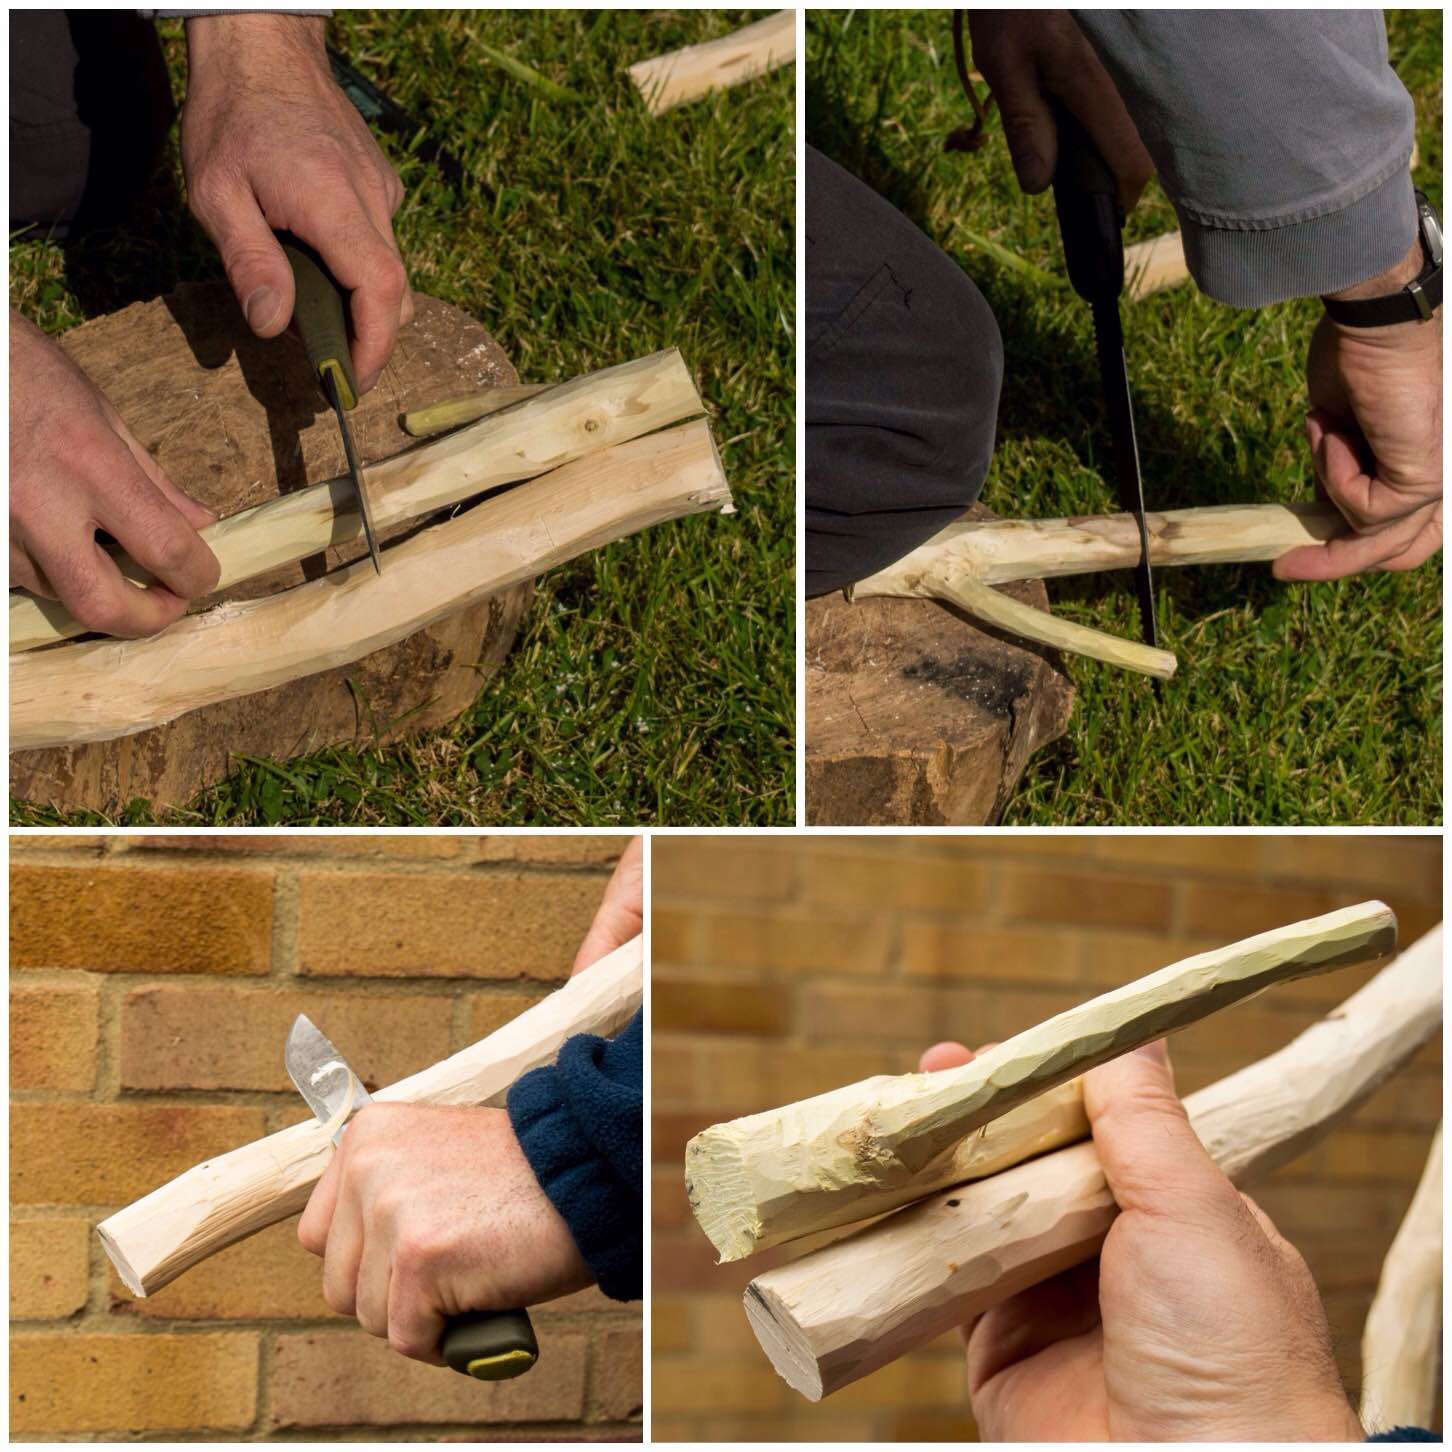
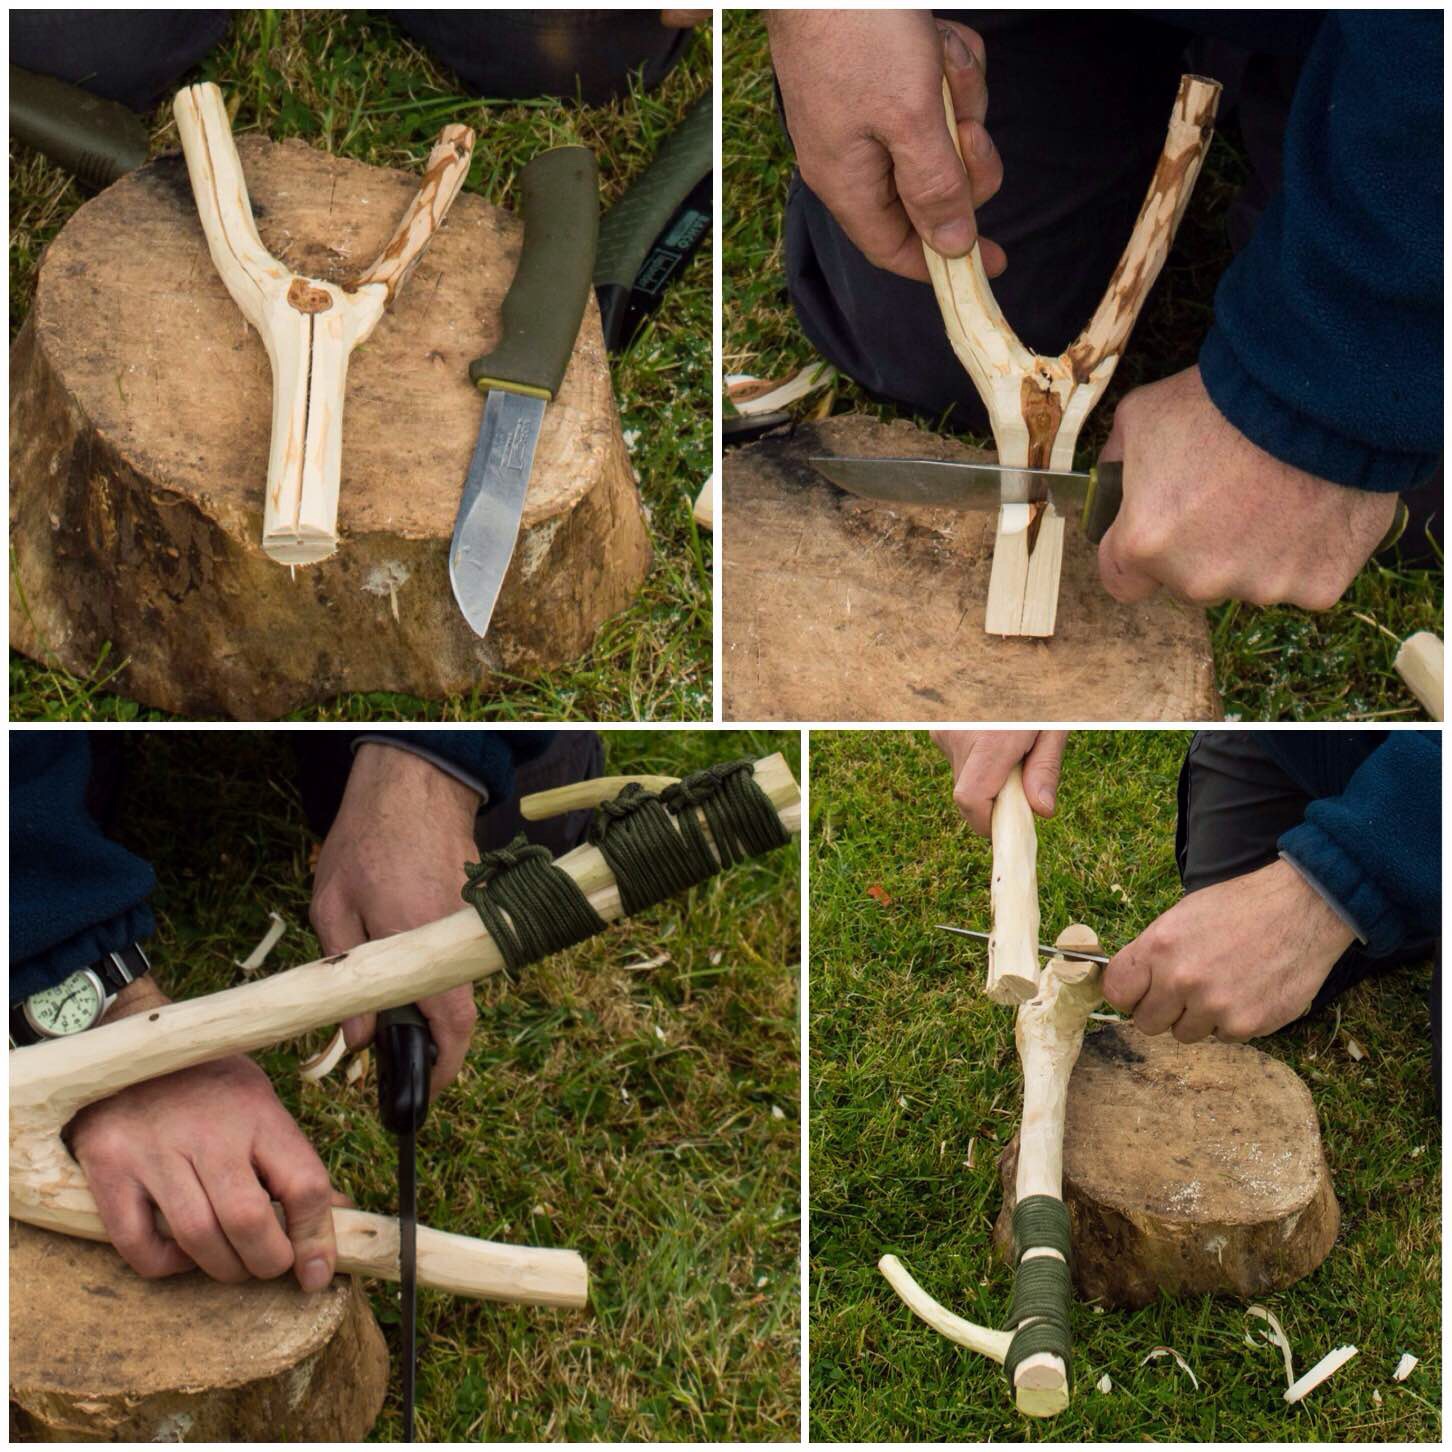
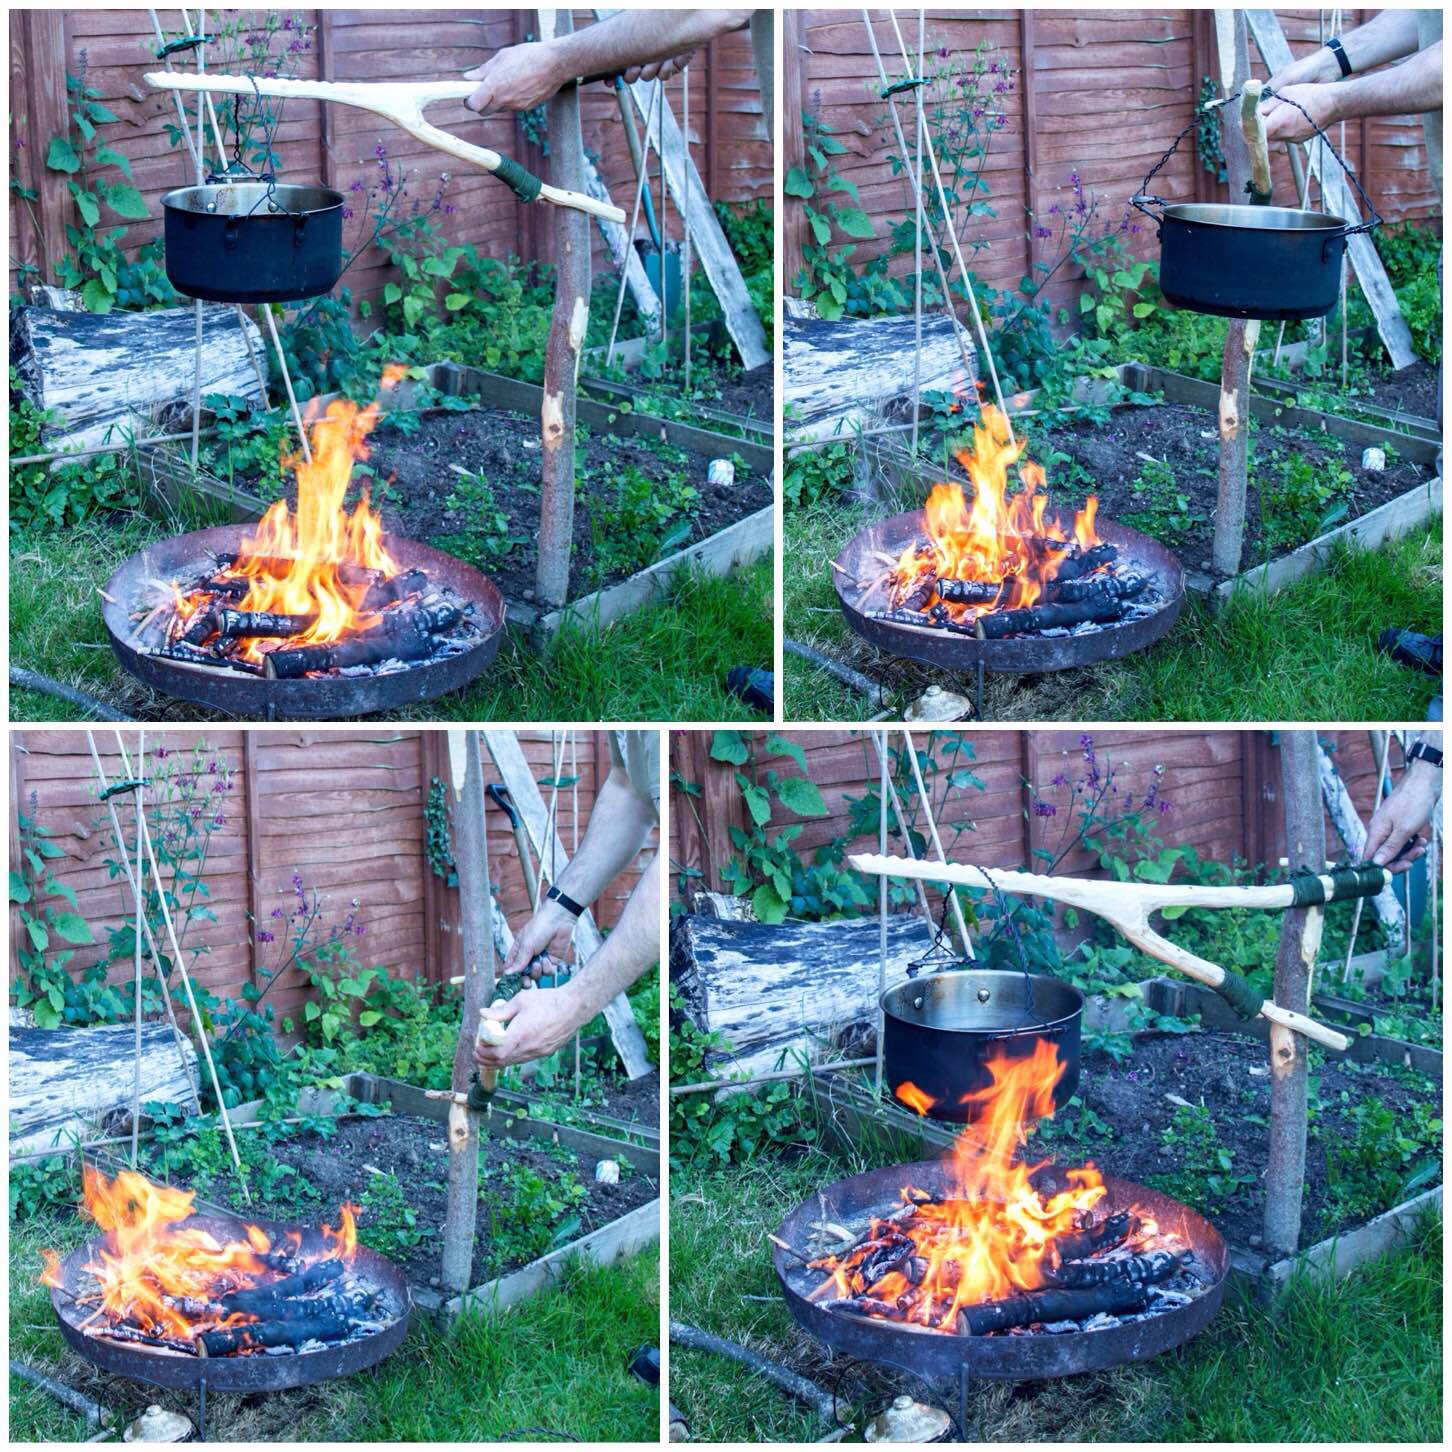
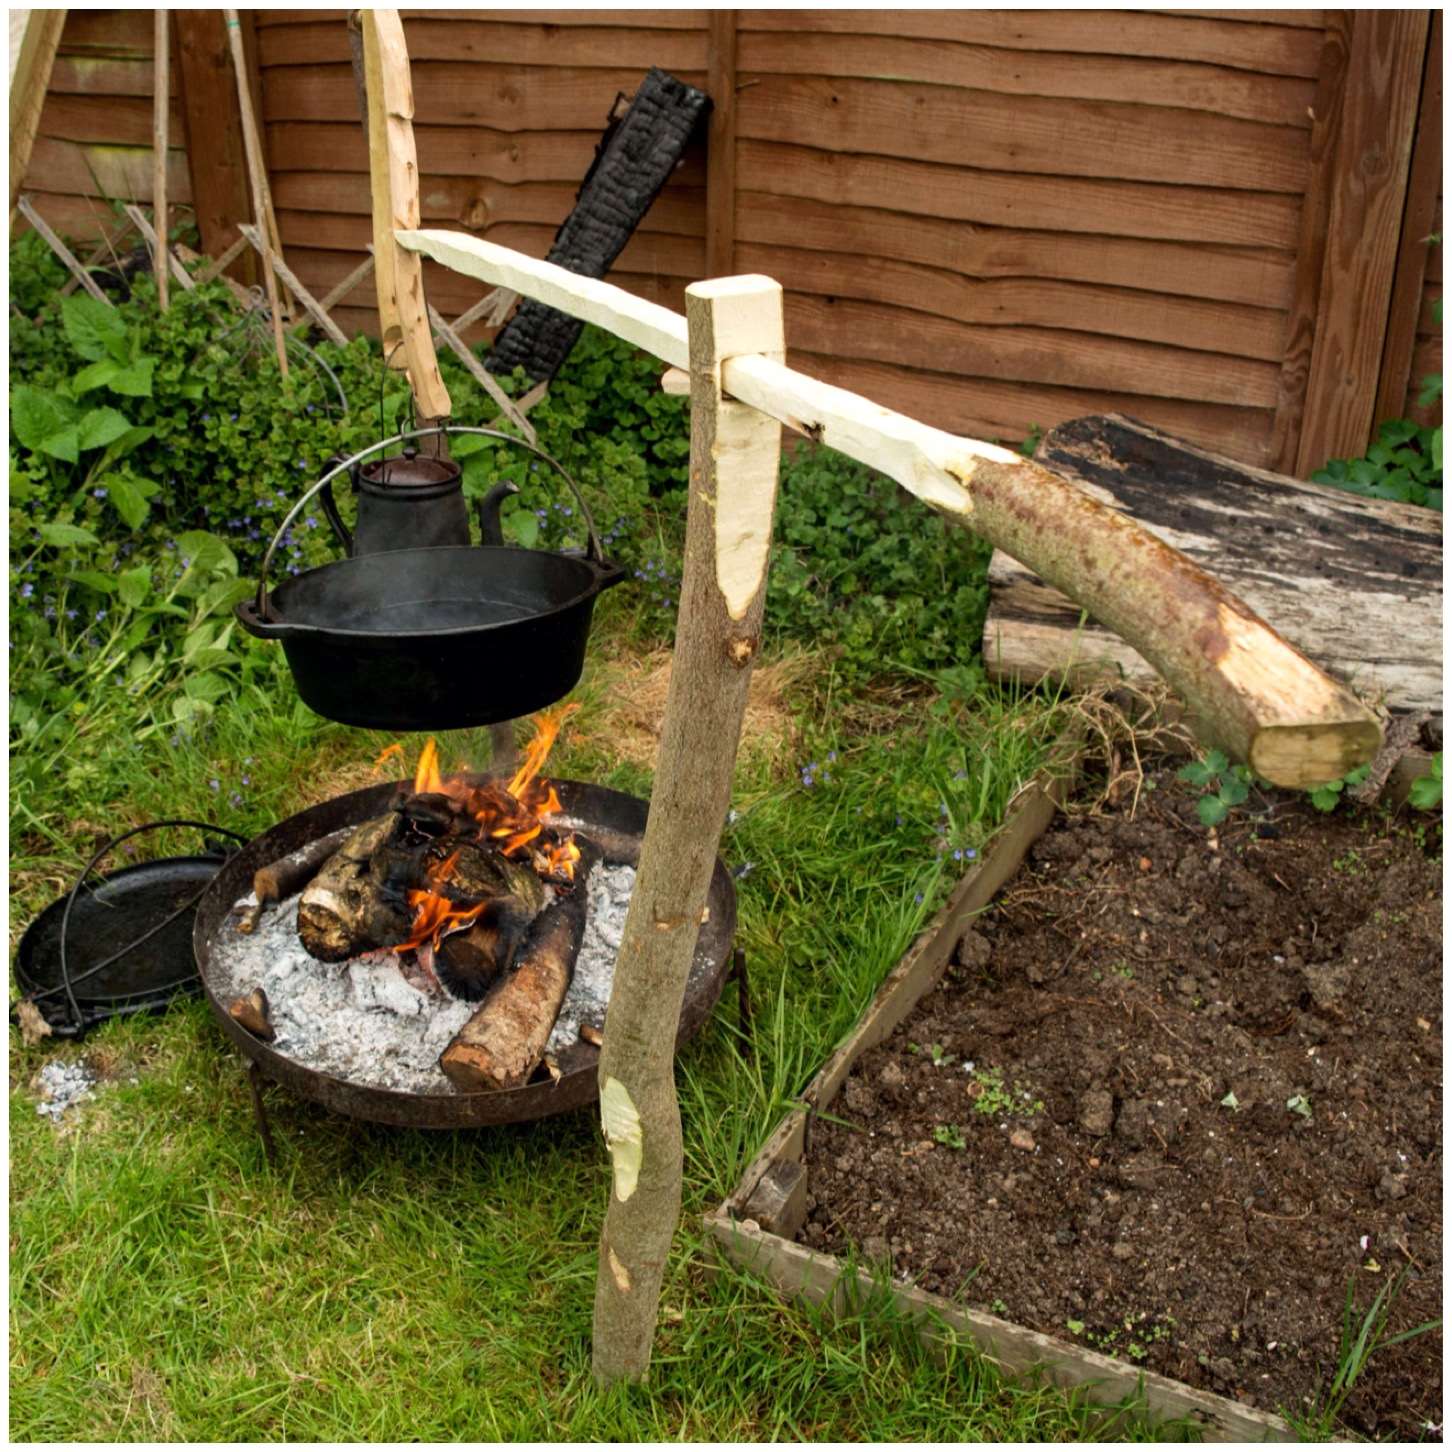
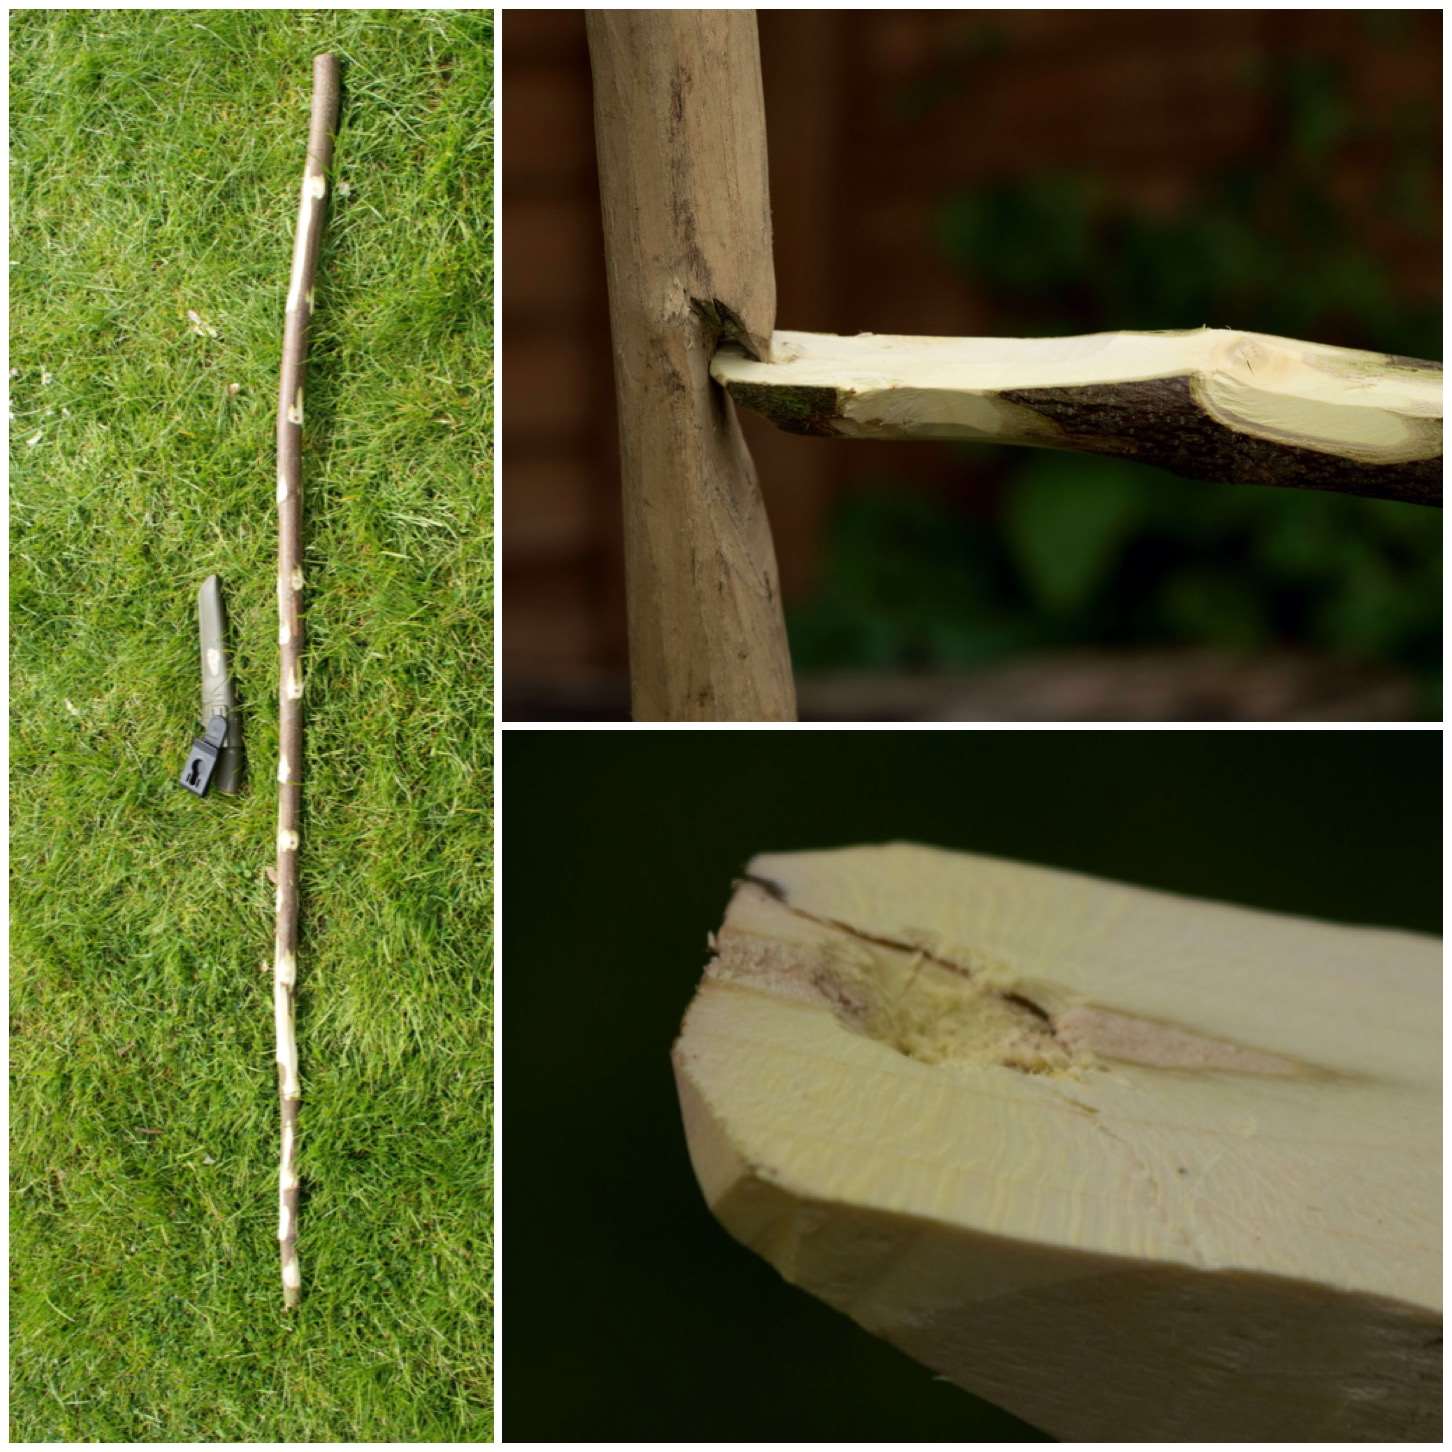
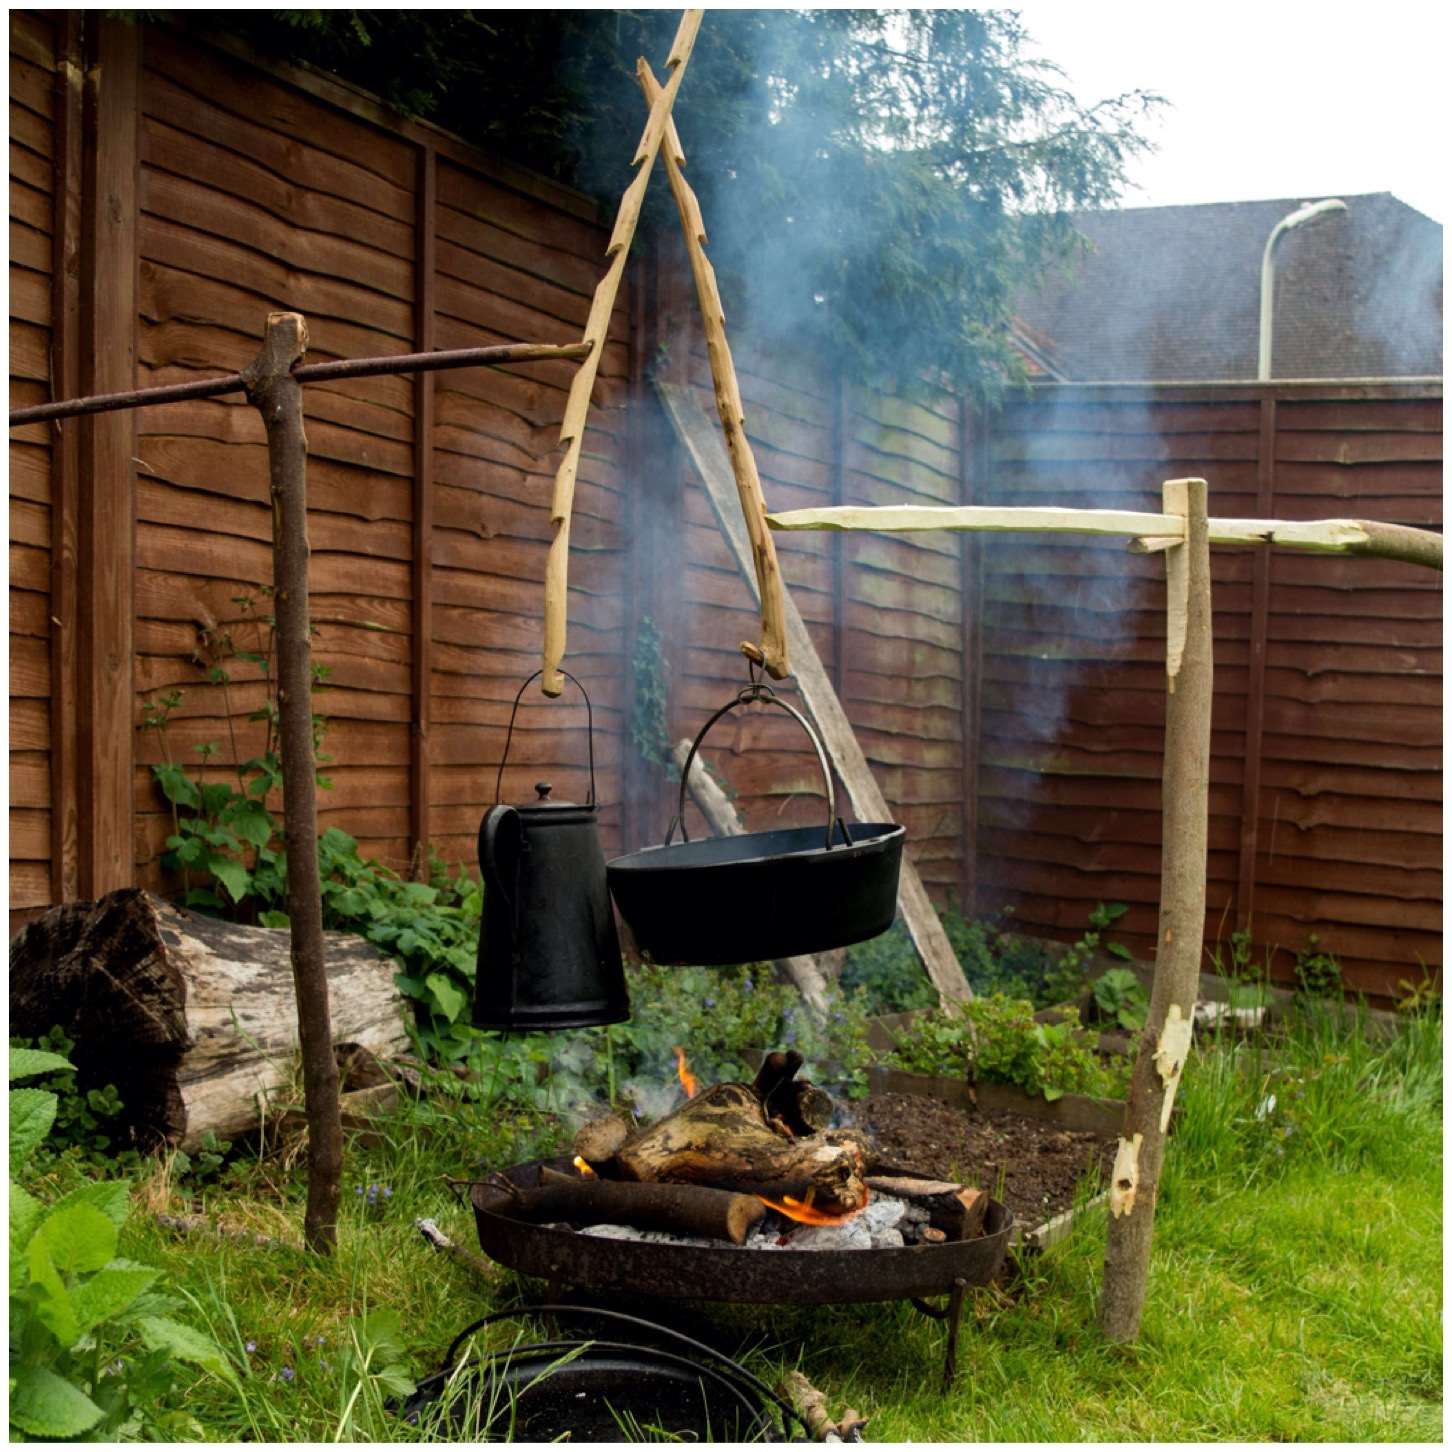
Let me introduce you to what I call the Mortise and Tenon Campfire Crane. This is a crane I made up at the the BCUK Bushmoot this Summer.
The idea came about as usual in a discussion around the fire with my good friends Charlie Brookes and Ian Woodham.
As you can see the arm of the crane can be set high or low (and ranges in between) and if set up correctly the upright can be easily rotated to swing your pot away from the fire.
Mortise and Tenon Crane
I would classify this one as more Pioneering than my usual constructions as it relies on some string to work. It is one for the long term camp however if you were on an overnighter with a couple of hours spare it would make a good project for an evening.
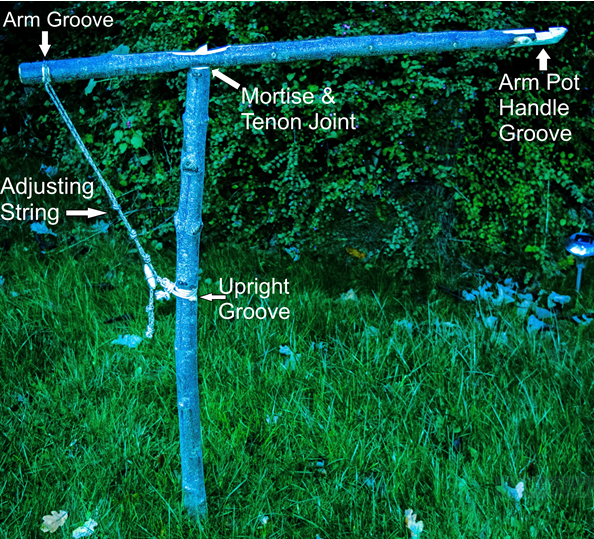
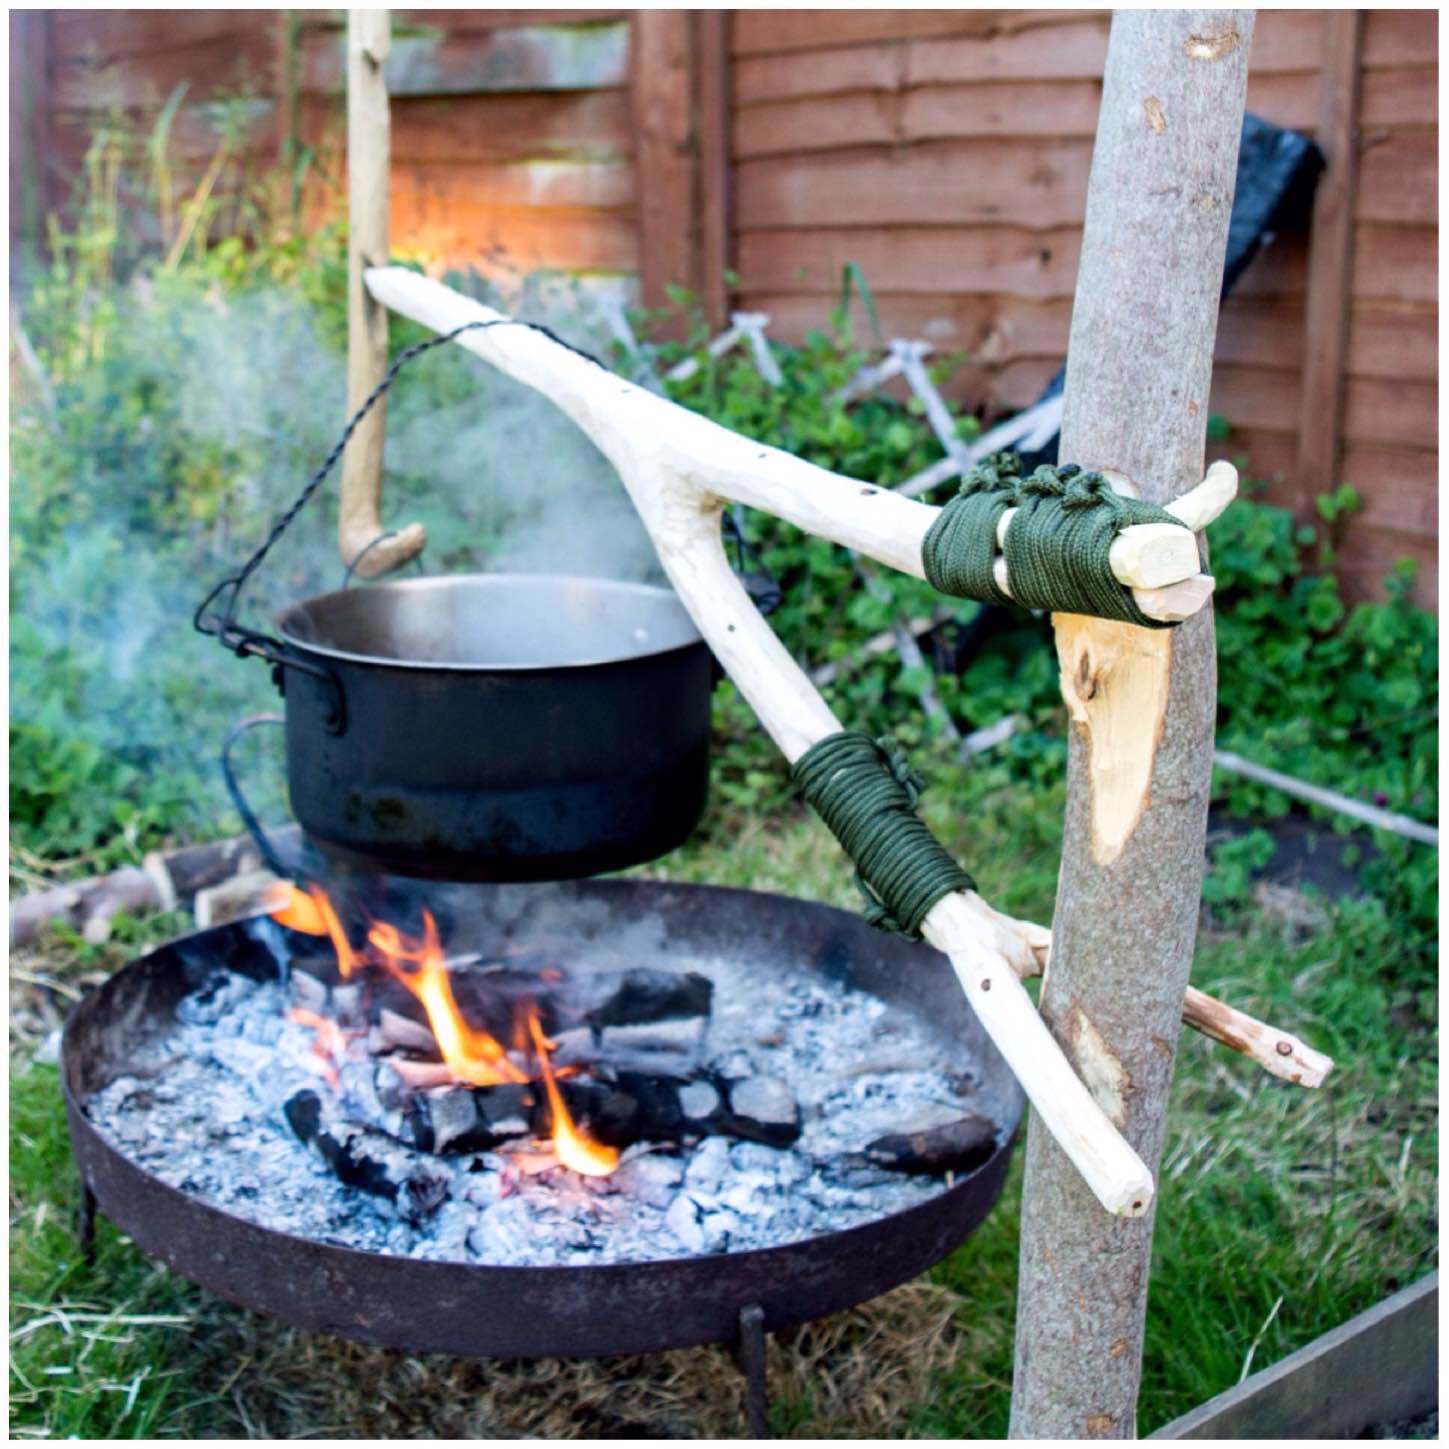
I will be describing the construction of the crane as I go through the post however I thought it would be helpful to have a completed picture of the crane marked up with the relevant work areas for you. Please refer back to this overview at any stage.
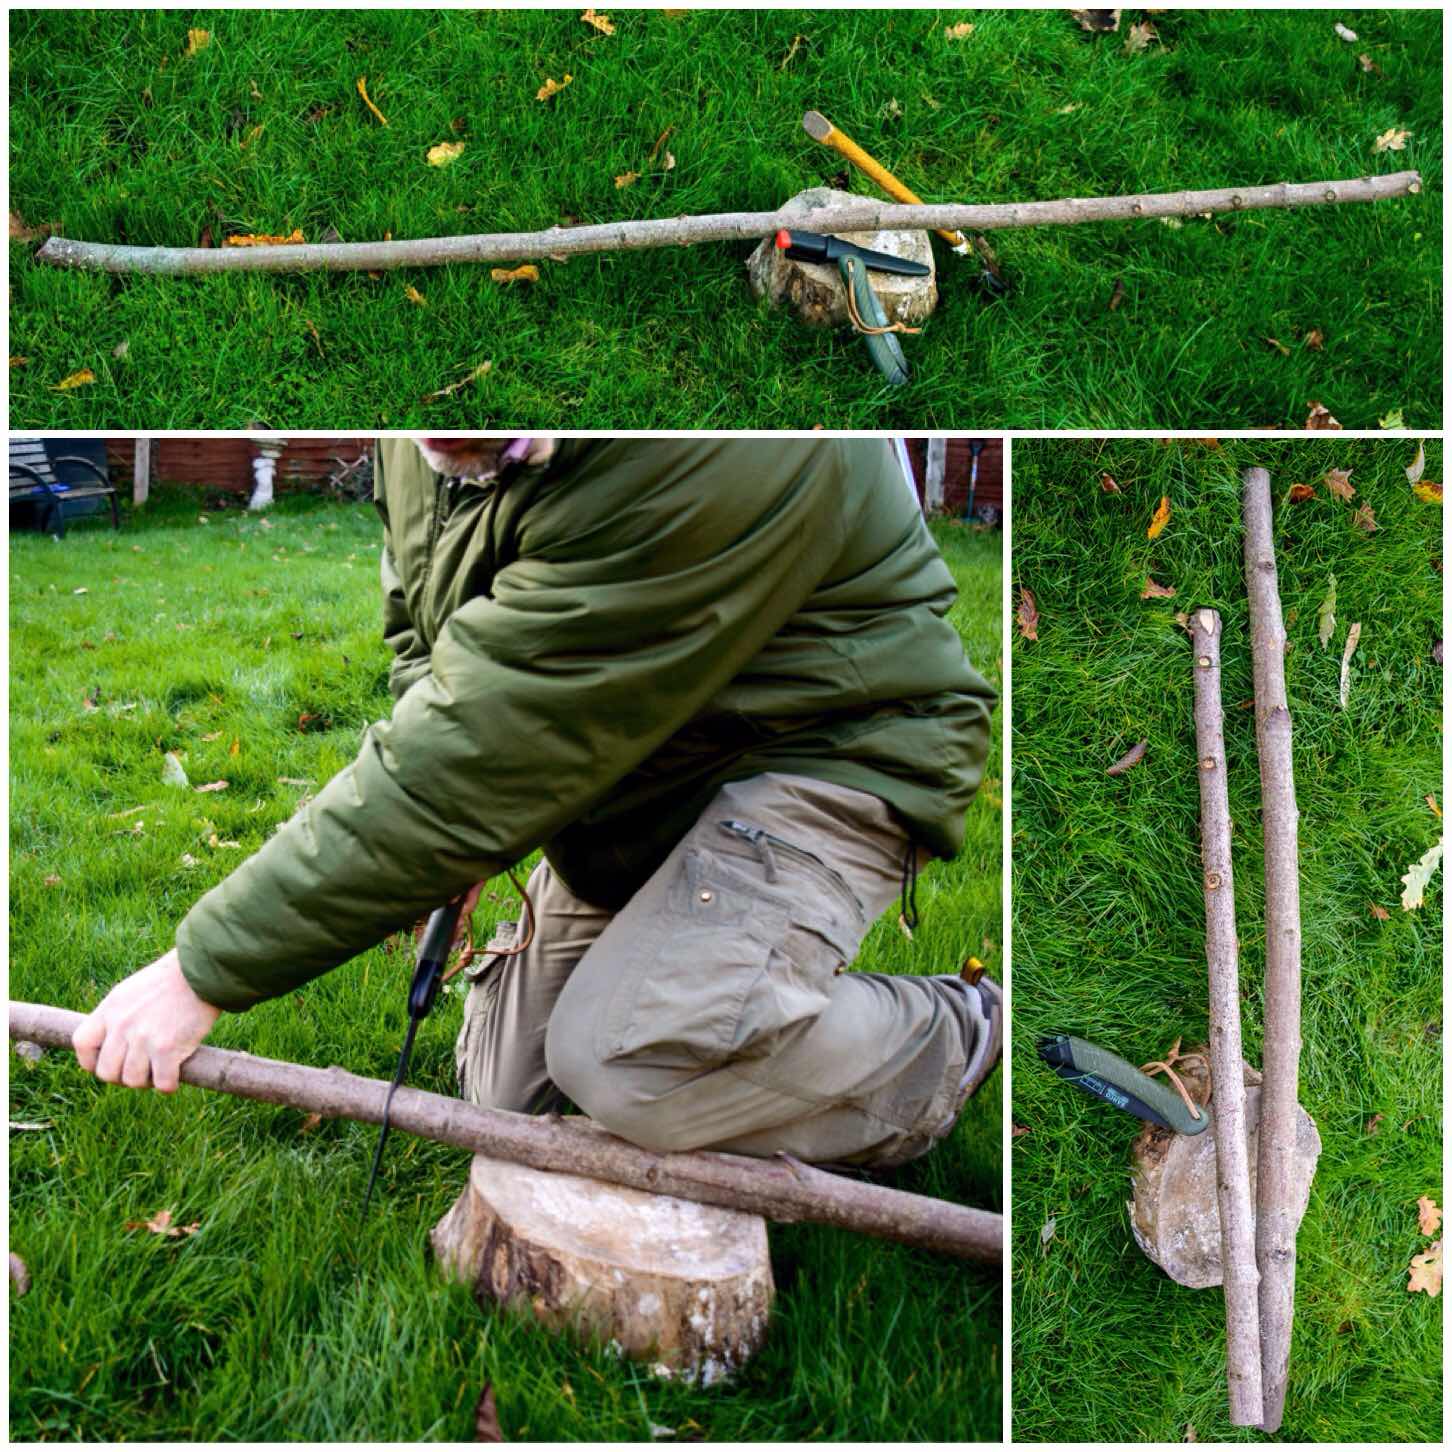
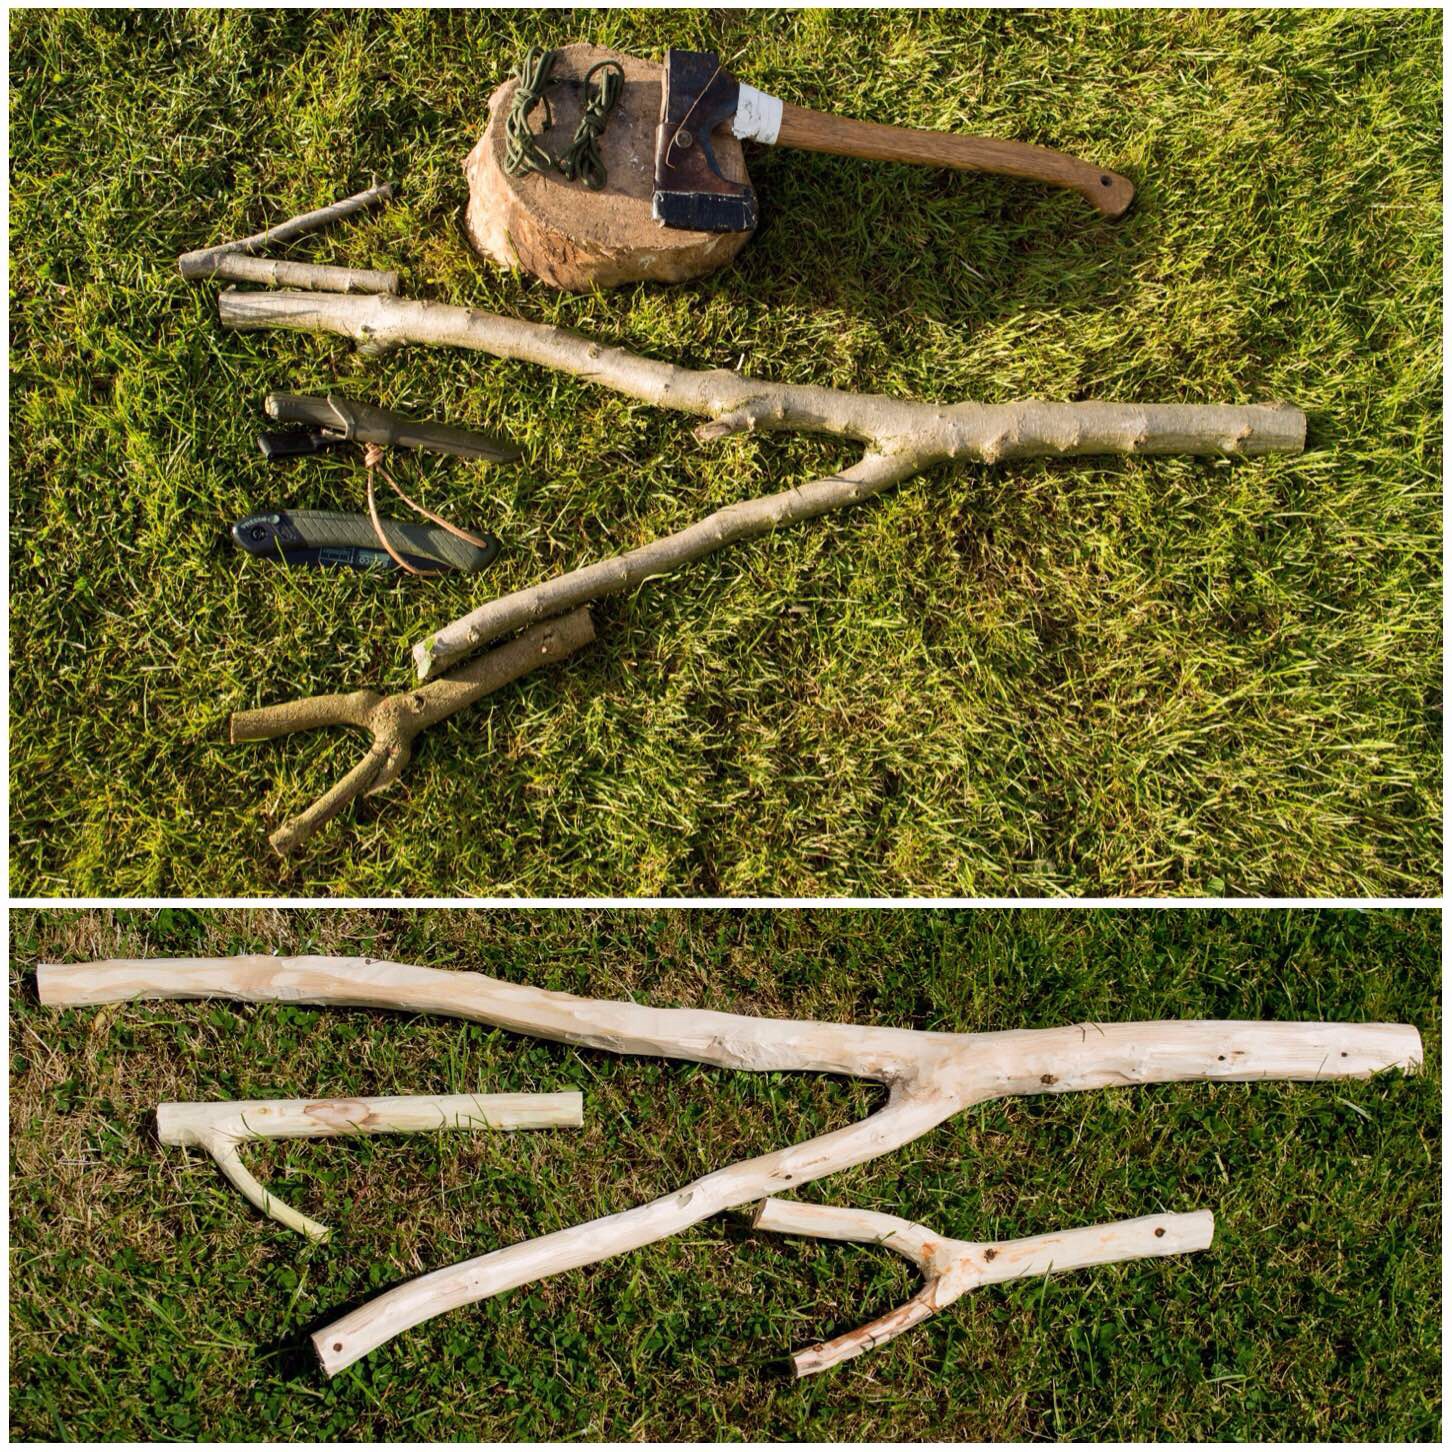
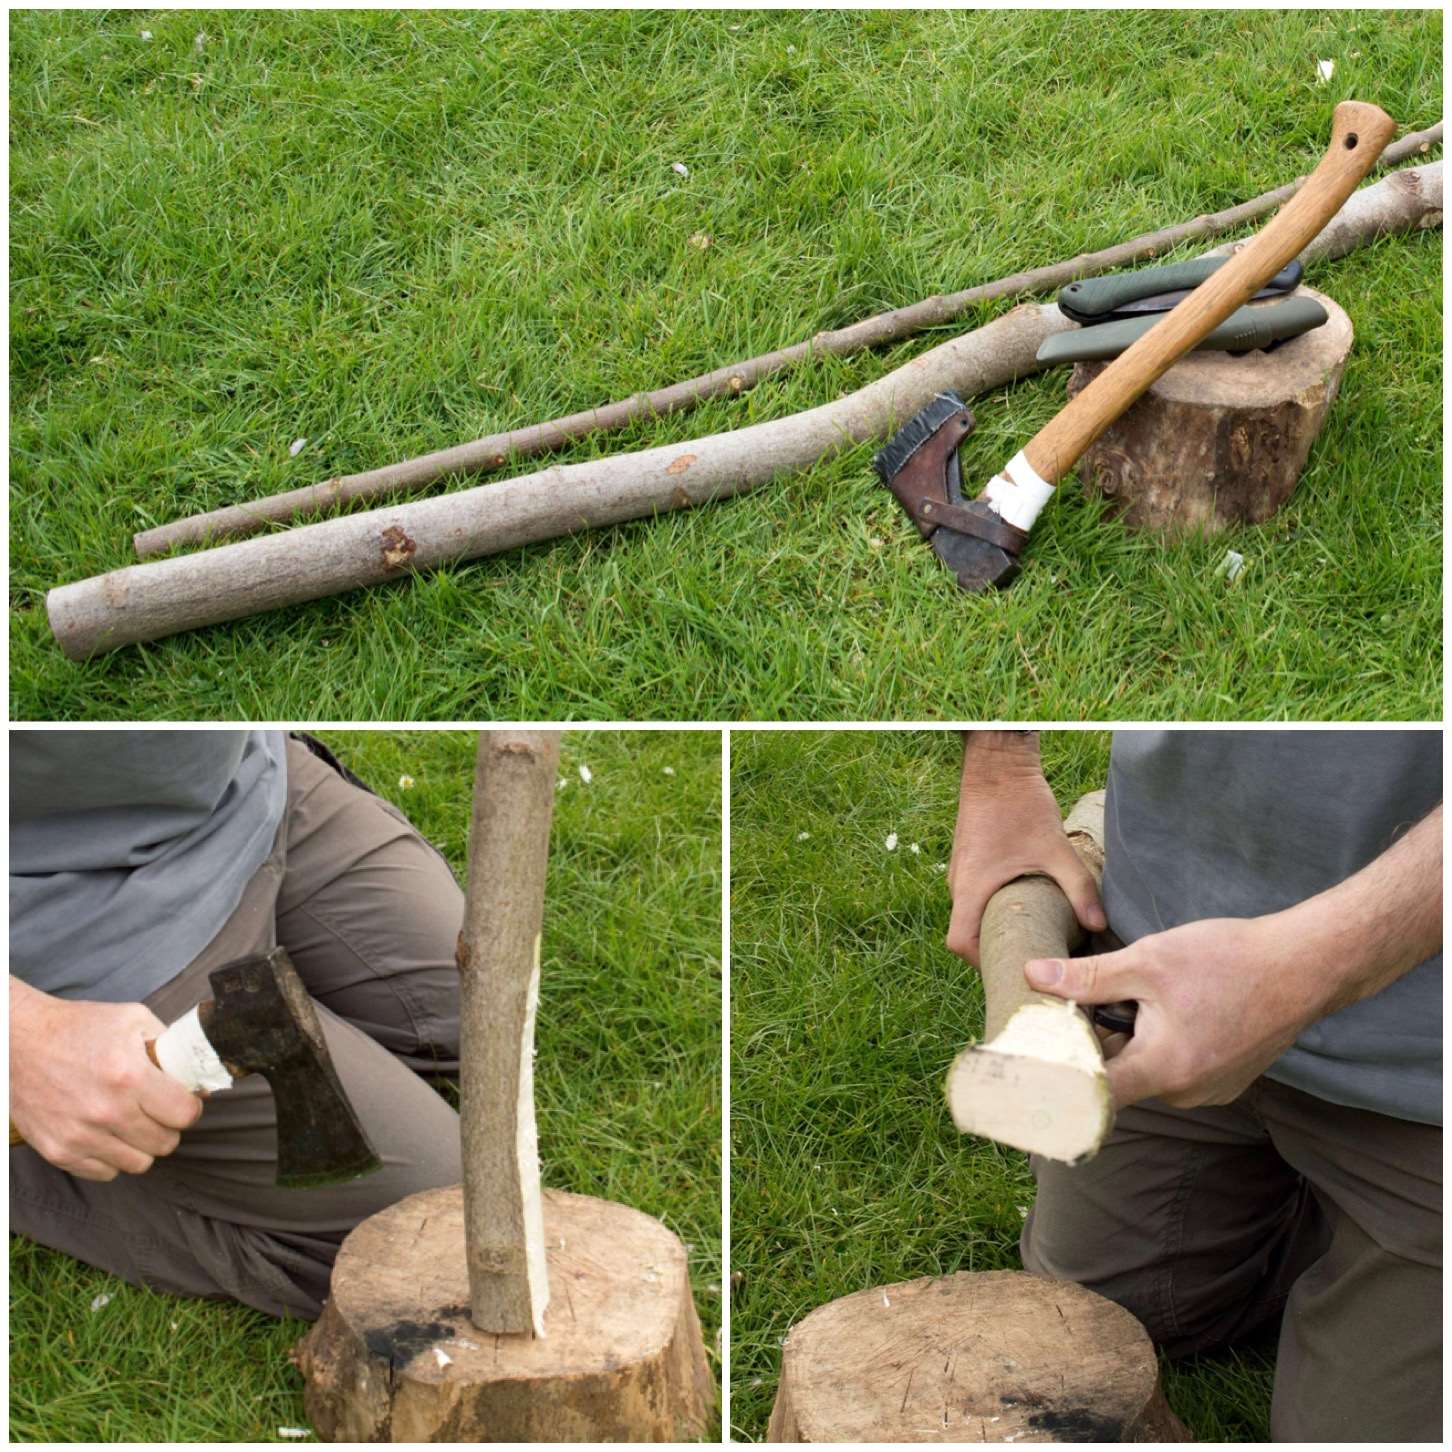
My tools for the job included my knife, a small saw and and axe but you may find having a pen or pencil to hand will be useful.
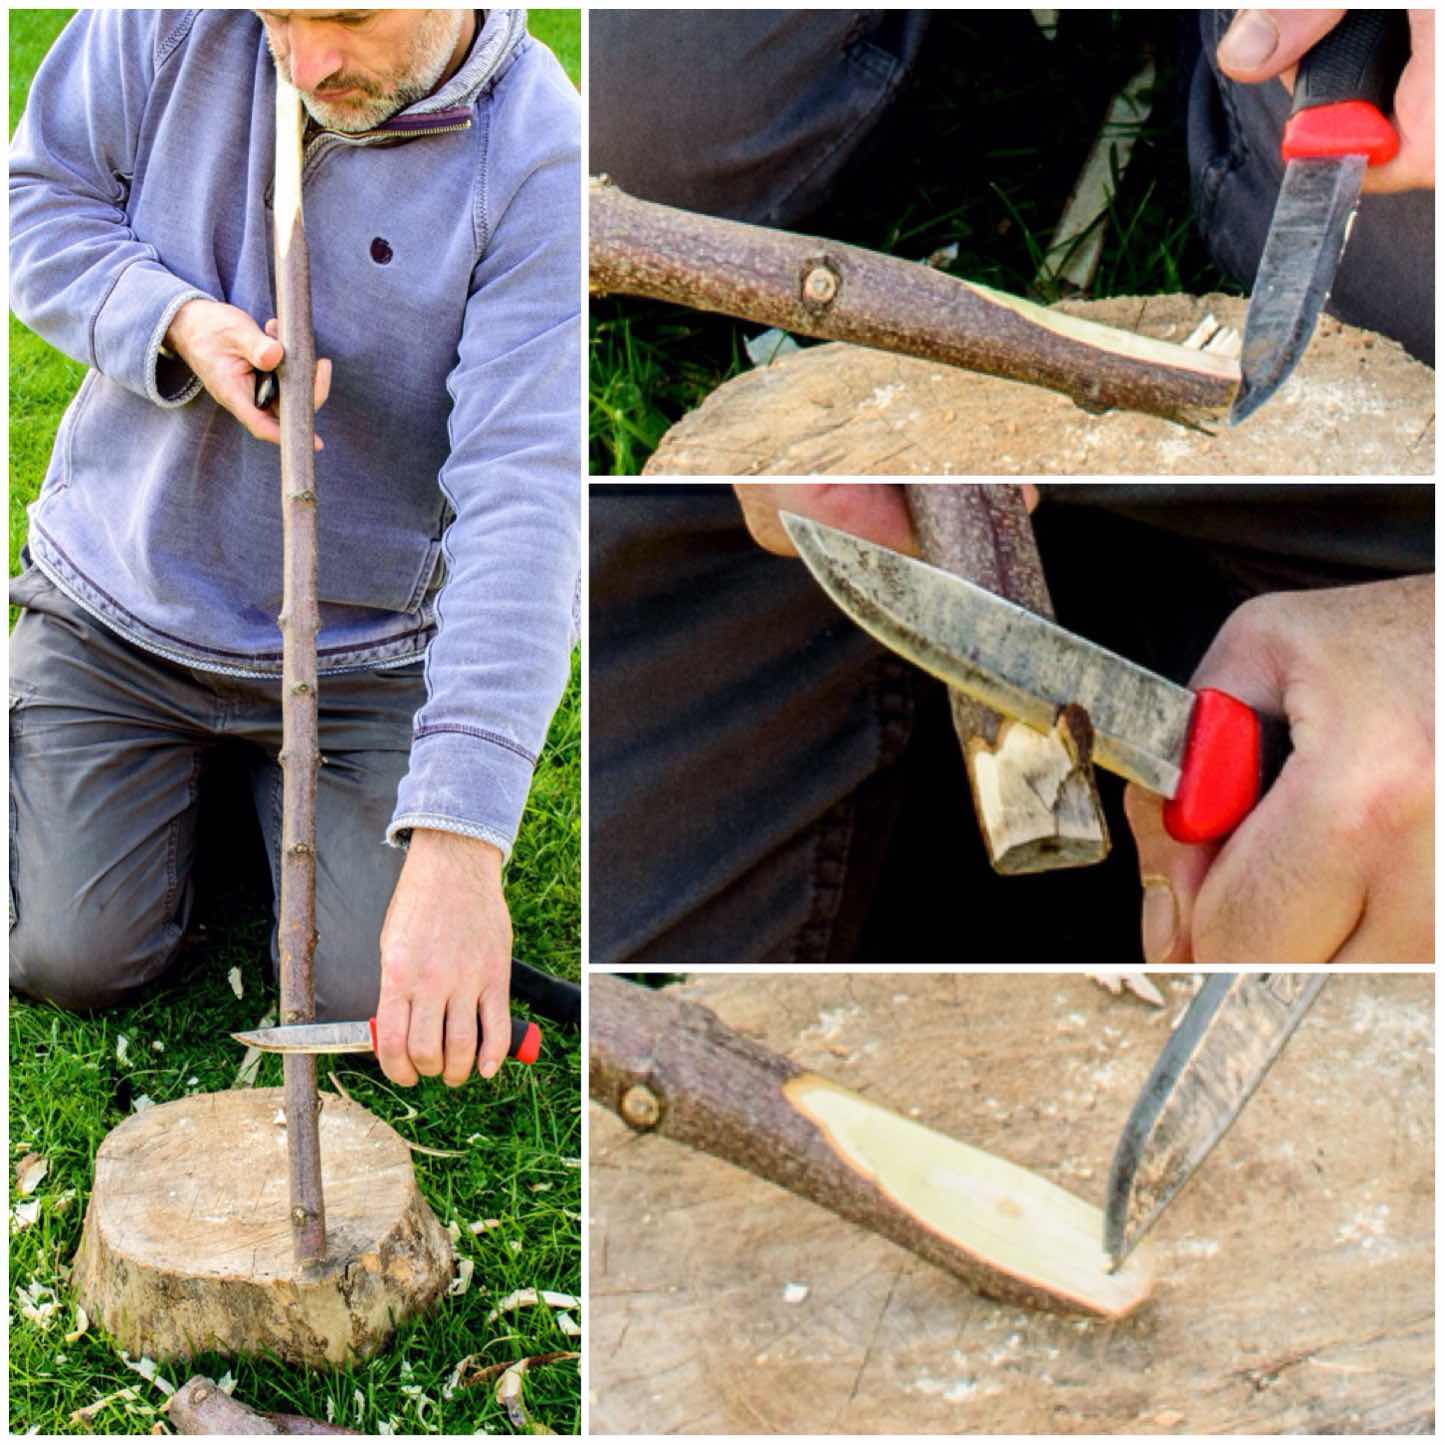
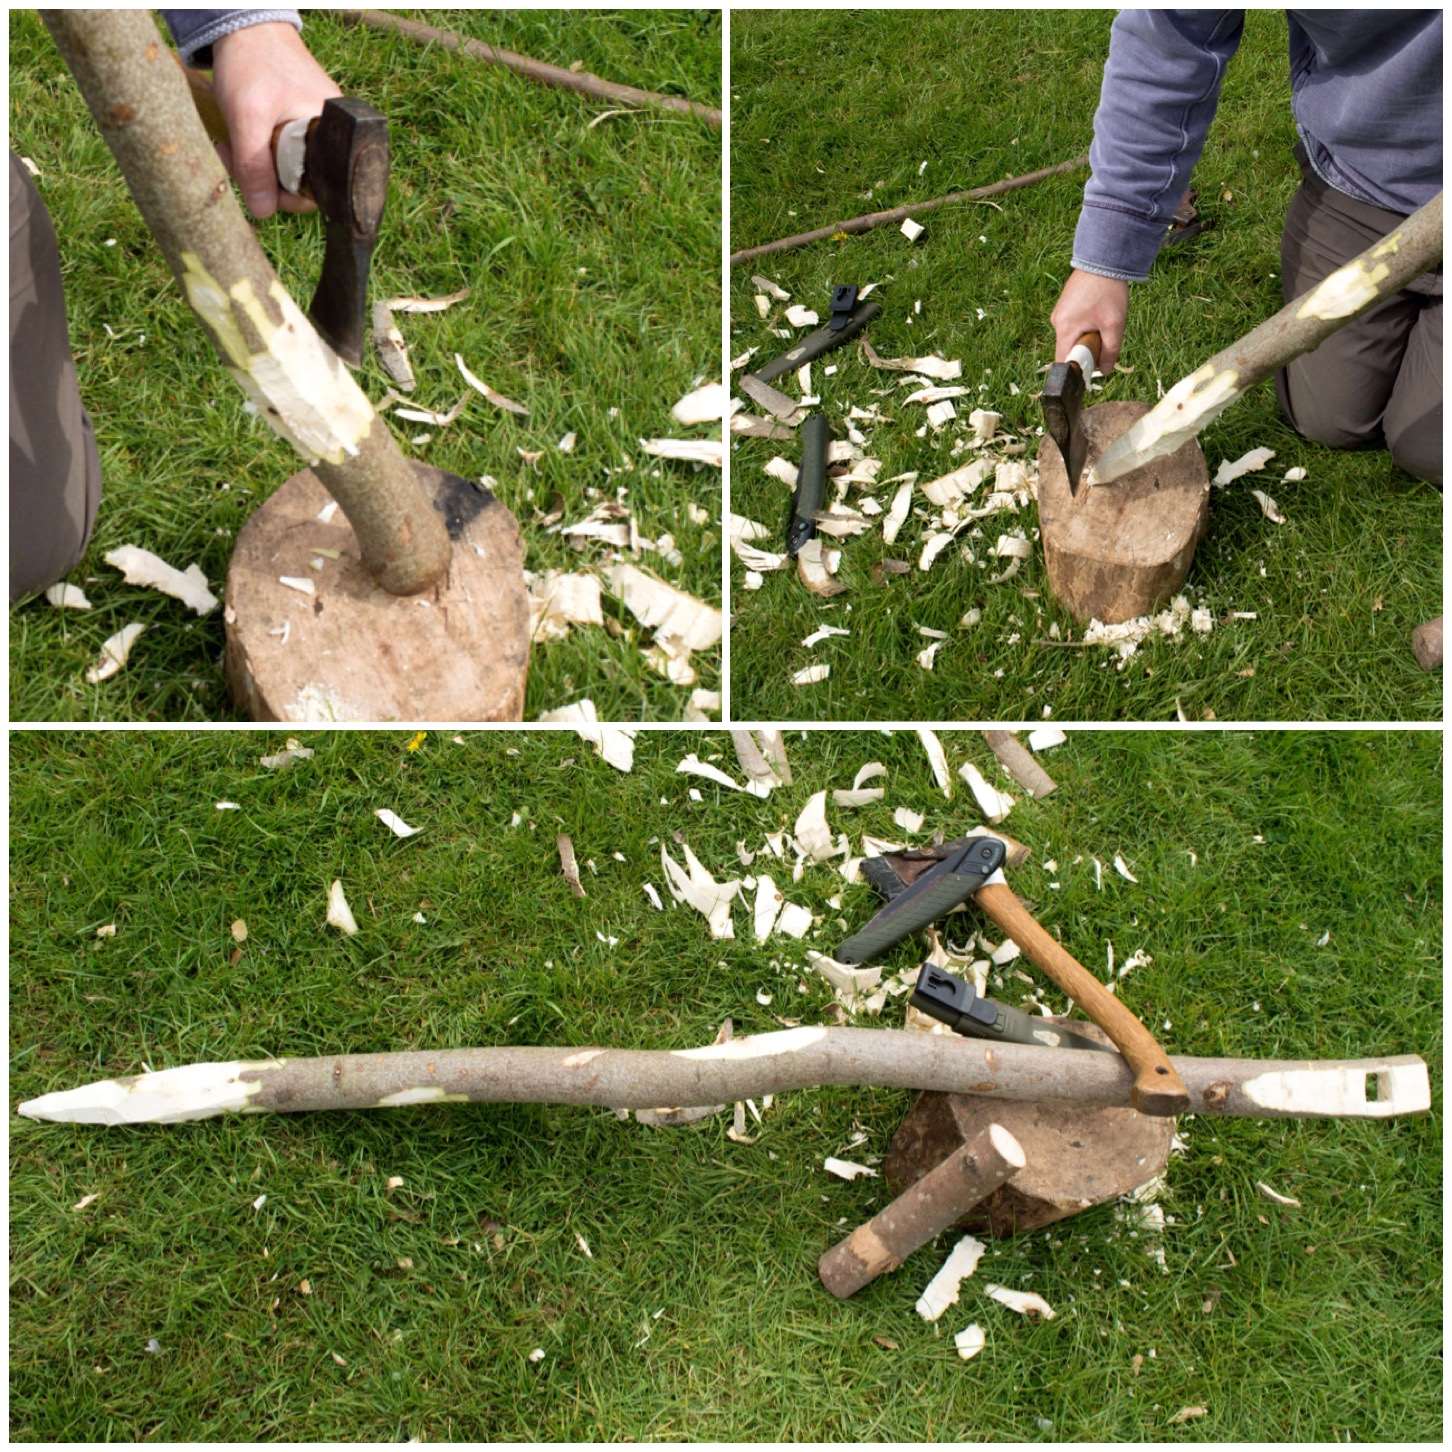
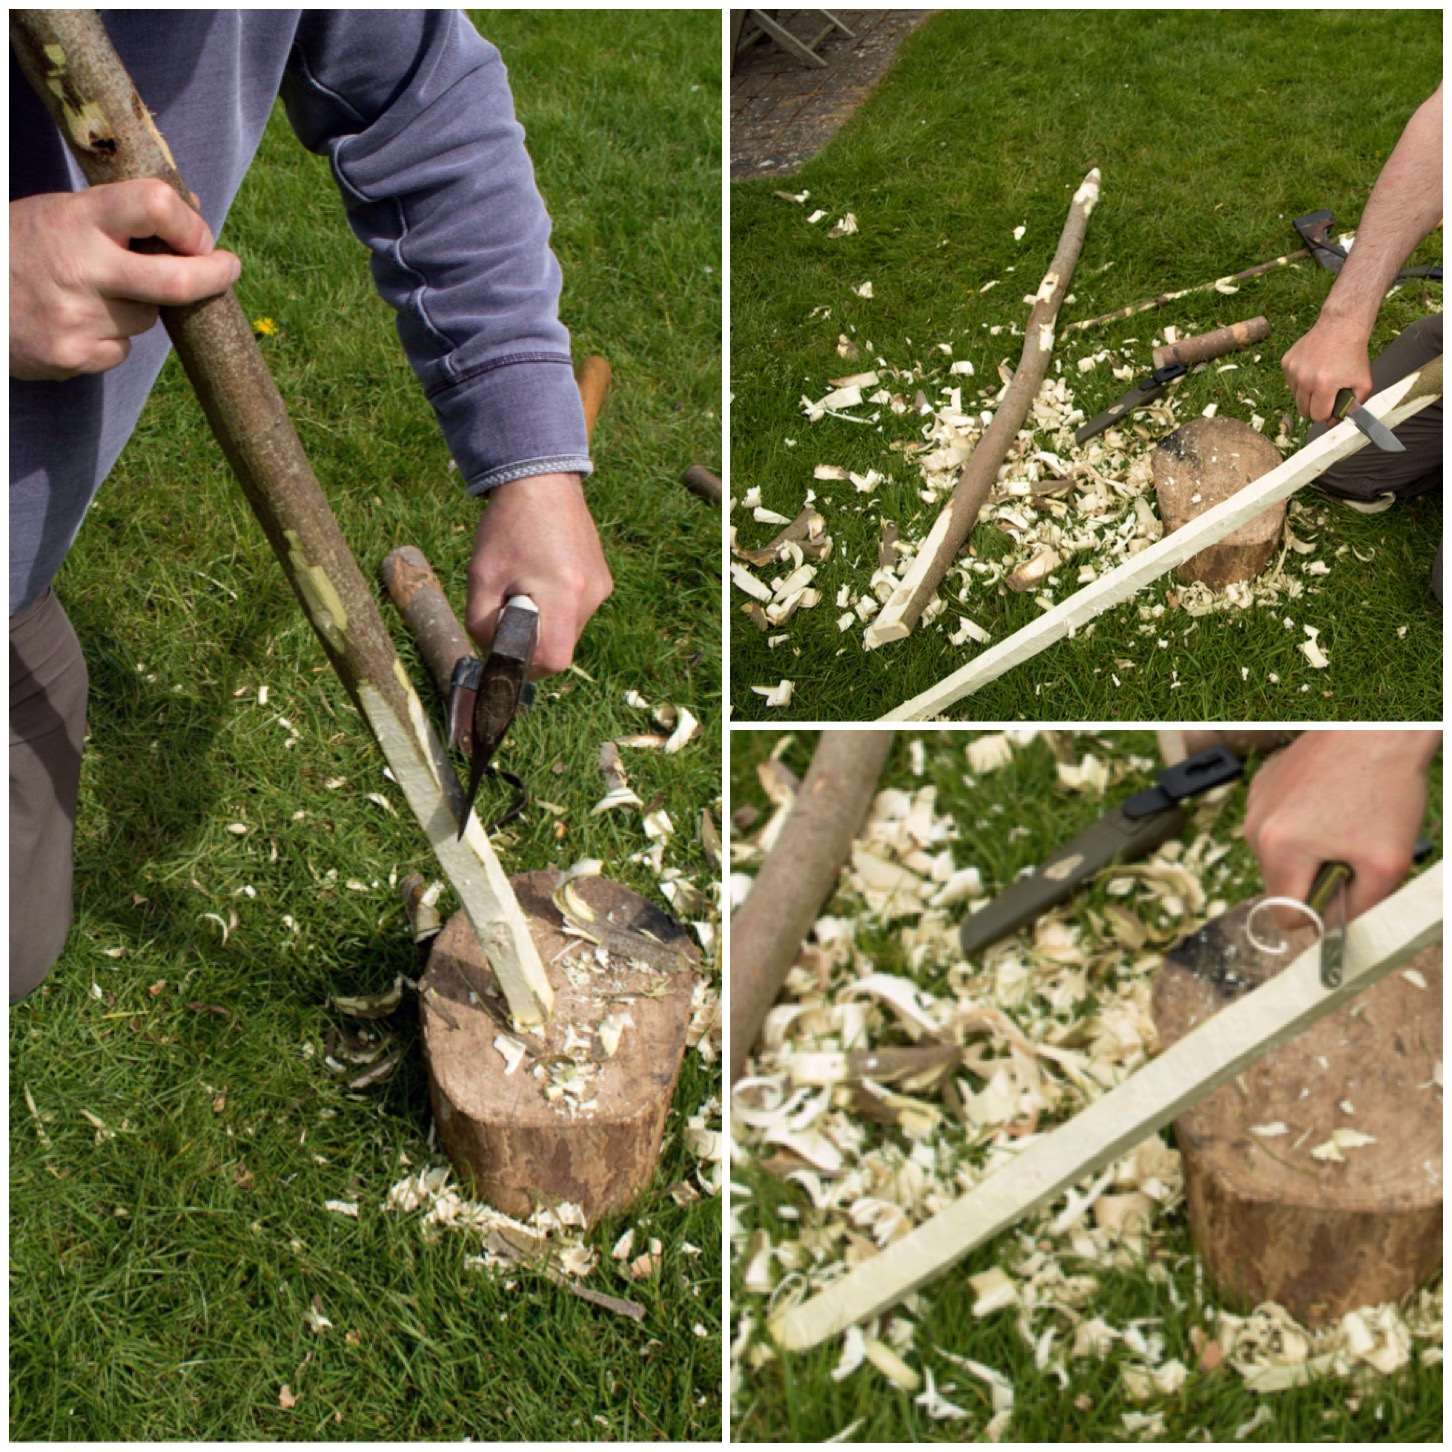
I took a rod of Sycamore (fairly well seasoned) and sawed it in two. In the picture you can see I have left the thicker end longer than the thinner end. The thicker pole will become the upright and the thinner pole will become the arm.
The Makings
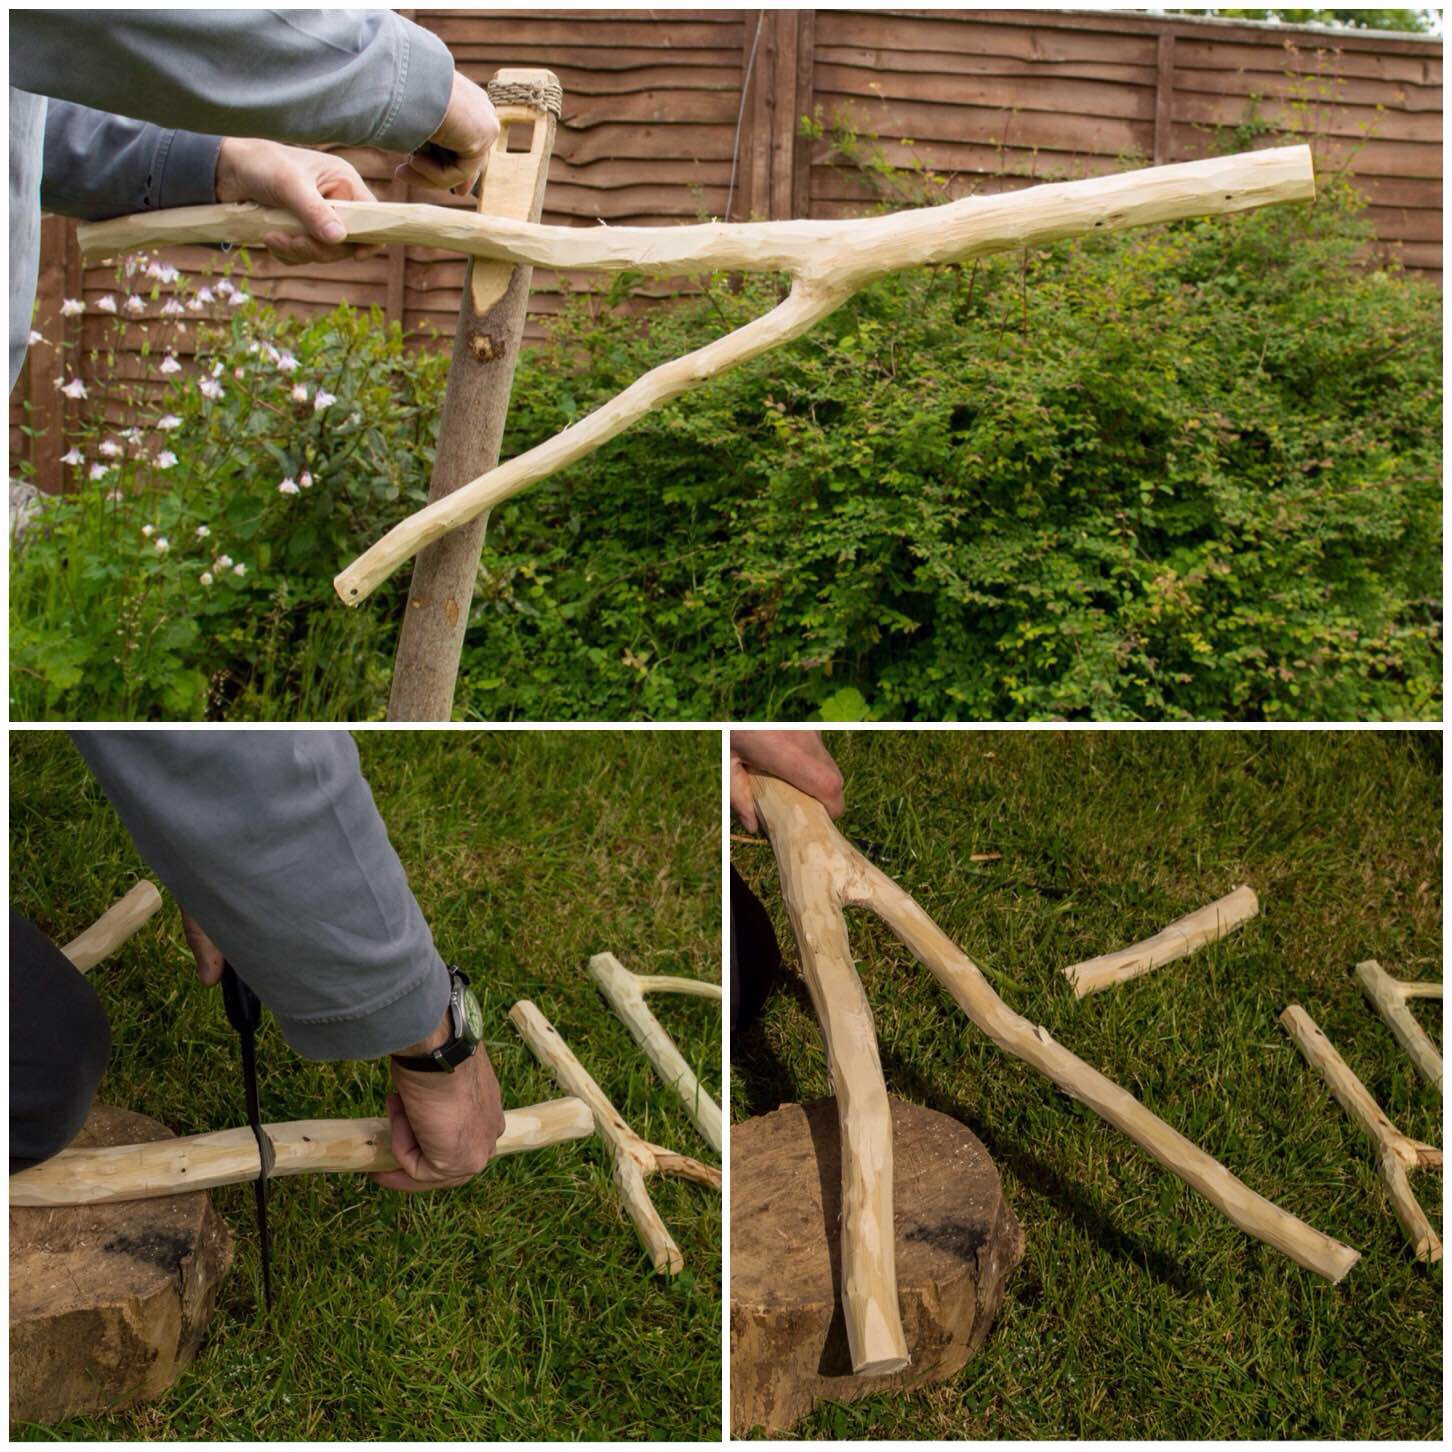
Carving the Upright
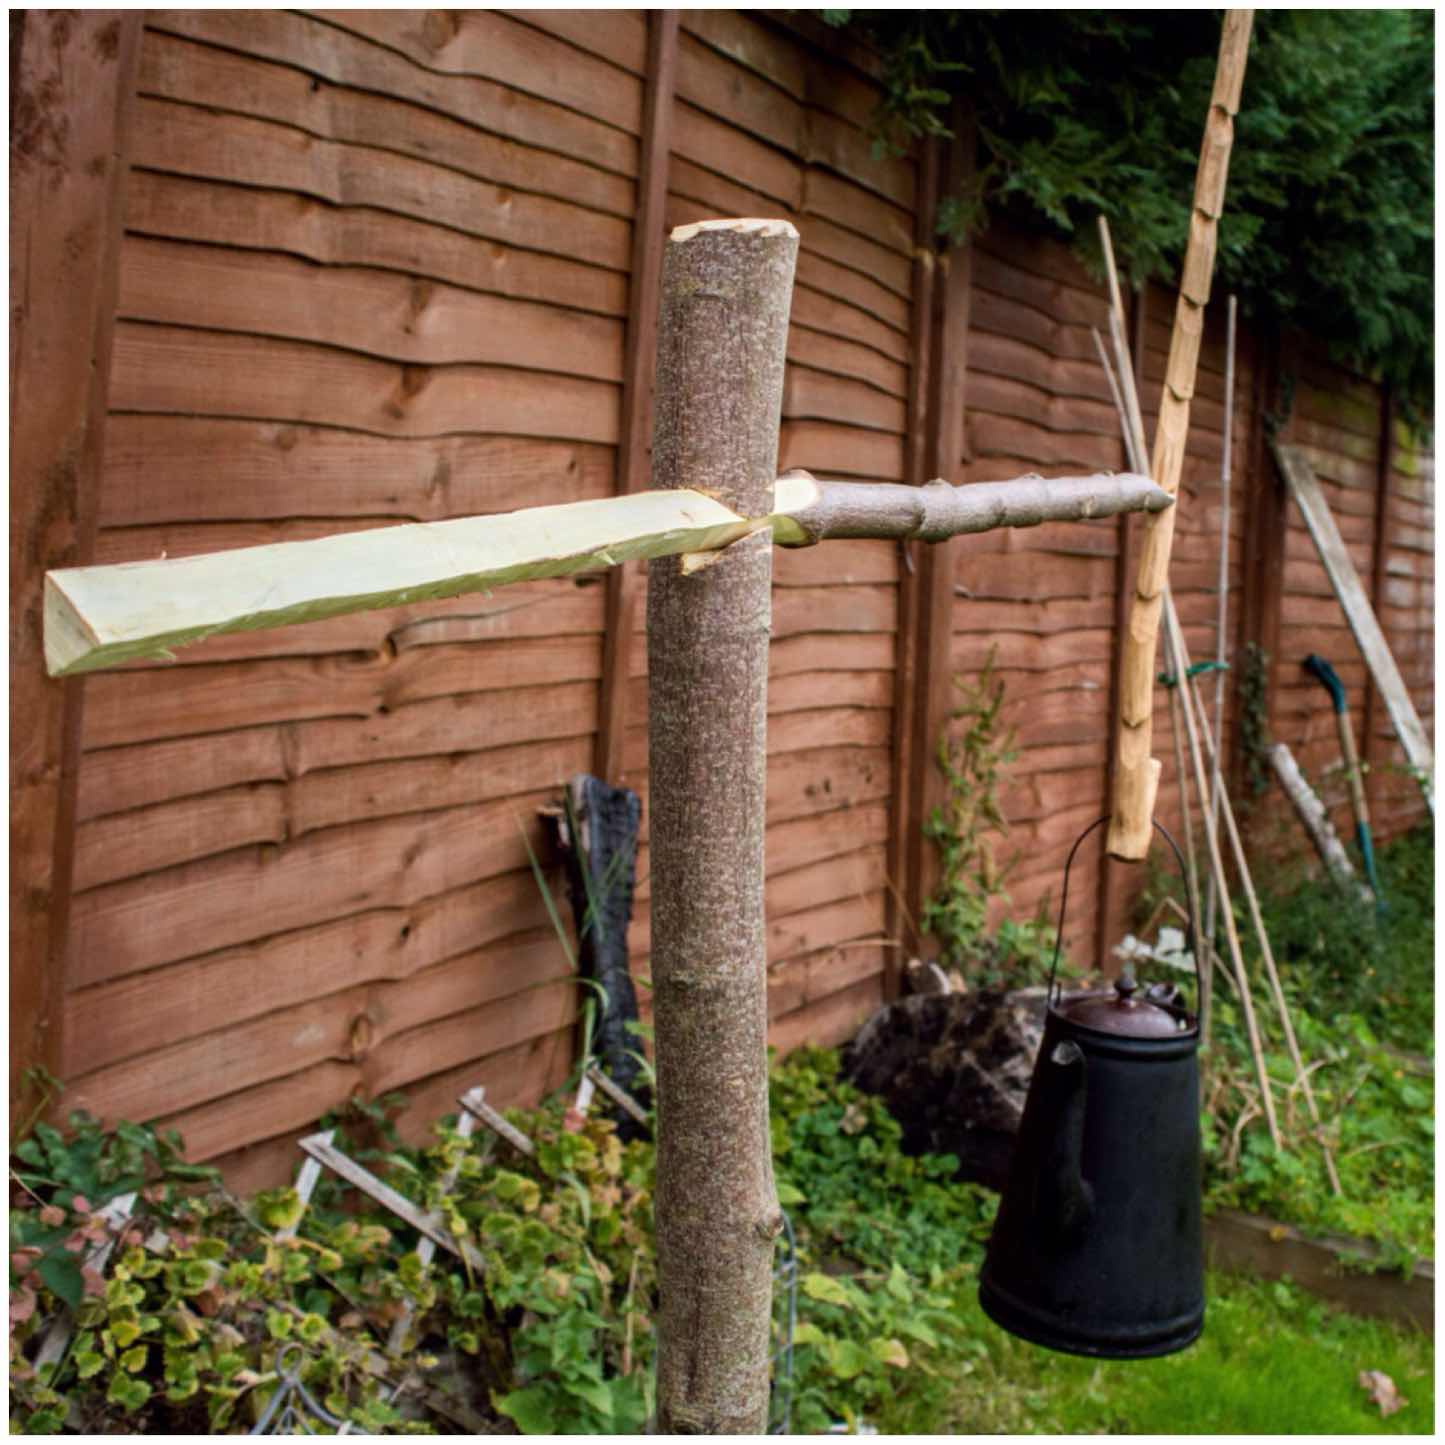
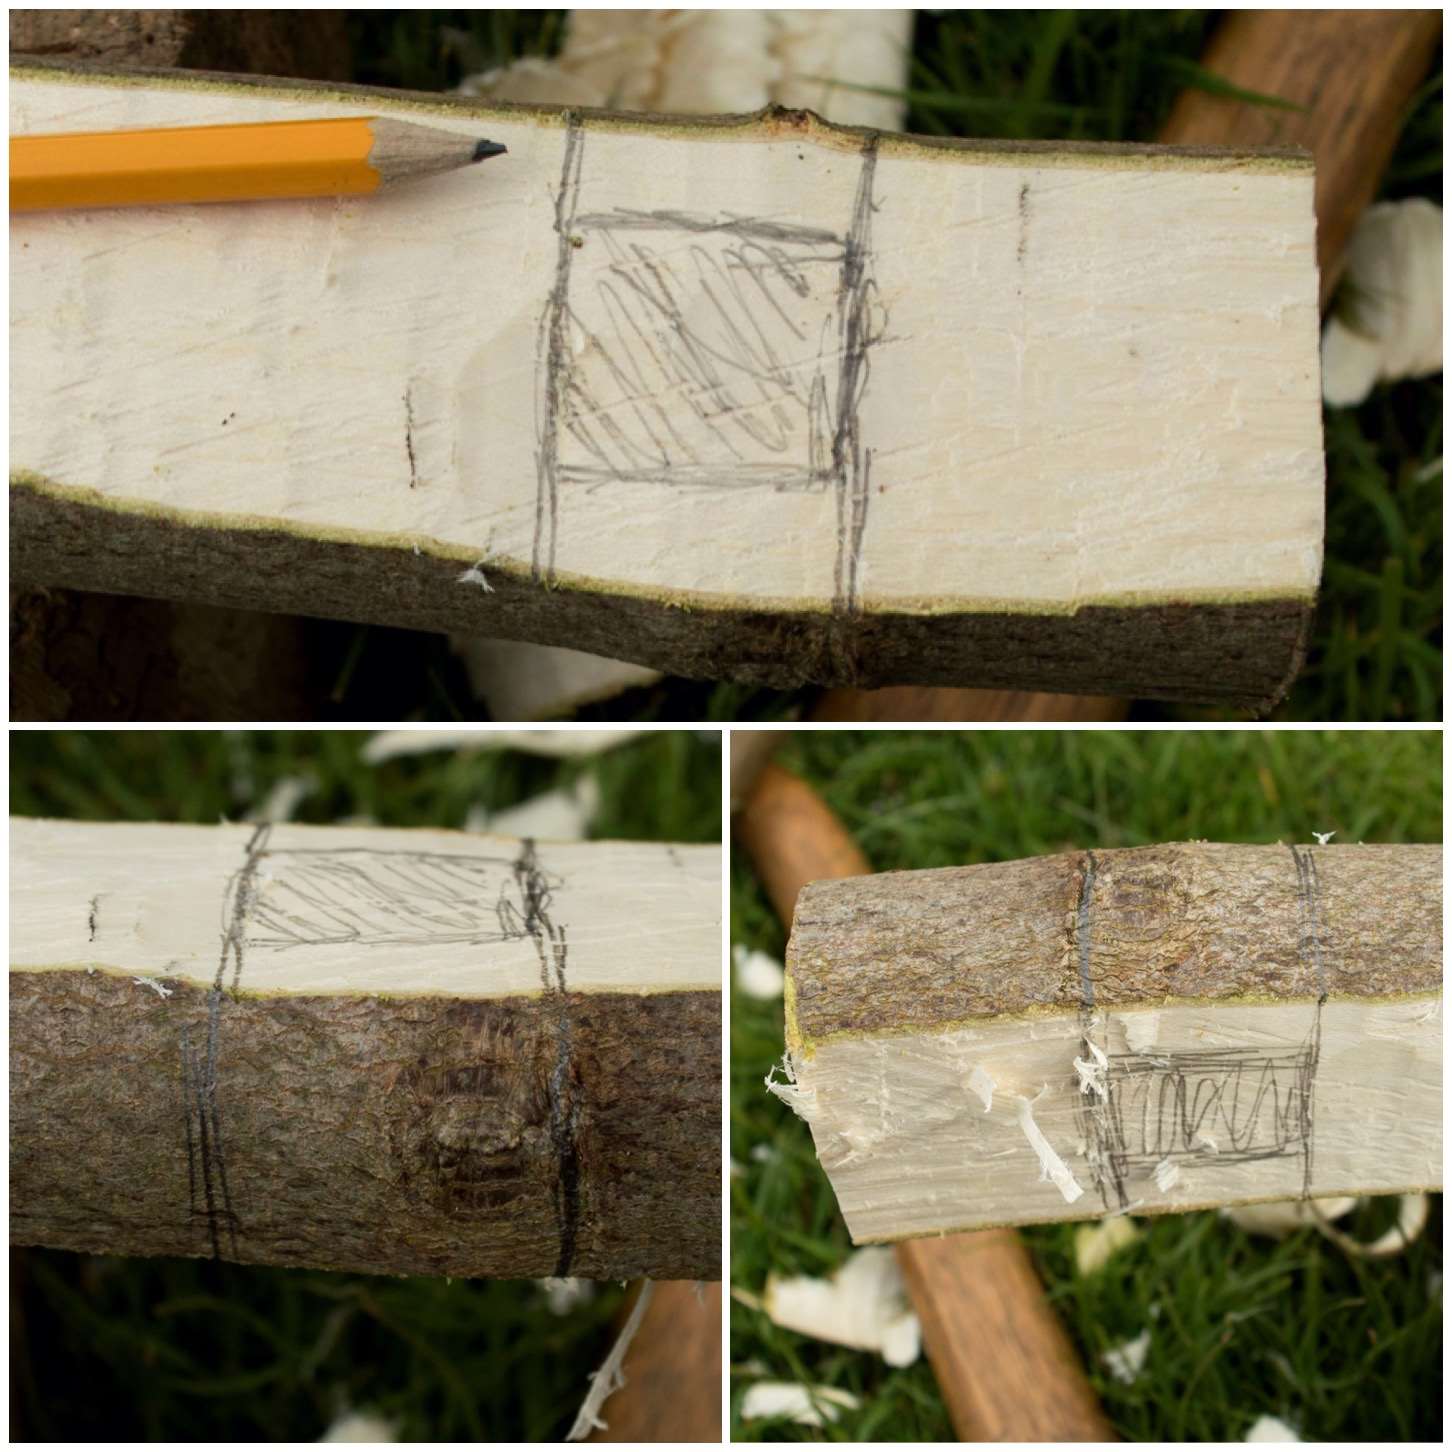
On the thinner end of the thick pole that was to be the upright I marked out the shape of the Tenon tongue and then cut two stop cuts into the side of the pole.
The stop cuts are put in to so that when I batton the waste wood off the split does not run on down the upright.
Creating the Tenon Tongue – Stop Cuts
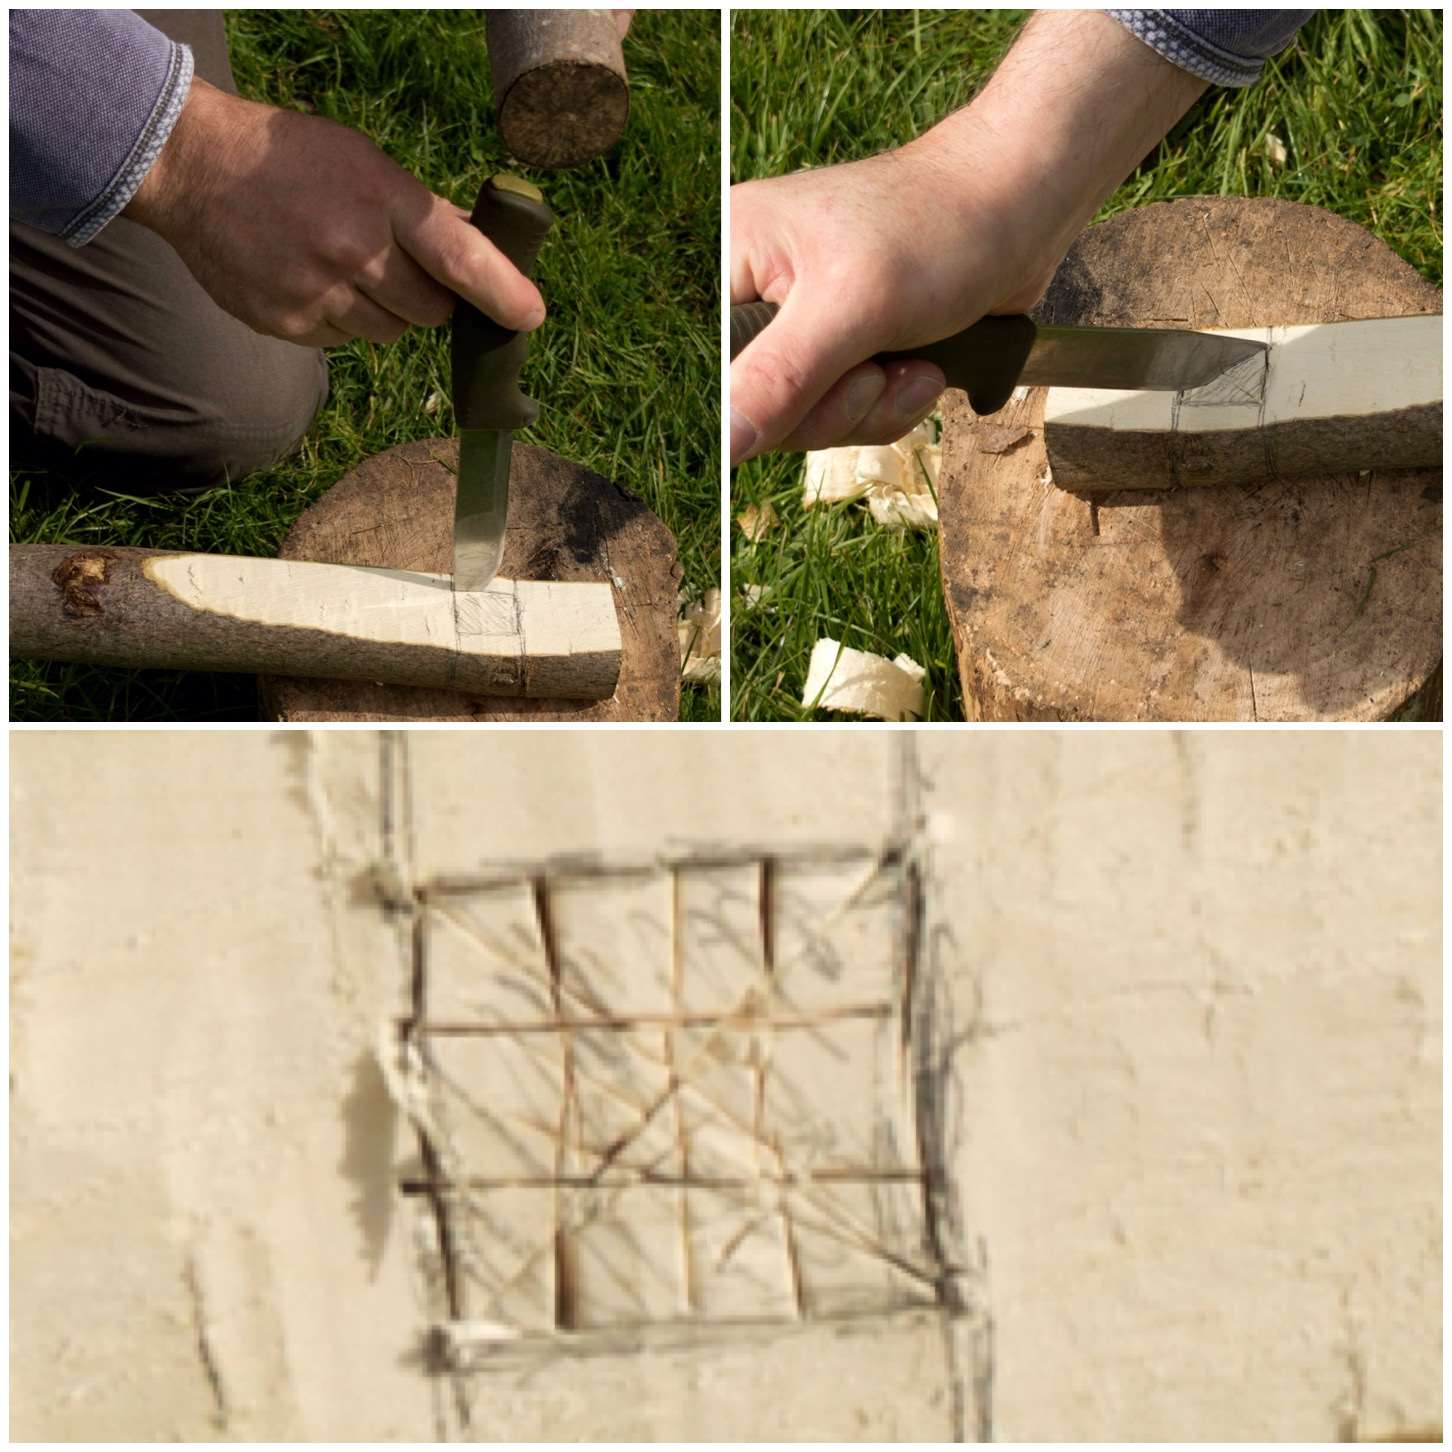
I used my knife to batton off the waste wood (make sure your knife blade is at 90 degrees to your body when you do this).
Once I had the Tenon tongue shape split out I carved one side of it into a curve. This is important to allow the arm of the crane to be raised up and down.
Creating the Tenon tongue – batton and carve
To finish the upright I axed out a point at the bottom and about half way down it I carved a small wedge-shaped recess. This wedge-shaped recess needs to be on the opposite side of the curve to the Tenon tongue.
The recess does not need to be that deep, just enough to allow some string to catch in it.
Little extras on the upright
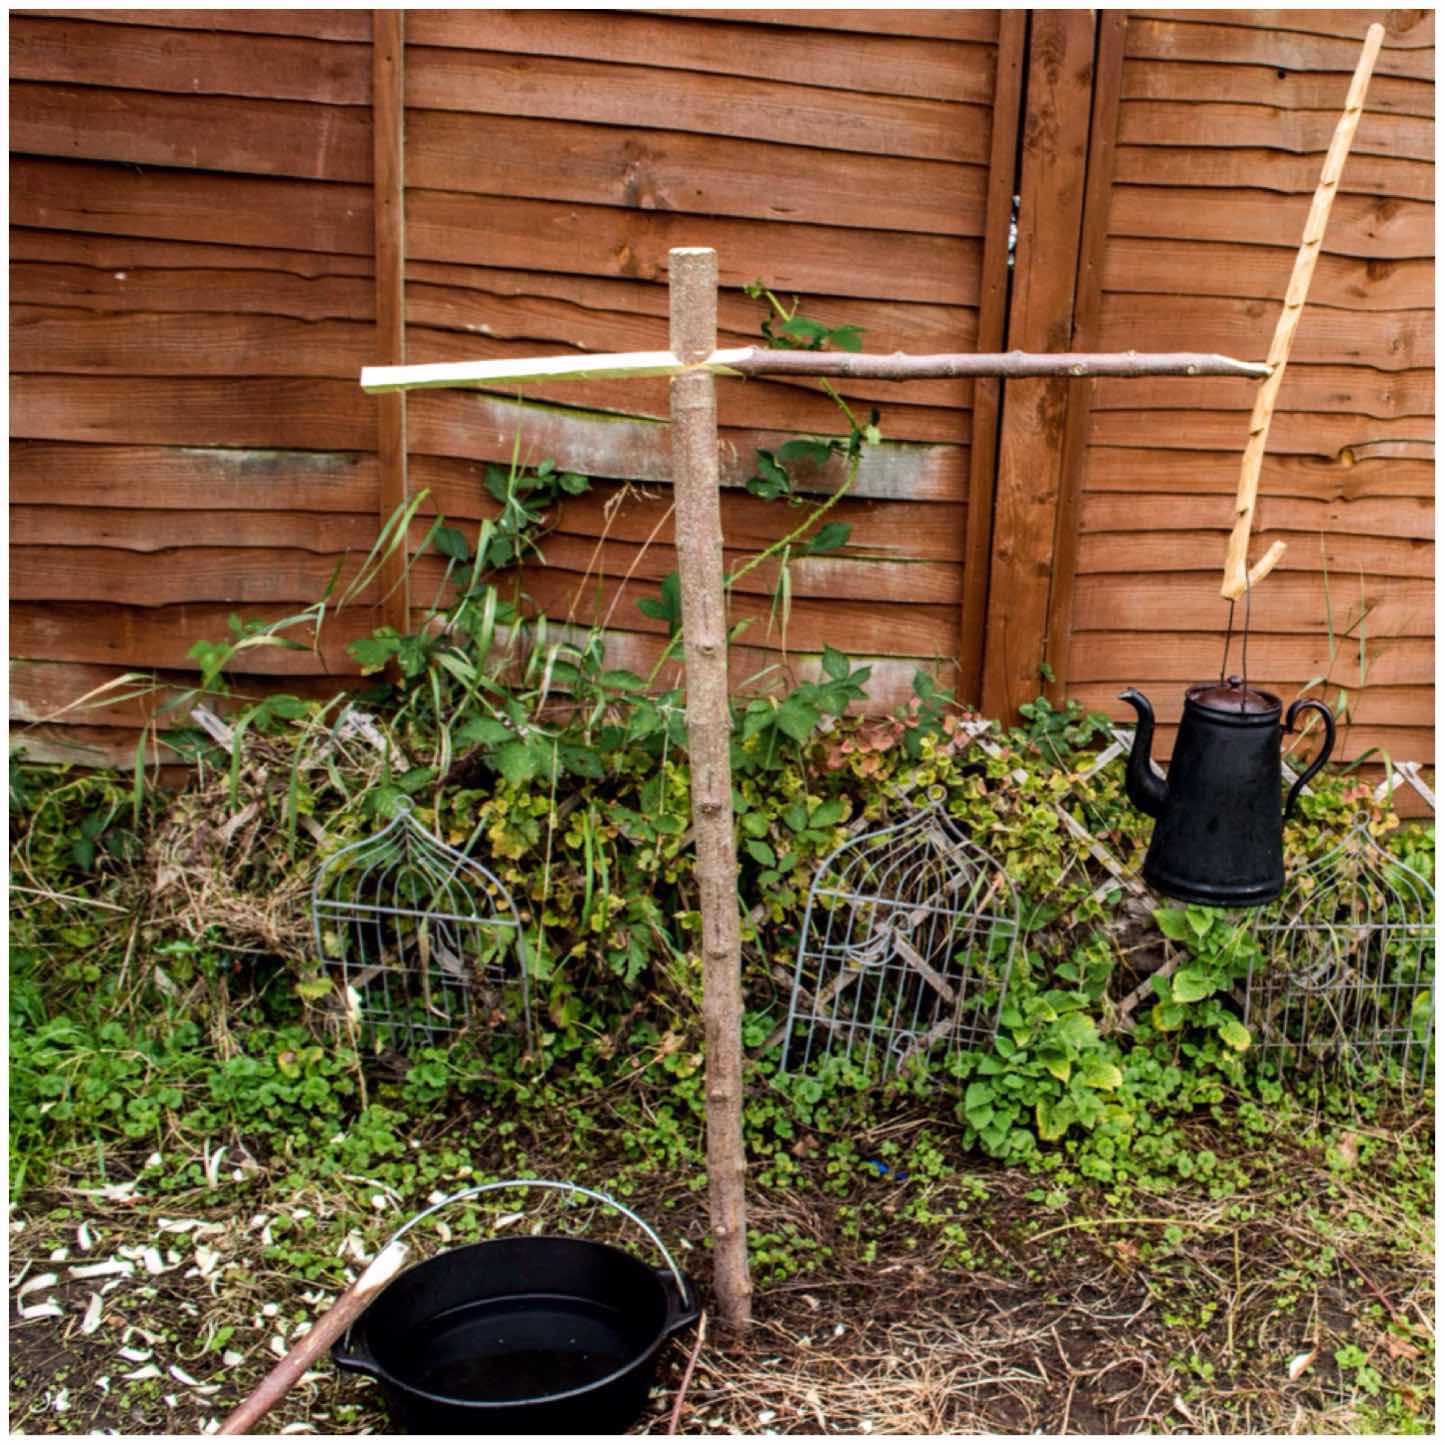
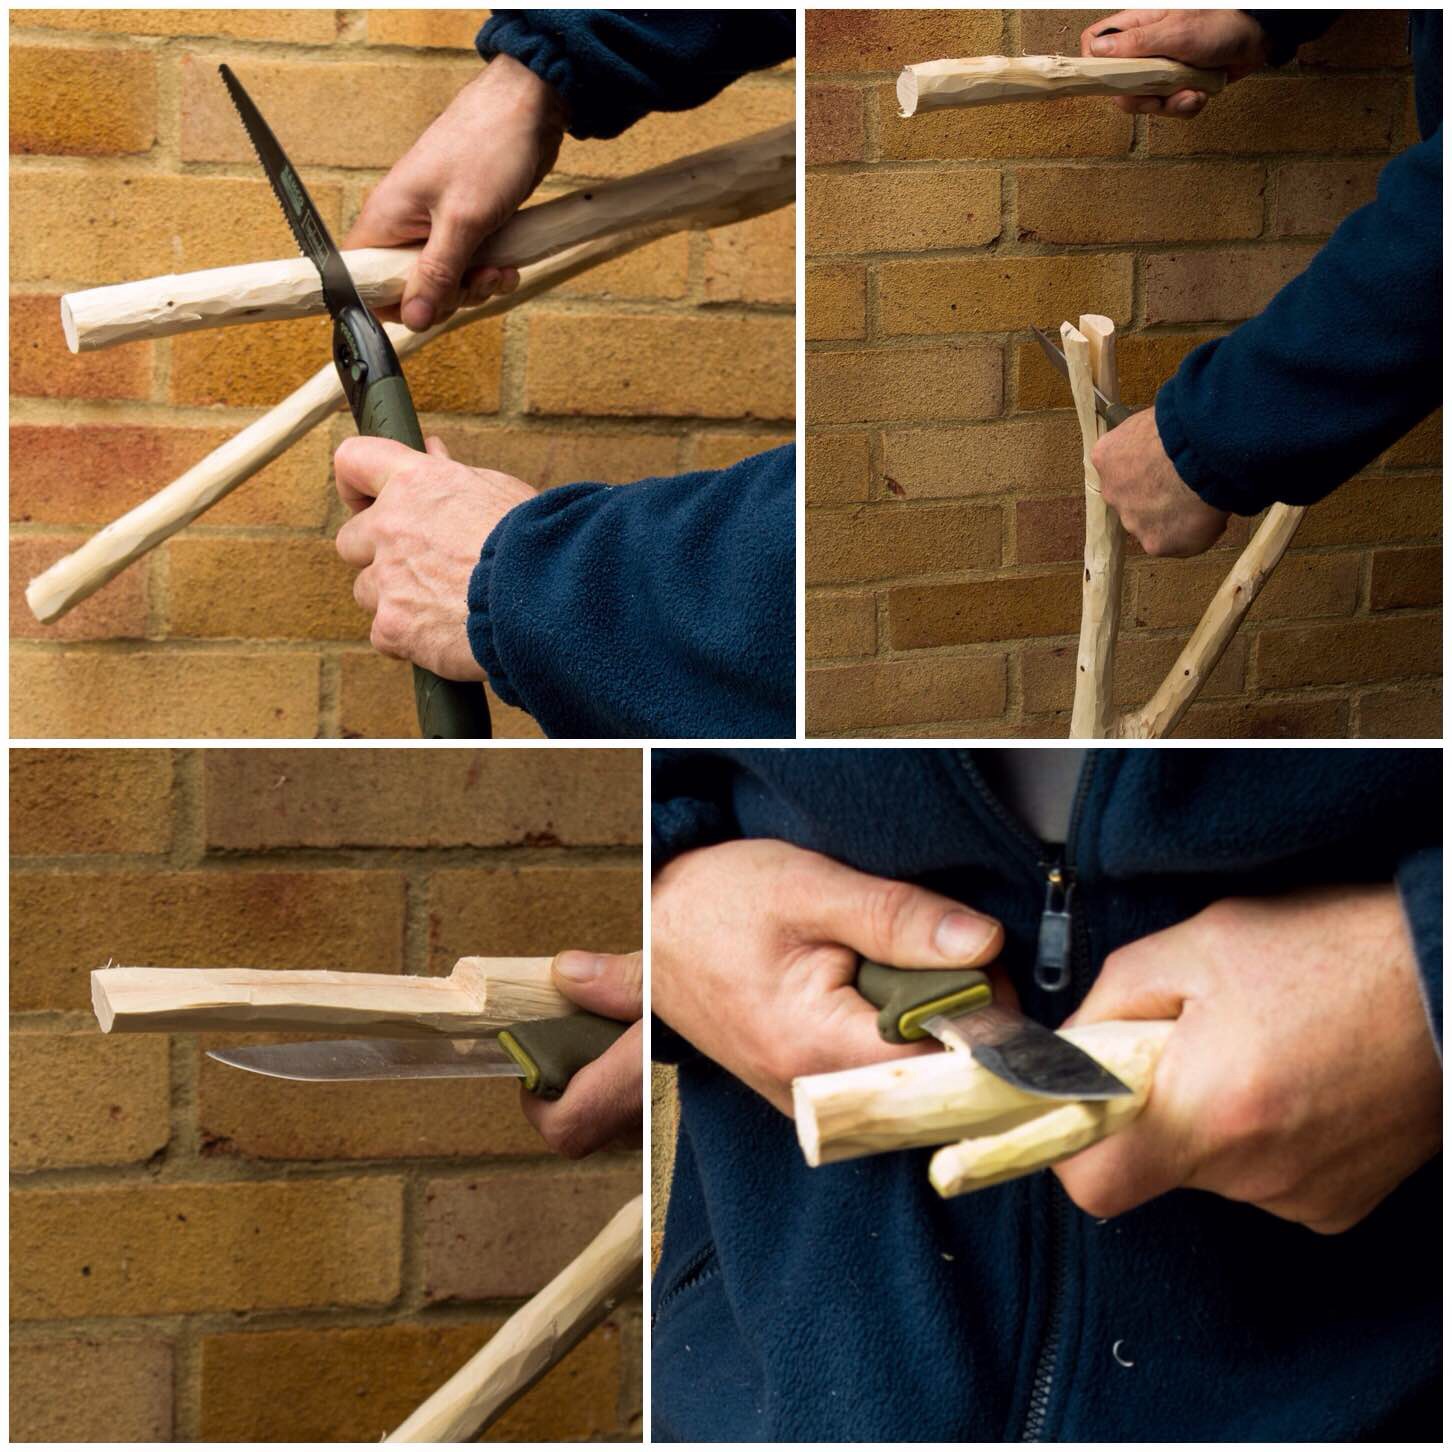
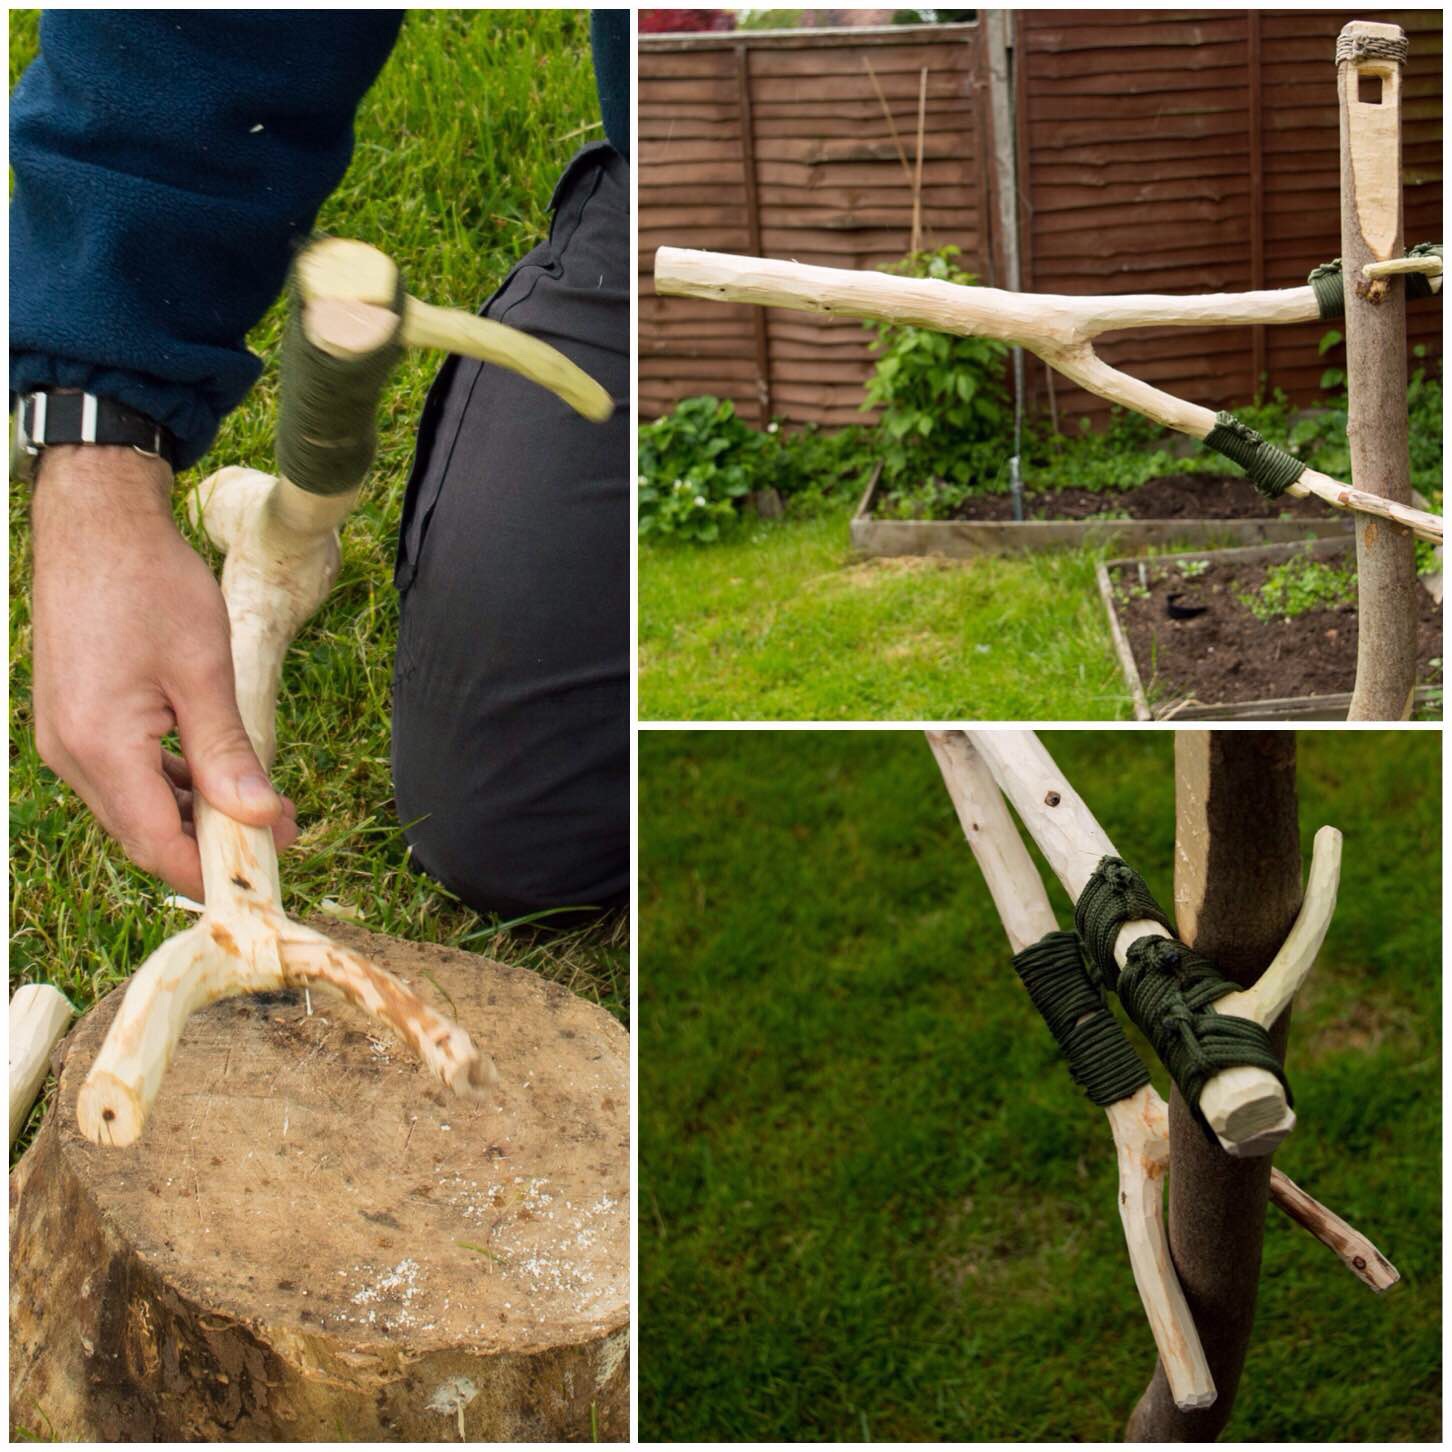
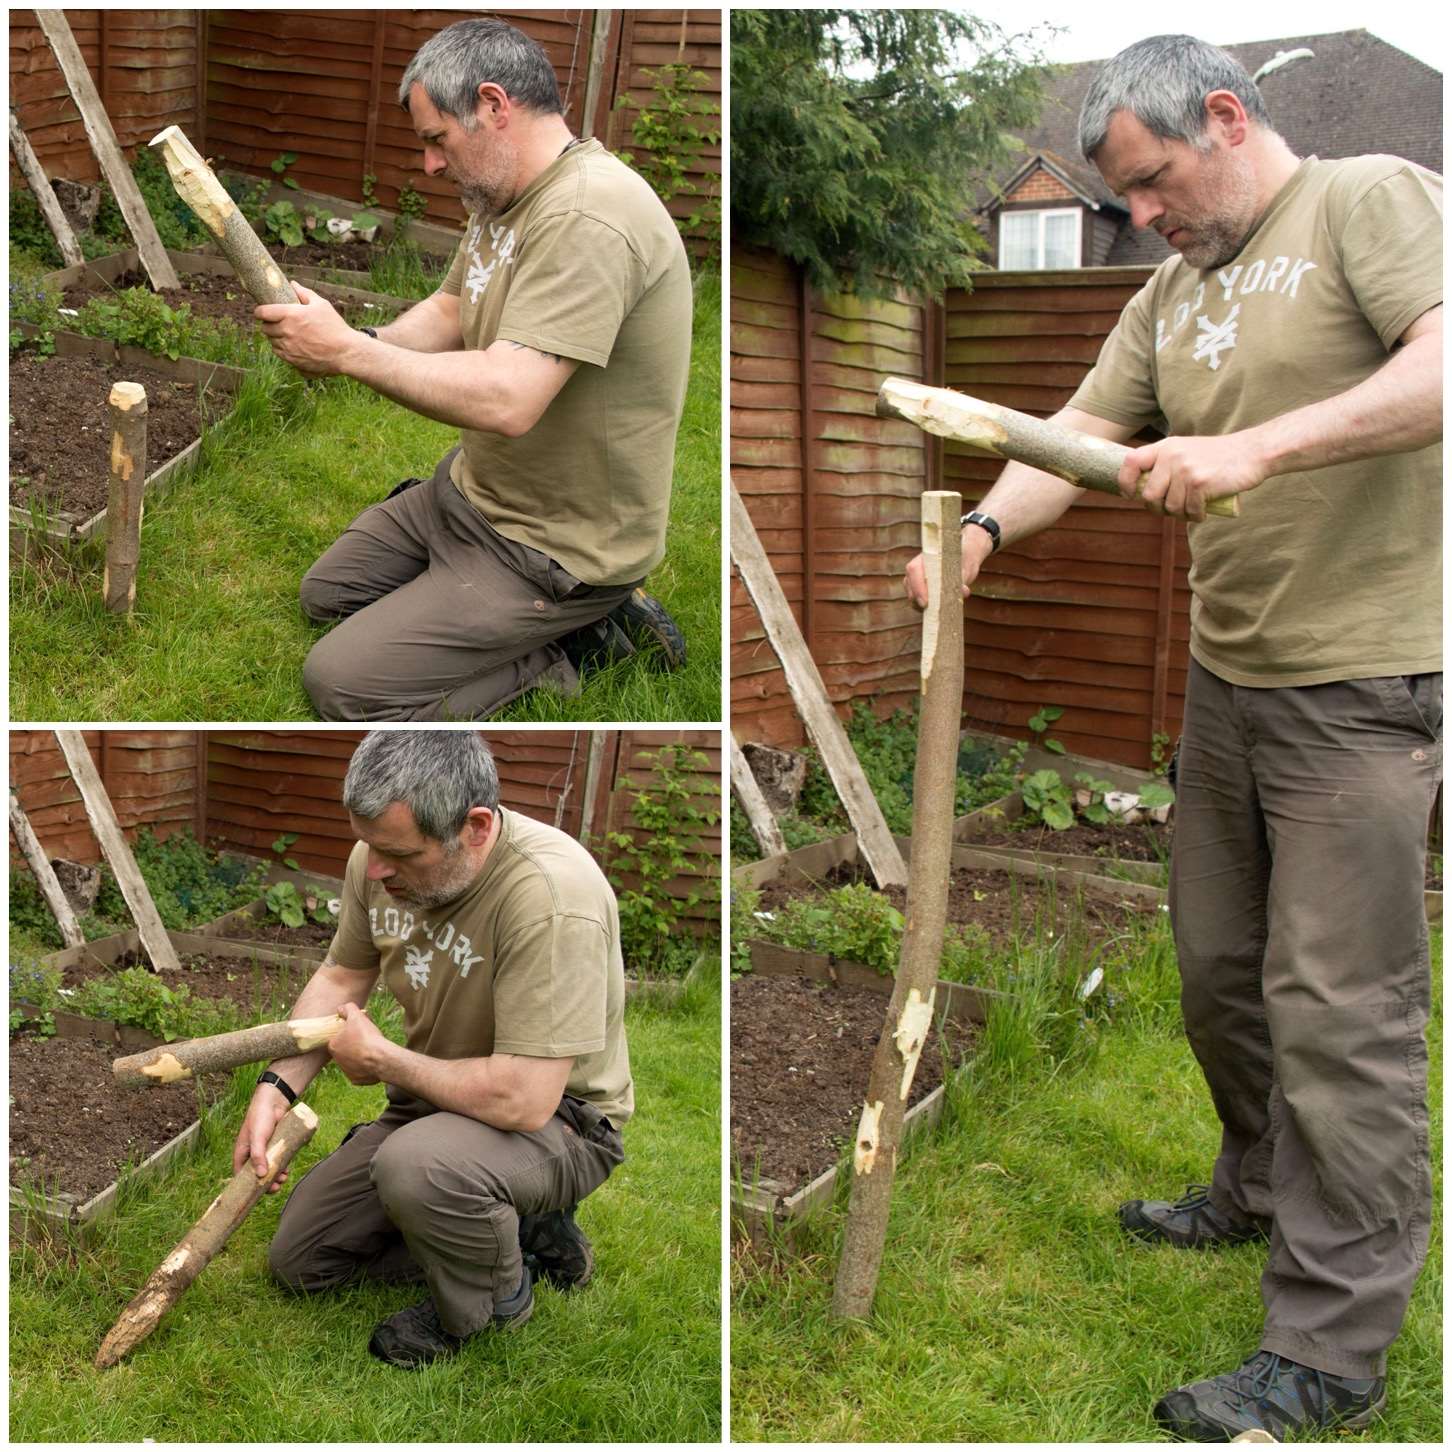
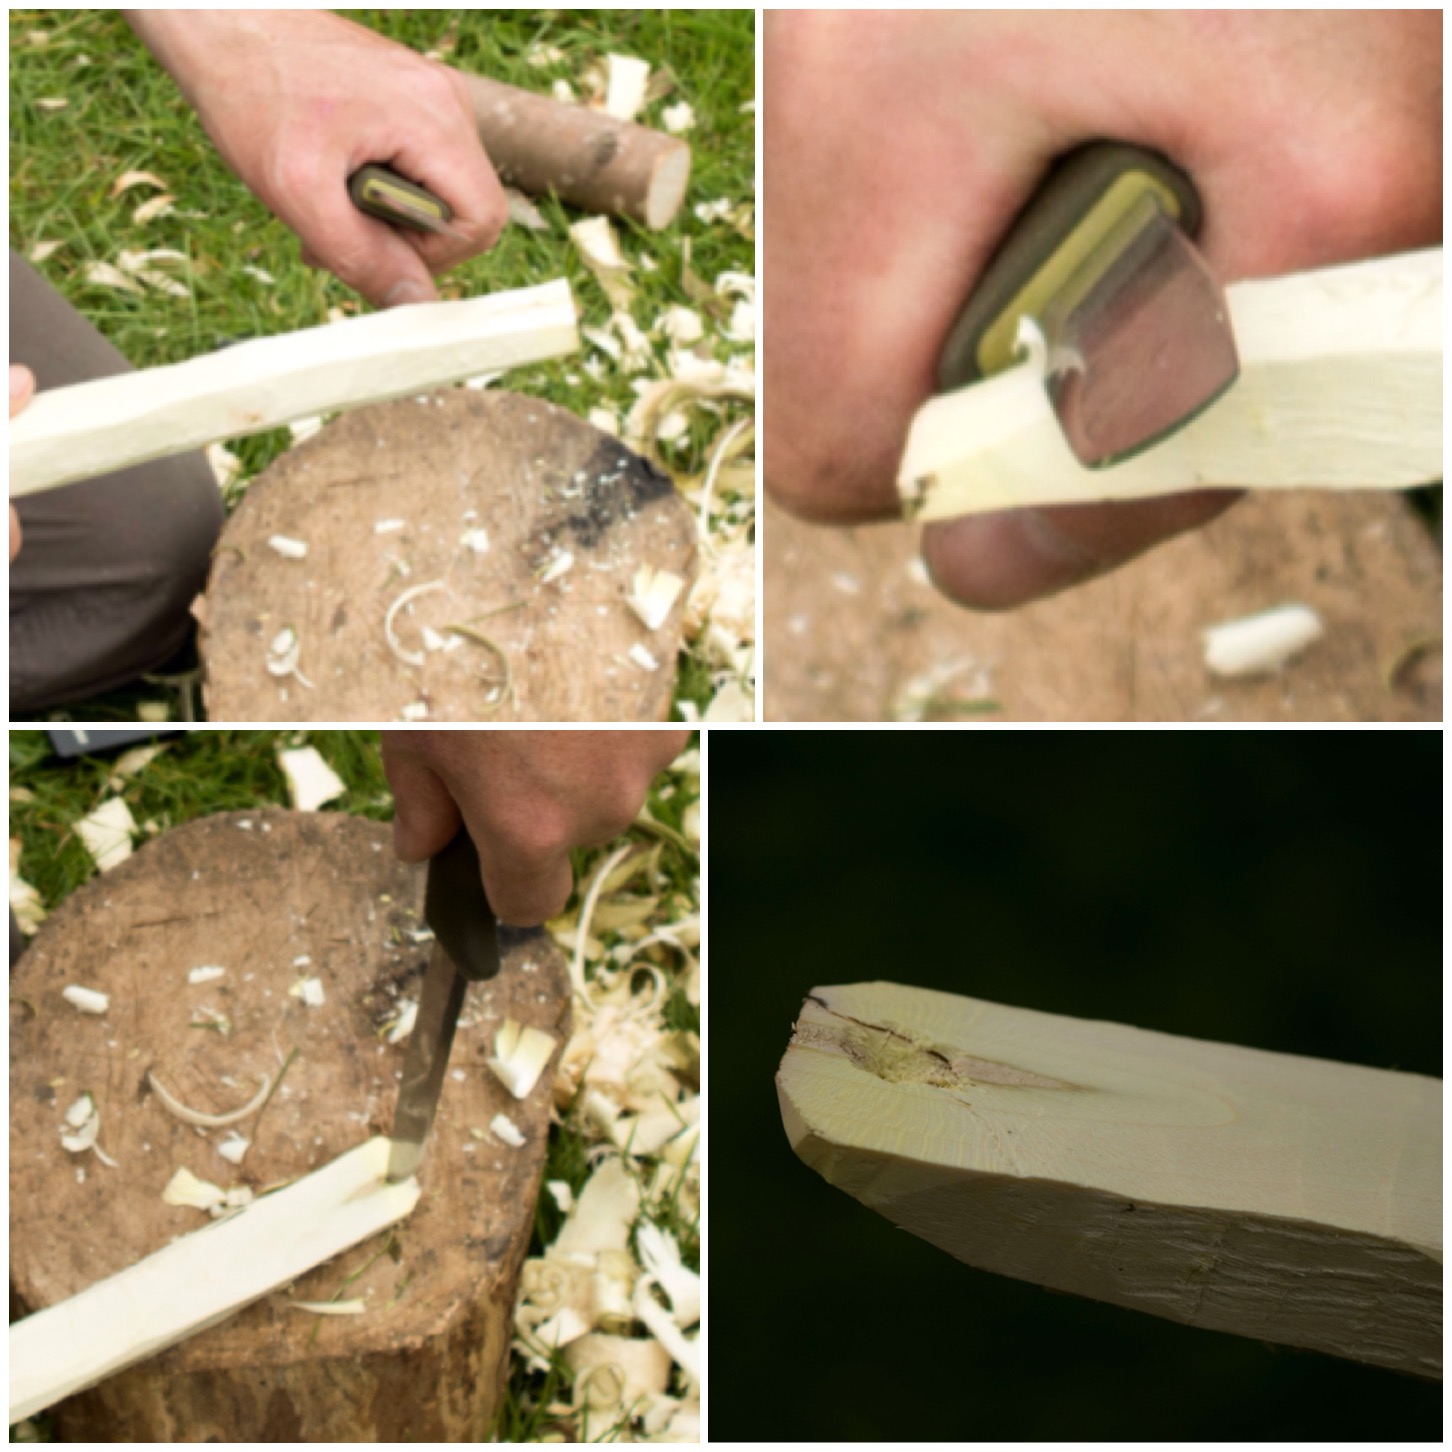
Carving the Arm
About a third of the way along from the thicker end of the arm flatten the wood with your knife on opposite sides. This gives you a decent working surface to carve out your Mortise hole.
In the bottom left picture you can see how I used the top of the upright to help me gauge how big to make the Mortise hole. Mark out your Mortise hole with a pen or pencil (mark out both sides of the arm).
Flattening the arm and marking out the Mortise hole
I used my knife and a piece of waste wood as a batton to cut out the Mortise hole. I took my time here so I would not split the wood along the length of the arm.
Once I got about half way down the depth of the Mortise hole I started on the other side.
Creating the Mortise hole – First Side
As I use the tip of my knife for this work I always ensure the work piece is secured on a flat surface. I have seen the after effects of a knife going through someone’s hand and it is not a pretty sight I can assure you.
Soon I had my Mortise hole cut through and tidied up. As I did not want to make the Mortise hole too large I tested out the Tenon tongue in it and trimmed the tongue down slightly so that it would fit in the Mortise hole easily.
Creating the Mortise hole – Second side
The Tenon tongue when fitted should sit slightly proud. You will probably find you will make lots of little adjustments here as you test the action of your crane at this stage.
Testing the joint
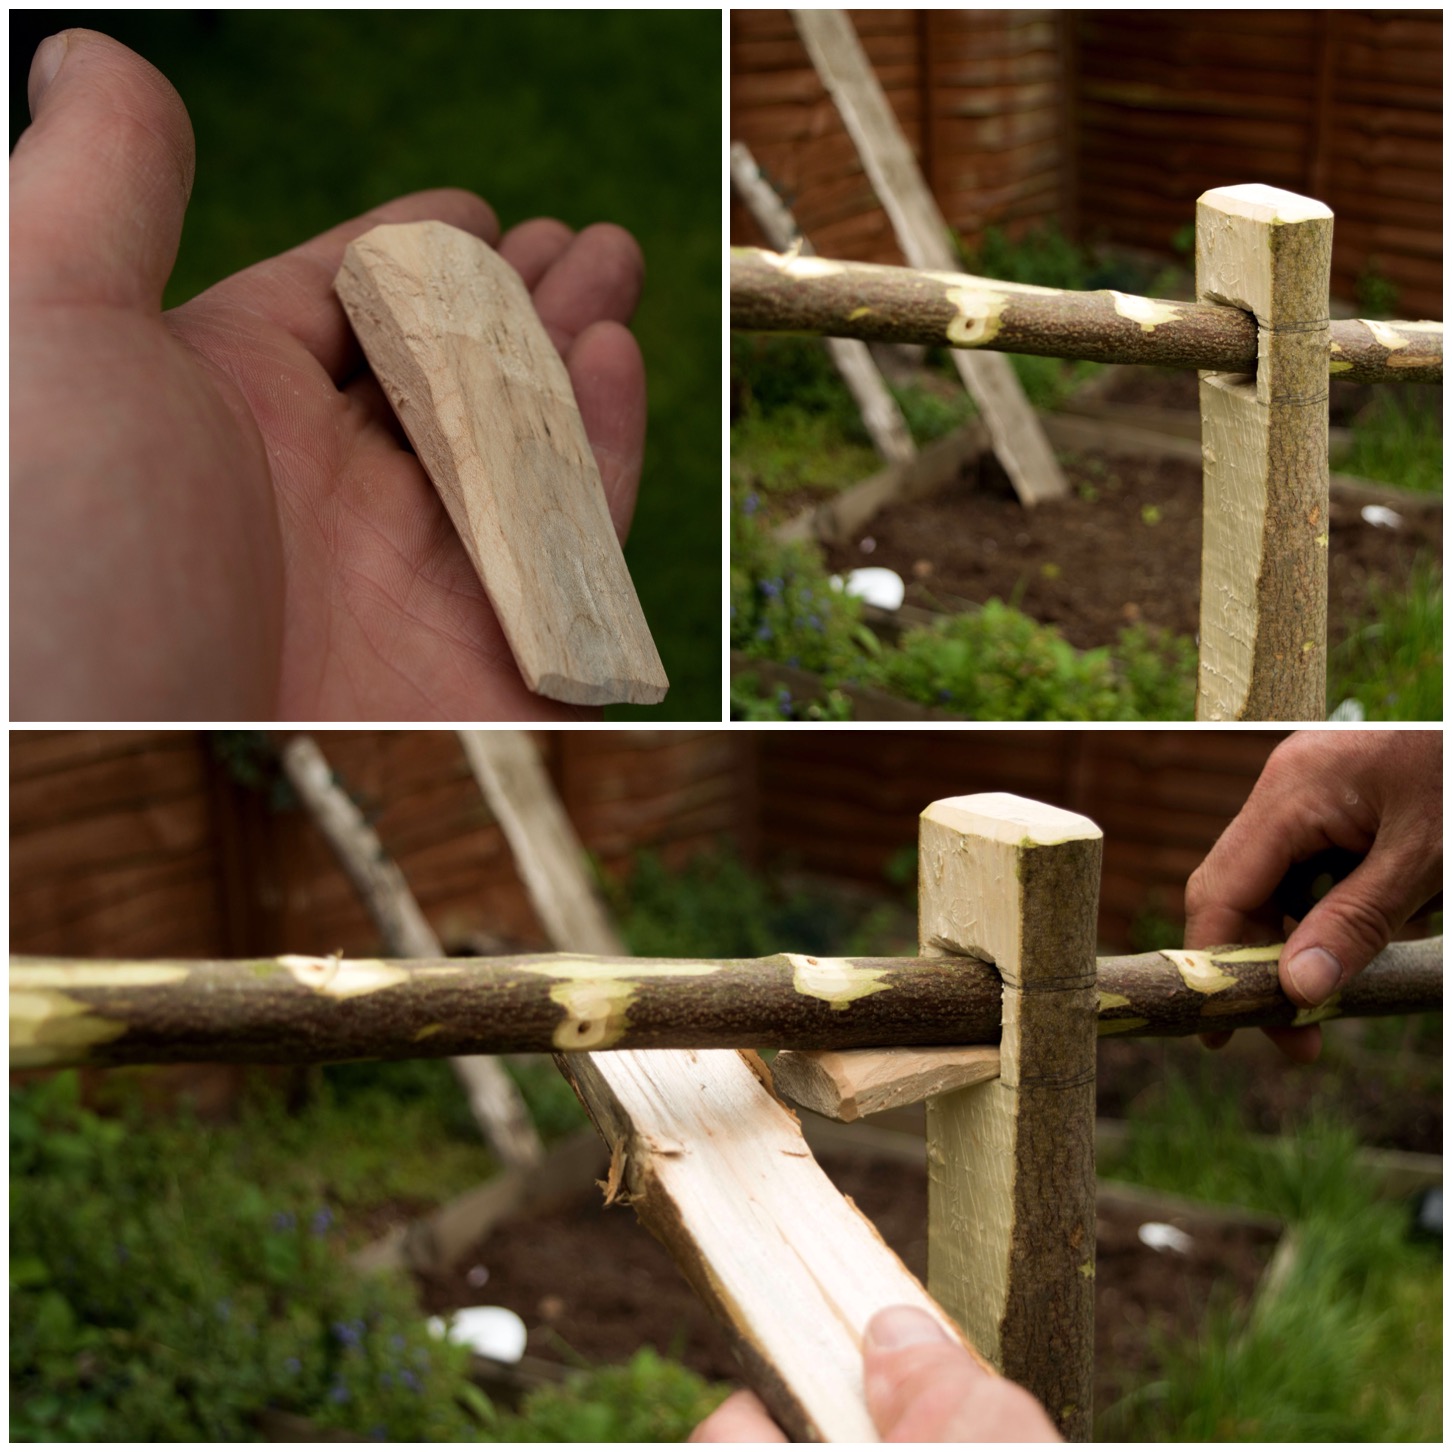
To finish the arm off I carved a groove near the thick end of the arm (for the string to grip), chamfered the thick end to tidy it up and cut out a groove at the thin end of the arm for attaching a pot handle (I will show this in detail in a further picture).
Finishing the arm
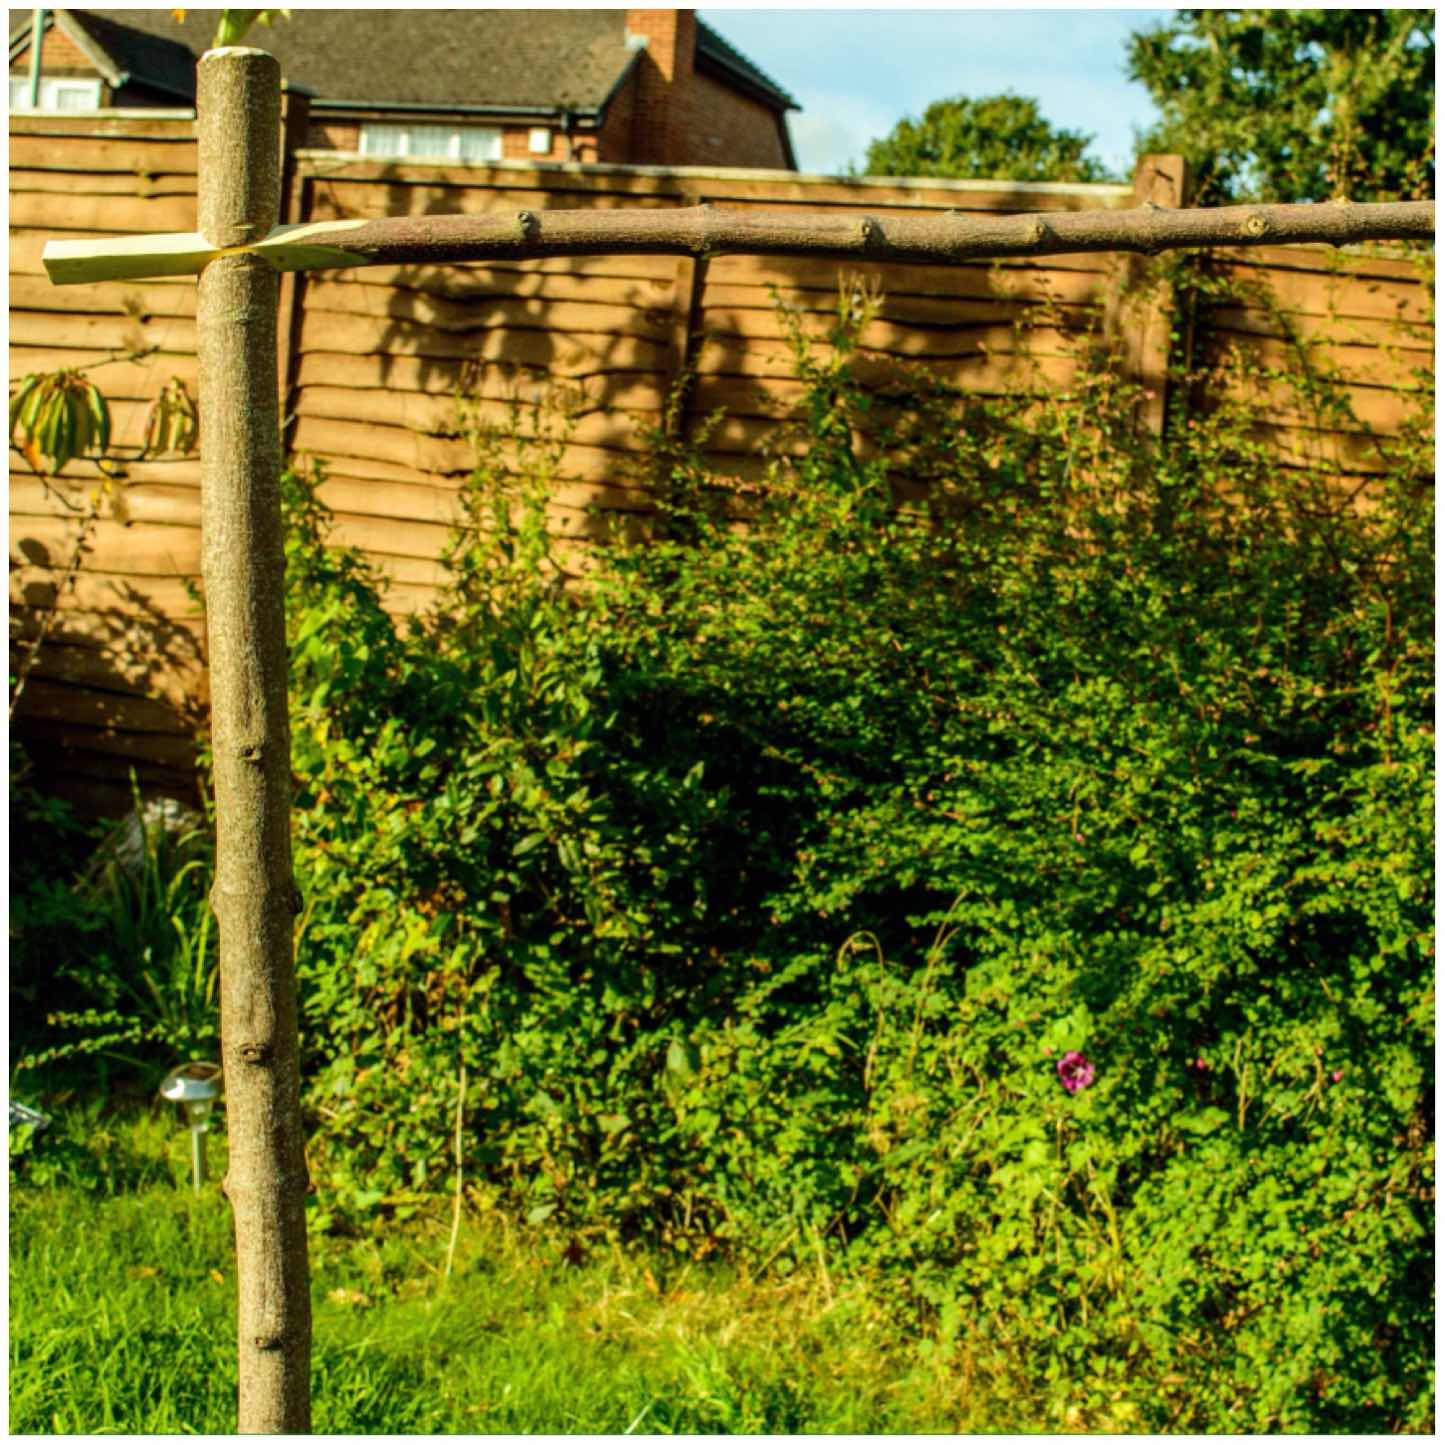
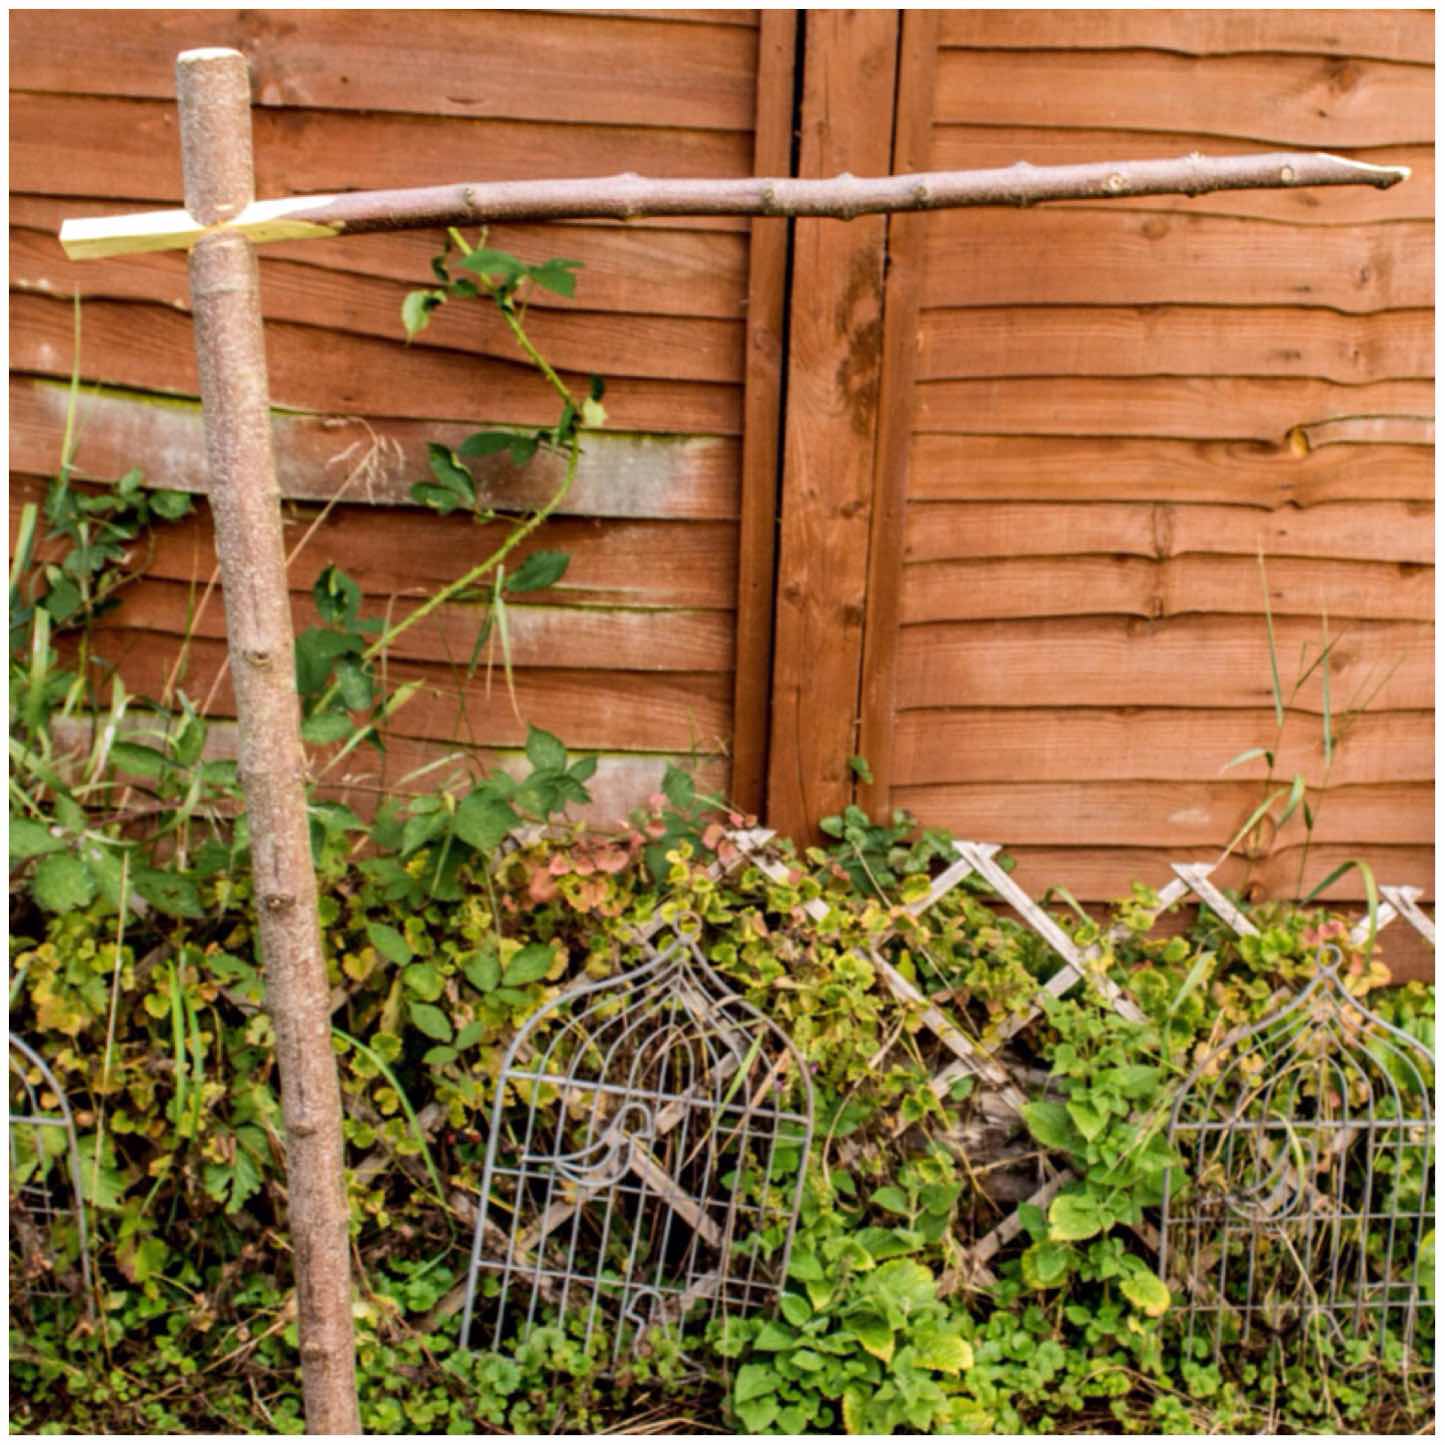
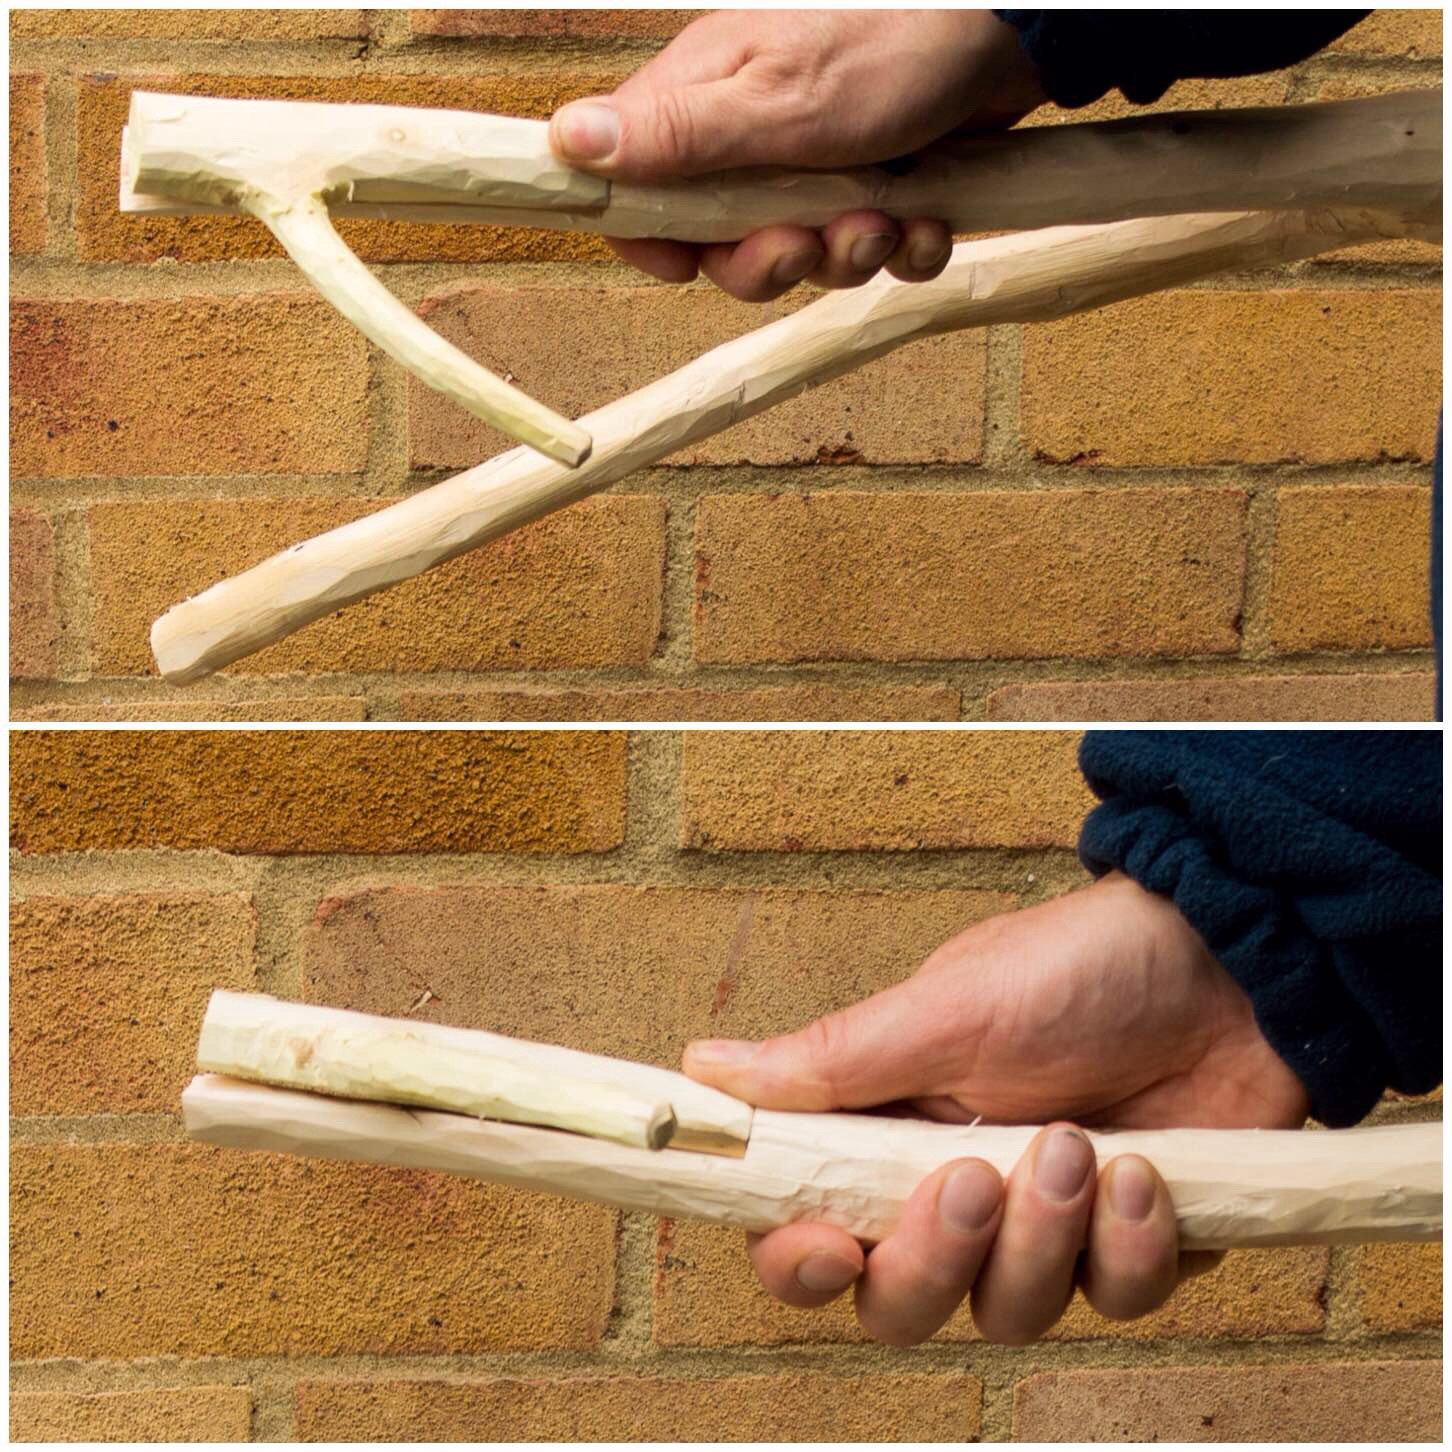
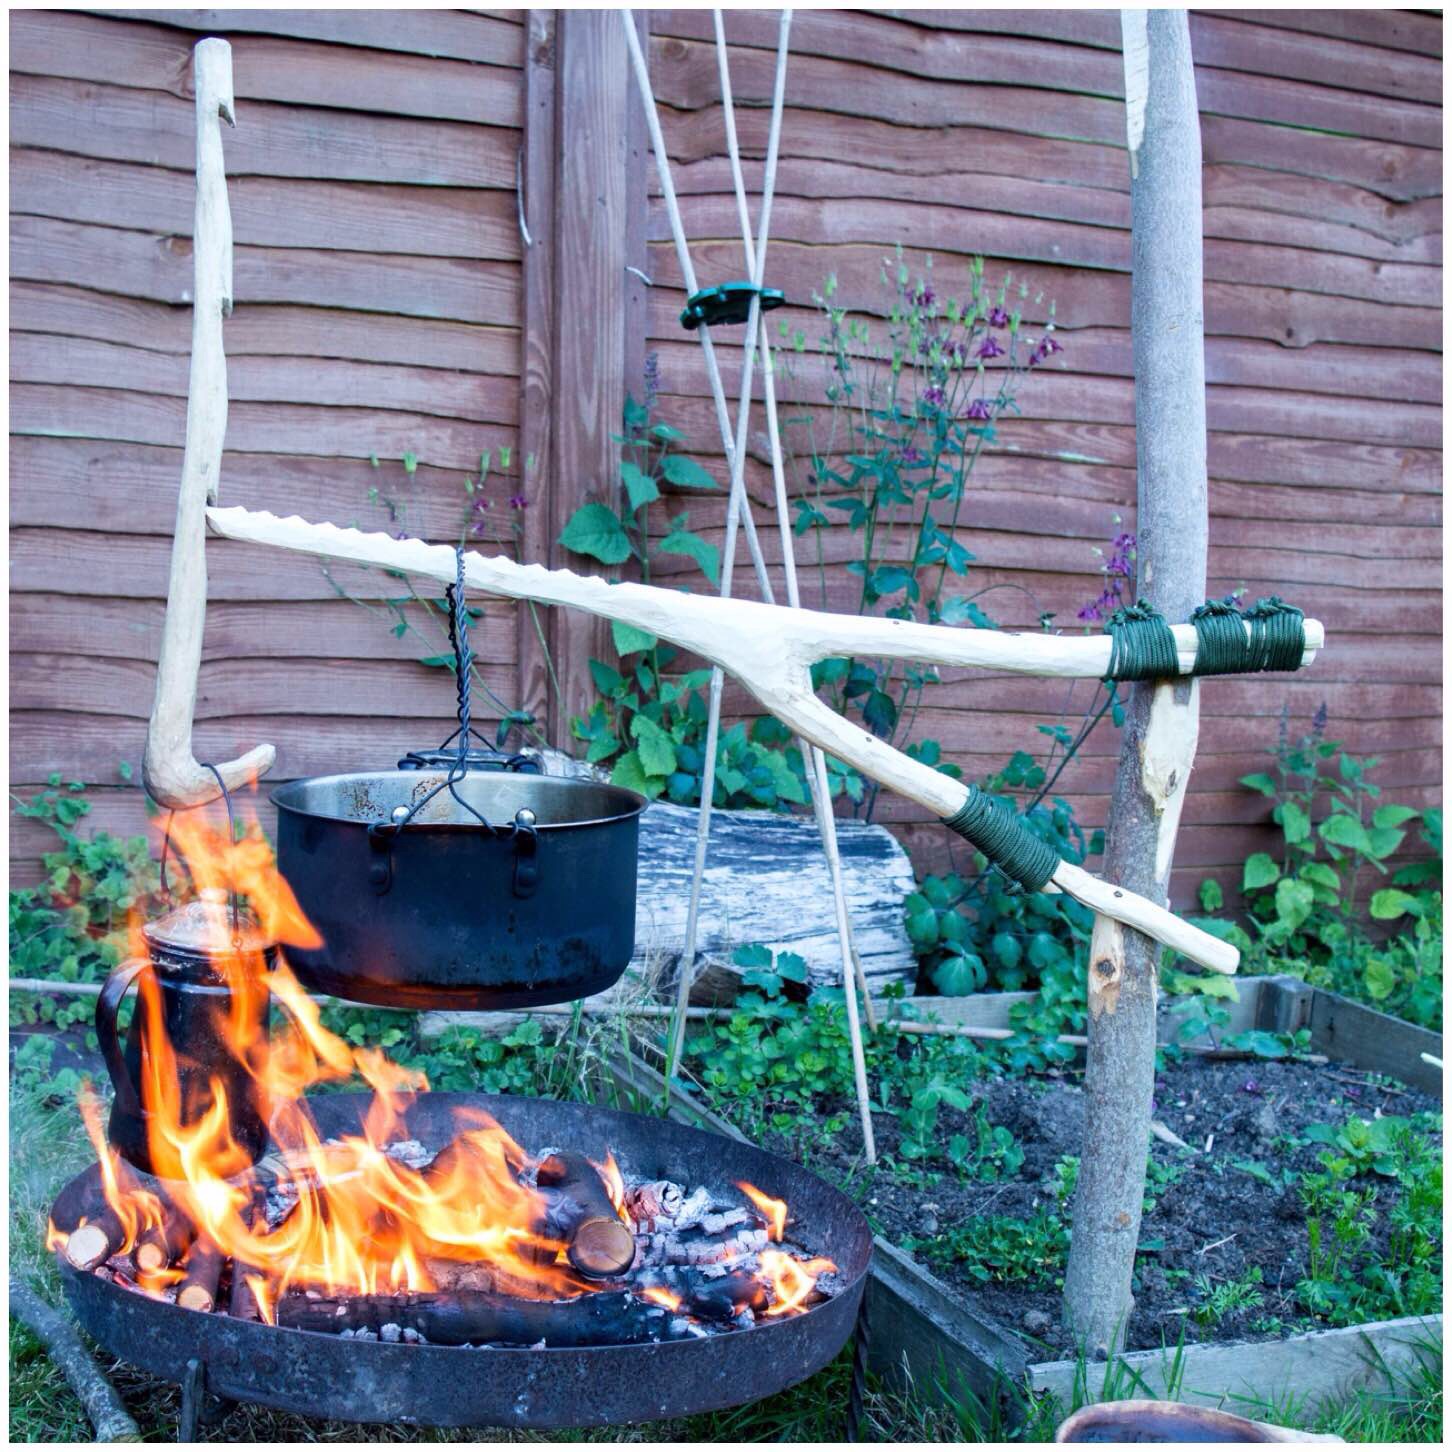
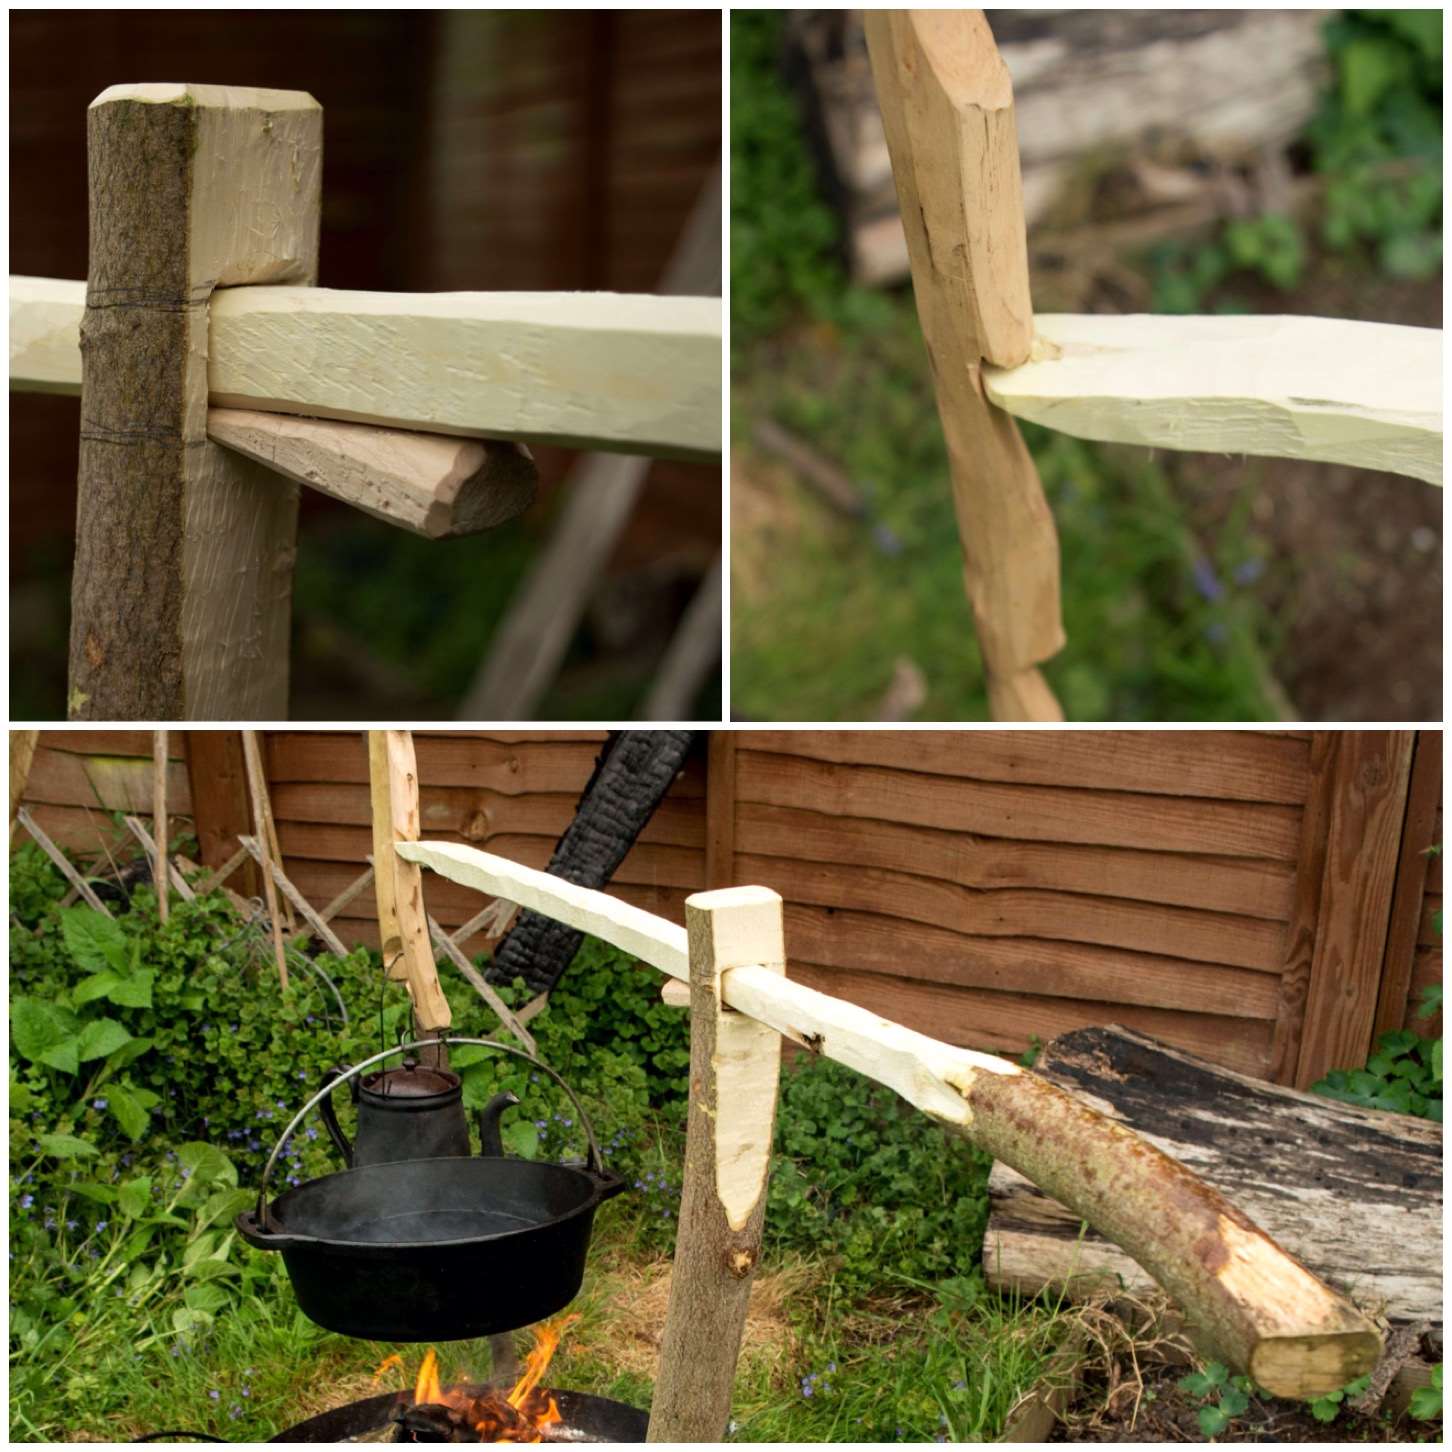
The Mortise and Tenon Crane
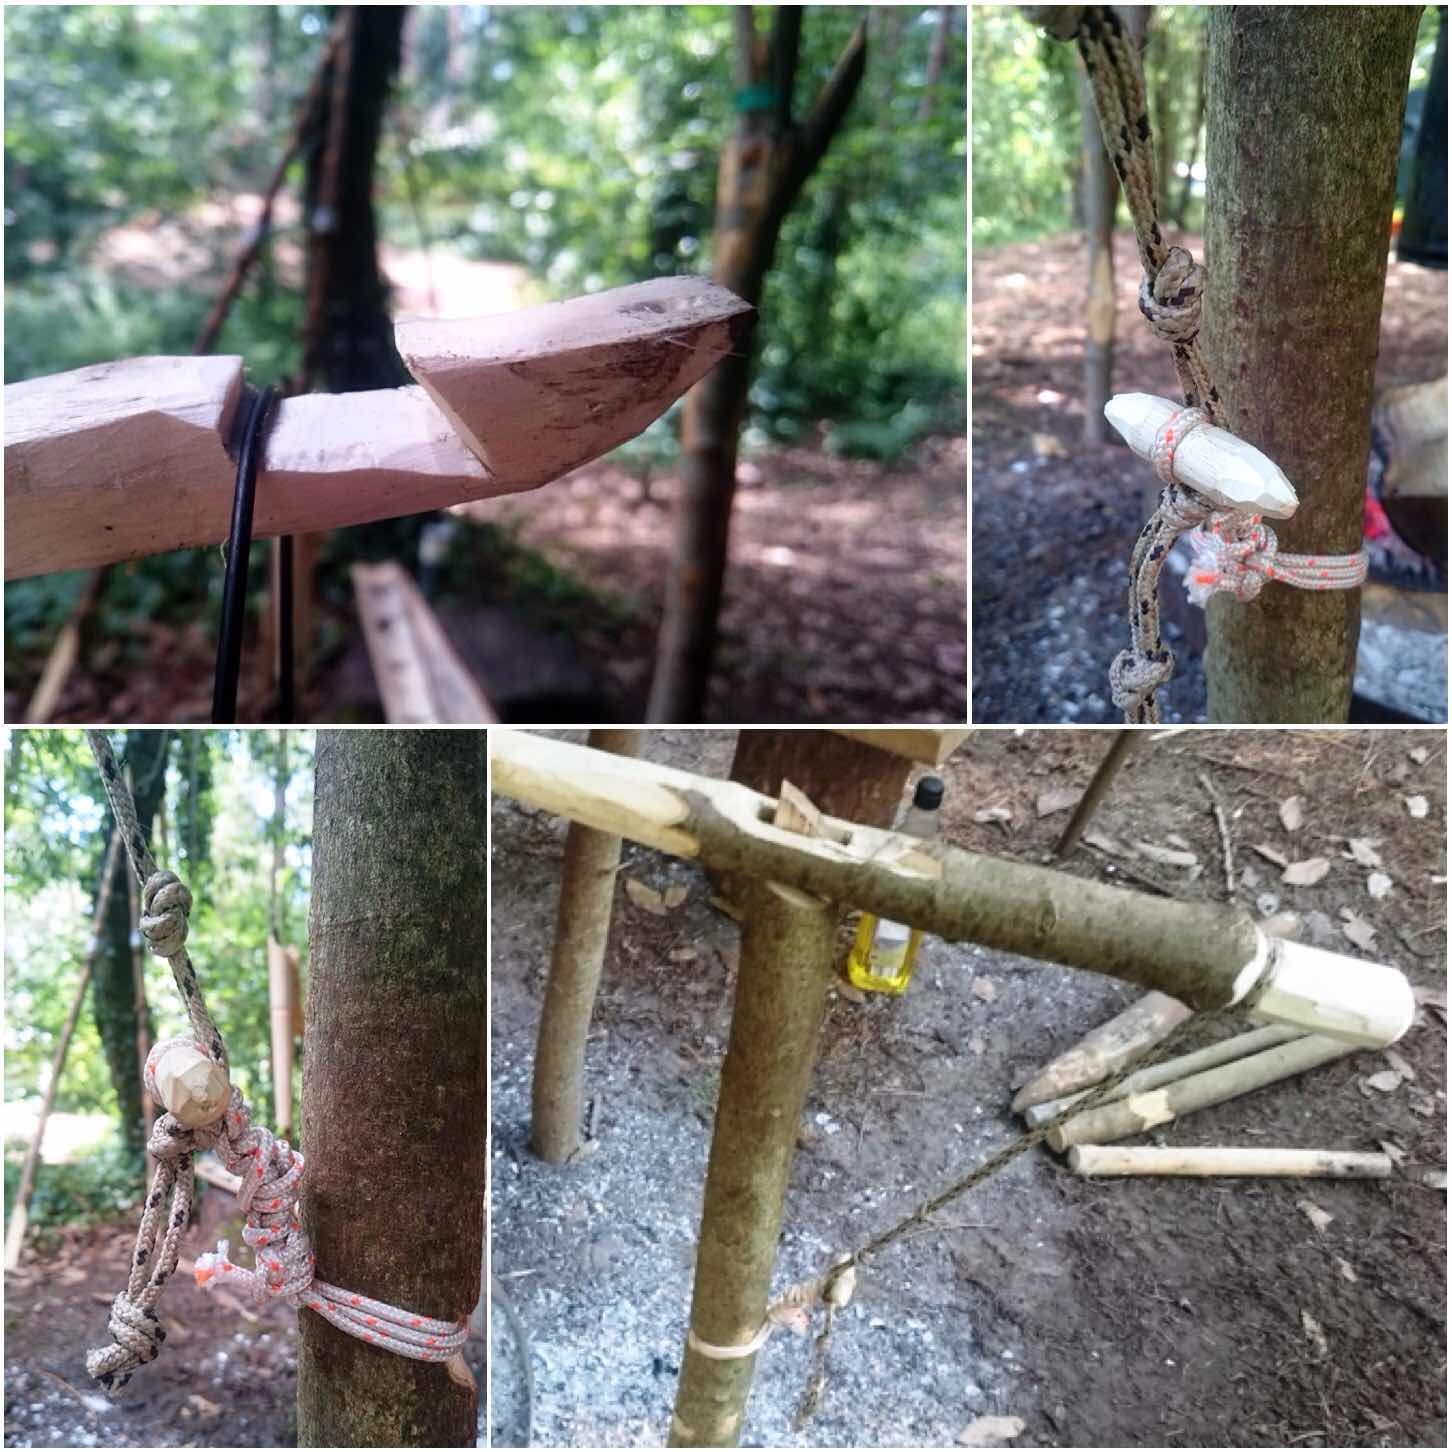
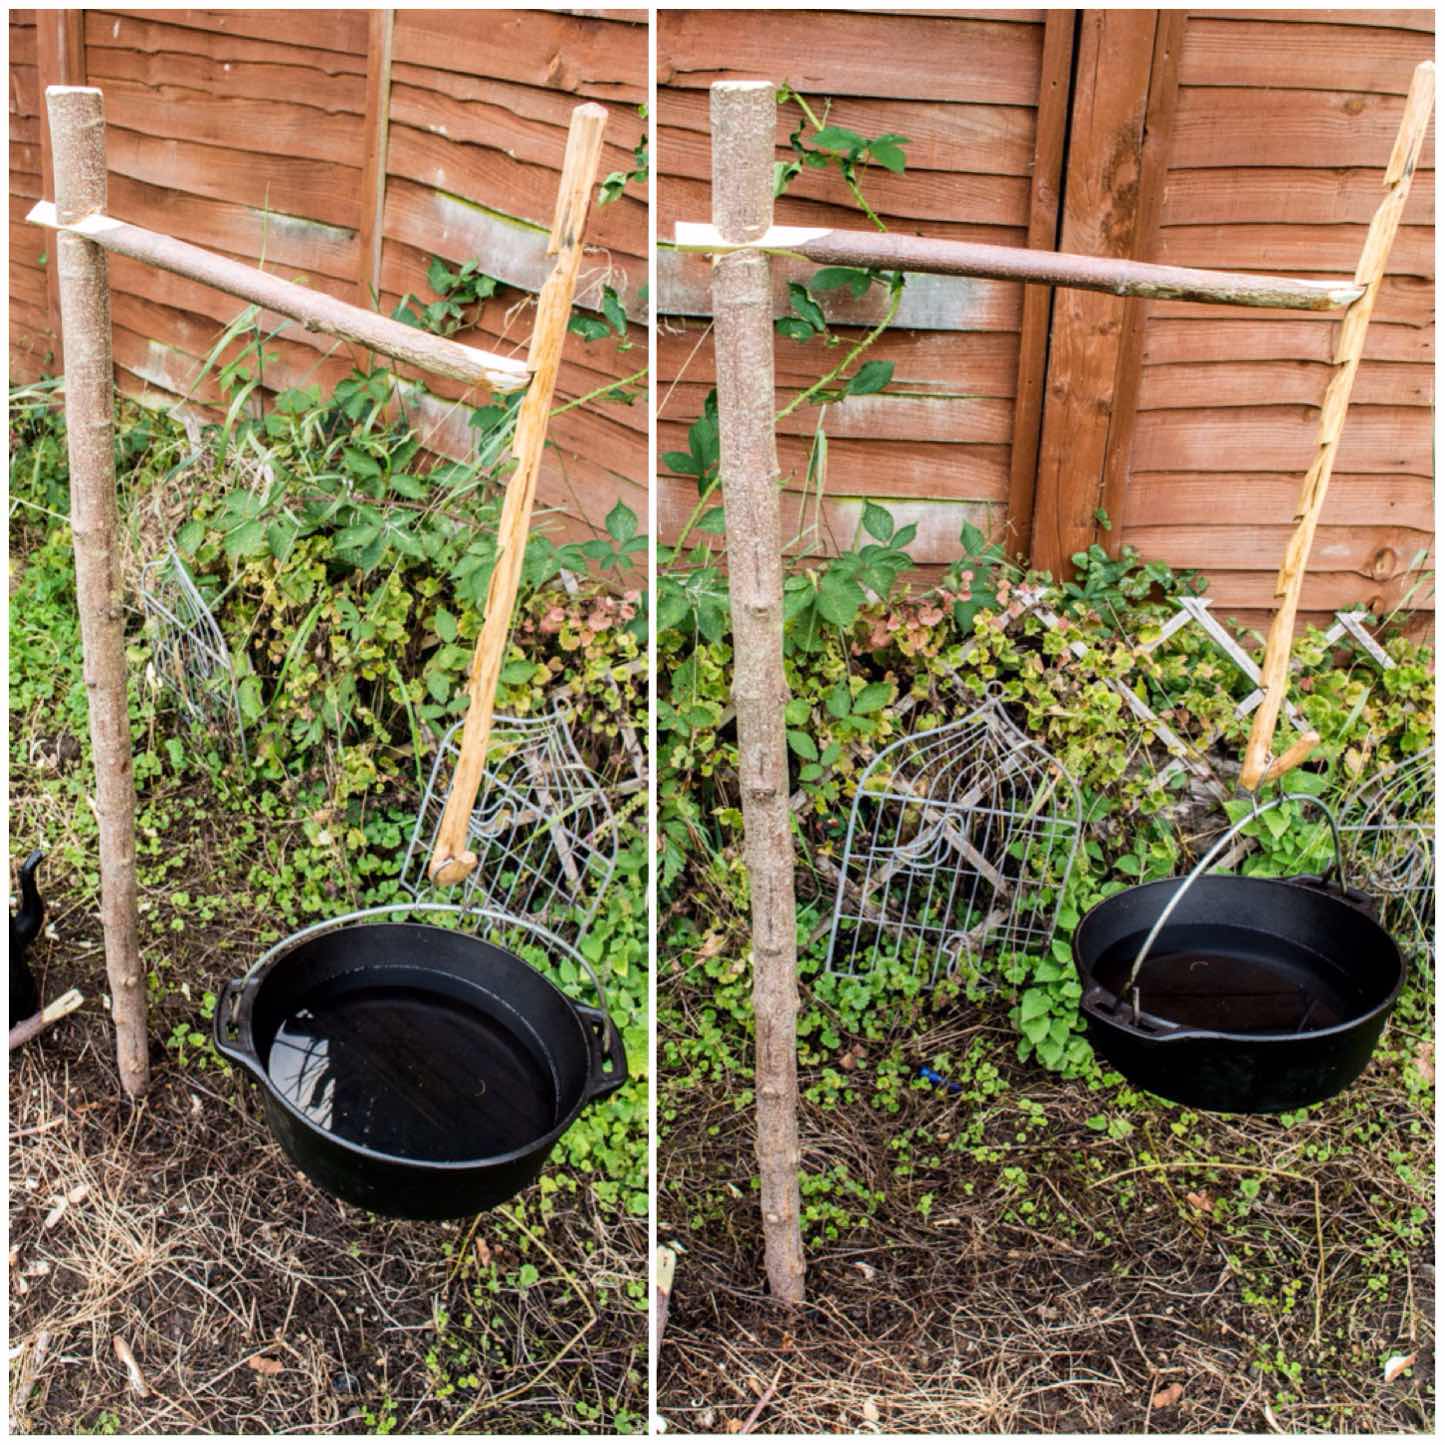
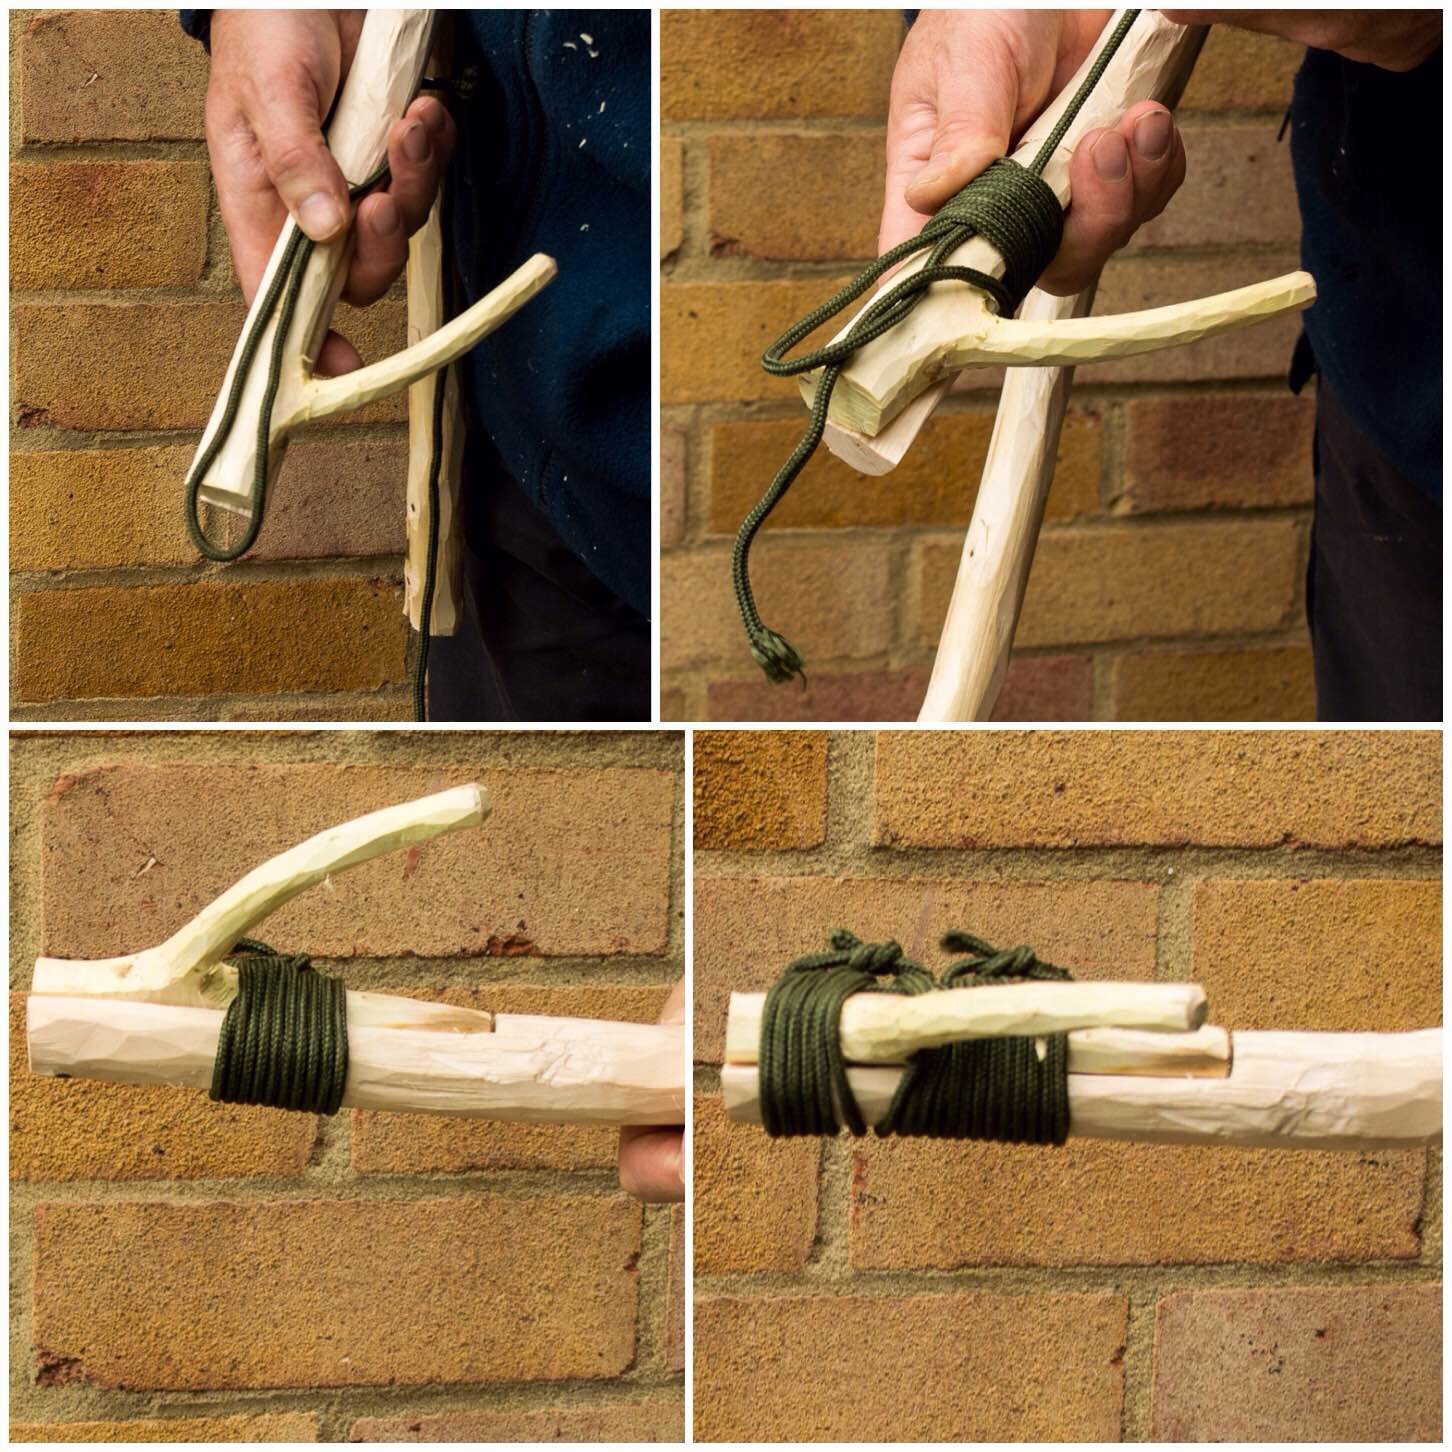
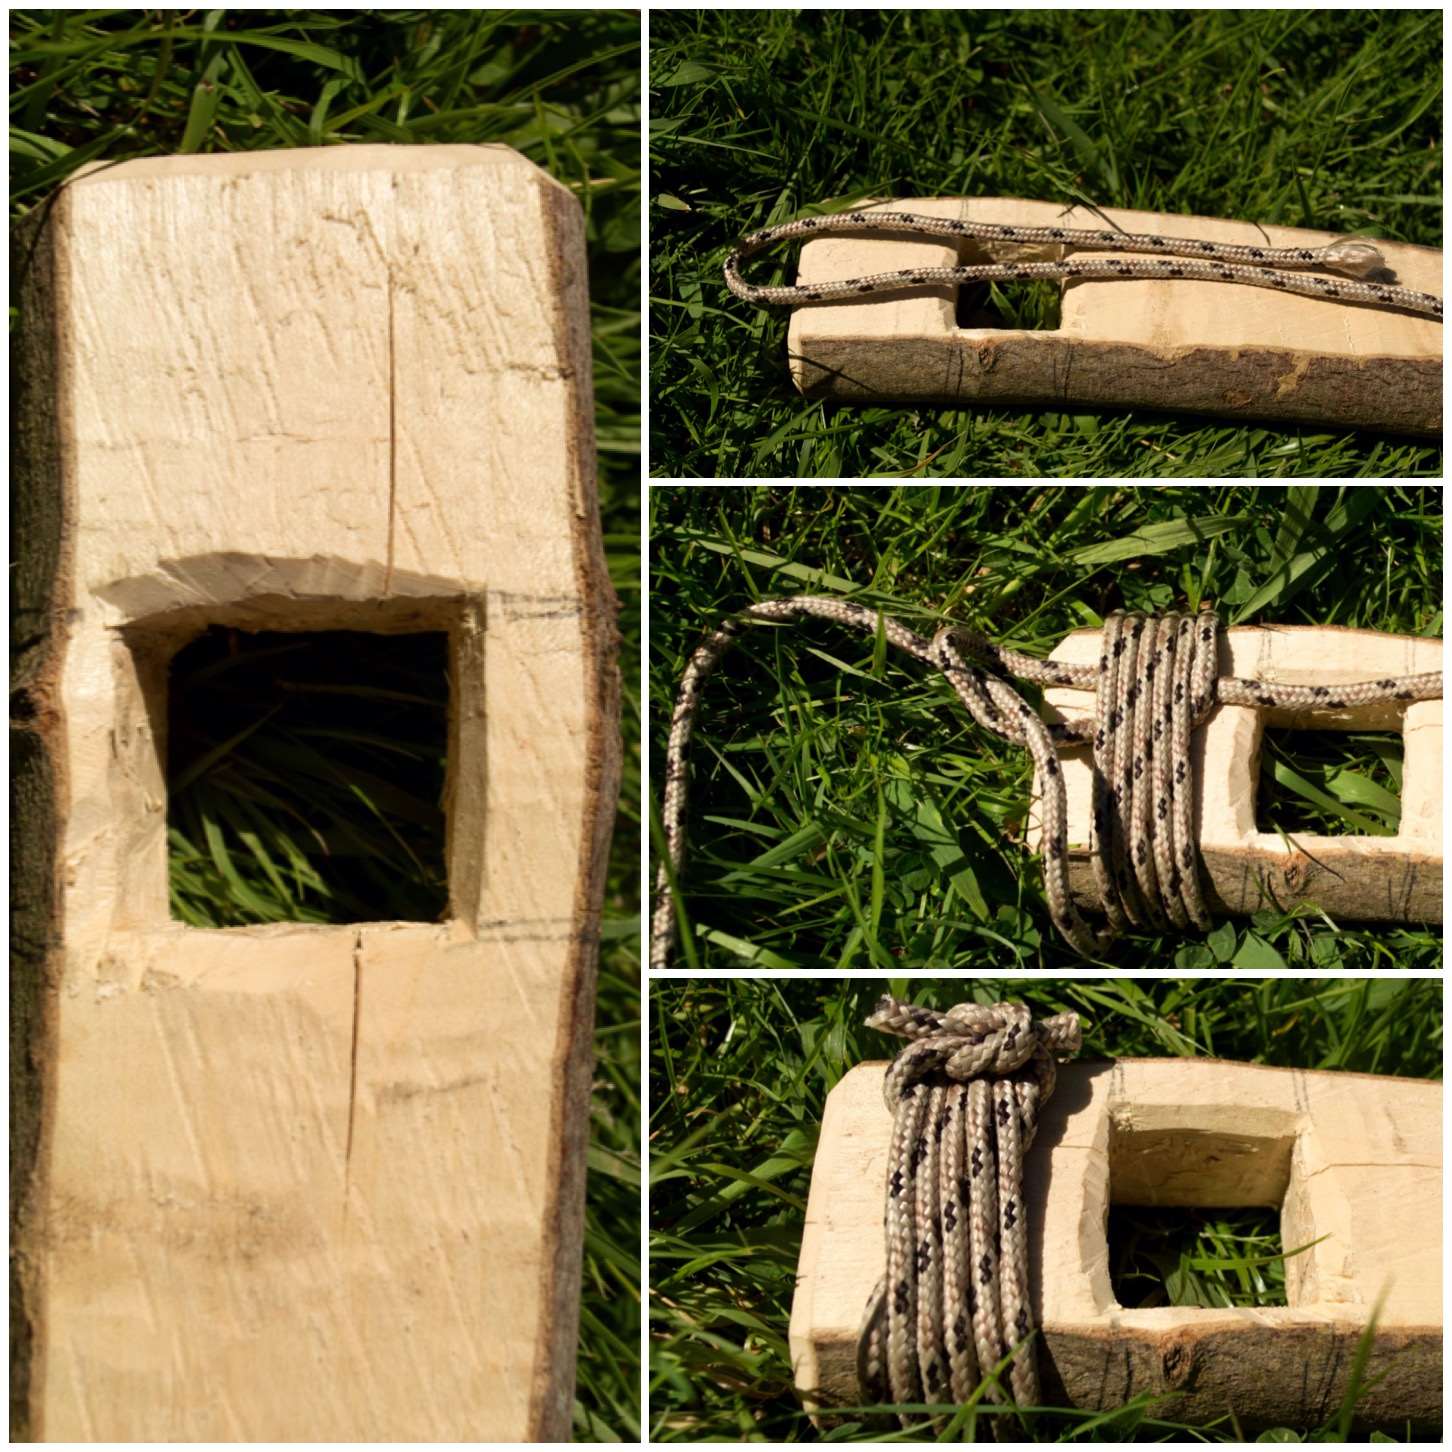
I spent a long time working out a way of making the arm fully adjustable with just the usual items in my rucksack. After discussing this with Ian and Charlie I opted for a simple system with string and a wooden toggle.
Below you can see that the upright and the arm are connected by string and a toggle on the left hand side.
In Profile
I tied off some doubled-up string to the arm groove and knotted it along its length with some simple overhand knots. This produced lots of little loops the toggle could fit into.
I attached a toggle to the upright groove and inserted the toggle into one of the loops in the string from the arm. Depending on what loop I put the toggle into I could adjust the height of any pot hanging off the other end of the arm.
The groove for the pot handle I made with a backstop and a slightly angled forward section. This shape allows the pot to remain secure when the arm is either raised or lowered.
In detail
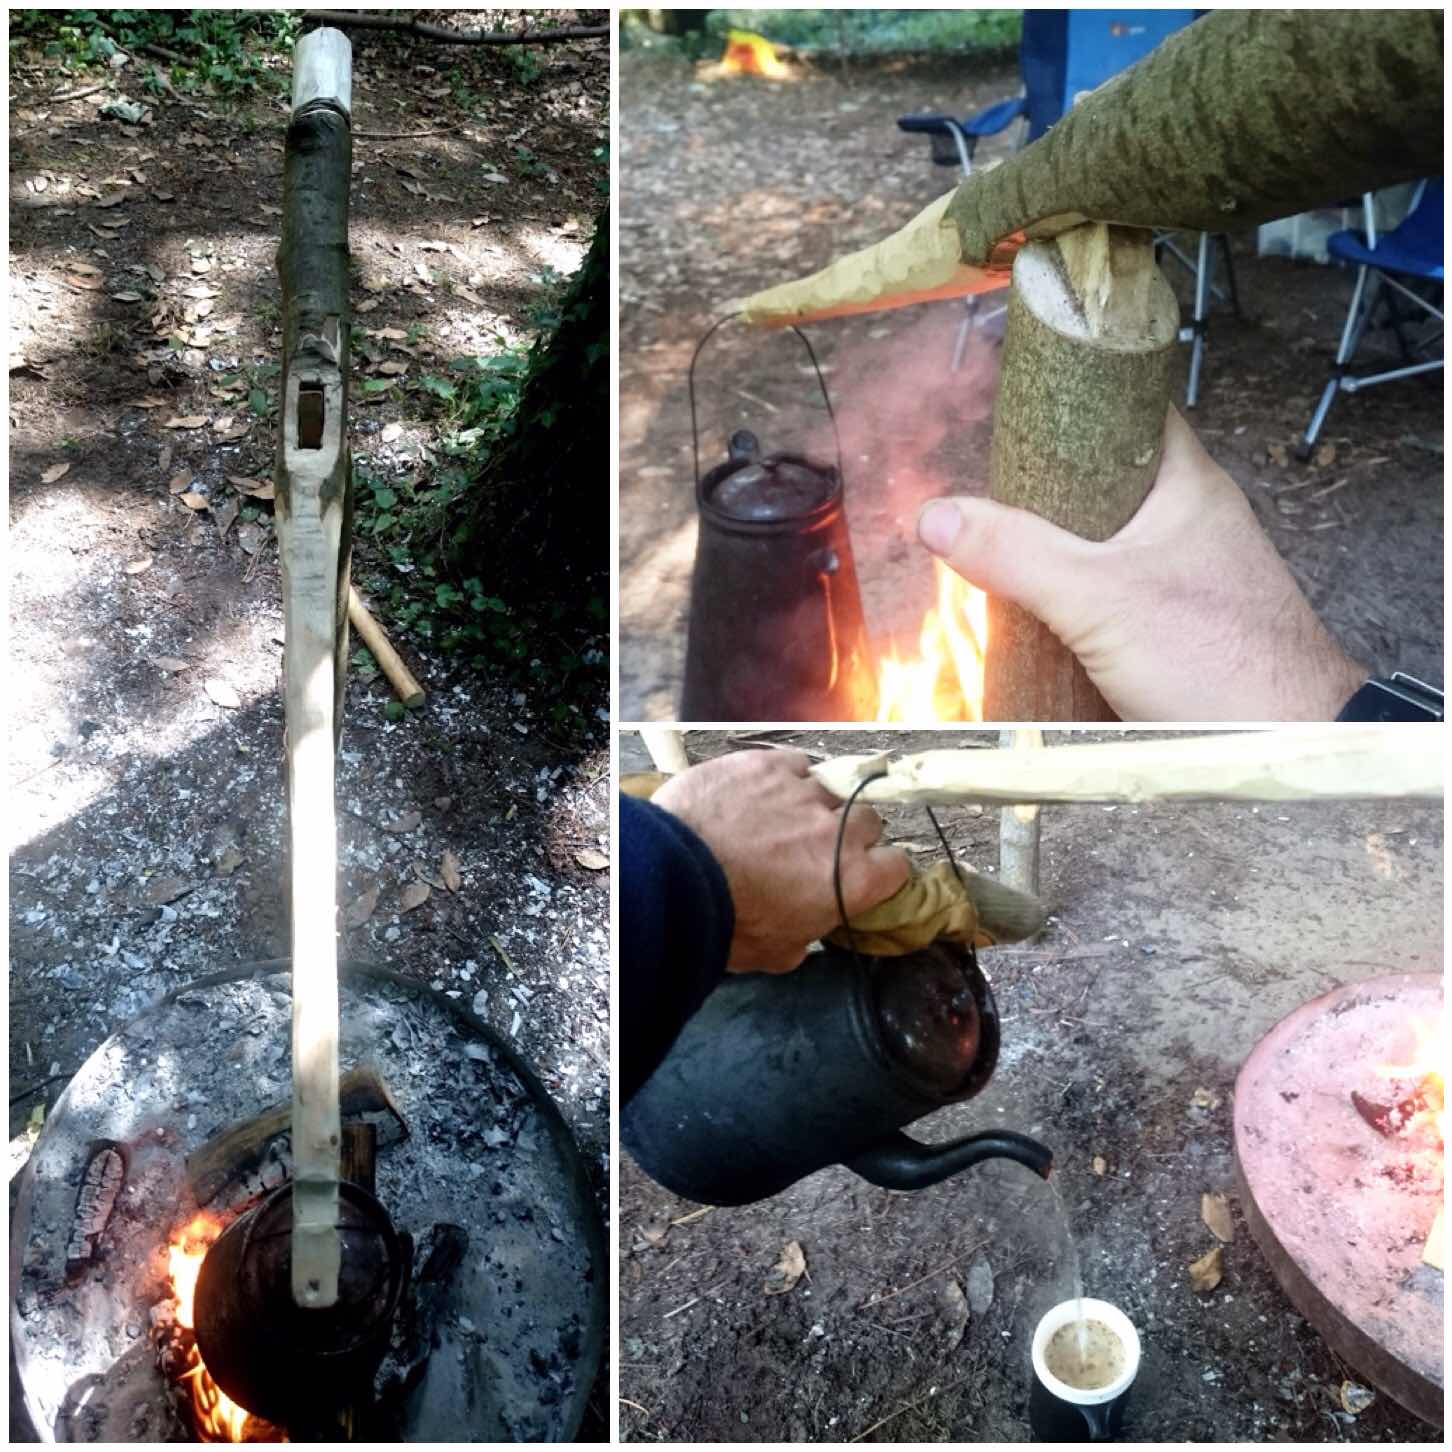
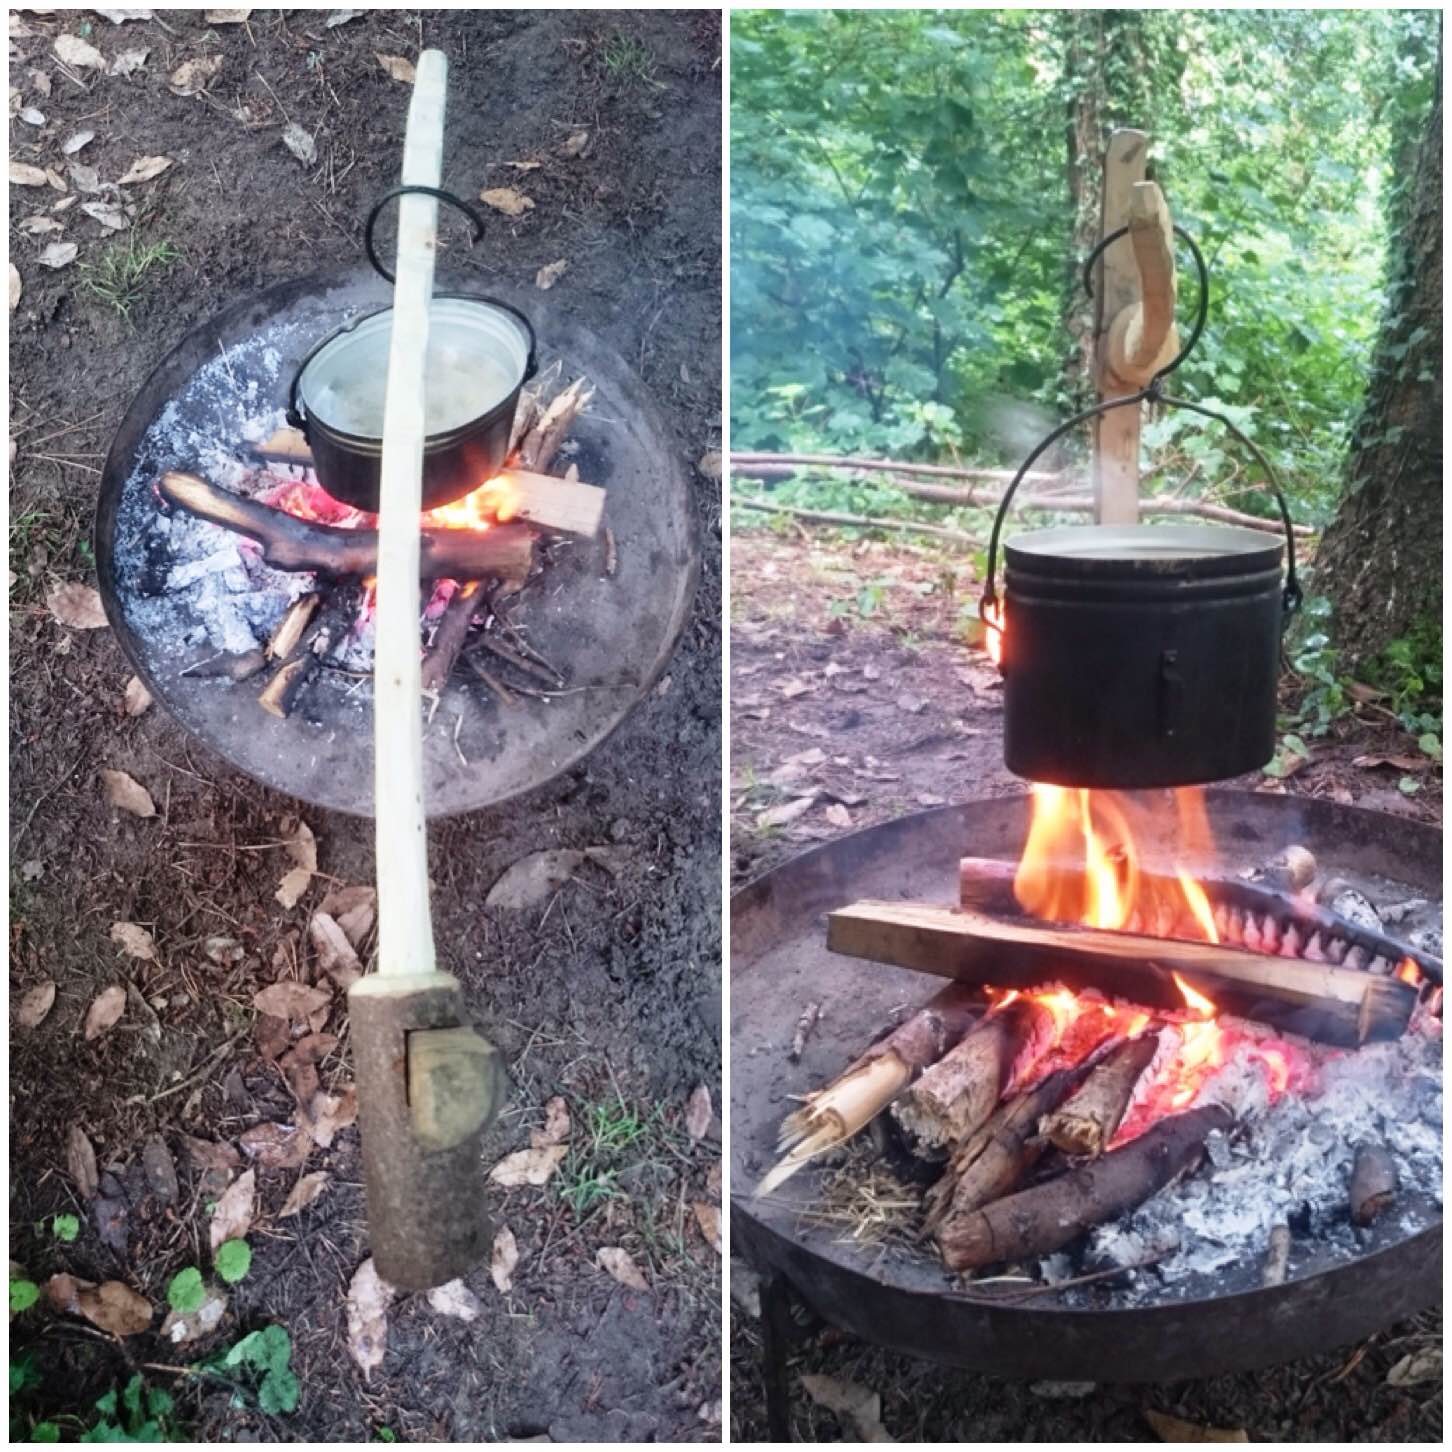
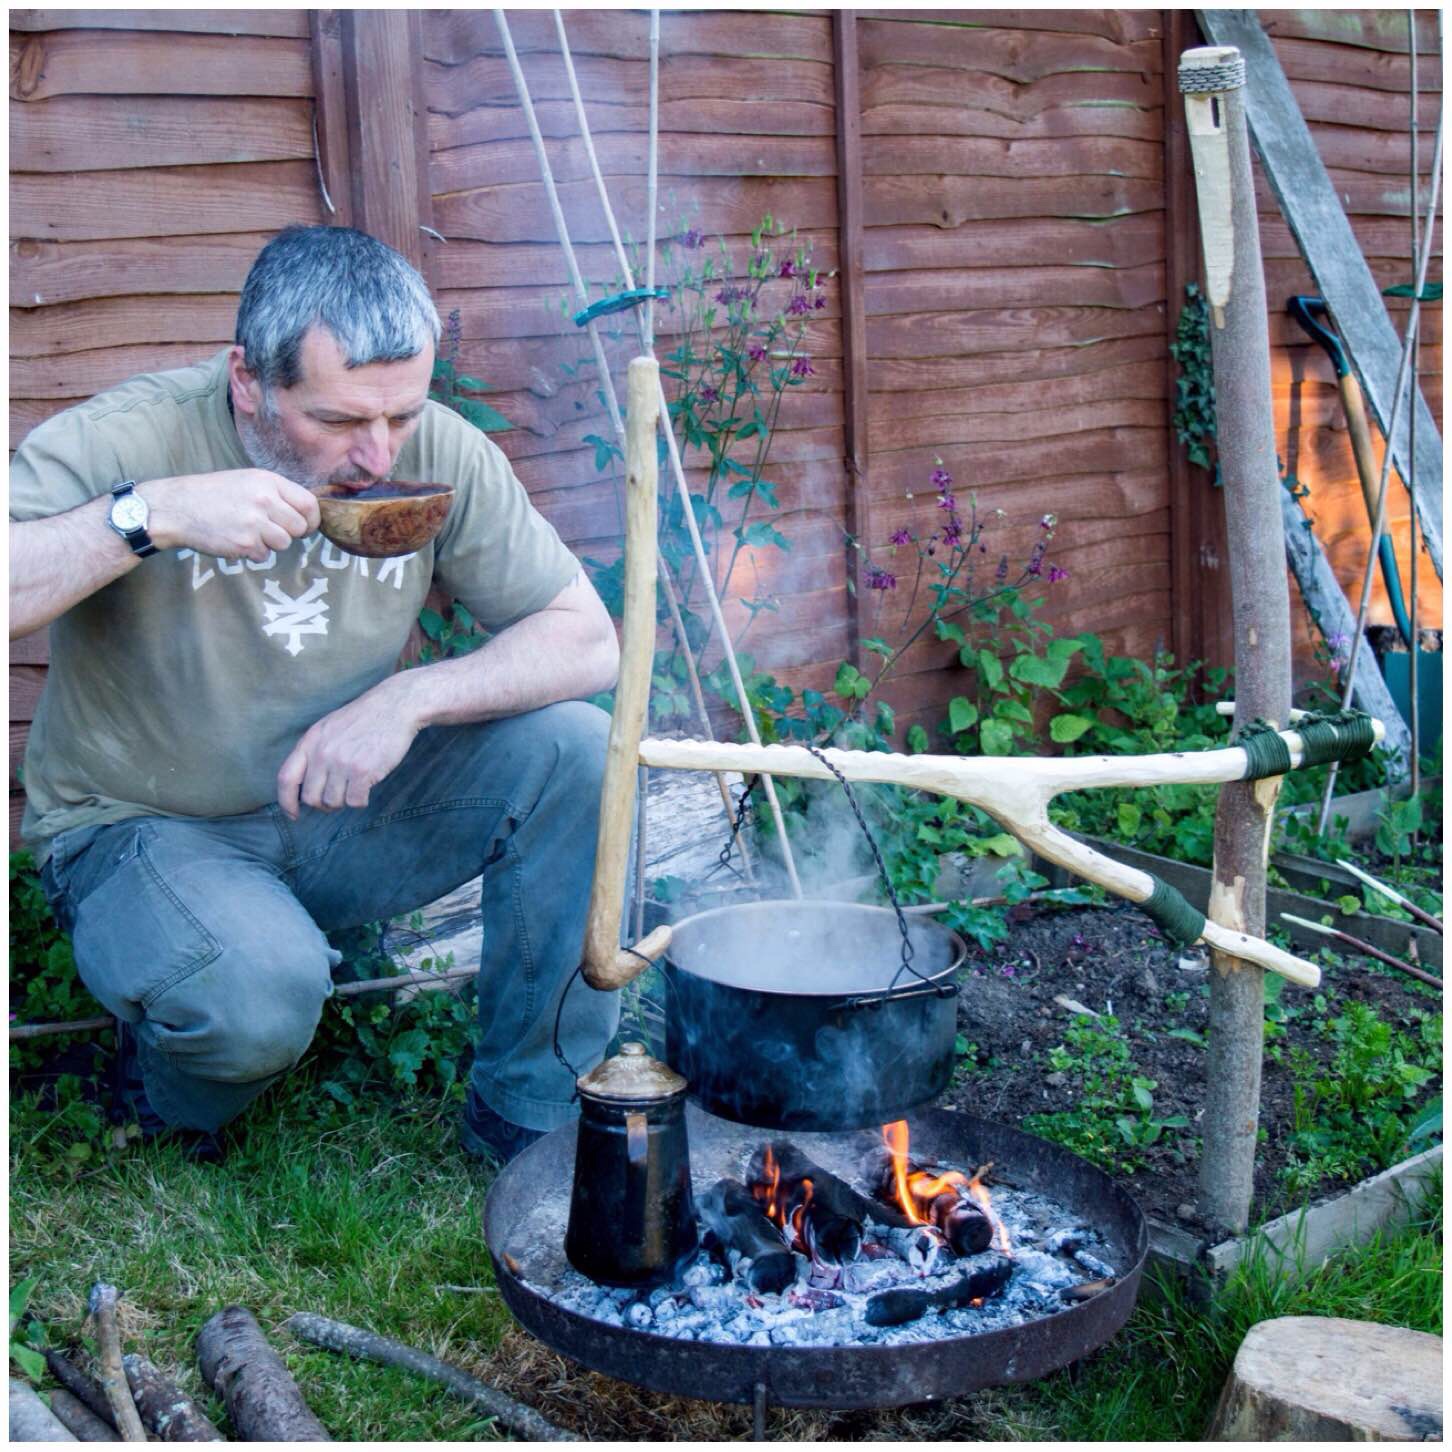
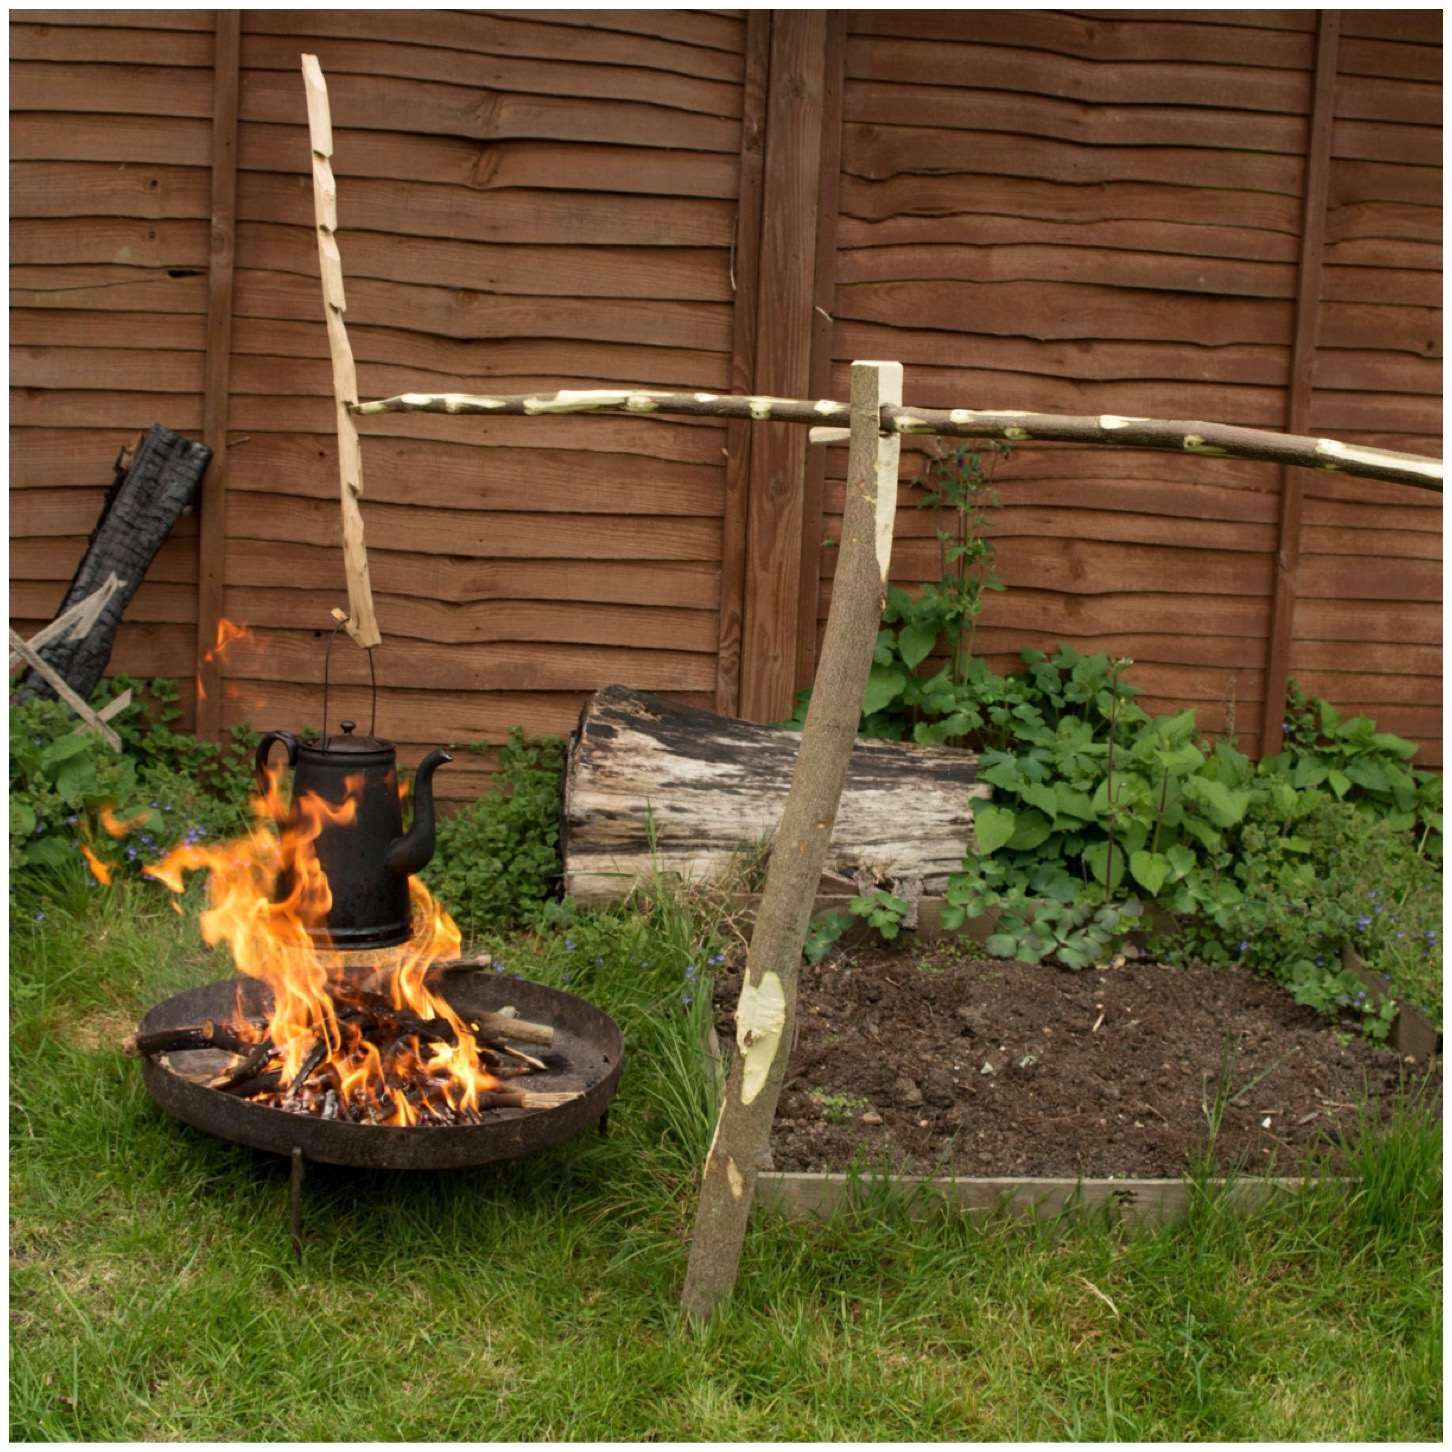
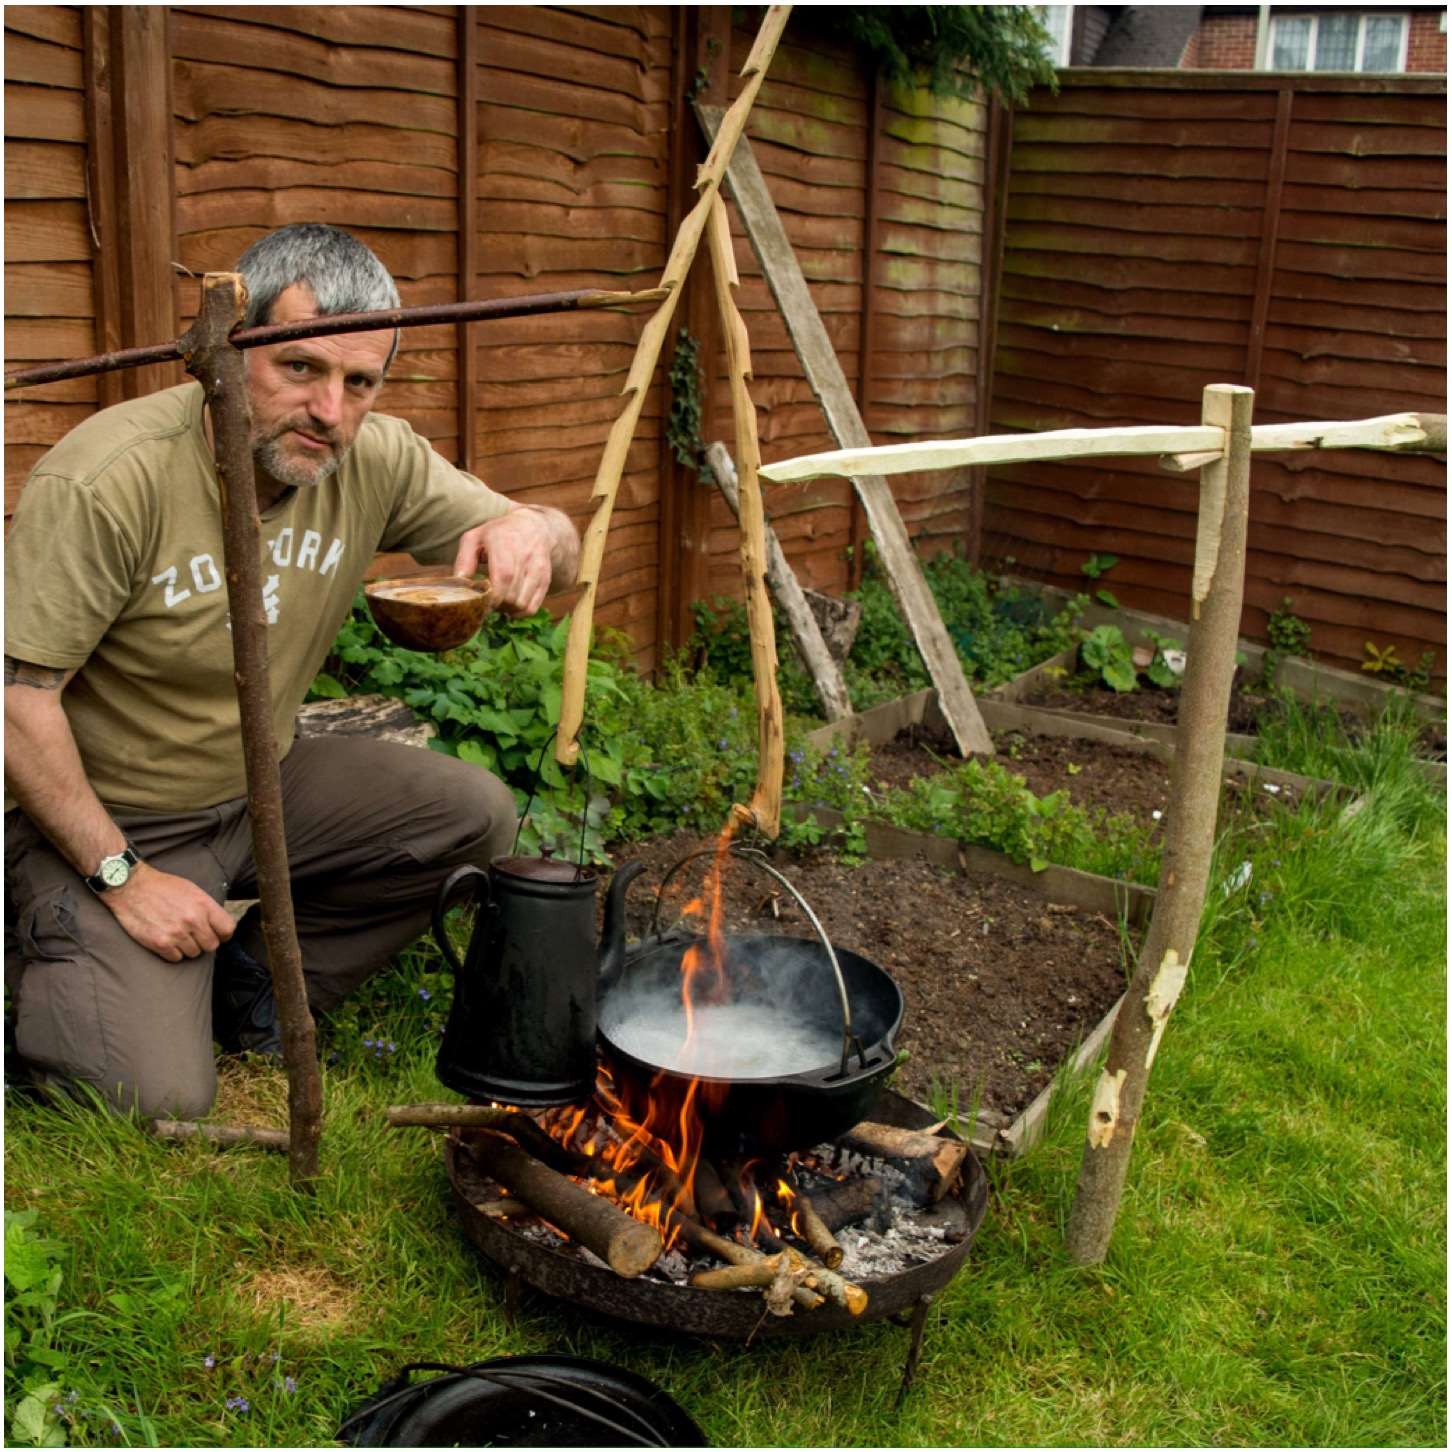
To insert the upright I had a separate pole to act as a pile driver. I hammered this into the ground first and then inserted the upright into the hole I’d created.
The upright can then be rotated quite easily to move your pot off the fire. I found that I could pour water from the kettle while it was still attached to the arm as the handle sat snugly in the angled section of the pot handle groove.
In use
I like this crane for the challenges it set me and the fact that I could overcome them with just the kit I would normally carry.
I plan to re-visit the string set up as there must be a simpler method to keep the arm securley attached while giving me the ability to adjust its height.
Feel free to suggest an alternative method for this but remember it needs to be created with what you would normally expect to carry in your rucksack or about your person while out in the woods.
Up and Down
This will be (for the moment at least) the last How To…. on building campfire cranes however I have really enjoyed exploring this very diverse and little documented area of Bushcraft.
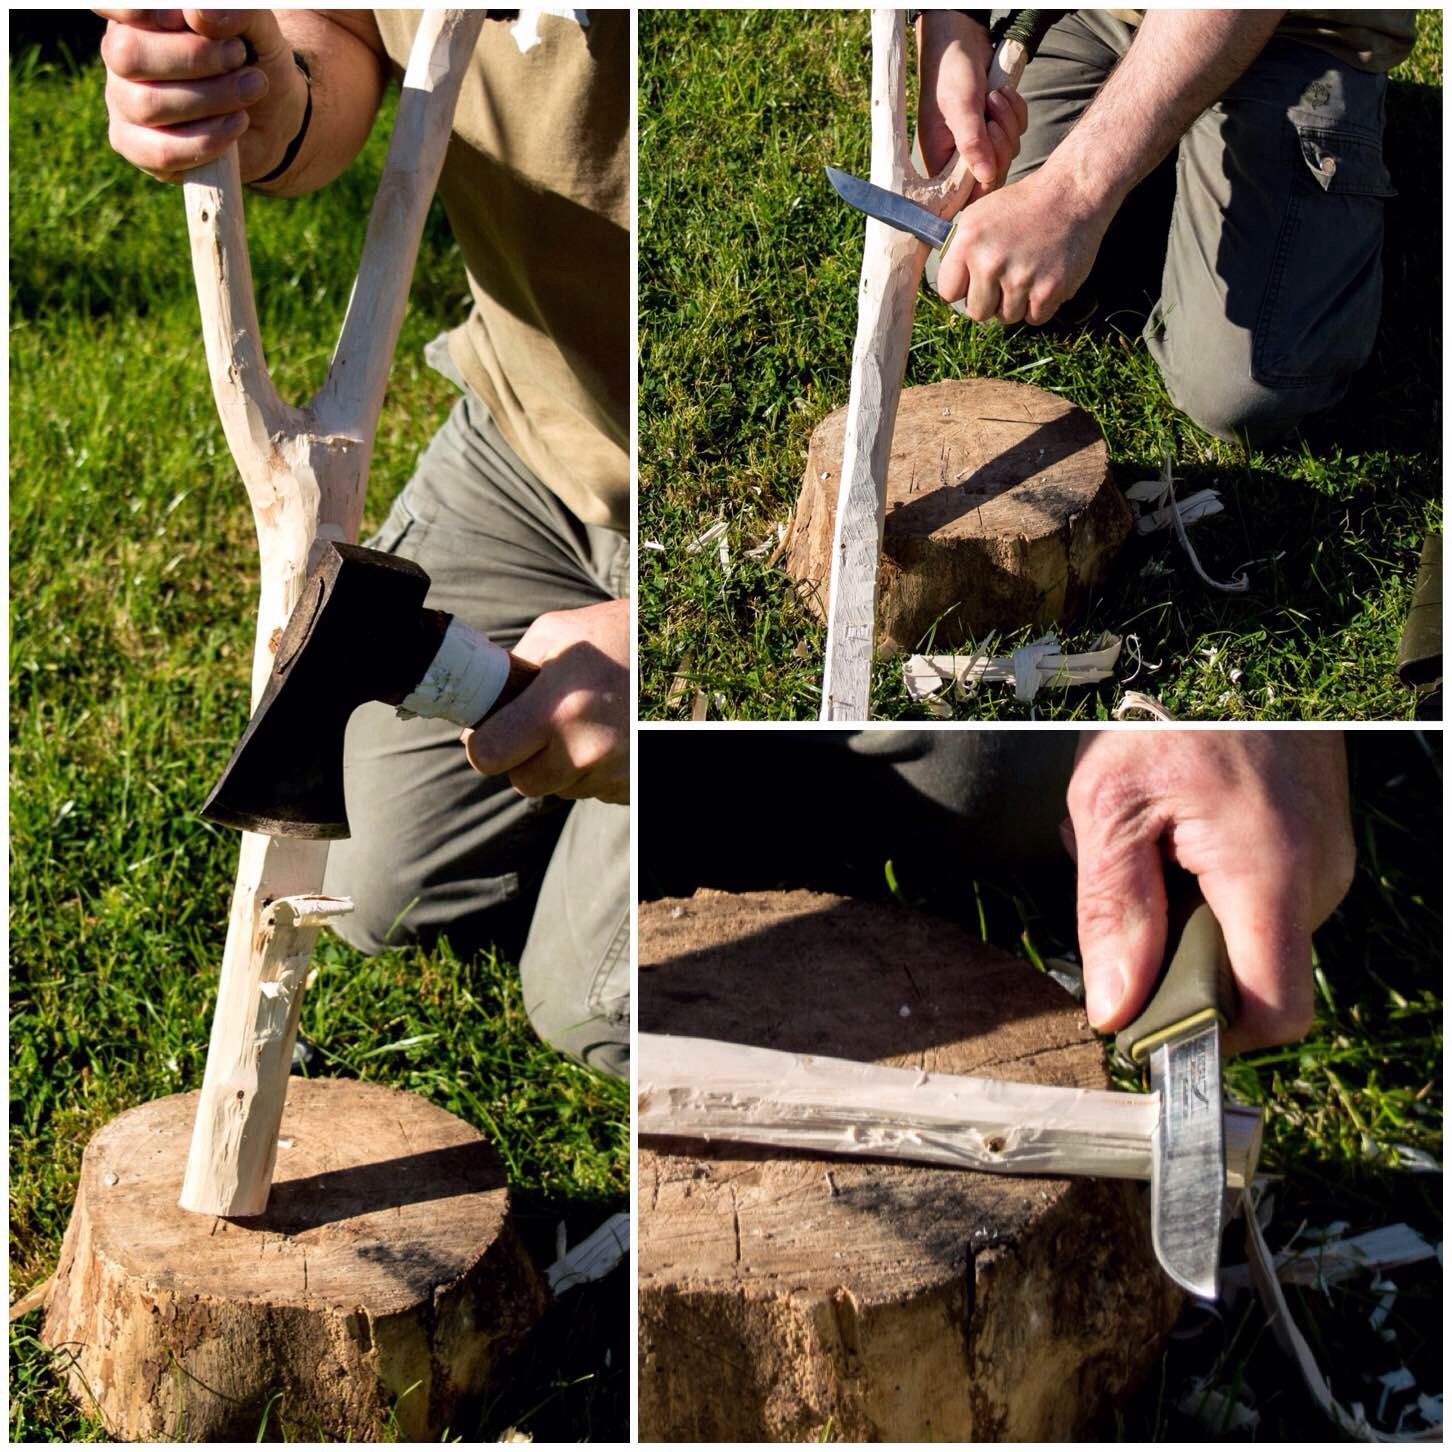
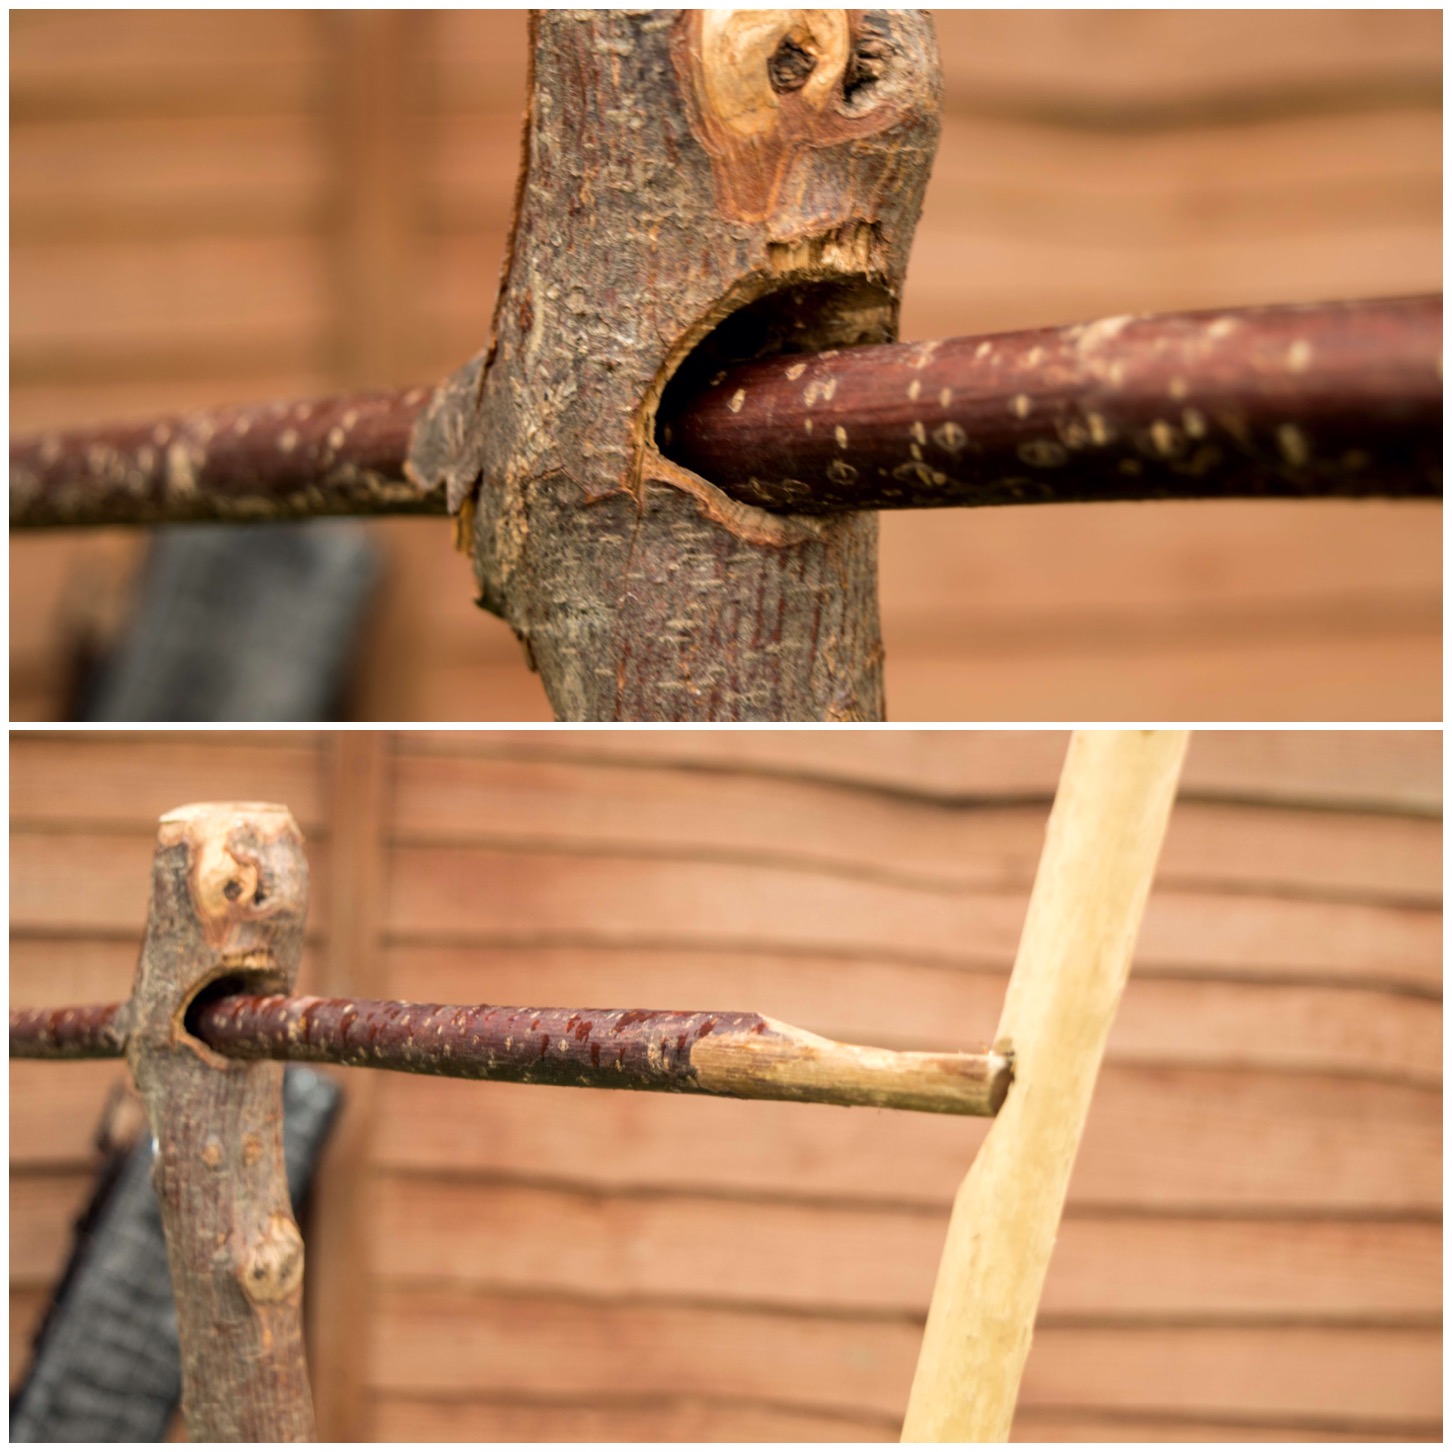
My search to find and document as many different campfire cranes brought me to this simple type of dovetail crane. I first came across this idea from a blog post by Ken Cole Jr on the Scout Pioneering site. I expanded on their idea with adding an adjustable pot hanger to the crane.
It is similar in concept to the Cooking Crane I documented previously except that the socket on the upright is created by cutting into the side of it instead of through the middle of the upright. This leads to a far quicker construction time.
Simple Dovetail Crane
I also like these vertical campfire cranes as there is little for people to trip up on around the campfire and like my previous post on the adjustable dovetail crane this simpler version is built using just a single pole.
Trimming
I used a sycamore pole on I had on hand trimmed it into two pieces using my folding saw.
One pole trimmed to size
The larger pole you can see below was destined to be the upright and the thinner piece was to be the cranes arm.
The arm
I started work on the arm first carving a triangular end on one side. I took my time here to make all the sides even in shape.
Carving the triangular bed of the arm
Once the arm had the correct shape carved out I used it as a template to mark out the dovetail socket I would cut into the upright.
The upright
It is worth the time doing this as you want to produce a socket that the arm will fit into snugly.
Using the arm to score out the shape of the socket
Once the shape had been marked out with my knife I used my saw to cut into the upright, one on each side and then a couple of cuts through the middle.
Roughing out the socket
I used my knife then to carve out all the loose excess wood and to smooth all the sides out.
I continually kept trying to insert the triangulated end of the arm to see if it would fit. As I wanted to keep as much wood on the arm I just used my knife to keep carving of more wood from the socket area on the upright to enlarge it. Eventually the arm was able to be inserted into the socket and released without too much force but still fitted snugly.
Finishing with the knife
To finish the upright I chamfered the top so that it would not split when I hammered it into the ground and carved a strong point on the other end.
Chamfering and pointing the upright
I hammered the upright and checked to make sure all the angles looked good. I like to have my crane uprights to have a little lean away from the fire but not too much as this could cause the arm to swing when it had a heavy load.
Checking the angles
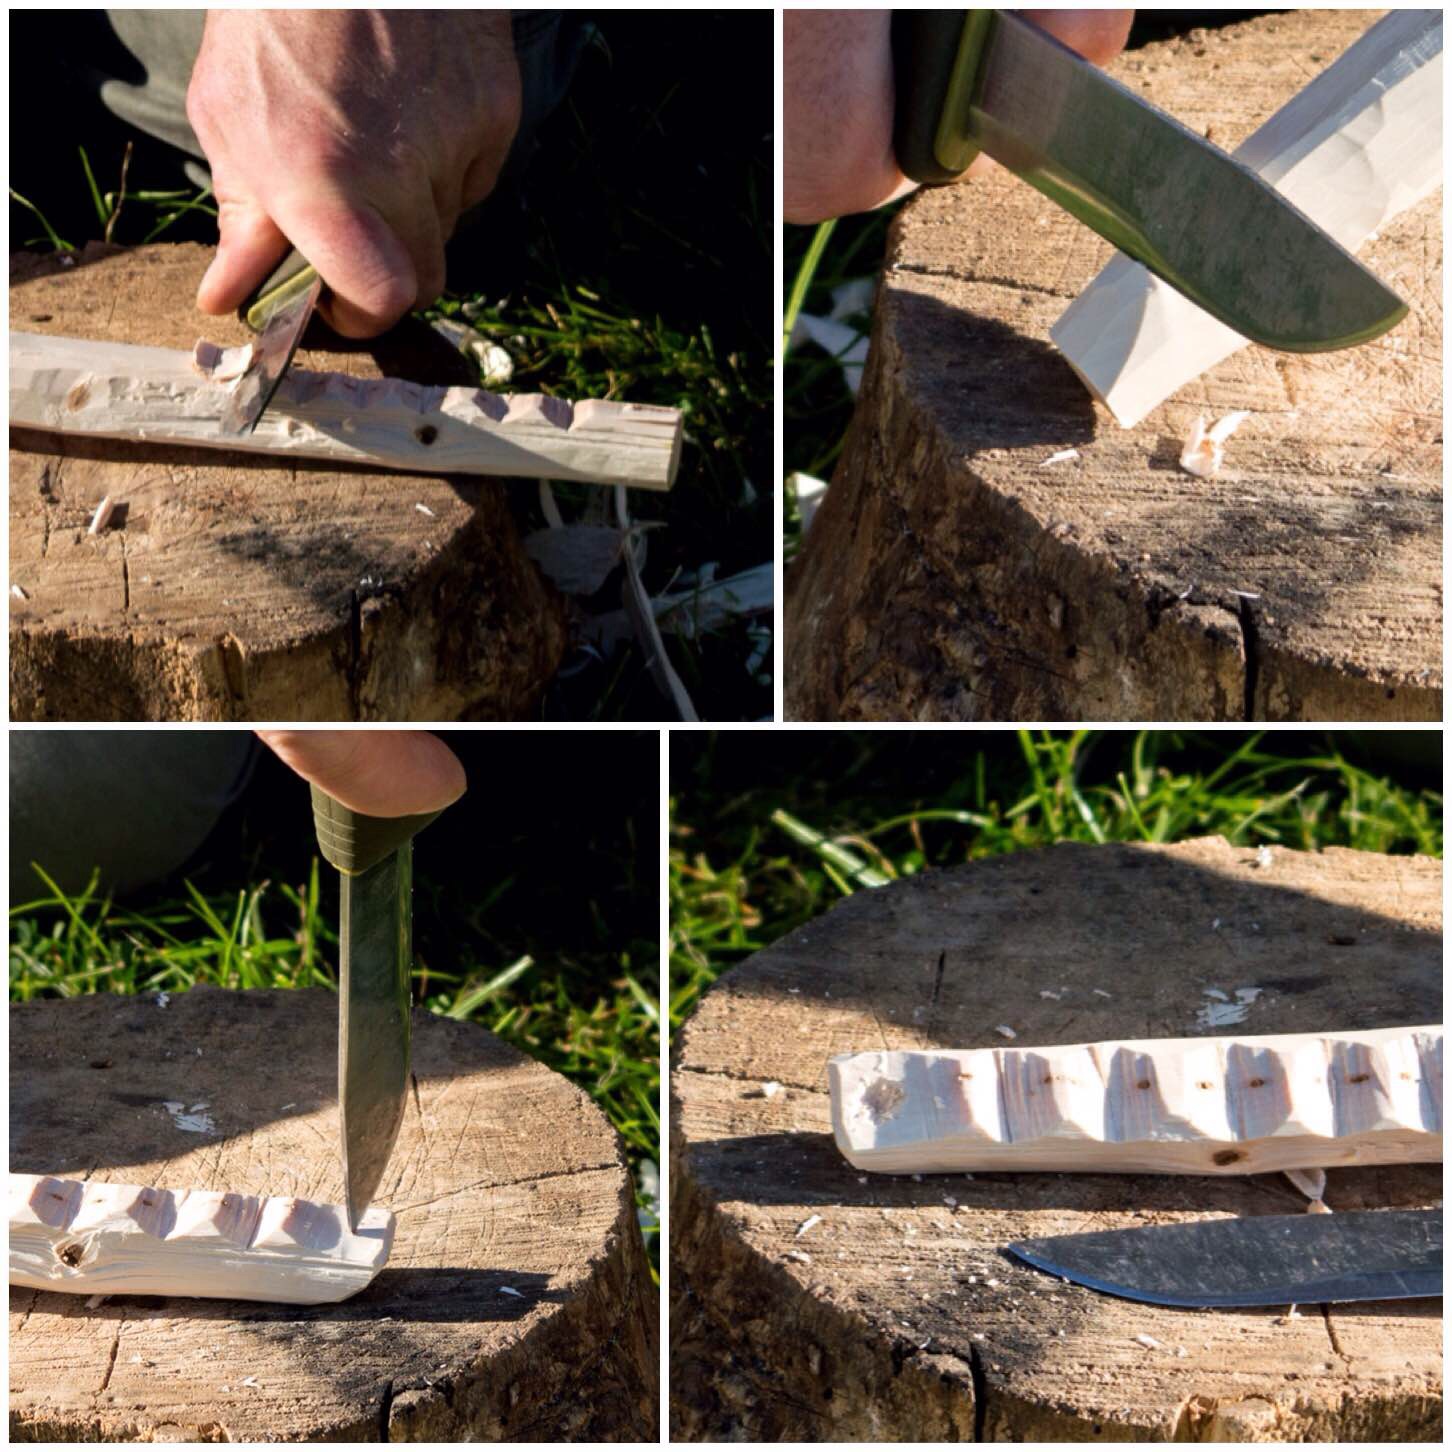
Hanging the pot hanger
The arm needs a little flat platform carved on the end with a little dimple in it the pot hanger to balance on. I have explained in a previous post on carving an adjustable pot hanger on how to make one of these.
Just make sure that you carve the flat platform on the correct plane in relation to how the arm fits into the upright – I used the triangular end as a guide for this.
Carving the pot hanger end of the arm
You can see in the picture below the end of the arm has a slightly flattened surface and a slightly curved surface underneath it.
Completed
If your pole is long enough you could carve your pot hanger from it. In this case I had plenty on hand so just used one I had made before.
Testing
You can see in the picture below how the pot hanger sits on the tip of the arm in the little dimple. It looks very fragile but it can hold a lot of weight if everything is carved properly.
Attaching a pot hanger
I decided to shorten the arm of the crane as it bent a bit with the weight of the full kettle so rather than cut the end with the dimple I just extended the triangulated area of the arm so that it could be adjusted easily(I did trim the back of the arm later).
Shortened arm
I was quite happy with the arm being this length for the weight of the full kettle.
I also brought out one of my Dutch Ovens and filled it with water to test out the crane. I decided though to carve another shorted arm so that it would stand up to the extra weight better.
A full kettle – little bend in the arm
This shorter arm did bend a little bit but it did not break. Just to make sure I left the pot hanging off the crane for two days without any problems.
Shorter arm for a heavy pot – more pronounced bend but still workable
I took the crane to a Sea Cadet camp last weekend and it was used all weekend to keep the kettle on the go. There were a lot of staff around the campfire most of the time but due to its minimal footprint the crane did not get in anyone’s way.
Kettles on
I really like this crane for various reasons, these being it is simple, quick to make, tidy and strong.
If you have never made a crane before I recommend this type as one to experiment with.
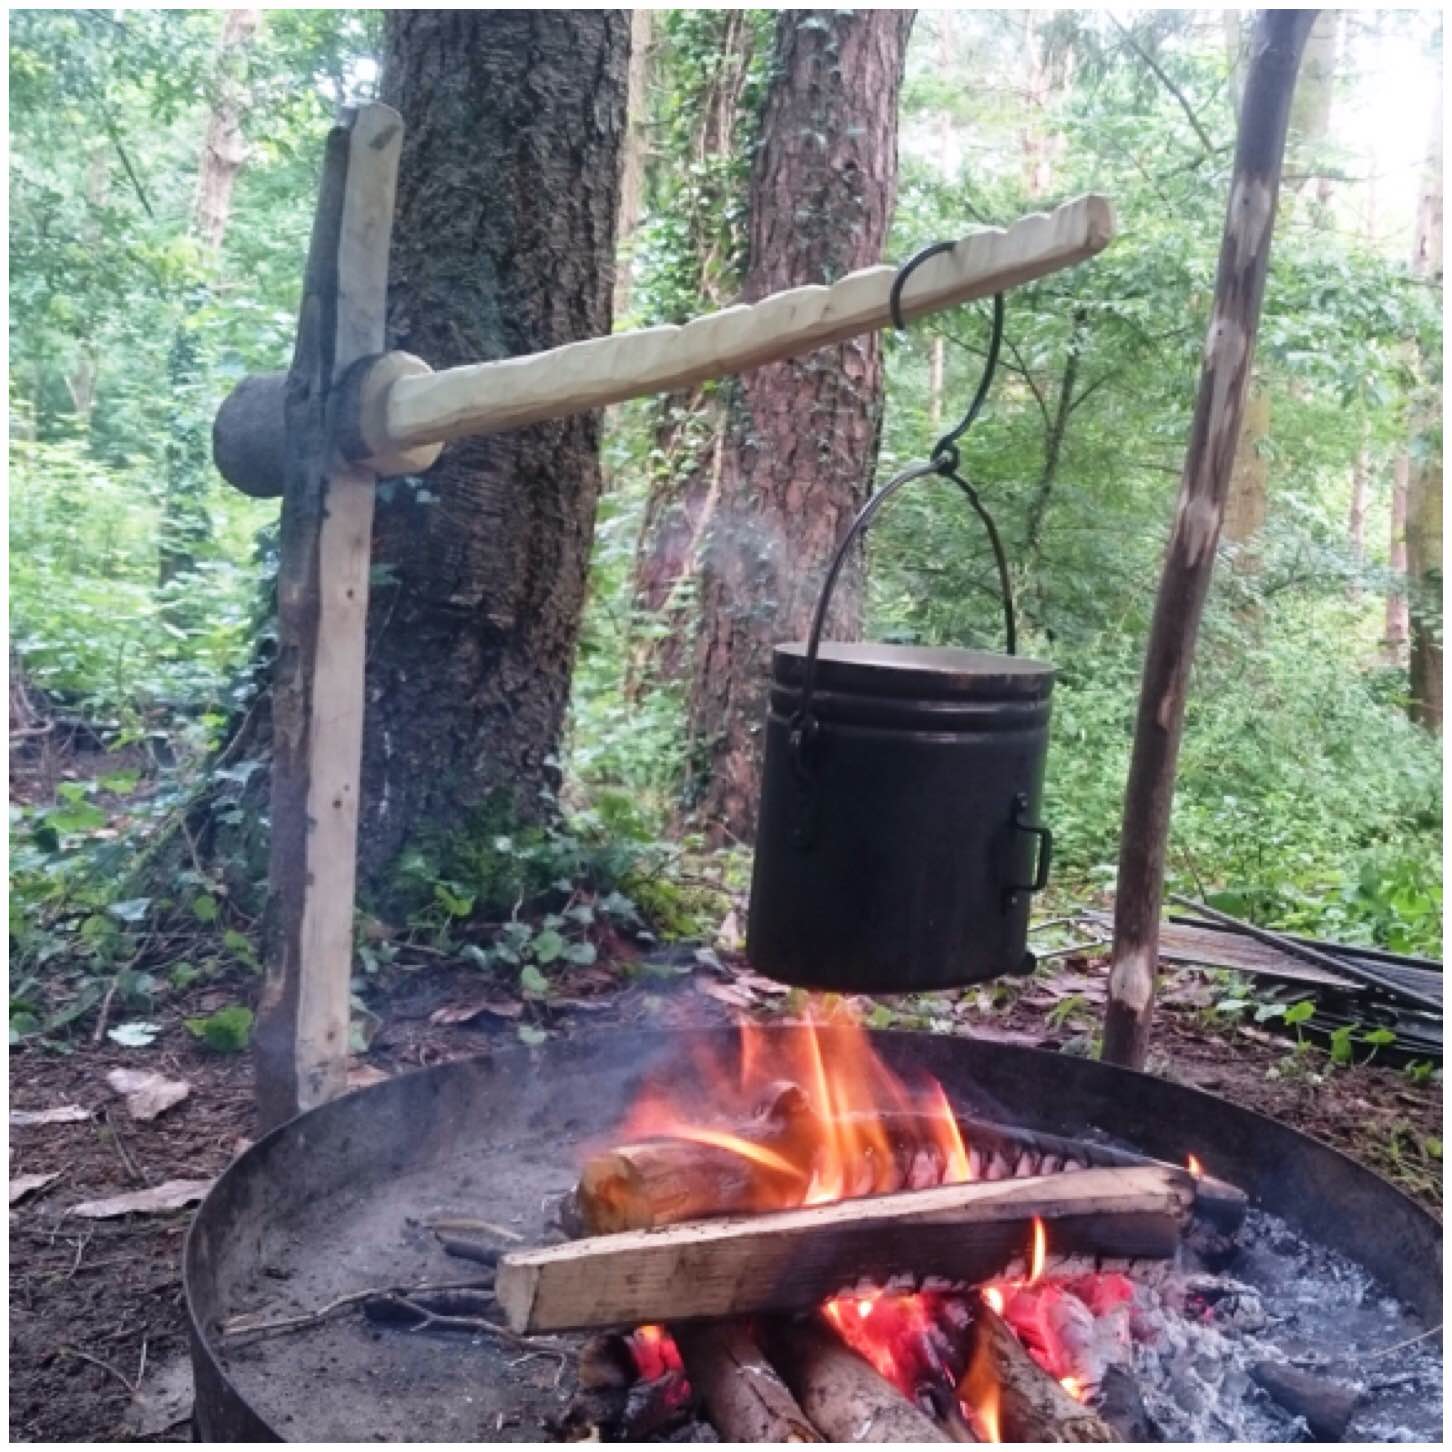
While I was writing my post on the Single Fork Aures crane I got a message from a Bushcraft USA member called Alukban about another type of campfire crane, which was made out of a single piece of wood and looked quite straightforward to carve.
The connection between the arm and the upright is a type of Lap Joint. It is easy to adjust and can take the weight of a decent-sized pot.
Lap Joint Crane
Trimming
I had some sycamore lying around, about a metre and a half long. I trimmed the fork off the end as it was not needed and then cut the pole into two further pieces.
In the picture below all the wood to the left of the folding saw became the arm and the rest became the upright for the crane.
Single Pole
The upright
I squared off three of the sides of the upright along two thirds of its length and formed a point on the bottom third.
I took my time doing this so that it was as even and as smooth as possible along its length where it was squared.
Square the top – Round the bottom
Once I was happy with the upright I moved onto the arm. The whole crane works on the principle that the weight of a pot hanging on it will create enough friction to hold the arm against the upright.
Line up to Mark up
The arm
I used the upright as a guide to measuring where I need to cut out the lap joint on the arm (I measured it so that the lap joint would be very tight initially). I did not make this a 90 degree angle but about 100 degrees, so that the tip of the arm would be pointing slightly upwards.
Once I had marked the width on the arm I cut some stop cuts to half the depth of the arm and then added some more to make it easier to carve out.
I also used my saw to carve out some of the excess wood from the joint area.
Stop cuts and Sawing out
Once I had taken out most of the excess wood with the saw I used my knife to remove the rest and make it all smooth.
Trim with a knife
I locked the two pieces together and started to move the arm up and down the upright. This allowed me to spot rough areas still on the upright and then I was able to easily trim that wood off with my knife.
Continually check the fit
Once I was happy that the arm could move easily up and down the upright I trimmed of loads of excess wood from the arm to make it easier to attach a pot.
I put a stop cut about a quarter of the depth of the arm all the way around it to protect the wood around the lap joint.
Trim the limb
You can see the general shape of the arm appearing now. I likened it to the shape of an old-style naval cutlass.
The arm
In use
I added a few ridges along the length of the arm to hold pots securely and then started trying it out.
Carve the notches
I used this crane for two weeks at the Bushcraft UK Bushmoot in South Wales over the summer and was quite impressed with it. It holds pots well under tension but it needs to be treated with respect when moving the pot up and down.
I found that the crane works best with the pot hanging from near the end of the arm. If you move the pot closer to the upright along the arm it has a tendency to slip.
It is all in the friction
I will be making a variation of this style over the next few days with more of a dovetail joint so that the arm cannot come off so easily.
A great crane
I like this crane due to its simplicity so give it a go.
This is the second of my blog posts on the Aures campfire crane trilogy. I call it the Gibbet crane based on a pot hook I found mentioned in the book Camp-lore and Woodcraft. The crane does look a bit like a traditional gibbet but the name apparently refers to the overlapping joints used in its construction rather than its likeness to an instrument of execution.
This is a great project for the longer-term camp or if you want a bit of practice carving joints and whipping.
The Gibbet Aures Crane
As usual the tools for making the crane are to be found in most bushcrafters’ backpacks – a knife, saw and axe. I saw this crane set up many years ago at a camp however I have seen little written up about it in books or online.
I found one piece of wood with a strong fork and a smaller catapult-shaped fork (bottom left below) and I cut a limb with a branch coming out (top left below).
The first job I did was to strip off all the bark from all the pieces.
Tools and basic parts
I placed the large fork up against the pole it would hang off to measure where I needed to trim each limb. To do that I just used my knife to mark the limbs. The top limb needs to be marked to the left of the pole (as you see in the picture below) and the bottom limb needs to be marked to the right of the pole as you see it below.
Carving the top limb
To begin with I trimmed the top limb at its mark with my saw, leaving the bottom one for the moment.
Measuring and trimming the top limb
I laid the small hook beside the end of the top limb so that the hook was pointing towards the big fork and marked where I wanted to trim it. I did not want to leave it too big – just big enough to be whipped to the big fork.
Measuring and trimming the top hook
I wanted the joint to be strong so I put a stop cut into the top of the upper limb so I could cut out a lap joint (also known as a Gib joint).
I then battoned off the excess so I was left with one half of the lap joint, then I trimmed the bottom of the small hook flat to fit snugly against it.
Cutting out the Gib cut on the top limb and hook
Not a perfect fit but good enough.
Putting them together
I then used paracord to whip the two together, on both sides of the hook. I left excess string tied in a knot as the wood was green. As it dries out the wood will shrink and I will have to redo the whipping.
Whipping The Gib joint
Carving the bottom limb
I flattened the upright of the ‘Y’ piece and split out a Gib joint on the lower limb. You have to make sure all the cuts are done on the correct planes so that the hanger will fit on the upright pole without twisting.
Cutting the Gib joint on the bottom limb and fork
After a bit of whipping it was time to set it up and make sure it worked correctly. In the bottom right picture you can see clearly how it all comes together.
Fitting and splicing
Carving the pot arm
I have a particular way of carving the hanging arm (you be as creative as you like). I axe out the basic shape I want, trim it smooth with my knife and cut in lots of grooves along the upper part to allow the pot to be hung on various areas of its length.
Carving the pot arm
Once all the grooves are cut I tend to put a dimple in the end so I can attach an adjustable pot hook. This allows me to hang two or three pots from the crane.
Finishing touches
Using the Crane
This sequence of shots shows the method I use for adjusting the height of the crane when it has a heavy pot attached to it. I swing the crane away from the fire, remove the pot, adjust the height of the crane, attach the pot again and swing it back over the fire.
With light pots you do not need to remove the pot but just lift the crane slightly so it detaches from the upright and then just move it up and down.
In use
In this picture you can see how the arm works with an adjustable pot hook attached to the end of the crane arm.
It looks precarious but with the usual level of care you take around any fire I have found this system works well.
Added adjustable pot hook
Dinner could be in one pot and the kettle on the other leaving plenty of room to sit comfortably around the fire without having lots of uprights protruding out (which can be a problem with other campfire cooking rigs).
Works a treat
I took the set up out on a recent bushcraft course I was running to show some colleagues and set it up with a fixed crane. All in all it worked a treat.
Sometimes you want an adjustable pot hook without a tripod set up.
Sometimes you want to pour your coffee without getting burnt by the flames.
If that’s what you want then build yourself a crane – It’s easy.
A robust and versatile campfire crane
There are a number of different ways to build a crane set up however I decided to try just with the general tools I would carry in my rucksack. These included an axe, a saw and a general bushcraft knife.
The wood I used was some sycamore I had recently polarded in my garden. The crane is made up of a thick upright and smaller pieces to act as the arms. I decided to make two different types of arms, one for small pots and one for bigger Dutch oven type pots.
Sizes and dimensions will vary depending on how high you want your crane to be and what weight you want it to hold.
Carving the upright
I decided which part of the upright would be the top and then flattened it to give me a working area. You do not need to do this however I find it gives me a stable working surface. You can see in the pictures below that the girth of the upright is just larger than my hand as my fingers do not fully close around it.
Basic parts and flattening the top of the uprght
For the crane to work you need a hole at the top of the upright. The size of the hole will depend on the size of the arm you will put through it and how much wood you want left around the hole for strength.
As I was going to carve this with my knife I opted for a square hole as this style is easier for me to carve. Once I had pencilled out one side I marked up the opposite side. In this crane I made the hole at 90 degrees to the upright (makes life easy) but you can angle it if you want so that the arm will be pointing upwards more when inserted.
Marking out the socket
I used my knife to score lines into the wood I wanted to remove. You can do this by gently tapping your knife handle with a batton or rolling the curved part of the blade. You need to do this gently so as not to cause unwanted splits in the wood. Also make sure that the work piece is secure on the ground and that your free hand (if not battoning) is well clear of the knife edge.
Scoring
To remove the wood I just pushed the tip of my knife inbetween the scores and prised it out. Again I did this gently alternating between pushing on the handle with my hand or doing light taps with a batton. When I twisted the point I did so gently so as to not cause any unwanted splits or worse still – snap off the tip of my blade.
I did another set of scores and chipping until I was about halfway through the upright.
Chipping
I then repeated the exact same procedure on the other side until my knife popped through the other side.
Repeating the scoring and chipping
Once the plug of wood was removed I trimmed the internal walls of the hole (using the wood I would use as an arm as a guide) and chamfered the edges off.
Finishing the socket
The upright was finished off with all the knobbly/sharp bits being removed and a point was axed out at the bottom of it.
Trimming and pointing
Carving the lightweight arm
I made the arm for the lightweight pots from a thin piece of sycamore. I trimmed a flattened piece near the end and carved a small dimple with the point of my knife in it.
The small dimple is needed to keep the adjustable pot hanger in place. I have covered the making of the making of an adjustable pot hook in my post How To…. Carve and use an Adjustable Pot Hanger.
Lightweight arm
Set up
In my previous post on making a Double French Windlass Cooking Rig I explained how to make a pile driver. I used this pile driver to make a hole for the upright to sit in.
Once you have created the hole it is just a case of gently tapping the upright into place. If you did not use the pile driver you would need to hit the upright hard to drive it into the ground and very quickly the wood around the hole would crumple or snap.
Using the pile driver to place the upright
As I had not made the hole at an angle I carved a small wedge to hold the arm securely and also to raise the tip up slightly.
When the arm is in place in the hole just tap the wedge into place gently. Do not ram it in as this could cause undue pressure and split the wood.
Create a wedge to secure the arm
Then it is a simple case of attaching the hanger with your pot or kettle onto the arm.
I like this system as it is easy to adjust the height of the pot and the whole crane can be swivelled to move the pot away from the fire easily.
In the picture below I have left the back of the arm overly long but I will trim it shorter eventually.
Ready to go
Carving a strong arm
As I had made a square hole I got a bigger piece of sycamore and squared it off along its length to fit exactly in the hole. This arm was designed to take bigger pots like a dutch oven.
Creating the heavyweight arm
The end was shaped to fit the pot hanger.
Finishing the tip
Then set up exactly as the first arm.
This time though I tested it out with a dutch oven half full of water.
Heavy Duty Cooking
I have a few of these cranes so I set up another one to put the kettle back on.
Multiples
I had used an auger and a palm gouge to carve this one out so you can see it ended up with a round hole. No wedge was required as the hole was set at a slight angle.
The crane made with an auger and palm gauge
After the water in the dutch oven had boiled it was easy to raise it all up off the heat.
Easy to adjust the pot height
If you plan to use these cranes on a longer term basis they may develop a crack if you are using green wood. This happened to this crane about a week after I made it but I secured it with a bit of whipping. You can do this right at the beginning if you wish or when you see a split start to appear.
The whipping will be well clear of the flames so I am not worried that it will be burnt through.
Some Whipping
If I had not being taking pictures along the way I would have completed this rig in about an hour or so.
There are other ways of doing this and other tools you can use so I will leave it to your imagination but if you are someone who likes to tinker around the campfire then I would give this one a go.
While we were on holiday in France at my friend Rick’s cottage he was telling me about some of the trees in his garden. He has an old, gnarly pear tree currently propped up by sticks as it was blown over in a storm a few years ago. It still bears fruit, but only on one side.
Rick agreed that I could trim a branch off the non-fruiting side as that would take some of the weight off the side that was being supported. I like to carve fruit woods when they are green as the wood is easy to remove.
Before and after
I cut the limb off very close to the trunk so as to minimise the chance of infection damaging the tree. I made a single cut as the branch was easy to support as I cut it. Also the cut was made as close to the Collar as possible so as to give the tree the best chance to heal itself.
De-limbing
The bark was easy to strip off with my axe – being very careful where my fingers were at all times – and then I used my saw to cut it down further so I had a piece I was happy to carve.
De-barking and trimming to size
One piece of the branch made a perfect hammer for battoning my work piece in two. I make sure that the blade of the axe is 90 degrees to my body so that if it slips the edge of the axe swings away from me.
This piece did not split evenly as the wood was quite twisted with its age.
Battoning
To make the split more even, I put the work piece on its side and split it further. A slower method but more controlled I think.
Splitting out
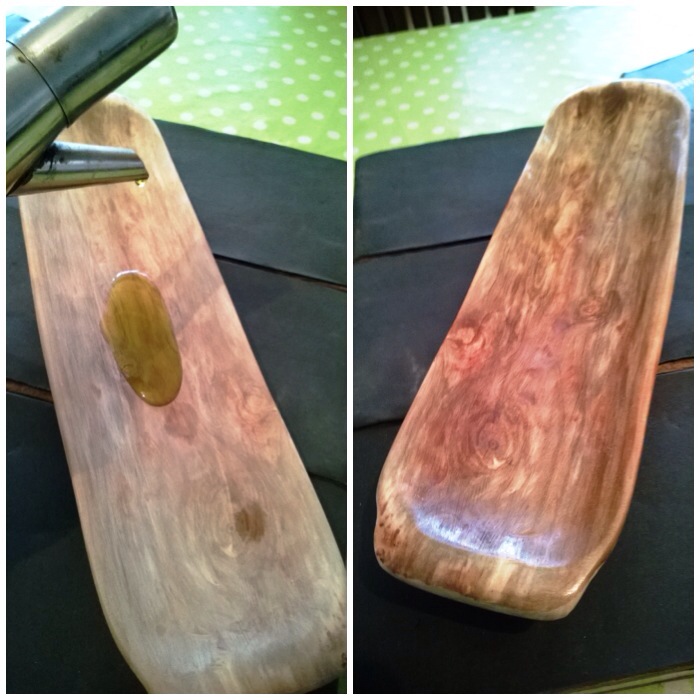
After splitting I cut out some wood from one of the halves to give it a flatter look.
Flattening
I used my axe to take of some of the excess wood around what would be the bottom of the platter. As the shape was going to be a shallow curve I did not put any stop cuts in but just chipped away, starting from the ends and chasing the wood back to the centre.
Axing out the back
To finish the flattening of the top part of the platter I finished with the axe and moved onto my knife.
Final flatten with the knife
Once the work piece was as flat as I wanted I drew the shape of the bowl area and used my crook knife to start removing the wood from this area. As the wood was very green this excess was removed very easily.
Using the crook knife
I also used my palm gauge and my bowl knife in this process. These are the only bowl-carving knives I have and I switch between them depending on what the wood is saying to me as I try and carve it out.
These tools make a real difference to carving the bowl area but are ones you really need to practise with a lot to be as safe and efficient as possible with when using them.
Palm gauge and bowl knife
Once I was happy with the amount of wood removed from the bowl area, I moved onto the back. I like to take my time when working on this area as it is all too easy to cut out large chunks of wood and suddenly reveal a great big hole in the bowl. I use a variety of cuts: brake cuts towards me, small pressure cuts using my thumbs and powerful but small chest lever cuts to name just three. With all cuts, the main thing to remember is that you must always be aware where the blade will end up if the knife slips.
Different knife cuts
I had a lovely time over a couple of evenings working on this carving – this is what I call relaxing.
Relaxation and fine work
I had kept a lot of the chippings from the carving and when I had removed enough wood I put the platter and lots of the chippings into a plastic bag and kept it in my garage (a nice cool area) for a month to slowly dry out. I added some water to the chippings every few days for the first week to keep them and the platter slightly damp.
This slow drying process allows the whole of the platter to dry in a much more even manner. The platter would potentially crack if the outside dried at a much faster rate than the inside (caused by pressure differences).
Roughed-out platter
After a month of drying I used different grades of sandpaper from rough to very smooth to get rid of most of the lumps and bumps.
Sanding
I coated the platter with 3 layers of olive oil (allowing each coat to dry fully before applying the next).
Oiling
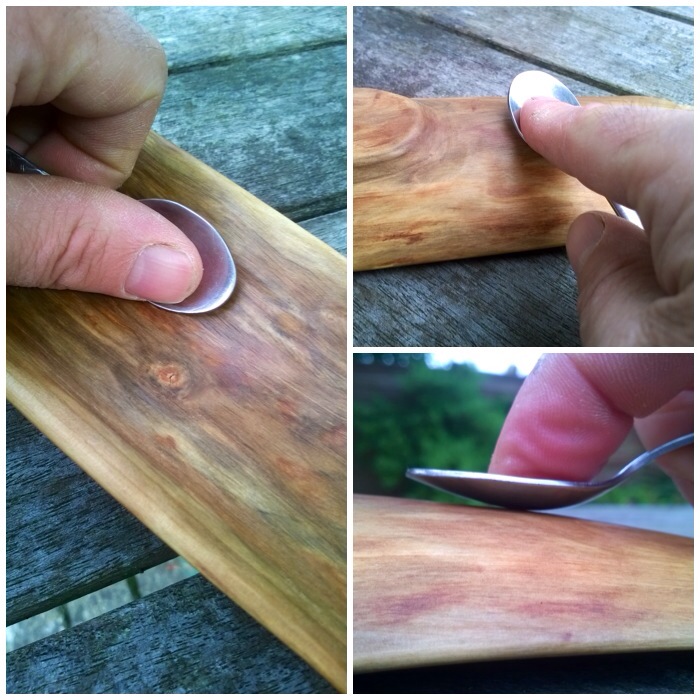
Then over a couple of nights I used the back of a spoon to rub the surface of the platter so that it became silky smooth (known as boning). Sometimes you get a very shiny surface doing this but I think that this wood may need to season for a bit longer as although it became beautifully smooth it stayed a bit dull.
The fibres of the wood may raise up again over the next few weeks but a light sanding and boning will soon have it smooth again.
Boning
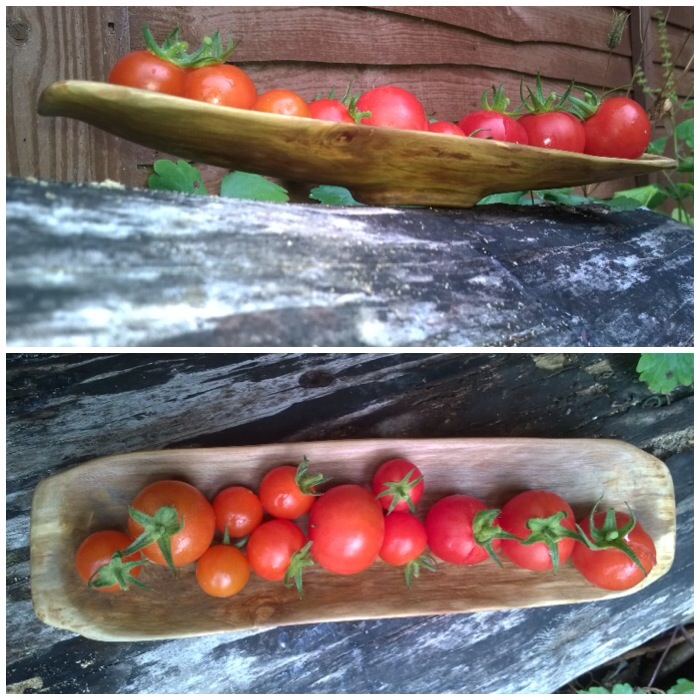
This is my 99th blog post and I am glad it was about something I was very happy to carve. The platter is destined to go back to France as a present to Rick for letting us use his cottage for what was a very lovely holiday – Brittany Adventures.
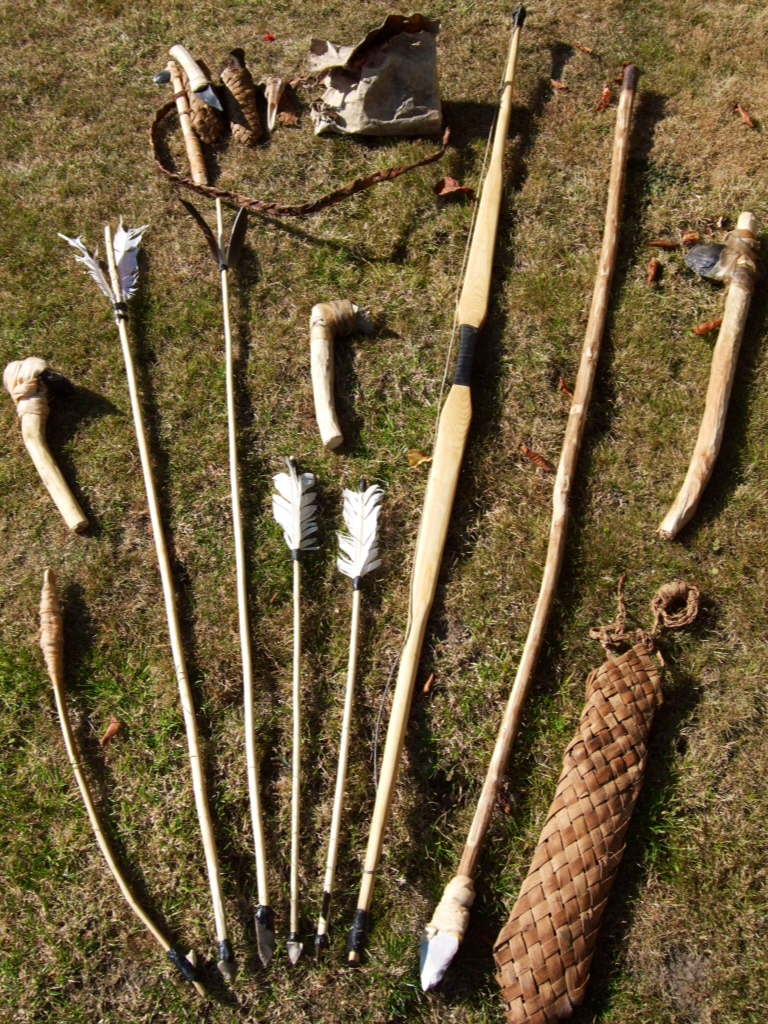
Sometimes a flint knife or adze is just not enough and you need something with a bit more clout. At times like these, what you need is a flint axe.
Here’s how I constructed the large flint axe you can see below, with a few pictures at the end about its little brother, the hatchet.
Two good tools
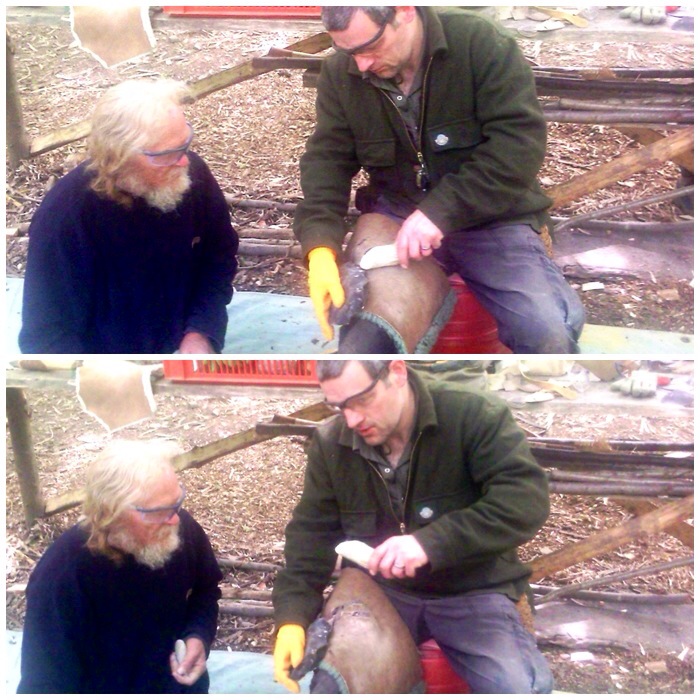
I made these tools on the Woodcraft School Primitive Technology course and had some excellent tuition from John Rhyder and John Lord.
John Lord gave an excellent demonstration on knapping a flint axe head. It was a joy to watch this master take a lump of flint and transform it into a work of art.
When it came to the turn of us students to knap out our axe heads John gave everyone lots of one-to-one tuition. If it hadn’t been for this (and John knapping the tricky bits) I would have been lucky to have ended up with an arrow head, never mind a large axe head.
Some tuition from the master Mr Lord
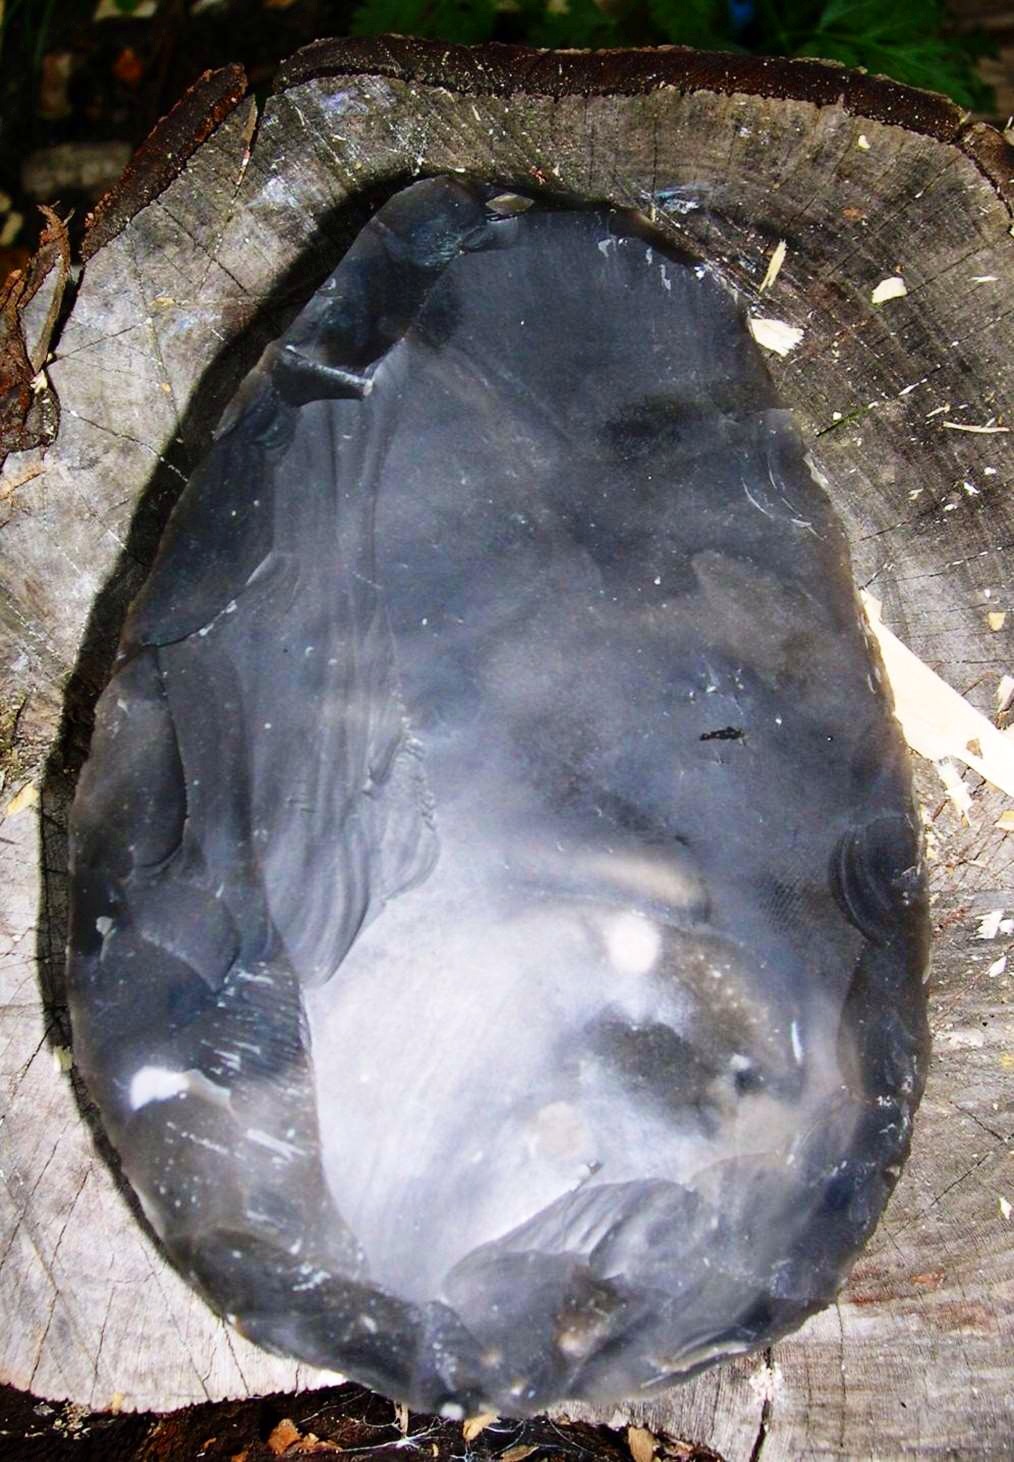
I like to think that this axe head has some of me in it but truth be told it’s more John Lord than me. I did however have a great time seeing this axe head appear out of the flint knowing at least part of it is me.
One knapped flint axe blade
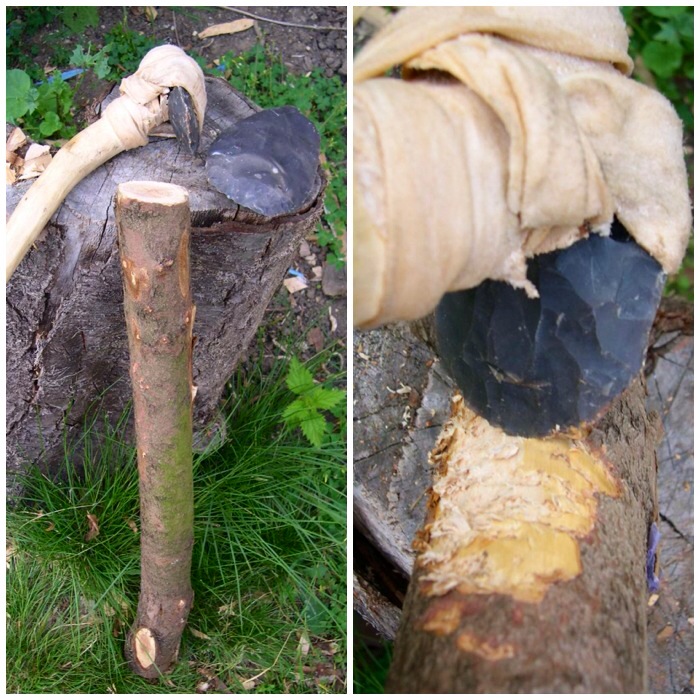
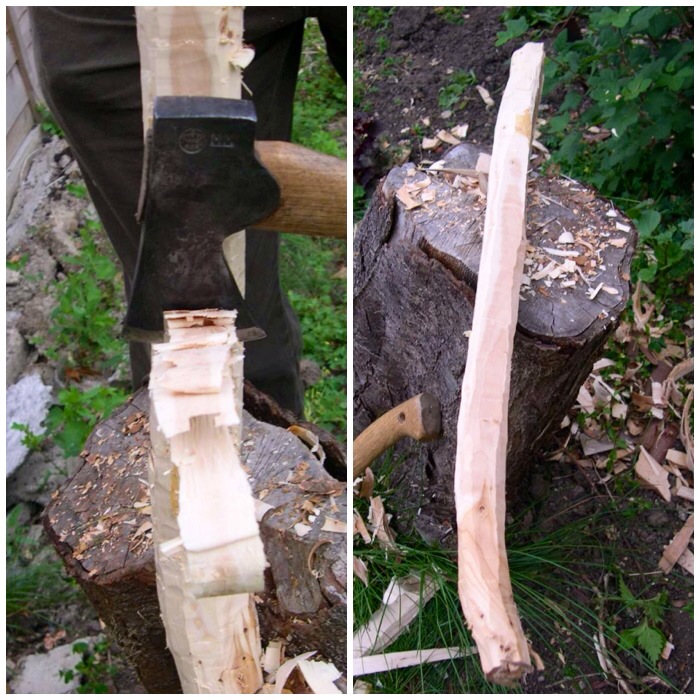
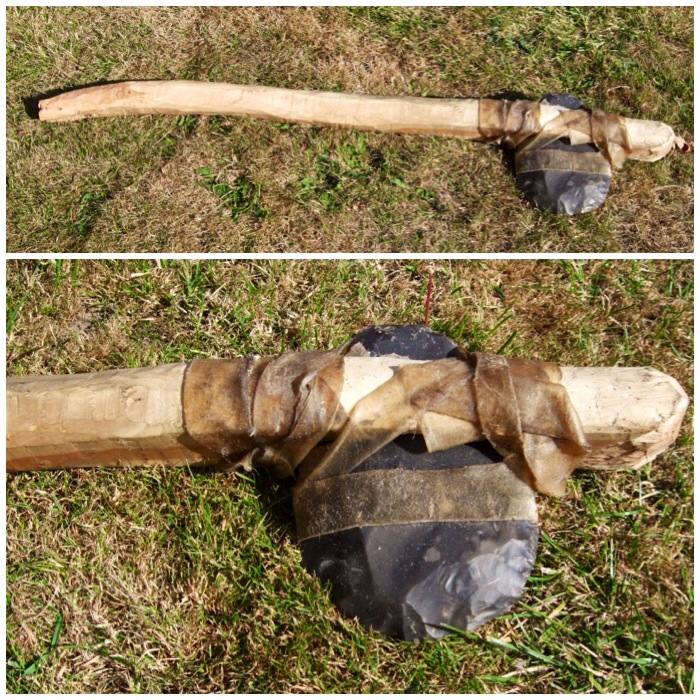
I used a well-seasoned piece of yew for the handle as that was what I had available at the time.
Initially I used my flint adze to try and shape the yew, but although the bark came off easily enough it didn’t make much of an impression on the hard wood beneath.
You can see the tool marks left on the wood by the adze in the right-hand picture below. As a Time Team enthusiast I have watched the archaeologists discuss such marks on many ancient pieces of worked wood they have found so it was good to see it in action for myself.
Stripping the handle
At first I used short chopping motions to tear away at the bark and wood with the adze. Ever experimenting, I tried a few strikes with a bit more force and eventually took a chip out of the adze blade. I was able to re-sharpen the edge of the adze by pressure flaking it but decided that the yew was just too tough for the adze (notwithstanding my lack of patience and skill).
Too tough for the flint adze
I reverted to my modern axe which took the excess wood off easily. In the picture on the right below you can see the very different tool marks left by the iron axe in comparison to the flint adze marks.
Time for an iron axe
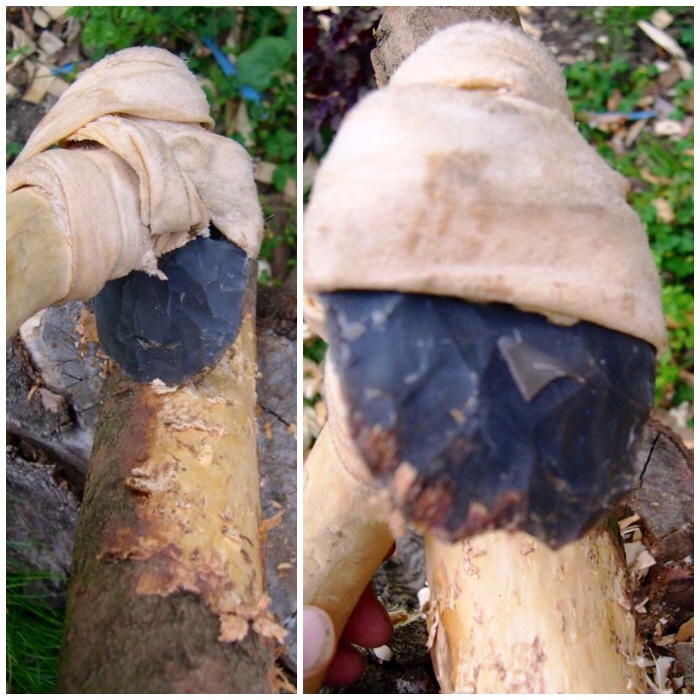
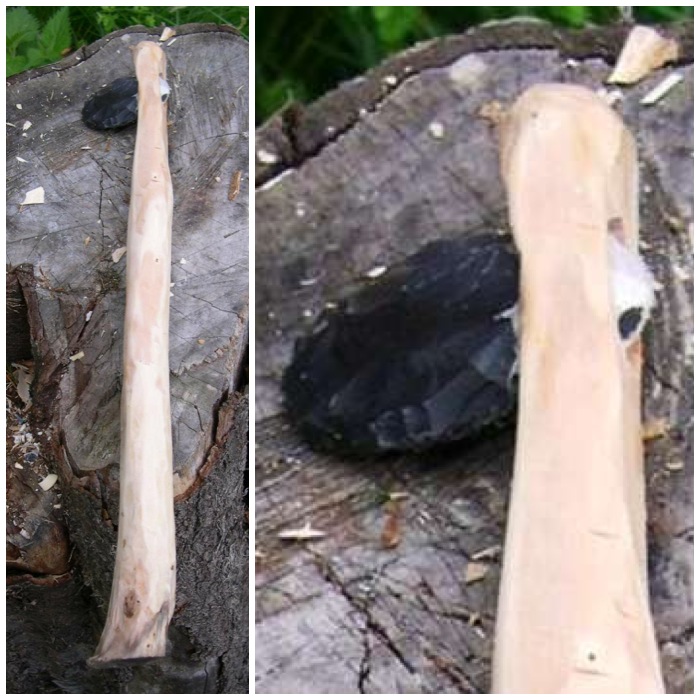
This piece of yew had a slight curve to it which I thought would give added strength to the handle. I left the handle fairly rough, just ensuring I would have a comfortable grip and not get any splinters.
One rough handle
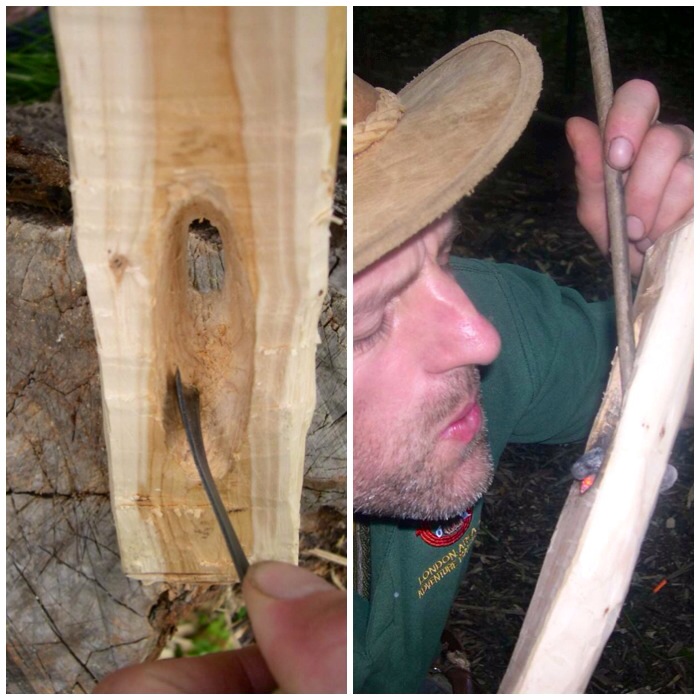
I initially started using a discoid all-flint knife to cut out the socket for the axe head but I did not take any pictures of this part. I did not do this for long as the yew was just too hard and the flint blade kept slipping. A few of the other students did just use flint for this stage but since the woods they were using were slightly softer they had more success. I ended up using my little palm gauge for the job and it worked very well.
I did try and burn out the wood with embers but soon got put off this with the fumes (yew wood being highly toxic).
Carving and burning
The socket finished – front and back.
The finished socket
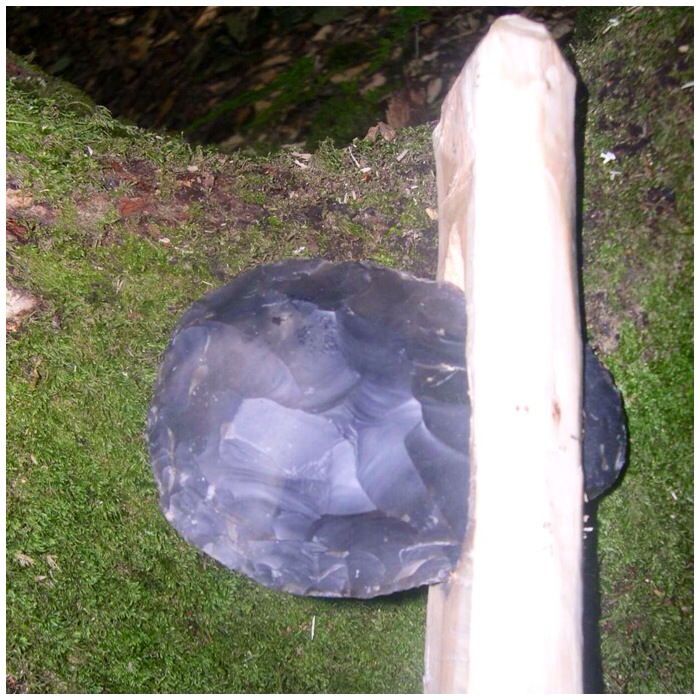
A good fit but too loose for use.
Test fit
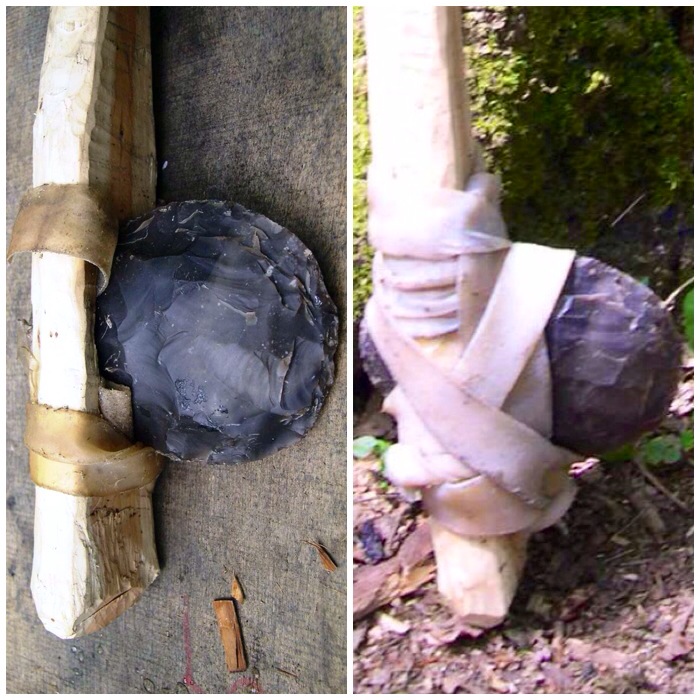
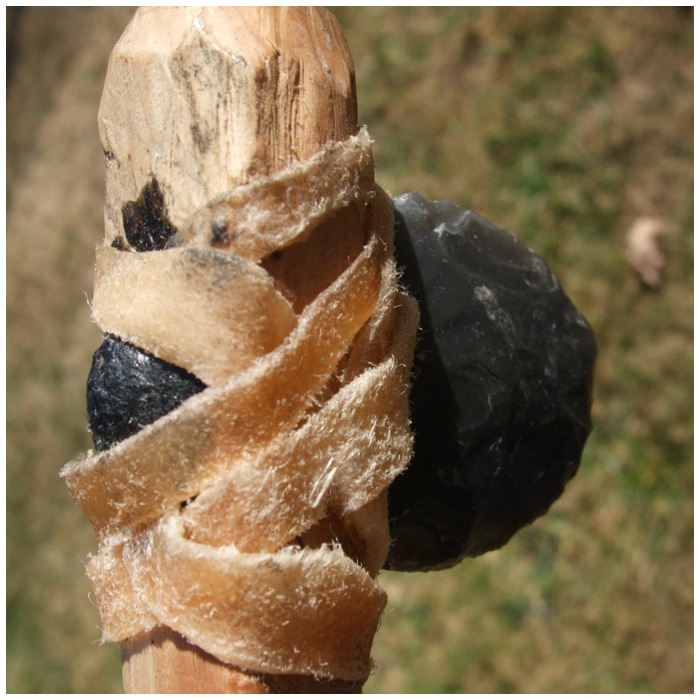
I wrapped the flint axe head in a piece of rawhide to see if that would secure the axe head in the socket (apologies for the poor quality of the pictures), but with one piece wrapped around it the axe head would not fit into the socket.
Prepping rawhide
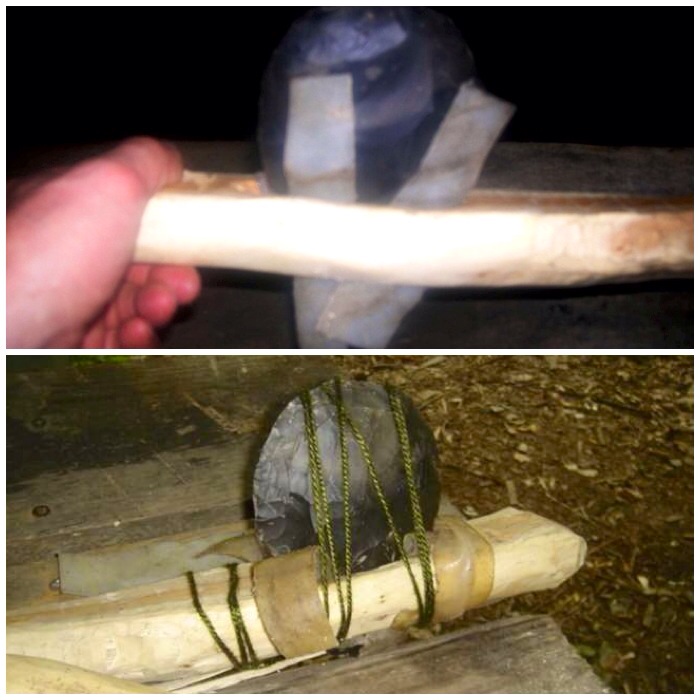
Instead I cut up some strips of rawhide and held it all in place with some string. As the rawhide dried out it really gripped the axe head and the wood of the socket.
Securing with rawhide
After that it was a case of wrapping a load more rawhide around the axe head and leaving it to dry for a couple of days.
Drying and adding more rawhide
After the rawhide had dried out it became almost translucent but it was a very strong hold.
Side profiles
Top and bottom profiles of the axe head.
Top and bottom profiles
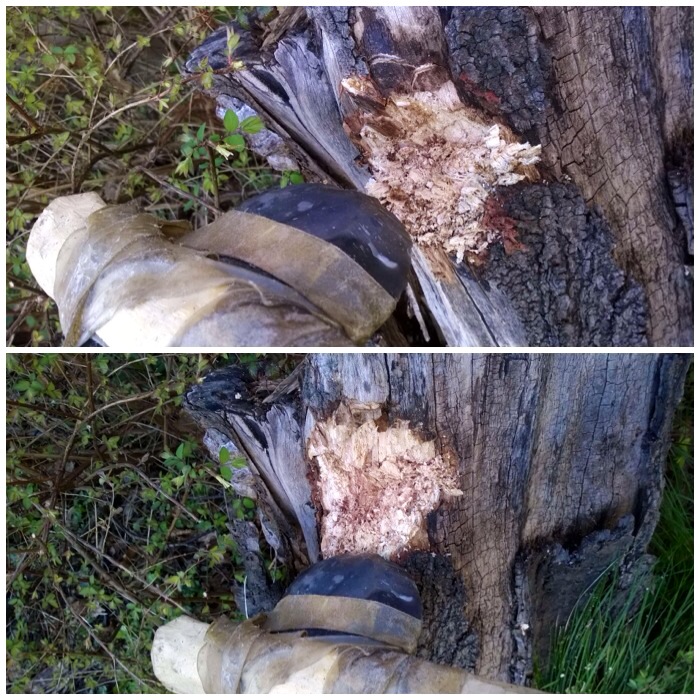
I tested the axe out on an old stump in my garden. Like the adze, the axe tears into the wood as opposed to slicing into it as a modern iron axe would do. It was still very effective in its own way.
Leaves the wood torn
The blade edge is not particularly sharp and has a good shoulder area behind it. This shoulder area really supports the edge so that it does not break off when the axe is used.
Up close
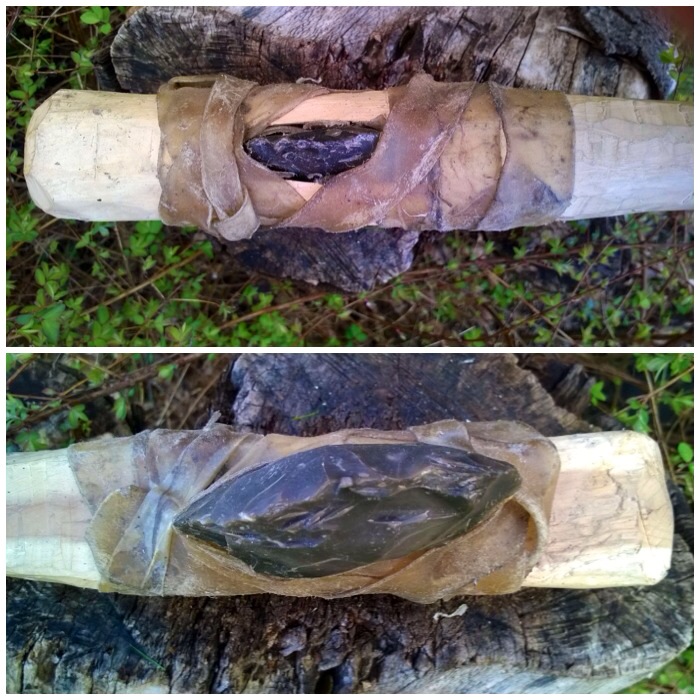
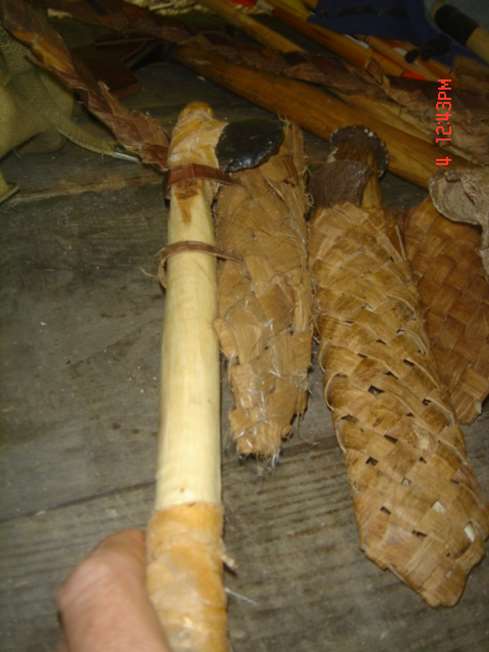
I had a small flint axe blade I had made at the same time as the larger one, so I just scaled everything down to make a hatchet.
Hatchet blade jammed in with rawhide
As well as using rawhide I filled the socket with some spruce pitch to fill up any gaps and to help secure the head more.
Gaps filled with resin
I have never used this tool on anything – it would have been used mostly to dispatch small game that had been caught in traps. I do like it a lot though, in some ways more than the larger axe.
Rawhide wrap
This hatchet sits nicely on my primitive belt order.