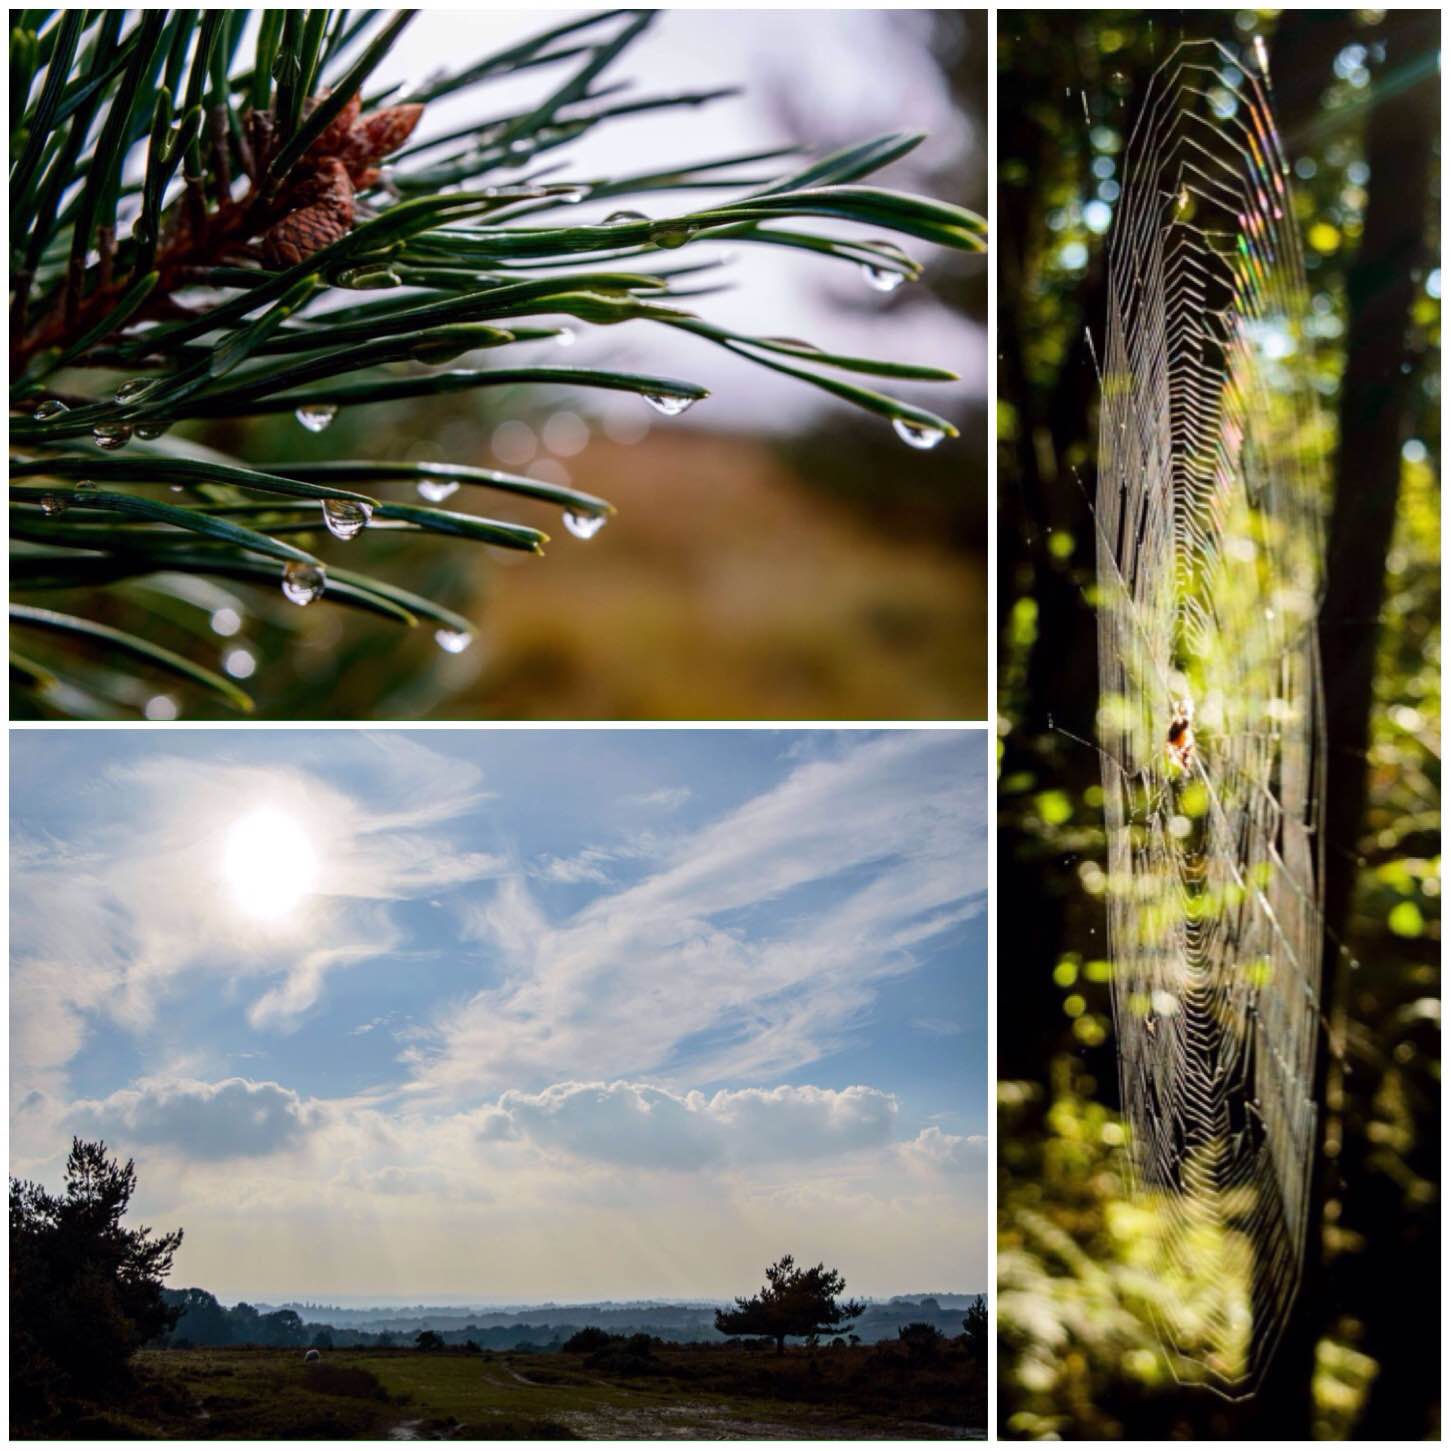
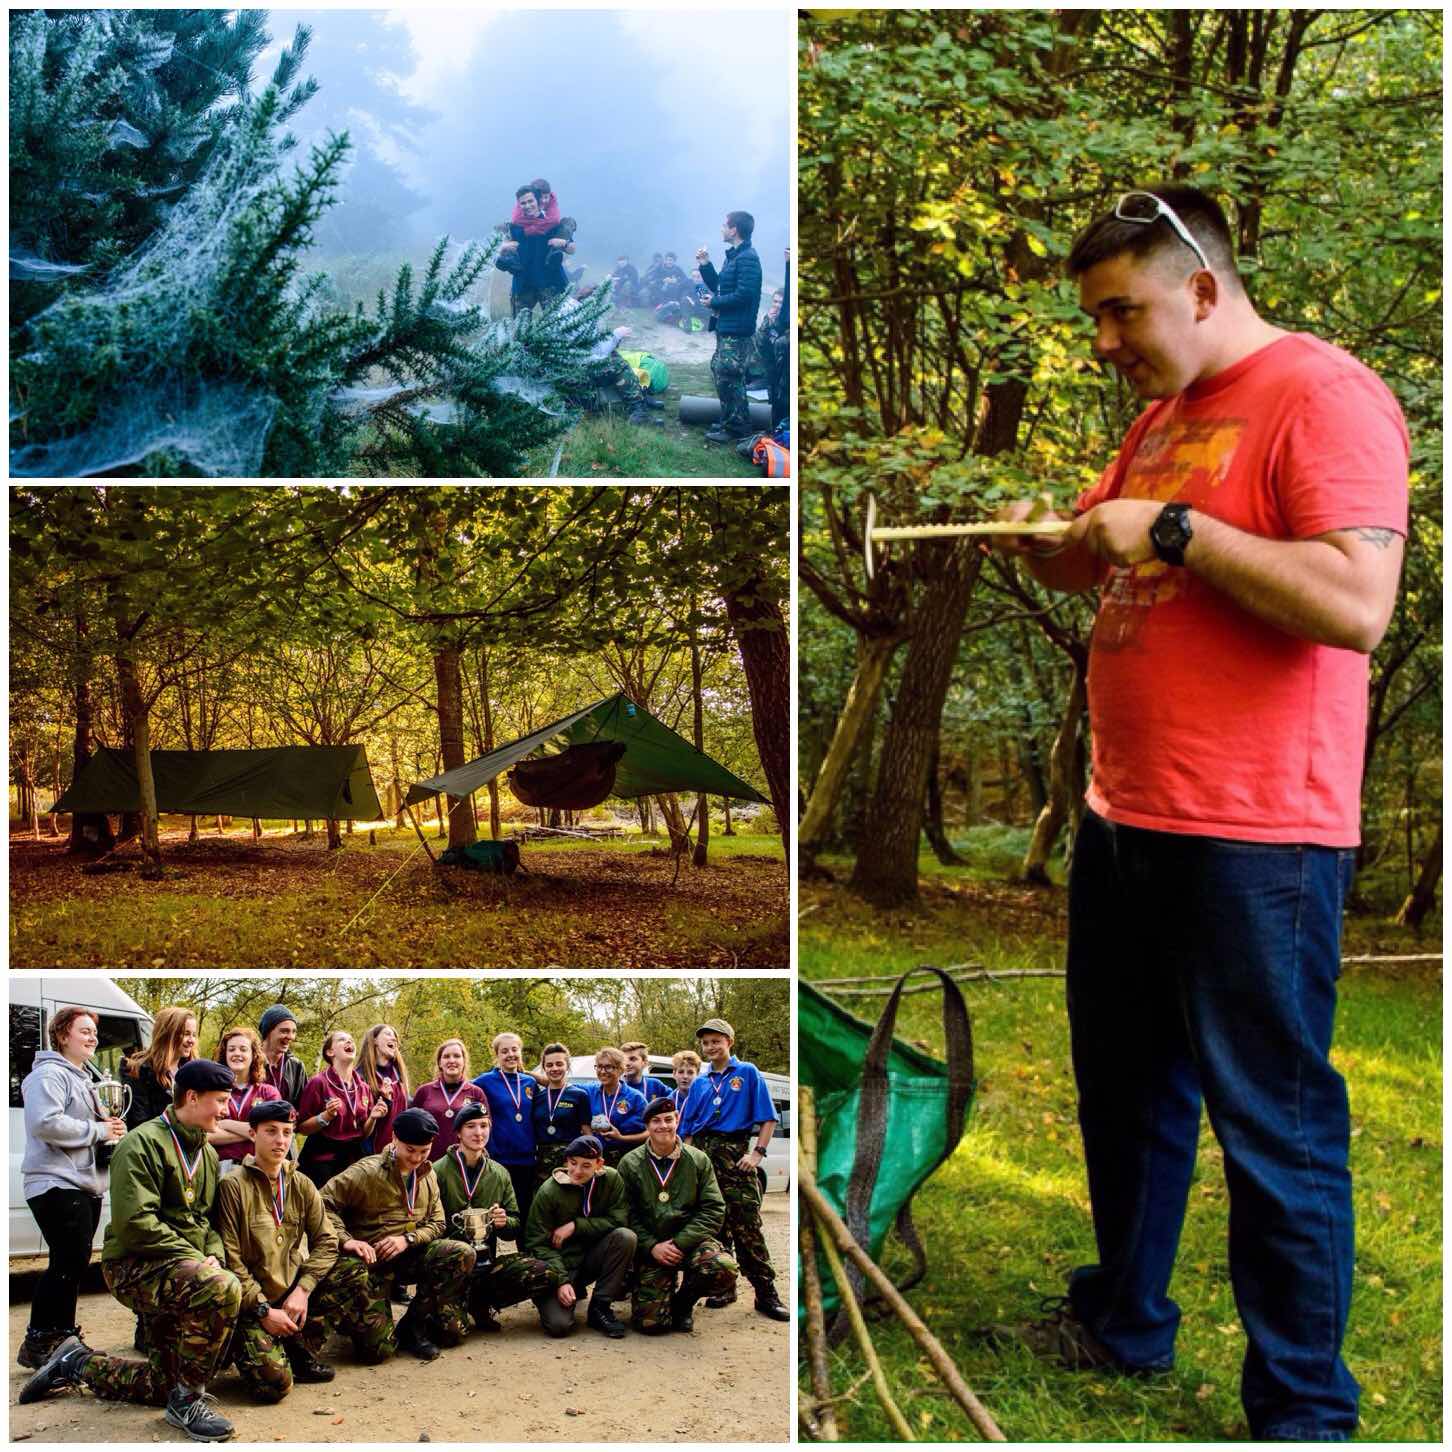
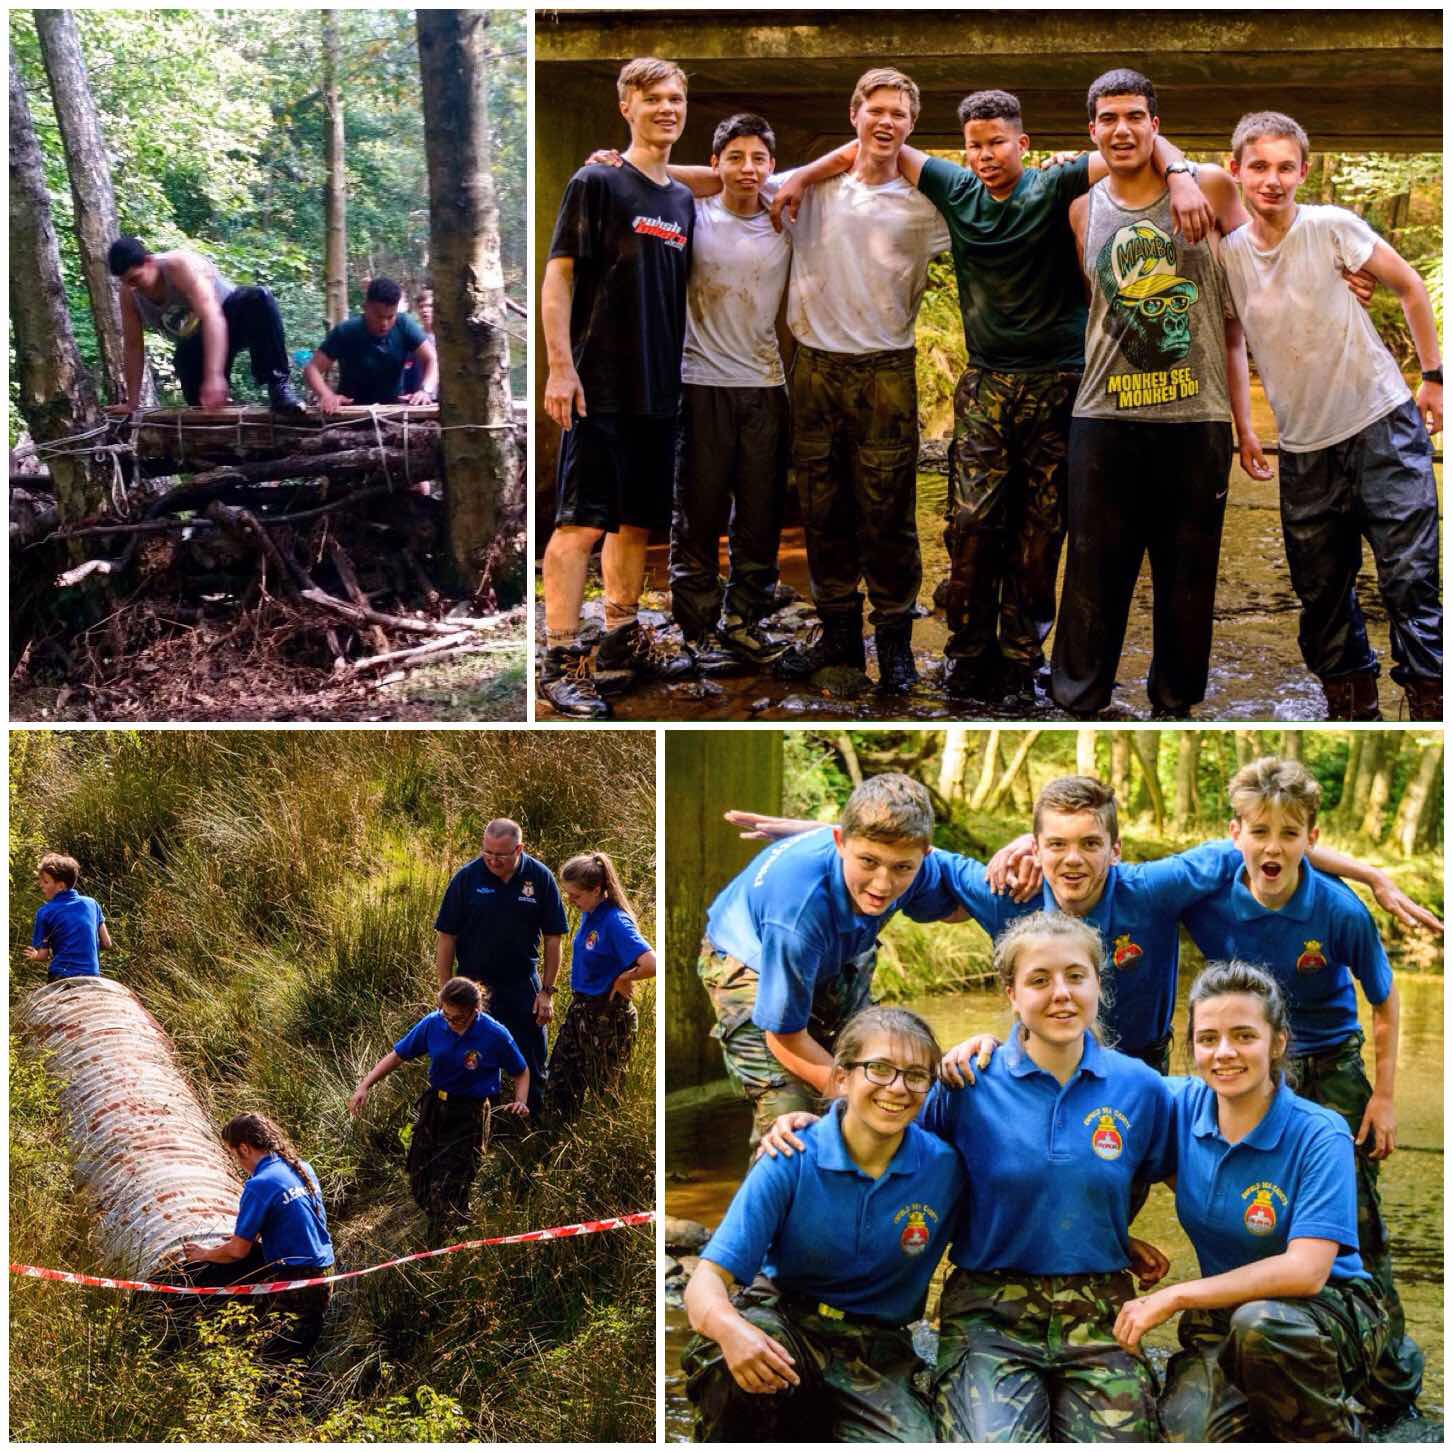
My trip to Ashdown Forest at the beginning of October with the Sea Cadets for Chosin Cup proved to be a stunning time for Mother Nature.
Not only were the trees looking at their best in terms of colour and the landscape shots proved pretty spectacular too, it was the spiders that caught my attention.
For the first time ever I managed to capture a rainbow in a web. My friend Eleanor spotted this phenomenon in the picture you can see below on the right. I had never heard of this before so it came as a real surprise to see all the colours in the picture.
The beautiful Ashdown Forest
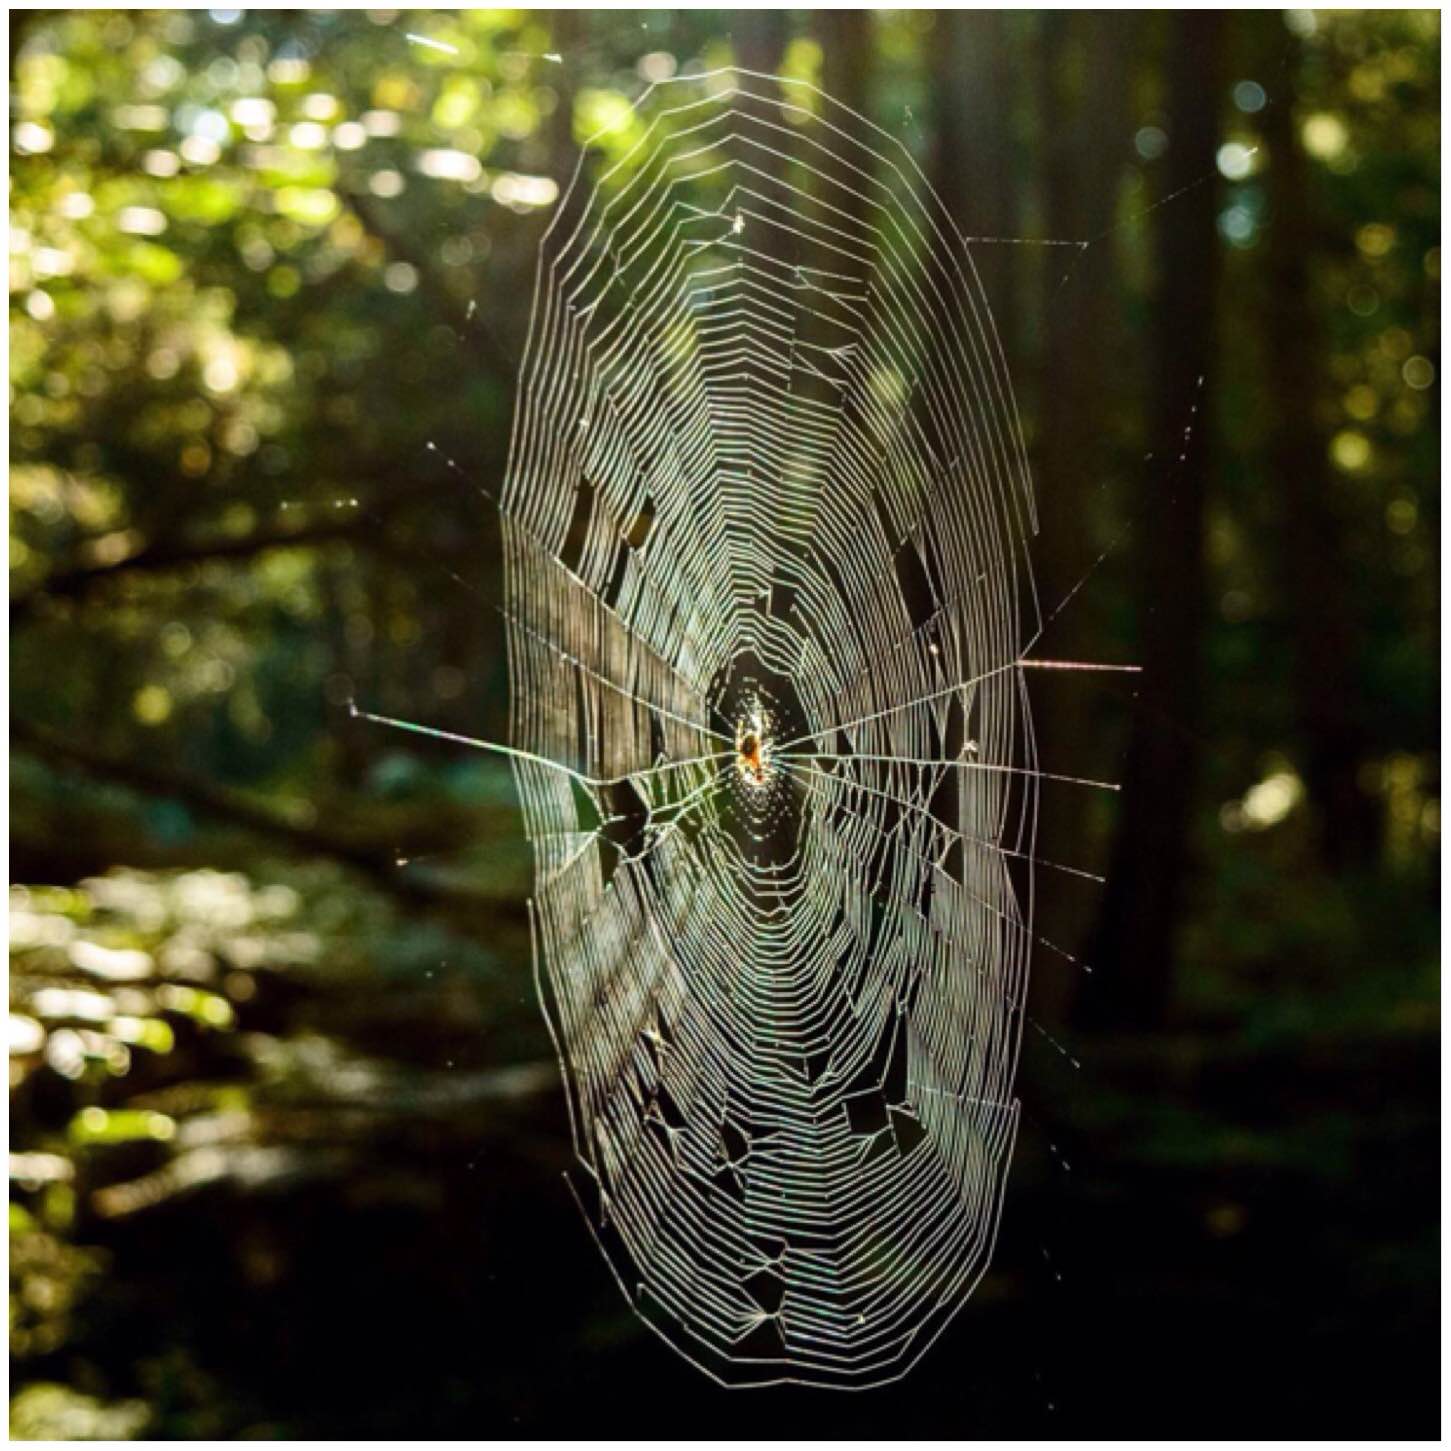
I was having a mooch around the forest in the military training area when my friend Charlie pointed out this beauty of a web. It was suspended at least 10 foot on either side from the trees. Quite a feat of engineering in my opinion.
We were lucky to pass by it just when the sun was at the right angle to frame it.
A floating web
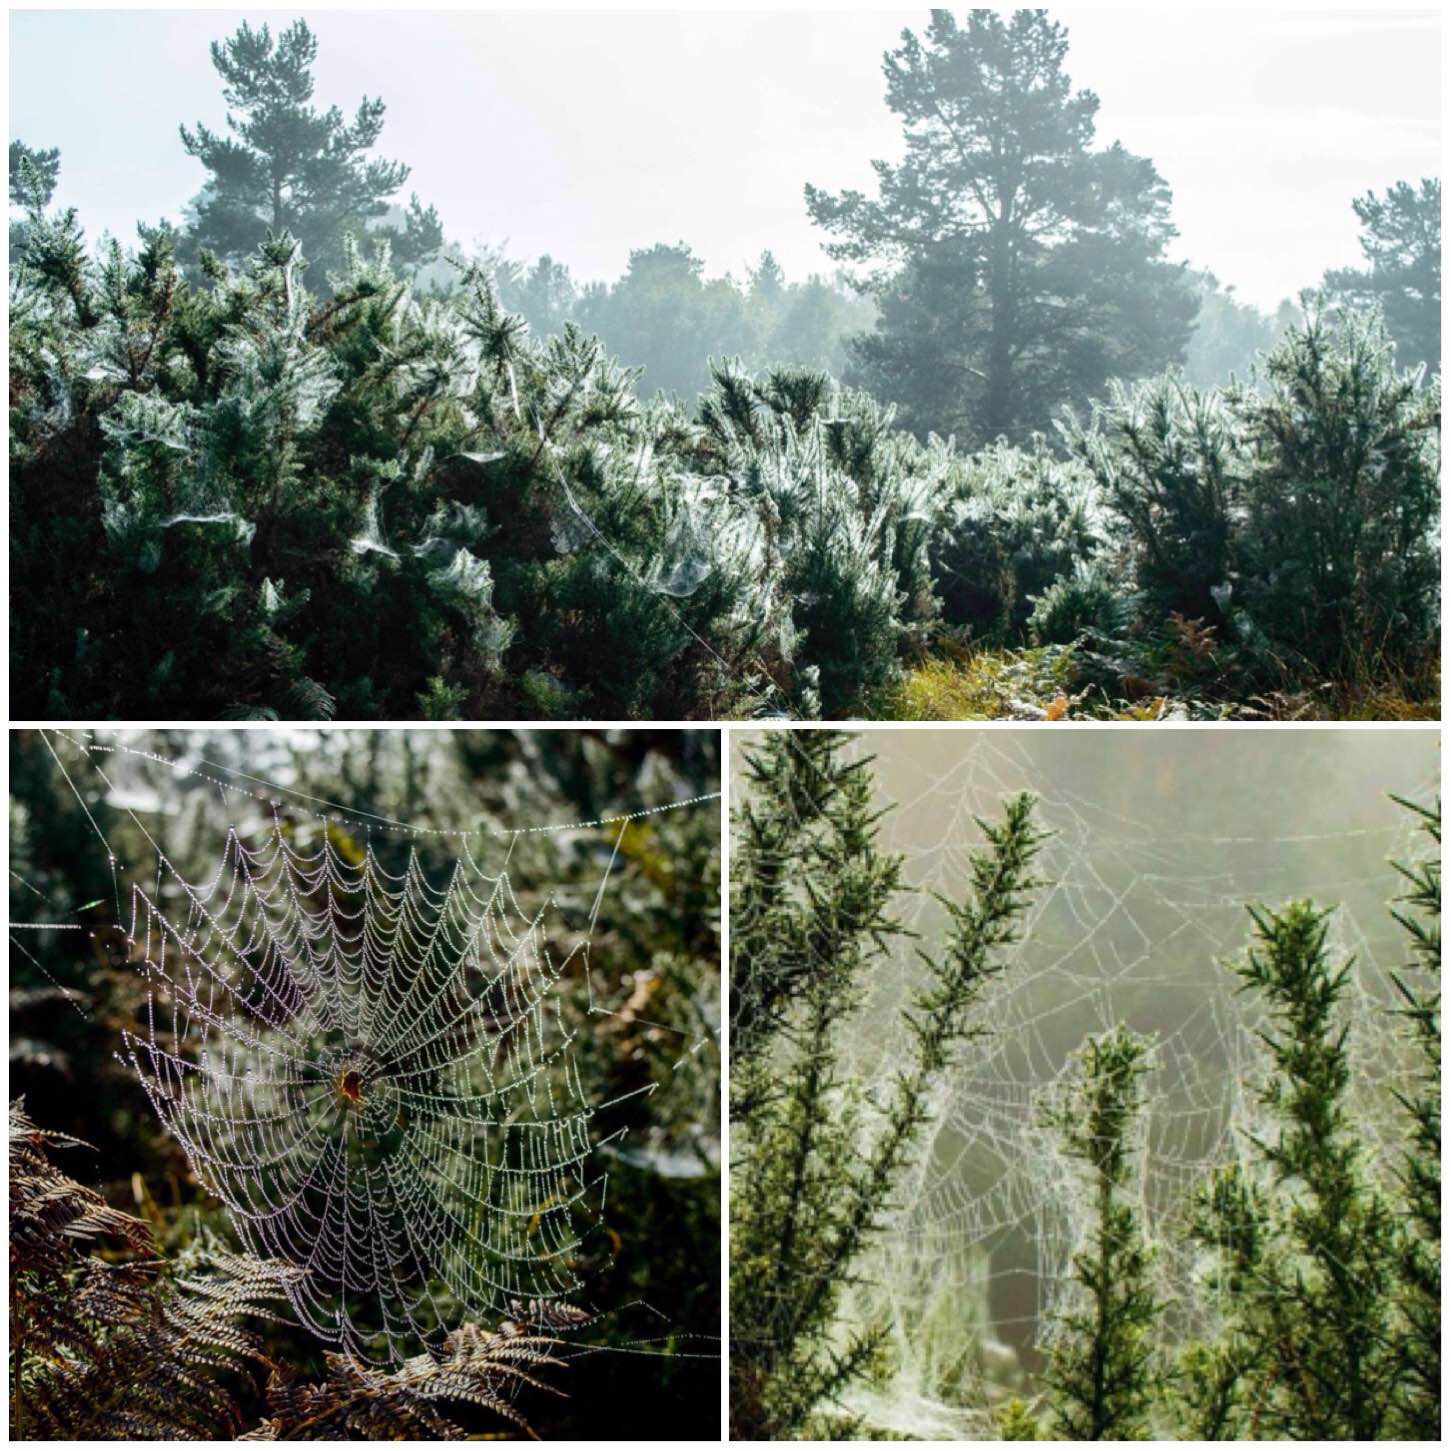
On the Saturday morning Charlie and myself were wandering the forest looking for the teams that were out navigating when we came across this blanket of webs.
All the gorse bushes were covered in a mat of webs. Many off them were from the spider mite (Tetranychus lintearius). This little fella is numerous in numbers and seemingly helps in the control of the spread of gorse.
In amongst all the spider mite webs the real spiders also were busy producing beautiful but deadly little traps.
A jungle of webs
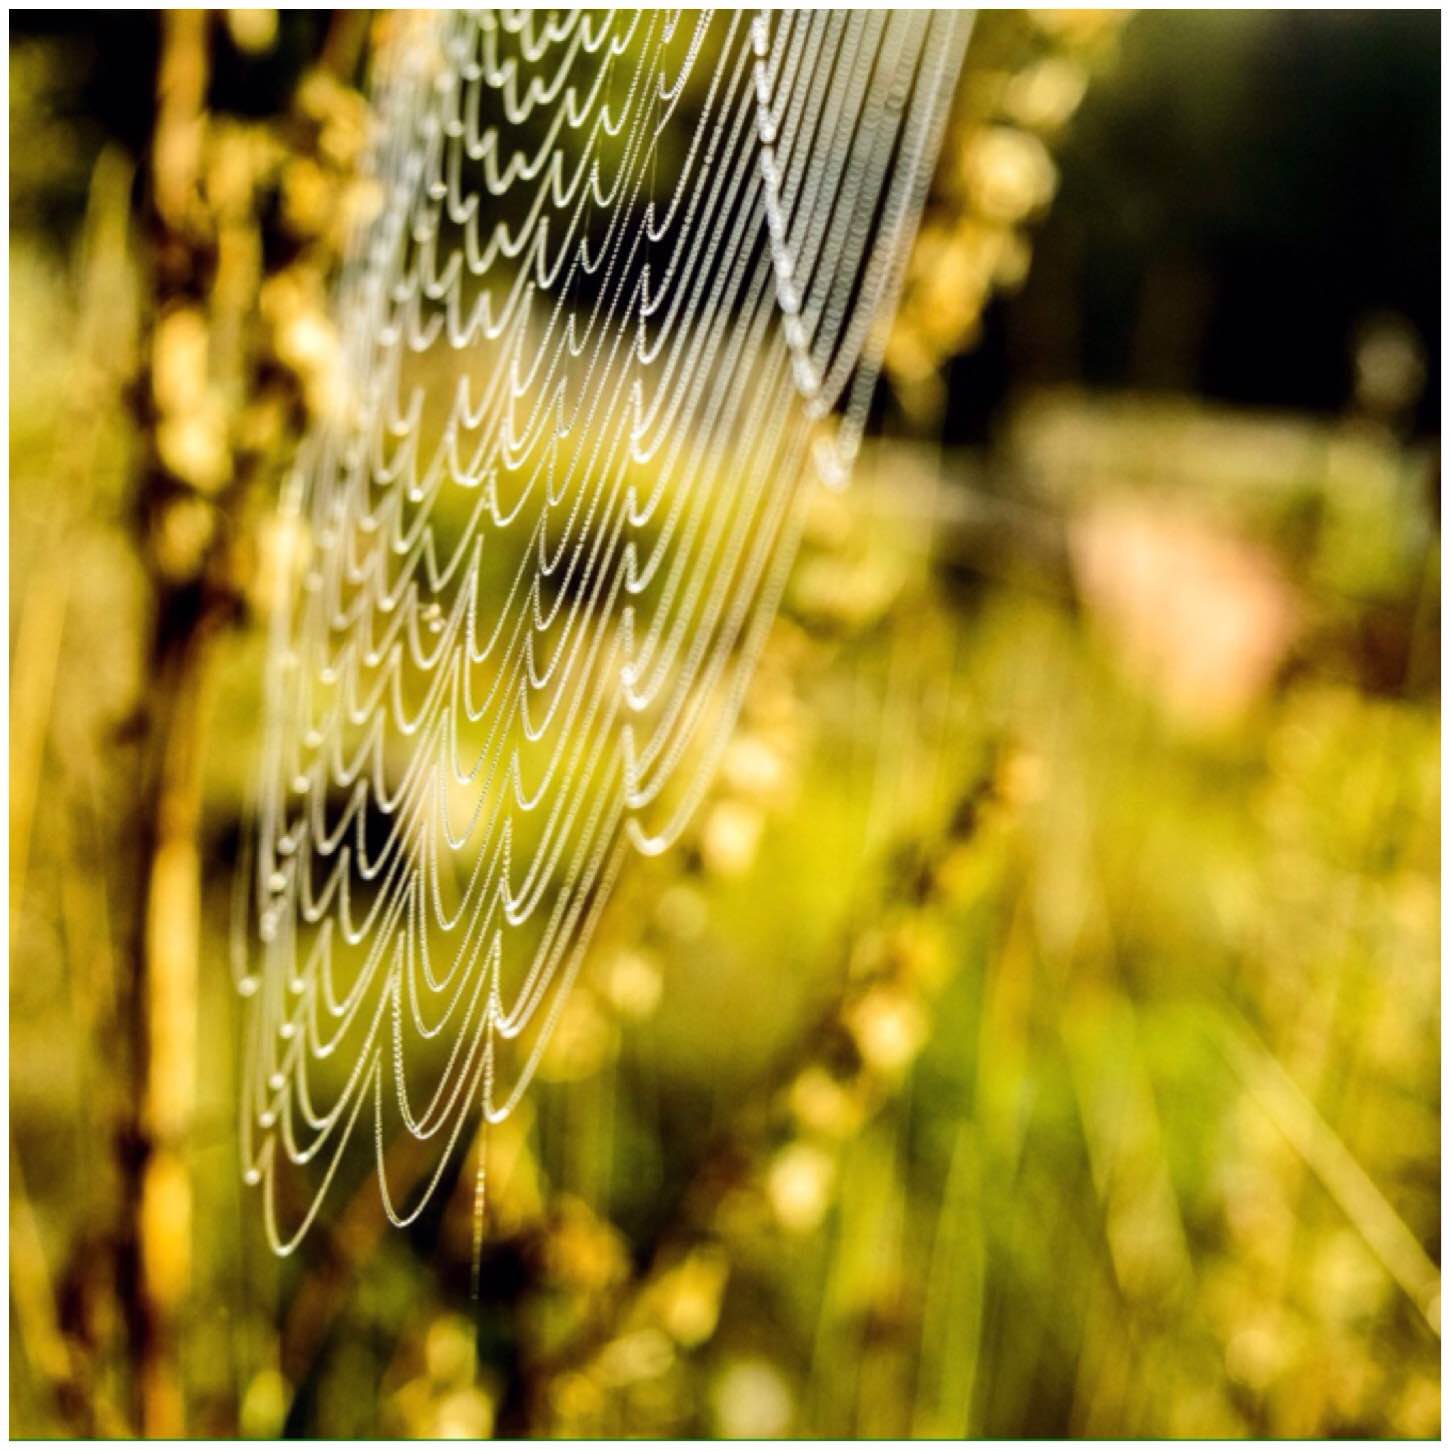
My final shot of the weekend was this one of the bottom half of a web. I was struck by how regular everything was however it was the similarities that the strands seemed to have with a pearl necklace that really caught my attention.
Symmetry
I went out to find the cadets on their travels never thinking for one second that I would find all these little treasures.
I had a cracking time photographing this years Chosin Cup competition with London Area Sea Cadets. This is the hardest competition I get involved with every year with the Sea Cadets.
It was a weekend of fun, tears, mist, spiders and Whimmy Diddles (a kids woodland toy) in the Ashdown Forest.
In the picture below you can see a few of the thousands of spiders webs that covered most of the bushes and small trees in the Forest that weekend – quite a stunning spectacle it was too.
The Chosin Cup
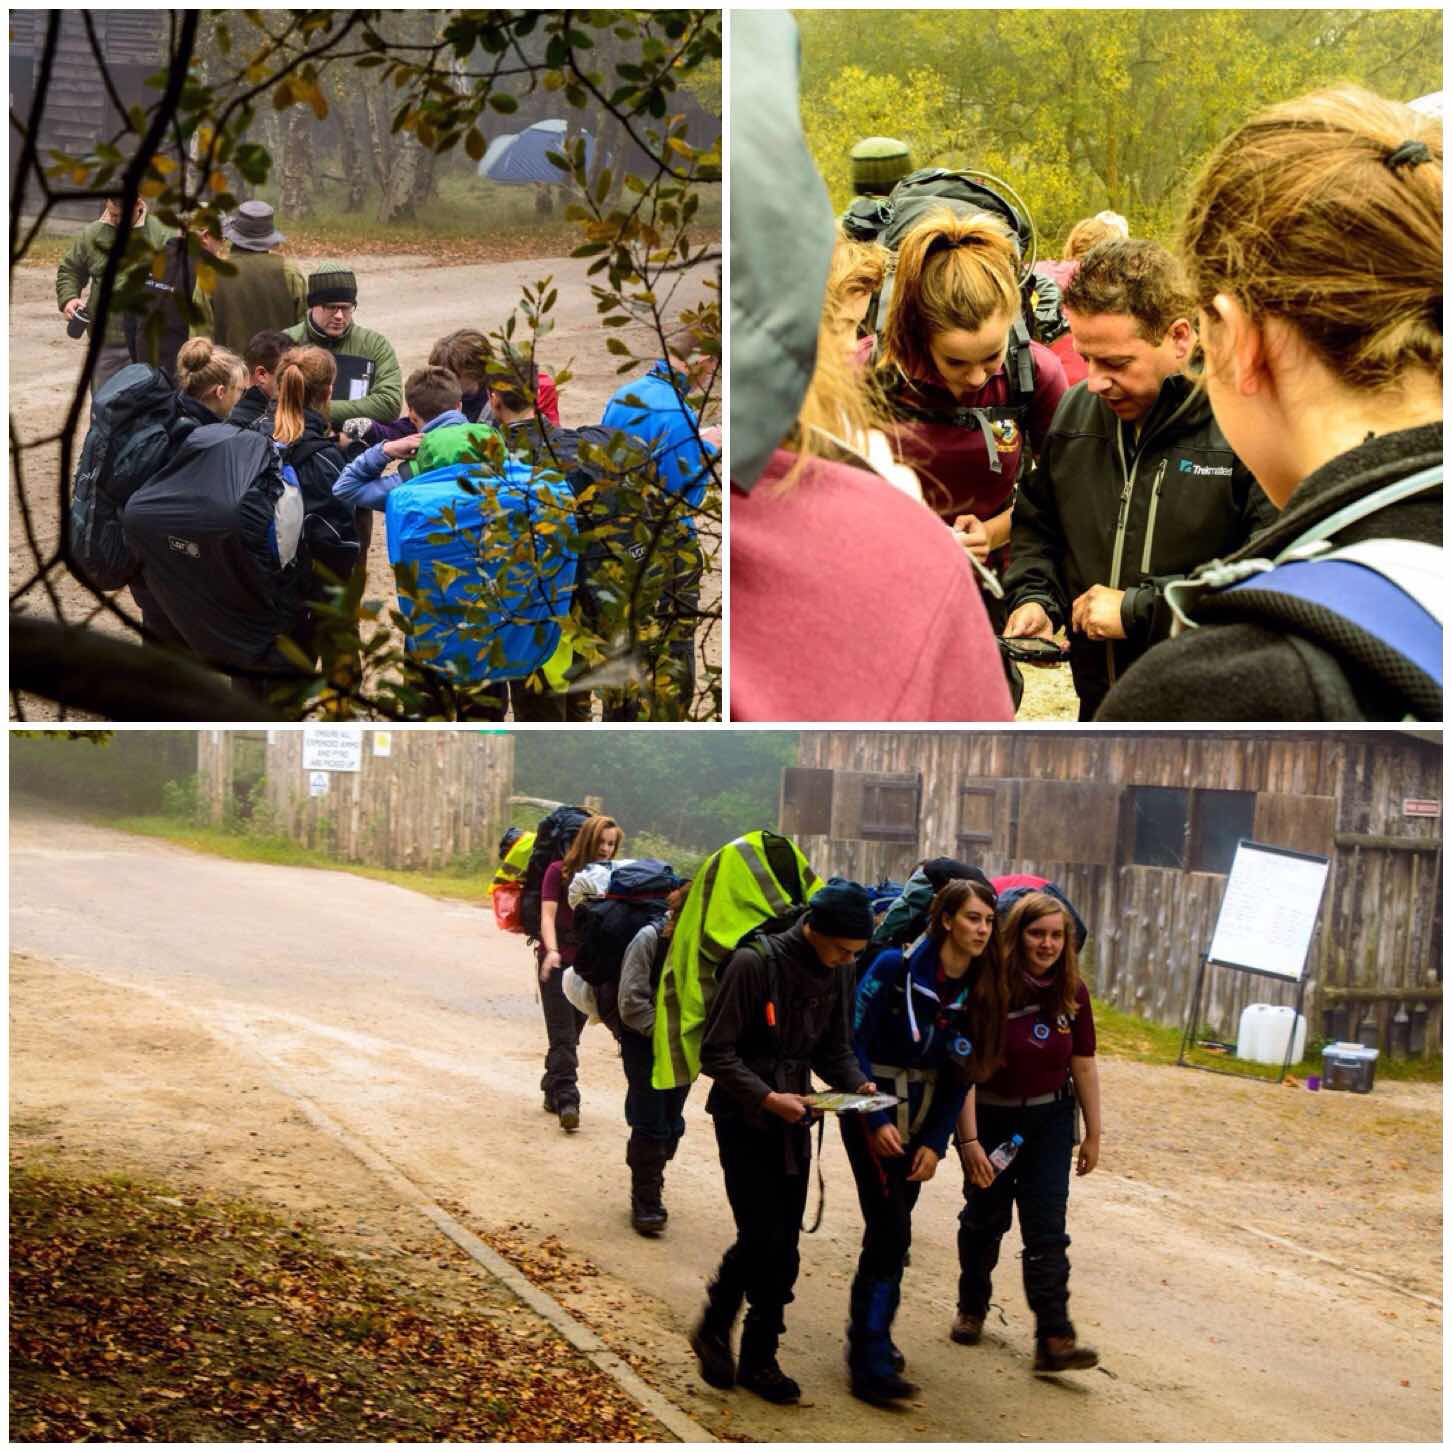
A few of us arrived early and set up camp before the arrival of the cadets in the evening. The cadets were dropped off in the Ashdown Forest and had to navigate in the dark to their campsite in Pippingford Park training area.
The walk was not particularly long however they needed to pay very close attention to their navigation so as to not get lost. I spent most of the evening sitting in the middle of the woods waiting to spot the teams coming through. Thankfully nobody got lost this year so the staff got time to sit around the fire and relax later on.
Friday Night
Saturday morning was a time of route planning, kit checking and setting off into the mist. The whole of the Ashdown Forest was covered in a thick blanket of mist so the cadets were briefed to pay particular attention to their micro navigation skills.
Prepping for the Nav Excercise
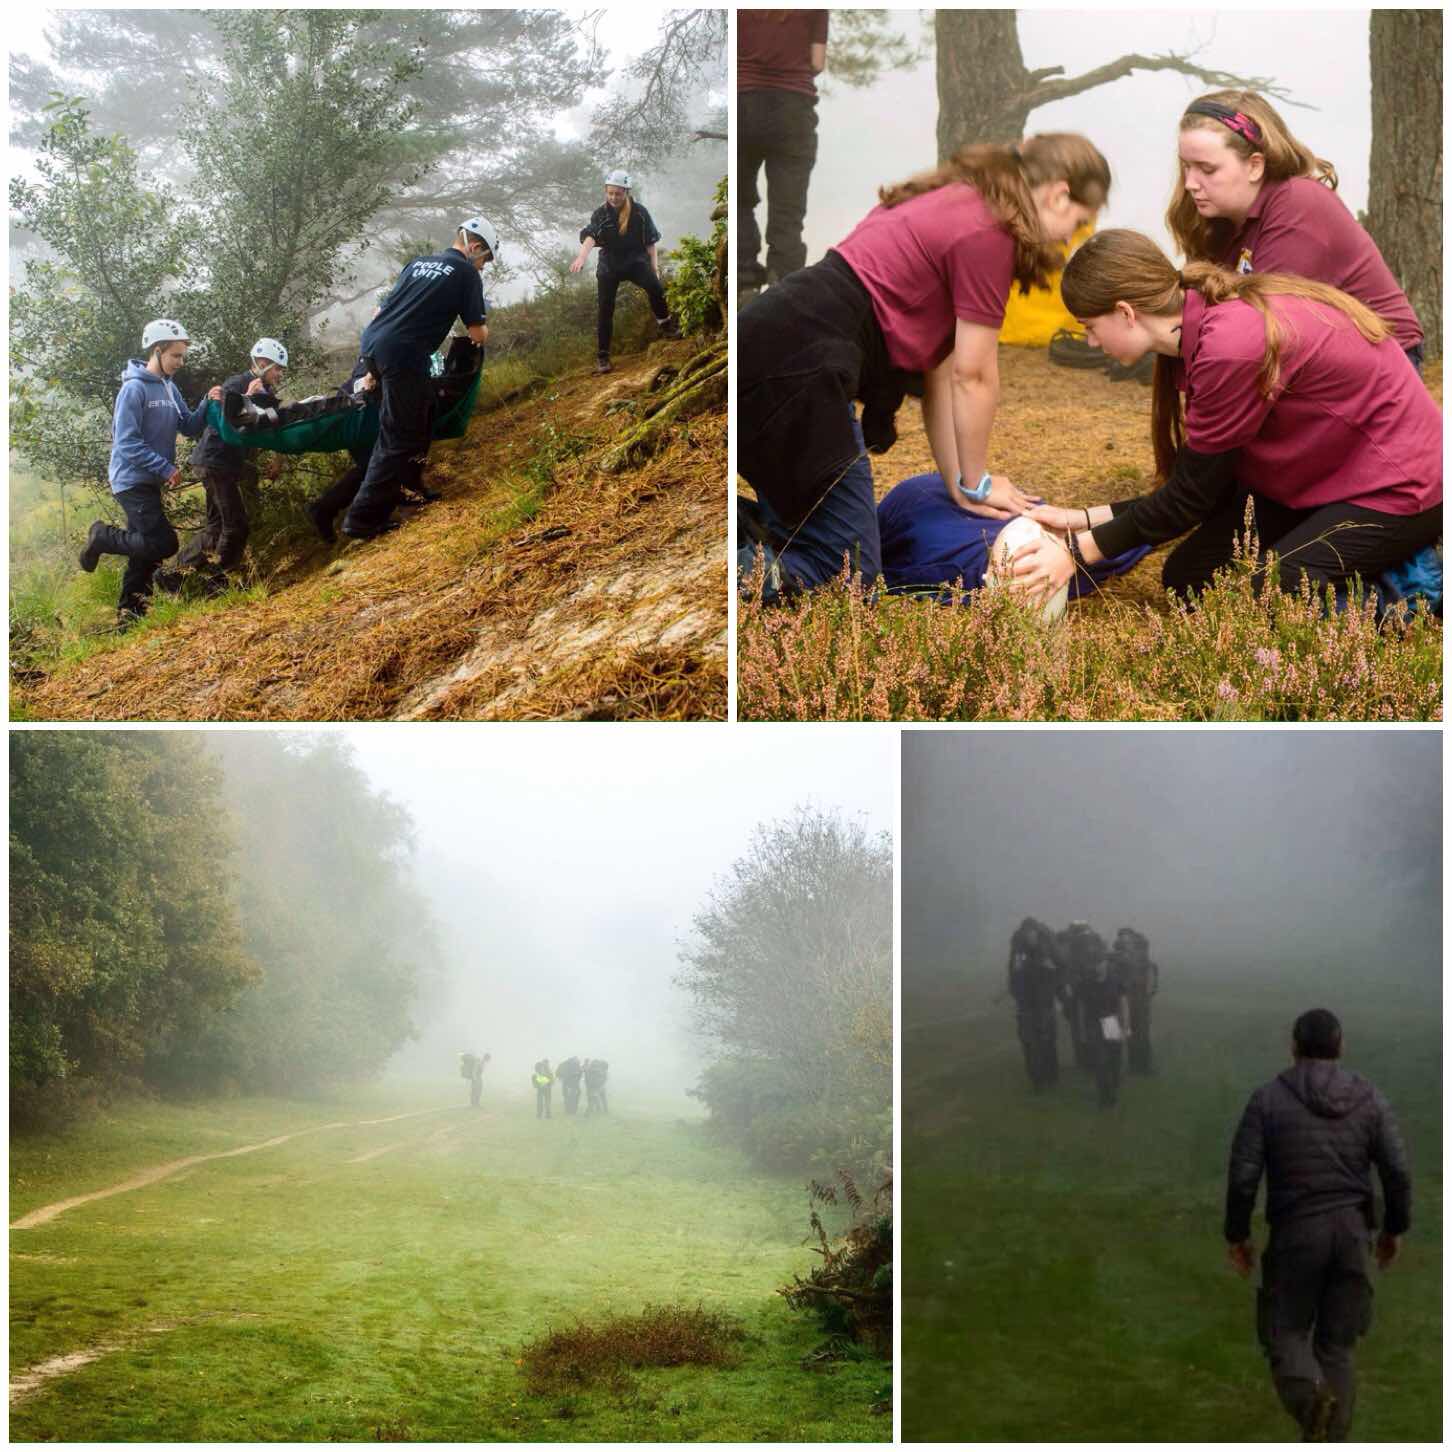
The route they had to navigate along was interspersed with lots of different check points and at some of these they had to undertake marked tasks. One of the first tests was to do with First Aid where they had to perform CPR and carry out a casualty evacuation.
I toured round most of the stances to ensure the cadets were heading in the correct direction and would sometimes spot them emerging out of the mist. The mist cleared up by lunchtime and thankfully all the teams stayed on course.
First Aid and Mist (bottom right picture courtesy of Charlie Brookes)
I did manage to get my little EDC hammock out a few times at the stances and chill out a bit. Some of these stances included searching for mines (pretend ones I hasten to add) and micro navigation games with string.
Mines and Micro Nav
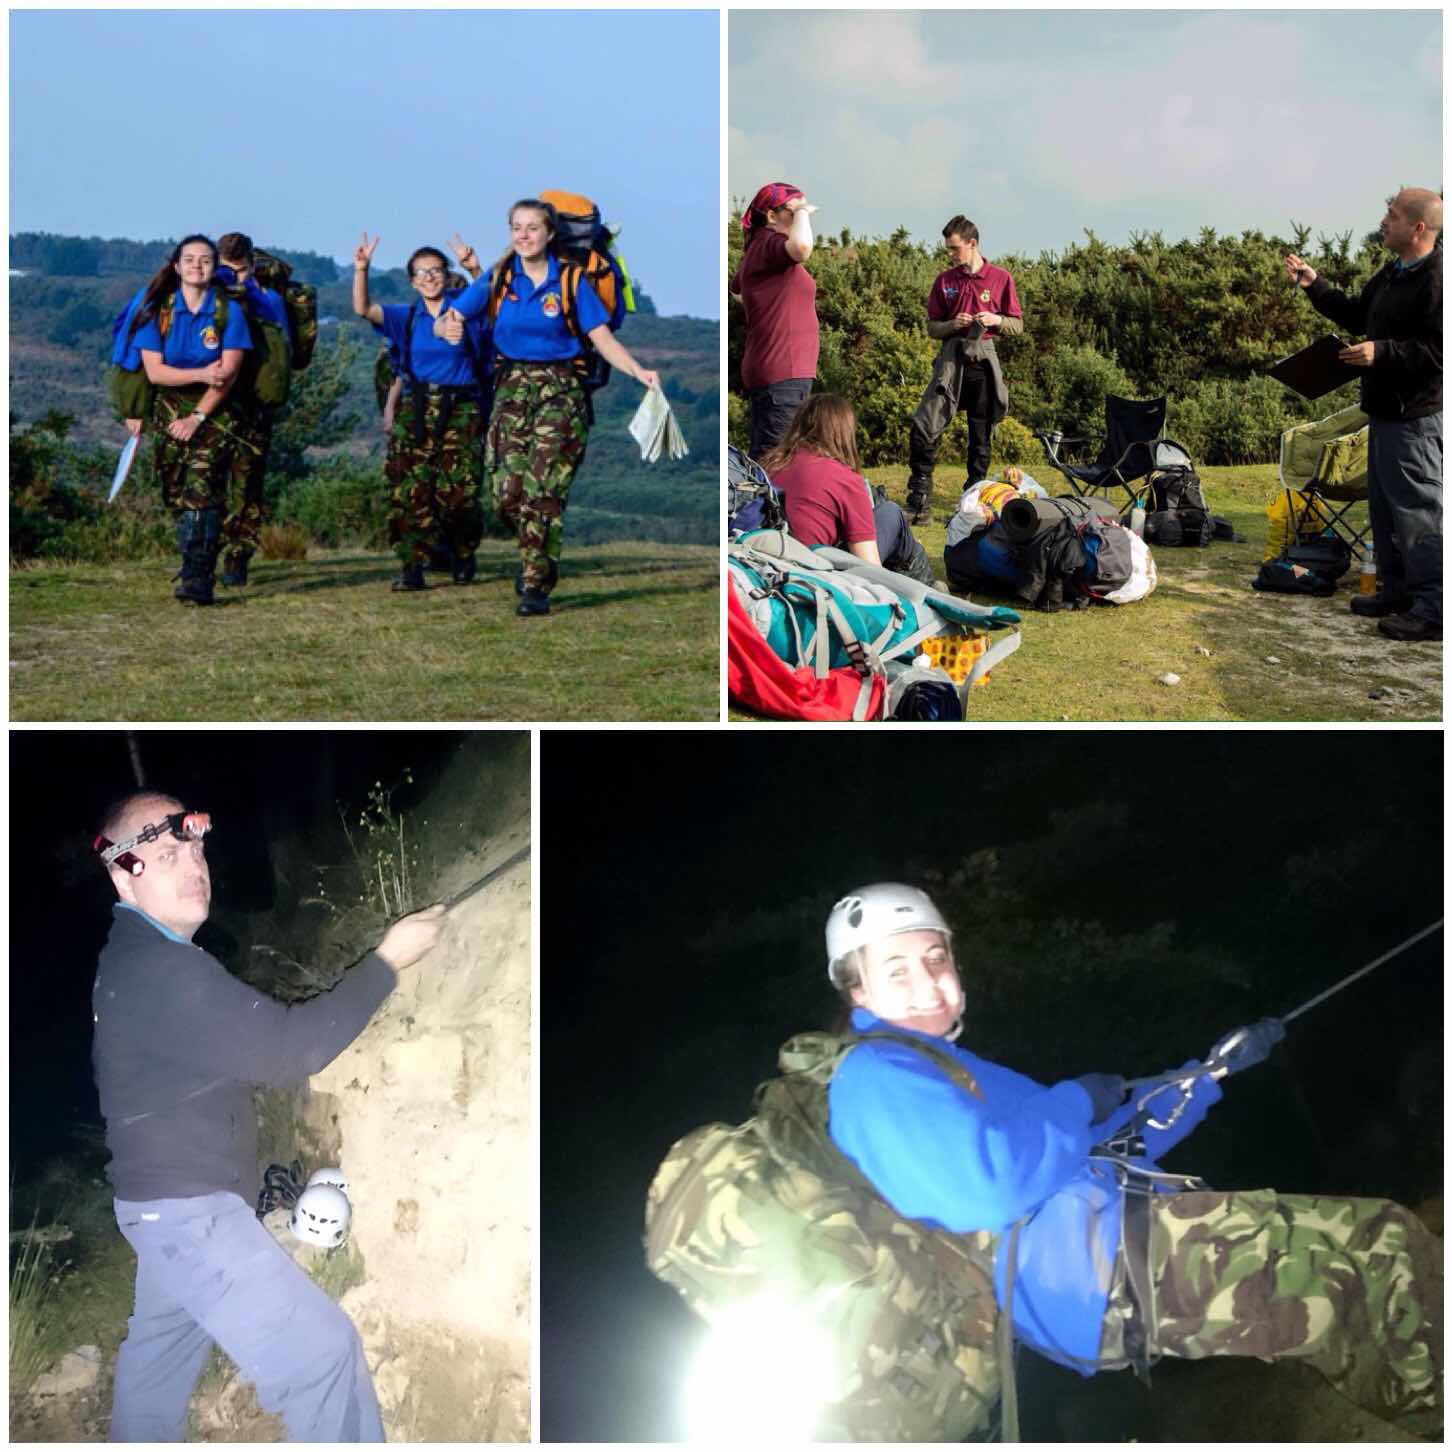
Eventually before the light faded all the teams were back at camp resting up and preparing for a night navigation exercise.
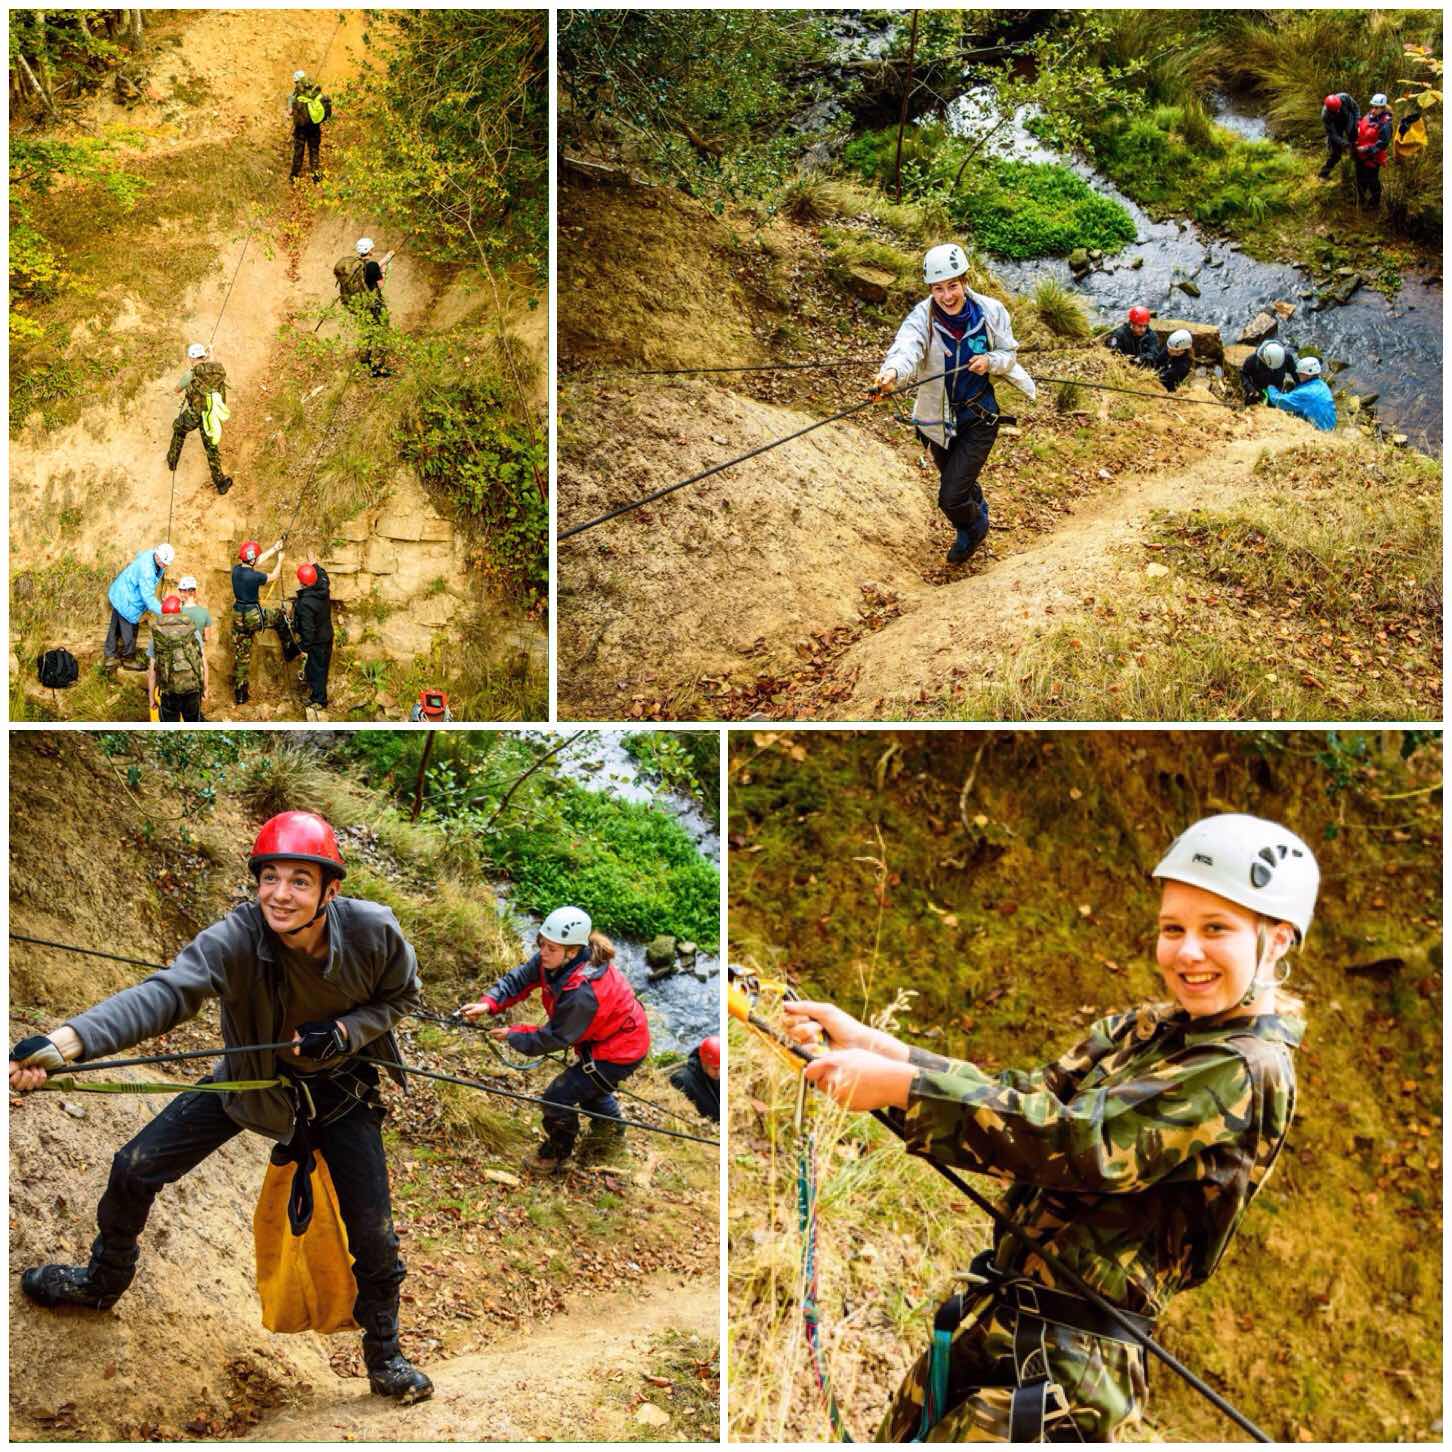
This night nav consisted of navigating to various checkpoints throughout the training area (we did allow the use of torches) and descending down a steep embankment using abseils.
Meet ups and Night Time Descents
Sunday morning was a busy one for everyone. We had set up a number of timed activities to test all the teams out.
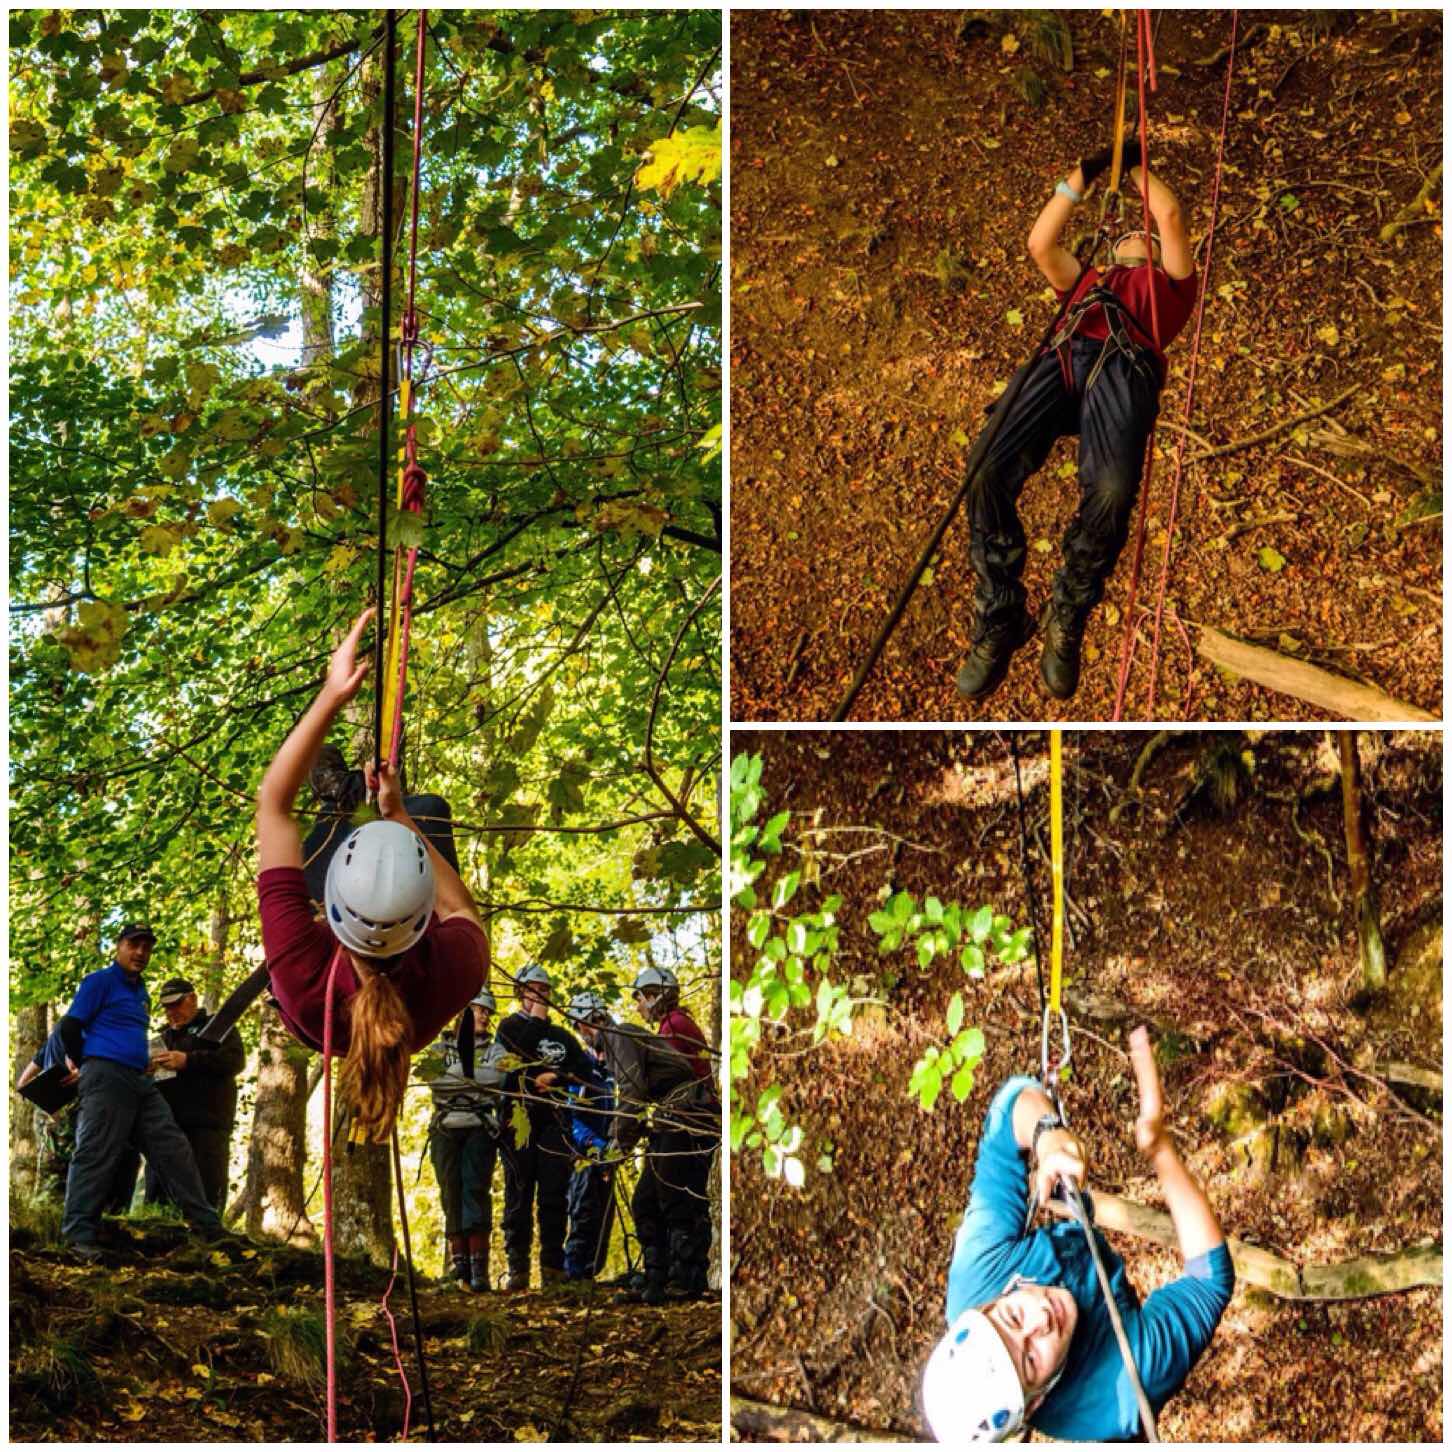
The cadets had to race up a steep embankment using ascending kit. Not an exercise for anyone with a fear of heights but one enjoyed by all the cadets.
Ascending
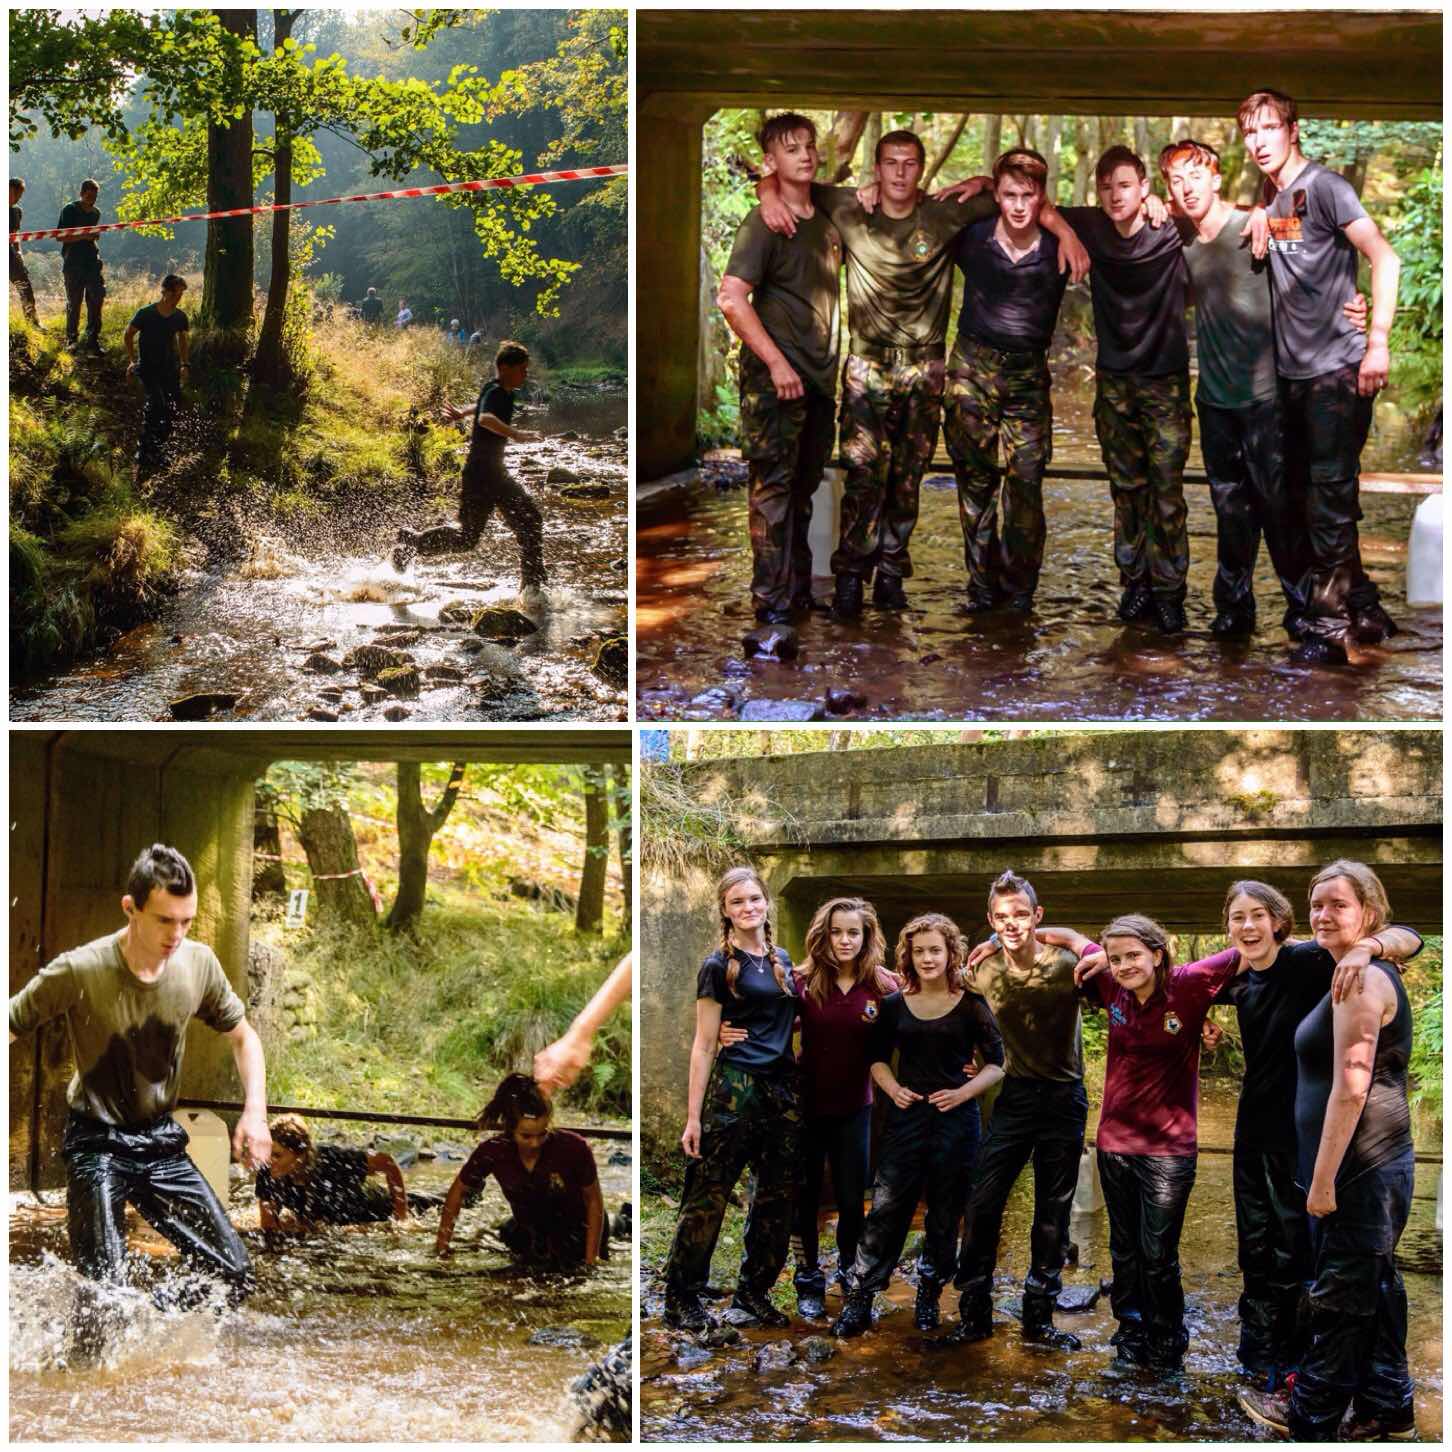
Each team had to run the Endurance race. This race was set up around the forest crossing a stream a number of times and a few other challenges along the way. Below you can see Bexley unit and Sunbury and Walton unit still looking good after the race.
Endurance – Bexley & Sunbury
Another challenge was to time the cadets getting their whole team across a ravine using a Tyrolean Traverse. The cadets had to devise a strategy of getting everyone across however they were only given one set of pulley equipment, so easier said than done.
The Tyrolean Travesrse
Each team took it in turn to run the Endurance race and as you can see below got thoroughly wet. They may have been tired at the end however by the smiles on their faces they thoroughly enjoyed the experience.
Endurance – Sutton and Merton
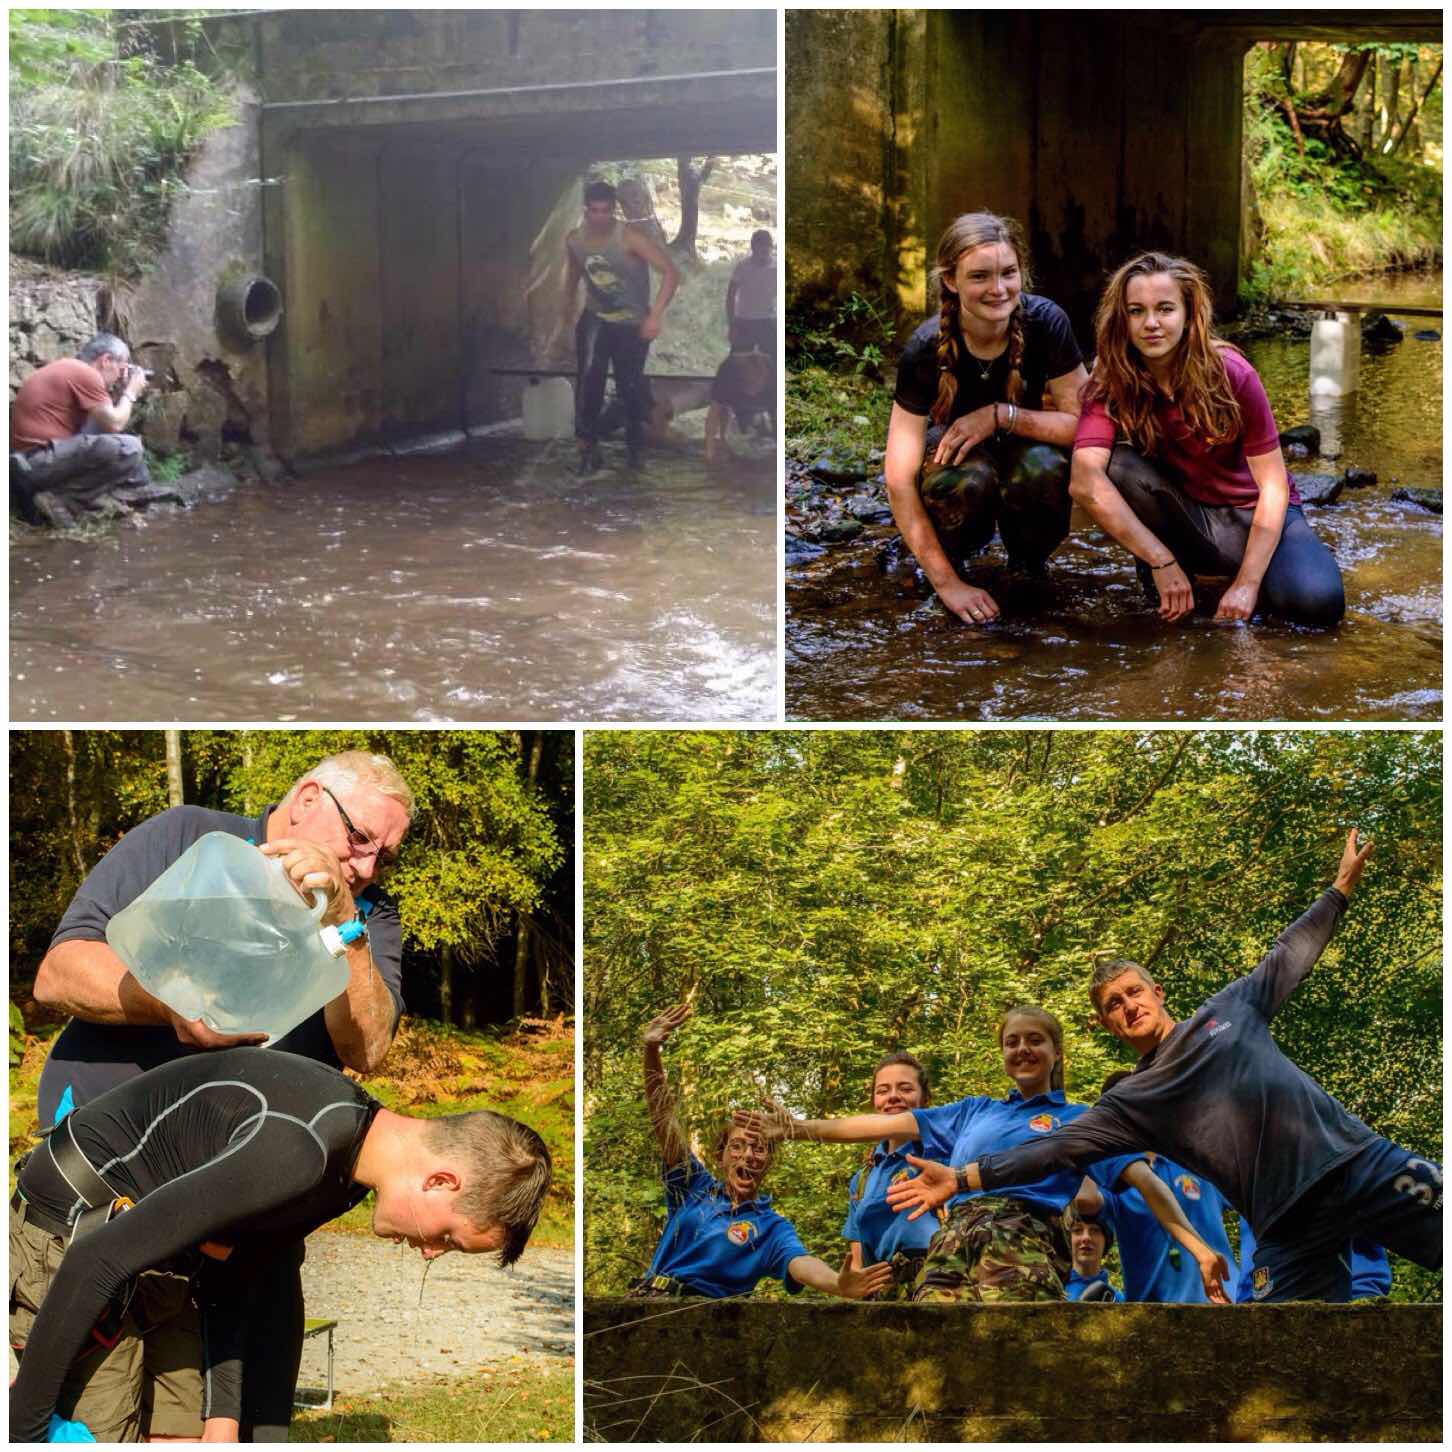
In between all this running and climbing a few little moments were captured – most involving water as you can see.
Moments in time (top left picture courtesy of Charlie Brookes)
The Endurance race went on for quite a distance through the woods and under tunnels. All the teams completed the race and enjoyed having their post race picture taken in the river.
Endurance – City and Enfield
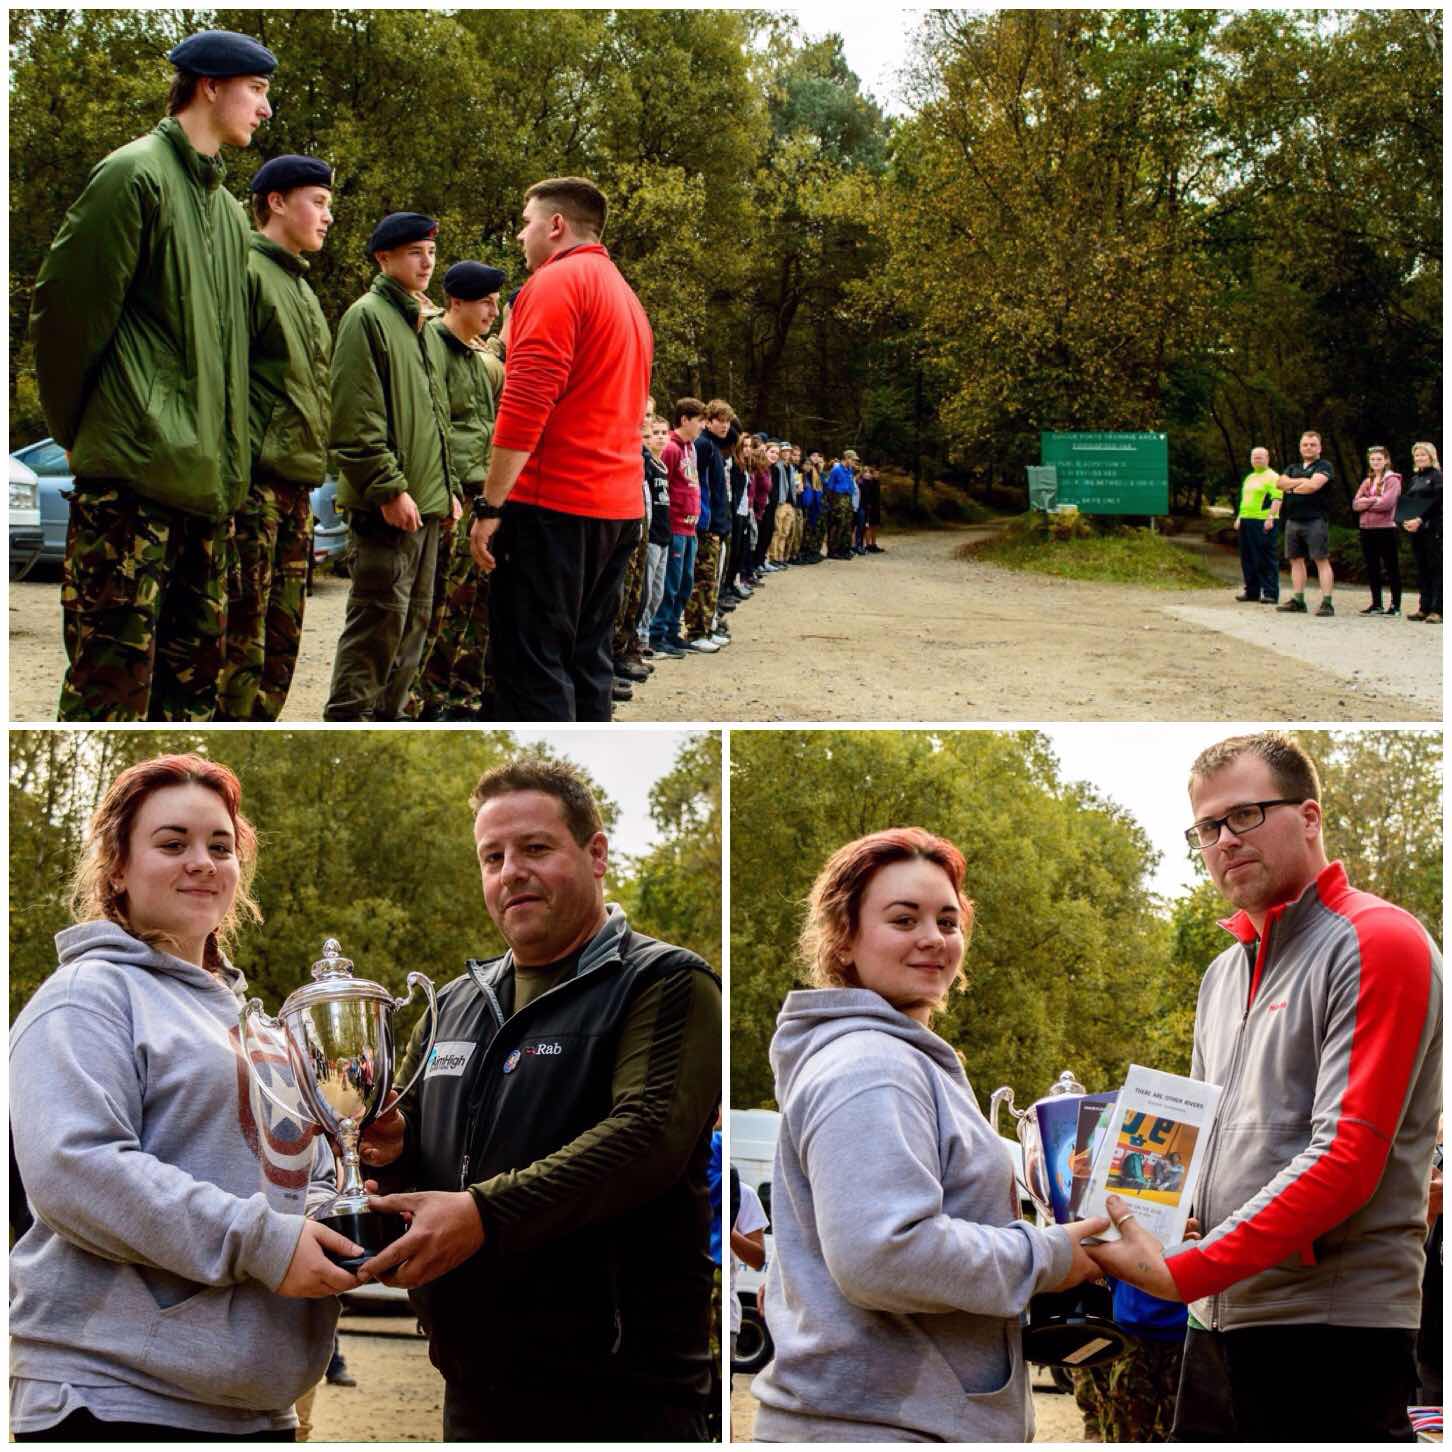
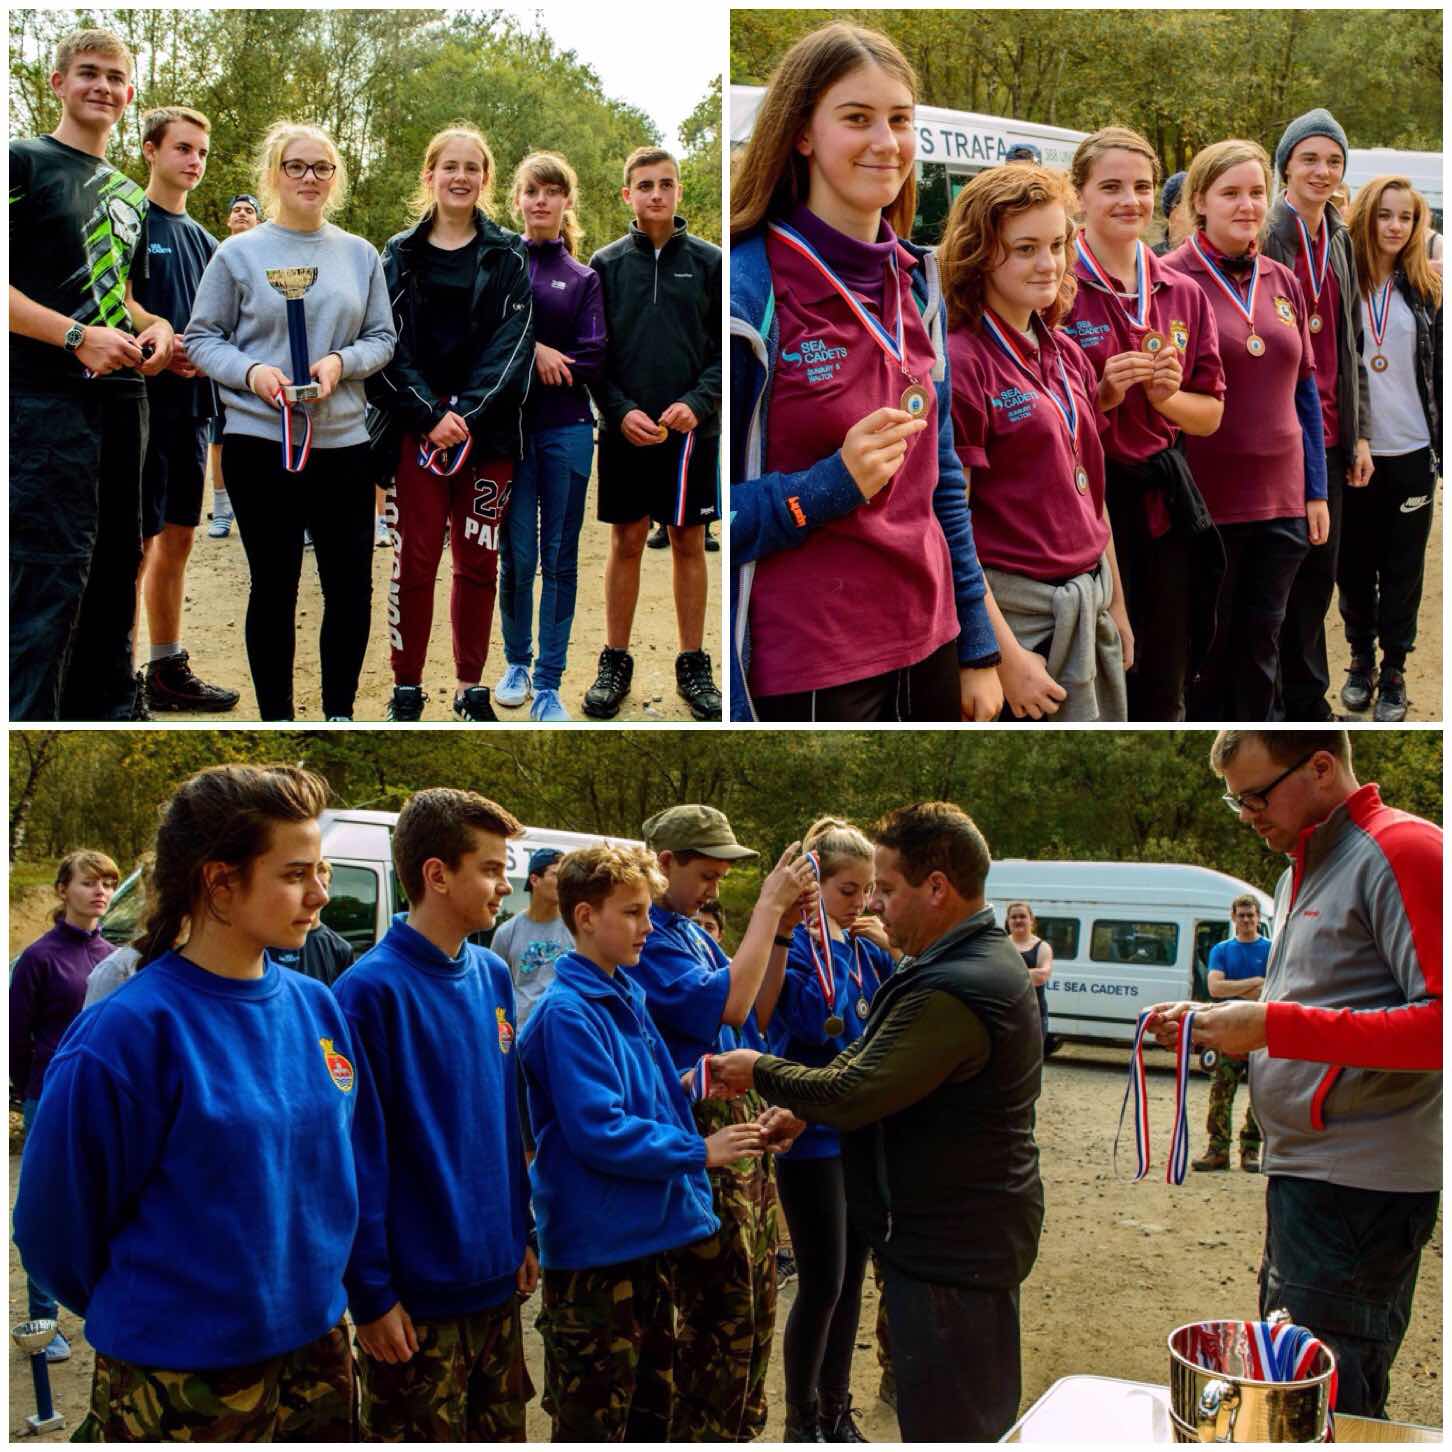
Soon it was time to tally up the scores and wait for the results.
There are a variety of cups up for grabs at the Chosin Cup including one for best team leader – The Reg Wheeler trophy. This year it went to Ordinary Cadet Harrison of Sutton unit. She also picked up some extra prizes donated by the adventurer and author Alaister Humphreys.
Declaration and the Best Team Leader
Our Visitors trophy went to Poole unit, third place to Sunbury & Walton unit and second place went to Enfield unit.
Runners Up
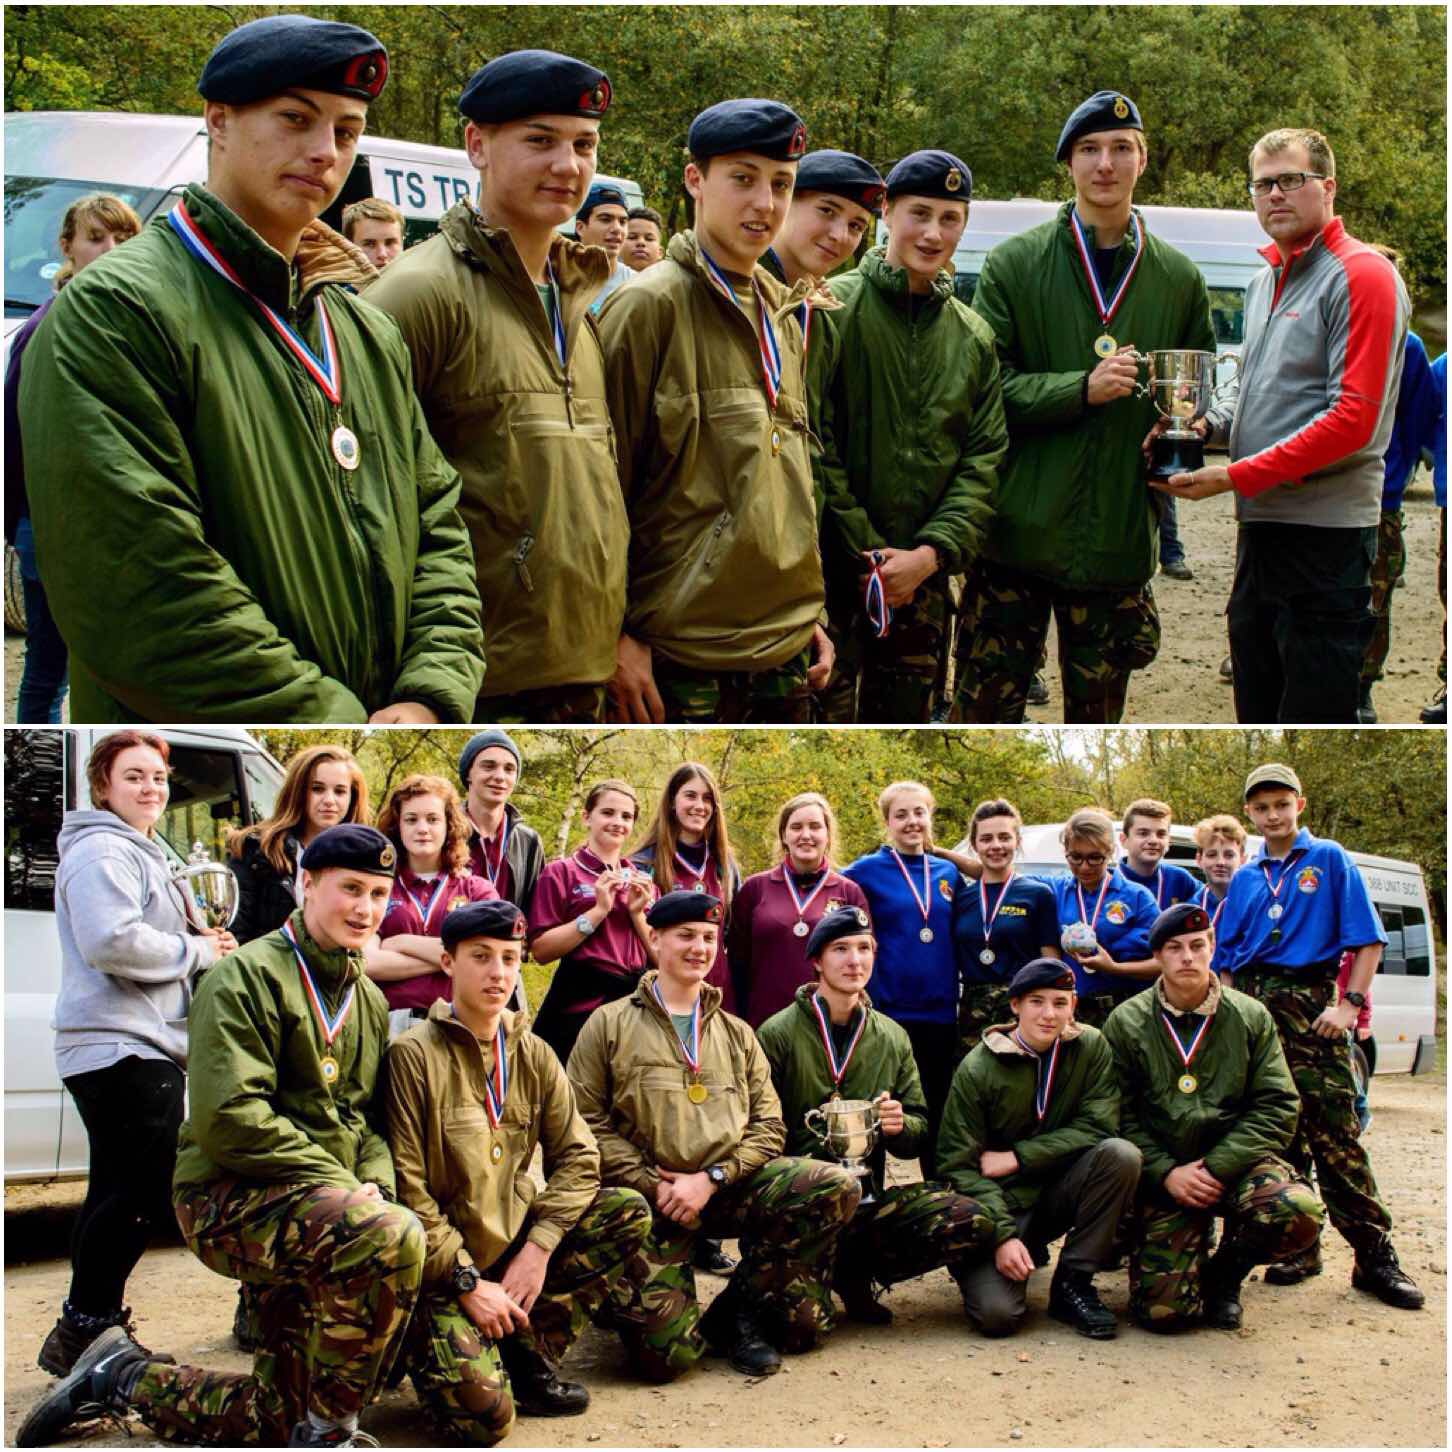
First place this year went to Bexley unit. They were a combined unit of Sea Cadets and Royal Marines Cadets. Well done Bexley for winning the competition this year. It was a hard fought competition with only about 8 points between the top two units (top scores were near the 800 mark so 8 points was a tight finish).
The Winners – Bexley
Finally I would like to say thanks to all the staff who helped run this years event, however a special thanks must go to Jacob Leverett who agreed to take on the mammoth task of organising it all.
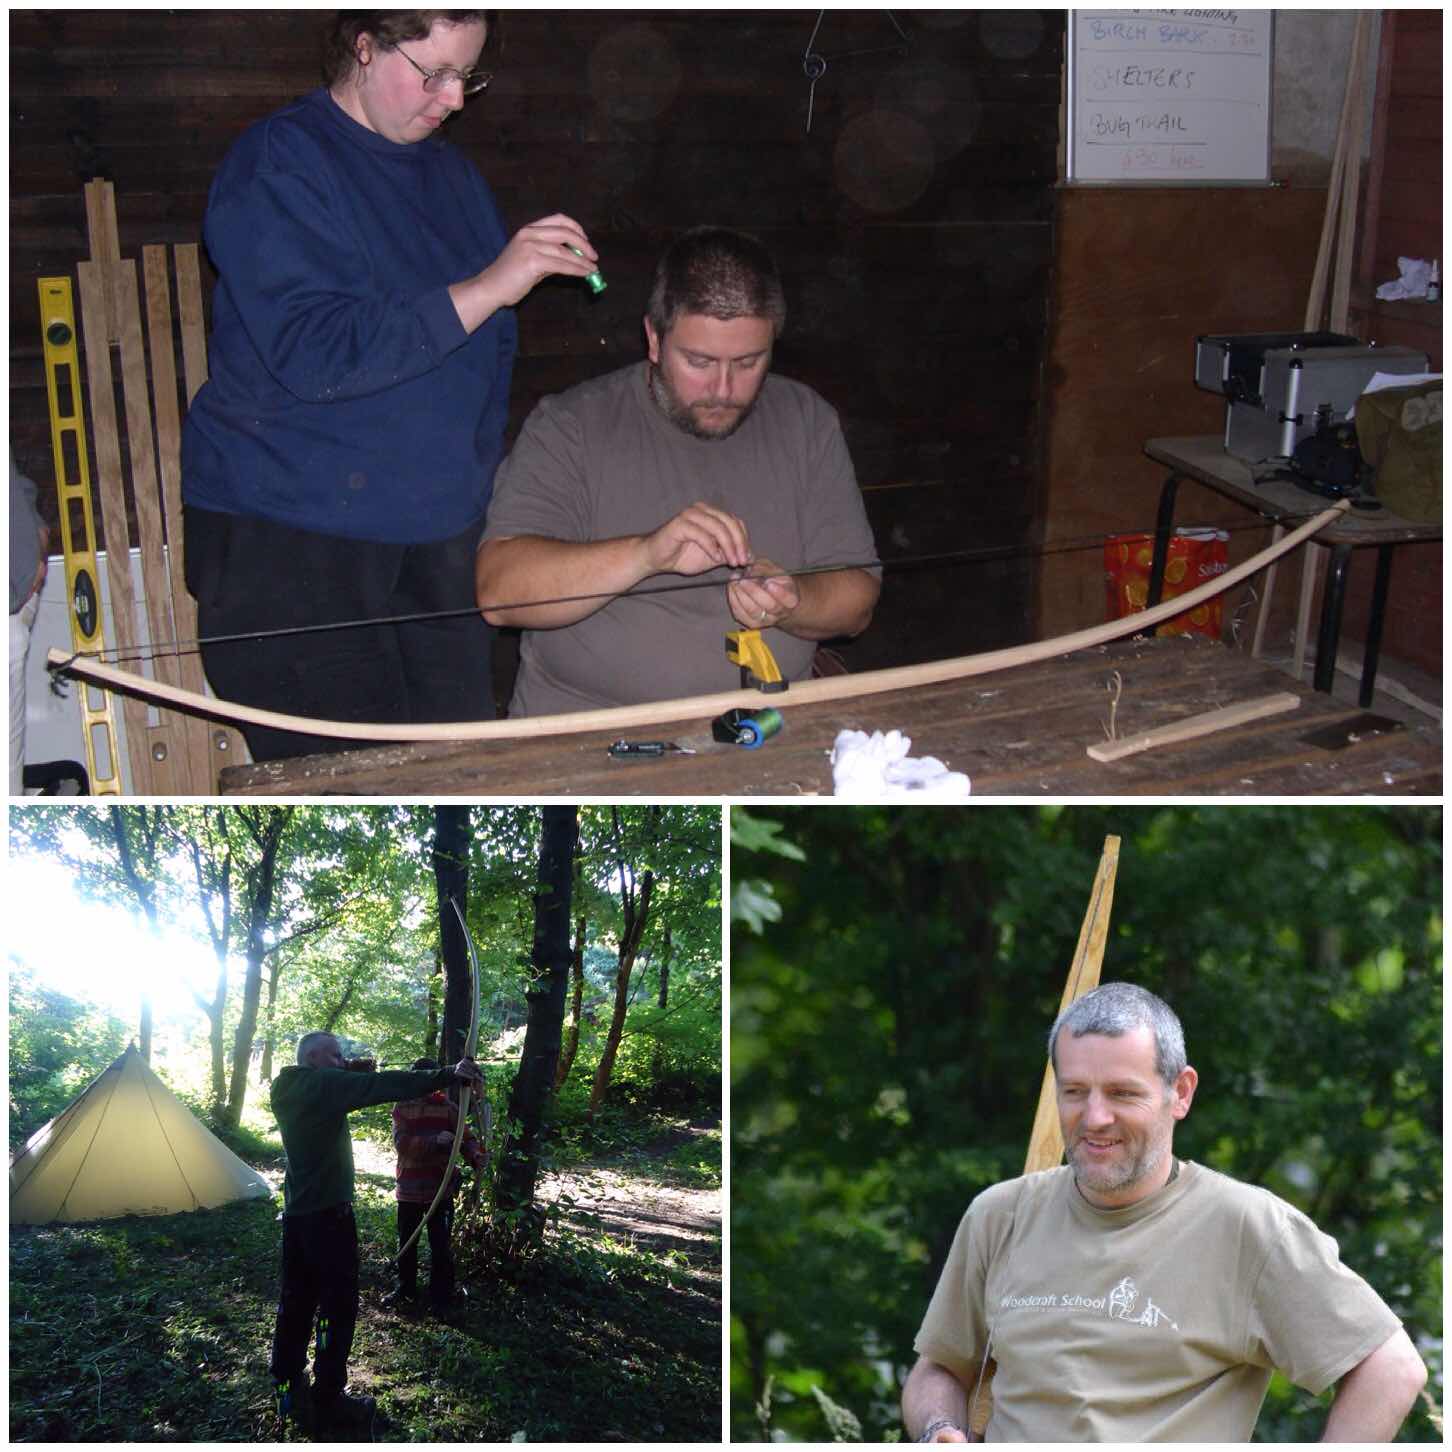
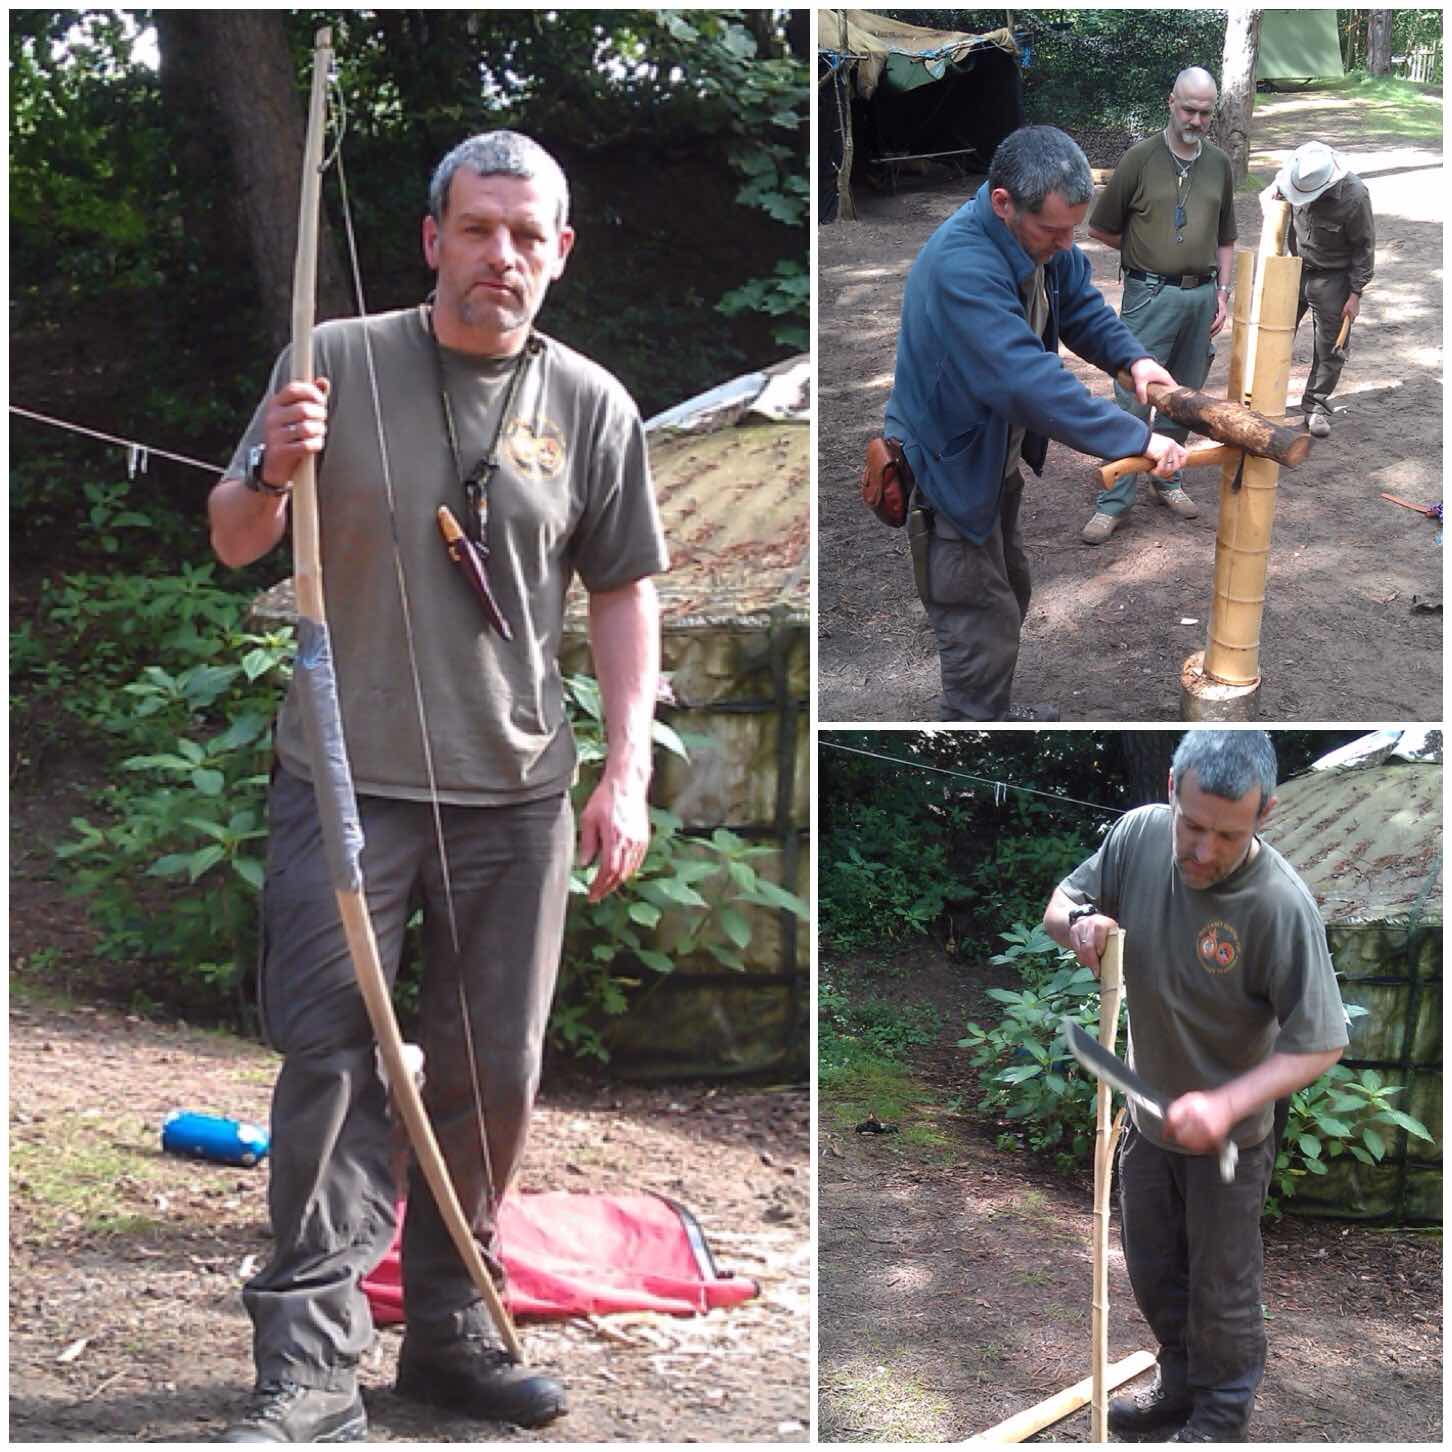
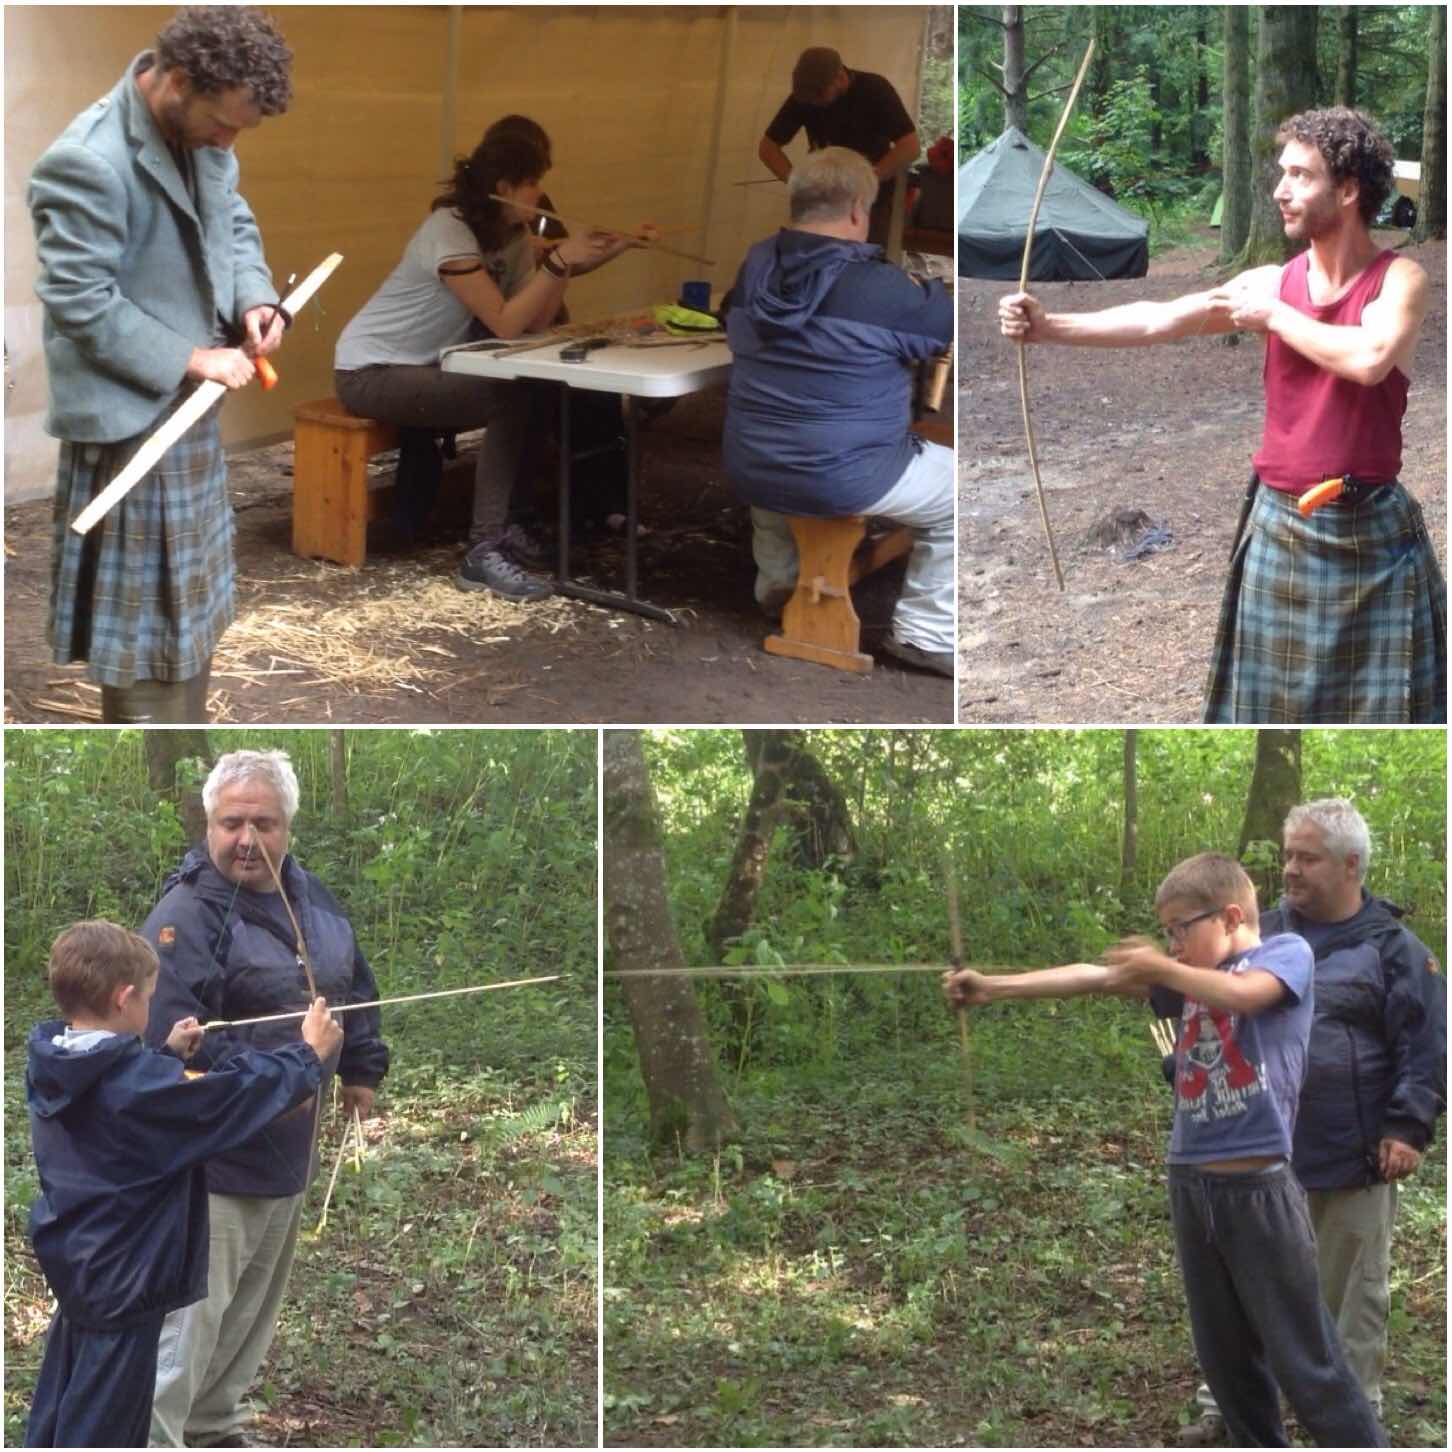
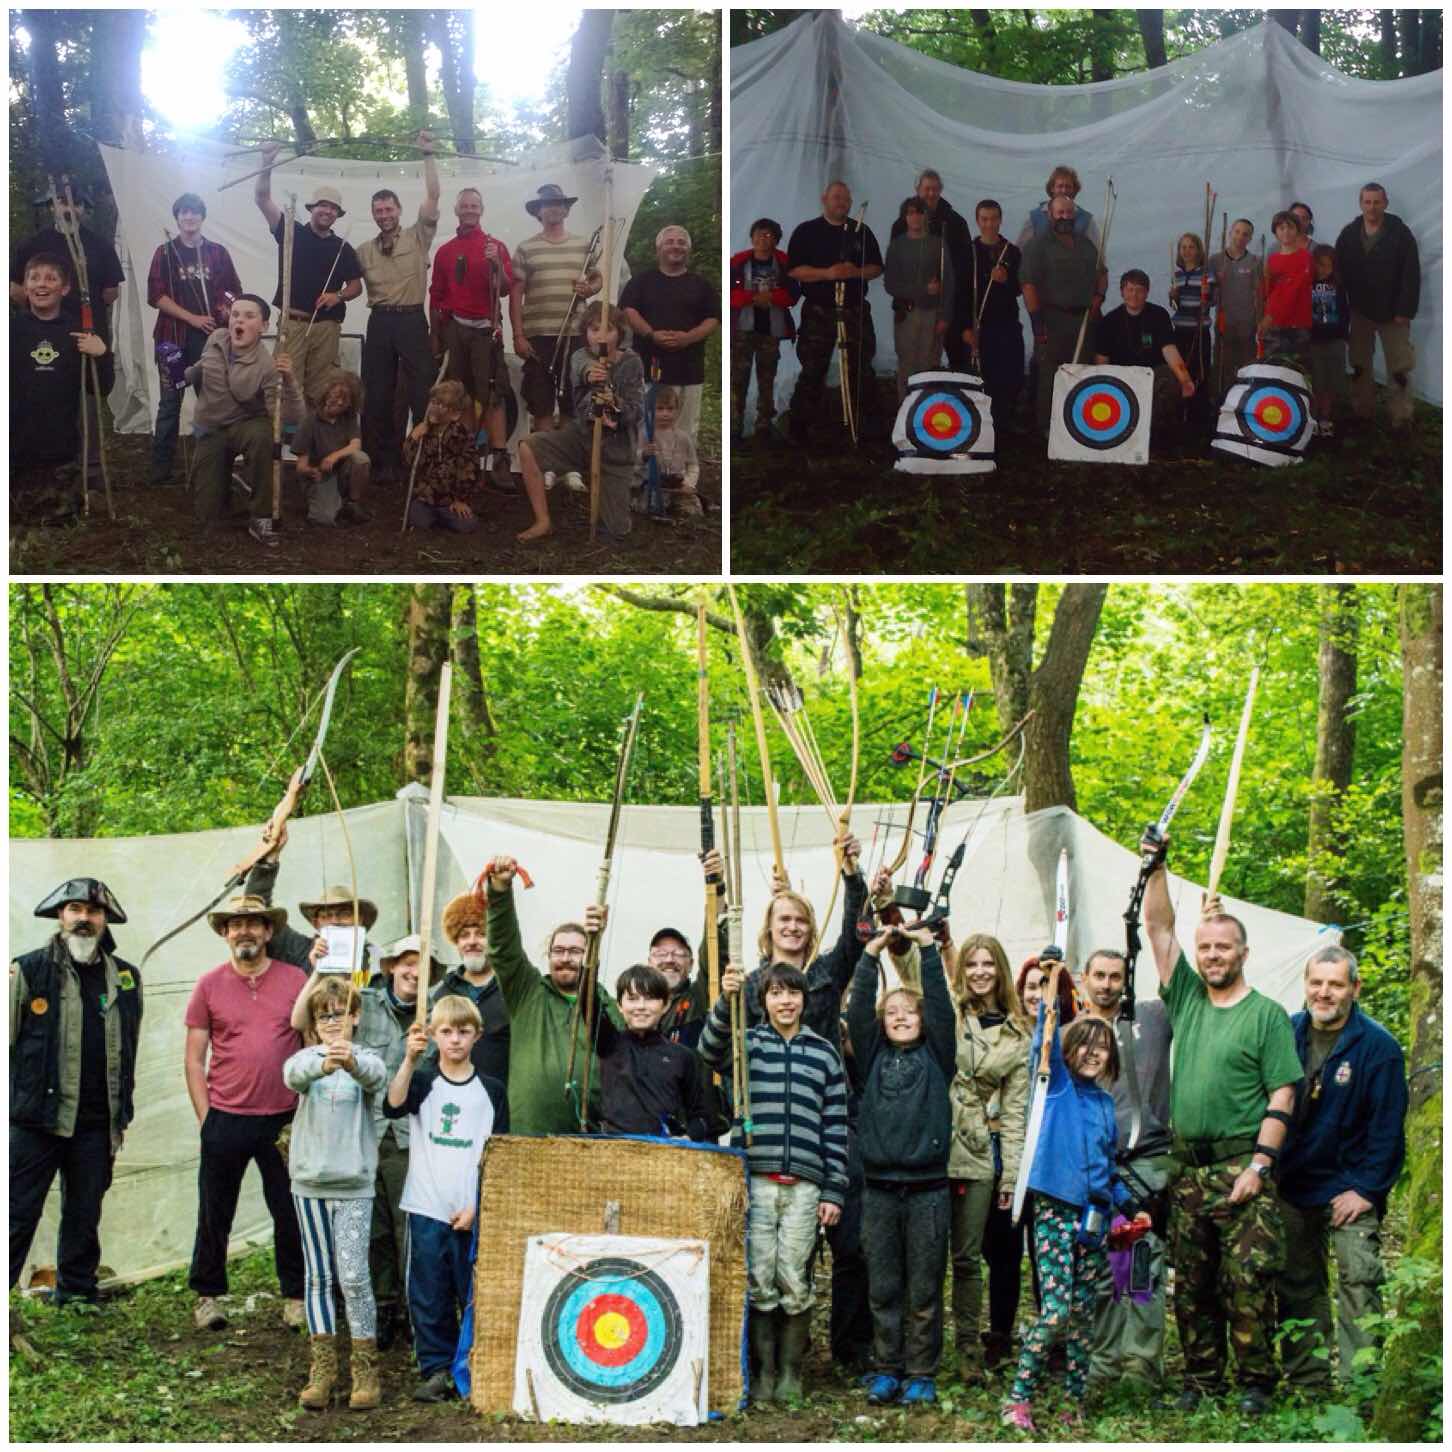
My annual holiday to the BCUK Bushmoot would not be complete without a bit of bow making and some time down on the range.
About ten years ago I was introduced to bowmaking by my friend Bardster (Paul Bradley). Bardster used to run workshops at the Moot which were always well attended. I then studied under John Rhyder of Woodcraft School and made a number of different bows from Ash Flatbows, Holmegaards and the Father & Son bow.
Bushmoot Archery
The Father & Son Bow
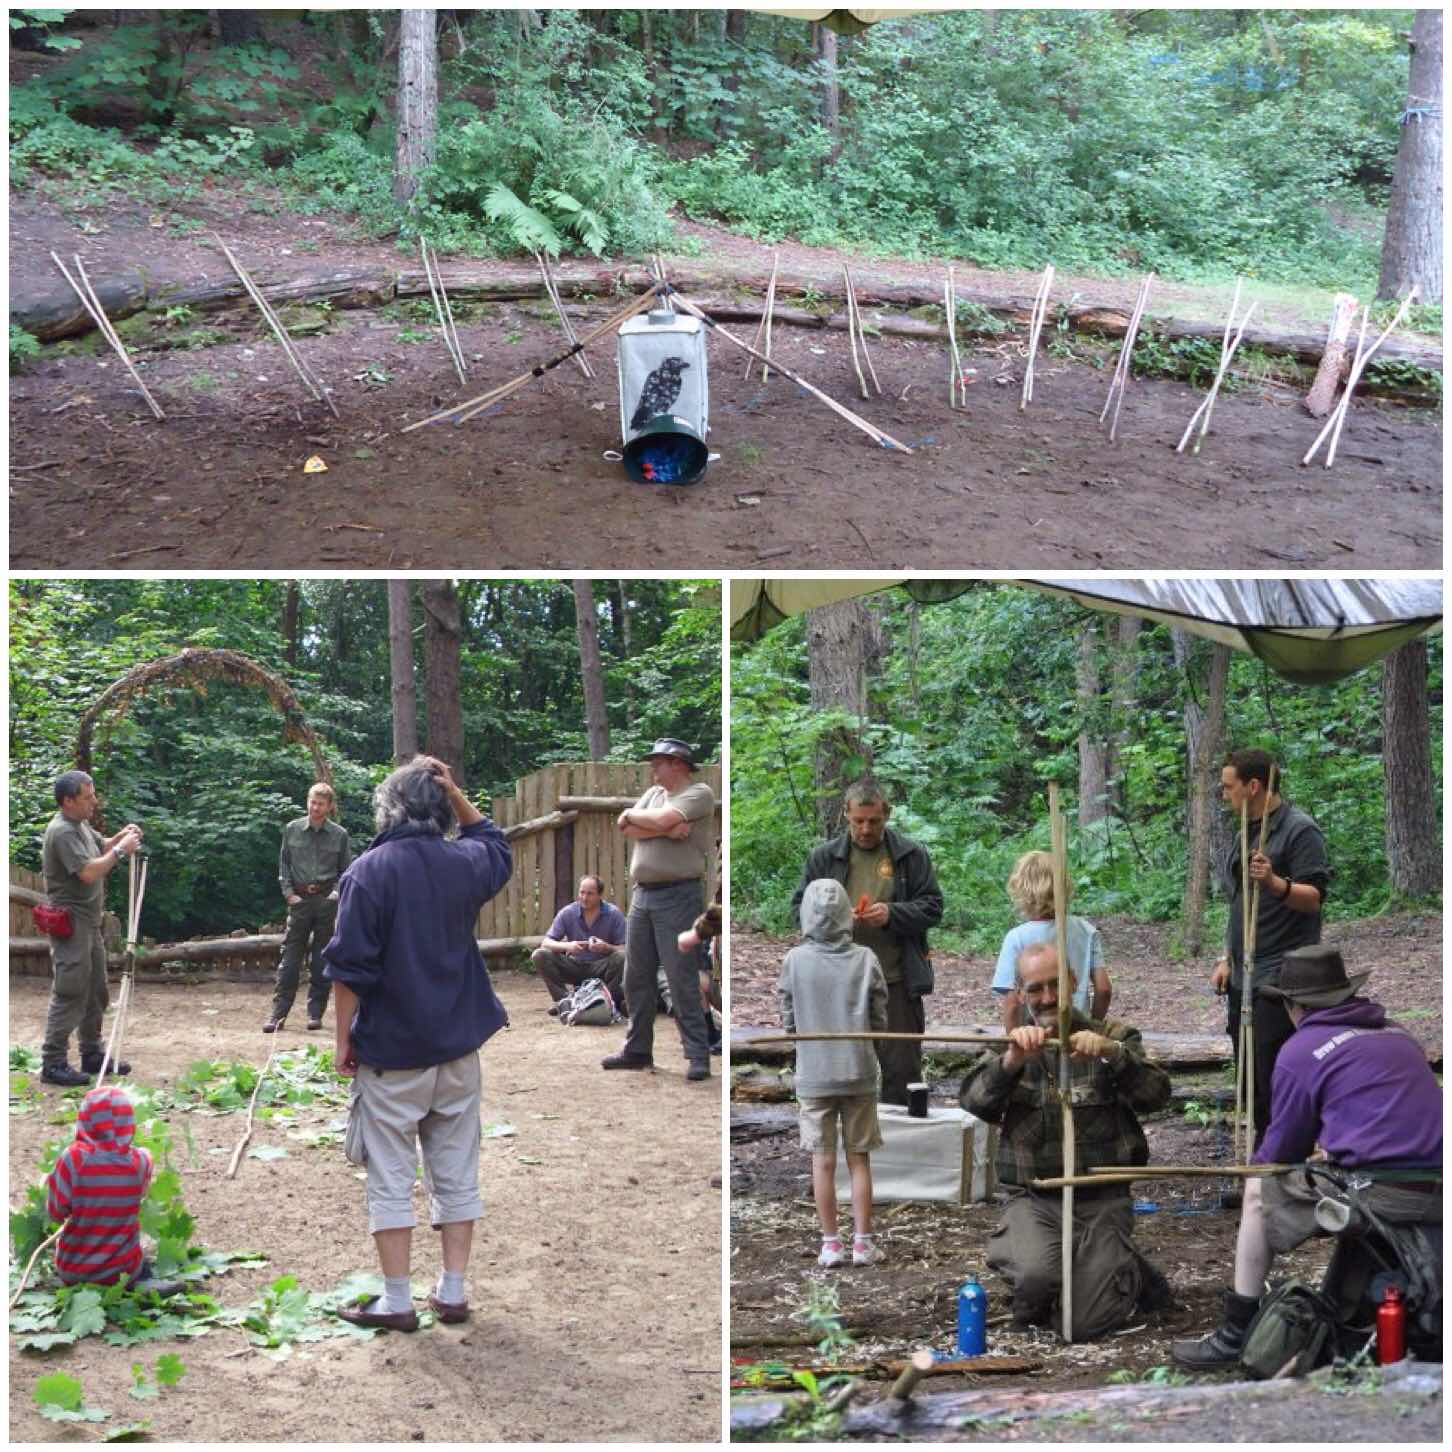
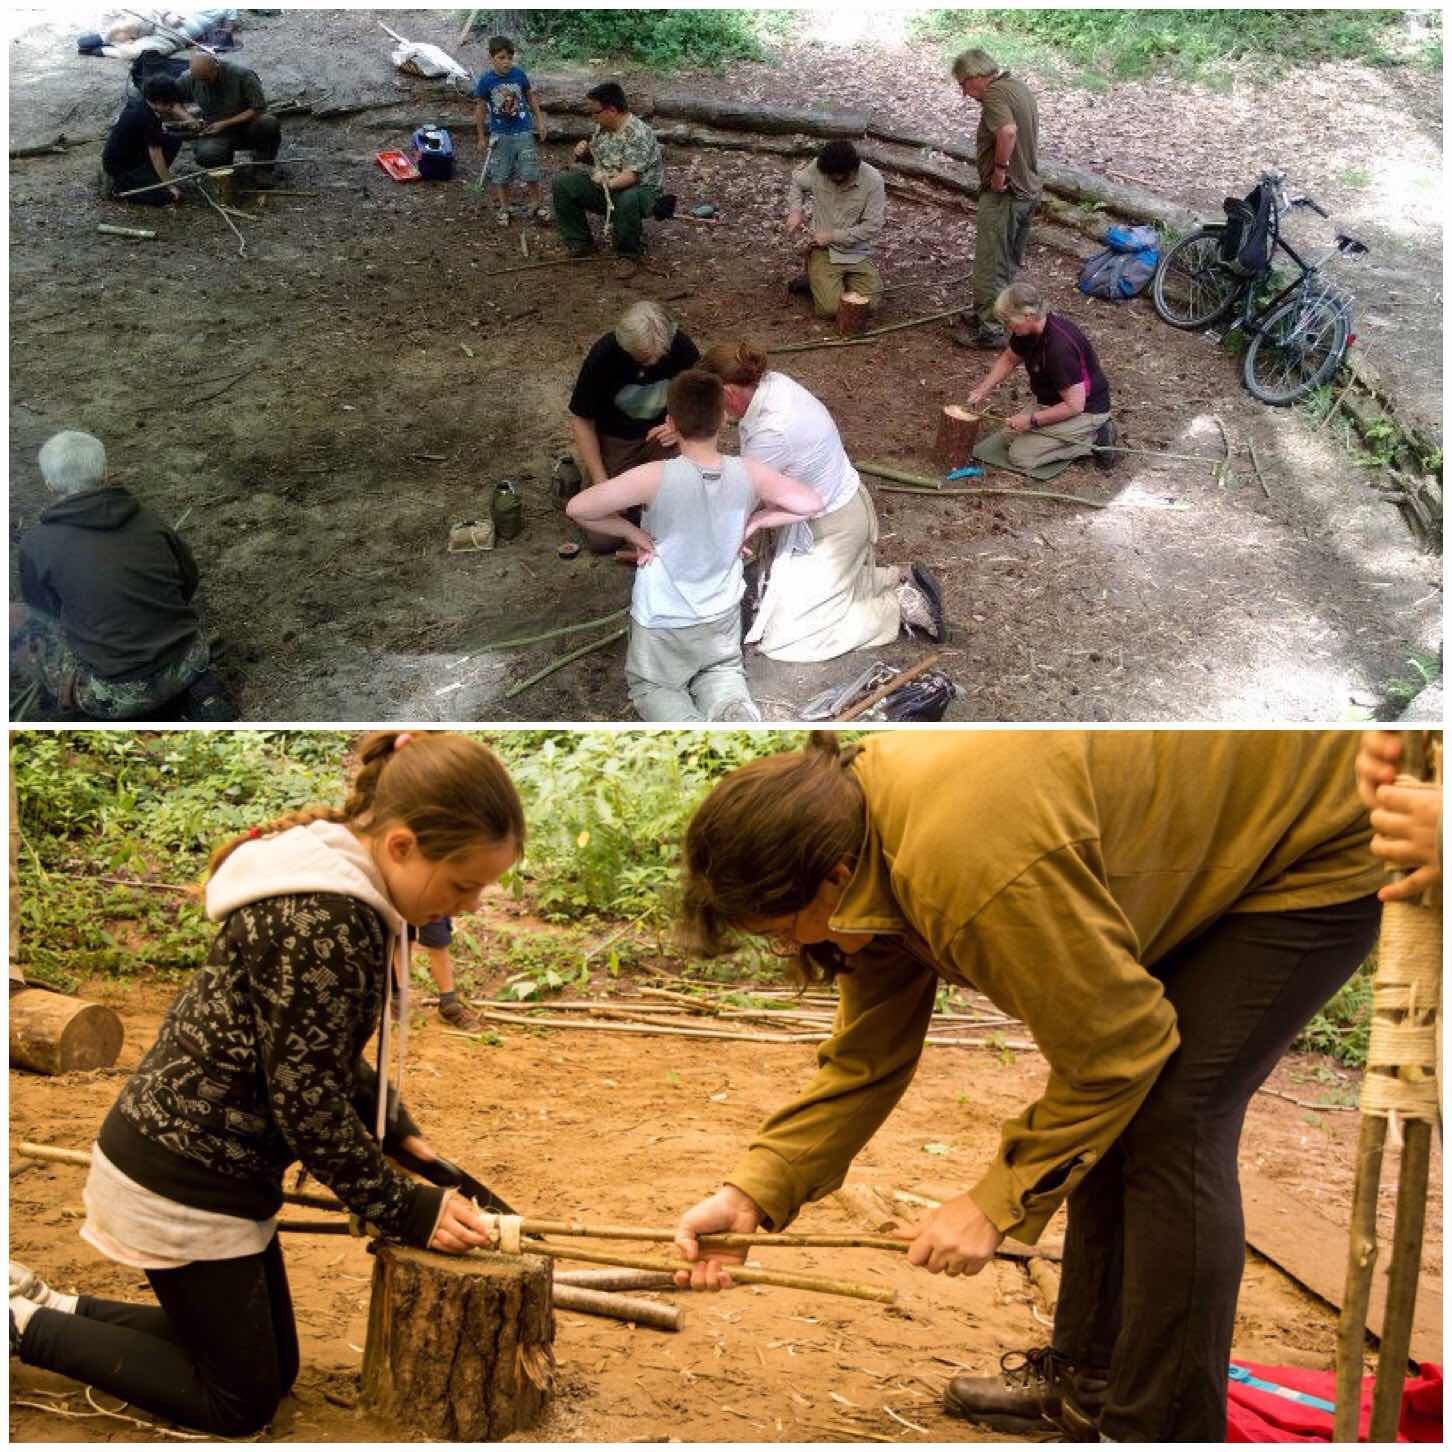
I introduced to the Moot a number of years ago the Father and Son bow (I had learnt this of my friend Mark Emery of Kepis Bushcraft) This is a ‘quickie’ bow to make and comprises two rods (usually hazel) strapped together. The bows take only an hour or two to make if you know what you are doing although they may take up to a day to make if you are new to it all.
I have run quite a few classes over the years at the Moot on the Father & Son bow. As you can see in the pictures below they were large classes.
The Father & Son bow
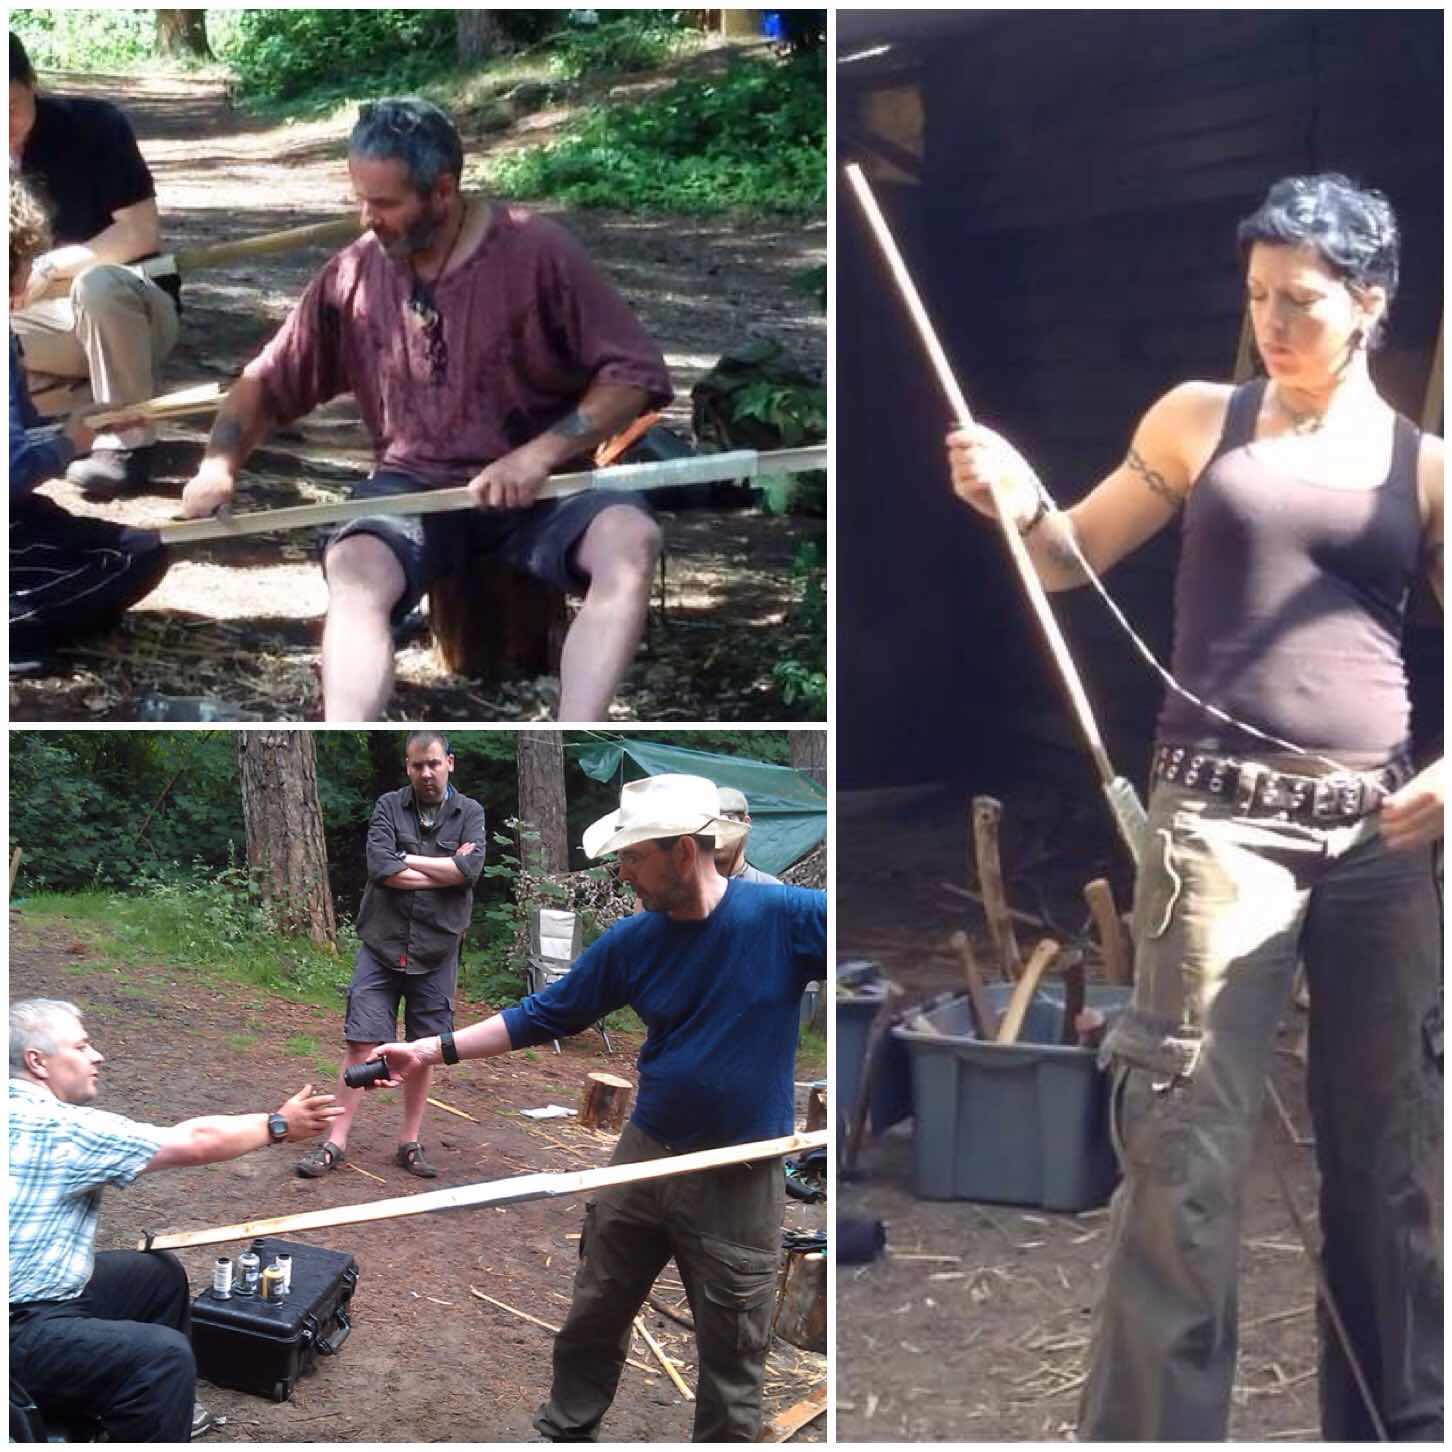
Nowadays Chris Pryke runs this class and it is well attended each year. The bows if made properly can last you years. I still have and use my first one which is over 6 years old now.
In new hands
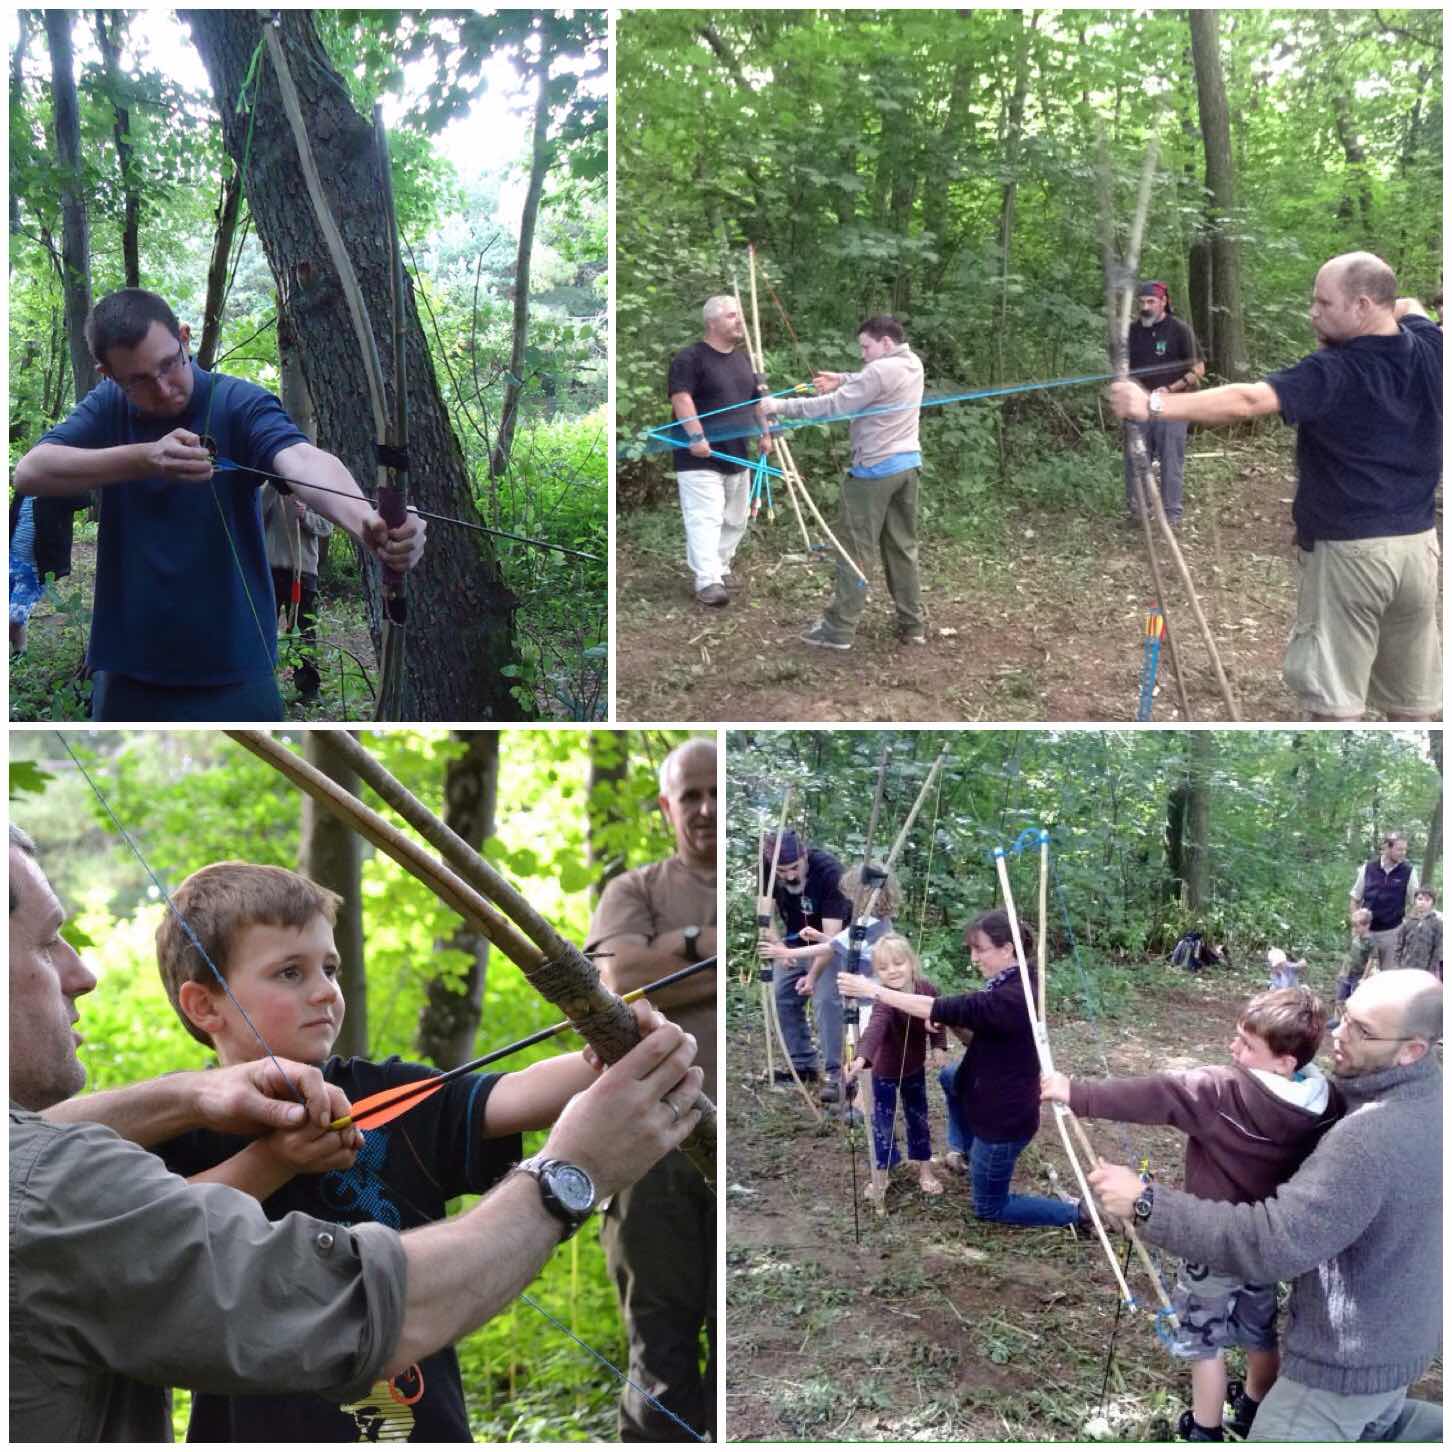
I have had hours and hours of fun making and using these bows over the years. They are cheap to make, very accurate with practice (normally I shoot them between 10 and 20 metres) and will shoot on a high arc about 60 to 70 metres.
Father & Son Bow in action
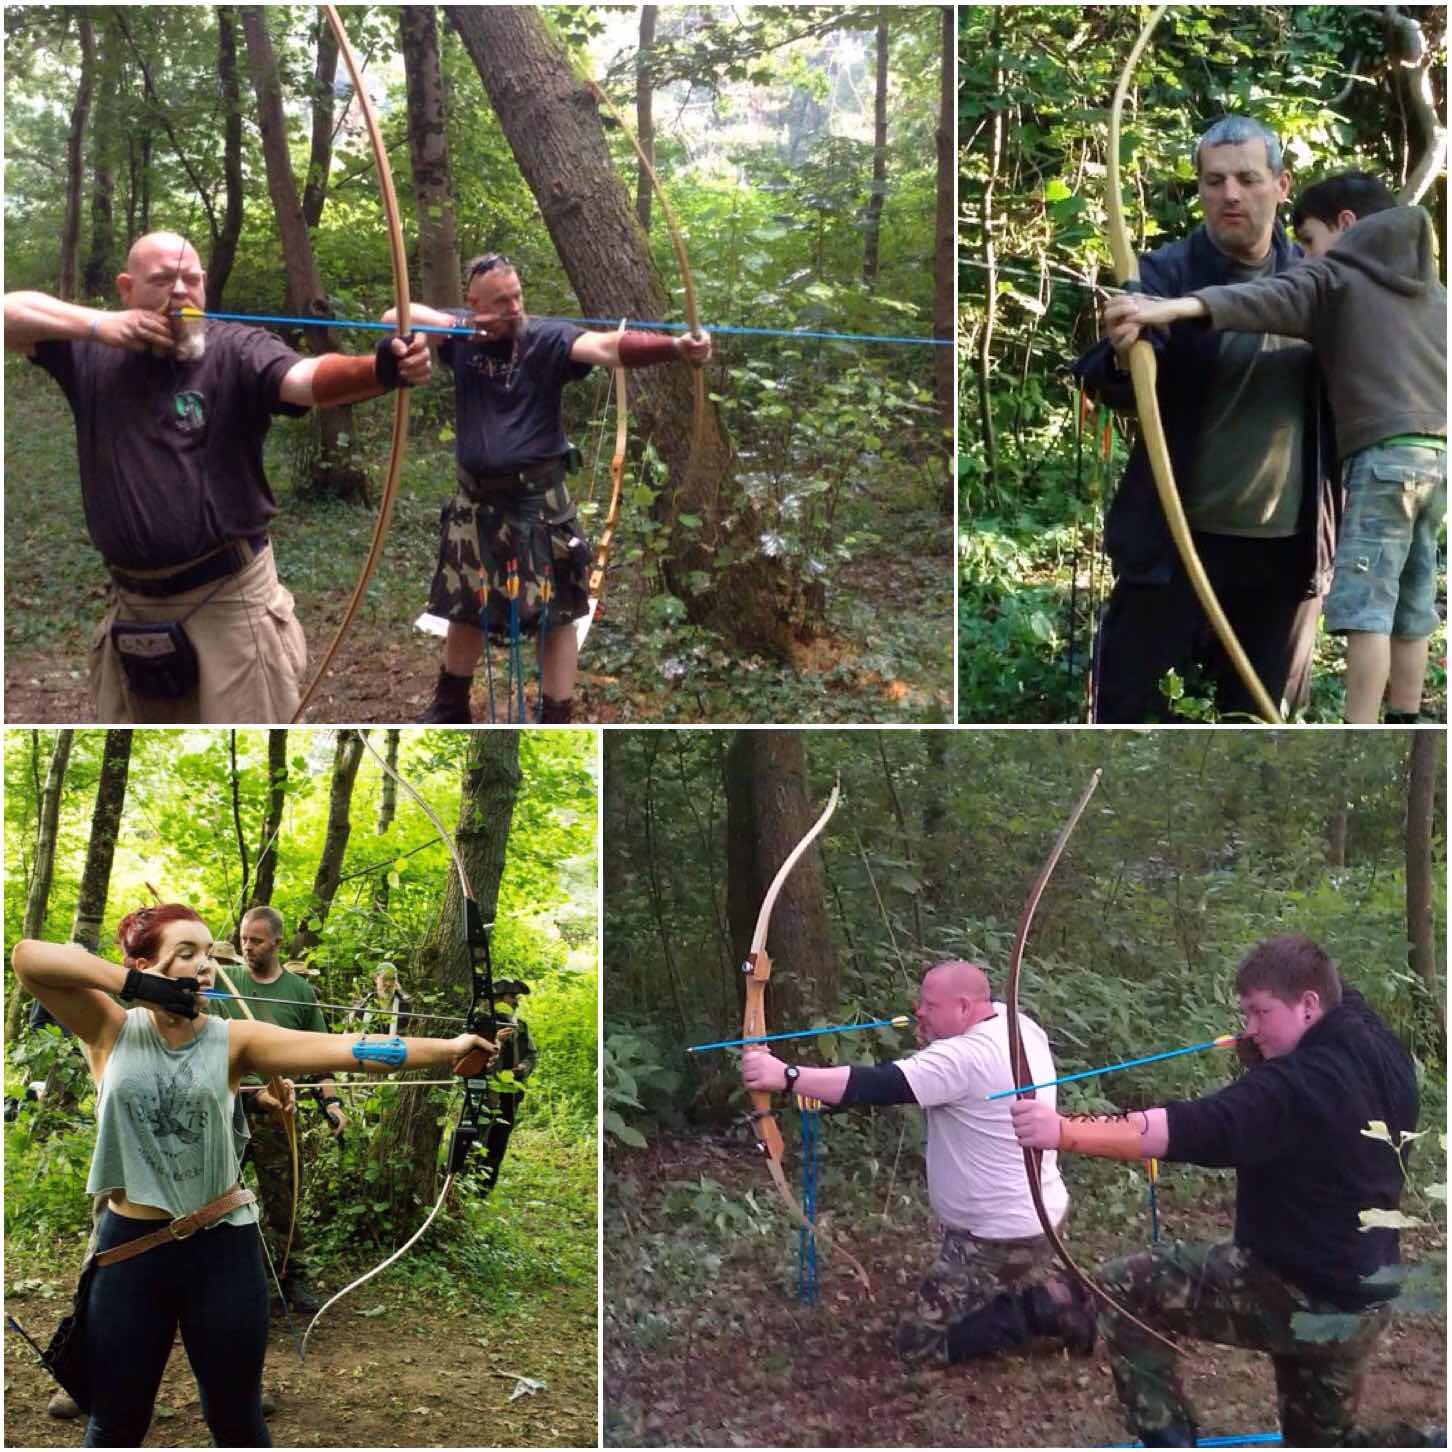
The Bhutanese Bow
One of our long-term members is Wayne Jones of Forest Knights bushcraft school. Wayne is an expert bowyer and taught me a few years ago to make a Bhutanese bow. This type of bow is made of a large piece of bamboo and relatively quick to make (about half a day I think it took me)
The Bhutanese Bow
The bow is constructed of two separate pieces of bamboo joined in the centre. The join can be with, tape, cord or with pins.
Building the Bhutanese bow
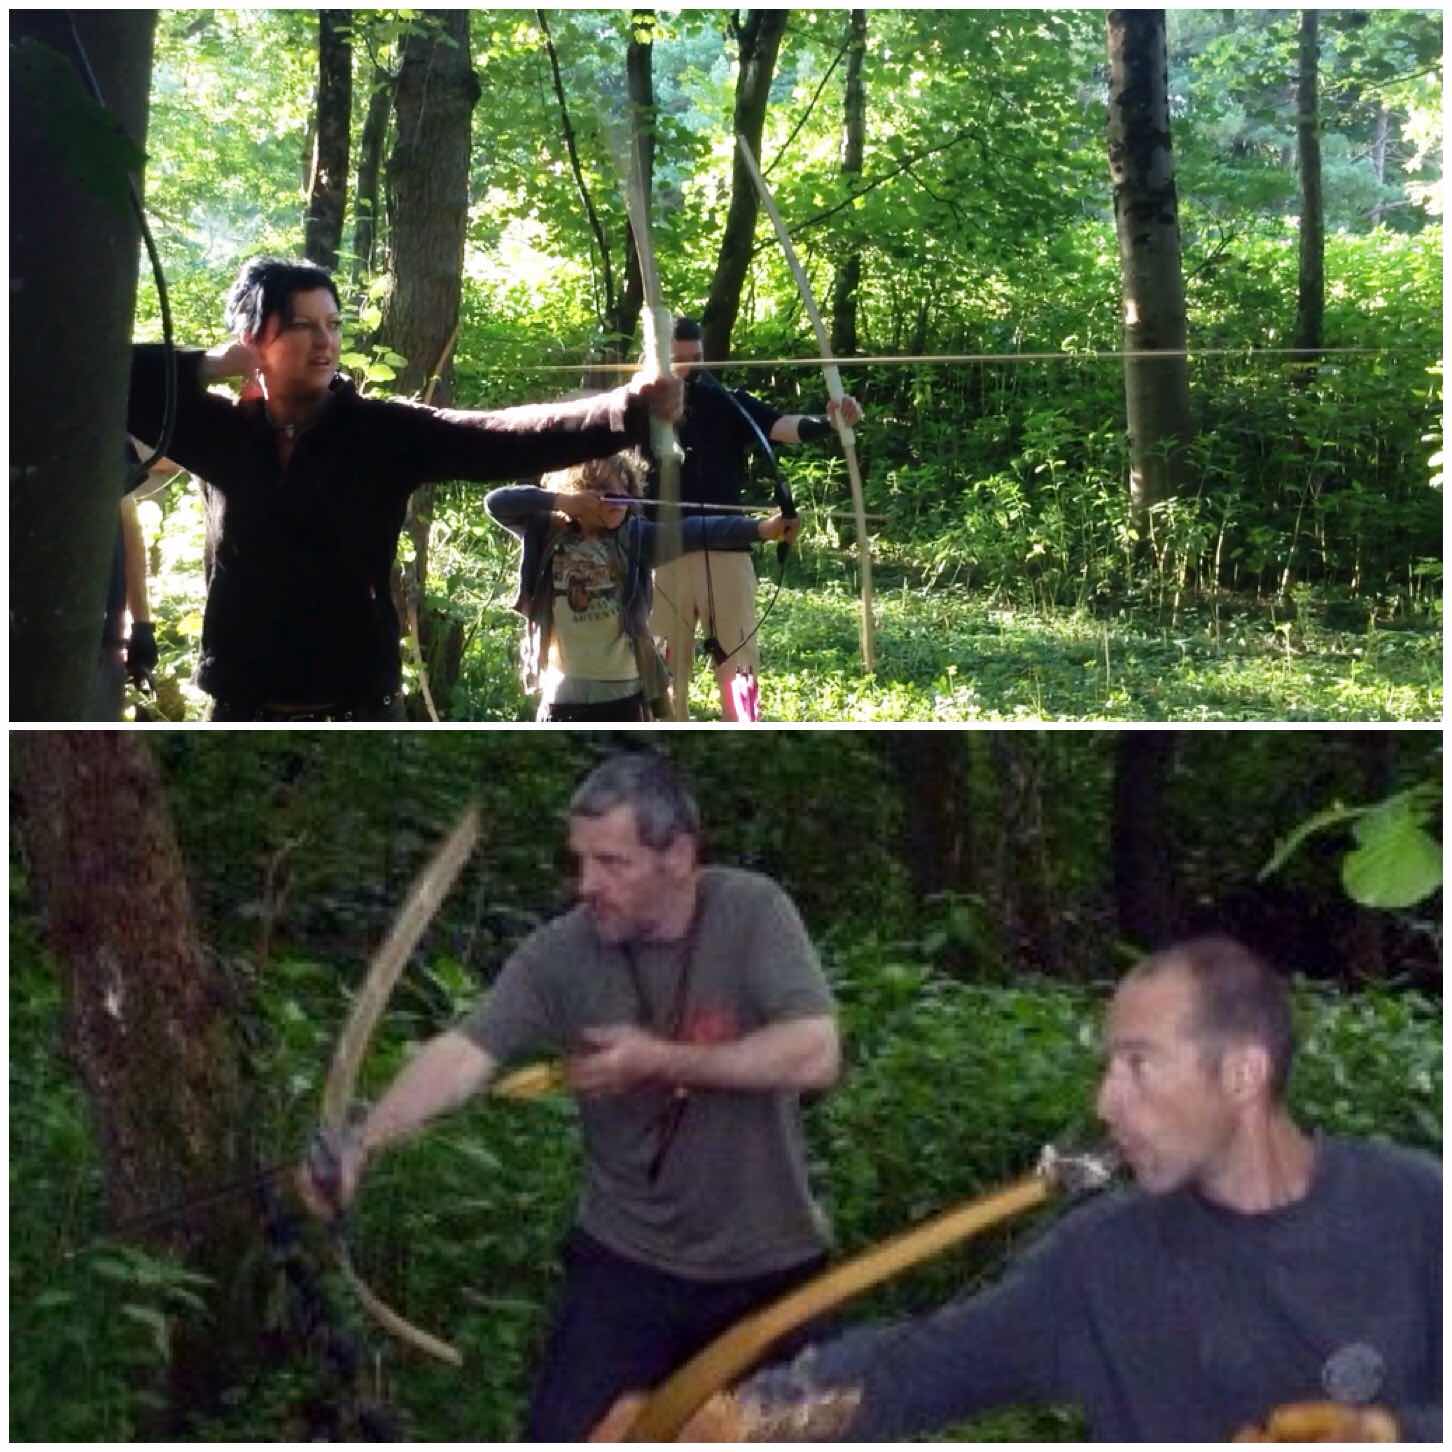
Most folk who start one of these bows can be found down on the range in the evening.
We started the range at the Moot about six years ago. it is well away from all the camping areas surrounded by wooded sand dunes. There are two Bhutanese bows in the top picture below in action and I am holding one in the bottom picture below.
Bhutanese bows in action
Traditional Bows
Wayne sometimes runs workshops similar to the ones Bardster did in the past making more traditional style flatbows. I hope to one day make time to study under Wayne as it has been a few years since I have made an Ash Flatbow.
Classic bows
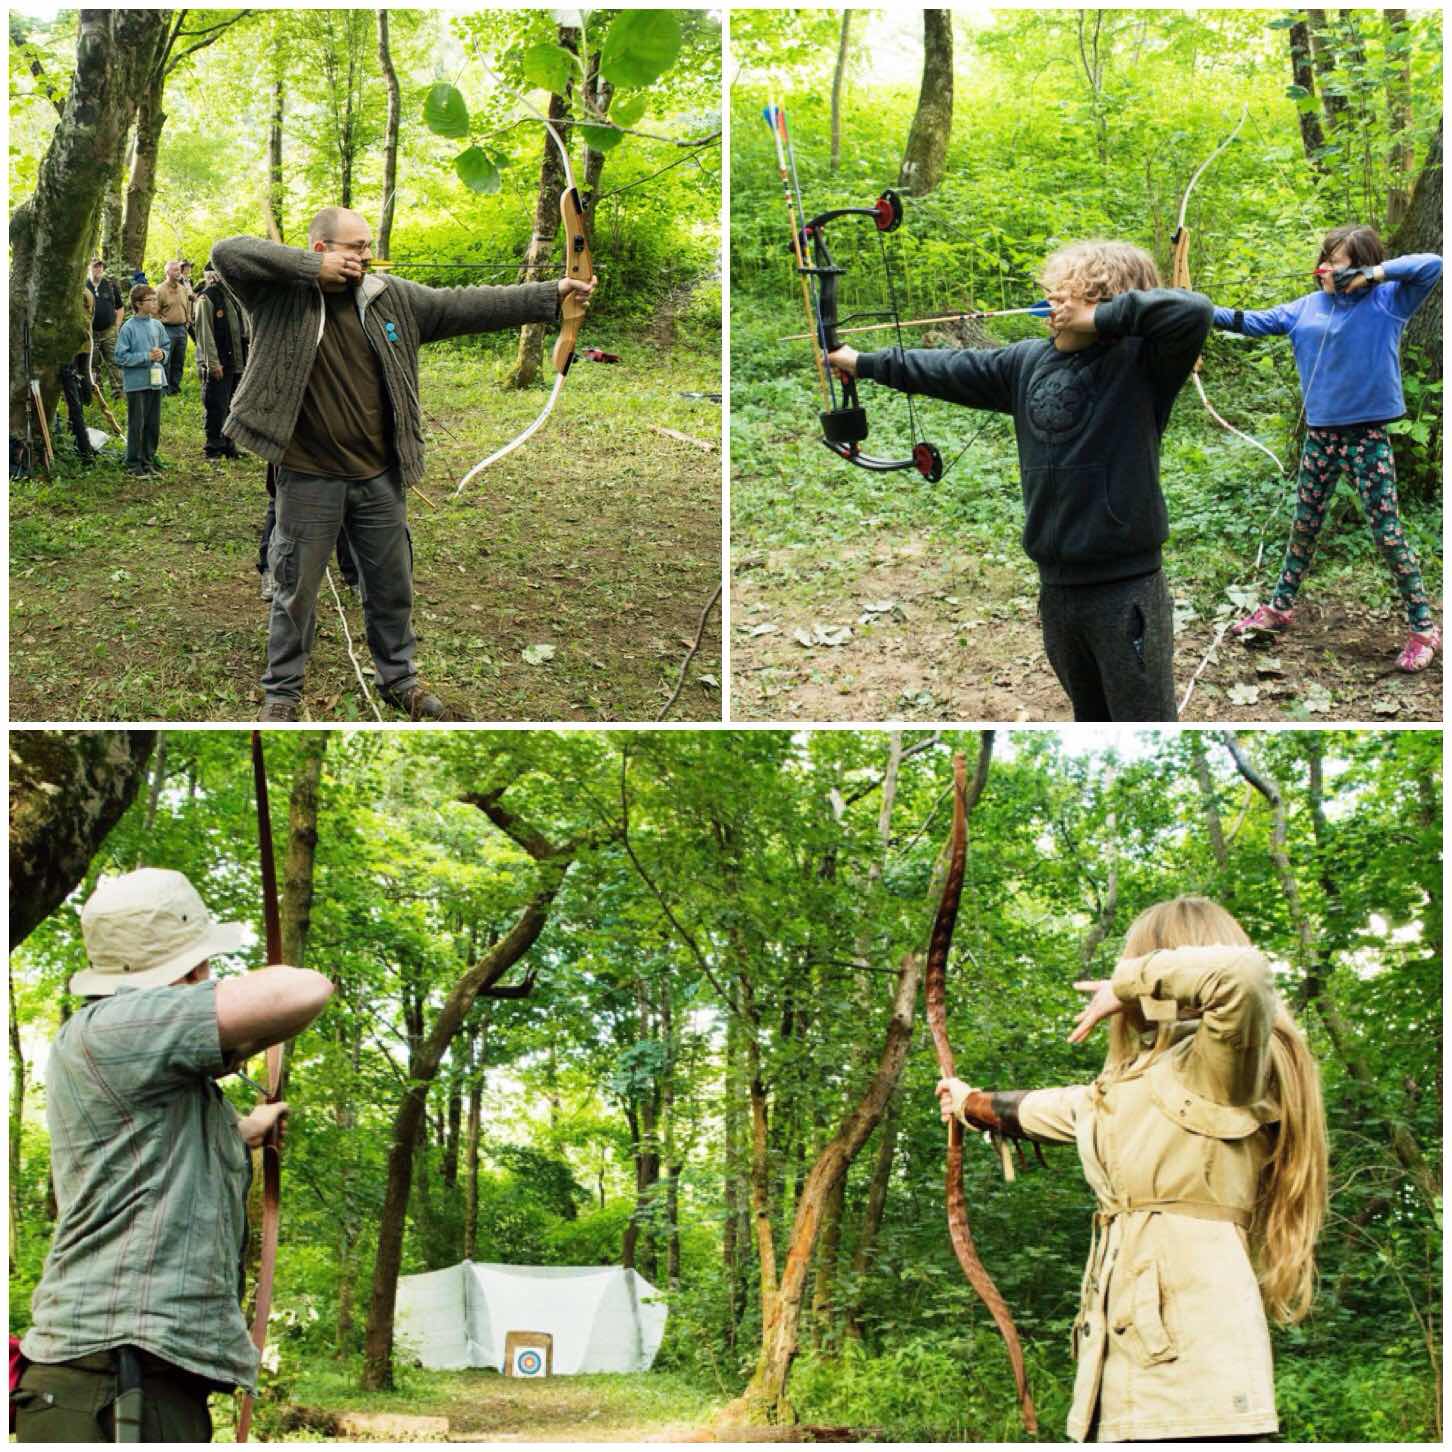
The Mini Bow
The final type of bow that is produced at the Moot is the Mini bow. Wayne uses the large pieces of bamboo he brings along for the Bhutanese bows to also make these very small Mini bows. The kids absolutely (and a few adults) love them.
They do not take long to make and are small enough to be made as one piece.
The Mini bow
Different Bows
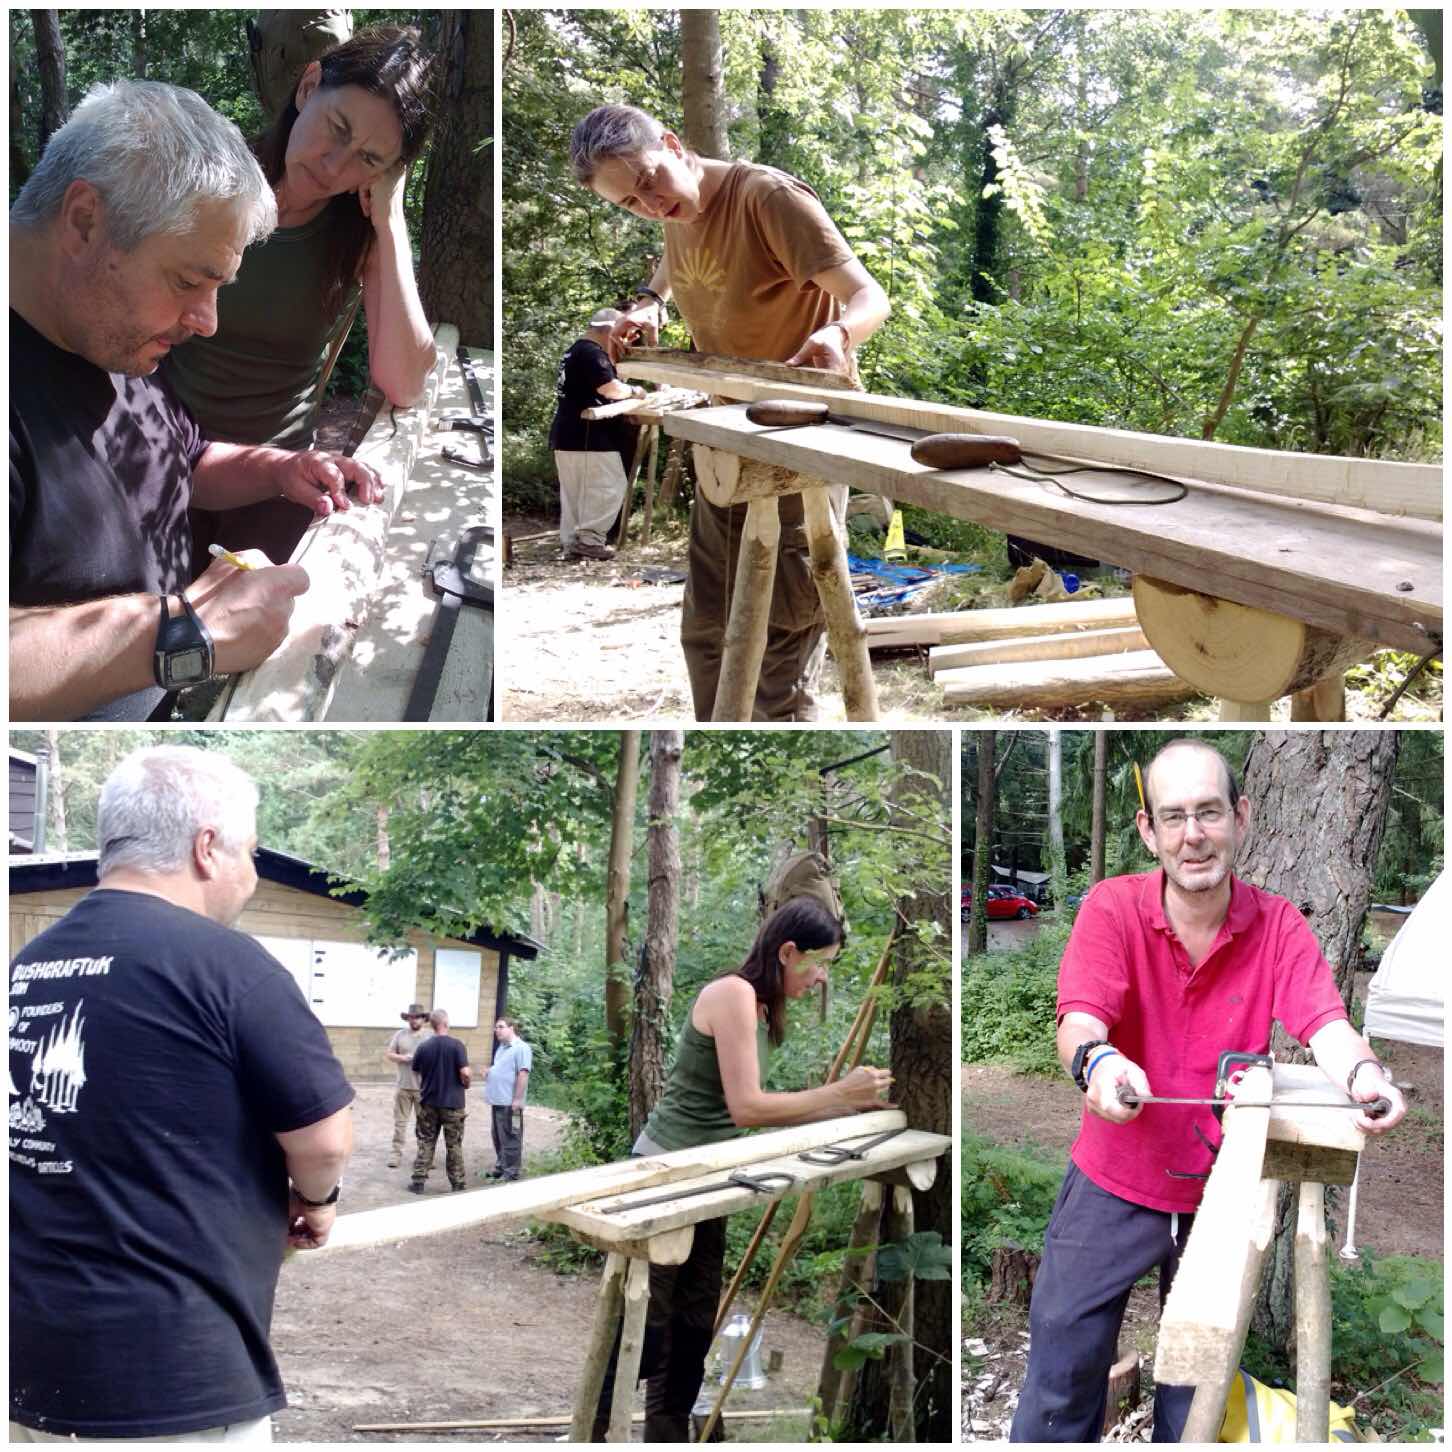
On the range you will see a wide variety of bows in action from the traditional (top two have my Ash Flatbow and my Holmegaard in use.
Below them are some of the modern bows people bring along to the Moot. Some are very powerful and come with all manner of attachments. When it comes to the competition we hold we do not mind what type of bow you use as long as it does not have extras such as stabilisers, sights or gears attached.
Old and new
I am always intrigued with the different bows that appear and was particularly interested in the Mongol style bow Lisa had brought along as I had never seen one before (bottom right).
Bows in all sizes
Each evening during the Moot (and sometimes during the day) a few of us troop down to the range for a shoot. Running the range is usually Cap’n Badger, Paul Pomfrey, Ian Woodham and myself.
We try and balance the time between teaching novices and letting the ‘Old and Bold’ have time to keep their eye in. After a full days teaching bushcraft having to do this can initially feel like a chore to me however once I have shot in a few arrows it can be quite relaxing, especially after a very busy day.
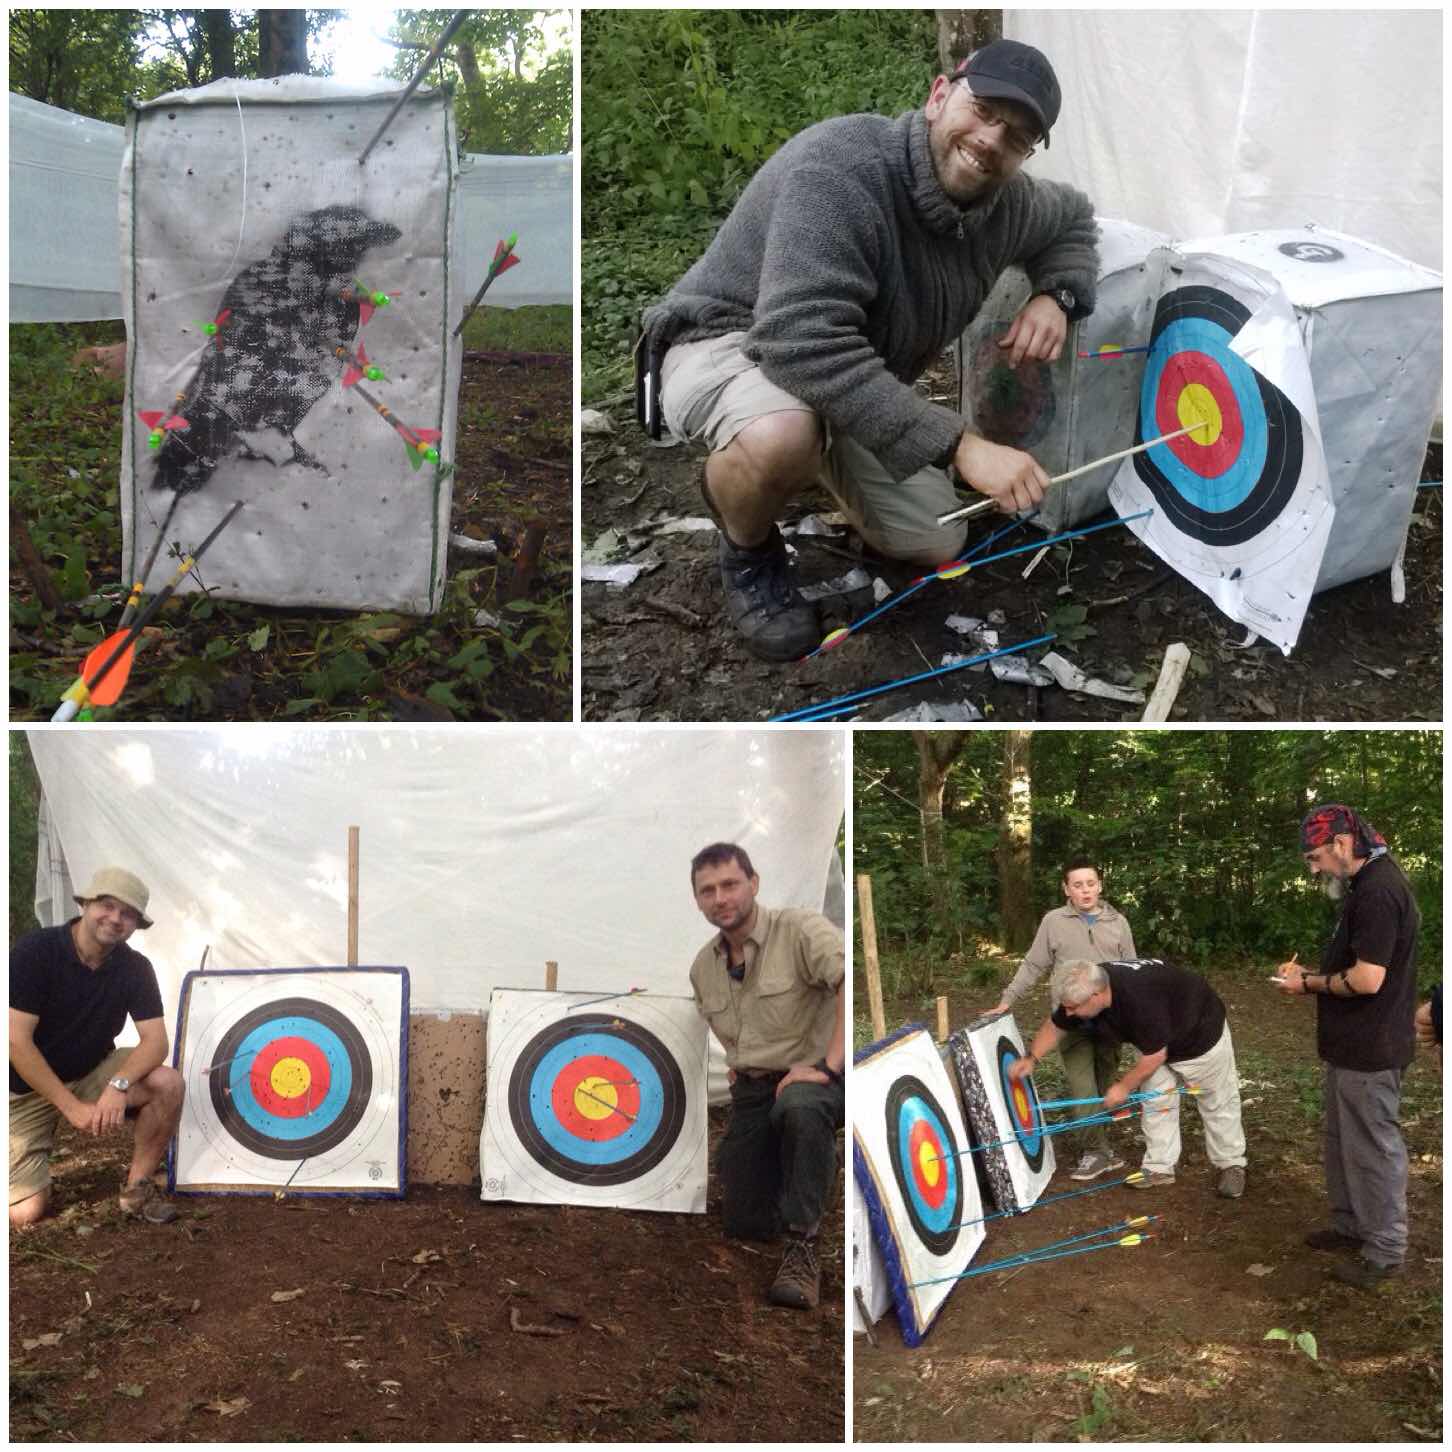
Hard contests
Competition day happens usually in the second week of the Moot and it gets very competitive. We normally run two competitions, one for the kids and one for the adults. They have to shoot at different ranges and are closely marked by the referees as there are usually some very good prizes up for grabs.
Over the years
Afterwards when all the scores have been tallied up the thing I really like about this time down on the range is how good natured everyone is.
The winners get first dibs at the prizes (everyone brings a prize for the pot with a few extras donated) however everybody walks away with a prize at the end.
Having fun
I have been to many different types of bushcraft shows, courses and meetings over the years but it is only at the BCUK Bushmoot that I see such a wide range of archery on display.
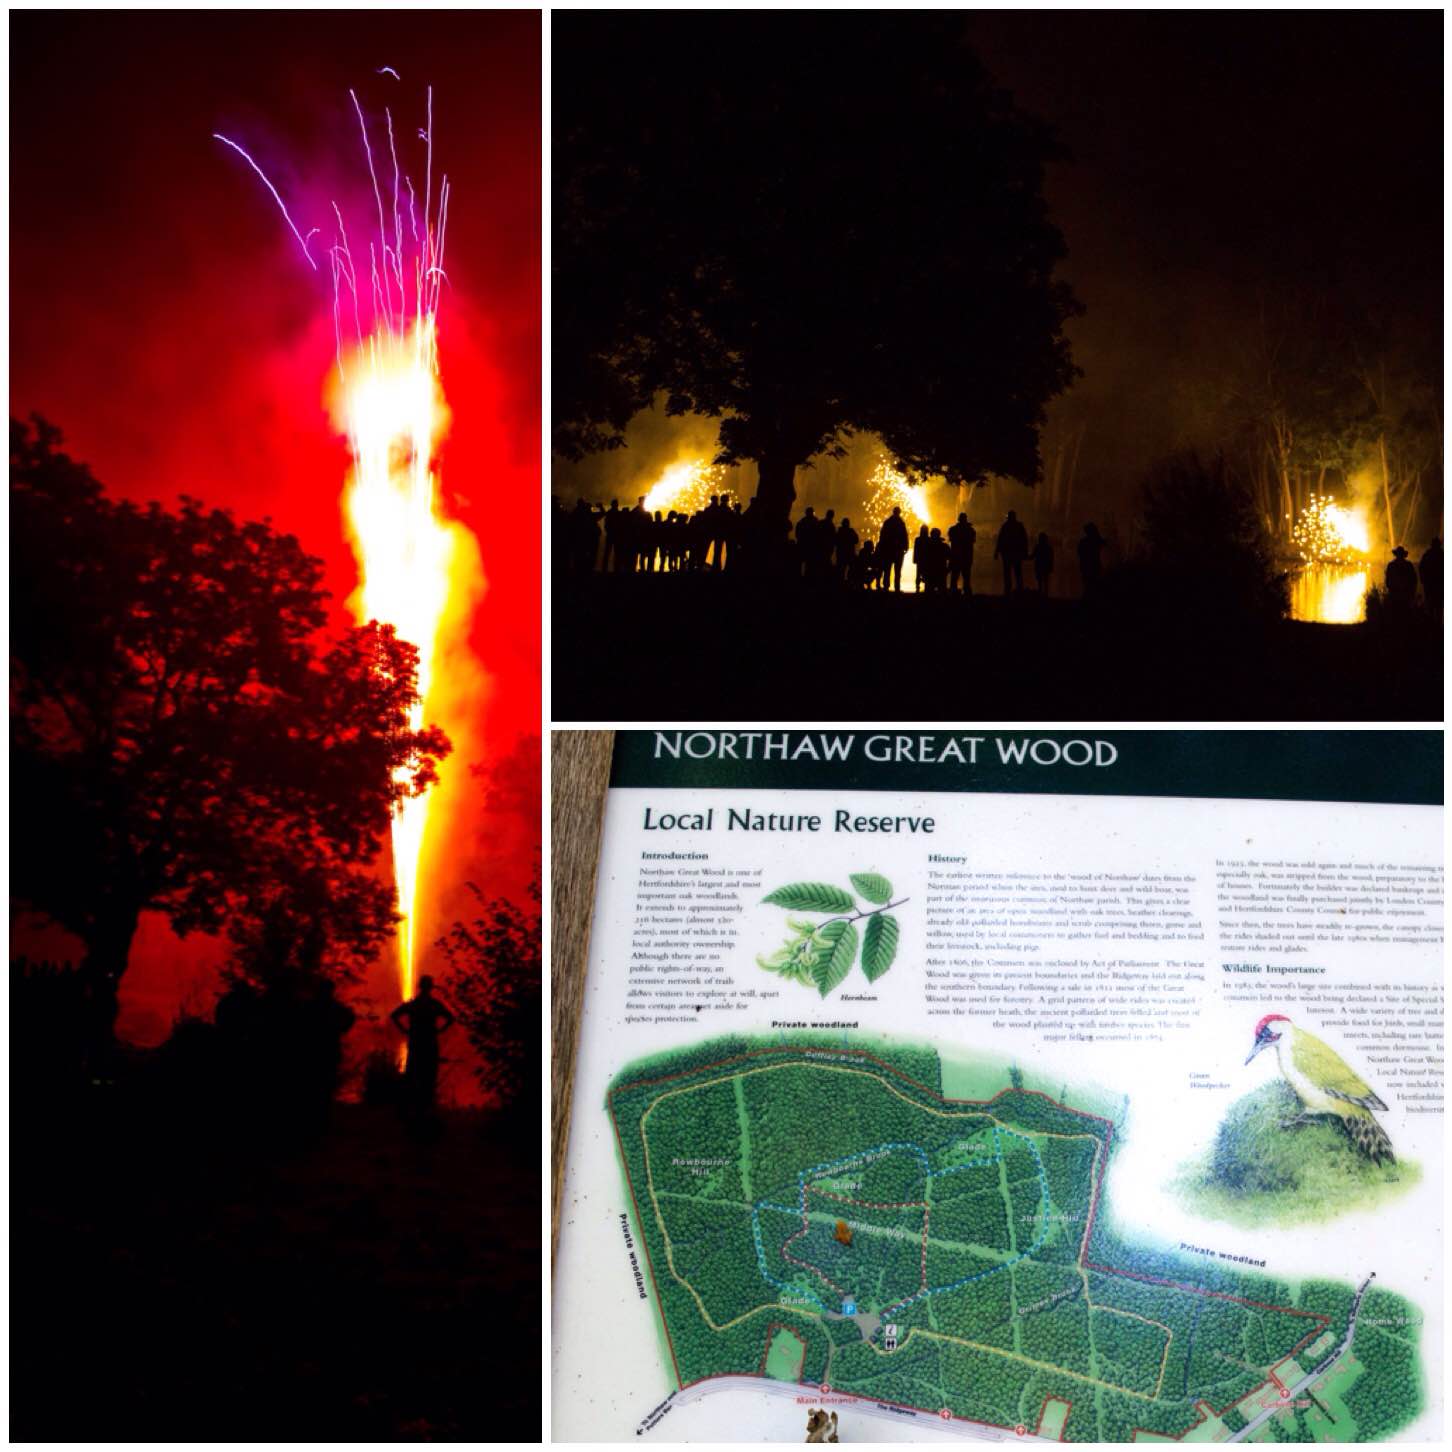
Sometimes in your life a little trip comes along that really lifts your spirits. This happened to me last September when my good friend Dave Lewis invited me along to a camp he had organised for Enfield Sea Cadet unit. The camp was at Tolmers Activity Centre near Potters Bar (just North of London) and turned out to be a quite magical weekend.
Dave was leading a training session for his older cadets for the upcoming Chosin Cup competition and he wanted me to work with his Junior cadets on their campcraft skills. After setting up camp I spotted a load of folks heading down to a small pond so I decided to follow on and see what was afoot.
As I approached the pond I could hear a story being told about the ‘Lady in the Lake’ and all of a sudden the skies lit up. As I was just approaching the pond at that time I managed to get these two cracking shots of the fireworks going off.
Friday fireworks and our playground
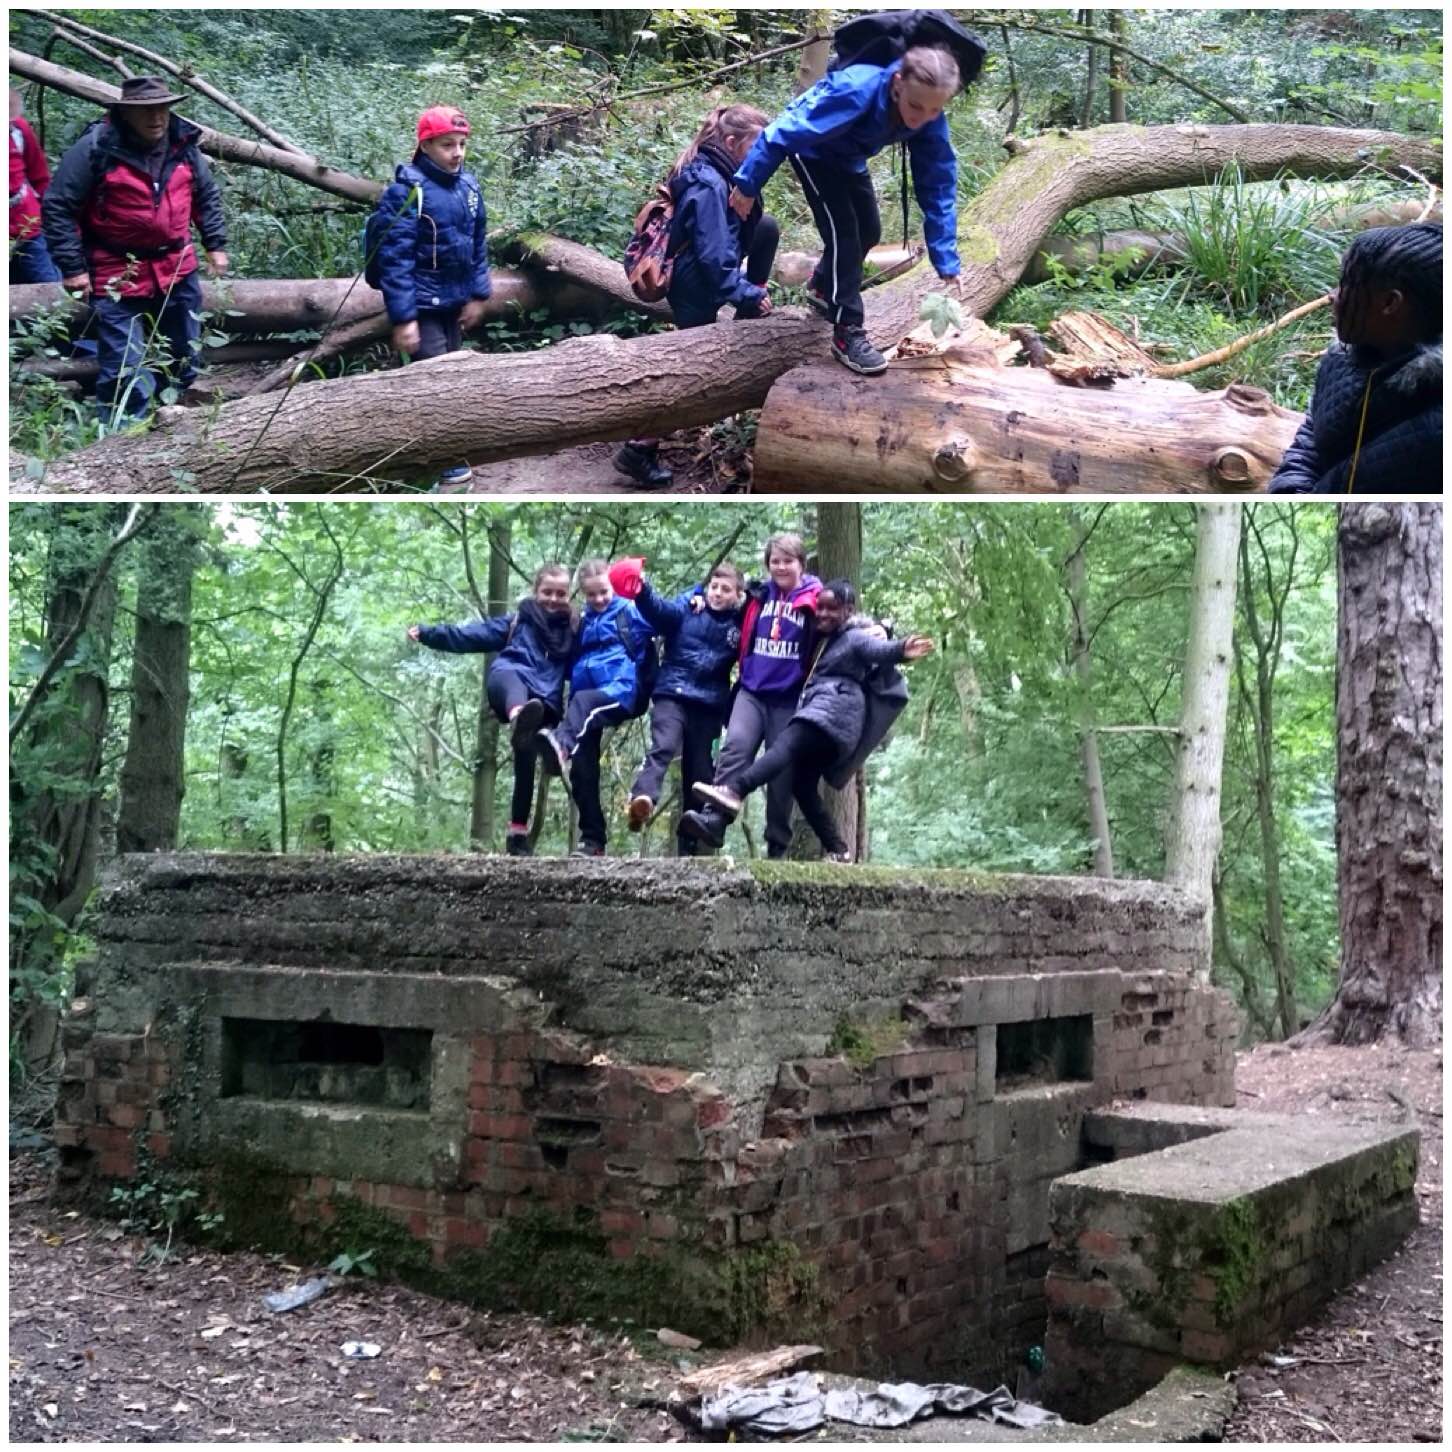
In the morning I took the cadets with some other staff members out towards Northaw Great Wood (a local nature reserve). Along the way we had to scramble over some tricky terrain but managed to have a bit of fun when we found an old World War 2 Pillbox.
Scramble and a dance
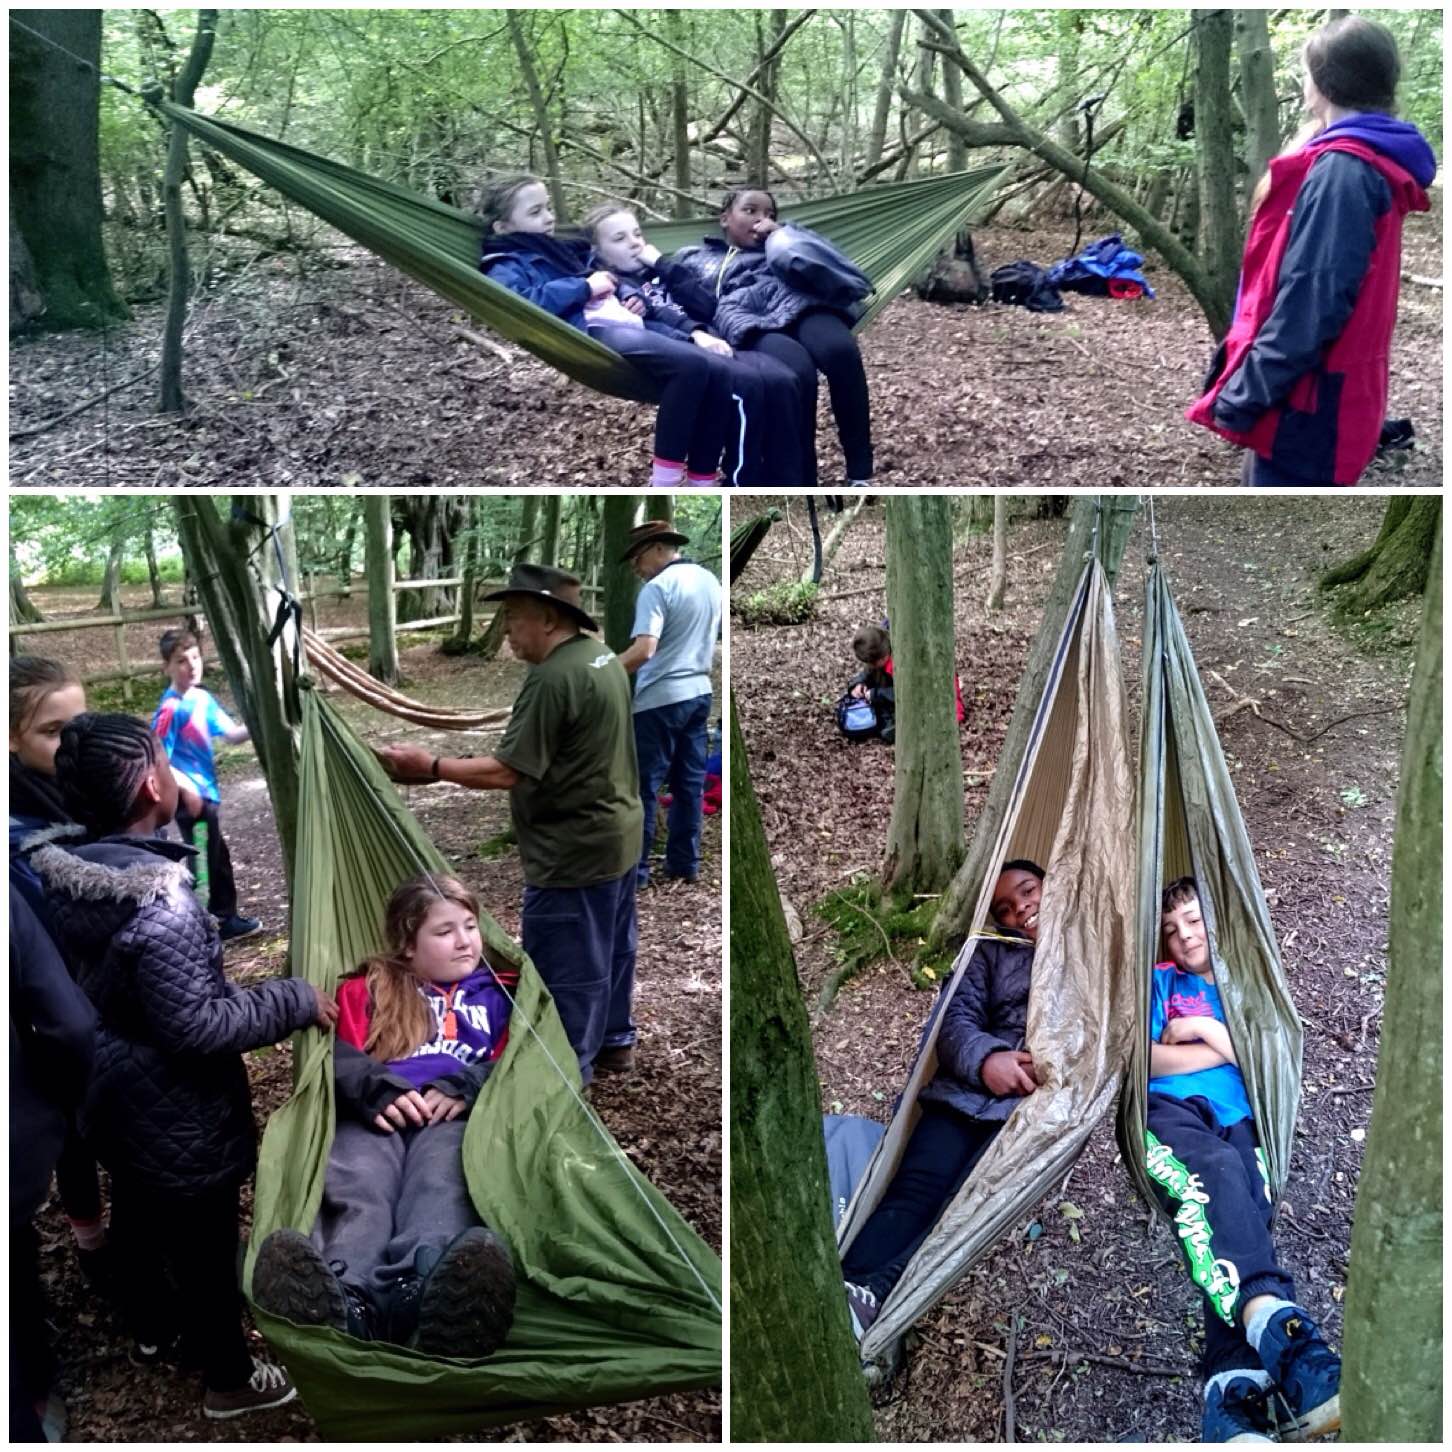
Once we got into the woods we found a lovely spot by a dried out stream to try out our hammocks. The Juniors had never tried hammocks before but soon got into the ‘Swing’ of things.
Chillaxing
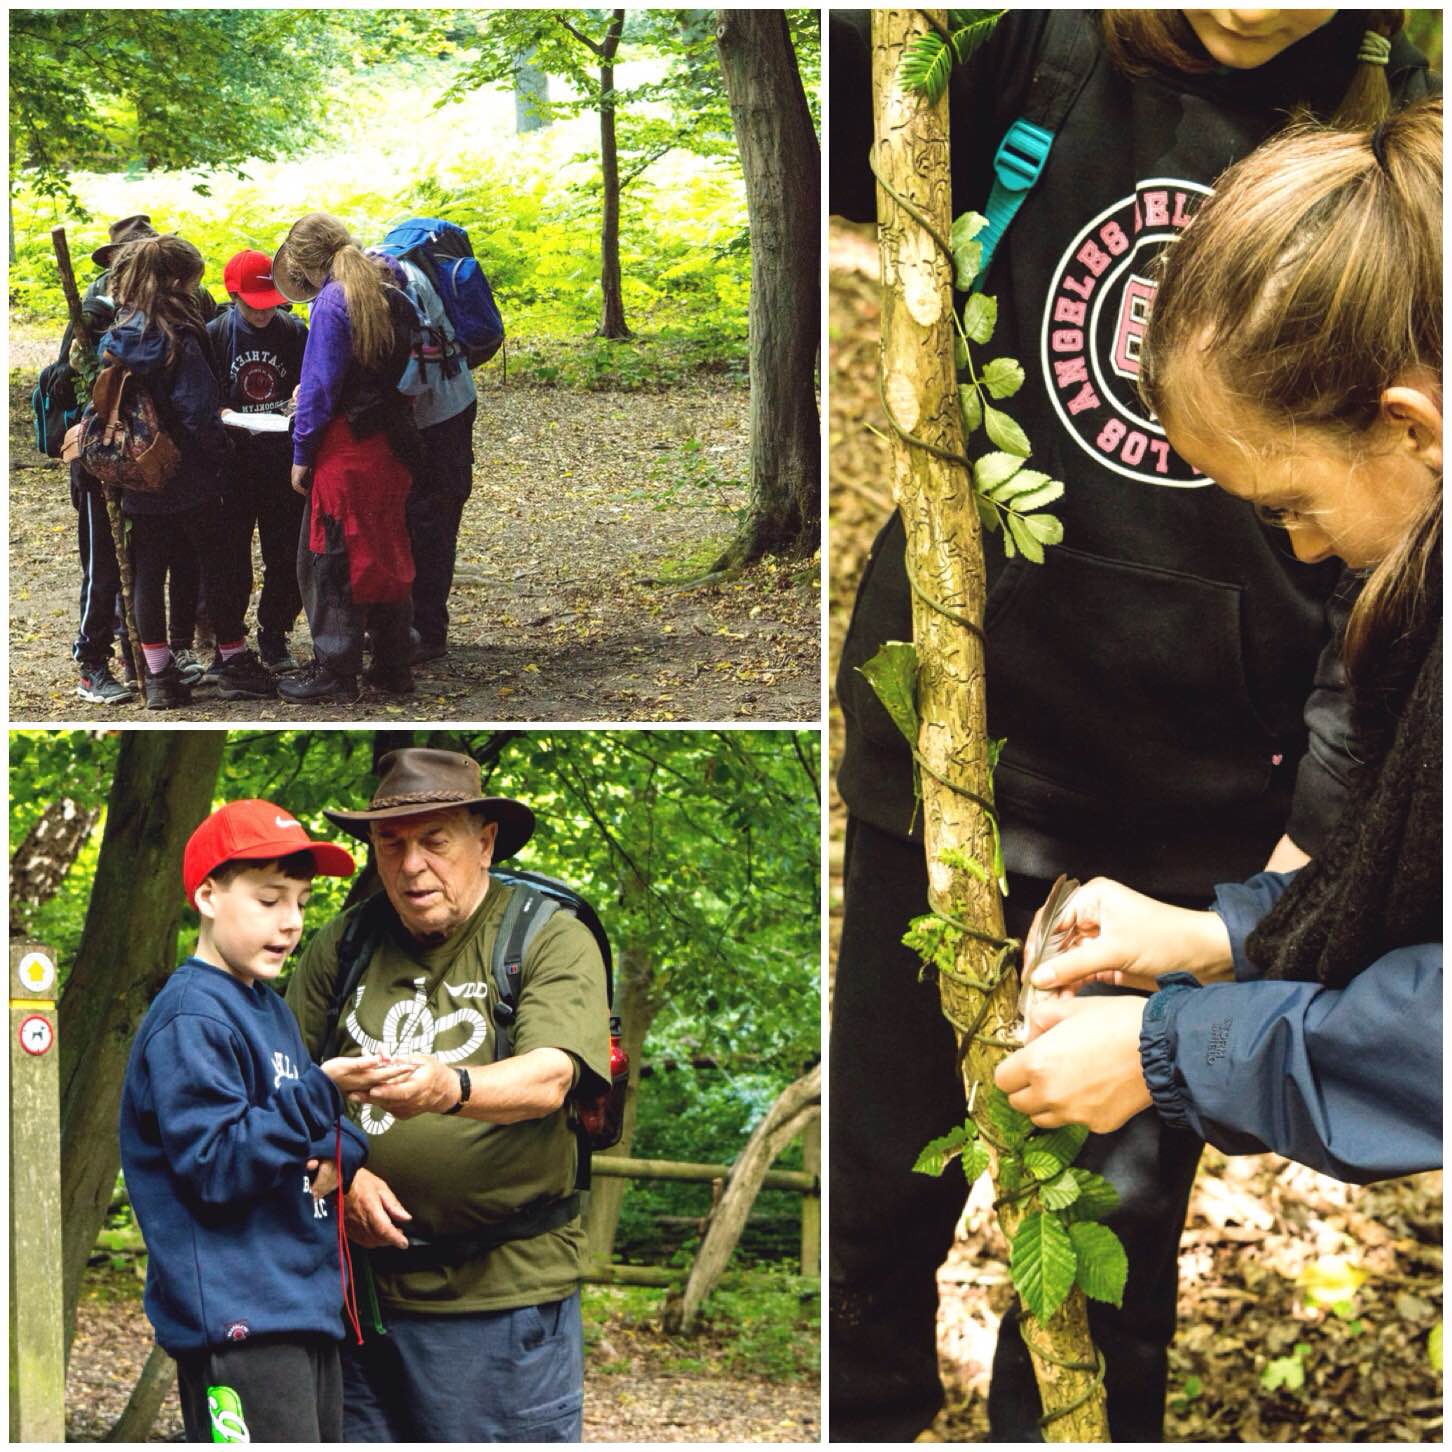
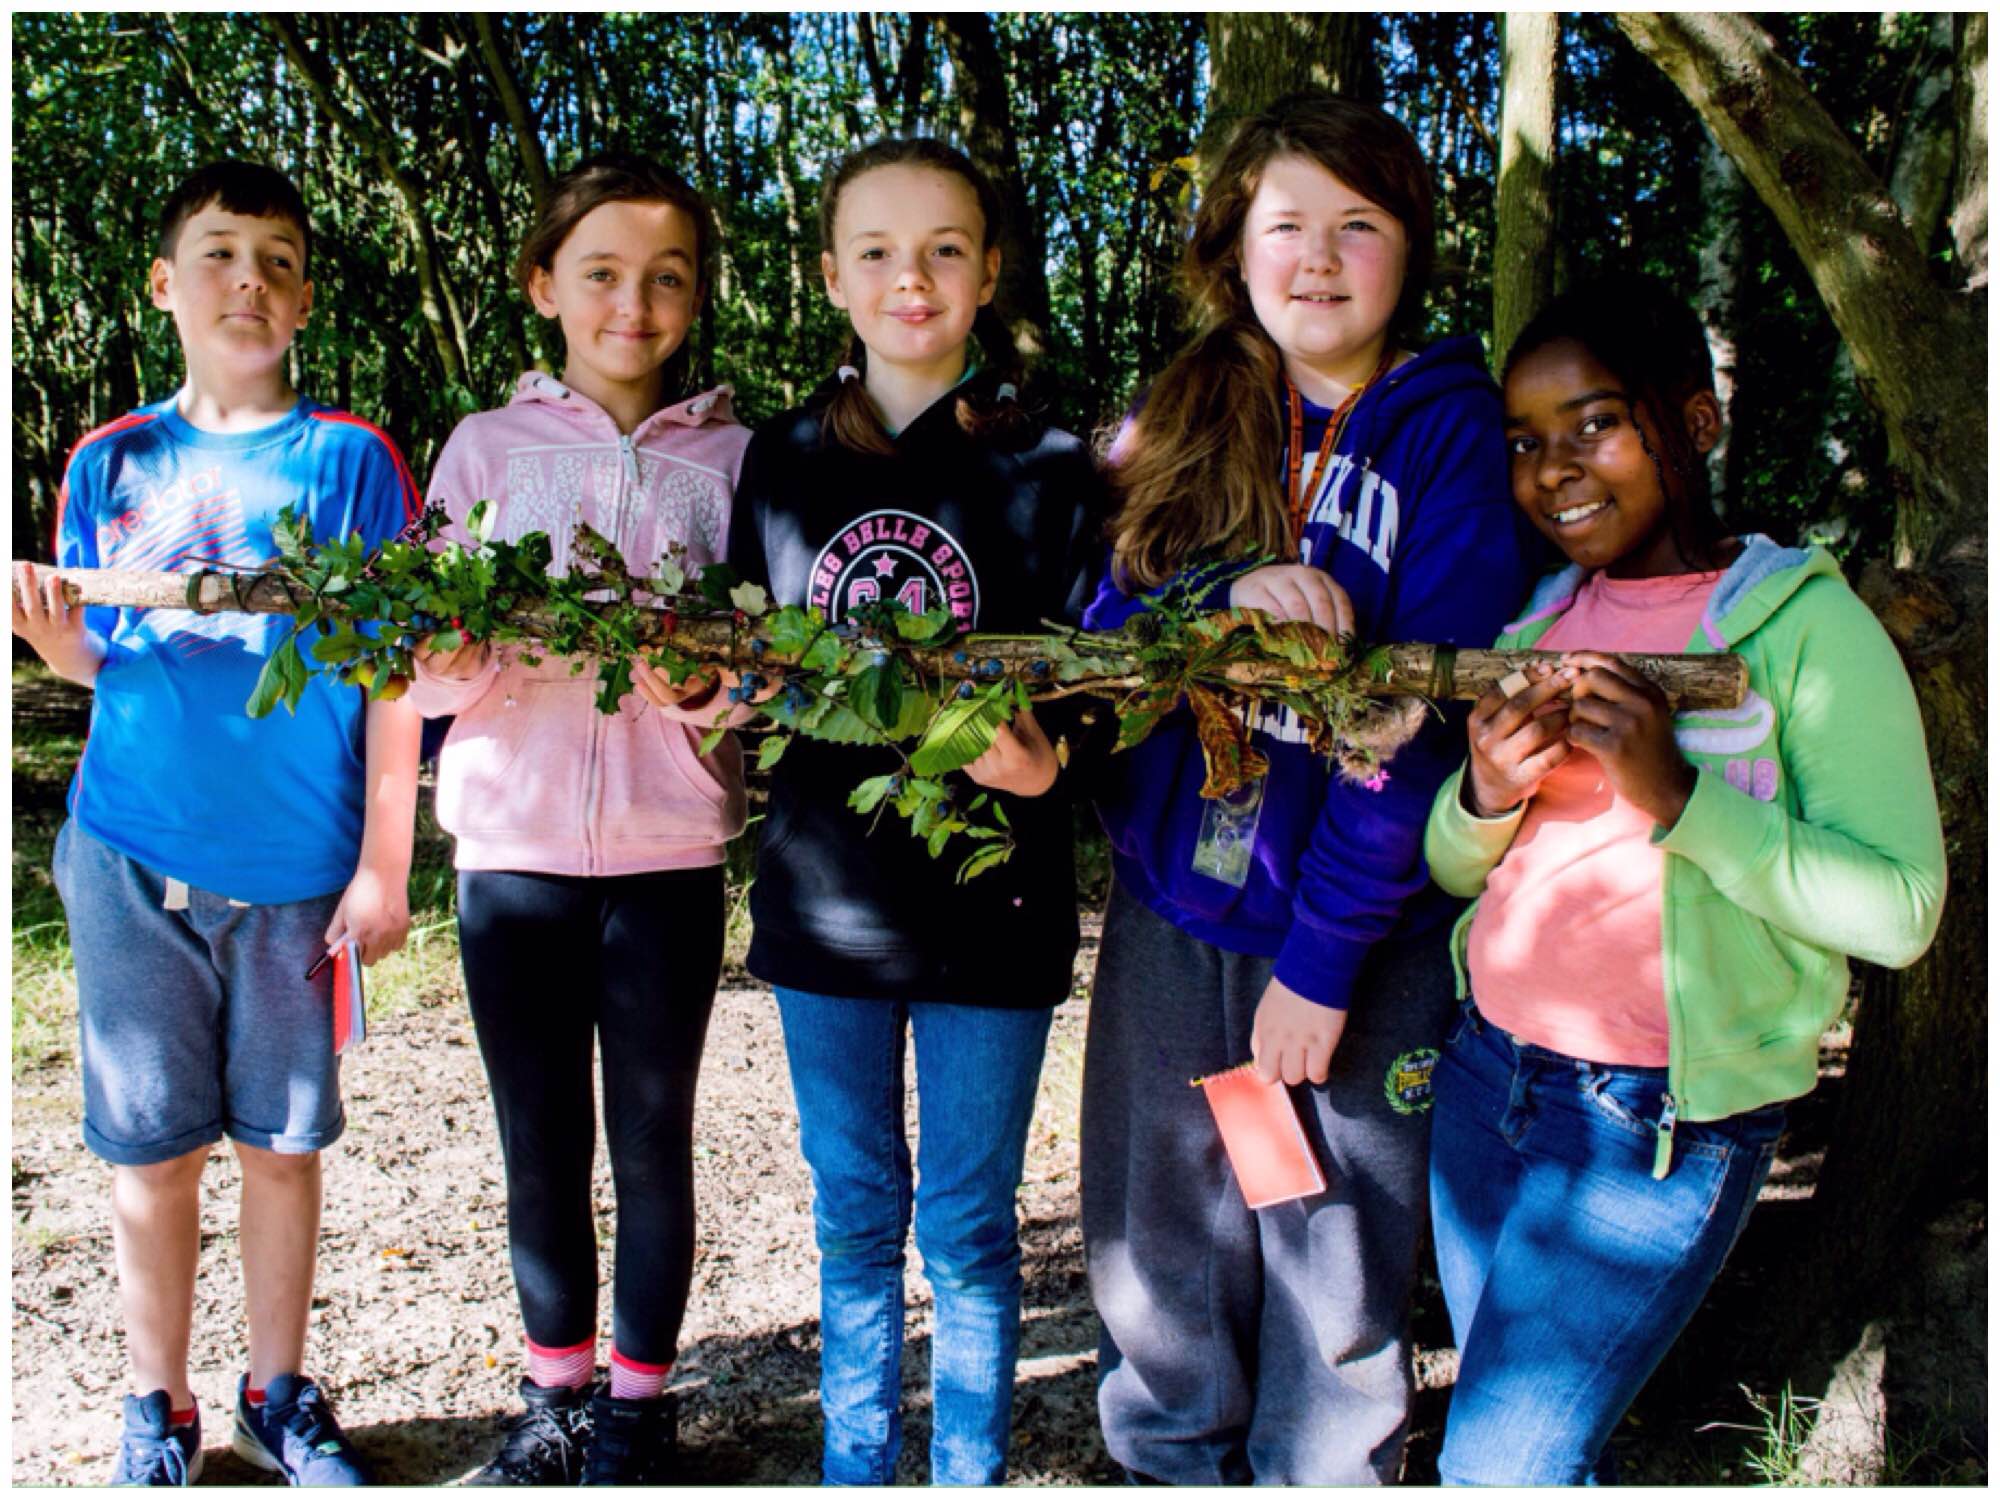
Our task on the weekend was to introduce the Juniors to basic Adventure Training skills such as using the map and compass, and to get an understanding of their natural surroundings.
So as we were learning to use the map and compass we carried a Journey stick with us. This stick had string and elastic bands wrapped around it so that we could add different items we found along the way to it.
The aim of the Journey stick was to ensure that the Juniors kept a good look out for different plants and objects so that they could add some of them to the stick and so tell a story of their journey when they had finished at the end of the day.
Green module learning
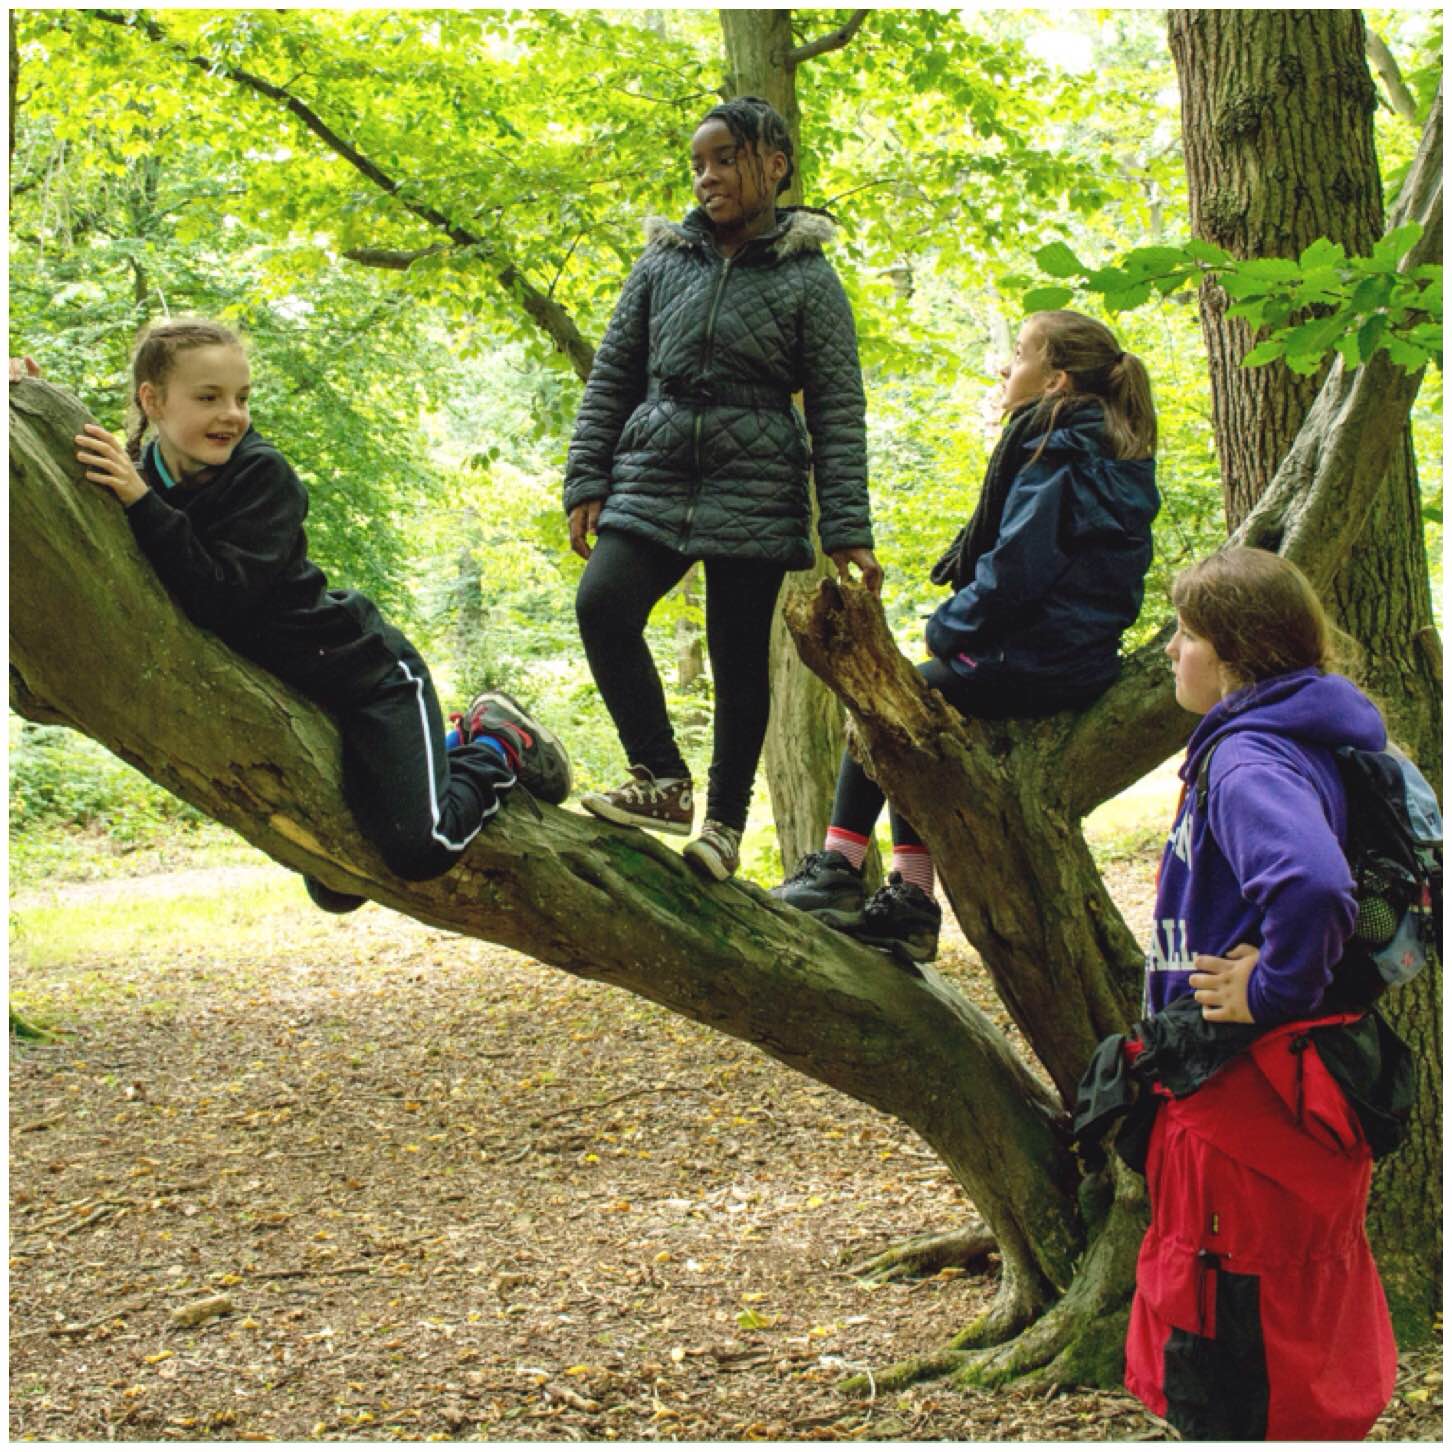
In amongst all this learning we took time out to climb the odd tree or two and just relax (the staff just tended to relax though).
In touch with nature
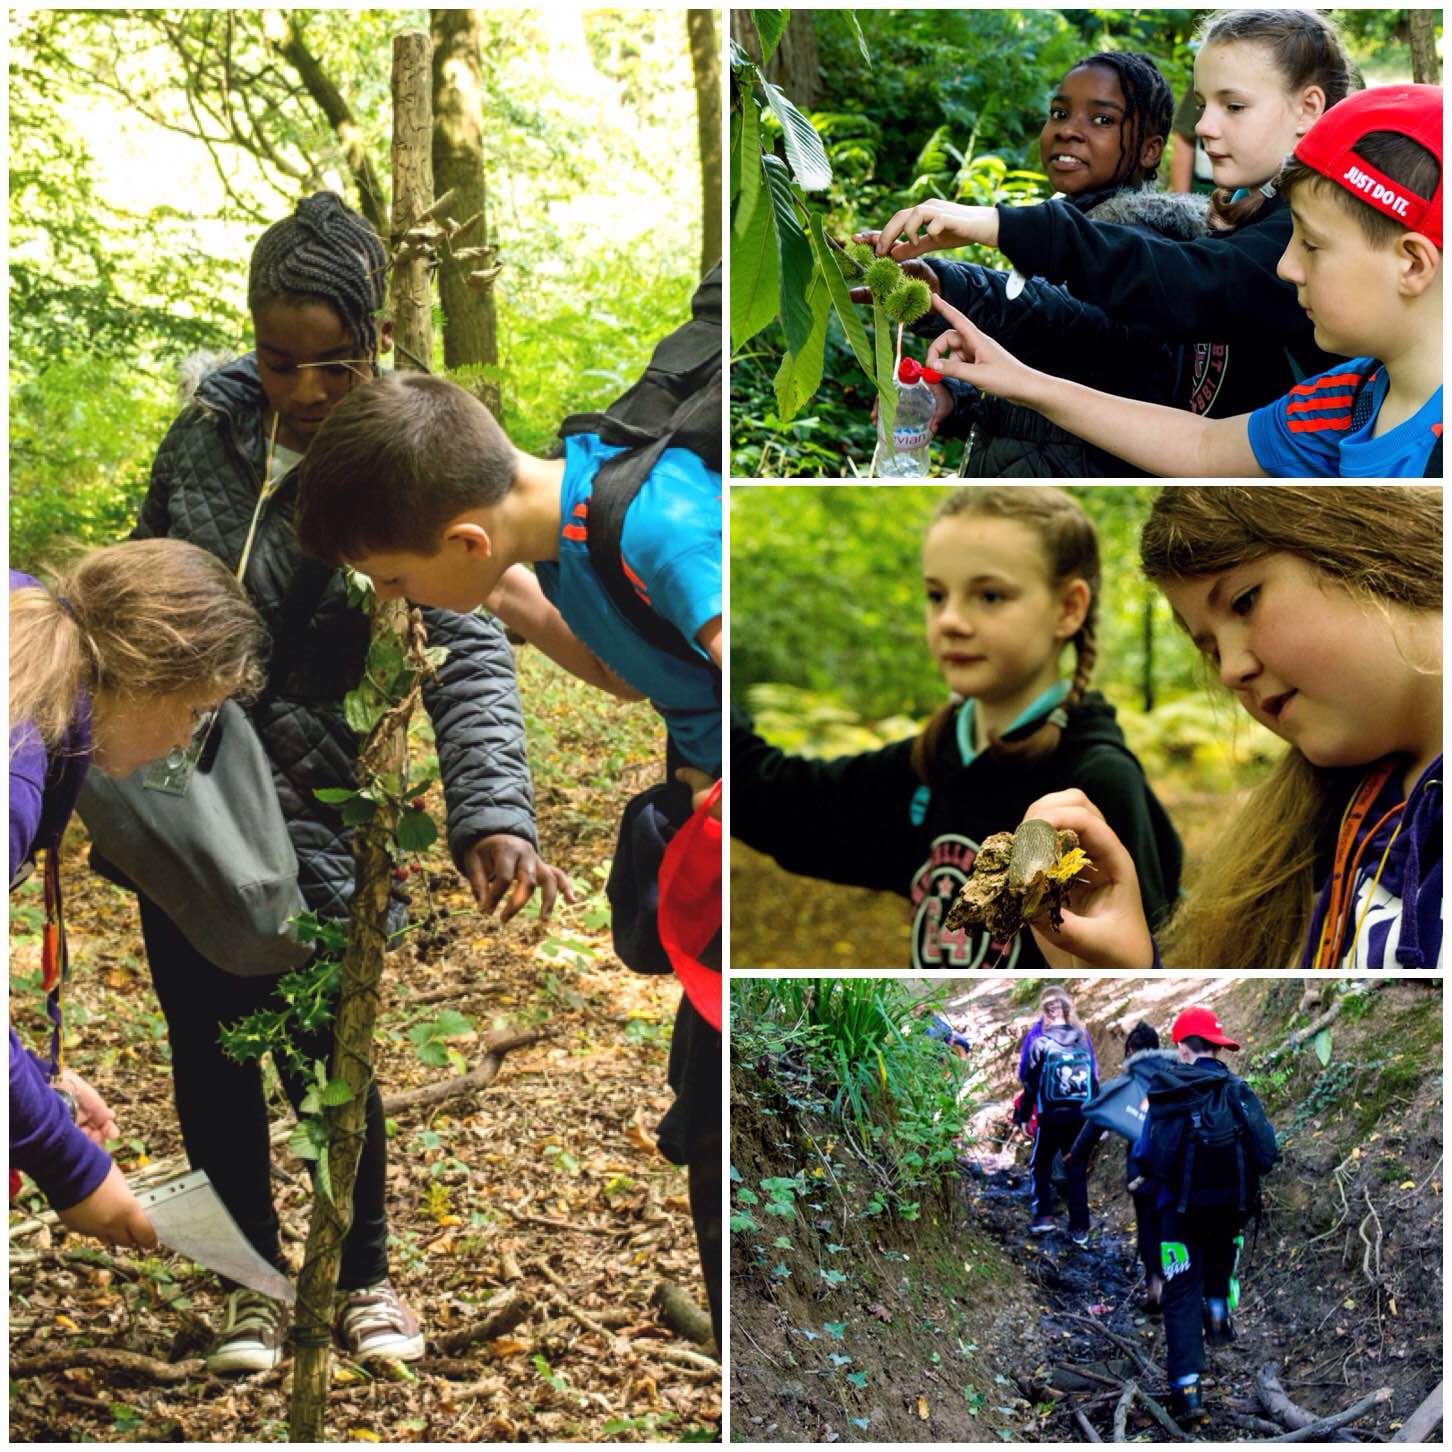
We spotted many different types of flaura and fauna on our travels and played a little naming game on the way. I got the Juniors to spot different trees and name them something they all agreed on – so the Sycamore became the Star tree, the Ash tree was named the Centipede and so on. They would walk through the woods shouting “There’s a Star tree” or “There’s another Centipede”.
At the end of the day I gave them a chart so that they could figure out their given names. This method I find works well as I find that kids learn best when they are having fun along the way.
Journey stick stuff
When we got back to camp we had a very full Journey stick with no two items the same. The Juniors really worked hard to finish the stick and each took it in turn to walk with it.
The Journey stick
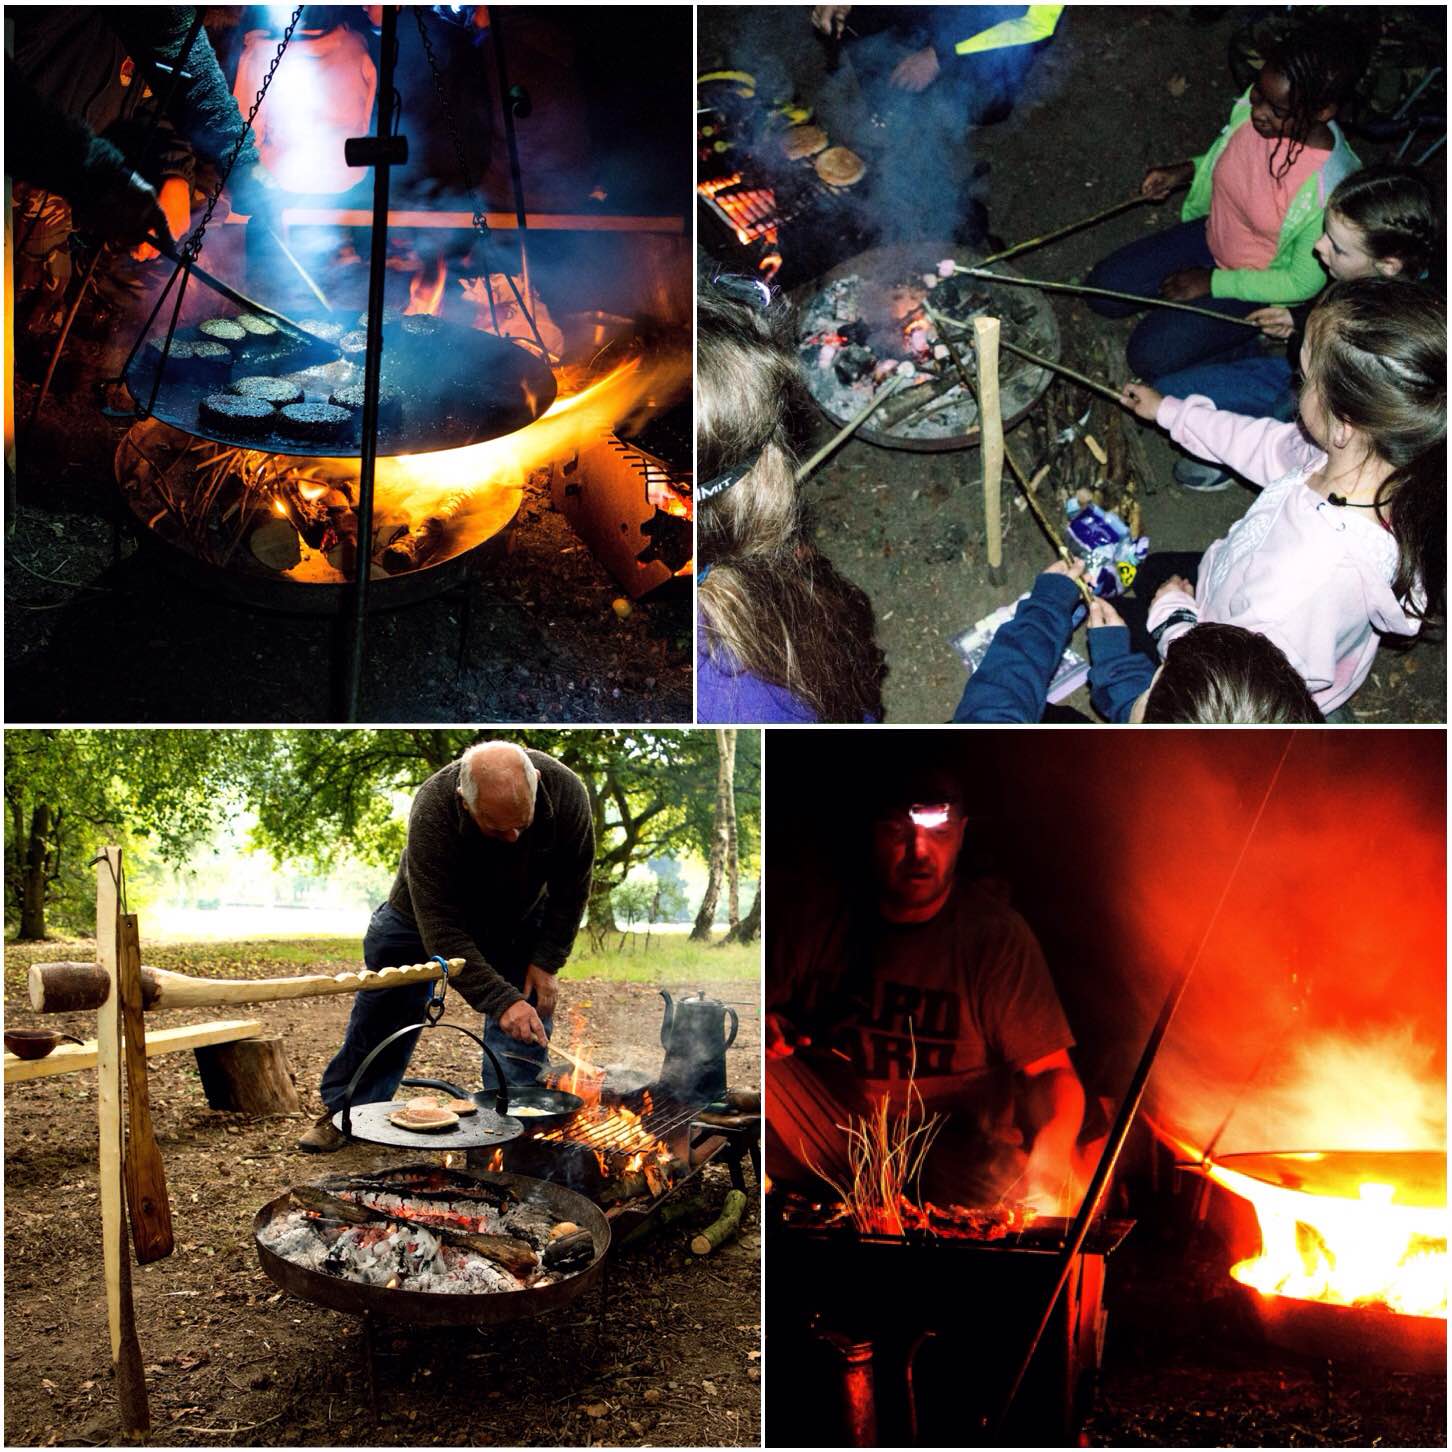
Back at camp we had a very busy campfire on the go with some great food being prepared by Alan and Dave Lewis. On the Saturday night we had a barbie and marshmallows, and each morning Alan cooked a fantastic breakfast with some lovely pancakes.
Bust campfire
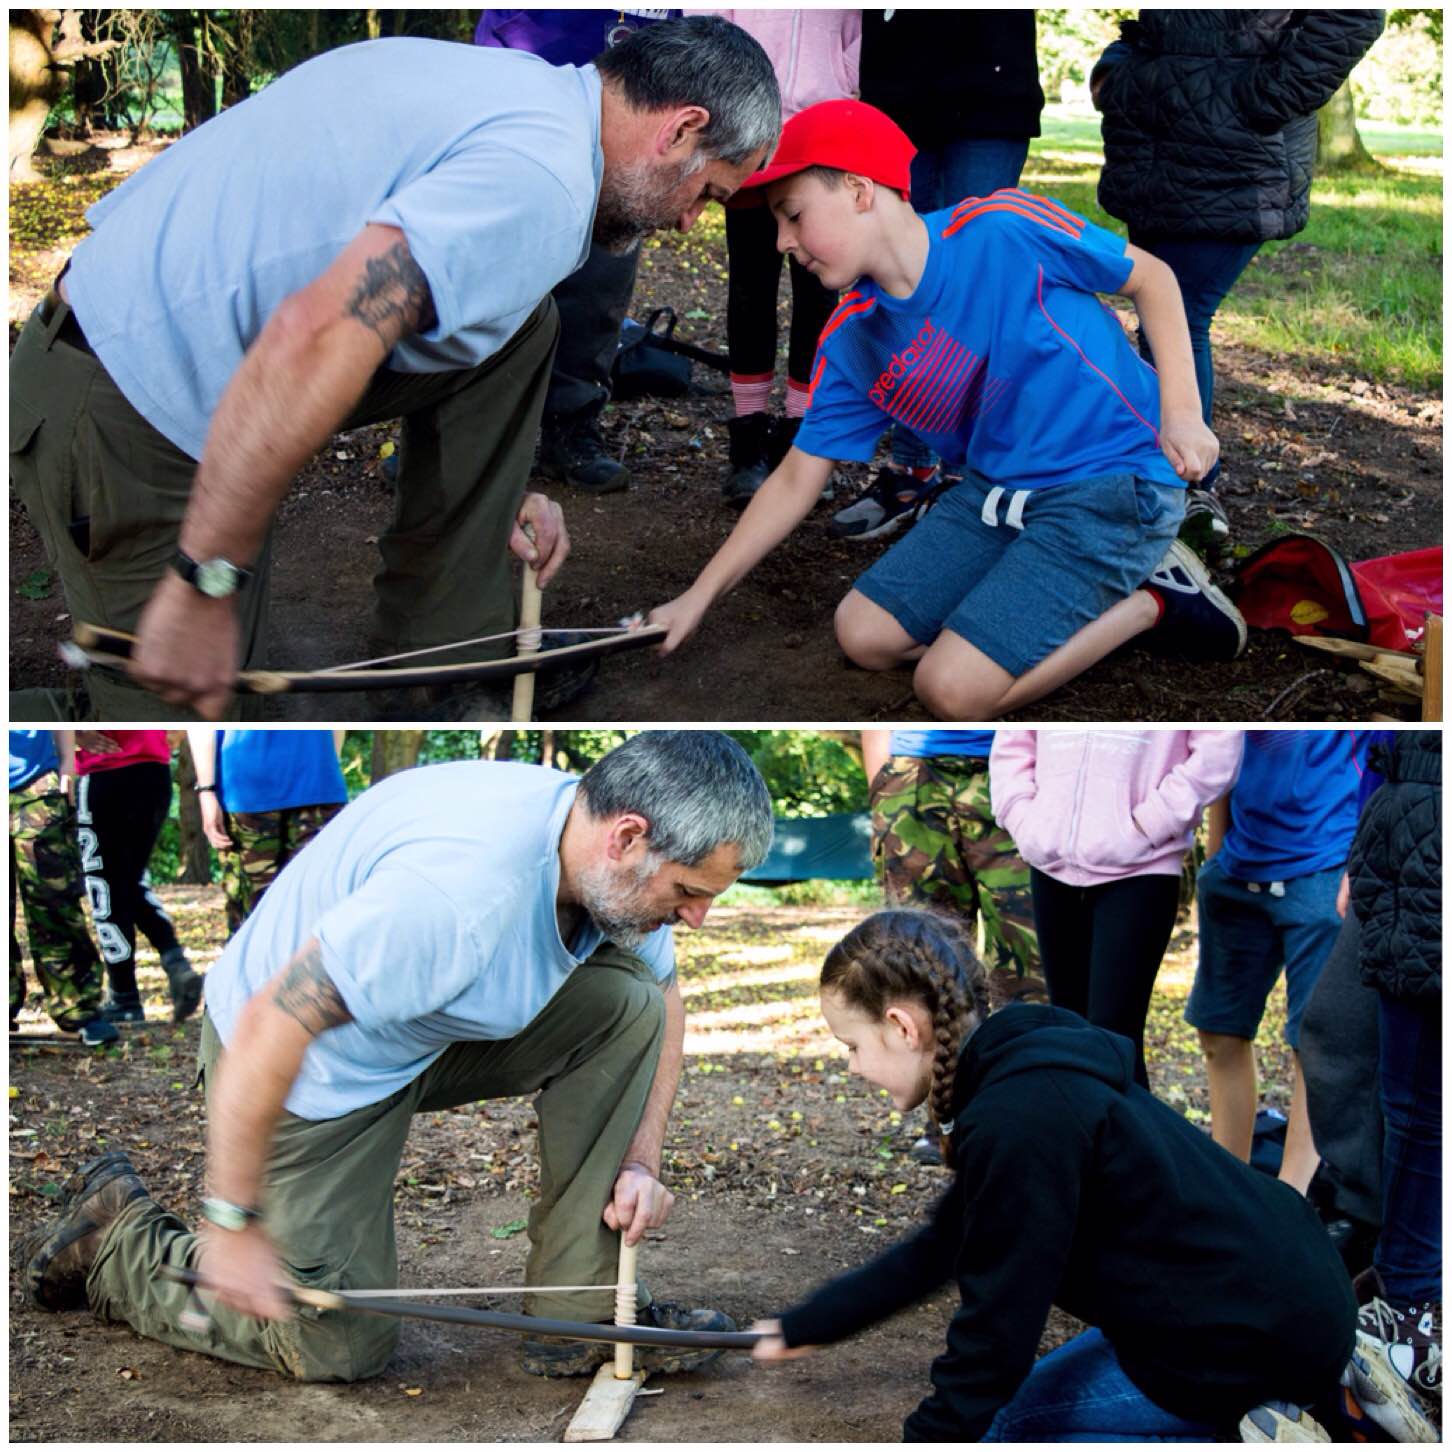
On the Saturday I had taught the Juniors how to light a fire using Firesteels so on the Sunday they all helped me to get an ember using the bowdrill. Each junior took part and we soon had a great big glowing ember.
One Junior said that he had watched the recent programme by a ‘well known survivalist’ where it had taken the contestants two days to get a fire going so he was over the moon to get an ember in just a couple of minutes.
Team bowdrill
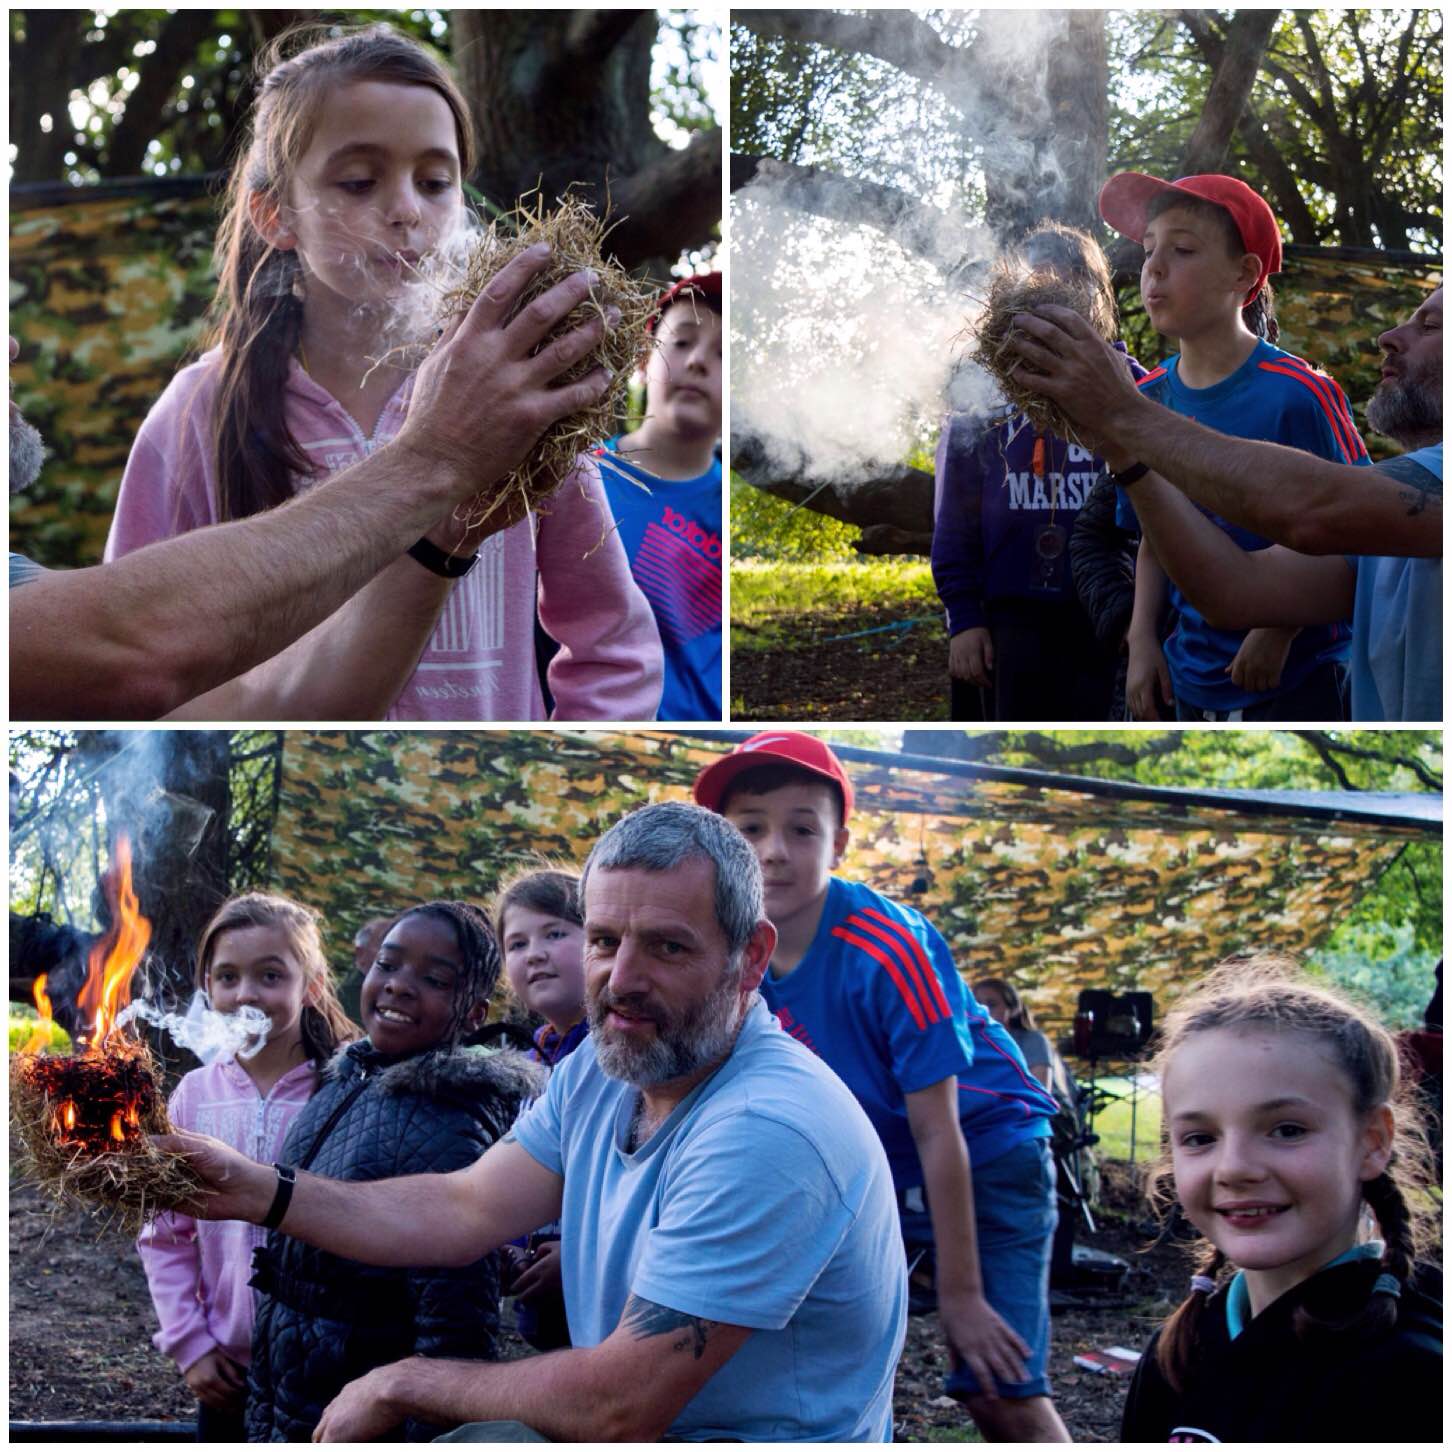
Once the ember was stable we popped it into a tinder bundle and everyone took it in turn to blow it into flame.
I think the smiles on their faces kind of say it all about the experience they just had.
Flammage
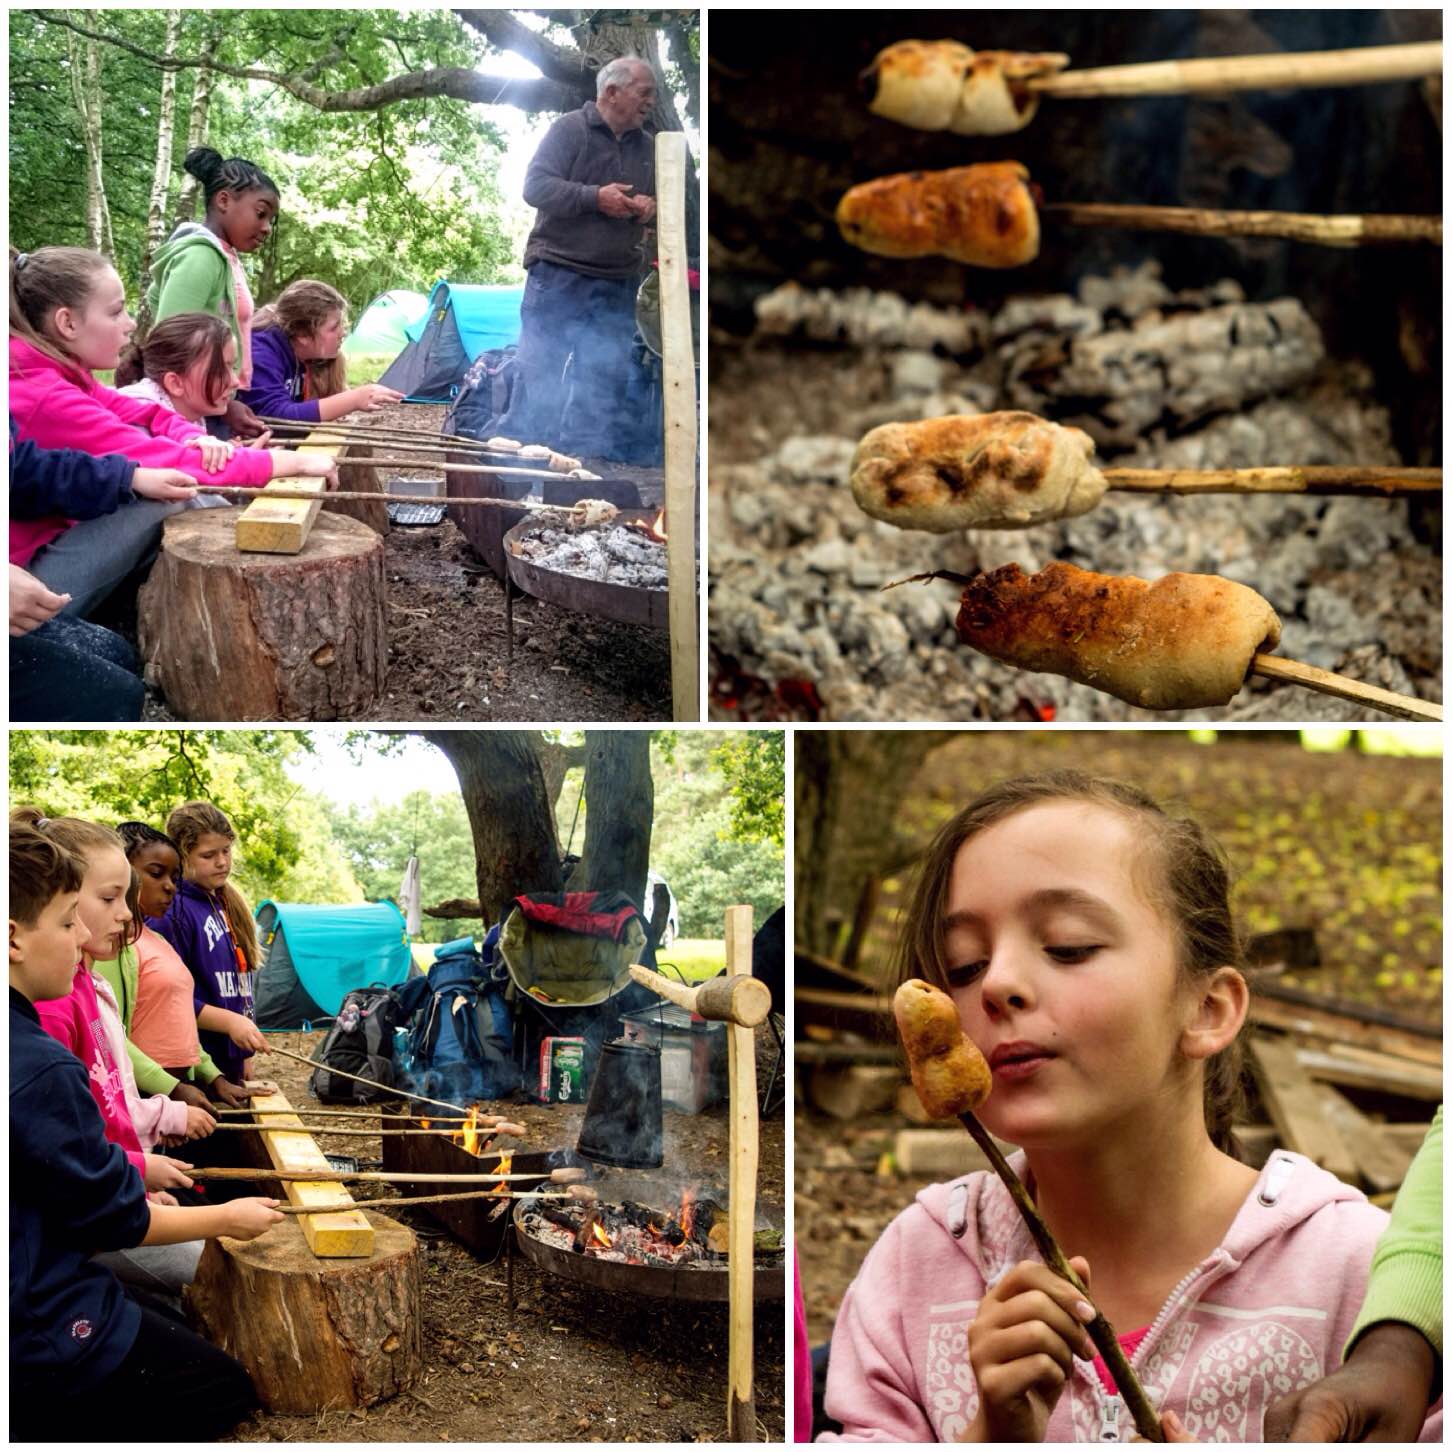
Once we got the fire going properly Alan Lewis took the juniors on a cookery class. He got them to cook sausages over the fire and then to make up a bread mix. The bread mixture was then wrapped around the cooked sausages and in no time they all had their own hand made sausage rolls.
Morning cooking
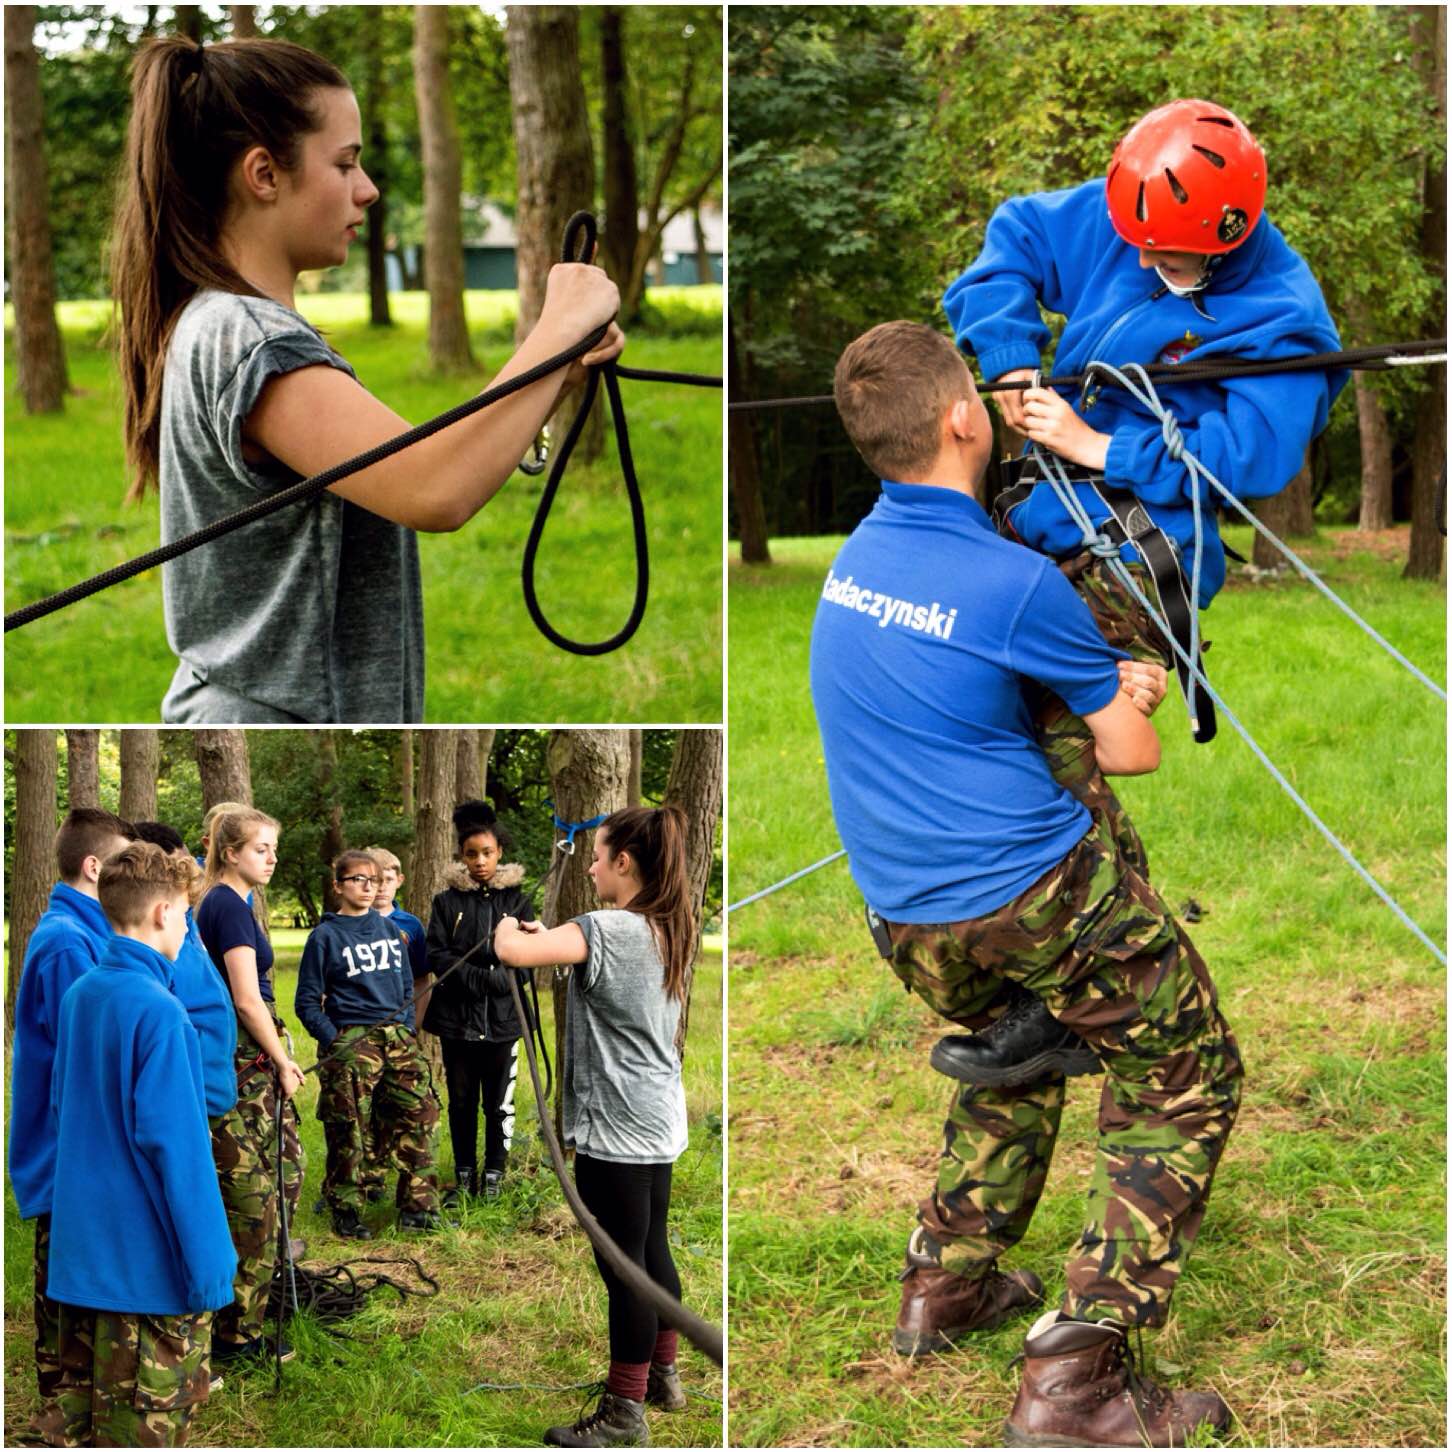
While the Juniors were cooking their sausage rolls I wandered over to where Dave was working with his older cadets. They were practising some ropework to set up a retrievable rope system for crossing a river. All this was in preparation for the forthcoming Chosin Cup competition in early October.
Older cadets practising for Chosin Cup
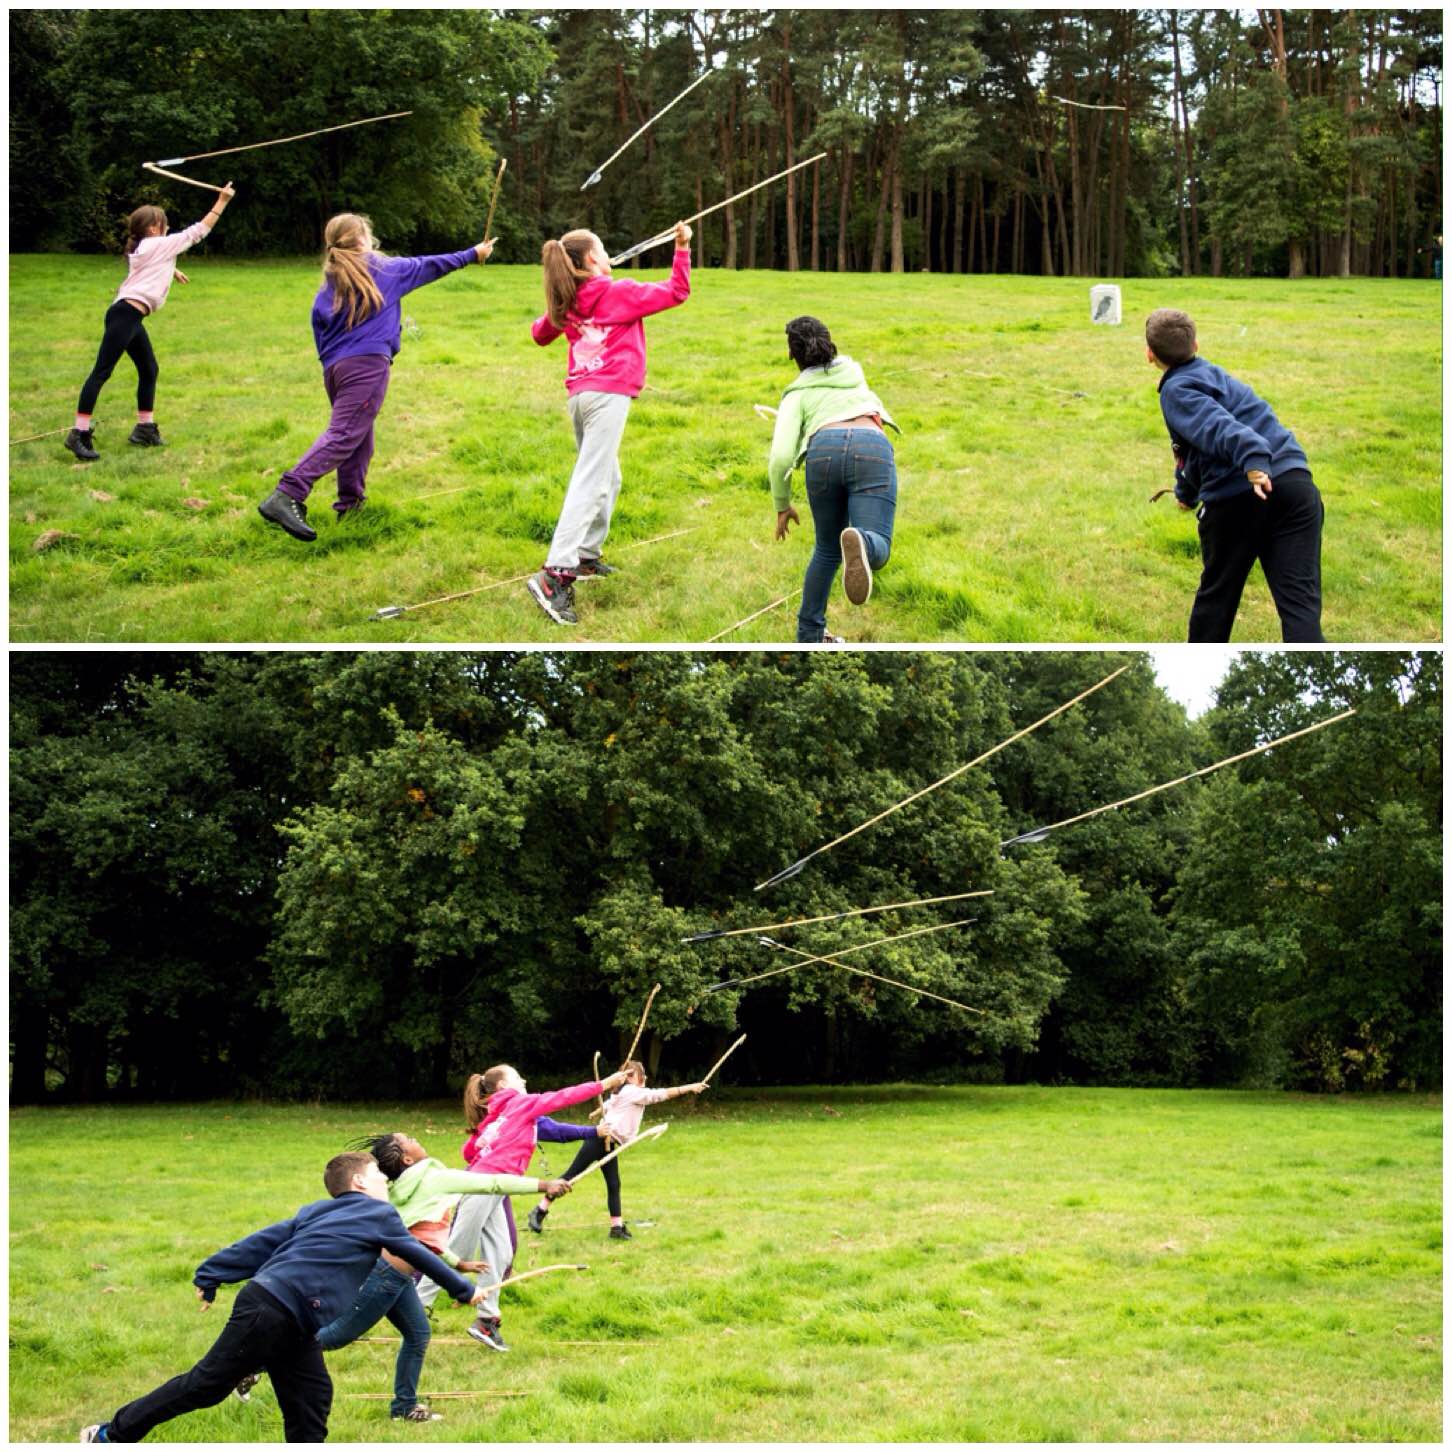
To finish the course off for the Juniors I set up the Atlatl range on an open slope. It was not long before they got a hang of this primitive hunting technique and were soon landing darts on the targets.
An Atlatl finish
I finished the weekend still feeling as fresh as I started. It is not often I can say that about Sea Cadet weekends (I usually need a day or two to get over them) but the juniors were so keen to learn and were a real bright and keen bunch that I look forward to being invited again next year.
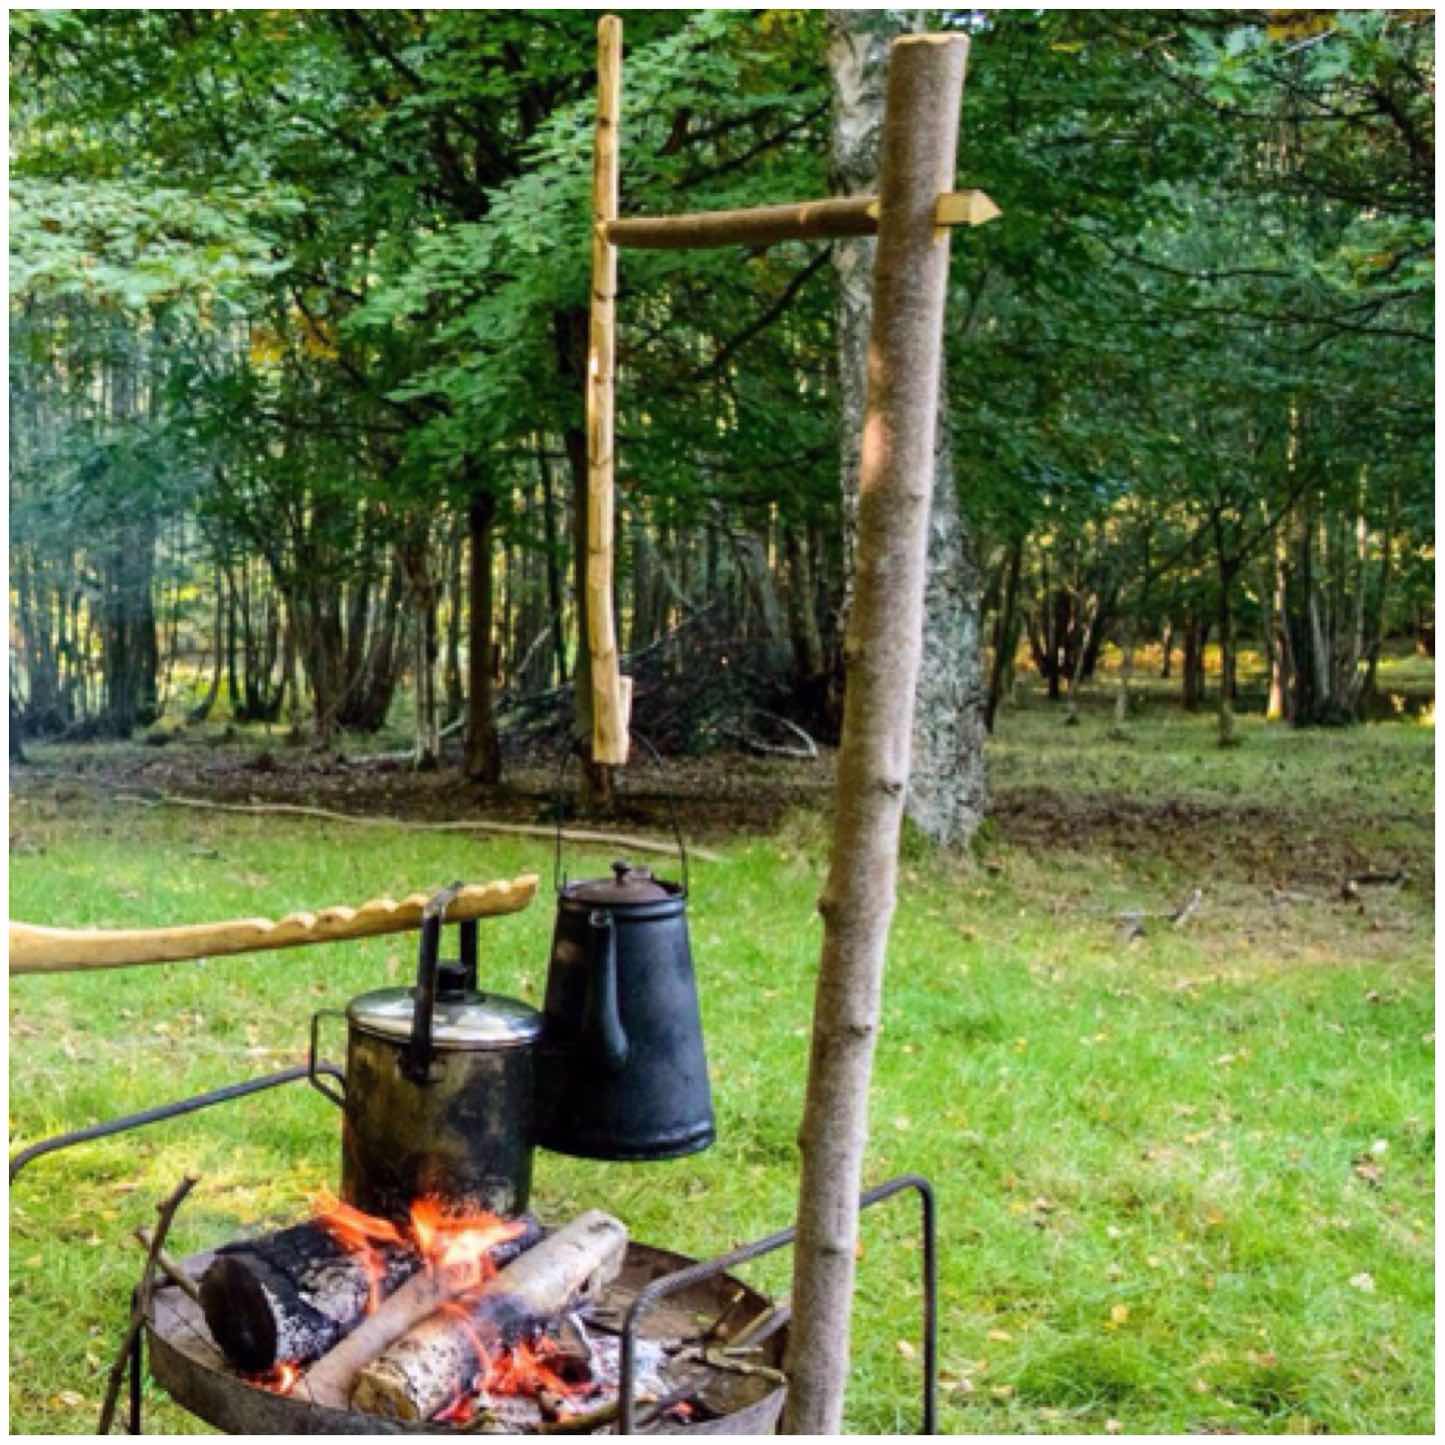
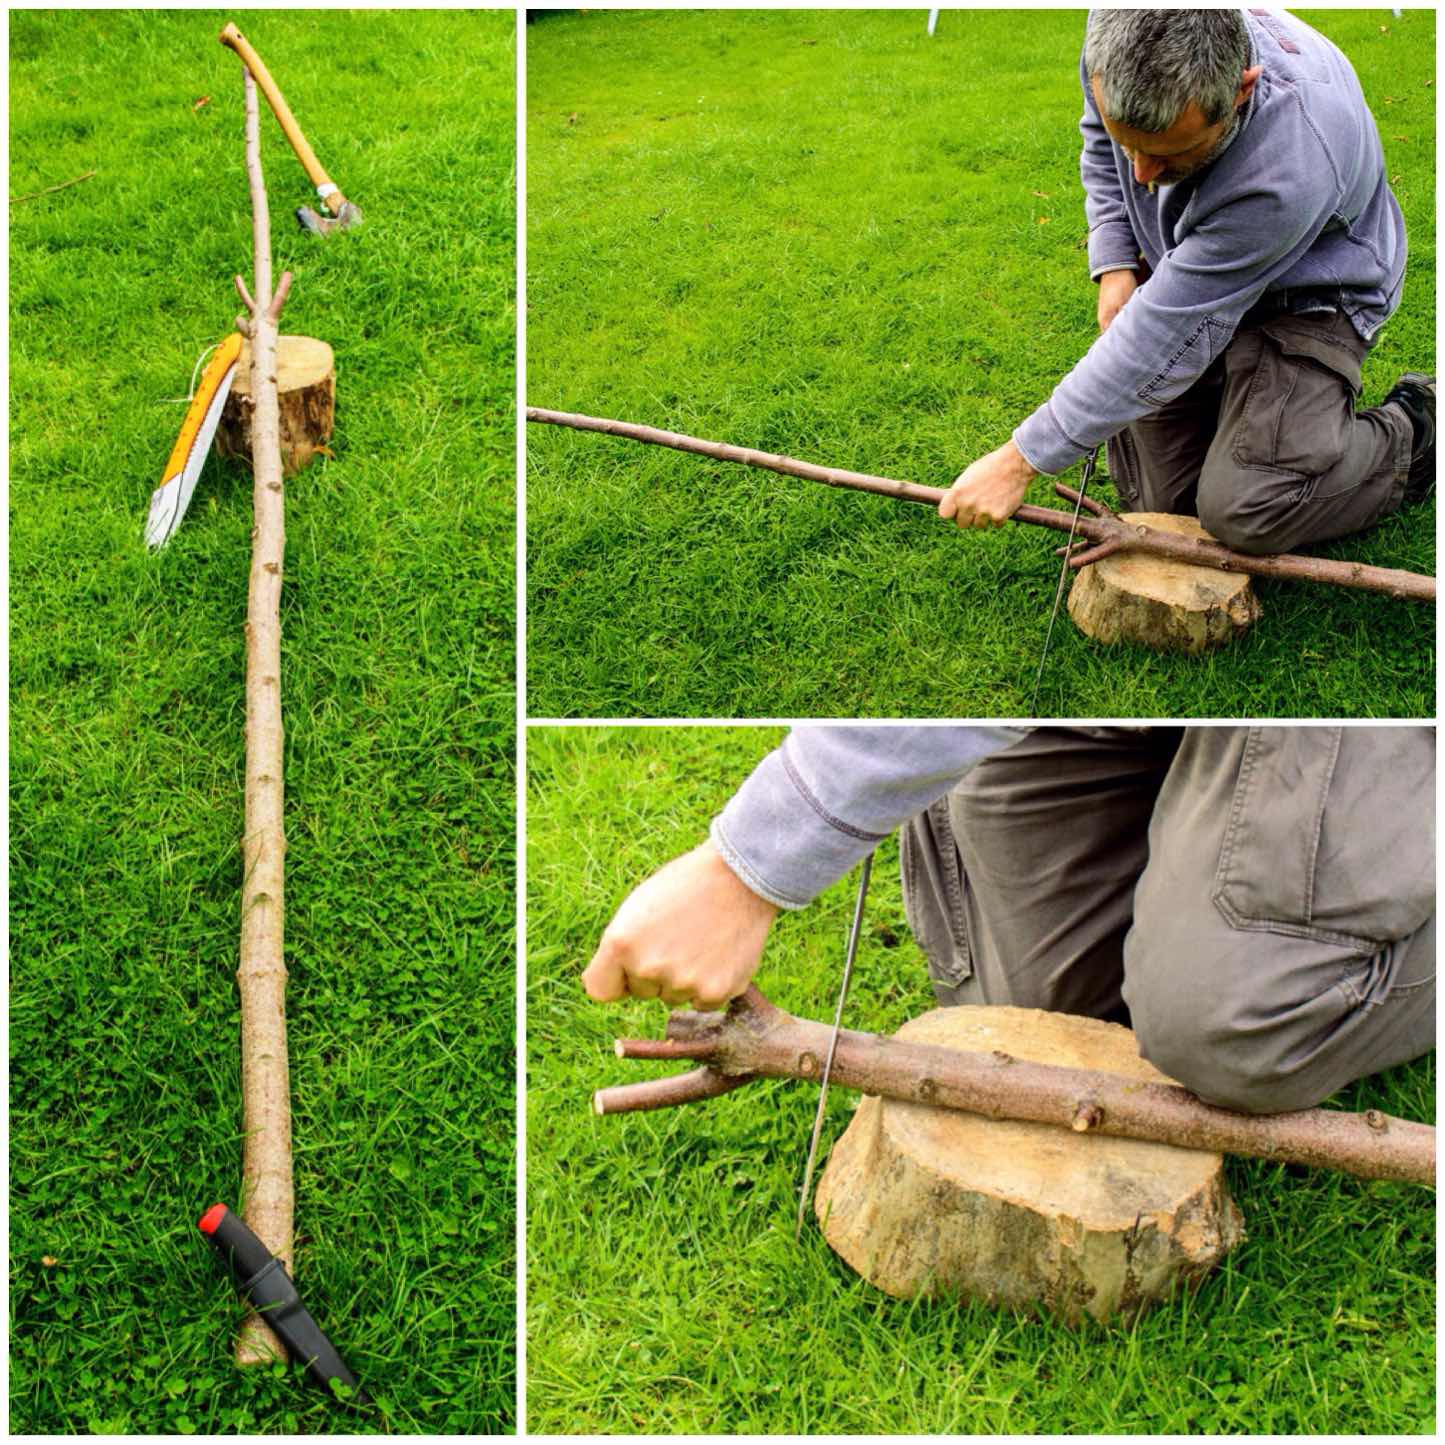
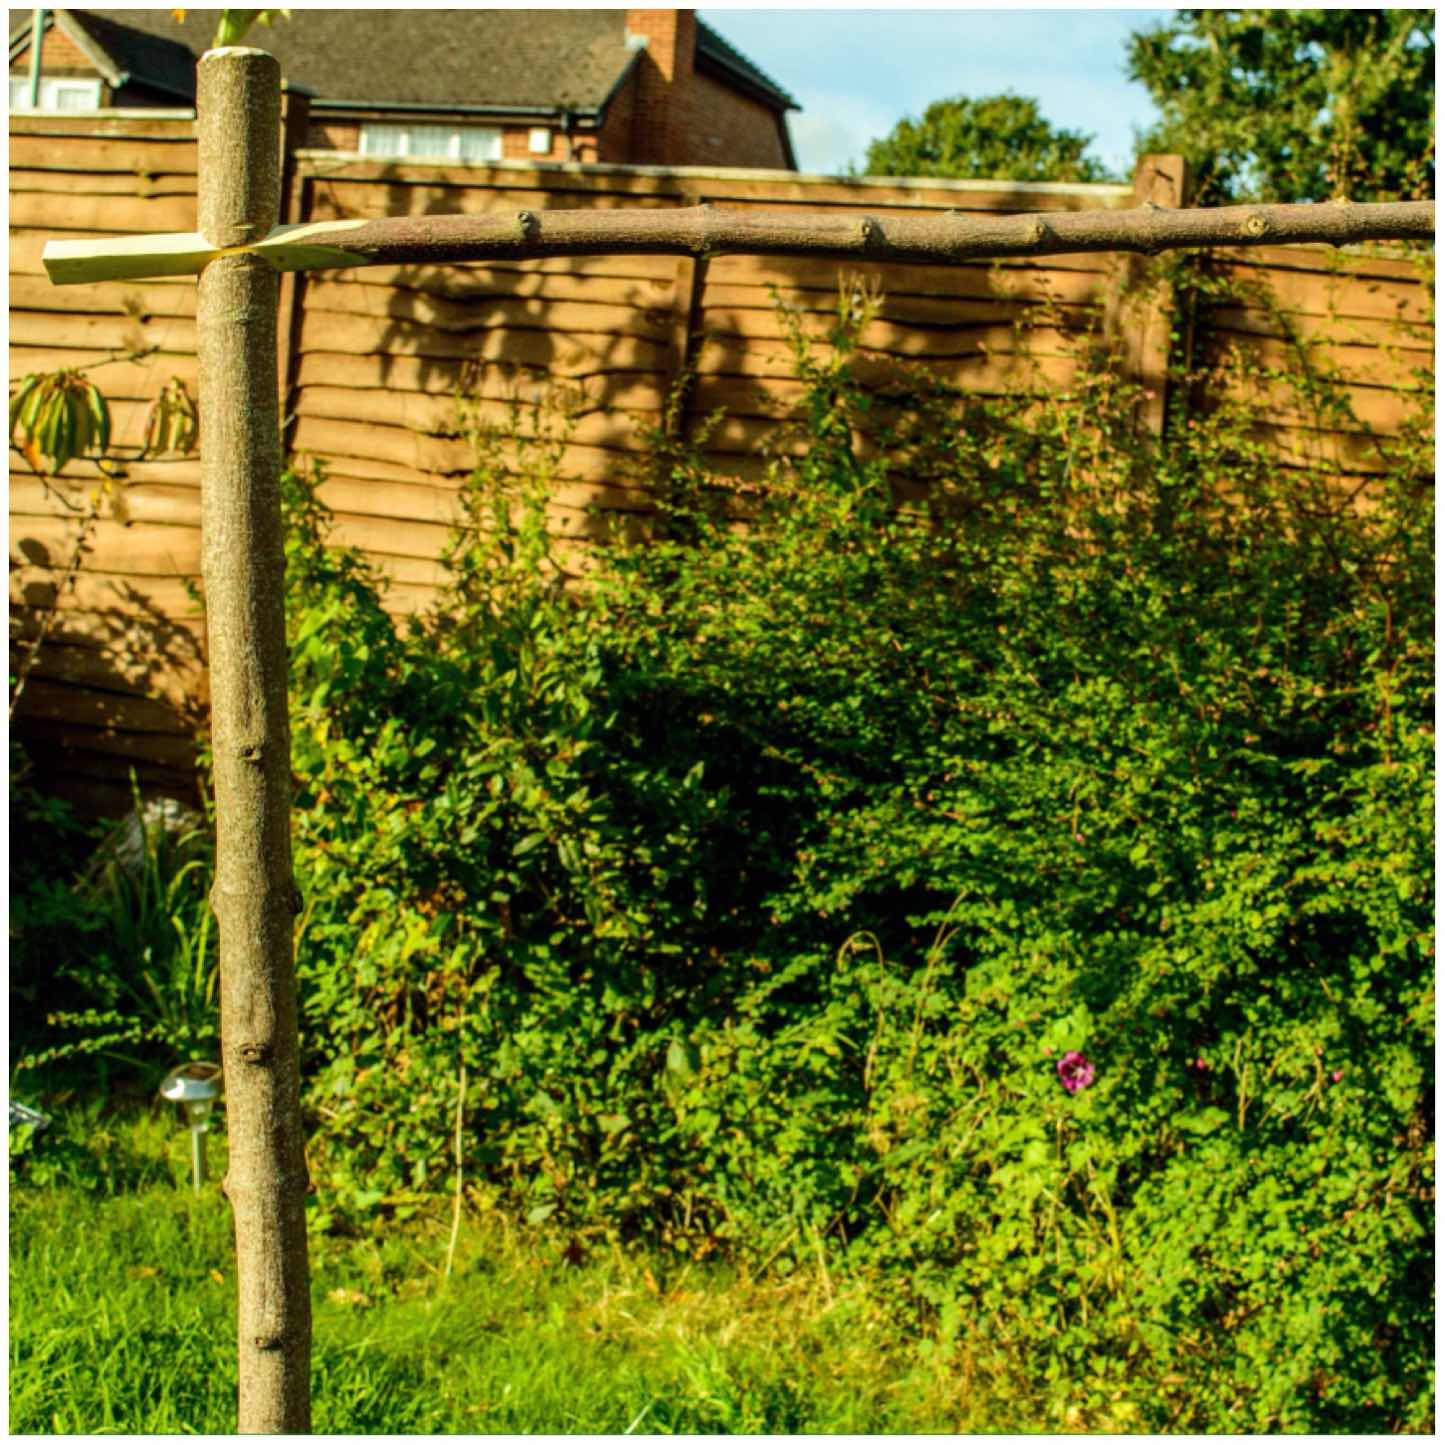
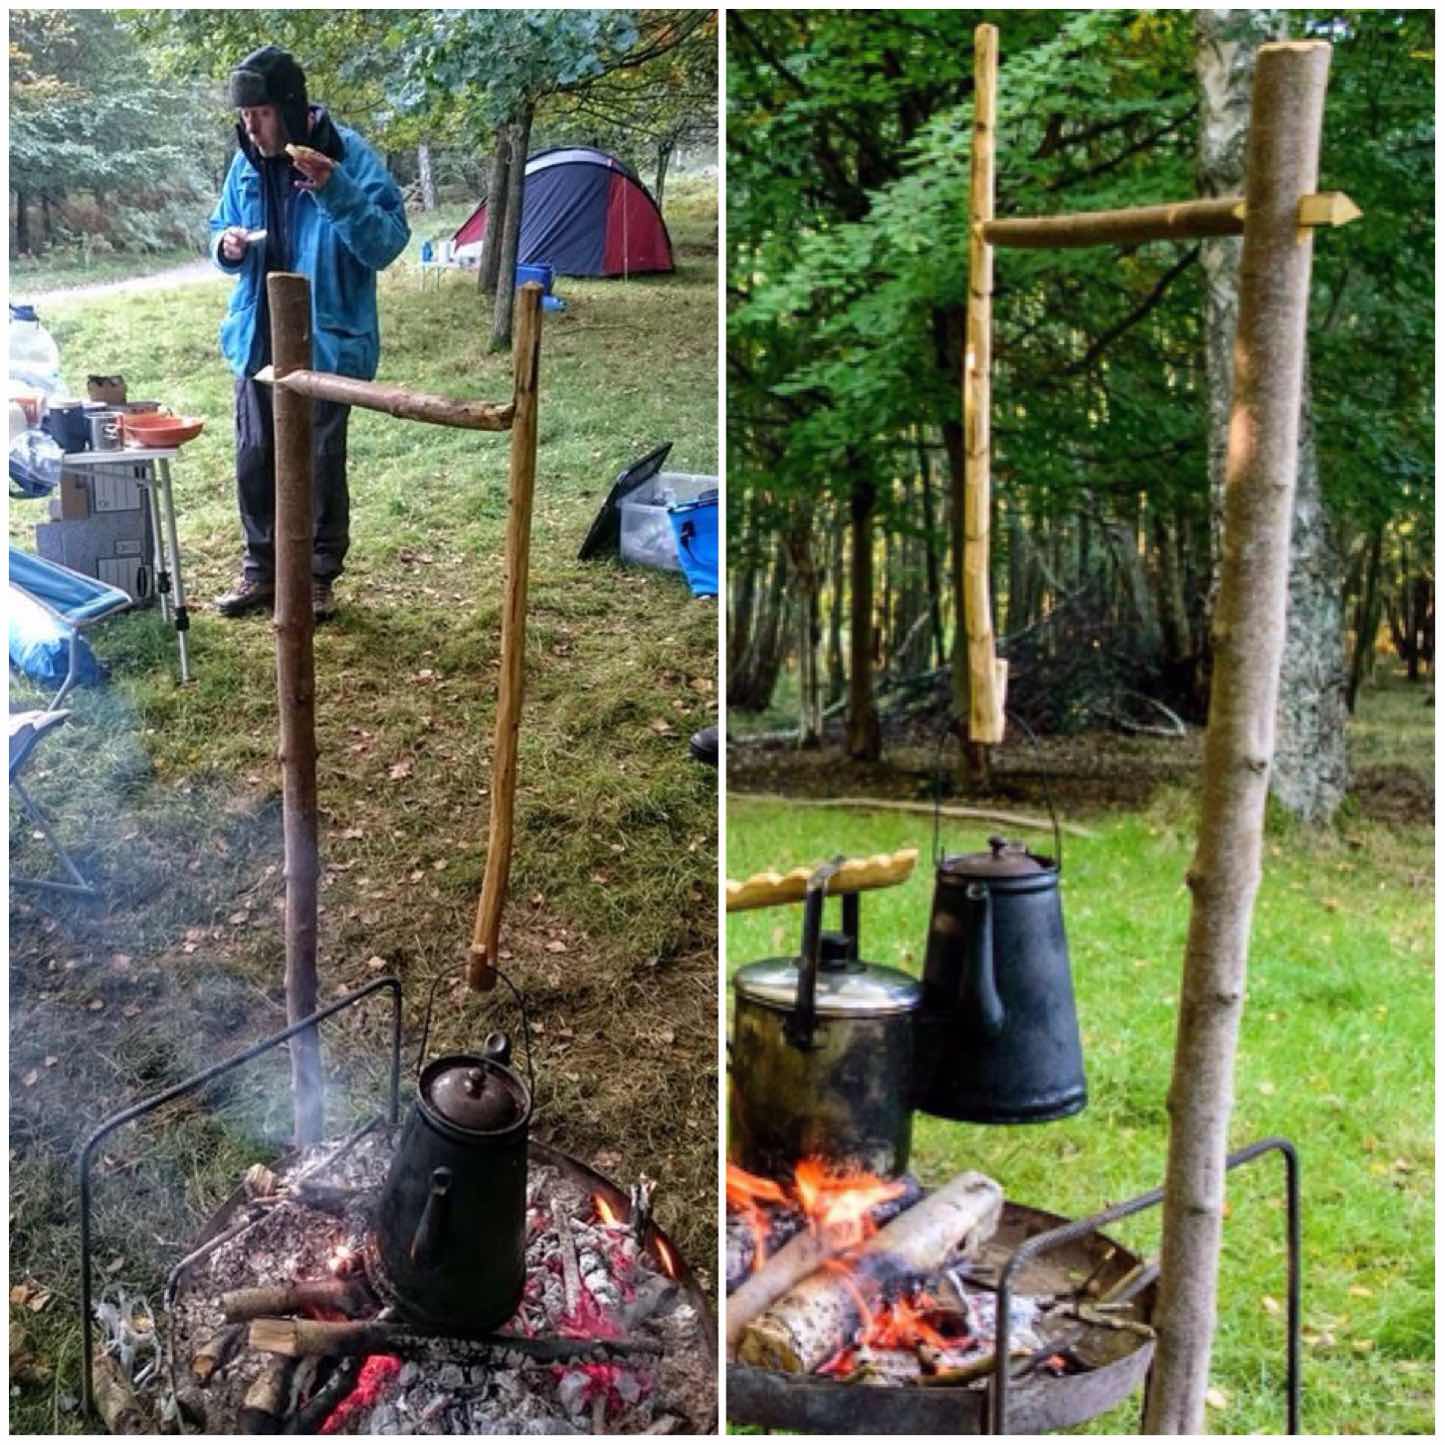
My search to find and document as many different campfire cranes brought me to this simple type of dovetail crane. I first came across this idea from a blog post by Ken Cole Jr on the Scout Pioneering site. I expanded on their idea with adding an adjustable pot hanger to the crane.
It is similar in concept to the Cooking Crane I documented previously except that the socket on the upright is created by cutting into the side of it instead of through the middle of the upright. This leads to a far quicker construction time.
Simple Dovetail Crane
I also like these vertical campfire cranes as there is little for people to trip up on around the campfire and like my previous post on the adjustable dovetail crane this simpler version is built using just a single pole.
Trimming
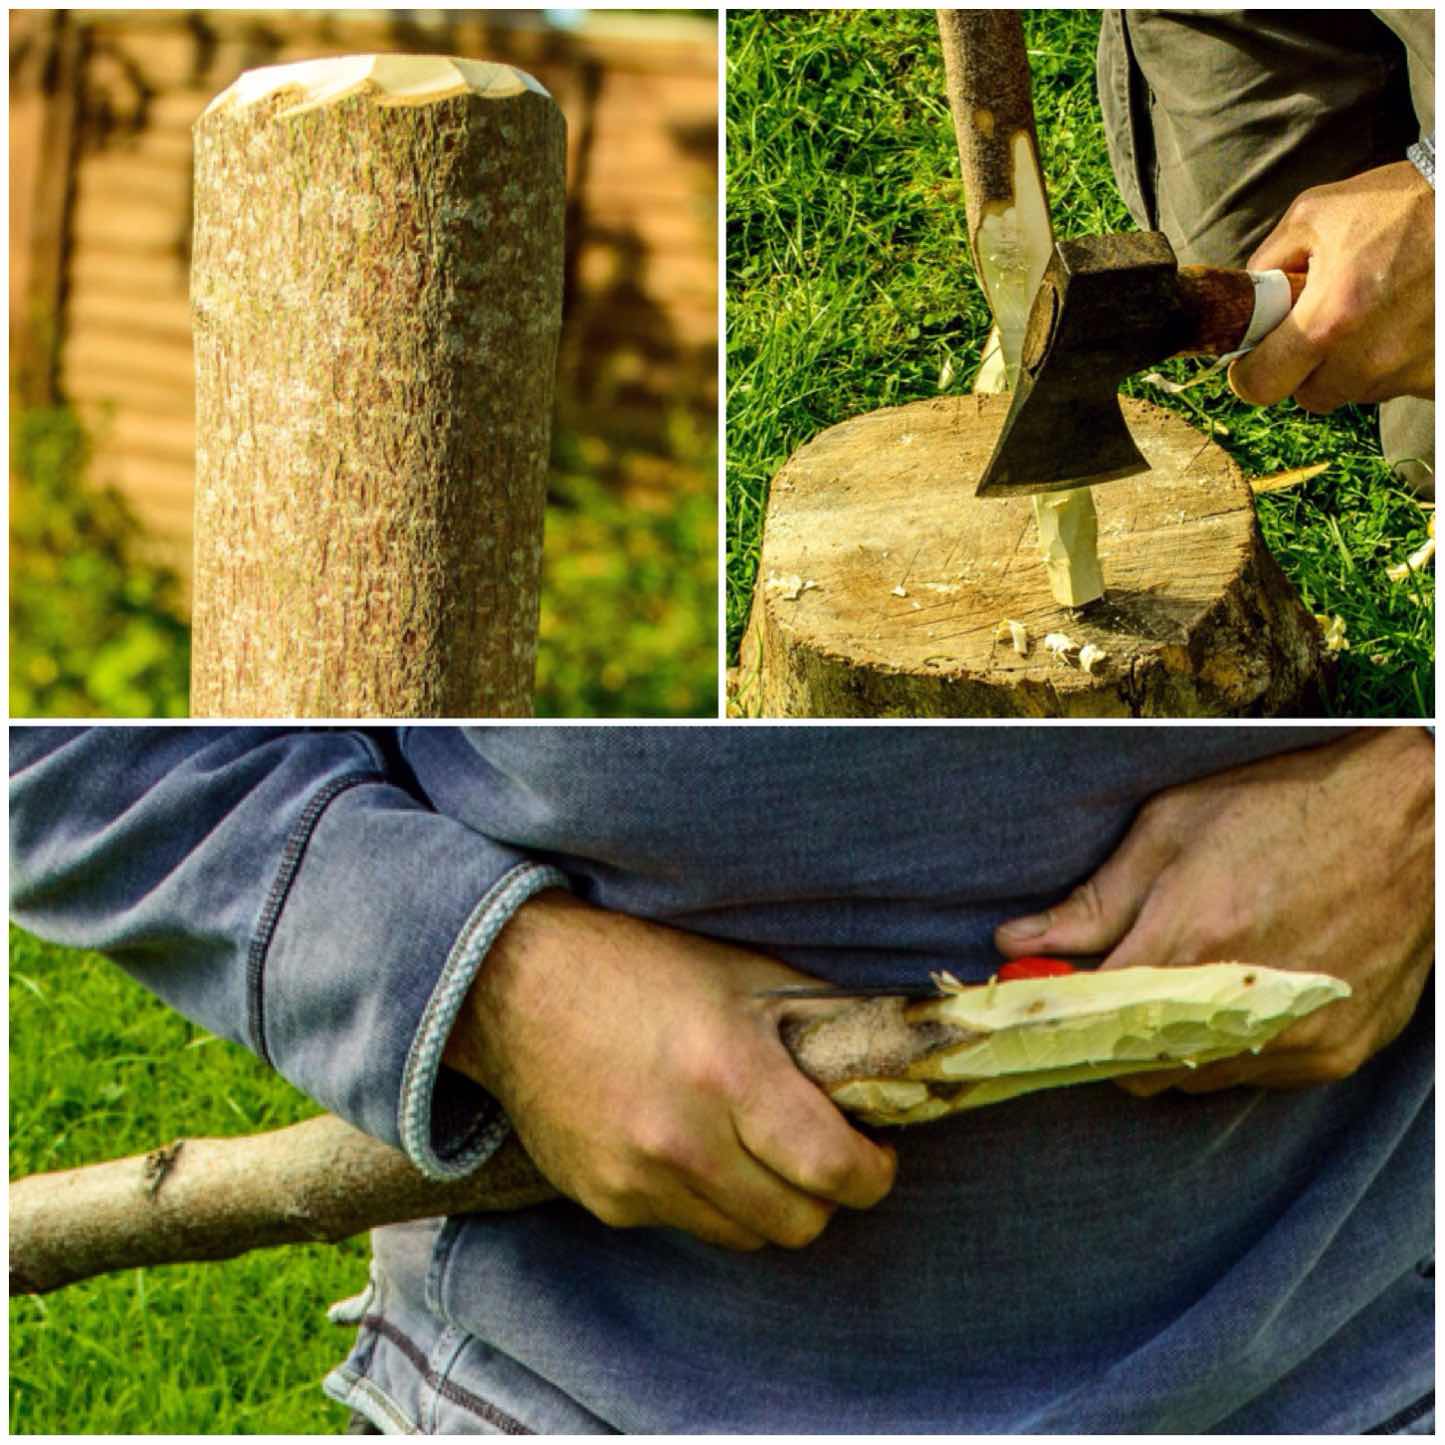
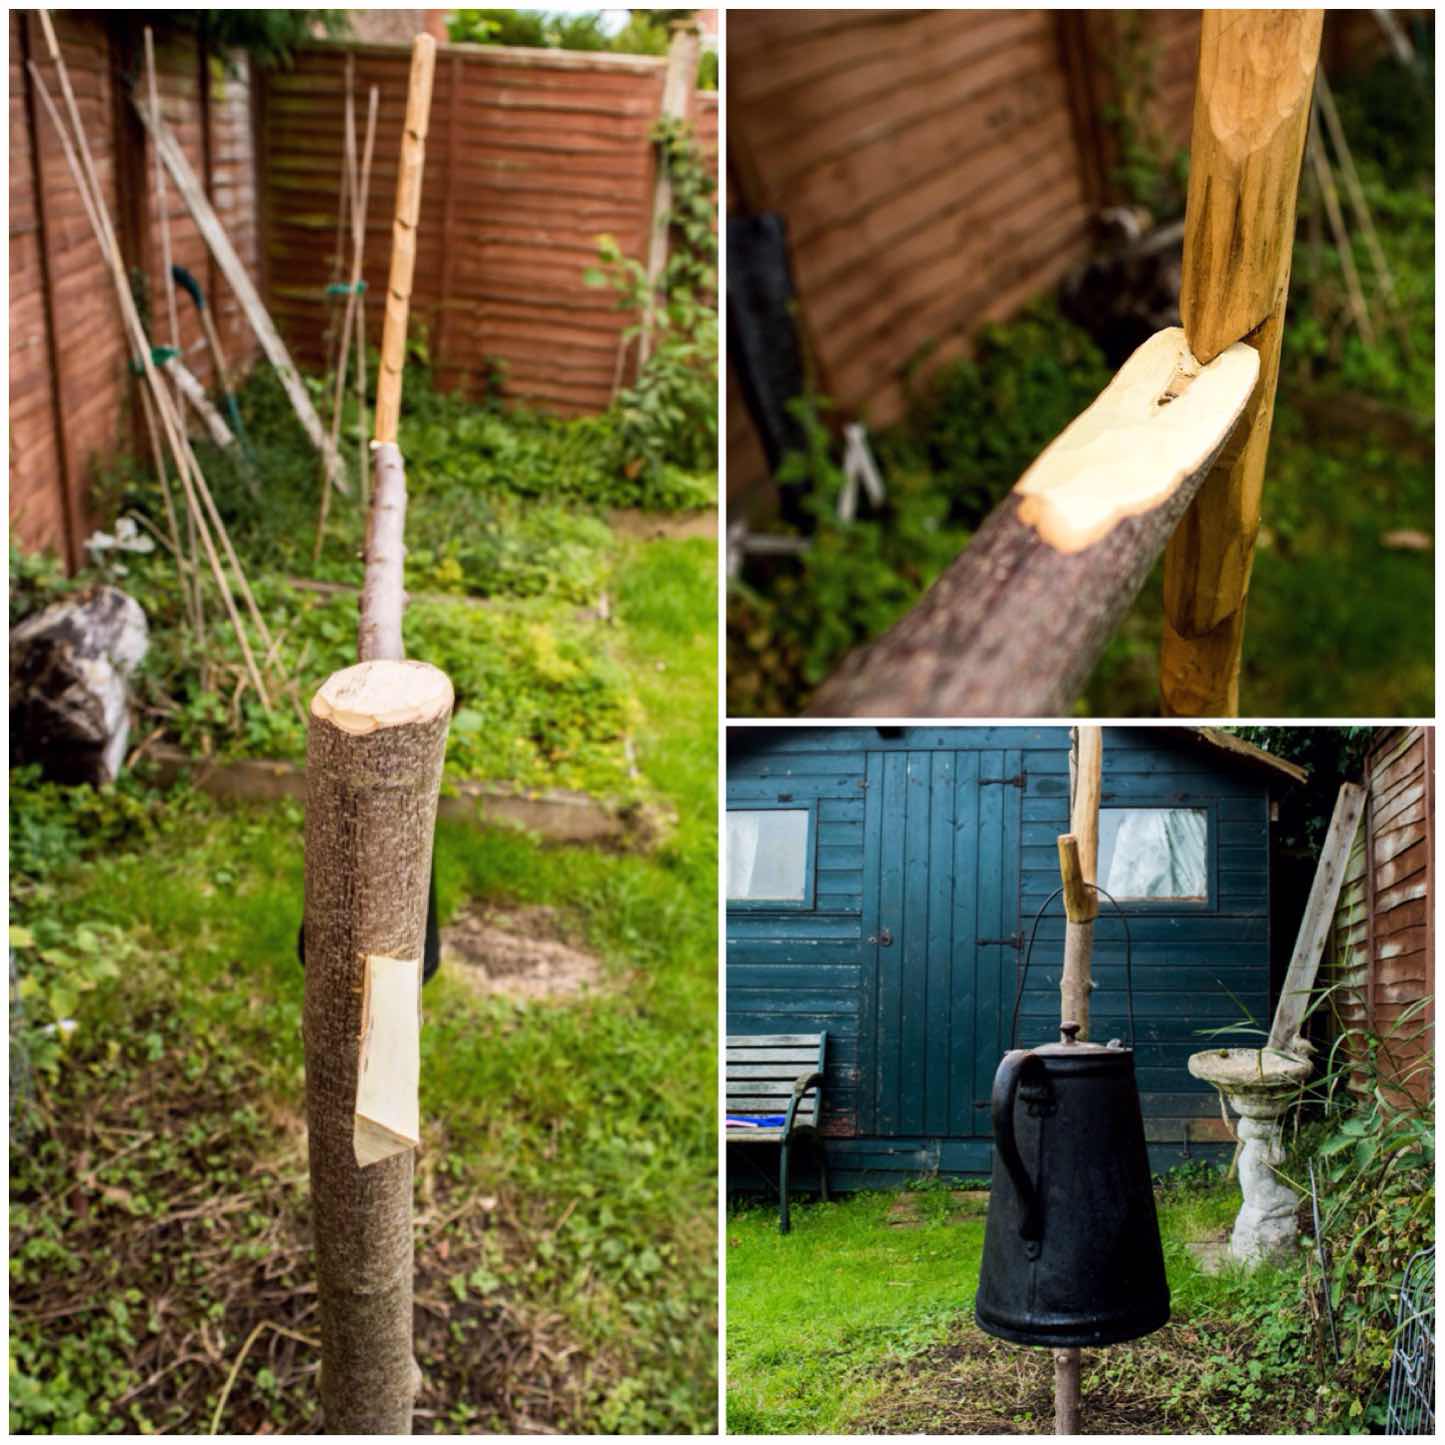
I used a sycamore pole on I had on hand trimmed it into two pieces using my folding saw.
One pole trimmed to size
The larger pole you can see below was destined to be the upright and the thinner piece was to be the cranes arm.
The arm
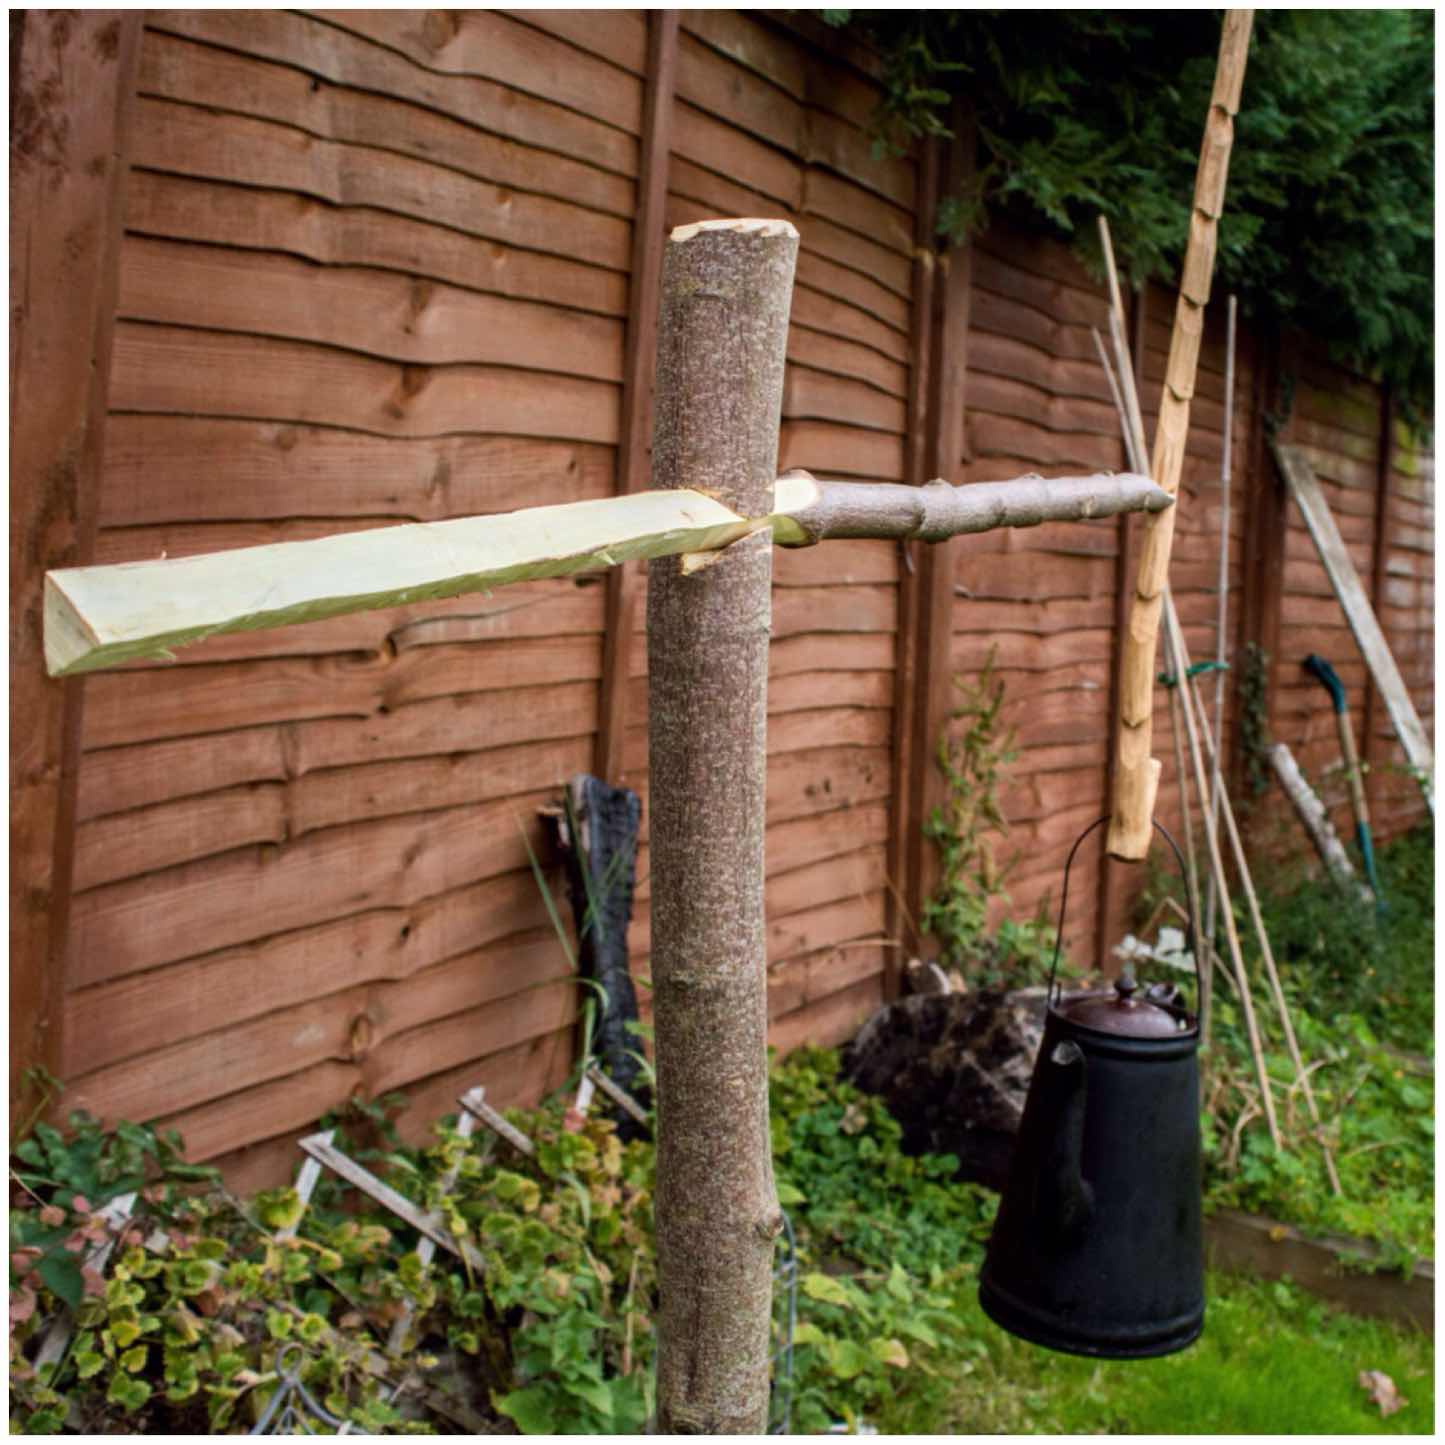
I started work on the arm first carving a triangular end on one side. I took my time here to make all the sides even in shape.
Carving the triangular bed of the arm
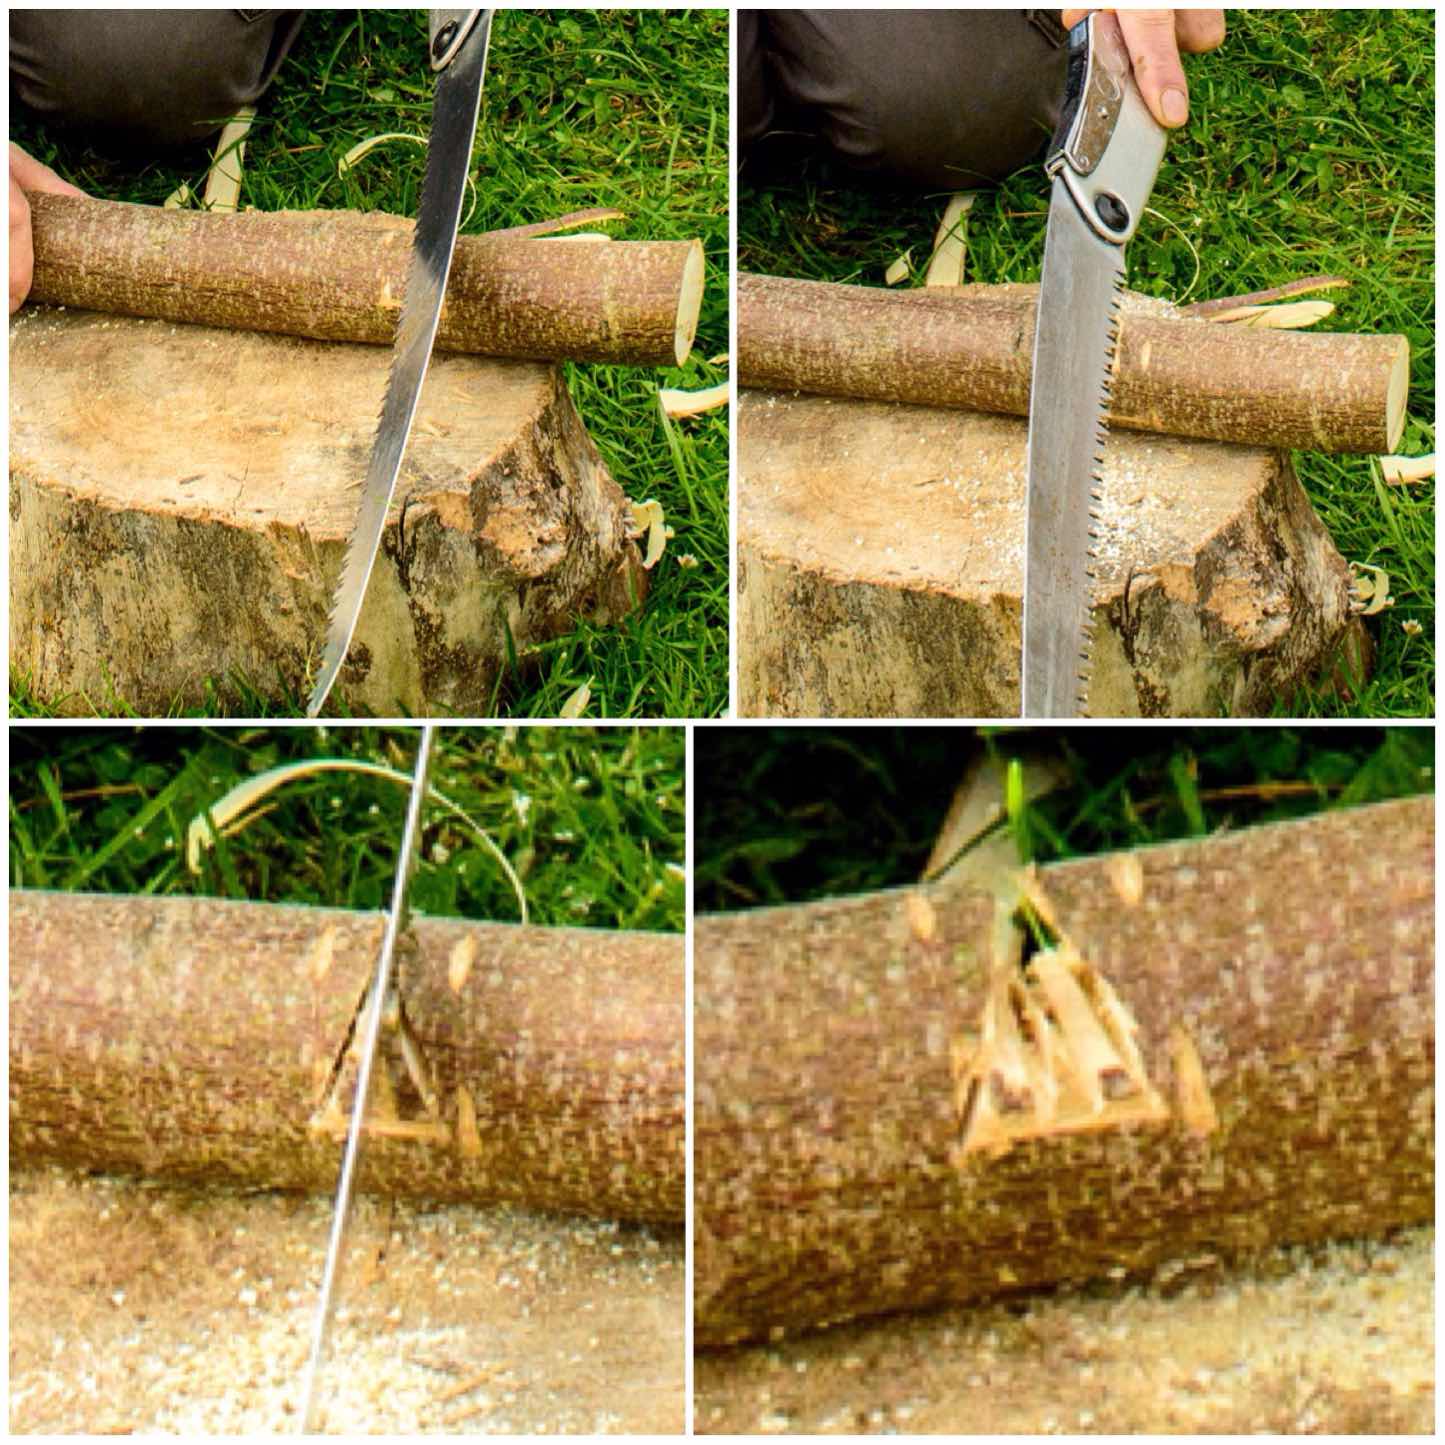
Once the arm had the correct shape carved out I used it as a template to mark out the dovetail socket I would cut into the upright.
The upright
It is worth the time doing this as you want to produce a socket that the arm will fit into snugly.
Using the arm to score out the shape of the socket
Once the shape had been marked out with my knife I used my saw to cut into the upright, one on each side and then a couple of cuts through the middle.
Roughing out the socket
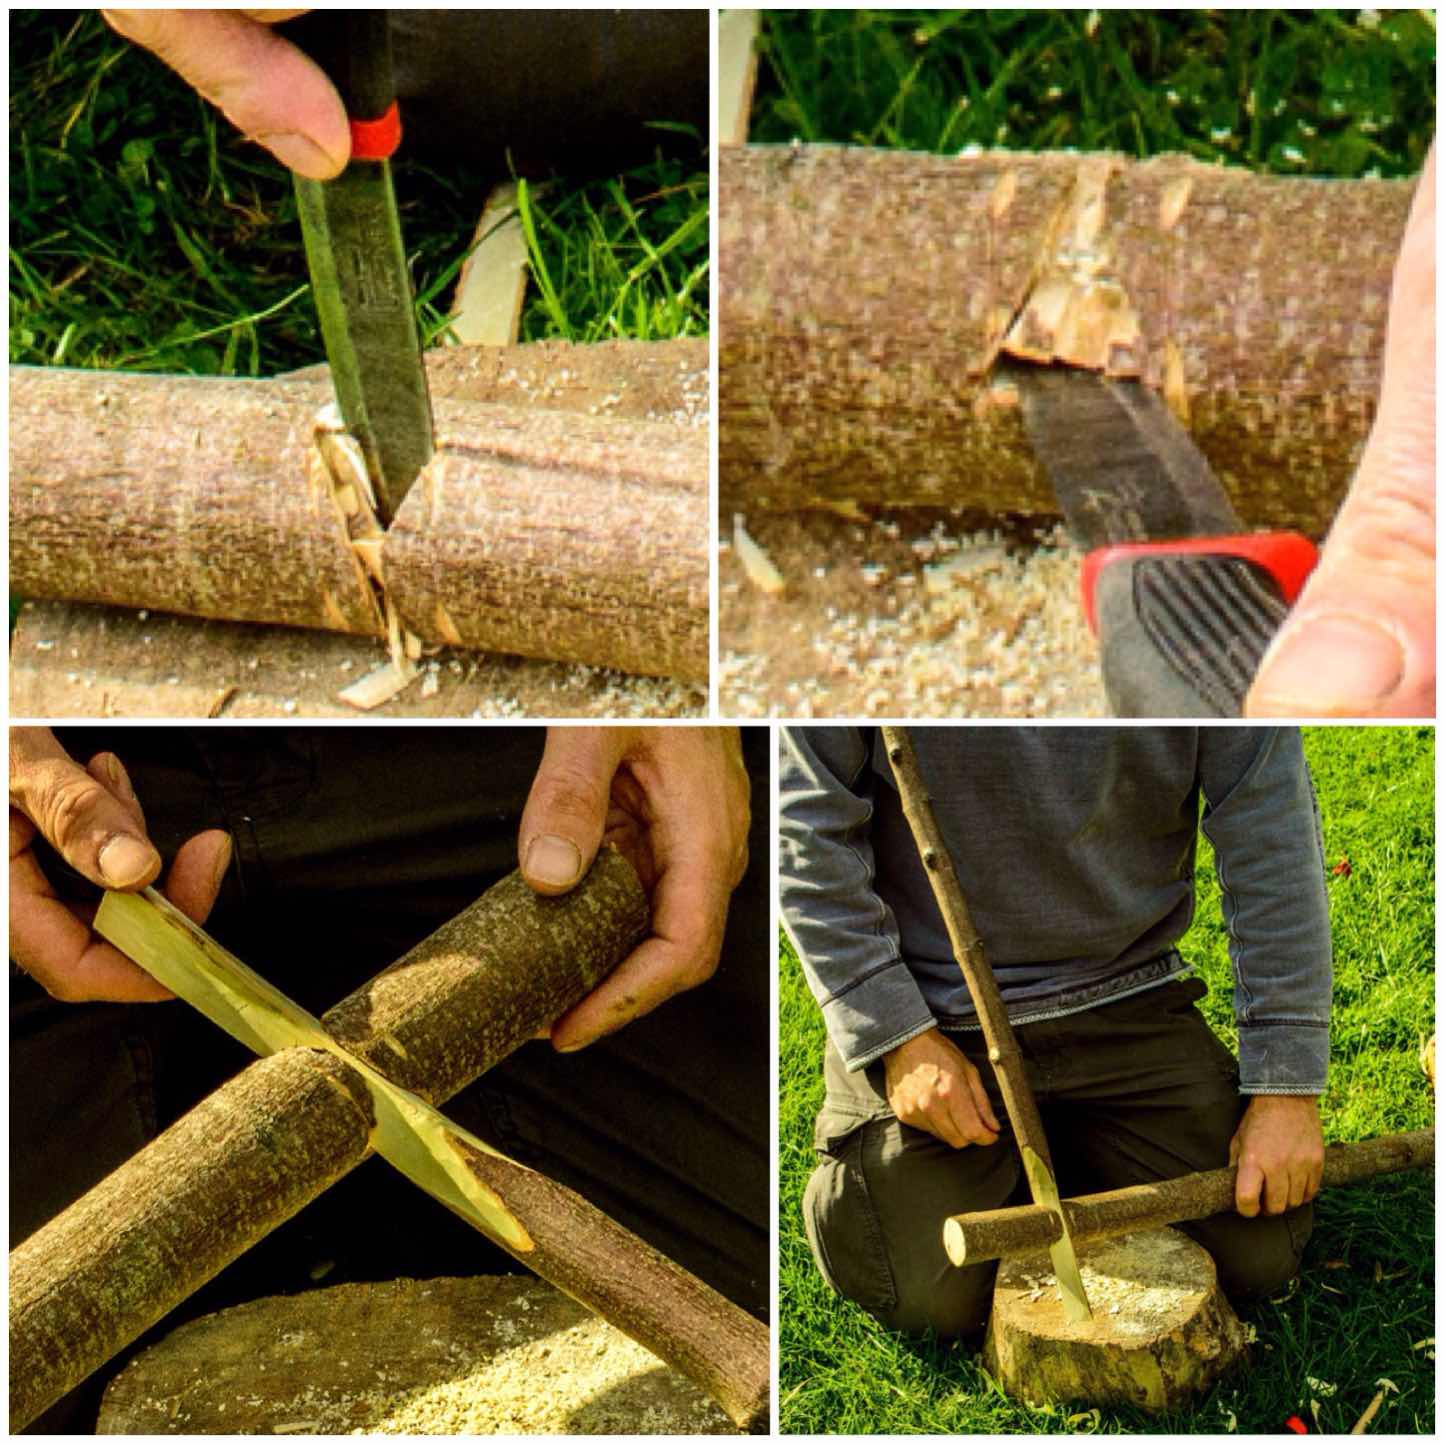
I used my knife then to carve out all the loose excess wood and to smooth all the sides out.
I continually kept trying to insert the triangulated end of the arm to see if it would fit. As I wanted to keep as much wood on the arm I just used my knife to keep carving of more wood from the socket area on the upright to enlarge it. Eventually the arm was able to be inserted into the socket and released without too much force but still fitted snugly.
Finishing with the knife
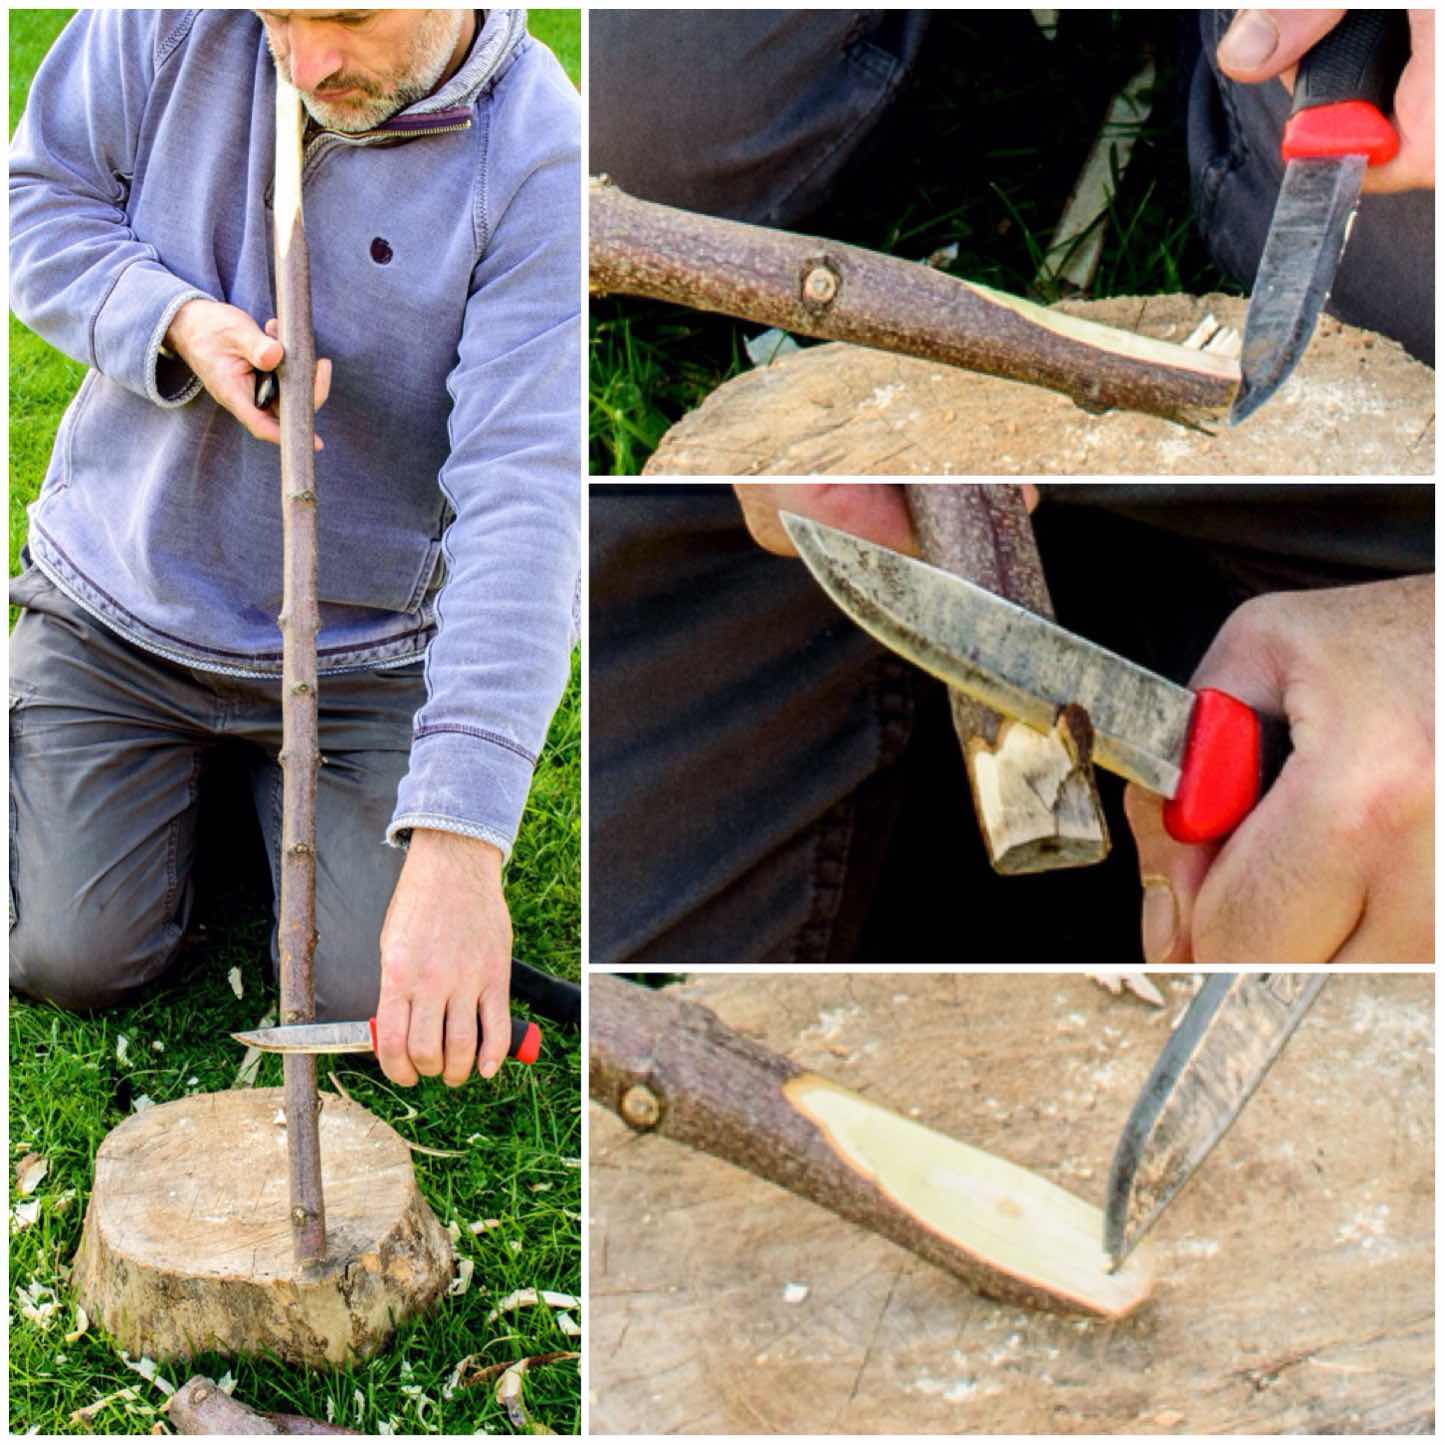
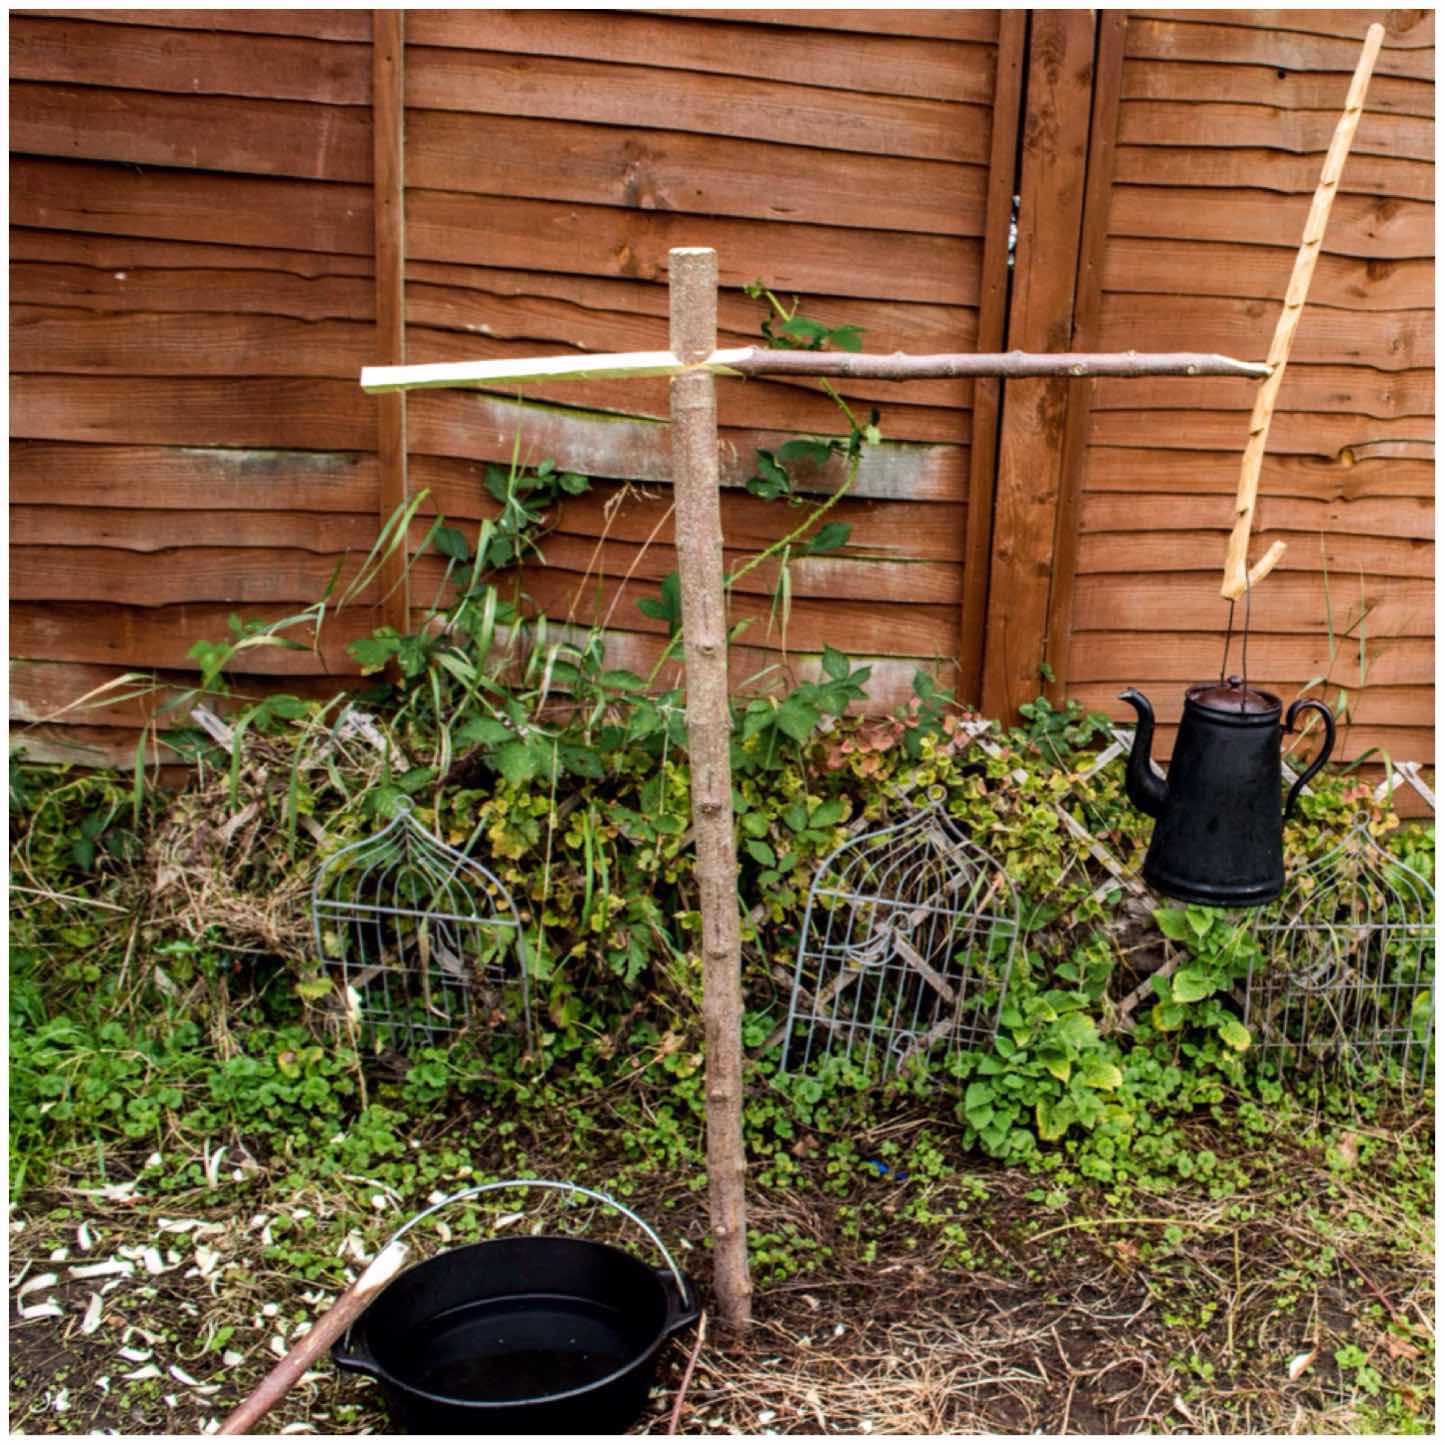
To finish the upright I chamfered the top so that it would not split when I hammered it into the ground and carved a strong point on the other end.
Chamfering and pointing the upright
I hammered the upright and checked to make sure all the angles looked good. I like to have my crane uprights to have a little lean away from the fire but not too much as this could cause the arm to swing when it had a heavy load.
Checking the angles
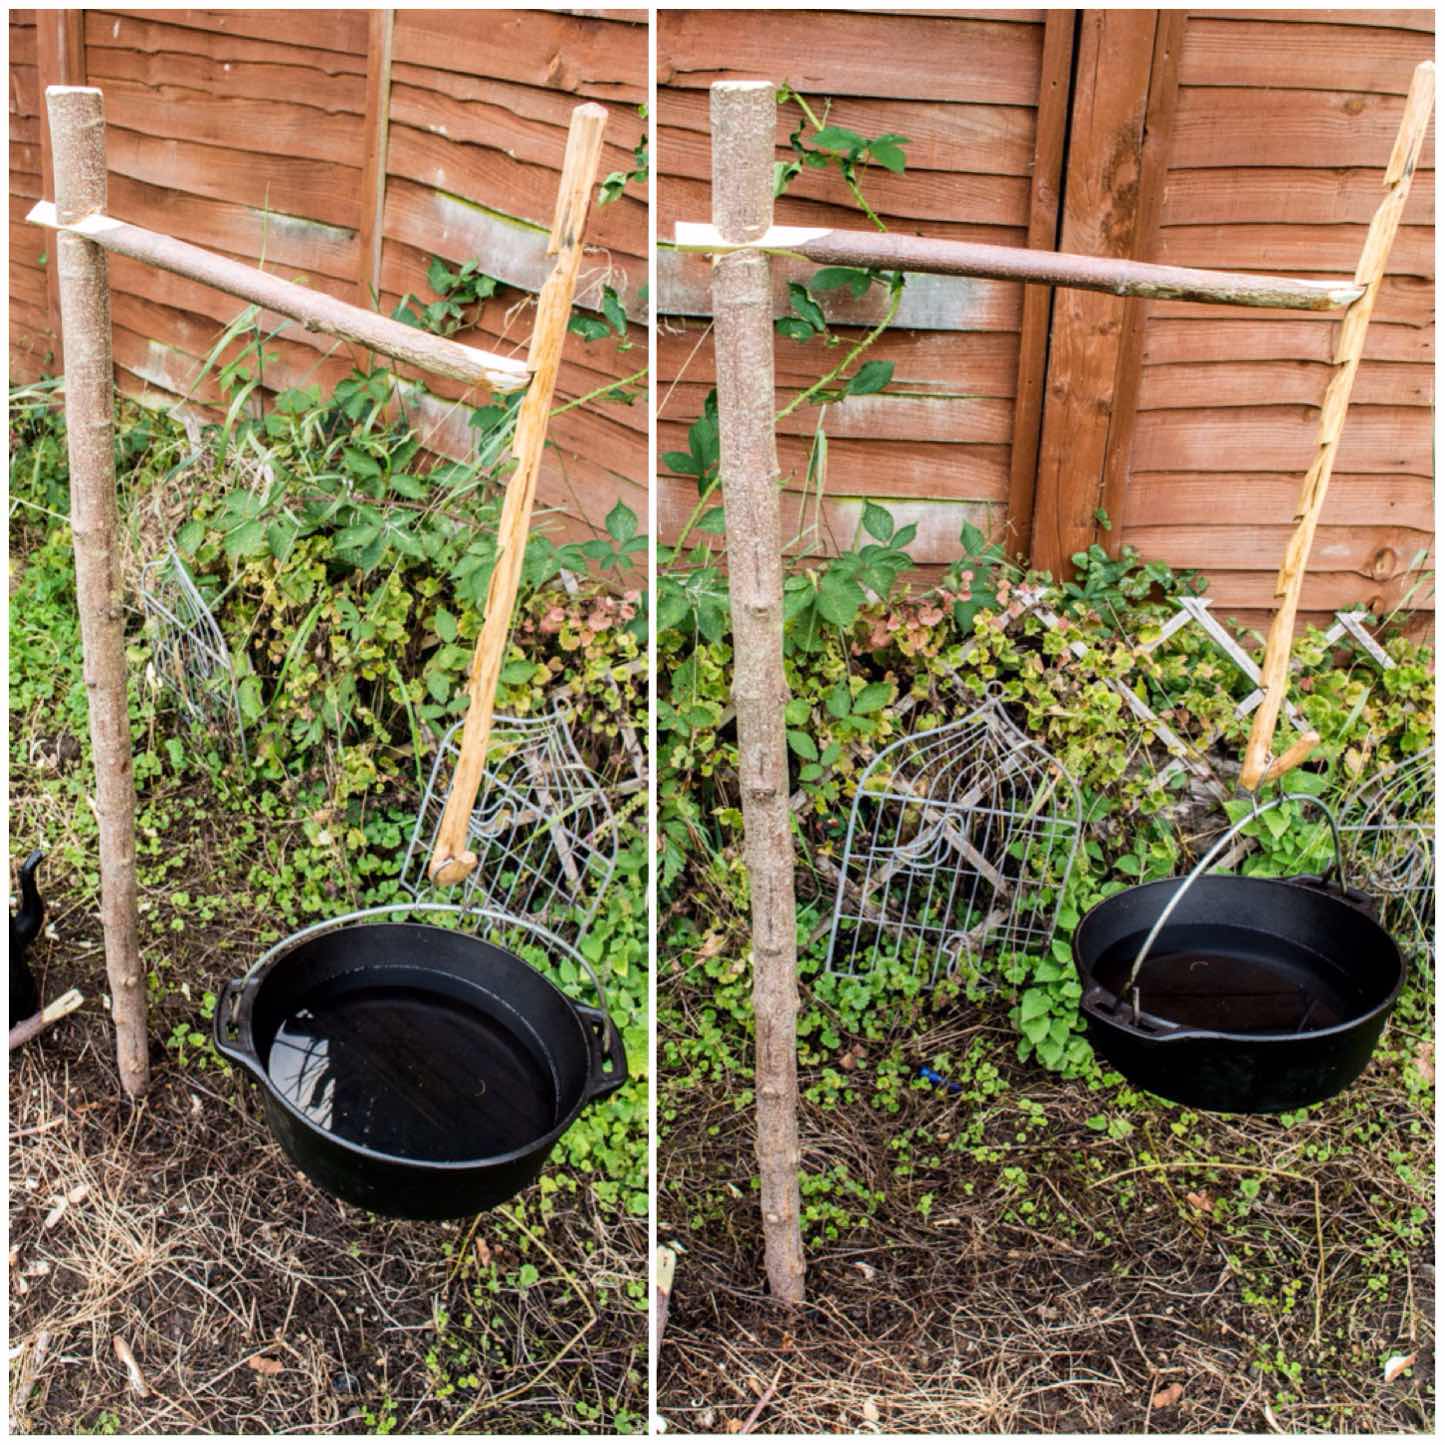
Hanging the pot hanger
The arm needs a little flat platform carved on the end with a little dimple in it the pot hanger to balance on. I have explained in a previous post on carving an adjustable pot hanger on how to make one of these.
Just make sure that you carve the flat platform on the correct plane in relation to how the arm fits into the upright – I used the triangular end as a guide for this.
Carving the pot hanger end of the arm
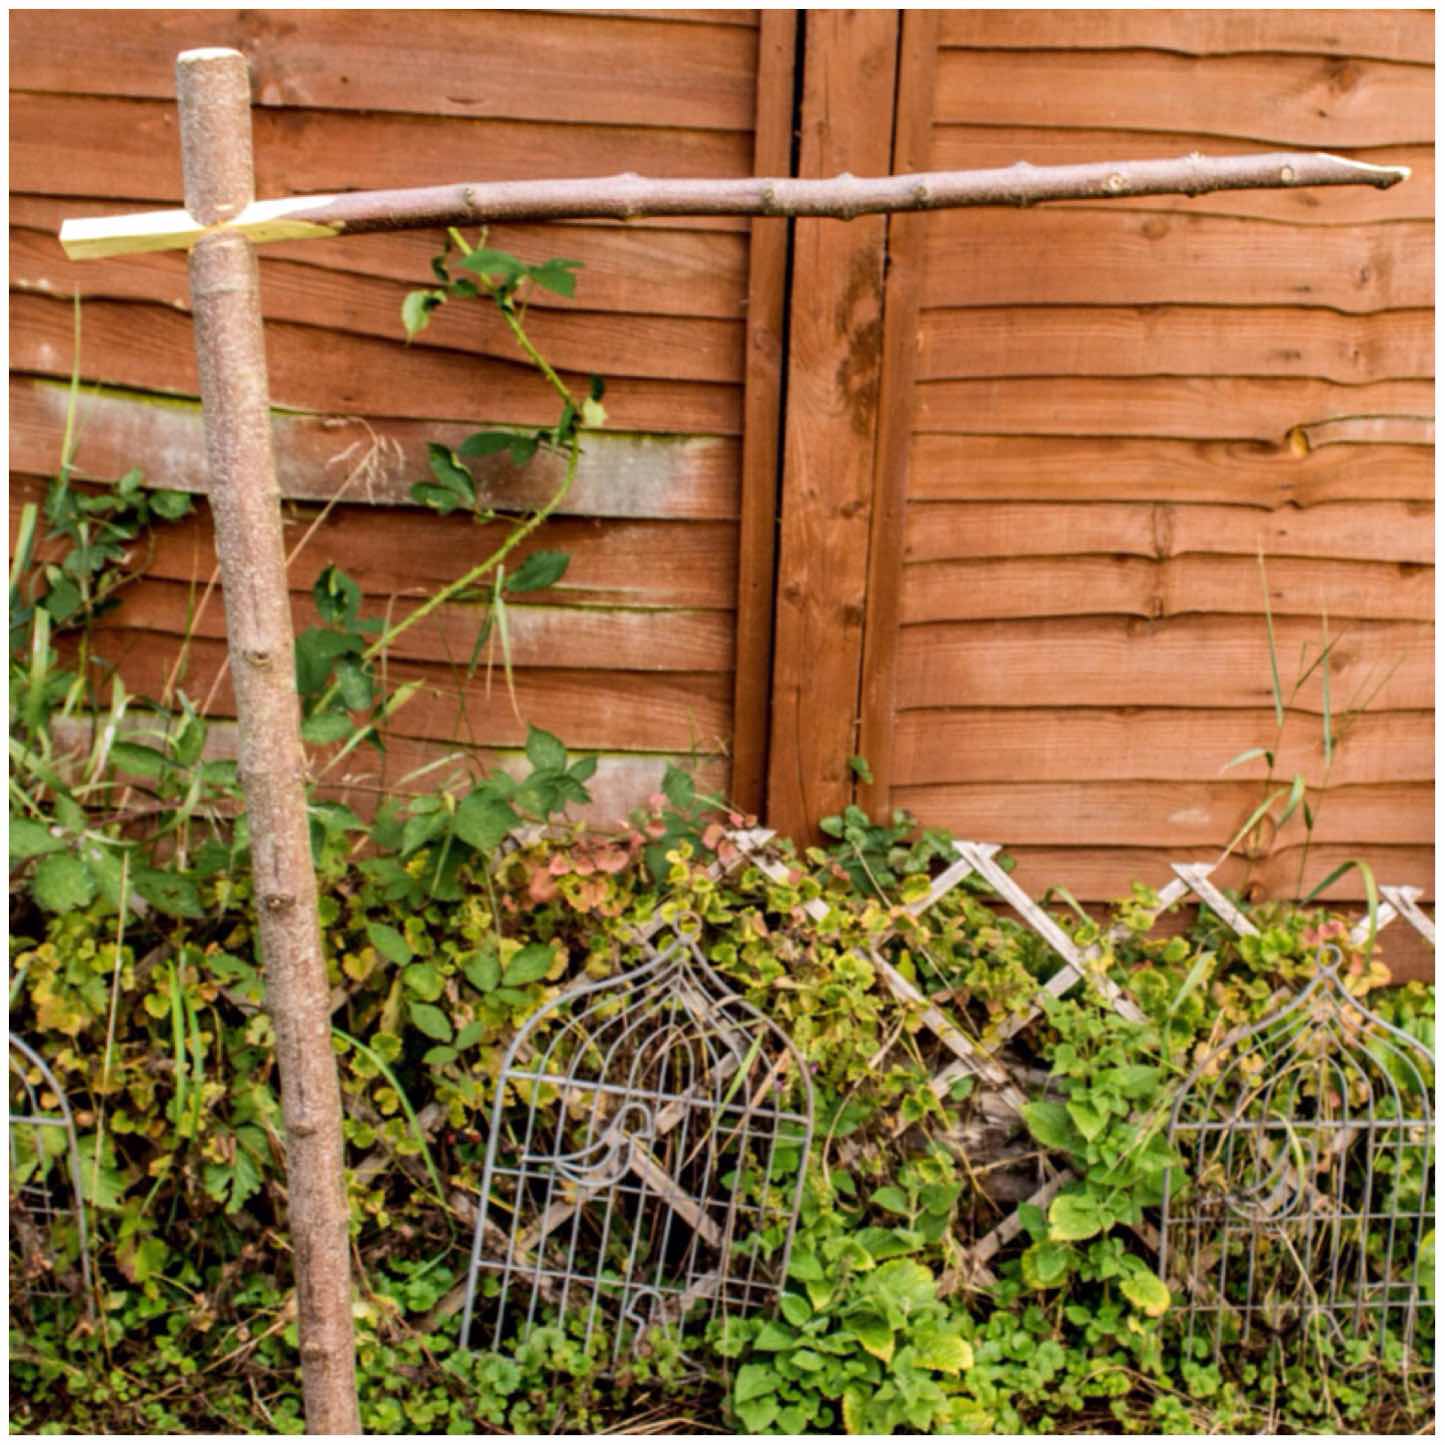
You can see in the picture below the end of the arm has a slightly flattened surface and a slightly curved surface underneath it.
Completed
If your pole is long enough you could carve your pot hanger from it. In this case I had plenty on hand so just used one I had made before.
Testing
You can see in the picture below how the pot hanger sits on the tip of the arm in the little dimple. It looks very fragile but it can hold a lot of weight if everything is carved properly.
Attaching a pot hanger
I decided to shorten the arm of the crane as it bent a bit with the weight of the full kettle so rather than cut the end with the dimple I just extended the triangulated area of the arm so that it could be adjusted easily(I did trim the back of the arm later).
Shortened arm
I was quite happy with the arm being this length for the weight of the full kettle.
I also brought out one of my Dutch Ovens and filled it with water to test out the crane. I decided though to carve another shorted arm so that it would stand up to the extra weight better.
A full kettle – little bend in the arm
This shorter arm did bend a little bit but it did not break. Just to make sure I left the pot hanging off the crane for two days without any problems.
Shorter arm for a heavy pot – more pronounced bend but still workable
I took the crane to a Sea Cadet camp last weekend and it was used all weekend to keep the kettle on the go. There were a lot of staff around the campfire most of the time but due to its minimal footprint the crane did not get in anyone’s way.
Kettles on
I really like this crane for various reasons, these being it is simple, quick to make, tidy and strong.
If you have never made a crane before I recommend this type as one to experiment with.