Seriously behind on my blogging now – life has lots of distractions for me at the moment (trying to learn Coding and French to name two). Looking back on my photographic filestore I came across some pictures of a cadet campcraft come bushcraft weekend from last Easter.
Friday
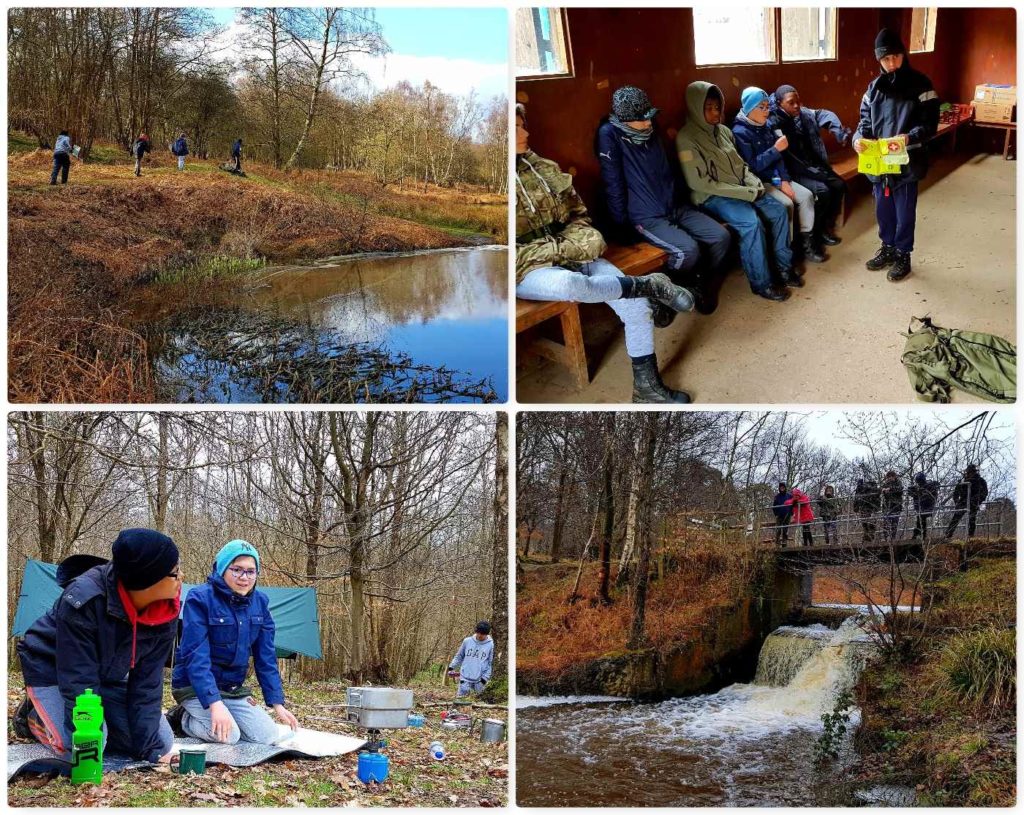
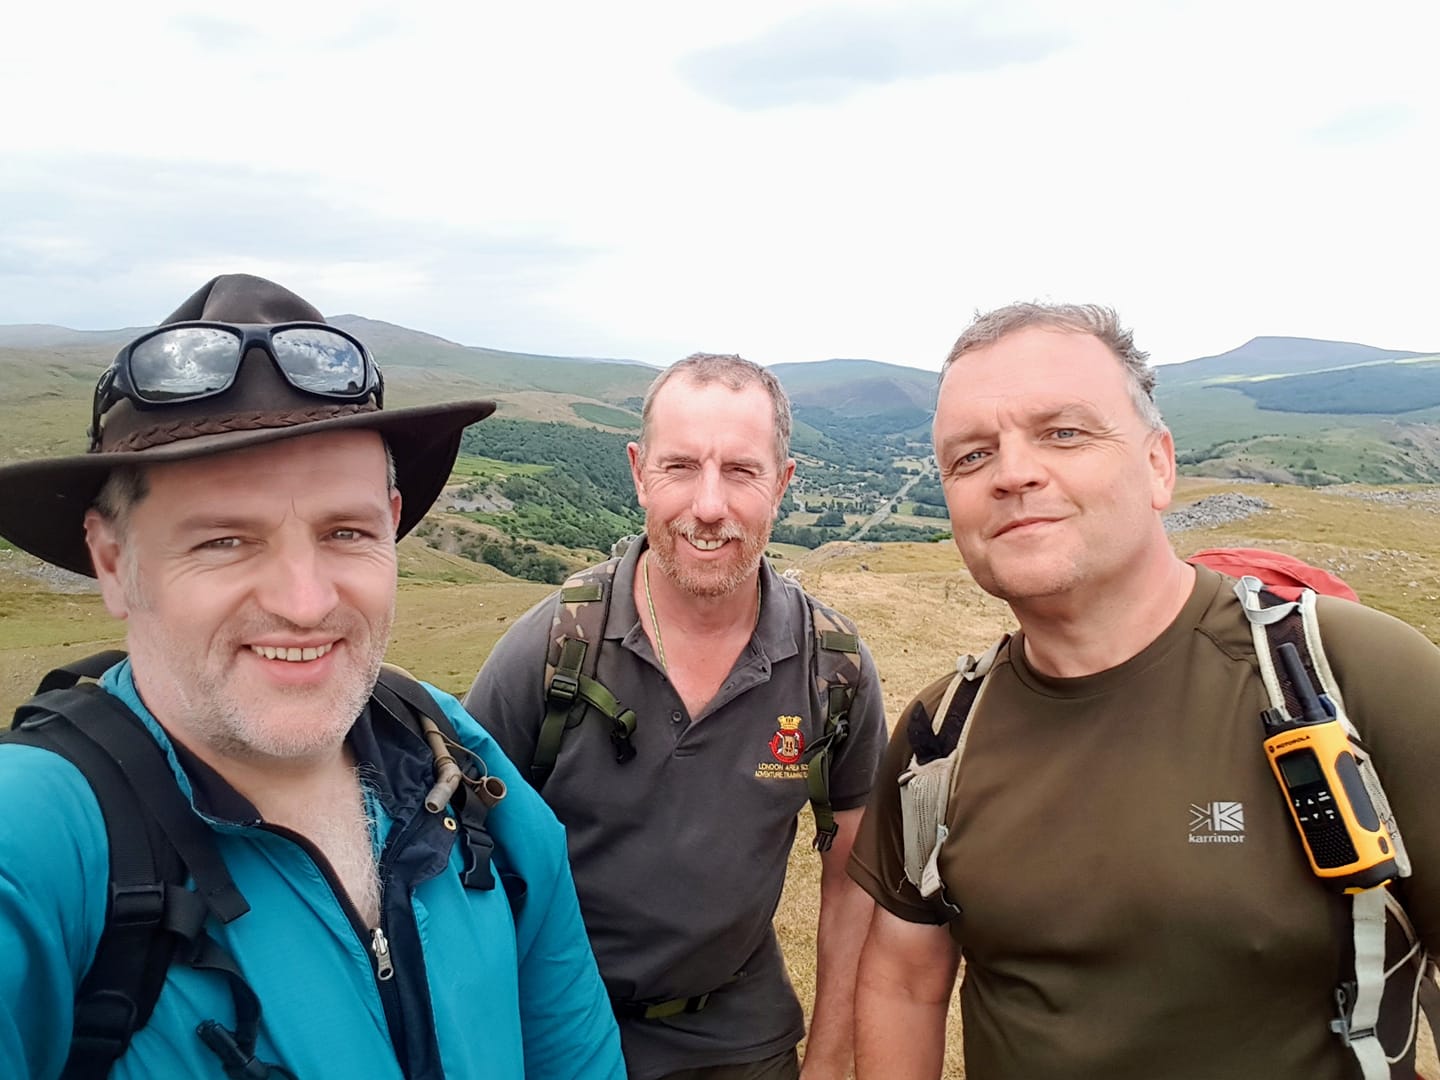
The Sea Cadets were only joining us on the Saturday so the Friday was a relaxed day of set up in the beautiful Pippingford Park in the Ashdown Forest. I was working with my friends Dave, Alan and Jess.
Friday set up
Saturday
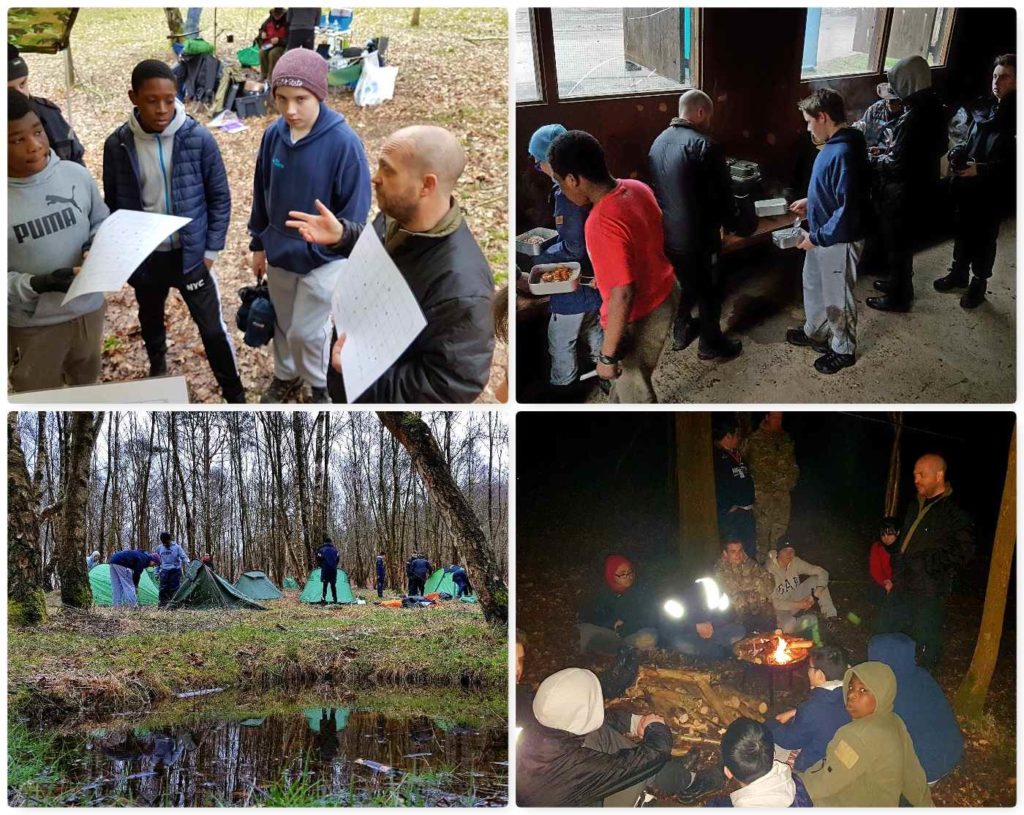
The cadets joined us first thing and thankfully brought the breakfast along with them – courtesy of the camp chefs. Then it was straight down to classes such as erecting tents, mapwork and kit. Evening time was spent around the campfire – these introductory campcraft weekends are for some cadets the first time they have ever slept out in the countryside.
Cadet time
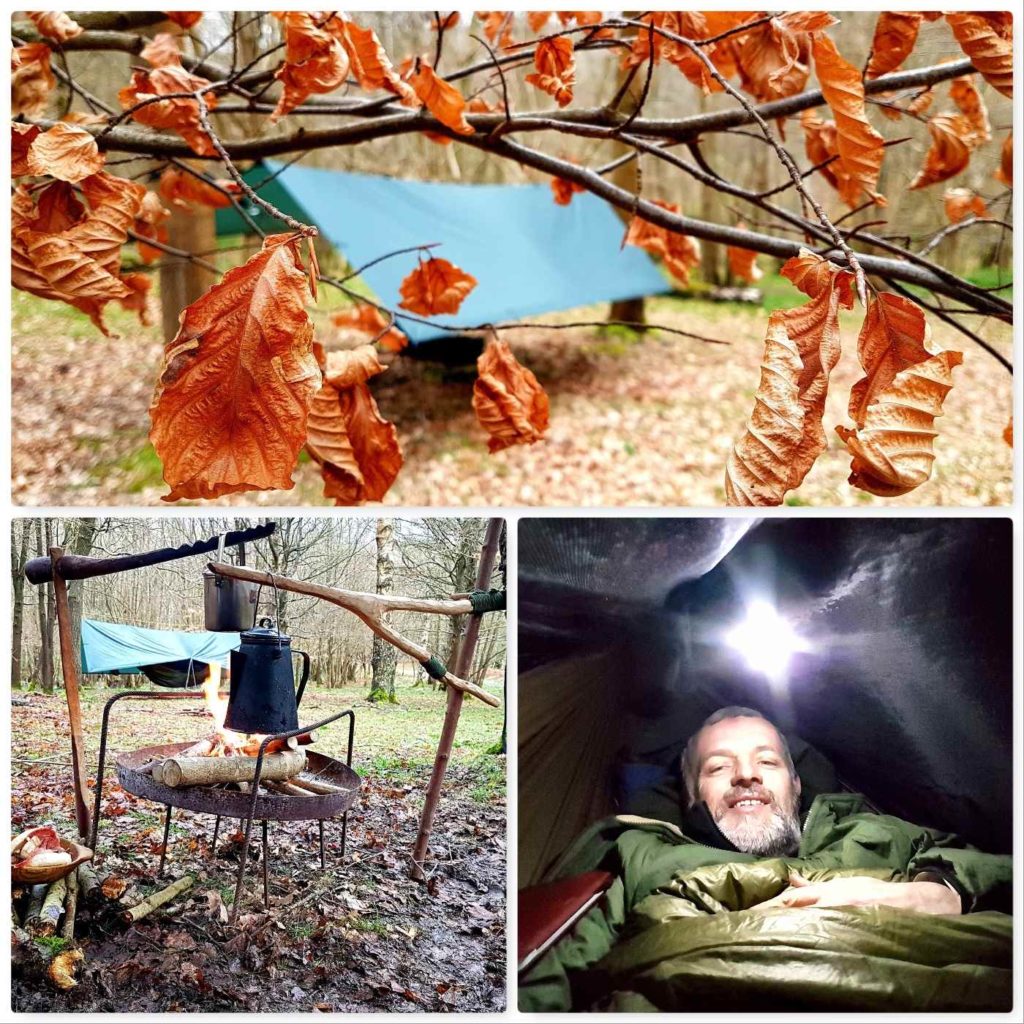
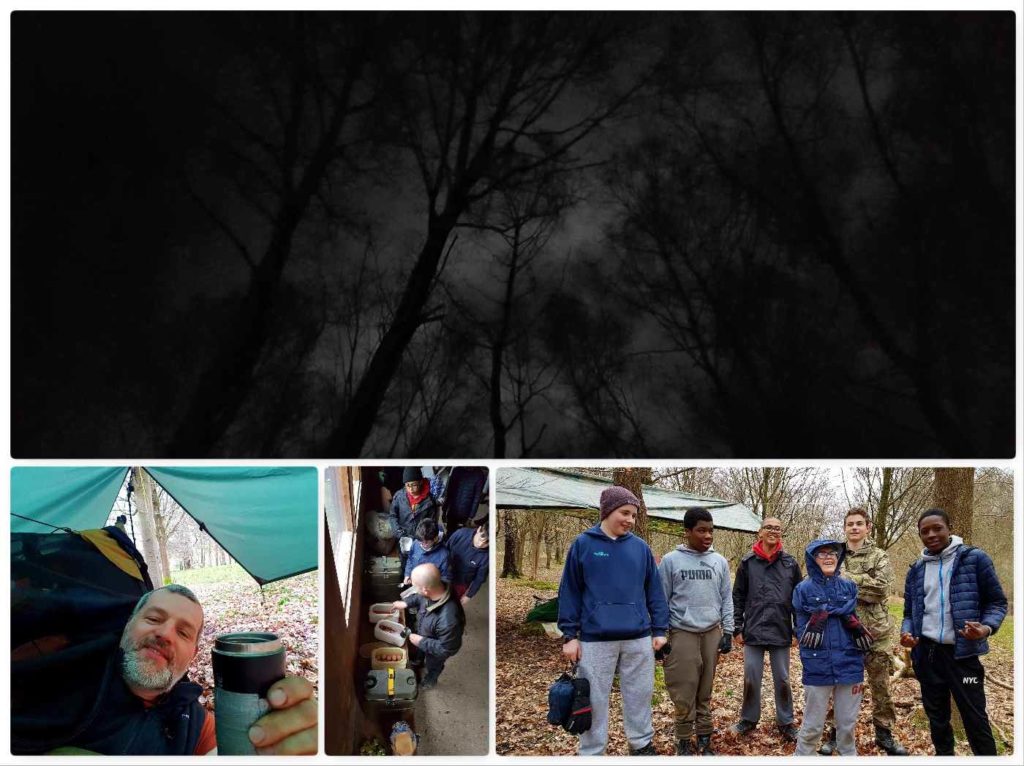
After the cadets had bedded down for the night I tried out a little night time photography with my Samsung phone camera – I was surprised that the lens captured all the detail of the tree tops.
Sunday
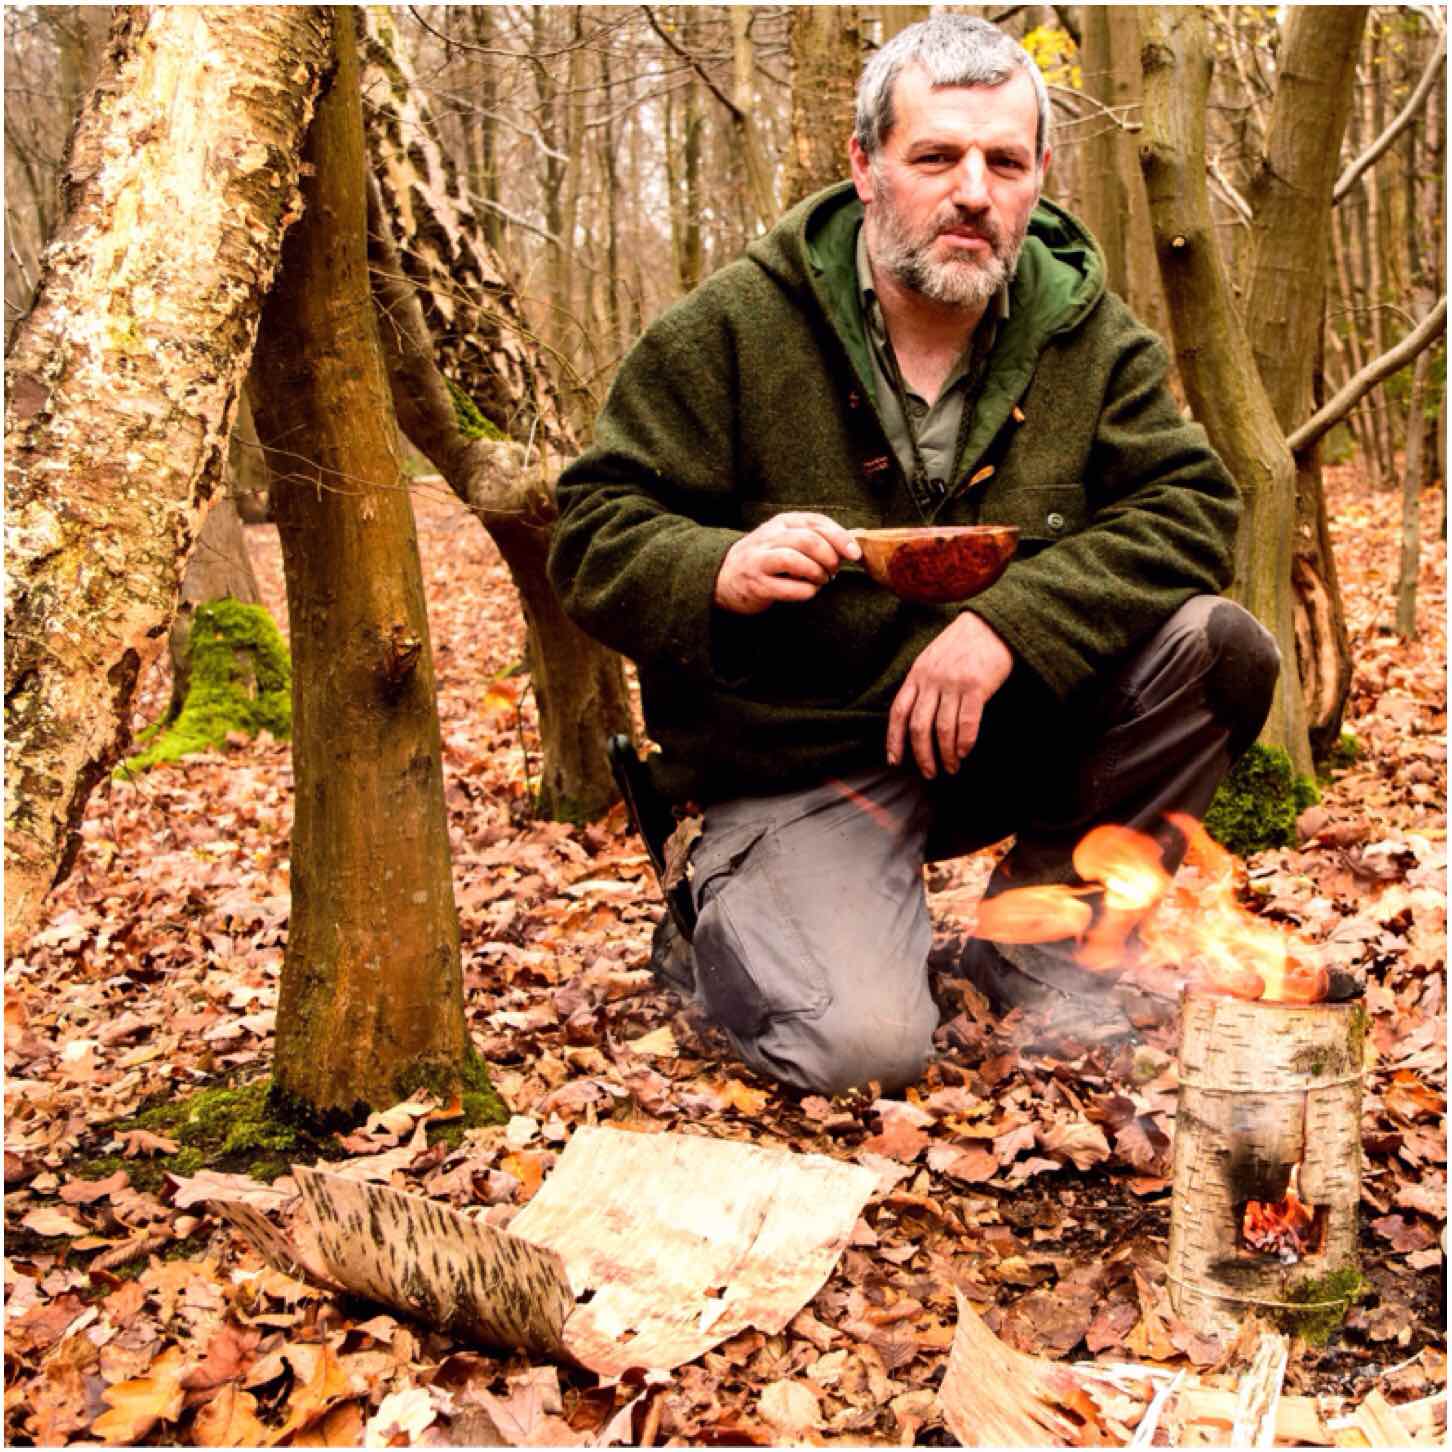
Early Sunday morning found me with a cup of coffee in my hand – supplied by our very own Warrant Officer – Dave Lewis – not often a Petty Officer receives such an honour – I did think he was after something 🙂
Settling in
Straight after breakfast it was back into class. The cadets covered some First Aid, cooking on stoves, packing kit away and some more nav.
Classes and more classes
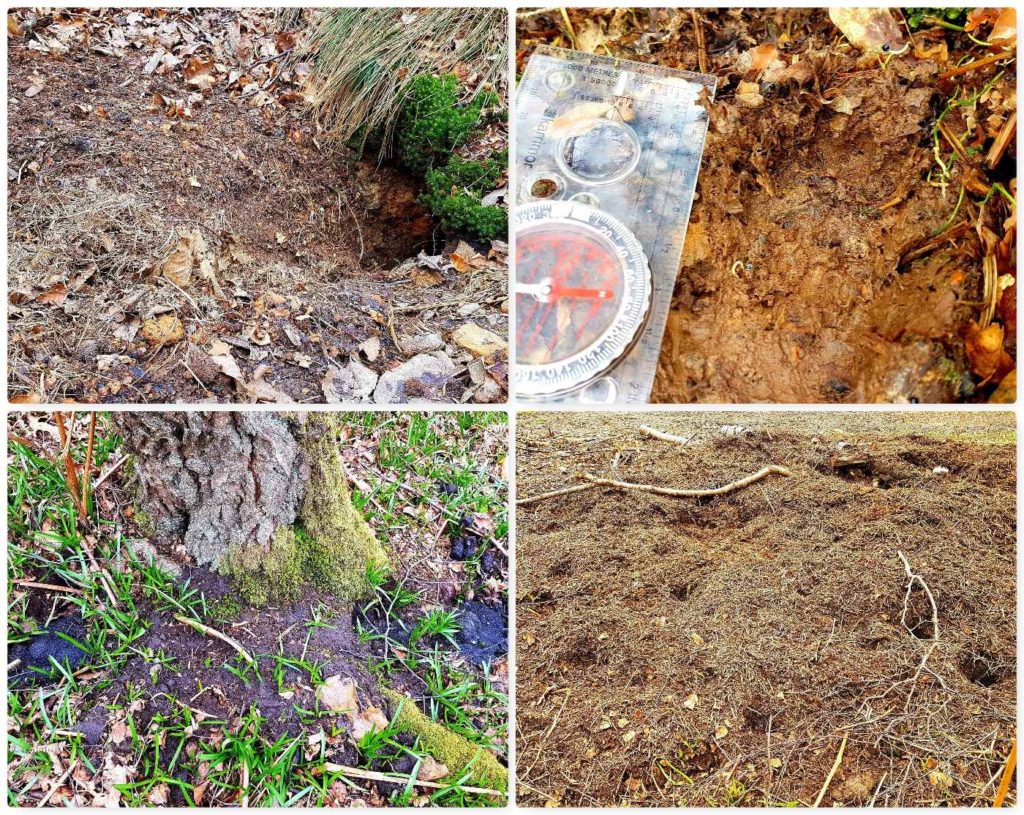
A Bit of Bushcraft
While out and about I did come across a Badger Set that was covered in tracks and other sign. The other sign included spotting their latrine and the snuffle marks their snouts leave in the humus layer.
Badger time
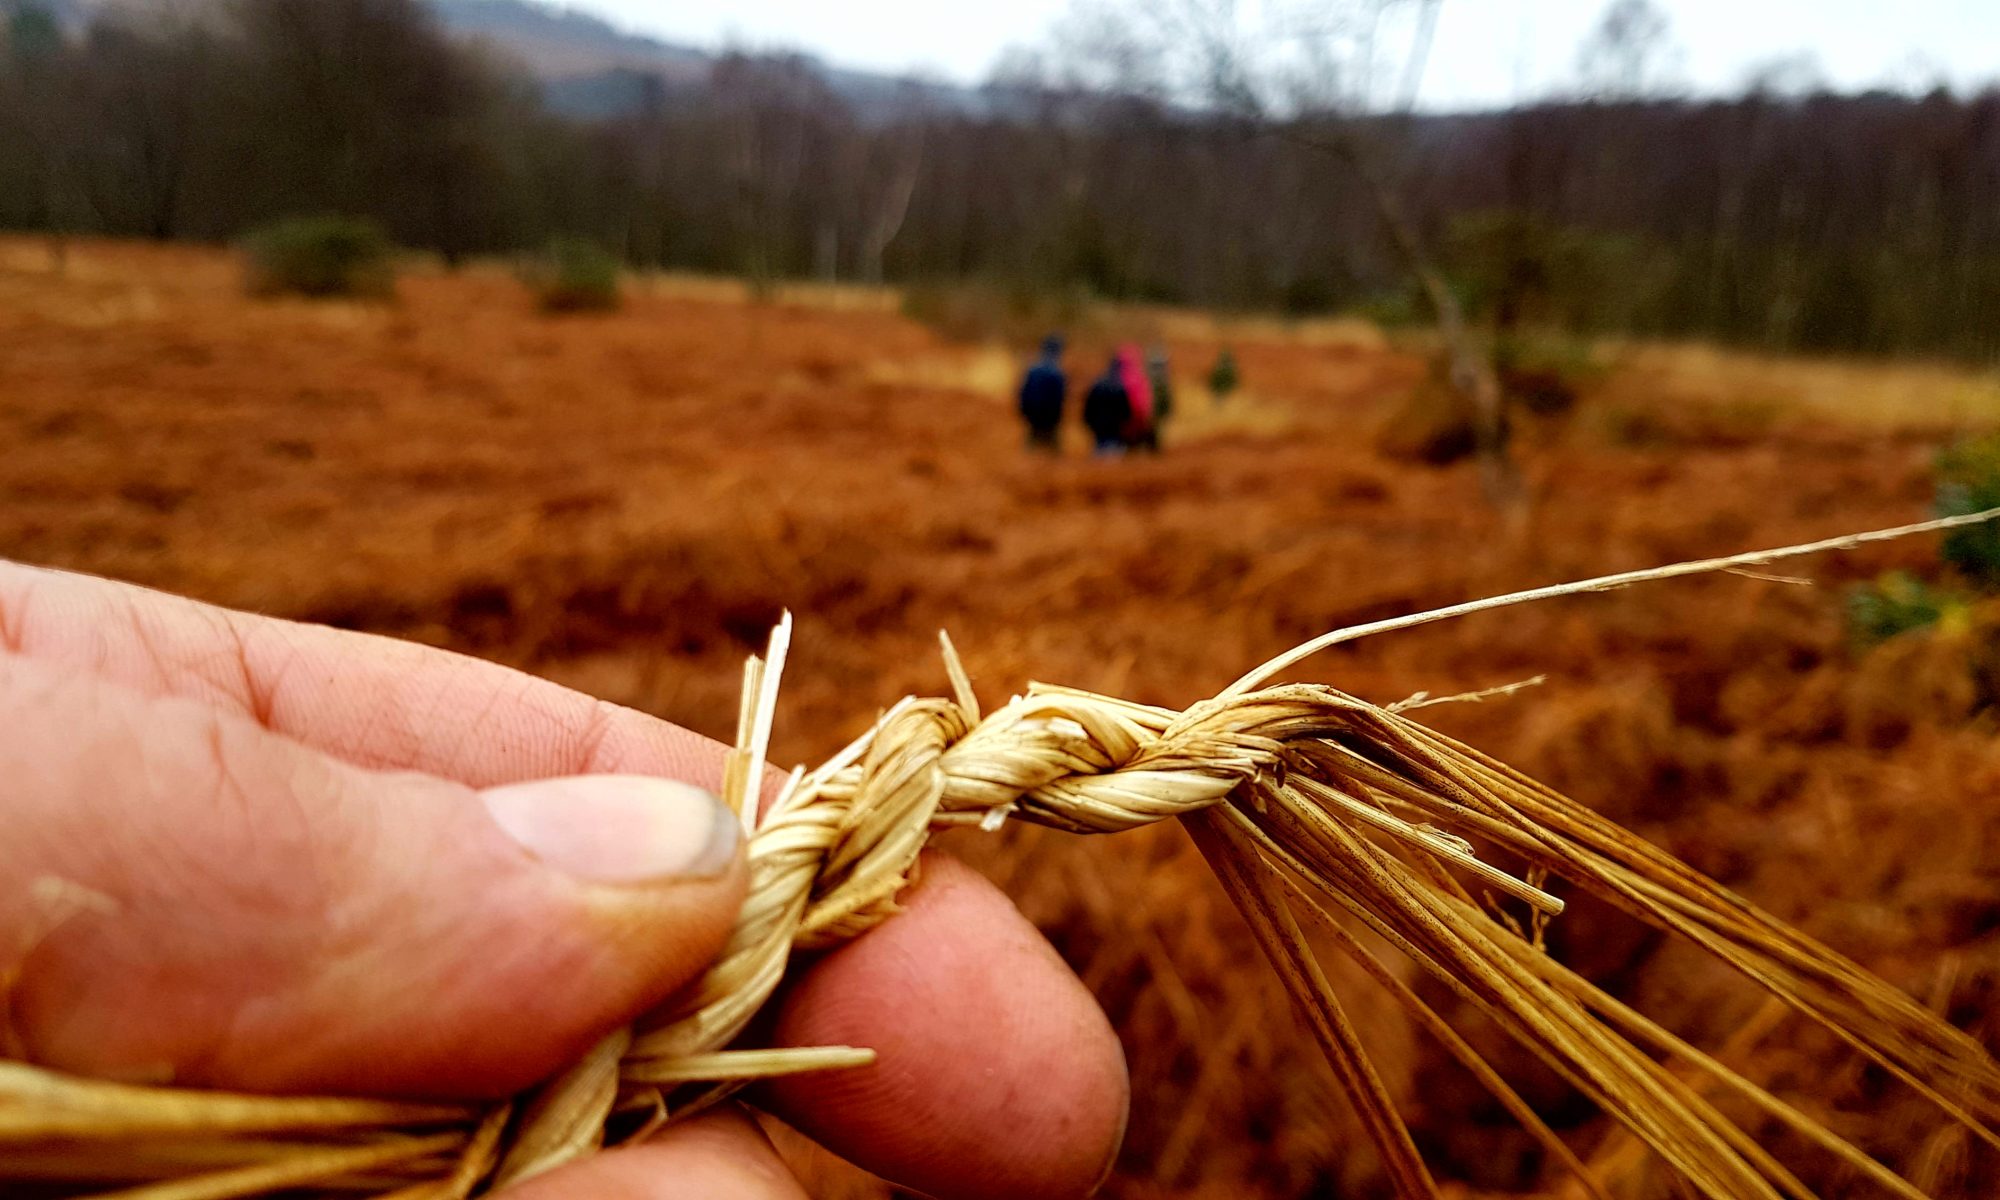
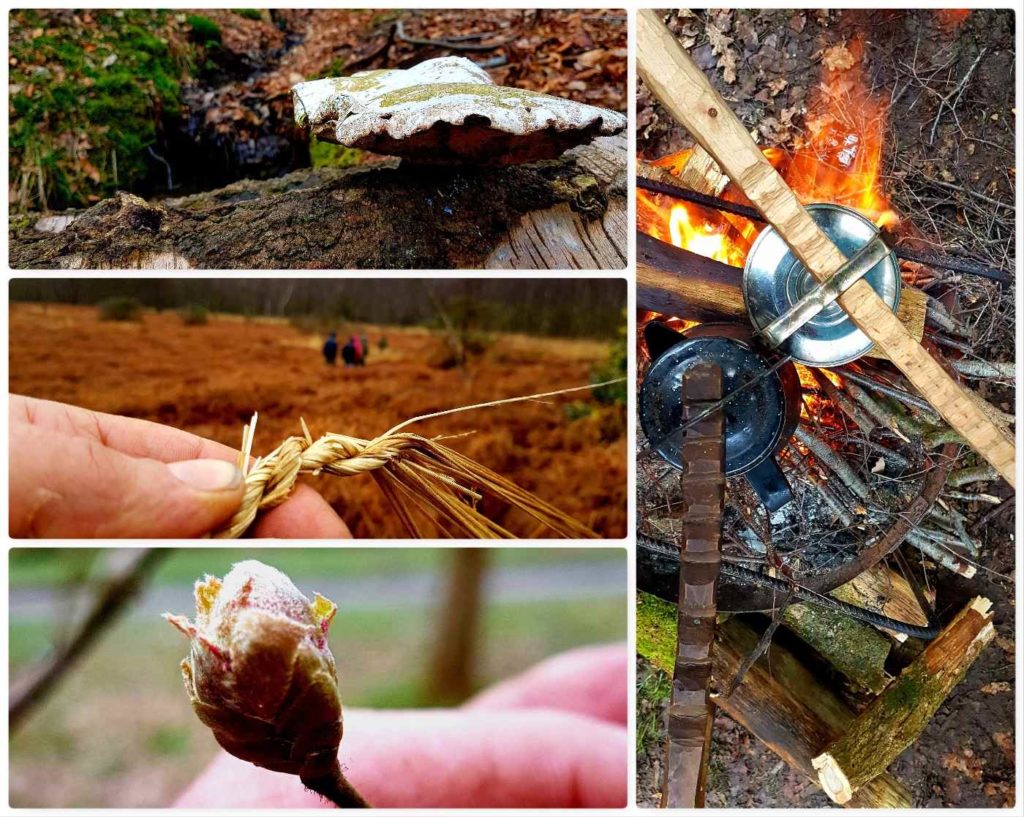
There was little in the way of fungus at this time of year except for the big Bracket fungus and the Birch Polypores. I also spent time turning grass into rope and looking out for early buds starting to poke out.
As per usual there was time to have a brew (and gave me an excuse to use my cranes).
Keeping my hand in
It will not be long to the next cadet camps in 2019 however I am told it will be an Advanced Campcraft course in the mountains of North Wales – looking forward to that one.
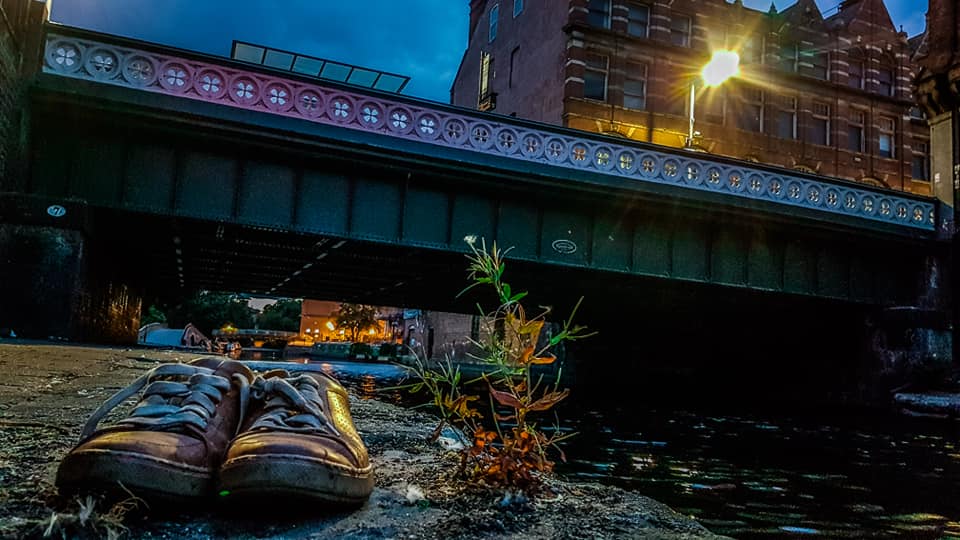
Travelling back from Manchester tonight I decided to re-instate my ‘Memorable Moments’ posts again. It has been a fantastic summer of photography for me – so here are just a few moments from July 18.
Nottingham Nights
On a work trip to Nottingham I happened across this little scene by the side of the canal – I wonder what the story was here?
Wonder what the story was here?
Foggy, Cyril, Cleggy and Compo
Meet three of the Sea Cadet ‘Last of the Summer Wine Troup’ – Graham, John and myself. We missed our final member Dave Lewis this year on our Brecon DofE trip – Hopefully you will be with us on our Peaks trip in October Dave?
Last of the Summer Wine minus one – Dave
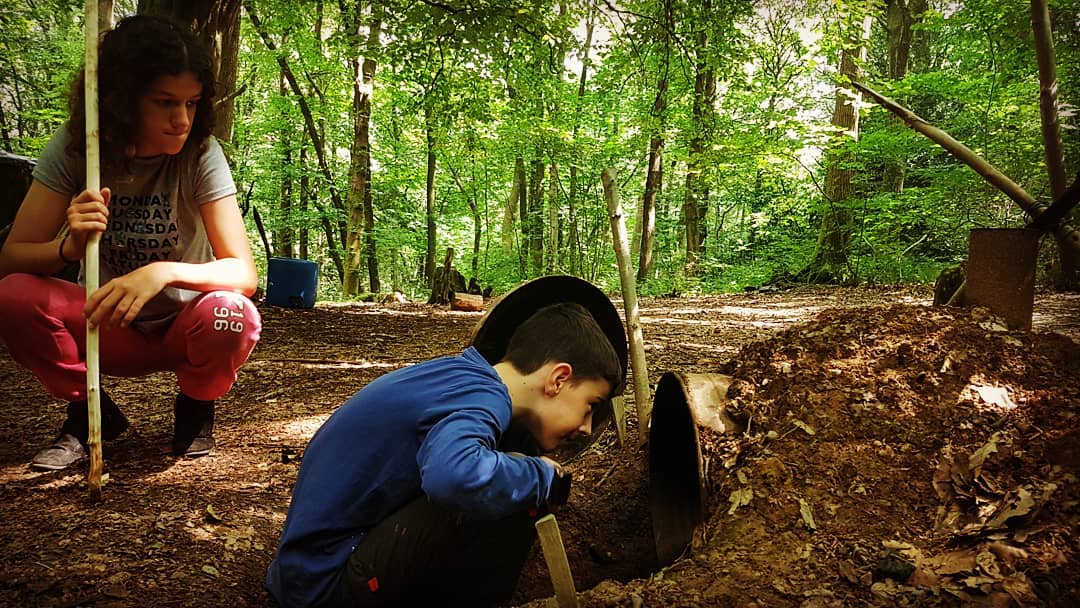
Woodcraft School
We attended John Rhyder’s book launch (Woodcraft – A practical celebration of the tree) at his woods. It was great to see the book being launched and catching up with old friends – the kids though had a ball investigating all John’s camp gadgets.
The Camp Stove
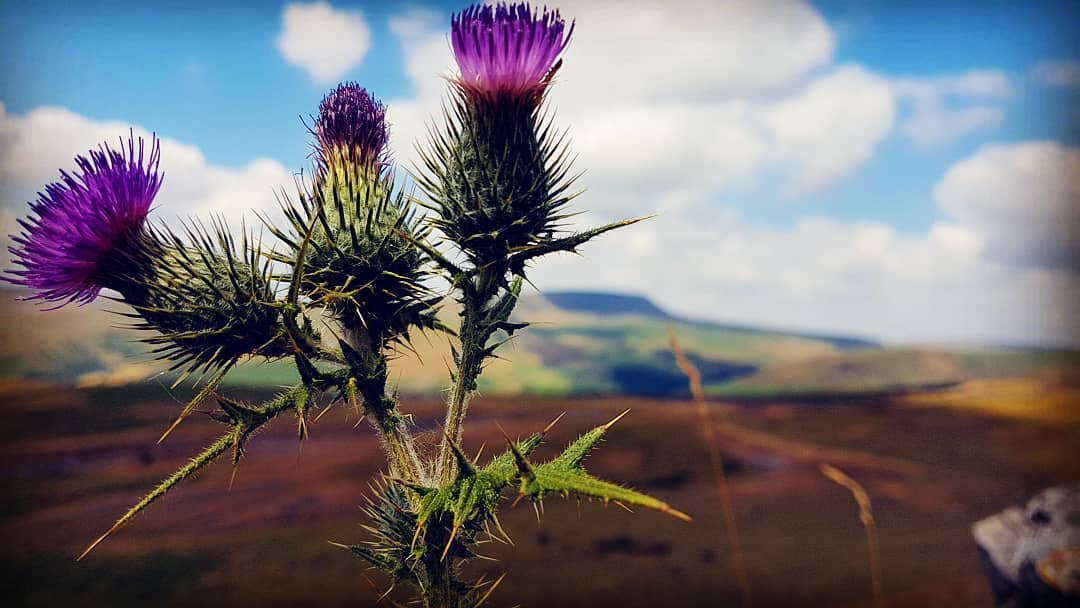
A Scottish view from a Welsh hill
I happened across this view on the side of a hill in the Brecon Beacons. I posted it on my Facebook account for all my Scottish friends. I did enhance the purple a little for artistic effect 🙂
A Scottish view – A Wesh hill
Hanging About
My local National Trust property is ‘The Vyne‘. I do spend a bit of time there when I can with the family however on my last trip I went alone. I would never have gotten this shot of the Thistle Down seedhead if the kids had been pulling on my shirt tails.
Just Hanging
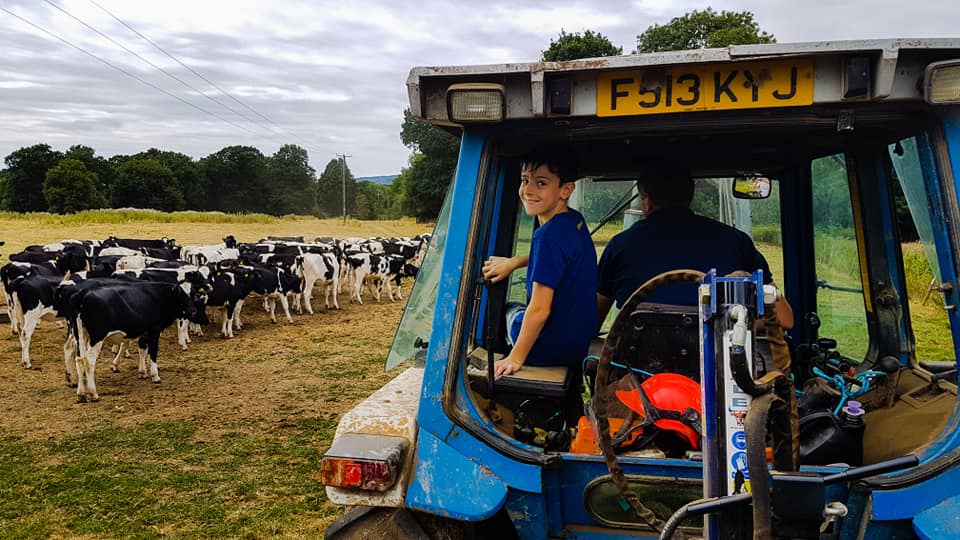
Boys and Toys
What can I say – boys and toys 🙂 Finlay and myself had a ball working at our friends Phil and Philippa’s farm – there is just something I love about driving tractors.
Boys and Toys
Farewell to a Friend
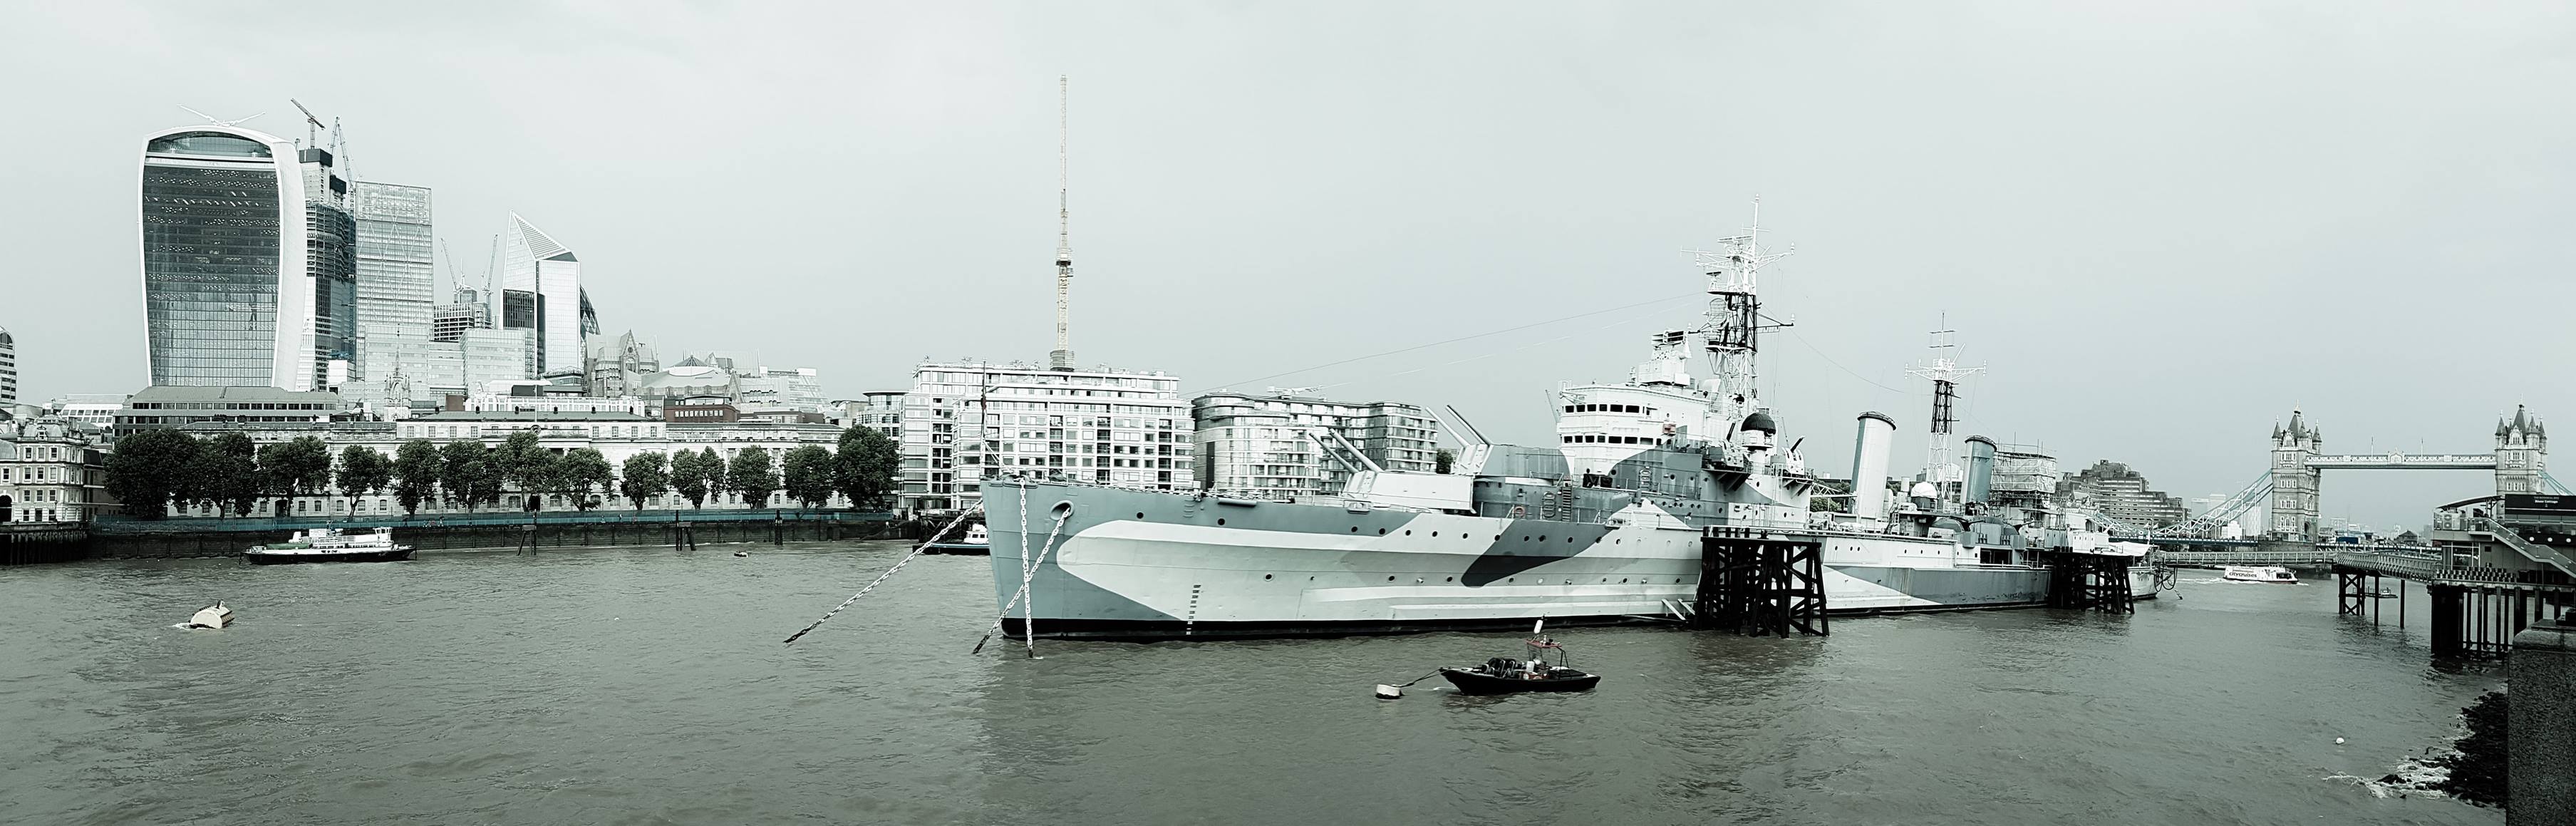
HMS Belfast – home to my Sea Cadet unit – City of London. I dont get down for a visit very often as I do not live in London these days. The visit was a sad one as it was for the funeral of our old shipmate Bernie – we did though give him a good send off at the Cathedral and the wake afterwards – Bernie was a WWII vet and a member of the Coastal Forces Association.
A rare visist
Parched Times
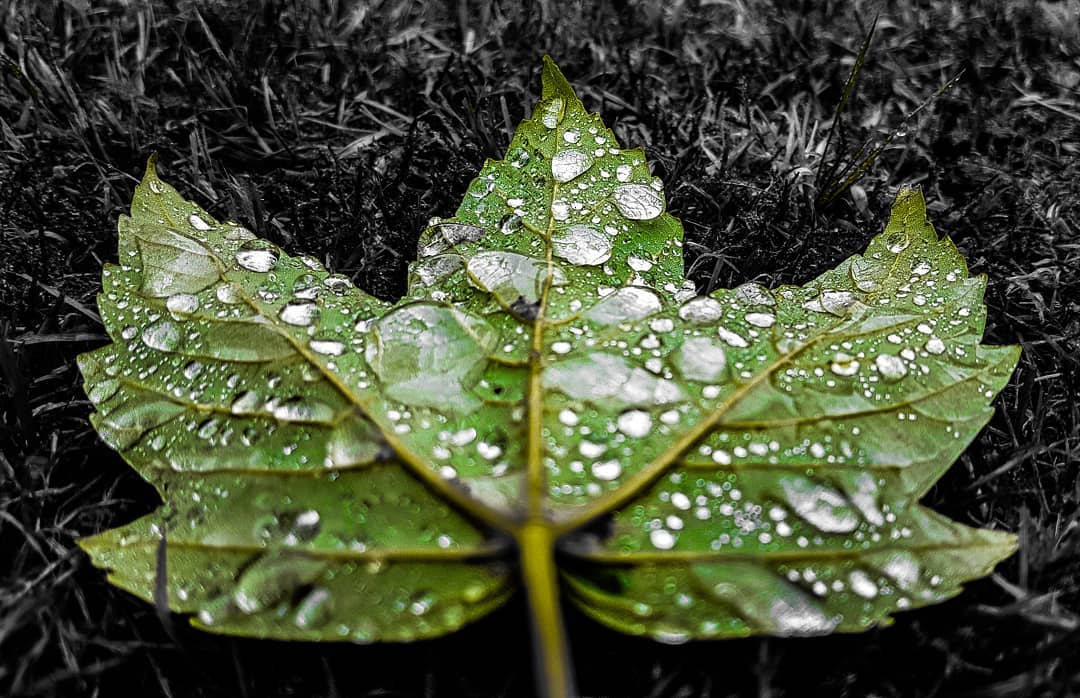
My final moment was found at the back of our church – St James. With all the hot weather over the summer I think we only had rain once or twice in July. I saw this wind blown Sycamore leaf lying on some very parched yellow grass and had to grab a shot of it. I used Lightroom to manipulate the colours so as to try and make the raindrops stand out a bit.
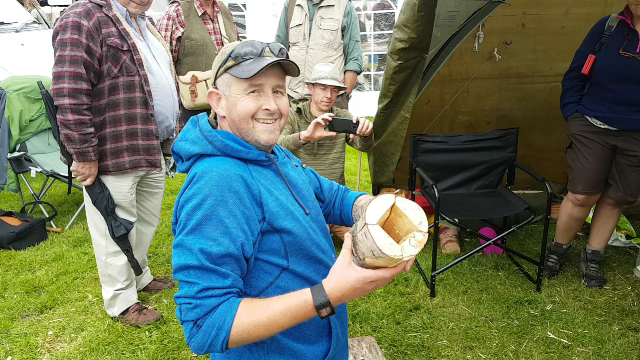
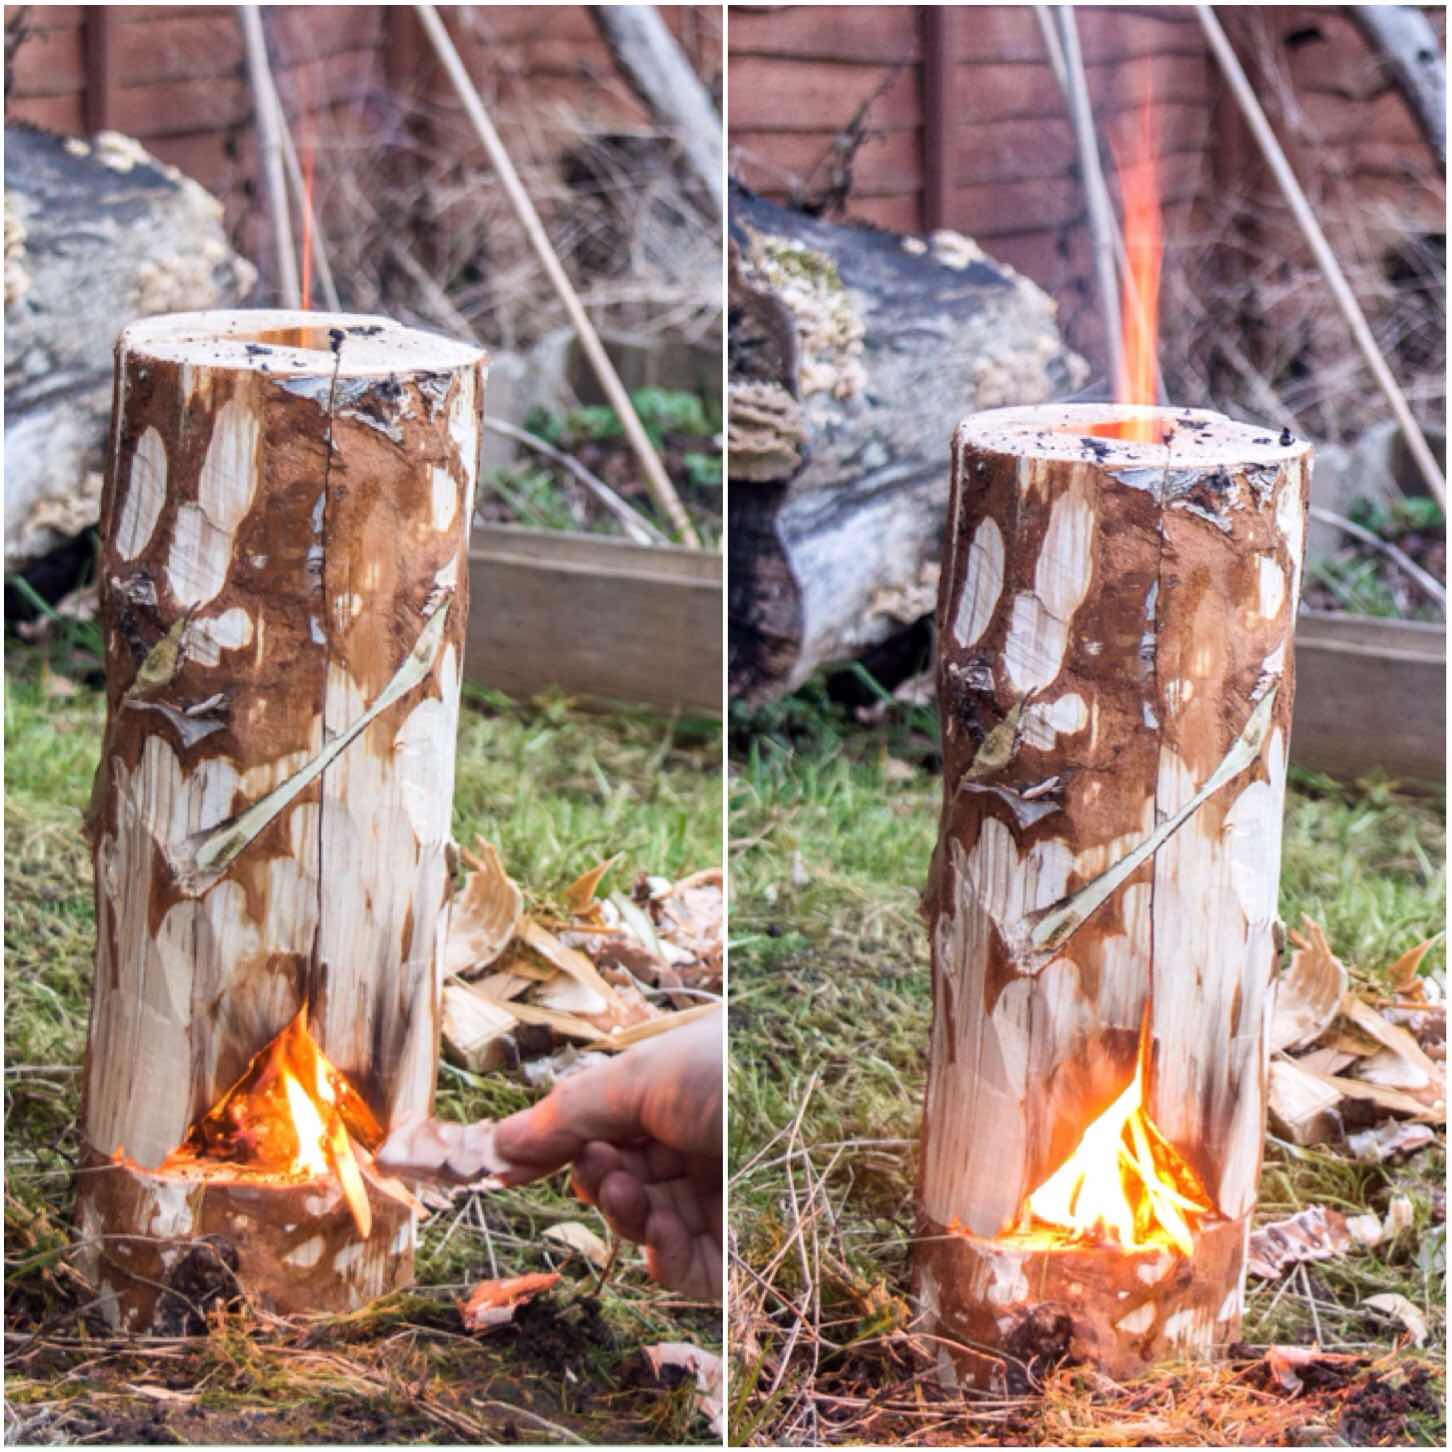
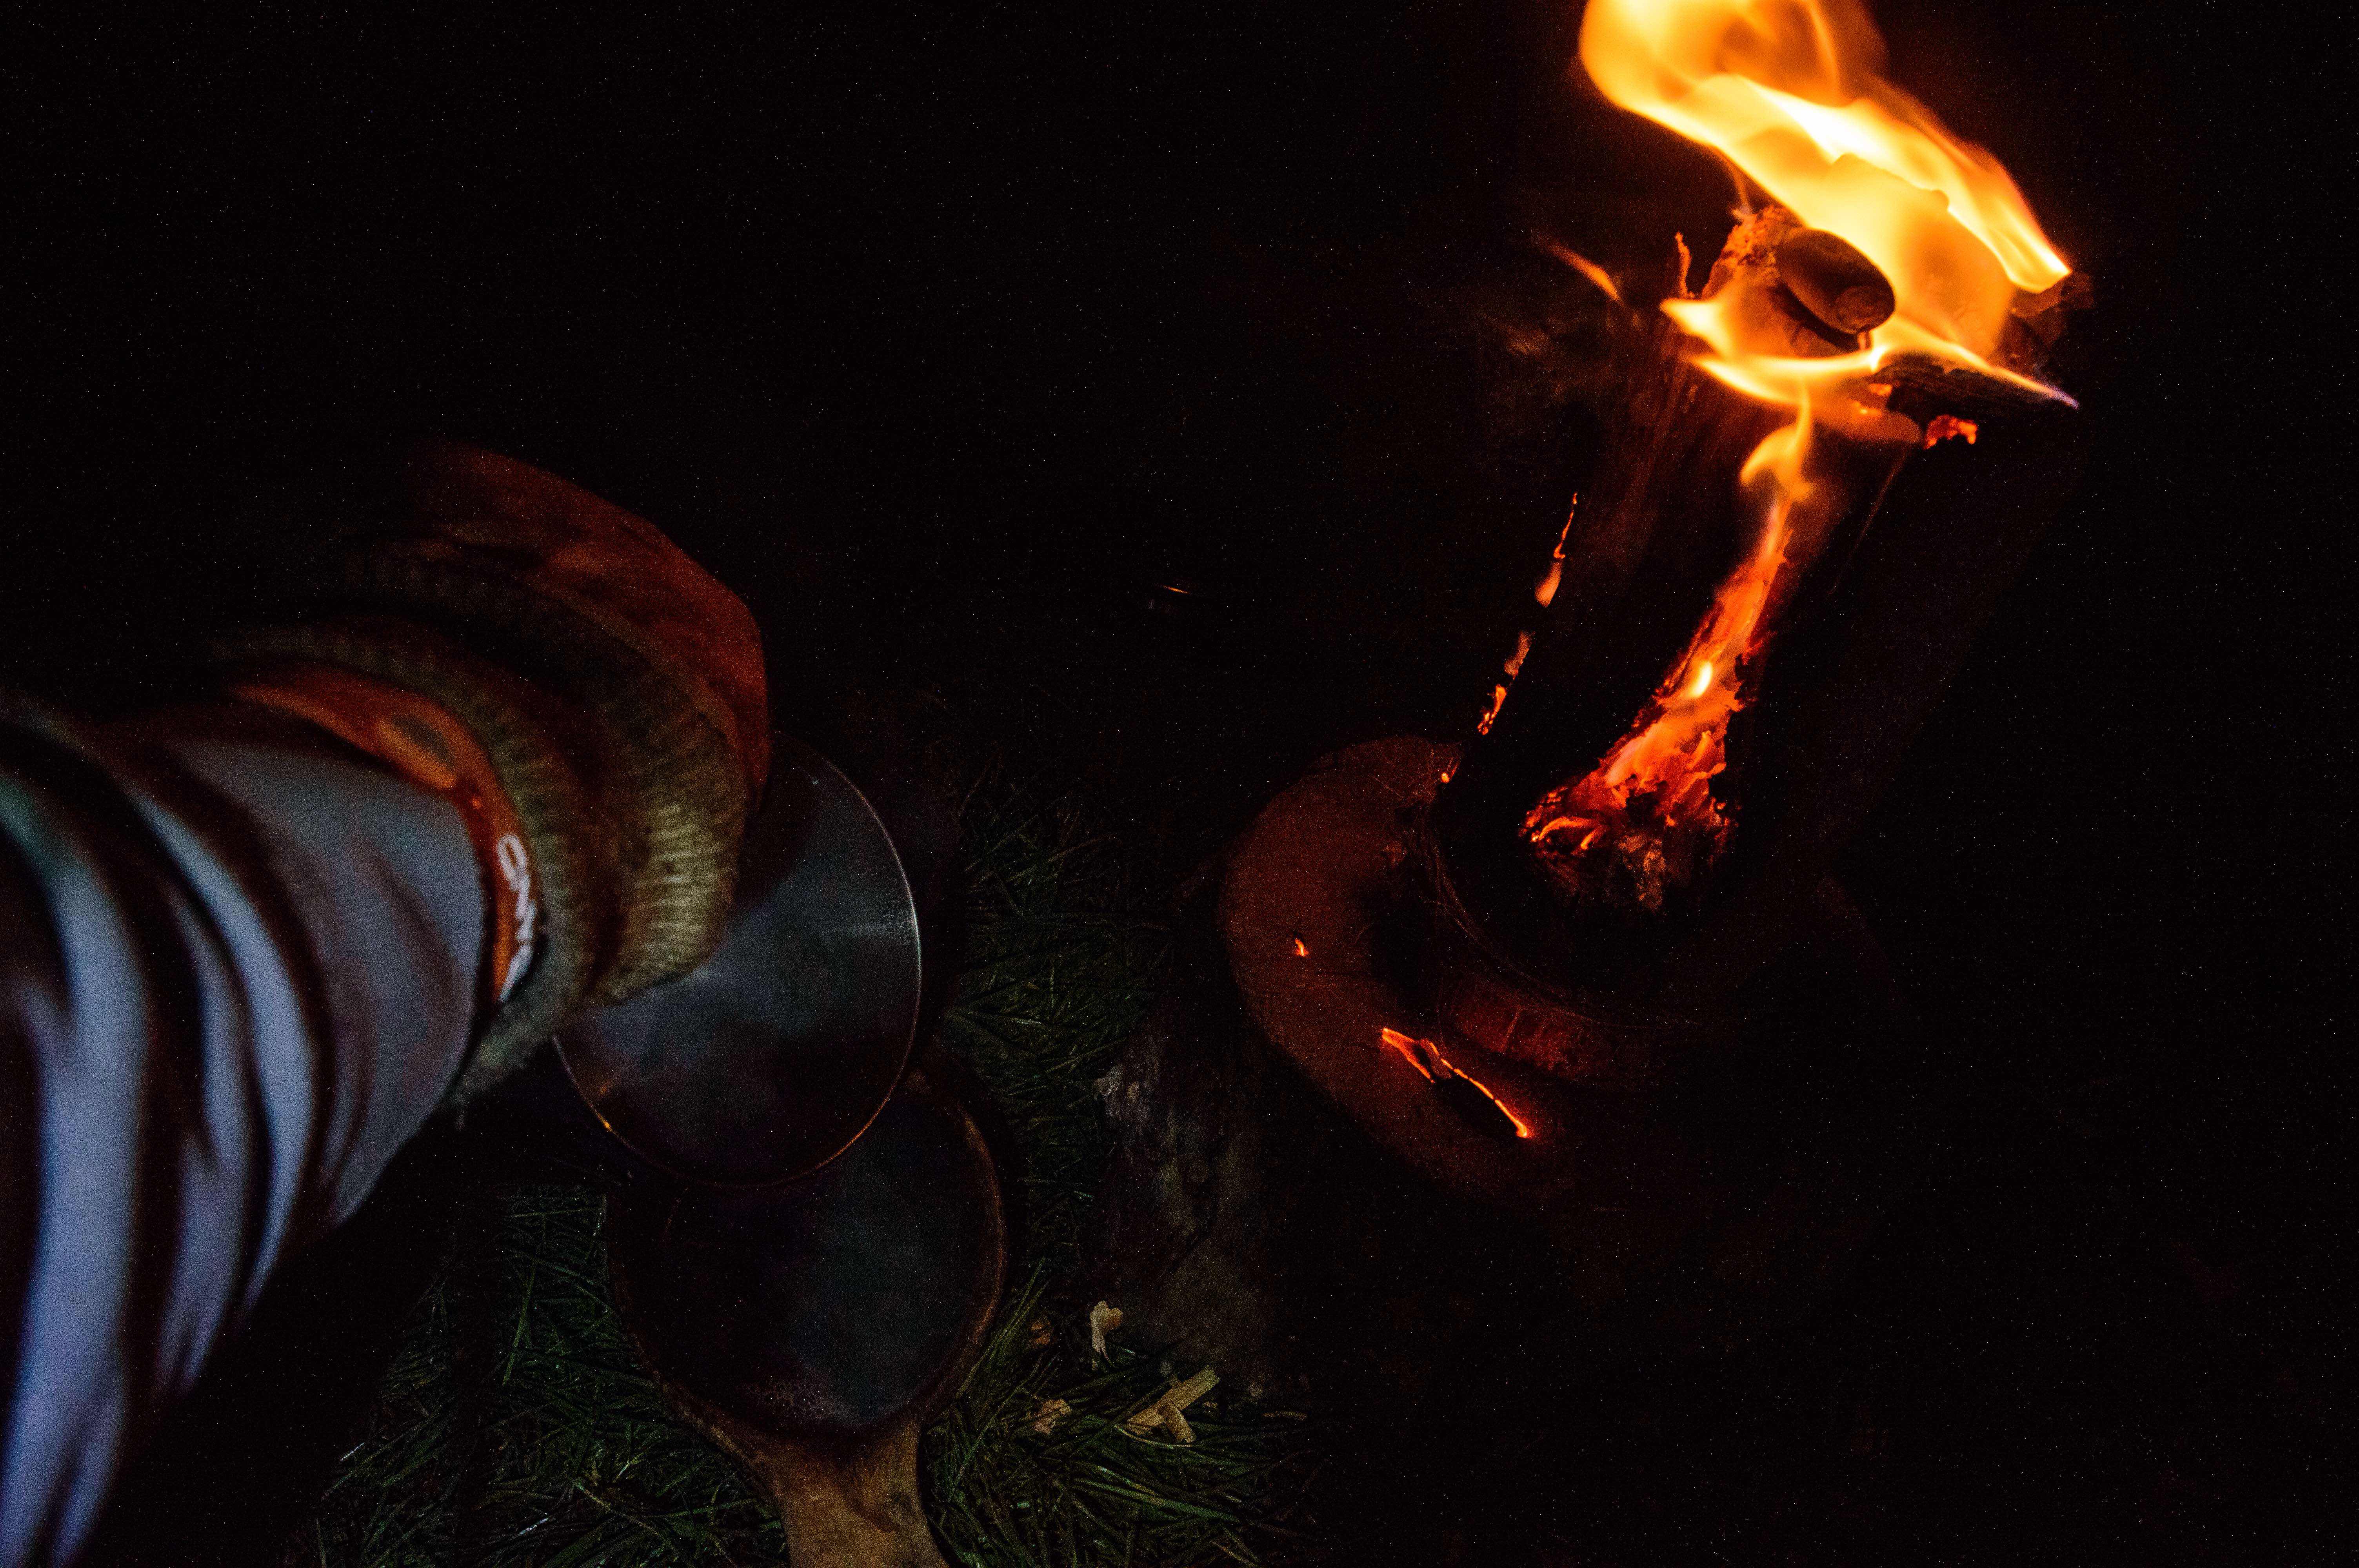
This year at the Wilderness Gathering my friend Des Cattys was showing his love of Log Rocket stoves to visitors. I decided to drop in on one of his sessions to watch how he constructs one. Like Des I am intrigued by these stoves and I am always looking to improve on their construction so watching someone else at work building one is a chance not to be missed.
If you want more detail on making one of these stoves have a look at my How To…. on building a Log Rocket stove. There are many variations on them and I have included some of them on my Bushcraftdays blog in my How To section.
In my continuing research into Log Rocket Stoves I came across a Wikipedia page called the Schwedenfeuer and in it details of a type of log rocket stove I had not come across before, with a built-in fire tray and a chimney formed by simply cutting away the inner corner of one section.
Clever though it was, though, this stove still relied on string or wire to tie the sections together. As these stoves have been around for a long time I figured there must be other ways of holding them all together. I thought perhaps that green wood dovetail wedges might do the job, so I set out to test this.
The Dovetail Log Rocket Stove
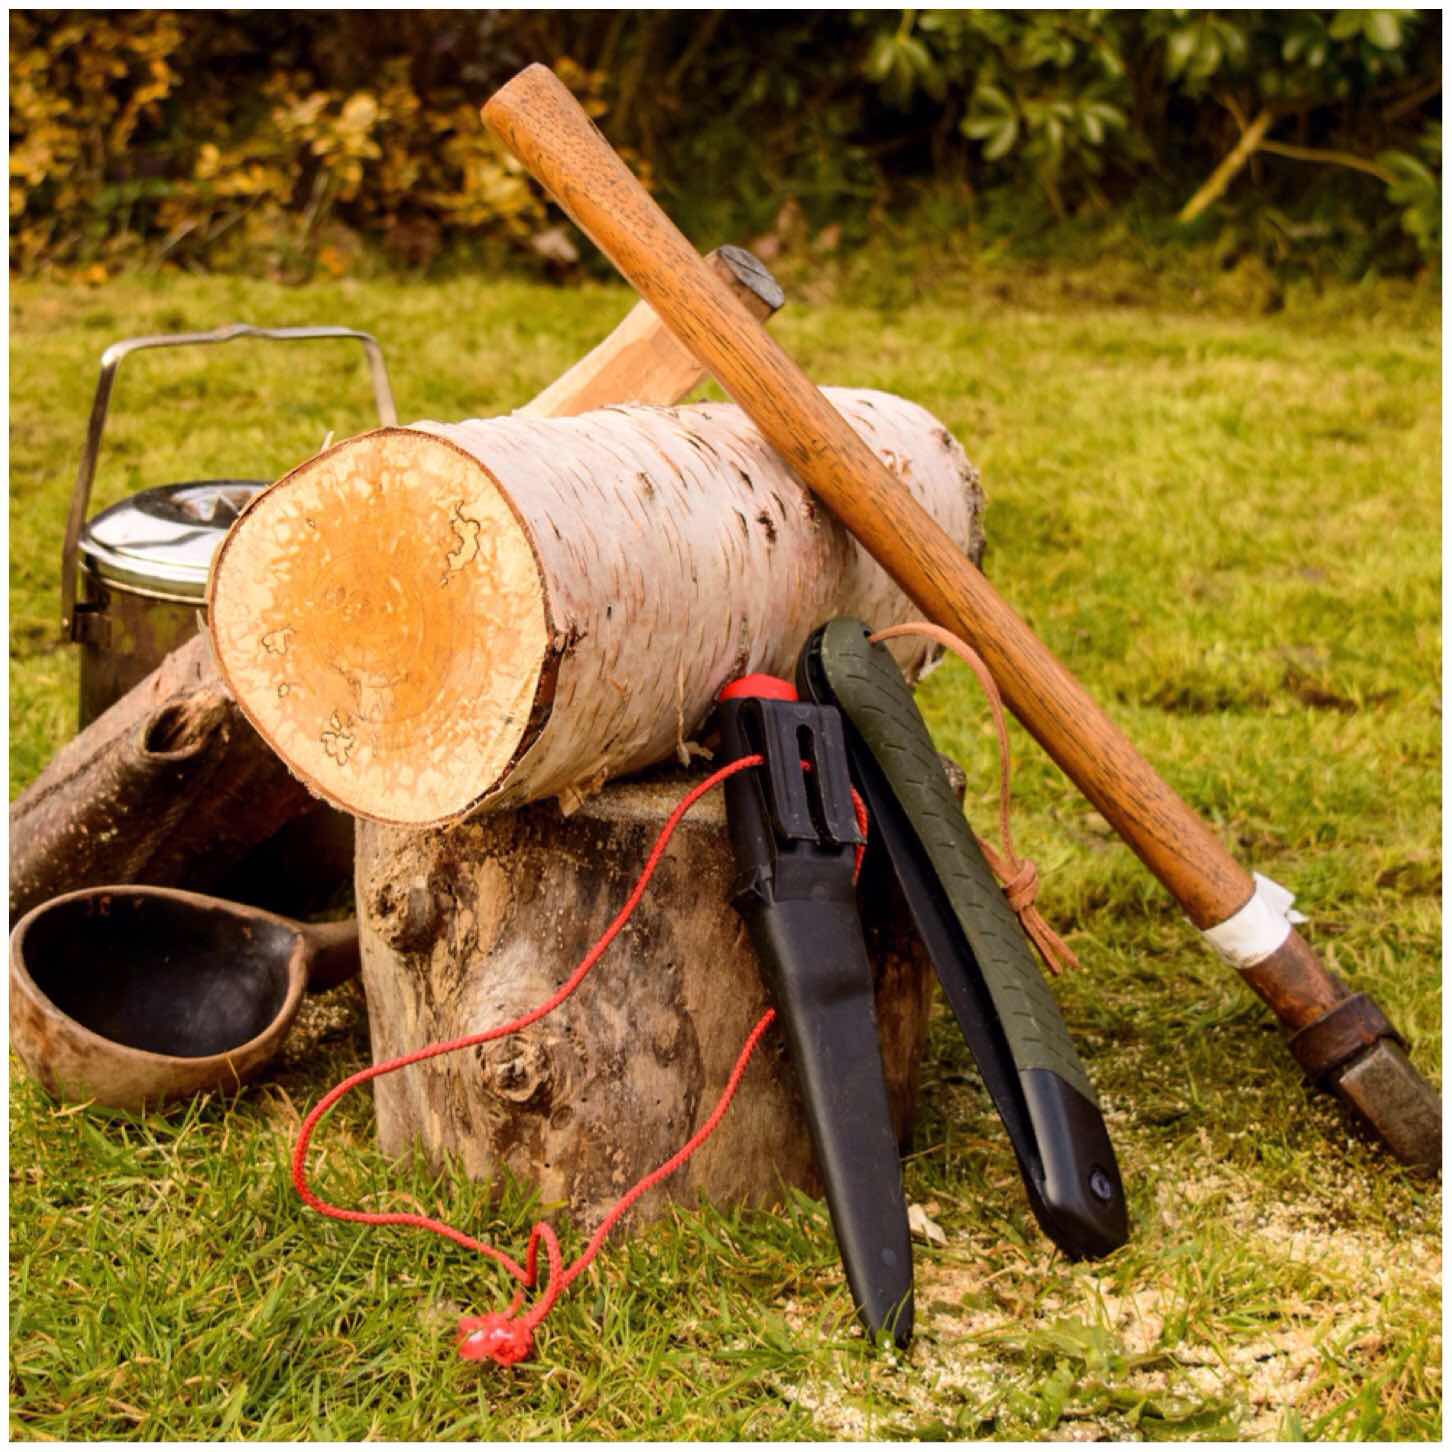
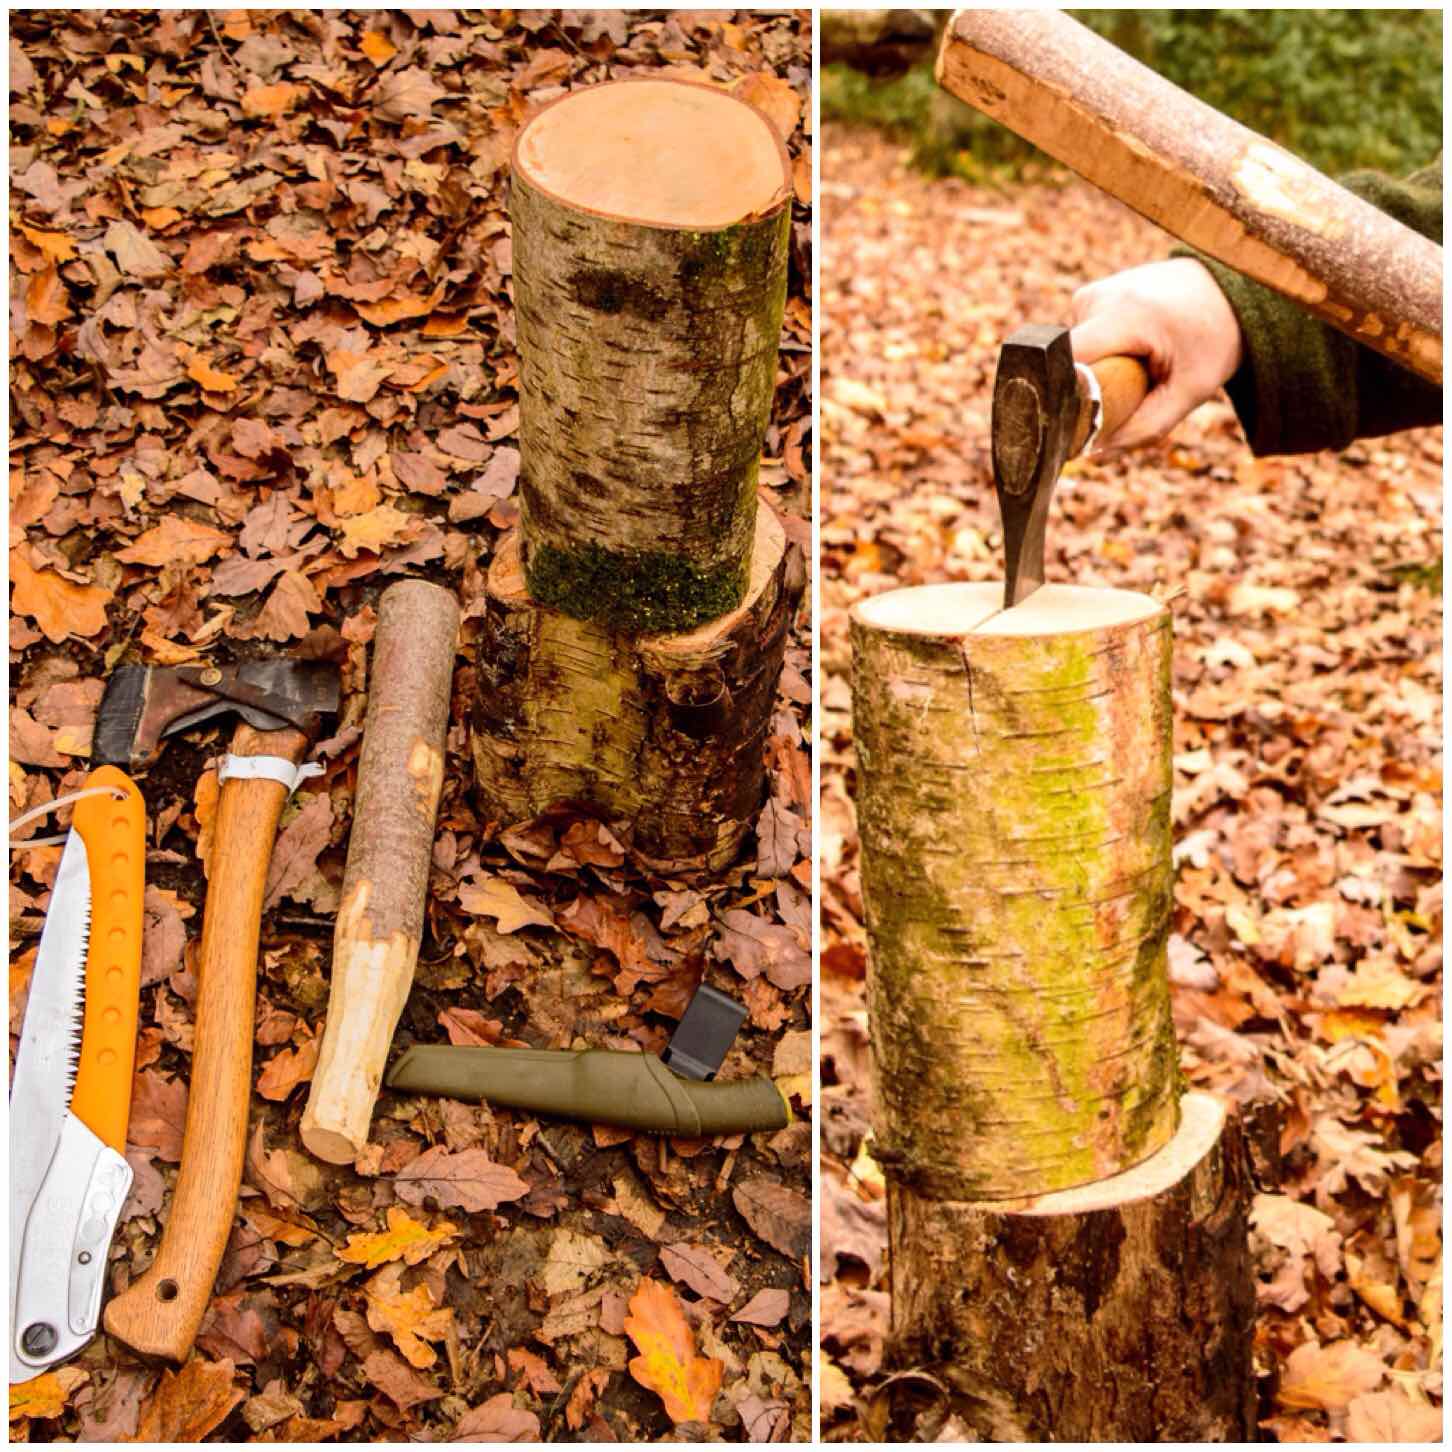
Tools and Material
As usual I limited myself to the tools I would usually carry in my backpack, including a knife, saw and axe. A pen or pencil is handy for this project as well.
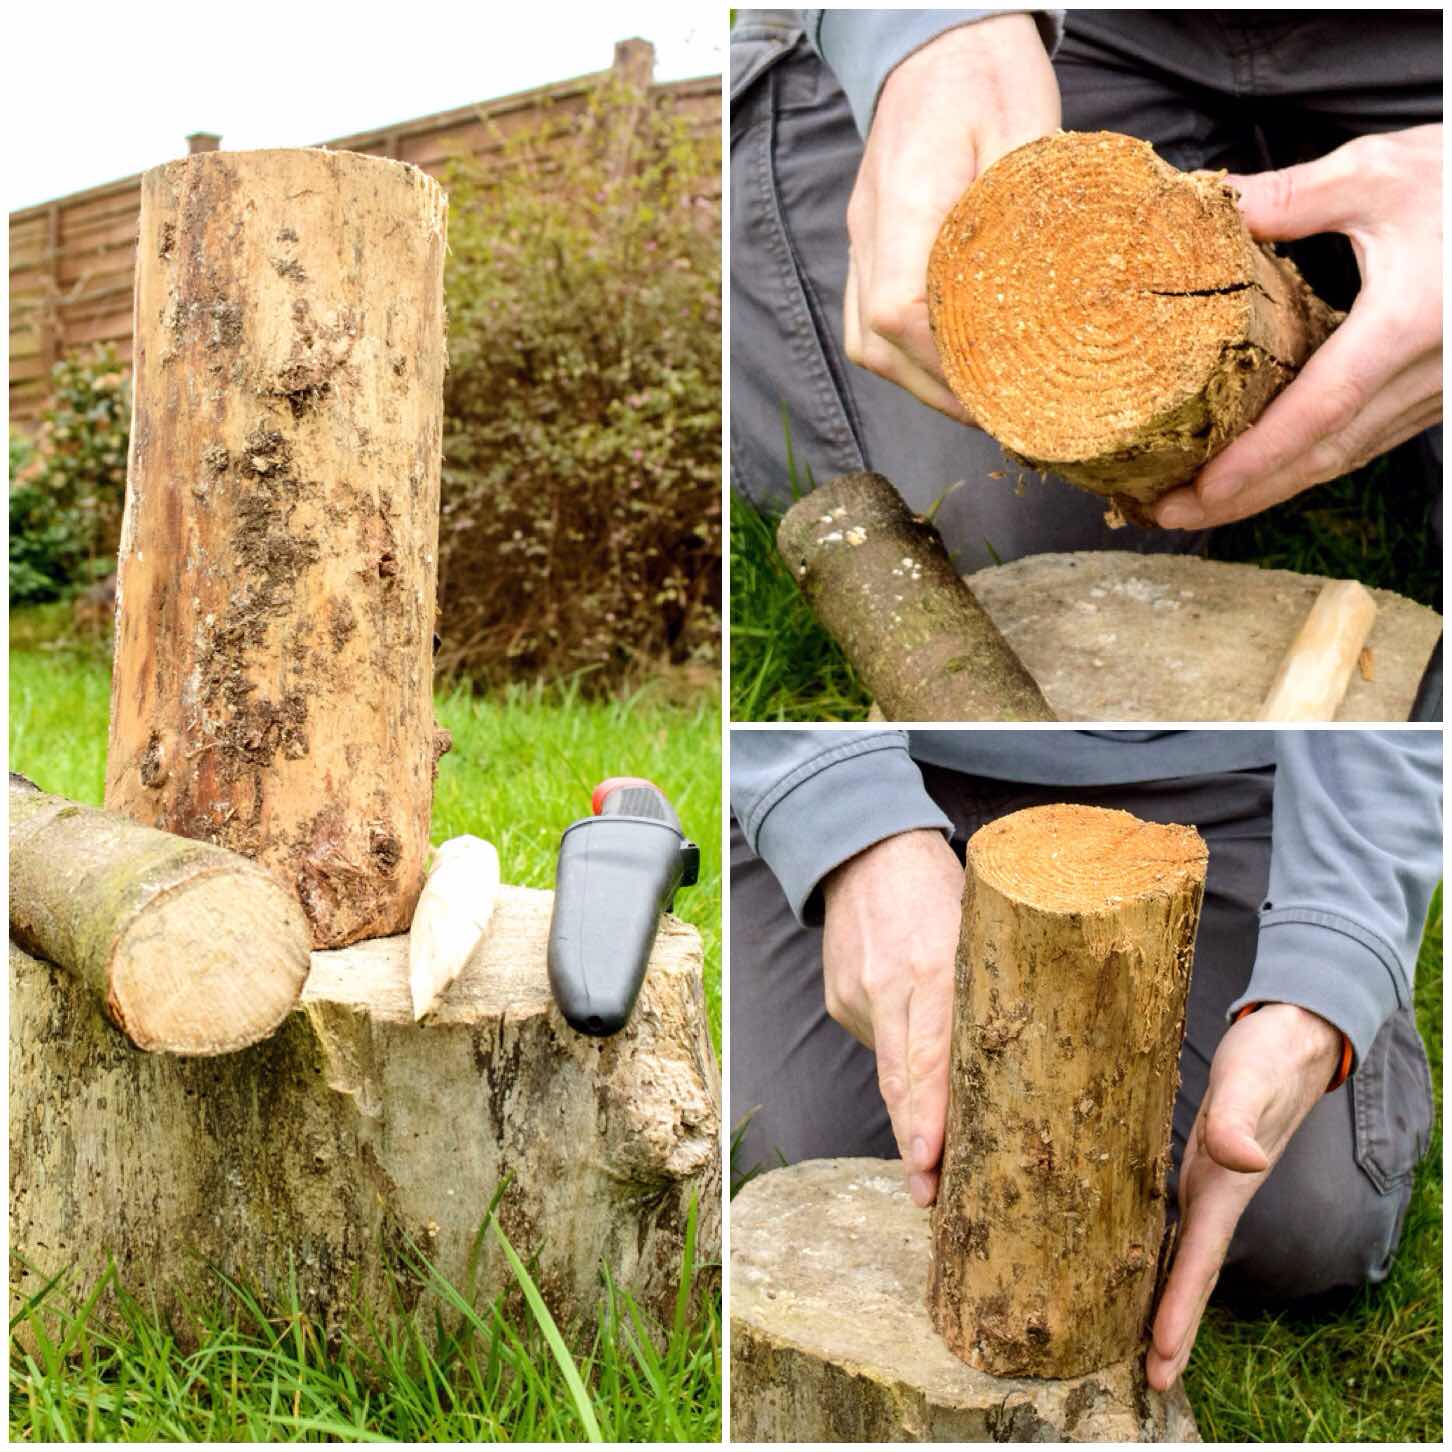
I’ve had a piece of birch stored in my garage for over a year however it had absorbed moisture over the winter and was fairly damp in its core.
Tools
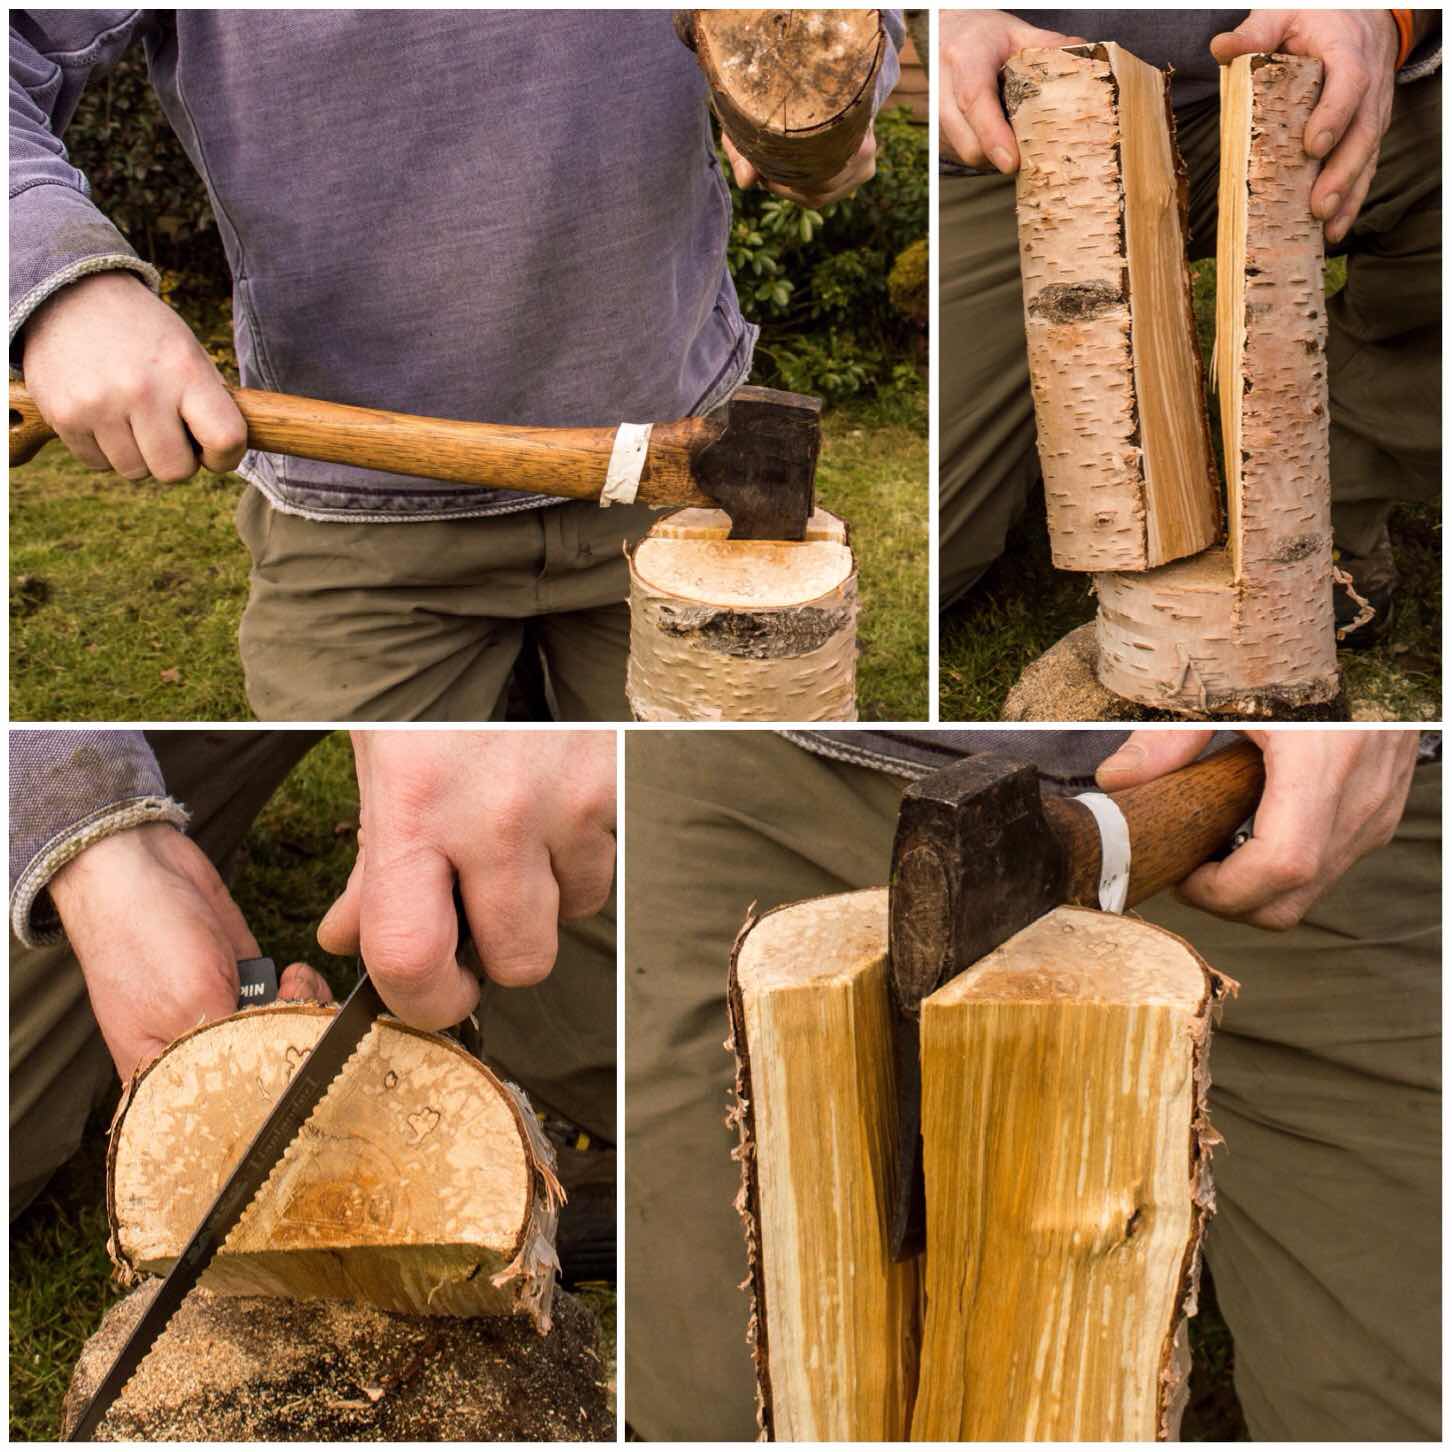
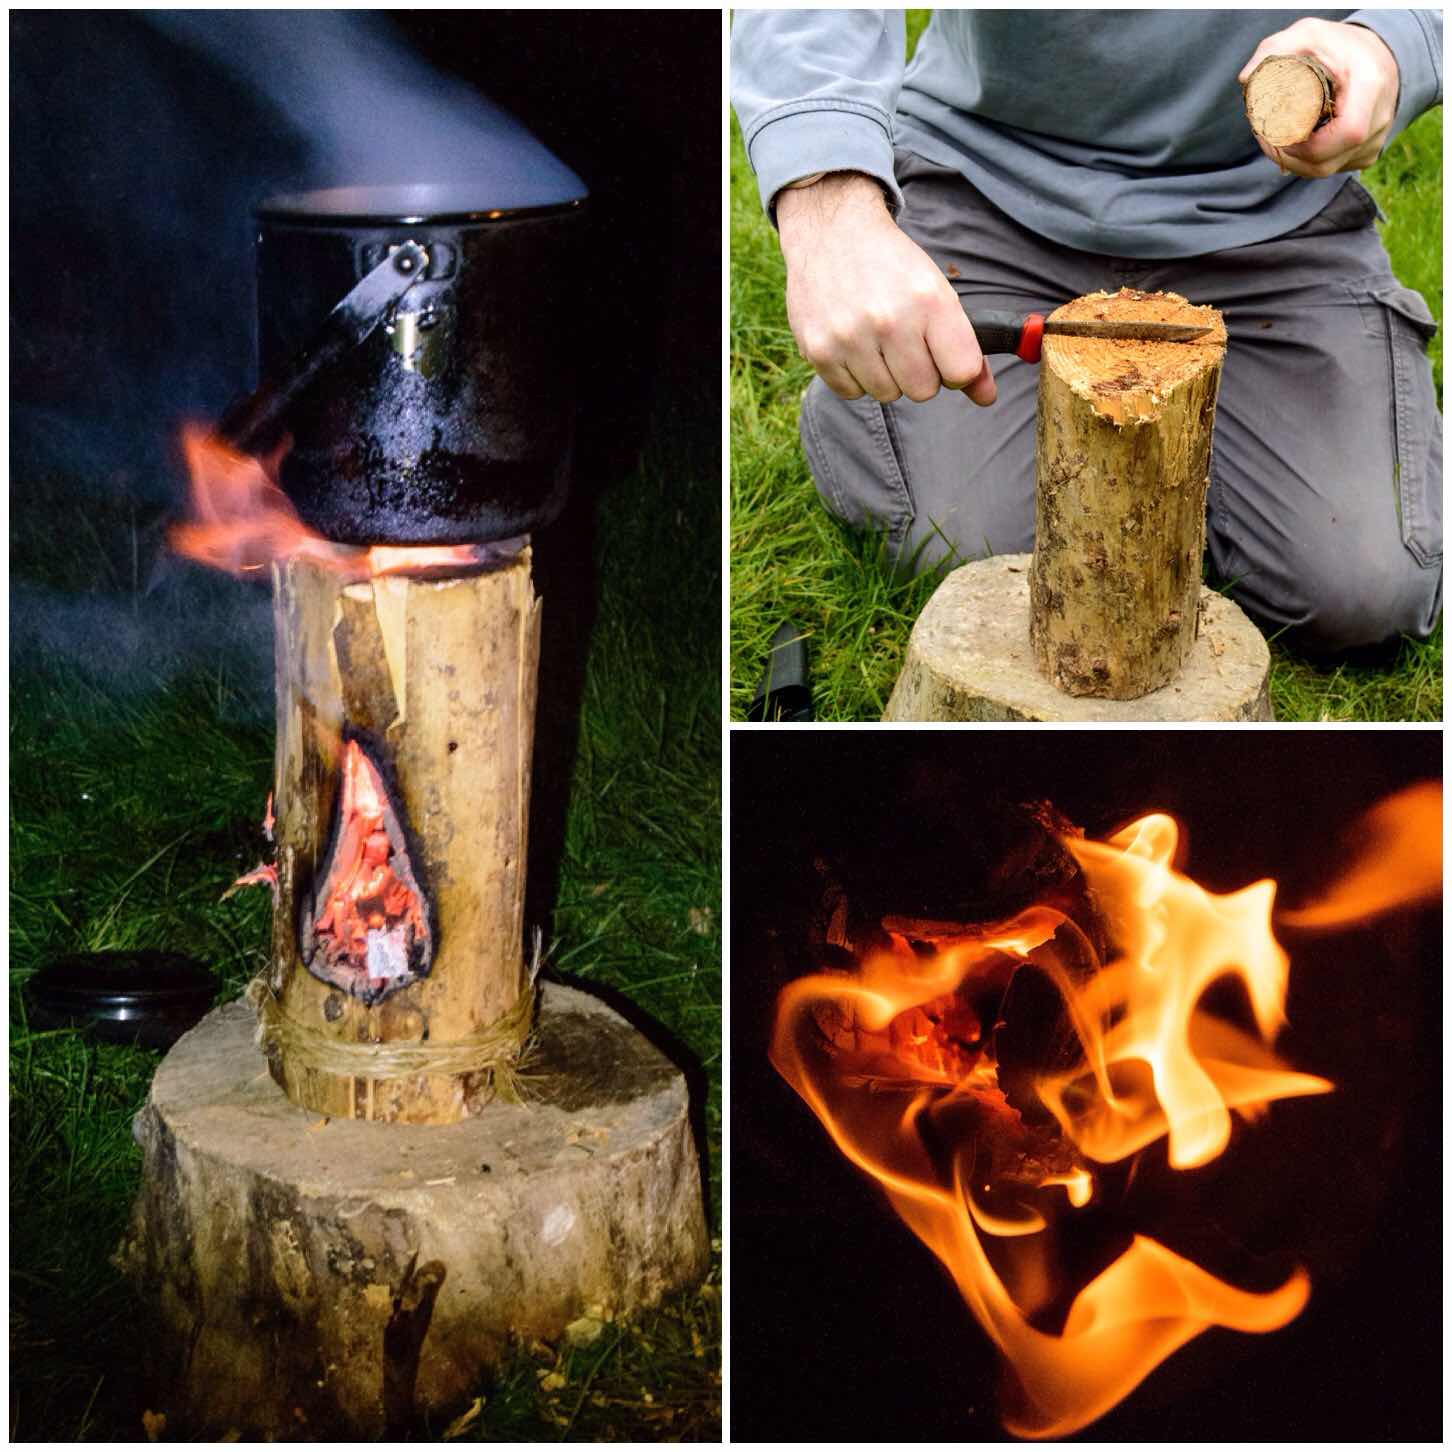
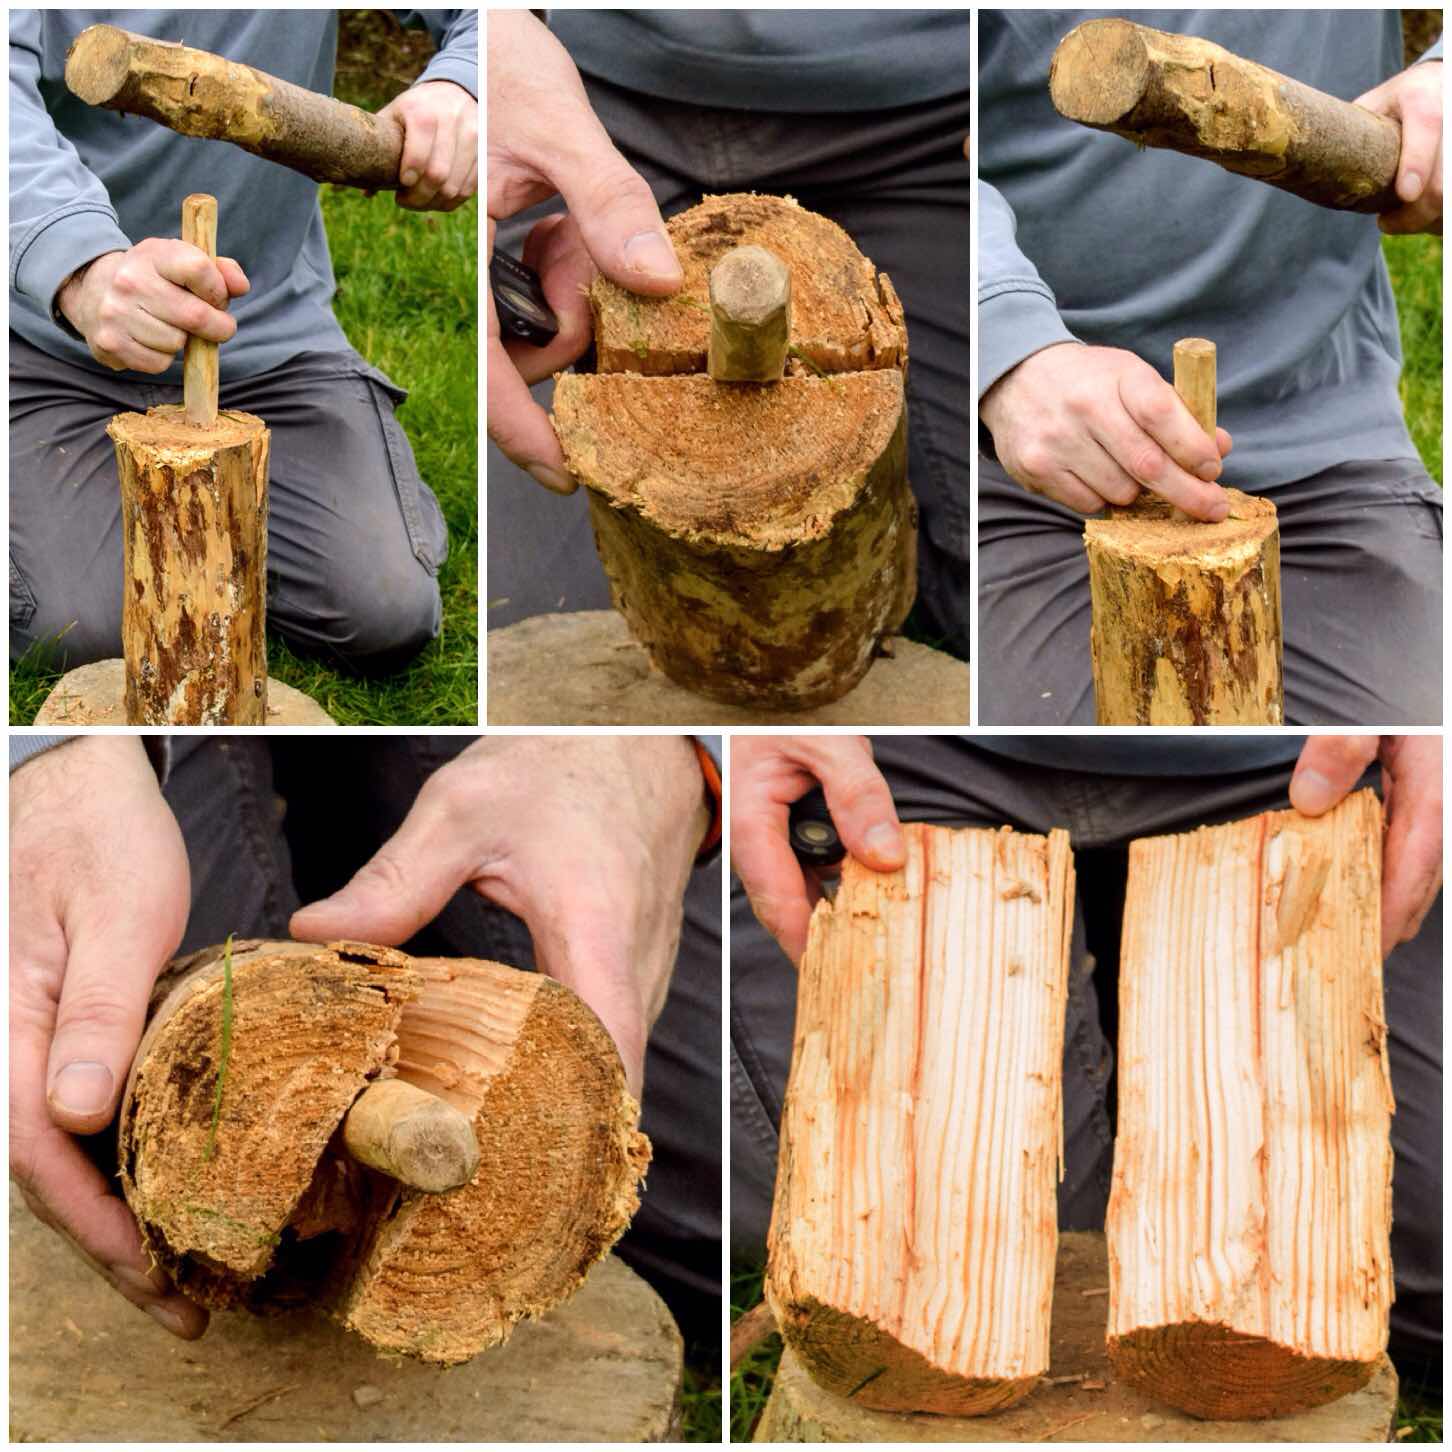
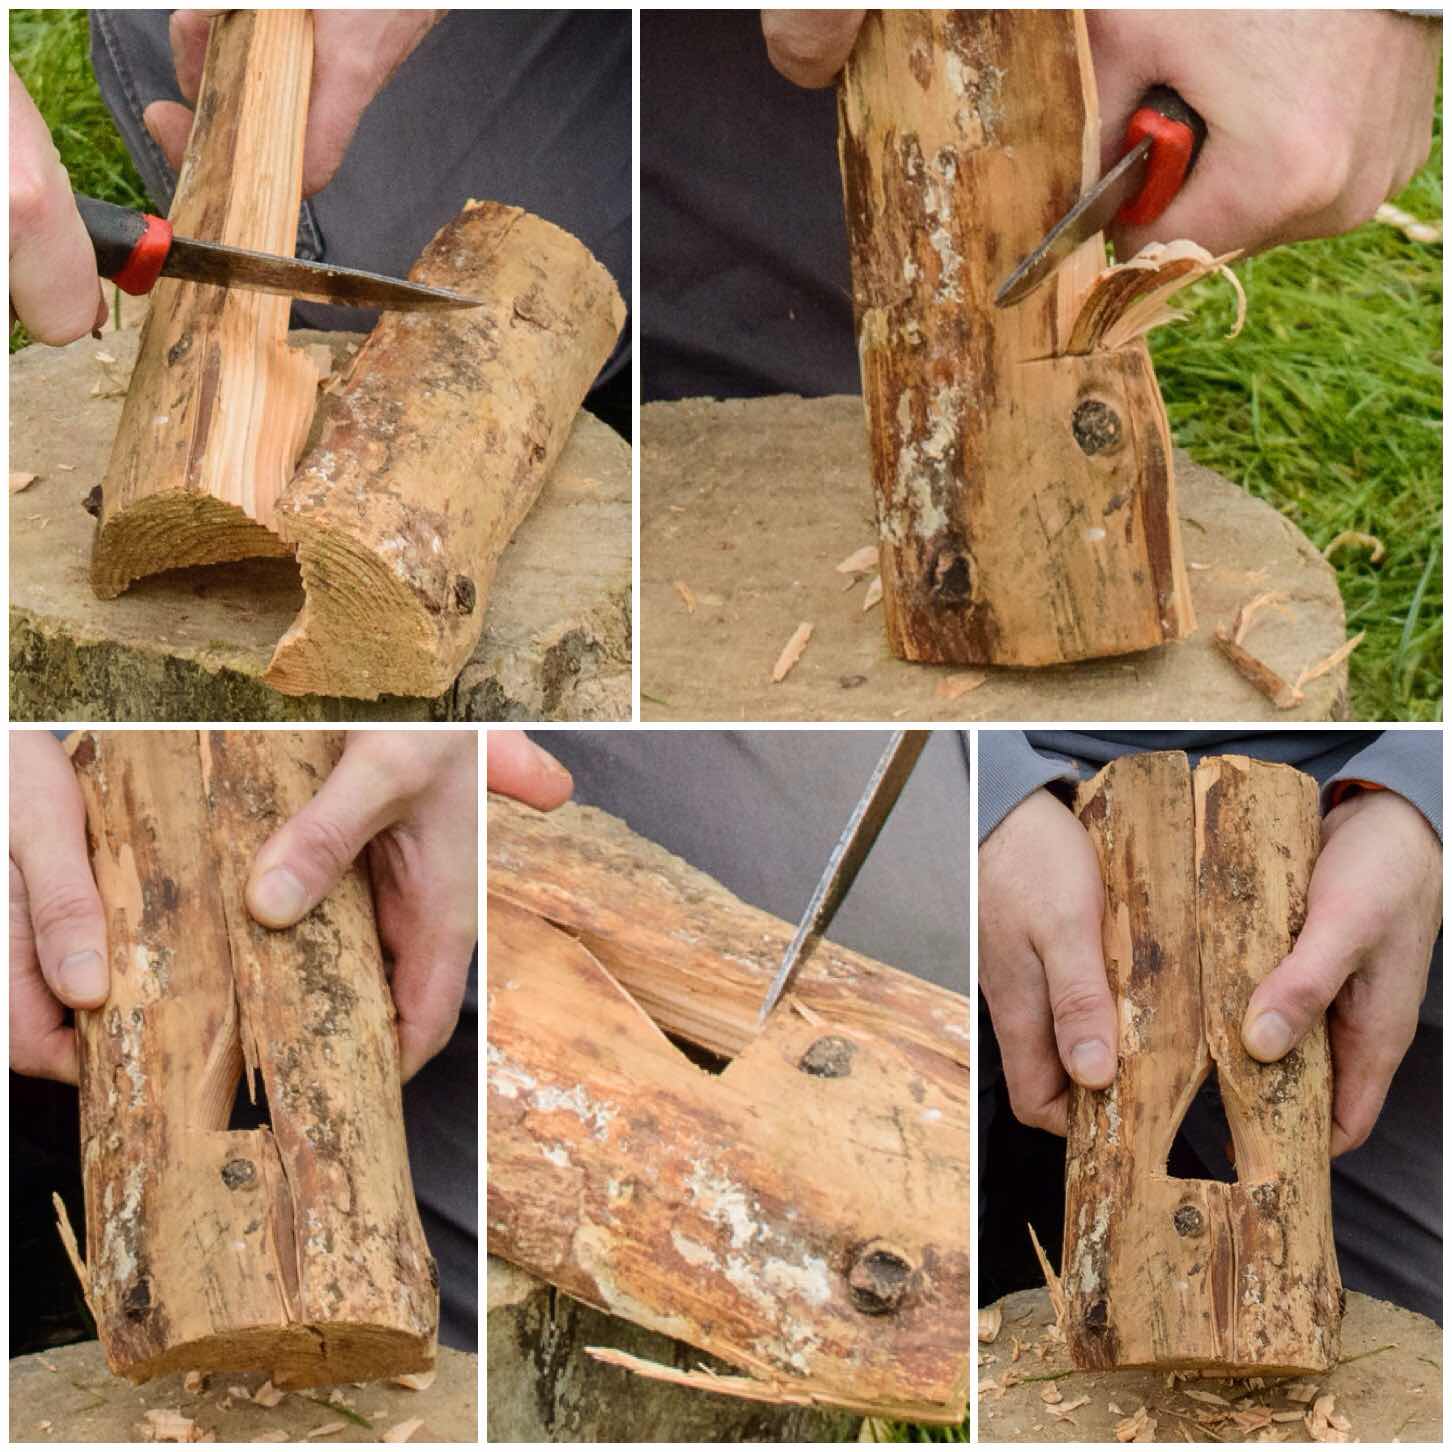
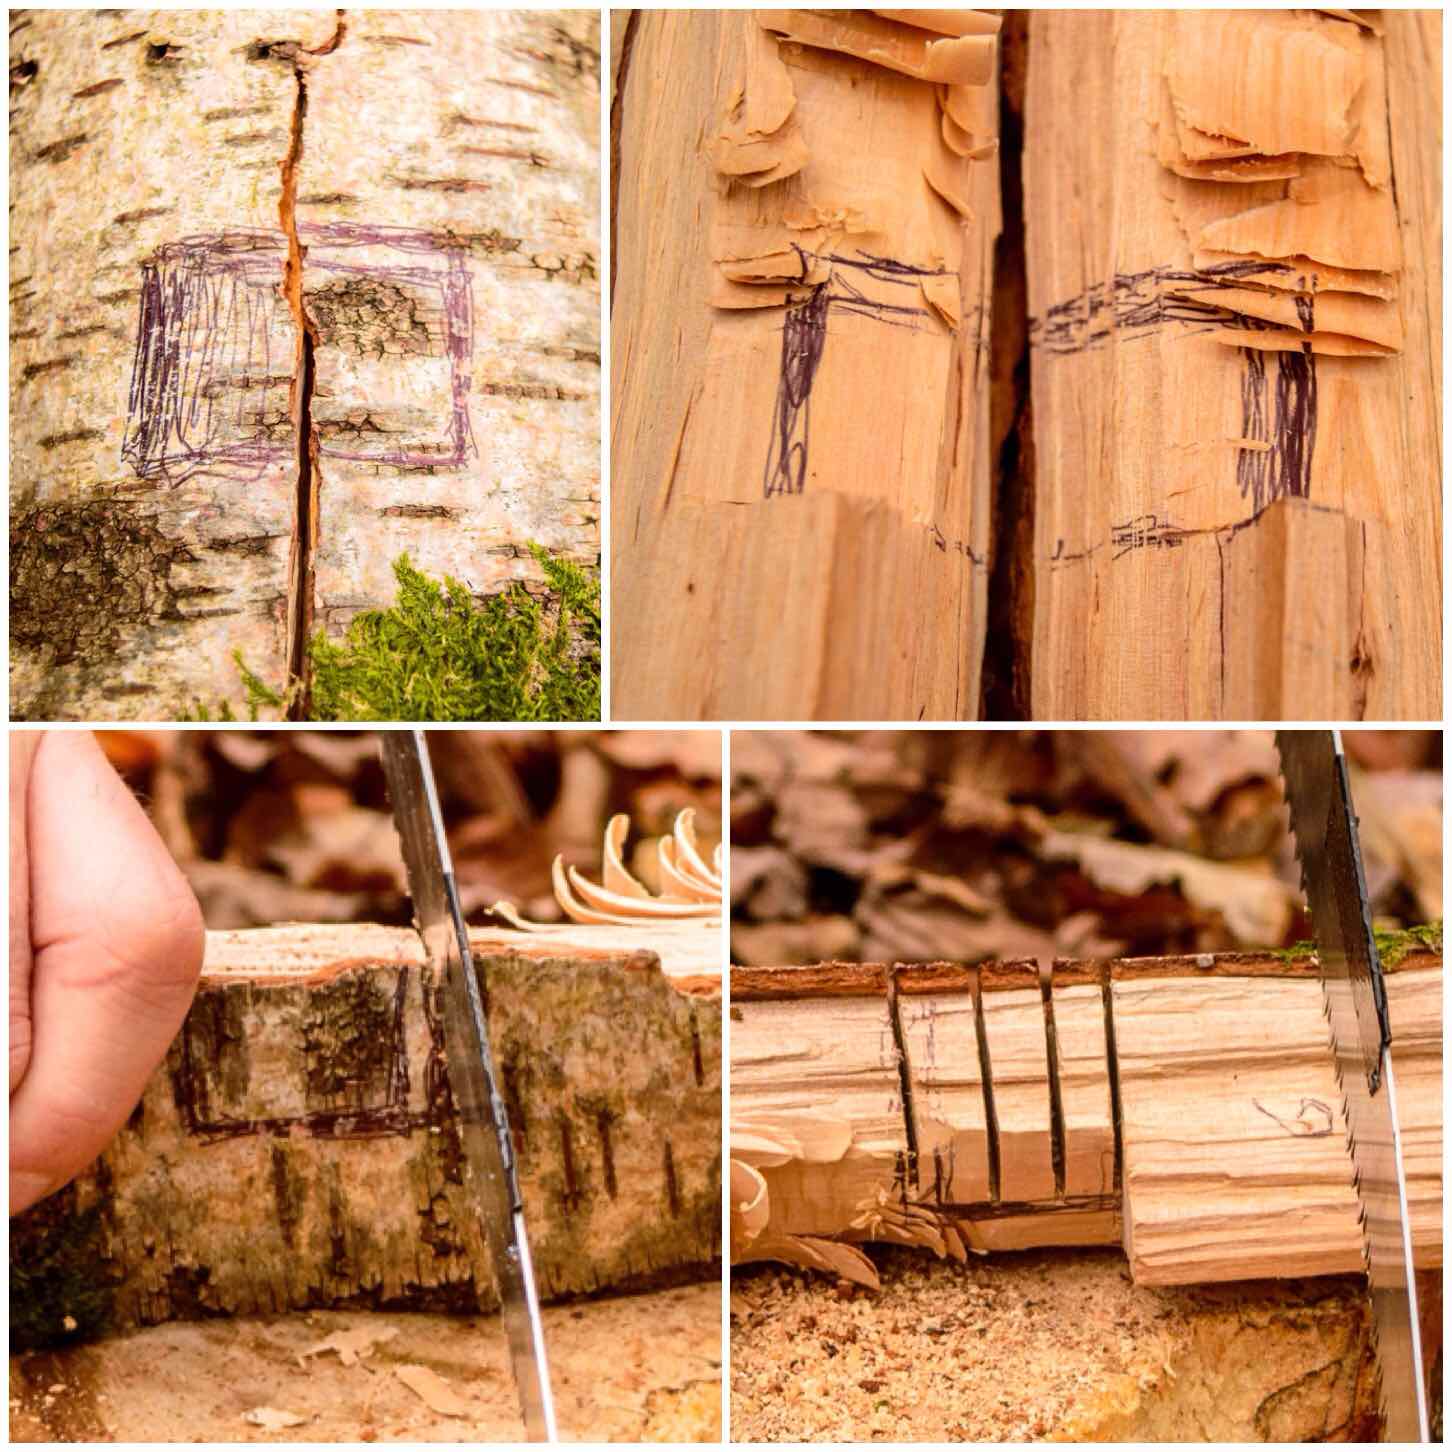
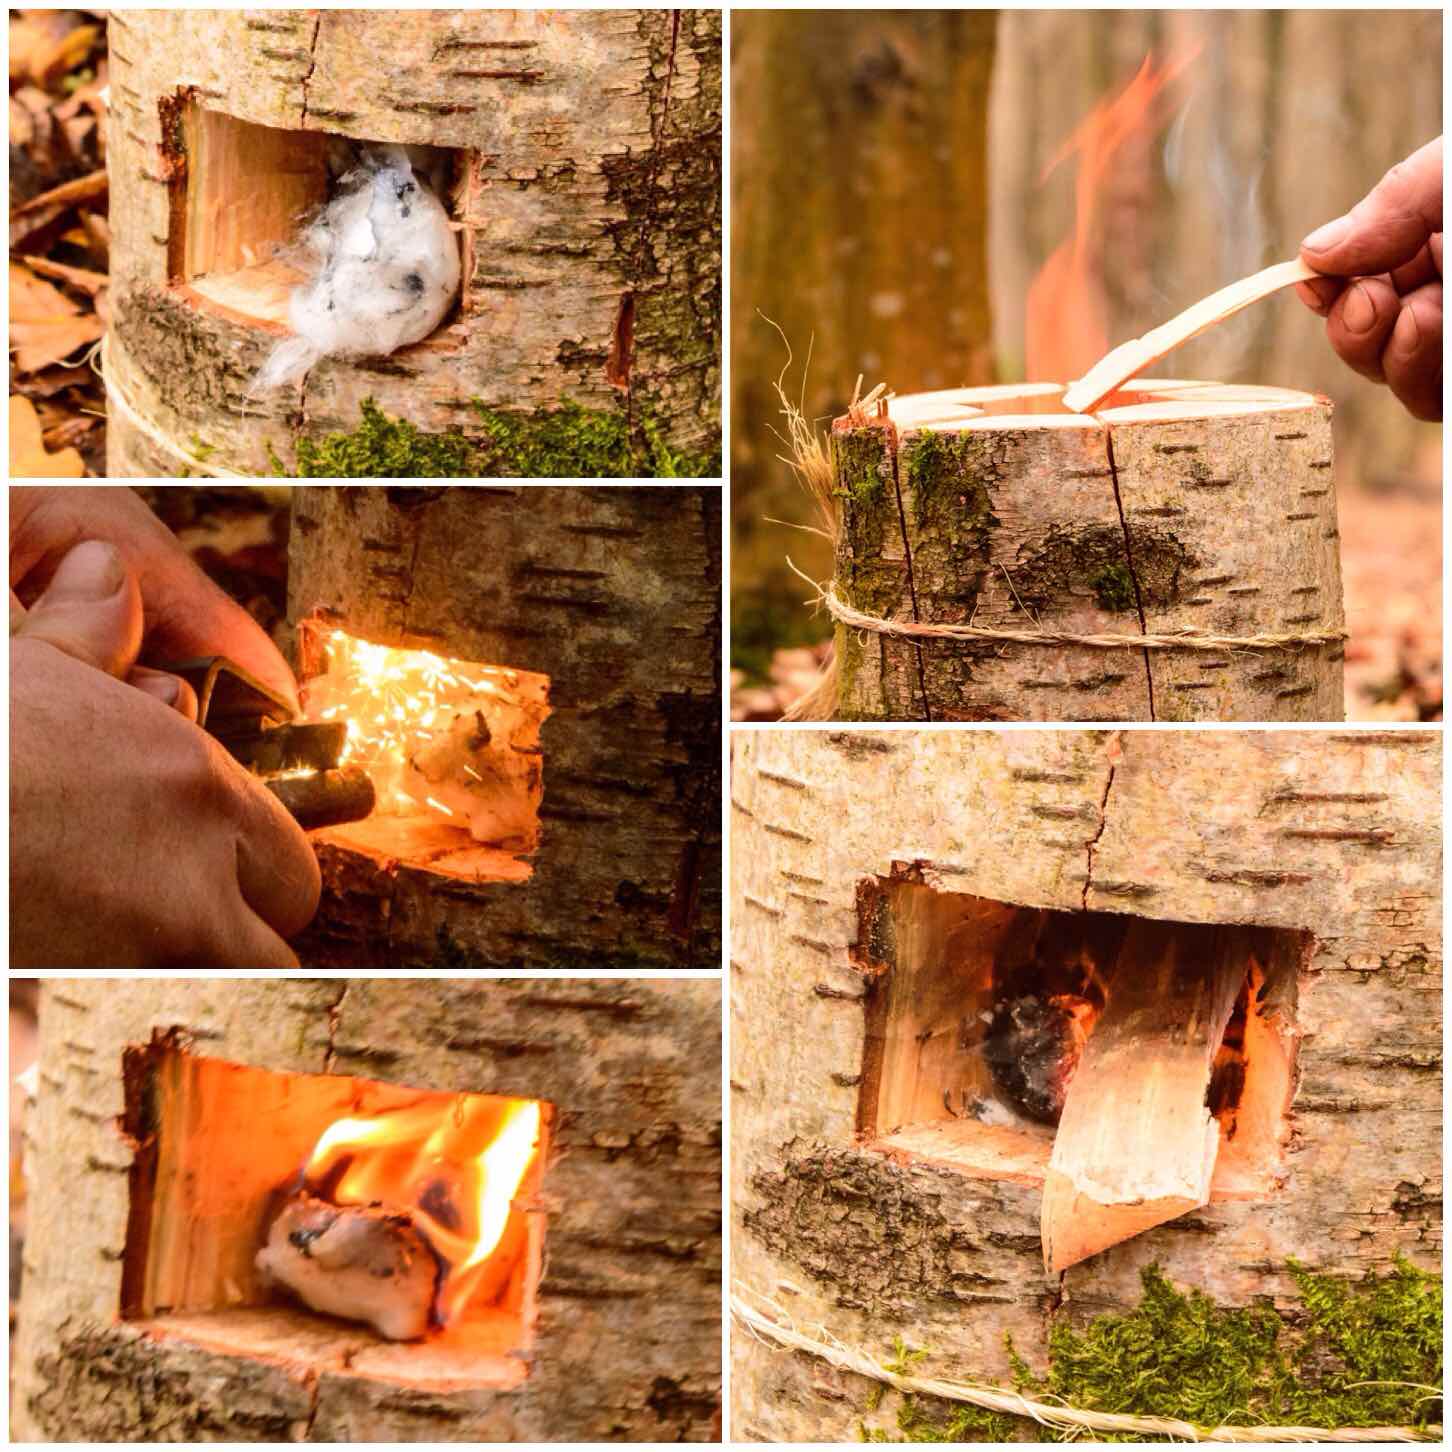
Splitting Out
This style of log rocket requires you to put a stop cut into the bottom of the log to about two thirds of its width. You can see in the top left picture below the cut is about 10 to 15 cms from what will be the bottom of the stove.
The top right picture below shoes you how far I put my stop cut into the log. The bottom two pictures show me marking out with my saw the approximate area I would be battoning out.
Bottom cut and marking out
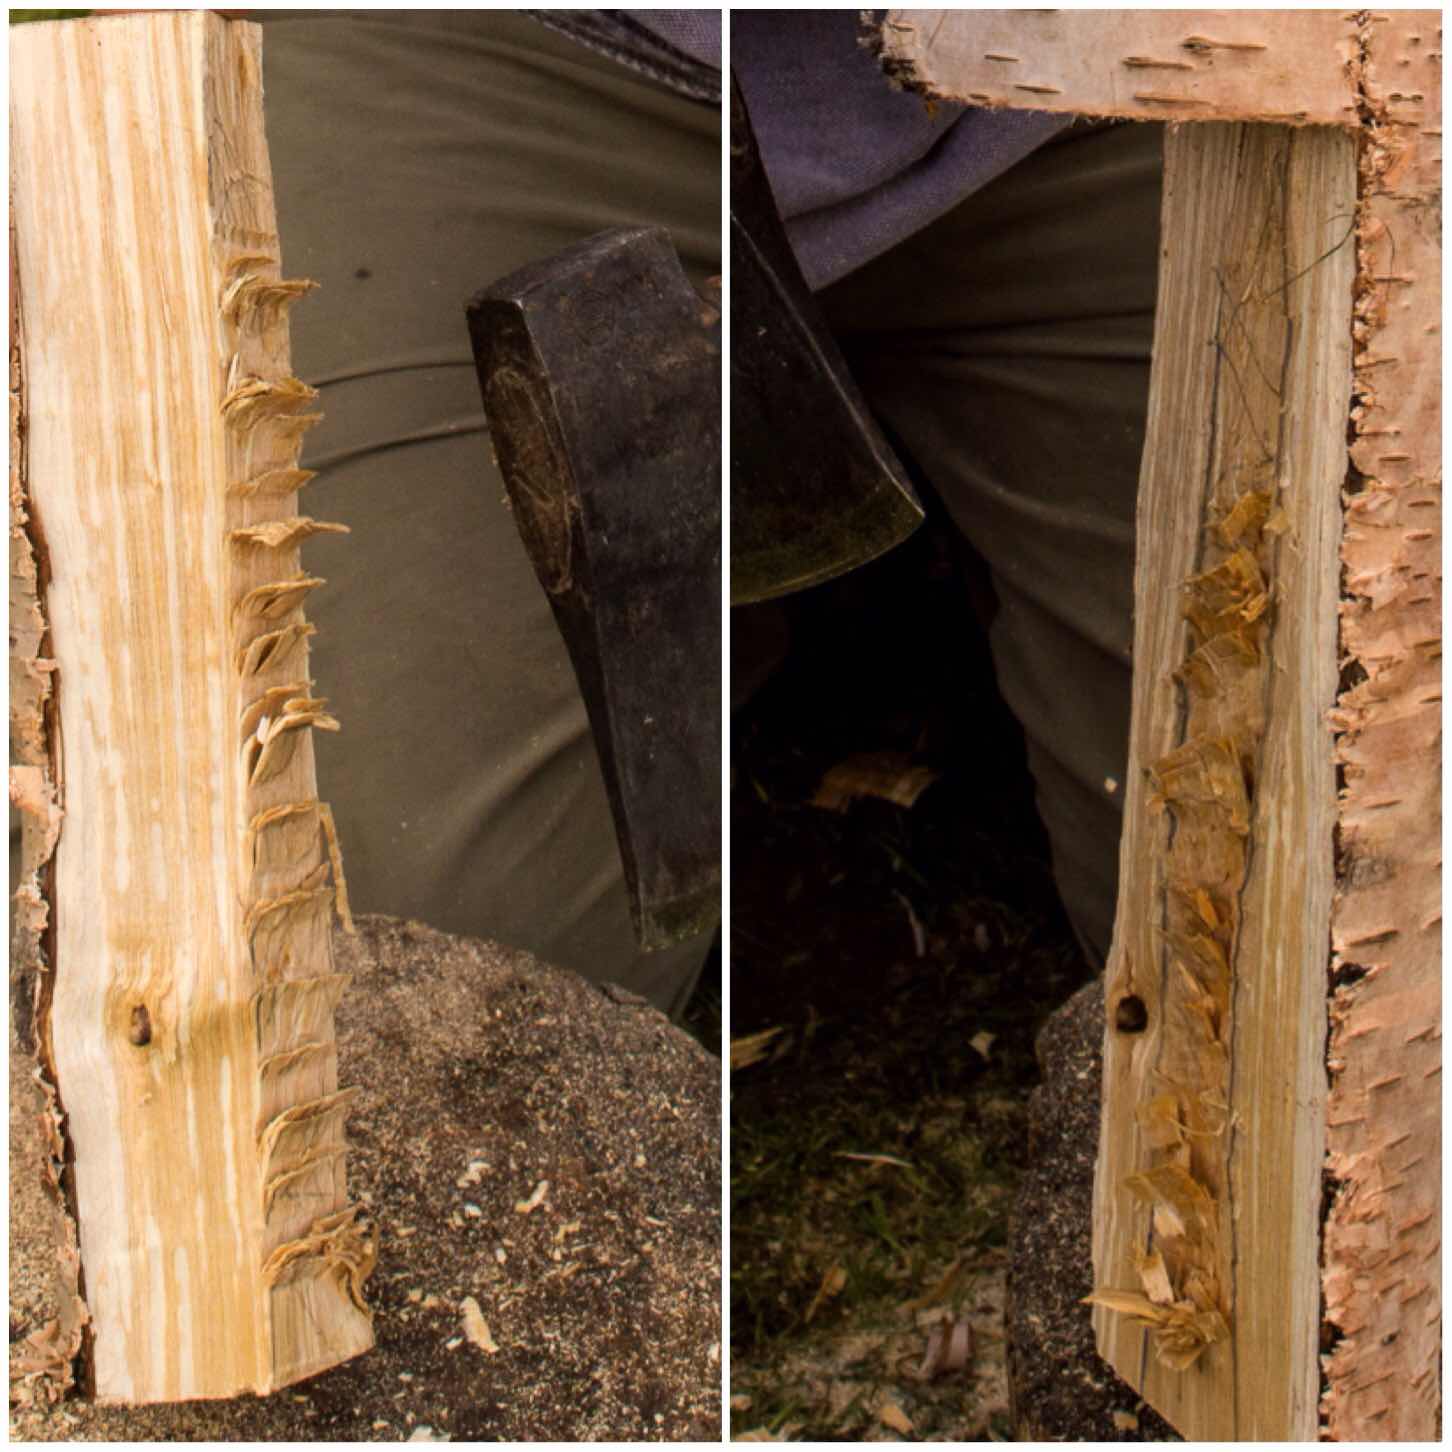
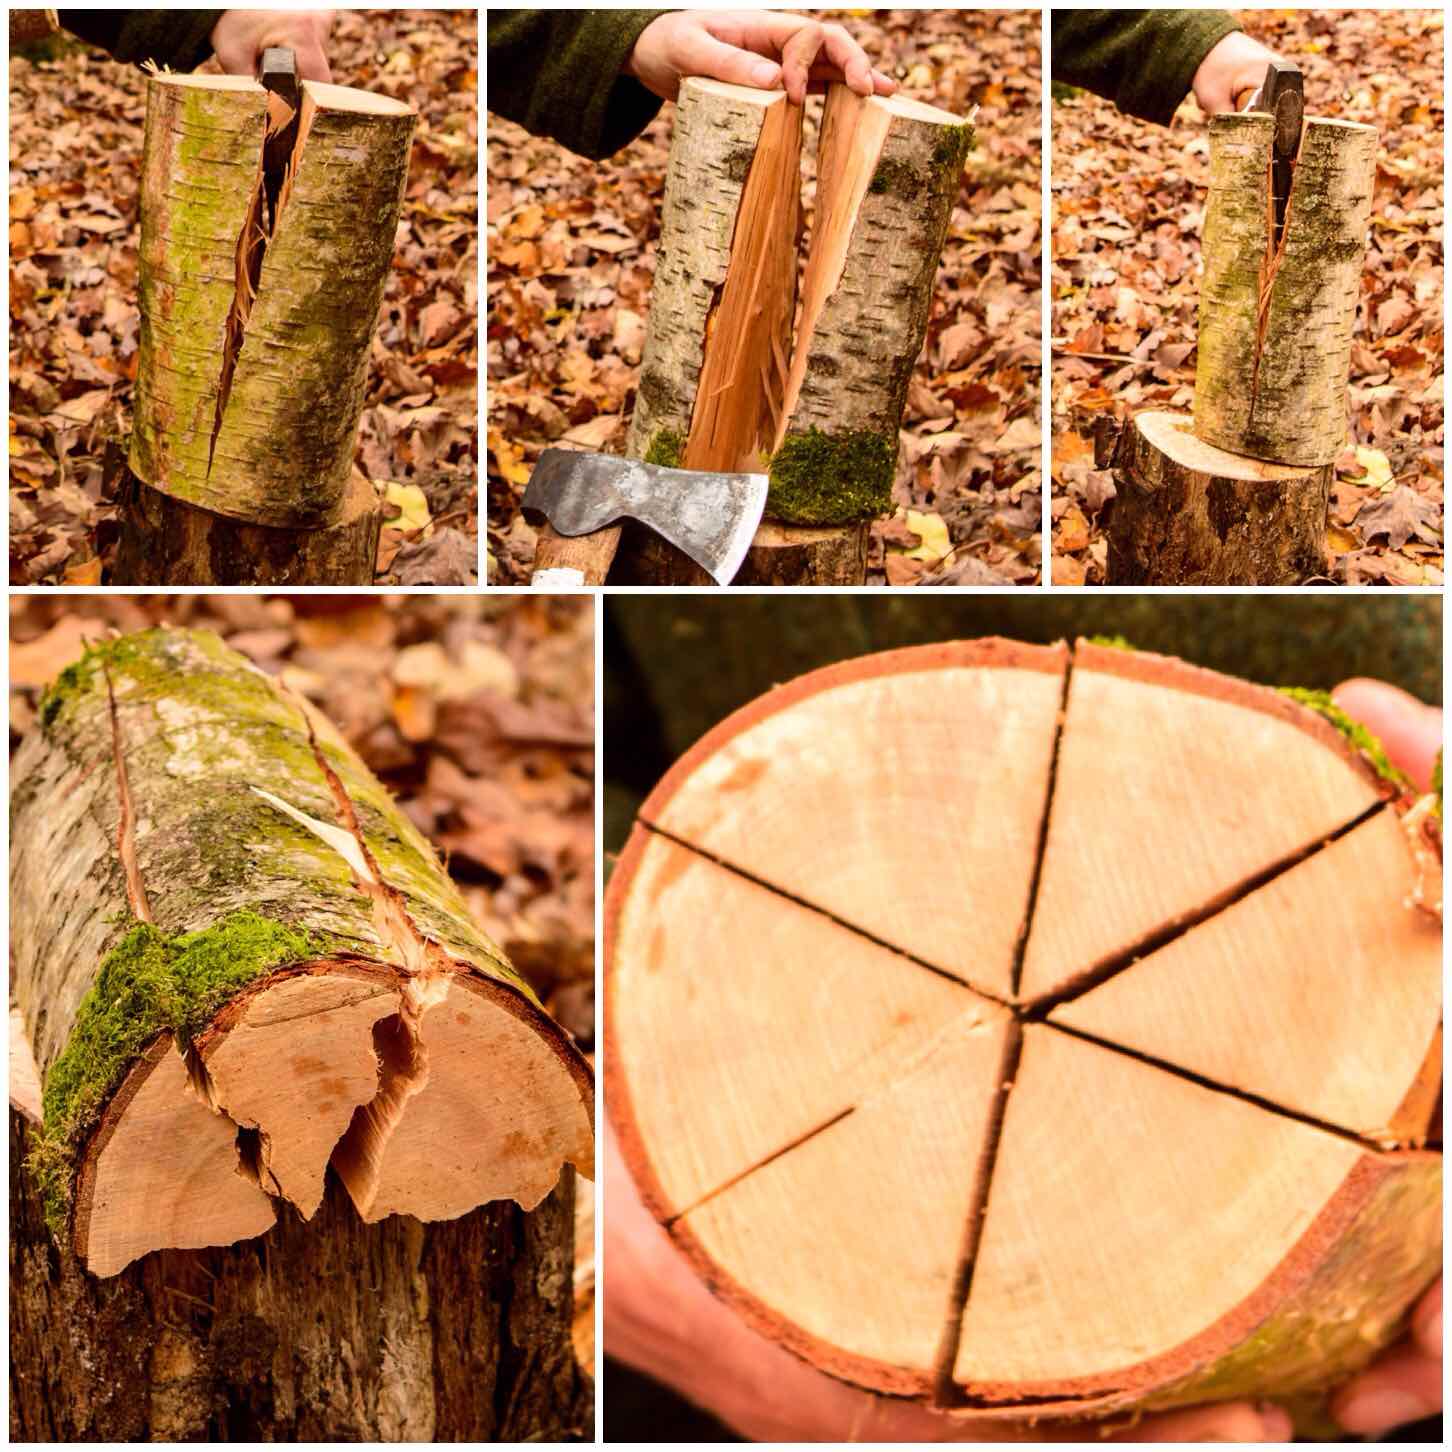
I used my axe and a large piece of wood to batton out the the wood. You can see the shape of the stove at this stage with one segment in an inverted ‘L’ shape (Segment 1) and a smaller piece (Segment 2).
The bottom two photos show me marking out the smaller piece for further splitting. This piece is not split exactly in two as this configuration allows you to form the chimney very quickly.
Splitting
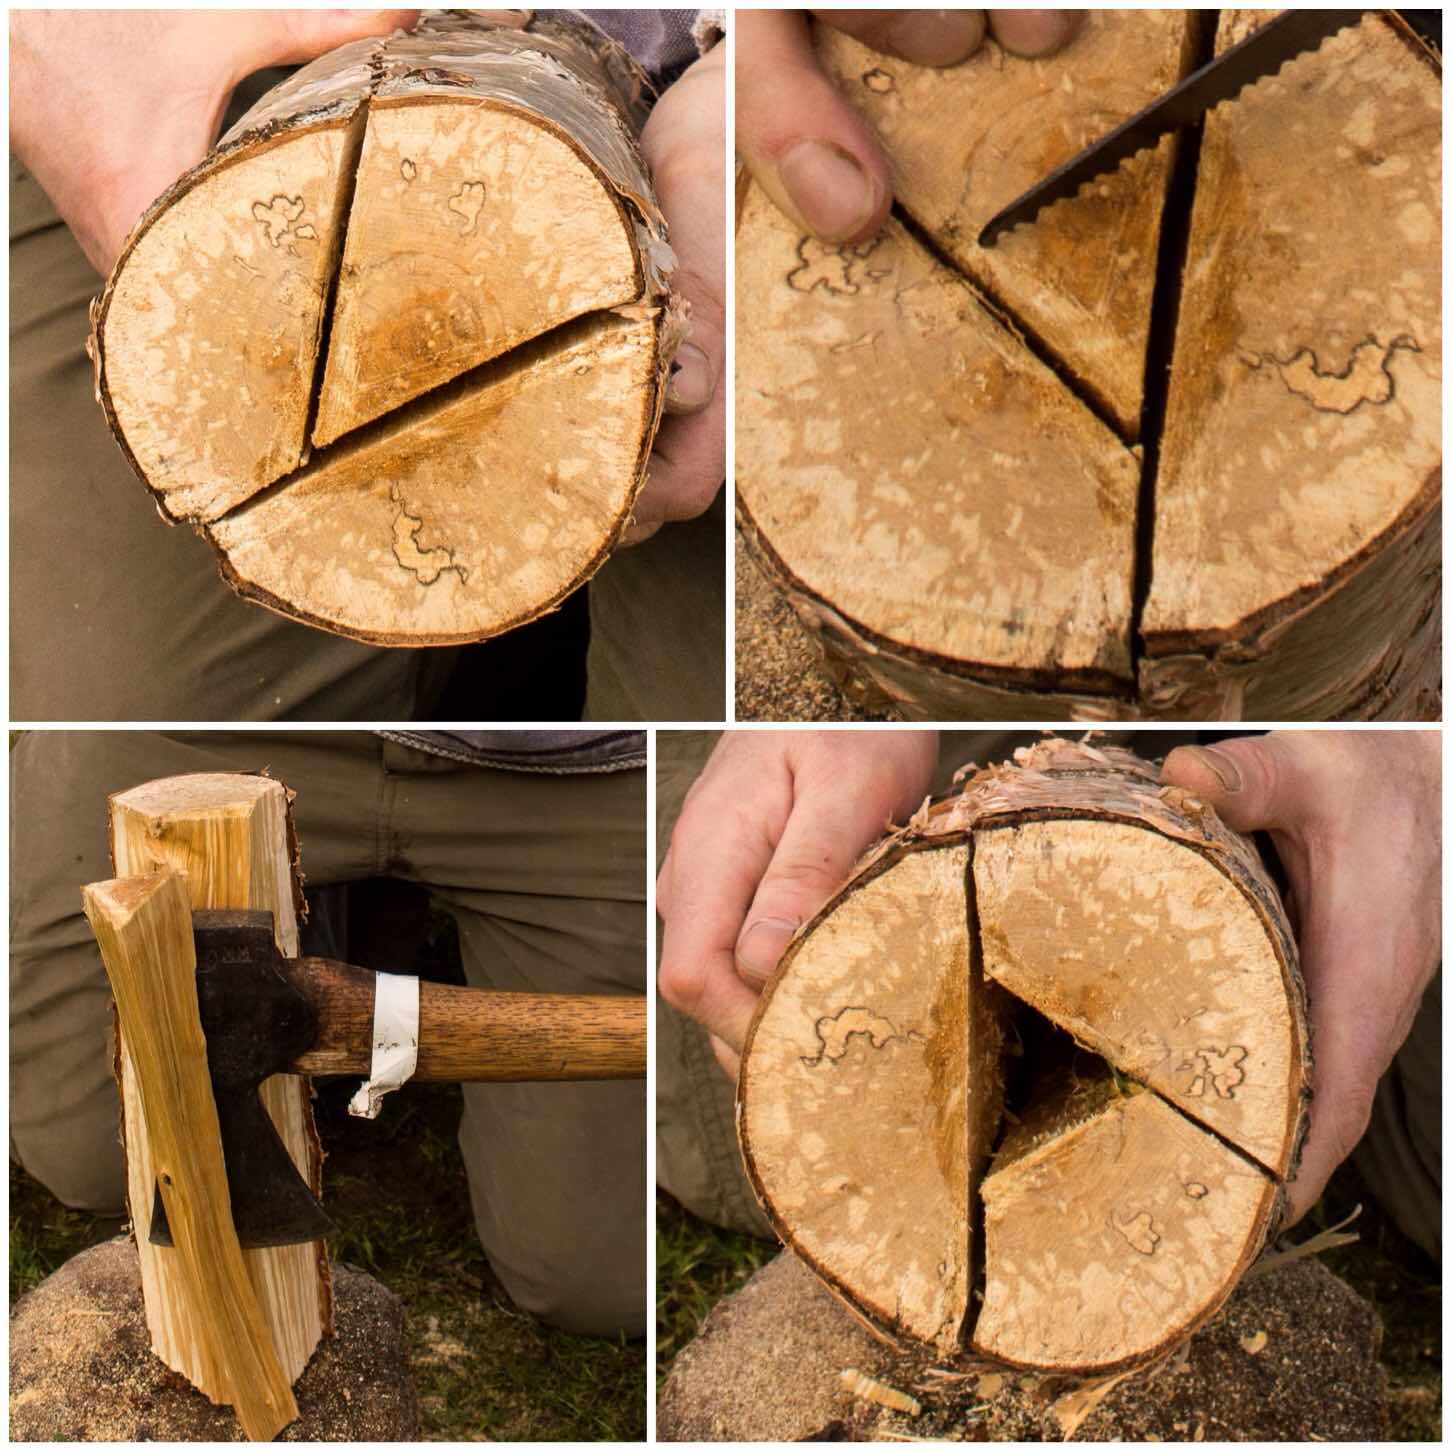
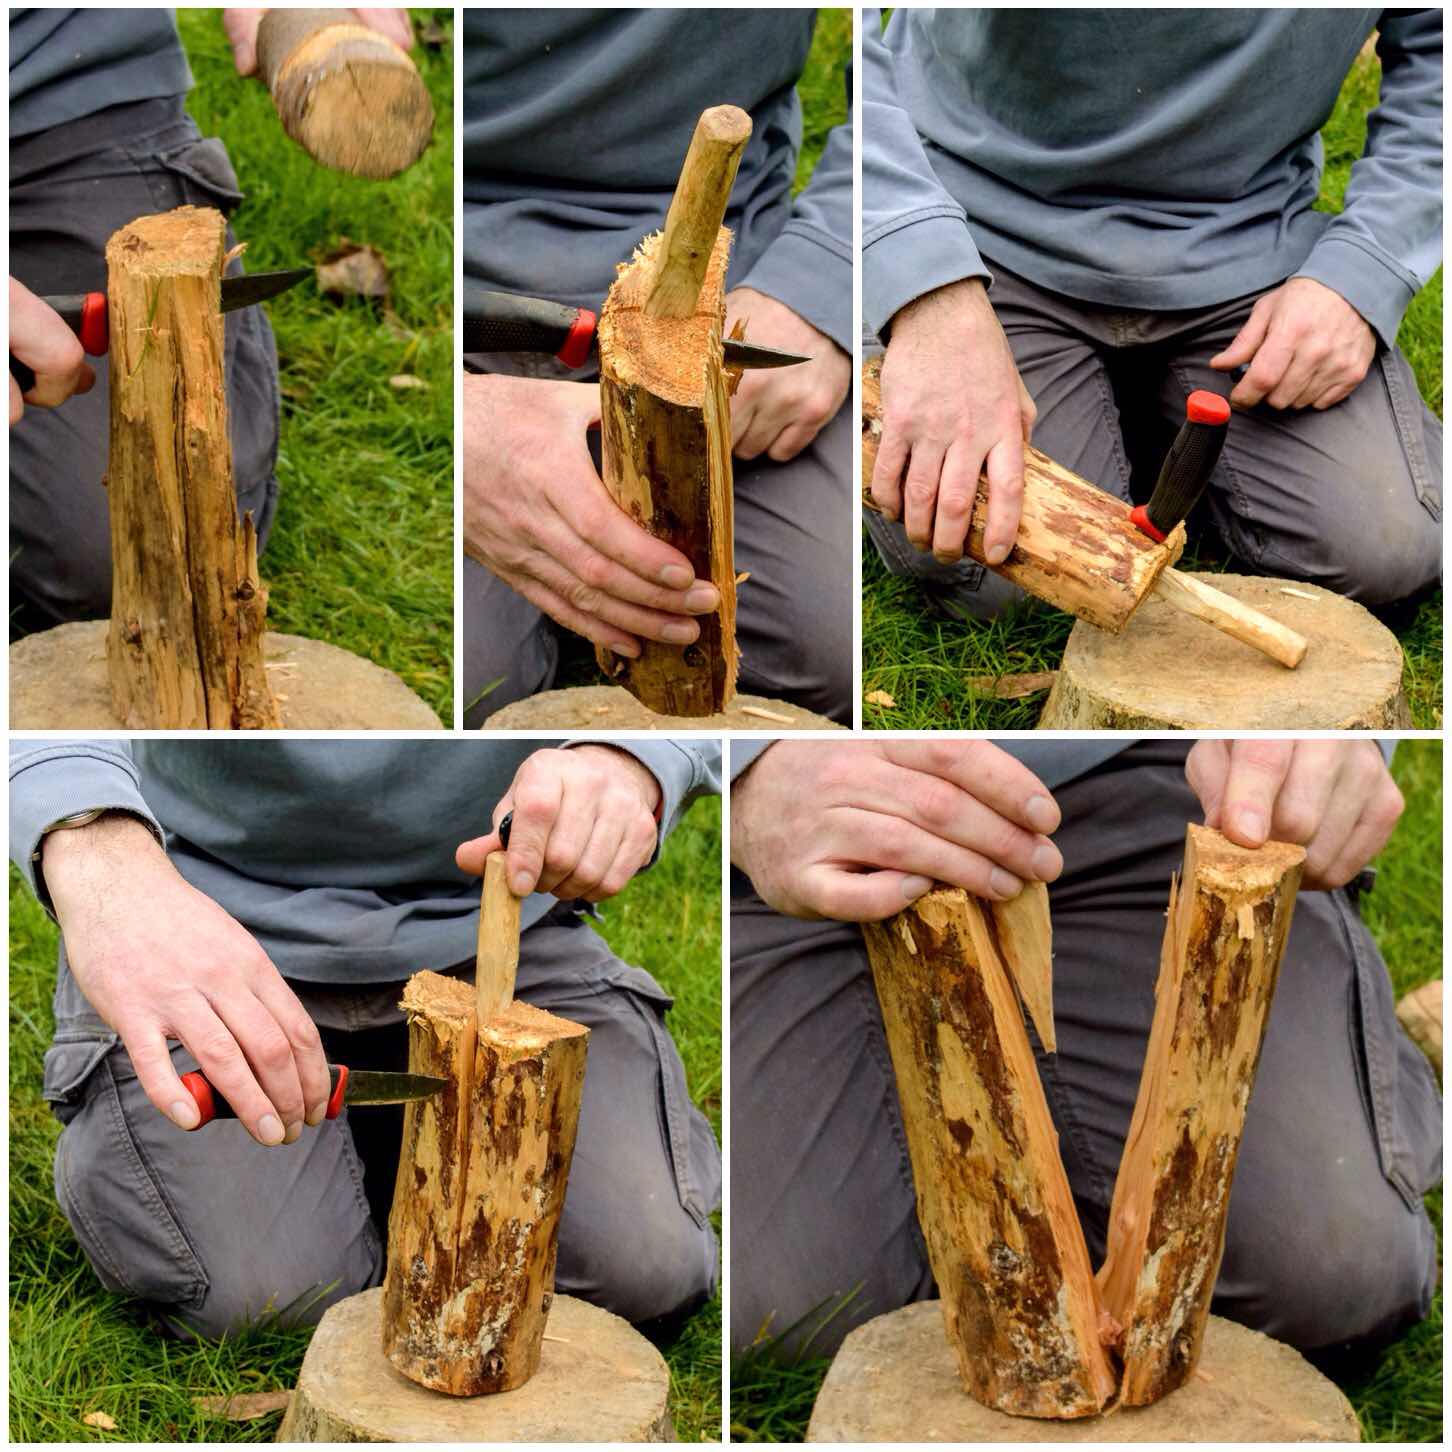
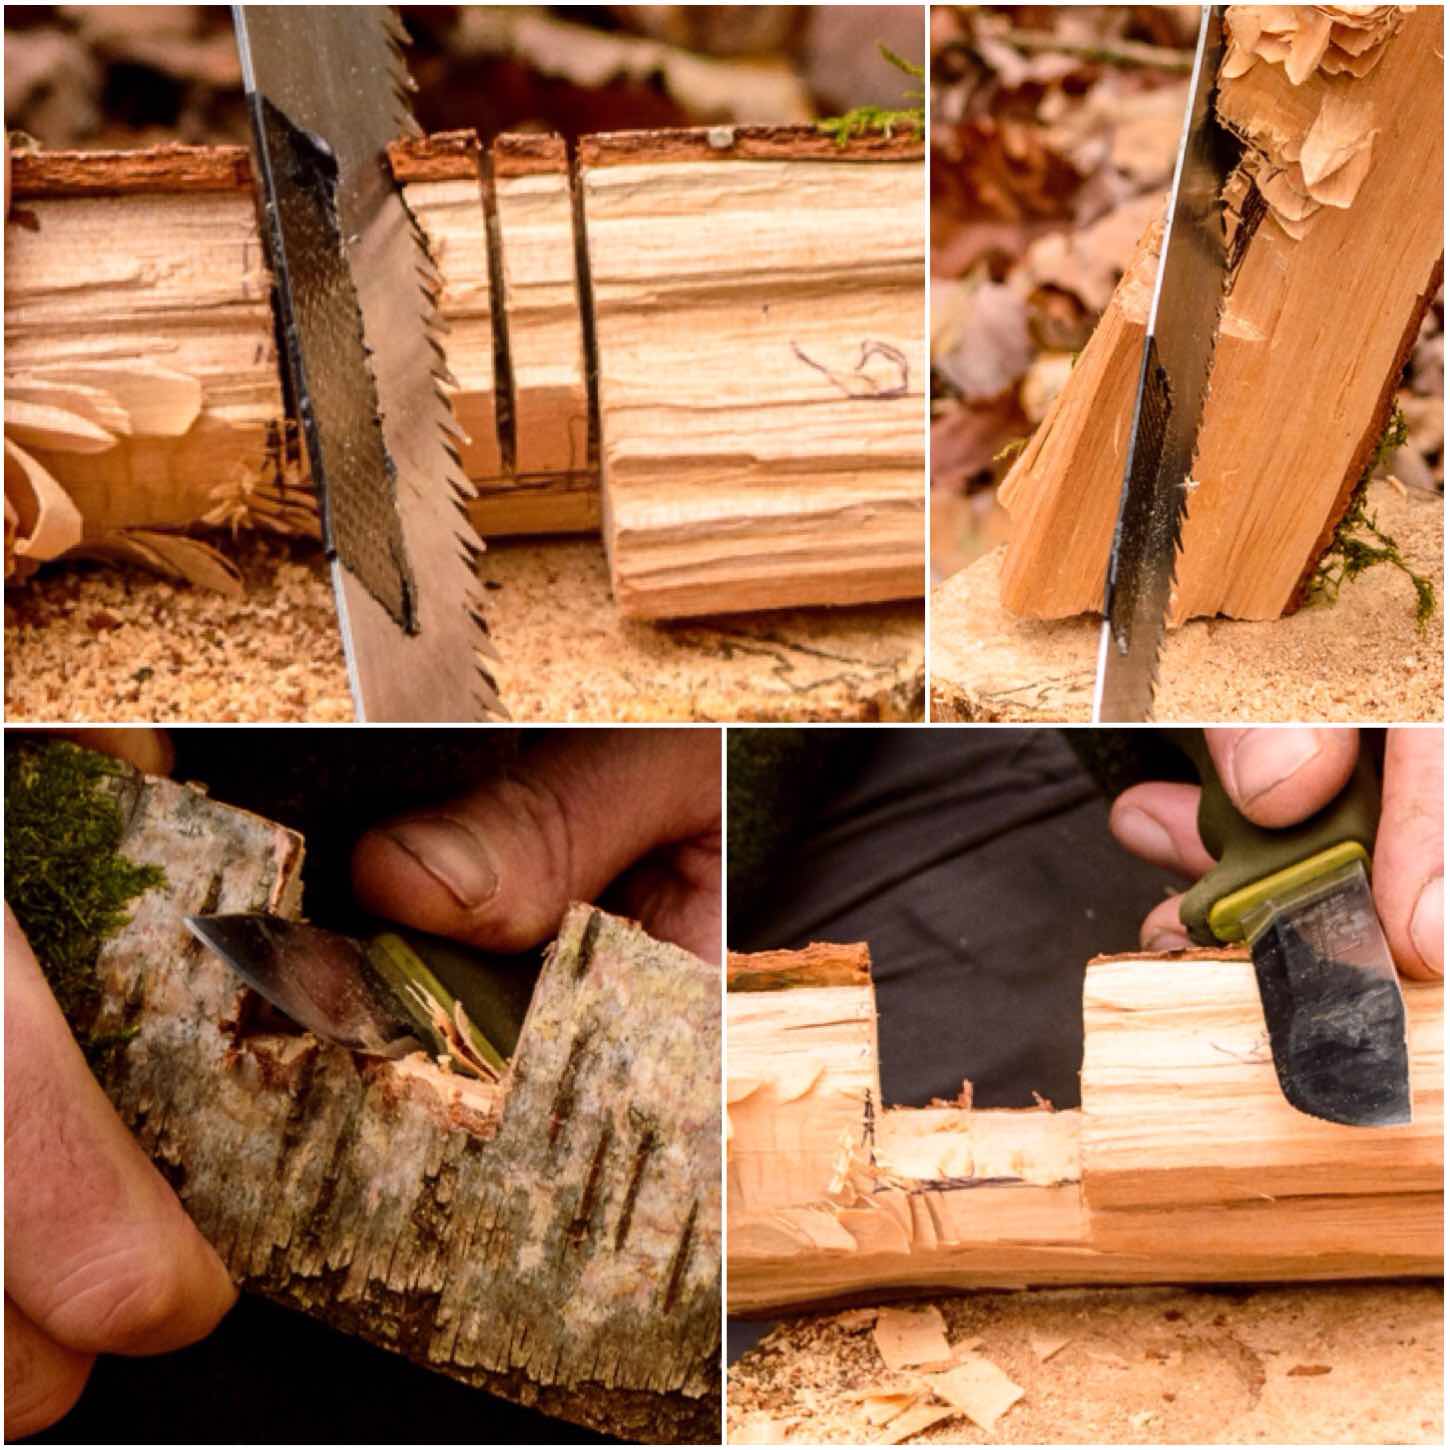
The Chimney
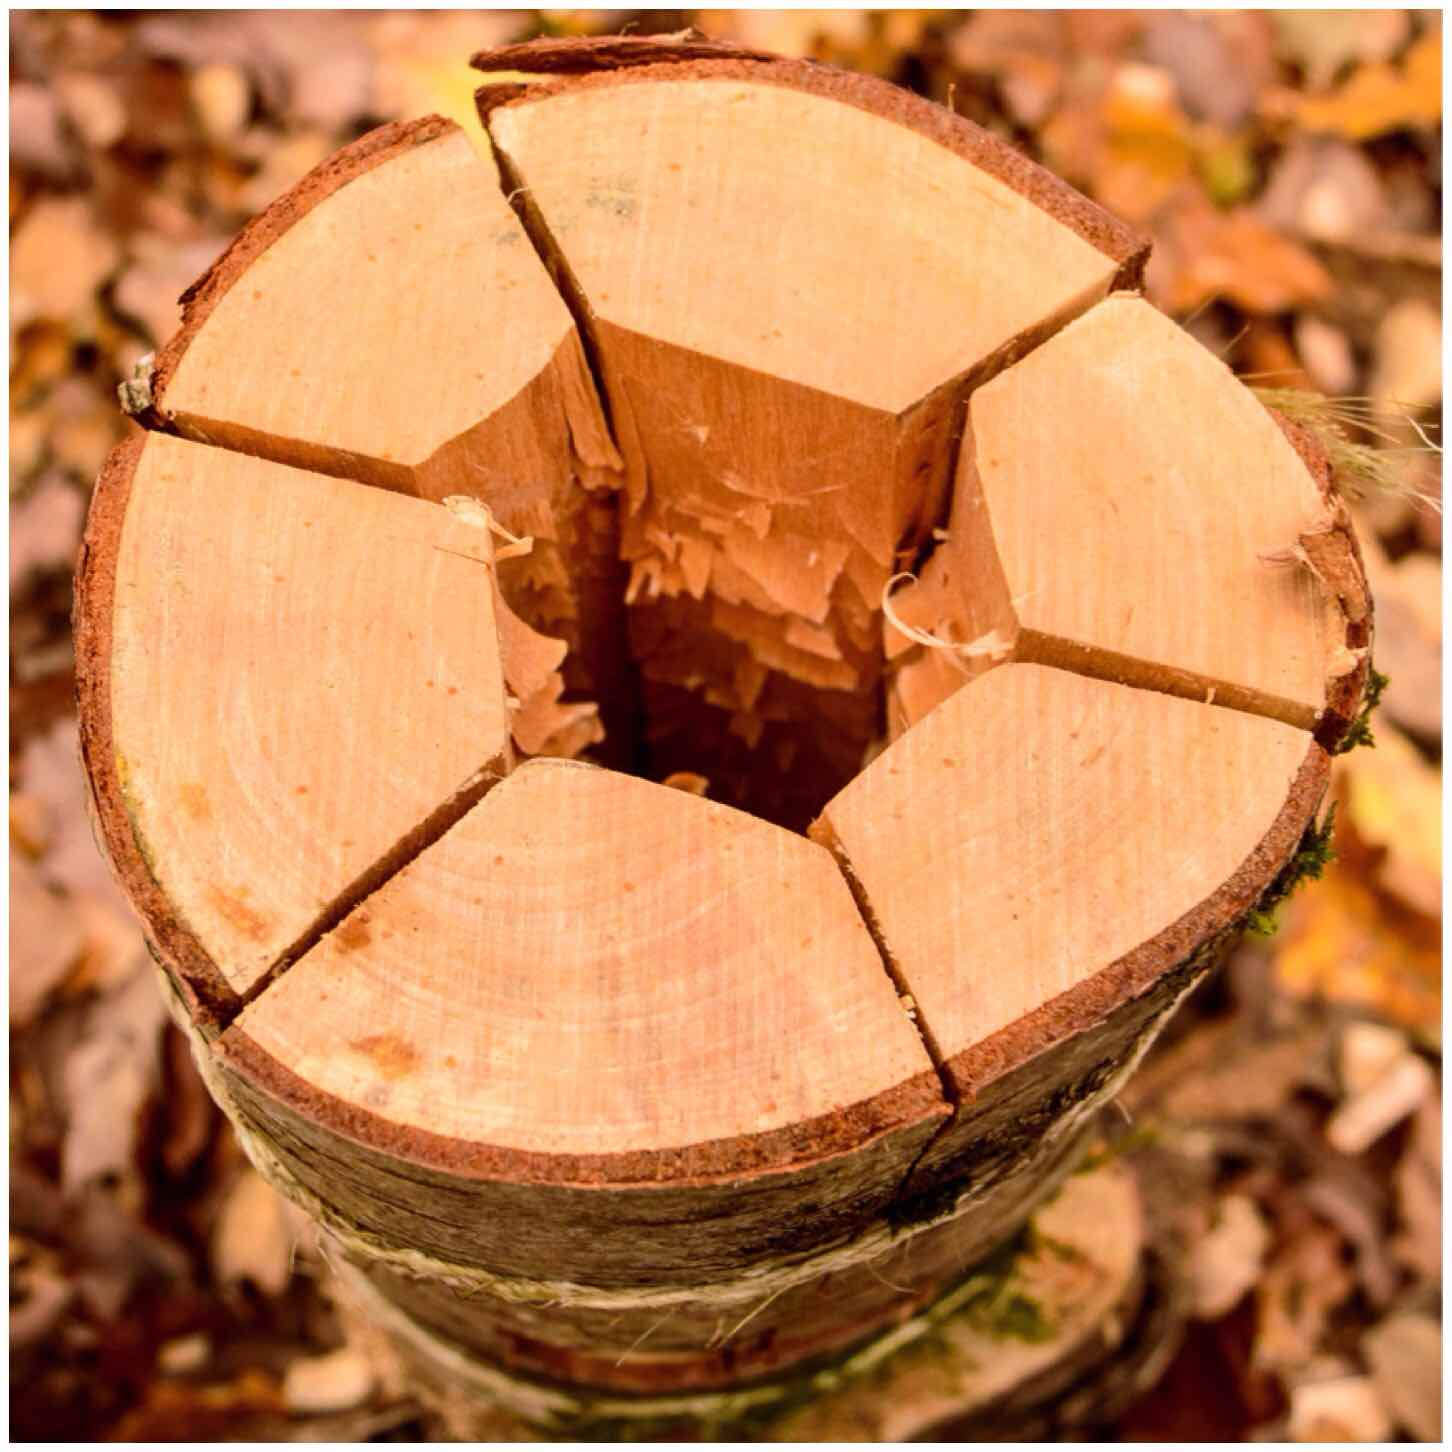
Below you can see the shape of all the pieces when they are put back together . I then battoned off the tip of the larger piece from Segment 2 so that a chimney would be formed. This piece of battoned-out wood I further split into fine pieces to act as kindling for the stove.
The One Cut Chimney
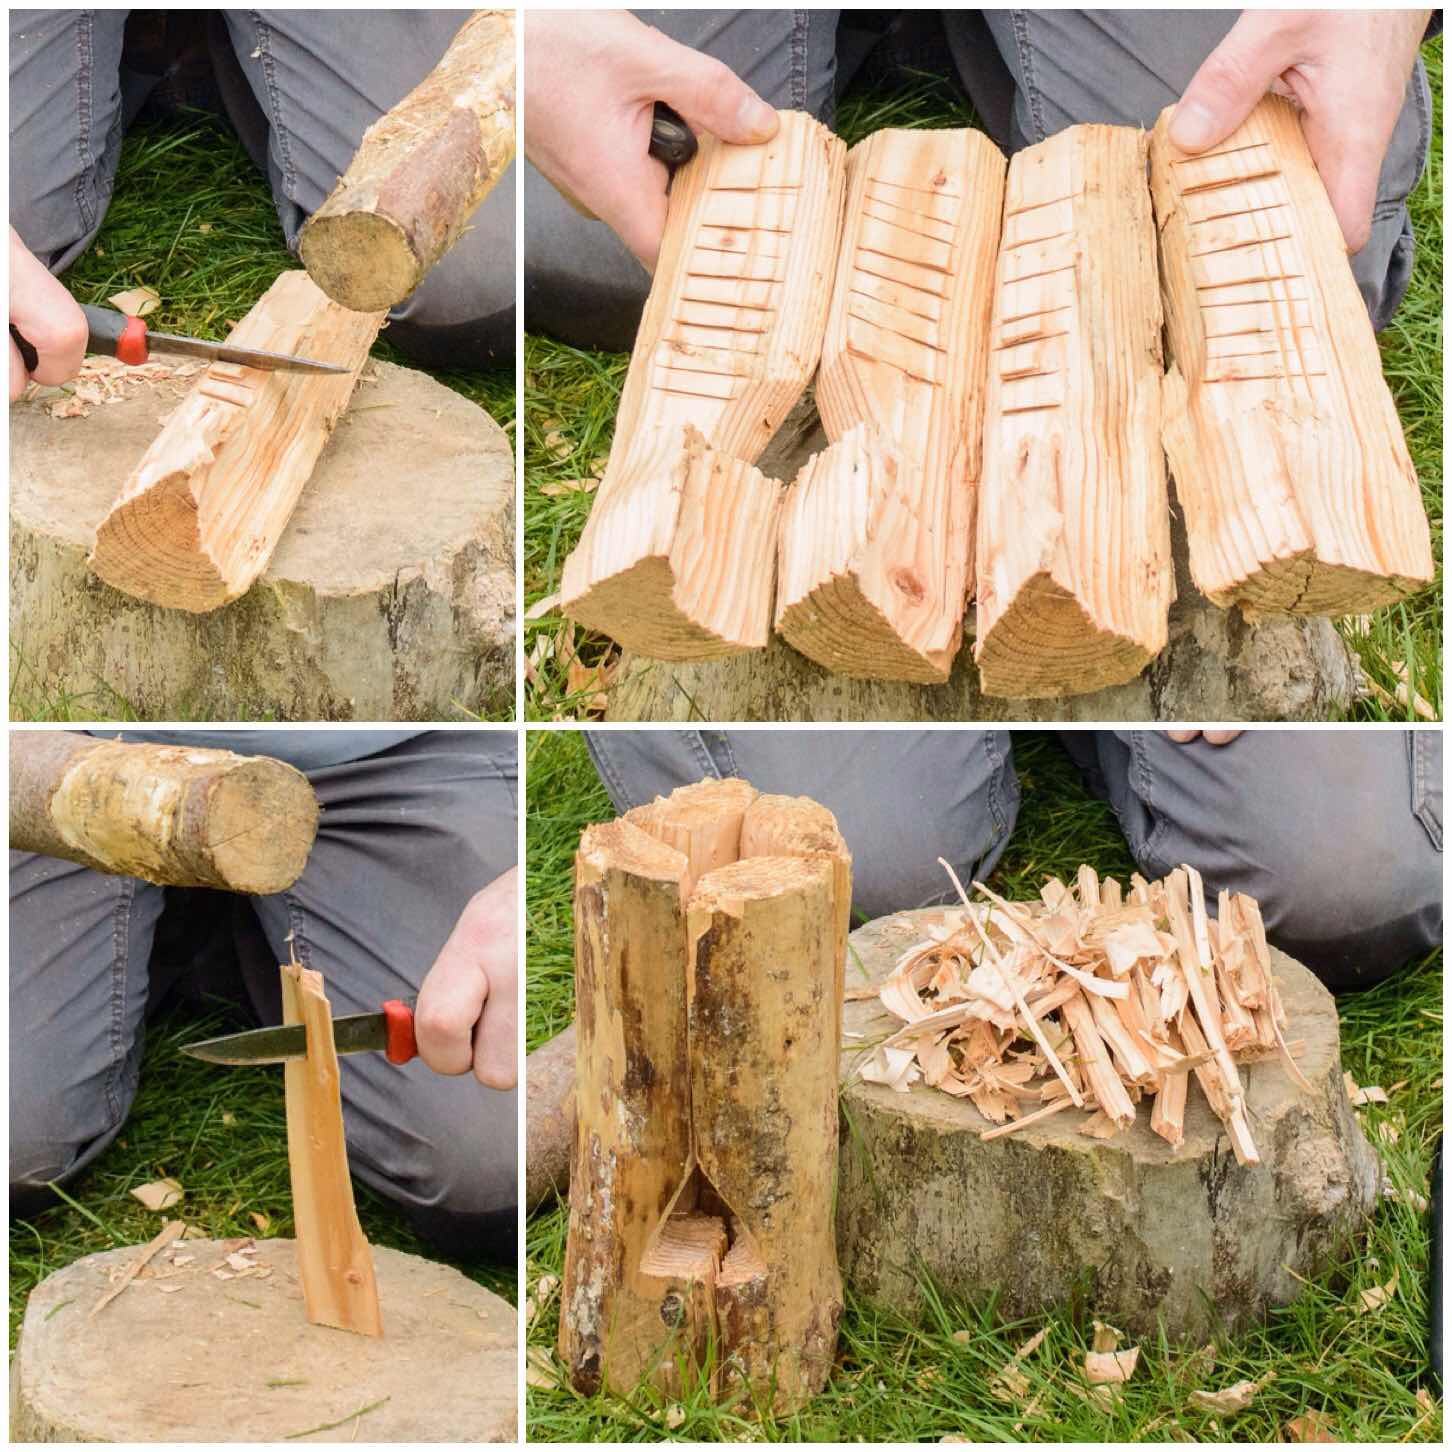
Once I had the chimney battoned out I trimmed off some excess wood from Segment 1 and then used a pencil to mark out the chimney area.
I did this so I could put some Raappanan tuli cuts into the chimney area. It is important to keep the sections of the log rocket that join together as smooth as possible for a good fit so marking out the chimney area ensures I do not cut into the wrong area.
Trimming & Marking out the chimney
The Raappanan tuli cuts are fairly simple to make with my axe. I just ensured I cut only into the wood in the chimney area and that the cuts were made upwards, towards the top of the chimney.
These cuts are particularly helpful when using damp wood as it offers far more surface area to the initial flame, allowing it to catch more quickly, and also it helps to dry the damp wood out.
Raappanan tuli cuts
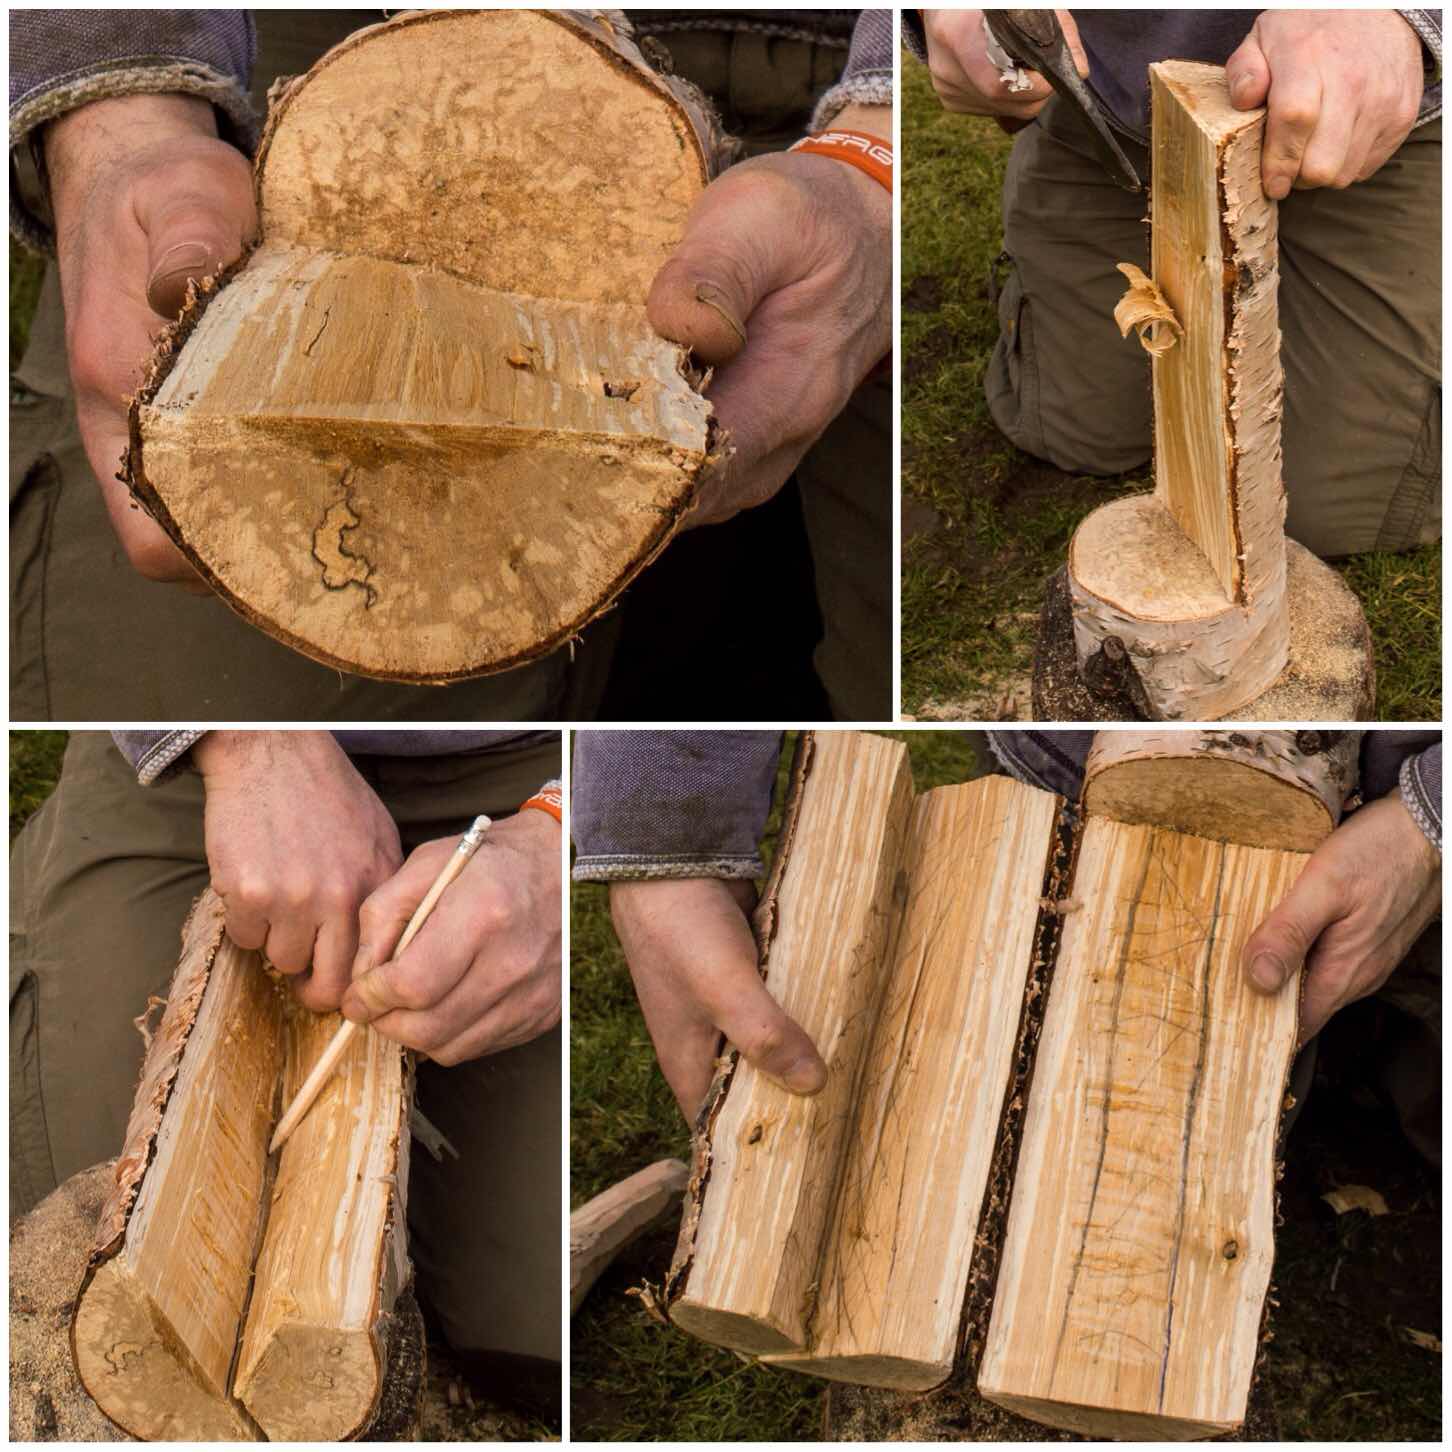
The Firebox
The next stage I worked on was the firebox opening. This can be done in a number of different way however I elected to go for a triangular opening.
I formed the opening by cutting a small triangle at the base of both pieces from Segment 2. I also tapered the inside of the cuts to open the firebox up a bit. I made this firebox slightly larger than normal as the wood was very damp. My thought was that the extra air intake would help to keep the fire going at the start before the insides of the stove became fully lit.
The firebox opening
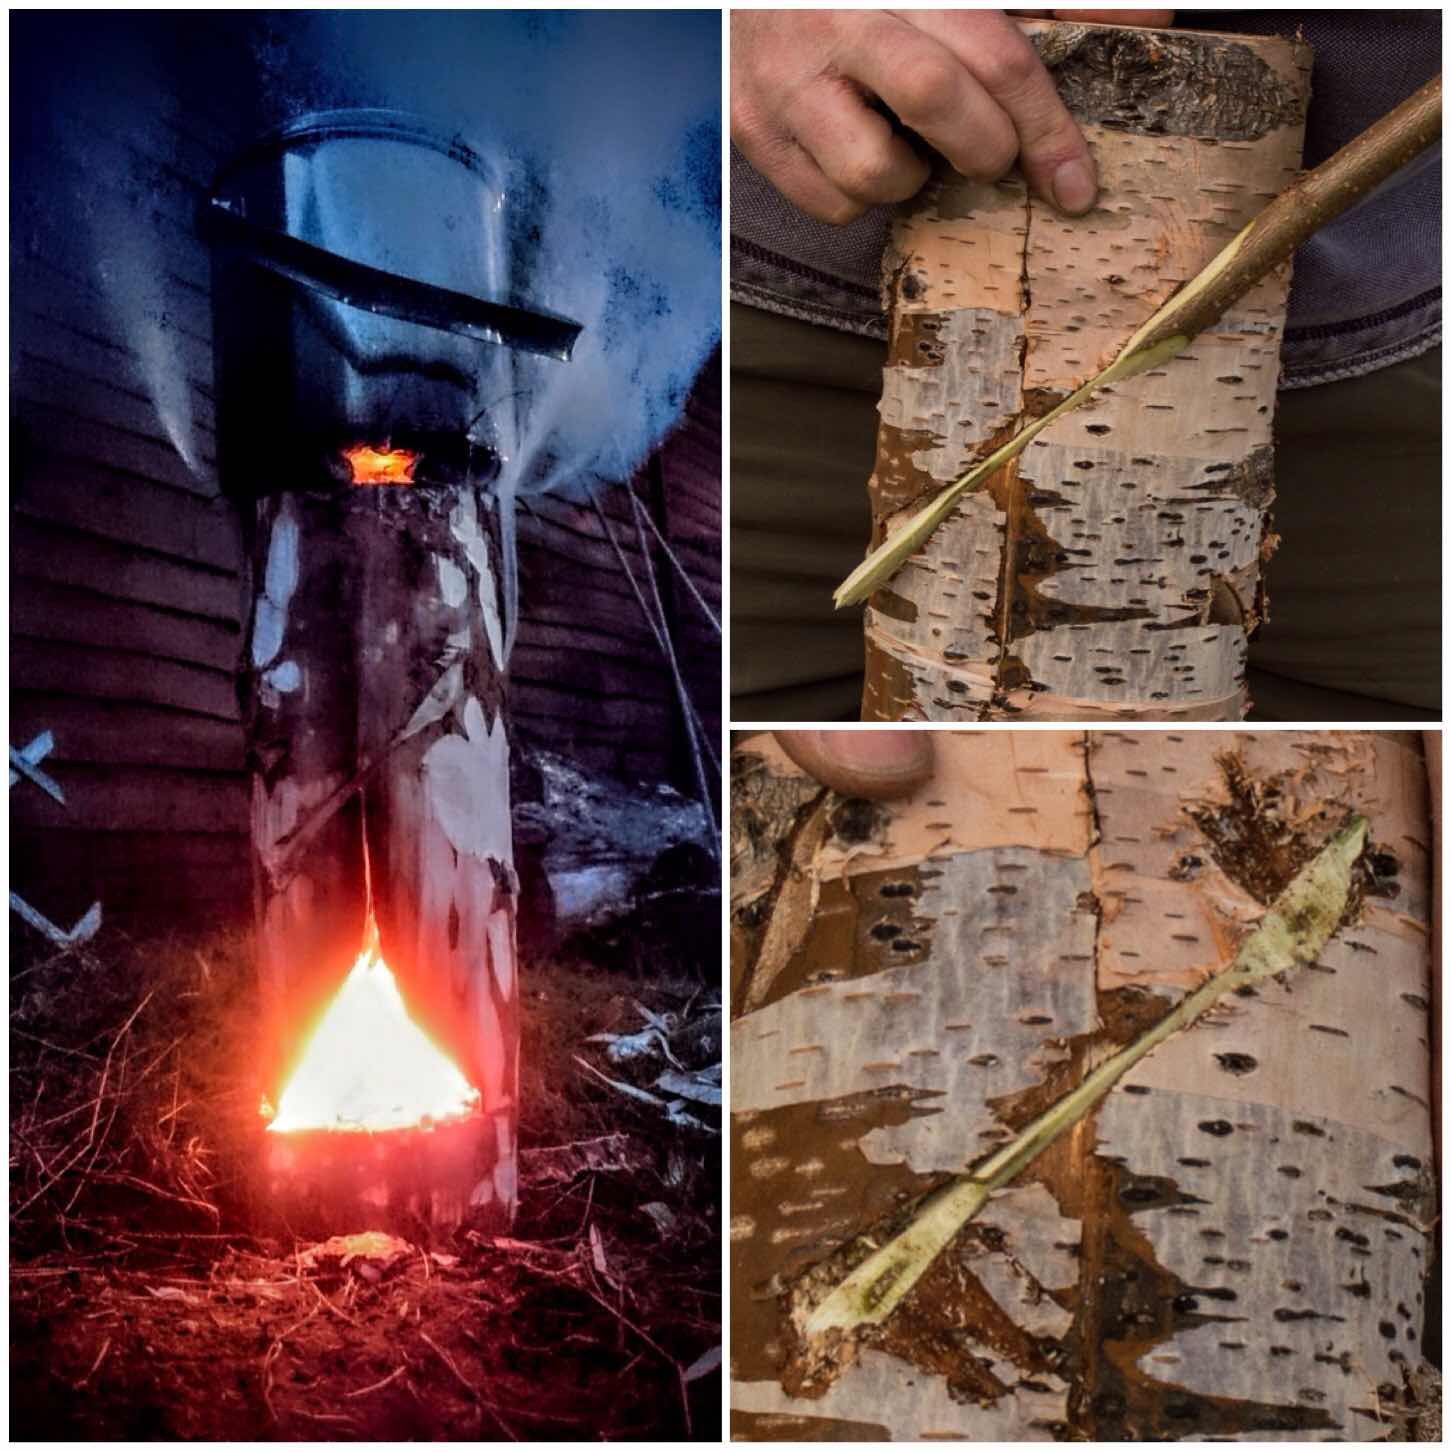
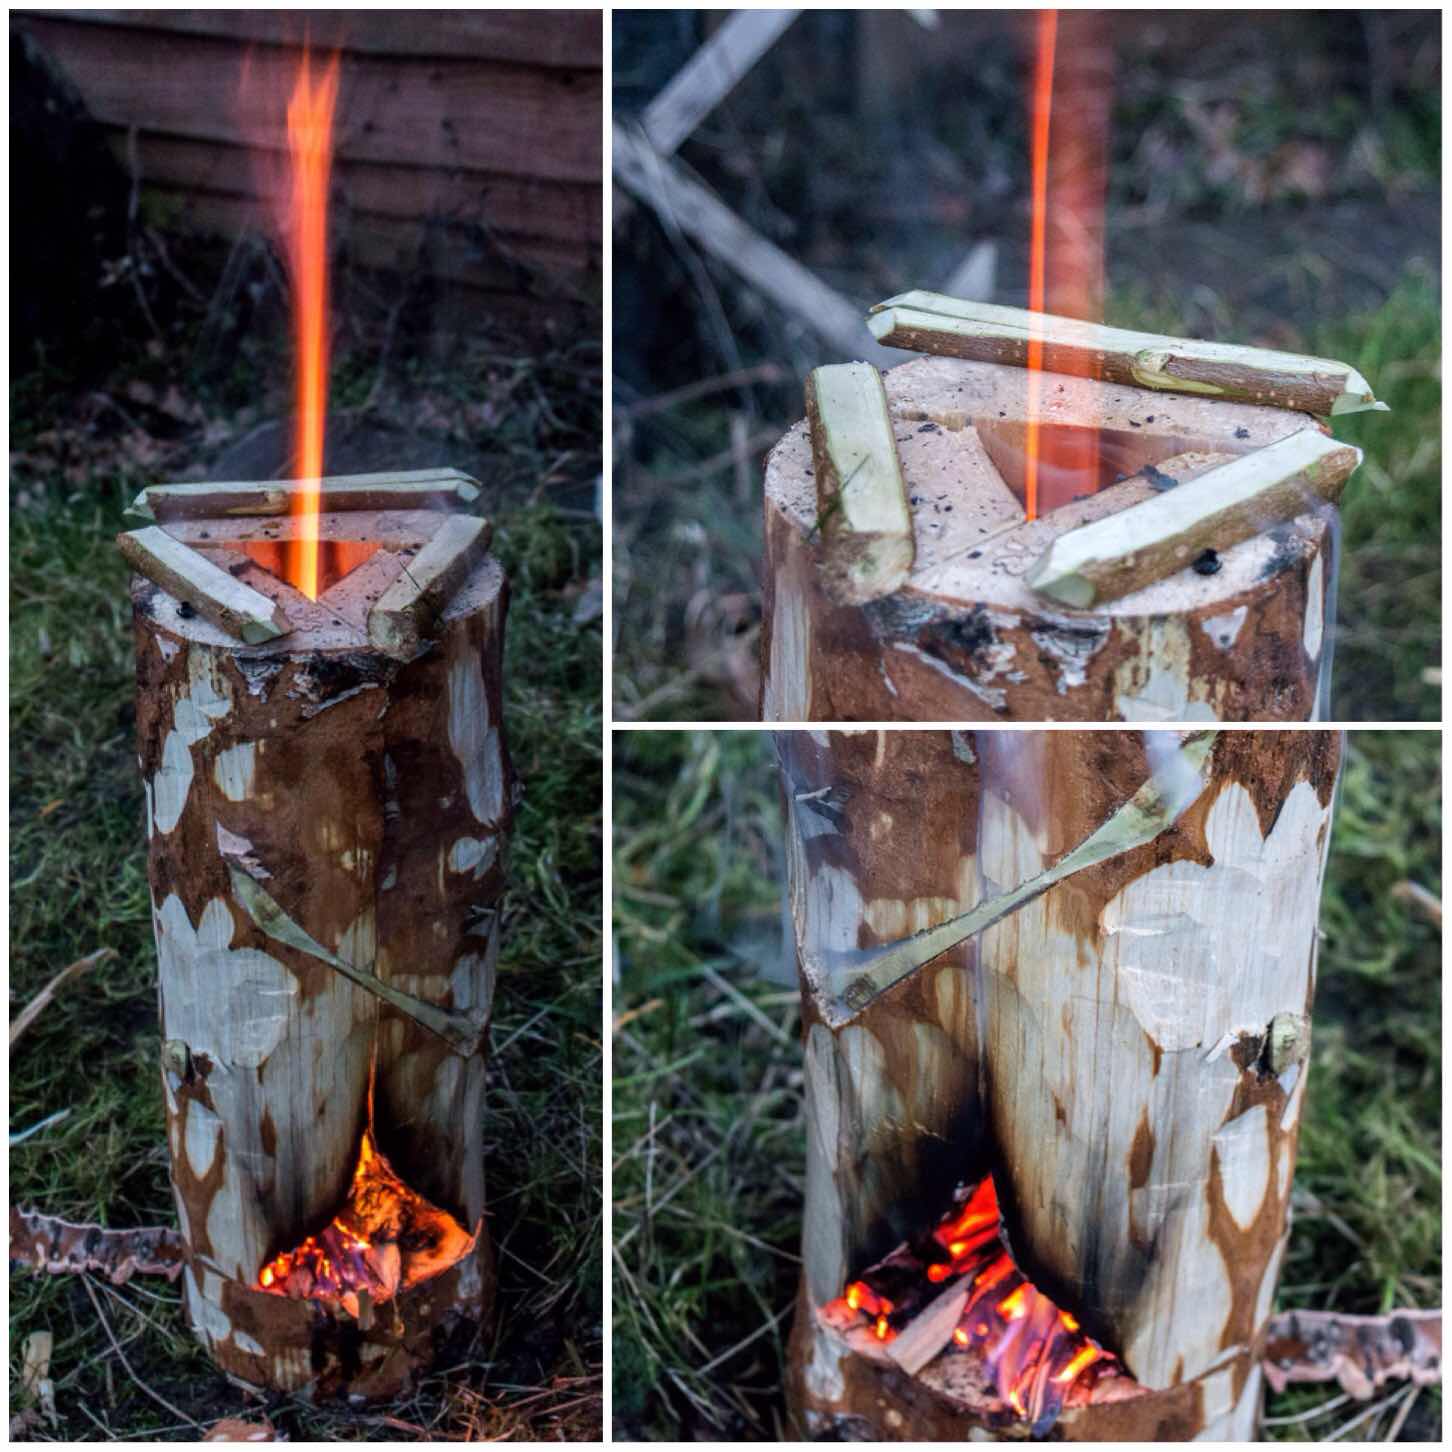
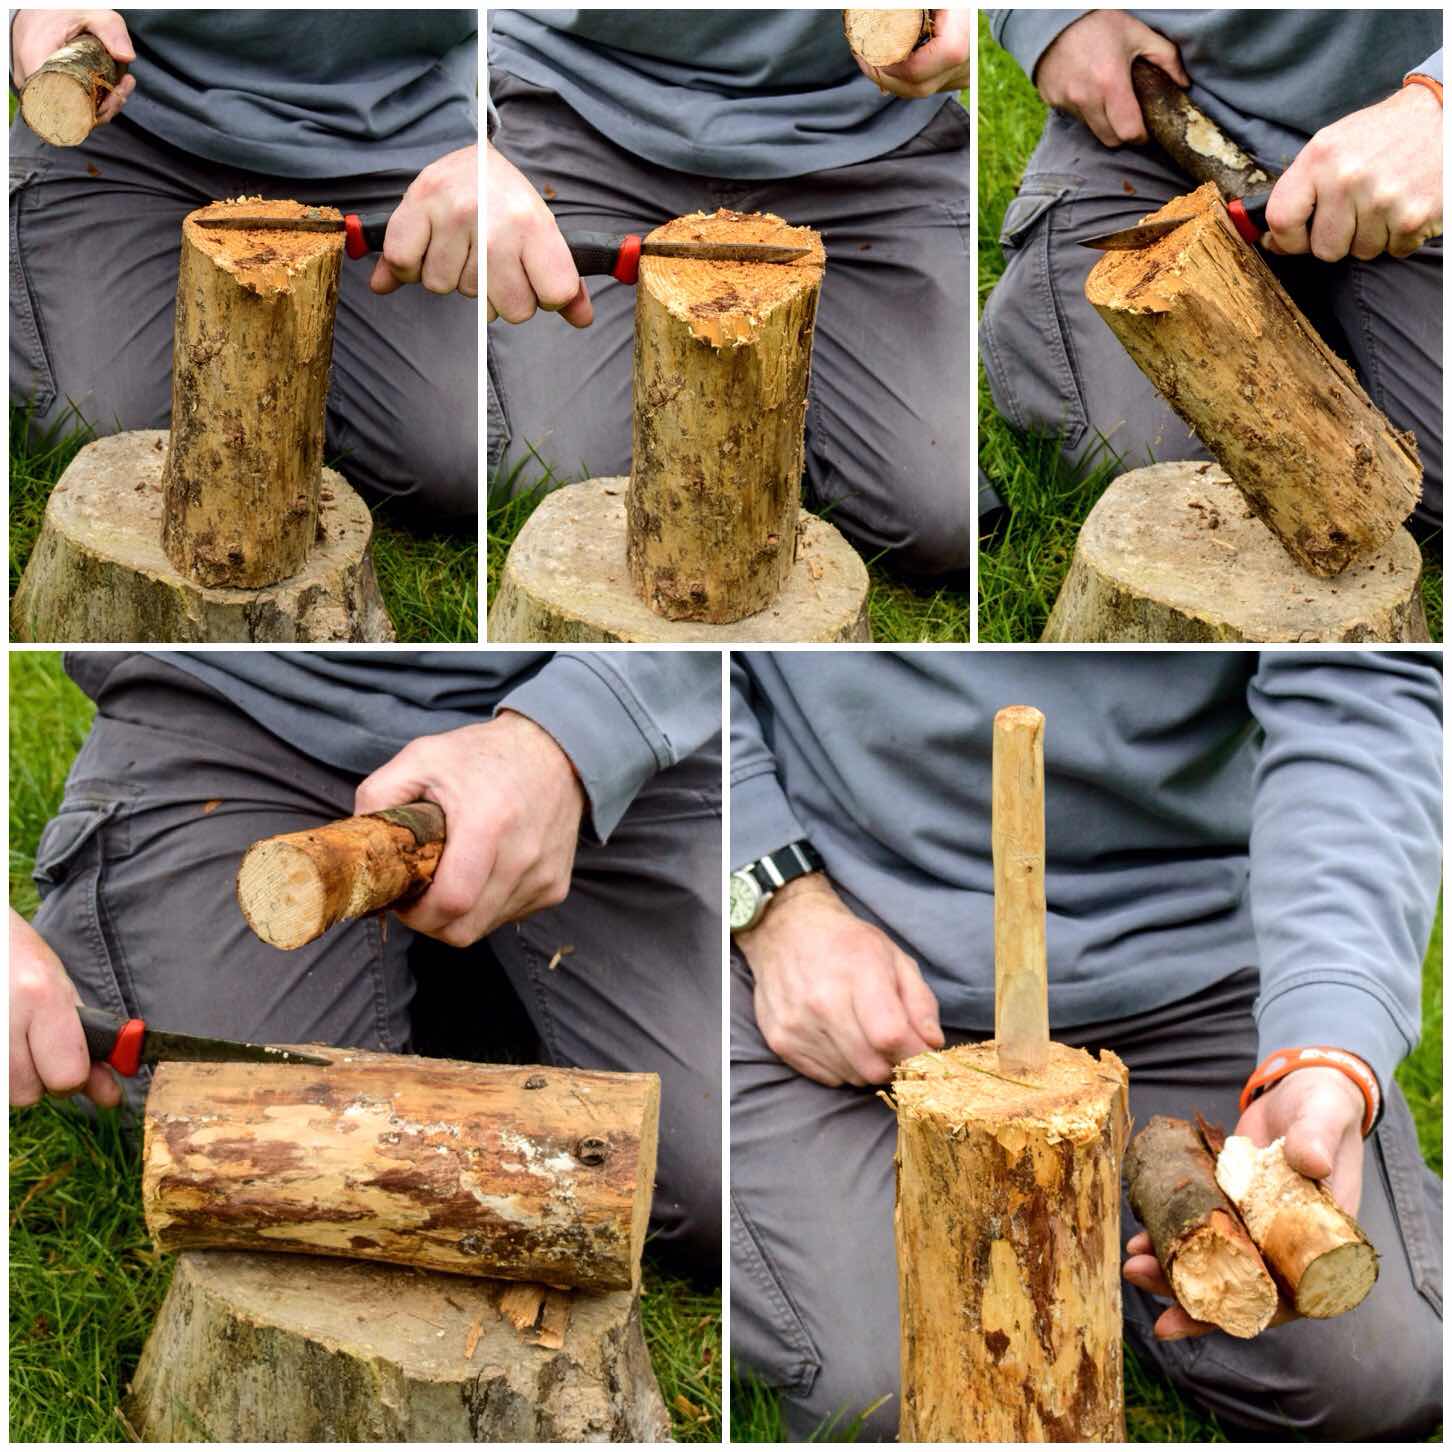
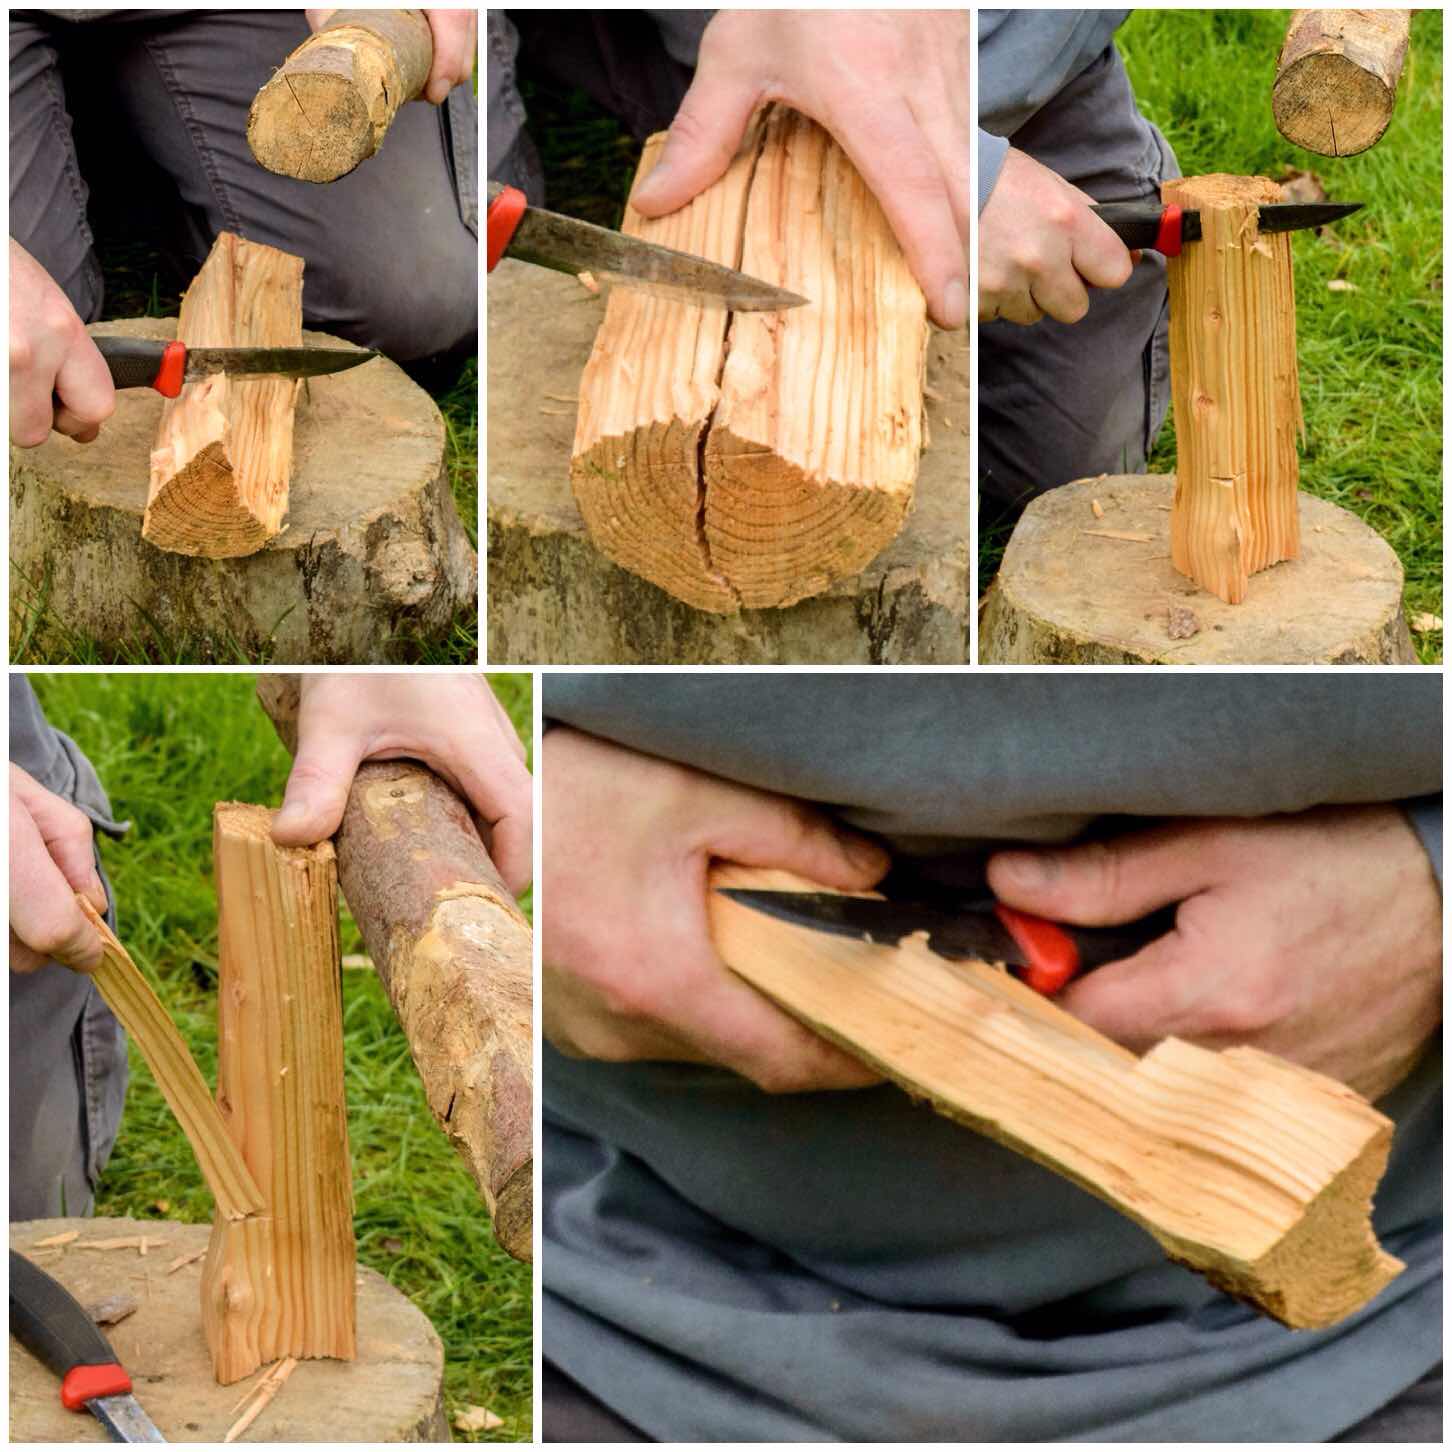
The Dovetail Joints
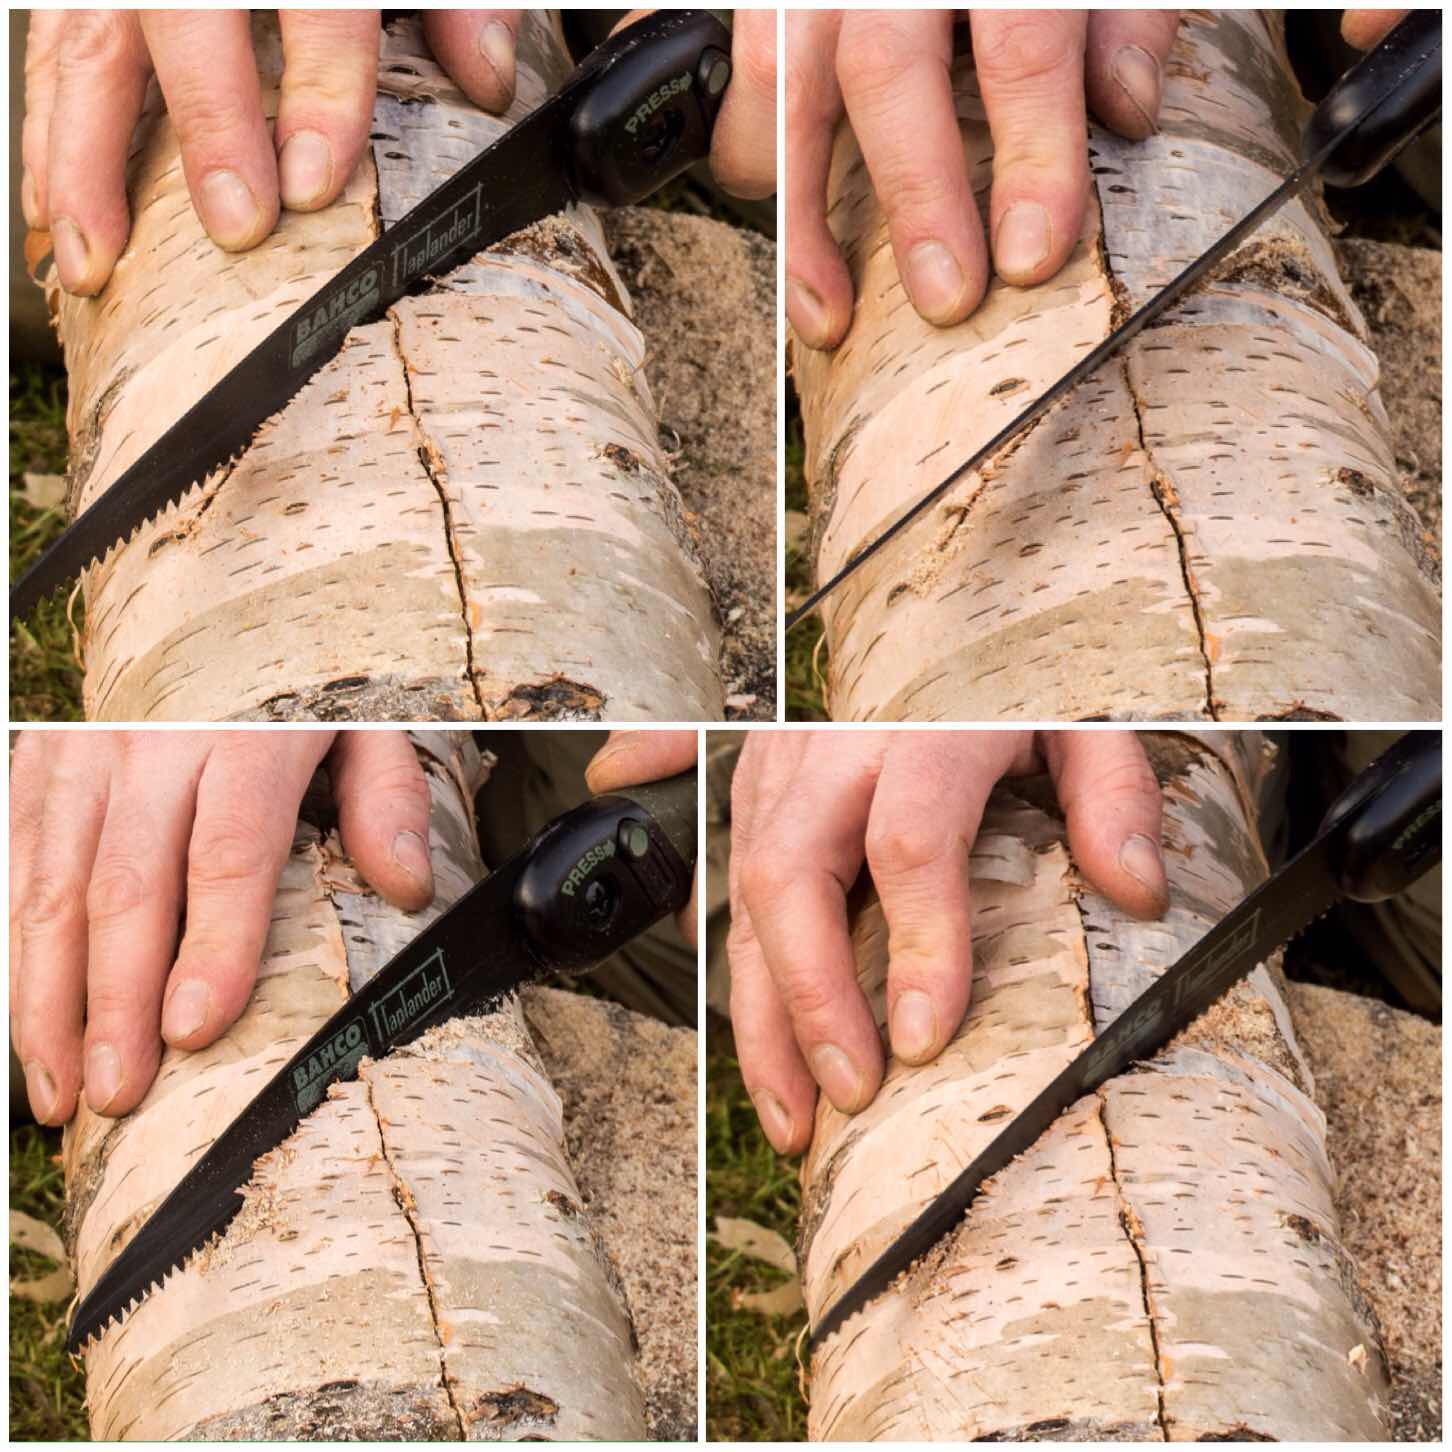
These joints were a total experiment. I put all the pieces together again and, holding them tightly, sawed a line to the depth of a centimetre across two of the joints. (I recommend you use some string or maybe a belt to hold everything together as you make the cuts – I didn’t and I wished I had.)
I then did the same cut but flared my saw out slightly (about 45 degrees) to the same depth. I then repeated the cut with the saw flared out 45 degrees in the opposite direction to the original cut to the same depth (there will be a picture of the cut further down the post).
Once that was done I used my saw like a rasp to carve out all the excess wood to form what is called the dovetail ‘Tail’.
Cutting out the ‘Tails’
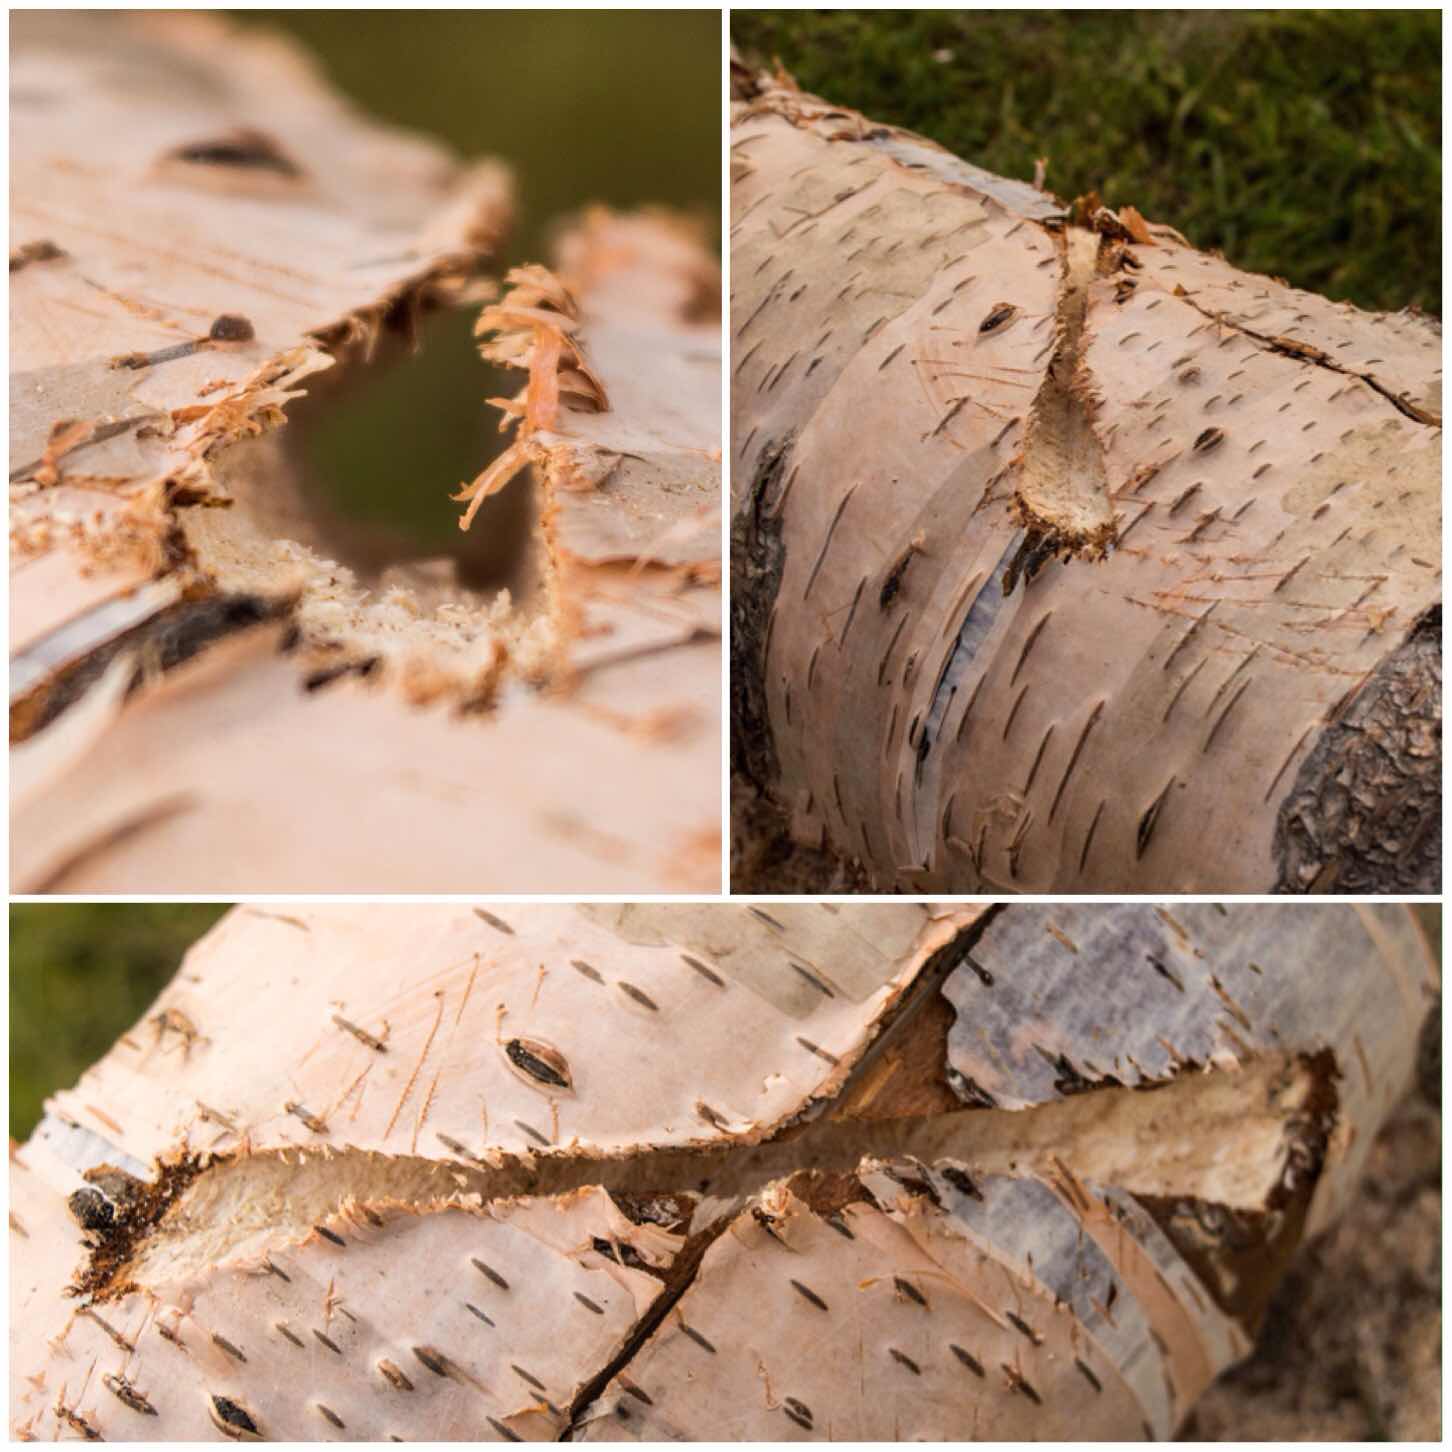
Below you can see this ‘Tail’ part of the dovetail joint. It forms what I think of as a bow tie shape when done properly. The important point is to start each cut from the same place, saw to the same depth each time and ensure that the middle of the tail is centred over the split in the segments.
I found that as I had not strapped the segments together I had to really hold them firmly together – this is where you will appreciate your belt or piece of string. Also while sawing these ‘Tails’ in be aware at all times where the saw is in relation to your thumb and forefinger on the hand holding the stove.
I made three of these tails (one over each split) to hold all the segments together.
The Tails
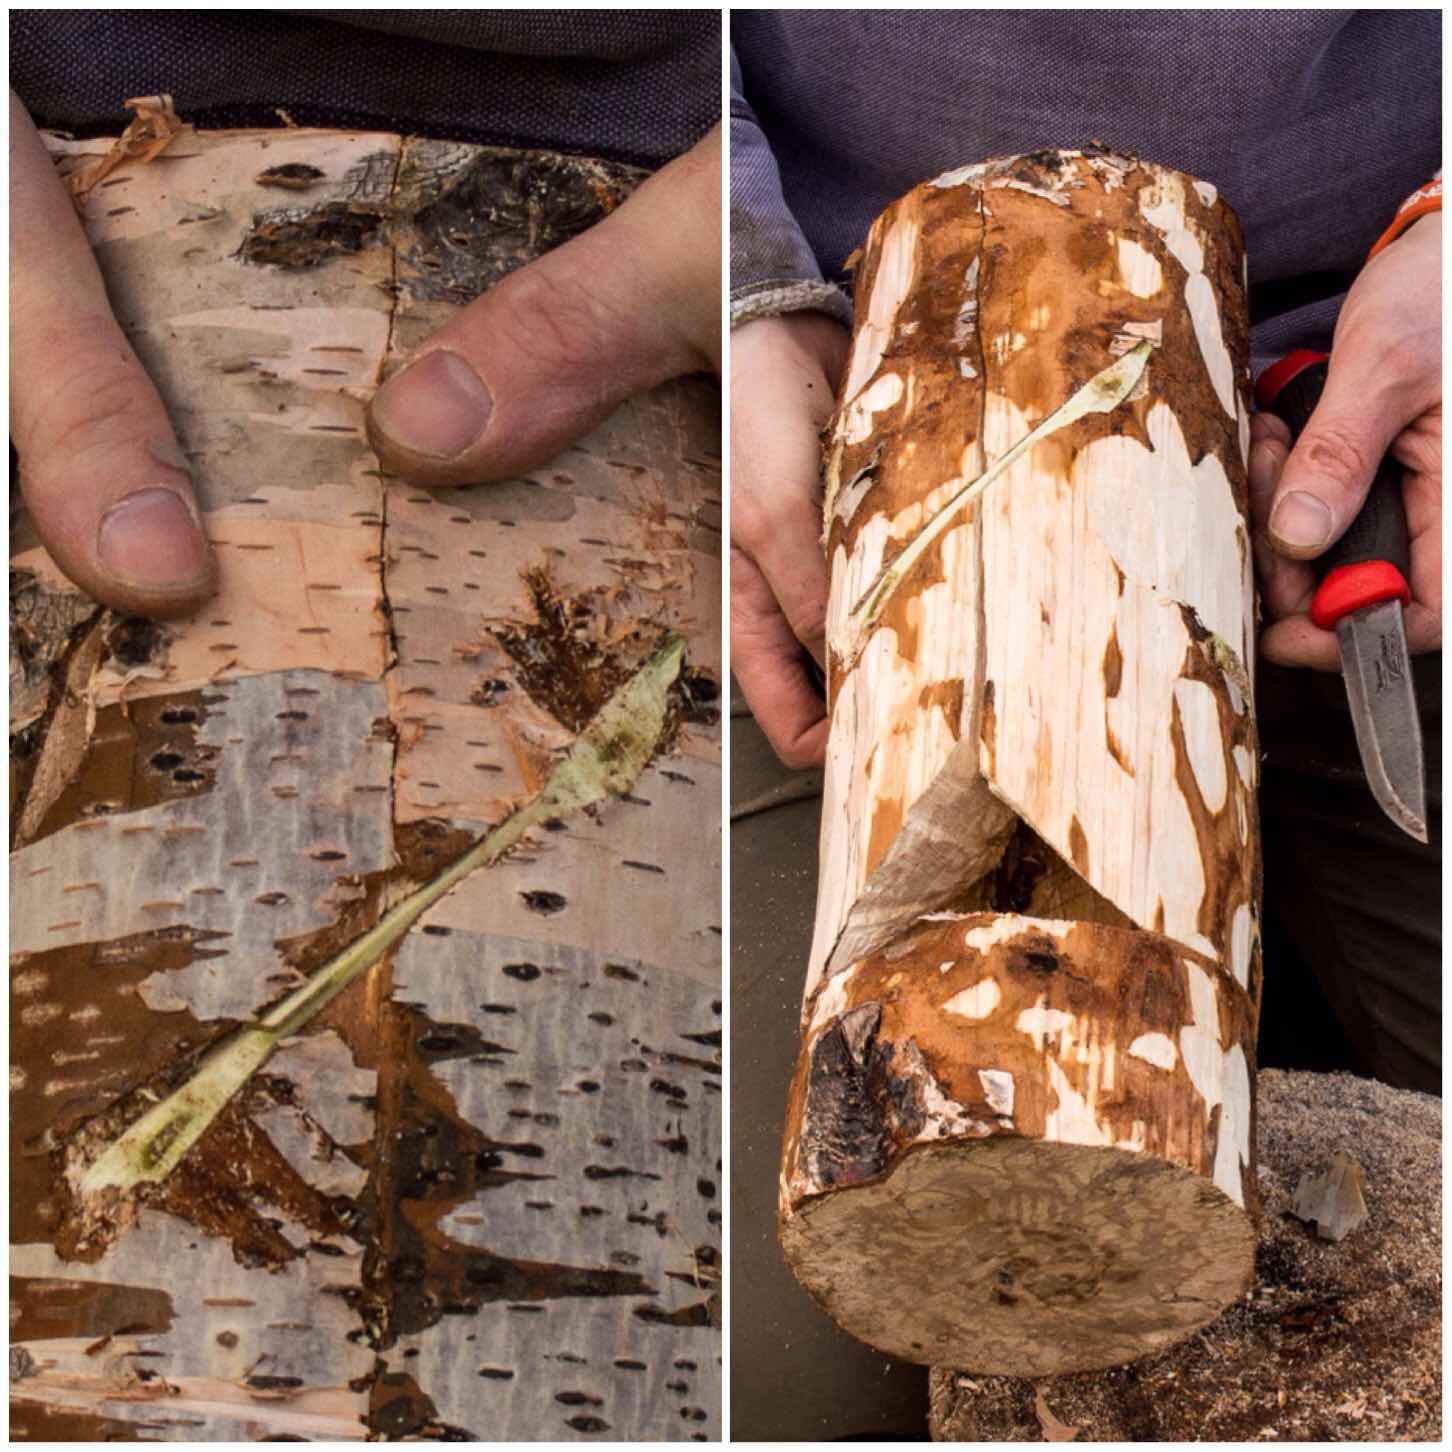
To hold the segments together you need to carve some ‘Pins’ to insert into the ‘Tails’. I used green hazel wood to make the pins and made sure that they were carved into a triangular shape but initially too big for the tail.
Carving in this manner allowed me to insert the pin into the tail and then progressively carve off smaller pieces from the pin until it started to slide in. I also used my large piece of wood to hammer the pins in to ensure a very tight fit.
If you find that your pin is too small just get a fresh piece of green wood and try again. They only take seconds to make. To finish the pins off I trimmed the ends with my saw.
Cutting and inserting the ‘Pins’
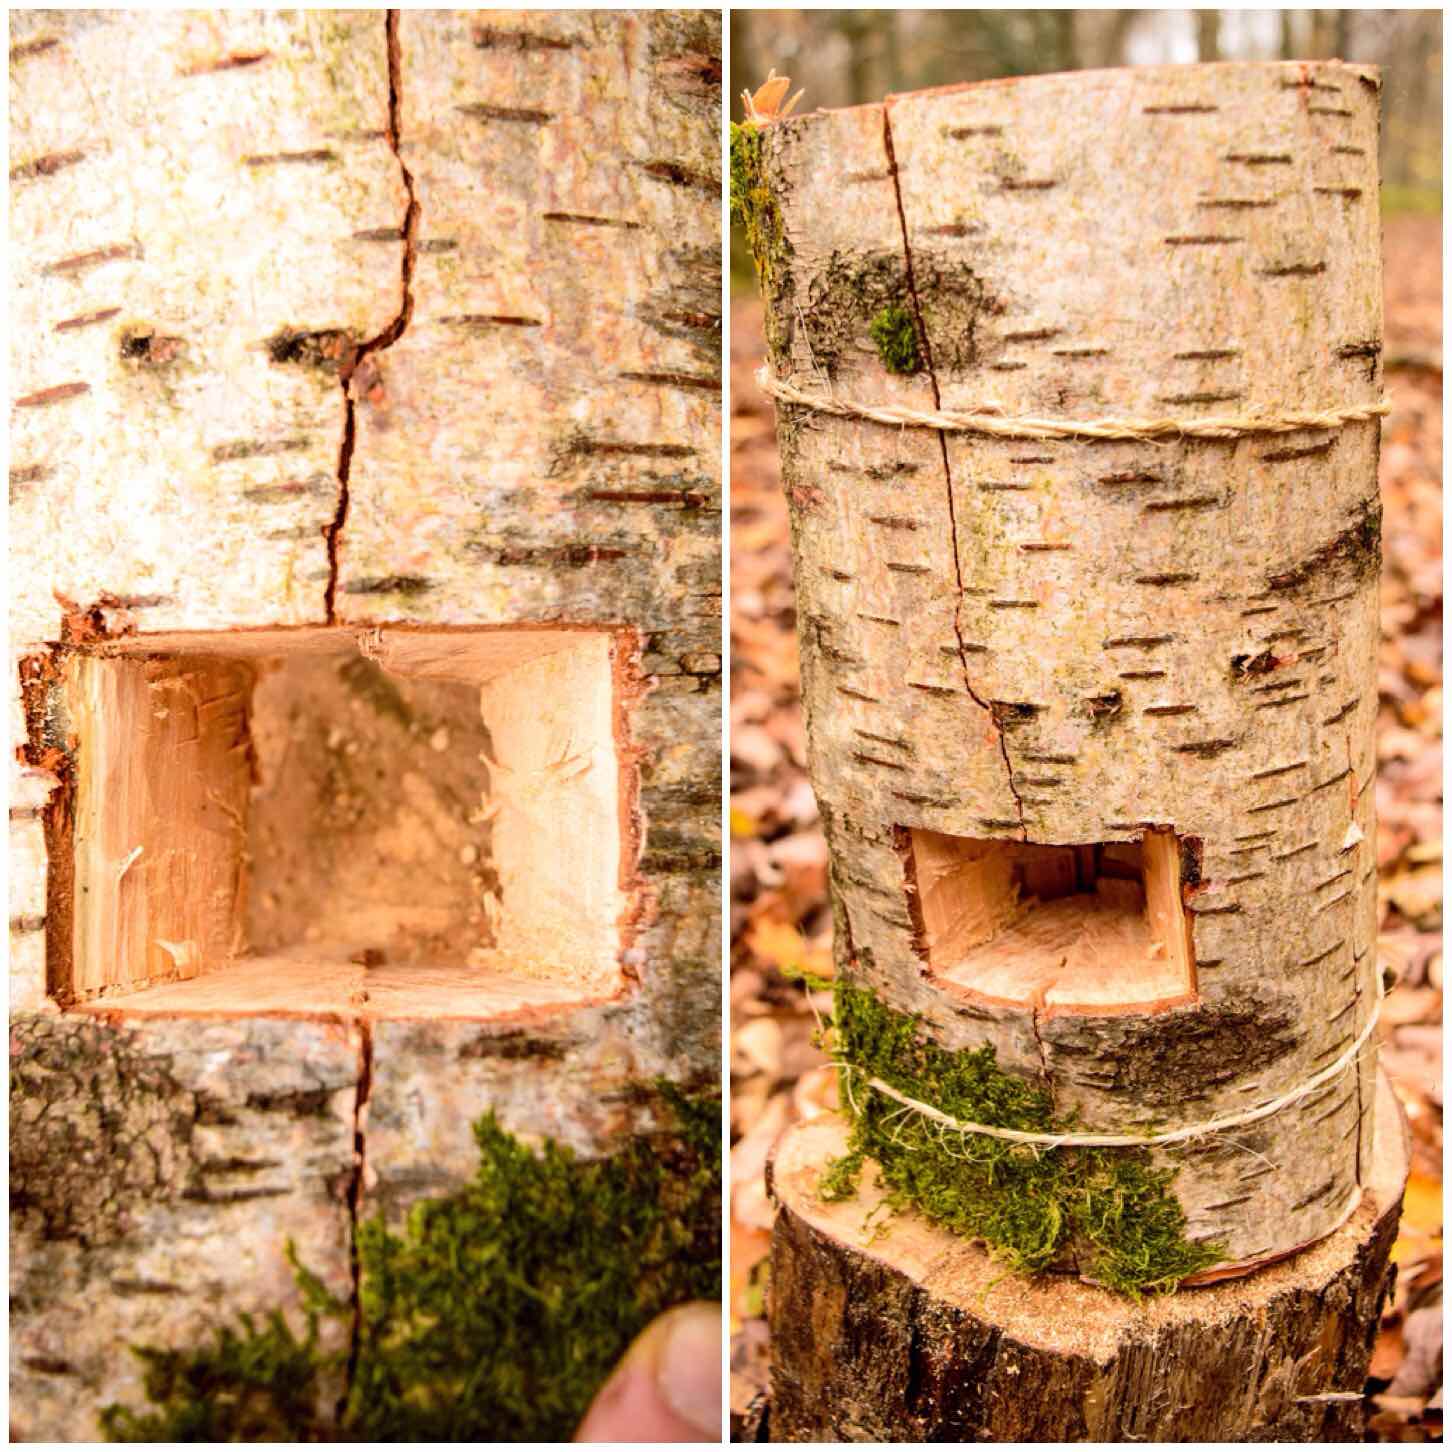
As the bark of the birch tree is very flammable I stripped it all off and kept it to the side to use later as kindling to get the fire started. The dovetail joints if fitted snugly will keep all the segments locked together tightly.
Trimming
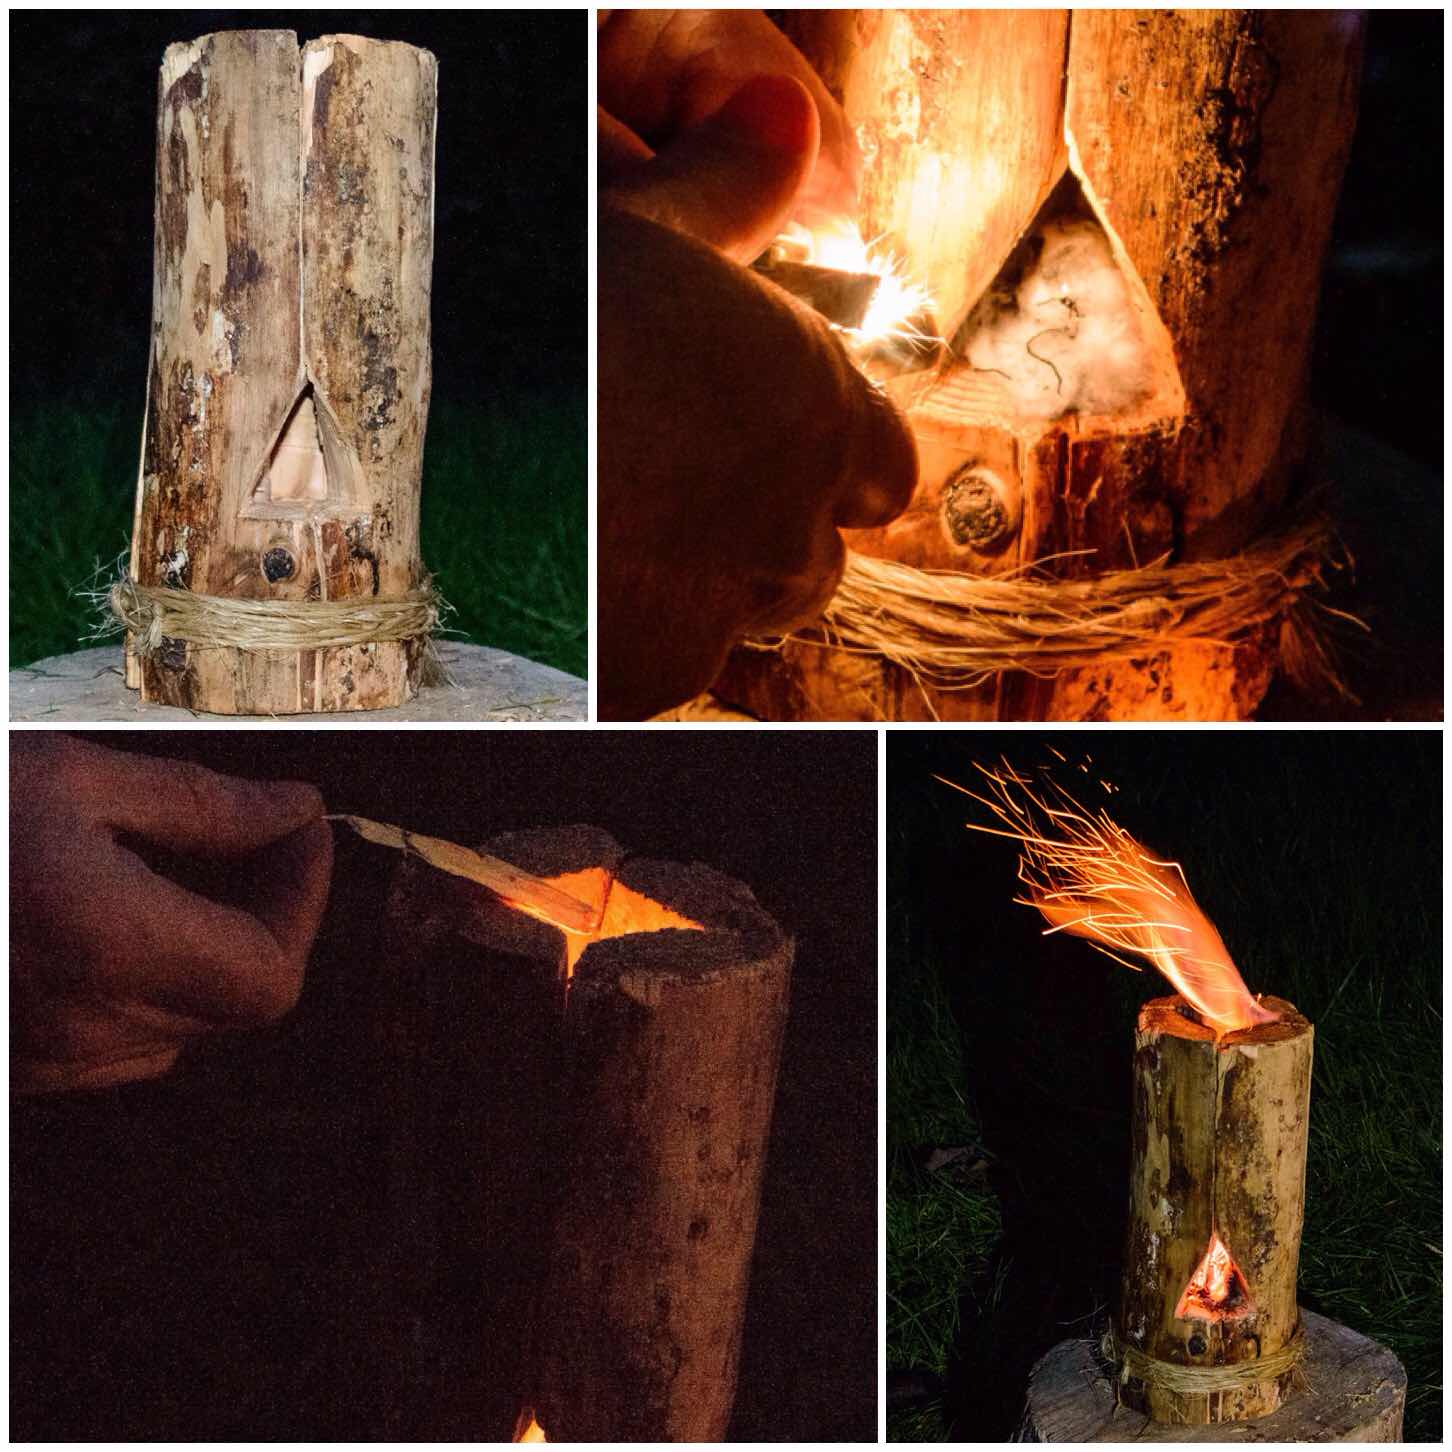
Firing Up
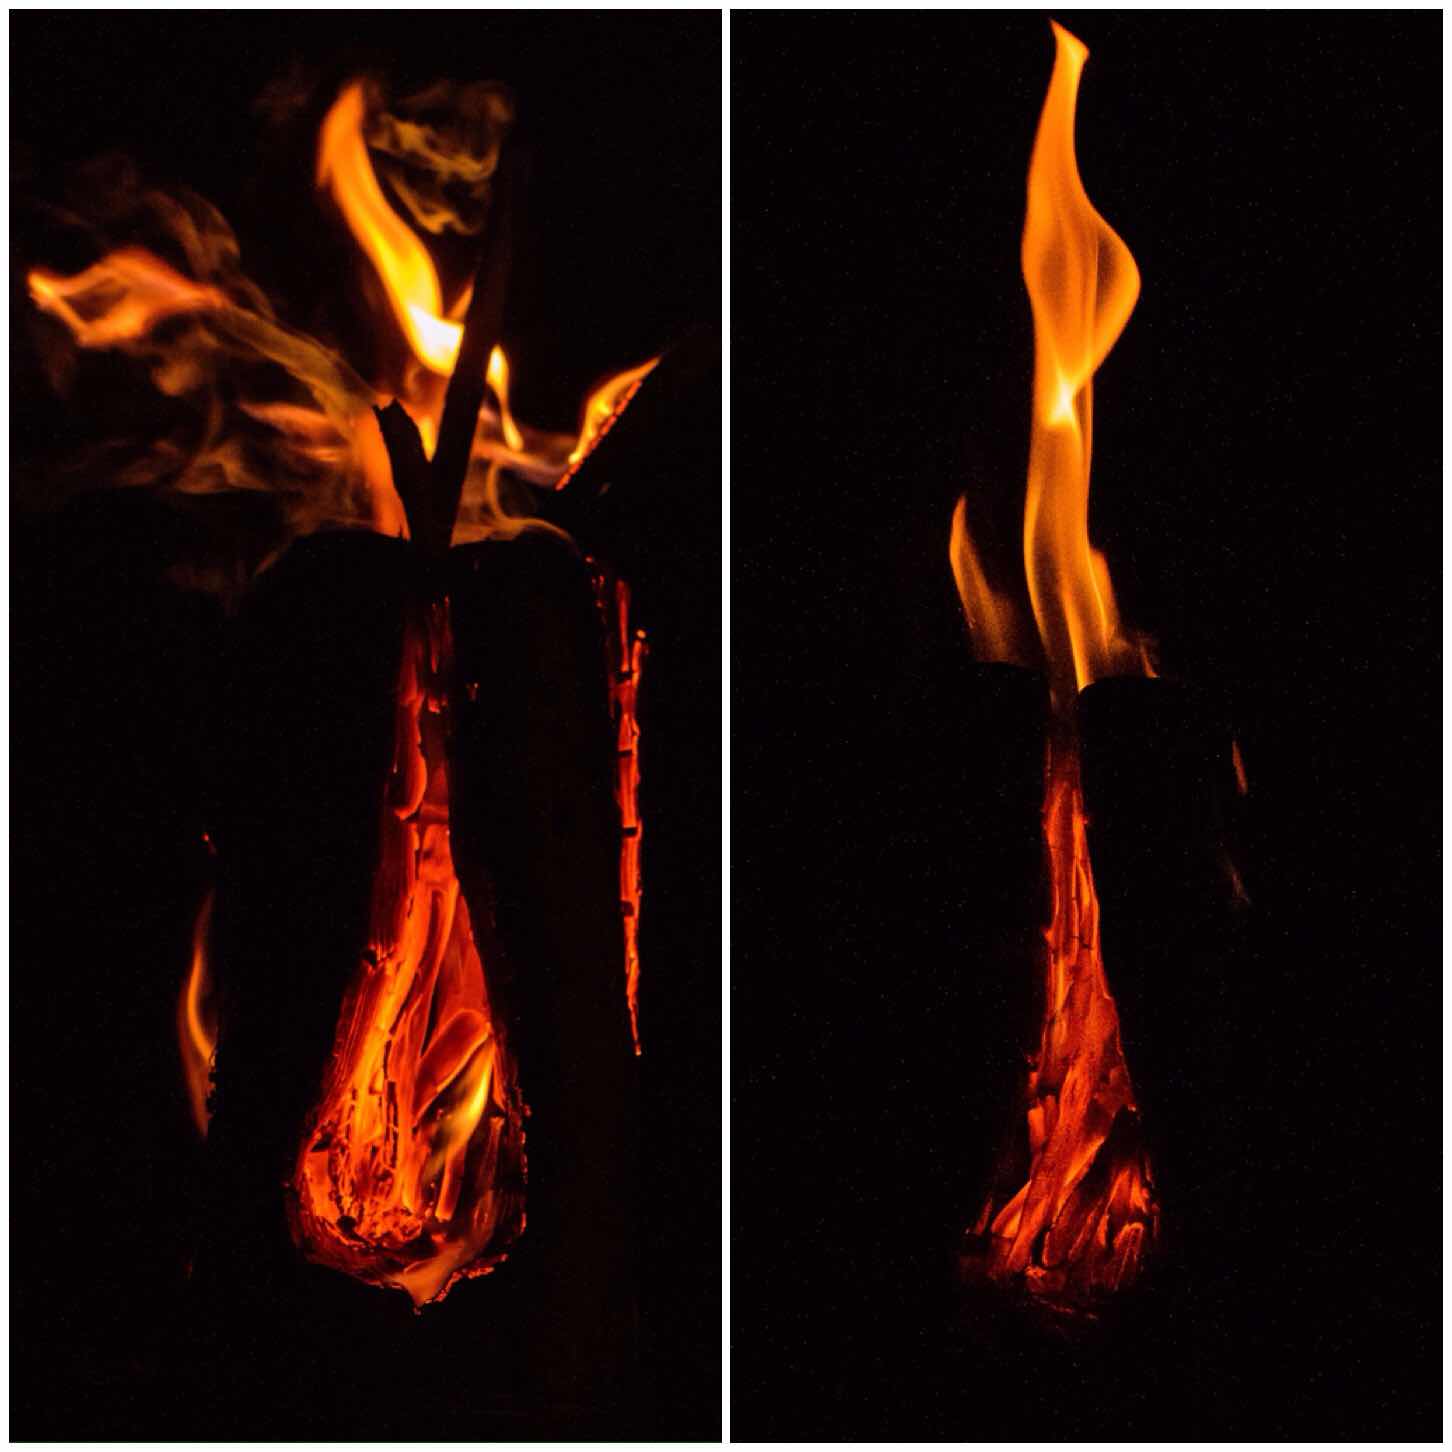
I lit the stove with some Vaseline-soaked cotton wool balls (which I always carry with me) because everything was so damp. The wind was non existent that day so it took me a while to get the stove going well.
Normally these stoves fire up really easily when there’s a little bit of wind to create the rocket effect up through the chimney
Firing up and drying out
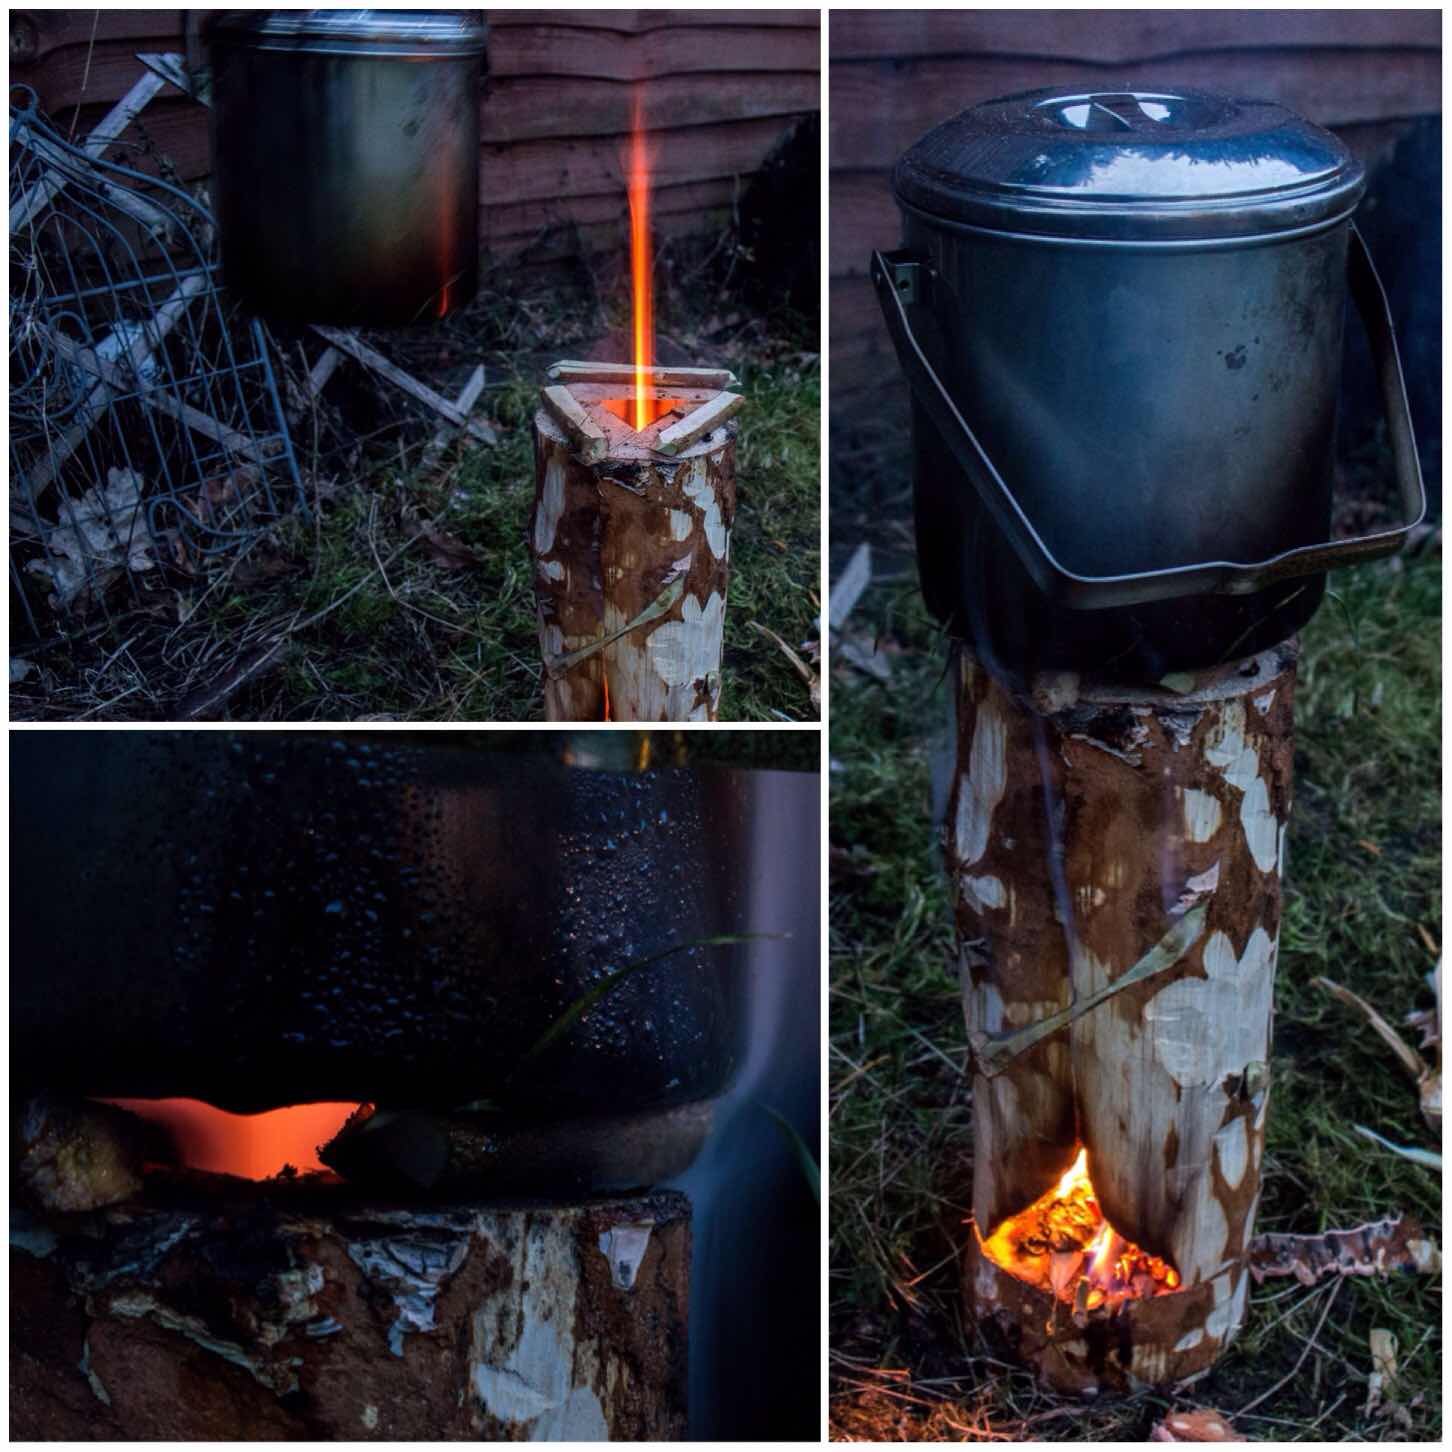
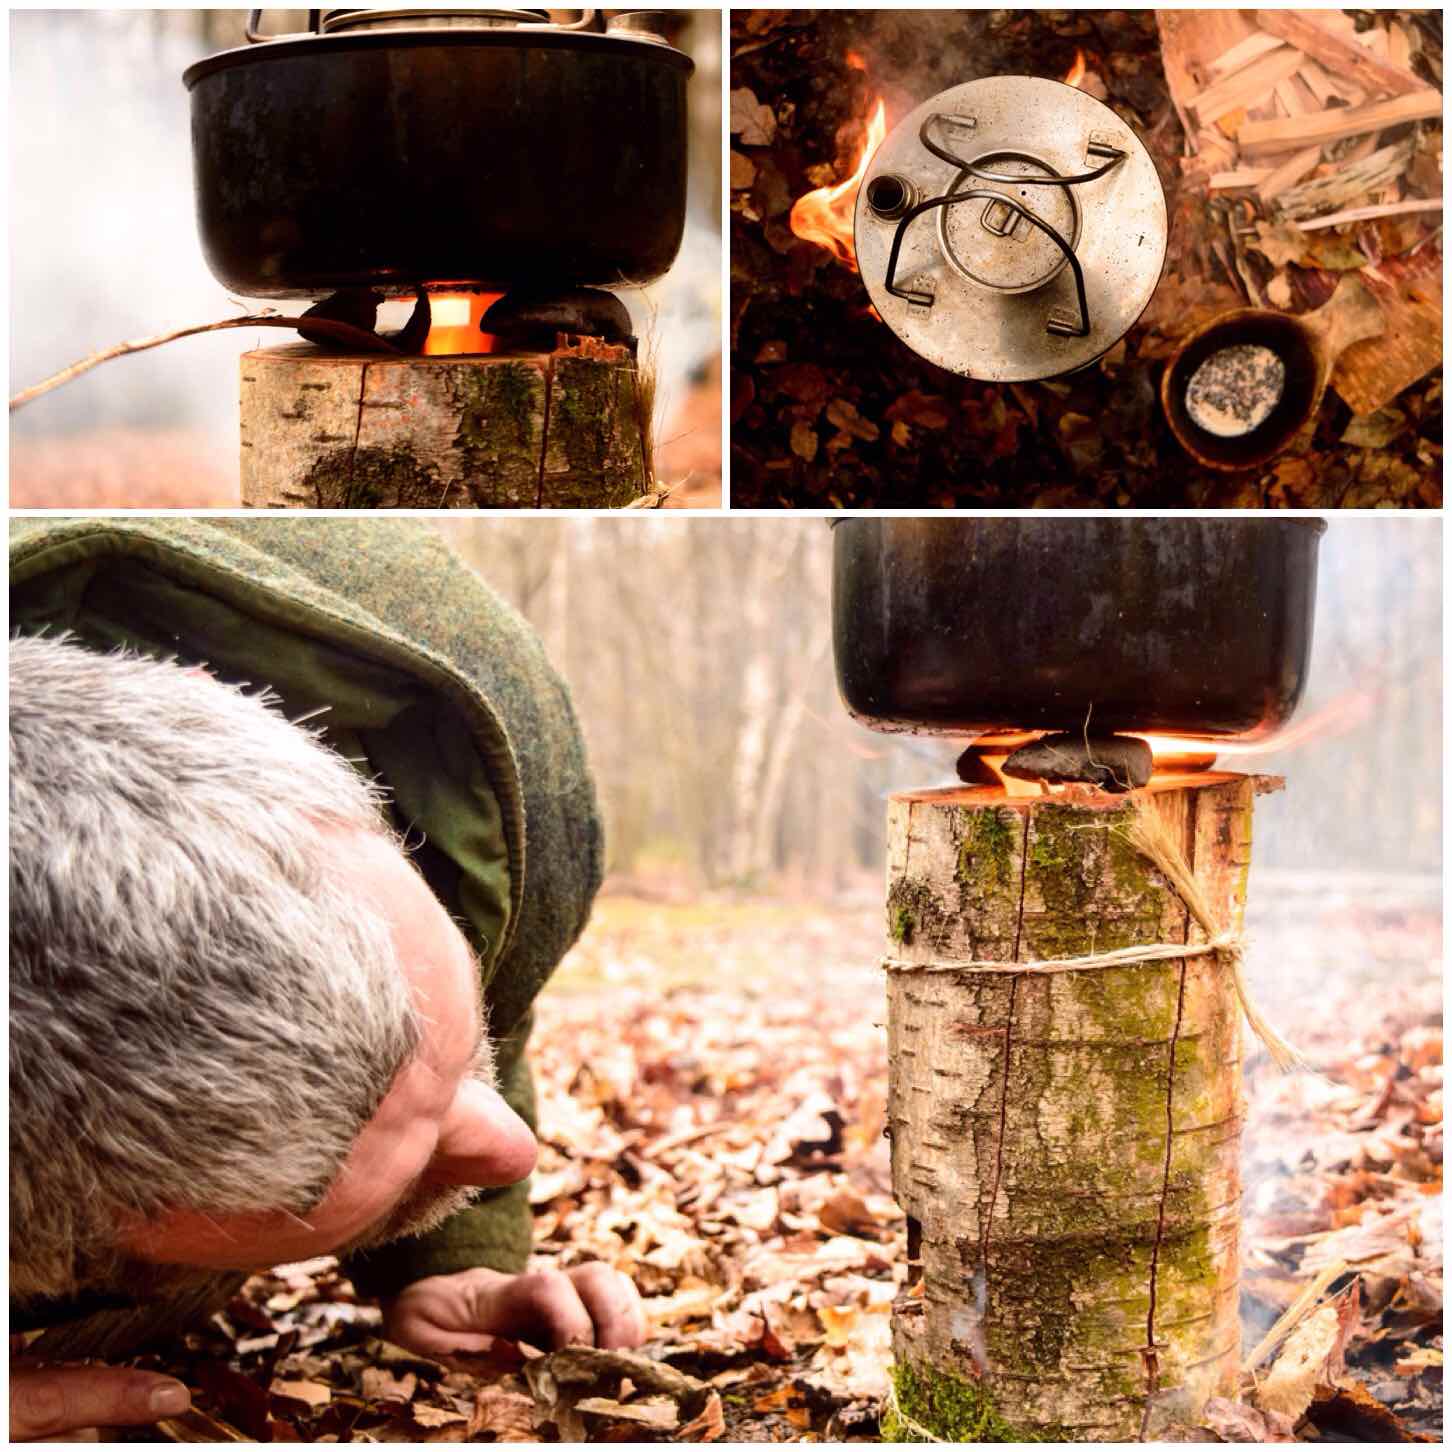
Eventually the rocket effect started and I placed three pieces of green wood onto the top for my pot to sit on. These were fairly thin pieces but would last long enough to boil some water. Have a few pieces spare on standby though if needed.
Green wood pot stand
Once the pot was on (about 10 minutes after initial burn) I needed to keep popping small pieces of wood into the fire box to keep the fire going. If your wood is really dry or resinous (like spruce or pine) you may not need to keep tending the fire as the internal walls of the chimney will probably be well lit.
Now it is a stove
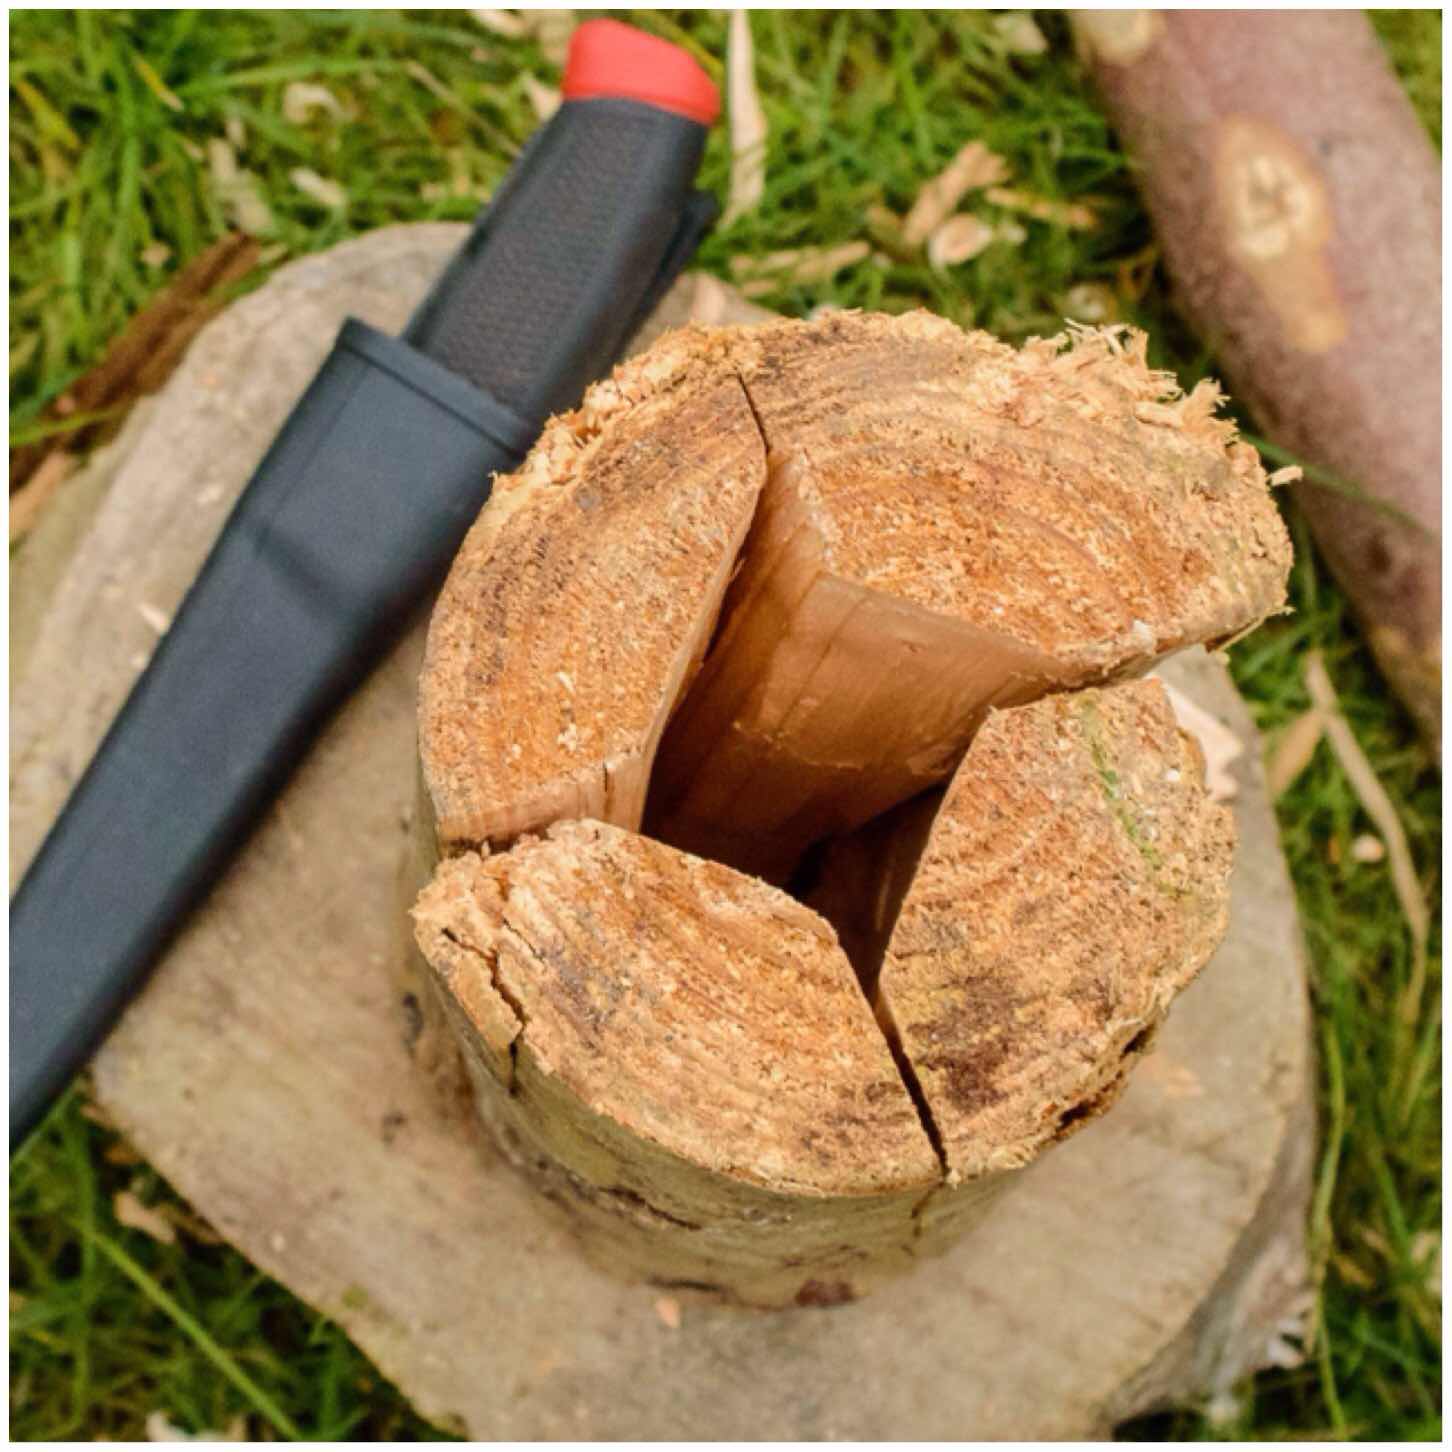
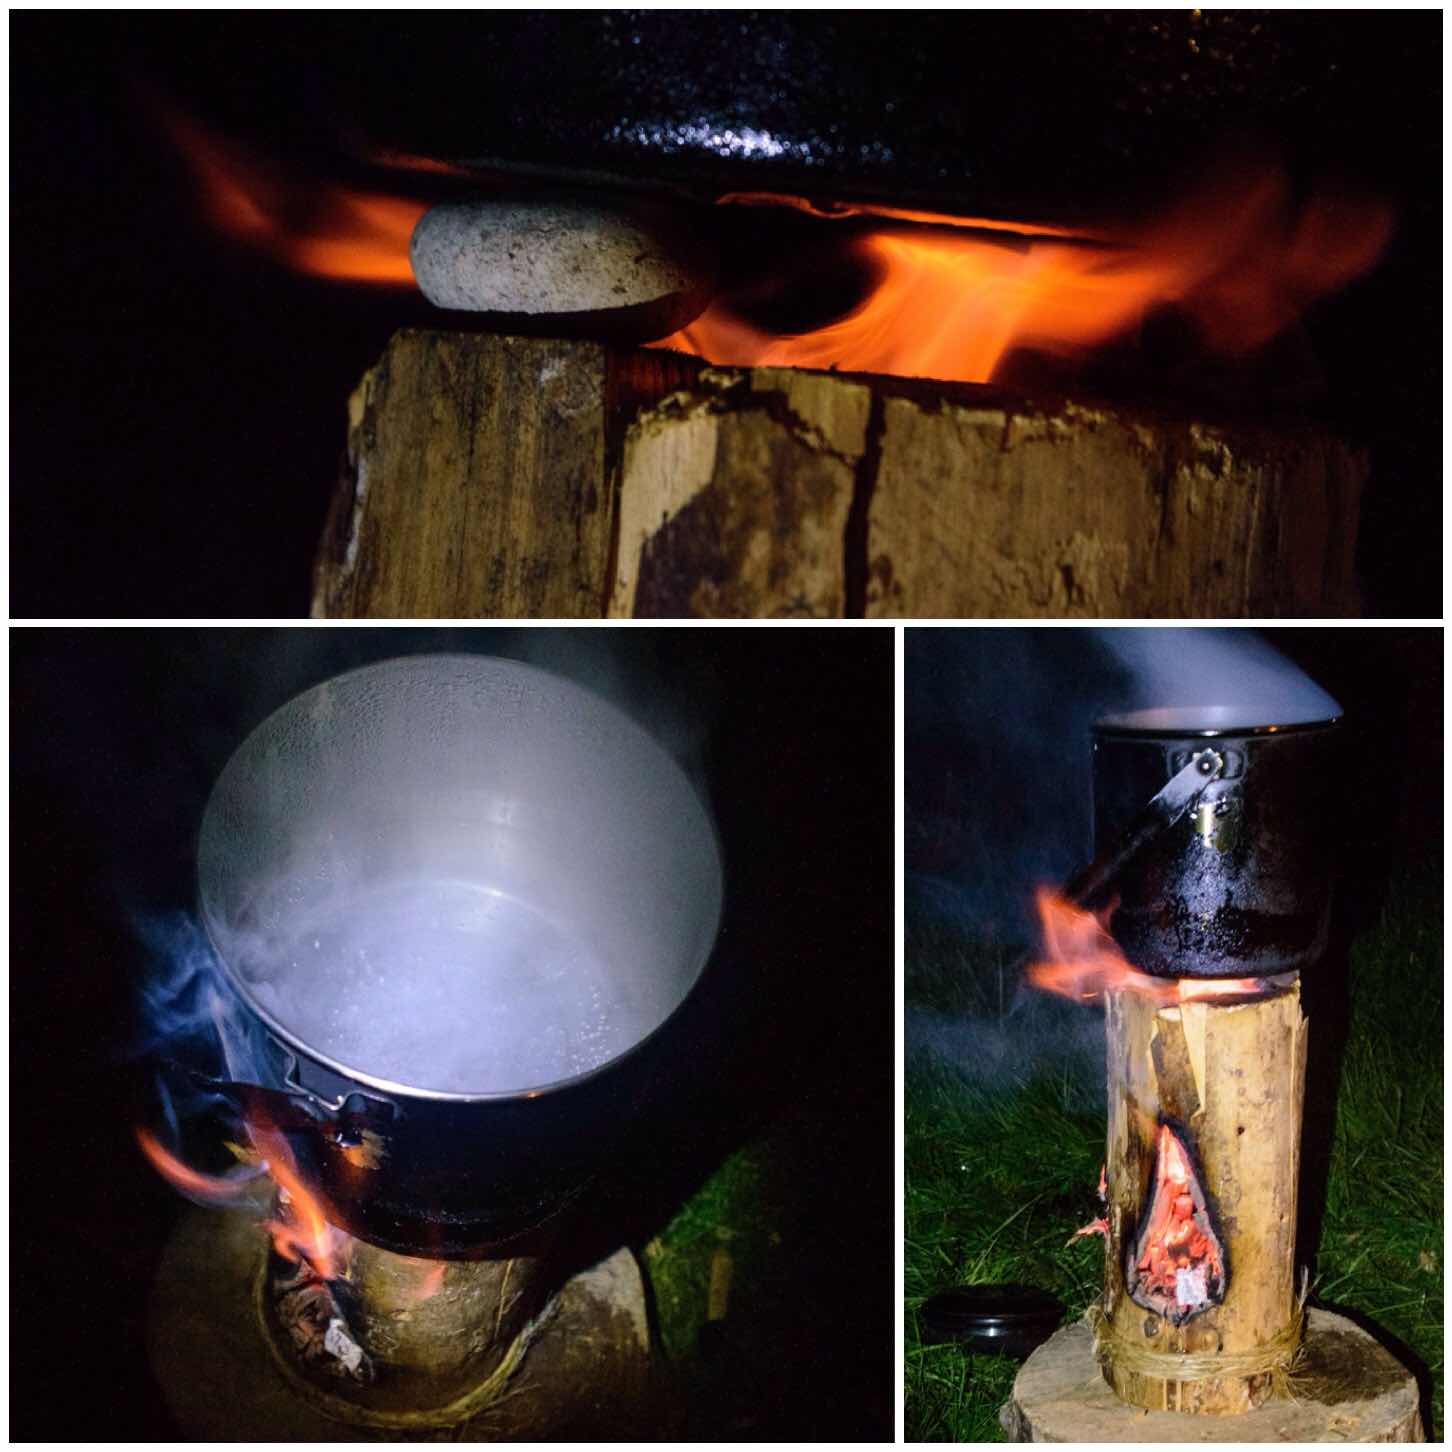
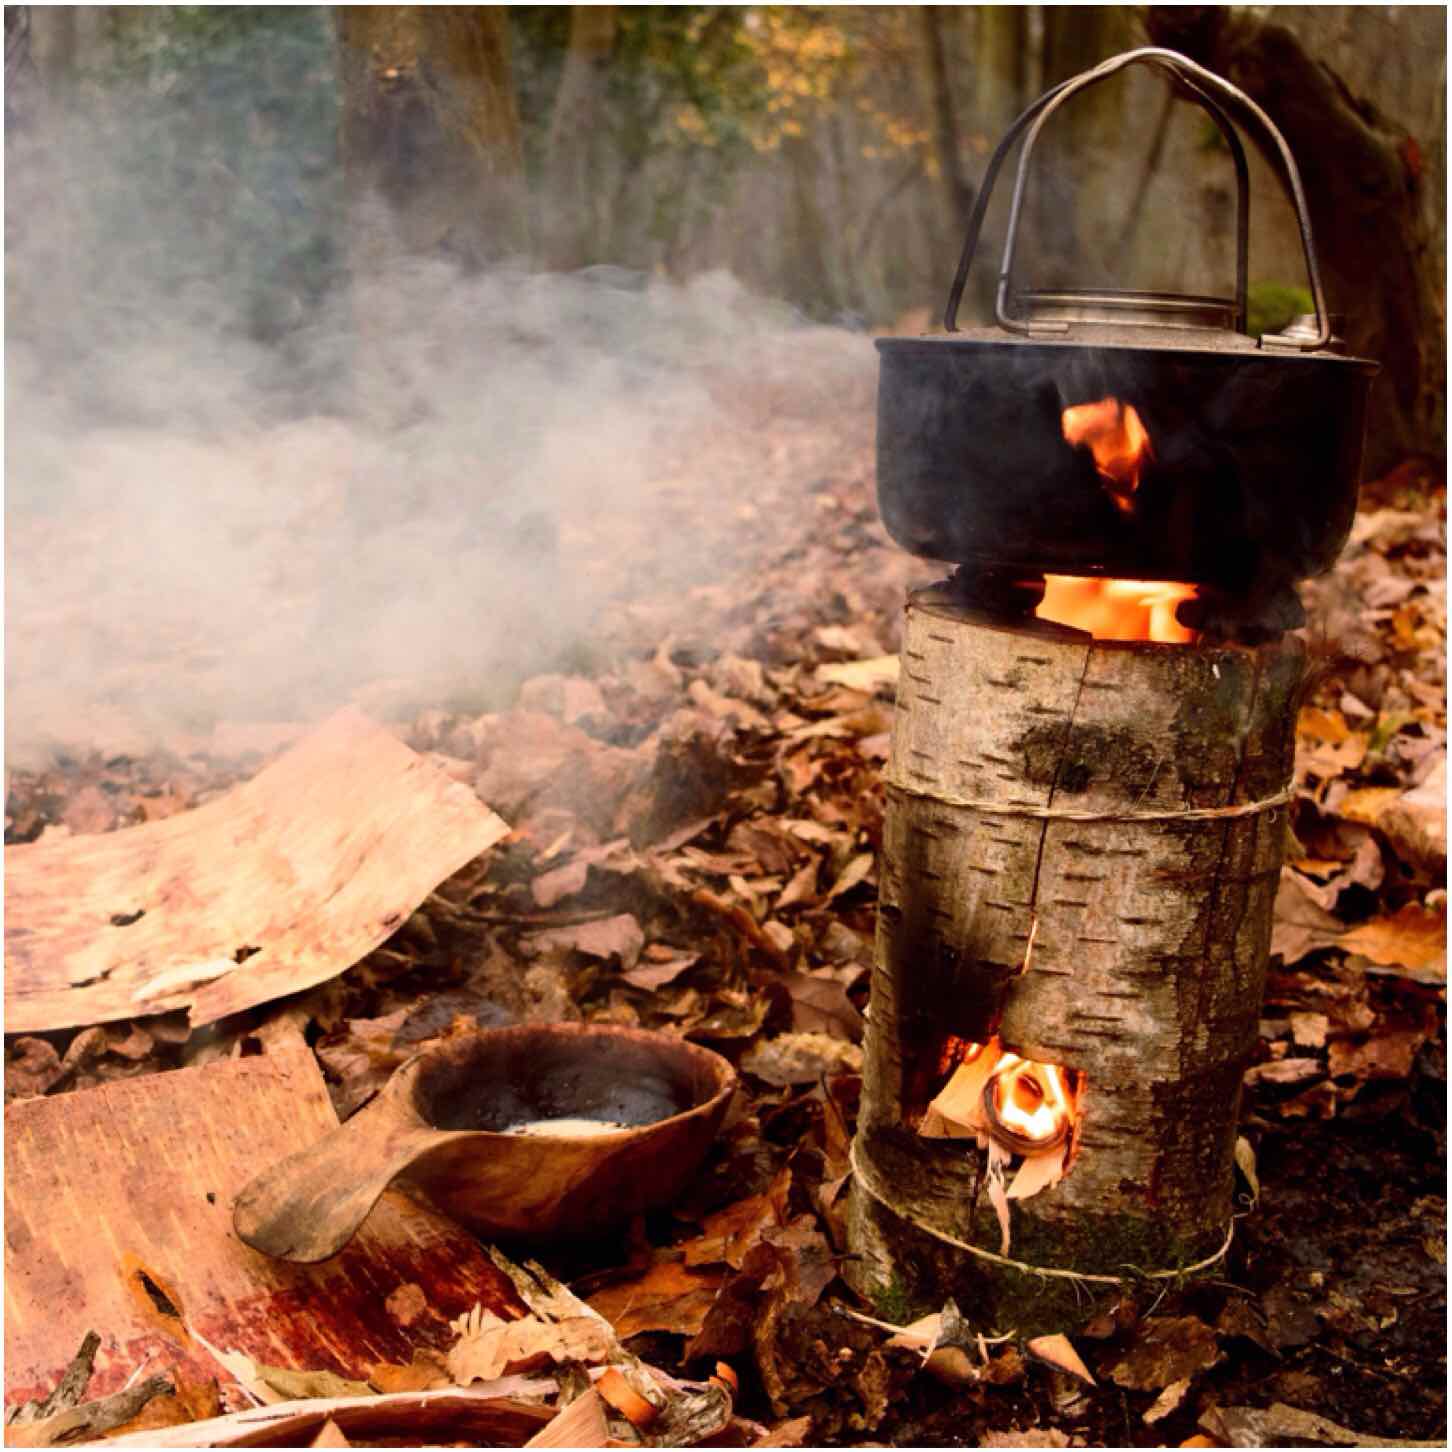
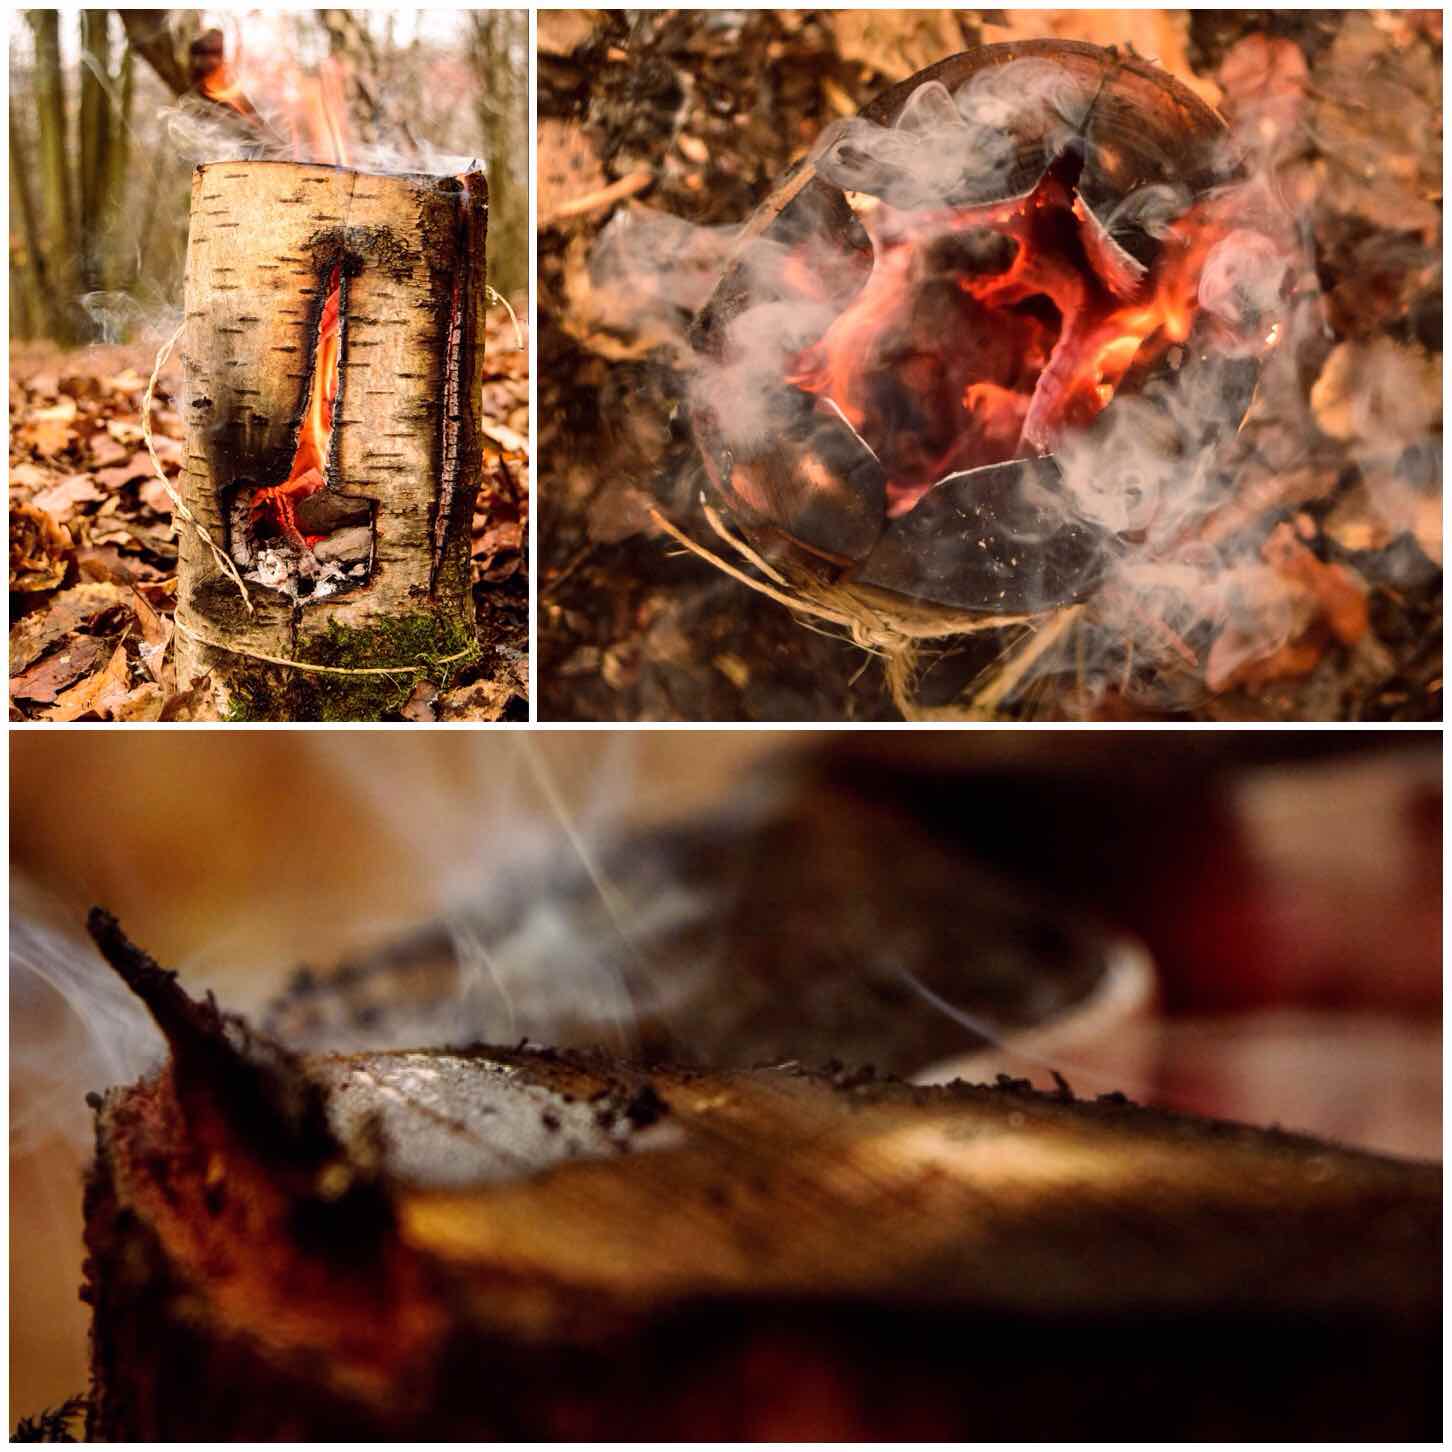
It took me just under 15 minutes to boil this pot of water (enough for approx 3 cups of coffee) and the dovetail joints remained strong throughout.
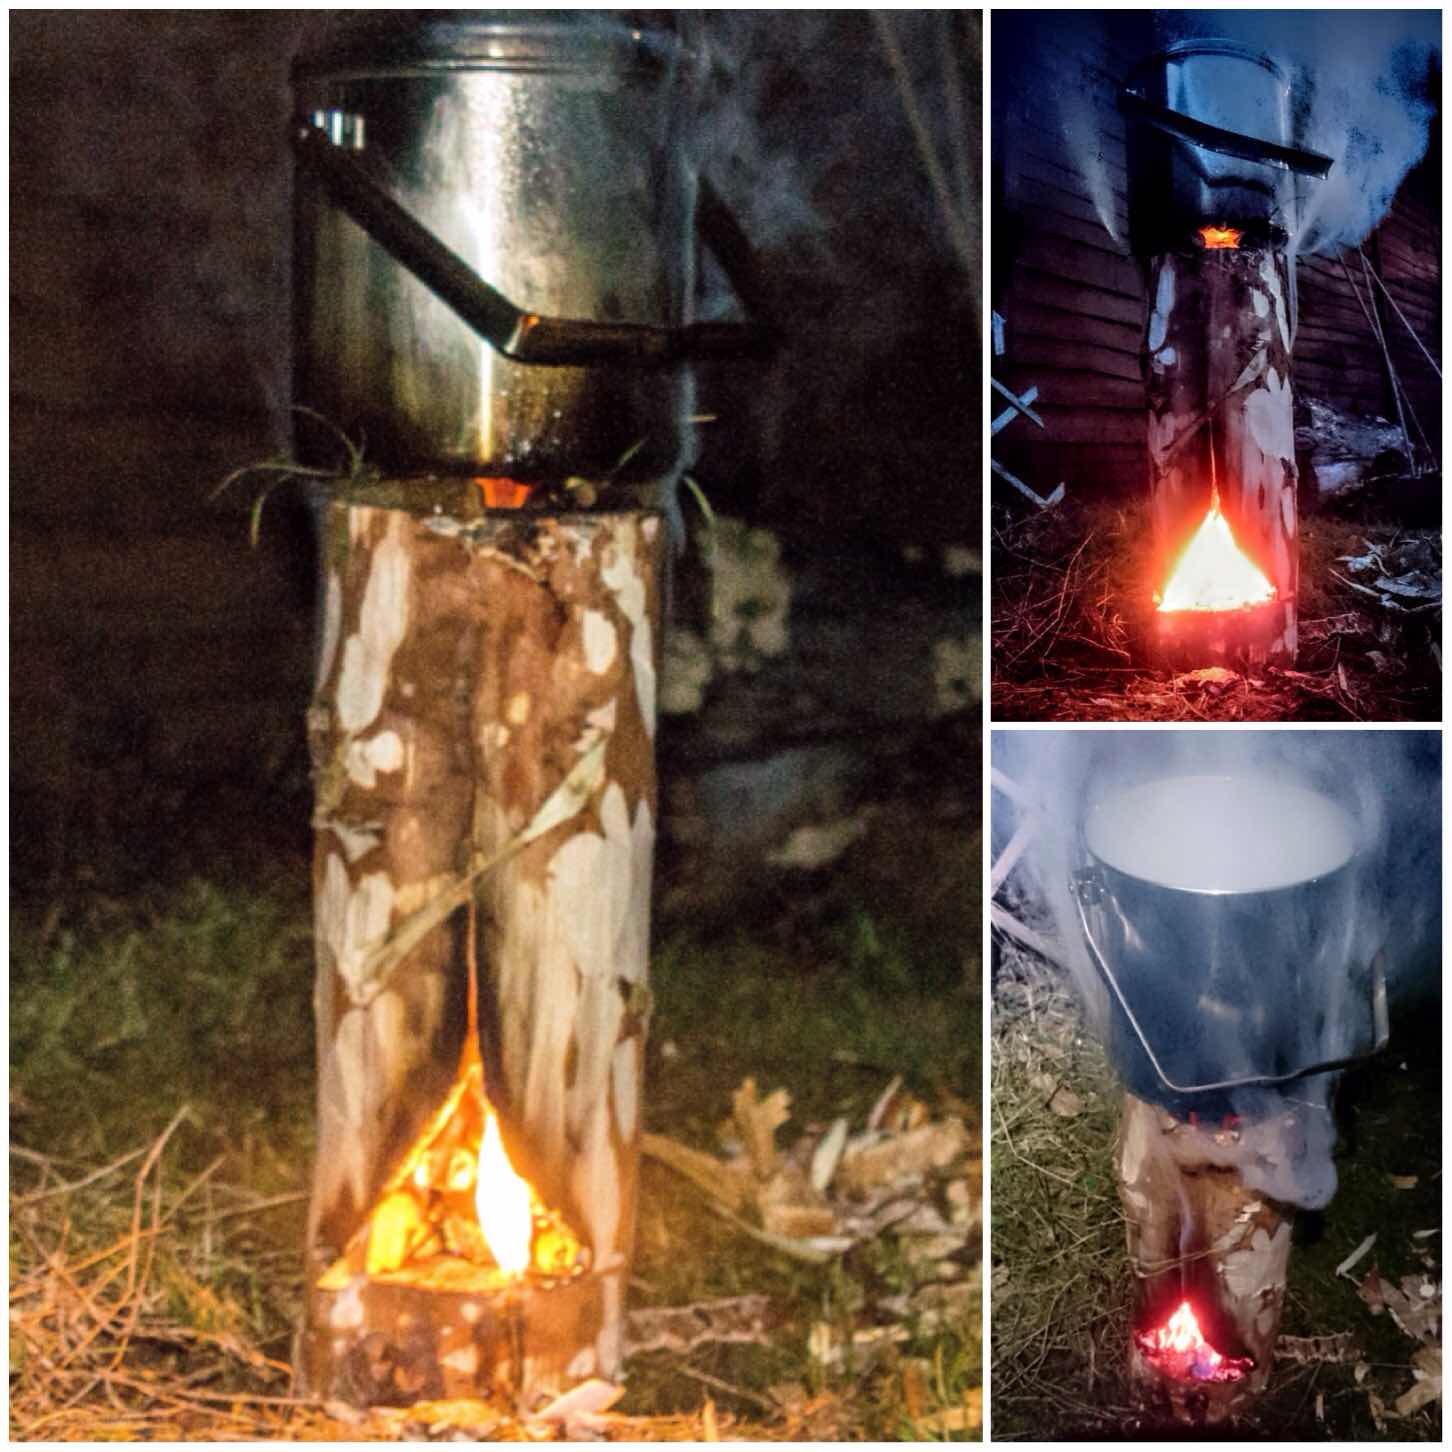
Roaring
After 45 minutes the first of the joints burnt through however the stove remained standing until it burnt out. Due to the lack of wind the majority of the wood did not burn through.
I made this short video of another Dovetail Log Rocket Stove to show it in action.
I like to experiment with log rocket stoves and this reliance on using string or wire to hold them together (although you can dig the segments of some types directly into soft ground) has always bugged me.
This Schwedenfeuer type of stove lends itself well to the dovetail joints I think, and once you have practised making a couple you will be able to knock together a stove very quickly with just natural materials.
As usual I am open to ideas and suggestions on creating more log rocket stoves and Scandinavian candles. If you have not seen my other posts on this subject have a look at my summary post on this subject titled – Candles, Rockets and Long Fires.
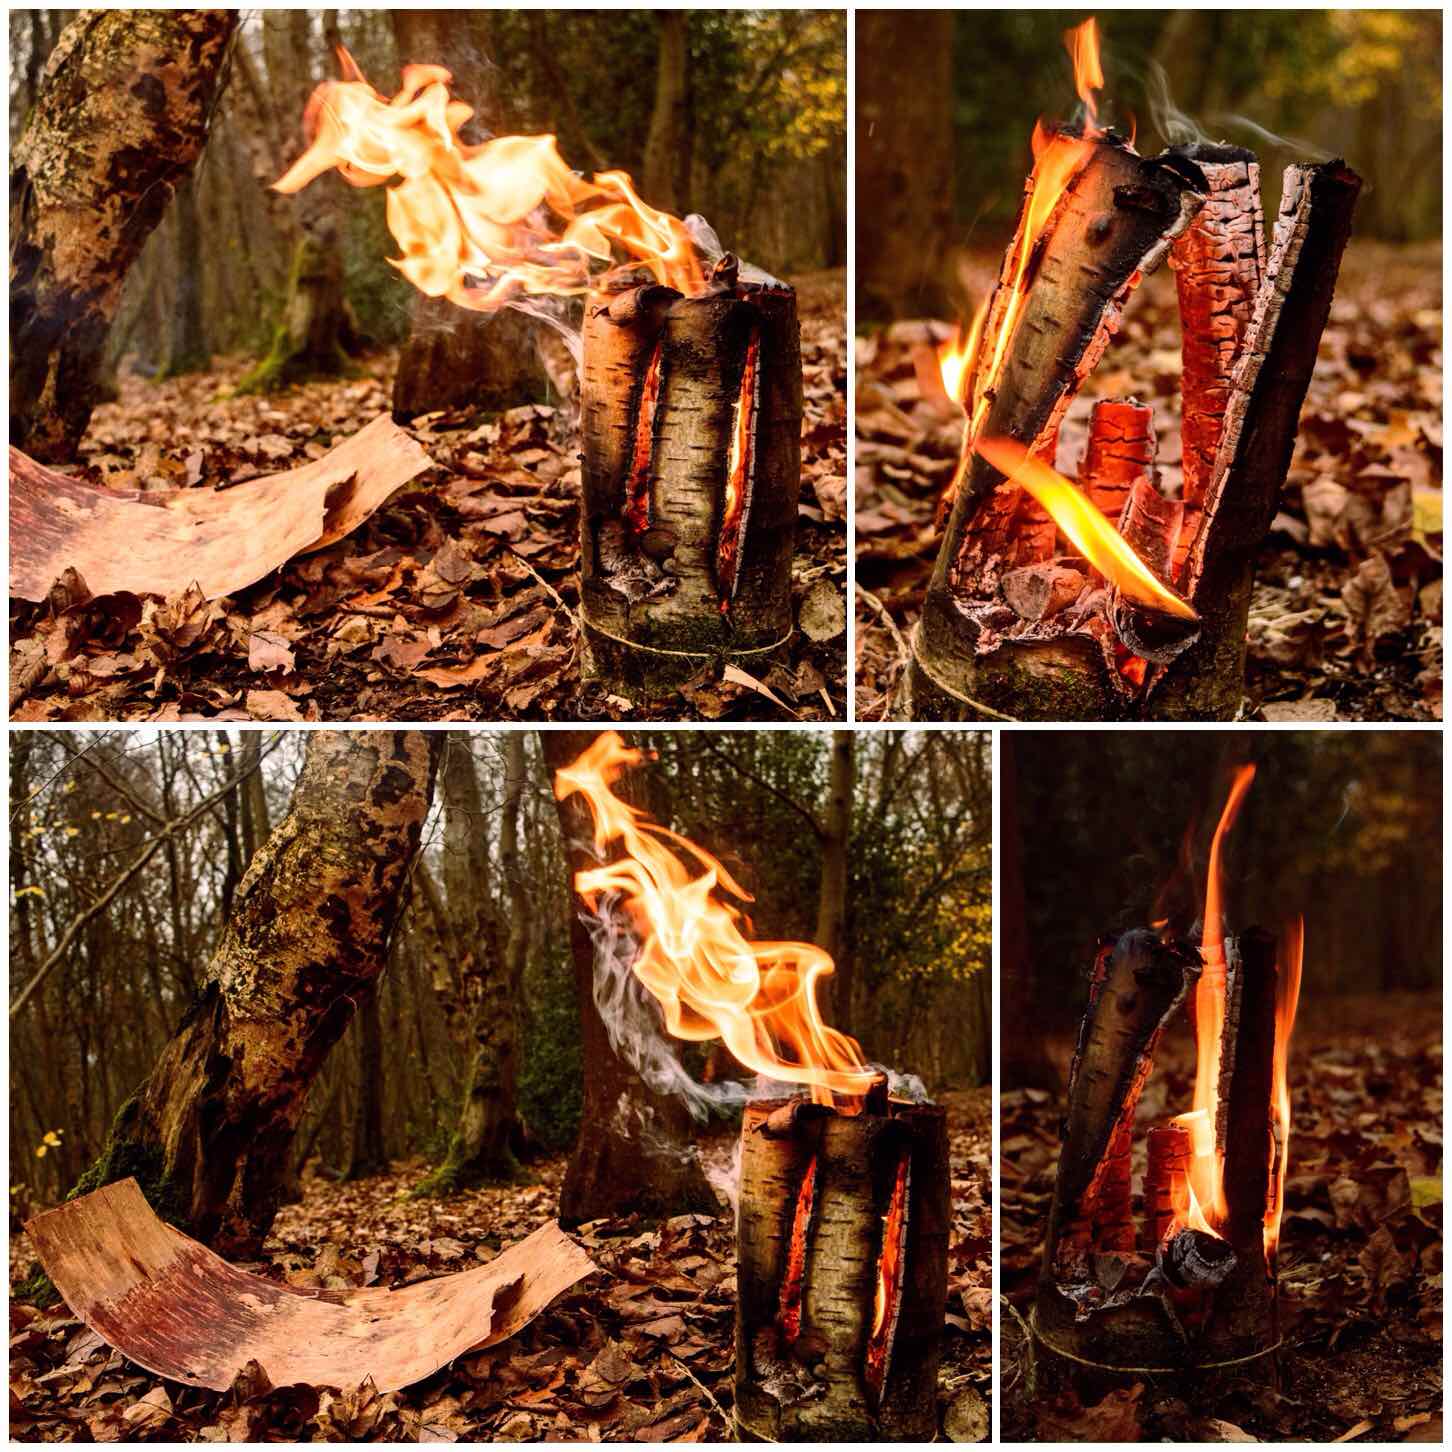
For a while now I have been making Log Rocket Stoves in different ways.
The ones I make in the workshop are easy as all you require is a drill however if you make one in the woods things become more complex. A common theme about these woodland Log Rocket Stoves is that you need something like string or wire to hold everything together.
I thought about this a lot recently and came up with this adaptation of the Log Rocket Stove using green wood dovetail joints.
I will post a full step by step tutorial in the near future in my How To…. section.
Ok, I know it is supposed to be one picture every week however I thought I needed to zoom in on this one a bit more so I added another for detail.
Many of you know I love to tinker with log rocket stoves so today found me once again working on another design.
Dovetail Log Rocket Stove
I came across an old Swedish design for a log rocket called the Schwedenfeuer (Swedish fire) however like many other log rockets all the parts were held together with wire. As these stoves are supposed to date back to at least the middle ages they had to be held together with something else then.
I came up with the idea to use green wood wedges carved into the stove in a dovetail fashion. They worked perfectly, I got my coffee made and also a video (to follow). I will also be popping a How To…. blog post soon to show how to make one.
One night recently I just could not get to sleep and my thoughts wandered onto the subject of log rocket stoves. Having written on the subject a few times with the Damp Log Rocket and the Fire Face Candles it struck me that I always used large tools such as axes or drills to make them.
This post is about making a Log Rocket Stove with only my knife (a small pruning saw was used to trim the log). I wanted to see if I could easily produce a stove without having to rely on my axe.
Log Rocket Stove – Without an axe
I like log rocket stoves as they can be made quickly, work well on wet or snowy ground, produce their own kindling and come with a ready made platform for your pot. Once the stove has done its job the collapsing embers make a good start point for a bigger fire.
Set Up
I chose a seasoned piece of spruce wood from my log pile which had a diameter slightly larger than the blade on my Mora knife (do not be tempted to use a log much smaller than this as you will end up with a very small cooking surface) . I also used a larger round of wood as a work surface, carved myself a small wedge to help with splitting the wood and had a offcut of wood ready to batton with.
Spruce log and a stable work surface
Splitting
I started with my knife first and battoned it into the log (note that the knife blade is at 90 degrees to my body for safety). My aim at first was to create a split as deep as I could with the knife all around the middle of the log to create a weak point in it. The knife was smaller than the log so I could only batton it in a couple of centimetres.
Once I had my point of weakness battoned in all around the log I inserted the wedge into the split at the top and battoned that in as well to try and increase the split some more (upon reflection I think two wedges would have helped). It was at this point my batton decided to snap on me.
Batton out a split as much as you can with your knife
I went off and got a bigger piece of wood to act as a batton and soon had the log split right down the line off weakness. This line I created with my knife will help you to keep an even split on the log when you have twists and knots in your log as I had with this piece of spruce.
Use a wedge to split the log
I repeated the process on each split so I ended up with four roughly even sized pieces of wood.
Safety
One thing to be aware is that as you batton down on the wedge is that it will go slightly out of line at times. If this happens just tap the end of the wedge against the work surface until it lines up. This is much safer than trying to drag it back in line with your hands as it is very easy cut yourself on the knife tip.
As the split widens the knife blade will come loose. Let it drop away and only pull it out when it it is completely free. Do not be tempted to force it out as this is another time when injuries happen.
Quarter the log by battoning with your knife and using the wedge
The Chimney
The stove requires a chimney and it is very easy to carve one out. About a third of the way from what will be the bottom of the stove I battoned my knife into centre ridge of one of the quarters of wood. I then used this a a marker to drive in stop cuts on all the other three pieces of wood.
Then from the what would become the top of the stove I battoned off the centre ridge of wood down to the stop cut. I then used my knife as normal to carve off some more excess wood so that part of the chimney looked fairly even. Once the first was completed I repeated the process on all the other pieces.
Keep all the offcuts and shavings as they will be needed to fire up the stove.
Batton out the core to form the chimney
From the top, looking down, your stove should look similar to the picture below. I have no idea how wide a chimney should be but I generally tend to take a couple of centimetres off each quarter.
The Chimney
The Firebox
Once the chimney is finished select two of the quarters that fit together and just at the base of the chimney on each quarter carve out a half triangle on each quarter.
I put a stop cut in first and then carved off the excess wood down to the stop cut. The whole just needs to be big enough to let air in and allow you to add slivers of wood into the fire.
Make sure your cuts are opposite each other so that when you fit the two quarters together again you form a triangle.
I used to carve out a square shape with my saw and an axe in the past but a fellow bushcrafter called Takeshi Mizumoto showed me this method by just using a knife – so much easier.
Carve out a triangular fire box
Raappanan tuli cuts
I like to increase the surface area of the inside of my chimney so as to give the initial flame from my tinder something to grab onto.
This is a technique from Finland and you can read more about it here in my post on the Raappanan tuli candle. To make the cuts place each quarter on the work surface and gently batton in cuts to the inside of the chimney. Ensure that the cuts are made so that the small split you create is travelling towards the top of the stove.
Finally collect up all the wood shavings you have created and split the larger off cut pieces down to nice small kindling.
Creating extra surface area and kindling
Firing the stove up
I found some old twine, thoroughly soaked it in water and then used it to tie the quarters together near the bottom.
To light the stove I used a firesteel to light some cotton wool smeared in vaseline. This gives me a burn time off about 5 minutes and as I always carry a supply in my rucksack am happy to use it. A more natural method that I like is to use birchbark and small lumps of spruce resin.
Once the cotton wool was well lit I added a few small pieces of wood in via the top of the chimney. At this stage it is important not to add too much kindling as this may block of the flow of air from the firebox to the top of the chimney. Also make sure your fingertips are not directly over the top of the chimney as you drop in the slivers of wood. Even at this early stage the heat is intense enough to cause injury.
Firing up
Three pebbles
I popped three flattish pebbles on the rim of the stove to act as a platform for my pot. As this is a small stove you need to keep a close eye on your pot as the water boils or the food cooks so that it does not accidentally fall over. I had this happen once before as I had left the handle of my pot up. The handle snapped back down eventually causing the pot to fall off the log.
All was well with this set up and after about 10 minutes of good heat my water was boiling. if you do not have pebbles to hand I find that 3 pieces of green wood work well instead.
Three stones and a pot
Afterwards as I was drinking my coffee the stove really came alive with some wonderful flames.
I really enjoyed making this small log rocket stove as it showed me that with a little ingenuity you can make do without an axe. It can be difficult but it is doable and a great way to test your personal skills.
When the weather is inclement and the ground is really wet then the option of making a rocket stove needs to be considered.
This How To…. sets out the steps I took on a wet and windy December morning to make a Damp Wood Log Rocket Stove with only the tools I normally carry in my rucksack.
The damp wood log rocket
I have dabbled with making different types of Finnish Candles for cooking on and they are excellent for when the ground is wet. Over the years I have also experimented with making Log Rocket stoves but restricted my activities to the workshop as I used drills to make them.
I recently stumbled on an idea on Facebook from the 1st Facebook Scout Group by Paul Hasling. This is the first time I have seen a log rocket stove done without the use of drills so I was instantly taken with the idea. Another Scout instructor José Xavier put Paul’s pictures together into a quick helpcard called the Rocket Stove de Madeira. This is a very simple design where a log is split four ways, a chimney and firetray are carved out and it is all put back together again with string. I will certainly be showing my Sea Cadets how to make one.
First though I wanted to make one when out in the woods with only what was to hand. It being December, there was nothing that was bone dry so I found a dead Birch and cut a section off. It was still damp to the touch, however it had been dead for over a year so it was slightly seasoned.
Splitting
For the job I had my knife, saw, axe and a pen. Using another round of wood I split the log in half by battoning it with my axe (keep the blade of the axe at 90 degrees to your body when you do this).
Tools and battoning
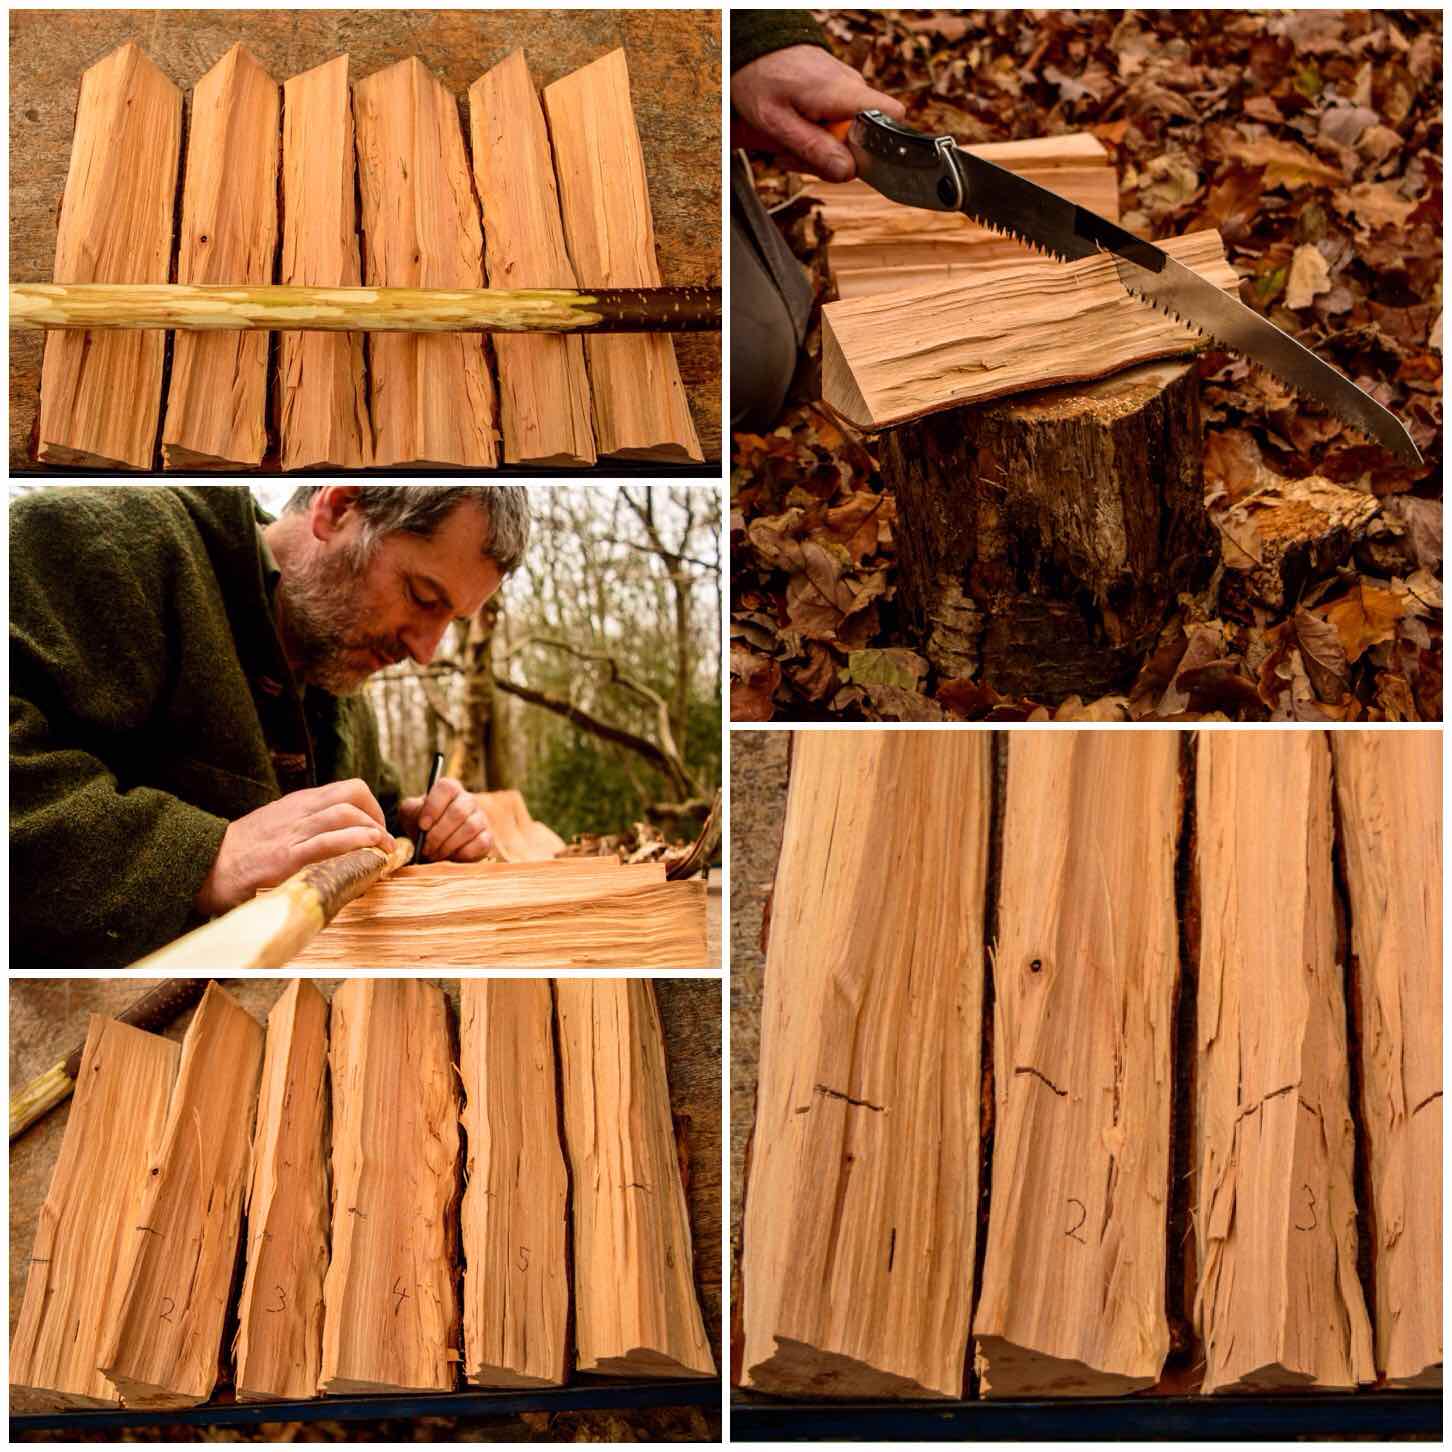
After splitting the log in half I split each half into three even sections. With very dry wood you only need halve the halves again to make four sections however my wood was damp so I wanted to produce as much surface area as possible which is why I opted for six sections.
The splits
Stop Cuts
Using a stick and a pen I marked a line on each section about a quarter of the way from the bottom and also numbered each section. These marks were put in so that I could cut in stop cuts so to make it easy for me to cut out the chimney section.
My friend Keith Coleman suggested using tape as a depth gauge for this and it worked a treat, with each stop cut ending up the same depth.
Stop cuts
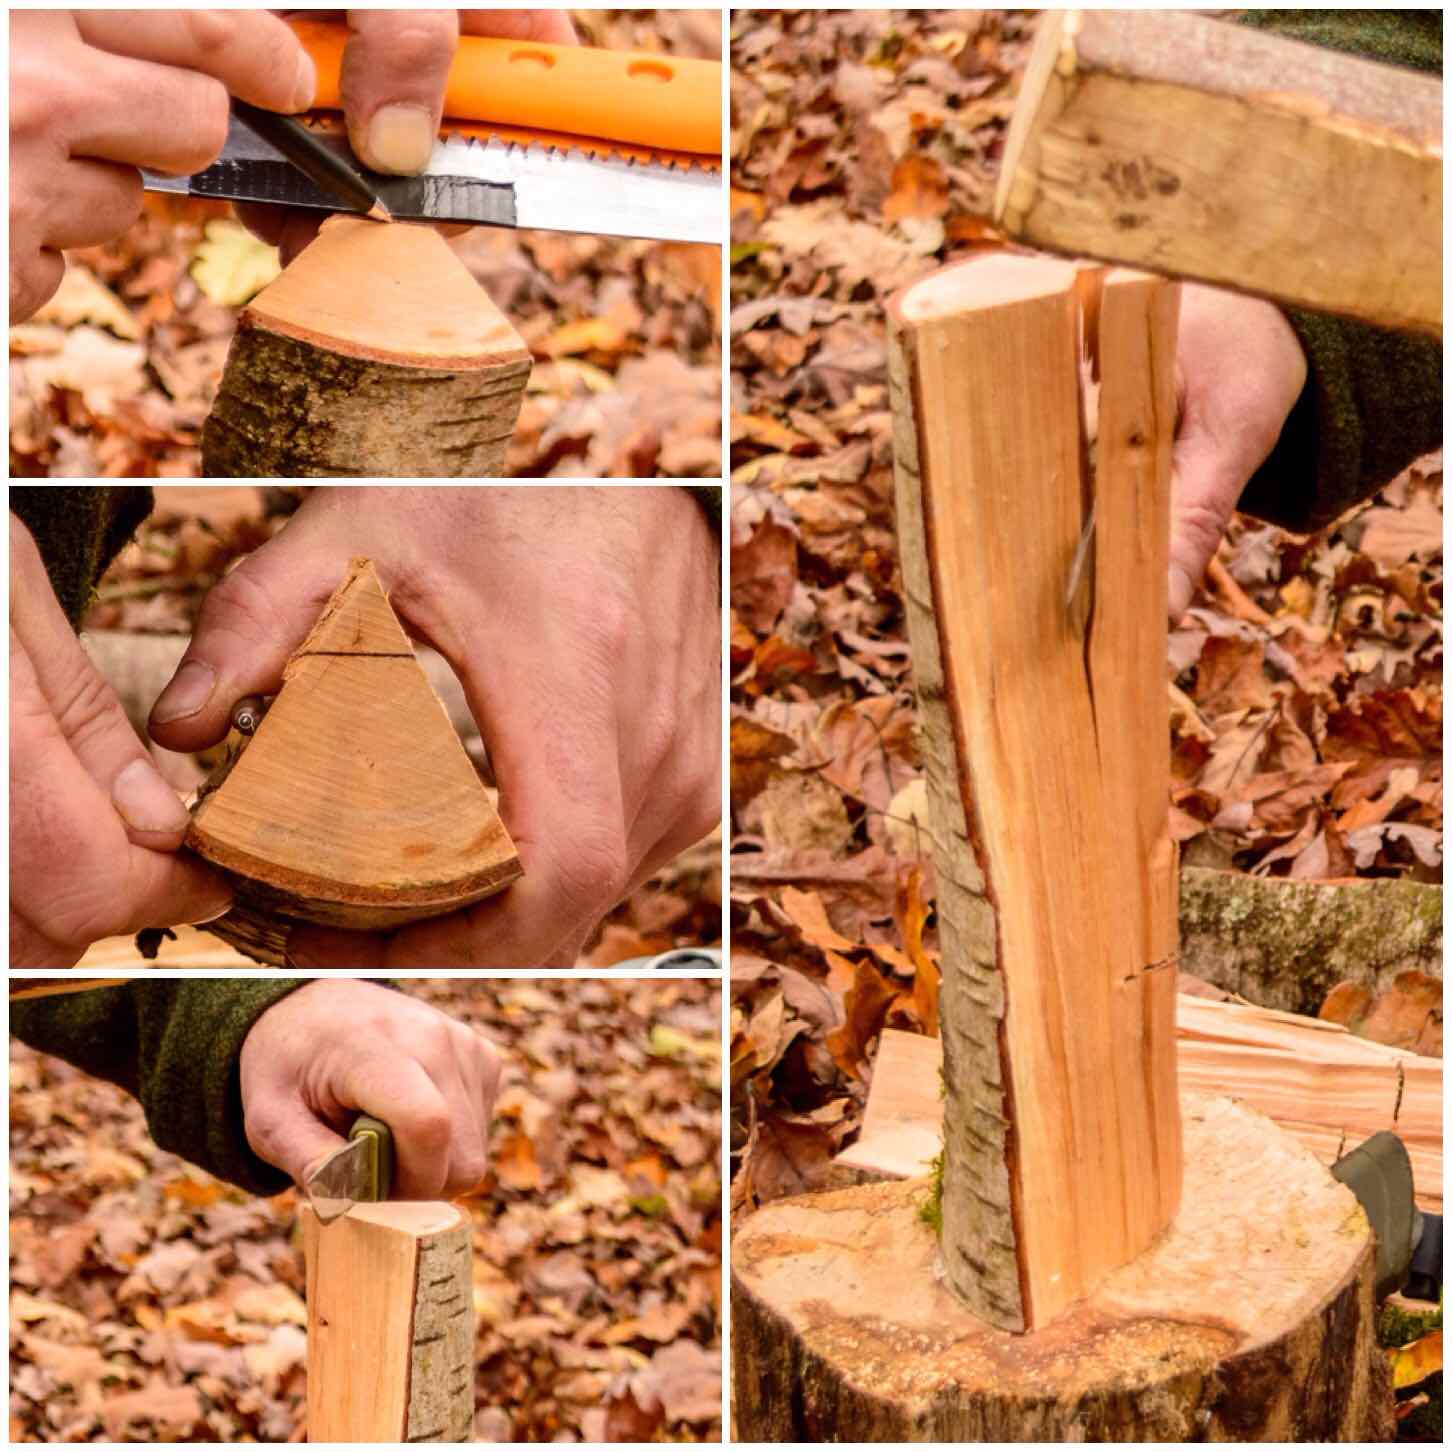
Creating the Chimney
Using the tape as a gauge again I marked a line at the top of each split section and then, using my knife, battoned off the excess wood.
The stop cuts help as the split does not travel all the way to the bottom and so creates a lintel that the fire will sit in.
Battoning out the chimney
After a little bit of whittling with my knife each segment had the wood removed so that the chimney would be formed when it was all put back together.
It is important to keep all the shavings and little chunks of wood from this process as it can be used as kindling for the stove.
Trimming the chimney
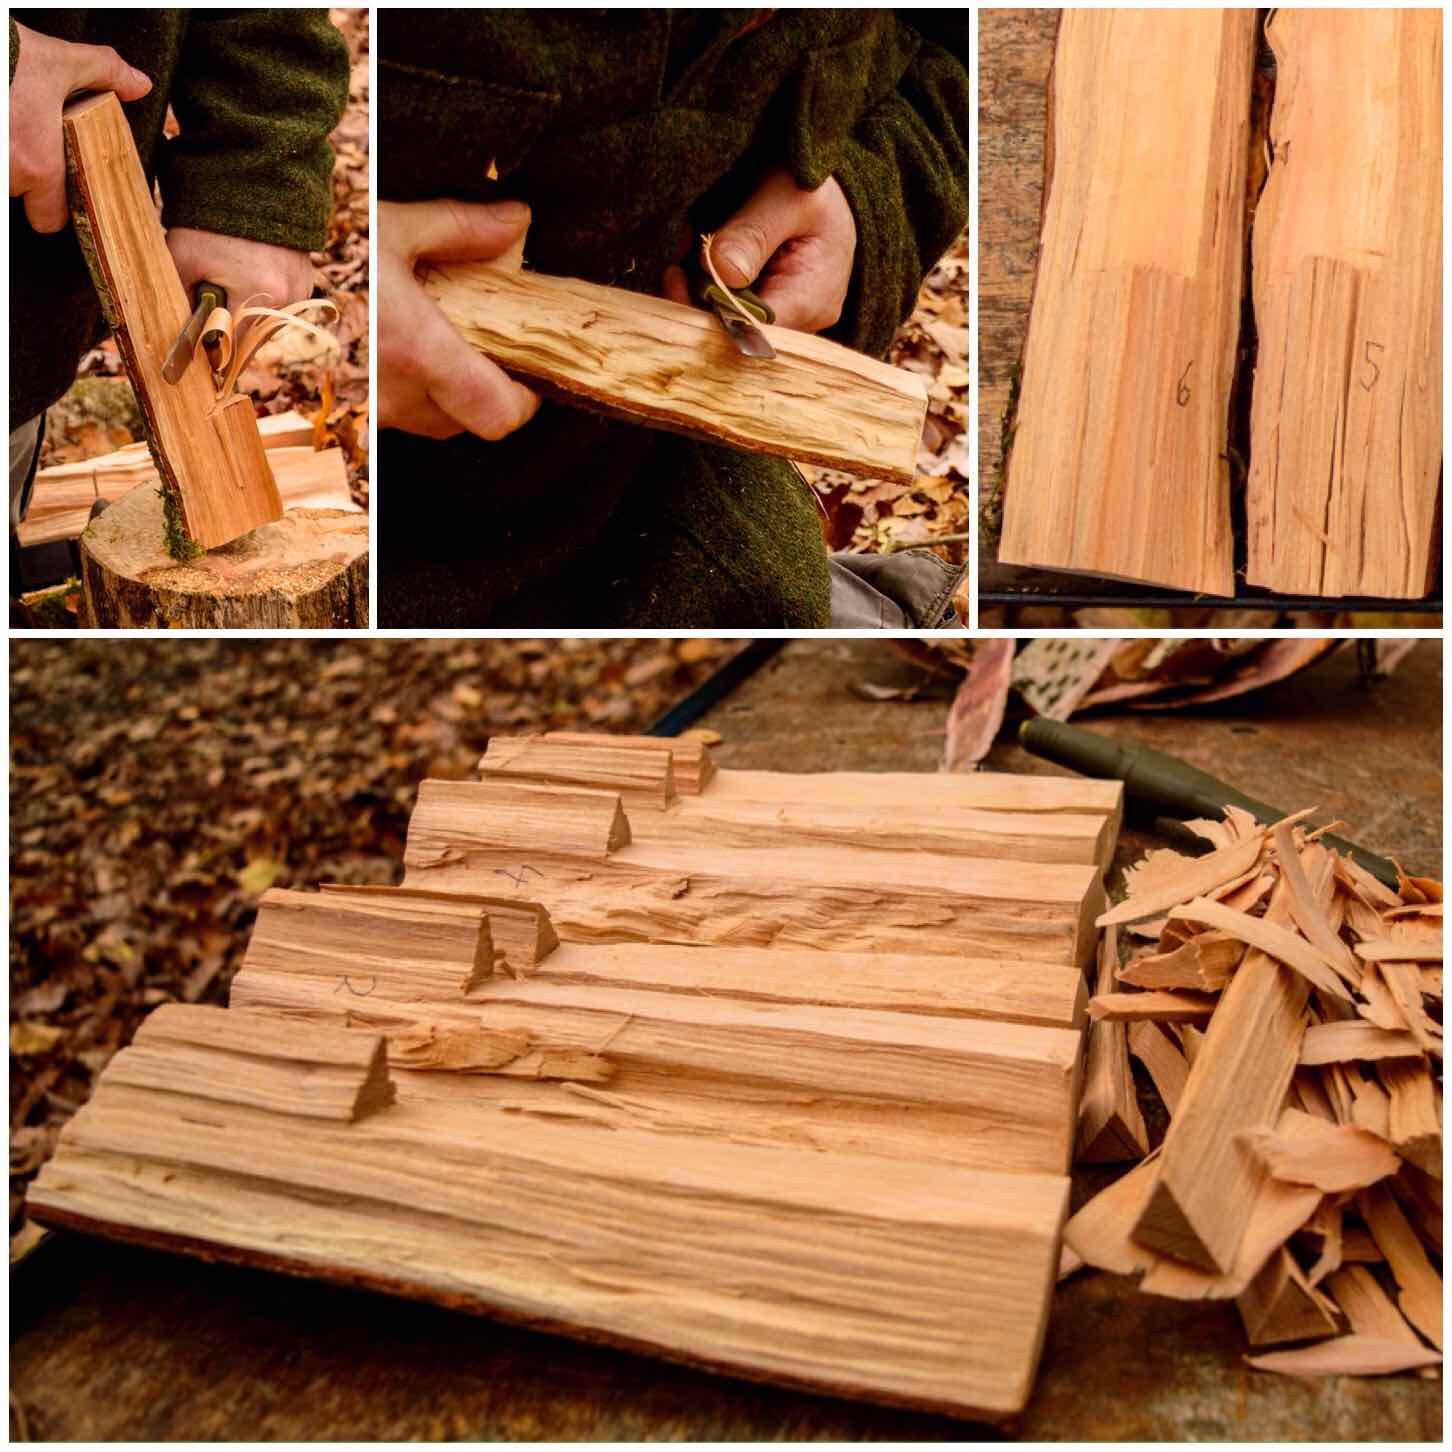
The Raappanan Tuli style
Now the secret of making damp wood burn is to produce as much surface area as possible for the flame to catch. I learnt this from researching and making the Finnish Raappanan Tuli candle.
On the inside of each segment cut as many burrs as you can so that the flame from your kindling has something to catch onto. I tried out different types of cuts here and some were easier to carve than others – your wood will soon tell you what works well.
The Raappanan Tuli style
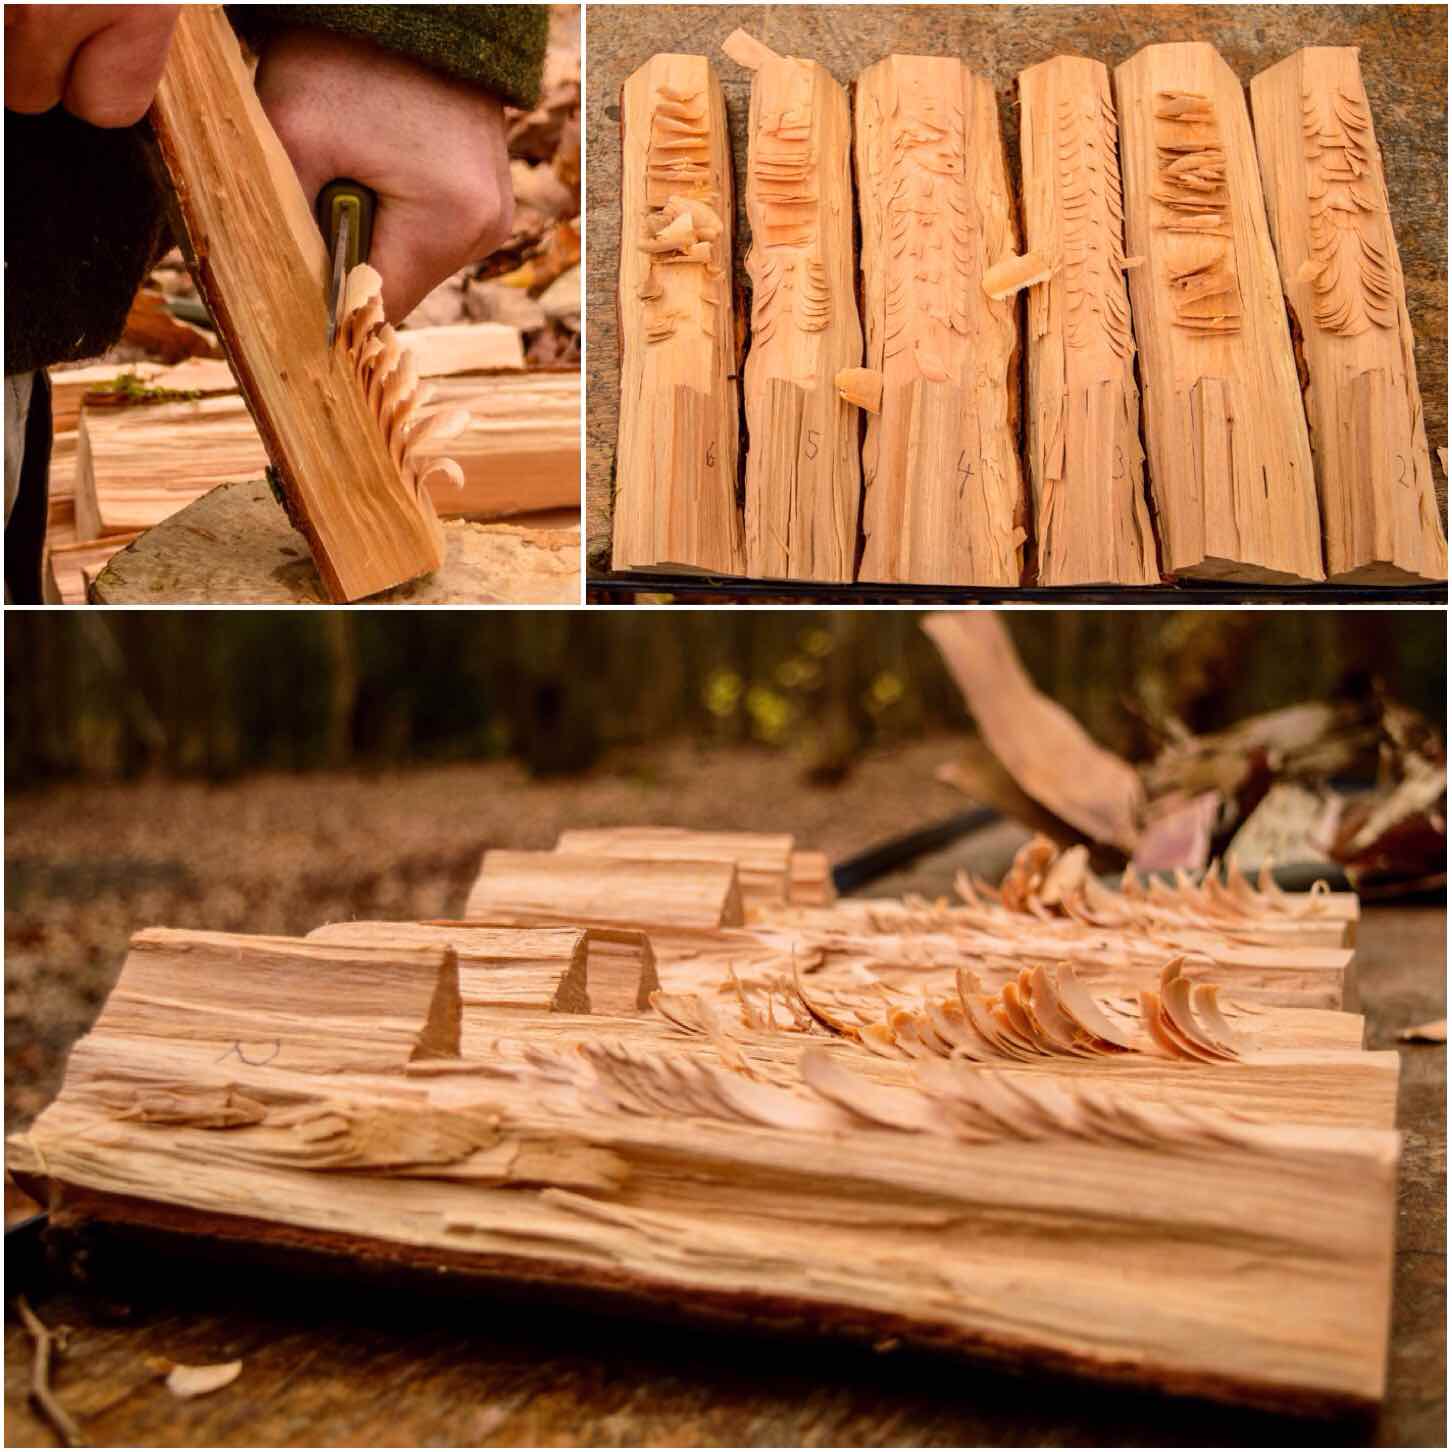
The Firebox
Next up is the opening for the firebox. I selected two segments that fit together (having them numbered really helped here) and marked out with a pen two rectangular areas just above the sill I’d created. I made sure the marking went all the way round to the other side of each segment.
I then used a saw to cut into the wood in the shaded area. Do as many cuts as you can as this makes it easier to remove this waste wood.
Carving the firebox – stage 1
I then used my saw at an angle to cut out the wood and finished the job off with my knife.
Carving the firebox – stage 2
When finished the idea is that you want an access point big enough to put your kindling into the firebox area at the bottom of the chimney.
I found some old sisal string tied to a tree and used that to tie everything back together. It was pretty damp anyway and I hoped that would last longer than the copious amounts of paracord I tend to carry around with me. I think some thin wire would be the ideal thing to use though.
Firebox and all wrapped up
From the top you can see how wide the chimney was. I have no idea what would be the optimal size to have so you may need to experiment for yourself.
The chimney
Firing Up
As the wood was so damp I decided to go for the sure-fire method of lighting the stove up – good old cotton wool and Vaseline. This worked well however I needed to use 4 Vaseline-coated cotton wool balls to maintain the fire.
I have used shredded birch bark mixed with spruce resin on a number of occasions to light Finnish candles before but I didn’t have the time to collect the resin this time.
Once the fire had started I added tinder/kindling down through the chimney and in through the firebox. The main thing at this stage is to not over-fill the firebox but allow the airflow to be maintained. It means about 10 minutes of work but the damp wood inside the chimney area will dry out and the overall heat of the fire will increase.
Firing up
Maintaining the Fire
I placed three pebbles on the top of the stove for the kettle to sit on securely.
The gap created by the pebbles also allows you to drop tinder/kindling down the chimney. I like to use strips of birch bark here as it is so pliable and flammable.
If the wind is low or changes direction you may need to get down low and blow directly into the firebox to keep the fire going. Once the wood has dried out a bit you will not need to do this so much.
Maintaining the heat
I gave the stove about 10 minutes before putting the kettle on and then in about 15 minutes the kettle was boiling. Not as fast as modern stoves but for what is in effect a wet log not bad.
Waiting for the kettle to boil
I have to thank Jess Edwards for a number of these pictures at the end. Jess is a great photographer and keen bushcrafter so it was great to concentrate for once on the tinkering and leave the photography aspect in someone else’s capable hands.
Brew time
Observations
Once the coffee was made I was able to have a good look at what was happening with the stove. As I looked closely I could see the moisture in the wood boiling off. If you look in the bottom picture you can see the water boiling away on the surface.
Drying off
The stove kept going for another hour before I had to put it out as we were leaving.
Overall I was very impressed with this Log Rocket stove with the Raappanan Tuli twist and I will be using it again on my courses.
A glorious farewell
Thanks again to the Scouts for documenting this stove – I hope you like my little twist on it?
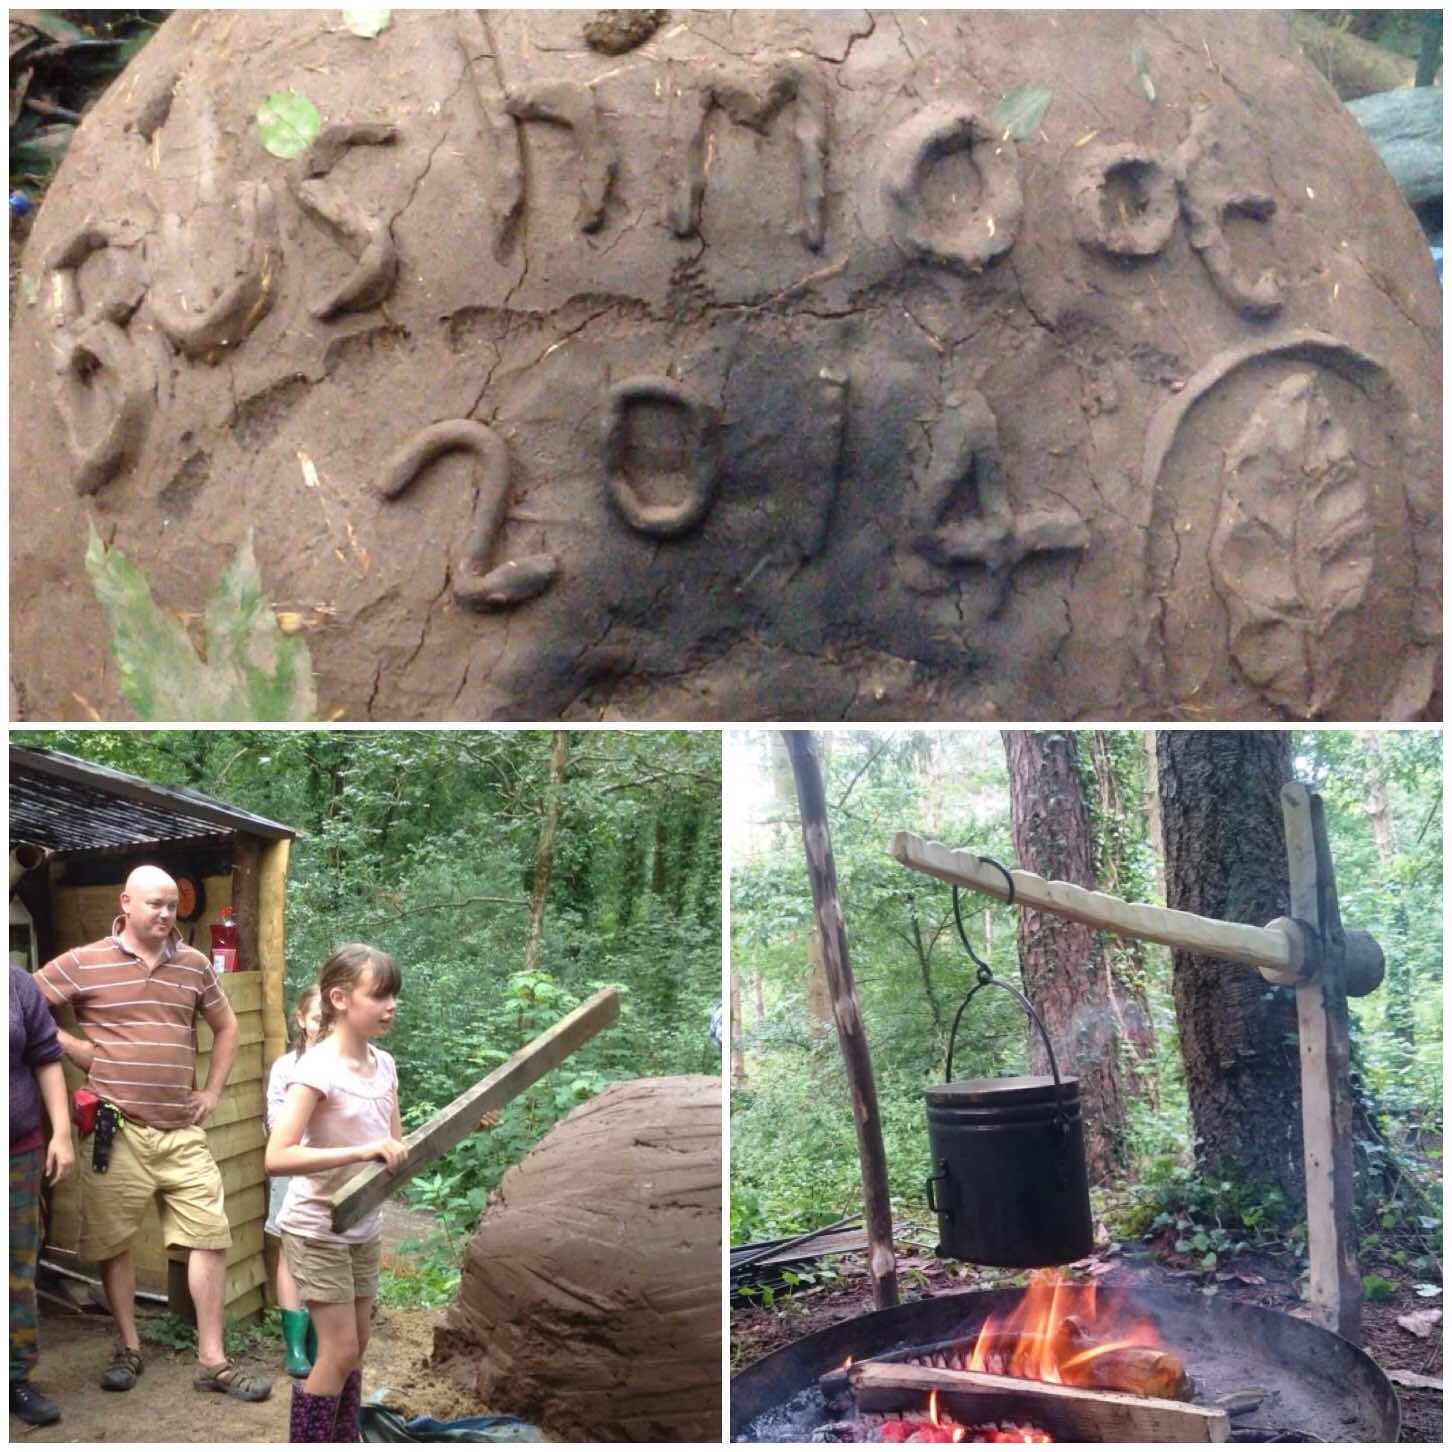
For ten years now I have been going to the BCUK Bushmoot and I have had great fun learning new crafts, making some amazing constructions and occasionally dabbling in a bit of art.
Craft, art and constructions
This post cannot do justice to the wide variety of crafts, constructions and artistic endeavours that are undertaken however I have trawled through my picture library to try my best.
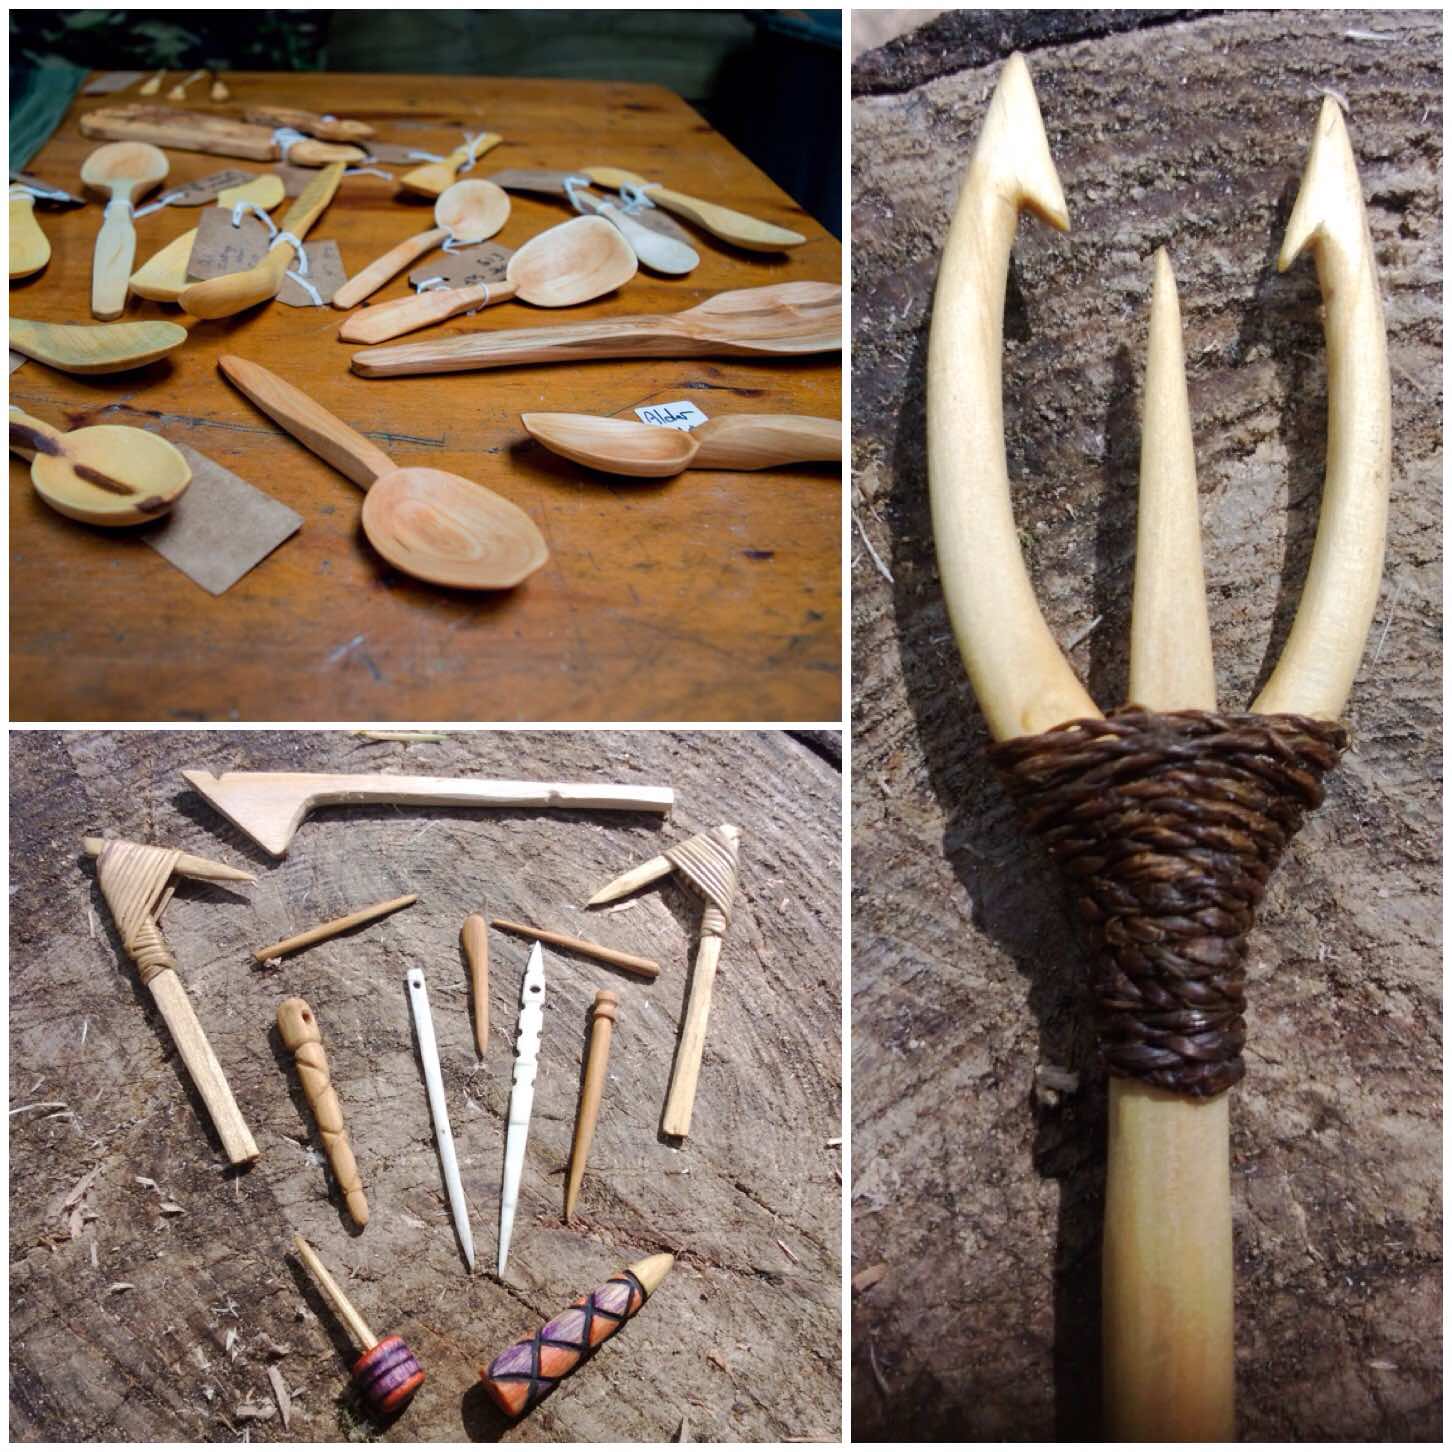
One of the most talented carvers who attends the moot regularly is Dean Allen. Dean makes beautiful spoons (particularly Welsh Spoons) and some fine primitive crafts as well.
Carving craft from Dean
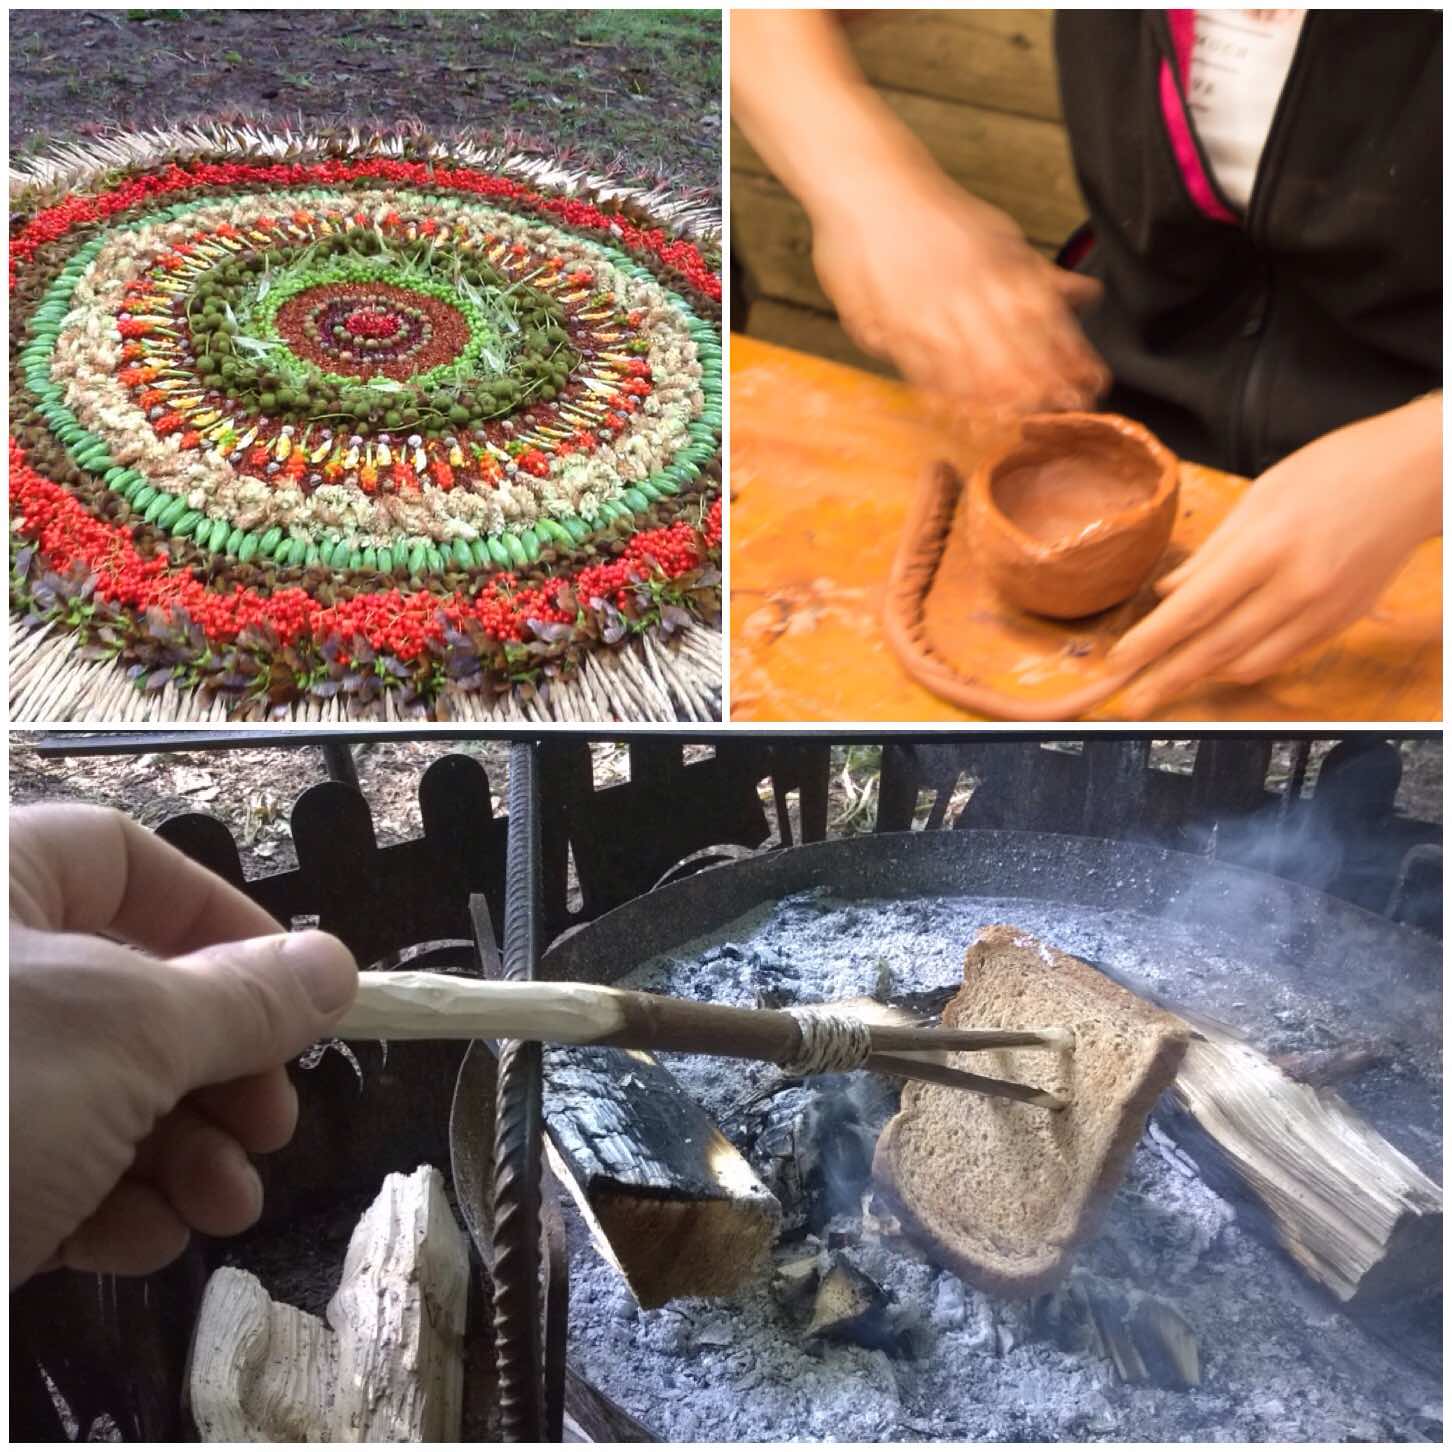
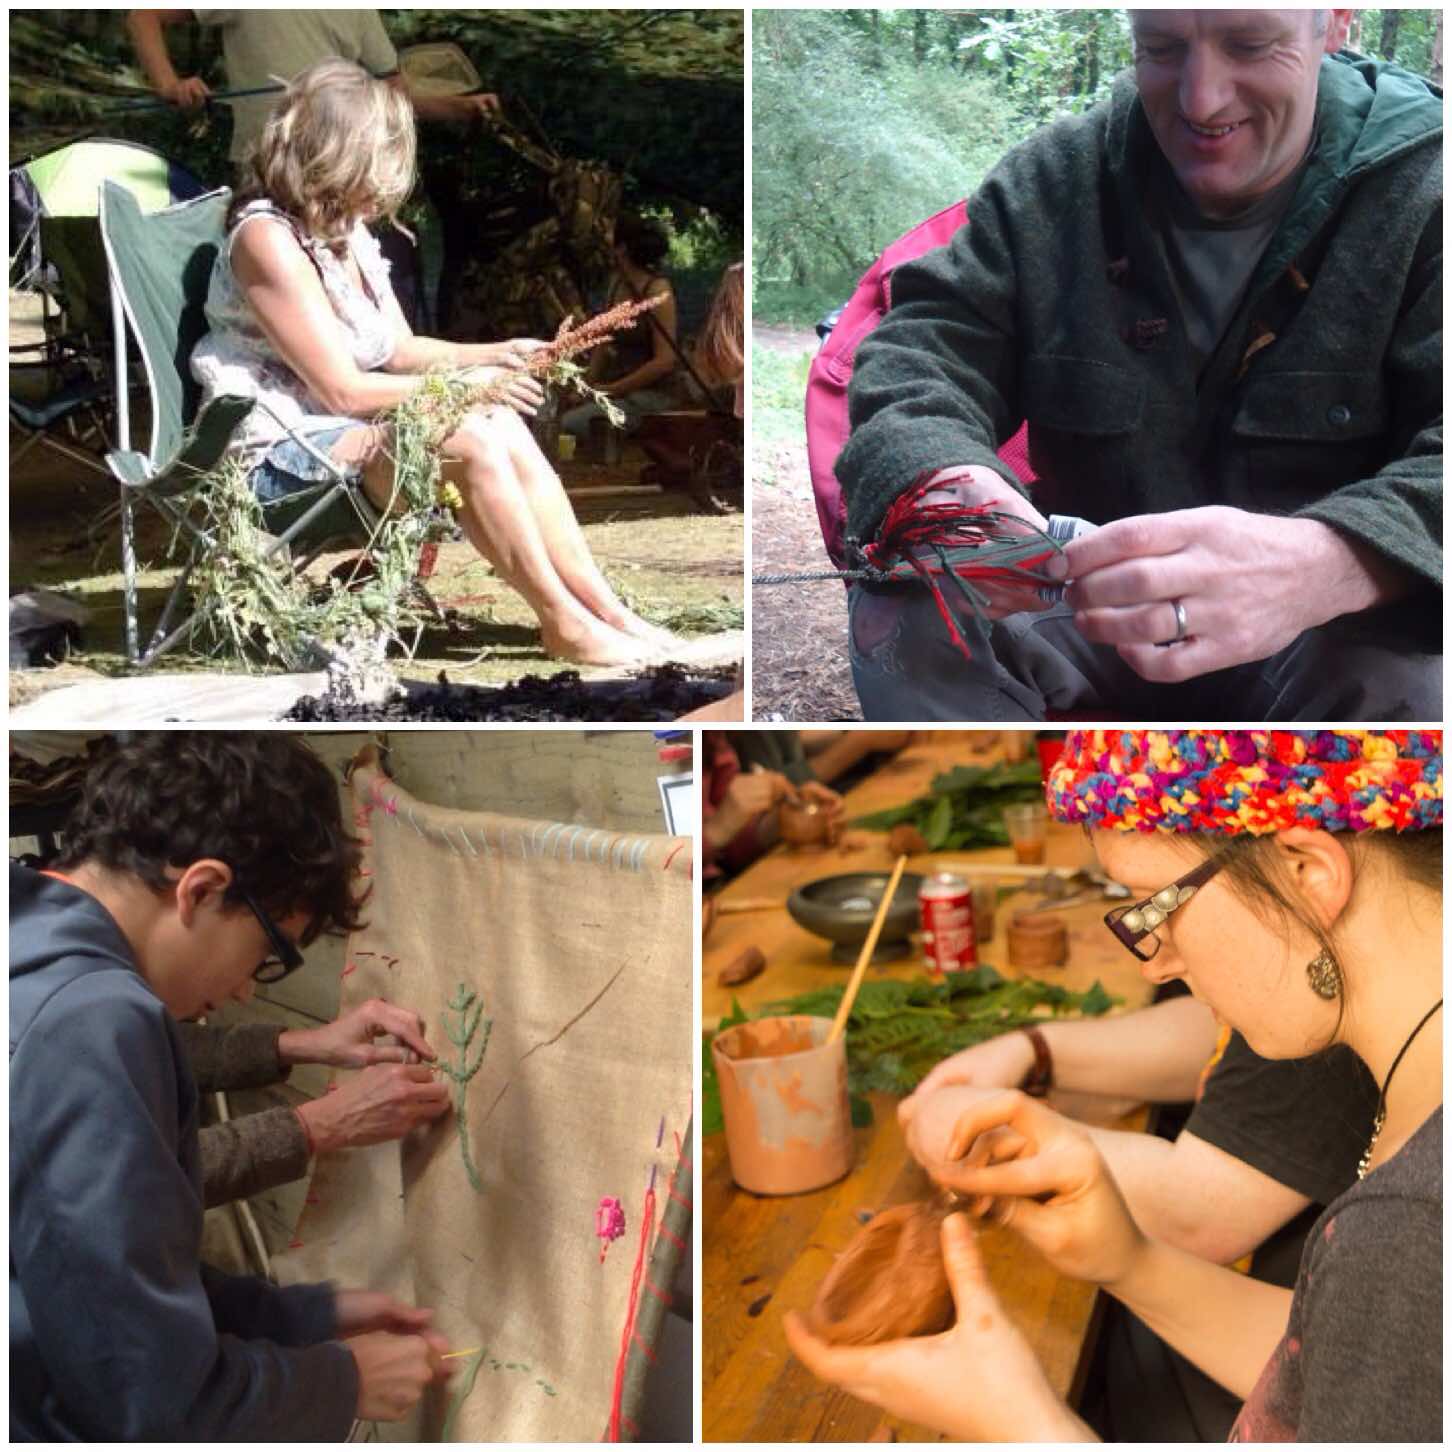
Hands are always busy doing something at the Moot – twisting grass rope, weaving beautiful tablet bands, embroidering flags and constructing clay pots – to name just a few activities.
I have attended the classes with Perry McGee on grass rope making and tablet weaving with Susannah Parsons. Both classes were hugely enjoyable as these instructors are experts in their craft.
Hands on with it all
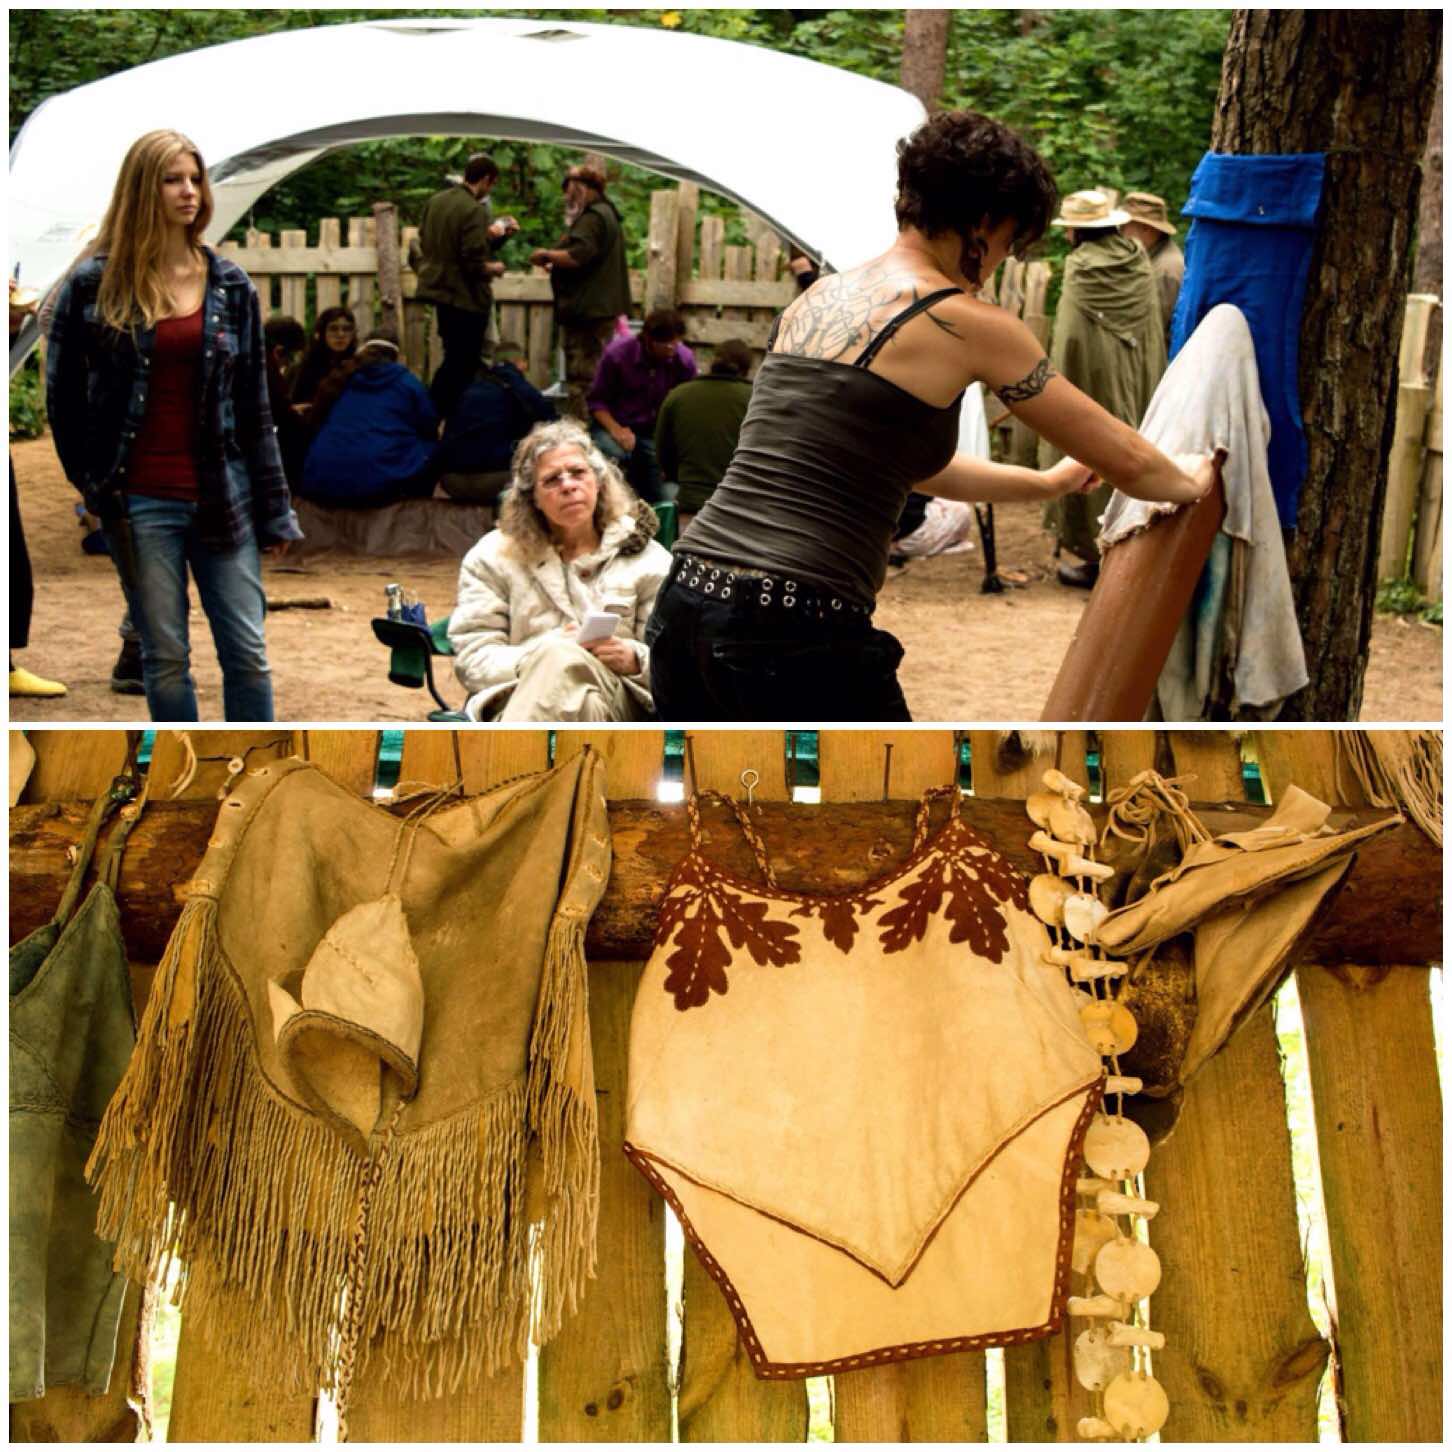
I have dabbled in animal hide work from scraping to tanning, and I know it is hard work (see my earlier blog How To….Make Buckskin from a Deer Hide). Theresa Kamper however makes it look so easy. She studied everything to do with working with animal hides for her PhD and is fantastically knowledgeable on the subject of everything we regard as ‘Primitive Skills’, and is happy to share that knowledge at the Moot.
Primitive skills craft from Theresa
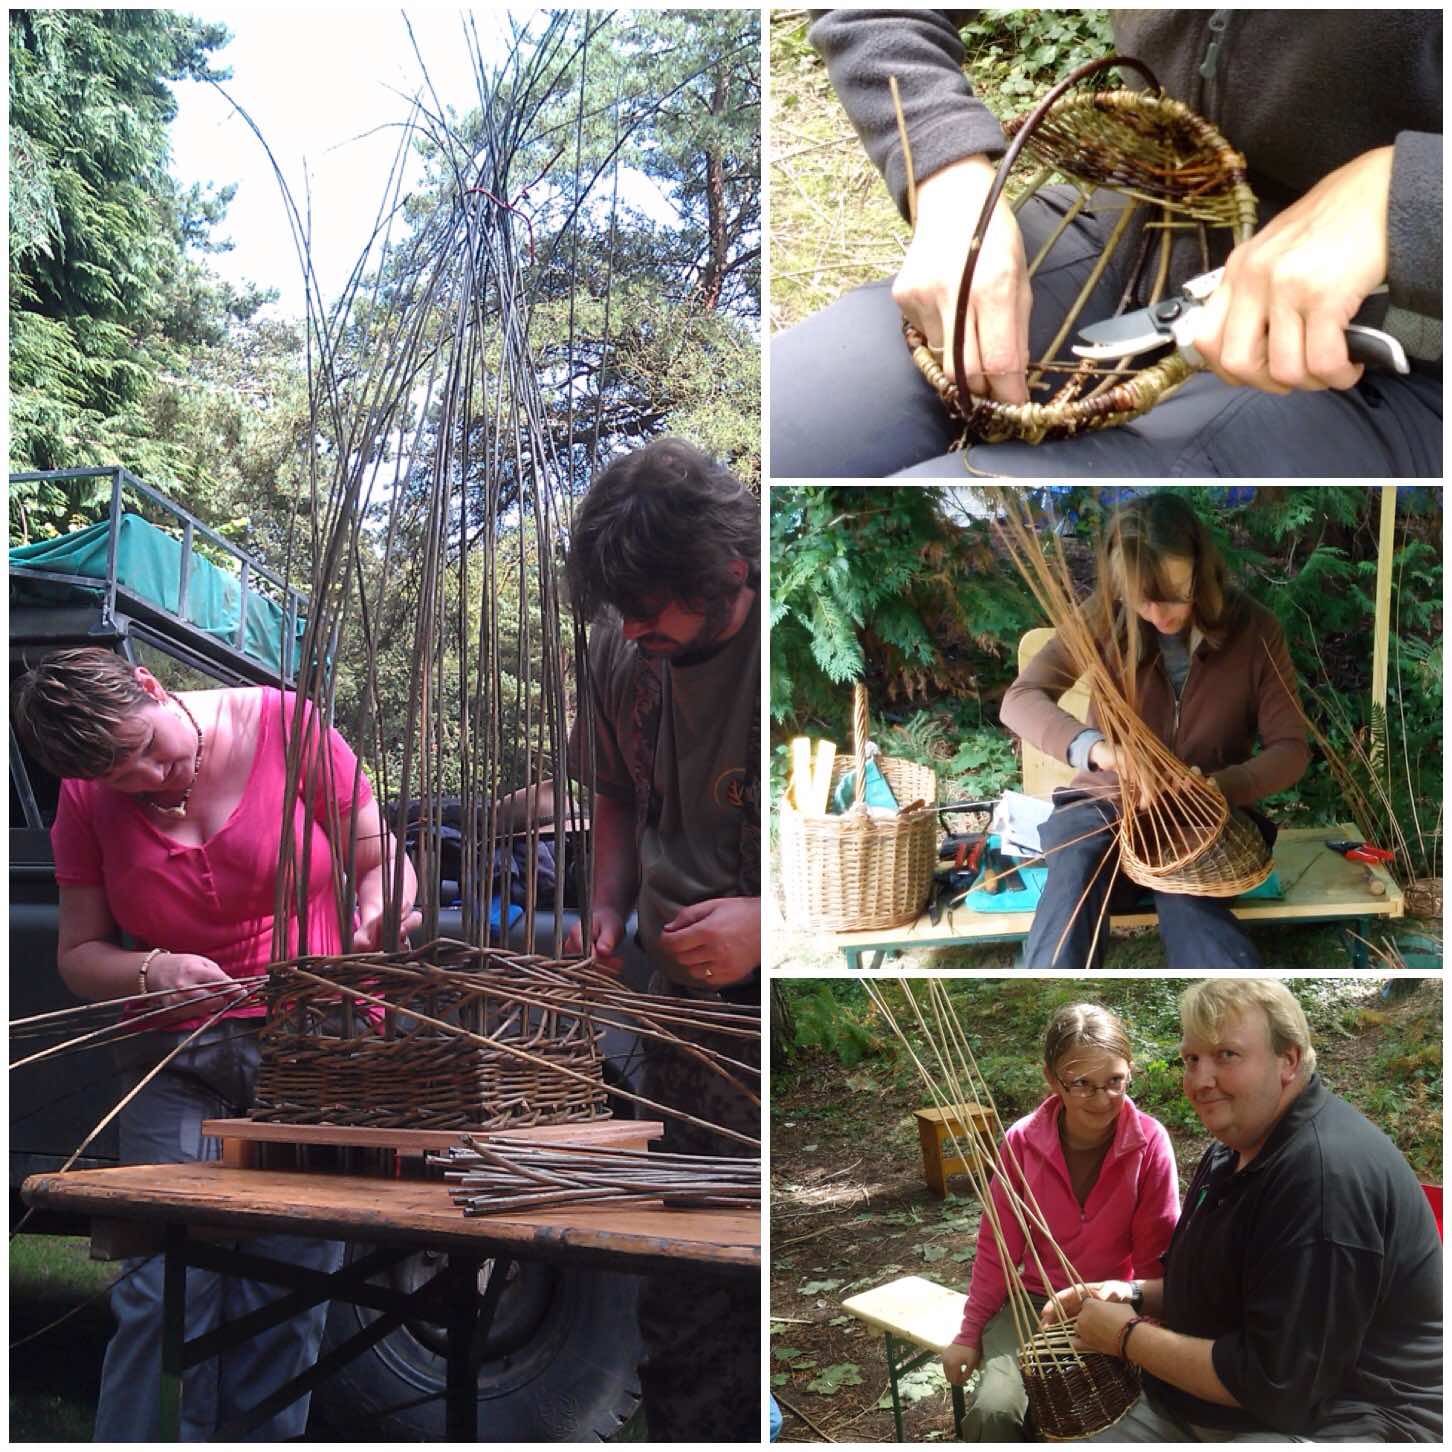
Basket- and lobster-pot making is very popular at the Moot. Our regular instructor on this is Julie Wagstaff from the Welsh Willow Works.
I have never had the time to do one of Jules’s classes however everyone I have spoken with has really learned a lot from her. Jules has a really patient nature and a very creative pair of hands.
Basket making
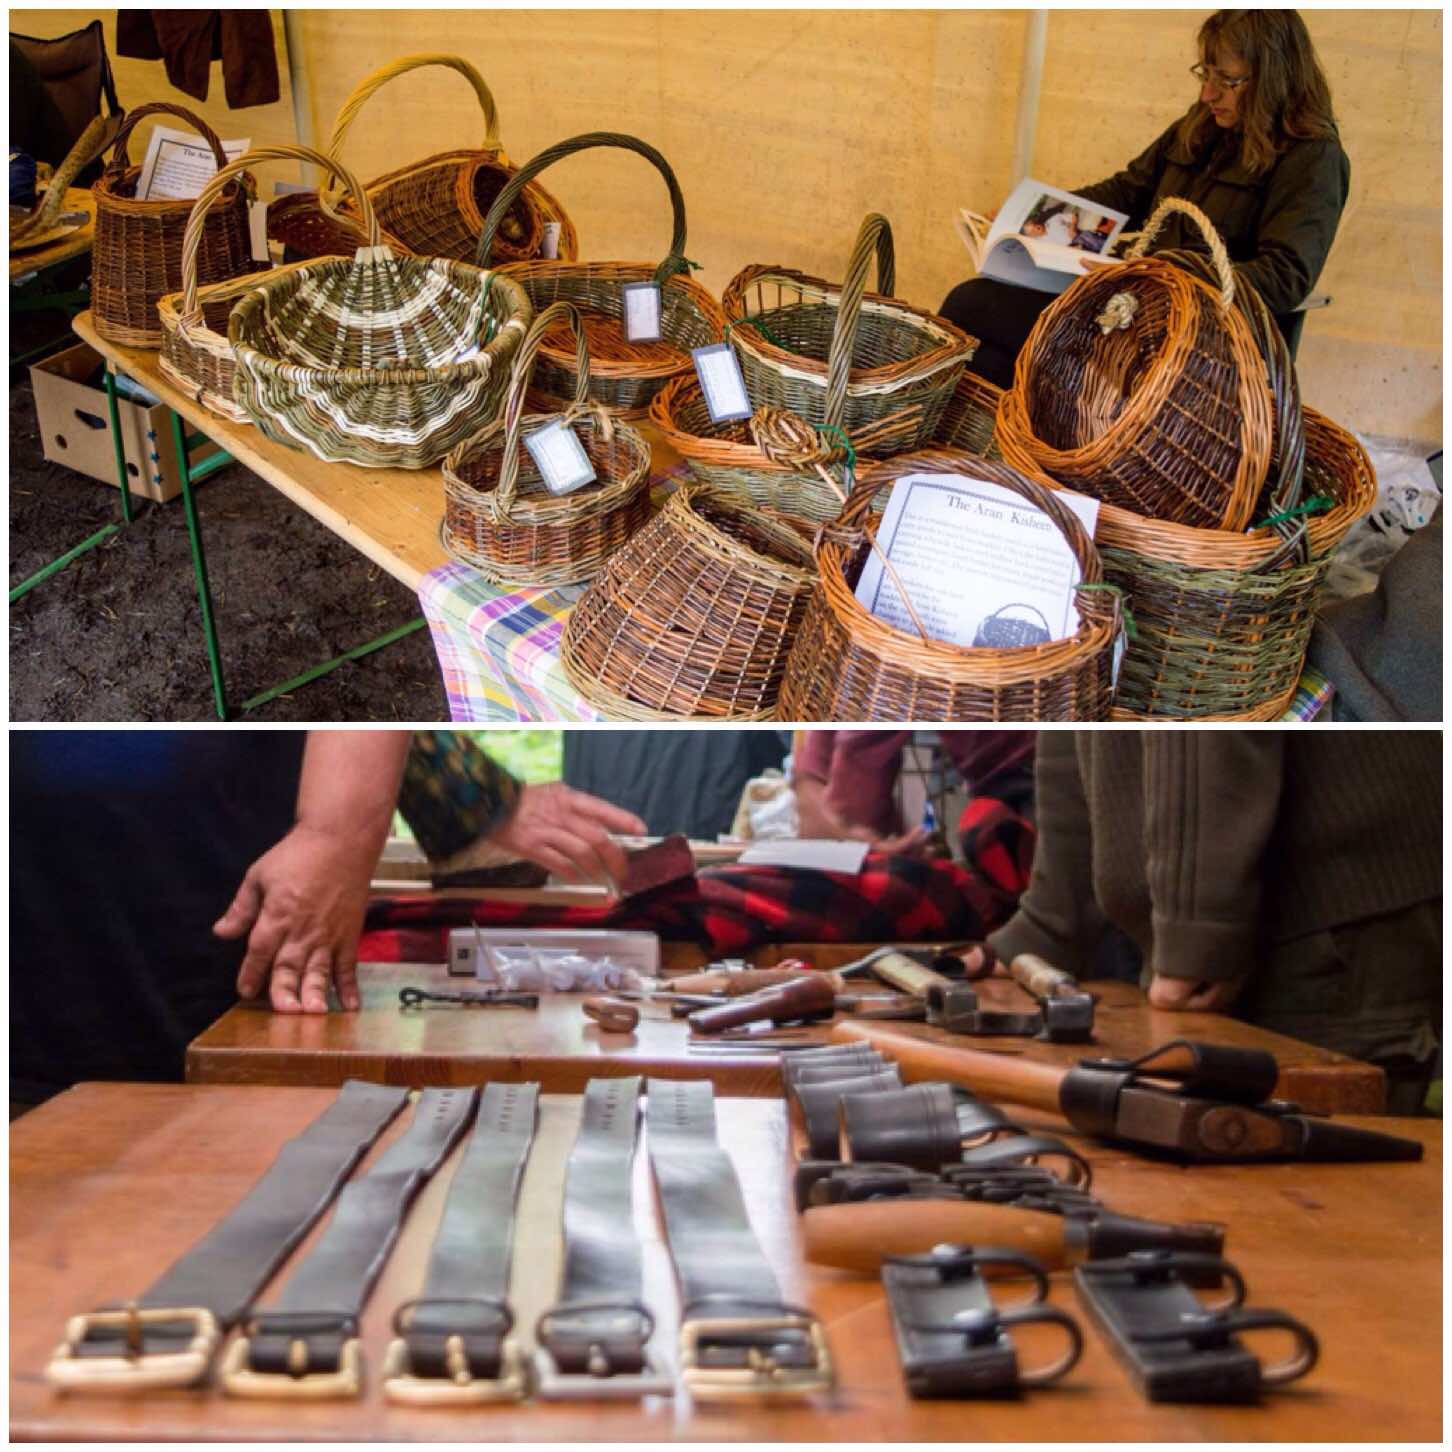
One day of the Moot is set aside as Traders Day. The Moot is not a particularly commercial event for traders however we do have a small shop open most days with a bring and buy stand.
On Traders Day many of the members set up a stand to sell their ‘wares’. Some of this is second hand, others have brand new bought-in goods, and a few sell their own creations. Some of these items like the baskets and the leather work you can see below are highly crafted and intricate.
Traders day
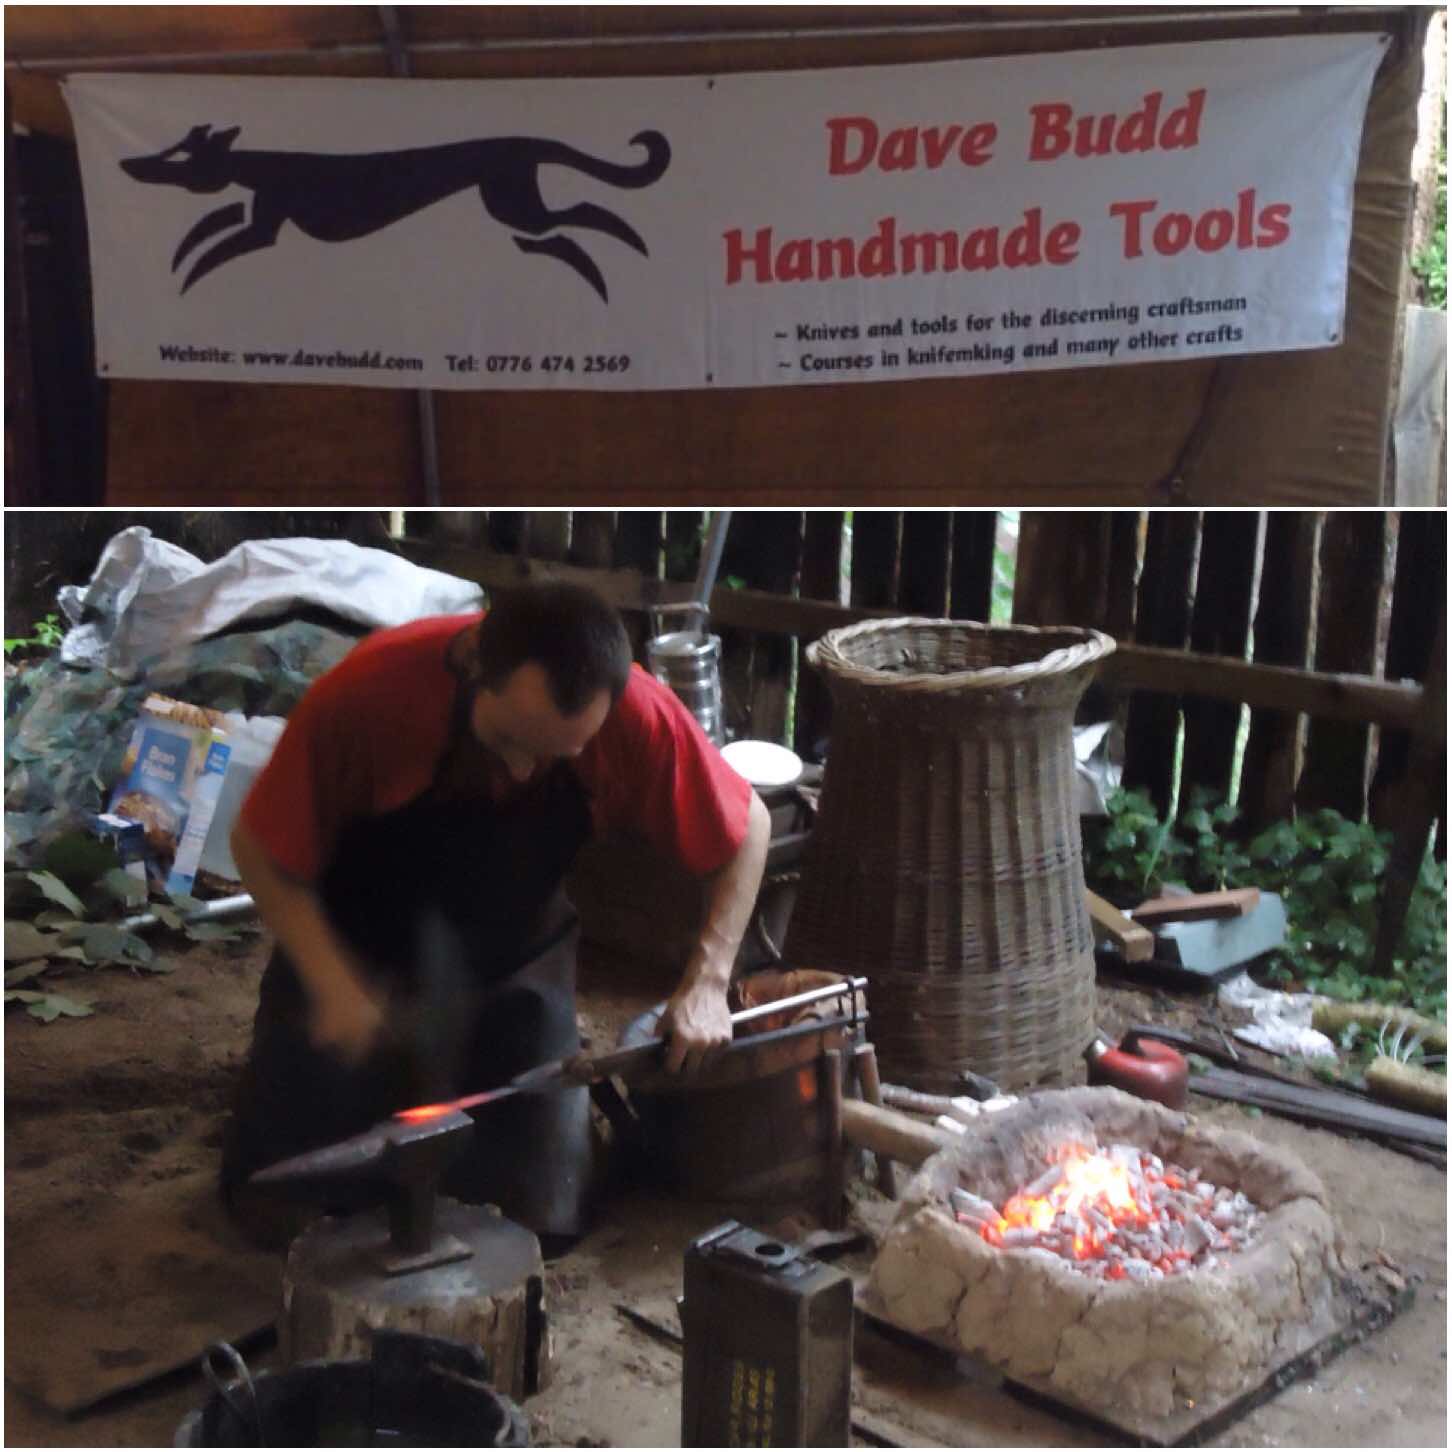
A post on craft cannot be complete without mentioning Mr Dave Budd. Dave is a master craftsman when it comes to metalwork, Using only the most rudimentary (but highly suited to the job) equipment he runs his own forge for us every year.
Dave makes excellent knives and other woodland working tools. My daughter Catherine enjoys being the ‘Pump Monkey’ – keeping the pump going to heat the forge. Dave also donated this year a beautiful knife and a bodkin arrow point as prizes for the archery competition.
Dave Budd iron craft
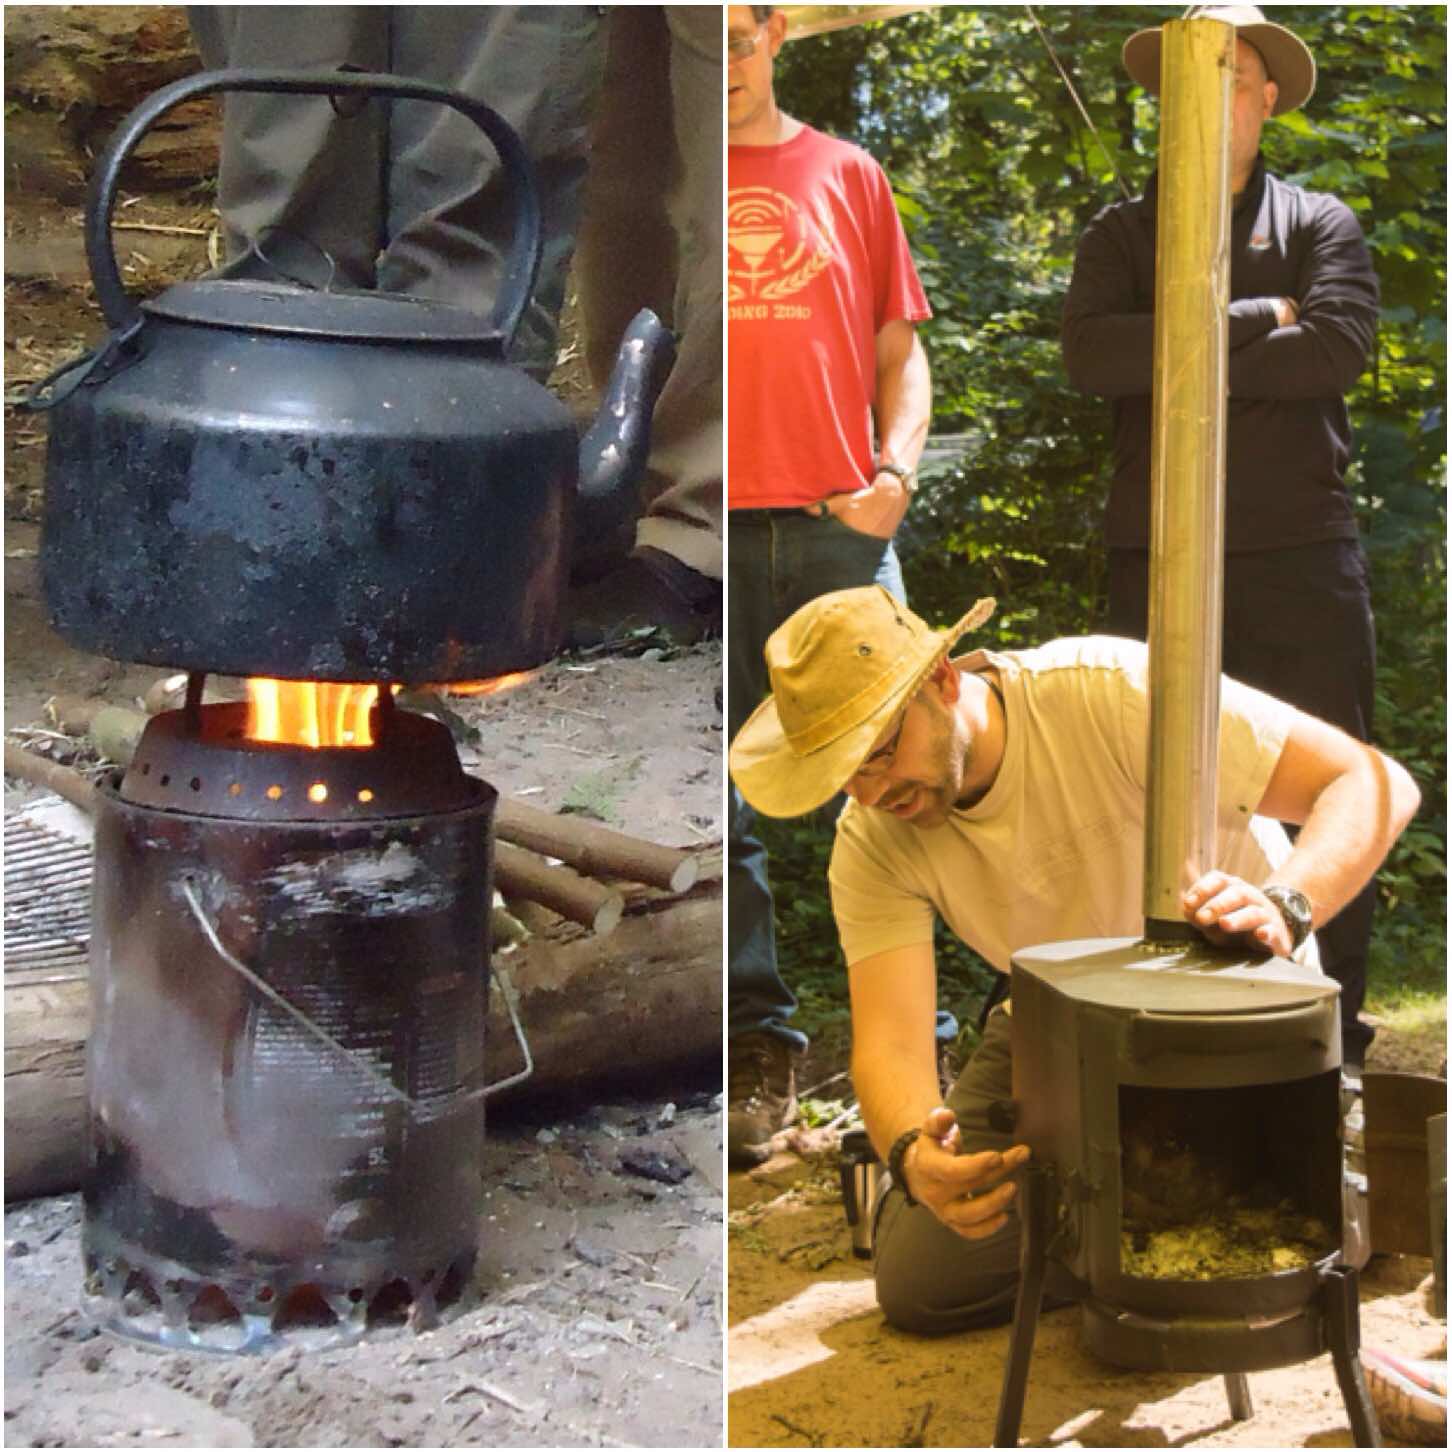
Another metalworker who is starting to experiment with this material is my Bushmoot neighbour Ian Woodham. A few years ago Ian showed a class I was running how he built a gas wood-burning stove out of a paint can. I was so impressed with it that I made one myself and wrote a tutorial on it – How To….Build a Wood Gas Stove.
This year Ian brought along a new stove he had built out of two gas bottles. The stove had a burner on one side and an oven on the other and I can confirm it did make excellent pizzas and cakes. Since then he has built another one which I am hopefully going to be trying out soon (as soon as I can figure out how to transport it from Yorkshire to Hampshire).
Cooking construction from Ian
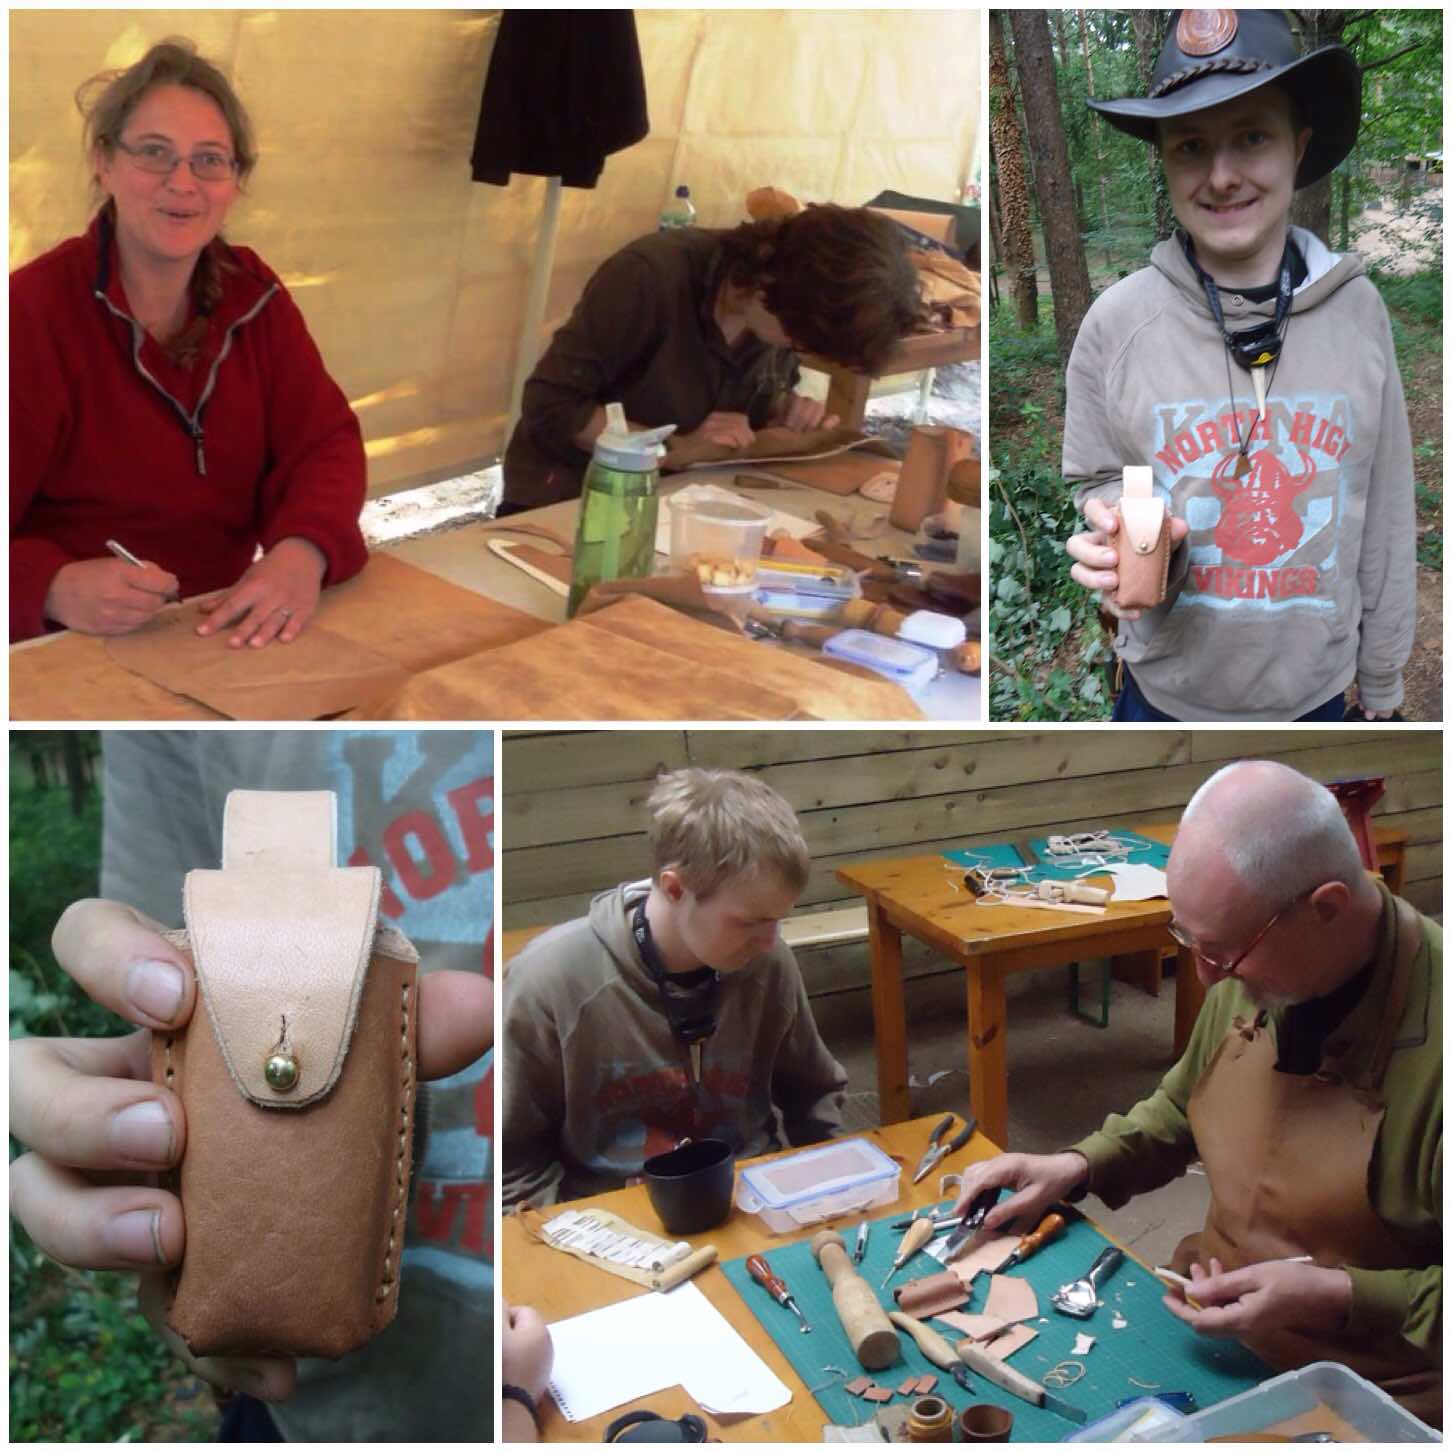
We have had a number of leatherwork instructors over the years however Eric Methven has been teaching this art at the Moot the longest. Eric can turn his hand to most things when it comes to working with leather from water bottles, tankards and sheaths to the likes of beautiful arm guards for archery (we got one of these guards as a prize for the archery competition one year).
Our good friend Drew passed away a few years ago and he was a keen student of Eric’s. I still remember clearly Drew coming up to my camp to show me the new sheath he had just made for his Leatherman multitool.
Leather craft from Eric
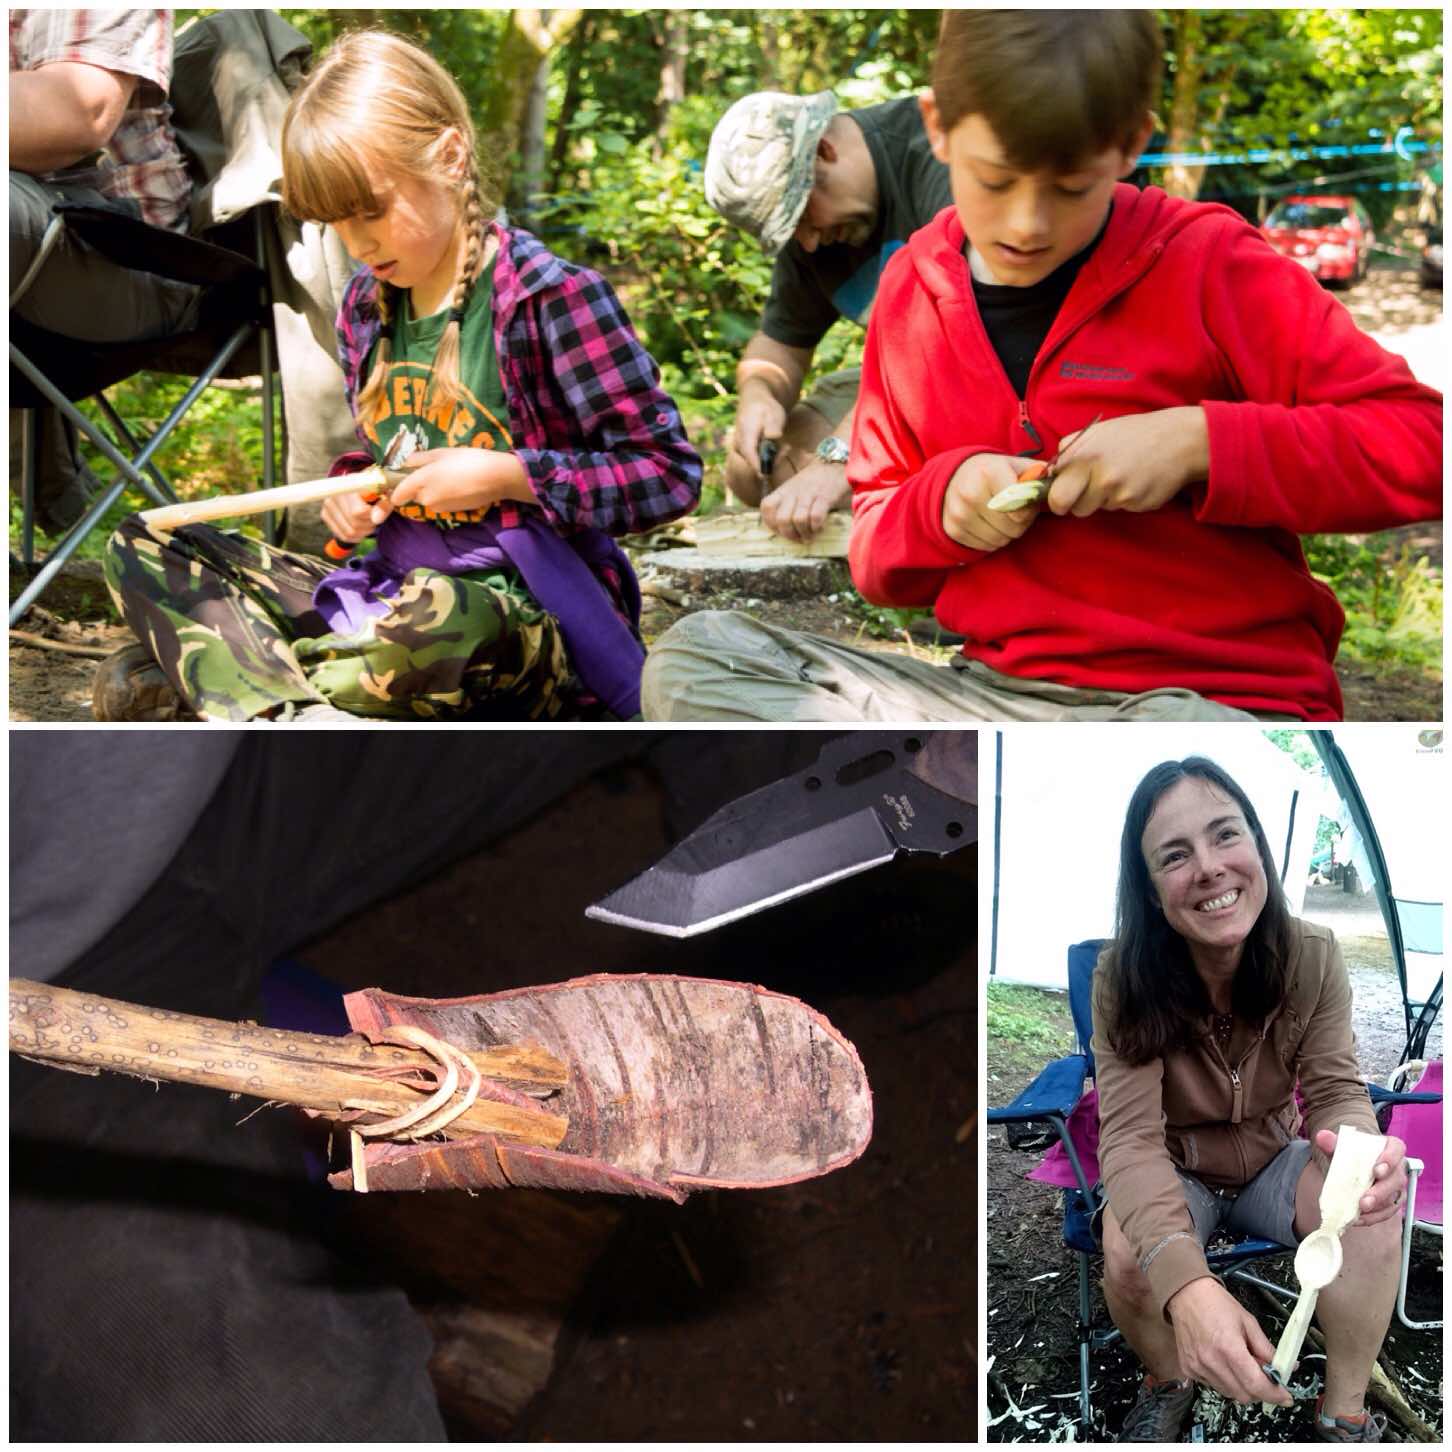
No Moot would be complete without some spoon carving. Our expert carver is Dean however quite a few of us lend a hand with this class. It is great to see all the kids learning to carve their first spoon (and adults too – that is my wife Alison with her first spoon below).
My first spoon at the Moot (way back in 2005) was quickly constructed from birch bark. It did not take long to make but it did impress me.
Spoonage
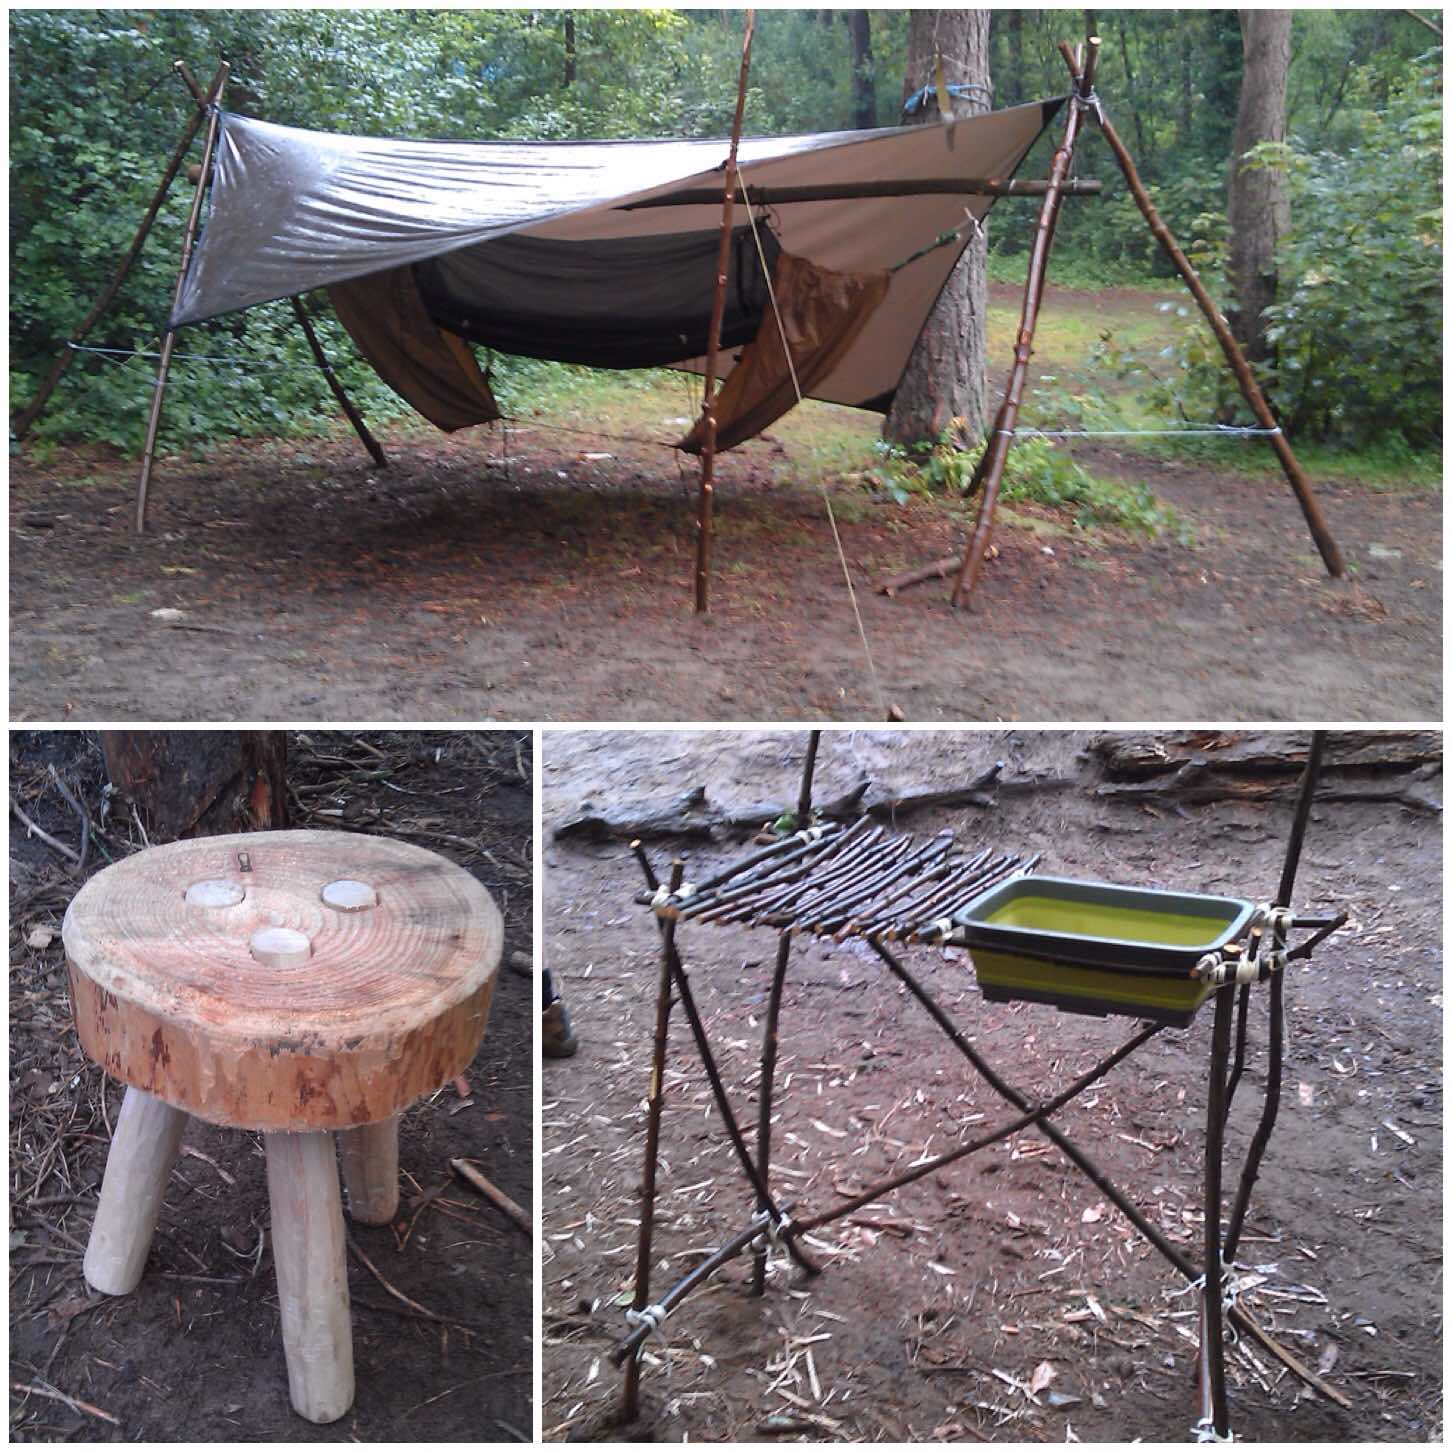
I ran a competition one year where everyone was tasked with constructing something for a bushcraft camp. There were many entries and you can see three below.
I loved the little stool and the washing rack, which had a lot of love and care put into its construction. My entry was this freestanding hammock stand (no land anchors were needed) .
Camp constructions
A couple of other construction projects have been around the theme of cooking. Tim Neobard built this fantastic pizza oven out of clay and straw last year. It baked some excellent pizzas (sadly some idiots smashed it up after the Moot finished).
Happily the oven was re-built by Neil this year using bricks as a skeleton so hopefully it will last for a few years.
My project this year has been on building campfire cranes and I tested out my Lap Joint crane at the Moot. It is a very simple device made out of one pole and I am happy to say it passed with flying colours. Since then I have been busy building other cranes with as many variations as I can think of.
Fireside constructions
One thing you can be guaranteed about at the Moot is being astonished by the numerous things you can do with string, be that Dream Catchers, crochet or making whoopie slings.
We also had David Colter making Balearic slings out of string at the Moot and running a competition with them. Most bushcrafters are quite happy at the Moot to show you what they think are the best knots to use in any given situation.
String craft
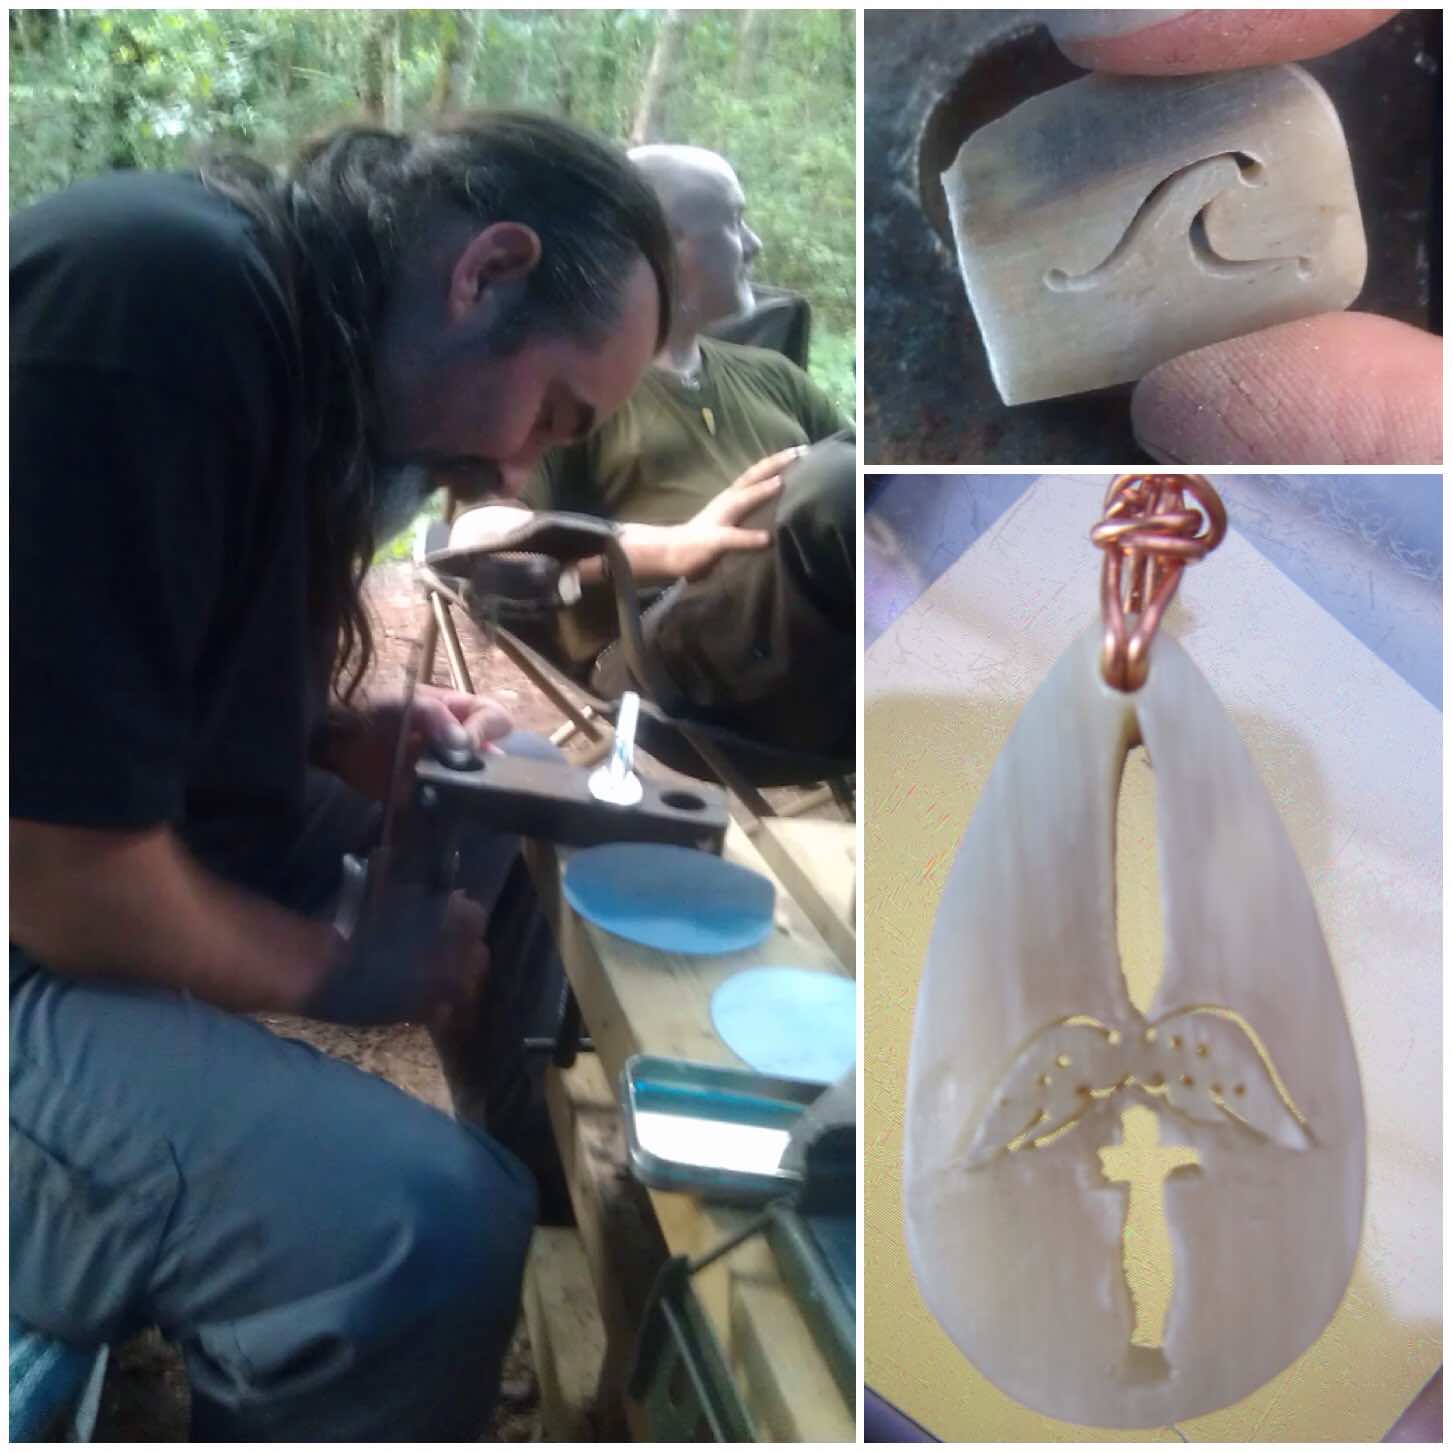
A very quiet craftsman is our very own Cap’n Badger. He uses a fine saw to carve bone and antler into beautiful pendants. You can see a couple of his designs in the picture below.
The pendant on the bottom right is the one he carved for me a few years ago. The design was very intricate (a Royal Marine dagger and parachute wings). Badger also made some more pendants this year and donated them to the archery competition where they were quickly snapped up by the competitors.
Fine bone craft from Cap’n Badger
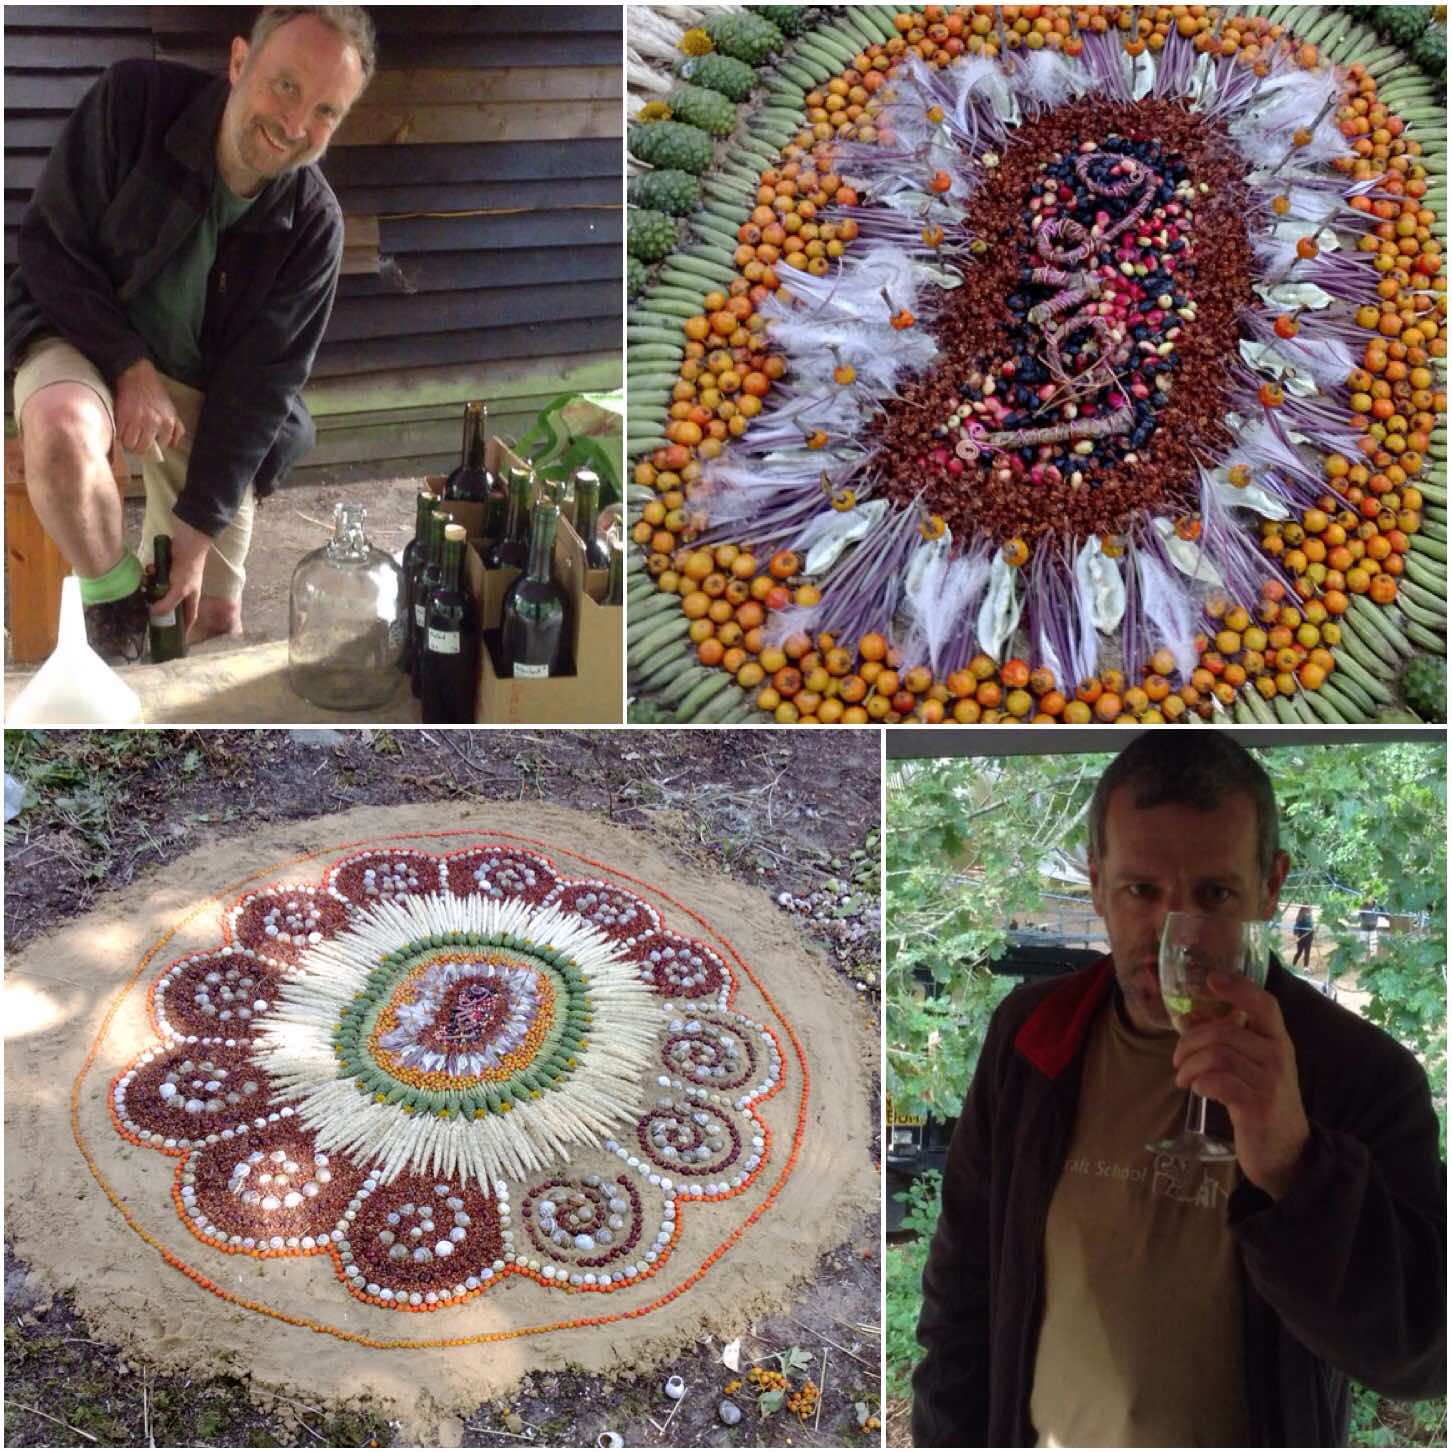
Now it is not all hard graft when it comes to the Moot. Last year my friend Richard brought along a number of his bottles of white elderberry wine. I managed to get a private tasting session and I was very impressed with the quality of the wine that he had produced.
Richard has managed to cultivate his own ‘orchard’ of elder trees that produce white elderberries. This has taken him years to do and it has paid off for him with some excellent wine.
I think though that the most beautiful sight you will come across at the Moot must be the fantastic mosaics of plants made by Keith Beaney (Keith refers to them as Land Art and you can see why clearly). Keith will spend hours producing these wonderful spectacles for us to marvel at. Many of the children head off to collect materials, inspired by his creations, and leave their own mosaics dotted around the woods.
Liquid art from Richard and plant art from Keith
I could have added lots more on this subject but I have to end somewhere.
I am looking forward to next year when I can practice some of these arts and crafts again and learn new ones.