How To…. Carve an Aures Campfire Crane – Single Fork

one upright – two cranes – three pots

I could never call myself a chef however I could call myself a campfire engineer. I love to make different cooking rigs that I can use around the fire depending on the circumstances I find myself in.

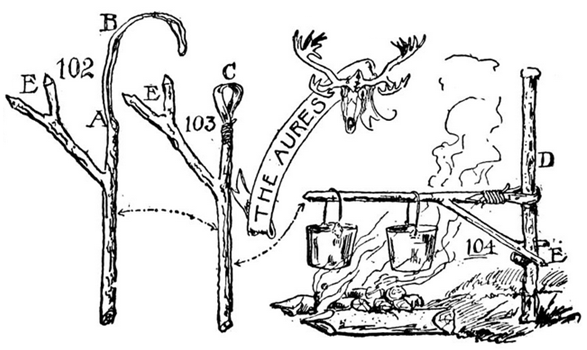
The Aures crane is one of these projects for the more long-term camp and is so easy to make. The crane is named after Victor Aures, a Scout Master from Buffalo, NY. I found a good article on this from an issue of the Boy’s Life from 1915.

Photo 29-05-2015 09 33 30
The Aures Crane – a version using a single-fork branch

I also found a book called The Book of Camp-Lore by Dan Beard on the Project Gutenberg website that shows the original idea of wrapping the bark of one limb around an upright and a forked lower limb.

Aures crane
The Aures Crane – Picture courtesy of The Book of Camp-Lore and Woodcraft, by Dan Beard – Sourced from Project Gutenberg

I have been making these cranes for many years now but it was only once I started researching them that I discovered its correct name. This post does not cover the making of the Aures crane as shown in the Boy’s Life magazine or on in the Book of Camp-Lore (I will do that one later) but a variation of it.

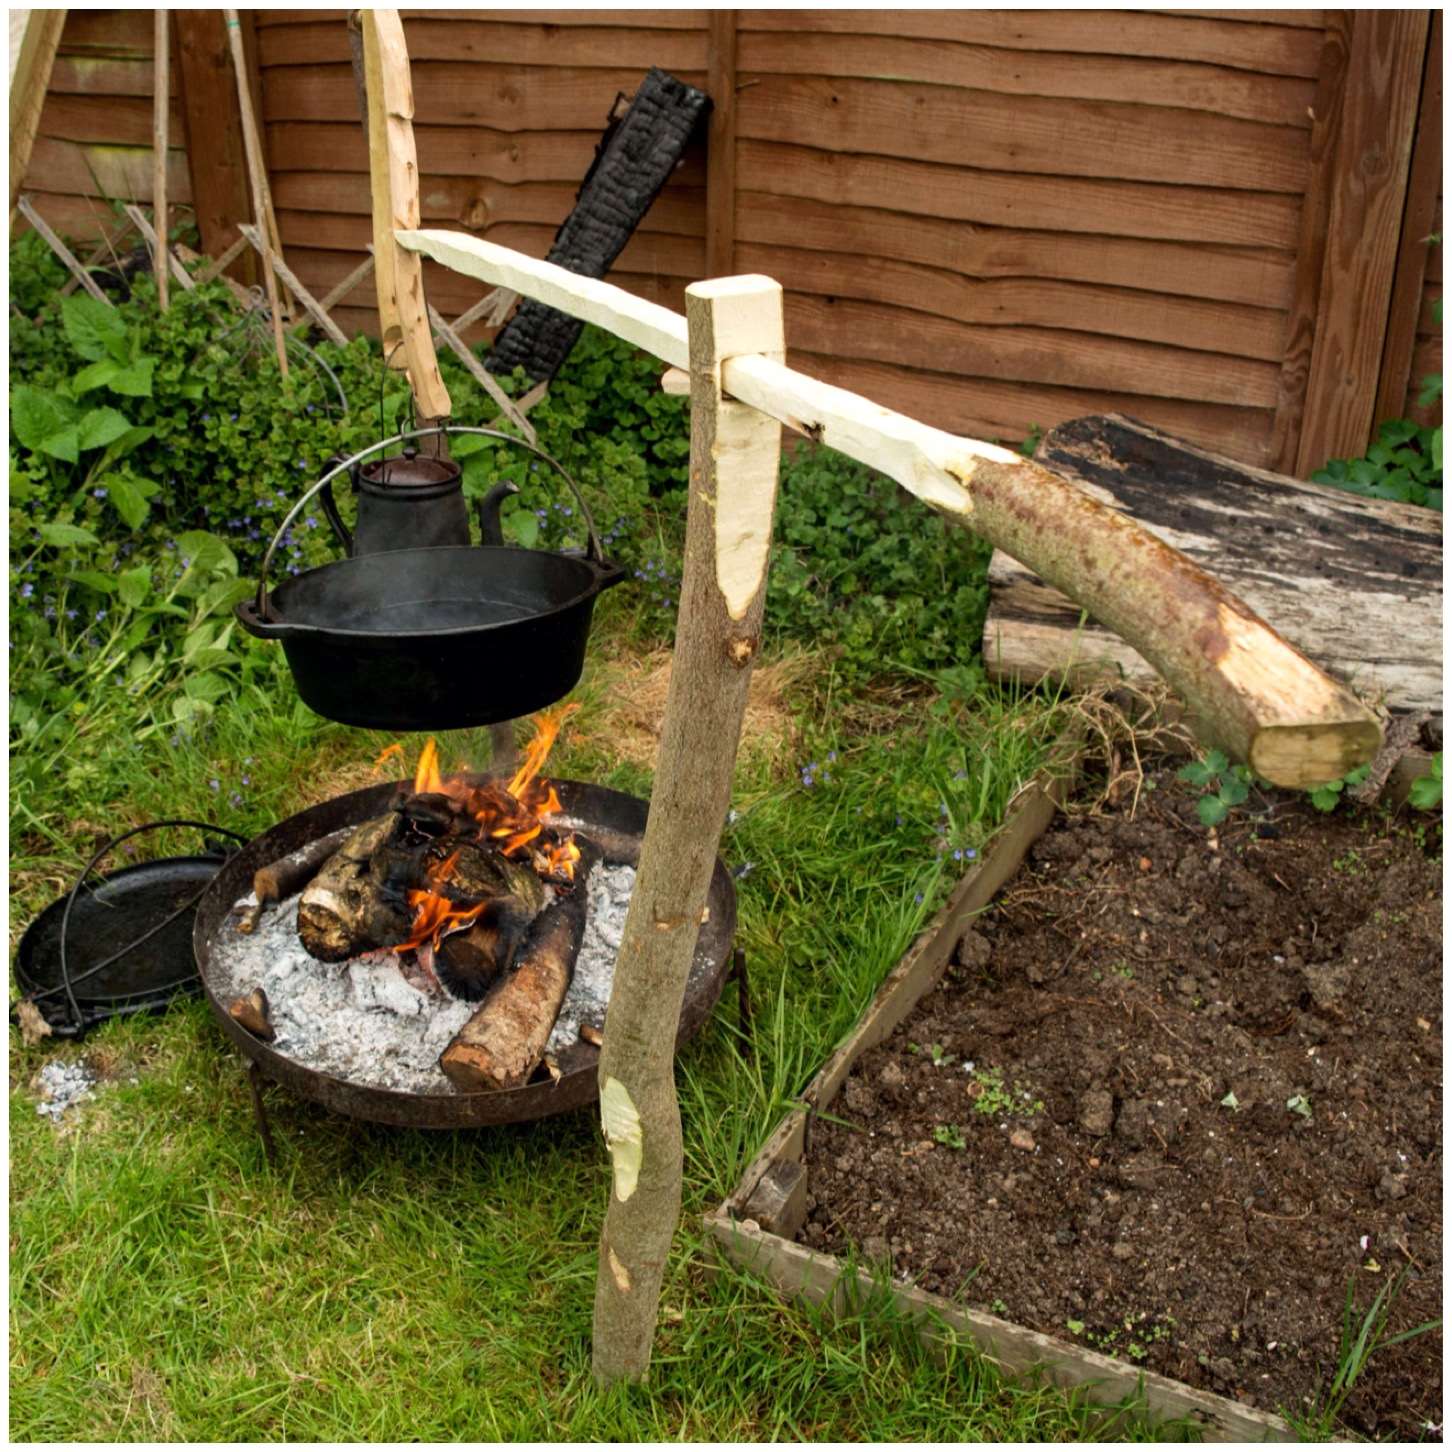
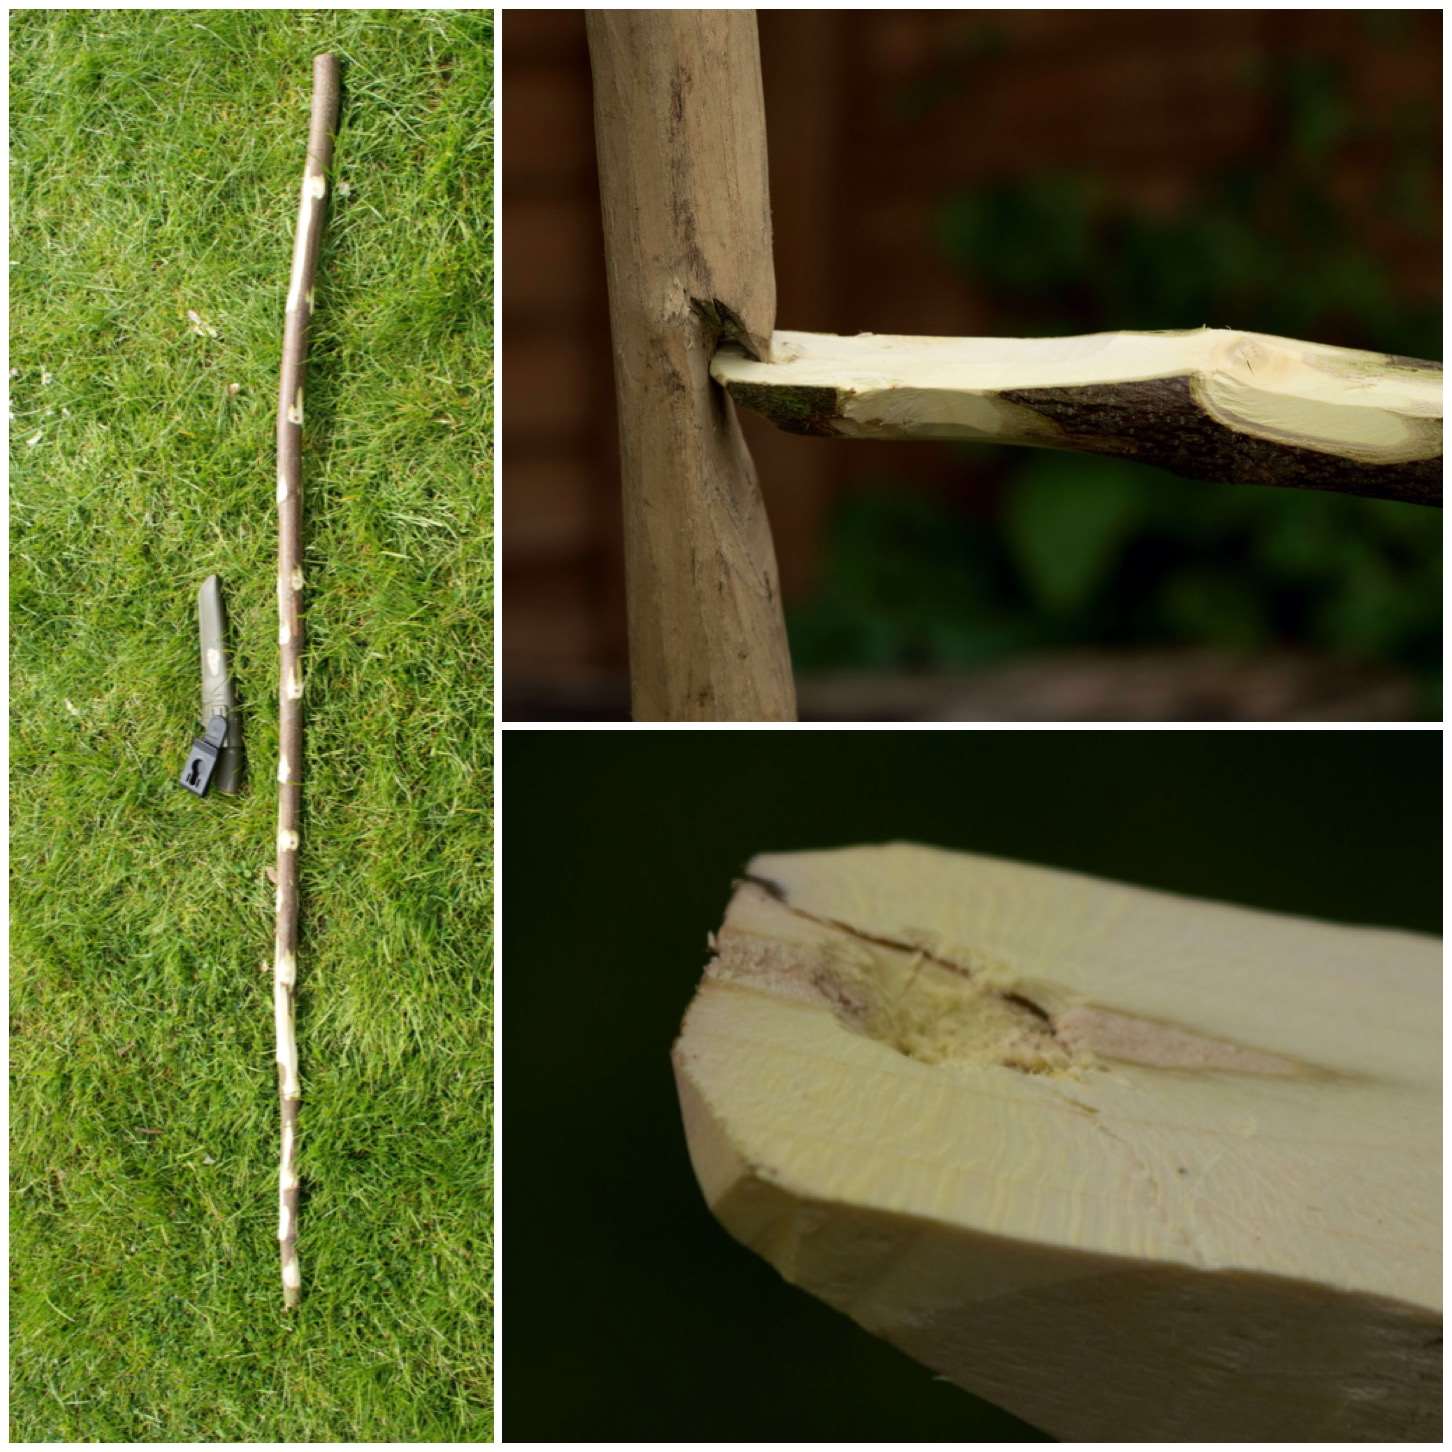
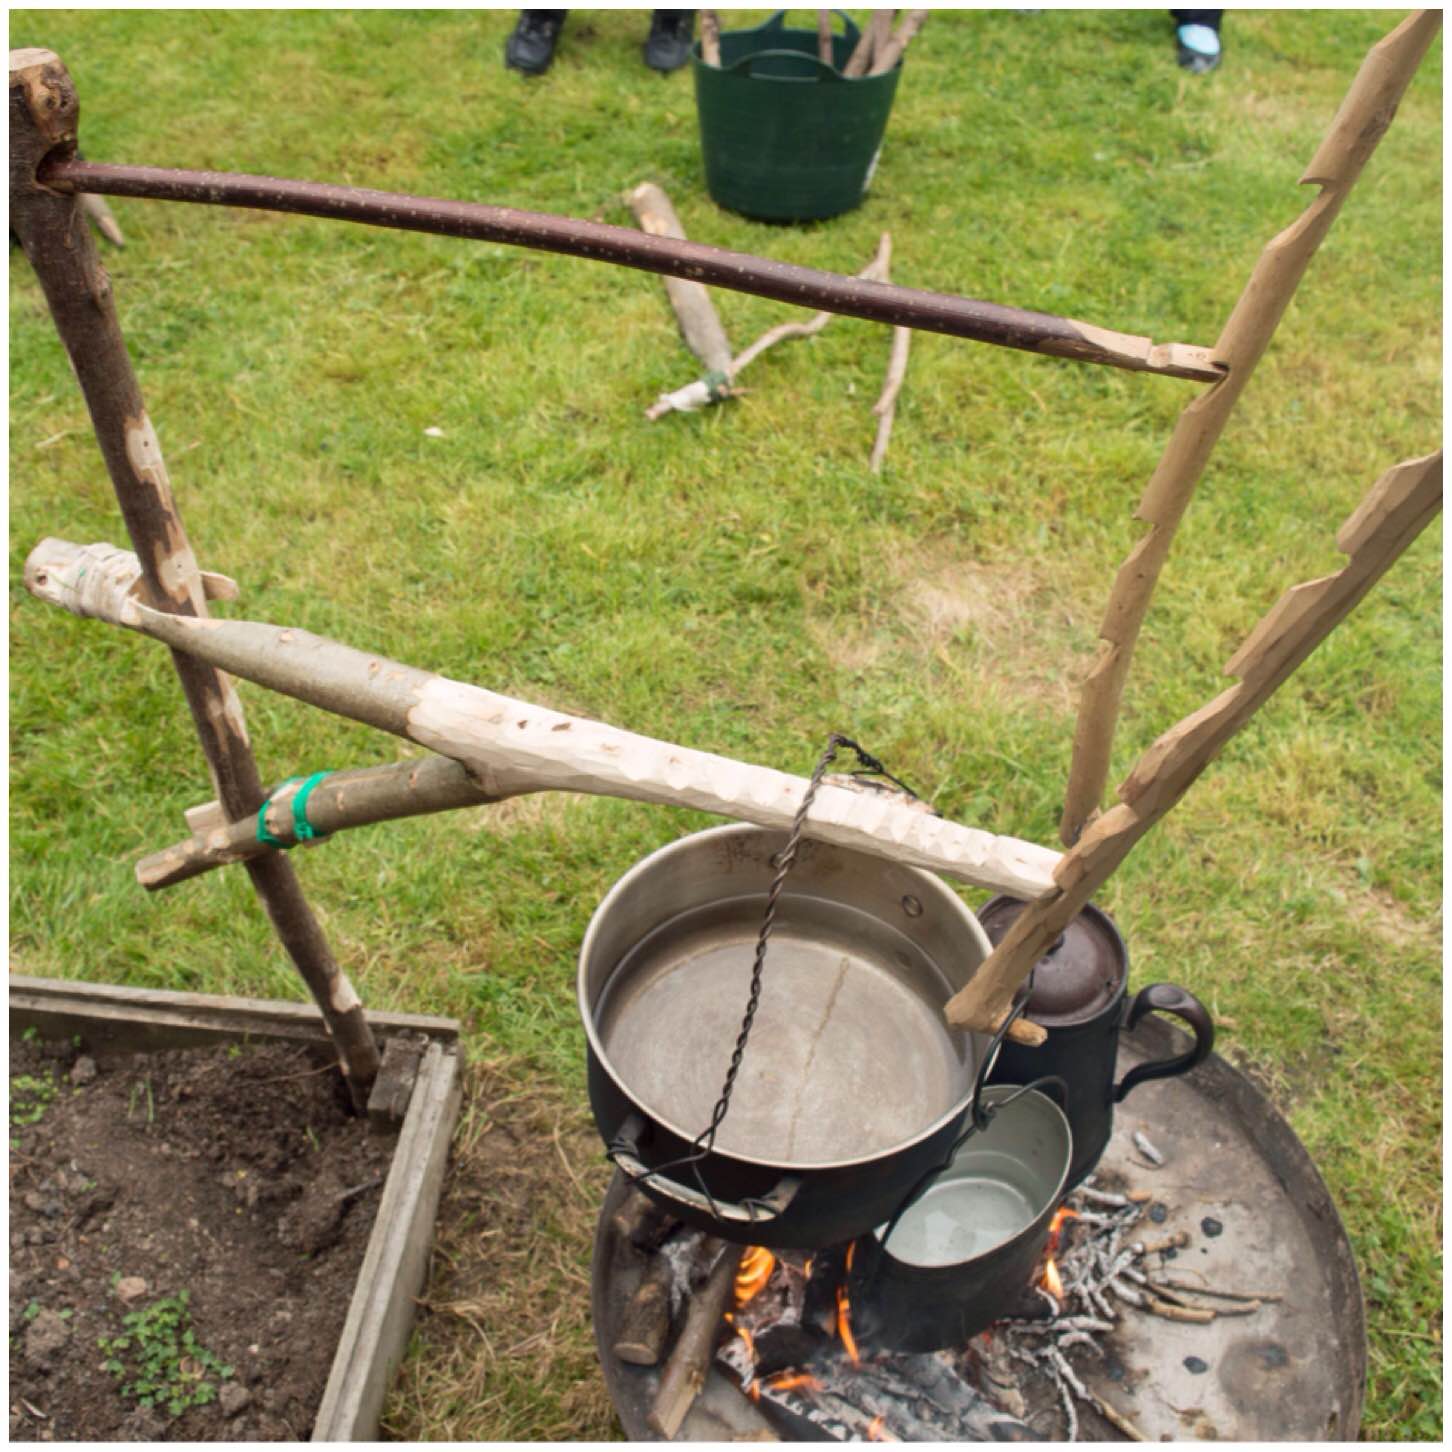
The picture below shows a classic Aures crane with a good secondary fork to rest against the upright. It’s not easy to find the exact combination of forks needed for this classic style so I set out to re-create the Aures crane using a branch with only one fork, as these are so much more common.

Photo 29-05-2015 09 33 29 (1)
The ideal Aures Crane with a perfectly placed fork

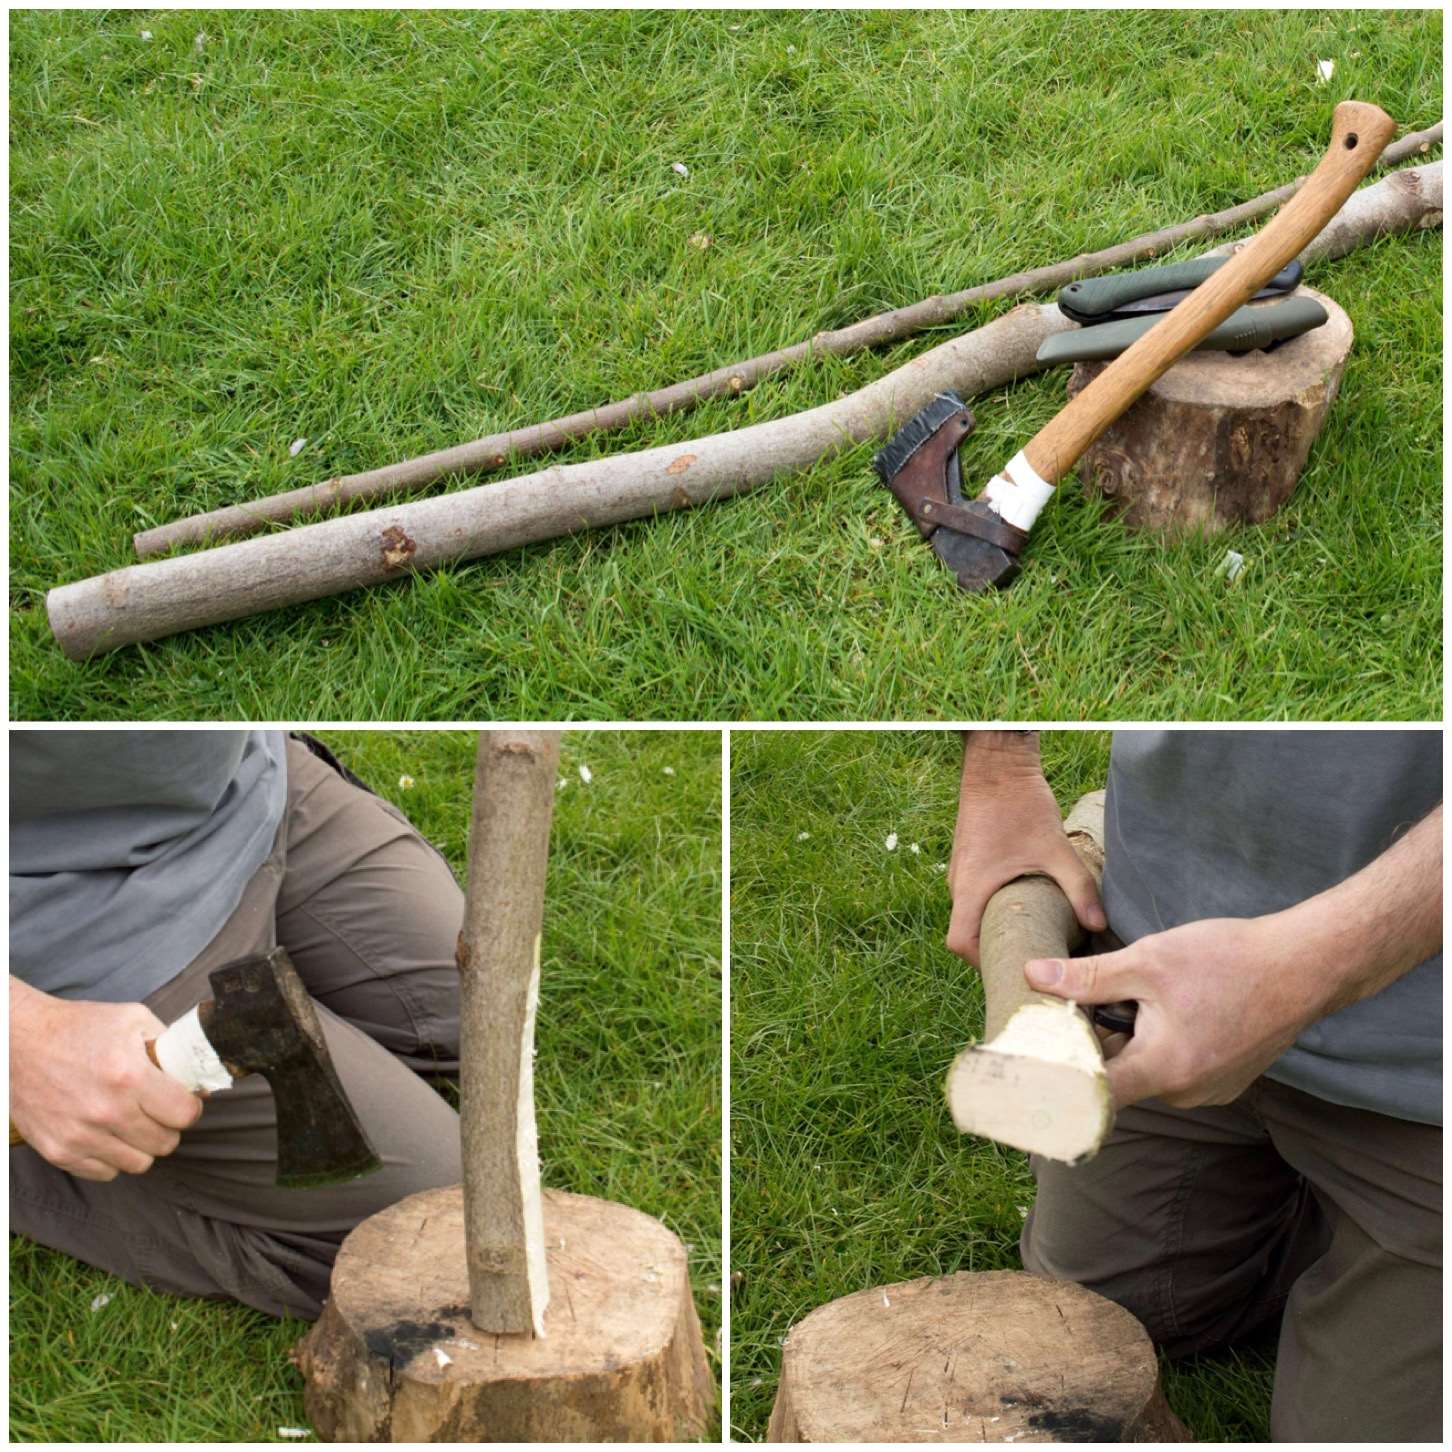
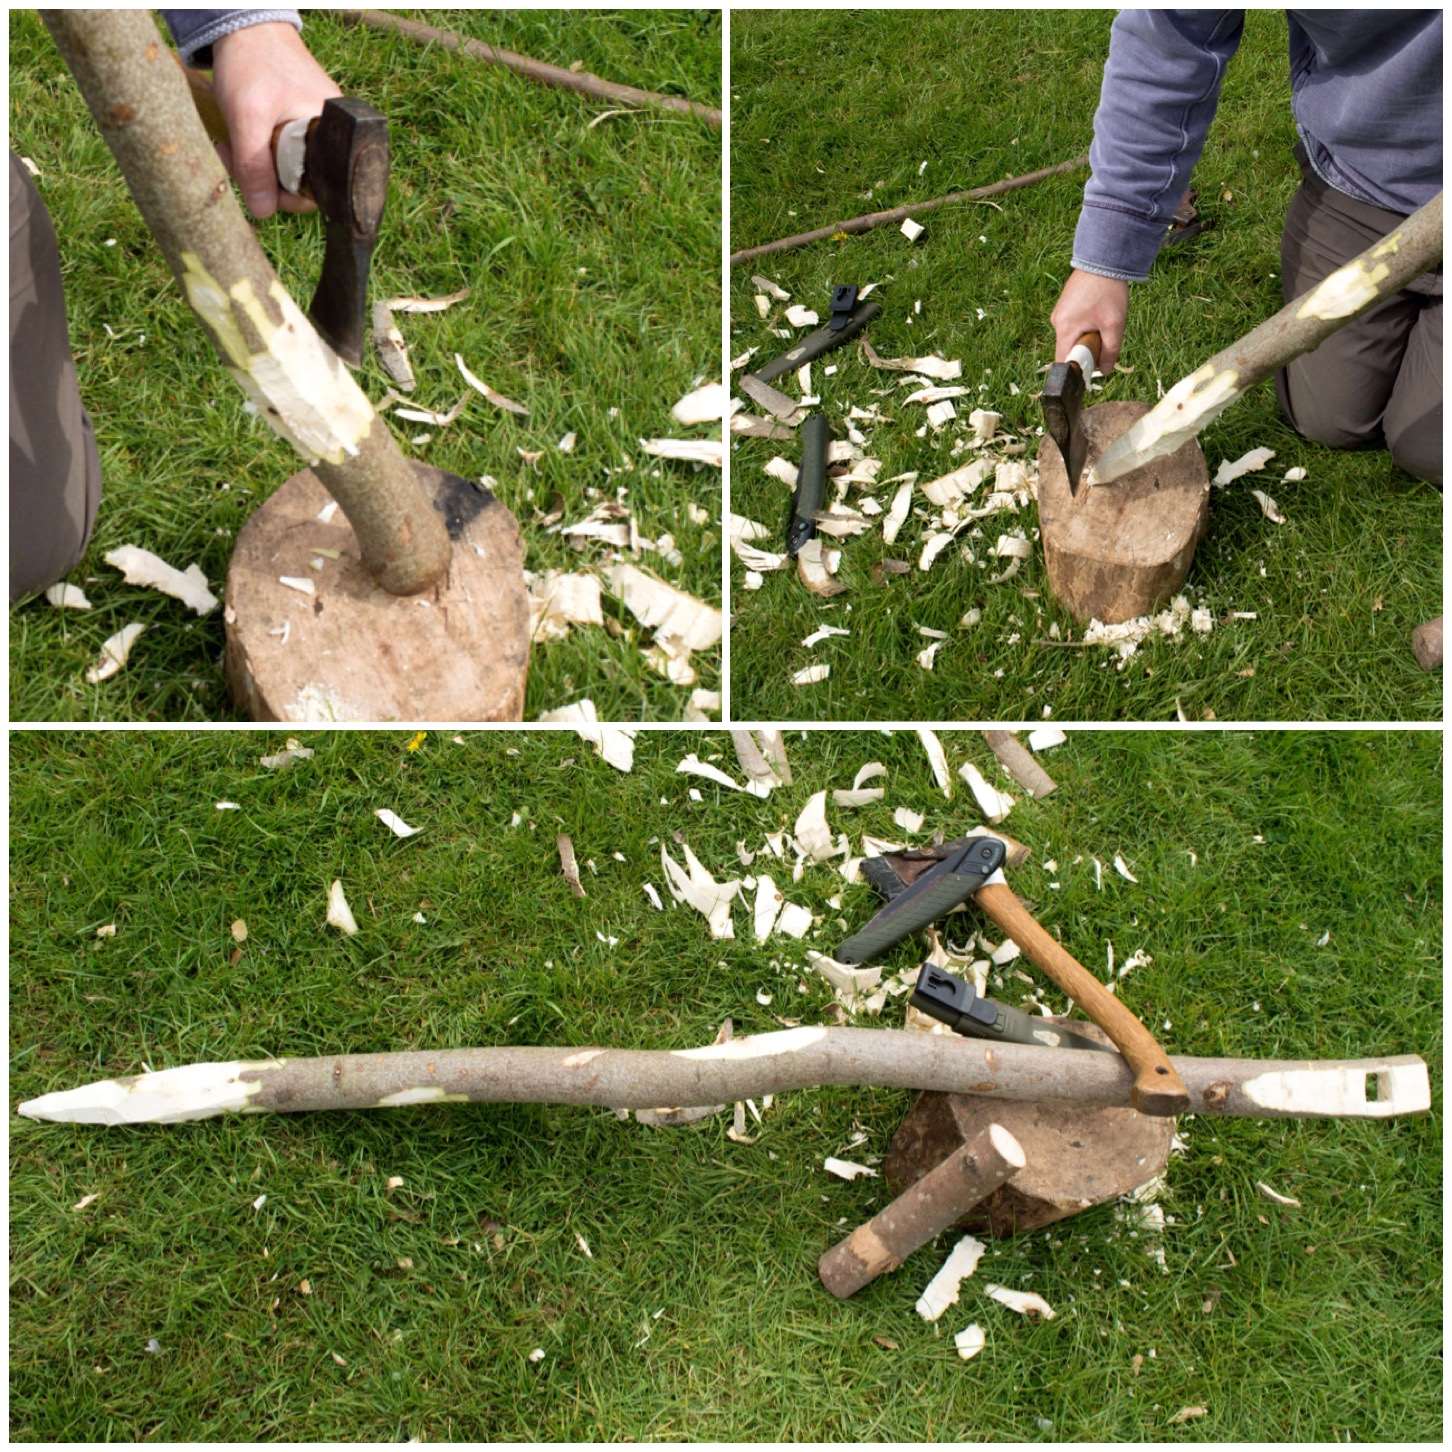
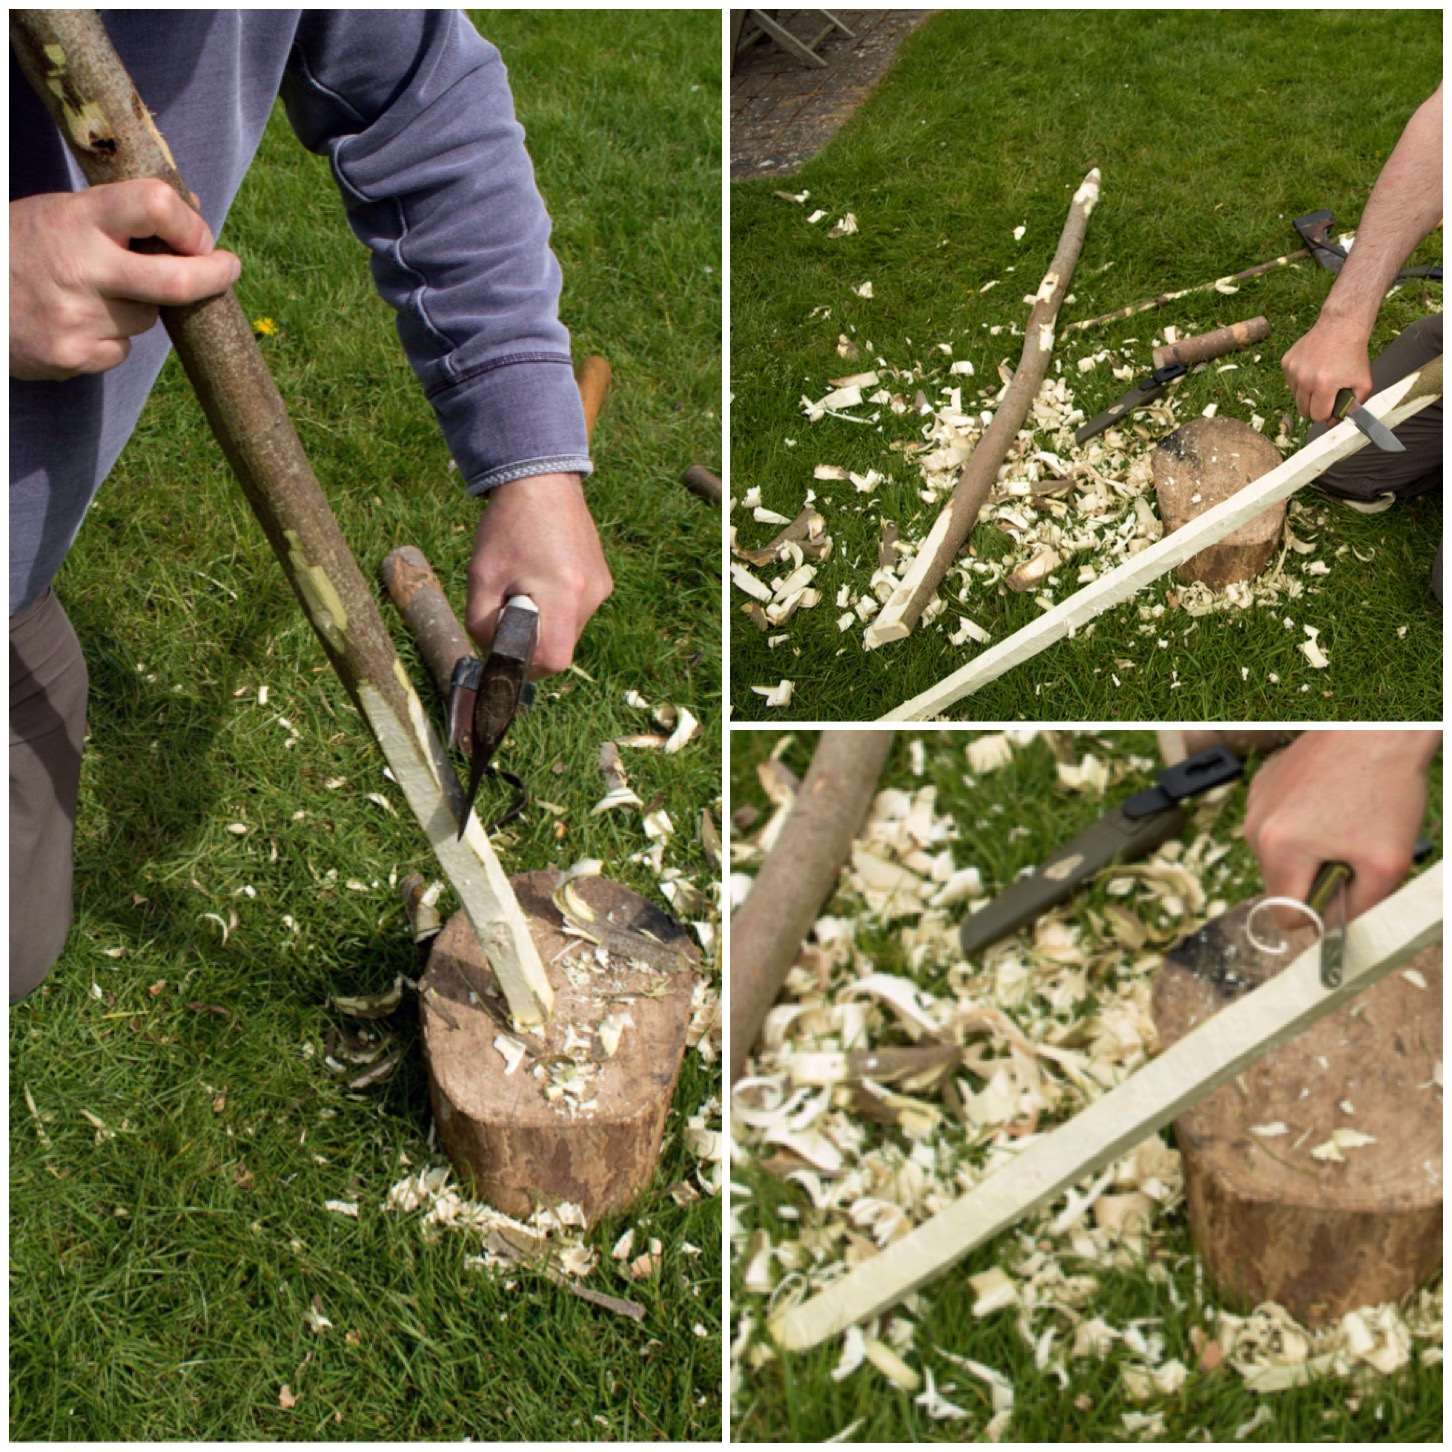
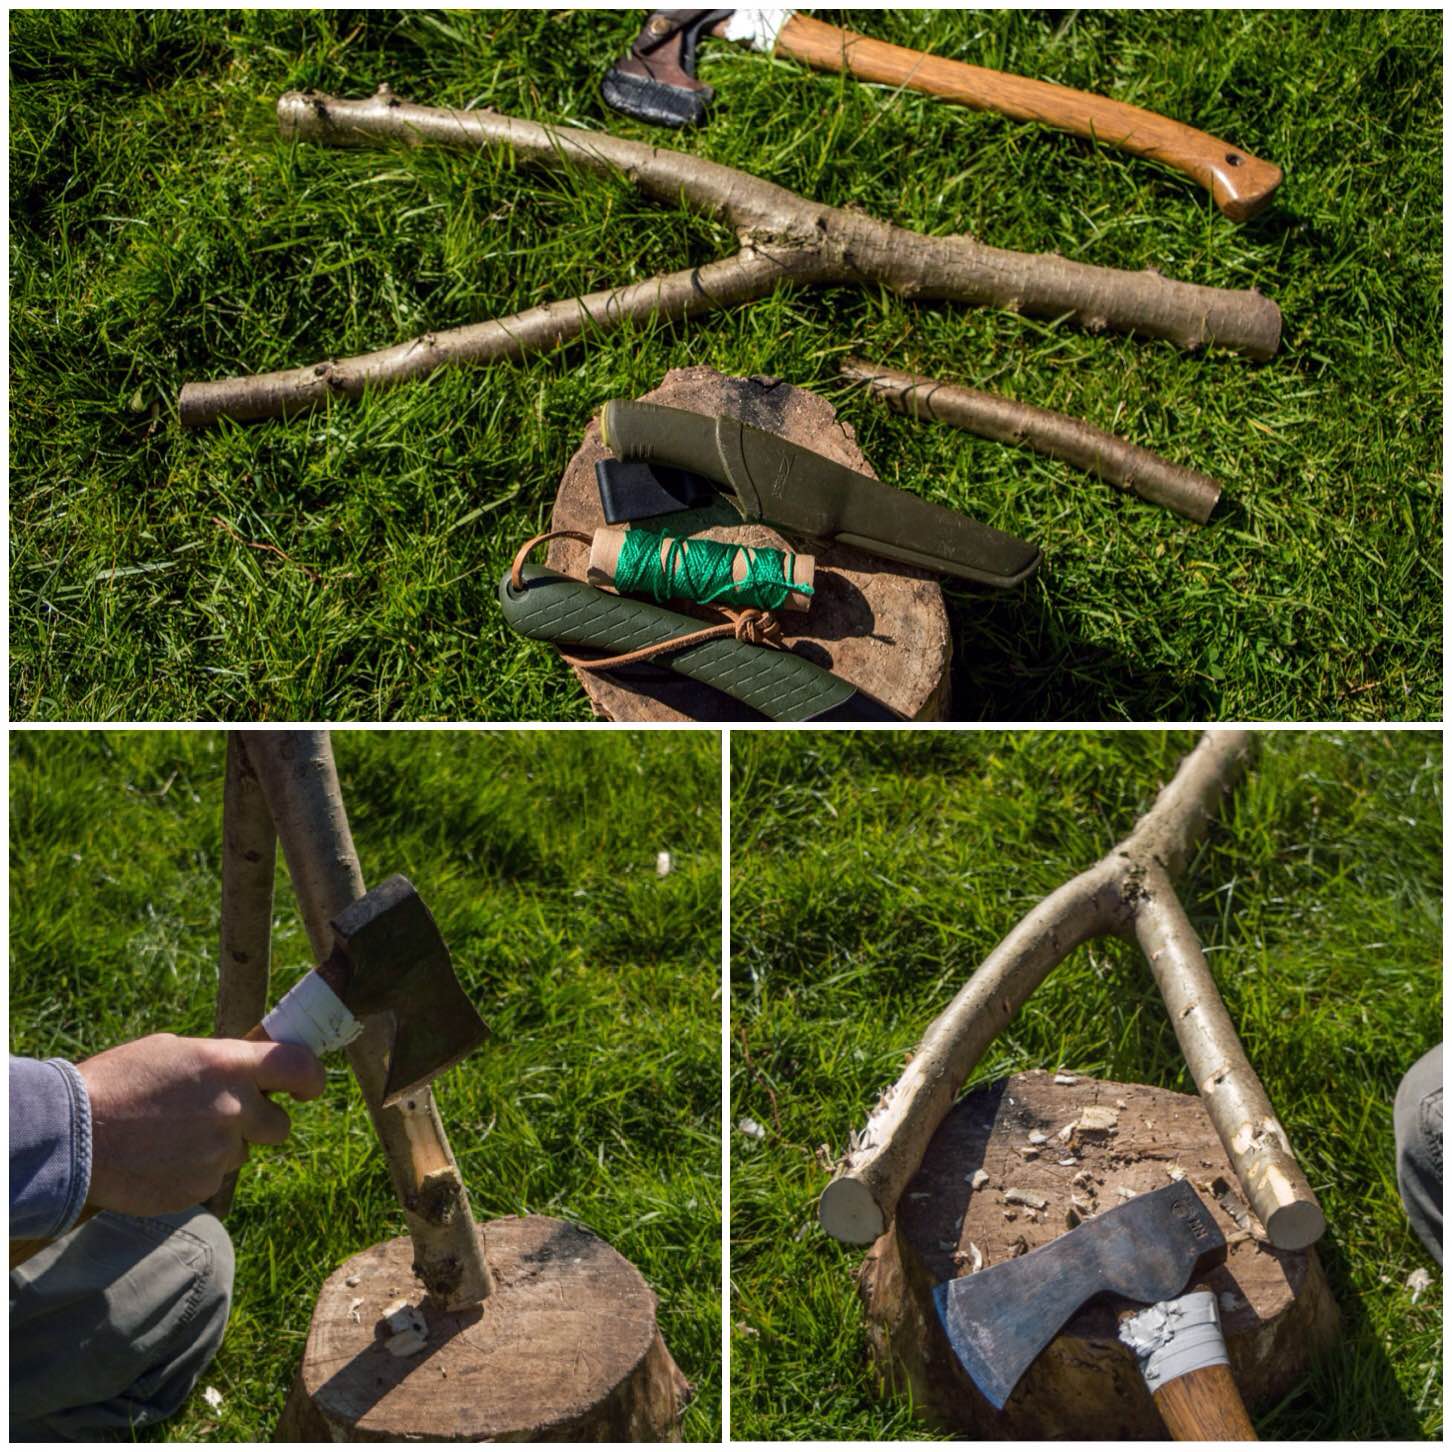
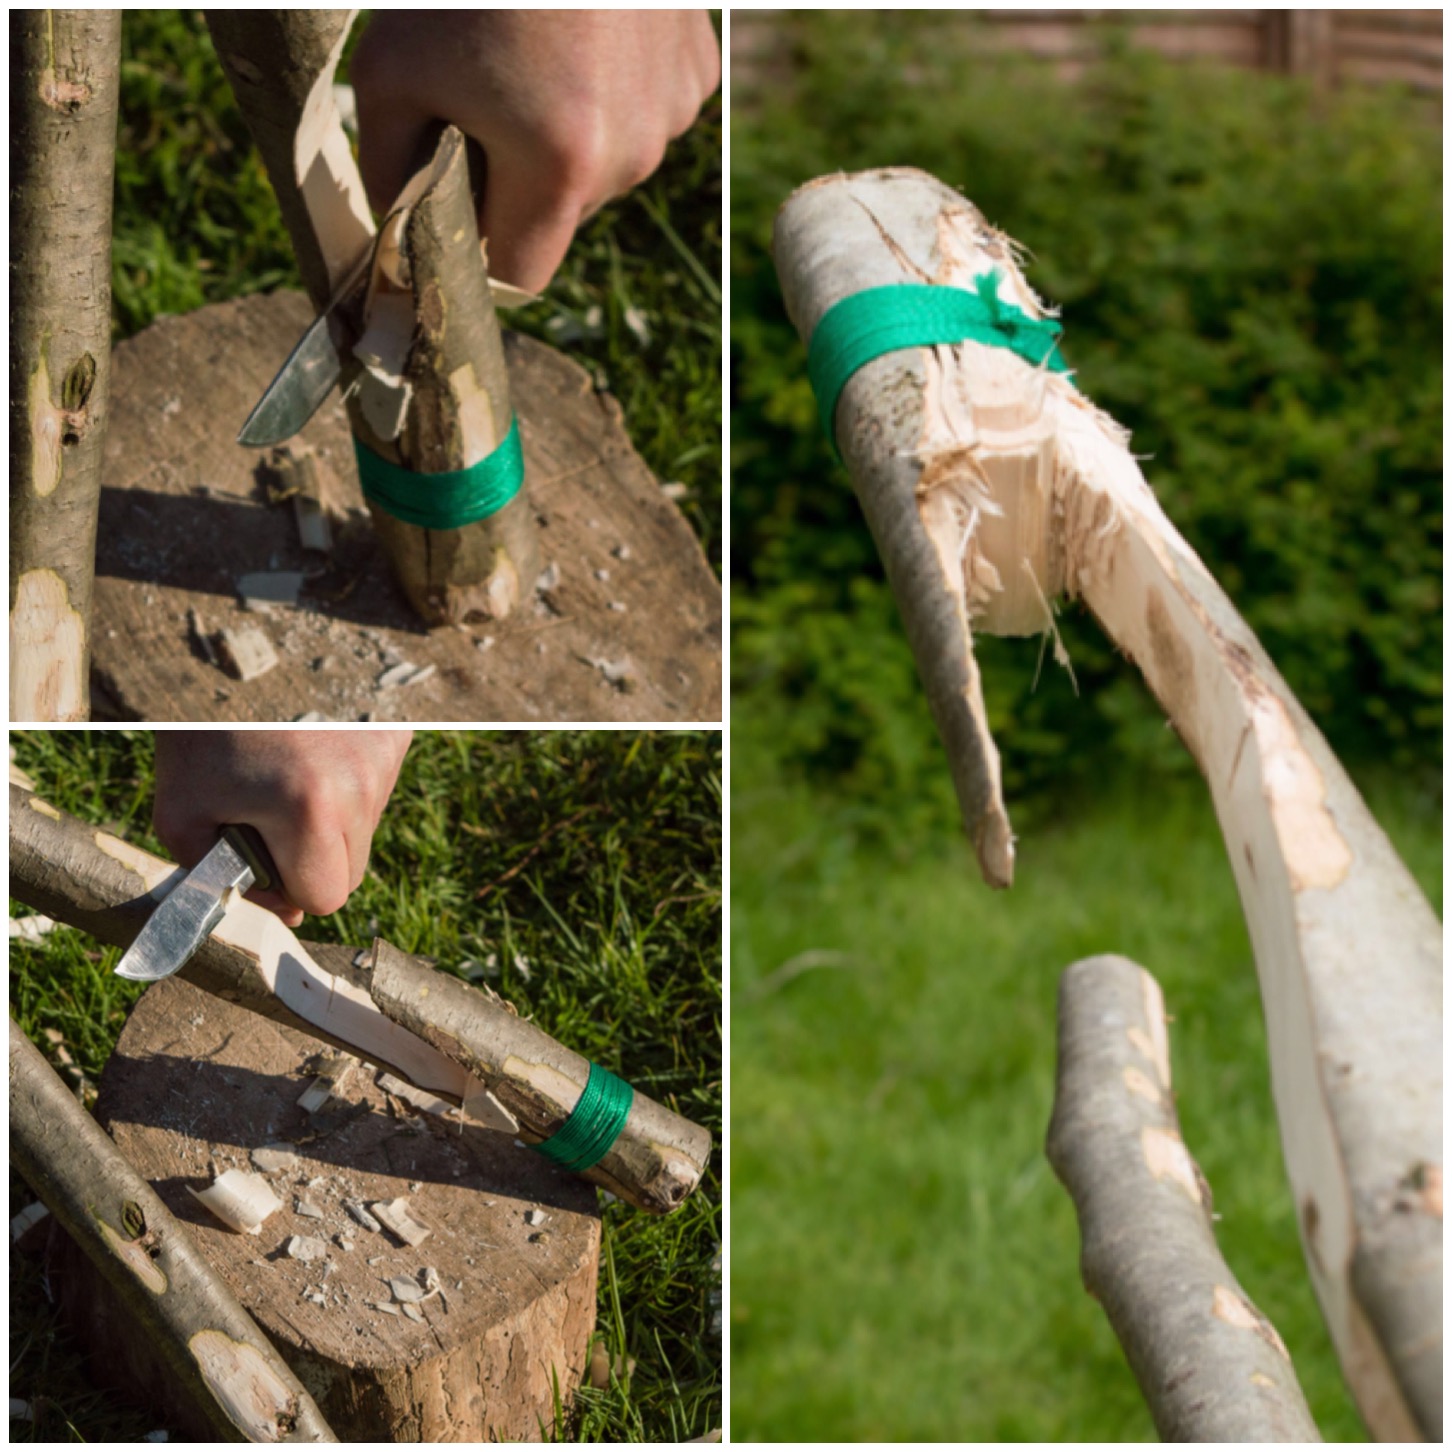
I chose a sturdy green piece of hazel wood with a single fork. After trimming the ends to the size I wanted I used my axe to get rid of all the lumps and bumps on the wood.

In the bottom right picture the limb on the left I will be calling the upper limb and the one on the right the lower limb.

Photo 29-05-2015 09 33 18
The not-so-ideal single fork – much easier to find

Top Limb

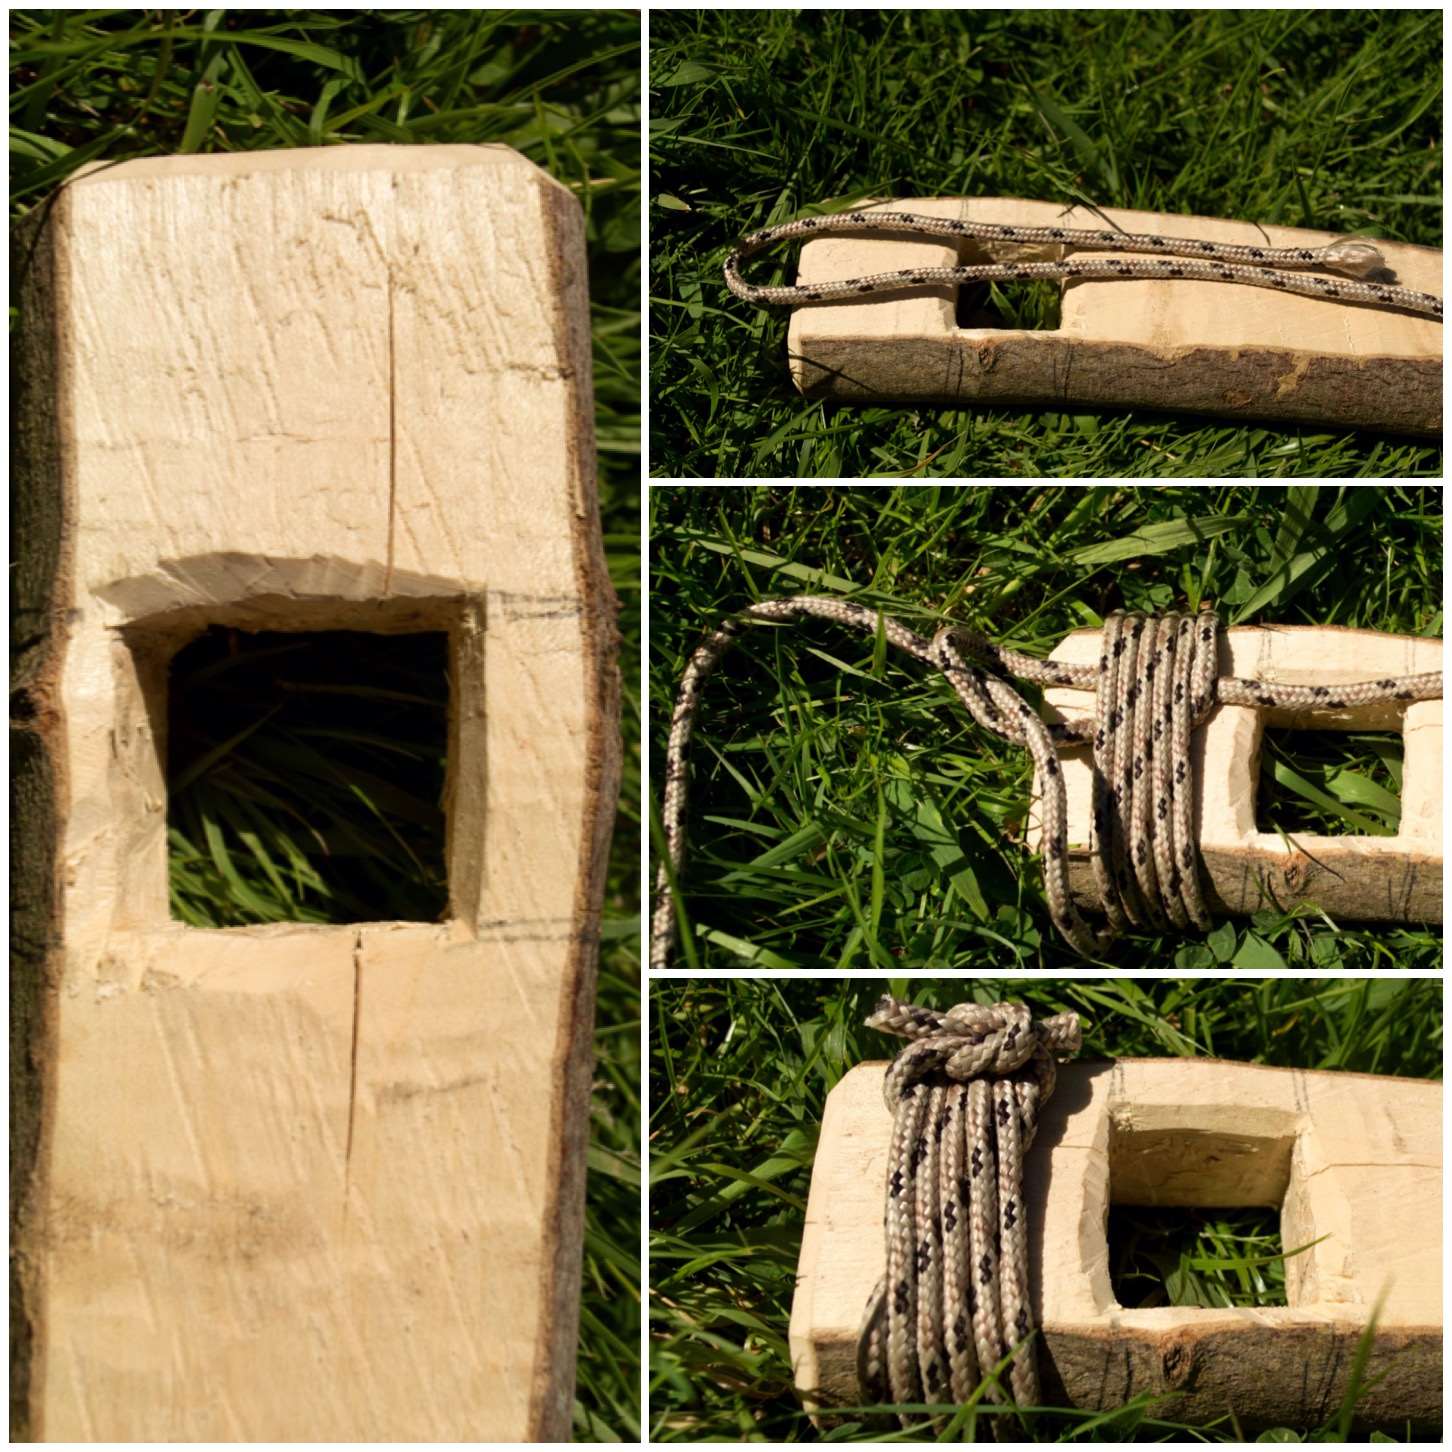
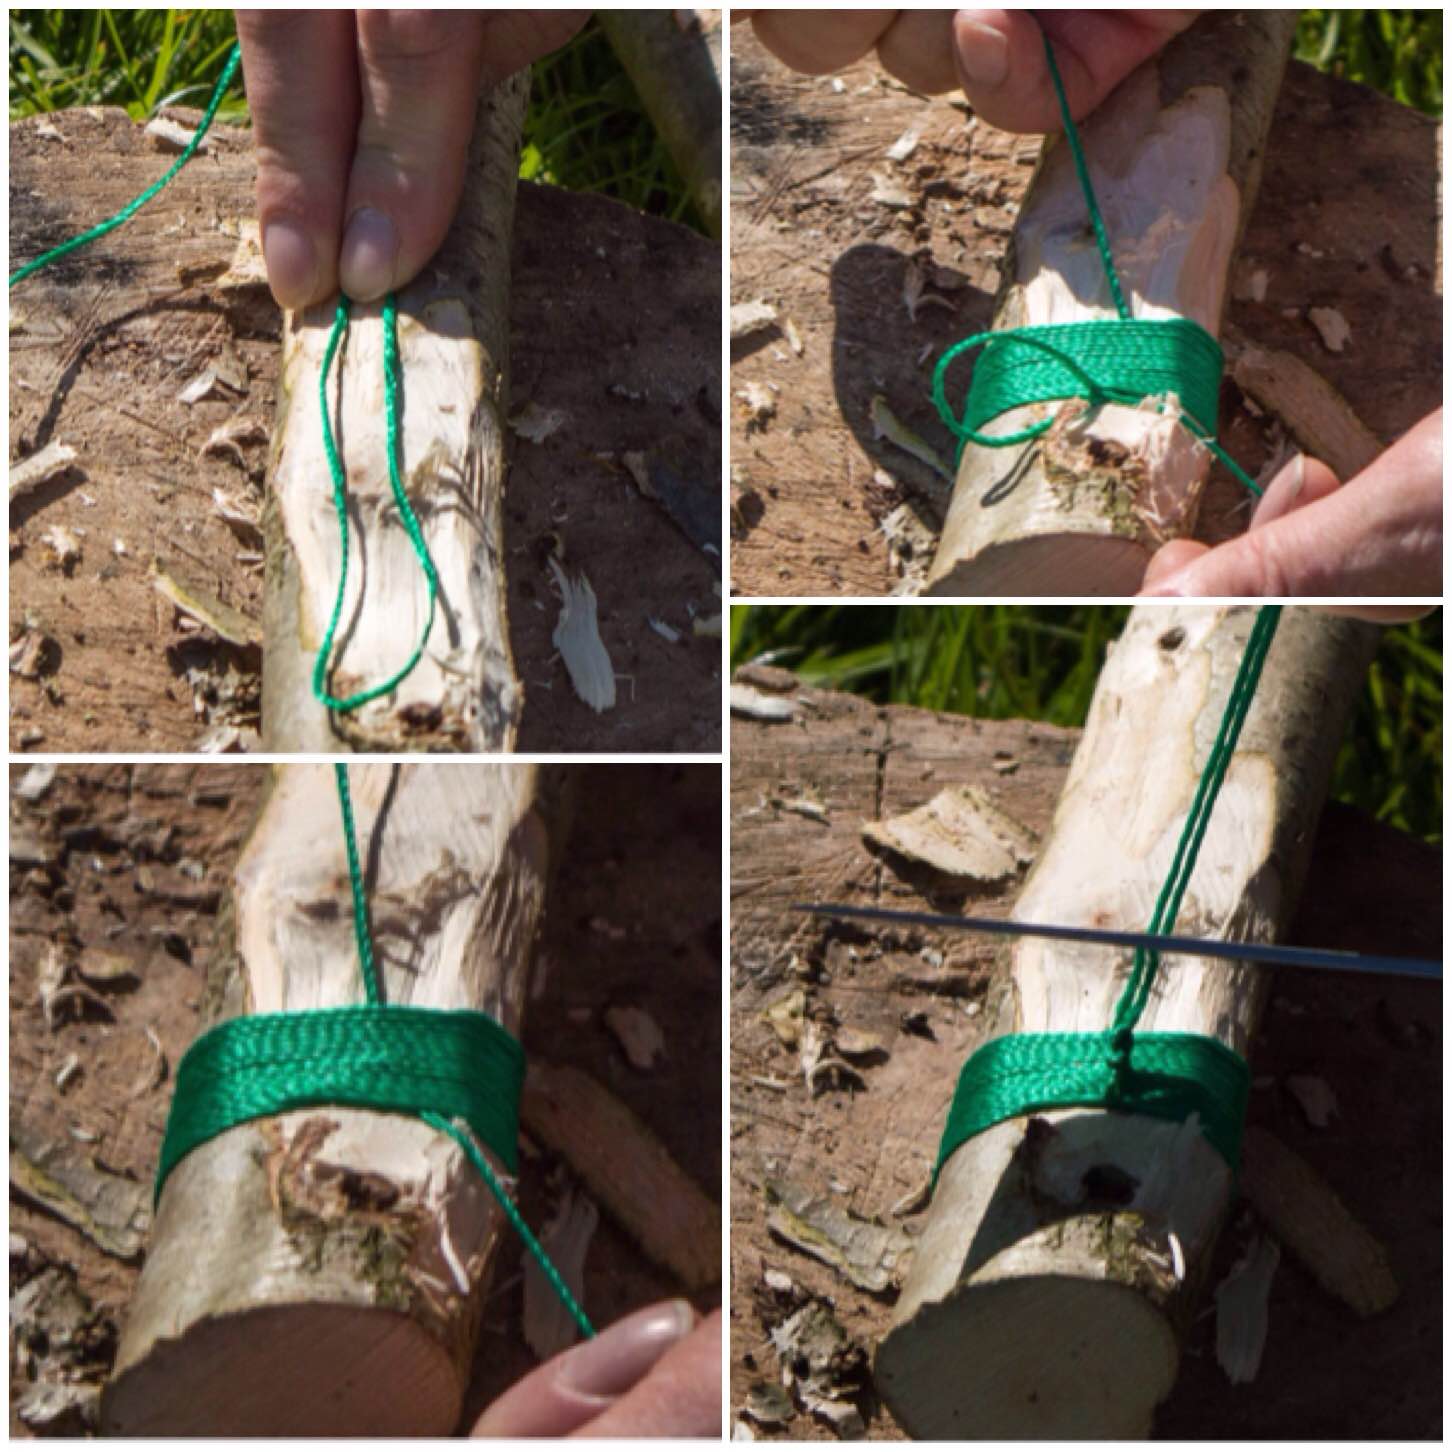
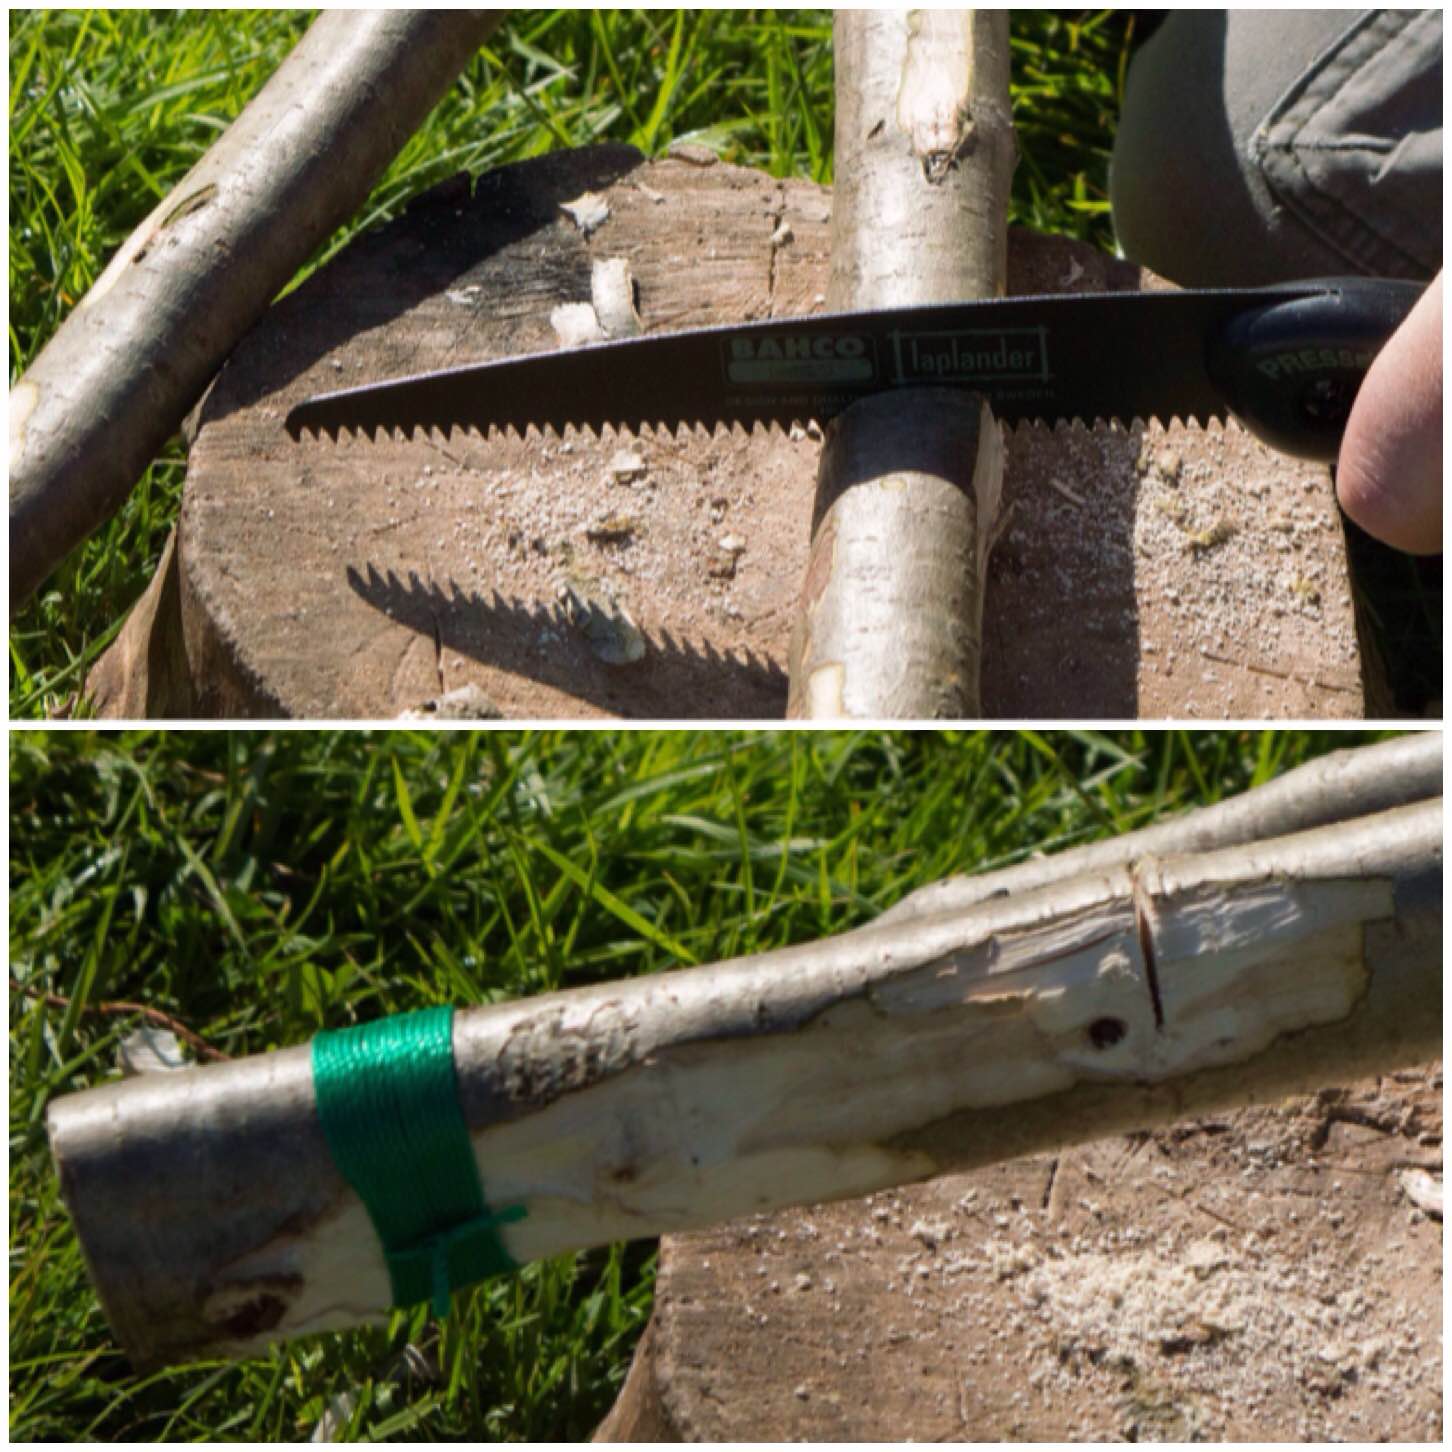
Next I whipped some strong non-stretchy string onto the top limb of the crane. Grogs knots have a good tutorial on this, however it’s not necessary to whip in any particular way-  just do it in whatever way works for you and binds that end of the limb tightly.

Photo 29-05-2015 09 33 20
Whip the end of what will be the top limb

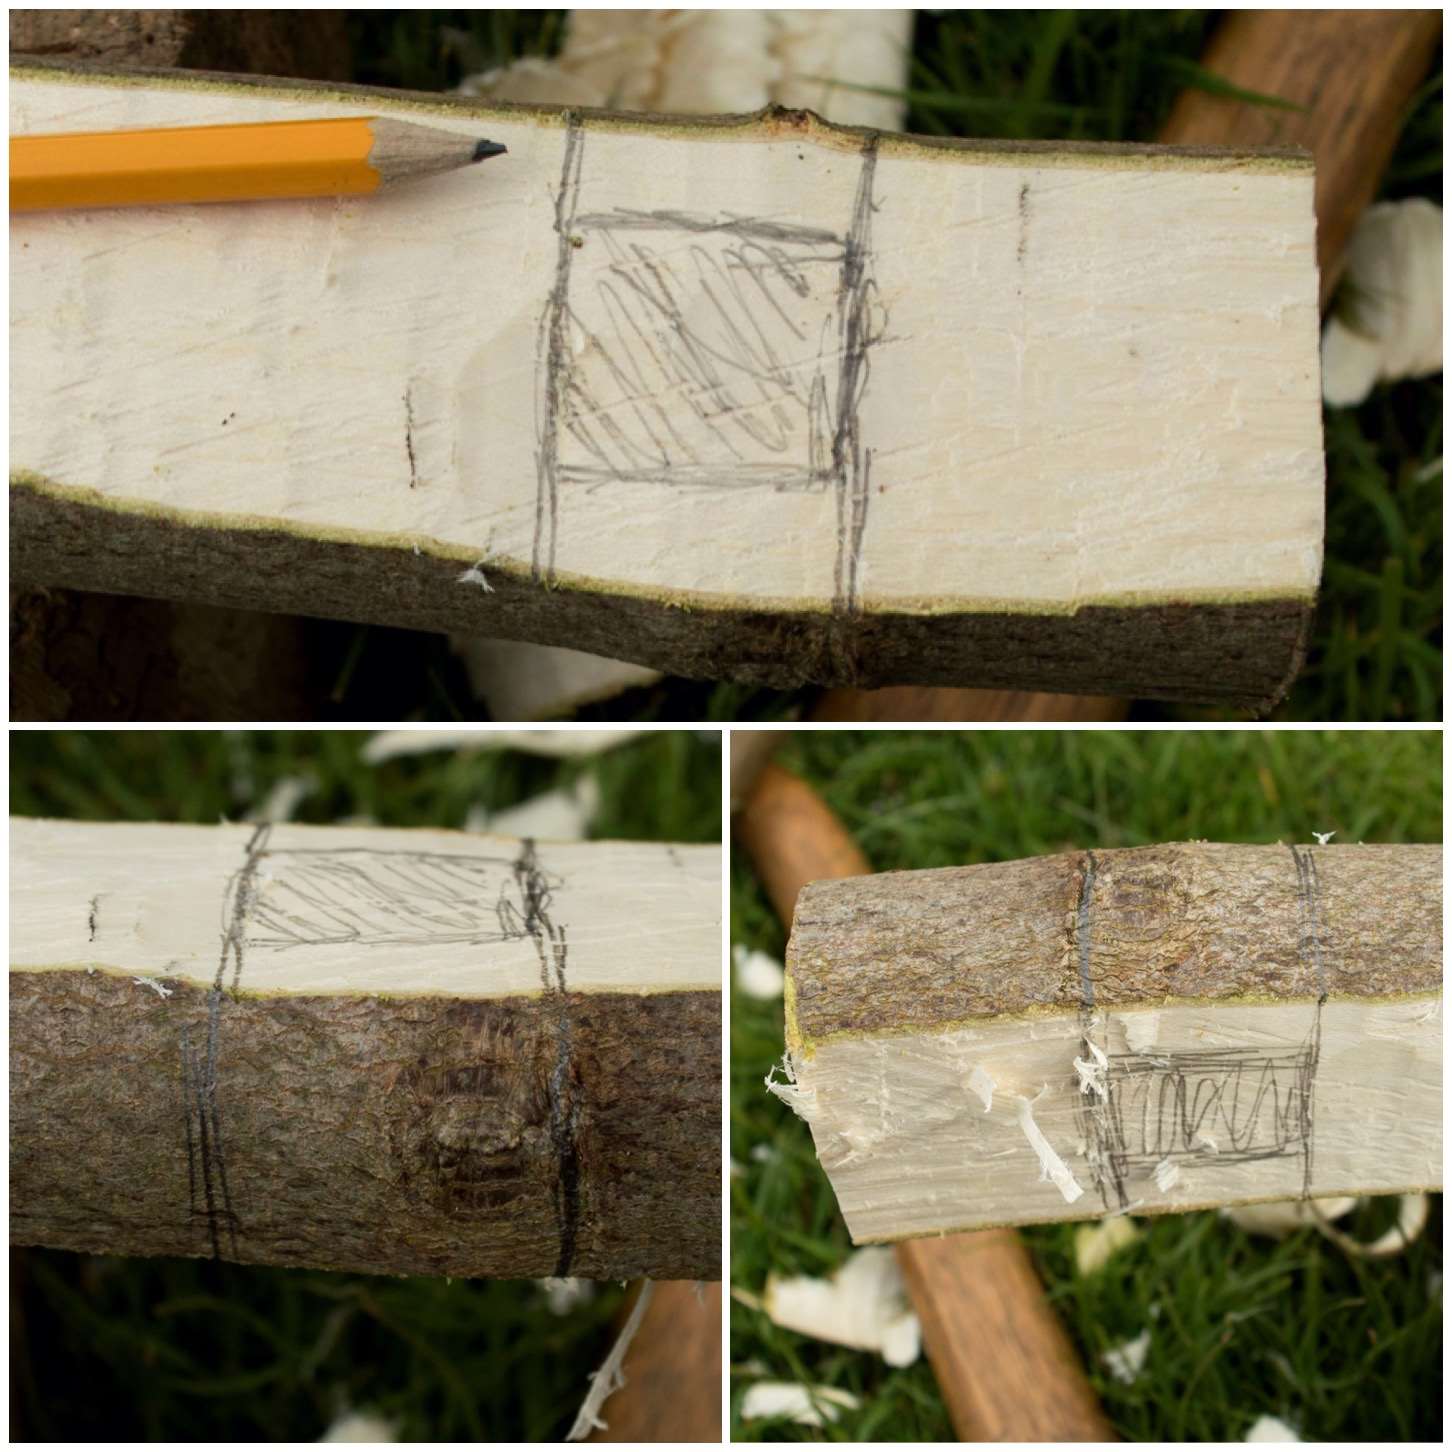
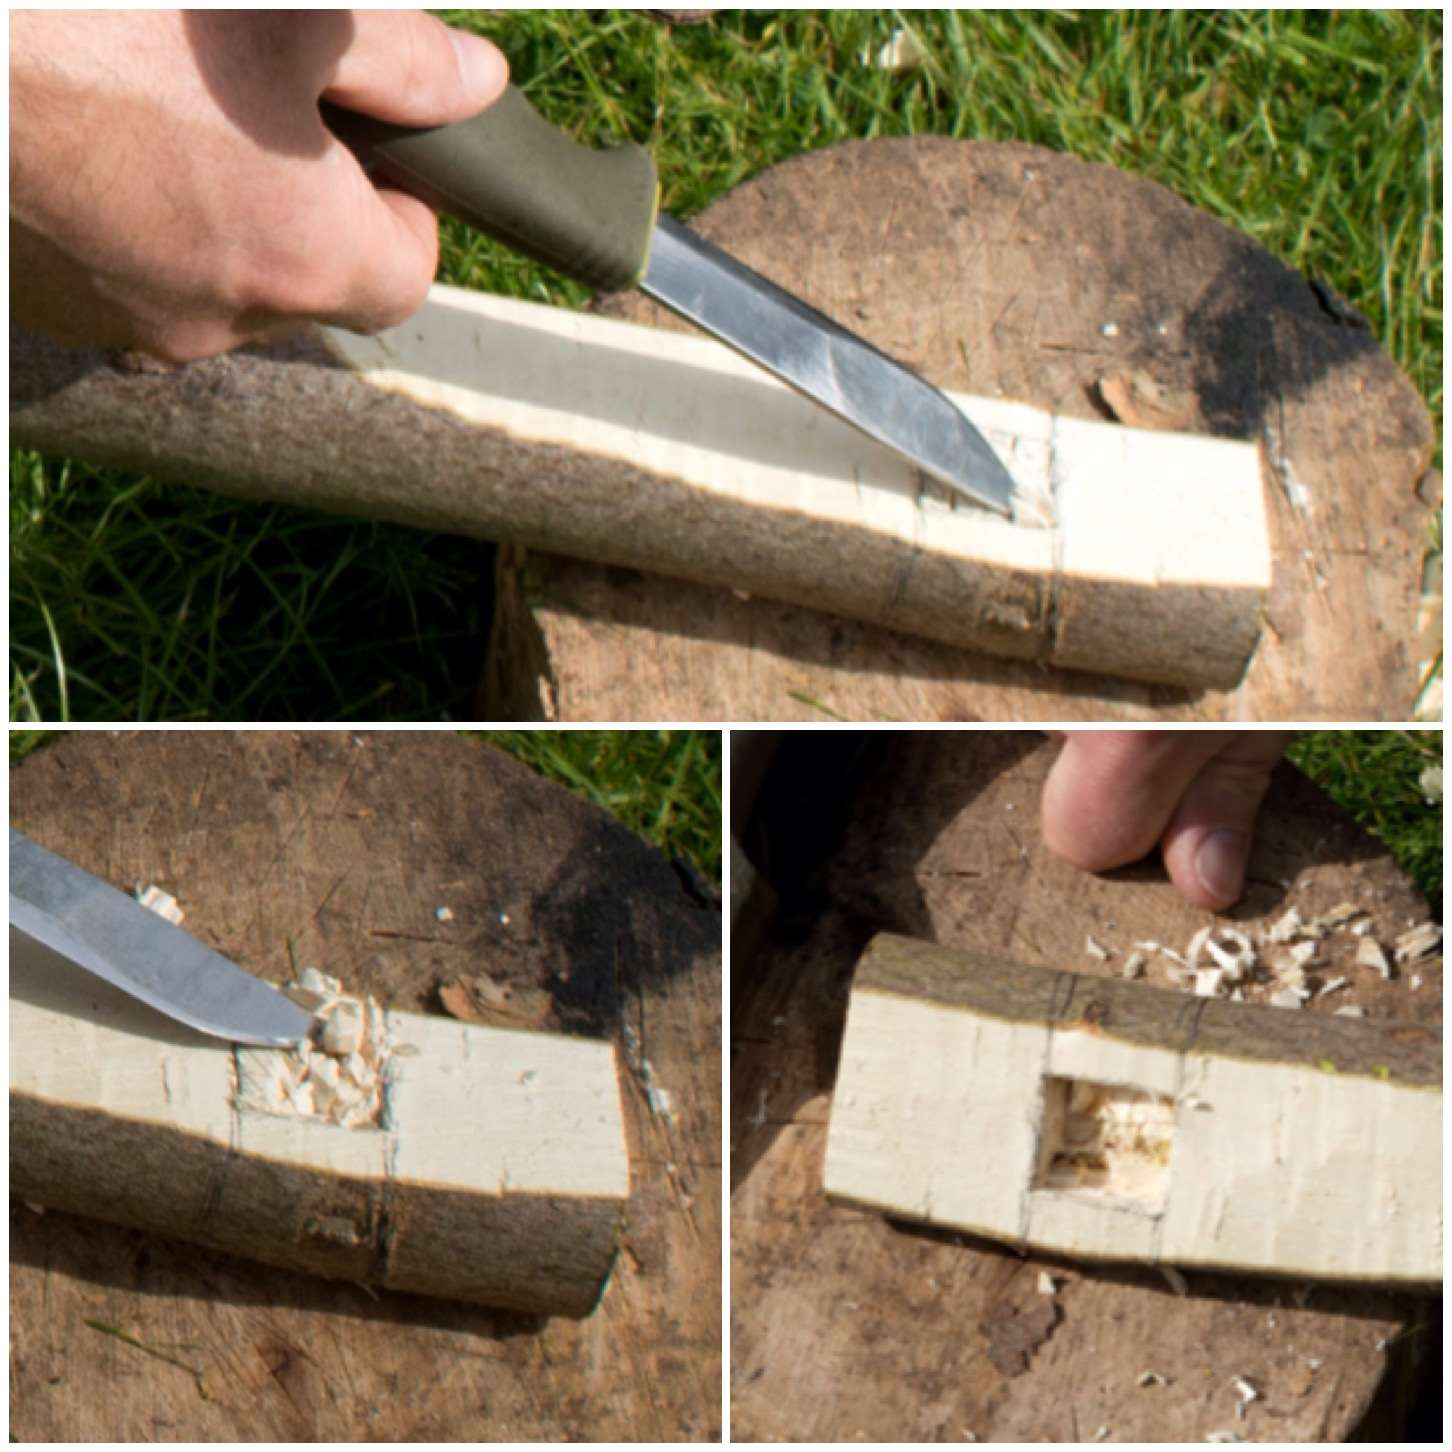
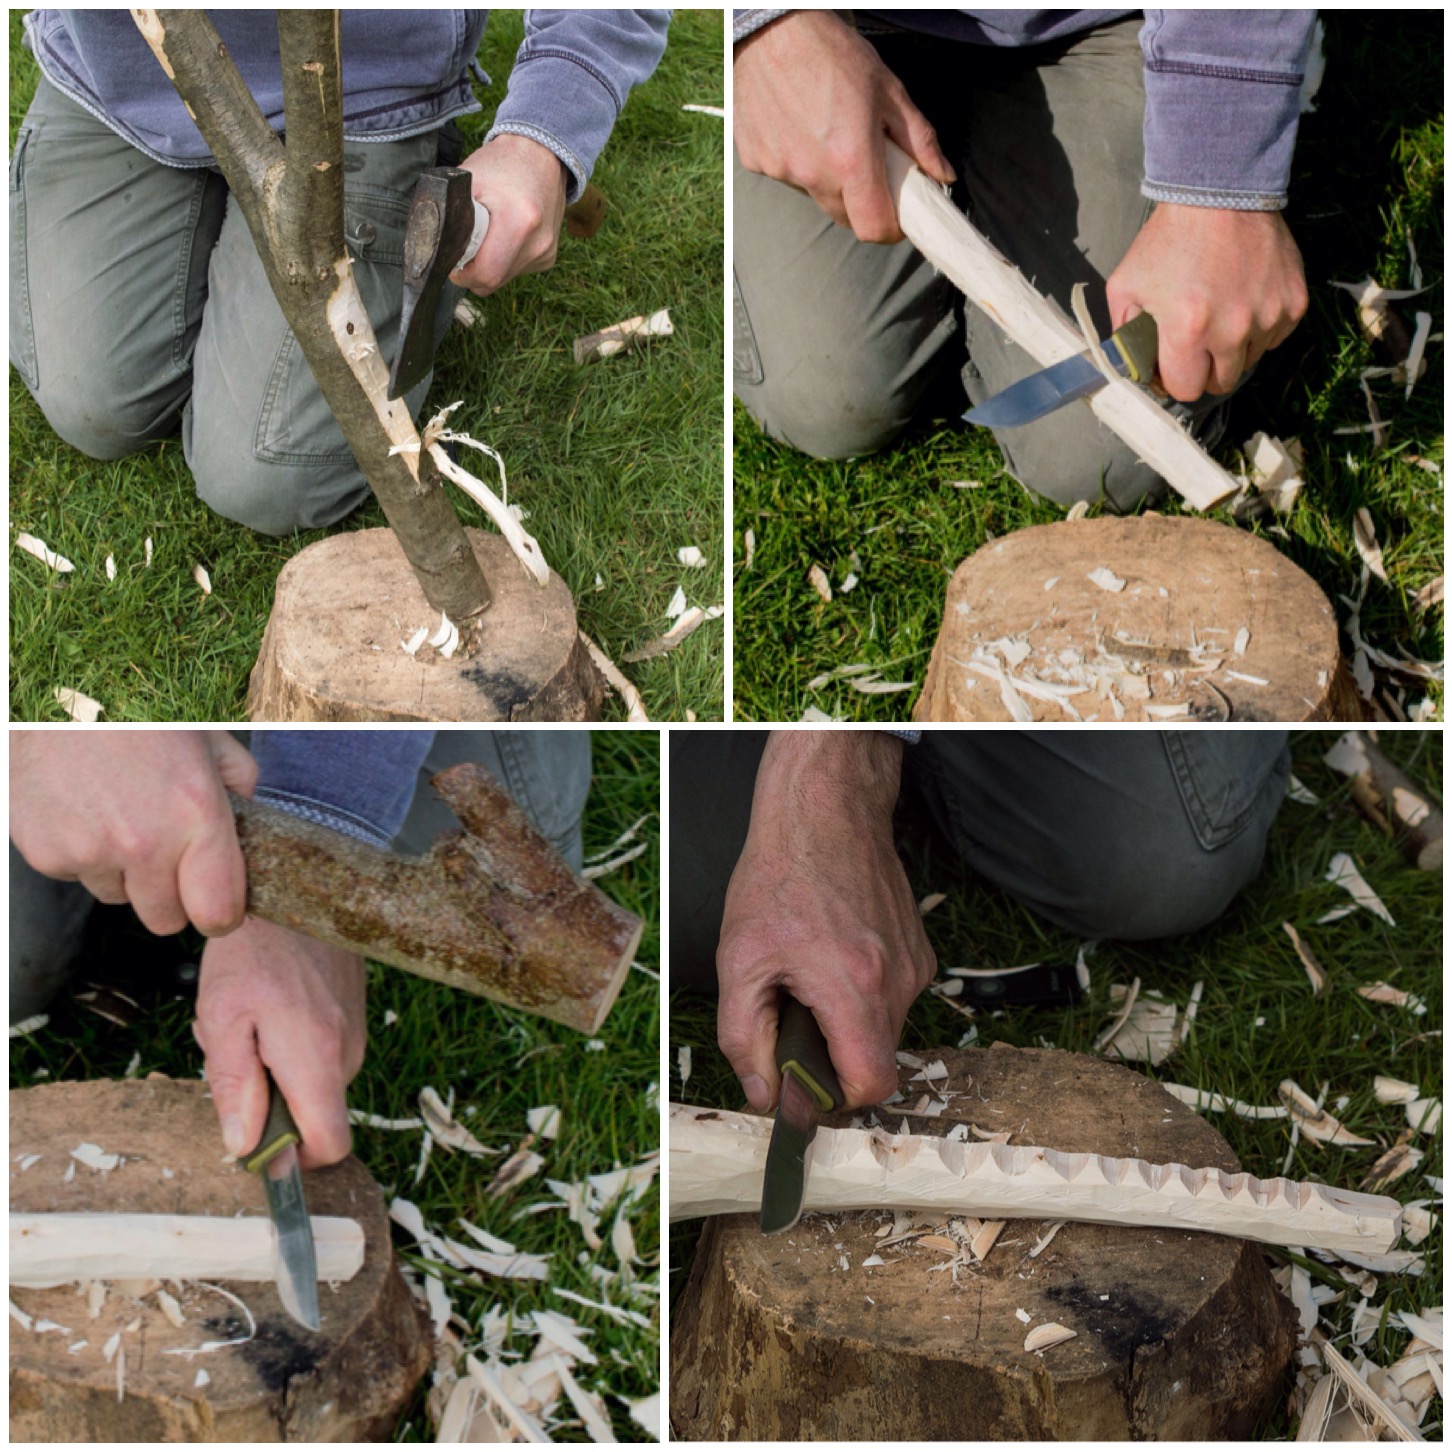
One of the reasons I selected a fairly sturdy fork was that I needed to put in a stop cut about a third of the way down the top limb. This stop cut will help you greatly in controlling the split you need to make to form the hook.

I sawed my stop cut to about two thirds of the diameter of the limb.

Photo 29-05-2015 09 33 20 (1)
Put a stop cut into the limb

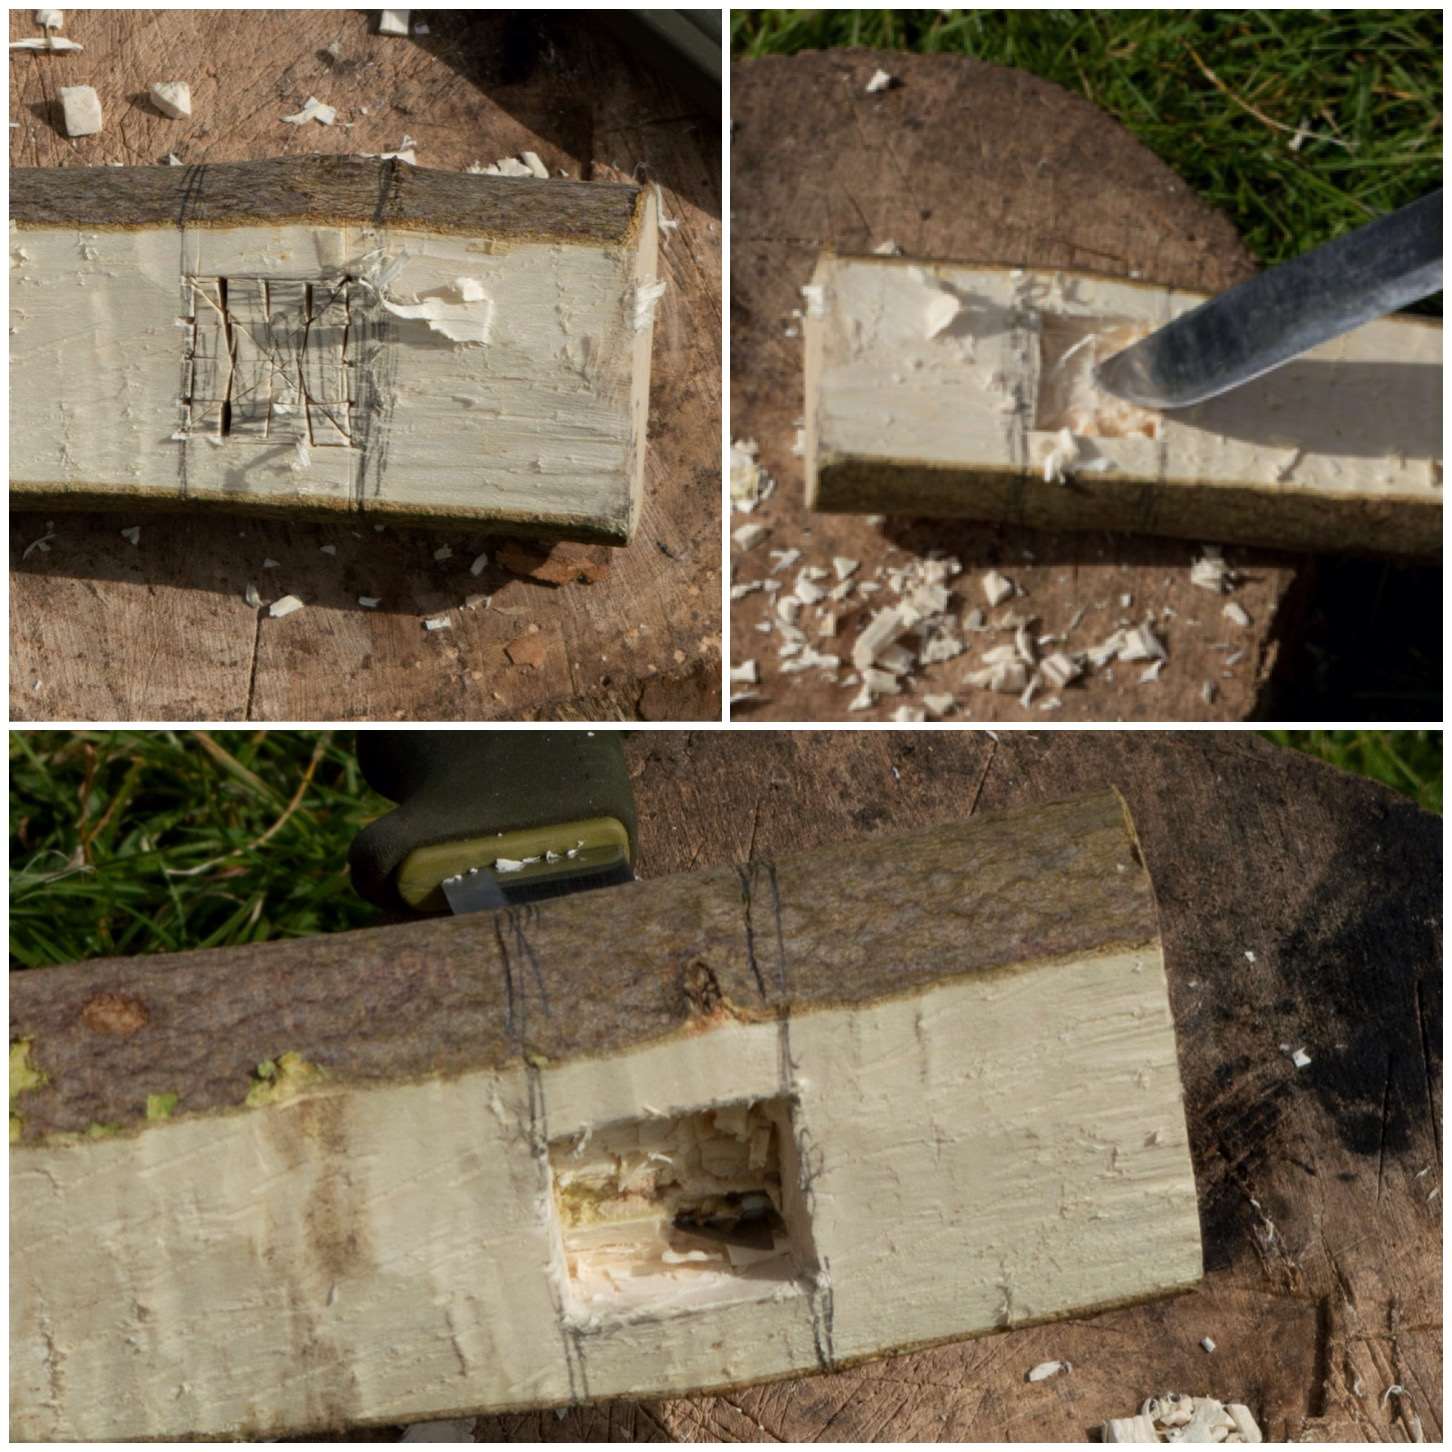
Using small cuts I then cut out a groove just above the stop cut towards the fork to the depth of the stop cut (the two bottom left pictures). This allowed me enough space to get my knife blade in to start battoning down to split the wood.
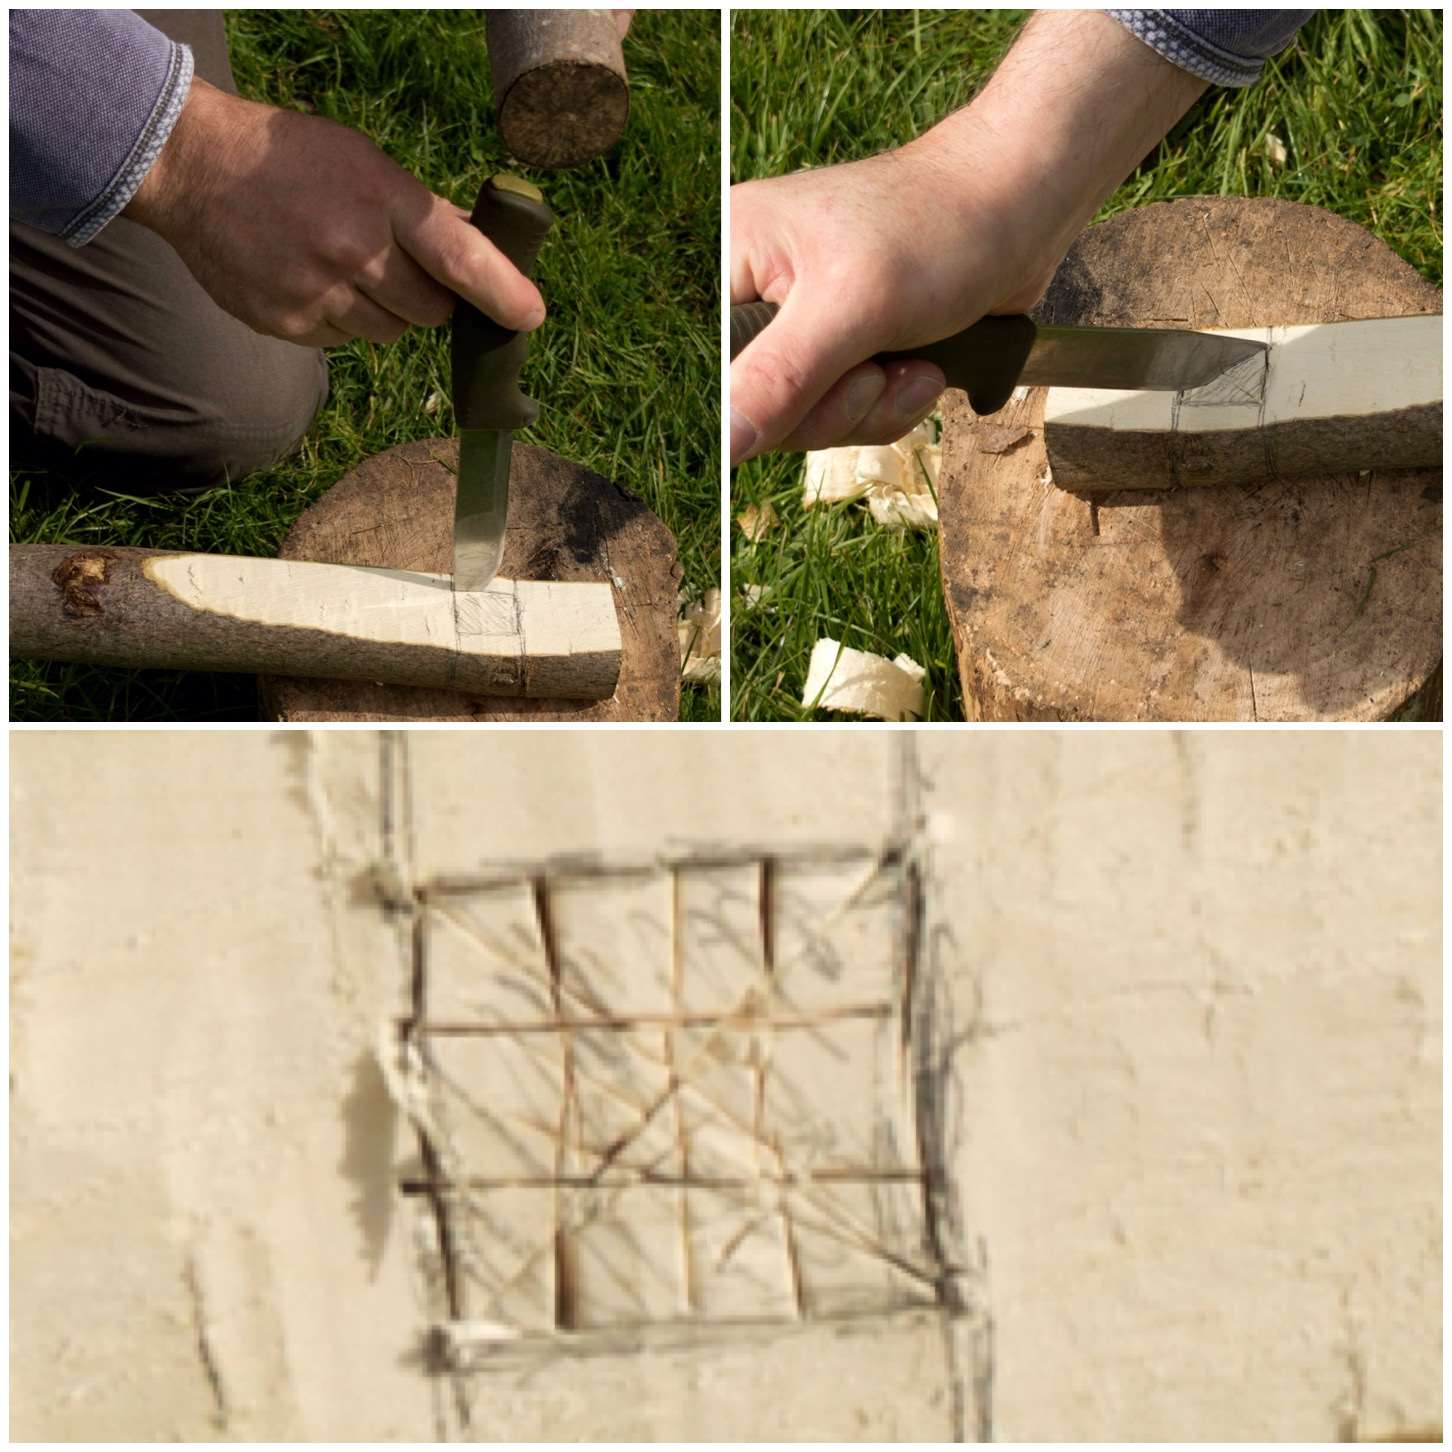
I was very careful when battoning not to let the blade touch the string that I had whipped onto the limb. Take care to wiggle the knife to remove it, keeping your non-knife hand well clear. I battoned a number of splits so as to easily carve them out.

Photo 29-05-2015 09 33 21
Carve and batton

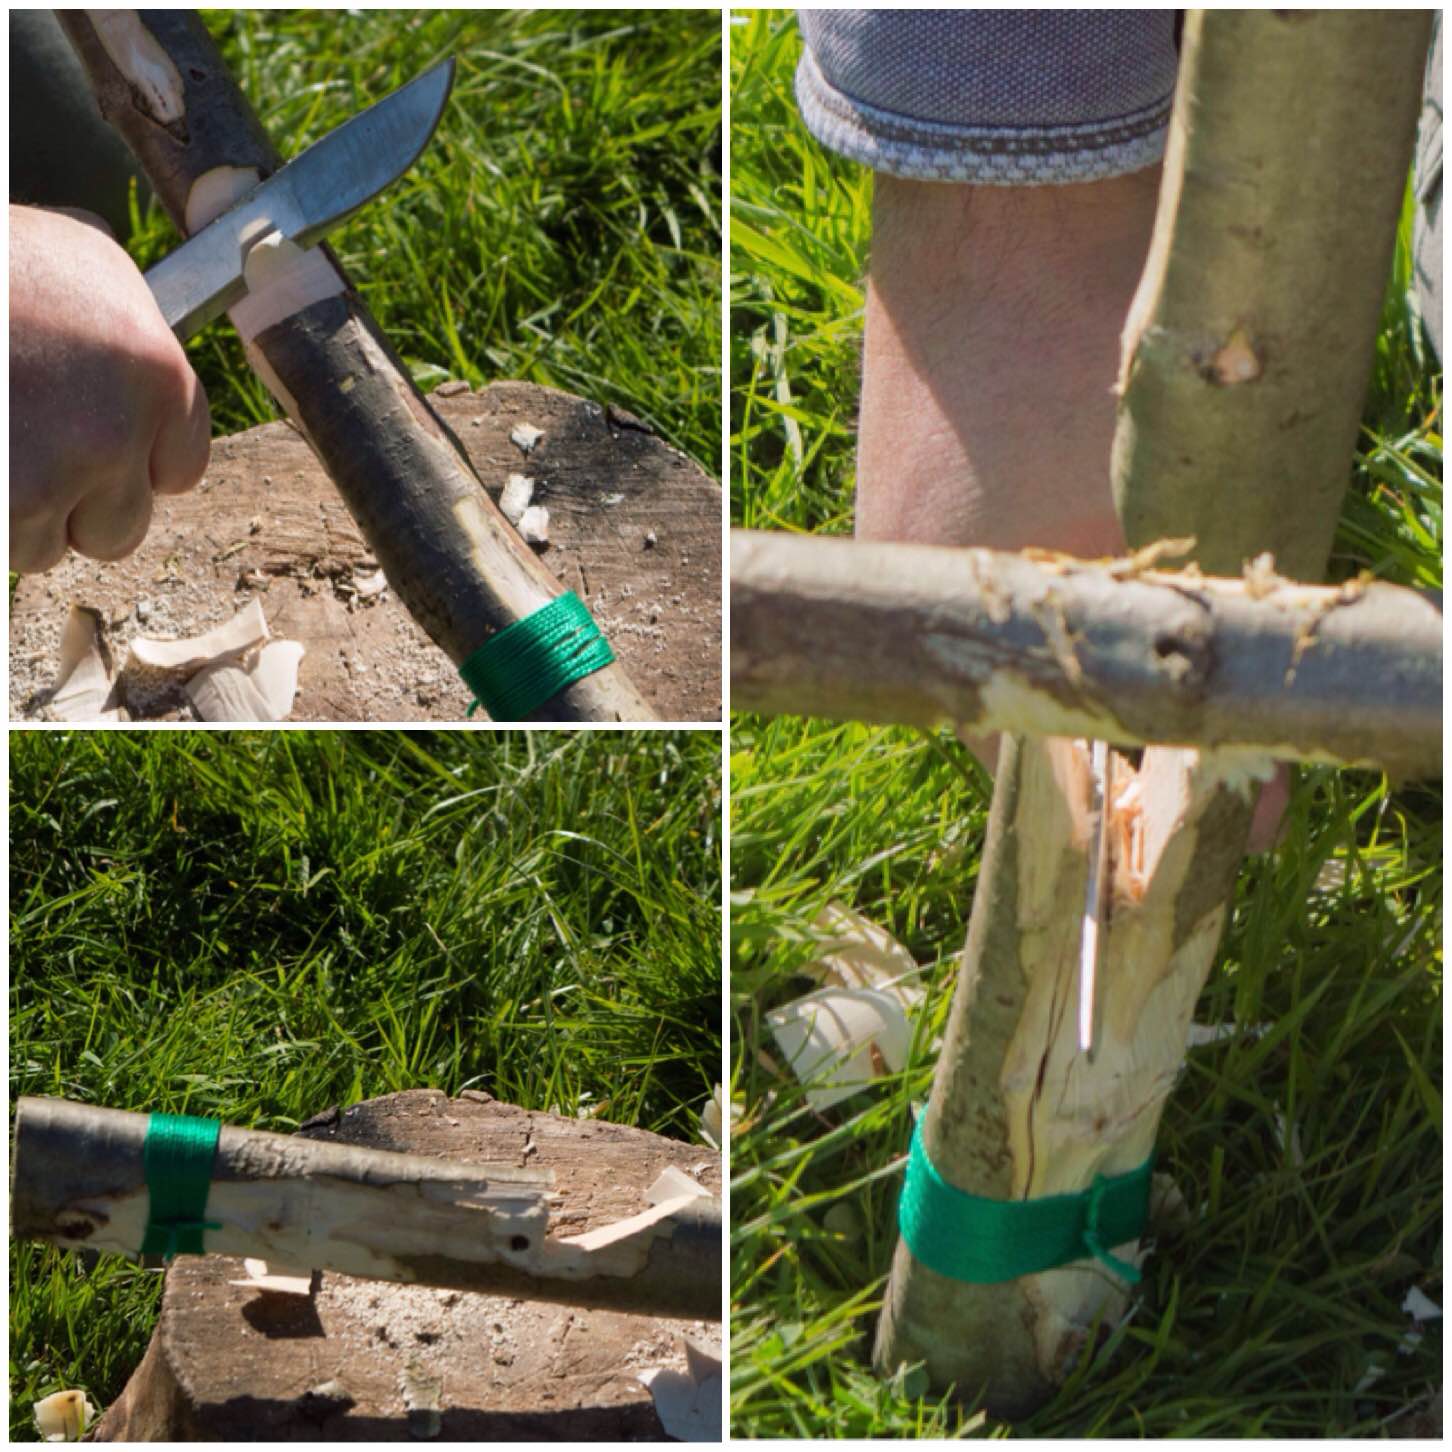
I also found that sawing down into the split helped with removing the wood. Once I had sawn or battoned down a number of times I carved out the excess wood by pressing down with my knife at a slight angle (you can just see the carved out area in the bottom left picture).

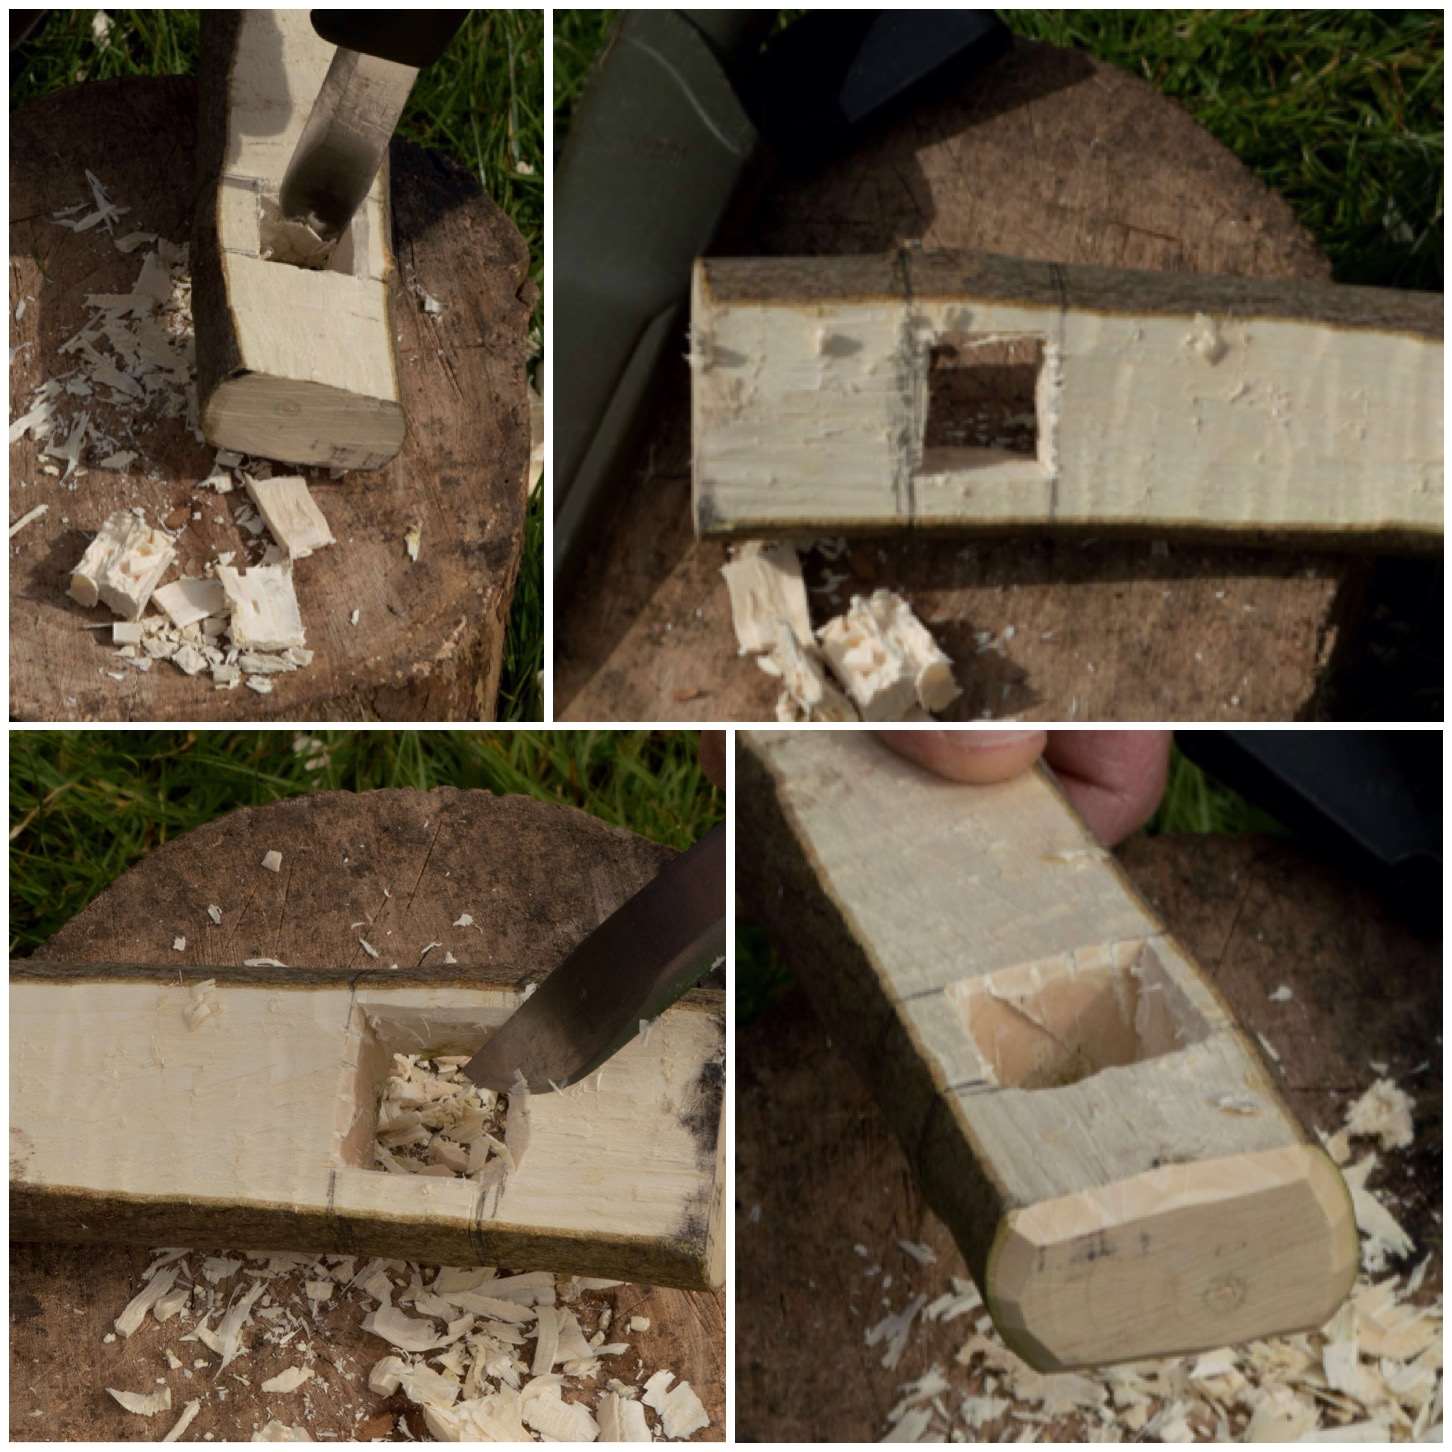
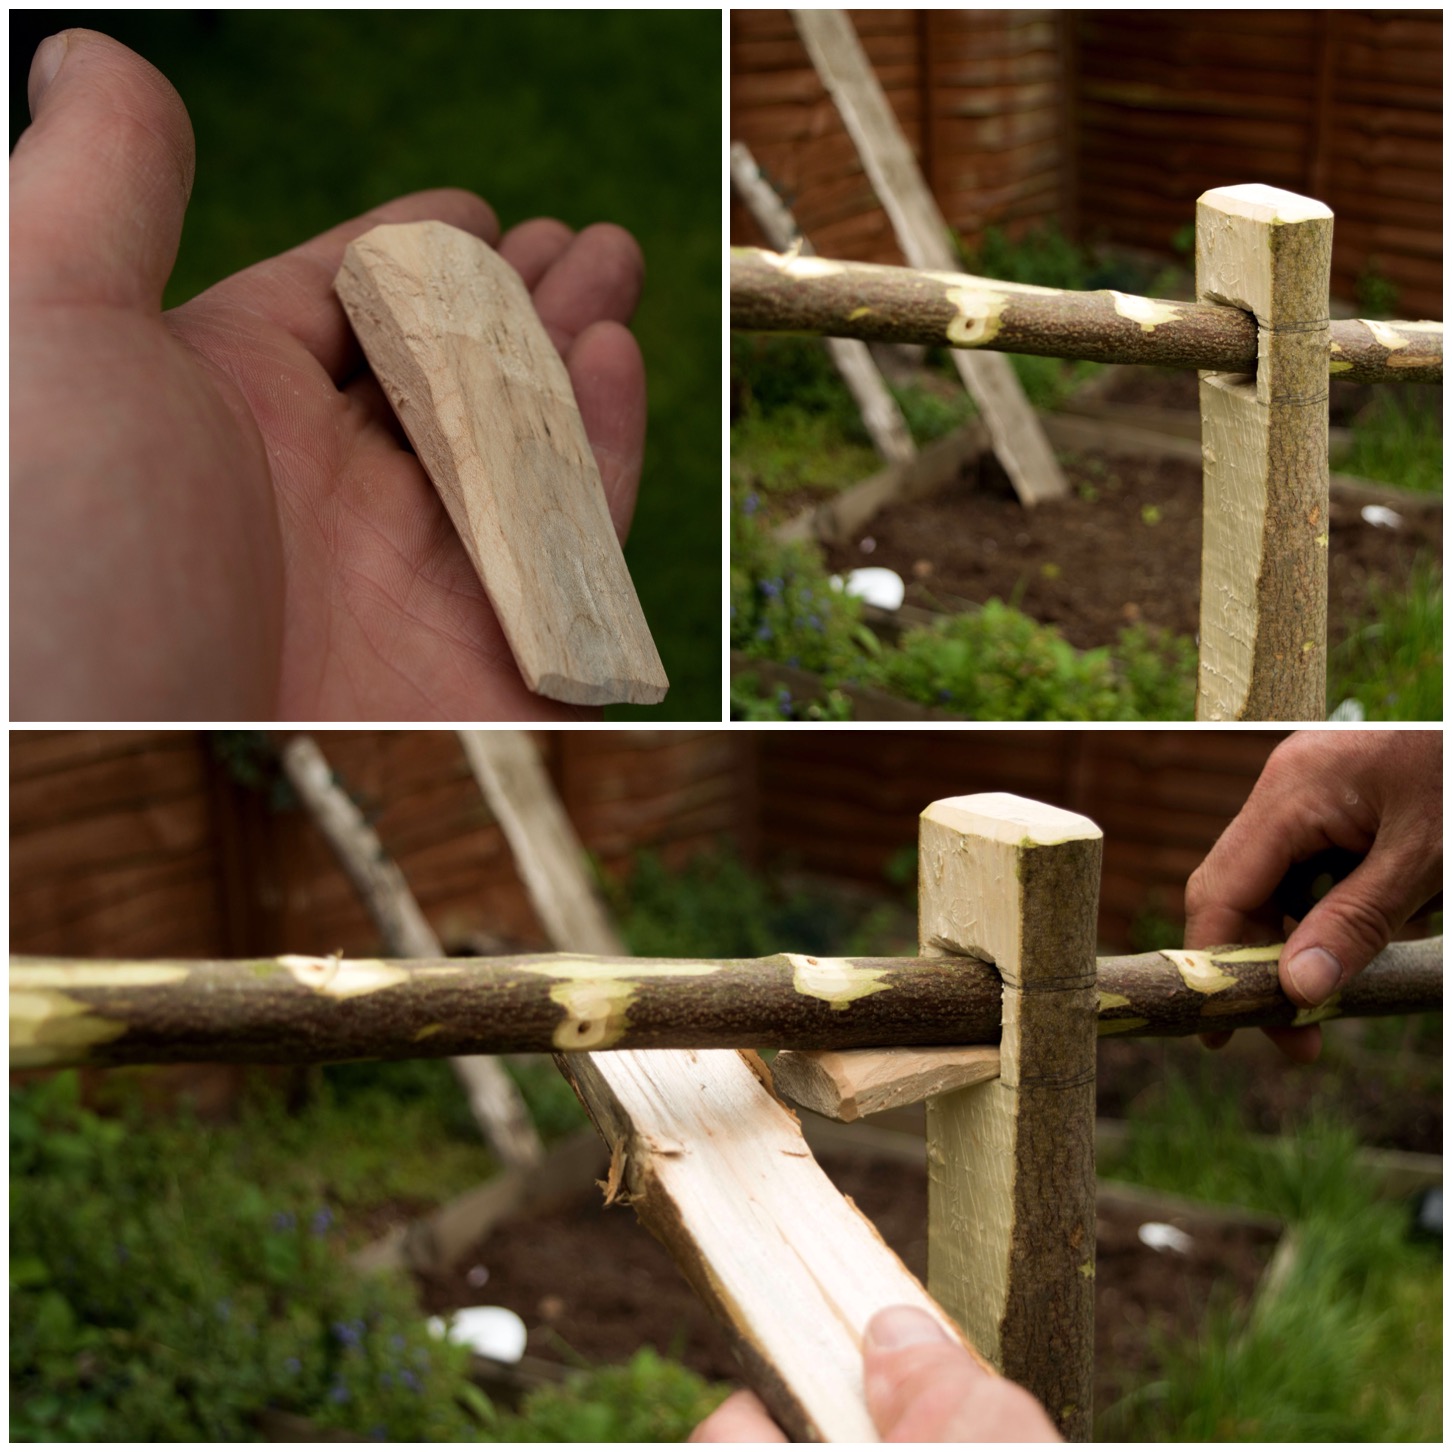
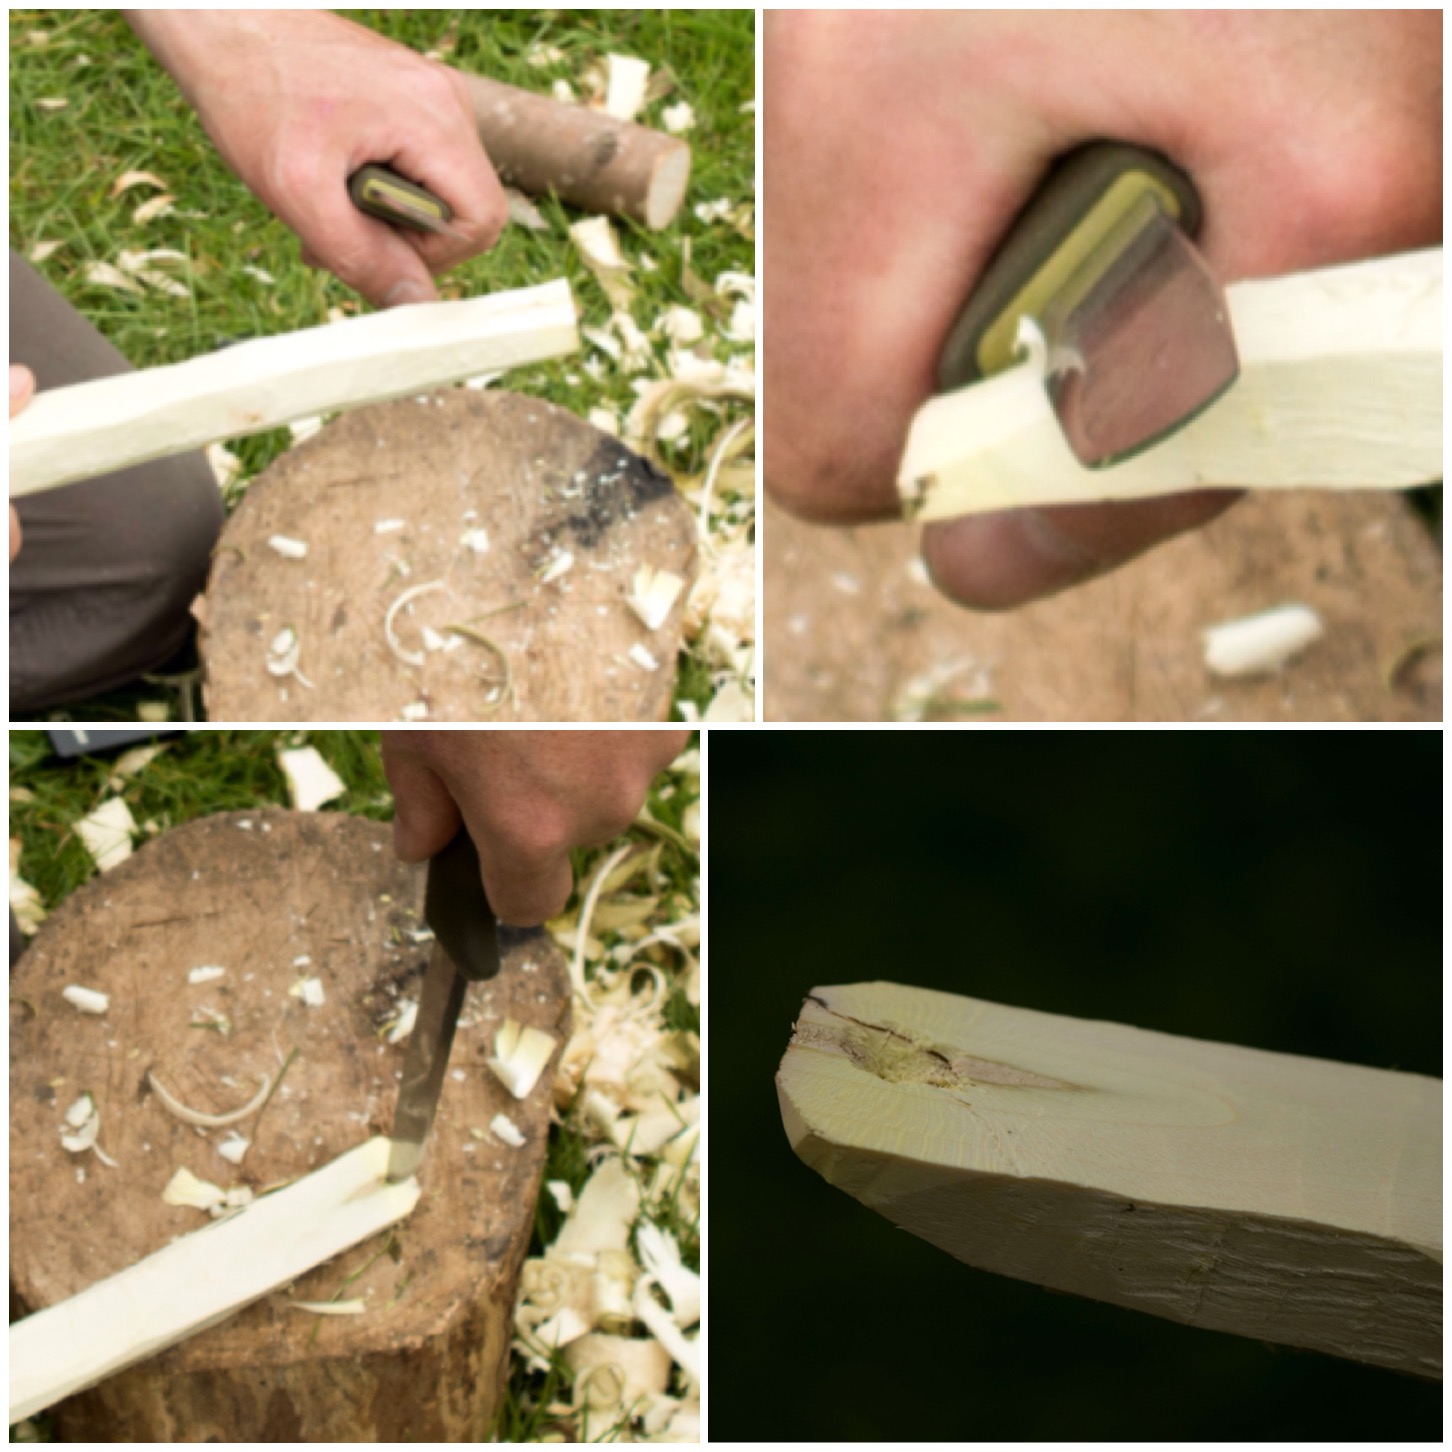
Next I took a small stick and carved it into a wedge shape to batton into the fork to expand it further.

Photo 29-05-2015 09 33 22 (1)
Use a saw and knife then make a small wedge

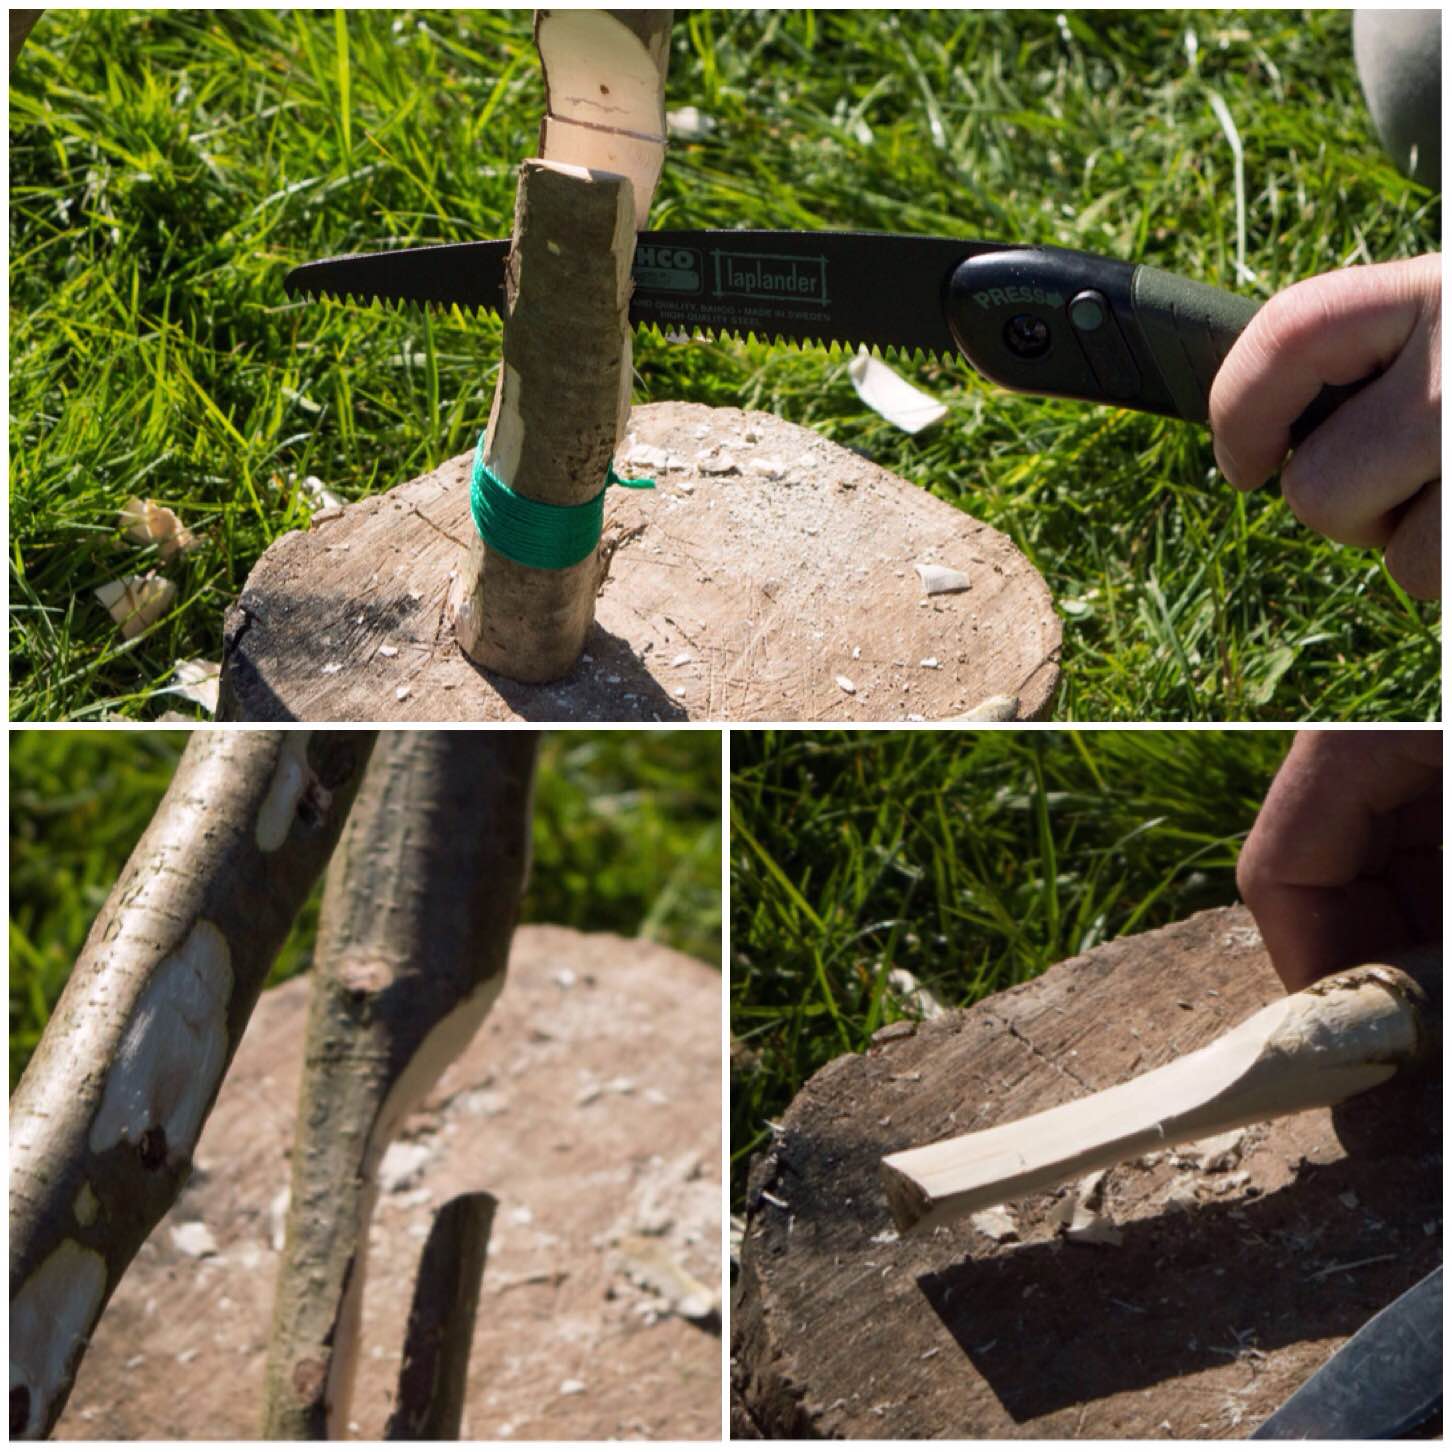
Double check that your whipping is secure and batton the wedge into the fork to expand it. Once it is securely fixed, trim the wedge so it fits neatly.

Photo 29-05-2015 09 33 23
Insert to widen and trim

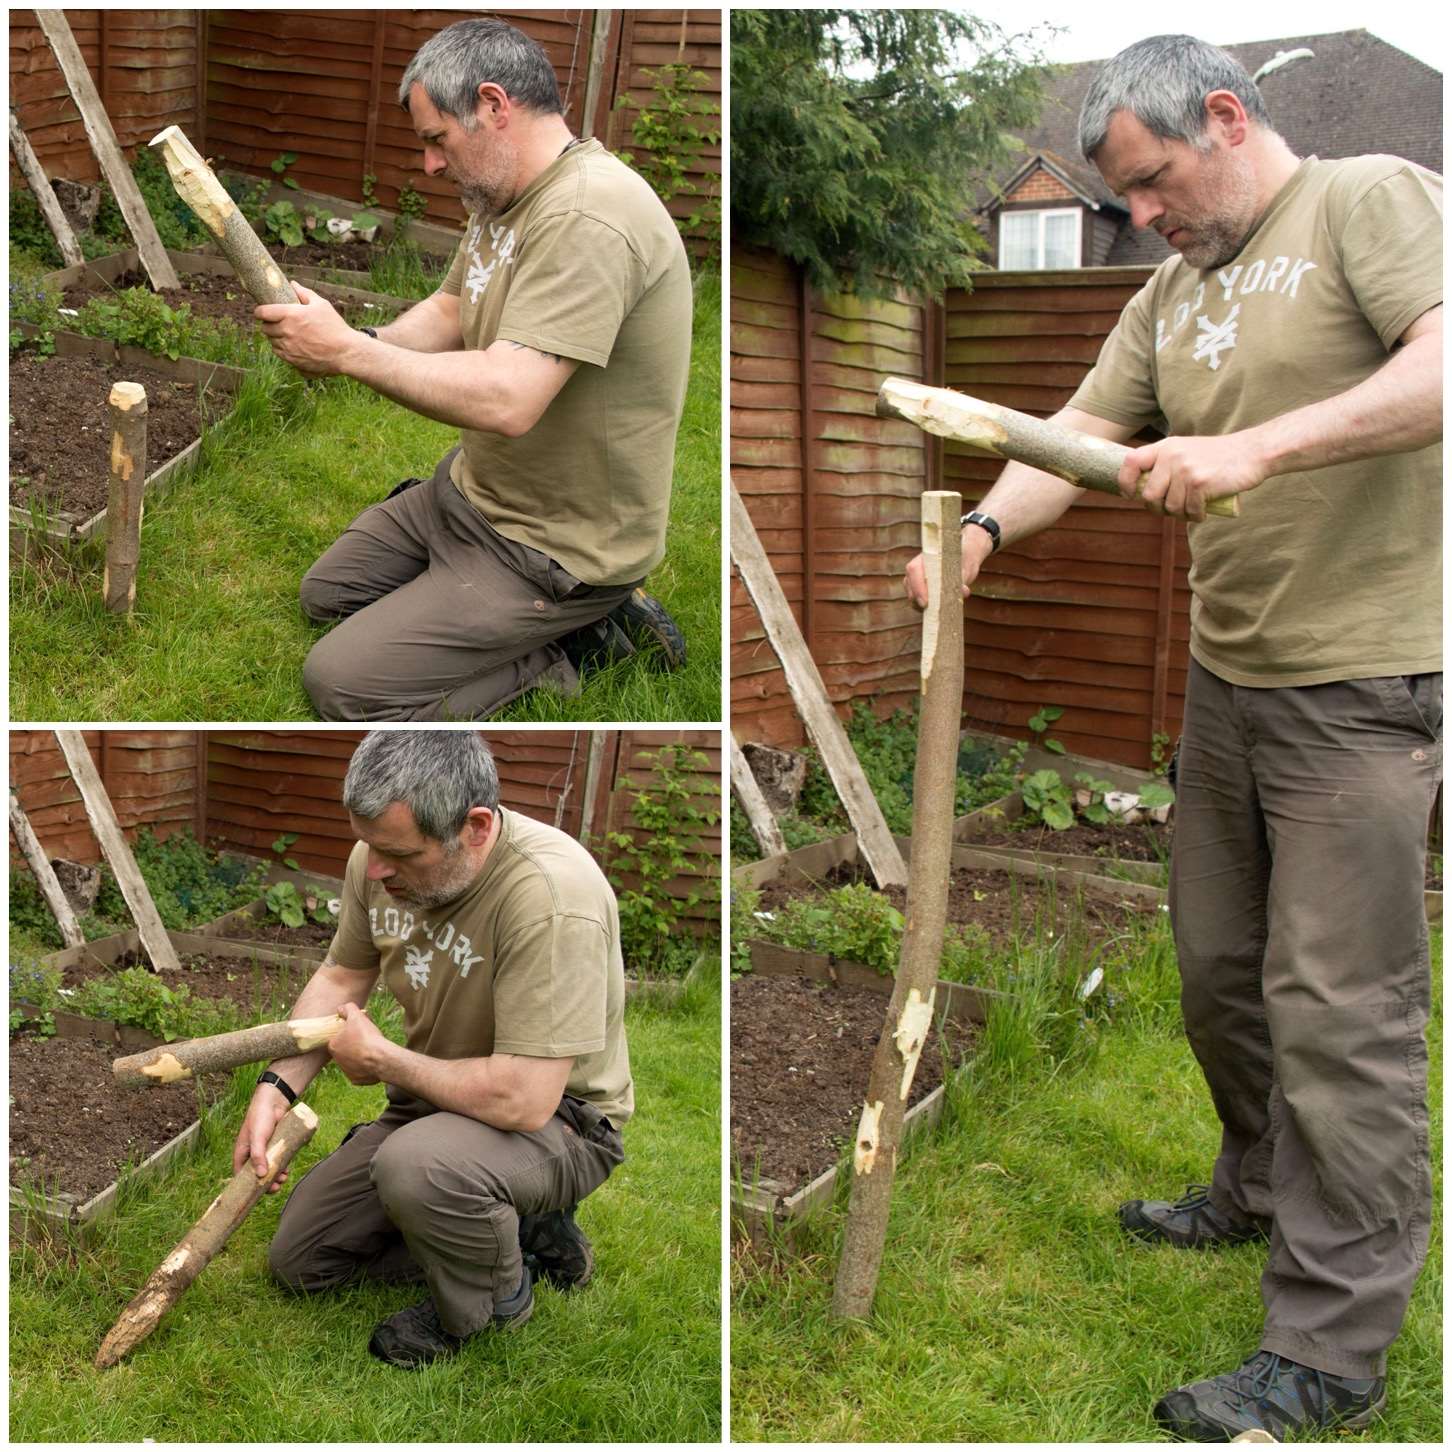
I used my knife to carve some more wood from the inner part of the fork to expand it a bit more. At this stage I was trying the fork out on the upright pole to see how it fitted. Don’t take off too much wood as you need to maintain strength in the fork so it will hold a heavy pot.

Photo 29-05-2015 20 20 47
Use a knife to carve out more wood

Bottom Limb

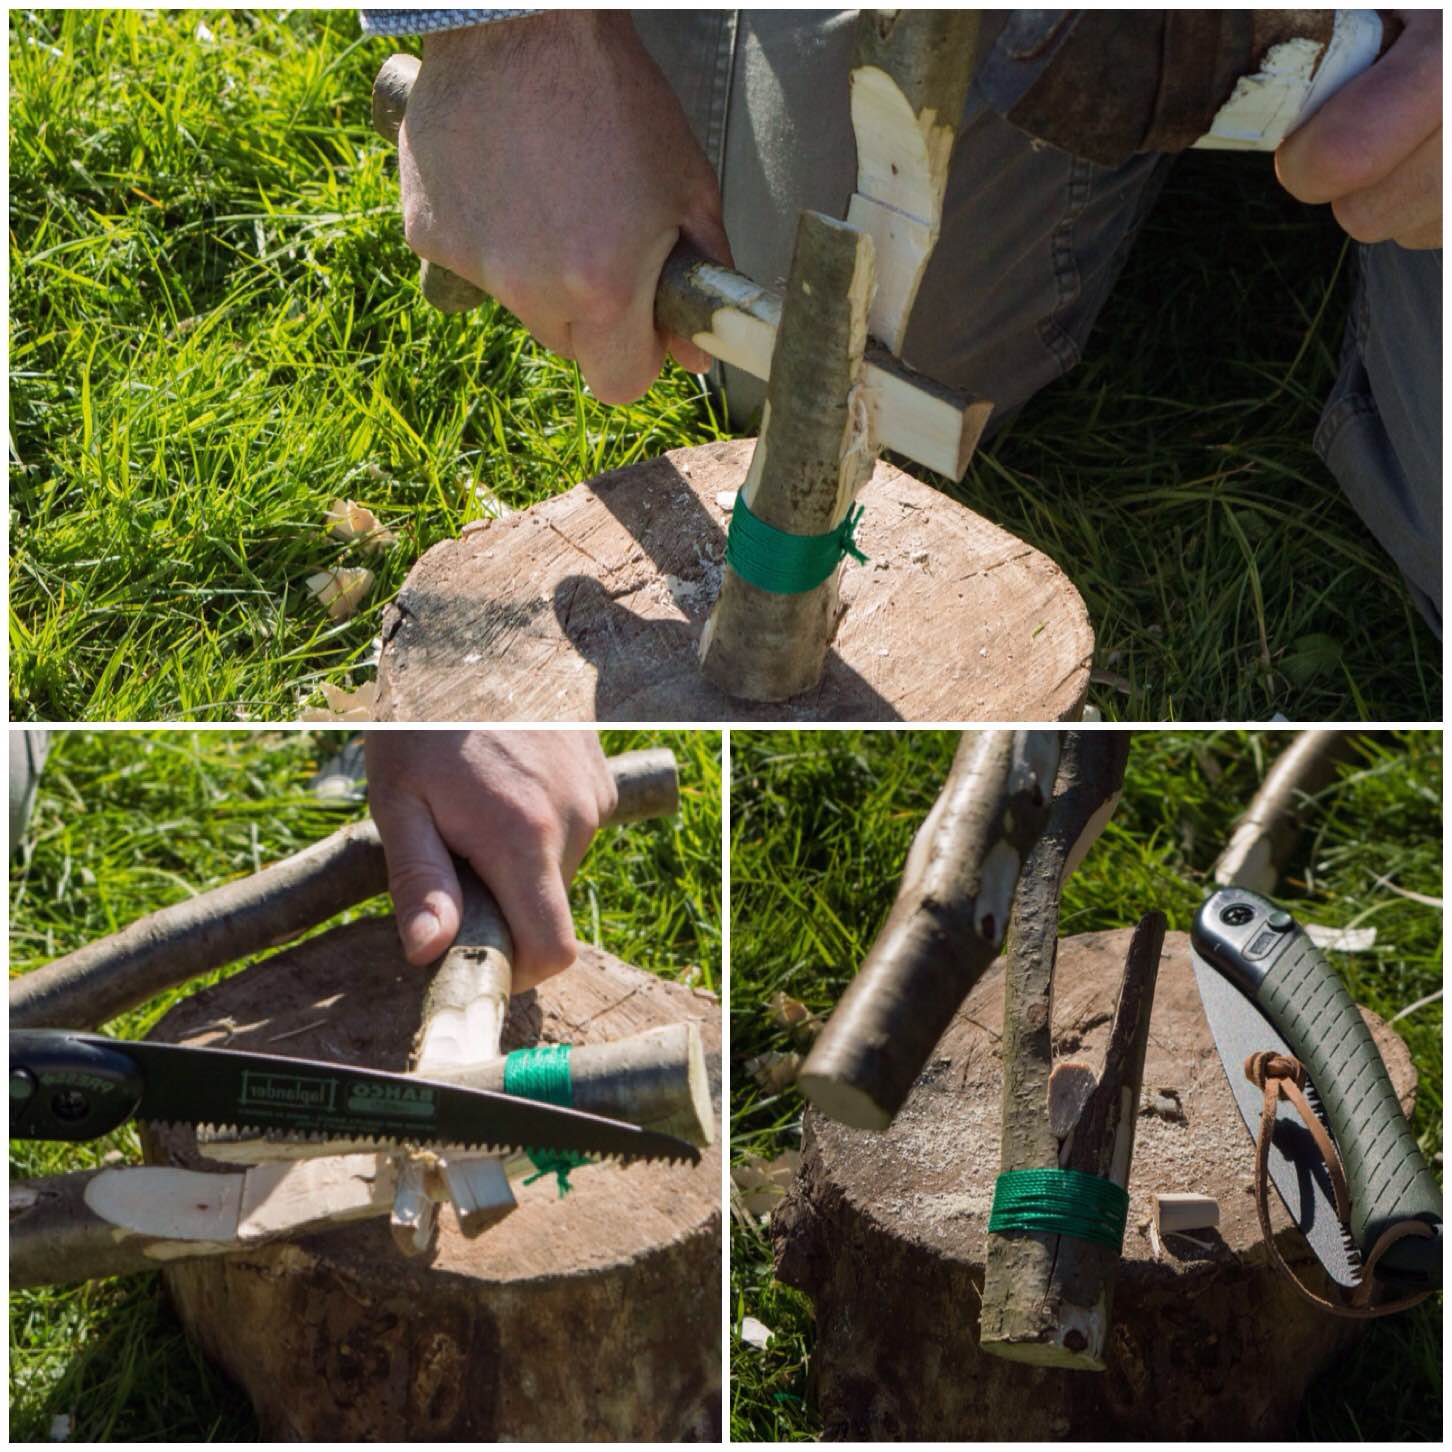
I split the lower limb nearly all the way down to the main fork. Do this slowly so that the split remains even on either side.

Make sure you get your angles right so that when the crane is placed on the upright everything fits neatly without twisting.

Photo 29-05-2015 09 33 25
Split the lower limb by battoning

I carved another wedge to fit the lower limb split and whipped string on either side. To finish this section off I trimmed the wedge with my saw.
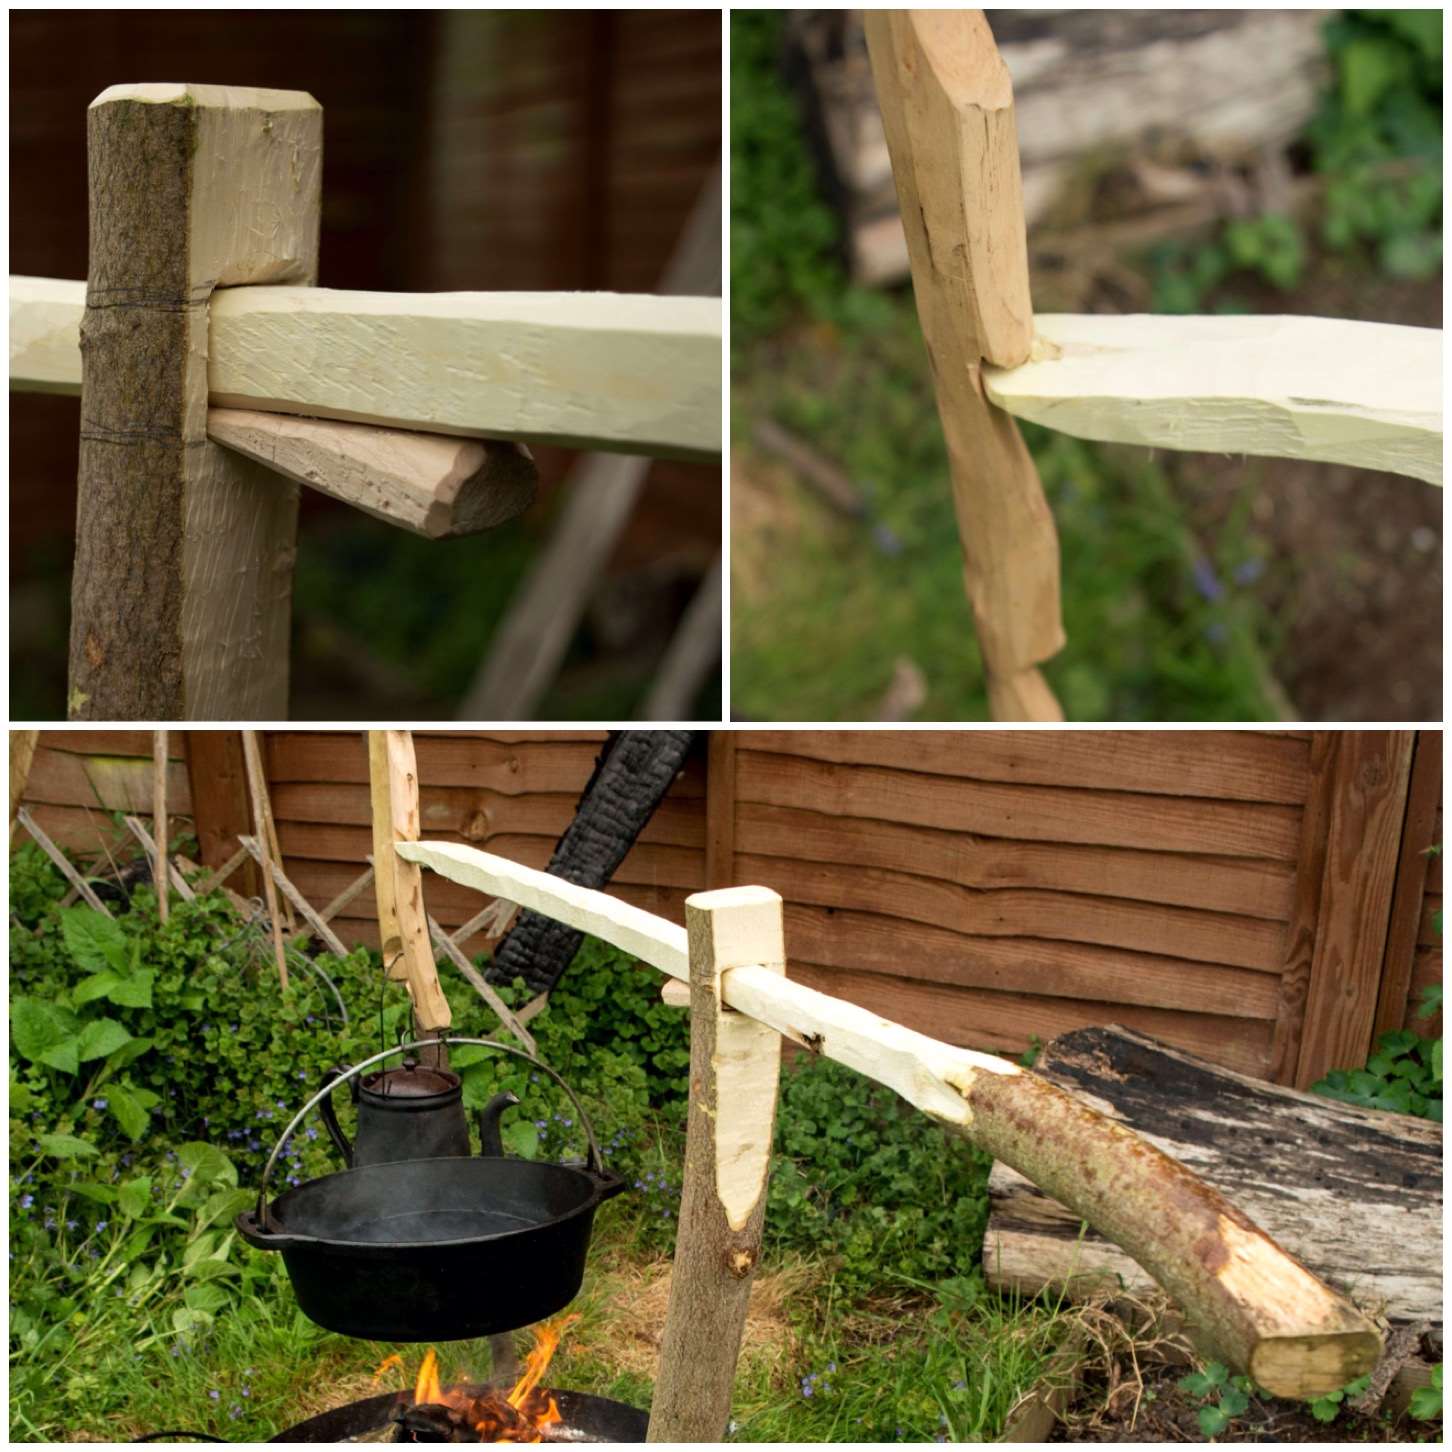
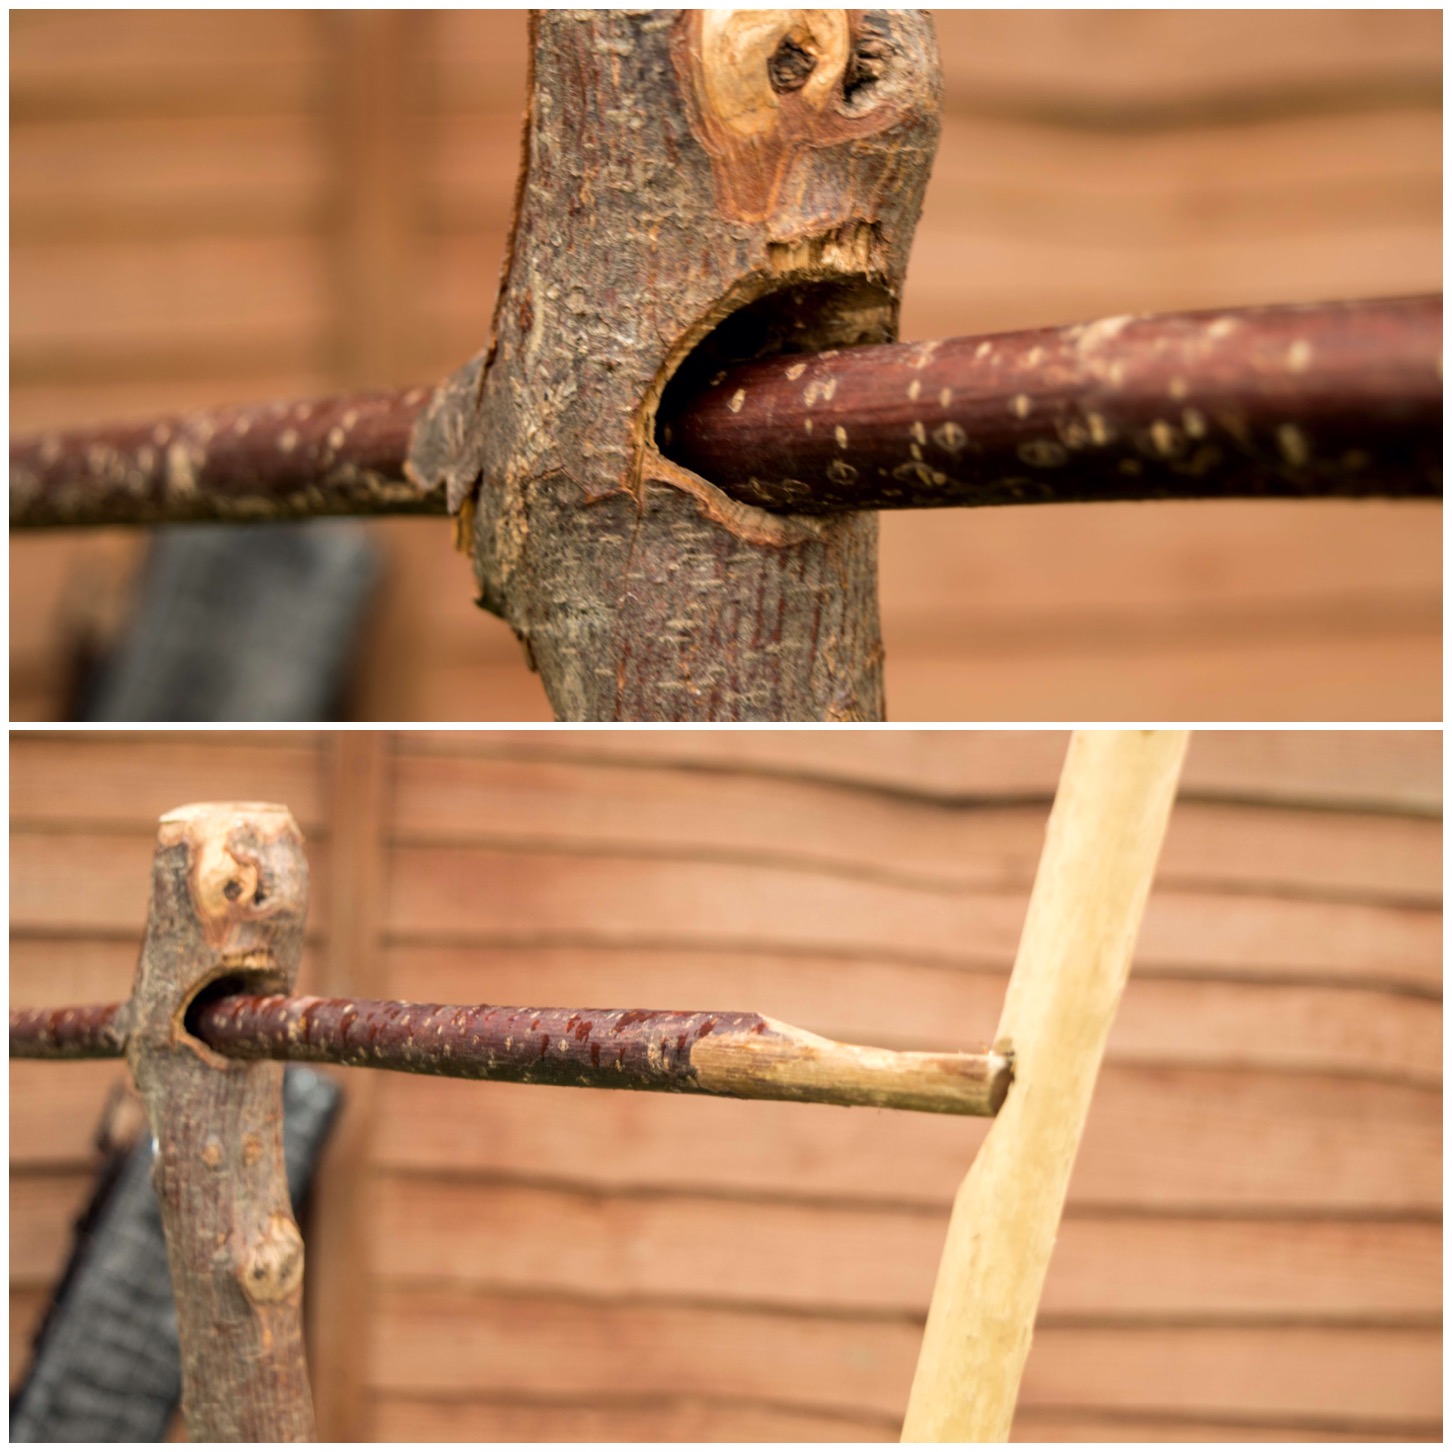
Photo 29-05-2015 09 33 25 (1)
Insert another wedge and whip

Pot Holder Limb

I removed a lot of wood with my axe and knife from the limb that would become the pot holder bar. I also battoned out some little grooves so as to hang pots safely.

Photo 30-05-2015 09 36 40
Carving the pot holder bar

At the end of the bar I also carved out a little recess on which to hang an adjustable pot hook.

After that I added some more binding to the top bar to make it really bomb proof.

That’s it in terms of construction.

Photo 29-05-2015 09 33 26 (1)
Pot holder bar in detail

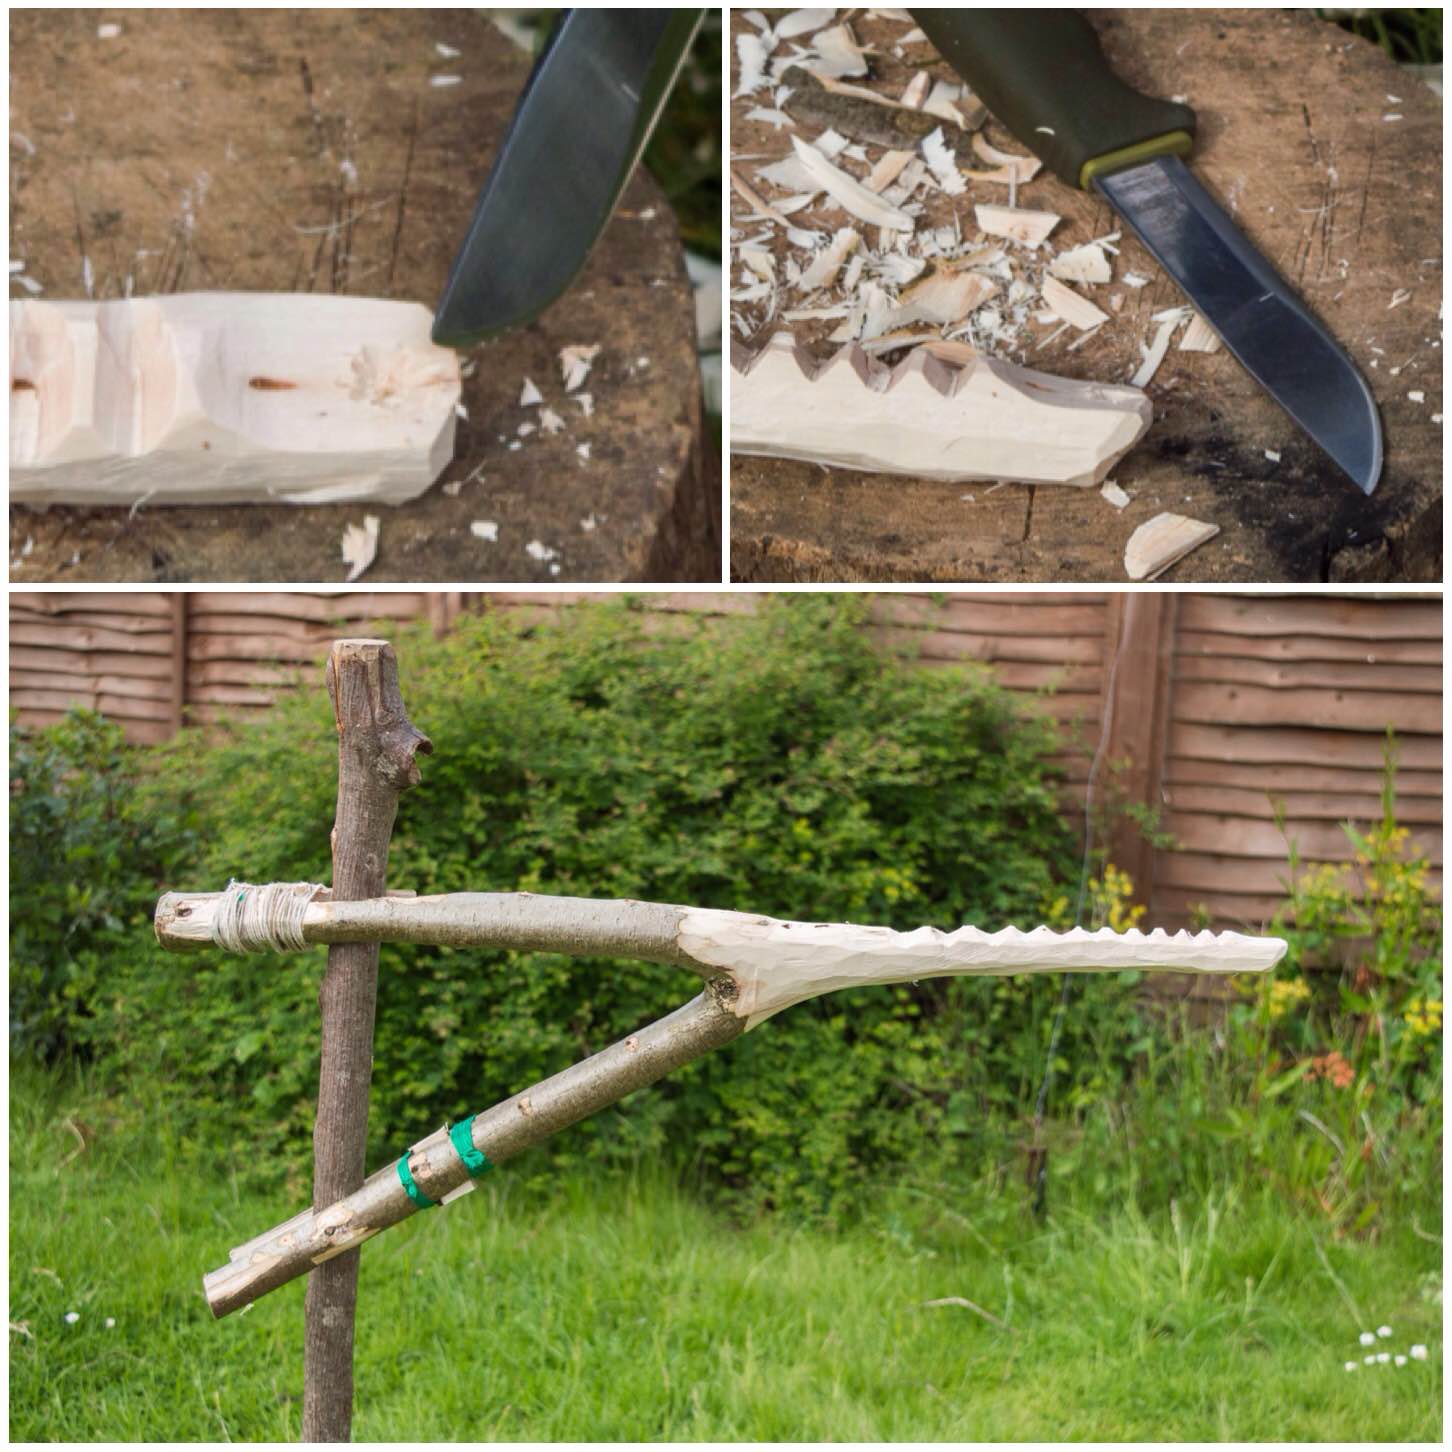
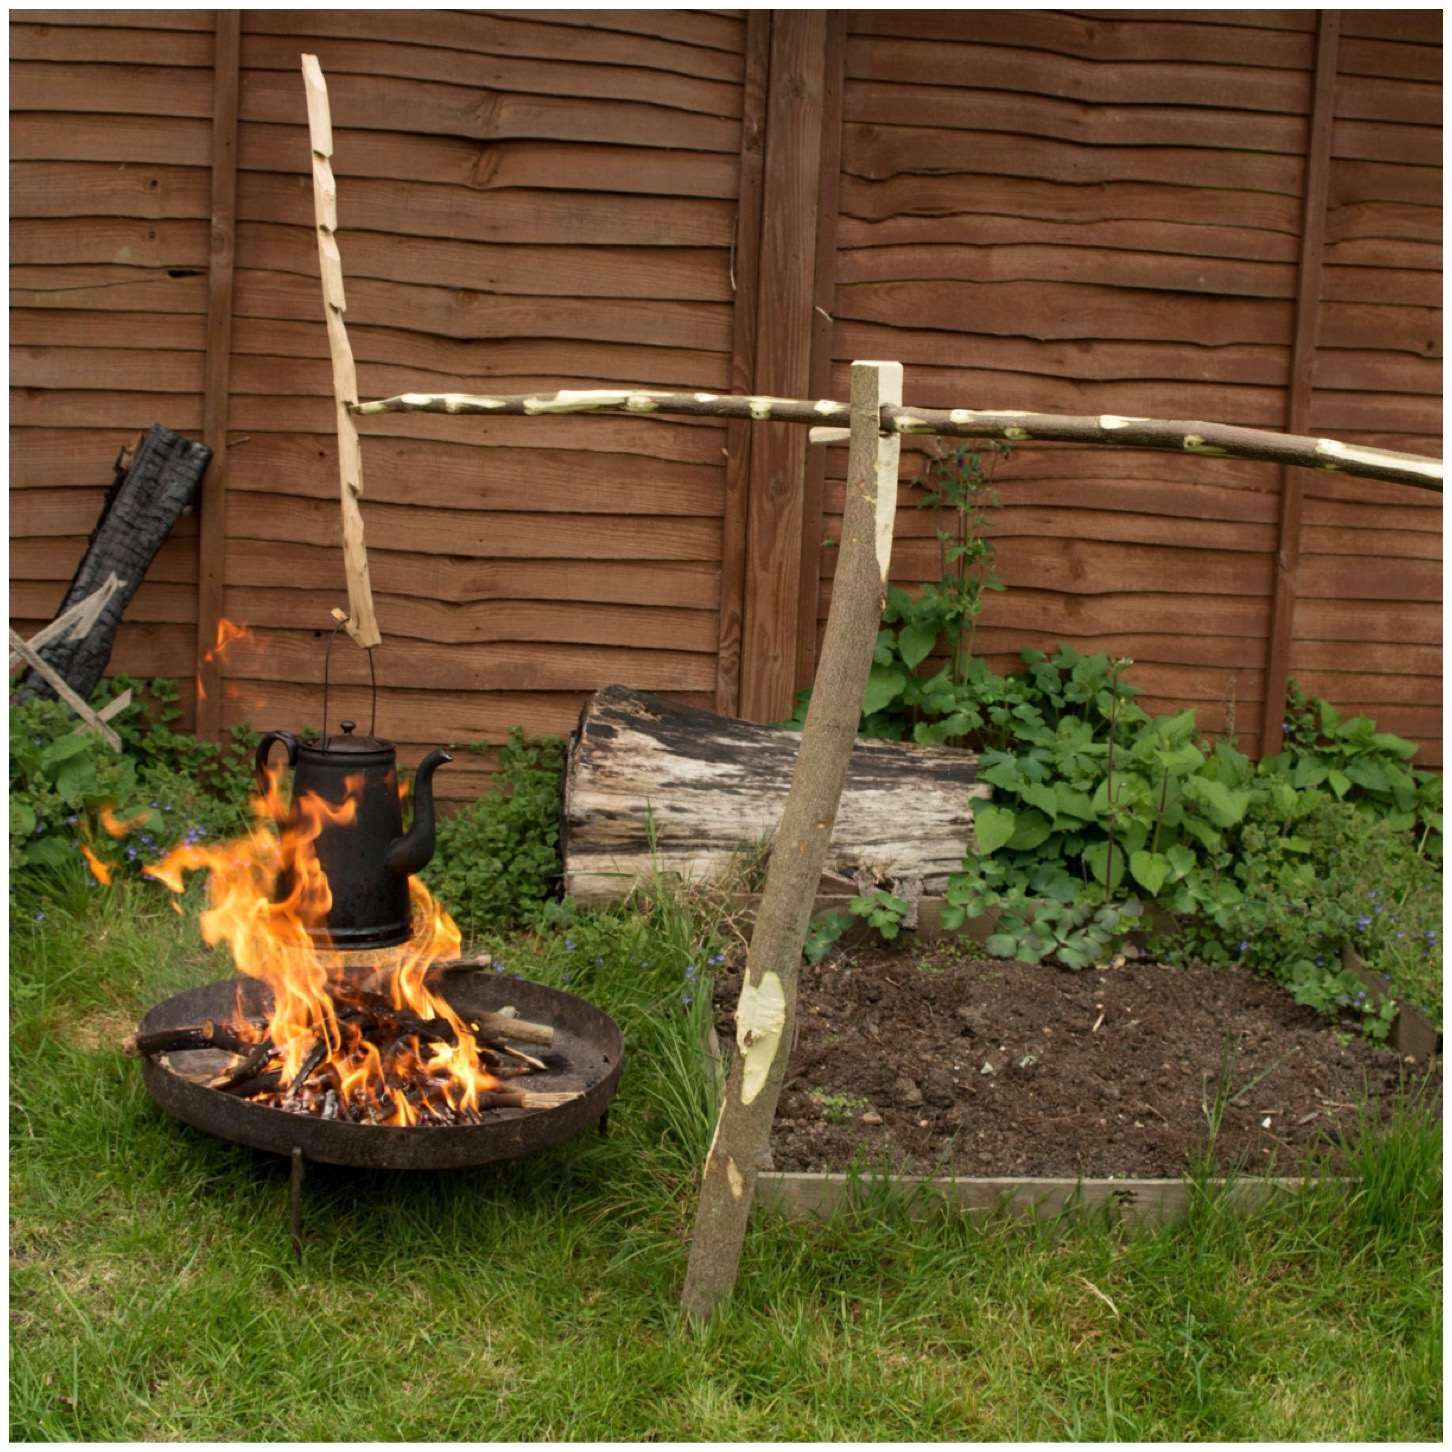
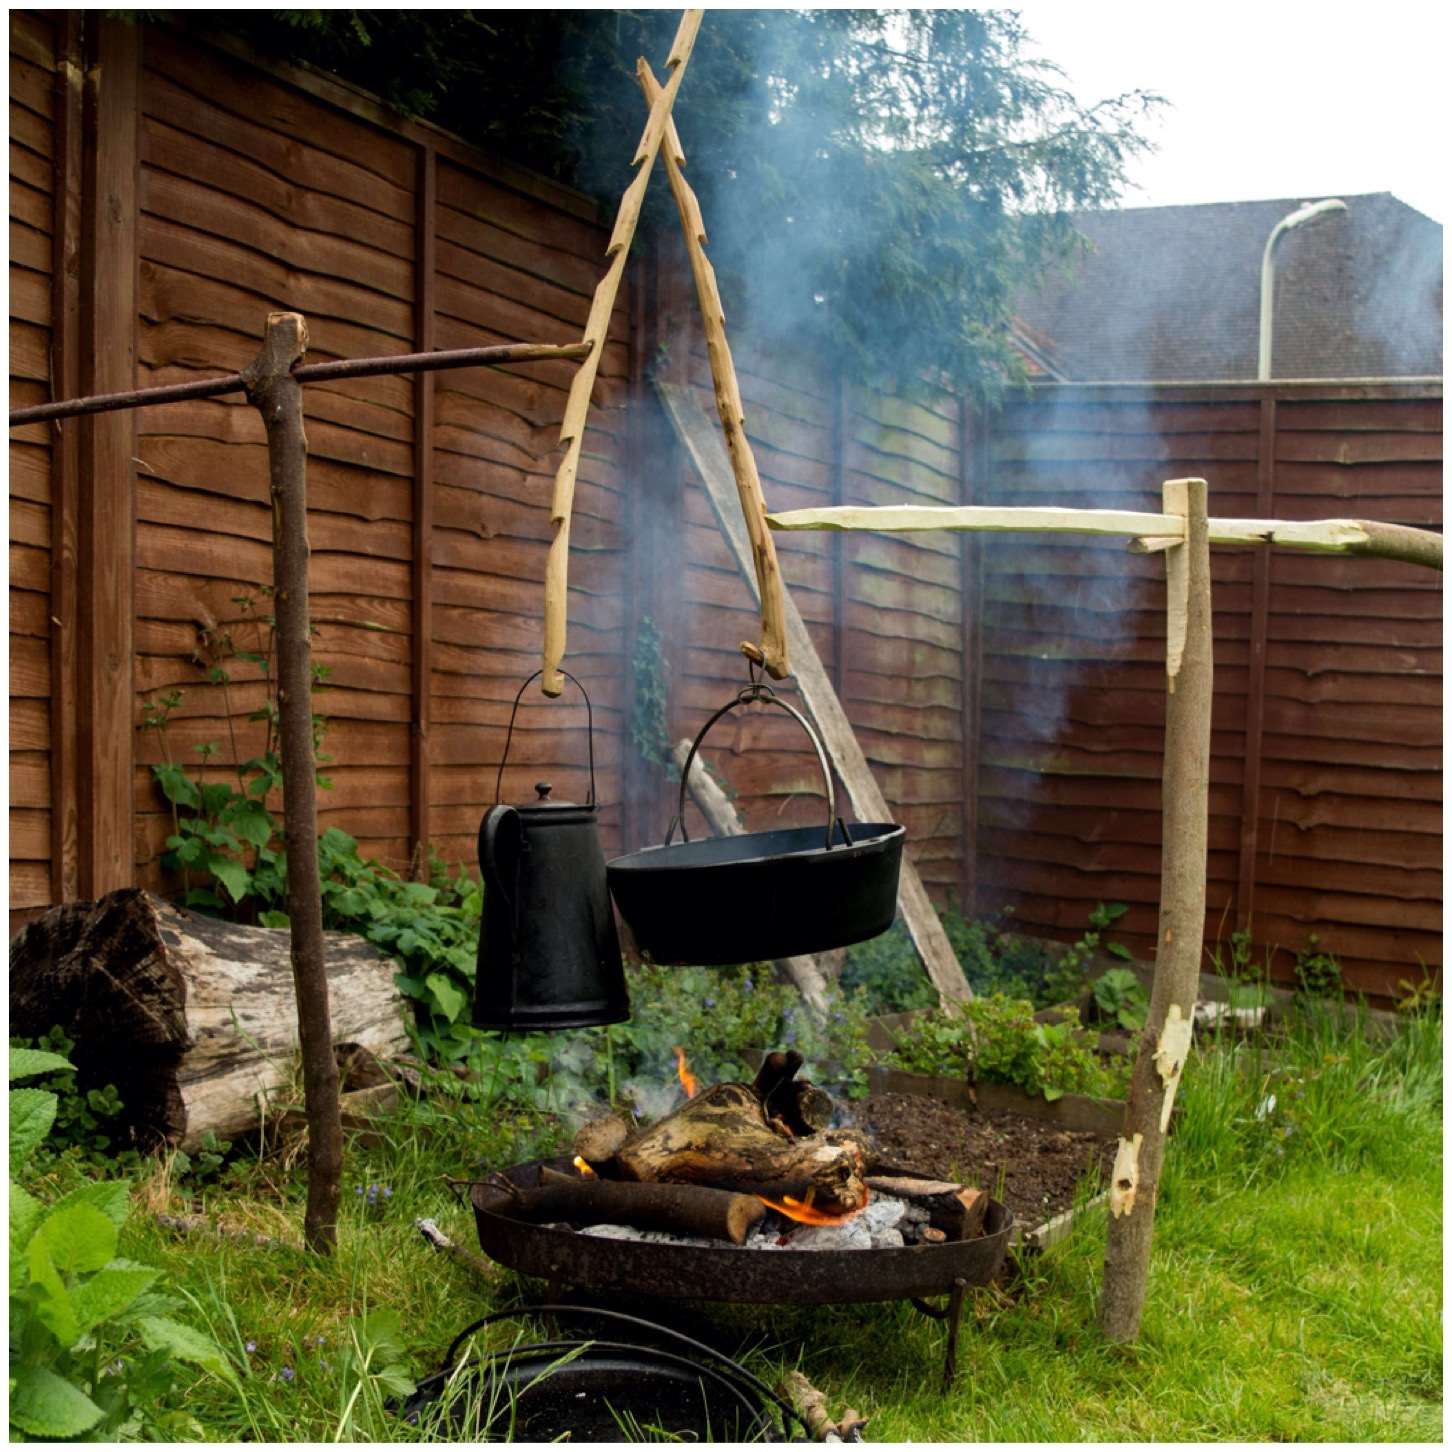
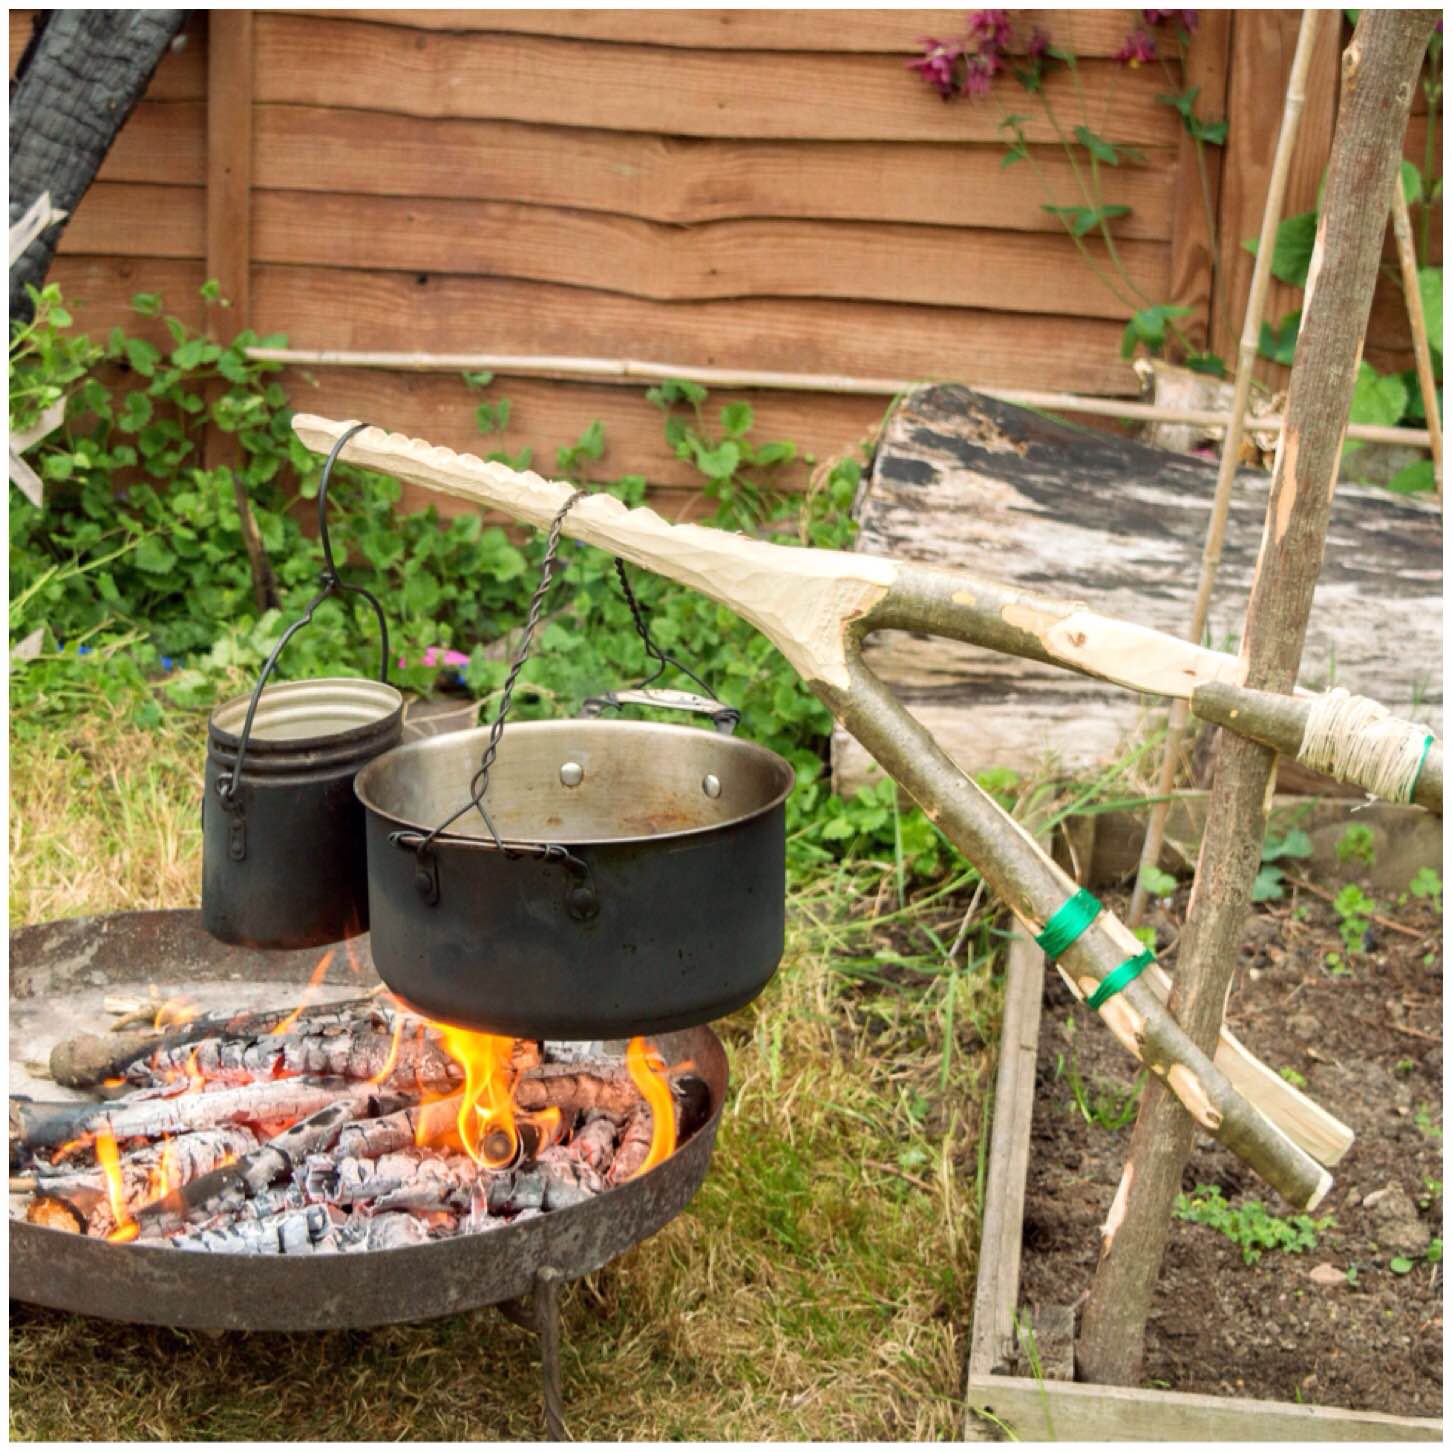
Aures crane in action

All the hard work is done now so all you have to do is light your fire, insert the upright, attach the crane and pot, adjust the height for optimum cooking and sit back.

The picture at the bottom shows how you can also attach an adjustable pot hook to the end if you want.

Photo 29-05-2015 09 33 27
High, low and balanced

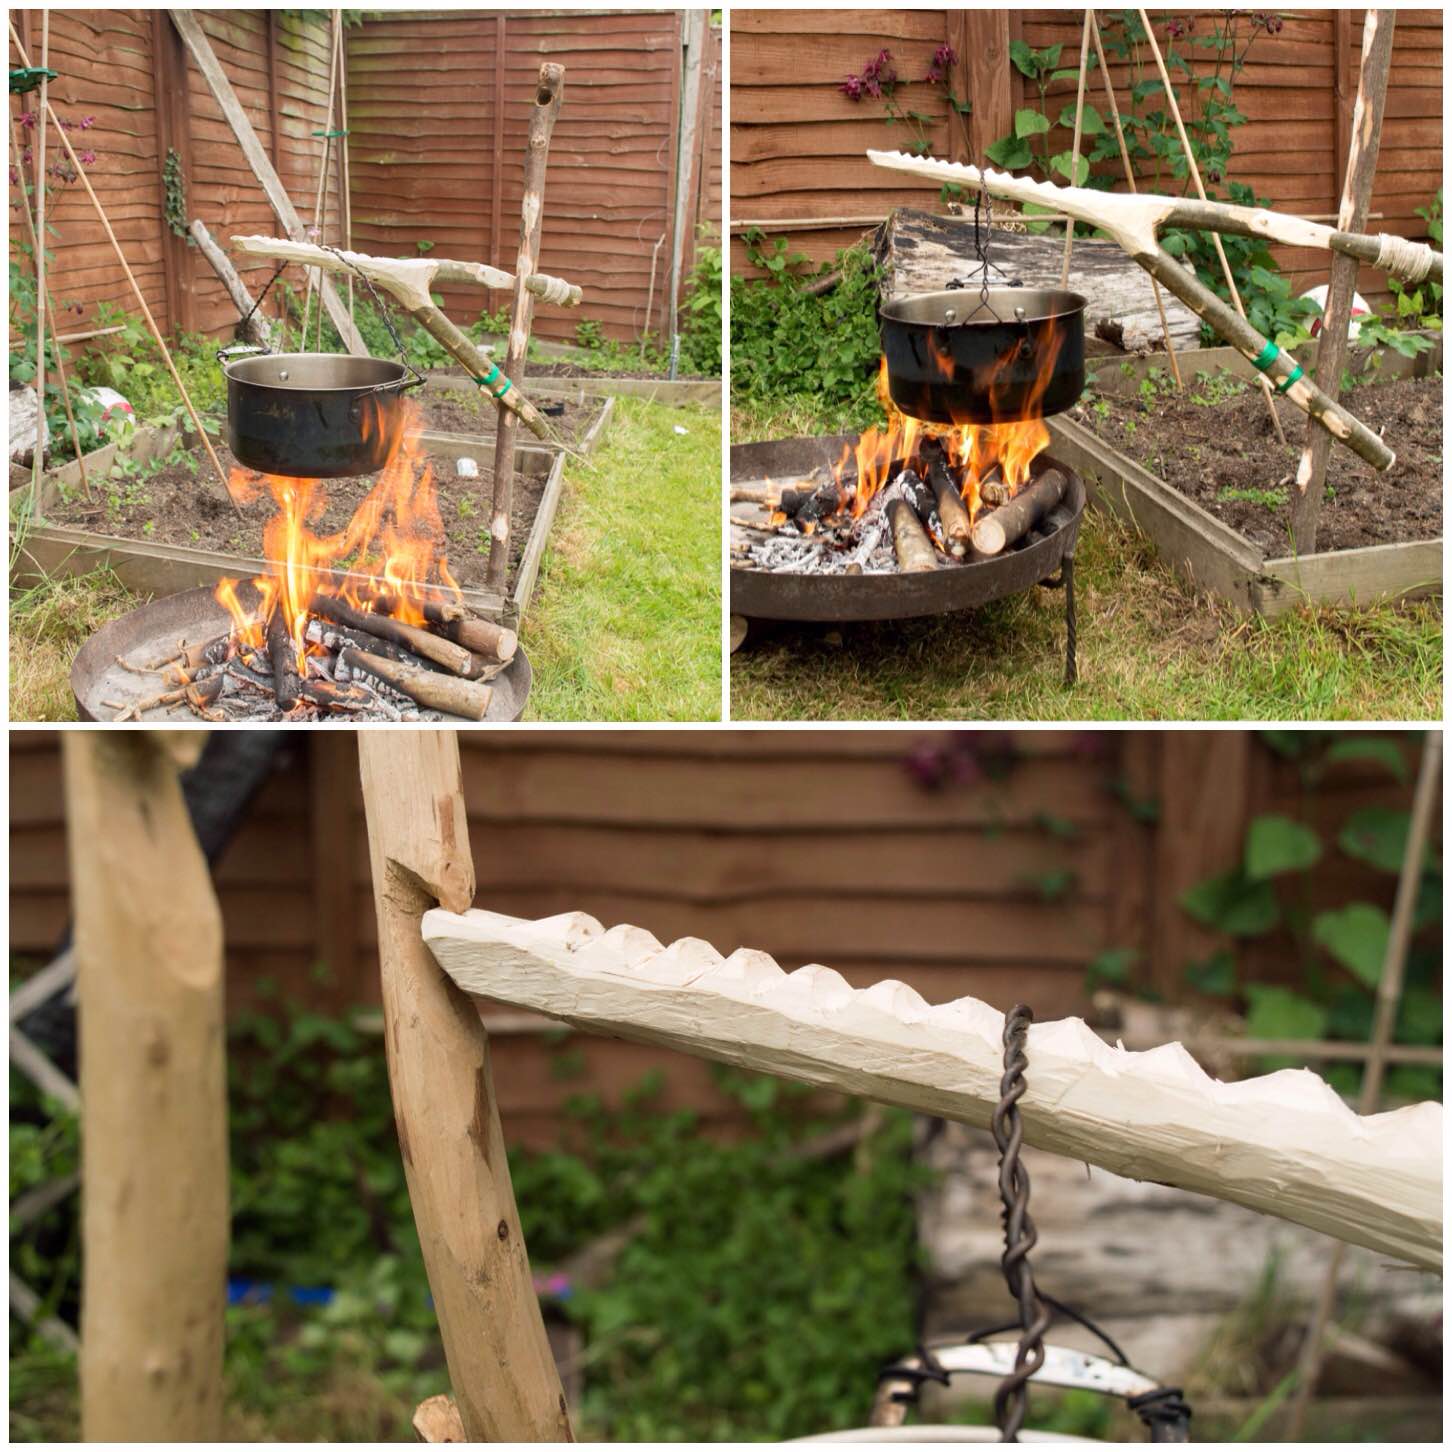
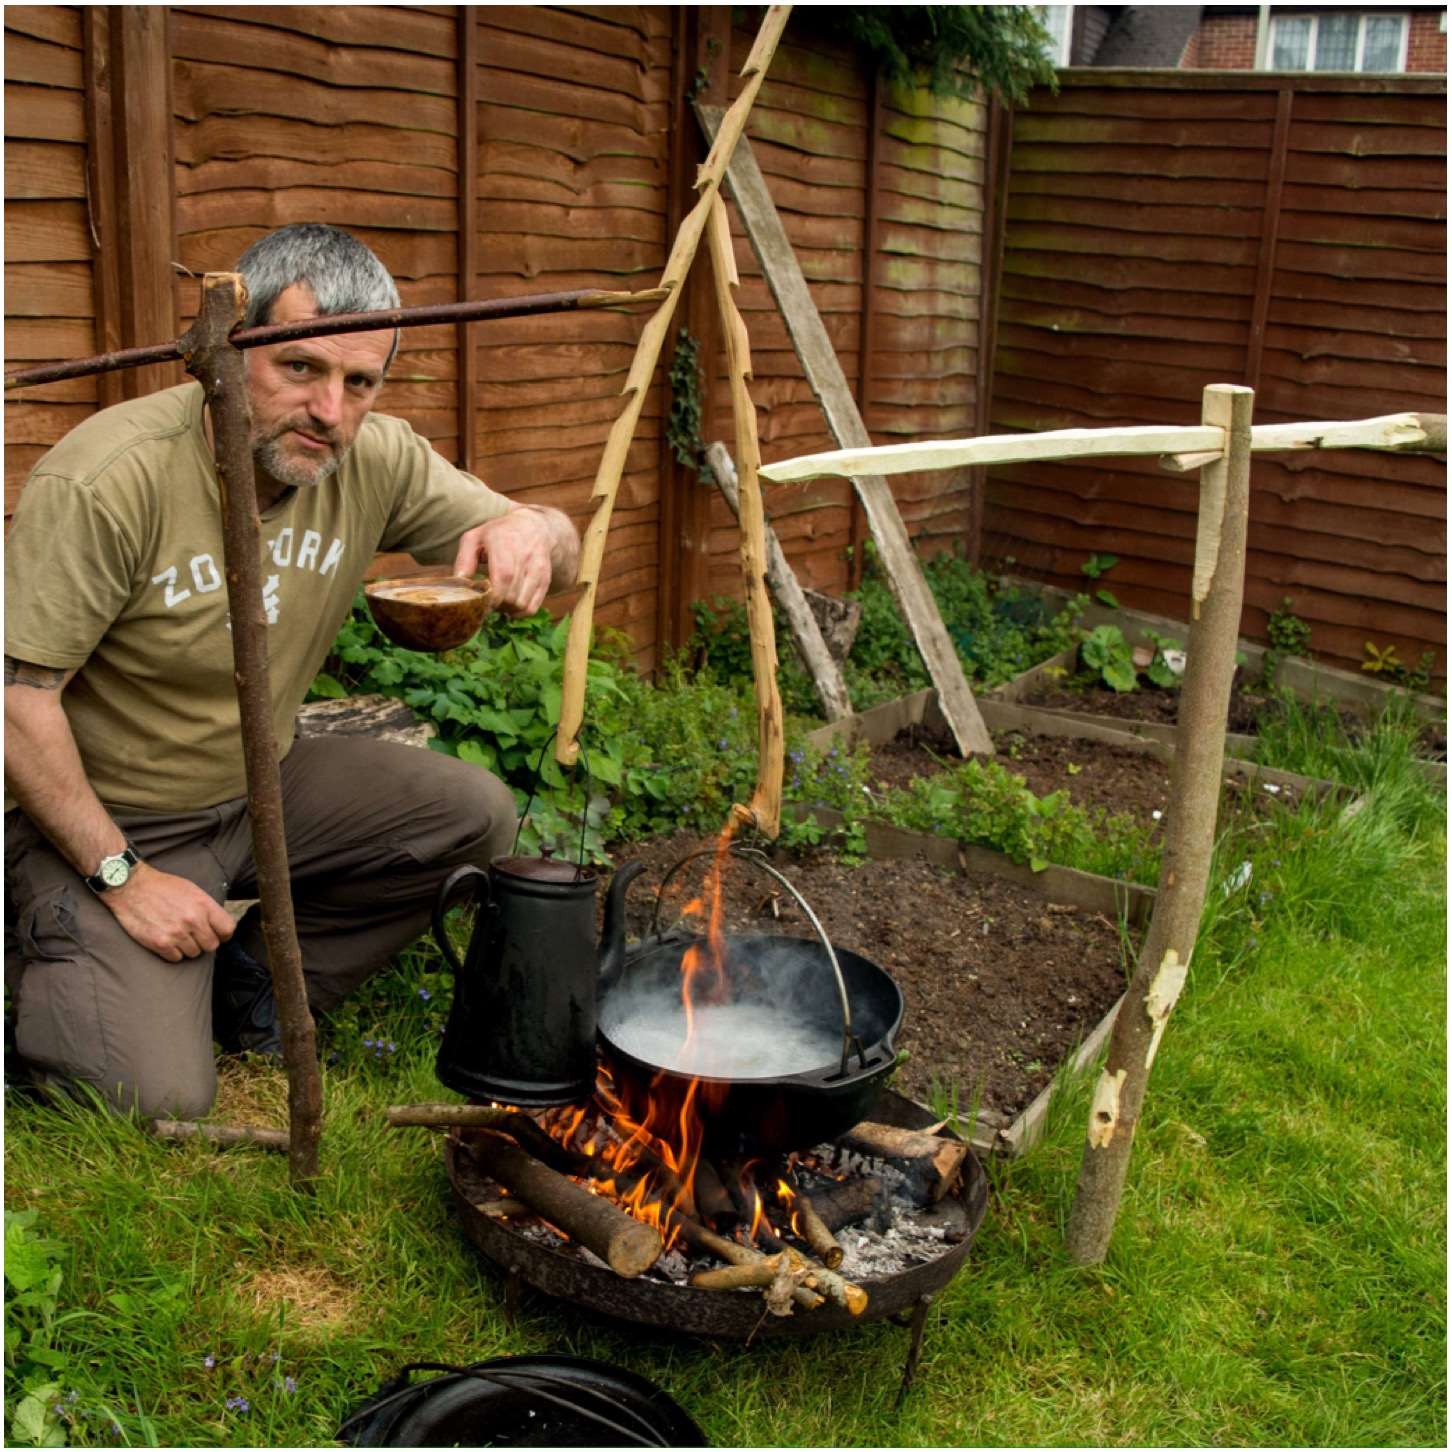
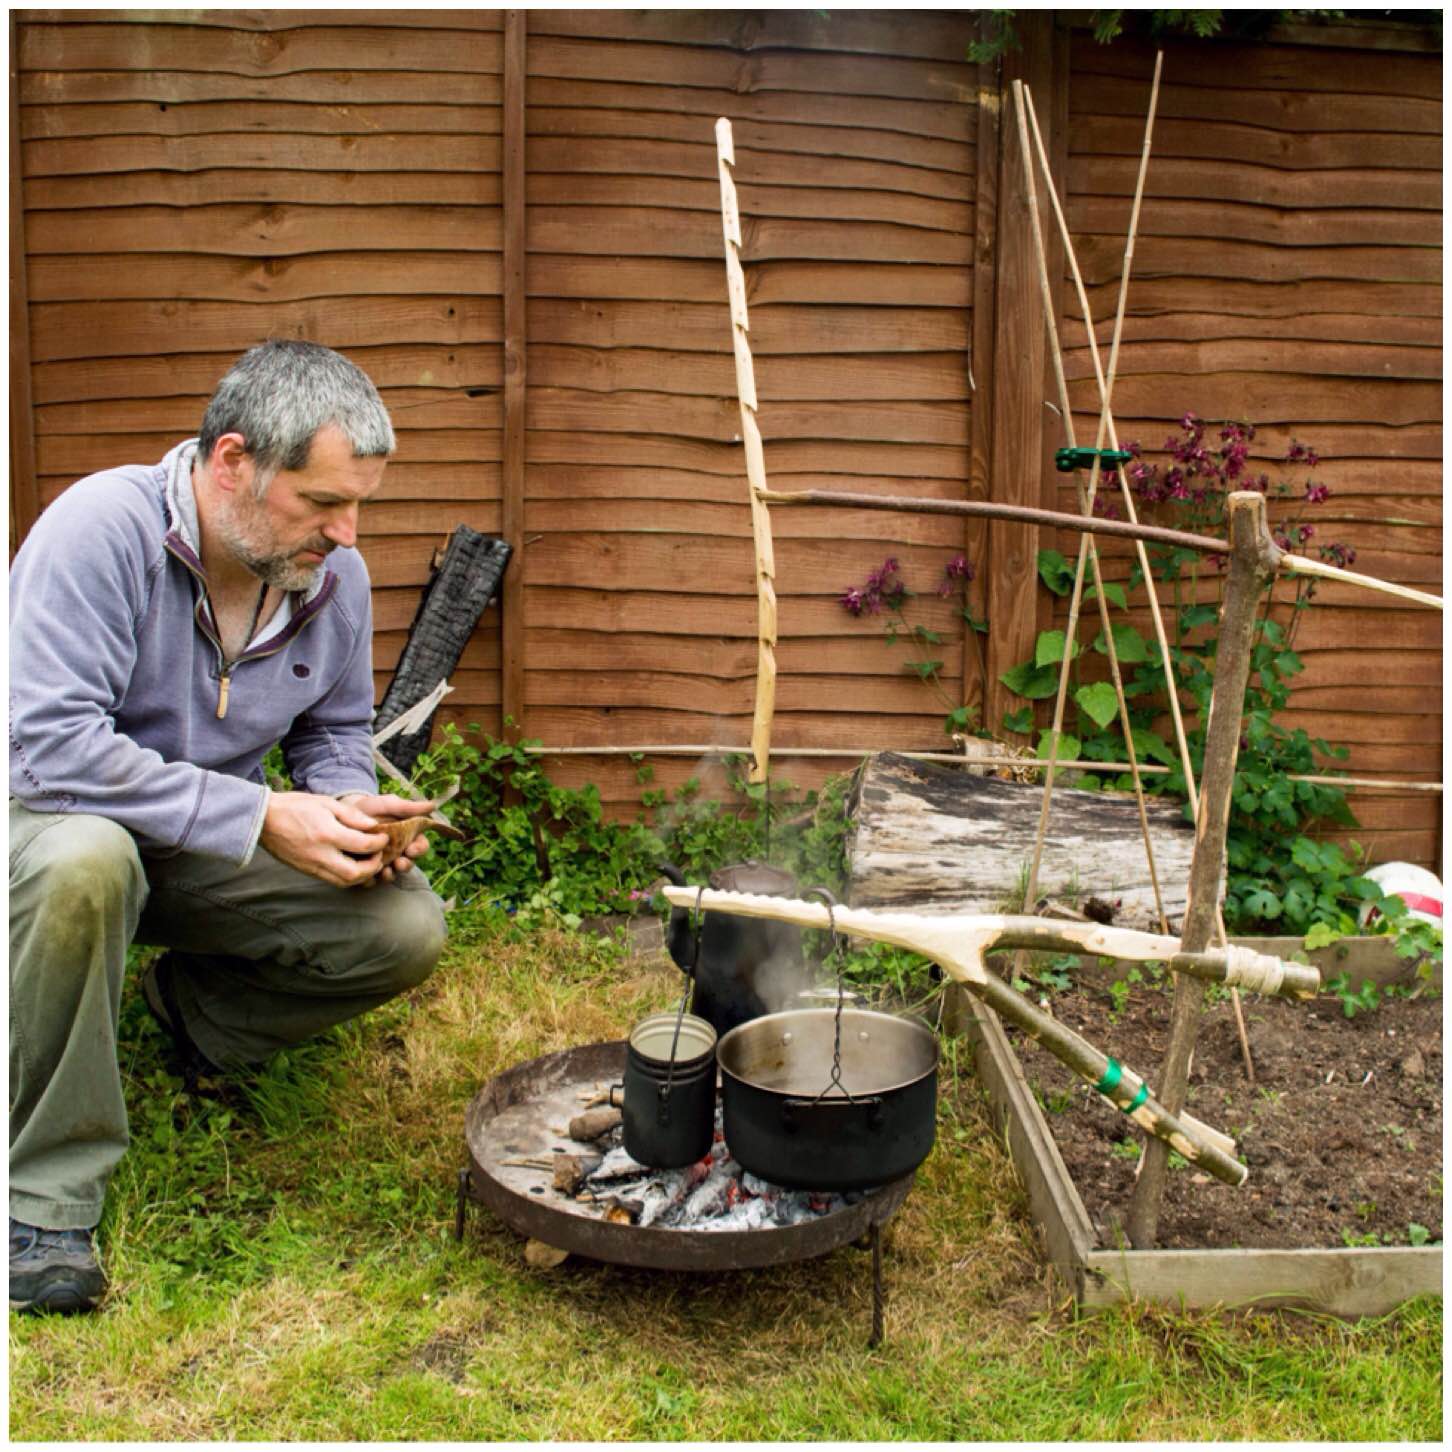
I have attached the Aures crane to the upright for my fixed crane allowing me to hang multiple pots. I have discussed how to make a fixed crane in my previous post How To…. Build a Campfire Cooking Crane.

The adjustable pot hook is only needed if you want different temperatures for the pots hanging off the Aures crane.

Photo 29-05-2015 09 33 27 (1)
Top down with fixed crane above

If you are happy for both pots to be at the same height both can be hung directly off your pot bar if it is long enough.

The crane is easy to adjust for height with the pots attached and you can easily swing it away from the heat when required.

Photo 29-05-2015 09 33 28
Heavy duty

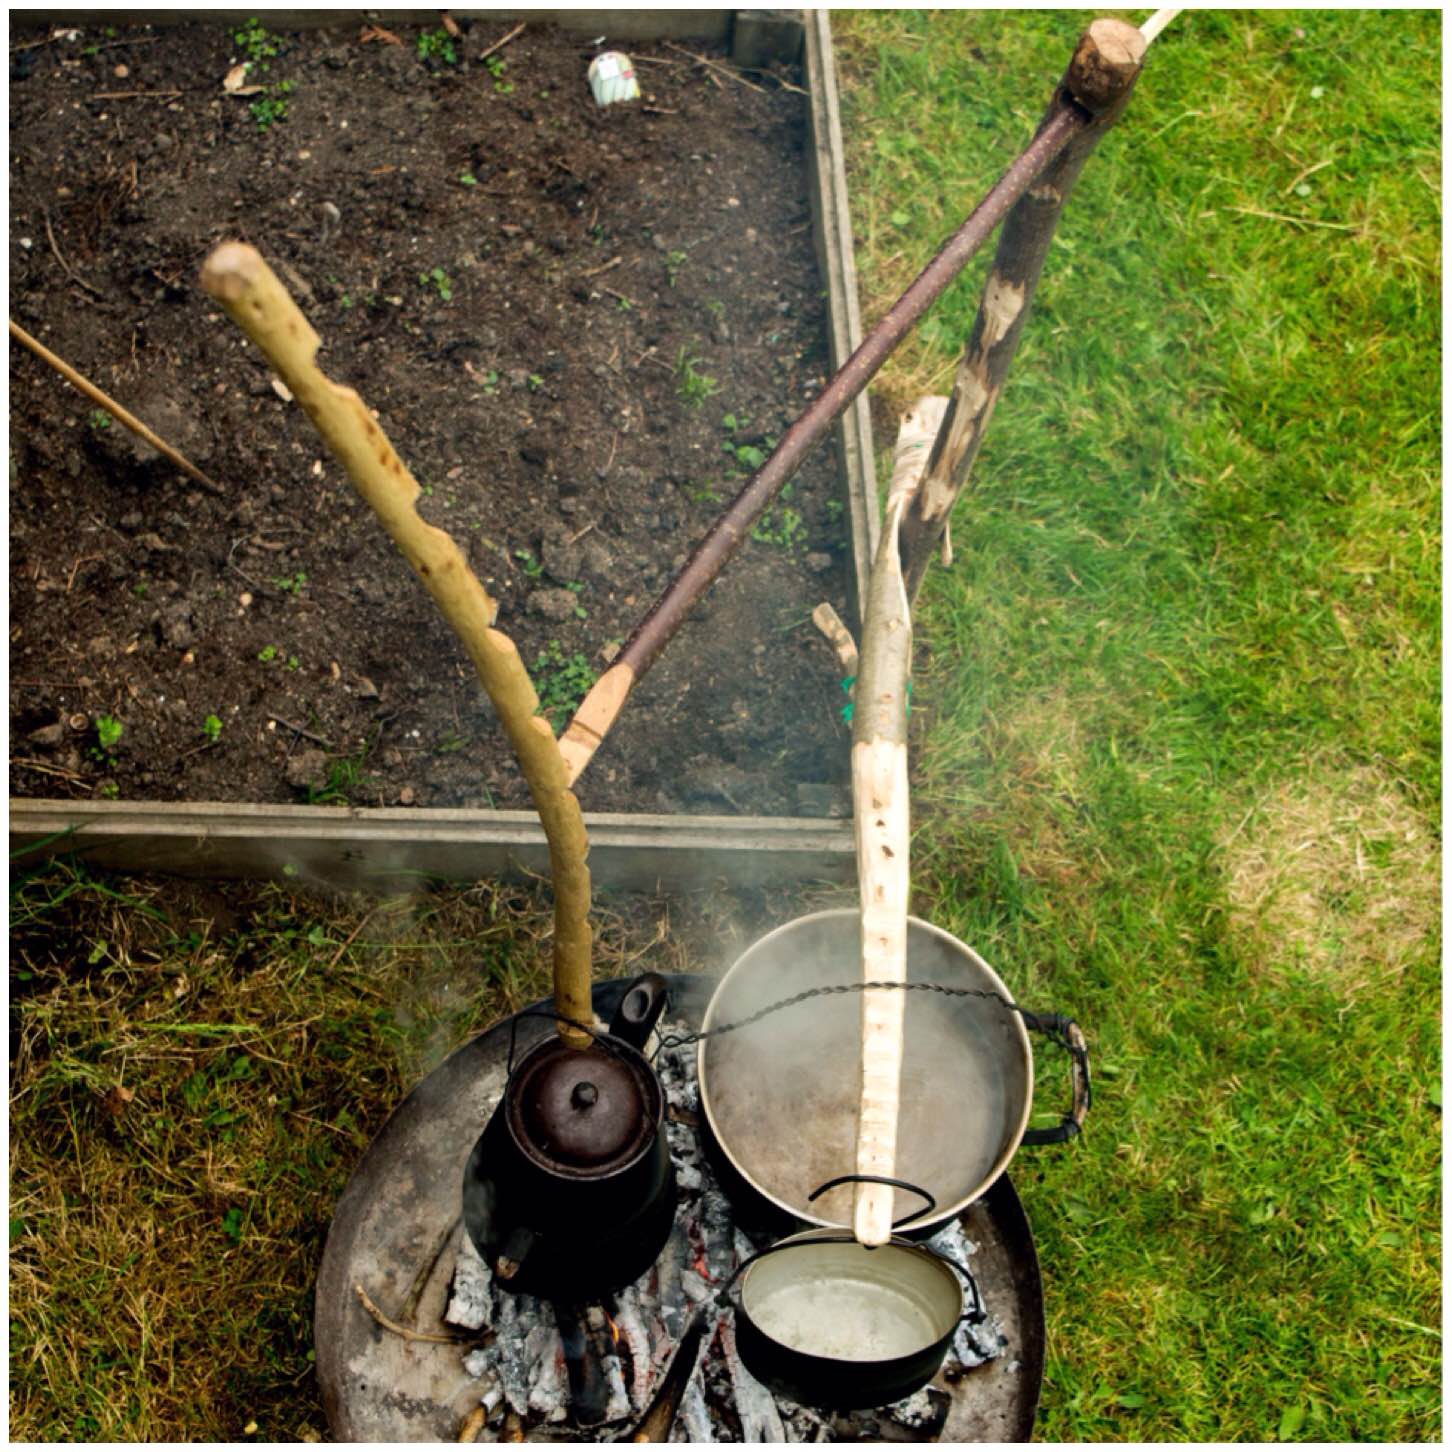
A view from above – one upright – two cranes – three pots

Photo 29-05-2015 09 33 28 (1)
One upright – two cranes – three pots

Do not be put off by the length of the instructions: this crane is very easy to make. Some of my bushcraft friends say that it’s not worth the bother – that may be so for a short term camp but if you want to practice your carving skills it’s perfect for the job.

Photo 29-05-2015 09 33 29
The ultimate aim – to have a brew

I have a feeling I may be writing about a few of the other variations of the Aures crane in the near future.

Cheers and happy carving.

George

Dartmoor Development Days

Early April found me back in one of my favourite locations – on Dartmoor. I was told recently by a friend that you need to say ‘on Dartmoor’ and not ‘in Dartmoor’ – seemingly that is something else entirely 🙂

Dartmoor can be a very tough place to learn about the art of navigation but if you can crack it there then most other places will seem like a walk in the park in comparison.

This was the second of four weekends that we are running as part of the Basic Expedition Leader (BEL) award for our Sea Cadet instructors.

The Crew

On the Friday night we stayed at Oakhampton Army camp on the northern edge of the moor and then camped out on the Saturday night.

Each student had to give a ten minute presentation on a given outdoor pursuits subject and also a five minute ‘on the hoof’ presentation while out navigating. We managed to do a few of the presentations on the Saturday morning before striking out onto the moor.

Rugged Terrain – out of remit for BEL

I was working with my good friend Graham Brockwell over the weekend so we split the students into two teams. My team headed up onto Yes Tor to work on our map and compass skills.

While up there we spotted the local hunt lower down on the moor. While watching them a Royal Navy Rescue helicopter came in below us and landed at Oakhampton Army camp. I always love being up high and seeing aircraft flying about below me.

Up high and looking down

It was soon time to come down of the Tor to navigate along the tracks in the valleys. The BEL qualification is a lowland award and the students have to show a high degree of accuracy while navigating on clearly marked paths.

After a few more presentations we found the old artillery range. The metal rails you can see in the picture on the bottom left were for the carriage that held a large target for the artillery to shoot at. 

Down low – in remit for BEL

Camp on the Saturday night was quite high up but very near to a road where we had our minibus parked.

The students soon were sorted out both fed and rested 🙂

Camp, Dinner and Rest

The last of the presentations were run that evening. It was still very bright but very windy. In this class Carol was doing a quiz on map symbols that involved a little artistic licence.

Once it got dark Graham and myself took everyone on a hike without torches onto one of the Tors. The skies were very clear and as everyone’s eyesight had adjusted to the dark the views of the stars were exceptional. There was a slight level of light pollution around the edges of Dartmoor but looking straight up was crystal clear.

Evening classes

This weekend I had to sleep in a tent (contemplated the hammock stand but it was just a tad too windy) but it was surprisingly comfy I have to admit – the two roll mats helped!!

Cooking on the moor can be difficult with the wind but Dave soon found himself the perfect niche to get out of the wind to brew up.

The wind was really helpful though with drying the tents off quickly. It was just the undersides that needed drying so as long as you held on tightly to it, it was soon dry.

A windy breakfast

Now Graham managed this on his own as he is a bit of a pro however some of the student instructors (I did say some) needed to get a bit of teamwork going to get everything packed away without being blown away.

Packing and wrap up

The Sunday morning was to be a short affair as we had a long drive back towards London. It was still a bit windy but brilliantly clear making the navigation slightly easier.

To begin with we did some compass work and were soon off.

Set off

Along the way it was time to run a scenario – a first aid scenario.

It is quite common for someone to trip on the moor and pull a muscle or twist an ankle. I asked Jack to quickly lie down, set the scene for the students and set them to it.

The scenario was that Jack had hurt his leg, bad enough to find it very difficult to walk but not a broken bone. The students were briefed that the minibus was nearby (it was) and that as they had enough people in the team they could treat Jacks injuries and rig a seat to carry him out.

Casualty simulation

Jack was helped over to the side of a collapsed building for shelter to be treated to get him out of the strong wind.

In the picture above you can see the students placing their hands on the ground. This was to show them how cold the ground gets very quickly and the importance of protecting Jack from the cold ground.

Once he was comfy a seat was rigged from a survival bag and slowly (everyone taking turns) Jack was transported about 100 metres or so off the moor.

Good teamwork

Dave got his bothy bag out for some of the guys who had never used one before to try out. This bit of kit is brilliant in an emergency to treat a casualty out of the wind or more commonly as a mobile shelter to each your lunch out of the wind.

Getting out of the wind

To finish some of us jumped into the minibus back to the camp while others enjoyed a nice walk down off the moor.

The whole weekend on Dartmoor was lovely in terms of the weather and the traffic on the A303 on the trip home ran really smooth – not often you can say that.

Cheers

George

How To…. Build a Campfire Cooking Crane

Sometimes space around the fire is at a premium.

Sometimes you want an adjustable pot hook without a tripod set up.

Sometimes you want to pour your coffee without getting burnt by the flames.

If that’s what you want then build yourself a crane – It’s easy.

Photo 06-05-2015 13 25 33
A robust and versatile campfire crane

There are a number of different ways to build a crane set up however I decided to try just with the general tools I would carry in my rucksack. These included an axe,  a saw and a general bushcraft knife.

The wood I used was some sycamore I had recently polarded in my garden. The crane is made up of a thick upright and smaller pieces to act as the arms. I decided to make two different types of arms, one for small pots and one for bigger Dutch oven type pots.

Sizes and dimensions will vary depending on how high you want your crane to be and what weight you want it to hold.

Carving the upright

I decided which part of the upright would be the top and then flattened it to give me a working area. You do not need to do this however I find it gives me a stable working surface. You can see in the pictures below that the girth of the upright is just larger than my hand as my fingers do not fully close around it.

Photo 06-05-2015 13 33 25
Basic parts and flattening the top of the uprght

For the crane to work you need a hole at the top of the upright. The size of the hole will depend on the size of the arm you will put through it and how much wood you want left around the hole for strength.

As I was going to carve this with my knife I opted for a square hole as this style is easier for me to carve. Once I had pencilled out one side I marked up the opposite side. In this crane I made the hole at 90 degrees to the upright (makes life easy) but you can angle it if you want so that the arm will be pointing upwards more when inserted.

Photo 06-05-2015 13 34 30
Marking out the socket

I used my knife to score lines into the wood I wanted to remove. You can do this by gently tapping your knife handle with a batton or rolling the curved part of the blade. You need to do this gently so as not to cause unwanted splits in the wood. Also make sure that the work piece is secure on the ground and that your free hand (if not battoning) is well clear of the knife edge.

Photo 06-05-2015 13 36 57
Scoring

To remove the wood I just pushed the tip of my knife inbetween the scores and prised it out. Again I did this gently alternating between pushing on the handle with my hand or doing light taps with a batton. When I twisted the point I did so gently so as to not cause any unwanted splits or worse still – snap off the tip of my blade. 

I did another set of scores and chipping until I was about halfway through the upright.

Photo 06-05-2015 13 39 14
Chipping

I then repeated the exact same procedure on the other side until my knife popped through the other side.

Photo 06-05-2015 13 57 15
Repeating the scoring and chipping

Once the plug of wood was removed I trimmed the internal walls of the hole (using the wood I would use as an arm as a guide) and chamfered the edges off.

Photo 06-05-2015 14 01 36
Finishing the socket

The upright was finished off with all the knobbly/sharp bits being removed and a point was axed out at the bottom of it.

Trimming and pointing

Carving the lightweight arm

I made the arm for the lightweight pots from a thin piece of sycamore. I trimmed a flattened piece near the end and carved a small dimple with the point of my knife in it.

The small dimple is needed to keep the adjustable pot hanger in place. I have covered the making of the making of an adjustable pot hook in my post How To…. Carve and use an Adjustable Pot Hanger.

Photo 06-05-2015 14 11 56
Lightweight arm

Set up

In my previous post on making a Double French Windlass Cooking Rig I explained how to make a pile driver. I used this pile driver to make a hole for the upright to sit in.

Once you have created the hole it is just a case of gently tapping the upright into place. If you did not use the pile driver you would need to hit the upright hard to drive it into the ground and very quickly the wood around the hole would crumple or snap.

Photo 06-05-2015 14 14 12
Using the pile driver to place the upright

As I had not made the hole at an angle I carved a small wedge to hold the arm securely and also to raise the tip up slightly.

When the arm is in place in the hole just tap the wedge into place gently. Do not ram it in as this could cause undue pressure and split the wood.

Photo 06-05-2015 14 16 55
Create a wedge to secure the arm

Then it is a simple case of attaching the hanger with your pot or kettle onto the arm.

I like this system as it is easy to adjust the height of the pot and the whole crane can be swivelled to move the pot away from the fire easily.

In the picture below I have left the back of the arm overly long but I will trim it shorter eventually.

Photo 06-05-2015 14 18 53
Ready to go

Carving a strong arm

As I had made a square hole I got a bigger piece of sycamore and squared it off along its length to fit exactly in the hole. This arm was designed to take bigger pots like a dutch oven.

Photo 06-05-2015 14 22 10
Creating the heavyweight arm

The end was shaped to fit the pot hanger.

Photo 06-05-2015 14 25 27
Finishing the tip

Then set up exactly as the first arm.

This time though I tested it out with a dutch oven half full of water.

Photo 06-05-2015 14 27 57
Heavy Duty Cooking

I have a few of these cranes so I set up another one to put the kettle back on.

Photo 06-05-2015 14 30 45
Multiples

I had used an auger and a palm gouge to carve this one out so you can see it ended up with a round hole. No wedge was required as the hole was set at a slight angle.

Photo 06-05-2015 14 36 52
The crane made with an auger and palm gauge

After the water in the dutch oven had boiled it was easy to raise it all up off the heat.

Photo 06-05-2015 14 31 39
Easy to adjust the pot height

If you plan to use these cranes on a longer term basis they may develop a crack if you are using green wood. This happened to this crane about a week after I made it but I secured it with a bit of whipping. You can do this right at the beginning if you wish or when you see a split start to appear.

The whipping will be well clear of the flames so I am not worried that it will be burnt through.

Some Whipping
Some Whipping

If I had not being taking pictures along the way I would have completed this rig in about an hour or so.

There are other ways of doing this and other tools you can use so I will leave it to your imagination but if you are someone who likes to tinker around the campfire then I would give this one a go.

Cheers

George

Glorious Dartmoor Days

I spent seven days this Easter on Dartmoor – seven glorious sunny days.

I never thought I could have said that with my previous experience of this often wet and windy but beautiful moorland landscape.

Photo 27-04-2015 09 59 12
Day 1 on the Moor

The first five days were with the Sea Cadets where my friend John Kelly was running a DofE Expedition on the moor. I was along as Mountain Leader safety and to help train the Gold training team.

John also had a Silver team under training, another Silver team under assessment and another Gold team under assessment – Quite a busy 5 days it turned out.

The first day was all about training for me as the Gold team were under my wing all day. We focussed on key map and compass skills so that the next day they could navigate under remote supervision safely.

Photo 27-04-2015 10 02 53
The Gold Training team

Early on the first day my friend Dave Lewis managed to pull a muscle in one of his legs and had to retire early on from the walk that day. It was serious enough stop him from getting back on the hills for a few days and I insisted he put his feet up – to which I received no arguments (I needed Dave fit for another course straight after this one).

The evening of the first night was spent indoors learning all about route cards. Thankfully we were located at the Langstone Manor campsite near Tavistock where they have excellent facilities and allowed us to take over their dining area to run the classes.

Photo 27-04-2015 10 03 43
R&R and Homework

Day two saw some of the teams starting out at the beautiful hump backed bridge over the West Dart river near the Dartmoor Training centre.  Never one to miss a photo opportunity I soon had them lined up for a quick shoot.

I spent the day monitoring these teams remotely, only meeting up with them occasionally.

Photo 27-04-2015 09 53 23
Day 2 start at the Dartmoor Outdoor Training Centre

At the end of the day the descent off the moor was pretty steep but very beautiful. The footpath that took them off the moor into the village of Michelcombe was very hard to locate so after a little bit of map revision with the teams we were all soon rapidly making our way downhill.

Photo 07-05-2015 19 05 07
Heading off the Moor

The campsites were varied from the relative luxury of Langstone Manor, to the basic beauty of camping in a field of new born lambs and finally the remote camping of a high moorland copse.

Photo 27-04-2015 09 55 22
Sunny Camping

I really enjoy these trips as I get to wander the hills on my own and getting to sit back and relax while waiting for teams to appear. I have to try and anticipate where the teams will be at any given time and observe them from a distance or from time to time wander down to meet them.

As the teams I was observing were all under training I was able to spend some time with them at some of these rest spots making sure they knew exactly where they were and offering them advice when needed.

Photo 27-04-2015 10 08 37
Meet ups

Near the end of the day on the Thursday one of the cadets (Jess) tripped and strained a muscle in her leg. As this was very near the end of the day I called all the teams in from the surrounding area and revised their walk to head off the moor on an easier path.

We really took our time so that every one including Jess managed to walk off the moor and arrive back at the minibuses together.

Photo 27-04-2015 10 11 38
Final push

For those doing the Silver award this was the end of the expedition and after a de-brief they boarded a minibus to take them back to London.

Those doing the Gold assessment and training had to do one more day so it was back to Langstone Manor campsite for one more night and a final days trekking the next day.

Photo 27-04-2015 10 13 51
De-brief

I did not manage to get everyone in one group picture but got these two in the end. The top picture is off the Silver teams and the gold training team.

The bottom picture is off the Gold assessment team prior to them heading off on their last days trek alongside some of the staff monitoring them.

Photo 27-04-2015 10 14 30
The whole Gang

My final picture is of my hammock stand I had brought along for the week. I like tents but why sleep on the floor when you can hammock 🙂

Photo 27-04-2015 10 13 38
My accommodation

I put together a short video of the trip.

The last two days of the week were spent on another course training up some Sea Cadet instructors to become outdoor pursuits instructors on the Basic Expedition Leader Award. That post will follow shortly.

Will I ever get so many sunny days on Dartmoor again I have no idea but I will certainly remember this trip because of it.

Cheers

George