Pitch can be made with many different materials and I have covered some of these in that previous post. On this occasion I used spruce resin, beeswax and charcoal dust. Instead of a nice handy tin to prepare it all though I opted to try this out using more primitive materials: hot rocks. I touched on this method previously in the post How To…. Make a Flint-Tipped Arrow but feel it needs its own stand-alone post.
Hot Rock Pitch
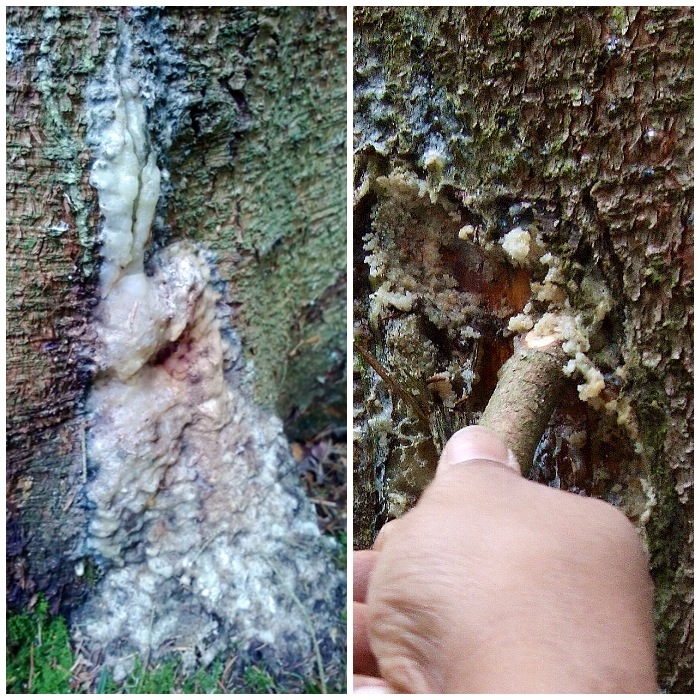
I collected a lot of resin from some spruce trees in my local area with the use of a stick as I find that this does not damage the trees as a knife would do. Also I look for areas where the resin has pooled at the base of the tree as you can collect all of this without affecting the tree.
Spruce Resin
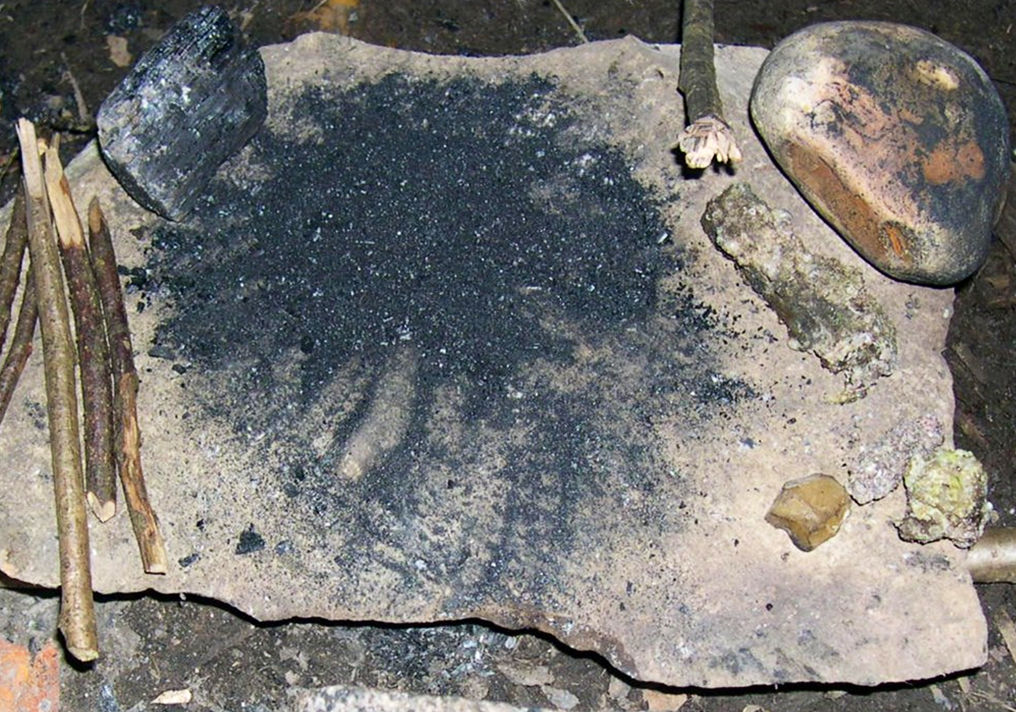
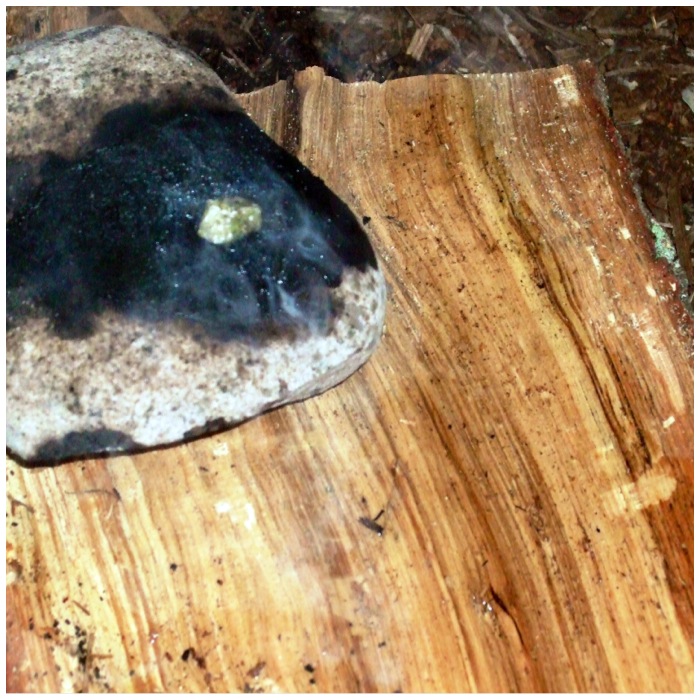
My other ingredients are charcoal dust to give the pitch body (I used the small rock to crush the charcoal) and beeswax to make it flexible. I used the sticks to make the finished pitch stick.
Preparation
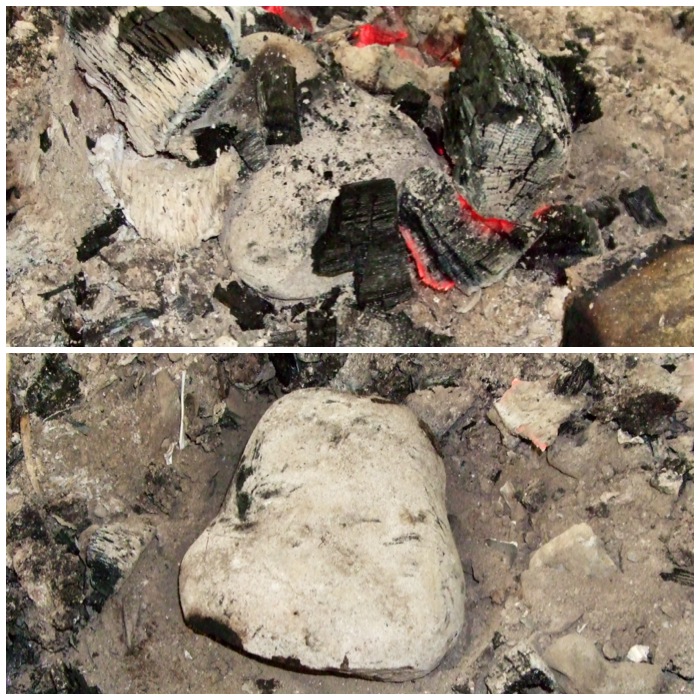
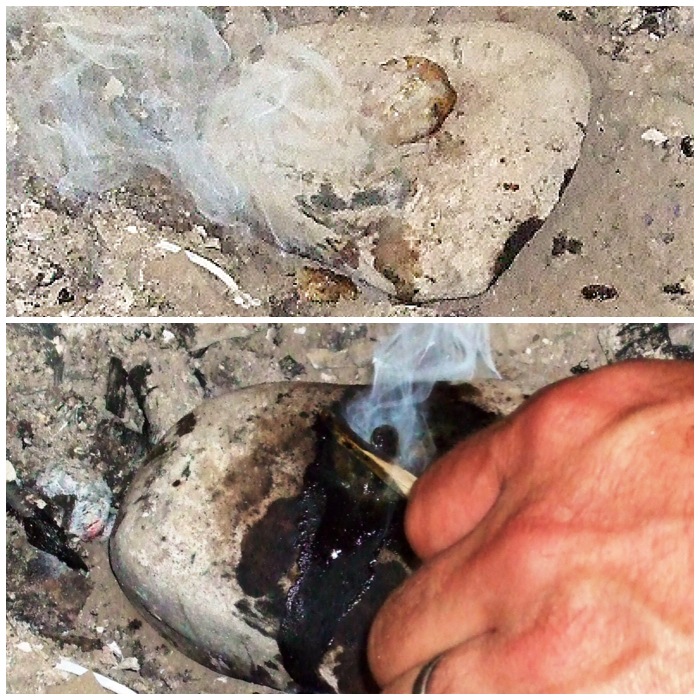
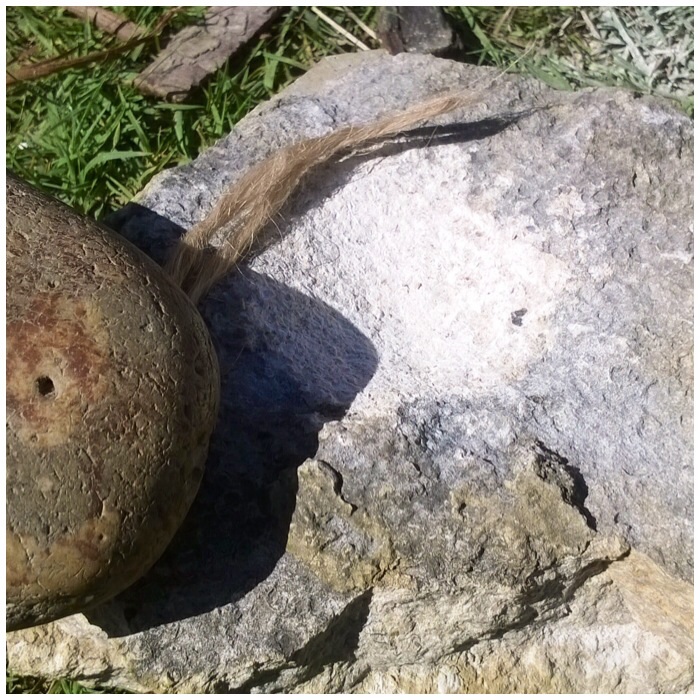
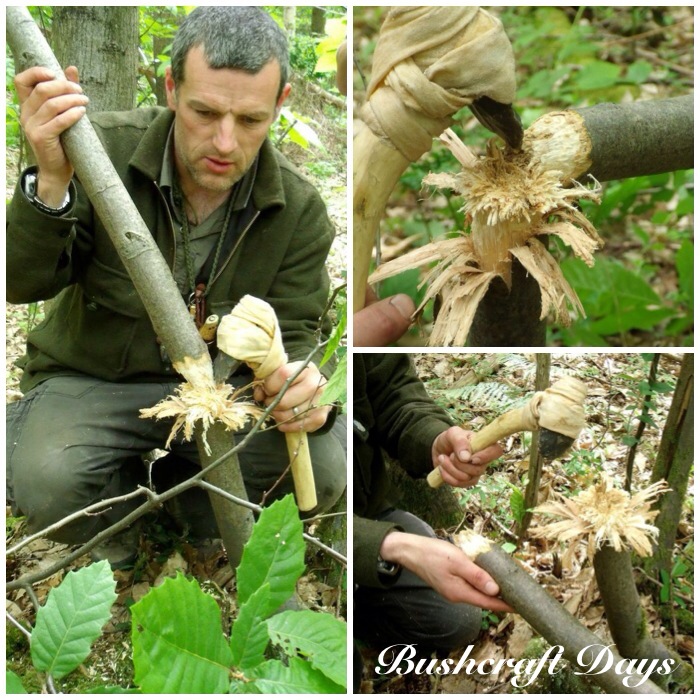
While I was out collecting resin and preparing everything else I had a rock heating up in the fire. I used a rock that had been heated before so I could be sure it would not crack. (If there is any trapped air or moisture in a rock there is a chance it will crack or, in the worst case scenario, explode.)
To handle the rock I used some wooden tongs I had made up (sorry, no photo).
Hot Rock
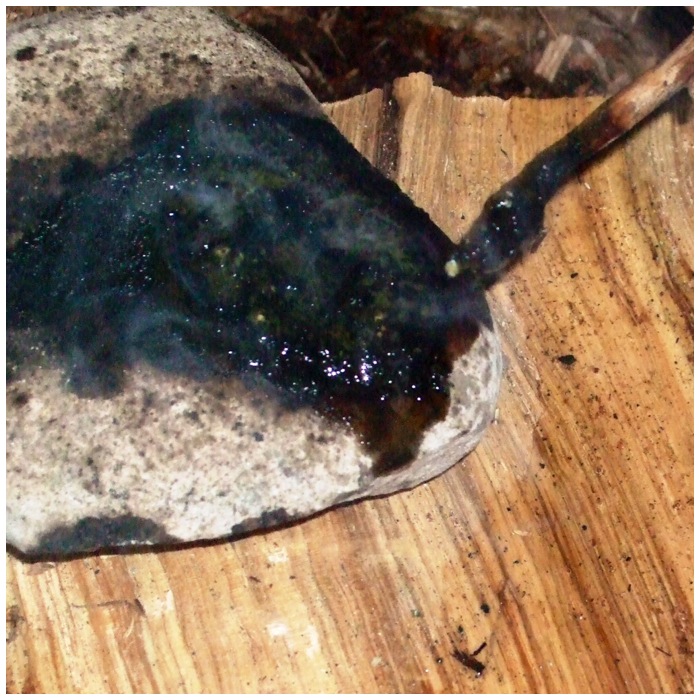
The rock I had chosen had a slight hollow in the top surface which I thought would help stop the resin from flowing away instantly as it melted. I dragged the rock to the side of the fire, popped a piece of resin onto it and with a small twig moved it around until it had all melted. Some resin did run off but enough was kept in the hollow for me to use.
Melting the resin
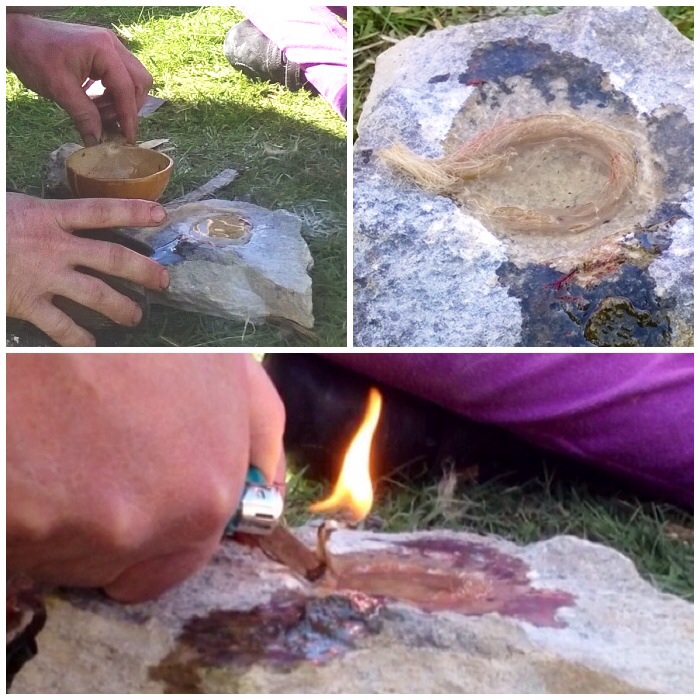
I then moved the rock onto a piece of curved bark which held some water to act as a coolant as I built up my pitch stick.
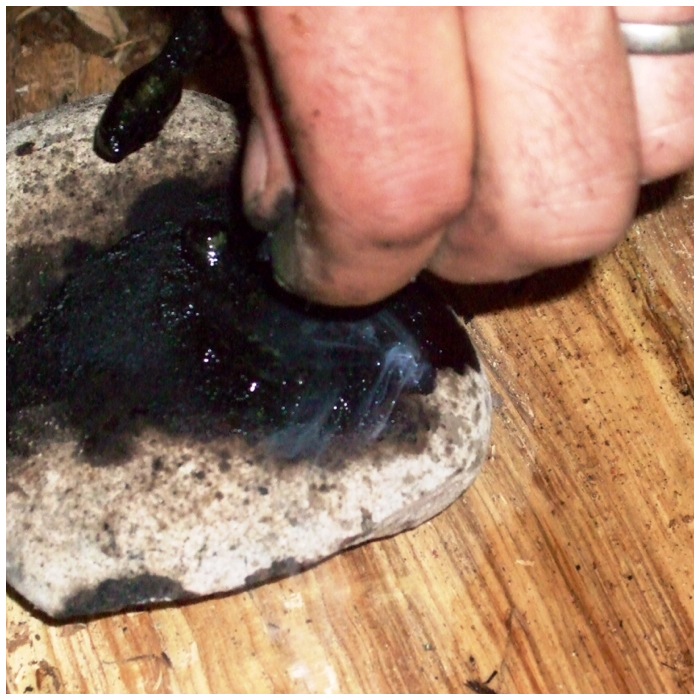
Once this was all set up I popped a piece of beeswax into the melted resin and allowed it to mix in (experiment for yourself with ratios).
Melting the beeswax
Then I sprinkled a good-sized pinch of charcoal dust into the mixture and carried on mixing it up.
Adding the charcoal dust
As the rock was quite small I could only make a little batch of pitch at a time so it did not take long to all melt and mix together.
Mix it all up
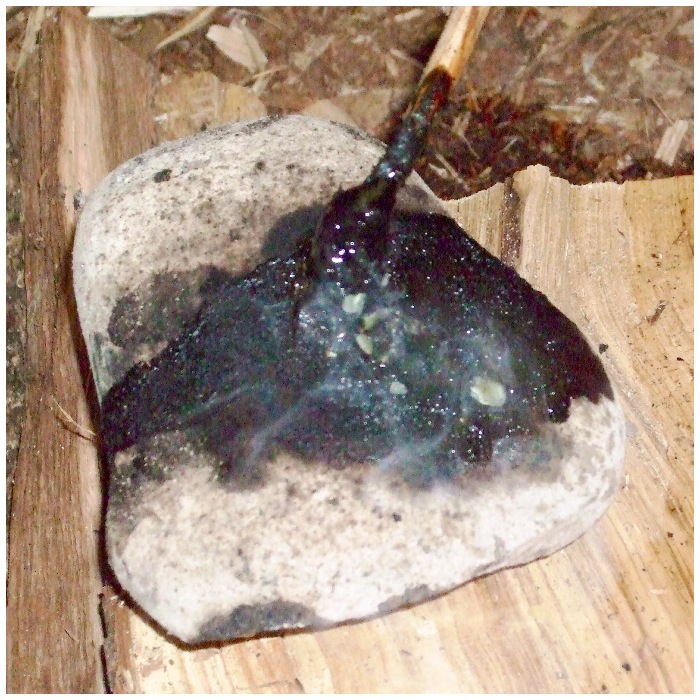
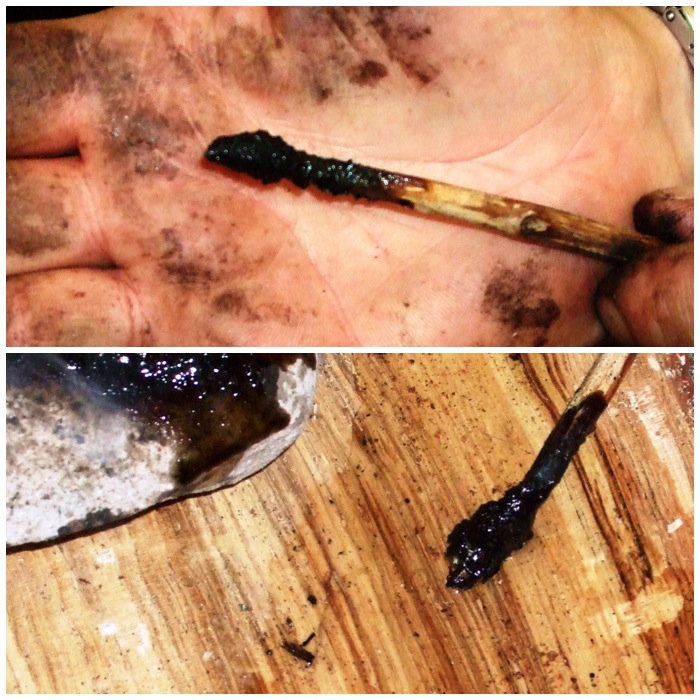
I used a sliver of wood to scrape the hot, sticky pitch onto a squared-off stick.
Scrape onto a twig
The pitch you create using this method is a bit lumpy but still perfectly useable. As soon as I had some pitch on the stick I dipped it into the water to cool it down rapidly. This cooling-down process allowed me to use wet fingers to mould the pitch and smooth it out.
I kept repeating this process until all the melted pitch was on the stick and then mixed up another batch.
Cool rapidly in water
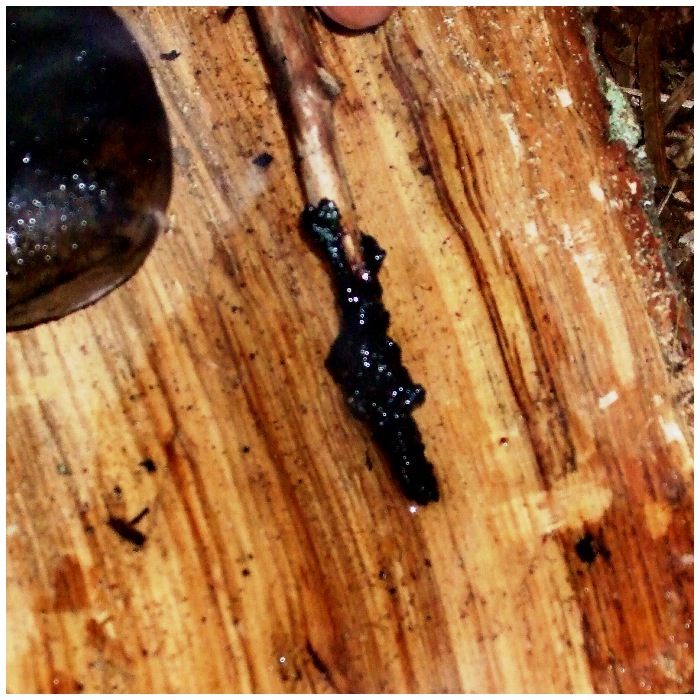
The rock was so hot that I was able to keep melting and mixing the ingredients several times to build up the pitch on the stick.
Mix more resin, beeswax and charcoal
I found that the curved piece of bark was very effective for storing water to cool the pitch.
Scrape onto the twig and cool again
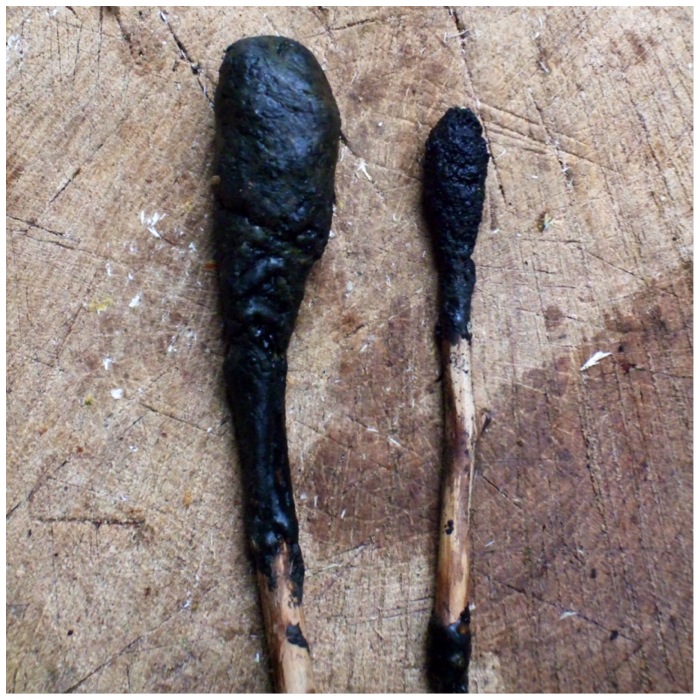
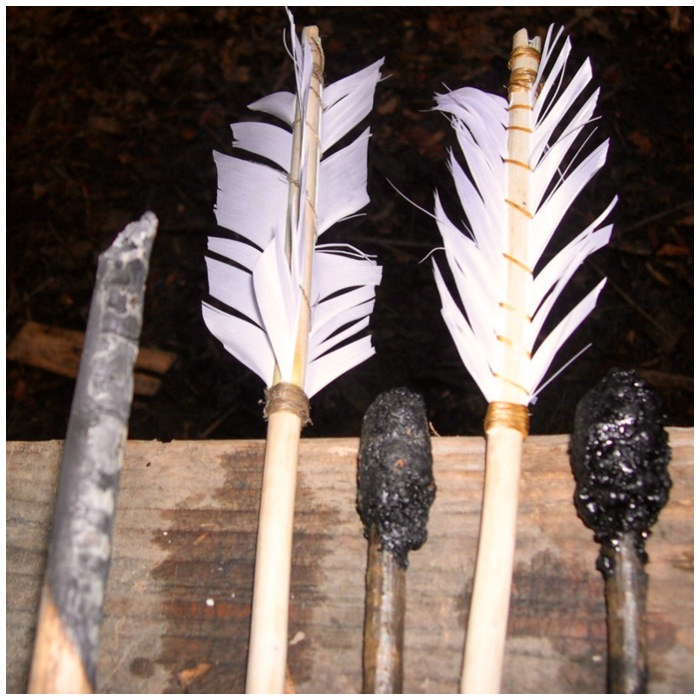
The pitch stick on the right was made using hot rocks and the one on the left using a tin can. The primitive hot rocks method takes longer and produces a coarser pitch but in my opinion was far more satisfying to make.
Keep repeating until you build your own pitch lollipop
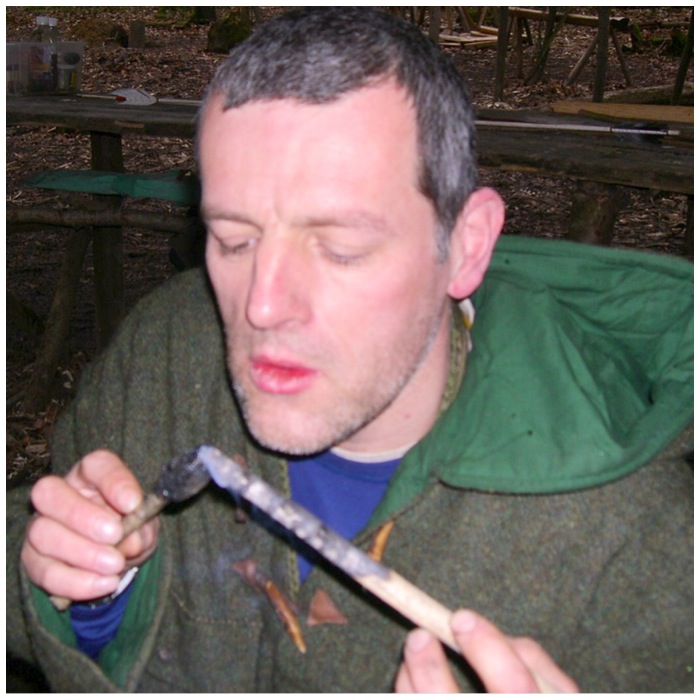
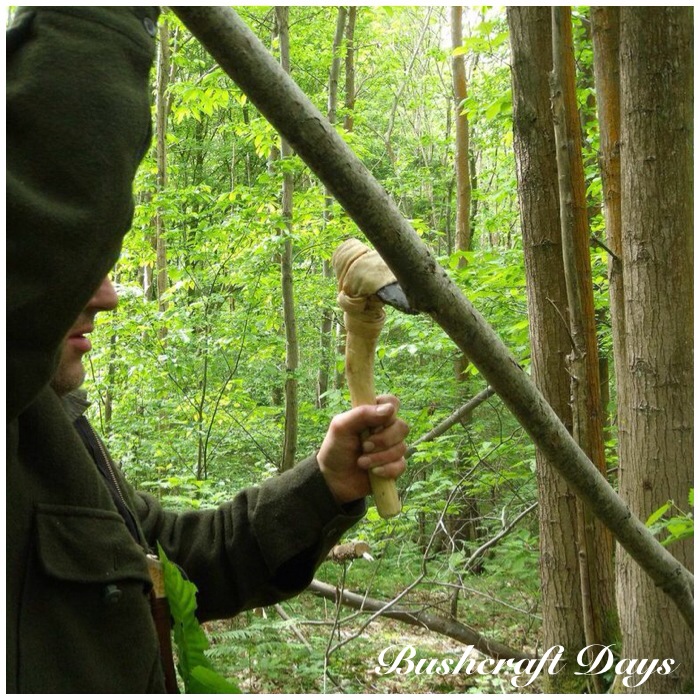
The pitch is great for waterproofing things like sinew on arrows. I prepared a ember stick to help melt the pitch so I could cover the sinew you can see in the picture below.
Ready to be used
To melt the pitch, simply blow on the ember stick while holding the pitch stick close to it.
Heat the resin with an ember stick to melt it
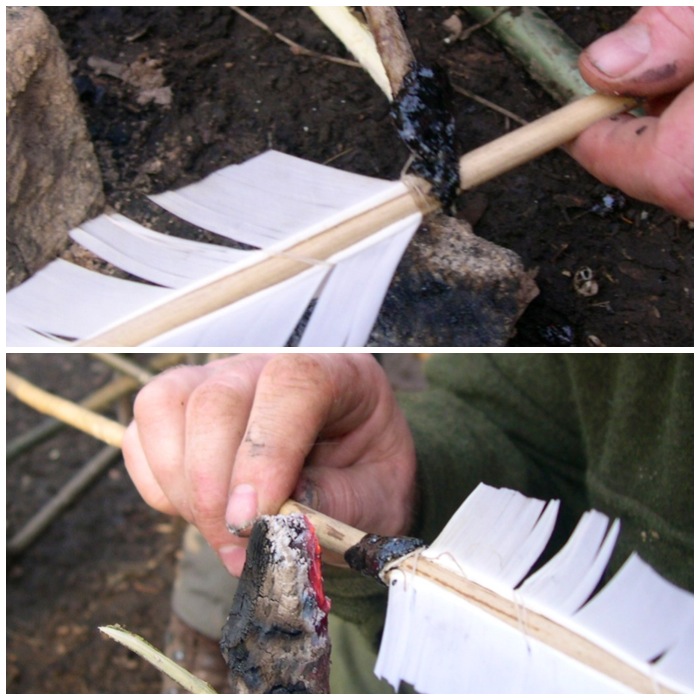
Drip the melted pitch onto what you want to cover and with wet fingers spread it around. Keep re-applying more pitch until you are happy everything that needs to be covered is covered. I sometimes re-heat the area I have covered with the ember stick to further smooth it out.
Drip it onto whatever you want to cover, fill or attach
With a little patience this primitive method can produce some very good pitch. I have seen some master primitive technology craftsmen makes some wonderful pieces with the use of pitch.
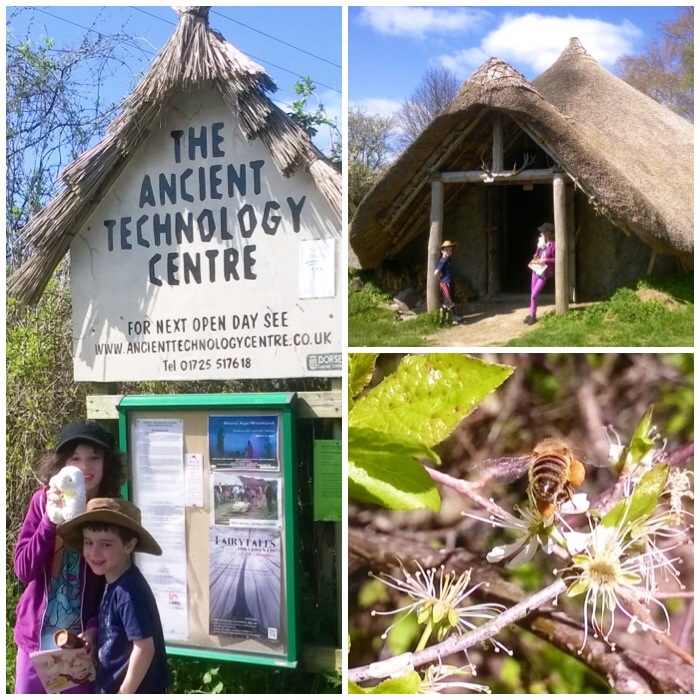
I was catching up on what was happening on Facebook last week and spotted that the Ancient Technology Centre (ATC) was holding a Stone Age Weekend the following week. Thankfully for me my calendar was free and as my kids love this sort of interactive show it was not hard to sell it to them. The centre is in Dorset, just over an hour’s drive from our house, and on this weekend the weather was perfect for my Scottish skin (warm but not too hot).
The Ancient Technology Centre
My main aims for the visit were to let my kids have lots of hands-on fun and pick up some ideas for myself for future projects. The ATC caters well for parents and kids and as it is a place where lots of experimental archaeology is undertaken it ticked all the boxes for me.
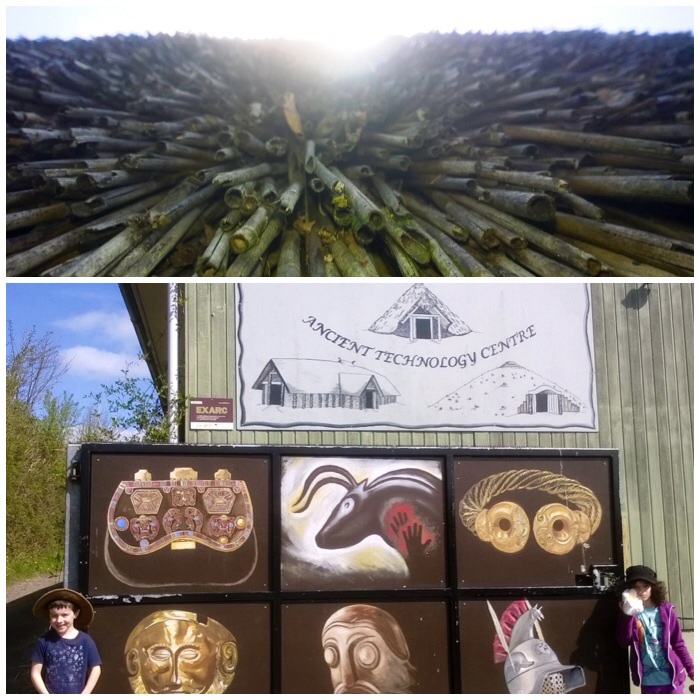
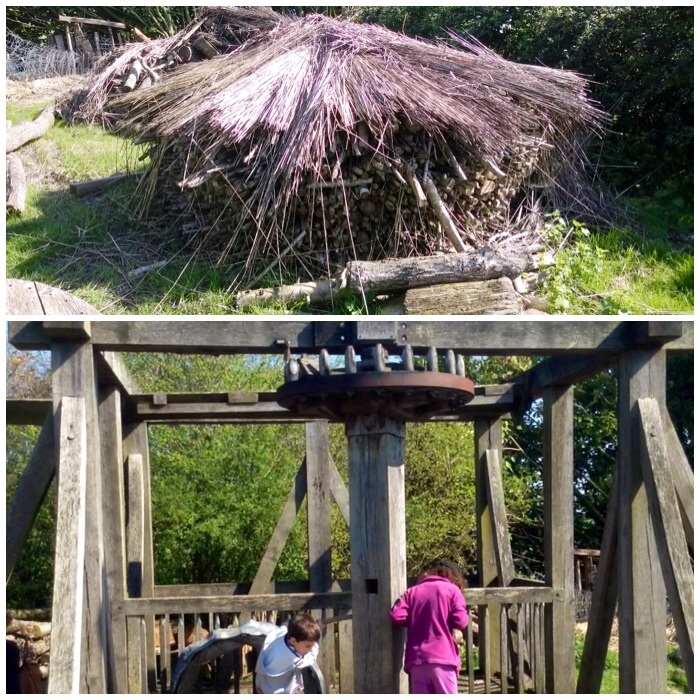
The top picture below is taken from the bottom of the roof of one of the roundhouses.
Great for kids (of all ages)
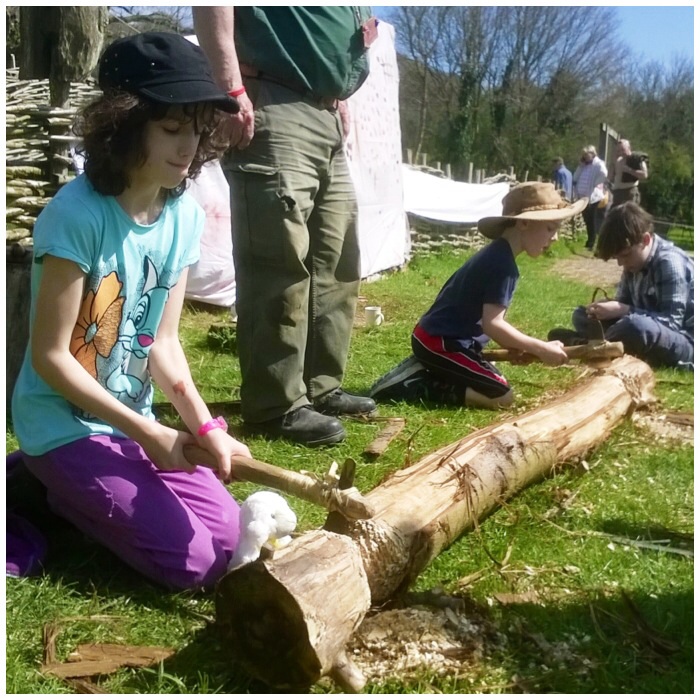
We took a walk around the whole site at first just to show Catherine and Finlay what they could do. In the end the kids had to drag me away from one of the roundhouses as I wanted to explore every item in it and how it was built.
After a five-minute wait Catherine and Finlay were using Bronze Age axes and happily chopping away. They did come back for a second go later and I managed to have a chop as well. This was the first time for me using a Bronze Age axe and it is different to using modern or flint axes. I liked the fact that the queues here were in single-figure minutes (currently writing this in a queue – 35 minutes at Legoland and counting) and everybody was really relaxed.
Bronze Age axes
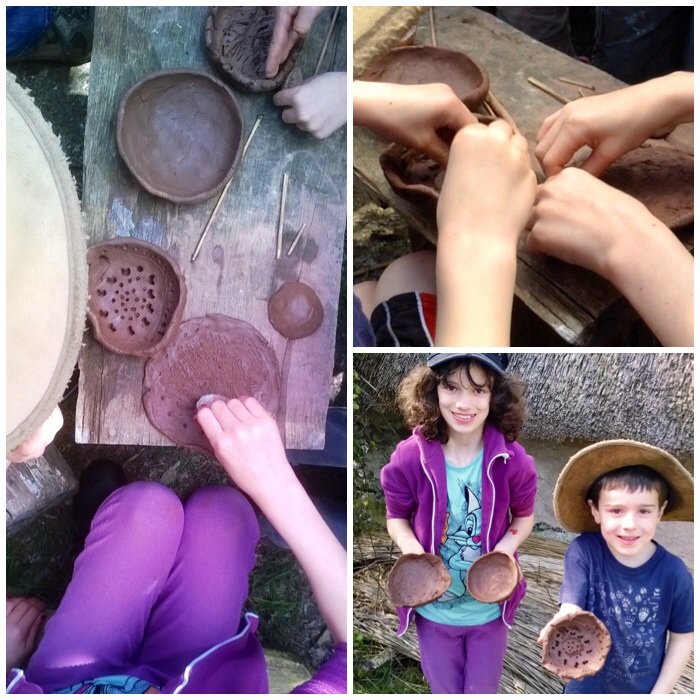
The centre also experiments with primitive pottery and had set up a work area where we could all make a pot and decorate it using old bones shells and feathers. We left our pots to dry in the sun before taking them home. We will have to let them dry for at least another two weeks before firing them over an open fire. I don’t know if we’ll do this final stage as they may crack.
Primitive pottery
While Catherine and Finlay were happily engrossed in cave painting techniques I managed to slip off and see what else was going on.
Cave painting
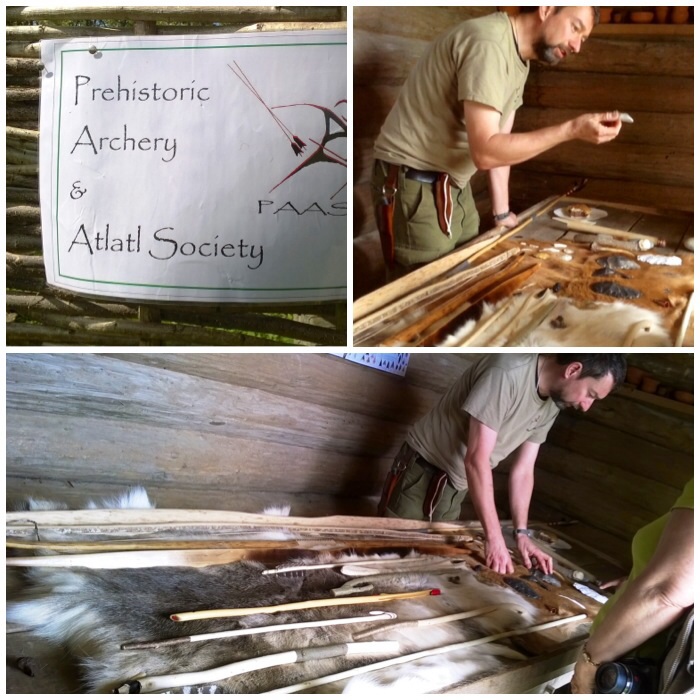
I popped over to see what was on display on the Prehistoric Archery and Atlatl Society (PAAS) stand. PAAS make some beautiful craft items based as close as possible to archaeological finds and are also keen experimental archaeologists. Last year PAAS visited us at the Bushcraft UK Bushmoot and gave some great classes on archery, atlatls and slings. They plan to be at the Bushmoot this year as well.
PAAS
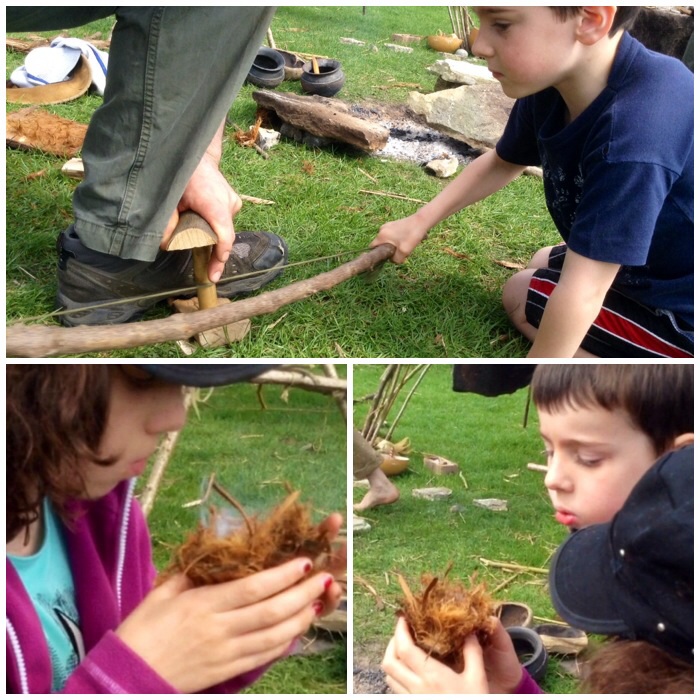
We watched a demonstration next of Bowdrill using just a primitive set. The couple doing the demonstration were from Outback2Basics and put on a great show. We missed the first class on making campfire bread and cooking salmon but managed to get some time bowdrilling.
Bowdrill with primitive kit
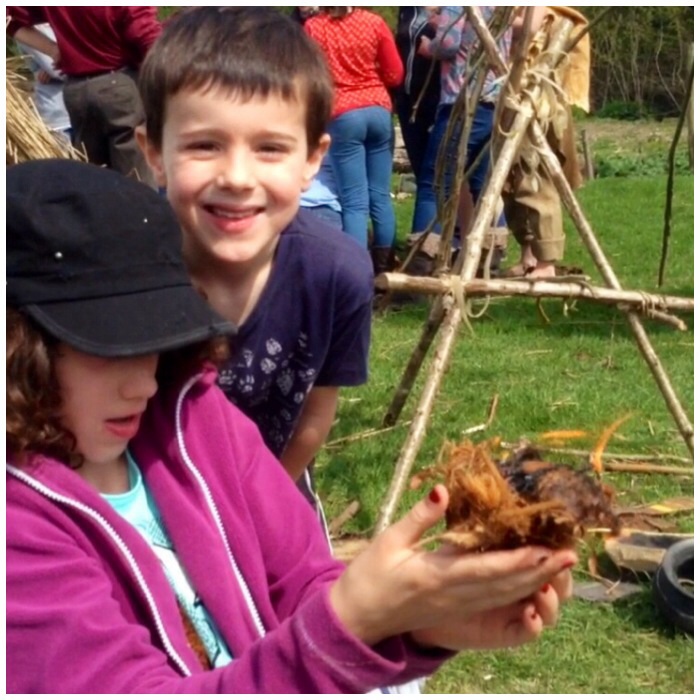
Finlay and myself took a twirl on the bow and then Catherine took over on blowing the ember into flame.
Family bowdrill
With a little help from Finlay we soon had a flame. The tinder was the inner bark from a Leylandi tree.
Flamage
The next class with them was making a fat candle using a rock as a holder. We chipped away on a soft rock with a hard rock to create a small scoop to hold the fat.
The wick we made out of some jute string by untwisting it and then loosely putting it all back together.
Fat candle – prepping the stone
The scoop took us about 20 minutes to chip out.
Fat candle – fat well and jute wick
I cannot remember what type of fat was used but once it was poured in the wick was added, leaving about a centimeter protruding from the fat so that it could be lit.
Fat candle – set up
The winds were quite light but would gust a little so we had to protect the flame.
Fat candle – alight
I managed to capture a lot of the day on this short video.
Afterwards we had a look at the wood carving section and Catherine learned all about how beds were constructed in the past.
Woodcarving
I picked up some ideas on making a circular stack for my kindling and the kids had fun on the Roman turntable.
Kindling wheel and Roman turntable
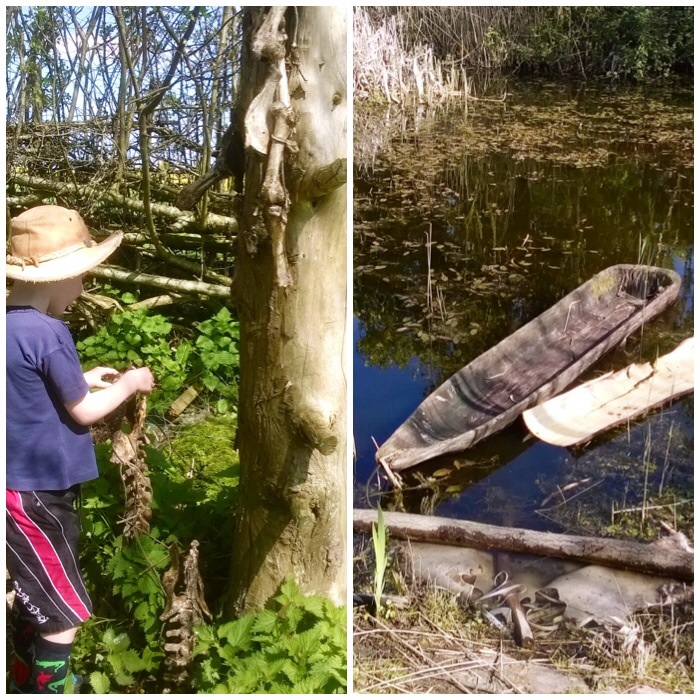
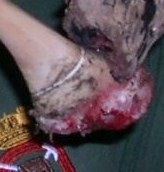
Two good finds of the day for me were the drying post for bones and the wooden dugout in the pond.
Bones and dugout canoes
I would thoroughly recommend you visit the ATC if you ever find yourself down near the New Forest as the work they undertake is quite amazing.
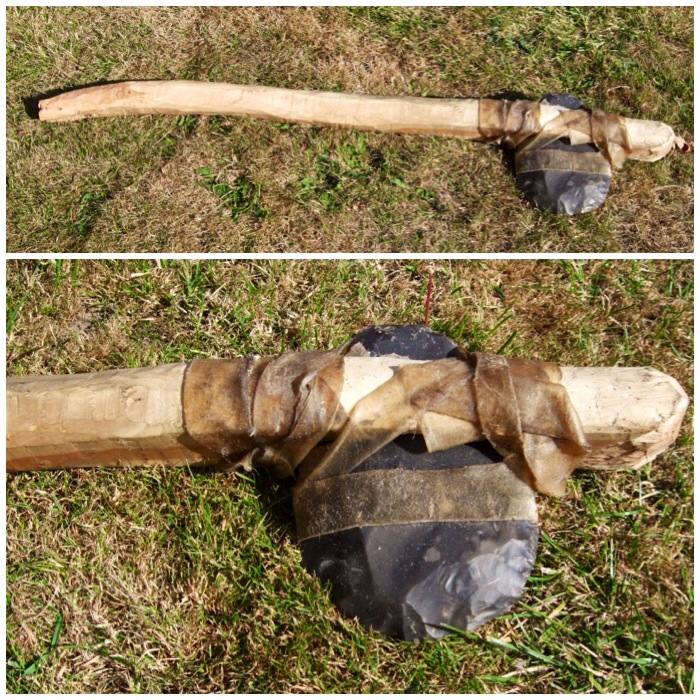
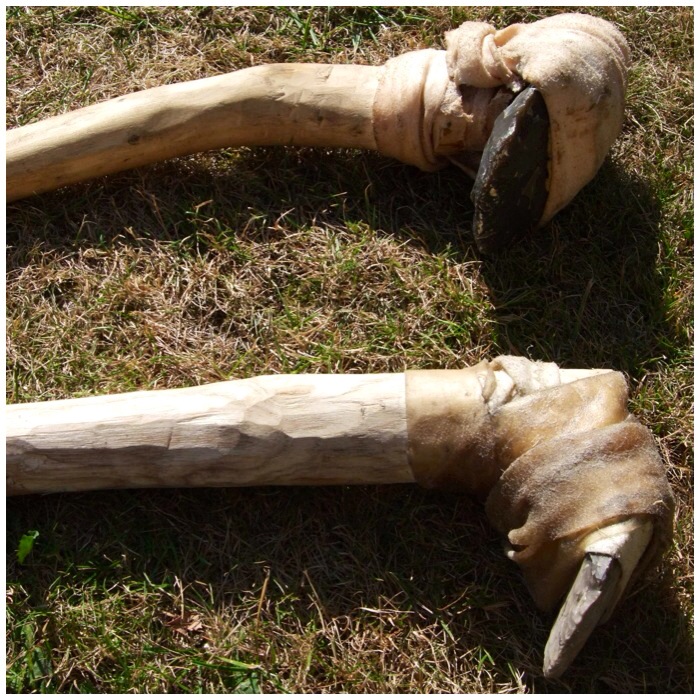
Sometimes a flint knife or adze is just not enough and you need something with a bit more clout. At times like these, what you need is a flint axe.
Here’s how I constructed the large flint axe you can see below, with a few pictures at the end about its little brother, the hatchet.
Two good tools
I made these tools on the Woodcraft School Primitive Technology course and had some excellent tuition from John Rhyder and John Lord.
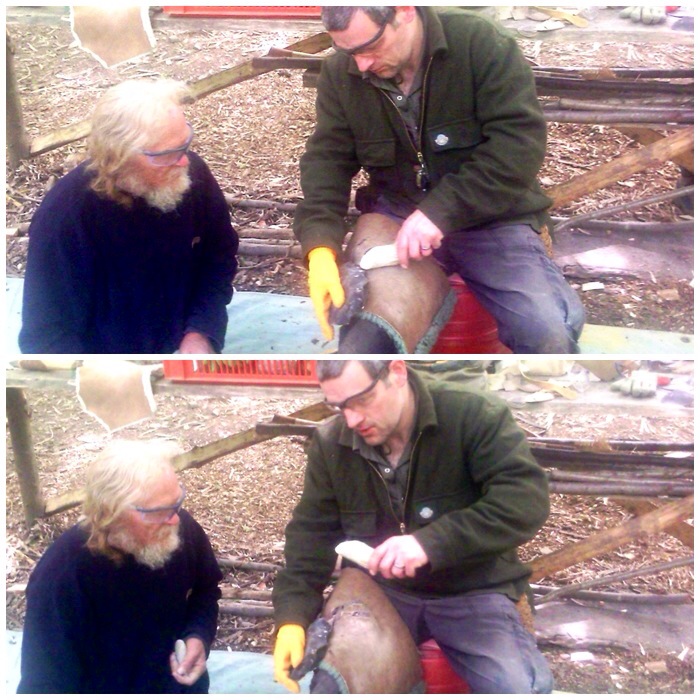
John Lord gave an excellent demonstration on knapping a flint axe head. It was a joy to watch this master take a lump of flint and transform it into a work of art.
When it came to the turn of us students to knap out our axe heads John gave everyone lots of one-to-one tuition. If it hadn’t been for this (and John knapping the tricky bits) I would have been lucky to have ended up with an arrow head, never mind a large axe head.
Some tuition from the master Mr Lord
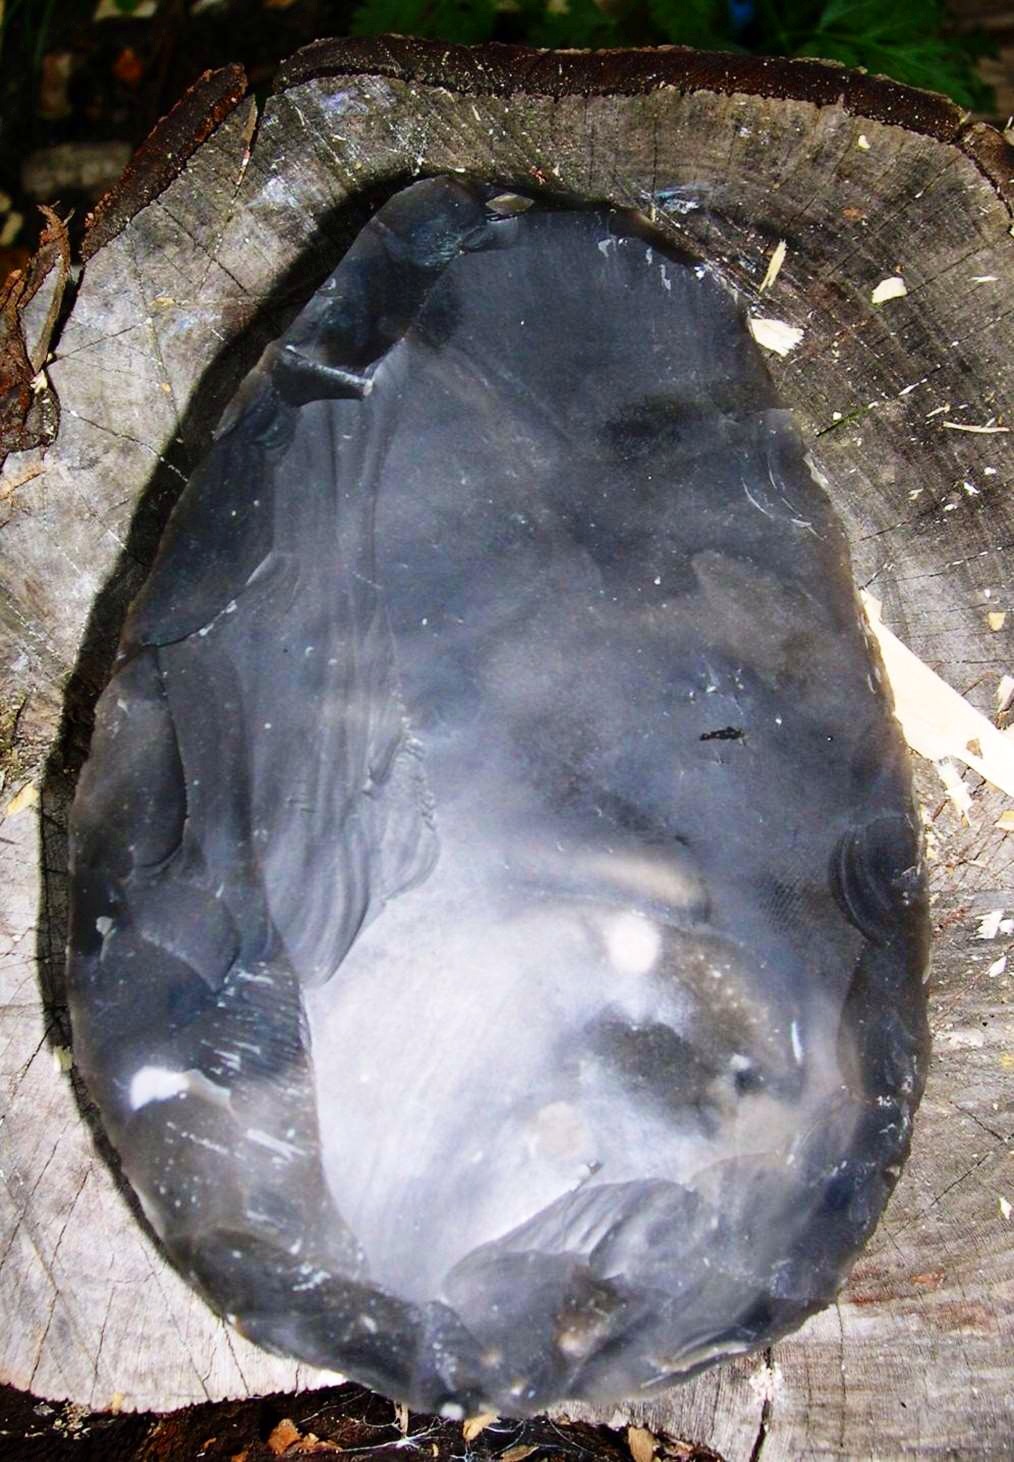
I like to think that this axe head has some of me in it but truth be told it’s more John Lord than me. I did however have a great time seeing this axe head appear out of the flint knowing at least part of it is me.
One knapped flint axe blade
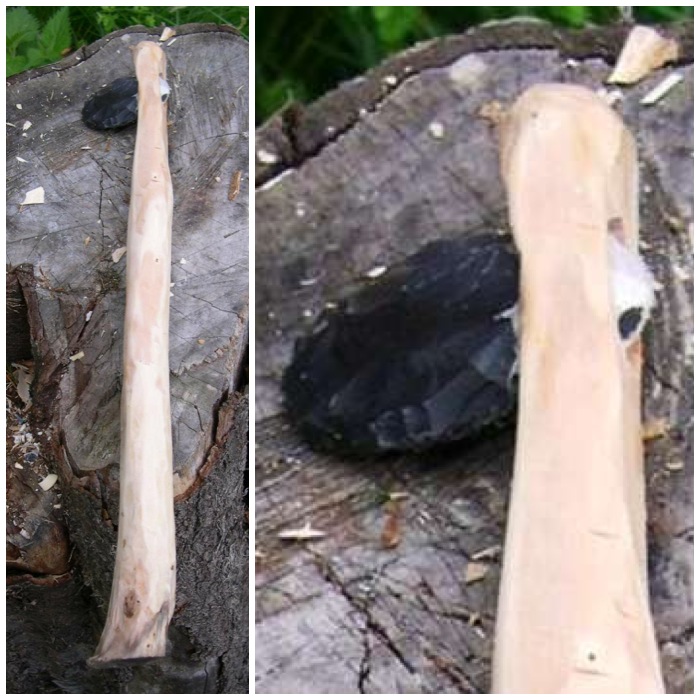
I used a well-seasoned piece of yew for the handle as that was what I had available at the time.
Initially I used my flint adze to try and shape the yew, but although the bark came off easily enough it didn’t make much of an impression on the hard wood beneath.
You can see the tool marks left on the wood by the adze in the right-hand picture below. As a Time Team enthusiast I have watched the archaeologists discuss such marks on many ancient pieces of worked wood they have found so it was good to see it in action for myself.
Stripping the handle
At first I used short chopping motions to tear away at the bark and wood with the adze. Ever experimenting, I tried a few strikes with a bit more force and eventually took a chip out of the adze blade. I was able to re-sharpen the edge of the adze by pressure flaking it but decided that the yew was just too tough for the adze (notwithstanding my lack of patience and skill).
Too tough for the flint adze
I reverted to my modern axe which took the excess wood off easily. In the picture on the right below you can see the very different tool marks left by the iron axe in comparison to the flint adze marks.
Time for an iron axe
This piece of yew had a slight curve to it which I thought would give added strength to the handle. I left the handle fairly rough, just ensuring I would have a comfortable grip and not get any splinters.
One rough handle
I initially started using a discoid all-flint knife to cut out the socket for the axe head but I did not take any pictures of this part. I did not do this for long as the yew was just too hard and the flint blade kept slipping. A few of the other students did just use flint for this stage but since the woods they were using were slightly softer they had more success. I ended up using my little palm gauge for the job and it worked very well.
I did try and burn out the wood with embers but soon got put off this with the fumes (yew wood being highly toxic).
Carving and burning
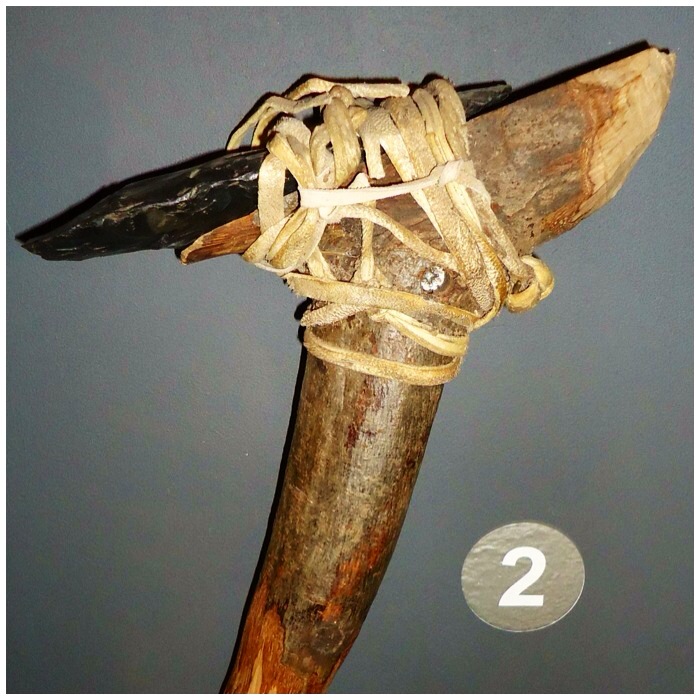
The socket finished – front and back.
The finished socket
A good fit but too loose for use.
Test fit
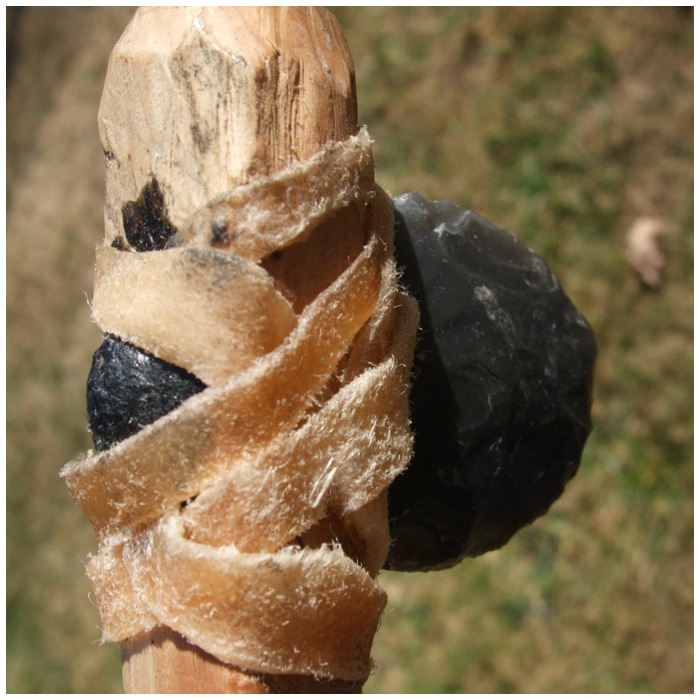
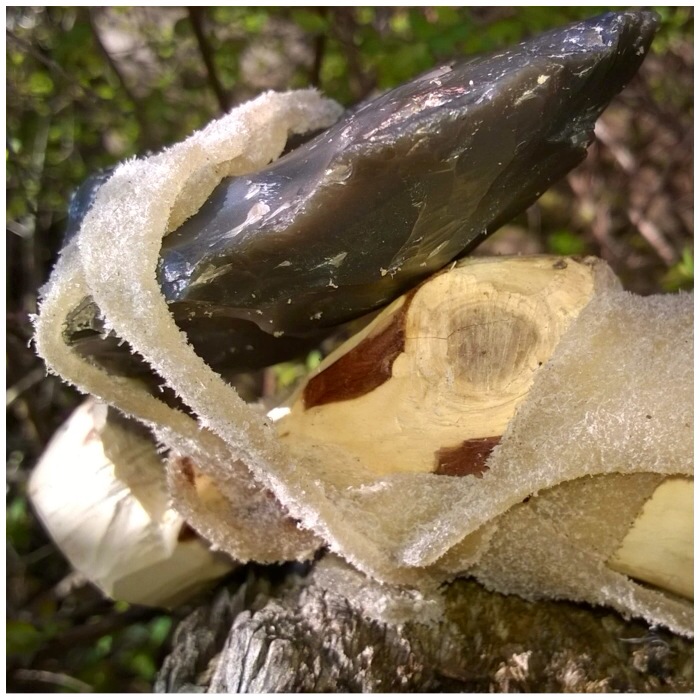
I wrapped the flint axe head in a piece of rawhide to see if that would secure the axe head in the socket (apologies for the poor quality of the pictures), but with one piece wrapped around it the axe head would not fit into the socket.
Prepping rawhide
Instead I cut up some strips of rawhide and held it all in place with some string. As the rawhide dried out it really gripped the axe head and the wood of the socket.
Securing with rawhide
After that it was a case of wrapping a load more rawhide around the axe head and leaving it to dry for a couple of days.
Drying and adding more rawhide
After the rawhide had dried out it became almost translucent but it was a very strong hold.
Side profiles
Top and bottom profiles of the axe head.
Top and bottom profiles
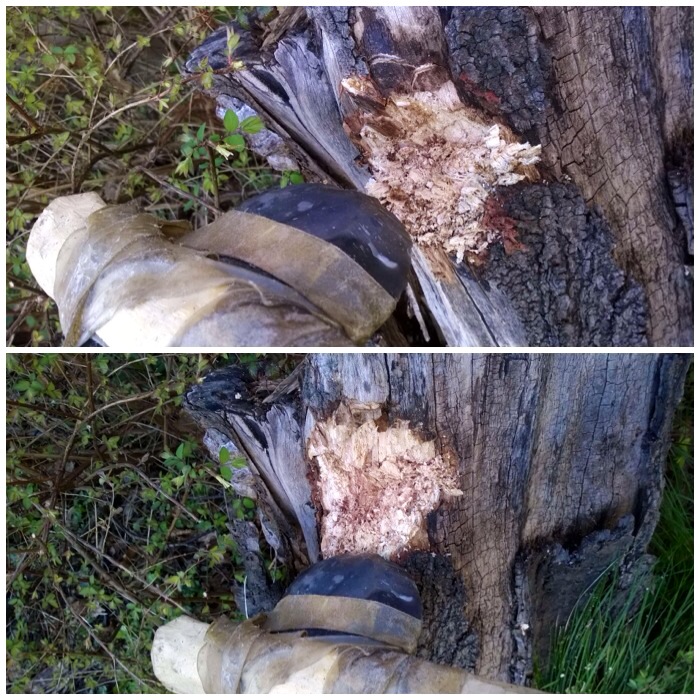
I tested the axe out on an old stump in my garden. Like the adze, the axe tears into the wood as opposed to slicing into it as a modern iron axe would do. It was still very effective in its own way.
Leaves the wood torn
The blade edge is not particularly sharp and has a good shoulder area behind it. This shoulder area really supports the edge so that it does not break off when the axe is used.
Up close
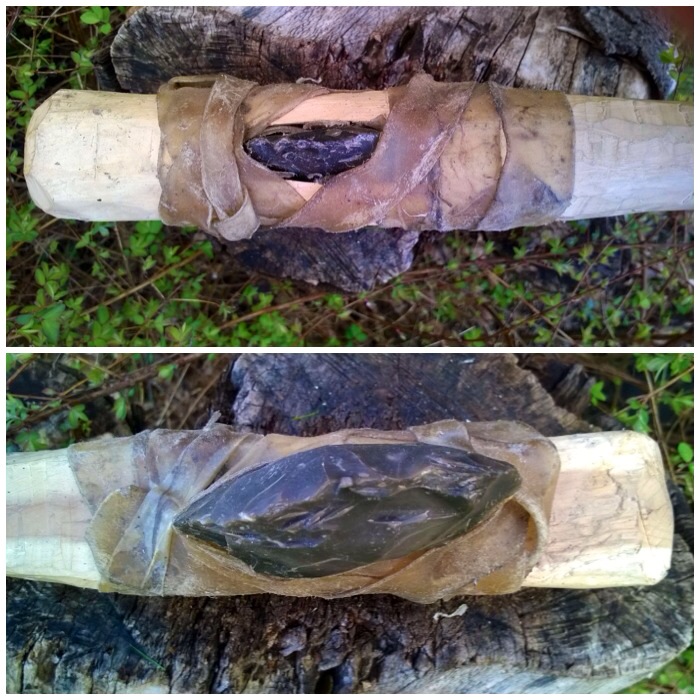
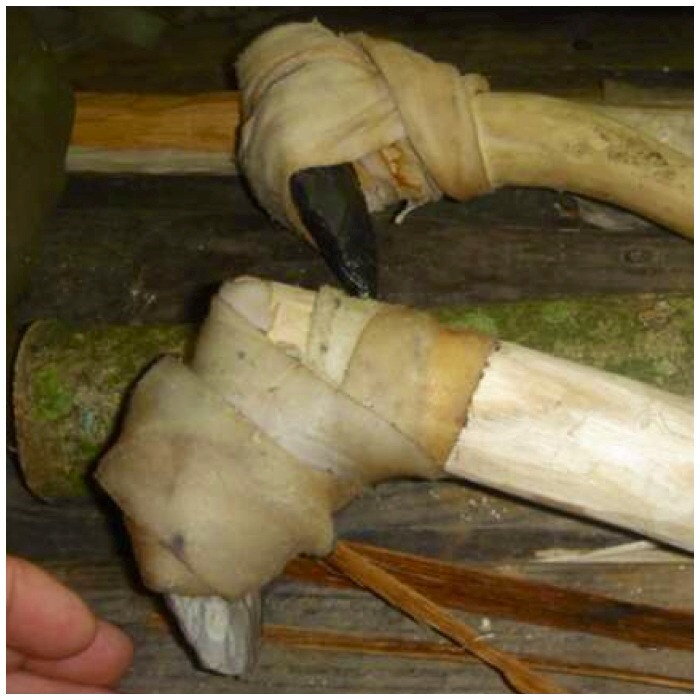
I had a small flint axe blade I had made at the same time as the larger one, so I just scaled everything down to make a hatchet.
Hatchet blade jammed in with rawhide
As well as using rawhide I filled the socket with some spruce pitch to fill up any gaps and to help secure the head more.
Gaps filled with resin
I have never used this tool on anything – it would have been used mostly to dispatch small game that had been caught in traps. I do like it a lot though, in some ways more than the larger axe.
Rawhide wrap
This hatchet sits nicely on my primitive belt order.
When I want a bowl fast a modern adze is what I use, but if I have the time and I want to create something in a more leisurely fashion then I love to use a flint adze
Any self-respecting Stone Age woodworker would always have had a decent flint adze to hand. So to become that self=respecting Stone Age woodworker I had to go out and make myself one as they do not turn up in the shops that often.
I needed one to undertake my final project on my Woodcraft School Primitive Technology course: to create a bone bodkin and a bark sheath. The aim was to make them without the use of modern tools and I would need an adze to help me craft the sheath.
The adze I created for this has been extremely useful since then on other projects such as hollowing out this long bowl.
Chunking out a bowl
I ended up making two adzes out of flint, rawhide and curved branches.
Two well used adze’s
I took my inspiration from the Cheddar Gorge Museum where I came across this very basic but beautiful flint adze.
Cheddar Gorge Museum replica
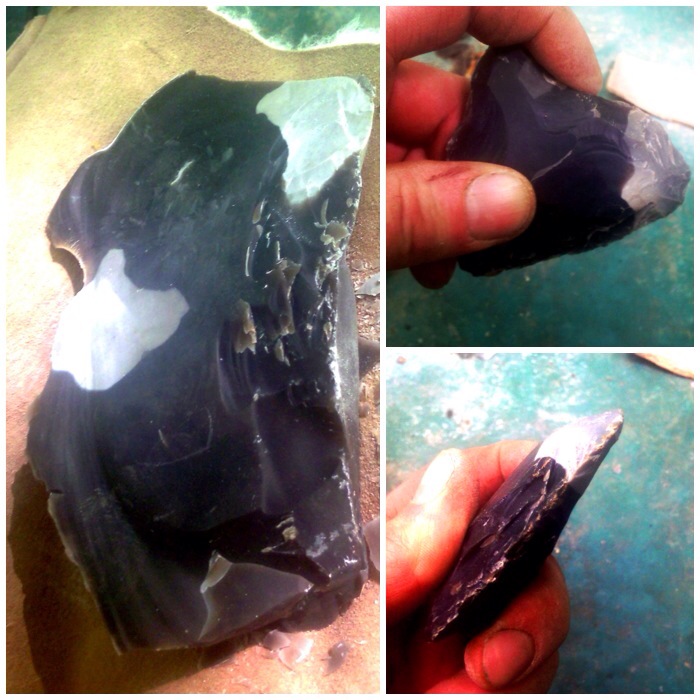
I had kept some flint from the course I had done with John Lordand I got a couple of good strong blades from this chunk of flint. The flint axe blade shouldn’t be overly sharp as that will make it fragile. It needs to have a well-defined edge that has good strong shoulders.
Knapped adze blade
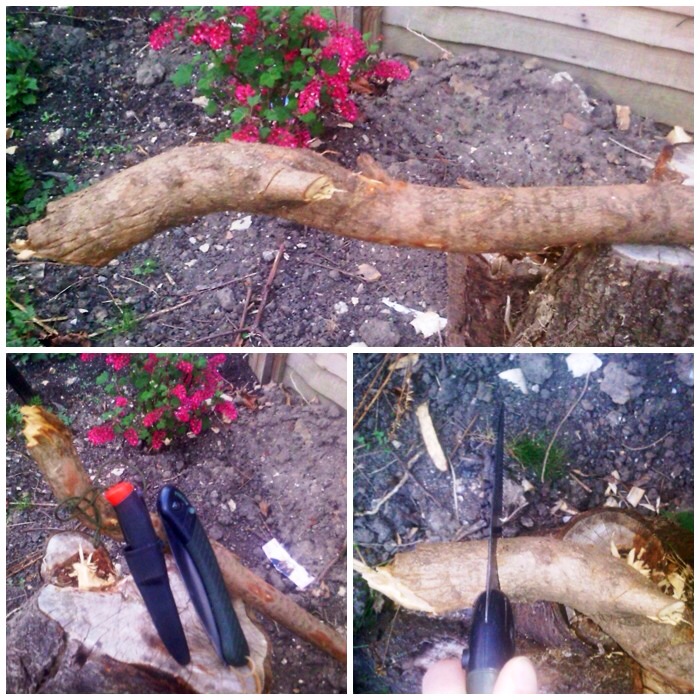
This piece of yew was cut down in my garden and then sawn to its basic shape with a modern saw.
The handle-to-be
I used the curve to give the flint blade a flat surface to sit on and carved out the notch to give the rawhide some additional surface area to hold on to. I did not cut so deep so as to weaken the handle as this tool was destined for some hard use.
Carving the shape
After shaping I stripped the bark off and roughly smoothed it with sandpaper. I did not smooth the handle down too much, as I wanted to retain some natural grip.
The platform for the blade
Traditionally rawhide was used to bind the flint to the handle alongside sinew, buckskin or other natural cordage. I like to use rawhide as it was commonly used and is easily obtained these days from dog chews (I buy the biggest I can find).
I boiled the dog chew in water for about twenty five minutes in order to soften it enough to be able to cut it into strips.
Rawhide from a dog chew
After laying the rawhide out flat I just used a sharp piece of flint to cut it into strips I could use to bind the adze together.
Cutting out strips
I wrapped thin pieces around the blade and the handle initially. Don’t pull too tight as this will snap the rawhide. Just tighten slightly, and tie off the ends when you are finished. I left this one to harden in a warm area for a couple of days. As rawhide dries out it shrinks and goes very hard (almost rock hard).
Initial rawhide wrap
For the next layer of rawhide I used wider strips, which allowed me to really pull them tight without worrying too much about it splitting. They were quite difficult to tie off but I settled for simple overhand knots to finish.
I left these adzes to dry out and tighten for a month until they were needed on the final part of the course.
Drying out
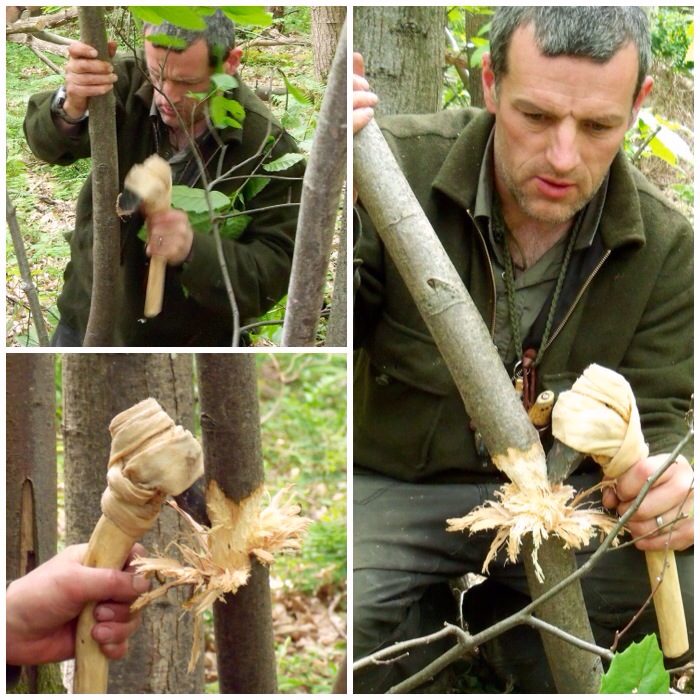
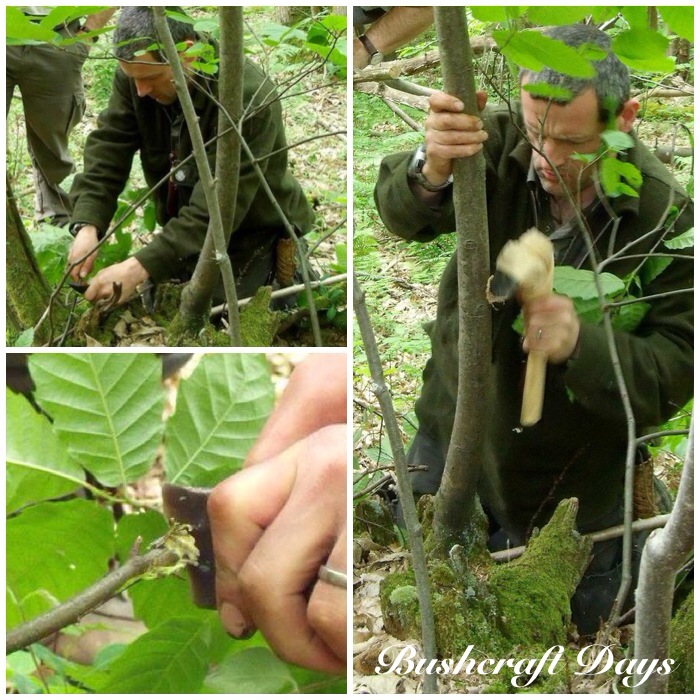
The first job I had to do with the adze was to take down a small sweet chestnut limb. I needed this to make bark strips for weaving a sheath out of the bark and the wood for carving spoons. I took the limb down using a rosette cut, chipping away at the wood all the way around the limb until it fell over. I did not use any large swings or try and gouge the wood out with it, just a steady chipping rhythm, and eventually worked my way through the limb.
First job – taking down a sweet chestnut limb
It took me about 20 minutes to fell the tree. (I used a modern saw to trim the stump, leaving a clean cut to help stop infection setting in and to help the stump re-grow a new limb.)
The Rosette cut
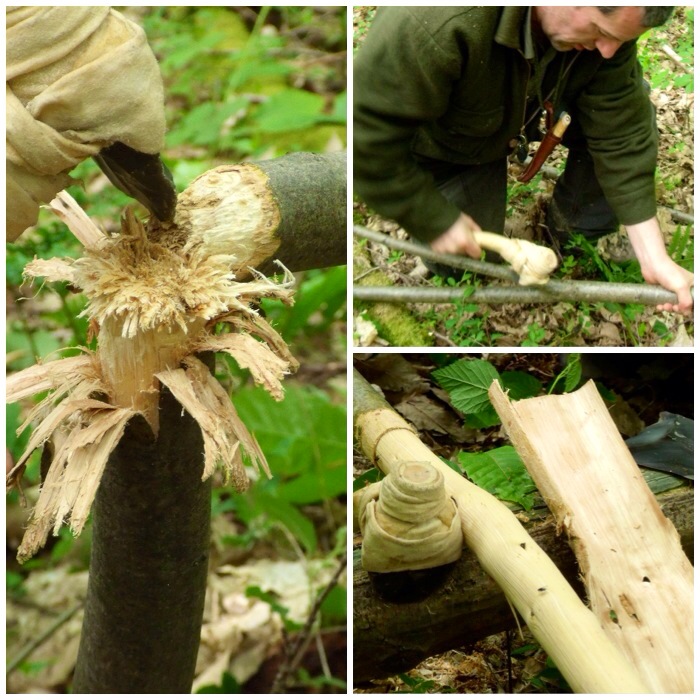
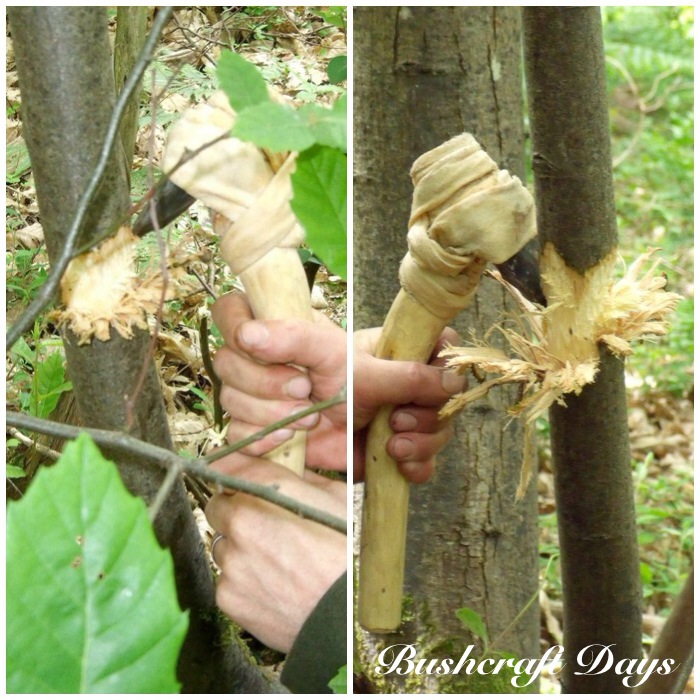
The next project I put the adze to was the shaping of a yew handle for a large flint axe. The yew piece I was using was well seasoned and proved too much for the flint adze. After about half an hour of chipping away at the bark and outer layer of wood I chipped the blade of the adze quite badly.
It was quite easy to re-profile the edge with a bit of pressure flaking but I resorted to using a modern axe for carving the flint axe handle.
Too tough for this adze
When working with green wood woods like this goat willow the adze worked very well. I used the adze here to create a wedge for my Split Stick Atlatl.
Chipping out a wedge for an atlatl
My friends have all been keen to try these adzes out. The silver birch that Angela is splitting was fairly well seasoned but still quite easy to cut with the adze.
Cutting into more seasoned wood as a test
When Angela had the branch weakened enough it was just a case of tap tap and…………………………………..
Final tap
…………we had two more logs for the fire.
Quite a beautiful finish
The adze really did come into its own when my friend Stephen Herries found this burnt-out log lying in a ditch. The adze was perfect for chipping out all that charcoal so that in the end I had a rather lovely long bowl to add to my collection.
Great for bowl work
In comparison to a modern steel/iron adze you have to invest more time in whatever you are creating when using a flint adze. Unlike a modern adze, which will slice wood off cleanly, a flint adze rips the wood off and leaves totally different tool marks.
When I want a bowl fast a modern adze is what I use, but if I have the time and I want to create something in a more leisurely fashion then I love to use a flint adze. It kind of takes me back in time I suppose.
As part of a primitive technology course I was taking with Woodcraft School back in 2009 I had to make various craft pieces. The aim of the course was to slowly take away our modern tools so that by the end of the course we would only be using primitive tools to make our craft items.
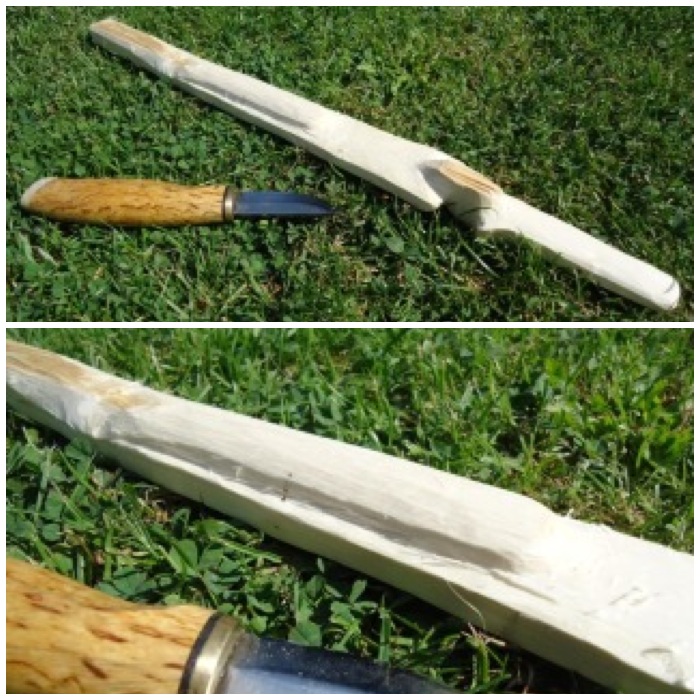
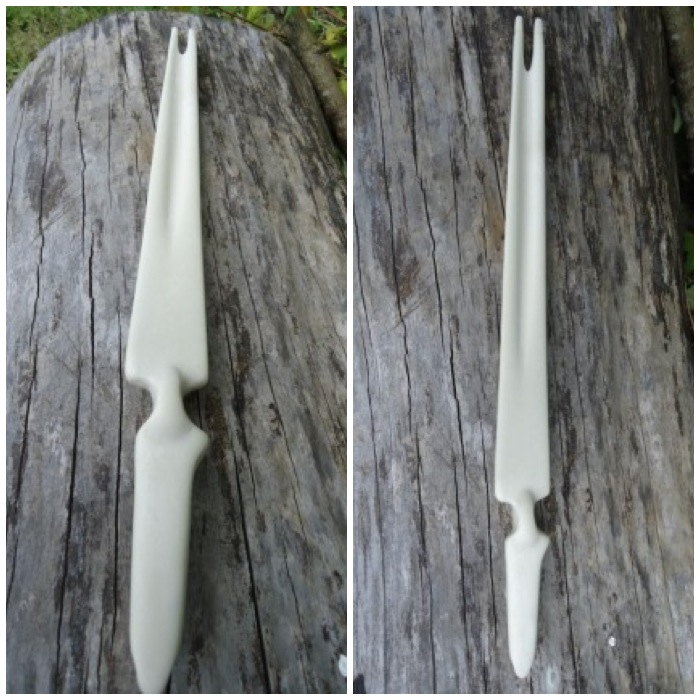
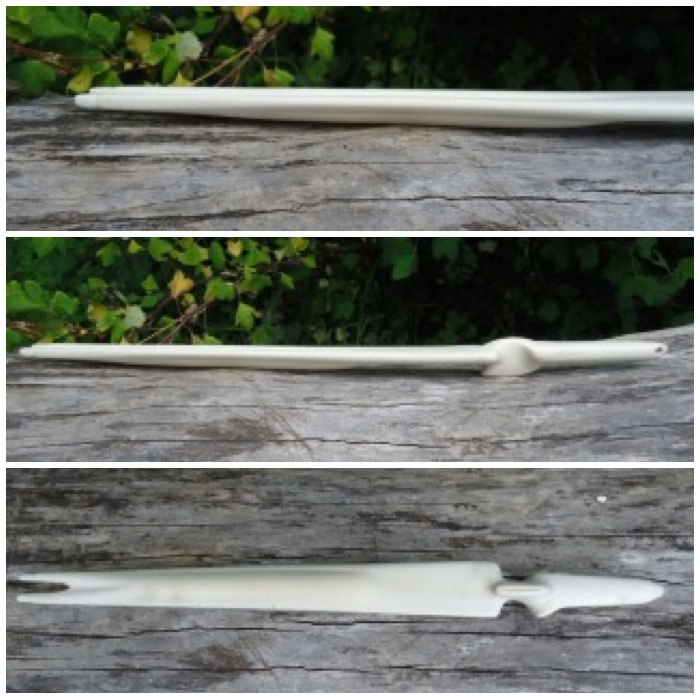
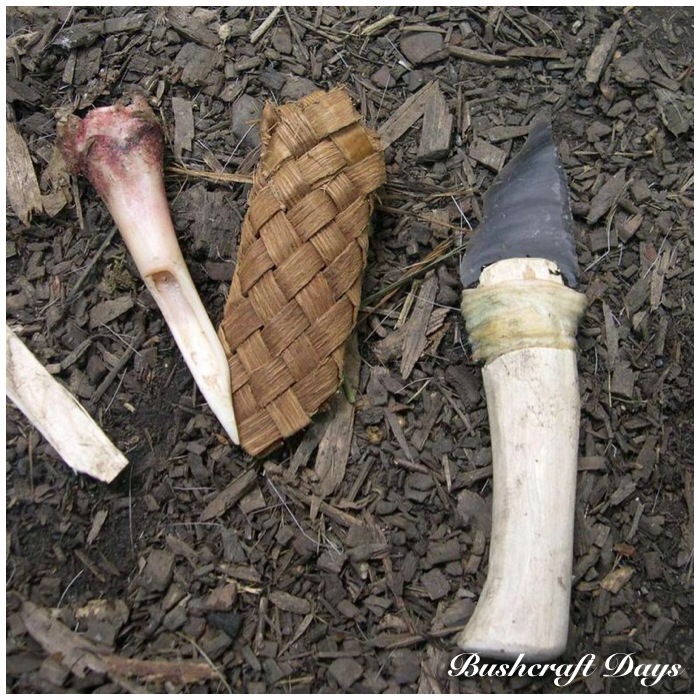
I was using hand-held flint tools such as discoidal knives in the beginning but about halfway through the course I decided something a bit better was required. This How To…. is designed to show you the simple steps I took to make my flint knife and show you some of the uses I have put it to since.
A simple flint knife
During the course (spread out over 5 months) I came across the knife you can see below left in the Museum of Prehistory at Cheddar Gorge. Not only was the knife beautifully constructed it also looked strong and practical. I knew I was to be taught on the next part of the course by top flint knapper John Lord so was keen to keep my eye out for a suitable piece while I was knapping flint with him. The knife I made on the course is on the right, not as strong or anywhere near as beautiful but for my needs very practical.
My inspiration
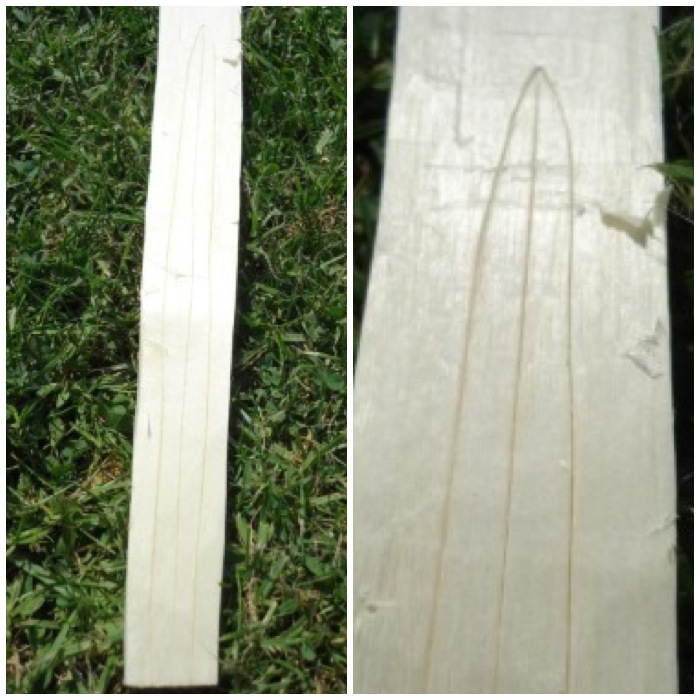
It was while I was knapping my flint axe head that I saw this piece pop off. The piece had a strong back, a sharp edge with good curves and a perfect point. I re-touched the back to smooth it down a bit and pressure flaked a groove where the sinew wrap to the handle would be.
The blank blade
I’m afraid I didn’t take many pictures of the handle preparation as it wasn’t going into my portfolio: I used a modern saw and knife for this part to save time. (As I said at the beginning of the post the course was designed to introduce me to primitive crafts by gradually reducing my reliance on modern tools.)
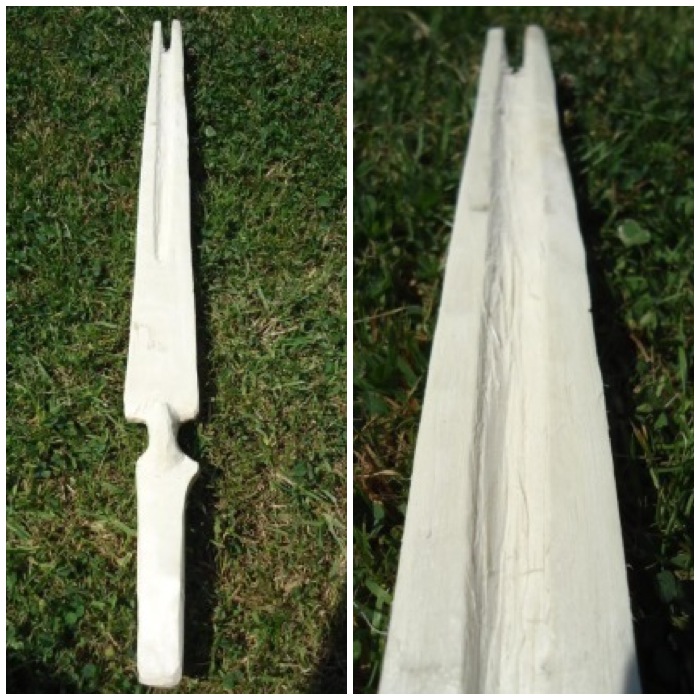
I selected a piece of dead standing wood that was well seasoned and had a slight curve in it, to make for a more comfortable grip and also to reduce the amount of carving necessary. I then used my saw to cut two stop cuts in a ‘V’ shape into the end of the wood. Since finishing the course I now know that a piece of serrated flint would have done this job just as well, if a bit slower.
The handle-to-be: starting the slot
Once I had the stop cuts in place I used the tip of my steel knife to cut out the centre of the ‘V’ for the tang part of the flint blade to fit into. Then using my steel knife I carved the wood down into the final handle shape.
Stop cuts in place
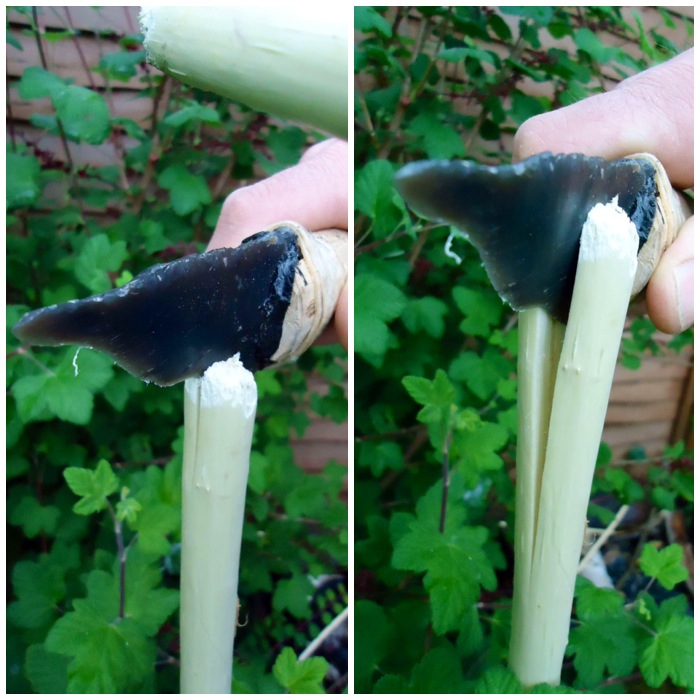
I filled the ‘V’ notch with some spruce pitch (see my article on arrow making for making spruce pitch) and slid the tang of the flint blade into the notch. I then bound the hilt of the handle with sinew to secure it and covered the sinew with more pitch to protect it. Within 24 hours this knife was ready to use.
Rawhide and pitch wrap
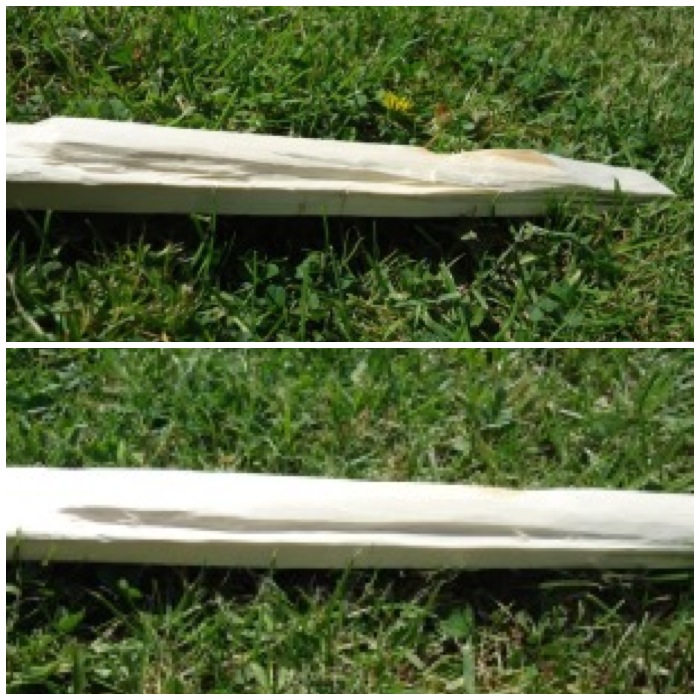
Not the best pictures I am afraid but as you can see this knife was the perfect size and shape to use on many of the jobs I would normally use a steel knife for.
A perfect size and very sharp
The purpose for which I created the knife was tanning some deer skin on the course. When splitting the hide of the deer the knife was comfortable to use and the top curve near the tip cut through the hide like a knife through butter.
First job – cutting a deer hide
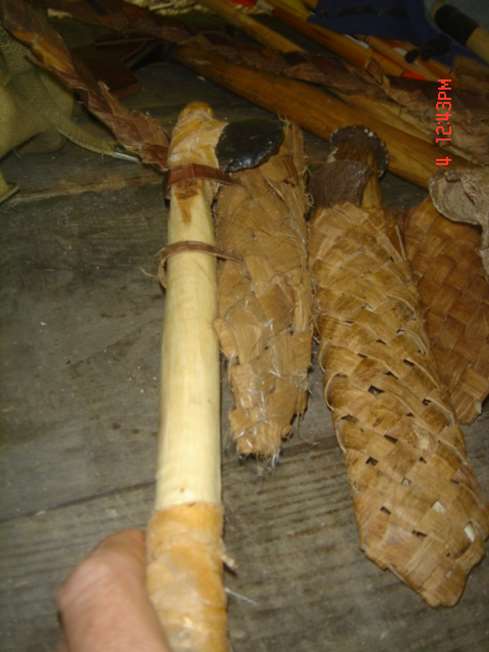
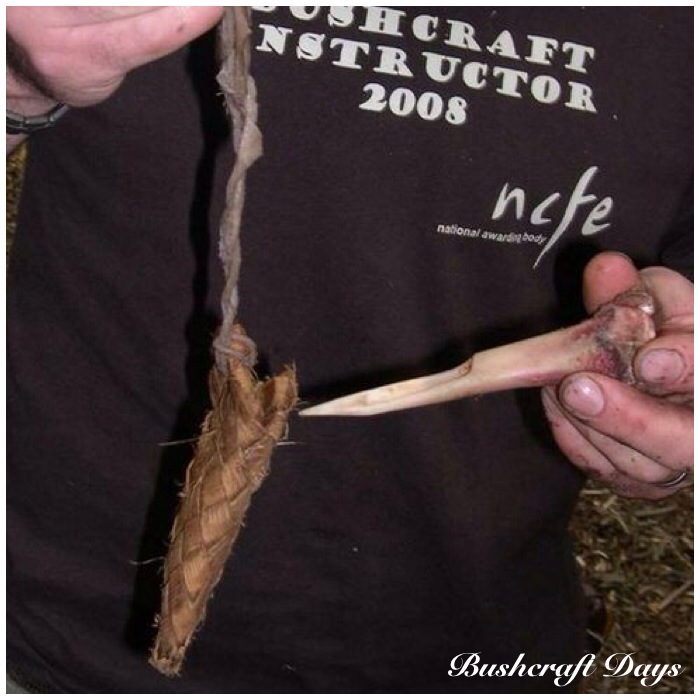
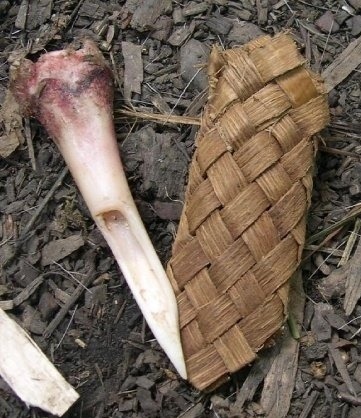
My final craft item was to make a bark sheath for the small bone bodkin you can see on the right. The knife allowed me to easily cut out many strips of bark in a very controlled manner so that the strips were all of the same width. I added a wrap of rawhide at this stage to protect the pitch and sinew from general wear and tear.
Creating bark strips and a new rawhide wrap
When I was finishing the sheath I found the knife edge was brilliant for trimming off all the excess bark.
Perfect for trimming
Finally, to hang the sheath on my bark belt I cut up lots of buckskin with the knife to make some rough cordage.
Good for cutting up buckskin
Since the course I have used the knife on a few other projects. So long as I am respectful of the fragility of the flint edge, the knife has produced some wonderful results. It’s great for scoring lines in bark, shaving pieces of green wood down to points and for making rosette cuts in small branches to snap them.
Scraping, point work and splitting
When I was making my Split Stick Atlatl and had to batton open a piece of green wood I found that the thick back of the blade was able to withstand a lot of force from my wooden hammer, which was a pleasant surprise, although I was very nervous throughout the process.
Robust enough for battoning
Eventually I made the knife its own bark sheath and it now sits proudly as a well-used tool on my primitive belt order.
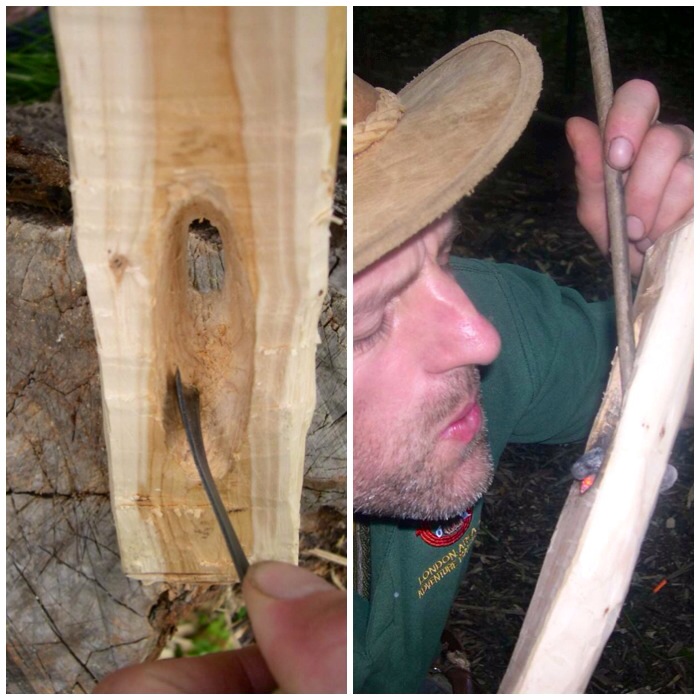
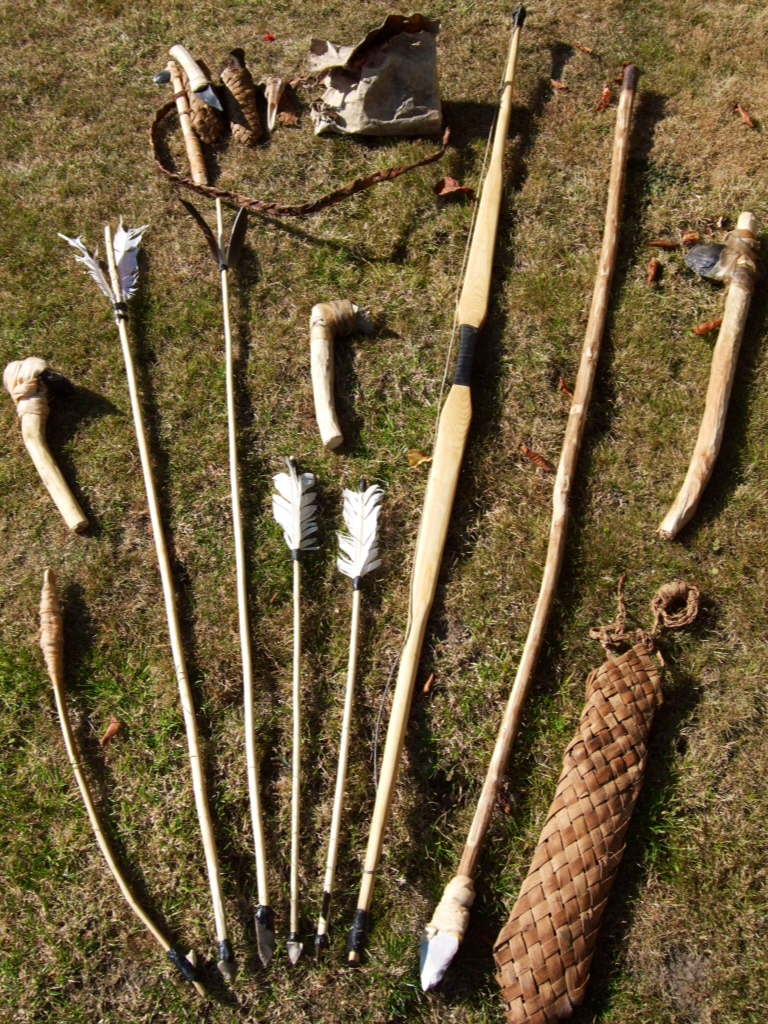
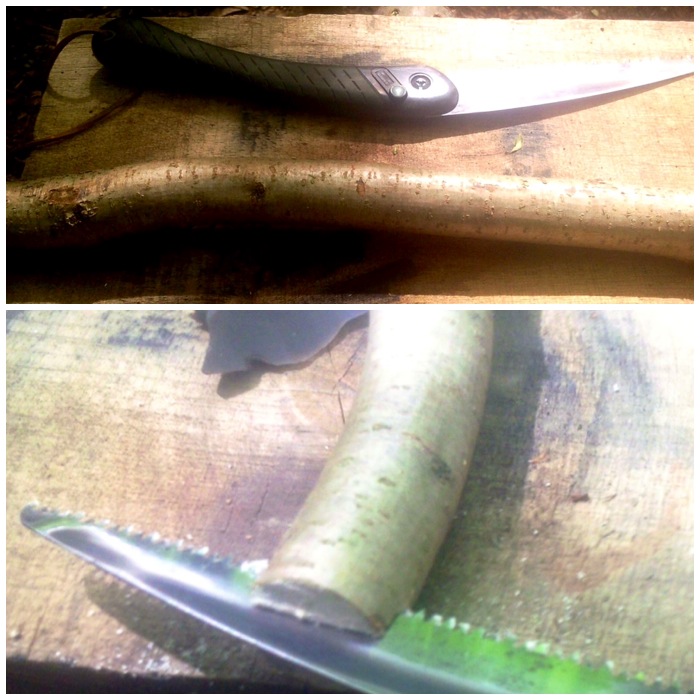
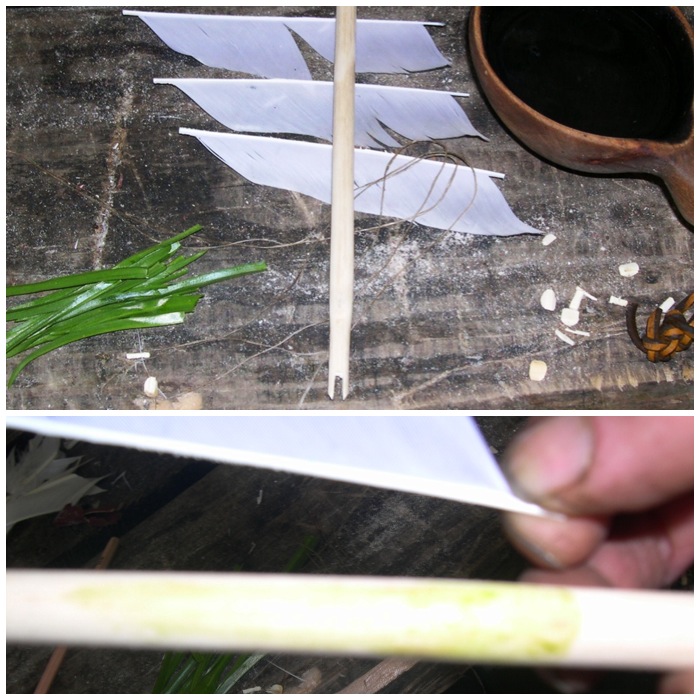
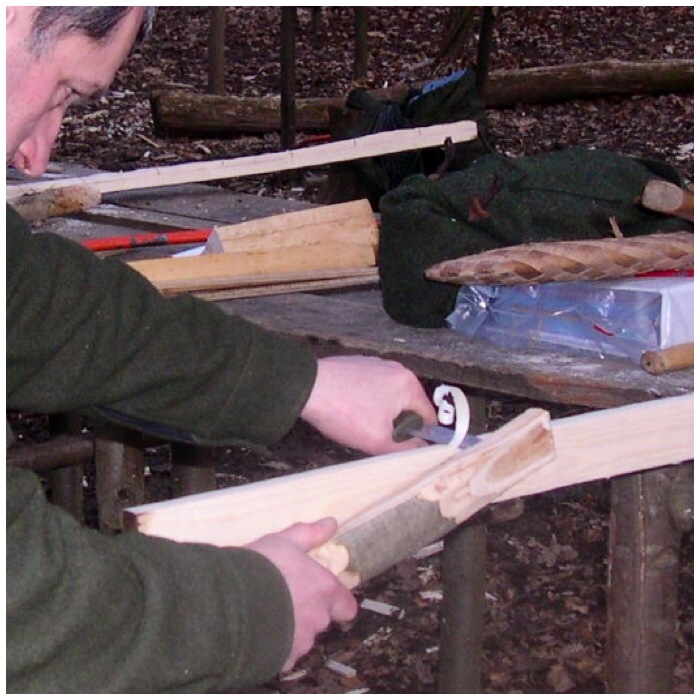
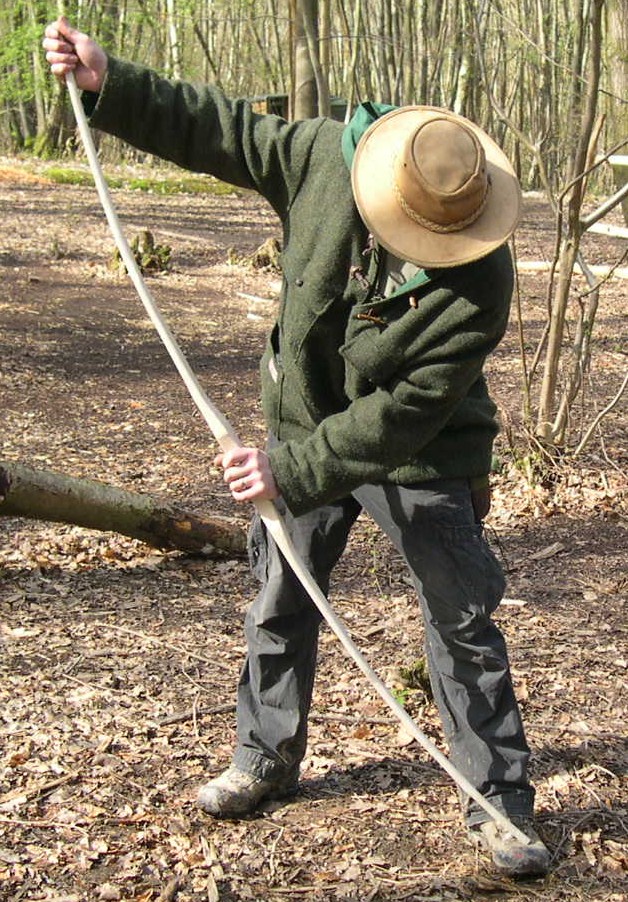
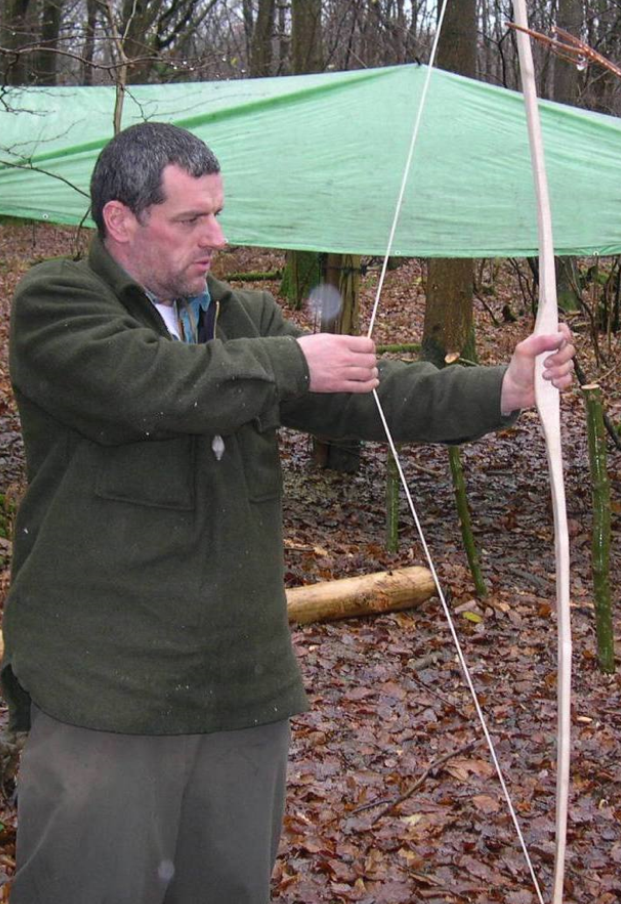
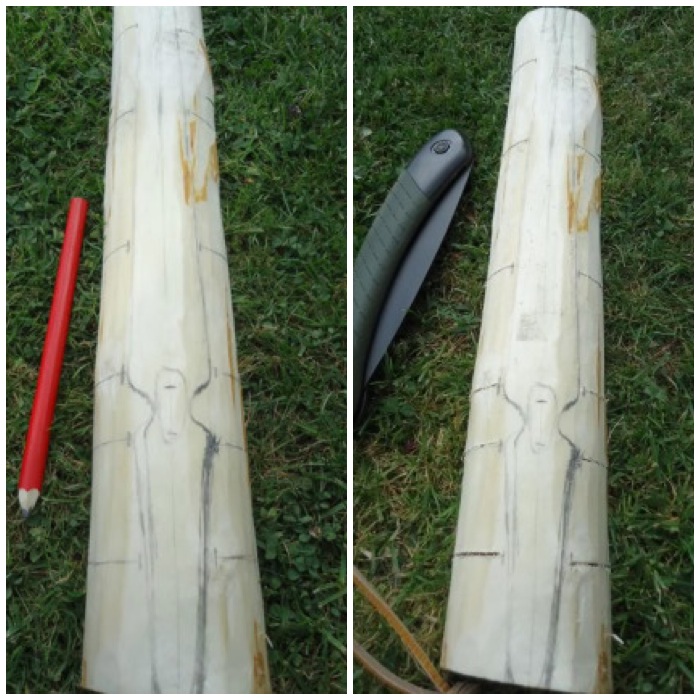
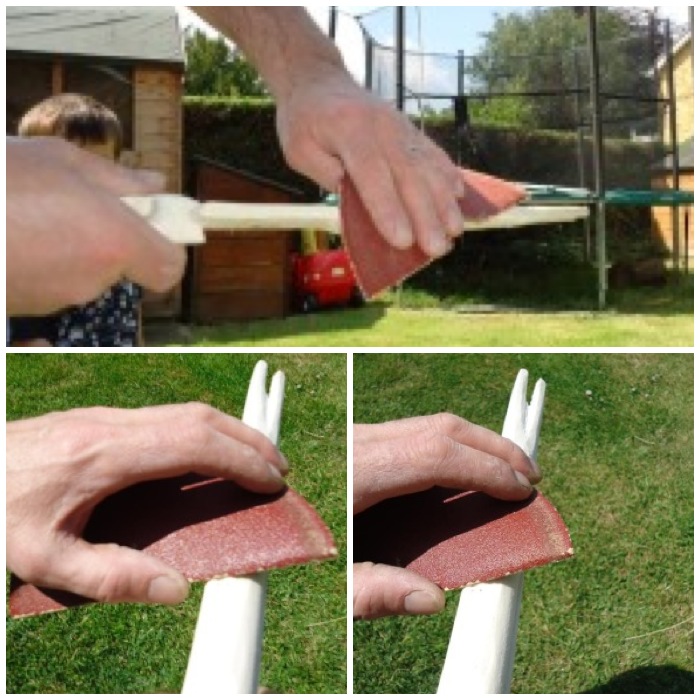
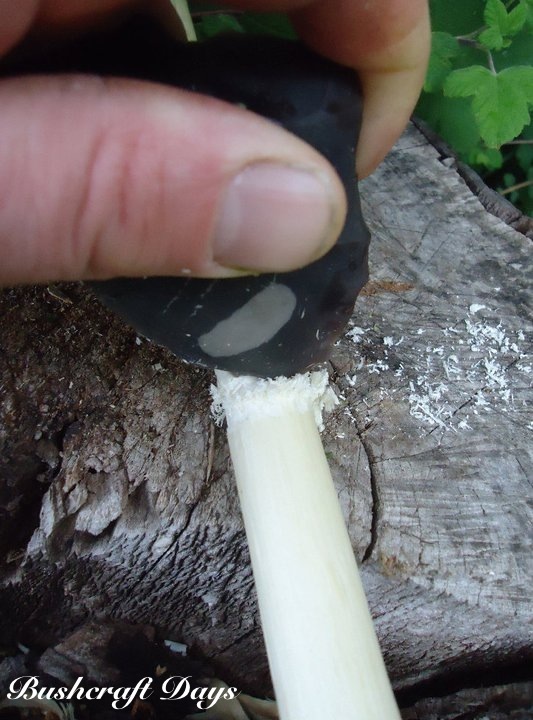
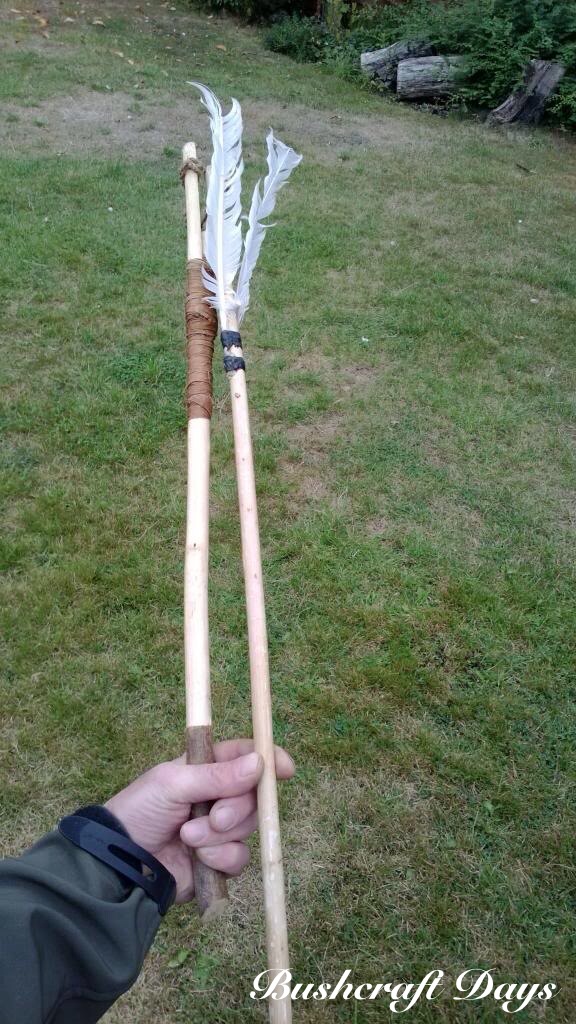
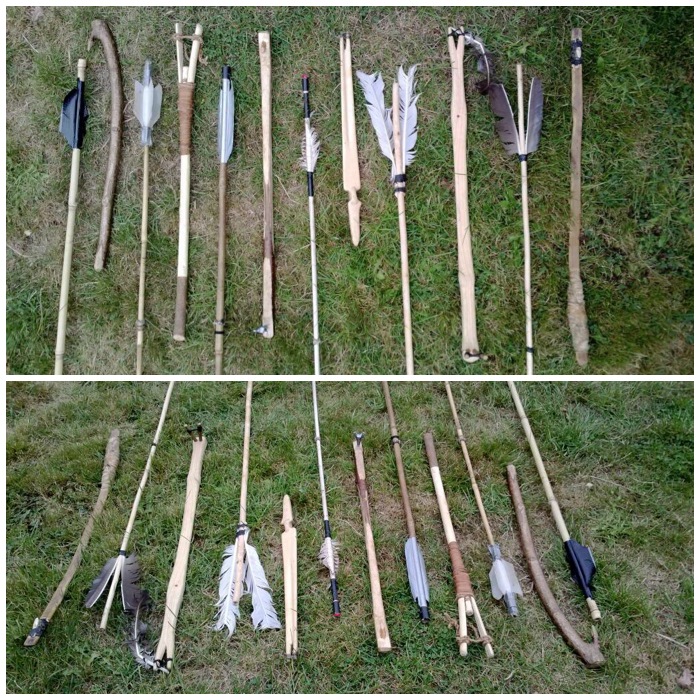
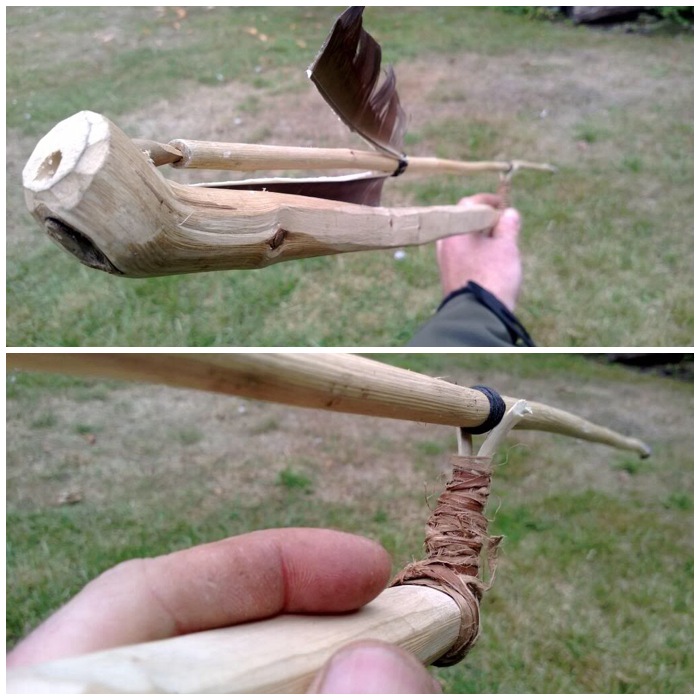
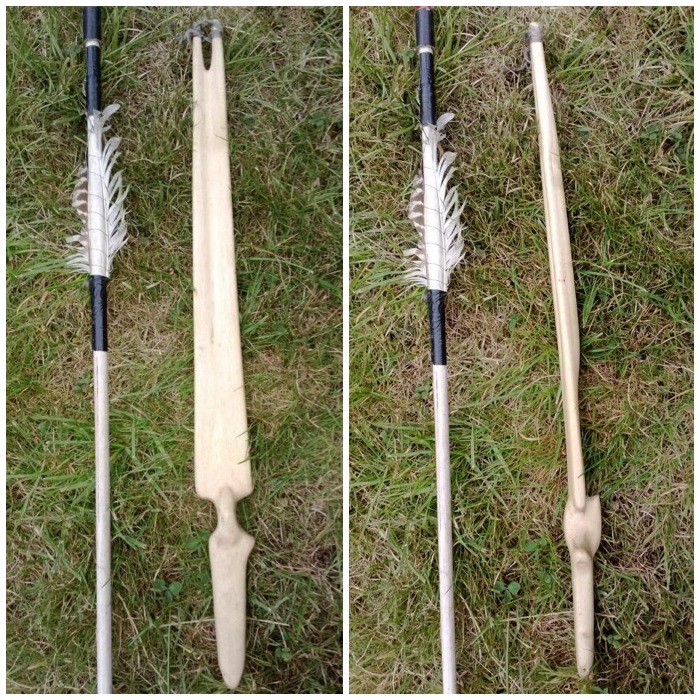
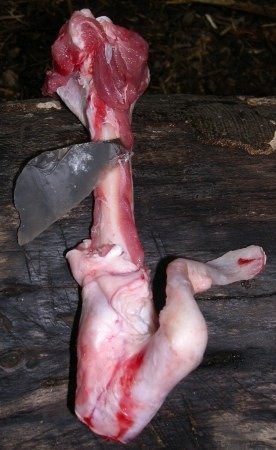
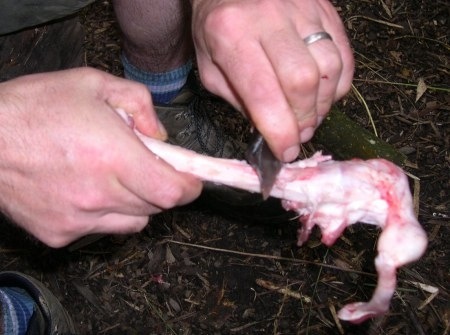
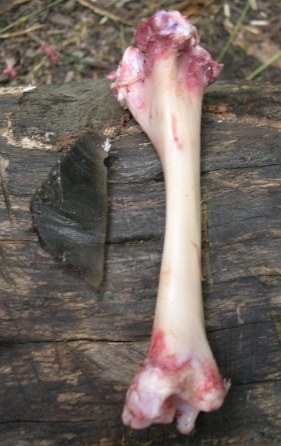
I put this How To…. together to show how to construct a couple of primitive arrows. I used mainly primitive tools with the exception of a few modern touches: the occasional use of a steel knife, adding false sinew when I ran out of real sinew, some sandpaper, a copper-tipped flaker and bleached feathers.
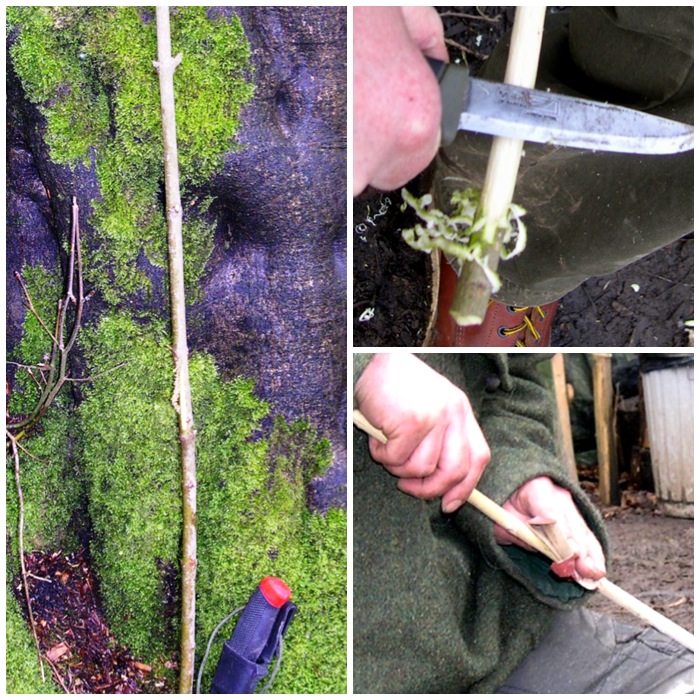
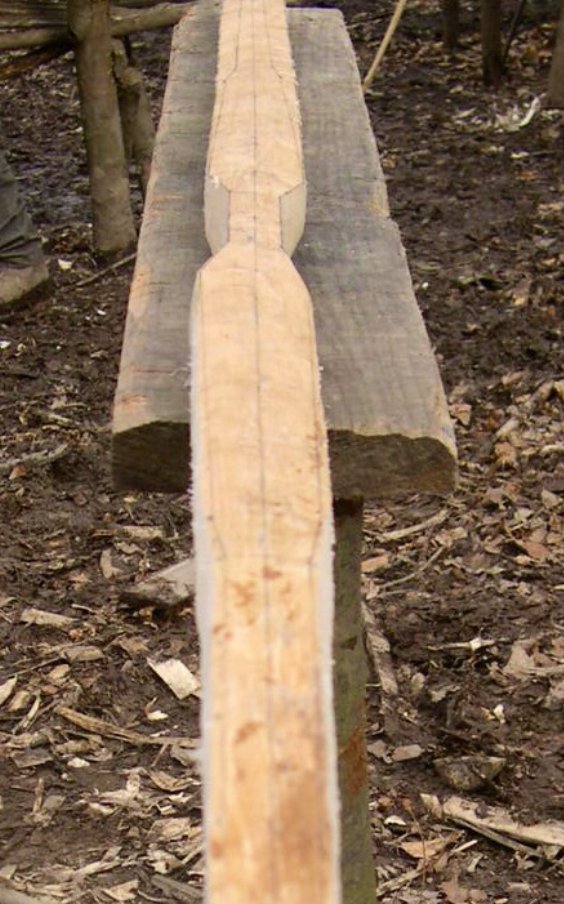
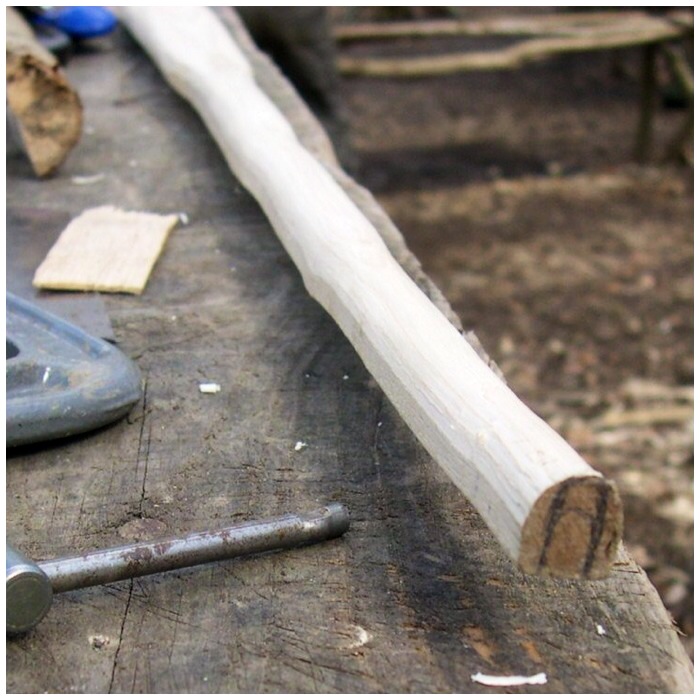
Preparing the arrow shafts
I made these arrows while on the Woodcraft School Primitive Technology course in 2009. John Rhyder the course instructor supplied us with pre-cut branches from a spindle(Euonynus europaeus) tree, which has traditionally been used for the manufacture of arrows as it is a hard wood and takes a point well. Another option that was available to us was hazel(Corylus avillana) as there was some on site. I chose to use spindle as I had never used it before to make arrows.
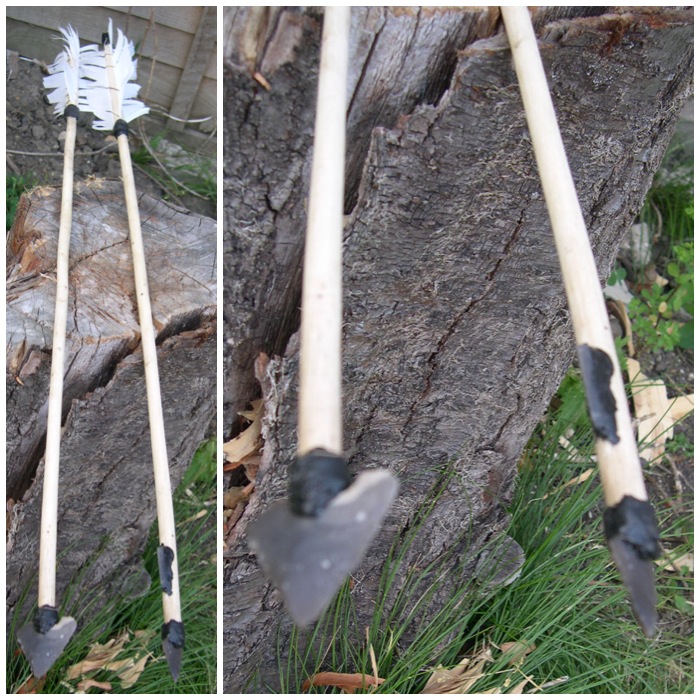
Flint-tipped arrows
I used the back of my knife to scrape the bark off the wood but this would traditionally have been done with a piece of sharp flint or other such stone. For safety I kept the knife still and pulled the green stick backwards, scraping bark off with the back of the blade. I like this method as the blade stays still making it very safe. I then roughly sanded each of the branches with sandpaper. This could have been completed traditionally with either a handful of sand or a soft rock such as sandstone.
De-barking
I then heated the branches over an open fire. I was careful not to scorch the wood as this changes its properties and makes it brittle. The trick is to slowly turn the branch in a circular fashion, heating evenly all around the section of wood that needs straightened. This in effect creates steam in the wood as the sap heats up and so allows you to slowly straighten the arrow (this method works best on green wood). To straighten the bumps in the wood you need to hold it in position (as straight as possible) until it cools and sets into its new shape.
Heating and straightening
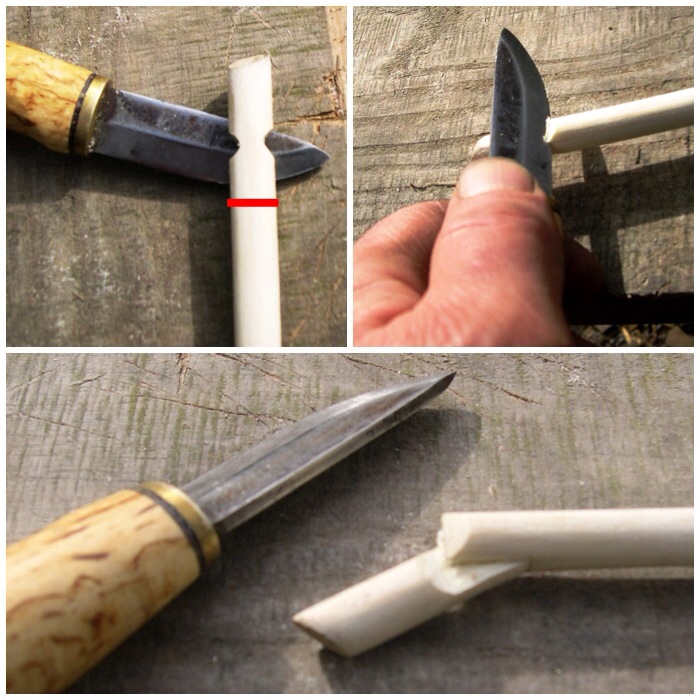
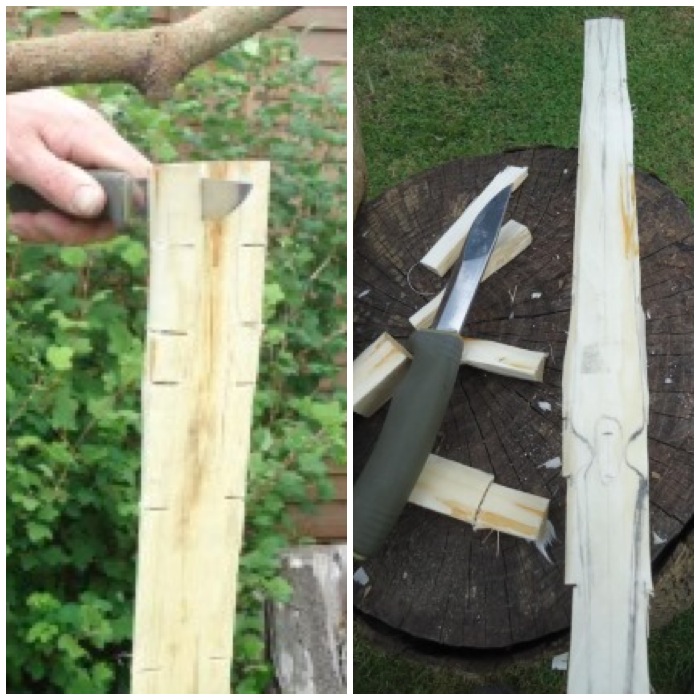
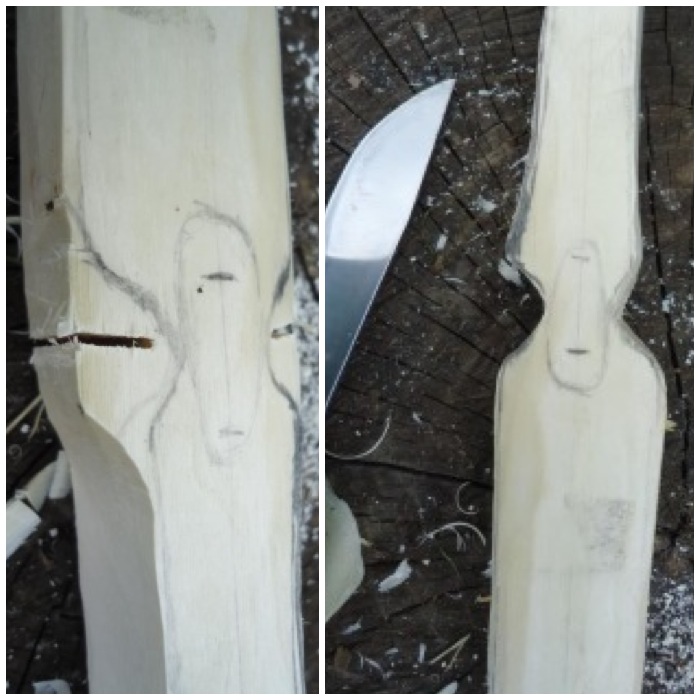
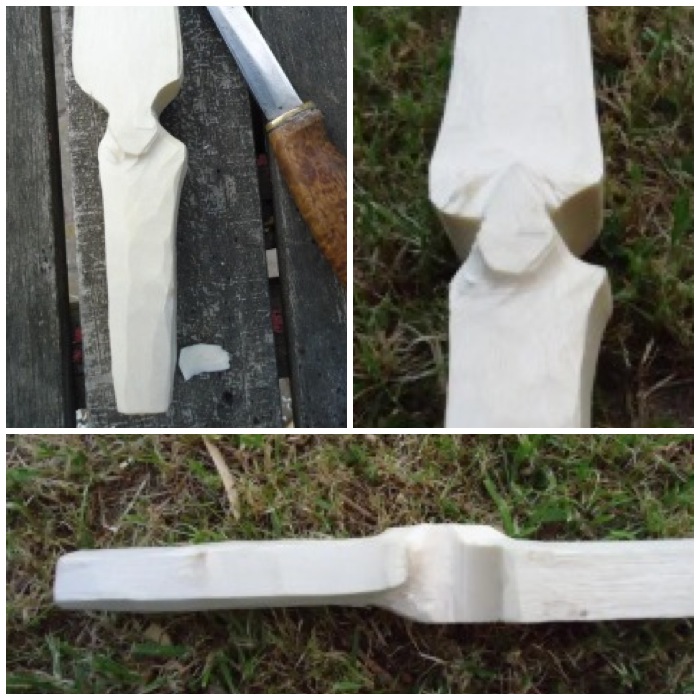
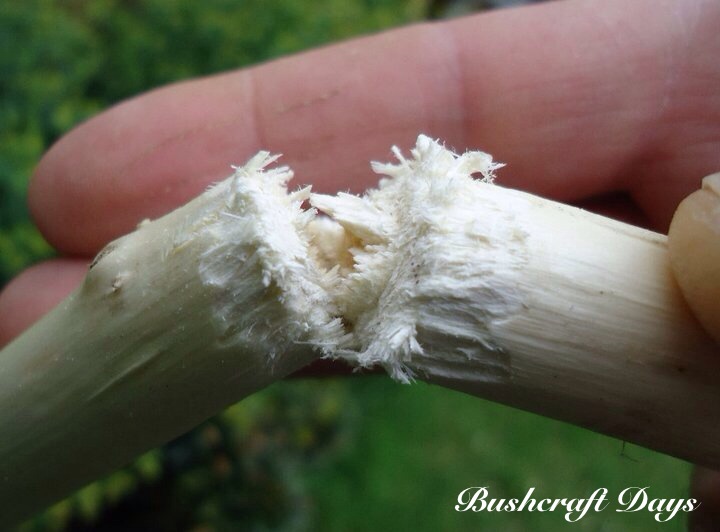
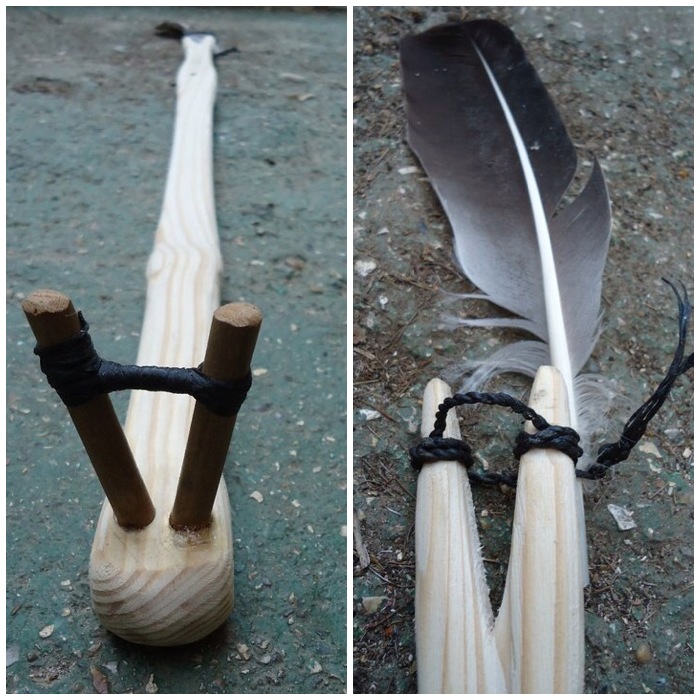
Making a Self Nock
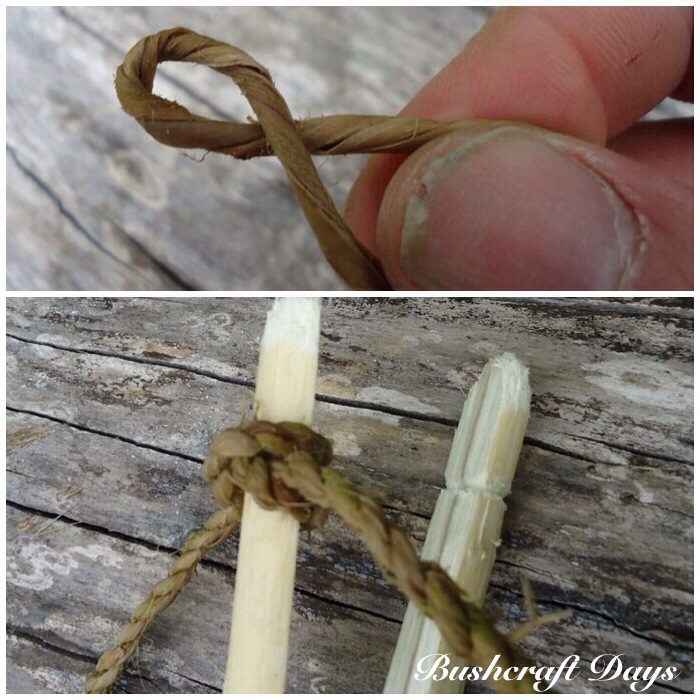
Next I needed to make the nock for the string. I cut two small grooves (opposite each other) at the thin end of each shaft. Then about a centimeter down the shaft (showed here in red) I rolled the knife edge to mark a thin line at 90 degrees to the first grooves (too fine to see in the picture).
I then placed the edge of the knife into one of the larger grooves to split the wood down to the lower line. The small cut in the wood at the lower line helps stop the split running off too far. I then repeated the procedure on the opposite groove.
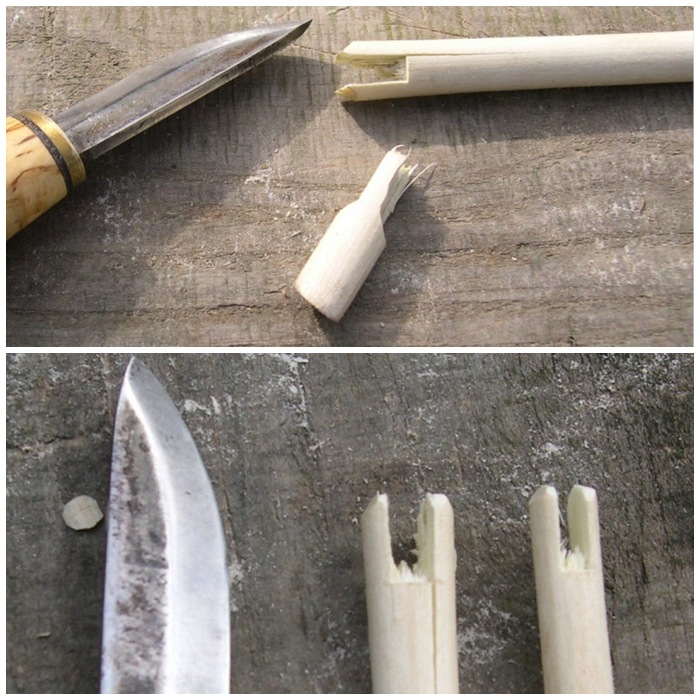
I wiggled the centre section back and forth until it started to break away from the main arrow shaft. In the bottom picture you can see the nock starting to appear.
Self Nocks
The resulting peg finally pops out after a lot of wiggling about. Freejutube has an excellent video on making a primitive nock using a slightly different method – Arrow snap self-nock – with flint and bone tools
The knocks
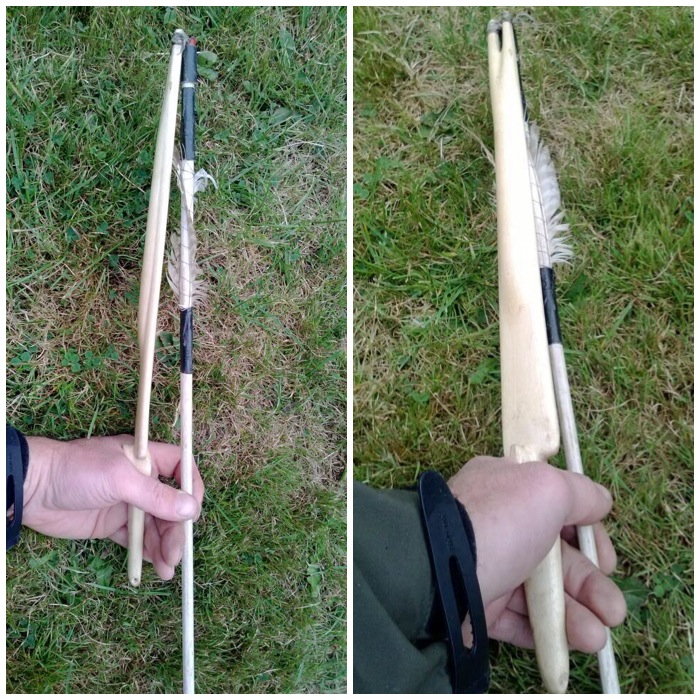
Preparing the Flights
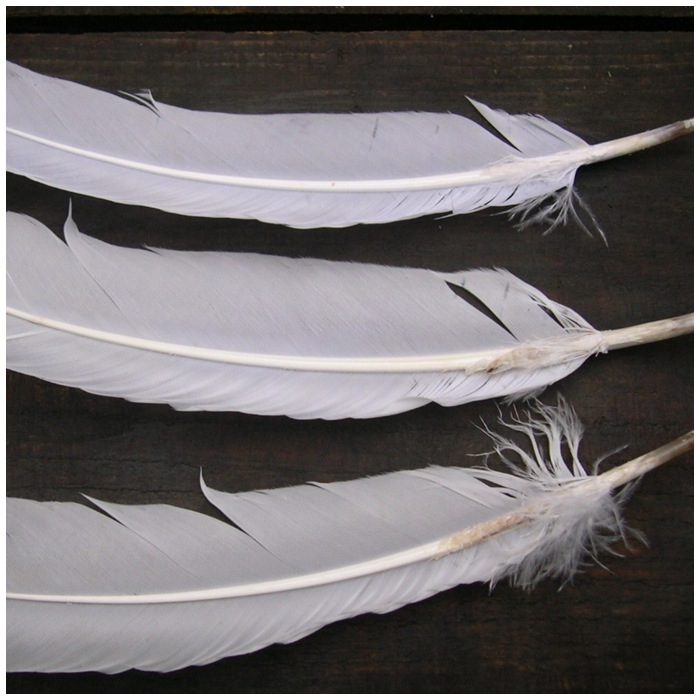
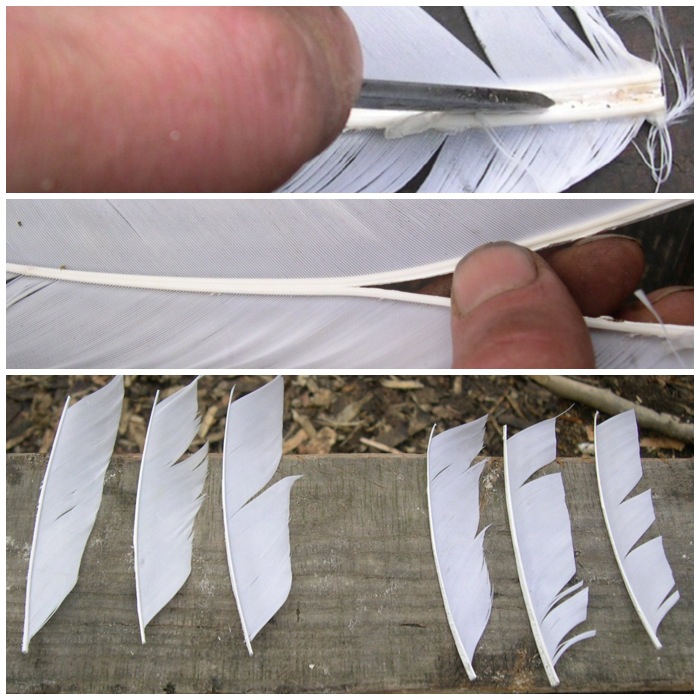
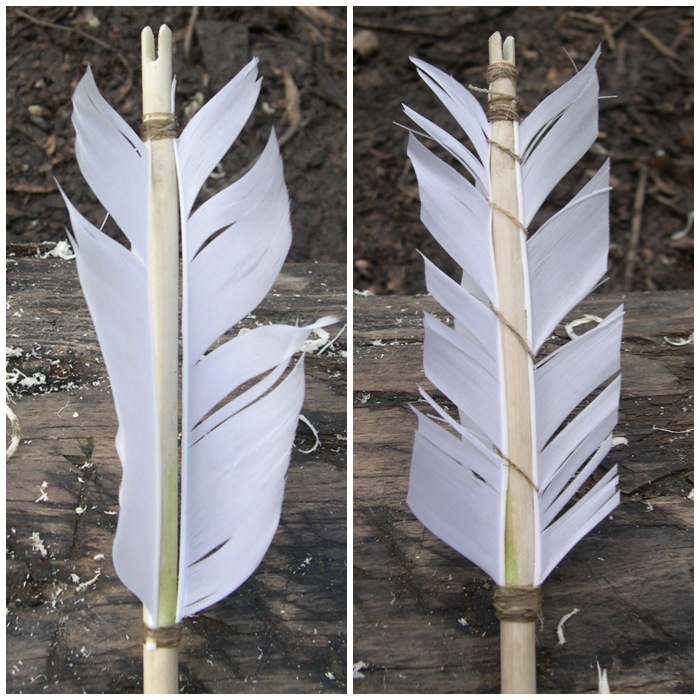
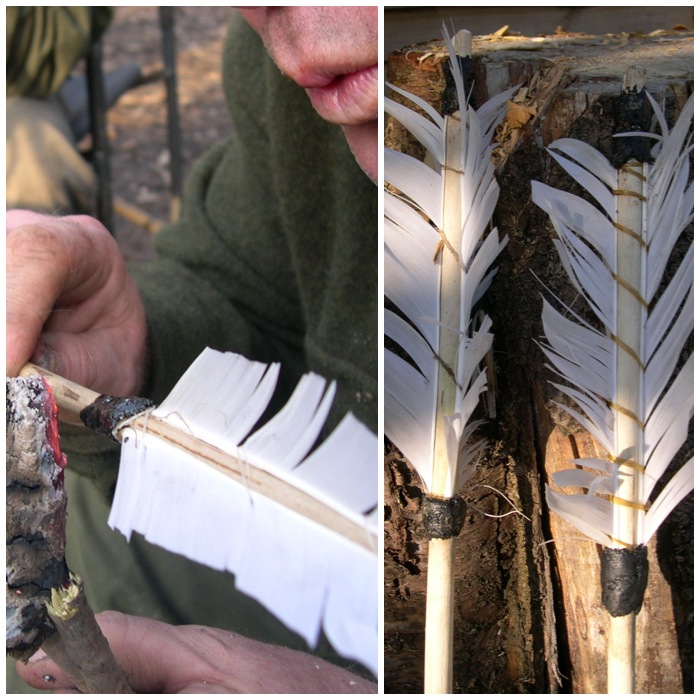
John Ryder provided feathers for us to use. Due to health and safety requirements John had to supply his students with feathers that had been washed: traditionally of course the remnants of bird kills would have been kept and the feathers used for this job. If the feathers are from the same wing they make excellent flights, making your arrows more accurate.
The Flights to be
I used my knife tip to start the split of the feathers to create the flights – a sharp piece of flint would have worked just as well. After the initial split had been made I used my fingers to split the rest of the feather. I tried to be very careful here to keep the split in the centre of the spine of the feather all the way to the end. It gets a bit tricky as it tapers out near the end.
I split and trimmed the feathers leaving enough of the spine at each end for wrapping purposes.
Splitting out the flights
Making Sinew Cordage
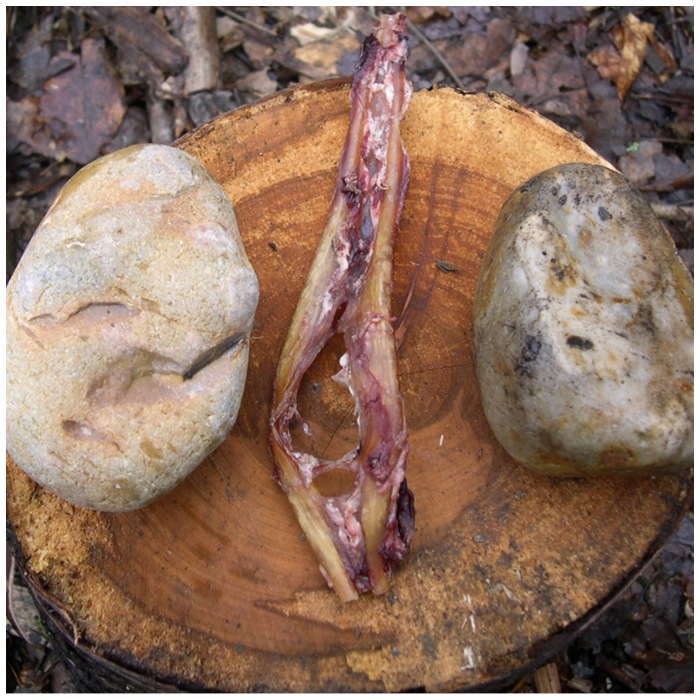
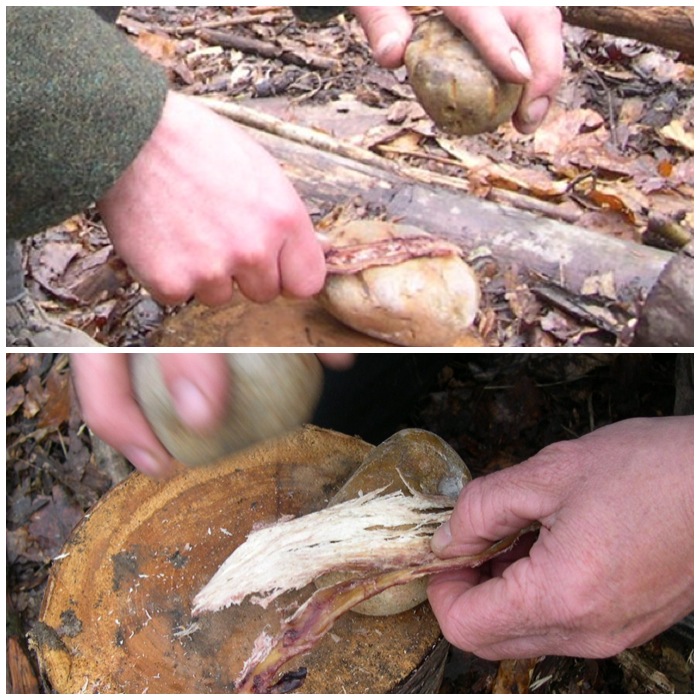
To wrap the feathers onto the shaft I used deer sinew. This needs to be pounded gently between two stones until all the sinew fibres separate.
Sinew
This takes time but it is worth it to see all the strands of sinew start to appear.
Breaking down the sinew
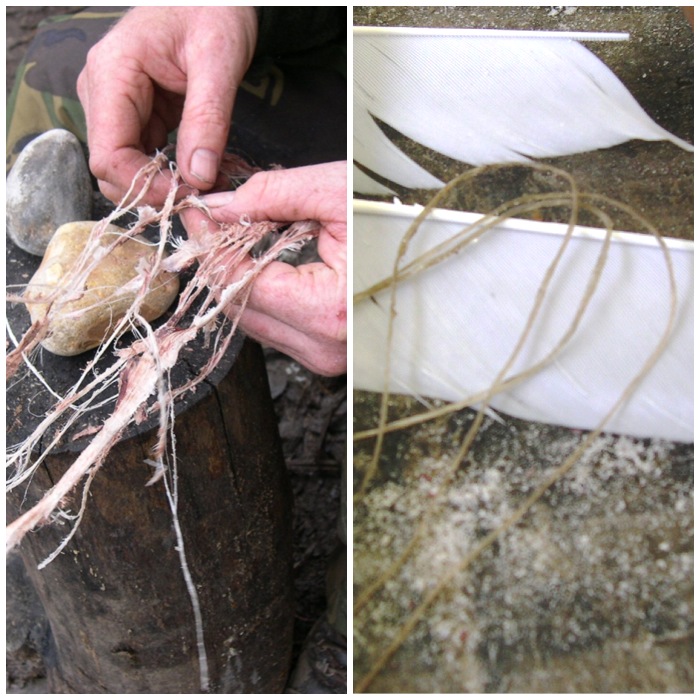
Here you can see the fibres starting to really fall apart. There wasn’t enough real sinew for everyone so I had to supplement it with some false sinew: dental floss is another possible alternative.
I rolled the sinew strands to make them stronger and wet each strand with saliva. This allows the sinew to bind to the shaft as the fats in it act like a glue when wet. On the right you can see some sinew that is ready to use as wrapping.
Finished sinew
Attaching the Flights
To aid in the process of attaching the flights to the shaft I tried out another type of glue made by crushing bluebell leaves to a pulp between my fingers. The resulting gloop was supposed to act as a first fixing to help keep the flights in place before wrapping; it turned out to be a little bit tacky but nowhere near strong enough to act as a glue. In the bottom picture you can just make out the shaded area on the shaft where the bluebell ‘glue’ was placed.
Bluebell glue
In the end I just used sinew to hold the flights in place. You can see the bluebell stain on the shaft in this picture.
First tie off
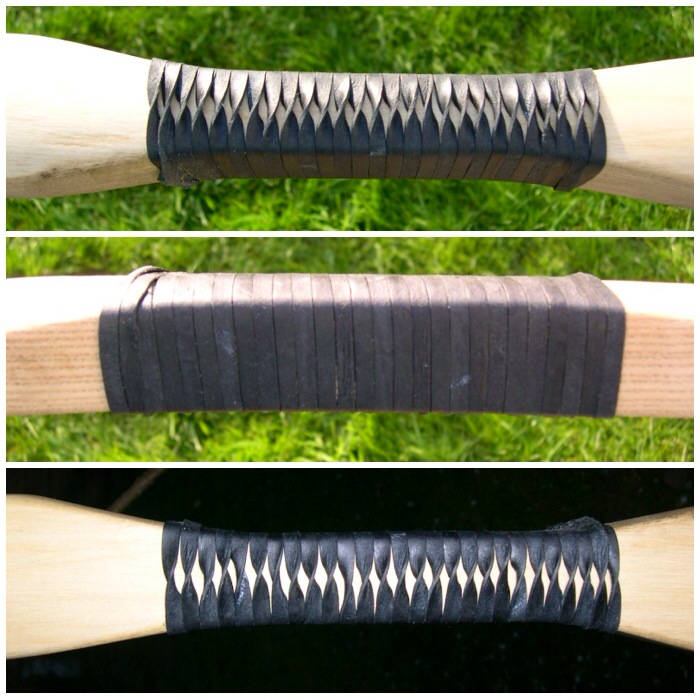
I then wrapped the flights at the top with sinew (bottom left) and then to finish this stage I wrapped the body of the flights with more sinew (bottom right).
I also wrapped sinew just below the nocks on each arrow to strengthen them. You can see this clearly in the arrow on the right. If I hadn’t reinforced the nocks with sinew they could easily have split with the forces of the bow string as soon as I shot them.
Tied off with sinew
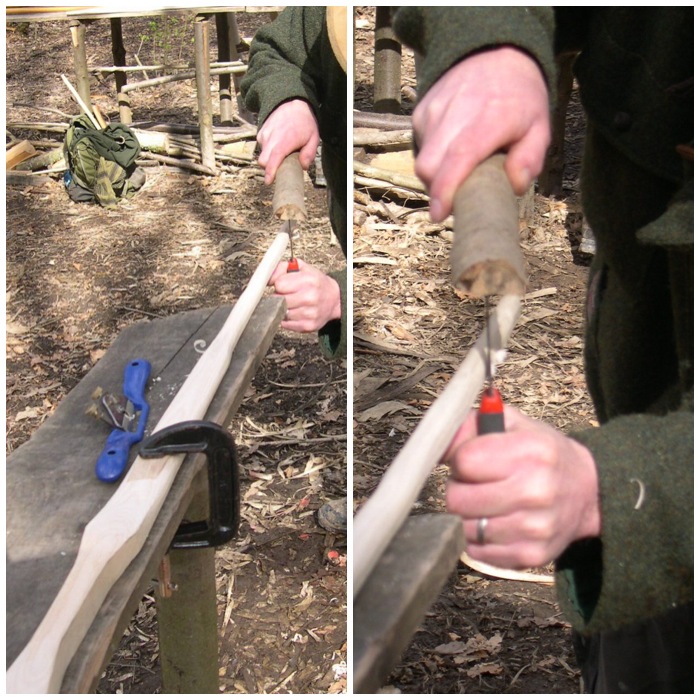
Creating and Using Pitch
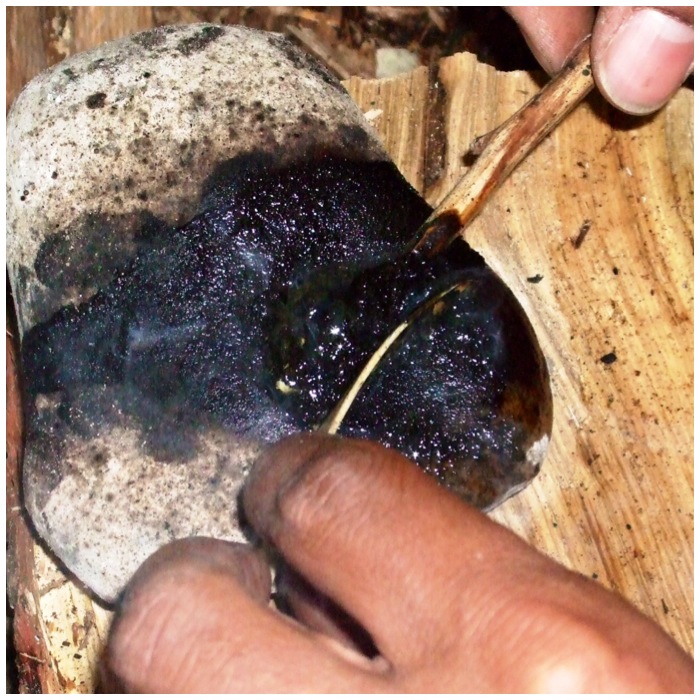
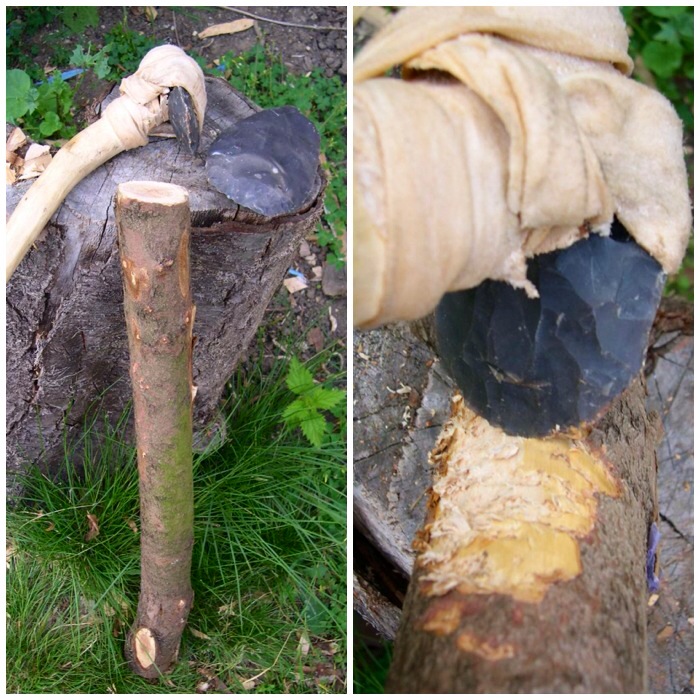
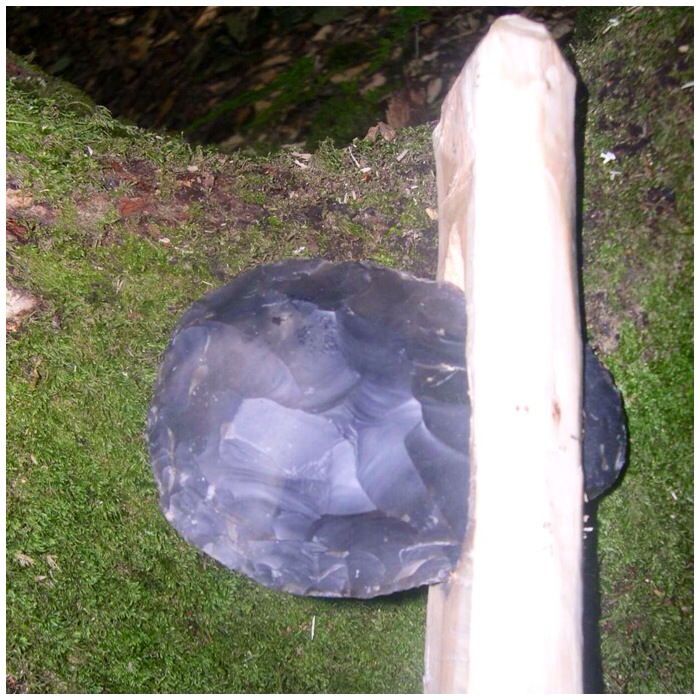
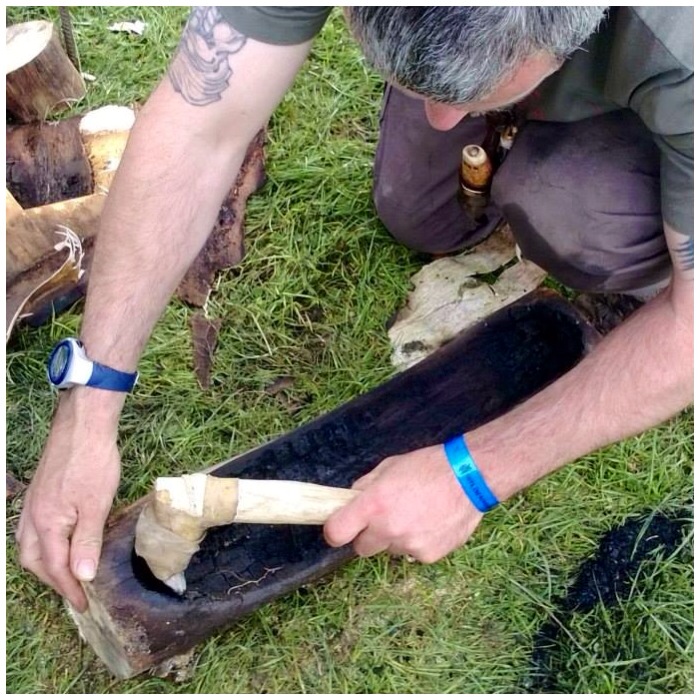
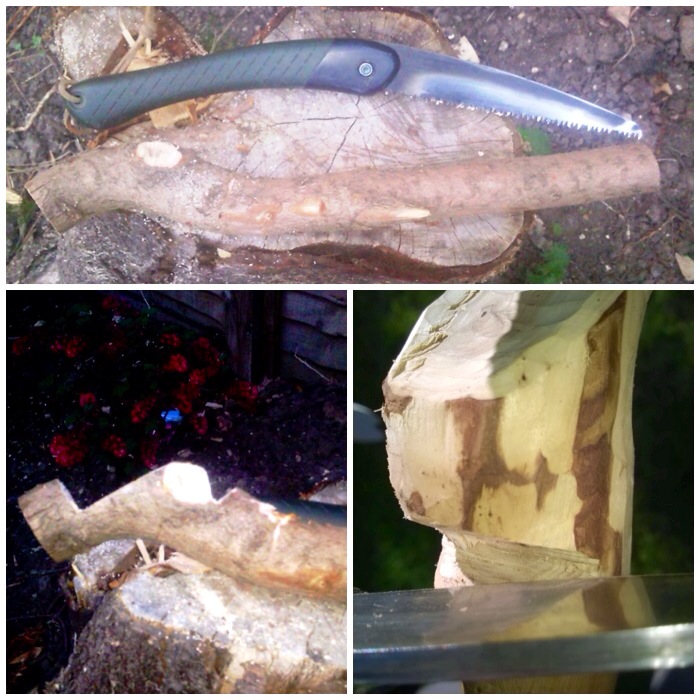
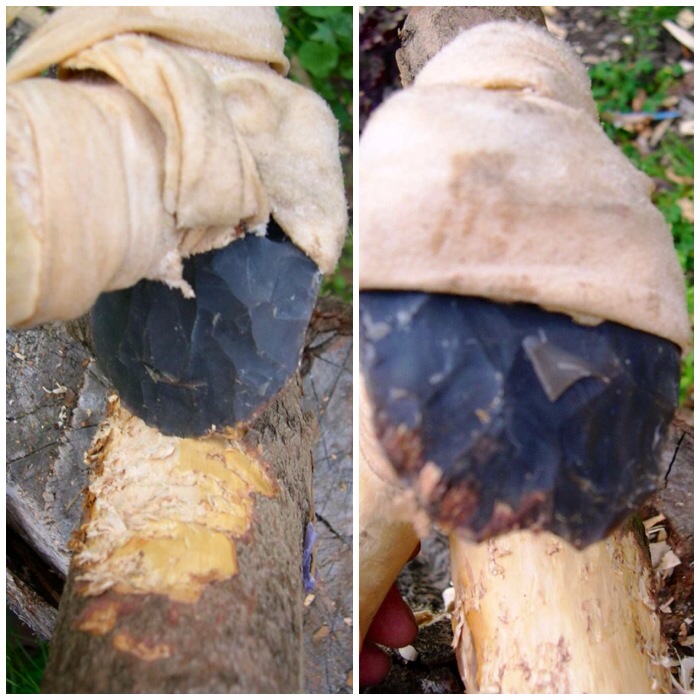
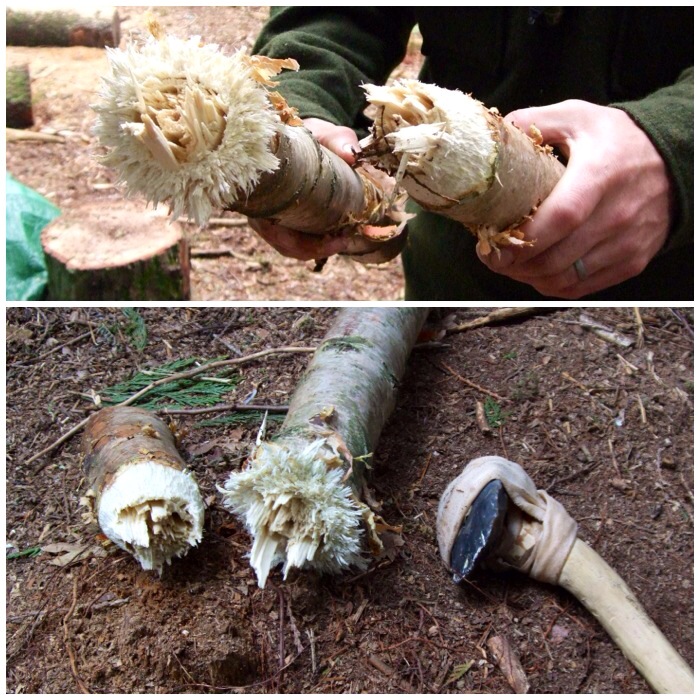
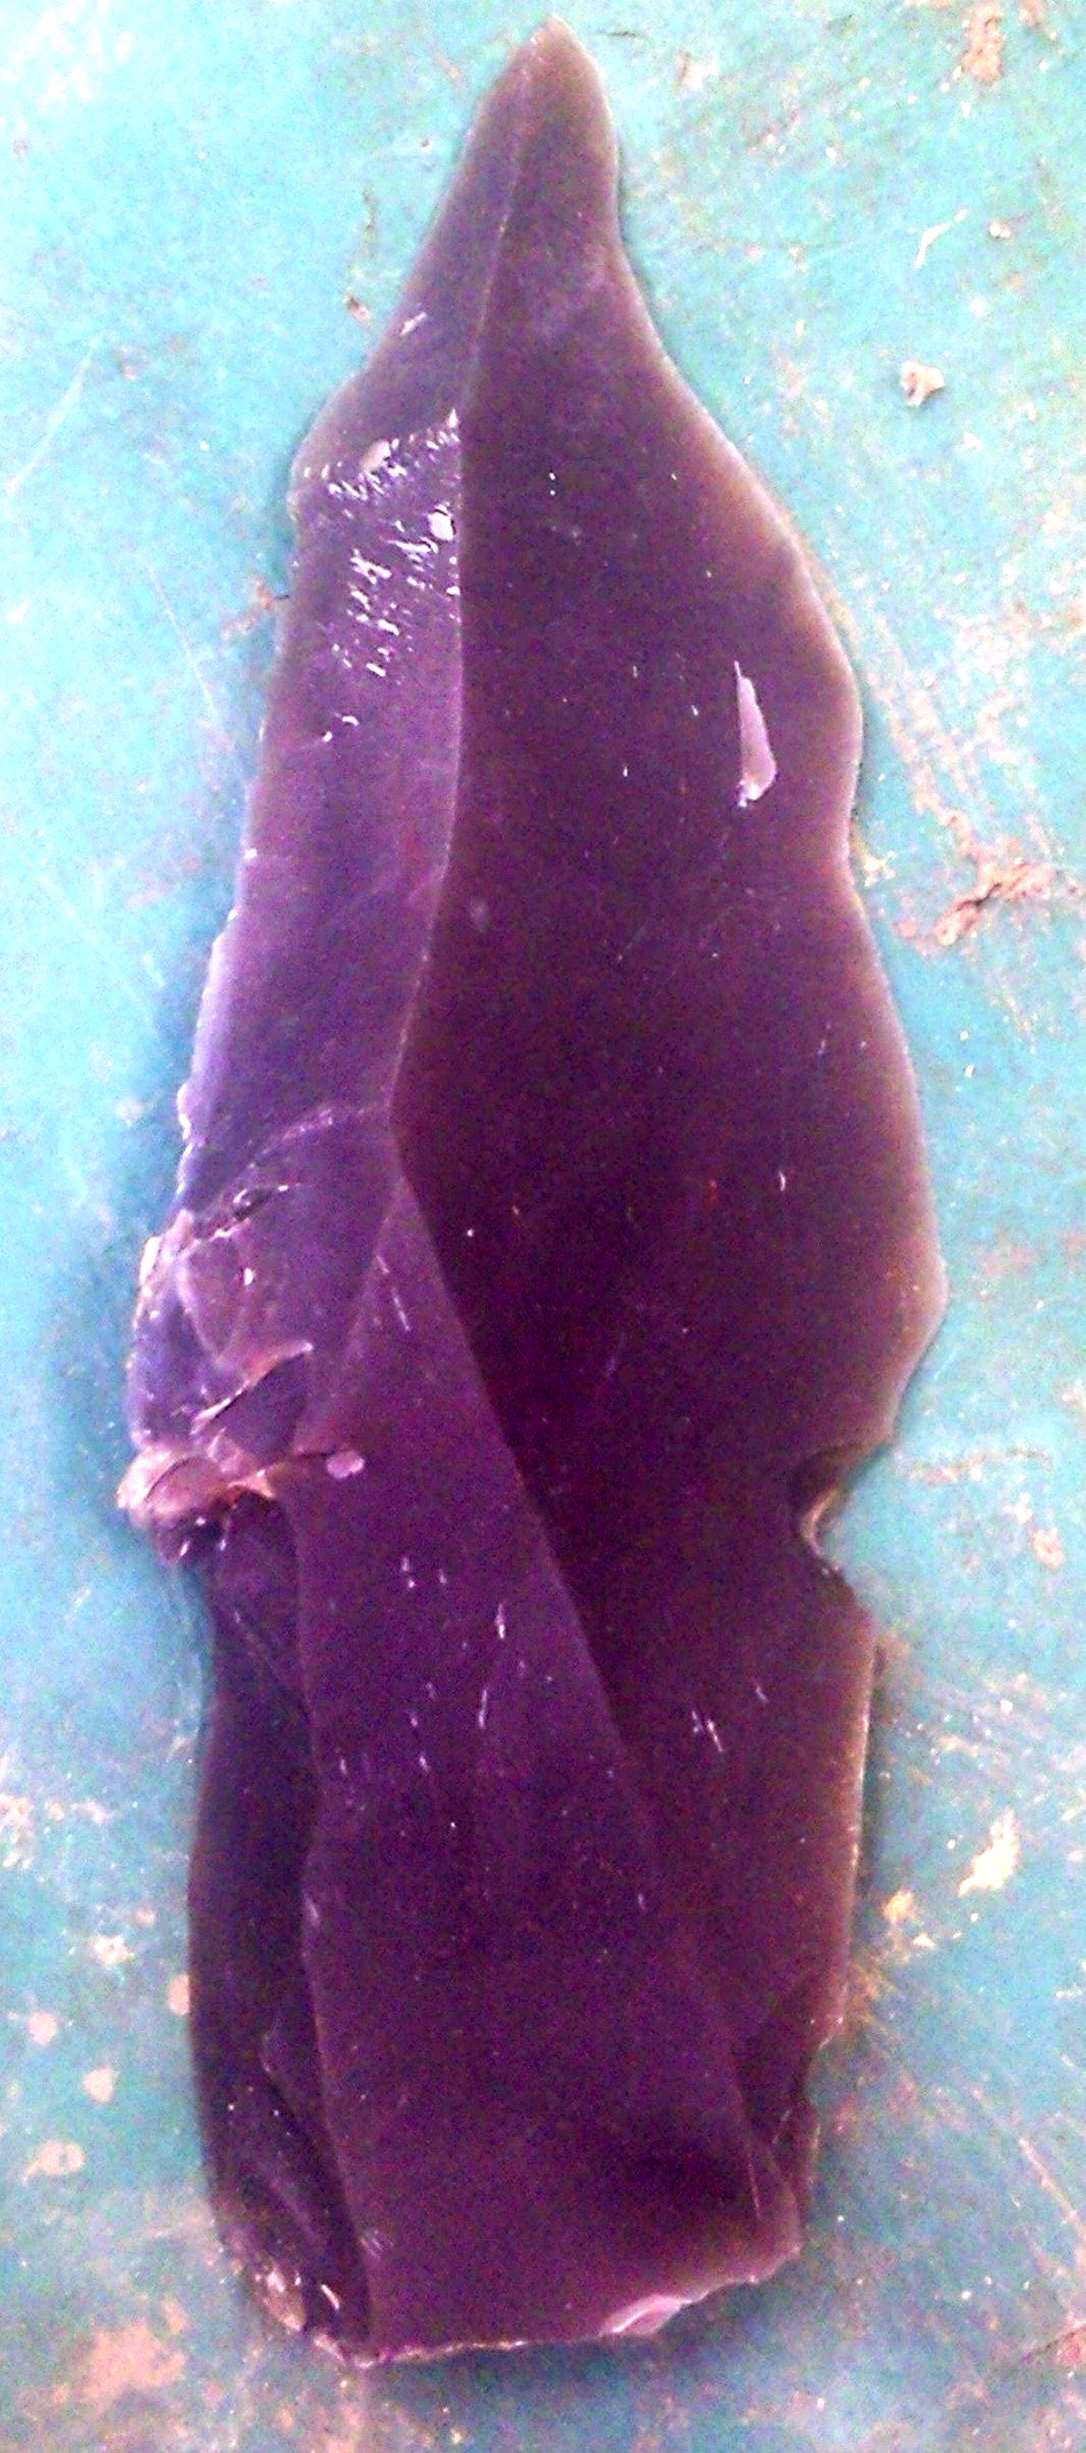
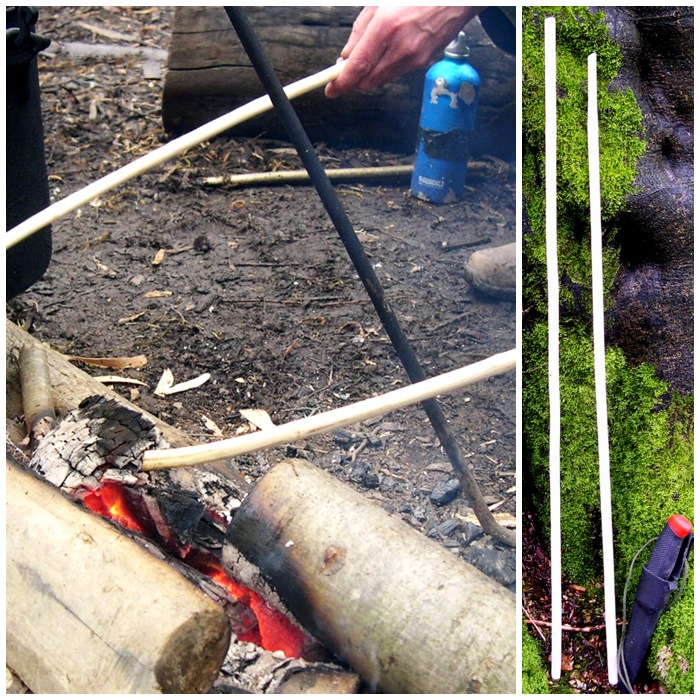
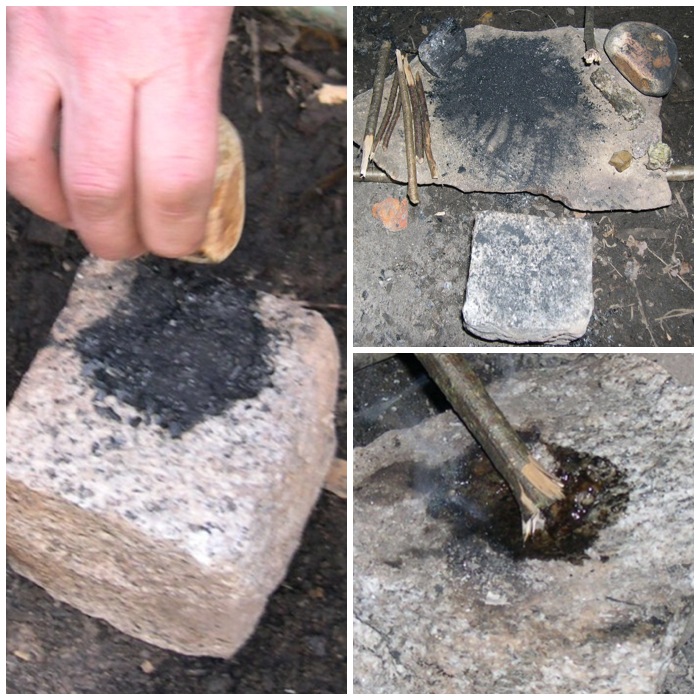
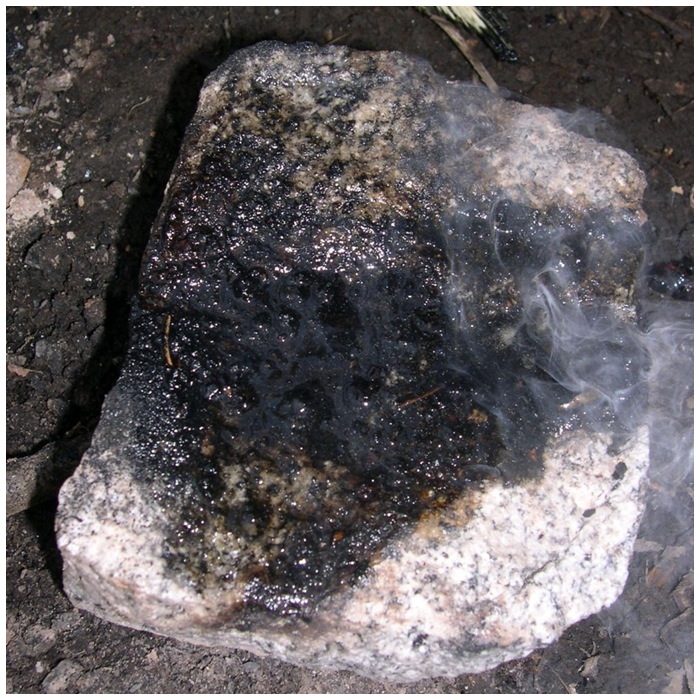
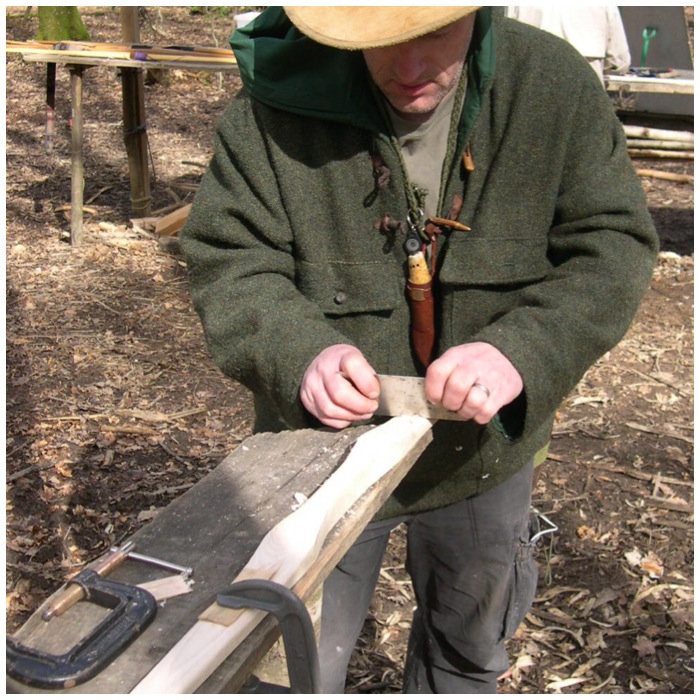
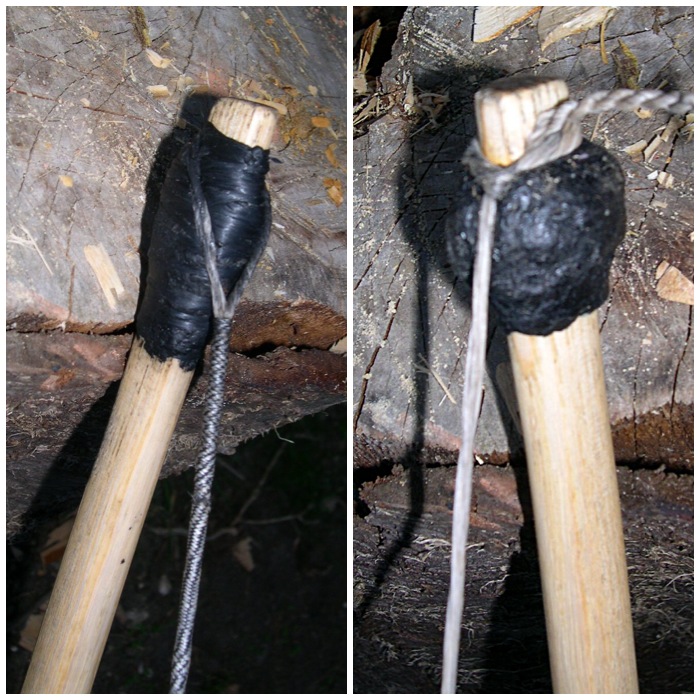
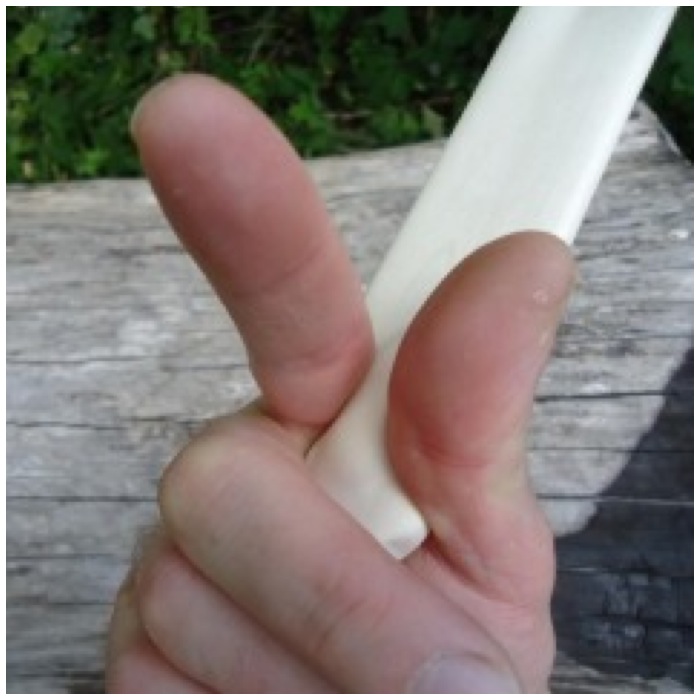
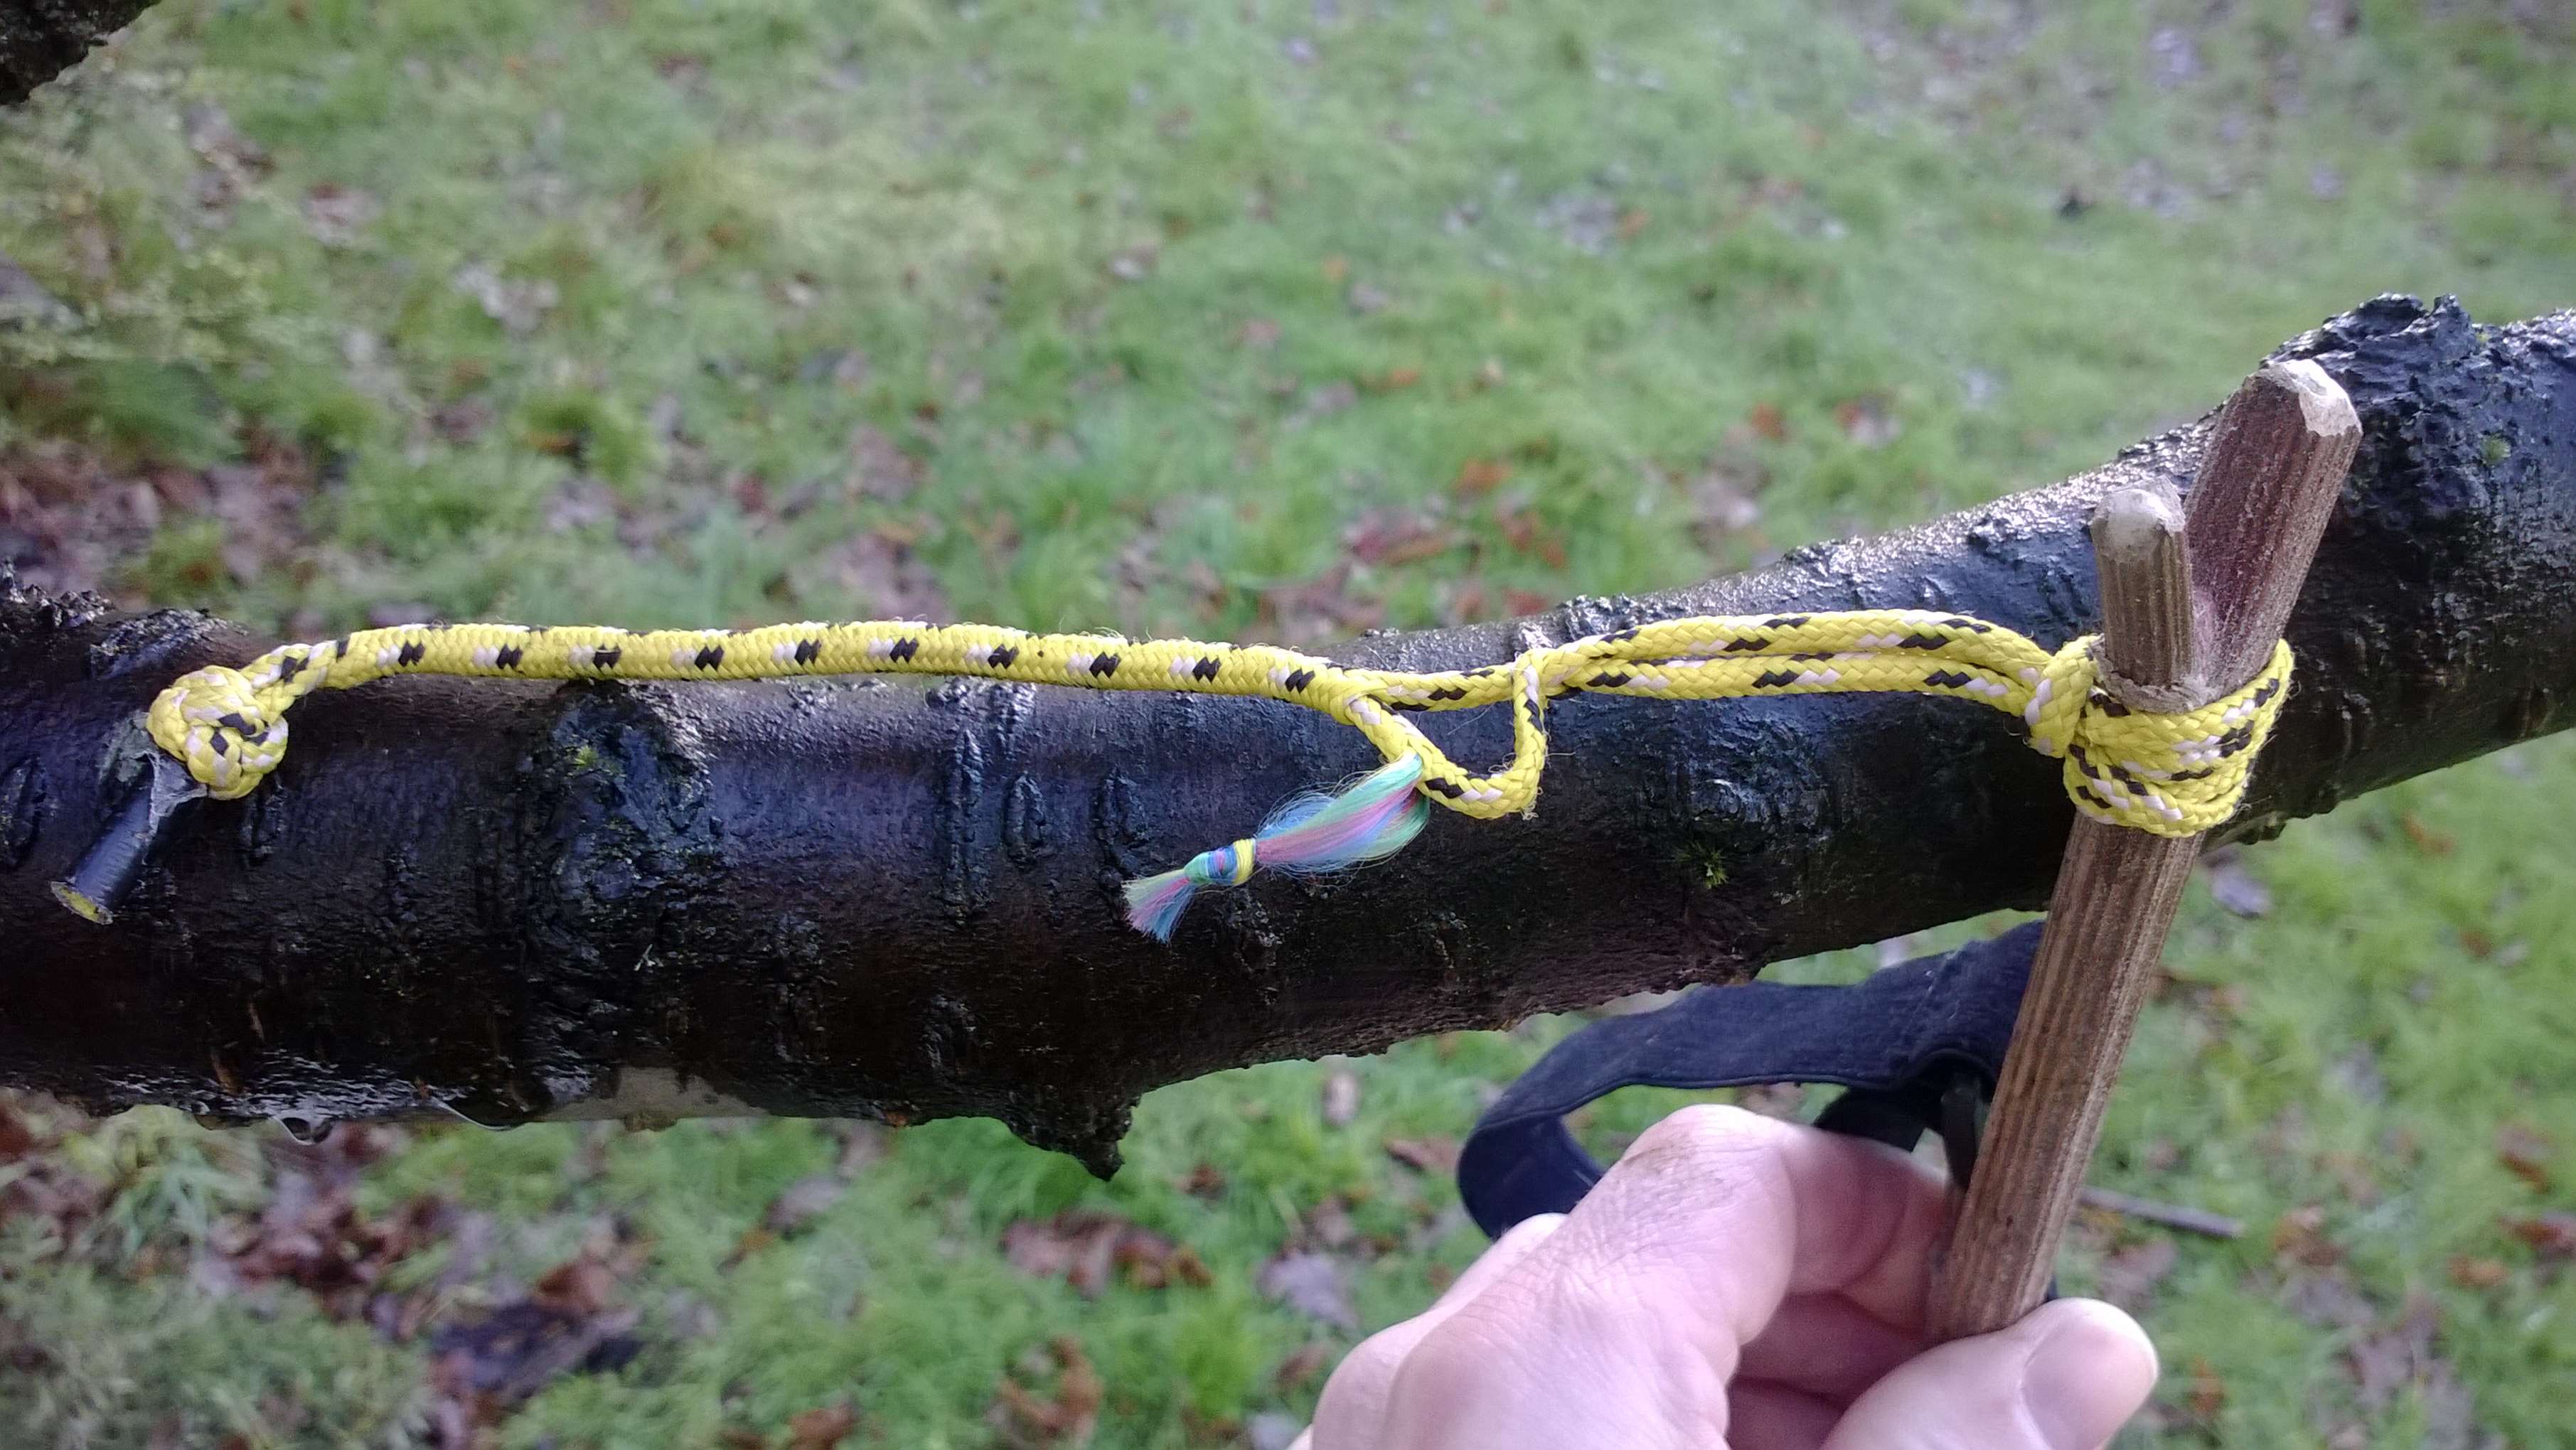
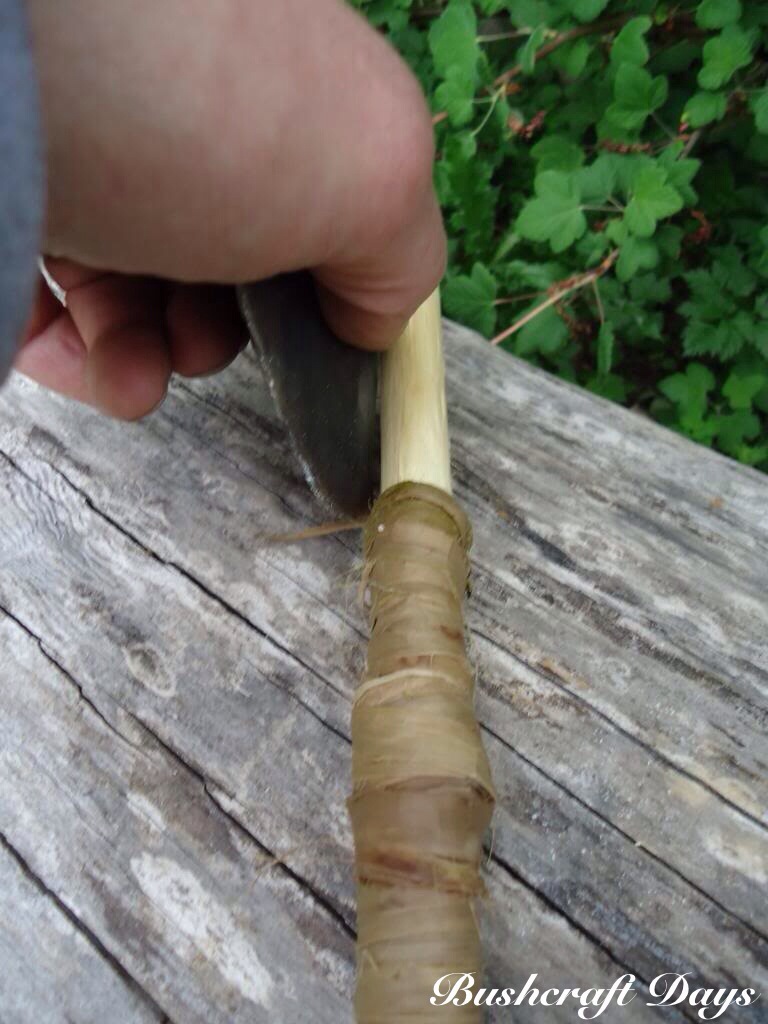
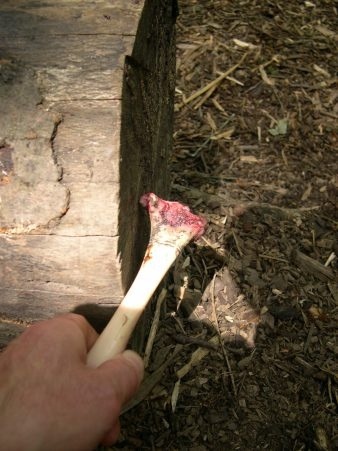
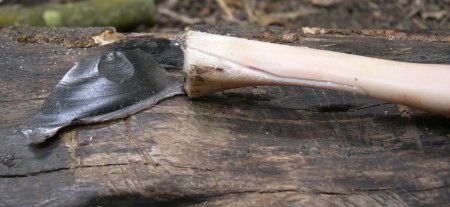
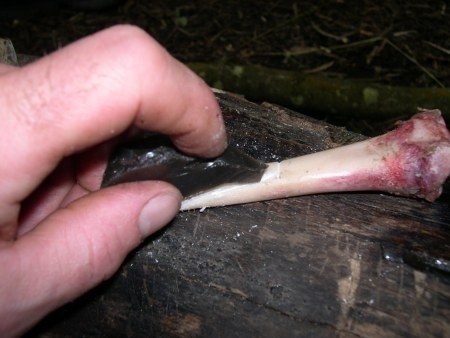
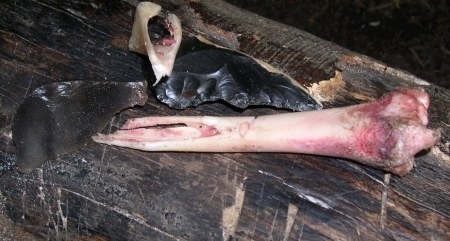
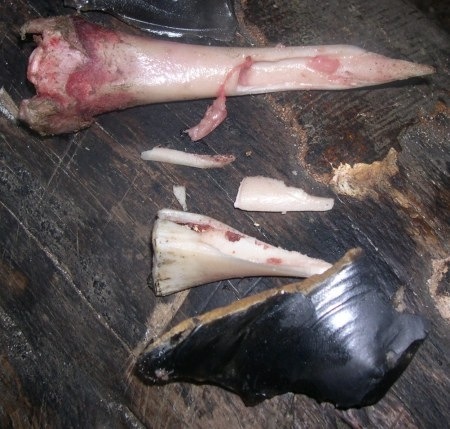
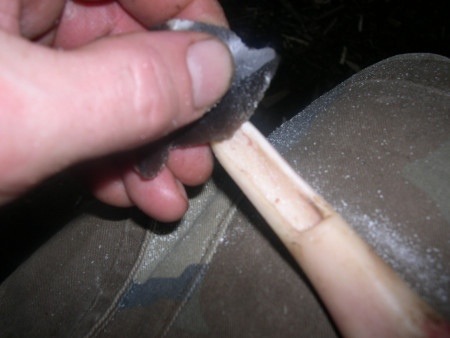
Once the sinew was attached to each arrow I decided to put together some pine pitch. This was to cover the sinew to protect it from fraying and also to waterproof it. The name pine pitch is a bit misleading as I used spruce resin, since that was what was readily available in the area. After collecting the resin that had oozed from spruce trees (the tree uses the resin to seal any damaged areas on its bark) I mixed it with fine charcoal (to give it strength) and beeswax (to give it flexibility).
I used the small rock (left hand picture) to grind the charcoal and a large flat rock (top right) as a preparation table. I heated the square rock in the fire to help with melting and mixing everything together. The sticks were used as mixers and to store the resin (see below). The hot rock I used had been heated before many times so there was no risk of it exploding (which can happen if they contain trapped air).
On the heated rock (bottom right) I heated the first lump of resin, and as it melted I scraped off any debris such as bark.
Pine Pitch Prep
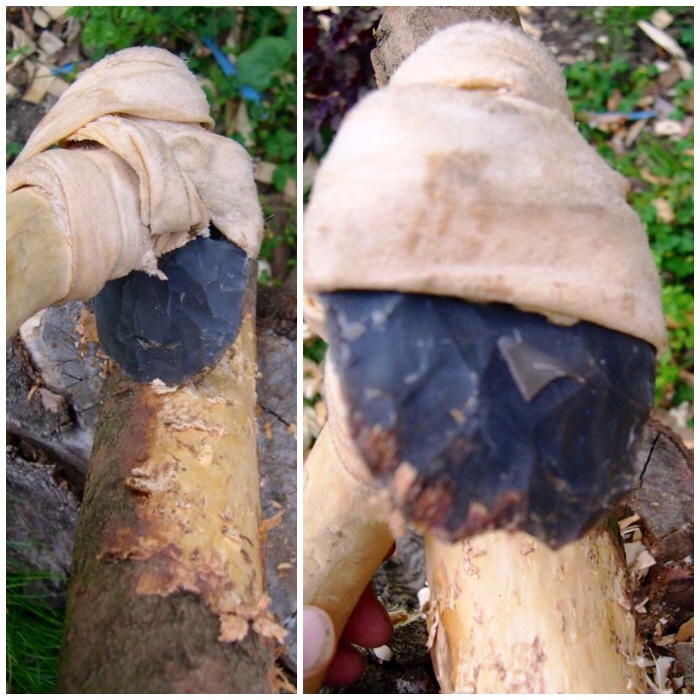
I kept adding more and more resin, charcoal and beeswax (I just added charcoal until the mixture thickened slightly and added beeswax in little lumps) until it had all melted. The rock was super-heated so I had to take great care not to burn myself.
Mixing
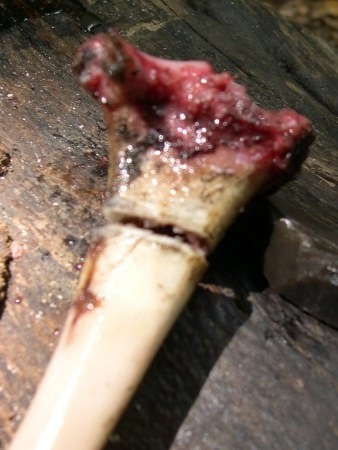
The rock had a slight indentation to collect the melted resin. It doesn’t look like there is much resin here but it was enough for what I had to do.
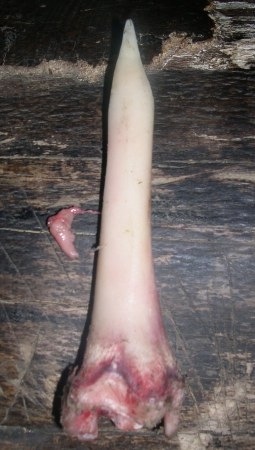
Hot Pine Pitch
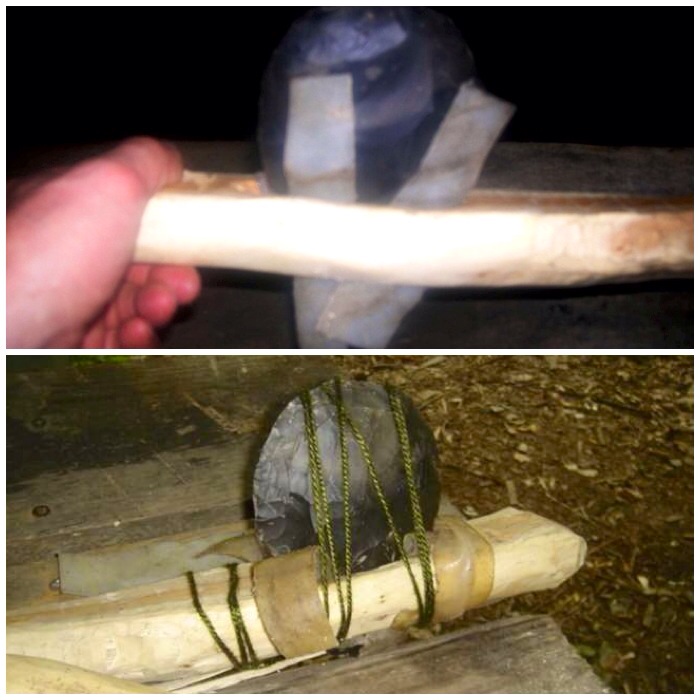
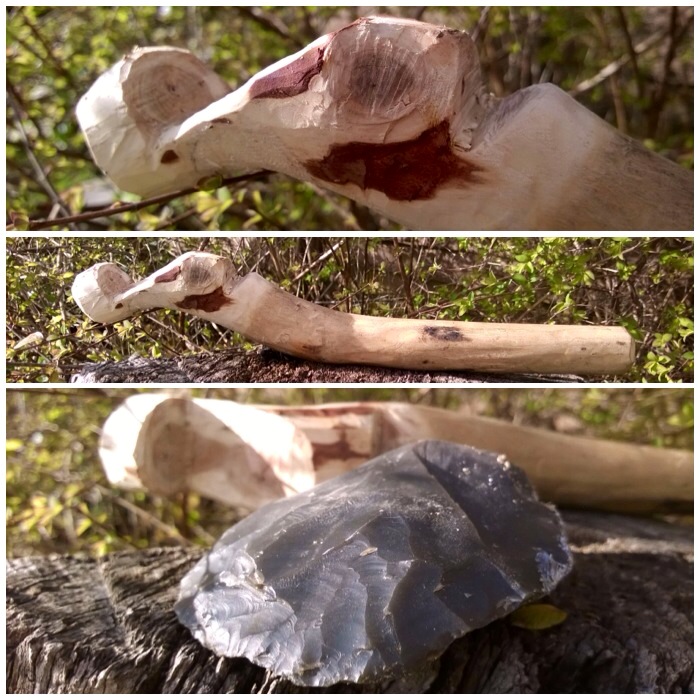
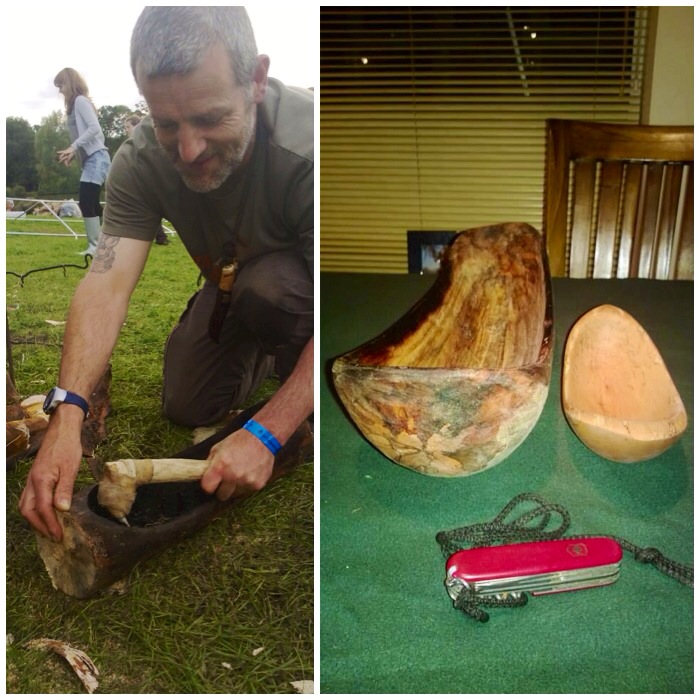
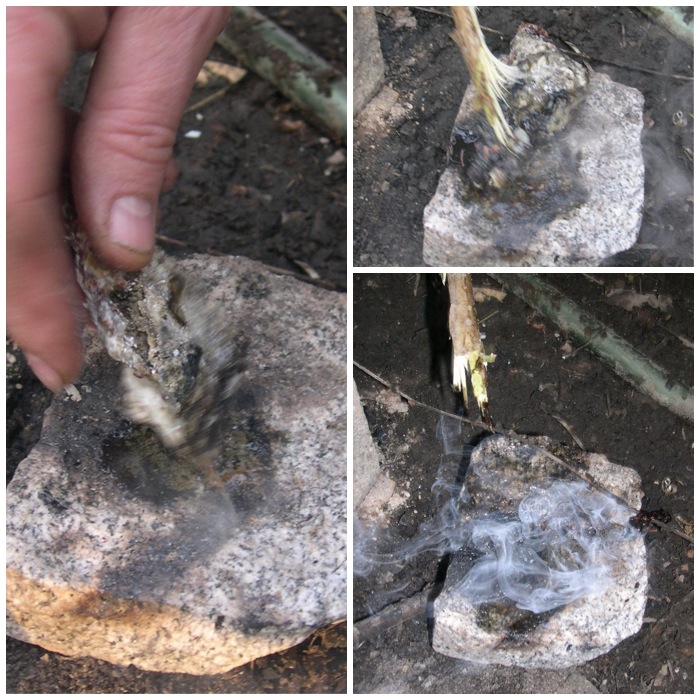
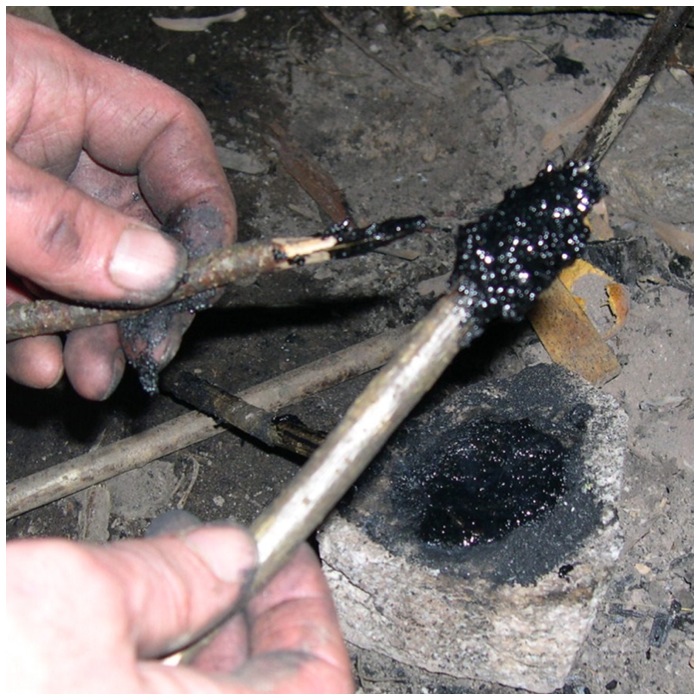
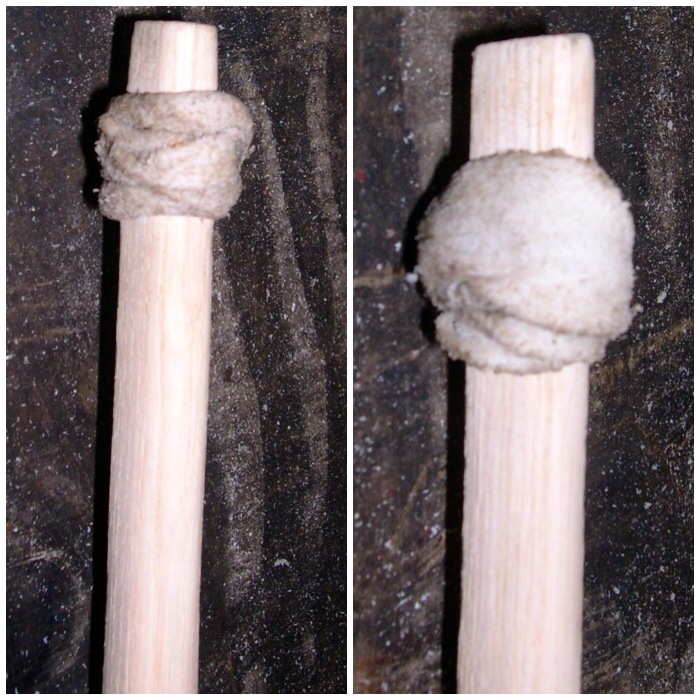
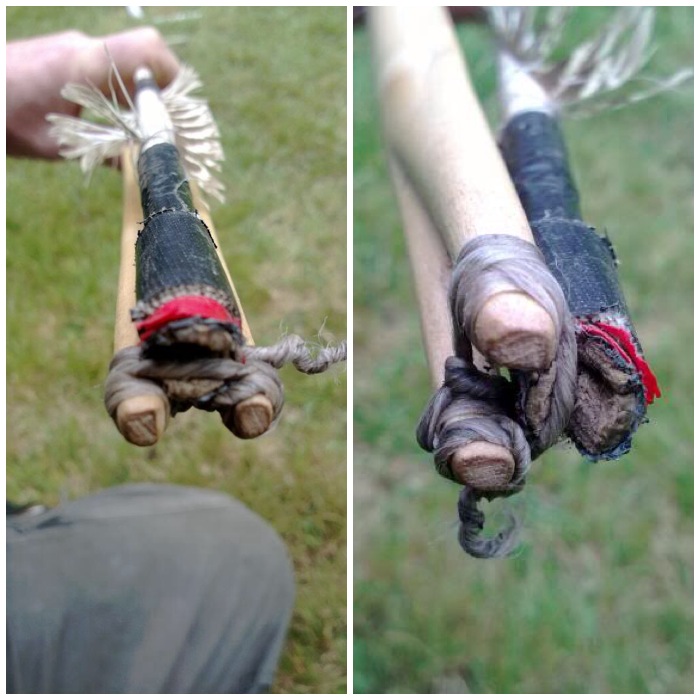
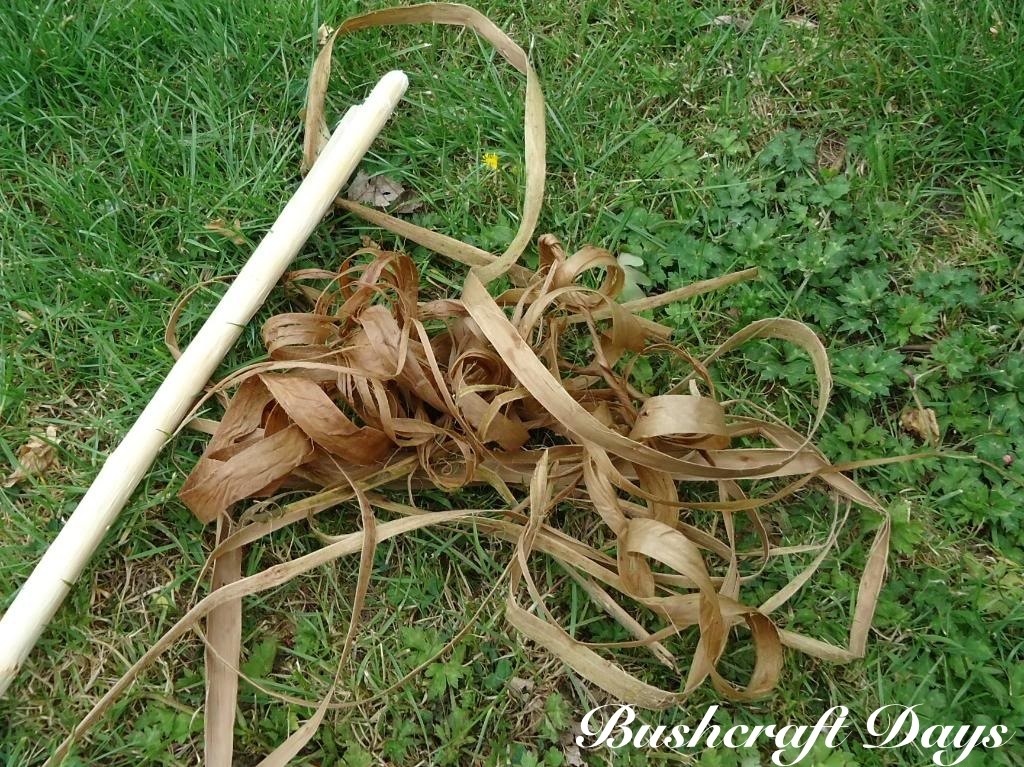
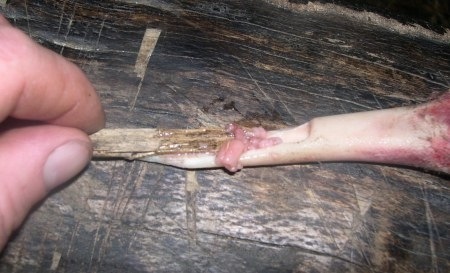
Using two sticks, one to scrape the pine pitch up and one to hold the cooling pitch, I coated the holding stick with the pitch mixture then submerged it in a pot of cold water to harden it. I would then repeat the process adding more and more layers. Using cold water speeded up the whole process.
Here you can see the pine pitch building up on the stick. This primitive method does not give you very fine pitch as you would get using a modern method but it does work surprisingly well
Creating a Pine Pitch Stick
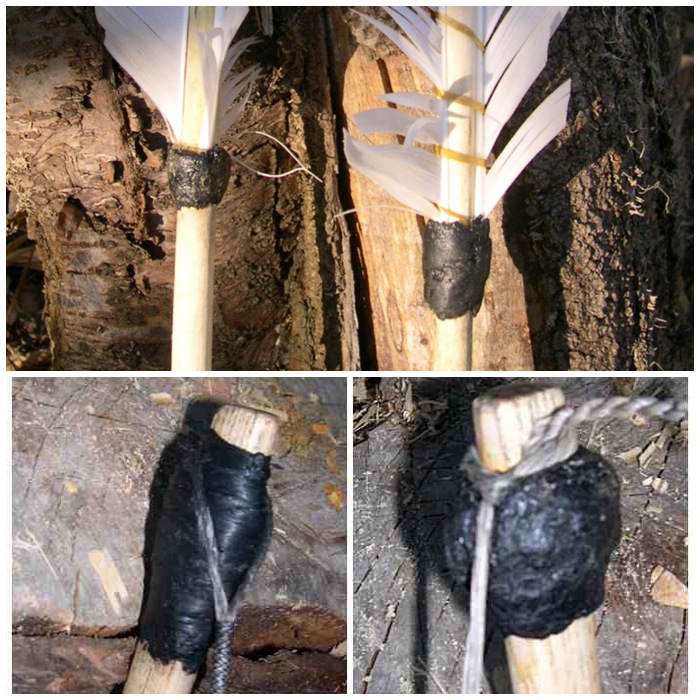
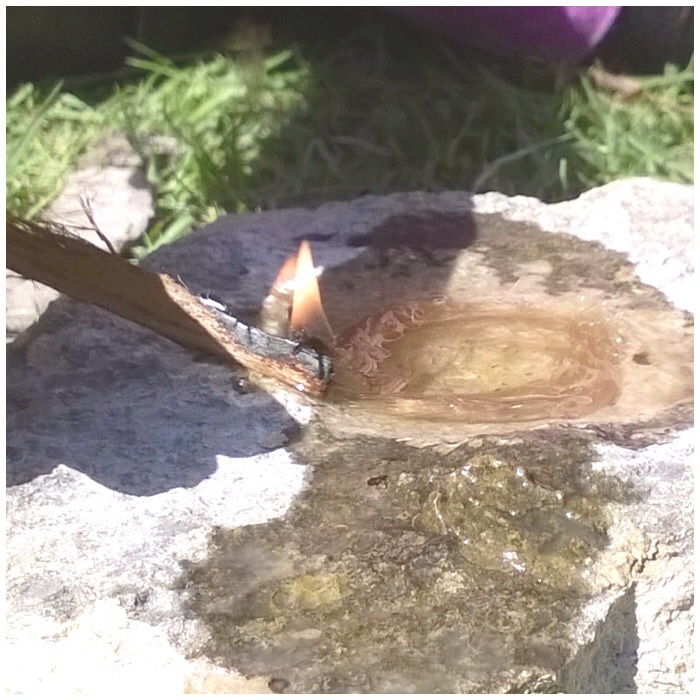
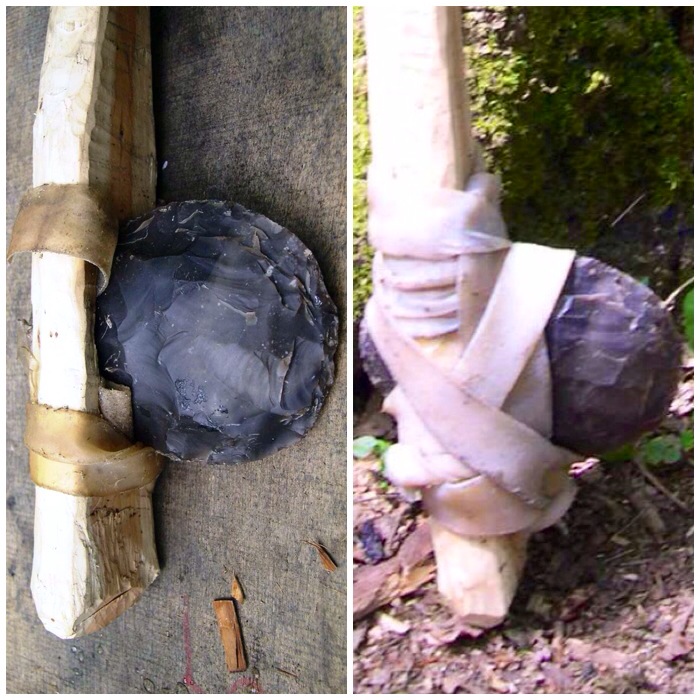
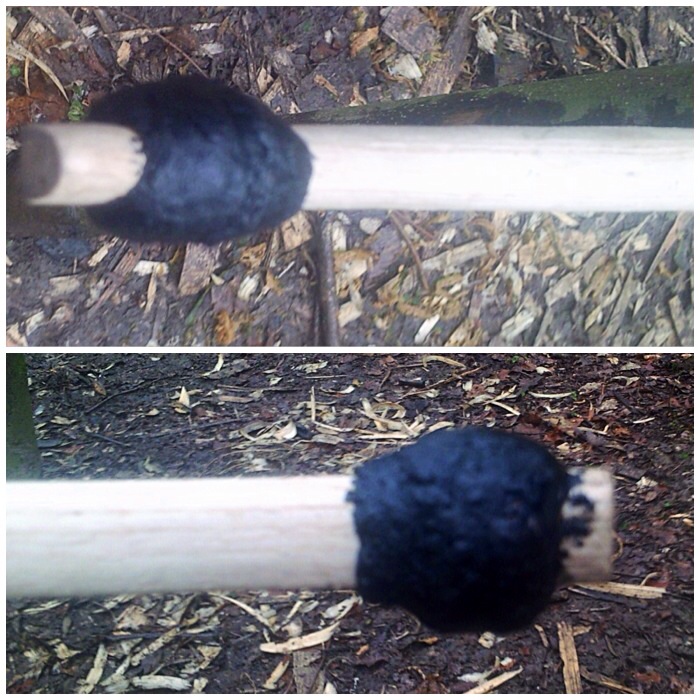
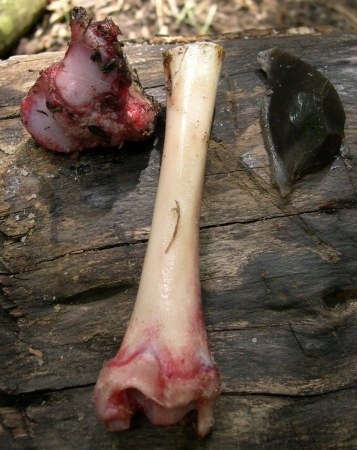
I made up two pine pitch sticks in the end. The stick on the far left has been charred and can be re-ignited quickly by dipping it into a fire to create heat to melt the pine pitch again to coat the sinew on the arrows. This protects the sinew and gives the arrow a nice finish
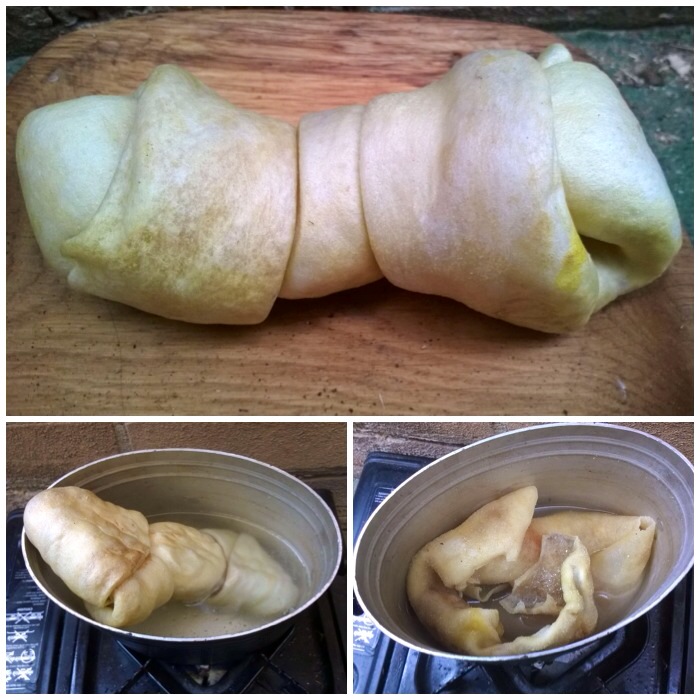
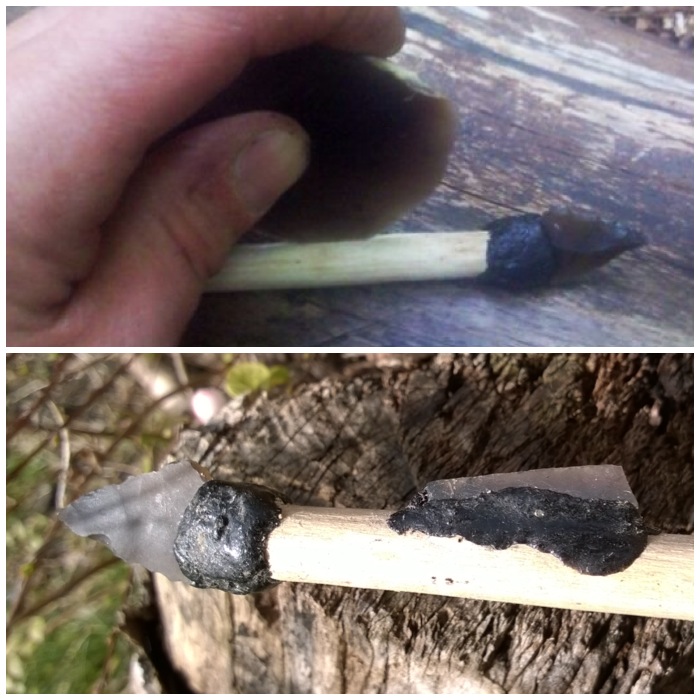
Prepping to coat the sinew
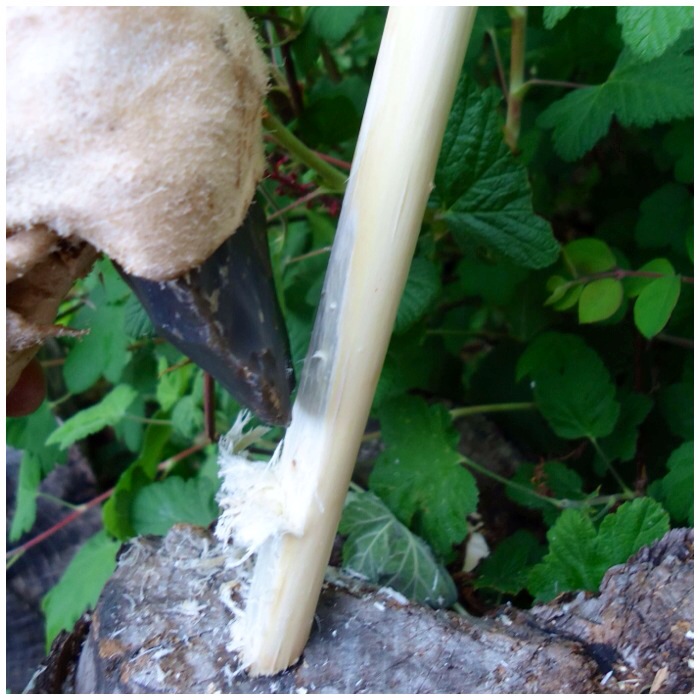
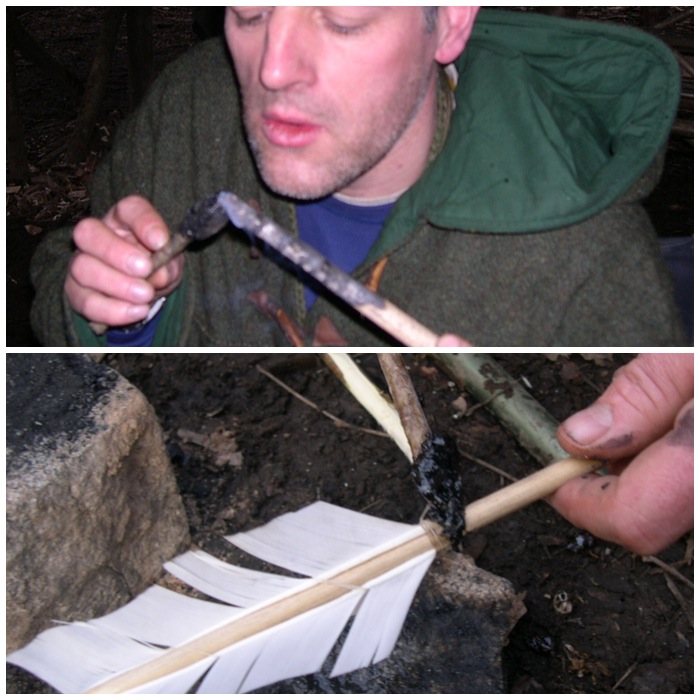
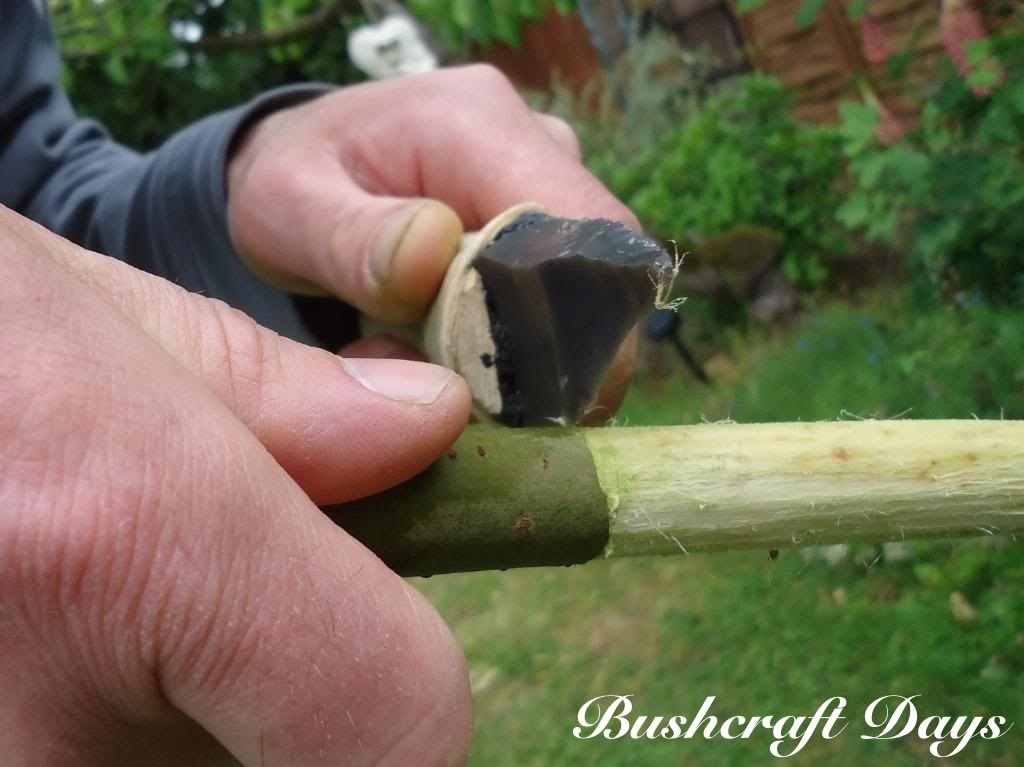
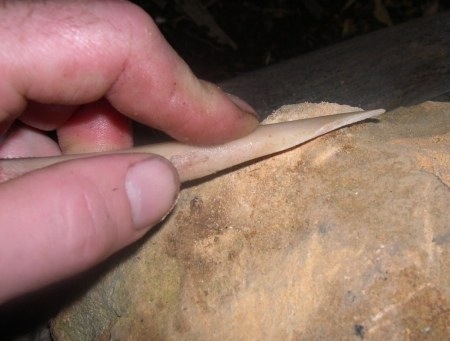
After re-lighting the charred stick I used it to to re-melt the tip of a pitch stick (top picture). I found it fairly easy to drip the melting pitch onto the area of sinew on the arrow I wanted to cover (bottom picture).
Heat and coat
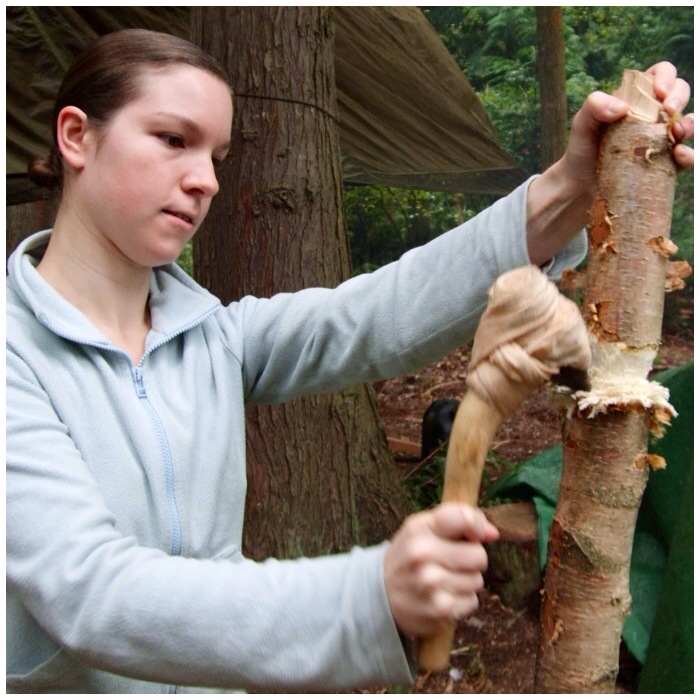
As I dripped the pine pitch onto the sinew I wet my fingers so that I could smooth the resin out and spread around evenly (John the course instructor is in the left hand picture demonstrating this). If you do not wet your fingers the hot pitch could burn you and also it will stick to your fingers (out in the woods without hot running water this is a pain to clean up).
Re-heat and smooth out
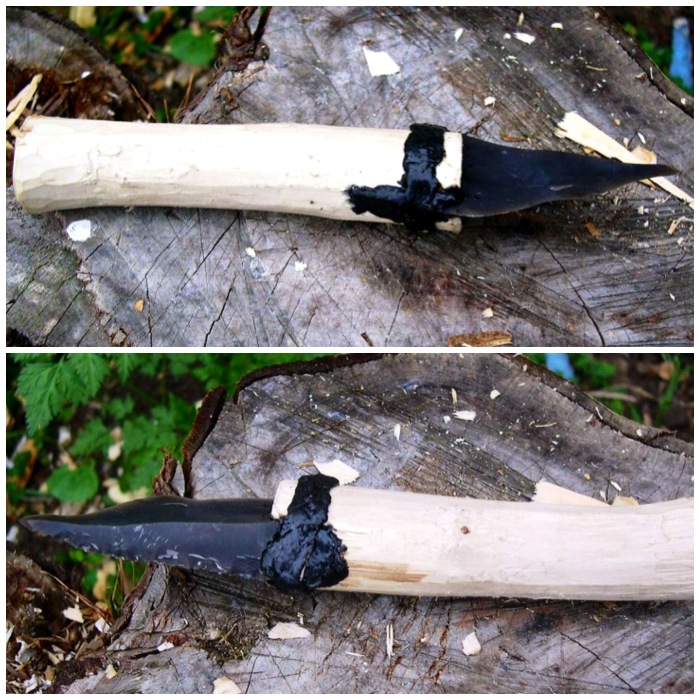
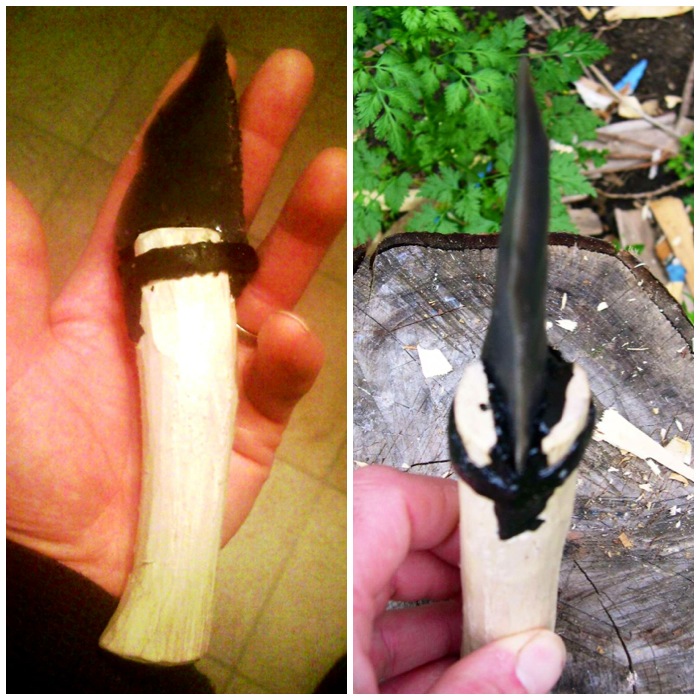
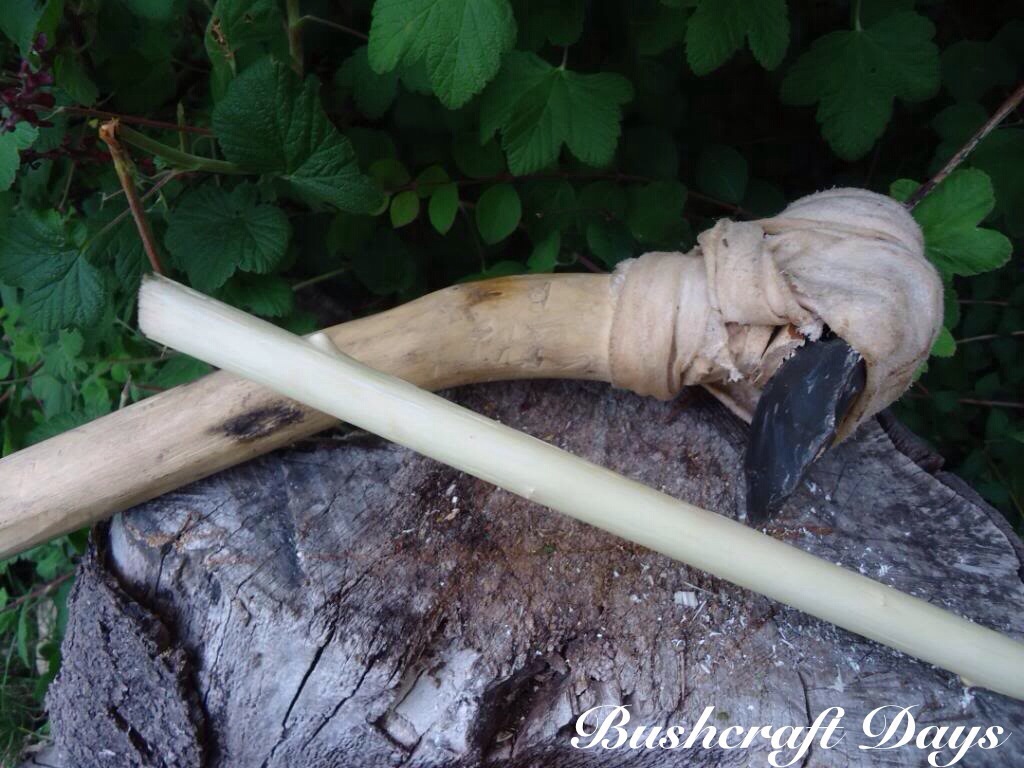
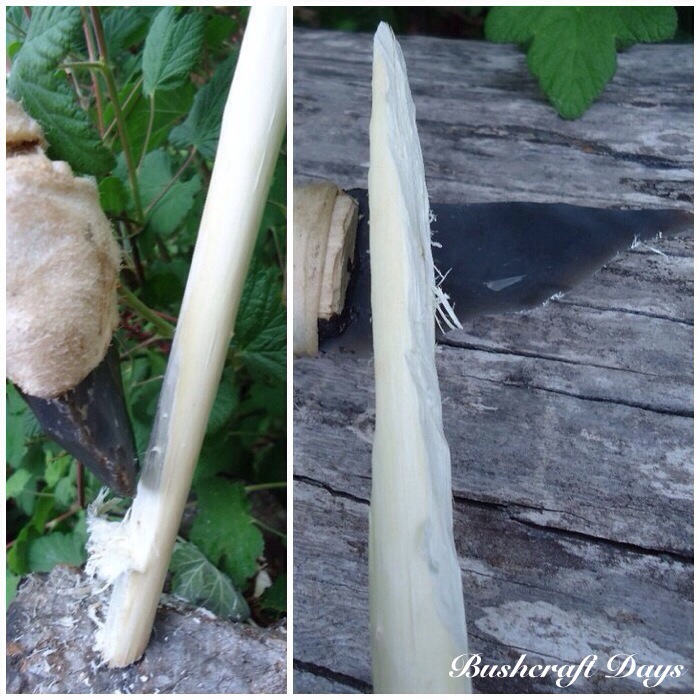
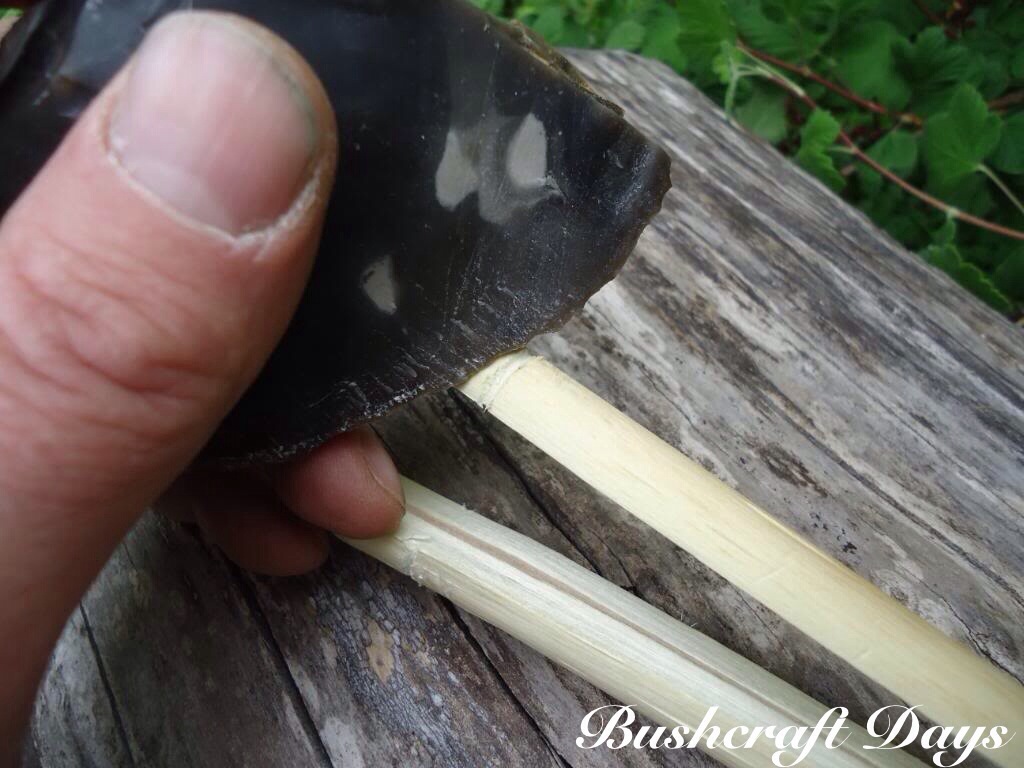
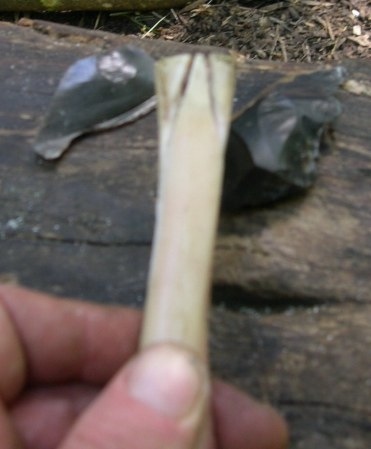
Knapping the Arrow Tips
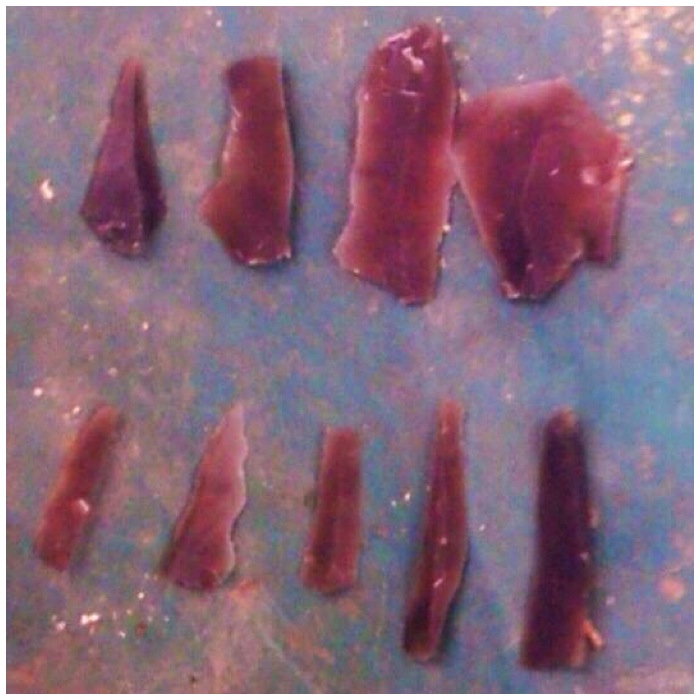
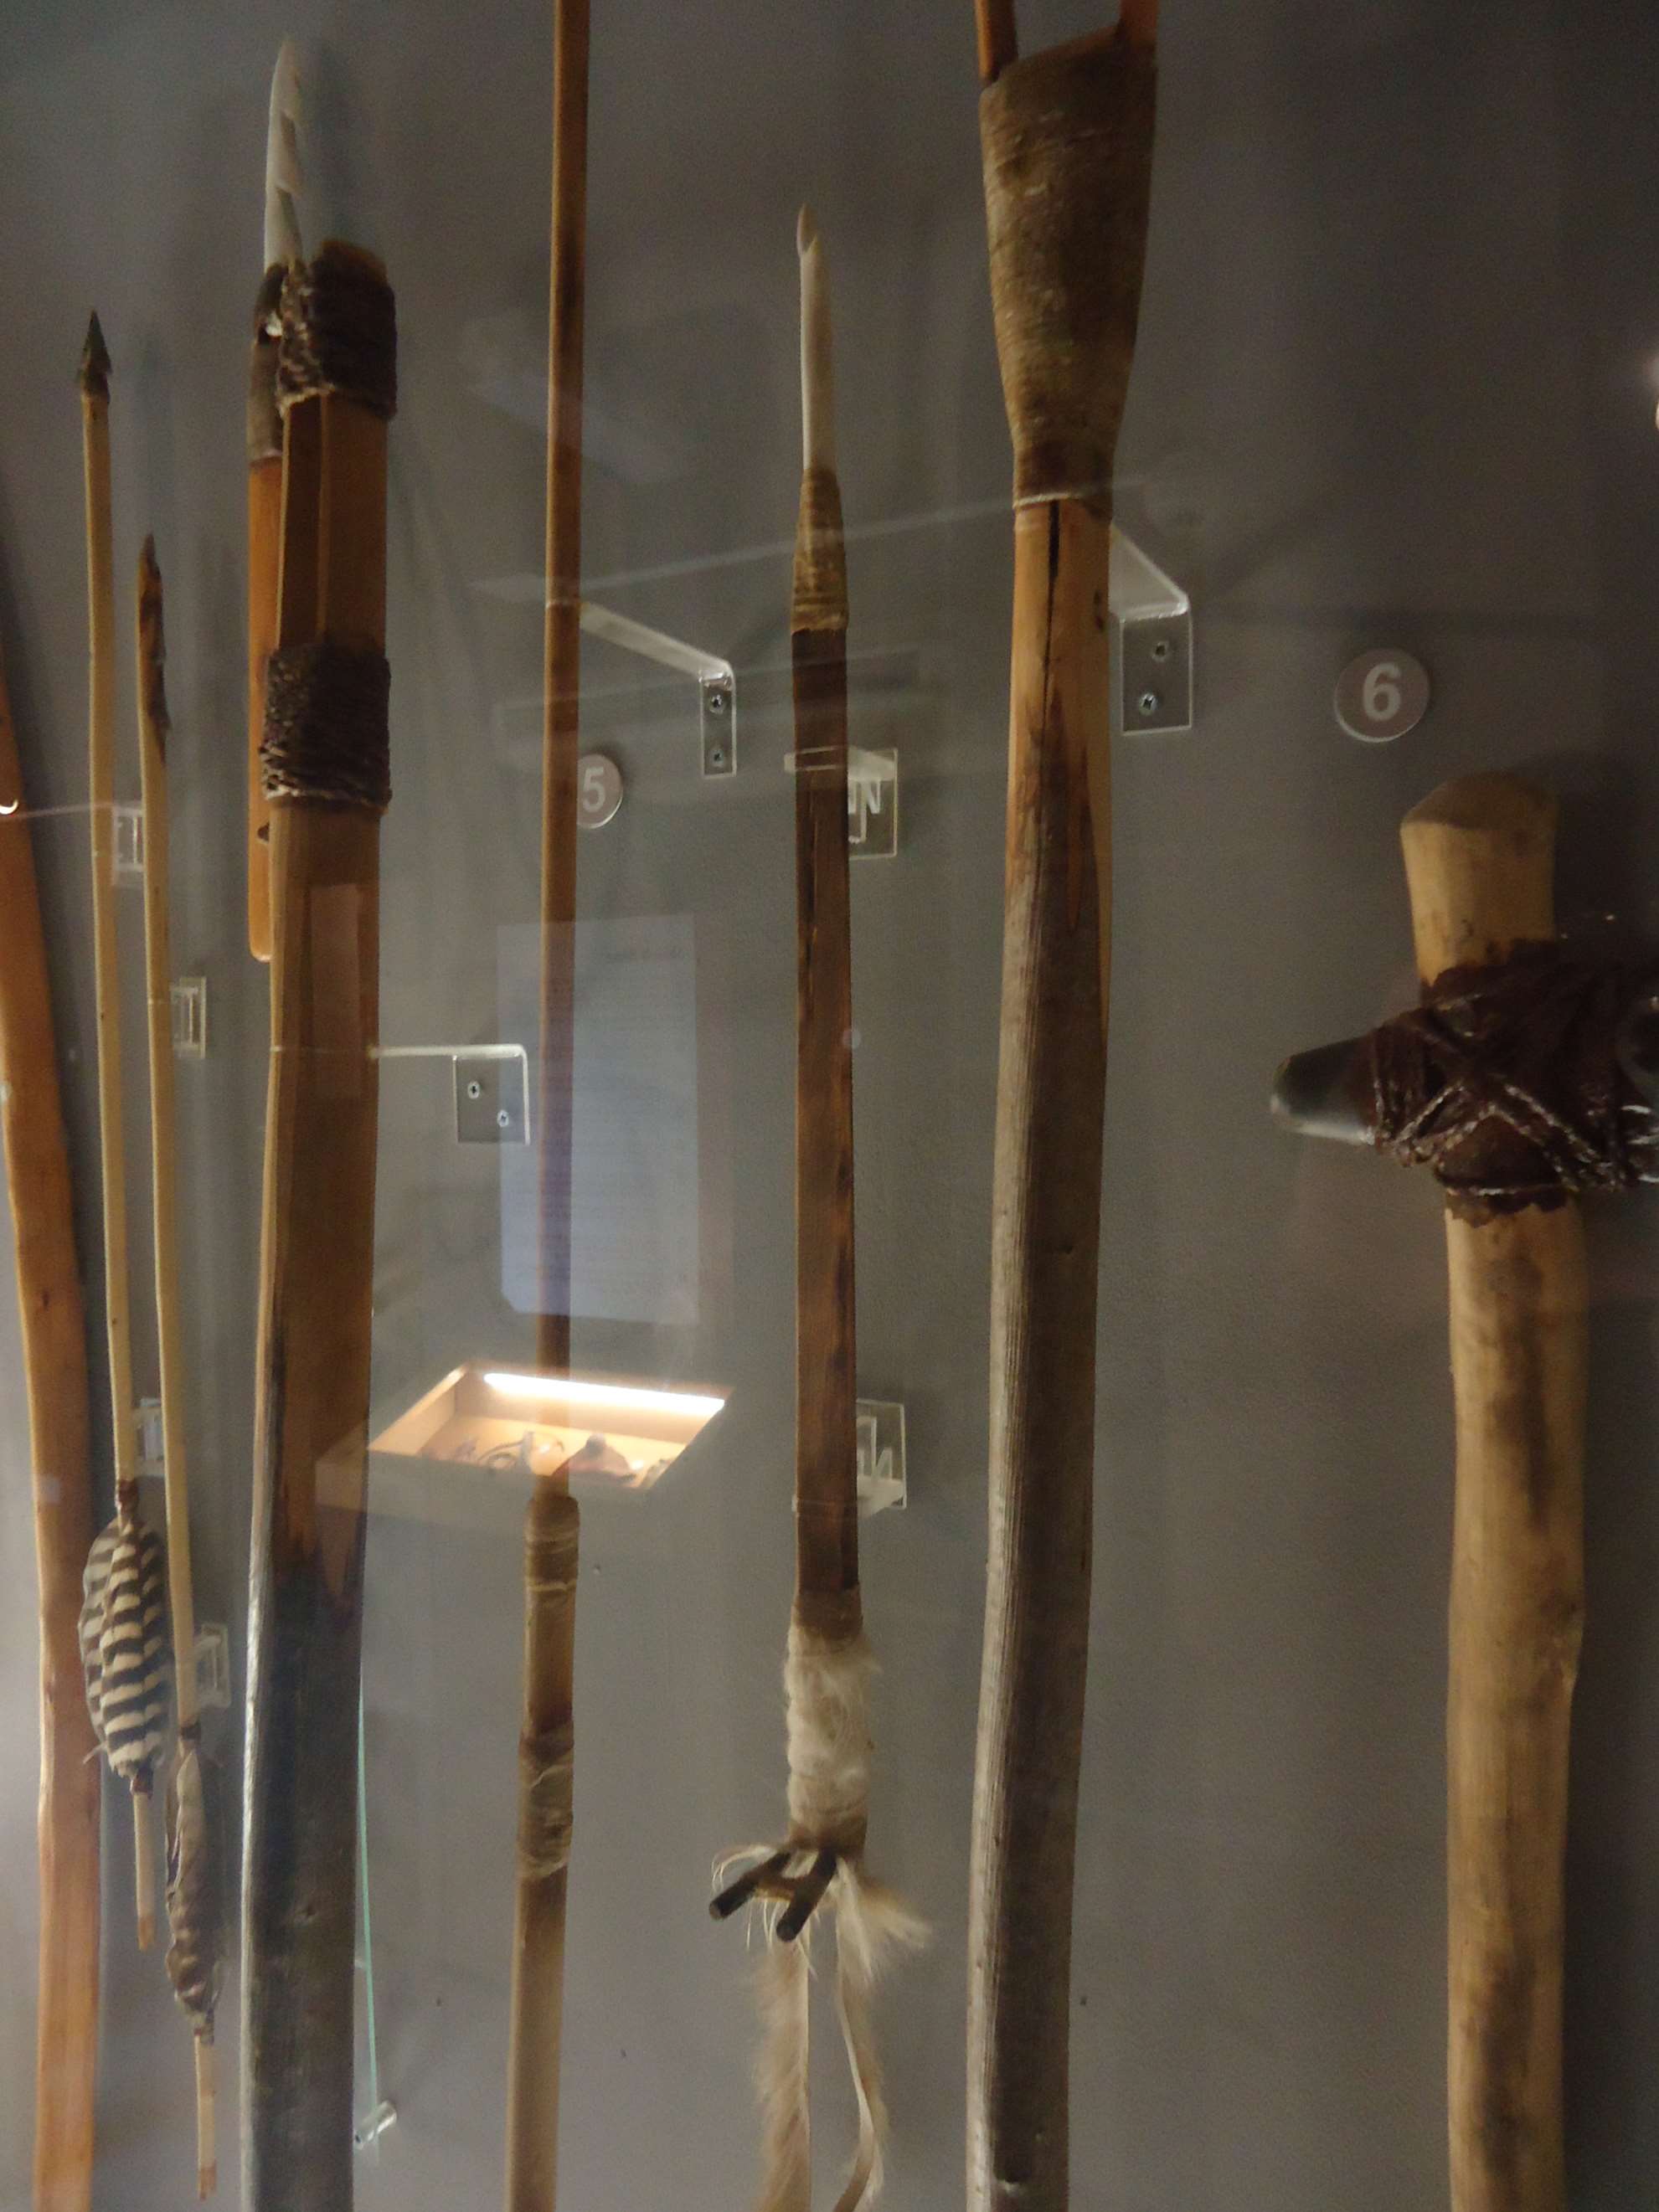
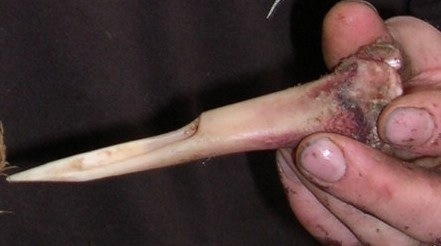
The next stage in the process was to make some arrow tips. I had collected up some shards of flint left over from the course we had with John Lord. Thankfully there was a mass of leftover flint for me to look through and choose from. All of the pieces shown below I thought could be made into decent arrow tips or barbs with the minimum of effort.
Possible points
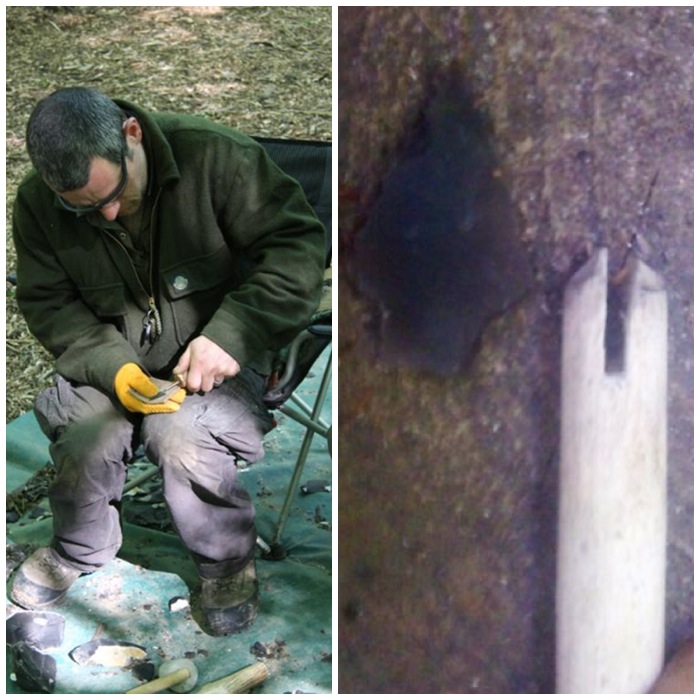
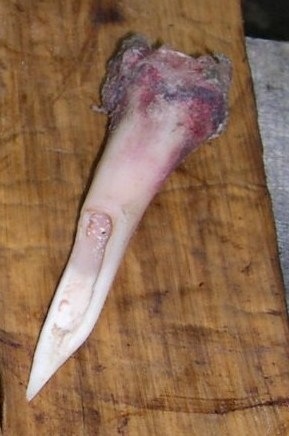
The next stage was to pressure flake the pieces with a copper tipped pressure flaker and an antler tine (I wanted to try both tools) into usable arrow heads. The glasses were worn to protect my eyes from flying pieces of flint and the glove protected me against cuts. I placed under the flint a strip of leather to give support and further protect my hand.
The picture on the right did not turn out very clear (a smear on the lens of my camera) but I soon had an arrowhead ready to insert into my arrow shaft. Using the same method as I used to make the knock, I created a groove at the arrow tip.
A bit of knapping
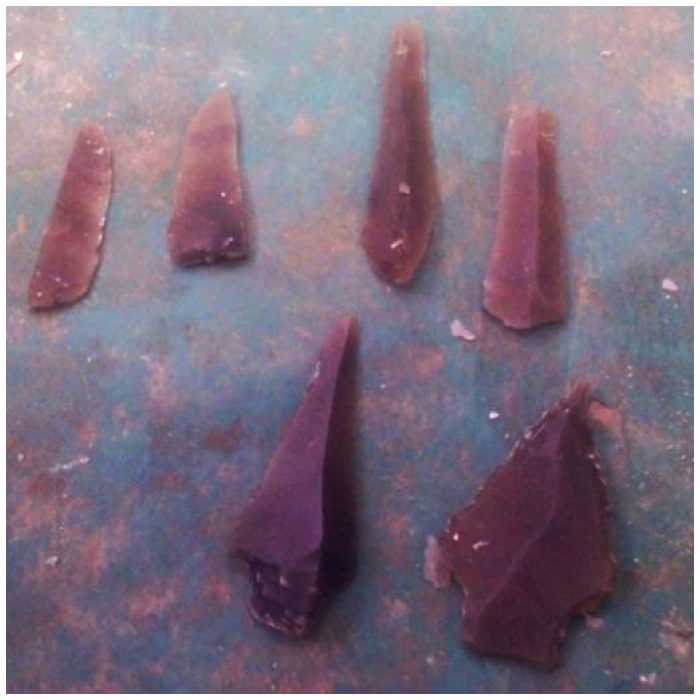
I re-worked the other pieces and after a little touching up these other flint points were ready to be used.
The rest of the finished points
Attaching the Tips
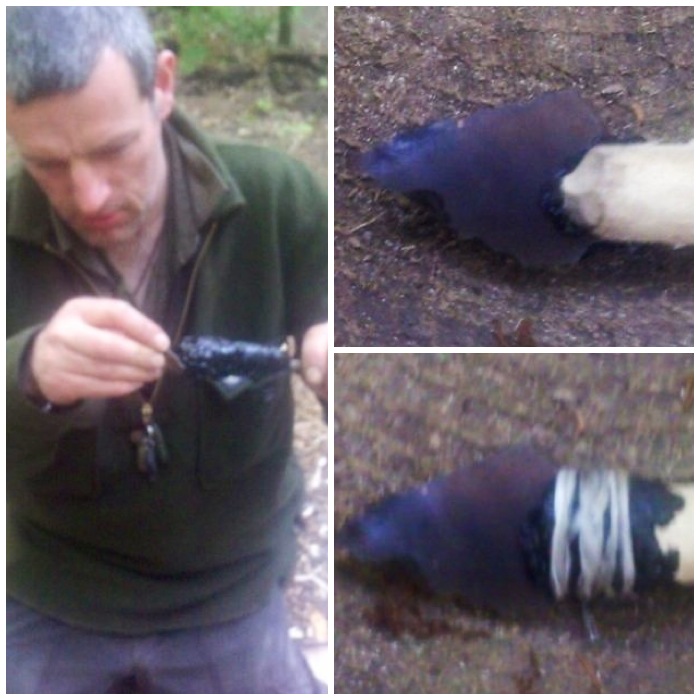
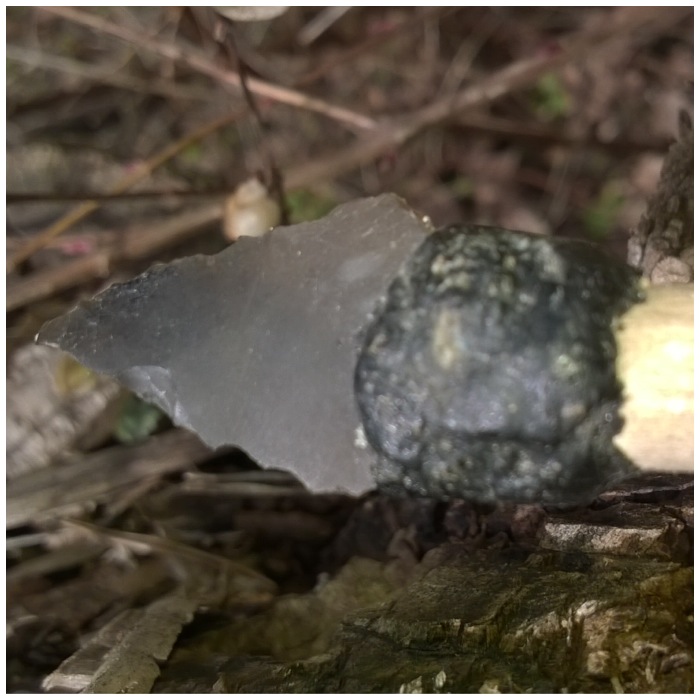
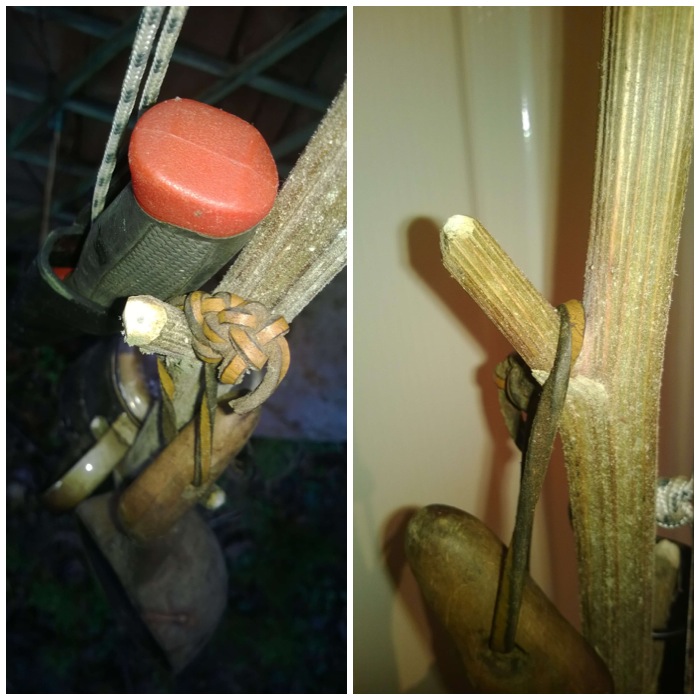
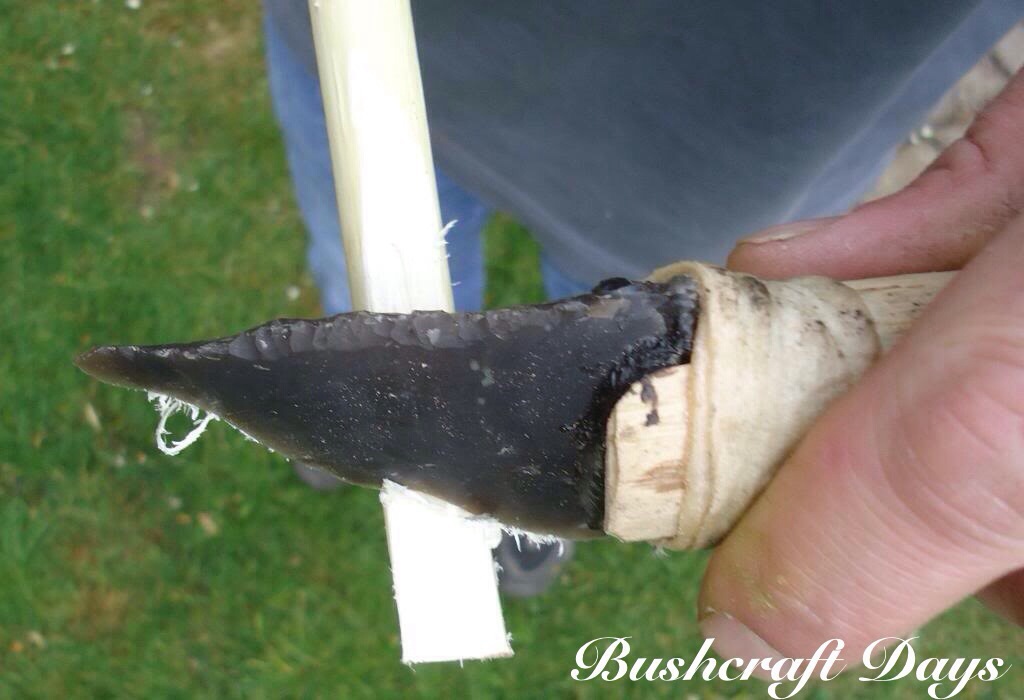
I then coated the arrowhead with some pine pitch and placed it into the groove on the shaft. I then coated the tip of the shaft in more pitch and wrapped sinew round it to keep the arrowhead secure.
Update 13/03/2014 – I have been advised by one of the Primitive Arts Society members David Colter that it is very important to securely bind the shaft immediately below the point for a length of about a centimetre to prevent it from splitting on impact and failing to drive the point into the target. There is a very good experiment showing this in the Traditional Bowyers Bible Vol 3. I did not bind it for a full centimeter in my example (thanks for the update David).
Attaching points
I finally added more pitch to cover the sinew to waterproof it all.
Well attached
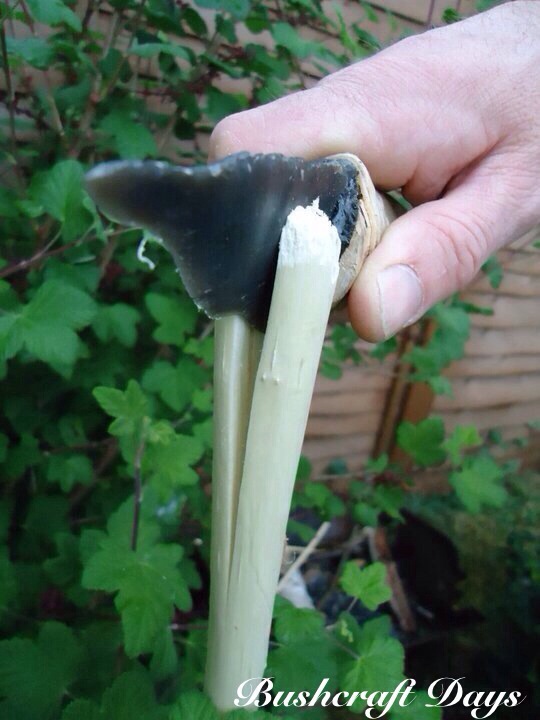
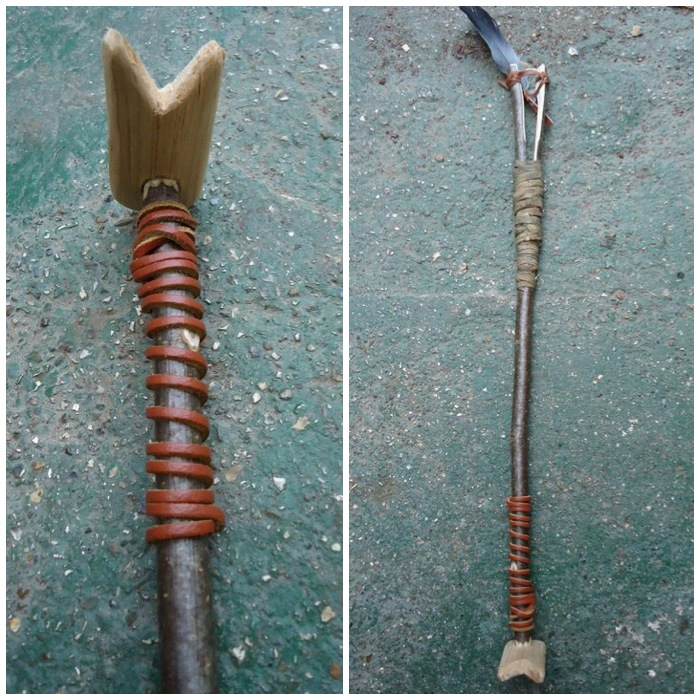
Based on archaeological evidence I decided to add a barb to the arrow. I firstly scraped a groove along the arrow shaft then put some pine pitch into it.
I then placed a long thin piece of sharp flint onto this pitch and coated more around the base of it (bottom picture) The barb is designed to cause maximum damage to the prey animal as the arrow enters its body.
Attaching a barb
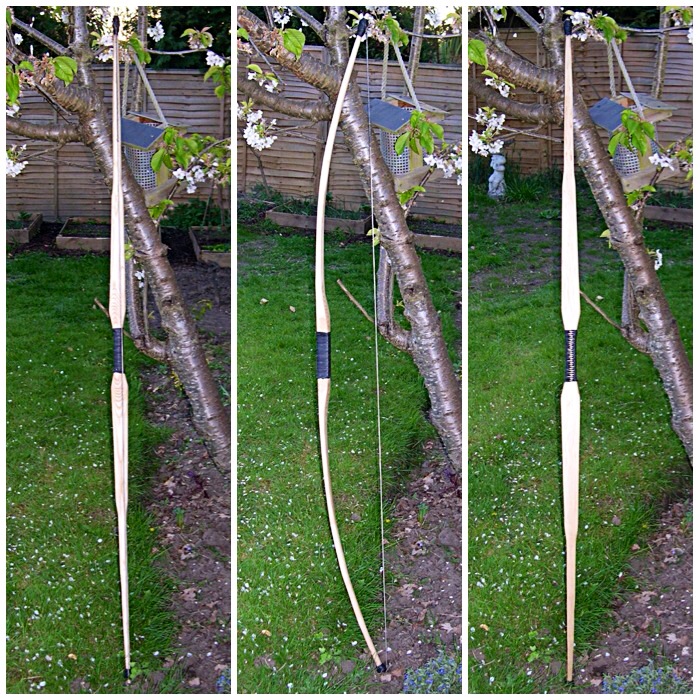
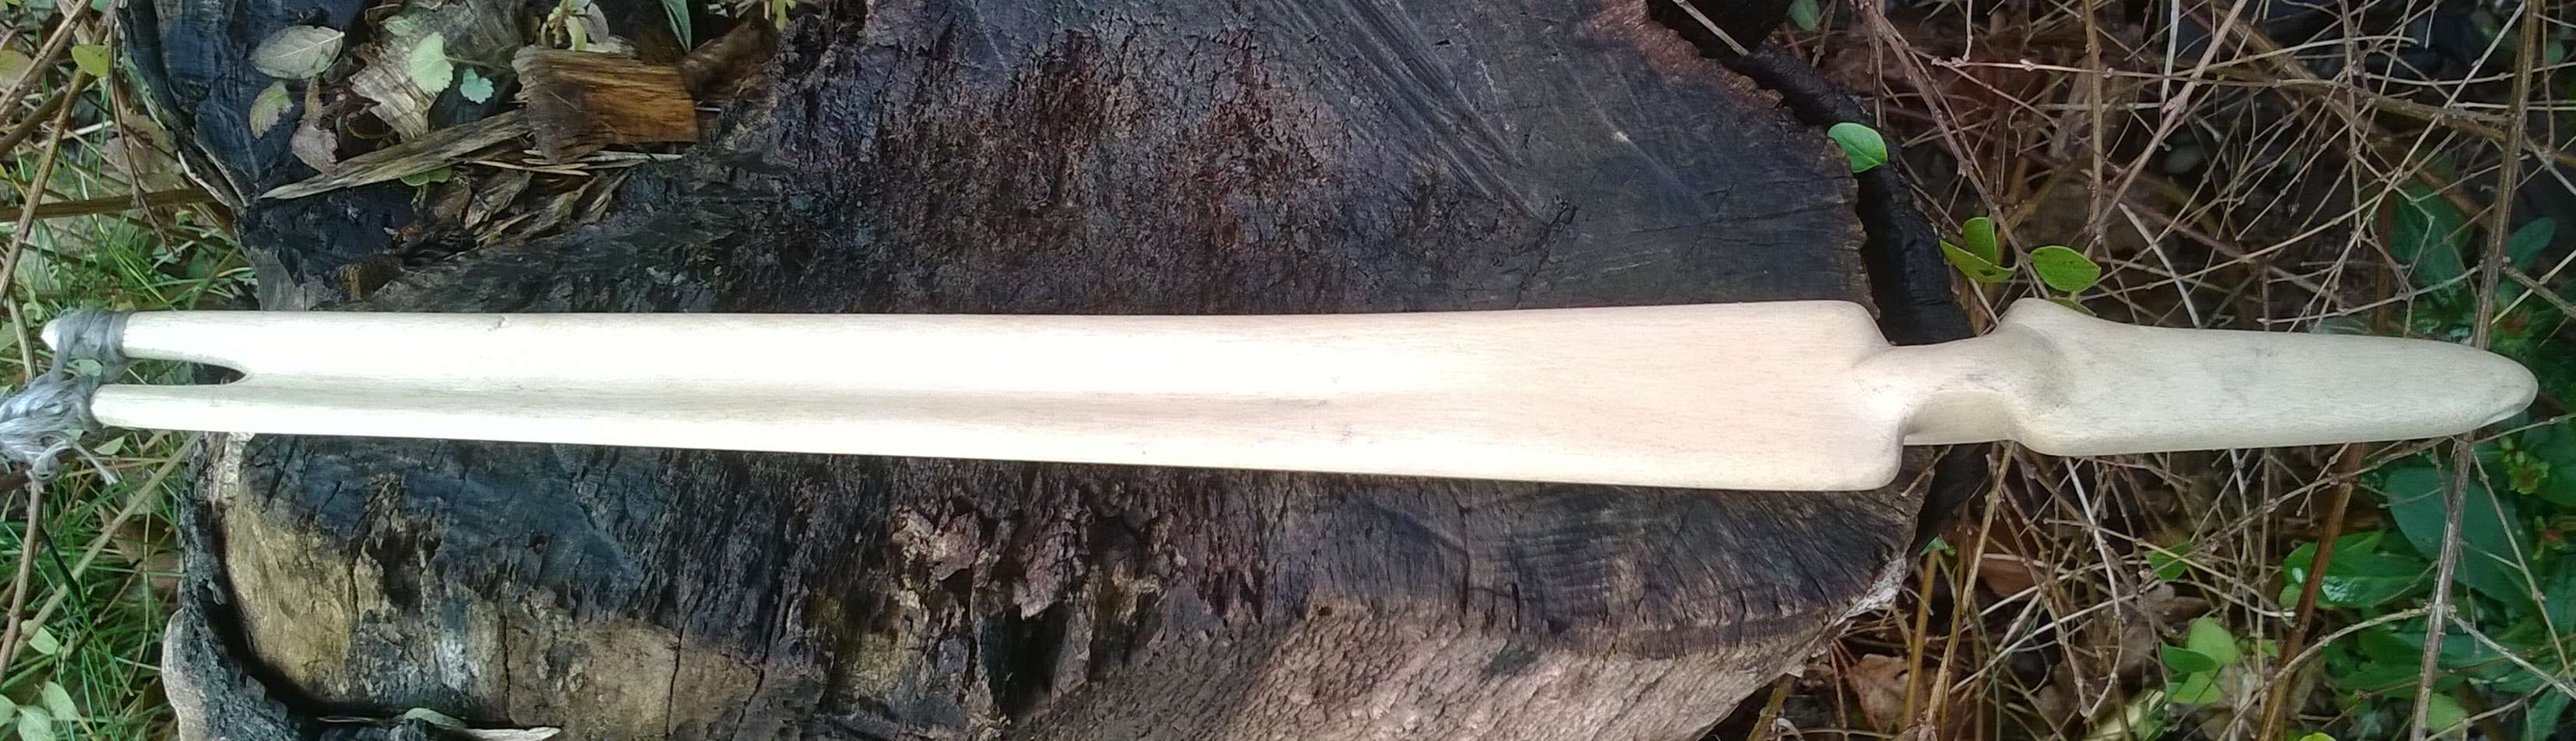
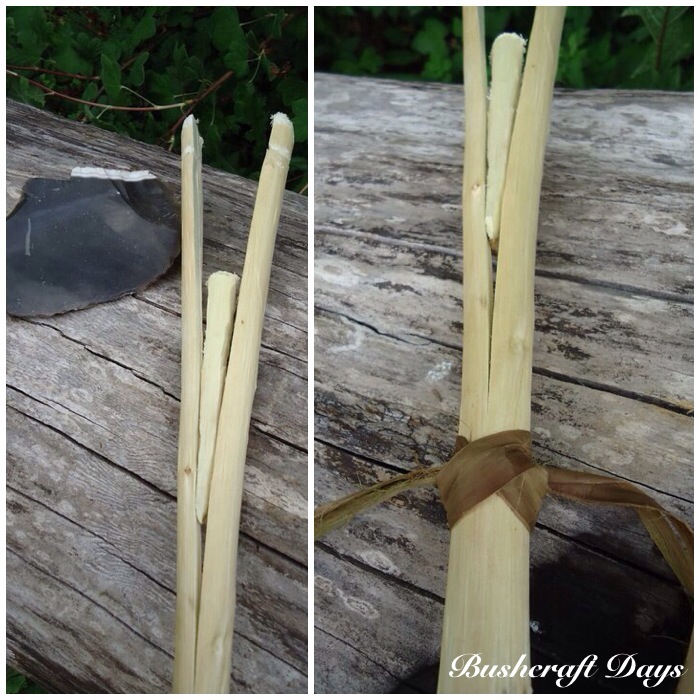
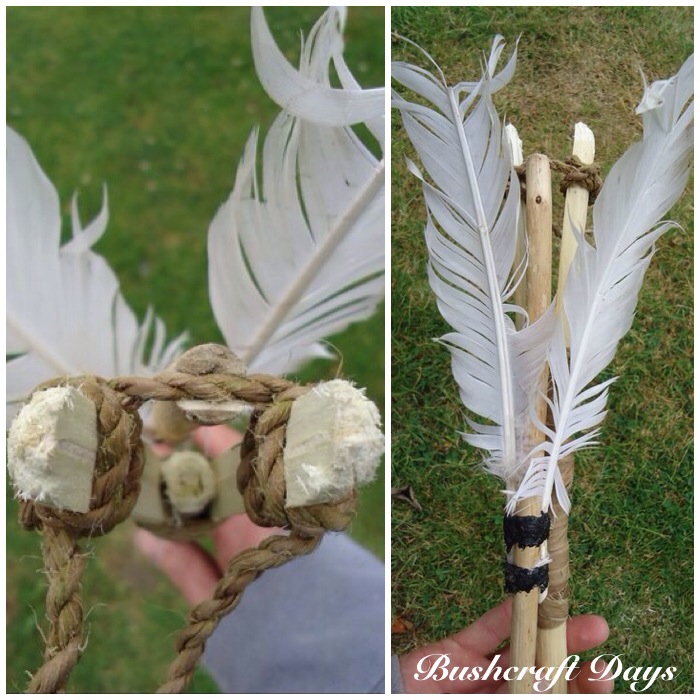
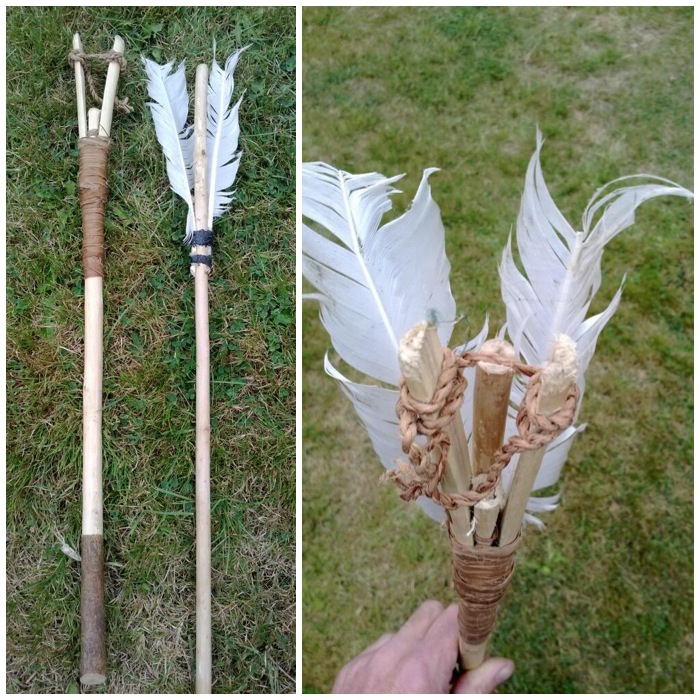
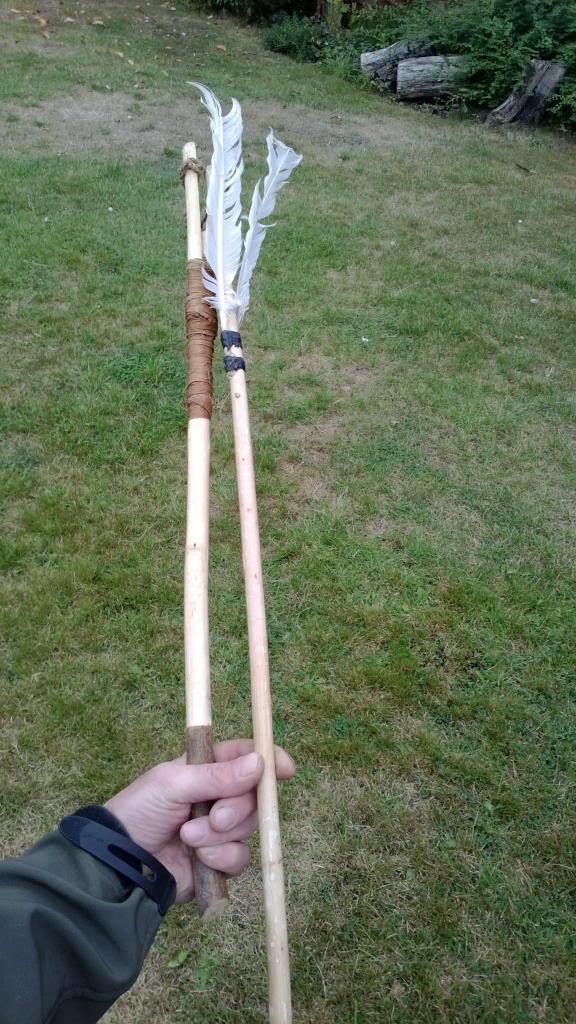
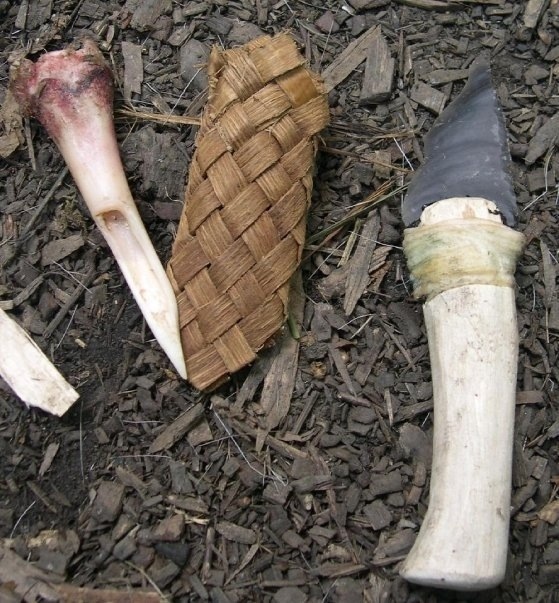
I finished two arrows in this project. The one I completed for this tutorial is the one on the right.
Finished arrows
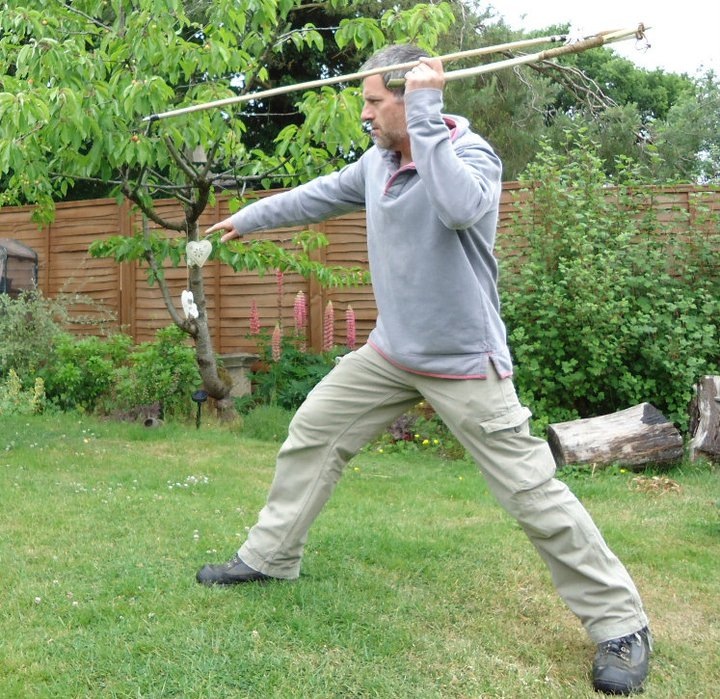
Using similar techniques I was able to produce an Atl atl set as well.
Atlatl extras
I have never shot these arrows at a modern target as I don’t want to break off the tips but I did shoot them into some bales of loose hay and was very impressed with their accuracy.
This was a great project as it introduced me to some primitive but very effective techniques in arrow making.
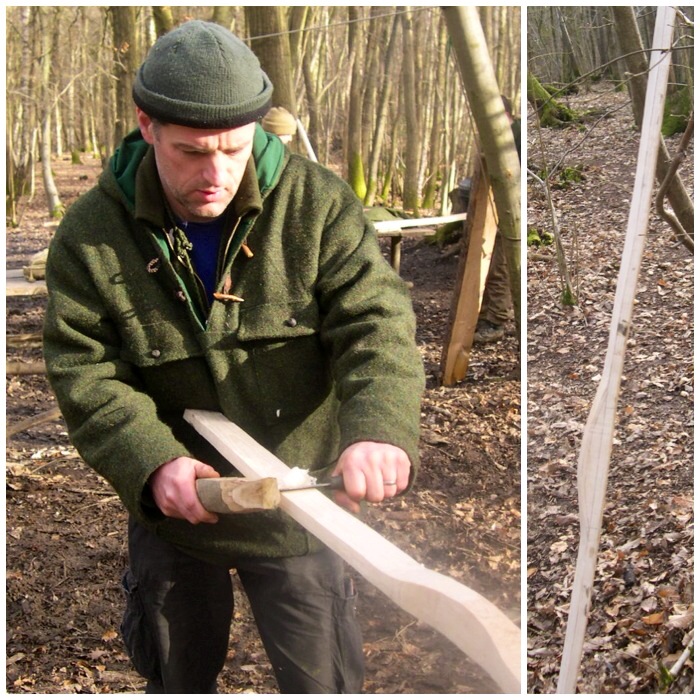
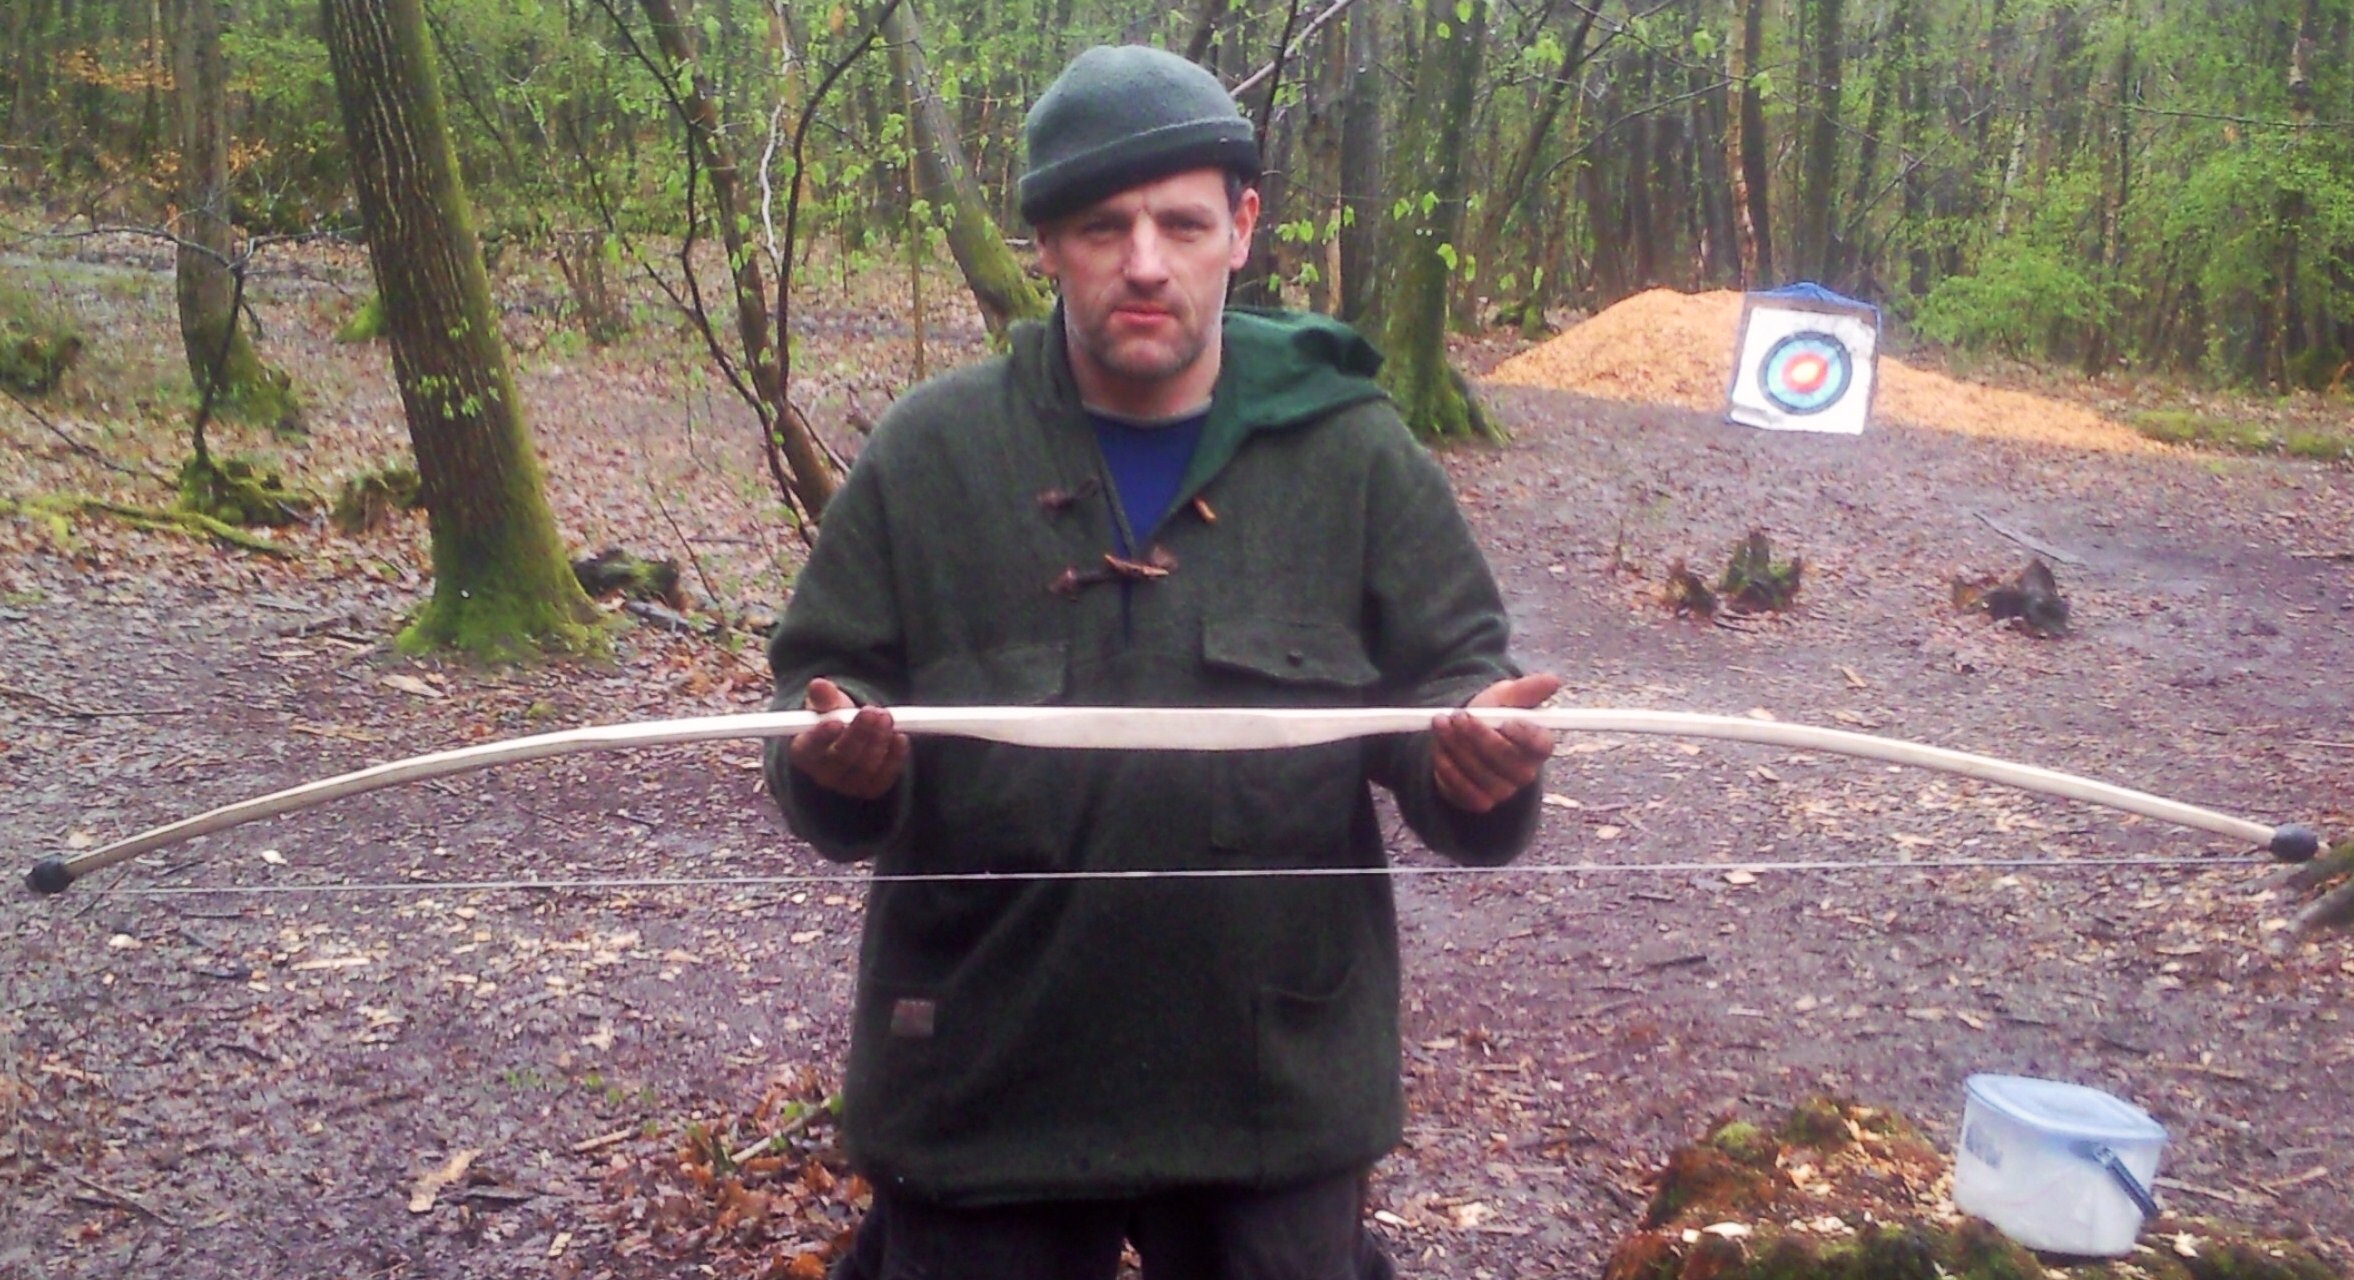
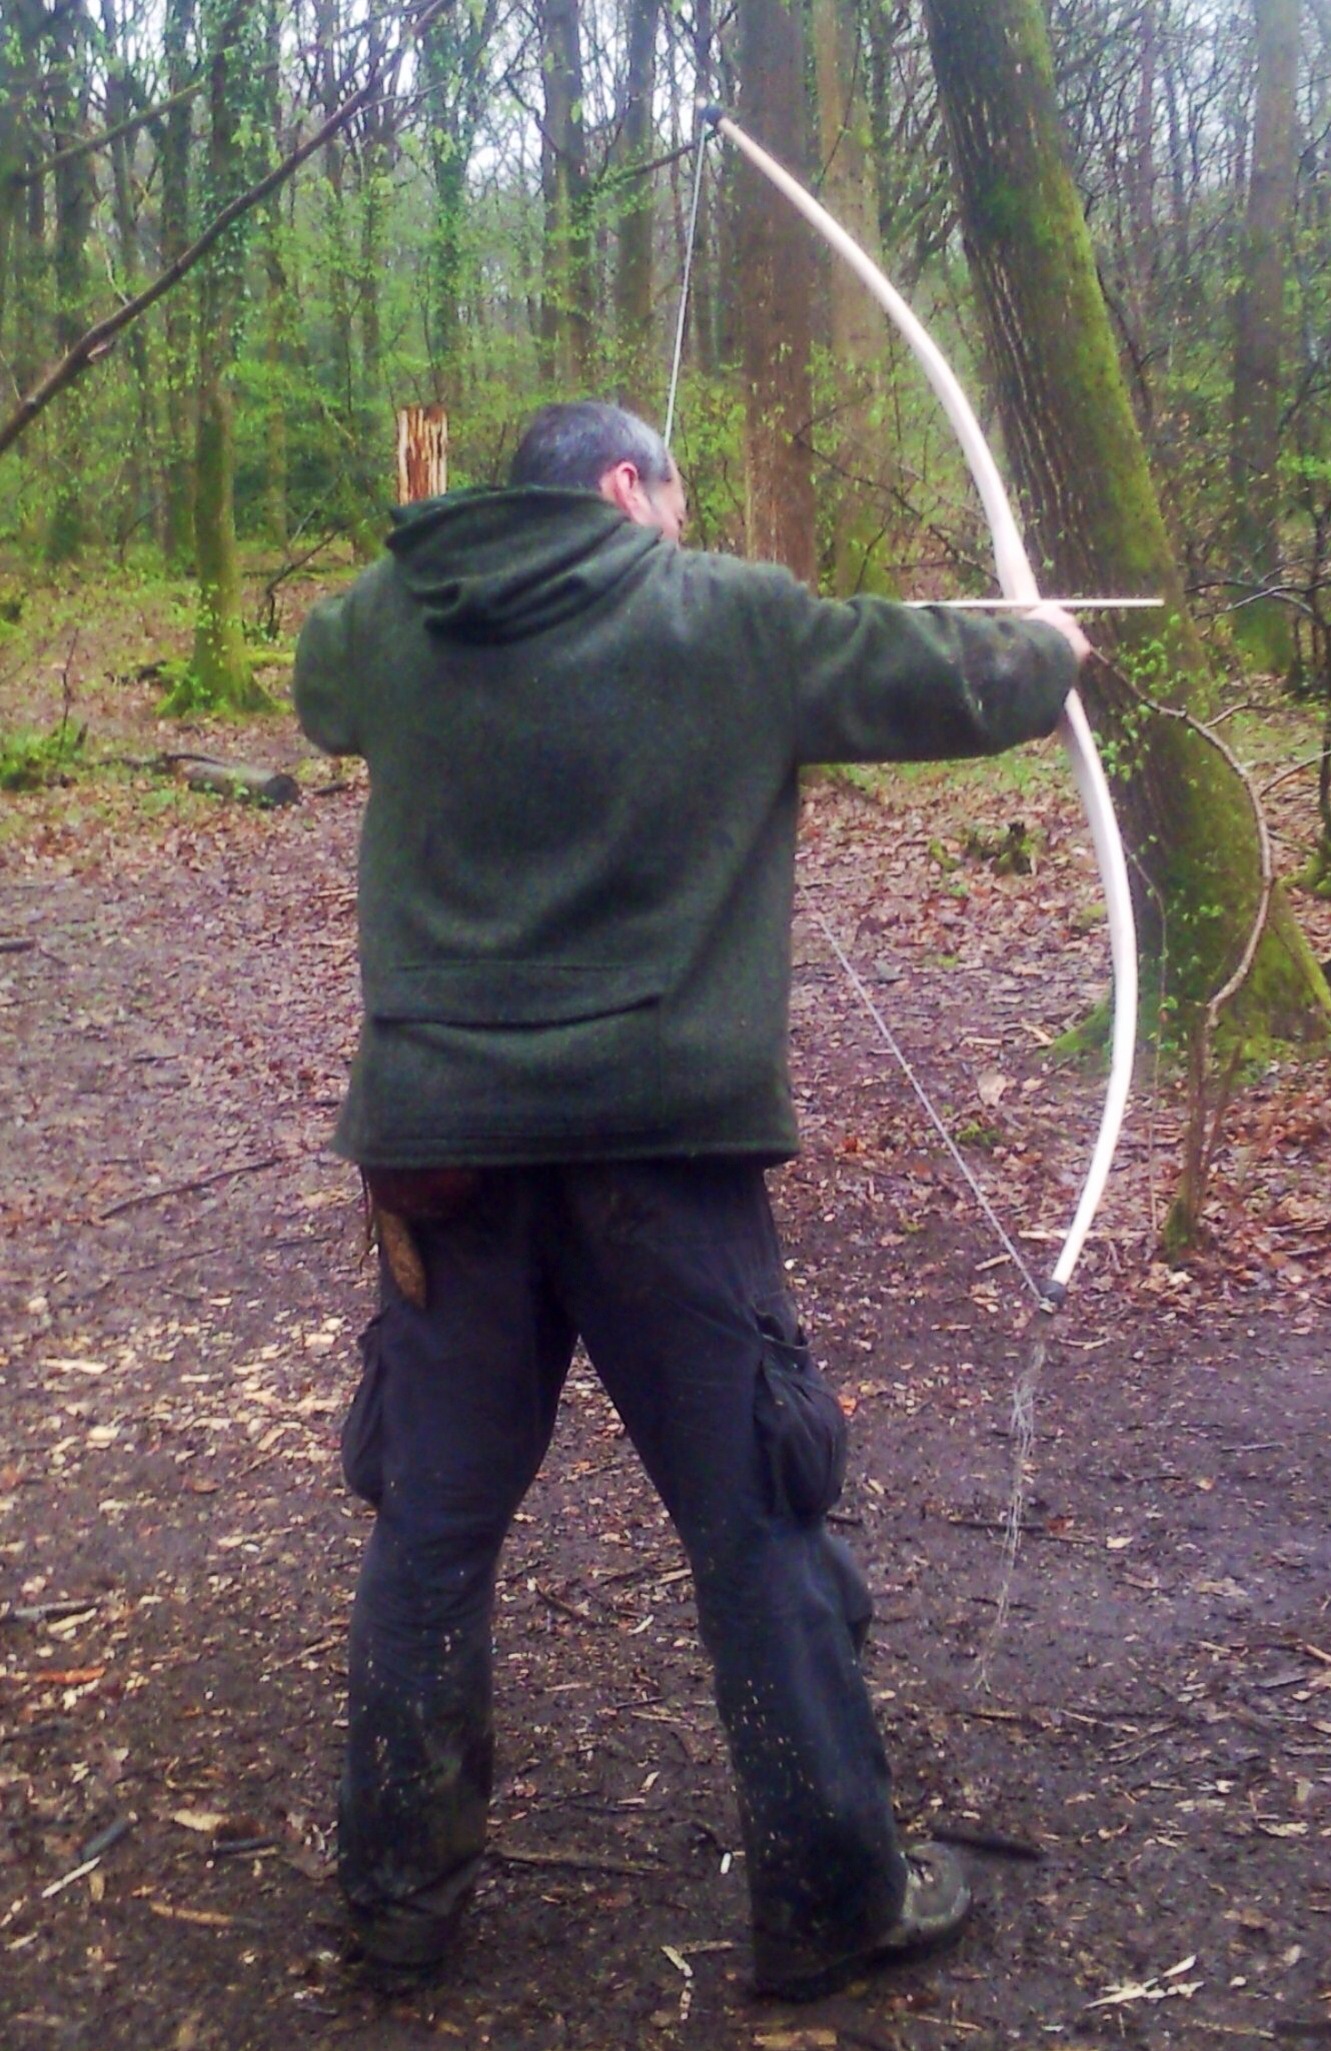
The second bow I ever carved was a Holmegaard-style bow made out of ash. The bow on which I based my replica was found in a peat bog in the Holmegaard area of Denmark in the 1940s and is thought to be over 9000 years old. I made this bow while studying at John Rhyder’s Woodcraft School doing a Primitive Technology course. The wood that was available to us at the time for bowmaking was ash but the original bow found in Holmegaard was made of elm. The bow is a mixture of styles with the limbs that have a flatbow shape for half their length and ‘D’ sectioned like a longbow on the limb tips.
The Holmegaard
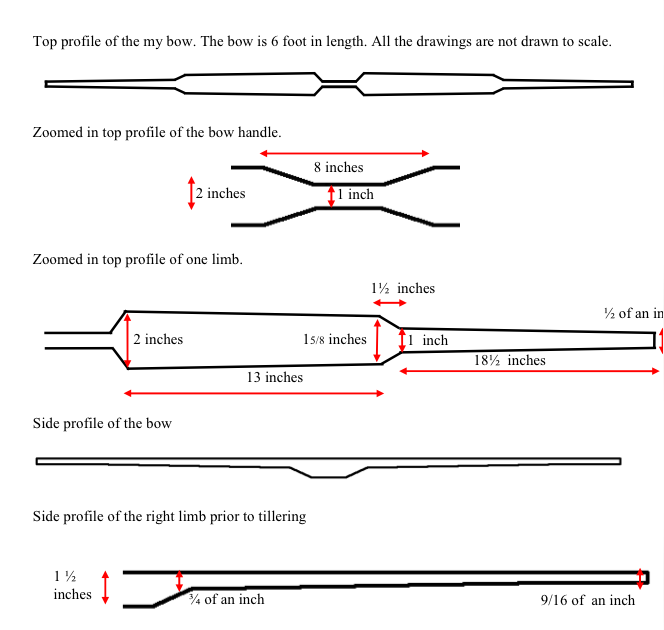
I really like this bow as it is very light in terms of draw weight but fast and whippy when it shoots owing to its ‘D’ sectioned tips. I have included in my previous post on Carving an Ash Flatbow explanations on different bow terminology and the differences between flatbows and longbows. Below are the rough dimensions I made my bow to – I tried to replicate the dimensions of the original bow as much as possible.
Holmegaard dimensions
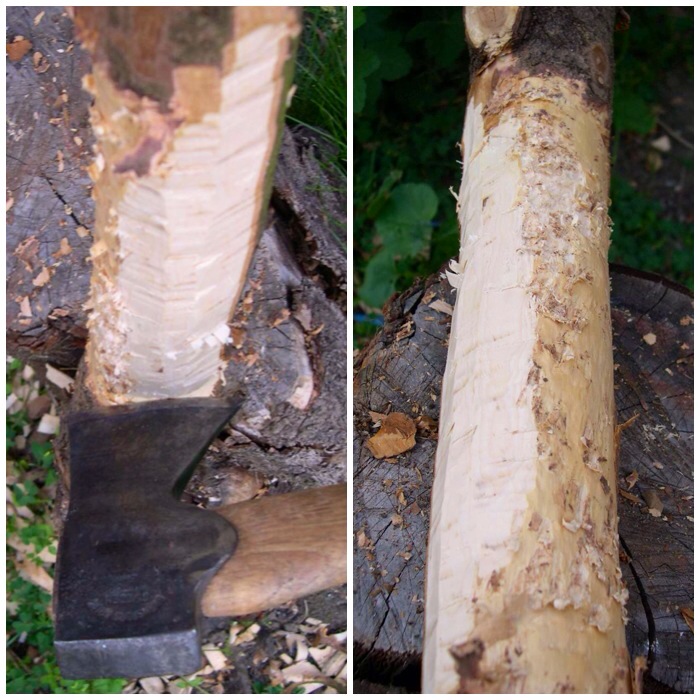
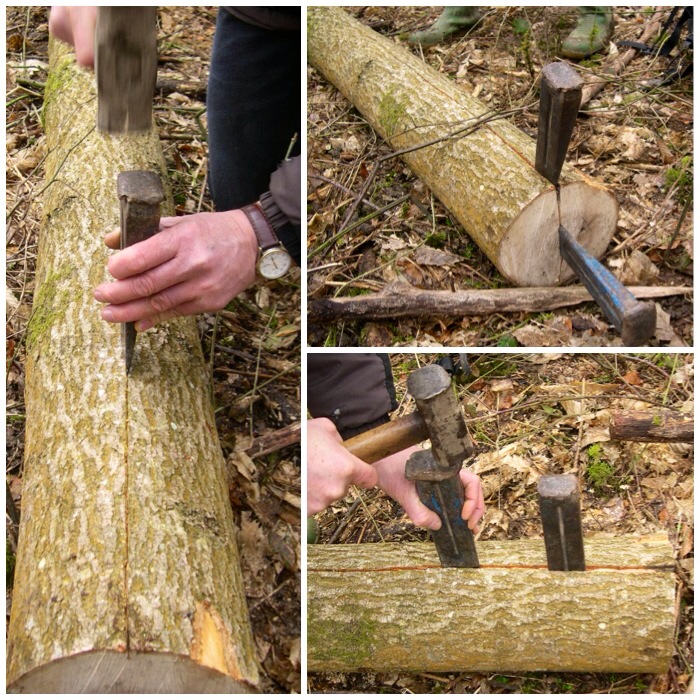
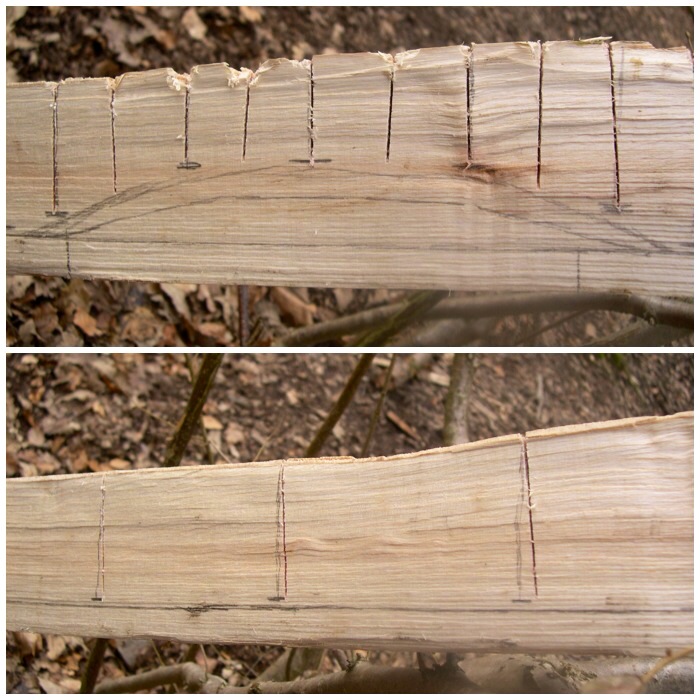
An ash tree had recently been felled and a section of the trunk cut down to just over 6 foot. I scored a line in the bark with a wedge down to the wood to help with guiding the split of the log. Note that the wedge is positioned to one side of the person scoring the line. This maintains a safe position for the worker. I then drove a wedge into the scored line to start the split at one end of the log (upper wedge in the top right picture). A second wedge was driven in at the base of the log to further split the log (lower wedge). Putting in the second wedge loosened the first wedge so I pulled it out and drove it in further down the line to widen the split.
Start of split
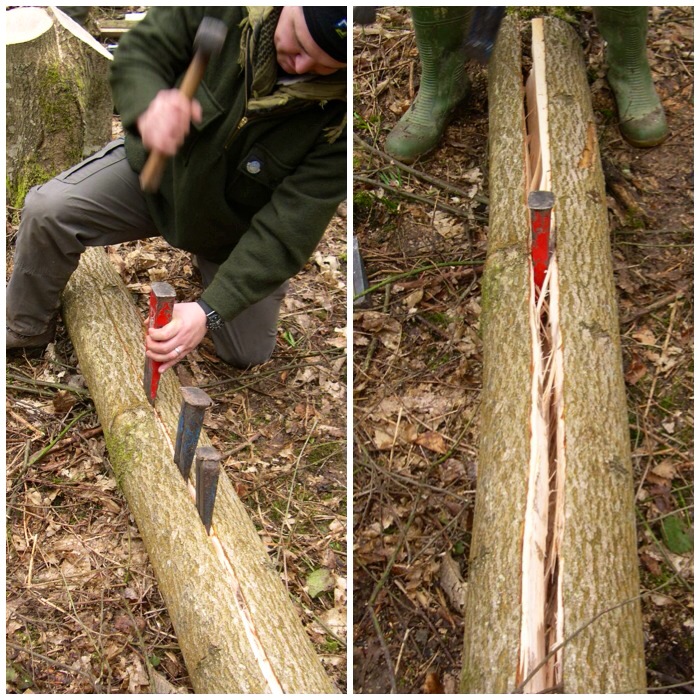
I just kept repeating this process of ‘leap frogging’ the wedges, and the scored line helped greatly with controlling the direction of the split.
First complete split
Once the log had been split I kept repeating the process again and again until all the staves were split out.
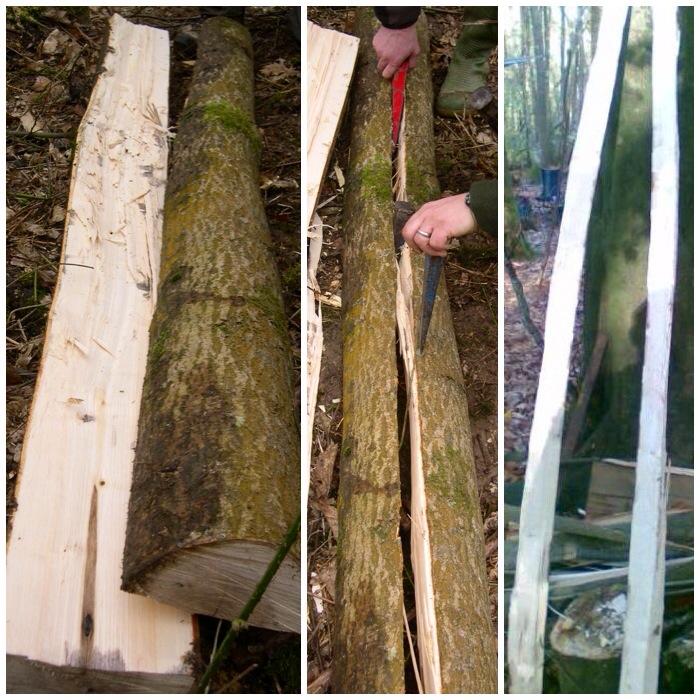
Finished staves
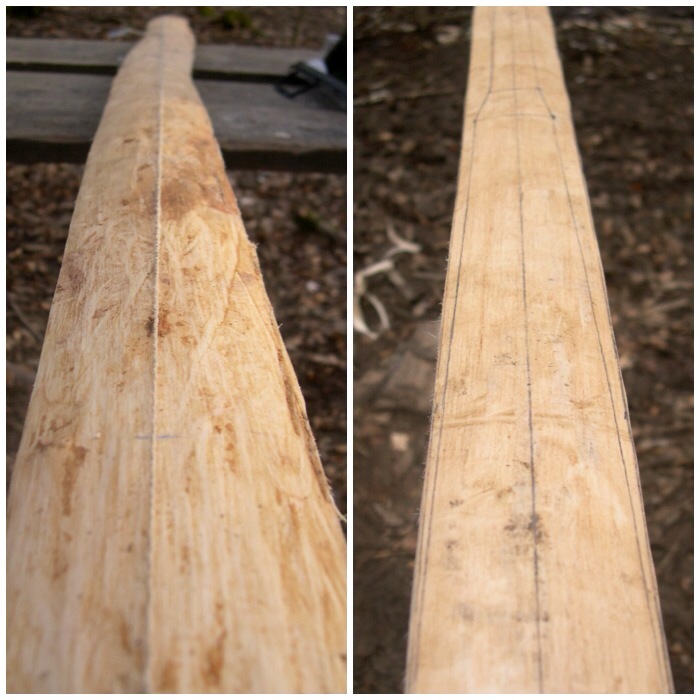
Using a wooden wedge I shaved off the bark of the stave. I was very careful to remove only the outer and inner bark and not to touch any of the wood. The wood found just under the bark is the most flexible part of the bow and will form the back of the bow. Apart from light sanding this area of the bow will not be touched.
De-barking with a wedge
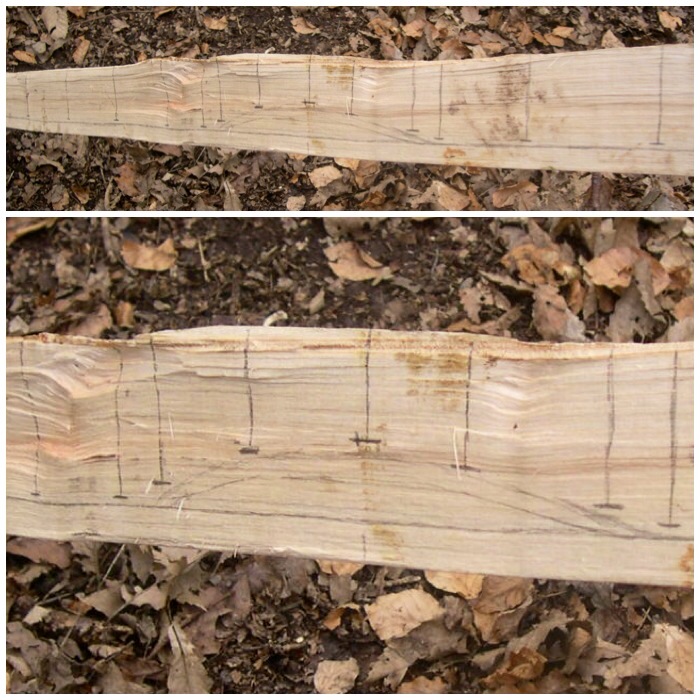
This is the side profile of the stave (top picture). The side profile has been roughly drawn out leaving plenty of room for error. A close up of the handle area can be seen in the bottom picture and the vertical lines are for the stop cuts.
Side profile
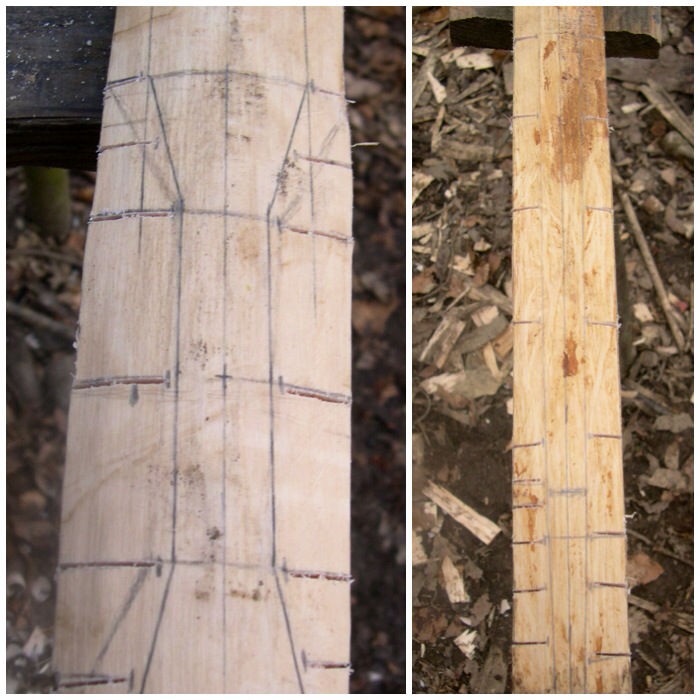
These stop cuts help greatly when getting rid of the excess wood. As the excess wood is cut out, the stop cuts prevent splits from travelling down the length of the bow. The top picture shows the area around the handle ready to be cut out and the bottom picture shows one of the limbs ready for work.
Stop cuts
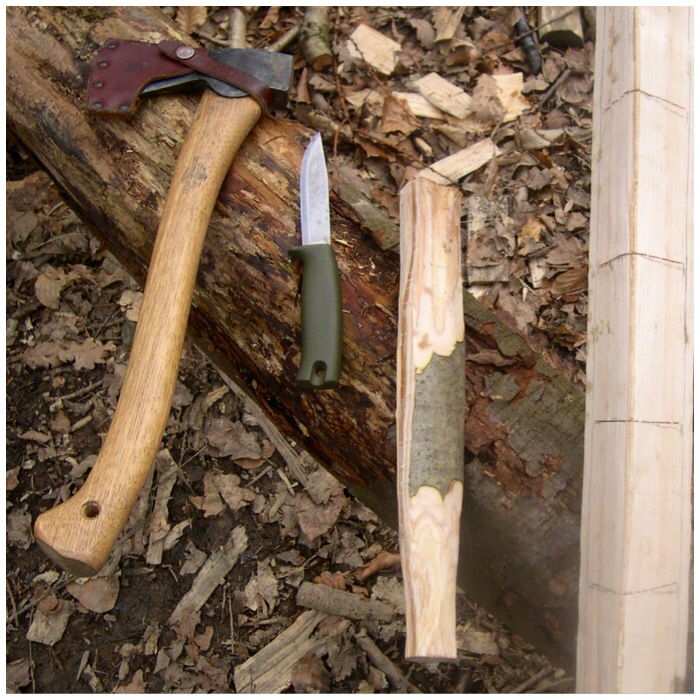
Some of the tools that are used to take off the excess wood: the axe for the start of the process and a knife and batton to finish it off.
Tools for initial shaping
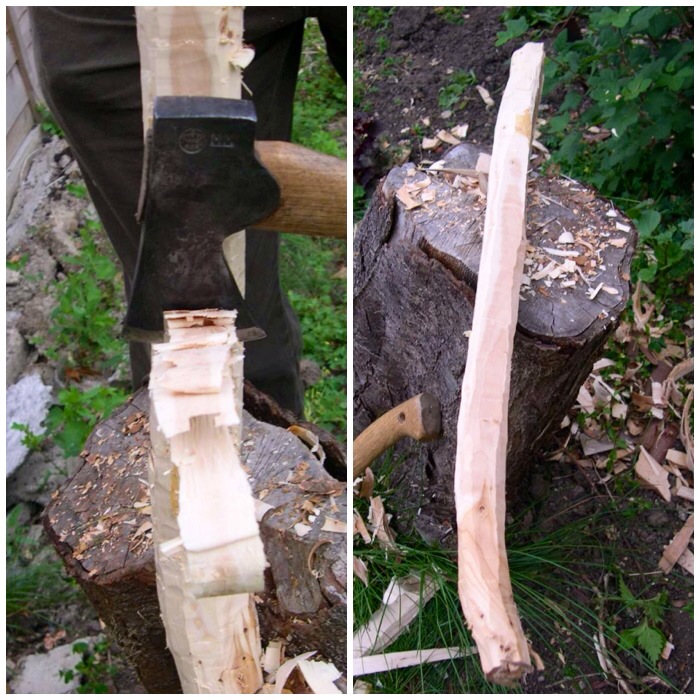
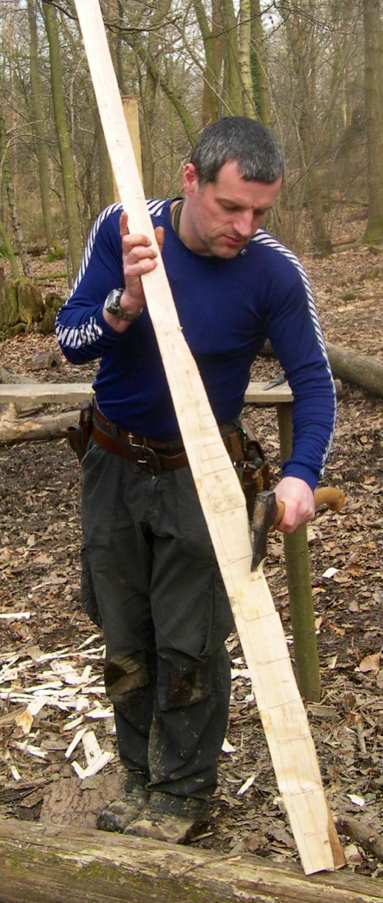
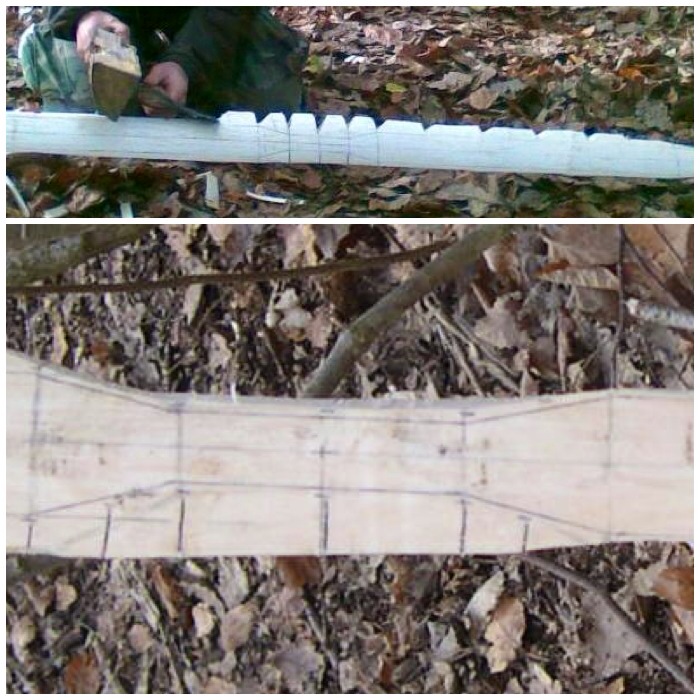
Keeping the stave off to one side of me and resting on a log, I trimmed the excess wood off. As the stave was off to one side I was in a safe position to work with the axe. If the axe had slipped its follow-through path would have been to my side.
Axing out
The tool on the left is a draw knife and can be used to finely trim the bow shape. If you do not have a draw knife you can embed the tip of a knife into a piece of wood to act as a second handle and use it as a draw knife. If you choose this method make sure that the piece of wood is on a secure flat surface before pushing the tip into it – never hold the piece of wood in your hand while you do this.
Professional and impromptu draw knives
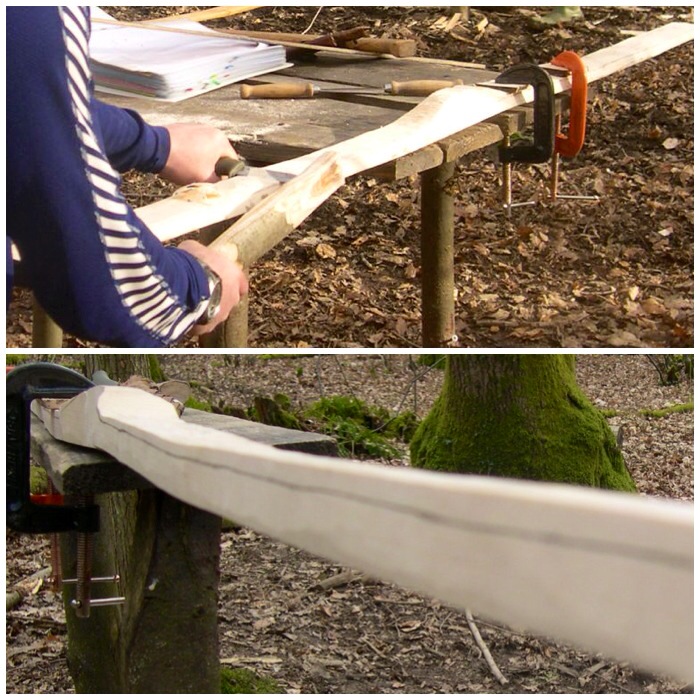
I clamped the bow securely to a workbench and then could easily start to use the draw knife. Here you can see the impromptu method in action; it works surprisingly well if your knife is sharp enough. It does not take long to work your way down to the line.
Using the draw knife
A lot of the time I braced the tip of the bow against my stomach as I removed the excess wood. As I worked towards the tip I repositioned the bow on the workbench so that it was held securely without needing to brace it. You can see the side profile of the bow emerging on the picture of the stave propped up against the tree on the right.
Side profile blanked out
The next stage was to mark out the top profile of the bow. I used a string to mark out a centre line down the length of the stave (picture on left). Then using my measurements (shown at the beginning) I marked out the shape of the bow (picture on right).
Marking out the top profile
The picture on the left is the handle area I drew out and the one on the right is of one of the limbs. Both now have stop cuts sawn in to help with chopping out the bow shape.
Stop cuts in place
I enlarged some of the stop cuts to make sure that no split would travel very far. I find that jamming one end of the bow against a tree helps with the axing-out process and that it can be done in a much more controlled, safe manner so that the axe blade can never swing into me. It’s important too to use the axe in a safe and controlled manner. In the bottom picture you can start to see the handle shape appearing.
Axing out the top profile
As well as taking off a lot of wood quickly, the draw knife method is useful for taking off fine shavings as you get down close to the line.
Draw knife on the top profile
The top profile slowly started to appear as I finely carved the excess wood down to the line.
Top profile getting there
The draw knife was very easy to use as the angle of the limb changed from a Flatbow (near the handle) to a more ‘D’ shaped Longbow limb near the tips.
The Holmegaard shape is appearing
The ‘D’ sectioned shape of the tips soon started to appear. It was at this stage I decided to let the wood season for a month before doing any more work.
Limb tip needing trimming
I seasoned the wood for one week in my garage and for three weeks in a cool spot in my house. This allowed the wood to season enough to start the fine work. During this seasoning process I tied the bow into a frame to induce some reflex into it.
Tied back to keep the shape while drying
One month later it was time to finish the bow. I started work on the tips of the bow so that they would have more of a ‘D’ section shape to them. Making the tips smaller meant there would be less weight in them, allowing them to move forward faster when shooting an arrow. Using my knife as a draw knife I was able to finely carve the shape of the ‘D’ section on each limb. As the tip of the knife is firmly embedded into a piece of wood it is very safe to use and highly manoeuverable.
Fine draw knife work
On each tip I came right down to the line but not past it with the draw knife.
Limb tip finished
Up to this point I had tested the bow’s flexibility by floor-tillering it. This involves pushing down on the limb and checking to see if I was getting a nice curve or if there were areas of stiffness.
Lots of hand tillering
To take off excess wood from areas of stiffness I used a metal cabinet scraper. The scraper only takes off minute pieces of wood and is ideal for this part of the process. I carried on this process of scraping and floor tillering until I got a fairly good curve on both limbs.
Time for the cabinet scraper
Before using the tillering pole to finely check the curvature, I had to add knocks to the bow. Some Holmegaard bows have been found without knocks carved into them and it is thought that they may have had bone-tipped knocks added, or some sort of wrap on each limb as a knock. I decided as an experiment to make a knock from some material wrapped around the tips of the limbs. I first tried cordage made from western red cedar bark, but I found that this did not grip the wood firmly enough and kept slipping.
Failed cordage knocks
Next I tried rawhide, soaking it in hot water and then wrapping strips onto each end. This took about one and a half days to harden but allowed me to string the bow.
Successful sinew knocks
I coated the rawhide in pine pitch to waterproof it so it would not soften and slip if it got wet.
Rawhide knocks covered in pine pitch
I just used some strong nylon string at first as a bowstring before starting the tillering process, tying on one end of the string with an overhand loop and the other end with a timber hitch. The string was just tied loosely, with no brace height. This picture is from when making my ash flatbow but the principle was exactly the same. Dick Baugh wrote a good article on tillering on the Primitive Ways website that is worth a read.
Tillering string
I then placed the bow on the tiller and in increments slowly bent it to view the curve on each limb. The pictures are of the bow during the tillering process. After viewing it each time I would return to the workbench to scrape wood from areas of stiffness using the cabinet scraper or spoke shave. Also I would raise the brace height a little by shortening the bow string to see how the bow reacted under pressure when braced. This whole process ensures you get a good even curve on each limb and also trains the bow to bend properly.
Tillering followed by scraping
This picture was taken at the end of the tillering process with a 4 inch brace height: I was happy to take my first shot now.
Ready to shoot
Having seen a few bows in my time still fail (split) at this point, I only drew back on the string about two thirds of my normal draw length for this first shot.
First shot
I then set about making my proper bowstring, which consisted of a Flemish twist on one end, a timber hitch on the other and serving the bowstring. Two good sites on this are Sam Harper’s site Poor Folk Bows for the string making and the Archery Talk forum for serving the string.
Flemish twist and timber hitch
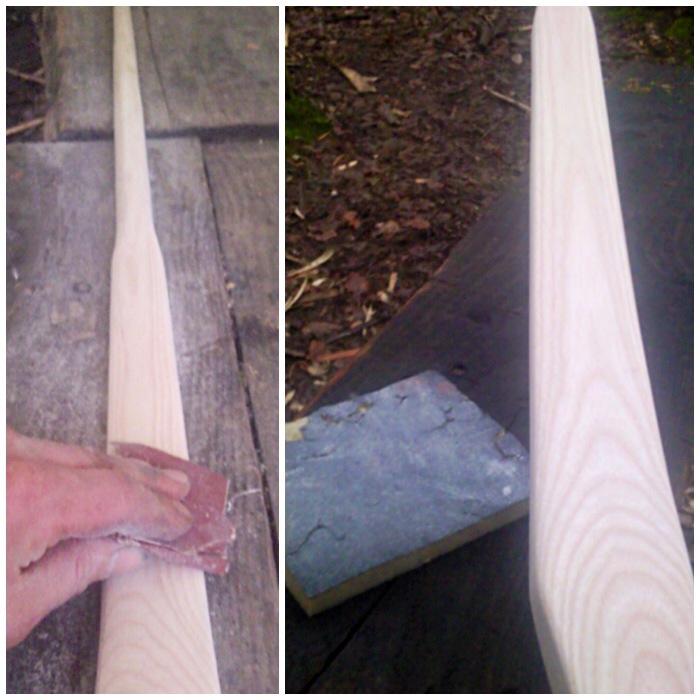
I used various grades of sandpaper to sand the bow down to get rid of any marks and sharp edges.
Hours of sanding
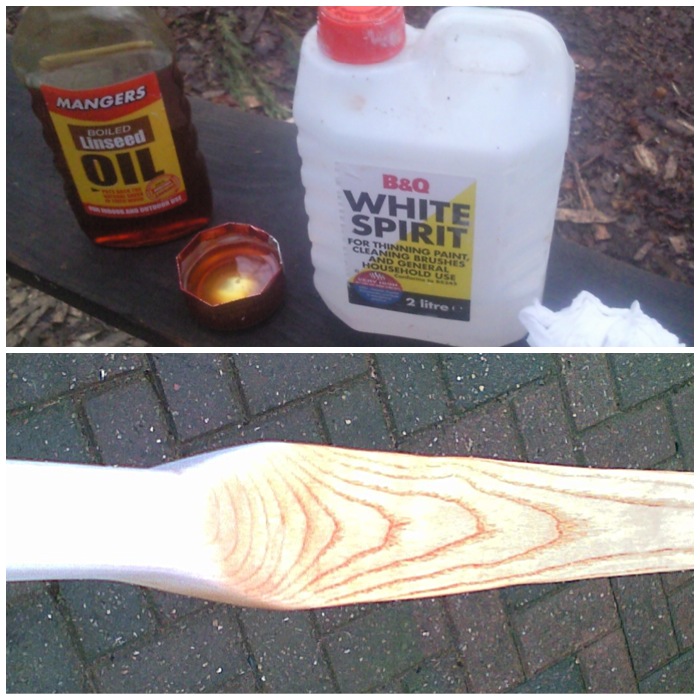
To protect the bow I stained the wood slightly. Then I applied a mixture of boiled linseed oil and white spirits (50/50 at first). After this had dried I reapplied more oil, but with less white spirits each time until by the end I was applying just oil.
Coats of linseed oil and white spirits
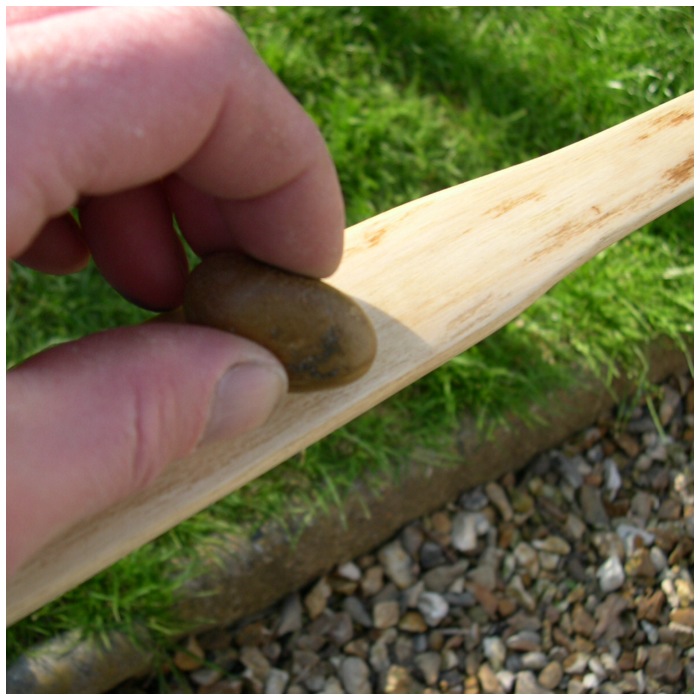
The next stage was to bone the wood by rubbing the whole bow with a small smooth pebble. This helps to close the fibres, making the bow very smooth, and also helps to lock in the oil. The whole process of boning can take a few hours but leaves a very smooth and shiny finish.
Boning with a pebble
Lastly I wrapped on a small leather handle secured with a little glue. I thought about stitching one on but felt the seams might be too uncomfortable when holding it.
Leather handle
The completed bow showing the belly, side profile and the back..
One bow I am very proud of
I am so glad that the rawhide knocks worked so well on this bow as they were something of an experiment. I don’t know if the size of the knocks slows the limbs down when shooting, but she does shoot fast.
This bow is particularly liked by youngsters as it is so easy to draw but still shoots fast. I managed to capture this arrow just after it had been released by the Holmegaard bow.
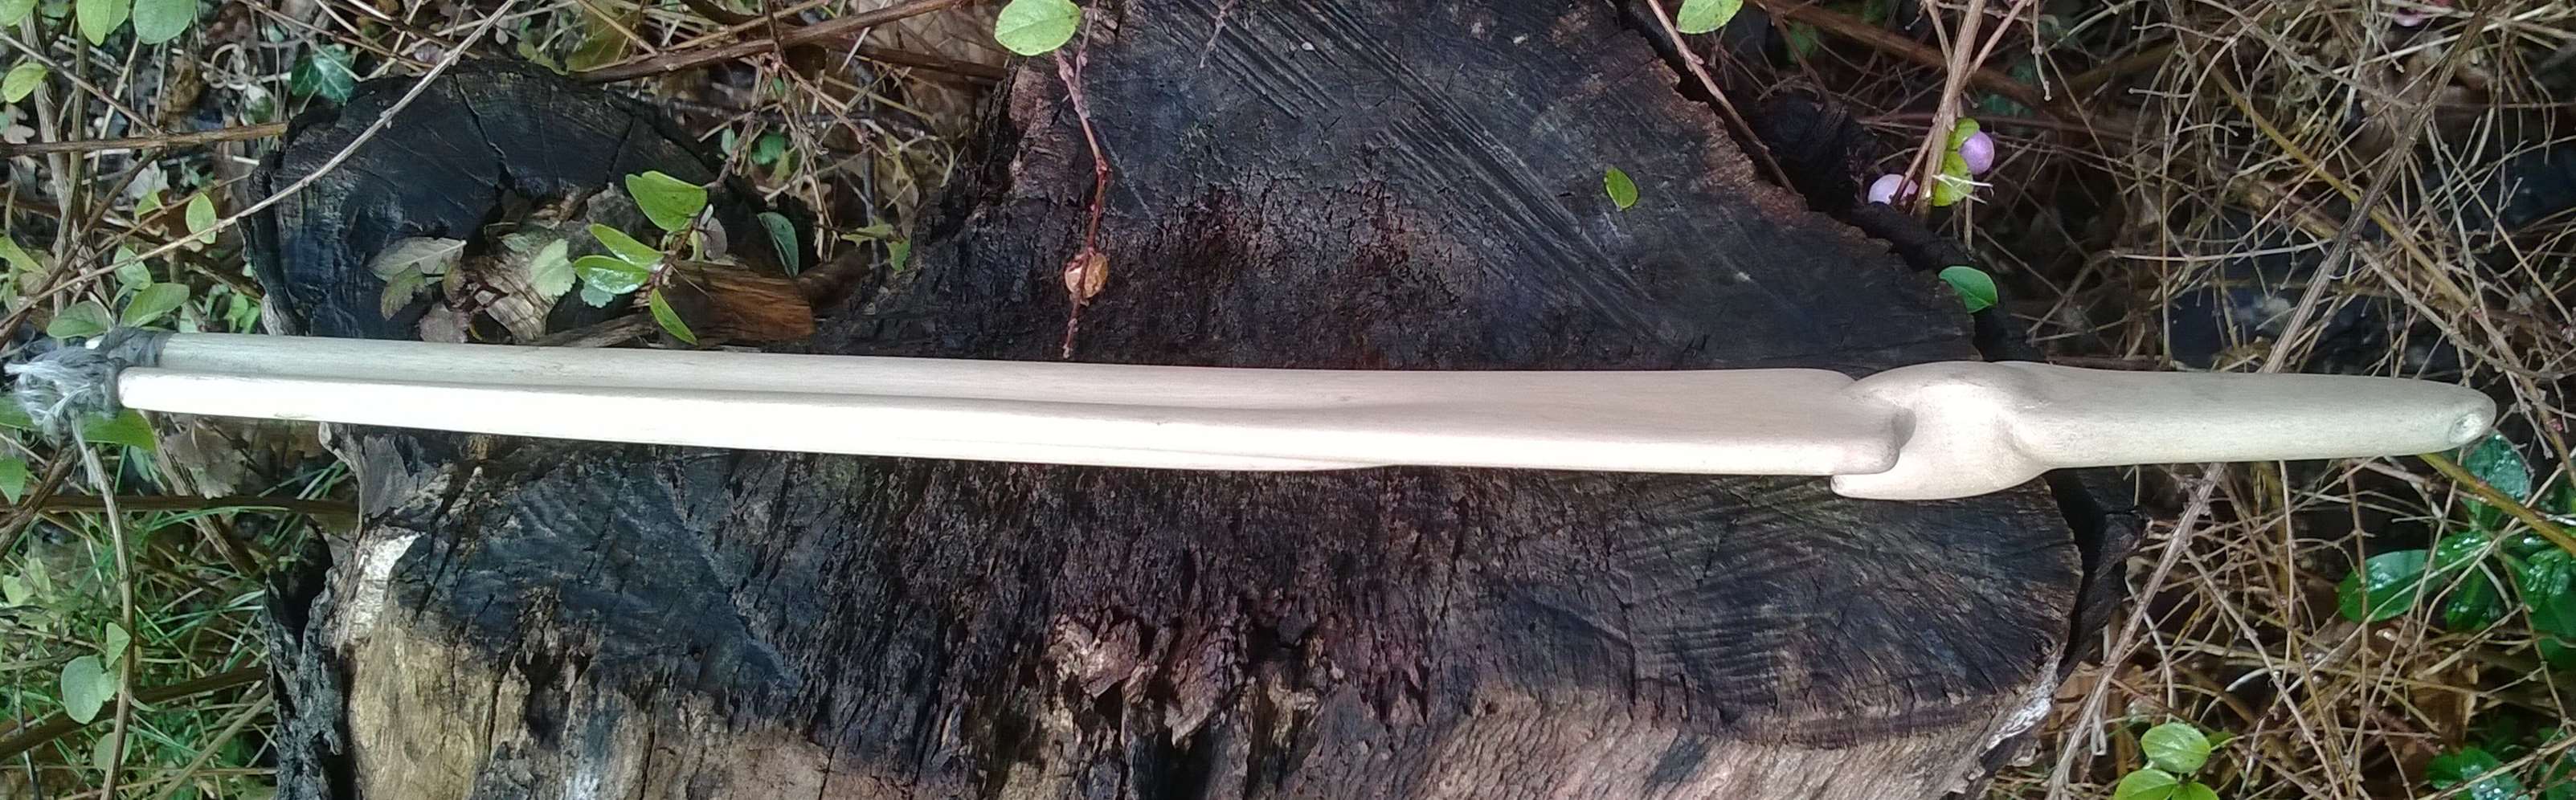
One of my favourite Atlatls is the Lovelock Cave Atlatl. I made this Atlatl a few years ago using modern tools including a Mora knife, a small carving knive, a flex gouge chisel and sandpaper.
My reproduction Lovelock Cave Atlatl – Top ProfileMy reproduction Lovelock Cave Atlatl – Side Profile
The original Atlatl was found in a cave over a century ago but was soon lost; thankfully, though, not before someone had made a detailed drawing of it. Lovelock Cave was previously known as the Sunset Guano Cave, the Horseshoe Cave and Loud Site 18. A good paper on the archaeological digs on the site was written by Phoebe. A. Hearst from the Museum of Anthropology (University of California Berkeley).
Lovelock Cave – Humboldt Sink USA
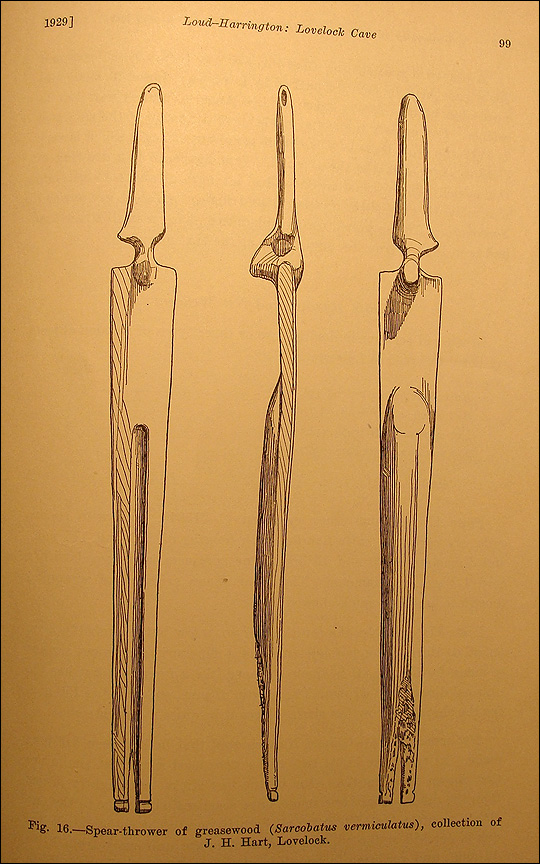
A copy of the drawing is shown below: I found this in a post by Mike Richardson on the Split Stick Atlatl, who also writes that the original was 17 inches long. I reproduced the Atlatl as closely to the drawing as I could.
It has a fork at the rear and the drawing shows a small groove around each prong. I have read that this was where a small piece of carved wood or bone known as a spur was attached as a point to hold the Atlatl. I decided though to see if the Atlatl would work with just some cordage wrapped around it. There is no historical evidence that this was done but it does work well. A good comparison of both attachment types on this Atlatl can be read in the PaleoPlanet forum here. A further project for me on this Atlatl is to make a spur for it.
Drawing 1
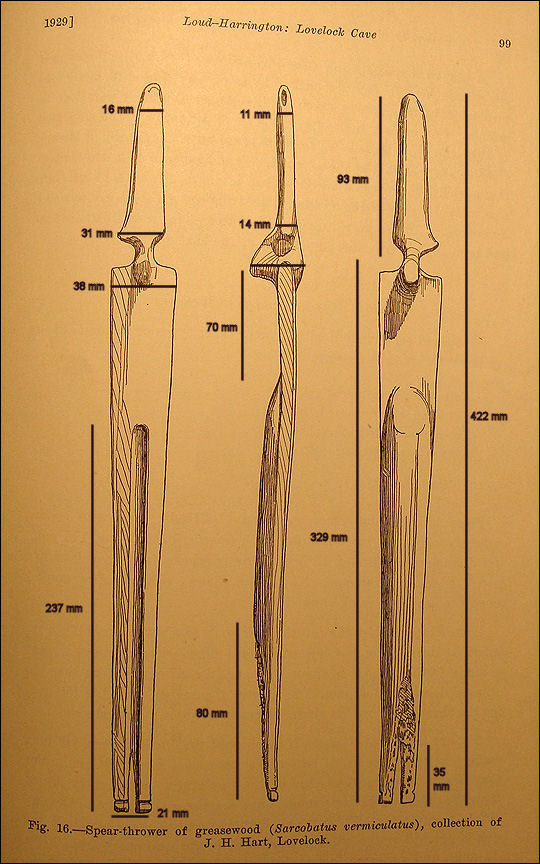
Knowing that the original was 17 inches long, I made a best guess at the other dimensions. The original Atlatl that was lost was made of Greasewood (Sarcobatus vermiculatus) but as this wood is not available in the UK I opted to use a piece of Siver Birch (Betulus pendula) as I had some available and it is easy to carve. The wood I had ready was only 16 1/2 inches long (422 mm to be exact) so using that as a starter and the drawing as a guide I scaled up all the other dimensions as shown below.
Dimensions of my reproduction
This was a beautiful Atlatl to carve as the finished lines are very smooth and pleasing to the eye. The top picture (below) is a close up of the handle of my reproduction. The final shape gives a surprisingly good grip even when smoothed down.
A beautiful slim design
I split my log down to a rectangular shape and then using my dimensions drew out the shape of the Atlatl. After that I marked stop cuts along the whole length of the Atlatl and cut into them with my saw, finishing a couple of millimeters from the outline. These are useful to have in place to stop any splits from running off down the length of the Atlatl when you carve it.
Draw out the profile and place stop cuts
I battoned out the rough profile first using only my knife and a small branch as a hammer. I did the battoning with the work piece placed on a log in front of me. I kept the blade of the knife at 90 degrees to my body as I hit it so that if the knife slipped it would swing away from my body. See my post on Knife Safety Tips for more detail on this.
Batton off the excess
Then using my knife I trimmed the excess wood down to the line, keeping the work piece well in front of me to avoid any potential cuts from the knife if it slipped.
Tidy up the profile with a knife
Using two more stop cuts I carved out the thumb and forefinger grip area.
Carve out the thumb and forefinger grip
Then it was a case of roughly carving the handle area down to a size comfortable for my hand. I also started to carve out the protruding areas above and below the thumb and forefinger grip area.
Roughly carve out the handle shape
I worked on the bottom of the tail next, carving a flat area near the handle and then carving out an elongated bowl shape to the tail. No need to worry too much about perfection at this stage as the sanding will produce the final shape.
Roughly carve out the underside of the tail
I tapered the tail area all the way to the end making a flat section of the final 8 cms (this will form the prong).
Taper the carving all the way to the end of the tail
On the top of the tail I marked out with my knife tip a 1 cm wide by 23 cm long spear shape that would form the bowl for the dart to rest in.
Mark out the top slot for the dart to rest in
I used a Flex Cut Gouge for carving the bowl area and my small carving knife for carving the prongs. This is the really tricky area of carving – you have to be particularly careful as it is very easy for the knife to slip.
Roughly carve out the slot for the dart to rest in and carve the fork out at the end
Once I’d carved the basic shape I used various sandpapers from about 40 grit to about 1000 grit to smooth everything.
Sand the whole Atlatl down using rough paper working up to very fine grades
Before I added the false sinew to the tail I oiled the Atlatl a couple of times and then boned it with a small pebble. Using a small pebble to rub the Atlatl wood down for a couple of hours smooths the wood fibres down and traps the oil in the wood. The whole process of boning really gives a smooth finish.
Add any oils (I used vegetable oil) and bone it smooth with a small pebble
The finished profiles of the Atlatl.
Tail, side and bottom profiles
The handle has a very unusual shape but gives you a fantastic grip.
Handle profiles
It is easy to flick with an open grip as the thumb and forefinger grooves keep the Atlatl fixed in the correct position in a throw.
Works with an open grip
As I carved the handle to fit my palm it makes for a very comfortable closed grip.
Works with a closed grip
After carving little notches around each prong I wrapped false sinew to the tail using a Constrictor knot. I kept it fairly tight but you may wish to experiment here. As I said earlier there is nothing in the archaeological record to prove this method was used but after experimenting with other Atlatls like the Split Stick method I see no reason why it could not have been used if a point was not available.
The problem with cordage however is that when you are in the act of throwing a dart, various forces are exerted on it. As you release the dart will flex/bend, and the cordage may cause the tail of the dart (fixed in place by the cordage) to go out of line with the point of the dart, thus decreasing accuracy. Having a point at the rear of the Atlatl holding the tail of the dart in place allows the tail to rotate with the point as it flexes during a throw, maintaining the dart’s accuracy. Chris from Paleoarts explains it well in a post on the Paleoplanet site. I will be experimenting with attaching a bone or wooden spur to the Atlatl in future.
False Sinew wrap at the tail to hold the dart
I am left handed and even though the shape of the handle is designed for a right hander (the slightly protruding piece of the handle to trap the thumb and the smoothed corner to fit in the palm) it is very comfortable still to shoot left handed.
Cordage wrap tail – No archaeological record of this
I enjoyed making this Atlatl and shooting it over the last few years. It would be great to see some more of this style being reproduced as there are so few to be found.
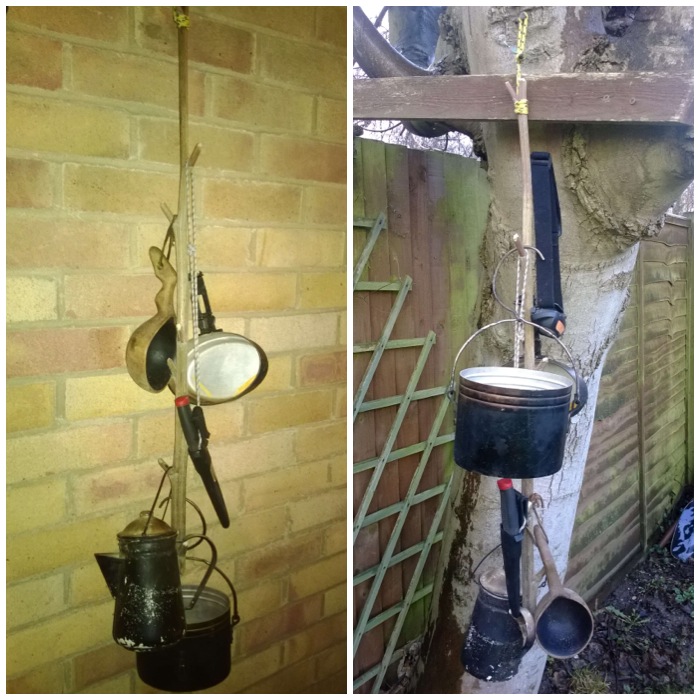
Historically what would have been used to hang up your clothes and kit up if you lived in an environment where there were very few trees?
On the Isle of Lewis in the Outer Hebrides where I was brought up the stems of the Burdock (Arctium lappa) plant were used. Lewis is predominantly moorland so the locals had to use whatever resources came to hand. Burdock is a biennial (a life cycle of two years) plant and in its second year sends up a tall shoot in order to flower and reproduce. It is this stem (which is quite woody) that can be easily trimmed down and used as a hanger.
A keen convert to this was my friend John Fenna (from BCUK) as he does a lot primitive living re enactments (flint tools etc only allowed) and he thought it would be ideal for hanging stuff in his camp.
Our Mr Fenna is happy he has a Burdock hanger in the making
I came across a post on this in 2009 on my friend Kevin’s Natural Loresite (written by the guest blogger Freebornjem). The hanger had been spotted by Freebornjem in one of Blackhouses at the museum in Arnol village on the Isle of Lewis. I can remember seeing hangers like this as a small boy but it was not until I read the post on Kevin’s site did I start using one.
I now use a burdock hanger regularly when I am using my tipi or have a base camp set up. I try and find dead standing stems (autumn/early winter) as the hanger is ready for use instantly after trimming. If you use the stem from a live plant it will work for hanging kit but will not be as strong as a dead stem.
2nd Year Burdock growth (Arctium Lappa)
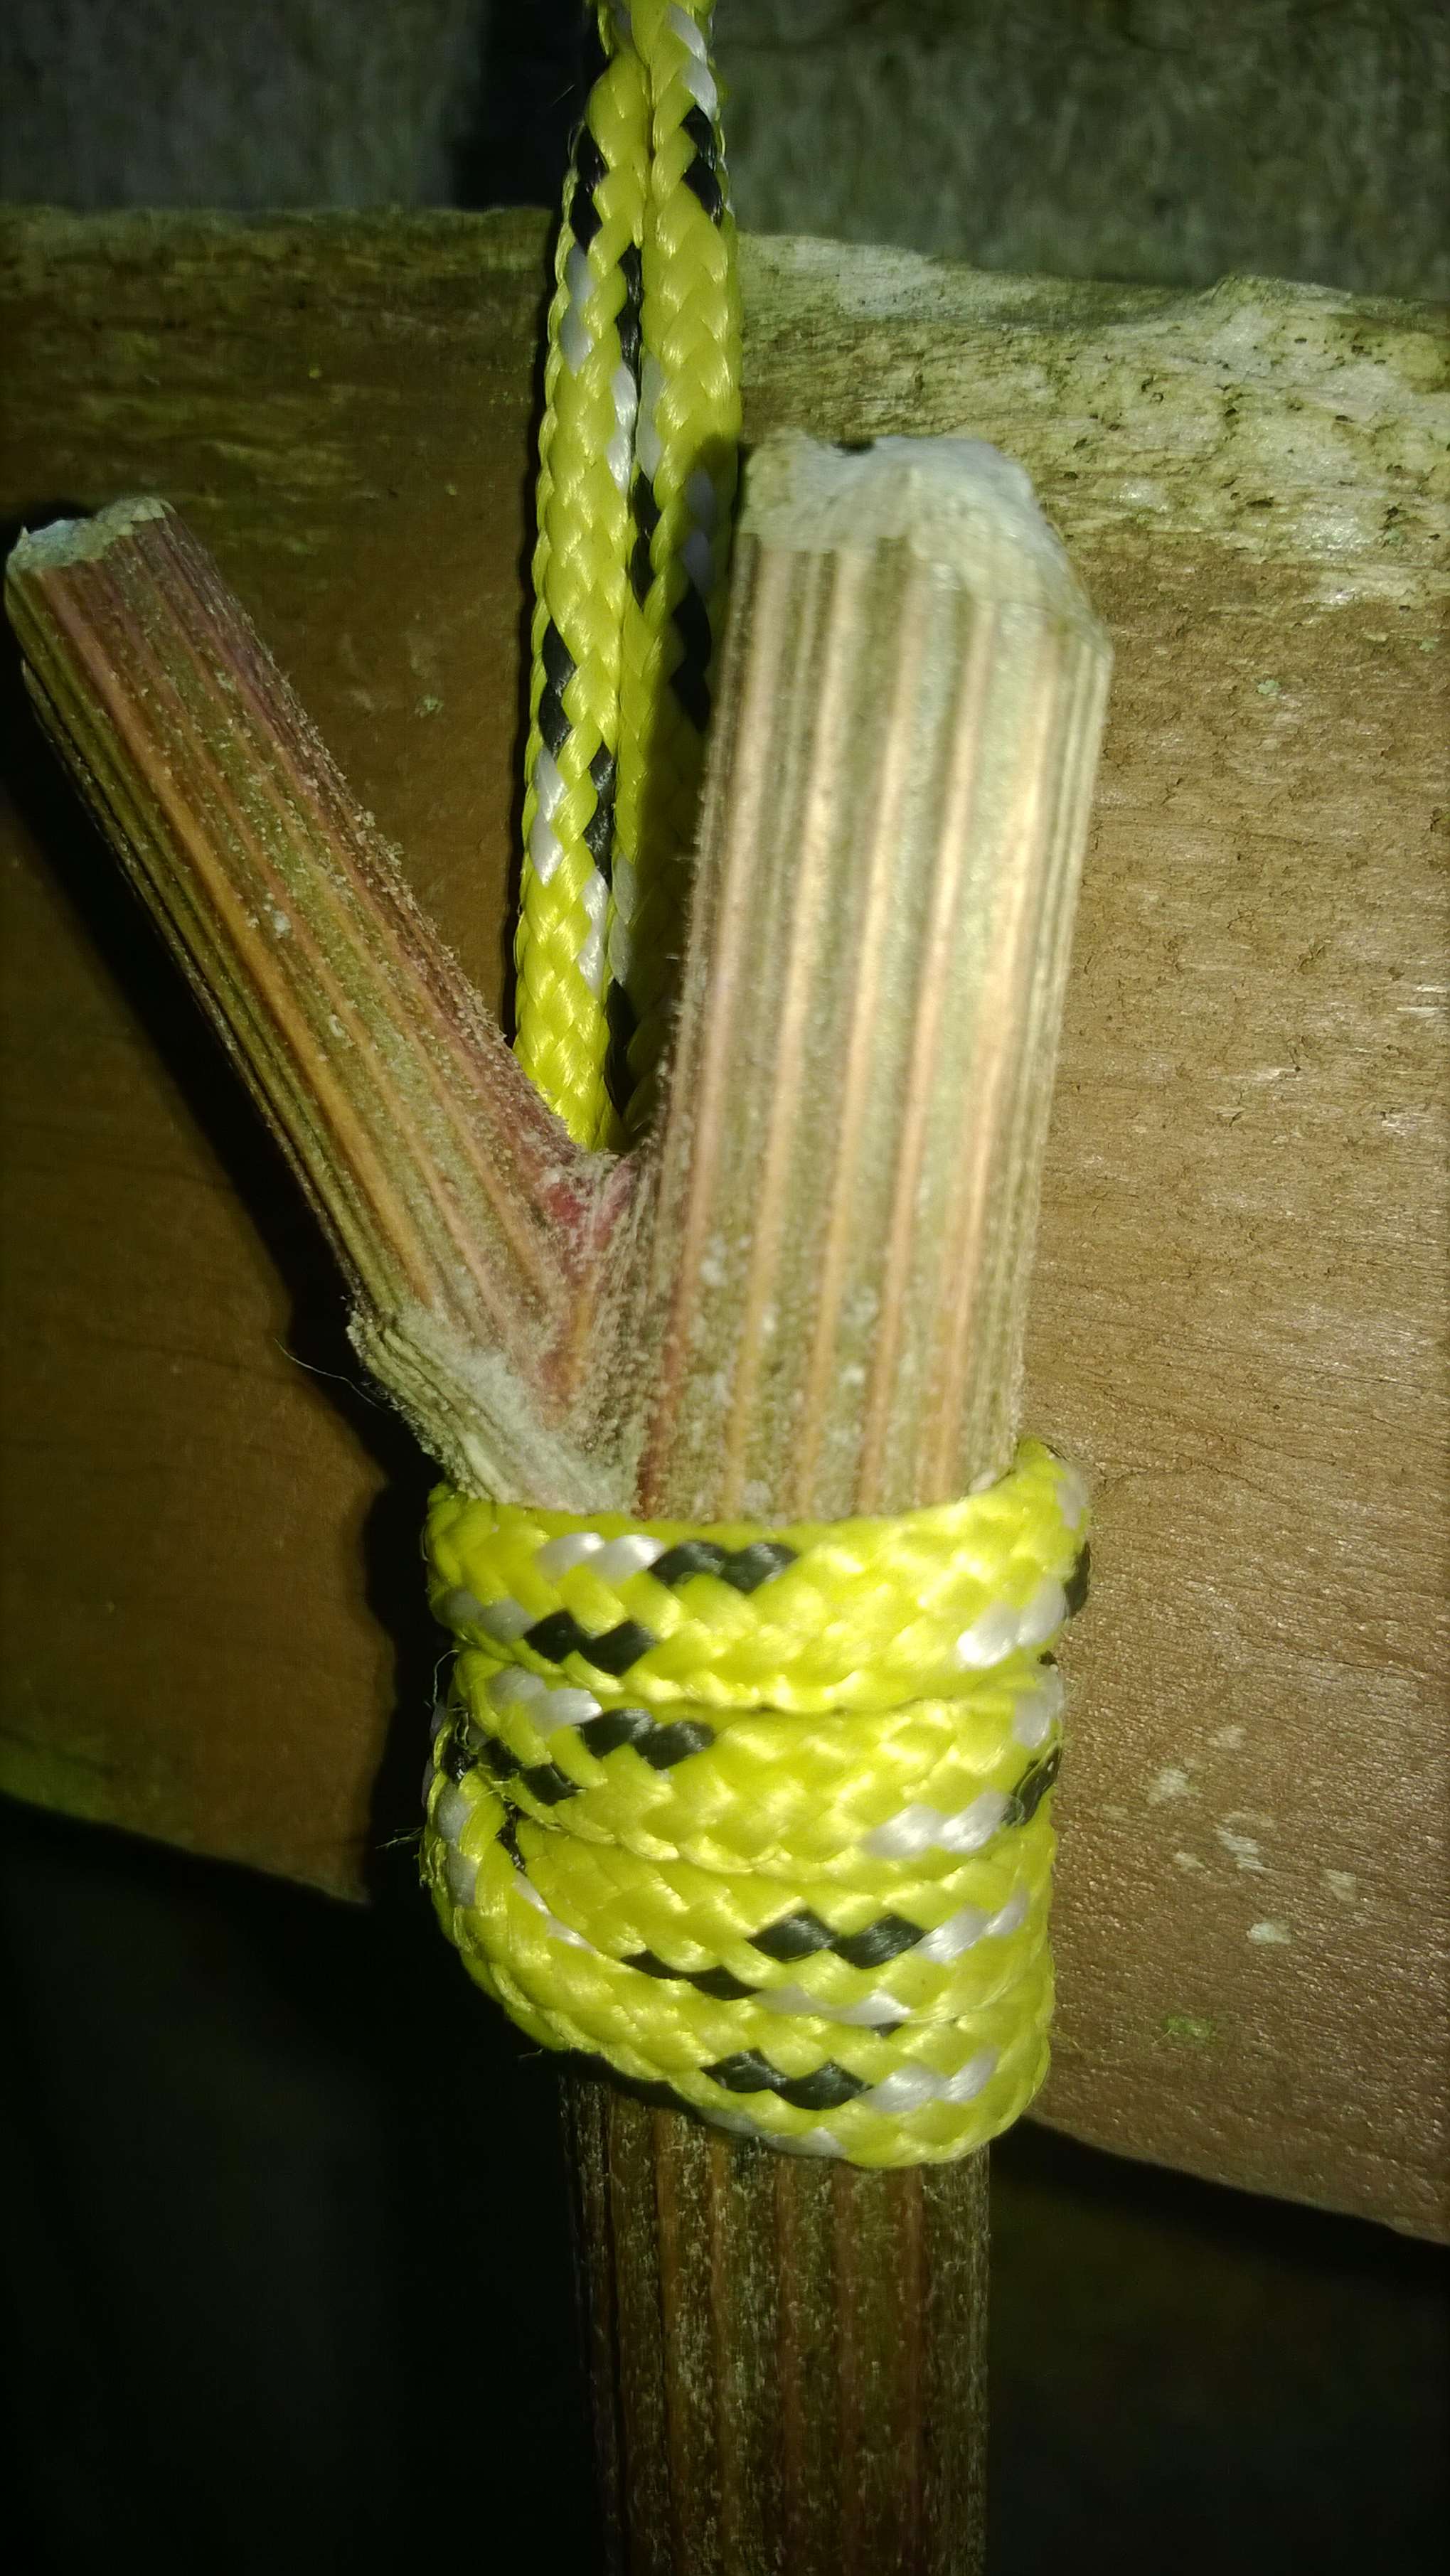
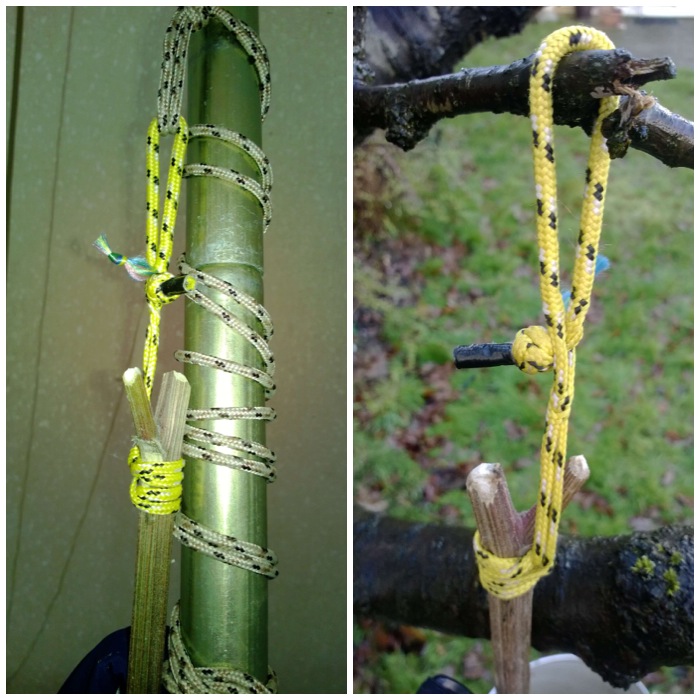
Once you have selected your stem, trimmed the leaves and burrs off cut the the branches back so that only about an inch is protruding from the main stem. Make sure you round each hook off as they can be very sharp if left after just a single cut.
Branches trimmed and rounded
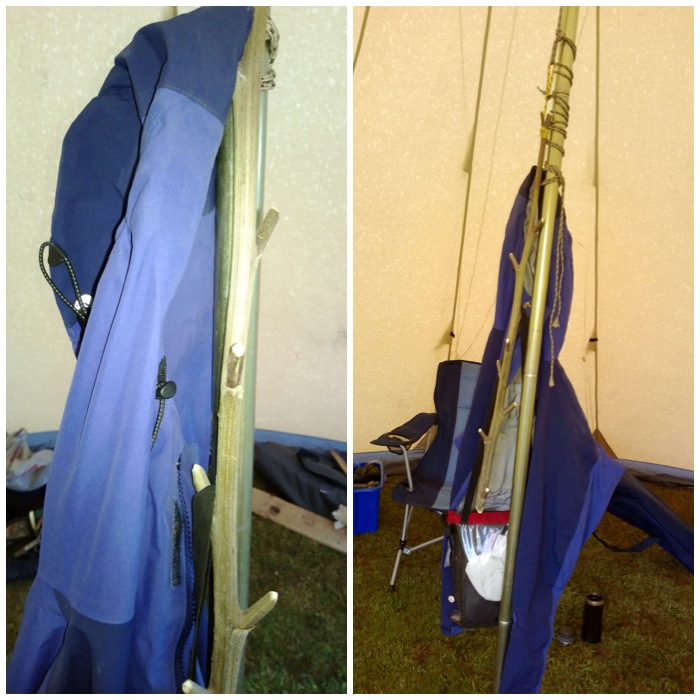
For this hanger I attached a modern connector (soft shackle prussick) but you can go natural by folding the thin top piece of the stem back and wrapping some cordage around it to form an eye. Kevin’s post covers this method. I use a modern connector now as it will take more weight. I use the hanger in my garage to hold any kit that I regularly use or it can be hung quite easily from a tree.
Great for indoors or outdoors
I particularly like this hanger in my tipi as it is easy to hang of the central pole and does not take up any room.
Hanging in my tipi
Experiment with how you want to attach the hanger to something. I like the soft shackle prussik as it grips very well and is easy to adjust.
Man made connector on this one
The top half of the shackle can be attached to a nail, branch or piece of rope very easily.
Soft Shackle Prussik
By pulling the little coloured tab you open the shackle up so making for an easy set up or take down. I will look to post an article in the future on making this type of shackle if anyone would be interested.
Soft Shackle Prussik opened up
Freebornjem mentions that the burrs when clumped into a fist sized bundle make a scouring pad. I have not tried that yet but may be worth a go next autumn.
Recently I posted an article titled – Atlatls – What they are and why I love them where I said I would be publishing a couple of How To…. guides on making them. This is the first of these guides on making what I call the One Stick – Split Stick Atlatl.
The One Stick – Split Stick Atlatl
As explained in the previous article, an Atlatl is basically a spear-chucking device. Many different types have been made by different societies: there is nothing in the archaeological record (as far as I know) of this type of Atlatl, but then as it’s made completely of organic material there is no surprise there. I decided to investigate this type after researching the Lovelock Cave Atlatl. There is debate over how darts were launched by that Atlatl and whether a point was used or whether a strip of cordage was used.
The One Stick -Split Stick Atlatl I made for this post was done using primitive tools only and a single shoot of goat willow (Salix caprea). I made the Atlatl just to prove to myself I could make one out of a single stick (shaft, wedge and cordage). All you would need to make one using modern tools would be a good sharp knife. The piece of willow I selected was about 1.5 metres long and about the thickness of my thumb. This was far longer than needed but I wanted it this length to get lots of cordage from the bark and to use part of the excess wood as a wedge (needed in making this type of Atlatl).
Goat Willow (Salix caprea)
The first thing I did was to cut into the bark all the way around the stick about 12cms from the thickest end, leaving an area of bark slightly larger than my fist. This bark-covered end acts as a handle area.
Cut a line through the bark around the stick
I used an old deer rib bone to scrape the dark outer layer of the bark off rest of the stick, leaving the handle untouched. If you leave this on the bark, the cordage you make from it will not of the highest quality.
Scrape the outer bark off
After scraping off all the bark I re-cut around the stick just above the handle area to make sure all the inner bark was disconnected from the handle area.
Cut again through the inner bark all around the stick
I then cut a line through the inner bark from the handle to the end of the stick to start to open the bark up.
Make a cut along the full length of the inner bark
I used my thumbs to peel open the bark. Other tools that make this job easier are a small wooden wedge or the back of your knife blade. In late spring the bark comes off easily so my thumbs were all I needed.
Slowly peel the bark off – use a wooden wedge if the bark does not come off easily
Wherever possible try and take the bark off in one piece so you can make long strands for easy cordage making. Do not worry if this does not happen, all it means is that your cordage may take slightly longer to make.
Try to get it off in one piece
I wedged the flint knife into a groove in the log and then sliced the bark into strips. I managed to get a good amount of strips out of this one piece of bark. I then left the strips to dry out in the sun. Cordage is best made from rewetted strips of bark as the bark shrinks considerably when it is dried out for the first time.
Split the bark into strands
I decided that I wanted my Atlatl to be about 64cms long (fingertip to armpit for me) so I used a piece of flint knapped as a discoidal (curved) knife to saw through the stick. This takes far longer than using a modern knife but I find far more satisfying.
Saw/cut a piece of wood from the end of the stick
Keep sawing until you can feel you can snap the wood without splitting it down its length. Once snapped, trim the end of the Atlatl smooth.
Primitive cut
The spare piece of wood needs to be trimmed down and cut to size to make a wedge. This will be used to form the split stick part of the Atlatl.
Spare piece of wood to make a wedge
I used my flint adze at first to blank out the wedge, making it about 10cms long.
Create a wedge
Then I used my flint knife to trim the wedge to its final shape.
Trim the wedge
I used my flint knife to split the non-handle end of the Atlatl open. As the knife has a flat spine I just hit the back of the knife to start the split. Be careful to keep the split in the middle of the stick. A piece of cordage should really be tied off on the shaft where you want the split to stop. I forgot to do this but thankfully the split did not travel too far. I made my split 20cms long.
Split the end of the Atlatl
I used my discoidal knife to create a small groove around each split limb for the cordage to grip onto.
Create a notch on each split
Before inserting the wedge I did tie off the split with some of the dried bark using a constrictor knot.
Insert the wedge but with the base of the split tied off.
Afterwards I used more of the bark strips to secure the wedge by wrapping them around it to hold it secure.
Split secured
I had plenty of bark left over after this, which was good as I wanted to make some cordage to create a strap to hold the dart in place before launching.
Dried-out bark ready to make cordage
I completed a piece of cordage about 50cms long to give me plenty to tie onto the Atlatl. I used a constrictor knot on each split to hold the cord in place. Jonsbushcraft blog has an excellent tutorial on making cordage.
Create cordage to attach to the splits
I was very happy with how this Atlatl turned out.
Completed One Stick – Split Stick Atlatl ready to go
You can see the dart has a groove instead of a hole at the end. This allows the cordage to hold the dart in place before launching.
Dart has a groove instead of a hole
The finger pinch hold is just the same as a normal Atlatl with a point.
Simple finger pinch hold
I think the launch with this type of Atlatl feels slightly different but once you get used to it I find the release is as smooth as it is with a normal pointed one.
Perfectly good Atlatl
I made this Atlatl purely for the joy of making one with primitive tools and to see if it was possible to produce a hunting tool out of just a single stick.
I have no idea whether hunters in pre-history used this type of Atlatl but I certainly now know they would have found it the easiest thing in the world for them to make.
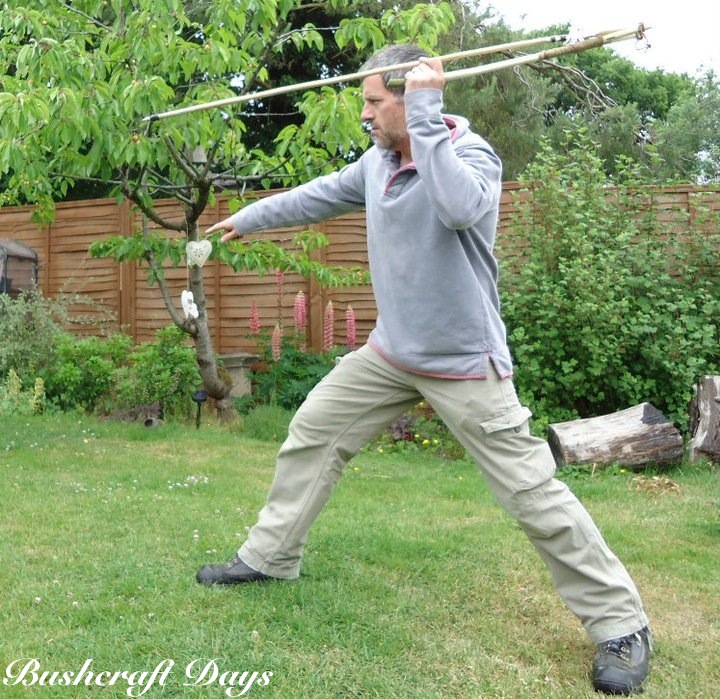
I’ve mentioned the Atlatl several times in previous blogs, so I thought it was high time I wrote a post devoted to this, one of my very favourite bushcraft activities. I’m going to introduce you to the three different types of AtlatlI use when teaching this art, together with some historical references to them I’ve found in the course of my research. For one of my types of Atlatl there is no historical record, and the exact makeup of other types are sometimes just a best guess, so please feel free to leave comments if you know more, as it is all a big learning curve for me. There are many different types of Atlatl but here I will concentrate on the three I regularly use.
What is an Atlatl?
An Atlatl is a spear-chucking device traditionally used for hunting or combat purposes It was developed in pre-history by many different societies. Some societies still use the Atlatl to this day, others used it alongside the bow while other societies stopped using the Atlatl after they developed bows. An excellent modern day comparison to help you understand how an Atlatl works is to watch a dog walker using a plastic tennis ball thrower. The ball travels much further than normal as the plastic ball thrower extends the thrower’s arm length and as the arm sweeps forward the plastic thrower is bent back, storing energy. This energy is released as the thrower does a final flick of the wrist. The dog is happy as it gets a longer run and the thrower is happy as he gets longer between throws :-).
The name Atlatl comes from the Aztec society but in Australia it is known as the Woomera. An excellent overview of the Atlatl can be found in Wikipedia.
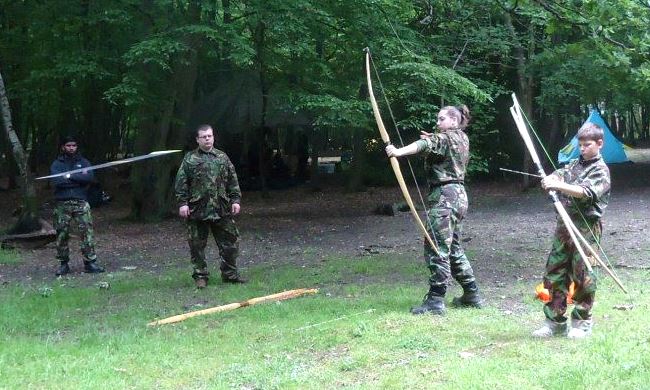
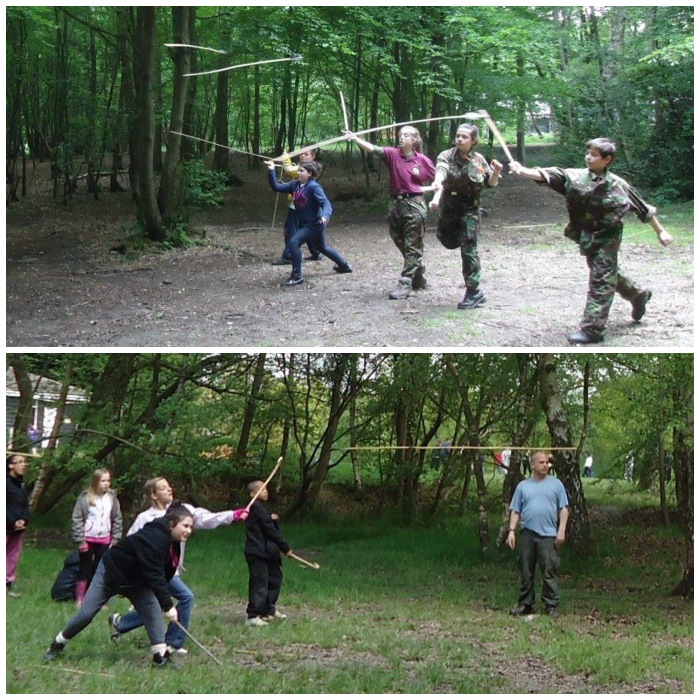
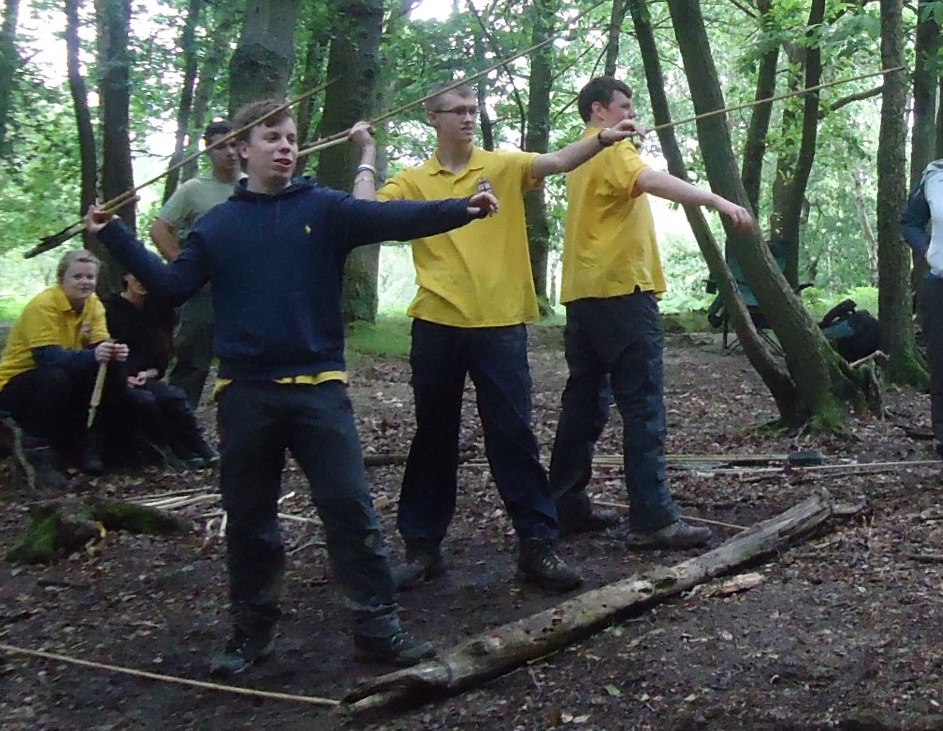
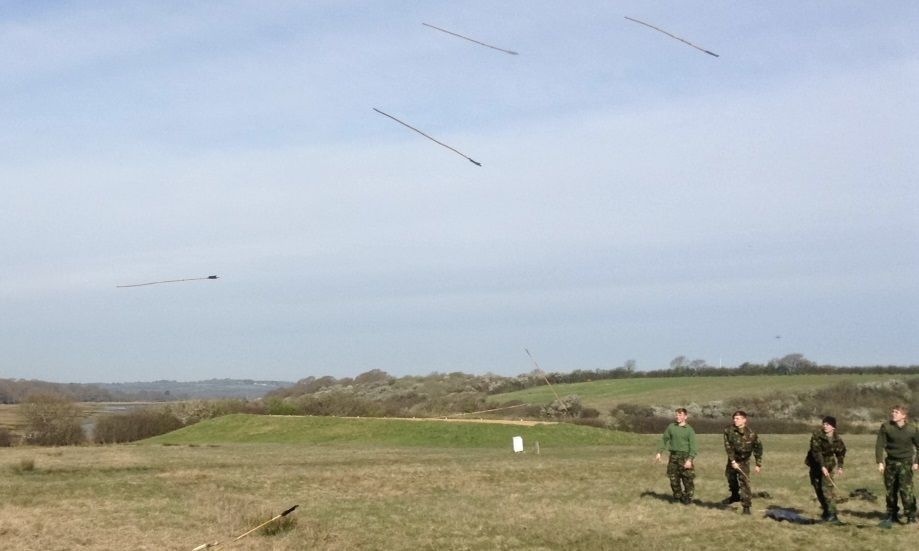
Atlatls in action with the Sea Cadets
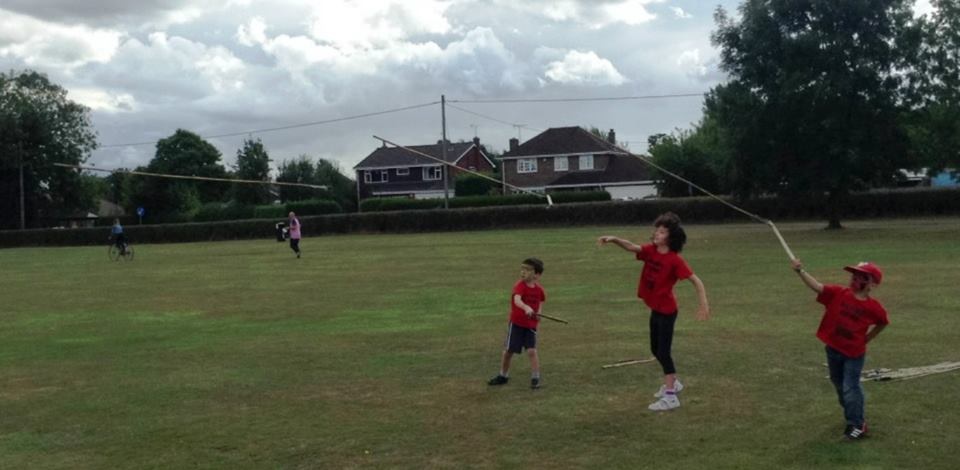
I like Atlatls as they are relatively simple to make, cost me next to nothing to make, students can make them and learn to use them easily and will provide hours of fun for kids from the age of about three years up (I still classify myself as a big kid).
When teaching this skill I always set up a proper range so that the darts can be thrown safely. I normally work on a range of about ten to twenty metres but a good Atlatl can reach up to a hundred metres in a competent thrower’s hands.
I made a short video last year showing the Atlatls in action with some of my Sea cadets – Video of Atlatls in Action.
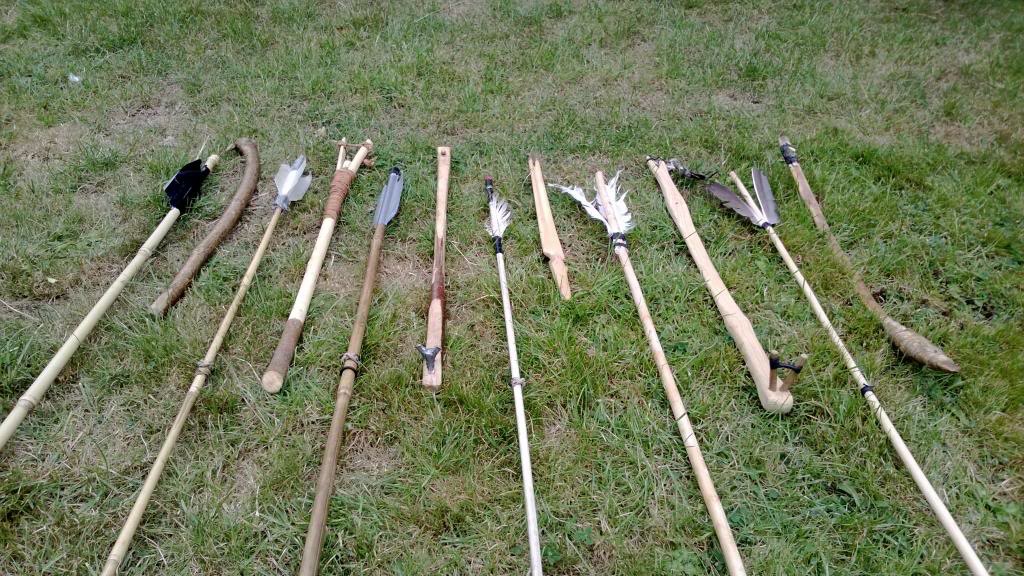
Here is a selection of some of my Atlatls. I will be posting in the near future a couple of How To…. guides on making some of these Atlatls.
Some of my different Atlatls – Front View
I have simple Atlatls that just have a point at the rear to attach the dart to, Split Stick Atlatls with cordage instead of a point, and other Atlatls that have a front ‘Y’ rest for the dart.
Some of my different Atlatls – Top and Back views
Simple Atlatls
The simple type of Atlatl shown below on the left just has a point at the rear to hold the dart in place before releasing it. You will see how this works later in the post. This is the easiest type of Atlatl to make. I generally use the base of a piece of hazel coppice (lots of other woods will work as well) for this where there is a fork in the wood near the ground. All I have to do is after cutting the shoot is to shape the smaller fork into a point with a knife and whip a para cord handle onto the main. The Primitive Ways website gives an excellent description of constructing a simple Atlatl.
The Atlatl on the right is also a simple one but made in a primitive manner, without modern tools. I used a thin yew branch, attached a rawhide handle and attached a carved antler point to the back.
Two simple Atlatls. One with modern cordage and one purely primitive
Once you have mastered the finger pinch grip these simple Atlatls are very easy to use and great fun can be had at very little cost. The Atlatl gives greater power to your throw by extending your arm length, enabling you to throw the dart faster and further.
Simple Atlatls being held in the finger pinch grip
Atlatls with Front Rests
I was on holiday in the Cheddar Gorge area of the UK a few years ago and spotted in the Museum of Prehistory some reproduction Atlatls on display. They had been reproduced as closely as possible to Atlatl finds in the local caves. One of them had a forked rest and I found that intriguing, as up to that point I had not found any reference to this type of Atlatl.
Cheddar Gorge Museum of Prehistory Atlatl (centre) with Rest
I soon found out that this style of Atlatl with a front rest is great for kids. As the dart is supported by the rest no finger pinch grip is required, making it easy for kids as young as three to use this type of Atlatl.
Younger children prefer an Atlatl with a Rest to begin with
In my research into this type of Atlatl I also came across a post by Mike Richardson In Primitive Ways explaining how if the thrower has to wear gloves (for example in arctic environments), the normal finger pinch method of holding the dart is not an option so a rest is attached to the front of the Atlatl. This along with some cordage wrapped around the dart allows the gloved thrower to have the dart locked in place but still easily released with a flick of the wrist. I have used this method numerous times and the cordage wrap/lock has no detrimental effect on the release of the dart.
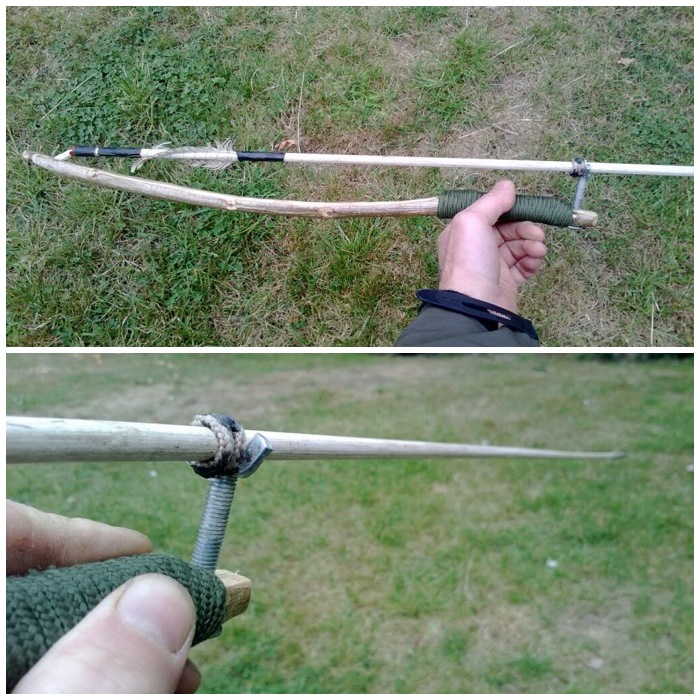
I made some Atlatls up with metal bolts as rests as I found the original wooden rests I had made were easily broken by my cadets so I had to design a ‘Squaddie-proof’ alternative. Not pretty but very effective and robust.
The Squaddie-proof Atlatl with metal rest
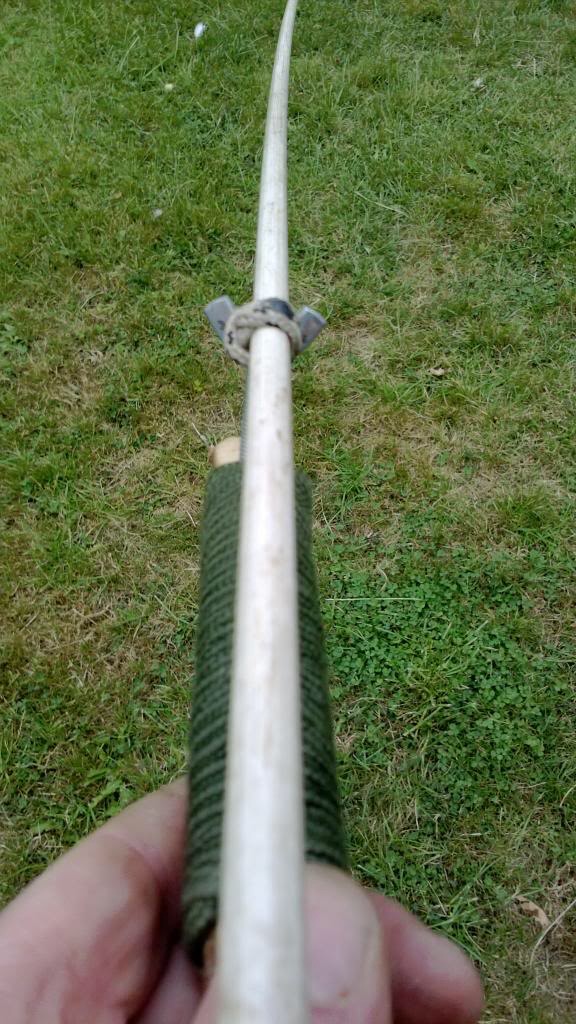
In the picture above and the one below you can see that the cordage wrap on the dart is locked up against the fork of the rest, ensuring the dart does not fall off before release. After a short piece of tuition most kids (except the very young) are able to set this up for themselves.
Locking mechanism in place
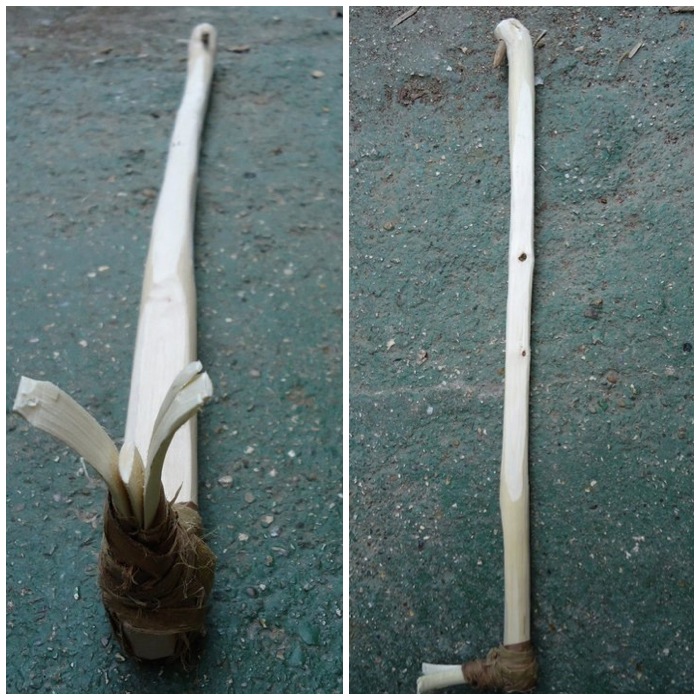
In the picture below you can see a wooden rest I made by wrapping a piece of shaved wood around the shaft of the Atlatl and tying it in place with some natural cordage. I inserted a further wedge piece in the rest to tighten the cordage wrap. This proved an interesting experiment but was too fragile for most of the cadets to use.
An experimental rest made of a strip of shaved wood and bark cordage
Again in the picture below you can see that, as with the Atlatl with the bolt, the dart is well locked in place requiring only a flick of the wrist to release it. I have not come across any historical evidence for the cordage wrap on the dart as a holding mechanism. It may not be authentic, but I like it as it opens up the world of Atlatl to the very young who find holding the dart and Atlatl in one hand difficult.
Dart locked in place – No finger hold required
The Split Stick Atlatl
The Split Stick Atlatl I found documented on the Primitive Ways website as well. No point is carved at the end but a piece of cordage is used instead to hold the dart in place. There is very little archaeological evidence for this type of Atlatl and much debate if it was ever used but I like it and with a little practice it is just as accurate as an Atlatl with a point. A good online discussion on this can be found in the PaleoPlanet forum.
The Split Stick Atlatl
I call this one the ‘One Stick Split Stick Atlatl’: I made the whole thing using primitive tools and out of just one piece of willow just to prove to myself that an Atlatl could have been made just using one straightish piece of stick. I will be posting a How To…. guide on making this Atlatl.
The ‘One Stick Split Stick Atlatl’
A sideways view of the Atlatl showing the finger pinch grip.
Finger Pinch Grip without a Rest
One of my favourite Atlatls is the Lovelock Cave Atlatl which I reproduced as closely to the original as possible. This Atlatl was found in a cave over a century ago but the original was lost; thankfully, though, not before someone had made a detailed drawing of it. A copy of the drawing can be seen in the post by Mike Richardson on the Split Stick Atlatl. It has a fork at the rear and the drawing shows a small groove around each fork. I have read that this was where a small piece of carved wood or bone was attached as a point to hold the Atlatl. I decided though to see if the Atlatl would work with just some cordage wrapped around it. Again there is no historical evidence that this was done but it does work well. A good comparison of both attachments to the Lovelock Cave Atlatl can be read in the PaleoPlanet forum here.
The Lovelock Cave Atlatl
Sideways pictures showing the finger pinch method.
The Lovelock Cave Atlatl and Alternative Finger Grip
A couple of pictures showing the dart attached to the cord wrapped around the fork.
The Lovelock Cave Atlatl – Dart Cordage Connection
A little experiment with a split stick and a rest. The rest did eventually split as the pine wood was quite weak with the hole drilled into it.
Split Stick with Rest
The rest here is based on the Cheddar Gorge replica I saw but instead of a point at the end I made it into a fork with cordage. This works perfectly well with a bit of practice.
My take on one of the Cheddar Gorge Atlatl reproductions
I really love making Atlatls and everyone I work with loves to have a go with them. I need to spend some more time on making different types of darts next to go with my shed full of Atlatls.
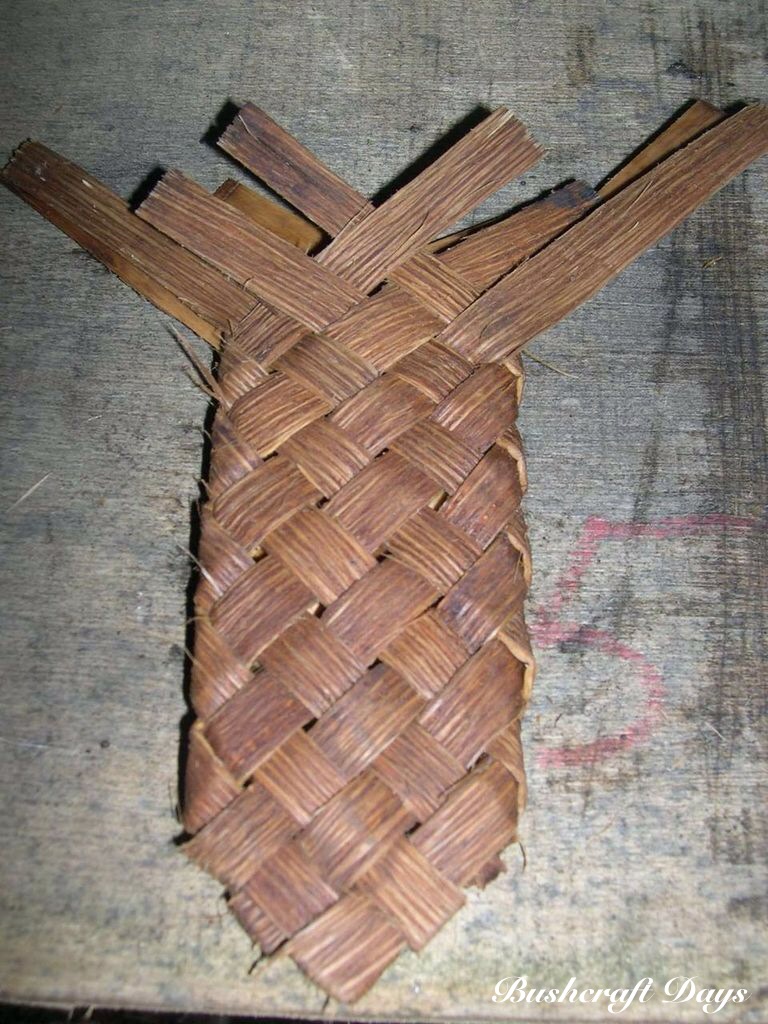
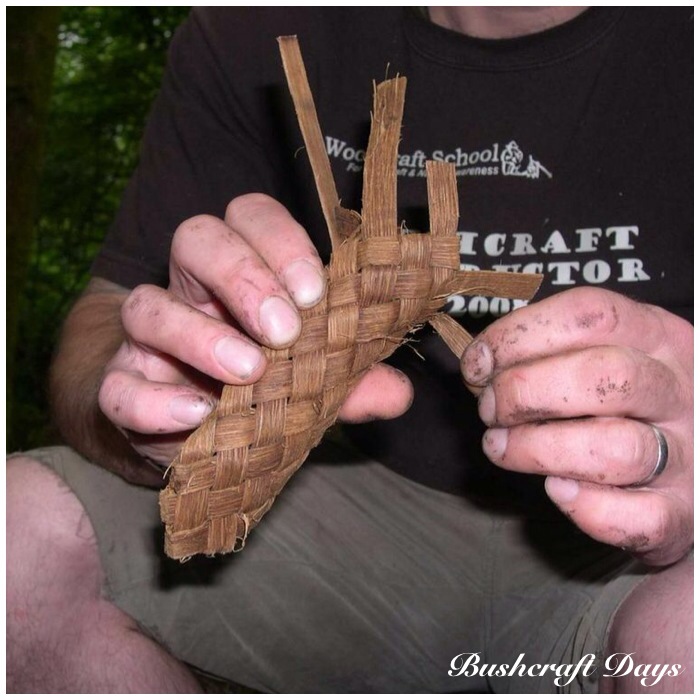
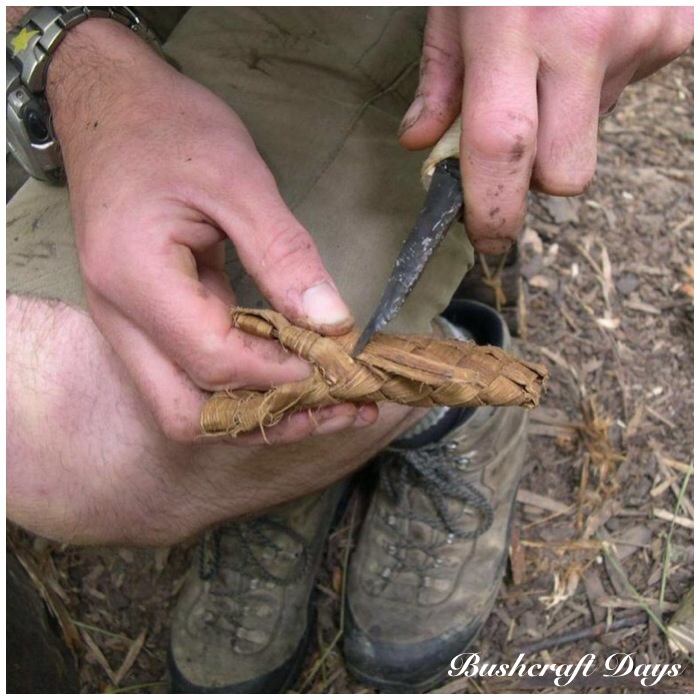
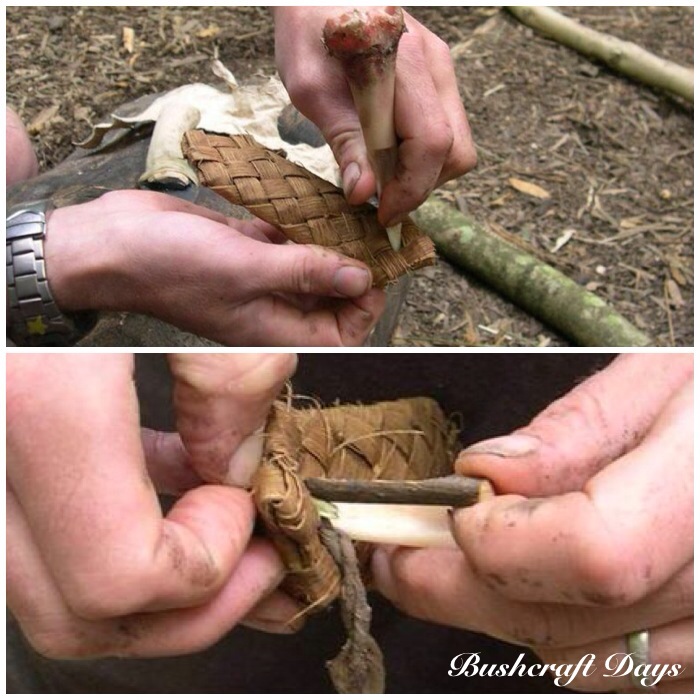
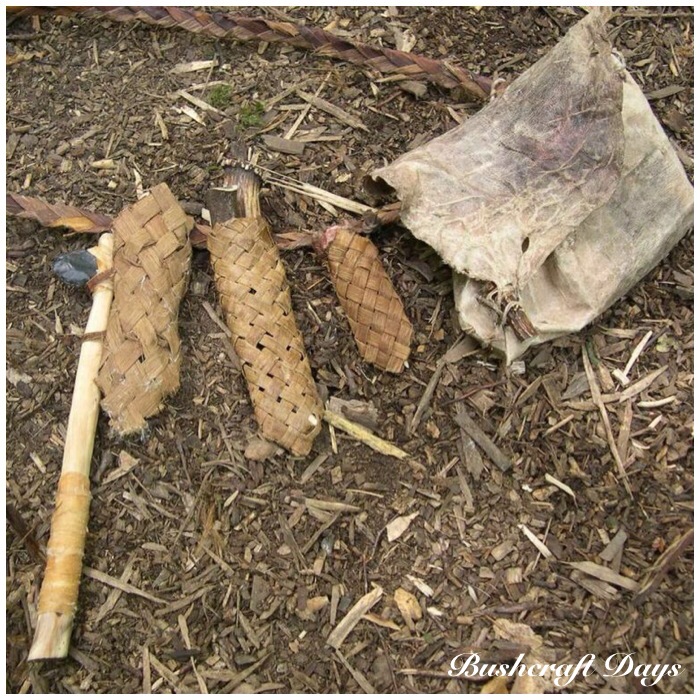
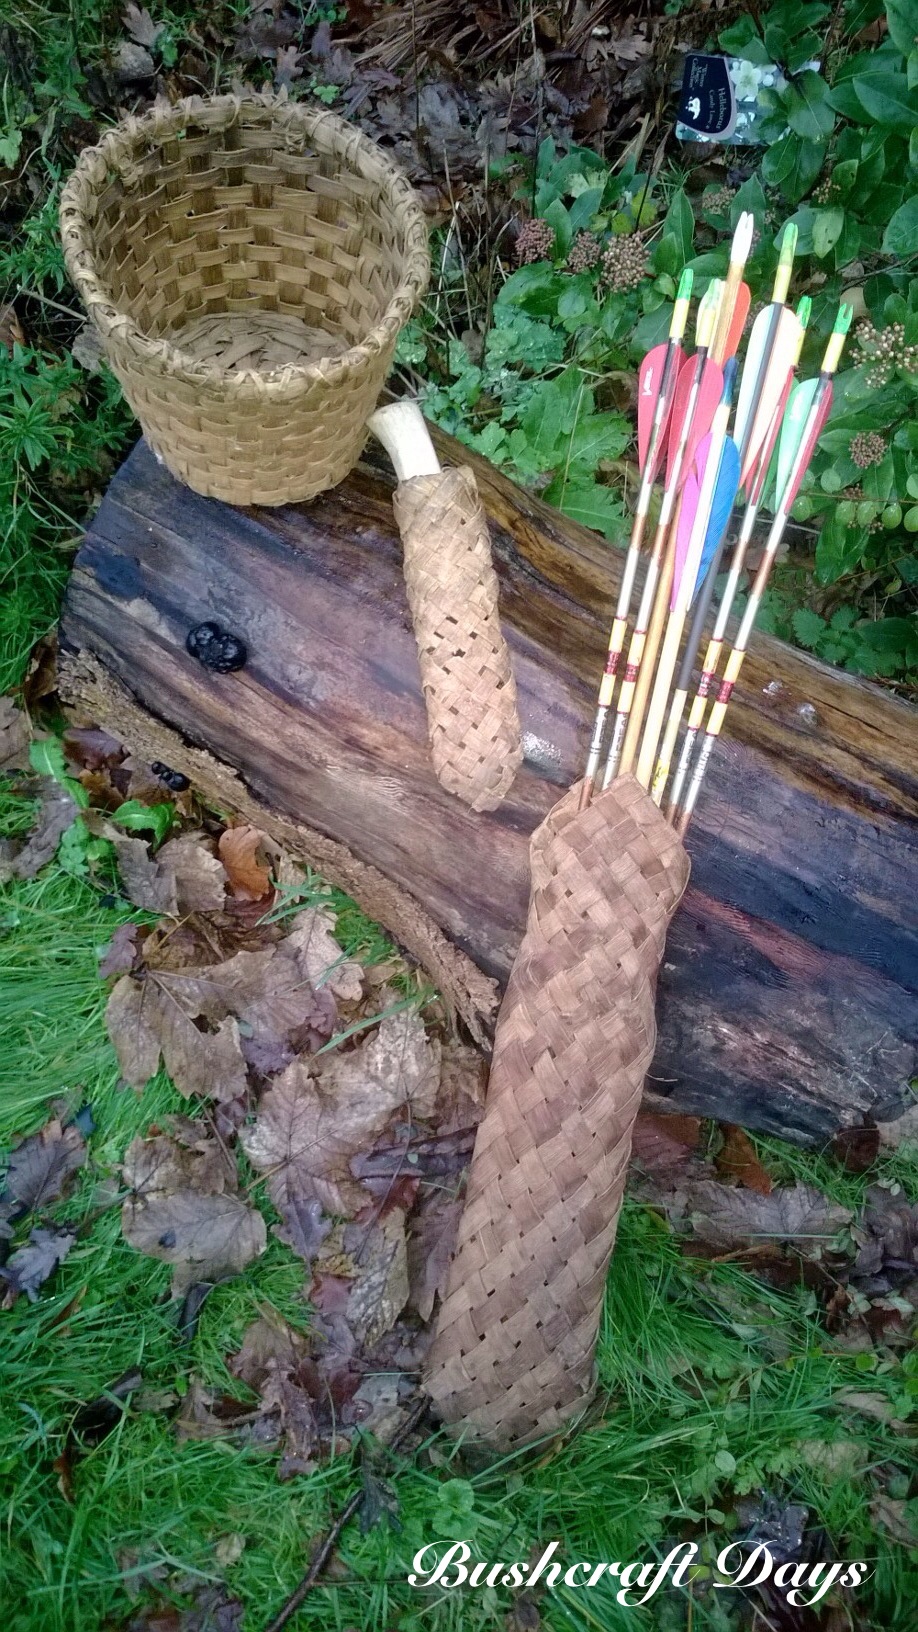
This How To…. lays out some simple steps to make a bark sheath for a knife. I have also used this method to make a quiver for my arrows and with a sightly different method you can easily make containers.
Sweet Chestnut Bark Sheath
I took these pictures in 2009 when I was on the Woodcraft School Primitive Technology course. The sheath was made using only primitive tools as required by the course. To do this I made for myself a flint knife, flint adze, some discoidal flint knives and also used the bone bodkin that I showed you how to make in the previous post. For more modern methods I would say you could do this job with a small saw and a small knife.
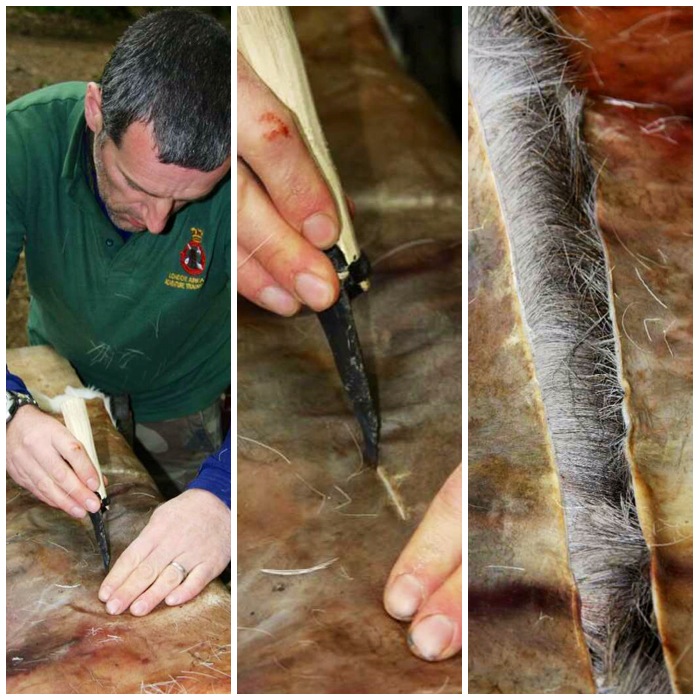
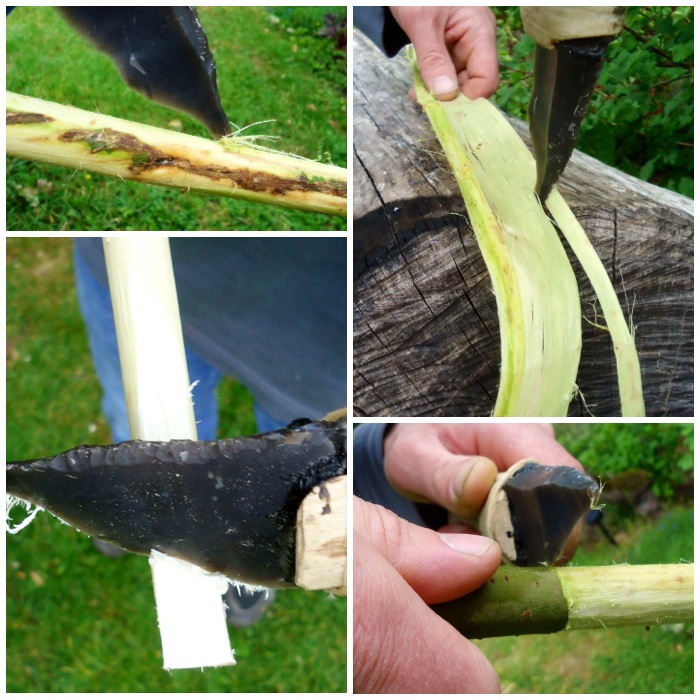
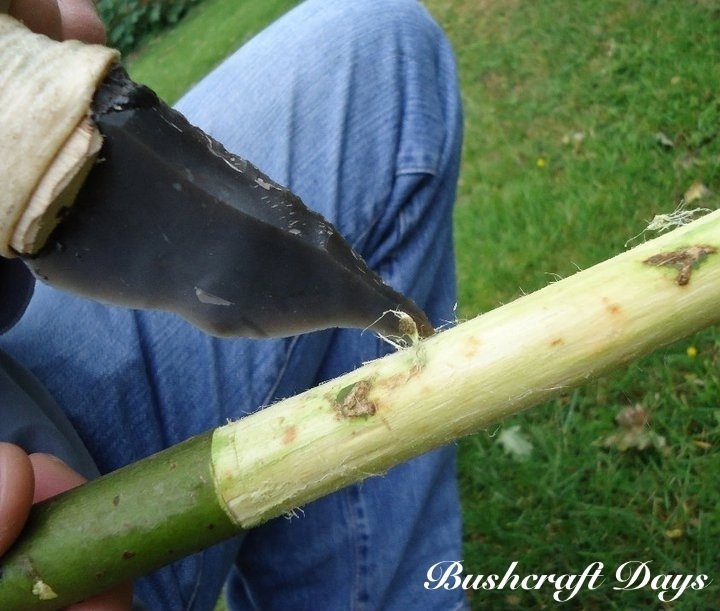
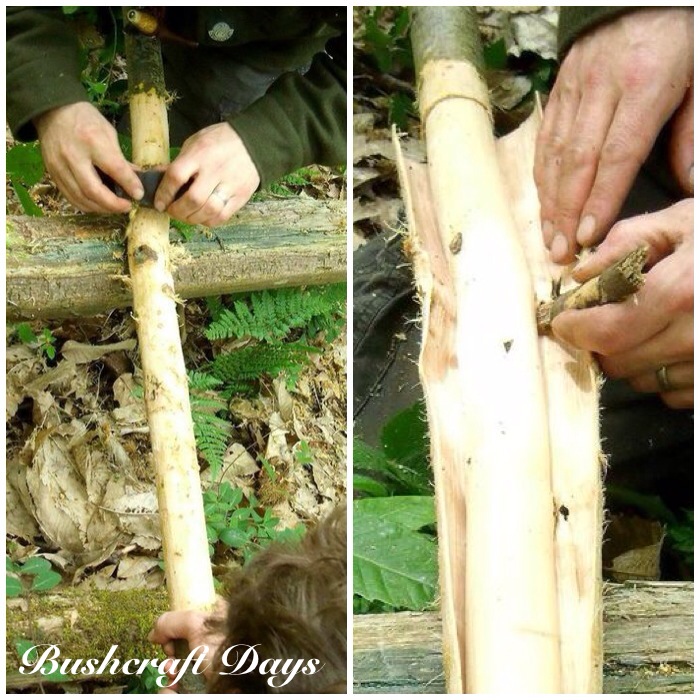
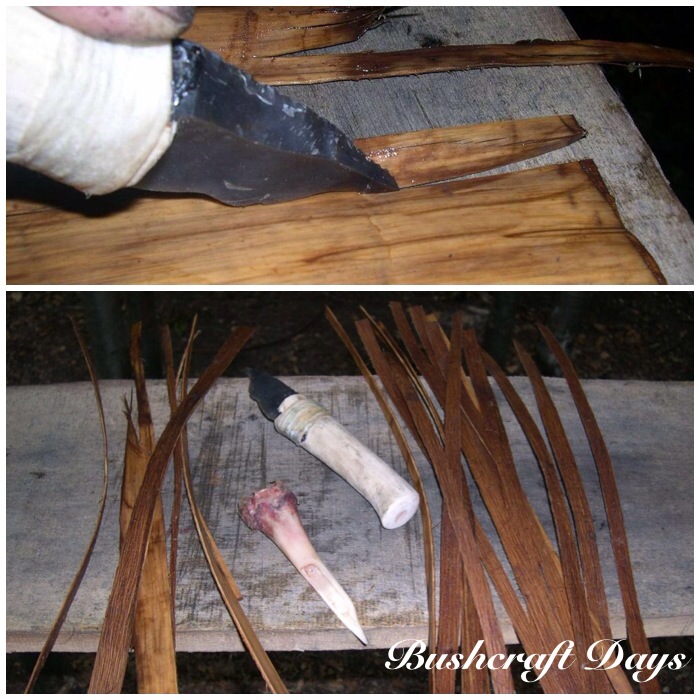
I started the project by selecting a suitable Sweet Chestnut (Castanea sativa) limb from a coppice stool to take down. After checking the tops for any dead wood I started to clear away the undergrowth using some flint. Clearing the undergrowth away ensured a safe working area around the limb. I used a large sharp piece of flint for this. Also I made sure I had clear exit routes around the limb I could use when it came down.
Trimming and starting the cut
I had created for the job a Flint Adze. This is a piece of worked flint attached to a handle with rawhide. Unlike traditional tree felling where a wedge is created and then a back cut made I am made a rosette cut all around the tree using short chopping motions. You can see the rosette cut appearing in these pictures. The small branch you can see in the foreground got in my way so I cut this down.
The Rosette cut
You can see that the Adze creates tears in the wood but is very effective in cutting into it. As I got into the heartwood I had to support the limb as I did not want it to fall uncontrollably and eventually I was able to let the limb to fall under control. I did not need to back out of the coppice stool as the limb was light enough to control. Had it been any heavier, my cleared exit routes would have come into play.
Traditionally the stump would have been left like this. I however sawed the stump cleanly at the base. If a stump is cleanly cut (with a little angle) then it has less chance of getting infected and will eventually have new shoots grow out of it.
A wooden flower
Using the Adze in a safe manner away from my body I trimmed off all the brash from the limb.
Trimming the limb
Using the flint that I had cleared the undergrowth with I scraped off all the outer bark of the limb as this is too brittle to work with. All I wanted to use was the inner bark. My friend Paul held the limb to secure it: this speeded up the process as I could use both hands.
I scored a line down the limb through the inner bark with my flint and also scored a line around the limb at the top and the bottom. Then, using a small piece of wood I’d found on the ground, I peeled away the inner bark from the limb. This was done in April so the sap was rising, making the debarking of the limb very easy.
Scraping and de-barking
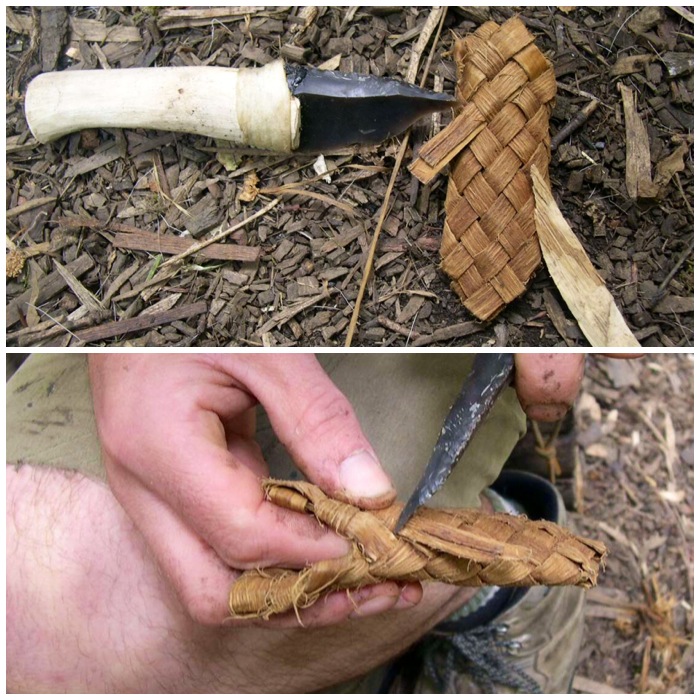
The tools I used for the job:
1) Adze
2) Flint
3) Piece of wood
I cut a further piece of bark off the limb as well.
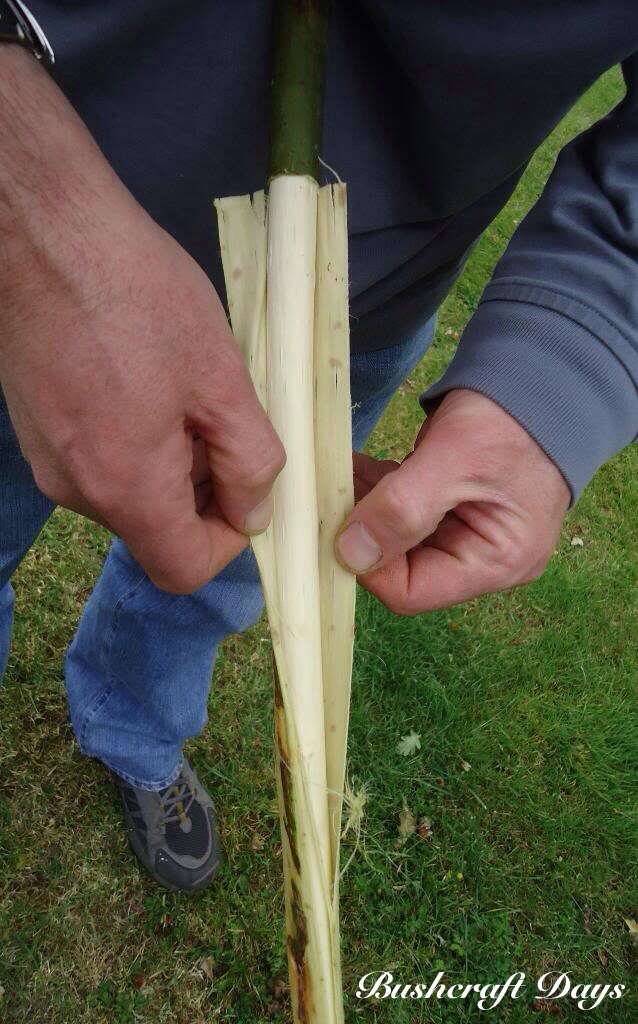
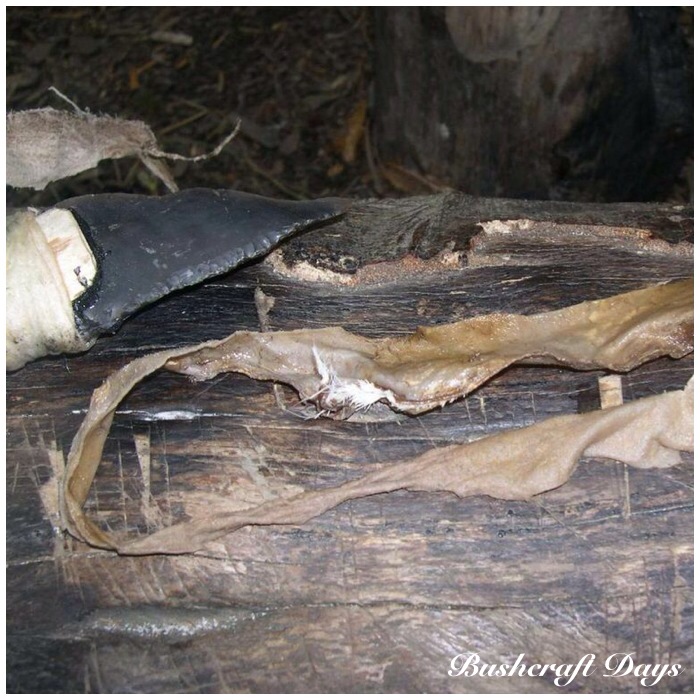
Fresh bark ready for drying
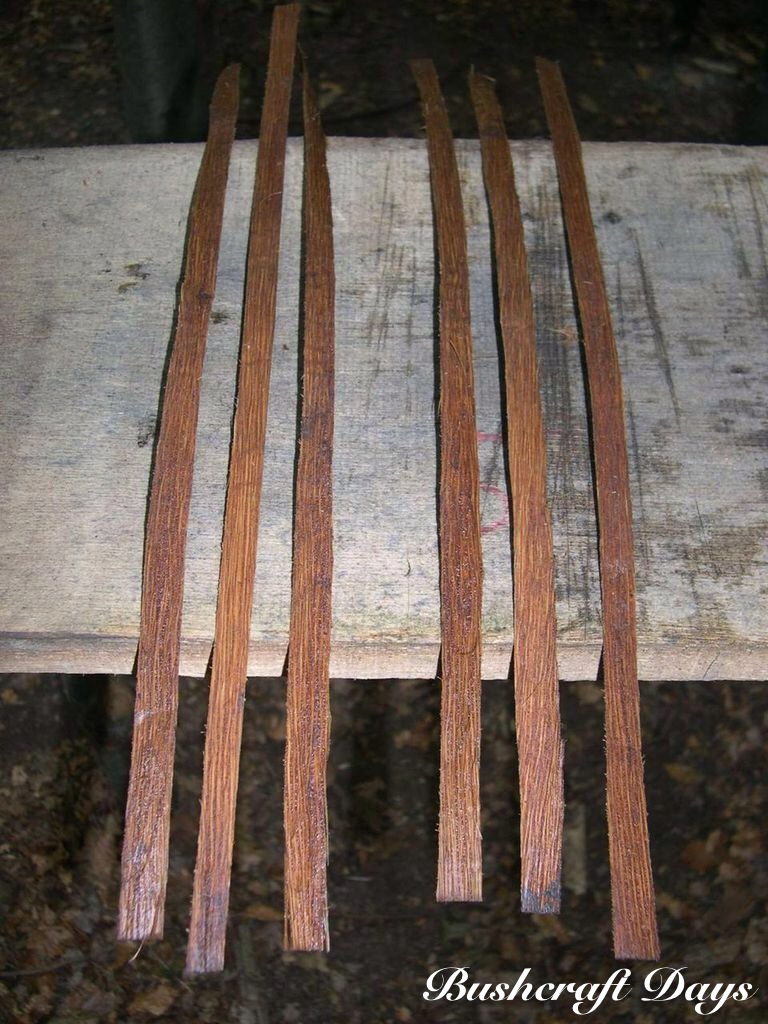
I left the bark to dry out overnight and then re-wet it the next day before cutting it into strips. If you use the bark straightaway after harvesting it, anything you weave will become loose as the bark will shrink slightly as it dries. This shrinkage does not happen again if you let it dry out first then just re-wet it to make it supple enough to work.
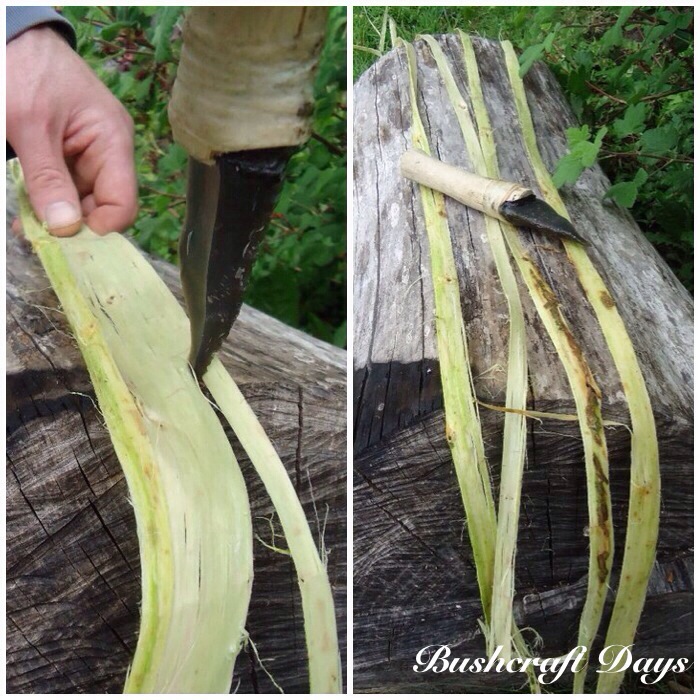
To cut the strips I had a flint knife prepared for this.
Re-soaked pliable bark
I cut the strips by eye only but I am sure you could rig up a worktop to cut consistently wide strips. The good strips are on the right and the offcuts on the left.
Bark strips
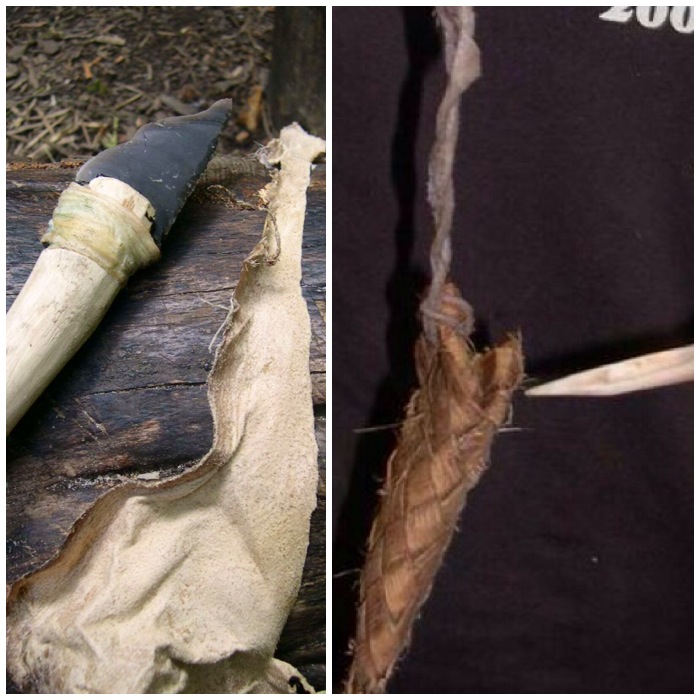
With practice you will be able to gauge how many strips you’ll need for your size of sheath. This was a small sheath so I estimated 6 strips.
Chosen strips
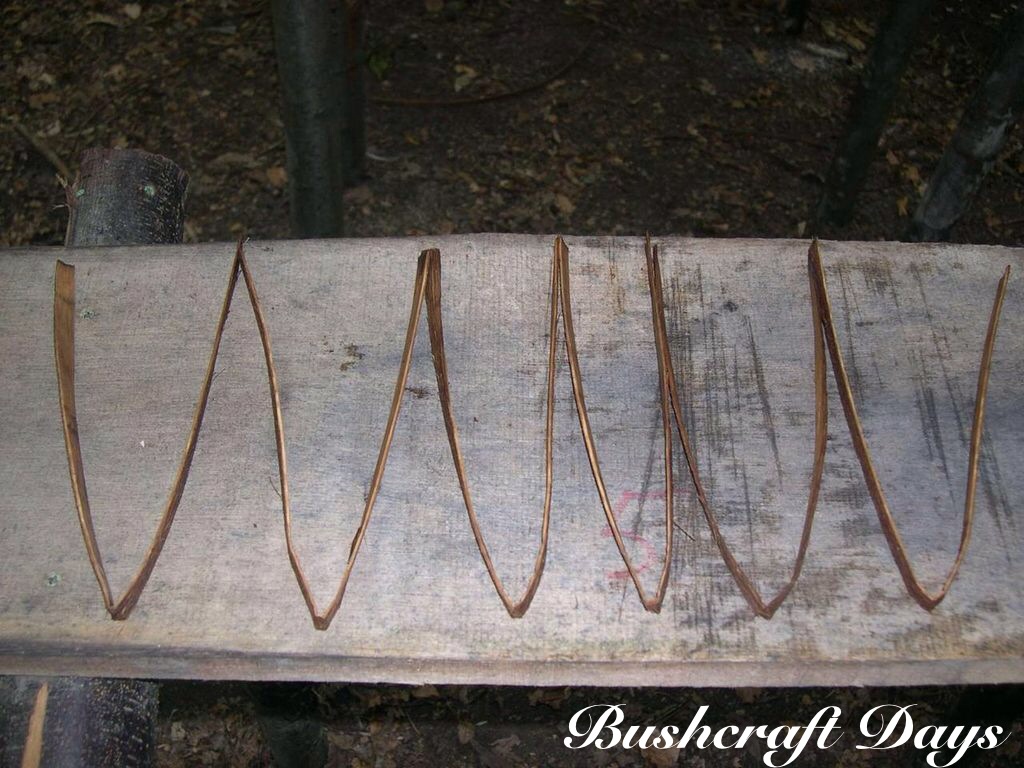
Firstly fold all your strips in half with the inner part of the bark showing as it is the smoother side.
Fold the strips in half
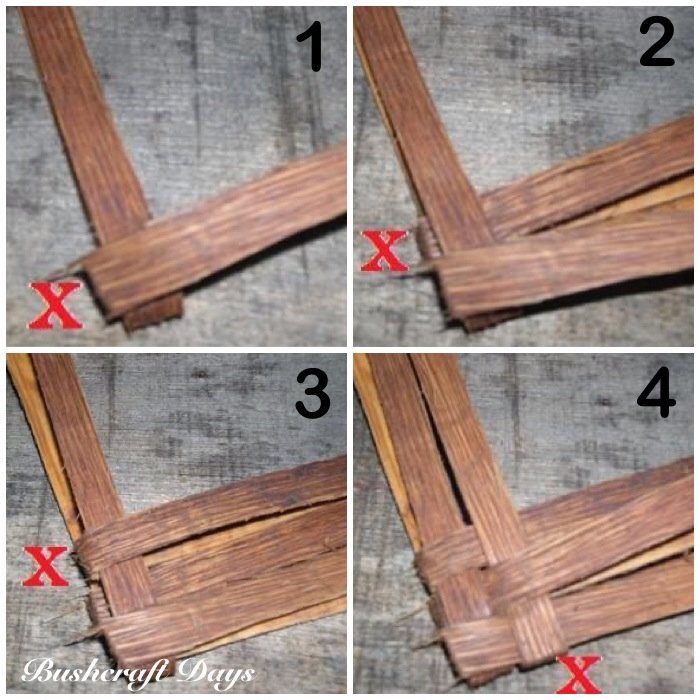
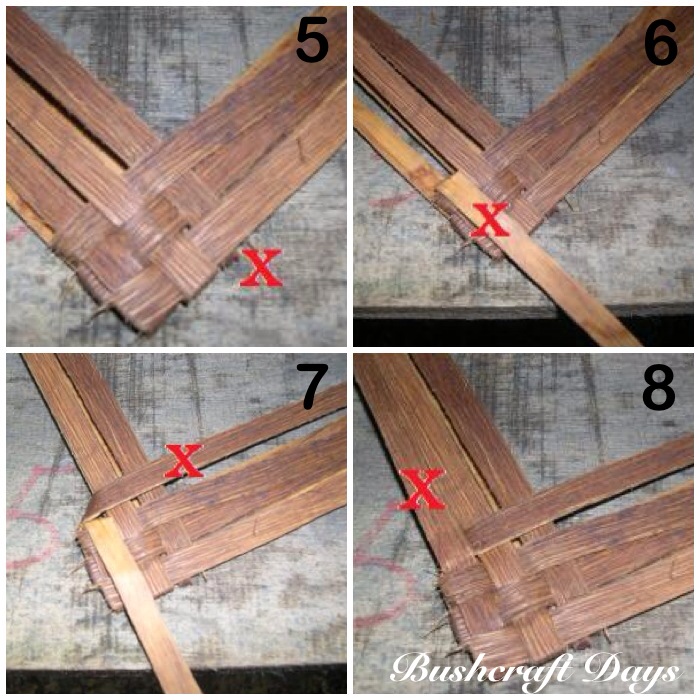
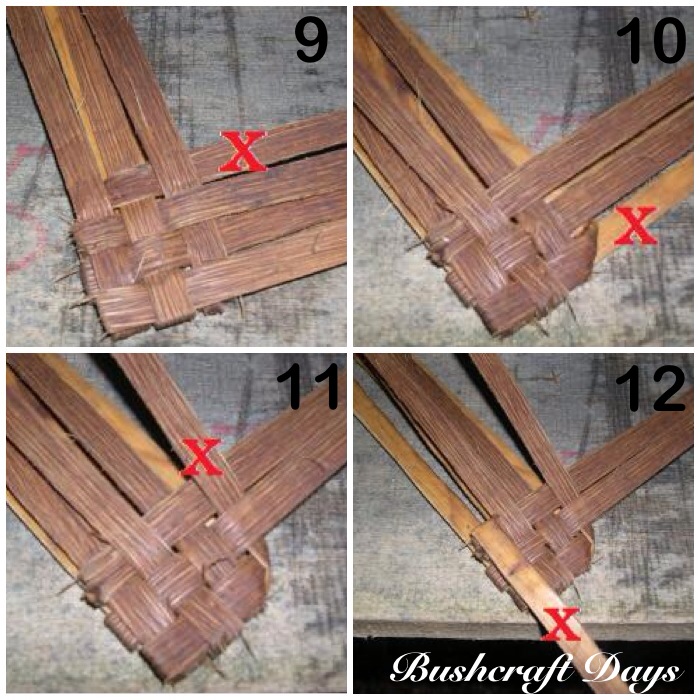
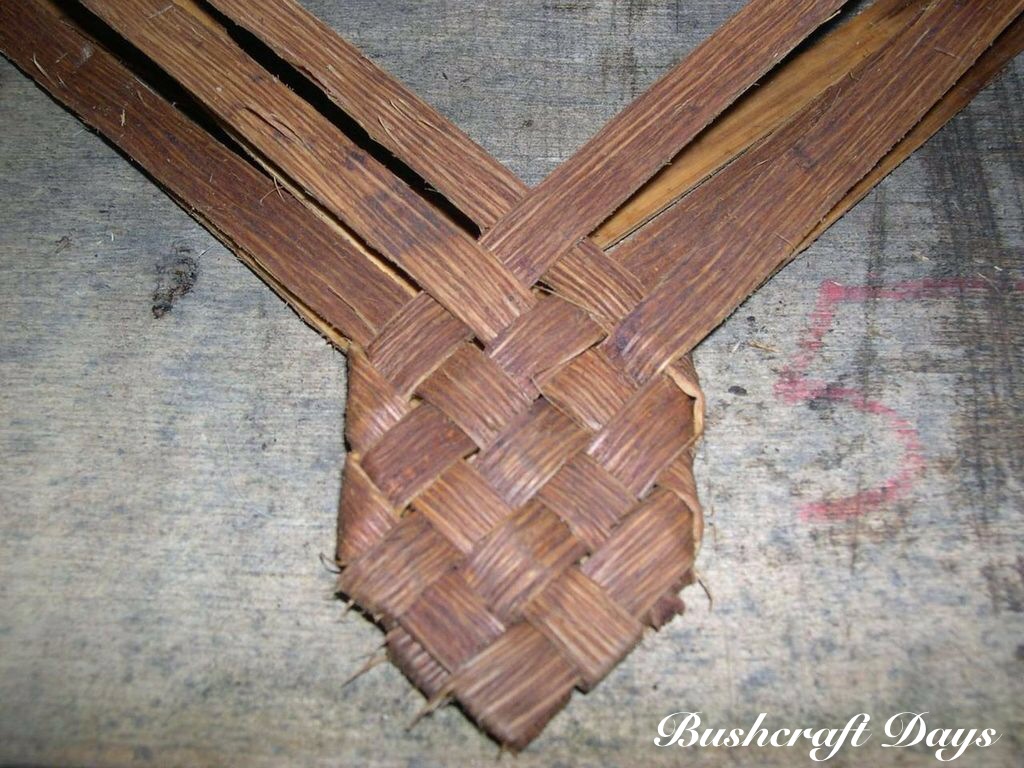
I have documented the first 12 steps of the weave in the next 3 pictures. Each numbered bullet point relates to a numbered picture below.
1) Lock the right hand strip onto the top half of the left hand strip. 2) Lock the next right hand strip onto the bottom half of the left hand strip. 3) Lock the third right hand strip onto the top half of the left hand strip. 4) Lock the second left hand strip onto the top of the first right hand strip and weave through the other strips.
Weave 1
5) Lock the third left hand strip onto the bottom of the first right hand strip and weave it through the other strips. The ‘point’ of the sheath is now complete. 6) Fold back the top of the first left hand strip. 7) Fold the bottom of the first left hand strip diagonally over the other left hand strips. 8) Then flip back up the top of the first left hand strip.
Weave 2
9) Lock the next right hand strip onto the bottom half of the left hand strip. 10) Flip the whole sheath over. There should be a single strip on the right now. 11) Now fold the bottom right strip diagonally over the other right hand strips and weave it in. 12) Starting again on the left hand side keep repeating the whole process.
Weave 3
Soon your sheath will take shape.
Keep weaving
Keep going with the weave and stop when you have enough to securely hold whatever will be kept in it.
Ready to close off
The top can seem a little bit tricky at first but all you need to do is turn the ends back on themselves and weave them into the sheath. Just tuck each end in as neatly as you can: it’s tricky as each end will be different, you might need to experiment.
Closing off
When you have closed the top off, trim all the ends so that you cannot see where the weave ends.
Trimming the excess
All the ends were trimmed so that the ends were hidden by the weave. The sheath is ready for a dangler strap now.
Ready for a loop attachment
I used some raw hide I had left over from making a bag. I wet it to make it more pliable and then rolled it in my hand.
Re-soaked rawhide
The bodkin I had made earlier came in handy here to make a gap in the weave. I then used a small stick to push the rawhide into the gap made by the bodkin.
Bodkin in use
Attach it as you like and it is ready. I think I used a simple Larks Foot knot here.
Dangler attached
This sheath completed my primitive belt order (the smallest one on the right).
My Primitive belt order
This type of weaving can make some very useful items. I have been using the quiver on a regular basis since 2008 and it shows no sign of wear and tear.
During the summer of 2009 I completed the Woodcraft School Primitive Technologycourse. I do not know if John Rhyder still runs this course but he still does a lot of excellent craft courses.
I originally wrote this How To…. for Fenlander and his Natural Lore blog back in September of 2009. It is a subject I love so thought it would be good to include in my How To…. section as well. I apologise for the quality of some of the pictures, I think the light was poor at the time and my fingers were quite slippery from the marrow.
The course required that at least one our craft items had to be made using only primitive tools and techniques.
I decided to make myself a bone knife and a bark sheath for it. The knife I made from a Lamb’s thigh bone and the sheath was made from Sweet Chestnut (Castanea sativa) inner bark. The How To…. on making the sheath can be found here – Primitive Skills – Bone Knife Bark Sheath.
This post concentrates on the knife only. I have put another link yo the bark sheath at the end.
The techniques I used were from what I had researched at the time and I am sure there are many other methods to do this.
As a word of warning please do have a First Aid Kit on standby as the flint is very sharp and thoroughly wash your hands after wards.
Bone Utility Knife and Sheath
I wanted to be able to use the knife as an Awl for working hides, as a Bodkin for when weaving and as a general knife for cutting cordage and meat.
This post will concentrate on how the knife was made. The next post will be about the sheath.
The bone I used was a thigh bone known as the Shank. Hence the names ‘Lamb Shank’ as a cut of meat and the word ‘Shank’ as a primitive knife.
Fresh Bone and Flint
As I was using primitive tools and techniques only I scraped all the fat and flesh off with a piece of flint.
Other students tried burning the fat and flesh off but the made the bone brittle so it easily shattered. It is slippery work that requires a lot of patience. One slip and the flint will cut you as cleanly as any sharp knife.
Slippery Work
After an hours work I had the bone cleaned up.
Ready for Carving
I decided that one knuckle would make a good handle but the other had to be removed.
I scored a line around the whole bone near the knuckle I wanted removed. Apologies for the slightly out of focus picture. The score line was about a couple of millimetres deep.
Removing a Knuckle
After scoring the line John Rhyder (course instructor) showed me how to scorch the line to make it a little brittle in that area.
Scorching the Bone
A close up.
Scorch line
Once the line was scorched all the way around a little gentle tapping was all that was needed.
Gentle Tapping
A crack soon appeared.
Cracked Bone
To finally remove the knuckle I carried on scraping with the flint.
Removed Knuckle
Once the knuckle was removed then I decided on the shape of my knife point. I did this by gently scraping with the flint on the bone to define my knife shape.
Flint Score Lines
Then making sure that the bone was on a stable surface and held in a secure grip the tedious scraping began. The carving out of the knife shape took a number of hours.
Making the Groove
The awl tip taking shape.
Awl Tip
Eventually I was able to prise a section of bone out.
Removal of Bone
I went through two pieces of flint carving the bone out.
Eventually the general shape of the knife was produced.
Basic Shape – Front
And the other side.
Basic Shape – Back
A messy but necessary job is to remove the remaining marrow. I just used a small stick for this.
Removing the Marrow
To give the knife a basic edge I used a piece of sandstone.
Sanding the Edge
Any rough edges I tidied up with flint.
Final Touches with Flint
Below you can see the side profile of the knife. This curve is useful as a Bodkin in basket weaving. In the next post you will see that this was the knifes first job.
Side Profile of the Knife/Bodkin
Here the knife is sitting on the inner bark I used to make the sheath out of.
Ready for a Sheath
Like any knife it needs a sheath. I did produce one using primitive methods and documented all the steps.
The Sheath How To…. is next
This whole process took a whole afternoon for me but I did find it very relaxing taking my time and really thinking about each step.
Afterwards I left the knife hanging for a few months in my garage to air dry and keep it away from any inquisitive rodents.