Today found me out and about with my family at The Vyne National Trust Property near Bramley in Hampshire. The day started wet and overcast but we still managed to get out and get muddy.
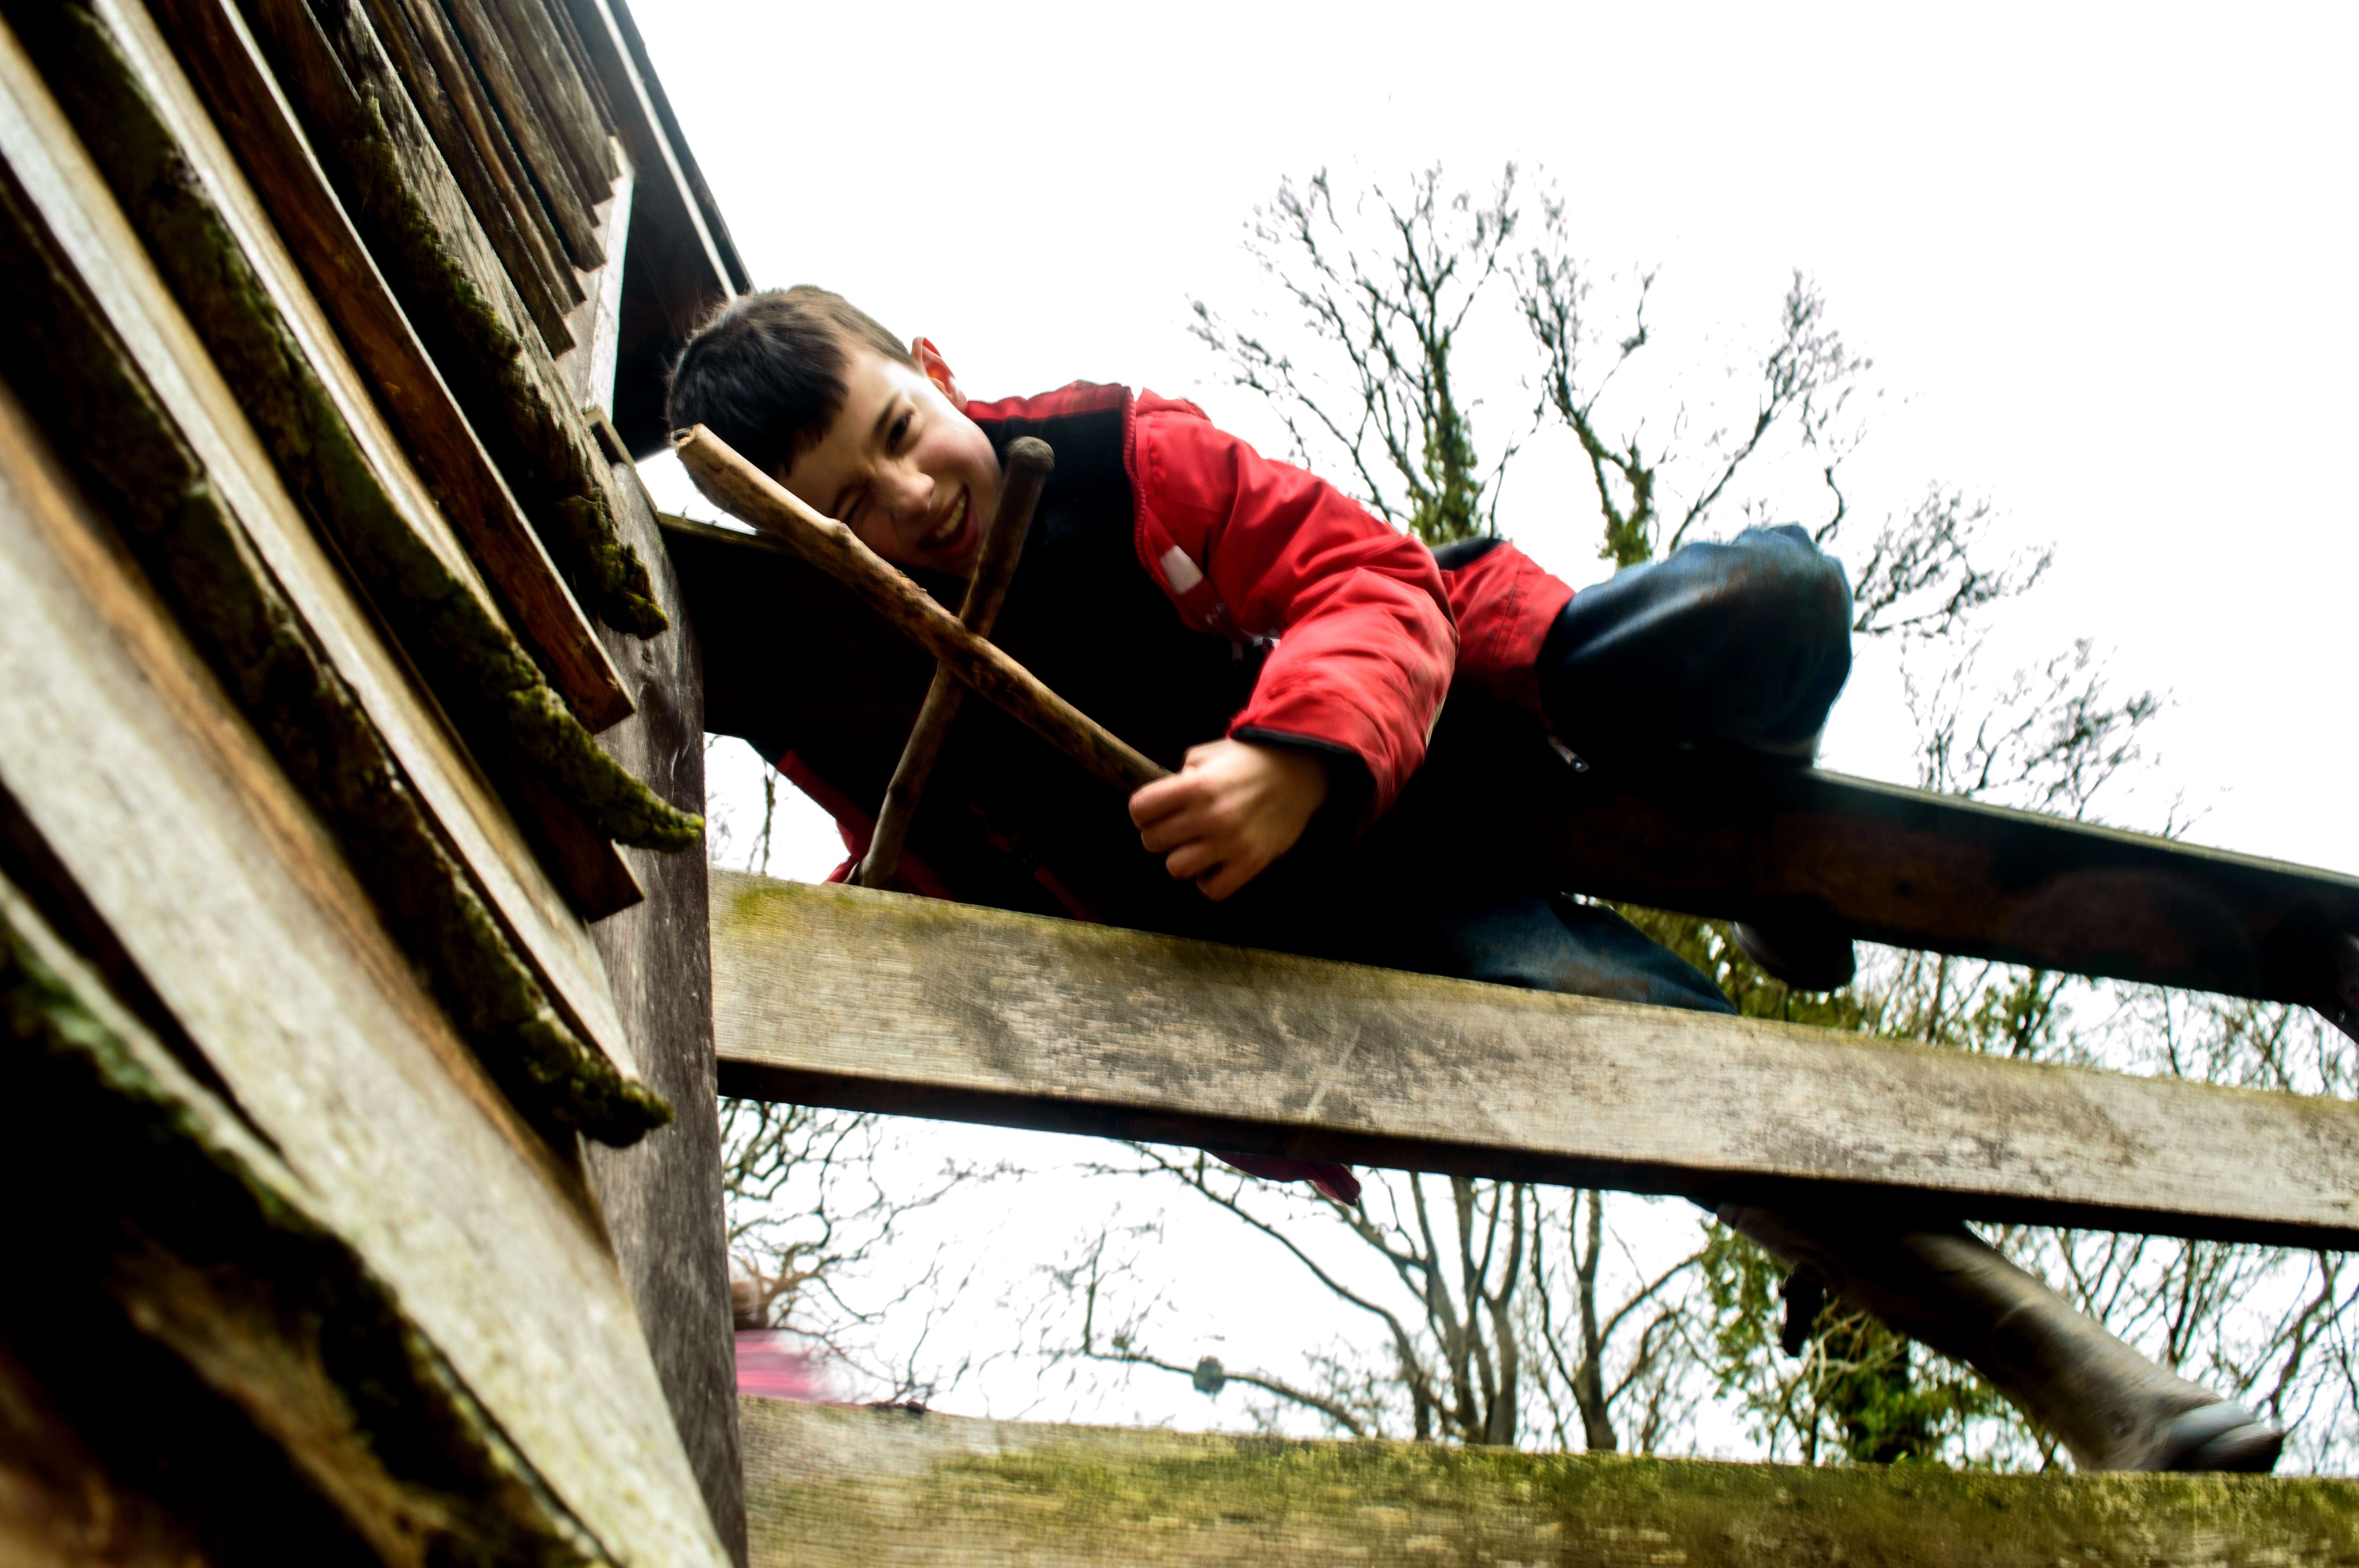
Stick Fun
I took lots of pictures but this one of my son managing to have fun with just a couple of sticks on an old wooden fence really put a smile on my face. He likes his X Box but thankfully likes to get muddy just as much.
This is my 200th post on my Bushcraft Days blog and I have had fun writing every one – Looking forward to the next 200.
Thank you to everyone who follows my little adventures.
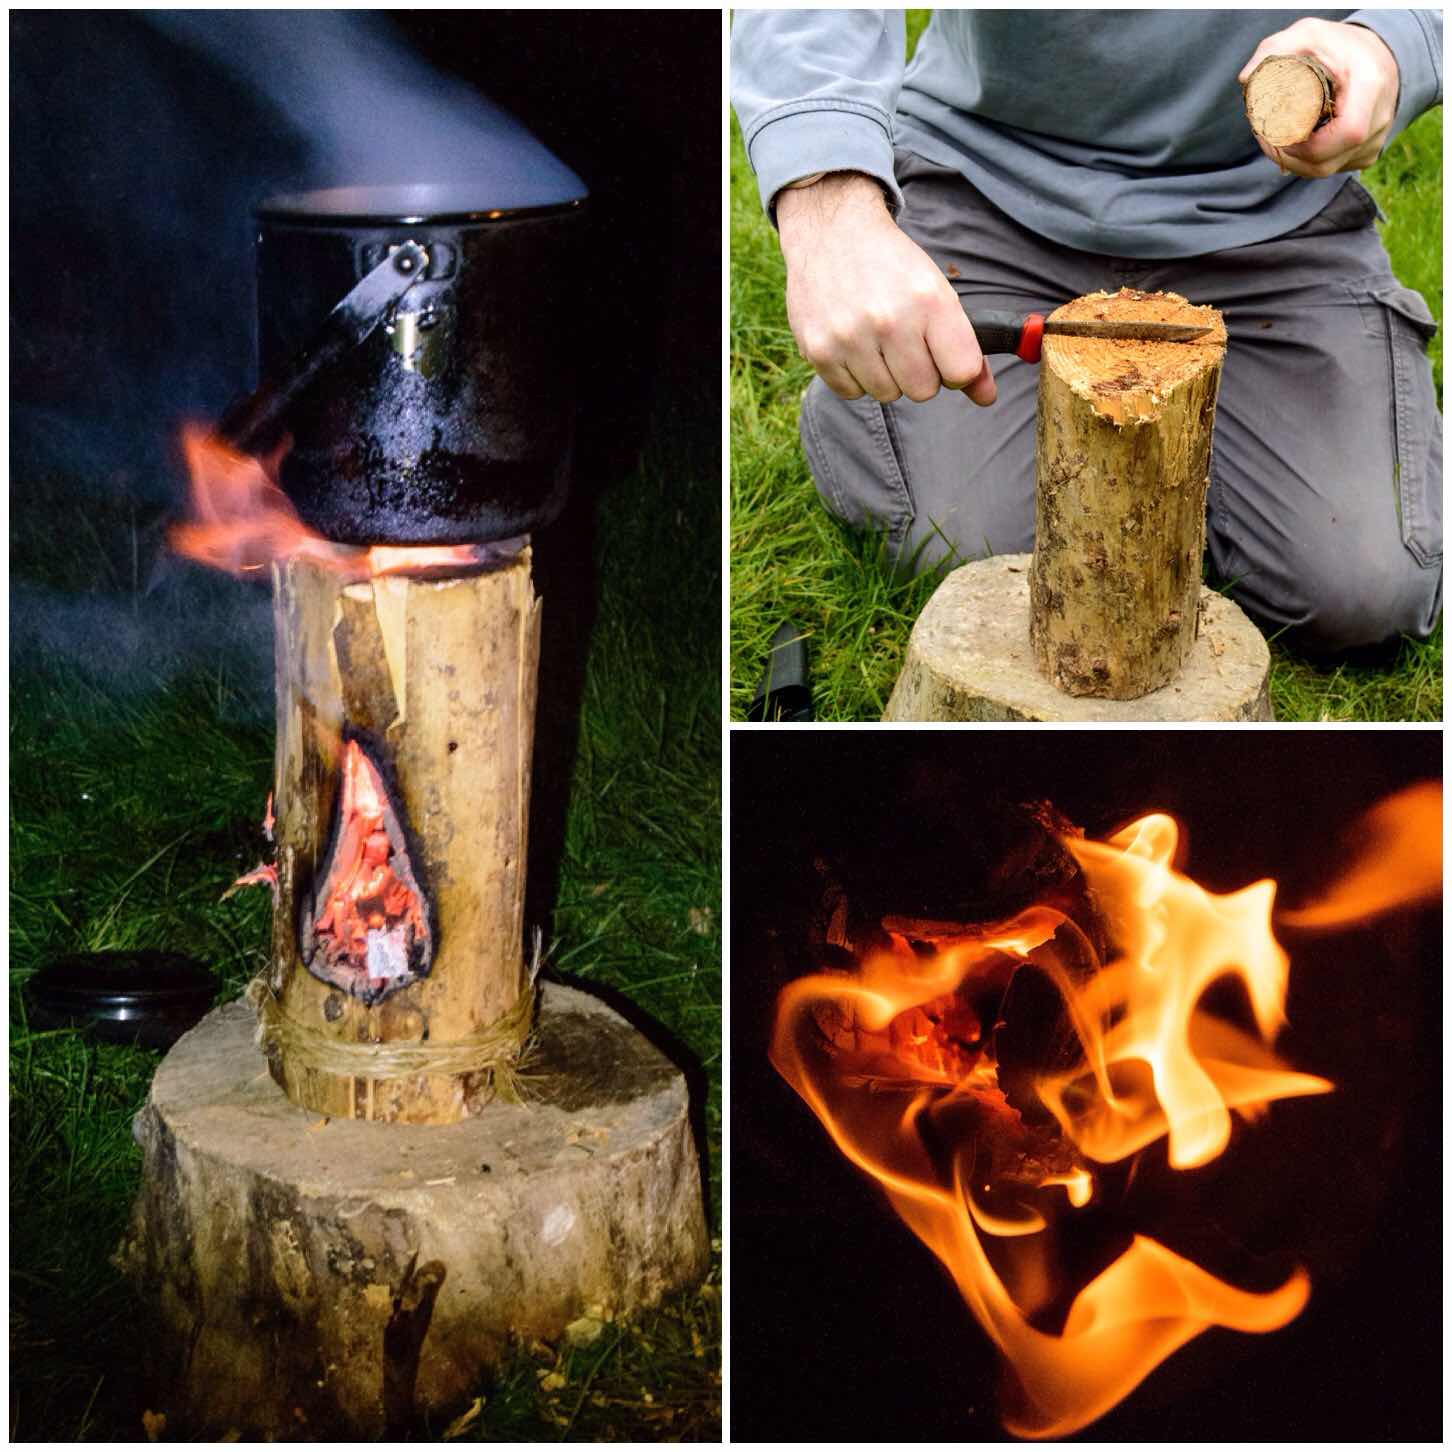
One night recently I just could not get to sleep and my thoughts wandered onto the subject of log rocket stoves. Having written on the subject a few times with the Damp Log Rocket and the Fire Face Candles it struck me that I always used large tools such as axes or drills to make them.
This post is about making a Log Rocket Stove with only my knife (a small pruning saw was used to trim the log). I wanted to see if I could easily produce a stove without having to rely on my axe.
Log Rocket Stove – Without an axe
I like log rocket stoves as they can be made quickly, work well on wet or snowy ground, produce their own kindling and come with a ready made platform for your pot. Once the stove has done its job the collapsing embers make a good start point for a bigger fire.
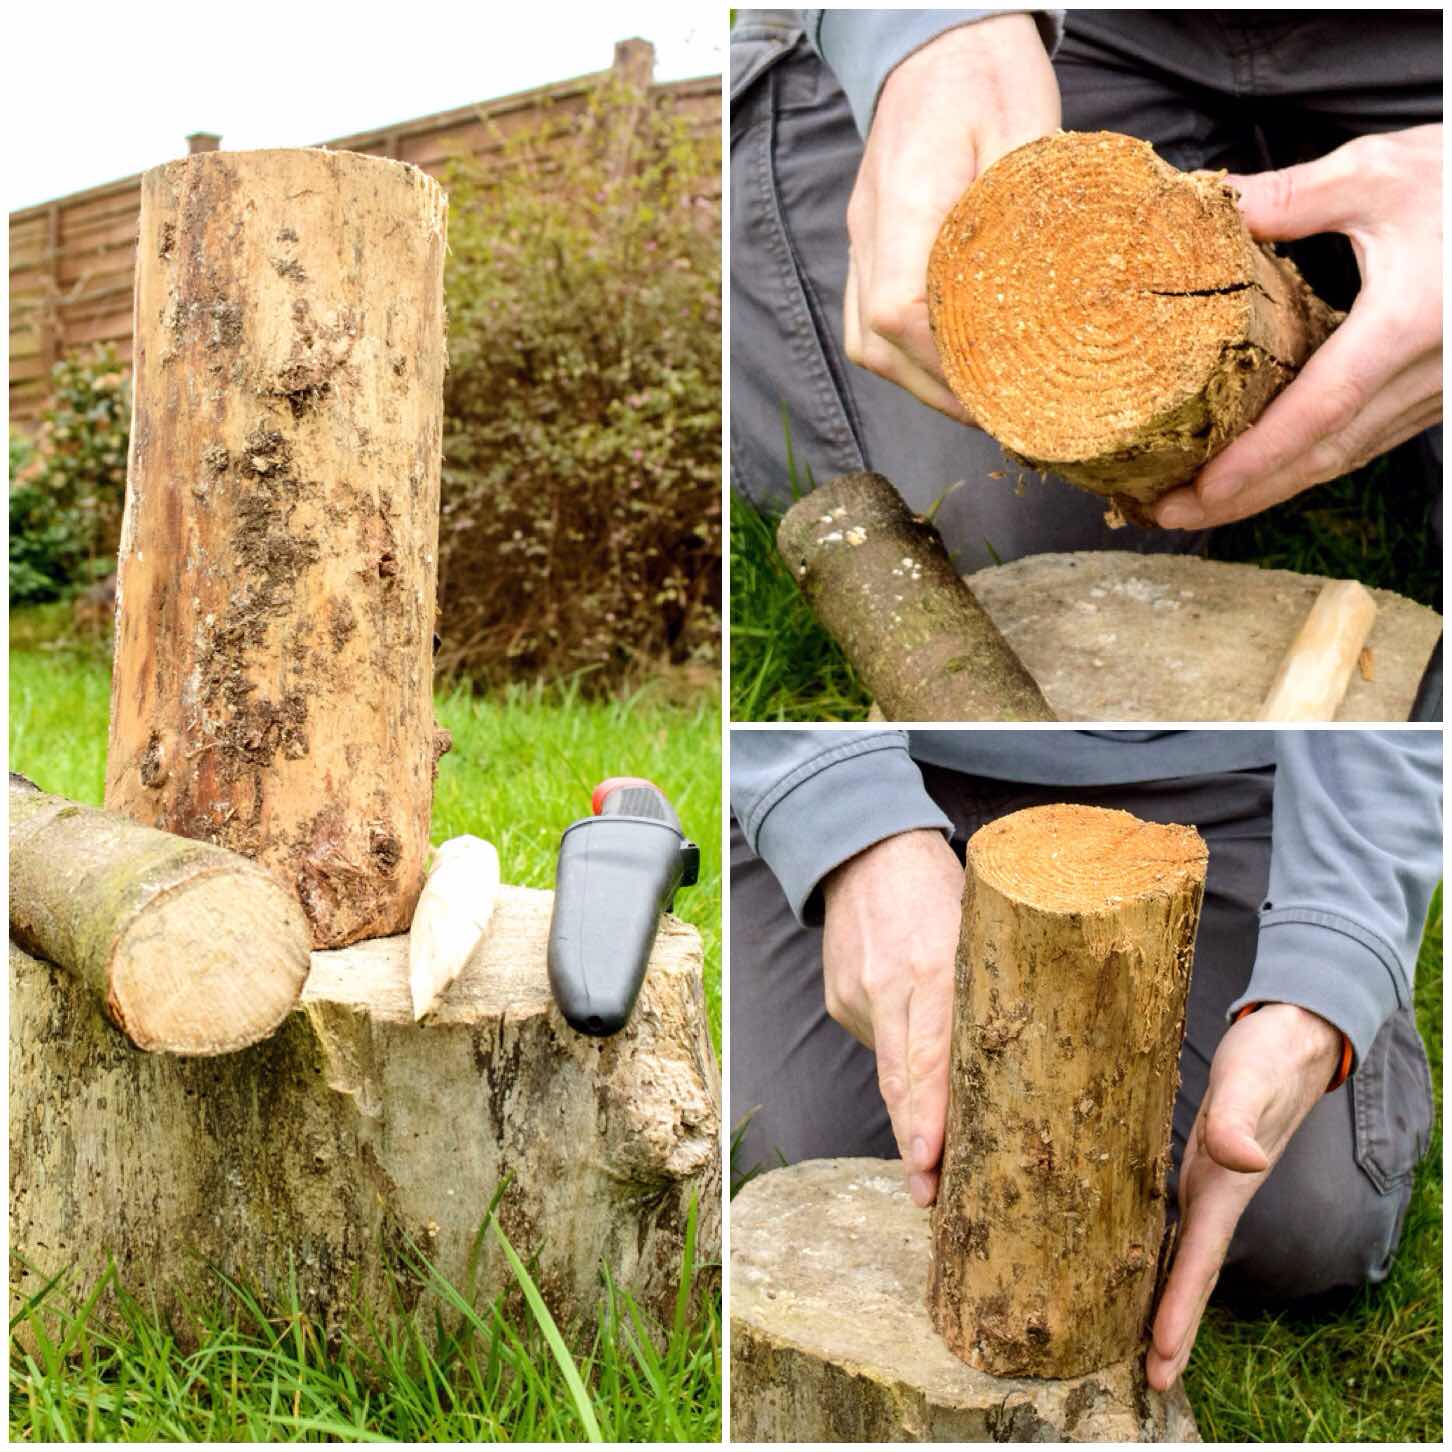
Set Up
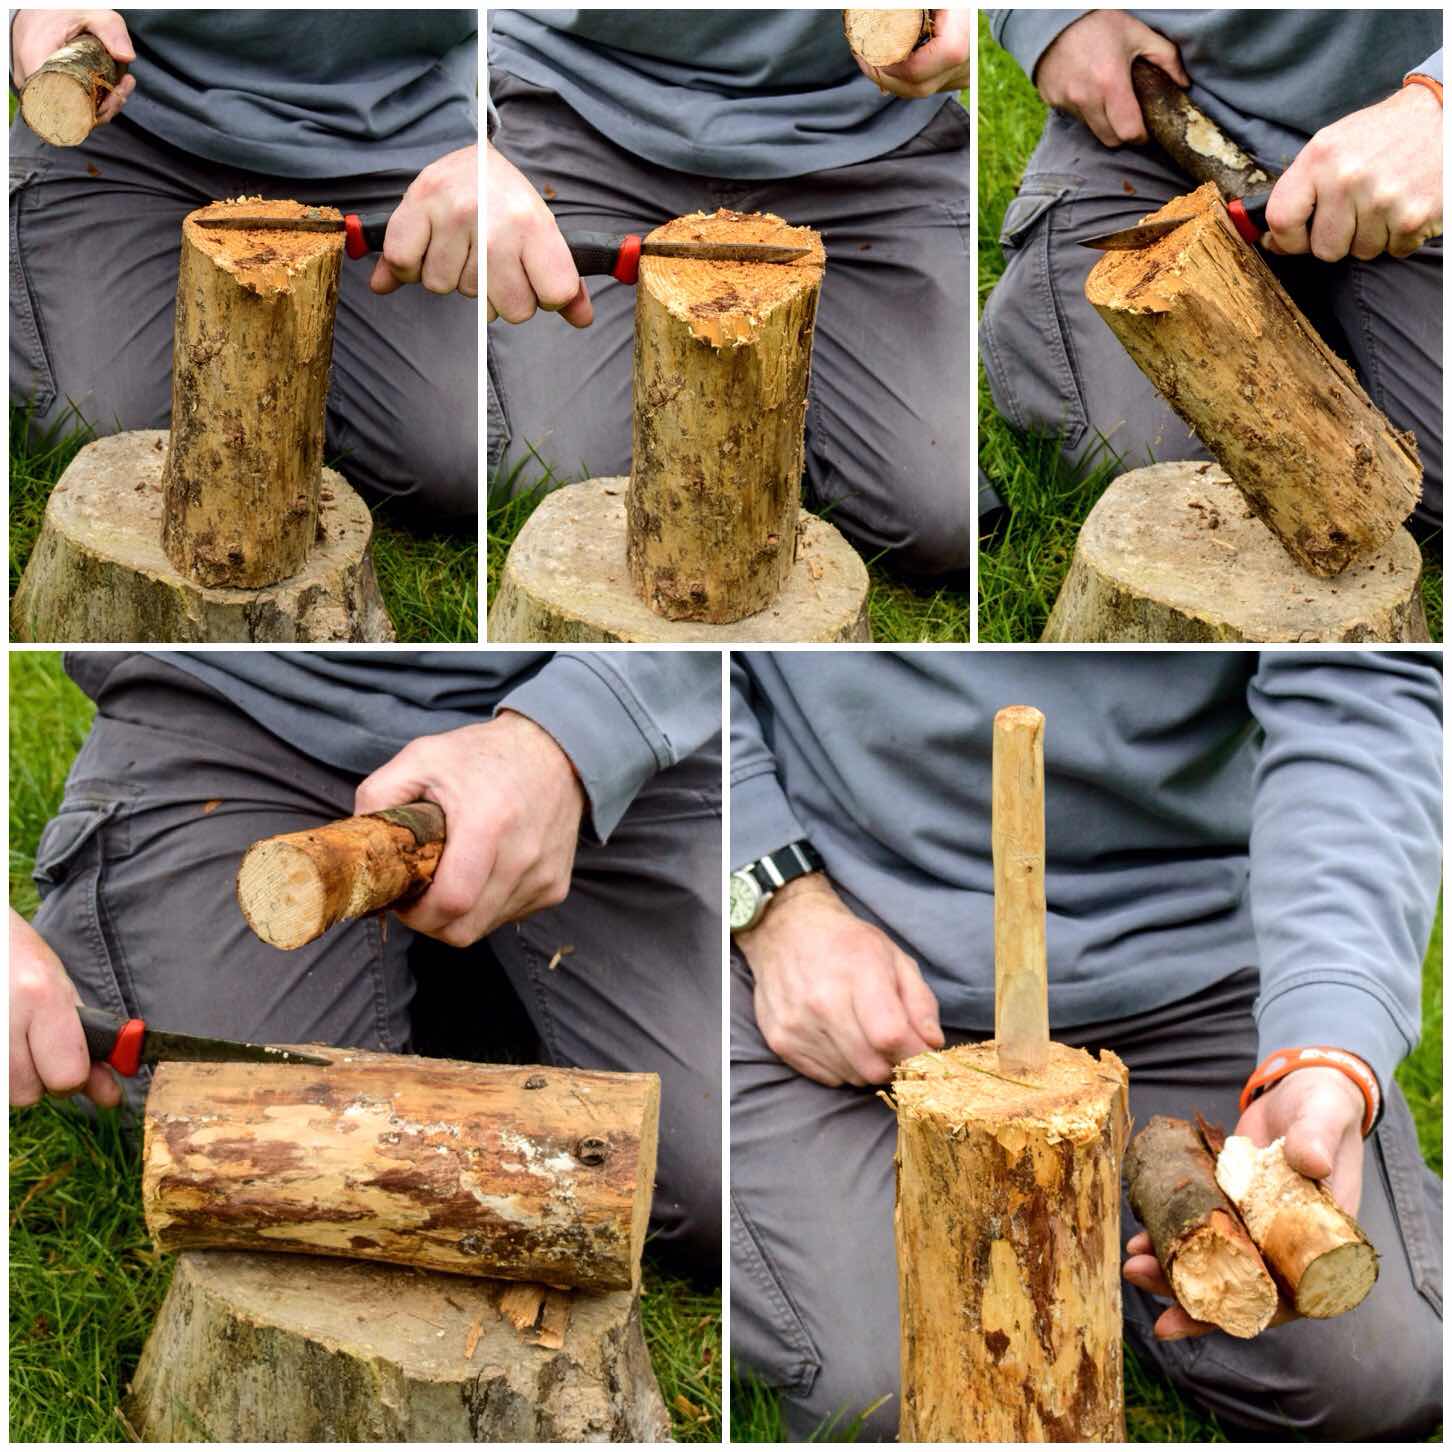
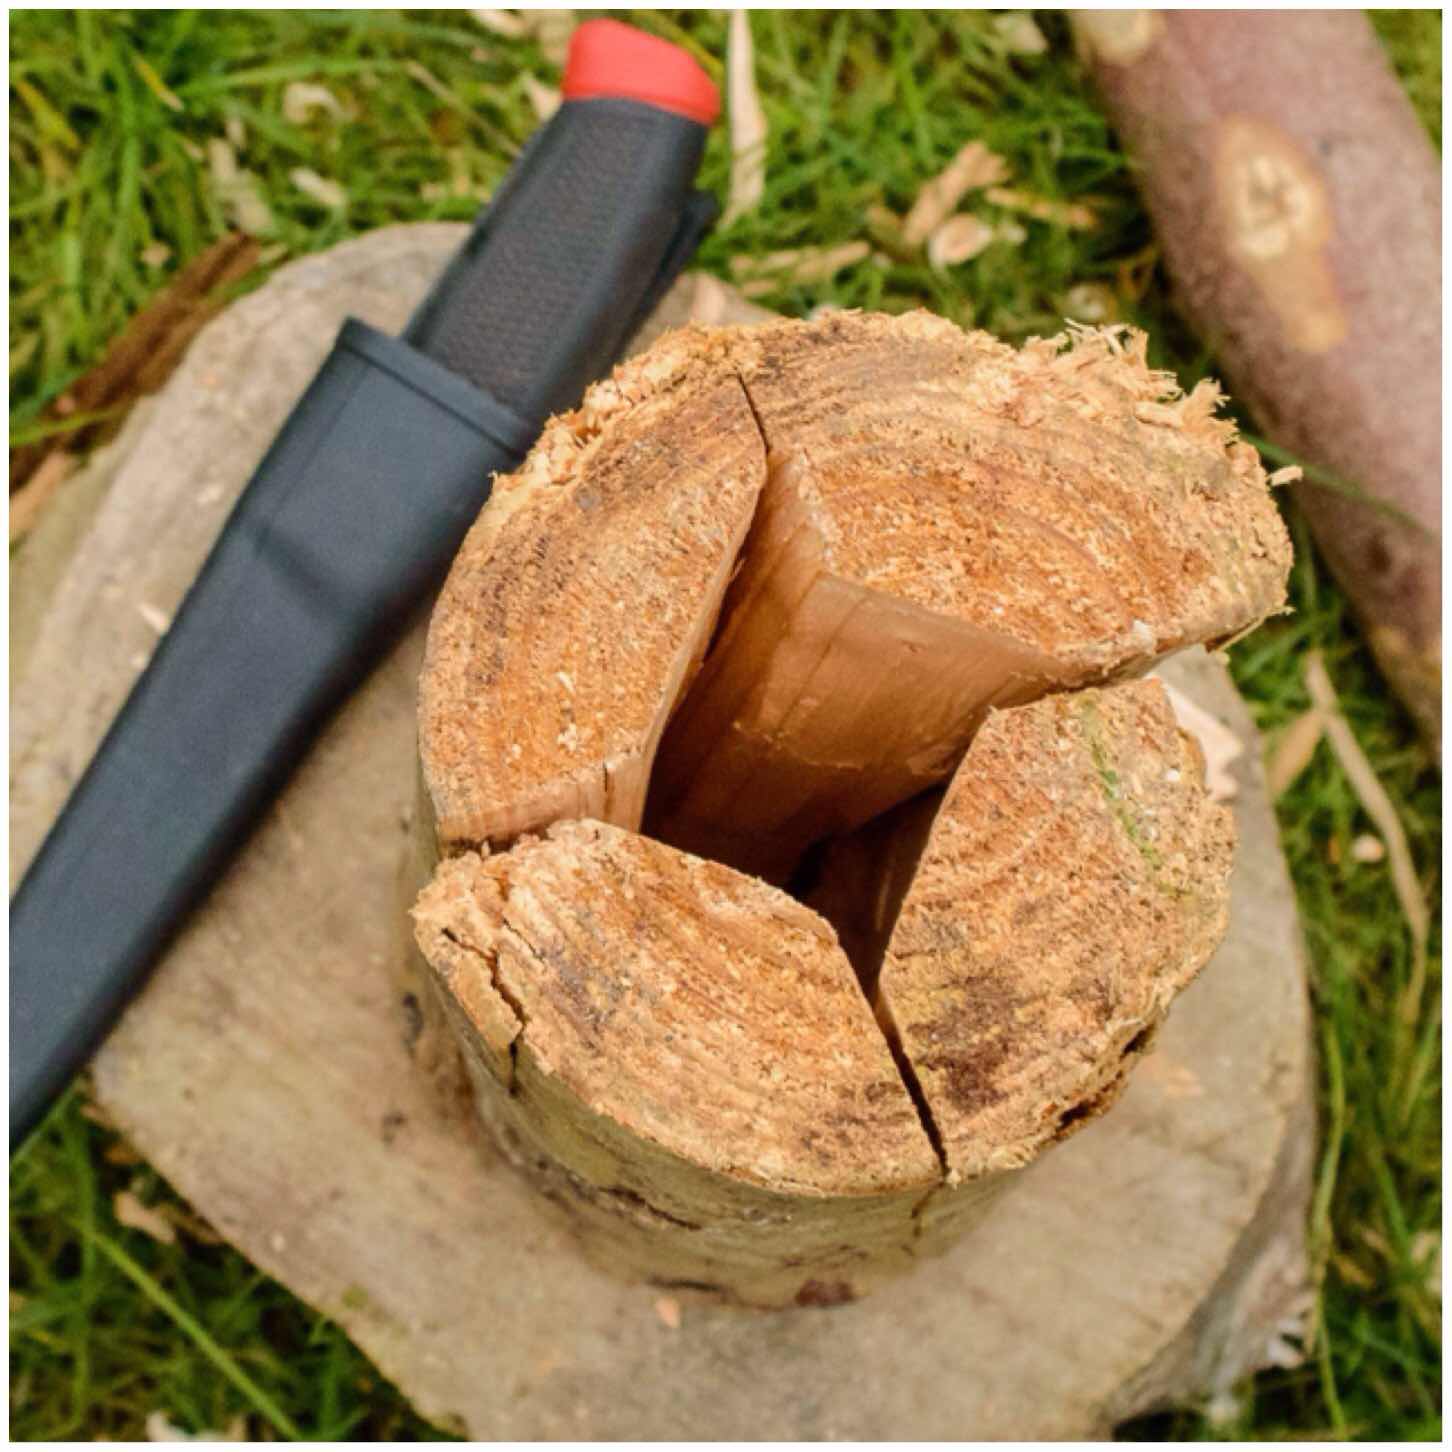
I chose a seasoned piece of spruce wood from my log pile which had a diameter slightly larger than the blade on my Mora knife (do not be tempted to use a log much smaller than this as you will end up with a very small cooking surface) . I also used a larger round of wood as a work surface, carved myself a small wedge to help with splitting the wood and had a offcut of wood ready to batton with.
Spruce log and a stable work surface
Splitting
I started with my knife first and battoned it into the log (note that the knife blade is at 90 degrees to my body for safety). My aim at first was to create a split as deep as I could with the knife all around the middle of the log to create a weak point in it. The knife was smaller than the log so I could only batton it in a couple of centimetres.
Once I had my point of weakness battoned in all around the log I inserted the wedge into the split at the top and battoned that in as well to try and increase the split some more (upon reflection I think two wedges would have helped). It was at this point my batton decided to snap on me.
Batton out a split as much as you can with your knife
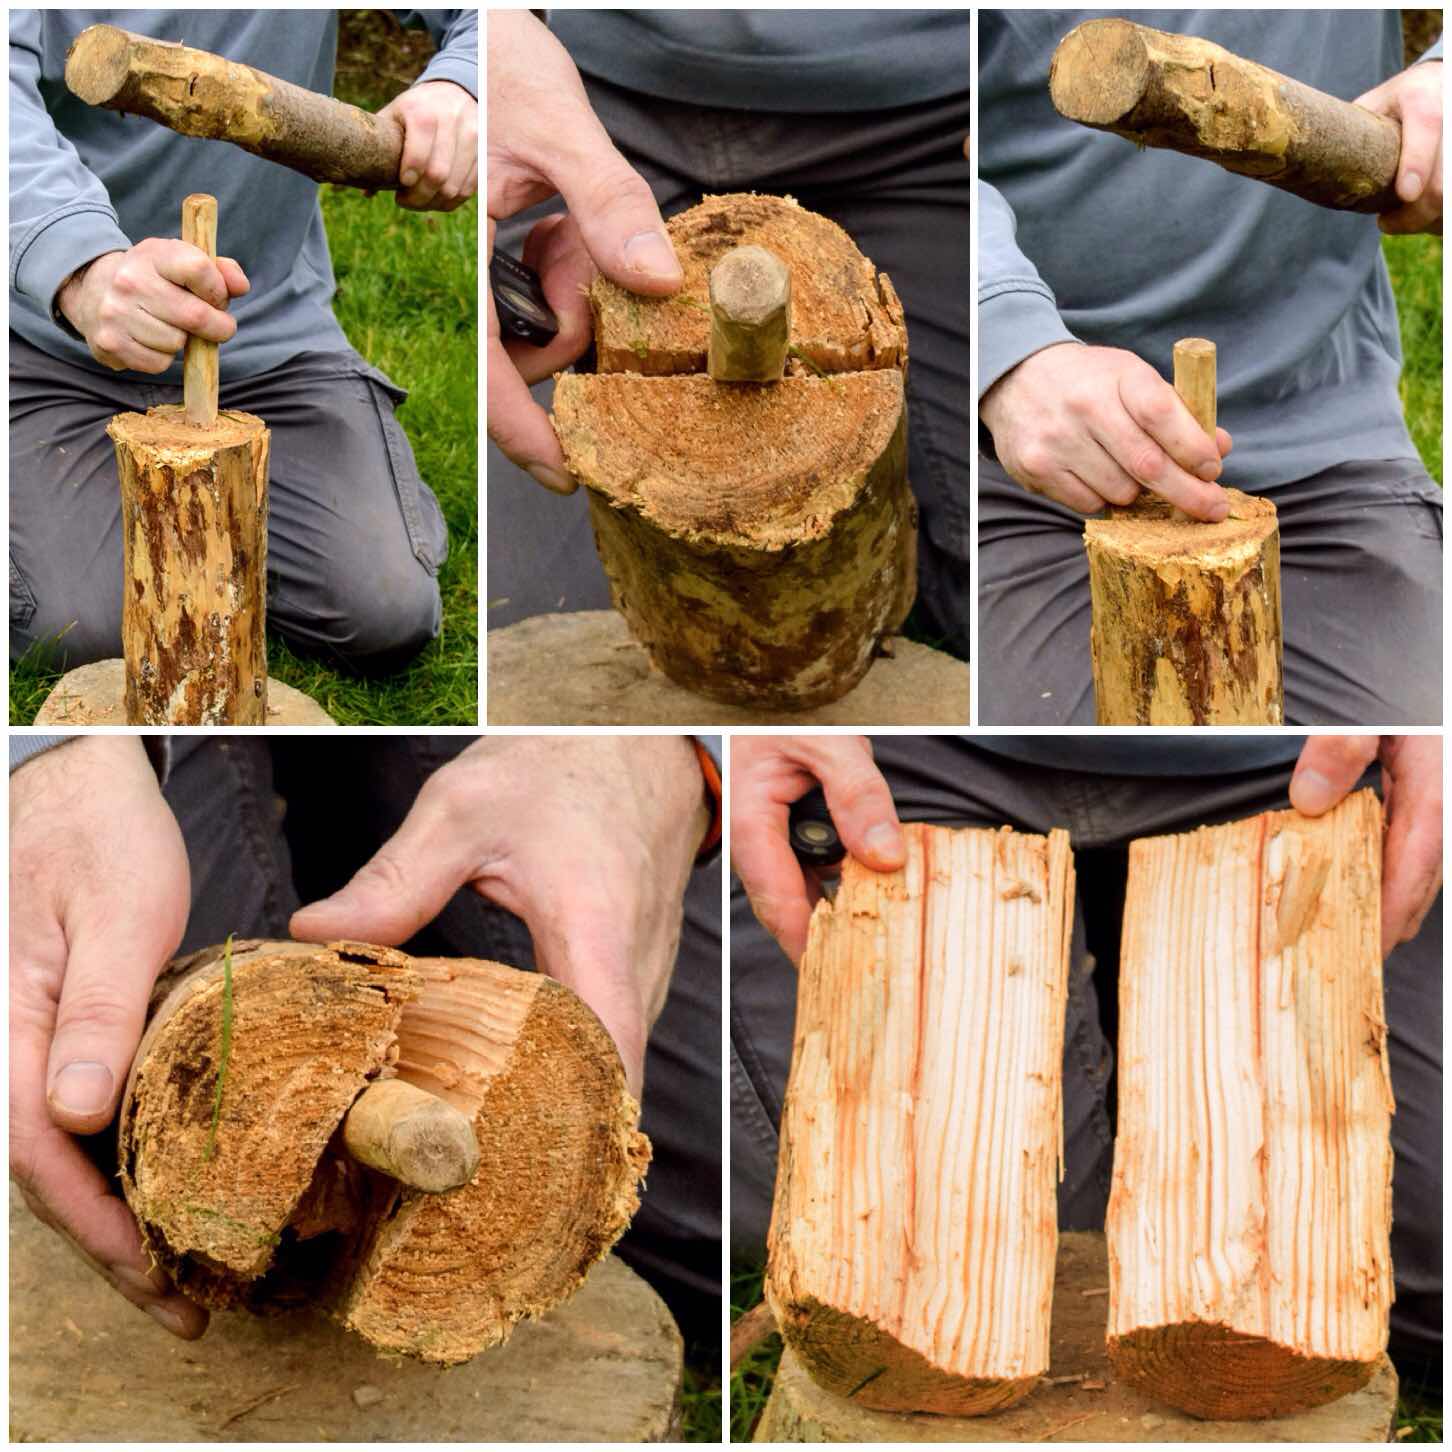
I went off and got a bigger piece of wood to act as a batton and soon had the log split right down the line off weakness. This line I created with my knife will help you to keep an even split on the log when you have twists and knots in your log as I had with this piece of spruce.
Use a wedge to split the log
I repeated the process on each split so I ended up with four roughly even sized pieces of wood.
Safety
One thing to be aware is that as you batton down on the wedge is that it will go slightly out of line at times. If this happens just tap the end of the wedge against the work surface until it lines up. This is much safer than trying to drag it back in line with your hands as it is very easy cut yourself on the knife tip.
As the split widens the knife blade will come loose. Let it drop away and only pull it out when it it is completely free. Do not be tempted to force it out as this is another time when injuries happen.
Quarter the log by battoning with your knife and using the wedge
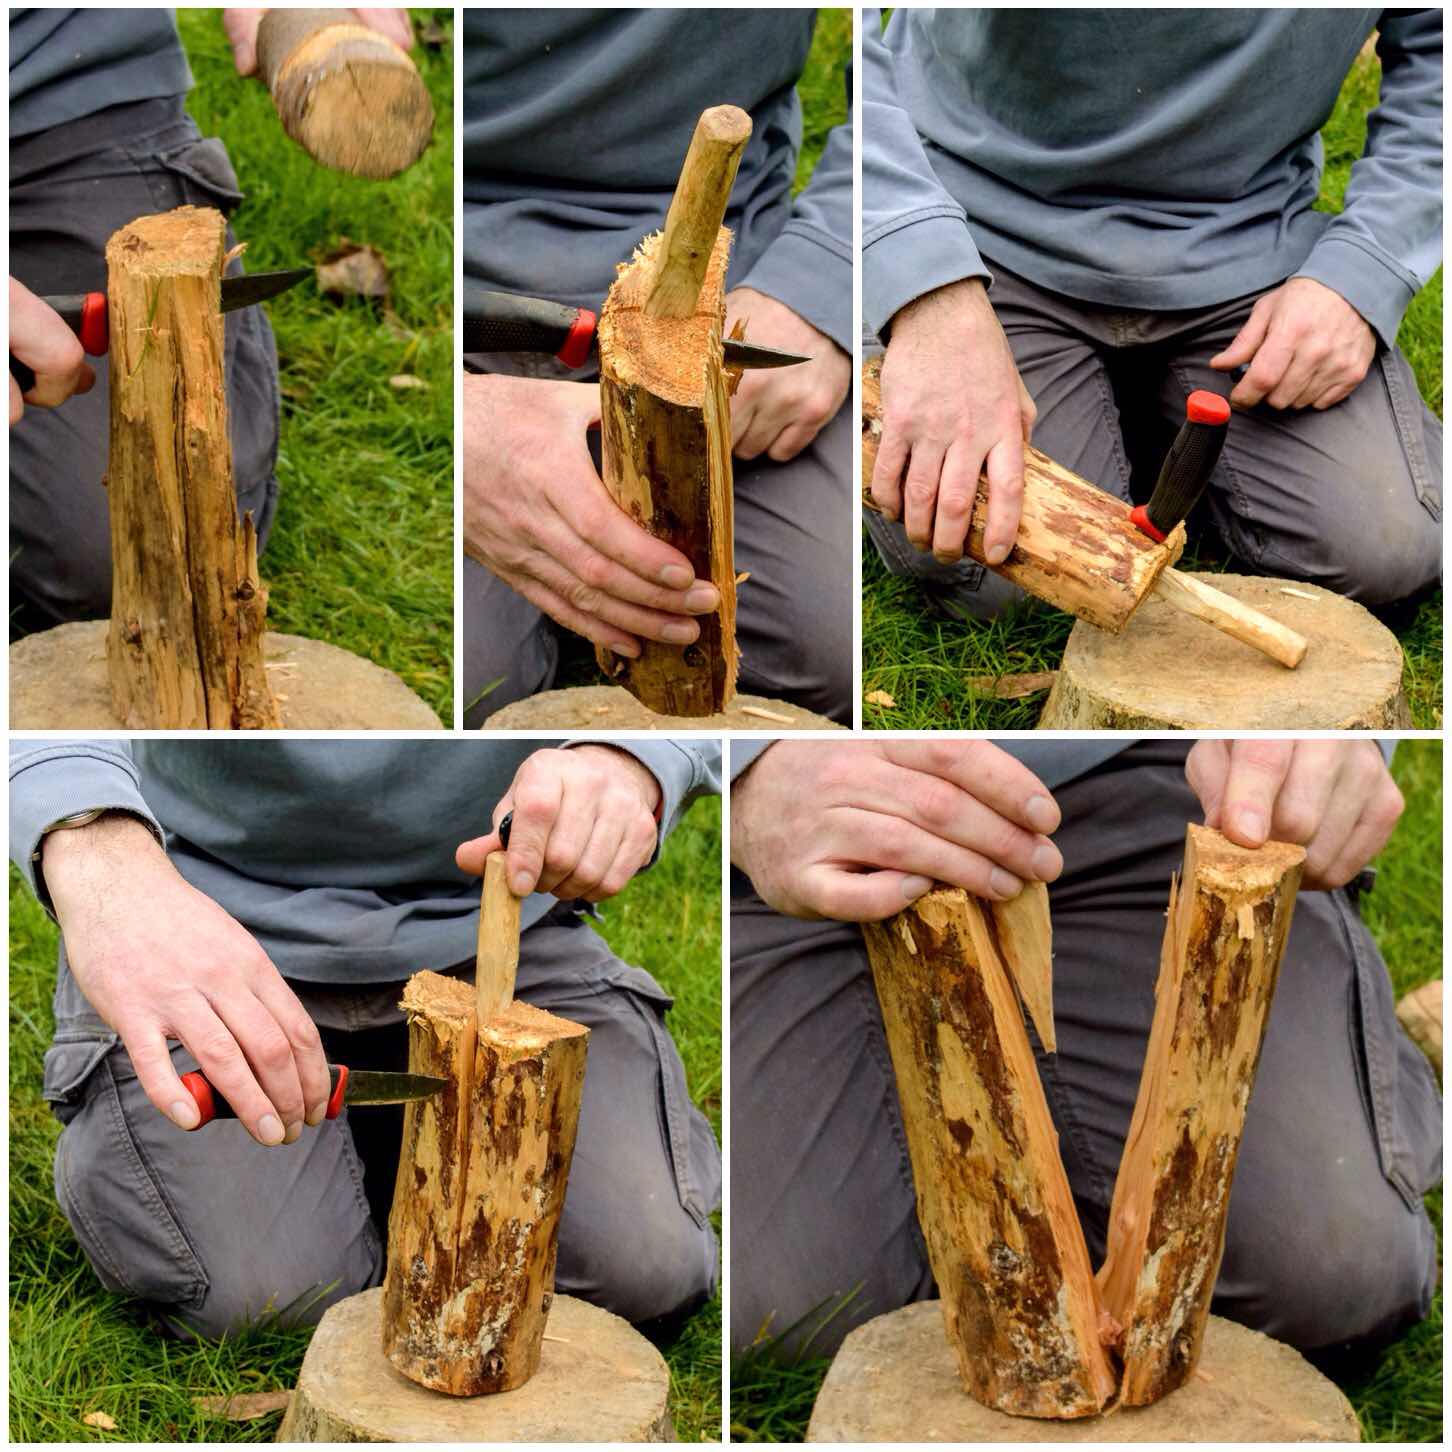
The Chimney
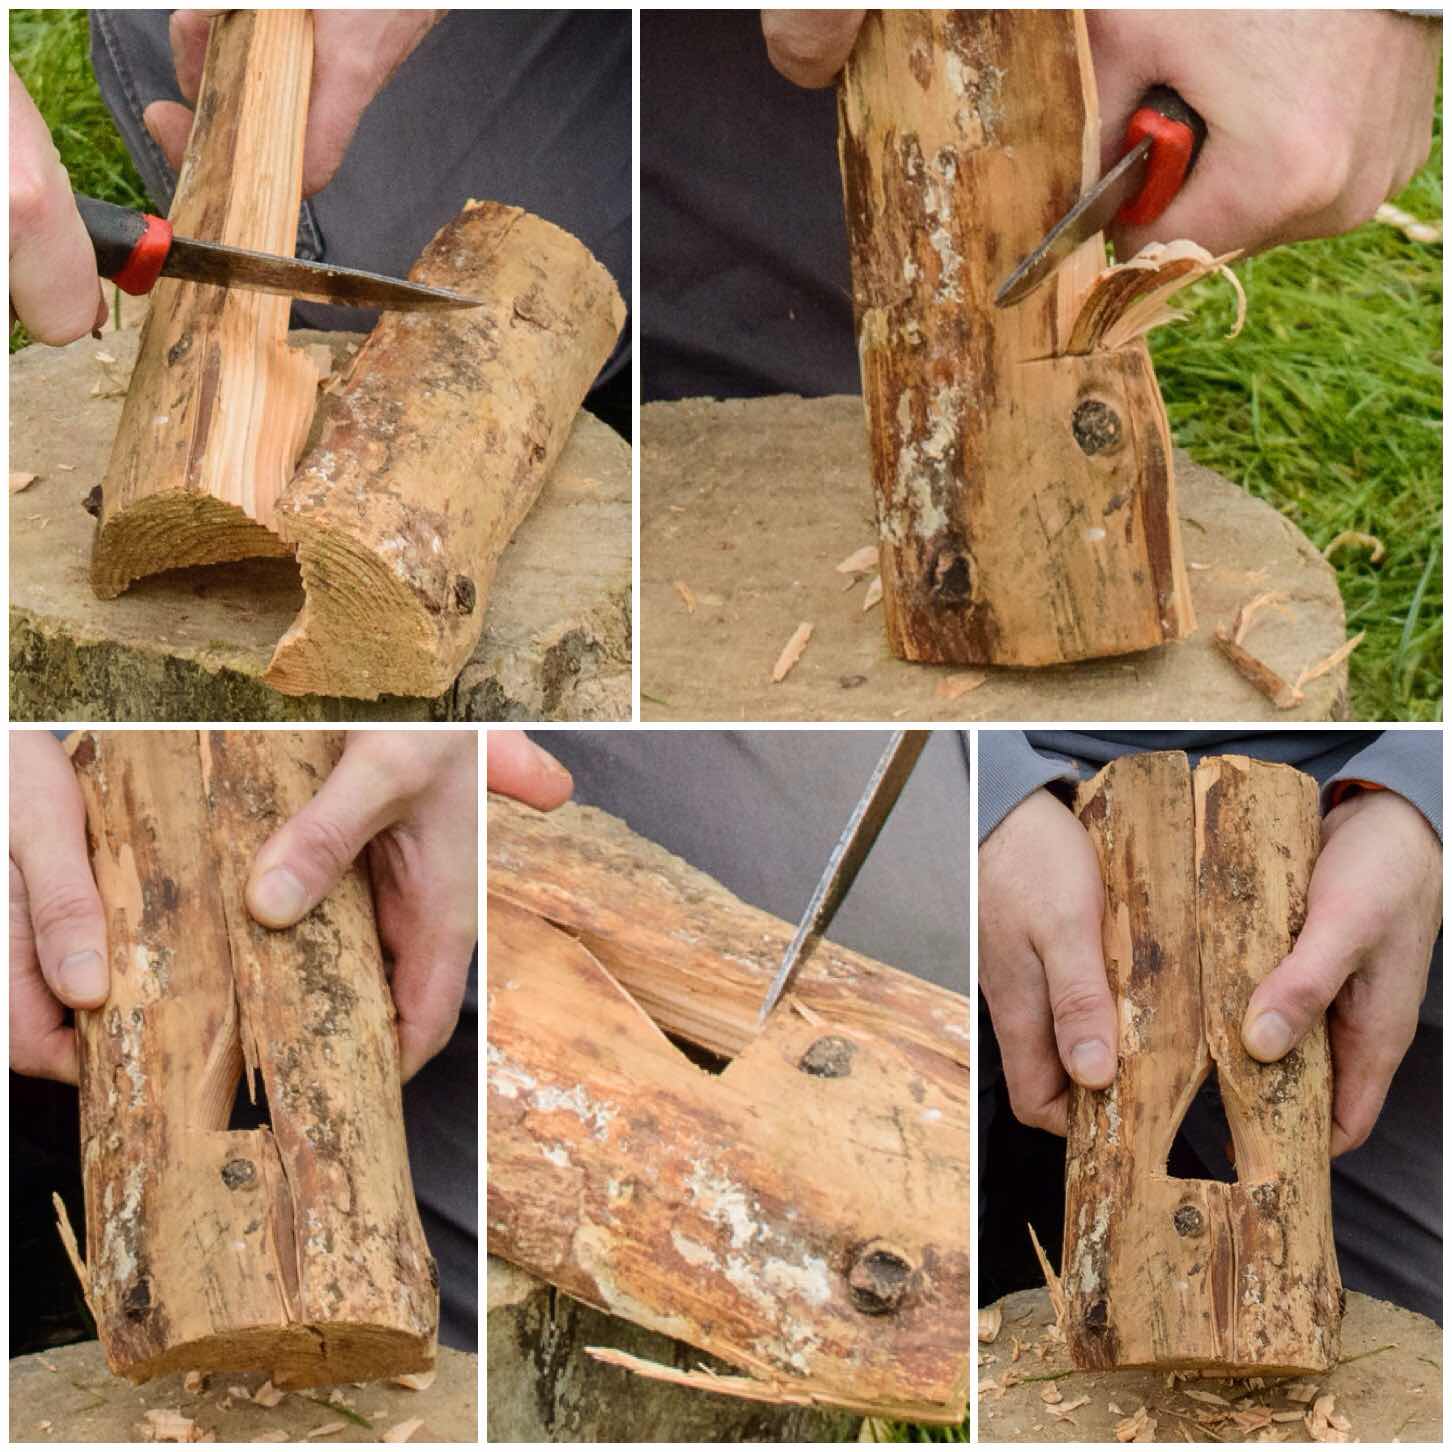
The stove requires a chimney and it is very easy to carve one out. About a third of the way from what will be the bottom of the stove I battoned my knife into centre ridge of one of the quarters of wood. I then used this a a marker to drive in stop cuts on all the other three pieces of wood.
Then from the what would become the top of the stove I battoned off the centre ridge of wood down to the stop cut. I then used my knife as normal to carve off some more excess wood so that part of the chimney looked fairly even. Once the first was completed I repeated the process on all the other pieces.
Keep all the offcuts and shavings as they will be needed to fire up the stove.
Batton out the core to form the chimney
From the top, looking down, your stove should look similar to the picture below. I have no idea how wide a chimney should be but I generally tend to take a couple of centimetres off each quarter.
The Chimney
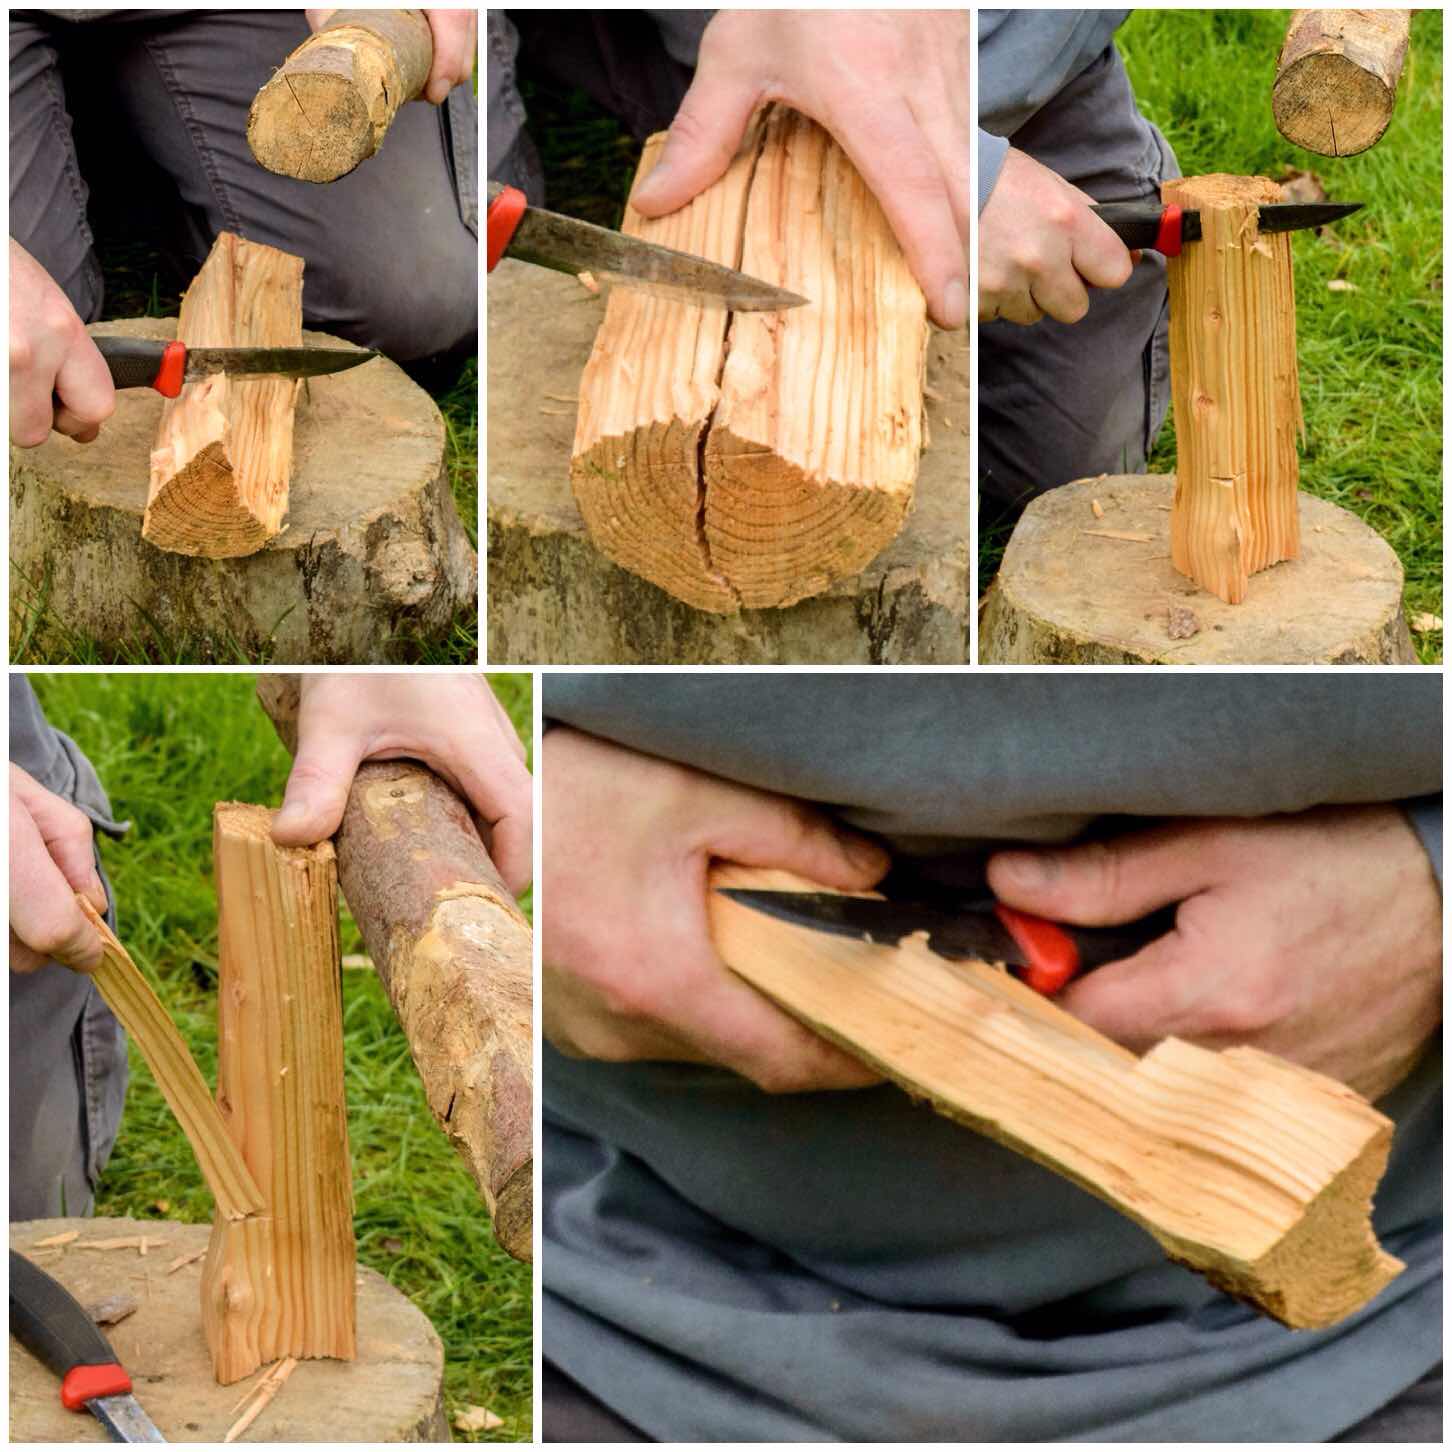
The Firebox
Once the chimney is finished select two of the quarters that fit together and just at the base of the chimney on each quarter carve out a half triangle on each quarter.
I put a stop cut in first and then carved off the excess wood down to the stop cut. The whole just needs to be big enough to let air in and allow you to add slivers of wood into the fire.
Make sure your cuts are opposite each other so that when you fit the two quarters together again you form a triangle.
I used to carve out a square shape with my saw and an axe in the past but a fellow bushcrafter called Takeshi Mizumoto showed me this method by just using a knife – so much easier.
Carve out a triangular fire box
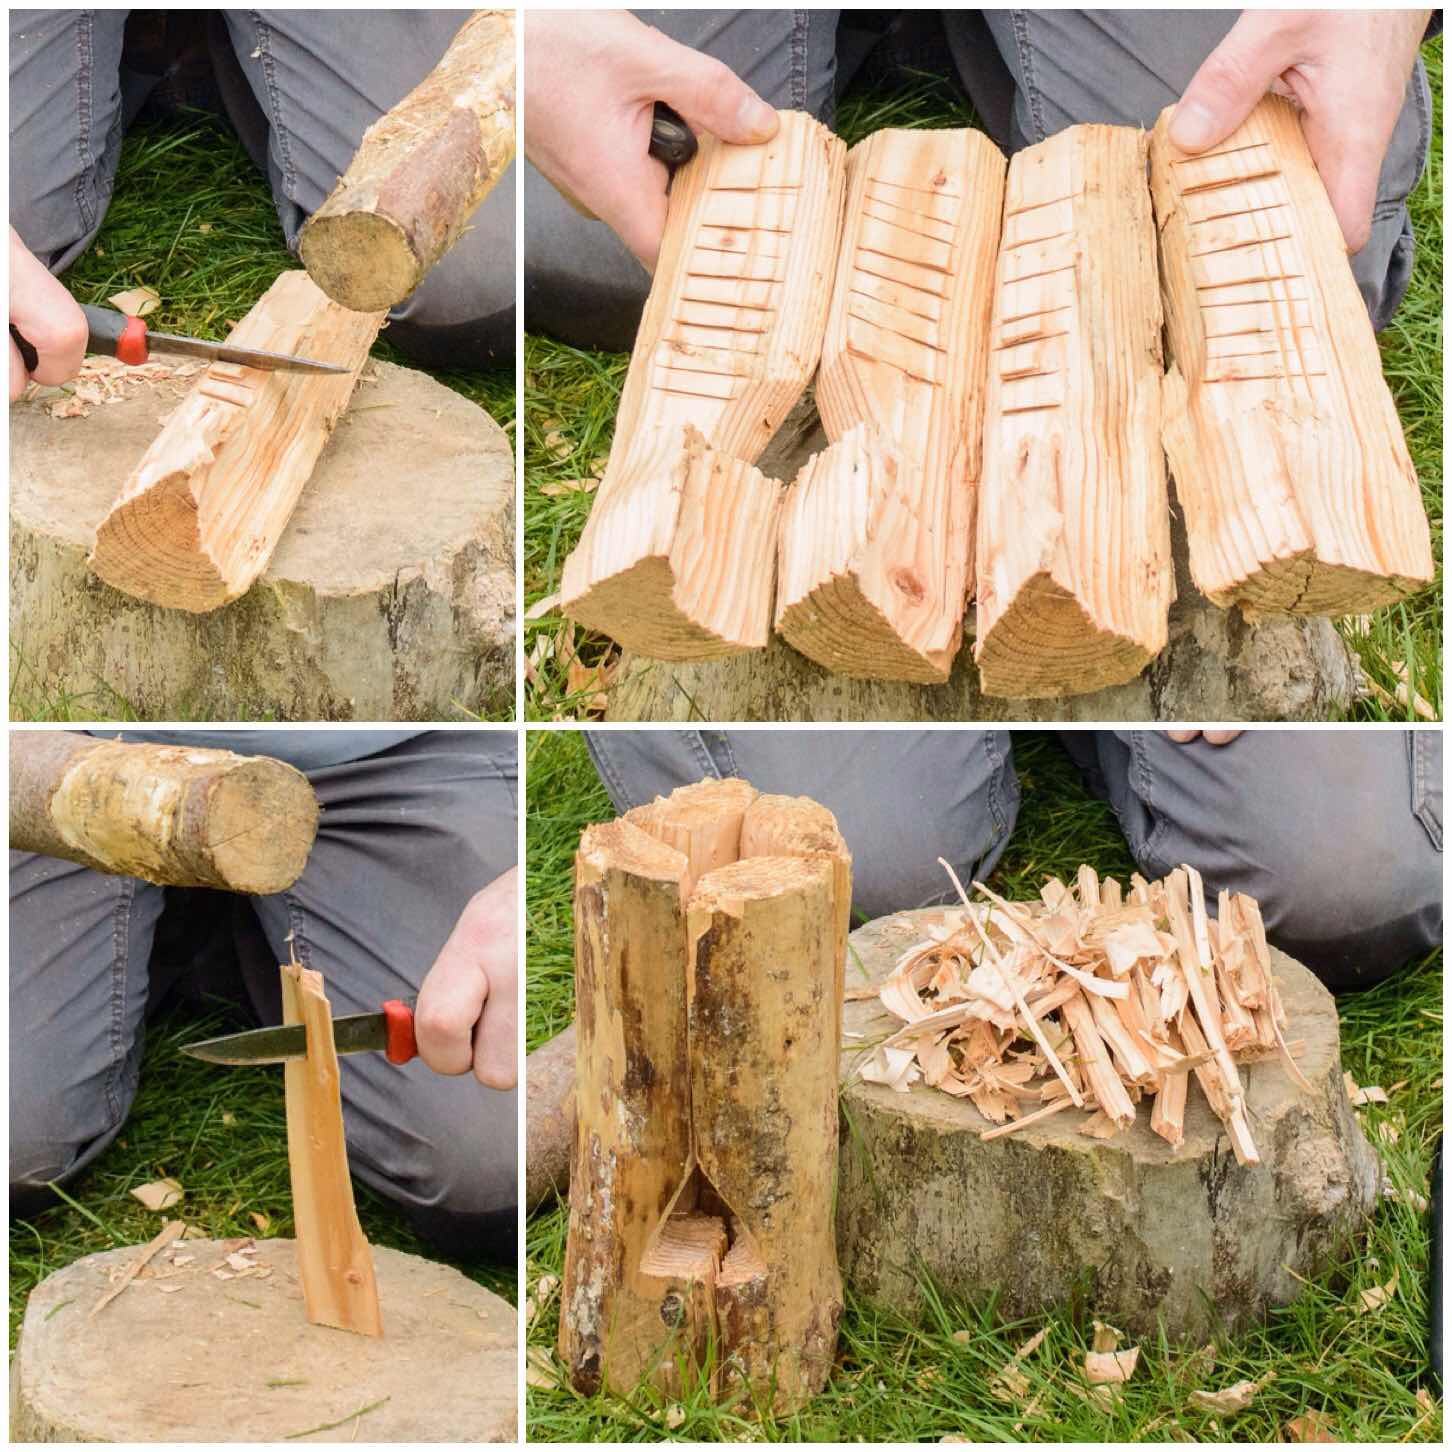
Raappanan tuli cuts
I like to increase the surface area of the inside of my chimney so as to give the initial flame from my tinder something to grab onto.
This is a technique from Finland and you can read more about it here in my post on the Raappanan tuli candle. To make the cuts place each quarter on the work surface and gently batton in cuts to the inside of the chimney. Ensure that the cuts are made so that the small split you create is travelling towards the top of the stove.
Finally collect up all the wood shavings you have created and split the larger off cut pieces down to nice small kindling.
Creating extra surface area and kindling
Firing the stove up
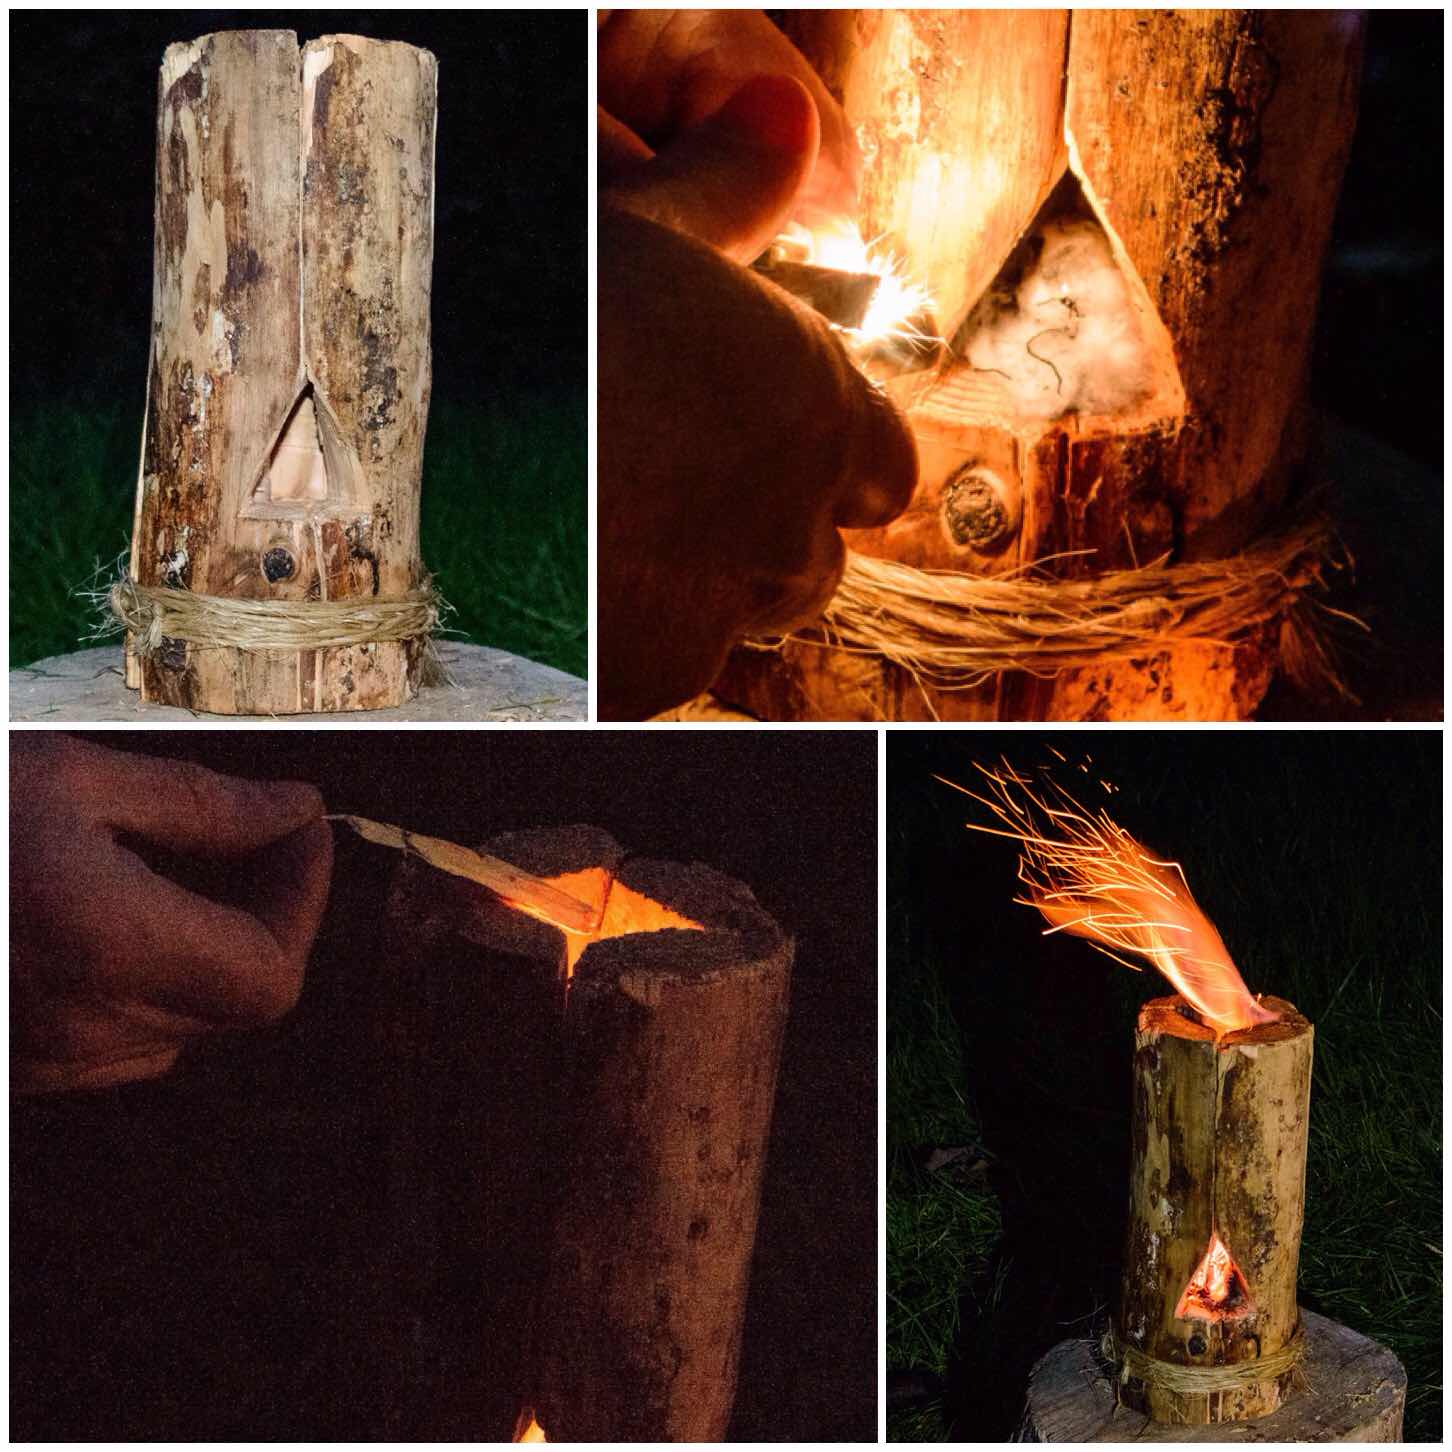
I found some old twine, thoroughly soaked it in water and then used it to tie the quarters together near the bottom.
To light the stove I used a firesteel to light some cotton wool smeared in vaseline. This gives me a burn time off about 5 minutes and as I always carry a supply in my rucksack am happy to use it. A more natural method that I like is to use birchbark and small lumps of spruce resin.
Once the cotton wool was well lit I added a few small pieces of wood in via the top of the chimney. At this stage it is important not to add too much kindling as this may block of the flow of air from the firebox to the top of the chimney. Also make sure your fingertips are not directly over the top of the chimney as you drop in the slivers of wood. Even at this early stage the heat is intense enough to cause injury.
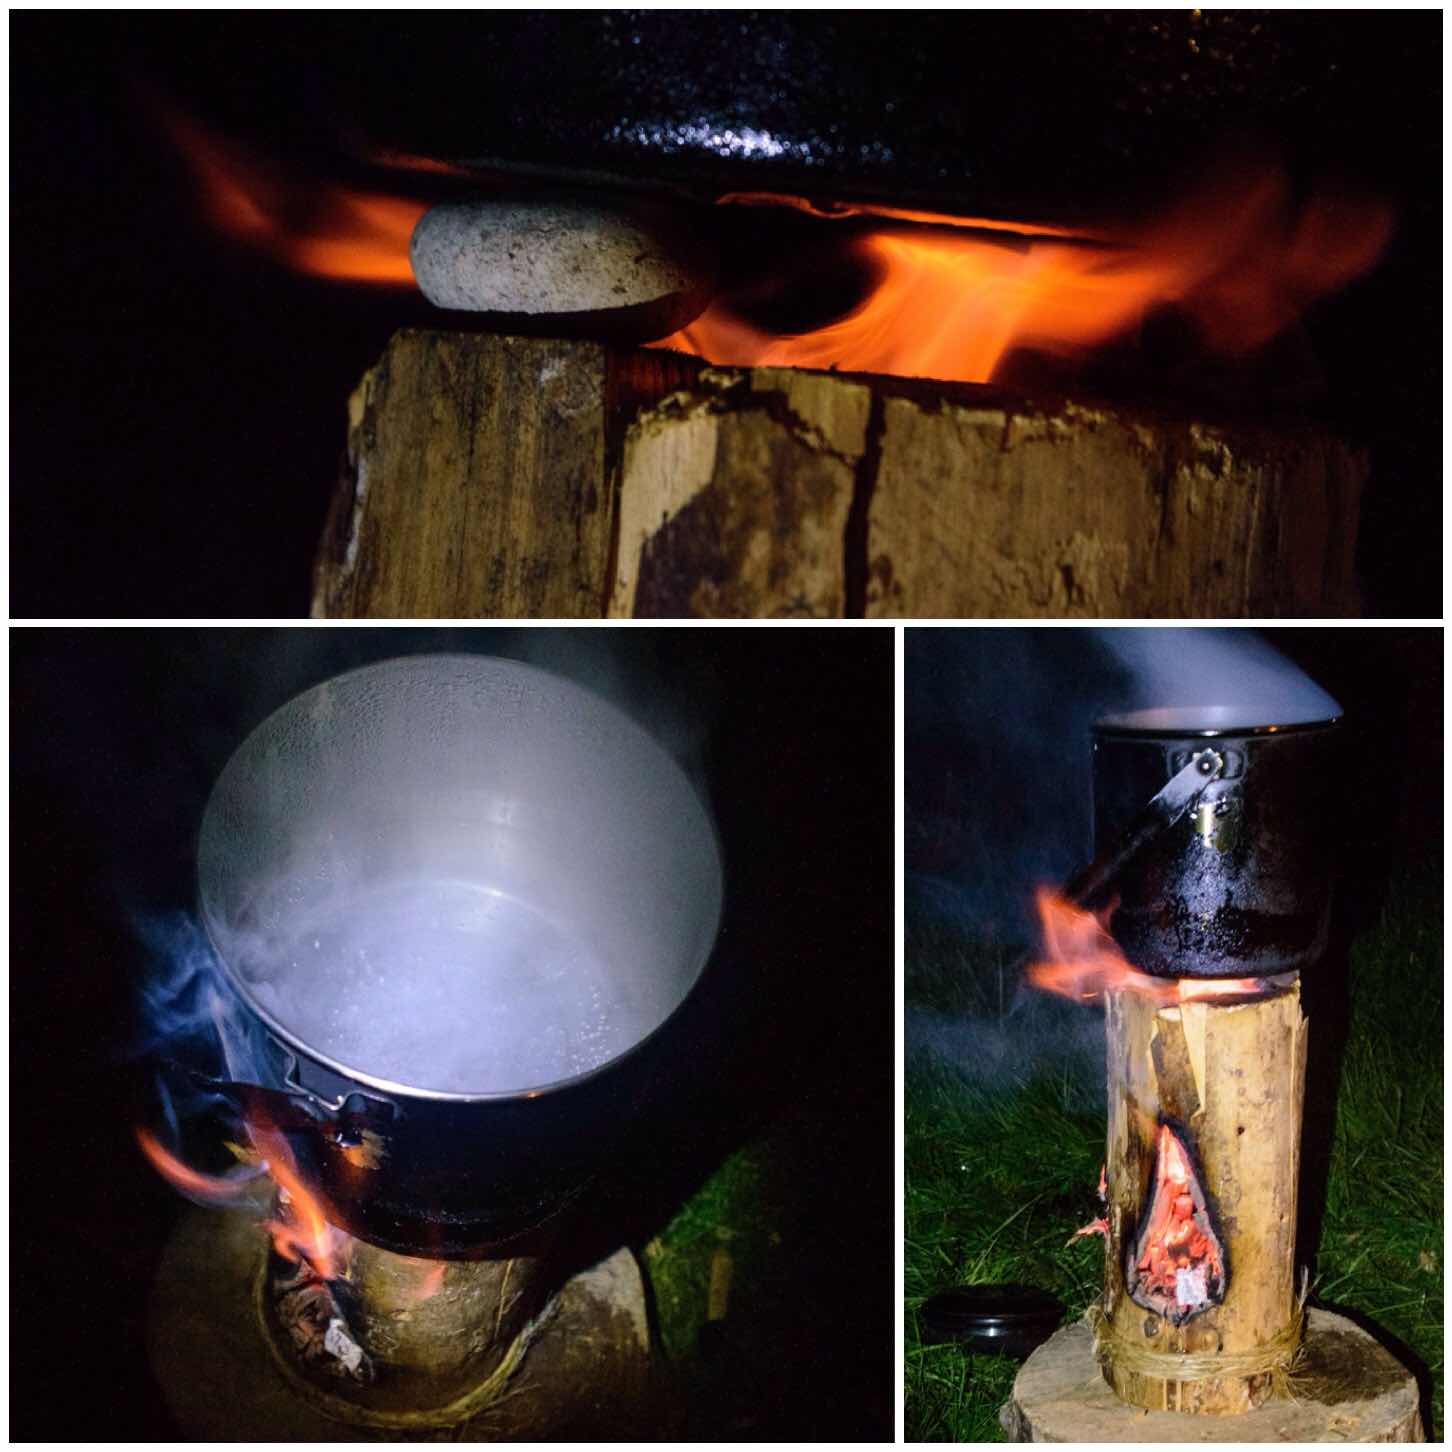
Firing up
Three pebbles
I popped three flattish pebbles on the rim of the stove to act as a platform for my pot. As this is a small stove you need to keep a close eye on your pot as the water boils or the food cooks so that it does not accidentally fall over. I had this happen once before as I had left the handle of my pot up. The handle snapped back down eventually causing the pot to fall off the log.
All was well with this set up and after about 10 minutes of good heat my water was boiling. if you do not have pebbles to hand I find that 3 pieces of green wood work well instead.
Three stones and a pot
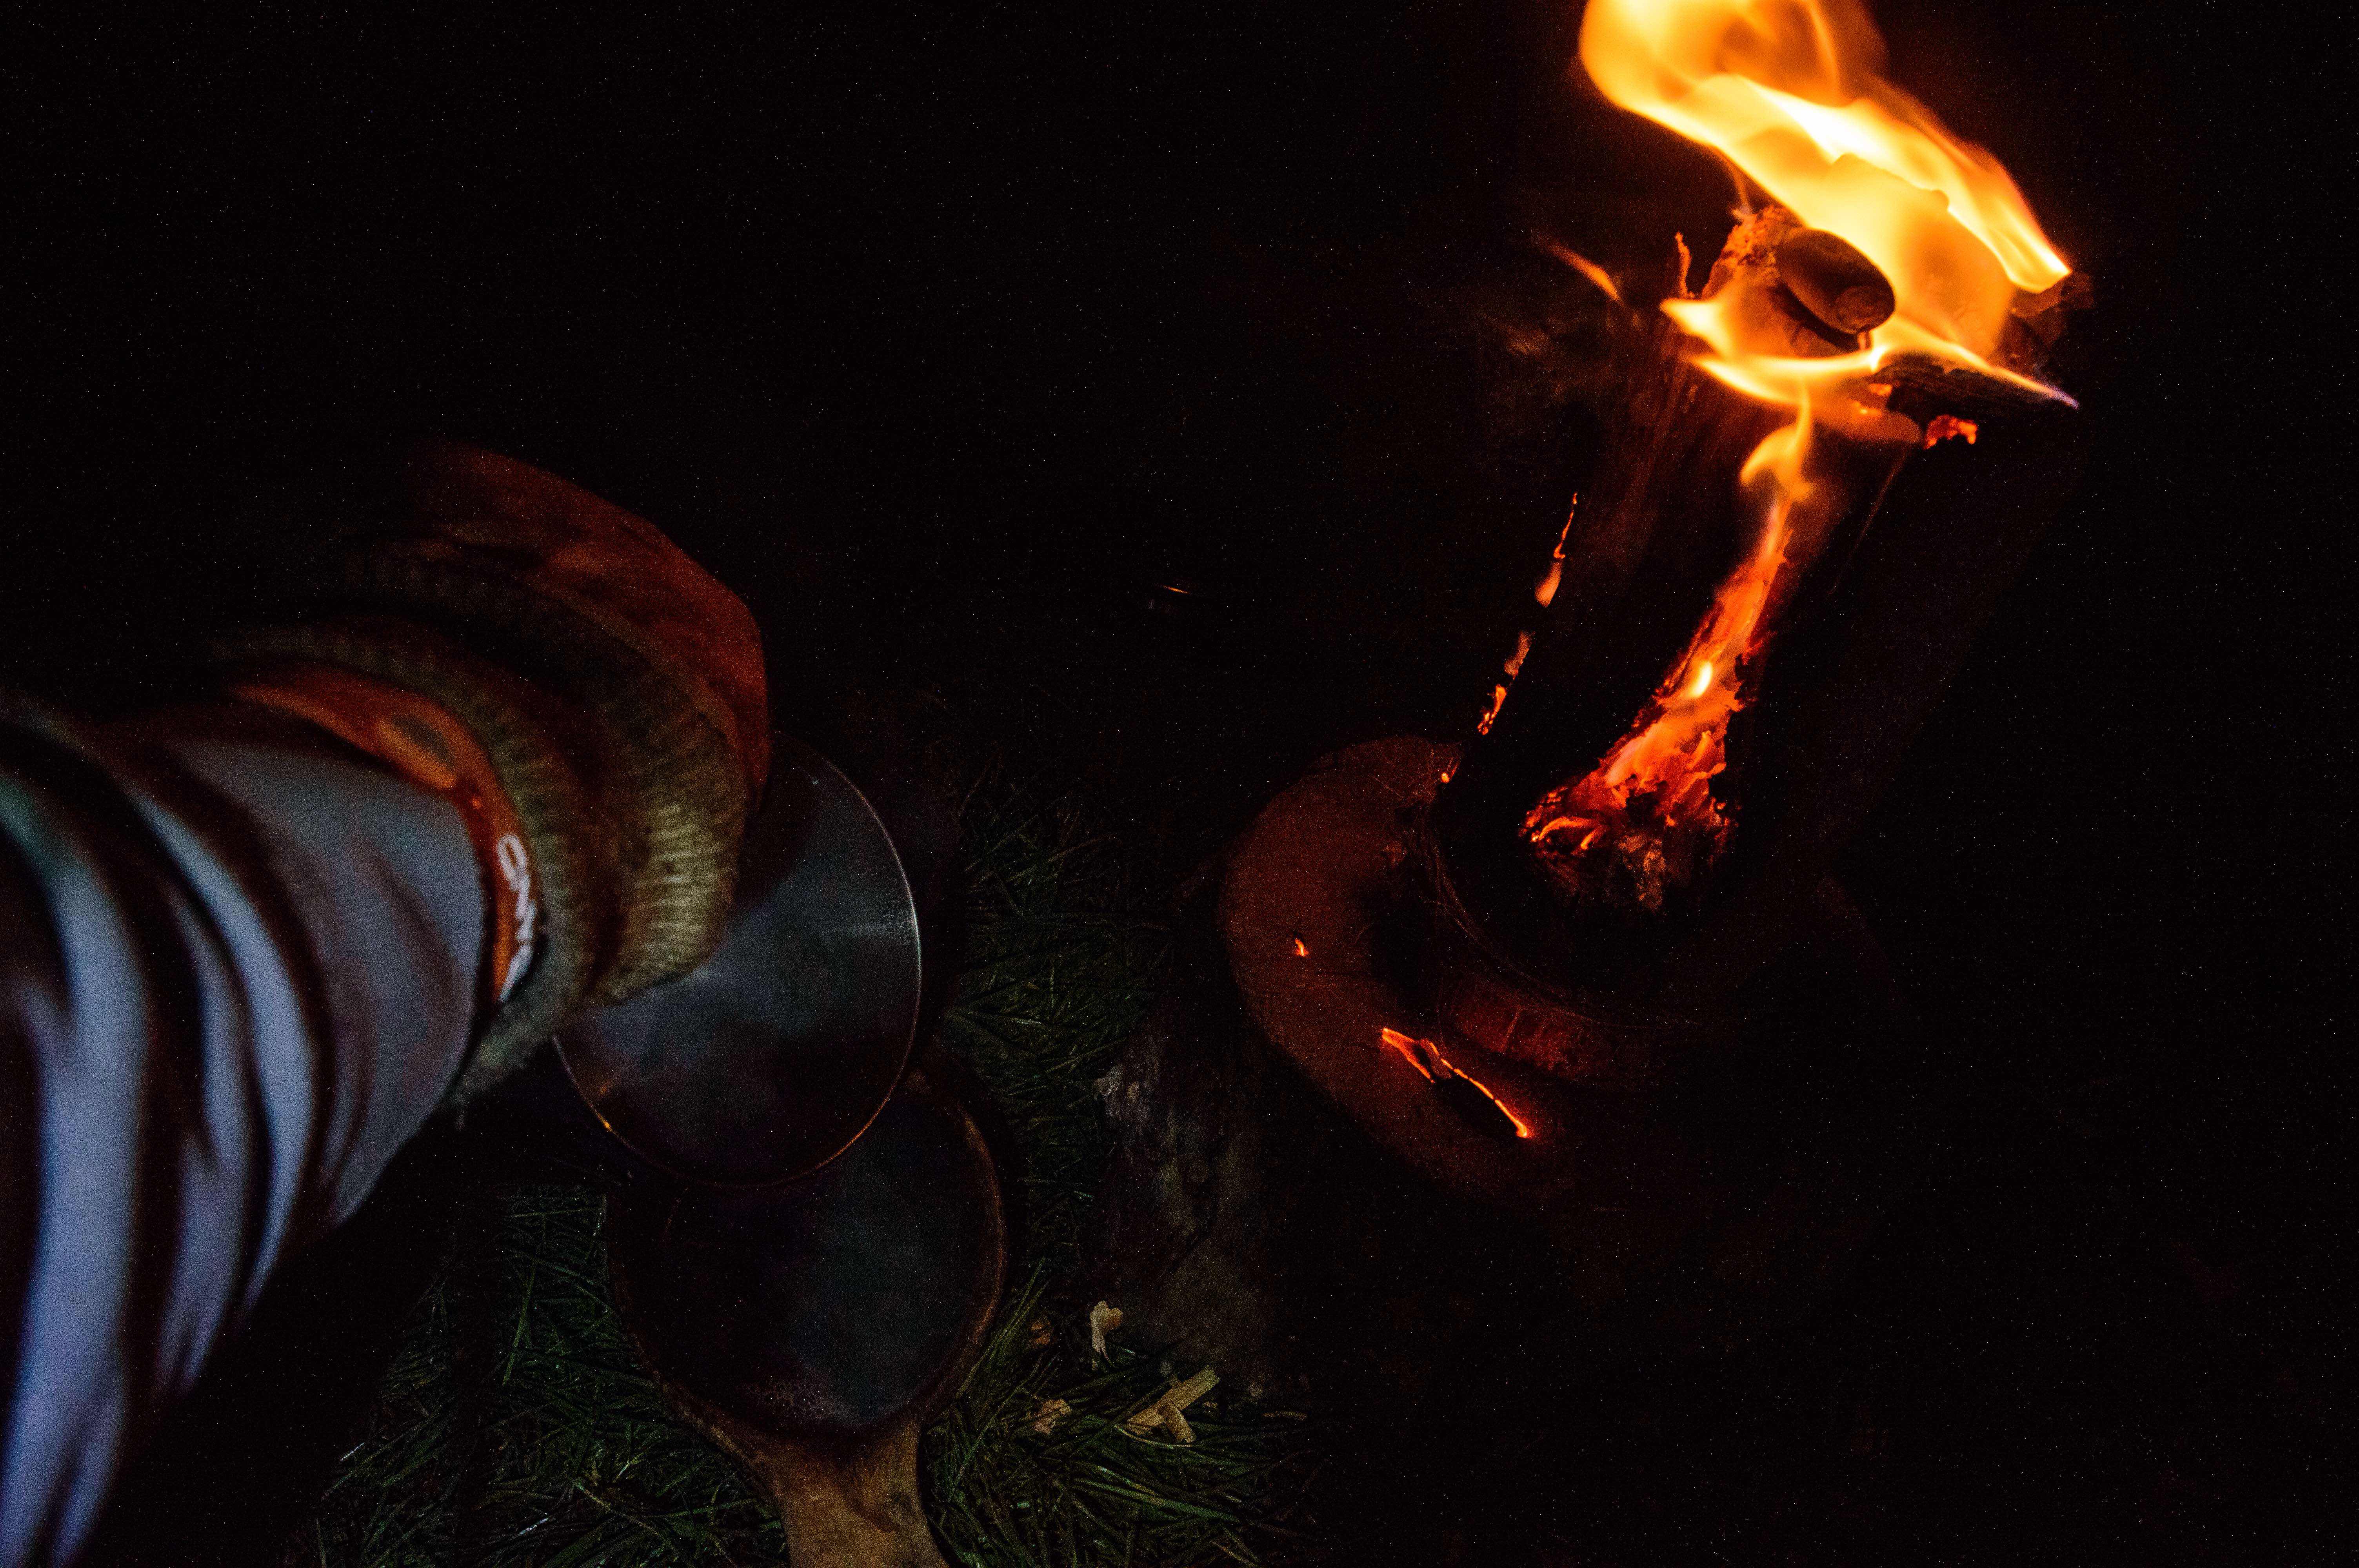
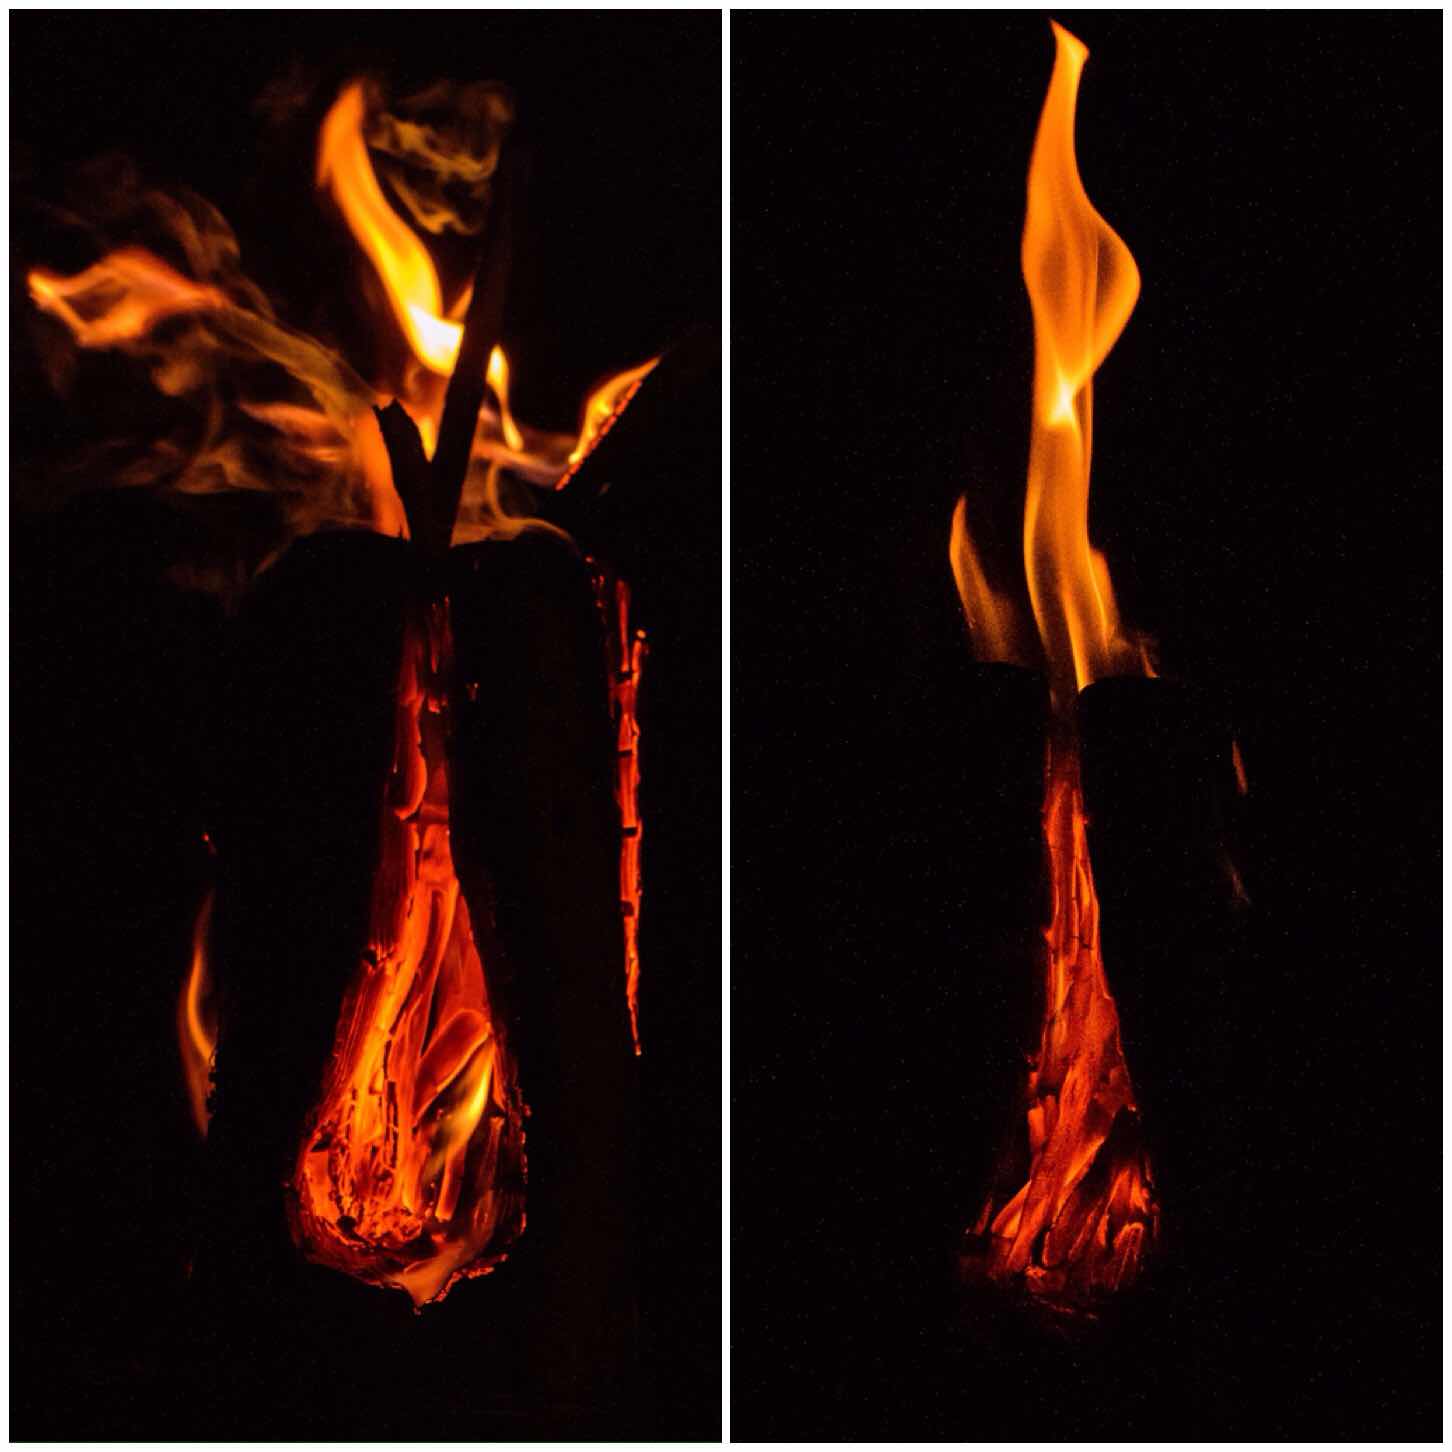
Afterwards as I was drinking my coffee the stove really came alive with some wonderful flames.
I really enjoyed making this small log rocket stove as it showed me that with a little ingenuity you can make do without an axe. It can be difficult but it is doable and a great way to test your personal skills.
Week 3 has been a bit of a downer for myself. I found myself working long hours up in Scotland (indoors) and at the weekend I retired myself to bed with a severe bit of man flu.
So it was a rare week that I did not take a single picture. I had a look at a few I had taken the week before and this one cheered me up no end.
We pass it by every day without a second glance but with the right light and looking close enough the beautiful seed head of the clematis can be quite enchanting.
Clematis seed head – beautiful and handy
And as a bushcrafter a handful of them always end up in my pocket to be added to my tinder bag.
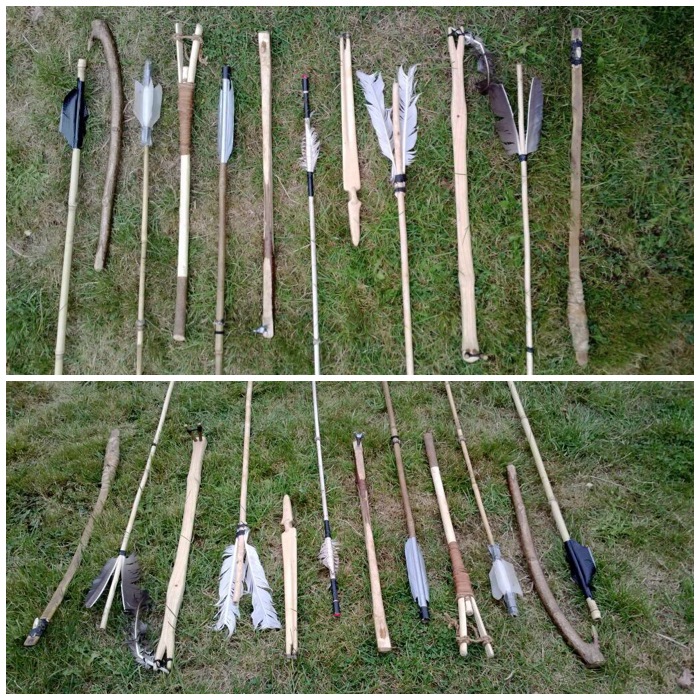
It has been 8 or 9 years now since I started making my own bows and Atlatls. In that time I have enjoyed making a number of different types and have brought them all together in this post. I am no expert in making them however I do like to carve them.
If you want to know how to make any of these tools just click on the title for each section to see a detailed How To…. guide on making them. This post will concentrate on my thoughts on them through my own personal use and that of my students.
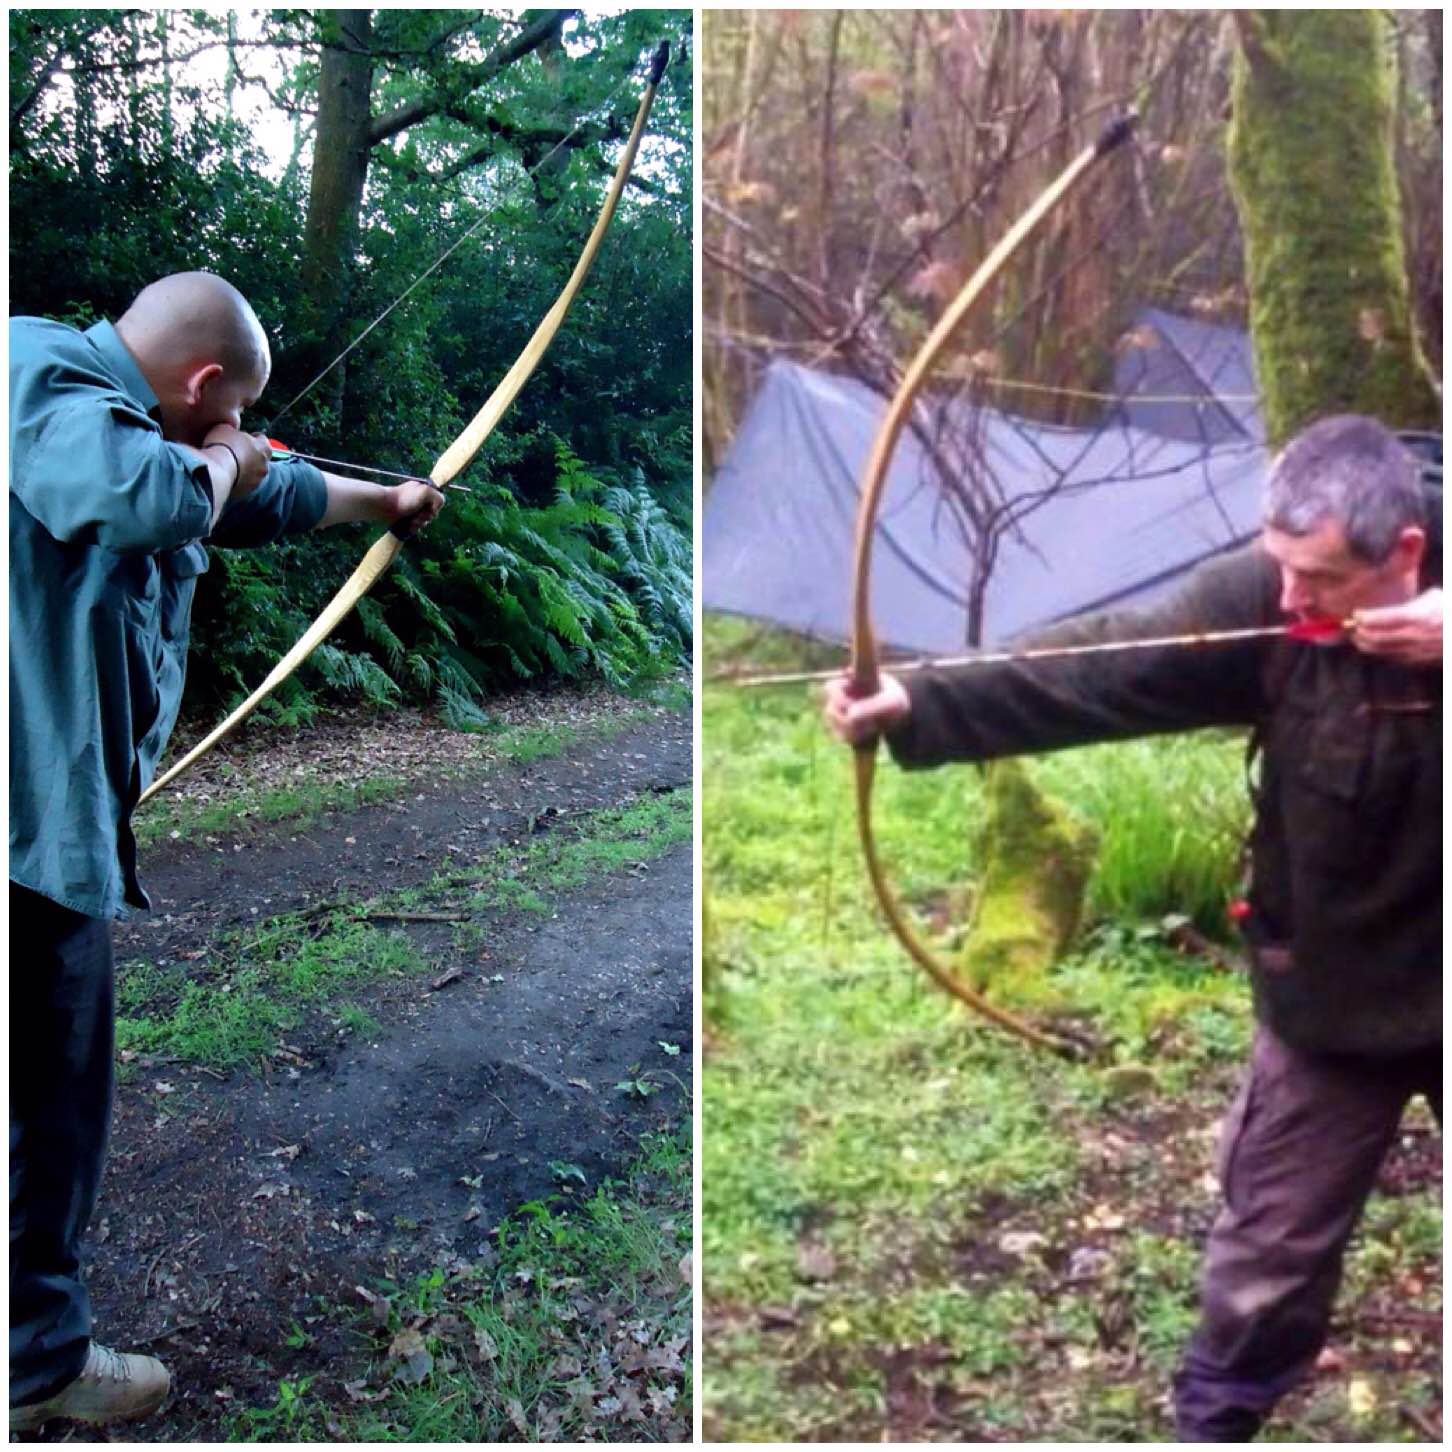
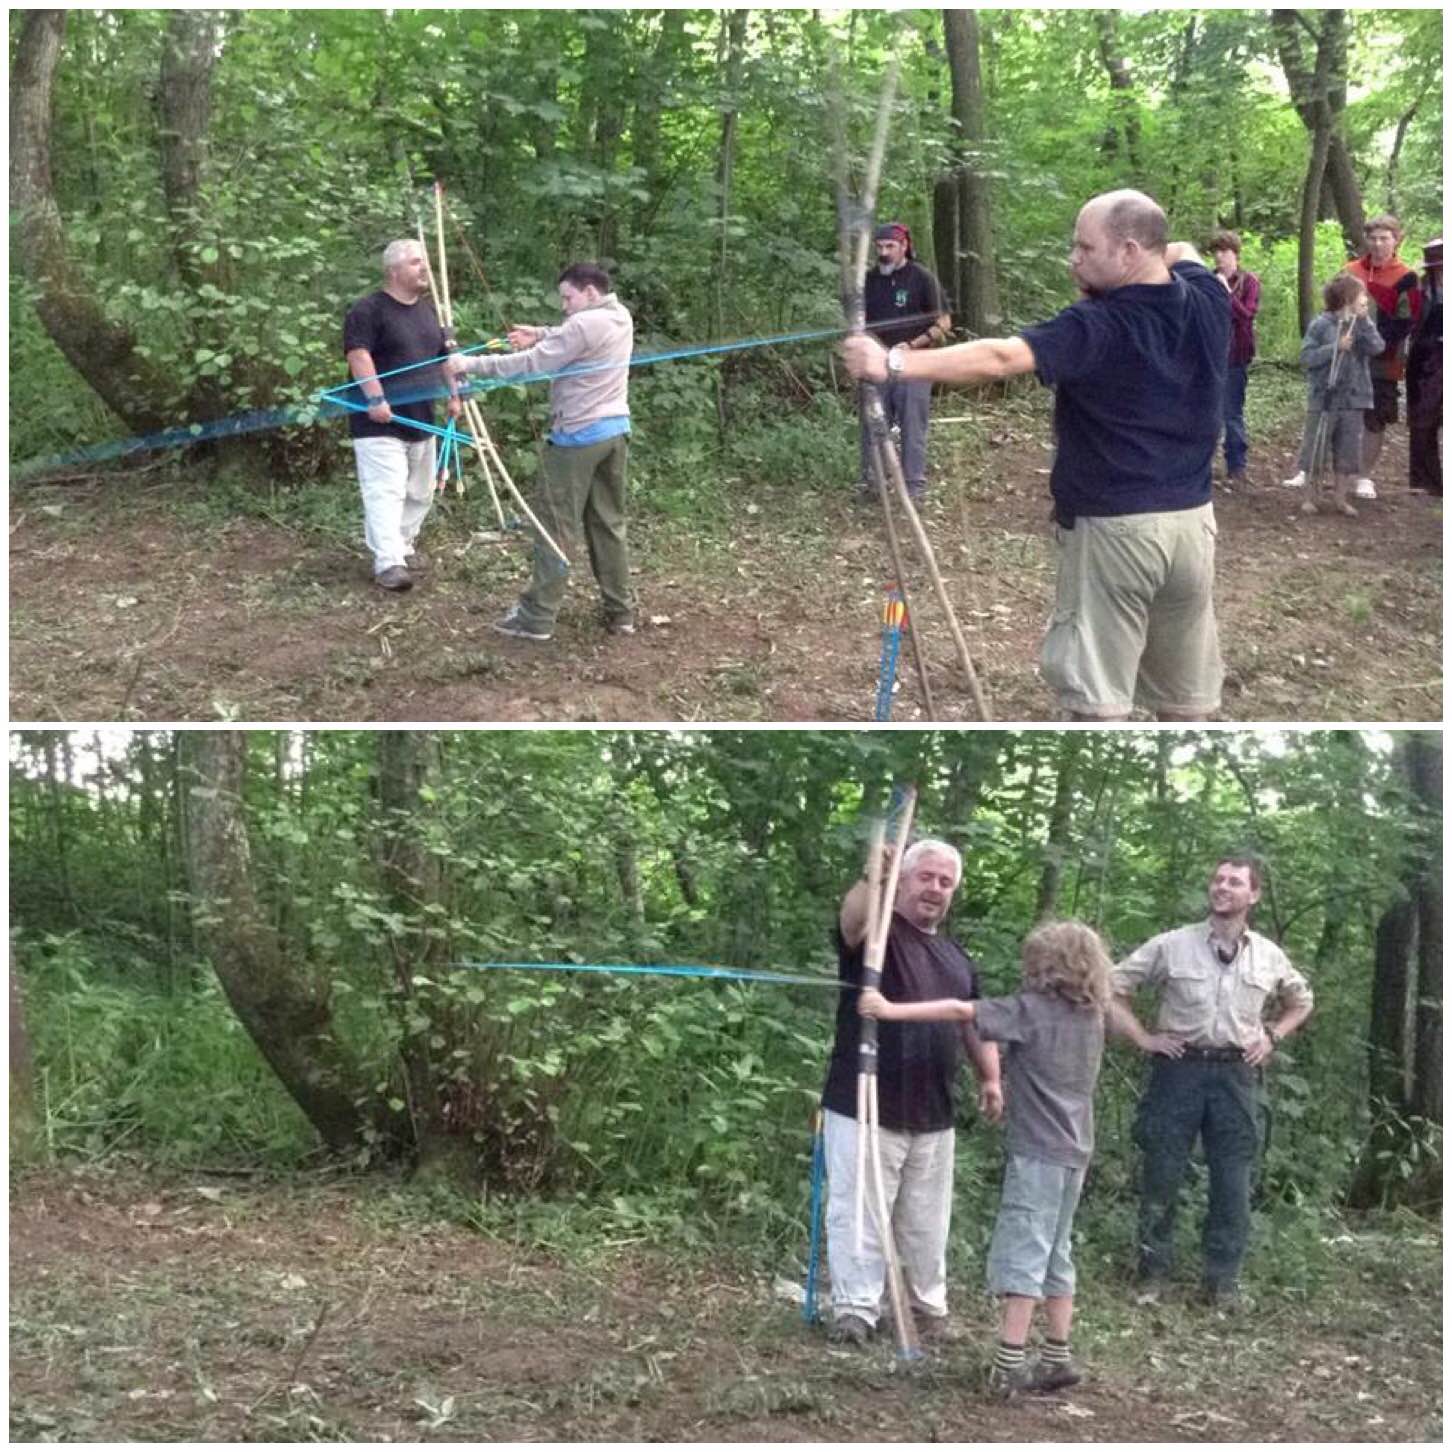
I have probably made at least a dozen of these quick bows and taught many students to make them since 2009. They take no more than a couple of hours to make and are quite powerful for green wood bows. I normally use two hazel or ash rods taped together to make them.
I learnt how to make them after watching a You Tube video by Mark Emery (Sussex Woodsman) who is an expert woodsman.
Father & Son Bow
The bow themselves are very light in terms of poundage (20 to 30lbs in draw weight) but on a high arc I can generally get them to shoot an arrow 60 to 70 metres. I usually shoot them on short ranges of less than 20 metres in the woods.
These have proven a massive hit at the Bushcraft UK Bushmoot and there has been a class run on them since 2009 with folks of all ages making them. I particularly like to see a family making one and then coming down to the range of an evening to shoot. I still have ones I made all these years ago and they still shoot well.
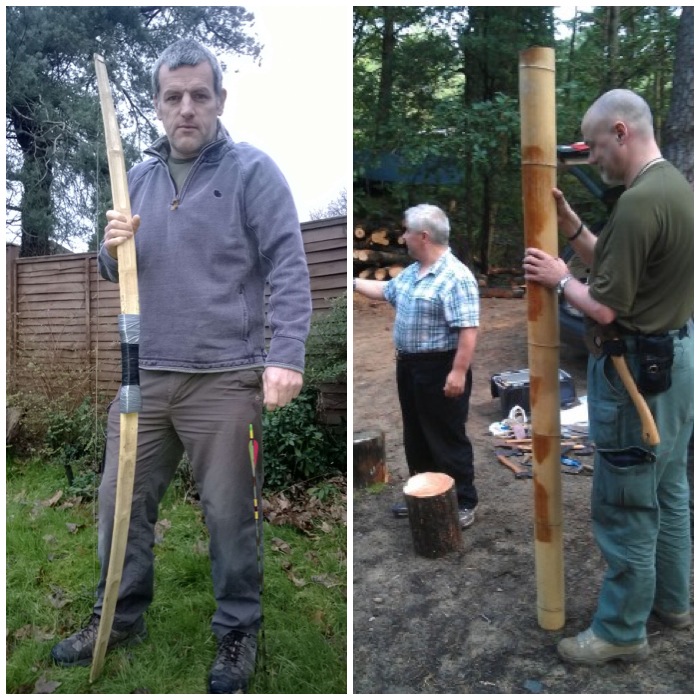
This was the very first bow I made back in 2008 on a Bushcraft Instructors course with John Rhyder of Woodcraft School.
As a group we felled an ash tree , split it into staves and carved our own bows. We did this over two weekends with a month in-between so allowing the stave to season before the tillering process. The ash flatbow has to be made wider than it is deeper due to its deep rings however if it is tillered well it will still shoot fast.
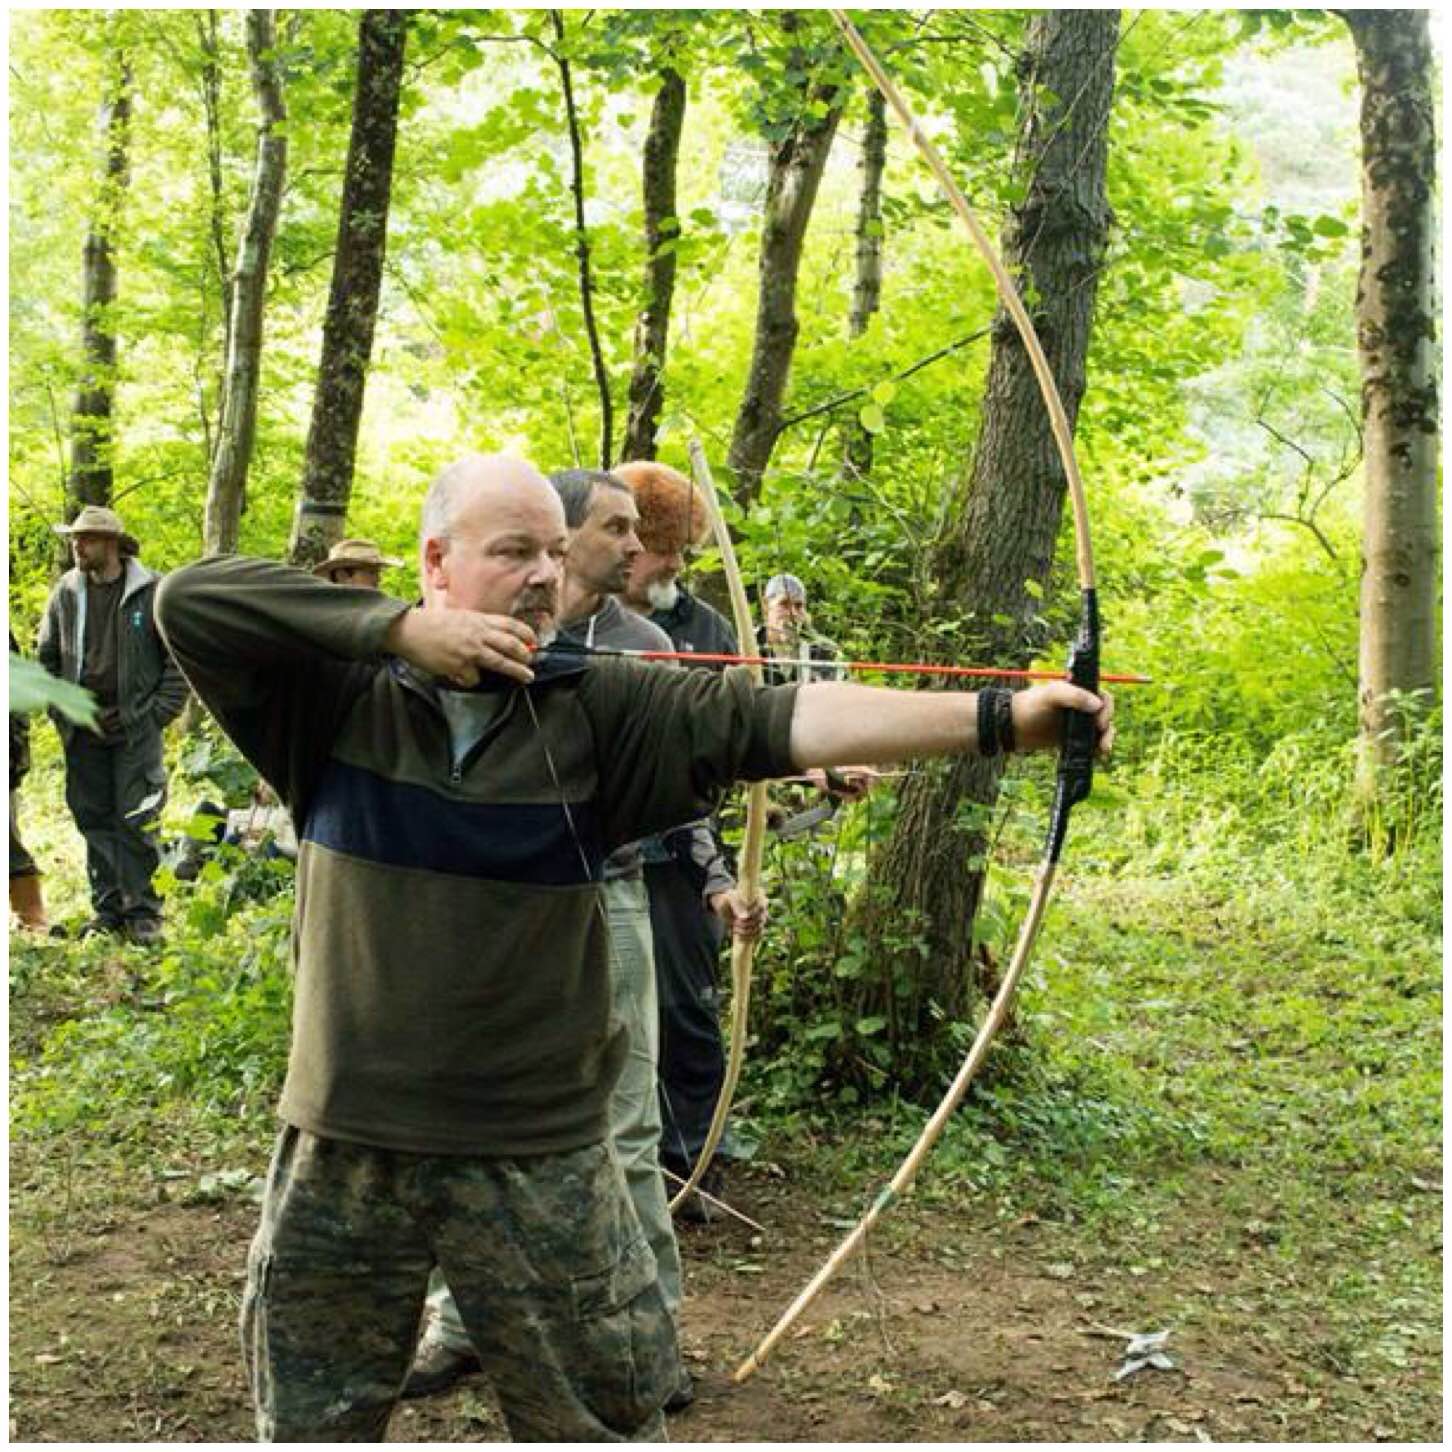
Ash Flatbow
This bow comes in at about 40 lbs in draw weight and has a tendency to ‘twat’ the inside of your forearm so a arm guard is a must.
I give this bow mostly to adults to shoot because of its draw weight but with a good eye and a steady hand she can be very accurate. I started shooting right handed as that is how I was taught to shoot a rifle many years ago however my friend Charlie Brookes suggested one day to try left handed shooting and suddenly I started to hit the target. I am left handed and left eye dominant but the muscle memory from using a rifle made it difficult to shoot left handed at first – however with a lot of practice that has gone, so I am now happy to shoot with either hand.
I made this bow about four years ago at the BCUK Bushmoot and was taught by Wayne Jones (Forest Knights). It is similar to the ash bow in that it is wider than it is deeper however it is made out of two pieces of bamboo (the HowTo…. goes into detail of why two pieces are used).
Bhutanese Bow
Traditionally the two pieces would be joined together with wooden pins and strapping but on the day all we had was tape. In the courses Wayne runs nowadays he uses the pins and strapping.
It is quite a light bow (about 30lbs in draw weight) however it has the advantage of being made very quickly (a couple of hours in competent hands).
Bhutanese Bow
Another unusual feature of this bow is that the hard outer shell of the bamboo becomes the Belly (the part of the bow facing you when shooting) of the bow and the softer inner part of the bamboo becomes the Back of the bow (the part of the bow facing away from you when shooting). I am told that this is to do with the characteristics of the bamboo – because it is a grass technically and not wood.
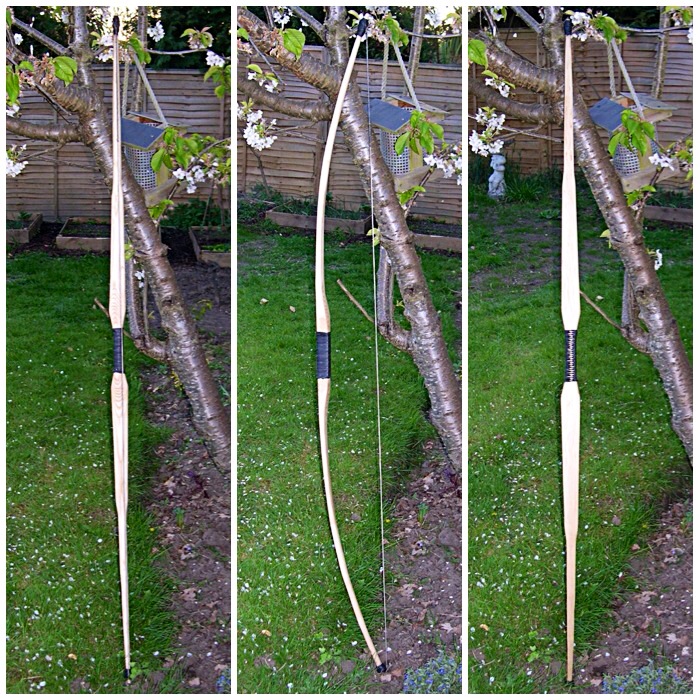
This is my favourite bow. I carved it while doing a Primitive Technology course at Woodcraft School.
I carved the bow based on the dimensions of the ones found in the peat bogs at Holmegaard in Denmark. The bow has the lower parts of its limbs shaped wider than they are deeper much like the ash flatbow. The upper parts of the limbs are more ‘D’ shaped so making them stiffer but thinner than the lower parts of the limbs.
Holmegaard Bow
This unusual shape works well with ash as it is not a particularly strong wood for thin bows. The wide lower limbs give it strength while the thinner and stiffer ‘D’sectioned tips allow the limbs to shoot forward at a very fast speed so making it an excellent hunting bow where you get fairly close to your prey..
Holmegaard Bow
I also decided to make the nocks out of rawhide and spruce pitch rather than carving them in. I did this as some Holmegaard bows have been found with no nocks carved into them. Whether they had bone nocks attached or rawhide as I experimented with will probably never be known but they work well.
This bow is a favourite amongst the children I teach as they can draw it easy. Personally I just love the shape of the bow and it shoots well for me,
I have written a number of posts on these little devices. When asked about them by children I teach I liken them to these modern ball throwing devices dog walkers use nowadays. So if you imagine replacing the ball with a spear (technically called a dart) you will get the idea.
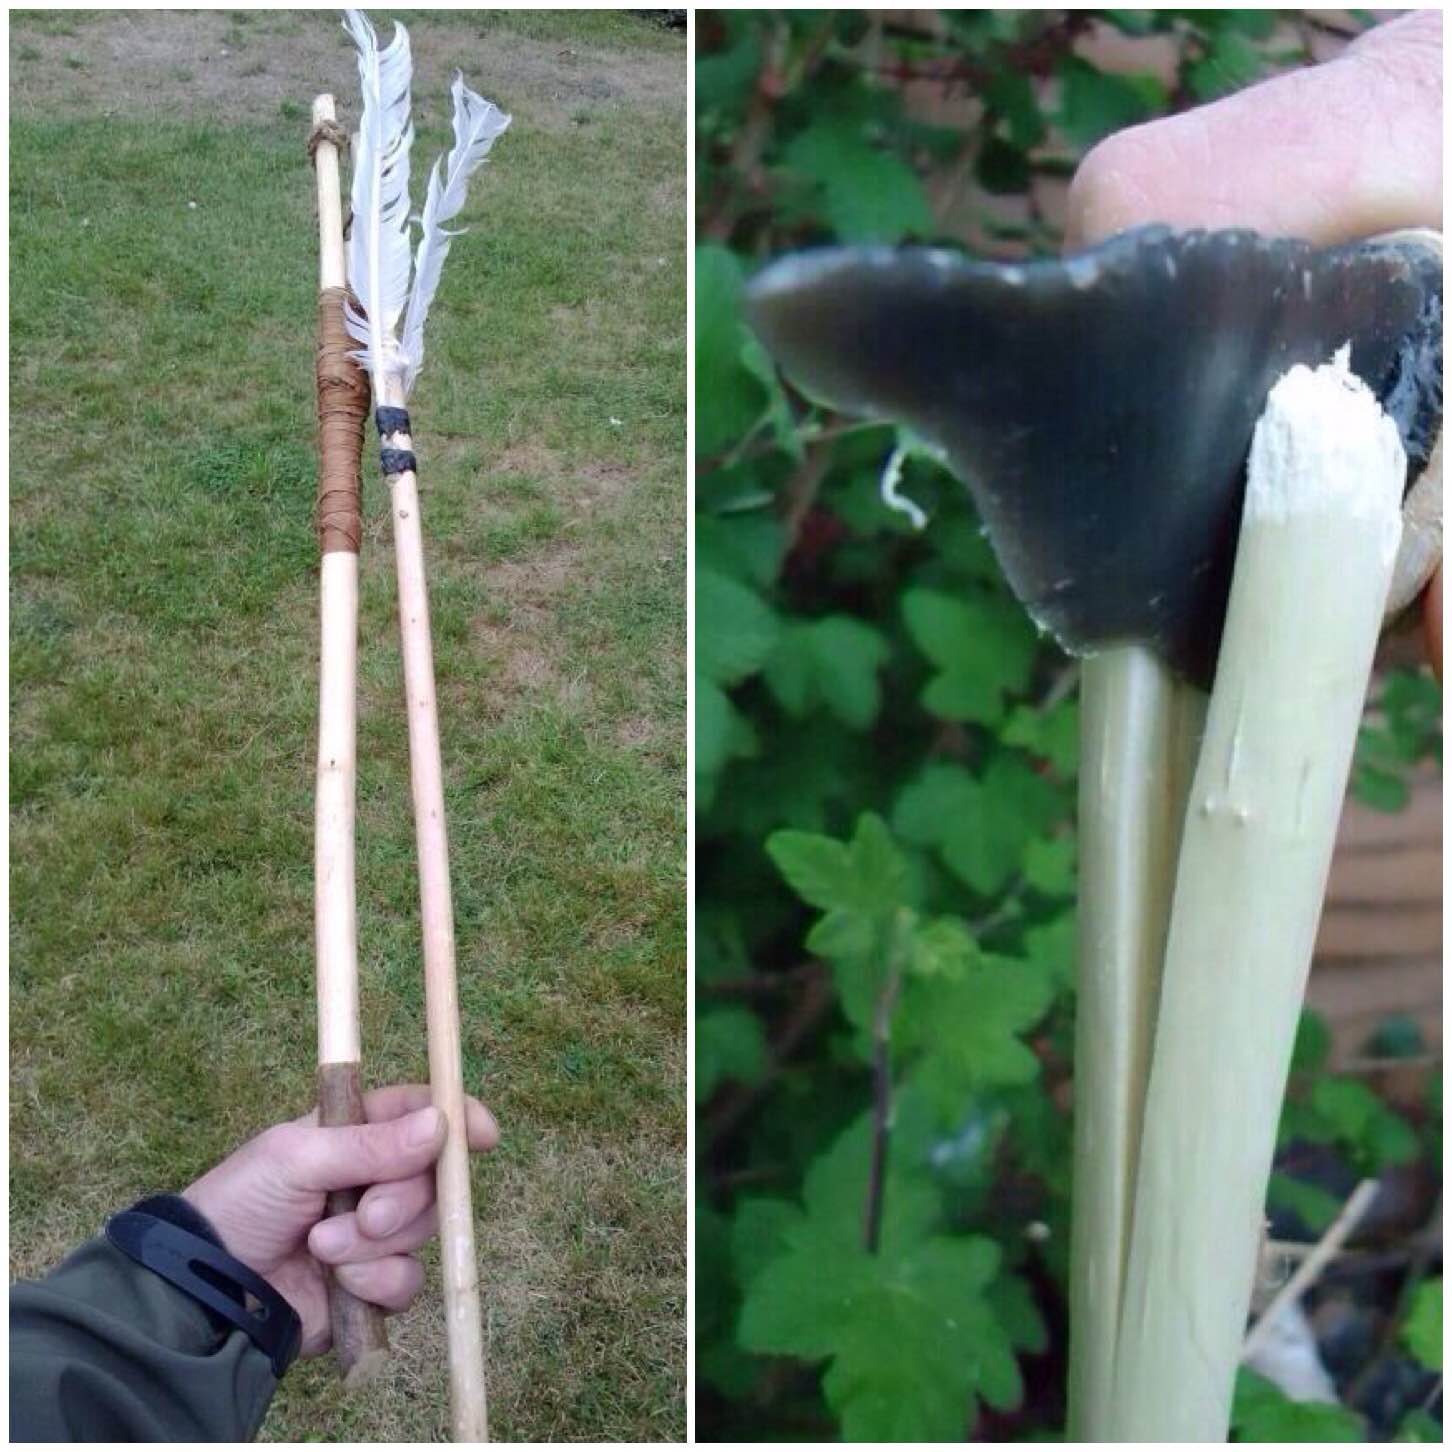
My Atlatl Set
The set is made up of two parts – the Atlatl (the throwing device) as shown below and a dart (seen above). My post on the Atlatl goes into detail on the history of them and the different designs you can find.
The ones below are very simple ones. The left hand one has been carved from a hazel rod and the one on the right is from a piece of yew with an antler tip attached by sinew and spruce pitch.
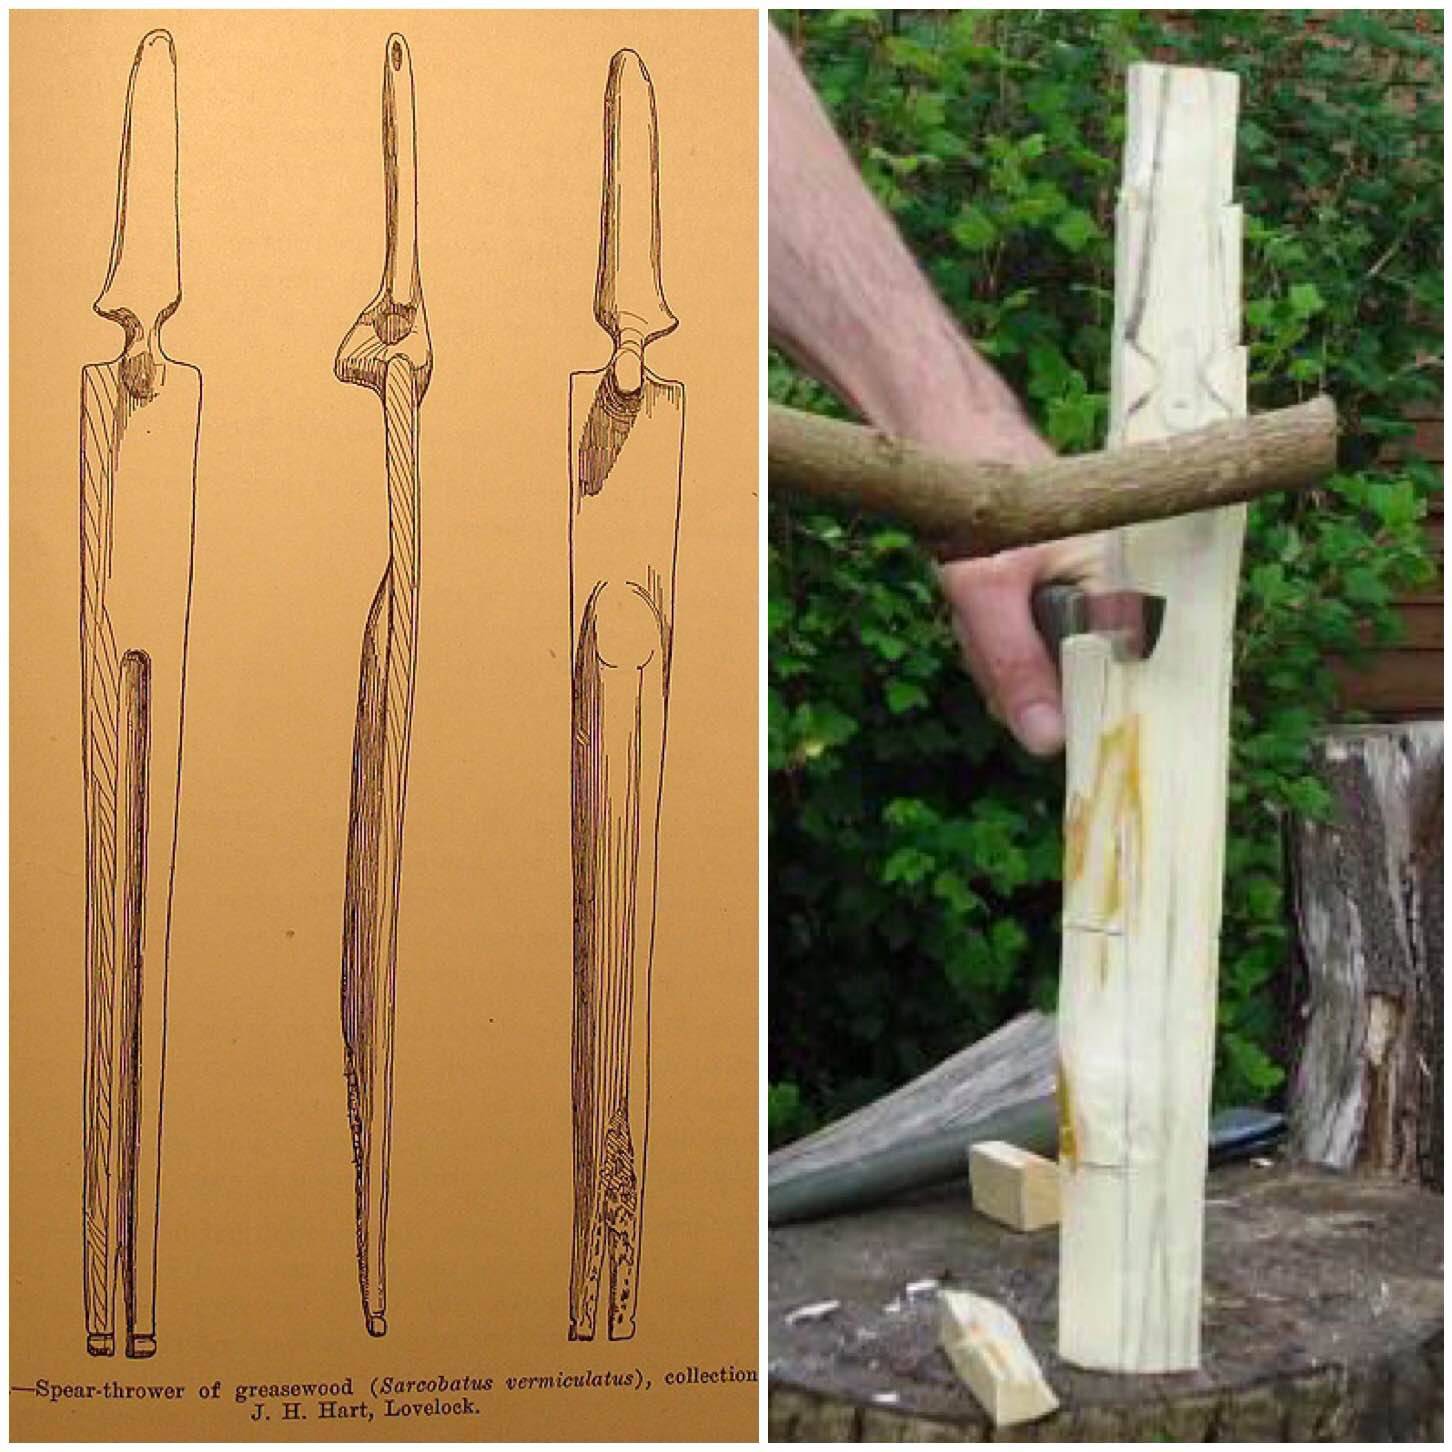
I have tried to make a number of different Atlatls over the years and a favourite of mine is called the Lovelock Cave Atlatl (named after where it was found in the USA). I came across some drawings of this Atlatl on the web and set about making one.
Lovelock Caver Atlatl
It was thought to have had a bone or wooden point at the end to attach the dart to it but I experimented with just cordage. This seems to work quite well however there is no archaeological records that this adaptation was ever used.
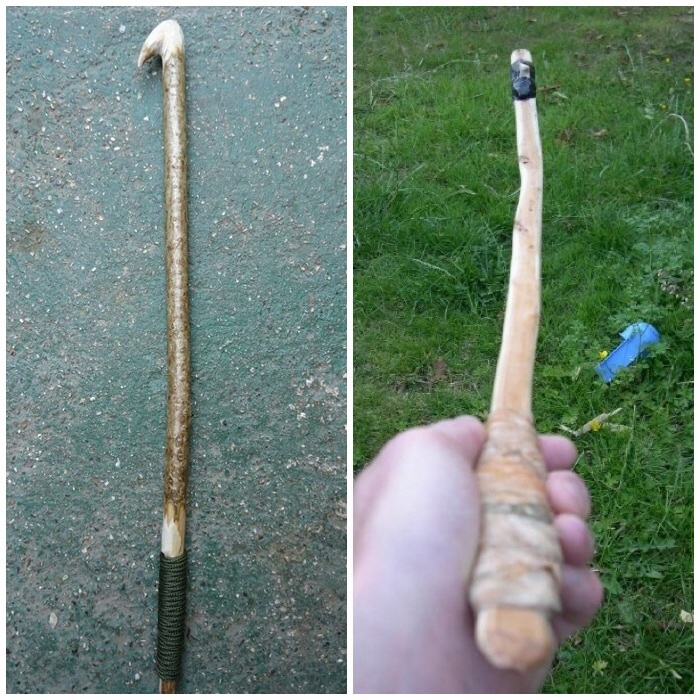
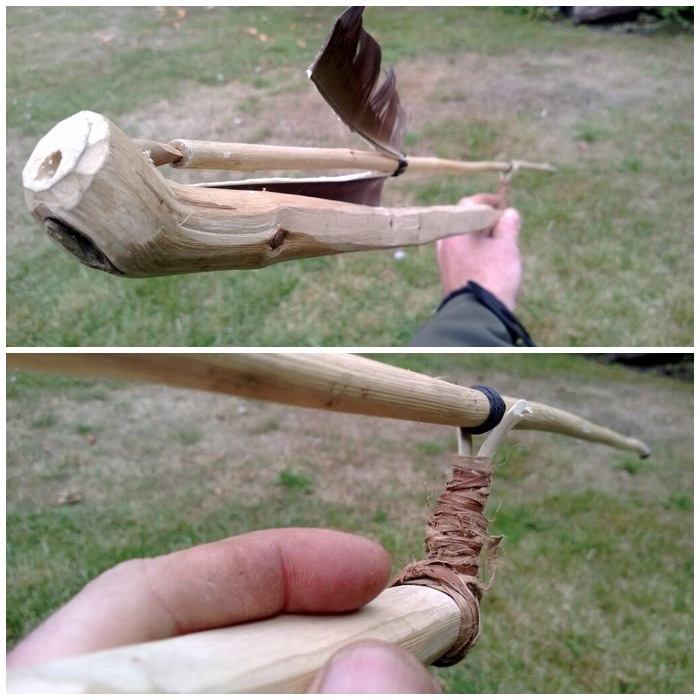
I set myself a challenge a while back to produce a split stick Atlatl from just one piece of willow and limited myself to just my primitive tools.
I scraped and carved the wood with my flint knife and used the bark as cordage. It turned out to be quite a nifty little Atlatl in the end.
One Stick Atlatl
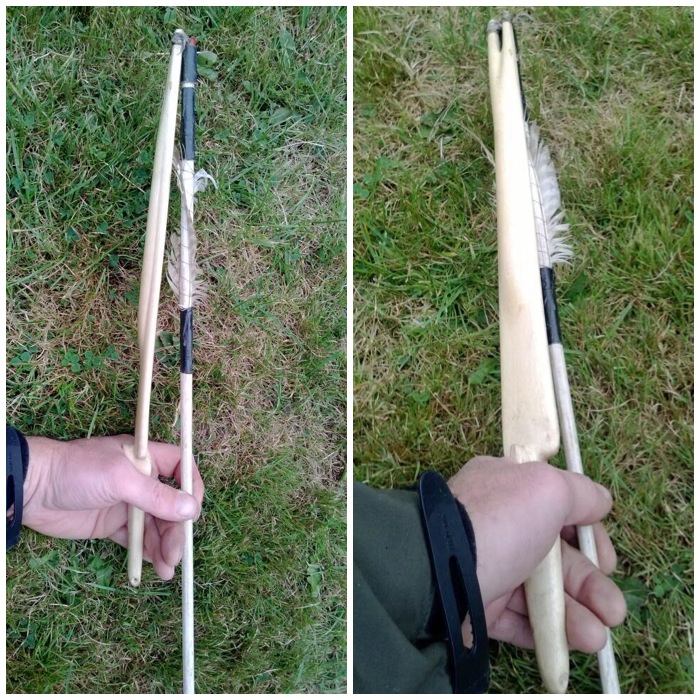
Atlatl with a Rest
I carved this Atlatl after reading about hunters in Arctic environments using this type of Atlatl. The rest allows the hunter to wear a glove while waiting to shoot the dart. The dart has a piece of cordage wrapped tightly around it that is pushed up against the rest so fixing the dart in place. With a quick flick the dart is away with no ill effect on its flight.
Atlatl with a Rest
Thats it for me on bows and Atlatls (unless I make some more).
So begins a New Year and I was considering where my photography would take me this year. After a long hard thought (about 10 minutes really) I came to the conclusion my photography could go wherever it liked.
So I plan to have a post once a week with what I consider my best or most interesting picture.
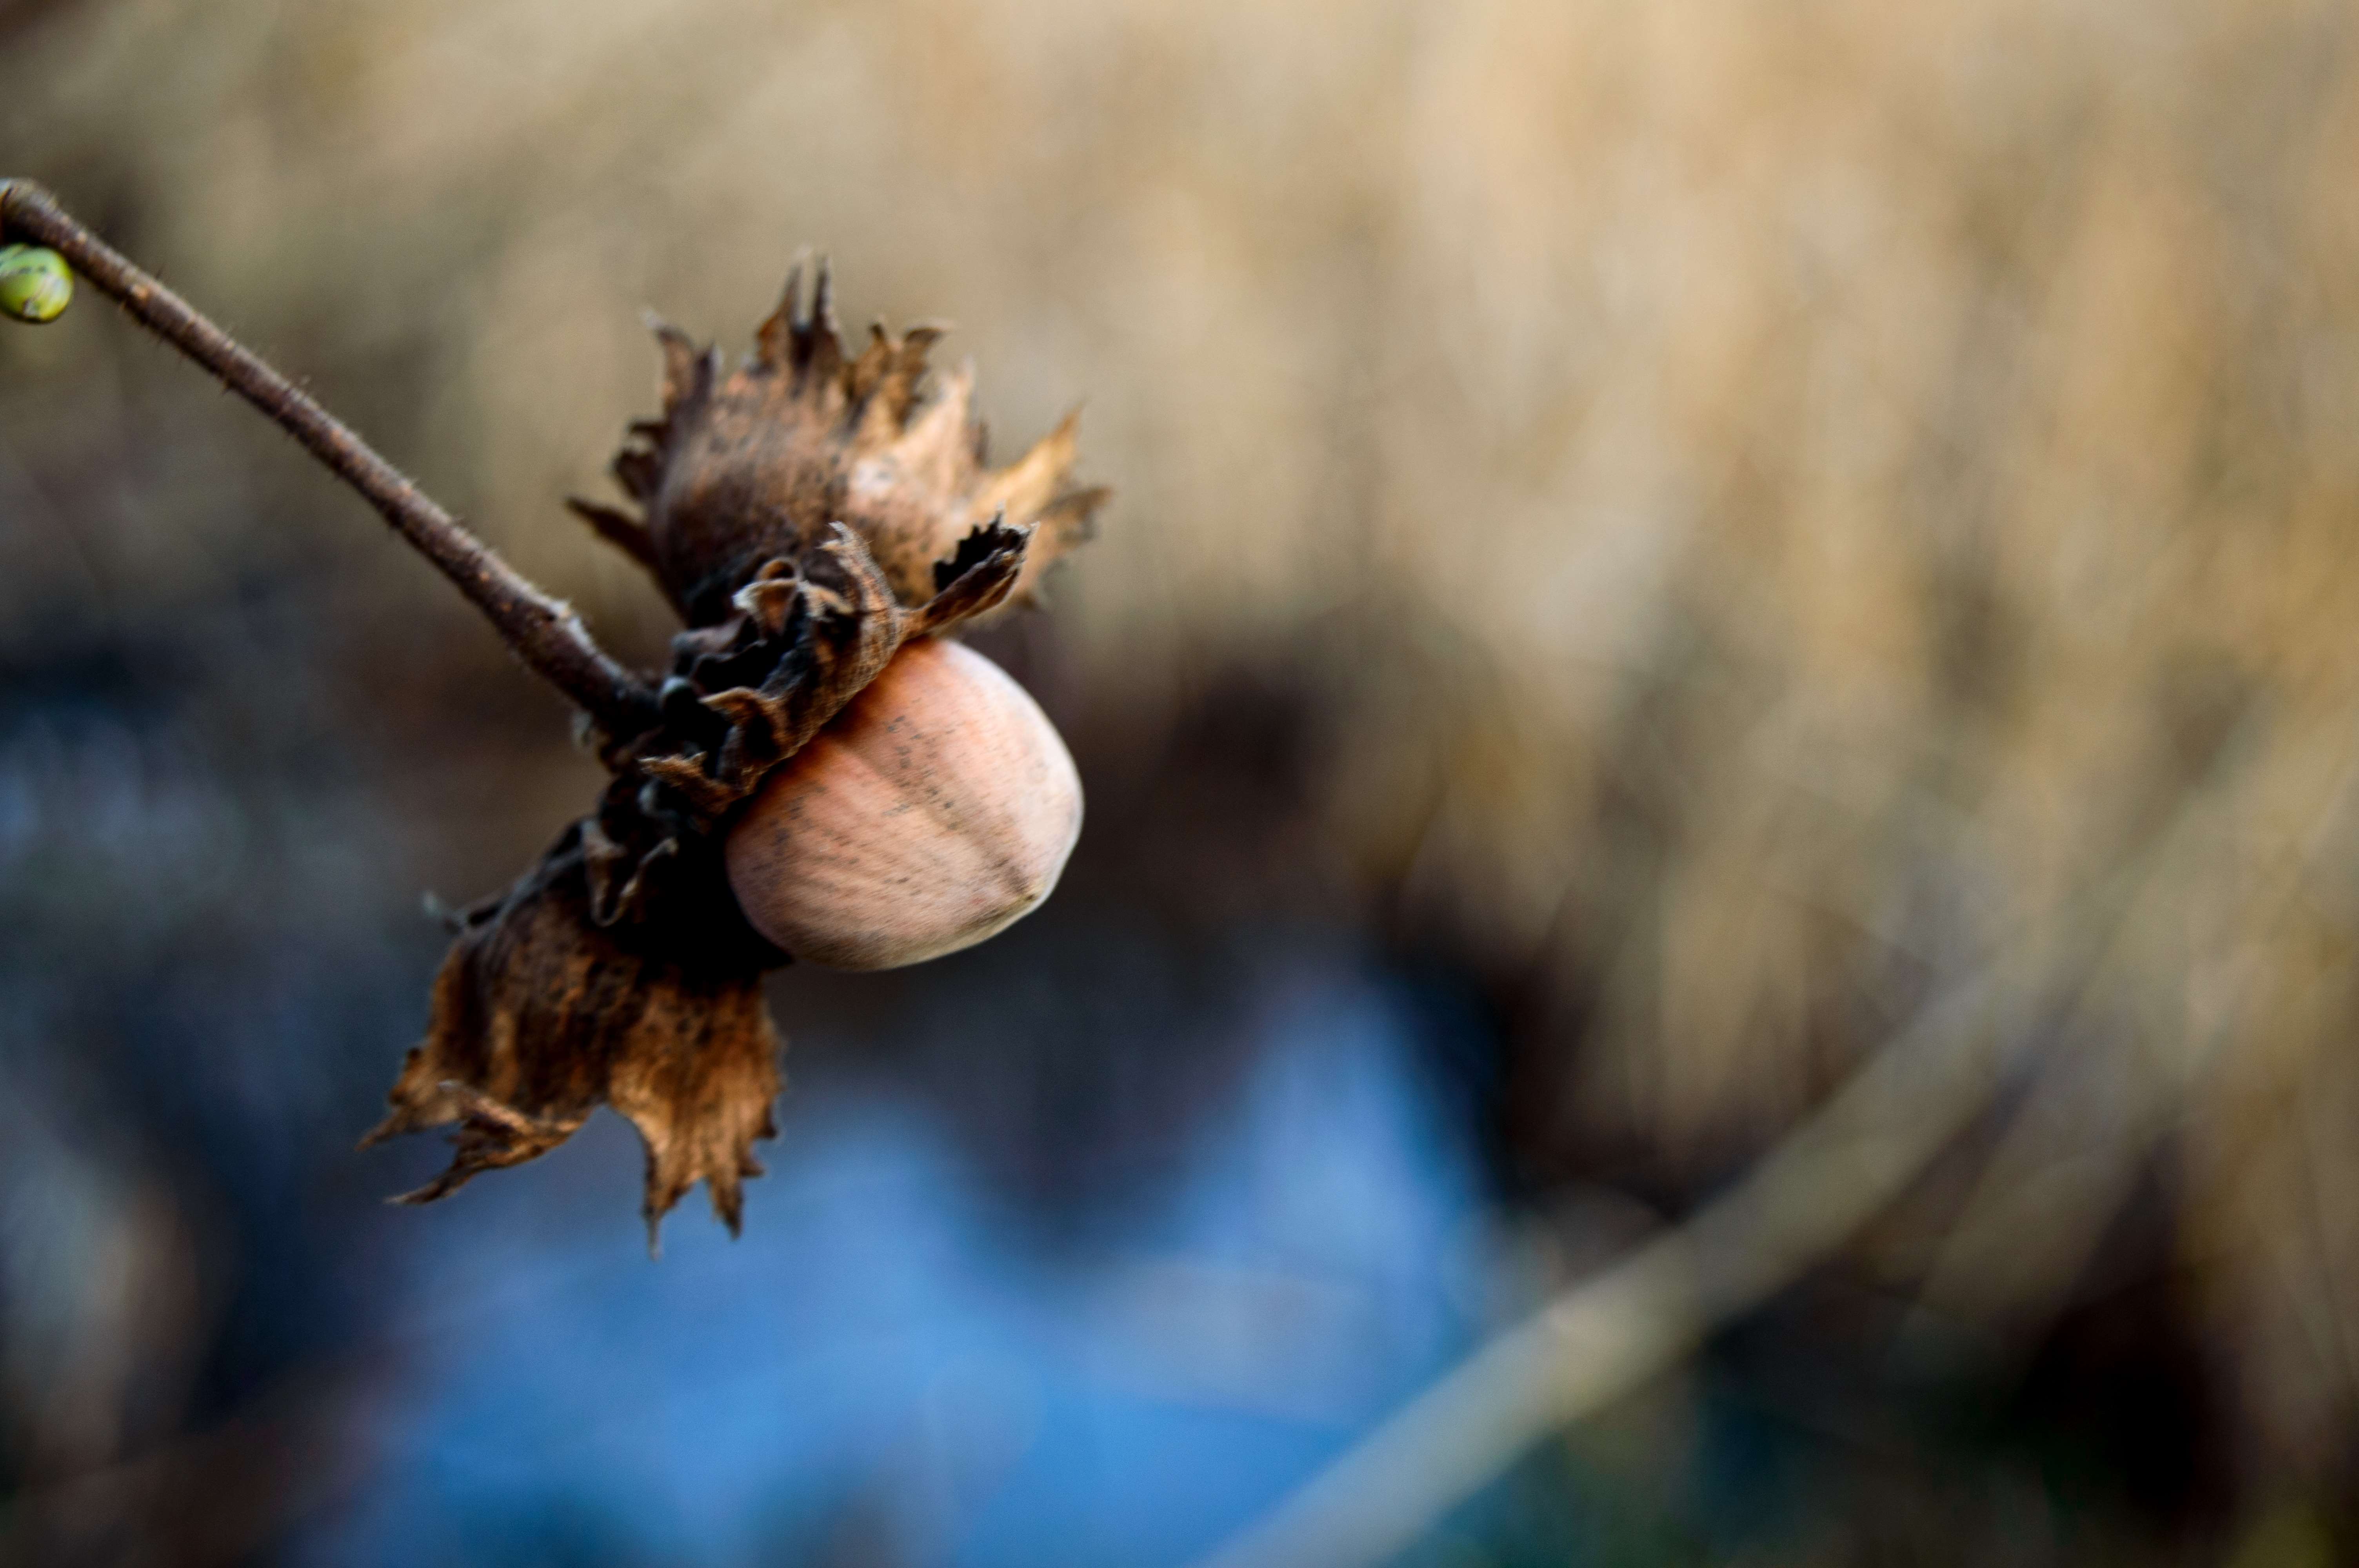
On New Year’s Eve I took a bimble around our village and was seeing lots of signs of spring (a bit early if you ask me) when I spotted this leftover morsel from last year.
Forgotten hazelnut
Normally the squirrels beat me to these little nibbles so I was surprised to see some still left over from last year’s crop. This hazel tree was overhanging a reedmace-covered pond so maybe it proved too precarious a perch for the little fellas.
I had a great time constructing contraptions to use around the campfire last year so I thought a little summary post of them all was in order.
This post is not about how to construct any of the contraptions themselves (I will link to the relevant How To…. guides in the title of each section) but my personal thoughts on them. I appreciate campfire gadgets are not for everyone and they may be seen as overcomplicating the cooking process however I think they are great fun to construct.
Raised Firepit/platform
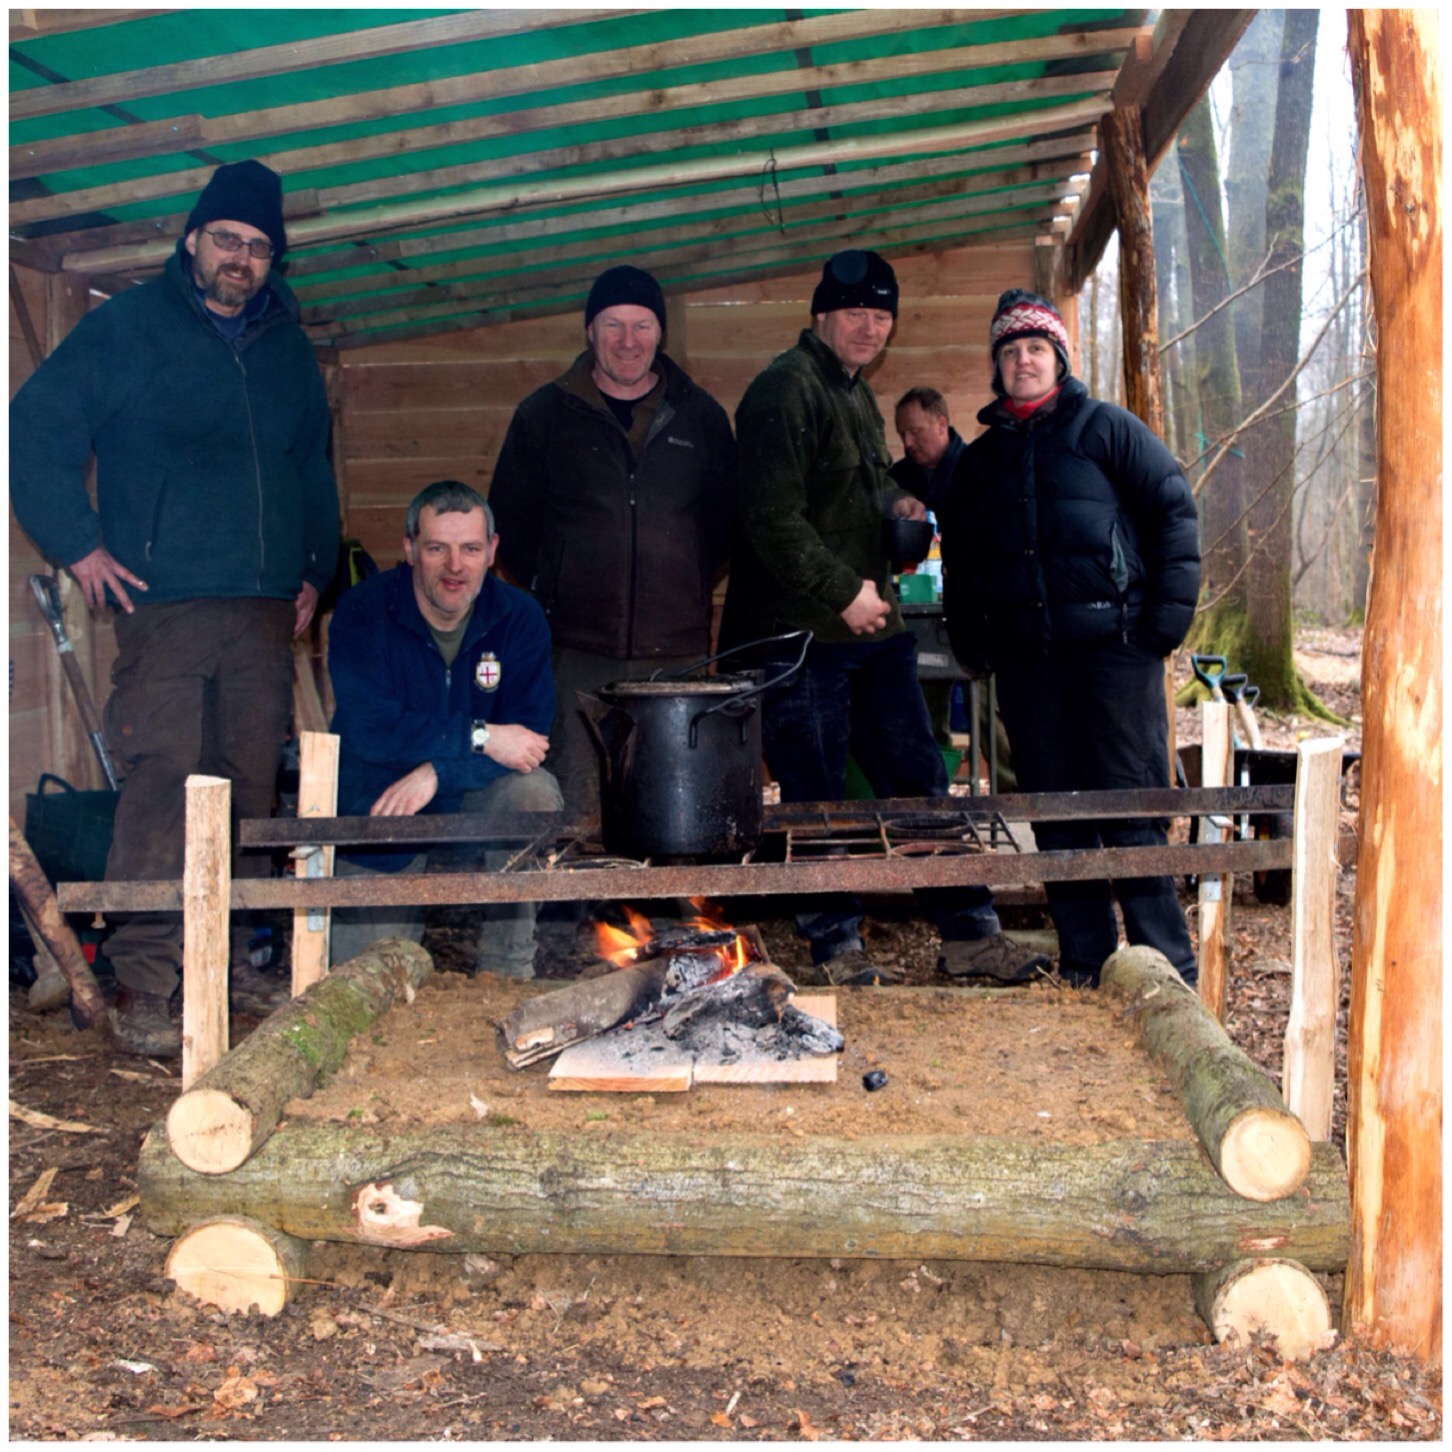
Before building any gadgets it is good to have an actual fire. I was asked to help build a raised firepit/platform by my friend John Rhyder at the Woodcraft School training area. John wanted a dedicated area for his students to cook on without having to bend down too far.
After a lot of discussion with his wife Caron we opted for a rectangular shape instead of a square. Caron argued that this shape would give a large cooking area but would be safer than a square, as the students would not have to stretch too far to reach the centre of the fire. This is an ideal construction for a fixed-base camp, with plenty of room to cook on and to sit around.
Raised Firepit
Collapsible pot hanger
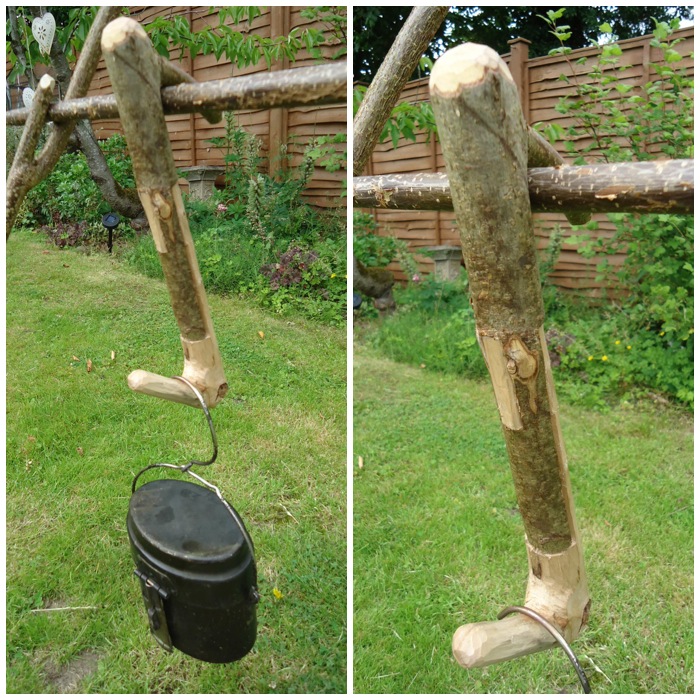
I love little wooden contraptions and these little collapsible pot hangers are ideal for the lightweight bushcrafter. They can be made in numerous different ways and are easily broken down to be stored inside your pot. One of the things I like about carving them is that the joints that hold them together are generally simple but need to be carved perfectly if the hanger is to take the weight of a heavy pot without coming apart.
Collapsible pot hook
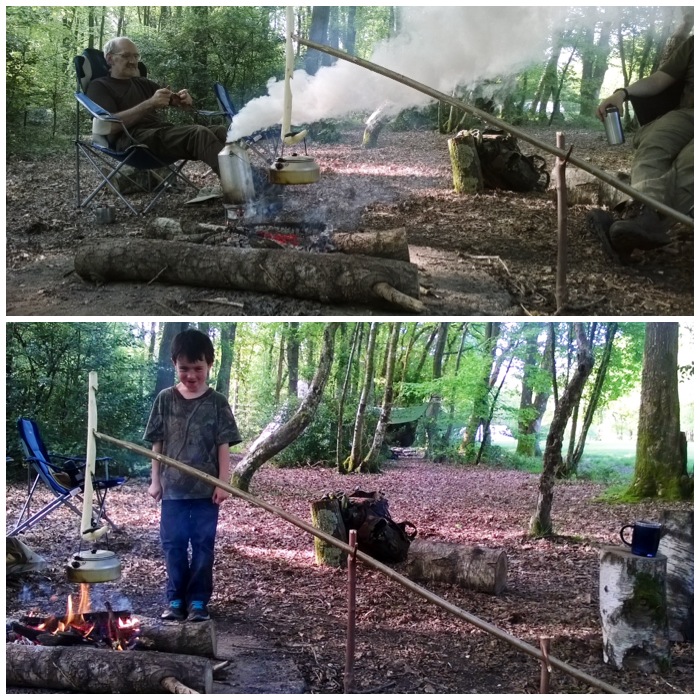
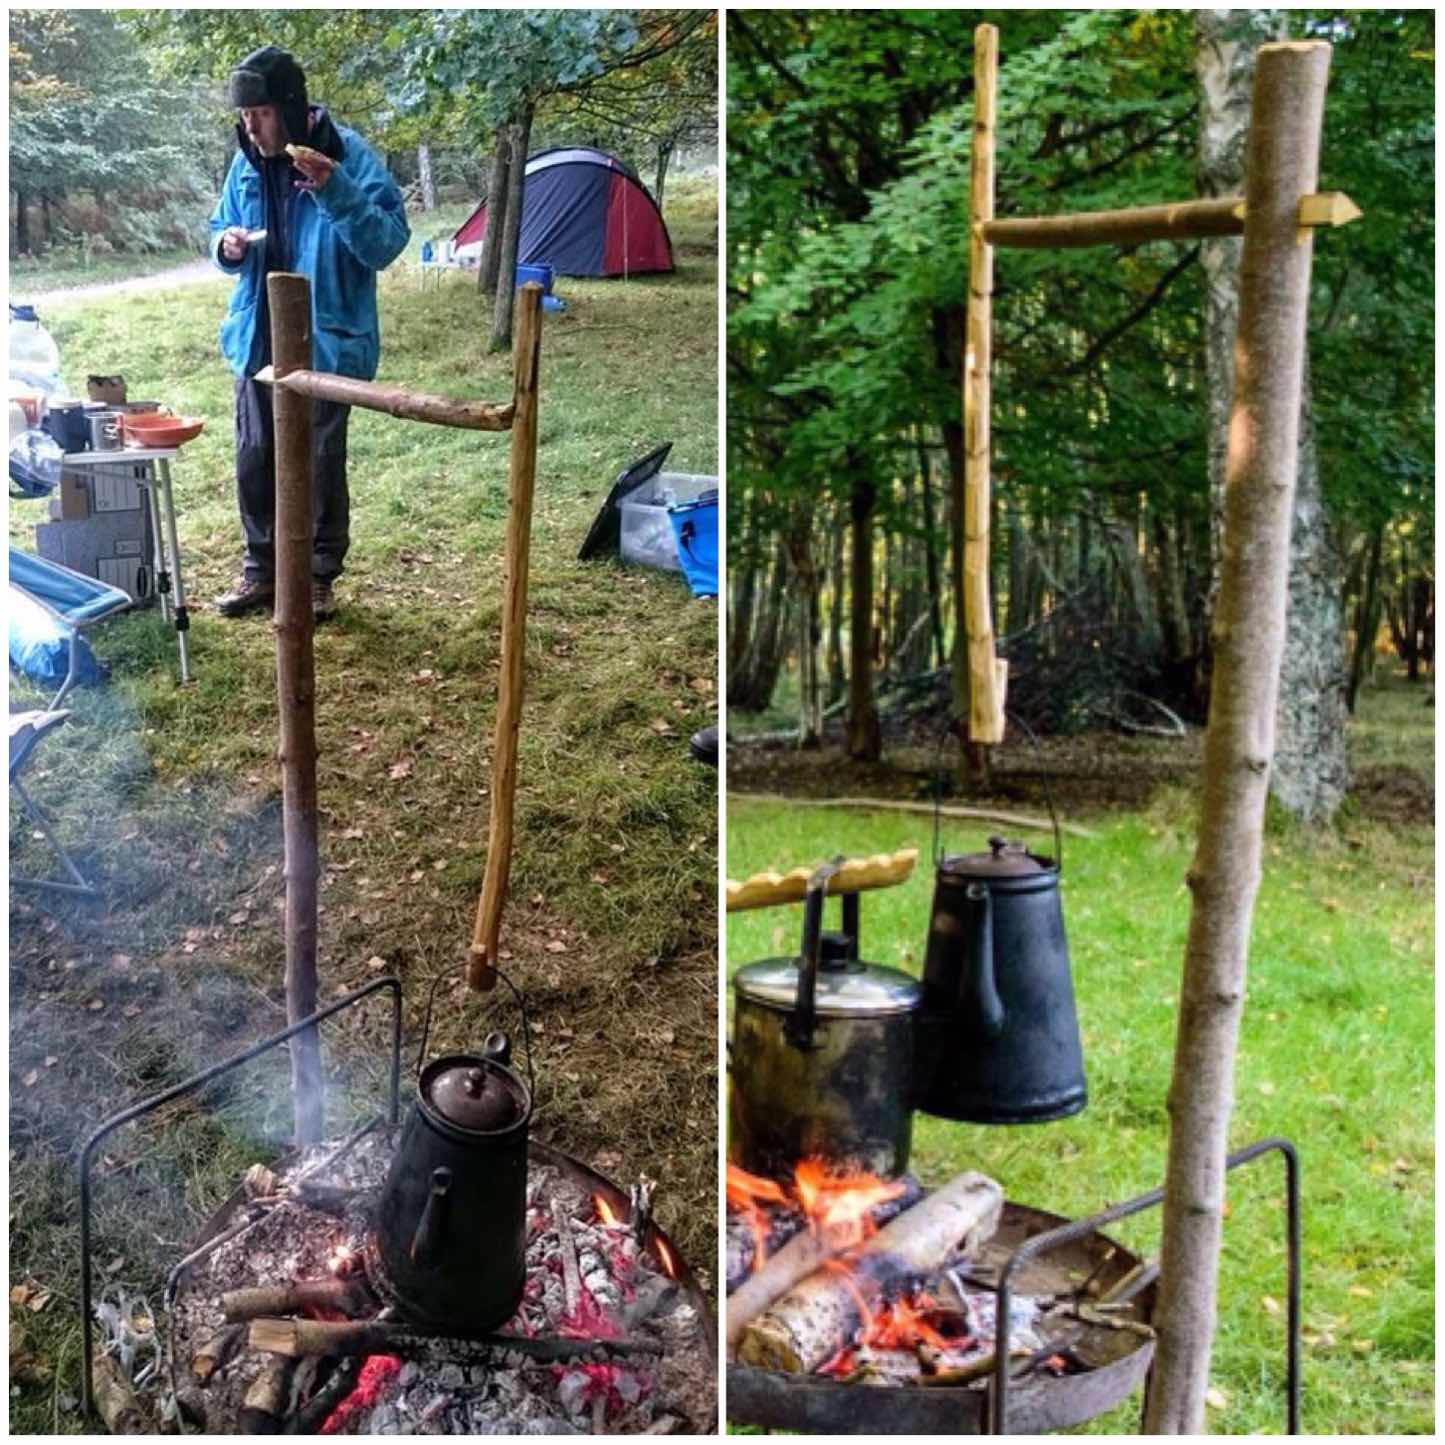
Wagon/Waugan Stick or Burtonsville Rig
This is an excellent cooking rig for bushcraft beginners to learn. It has lots of different parts and requires a number of different knife cuts to produce the hanger and the hanging poles. I have heard this set up called many different names from Waygon or Waugan stick and Mors Kochanski refers to it as the Burtonsville rig. All have their own stories behind them however the common factor is that it a very easy set up and offers the bushcrafter a wide range of cooking heights.
Wagon/Waugan Stick or Burtonsville Rig
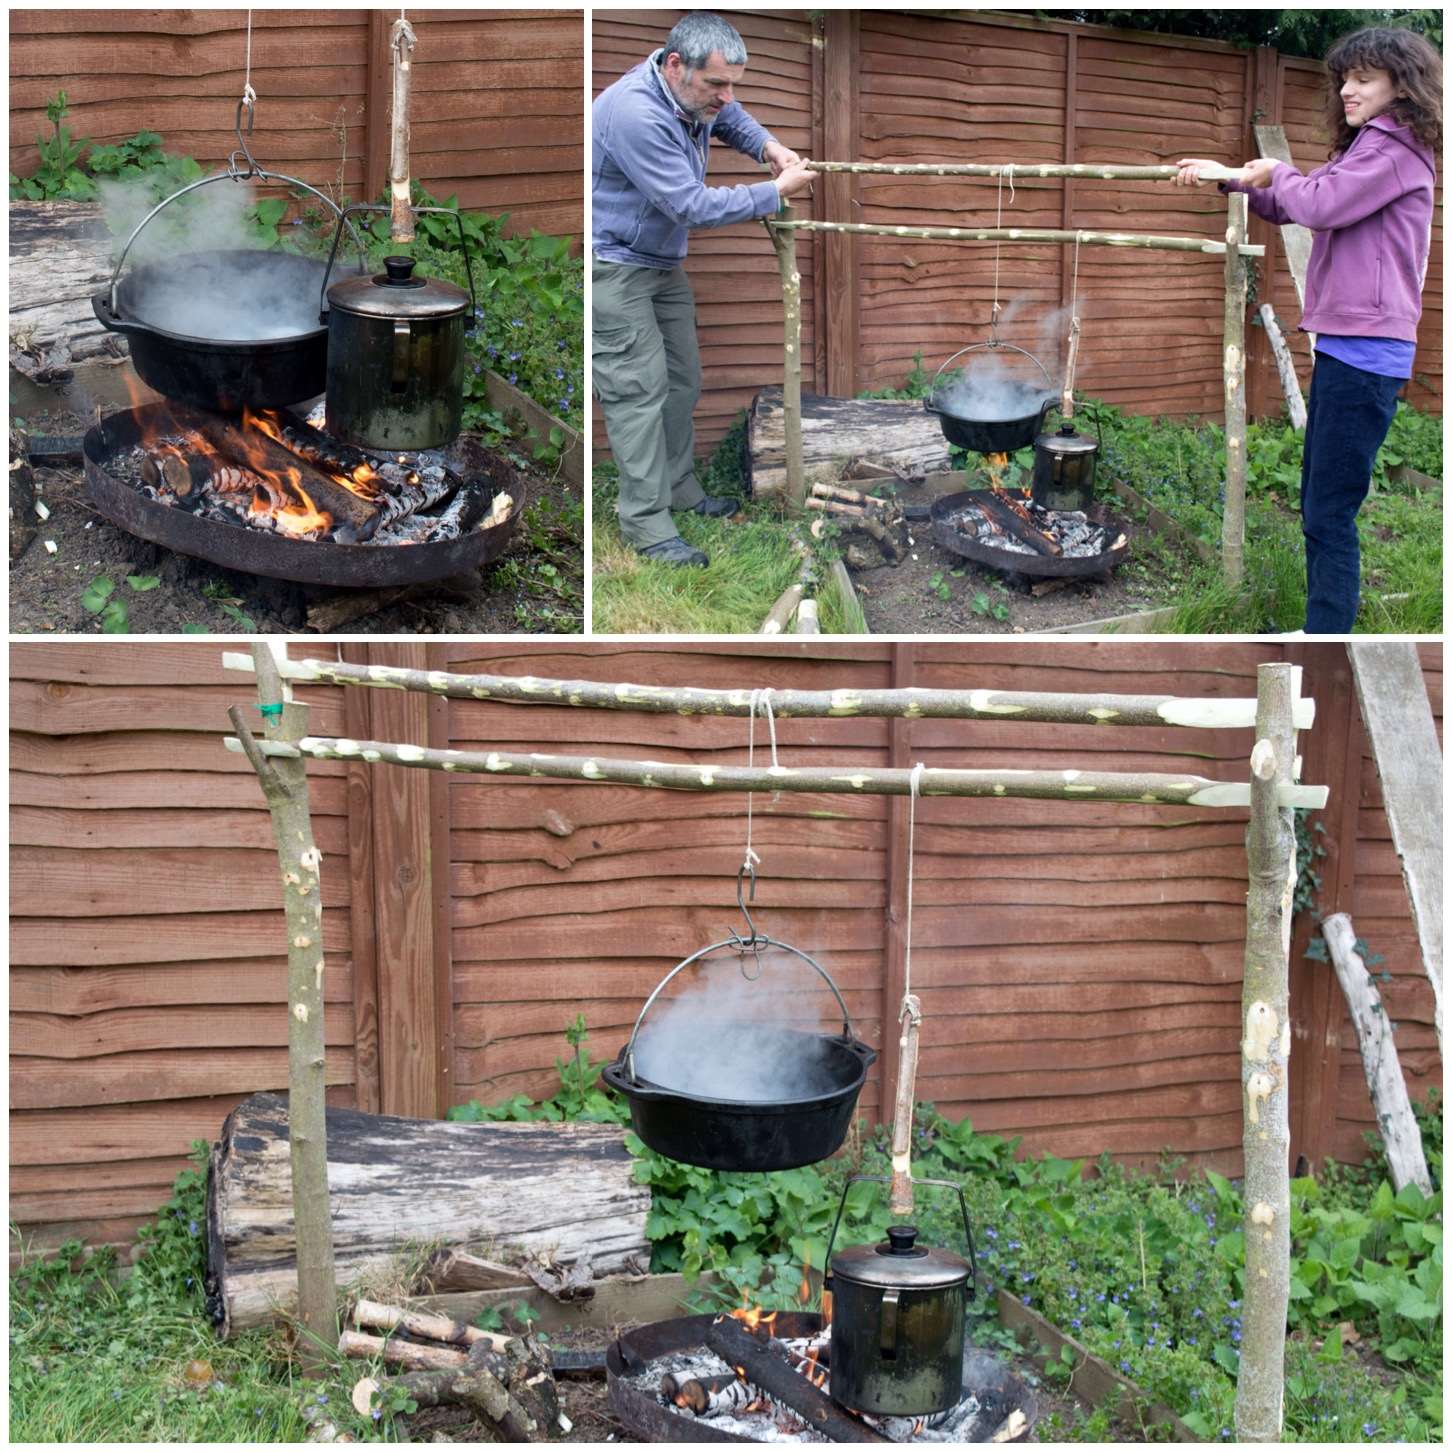
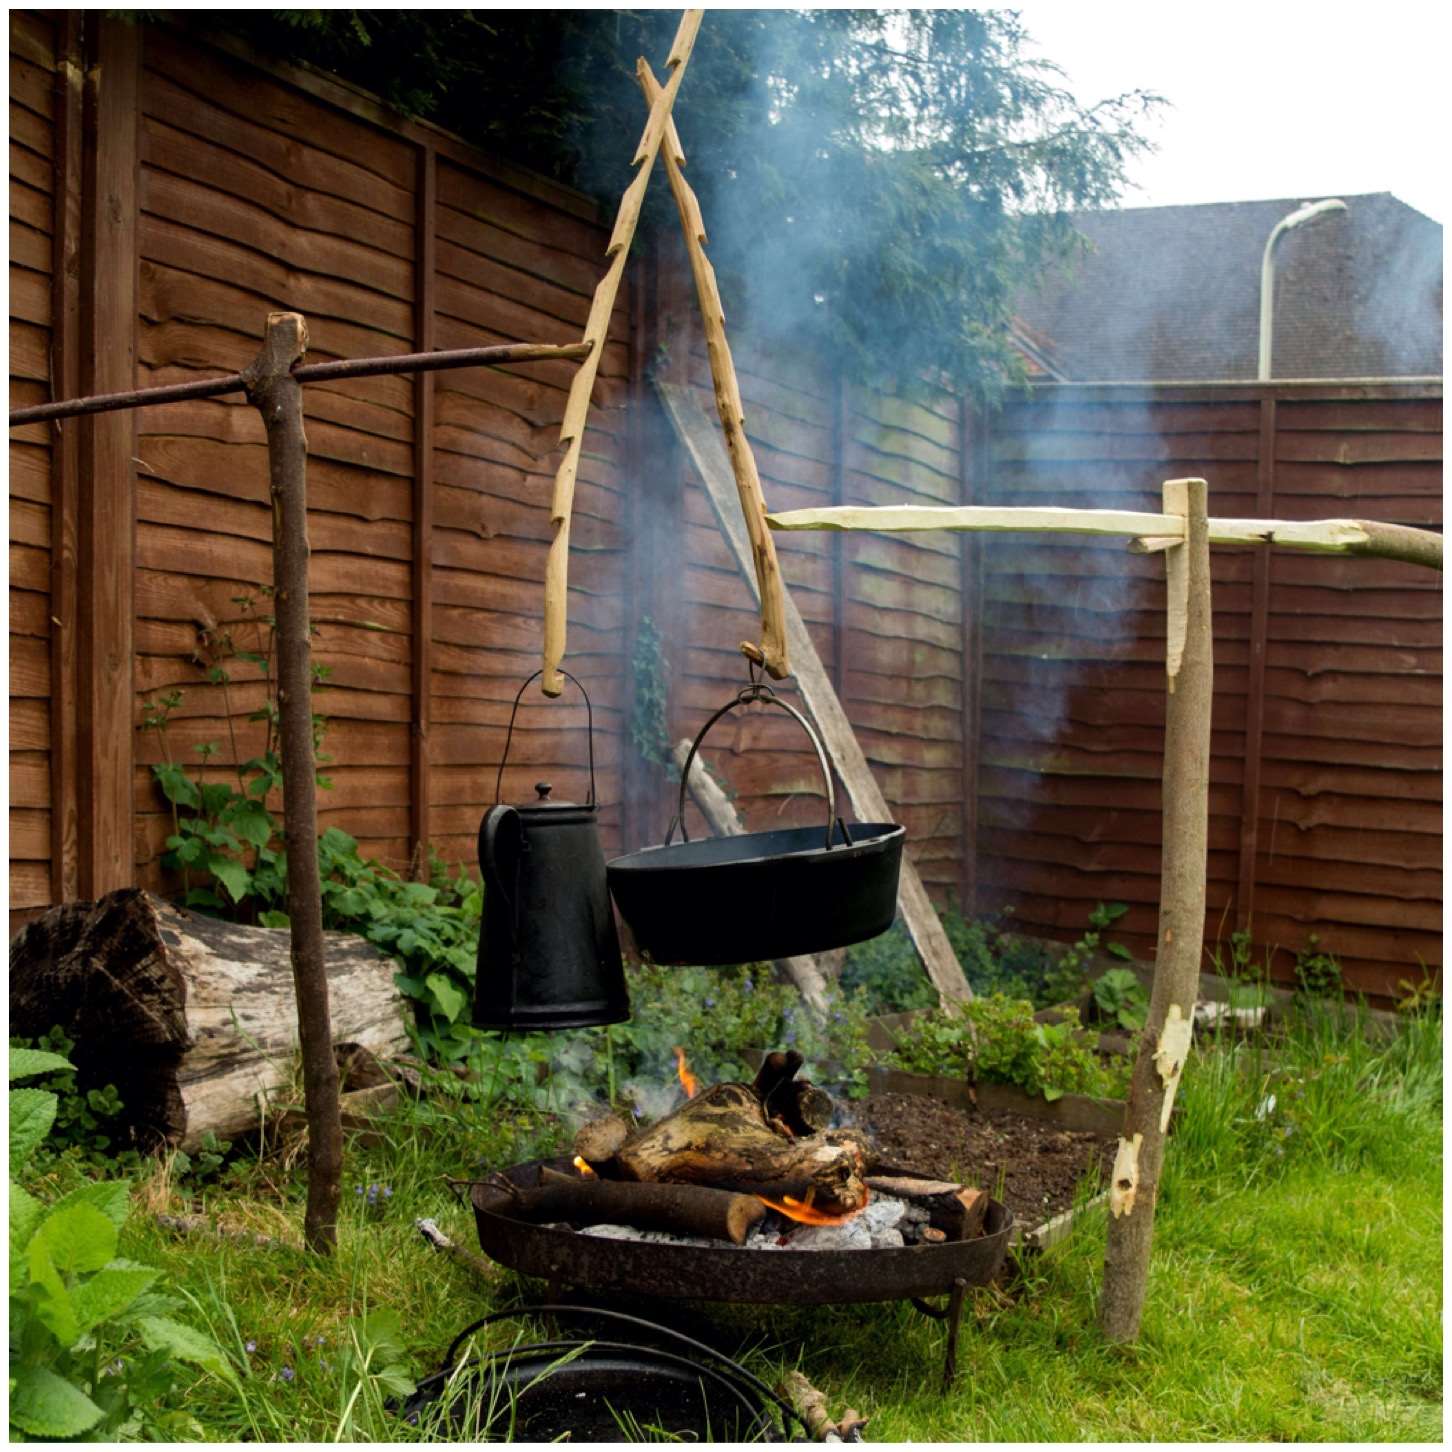
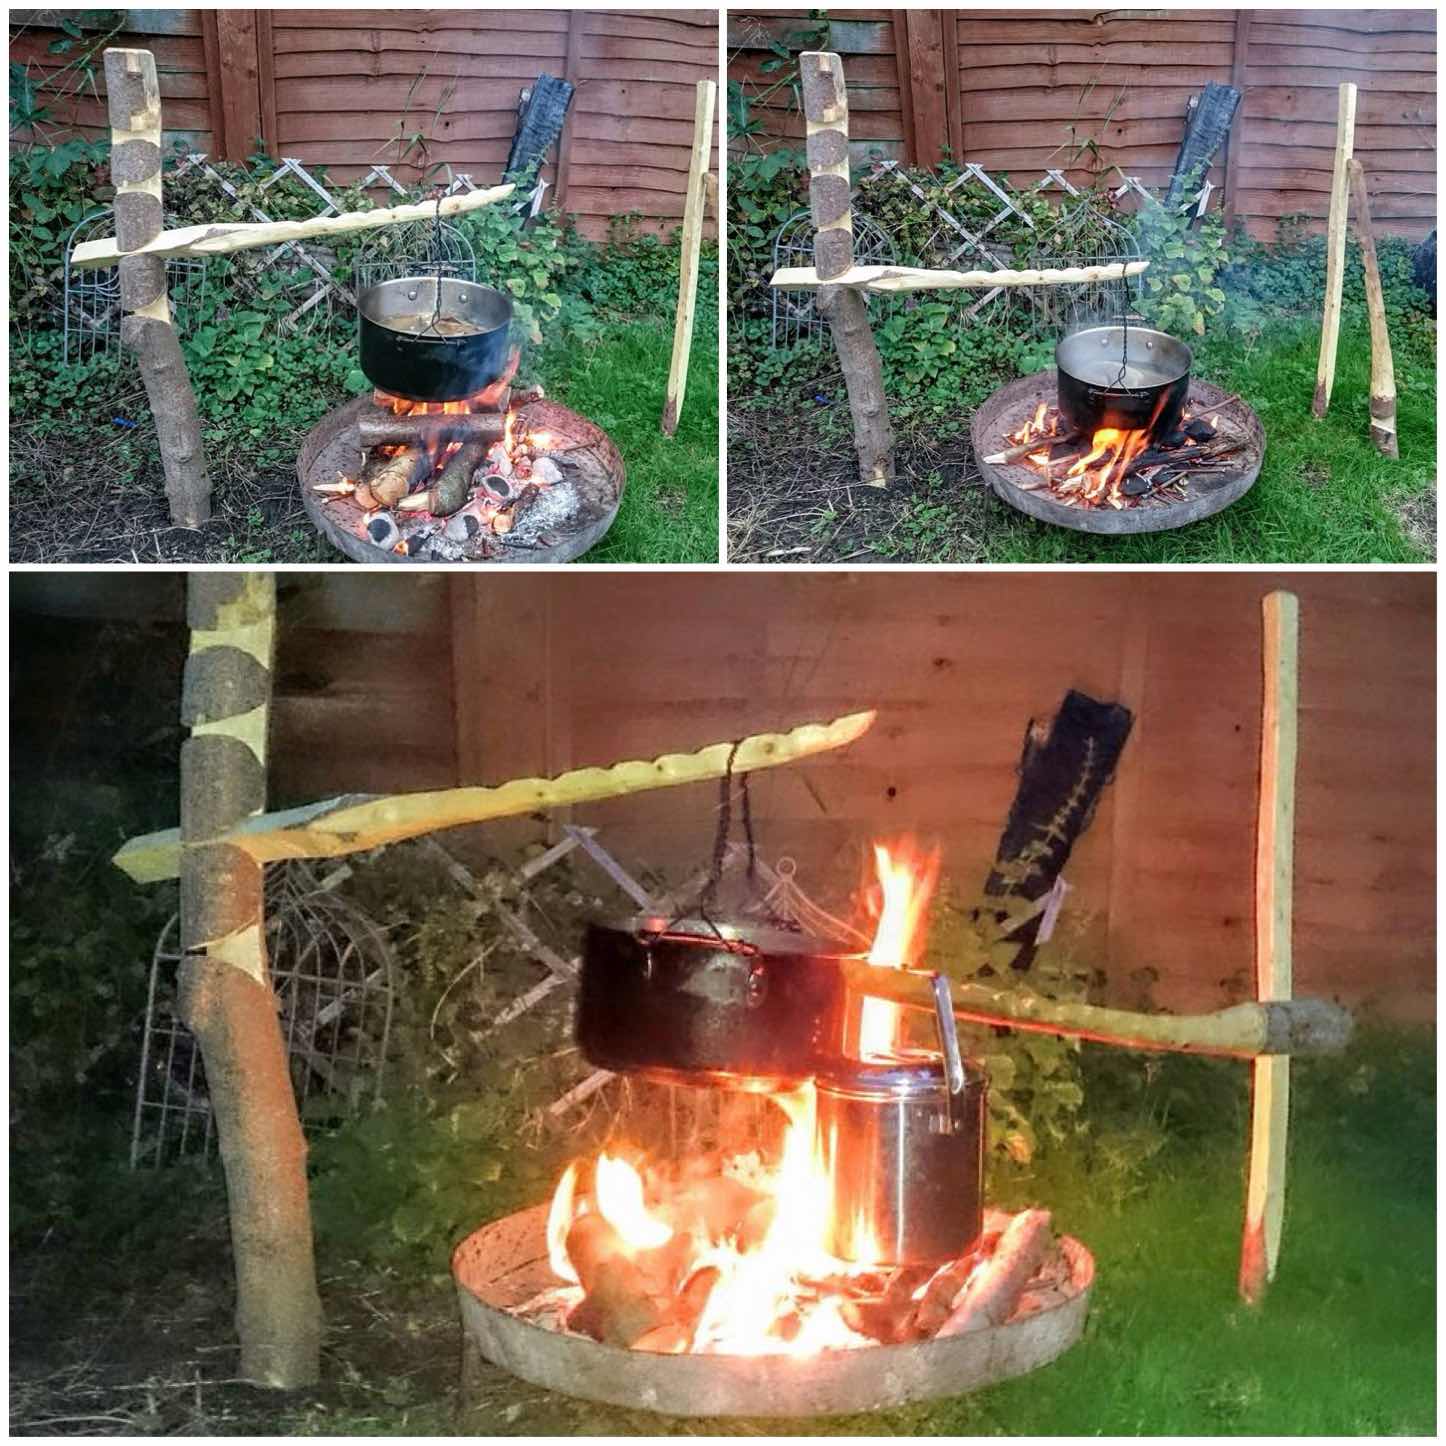
Double French Windlass
The Double French Windlass is a cracking cooking rig. I was taught this by my friend Steve ‘Mesquite’ Harral at the Bushcraft UK Bushmoot a number of years ago. I used it at this year’s Bushmoot for two weeks and it allowed me to cook with a number of different pots at one time with the ability to have them all at different cooking heights.
Double French Windlass
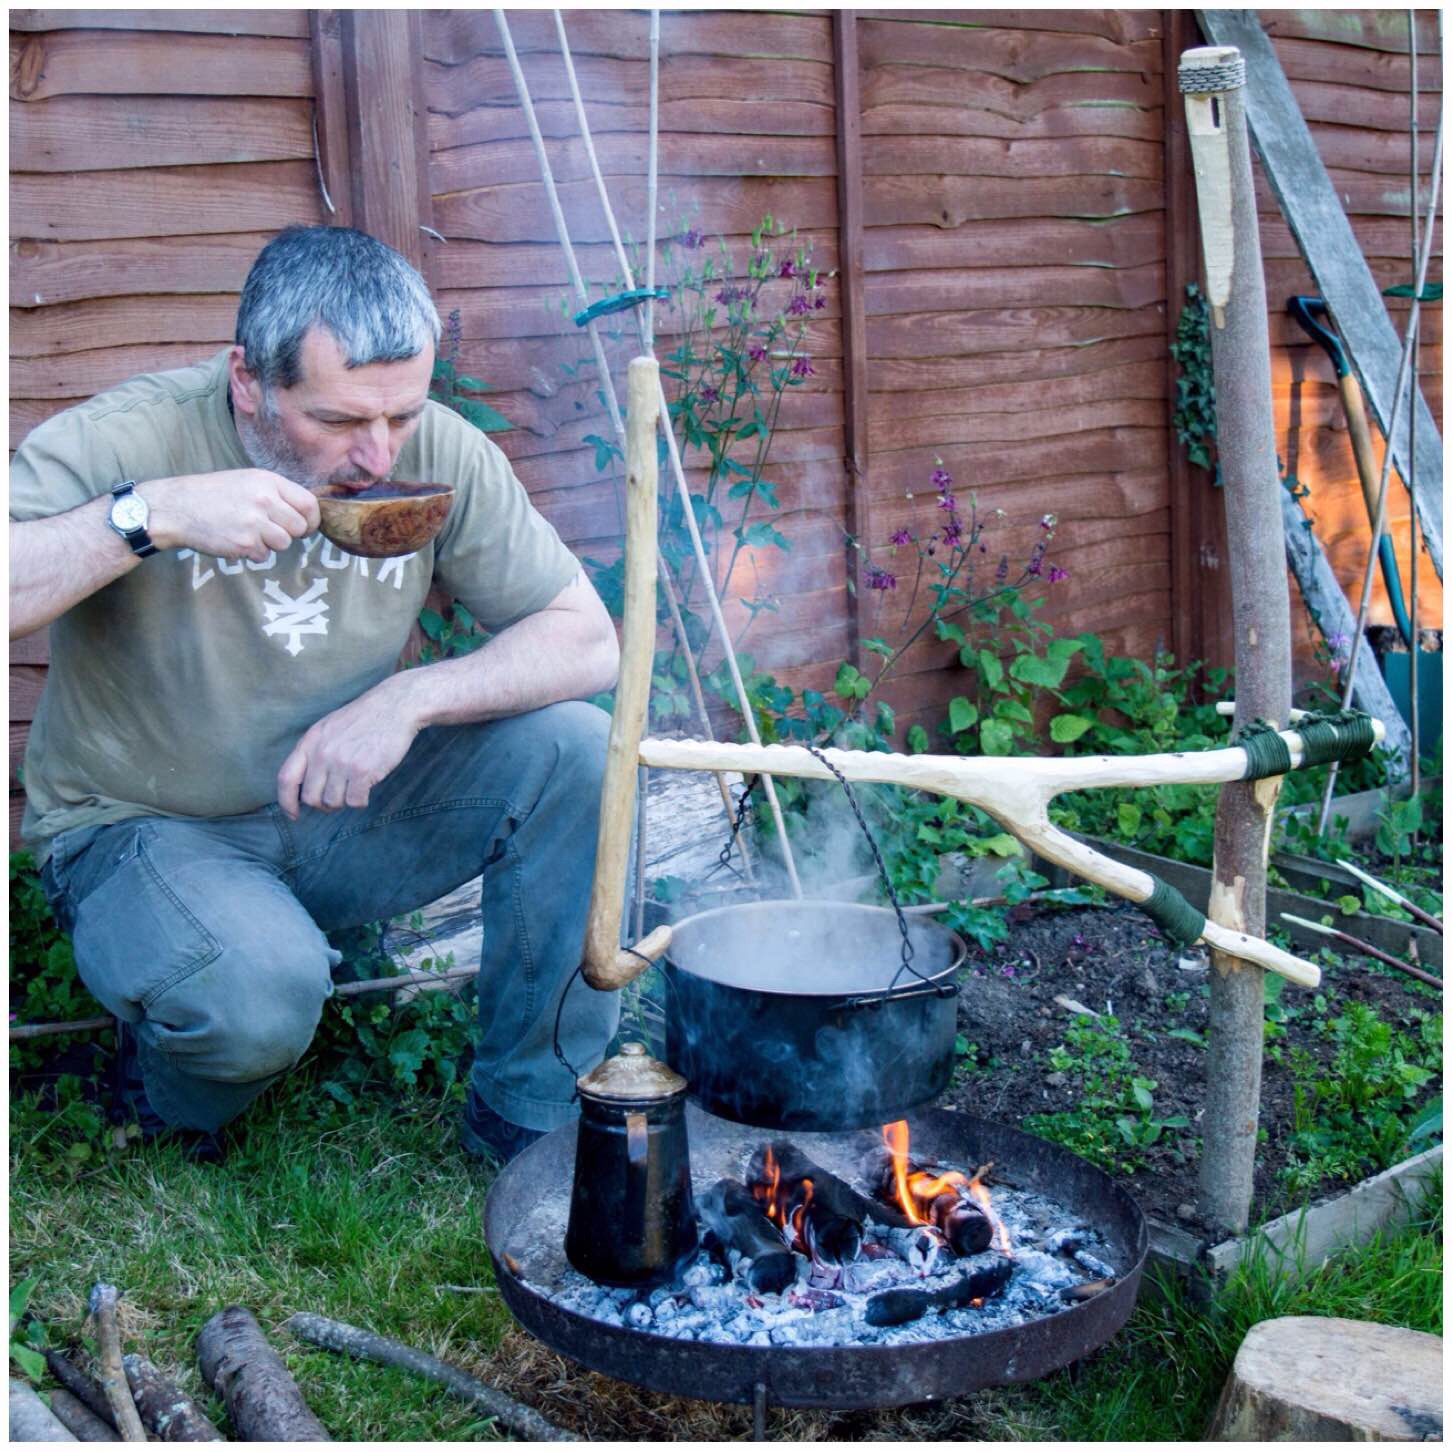
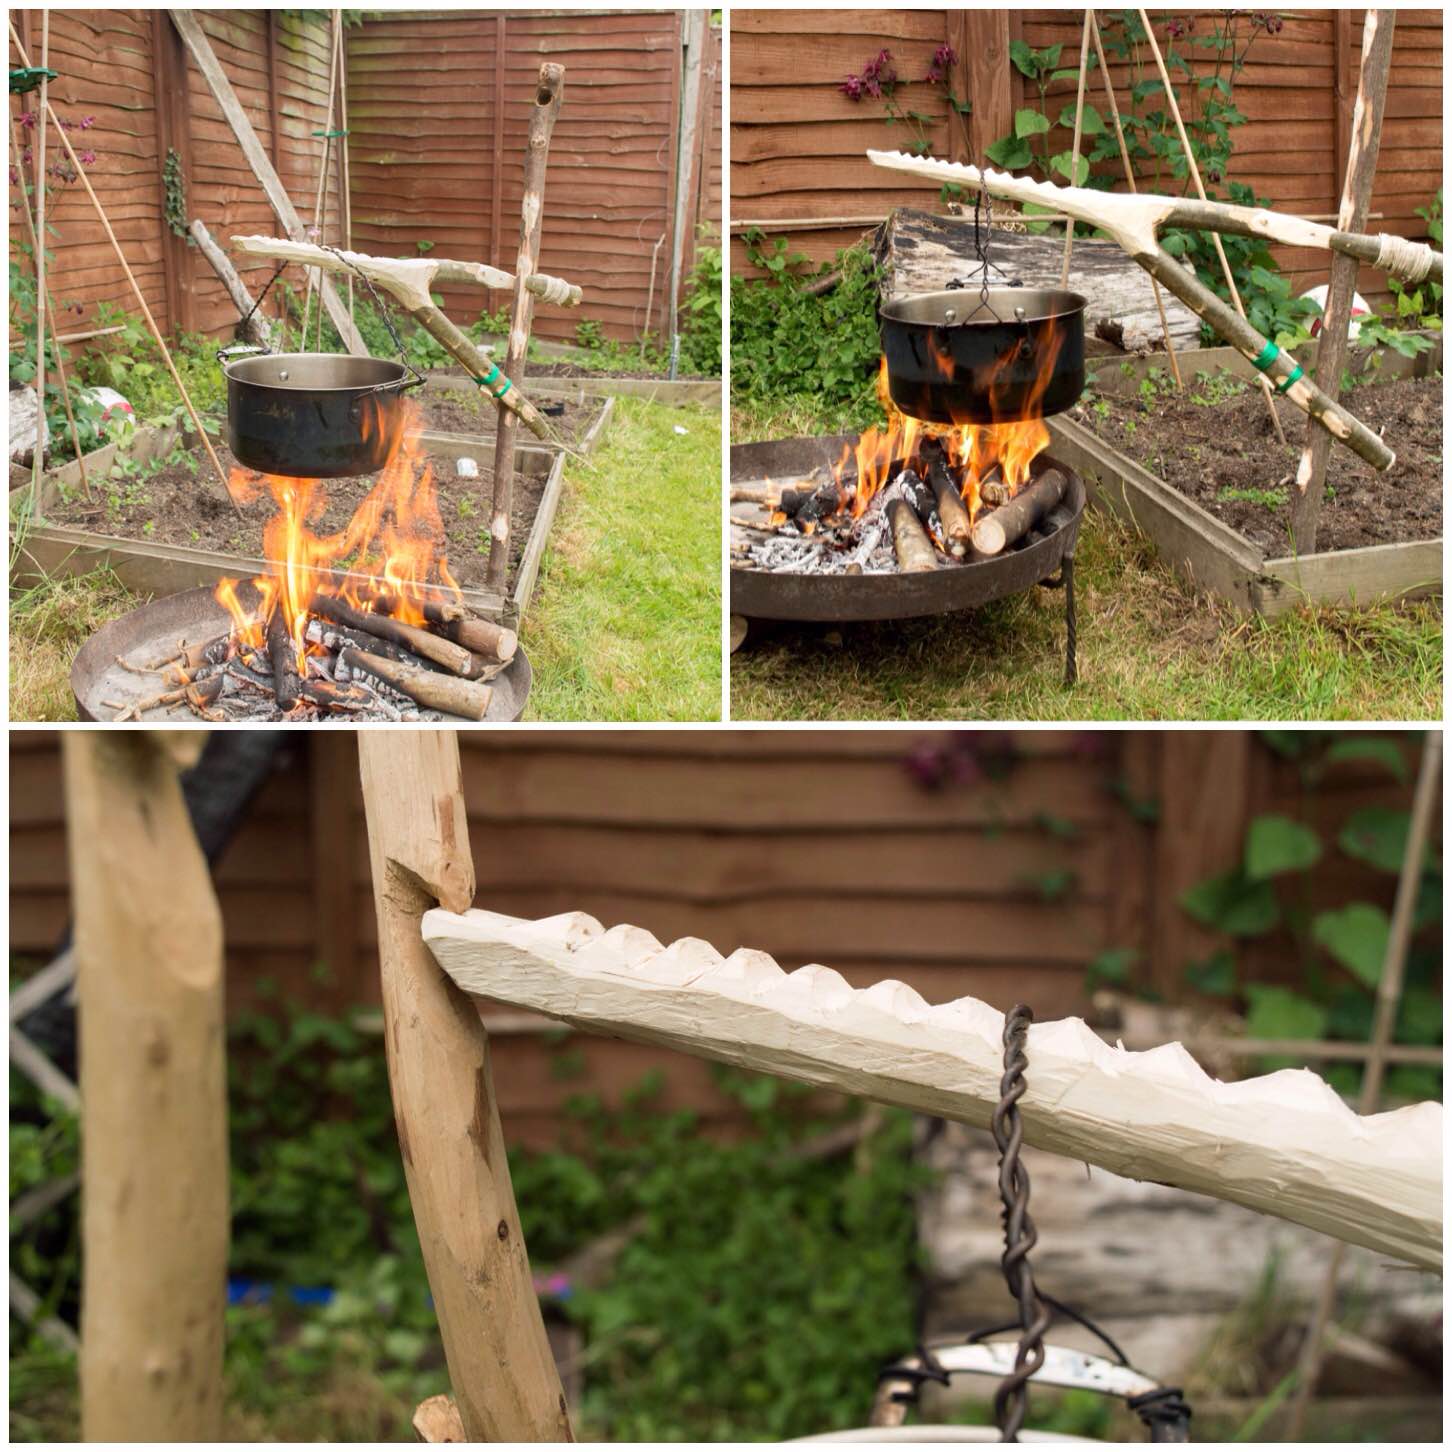
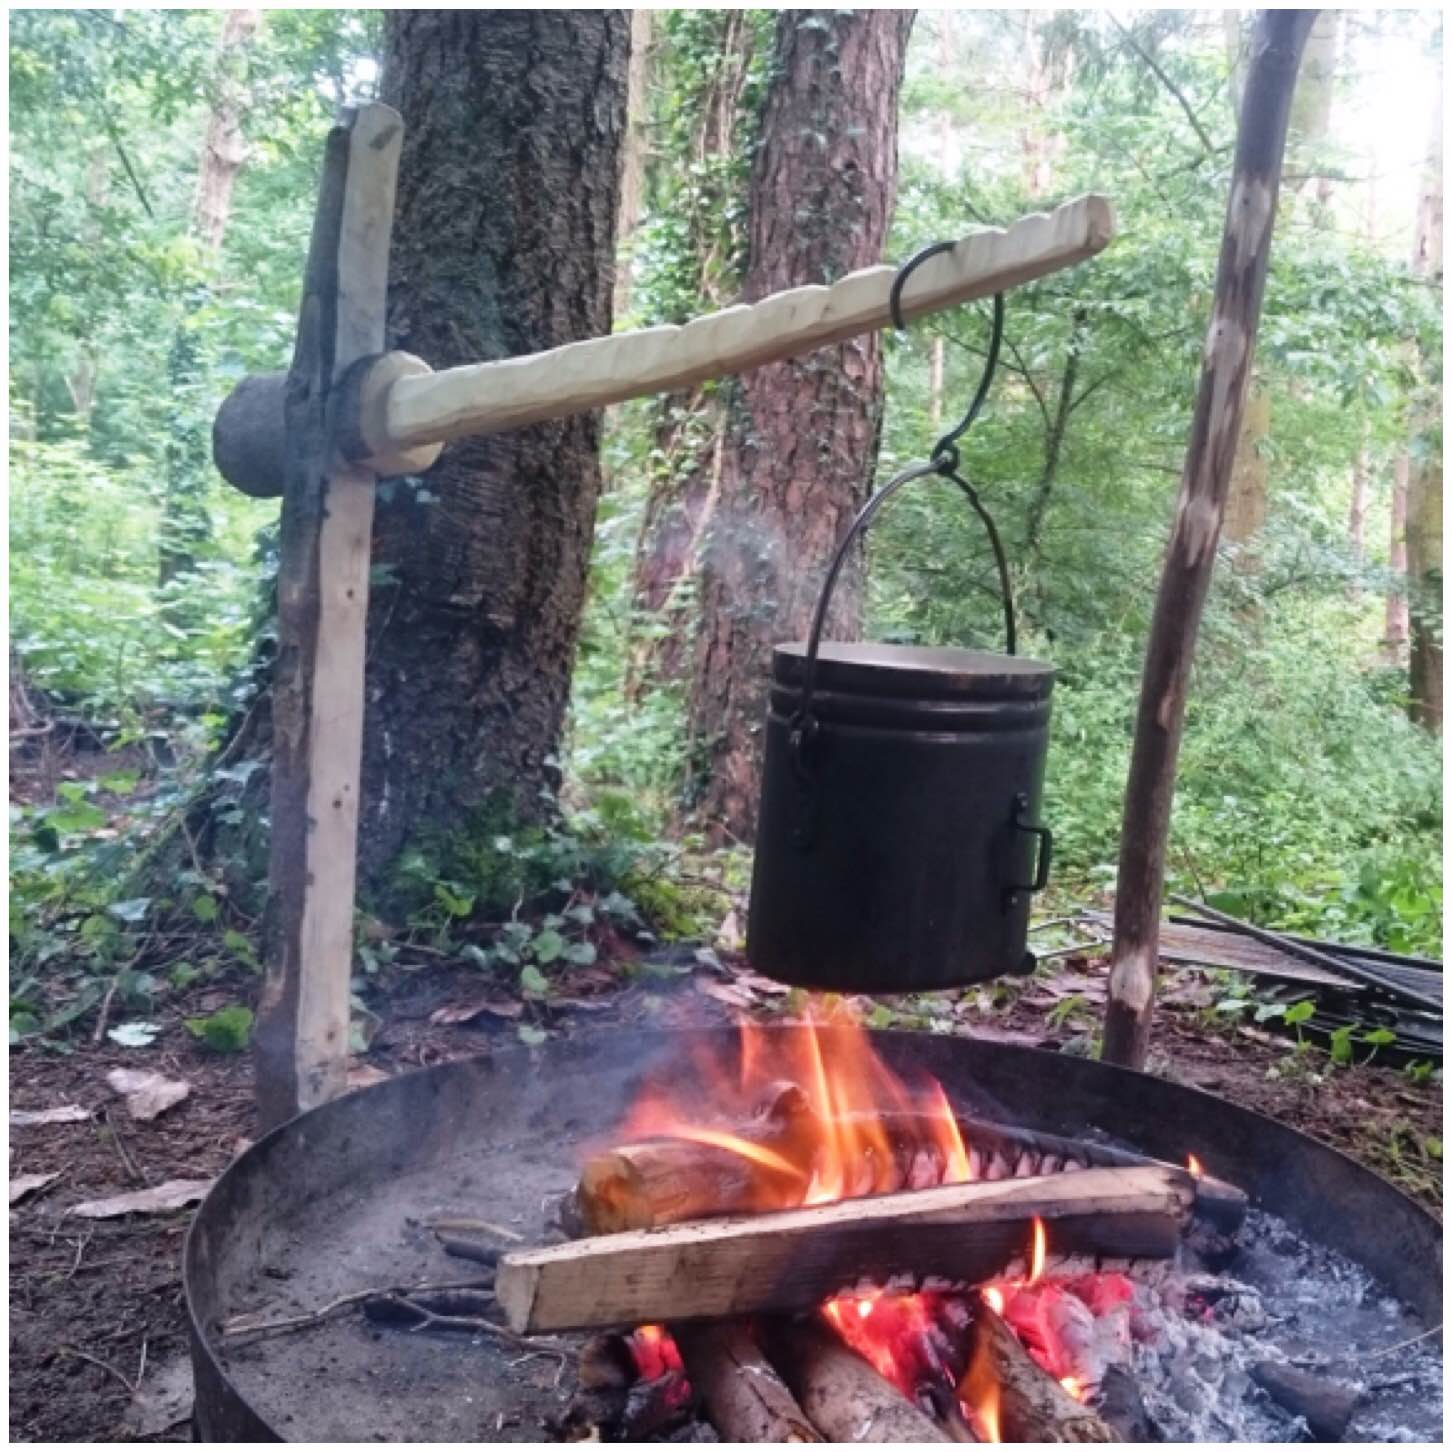
Single Fork Aures
I read in the Wildwood Wisdom book of a type of adjustable crane first documented in the early 20th century by a Scout Master called Victor Aures. It is a simple device however it is reliant on finding a branch with a specific set of smaller branches off it. I discovered a variation on this crane a number of years ago that required only a single fork in the branch and after a bit of splitting and splicing you have a fully adjustable crane.
Single Fork Aures Crane
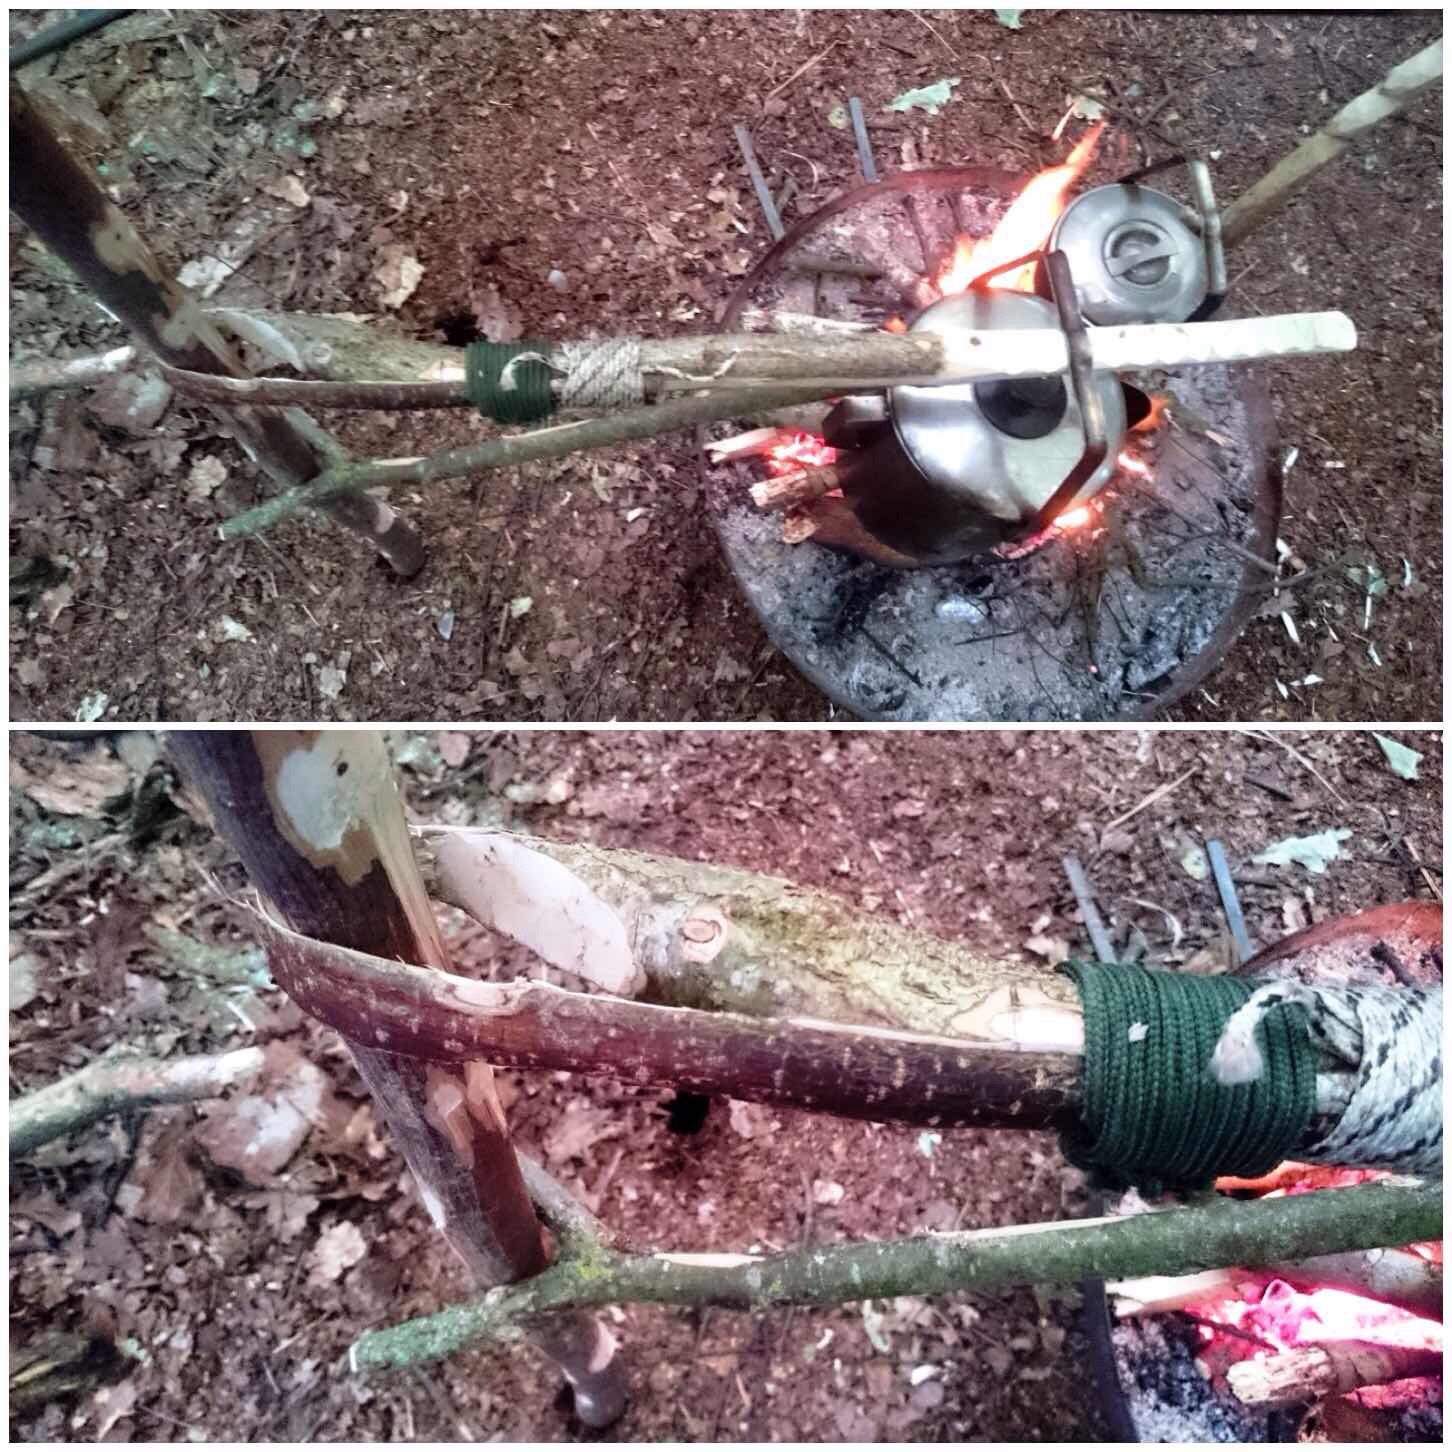
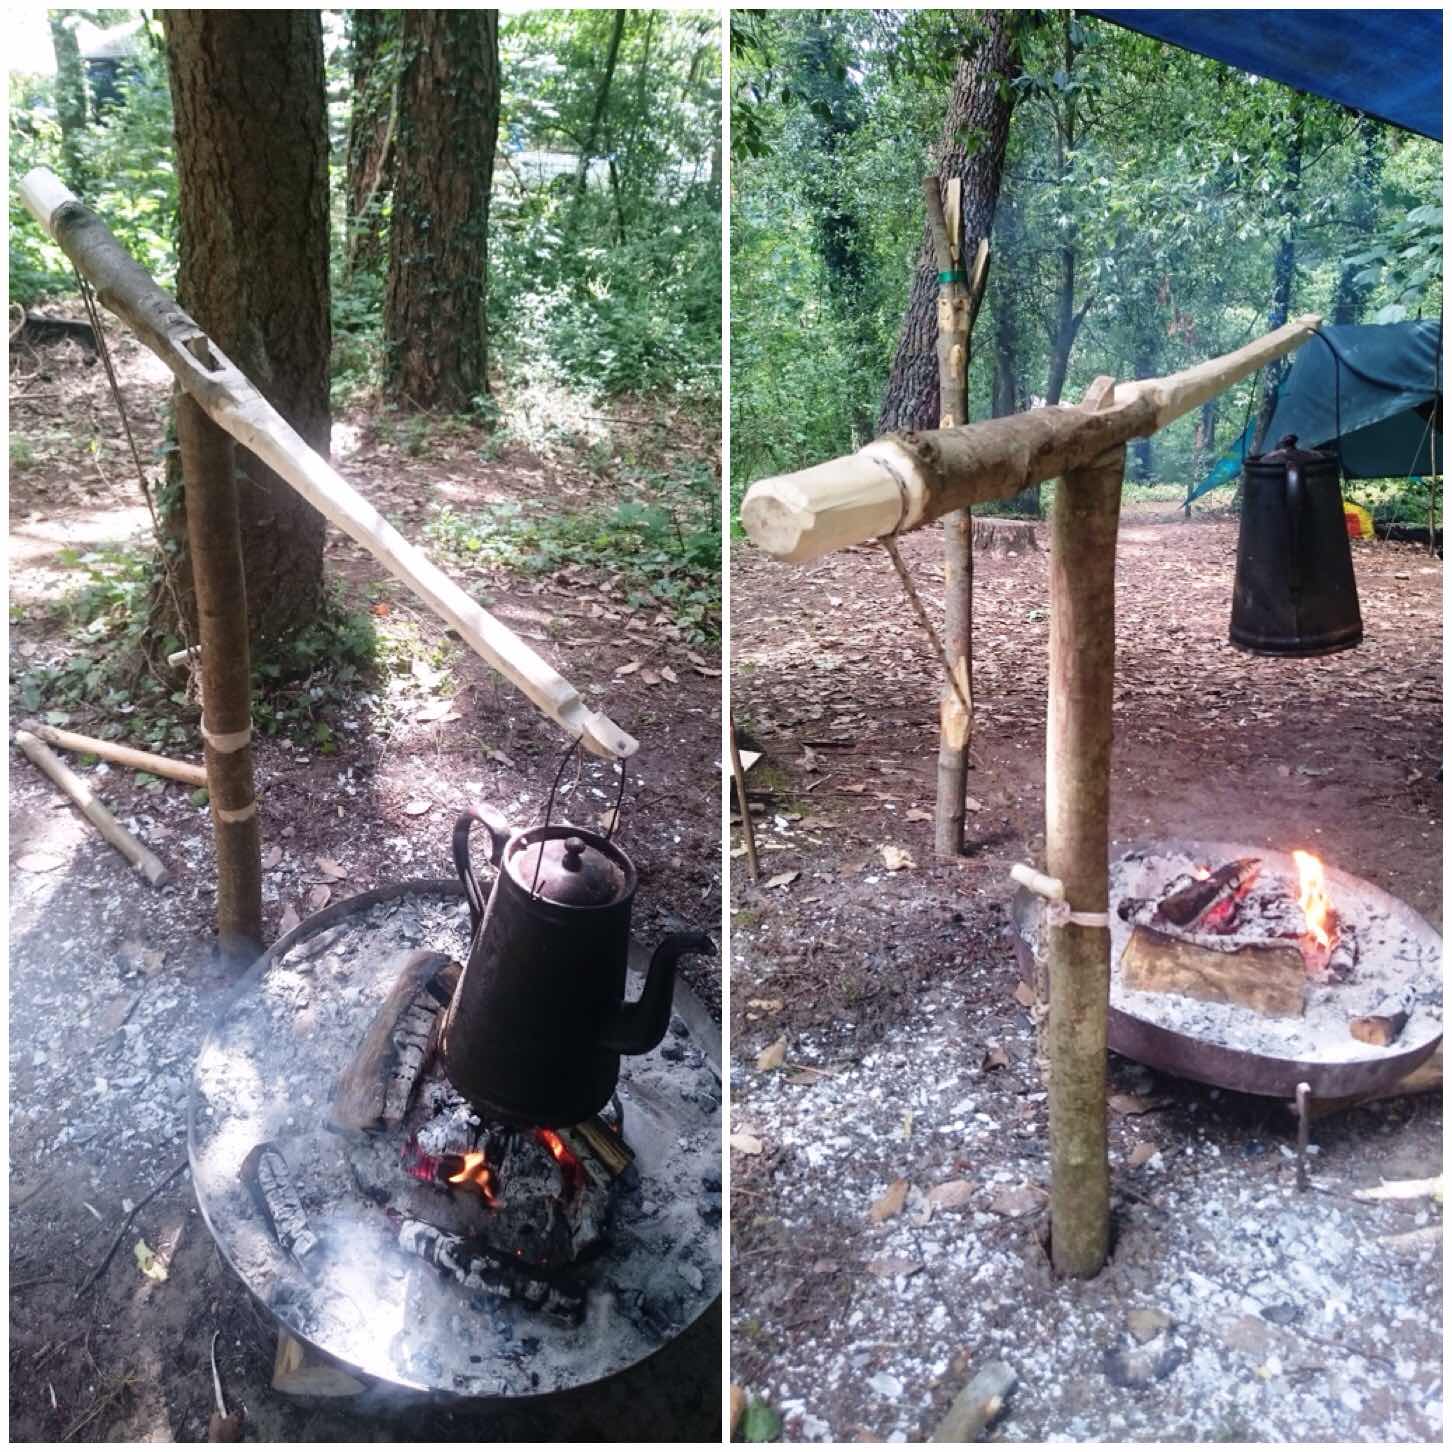
Gibbet Aures Crane
This variation on the Aures crane does not rely on splitting the wood but on the addition of other branches so that the whole thing hangs off your upright pole. It is easy to find all the parts which is probably why this is the version of the Aures cranes I most commonly see around campfires.
Gibbet Aures Crane
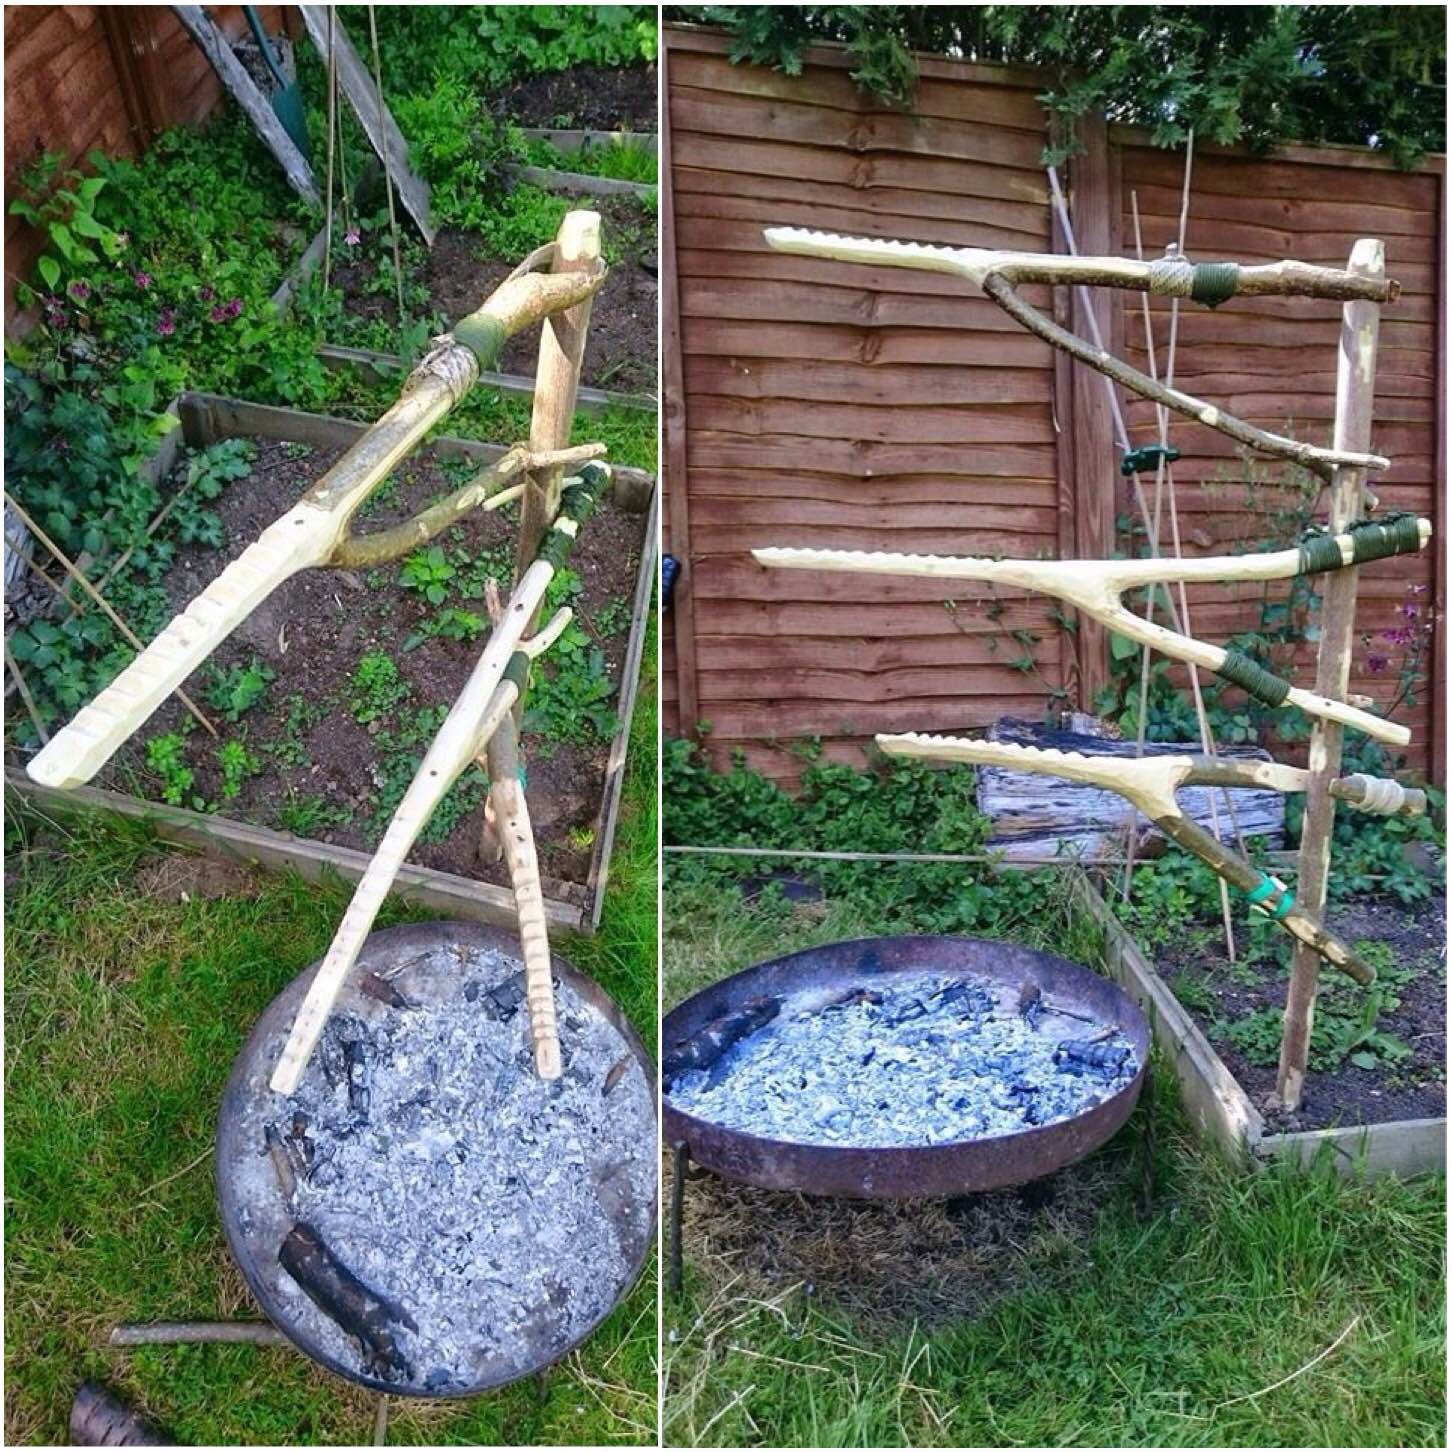
Classic Aures Crane
It took me a long time to find the perfect combination of branches for this crane. I have never seen another one before except as a drawing in the Wildwood Wisdom book. The hardest part in making this crane is the thinning of the wood to create the loop. It is a real challenge but also very enjoyable and satisfying.
Classic Aures Crane
The Three Cranes
I really liked making these cranes and would encourage you to have a go at them if you like campfire projects. They are not for you if you prefer simply to put your pot on the fire, but if you like to tinker and experiment, have a go.
The Three Aures Cranes
Notched Crane
The idea for this crane came to me a number of years ago while making myself up a little squirrel cooker from some metal rods. I have cut the notch out using an auger in the past but nowadays I usually just use my knife. I like this set up as you can make your crane out of one pole. With the addition of an adjustable pot hanger you have a crane that offers a variety of cooking heights without having a bulky tripod set up over the fire.
The Notched Crane
Simple Dovetail Crane
I got this idea from a Scouting page a number of years ago and it is very simple and quick to carve. The part that takes the longest to make is the adjustable pot hanger. I would recommend if you decide to experiment with making these cranes that you start with this one as the dovetail notch is so easy to cut out.
Simple Dovetail Crane
Lap Joint Crane
Still sticking with the single pole theme, another easy crane to make is the Lap Joint crane. The main thing to remember is to make sure that the squared-off fit of the upright is consistent along its length with the notch in the arm.
Once weight (eg a pot) is applied to the end of the arm, everything locks together. I have found that this crane works best when the pot is hung off the very end of the arm. I have experimented with hanging the pot half way along the arm only to find it all collapses. It is a good and simple crane to make – treat this one with respect, though.
Lap Joint Crane
Dovetail Crane
This is my all-time favourite crane. With the dovetail notch the arm cannot fall off (unlike the Lap Joint crane) and it offers a wide variety of heights to choose from when cooking. The arm is very easy to adjust even when there is a pot attached and will take you no more than an hour to carve.
Dovetail Crane
Heavy Duty Crane
This one came about from an article I spotted in a Scouting site. Some of the Dutch Oven pans I use can be extremley heavy. This crane offers a number of different cooking heights and will not bend in the slightest even with the heaviest pot attached (well, the heaviest I have, at least). I have though learned to take the pot off the arm with this one before changing the height.
Heavy Duty Crane
Mortice and Tenon Crane
This was the last crane I worked on last year and the one that is the most technical, I think. The joint is a simple tenon and mortice set up however there were a lot of angles to consider (I have discussed then in the article) and the string I used to adjust the height could possibly do with further development. It is however an excellent crane with lots of movement up and down and side to side.
The Mortice and Tenon Crane
In time I hope to add a few more How To’s…. to this series as I find the whole subject of campfire contraptions so fascinating.