Over the years building hammock stands have really intrigued me.
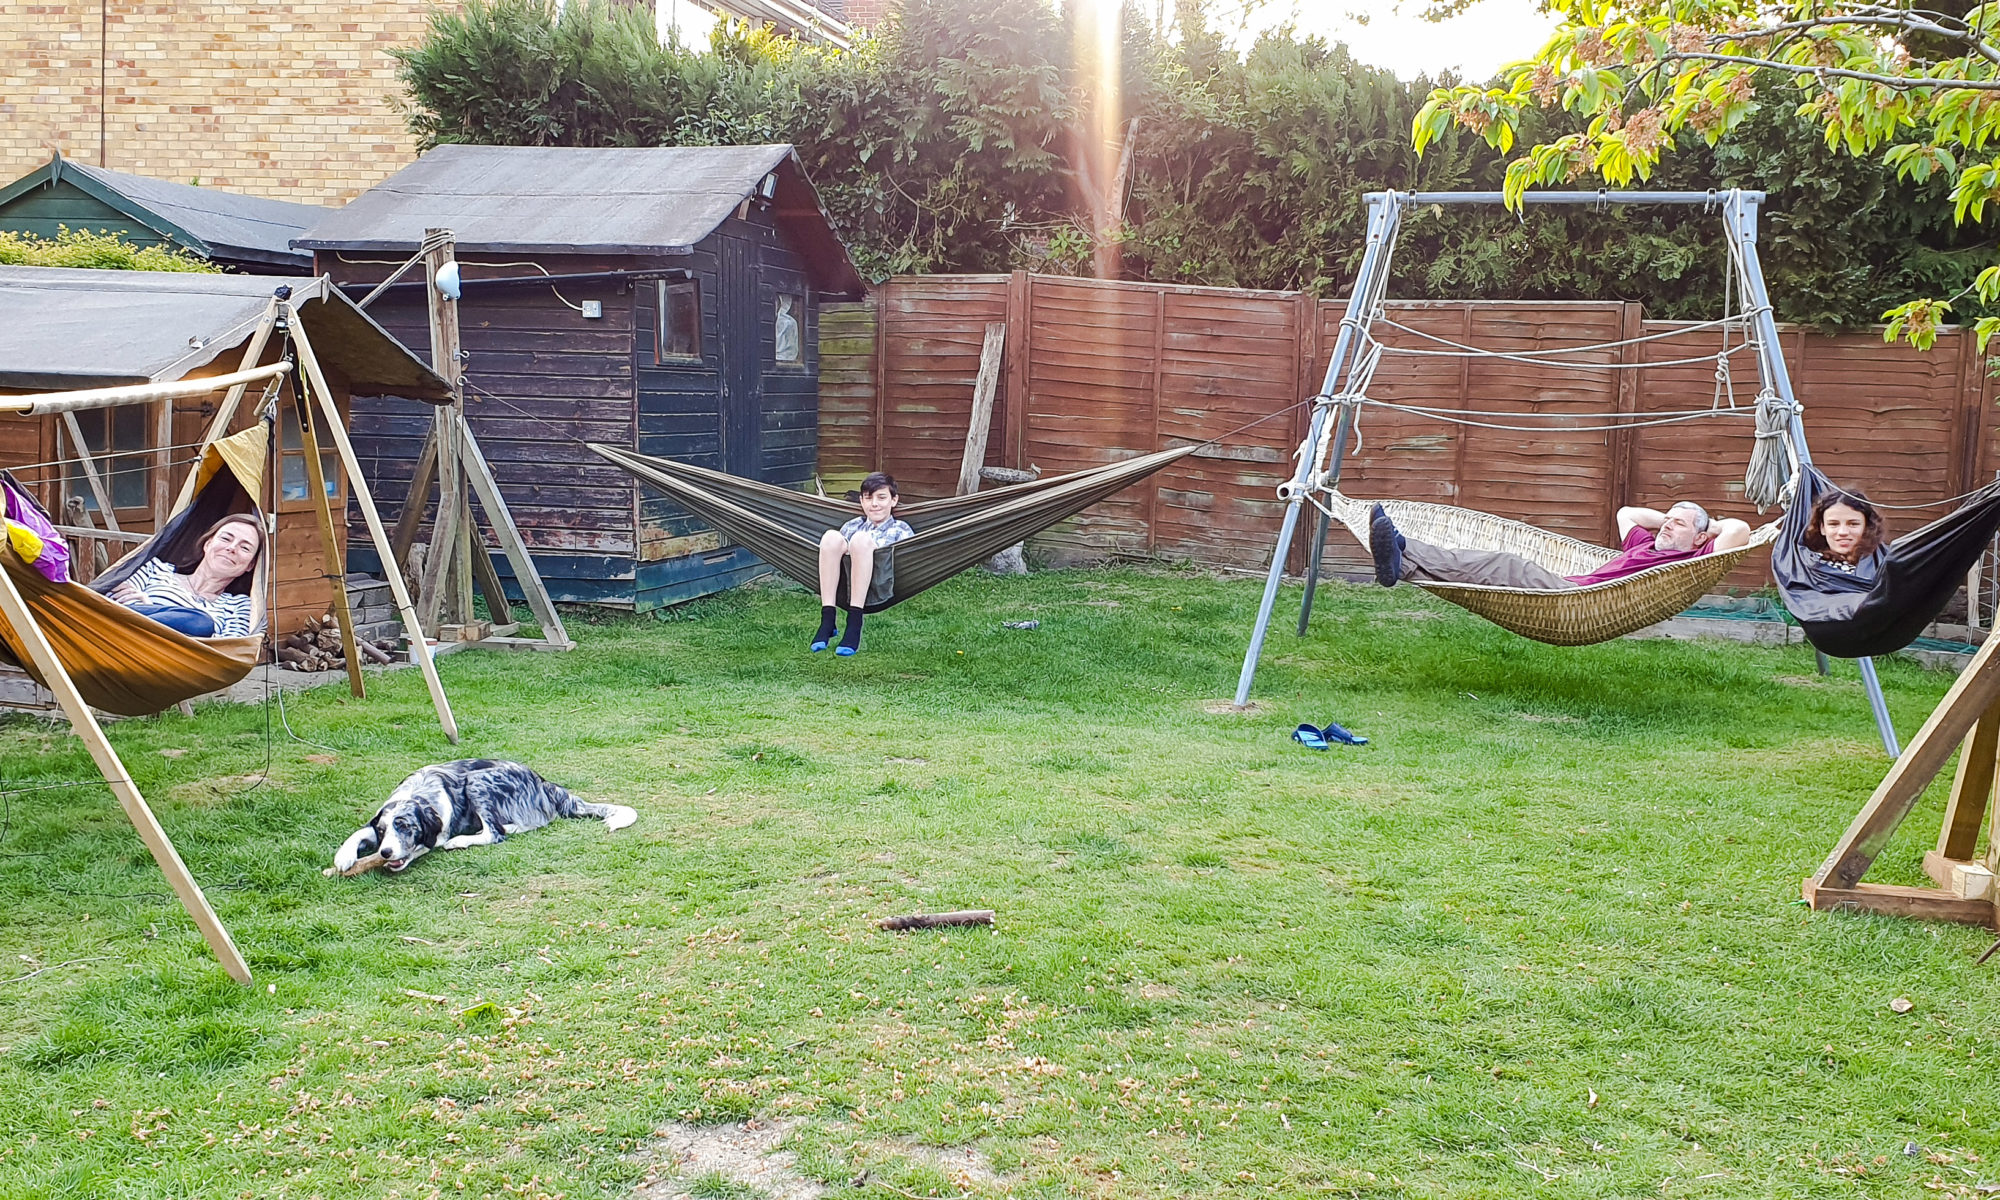
My Freestanding Hammock Stand is great for popping up in the garden or putting in the back of the car to take to events – however I have only one and with this current Covid crisis found I have been spending more time in the garden – so more hammock stands were needed. I did not have all the wood I needed for another Freestanding Hammock Stand however I found I had a lot of old fence posts that could be turned into something.
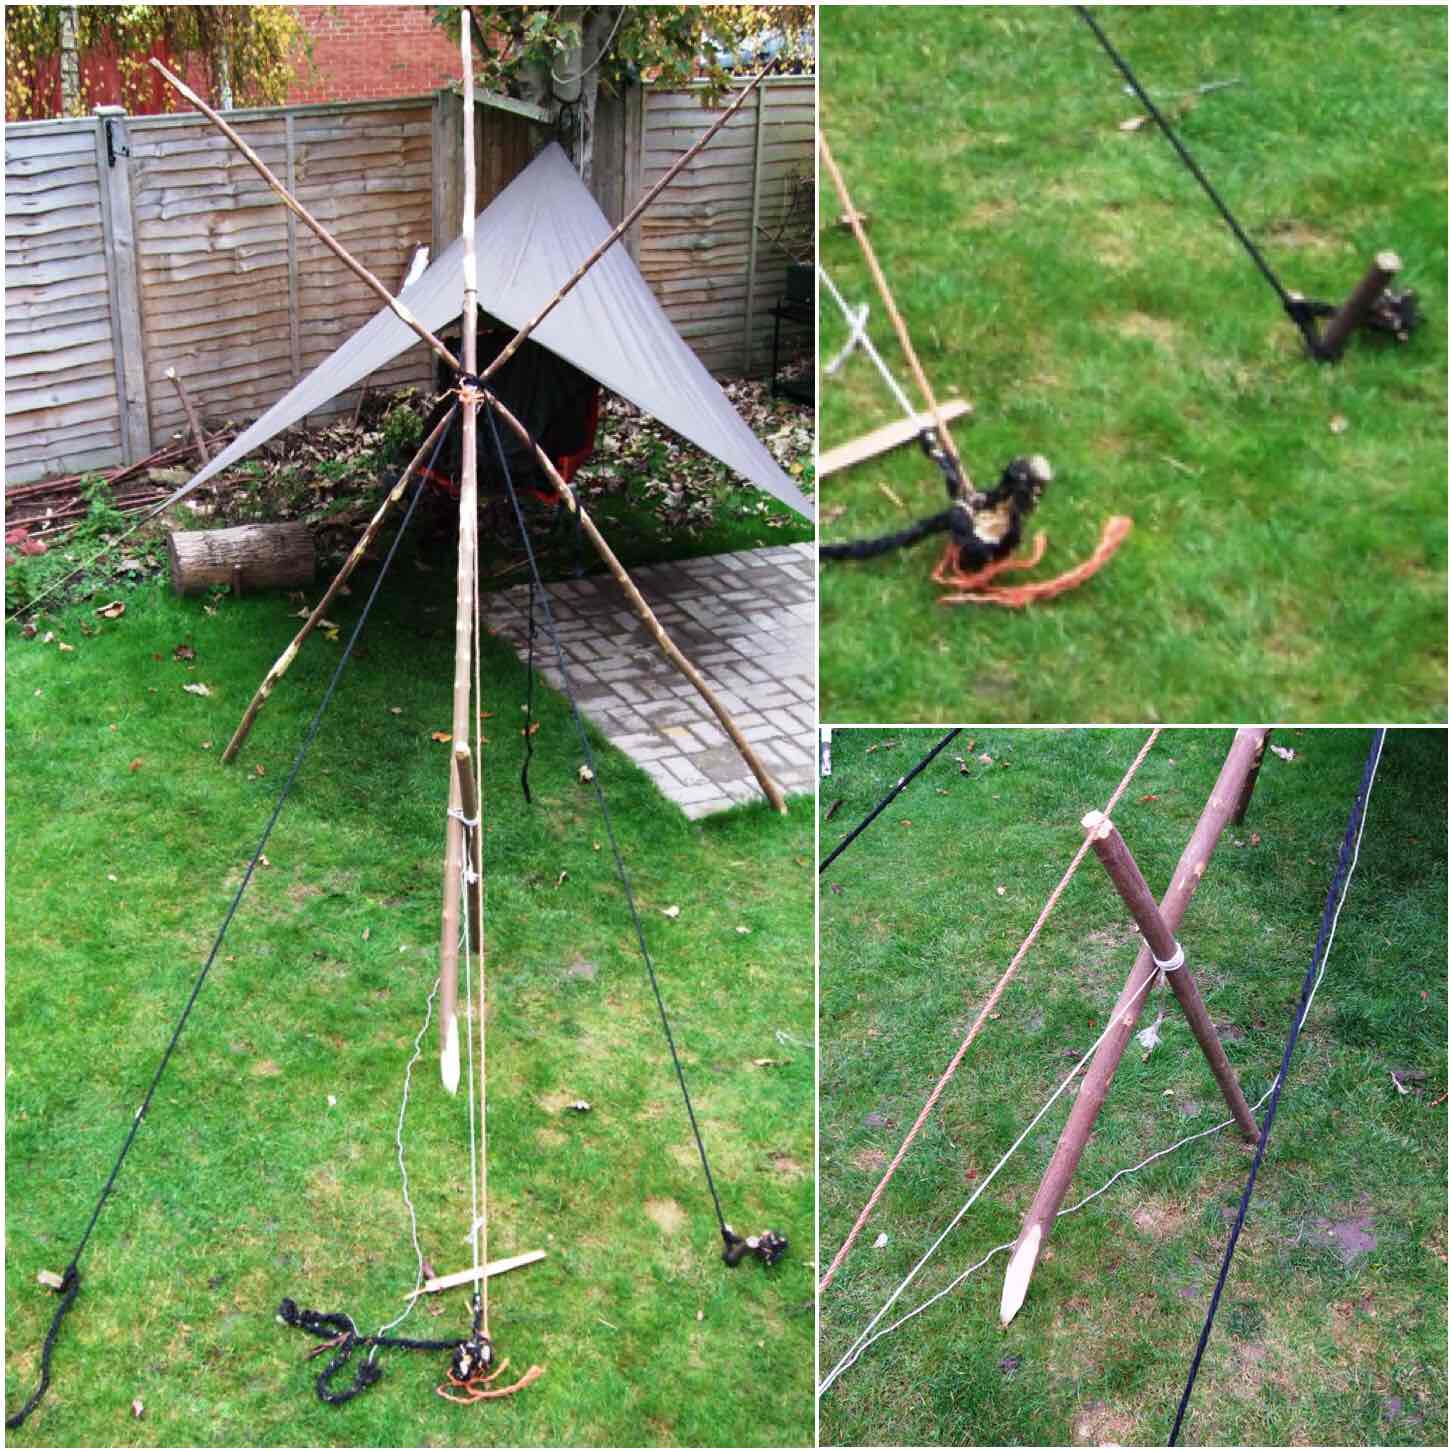
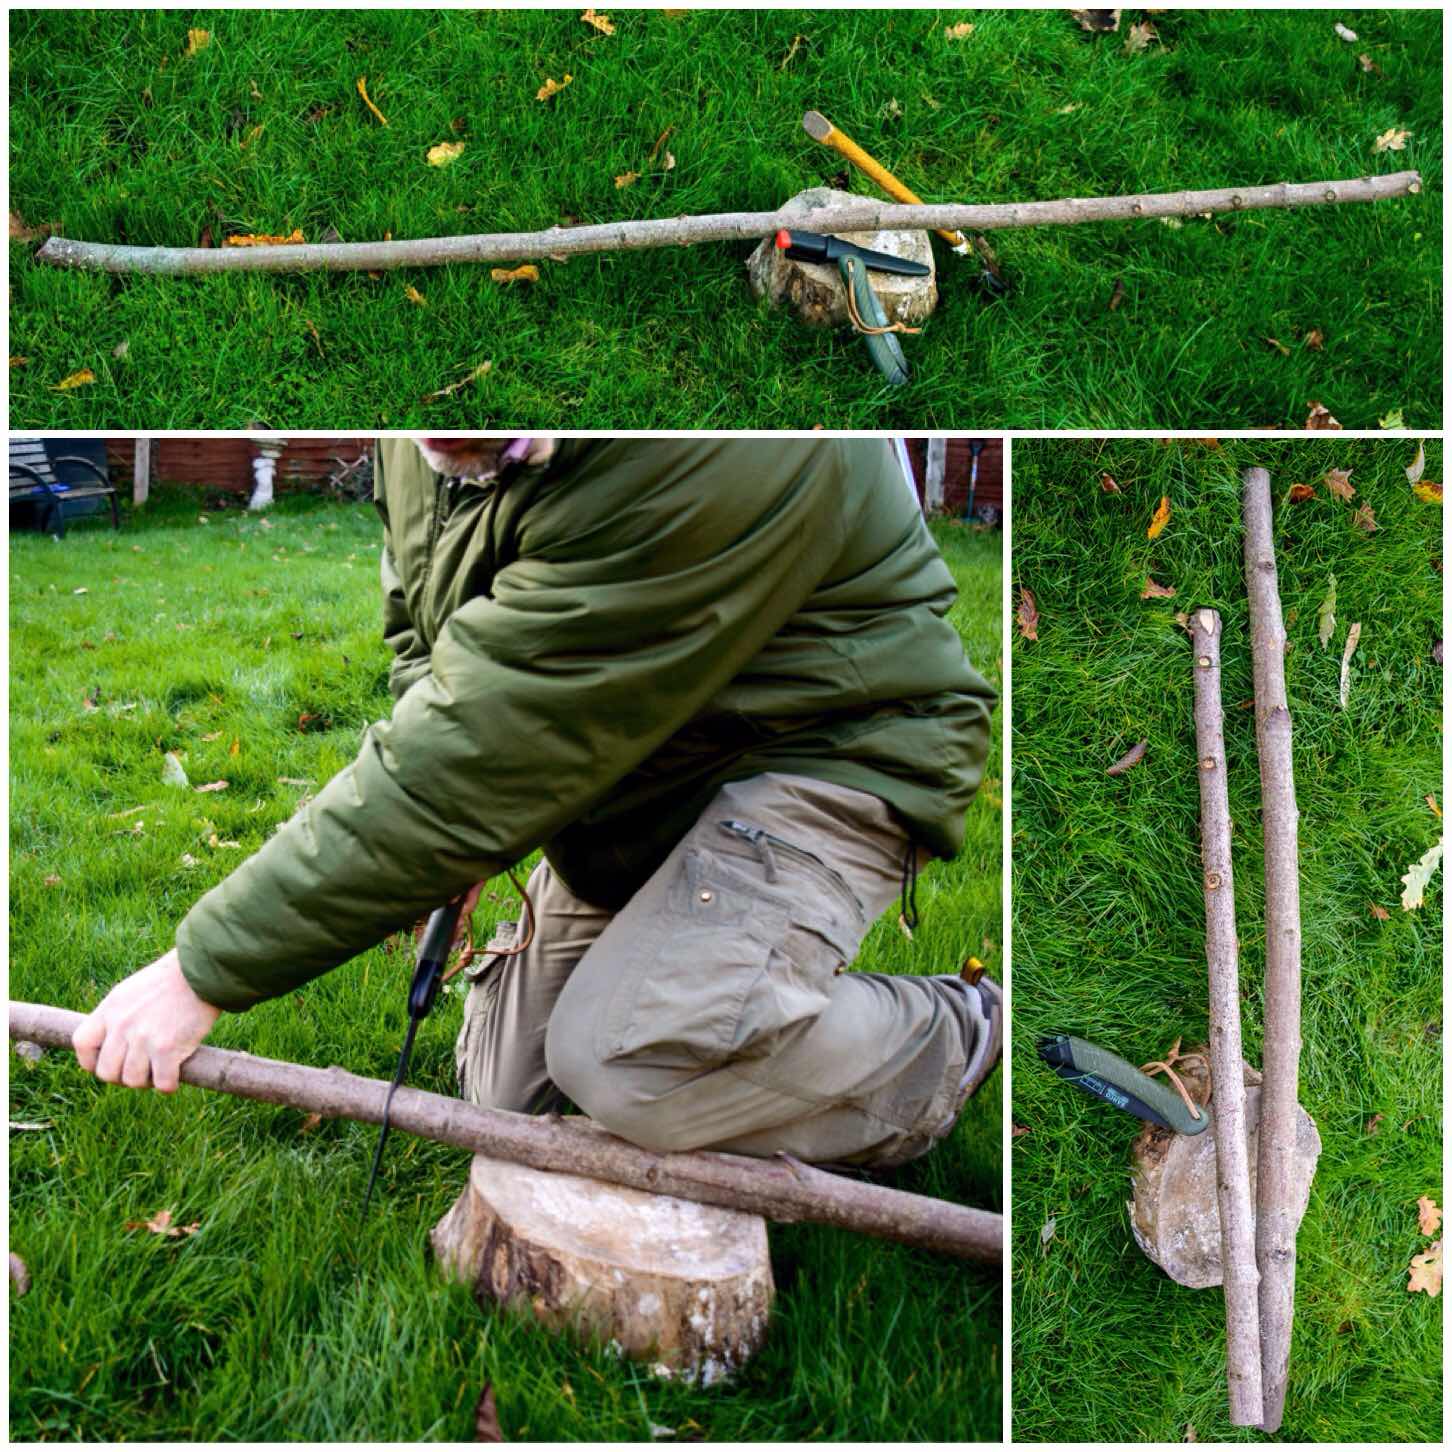
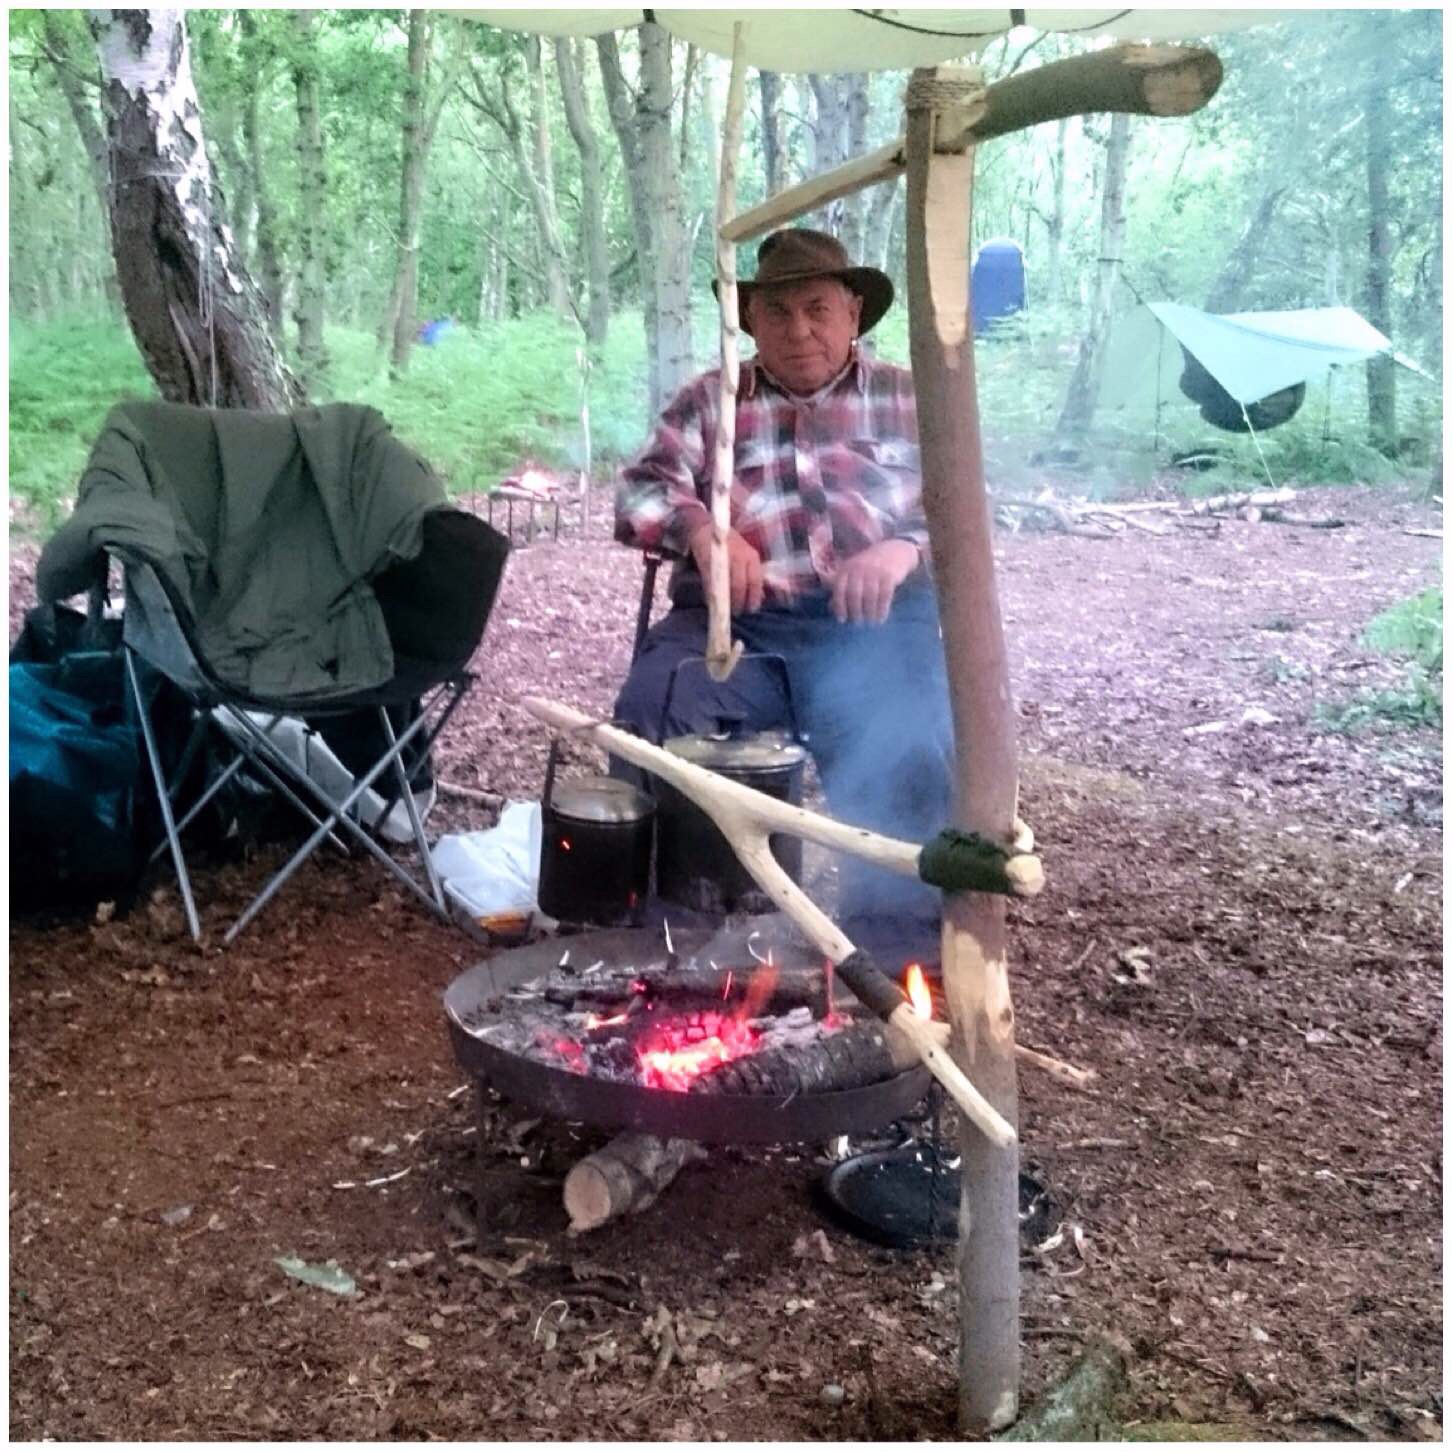
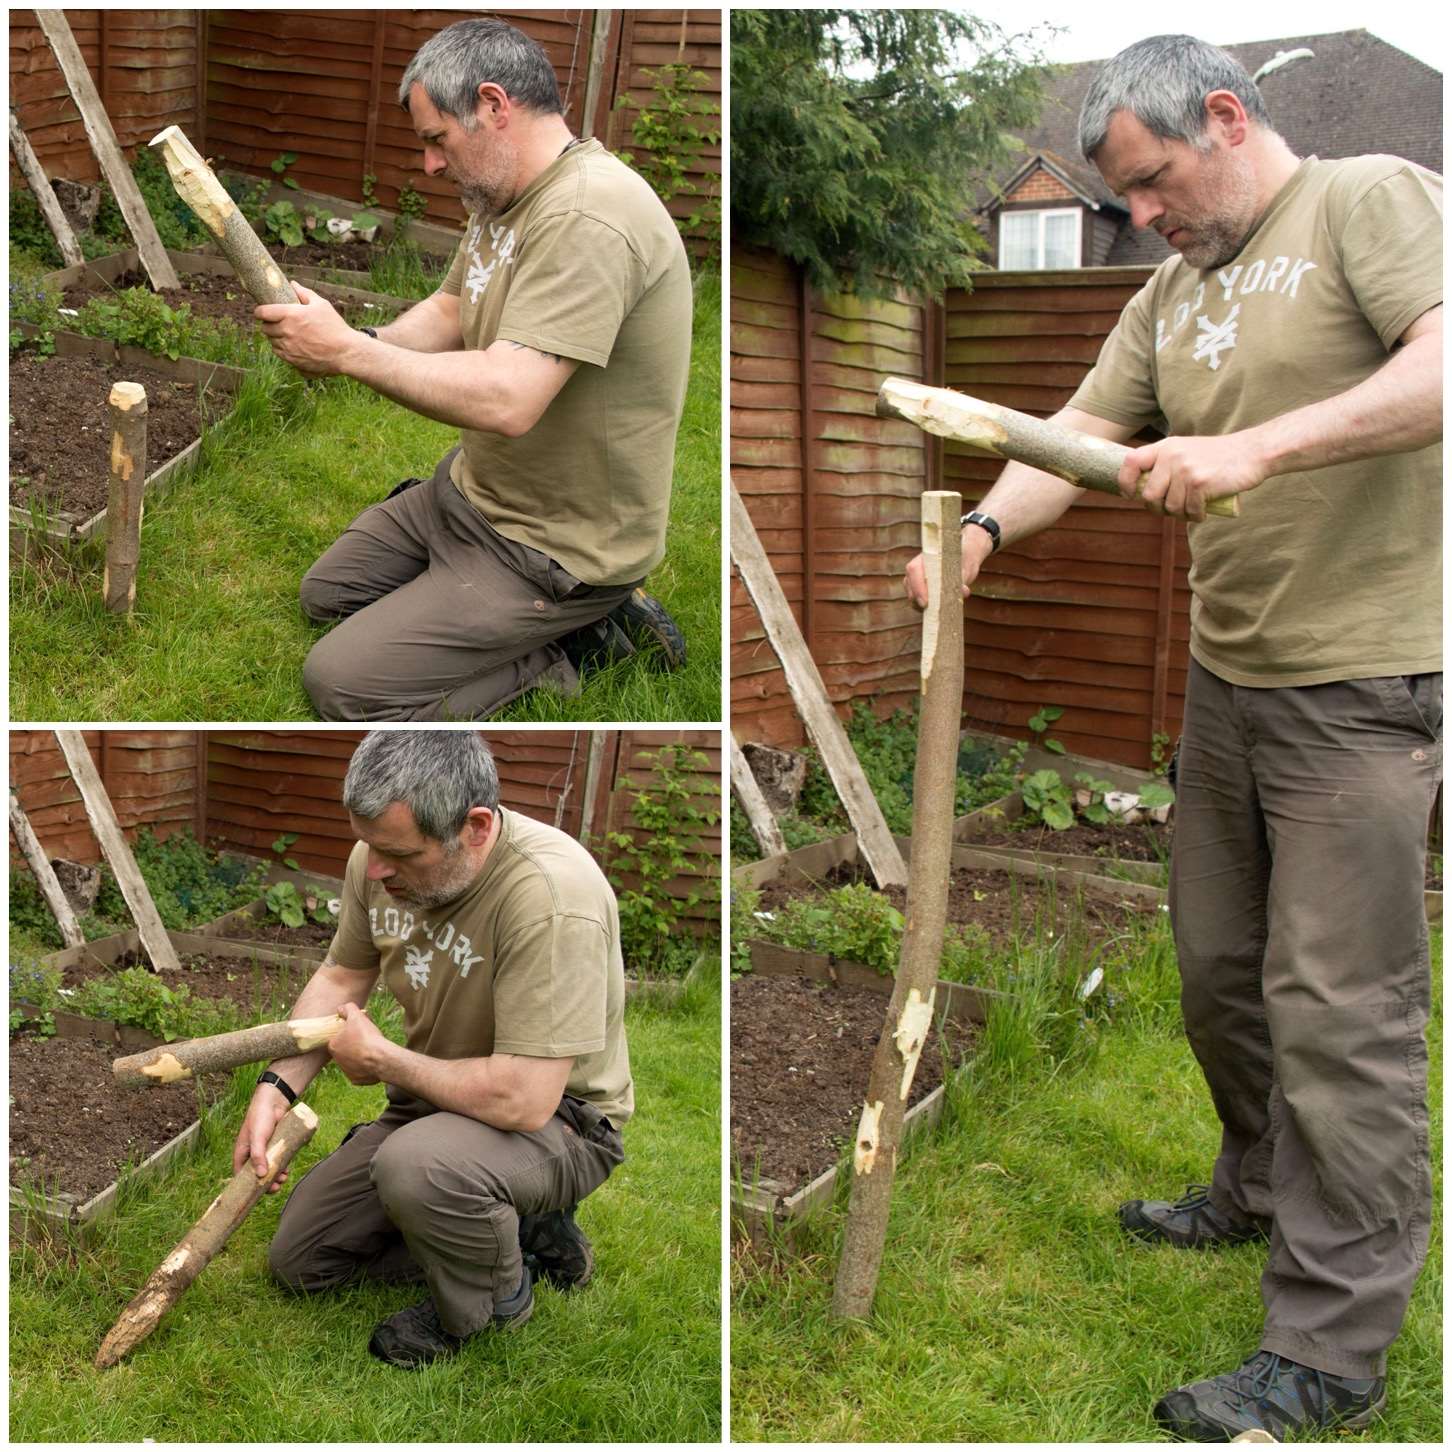
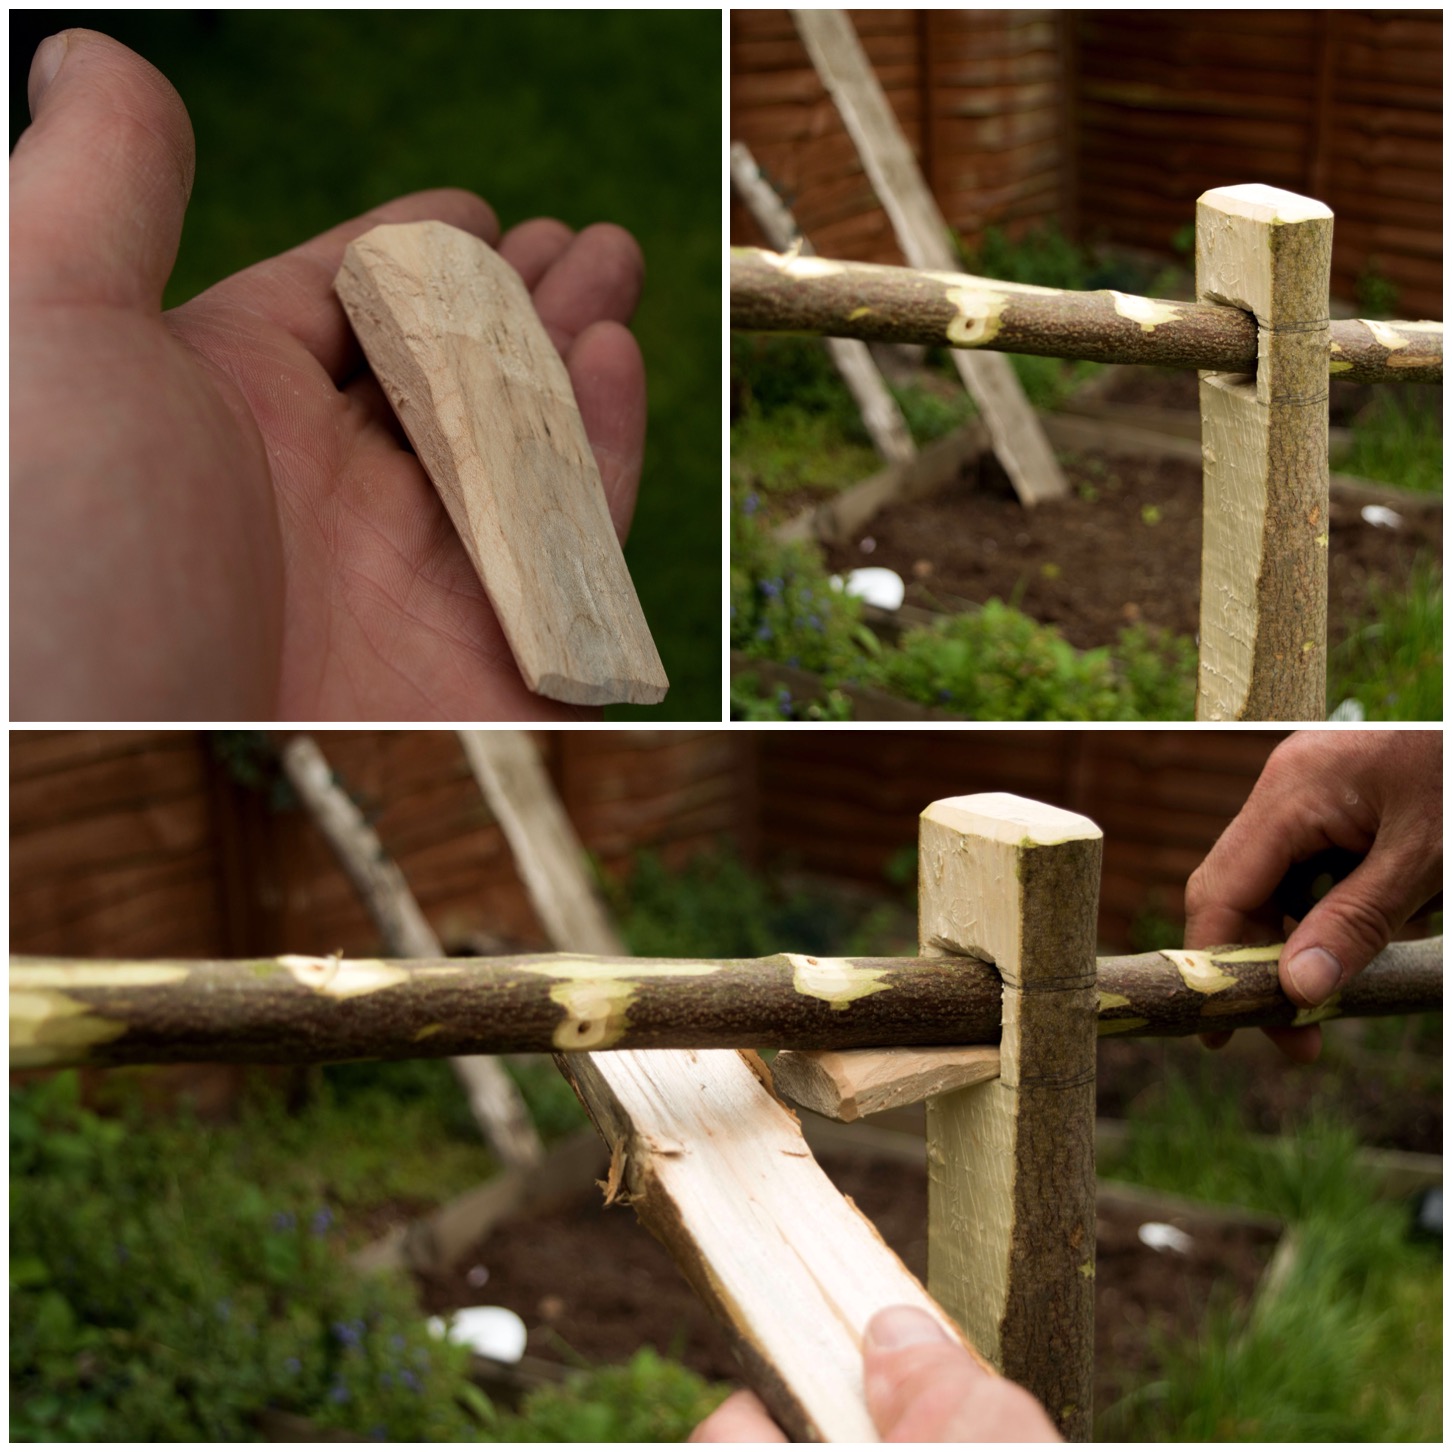
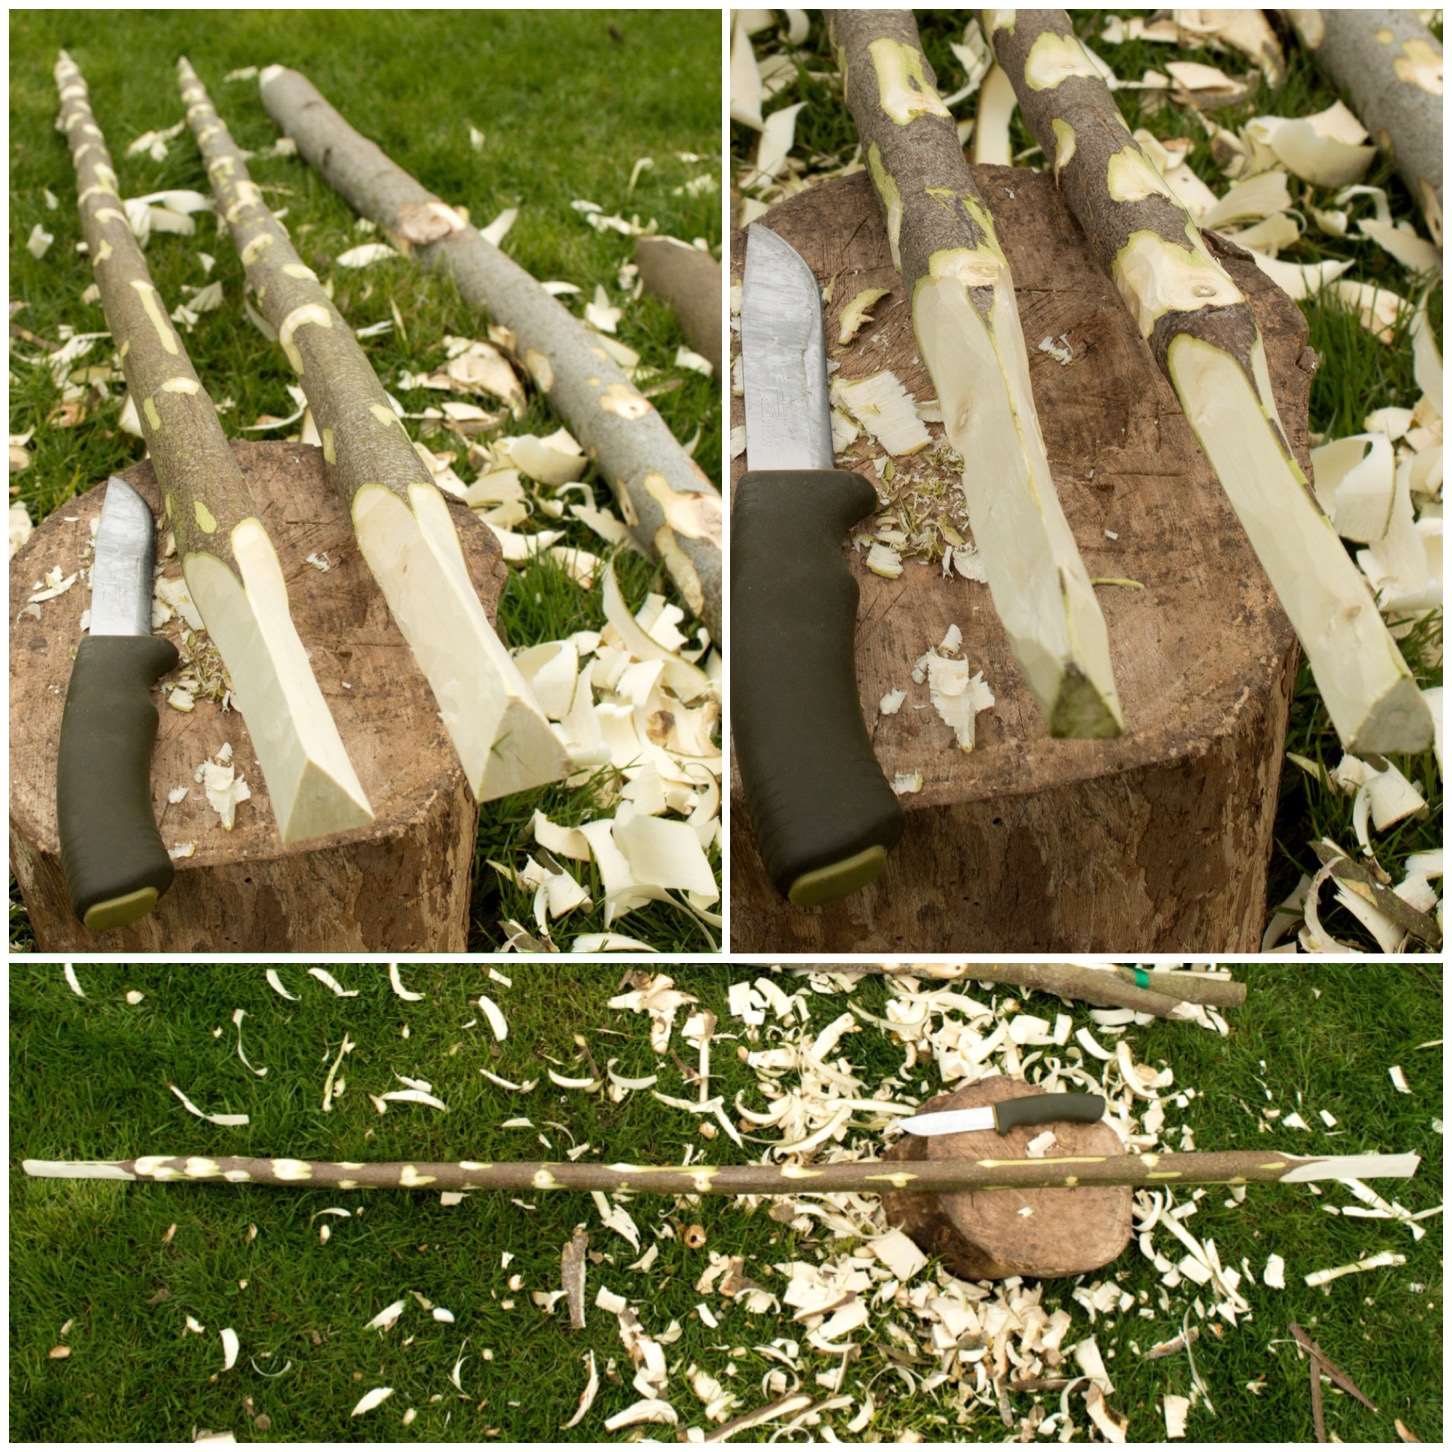
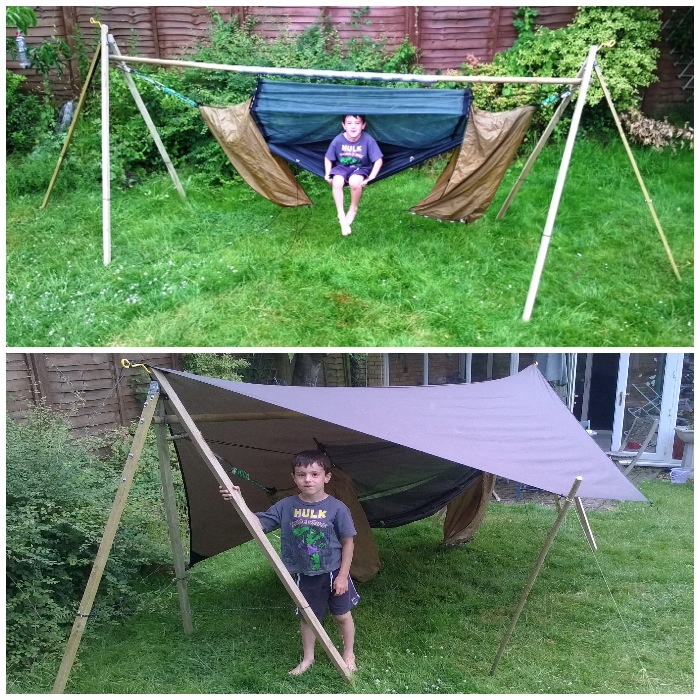
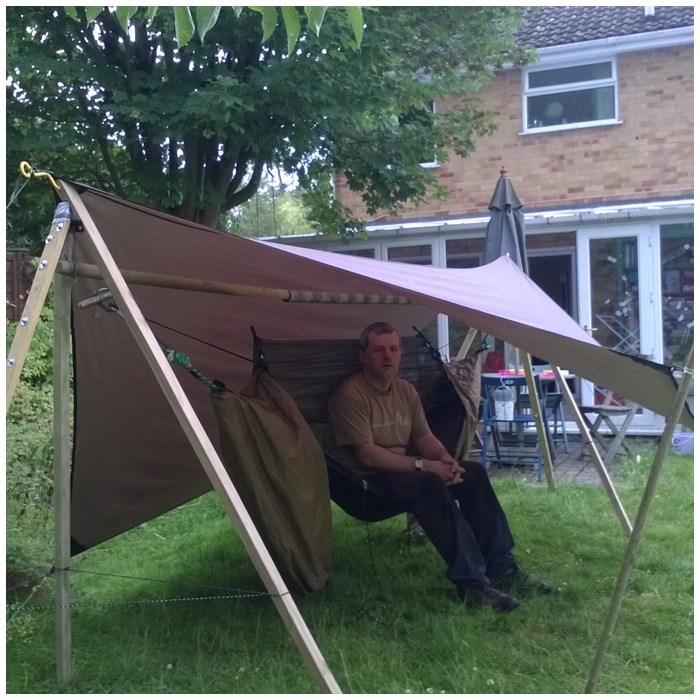
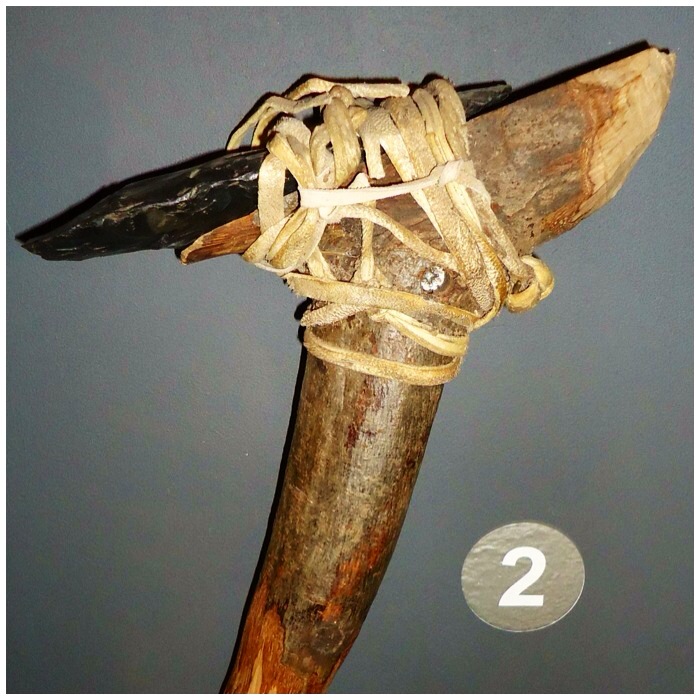
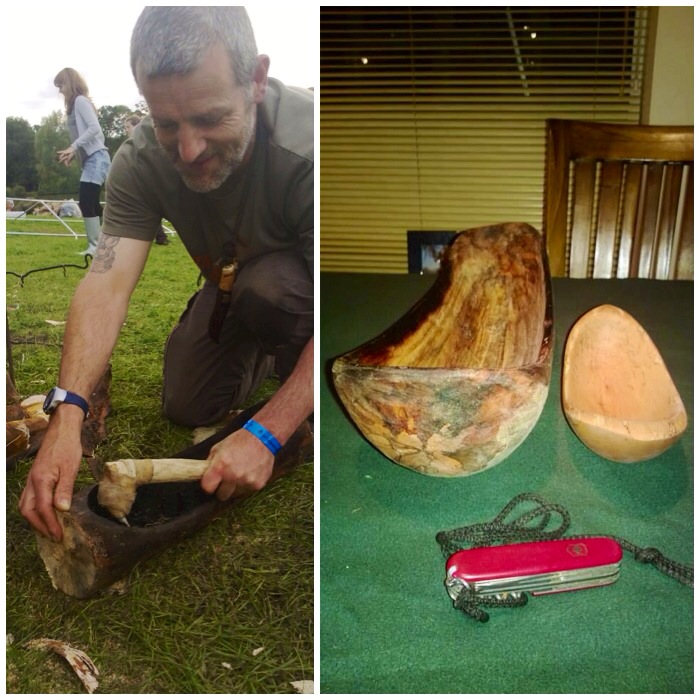
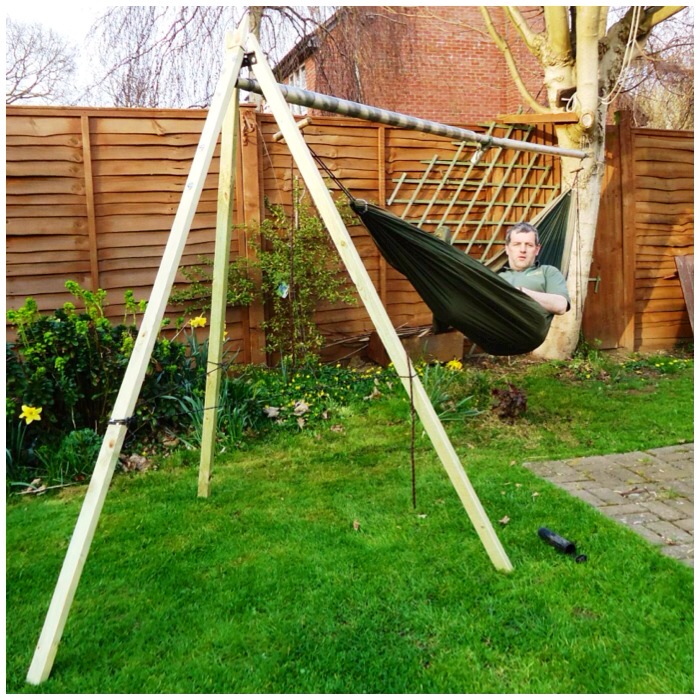
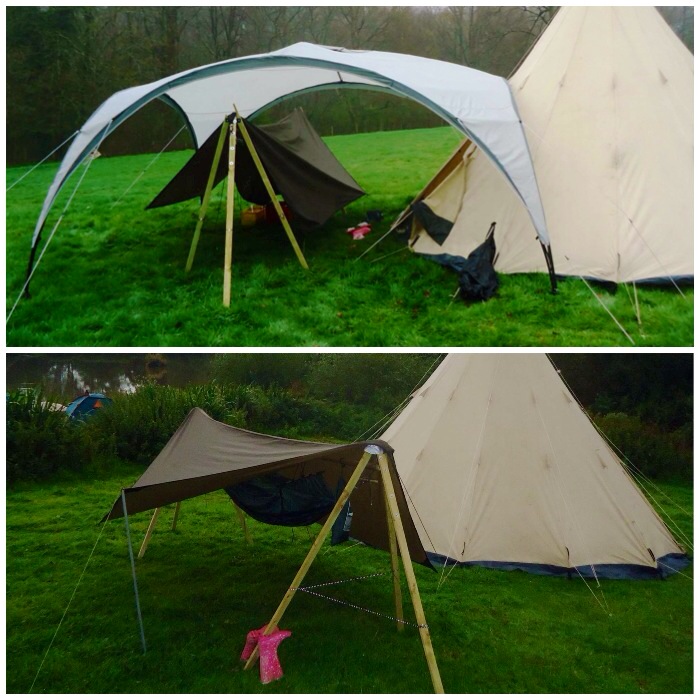
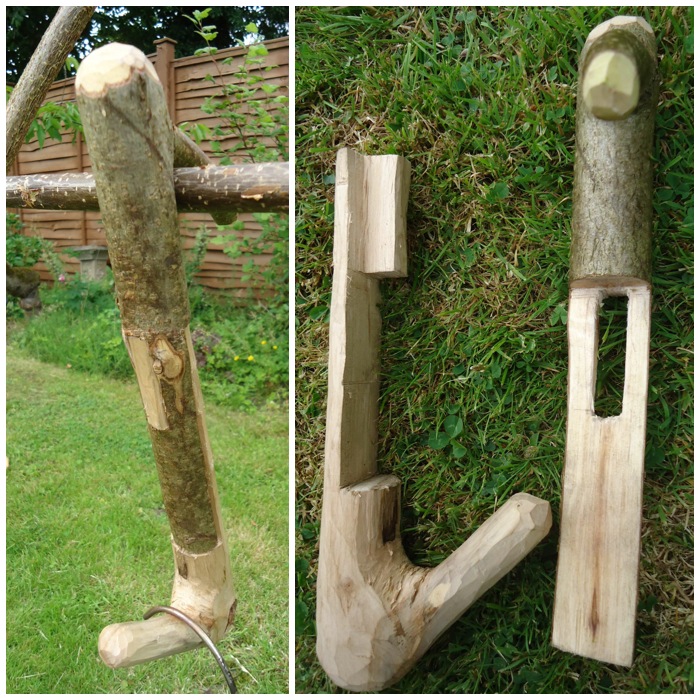
I have only one decent tree in my back garden and an old swing frame (they are too far apart to use together) that I can hang a hammock off so I needed some kind of ‘Hammock Upright’ that did not need to be dug into the ground.
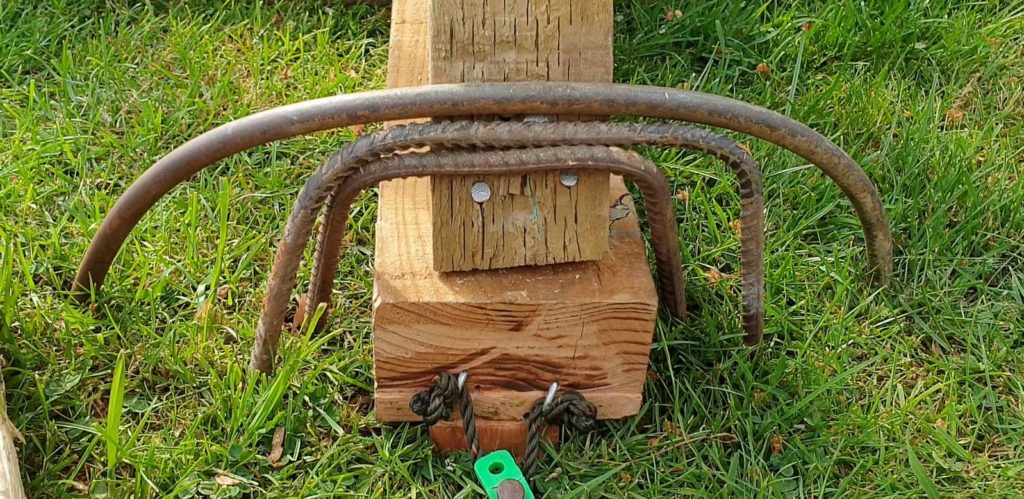
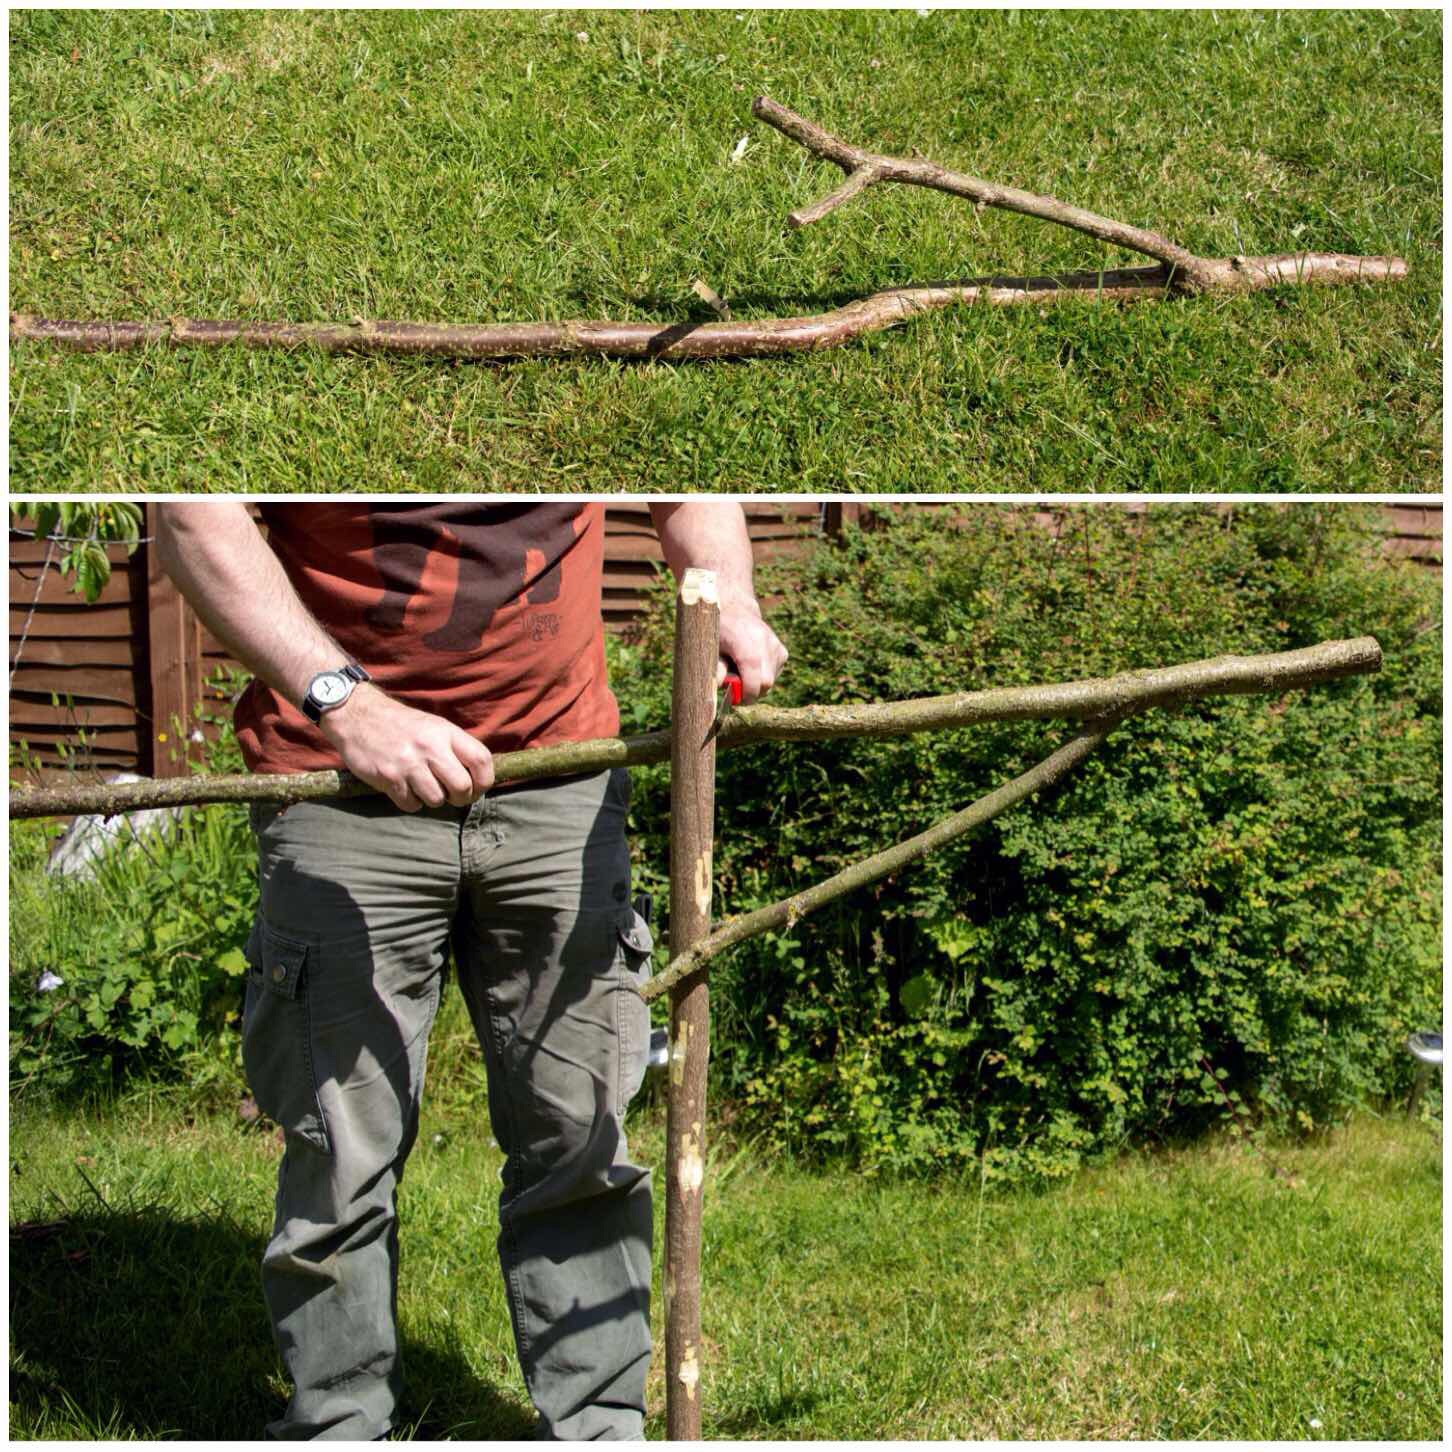
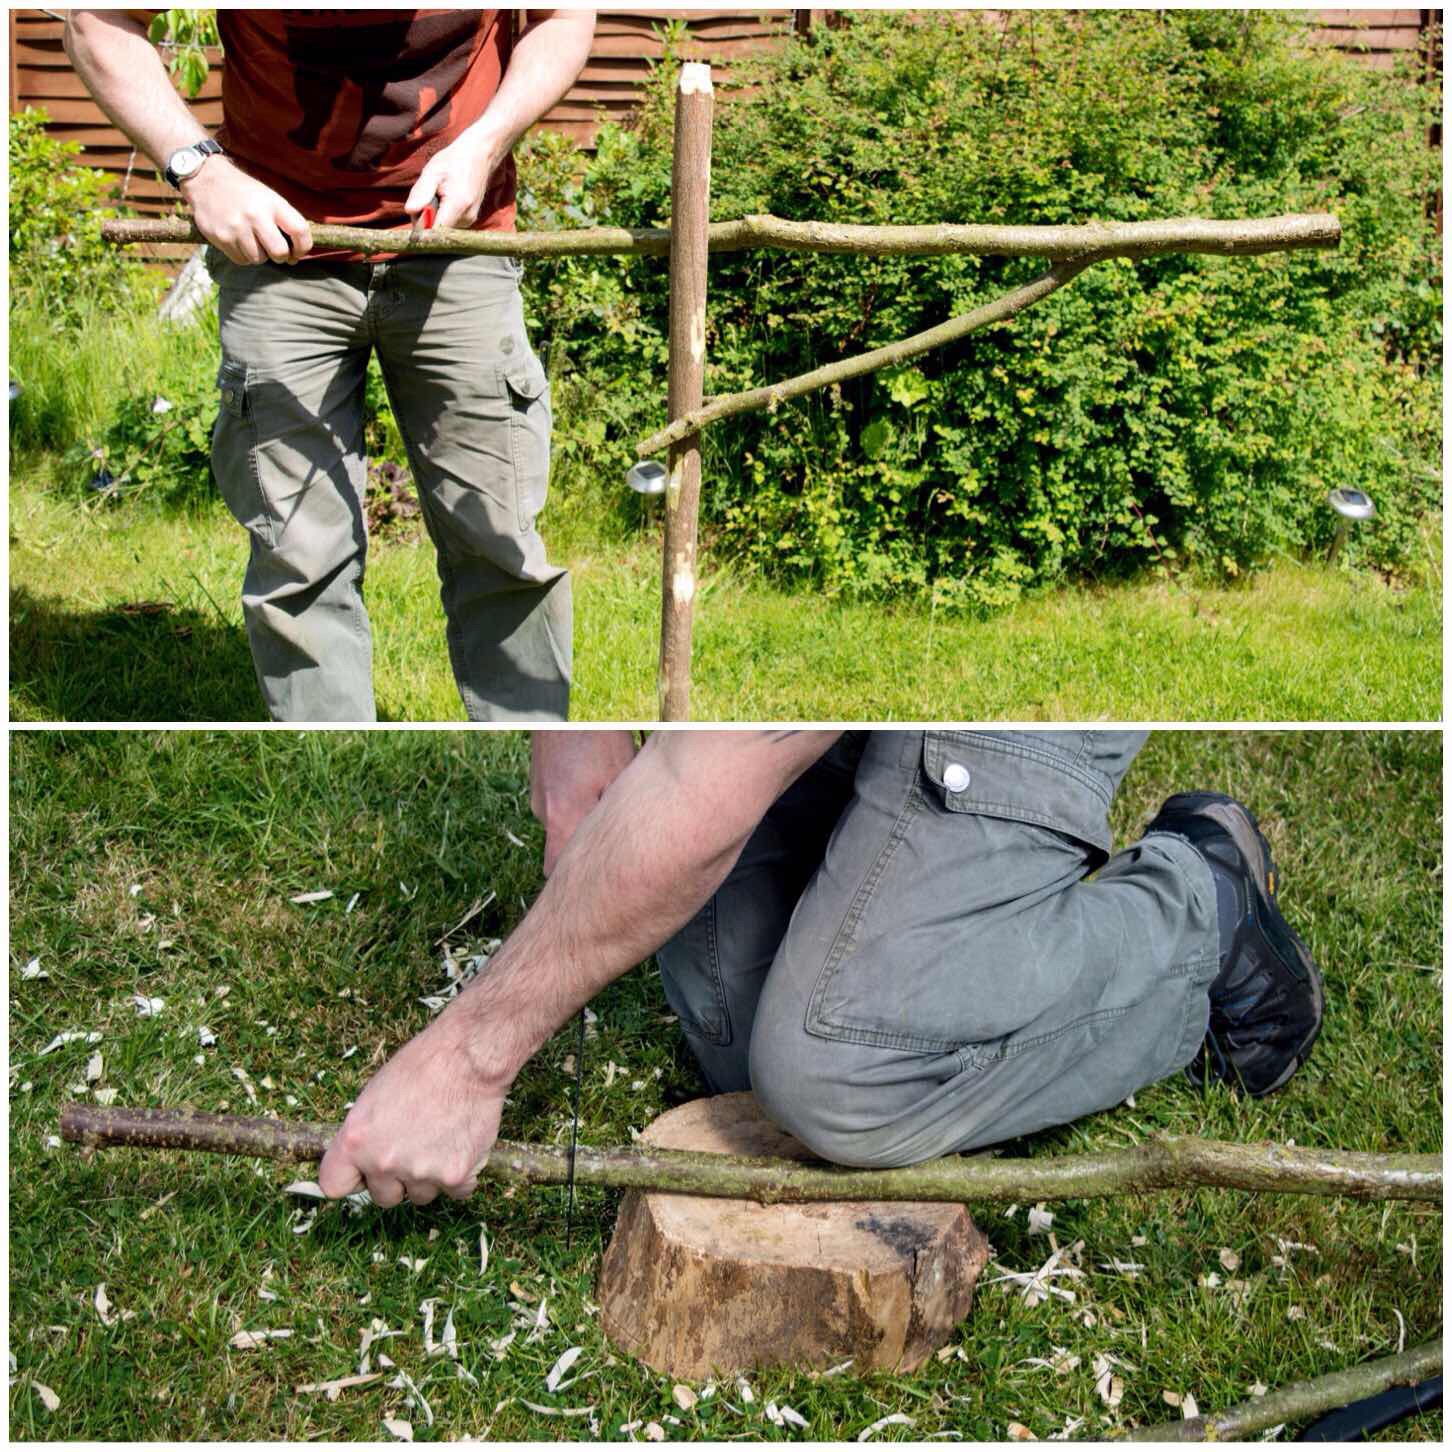
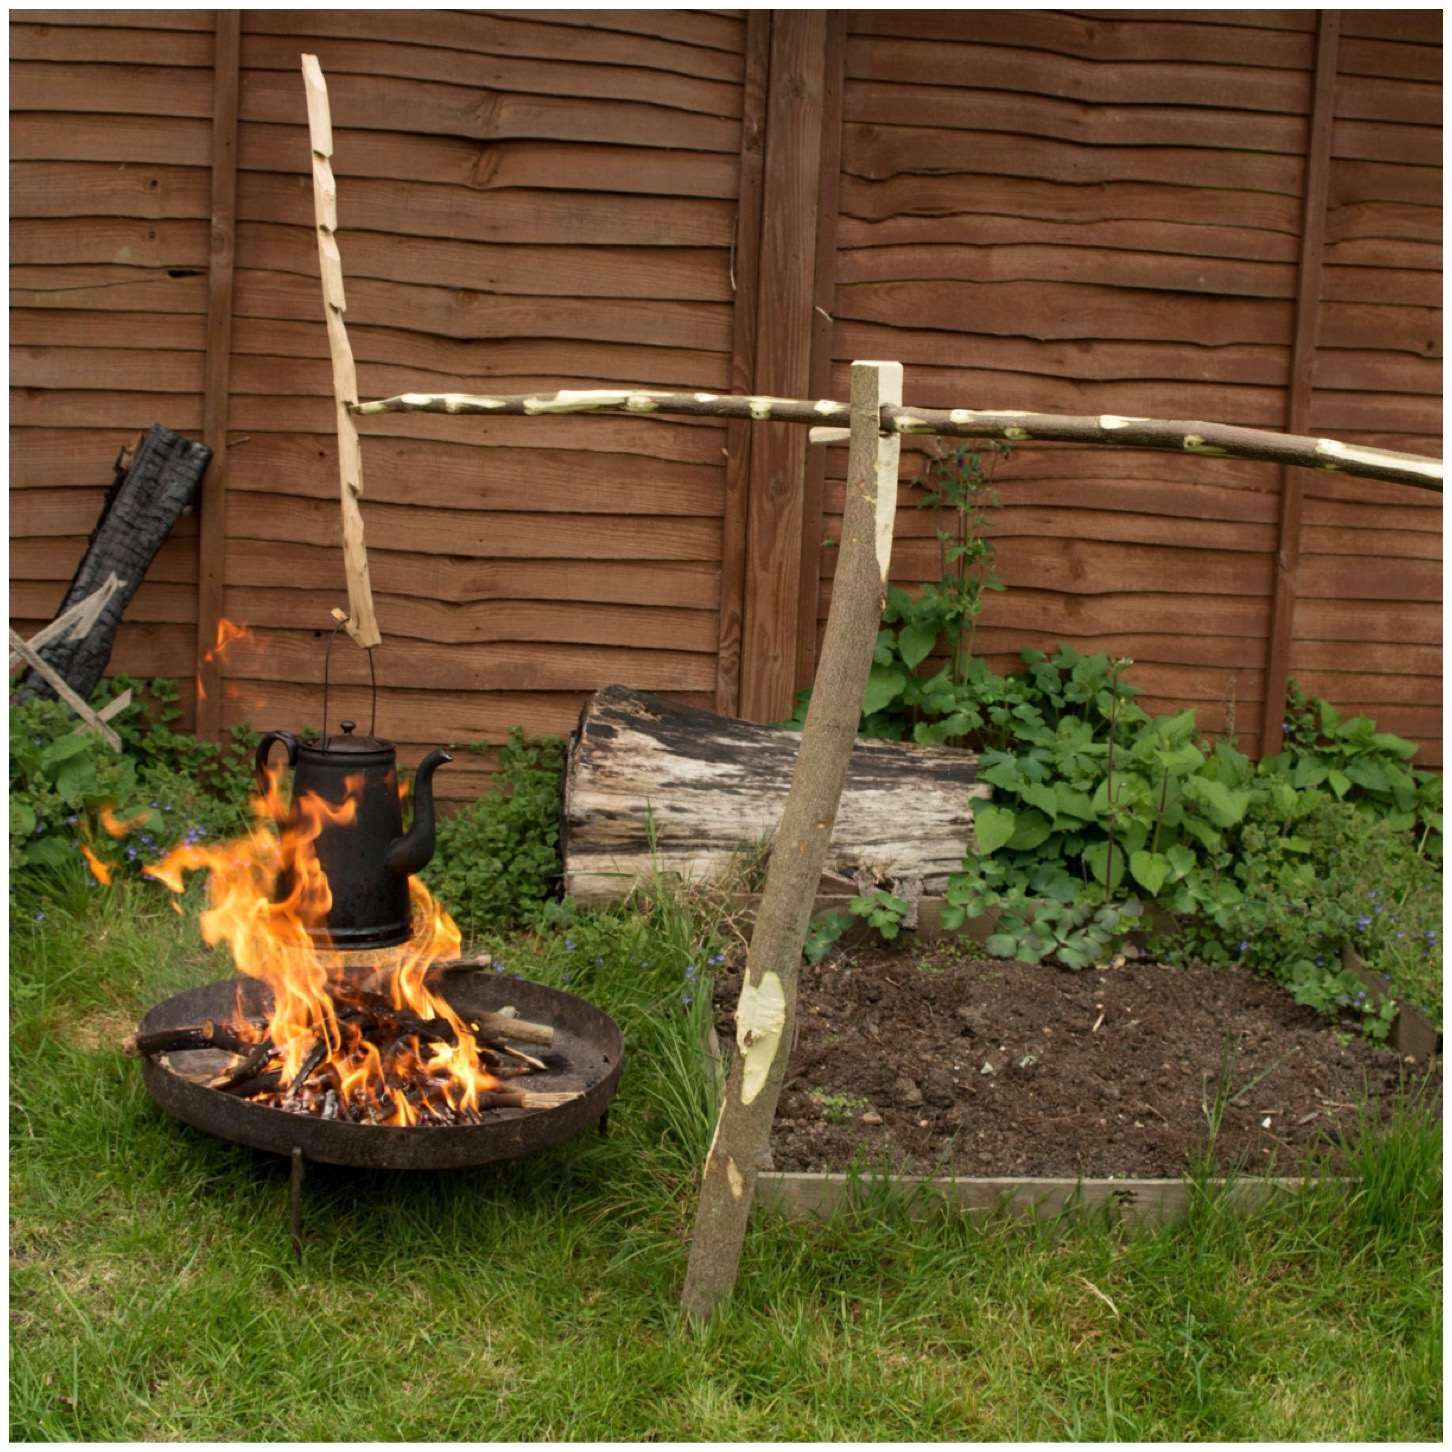
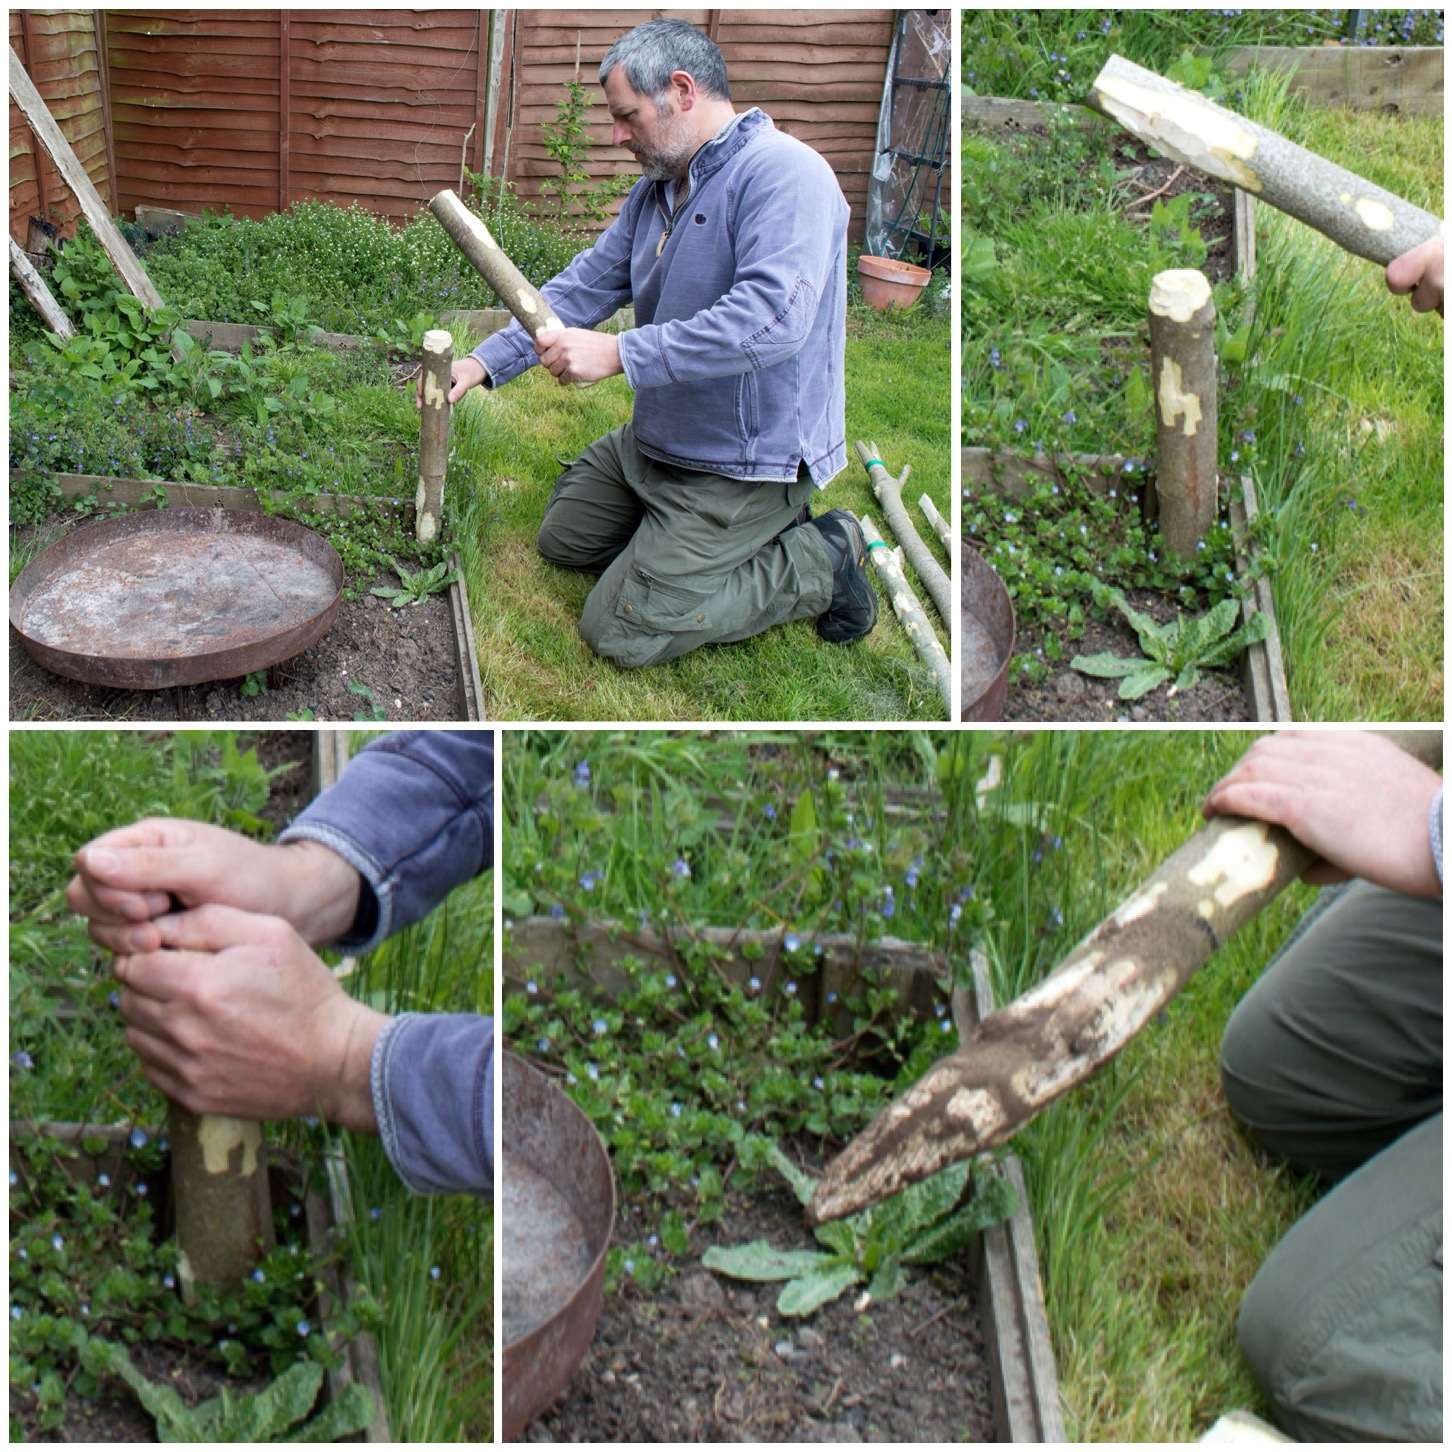
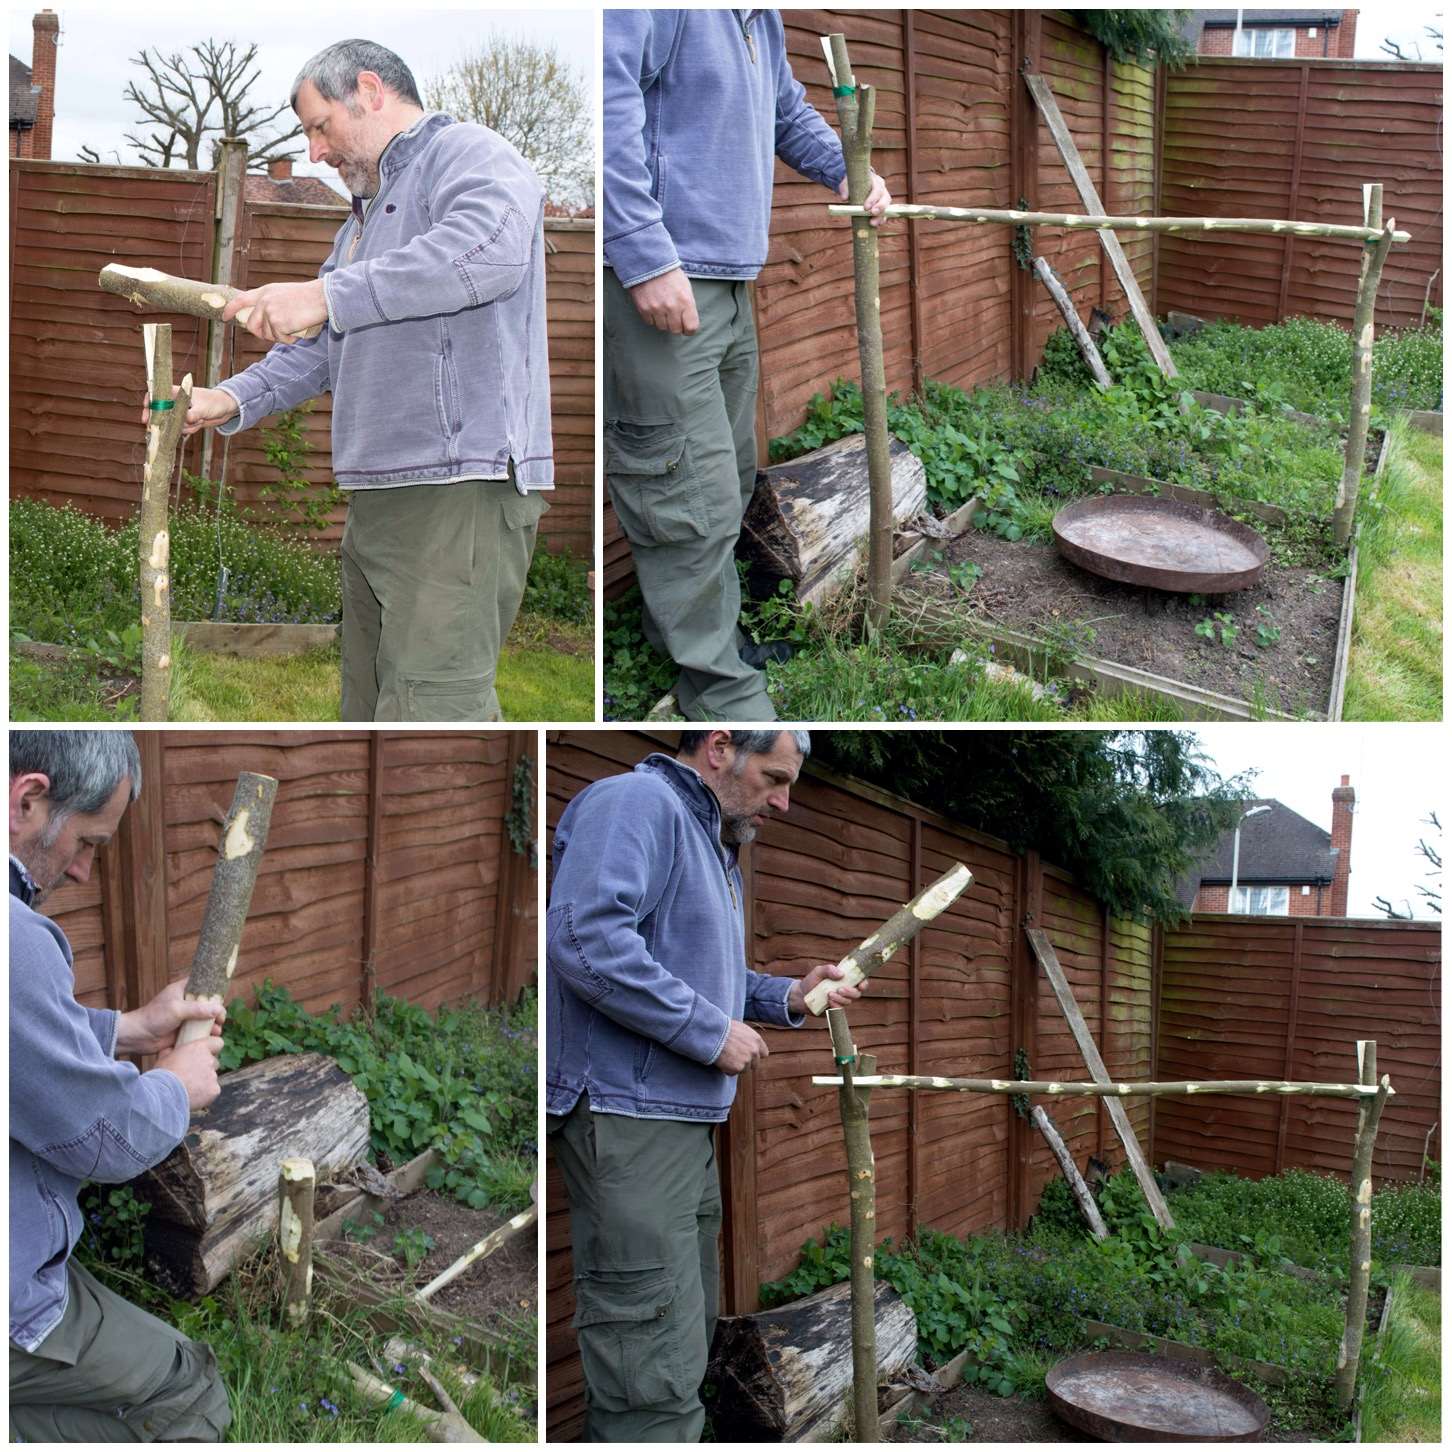
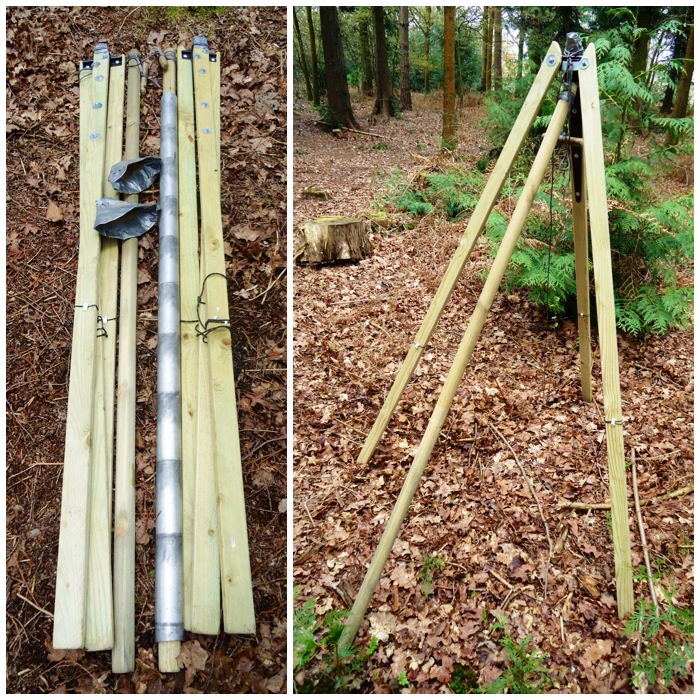
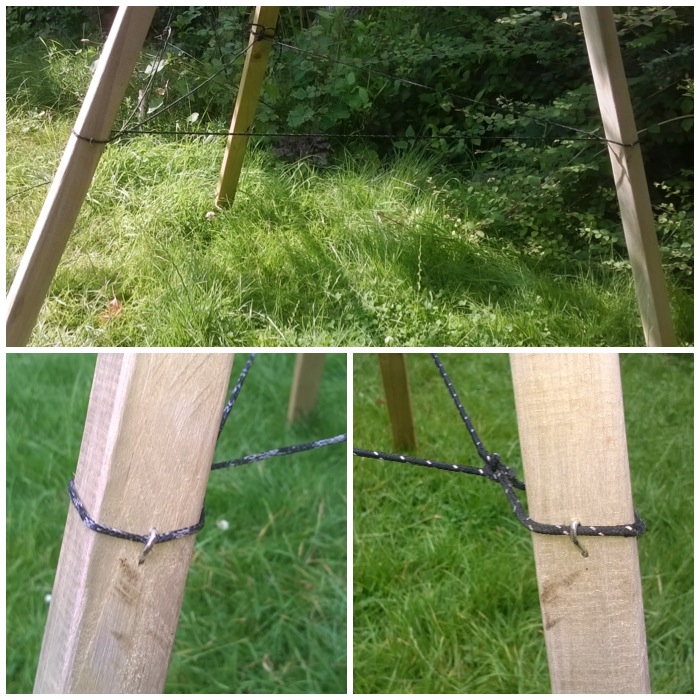
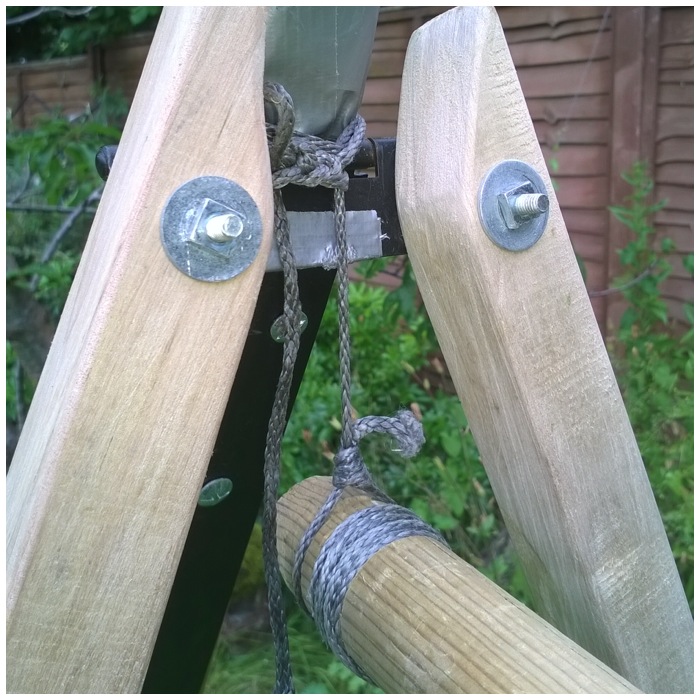
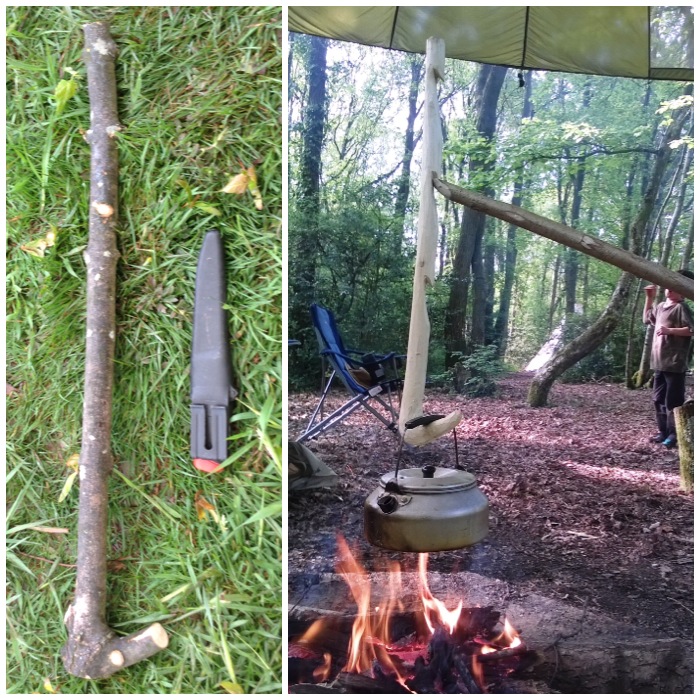
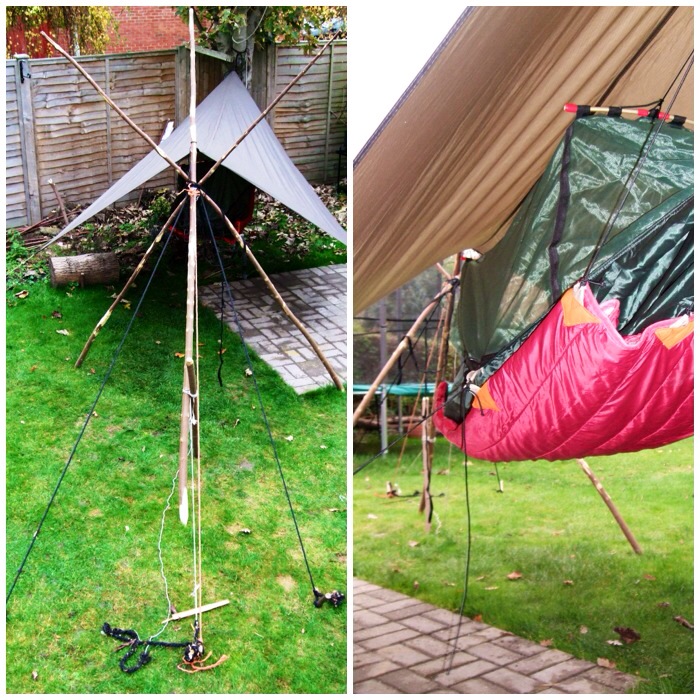
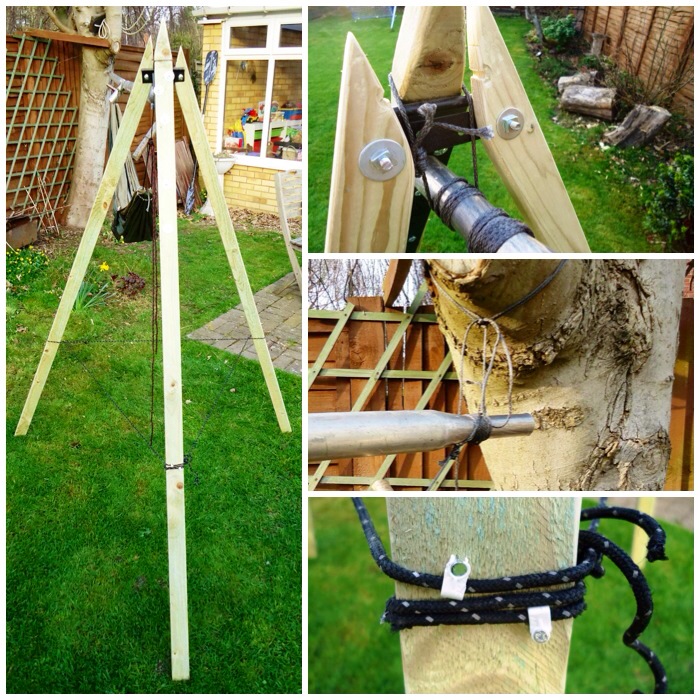
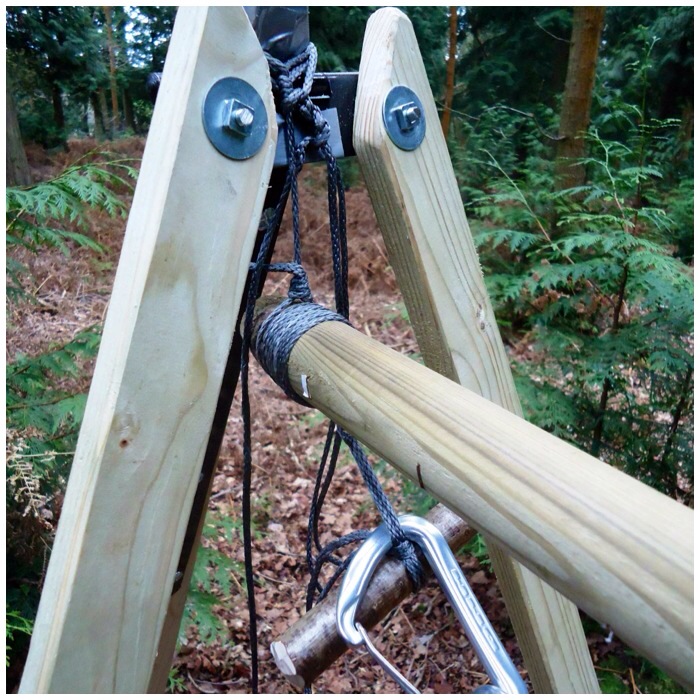
The ‘Hammock Upright’ you can see below is the one I built and it shows it being secured by land anchors. It is not portable (well I can move it around the garden easily) but it is robust. I know that there are ways to make them lighter however I wanted to use the wood I had on hand.
Land Anchor Secured
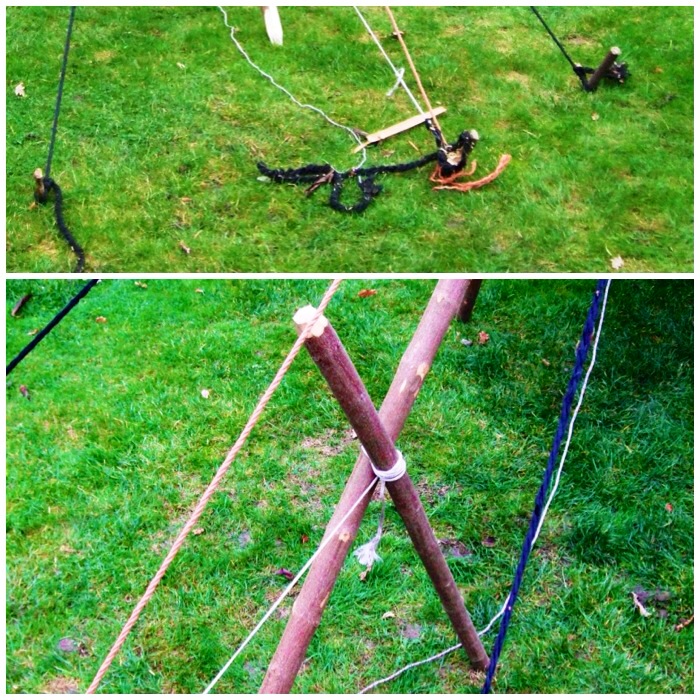
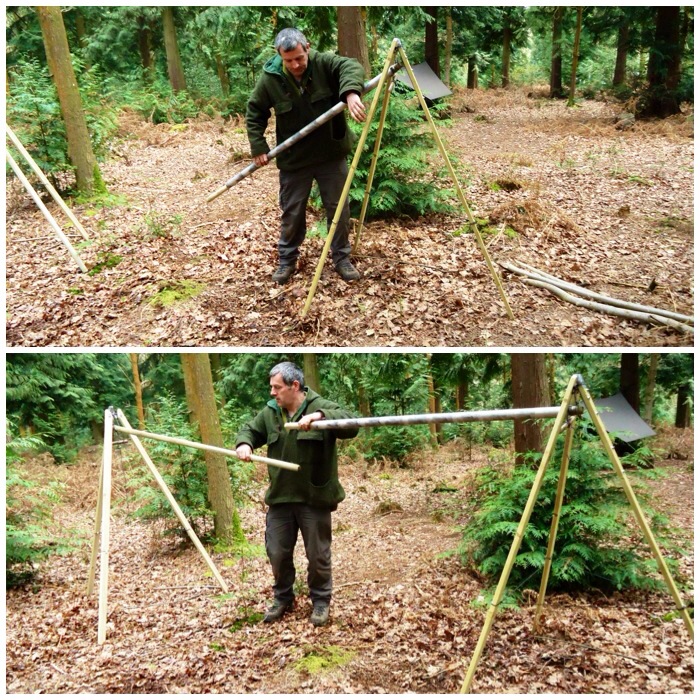
While making a video on the upright it struck me that iron pins would do the same job as the land anchors.
Iron Pins
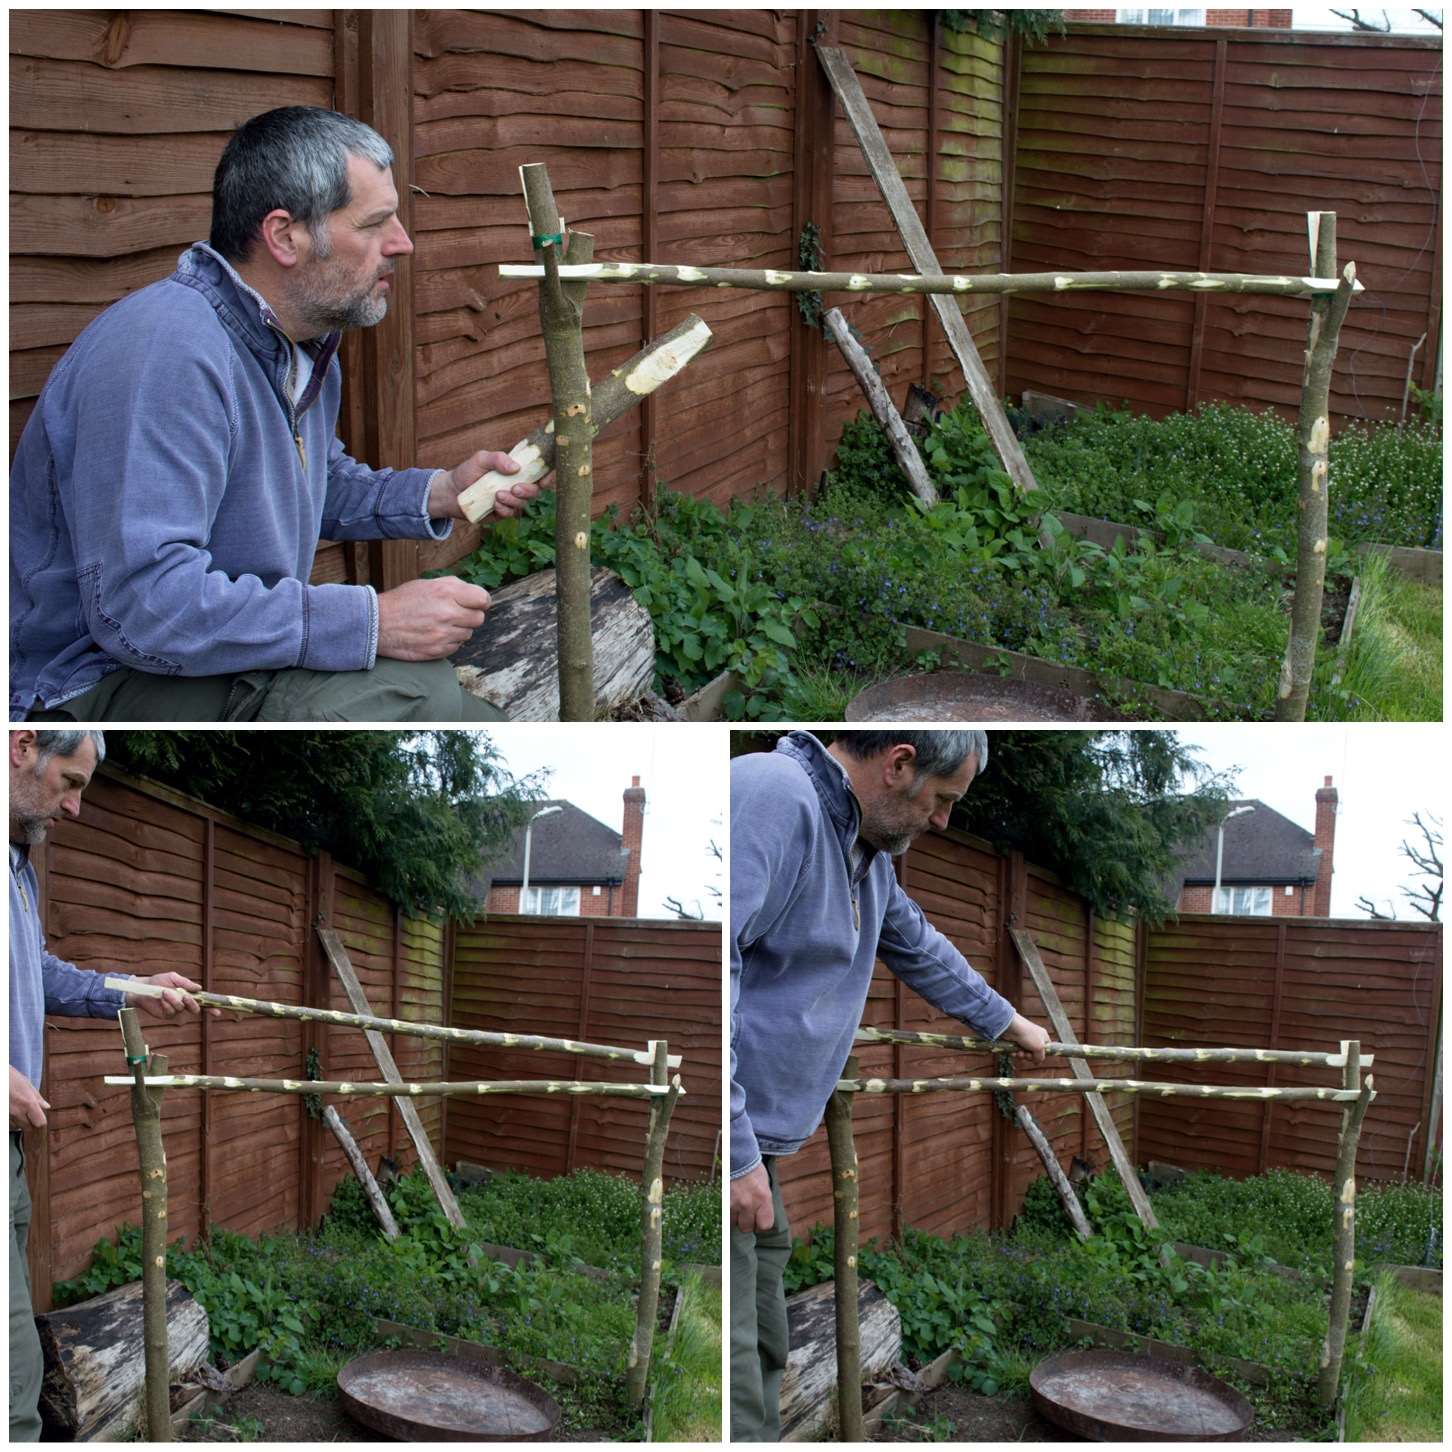
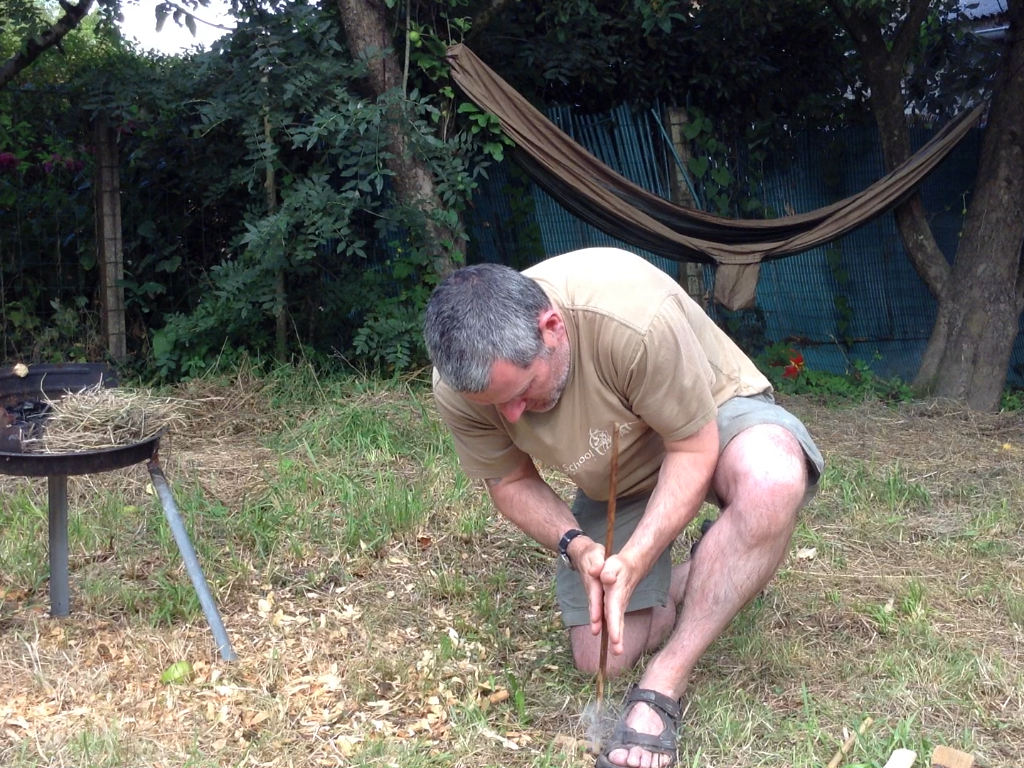
So to see how it is all built have a look at my video below.
Cheers, George
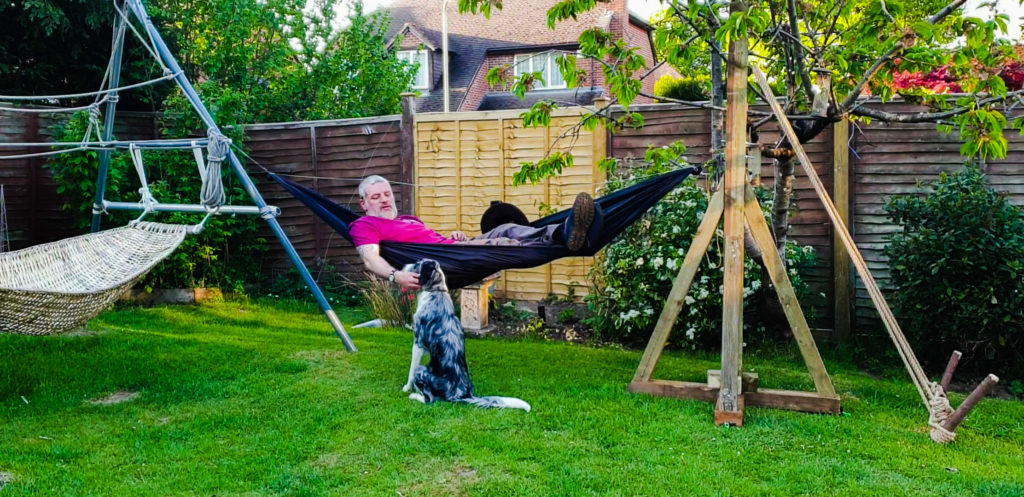
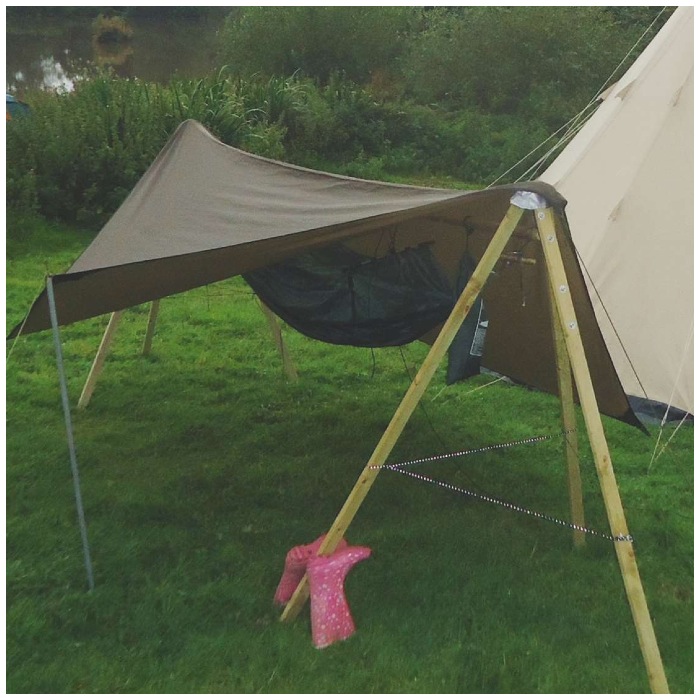
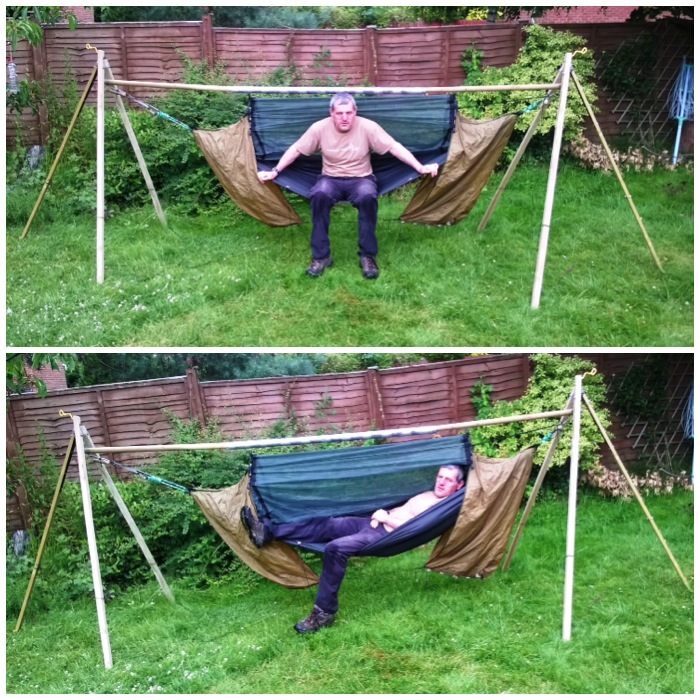
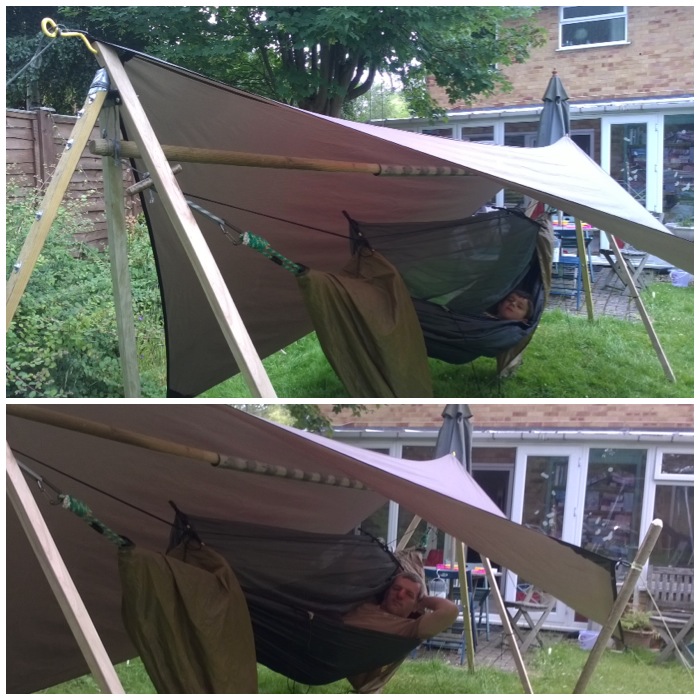
Update (02/05/2020) – Brought the two uprights together and used pins on both.
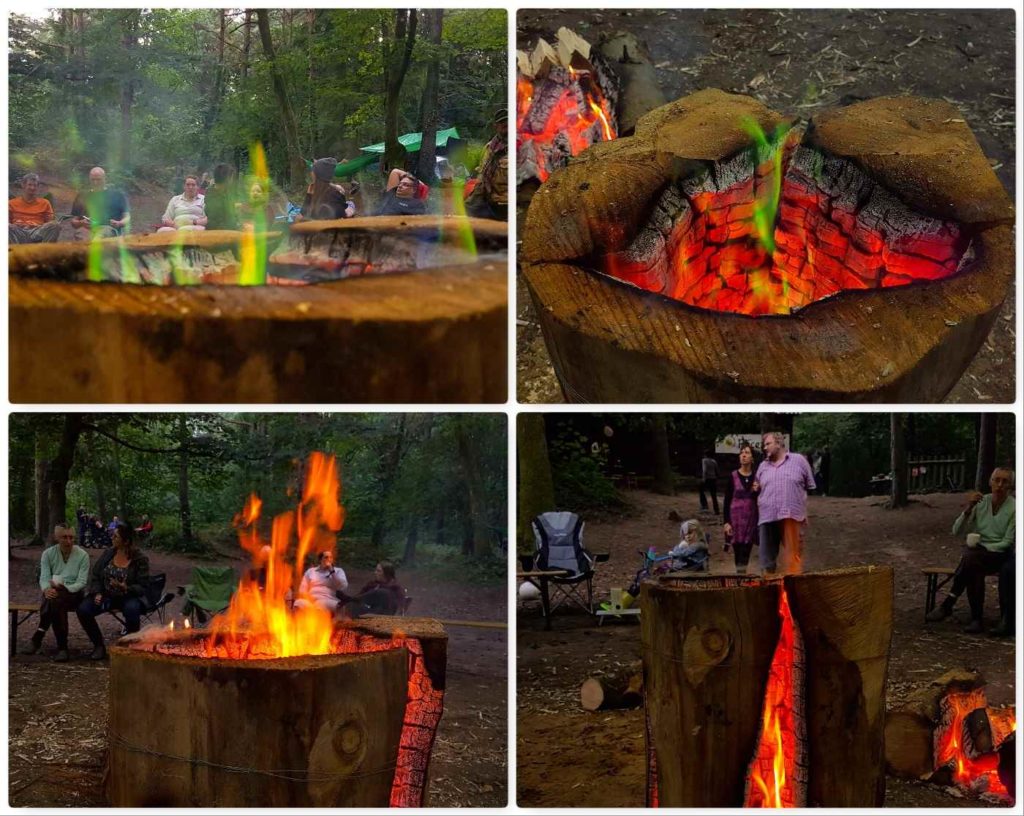
Over the last few years I have written a fair bit about carving Finnish Candles or Log Rockets using just the tools I would carry in my bergen (saws, knives, axes etc) so I thought it was time to see what could be done with a chainsaw.
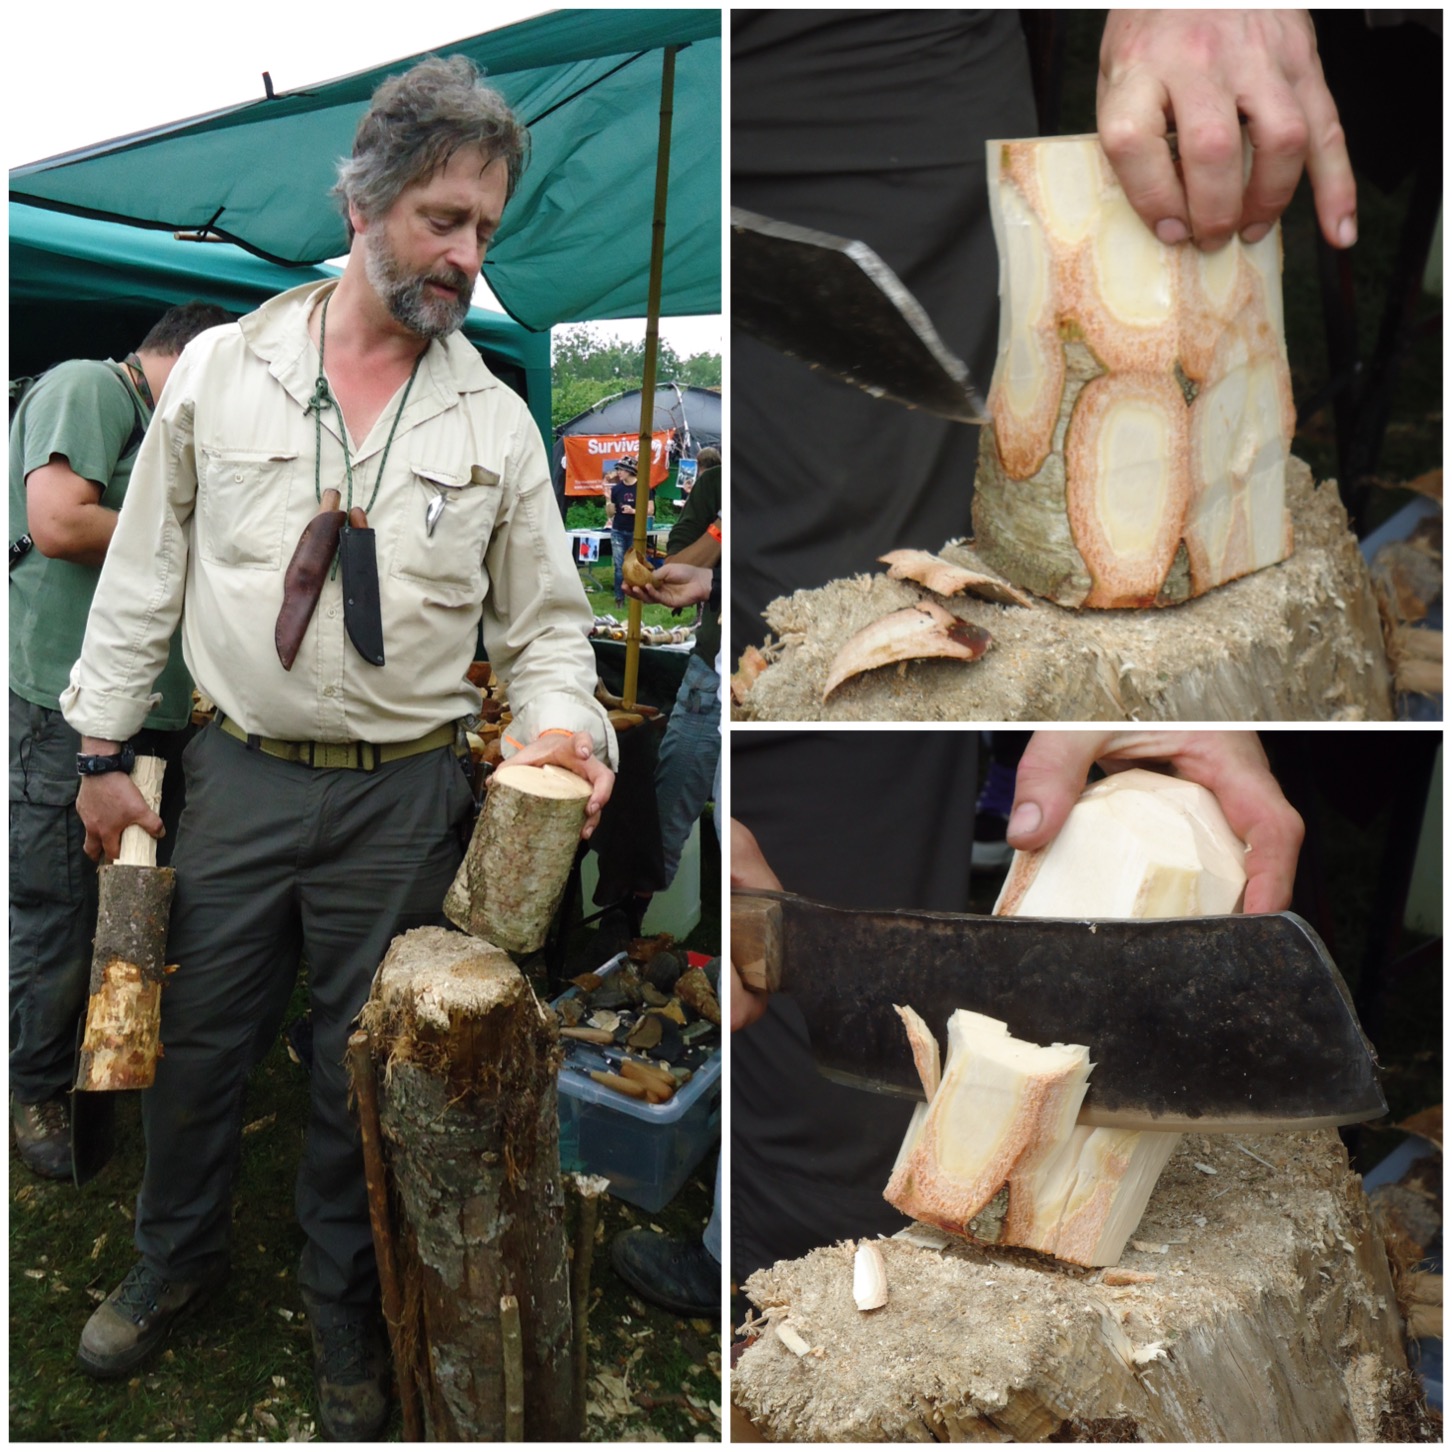
I decided to opt for the Log Rocket as I thought there has been plenty written about using Finnish Candles (referred to sometimes as Swedish Candles/Torches). At the Bushcraft UK Bushmoot last year I asked my friend Rob Nash if he was willing to carve a large log rocket for me using his chainsaw.
For those of you who just like to watch a short video on its construction here it is – for those of you who prefer detailed instructions there are loads of pictorial steps after the video below.
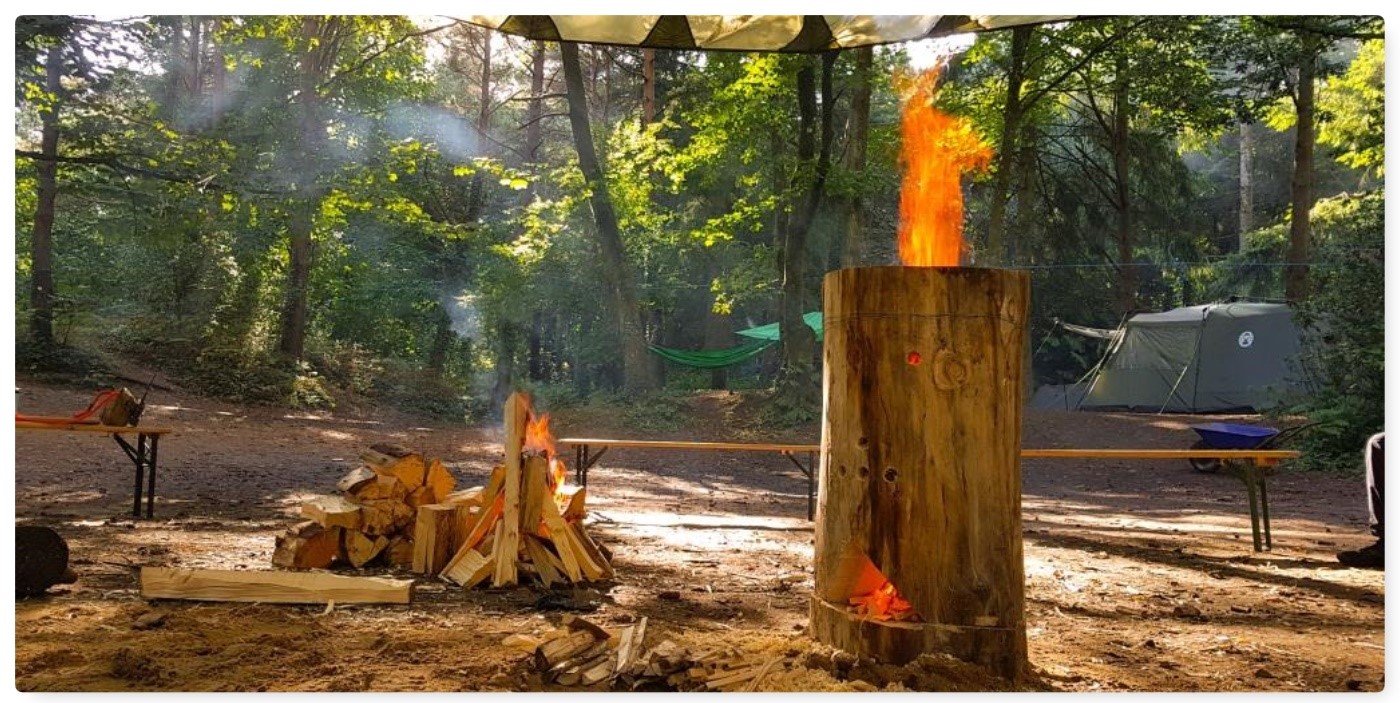
The Log Rocket
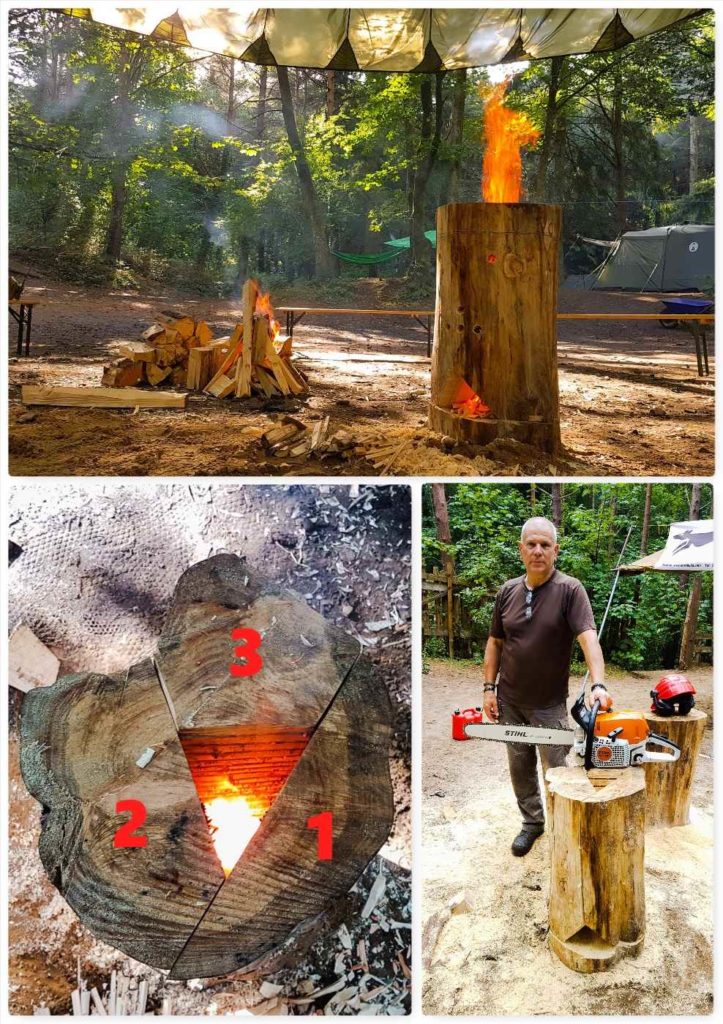
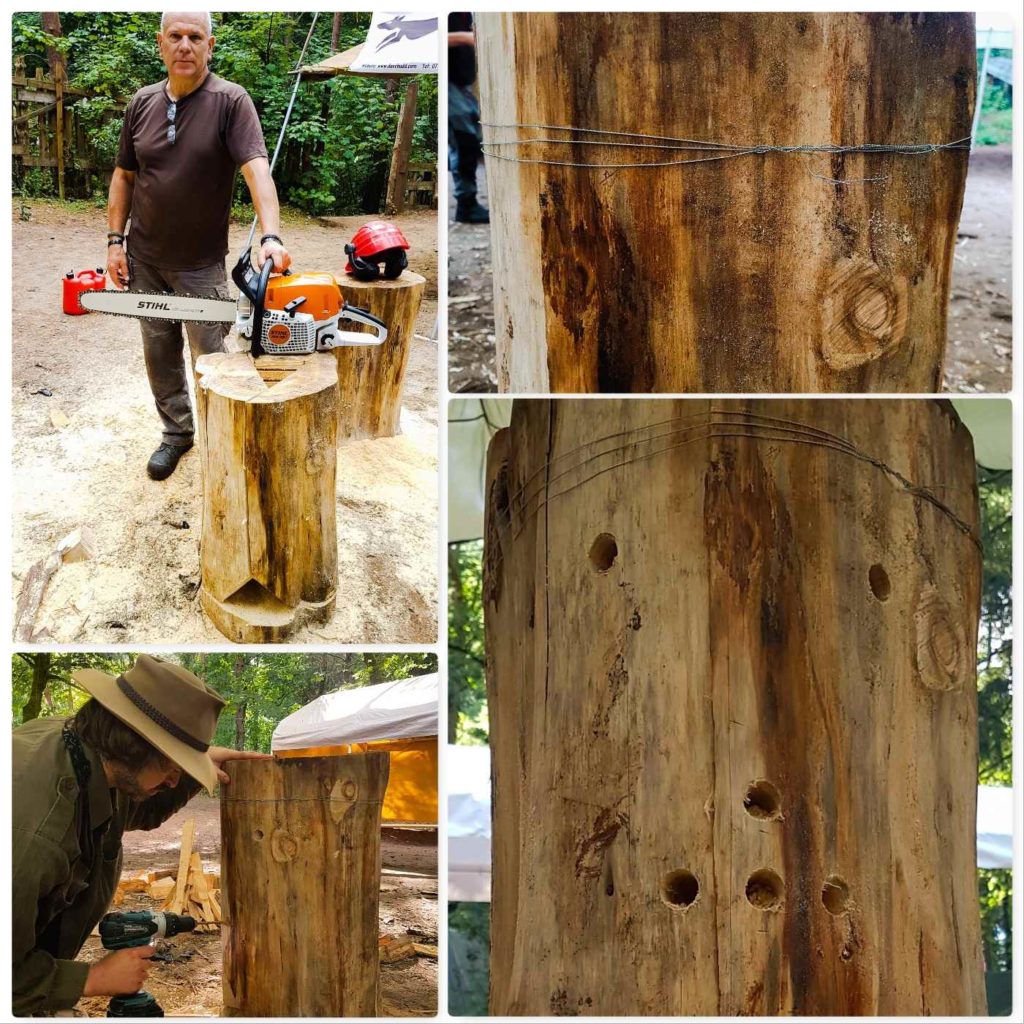
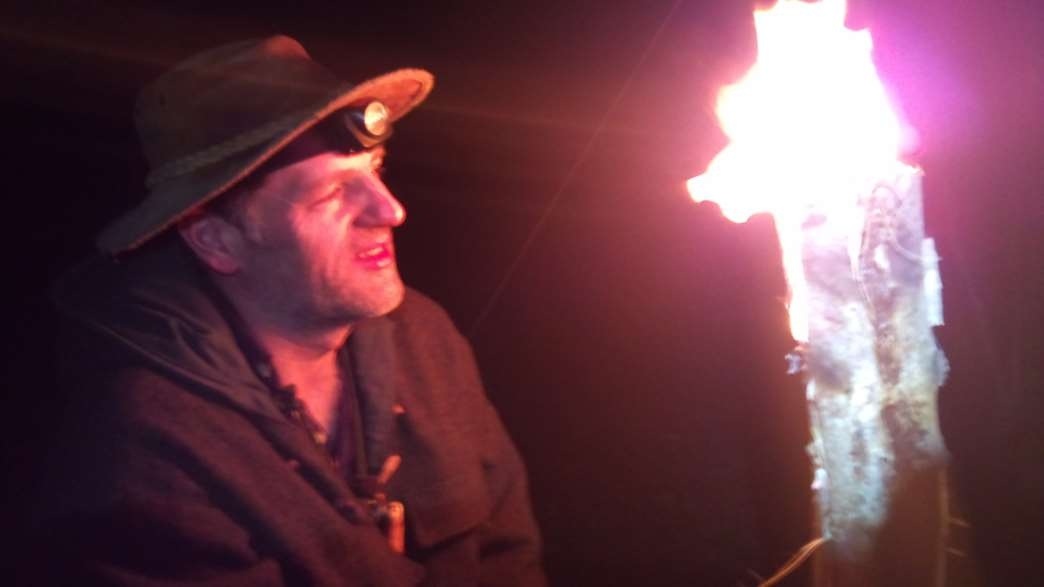
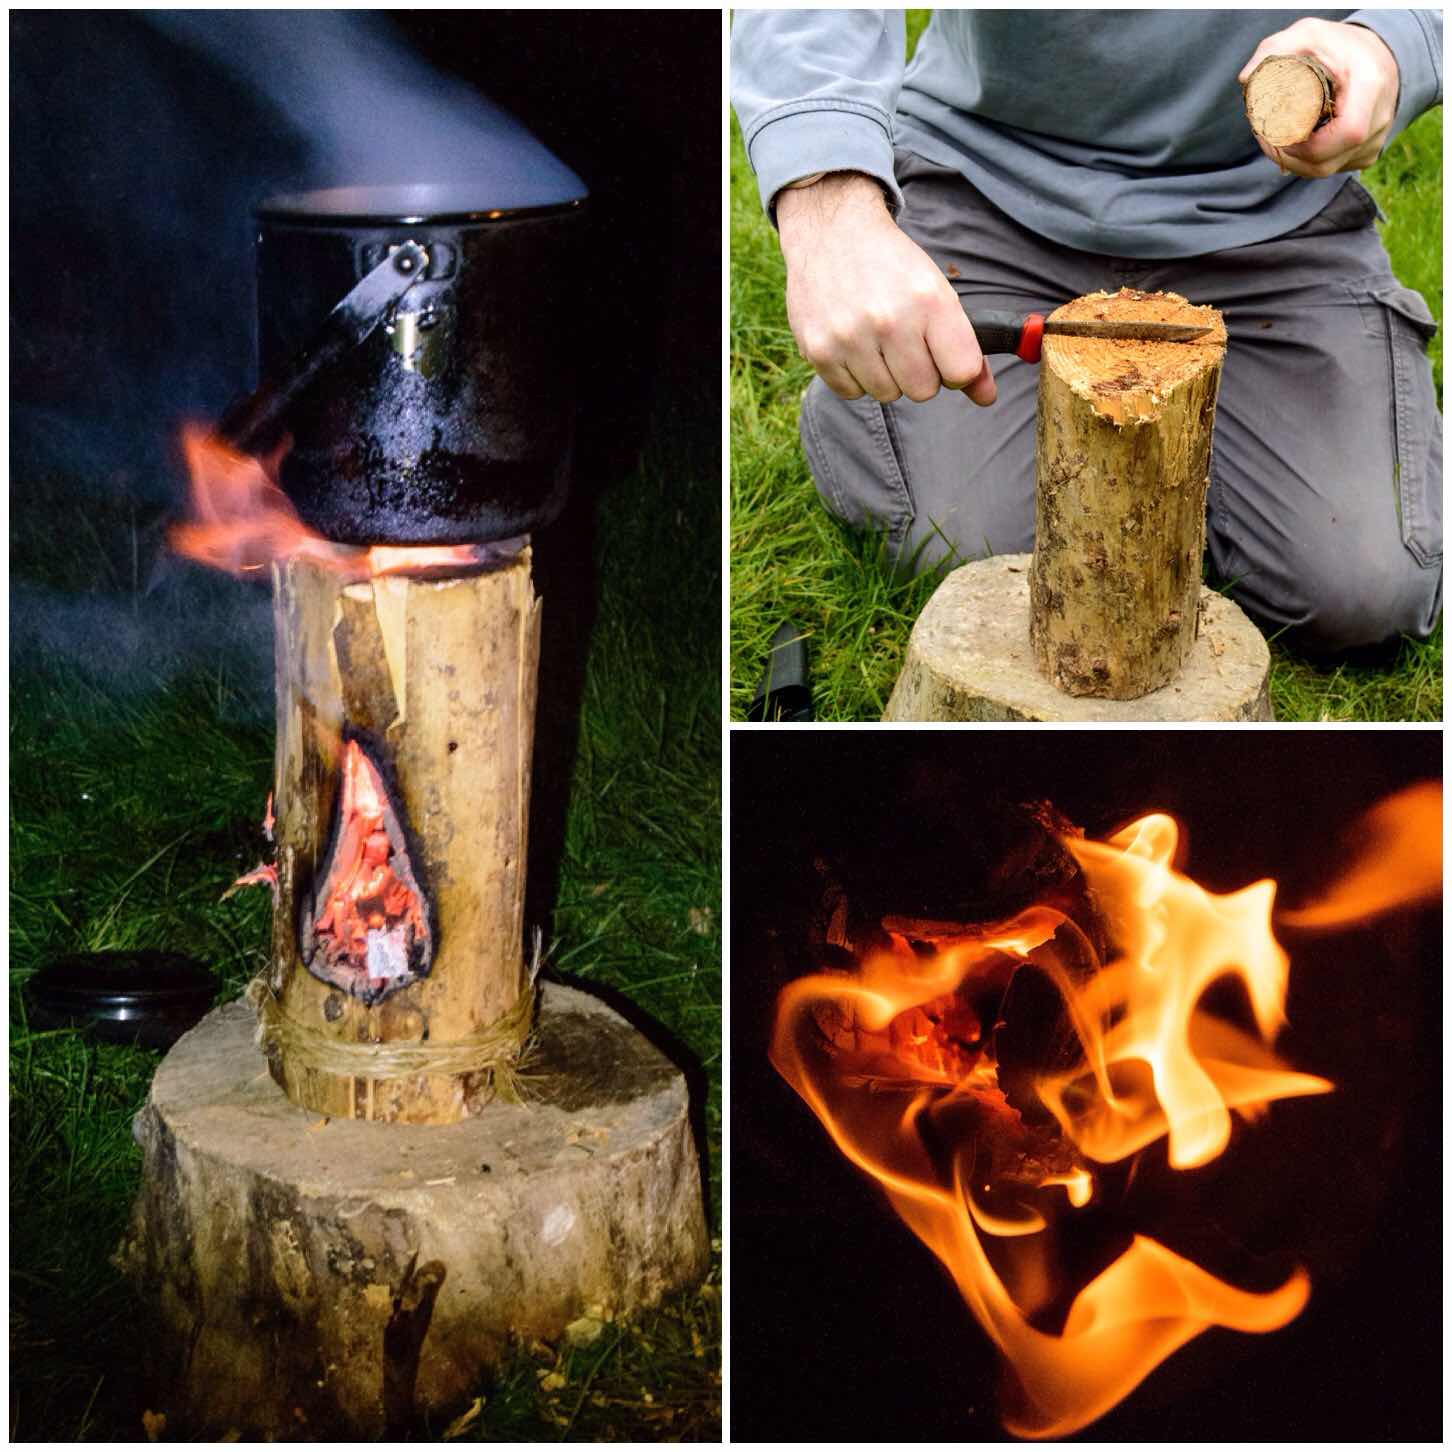
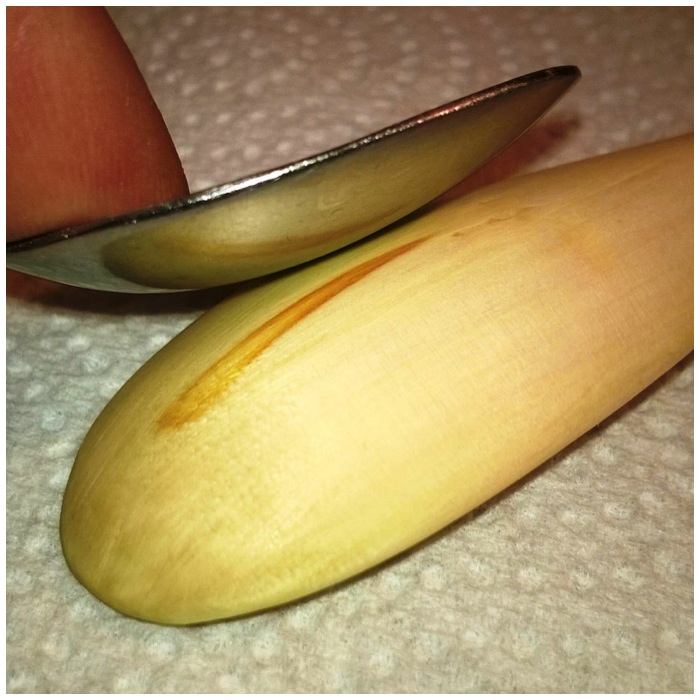
The log rocket worked spectacularly and you can get a sense of scale (forgot to measure it) from the picture of Rob standing next to it.
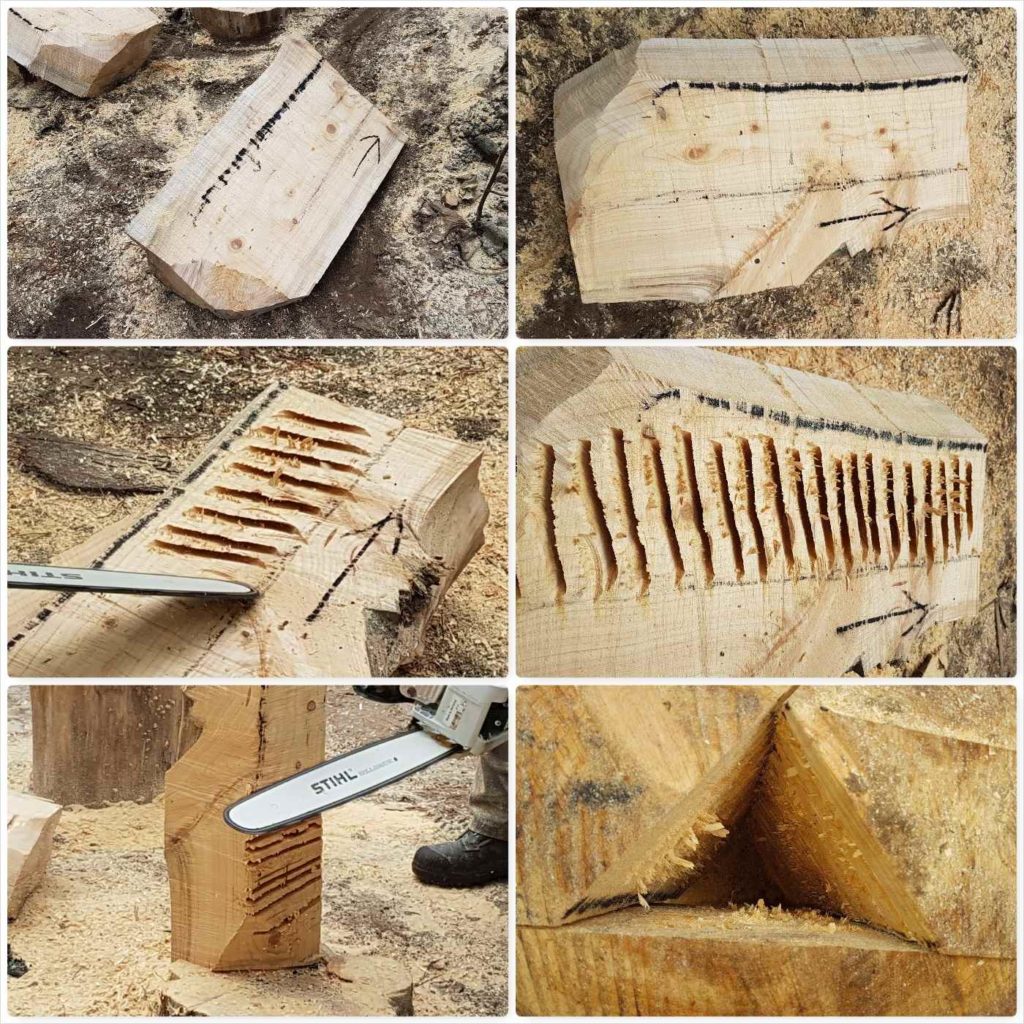
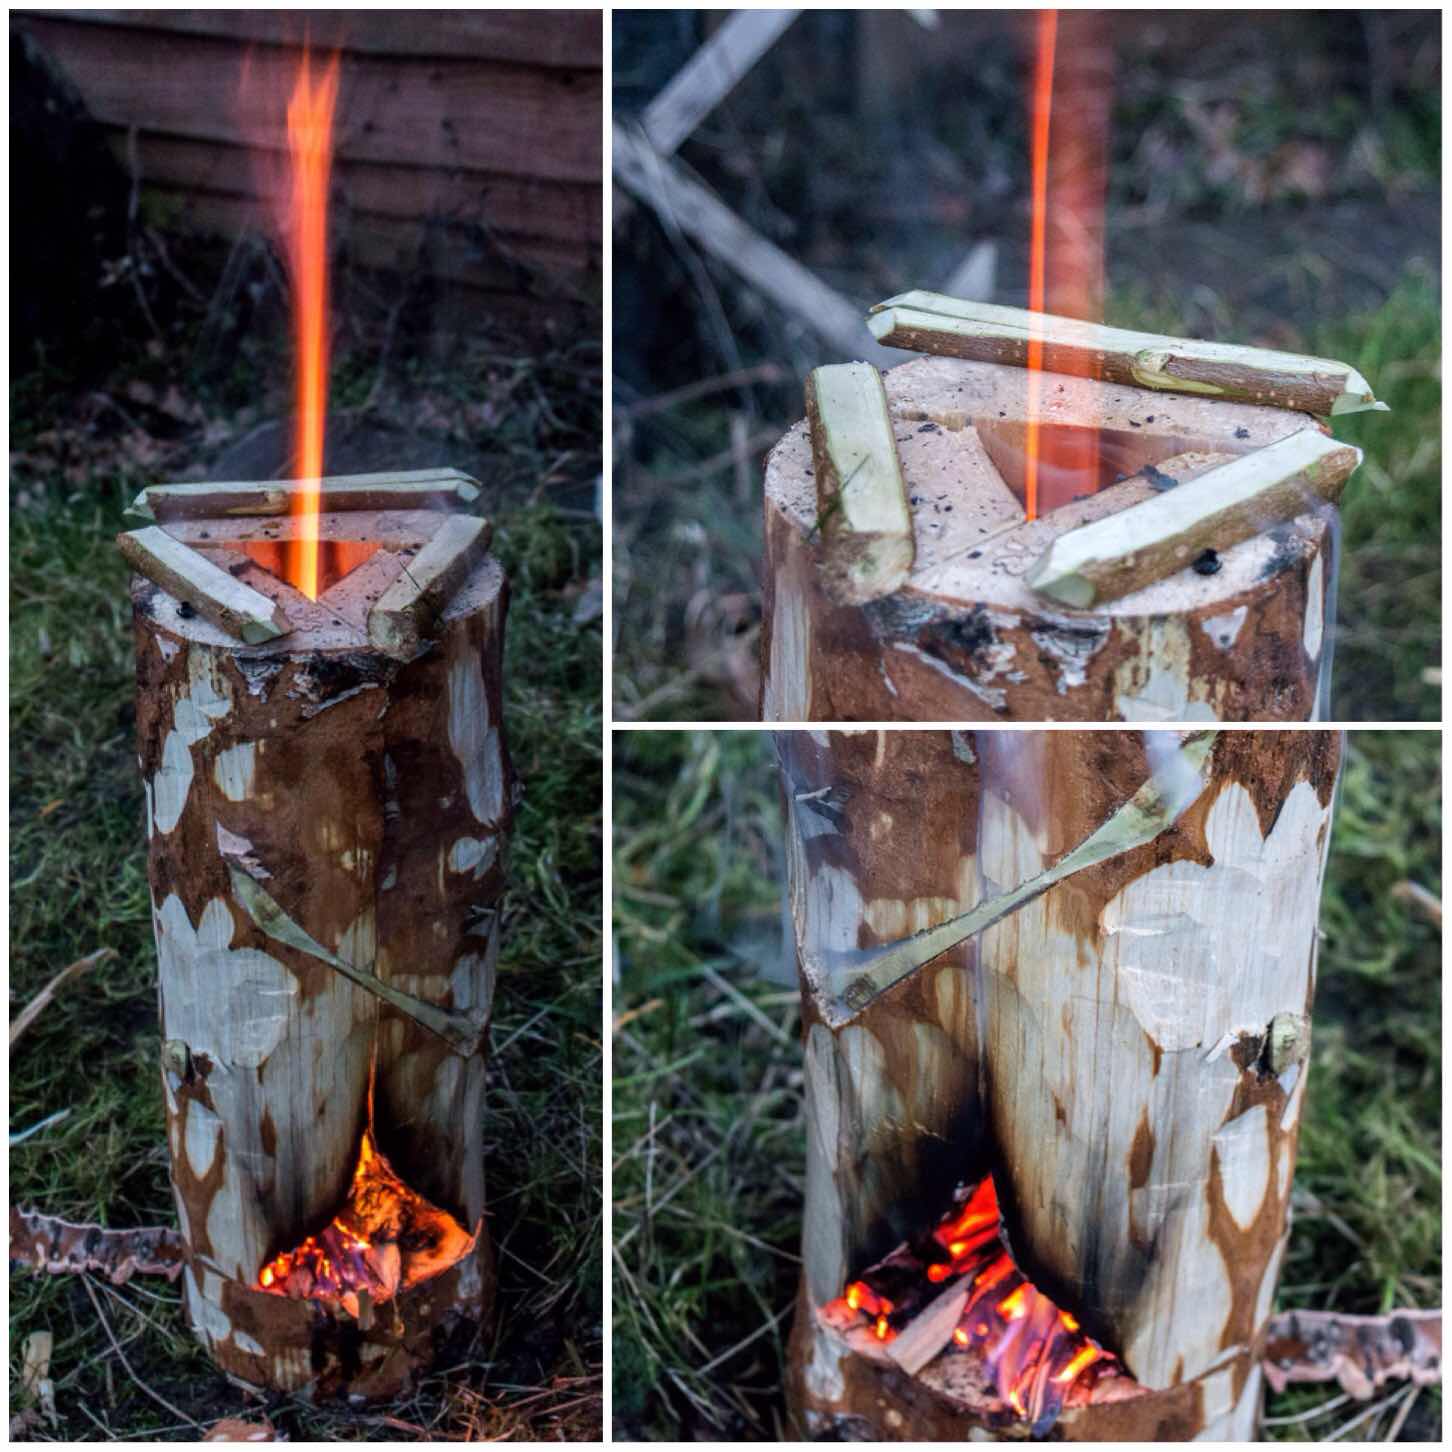
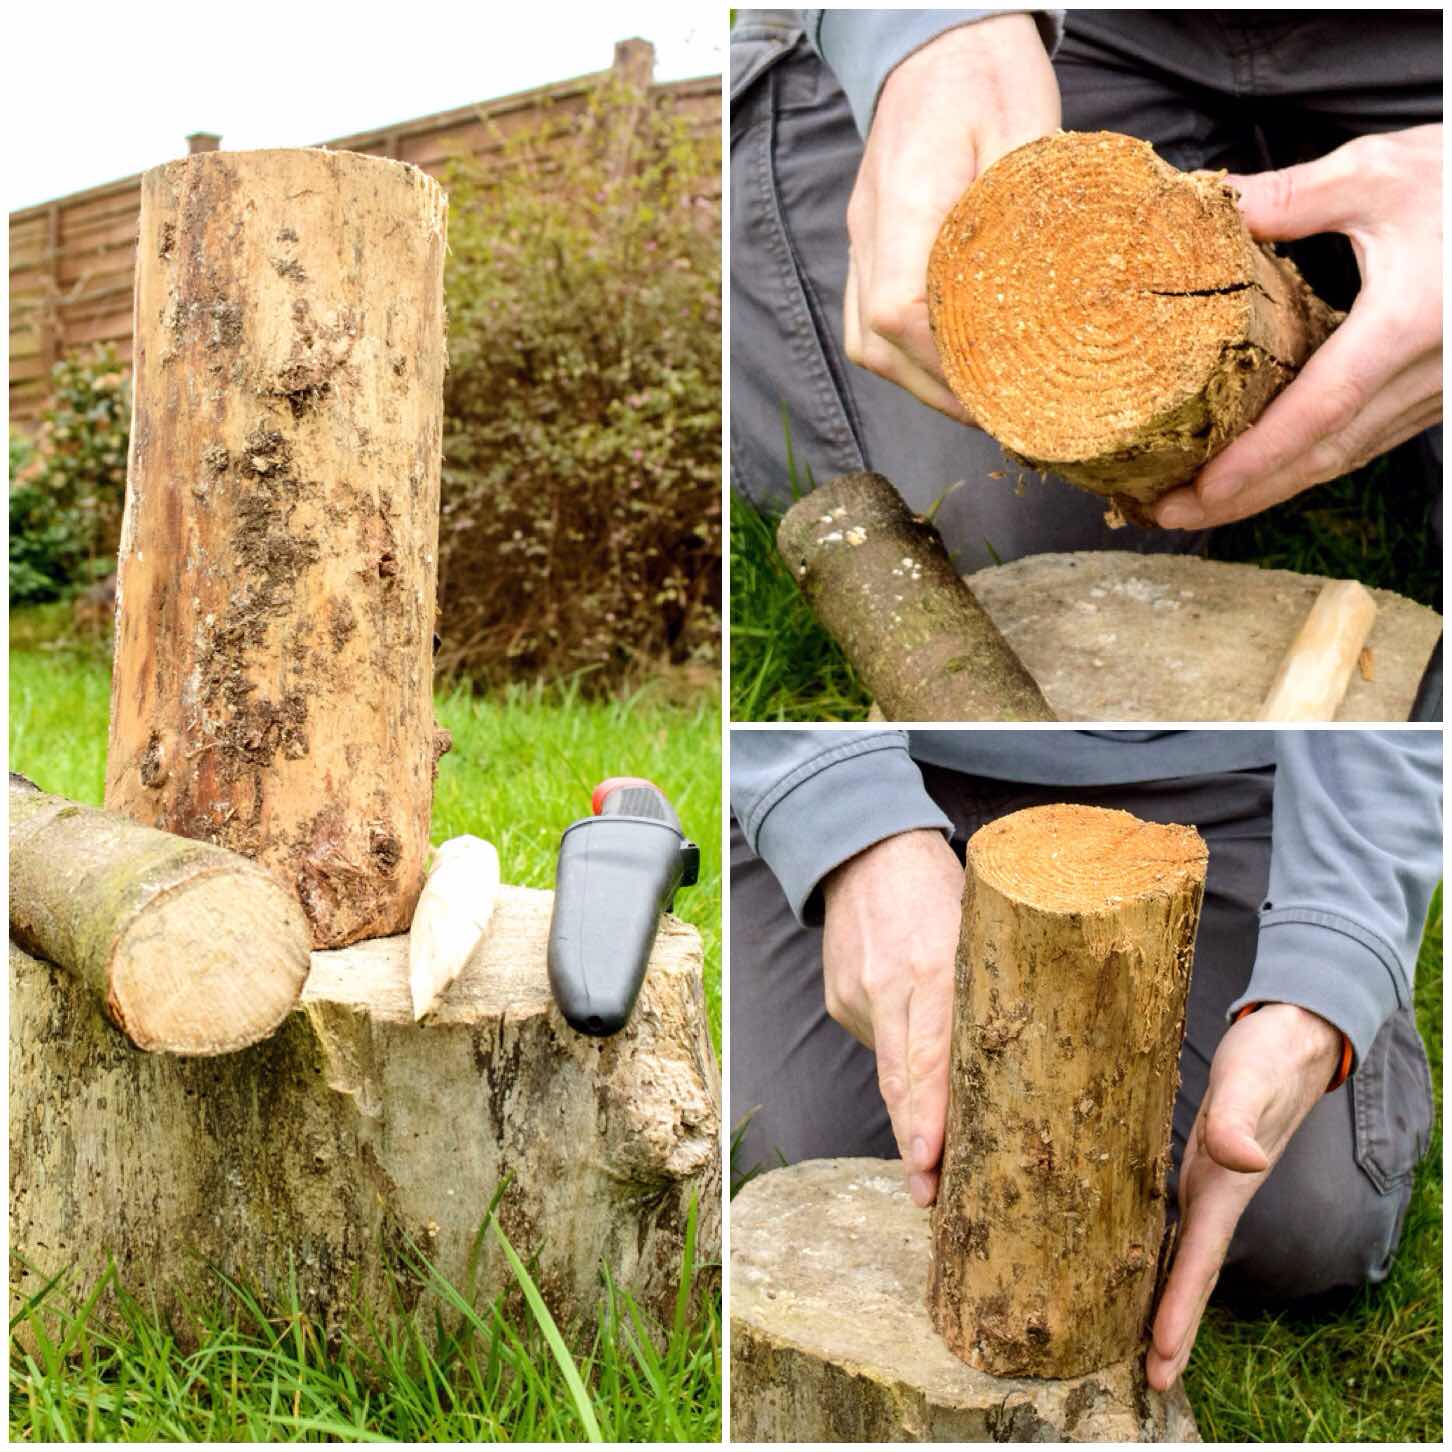
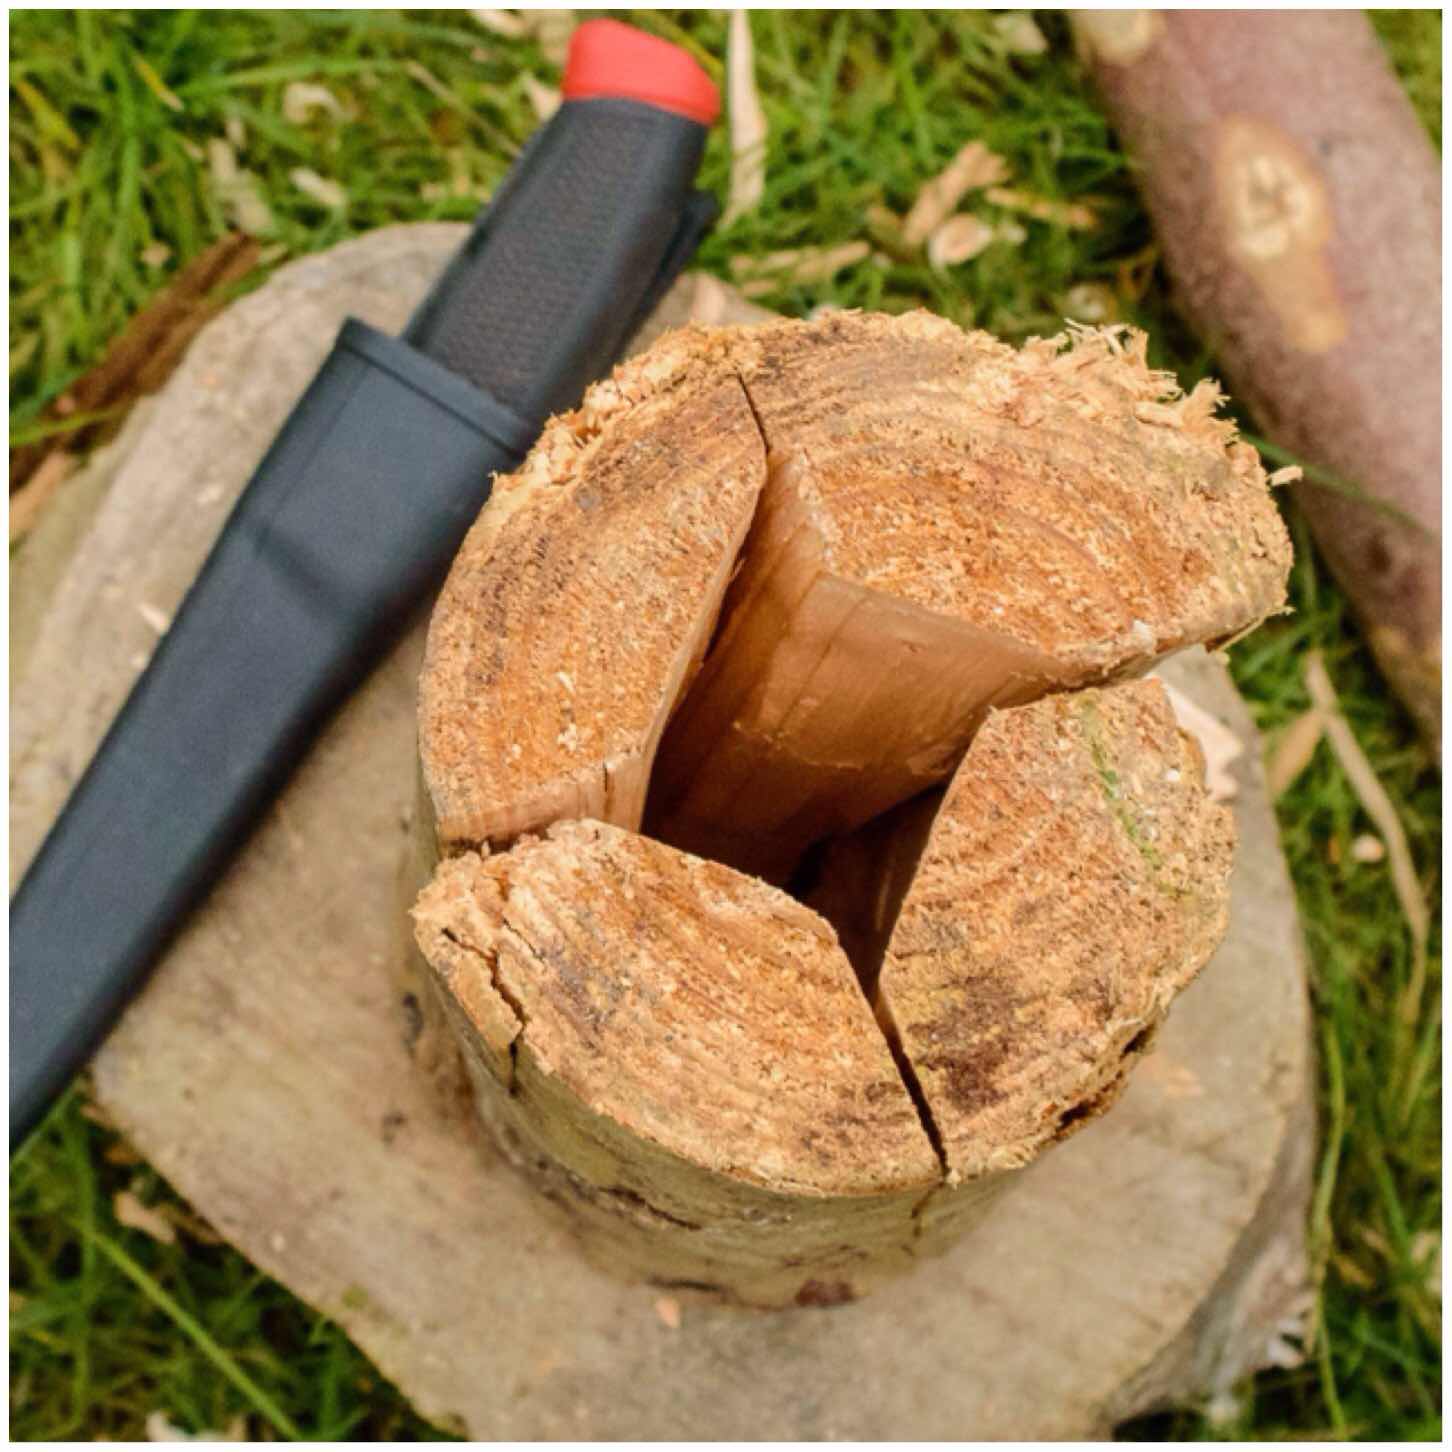
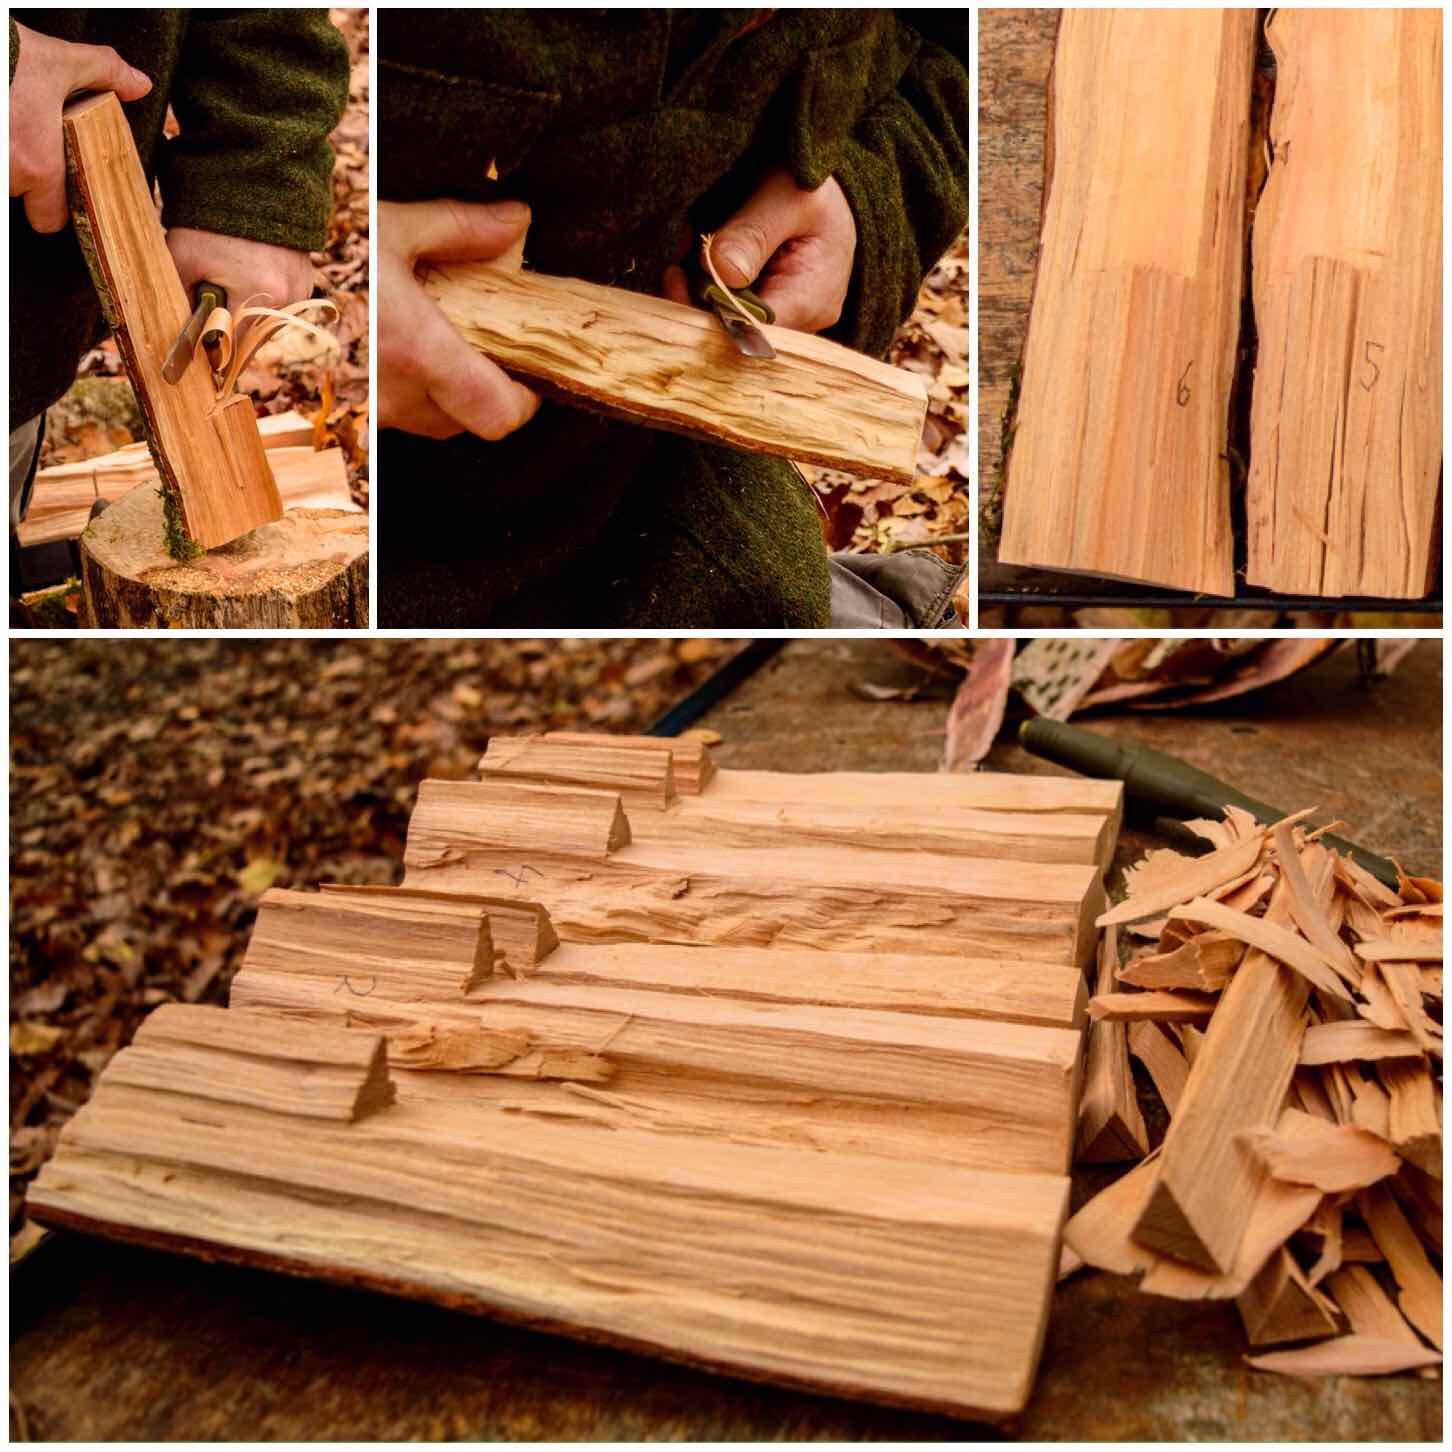
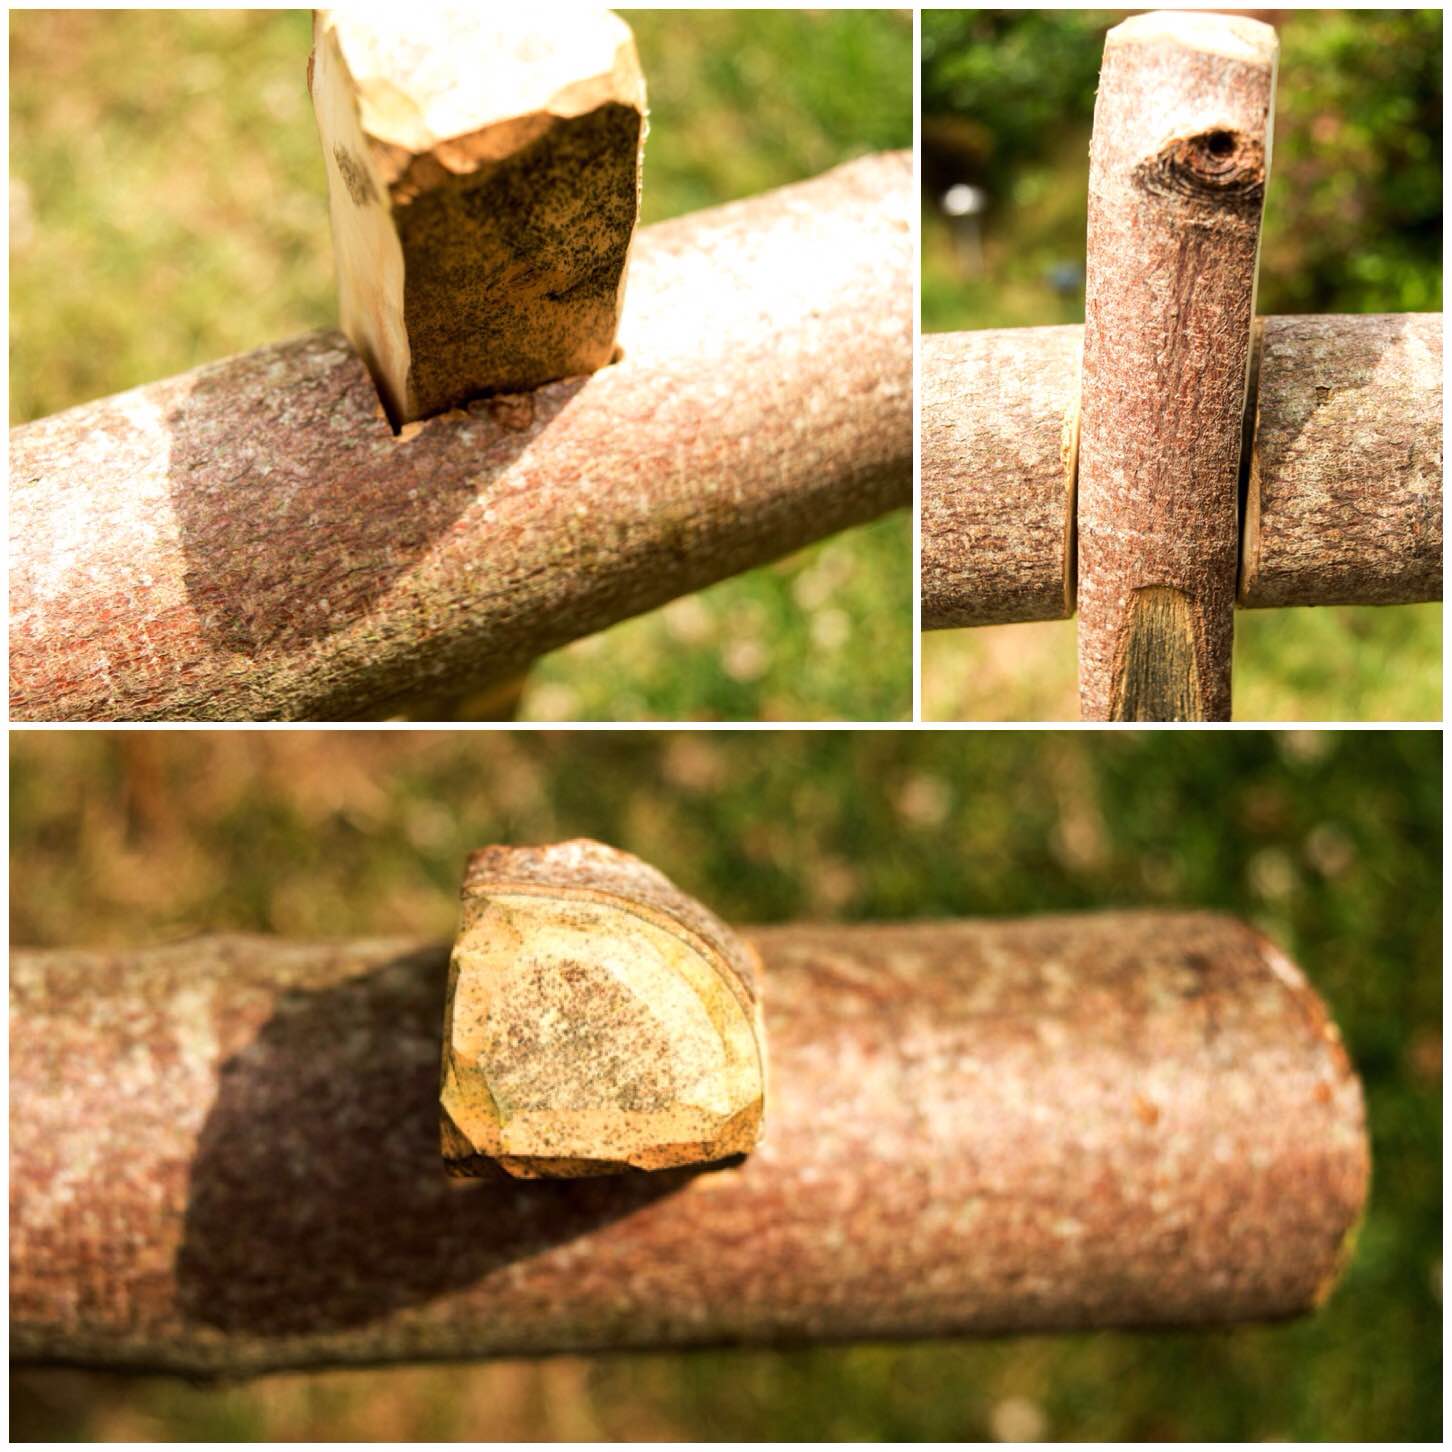
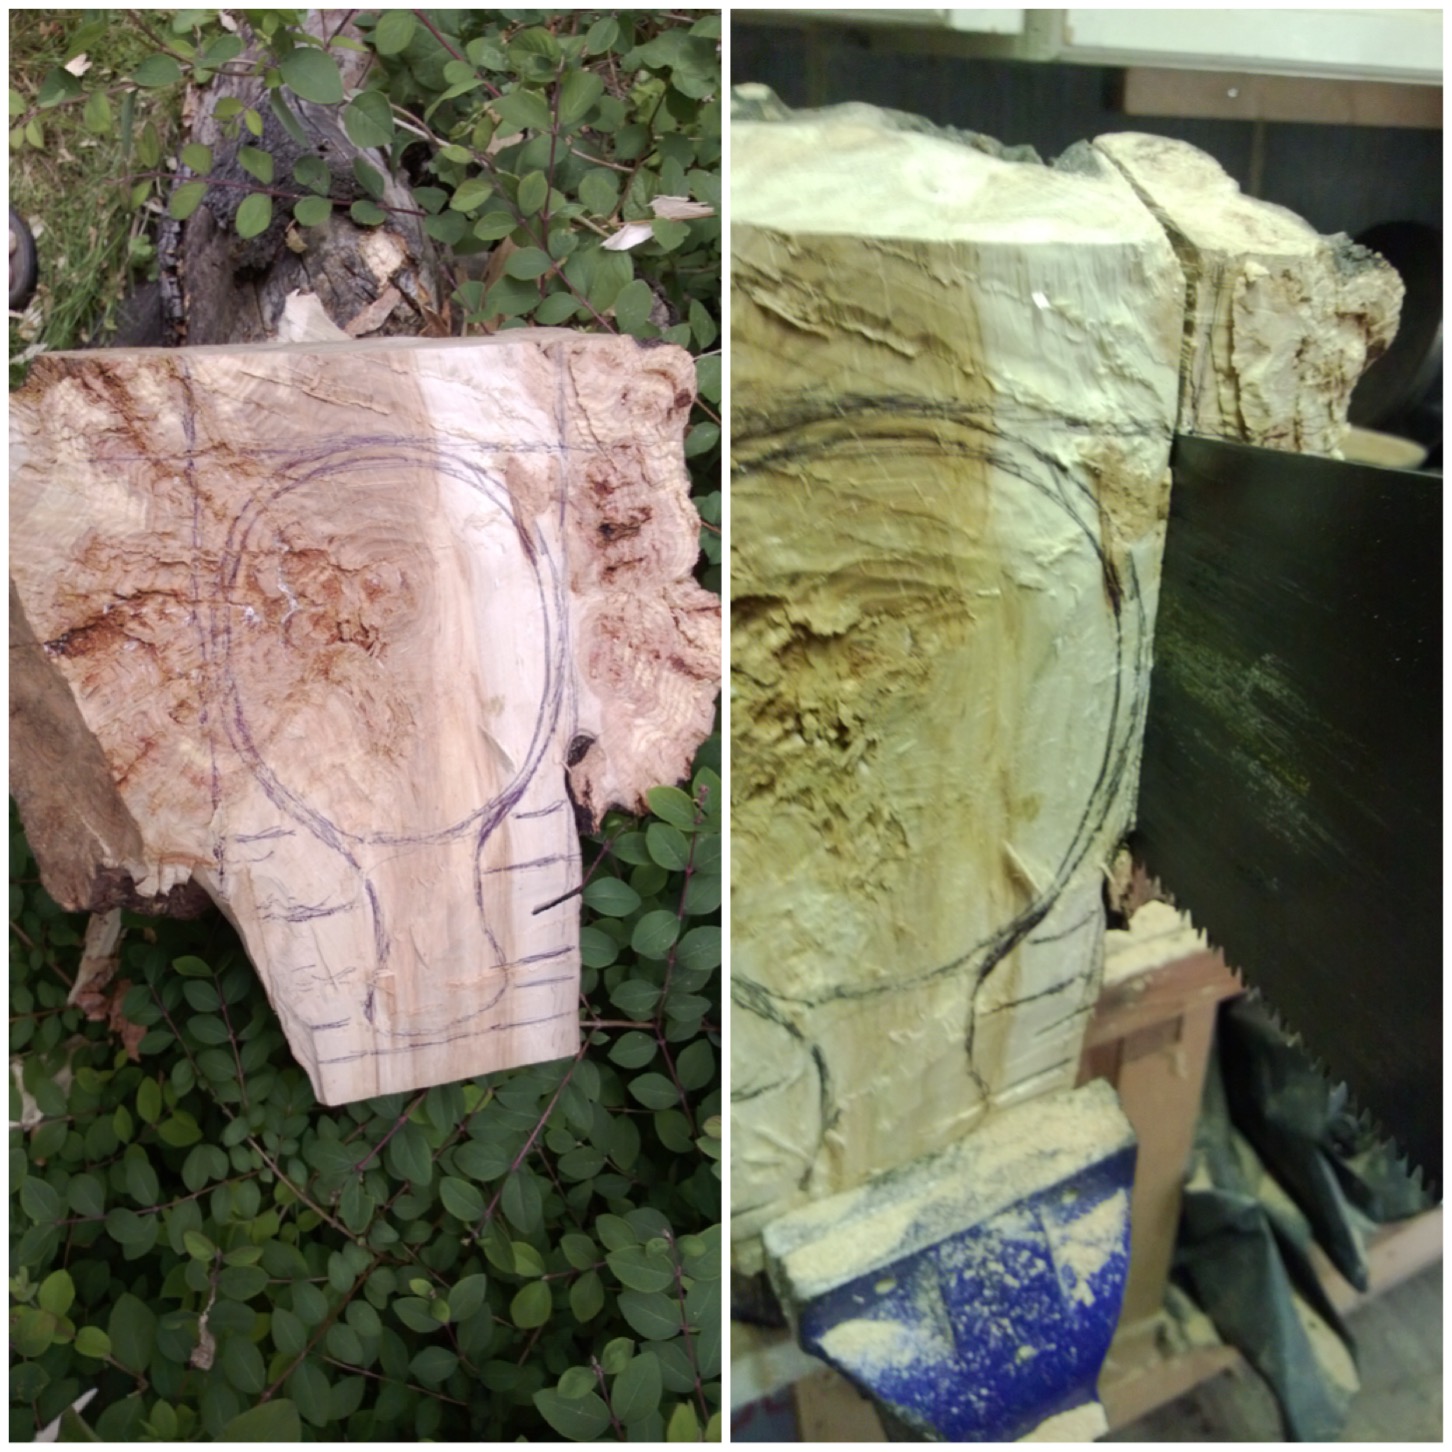
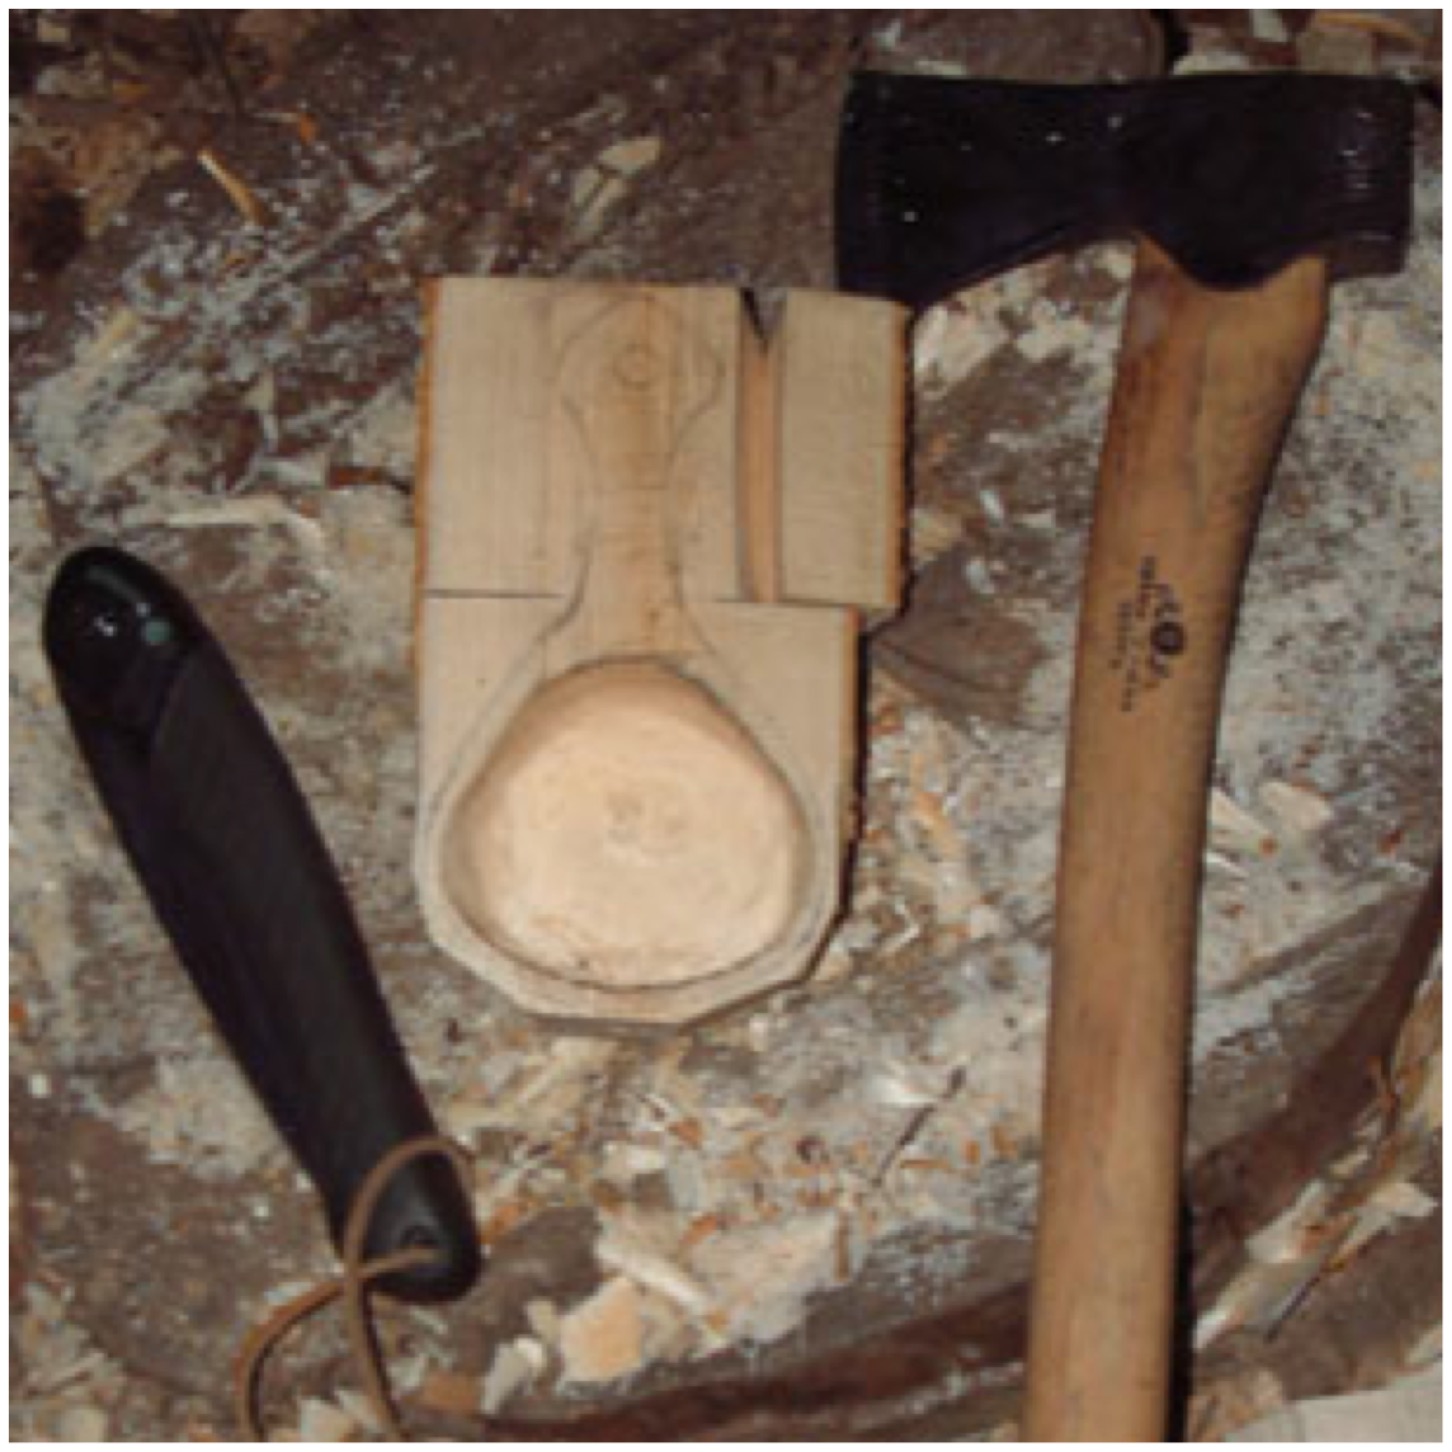
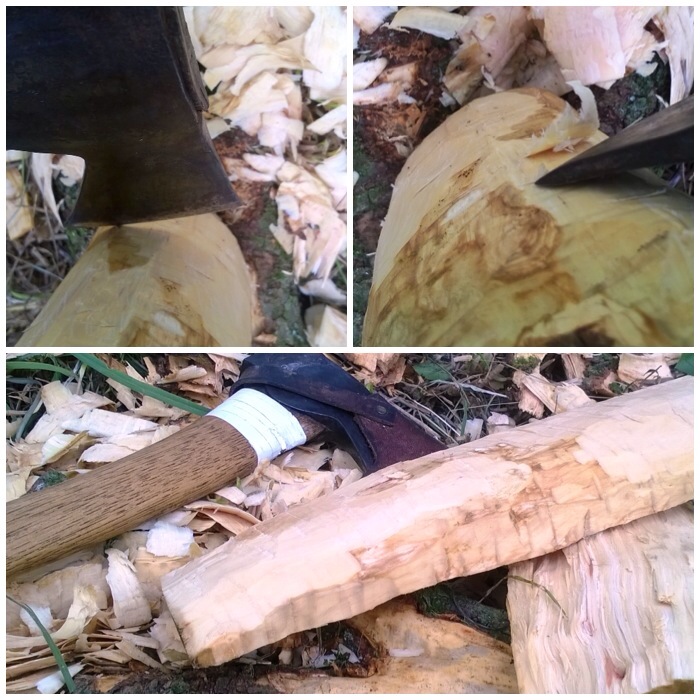
I chose a large piece of piece of what I think was Spruce (hard to tell when there is no bark and it is seasoned). I will be referring to the 3 parts of the log rocket as you can see in the bottom left picture below.
The Giant Log Rocket
Section 1
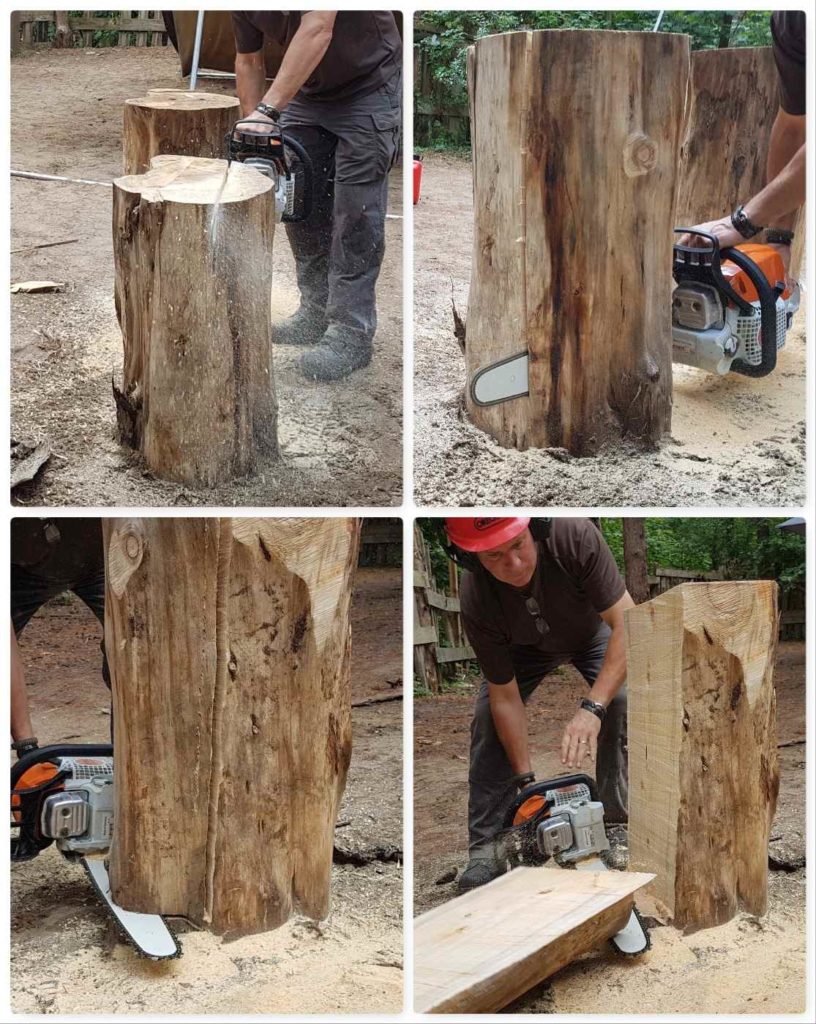
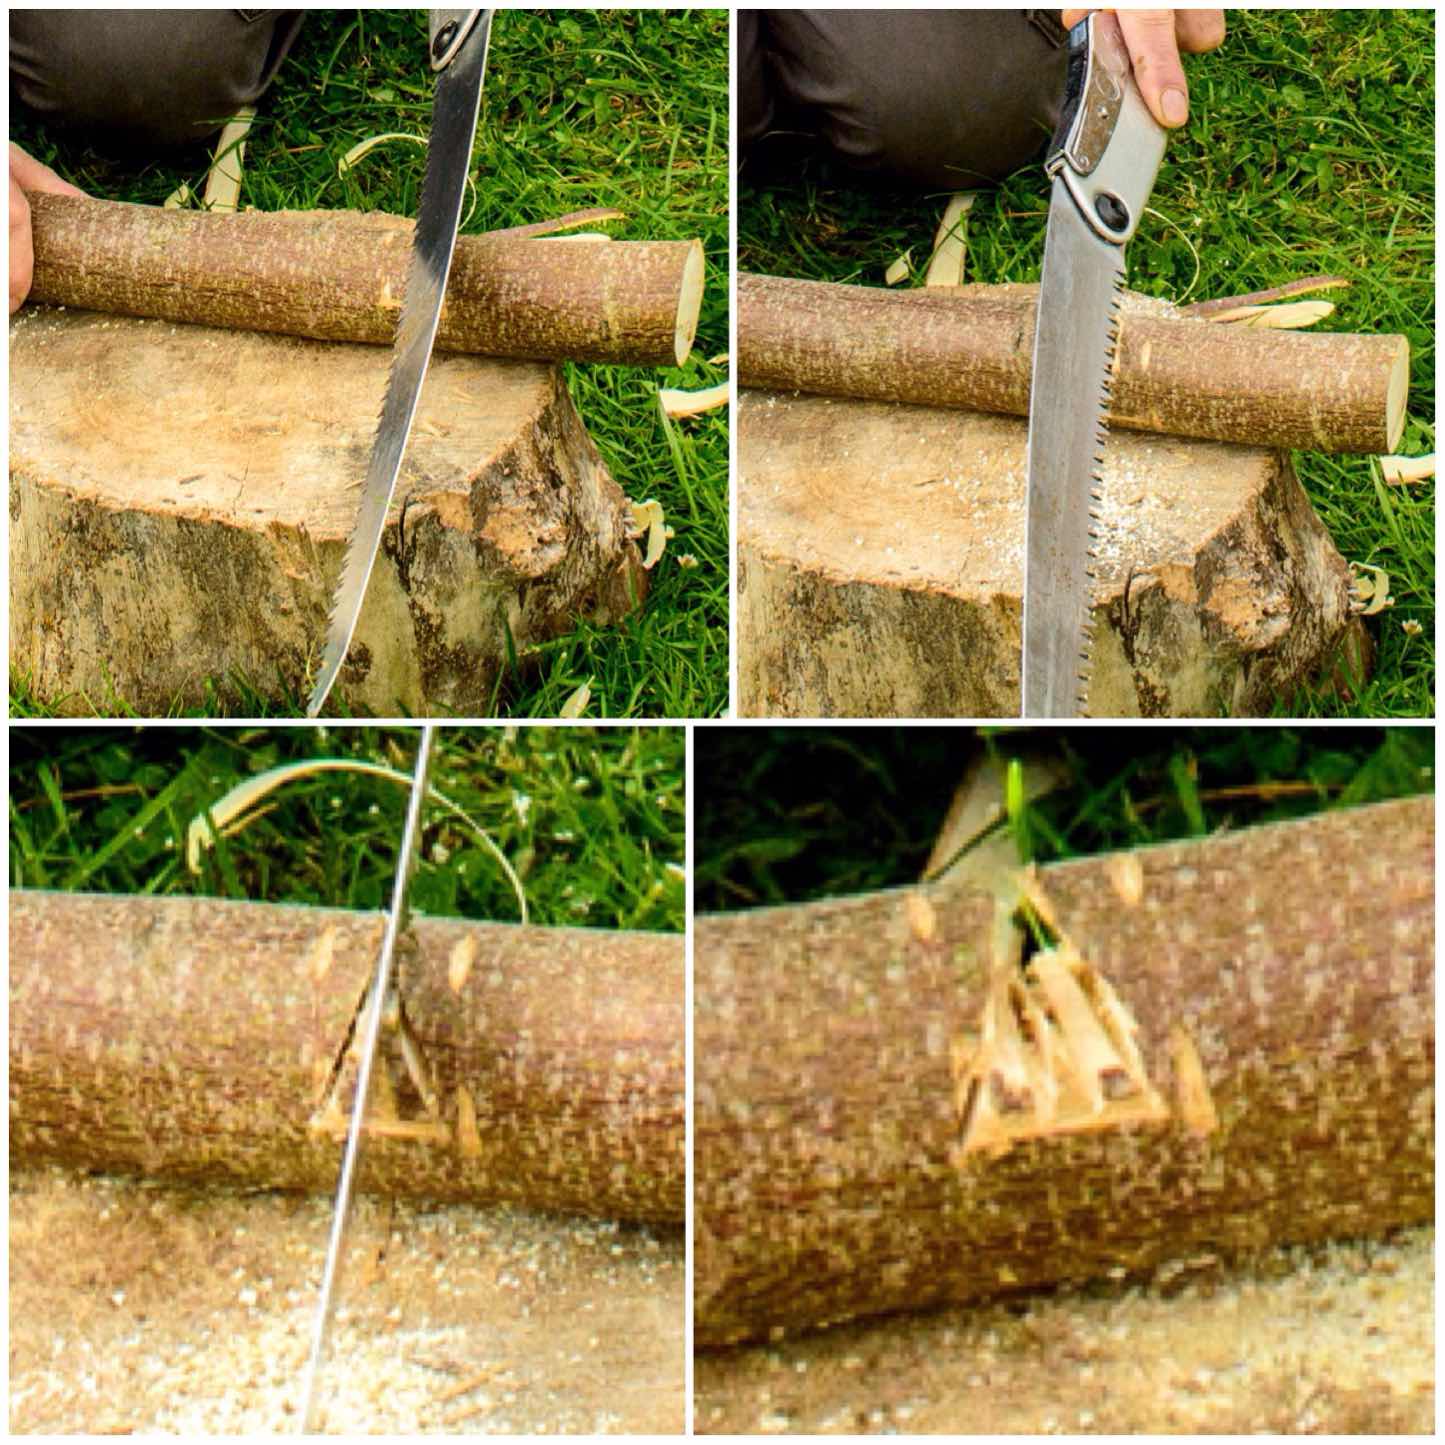
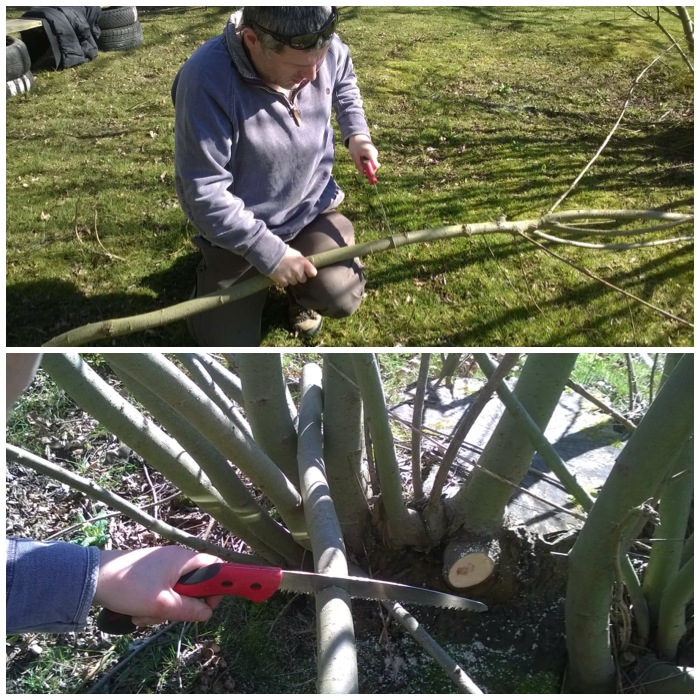
Rob took out a slice of the log (approx 1/3 of the log) and stopped the cut about 15 cms from the bottom. Then he cut in from the side at the bottom of the log to remove Section 1.
Cut 1
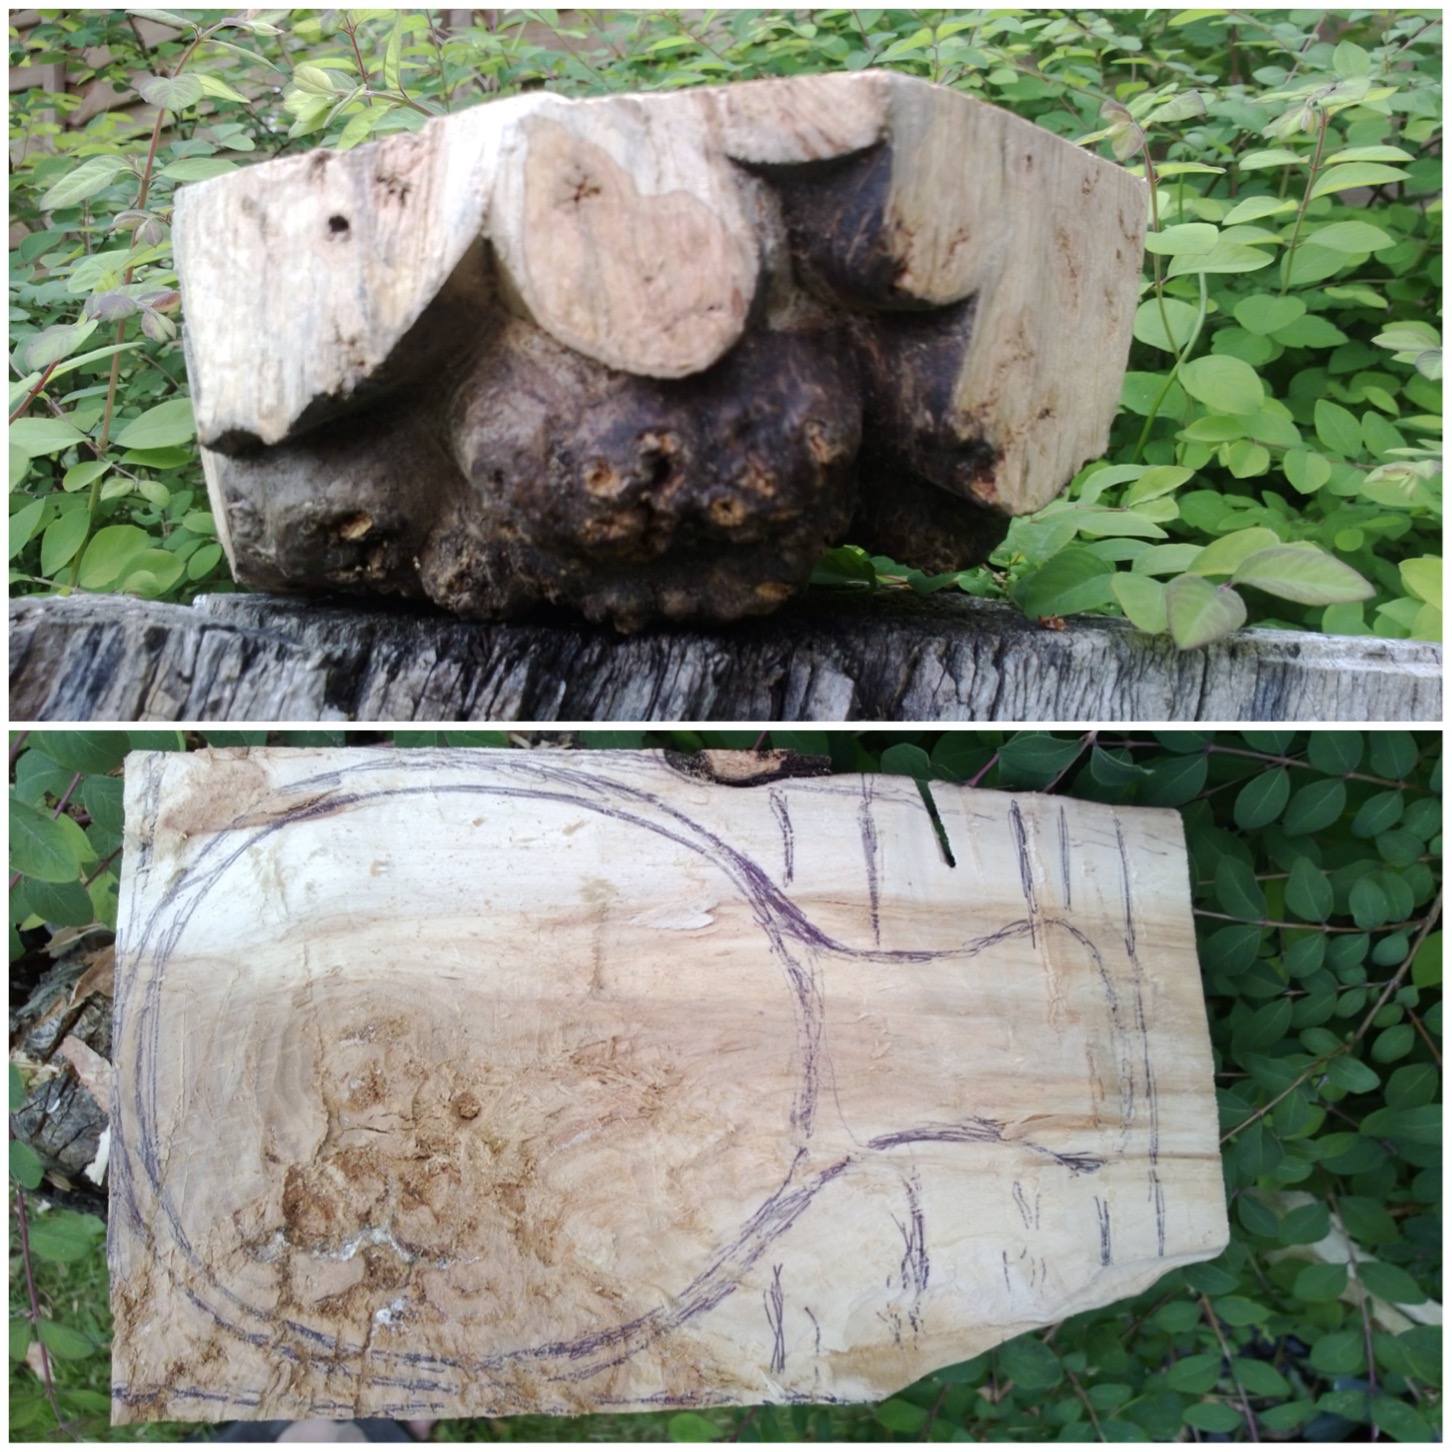
Section 2
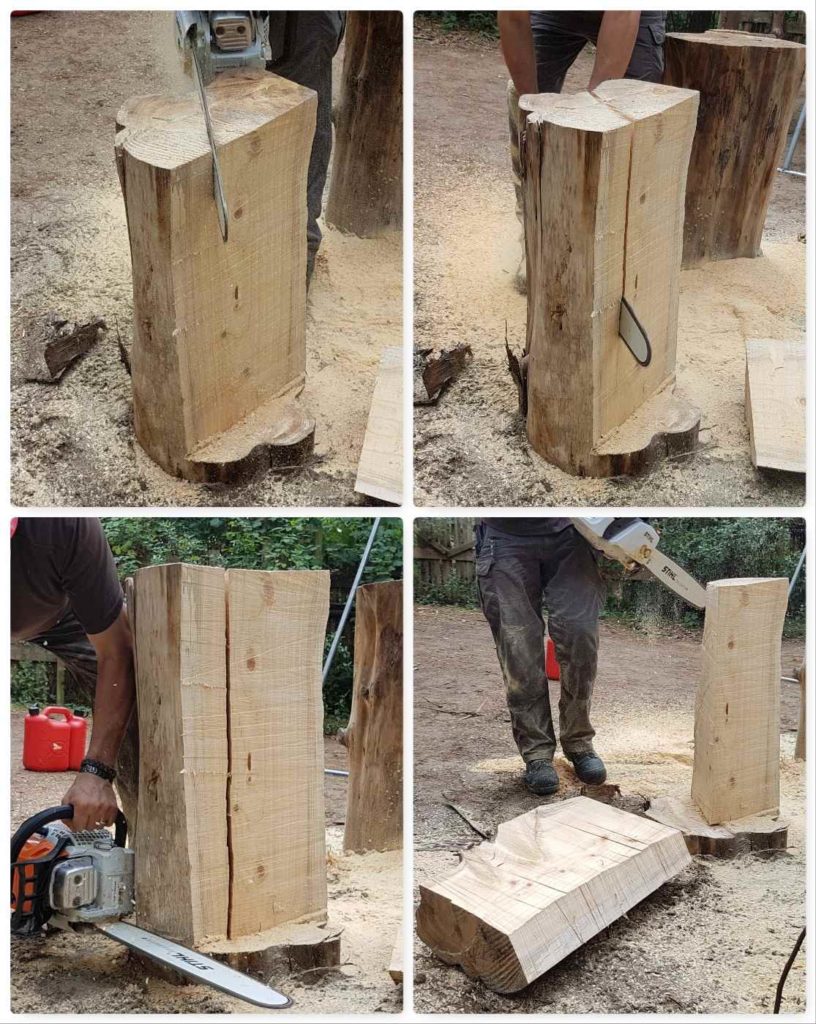
To describe this cut is quite difficult so refer to the picture above in which the pieces are numbered. The aim was to leave Section 3 with a point that could be removed to form the chimney. Again it was a case of cutting down to about 15 cms from the bottom and removing section 2 by cutting in from the side.
Cut 2
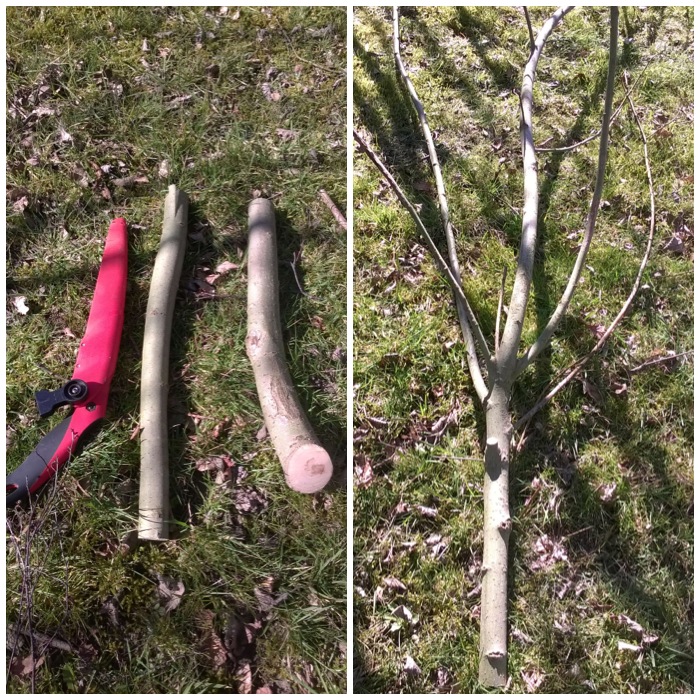
Section 3
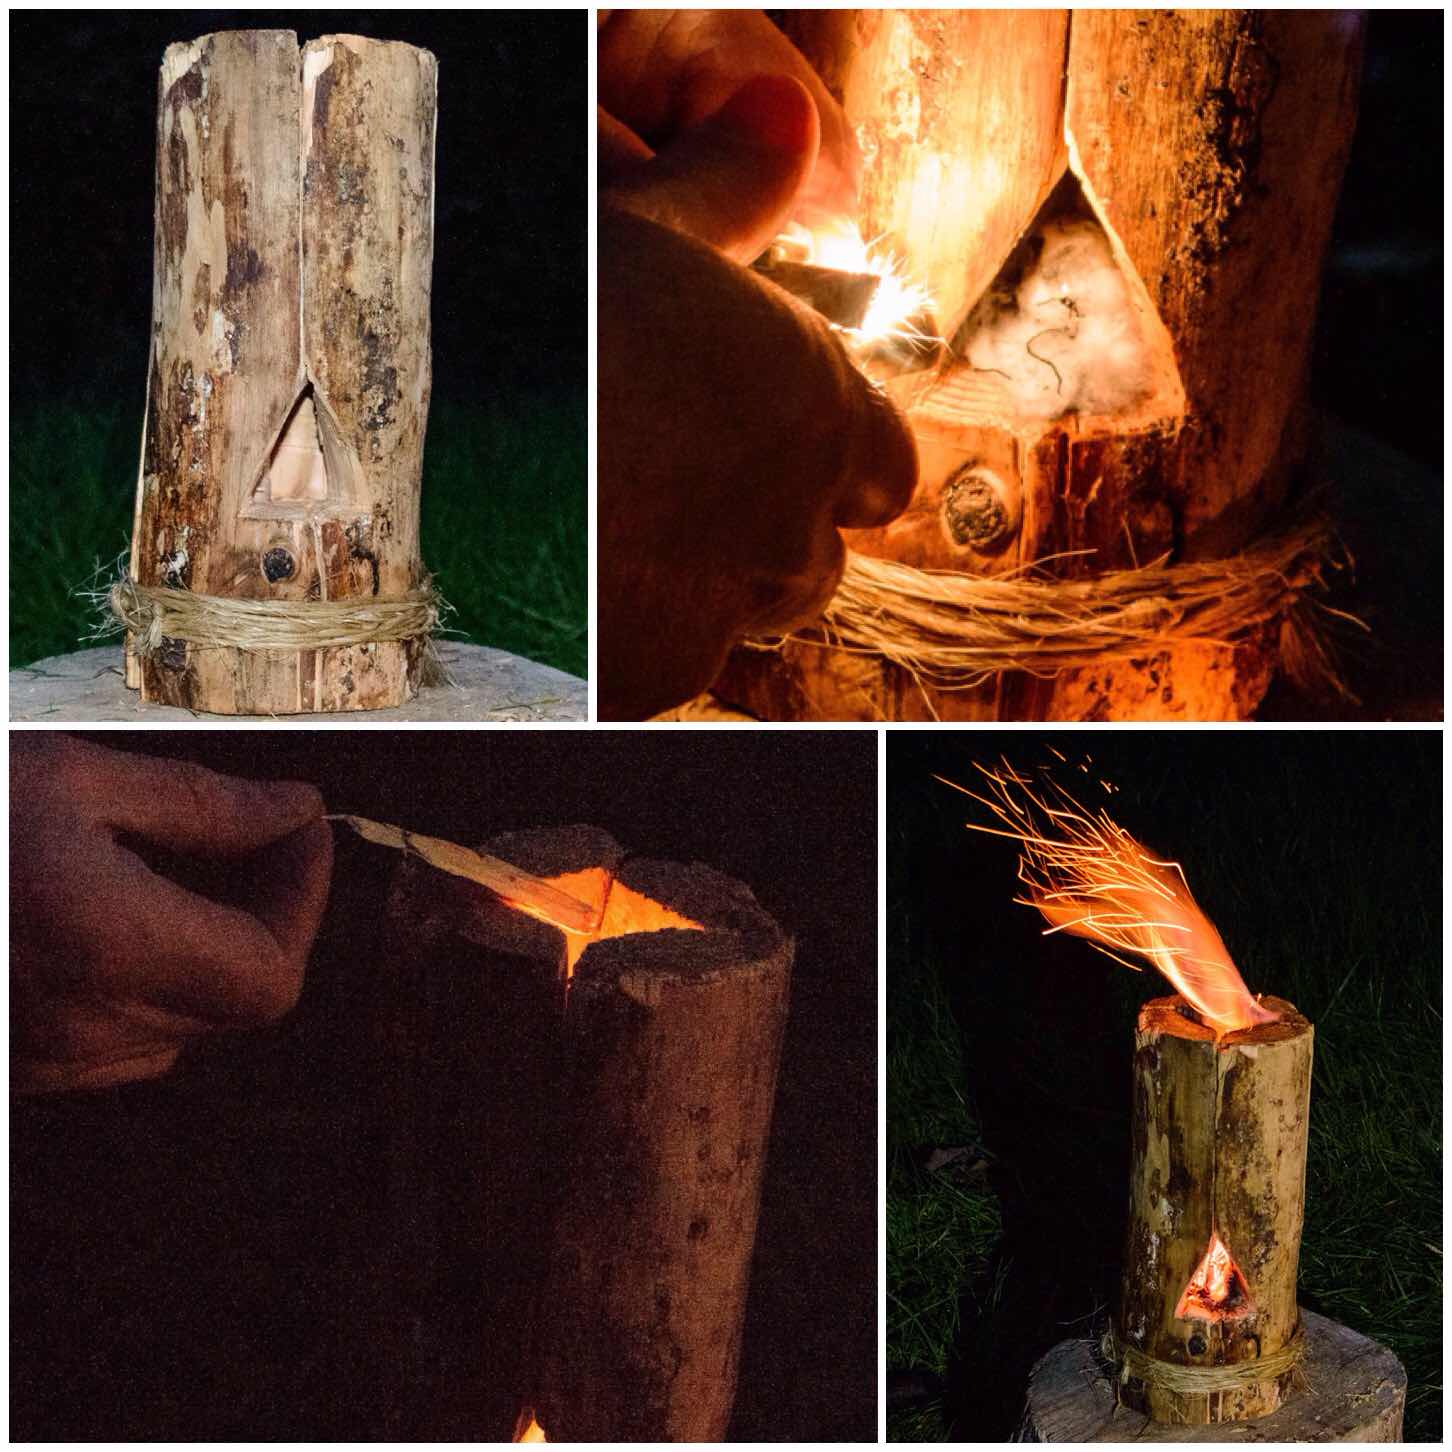
You can clearly see the point left on Section 3. Rob made an undercut at the bottom first this time and then removed the ‘Point’. This is the area that would form the chimney. The triangular-shaped piece of wood from the centre point was split down further with an axe to form the kindling to get the log rocket going.
The final step here in the bottom right picture shows Rob cutting out a piece of wood at the bottom of Section 3 to slightly enlarge the ‘firebox’ area.
The chimney
Firebox opening
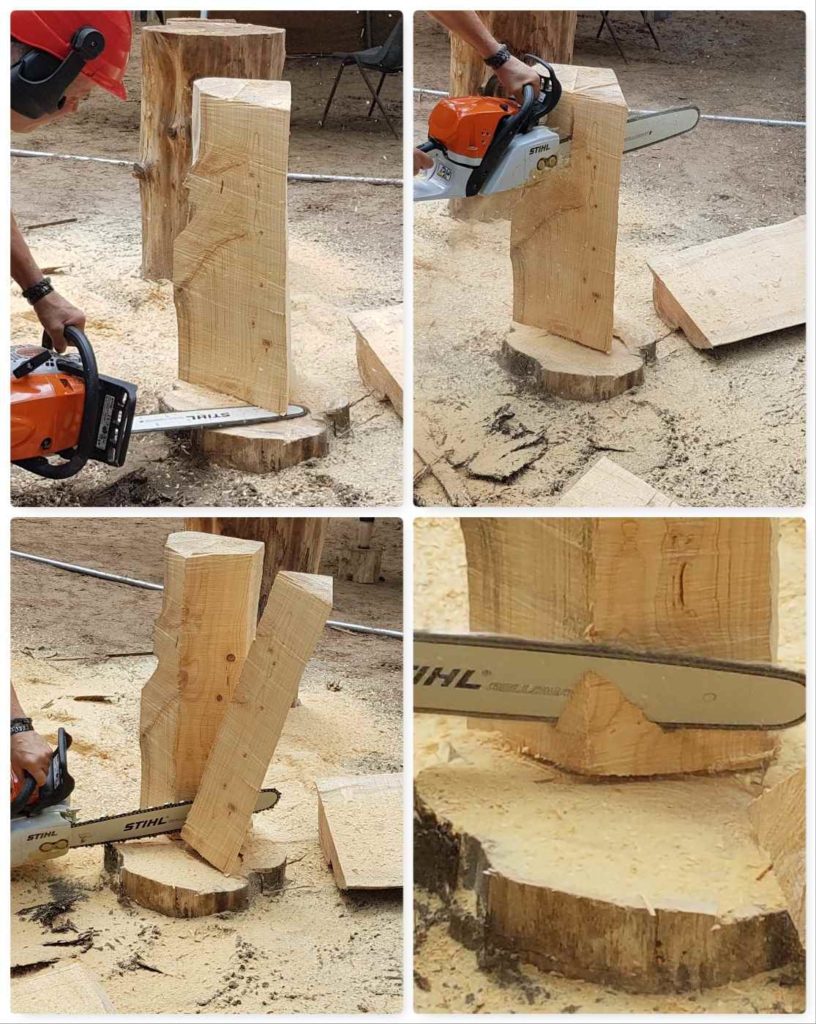
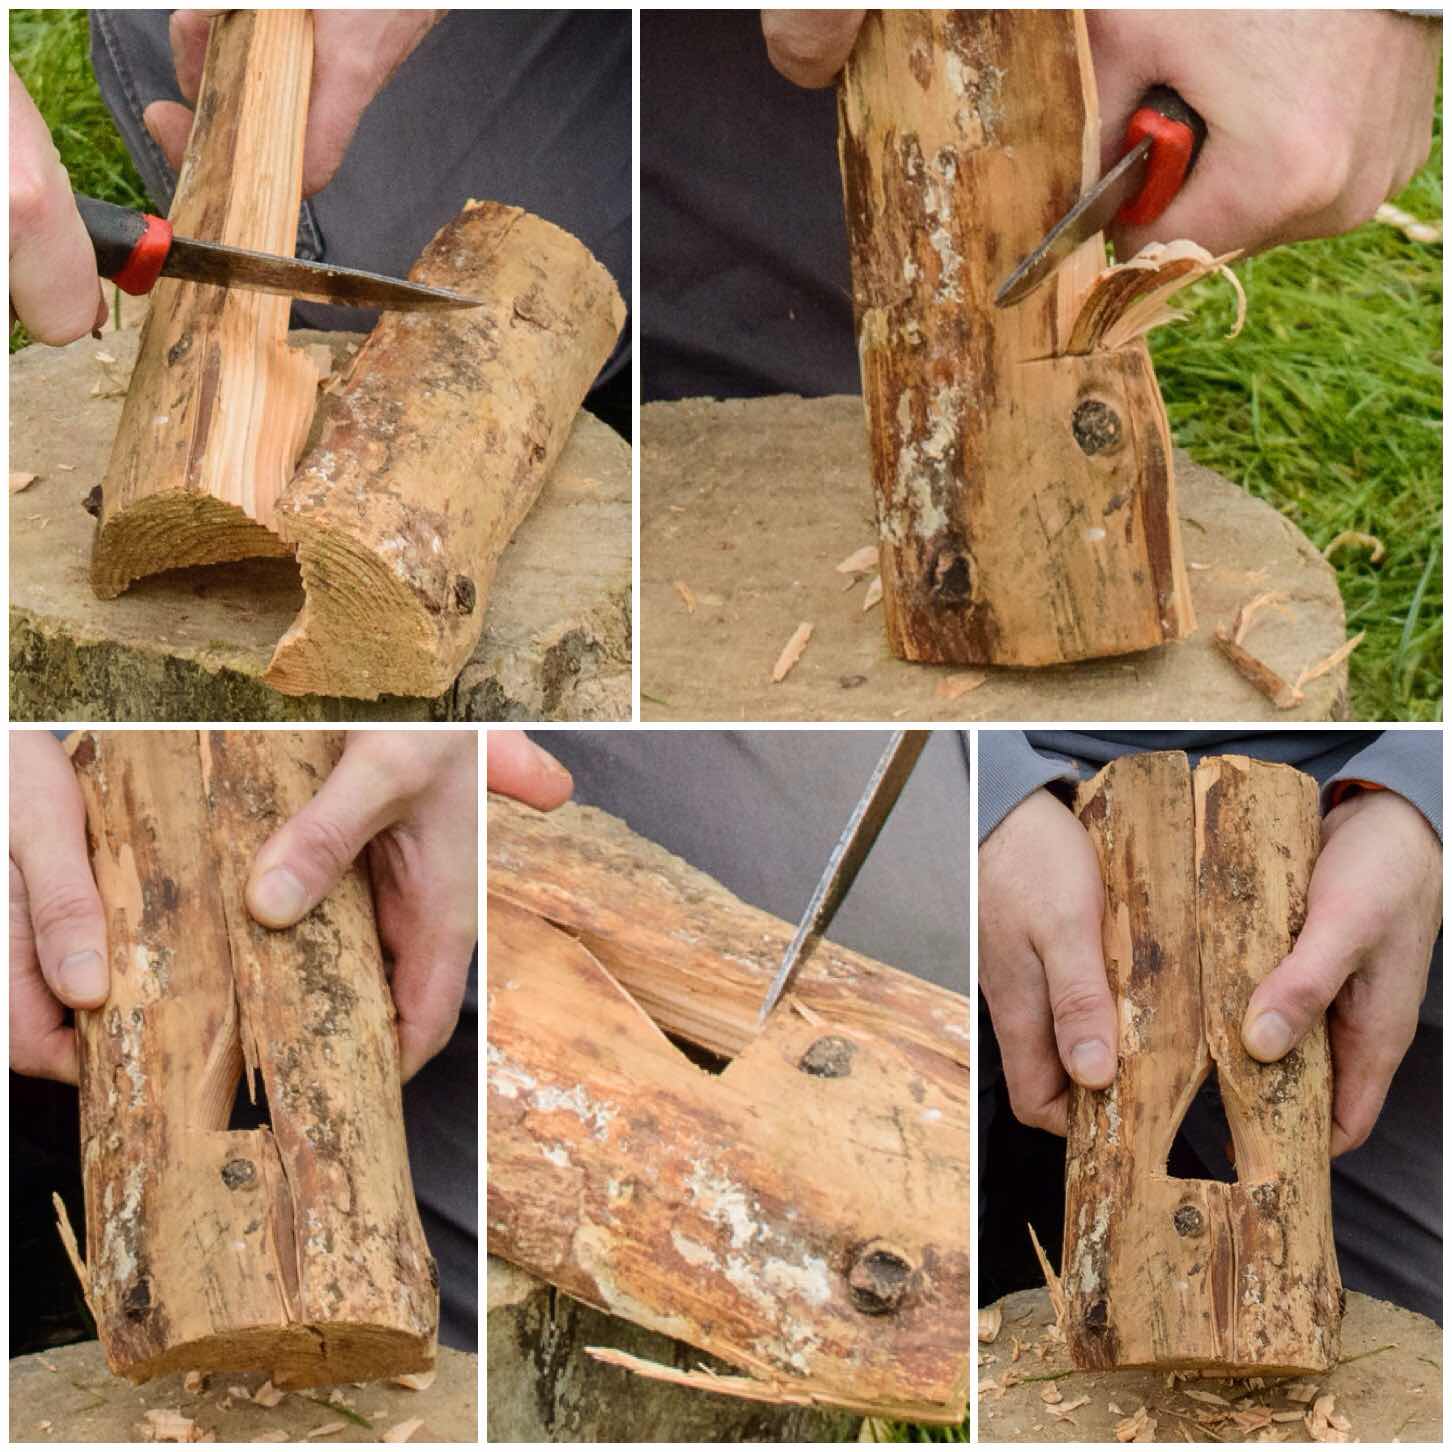
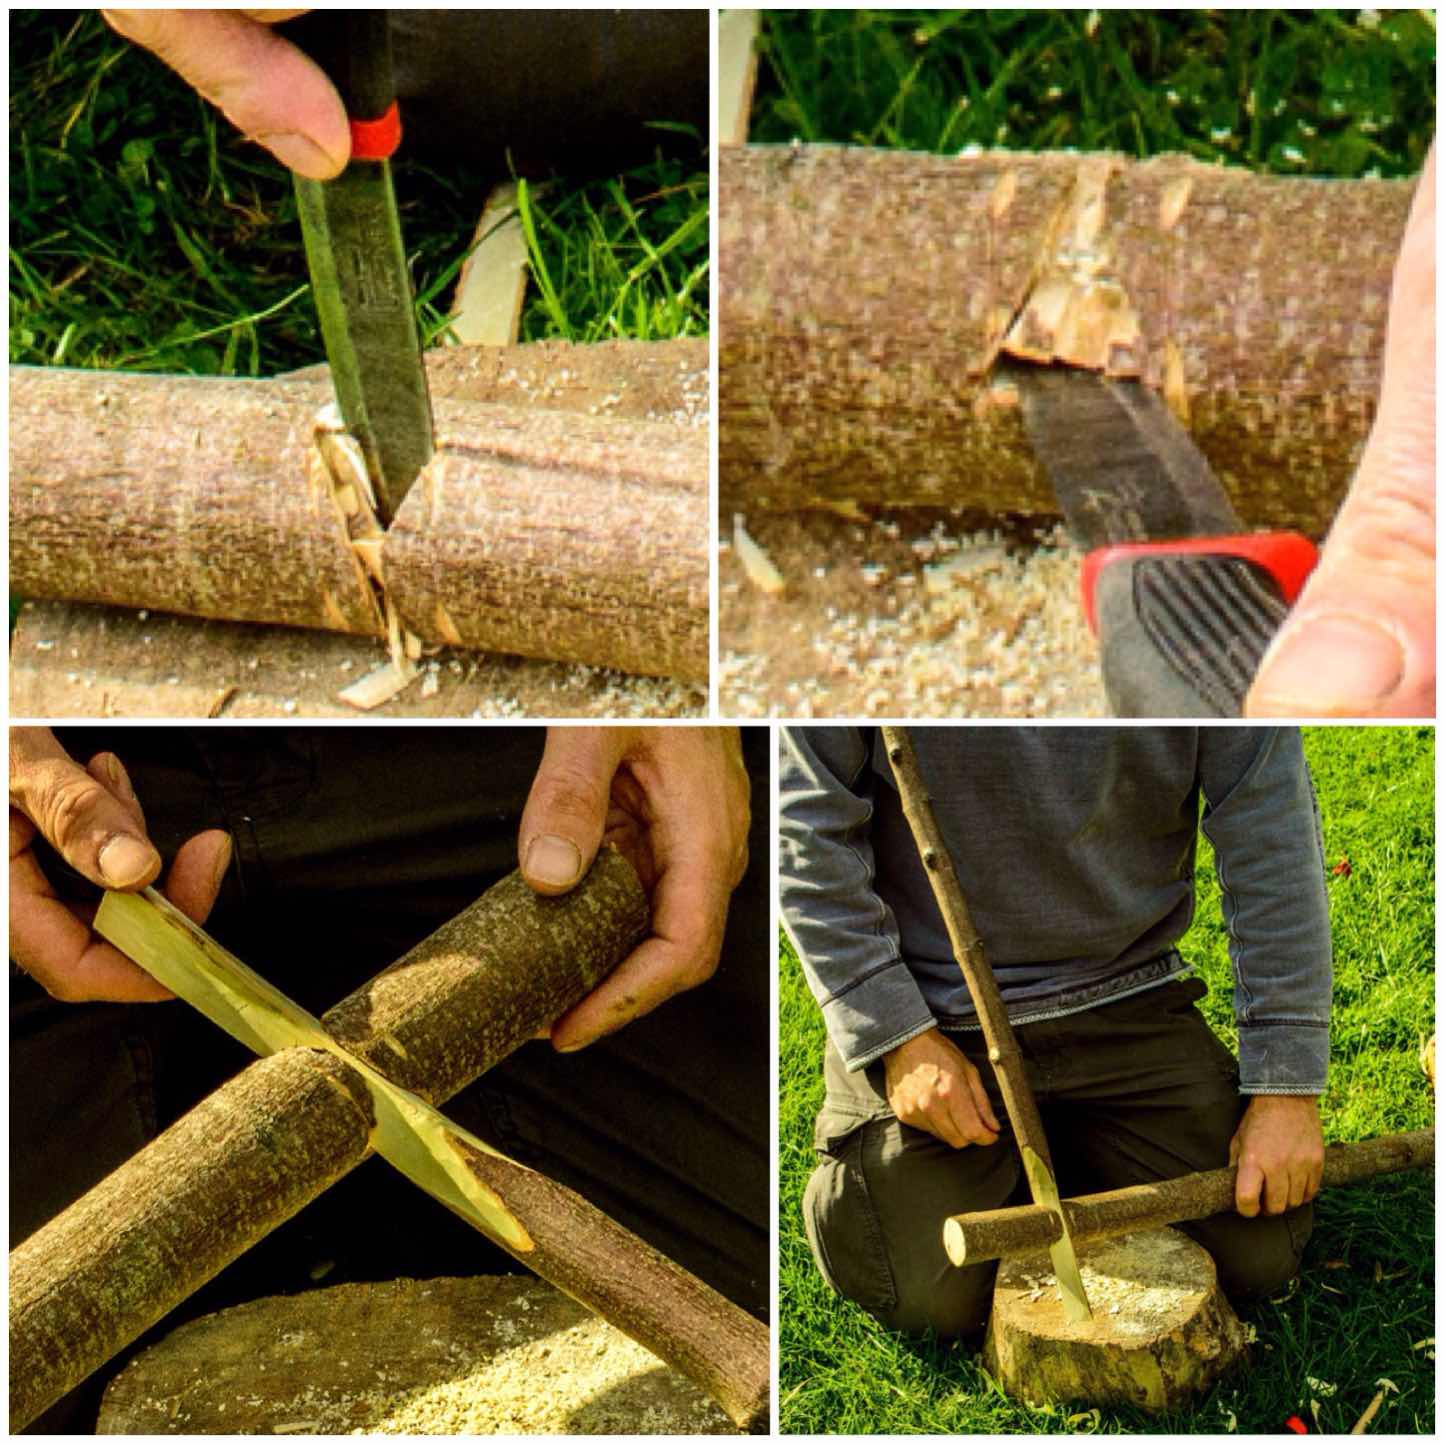
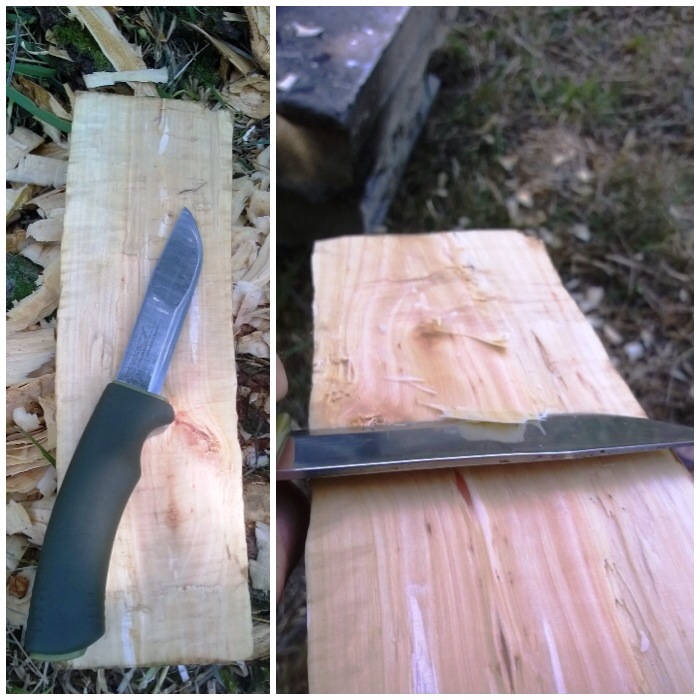
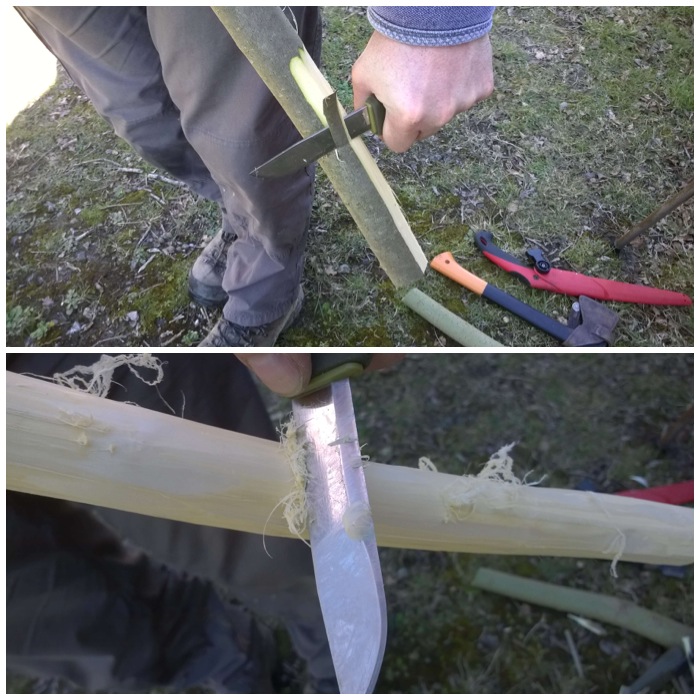
I have shown the final look of the firebox opening in the top left picture below. Rob created this firstly by re-assembling Sections 1 & 2 with Section 3. The he marked the corners of Sections 1 & 2 that needed cutting to form the firebox opening (that might sound overly complicated, but it’s important if you’re not to cut the wrong corners).
Once he’d cut off the corners he shaved off more wood from the ‘Shoulder’ of the opening so as to enlarge the firebox area.
The Firebox
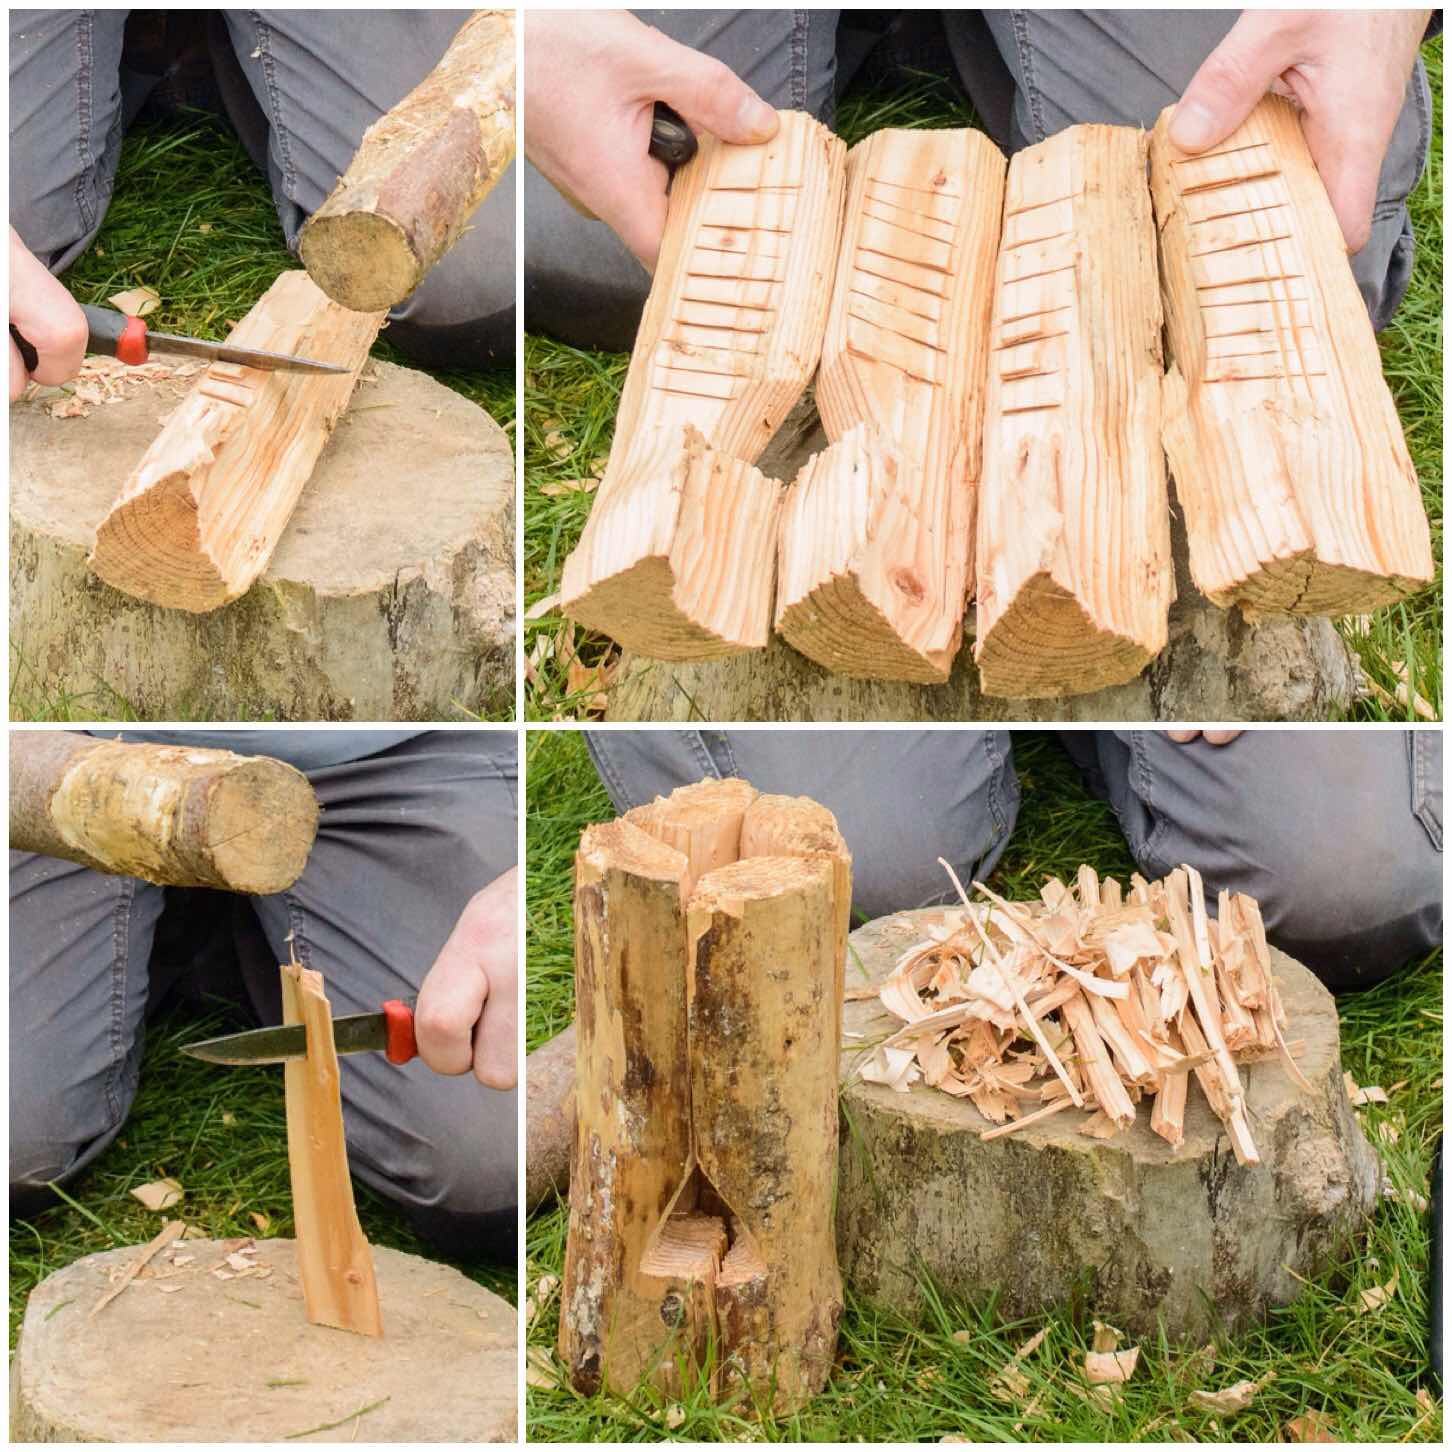
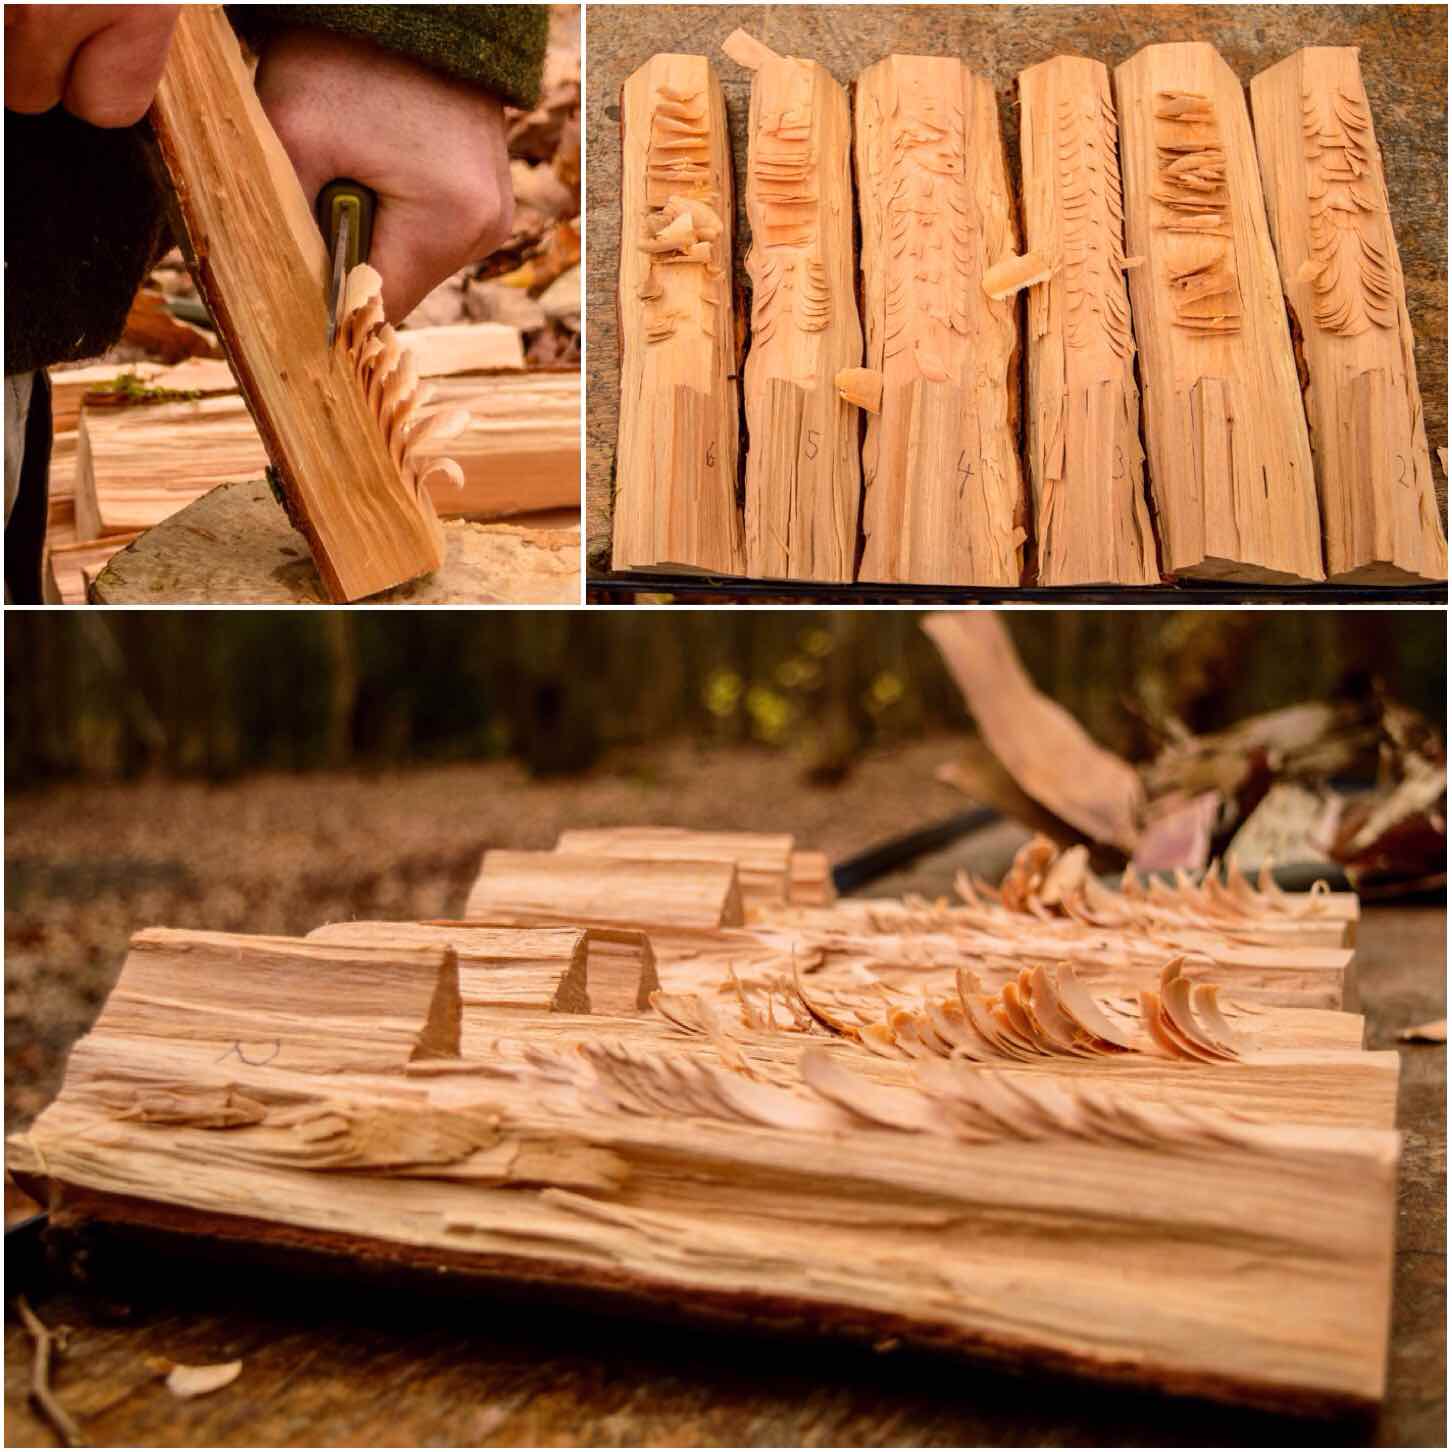
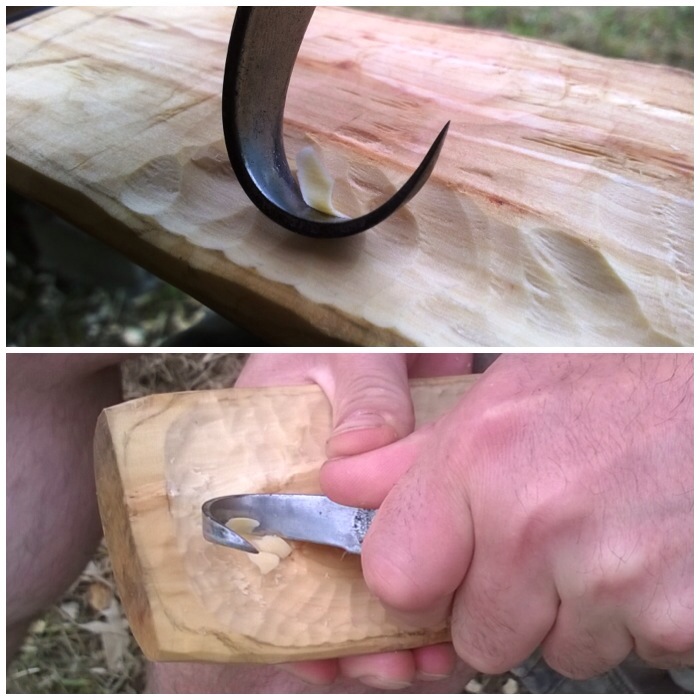
The Raappanan Tuli cuts
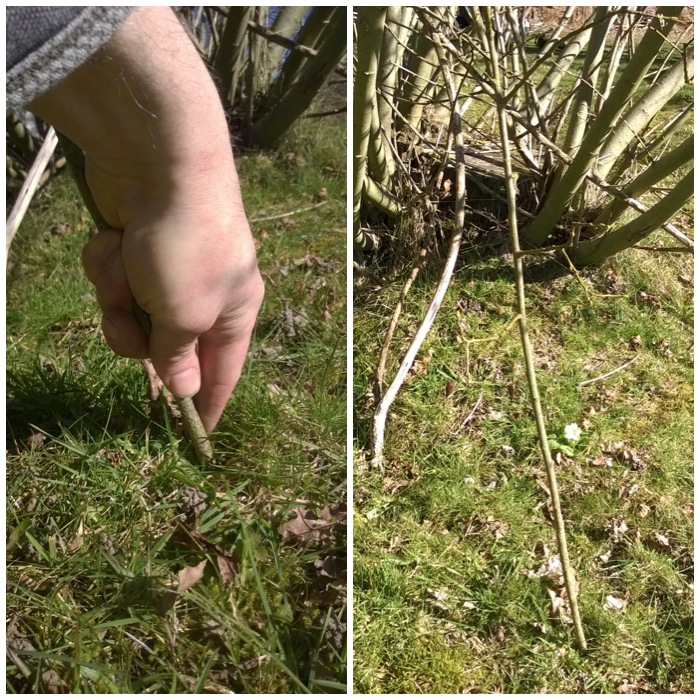
To increase the surface area of the chimney and help the log catch light more quickly I asked Rob to makes some cuts in the flue area. I got this idea from researching different types of log fires – this style of cut comes from the Raappanan Tuli log fire.
These cuts are particularly useful when you have a damp log as the increased surface area greatly increases the chances of the fire taking properly.
Ribbing the chimney
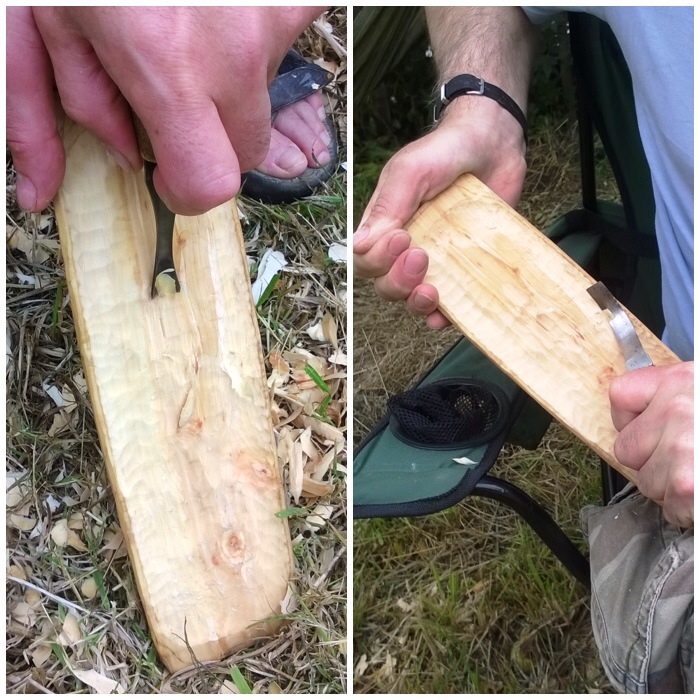
Final touches
I used strong wire to hold all the pieces of the reassembled log together – an alternative would have been to make some dovetail joints and join them together with green wood pegs – see here for more details – How To…. Build a Dovetail Log Rocket Stove.
Finally my friend Mark used his drill to give the log rocket a face (which also helped provide a bit more ventilation).
Final touches
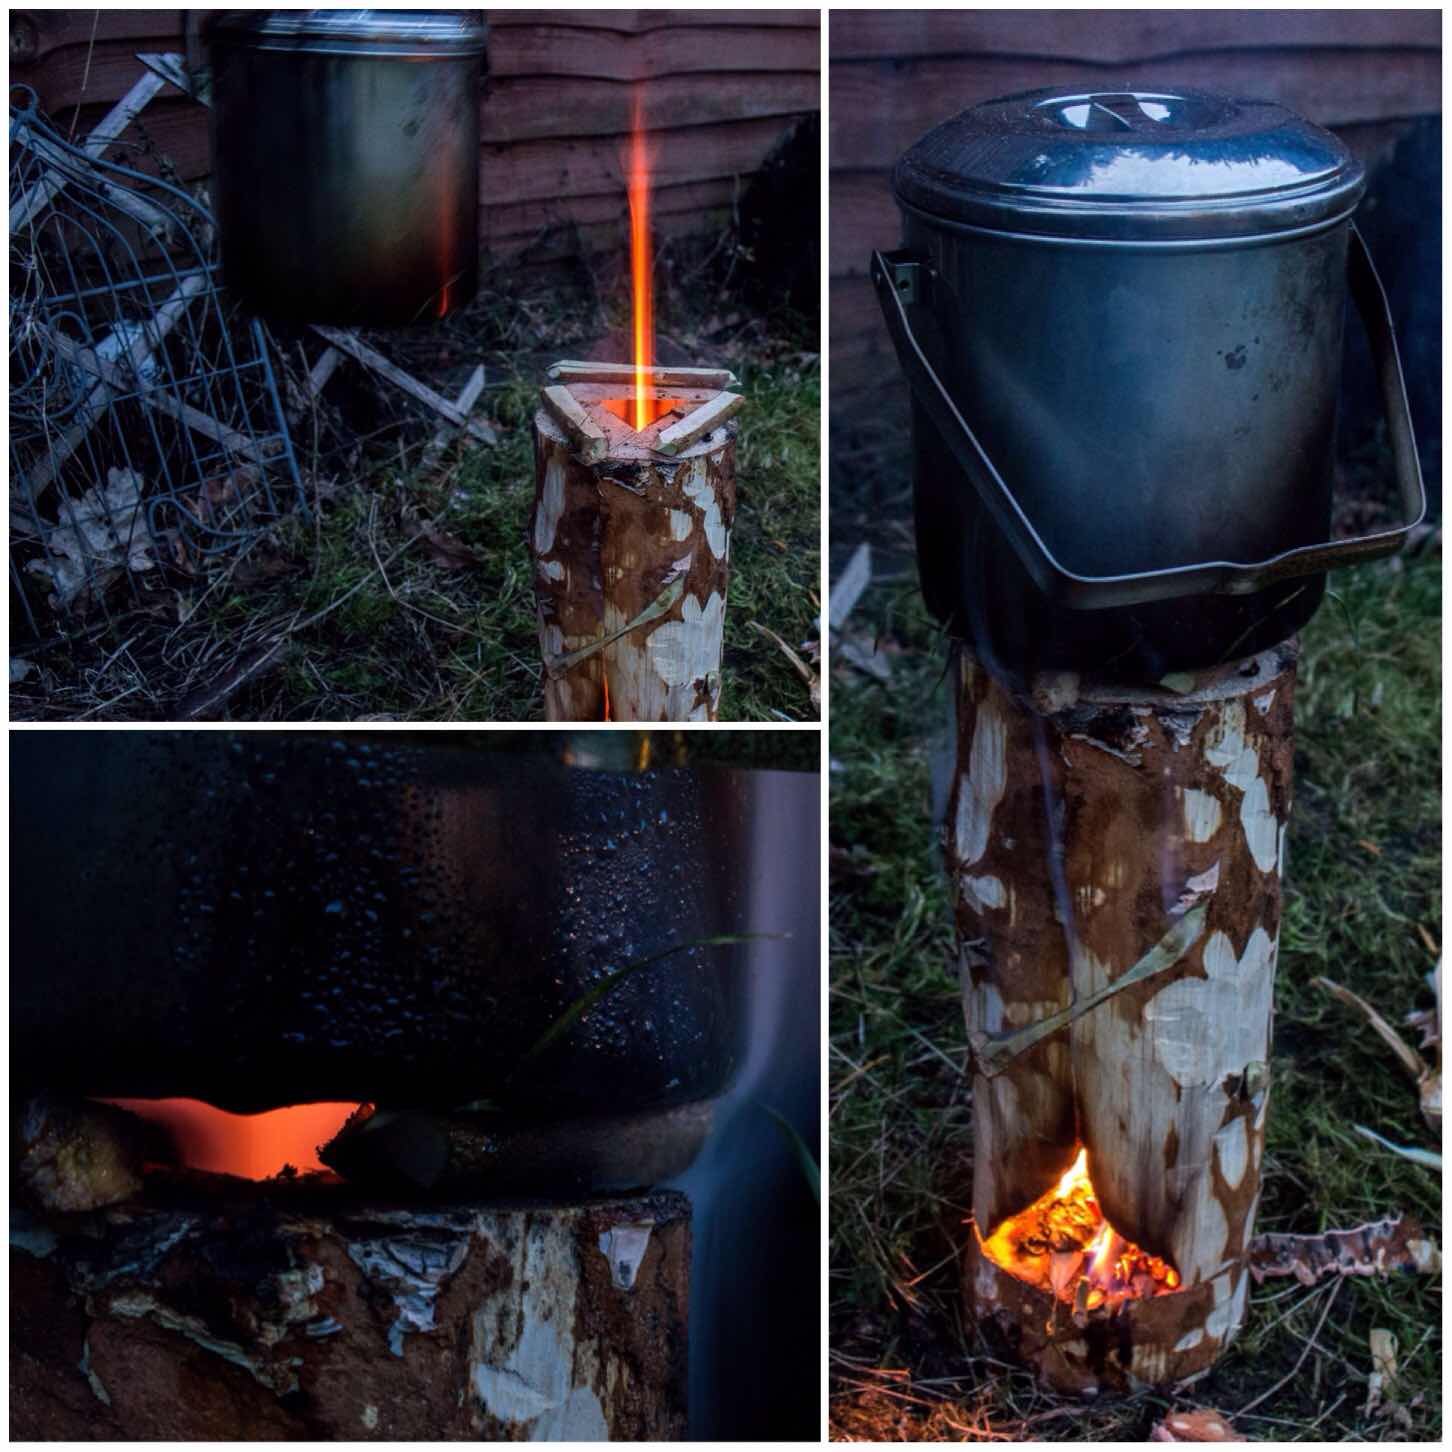
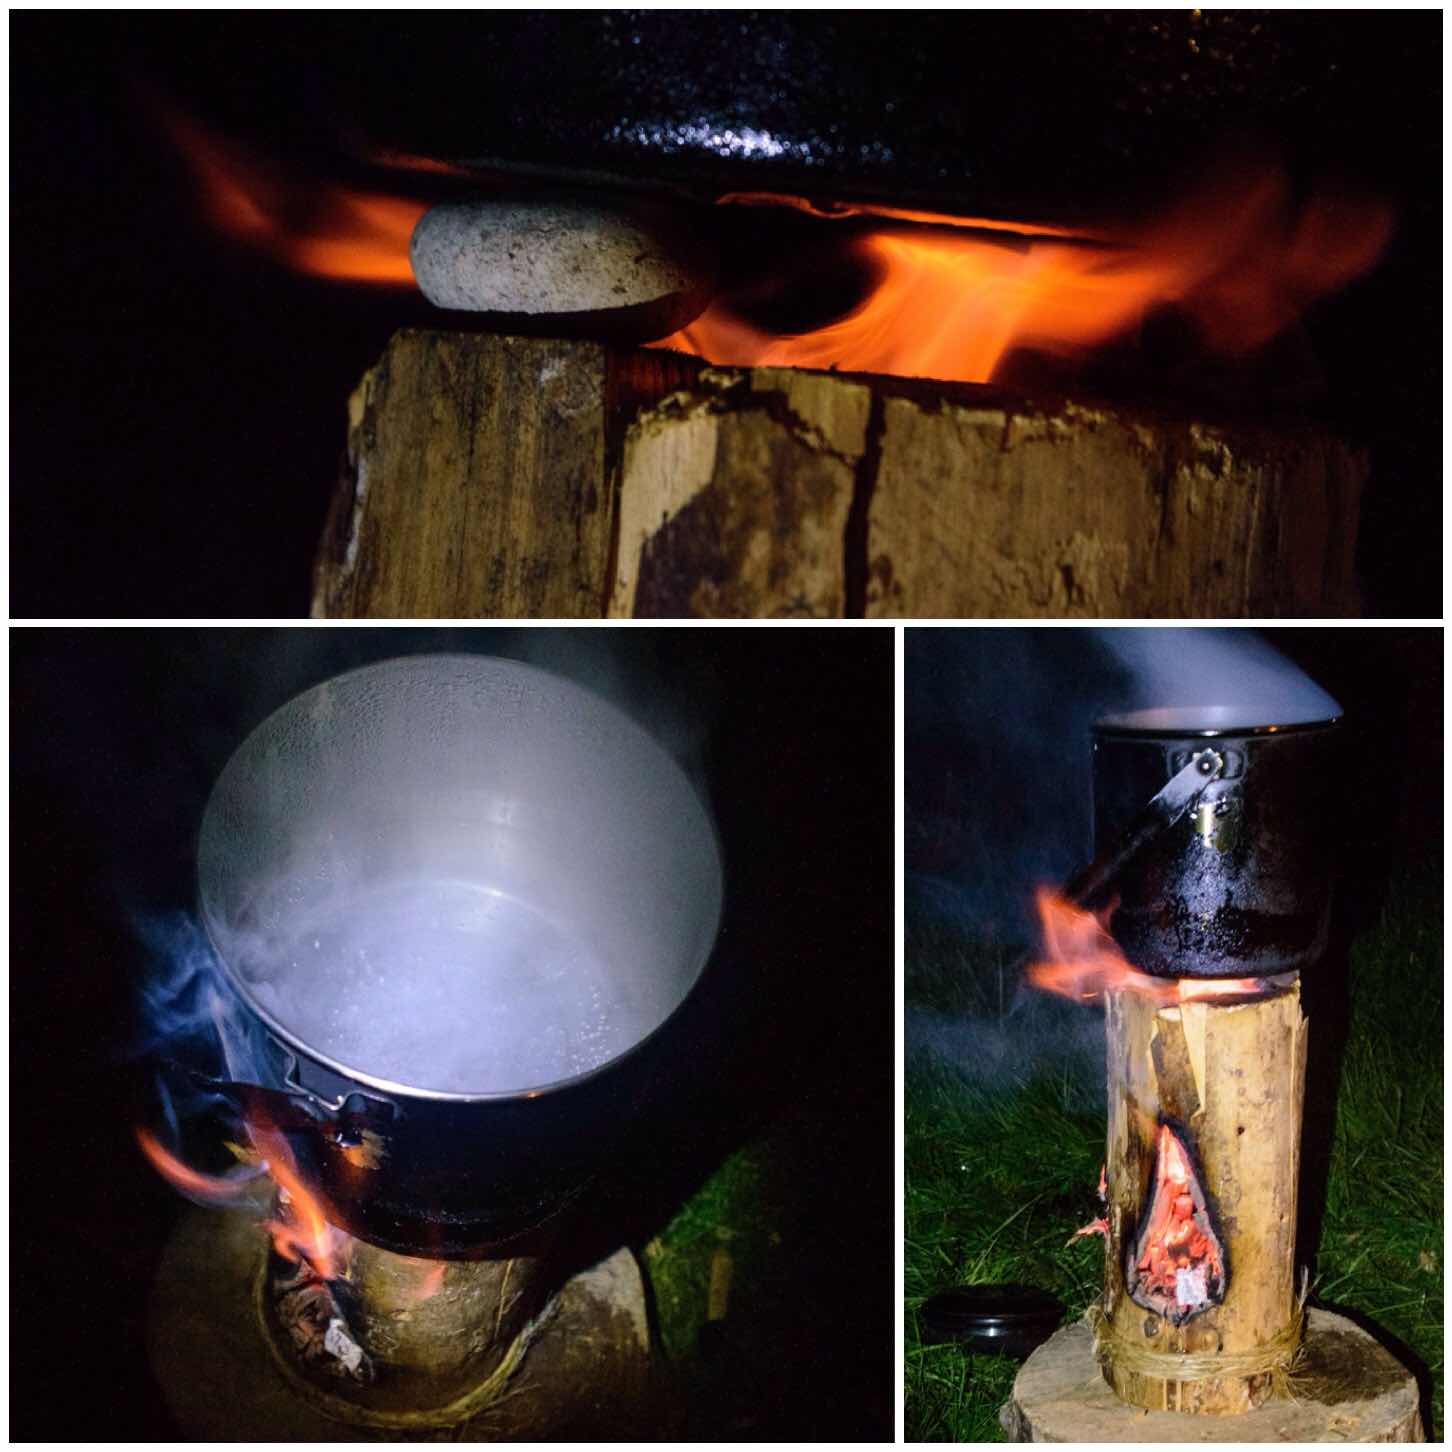
Firing up
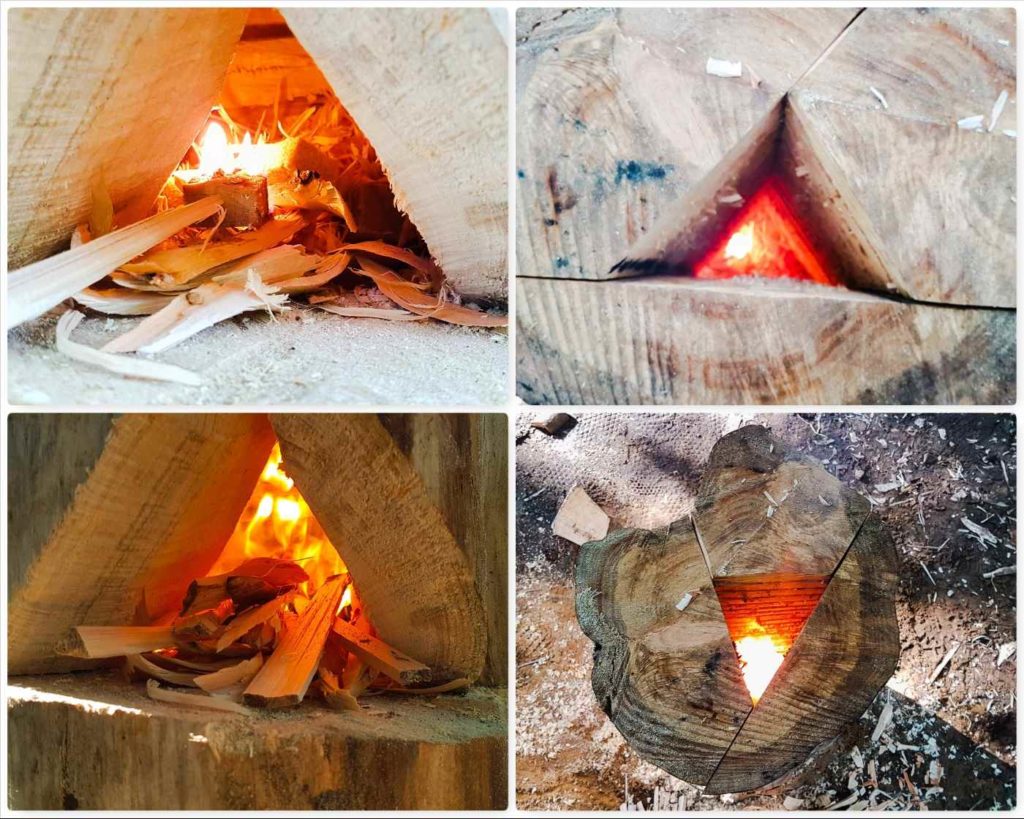
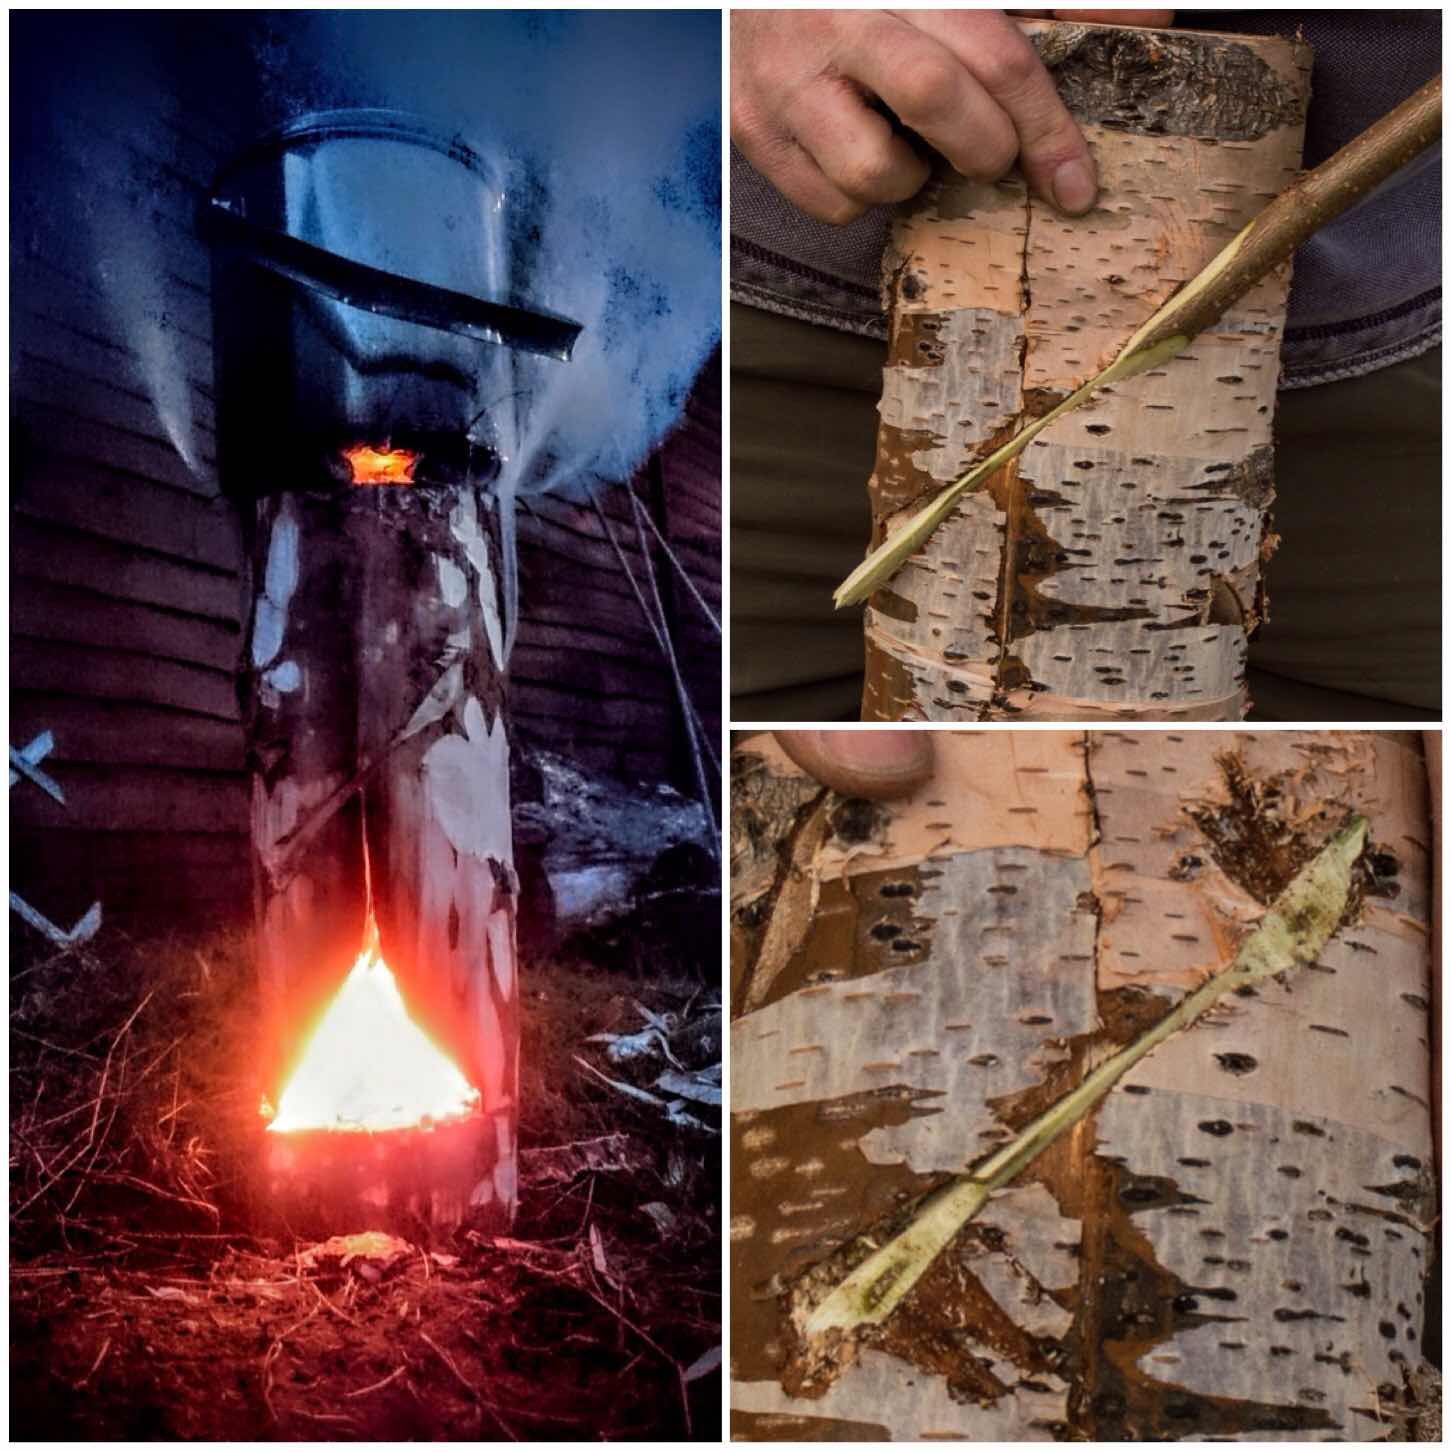
I used slivers of the central section Rob had cut out of the log as kindling and lit it all with a lollistick lighter (a firelighter pierced on a sharp stick – have a look here – Lolli Stick Fire).
Firing up
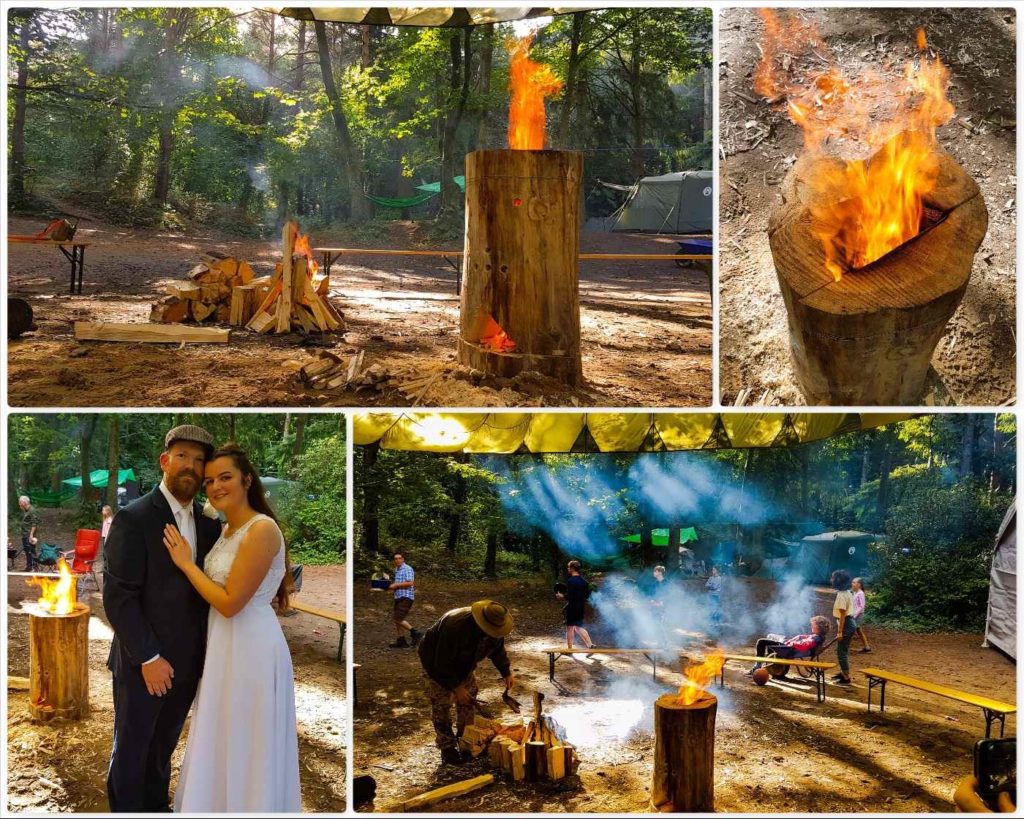
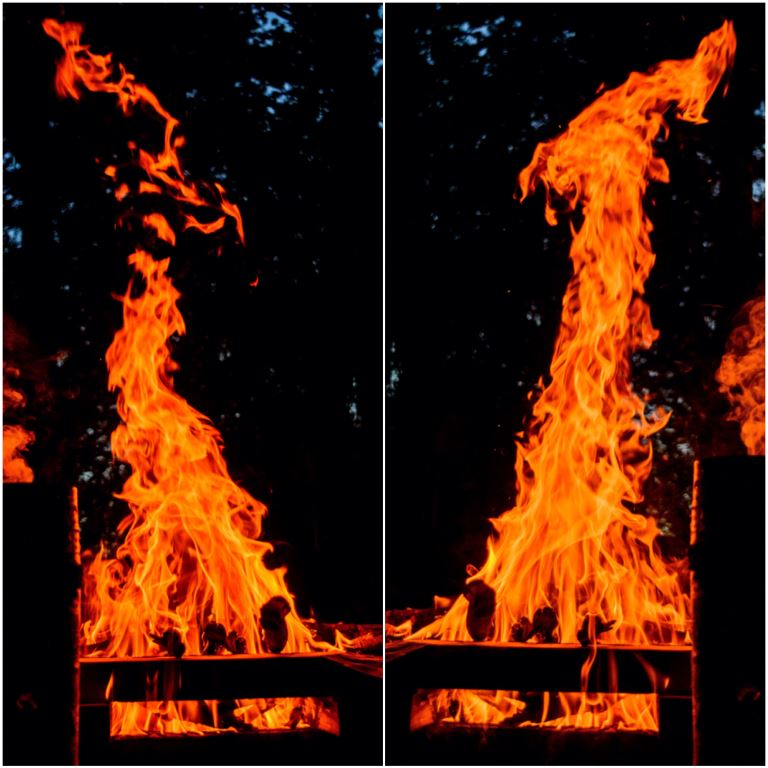
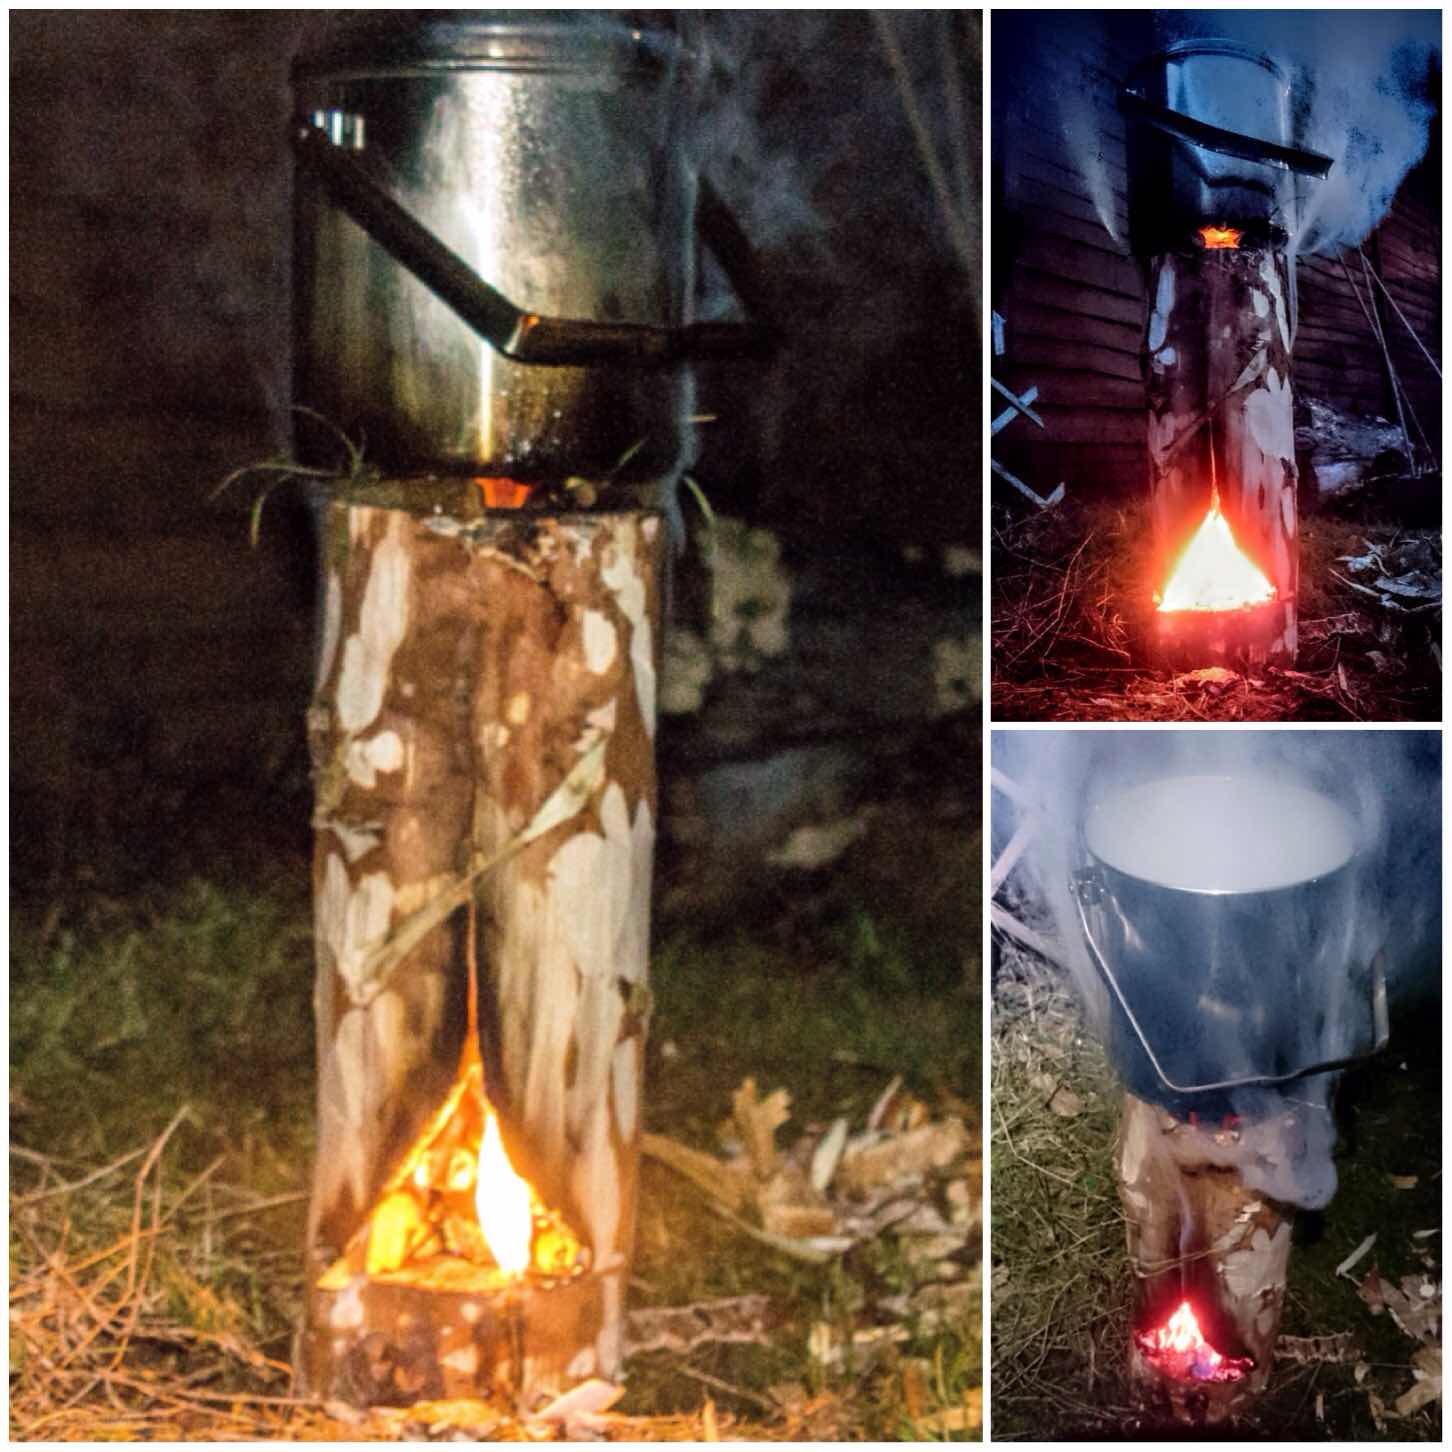
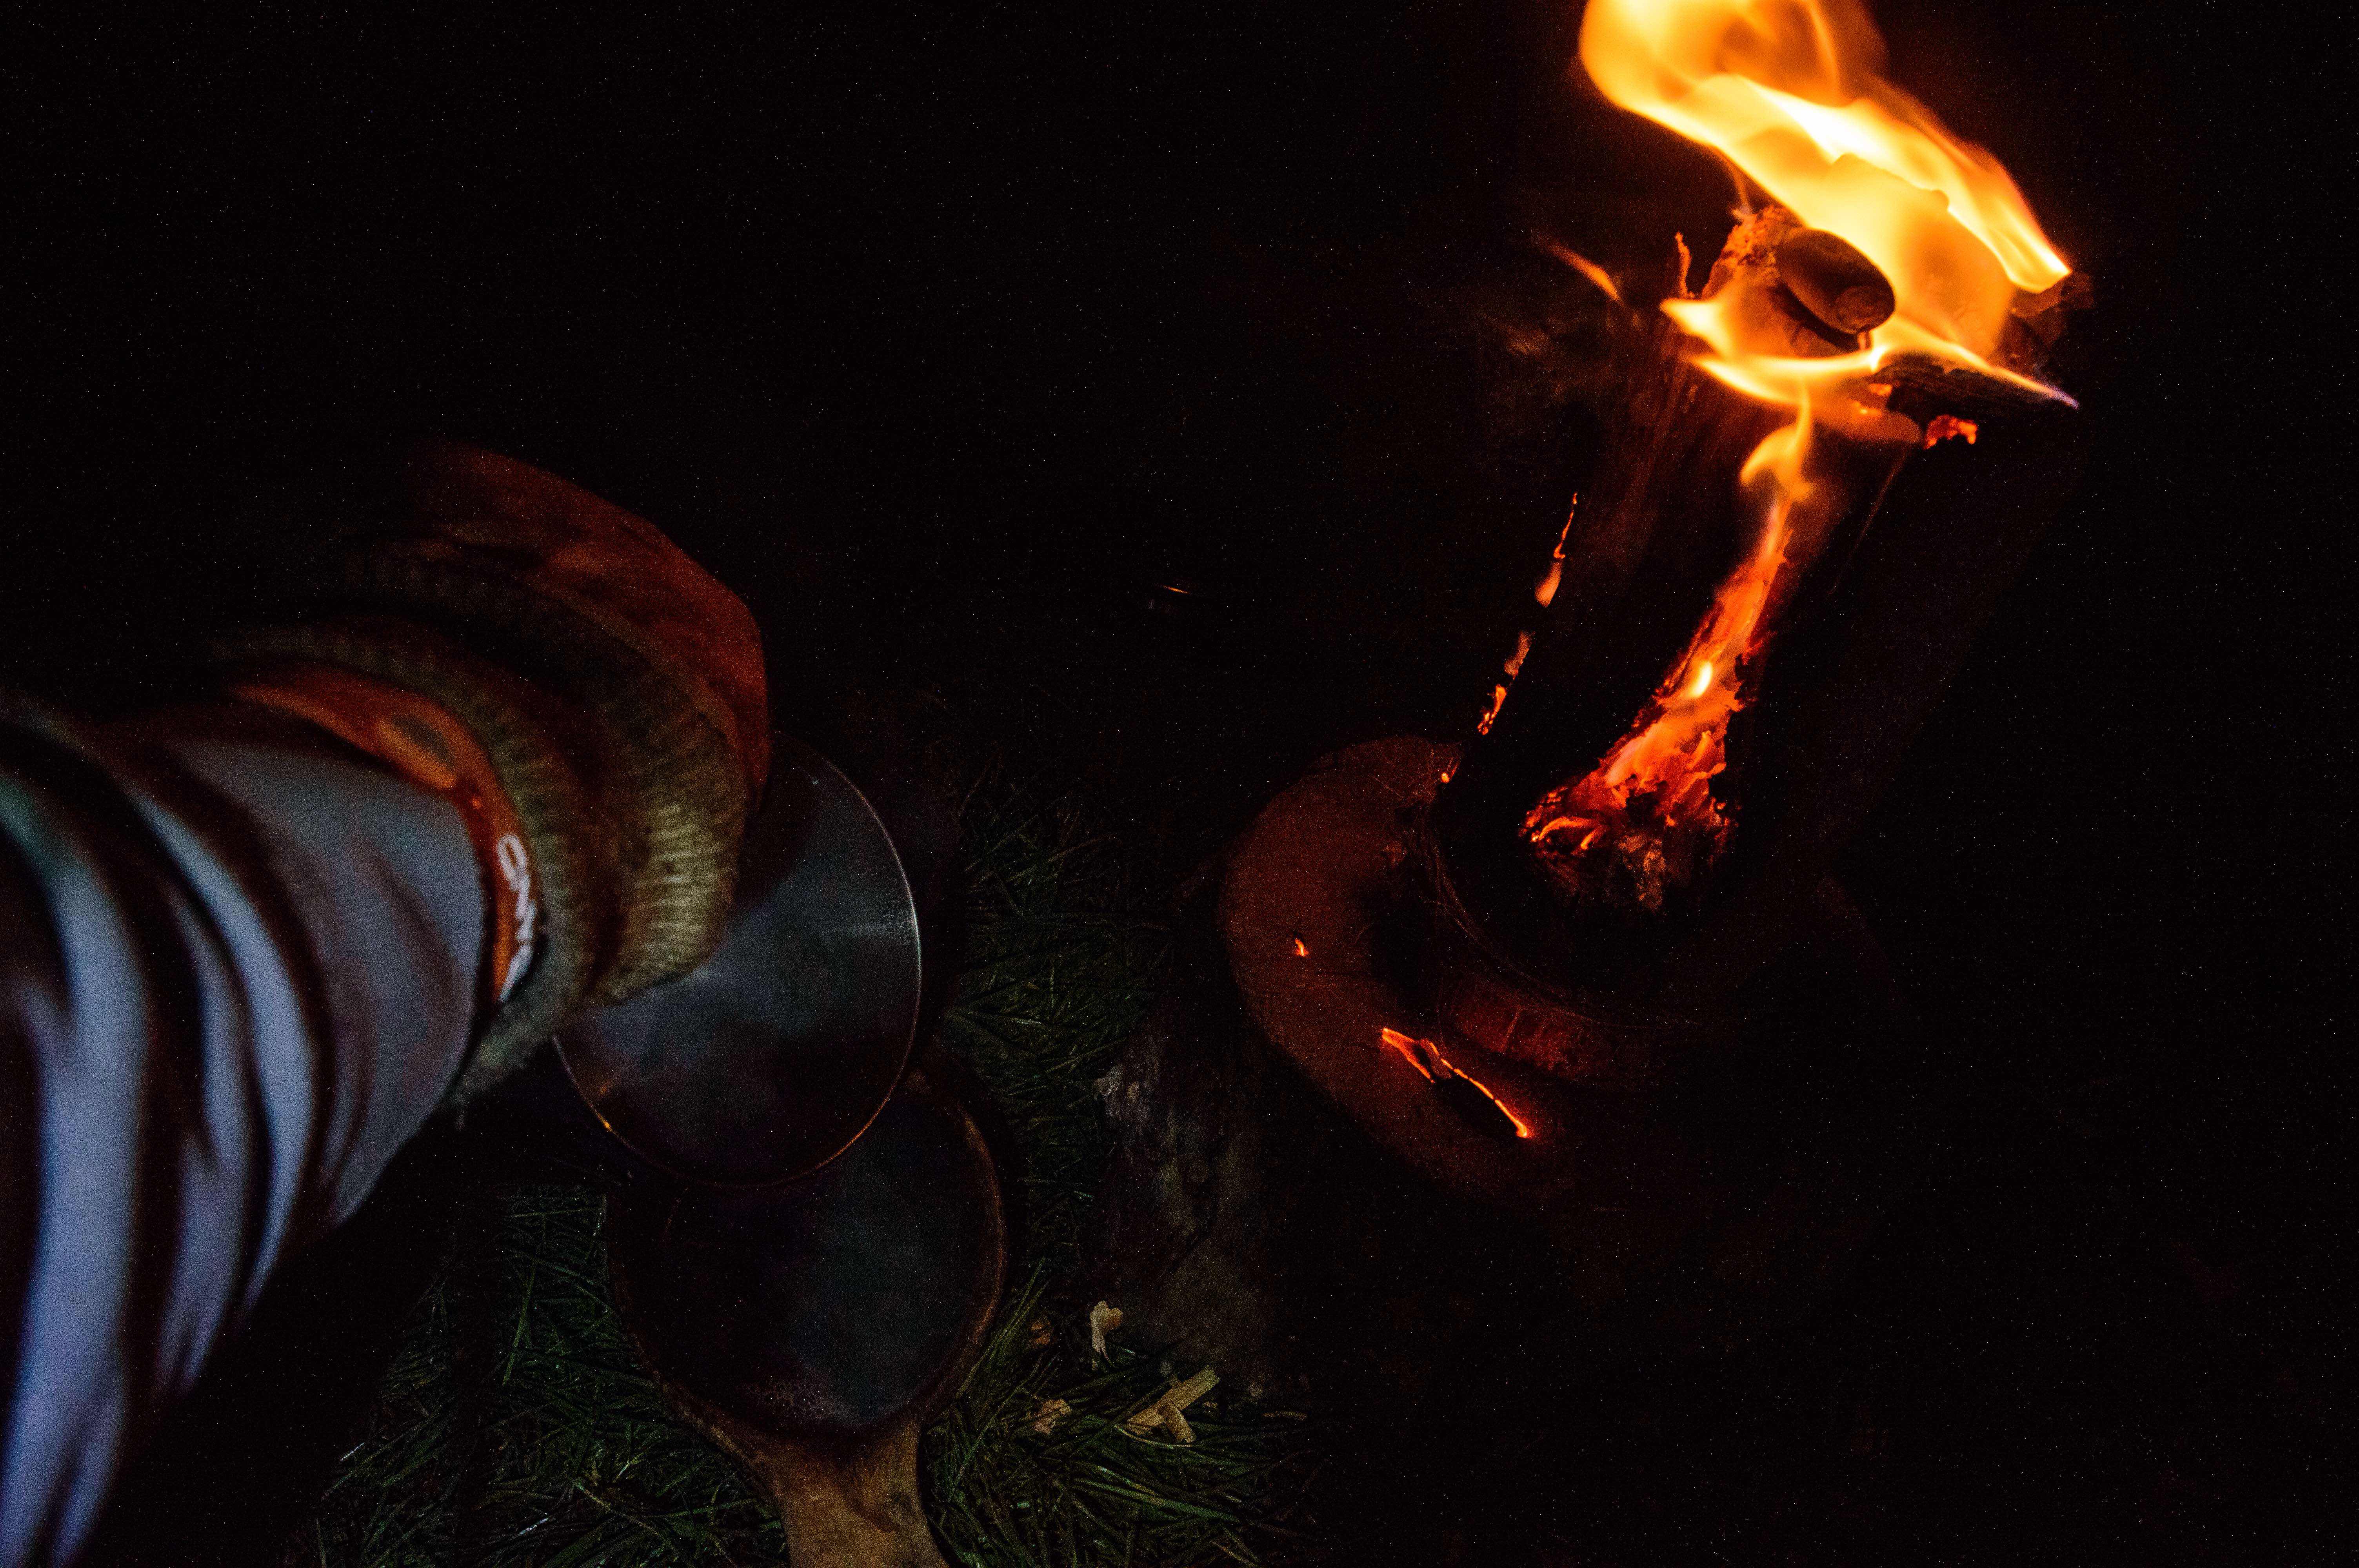
Party time
The log rocket was a stunning central feature for everyone to sit around in the evening and we even used it as a backdrop in a wedding photo (Magdalena and Phil renewed their vows at the Bushmoot).
Why it is called a Log Rocket
We even added a little bit of Cap’n Badger’s magic Rainbow dust to ‘mix the colours up’ a bit.
Some Magic Dust
When I looked at the log rocket the next day (over 14 hours after it was lit) the base was just a mass of burning embers – quite a log rocket, I would say.
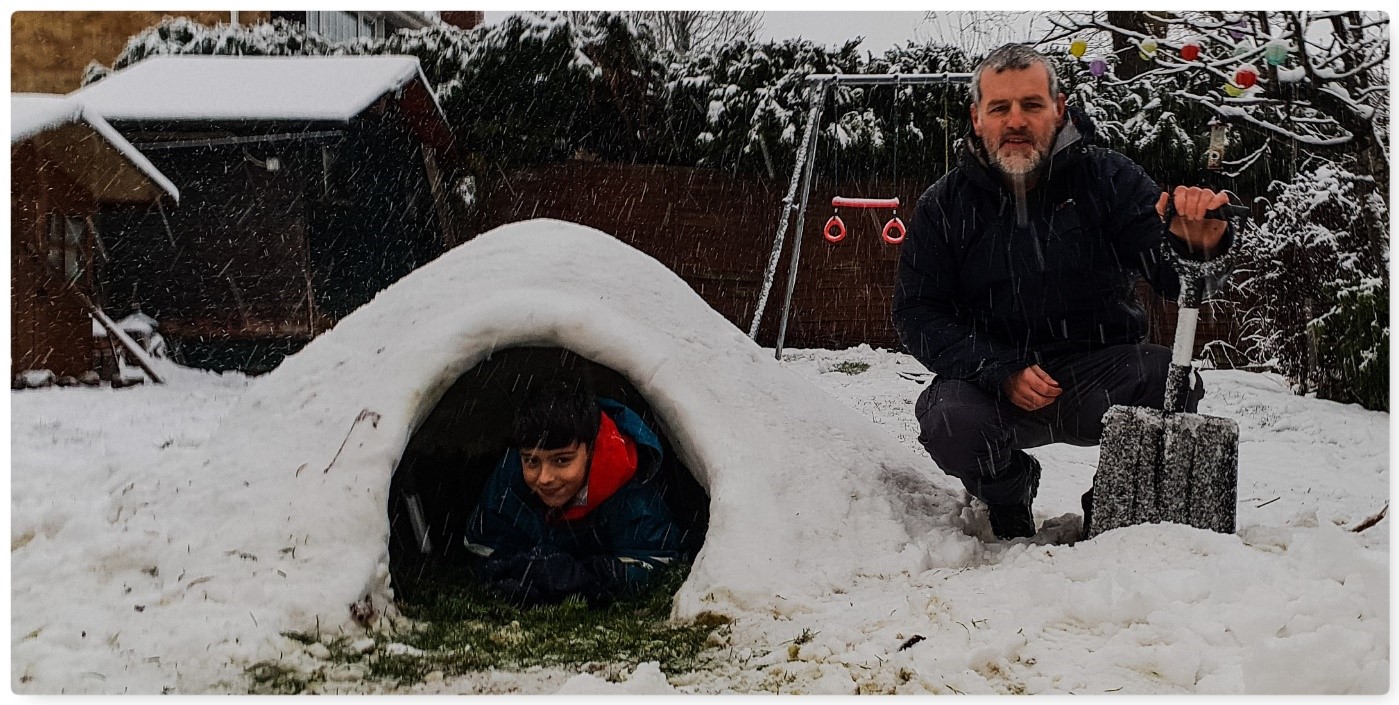
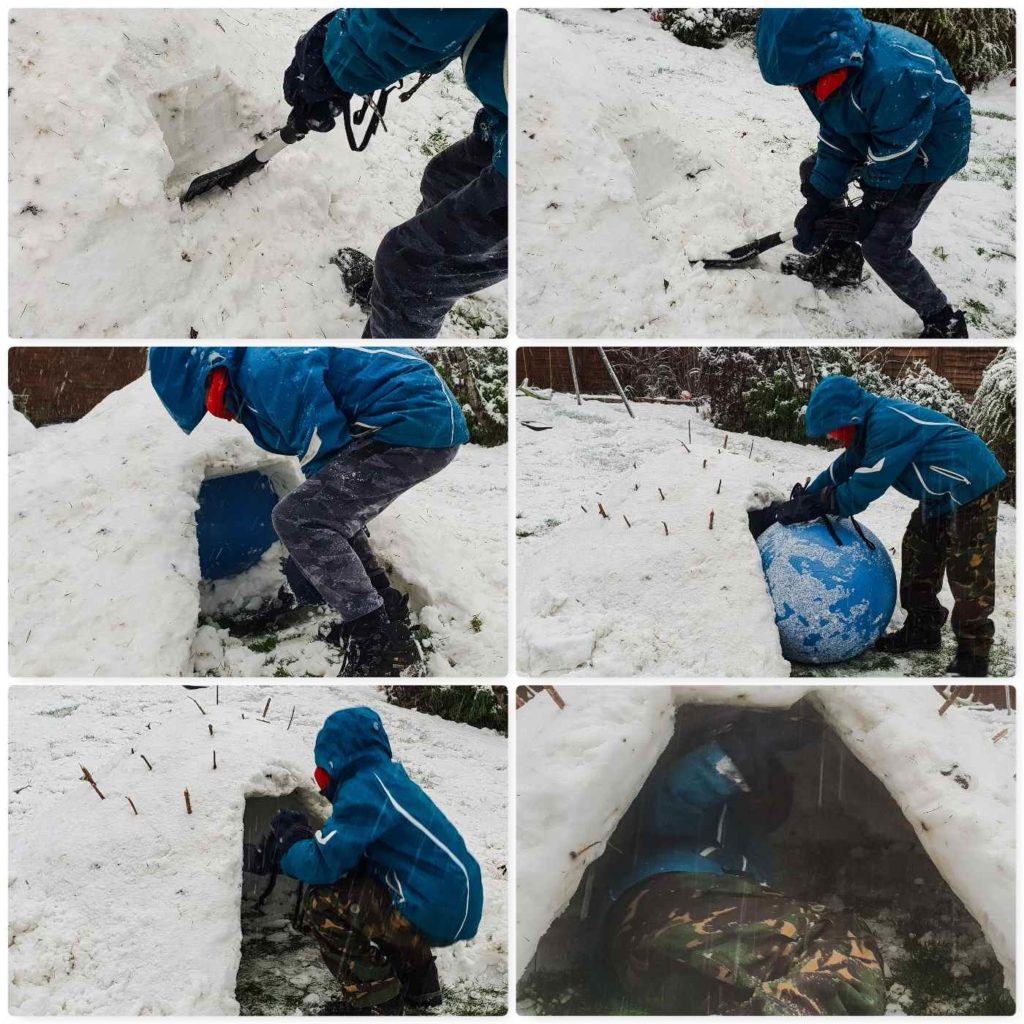
With the fair bit of snow we had last Friday here in Hampshire I decided to get out and have a bit of fun in our garden with my lad Finlay. We decided to build ourselves a little Quinzee snow shelter. We had built one years ago and Finlay wanted to see if he could remember all the steps.
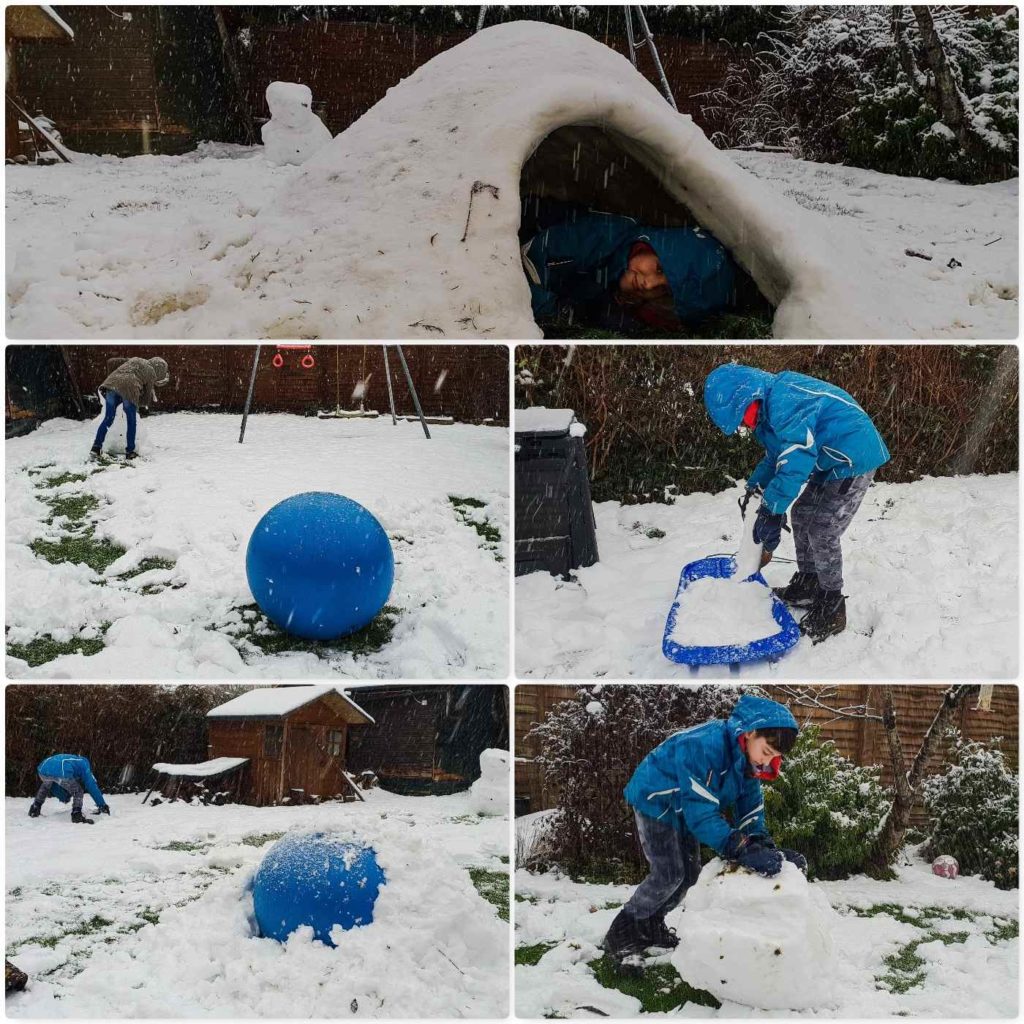
The snow was coming down fast however we did not think we had enough snow to make a massive pile. Normally I would pile rucksacks, brash, logs or rocks into a pile, cover it in snow, pack it down and then pull out everything from the centre from what would become the door – we did not have anything like that so we managed to beg the use of my wife Alison’s pilates ball – did the job 🙂 Granted I would not have the ball out on a trip but needs must and all that – you decide what you want to put in the centre of your Quinzee (saves digging out a lot of snow as well).
We tried lots of different methods of collecting snow, from using a spade, the sledge, the rake and rolling up massive snowballs. They all worked to different degrees however the giant snowballs were pretty efficient.
Once we had collected enough snow we used the spade to pack the snow down really well and smoothed the whole thing down with our hands.
Both Finlay and myself took it in turns to dig out the ball – it did not take long and as the snow was well packed it did not destroy the walls of the doorway as it came out. At this stage I would normally be pulling out the rucksacks, rocks etc.
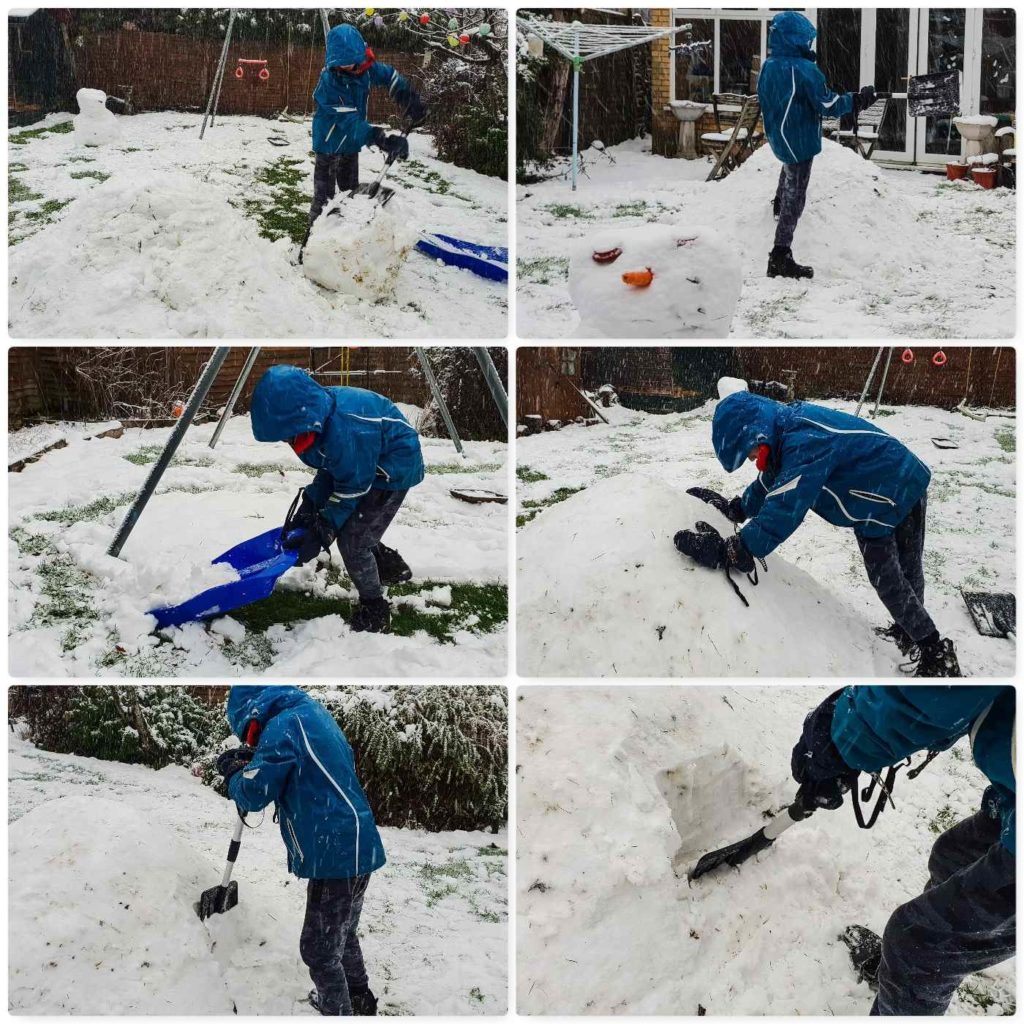
I also pushed a lot of twigs into the top of the Quinzee where it was thinnest to a depth of about 10cm’s. These twigs are a safeguard for when you dig out more snow from the middle.
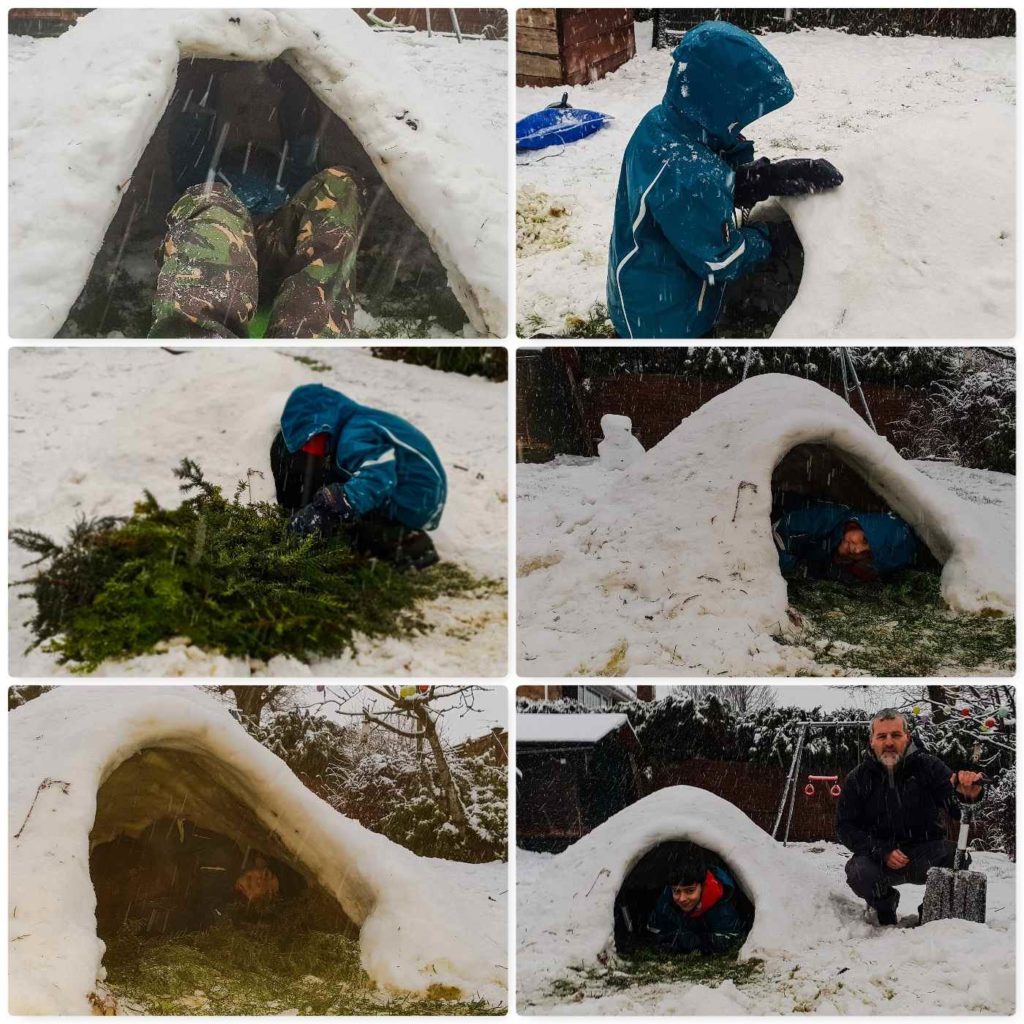
Once insided we had plenty of room to enlarge the shelter. We used our snow shovel but I have done this with just a piece of wood before. As soon as a twig appeared we left that area alone and carried out excavating elsewhere. Soon we had a space big enough that either of us could curl up in. I do not like to make these Quinzees to large as a small space is easier to keep warm than a large one is.
Finlay finished the Quinzee off by smoothing off the inside walls with his hands, making the entrance smaller and lining it with conifer branches.
All the snow is melting now (48 hrs since we built it) however it is still standing and looking good. We could have spent a little while longer making the doorway smaller however hot chocolate was calling and we took our final snap and headed indoors.
It was a good project to work on with Finlay (some good Father and Son time) and I was proud to see that he stuck it out in some heavy snow conditions to the end.
There is no rocket science here or fancy skill to learn – just down right common sense.
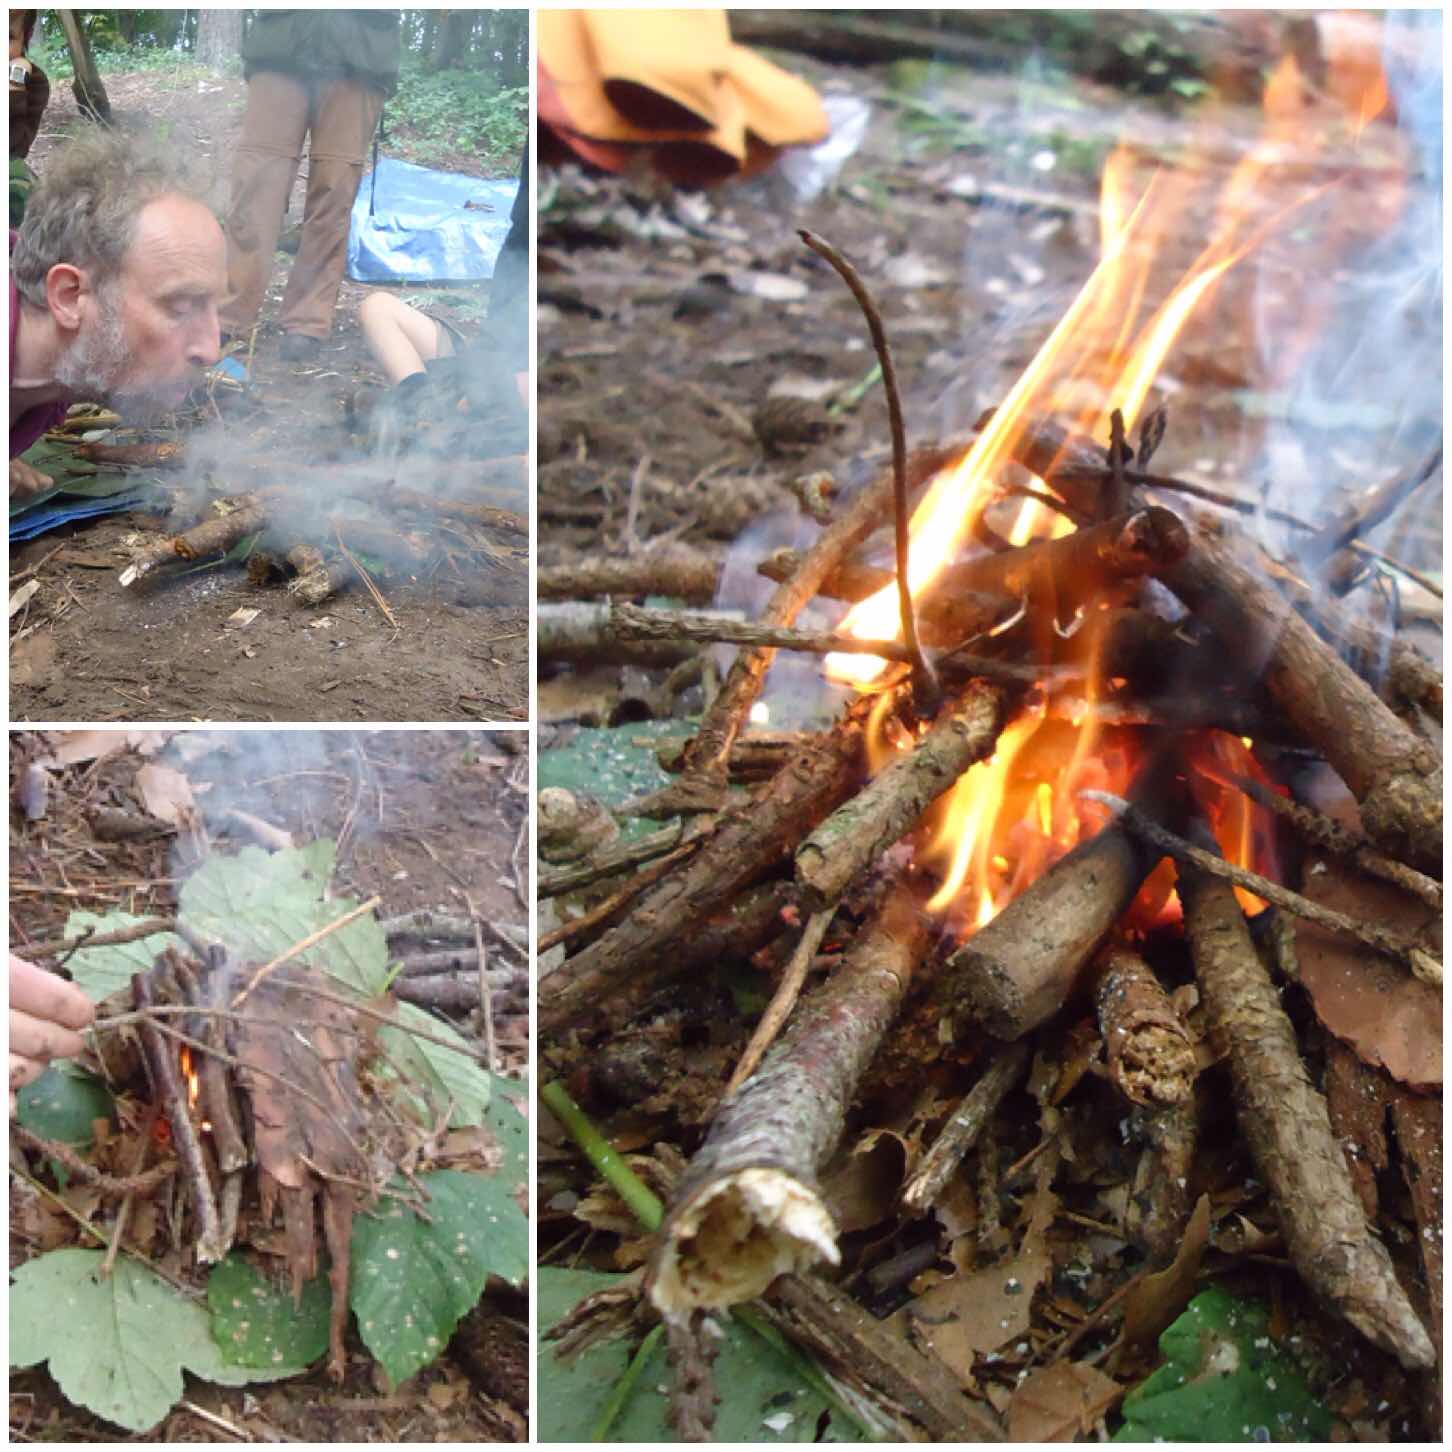
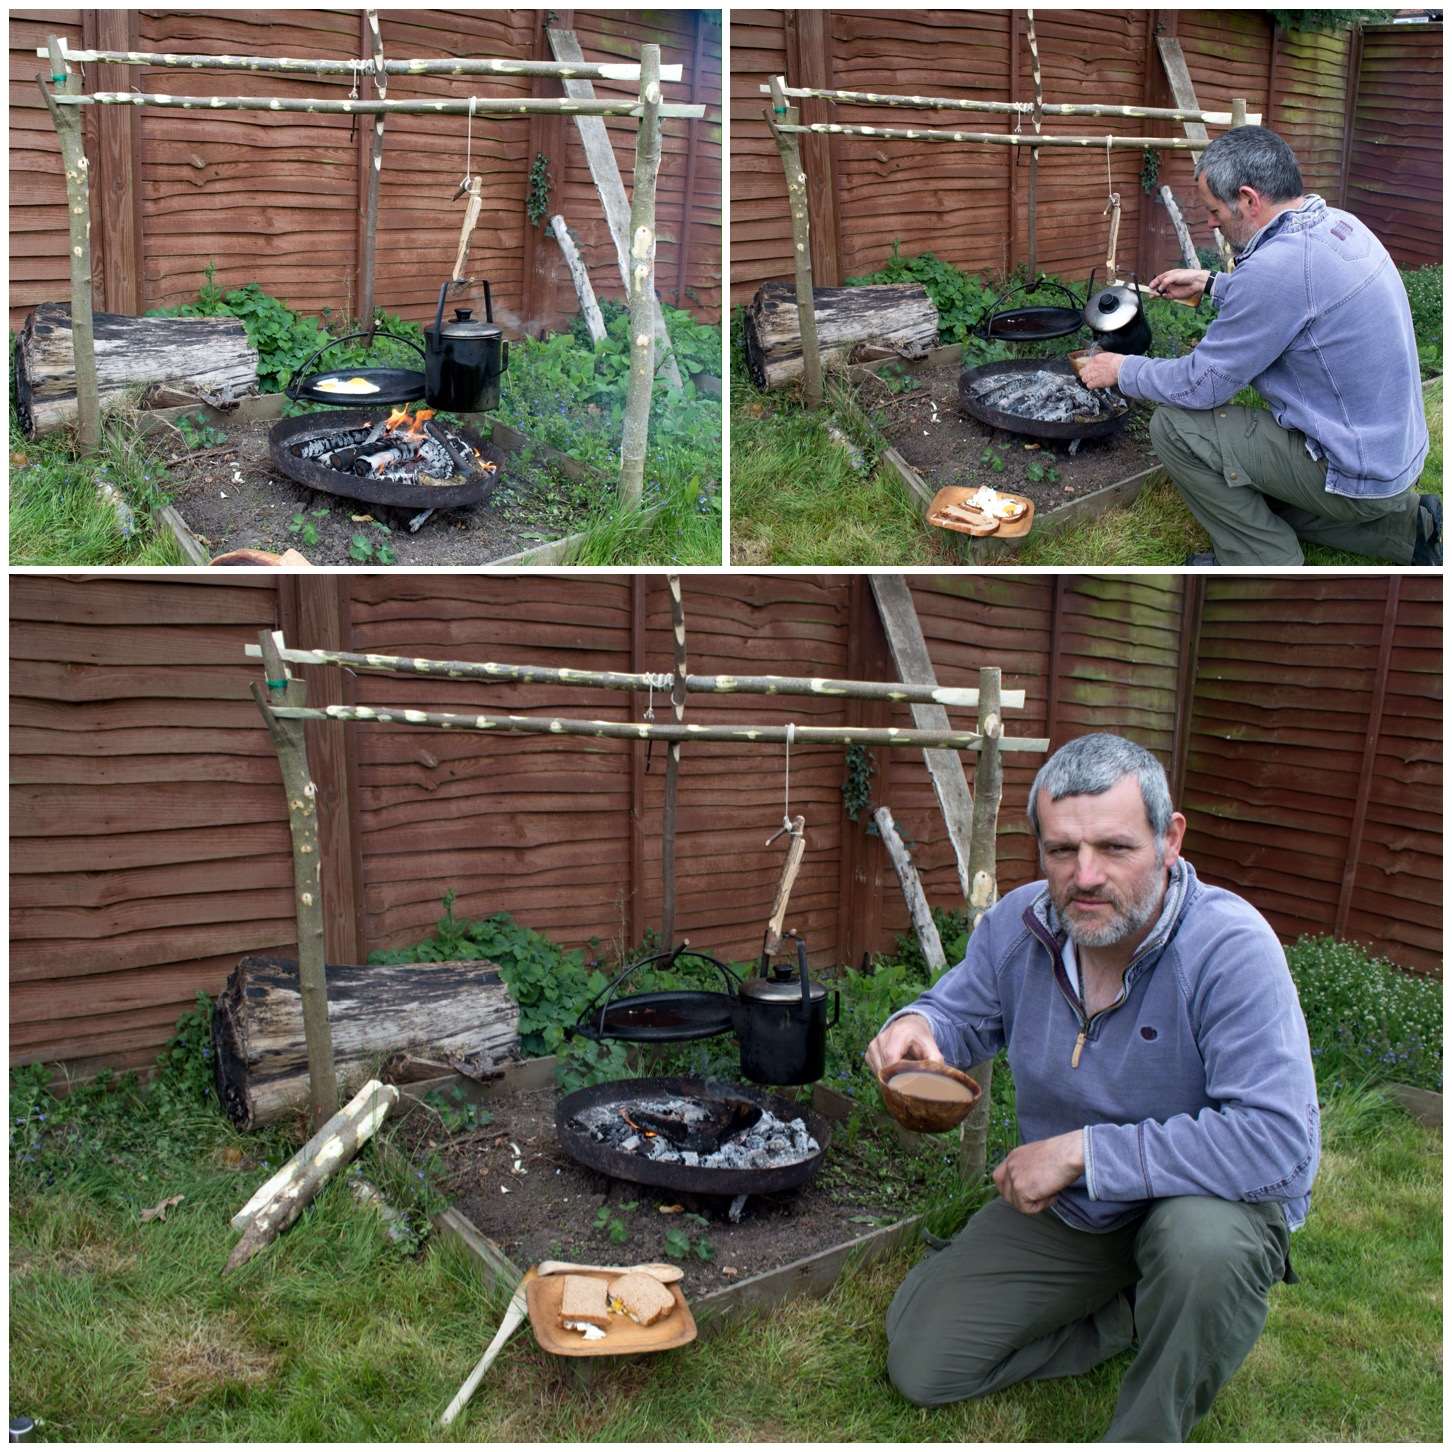
When you have limited resources and the elements may be against you, then you may wish to consider the ‘Lolli Stick Fire’.
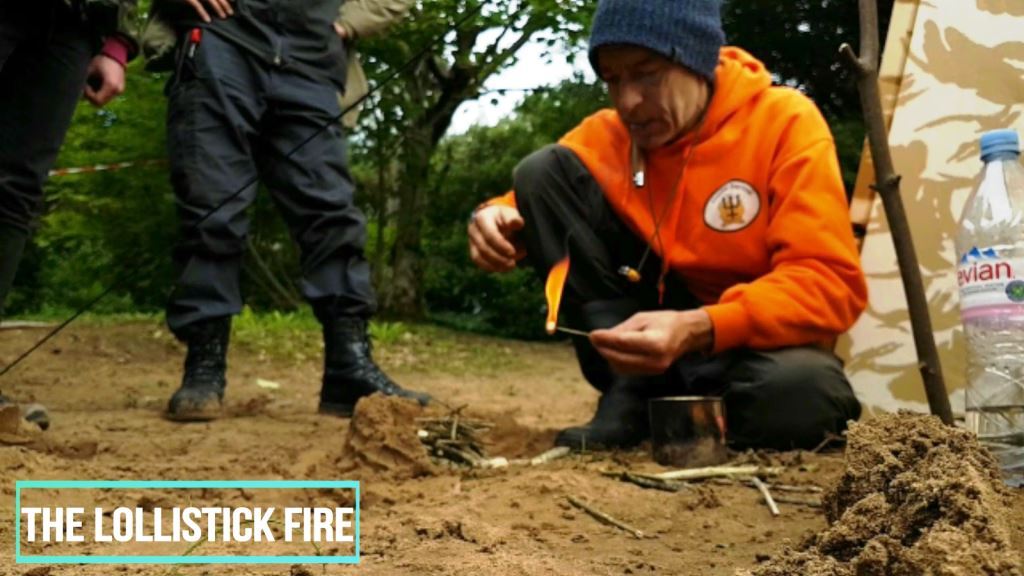
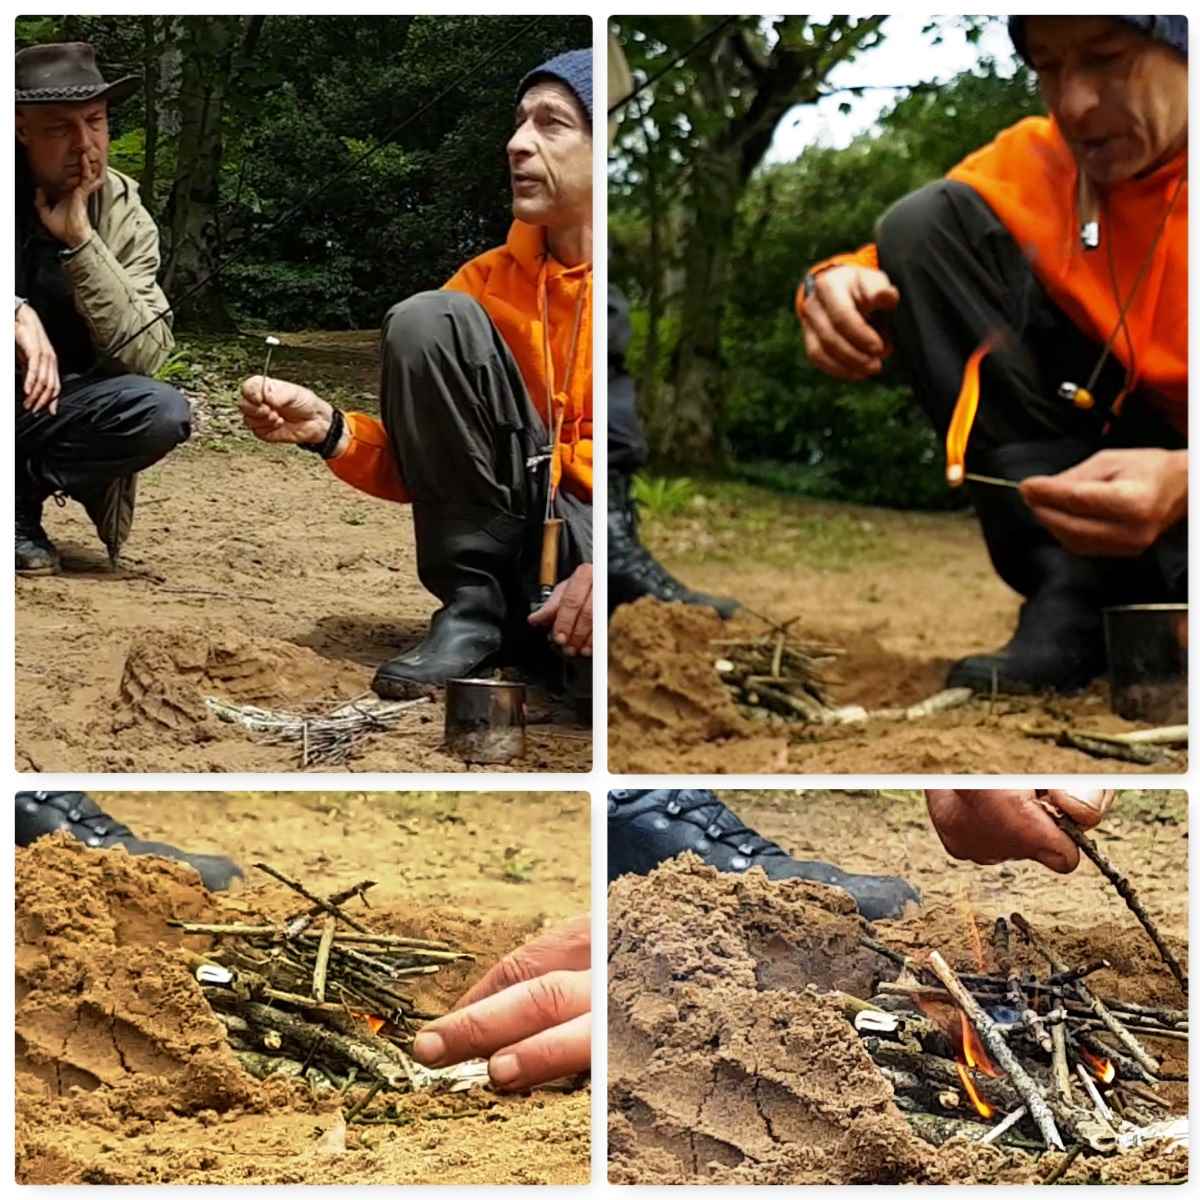
At the 2017 BCUK Bushmoot my good friend Fraser Christian from Coastal Survival was running a 48hr workshop on Coastal Survival. One of the classes was on lighting a fire on the beach in windy conditions with very limited resources – he called this the ‘Lolli Stick Fire’.
The ‘Lolli Stick’ Fire
There is no rocket science here or fancy skill to learn – just down right common sense.
Fraser built using sand a little reflector wall in a horse shoe shape and within it he laid a platform of dry dead twigs. On the surface of this platform he laid three loose piles of twigs in a ‘U’ shape. On top of this ‘U’ shape he laid a further pile of loose twigs making a roof. This shape left a hole in the side to add a firelighter.
Rather than using a whole firelighter Fraser cut a firelighter into 8 pieces and stuck one of these small pieces onto a thin sharp twig (and here likened it to a ‘Lolli Stick’). He lit this in the shelter of his tarp and easily popped it into the middle of his twigs.
Minimal resources
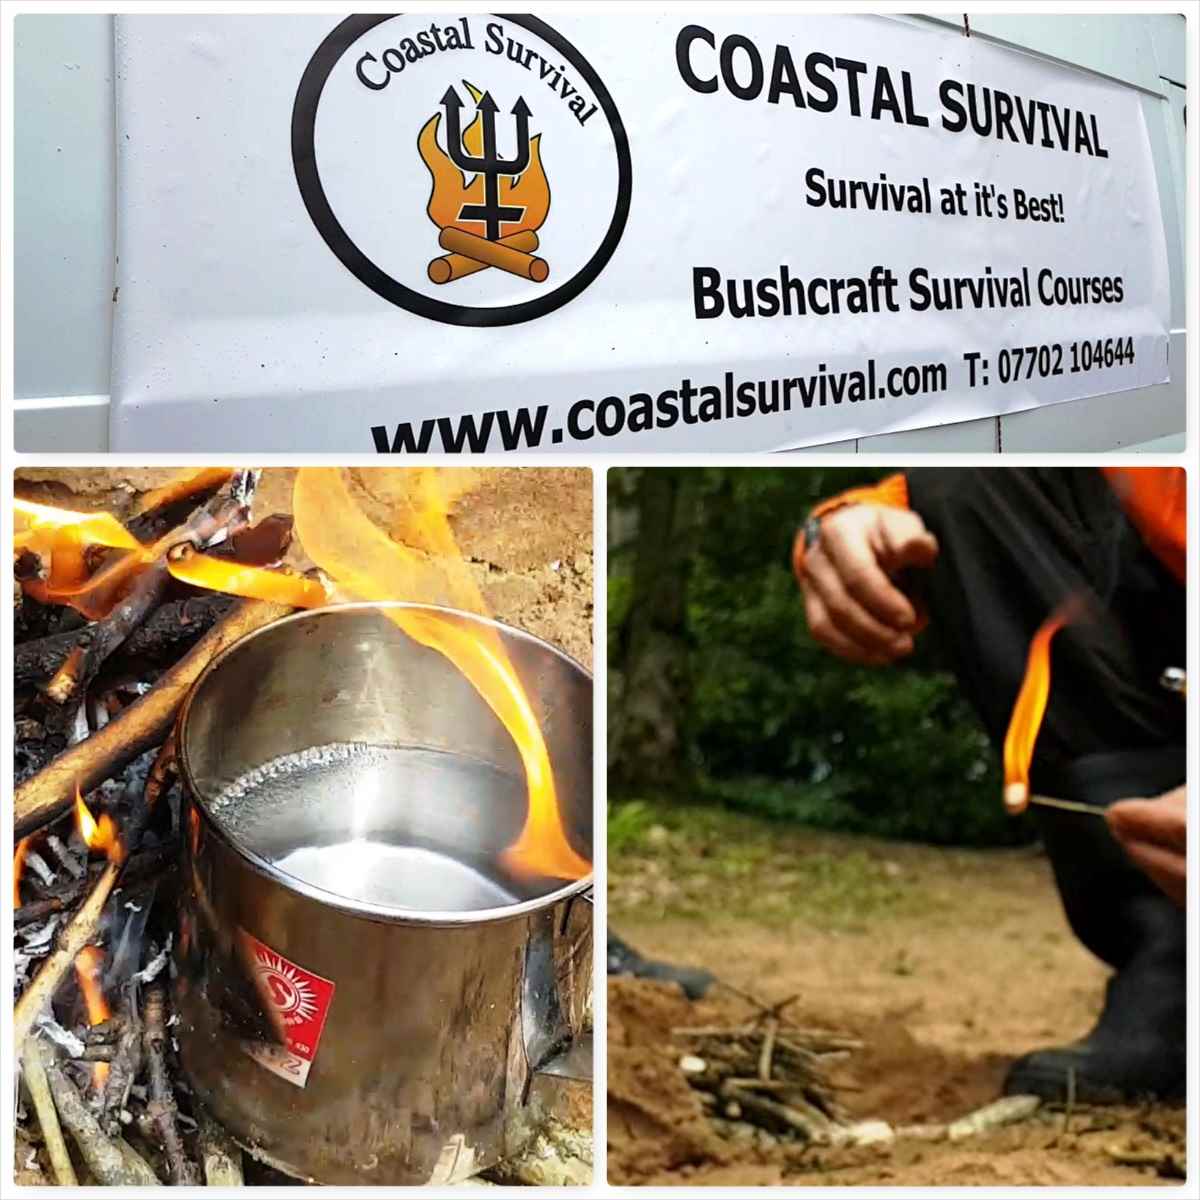
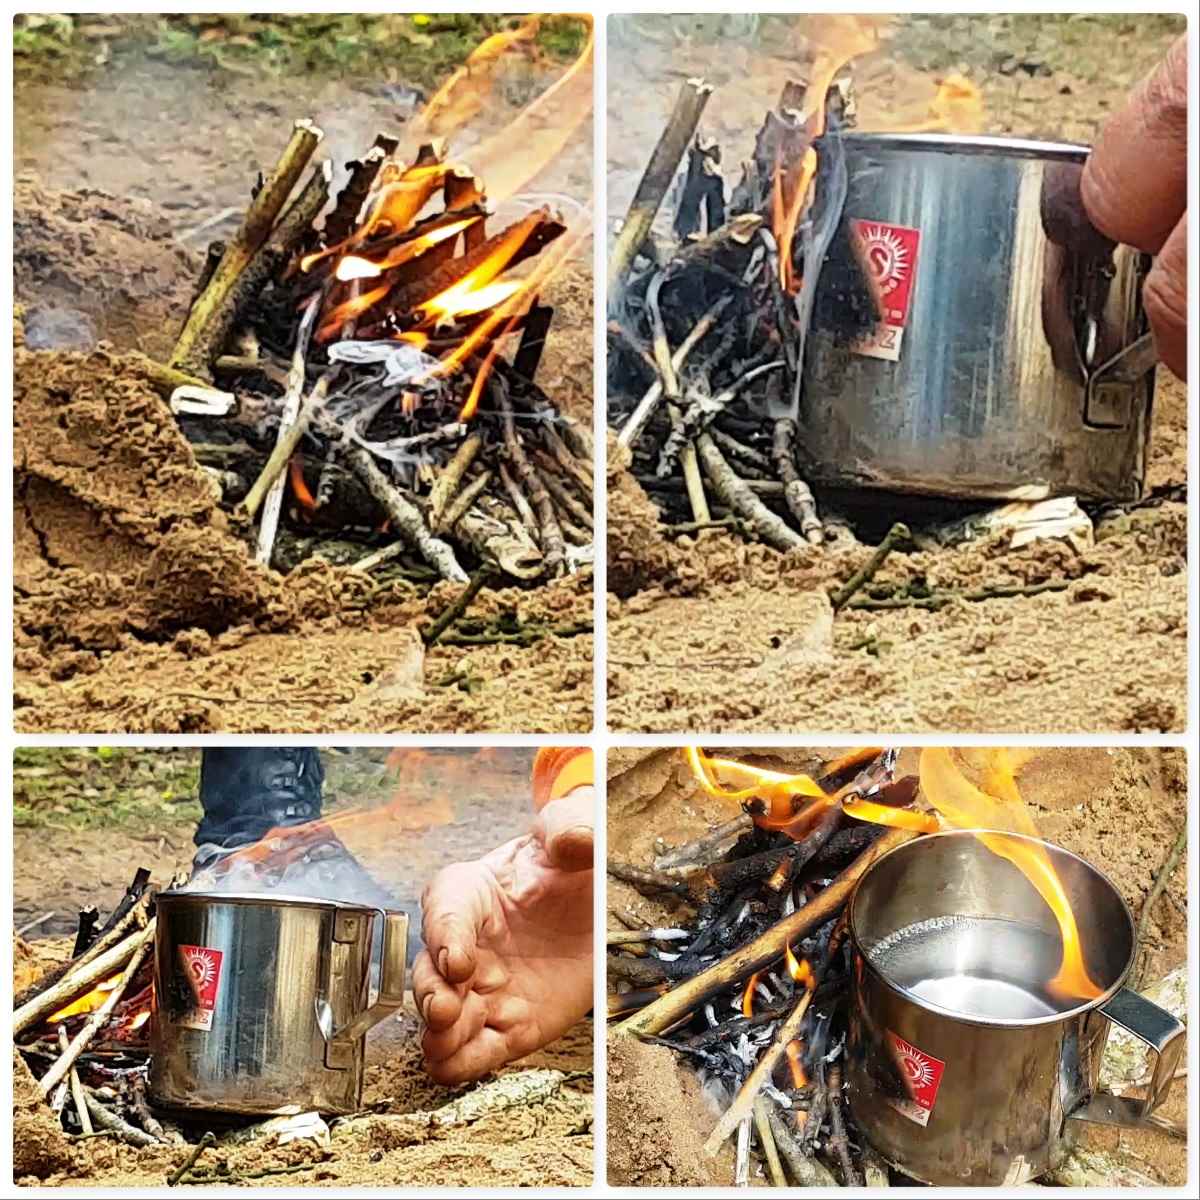
The flames spread through the twigs very easily as they were loosely laid and Fraser topped them off with further twigs to get the fire going really well. This process only took around a minute and he soon had a cup of water pushed up against the side of the fire.
Enough for a brew
The small reflector wall helped bounce the heat back onto the cup and so boil the water quite quickly.
You can see it in action in the short video below.
Fraser uses this technique on the coast as the reflector wall protects the fire from the fierce winds and because of the minimal resources needed to light and maintain it. I incorporated this technique into our Starter Course at the Bushmoot and everyone easily got there fires going with it with very limited resources.
The ‘Lolli Stick’ is safe to handle, requires only an eighth of a firelighter and is easy to light – as I said before ‘down right common sense’.
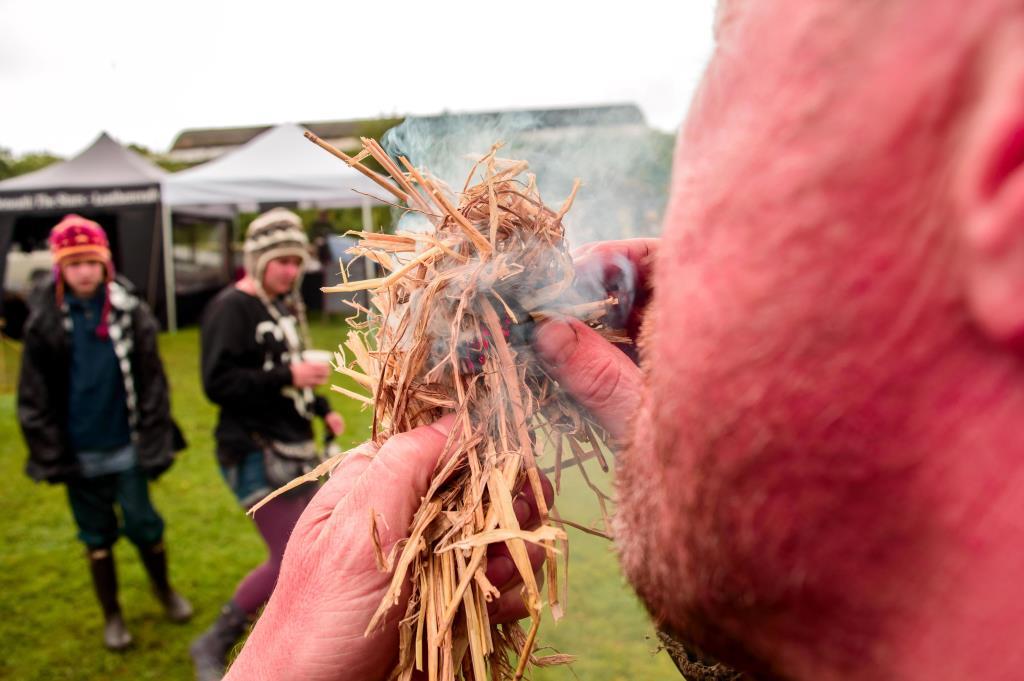
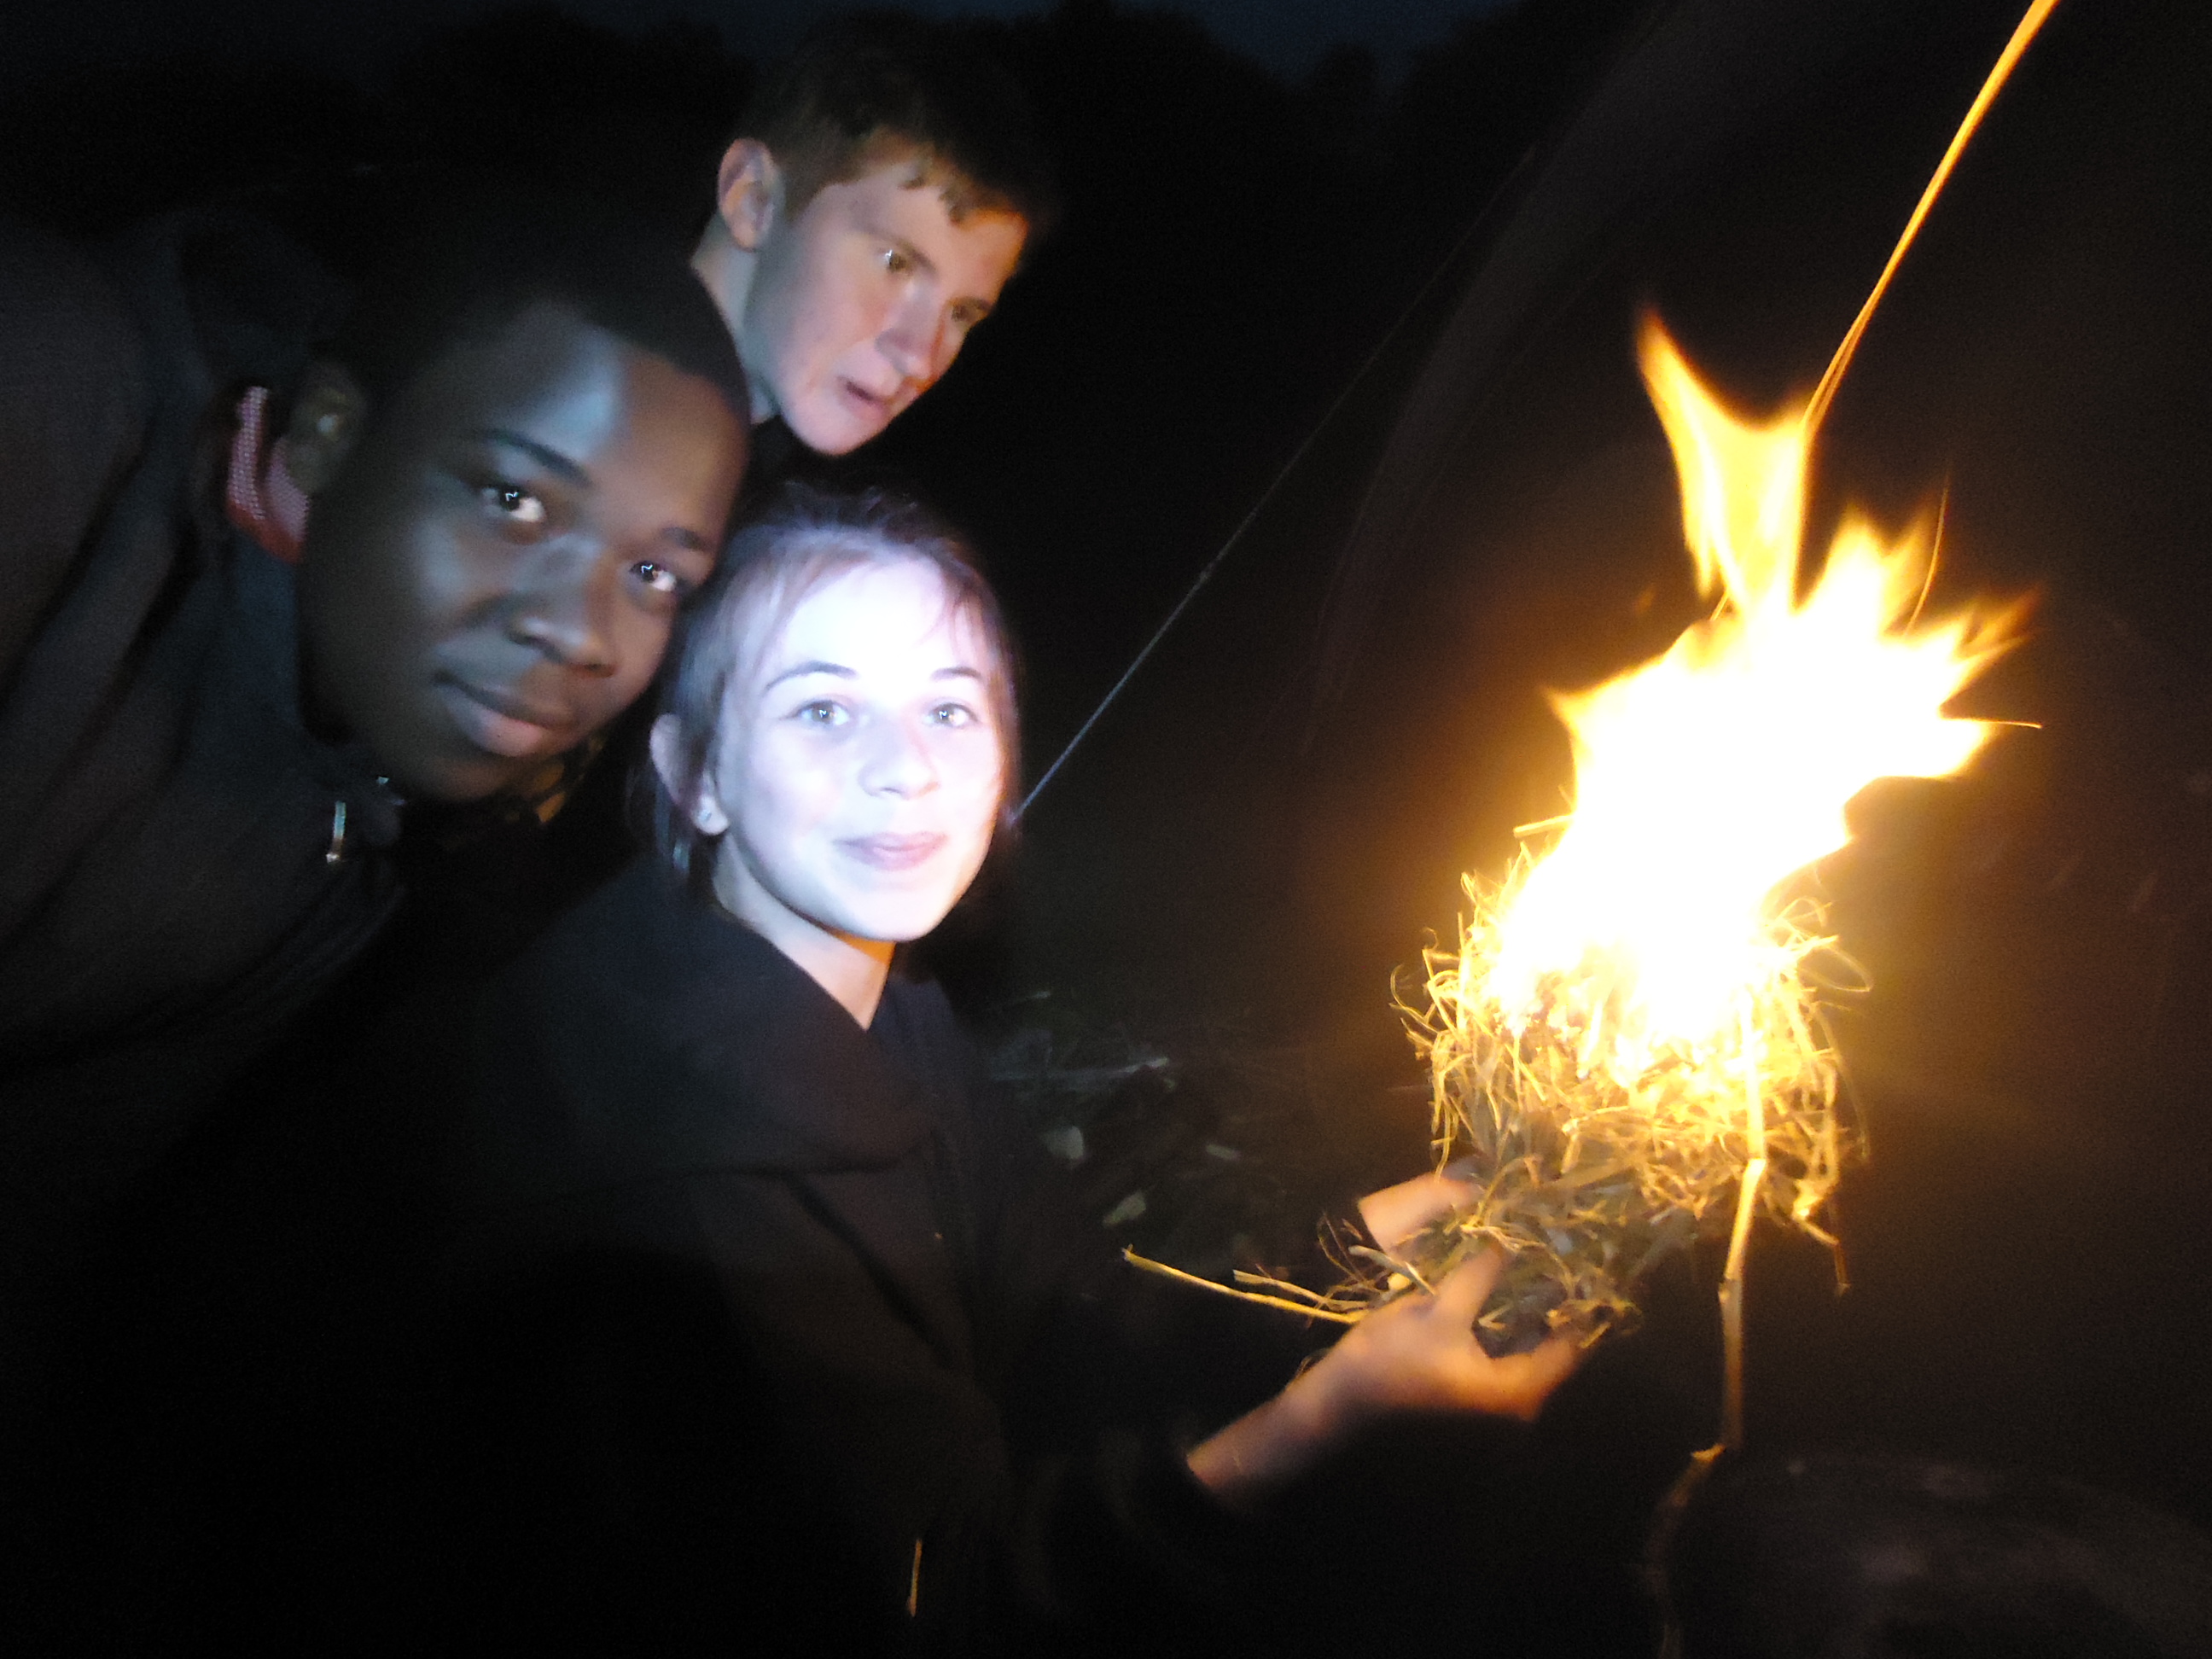
everything you need to light your fire is under your feet
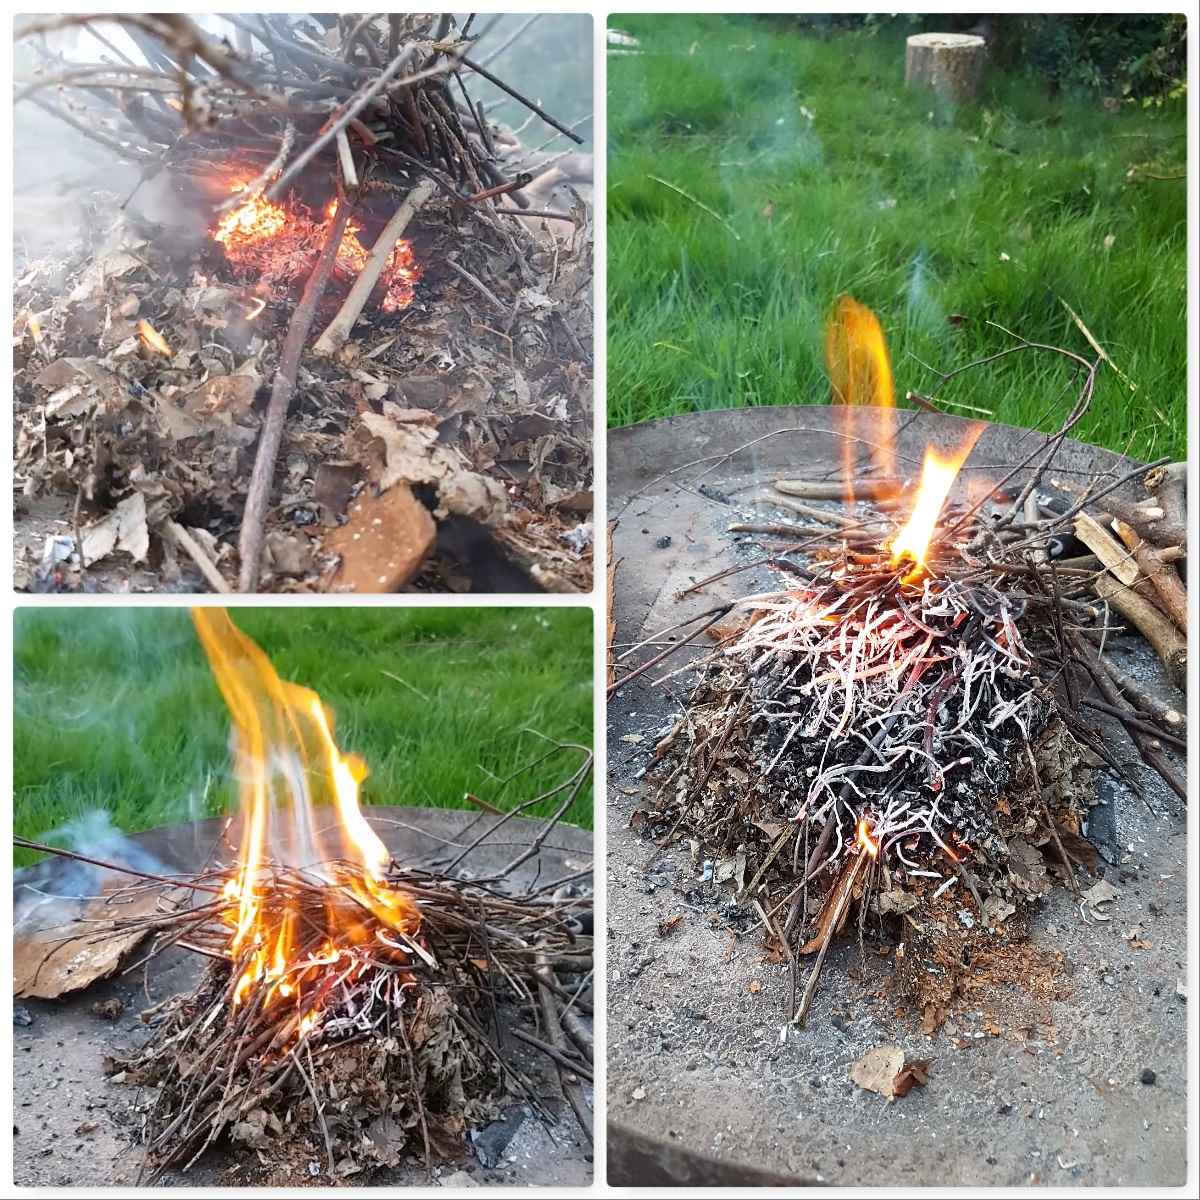
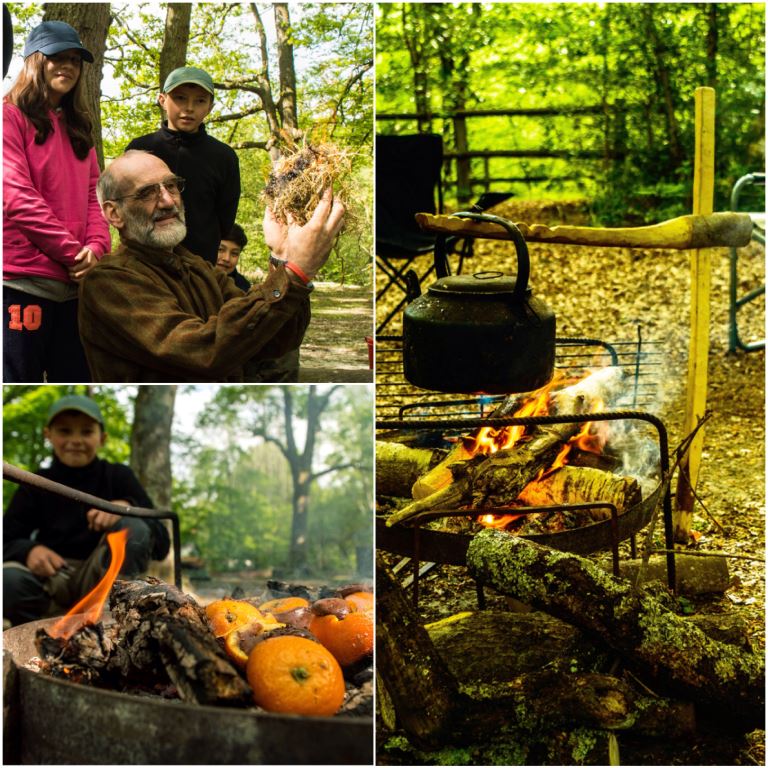
Need a fire? – Need tinders? – Look under your feet – that is what I say to my students when it comes to this basic human need.
With a little bit of patience you can take much of the leaf litter you find on the woodland floor and turn it into a toasty fire.
The Damp Tinder Fire
A number of years ago my friend Richard Neal (aka Rich59 on BCUK) was chatting with me around our campfire at the BCUK Bushmoot and he suggested an idea around lighting a fire using only what he could find on the woodland floor.
Richard and myself both have a keen interest in all things ‘fire’ and so in no time whatsoever we had collected a range of damp dead leaves, processed them down and soon had a decent fire going – breaking all the rules on having to use dry tinder.
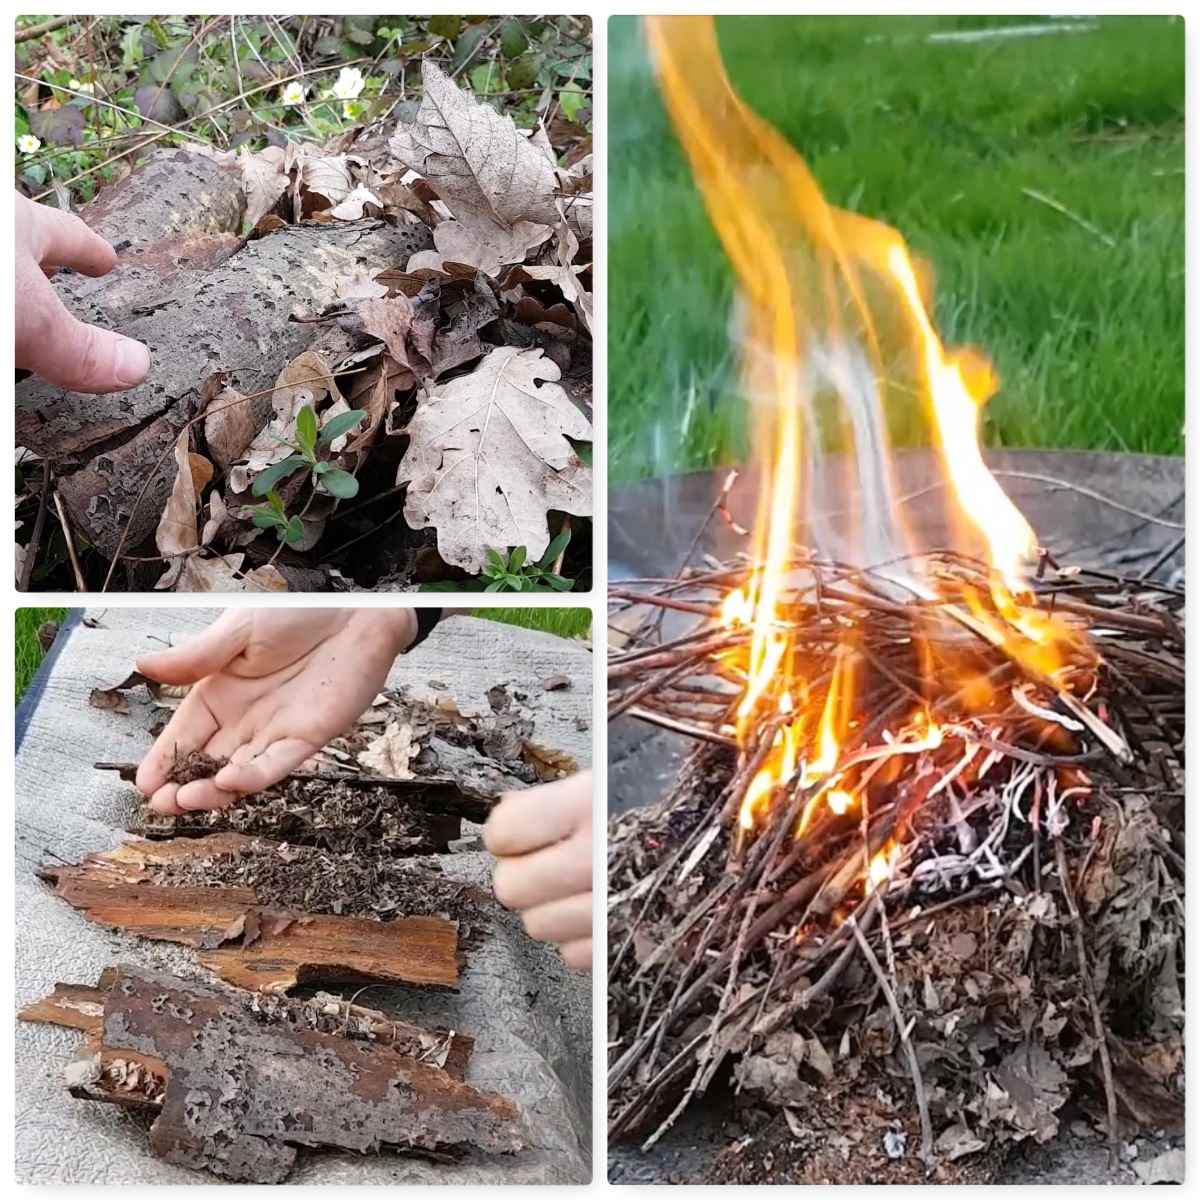
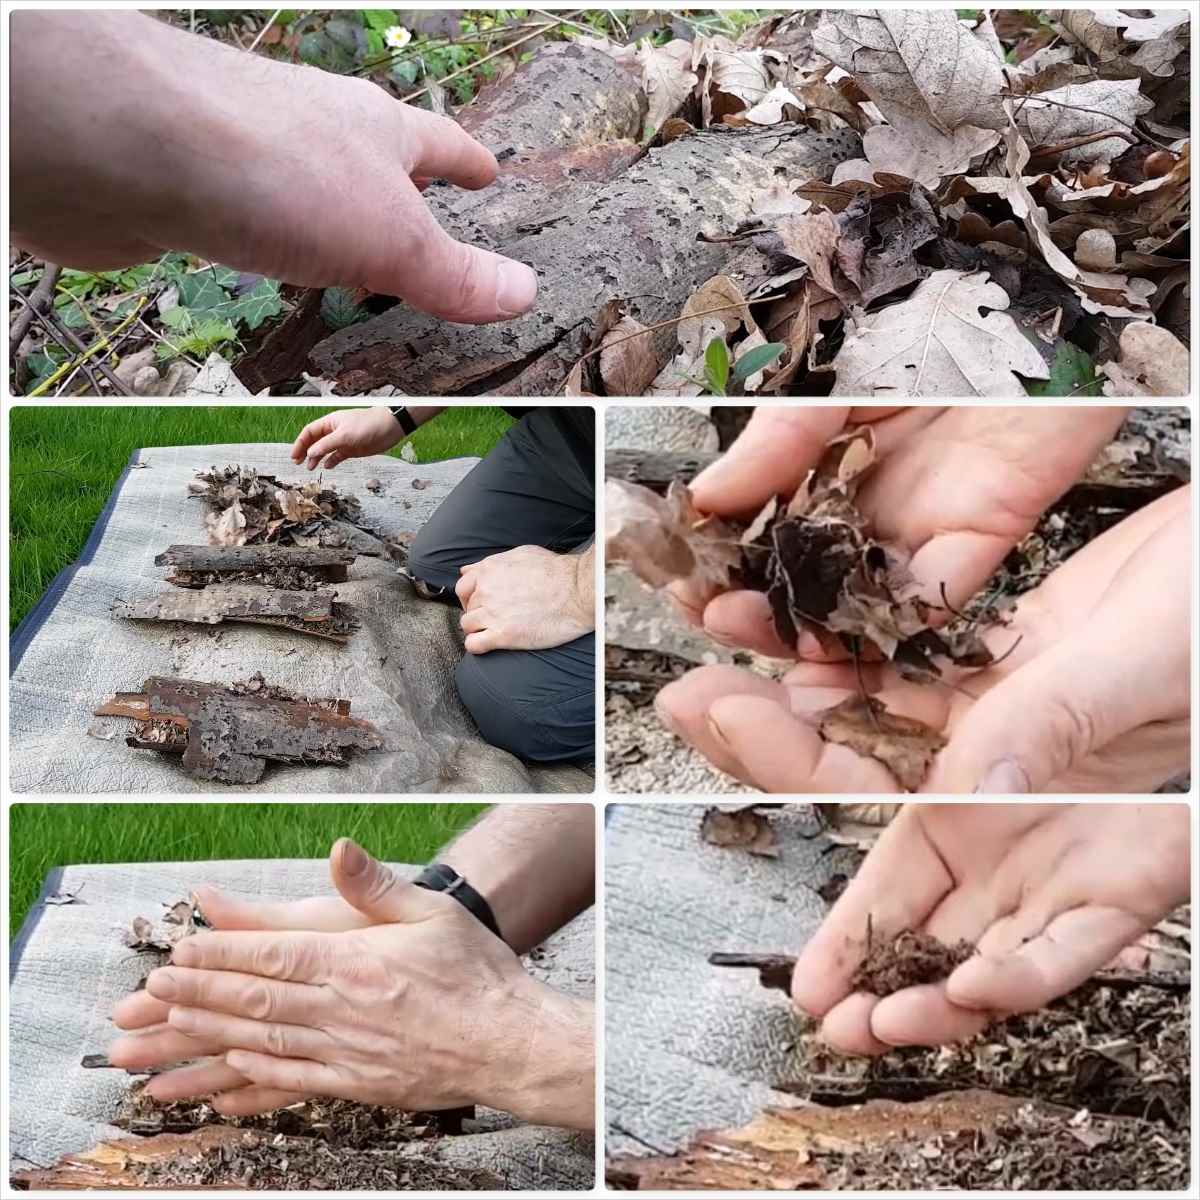
Gather a good bundle of dead leaves from the top layer of the leaf litter. You may need to do this over a wide area depending on the amount of leaf litter but collect the driest leaves you can.
Here in the UK even the driest leaves are still pretty damp on most days but don’t worry about that. Try to collect some rotted pieces of bark too as they will be useful in the processing stage.
I take small bundles of the leaves and start to rub them in the palms of my hands. I let the small pieces that break off from this rubbing fall onto one of the pieces of bark. After a short period of time I’ve accumulate quite a pile of crumbled leaf litter.
Once I stop seeing any crumbled pieces of leaf falling I put the skeletal remains of the leaf into a separate pile. (Spare pieces of bark are also useful for covering your leaf bundles when you have any wind trying to blow it all away.)
Gathering and processing
I carry on rubbing all the leaves until I feel my two bundles of fine and skeletal remains are big enough. Then I spend a little while longer rubbing handfuls of each bundle again to dry them out as much as possible.
When I re-rub the fine material I make a 3rd bundle from the finest leaf litter that falls out from between my palms. It is important that you have this finest 3rd bundle as that is the material that will eventually start to smoulder and burn first.
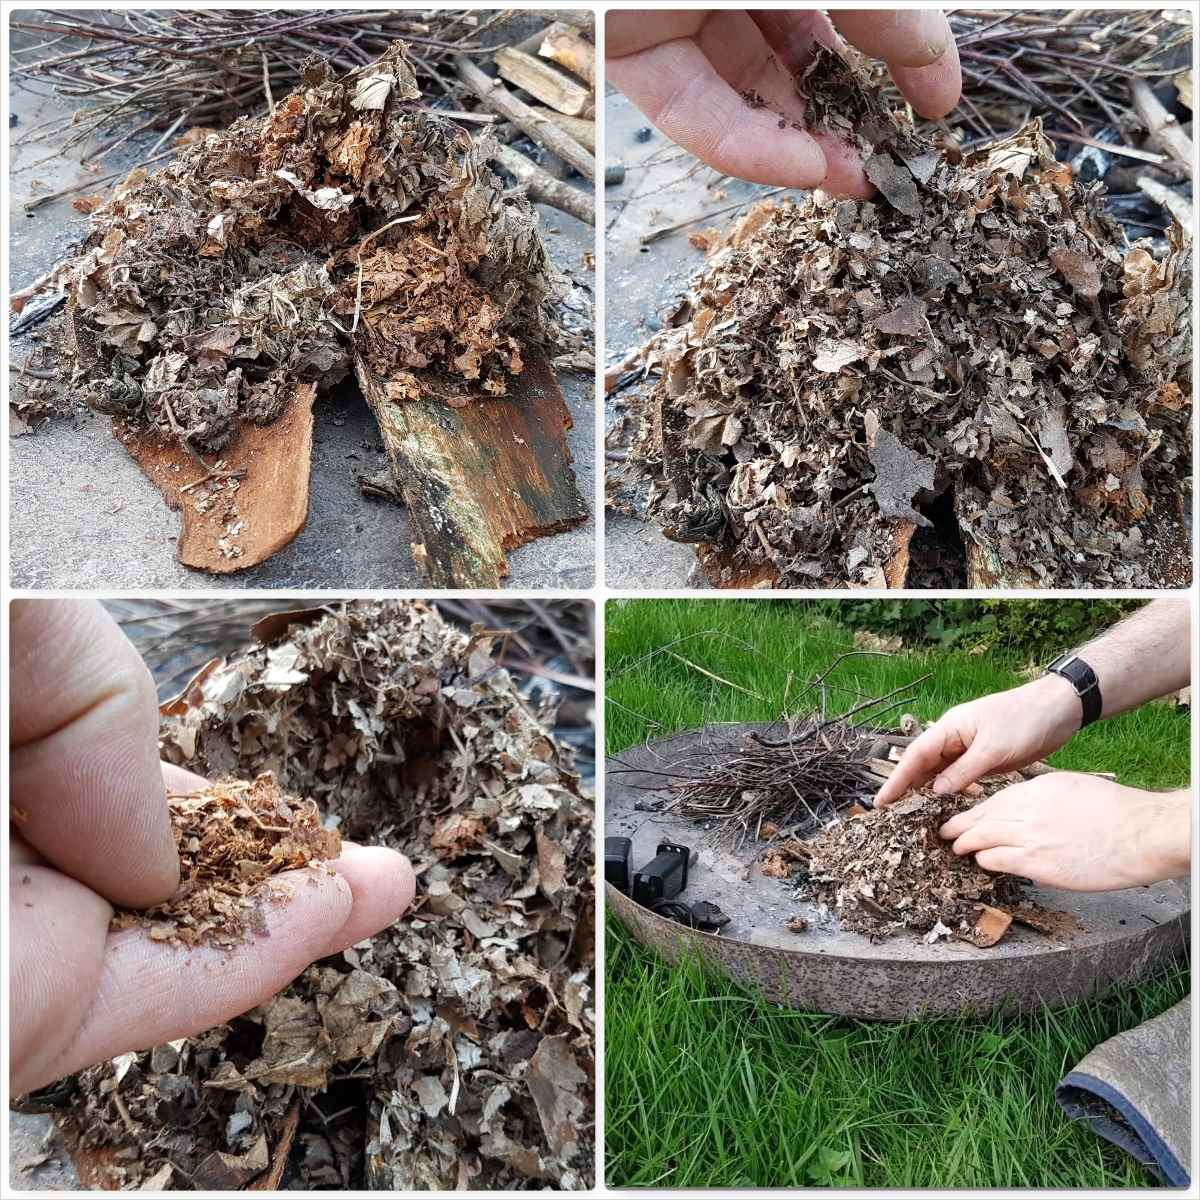
The Tinder Pile
I like to make a nest of the skeletal remains of the leaves first on top of my pieces of bark. Onto the top of this I add the mixed grade crumbled pieces of leaves, working the skeletal remains of the leaves around these crumbled pieces to support them.
Into the side of this pile I then make a hole with my finger and fill it with the finest pieces (the 3rd pile) of leaf litter that I have processed.
If the wind is causing you a problem at this stage keep a piece of bark handy to pop onto the top of it all and keep it from blowing away.
Building your stove
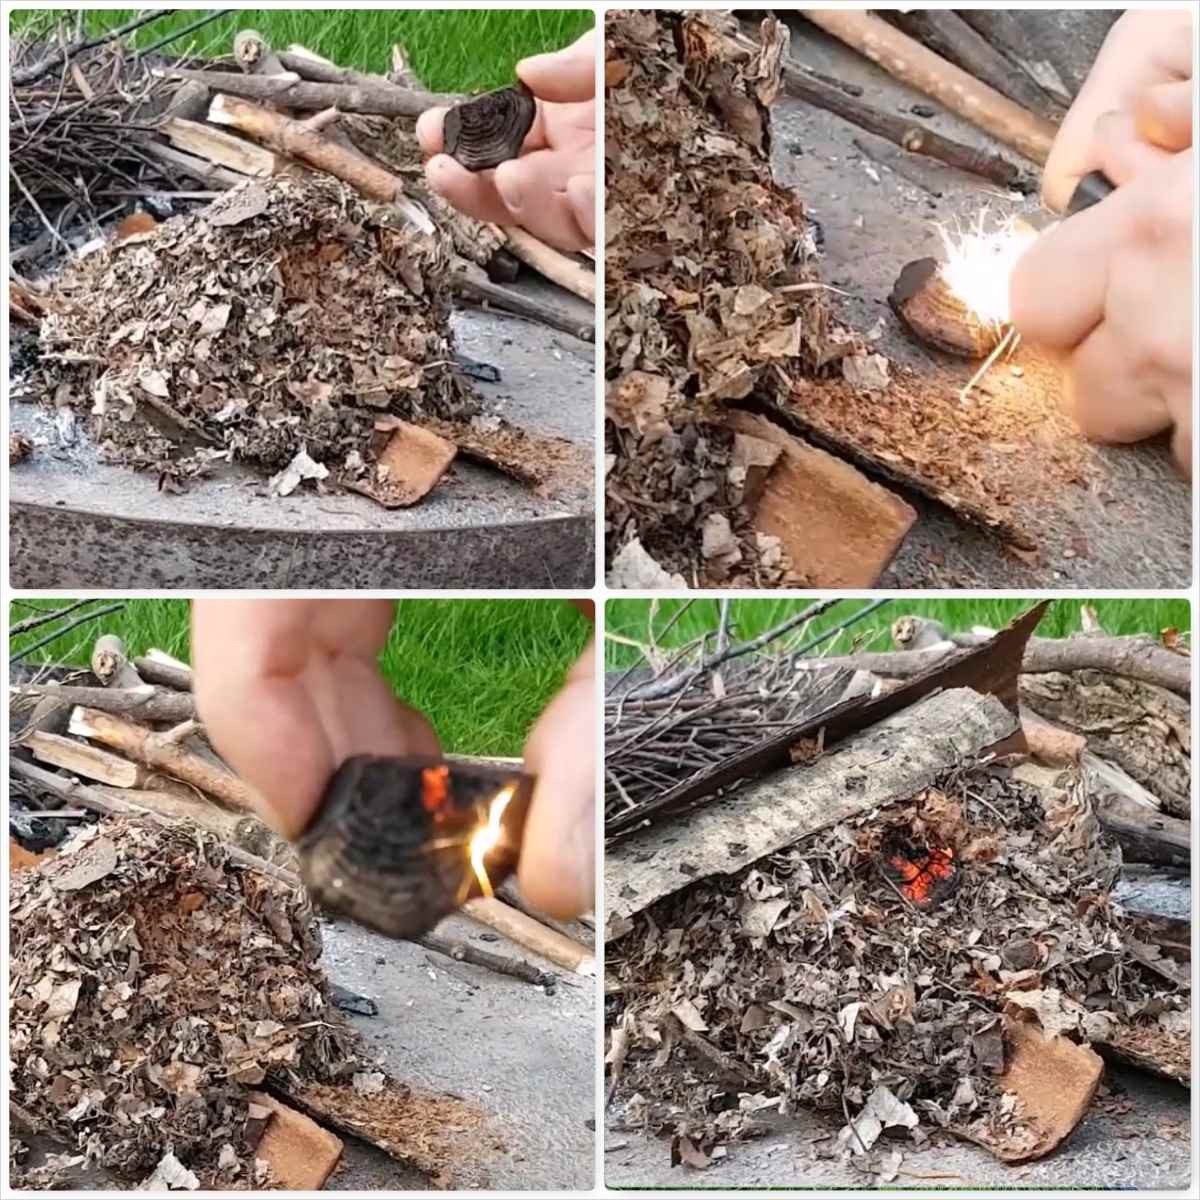
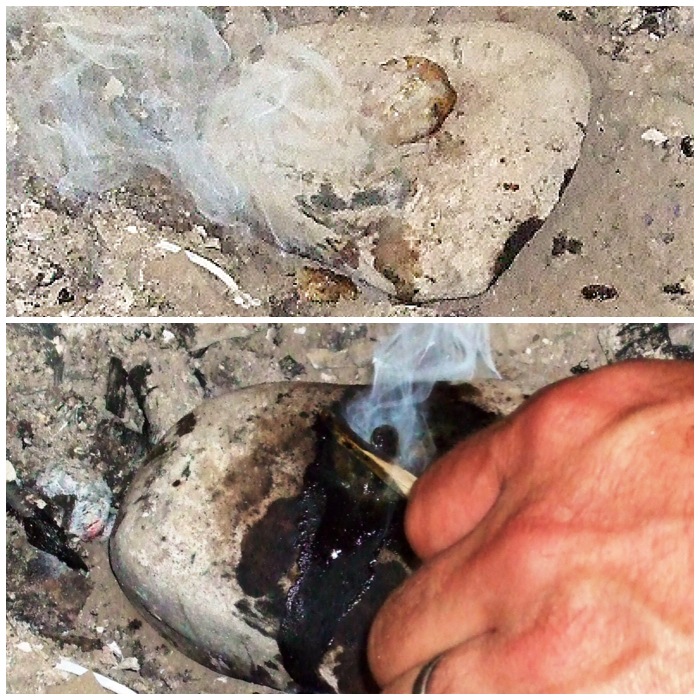
The Ember
For this fire I used a Cramp Ball (Daldinia concentrica) to get it going. I also regularly use char cloth and embers from a bowdrill or handrill. Try experimenting for yourself and let me know what works for you.
Once I had sparked up the Cramp Ball I popped it into the middle of the finest material and placed my bark on top of it all to keep everything in place.
Setting your ember
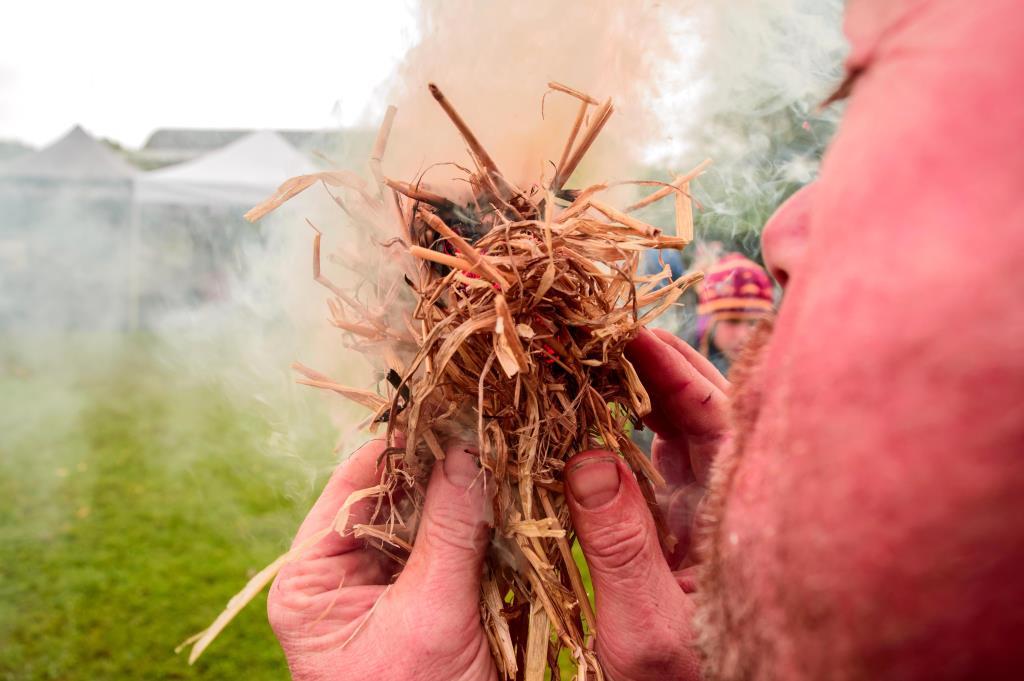
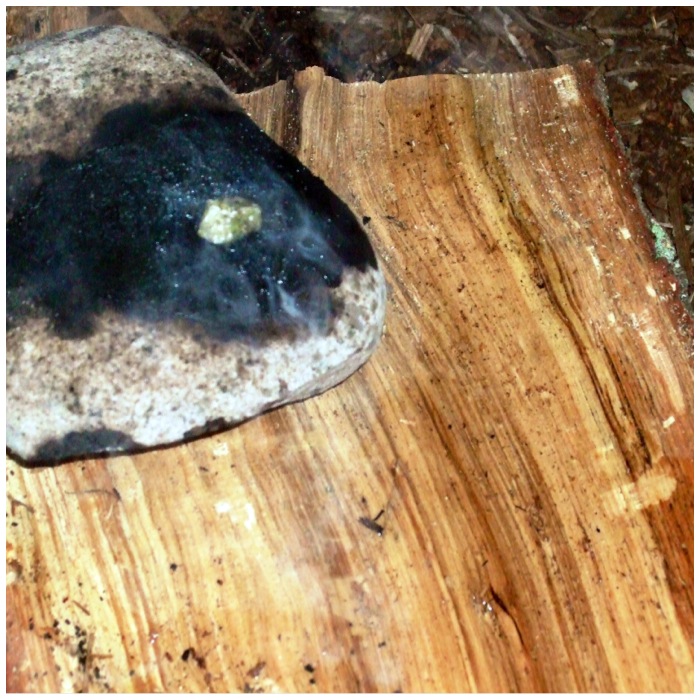
Spreading the Heat
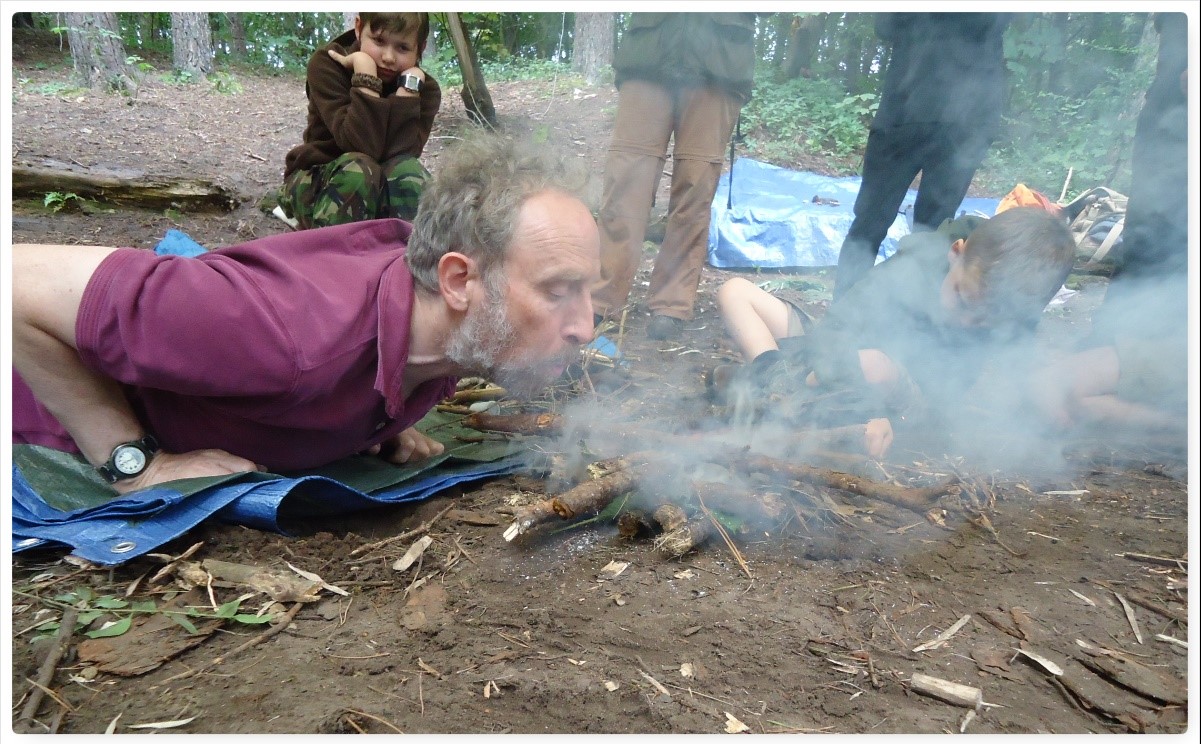
Watching what is happening with the wind (position yourself so the smoke is not blowing in your face), start to blow gently into the centre of the bundle. The trick here is to warm up the leaf litter around your ember so that it dries out enough for it to start to smoulder.
You might get the odd flame or two here but they tend to die back quickly. Keep taking your time (I have taken up to 20 minutes doing this with very damp tinder) and the leaf litter around your initial ember will eventually dry out and smoulder.
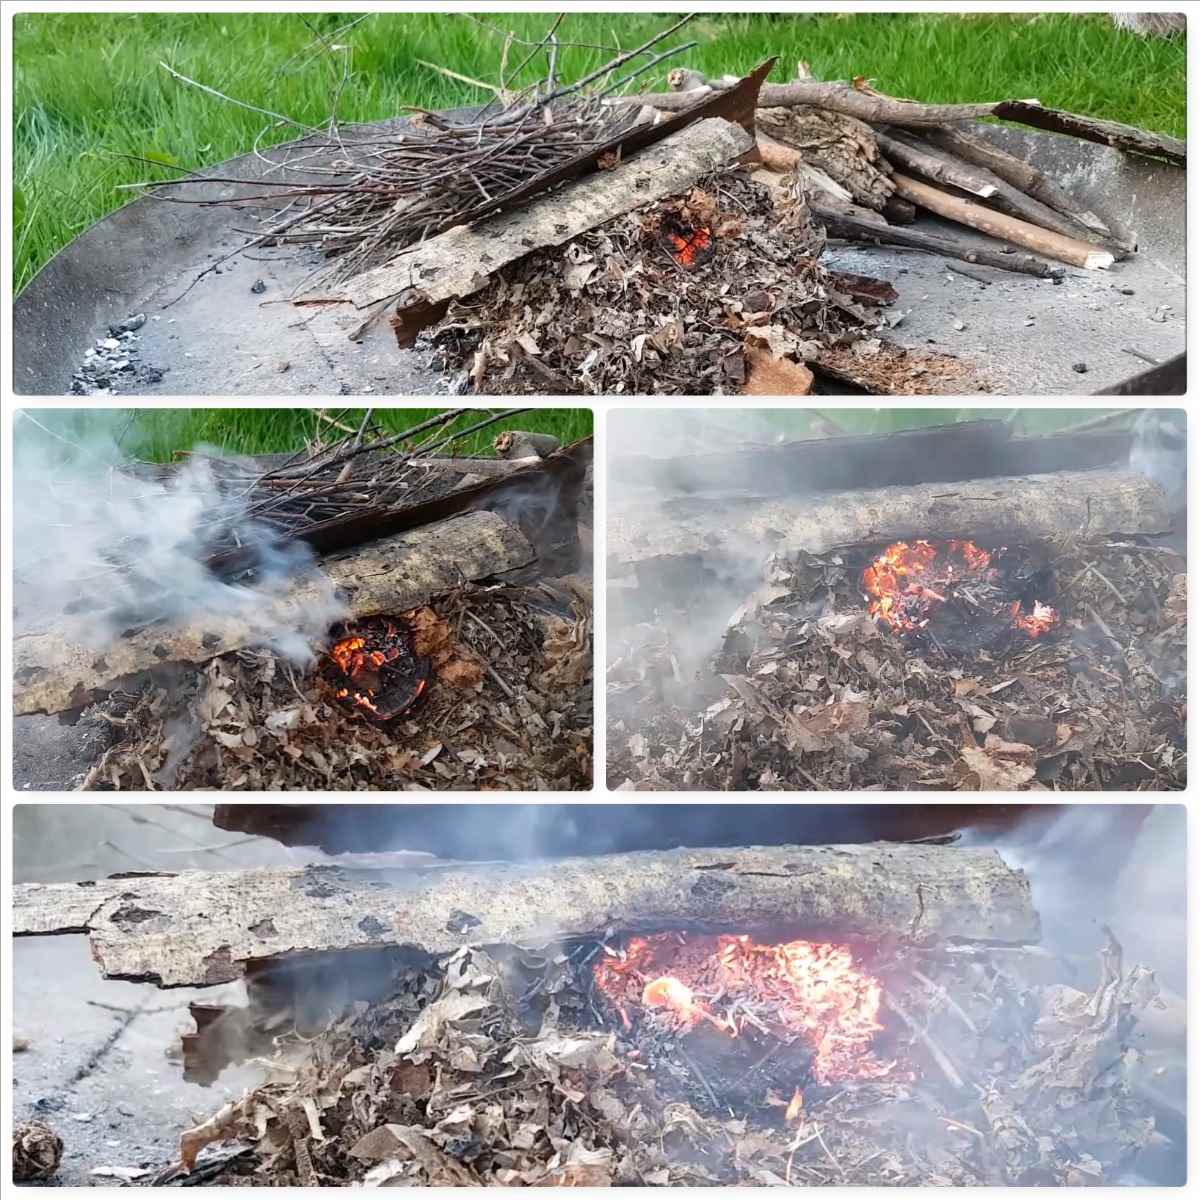
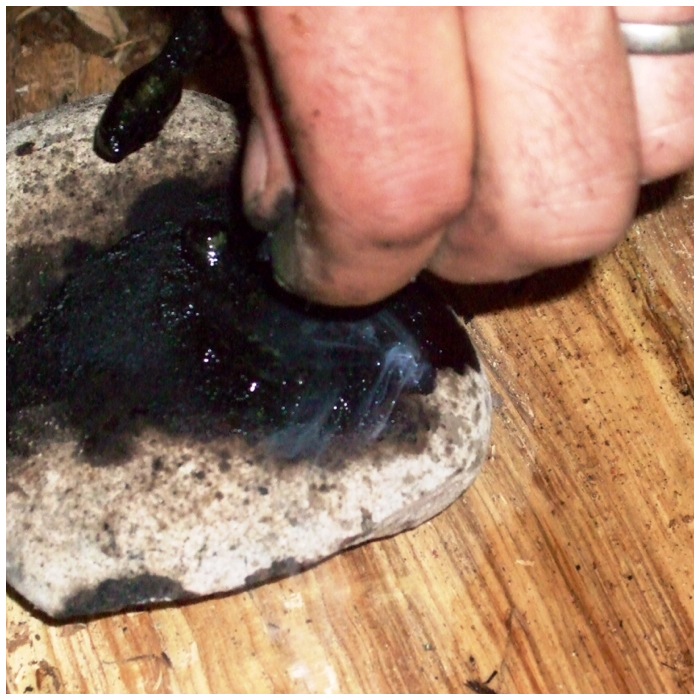
The slow burn
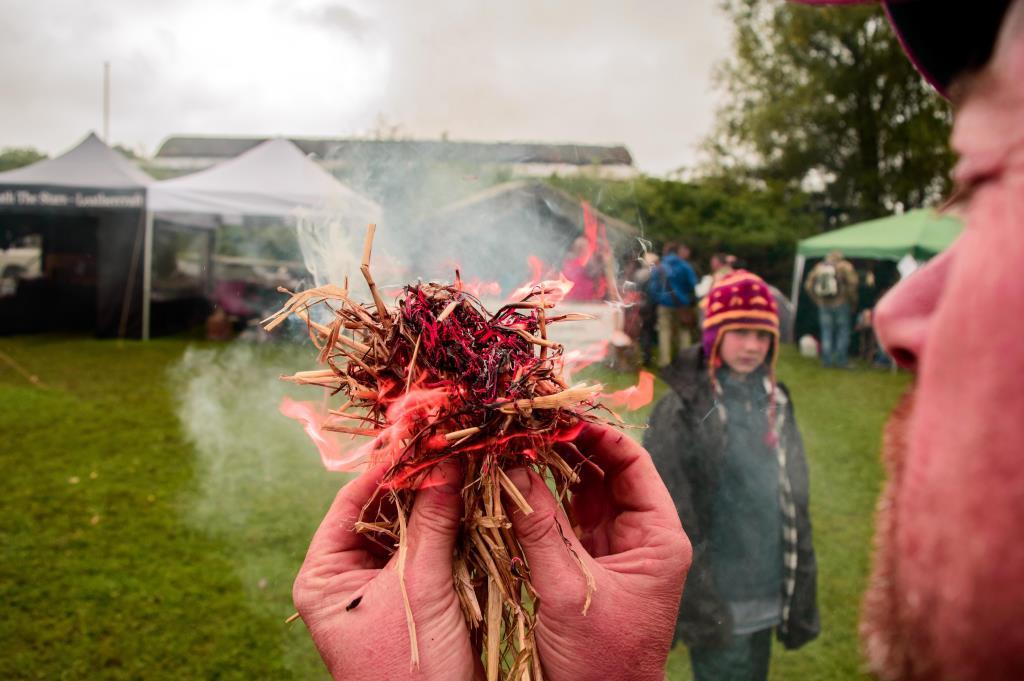
Catching the Flames
Once the flames you produce start to last for longer, remove the top cover of bark and add a pile of the finest dry twigs you can find to the top of the pile. You might have to gently blow a few more time but you will soon have some beautiful flames licking their way through your twigs.
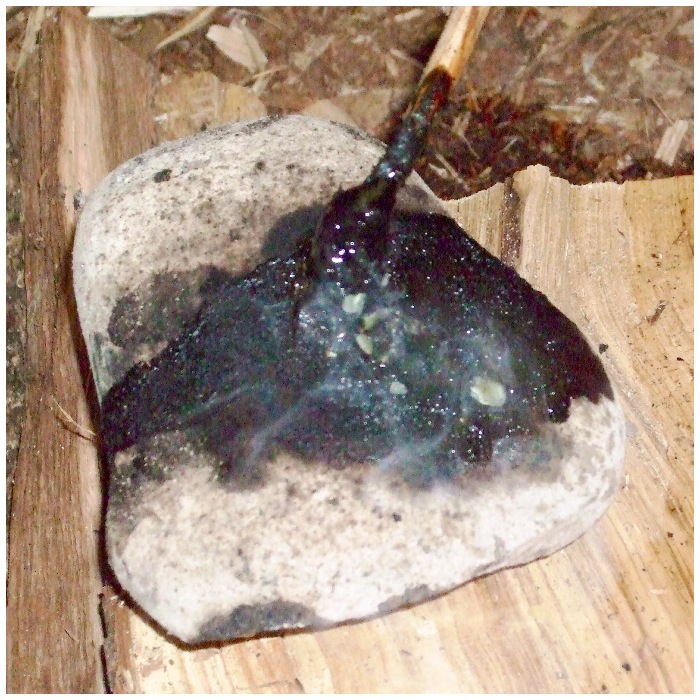
Remember also to have all your other grades of wood ready to add to the fire as it sustains itself – it would be a real shame to lose it all at this stage for the sake of poor preparation.
Feeding the flames
Variations
Instead of using bark to lay your leaf litter on try using large green leaves.
Using green leaves instead of bark
No bark or green leaves? Use small branches to lay everything on and to cover your pile.
The Master – Rich59 – at work
Finally test yourself like I did with my friend Mark Beer – get out into the woods and collect everything for making your fire (including making a bowdrill or handrill) and get your fire going using damp tinders.
Test yourself
I made this video for you to see the whole process in action.
Happy gathering, and remember that everything you need to light your fire is right under your feet.
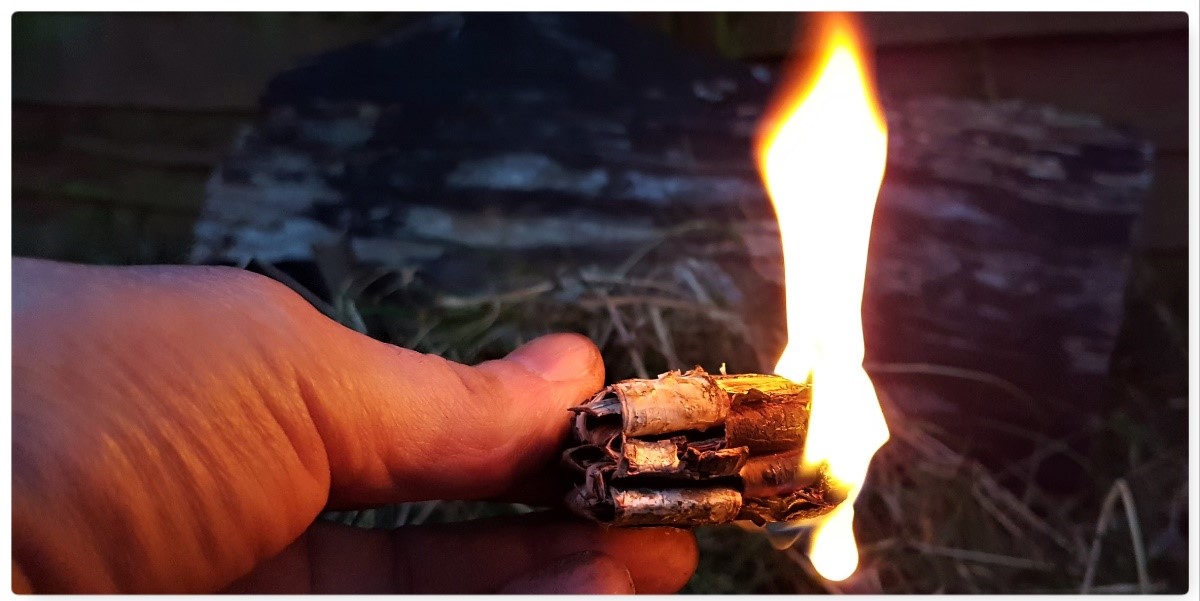
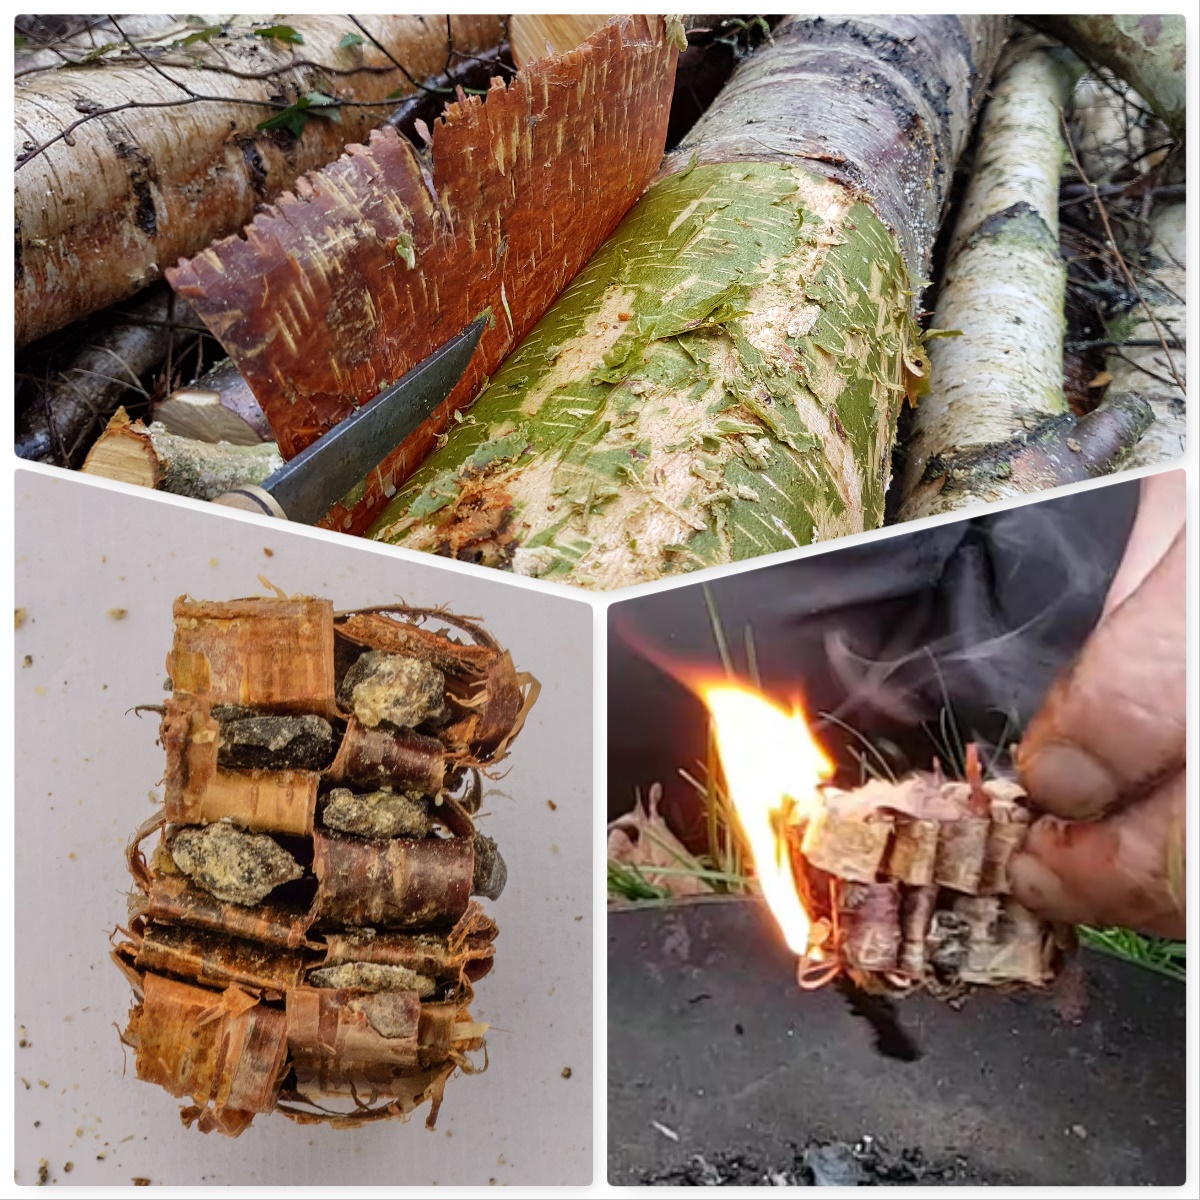
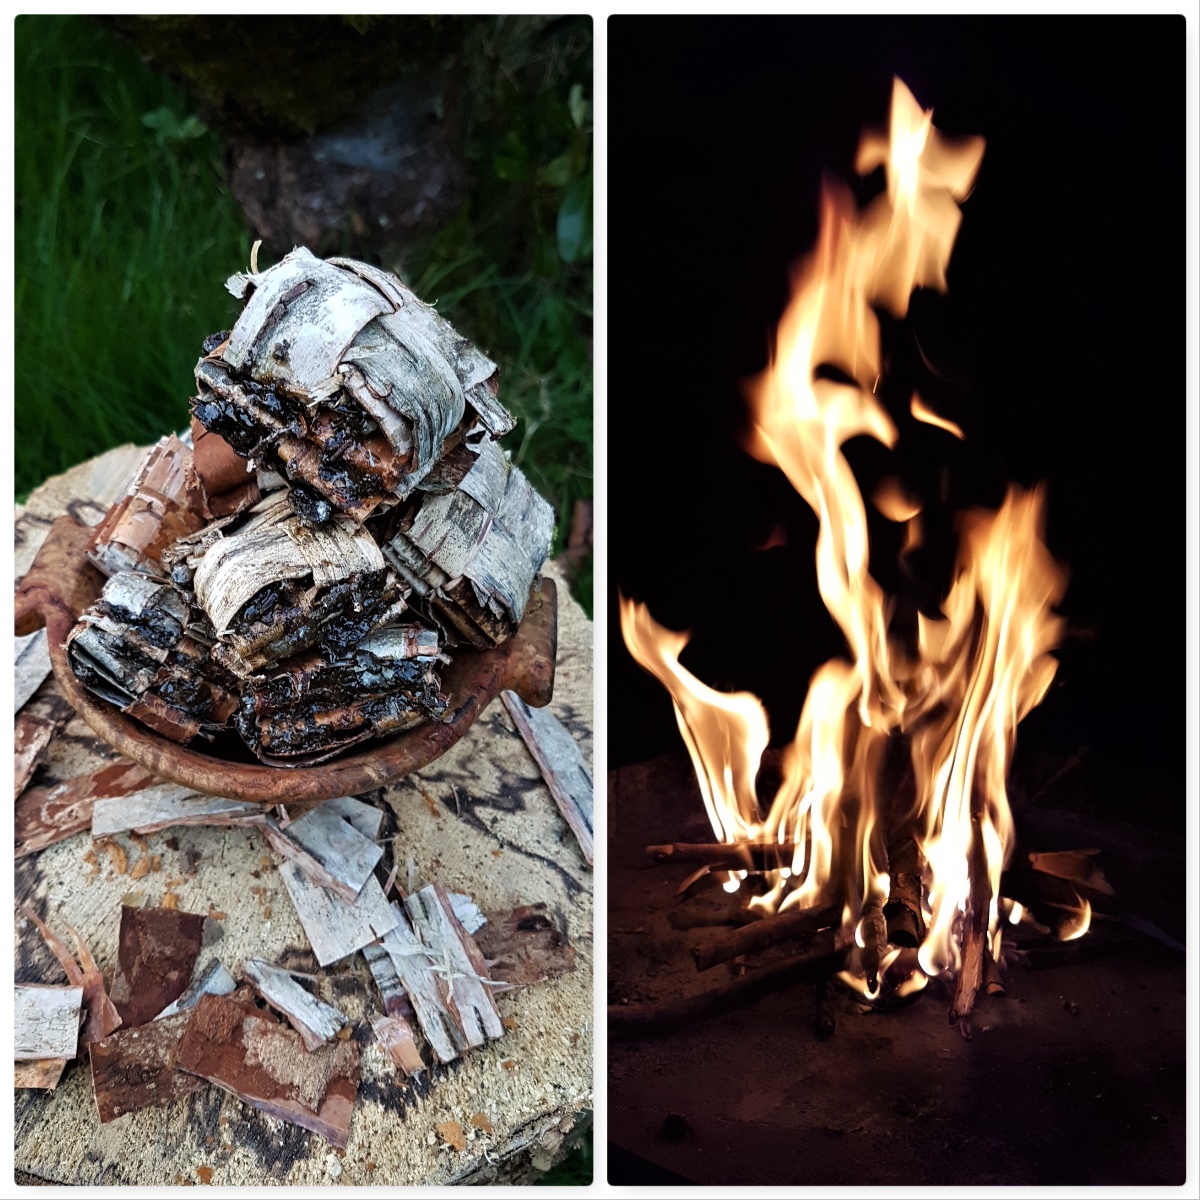
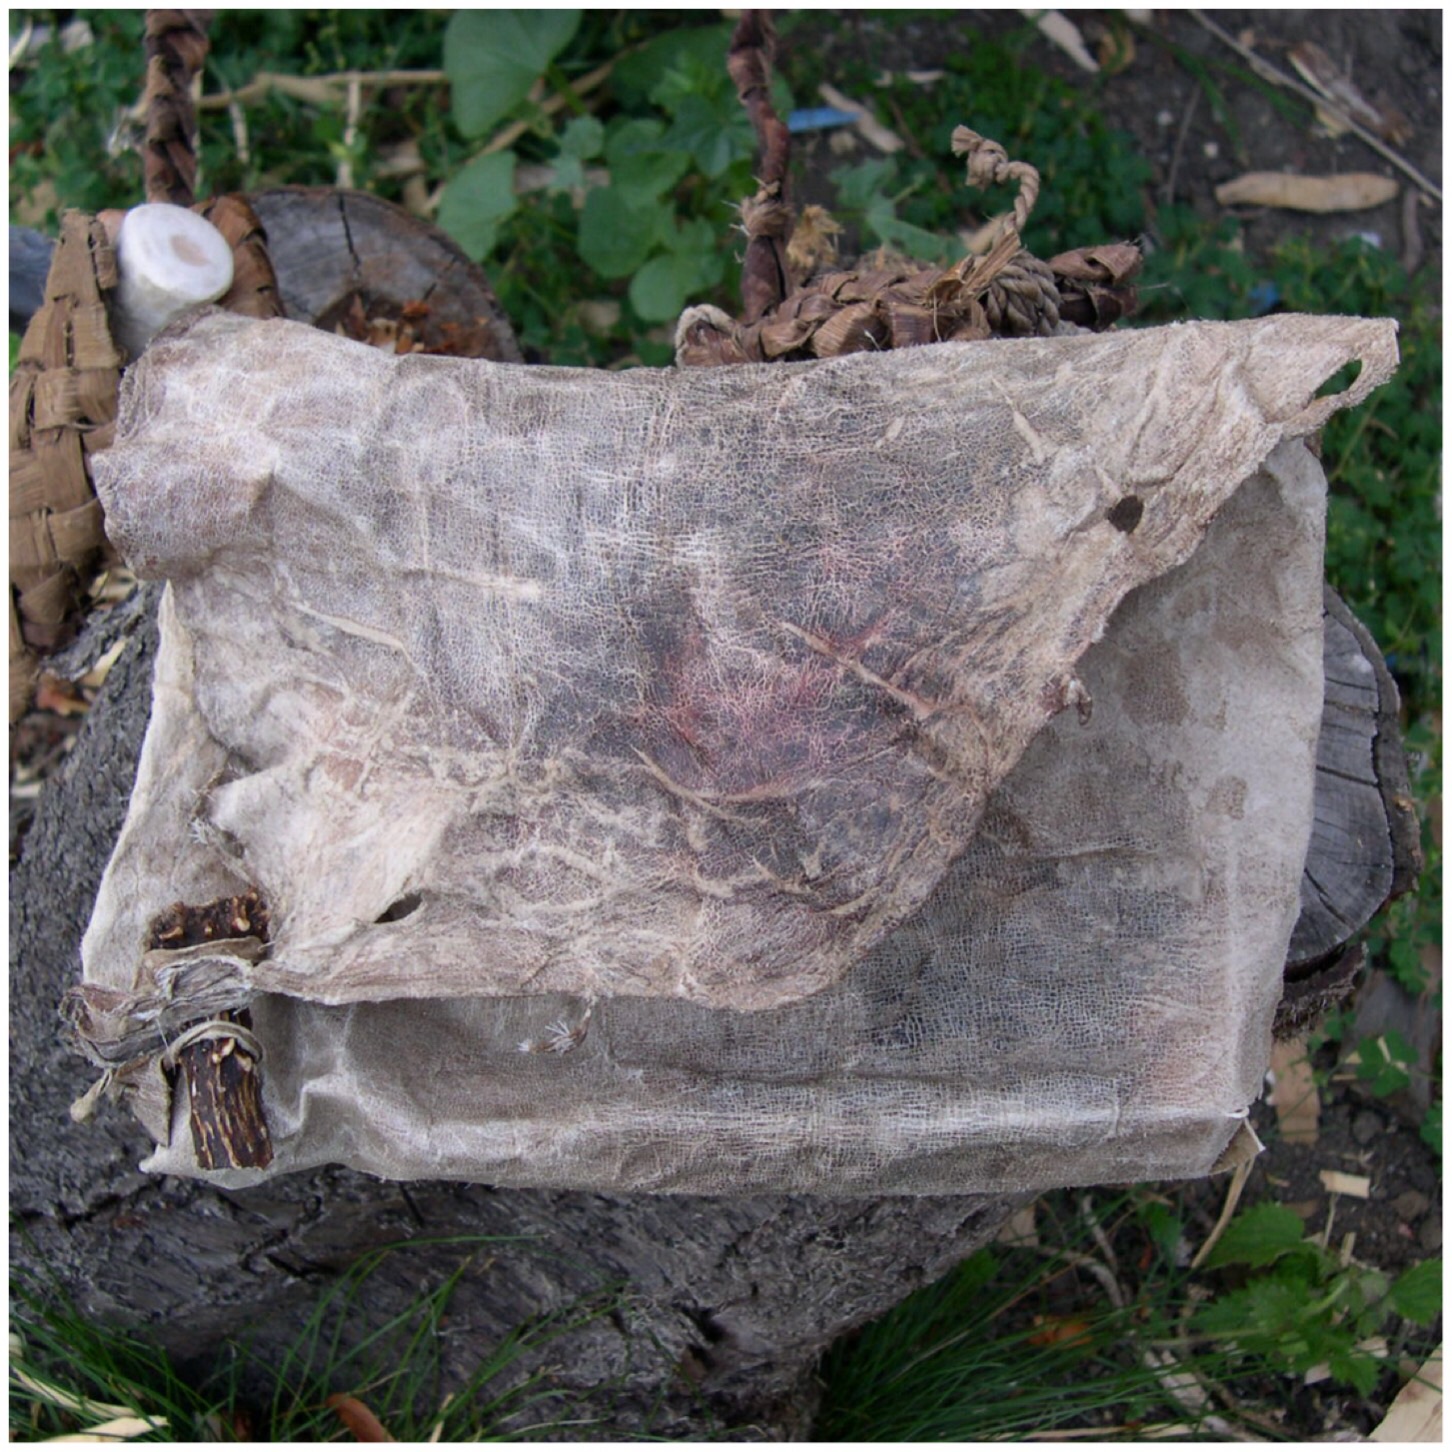
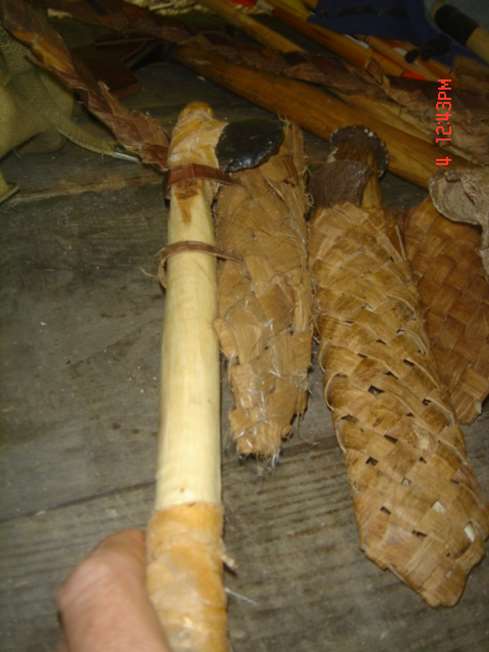
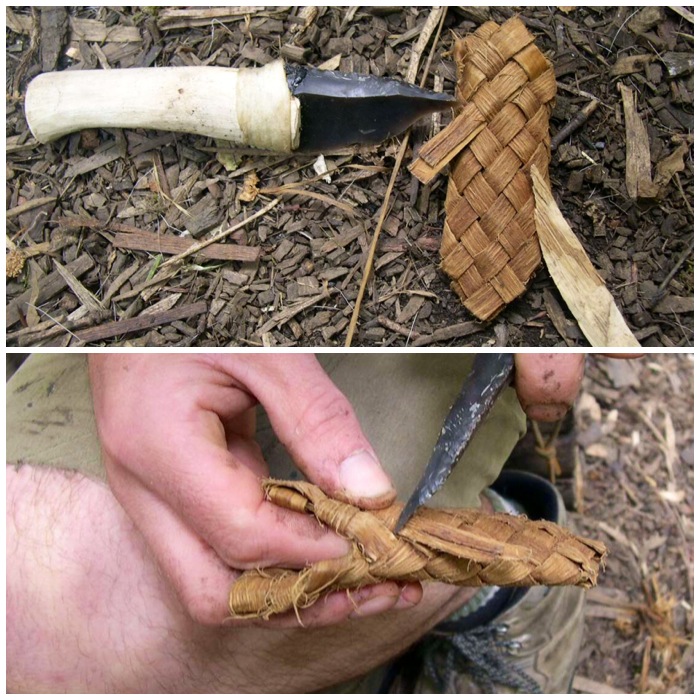
Apart from making baskets and sheaths out of bark I have been experimenting these last few years with weaving bark into natural firelighters. I came across a post on Bushcraft UK by a member called Woodwalker on these firelighters from 2010 – he called them Woven Kindling.
I have since added spruce resin to mine and liken them more to Natural Frelighters as they burn long and fierce. This is the second part in my two part series on natural firelighters – the first being my post on Birch Bark Fire Fans.
The Birch Bark Firelighter
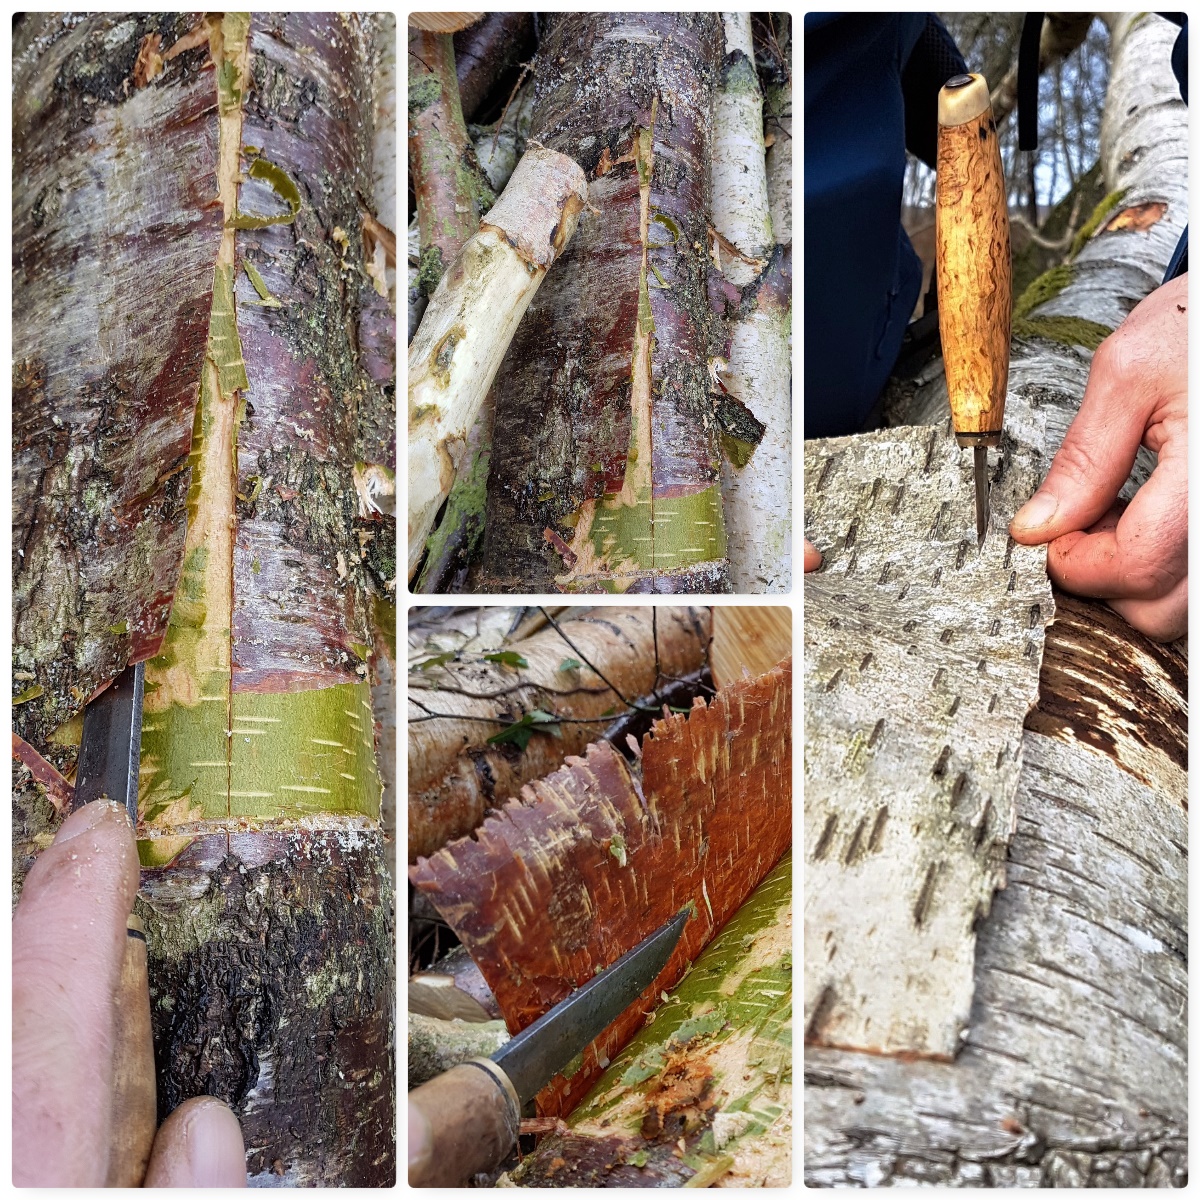
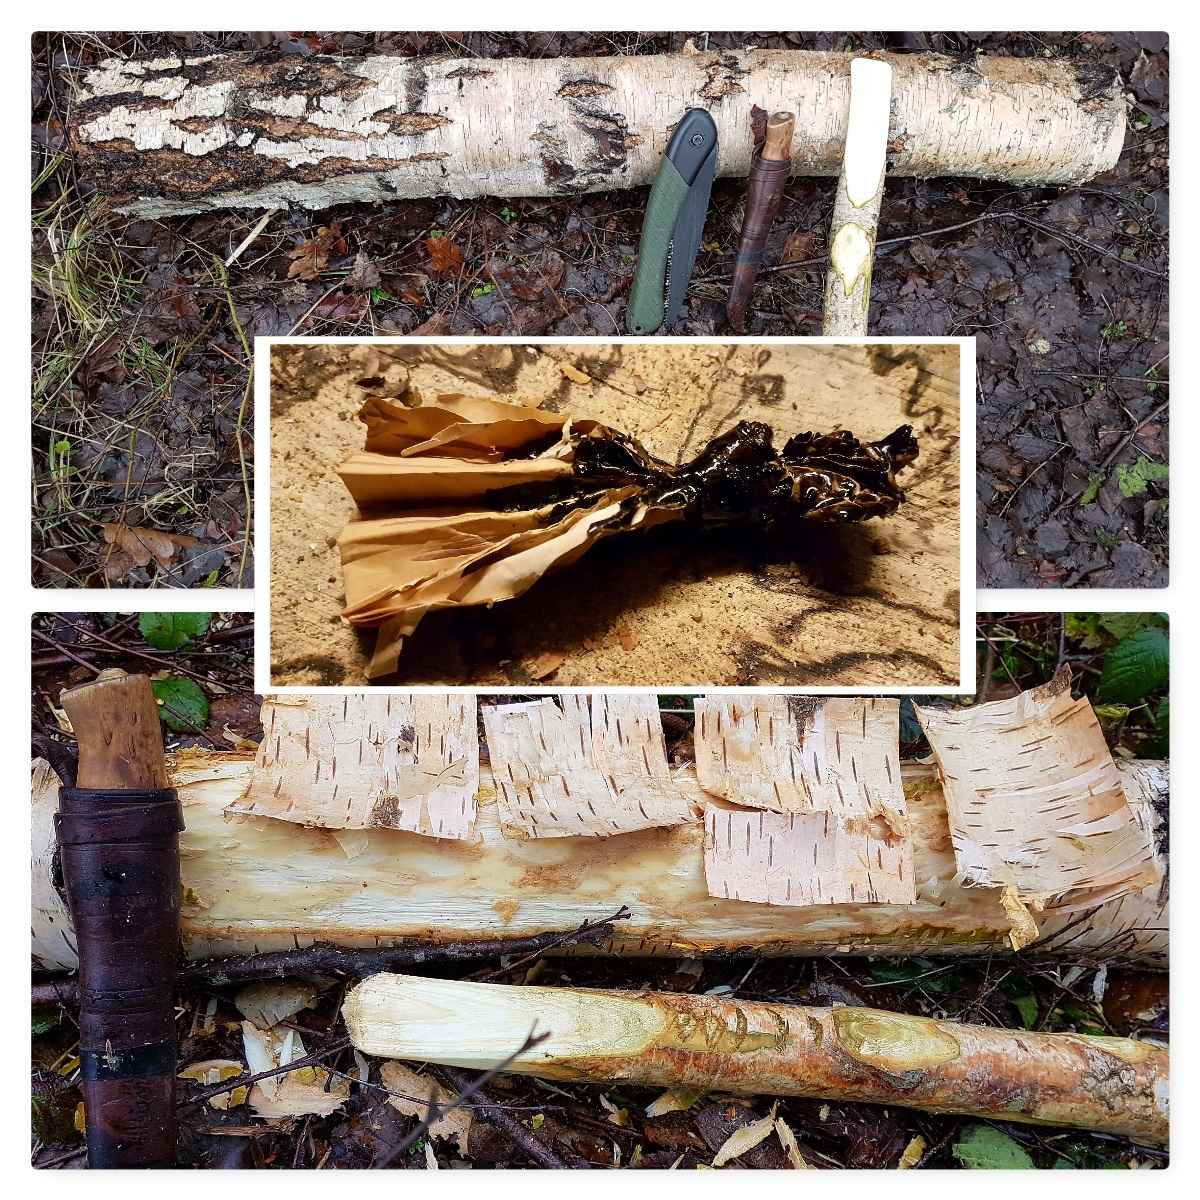
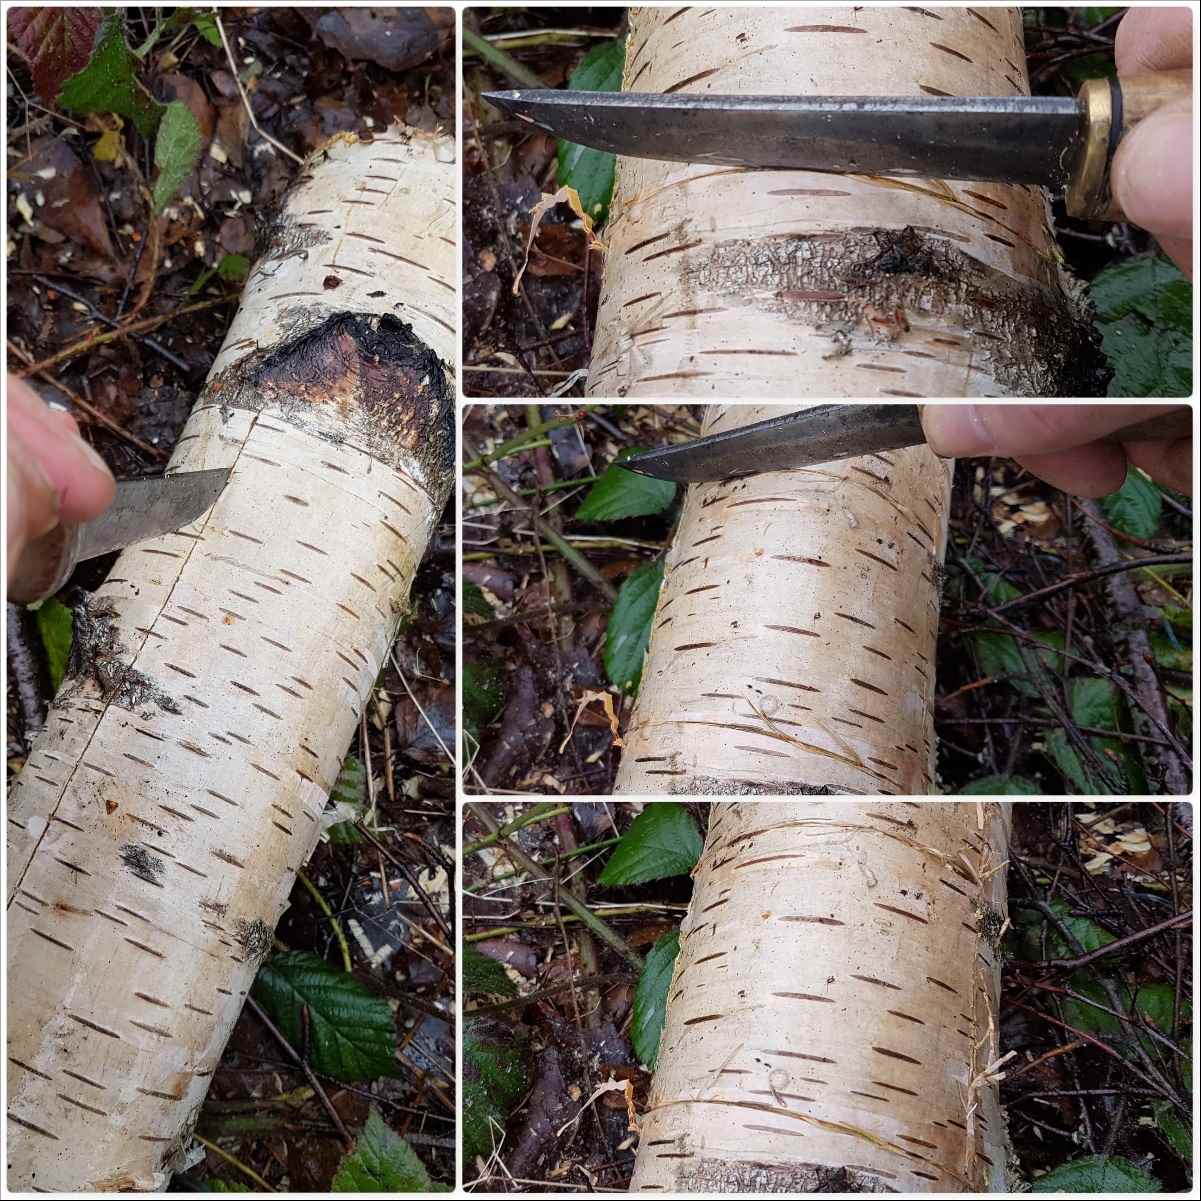
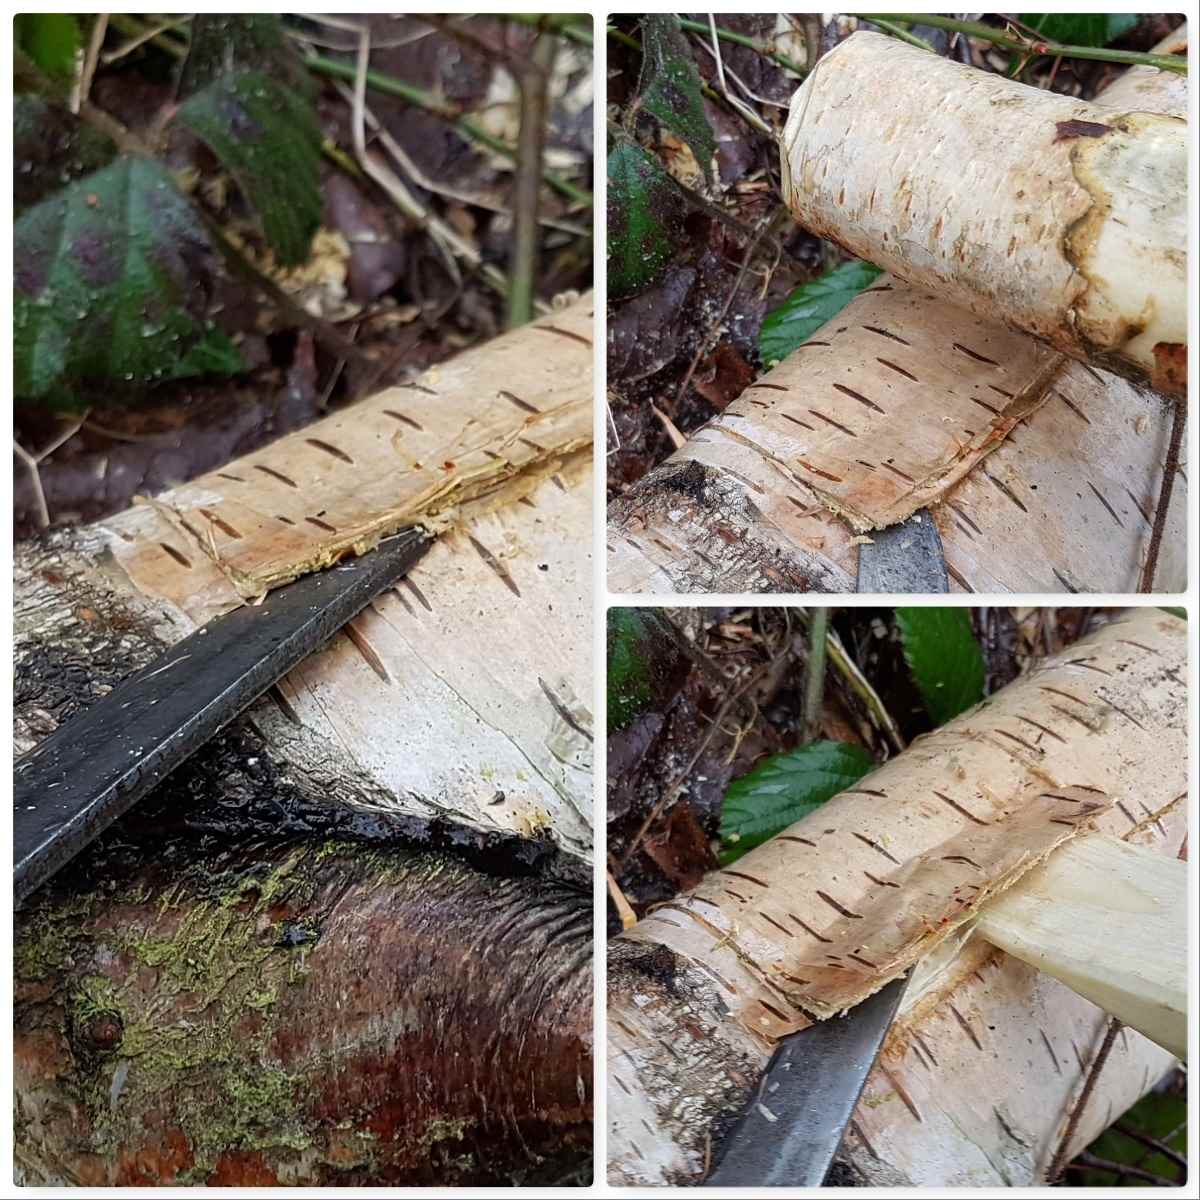
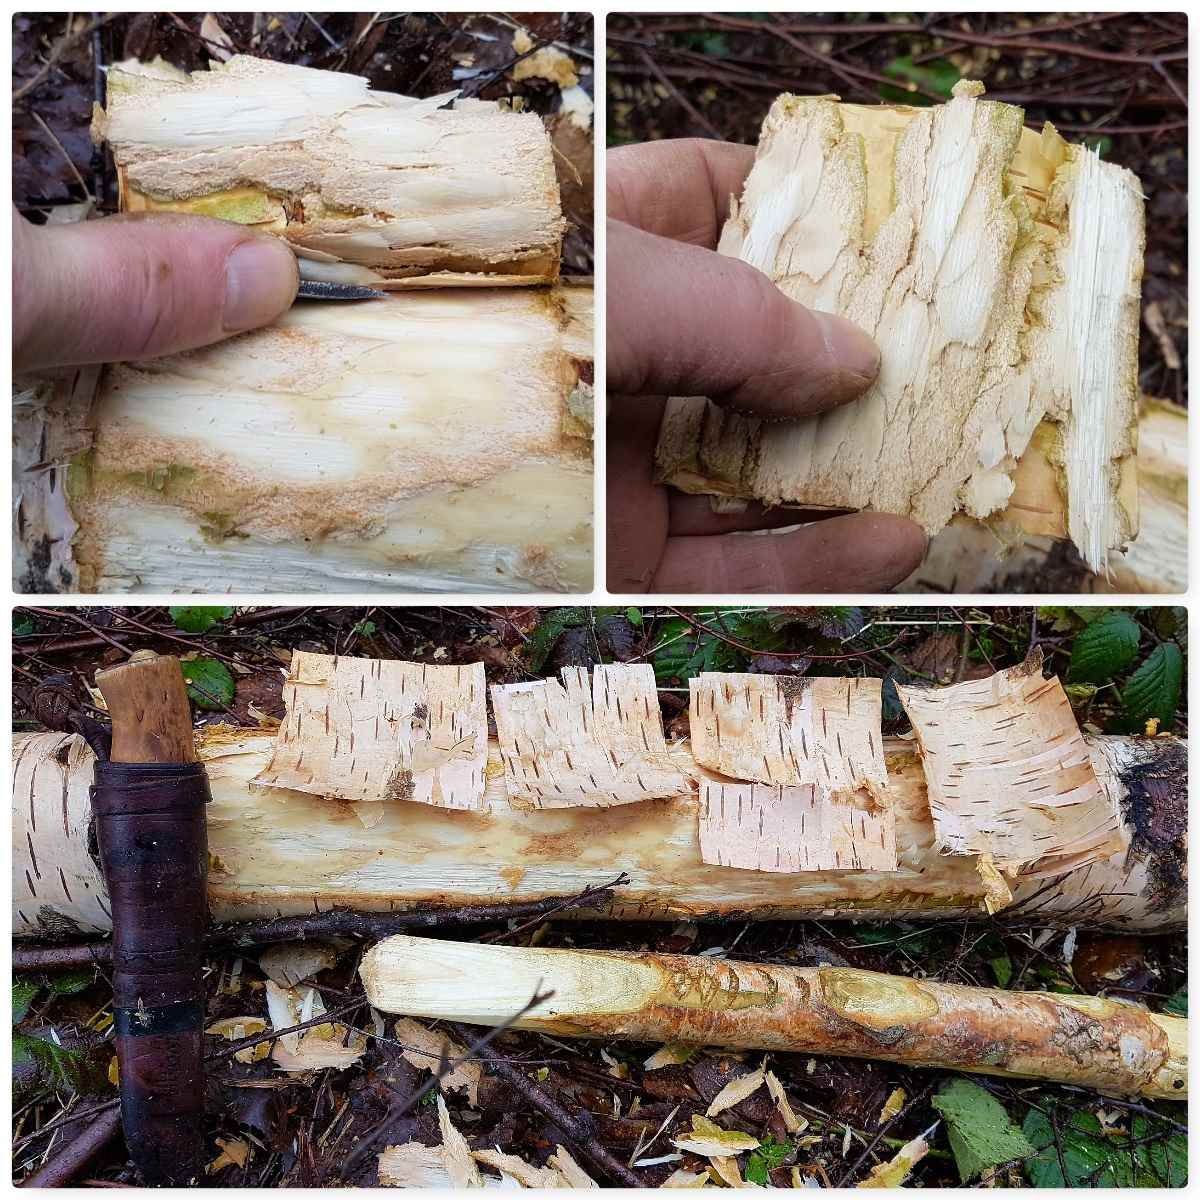
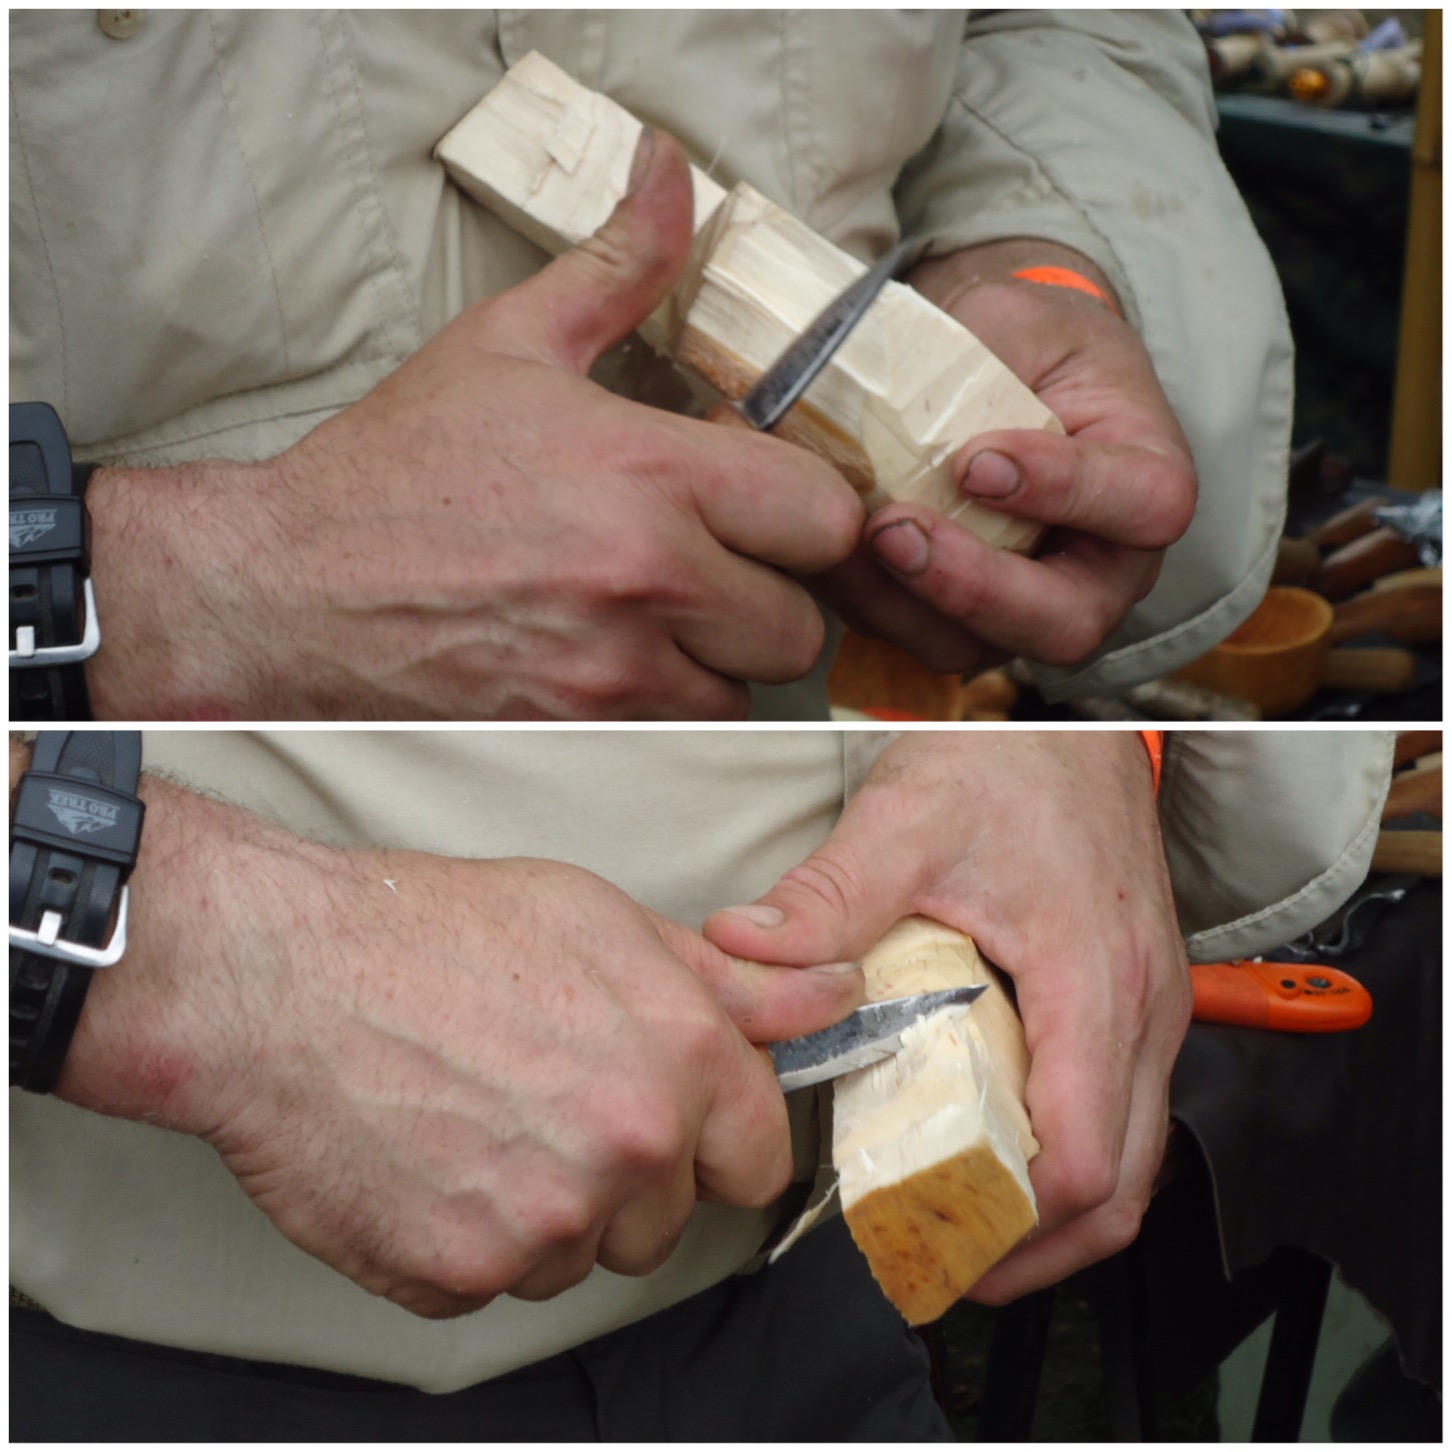
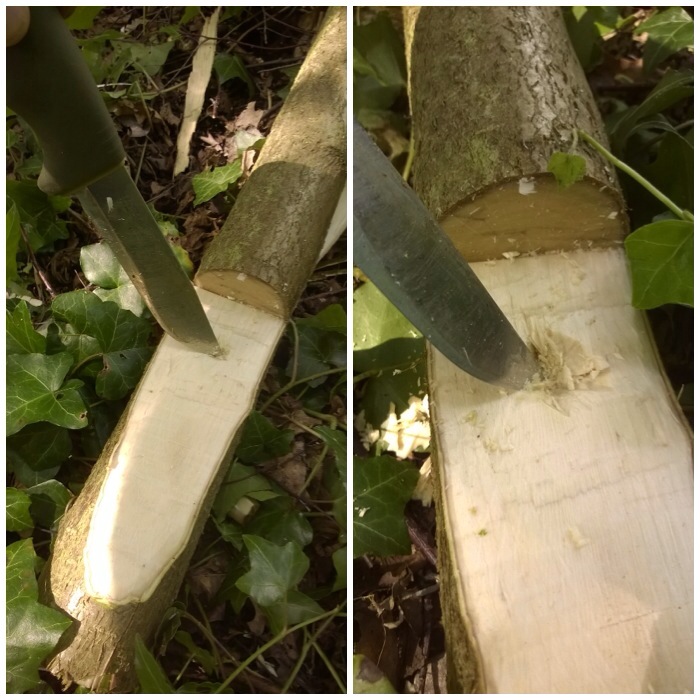
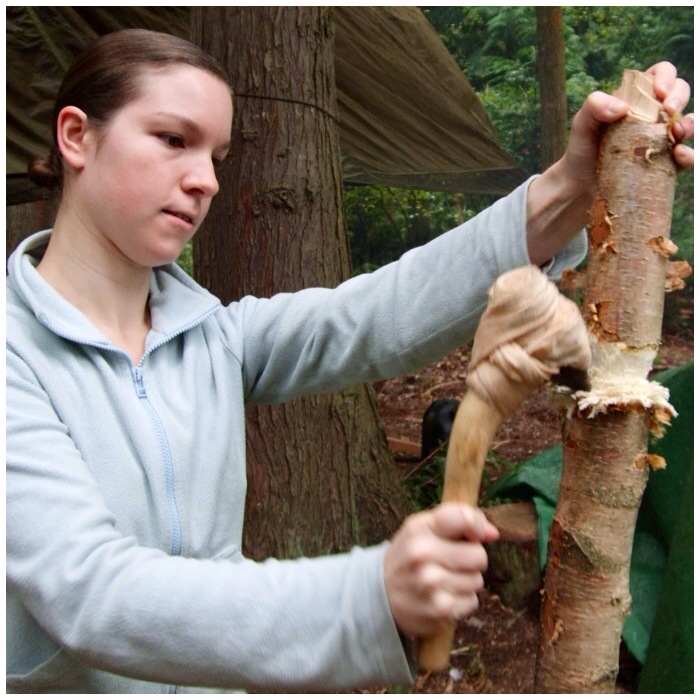
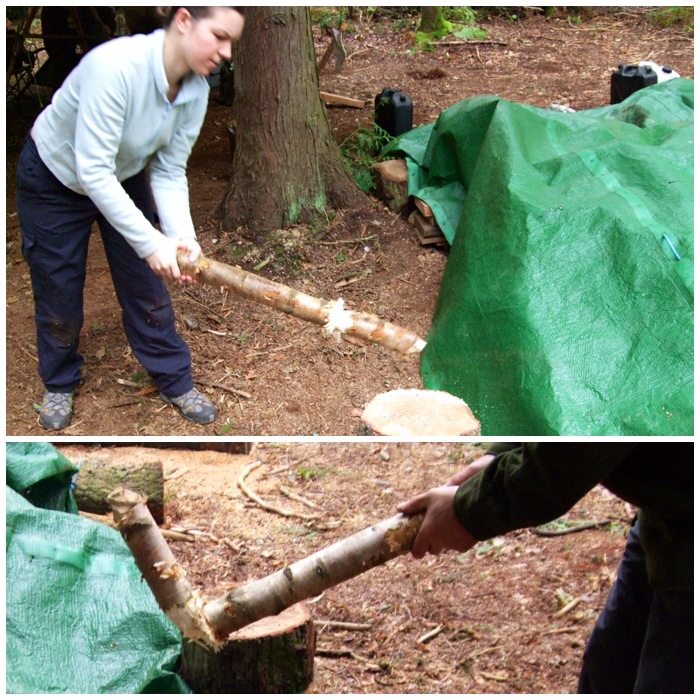
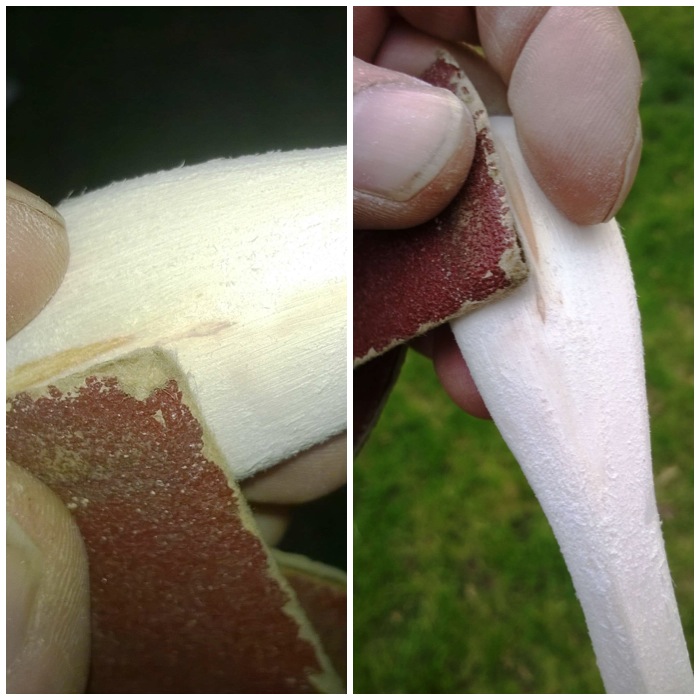
Removing the bark
If you can find a semi rotten fallen birch log the bark tends to come of easily so just pull of the what you need. If you use semi rotted logs just take a little piece from as many different logs as you can as these logs are home to many different invertebrates.
If the logs are freshly fallen then I use my knife to score out the area I want to cut out (ensure it is a smooth an area as possible). If the bark does not peel off easily I batton it with a small log to loosen everything up before prising it off with my knife. I go into the specifics of removing the bark in more detail in my post on the Birch Bark Fire Fan. The main thing is to take your time when the bark does not come off easily.
Stripping the bark
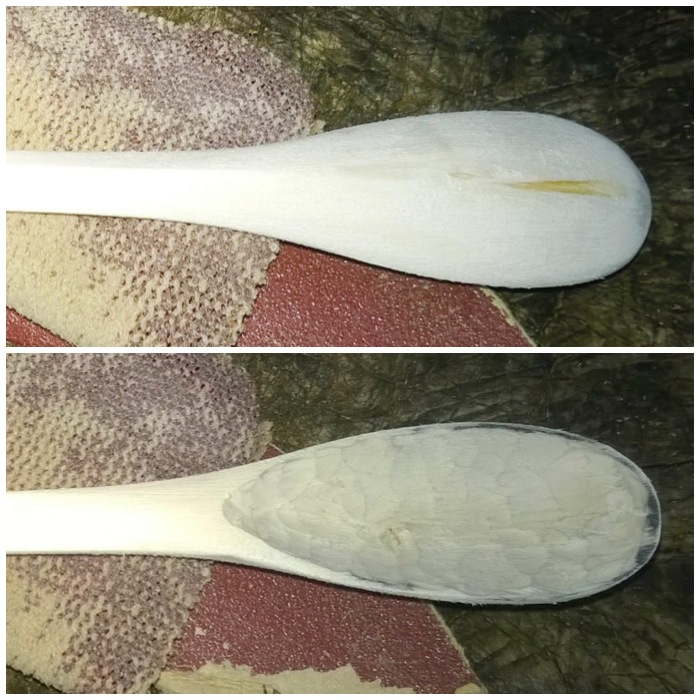
Once I have my section of bark I will either peel it by hand into strips of about 1 cm in length or if I am feeling the need to be very accurate I will tap my knife into a log and use that as a tool to cut the bark into even strips.
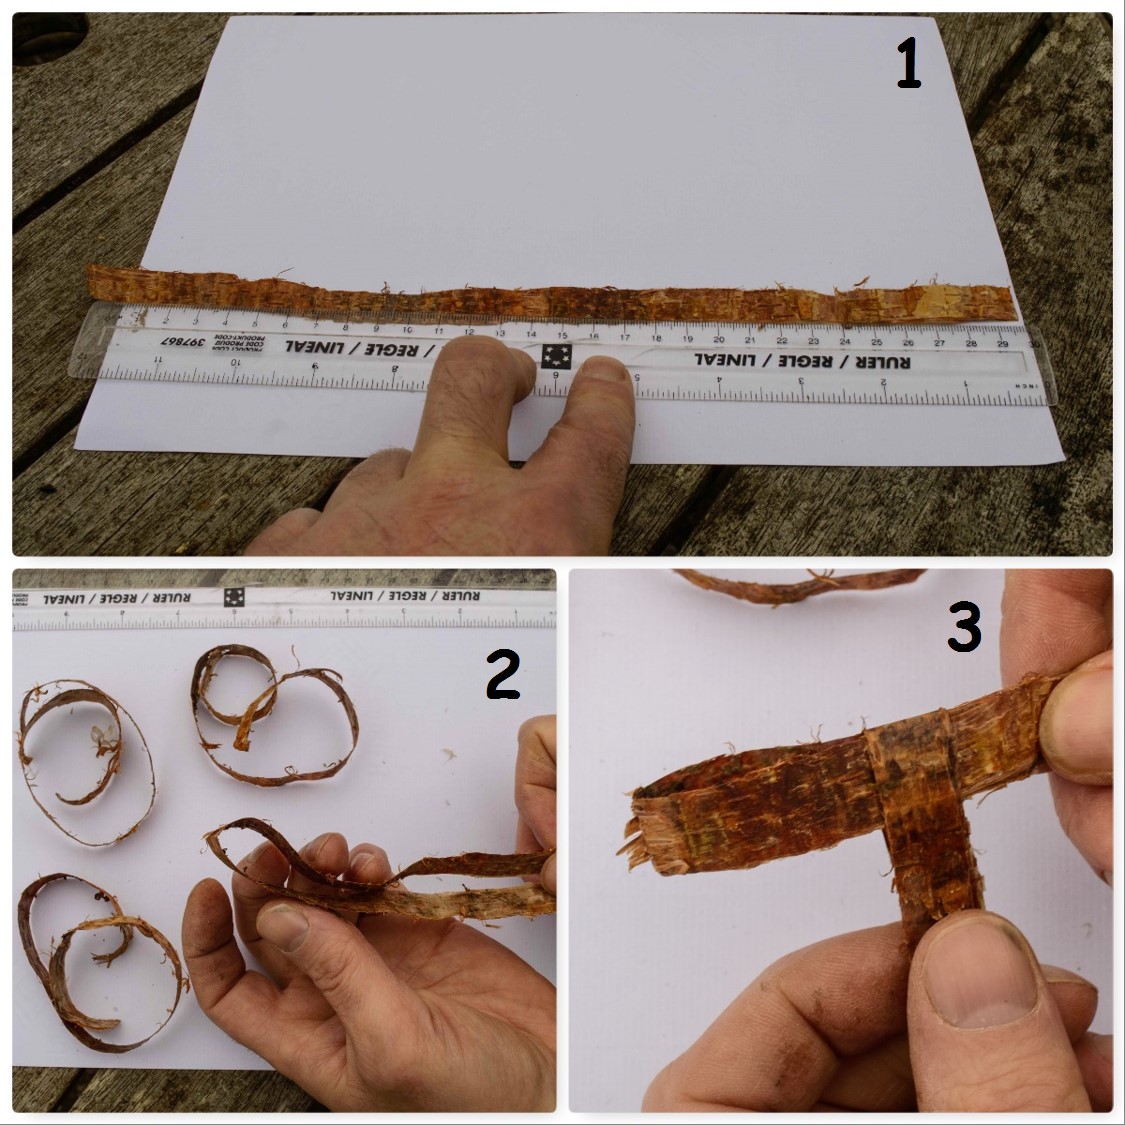
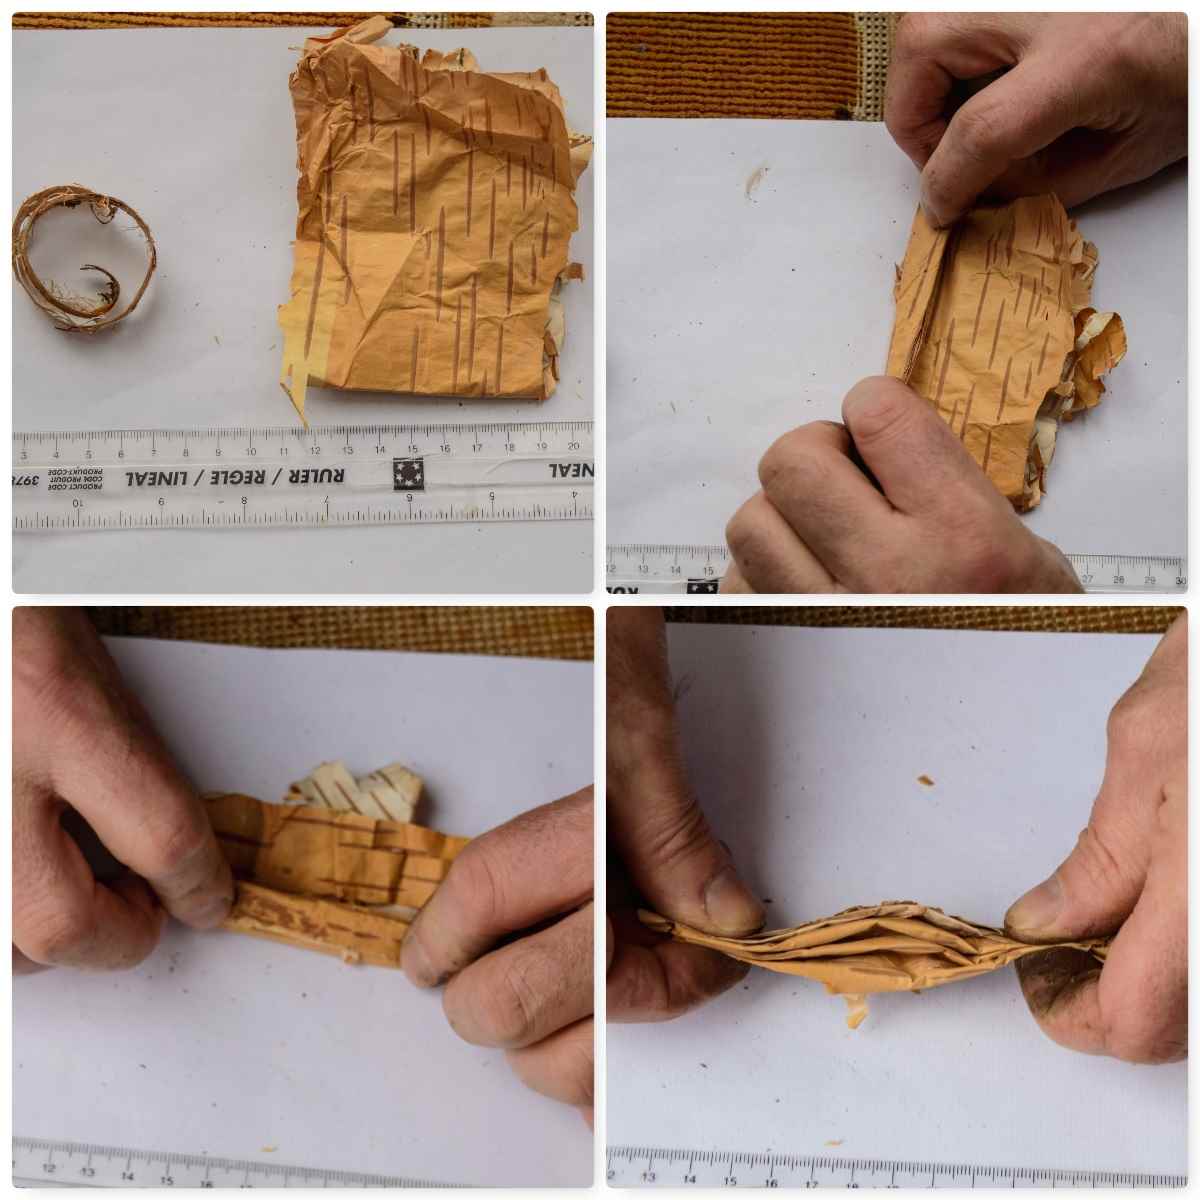
Locking the strands together
1. To make one firelighter you need four strips of birch bark. I use strips about 30 cm’s in length and 1 or 2 cm’s width.
2. Fold each strip in half – the folded end is called the closed end and the end with the two tails is called the open end.
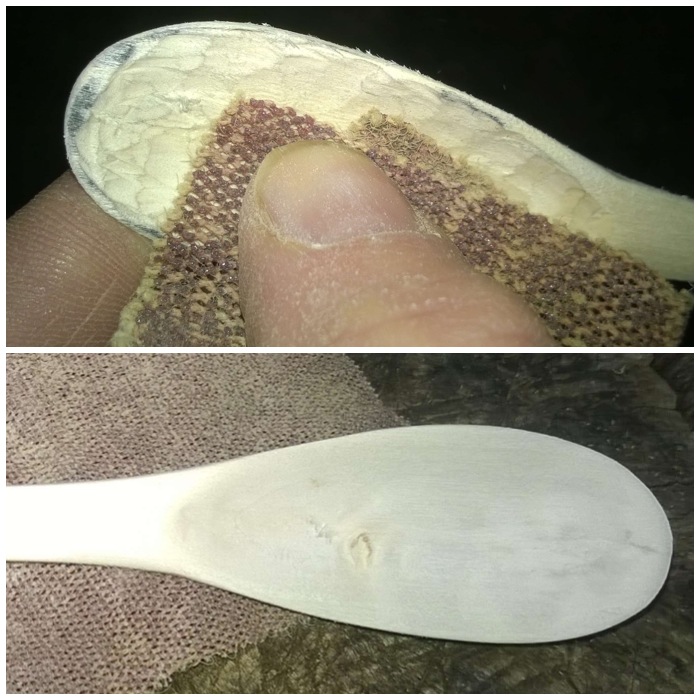
3. Slide one closed end between the open end of another strip so it sticks out by 2 or 3 cm’s. In the picture below in section 3 you can see a T shape is formed.
Folding – Open – Closed
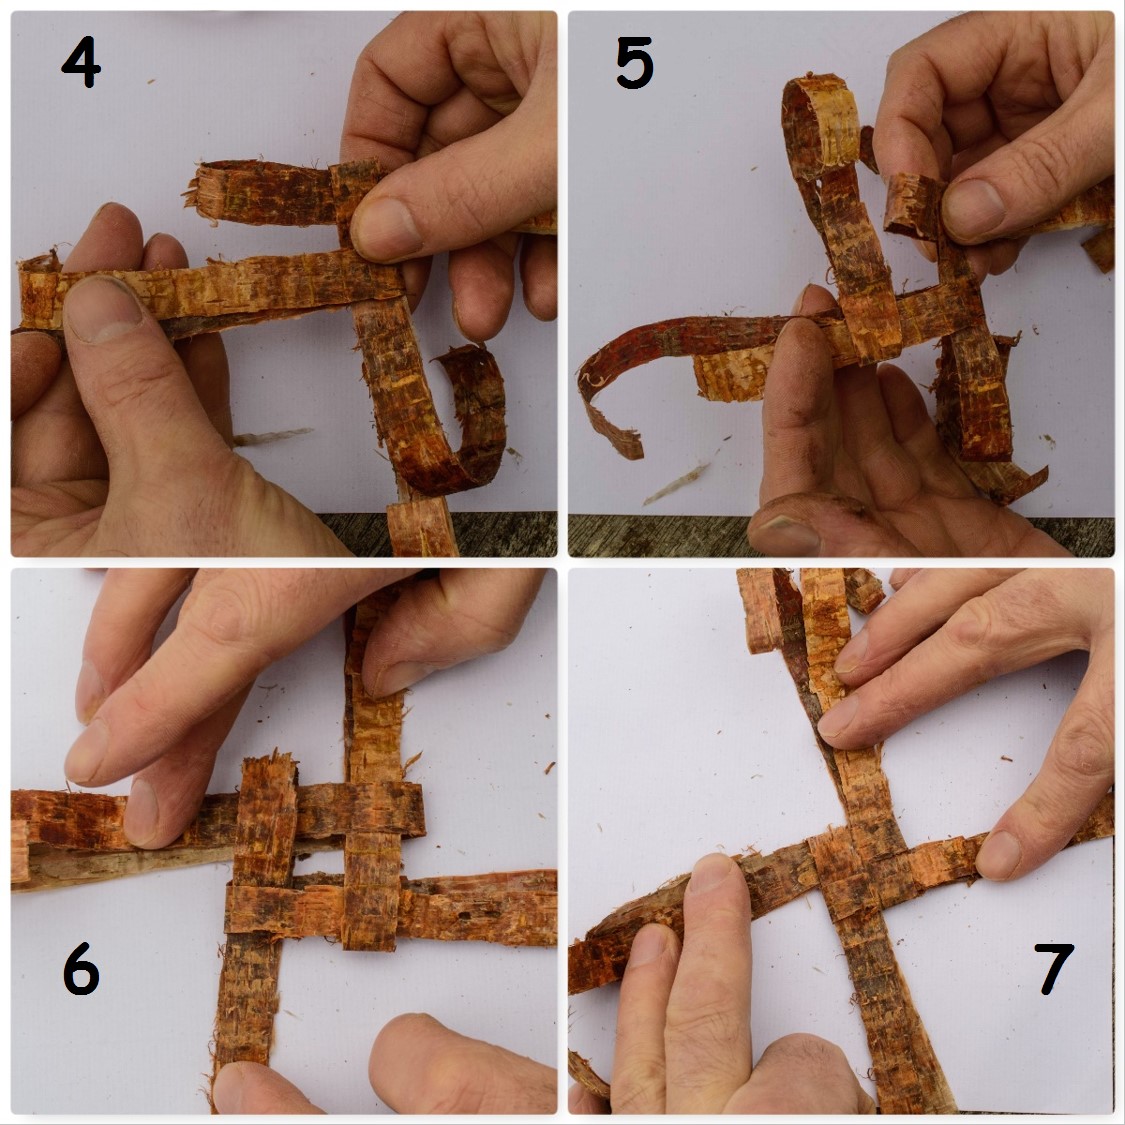
4. The closed end of a third folded strip is added to the upright part of the initial T shape to lock it off.
5. A fourth folded strip is added to the third strip to lock it off and the tails are threaded through the protruding loop of the first strip.
6.All the strips should now be locked off.
7. Pull everything in tight.
Locking in
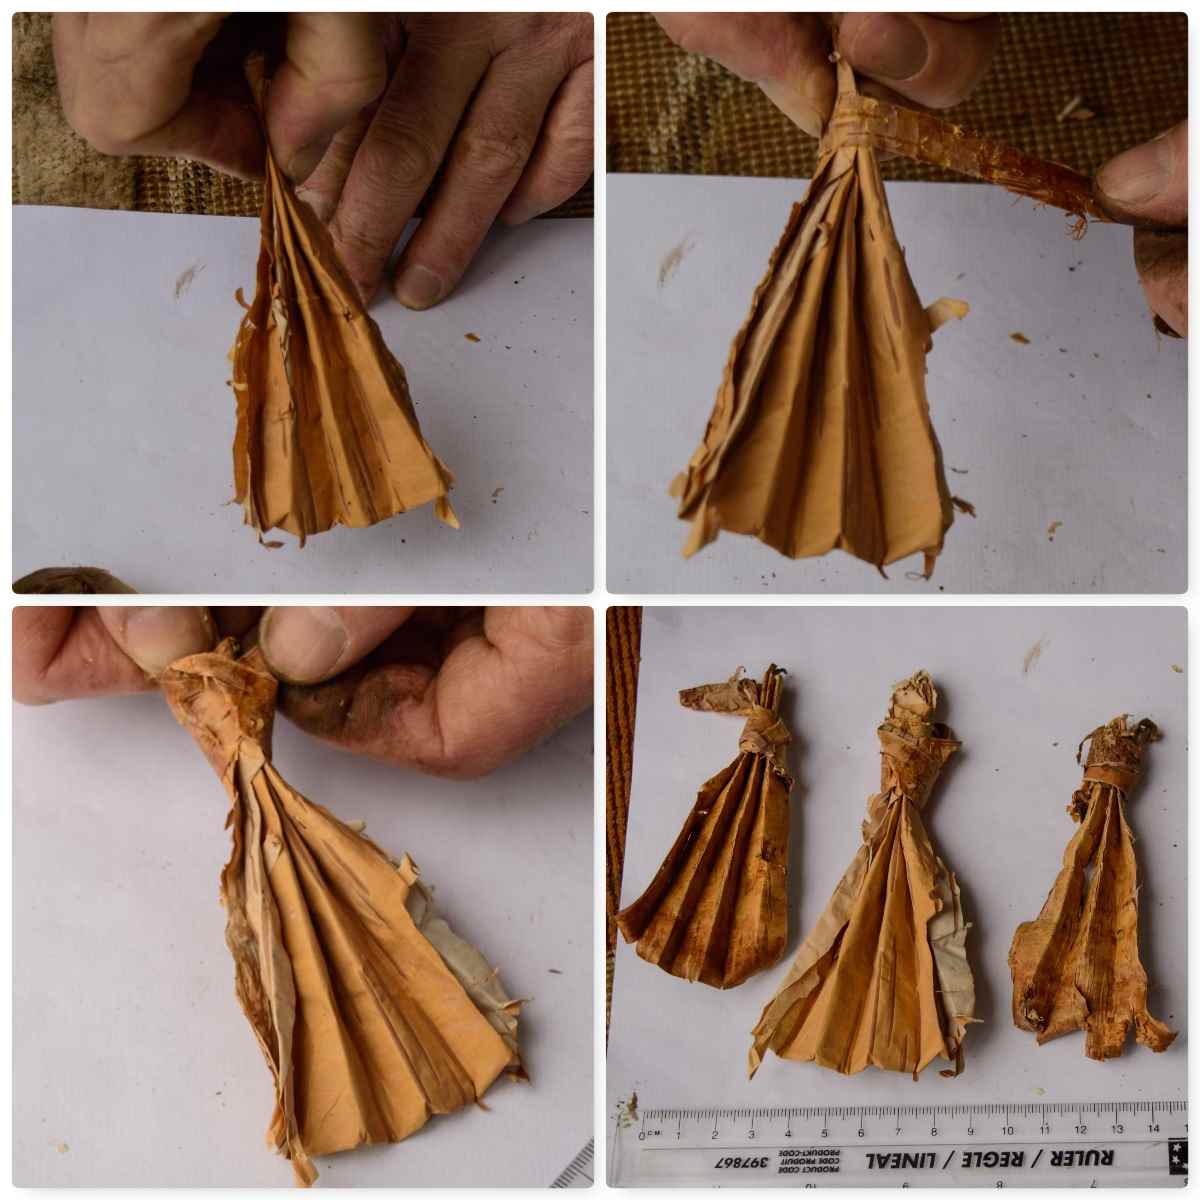
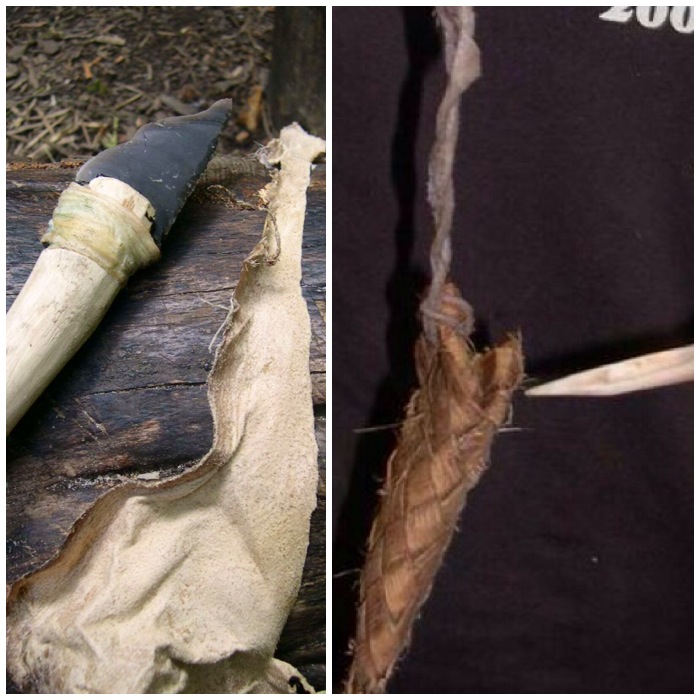
The Four Strand Crown
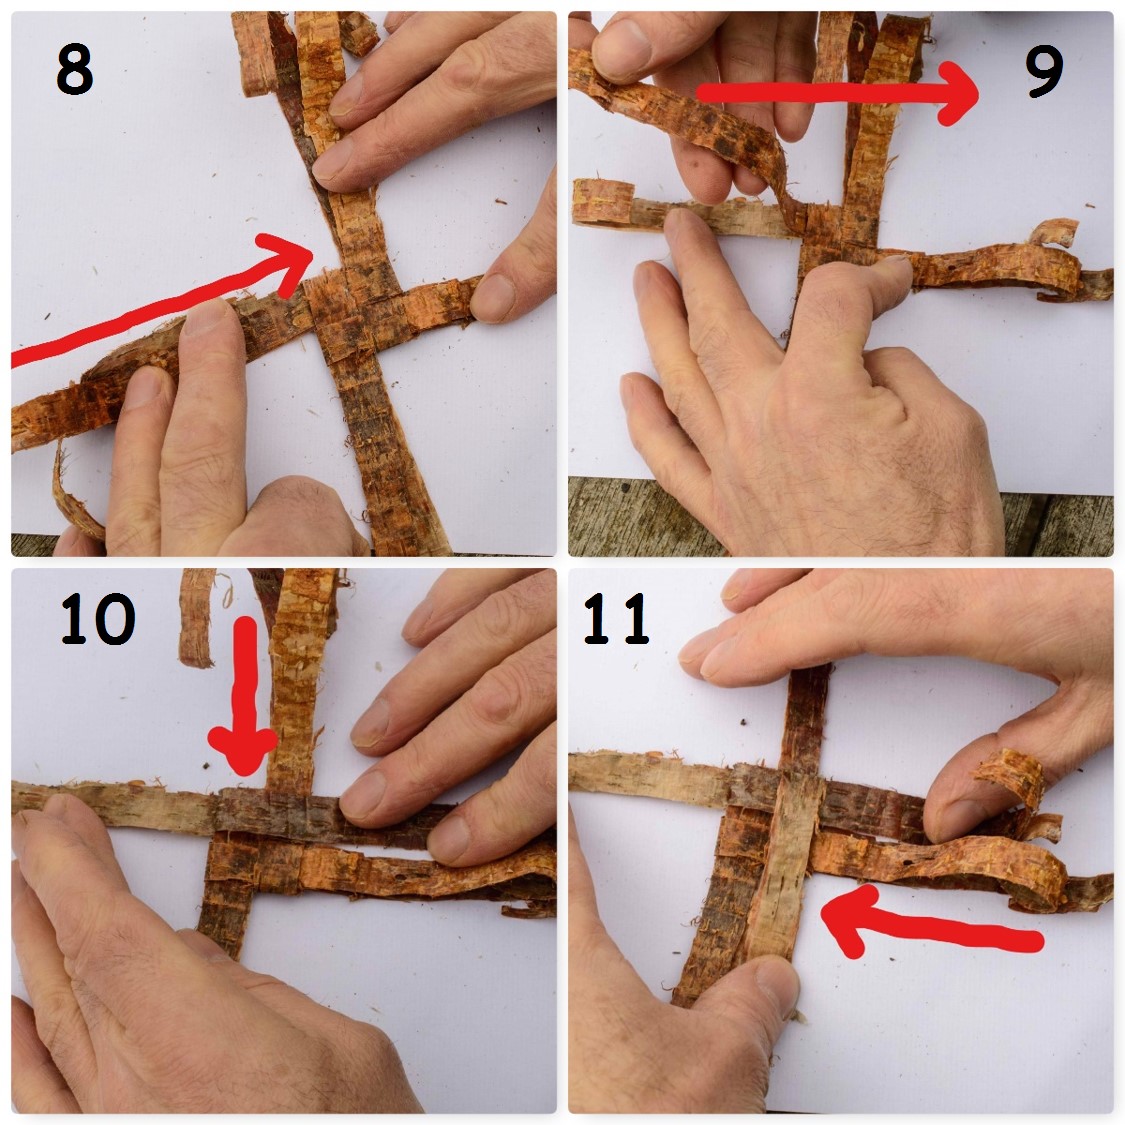
The firelighter is formed by weaving a Four Strand Crown knot. I have added the arrows to help you visualise what I am doing. Important – There will be two strips of bark at each open end. Only use the top strip of each open end when you begin the weave
8. To begin the knot fold one of the strips over. In section 8 I chose to fold the top strip on the left over first.
9. The strip is folded over to the opposite side.
10. To secure that strip in place I folded the strip at the top over this first strip to secure it in place.
11. This top strip (now at the bottom) was secured in place by folding the right hand strip over it.
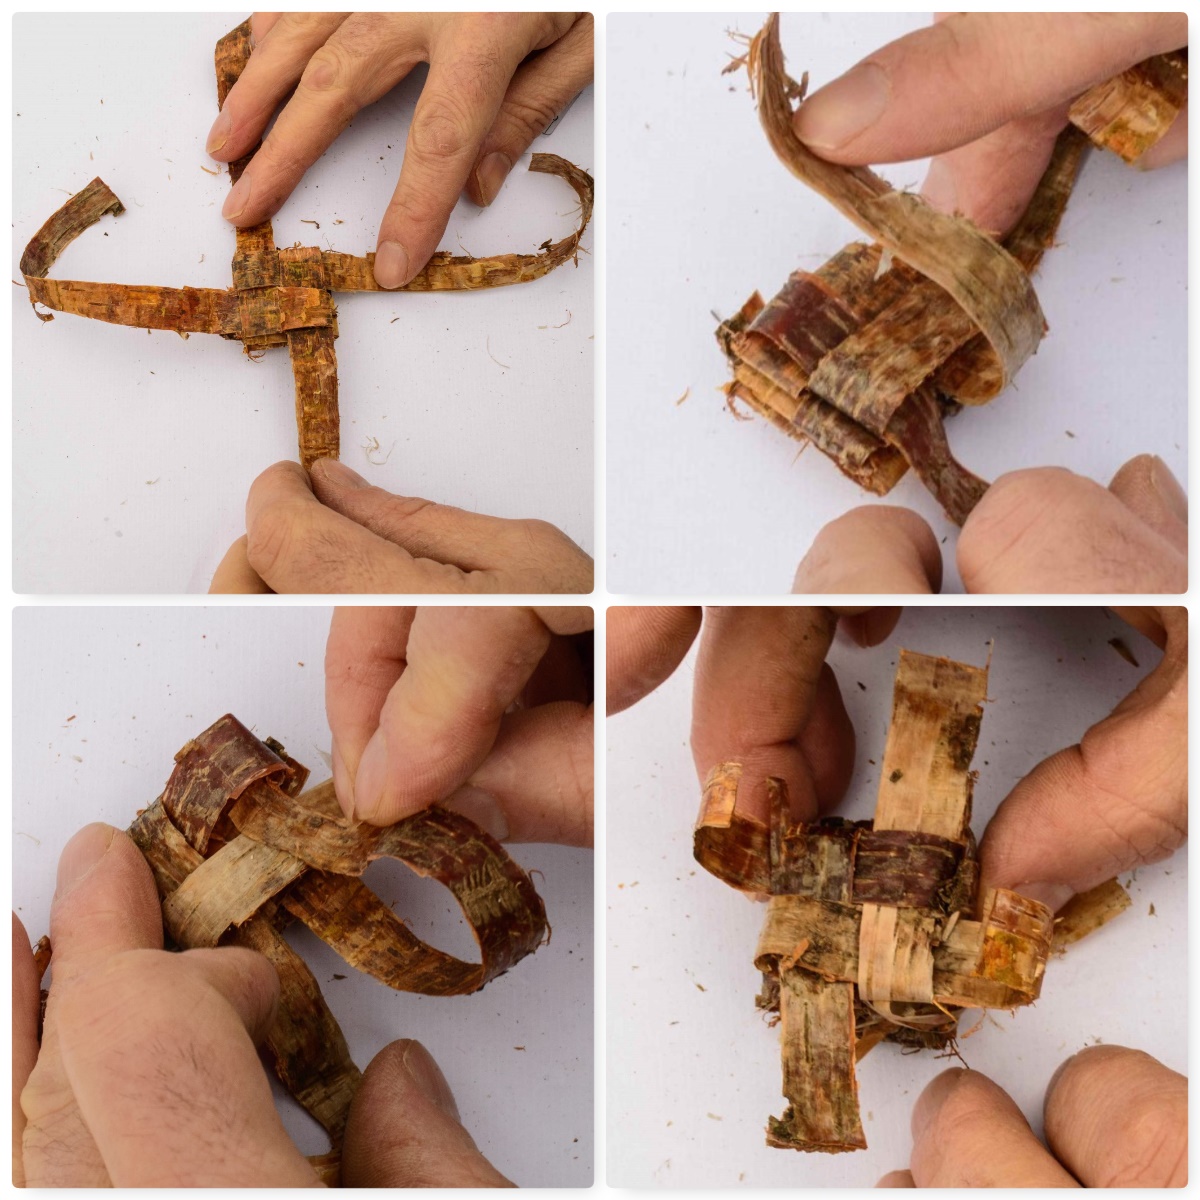
Four Strand Crown Knot
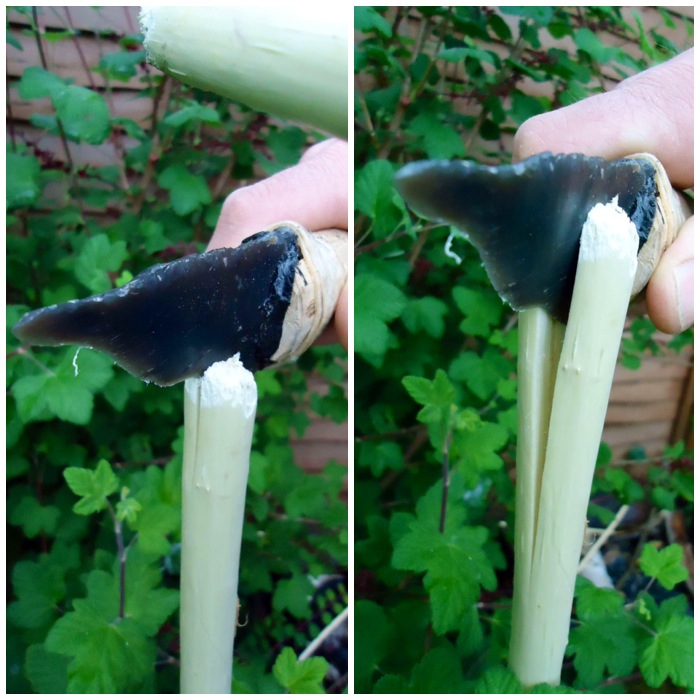
12. To secure the fourth strip loosen the first strip slightly so that it forms a small loop by its fold – known as an eye.
13.Feed the tail of the fourth strip into this eye.
14. Pull the tail of the fourth strip in tight.
15. Repeat from step 8 to 14 again to form another layer of weave.
Building the layers
Flip the whole piece over and begin the weave on what were the bottom strips. Once you run out of bark to fold over tuck in the ends into a suitable slot or trim them off with your knife.
Repeating on the other side
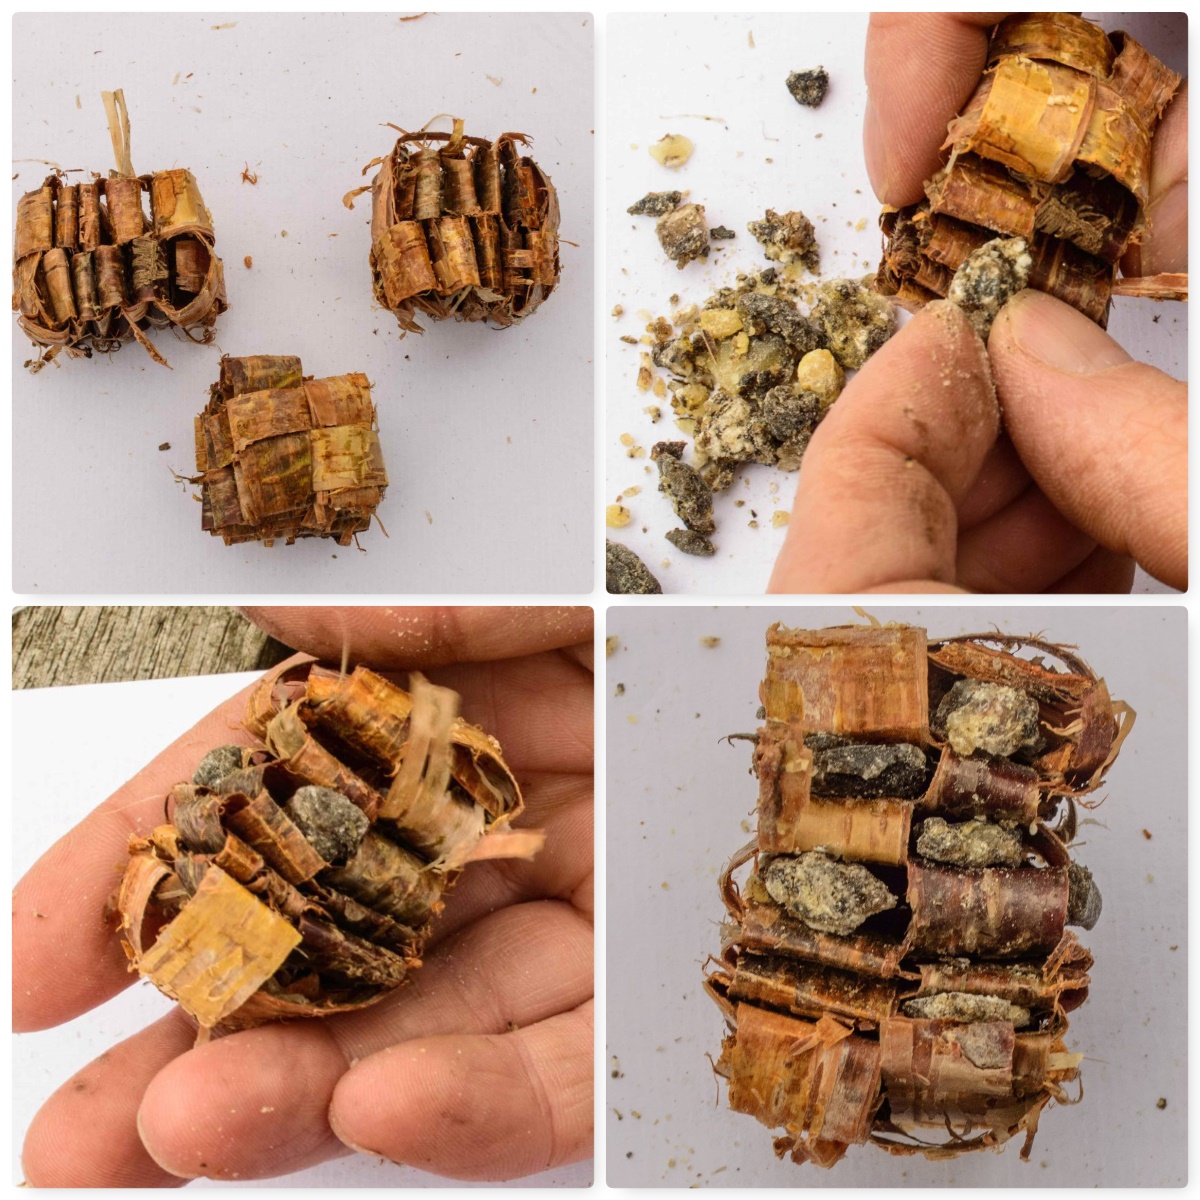
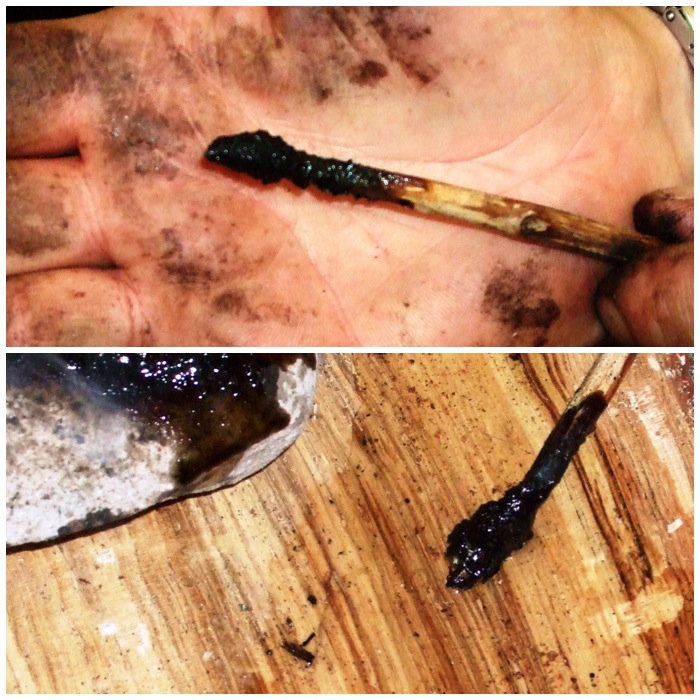
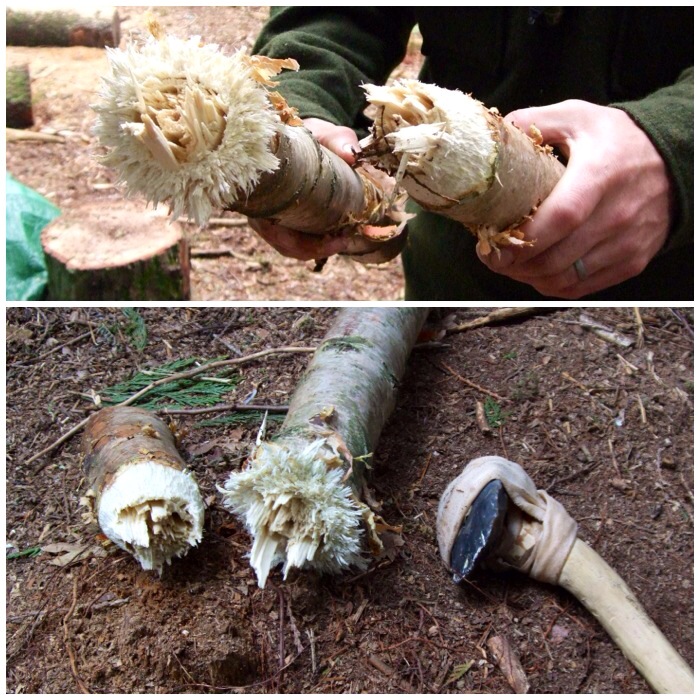
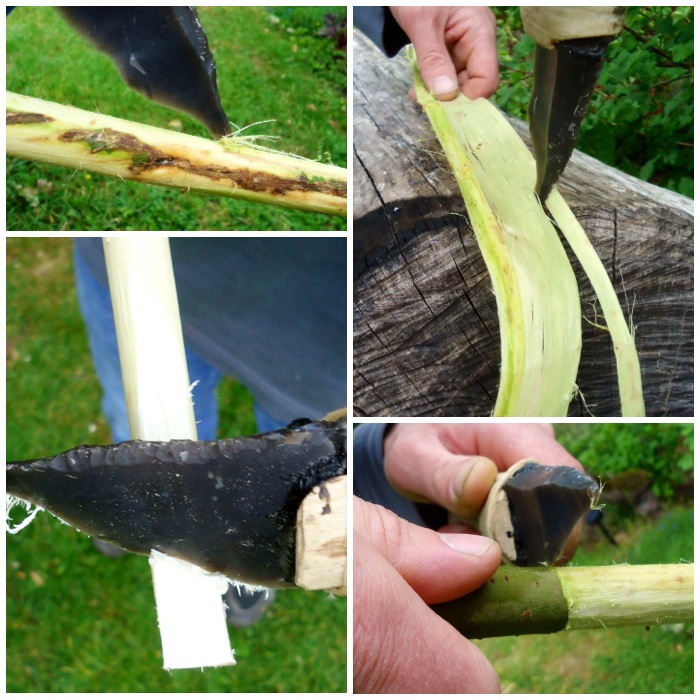
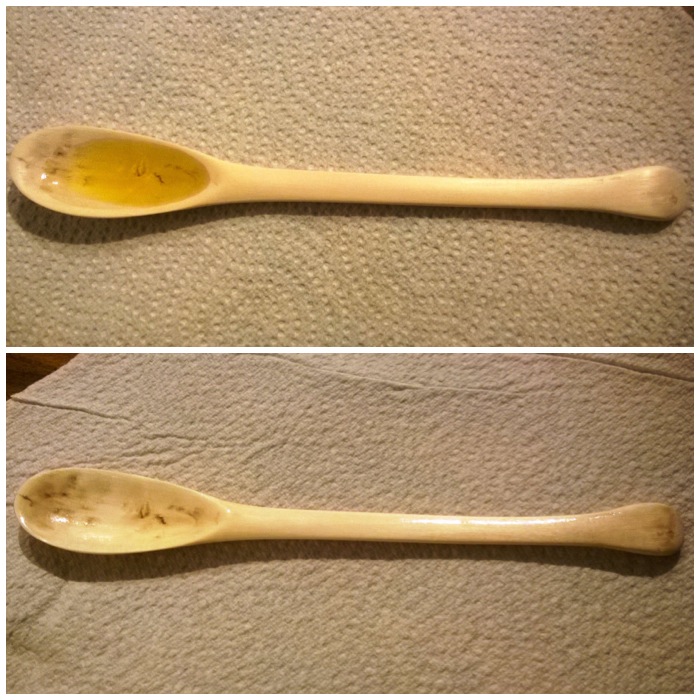
The Resin
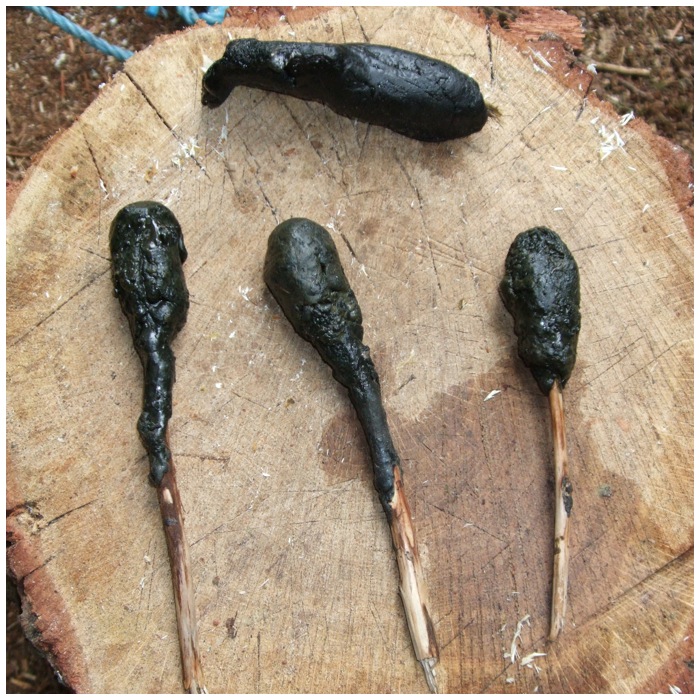
These little firelighters take only a minute or two to make but they can burn for far longer if you add some resin to them. I use spruce resin as it is plentiful here in the UK (again I discuss harvesting resin in my post on the Birch Bark Fire Fan in more detail).
I break of little blobs (it can get messy if the resin is runny) of resin and insert them into the little slots formed by the weave and that is basically it (use as much resin as you can).
Add the magic ingredient
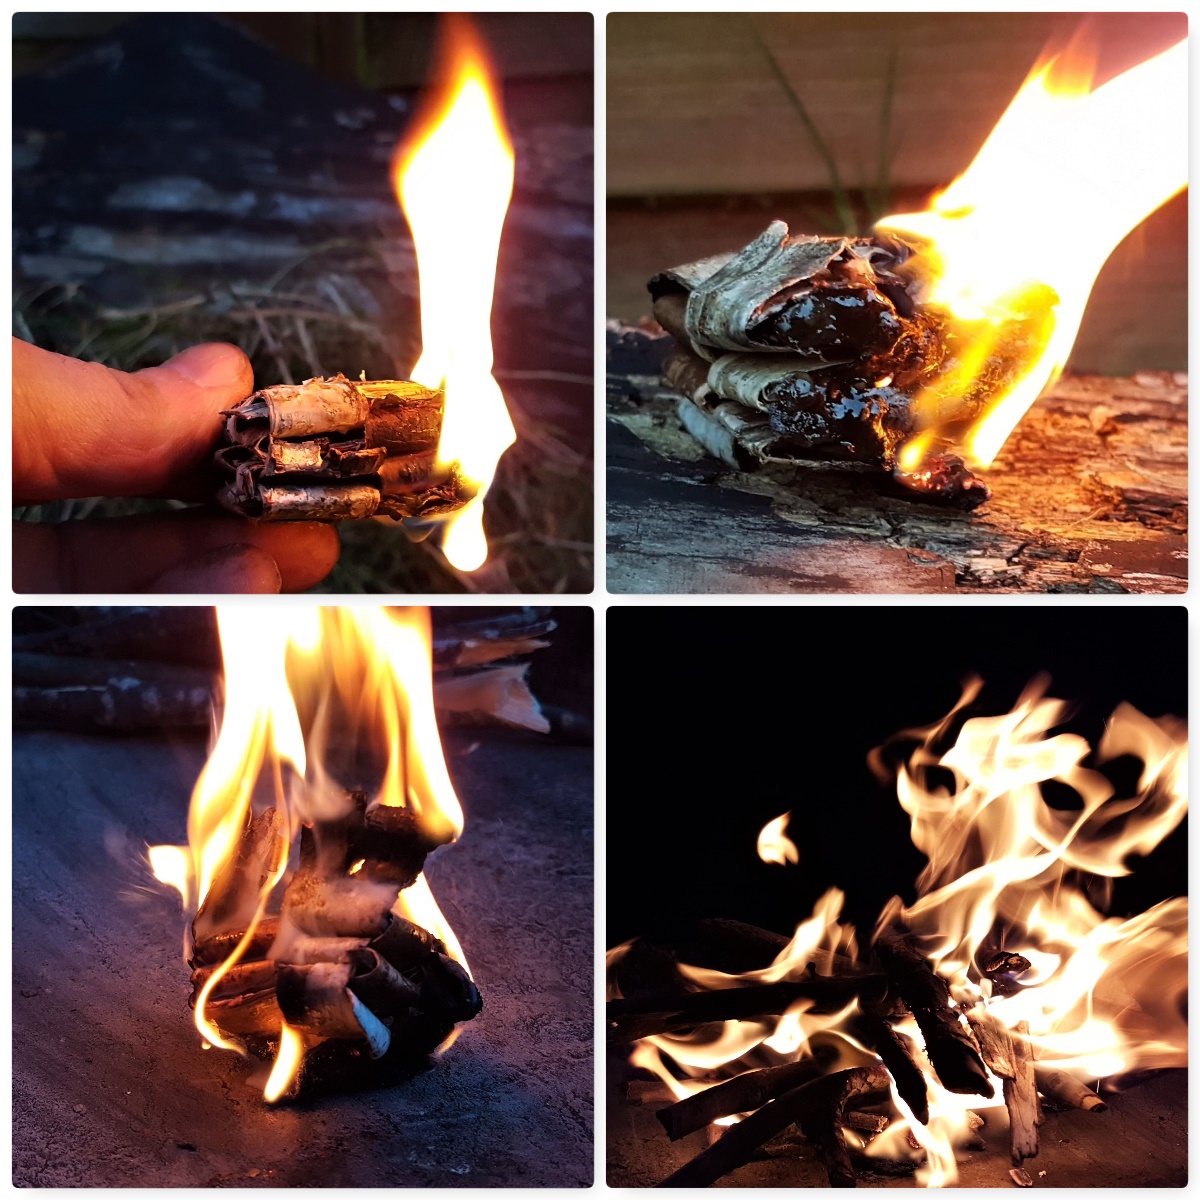
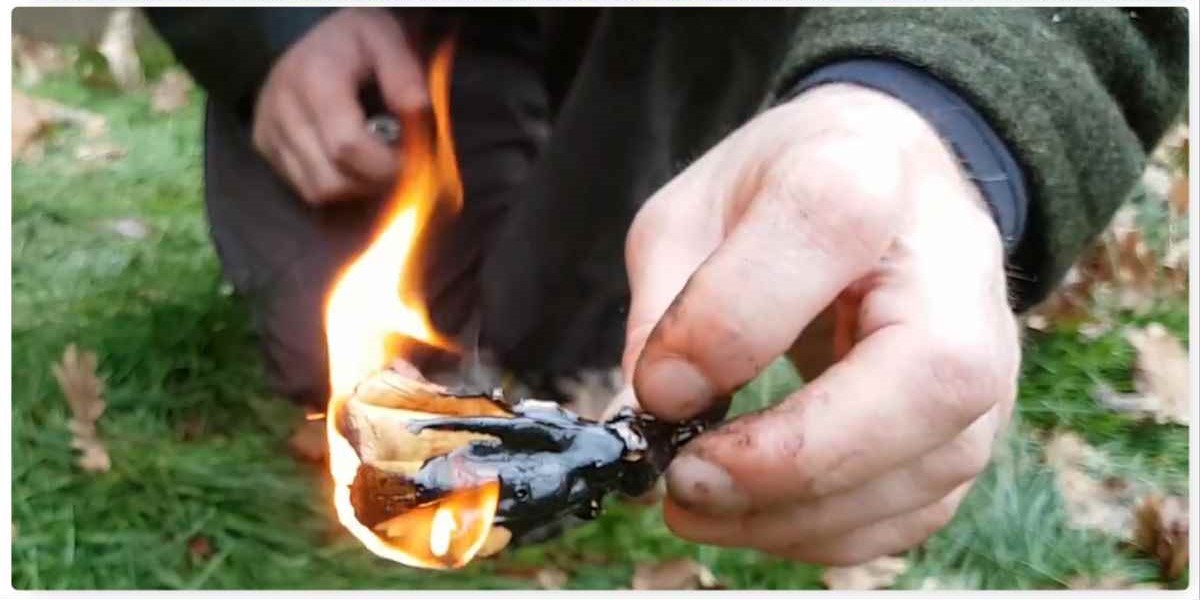
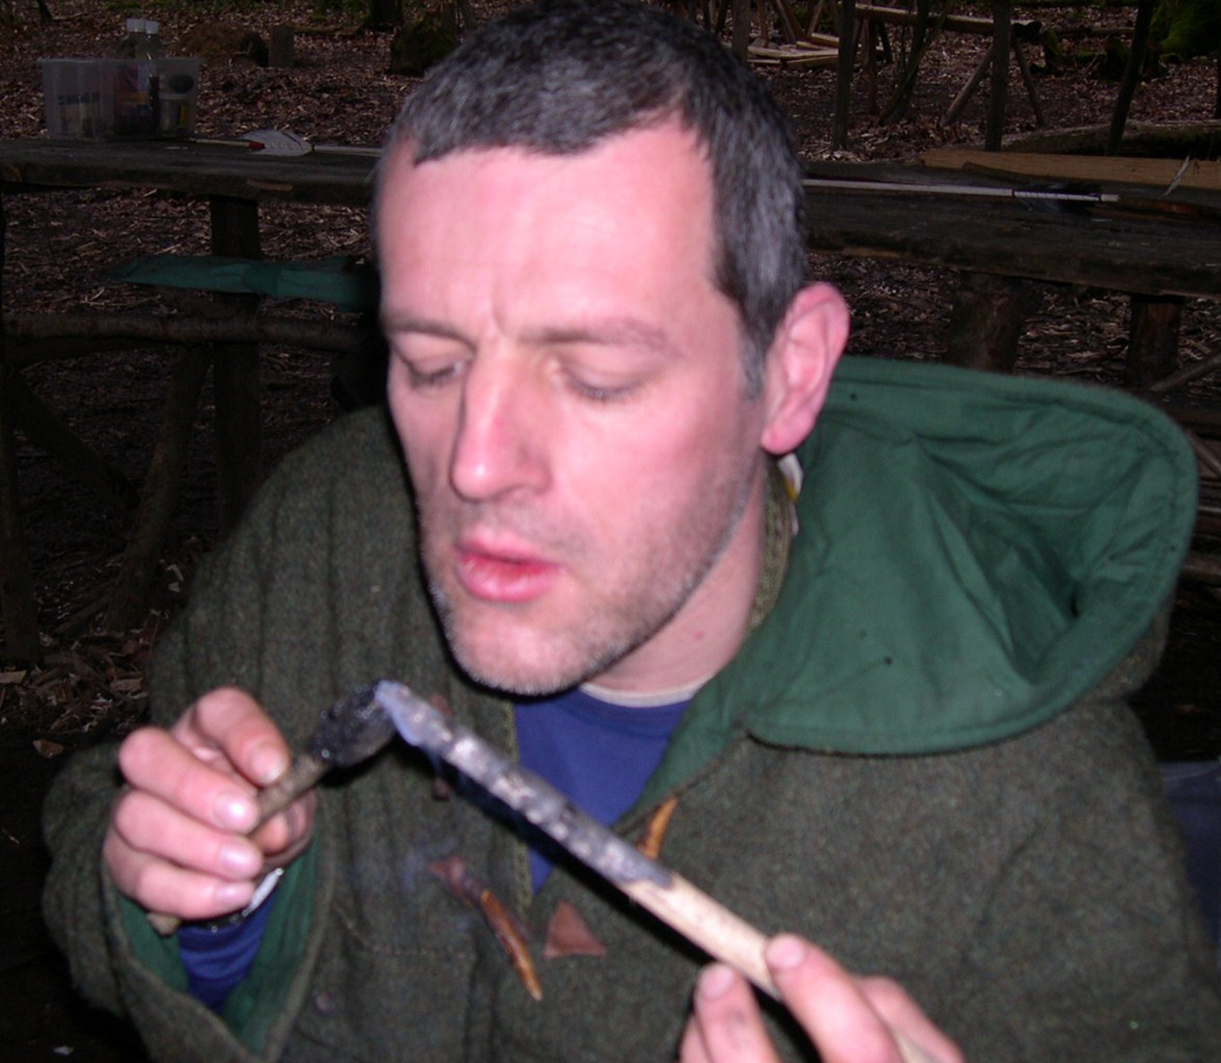
When lit these firelighters burn easily for over 5 minutes so giving you time to build your fire without resorting to using fine tinder and just small twigs. I can easily hold the firelighter for the first minute before it becomes to fierce to hold.
Once it gets going and the resin is well lit then it I go no where near it with my fingers. I like to use them first thing in the morning when I do not want to faff about with collecting tinders and just get a brew on.
Ready to go
I prep mine in the evening while sitting around the fire and pack them away for when I need them. If you are looking for a viable alternative to modern firelighters then these are ideal – if you are always a purist and insist on foraging for your tinders every time you light a fire then maybe they are not for you.
Quick to make and lasts for ages
For those that like a video intead of the step by step I put this short video together to explain the process.
Ever find yourself relying on using non-natural firelighters a lot due to their convenience? I do as I normally have a lot to organise before courses and using natural methods every time when I have a class can be time consuming when things are damp.
This is the first of two blogs on natural firelighters I like to use and how to make them. I like to prepare them well in advance of trips, pack them away in my bergen and use them instead of the likes of cotton wool and Vaseline (my usual non-natural method).
The Birch Bark Fire Fan
I came across a number of years ago a small section in Ray Mears book Essential Bushcraft on using a Birch bark fan. Ray recommended folding pieces of bark into a fan shape to stop the bark curling up quickly and becoming impossible to handle when it was lit.
I teach this method to my cadets however if I have time I like to add some melted spruce resin to these fans. This really extends the life of the fan giving me a better chance to get my fire going (great for these damp days) and because the resin soon hardens the fans they do not fall apart or deform so much when carried in a bag.
Removing the Bark
If you have a semi rotted birch log then the bark should come off easily however if it is a freshly felled log things may get a little more difficult for you. Here in the UK the birch bark can be quite thin and more difficult to remove than the thicker bark of birch trees you would find in more northern climes.
Mark out the squares
I mark out small squares with my knife and if the bark does not peel off easily I use a small batten to gently hammer the bark. This gentle hammering helps to loosen the inner bark from the sapwood.
Also having a wooden wedge helps to peel the bark of but mostly I tend to just use the curved part of my knife. Some folk say it is better to use the back of the tip of your knife but I find the curved part works well for me. The main thing is to take your time and remove the inner and outer bark from the sap wood.
Tap and Peel
Remove the Inner Bark
When I have removed a small square I gently remove the inner bark. Again do this job slowly removing the inner bark in small pieces. It is very easy when using thin bark to rip the outer bark.
Carefully strip off the inner bark
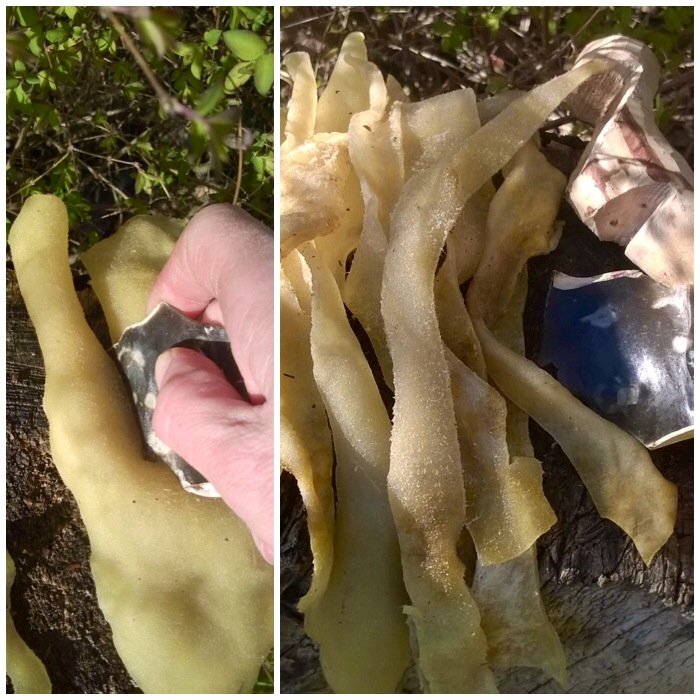
Folding the Fan
To make your fan start folding your square as if you were making a very small fan – not much more you can say about that 🙂
Fold like a paper fan
Keep a hold on one end and with a strip of bark tie off the other end. They do not take long to make and are soon ready for the resin.
Tie a tail
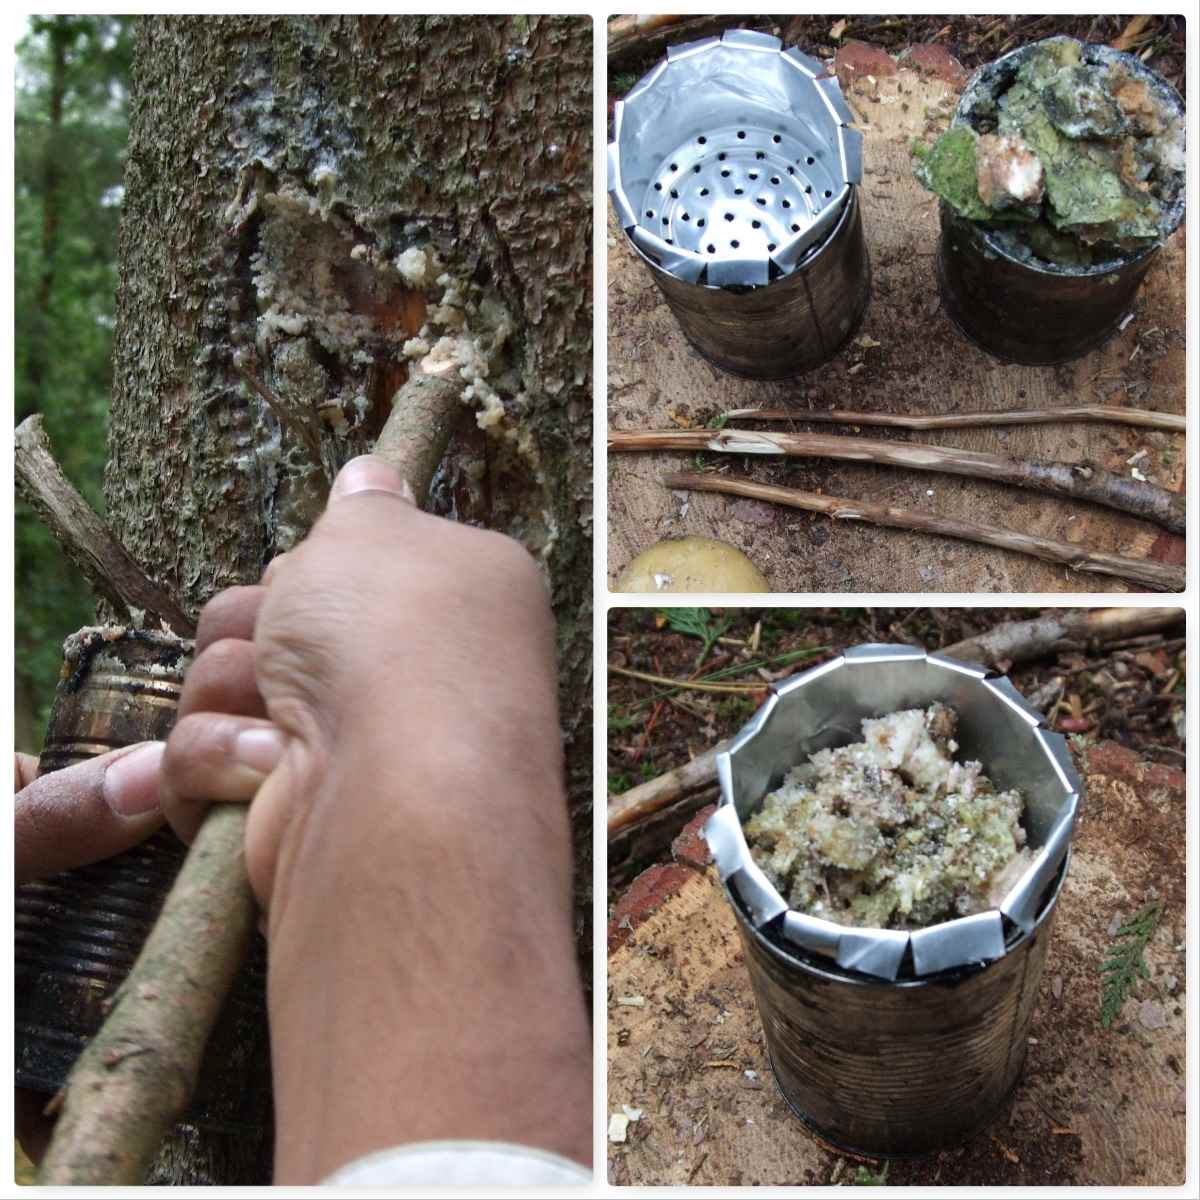
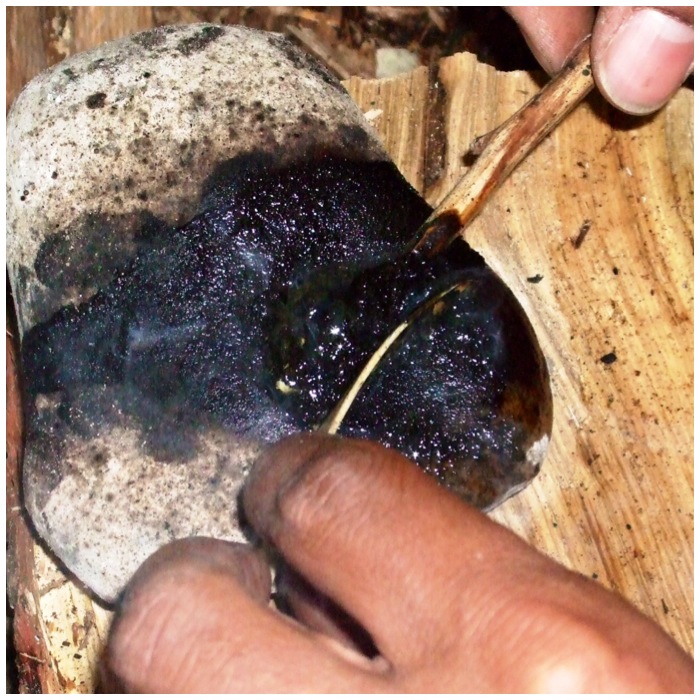
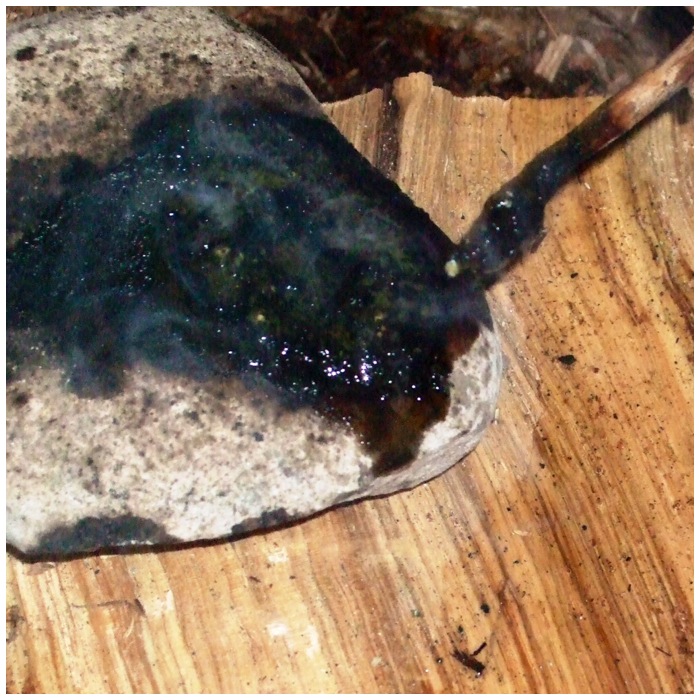
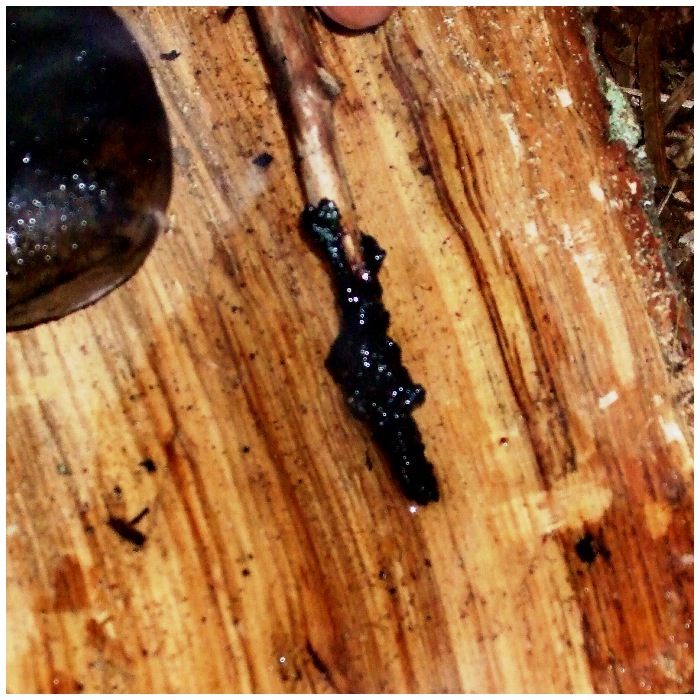
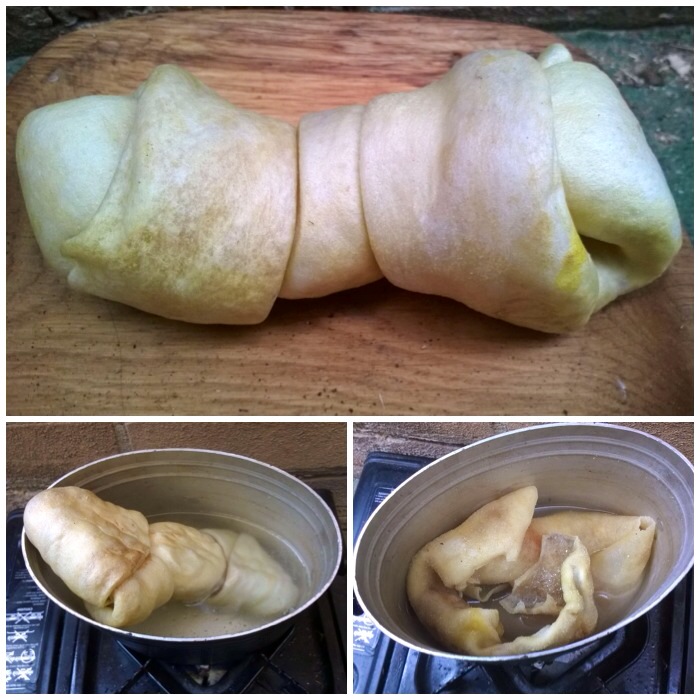
Spruce resin
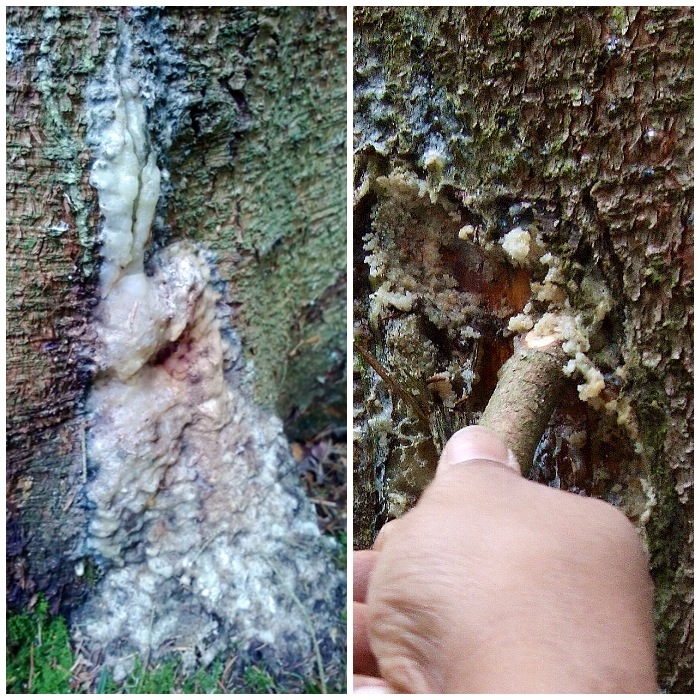
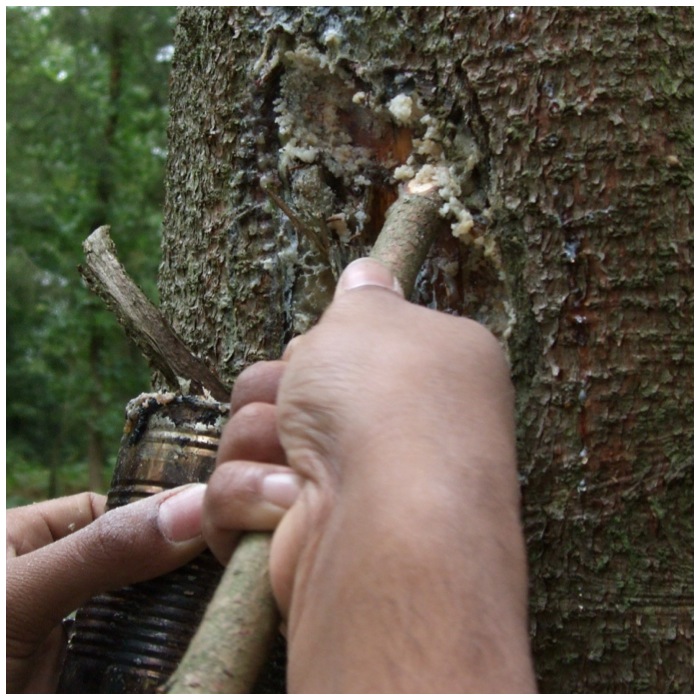
Here in the UK a handy and plentiful resource is Spruce resin. There are lots of conifer plantations where I live and a common tree in them is the Spruce. I keep an eye out for areas where the foresters have been using tractors to thin out the spruce as they tend to damage lower branches on trees they pass by.
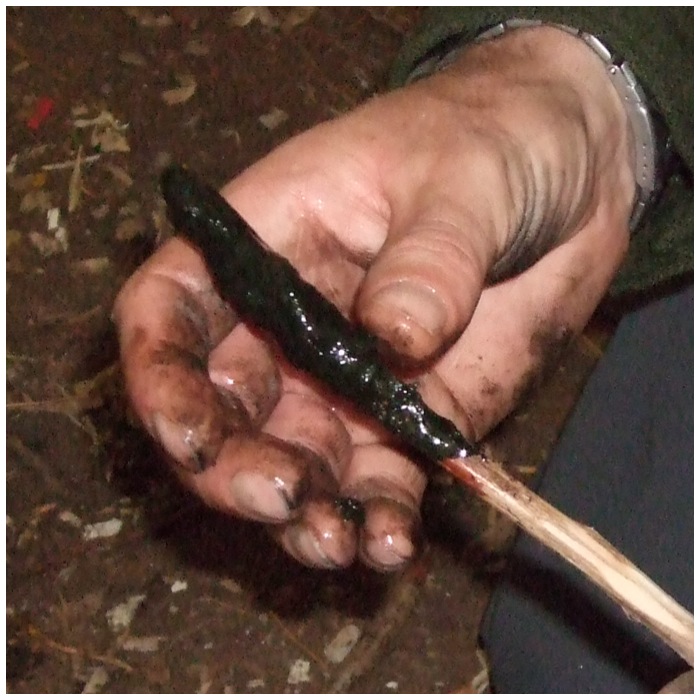
To help heal itself the trees produce copious amounts of resin and this is full of oils that are flammable. By taking a little from different sites (I use a stick to scrape the resin) I can soon have plenty to melt and coat the Birch bark fans and leave plenty for the trees.
Harvest some resin
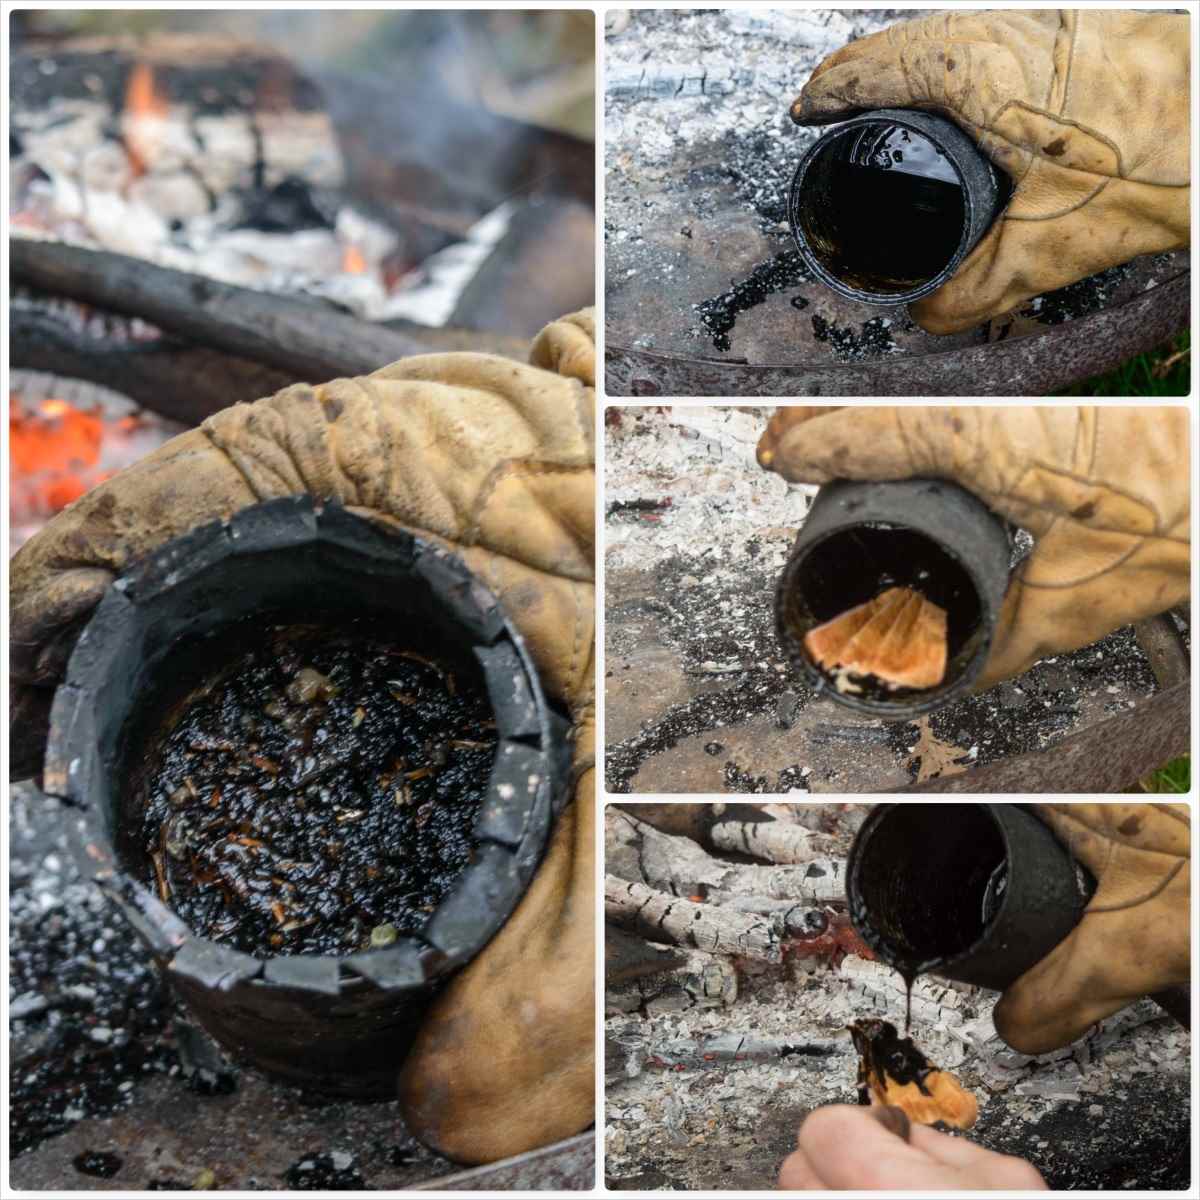
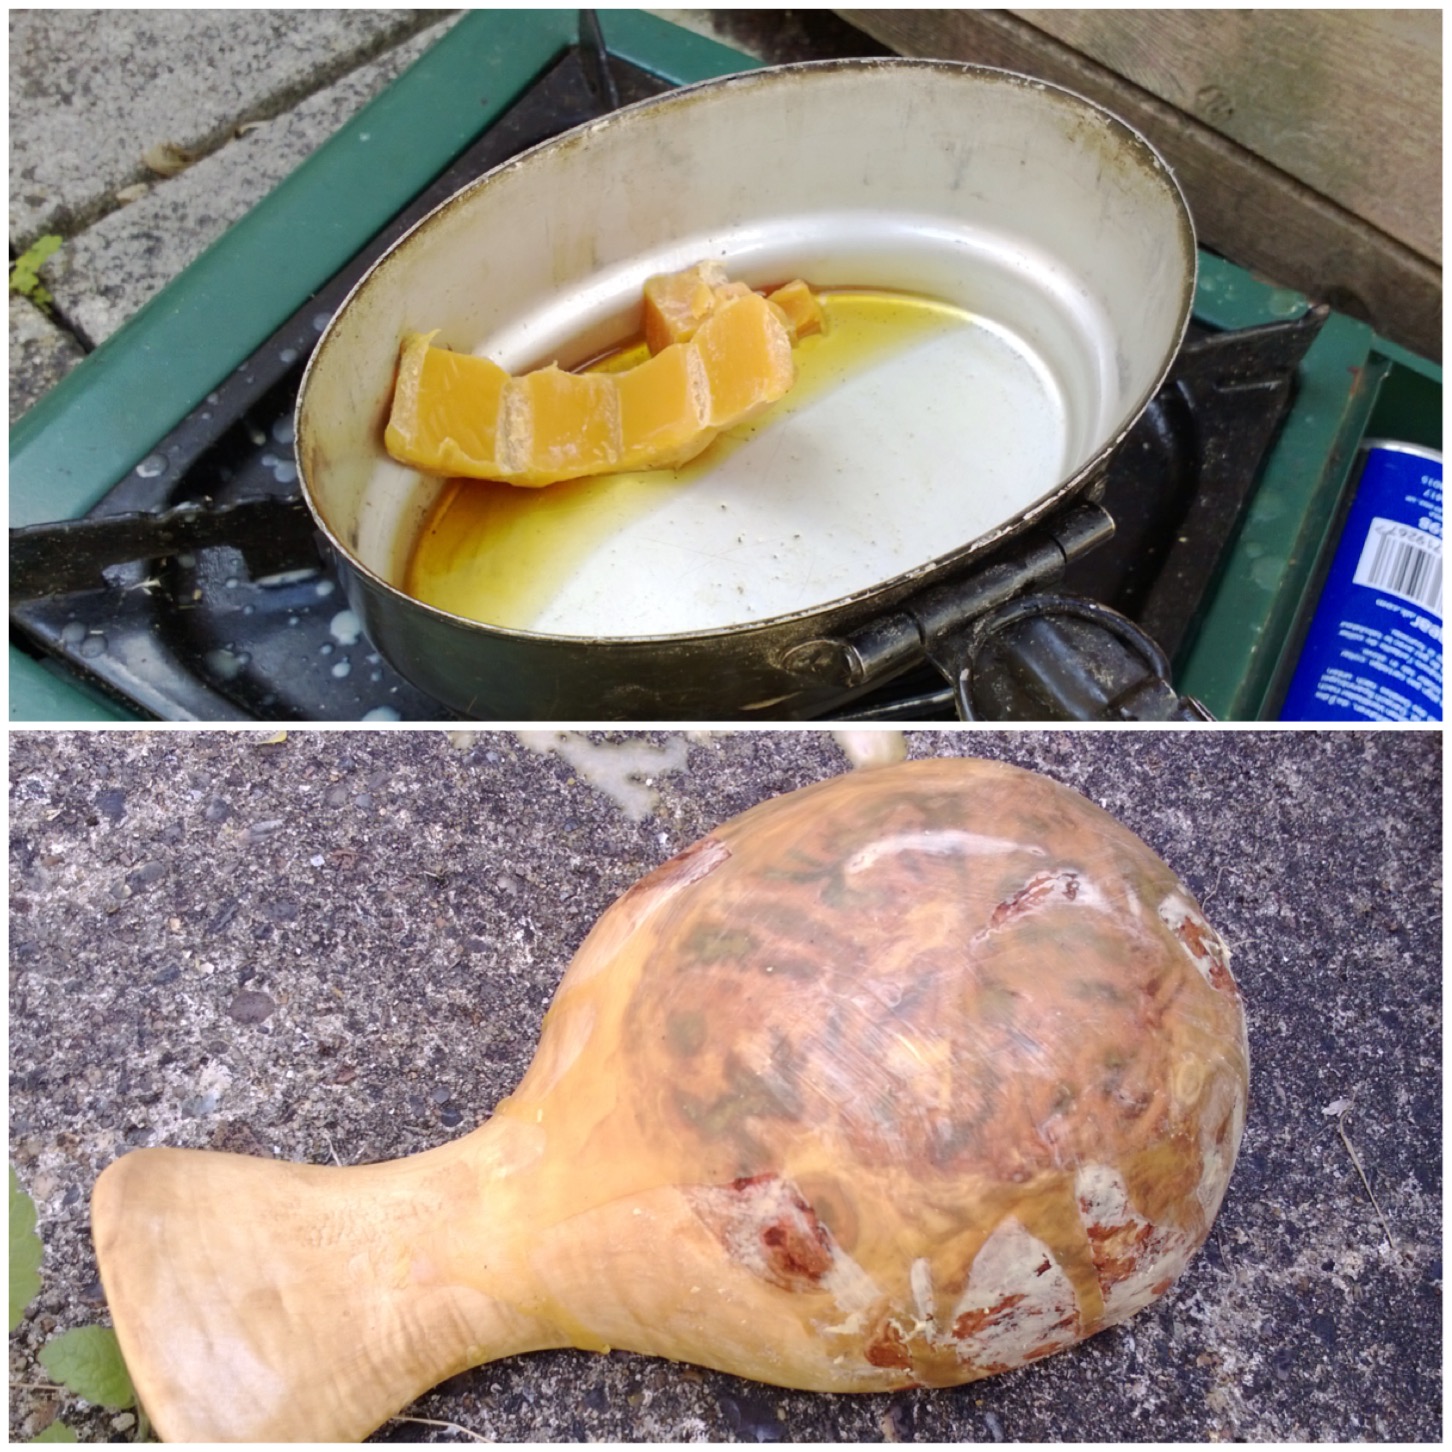
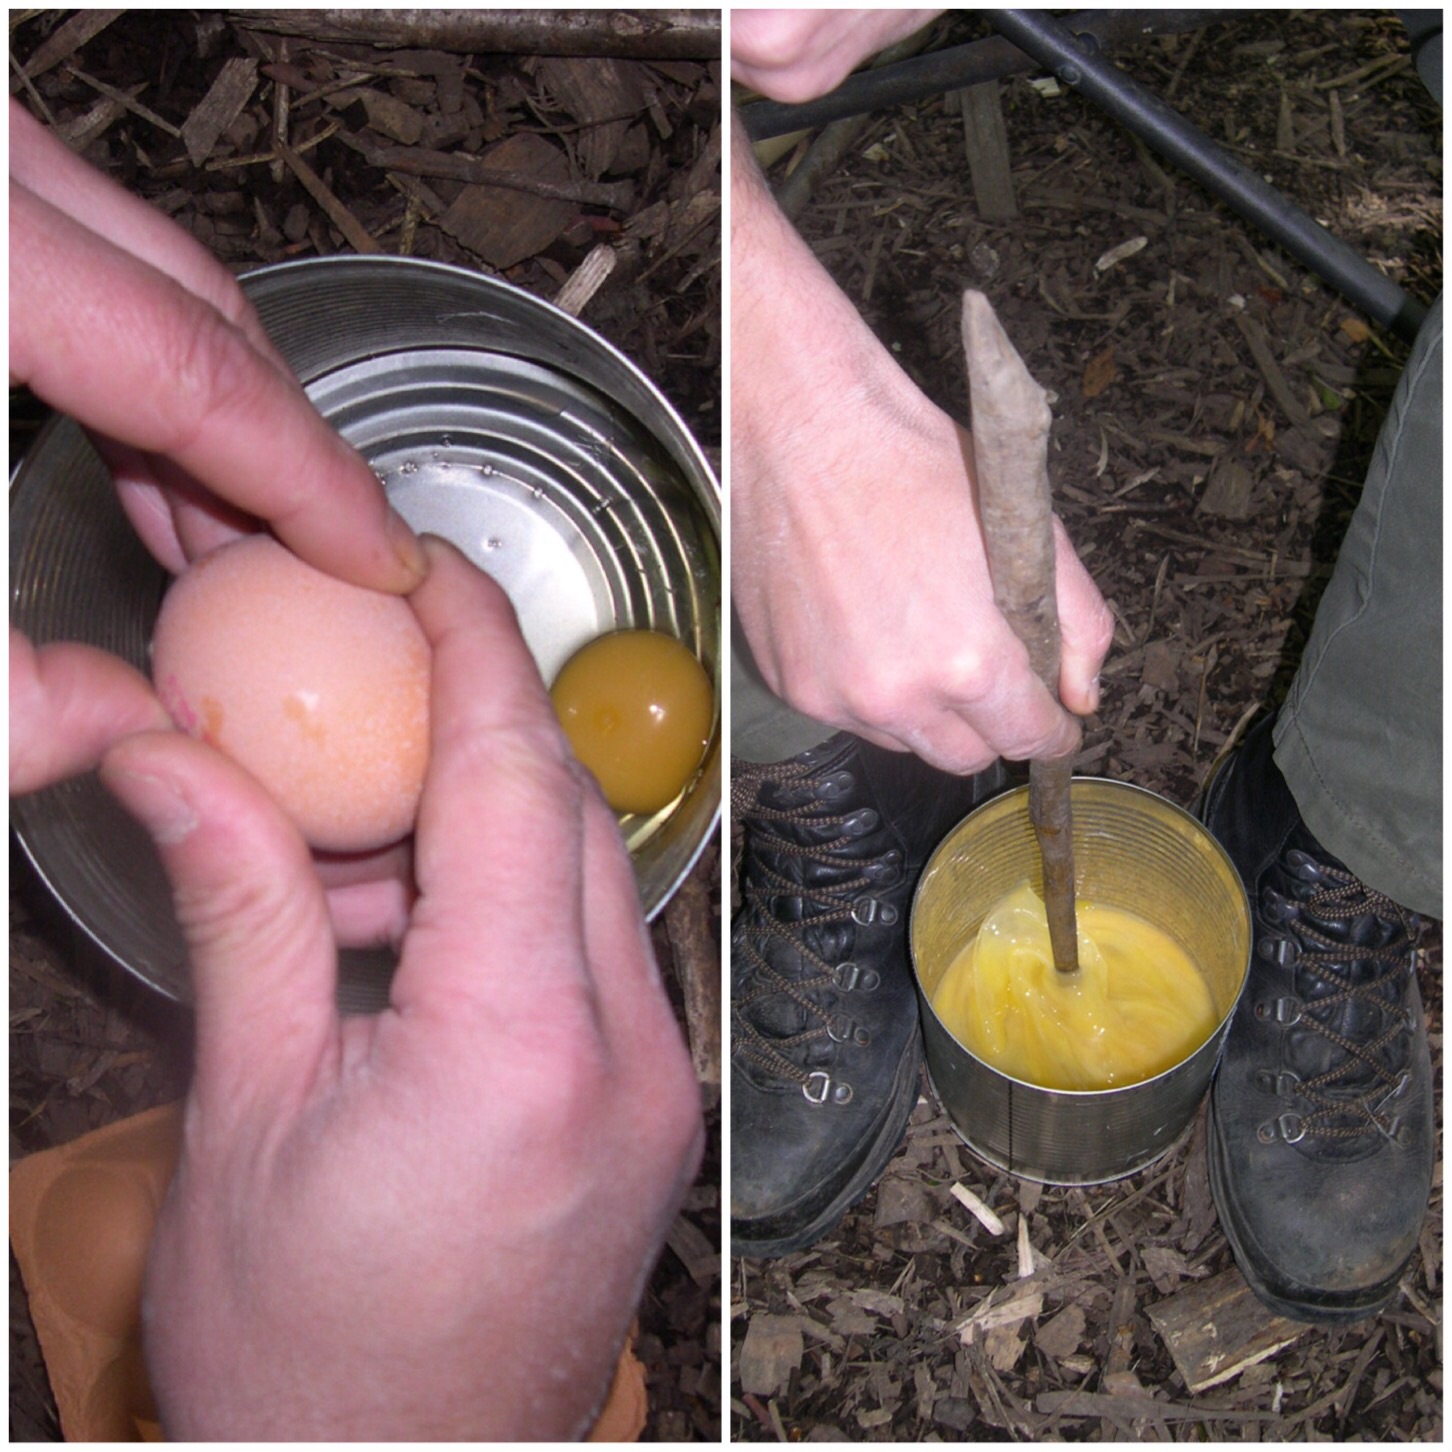
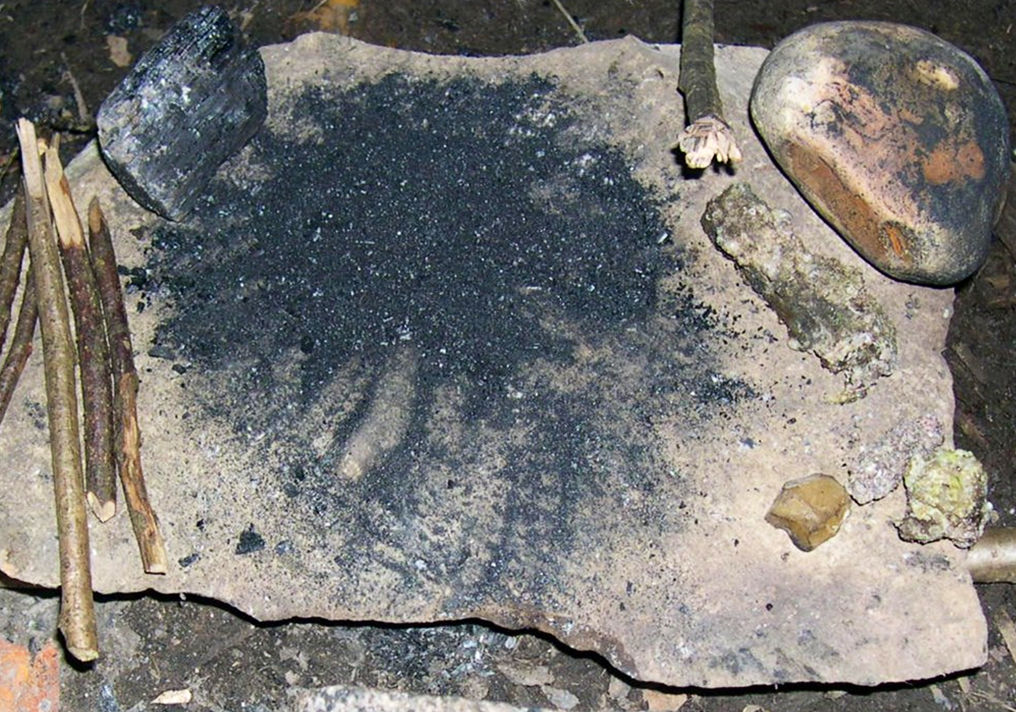
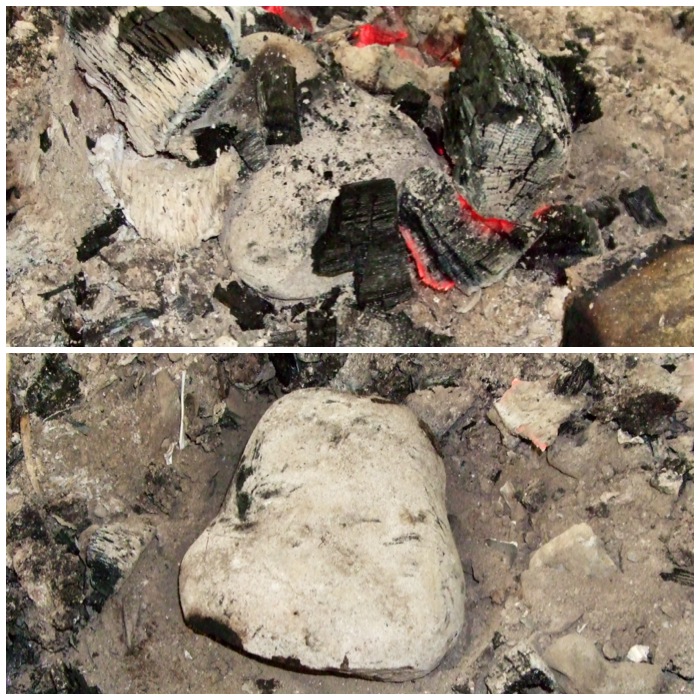
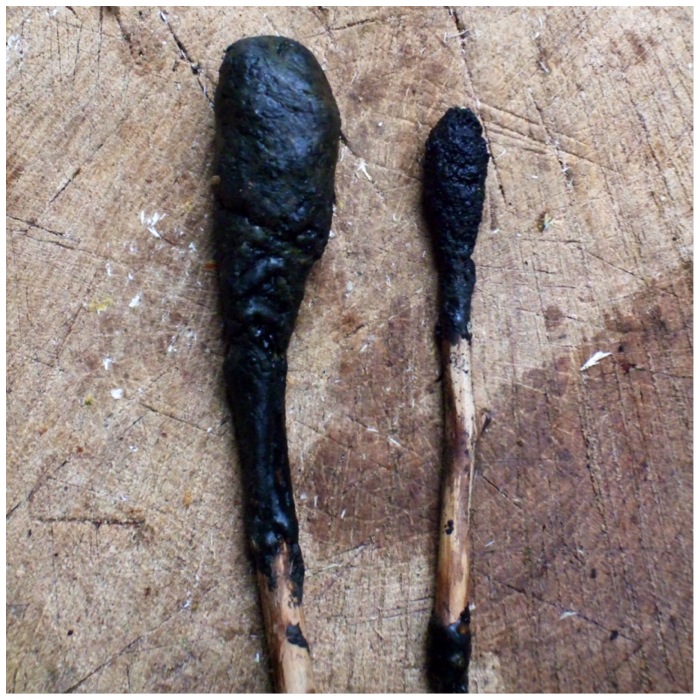
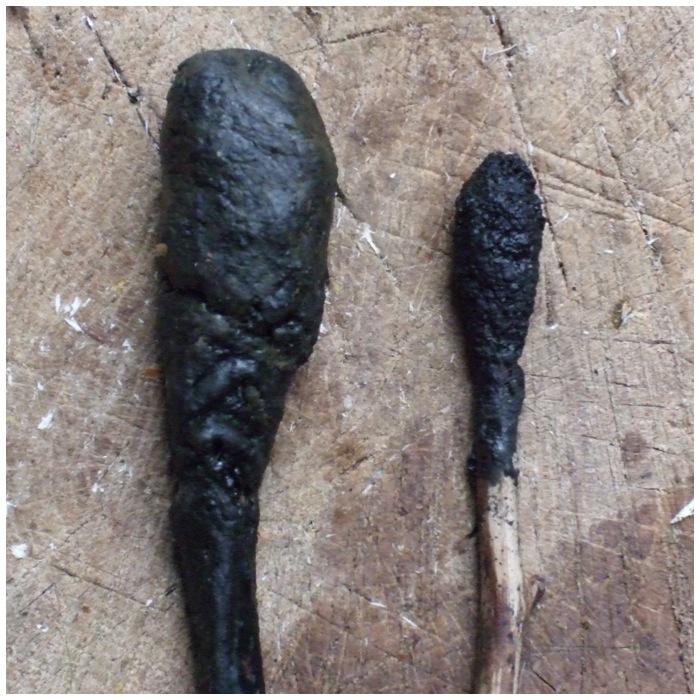
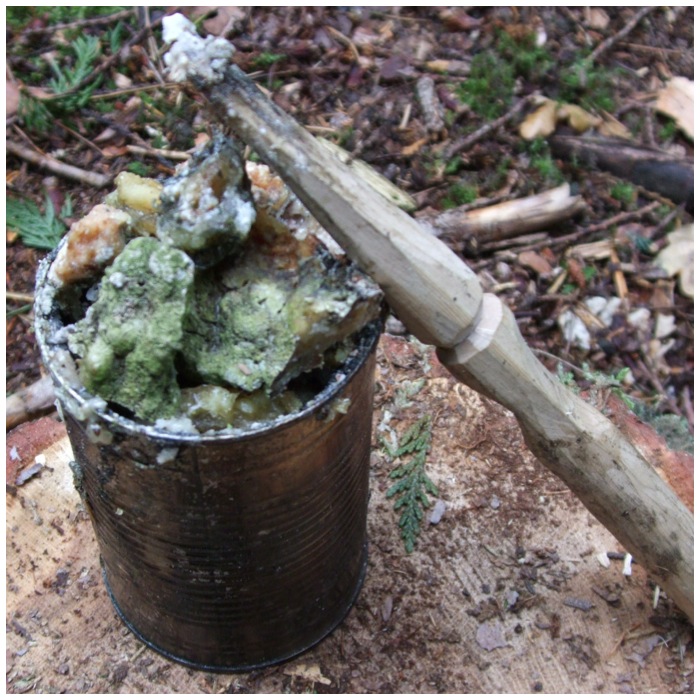
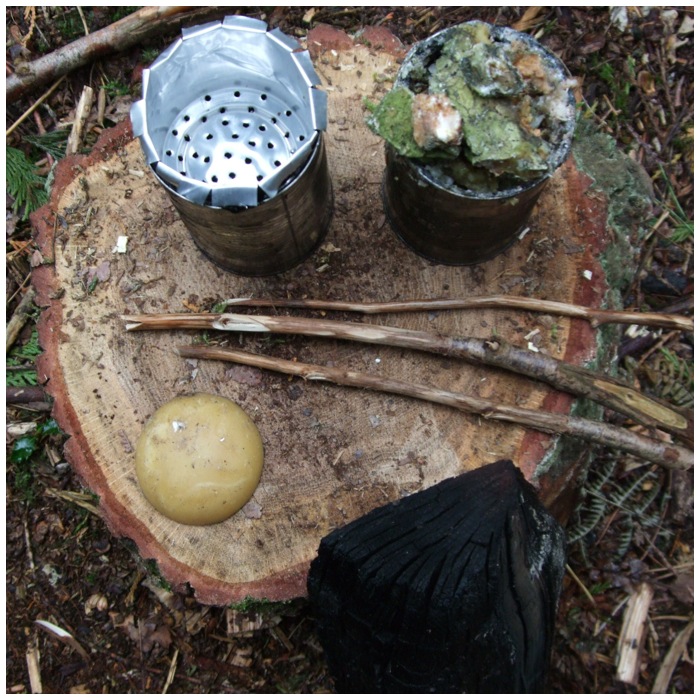
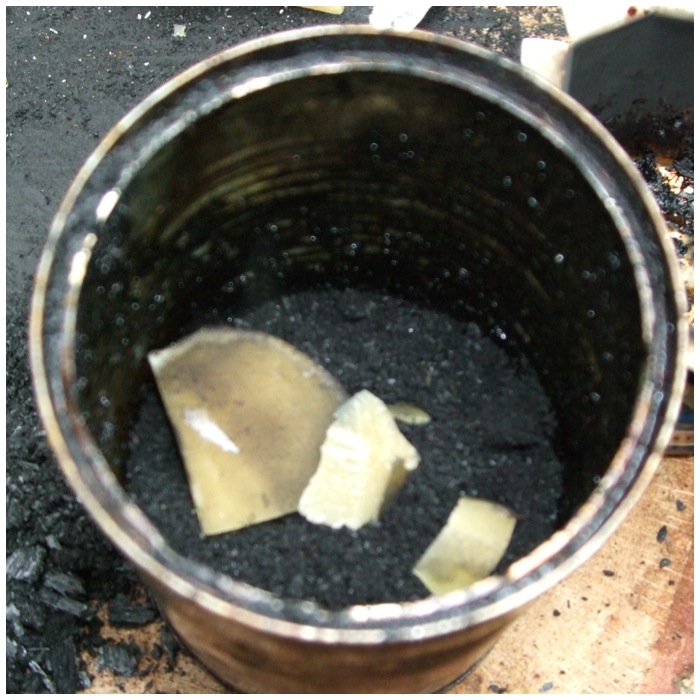
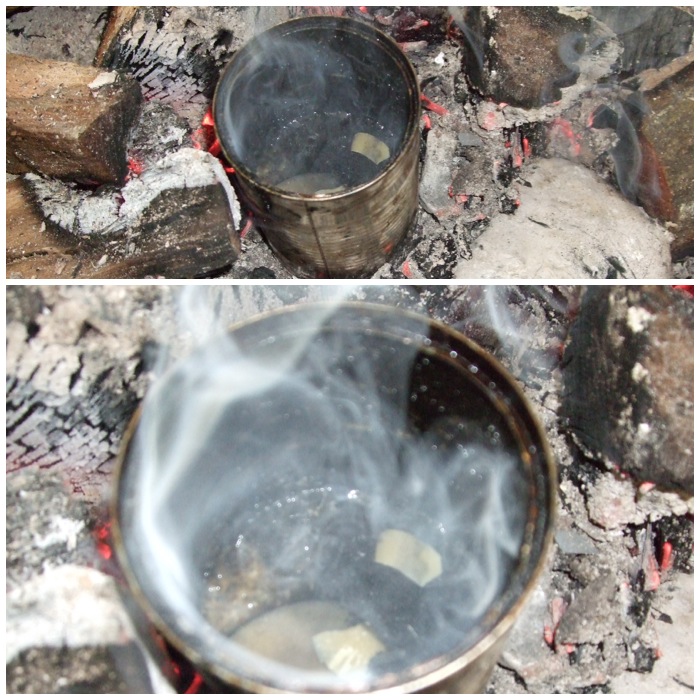
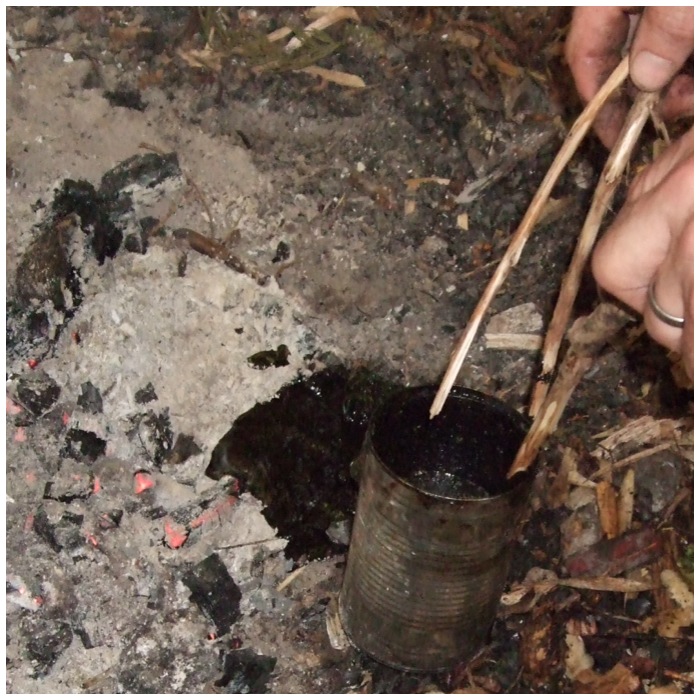
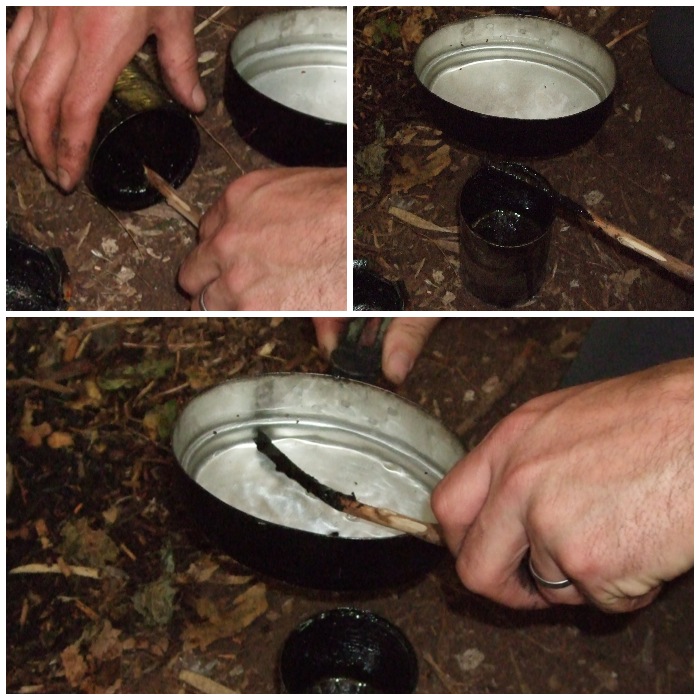
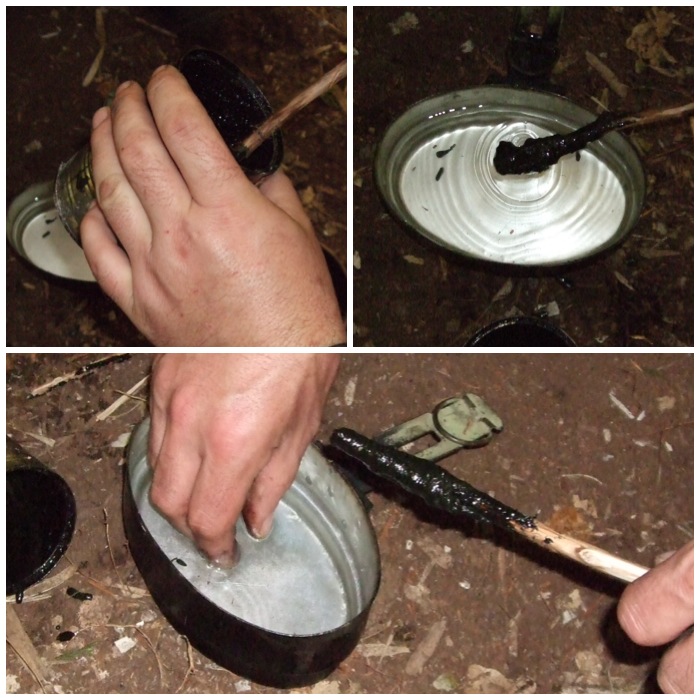
I just use a couple of tins (the inner tin has lots of little holes) to melt the resin by my campfire (I have documented this process in How To…. Spruce Pitch in a Tin Can) and dunk the tail of the fan into this hot liquid (good gloves or tongs are required here).
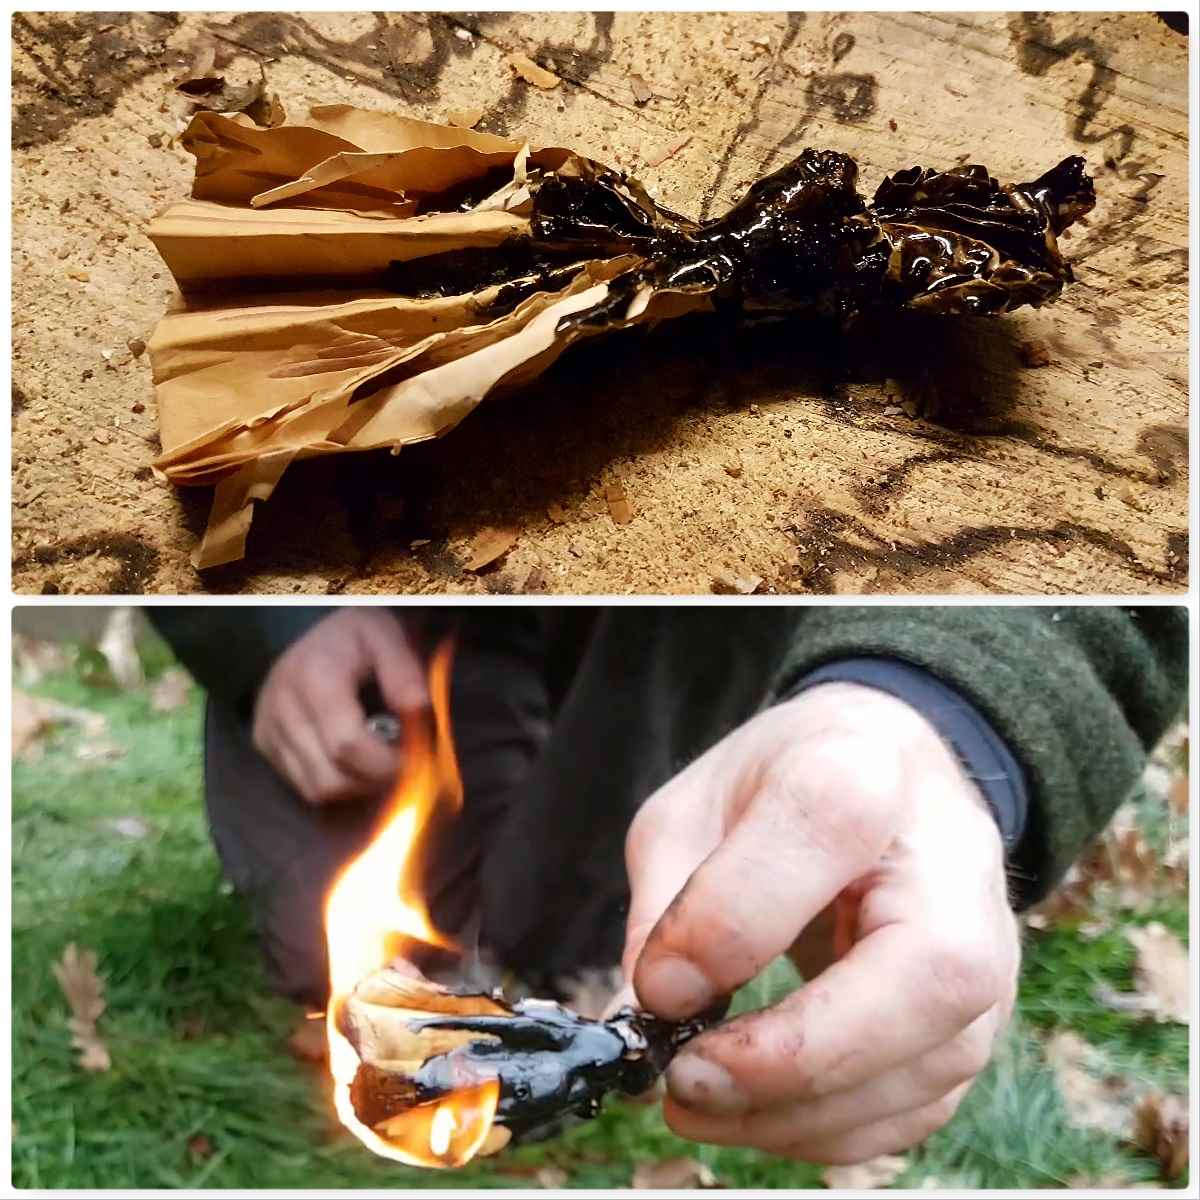
Once the tail is covered I pour some of the resin onto the area of the fan by the tail leaving the top of the fan clear of resin.
Melt, dip and pour
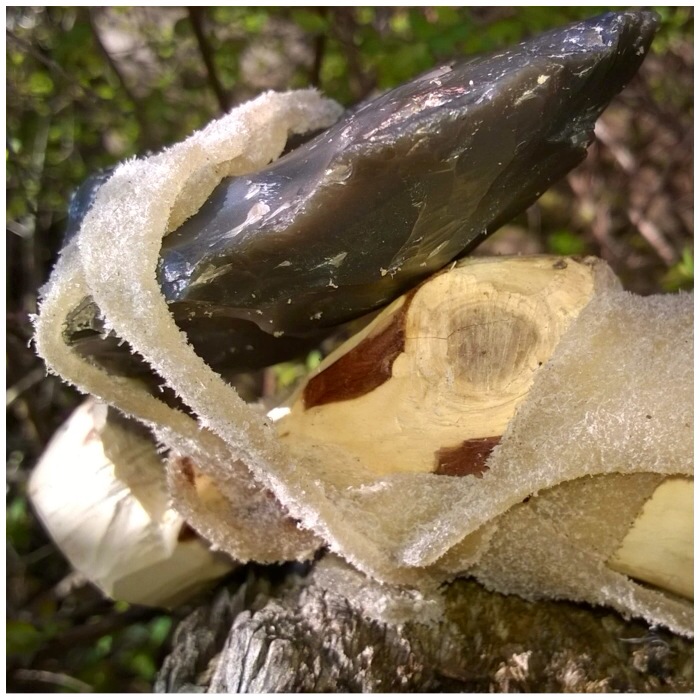
I find this combination works for me as the folds stop the bark from curling straight away and when the flame reaches the resin it burns for far longer.
One excellent fire lighter
I put a little video together on this to show you the process from start to finish.
The next post in this short series will be on making a woven Birch bark firelighter (again with Spruce resin).
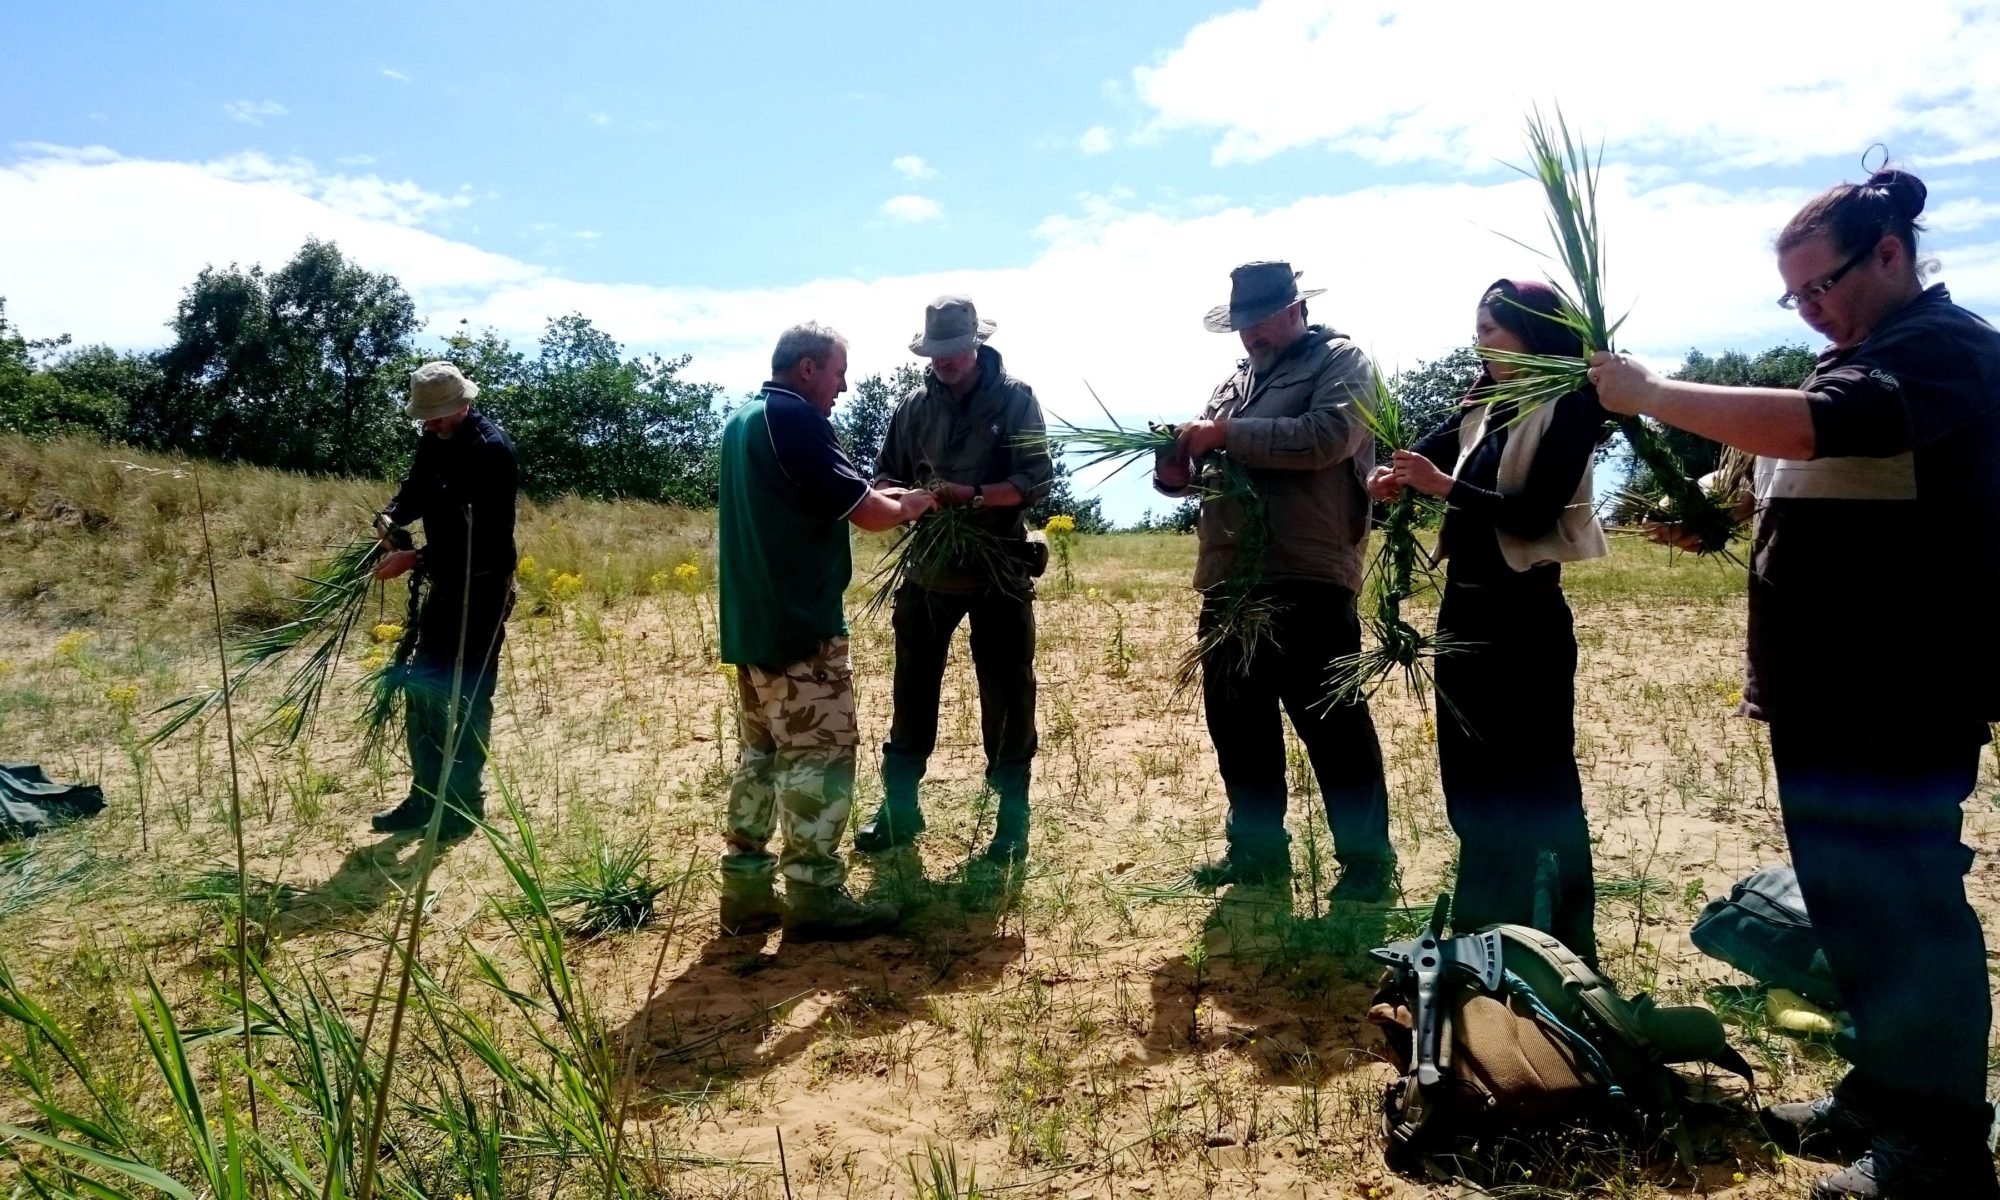
For years now I have been making rope out of various different natural materials. This has generally been a relaxing though time-consuming process for me, until Perry McGee from the National Tracking School taught me at the Bushcraft UK Bushmoot that it could be a fun and frantic process as well.
Now this may not be the prettiest, smoothest or most perfectly formed rope, but it is fast to make, strong enough for most camp jobs and can be made out of many different grasses. This is a technique that is not just for bushcrafters but for any outdoor pursuits leader (I am a Mountain Leader as well) as a way of putting a rope together in an emergency.
Grass Rope – Quick and Strong
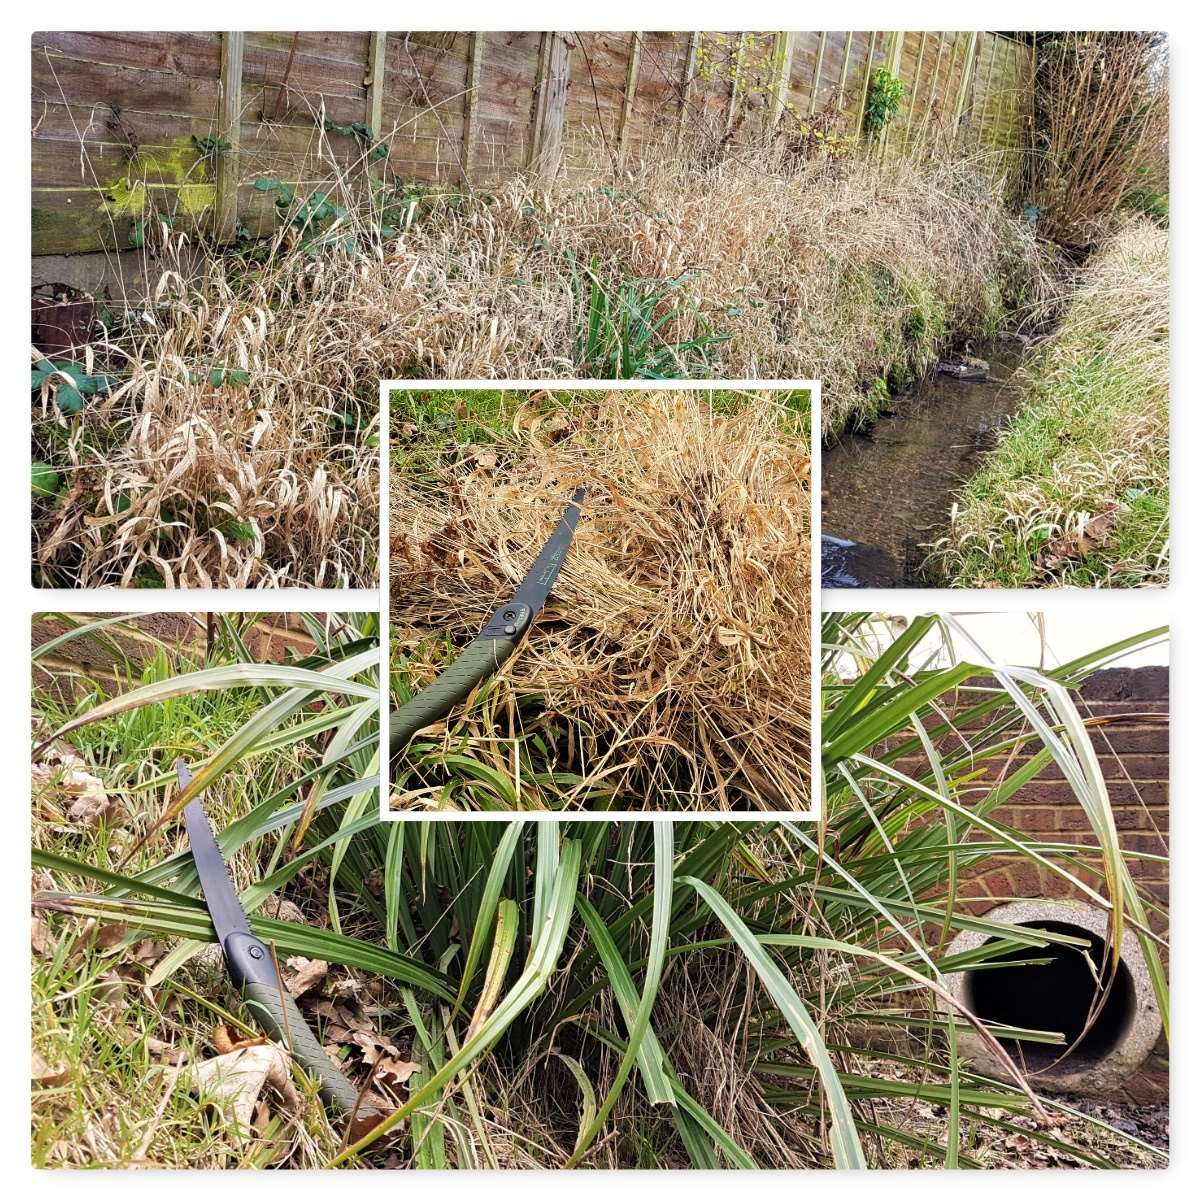
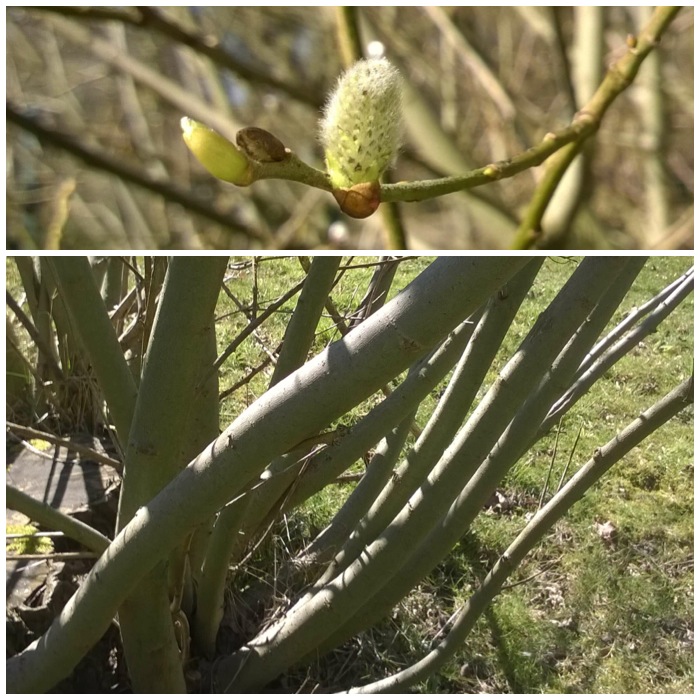
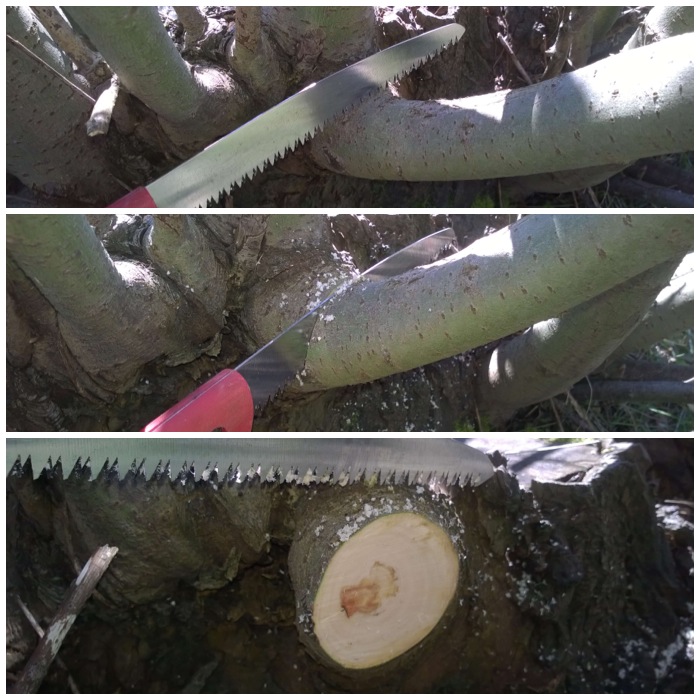
Harvesting
For this blog I had a wander along a nearby stream and harvested some dead grasses and some leaves from a Pendulous sedge. To harvest the grasses I would advise you to wear gloves and use something like a Laplander saw to cut the grass.
Gloves are useful to protect you from hidden brambles etc and also because you can easily slice your fingers open on some grasses. I do not use a knife as I find grass quickly blunts its edge, so instead I hold the grass firmly half way along its length and sweep the base of it with the saw before pulling the grass away. Pulling grass straight out of the ground with bare hands will eventually lead to cuts on the inside of your fingers.
Harvesting
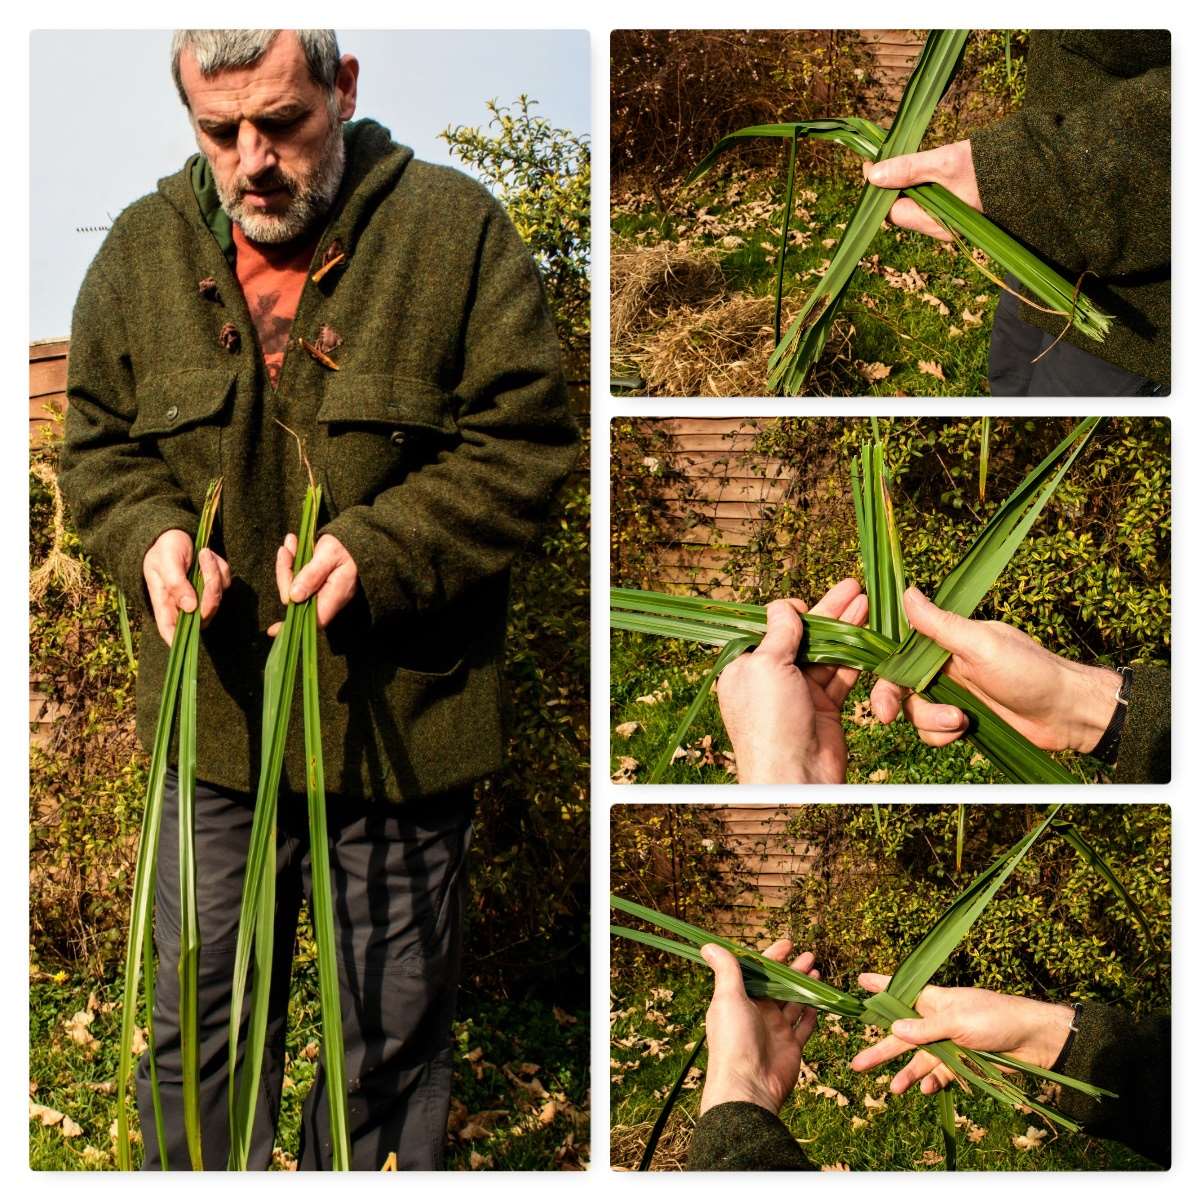
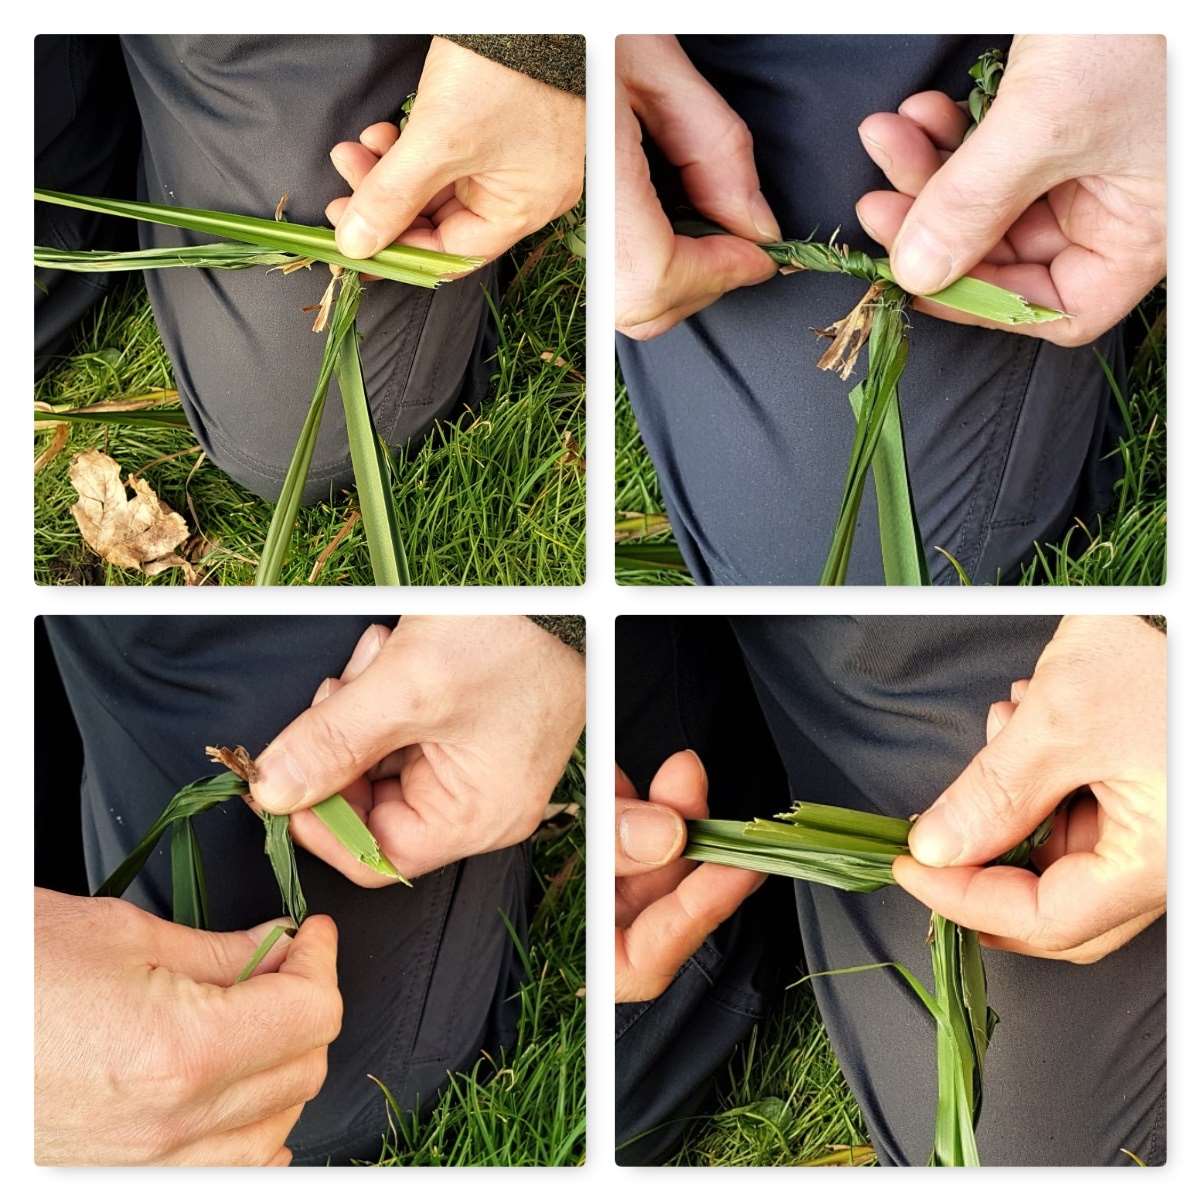
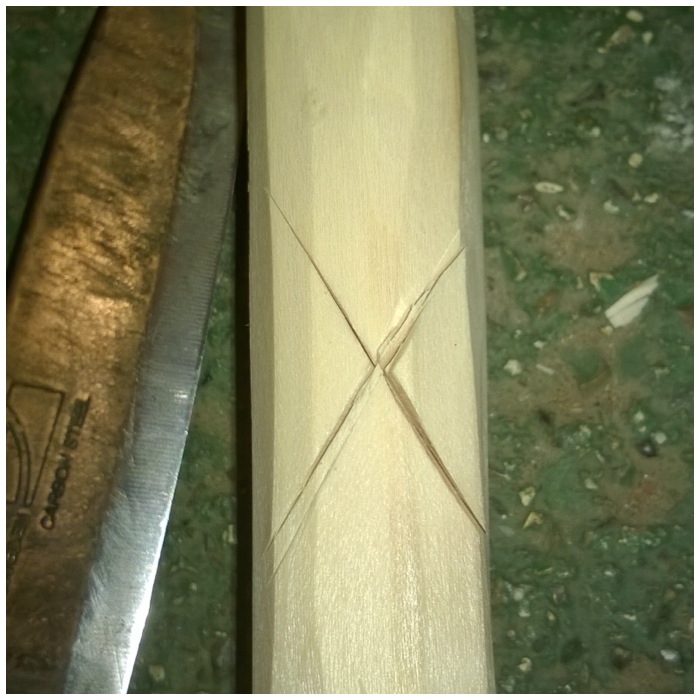
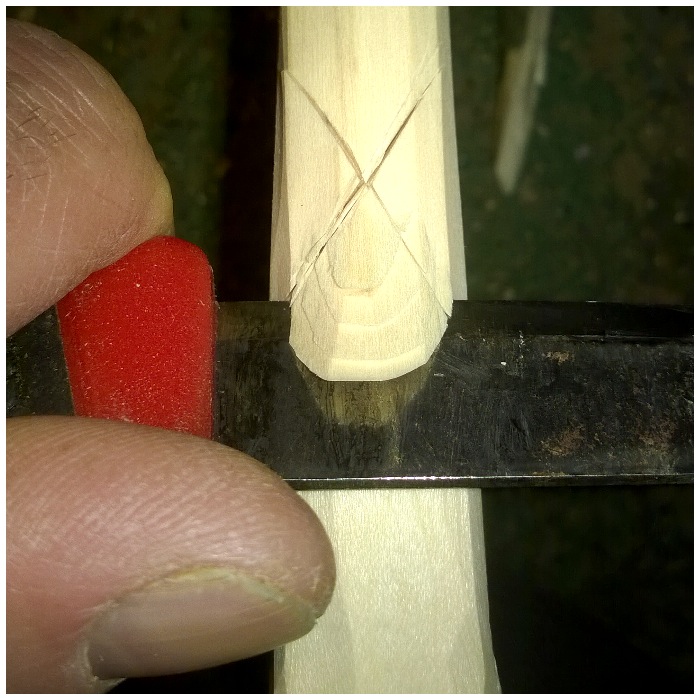
The X and Y start
To start your rope off begin with two evenly thick strands (this thickness will determine the overall thickness of your rope). I vary the individual lengths of the grass within each strand so that as it thins out and I add in more grass later the joins will be staggered (this will make a stronger rope).
Form the X first (the ends of the grass nearest to me are called the standing ends) close to the standing end and then wrap one of the standing ends under the other strand, back through the middle, and join it to the other standing end to form the Y shape. You can see all the steps below.
X and Y
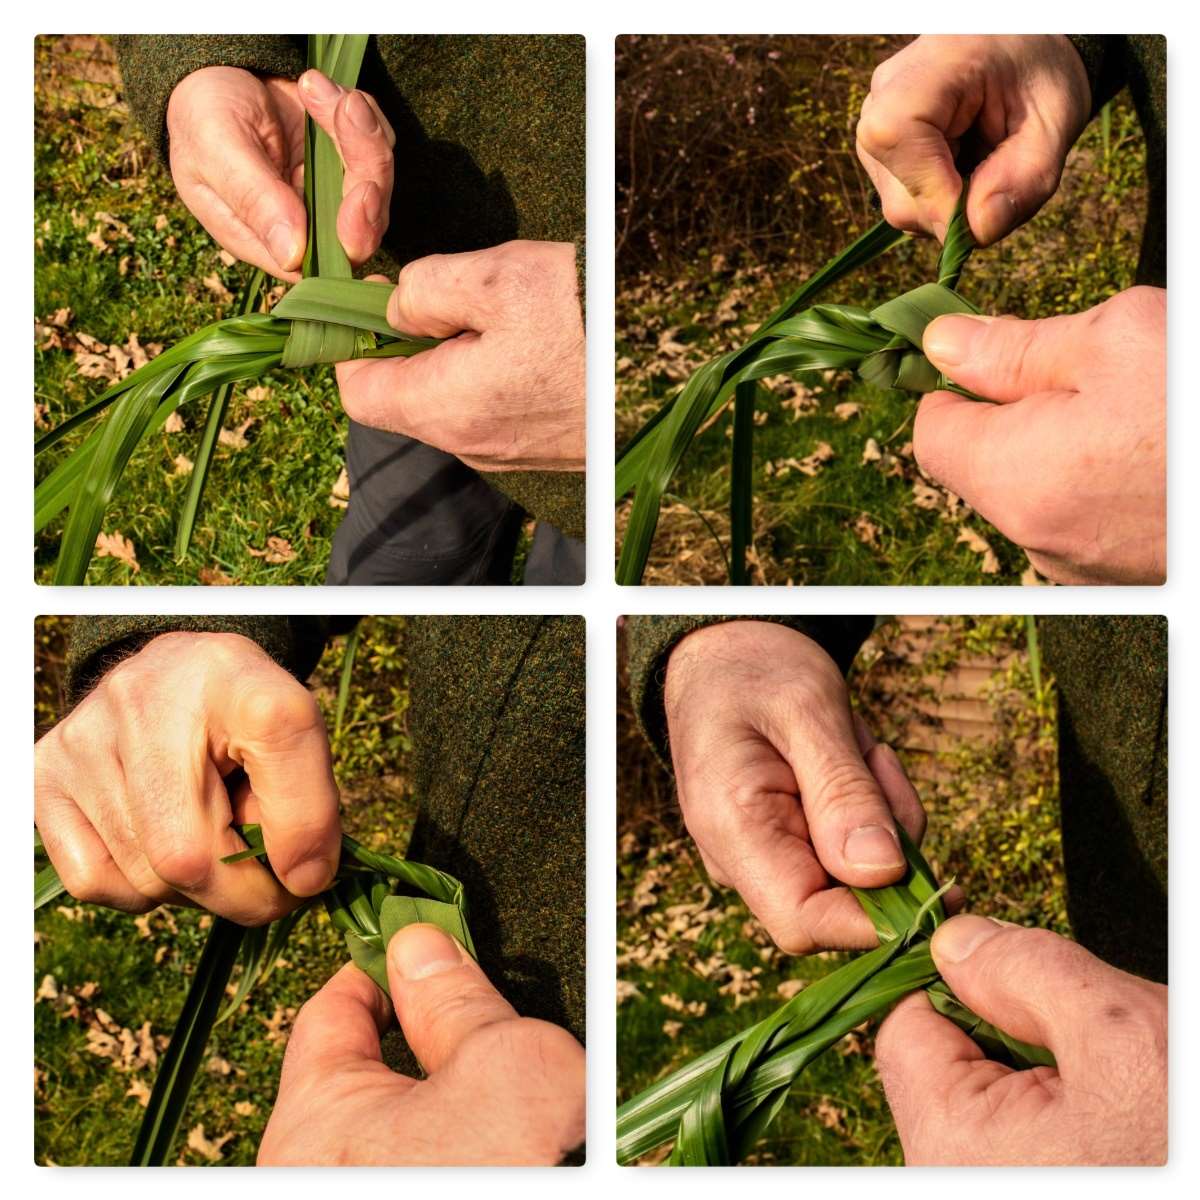
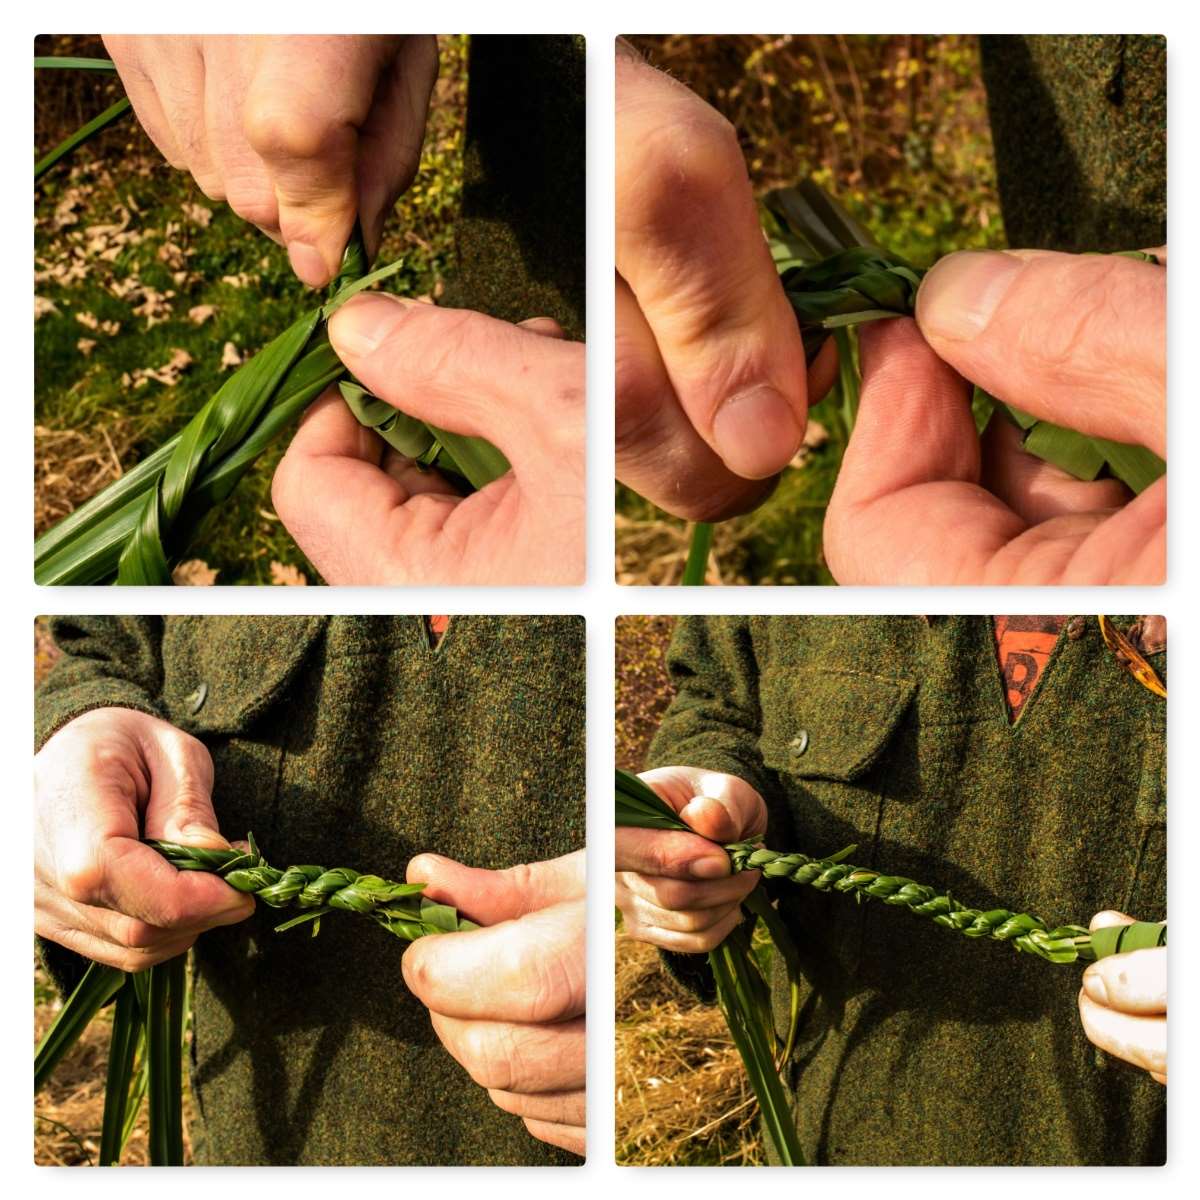
Laying in the rope
In the pictures below I am holding both the standing ends in my left hand (on the right in the picture) and twisting the strand closest to me a couple of times towards myself.
Keeping the tension on the twist, I then turn the newly twisted strand away from me over the top of the other strand and clamp it in place with my left thumb (I have added a video at the end of the post to show you this in more detail). Once done this means the other strand will be closest to me, and it’s simply a case of repeating the process of twisting the closest strand towards me a couple of times, then turning it away from me over the top of the other strand and carrying on.
Twist and Turn
It does not take long to start forming the rope but you do have to be careful when using whole pieces of grass as you can easily cut yourself. The rope made from this fresh grass will be perfectly usable in the short term however as it dries out and shrinks the strands will loosen.
If I had wanted to make rope for long-term use I would have stored the harvested grass until it had dried out and then re-wetted it before making the rope. This would mean the rope would not shrink and loosen afterwards.
Pinch and repeat
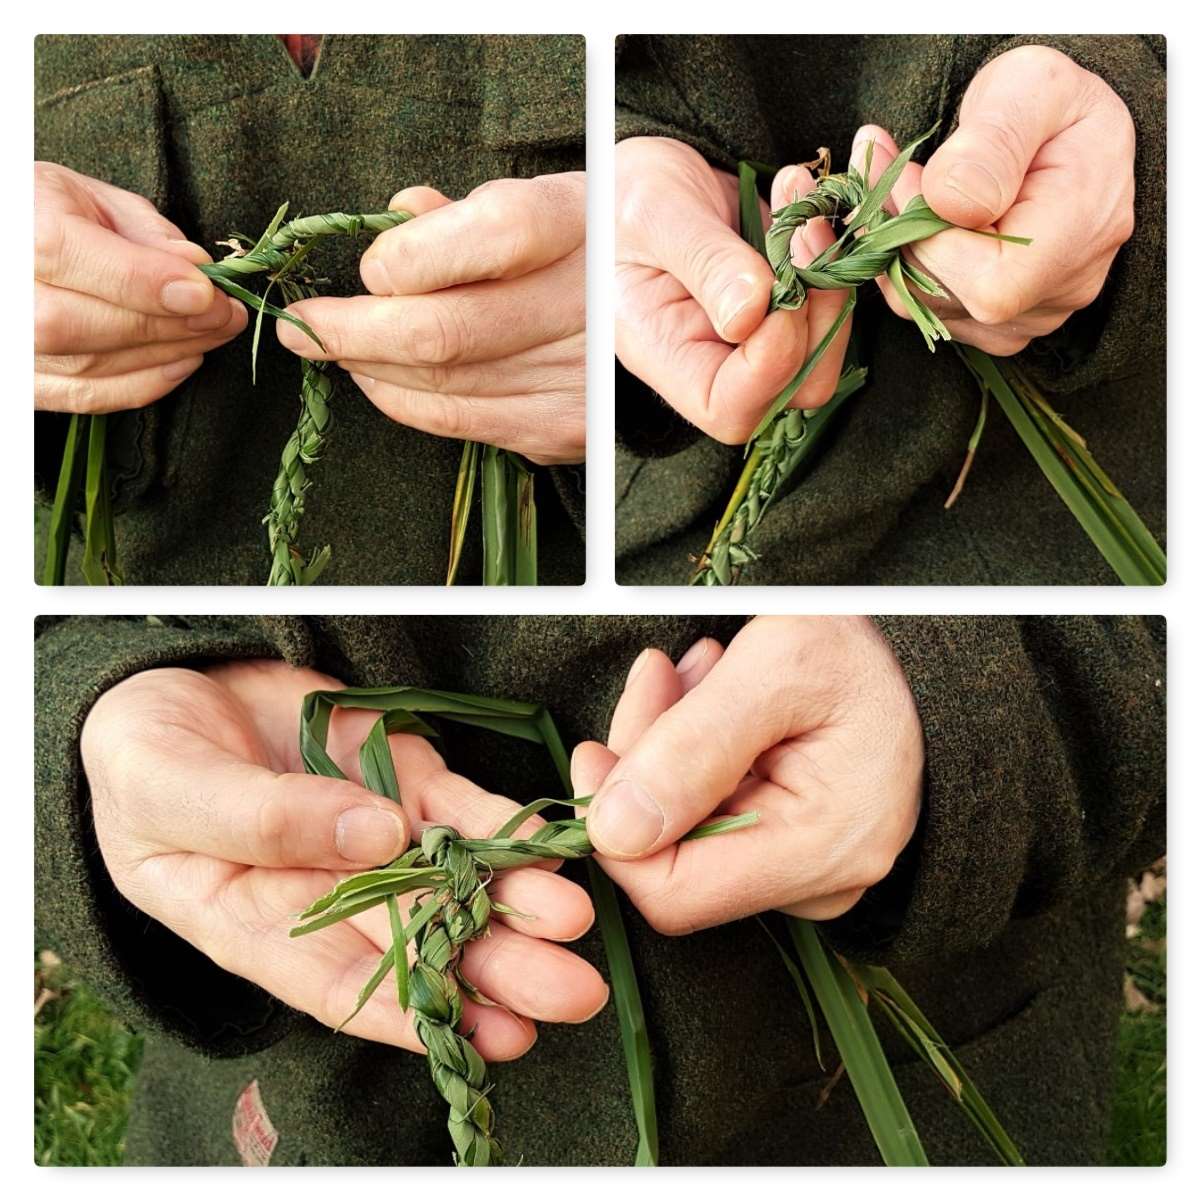
Adding more grass
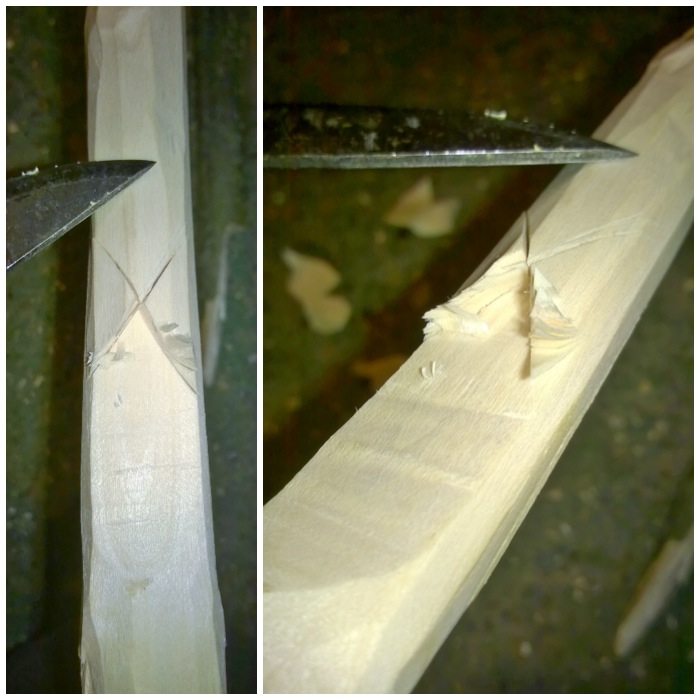
Eventually one of the strands will start to get thinner. It is at this point you will need to add in more grass. I lay a fresh piece of grass into the strand that is thinning out with the short end sticking out by a couple of centimetres. After twisting and laying in the strand as normal I twist the small piece sticking out back and incorporate it into the other strand.
Every time a strand starts to thin out I add another piece of grass in this way.
Laying in new strands
Once I have finished the rope to the length I want I finish the end of by twisting the two strands tightly and tie it off with an overhand knot.
To finish you can trim off any pieces of grass that are sticking out with a knife if you want to tidy it up.
Finishing Off
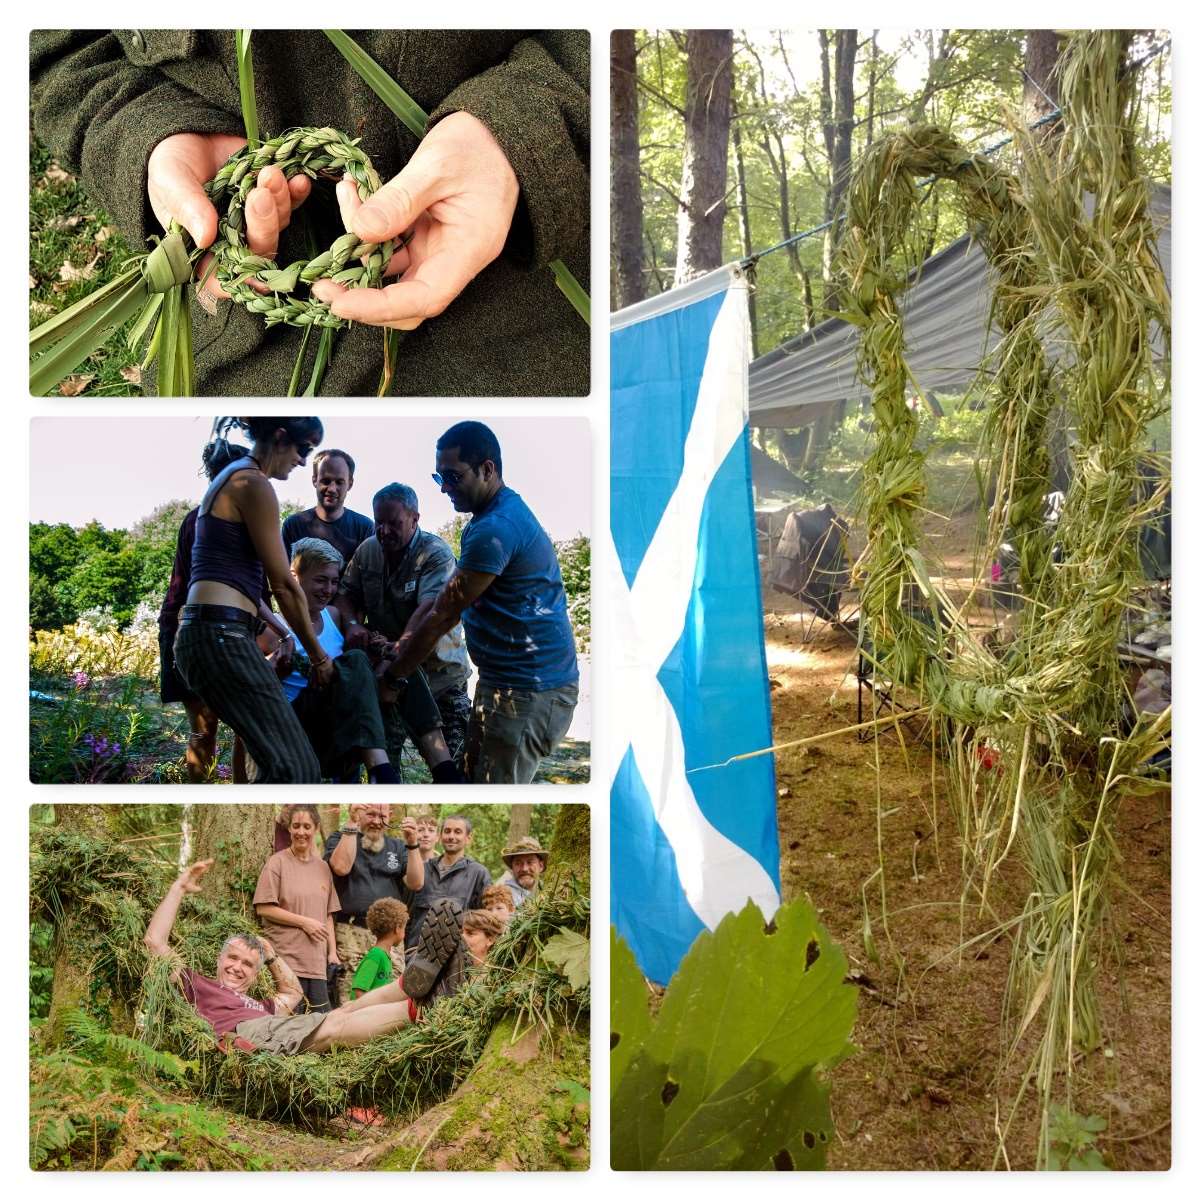
Uses
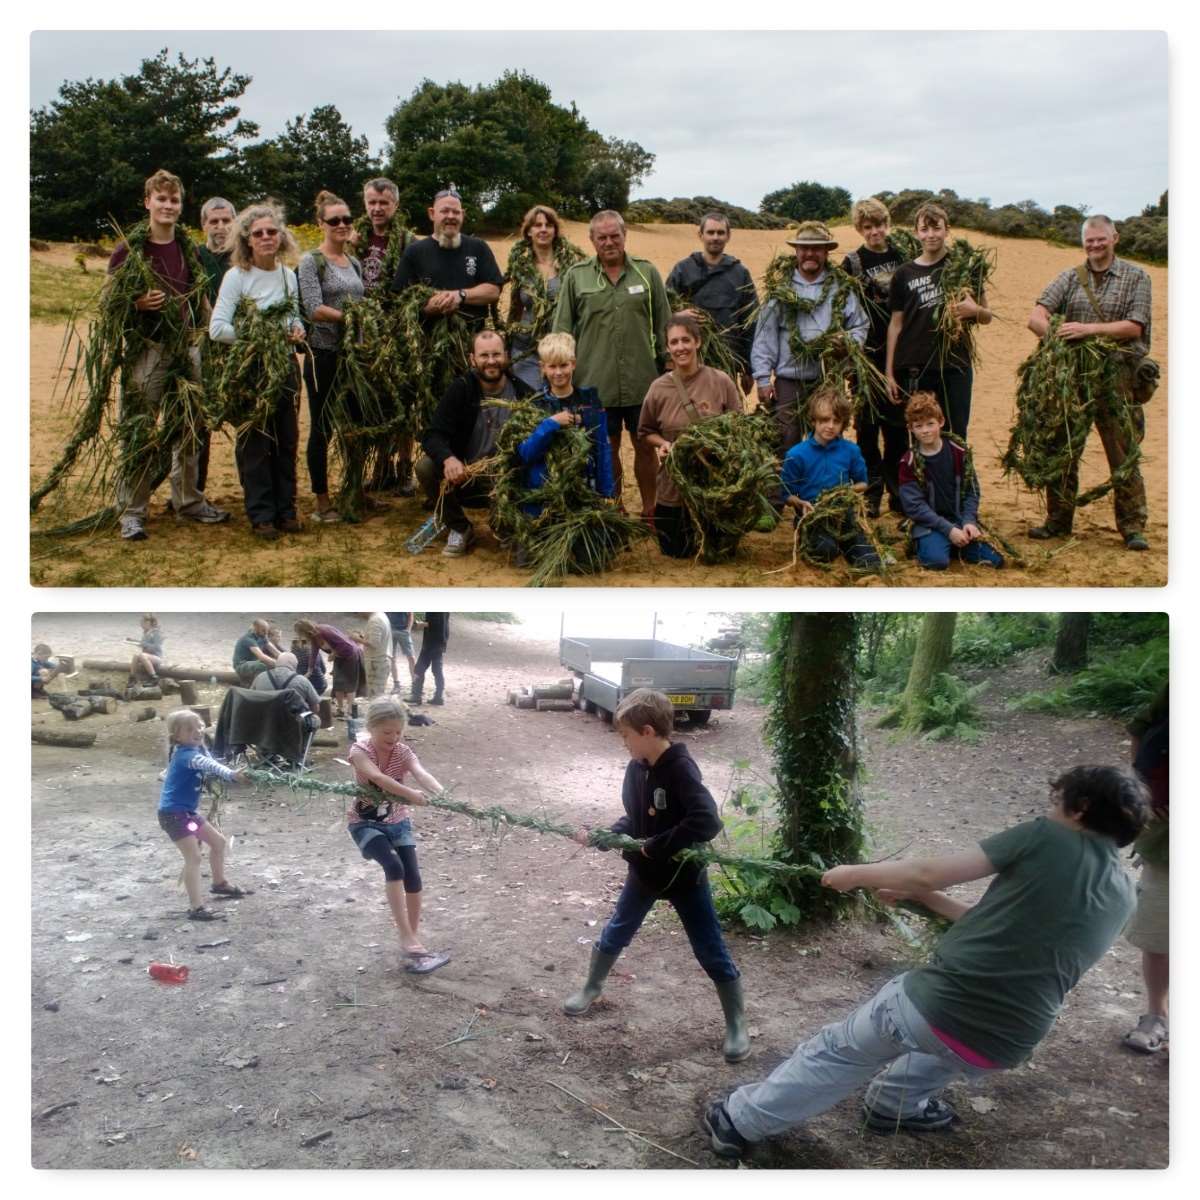
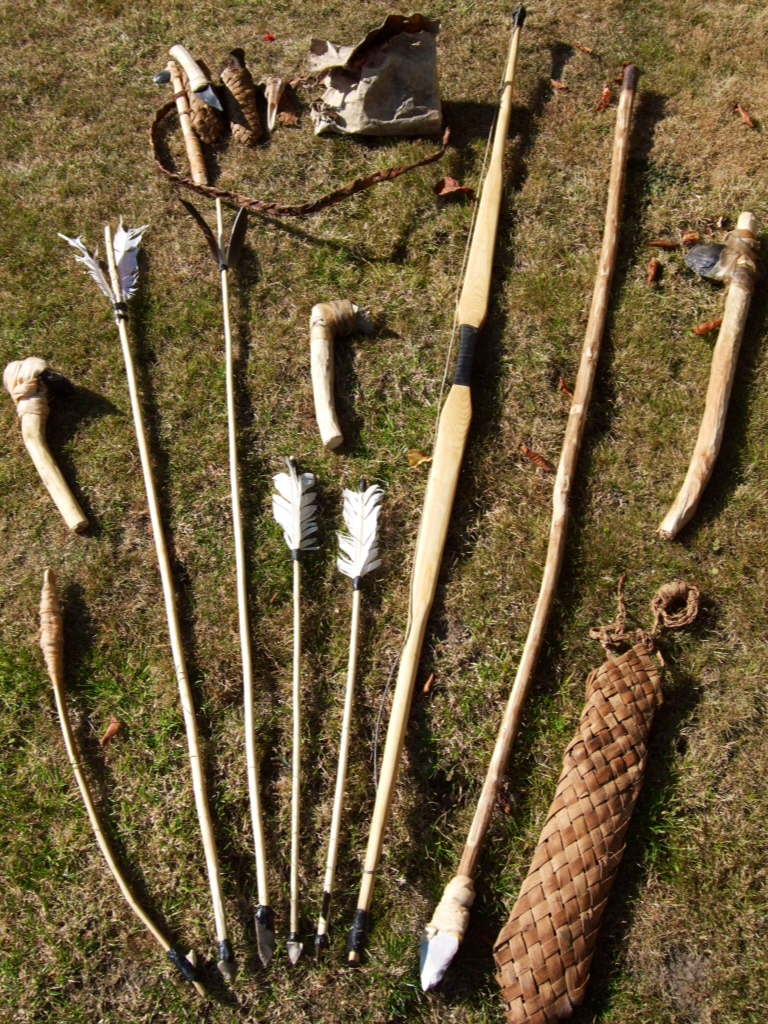
Perry insists that students on his tracking courses should be able to make thick coils of rope the length of their body in about a minute. I have a bit to go to be able to do that but as you can see below the rope – whether it is thin or thick – can be used for many purposes.
You can evacuate a casualty, construct a hammock, make coil baskets or even a great tug of war rope to keep the kids (of all ages) happy.
Many Uses
As the steps can be a little hard to follow with just pictures I put this short video together to show you the process in action.
Have fun, and I’d love to see pictures of the rope you make!
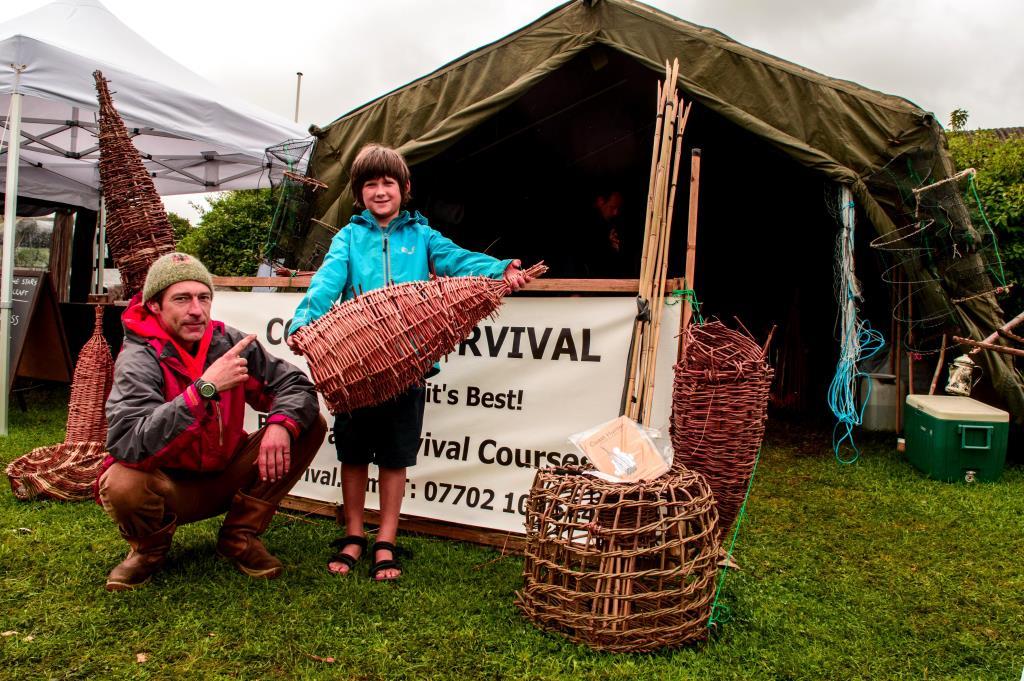
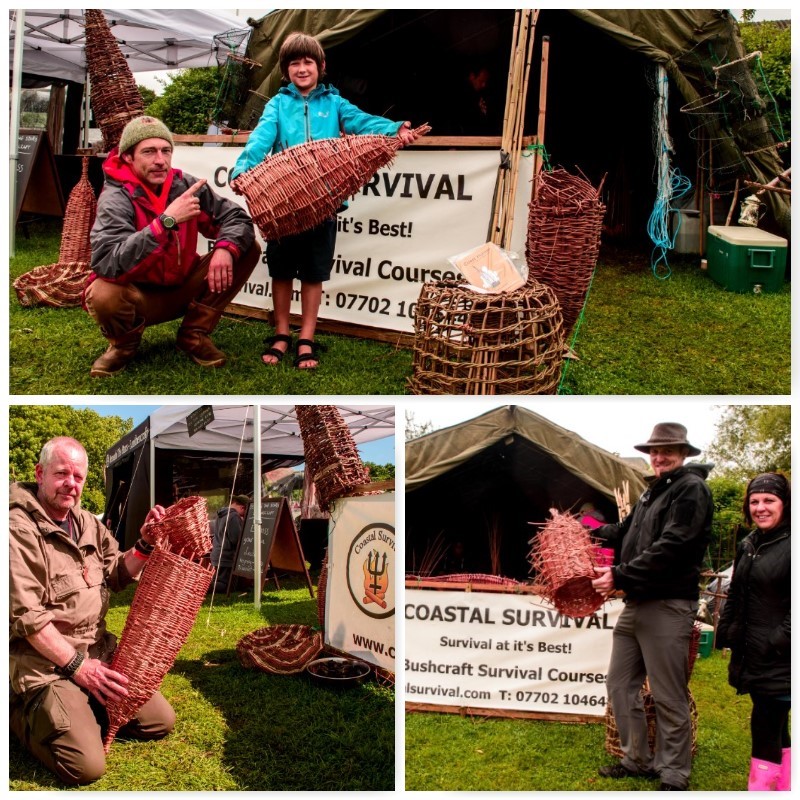
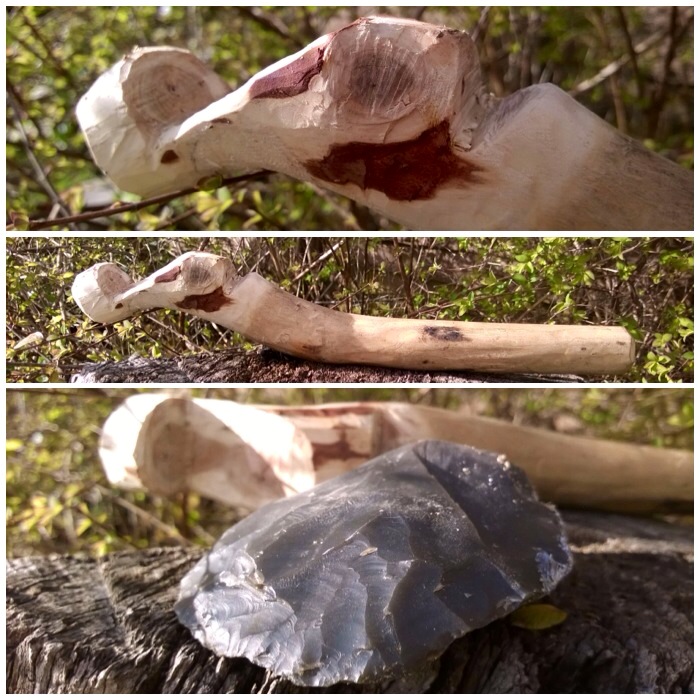
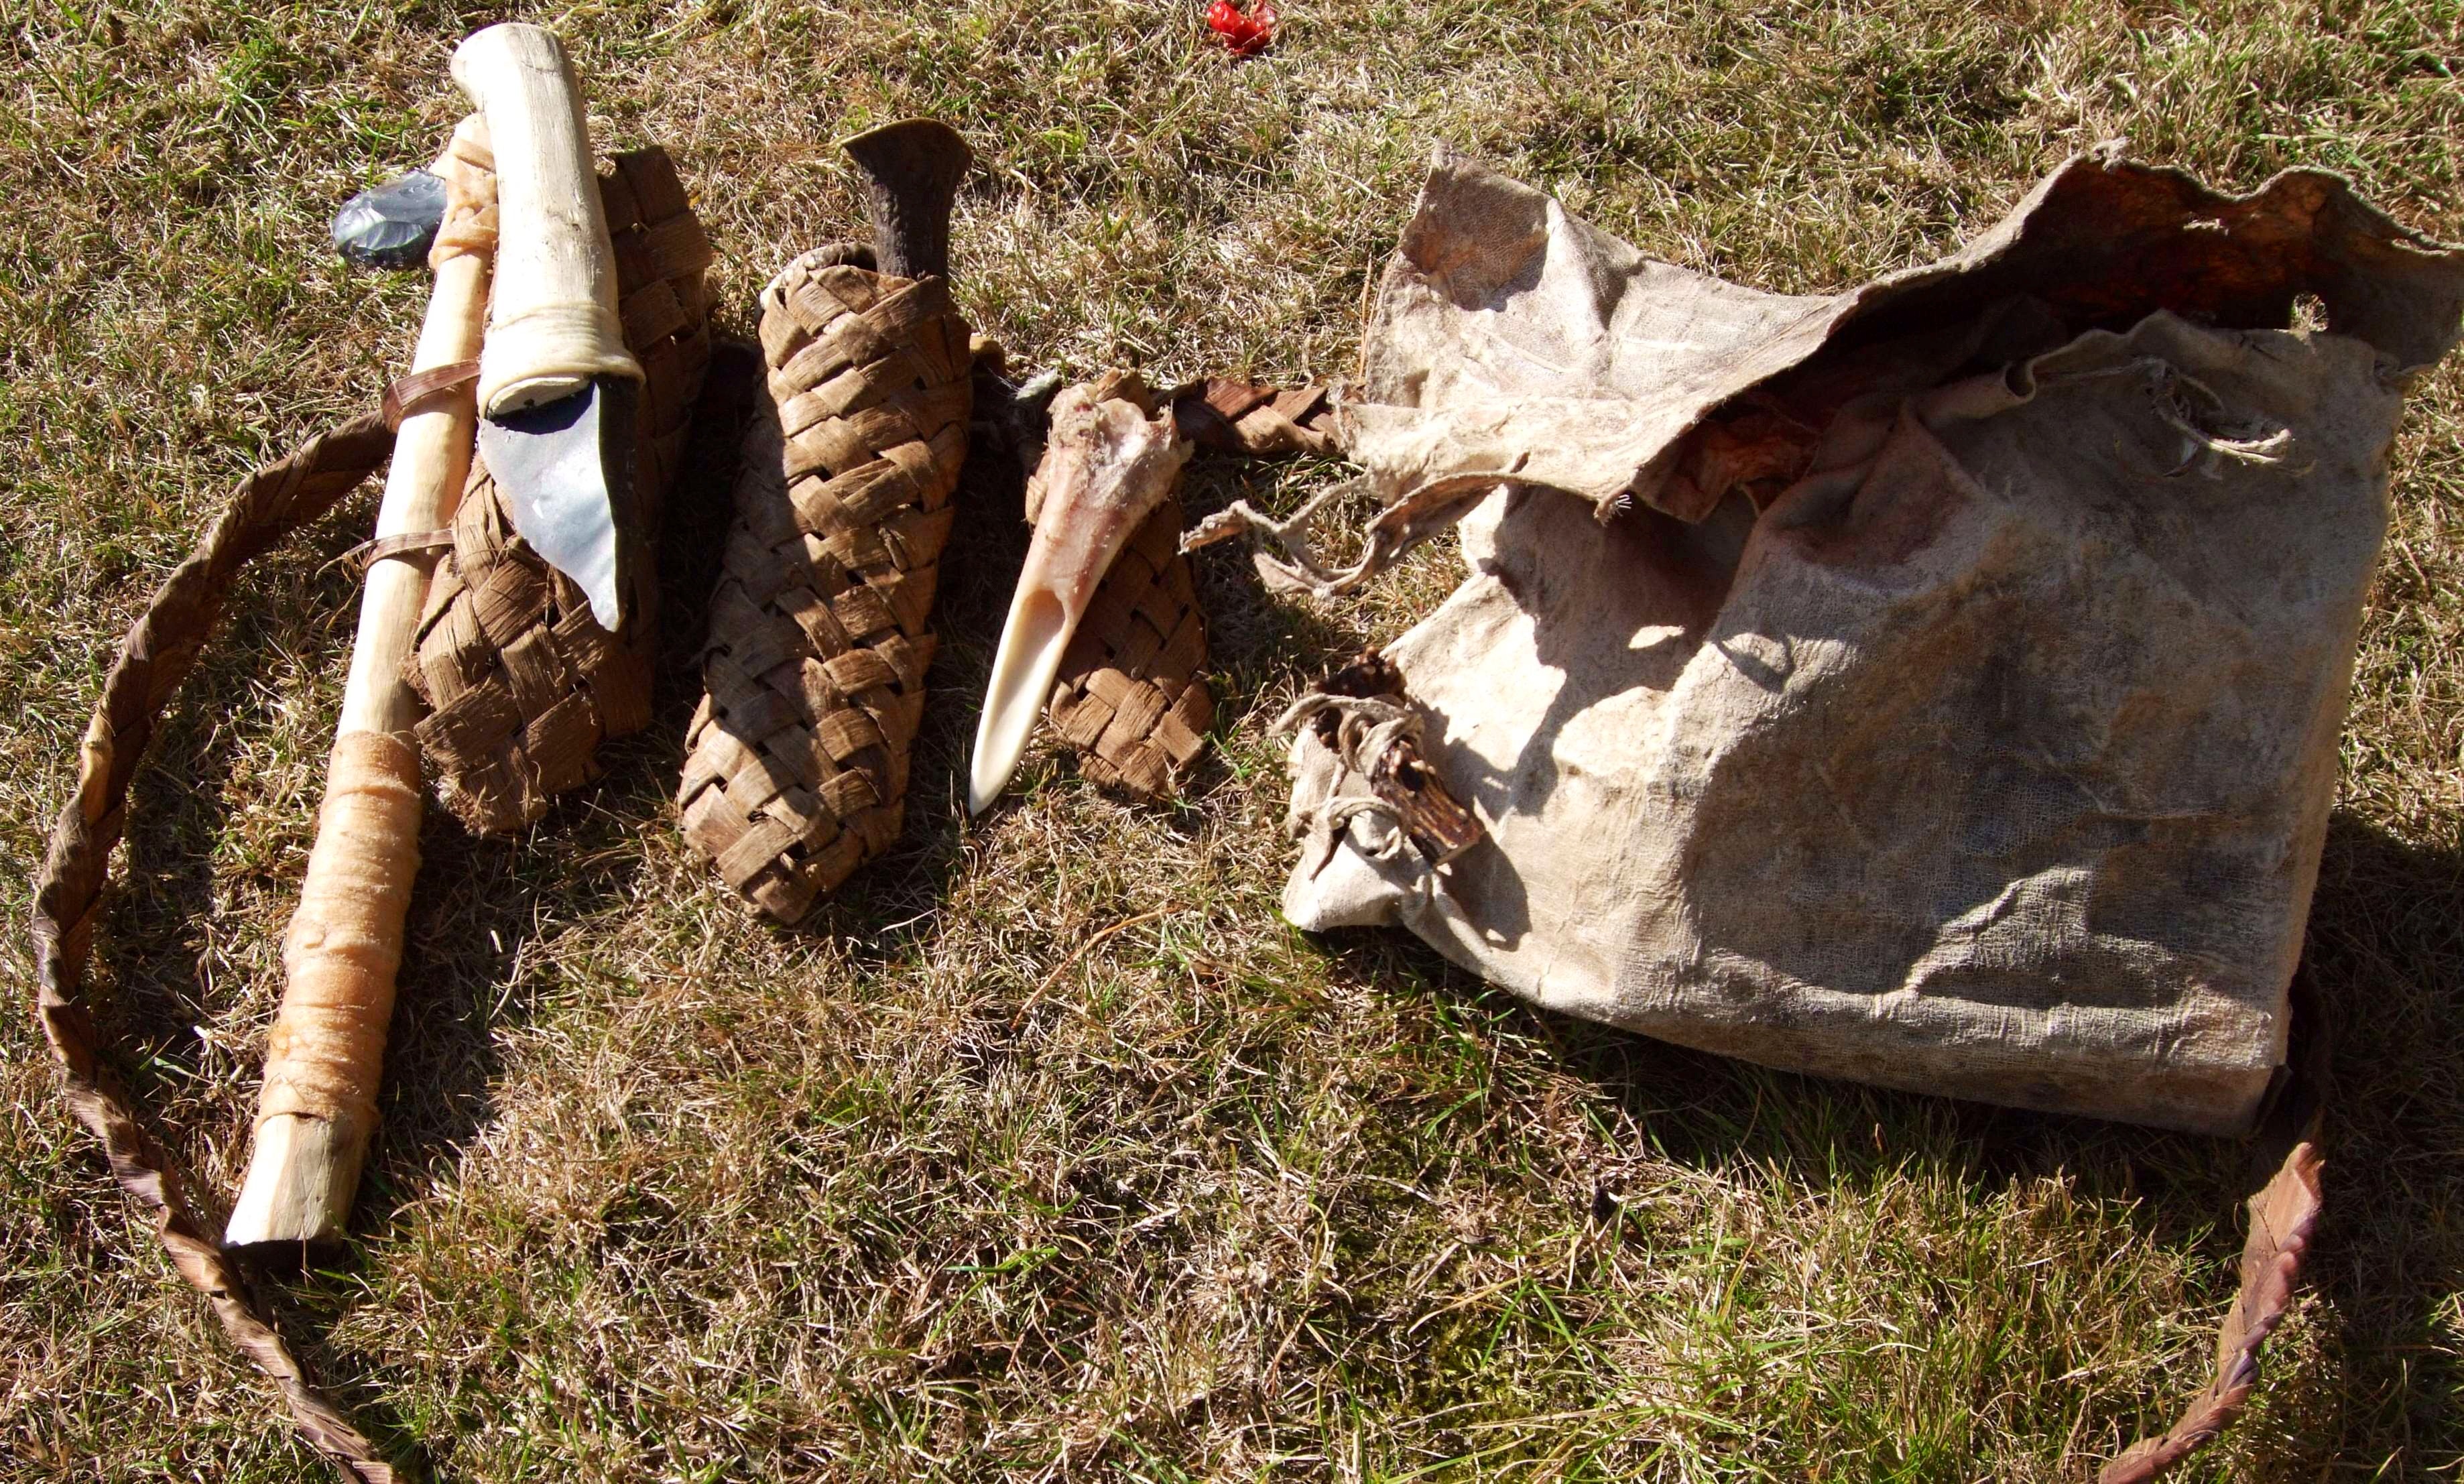
These traps are not just for show but tools for living as comfortably as you can on the coast
Last August found me at the Wilderness Gathering here in the UK with my good friend Fraser Christian of Coastal Survival. Fraser ran a Masterclass at the Gathering for about 8 people in how to make a stick fish trap.
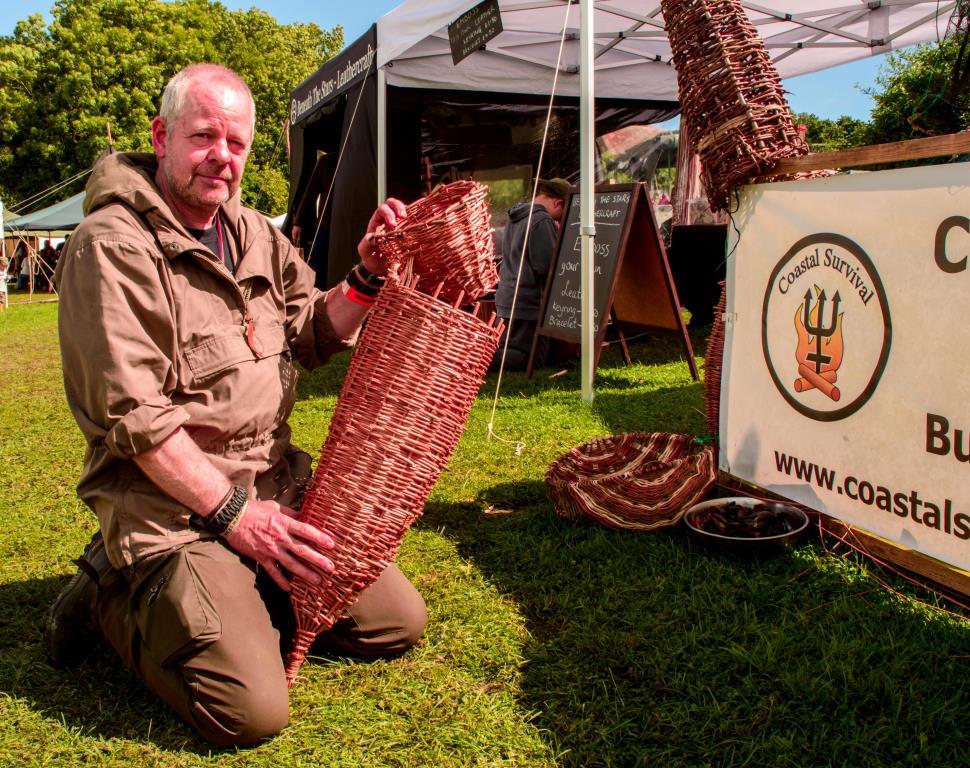
Willow Fish Trap
Fraser has a couple of books out now called Eat the Beach and Coast Hunter (he is currently working on his third book called Castaway on the Seashore). In the book Coast Hunter Fraser goes into detail on many coastal hunting techniques (including making this trap) and I encourage you to get a copy of these books if you are interested in the art of coastal survival.
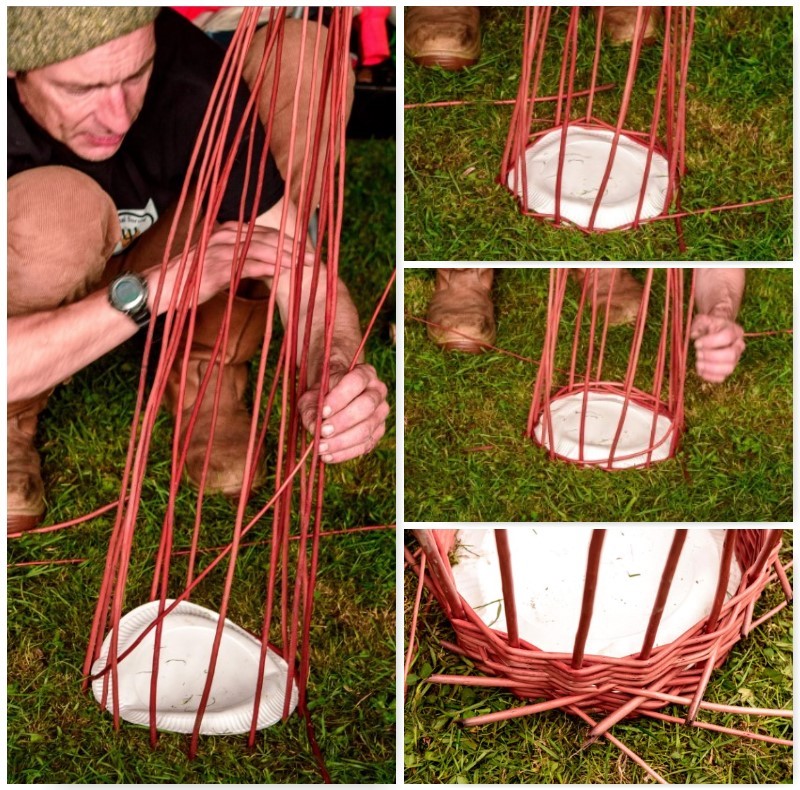
Fraser uses this type of trap on the coast weighted down with stones in the inter-tidal zone to catch fish, crabs and lobsters. You can make the trap with many different woods found in the woods and hedgerows – just make sure it is pliable. As he was running a class for 8 people he brought in some commercial willow from Musgrove Willows.
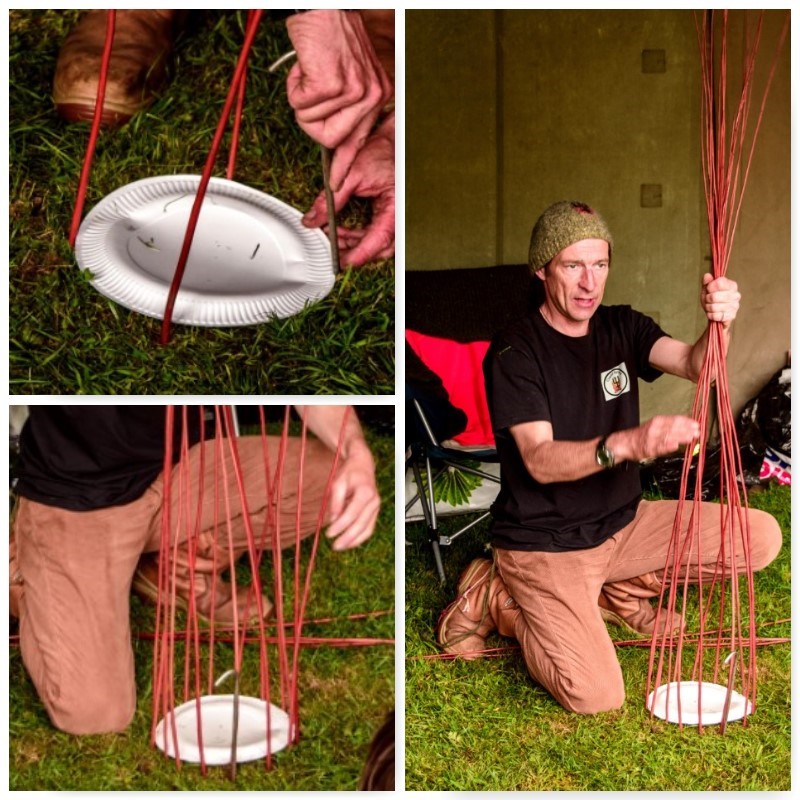
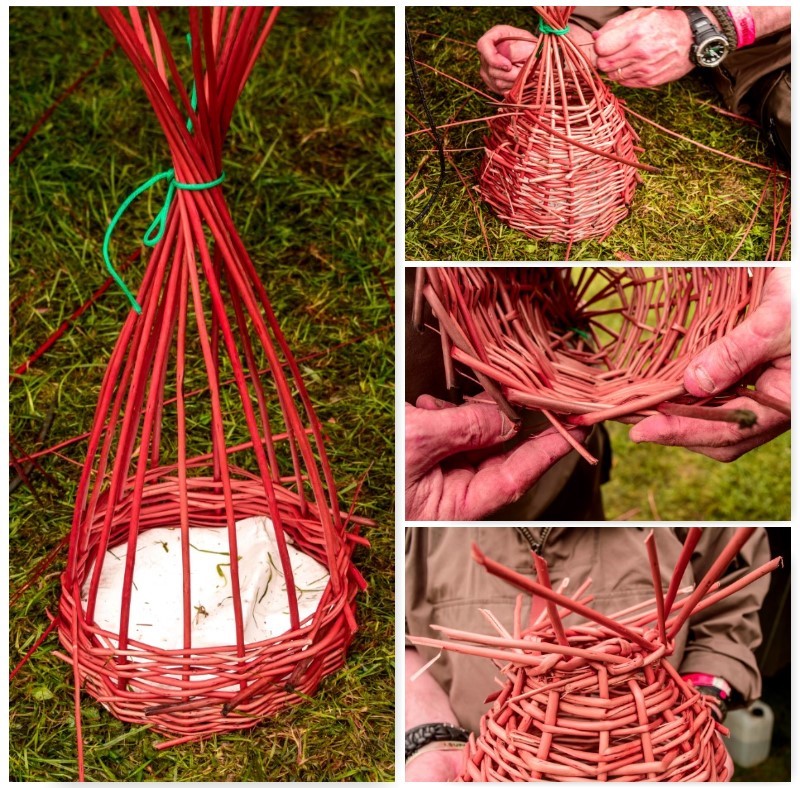
Step 1 – Set Up
I will go through the steps as I saw them on the day but for more detail on this trap have a look inside the Coast hunter book. To form the shape Fraser used a paper plate and a tent peg to create a circle of willow. He tried to maintain an even distance (about two fingers width between each piece of willow) as he inserted the willow (thick ends) into the ground, They were pushed in about 10cm’s and the tent peg really helped as the ground was hard.
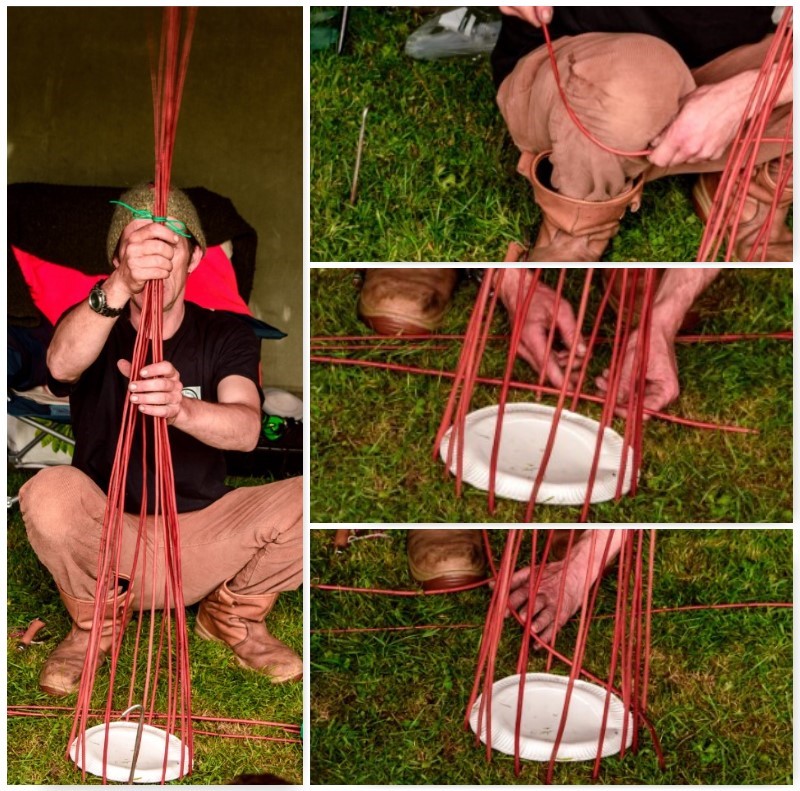
Set Up
Once the willow was secured in the ground he tied of the top ensuring the willow sticks all came in at the same angle.
Step 2 – Weaving
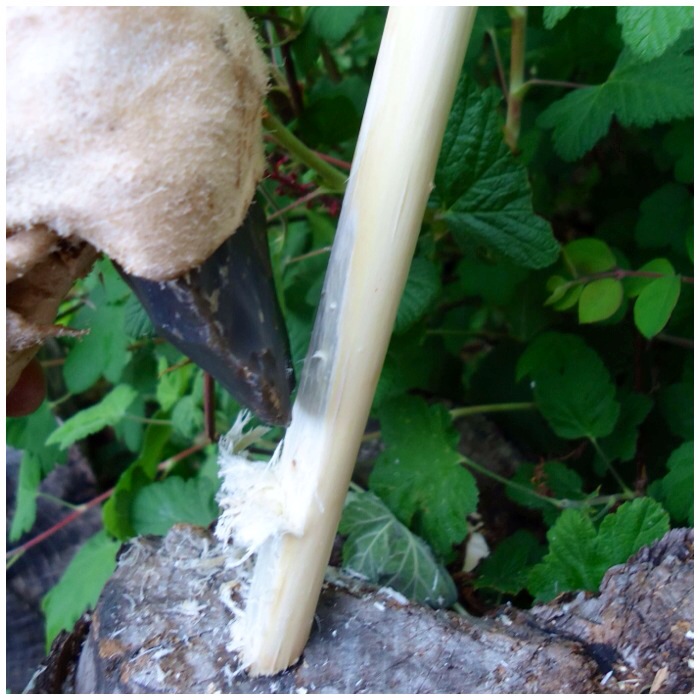
The willow had been left overnight in a lake to ensure it was as pliable as possible however to make sure Fraser pulled each piece of willow he would weave with around his knee. This makes the weaving process so much easier and less tiring on your hands.
Starting with the thick end of a piece of willow he threaded it in and out between 4 or 5 uprights, Once that was secure he raised up the thinner in to carry on that in and out weave (raising the tip of the thinner end really makes the weaving easier).
Weaving
In the picture in the bottom left you can clearly see that raised thin end being woven in and out of the uprights. He stopped the weave when he judged that part was too thin (the excess would be trimmed off later).
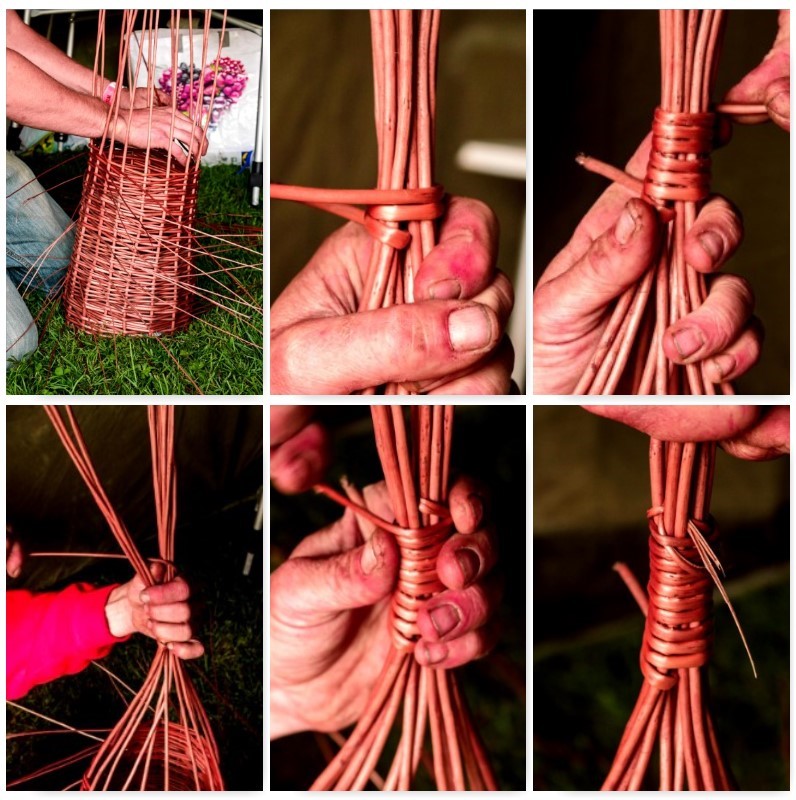
Once one piece was finished it was a case of repeating the process with a new piece of willow but from the next upright along. You can see in the picture in the bottom right below these staggered start points. Frase ensured that the ends stuck out proud so that they would not slip off the first upright while weaving. These would be trimmed down later.
Staggered
Step 3 – Wrapping the Top with willow
Over time the trap started to develop (a height of 50 or 60 cm’s) and the string at the top was replaced with willow. I have put the steps for you below. The thick end was slid through the middle of the uprights then wrapped tightly around the uprights for about ten turns, through the uprights again, a couple more turns and back through once more to finish.
Tying off the top
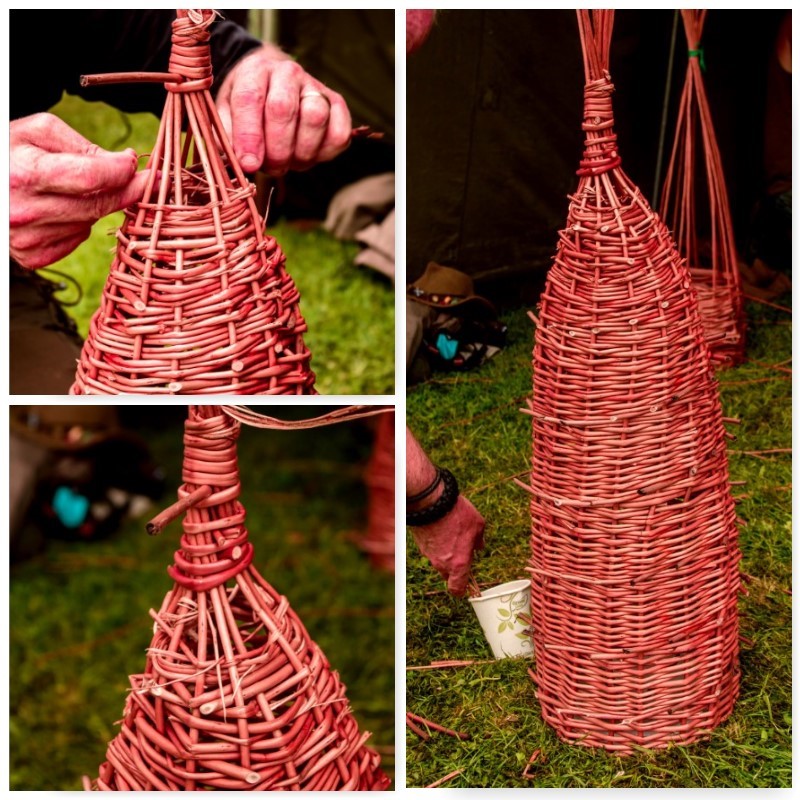
Step 4 – Closing the Gap
Finishing the top section can be quite difficult as you have less room to push the willow in and out of the uprights. Make the willow as pliable as possible and experiment with smaller thinner pieces and with starting with the thin end and threading through the thicker end.
Depending on what you are hoping to catch will decide how much of a gap to leave but ideally the gap should only be a couple of centimetres.
Closing the gap
Step 5 – Locking off the Opening
When the top has been finished pull the trap out of the ground slowly and it is time to lock off the uprights around the opening.
Take one upright and bend it over in front of the one directly to its right but behind the 2nd one on the right. Repeat the process with the upright on the right and so on. Before long you will be left with just one upright standing vertically. Twist it back and forth and you can thread it easily through the laid uprights to its right.
Look closely at the pictures below and you will see how this works.
Locking off
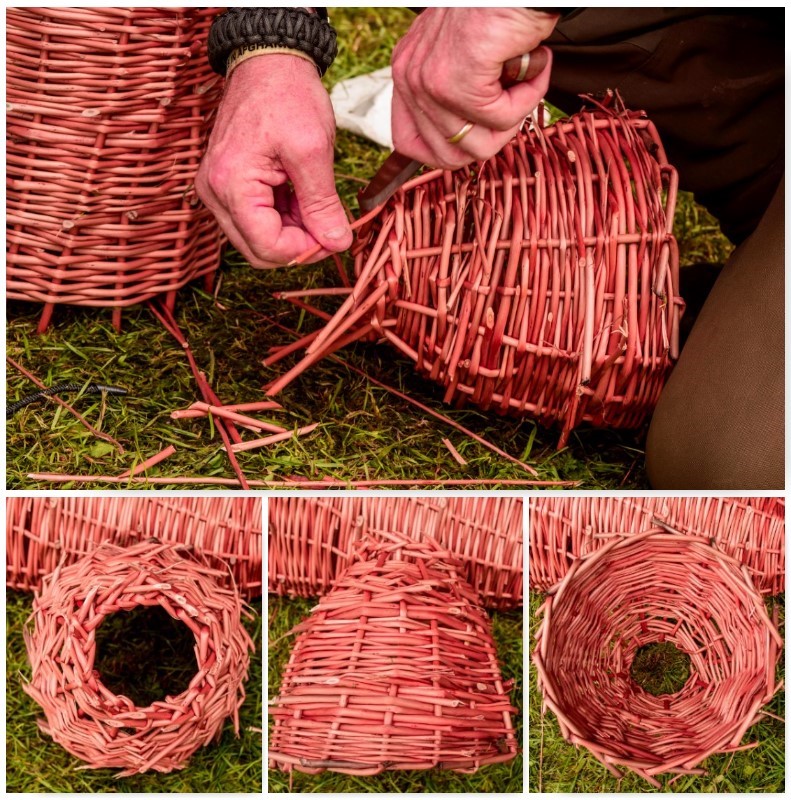
Step 6 – The Lid
The lid is about a third of the size of the main body of the trap however the opening is the same size. Use the paper plate, peg and string in the same fashion as before to set up the skeleton of the lid and weave in the exact same way as with the main body of the trap.
The difference though is that the top is not tied off but left open as this will become the opening that your catch will enter the trap through. When the hole in the top is about the size of your fist repeat the process of locking off at Step 5. You will also need to lock of the rim around the bigger opening when it is pulled out of the ground.
The Lid
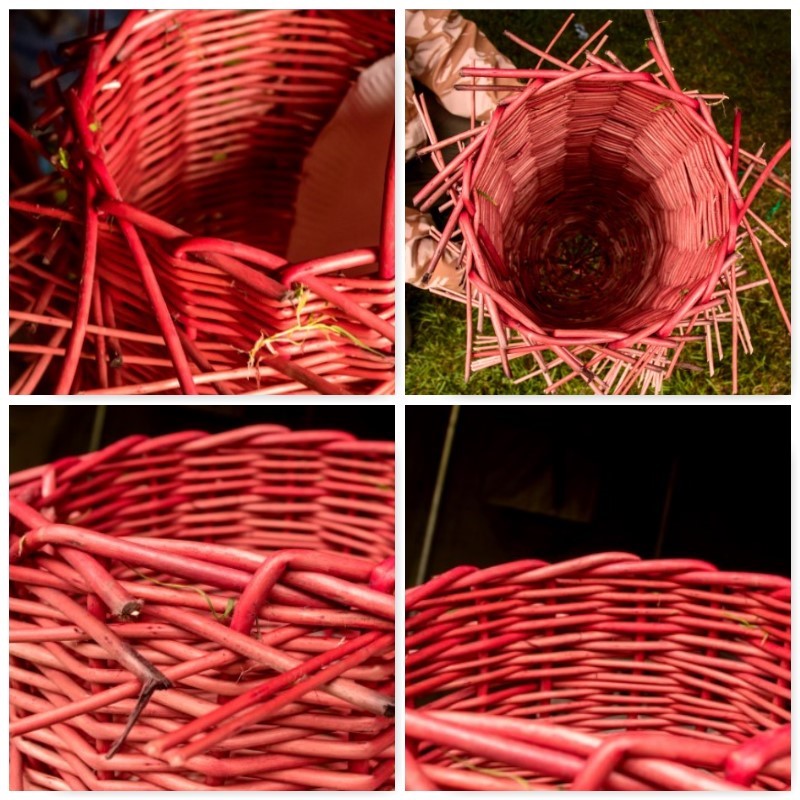
Step 7 – Trimming
When you trim off the ends of any piece of willow when making this type of trap try to leave about a cm or so sticking out so that the end of the willow does not slip inside the trap. The outside should be quite prickly but the inside should be smooth.
Trimming
Step 8 – Attaching the Lid to the main body of the Trap
The lid should sit in the opening of the main body of the trap with the small opening in it well inside it. We split and soaked some willow (soaked in a cup of water) to make it really flexible and used that to tie the lid and the main body of the trap together.
They were tied together at one point only to ensure that the lid stayed attached but could be opened easily to remove any catch or to place any bait.
Attaching the Lid
This project would take a confident weaver/basket maker a few hours to make however our students took most of the day (and one or two came back the next day to finish off) to complete theirs.
These traps are not just for show but tools for living as comfortably as you can on the coast. If you are interested in making these traps under a bit of guidance do contact Fraser at Coastal Survival.
Happy Weavers
As with any trap do check out whether it is legal to use it in the place you want to set it. In the UK check out the Environment Agency.
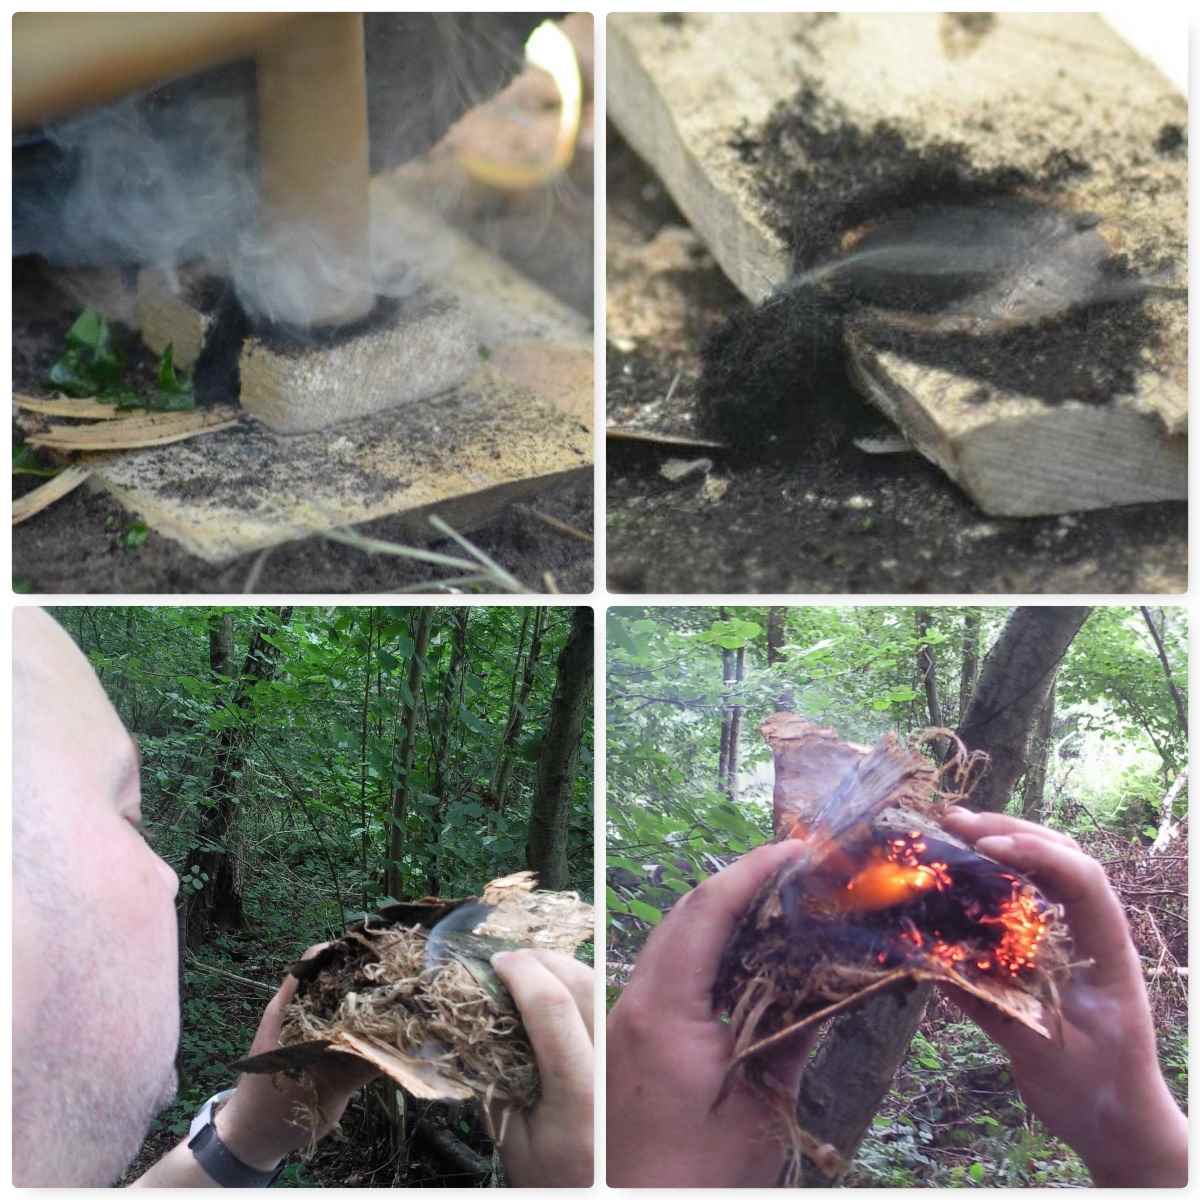
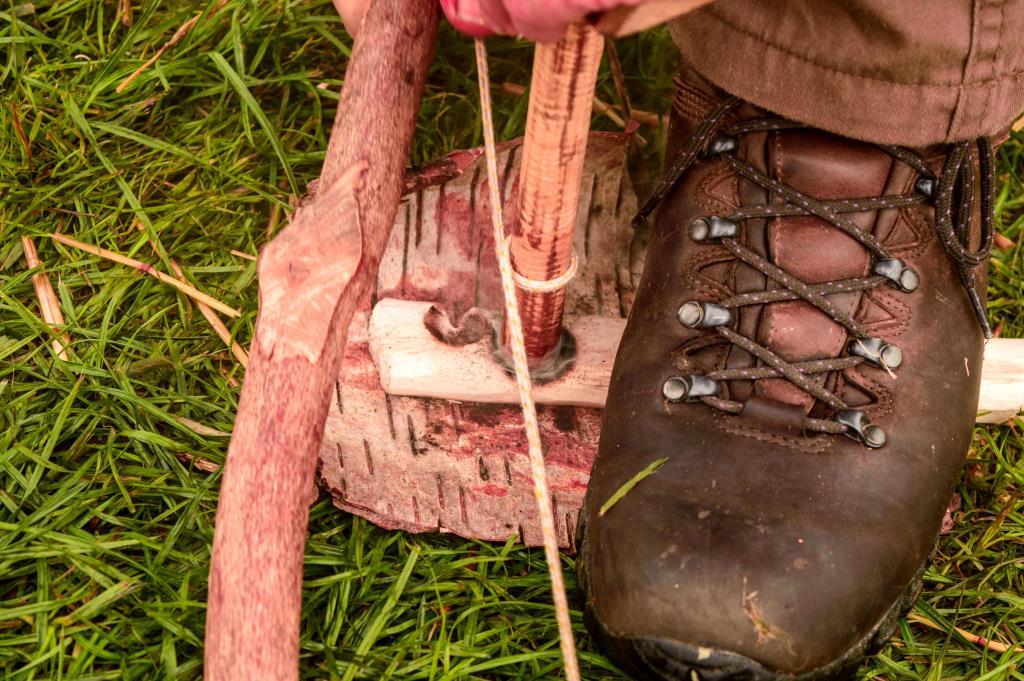
Last August I was at the Wilderness Gathering here in UK with my friends from Coastal Survival. Just across from us was my friend Jason Sears demonstrating the use of a bowdrill to visitors.
Meet Jason
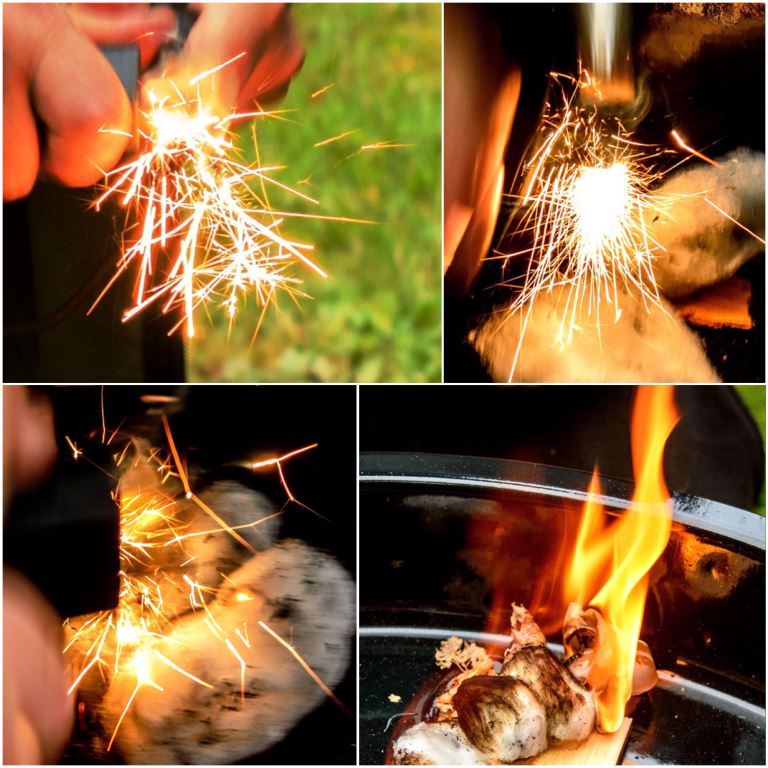
Jason is passionate about fire lighting and passing this skill onto others. I decided to sit back and watch his progress. I cannot remember the combination of wood types he was using but he did spend a minute gently warming everything up with some slow rotations of the spindle.
Warming up
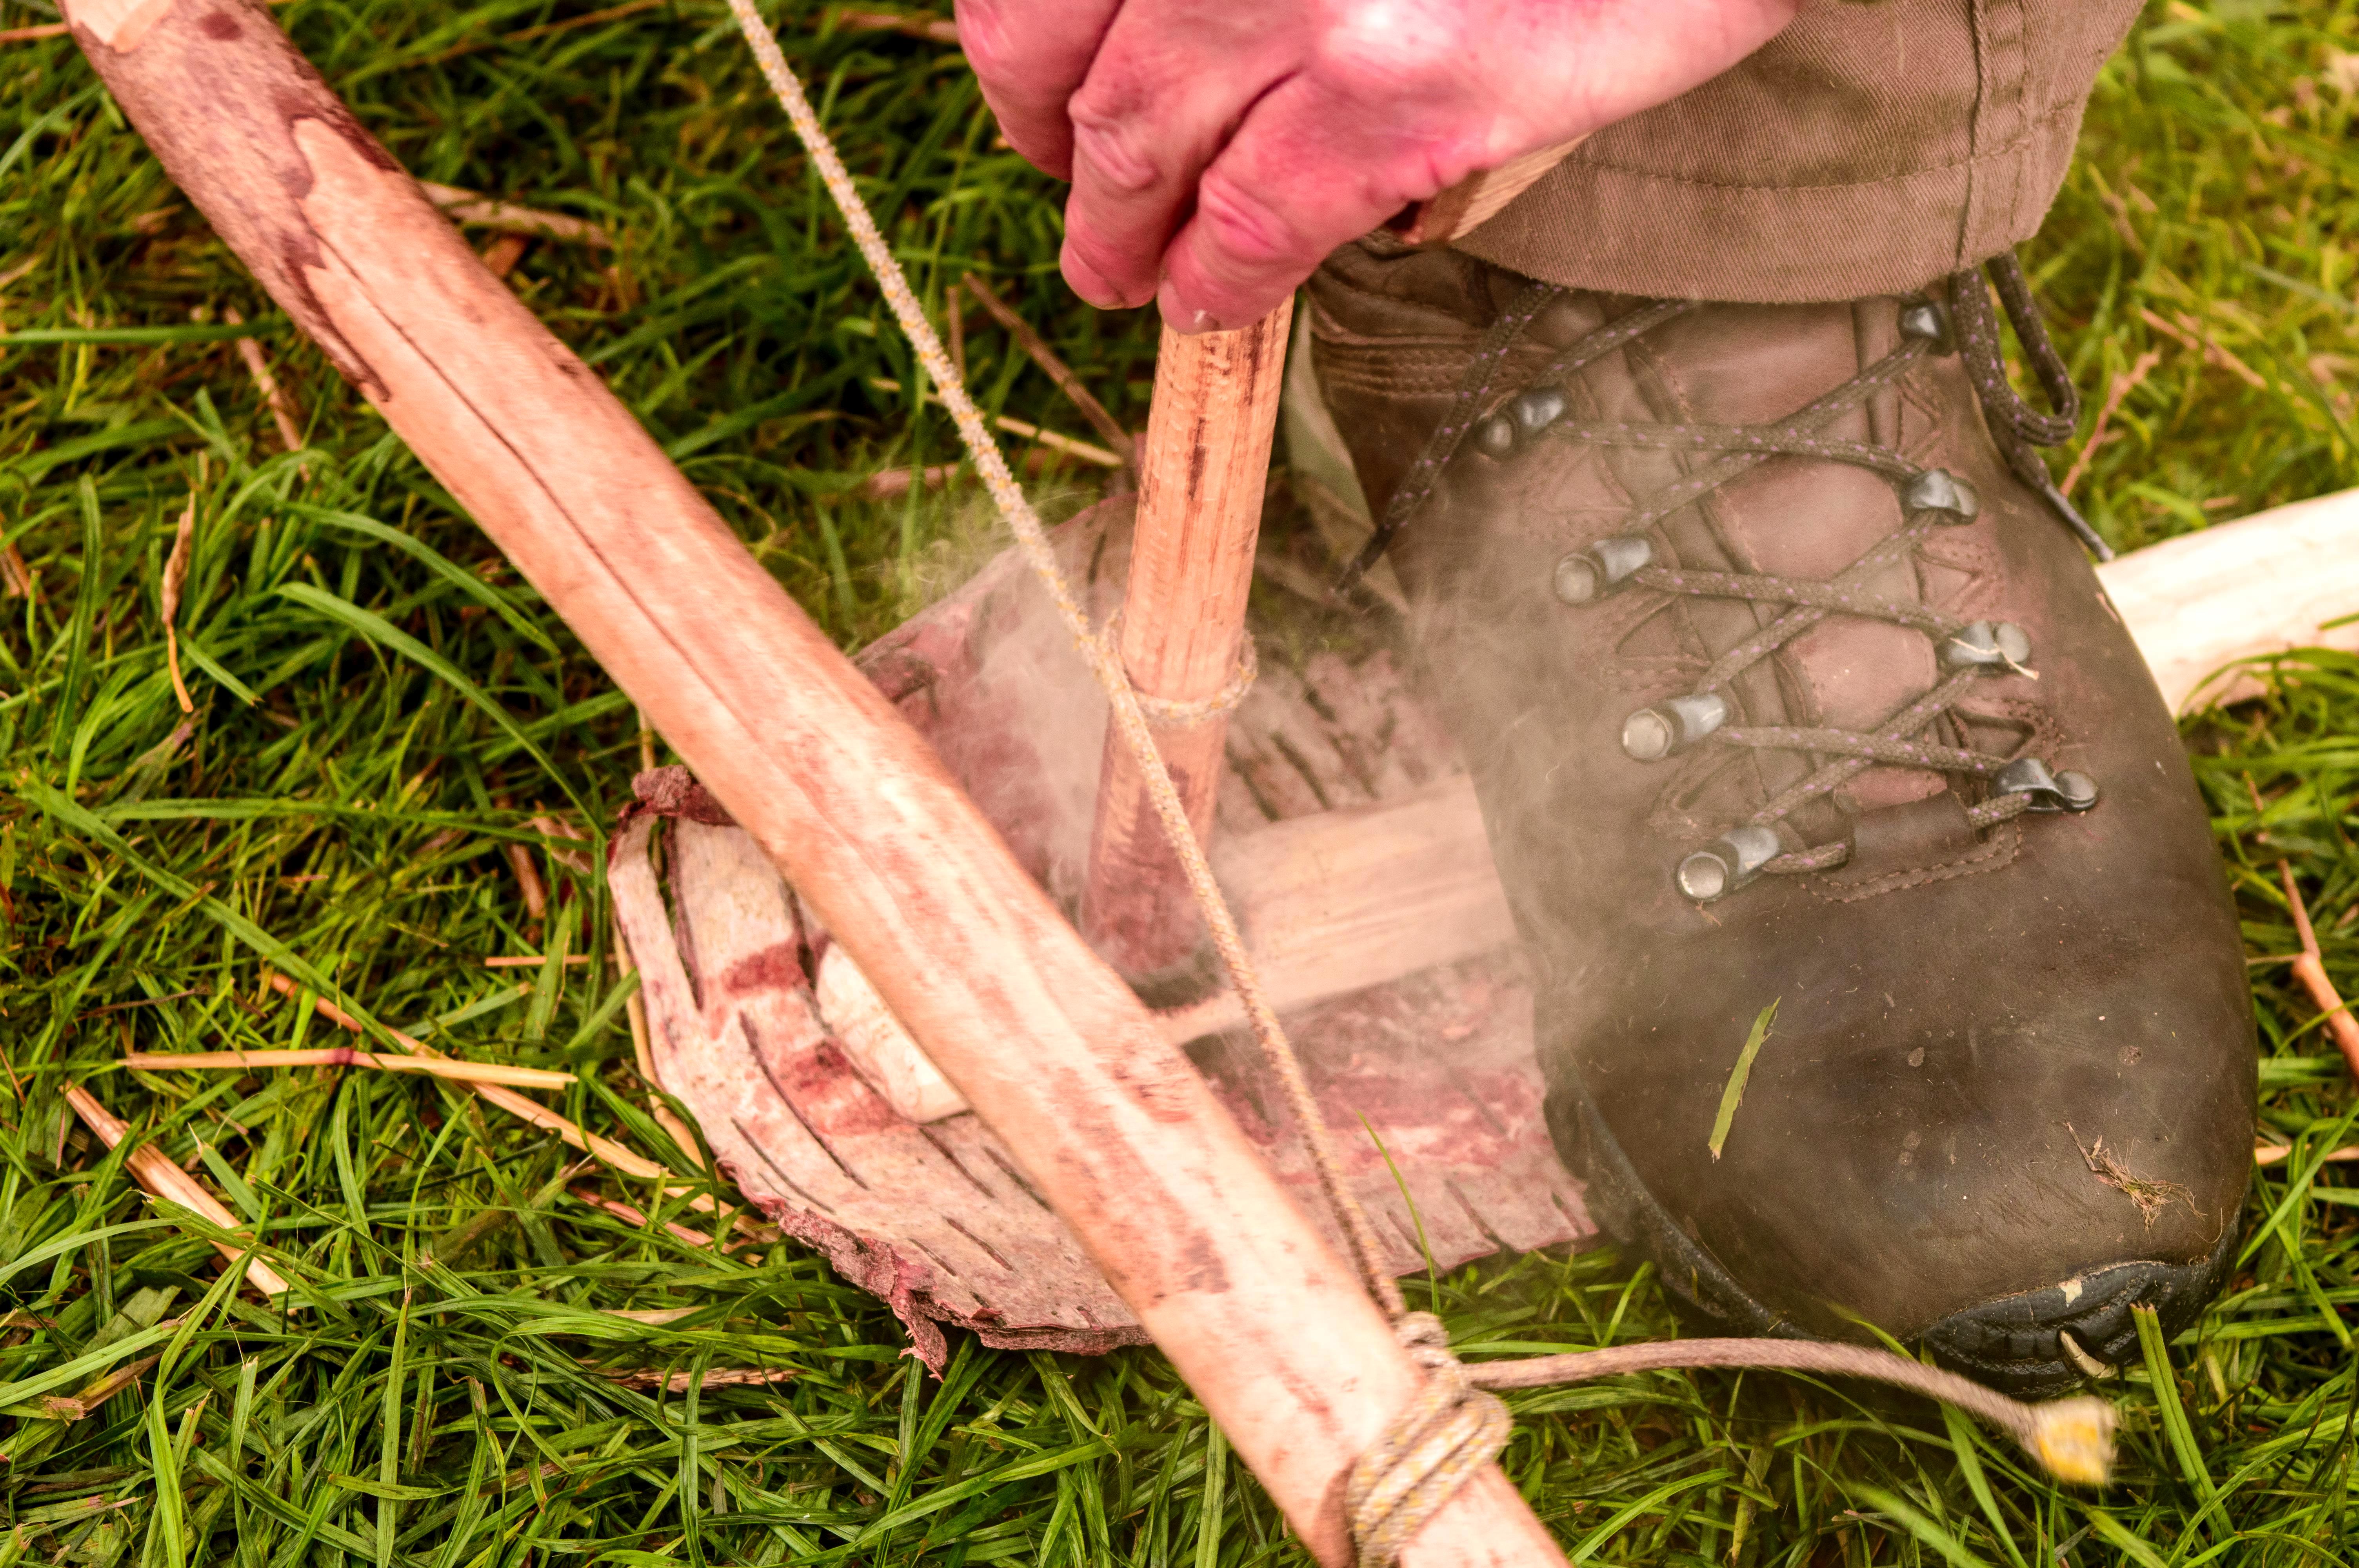
Once he felt everything was a dry as he could get it where the spindle meets the hearth board he really powered up to produce a hot ember. The day had been really wet so all this preparation was essential – all the while he was talking to the visitors explaining what he was doing.
Powering in
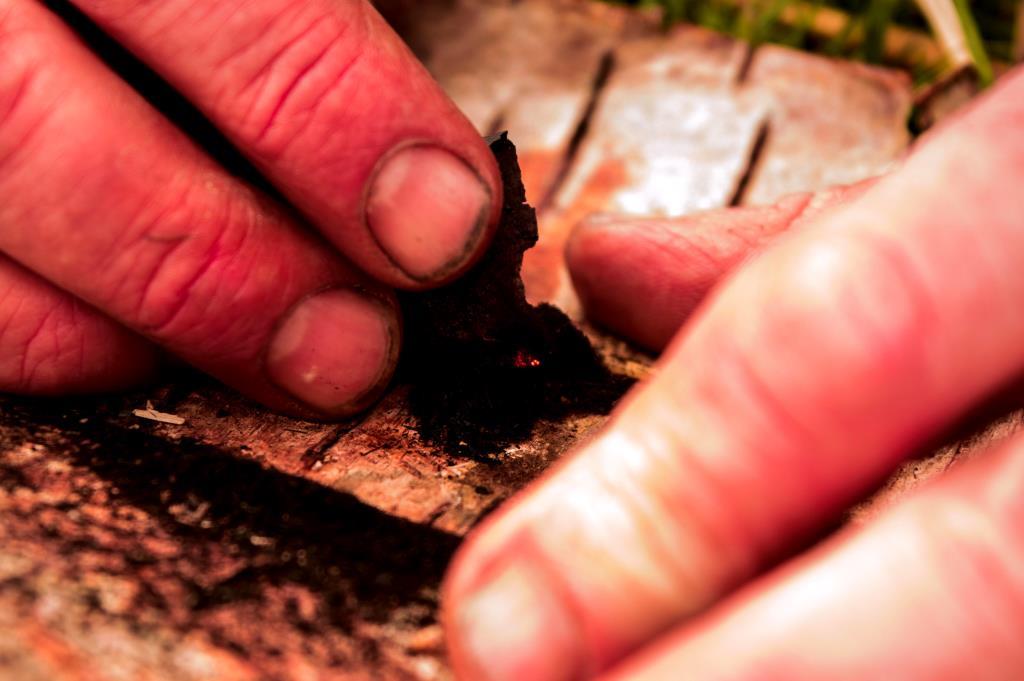
To help himself along in getting his flame Jason had a piece of Cramp Ball fungus (Daldinia concentrica) on hand. He gently laid the piece of Cramp Ball beside the glowing ember to get it alight. This is a handy trick to remember in damp conditions as the ember created from the bowdrill can easily die out if you are not careful.
A small coal with a touch of cramp ball fungus
After a few seconds and a few puffs of breath the Cramp Ball was well alight then………………………
Well lit and very stable
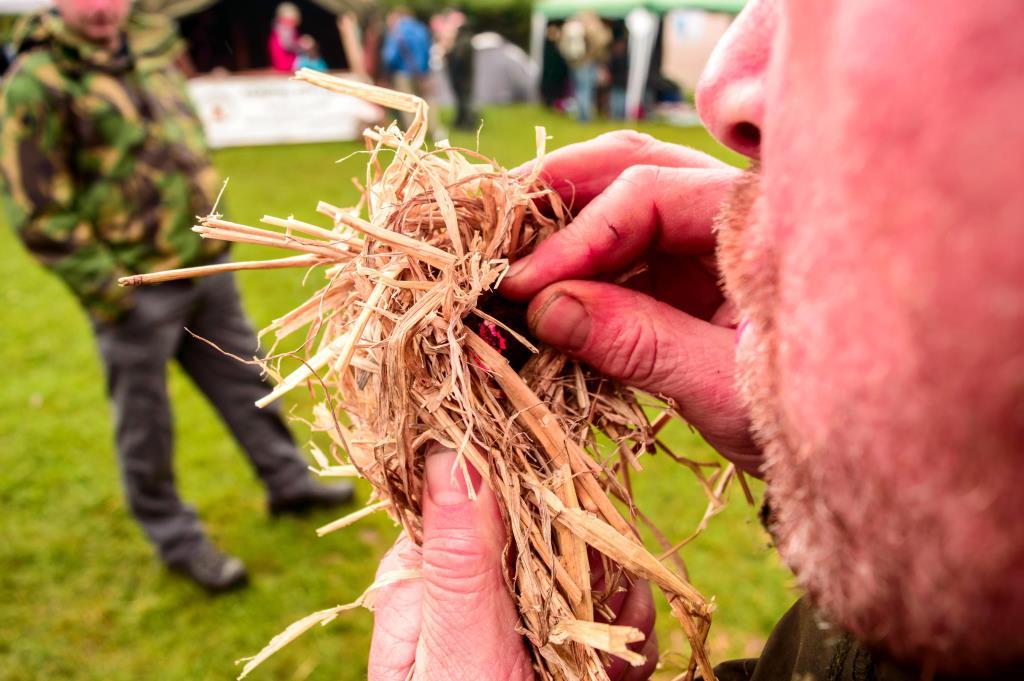
He added to some straw and huffed and puffed for a bit 🙂
Easy to control
Jason’s straw was also a bit damp so he spent a few moments just drying out the area around the cramp ball by gently blowing into it. It is at this stage that many embers disintegrate if you are not careful or they simply die out as they are too small to overcome the damp material.
Spreading the heat
After a minute the centre of the straw was well dried out and smouldering nicely. Normally, I notice a sudden increase in smoke at this stage and the colour changes slightly telling me I am about to get a flame………………………
The straw is smoldering well
Which he did – one impromptu looking candle in fact.
Flammage
It is always a pleasure to watch Jason at the Wilderness Gathering teaching visitors fire lighting, so if you are thinking of coming along next year check him out.
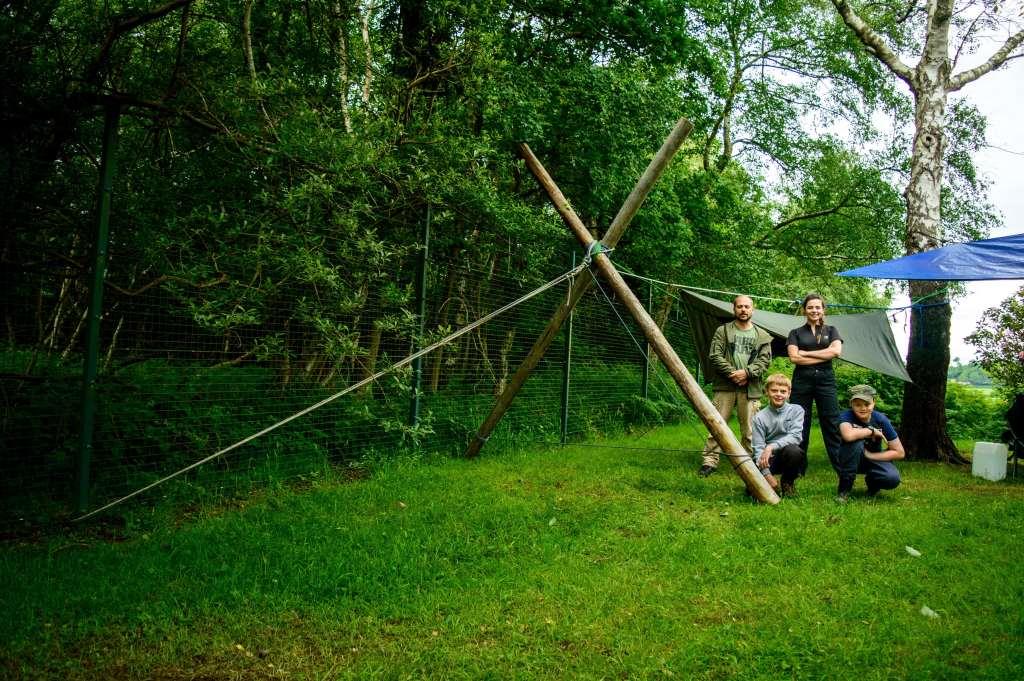
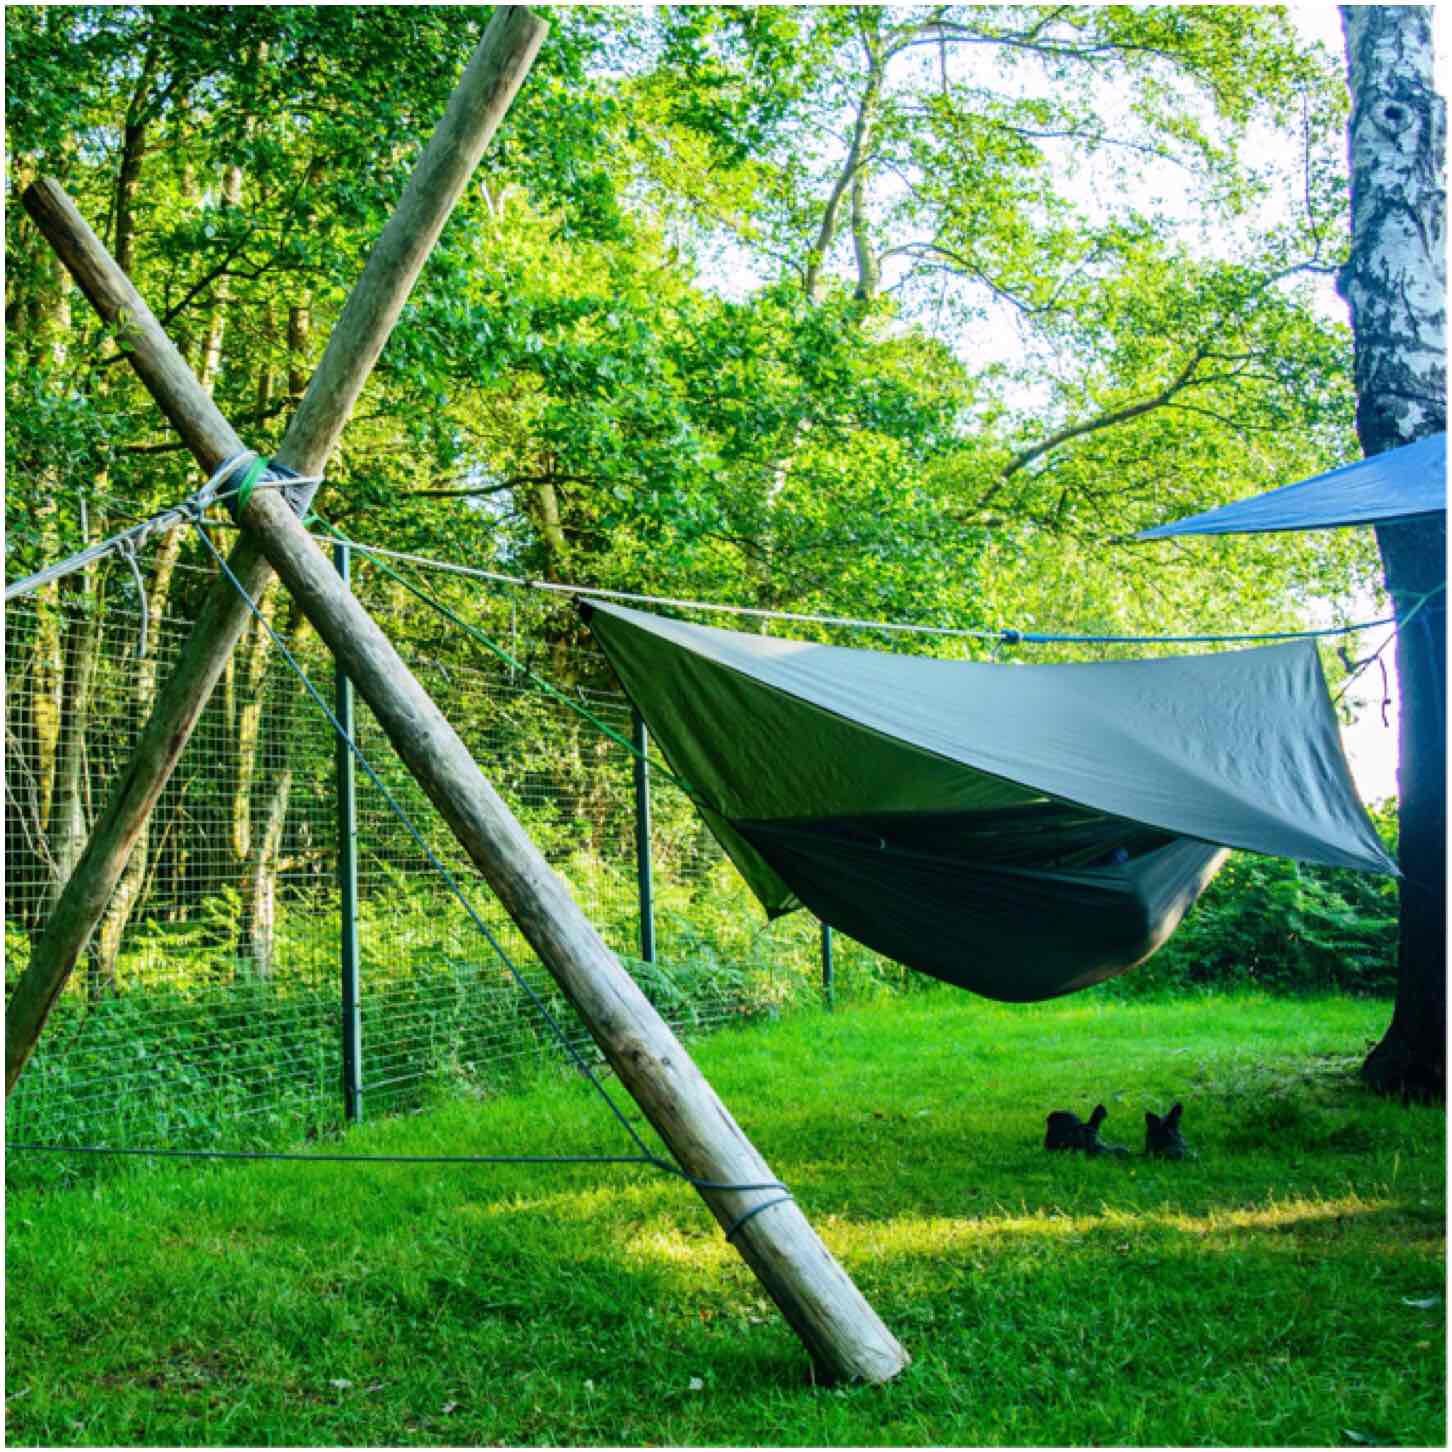
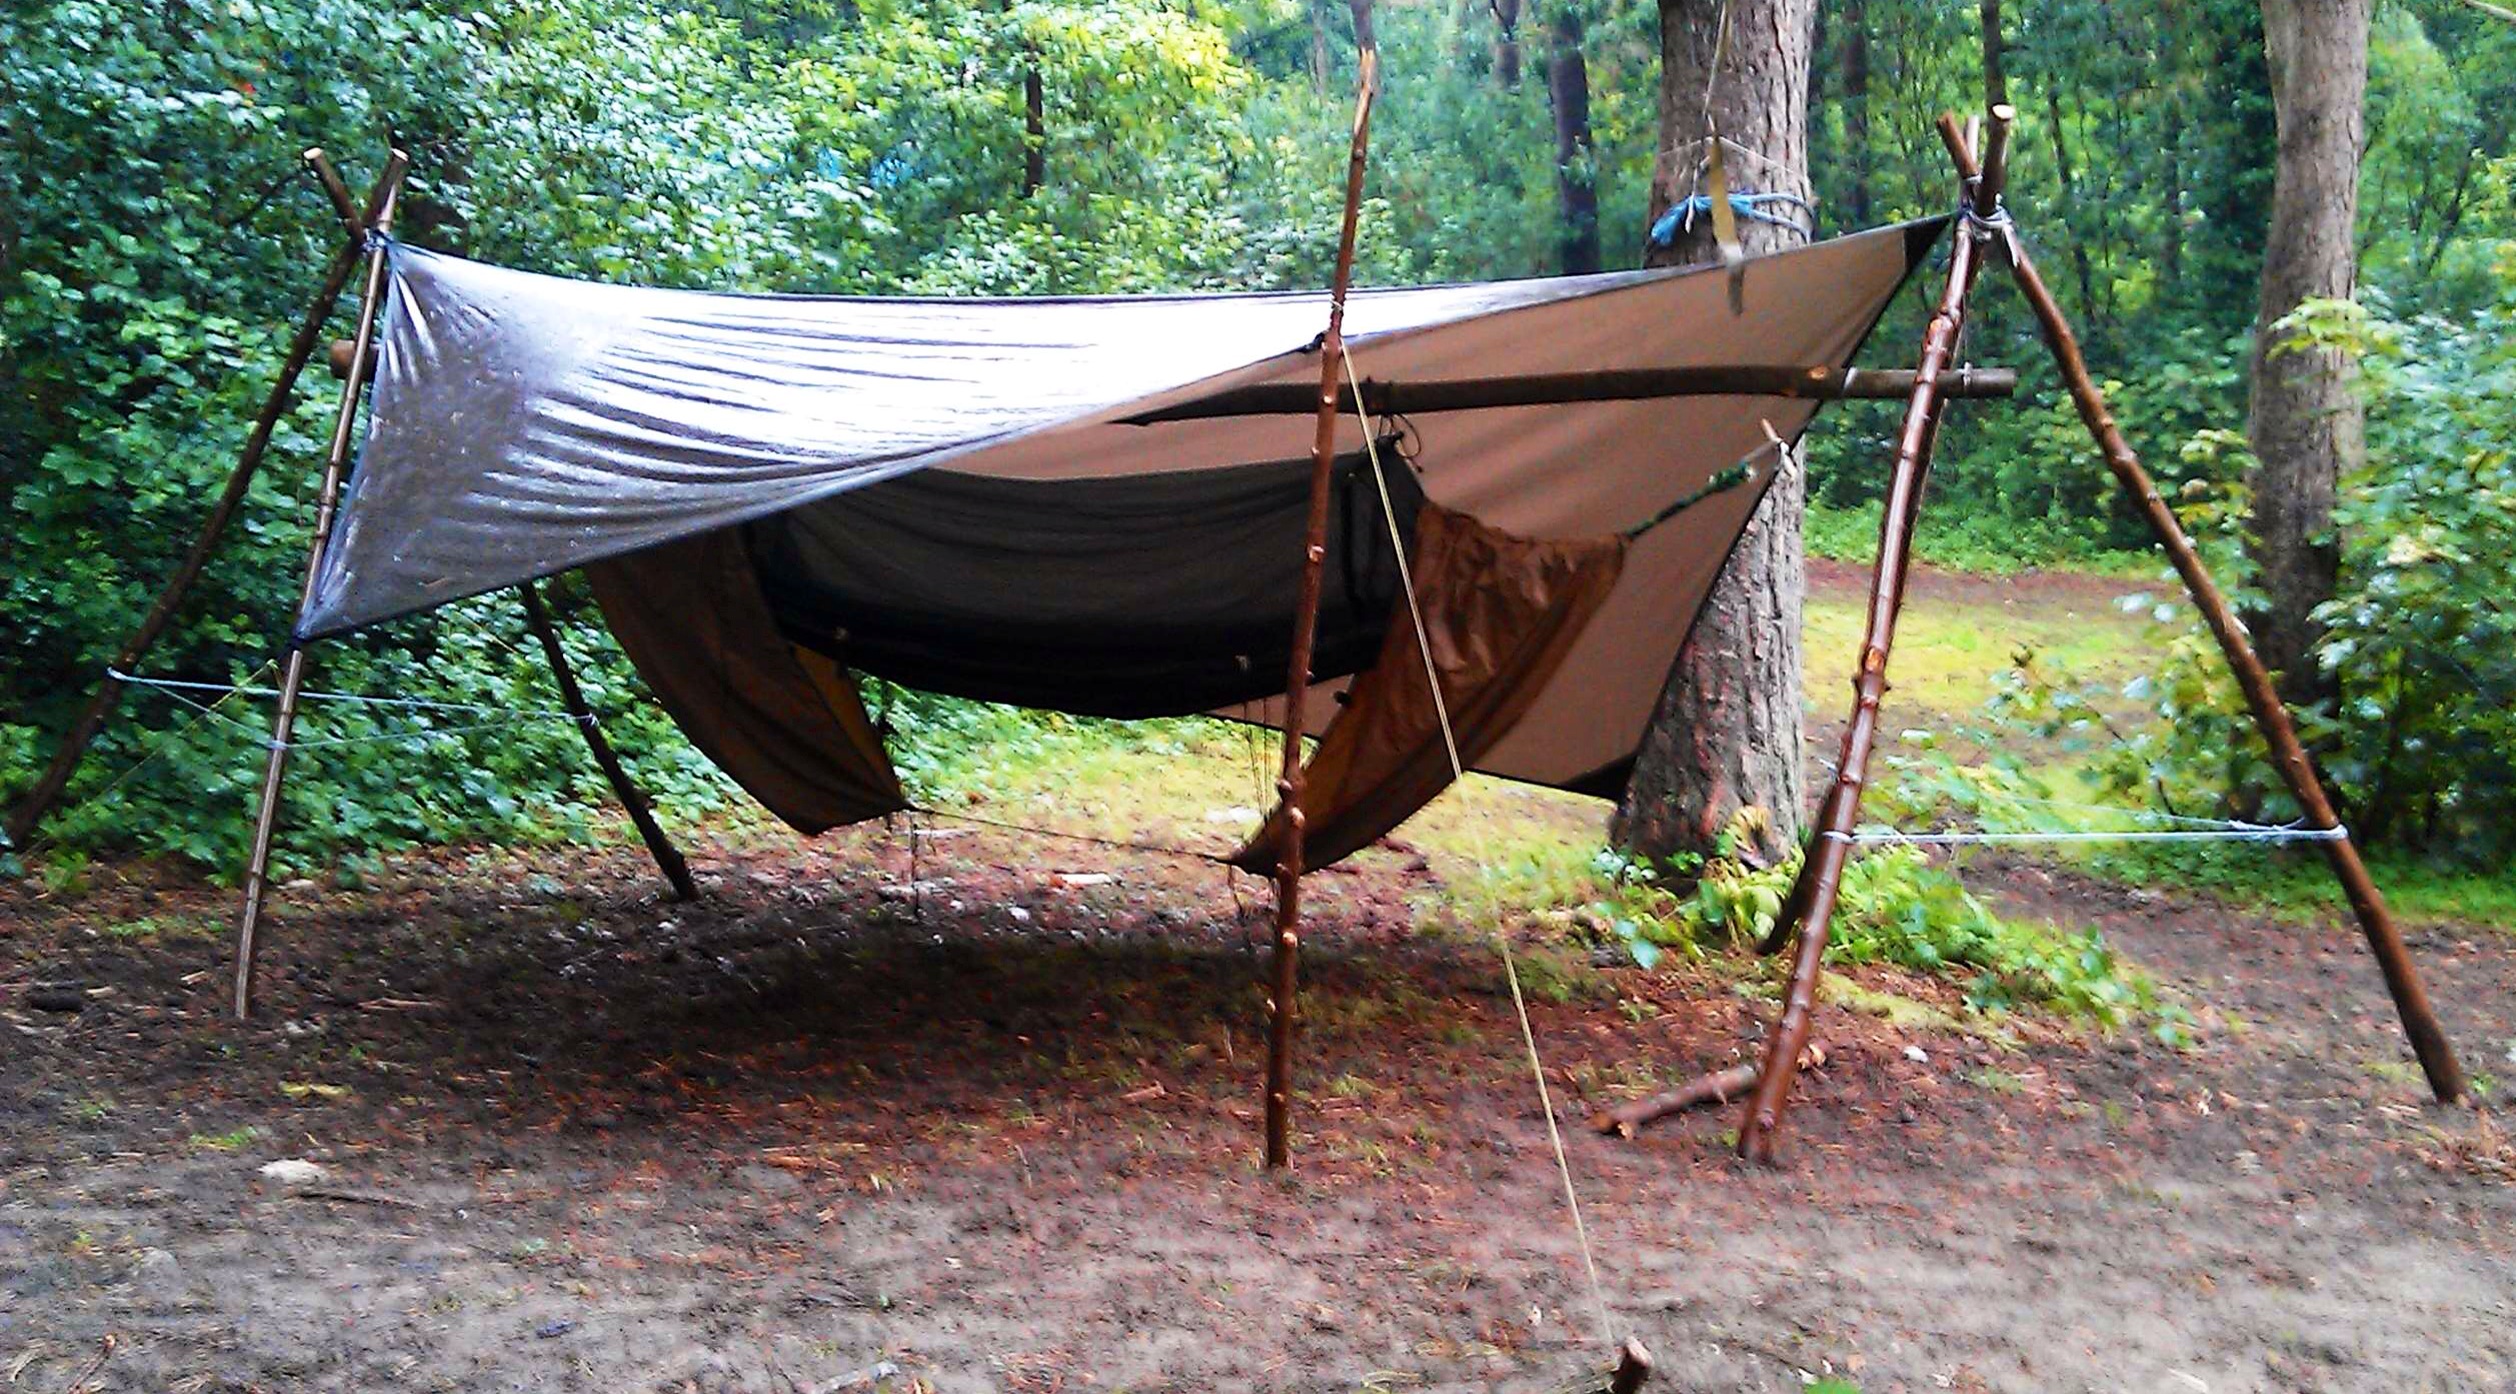
This is a post that came about because someone decided to chop down a tree. On a recent Sea Cadet training weekend we ended up with one instructor (Jess), one hammock and one tree – my friend Dave and myself had bagged the other trees for our hammocks :-). Not an ideal situation for Jess you could say.
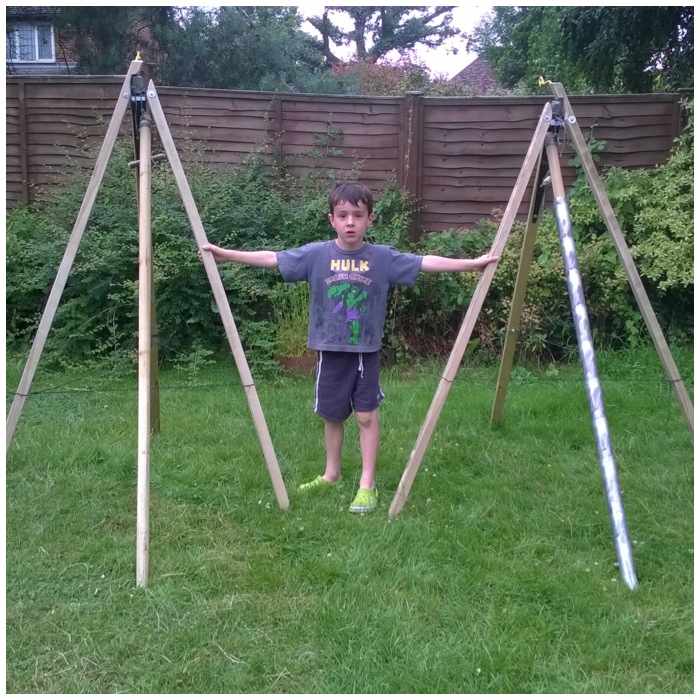
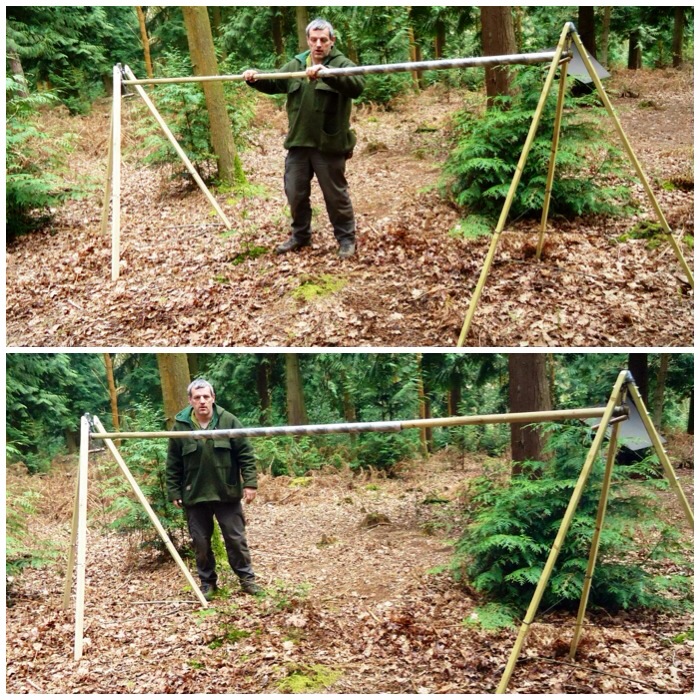
We could not camp elsewhere and there was nothing in the way of available natural material to help us (we were on a military camp). Thankfully my friends Alan and Dave spotted some old poles (used for team building exercises) at the back of of a building. So Dave with Jess as his assistant in true Seacadet style, set out to apply their seamanship talents to our problem.
Shear Leg Stand
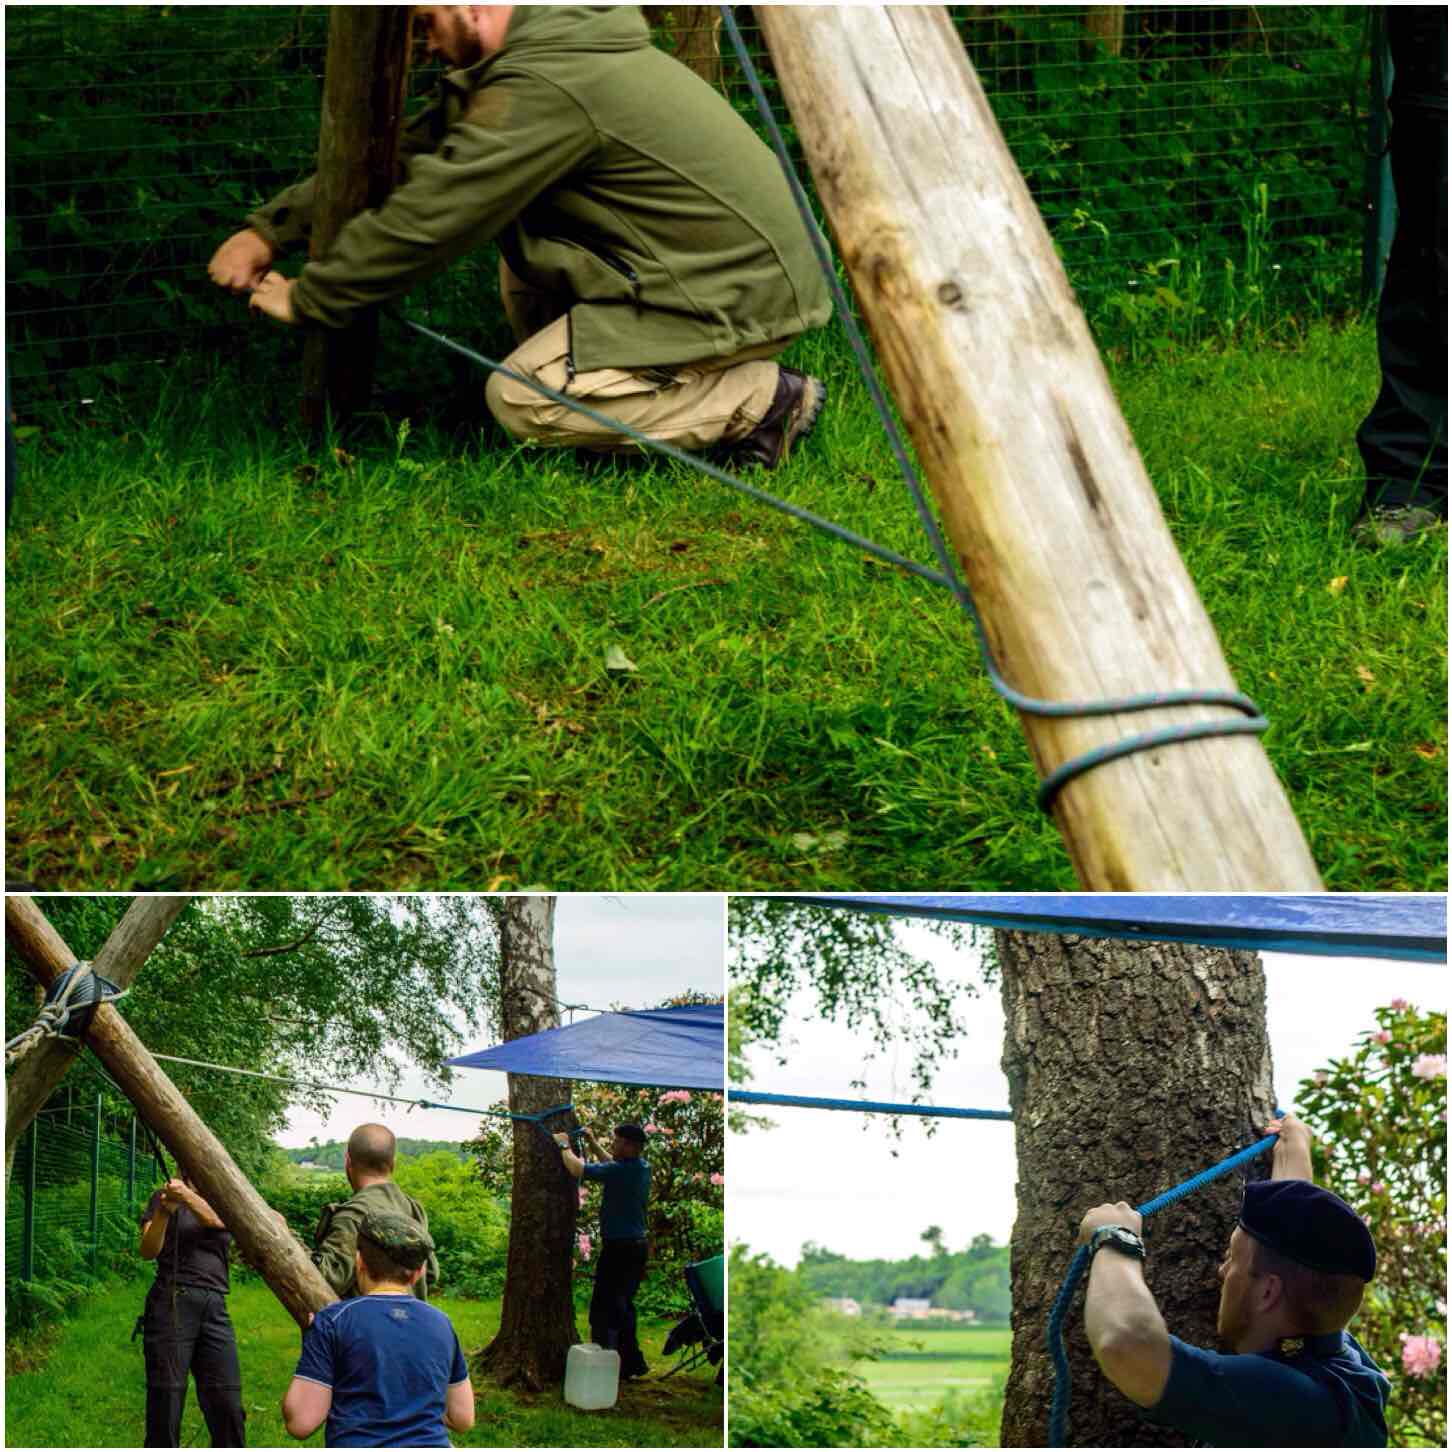
The Shear Lashing
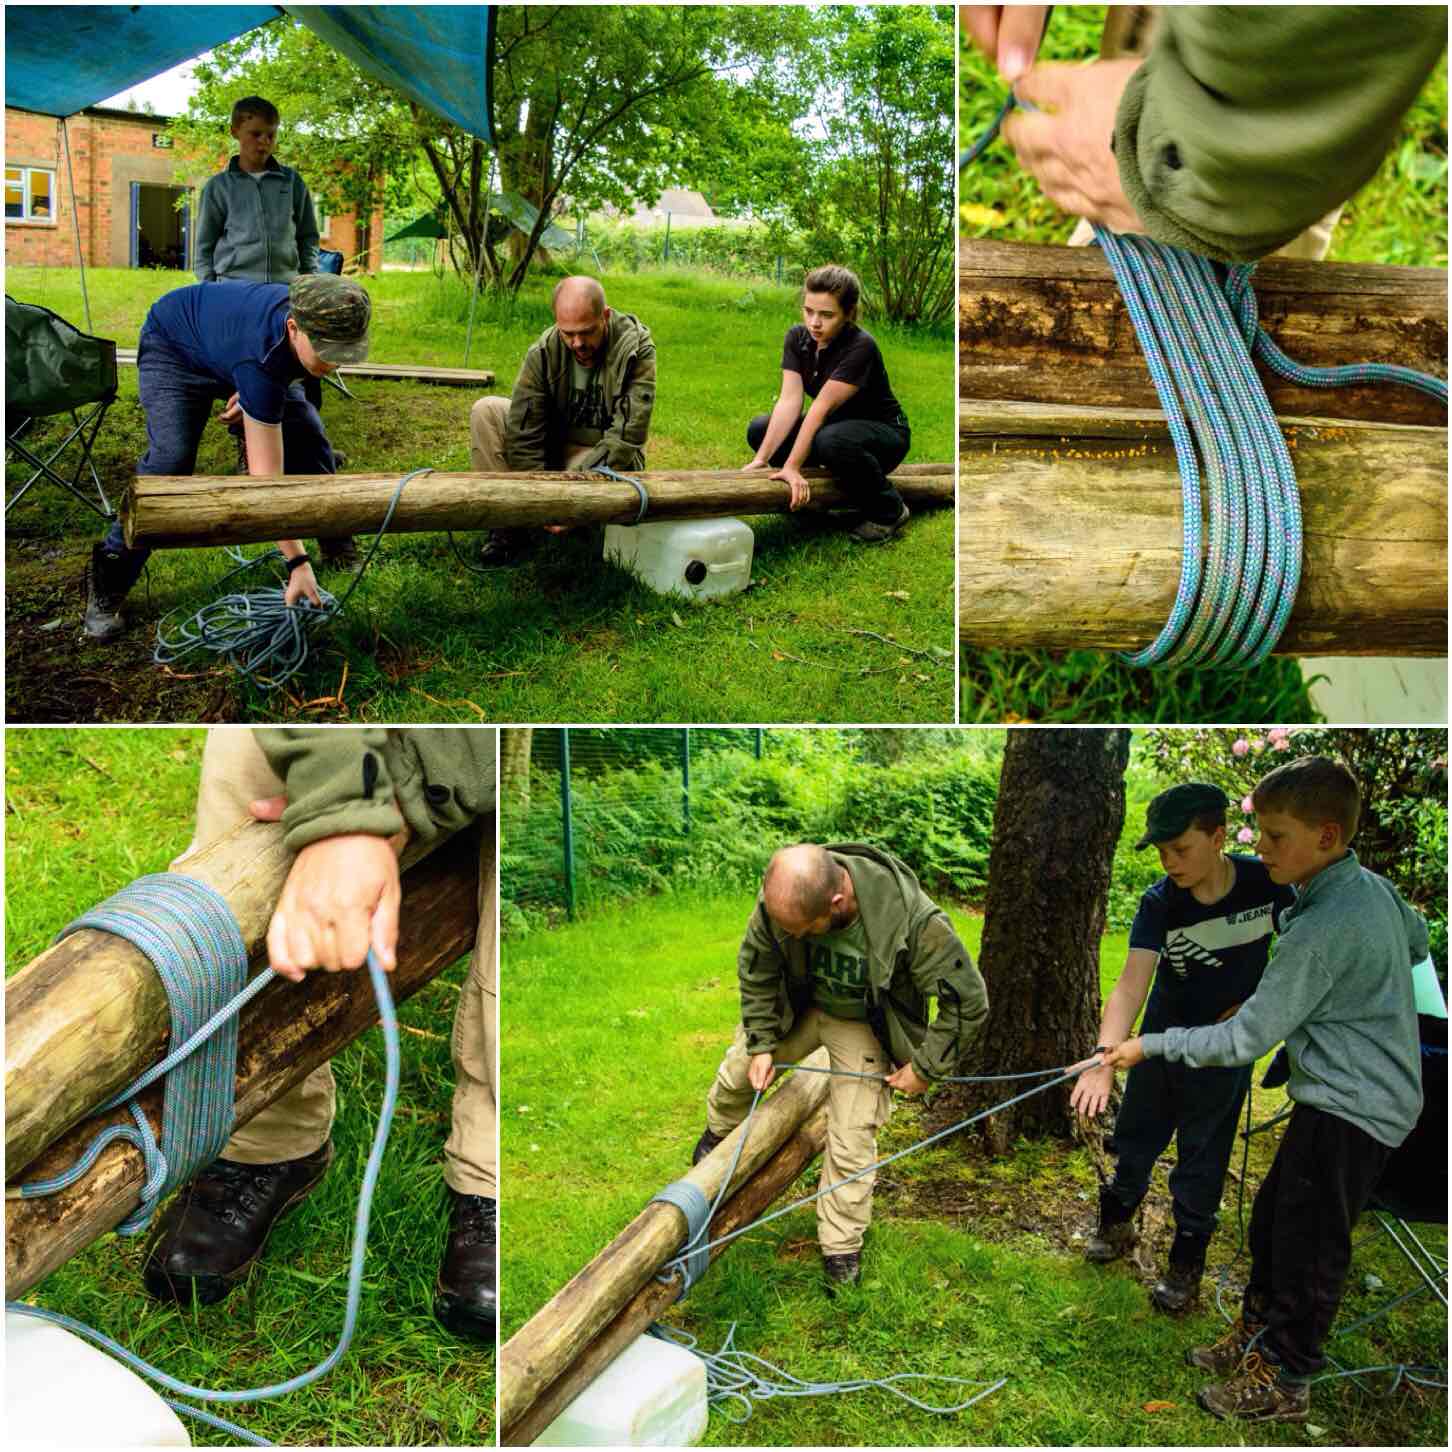
They collected some assorted pieces of rope and a couple of cadets to help out. The poles were quite long and thick so they decided to tie the poles together about two thirds of the way along their length. The poles were tied together using a shear lashing (I will be using Grog’s Knots to help describe how they did this).
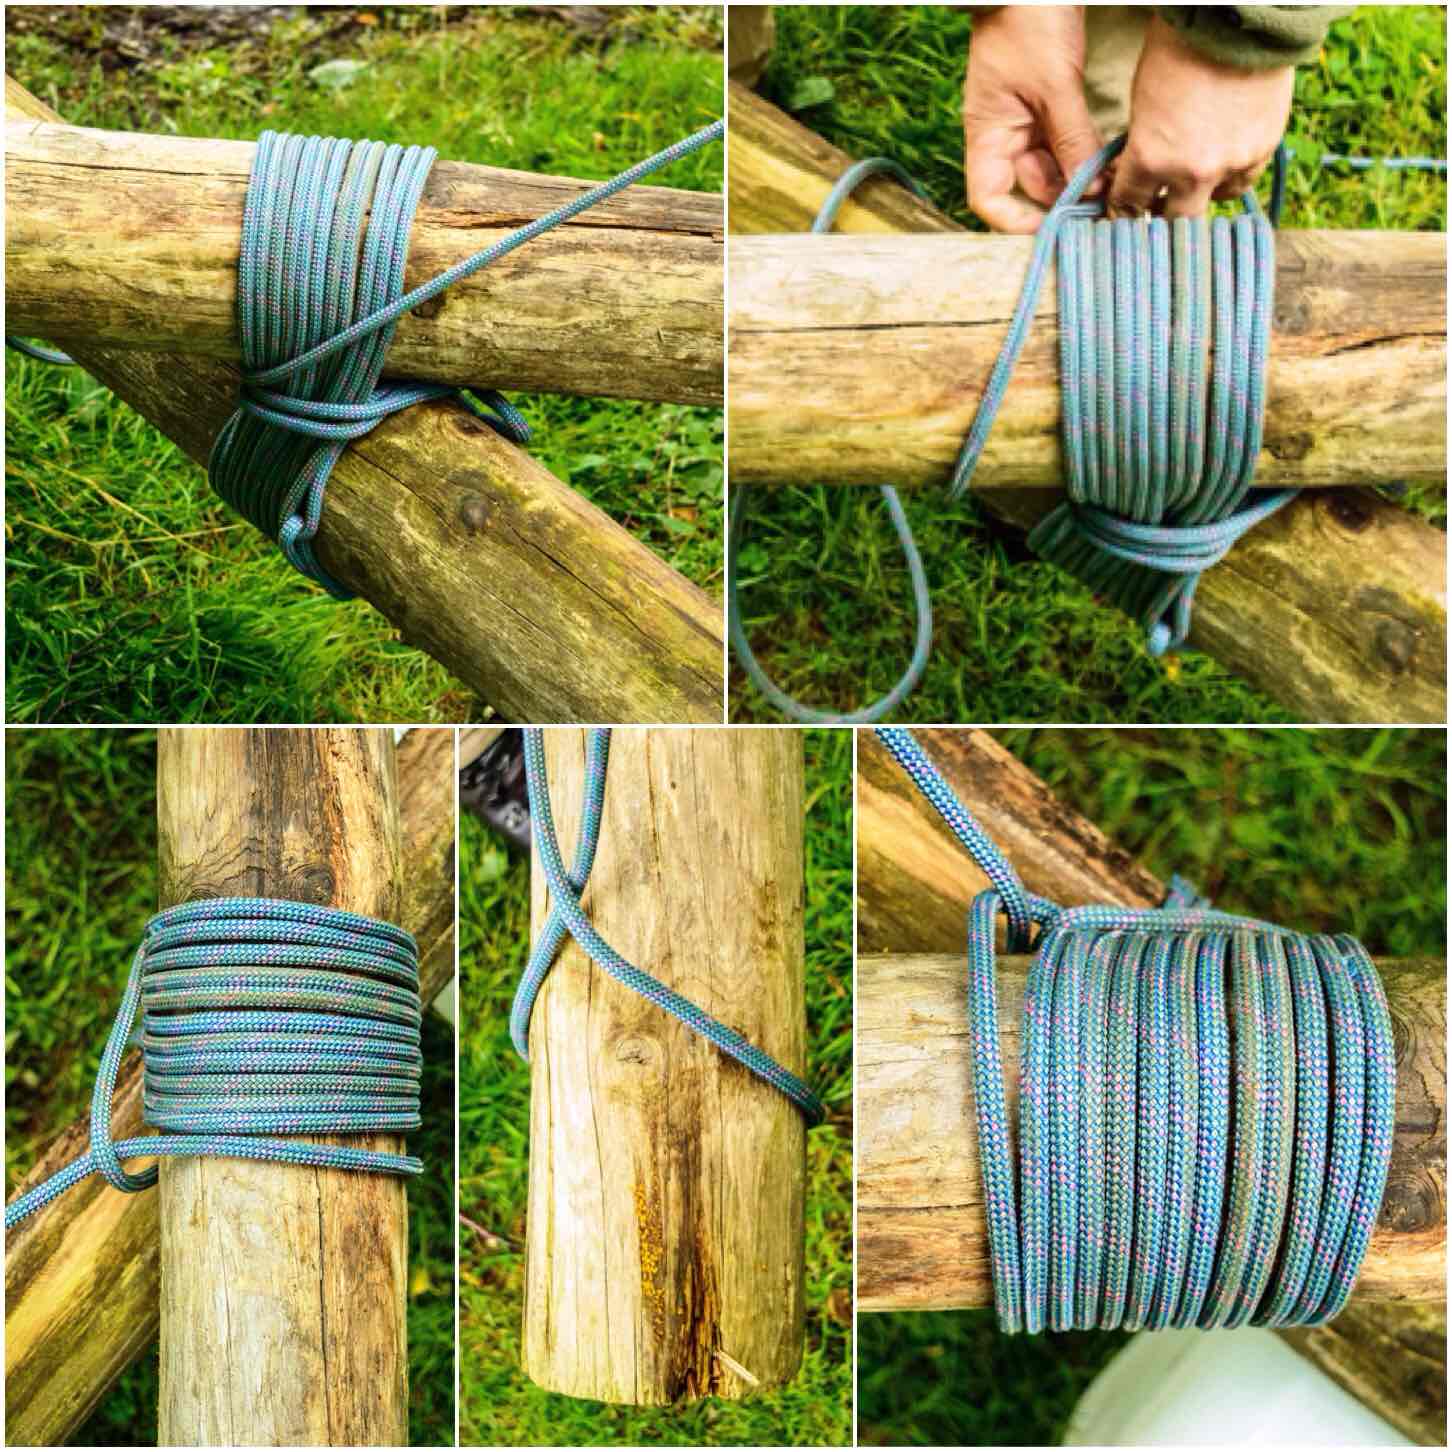
To start the shear lashing they attached the rope to one pole using a timber hitch and then wrapped the rope a number of times around both poles (this is known as wrapping). To make this easier the poles were raised slightly of the ground and the cadets helped to pass the masses of ropes around the poles.
Wrapping
Once the wrappings were completed the lashing was tightened by being frapped (nothing to do with Facebook). Frapping is the nautical term to describe the tightening of a rope or cable. Dave did this by completing a number of turns around the centre of the lashing and pulling it all in tight.
To finish the lashing off he secured it with a clove hitch to the pole without the timber hitch. There was plenty of rope left over as well to help with anchoring the shear legs down.
Frapping
Anchoring
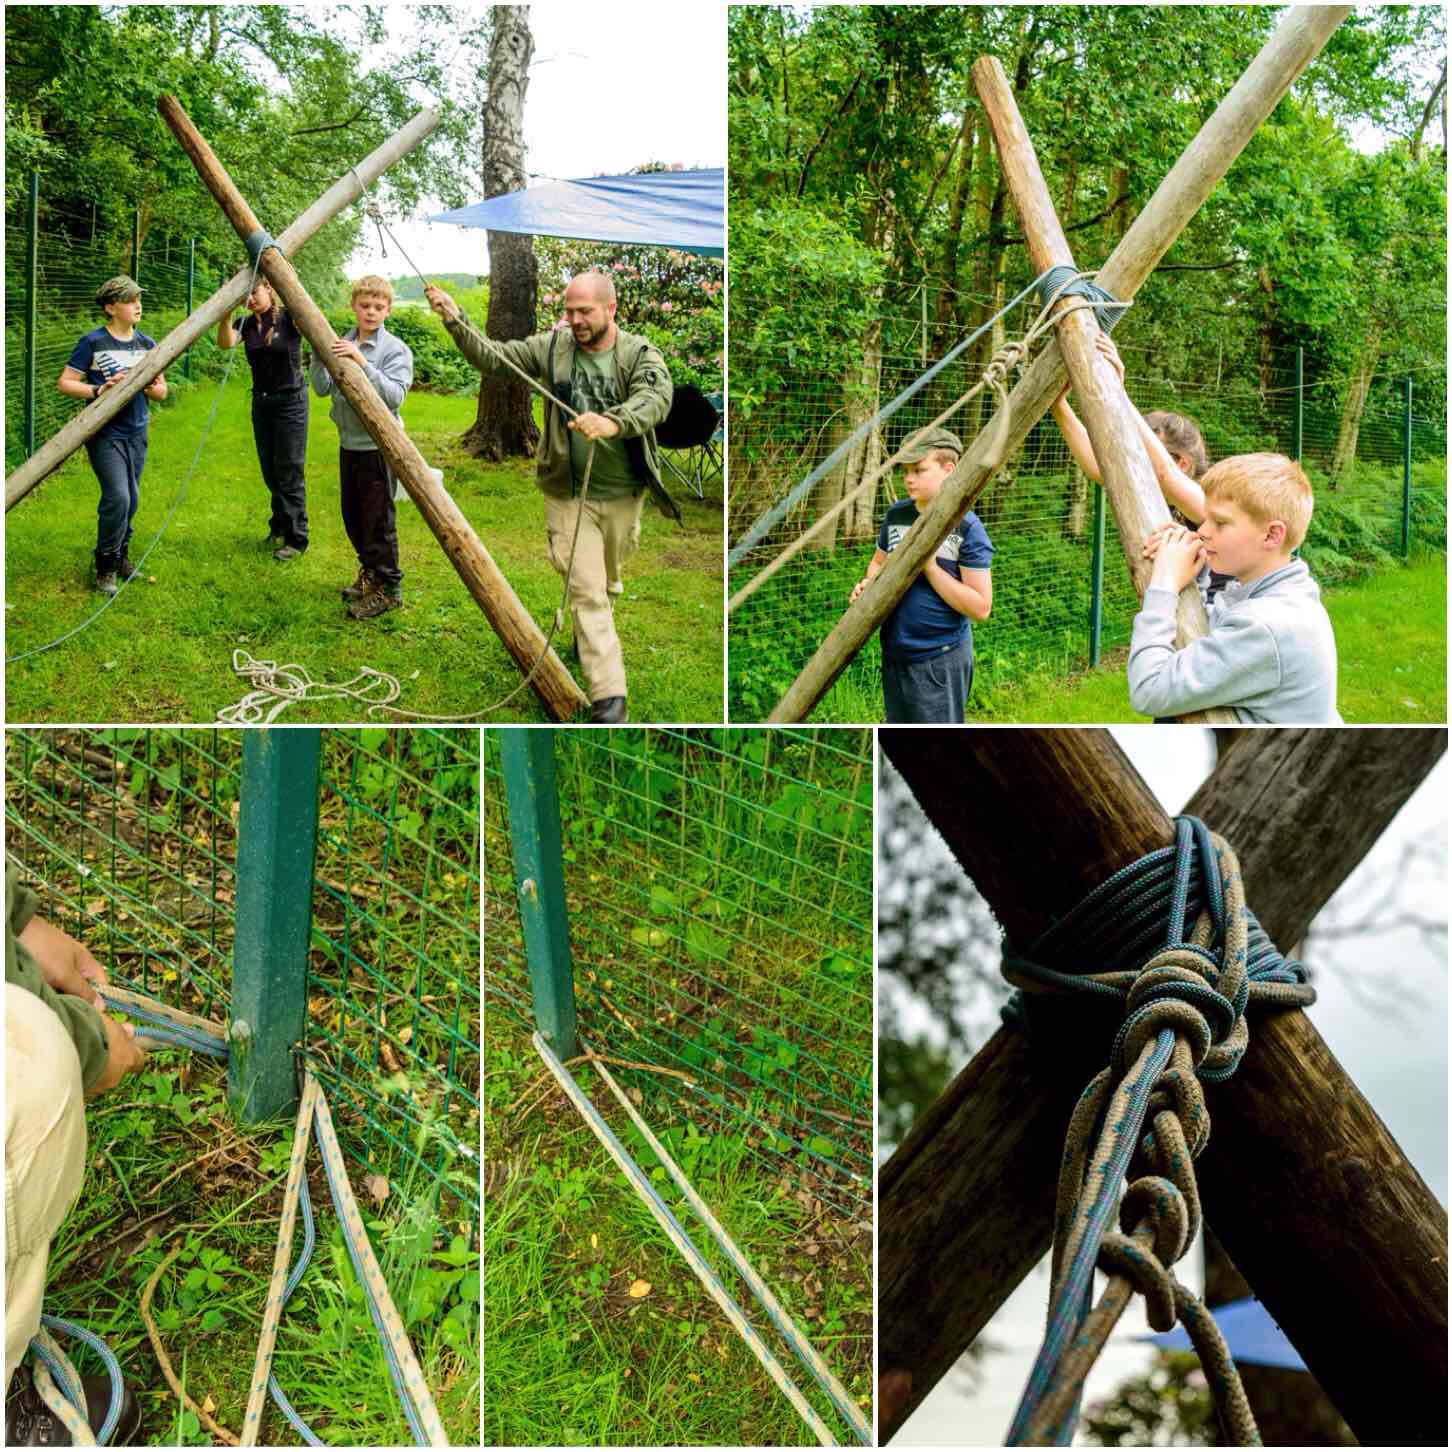
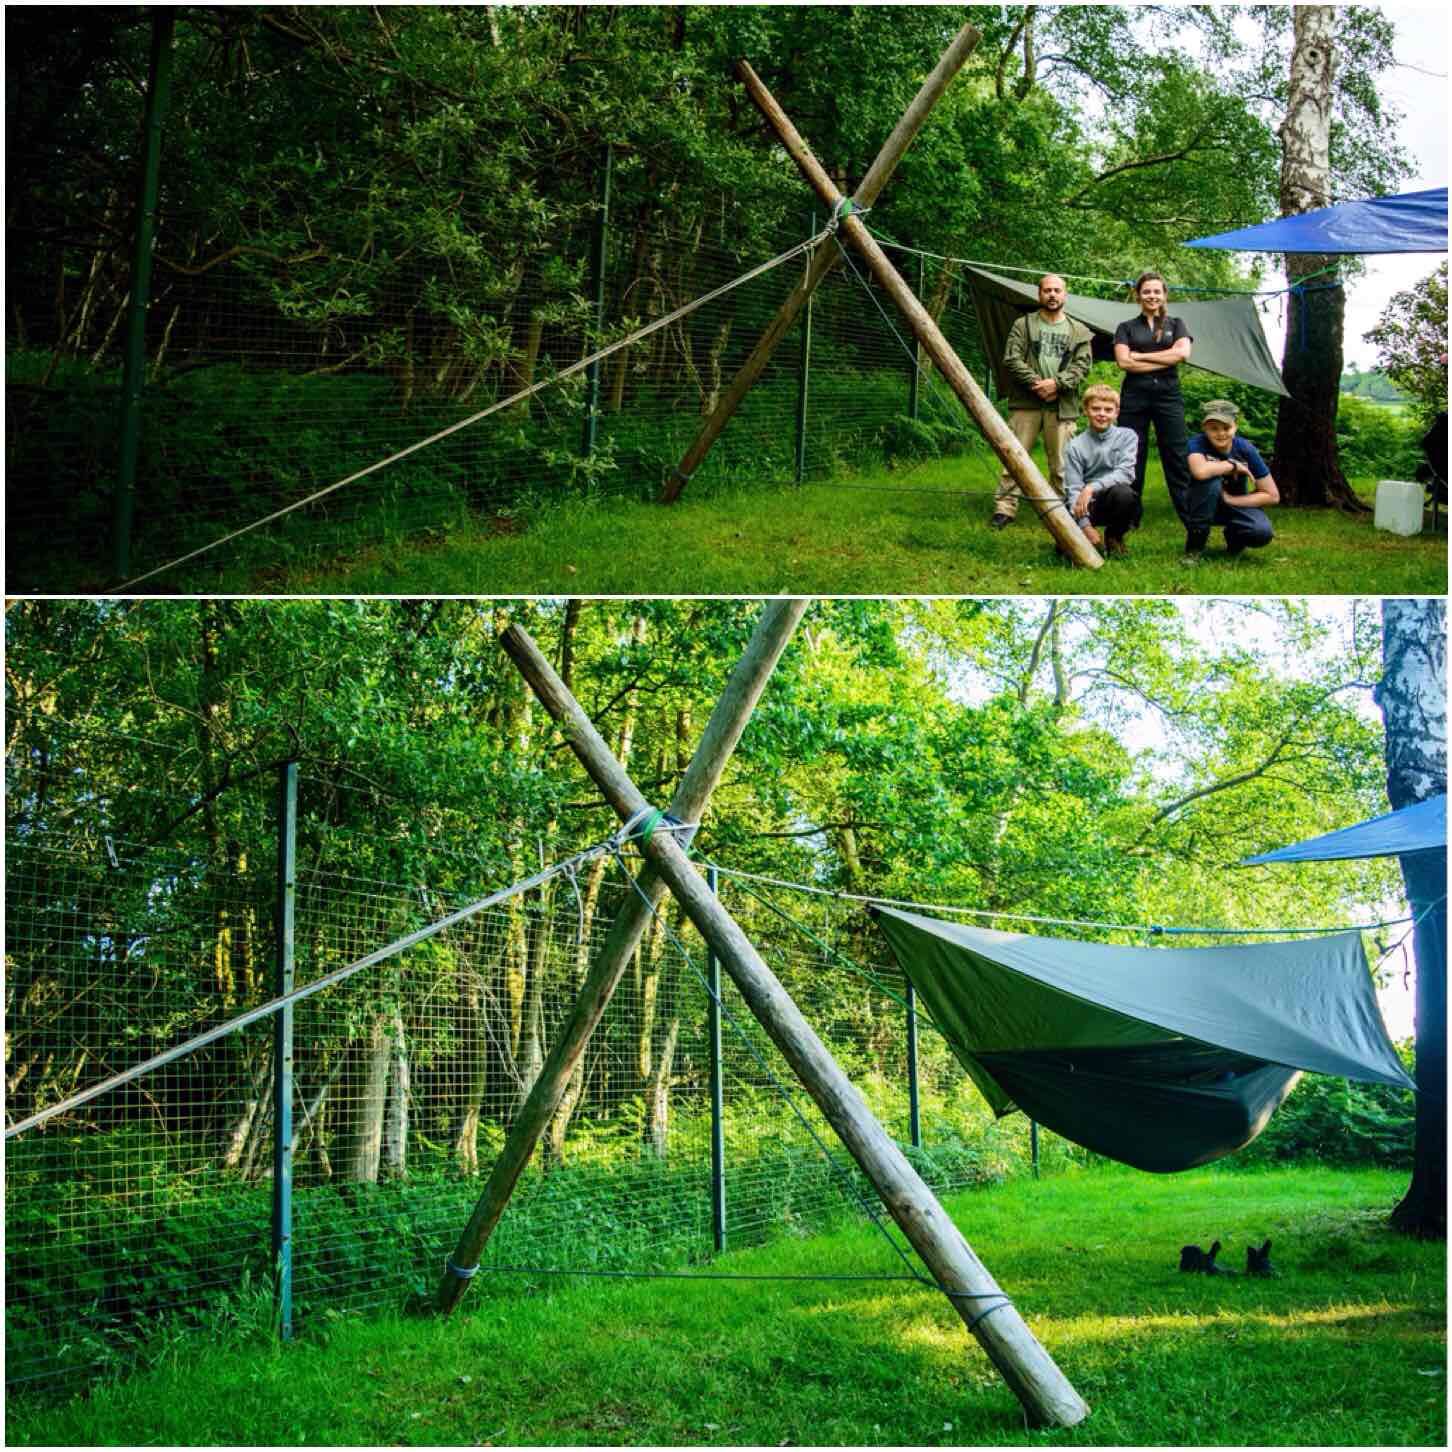
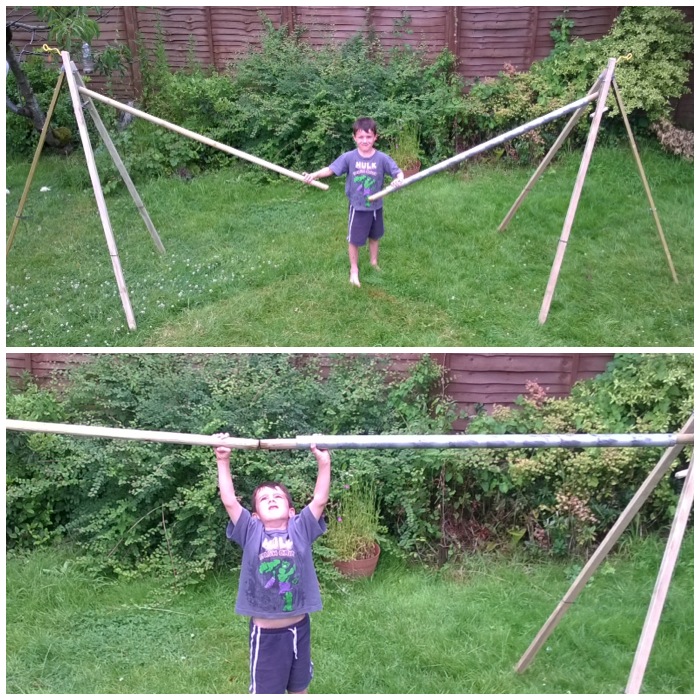
Though the poles were large they were surprisingly light so they were soon standing vertical. A spare piece of rigging line was looped over the pole with the timber hitch on it and with the spare rope from the shear lashing the legs were securely anchored by wrapping both ropes around base of a solid fence post.
Both ropes were then tied off around the shear lashing on the poles to make it all secure.
Anchoring
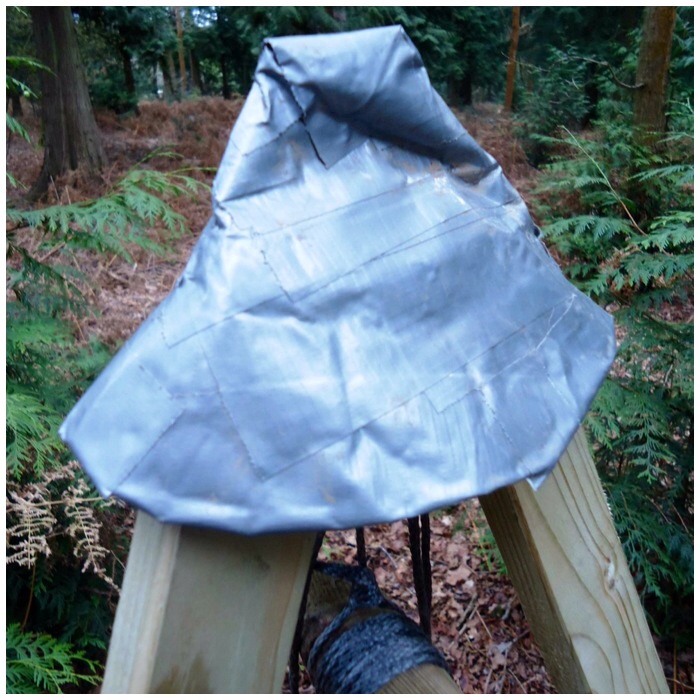
Alternative Anchors
If you do not have a handy anchor like our fence post you can make your own. In the past I have had shear legs and tripods for hammocks anchored safely with three large wooden stakes.
Alternative Anchors
Securing
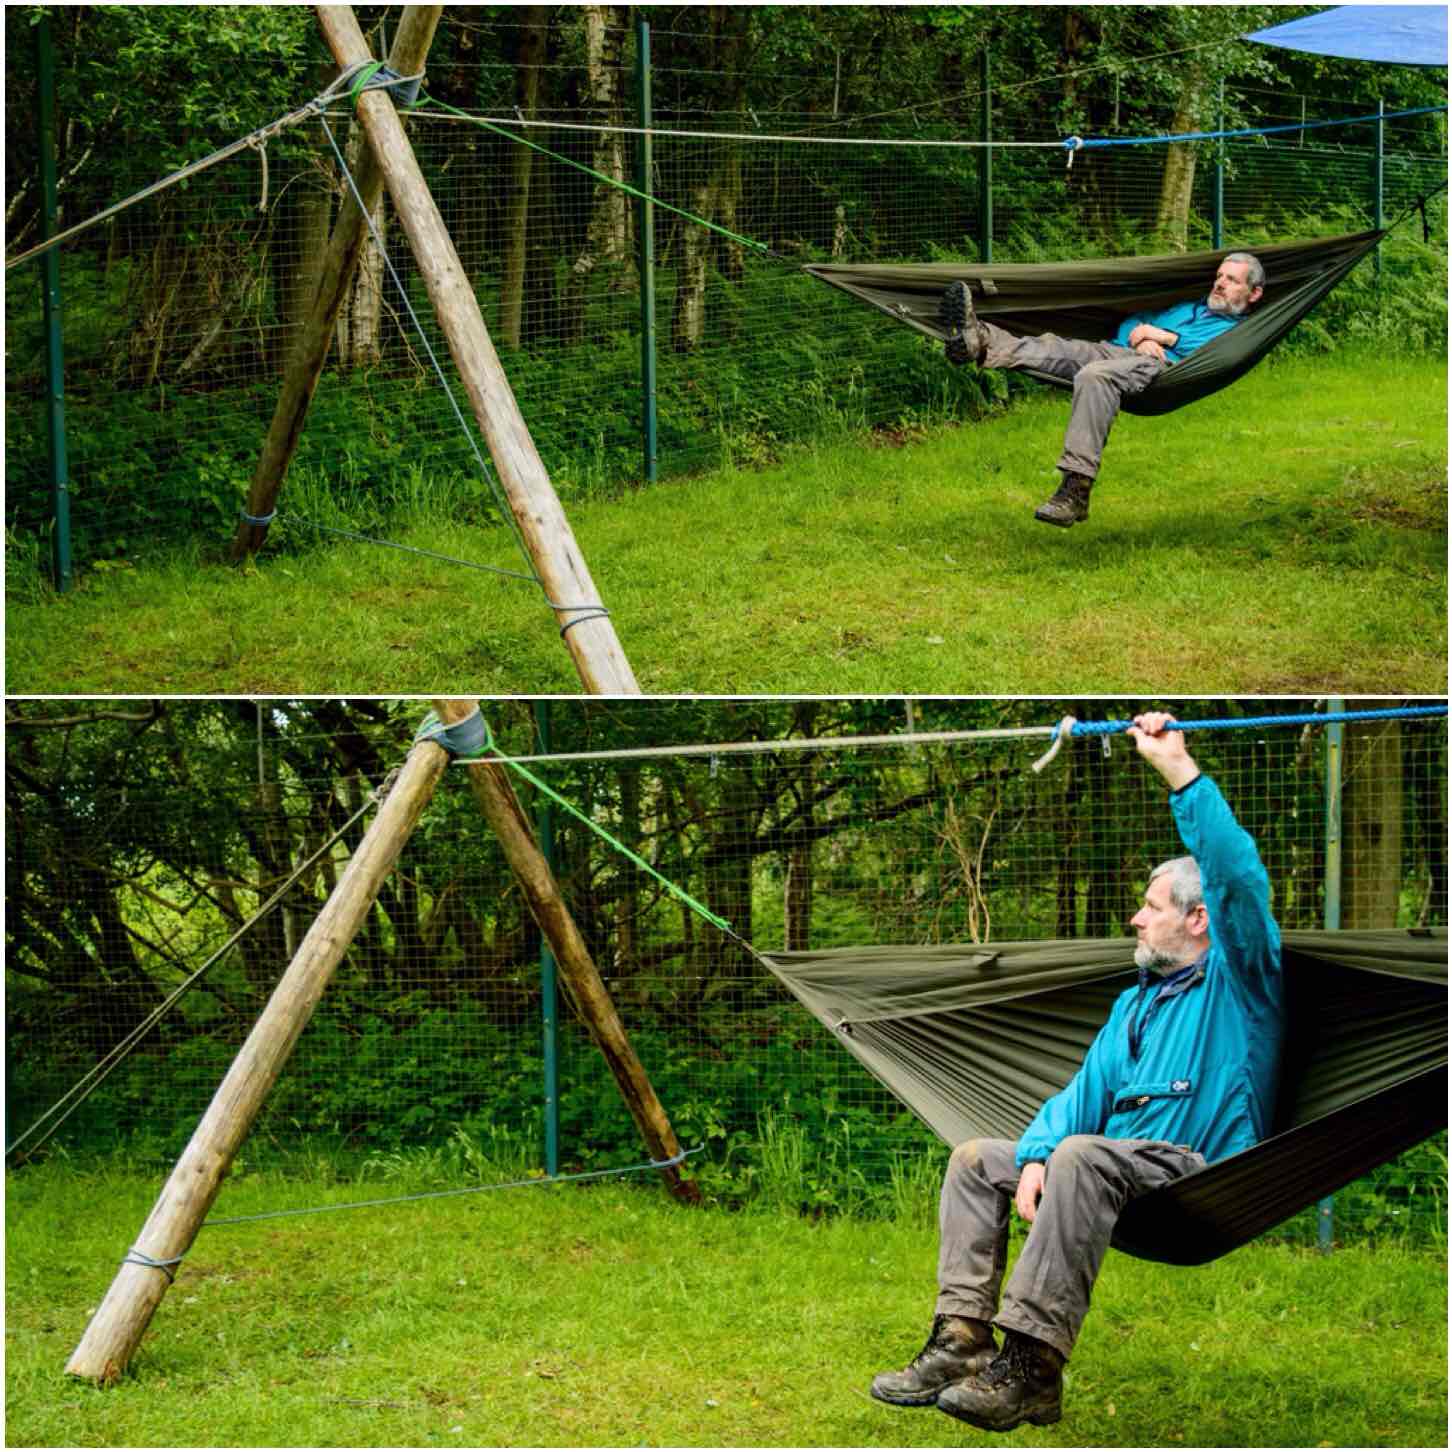
If you cannot drive your shear legs into the ground I would advise you to tie them together near the bottom so that they do not inadvertently splay out. Dave used the last of the lashing rope (it was a rather long piece of old climbing rope) to do this.
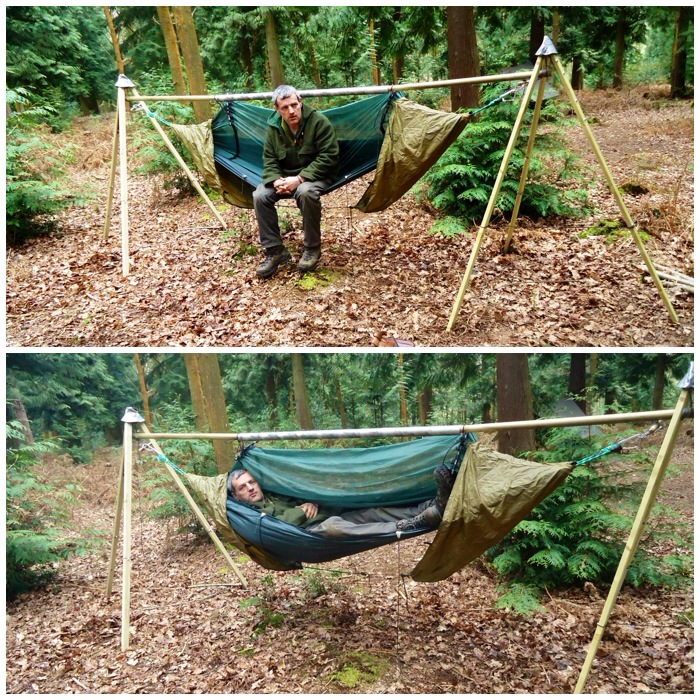
Finally, to finish the set up the shear legs were tied securely to our single tree using a top line. This top line as well as securing the shear legs was to act as a line to hang Jess’s tarp off.
Securing
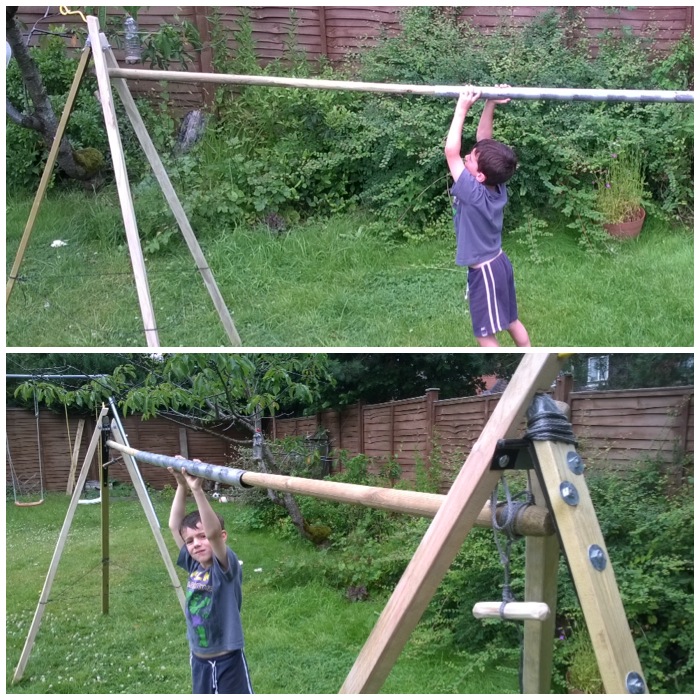
Testing & Set Up
I did a bit of testing after we had hung the hammock. I figured if it took my weight then Jess would have no problems. The top line went slightly slack when the system took my weight so that was re-tightened while I was in the hammock.
Testing
After that it was a simple case of rigging the tarp and Jess setting up home for the night.
Setting up home
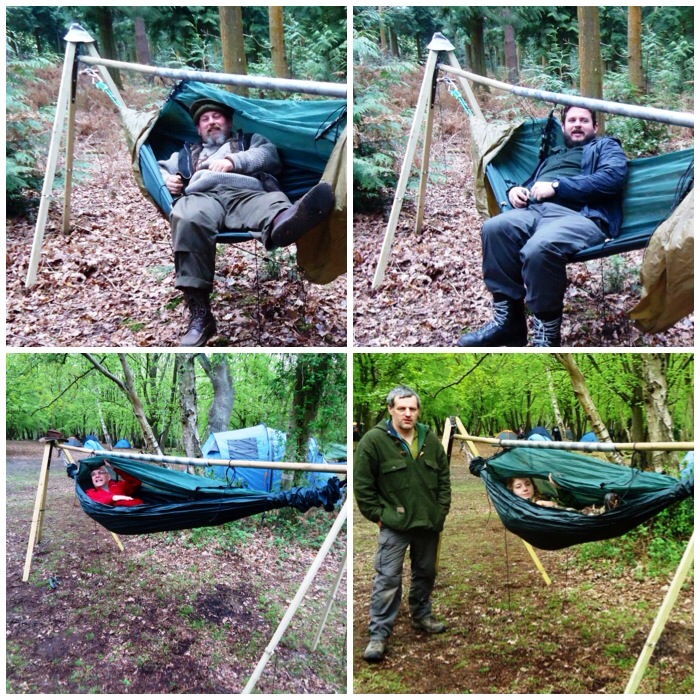
This was a great solution from Dave to our missing tree problem and took less than an hour to complete. Jess slept the whole night soundly in her impromptu sleep system and I was chuffed that I managed to capture most of the stages in its construction.
A Good Nights Sleep
If you are interested in making a slightly smaller and more mobile hammock stand yourself have a look at my two other posts on this subject,
Flammage – A phrase I heard for the first time at Woodcraft School when I was studying for my Bushcraft instructors certificate. I love the word as teaching firelighting has always been a passion of mine. Over the last couple of months I noticed I had gotten some excellent flammage shots.
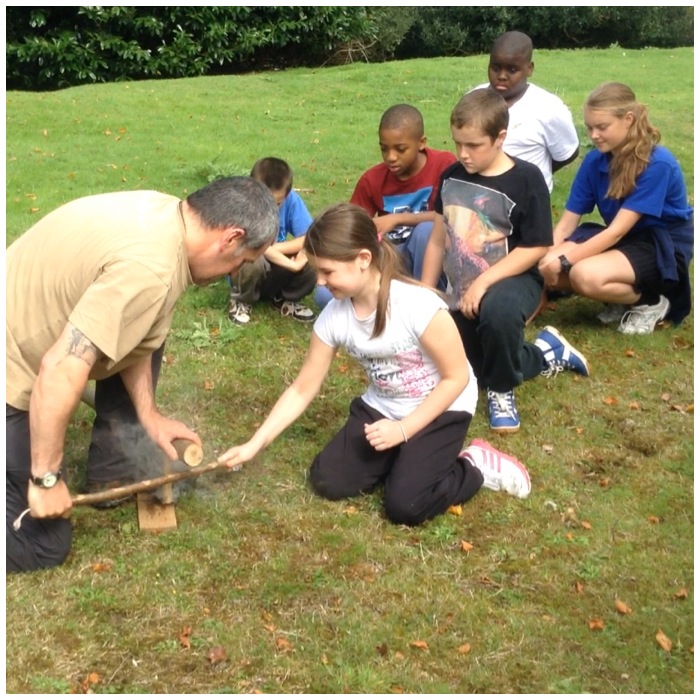
I teach firelighting using many different methods however when you have lots of kids to teach and not much in the way of time then firesteels do the trick. They do make for some cracking pictures as demonstrated below by my friend Dave Lewis at a recent Sea Cadet camp. When teaching firesteels to very young children I liken them to fairy lights and you can see why below.
Fairy Lights
Now it is not all just one big firelighting fest as we do teach everyone to respect fire and how to be responsible in using it. Charlie got the kids in the picture below to use firesteels to strike onto char cloth and then blow it all into a flame using some dried grass. The resulting fire was kept contained in a fire tray and soon produced plenty of tea and chocolate cakes.
Flammage
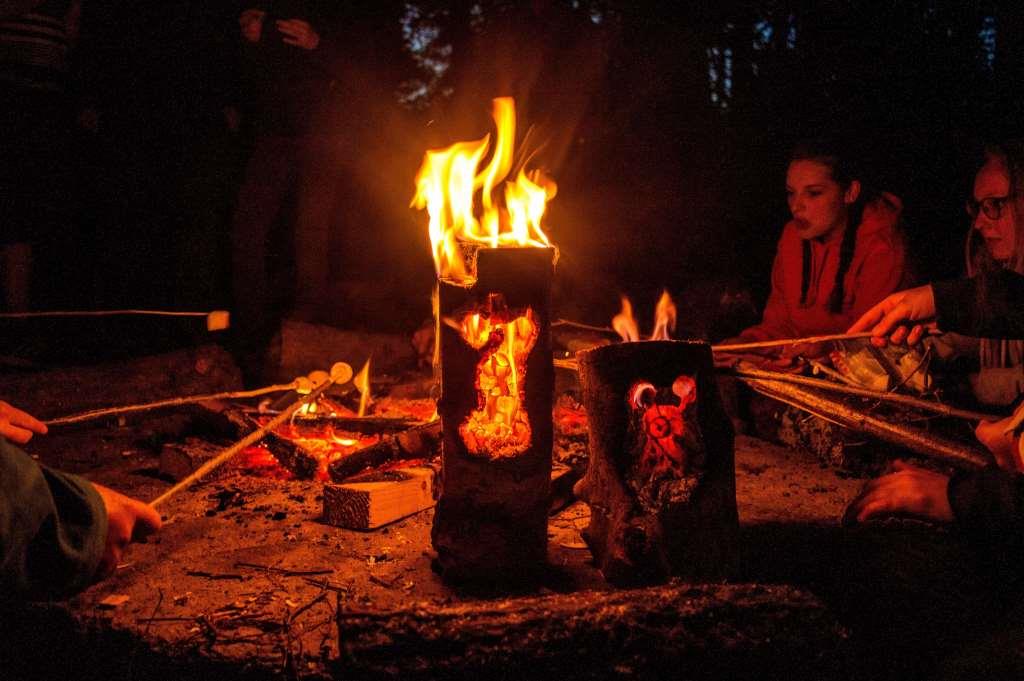
Some flammage fun here – we were given some offcuts of soft wood to burn by one of the other Sea Cadet instructors and I had brought along a pre-drilled fire face log rocket stove. With a criss cross fire lay and a well lit log rocket with the parachute in the background taking a picture seemed like a good idea.
Log rocket fire face
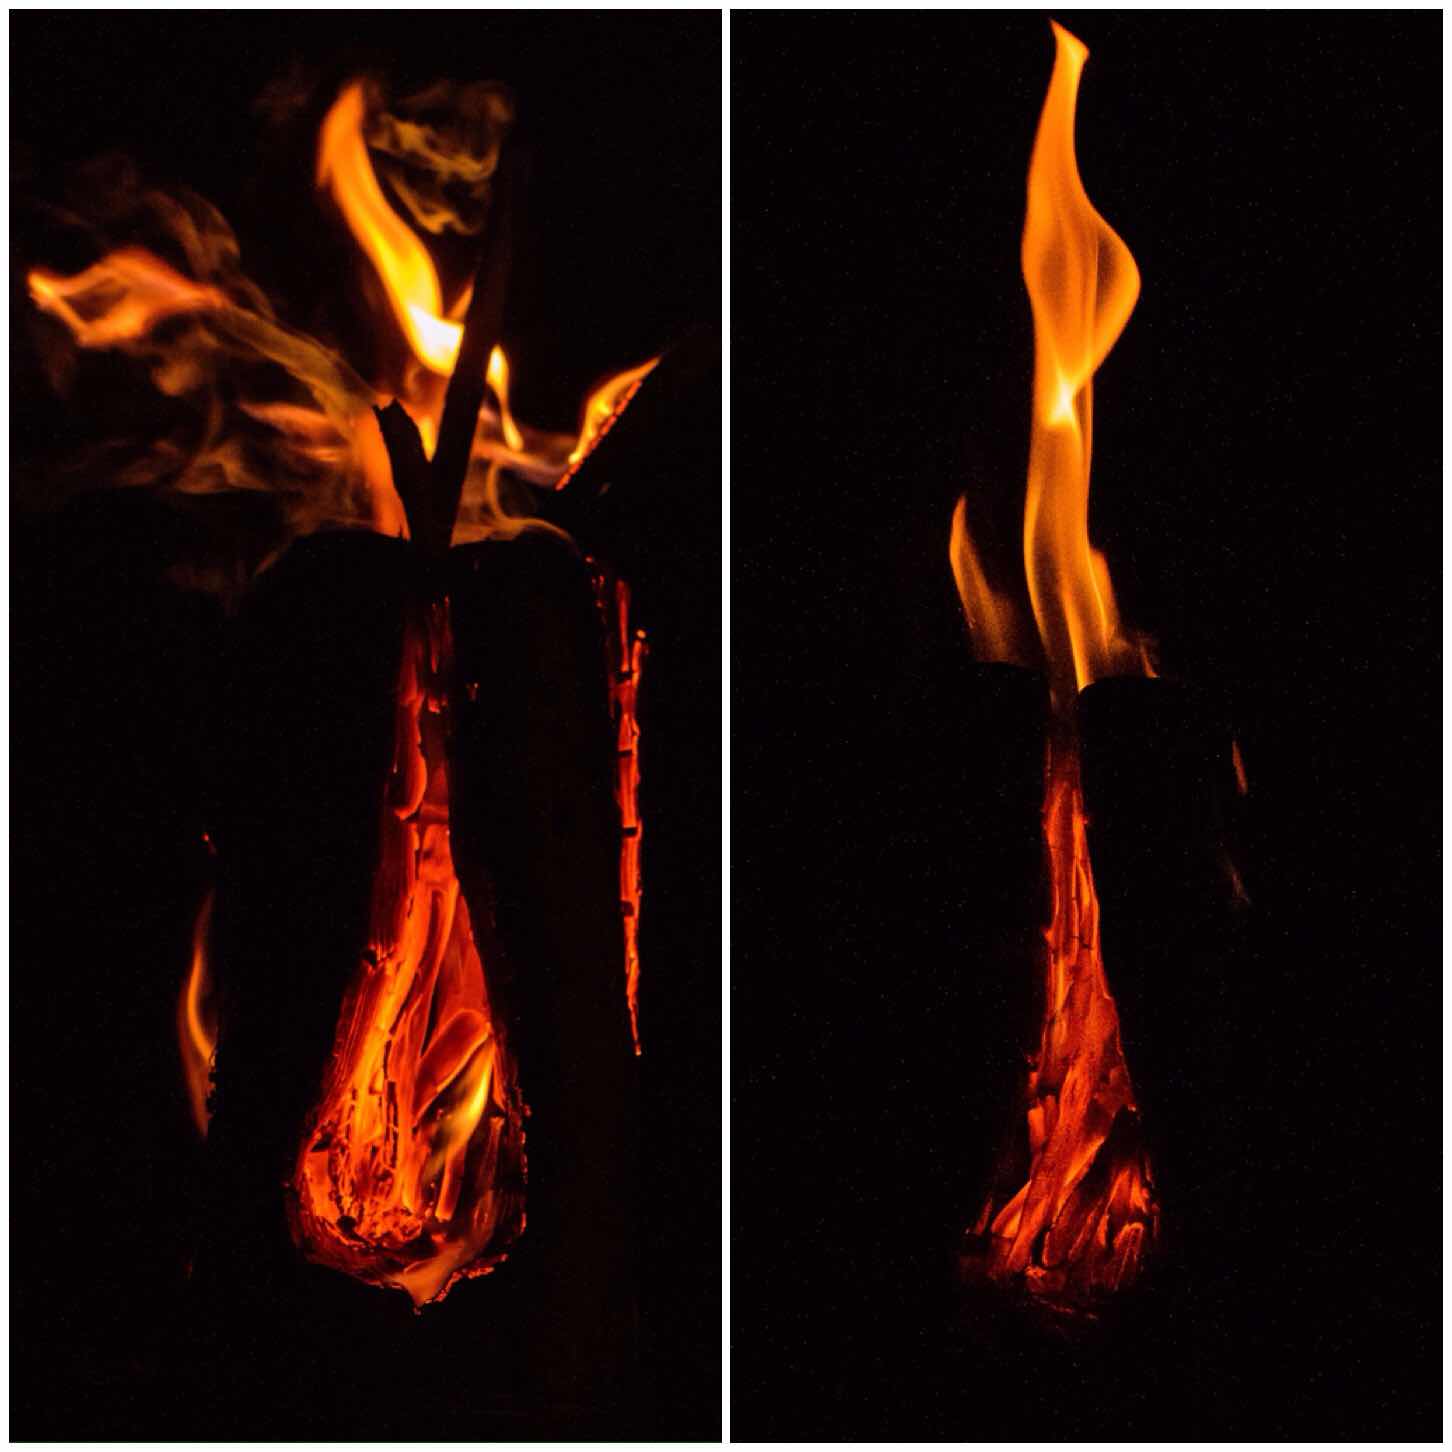
I can spend hours watching a fire and when I think the flames are right out comes my camera and I start snapping away. I may take a hundred pictures in the hope that something will appear in the flames.
I call these pictures Fire Faces and in the two below I spotted two old men of the woods – see if you can spot them?
Old men of the woods
I have plenty of pictures of the cadets and my own kids sitting around a fire toasting marshmallows and this simple act is something I never tire off. This evening though really stands out in my memory with the Fire Faces adding that bit of extra light and ambience.
Marshmallows by candelight
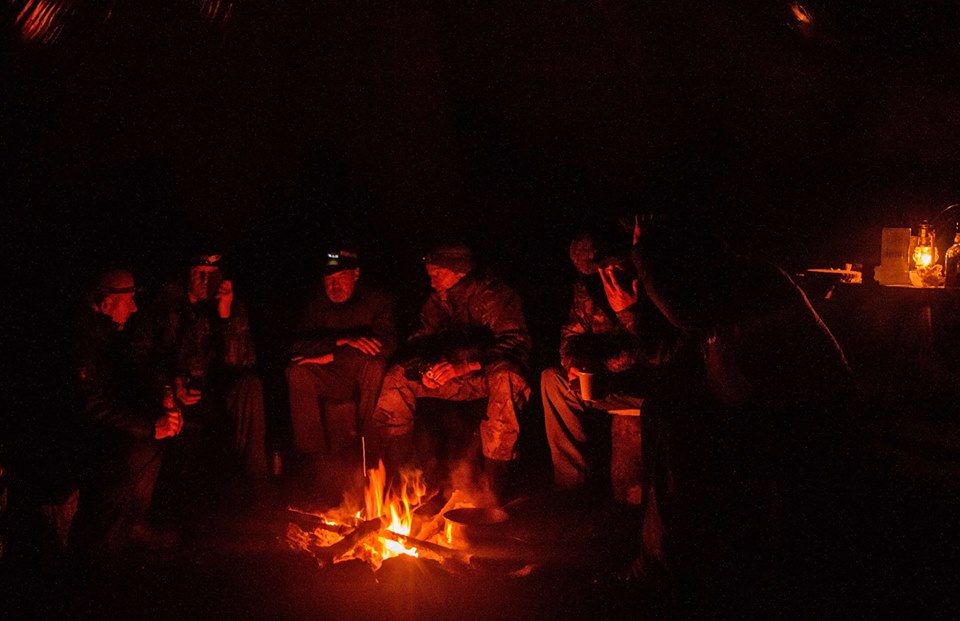
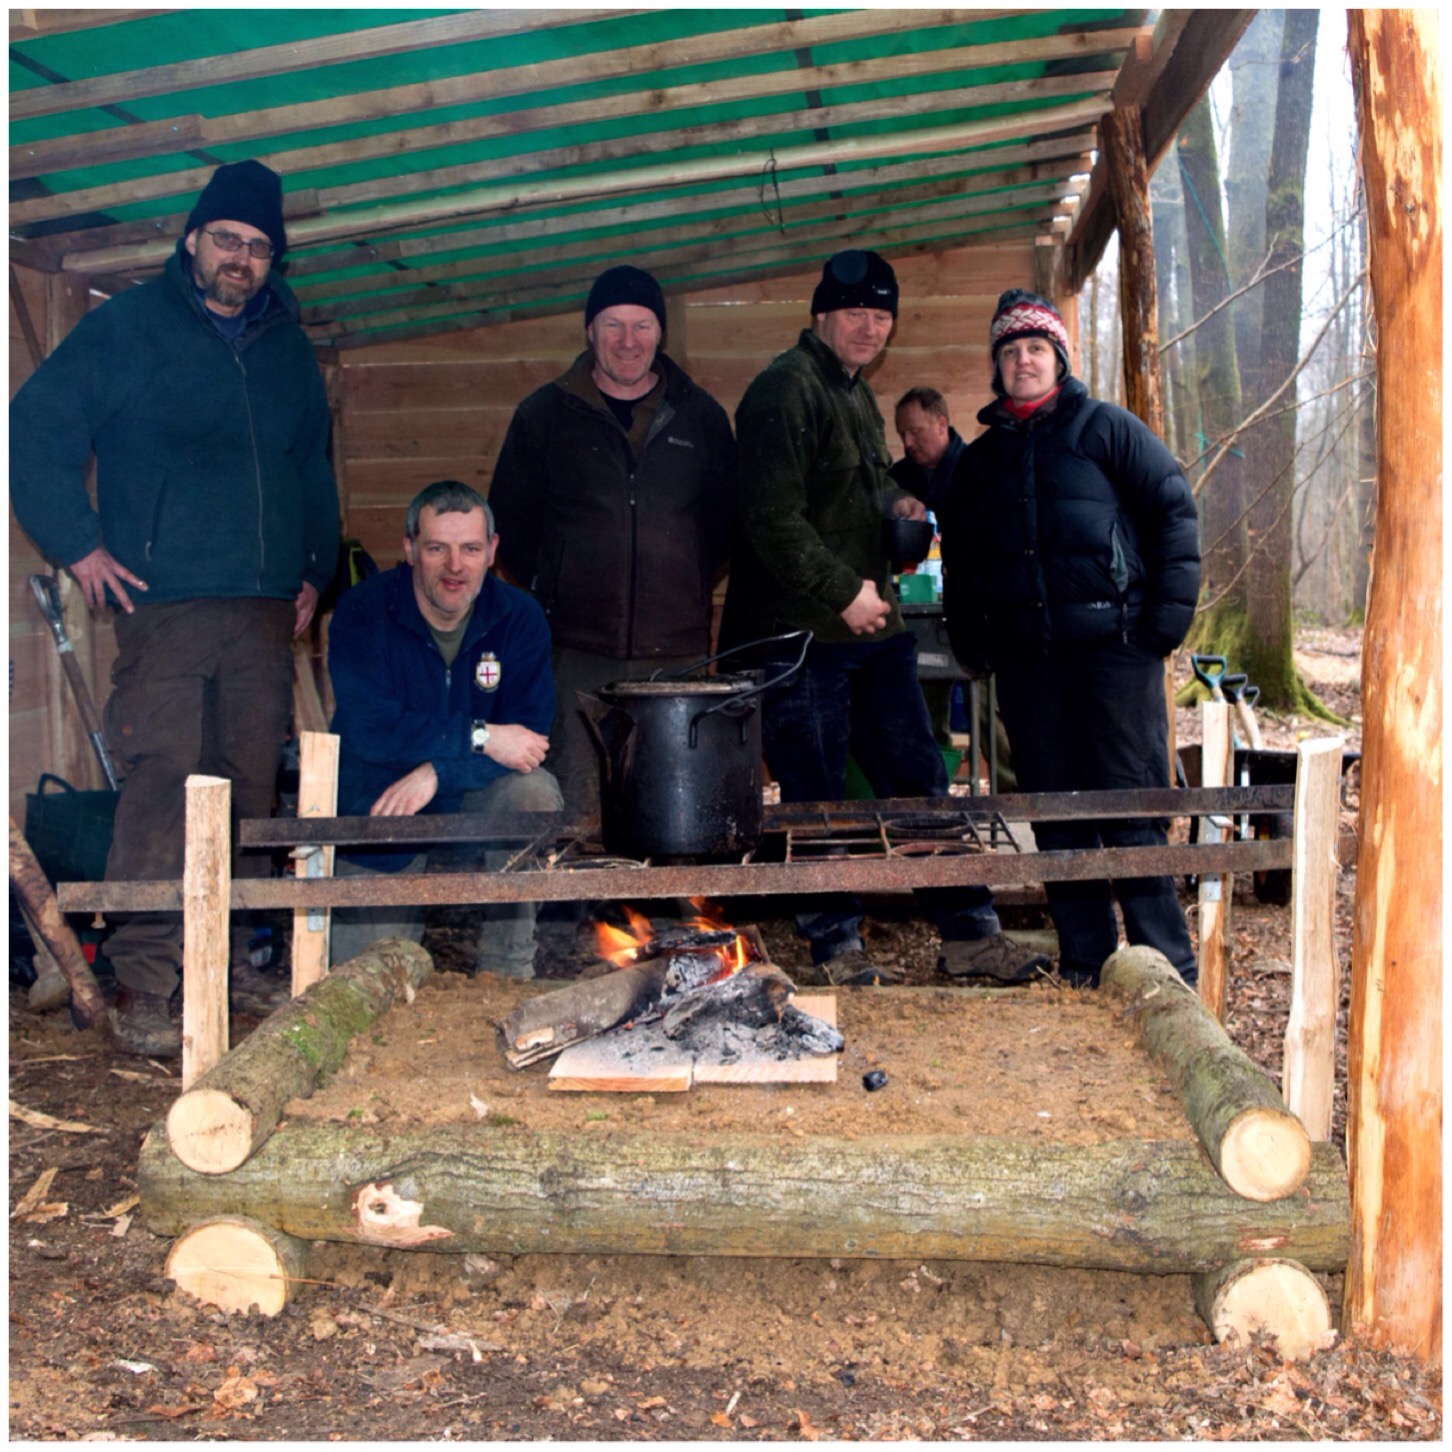
Taken in late spring down at my friend Fraser’s (Coastal Survival) during a rather stormy night was this picture of a bunch of hairy bushcrafters sitting snugly around the fire. Needless to say a dram or two helped pass the evening along nicely.
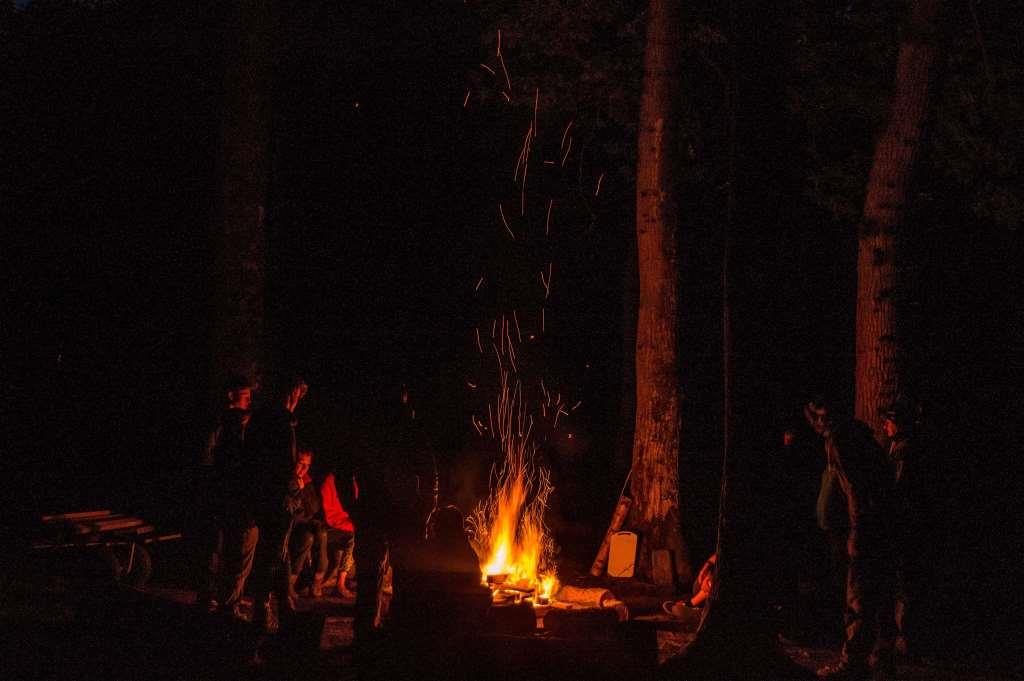
Stormy nights
My favourite fire picture of the last couple of months though is this one. It is the fire the cadets were sitting around and I played around with the settings of my camera to try and capture the picture as best I could without a flash. I then just waited until a piece of wood split in the flames to capture all the sparks spiralling upwards.
Woodland TV
No doubt there will be a few more Flammage pictures coming up over the summer as the Bushmoot and the Wilderness Gathering approach so I will leave you with these for now.
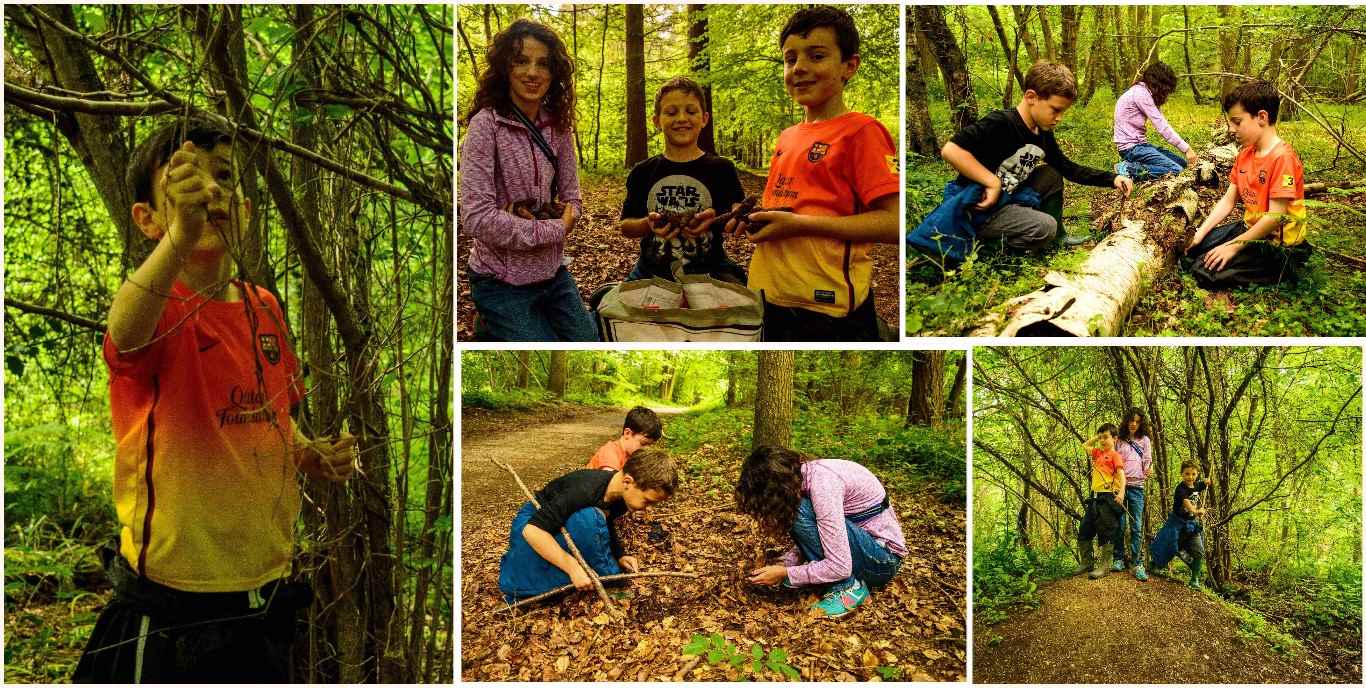
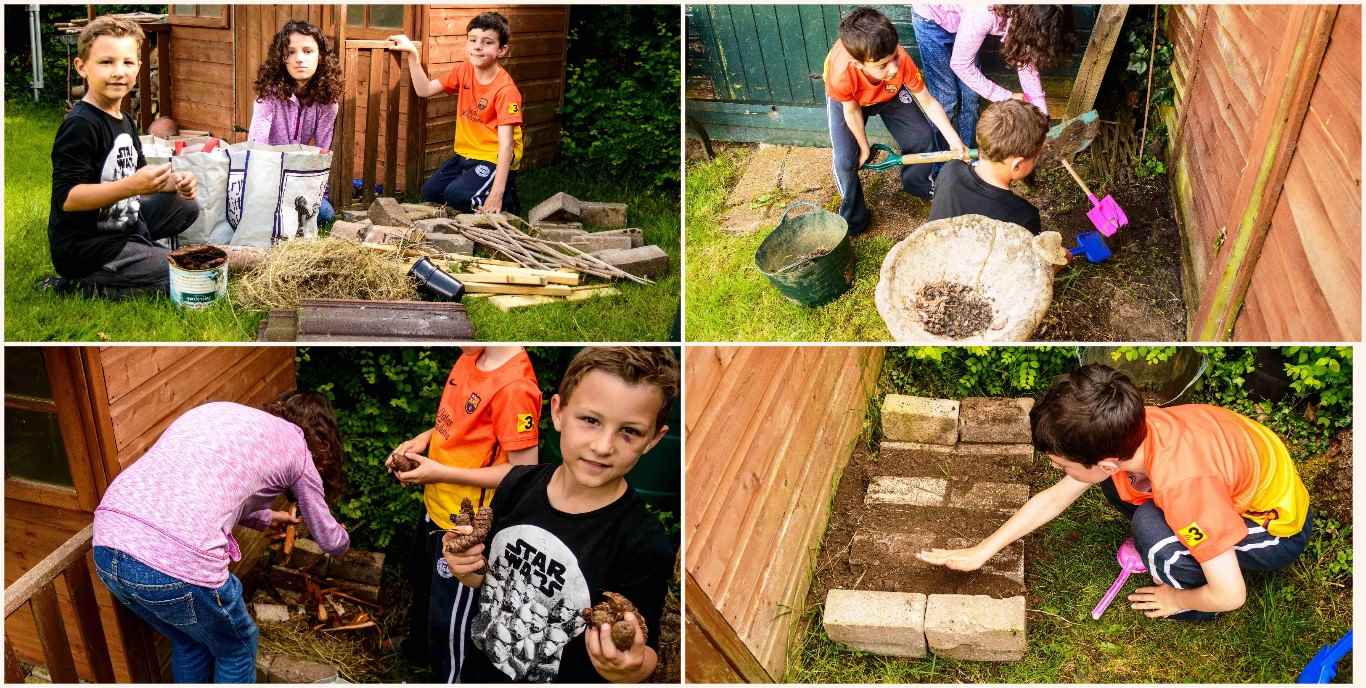
One of the requirements for Finlay’s Naturalist badge at Cubs was to build a Bug Hotel. So off to the woods we went with his friend Finlay (yep, two best friends called Finlay) and his sister Catherine to get supplies.
We collected a range of material including twigs, spruce cones, elder shoots and bark. We only took a little from each area we visited but we did visit a lot of different areas and soon had a good haul.
Collecting
I had prepared some extra material including bricks, timber, drilled logs, plastic plant pots and grass. I got some good ideas from the RSPB Giving Nature a Home project and also from the blogs shown on the 30 Days Wild site.
To begin with the kids dug up a load of dirt to help build up the base and then set to building the base of the hotel.
Laying the foundations
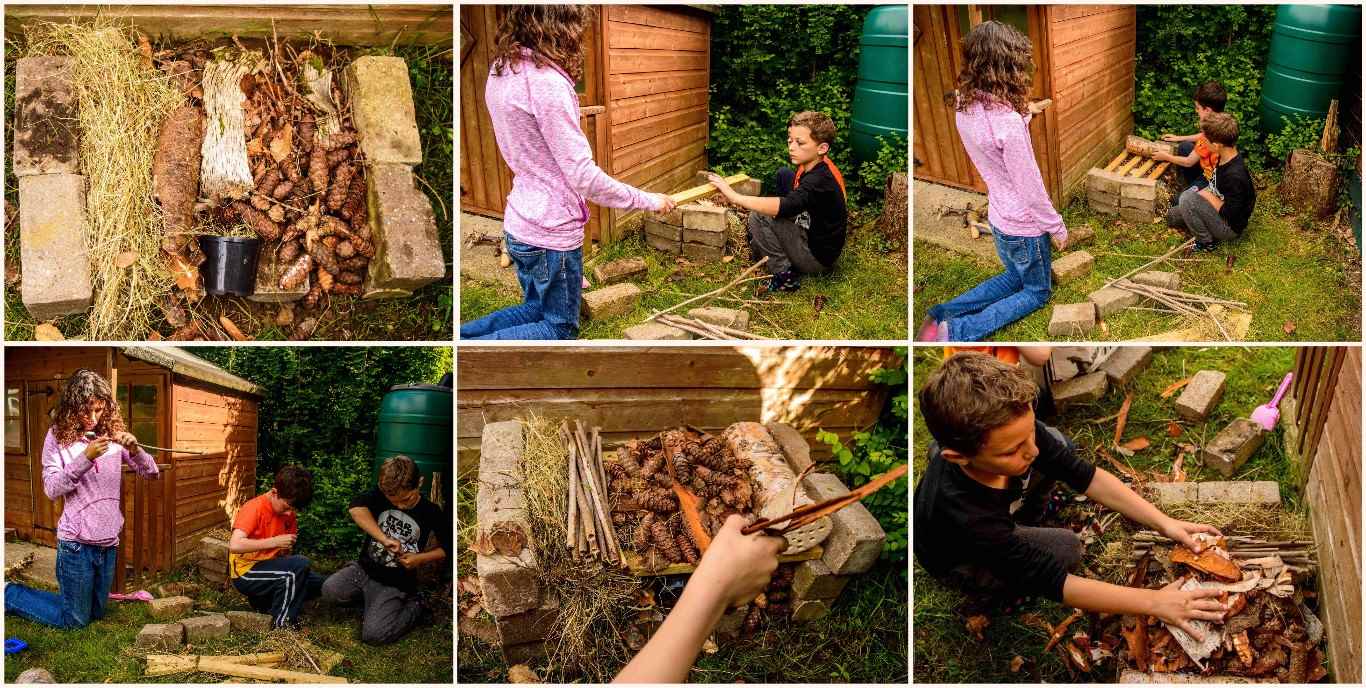
They built two layers of material to attract different insects. I got them to hollow out the pith from lots of elder sticks and they also stuffed grass inside some plastic plant pots. The plant pots have holes in the bottom of them so the hope is they will make good bug nests.
Building the Bedrooms
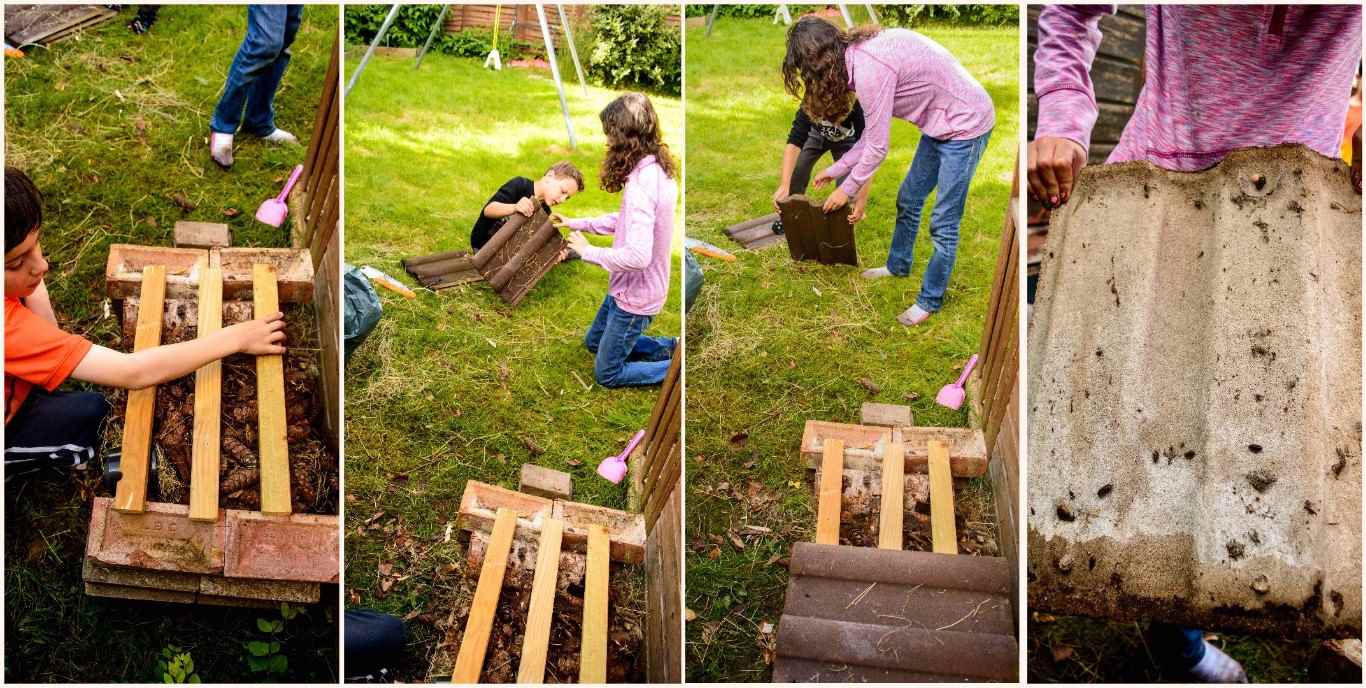
I had found some old roof tiles at the back of the shed and we used four of them to create an overlapping roof to keep the rain out. These heavy tiles also helped lock the rather wobbly bricks into place.
Each of the tiles though had some residents already in place on their undersides 🙂
On goes the roof
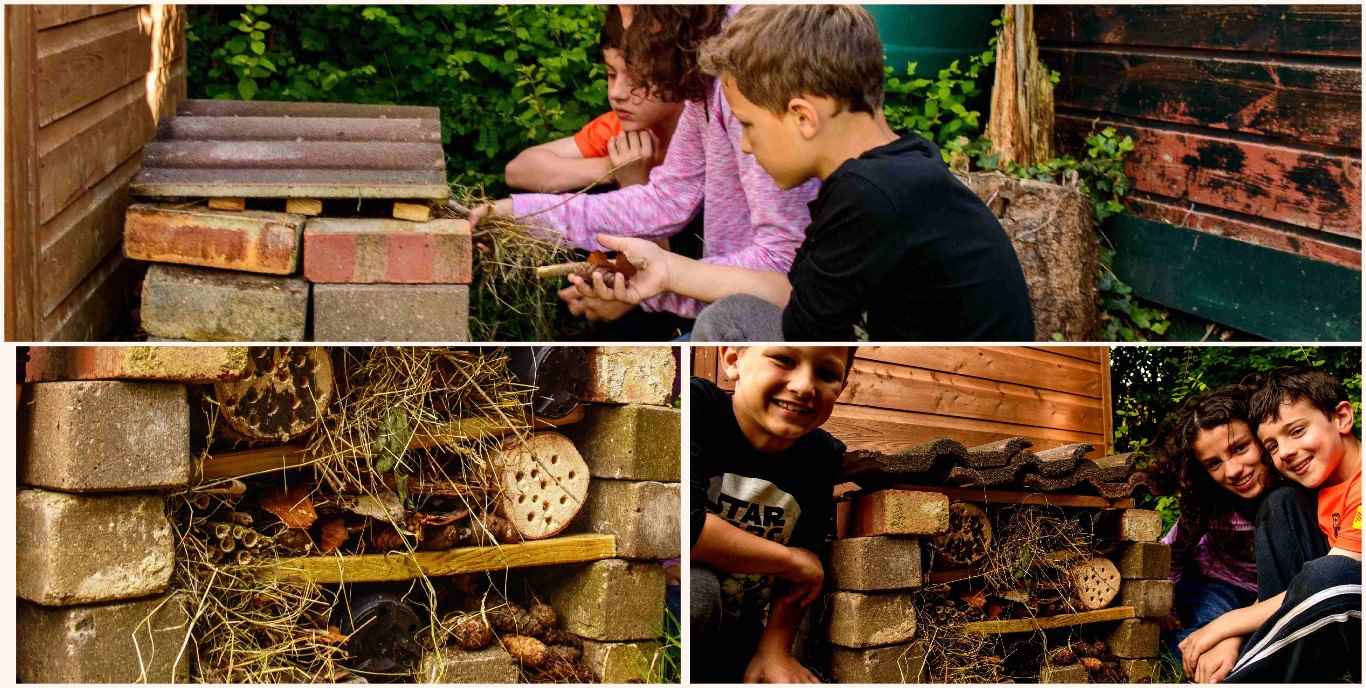
To finish off they stuffed more material into the hotel and tidied it all up a little.
The longest part of this whole process was the collecting of the material however combining it with a good walk in the woods worked well. I did a little bit of work in the garage sawing the timber to length and drilling holes into the tops of two birch logs. Other than that the kids did most of the work.
Finishing touches
I am looking forward to seeing if we get any residents over the next few months. I do hope the hotel provides a snug over-wintering spot for our local bugs and that it is teeming with life next year.
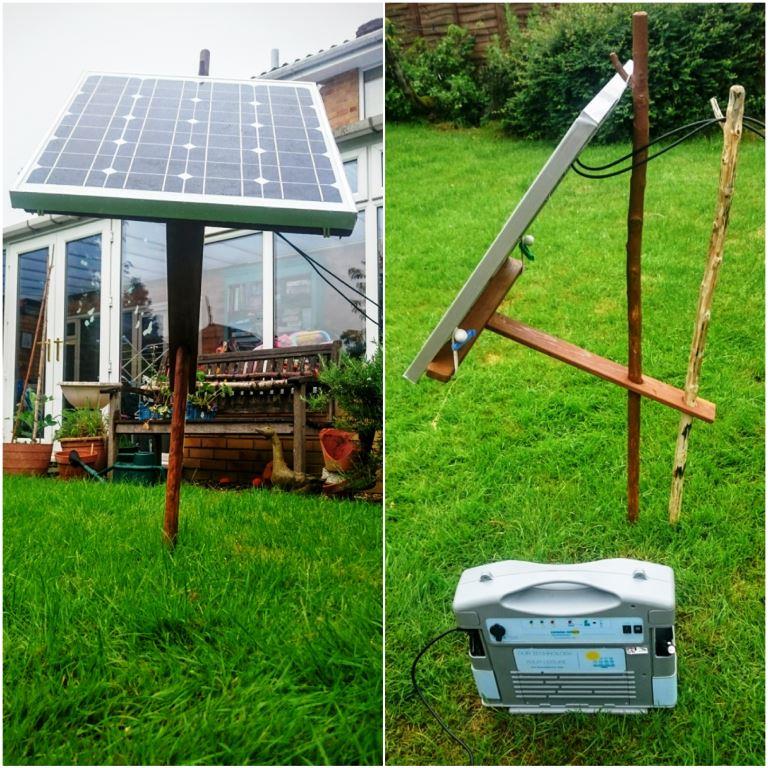
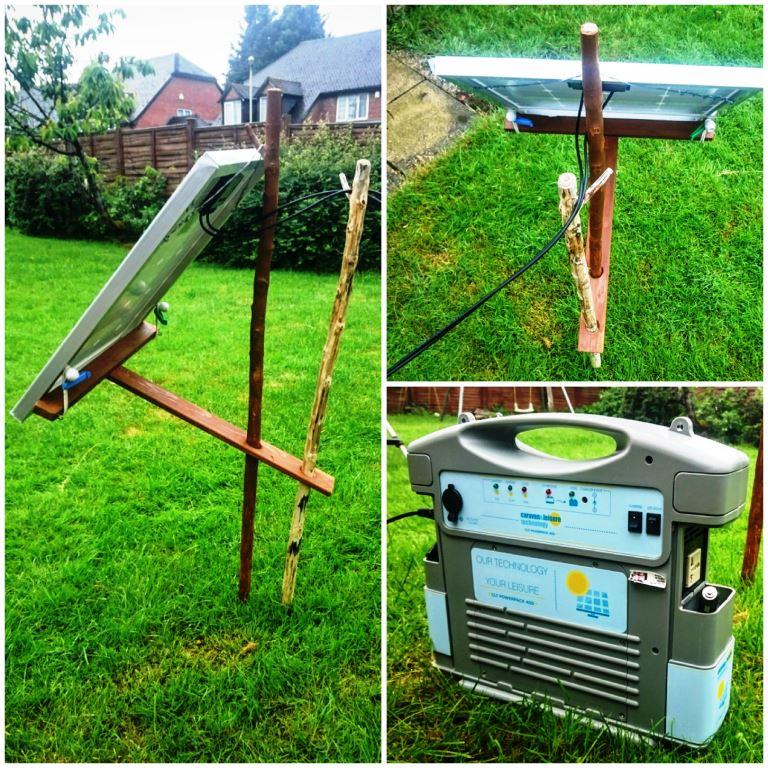
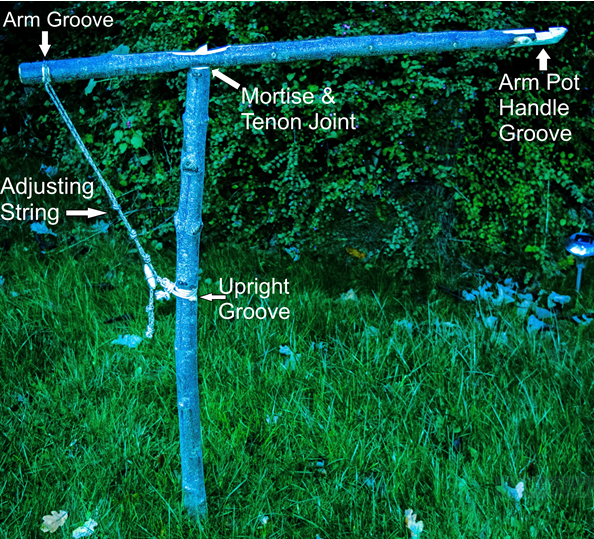
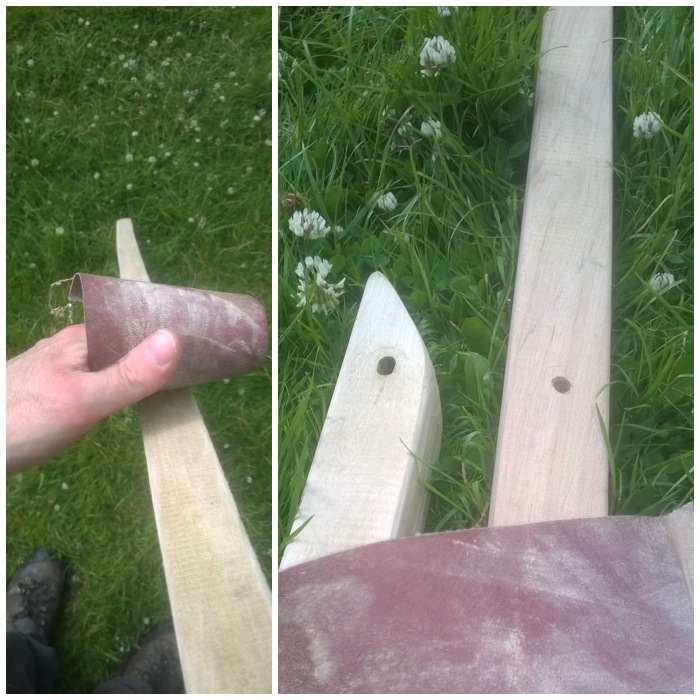
This post is not a full How To…. on building a adjustable stand for a solar panel as the actual steps to make one are very simple. I will not even go into the detailed dimensions of the stand as they will vary depending on the type of panel you have, instead I’ll focus on all the different parts of the stand and how it works.
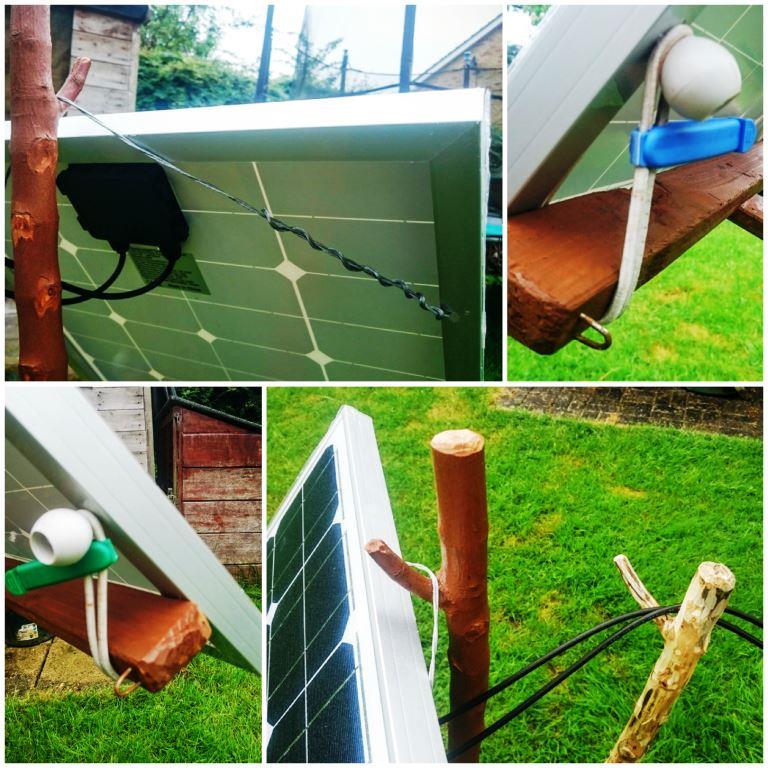
I wanted my stand to keep the solar panel clear of the ground, and it had to be able to rotate, lock in place (so the wind would not move it), pack away flat and have parts that could be sourced in the woods if needed.
My solar panel stand
Over the last few years my family has come out to join me at the BCUK Bushmoot, wanting to come and explore this magical place I disappear to in South Wales for two weeks every year.
Living without any power was not an issue when it was just me (I could charge my phone up in my car) however my family’s power requirements are slightly higher. After a long day’s playing in the woods the kids like to settle down with a video on my laptop before bed, and that requires power.
I have relied on my friends Fraser Christian (Coastal Survival) and Stephen Conway to recharge the laptop for me over the last couple of years and this year I decided it was high time to get my own set up. I had long discussions with my friend Si Parker on the different types of set ups I could go for. Si has a fantastic level of knowledge and I was soon clear about what I needed. I opted for a CLT400 solar powerpack (Si’s suggestion – with built in regulator and inverter) and a SUNDELY® 50W 12V Monocrystalline Solar Panel.
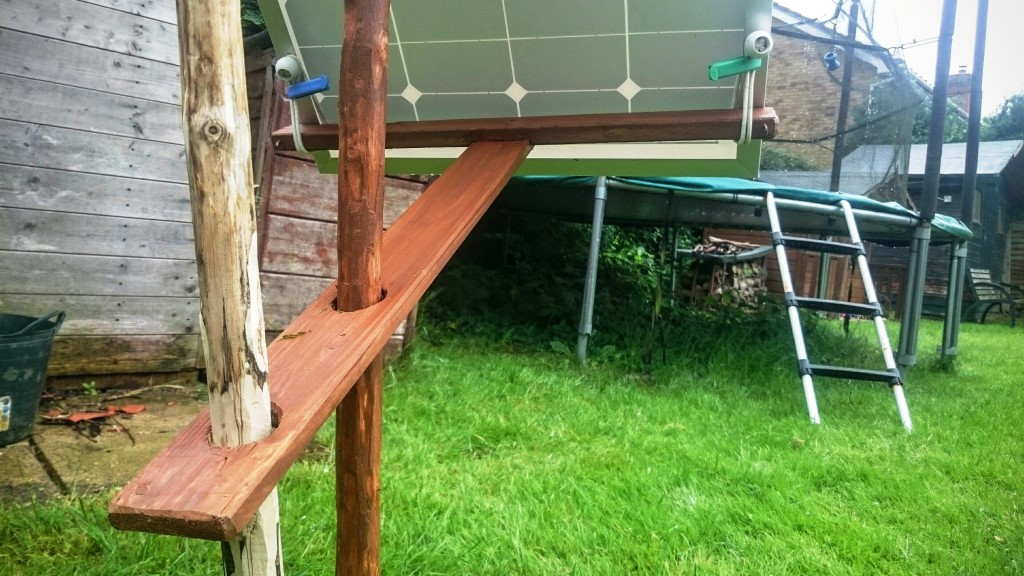
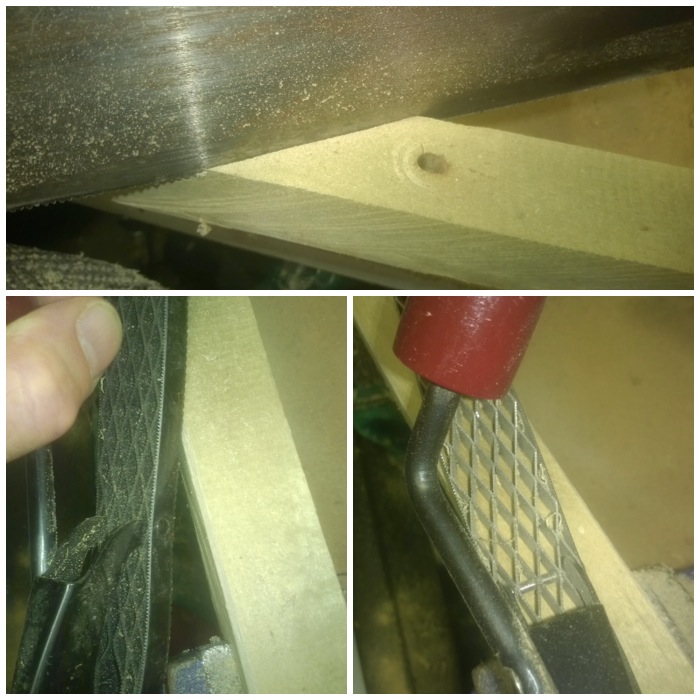
The arm
The Arm
I’d seen a stand that Stephen had built a few years ago at the Moot that could rotate so I set out to build something similar. I had some scrap wood lying about (from my old hammock stand) and made this T-shaped arm to hold the panel out so it was angled correctly.
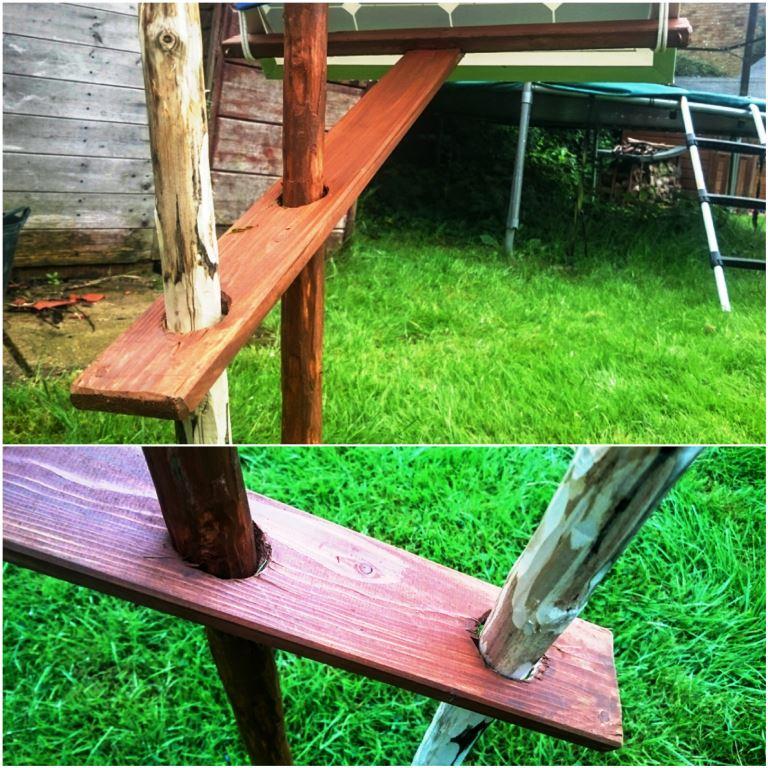
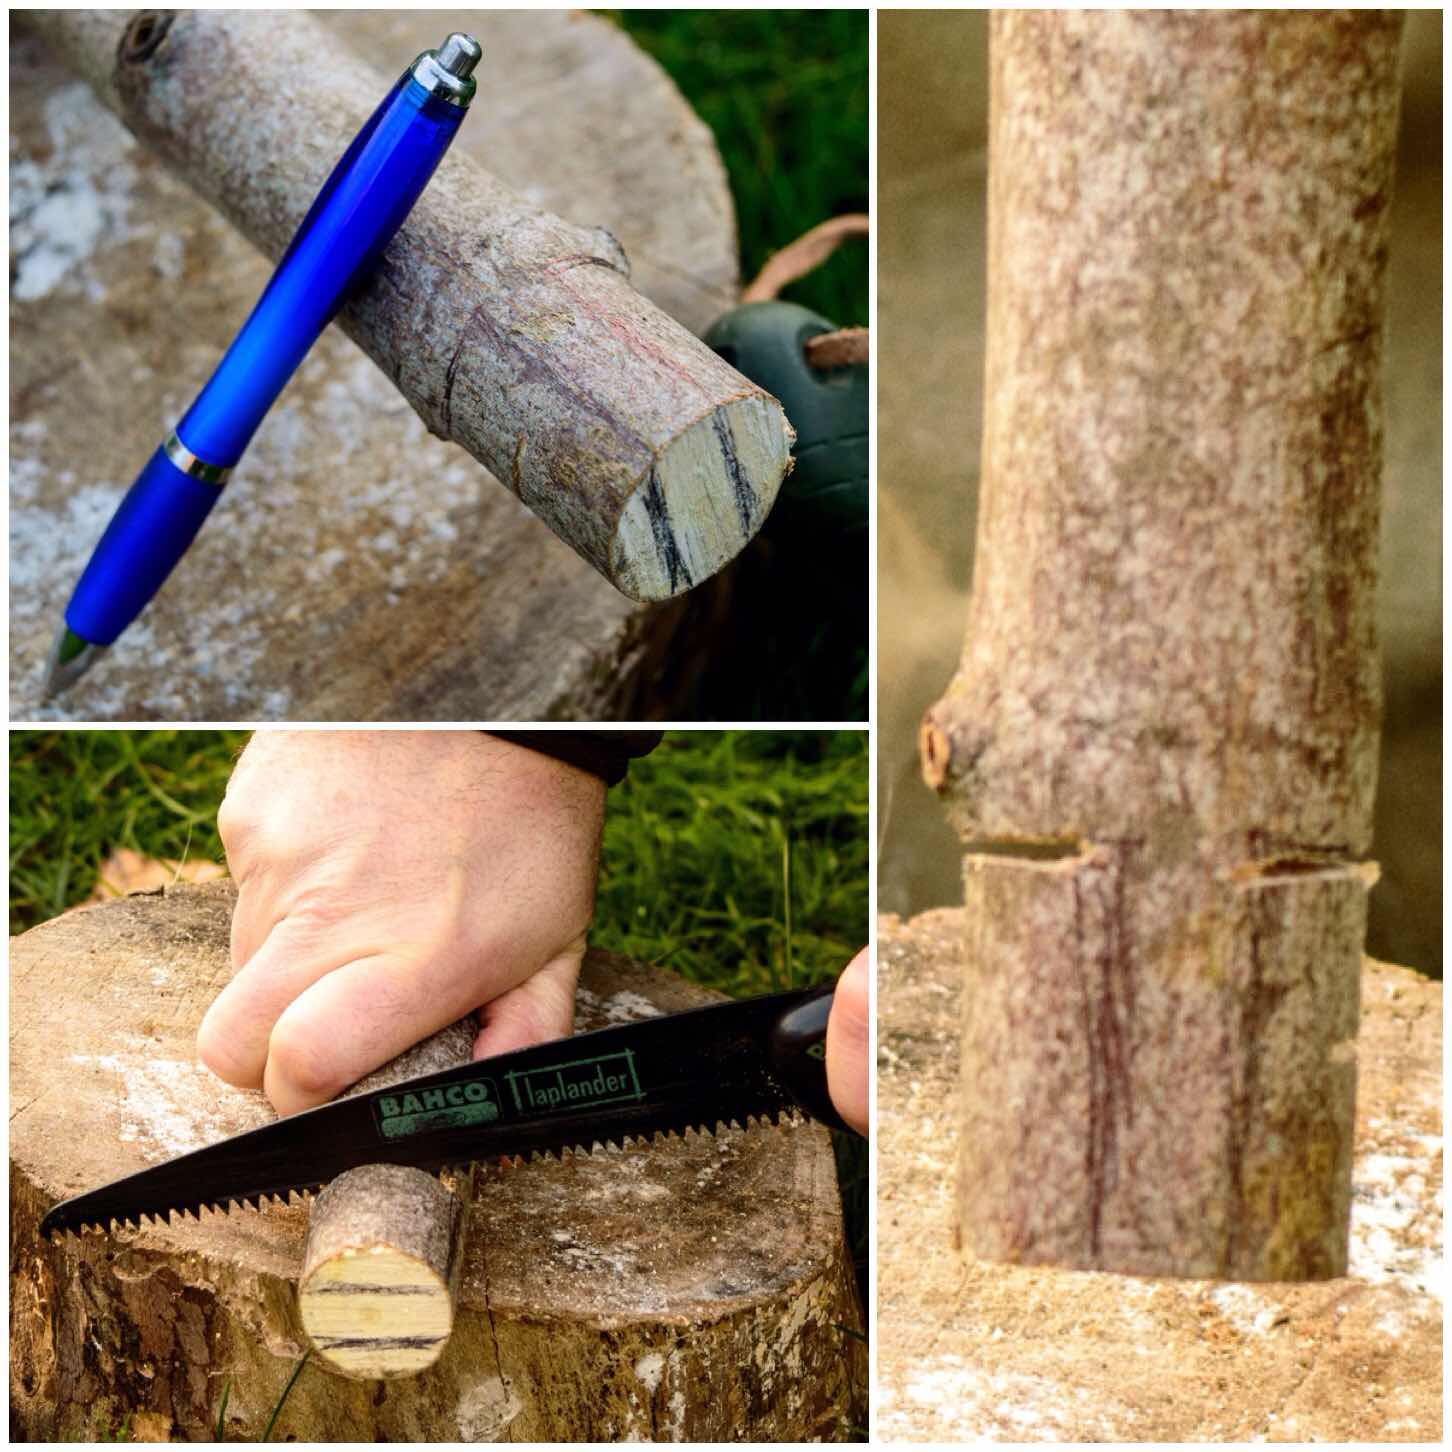
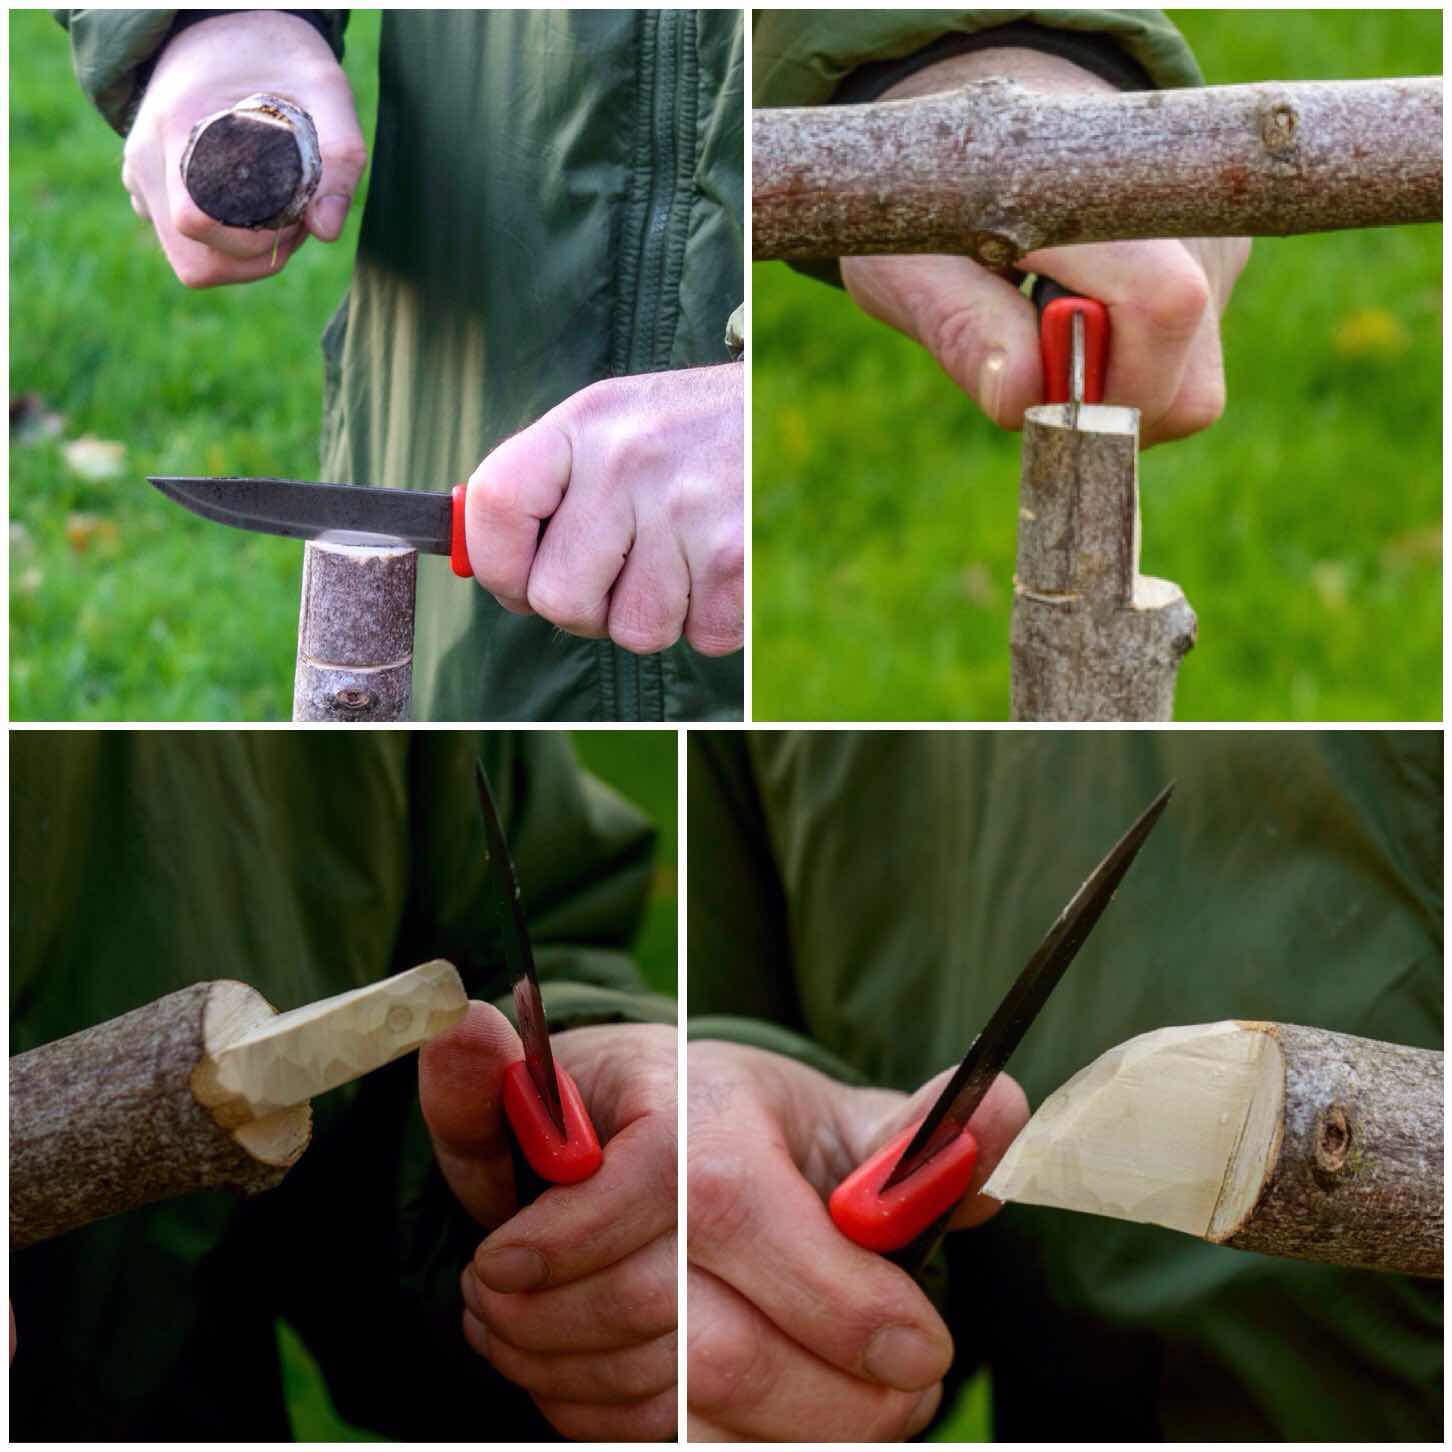
The system works on similar principles to my campfire cranes using friction to hold things in place. I worked out the length of arm I would need and drilled these two holes out (just big enough for the uprights to slip in).
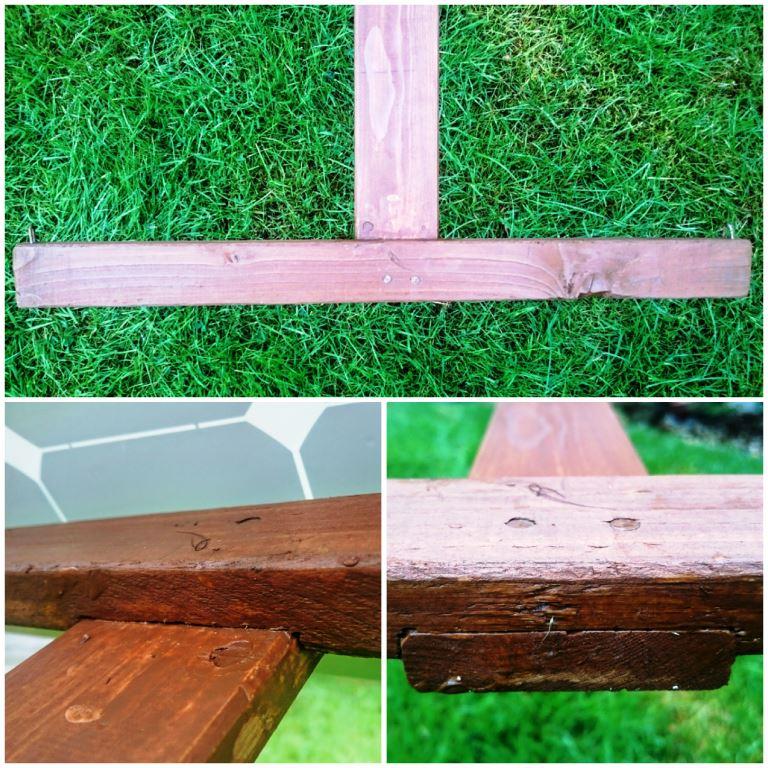
The mini lap joint
The other end of the arm I joined together with a small lap joint, some wood glue and a couple of nails.
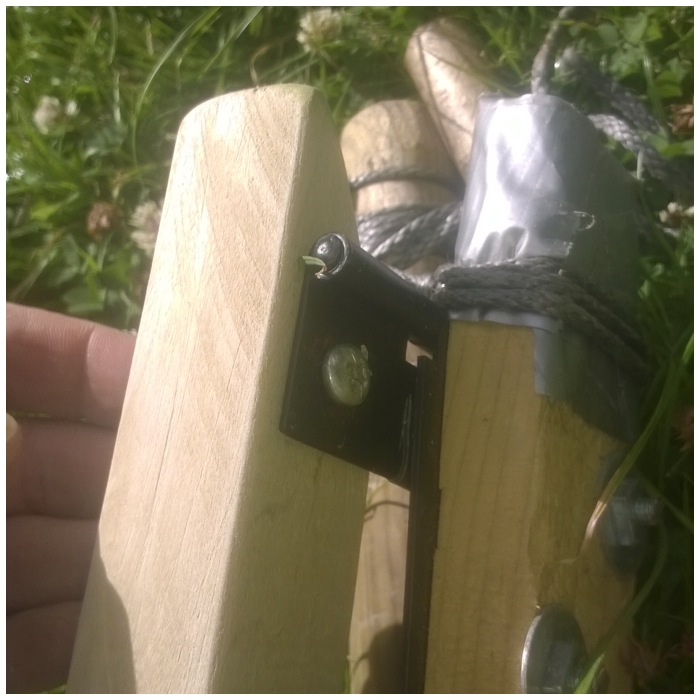
The Attachments
Below you can see the attachments on the solar panel I added. I just used some wire to hang the panel off the upright however the bottom of the panel required something more flexible.
I opted for some tent bungees, fencing nails and food bag clips. I attached the bungee to the panel by a mounting hole and then wrapped it around the T bar back onto itself. The food bag clip ensures the bungee does not slip over the plastic ball, and the fencing nail stops the bungee slipping off the side of the T bar.
Panel attachments
Testing
I have had this out for a couple of days now and used the CLT400 to charge up my laptop and other small battery packs. Even in low light (it has been very wet over the last few days) the solar panel has kept the powerpack well charged.
I just went out every now and then and removed the back pole, rotated the panel slightly and then hammered the back pole back in. This back pole stops the panel from moving out of its set position. I had originally thought to use guy lines instead of this second pole but I prefer this method because it’s so much easier to adjust as the sun moves (the idea came to me as usual when I was trying to get to sleep).
Fully adjustable
As well as at the Bushmoot I will be using this set up at our Sea Cadet camps to charge the other instructors’ phones and radios.
Somehow though I think the family will be wanting to bring along a few more appliances to the Moot – I am hoping it will not be the hairdryer or the XBox 🙂
In my continuing research into Log Rocket Stoves I came across a Wikipedia page called the Schwedenfeuer and in it details of a type of log rocket stove I had not come across before, with a built-in fire tray and a chimney formed by simply cutting away the inner corner of one section.
Clever though it was, though, this stove still relied on string or wire to tie the sections together. As these stoves have been around for a long time I figured there must be other ways of holding them all together. I thought perhaps that green wood dovetail wedges might do the job, so I set out to test this.
The Dovetail Log Rocket Stove
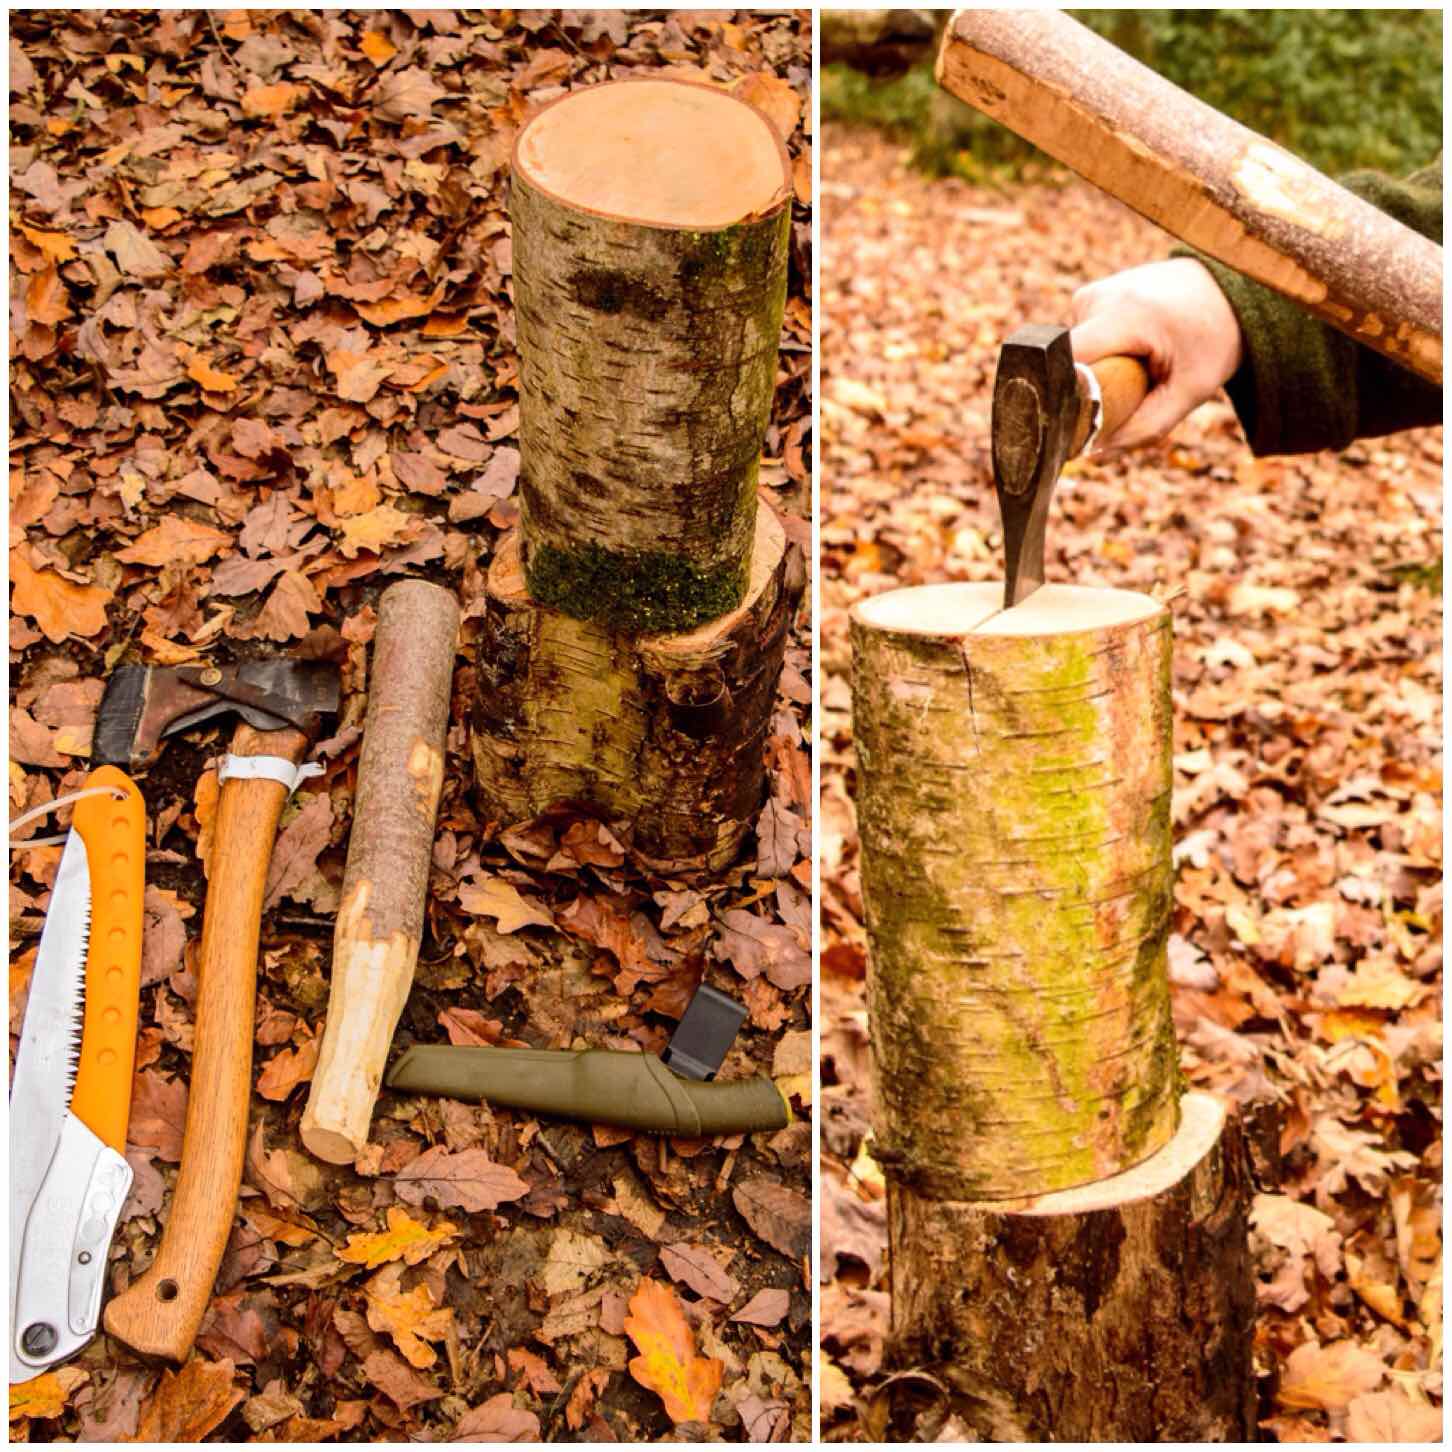
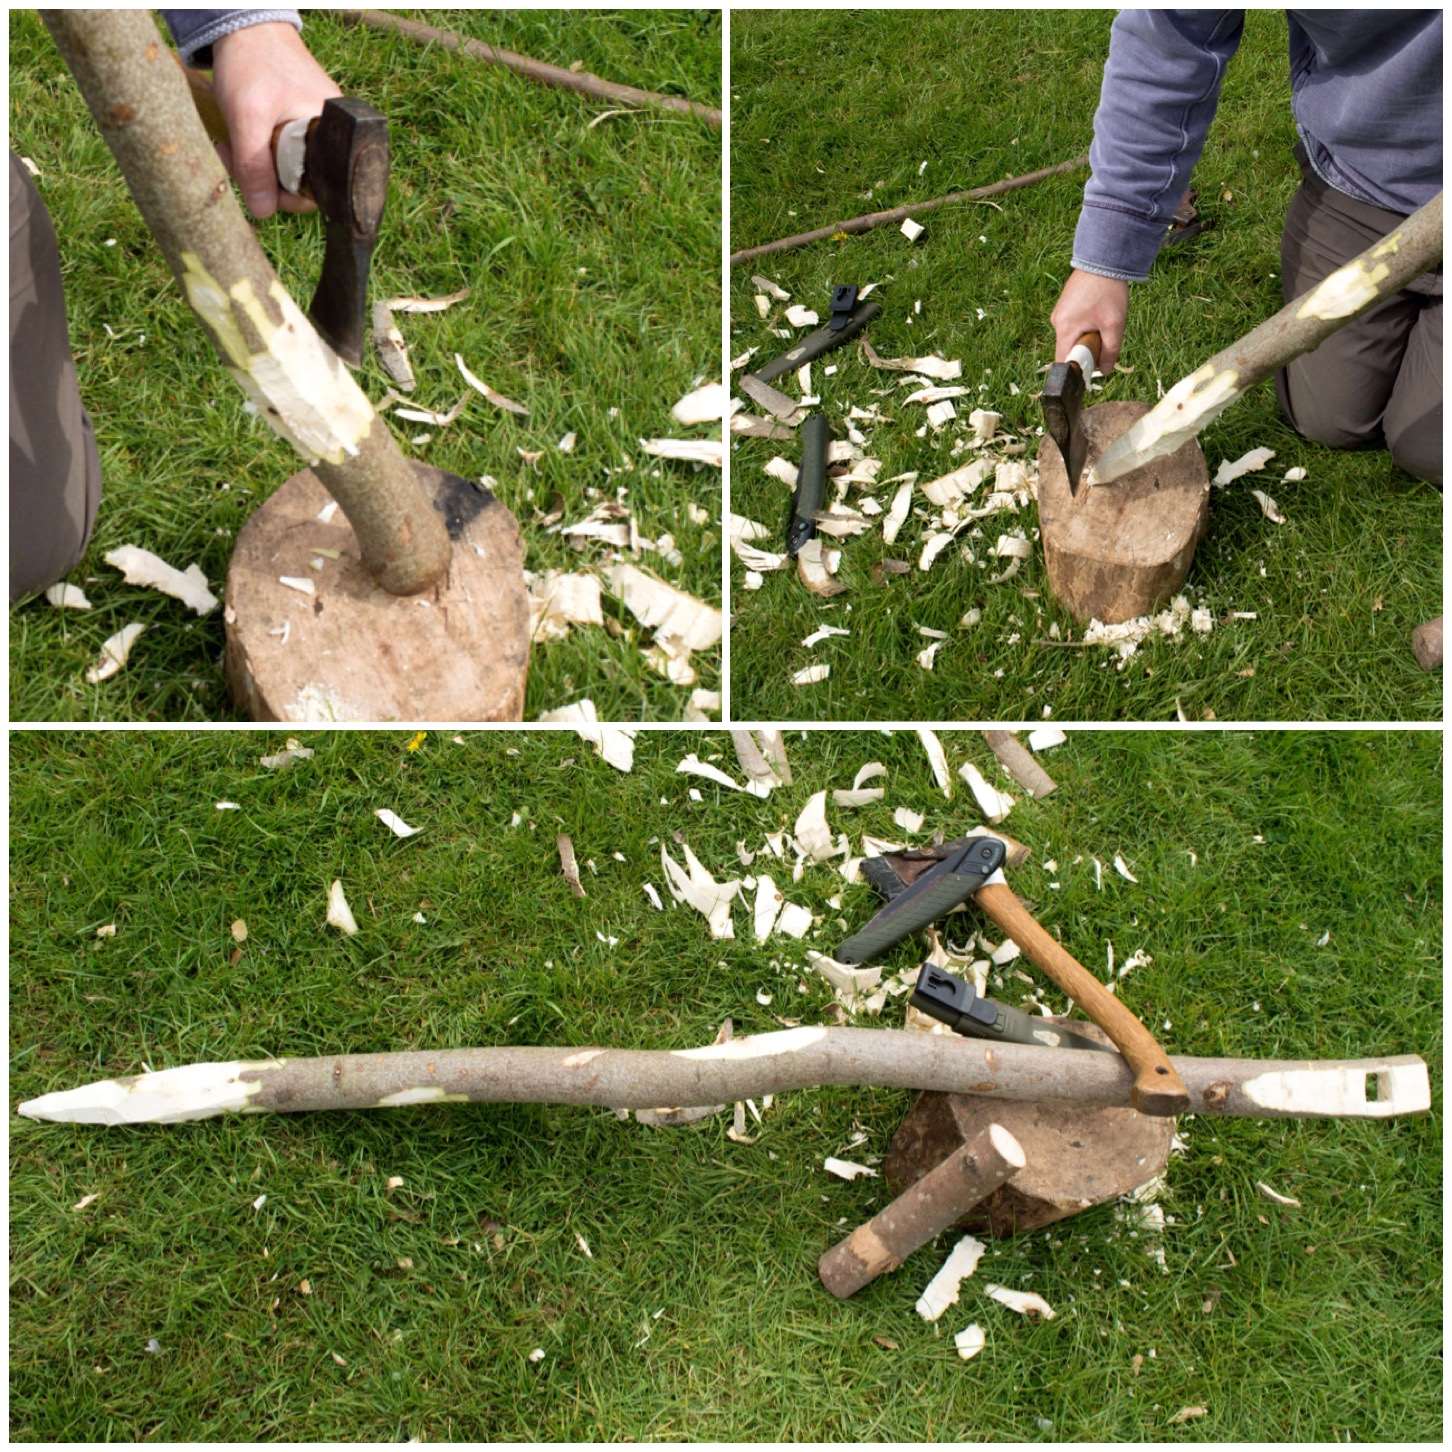
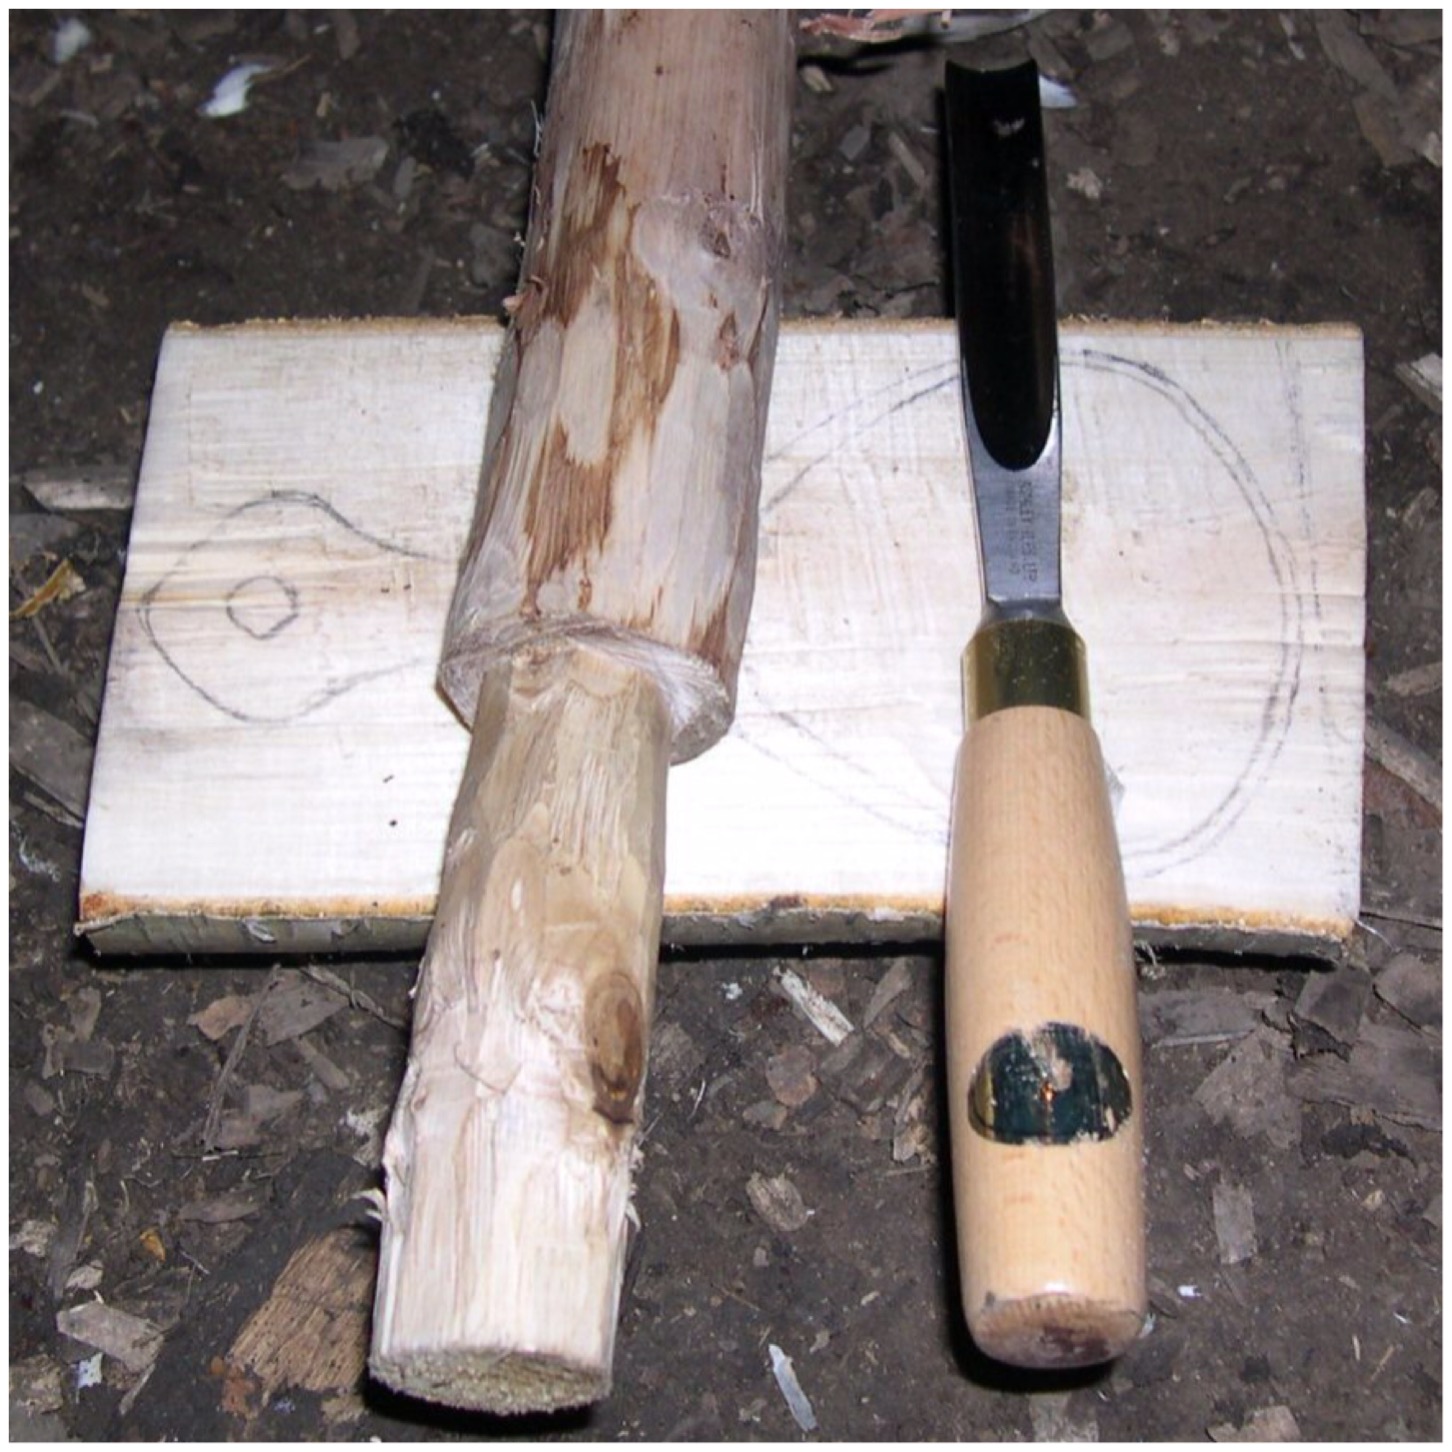
Tools and Material
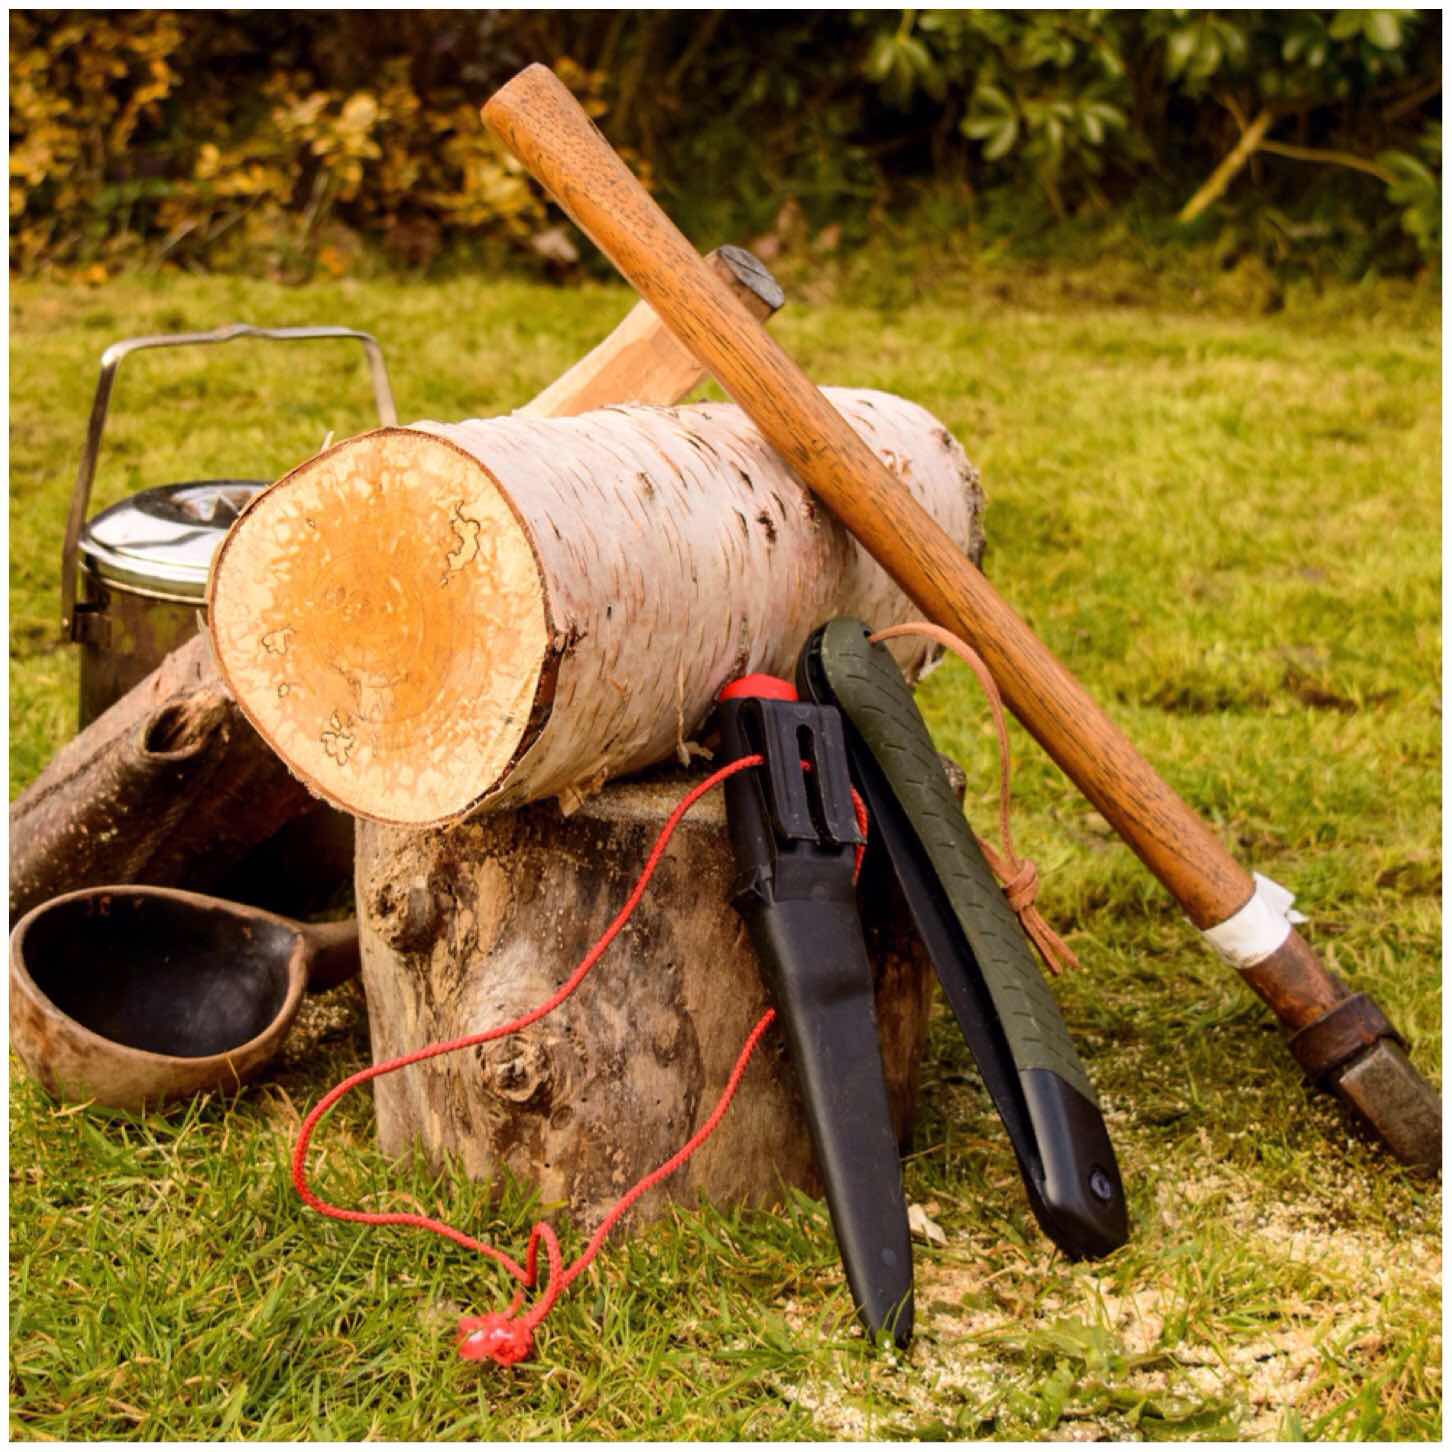
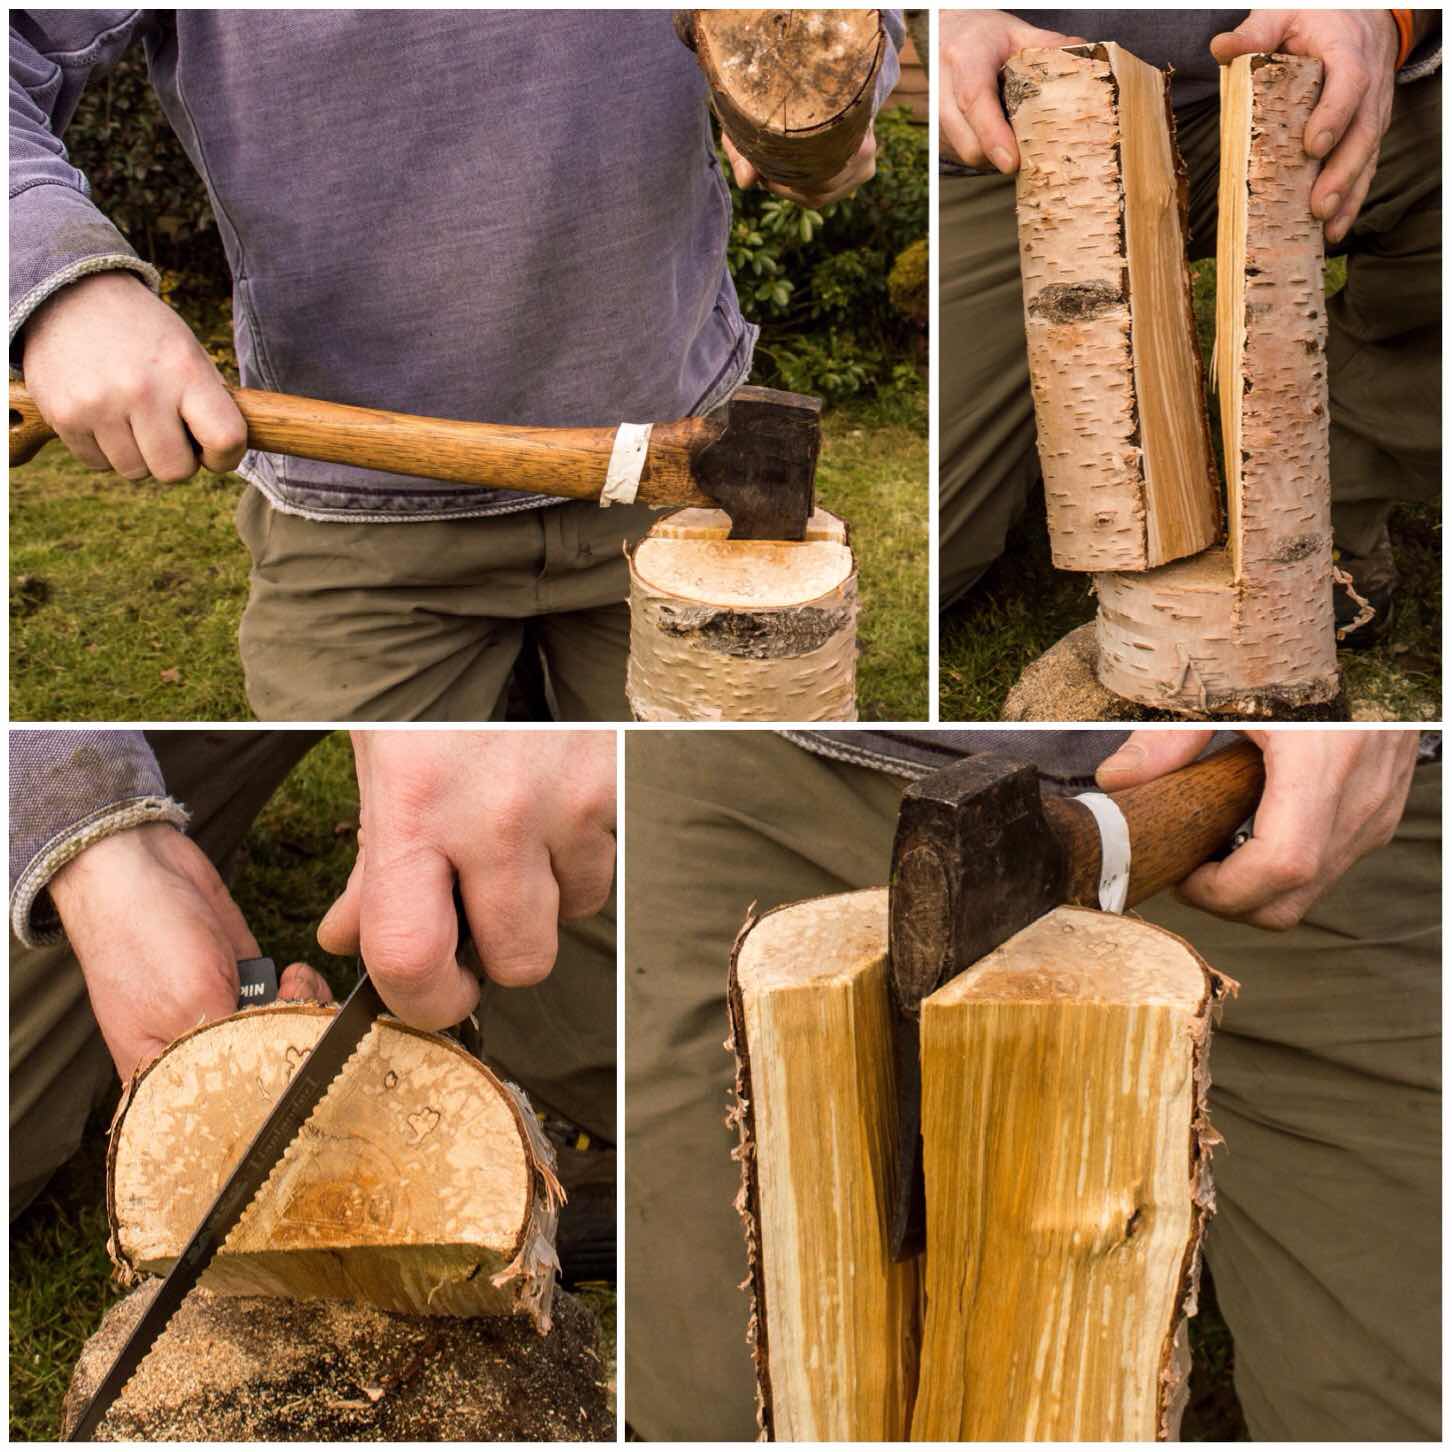
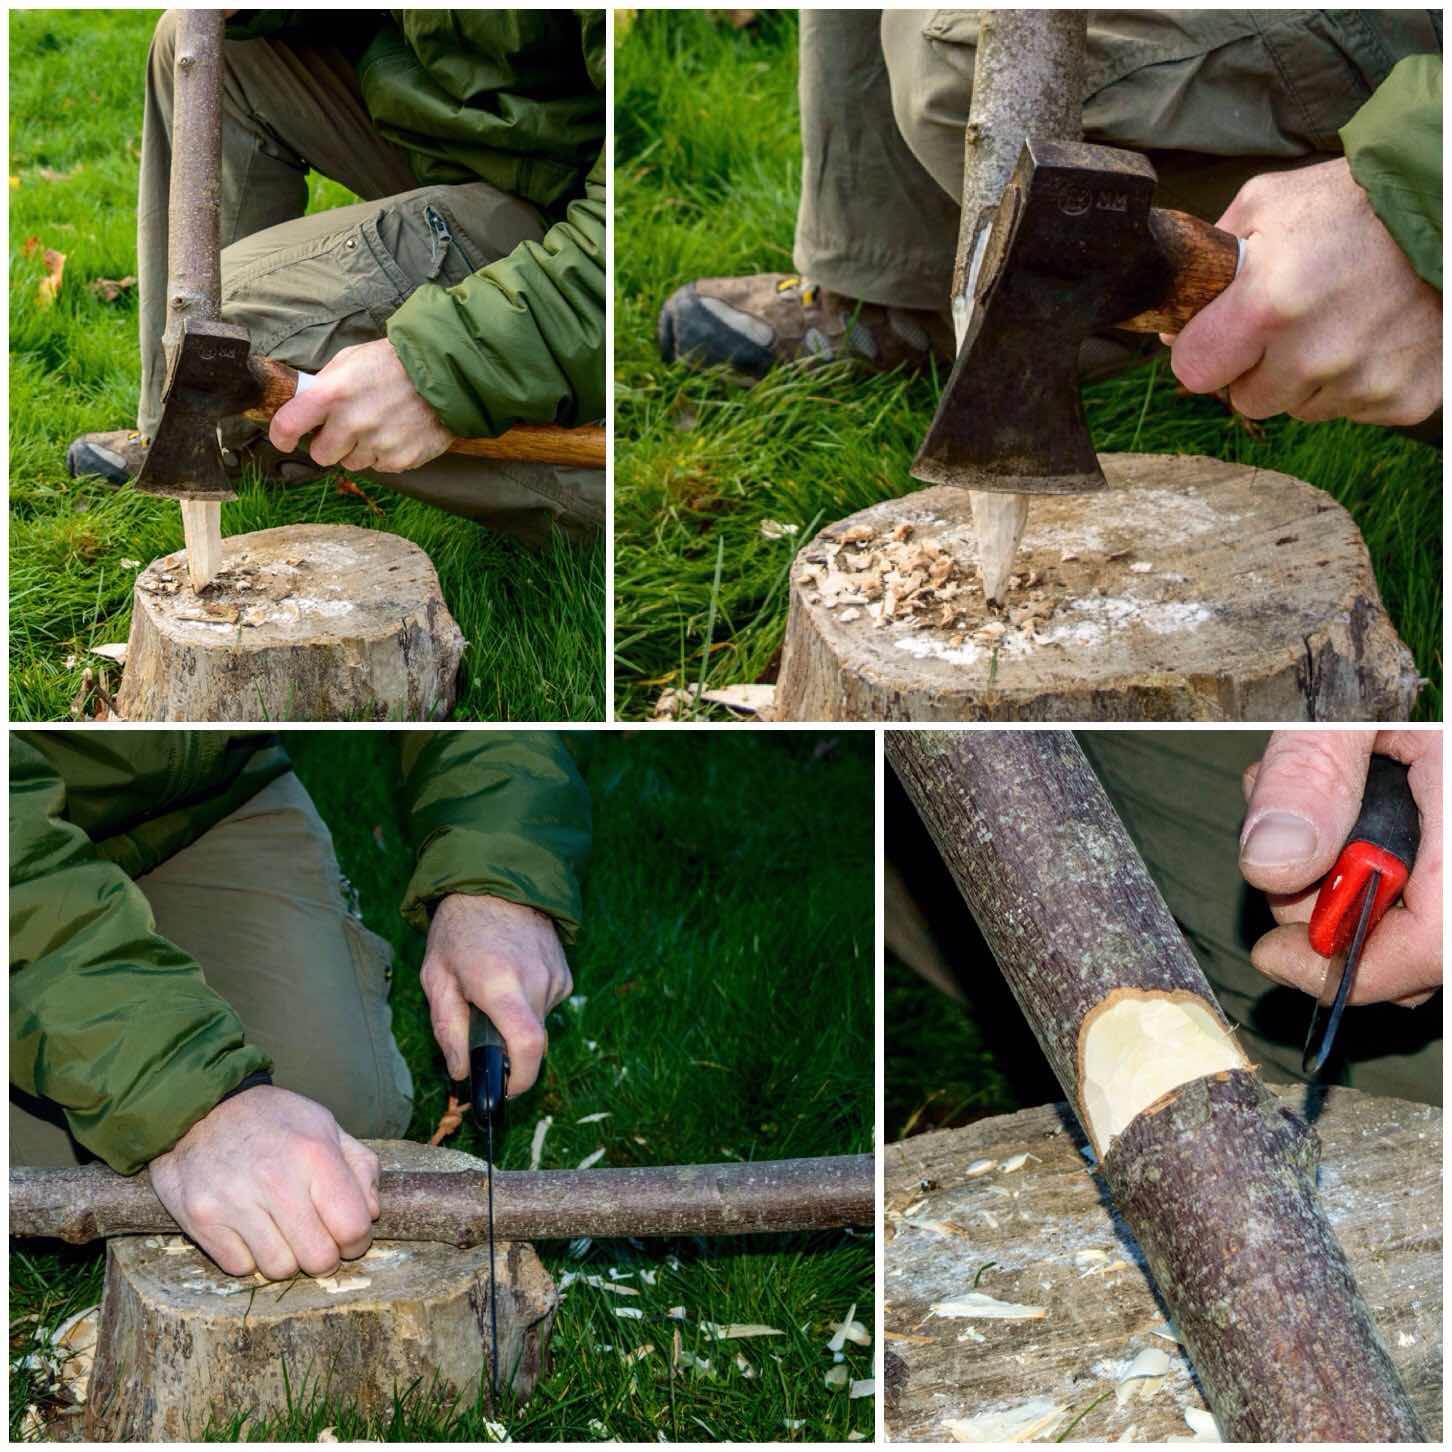
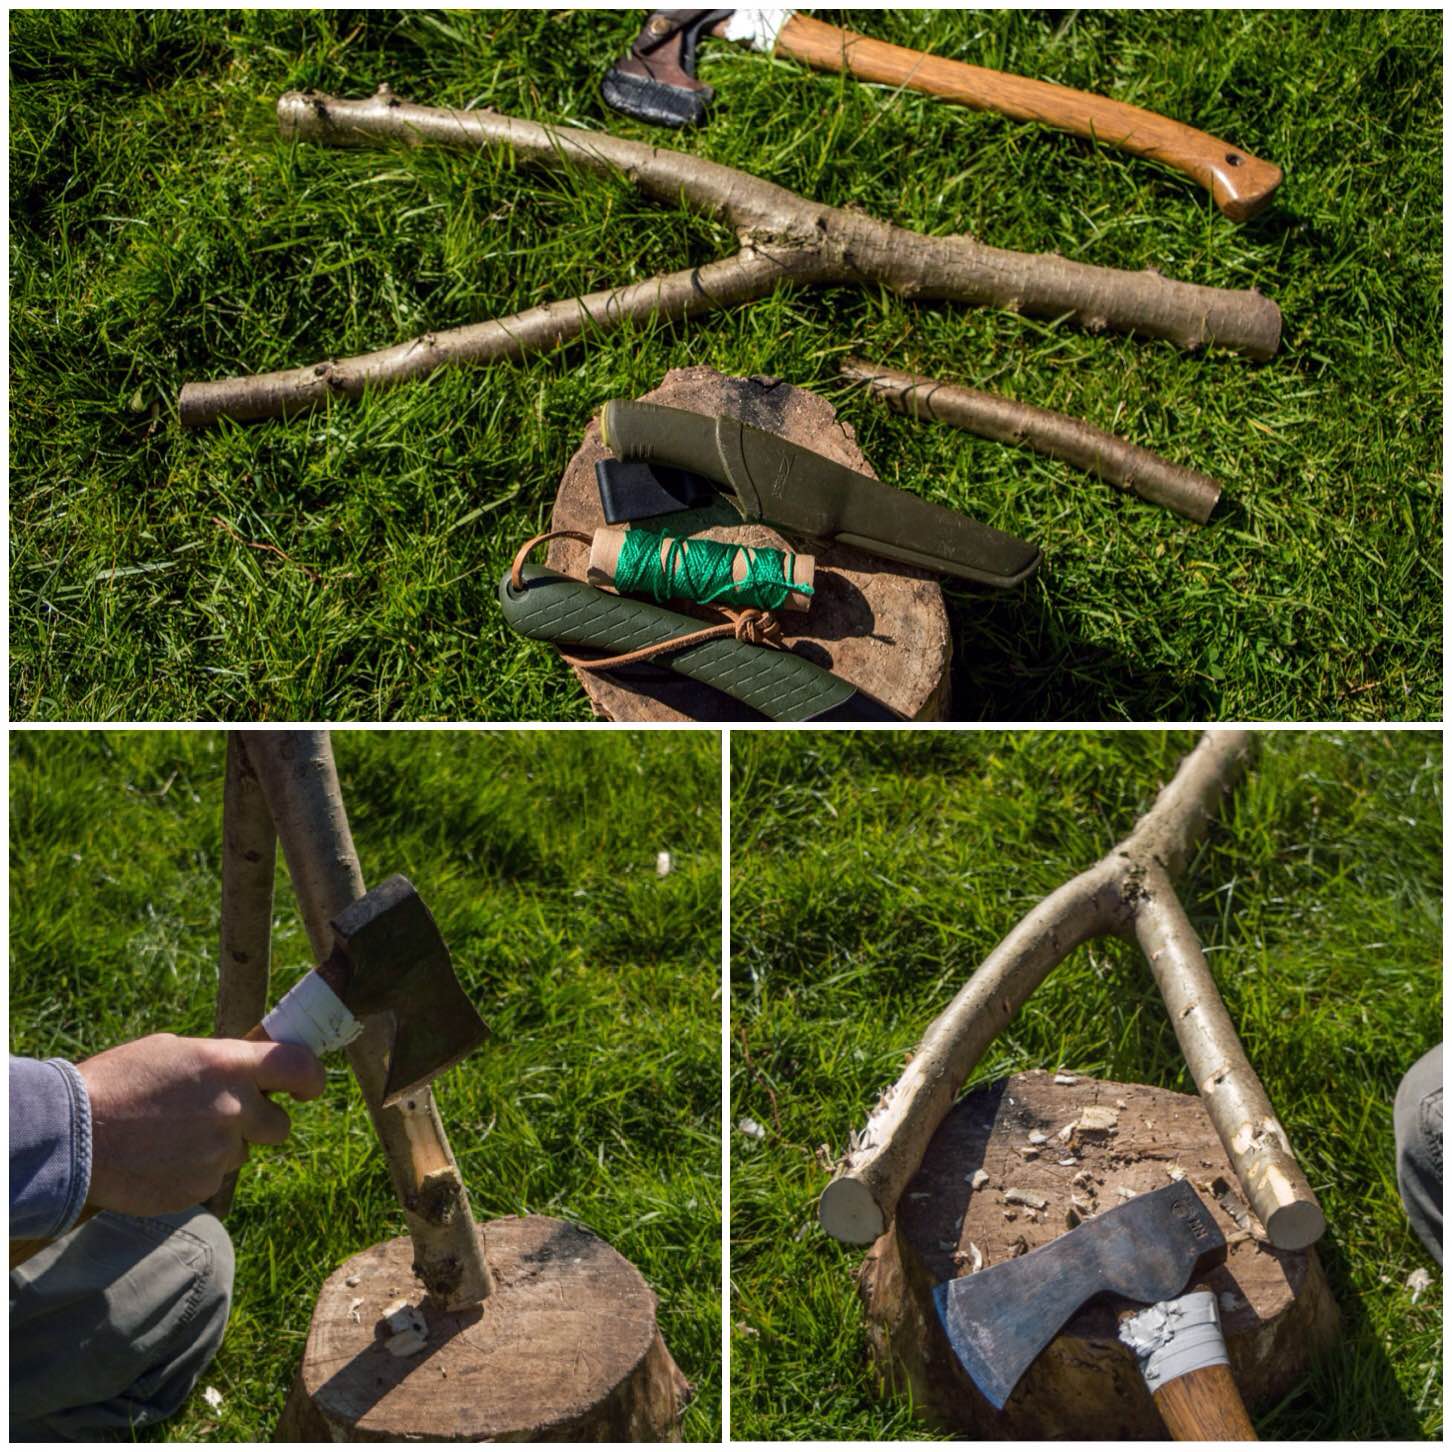
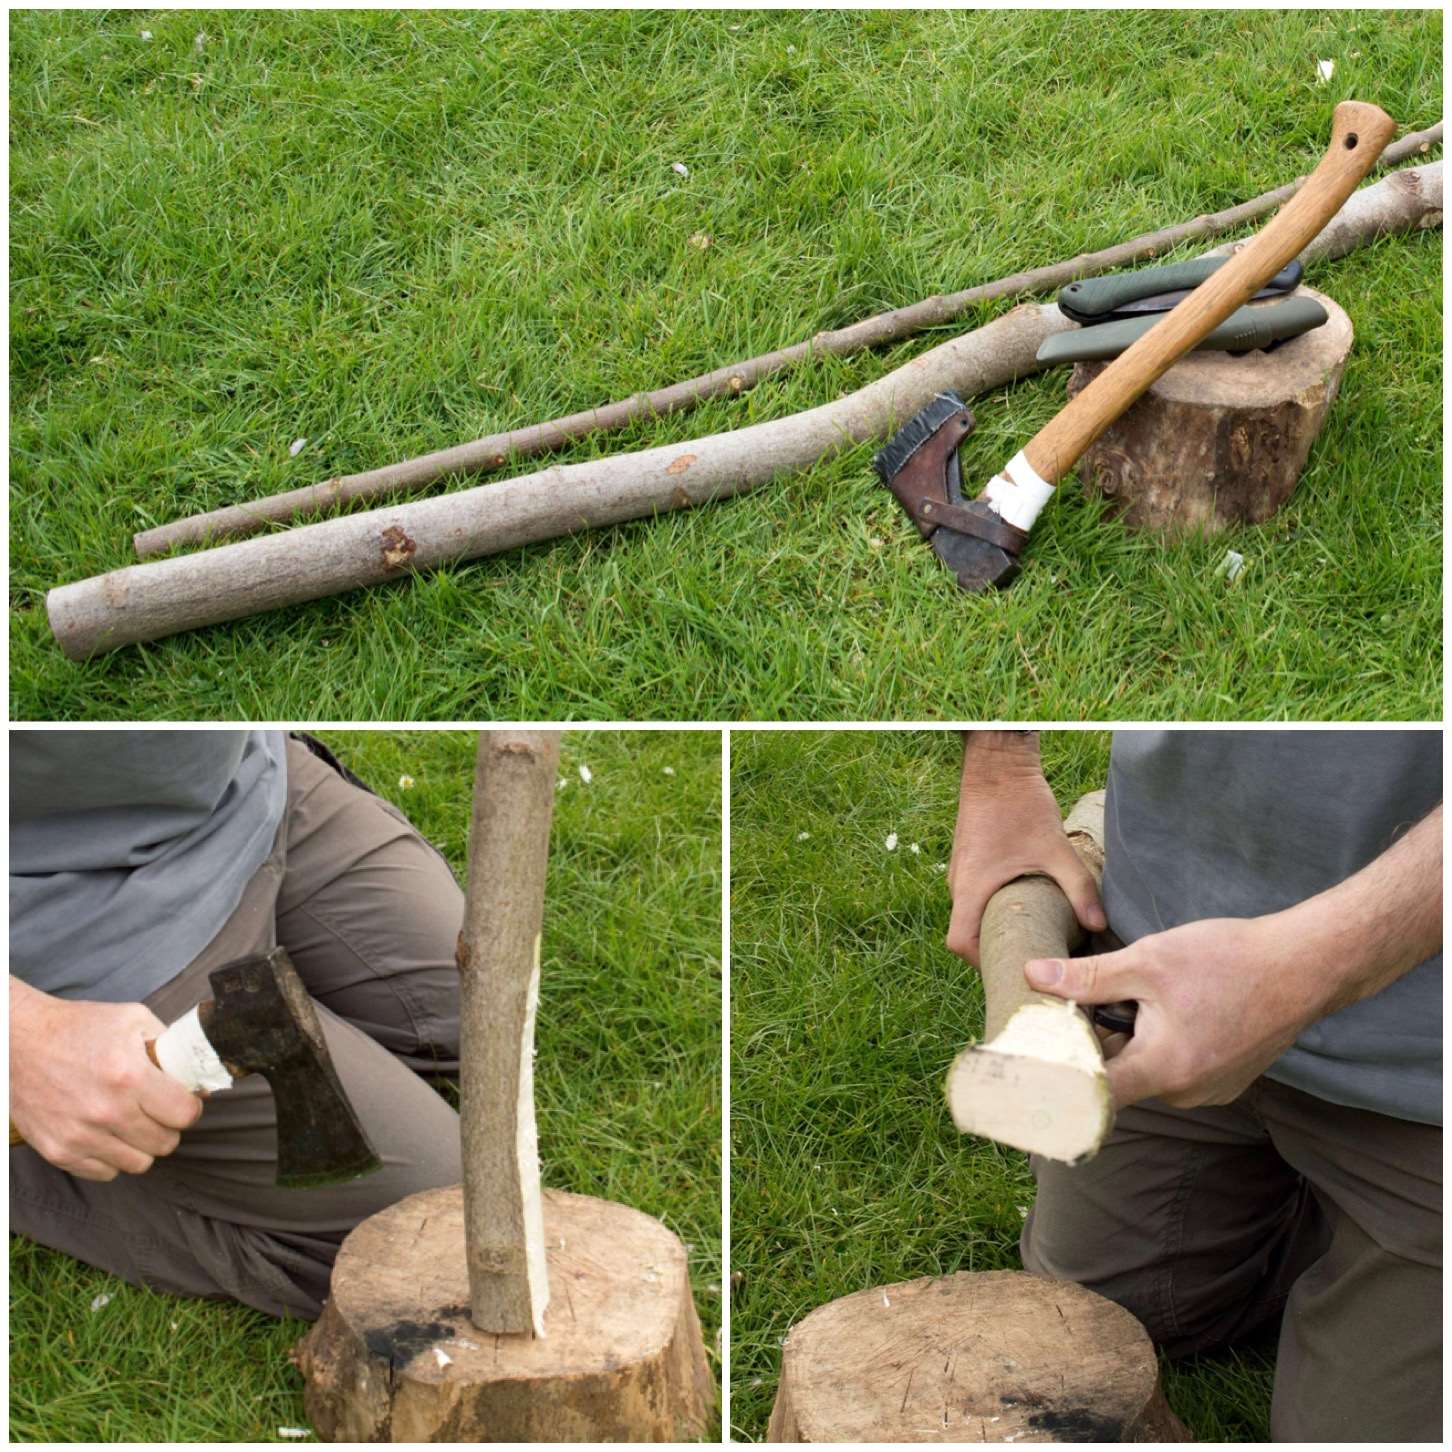
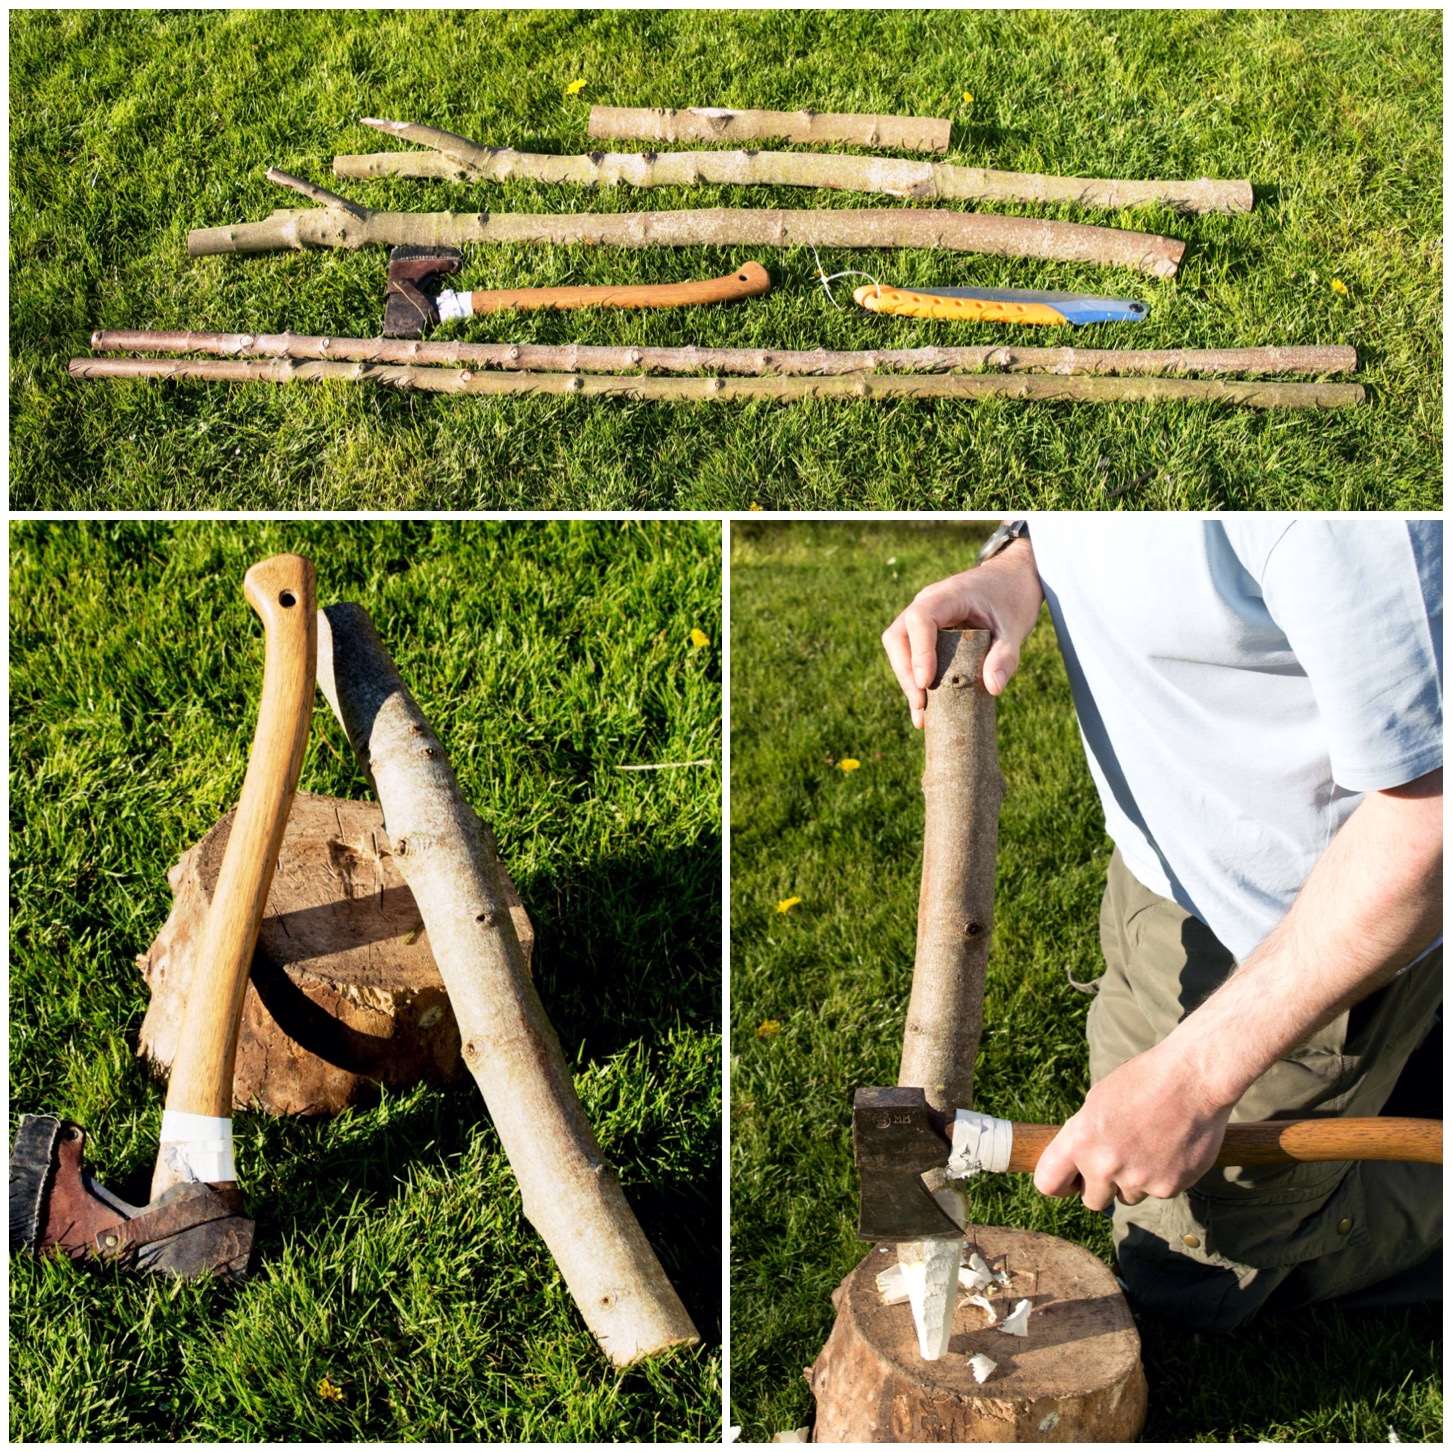
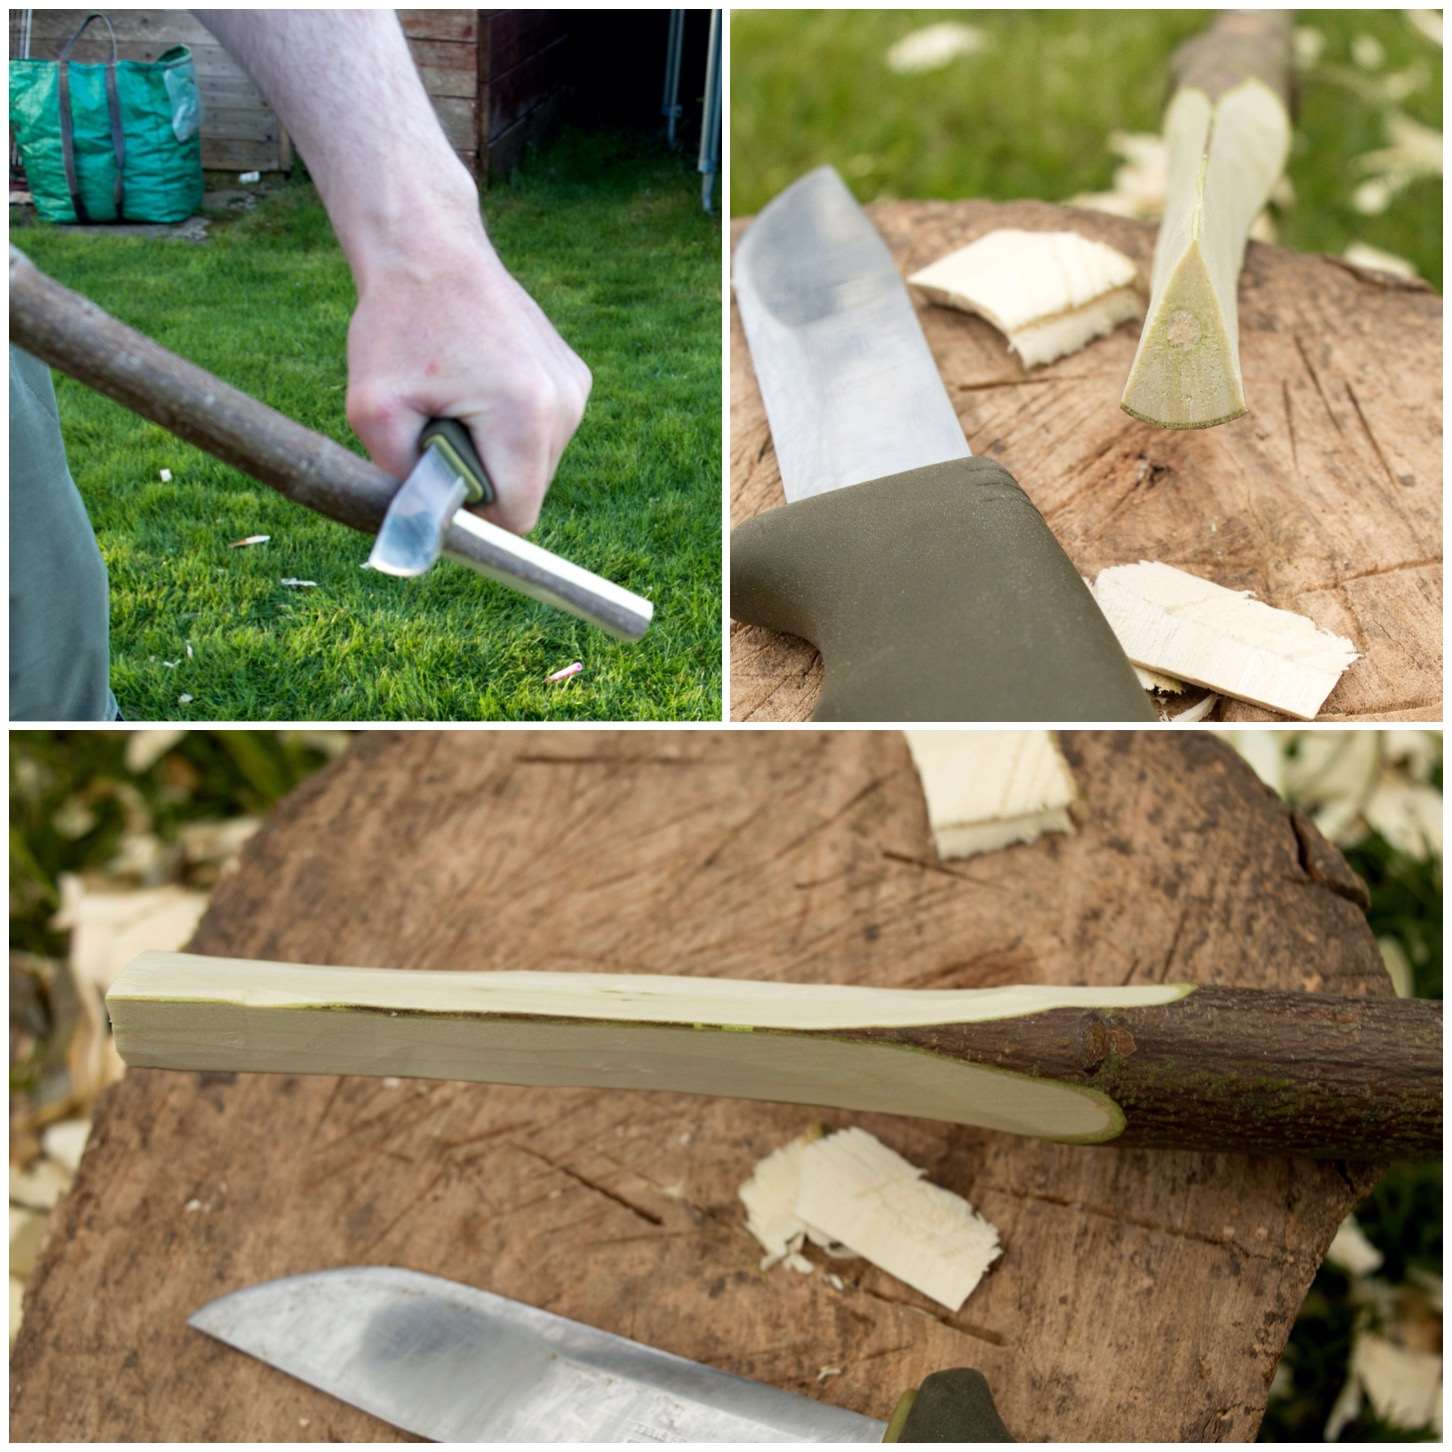
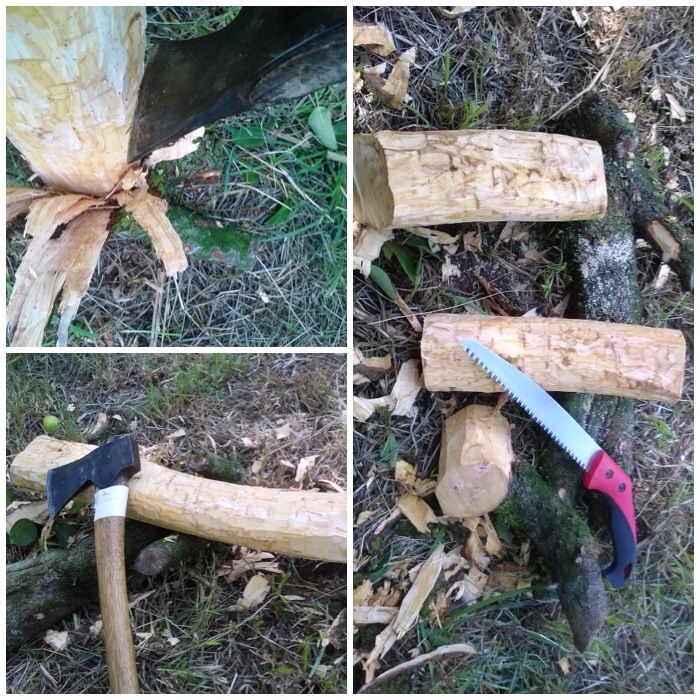
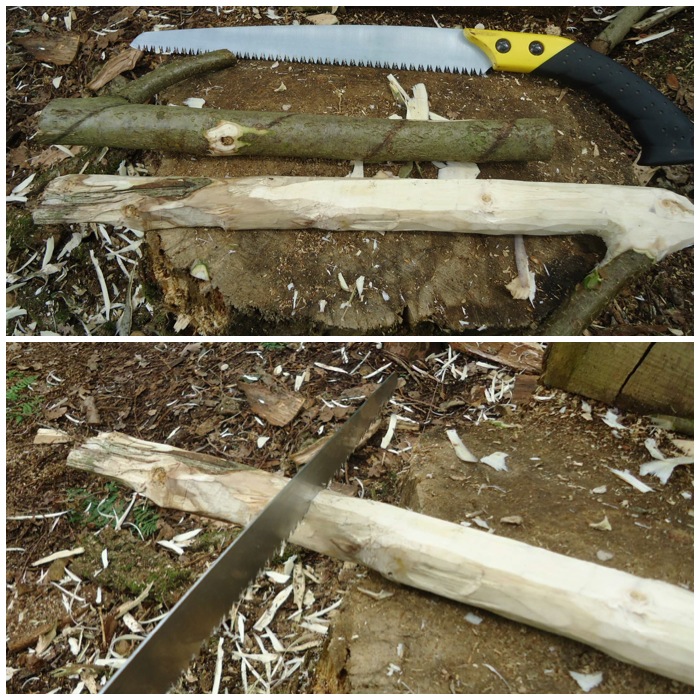
As usual I limited myself to the tools I would usually carry in my backpack, including a knife, saw and axe. A pen or pencil is handy for this project as well.
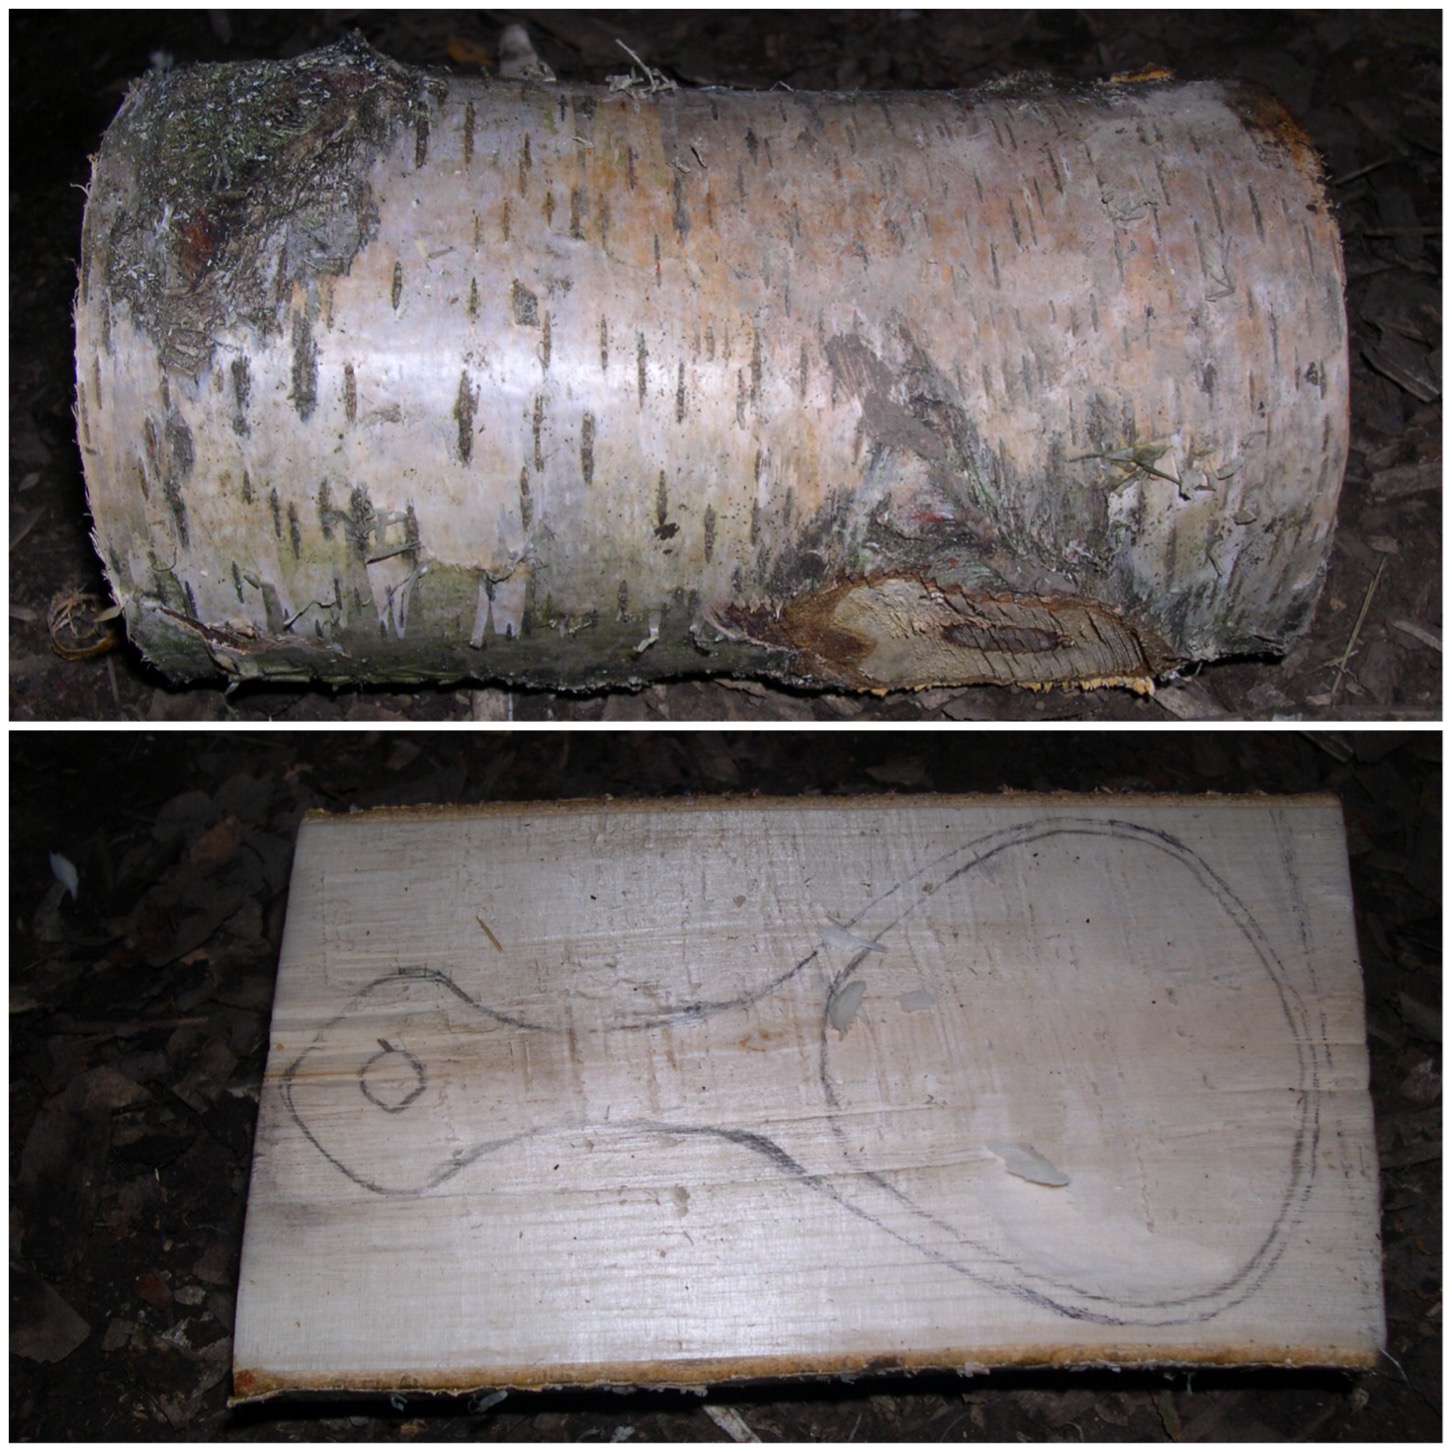
I’ve had a piece of birch stored in my garage for over a year however it had absorbed moisture over the winter and was fairly damp in its core.
Tools
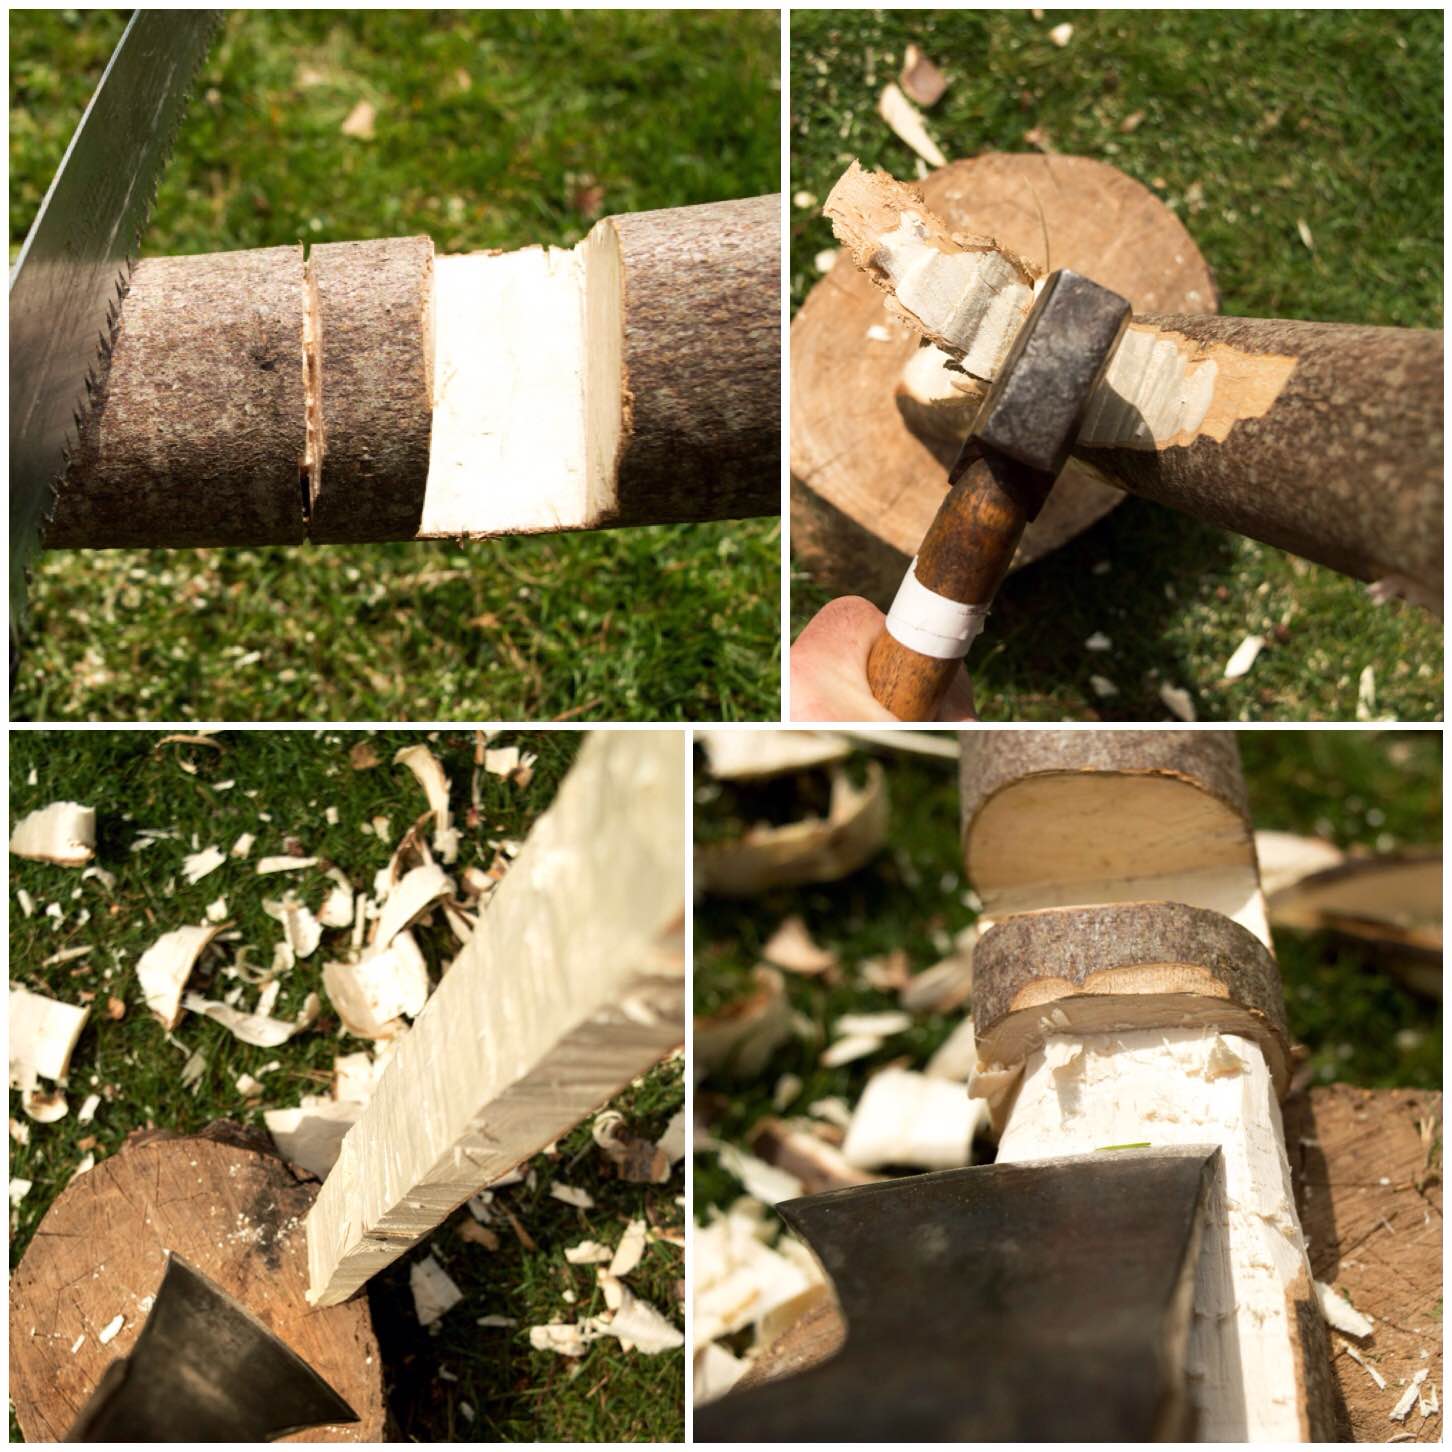
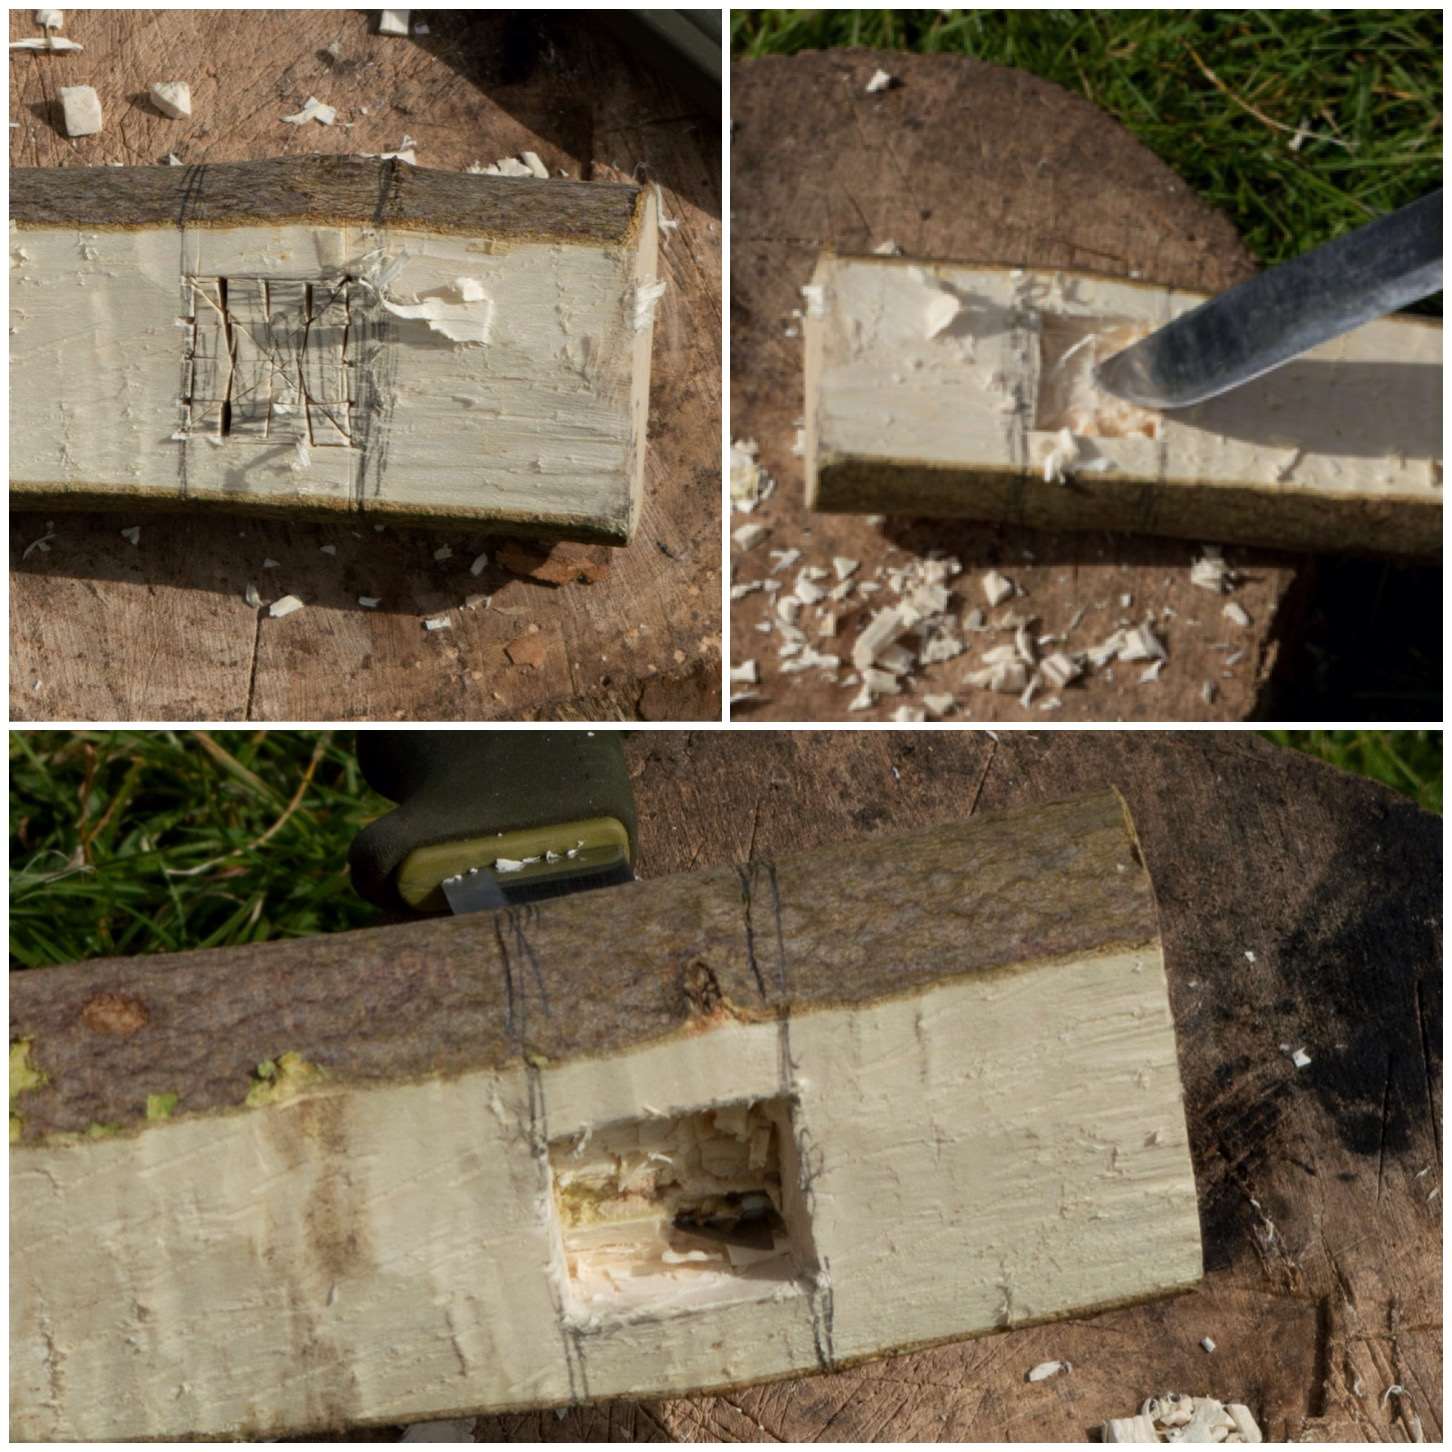
Splitting Out
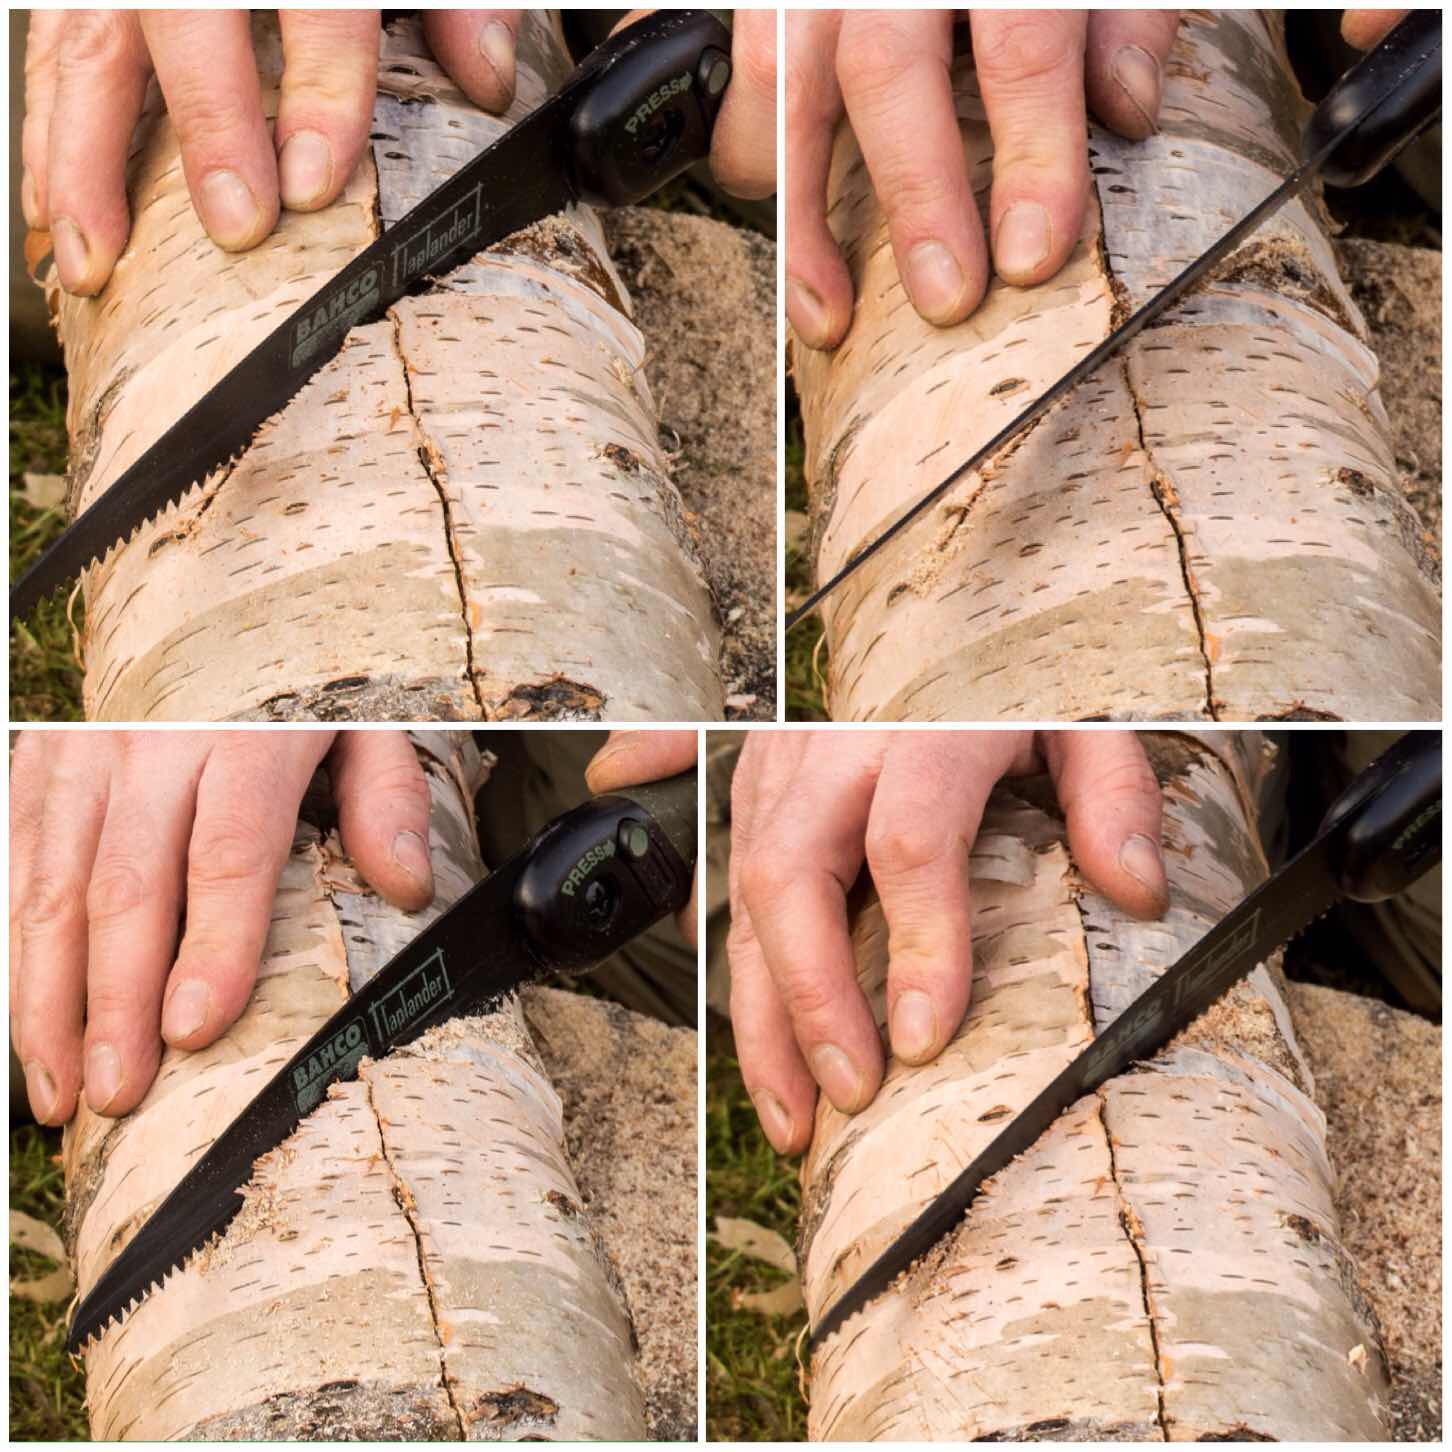
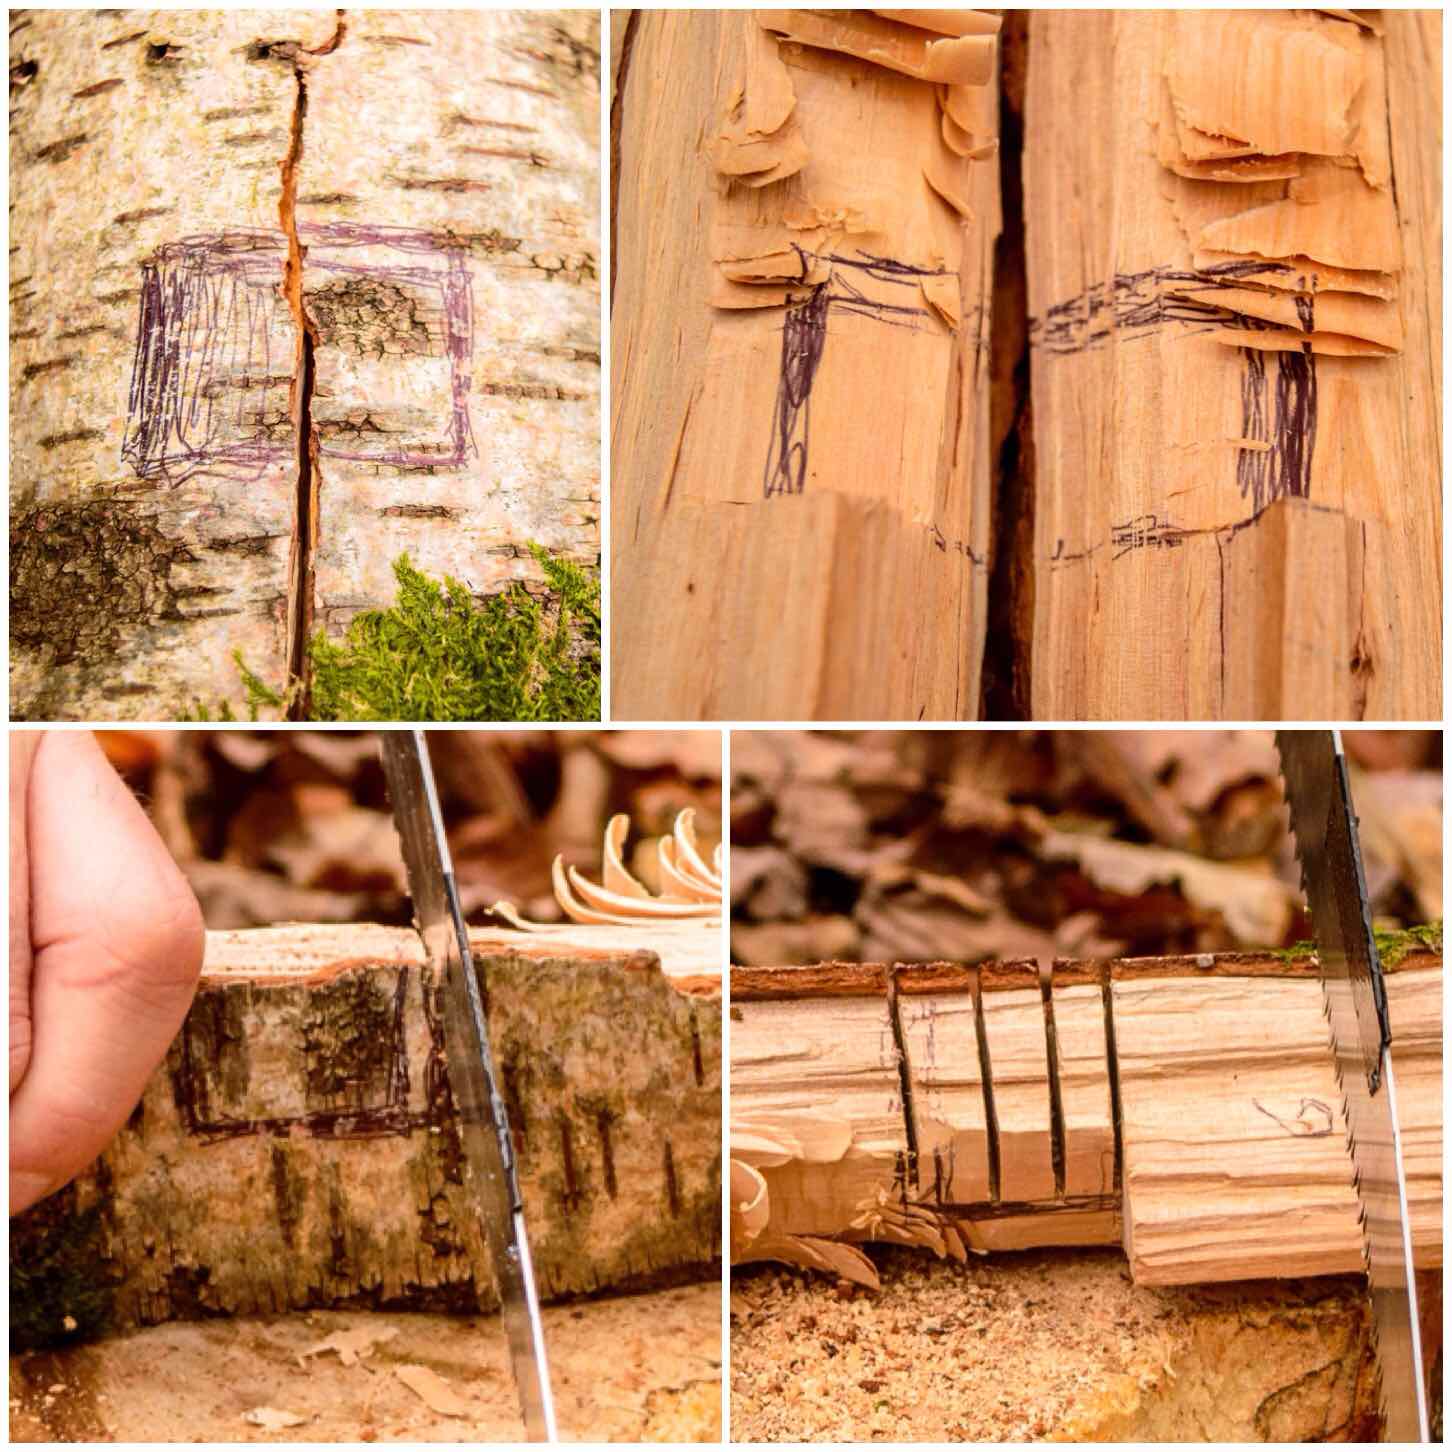
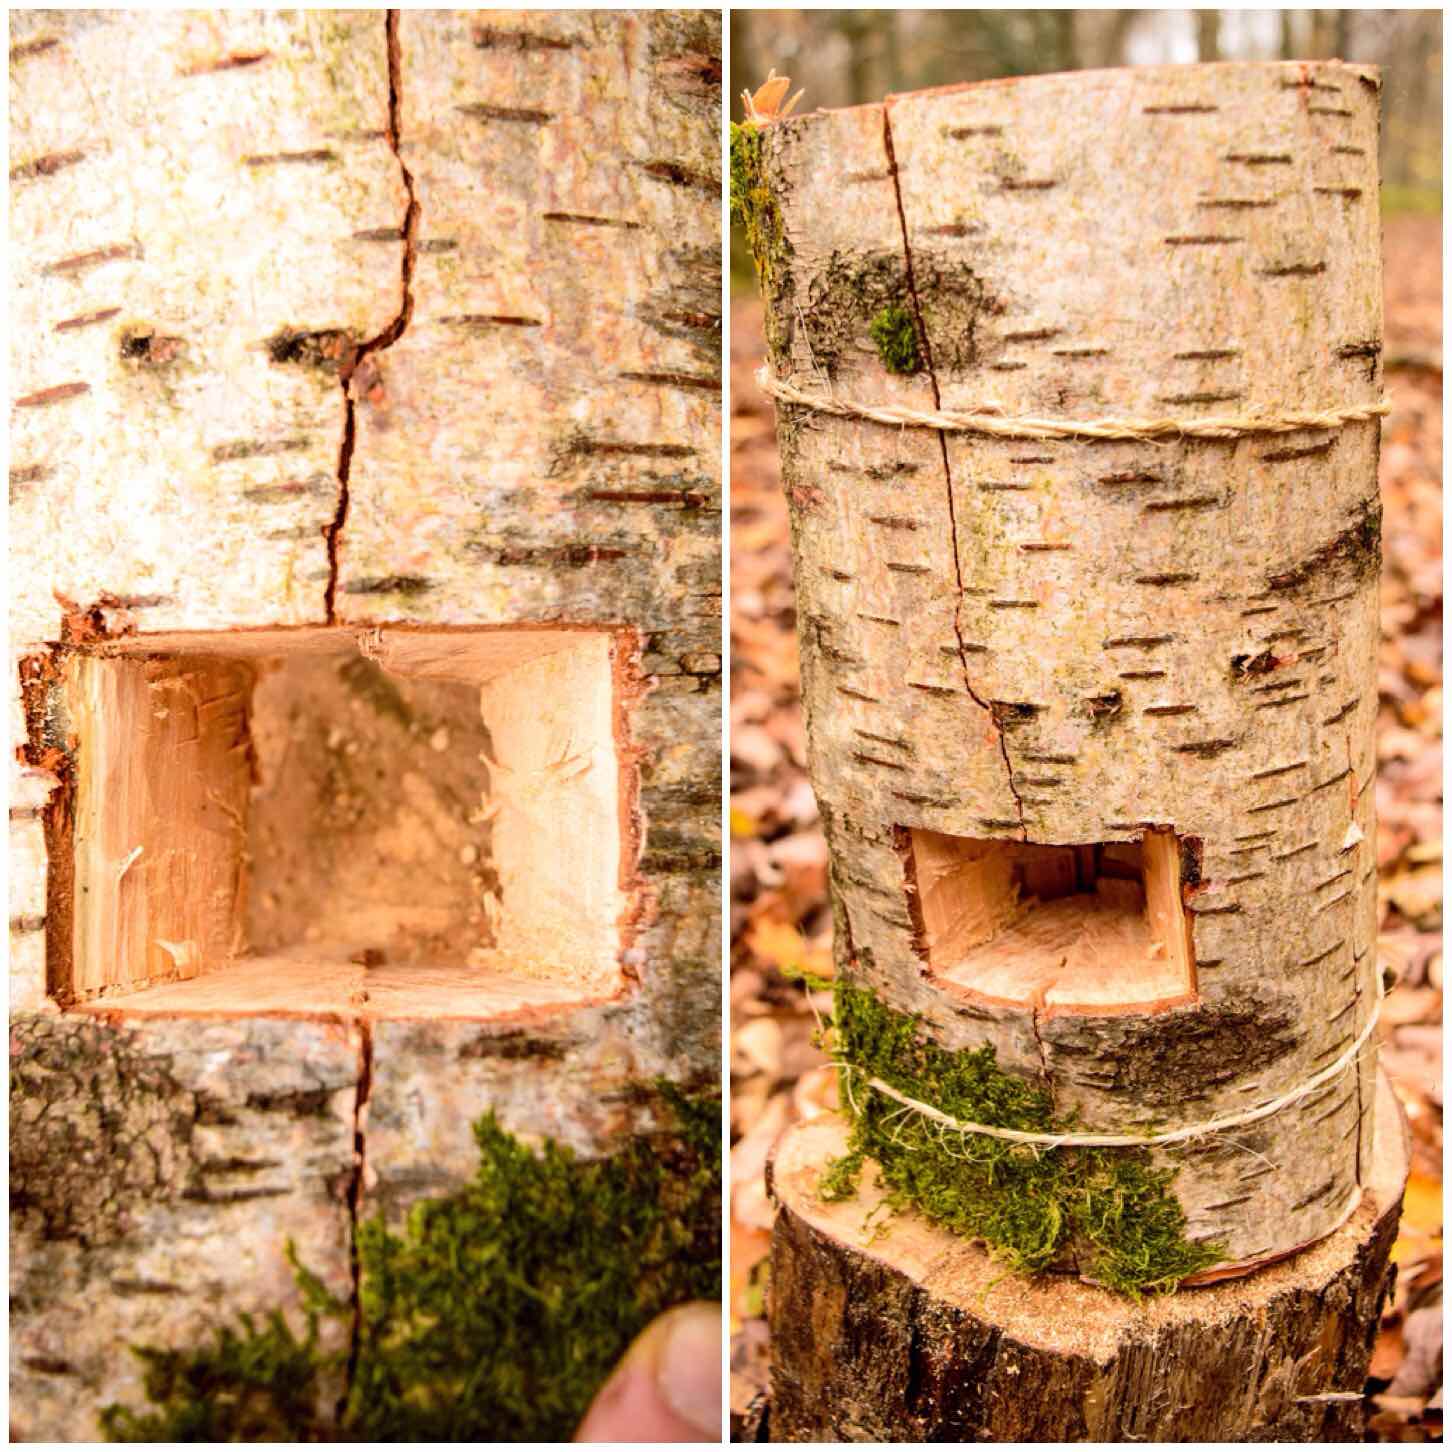
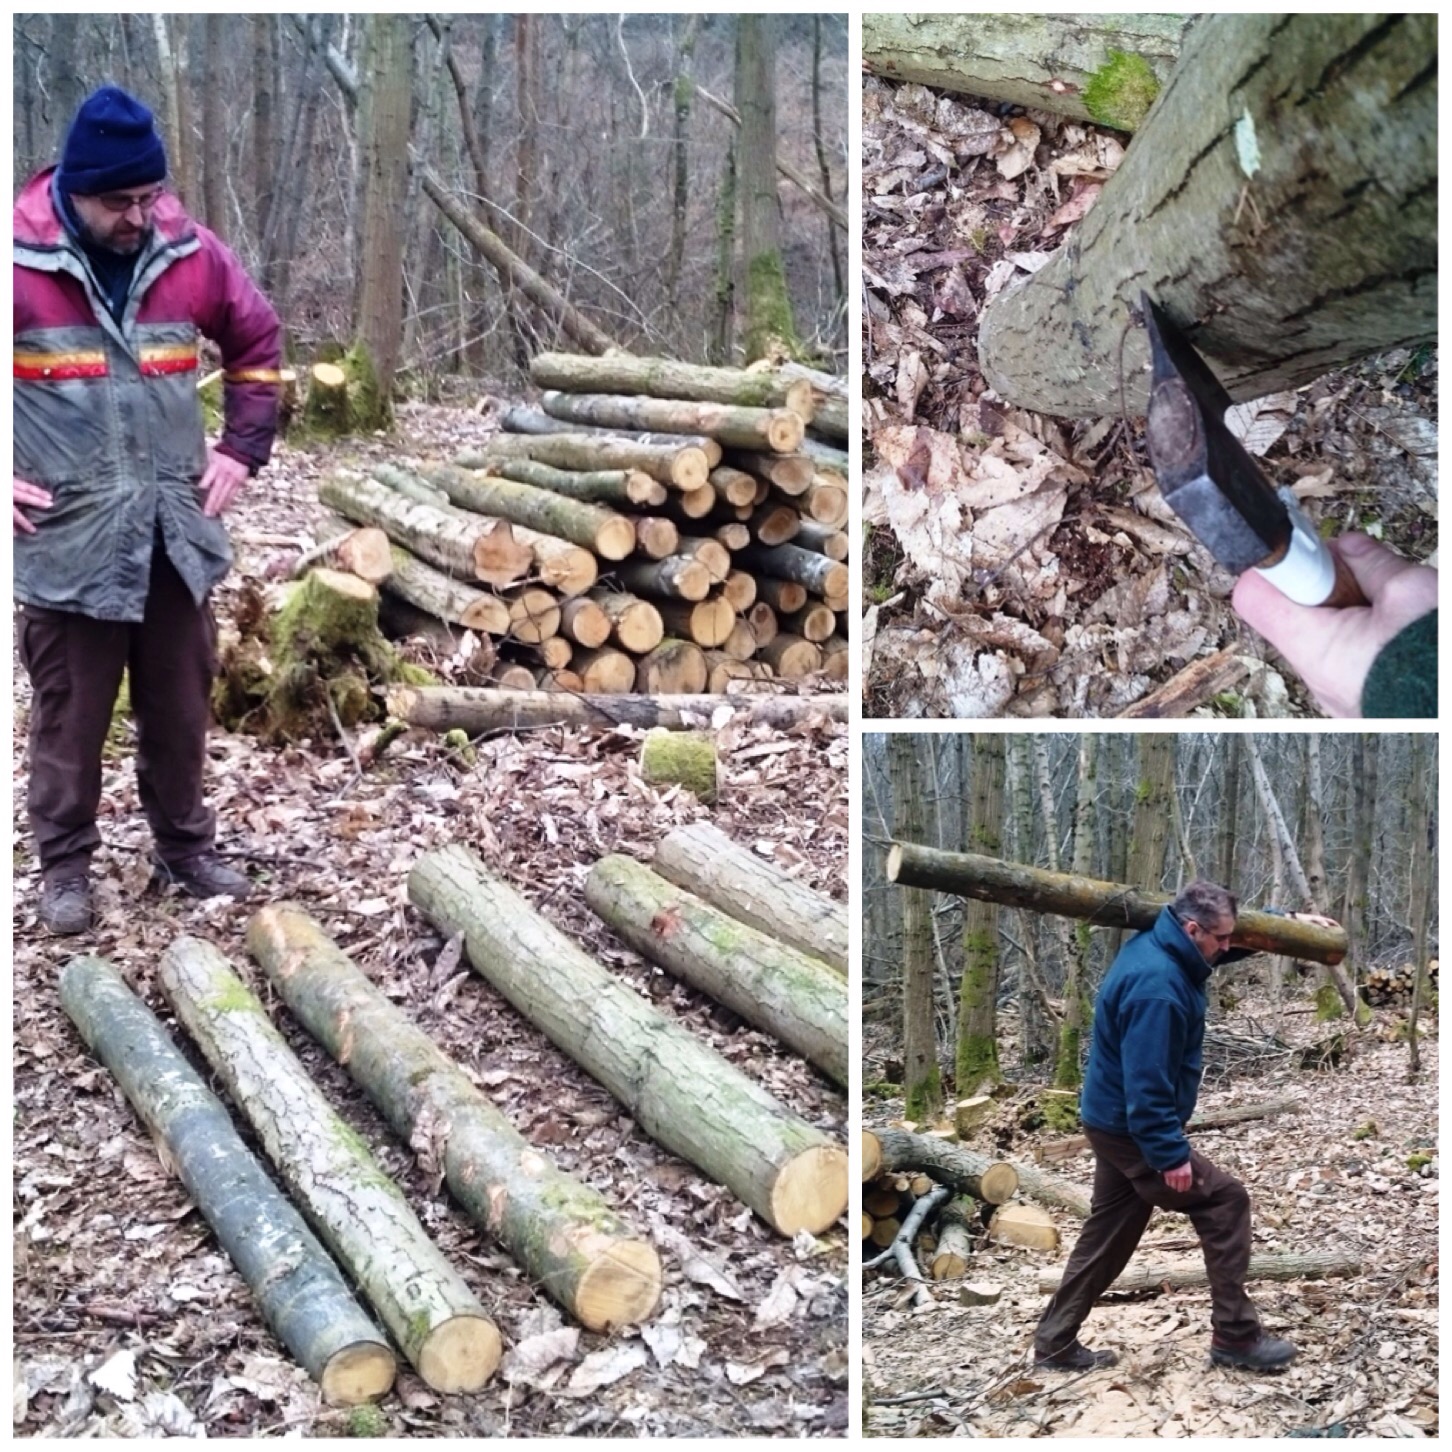
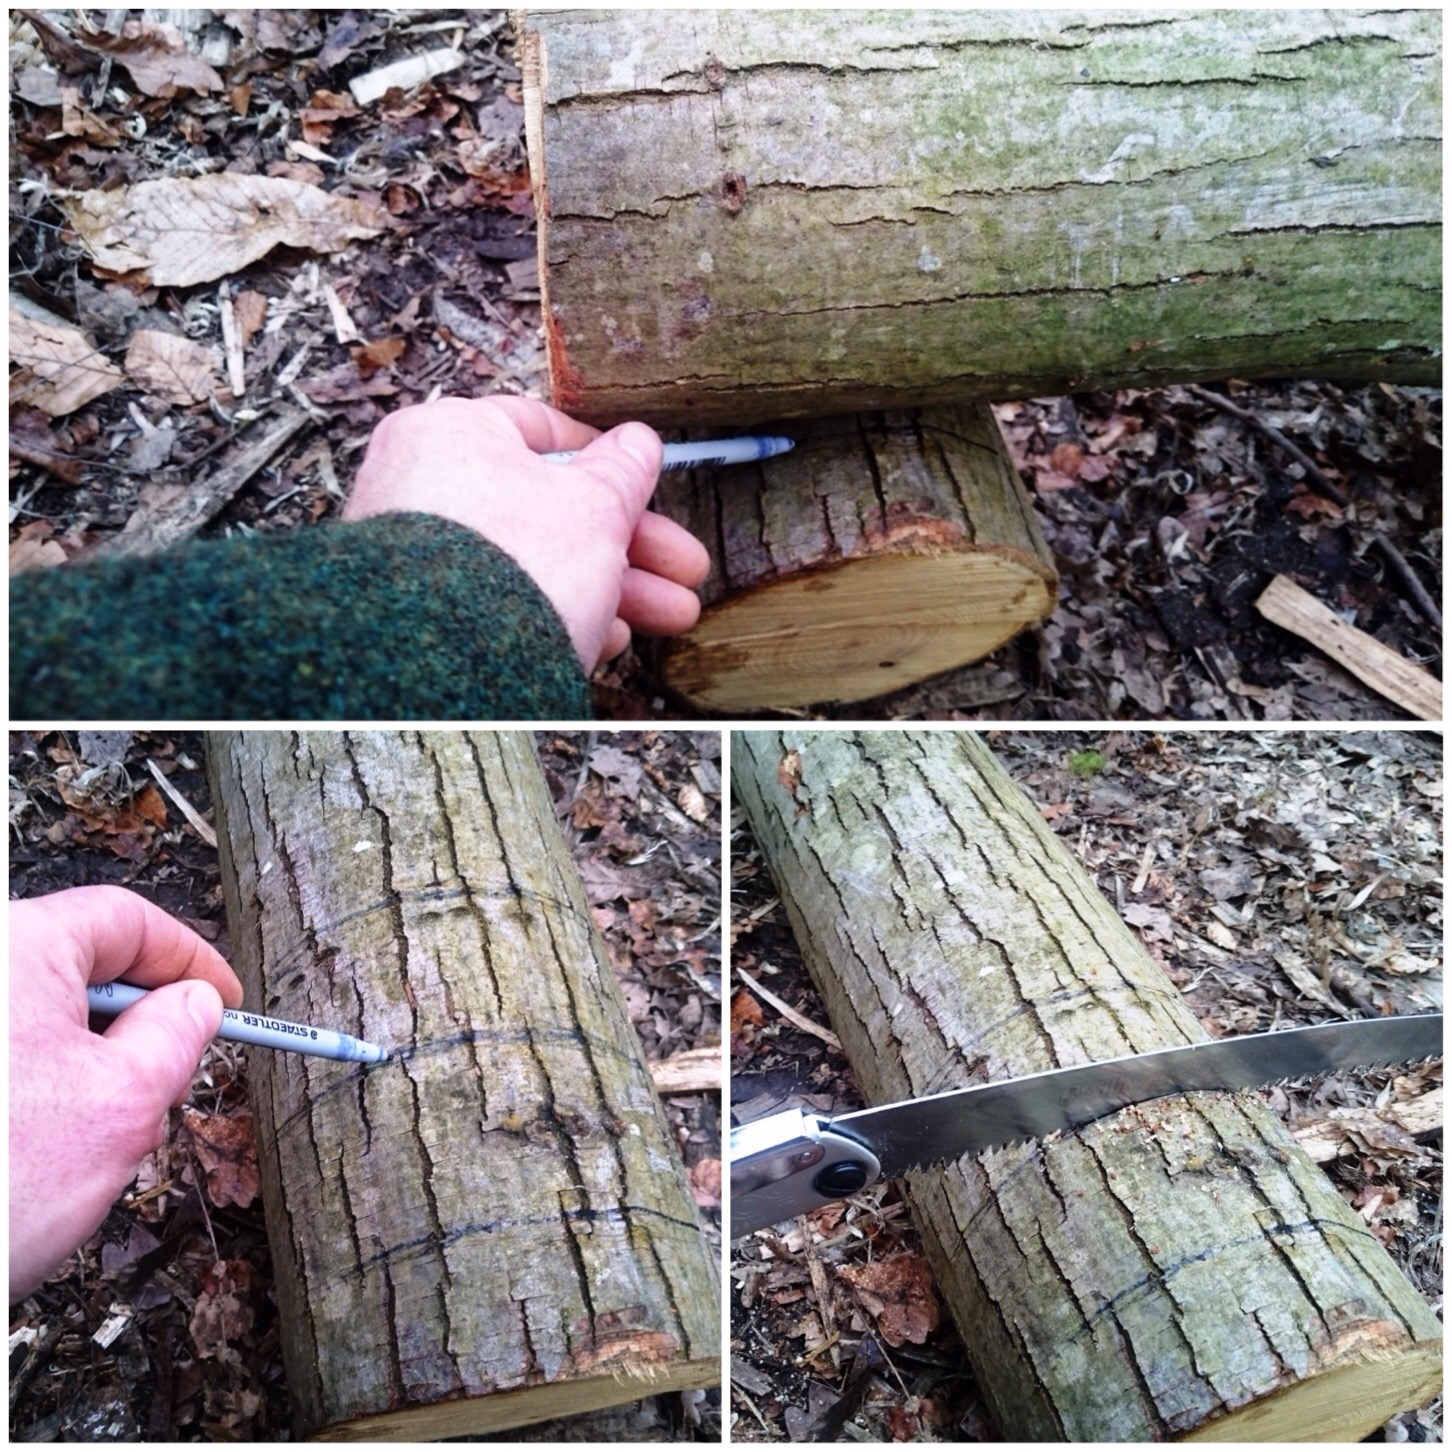
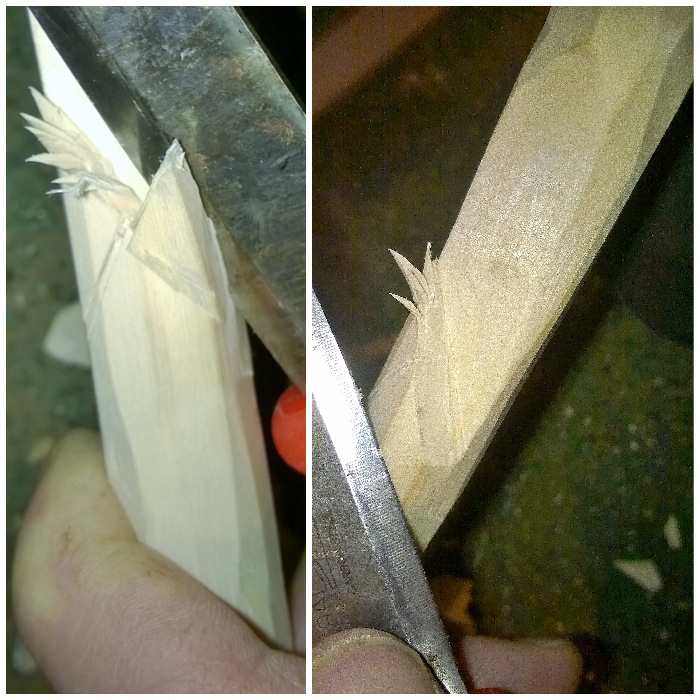
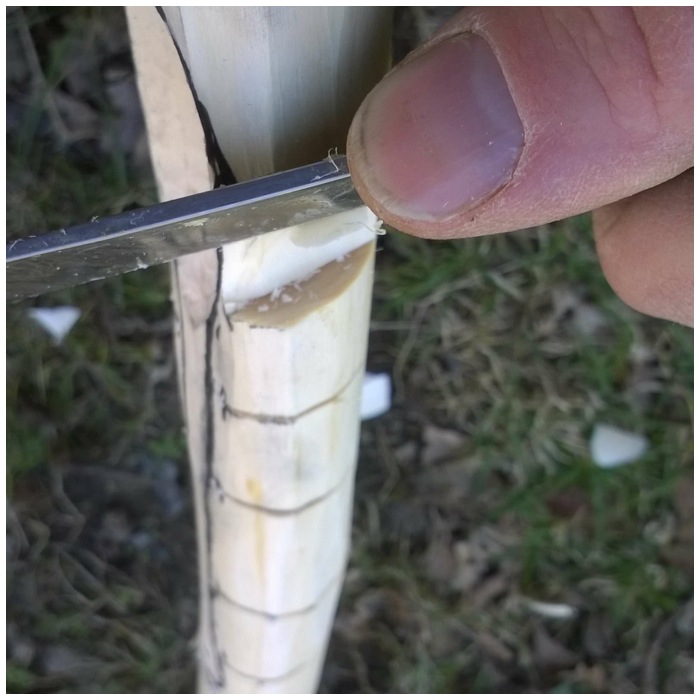
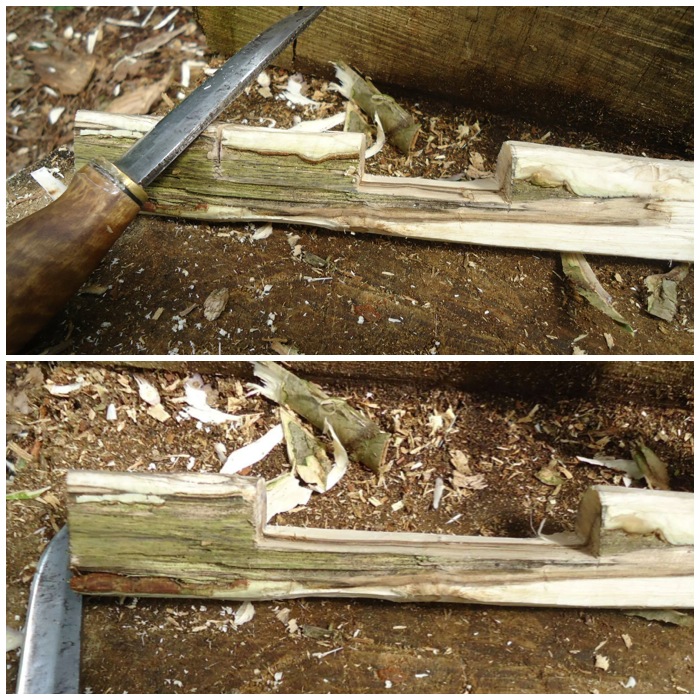
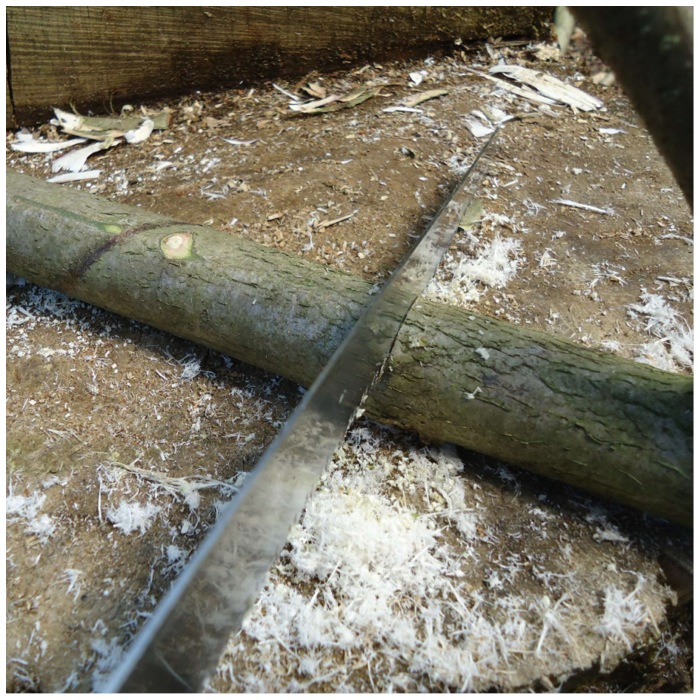
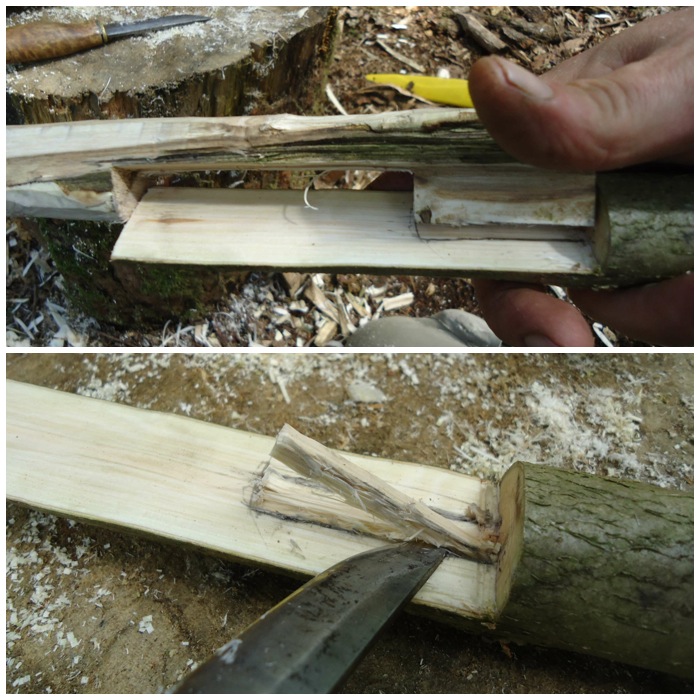
This style of log rocket requires you to put a stop cut into the bottom of the log to about two thirds of its width. You can see in the top left picture below the cut is about 10 to 15 cms from what will be the bottom of the stove.
The top right picture below shoes you how far I put my stop cut into the log. The bottom two pictures show me marking out with my saw the approximate area I would be battoning out.
Bottom cut and marking out
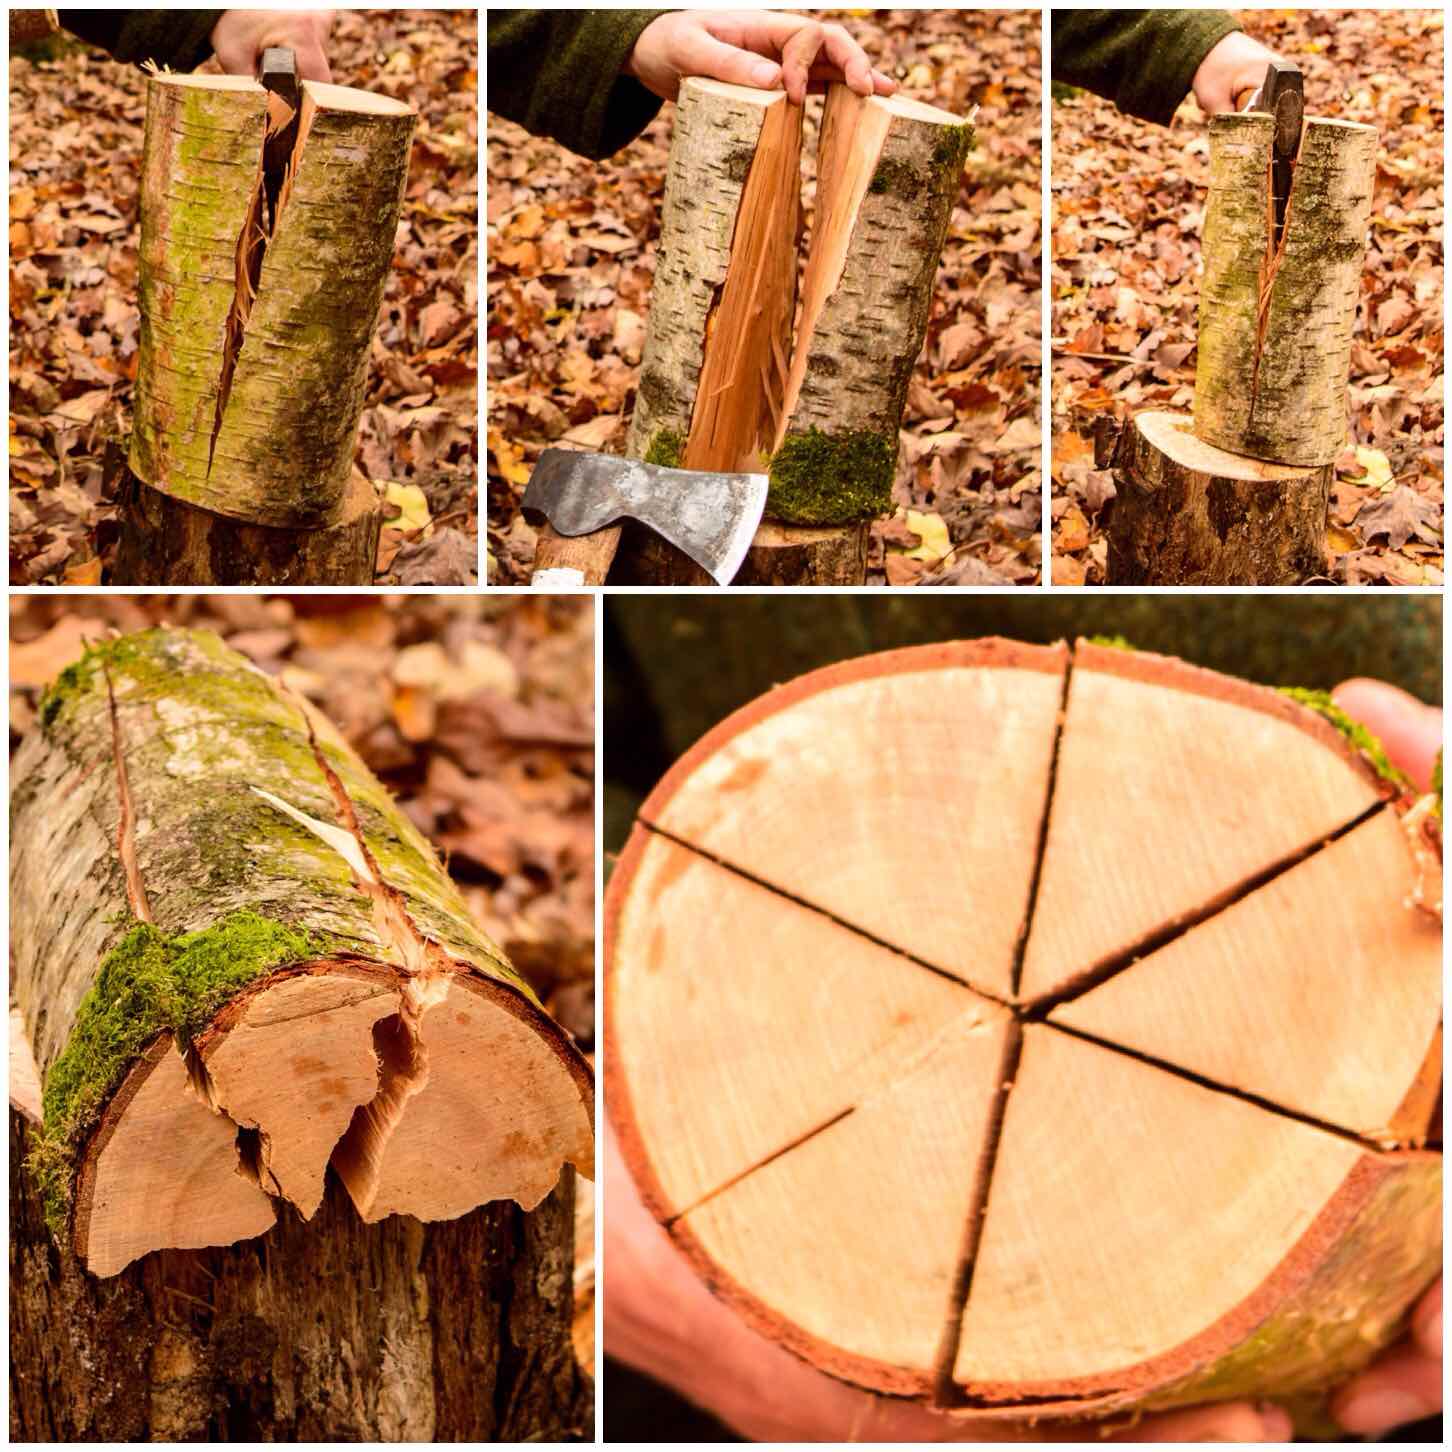
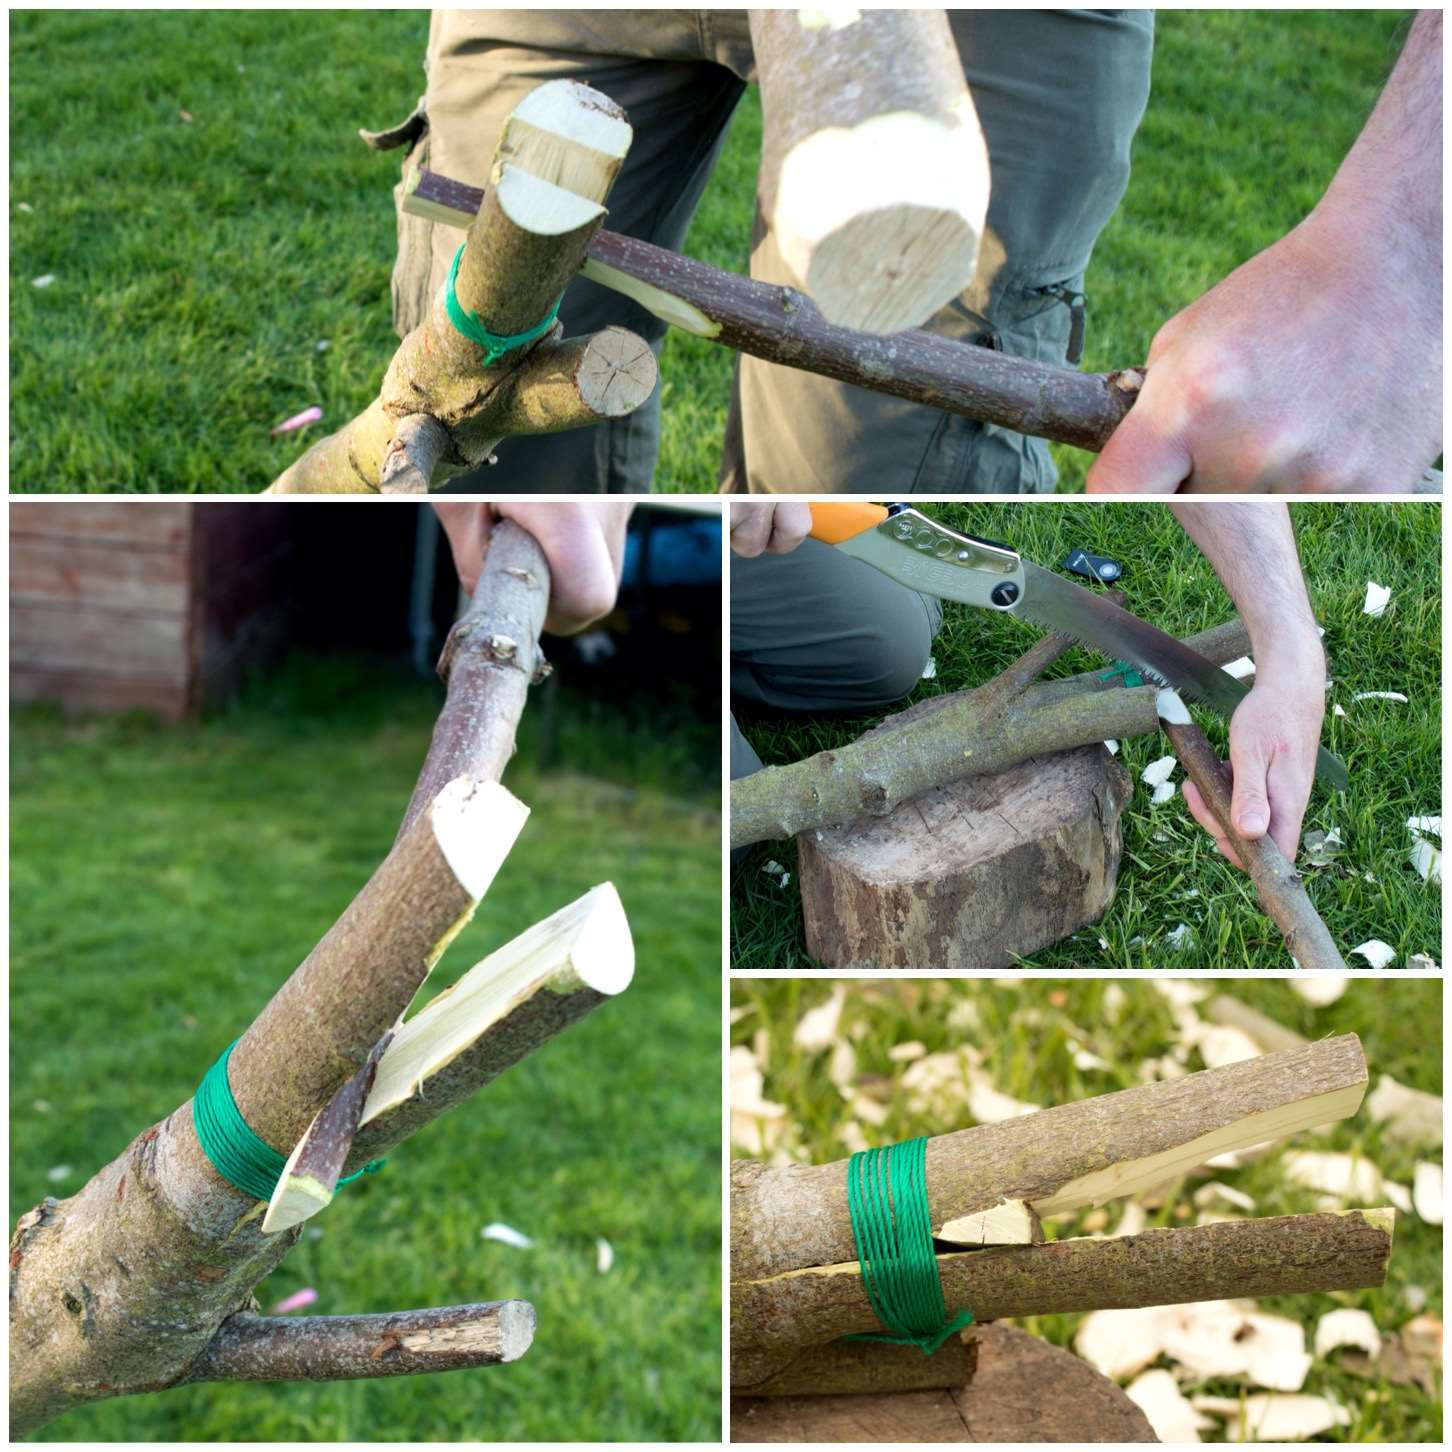
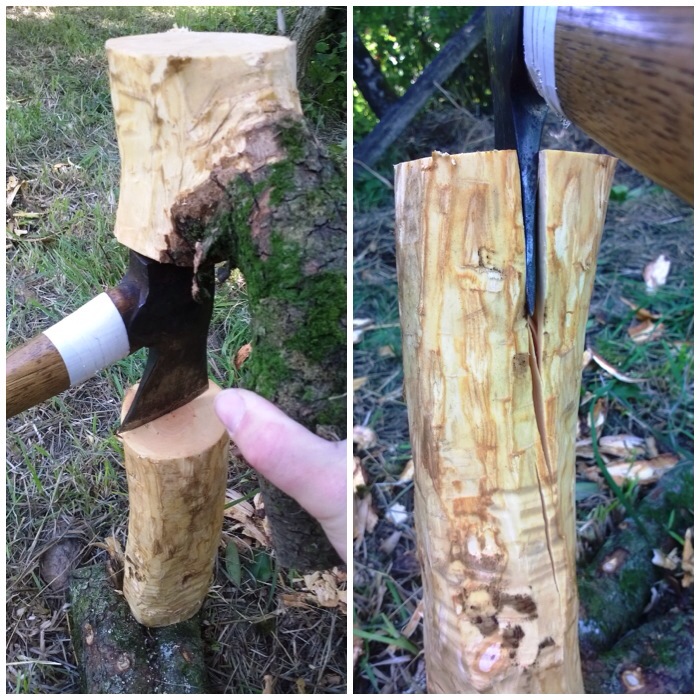
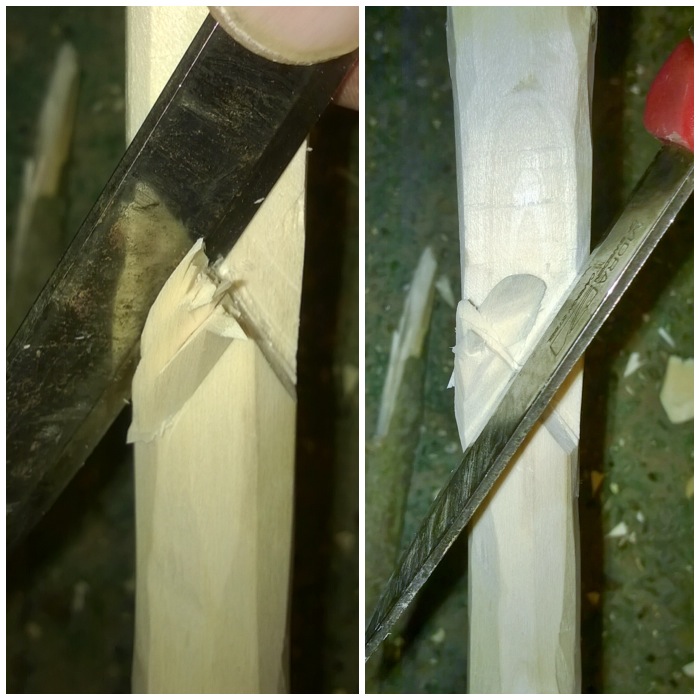
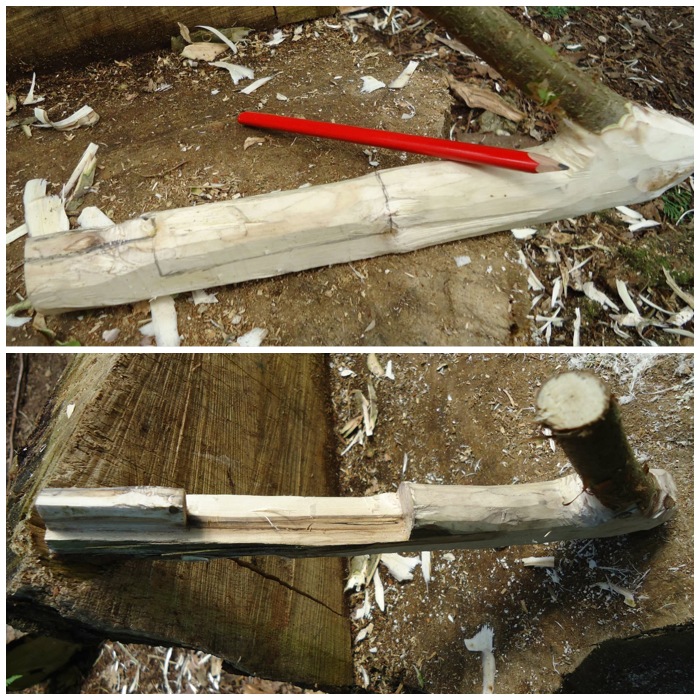
I used my axe and a large piece of wood to batton out the the wood. You can see the shape of the stove at this stage with one segment in an inverted ‘L’ shape (Segment 1) and a smaller piece (Segment 2).
The bottom two photos show me marking out the smaller piece for further splitting. This piece is not split exactly in two as this configuration allows you to form the chimney very quickly.
Splitting
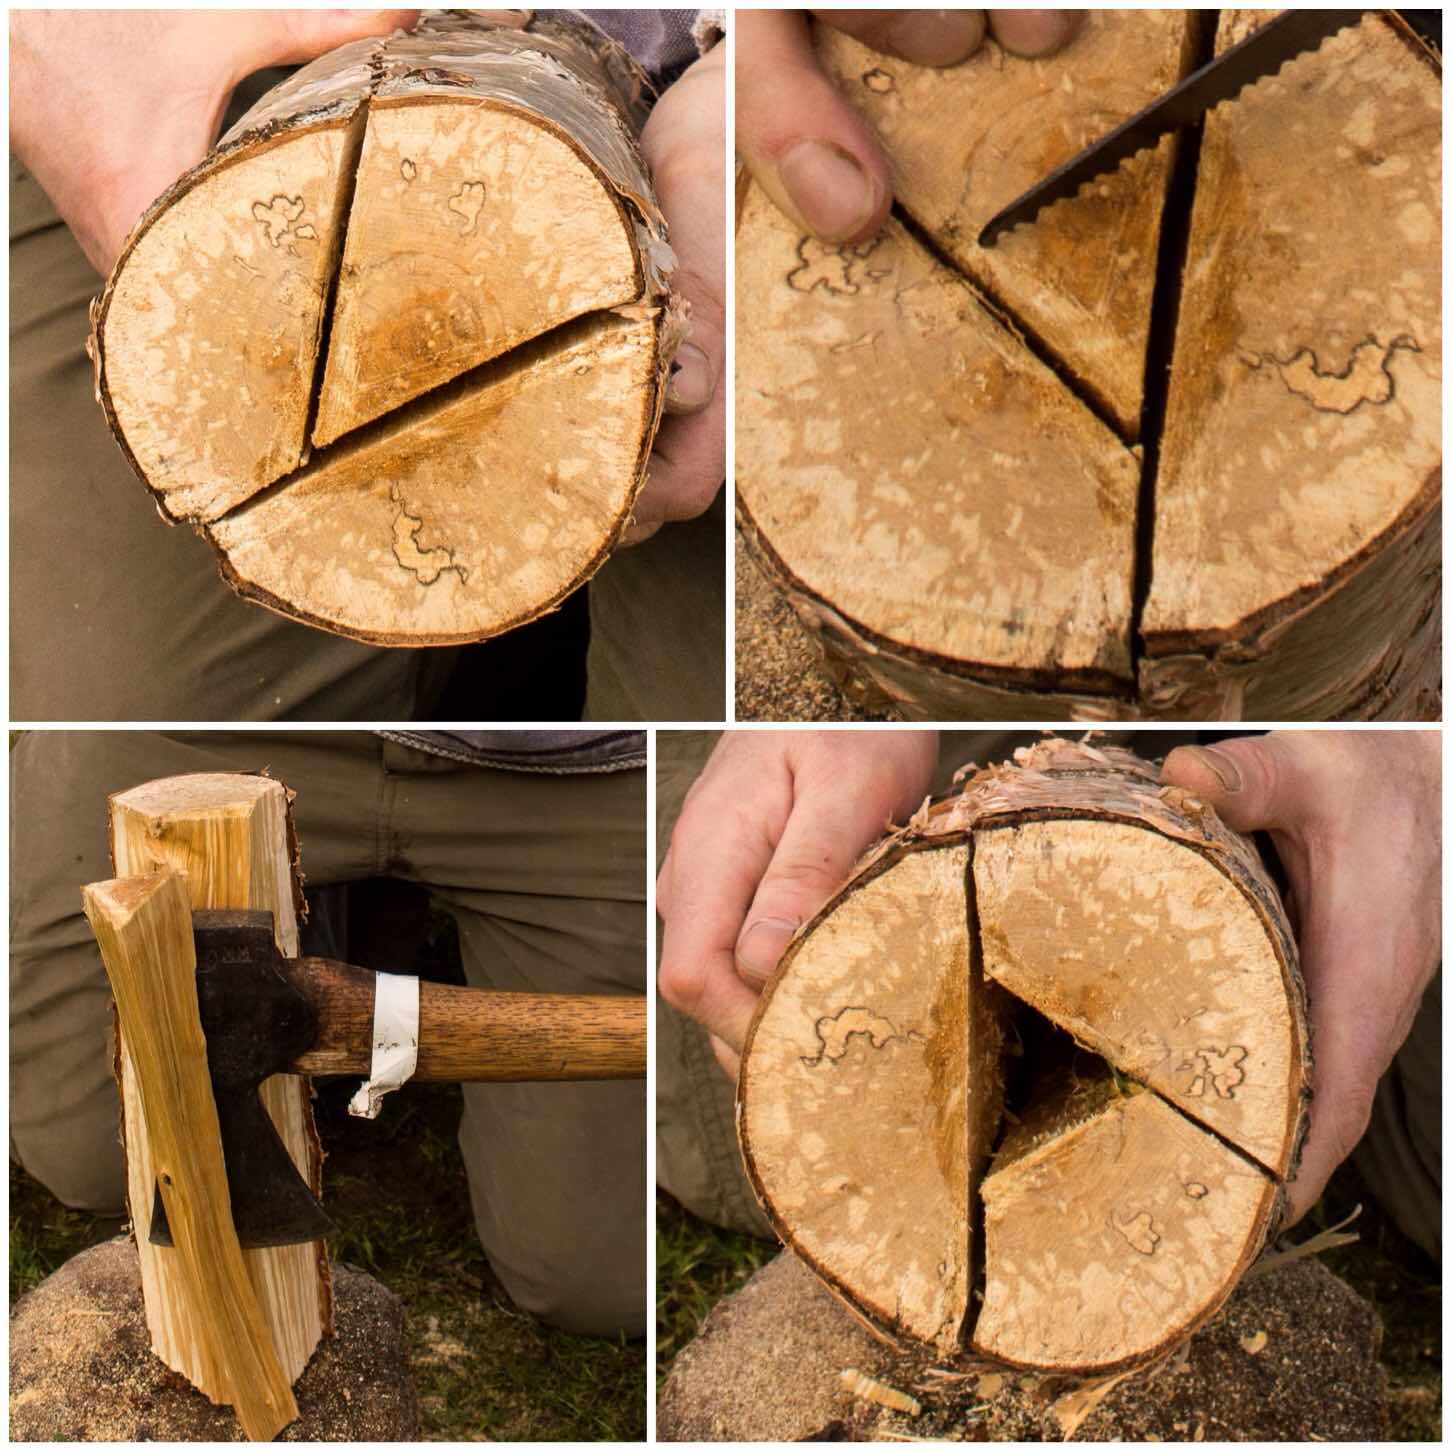
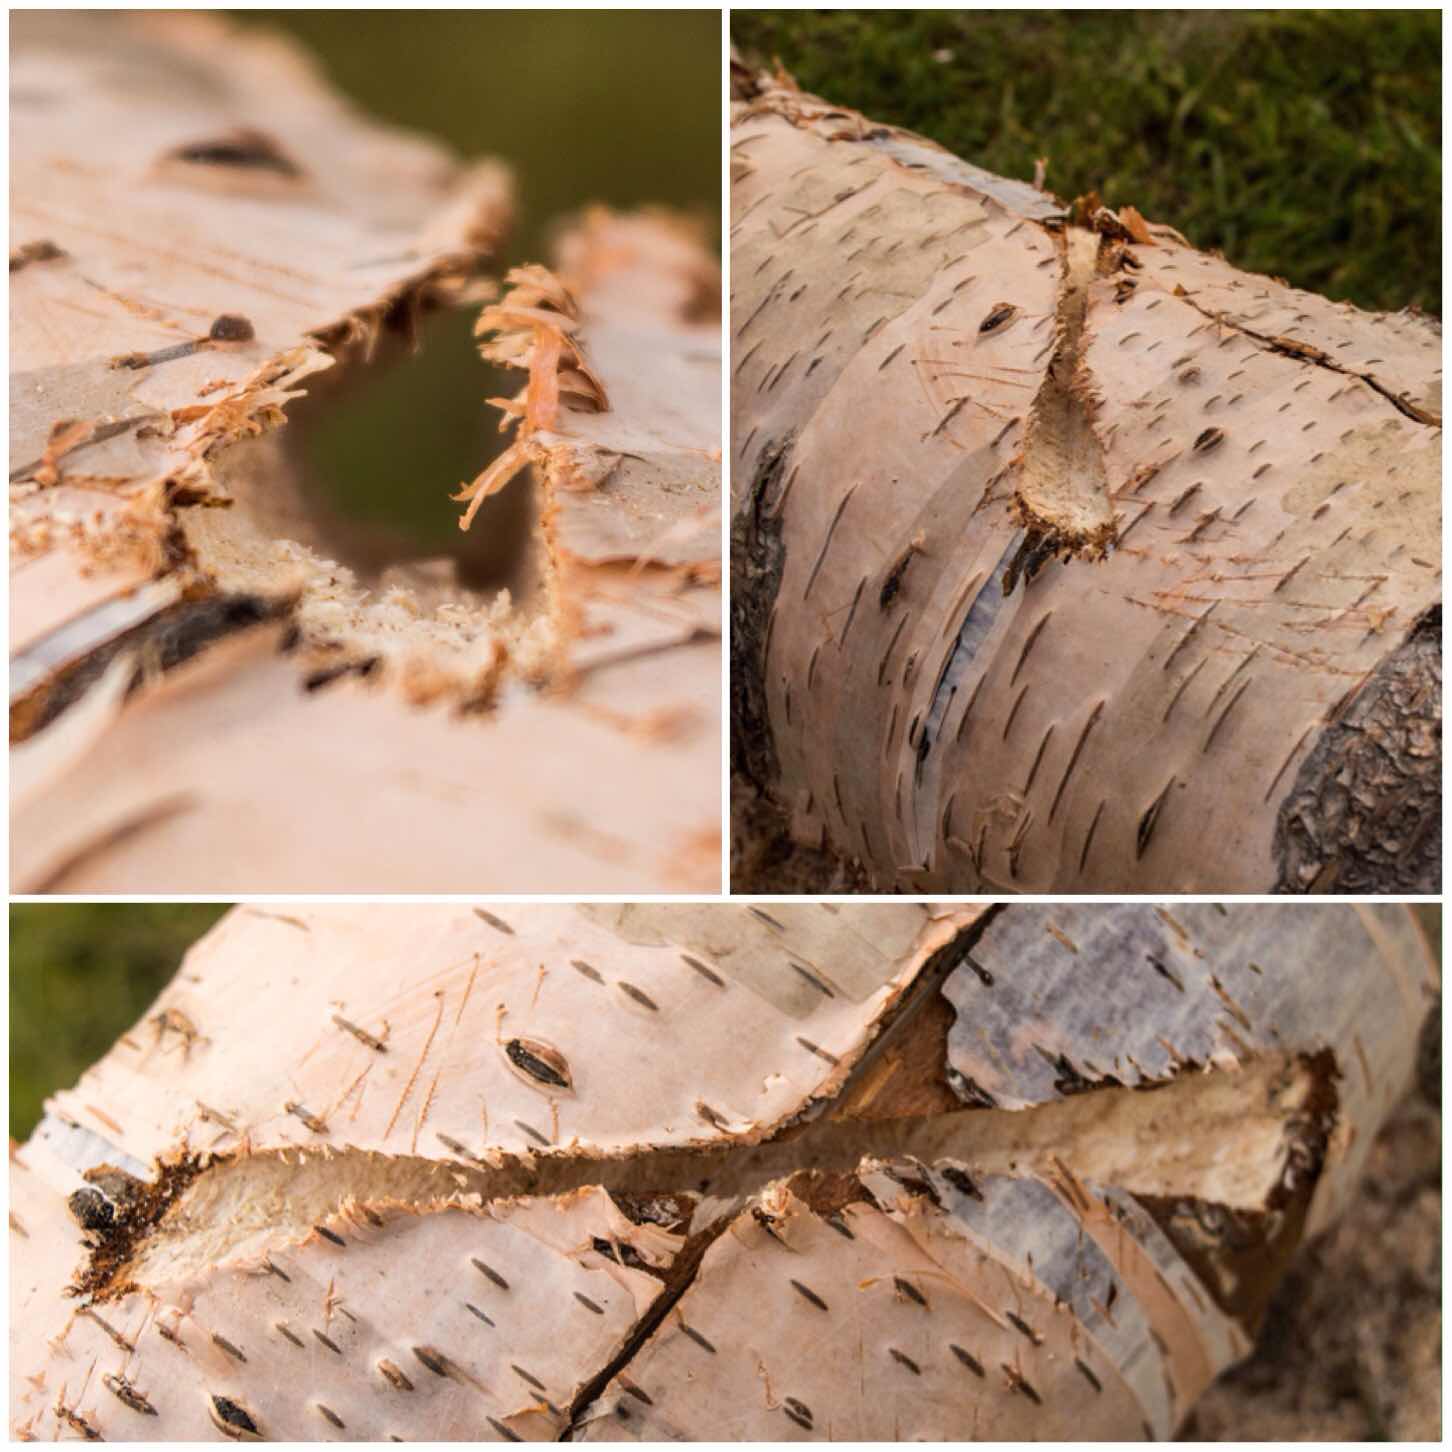
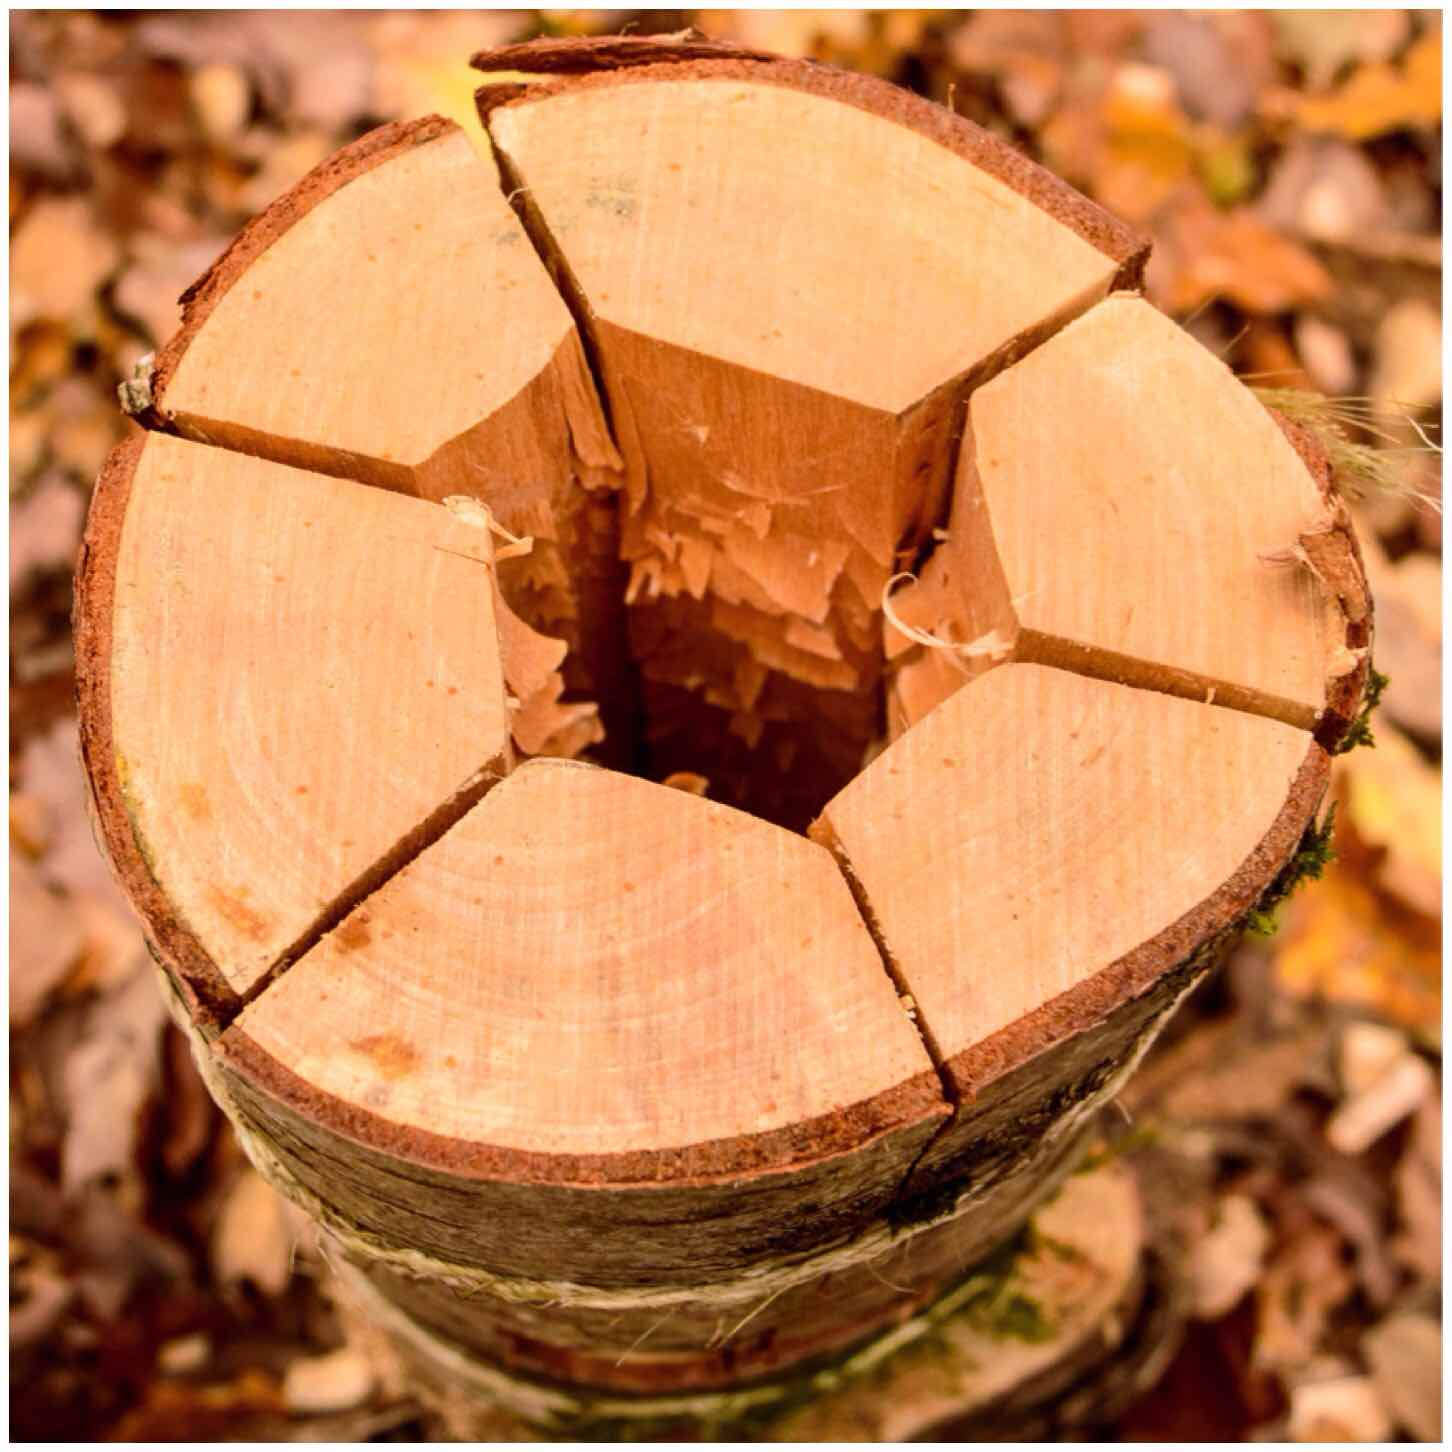
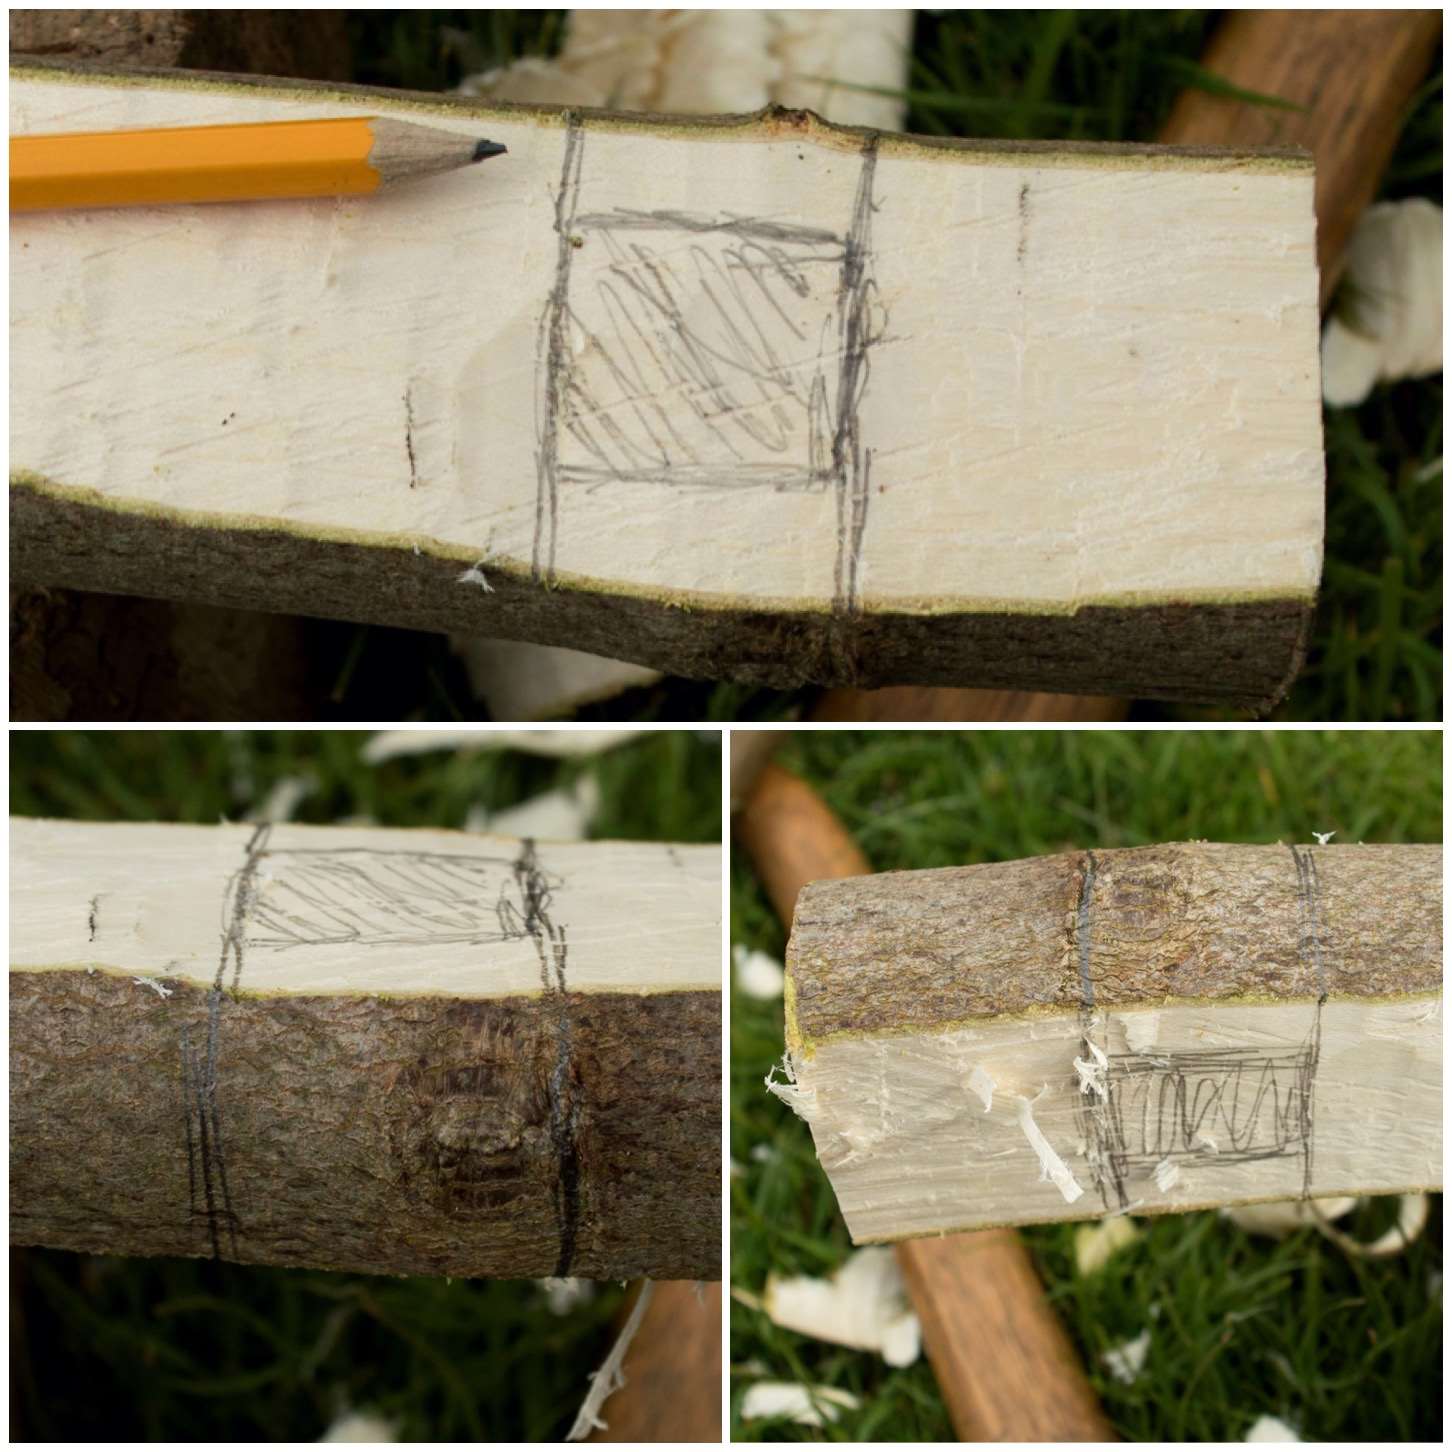
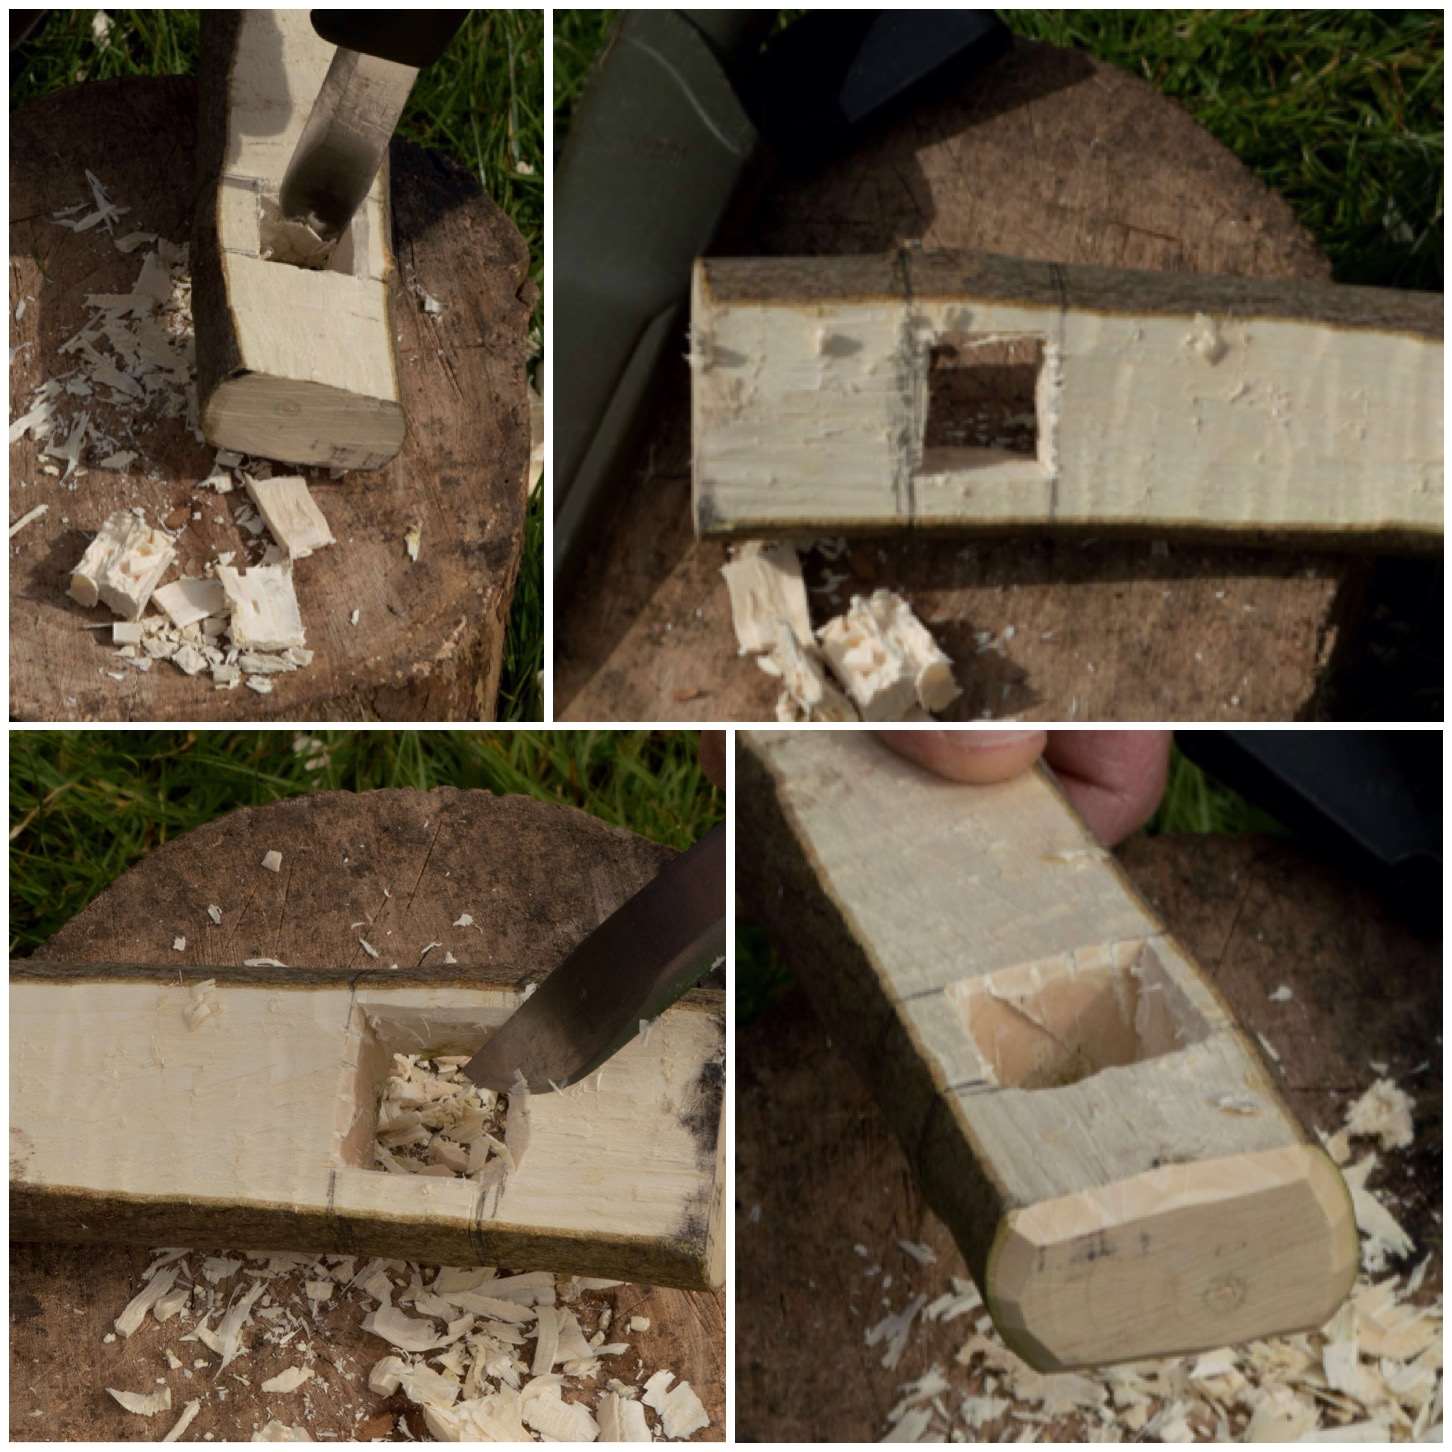
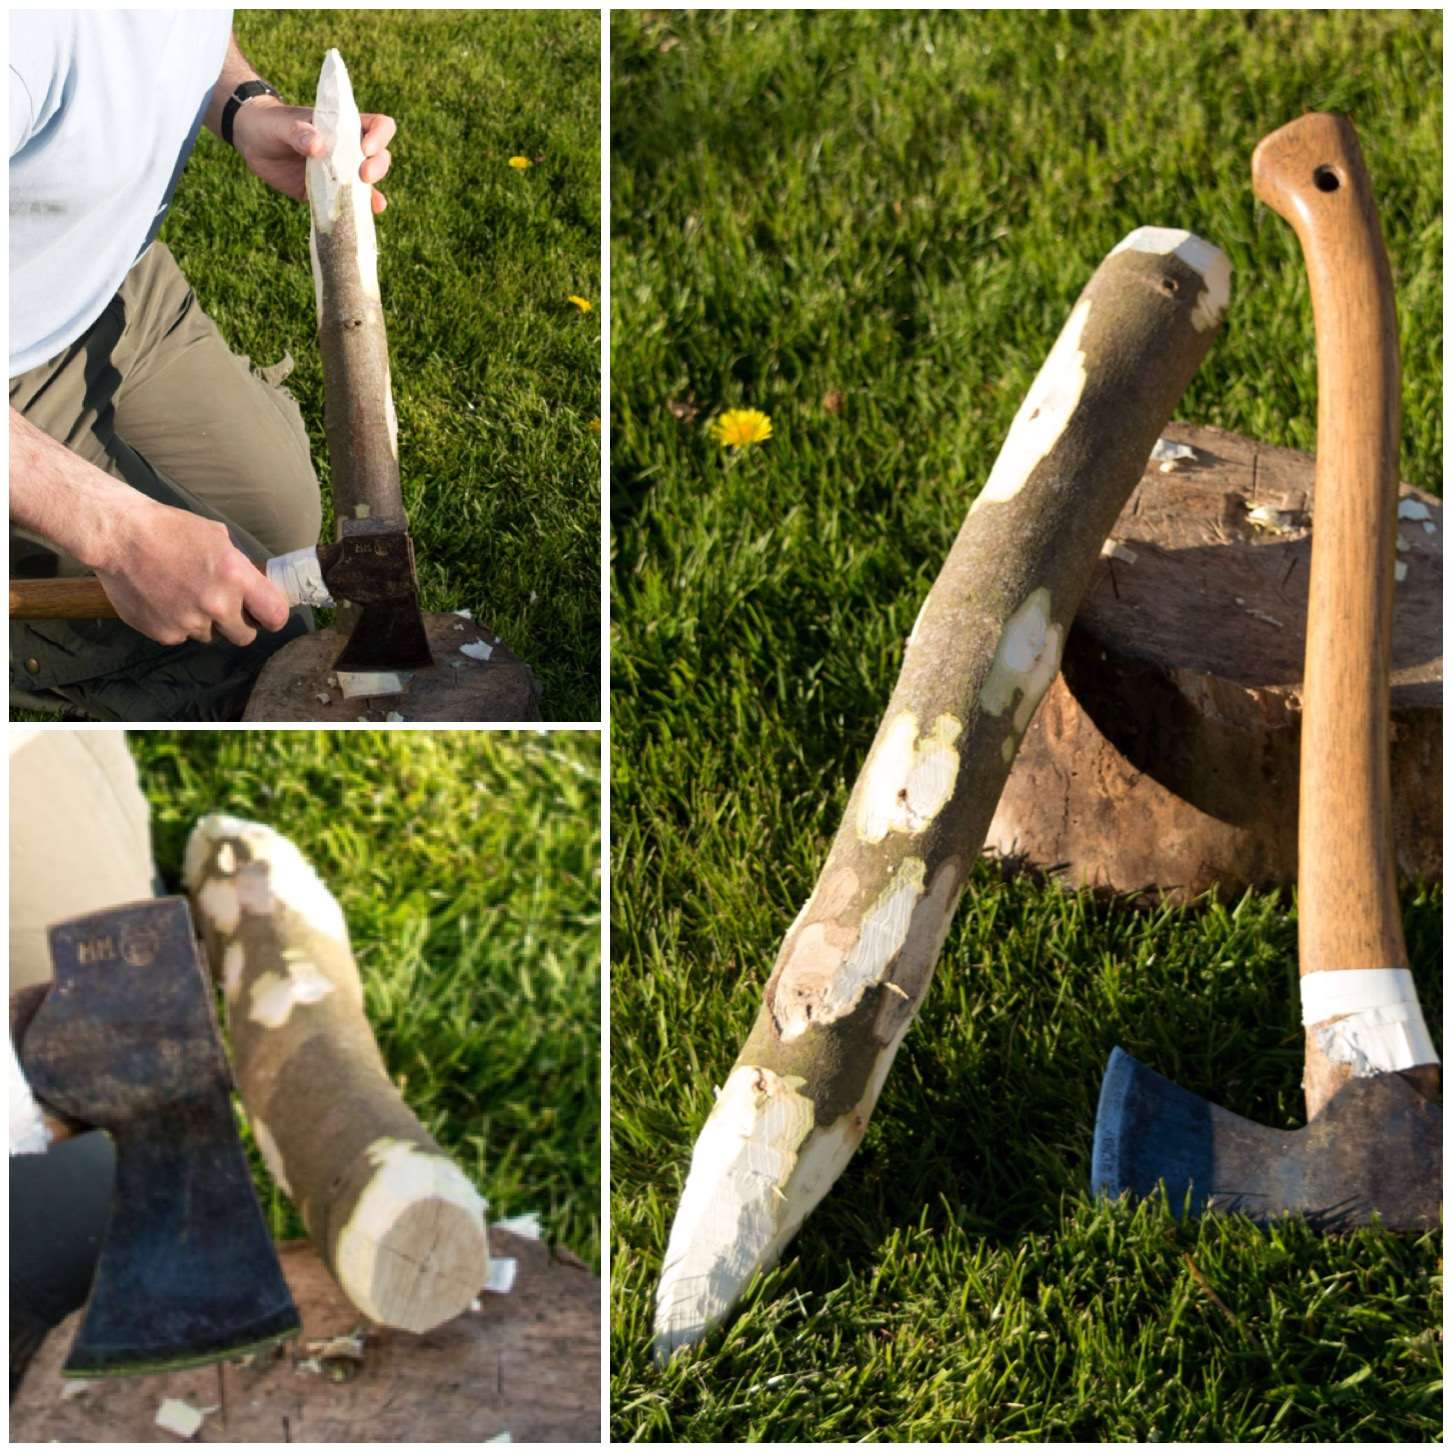
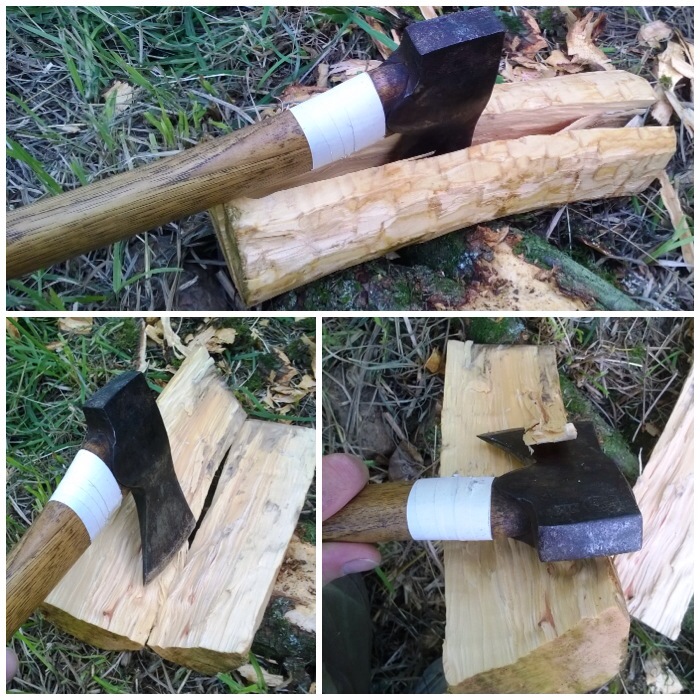
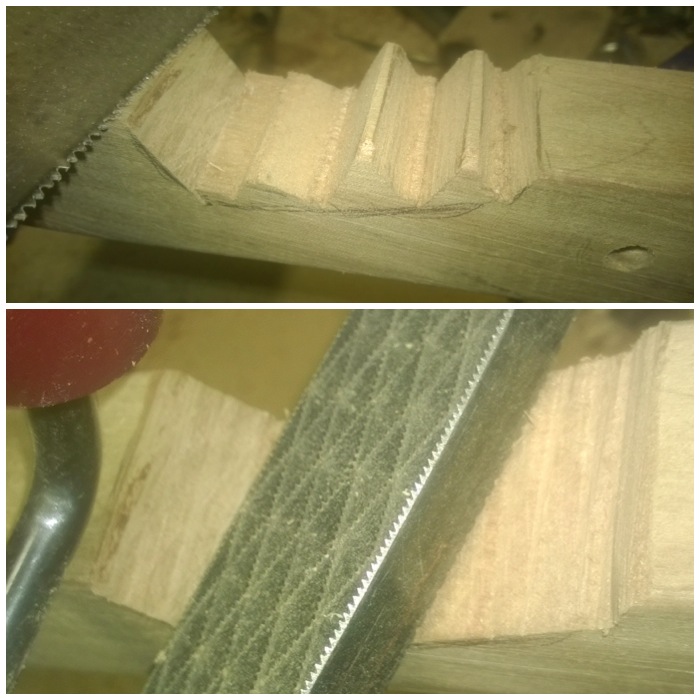
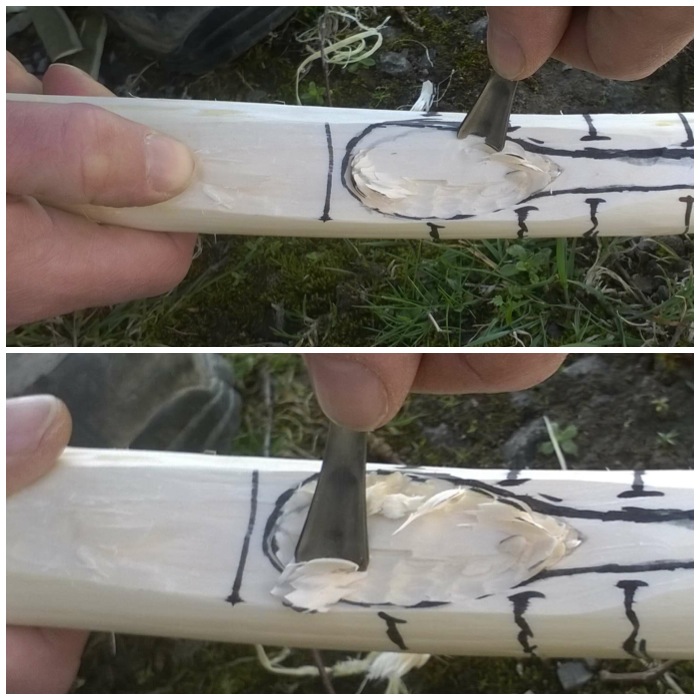
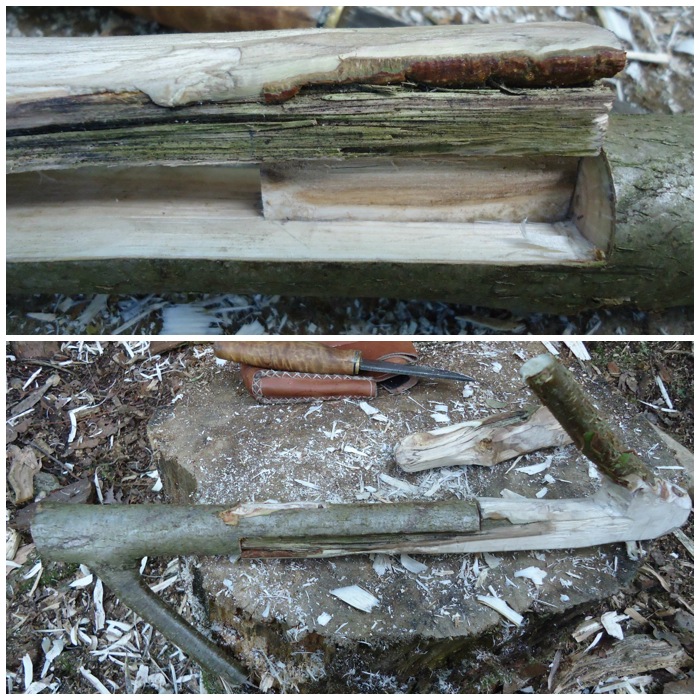
The Chimney
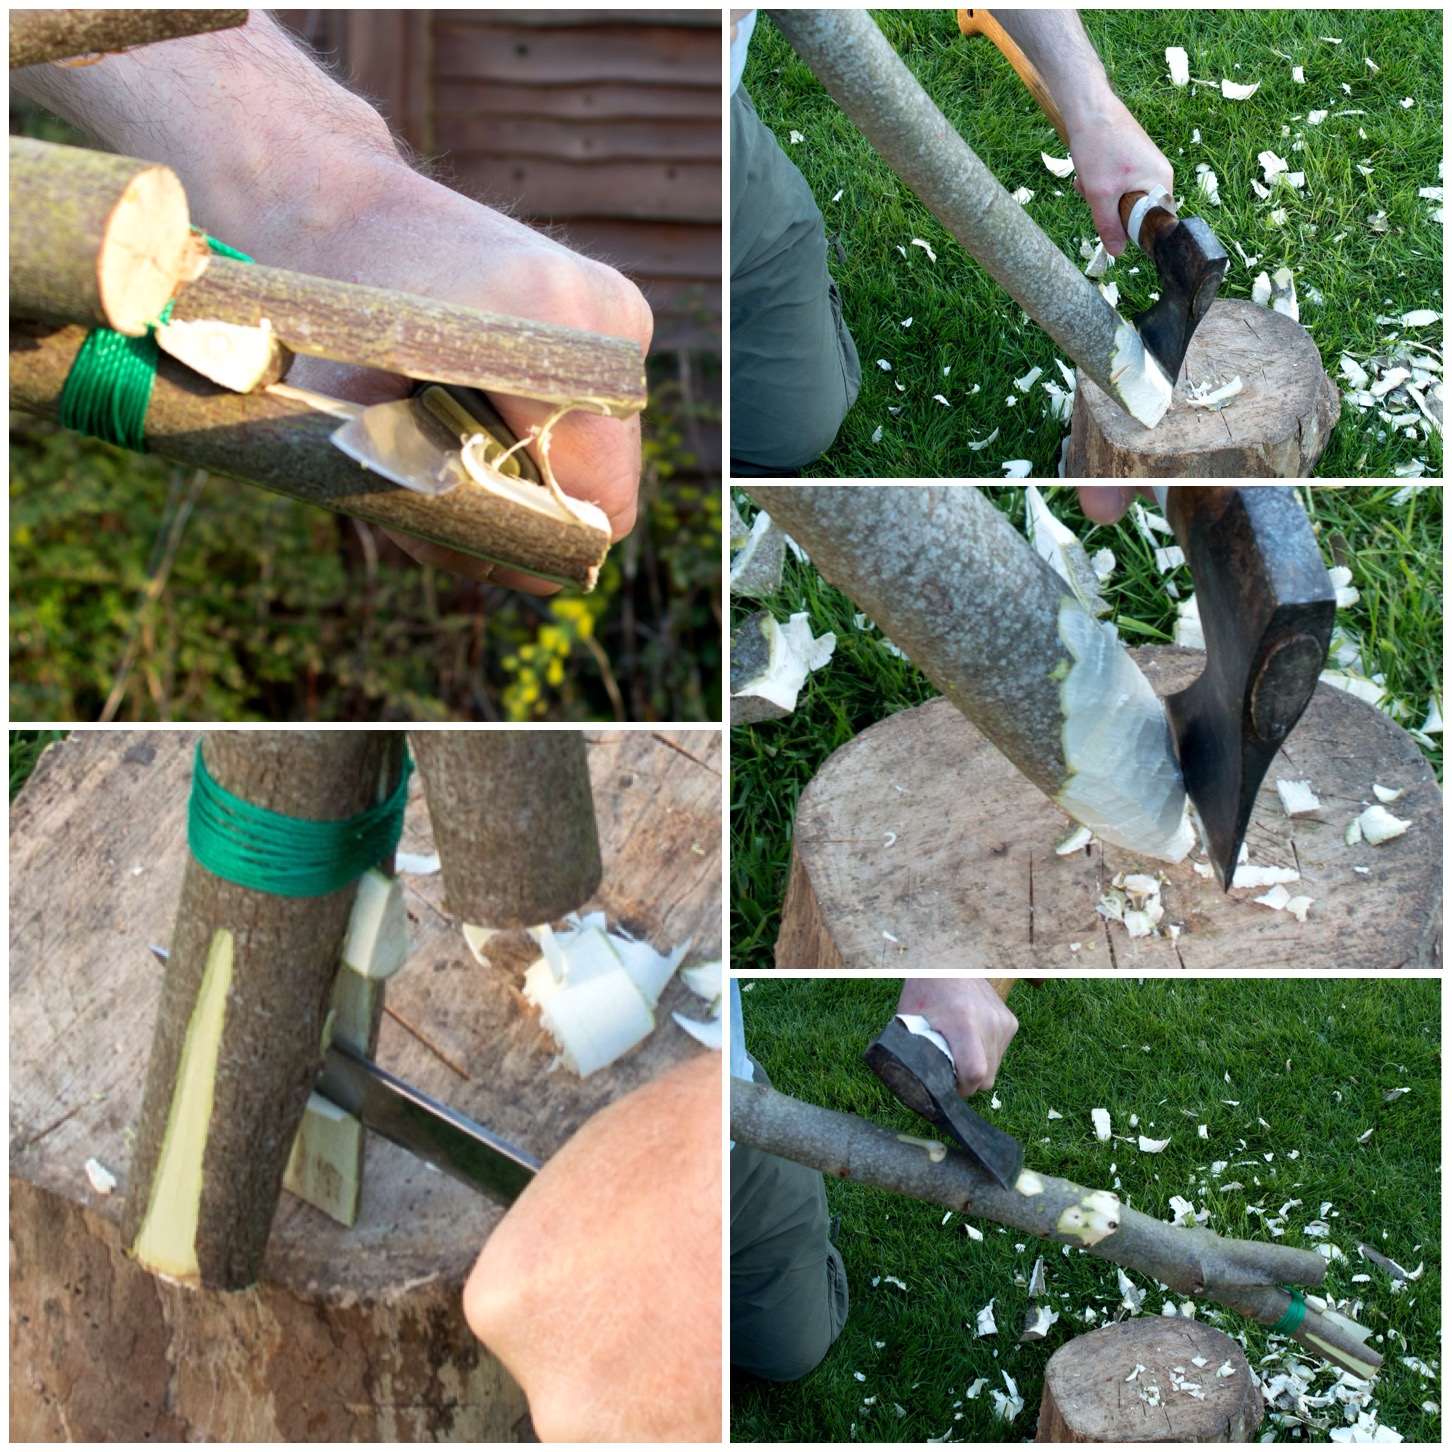
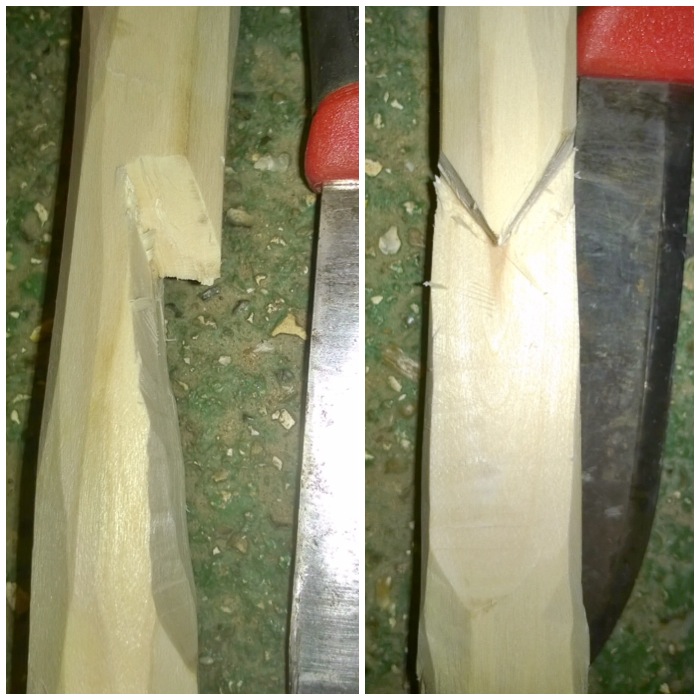
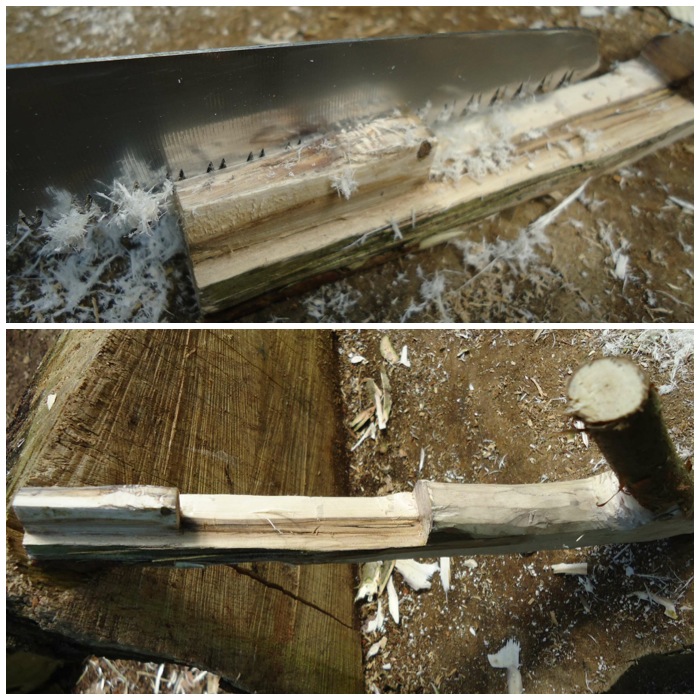
Below you can see the shape of all the pieces when they are put back together . I then battoned off the tip of the larger piece from Segment 2 so that a chimney would be formed. This piece of battoned-out wood I further split into fine pieces to act as kindling for the stove.
The One Cut Chimney
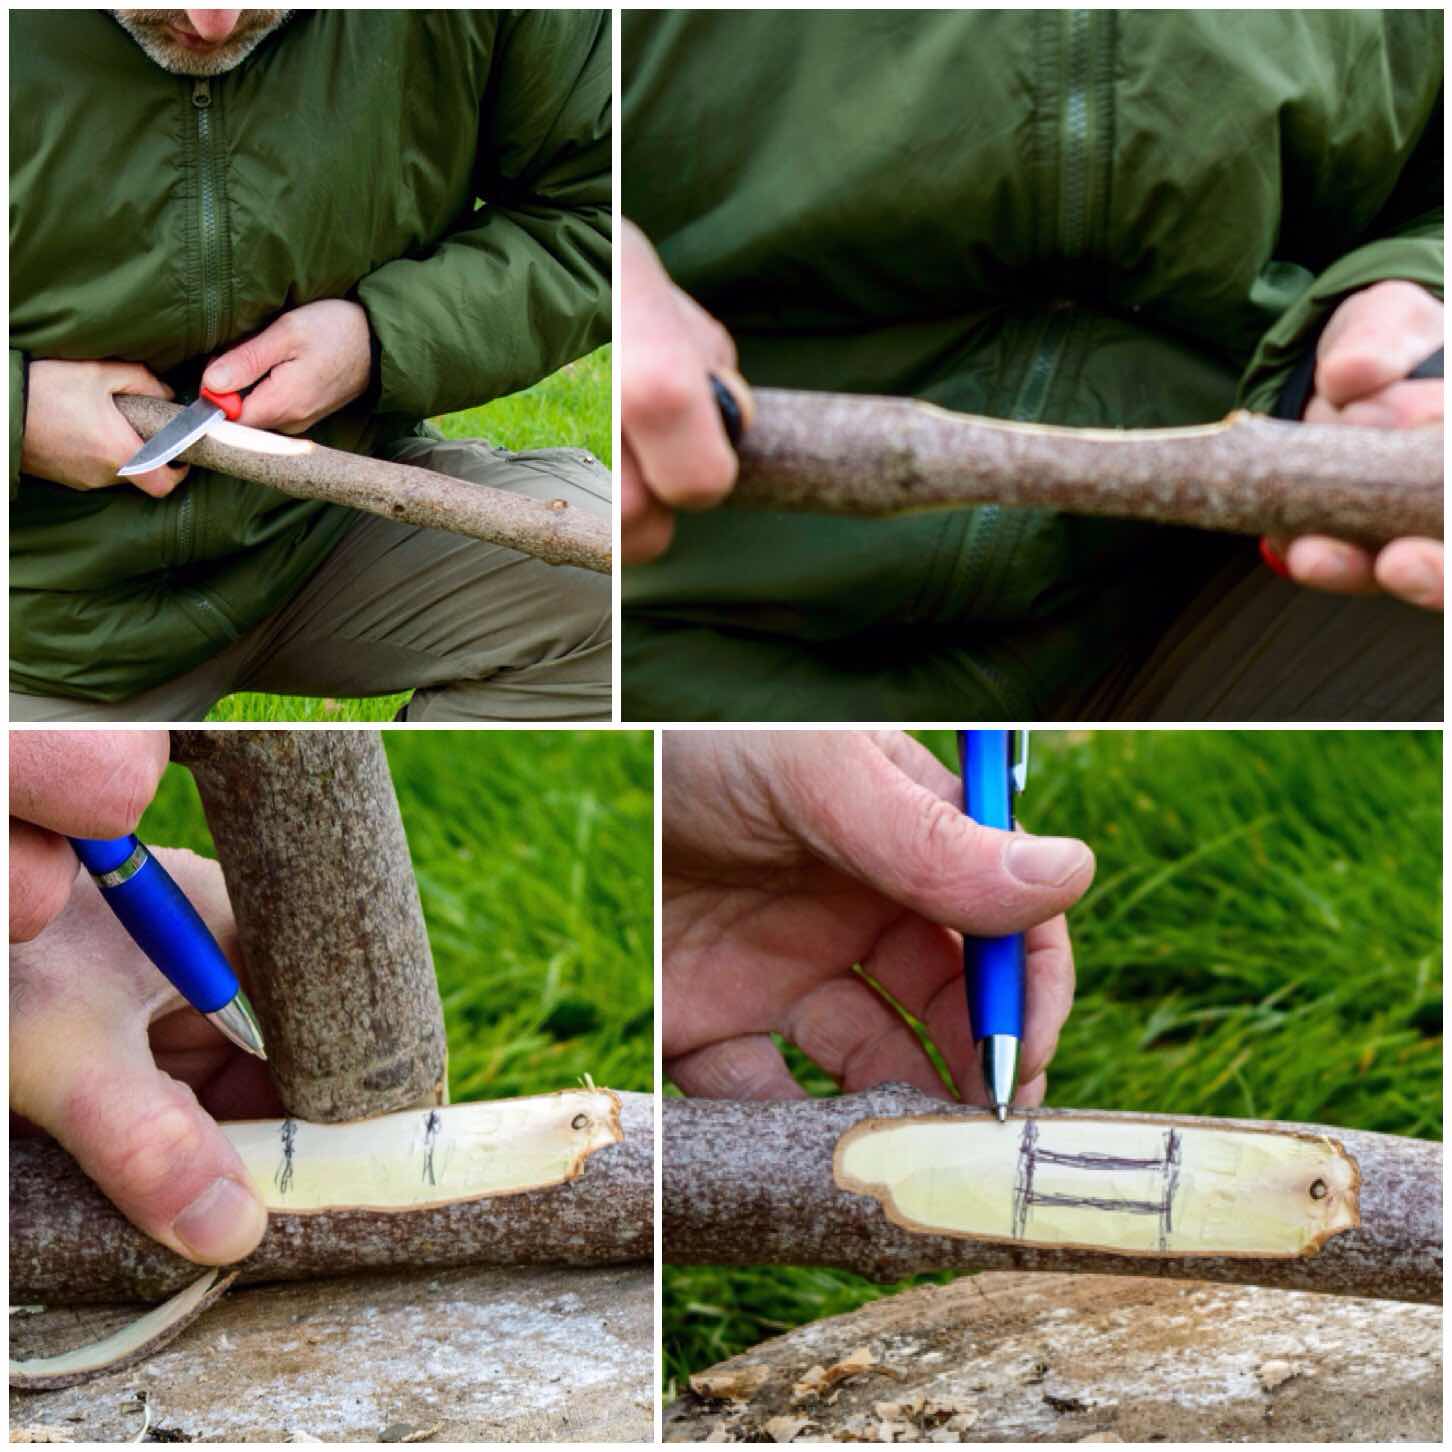
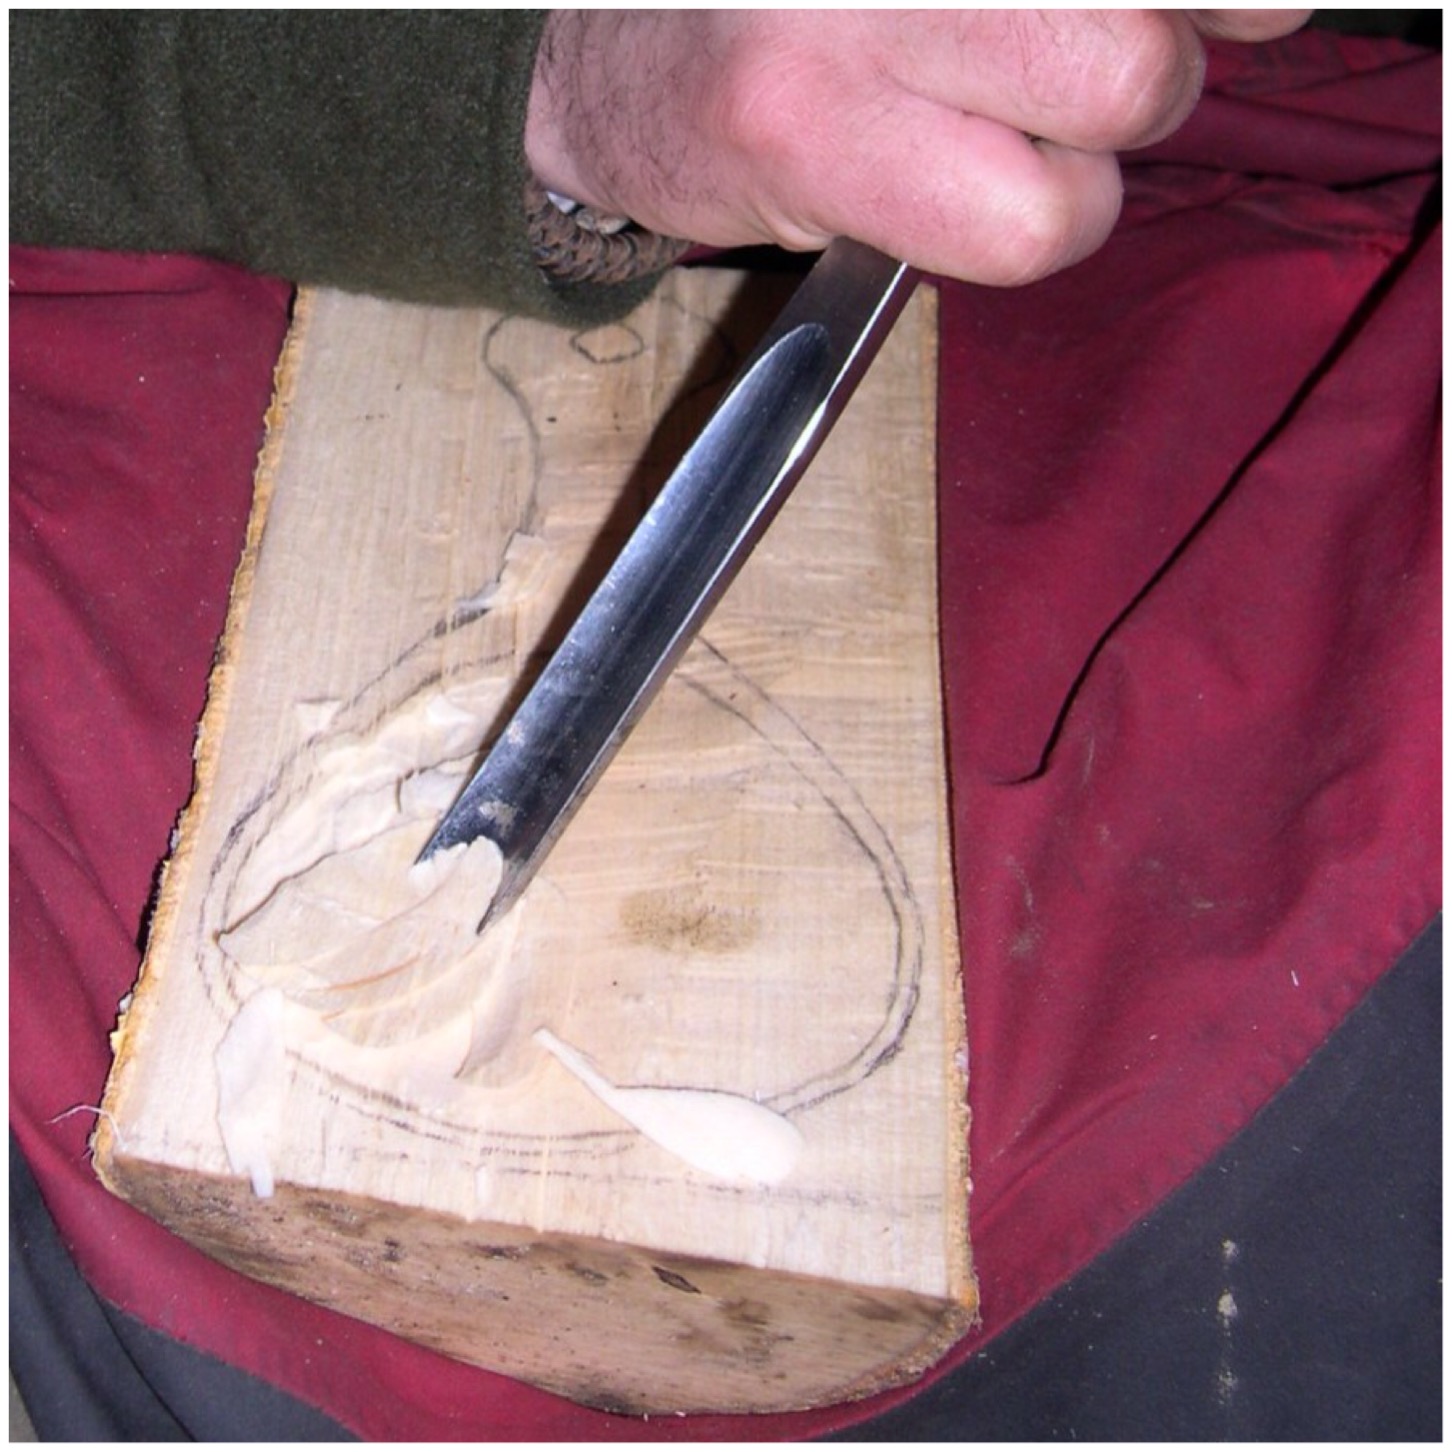
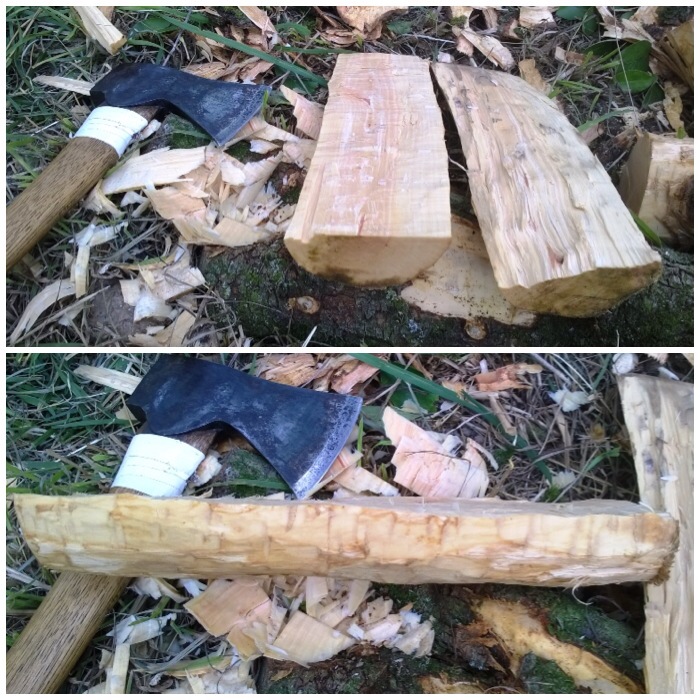
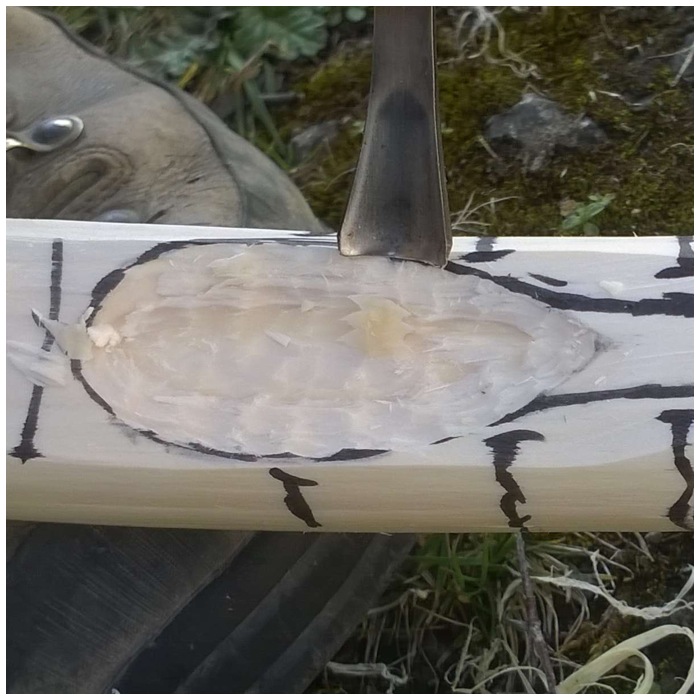
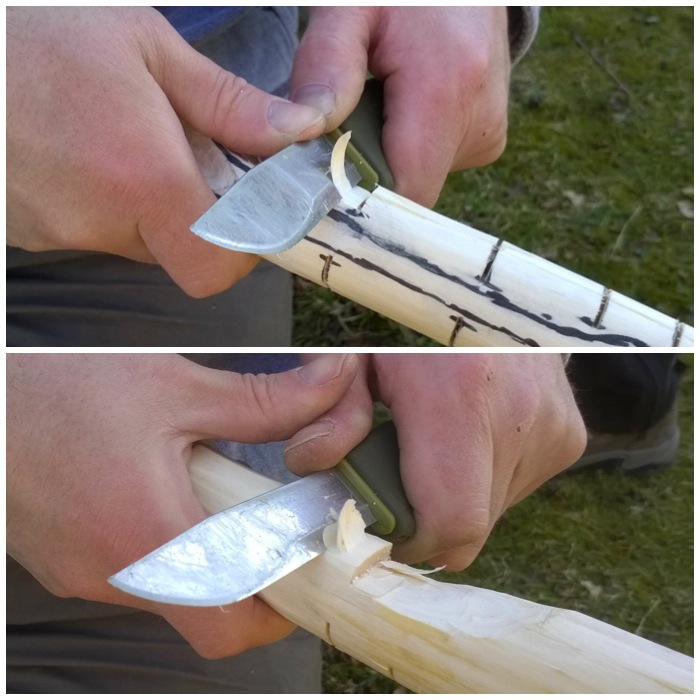
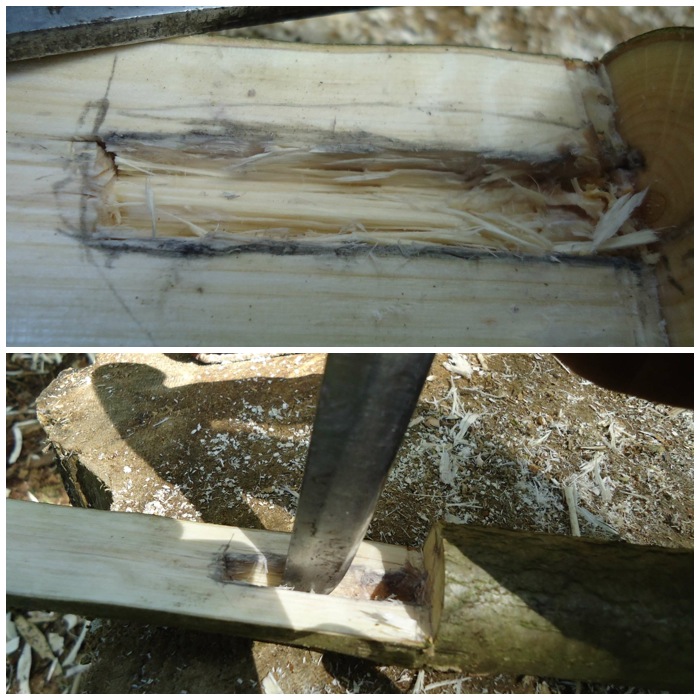
Once I had the chimney battoned out I trimmed off some excess wood from Segment 1 and then used a pencil to mark out the chimney area.
I did this so I could put some Raappanan tuli cuts into the chimney area. It is important to keep the sections of the log rocket that join together as smooth as possible for a good fit so marking out the chimney area ensures I do not cut into the wrong area.
Trimming & Marking out the chimney
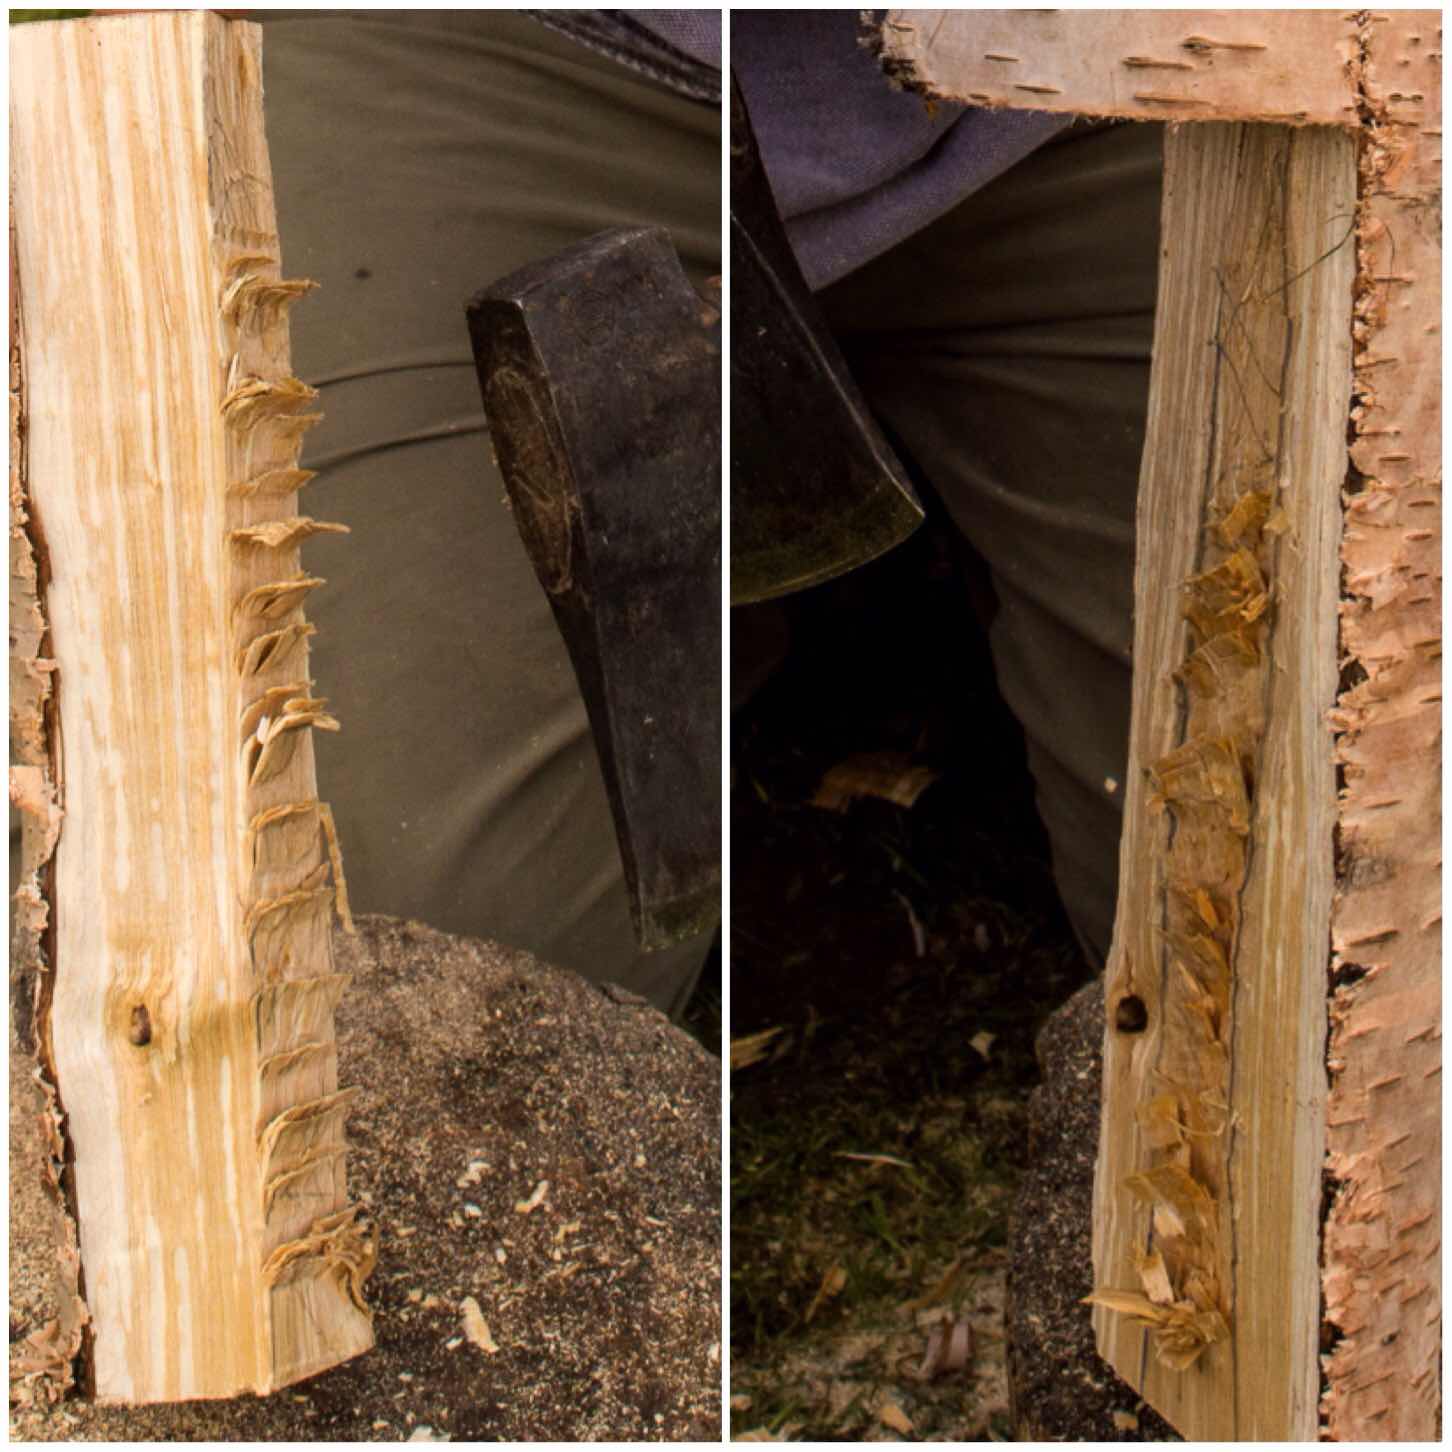
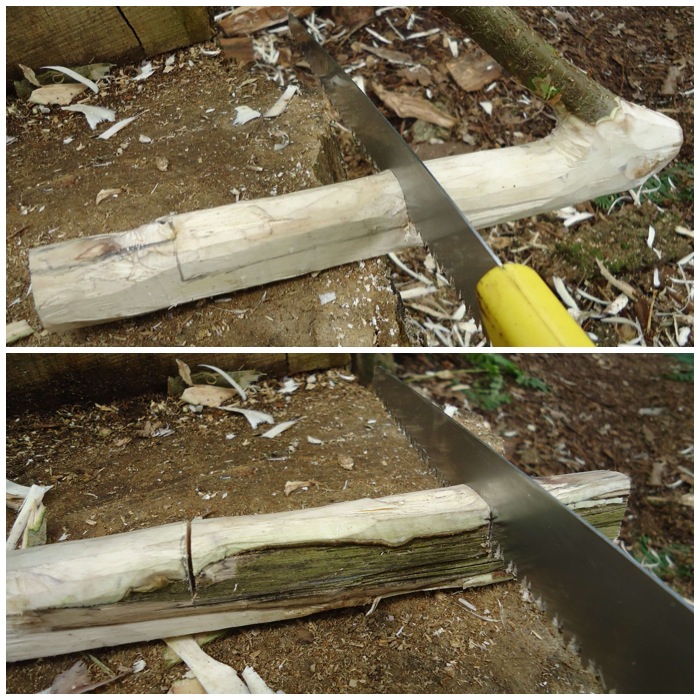
The Raappanan tuli cuts are fairly simple to make with my axe. I just ensured I cut only into the wood in the chimney area and that the cuts were made upwards, towards the top of the chimney.
These cuts are particularly helpful when using damp wood as it offers far more surface area to the initial flame, allowing it to catch more quickly, and also it helps to dry the damp wood out.
Raappanan tuli cuts
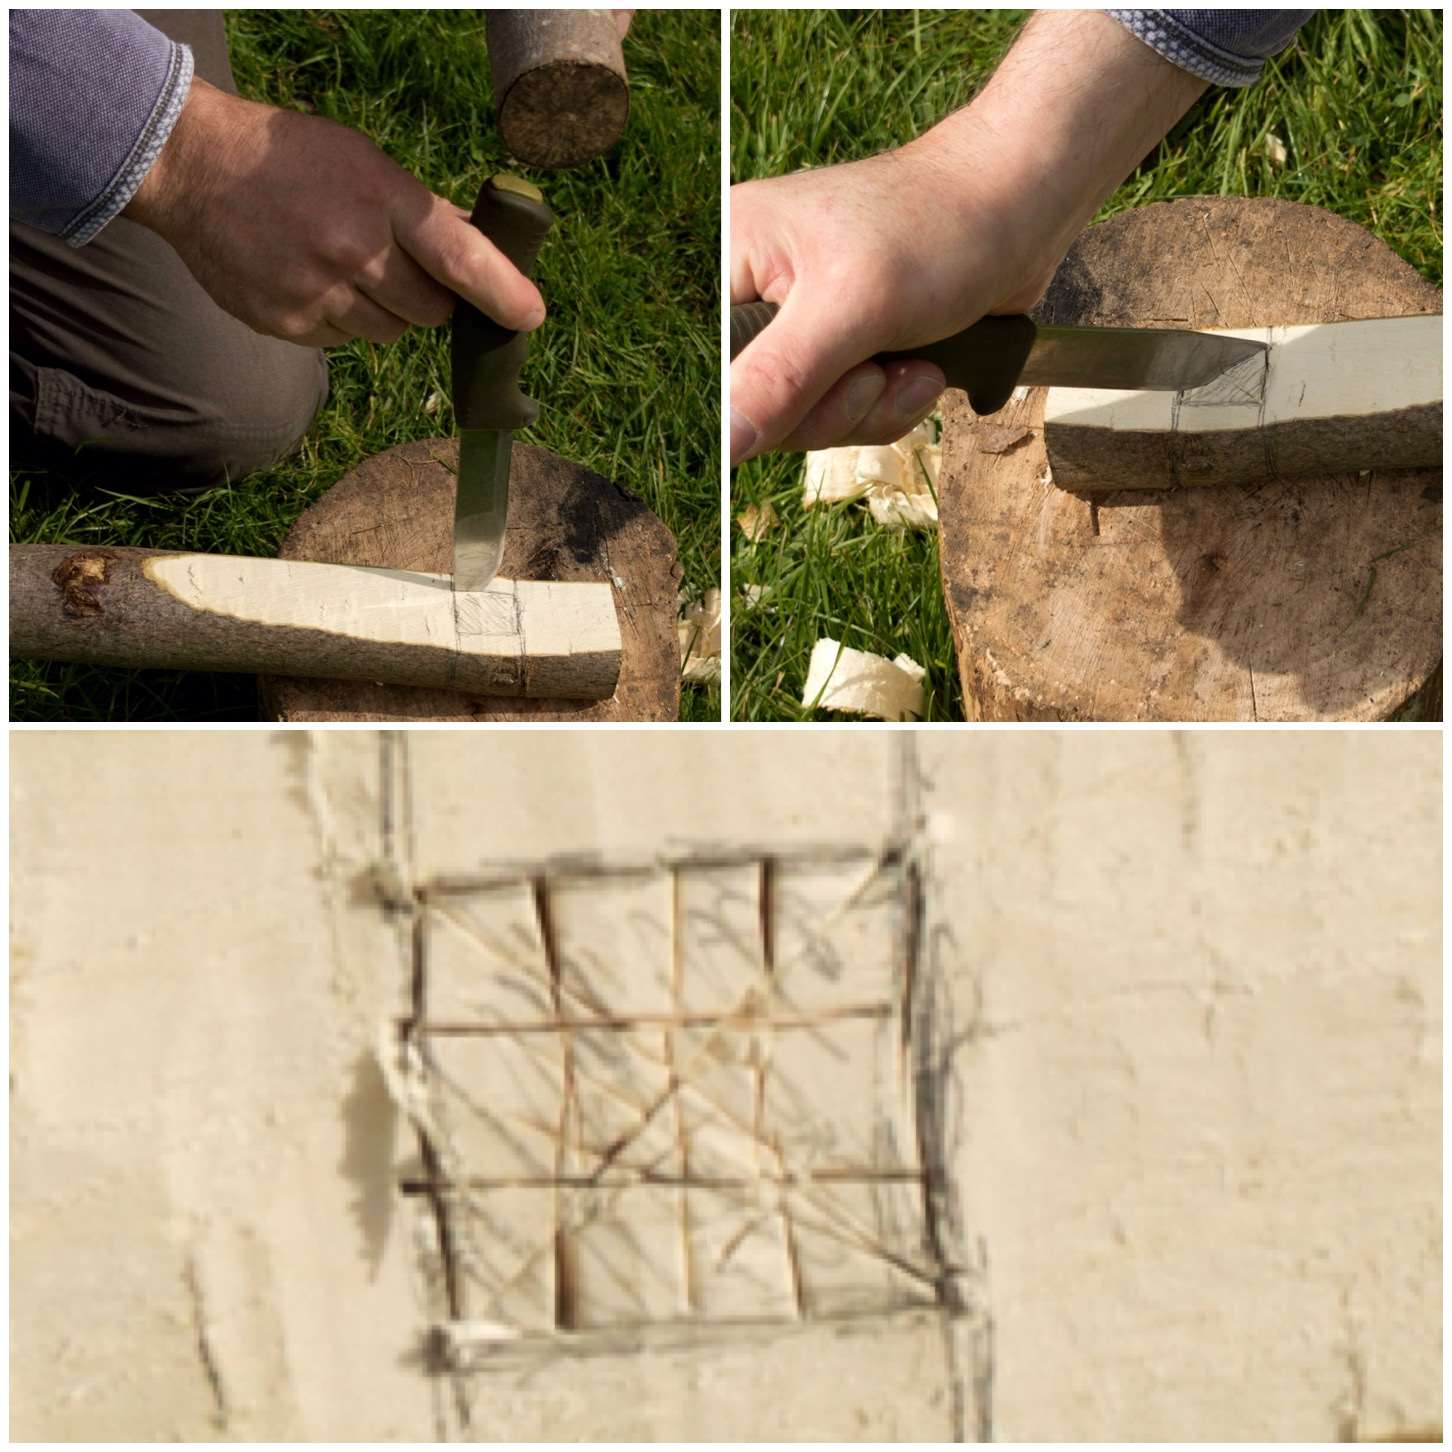
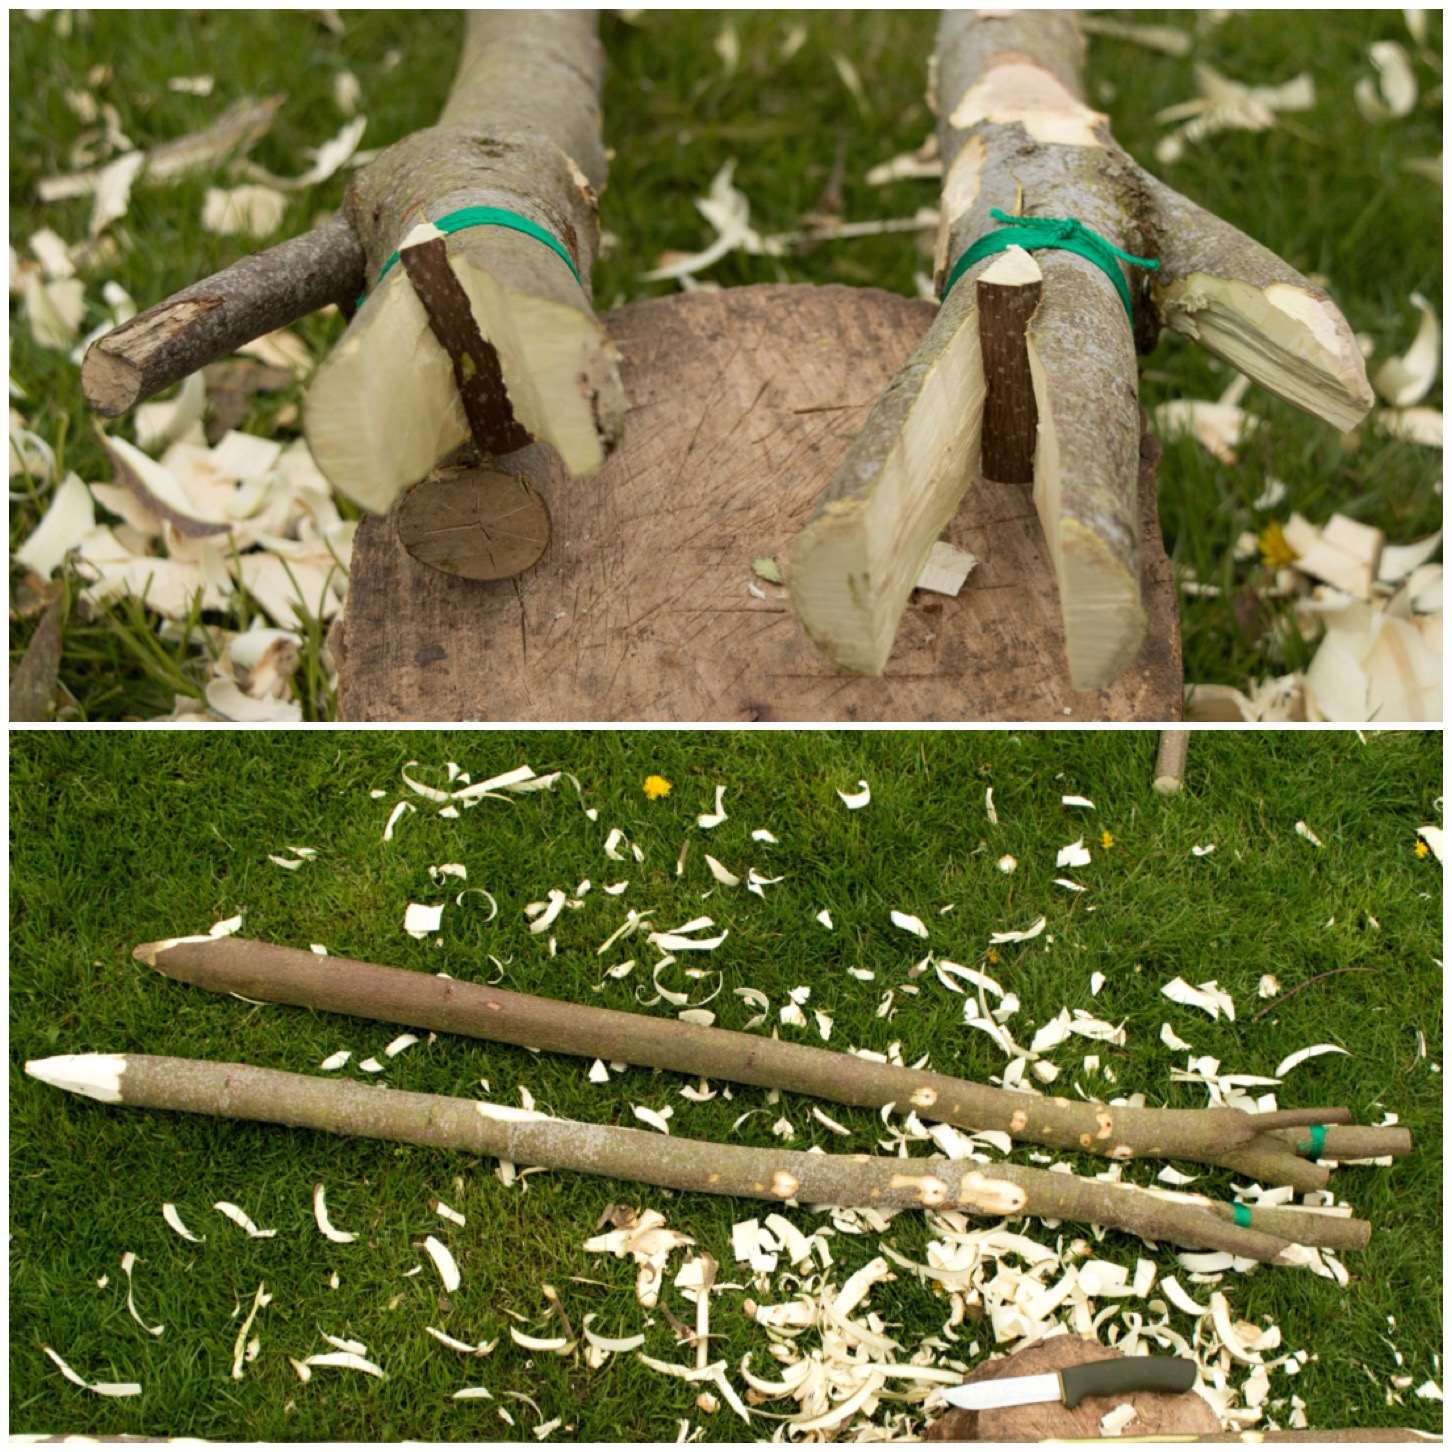
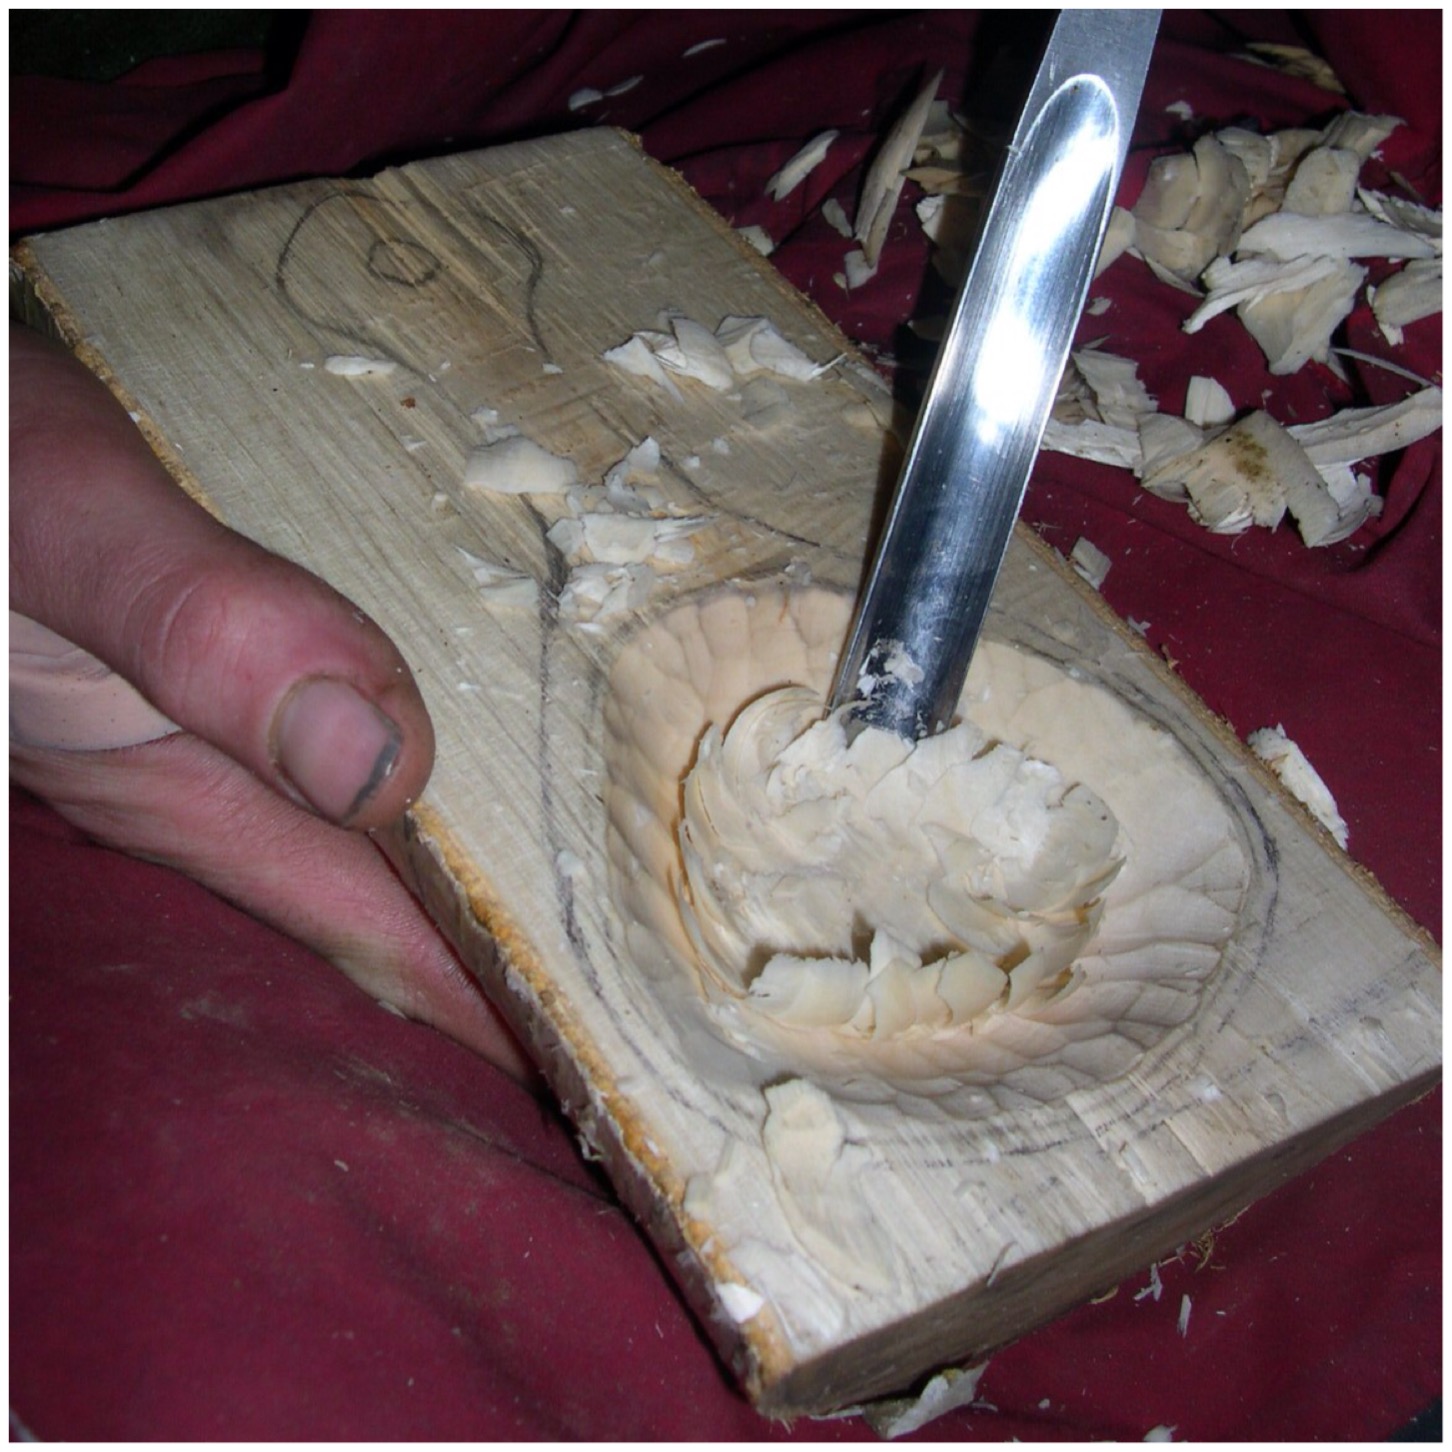
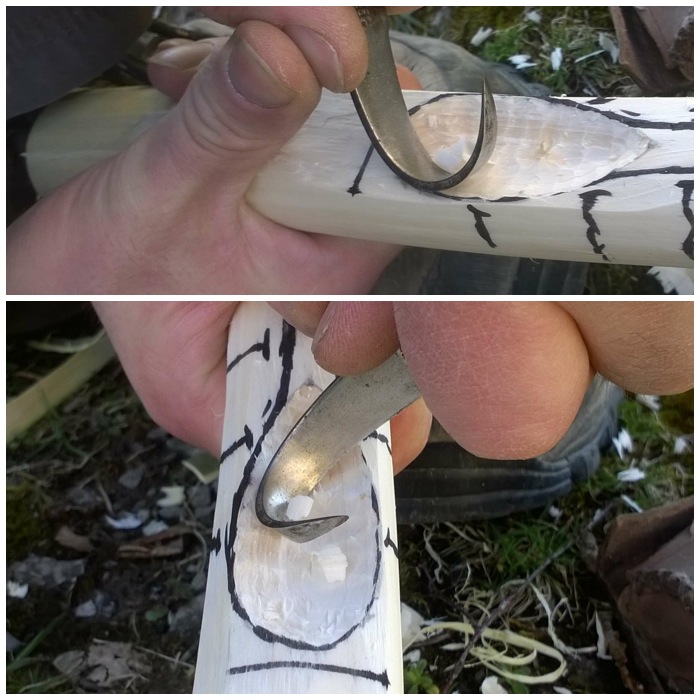
The Firebox
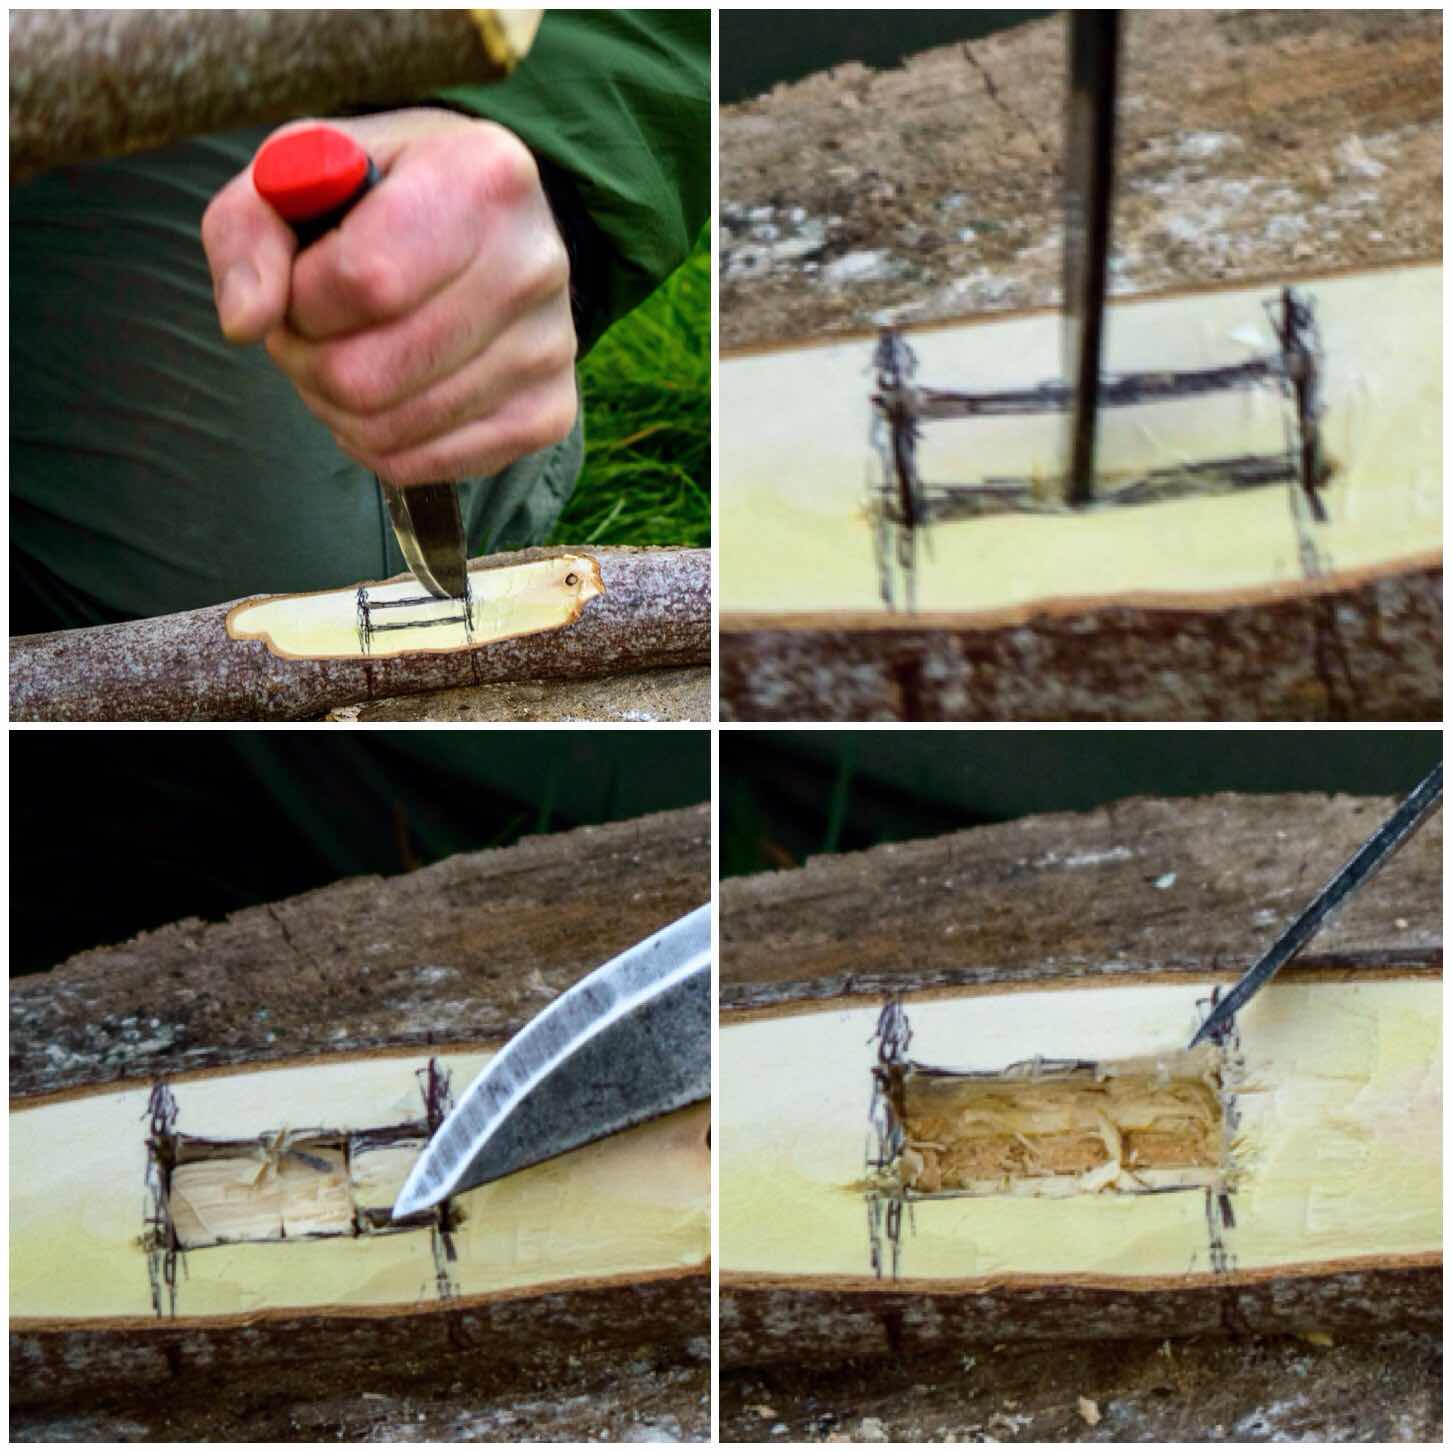
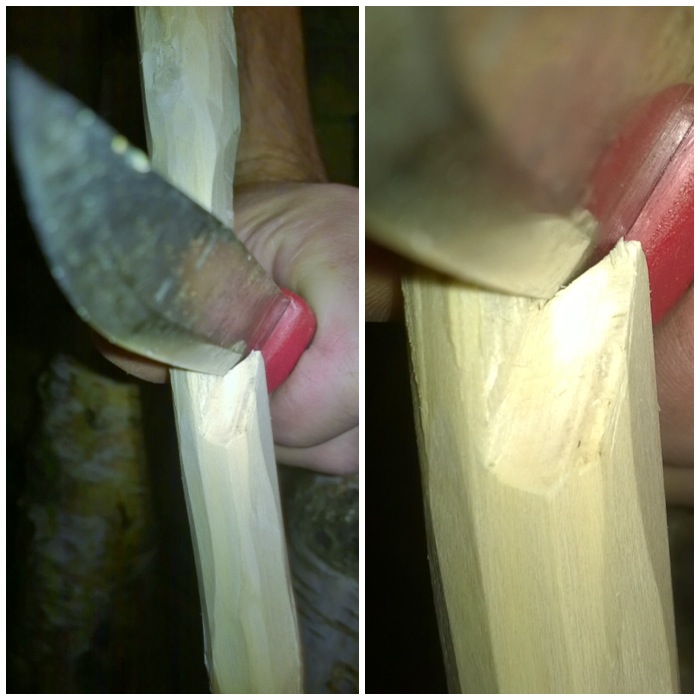
The next stage I worked on was the firebox opening. This can be done in a number of different way however I elected to go for a triangular opening.
I formed the opening by cutting a small triangle at the base of both pieces from Segment 2. I also tapered the inside of the cuts to open the firebox up a bit. I made this firebox slightly larger than normal as the wood was very damp. My thought was that the extra air intake would help to keep the fire going at the start before the insides of the stove became fully lit.
The firebox opening
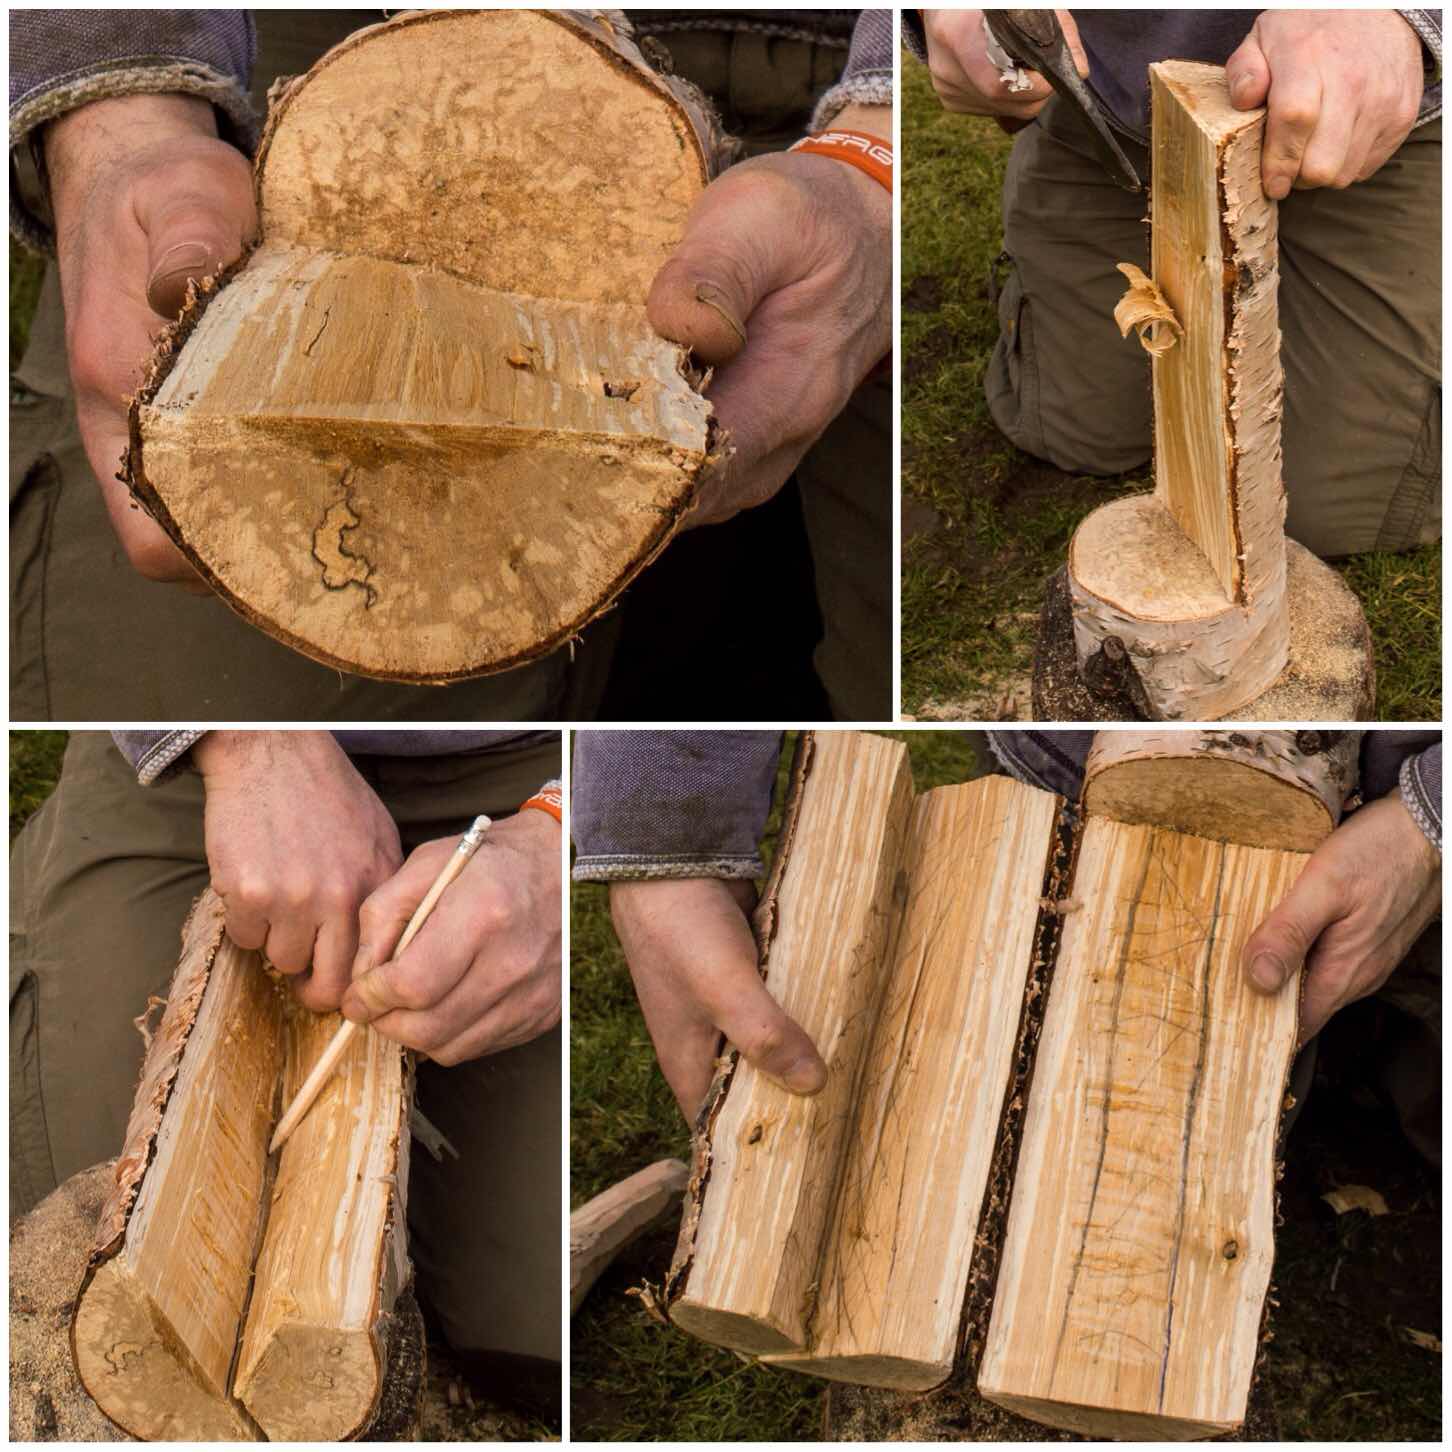
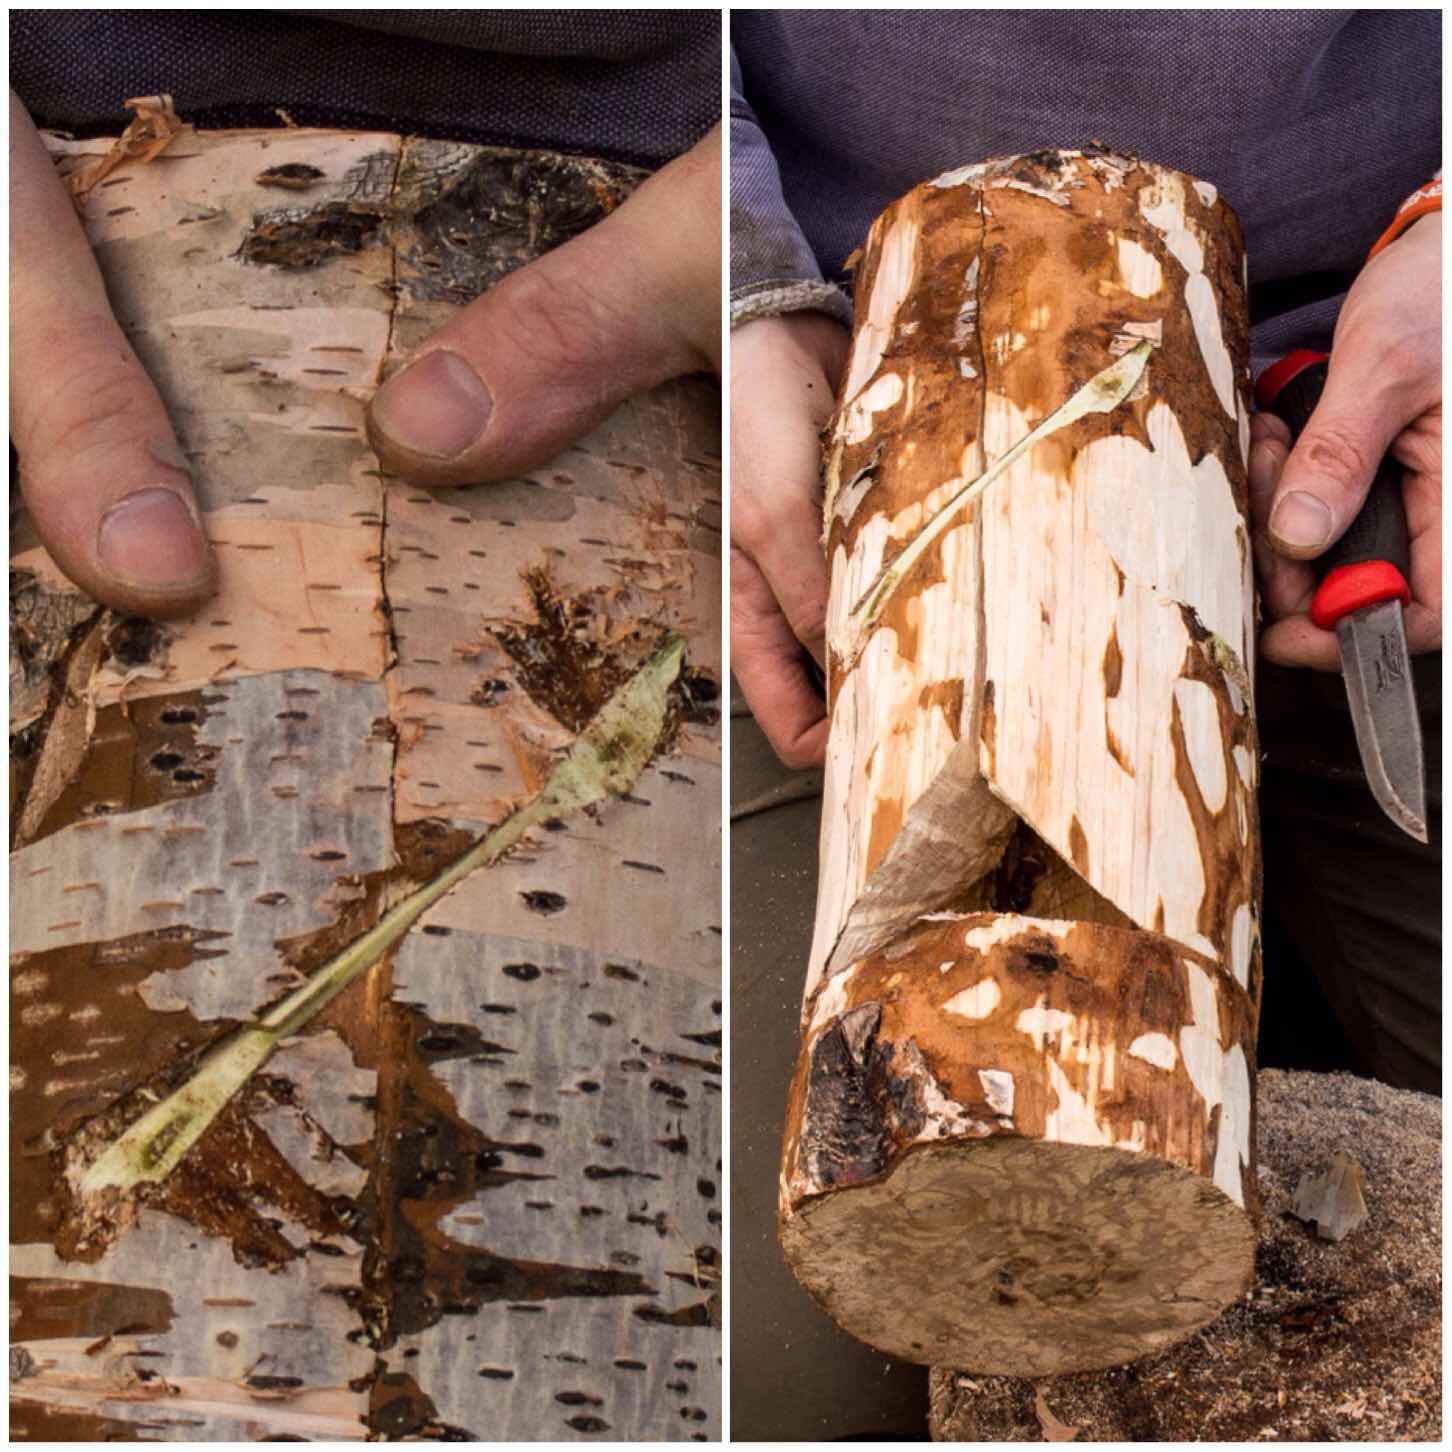
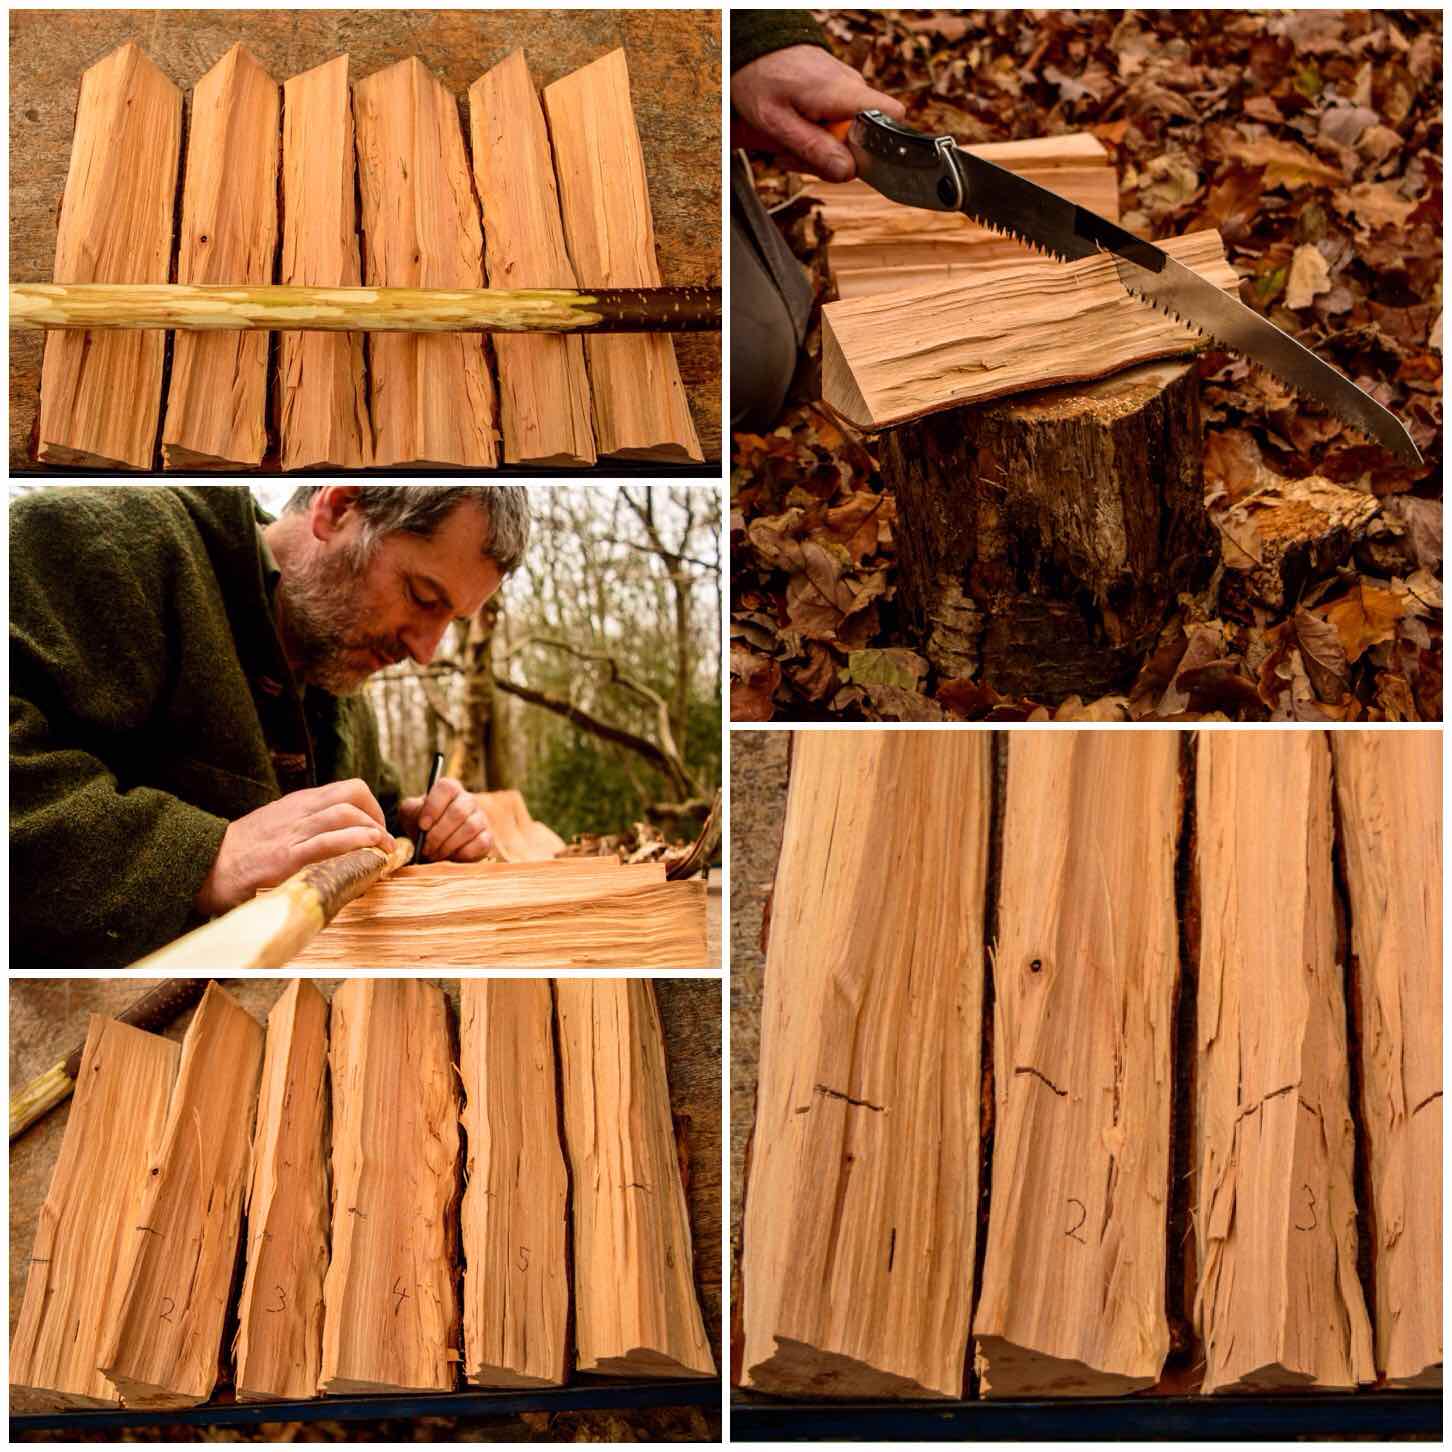
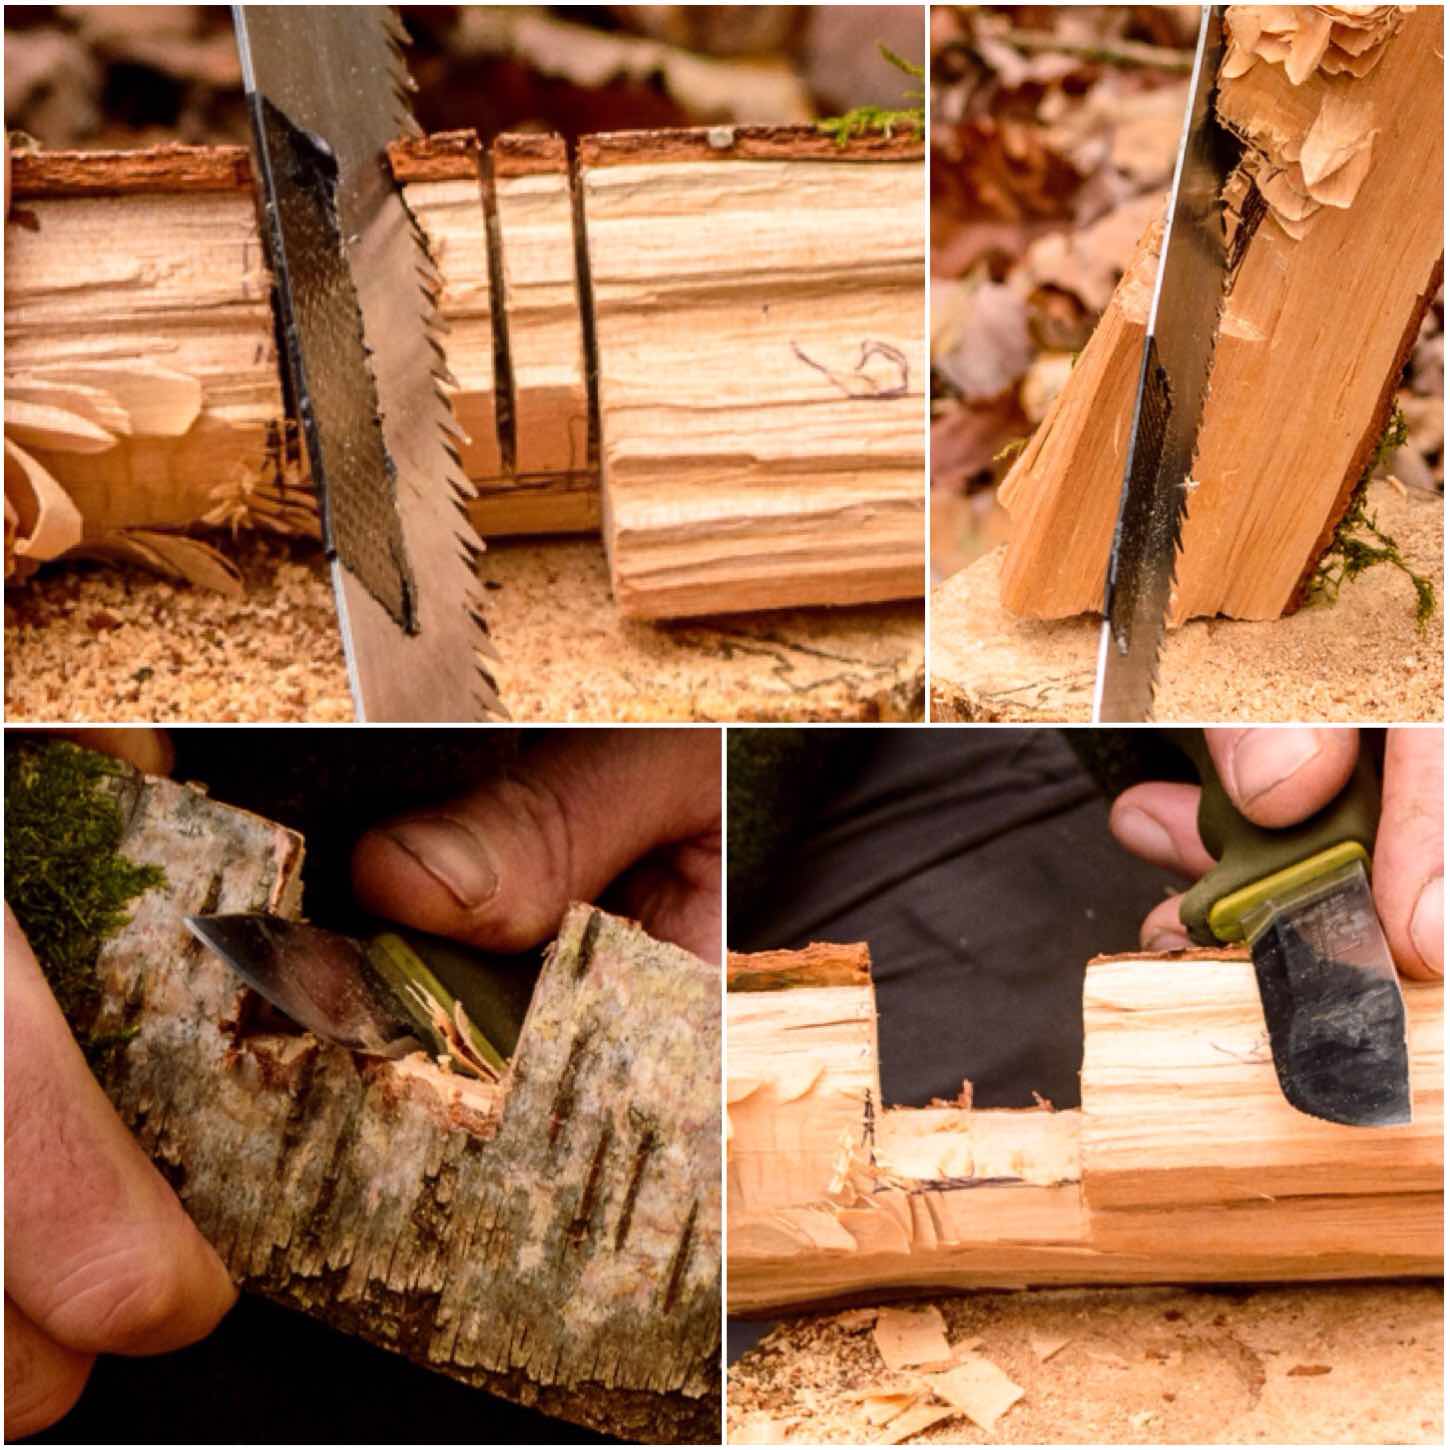
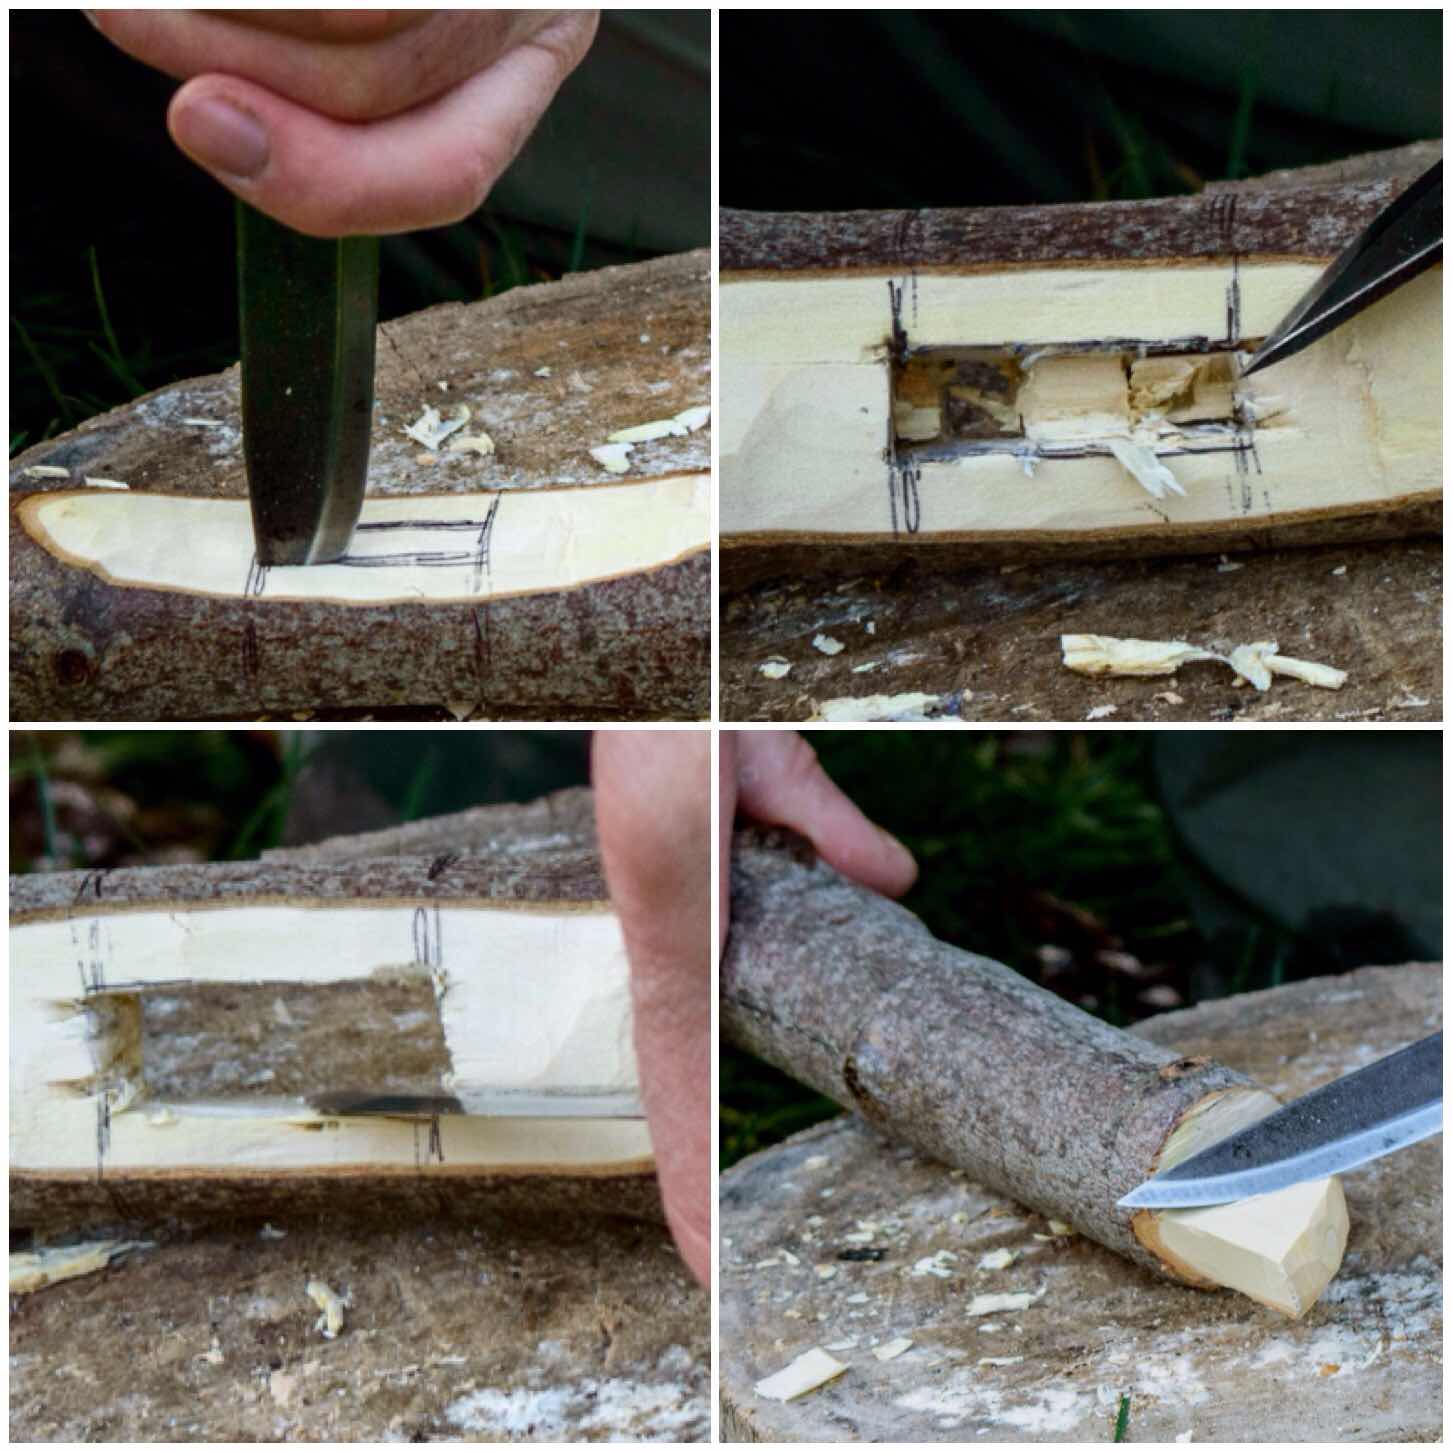
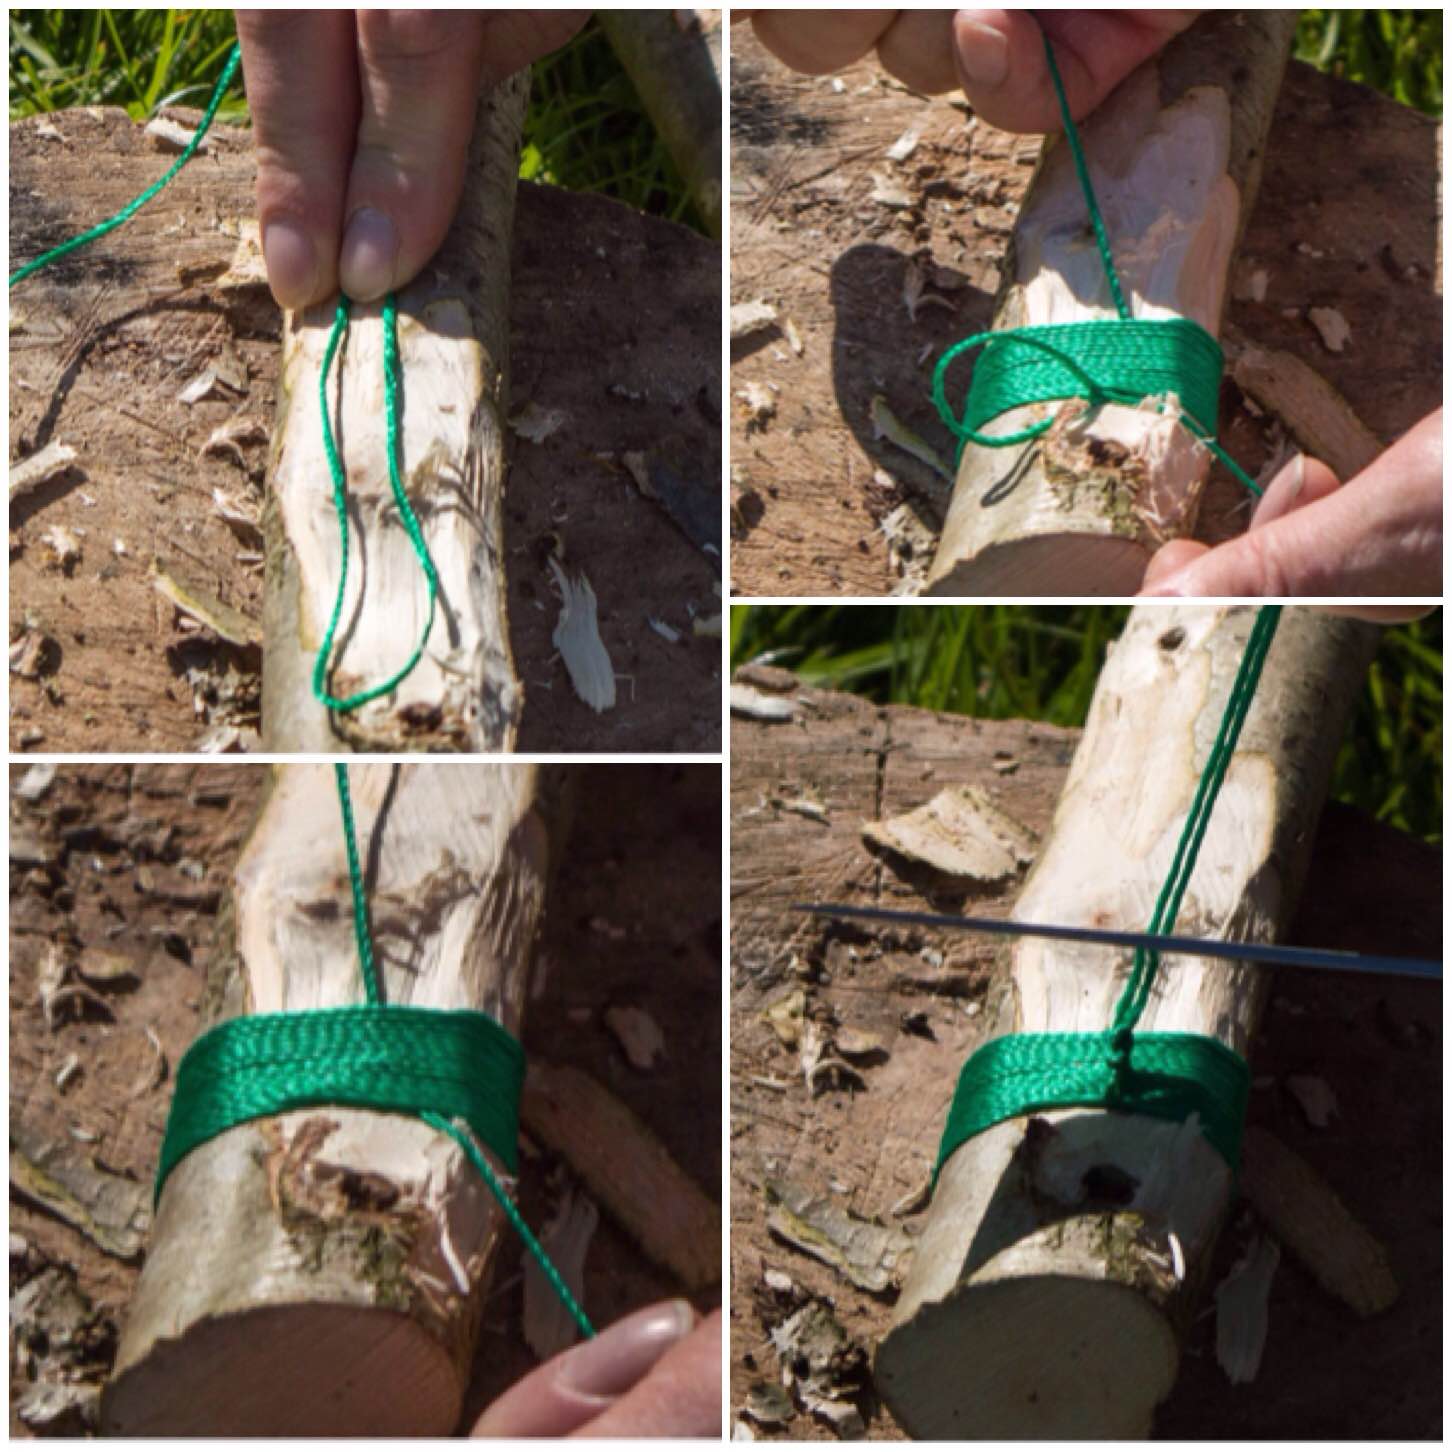
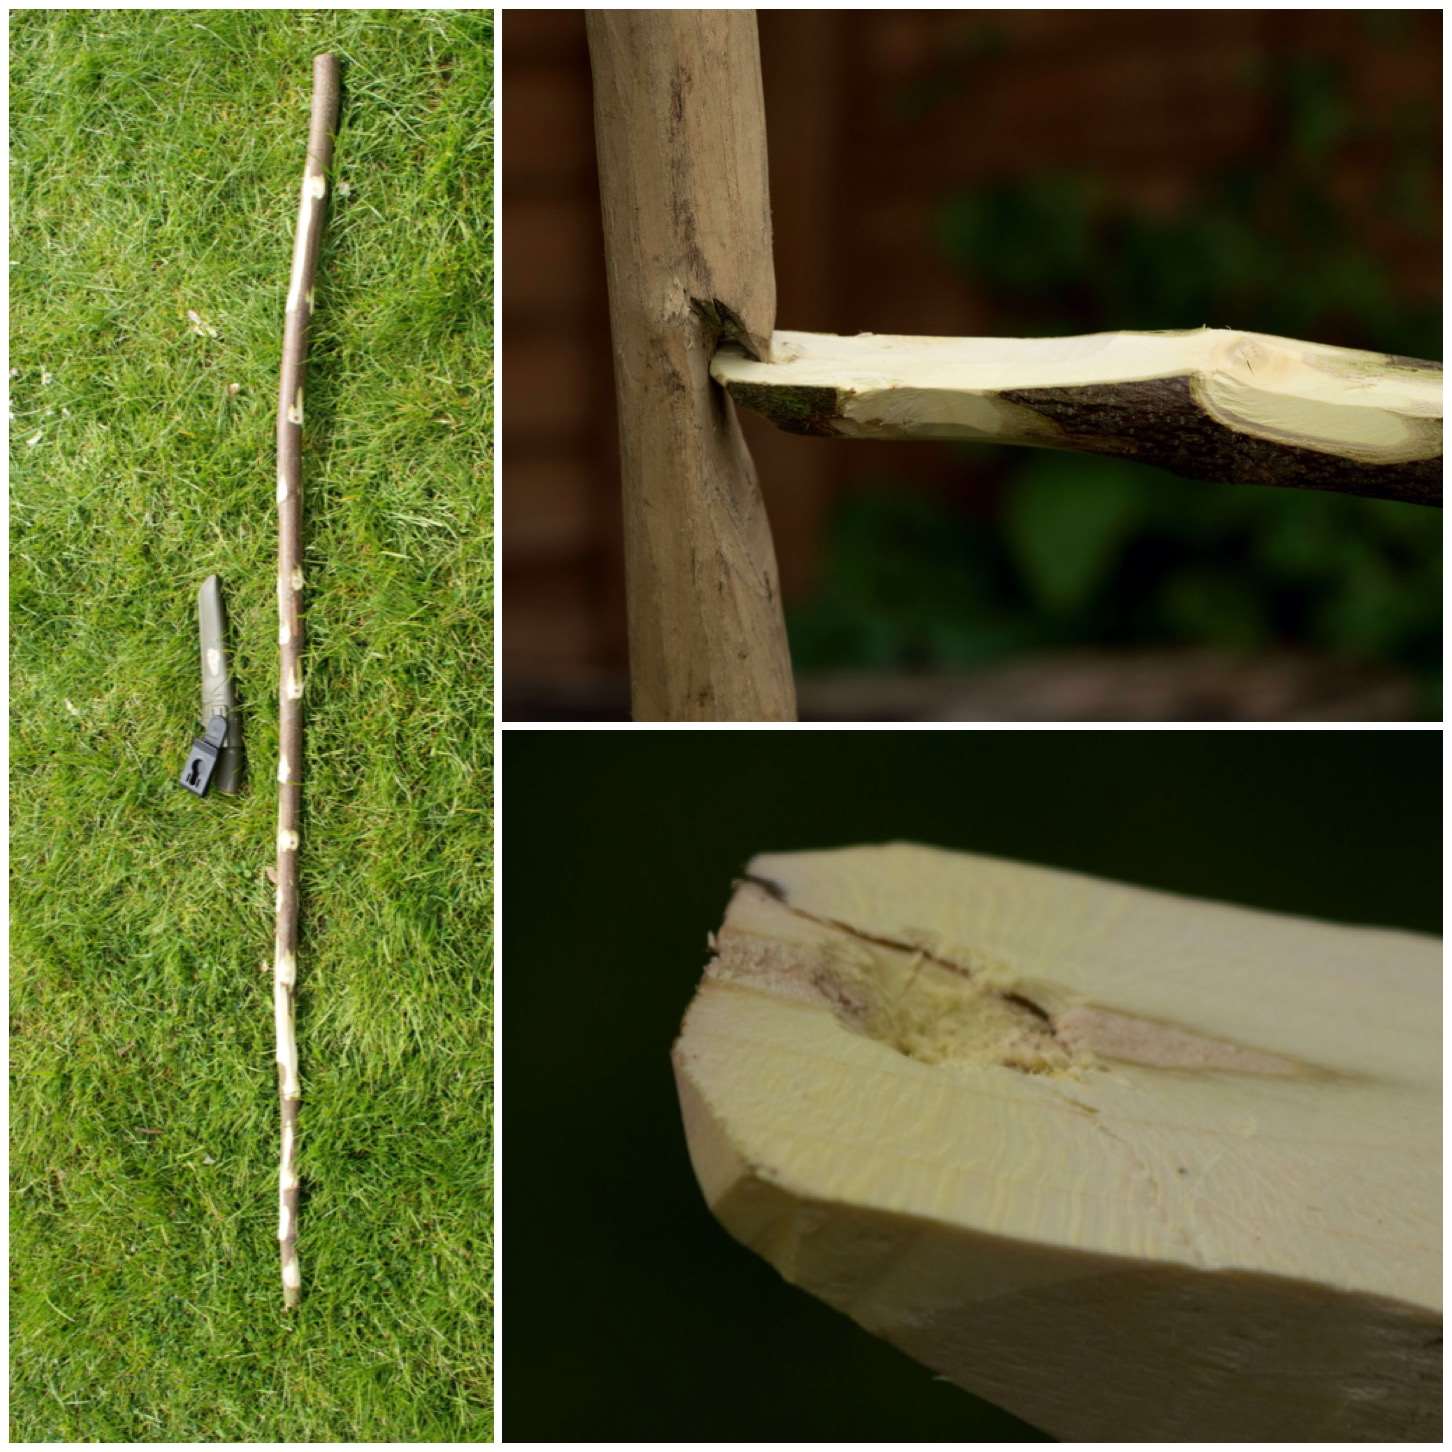
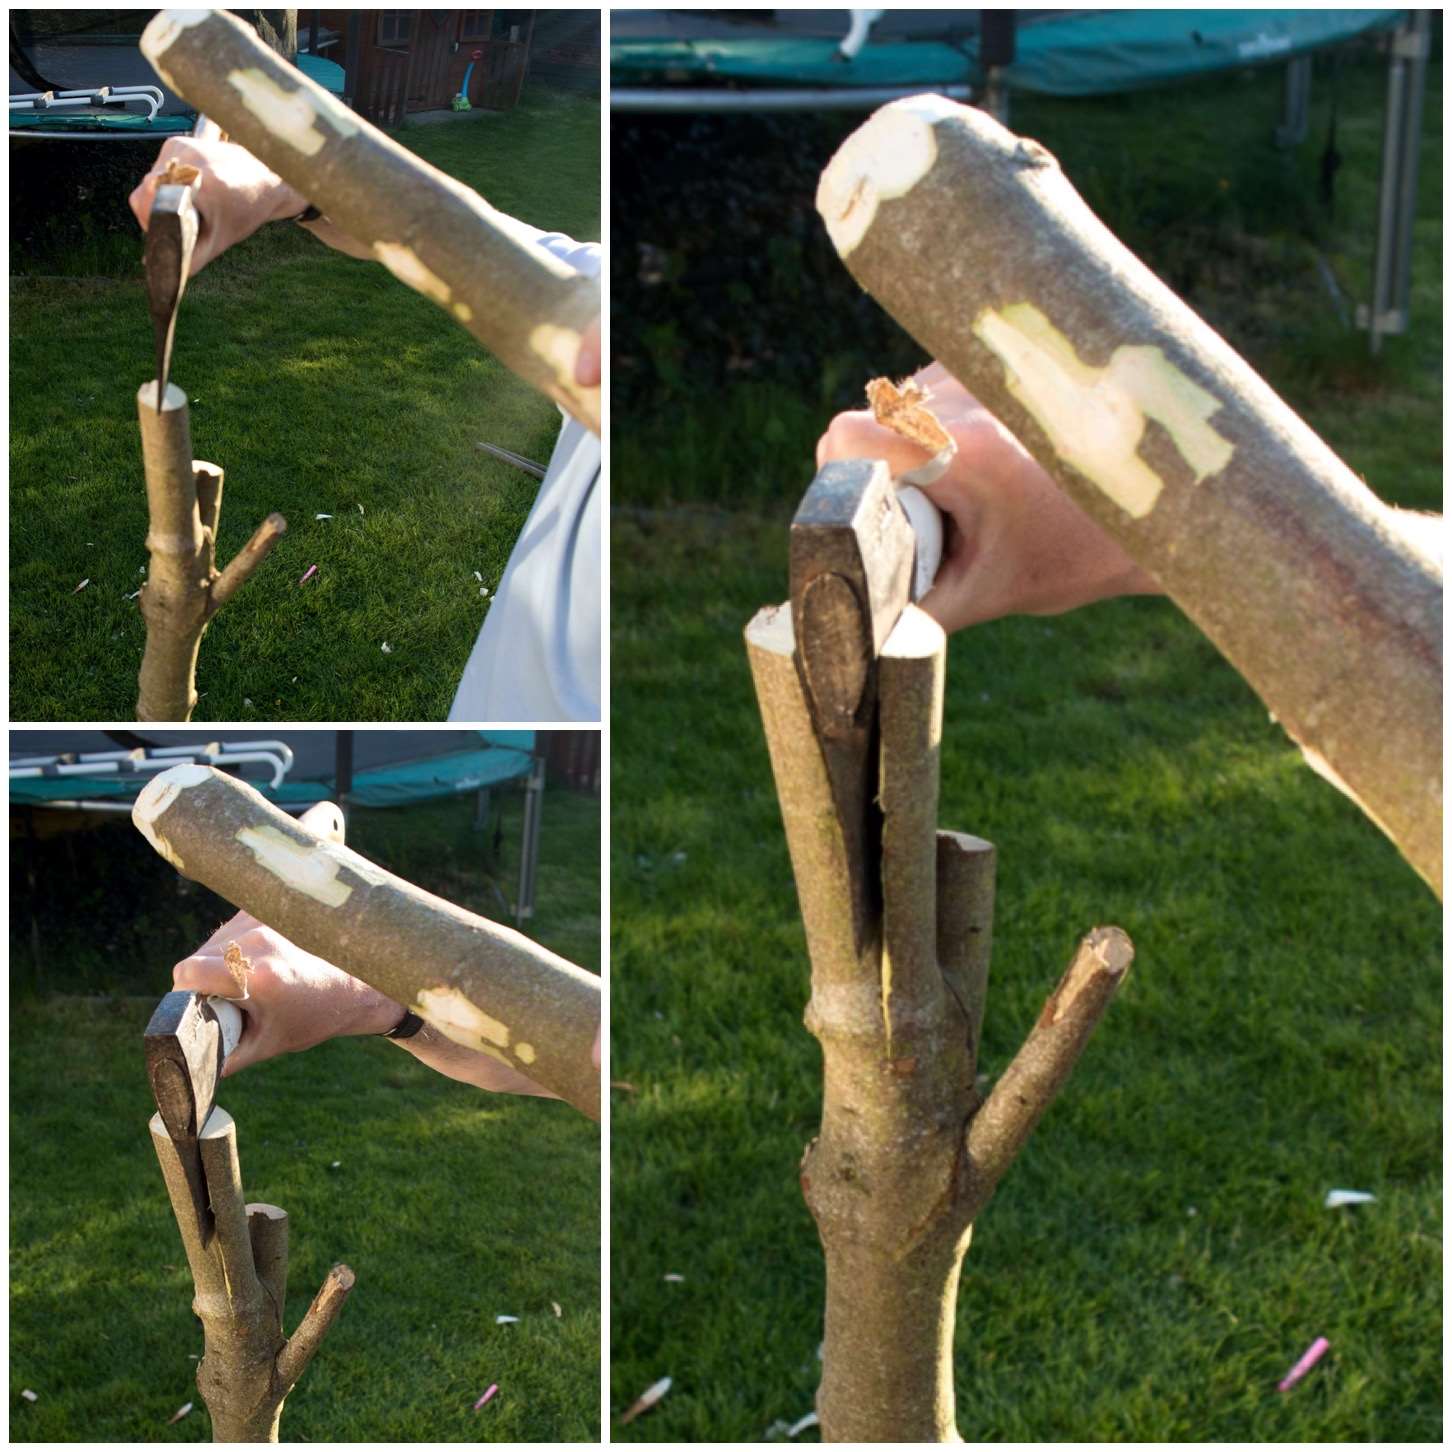
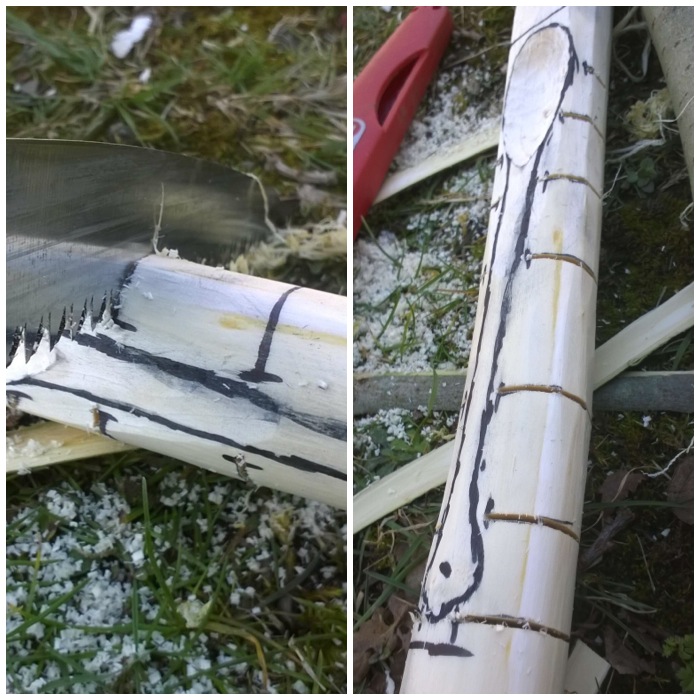
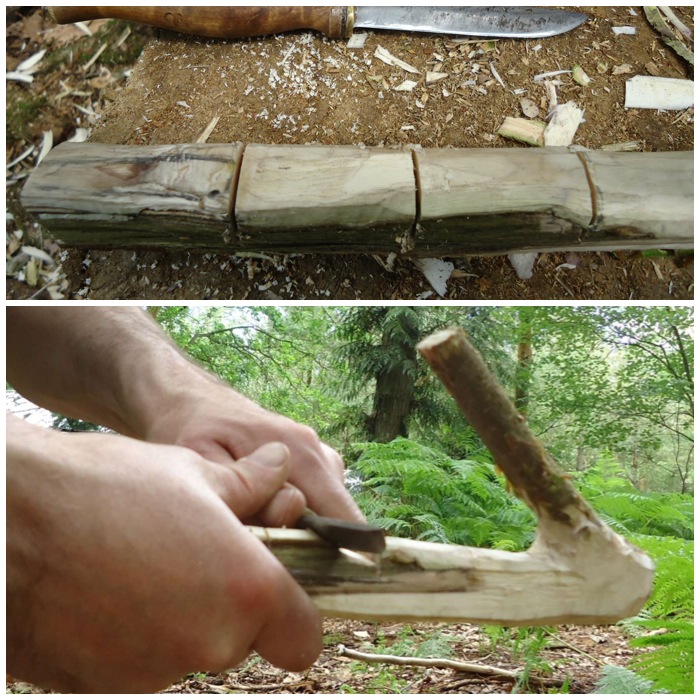
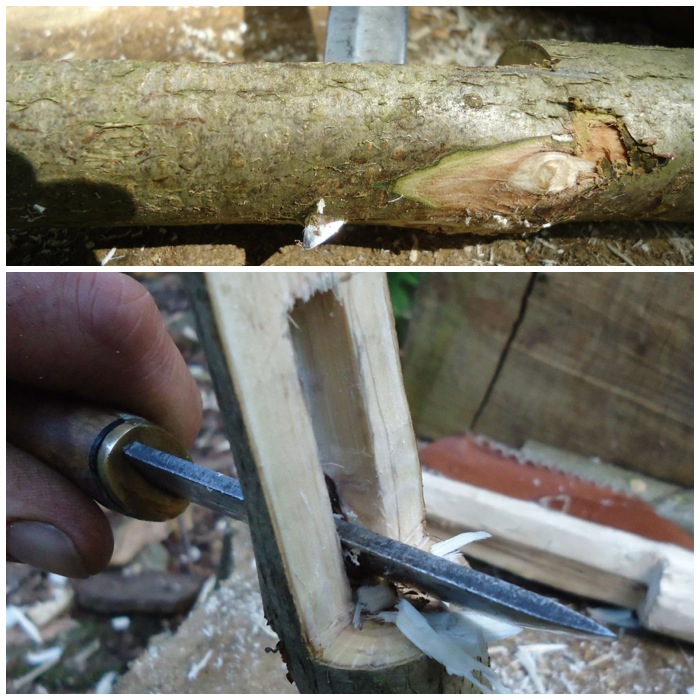
The Dovetail Joints
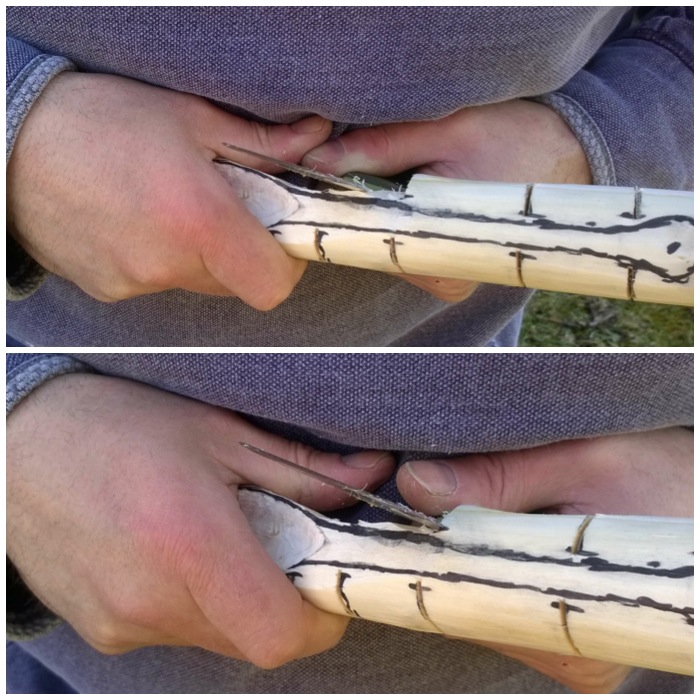
These joints were a total experiment. I put all the pieces together again and, holding them tightly, sawed a line to the depth of a centimetre across two of the joints. (I recommend you use some string or maybe a belt to hold everything together as you make the cuts – I didn’t and I wished I had.)
I then did the same cut but flared my saw out slightly (about 45 degrees) to the same depth. I then repeated the cut with the saw flared out 45 degrees in the opposite direction to the original cut to the same depth (there will be a picture of the cut further down the post).
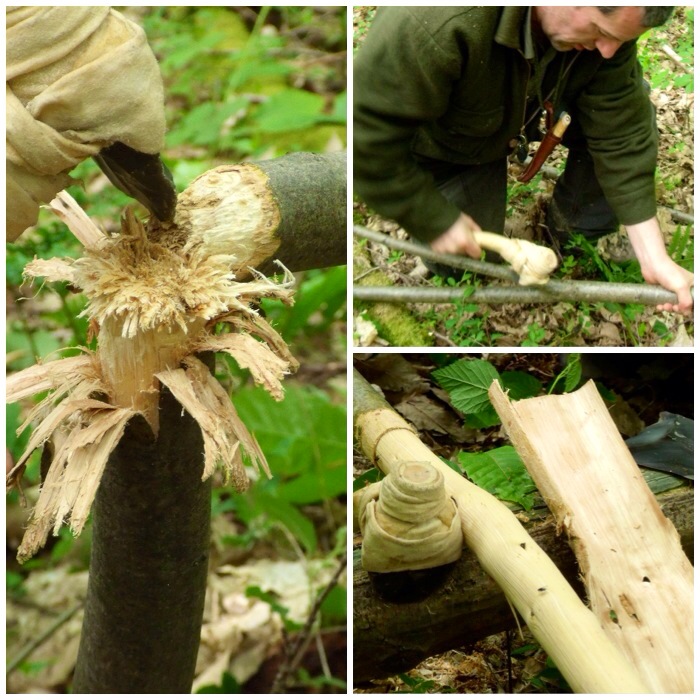
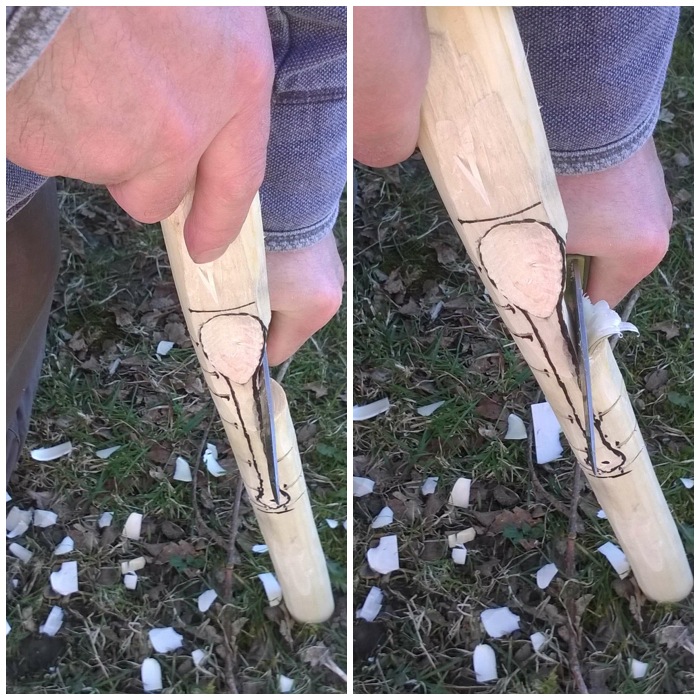
Once that was done I used my saw like a rasp to carve out all the excess wood to form what is called the dovetail ‘Tail’.
Cutting out the ‘Tails’
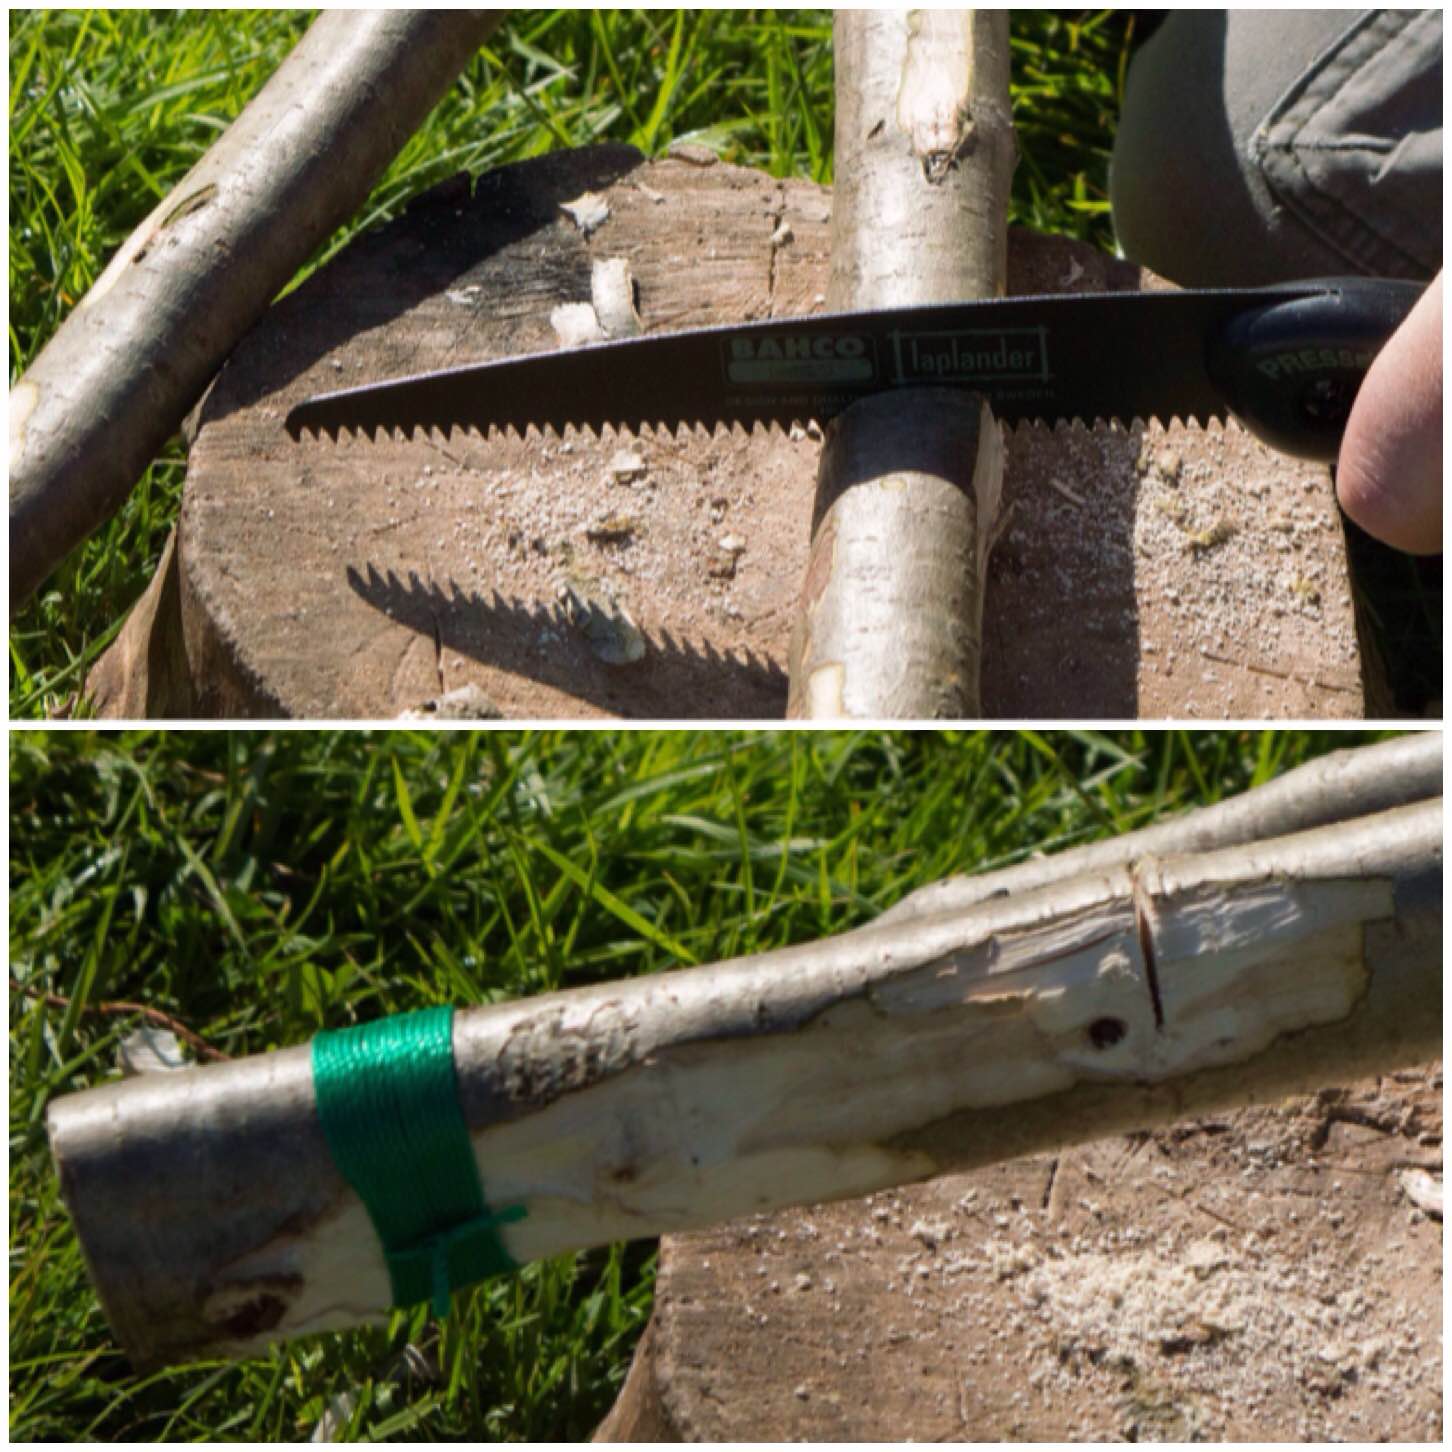
Below you can see this ‘Tail’ part of the dovetail joint. It forms what I think of as a bow tie shape when done properly. The important point is to start each cut from the same place, saw to the same depth each time and ensure that the middle of the tail is centred over the split in the segments.
I found that as I had not strapped the segments together I had to really hold them firmly together – this is where you will appreciate your belt or piece of string. Also while sawing these ‘Tails’ in be aware at all times where the saw is in relation to your thumb and forefinger on the hand holding the stove.
I made three of these tails (one over each split) to hold all the segments together.
The Tails
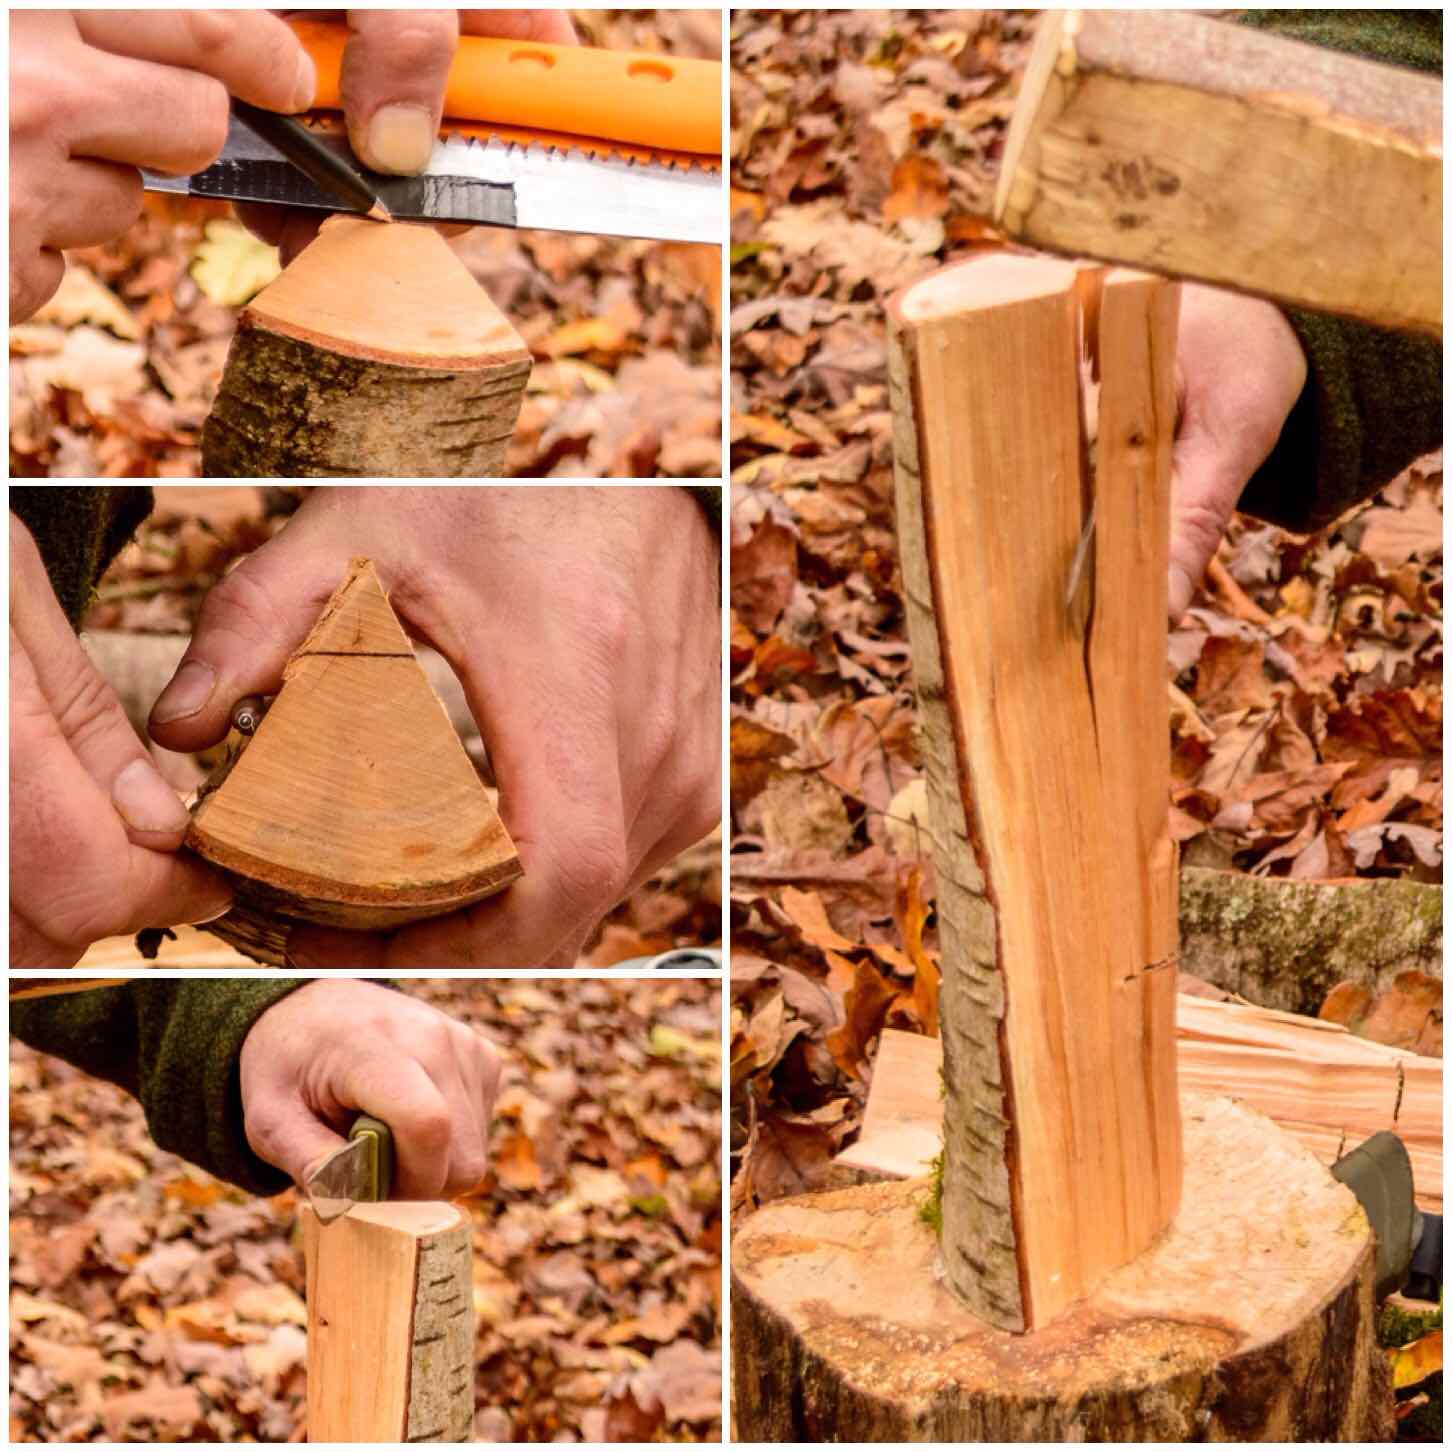
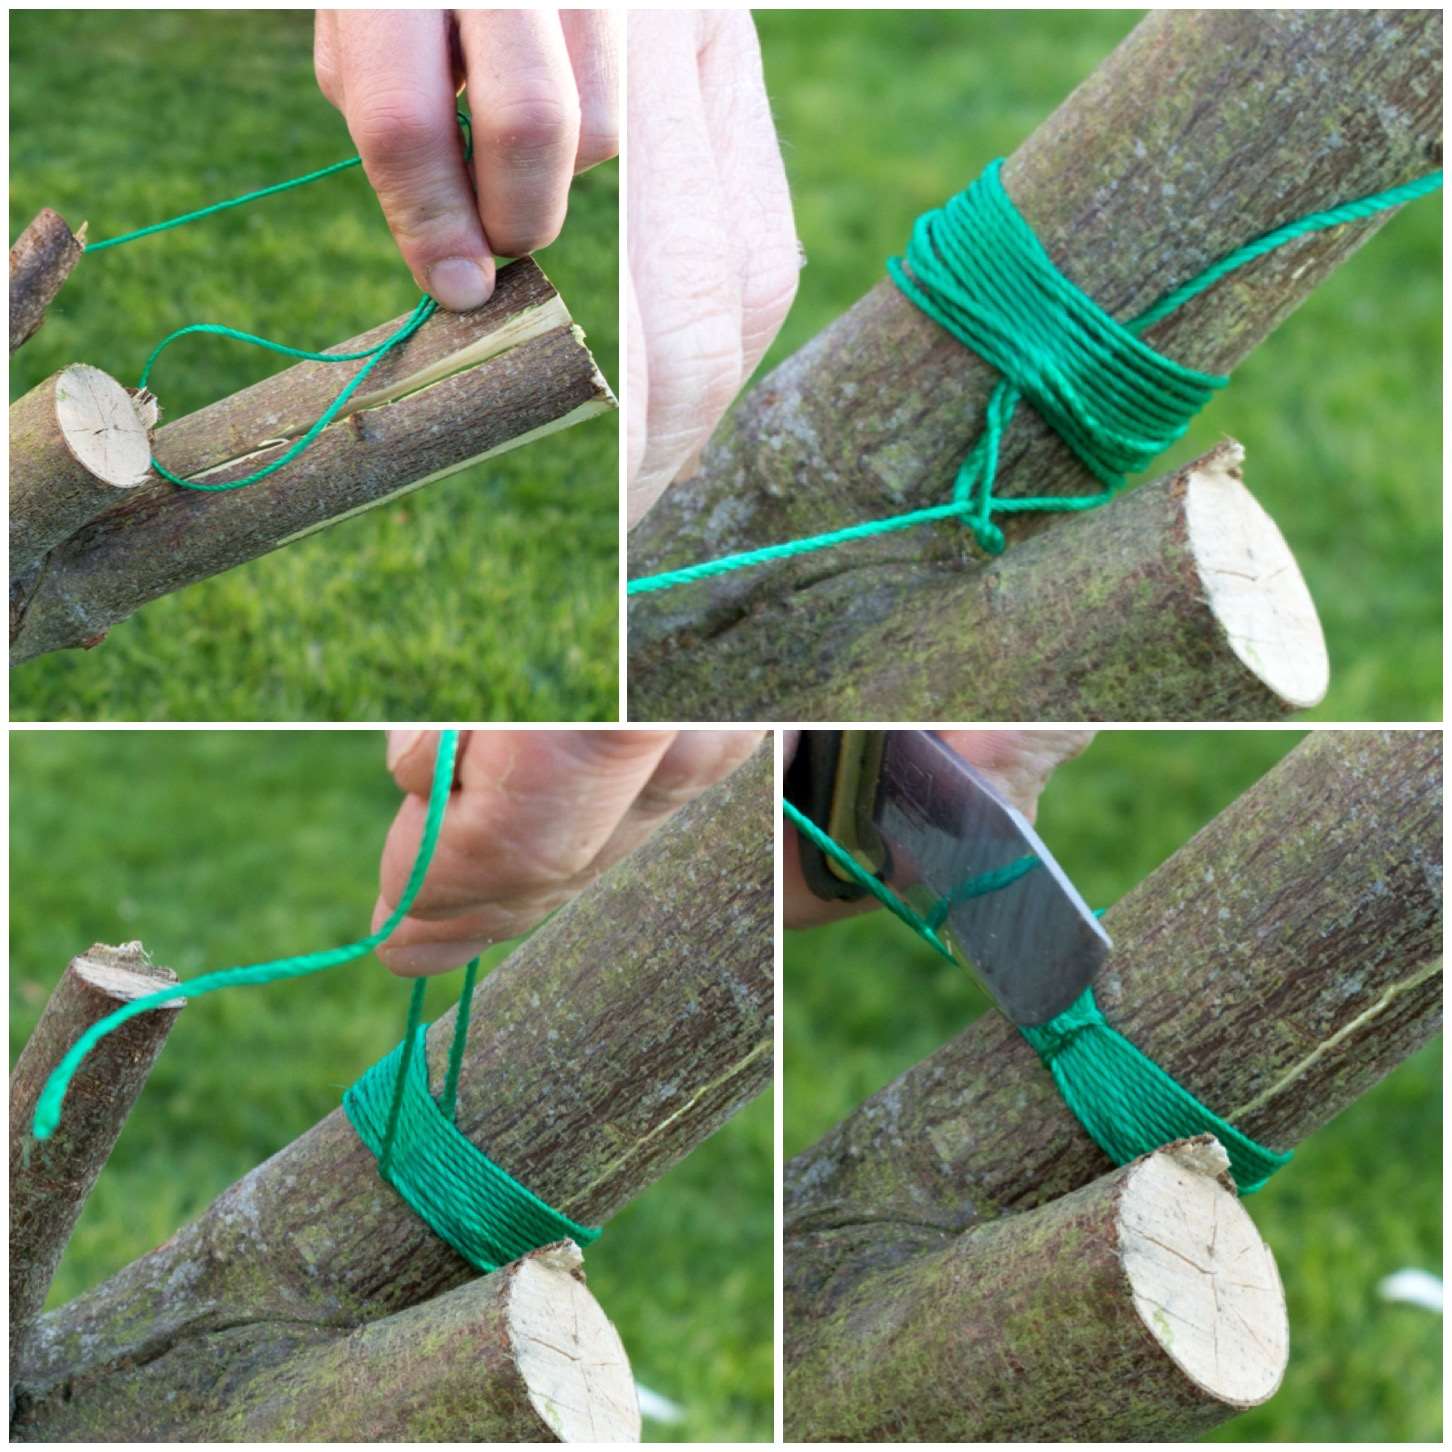
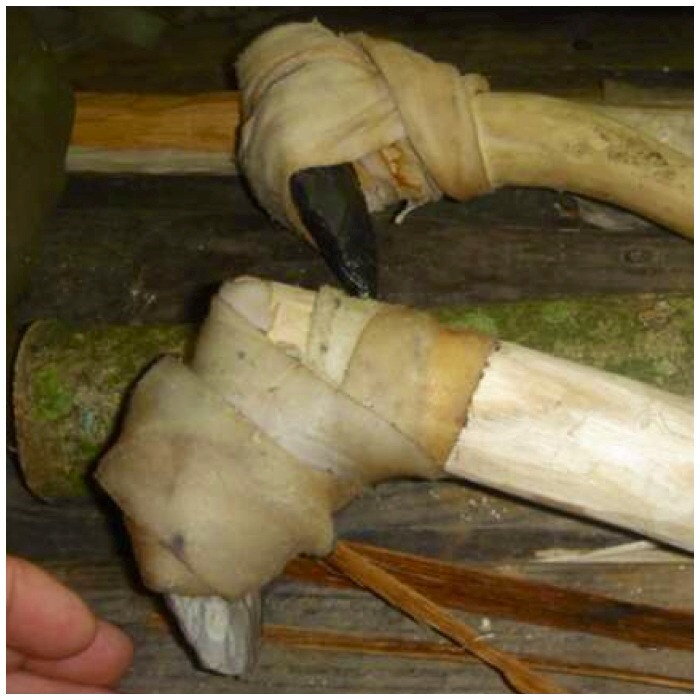
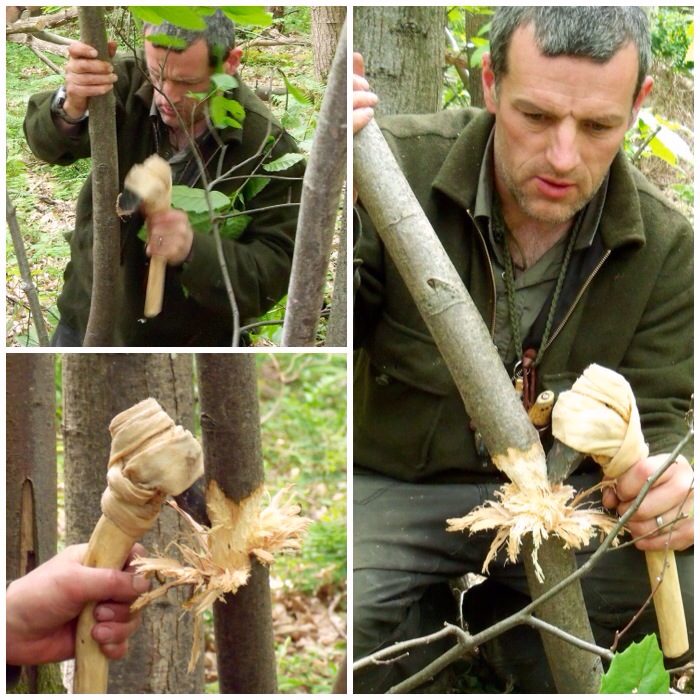
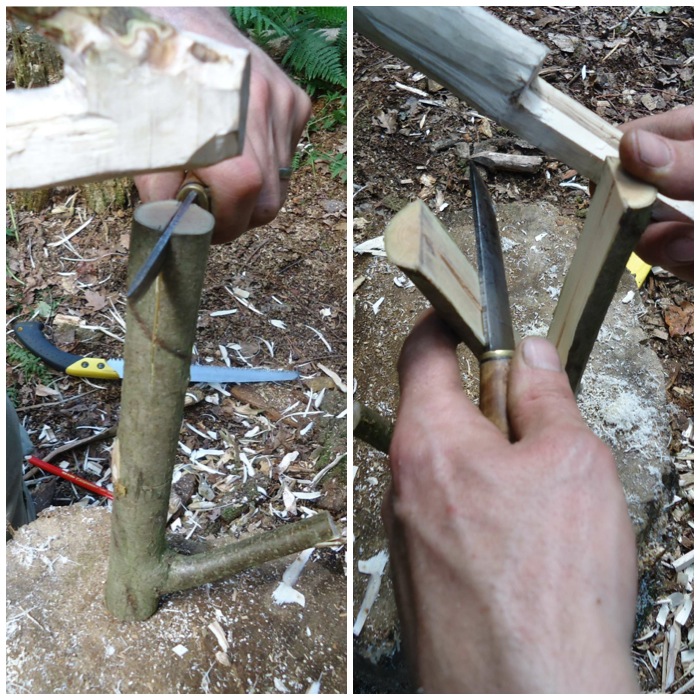
To hold the segments together you need to carve some ‘Pins’ to insert into the ‘Tails’. I used green hazel wood to make the pins and made sure that they were carved into a triangular shape but initially too big for the tail.
Carving in this manner allowed me to insert the pin into the tail and then progressively carve off smaller pieces from the pin until it started to slide in. I also used my large piece of wood to hammer the pins in to ensure a very tight fit.
If you find that your pin is too small just get a fresh piece of green wood and try again. They only take seconds to make. To finish the pins off I trimmed the ends with my saw.
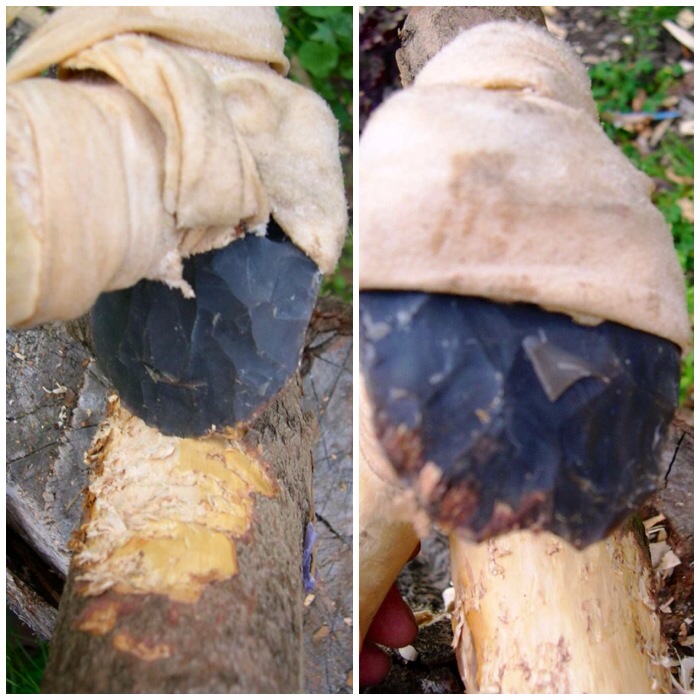
Cutting and inserting the ‘Pins’
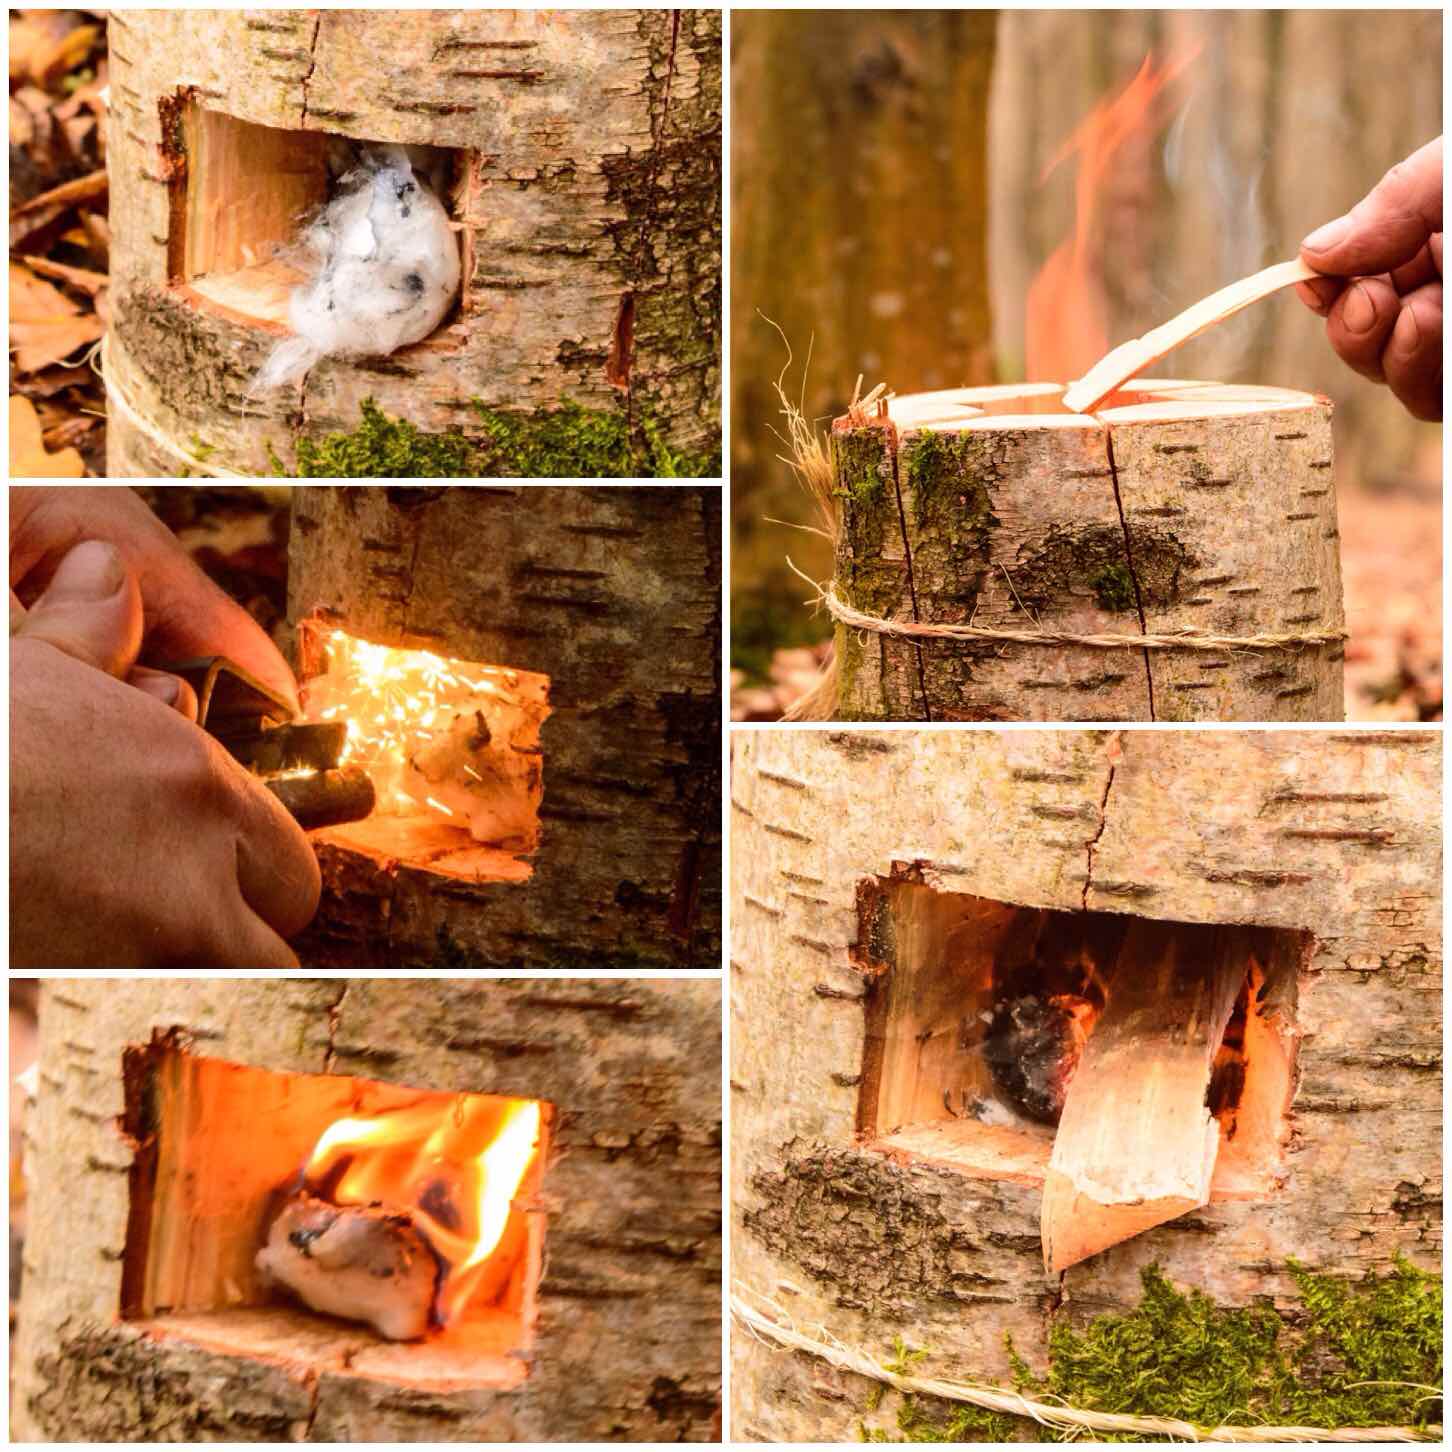
As the bark of the birch tree is very flammable I stripped it all off and kept it to the side to use later as kindling to get the fire started. The dovetail joints if fitted snugly will keep all the segments locked together tightly.
Trimming
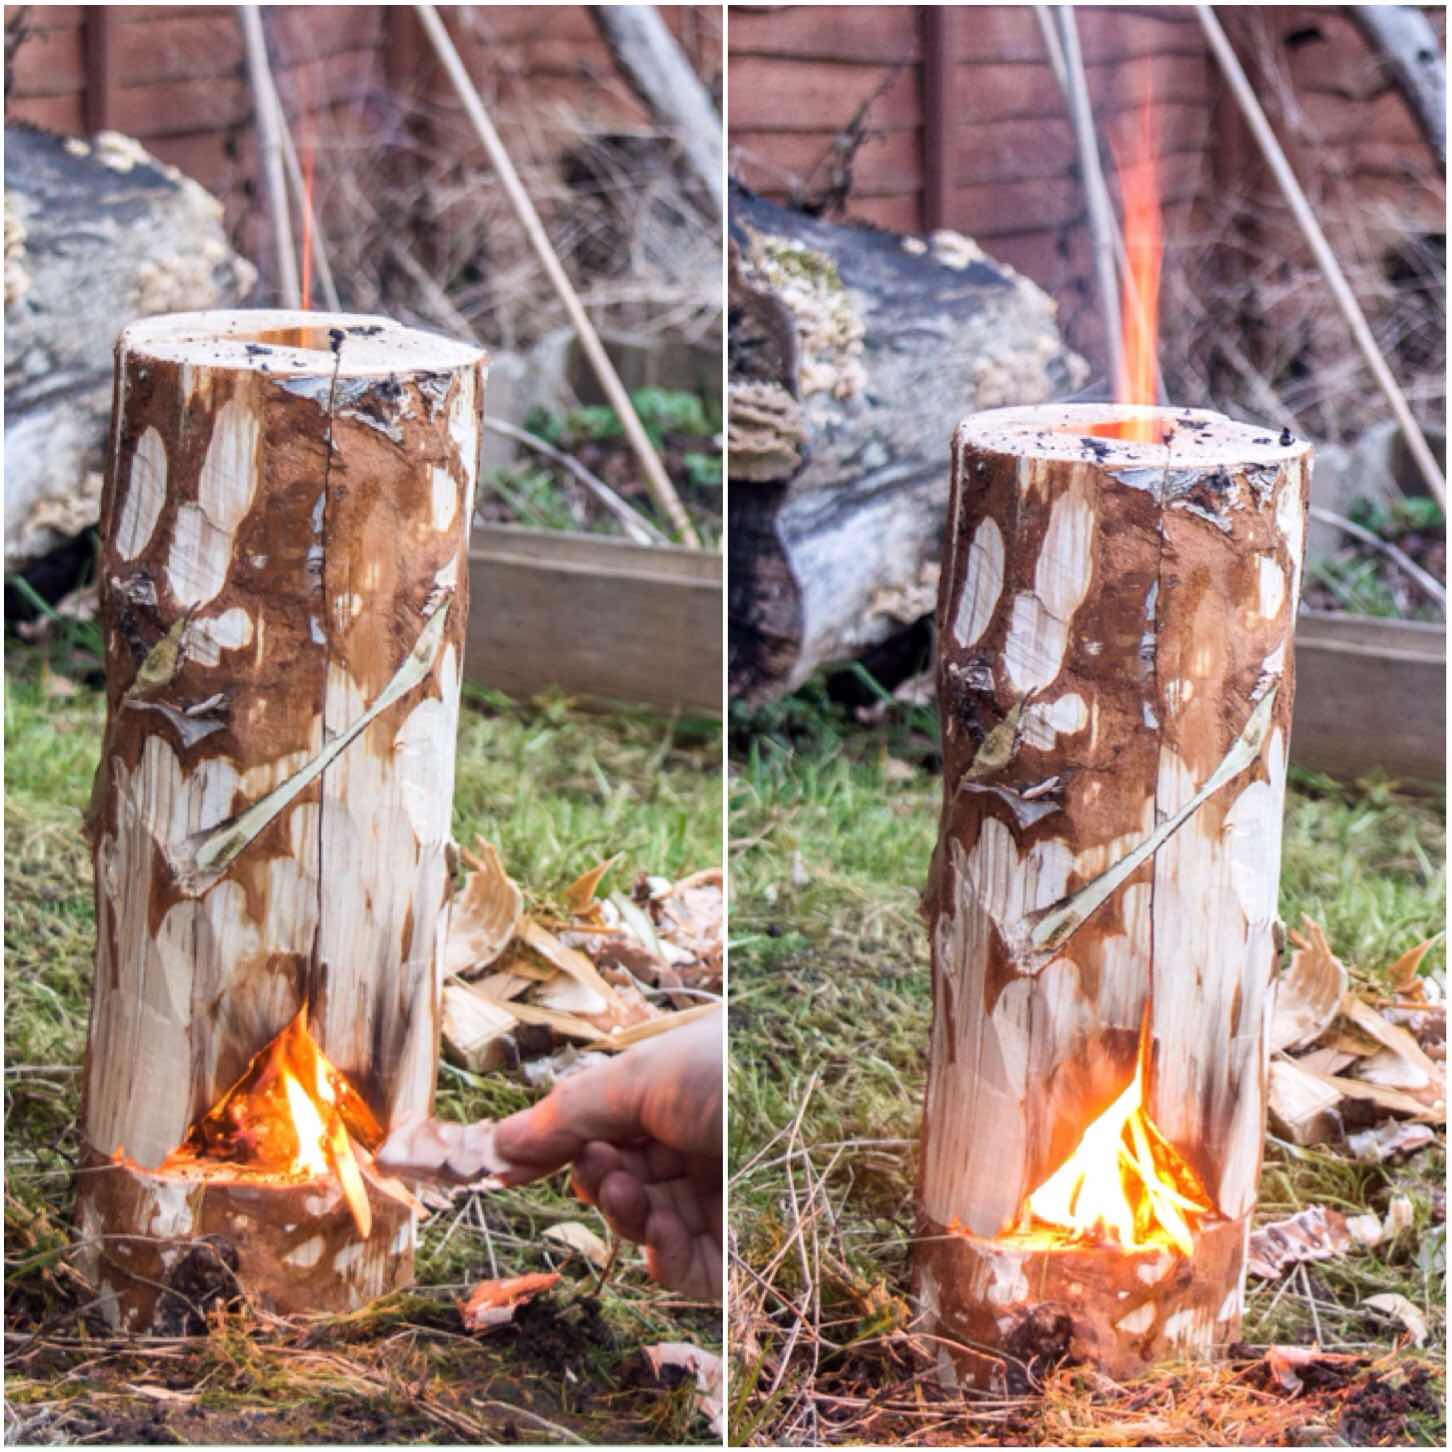
Firing Up
I lit the stove with some Vaseline-soaked cotton wool balls (which I always carry with me) because everything was so damp. The wind was non existent that day so it took me a while to get the stove going well.
Normally these stoves fire up really easily when there’s a little bit of wind to create the rocket effect up through the chimney
Firing up and drying out
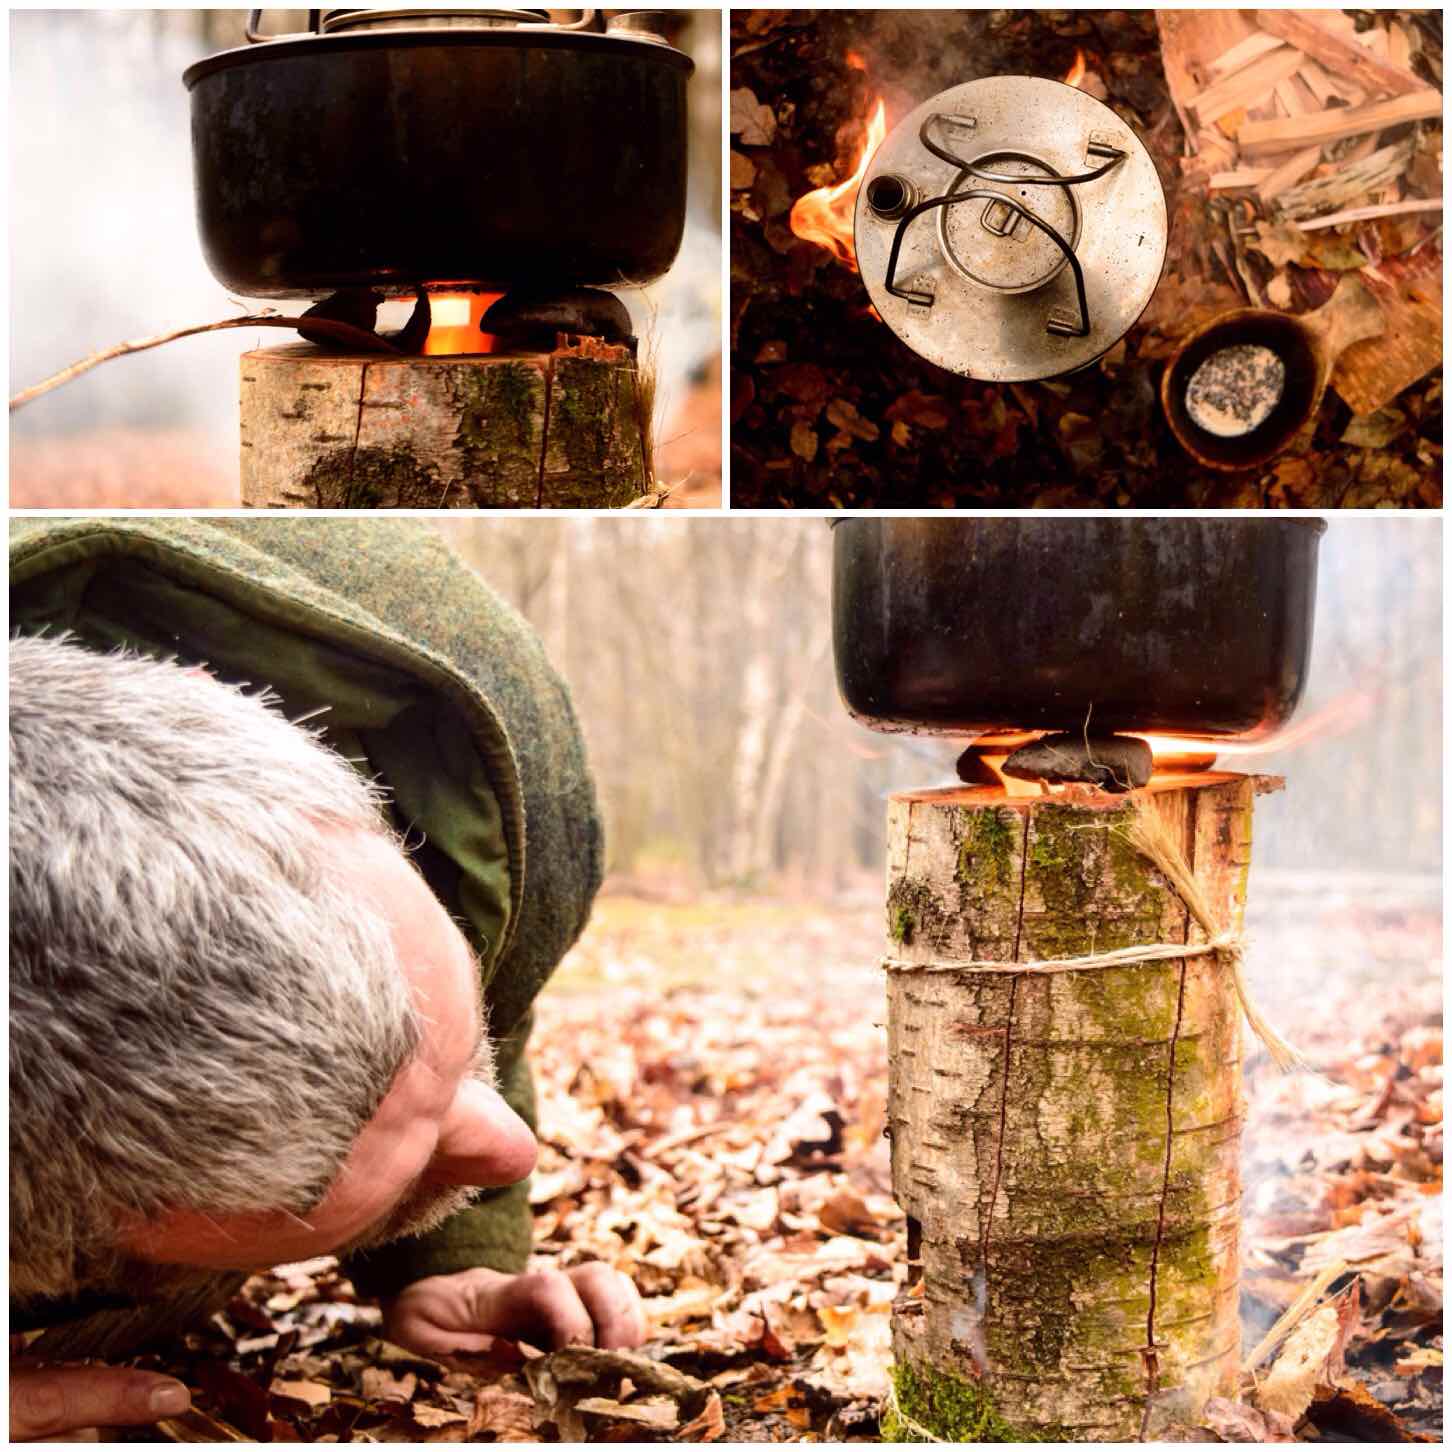
Eventually the rocket effect started and I placed three pieces of green wood onto the top for my pot to sit on. These were fairly thin pieces but would last long enough to boil some water. Have a few pieces spare on standby though if needed.
Green wood pot stand
Once the pot was on (about 10 minutes after initial burn) I needed to keep popping small pieces of wood into the fire box to keep the fire going. If your wood is really dry or resinous (like spruce or pine) you may not need to keep tending the fire as the internal walls of the chimney will probably be well lit.
Now it is a stove
It took me just under 15 minutes to boil this pot of water (enough for approx 3 cups of coffee) and the dovetail joints remained strong throughout.
Roaring
After 45 minutes the first of the joints burnt through however the stove remained standing until it burnt out. Due to the lack of wind the majority of the wood did not burn through.
I made this short video of another Dovetail Log Rocket Stove to show it in action.
I like to experiment with log rocket stoves and this reliance on using string or wire to hold them together (although you can dig the segments of some types directly into soft ground) has always bugged me.
This Schwedenfeuer type of stove lends itself well to the dovetail joints I think, and once you have practised making a couple you will be able to knock together a stove very quickly with just natural materials.
As usual I am open to ideas and suggestions on creating more log rocket stoves and Scandinavian candles. If you have not seen my other posts on this subject have a look at my summary post on this subject titled – Candles, Rockets and Long Fires.
For a while now I have been making Log Rocket Stoves in different ways.
The ones I make in the workshop are easy as all you require is a drill however if you make one in the woods things become more complex. A common theme about these woodland Log Rocket Stoves is that you need something like string or wire to hold everything together.
I thought about this a lot recently and came up with this adaptation of the Log Rocket Stove using green wood dovetail joints.
I will post a full step by step tutorial in the near future in my How To…. section.
It has been a dream of mine to one day head on over to Scandinavia to practise my bushcraft skills, particularly in winter time. Time and money have so far not allowed me to do that however that has not stopped me from researching some of the ways of lighting fires in the snow or wet conditions.
I have seen many a Scandinavian (sometimes referred to as Swedish candles though Finnish seems the origin for many ) candle at bushcraft meets that have been carved using a chainsaw however I do not own one. My research showed me that chainsaws were not required and there are many other ways to light a fire in the snow or on wet ground other than candles, such as long fires and log rocket stoves.
This post brings together all my posts over the last couple of years on this subject. You will find if you click on the title for each section it will bring you to a more detailed post on making these fires.
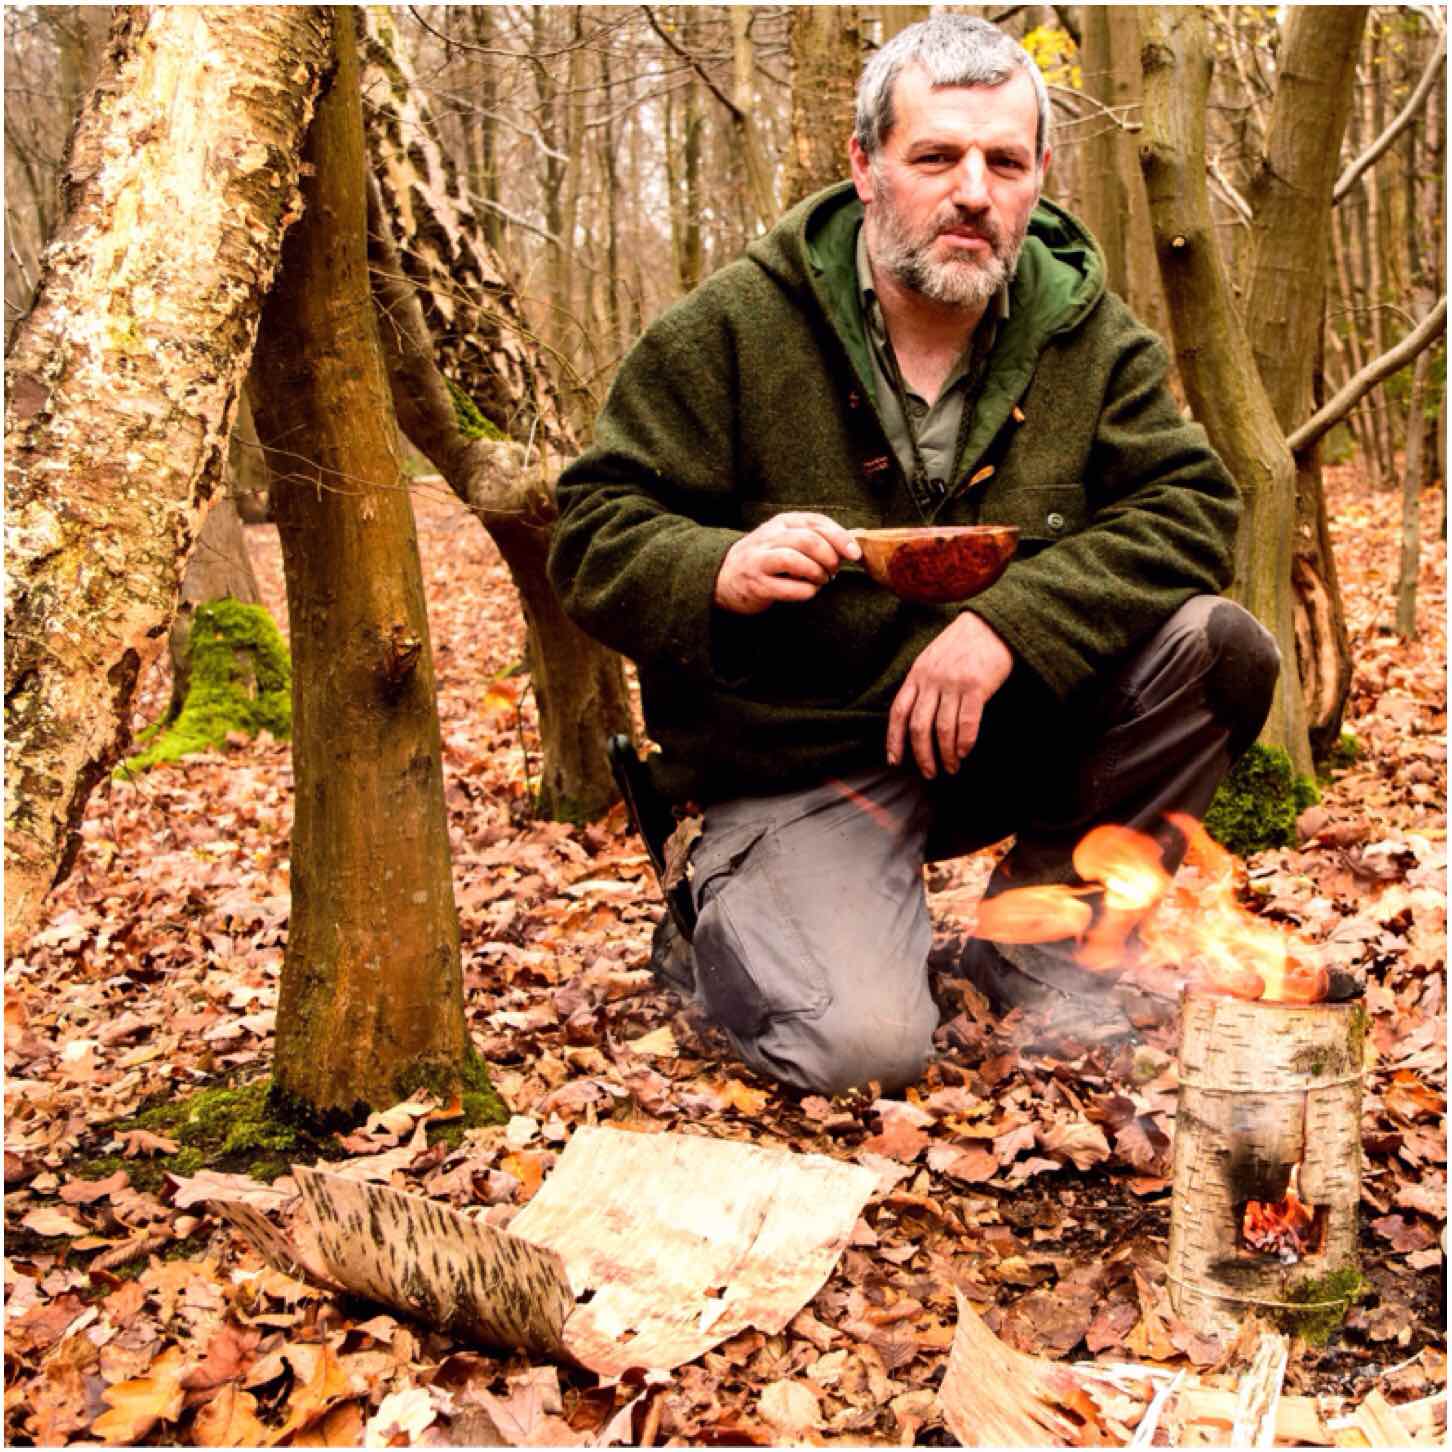
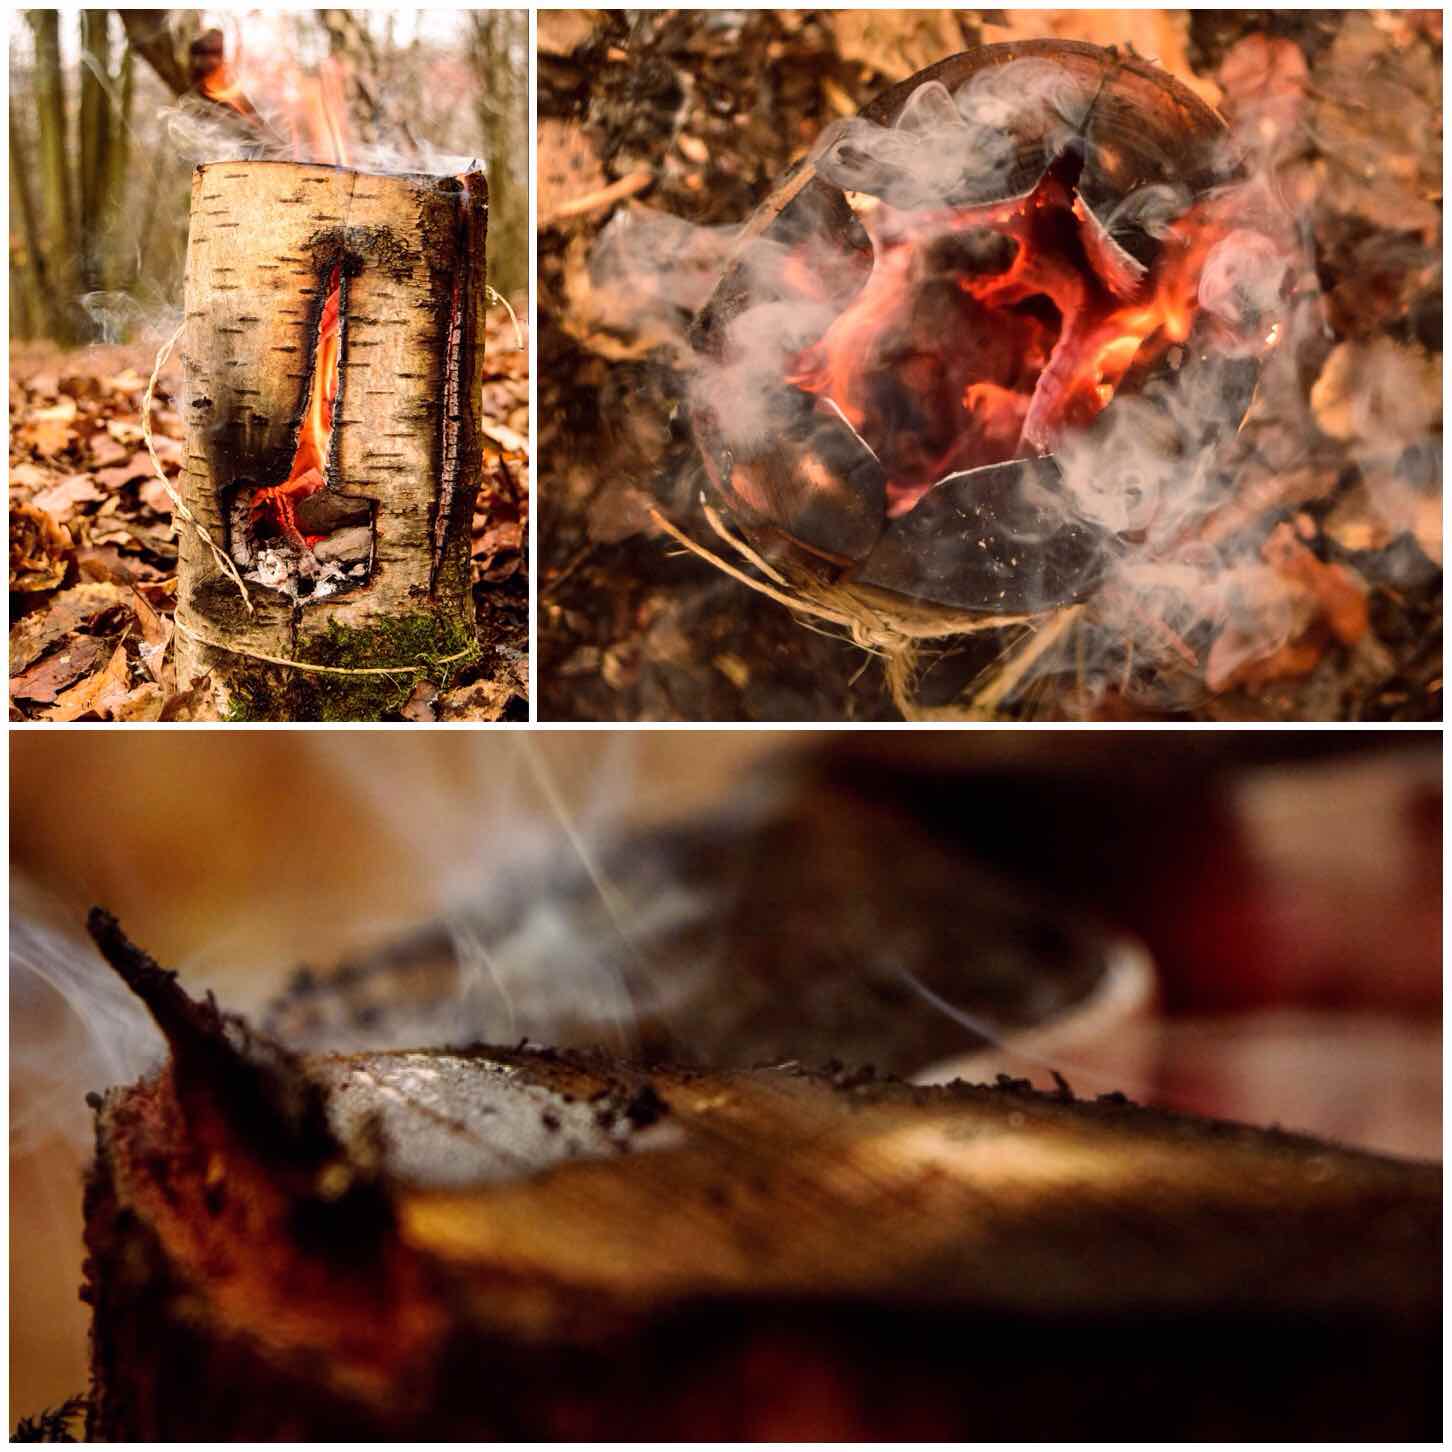
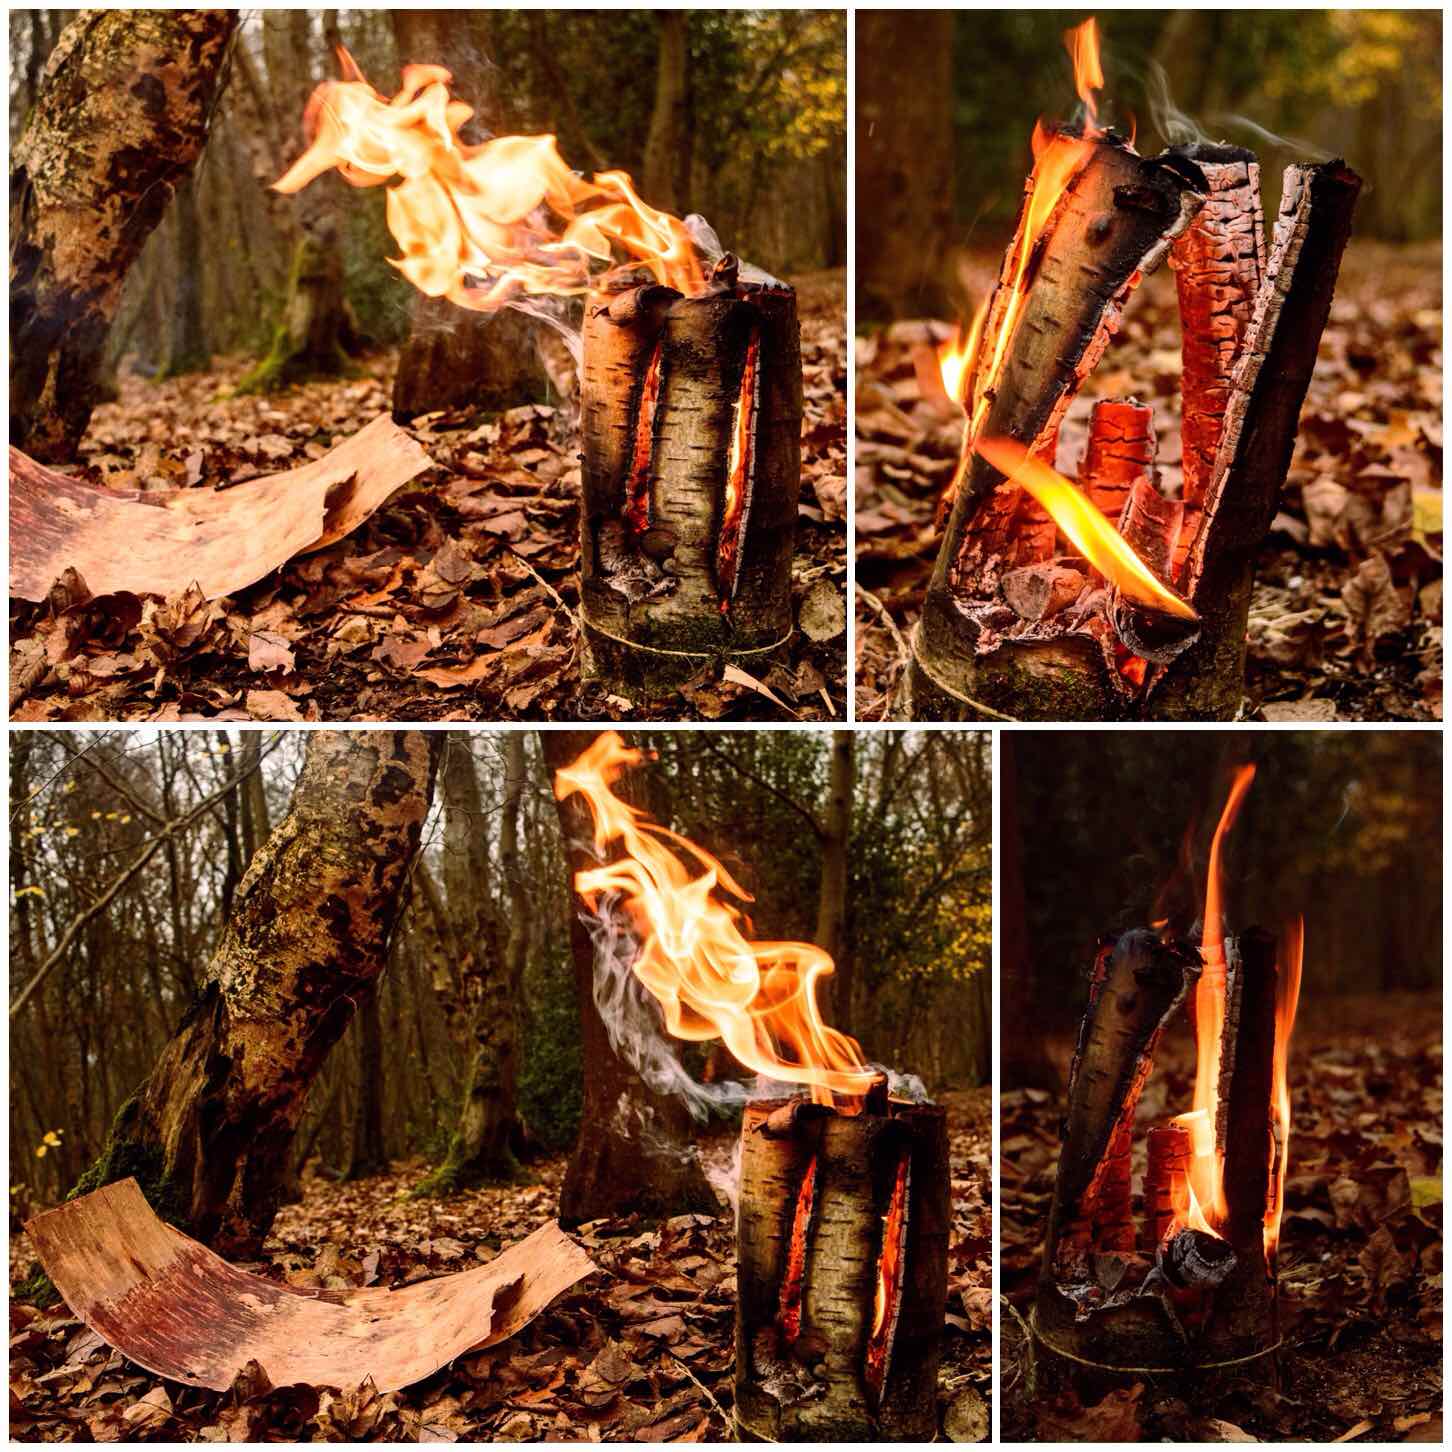
Trawling You Tube one evening a few years ago I came across a video titled the Log Stove from Hobbexp. Up until that point I thought to make a candle you needed a chainsaw. Hobbexp showed me that you could make a perfectly good candle with just an axe and some kindling.
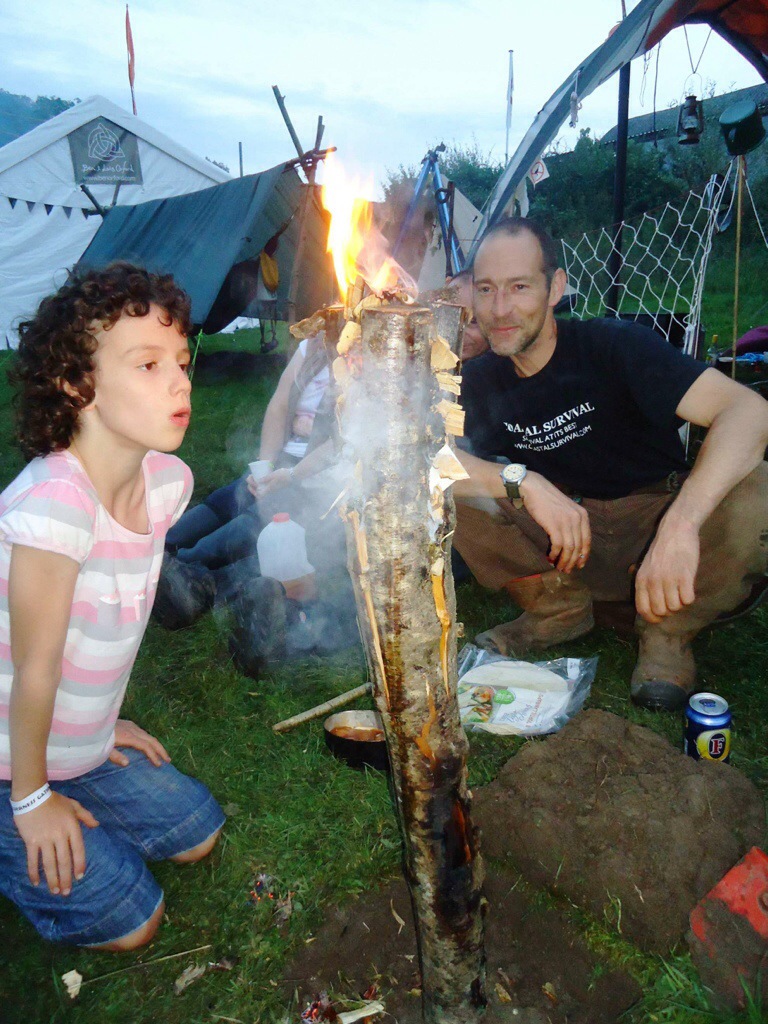
The one below was made using a birch log and stuffed with birch bark and spruce resin (and a couple of battoned-down pieces of green wood to keep the splits open). These candles can burn for a good couple of hours, are easy to set up and look great. I have no idea how many I have made over the last couple of years.
I got another idea for a candle during my research once again from You Tube from ‘bushcraftmyway’ titled the swedish torch/stove – my way. I liked this stove as it could be made from damp wood (ideal in the UK).
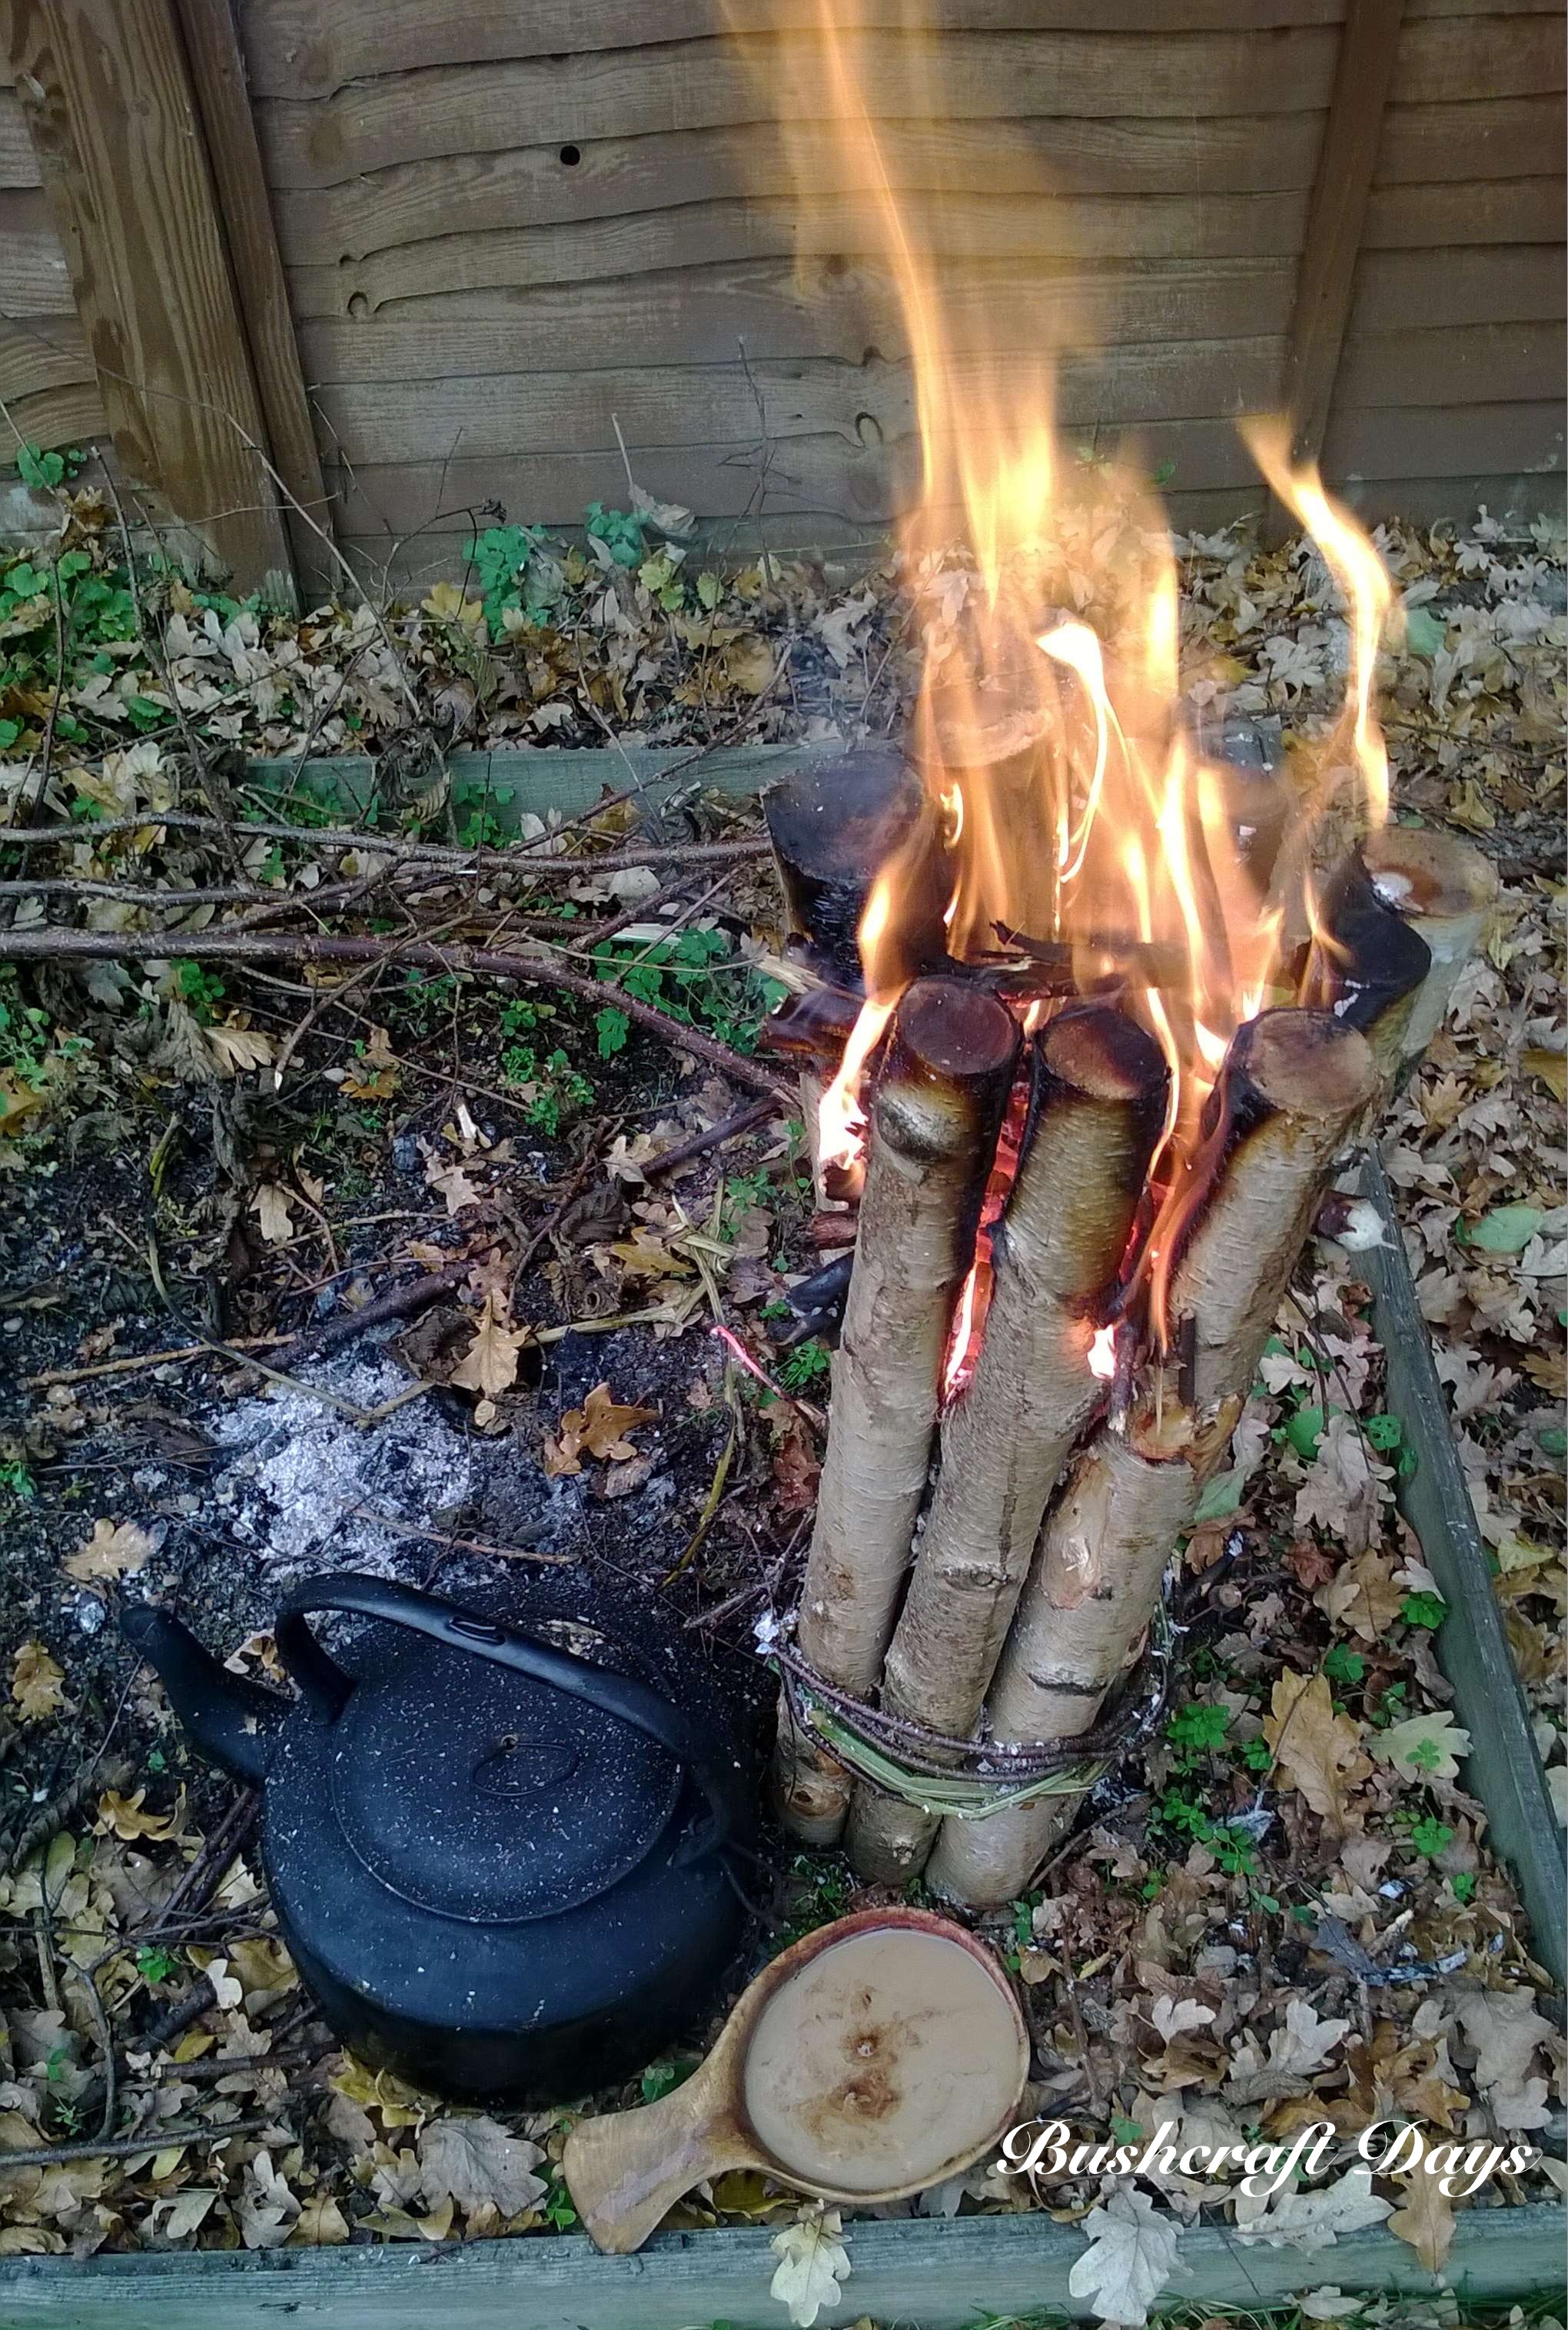
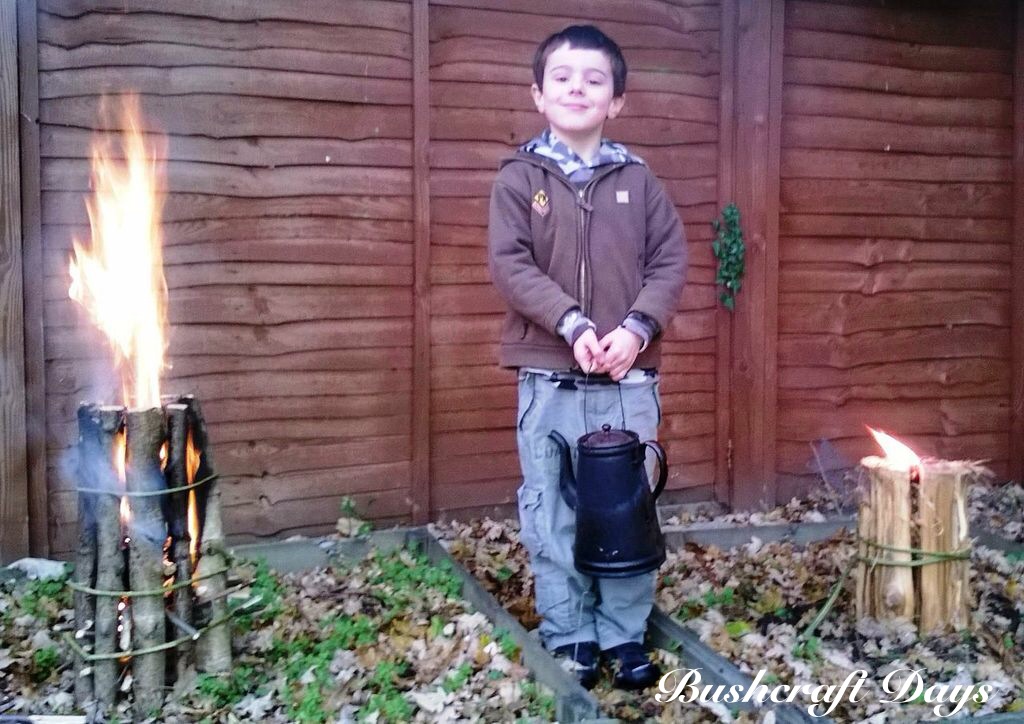
I tied some seasoned but damp birch rods together with bramble strips and willow bark then stuffed in tiny pieces of kindling and Vaseline-coated cotton wool. I decided to use the Vaseline and cotton wool so as to give the damp wood a chance to dry out.
After a bit of tender care the wood started to dry out and I easily managed to boil a kettle on it. This is an excellent way to get a fire going in damp/wet conditions. The remains of the candle after it had burnt down provided me with a great bed of coals to maintain a more traditional firelay.
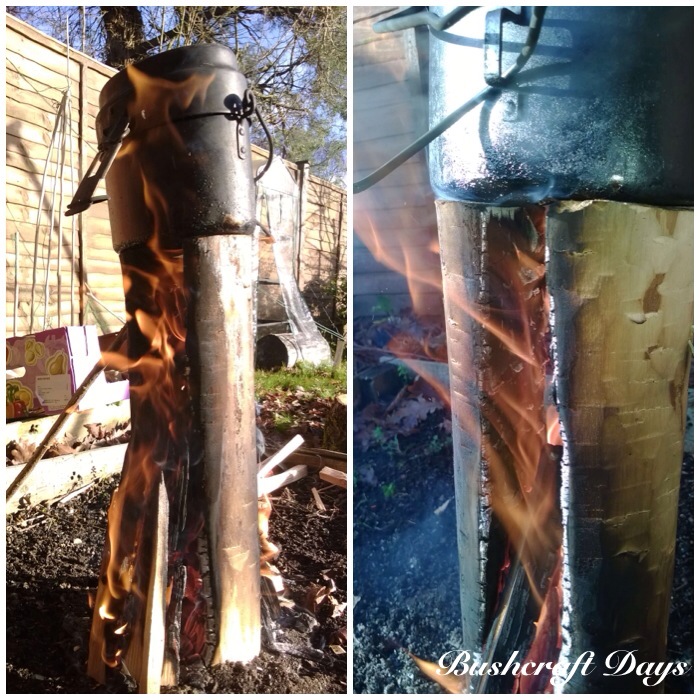
All this research led me to compare this rod style of candle with the more commonly split log candle. I set up the rod candle this time with very dry rods and split a spruce log with my axe into a number of wedges.
I tied them all together with natural cordage and lit them. The rod candle took off very quickly as it was stuffed full of very fine kindling however the split log candle lasted longer as it took longer to fully get going.
Again I managed to easily boil a kettle on both of these candles. Both are simple and easy to make.
The idea for this one came from Perkele’s Blog Spot but the post is no longer available. I think this candle is regarded by many as the original Finnish Candle.
A log is split from top to bottom and pieces from the central core are then axed out to act as kindling. Lots of cuts are made into the inner faces of the candle to give the flames plenty of surface area to catch onto.
It took me a while to get the flames self sustaining, but once they’d caught the candle worked well. It looked precarious as the two pieces of wood are not lashed together but they stayed upright till the end.
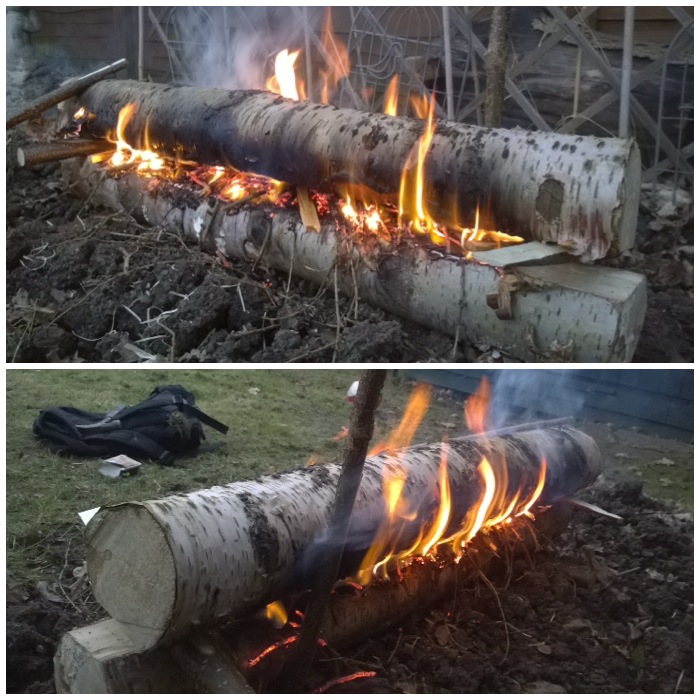
The Rakovalkea Gap fire hails from Finland and I was taught a similar method by my friend Kevin Warrington (Laplanders Natural Lore) back in 2007. I came across the term Rakovalkea around about 2011 after seeing pictures of this fire being made by the Finnish army on the internet.
This is a scaled-down model I made however it was fully functioning and its set up makes for a long burn time with easy adjustment to increase or decrease the flames. This has proved to be the most most popular post on my website.
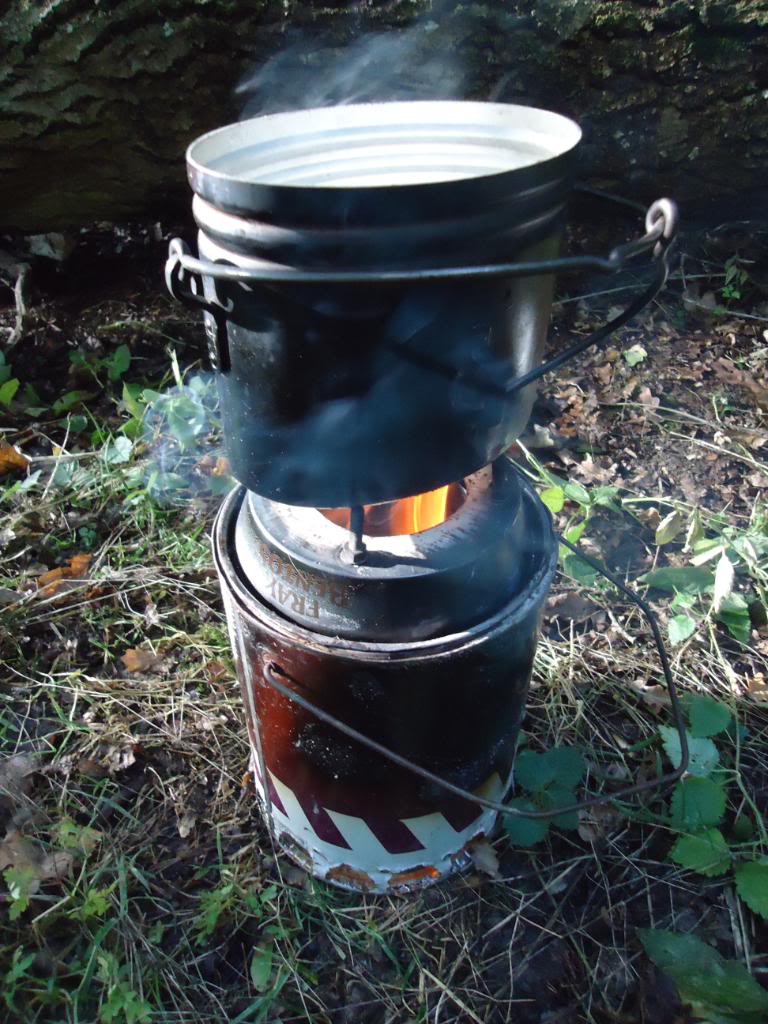
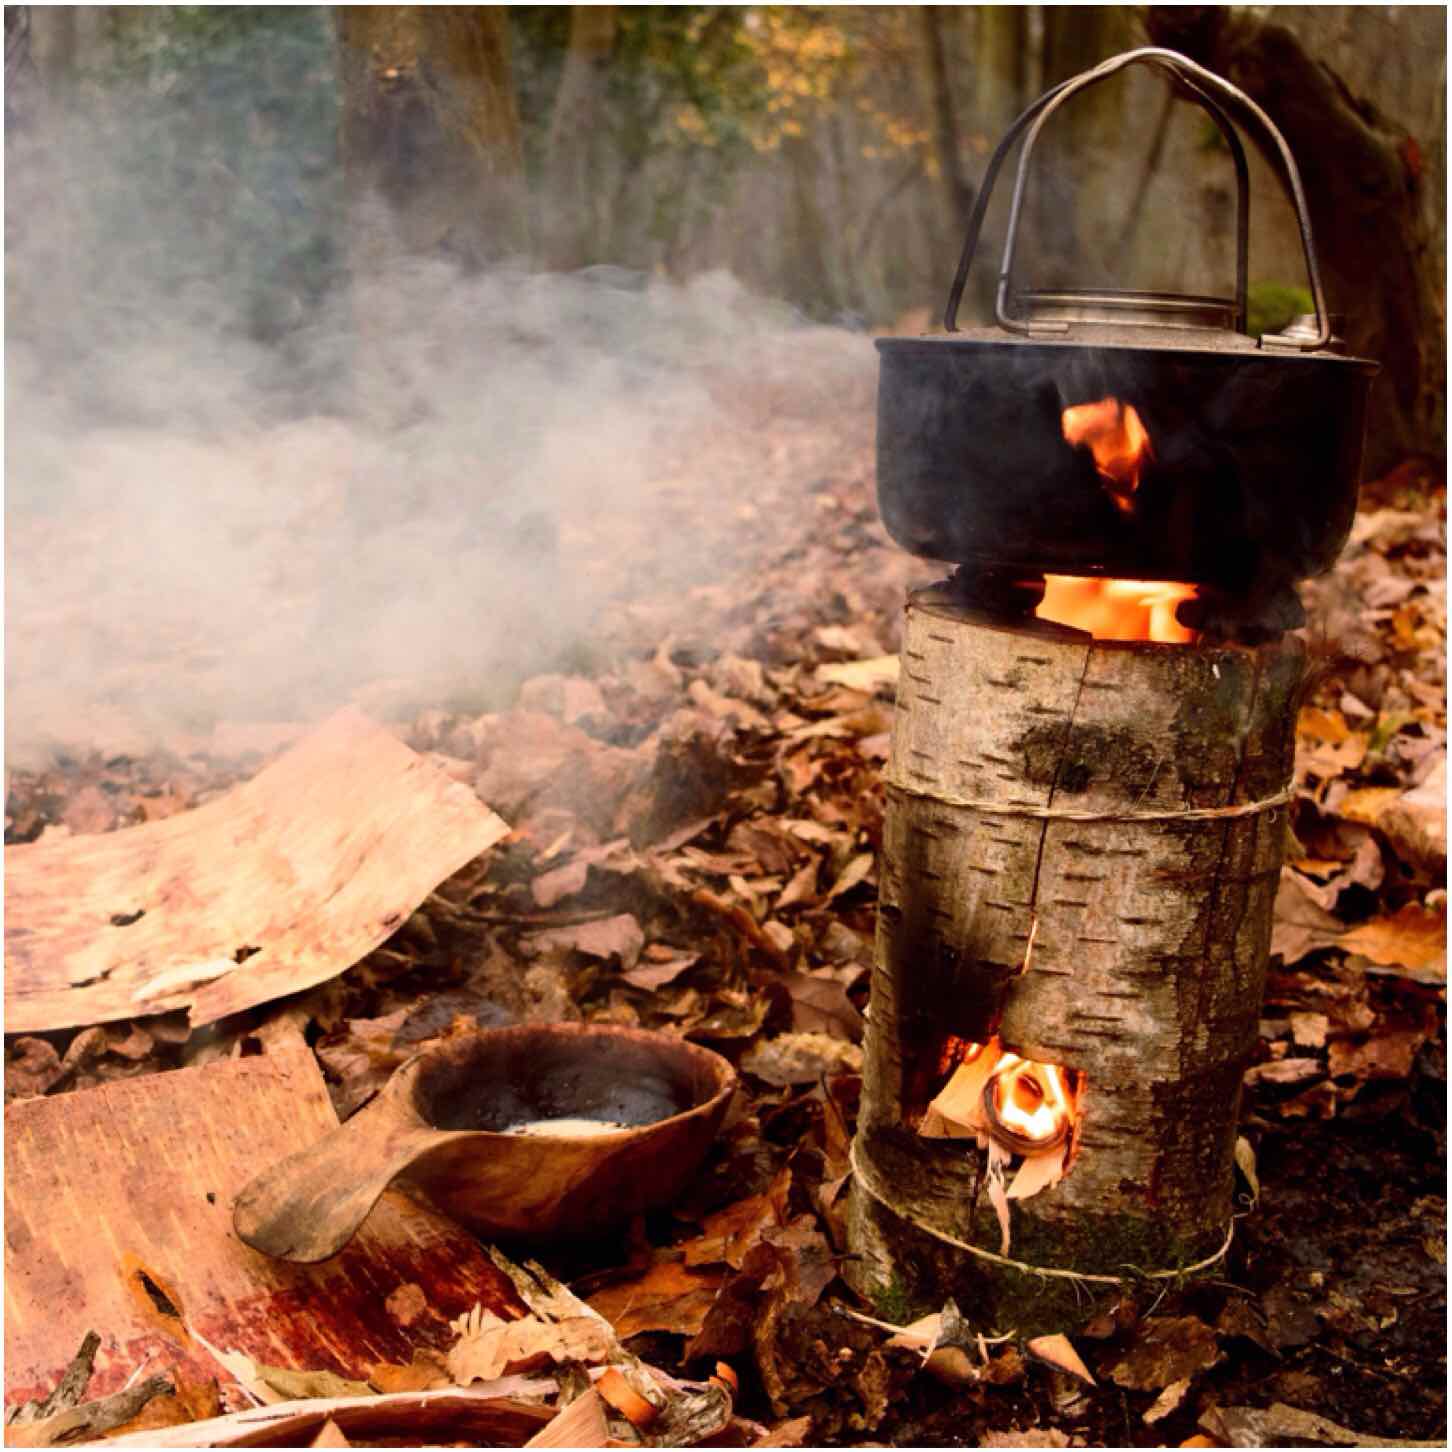
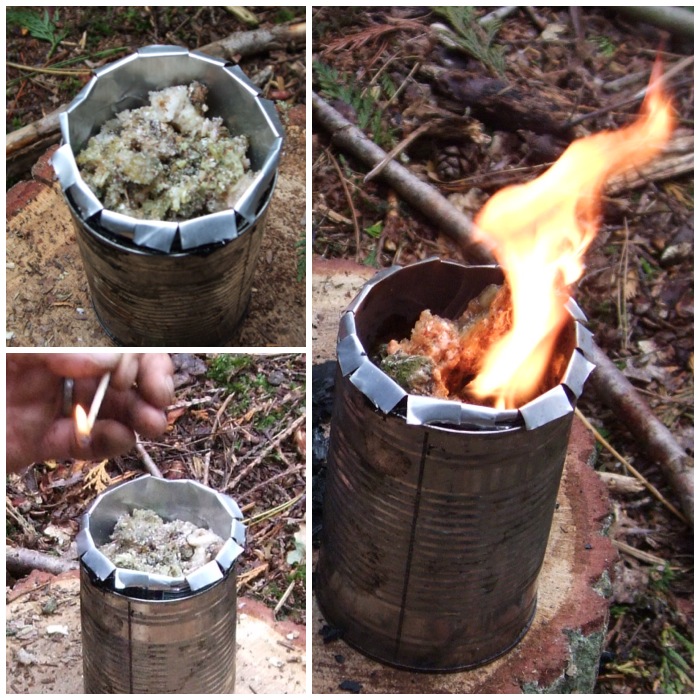
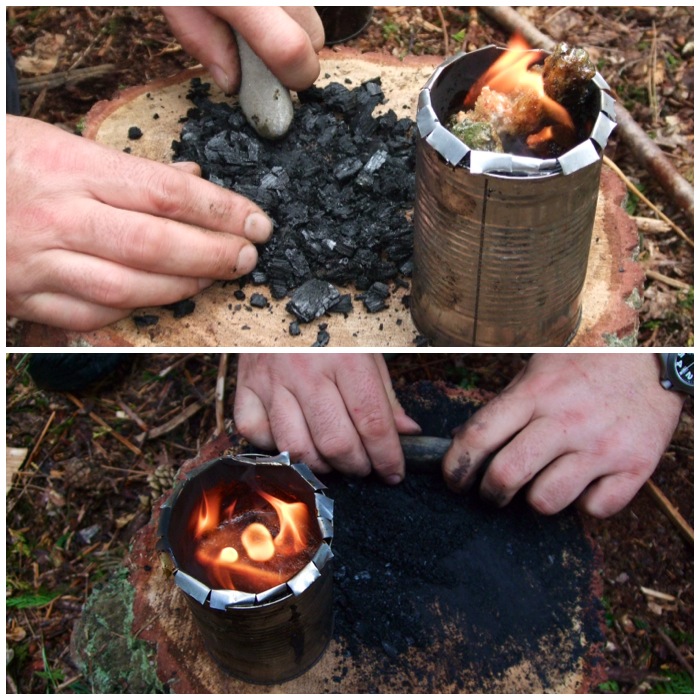
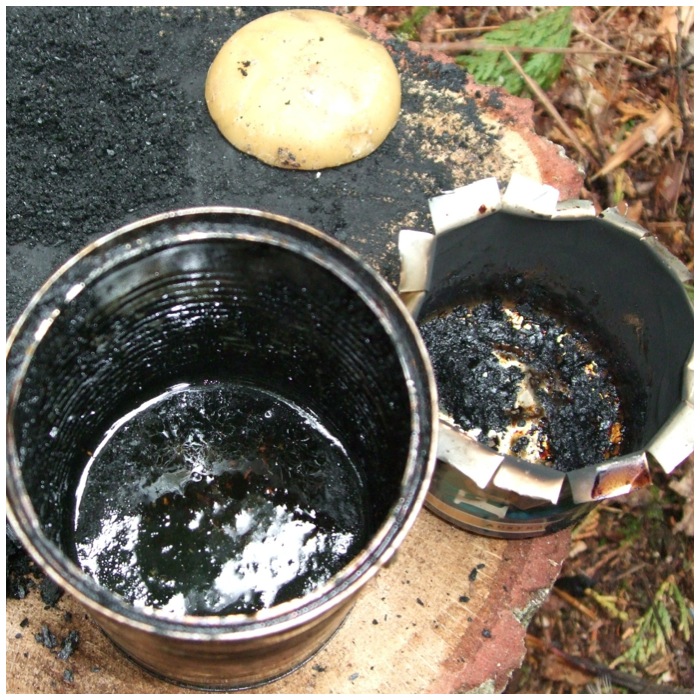
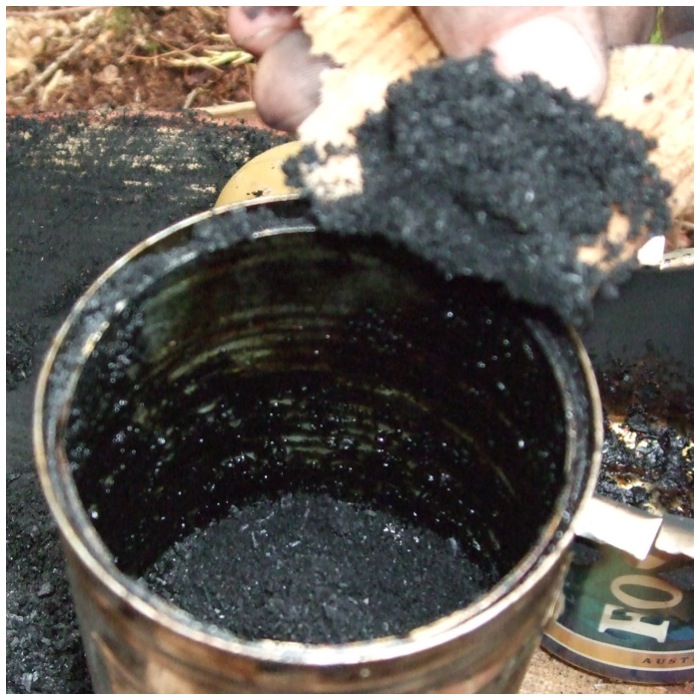
I decided to include this little fella as it is excellent for cooking in damp or wintry conditions. It is a wood gas stove and burns very efficiently. I was shown this by my friend Ian Woodham back in 2011 at the Bushcraft UKBushmoot. As soon as I got home I made one up and documented it on my blog.
I made this out of a metal paint pot, a large dog food tin, a Fray Bentos pie tin and a few bits and bobs. It works a treat and needs very little fuel to keep it going. I like to use dry seasoned pine/spruce/larch cones in the stove as they burn for a good length of time.
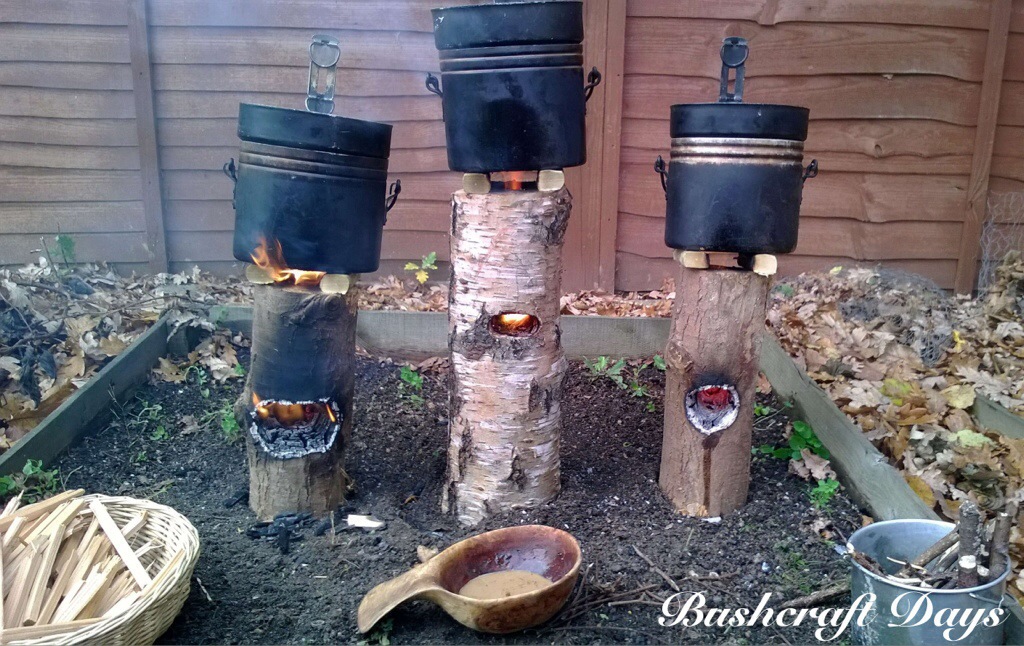
The next type of candle I came across was what has been termed the log rocket stove. I spotted a video by James Hookway and soon set to work in my workshop creating 3 stoves from different woods.
Log rocket stoves really intrigued me as they require very little kindling to keep them going (the damper the log the more kindling you require).
Have a look at the original post here to see how they compared.
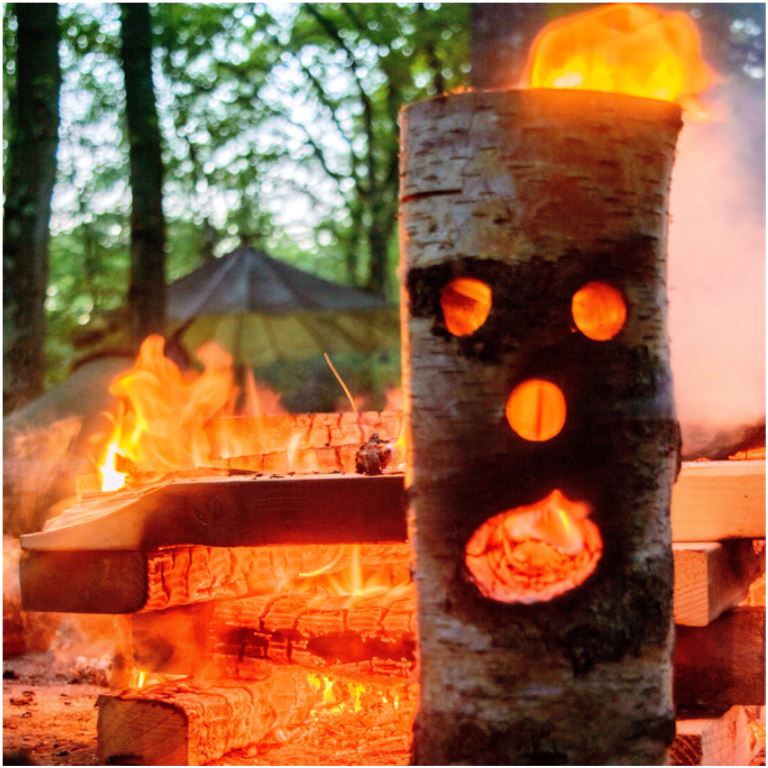
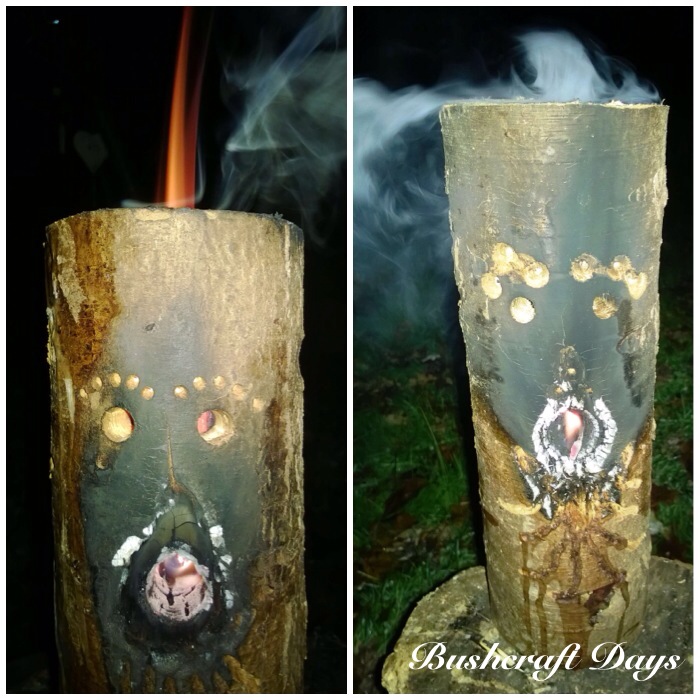
Now the kids love this stove – whenever you are having a barbie in the garden or if you are having a family camp make one or two of these up.
The principles are the same as the log rocket in the previous post except for the faces you can carve on them. Once they get going the faces really light up. They are perfectly able to be used as a normal log rocket stove for cooking or boiling but have the extra appeal factor of the face. A good video on this is the one made by Marcels Workshop.
Log rocket stoves have always appealed to me as a woodsman however when I am lightweight camping I do not fancy carrying around pre-prepared ones. Recently on Facebook Paul Hasling posted an article on making one with an axe and saw with no need for a drill. One of the other Scout leaders posted up a step by step guide on making one but it is in Spanish – the pictures though speak for themselves – Rocket Stove de Madeira.
I was instantly attracted to this method however when I was next out in the woods I could only find damp logs. To overcome this I split the log into six pieces and added Raappanan tuli cuts inside the chimney. This damp log rocket stove took slightly longer to get going as the internal wood slowly dried but once it was going there was no stopping it.
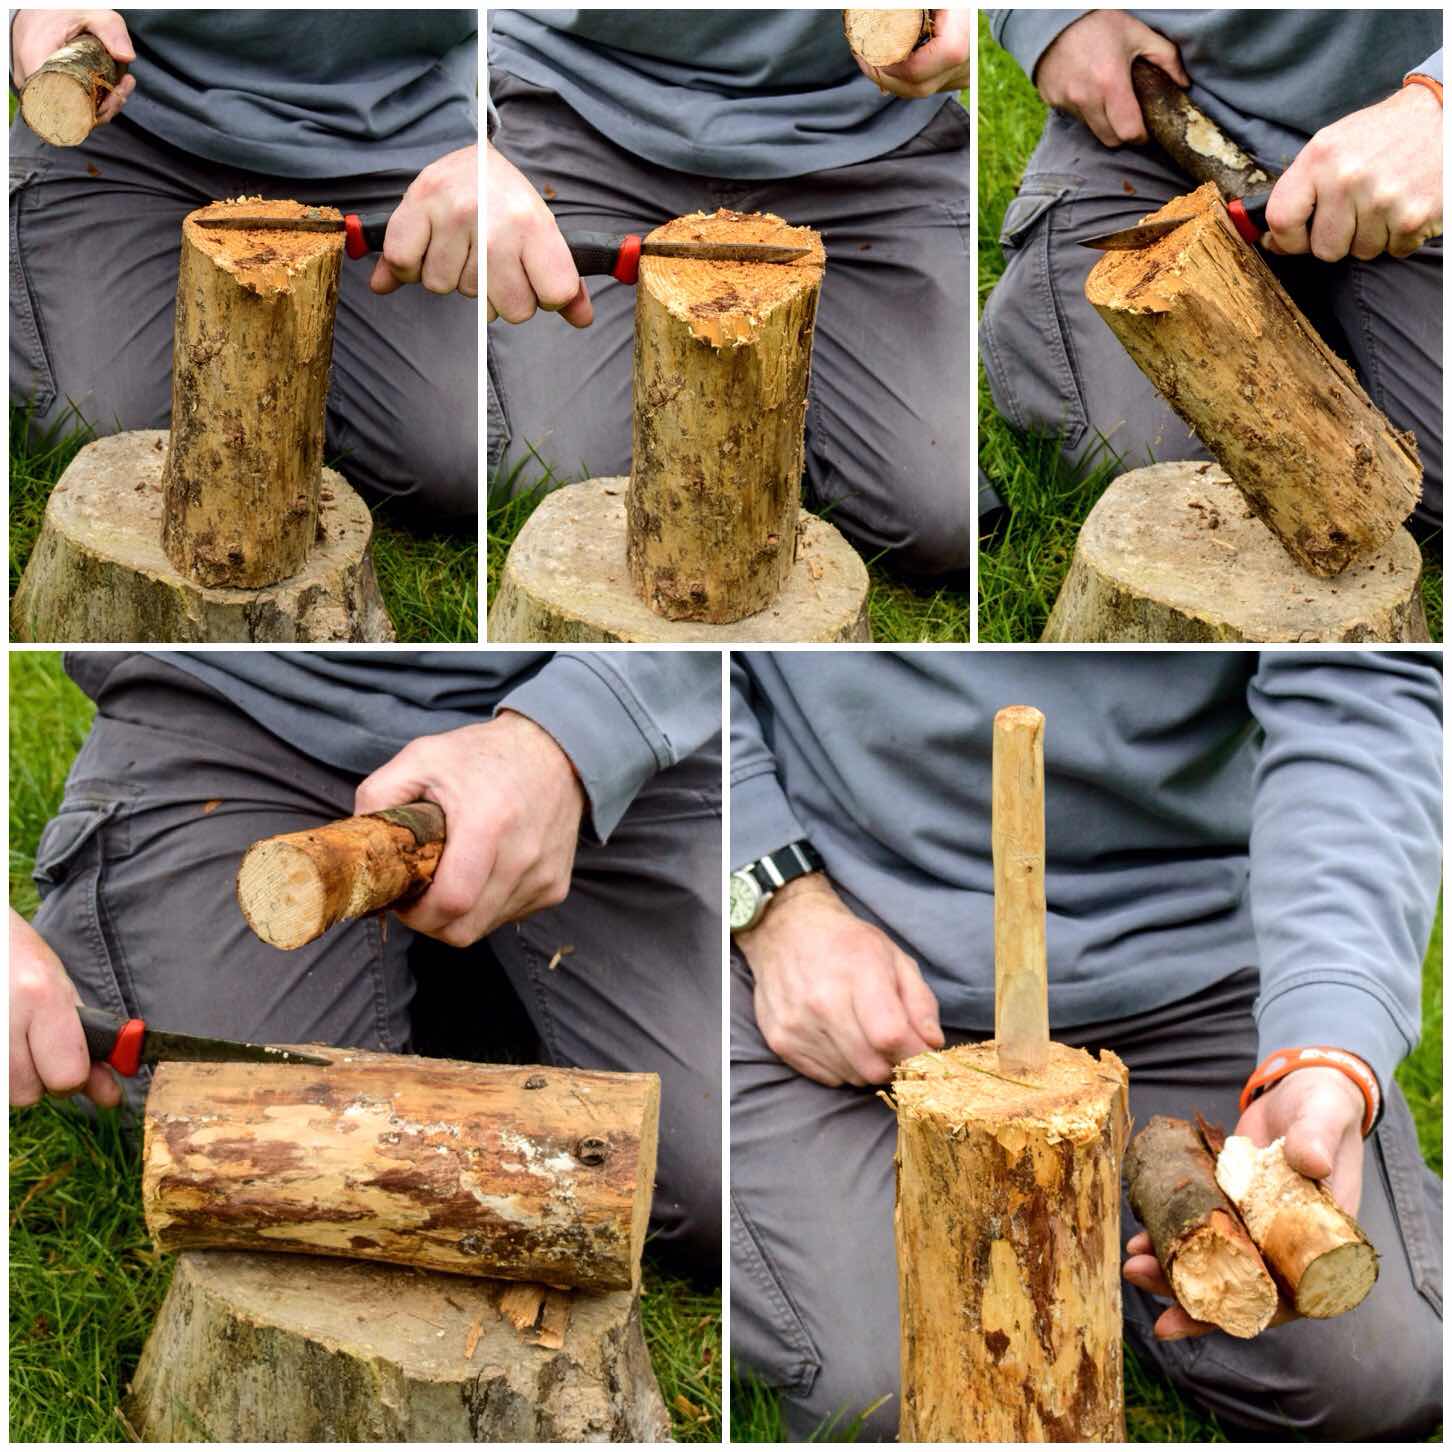
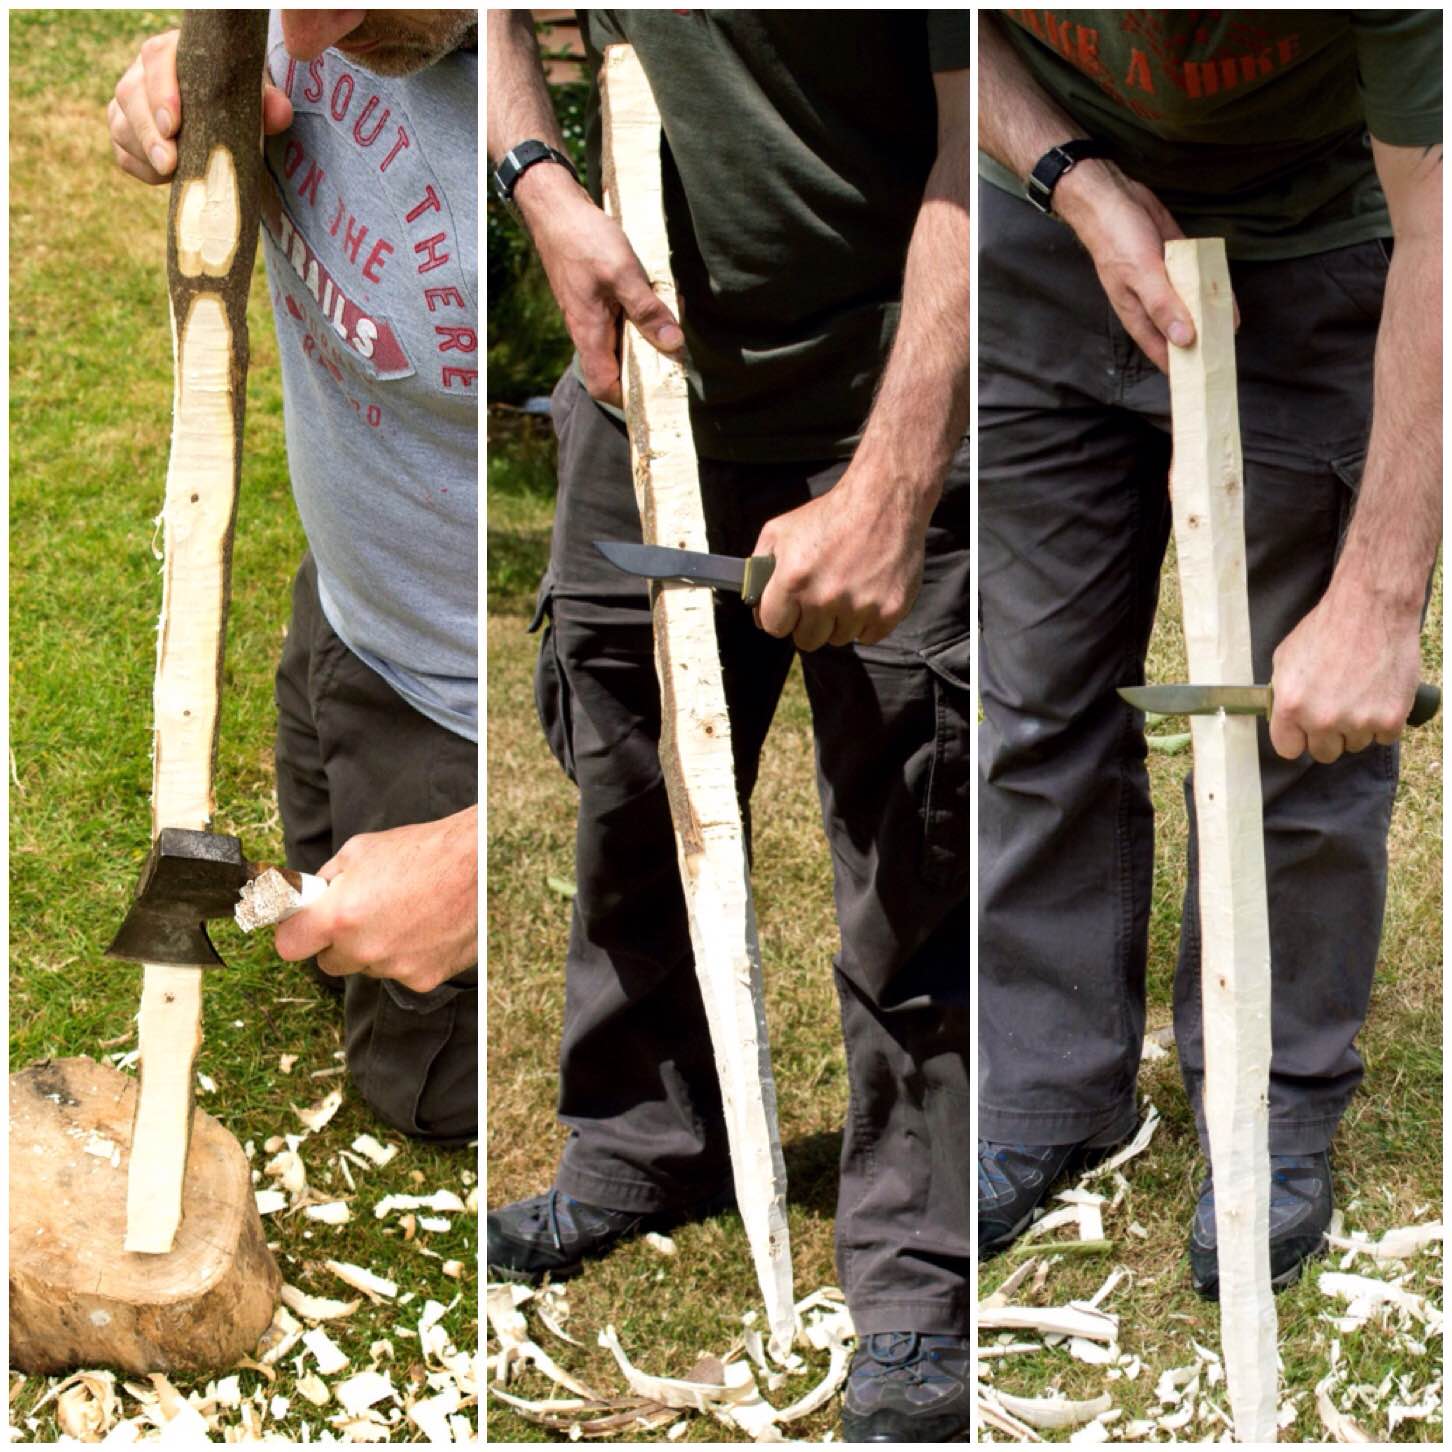
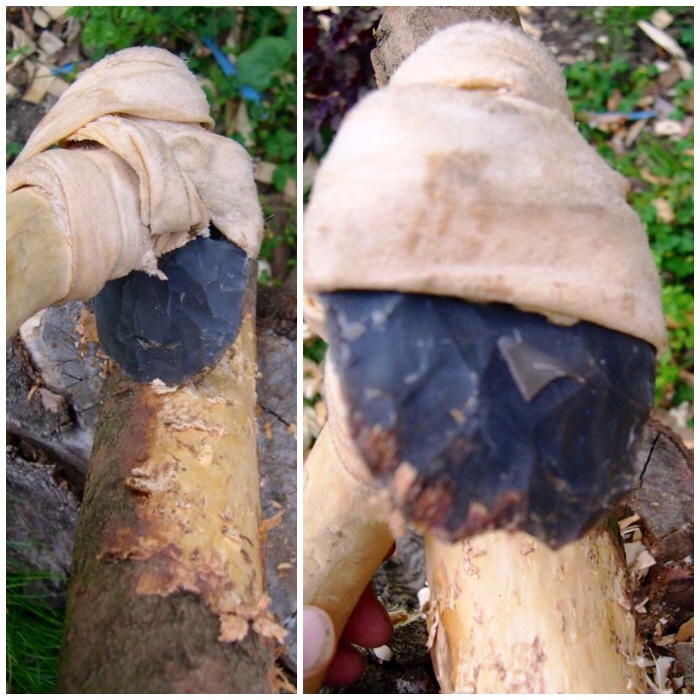
The final post in this series came to me one evening when I was wondering how I could operate in the woods without an axe. I figured it was worth a go trying to make a log rocket stove with just my Mora knife (I did use a small saw to trim the log).
With some battoning and the use of a wooden wedge I was able to split a decent sized log and fashion a perfectly good log rocket stove.
This exercise really is an excellent way to test out your knife skills.
Log Rocket using a Knife
Is the story over on candles, long fires and log rocket stoves? – I think not. I will continue to research this intriguing subject and if you have any ideas that I could try out to add to this library of knowledge I would really appreciate hearing from you.
One night recently I just could not get to sleep and my thoughts wandered onto the subject of log rocket stoves. Having written on the subject a few times with the Damp Log Rocket and the Fire Face Candles it struck me that I always used large tools such as axes or drills to make them.
This post is about making a Log Rocket Stove with only my knife (a small pruning saw was used to trim the log). I wanted to see if I could easily produce a stove without having to rely on my axe.
Log Rocket Stove – Without an axe
I like log rocket stoves as they can be made quickly, work well on wet or snowy ground, produce their own kindling and come with a ready made platform for your pot. Once the stove has done its job the collapsing embers make a good start point for a bigger fire.
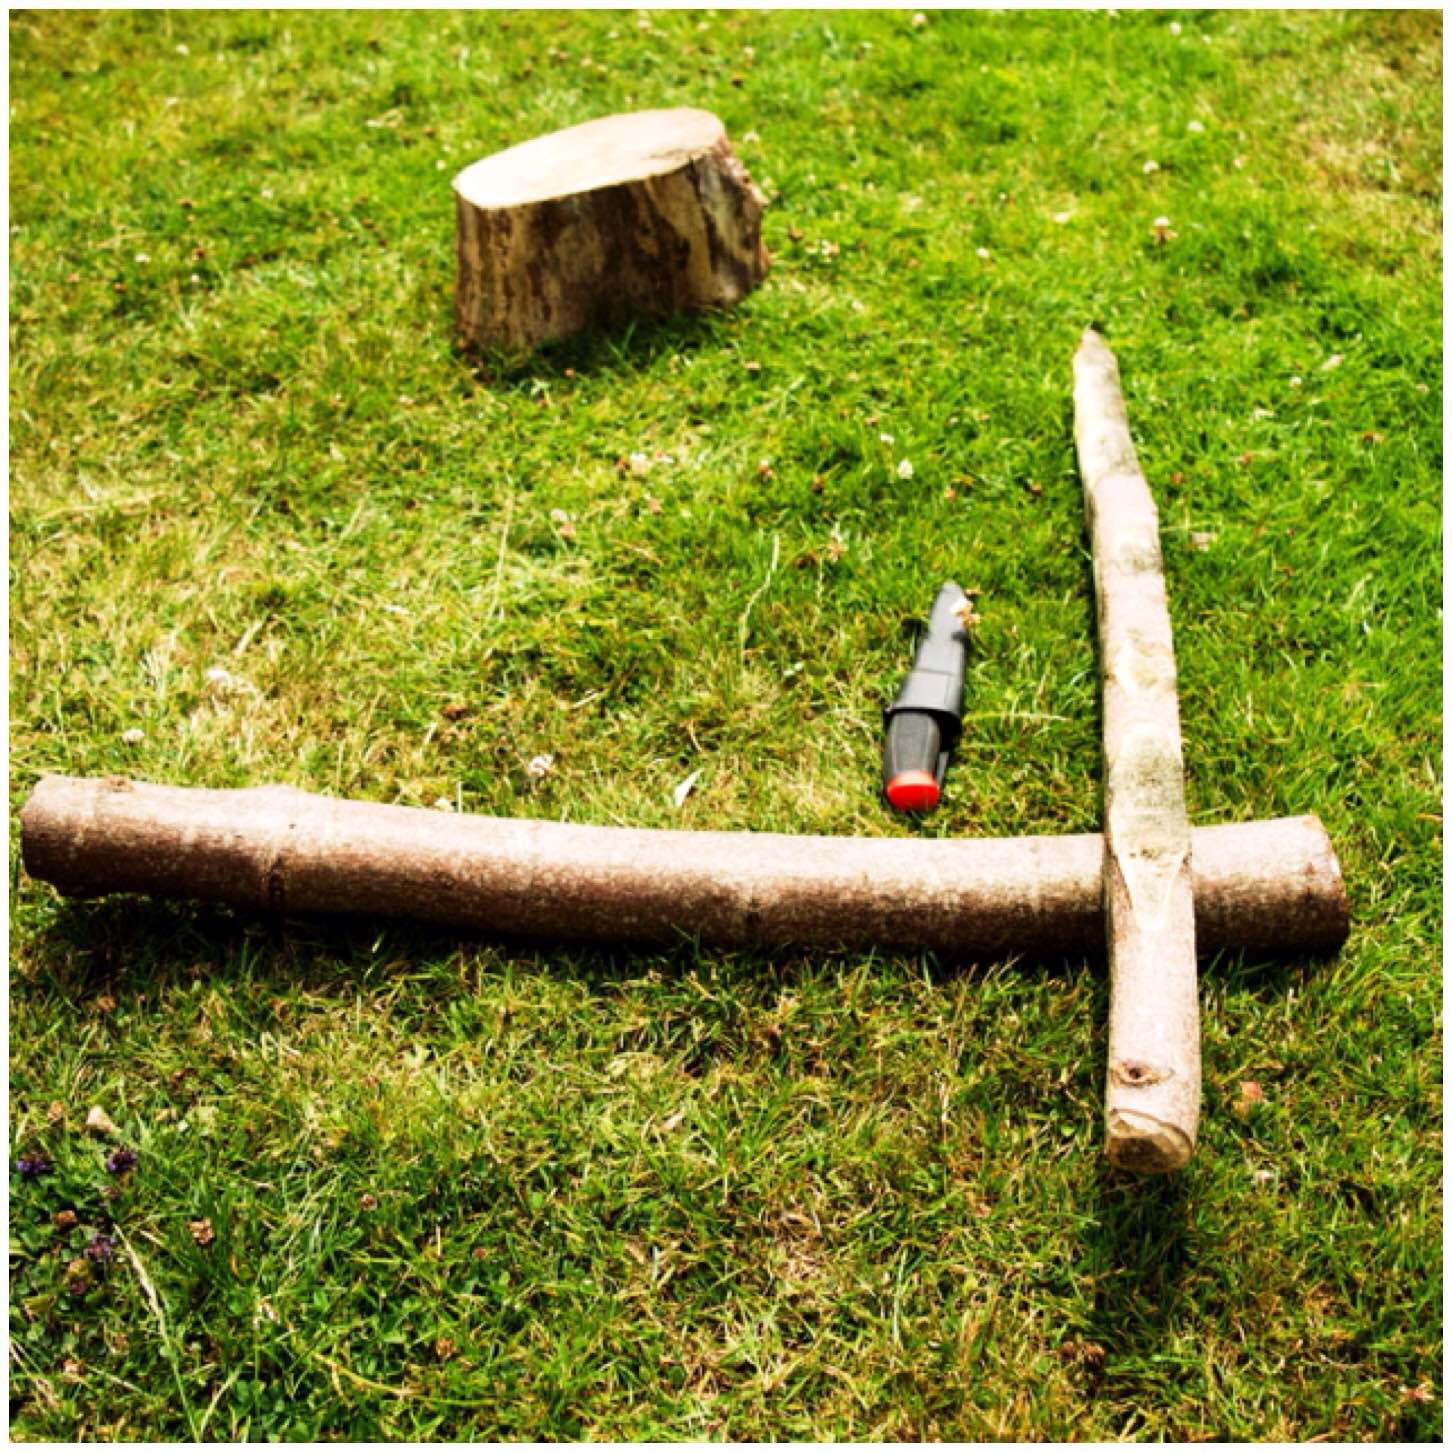
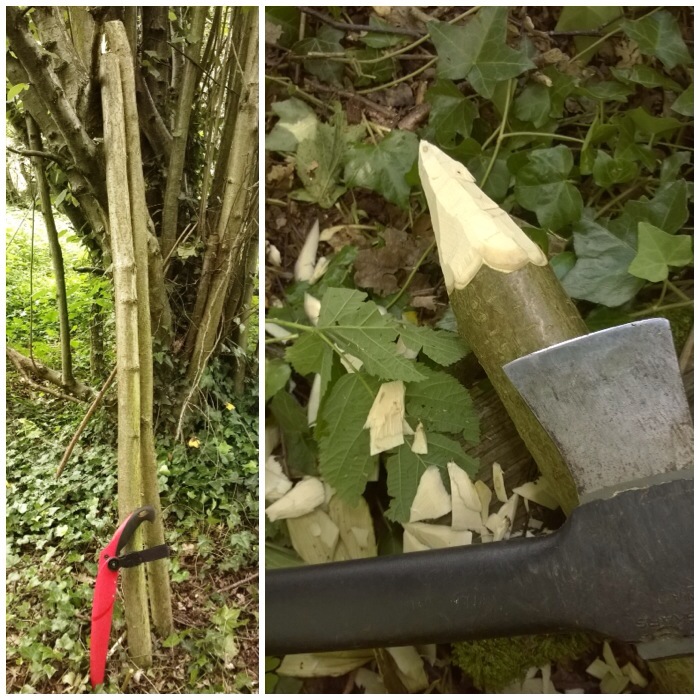
Set Up
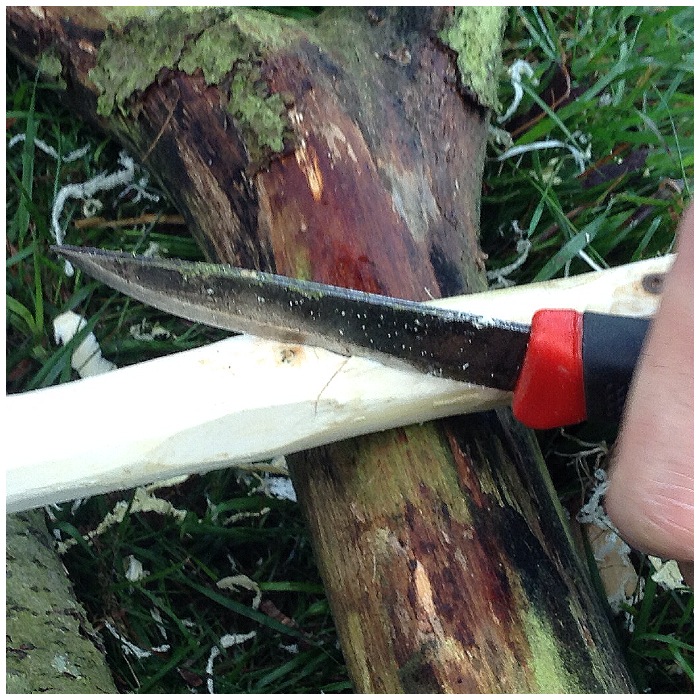
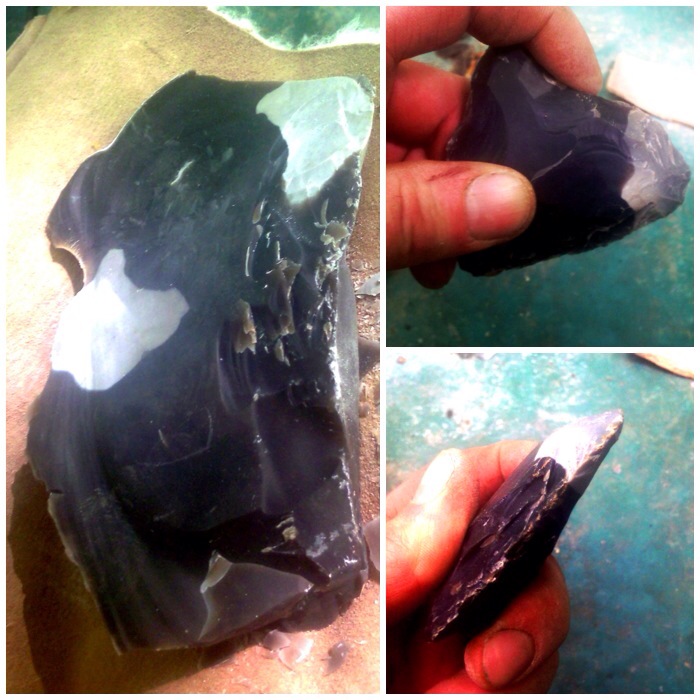
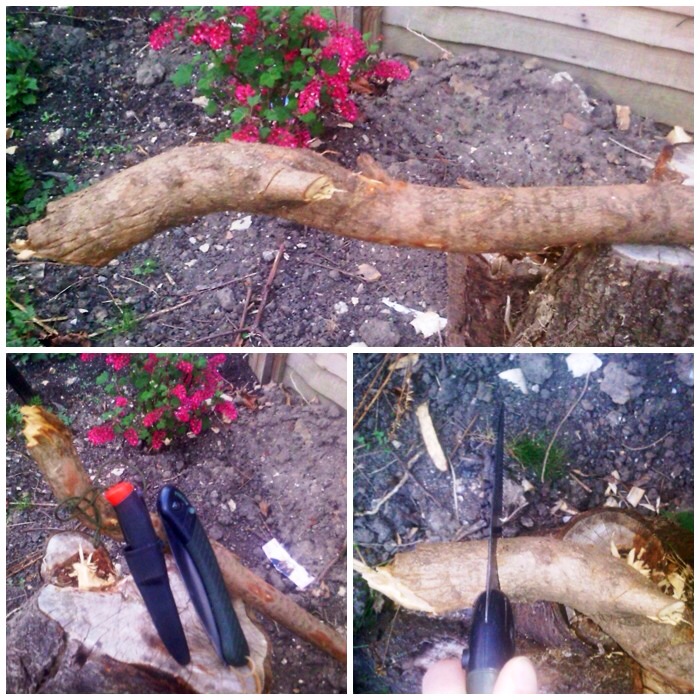
I chose a seasoned piece of spruce wood from my log pile which had a diameter slightly larger than the blade on my Mora knife (do not be tempted to use a log much smaller than this as you will end up with a very small cooking surface) . I also used a larger round of wood as a work surface, carved myself a small wedge to help with splitting the wood and had a offcut of wood ready to batton with.
Spruce log and a stable work surface
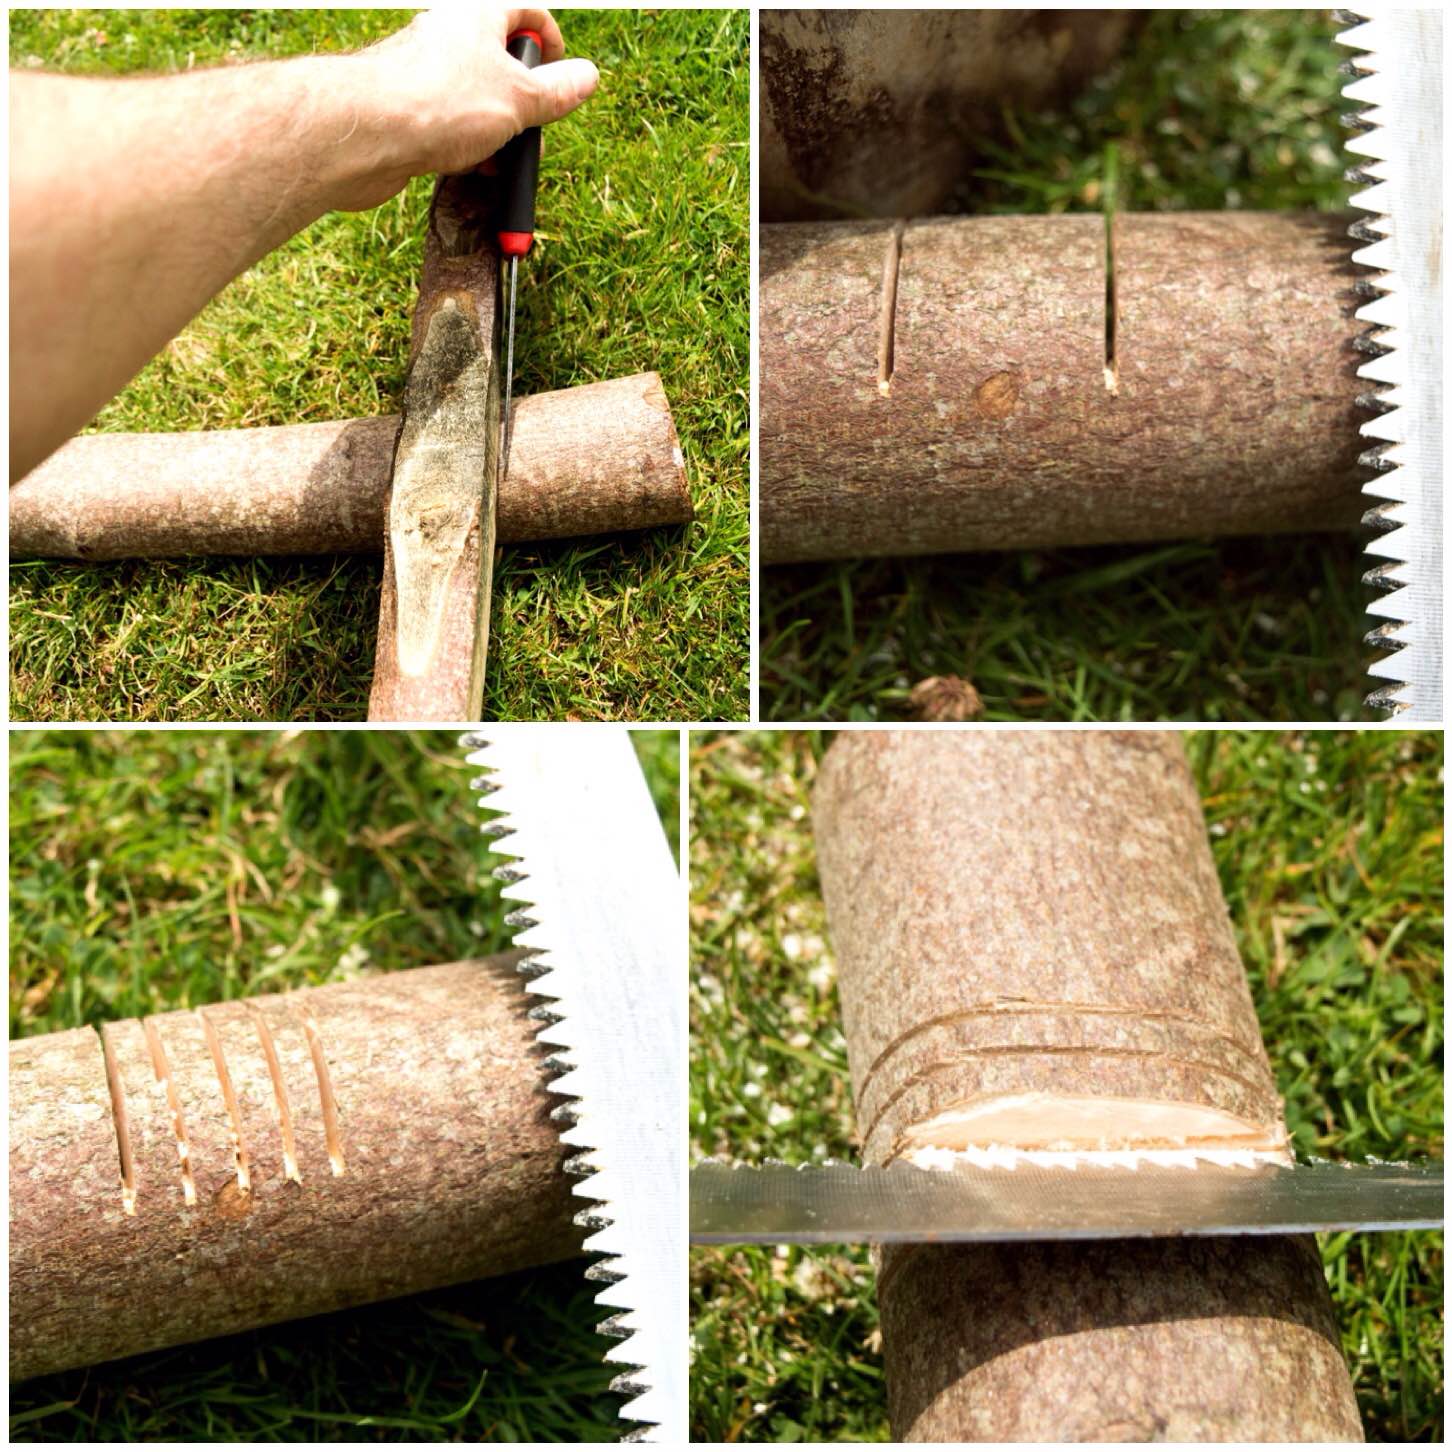
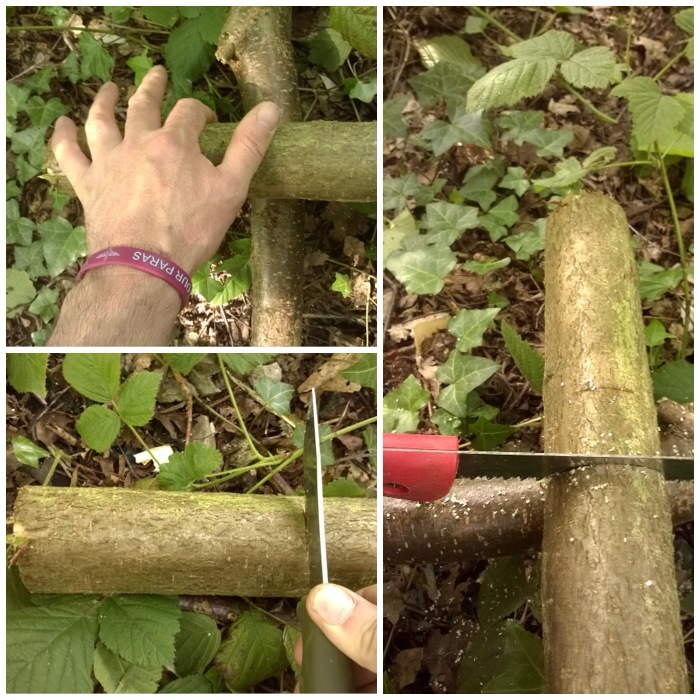
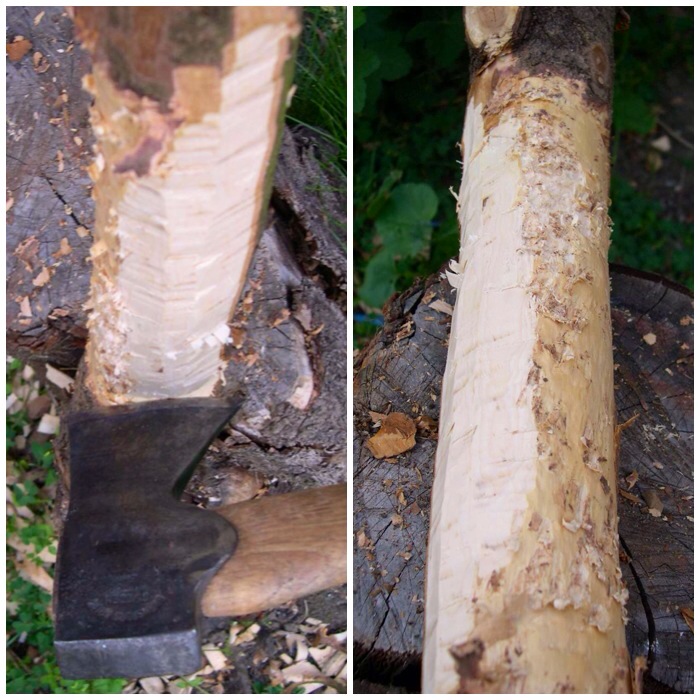
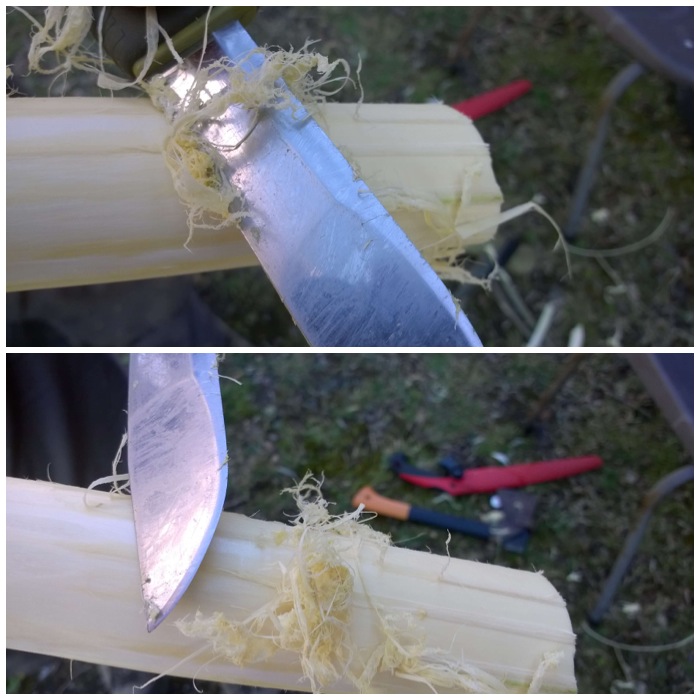
Splitting
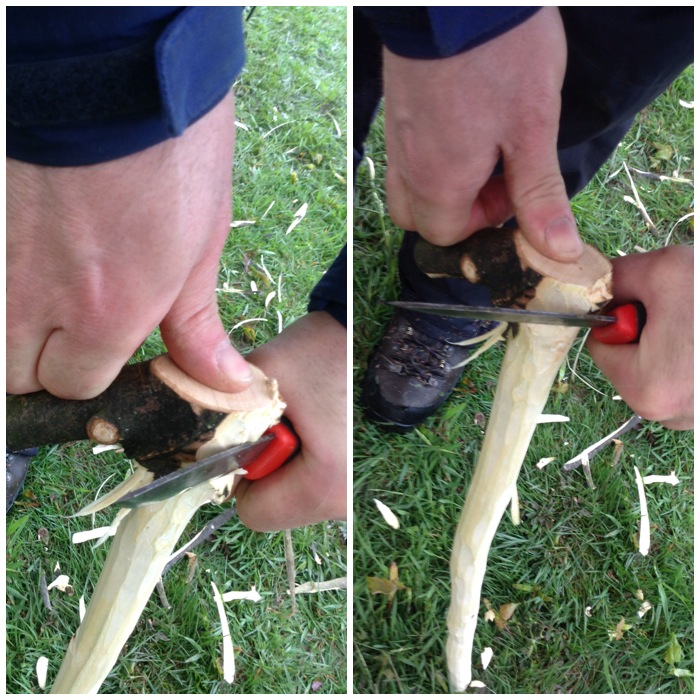
I started with my knife first and battoned it into the log (note that the knife blade is at 90 degrees to my body for safety). My aim at first was to create a split as deep as I could with the knife all around the middle of the log to create a weak point in it. The knife was smaller than the log so I could only batton it in a couple of centimetres.
Once I had my point of weakness battoned in all around the log I inserted the wedge into the split at the top and battoned that in as well to try and increase the split some more (upon reflection I think two wedges would have helped). It was at this point my batton decided to snap on me.
Batton out a split as much as you can with your knife
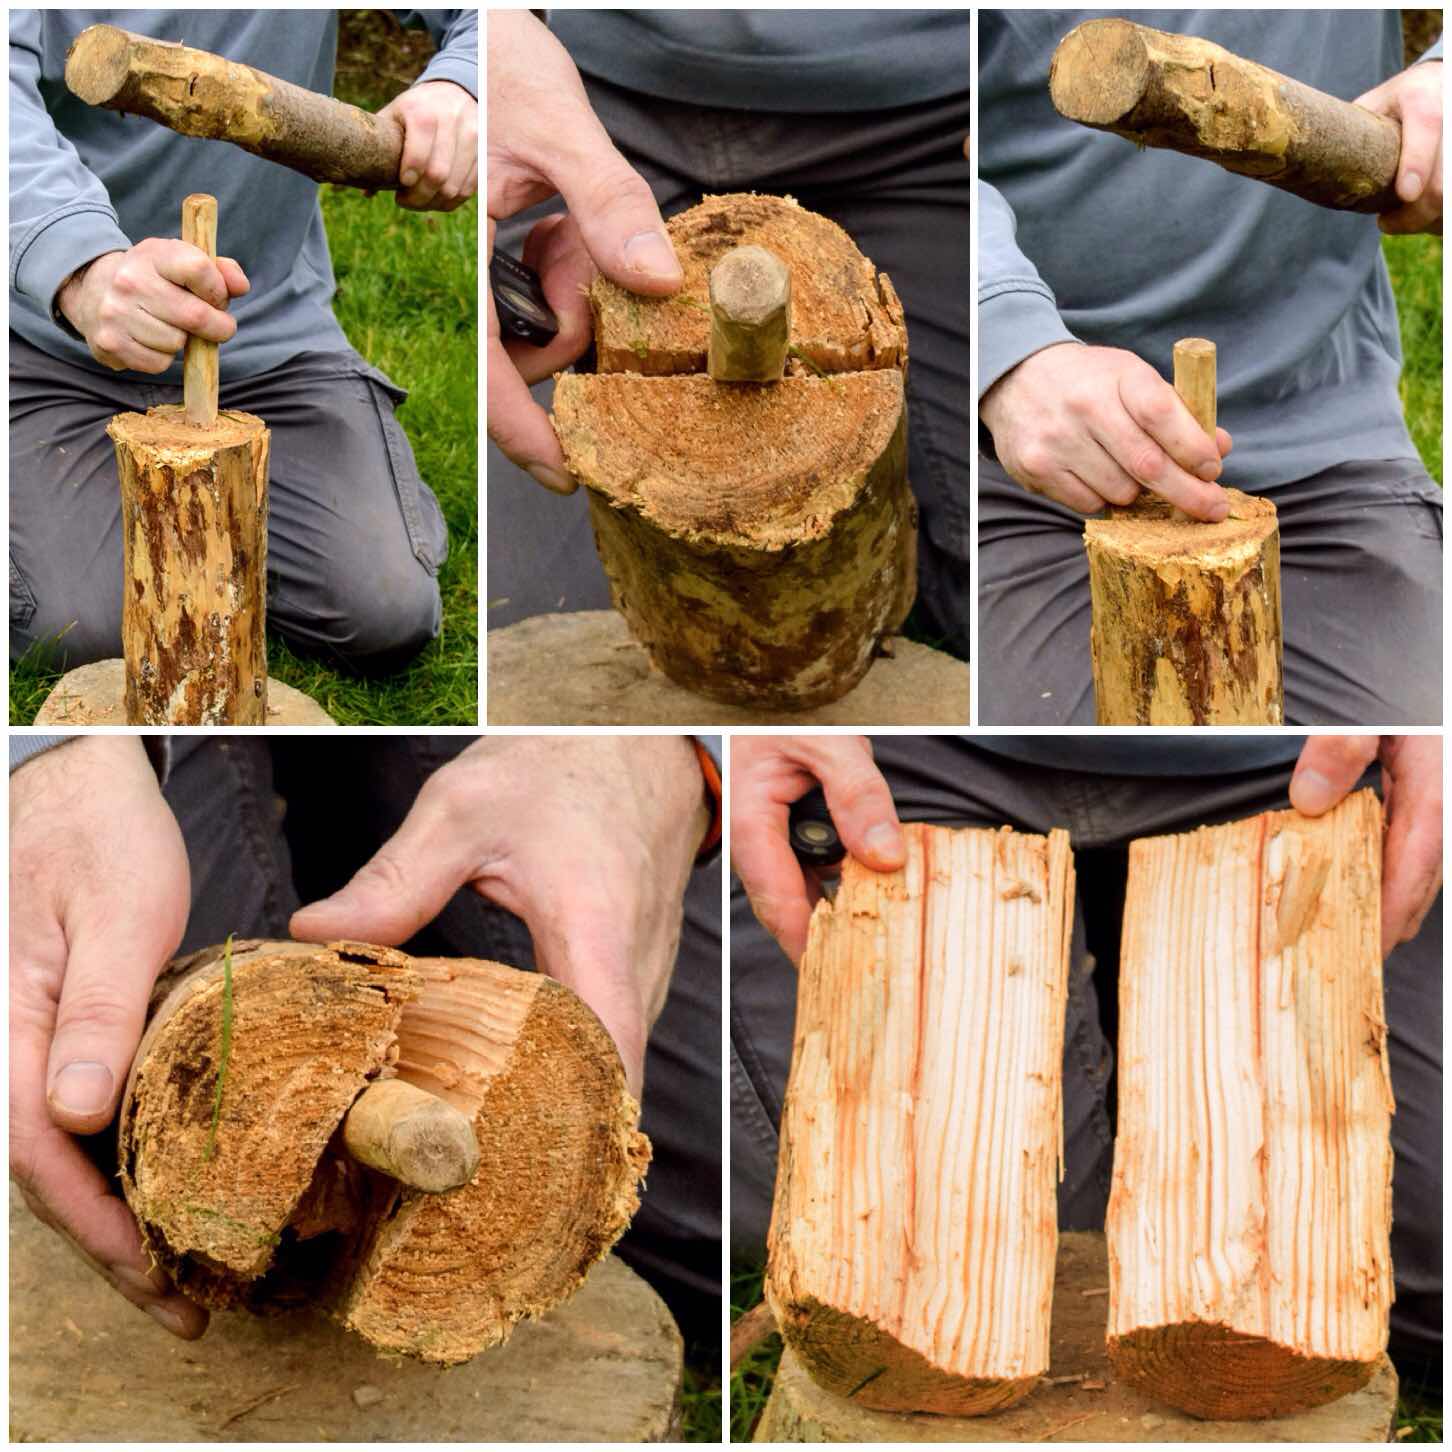
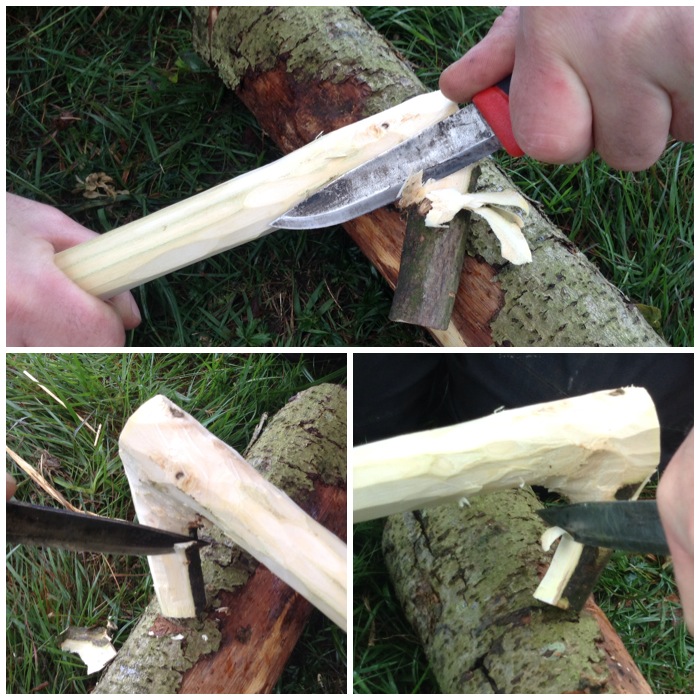
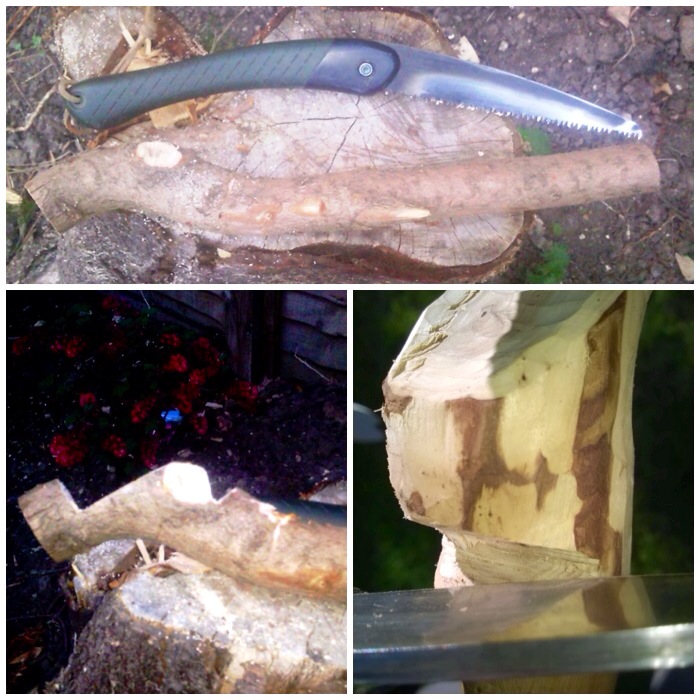
I went off and got a bigger piece of wood to act as a batton and soon had the log split right down the line off weakness. This line I created with my knife will help you to keep an even split on the log when you have twists and knots in your log as I had with this piece of spruce.
Use a wedge to split the log
I repeated the process on each split so I ended up with four roughly even sized pieces of wood.
Safety
One thing to be aware is that as you batton down on the wedge is that it will go slightly out of line at times. If this happens just tap the end of the wedge against the work surface until it lines up. This is much safer than trying to drag it back in line with your hands as it is very easy cut yourself on the knife tip.
As the split widens the knife blade will come loose. Let it drop away and only pull it out when it it is completely free. Do not be tempted to force it out as this is another time when injuries happen.
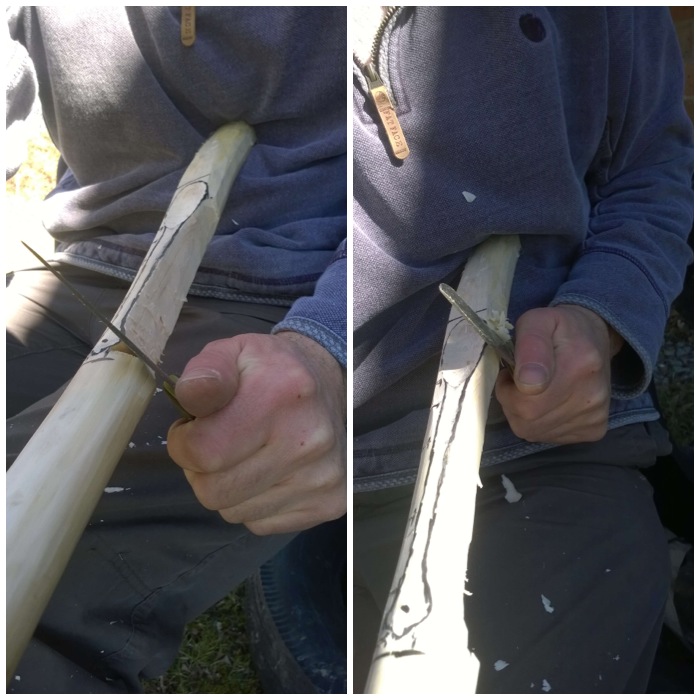
Quarter the log by battoning with your knife and using the wedge
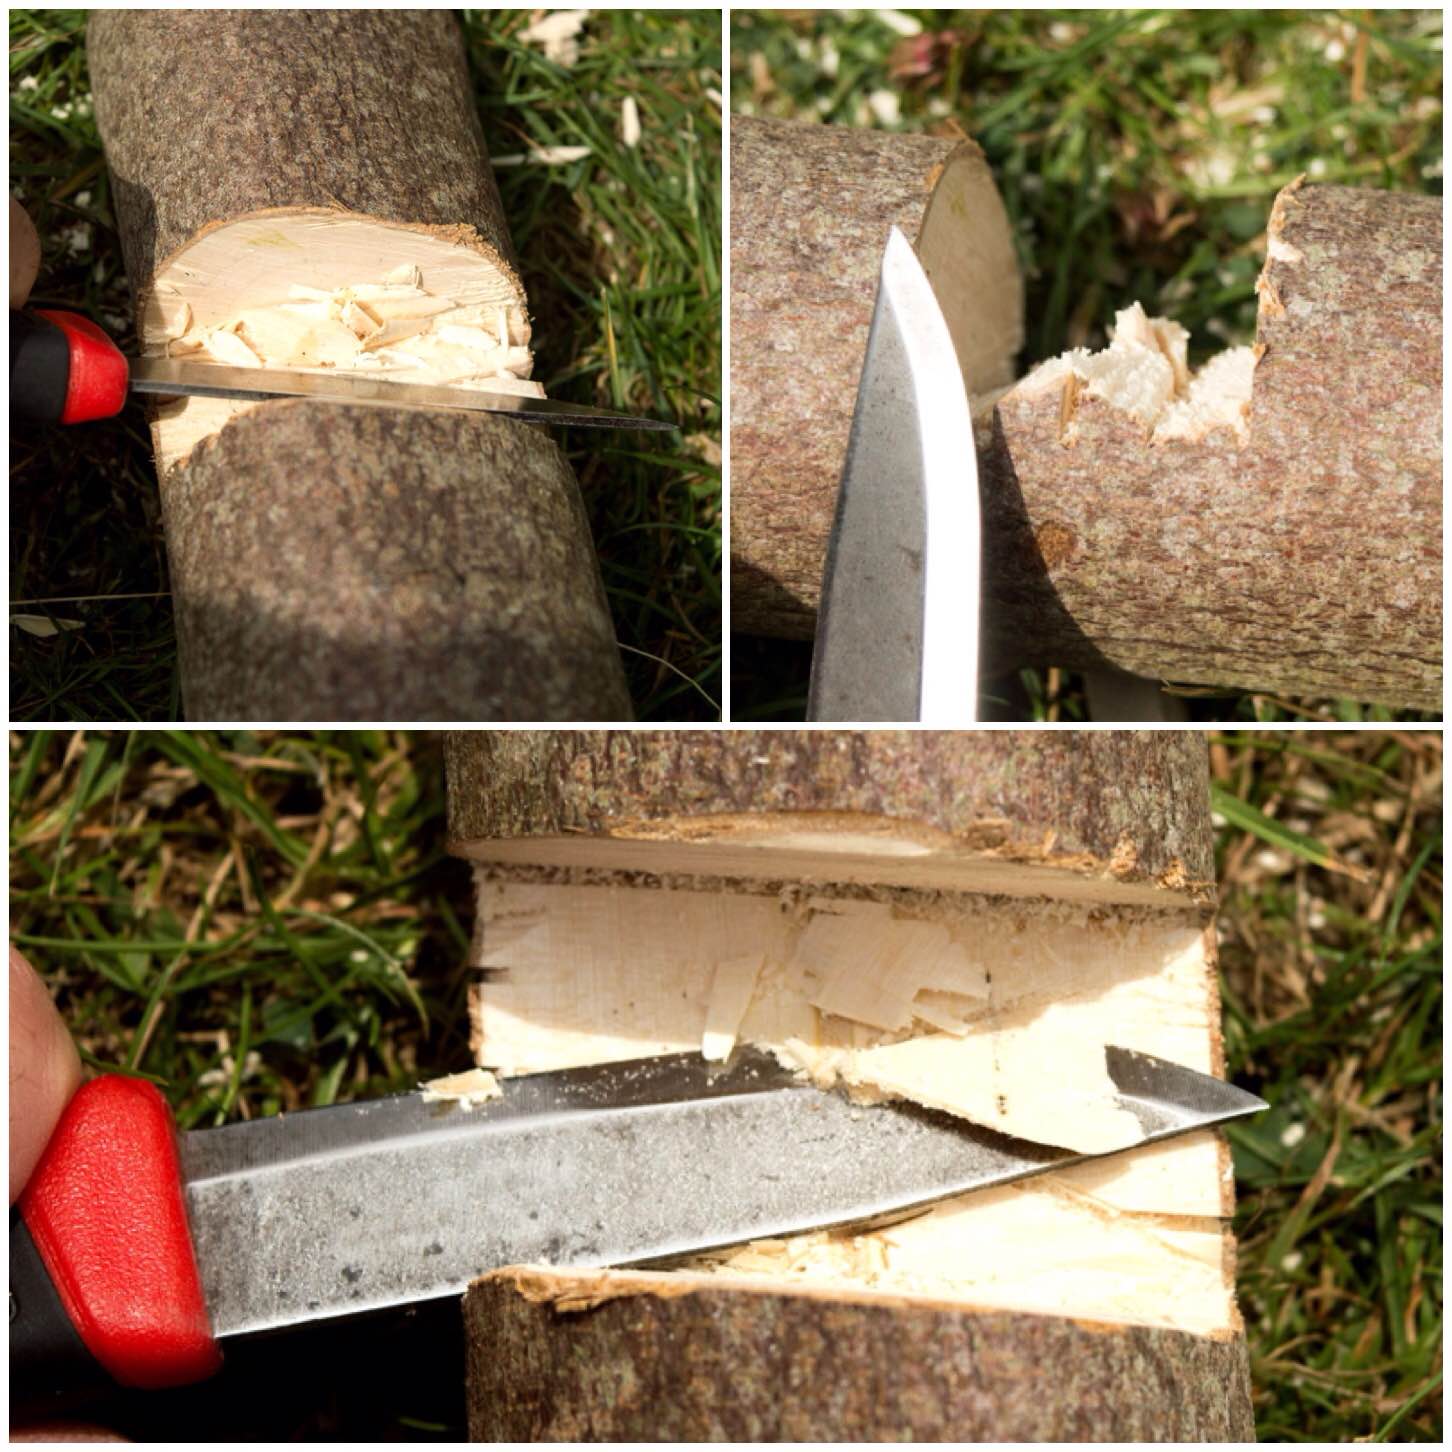
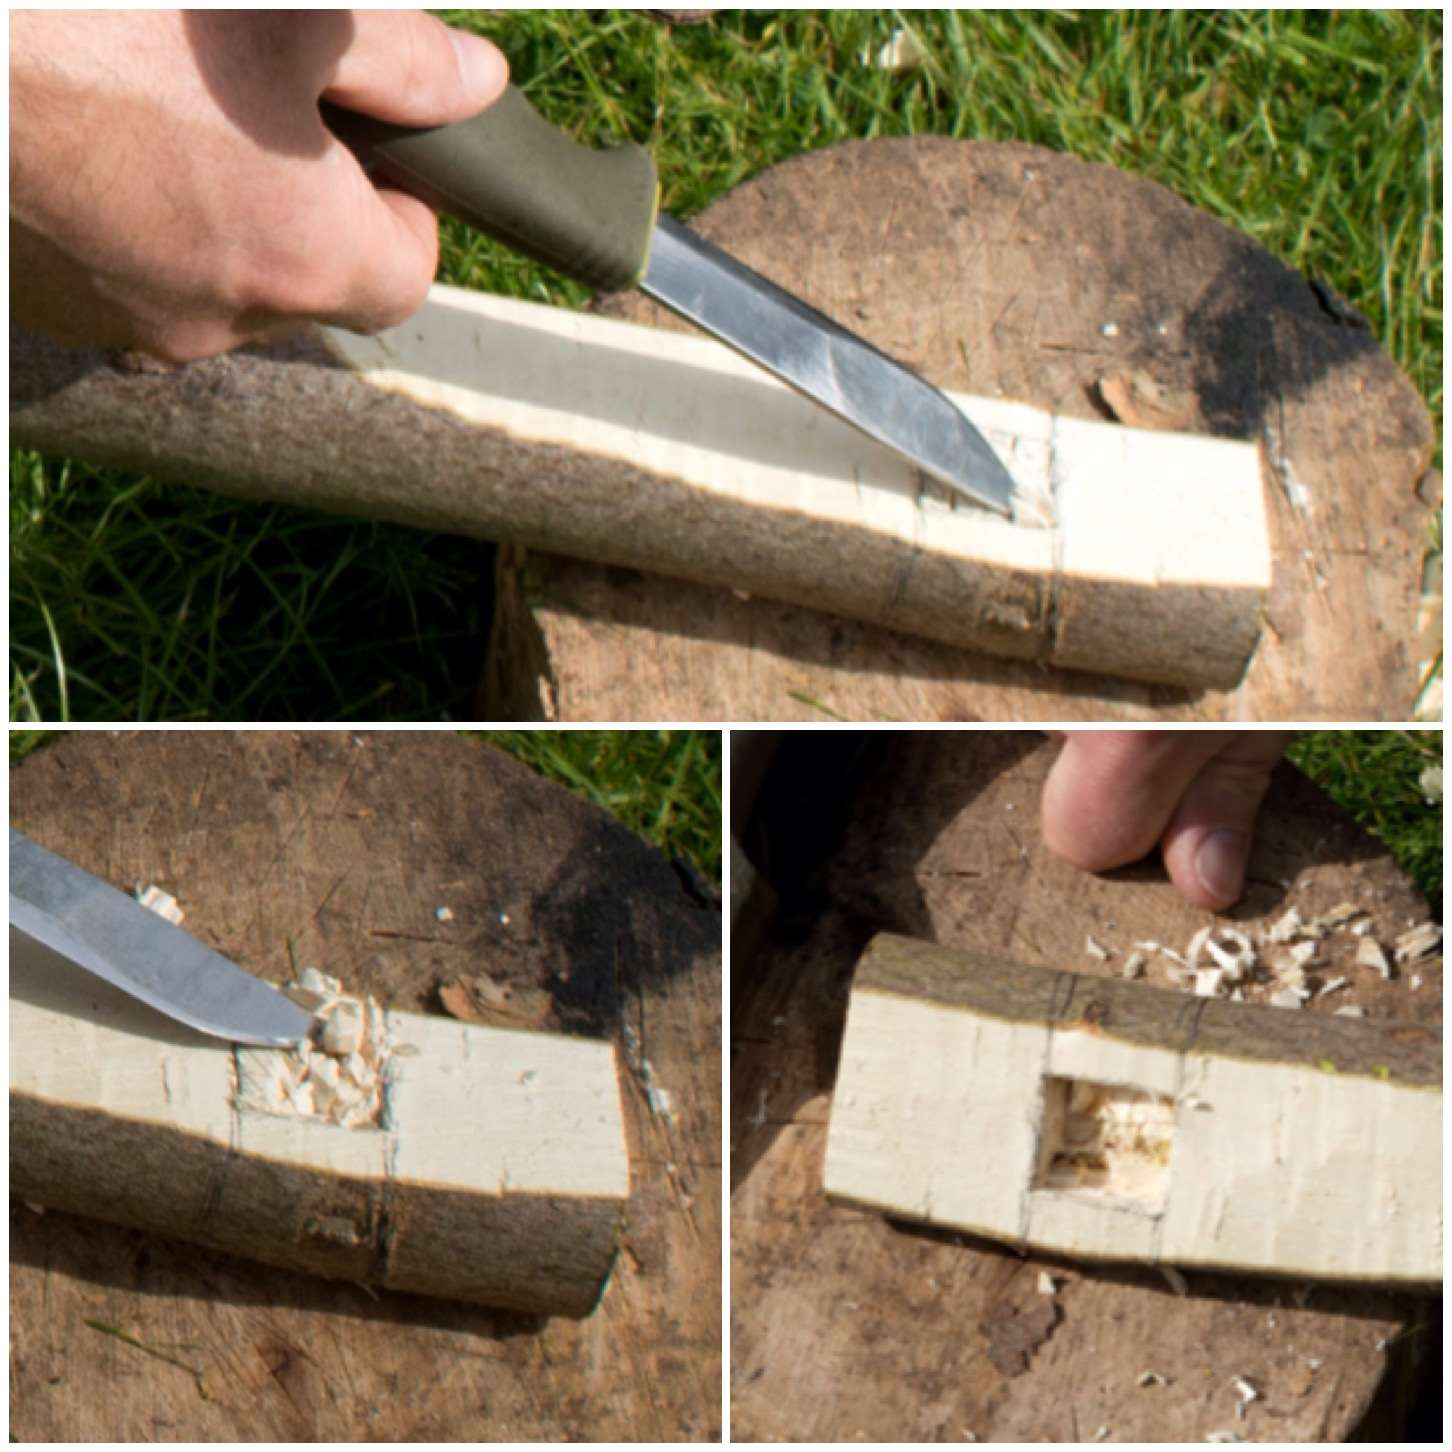
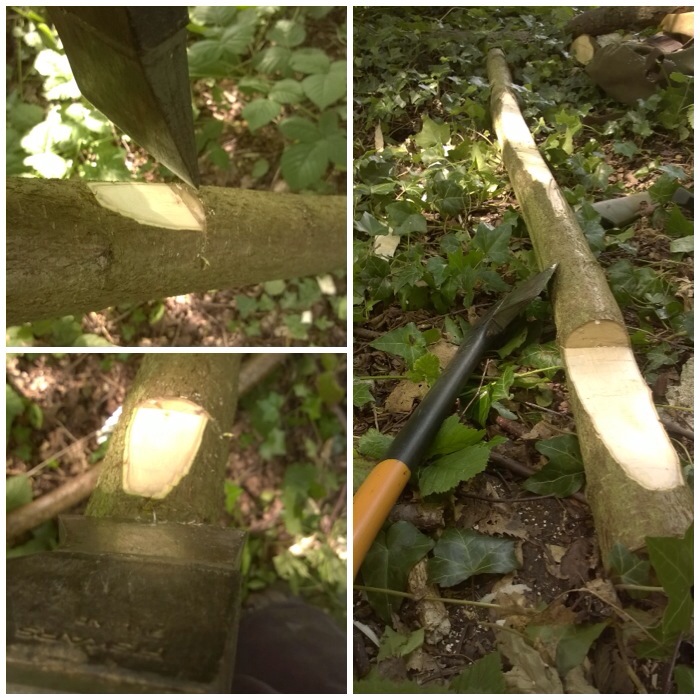
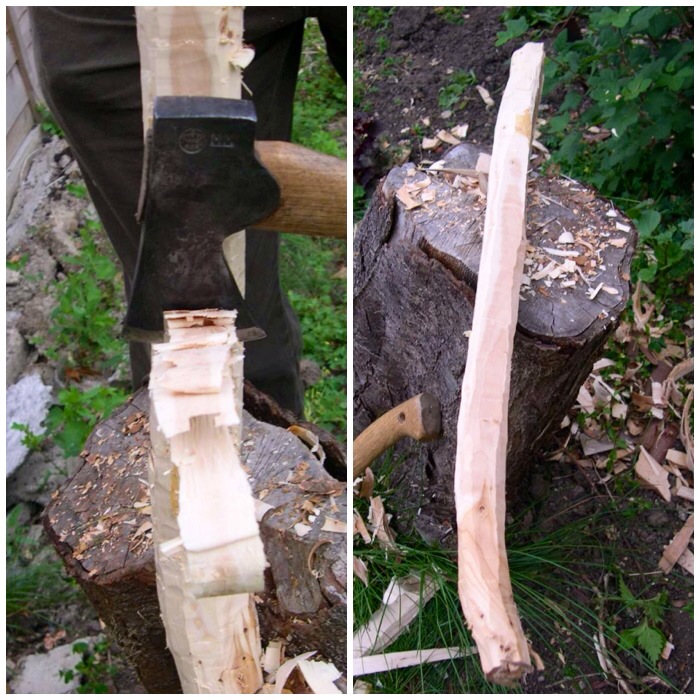
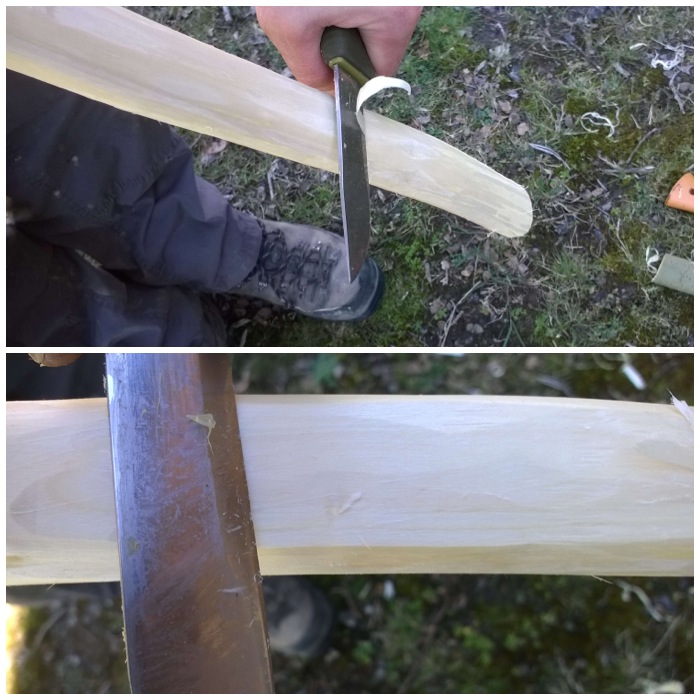
The Chimney
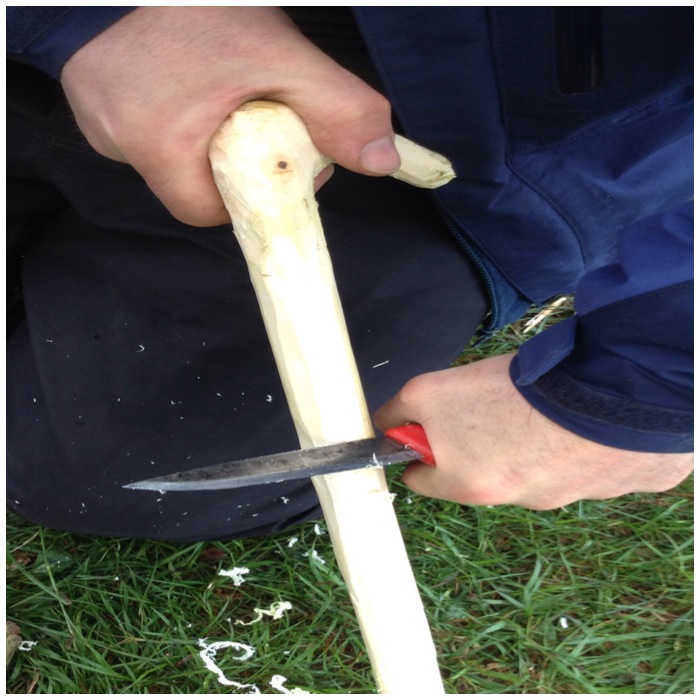
The stove requires a chimney and it is very easy to carve one out. About a third of the way from what will be the bottom of the stove I battoned my knife into centre ridge of one of the quarters of wood. I then used this a a marker to drive in stop cuts on all the other three pieces of wood.
Then from the what would become the top of the stove I battoned off the centre ridge of wood down to the stop cut. I then used my knife as normal to carve off some more excess wood so that part of the chimney looked fairly even. Once the first was completed I repeated the process on all the other pieces.
Keep all the offcuts and shavings as they will be needed to fire up the stove.
Batton out the core to form the chimney
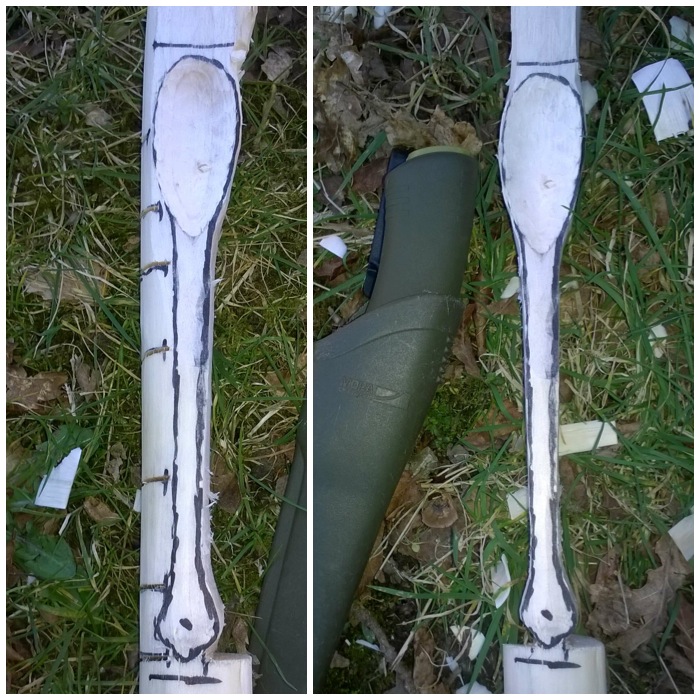
From the top, looking down, your stove should look similar to the picture below. I have no idea how wide a chimney should be but I generally tend to take a couple of centimetres off each quarter.
The Chimney
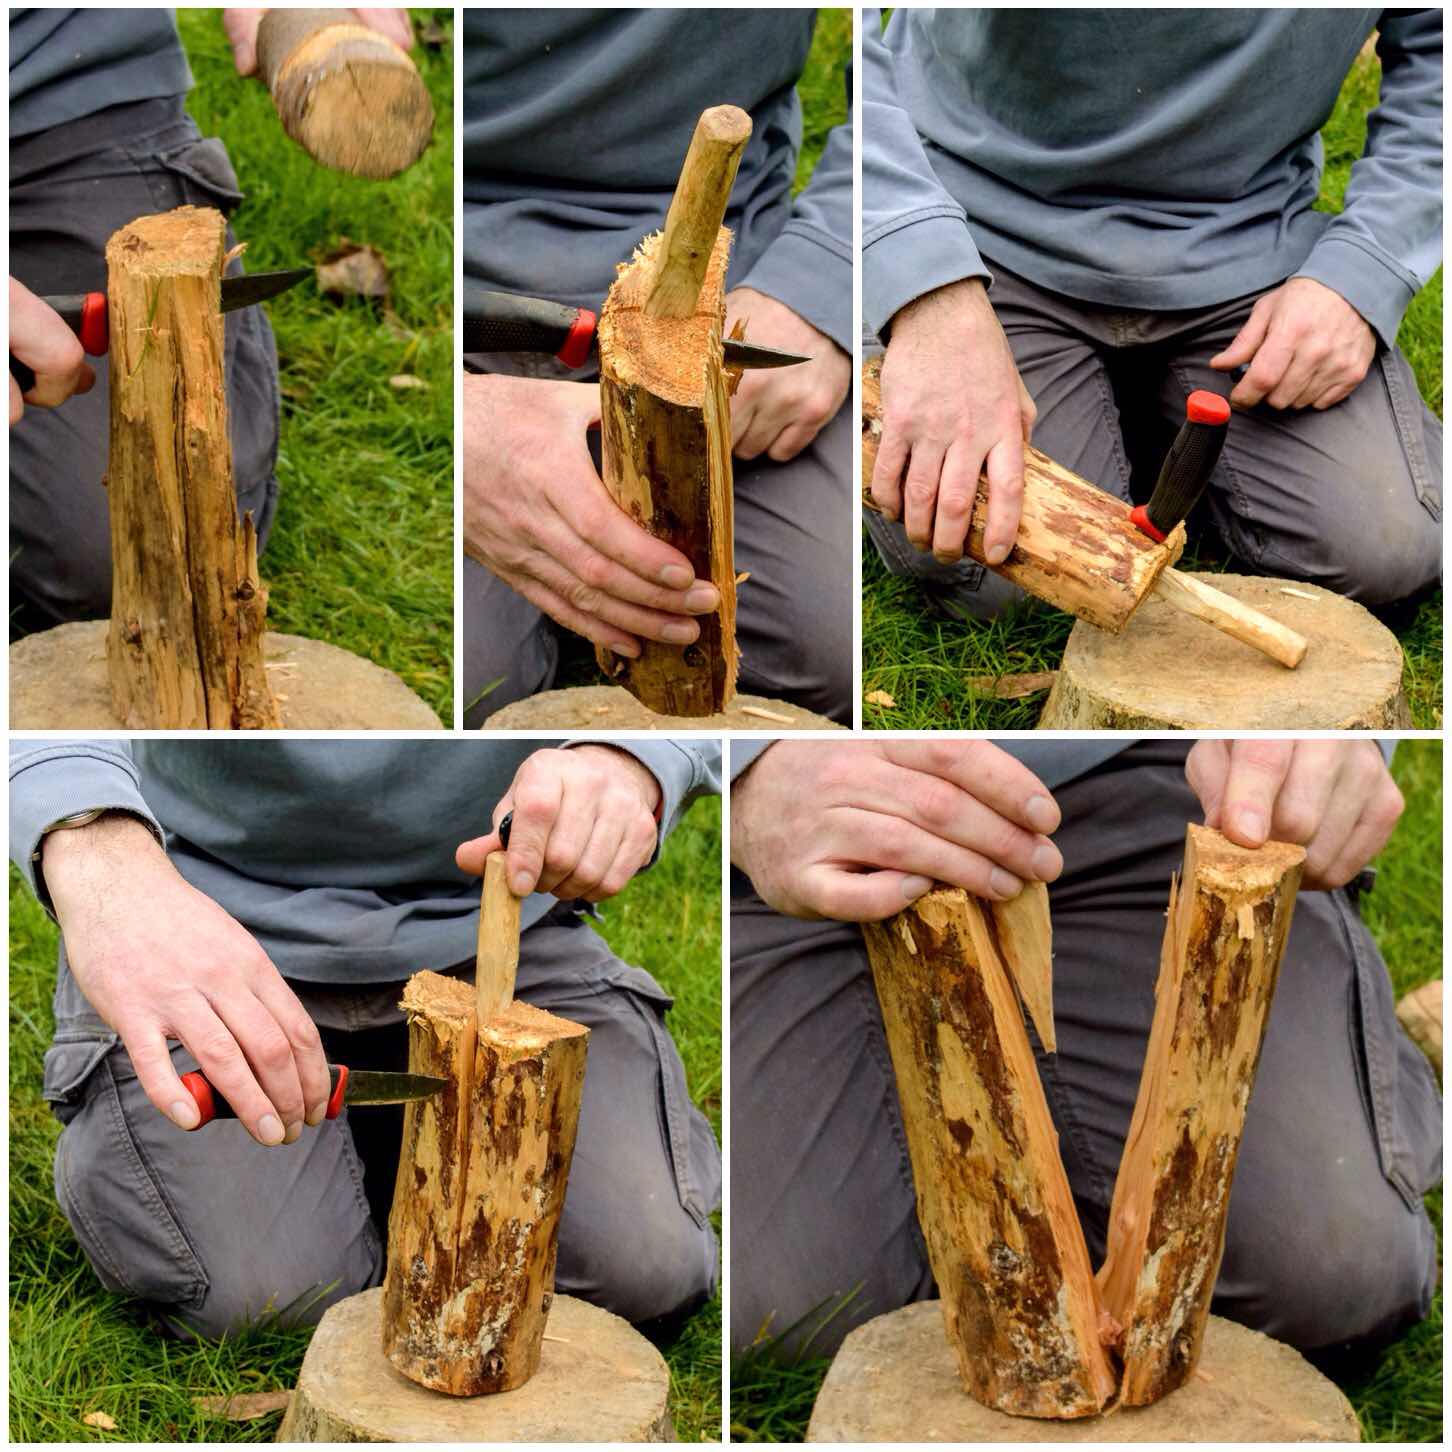
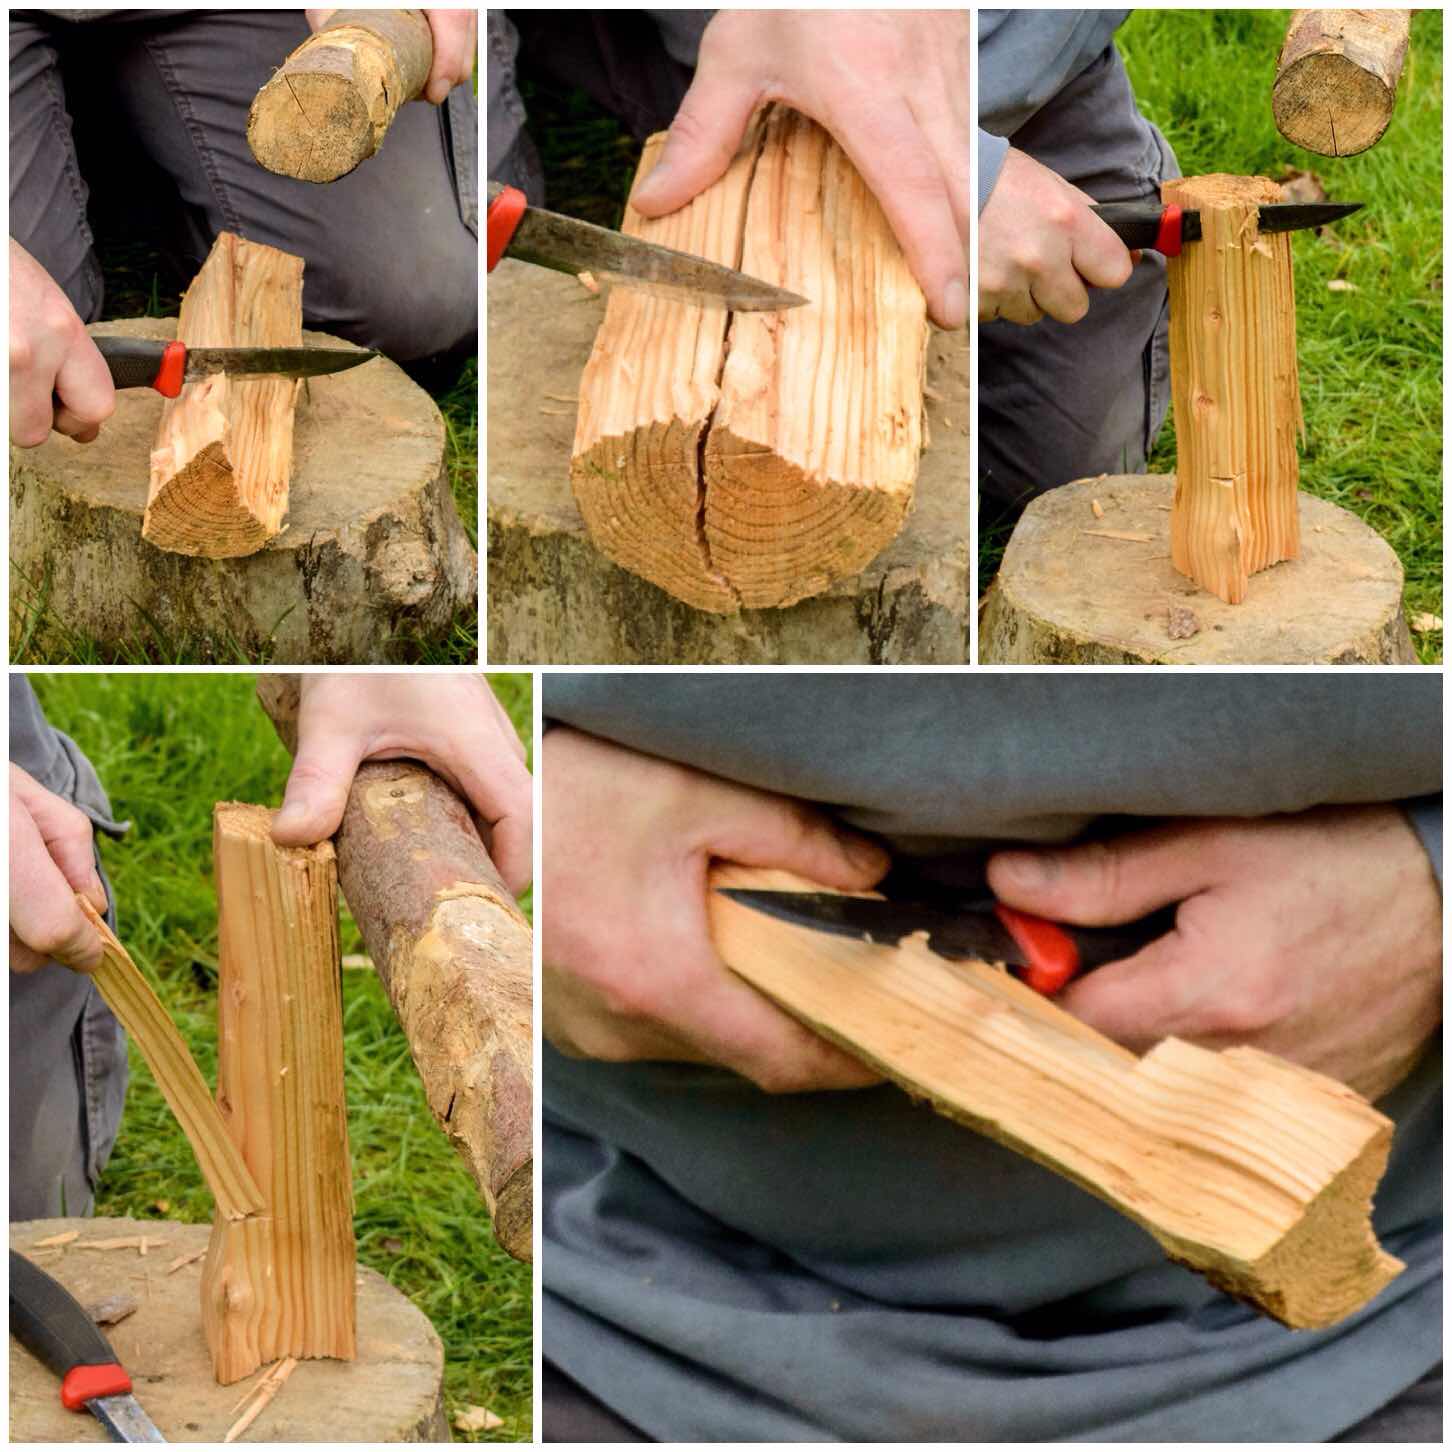
The Firebox
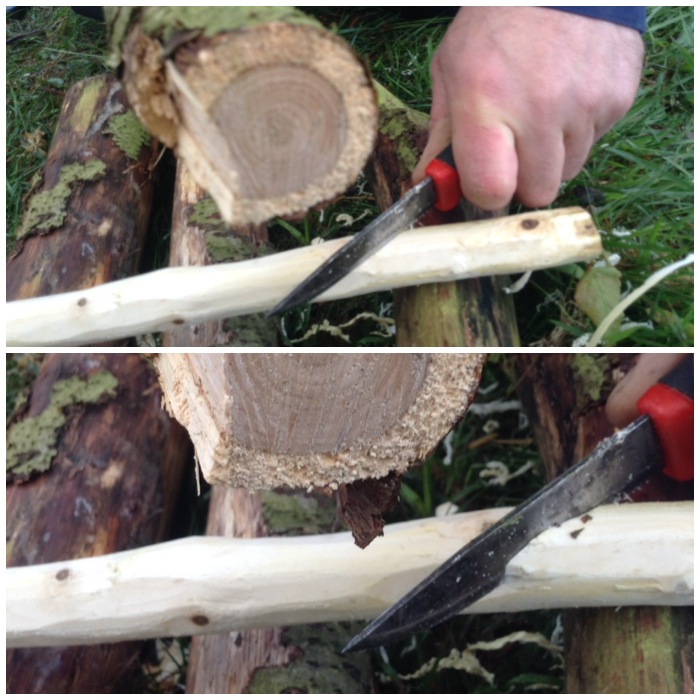
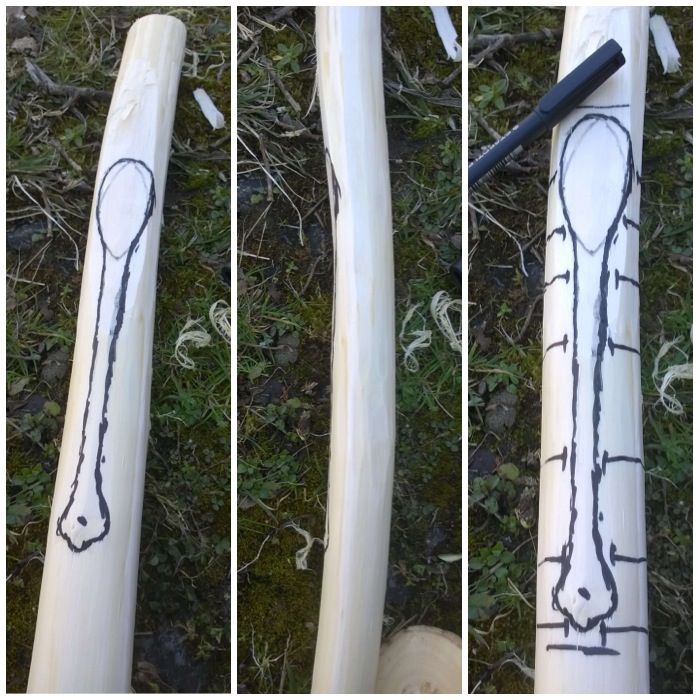
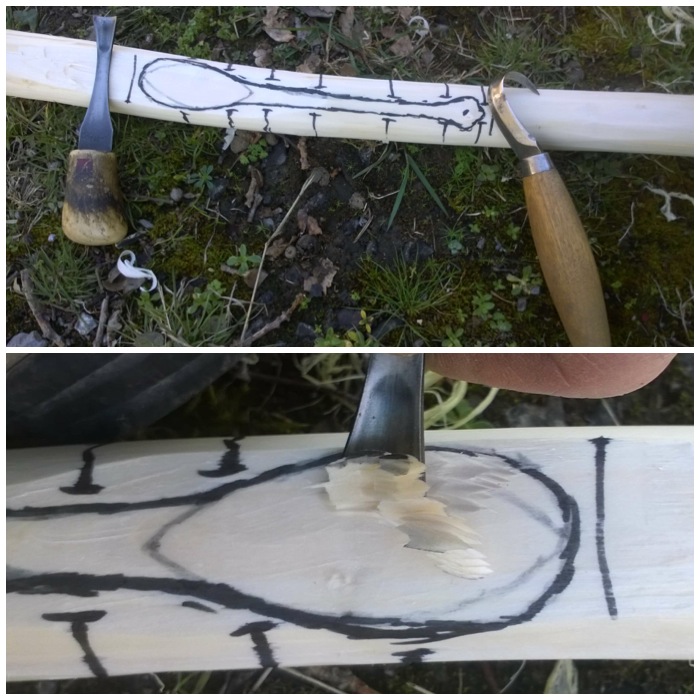
Once the chimney is finished select two of the quarters that fit together and just at the base of the chimney on each quarter carve out a half triangle on each quarter.
I put a stop cut in first and then carved off the excess wood down to the stop cut. The whole just needs to be big enough to let air in and allow you to add slivers of wood into the fire.
Make sure your cuts are opposite each other so that when you fit the two quarters together again you form a triangle.
I used to carve out a square shape with my saw and an axe in the past but a fellow bushcrafter called Takeshi Mizumoto showed me this method by just using a knife – so much easier.
Carve out a triangular fire box
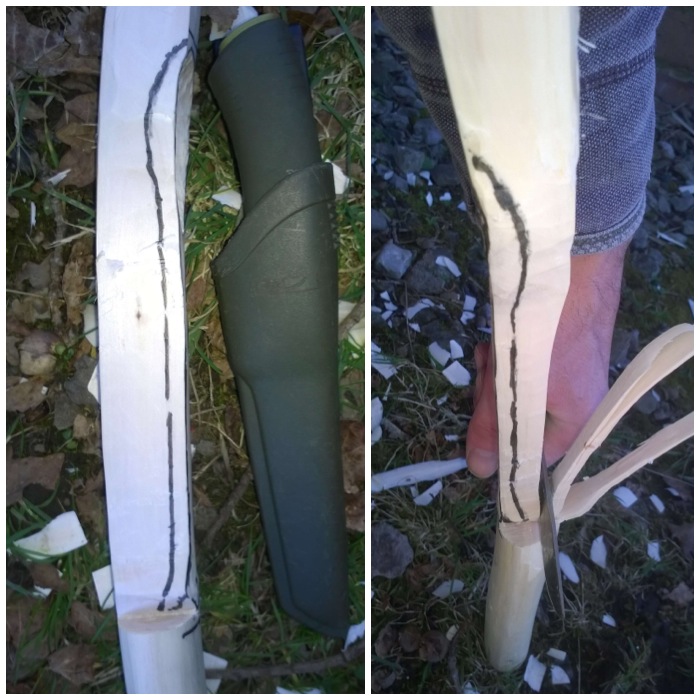
Raappanan tuli cuts
I like to increase the surface area of the inside of my chimney so as to give the initial flame from my tinder something to grab onto.
This is a technique from Finland and you can read more about it here in my post on the Raappanan tuli candle. To make the cuts place each quarter on the work surface and gently batton in cuts to the inside of the chimney. Ensure that the cuts are made so that the small split you create is travelling towards the top of the stove.
Finally collect up all the wood shavings you have created and split the larger off cut pieces down to nice small kindling.
Creating extra surface area and kindling
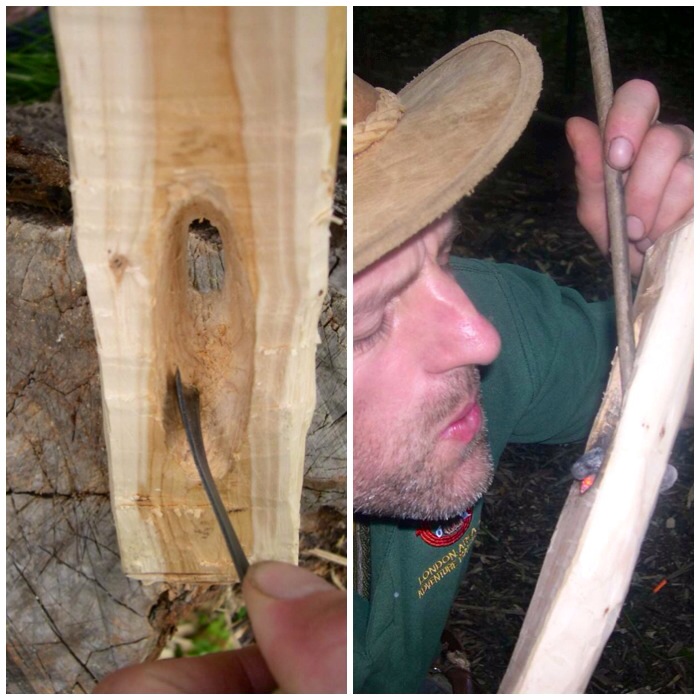
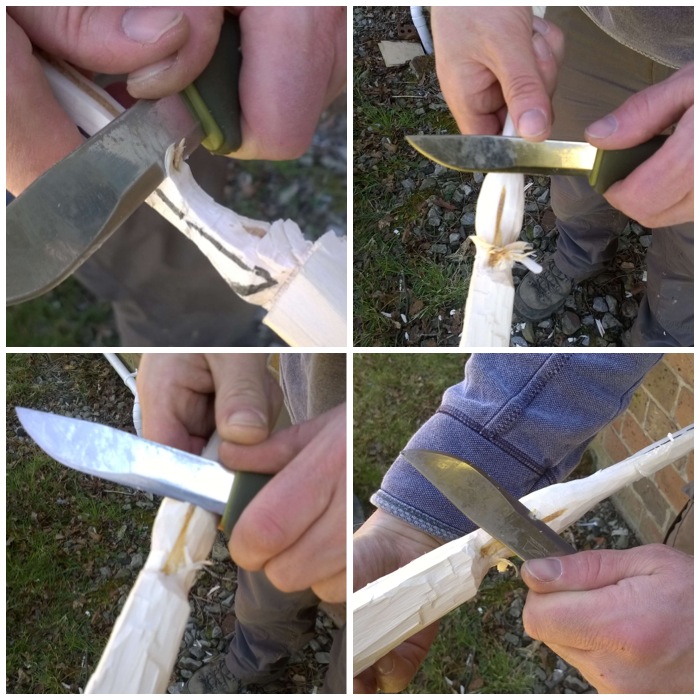
Firing the stove up
I found some old twine, thoroughly soaked it in water and then used it to tie the quarters together near the bottom.
To light the stove I used a firesteel to light some cotton wool smeared in vaseline. This gives me a burn time off about 5 minutes and as I always carry a supply in my rucksack am happy to use it. A more natural method that I like is to use birchbark and small lumps of spruce resin.
Once the cotton wool was well lit I added a few small pieces of wood in via the top of the chimney. At this stage it is important not to add too much kindling as this may block of the flow of air from the firebox to the top of the chimney. Also make sure your fingertips are not directly over the top of the chimney as you drop in the slivers of wood. Even at this early stage the heat is intense enough to cause injury.
Firing up
Three pebbles
I popped three flattish pebbles on the rim of the stove to act as a platform for my pot. As this is a small stove you need to keep a close eye on your pot as the water boils or the food cooks so that it does not accidentally fall over. I had this happen once before as I had left the handle of my pot up. The handle snapped back down eventually causing the pot to fall off the log.
All was well with this set up and after about 10 minutes of good heat my water was boiling. if you do not have pebbles to hand I find that 3 pieces of green wood work well instead.
Three stones and a pot
Afterwards as I was drinking my coffee the stove really came alive with some wonderful flames.
I really enjoyed making this small log rocket stove as it showed me that with a little ingenuity you can make do without an axe. It can be difficult but it is doable and a great way to test your personal skills.
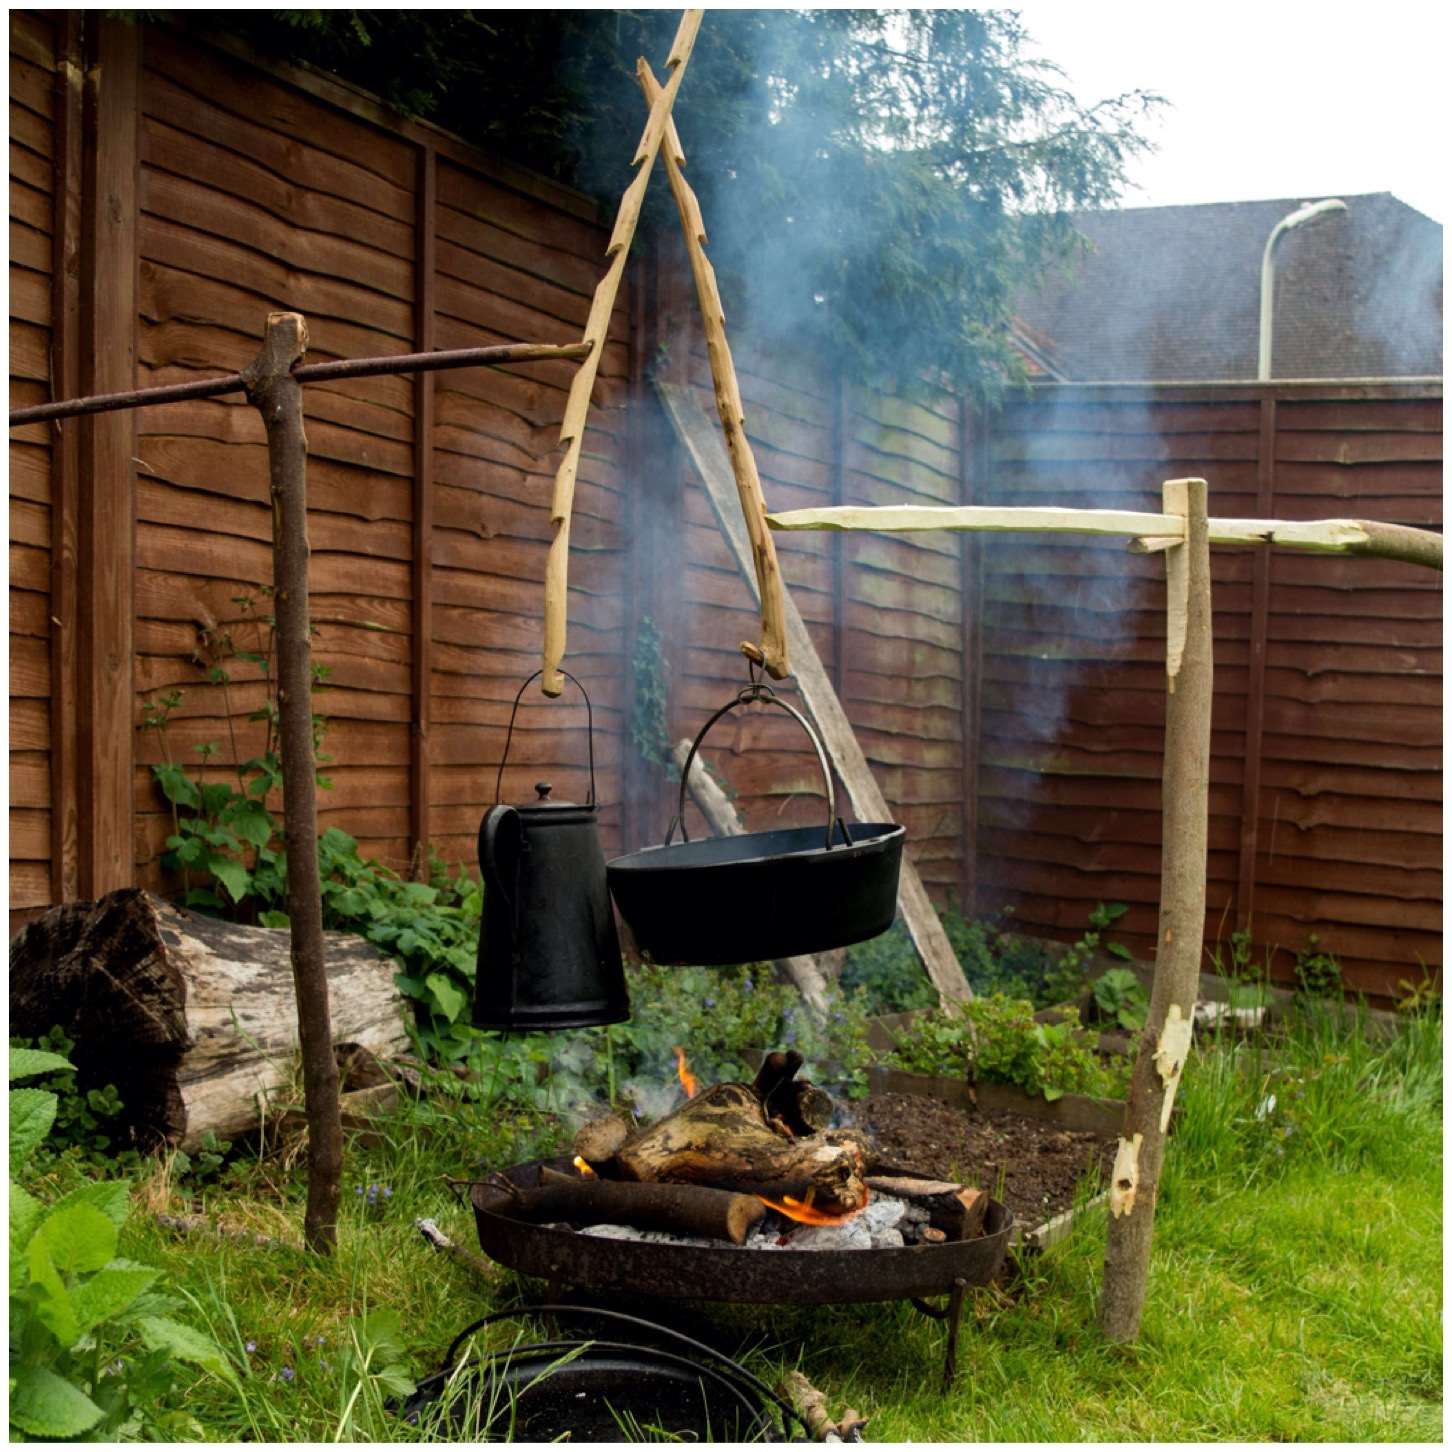
I had a great time constructing contraptions to use around the campfire last year so I thought a little summary post of them all was in order.
This post is not about how to construct any of the contraptions themselves (I will link to the relevant How To…. guides in the title of each section) but my personal thoughts on them. I appreciate campfire gadgets are not for everyone and they may be seen as overcomplicating the cooking process however I think they are great fun to construct.
Raised Firepit/platform
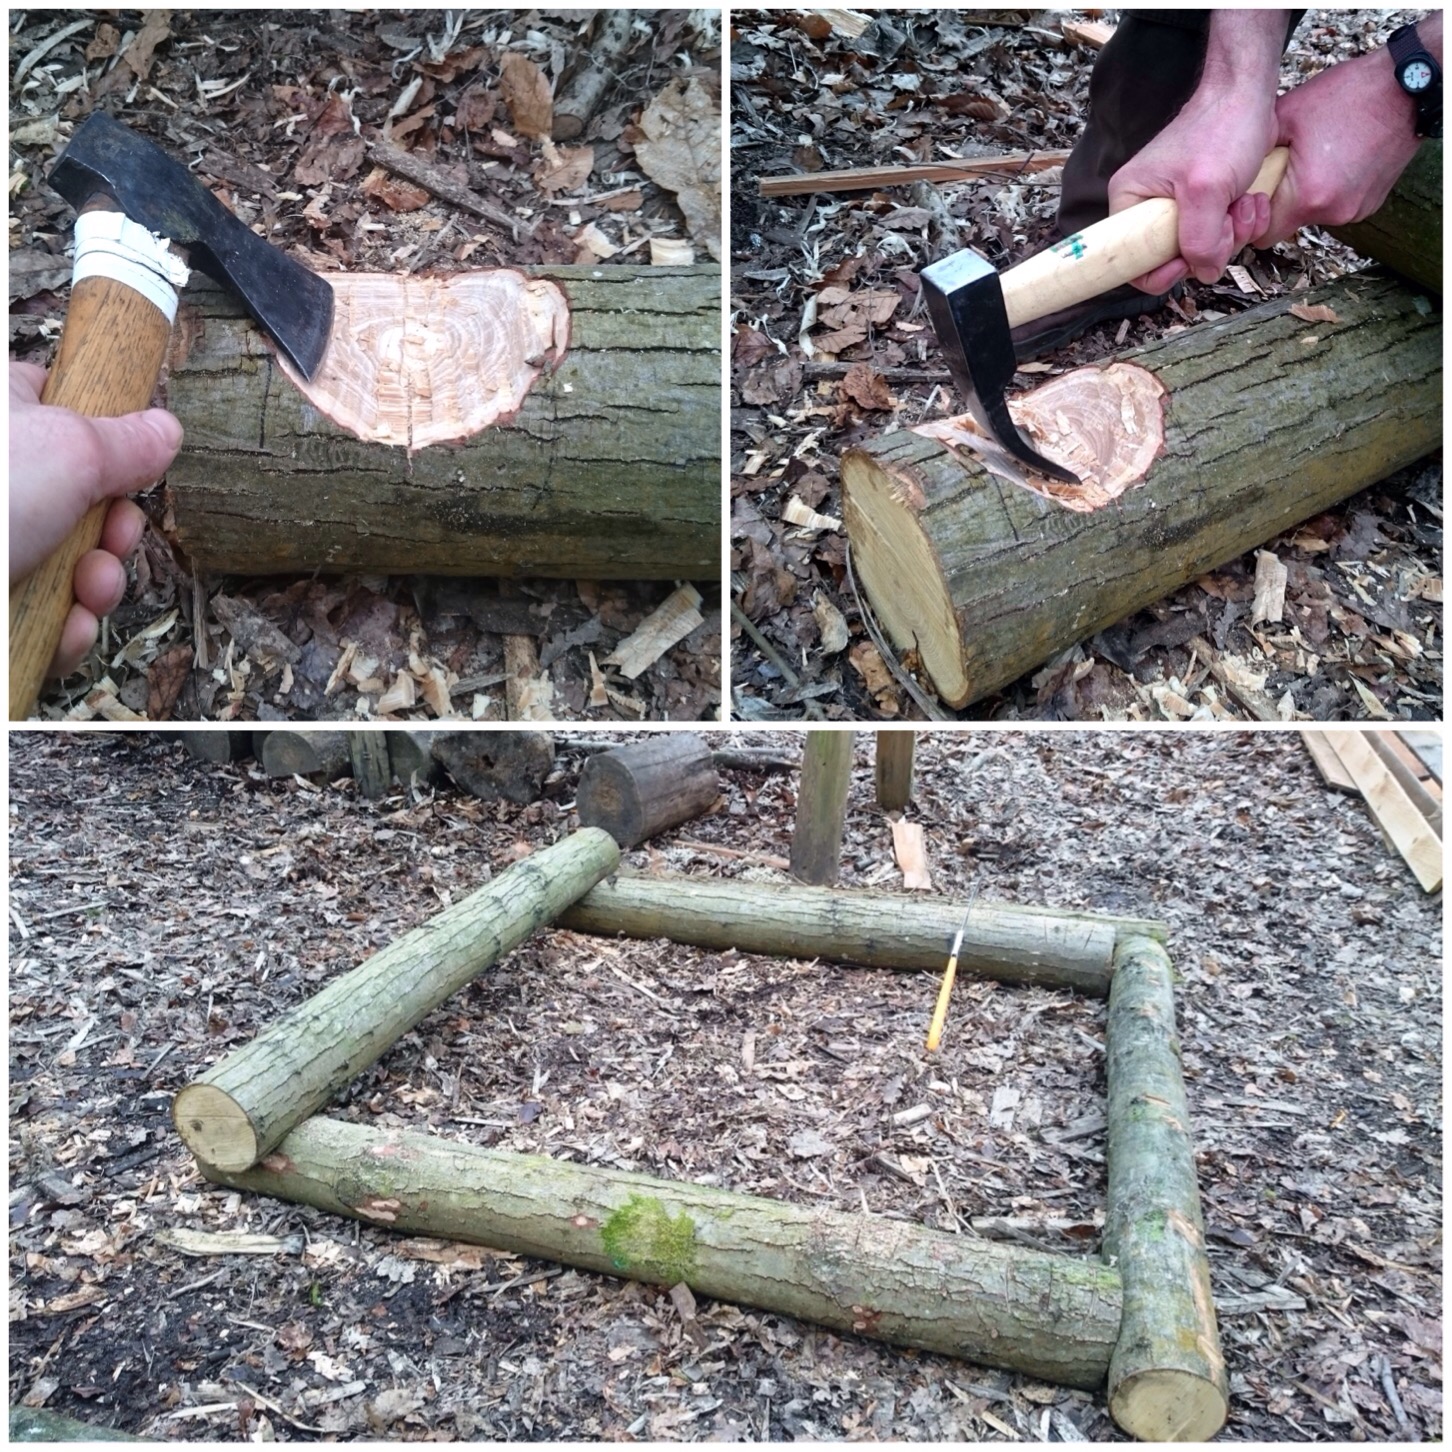
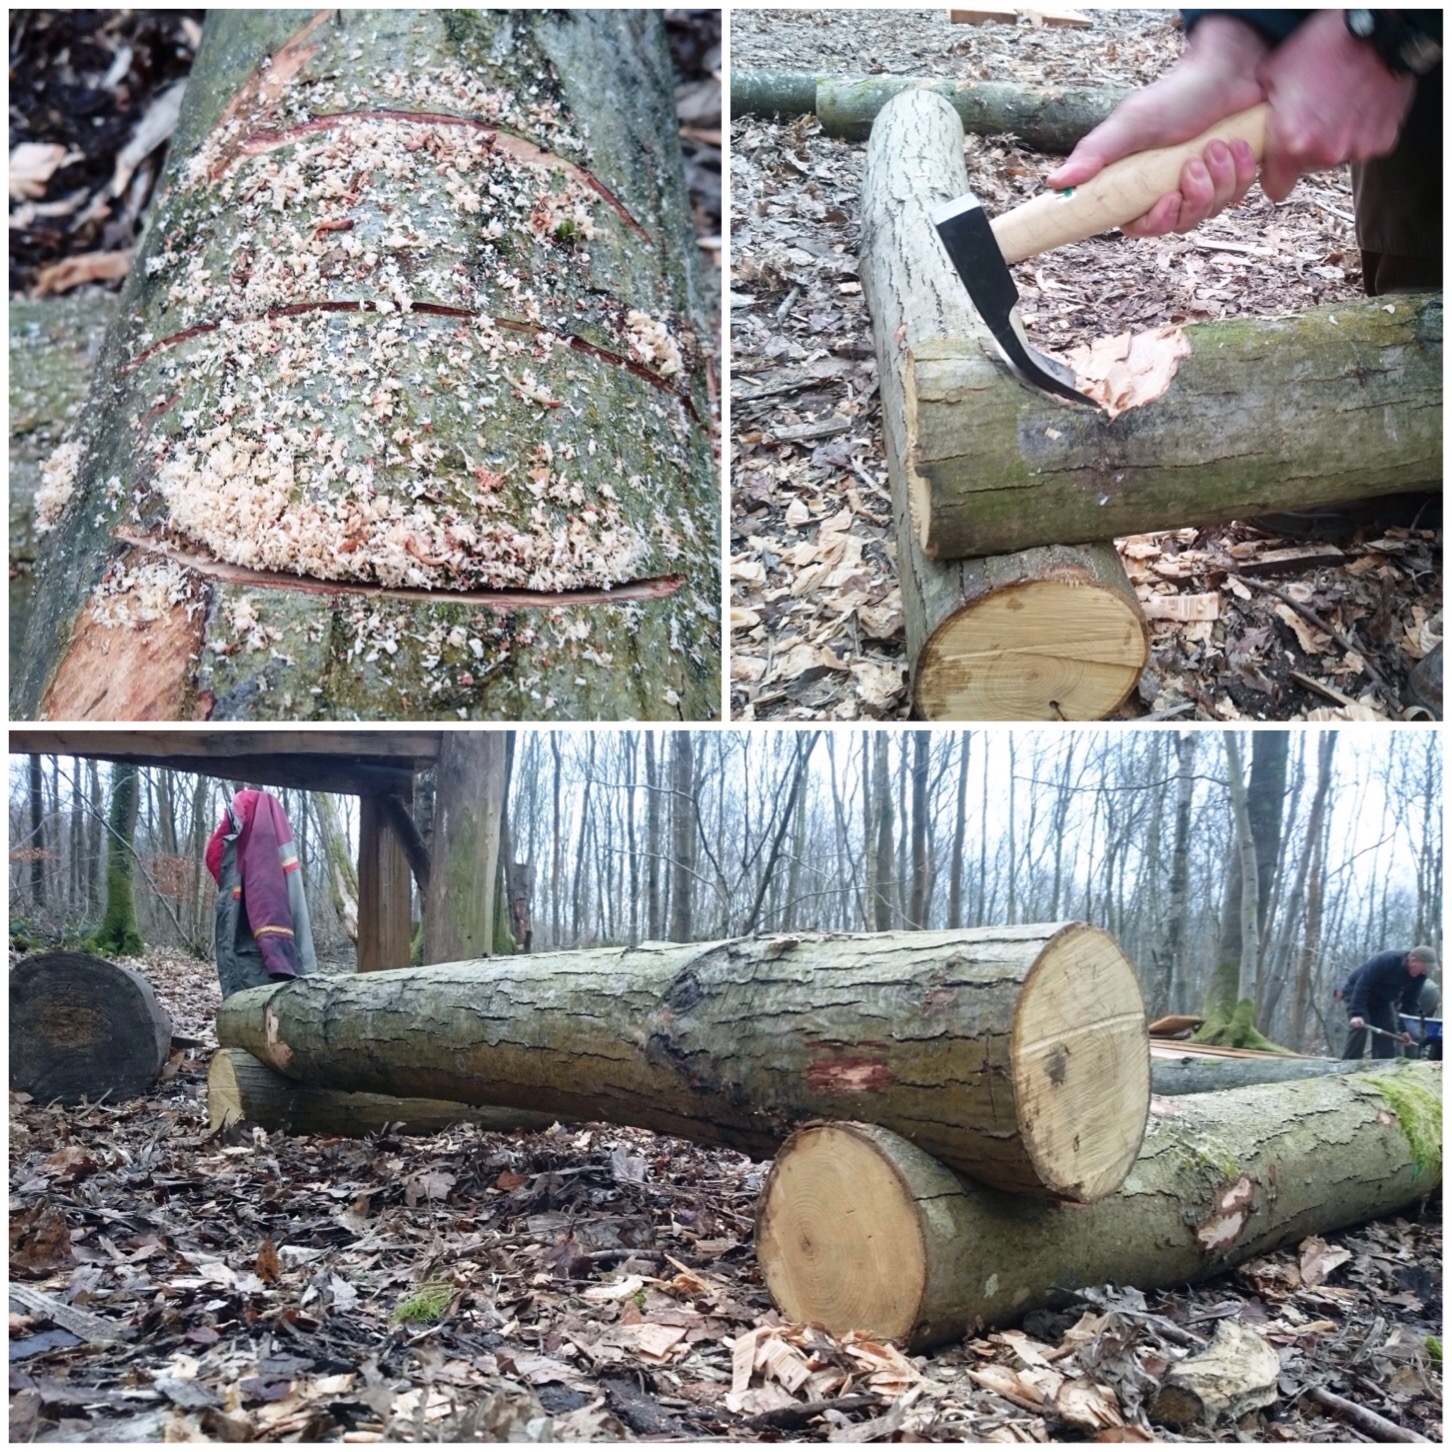
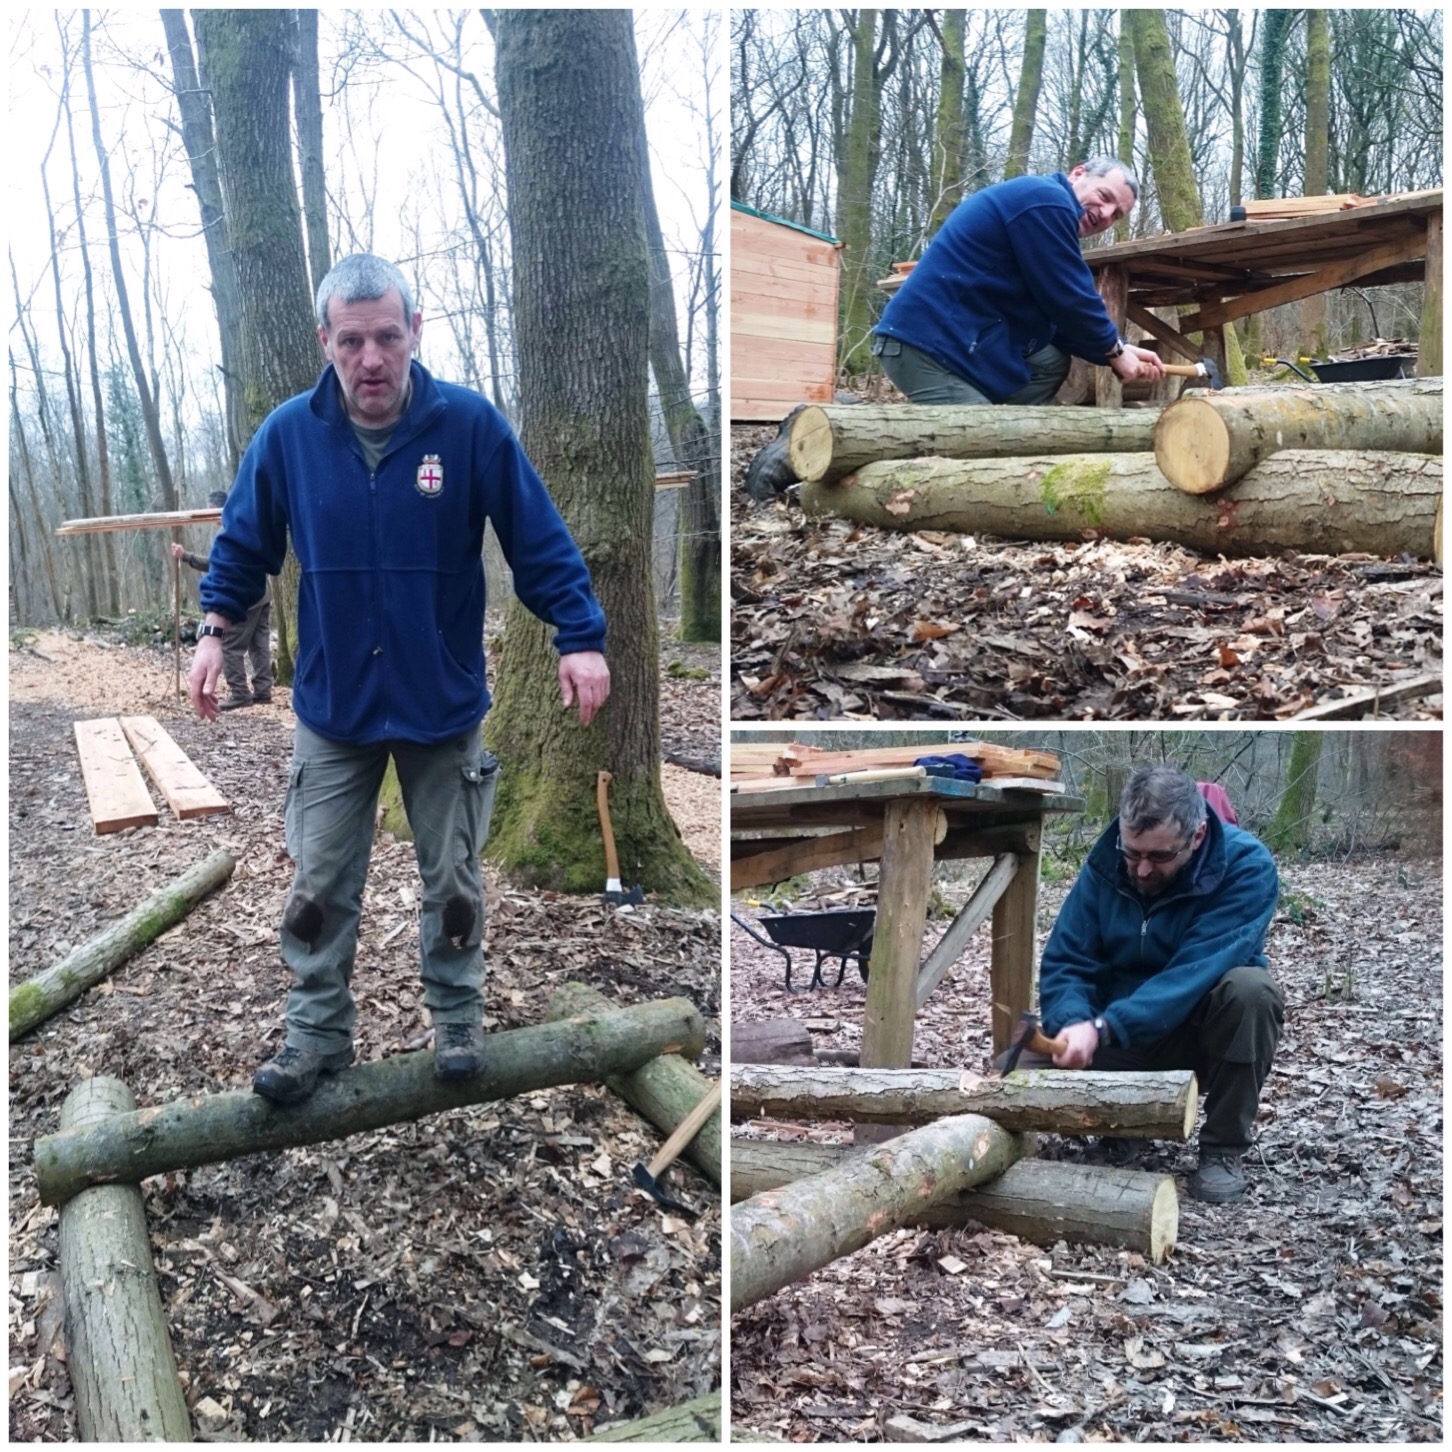
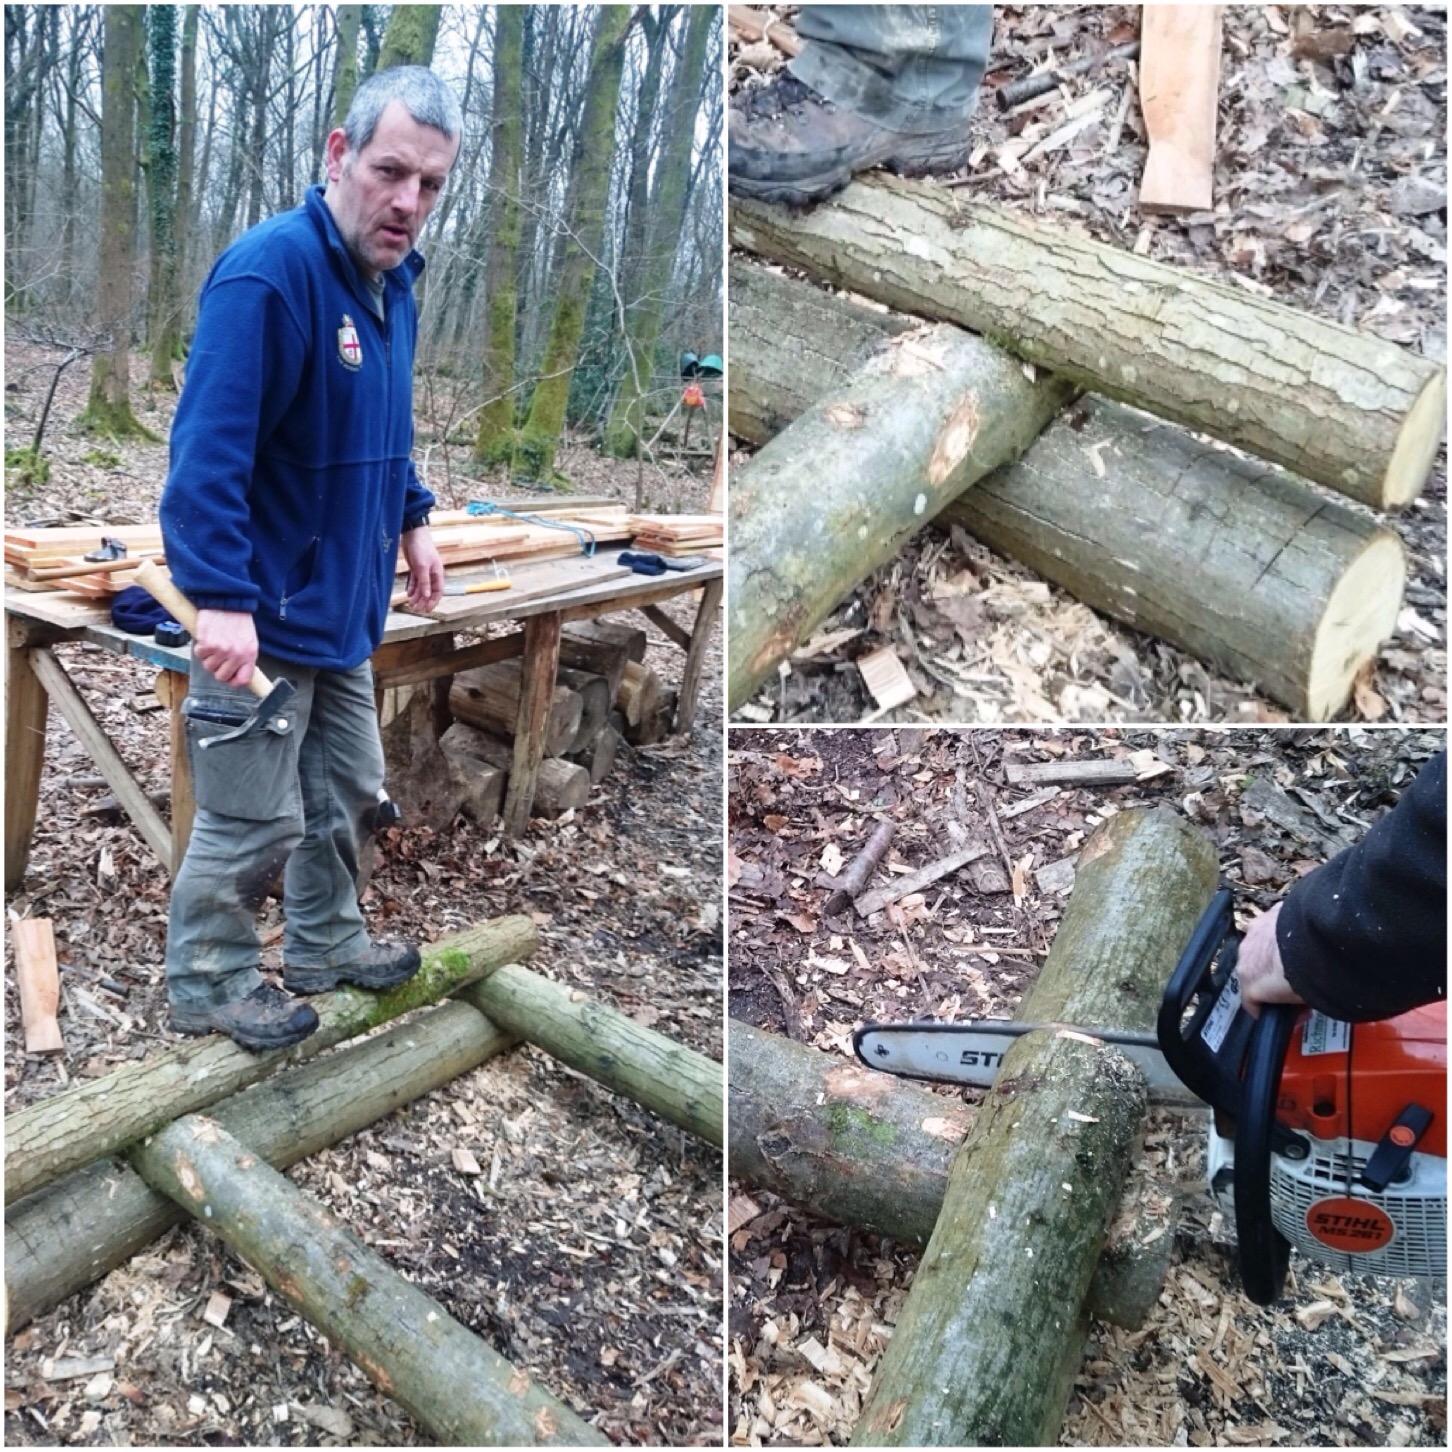
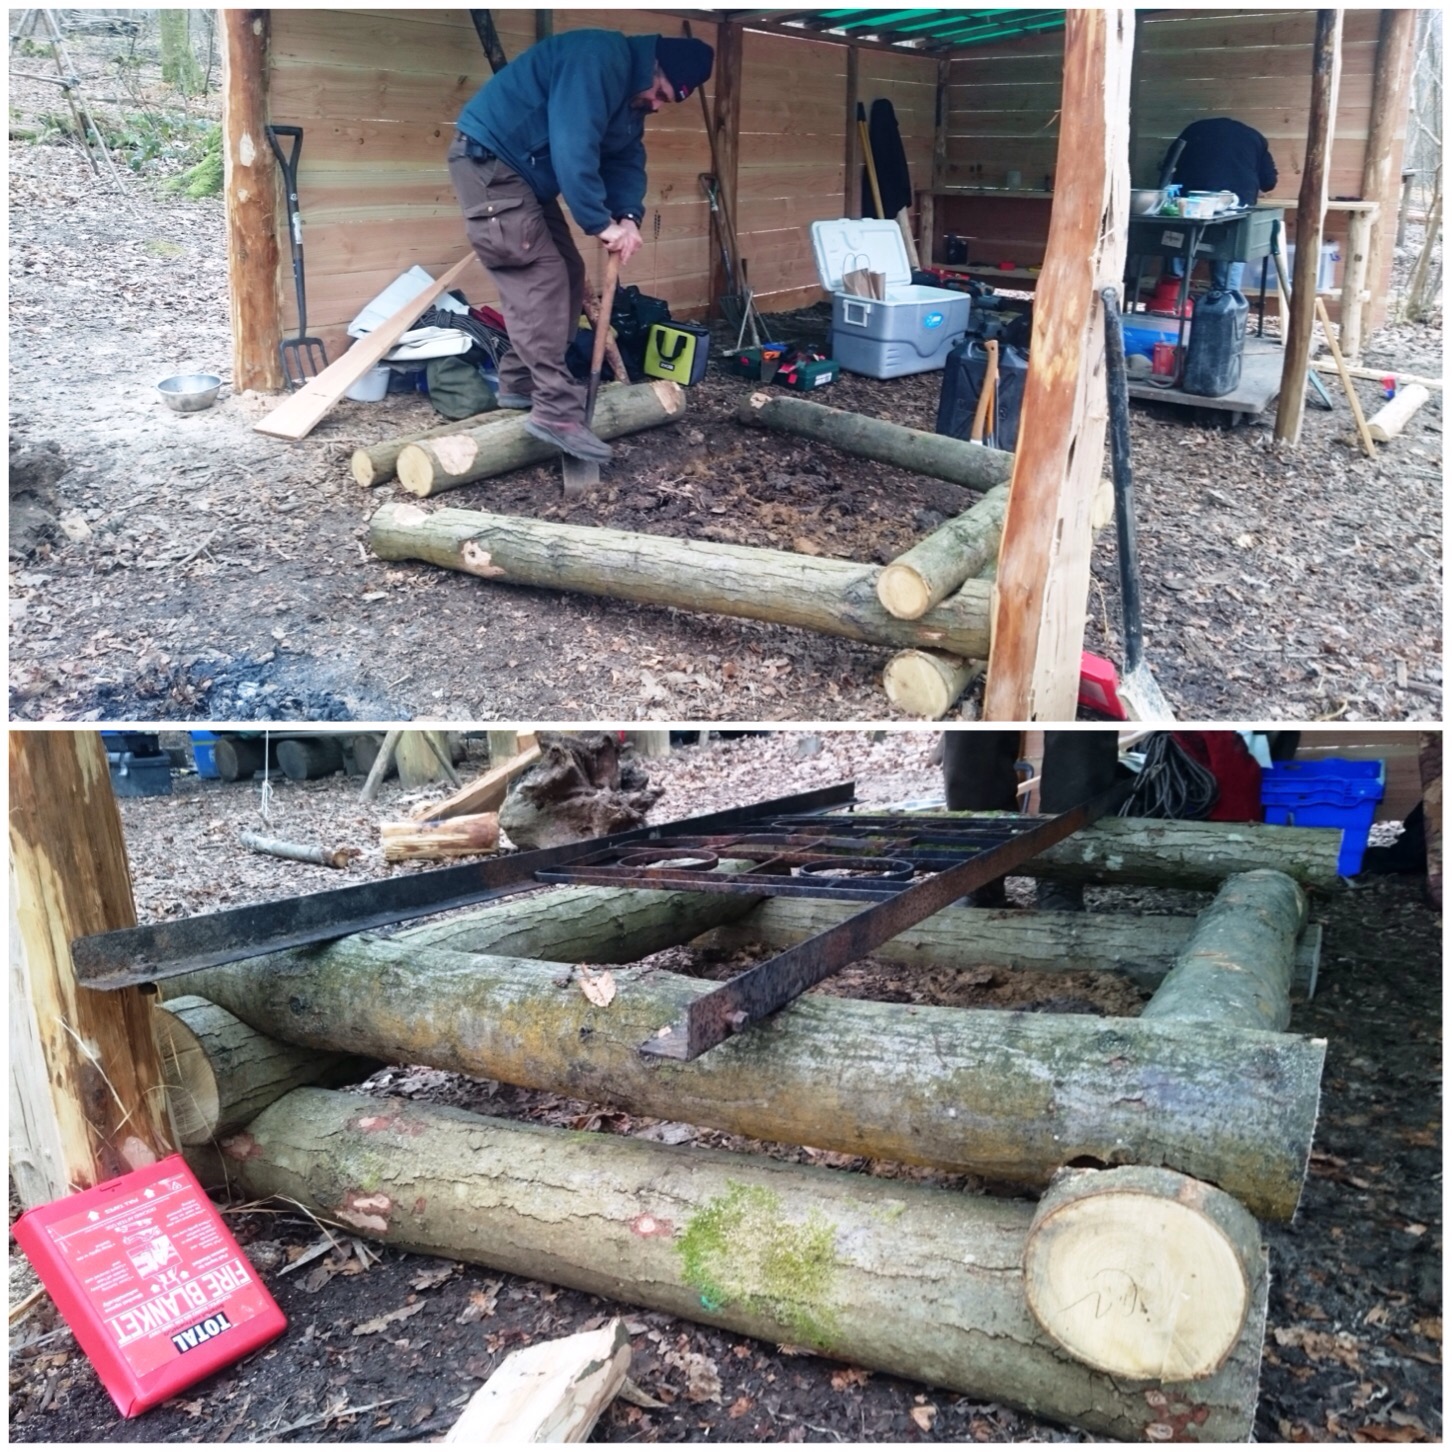
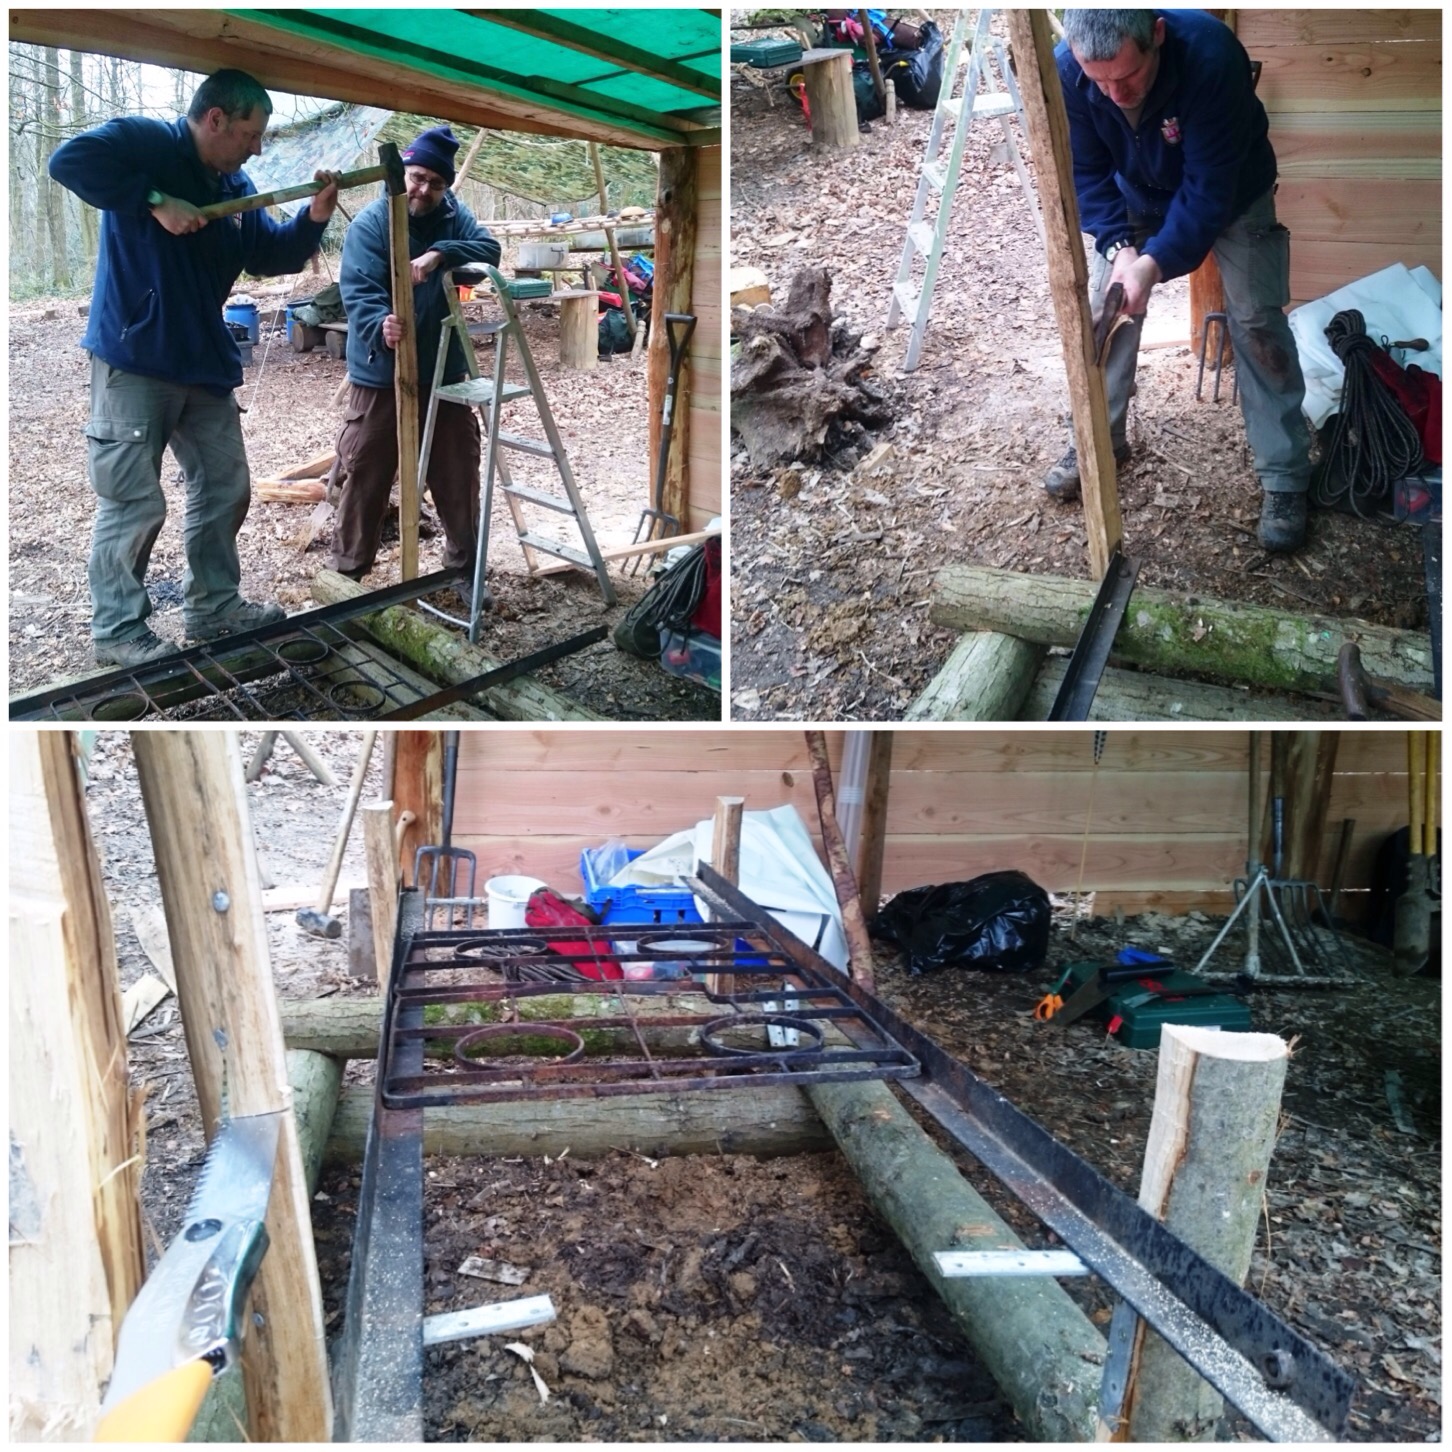
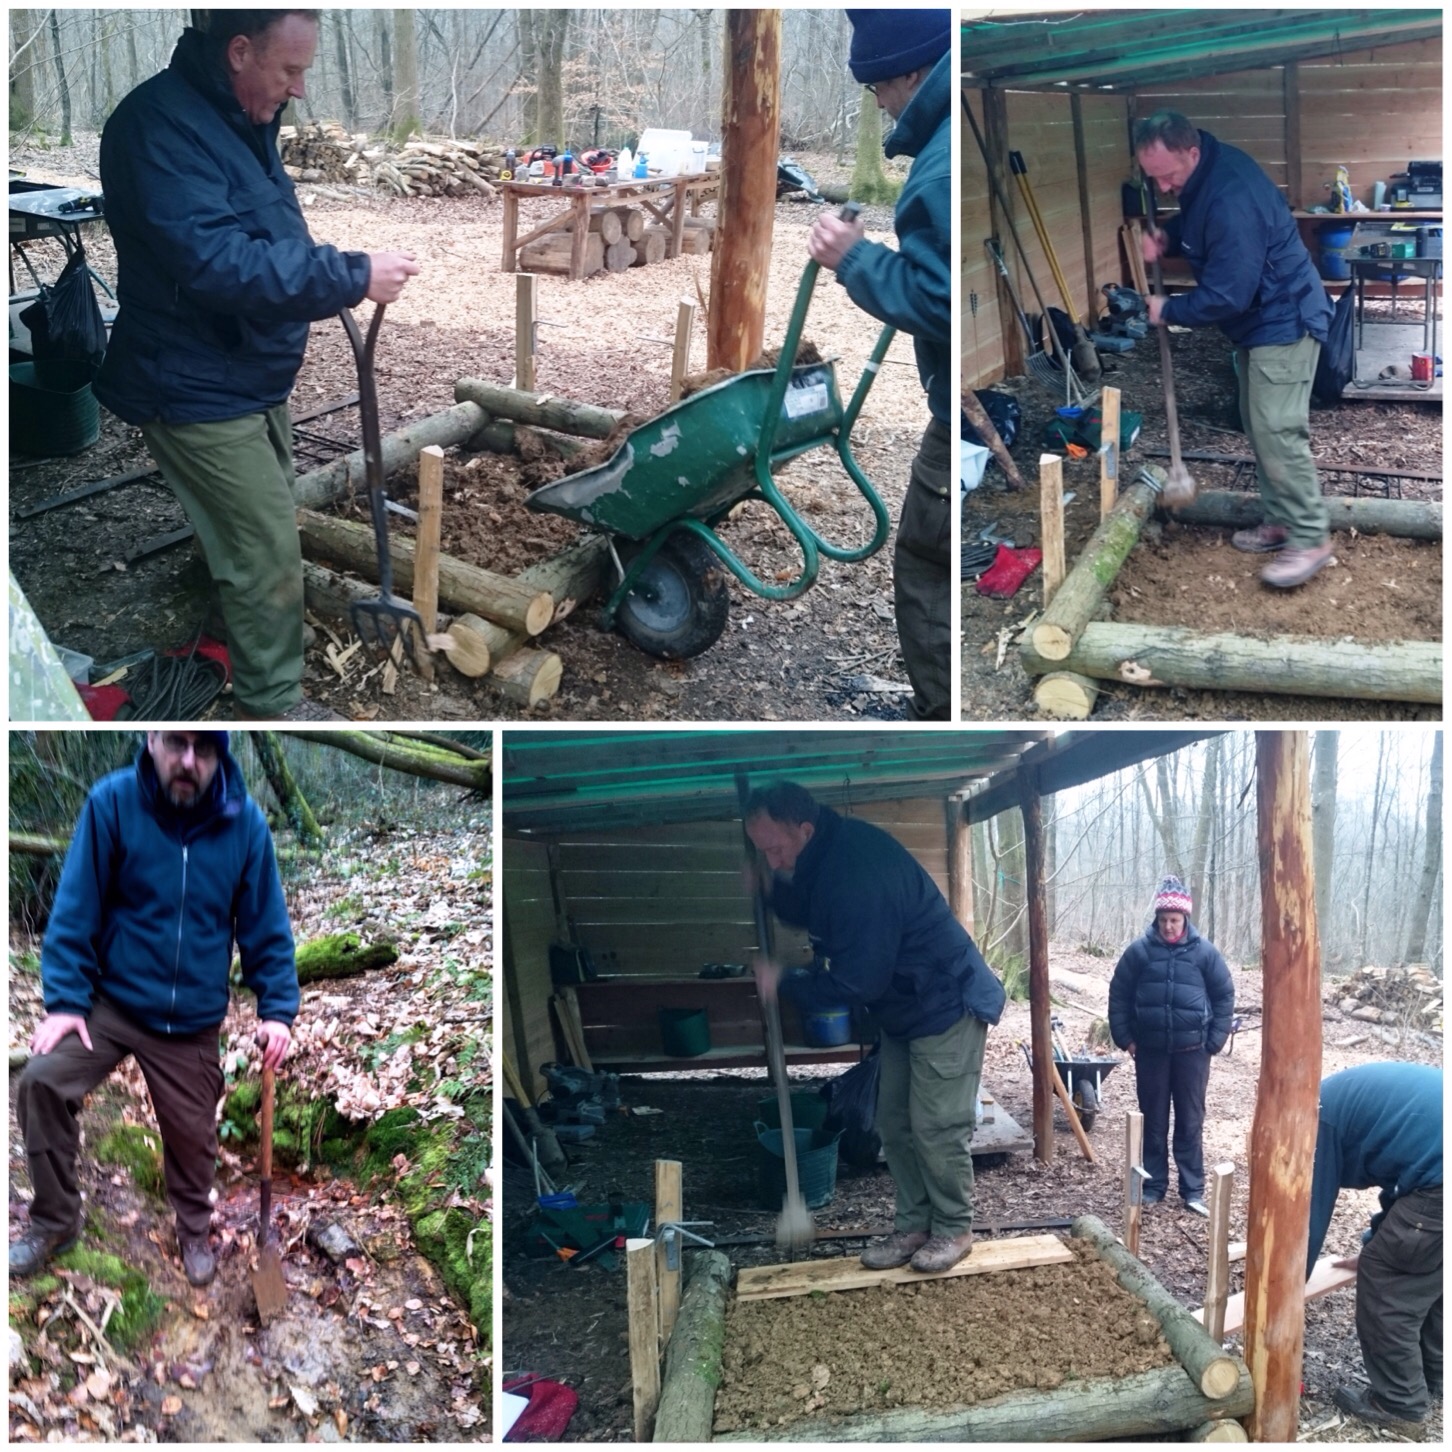
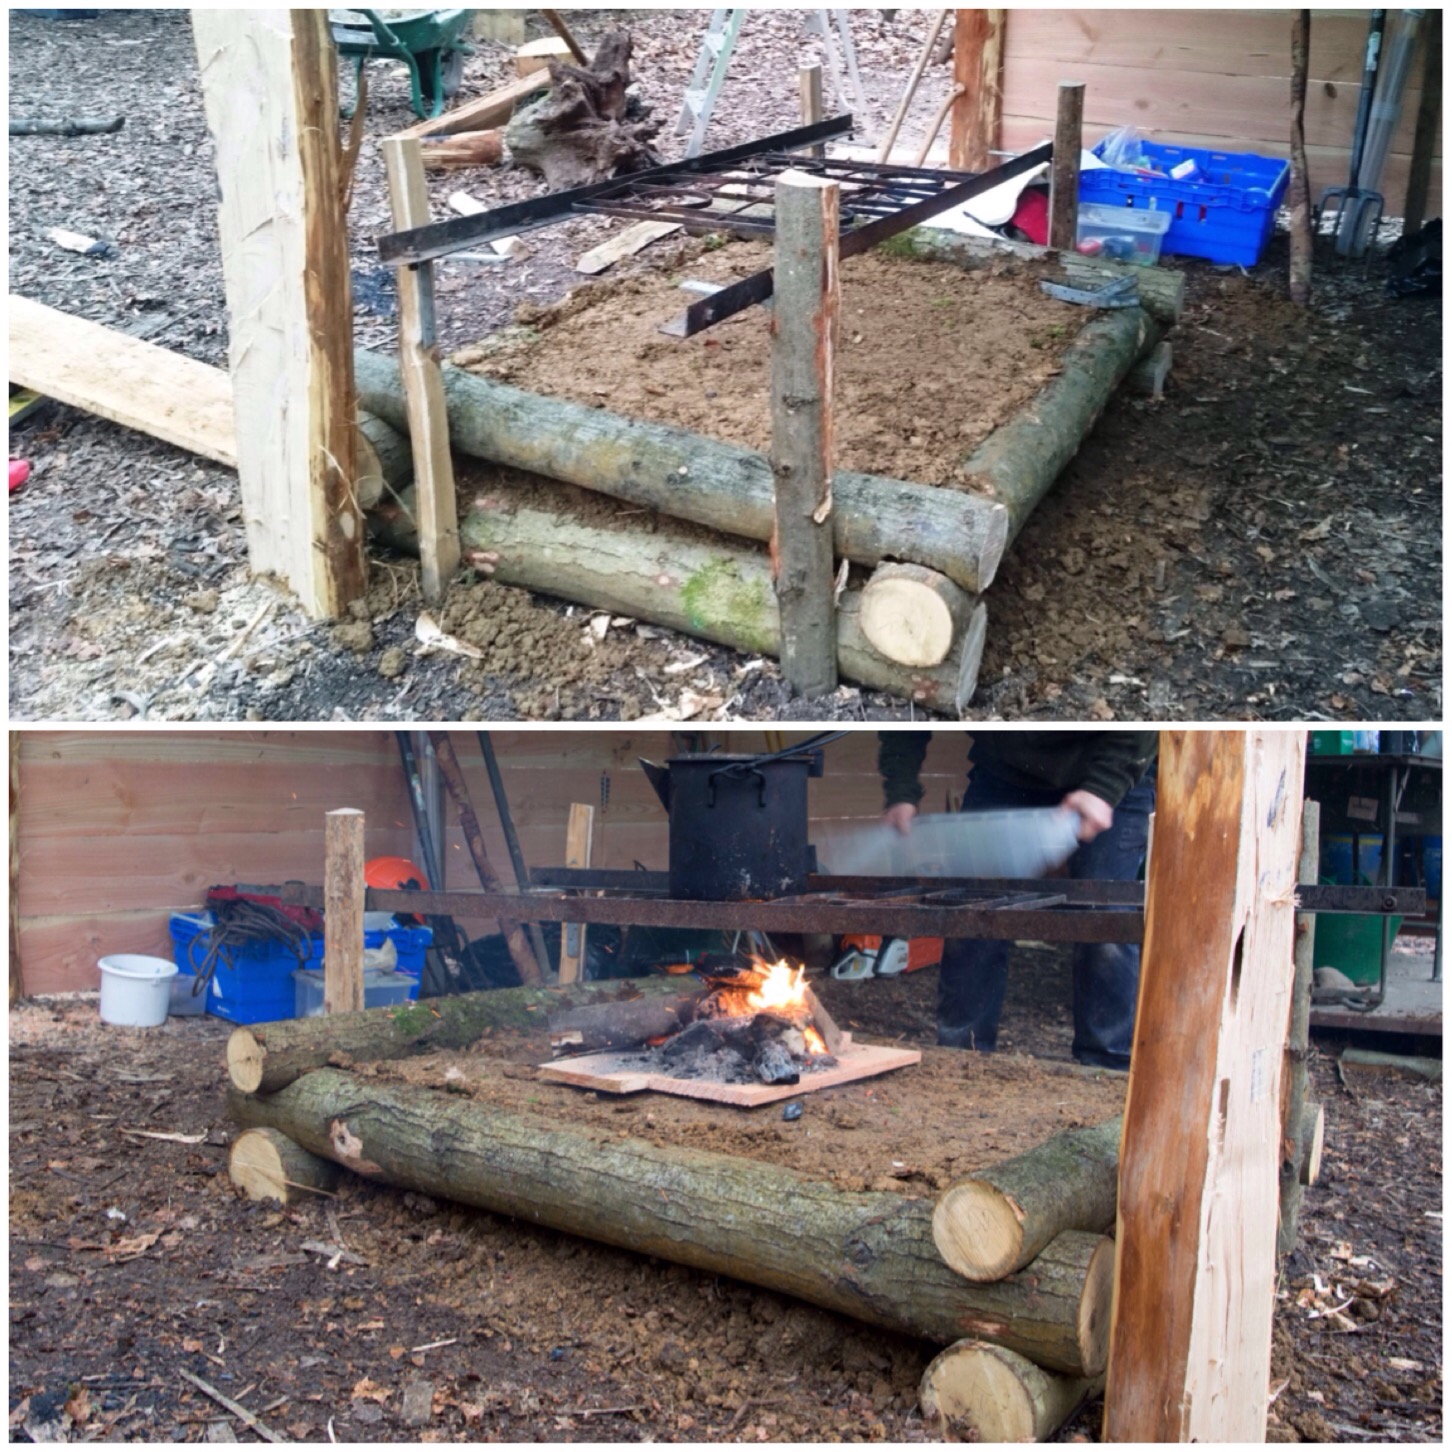
Before building any gadgets it is good to have an actual fire. I was asked to help build a raised firepit/platform by my friend John Rhyder at the Woodcraft School training area. John wanted a dedicated area for his students to cook on without having to bend down too far.
After a lot of discussion with his wife Caron we opted for a rectangular shape instead of a square. Caron argued that this shape would give a large cooking area but would be safer than a square, as the students would not have to stretch too far to reach the centre of the fire. This is an ideal construction for a fixed-base camp, with plenty of room to cook on and to sit around.
Raised Firepit
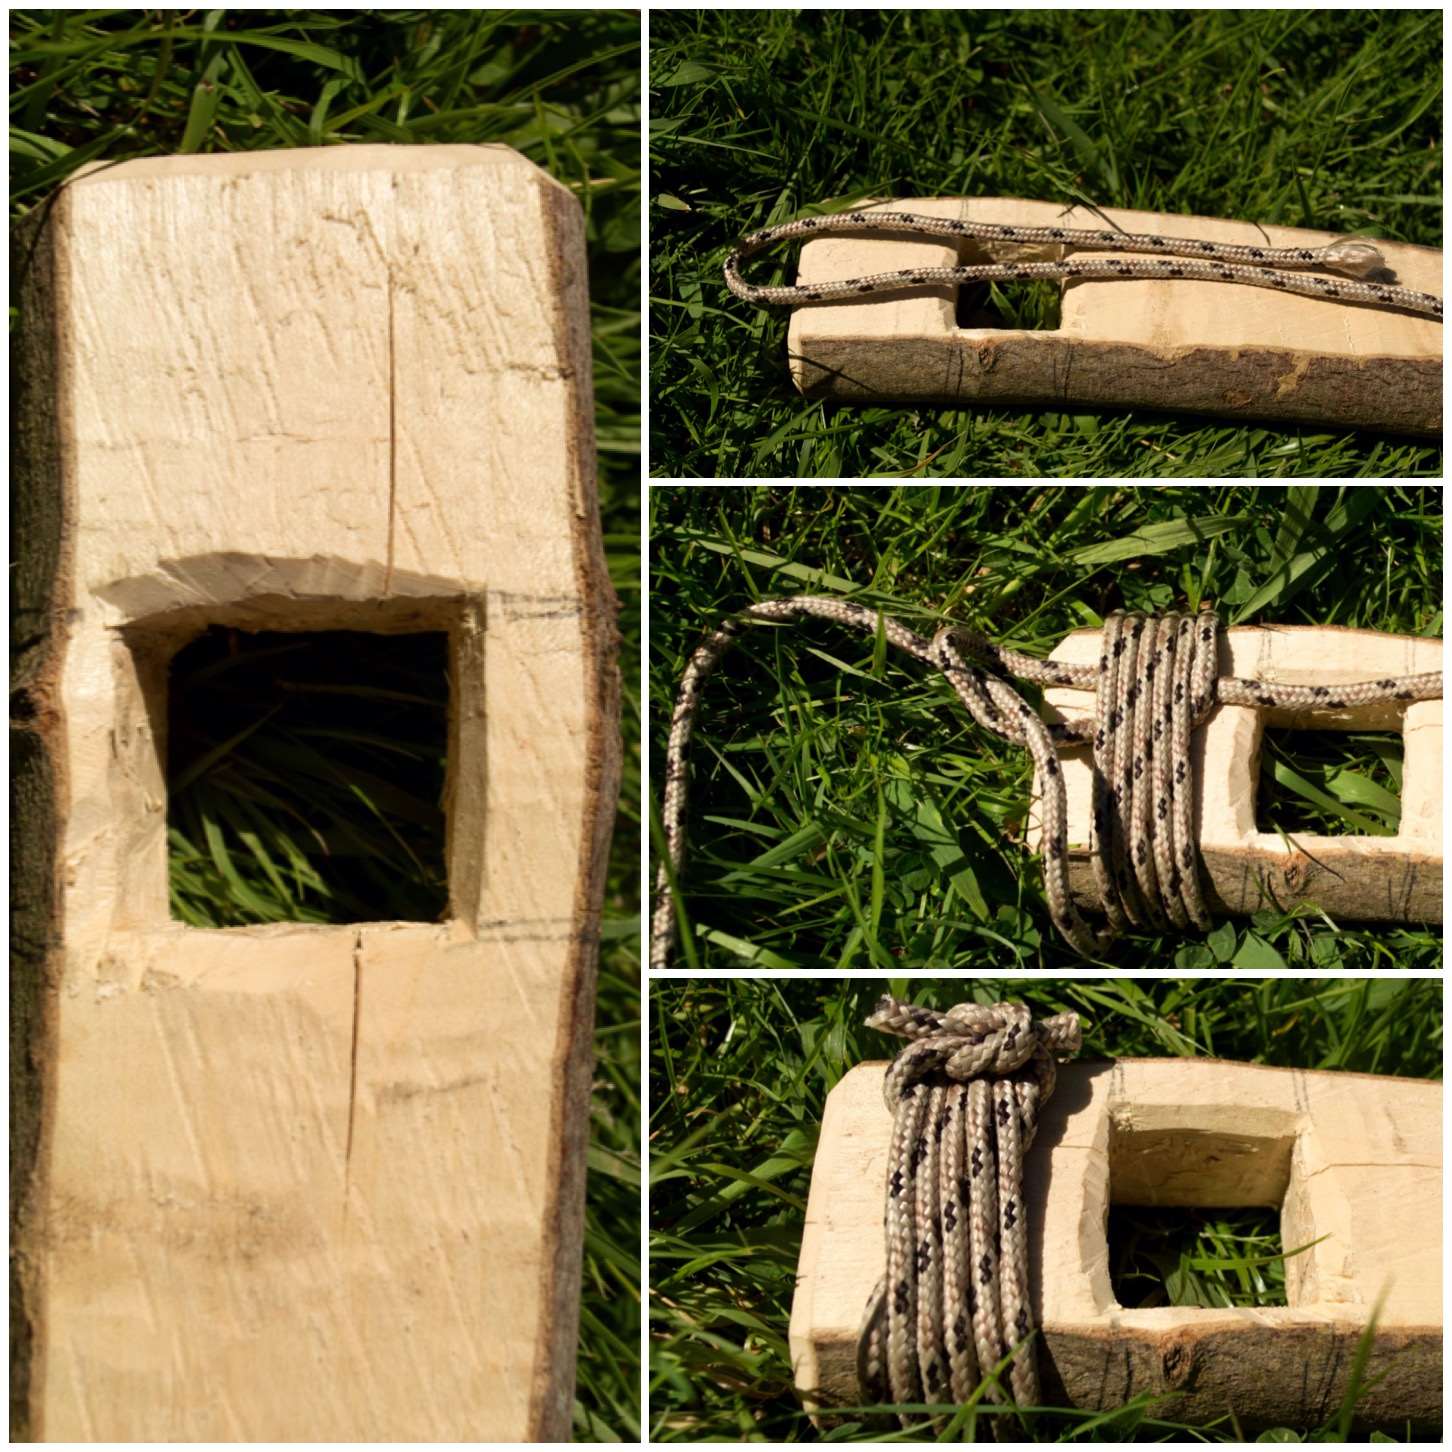
Collapsible pot hanger
I love little wooden contraptions and these little collapsible pot hangers are ideal for the lightweight bushcrafter. They can be made in numerous different ways and are easily broken down to be stored inside your pot. One of the things I like about carving them is that the joints that hold them together are generally simple but need to be carved perfectly if the hanger is to take the weight of a heavy pot without coming apart.
Collapsible pot hook
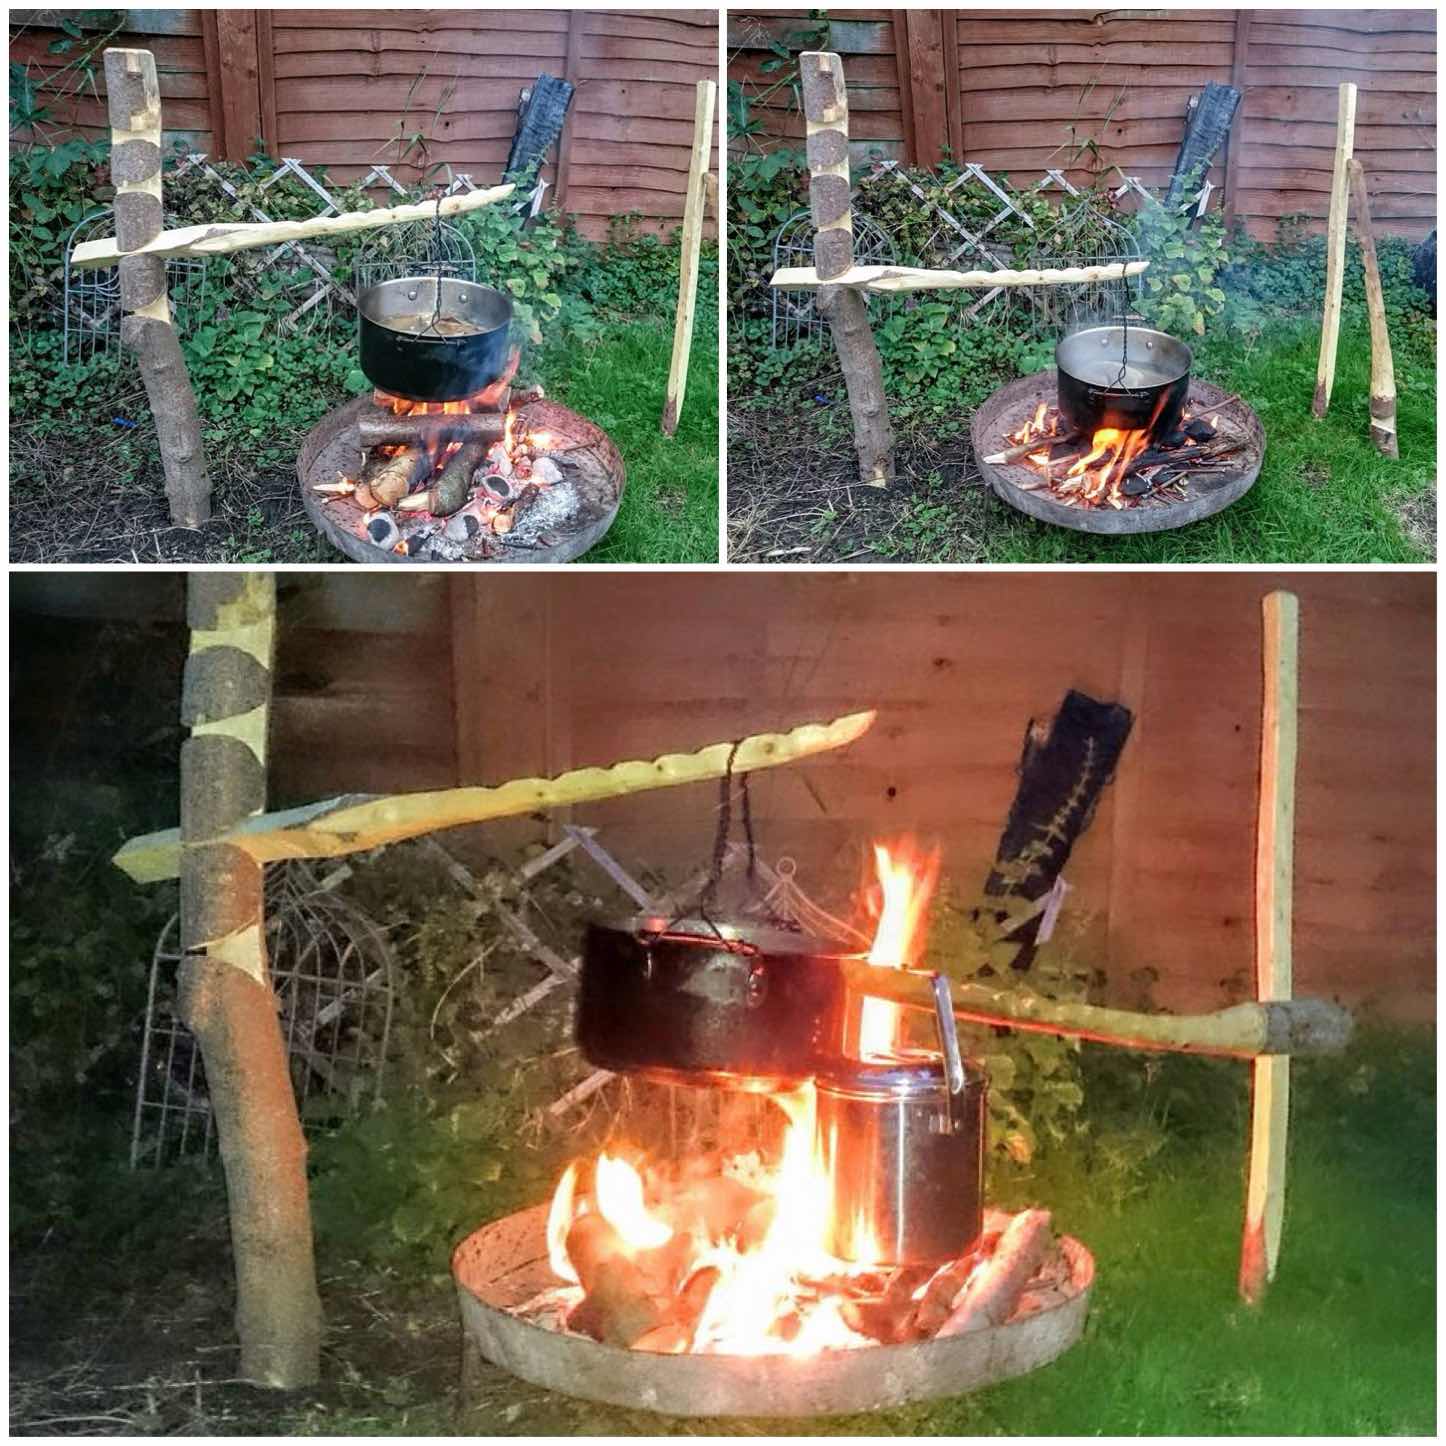
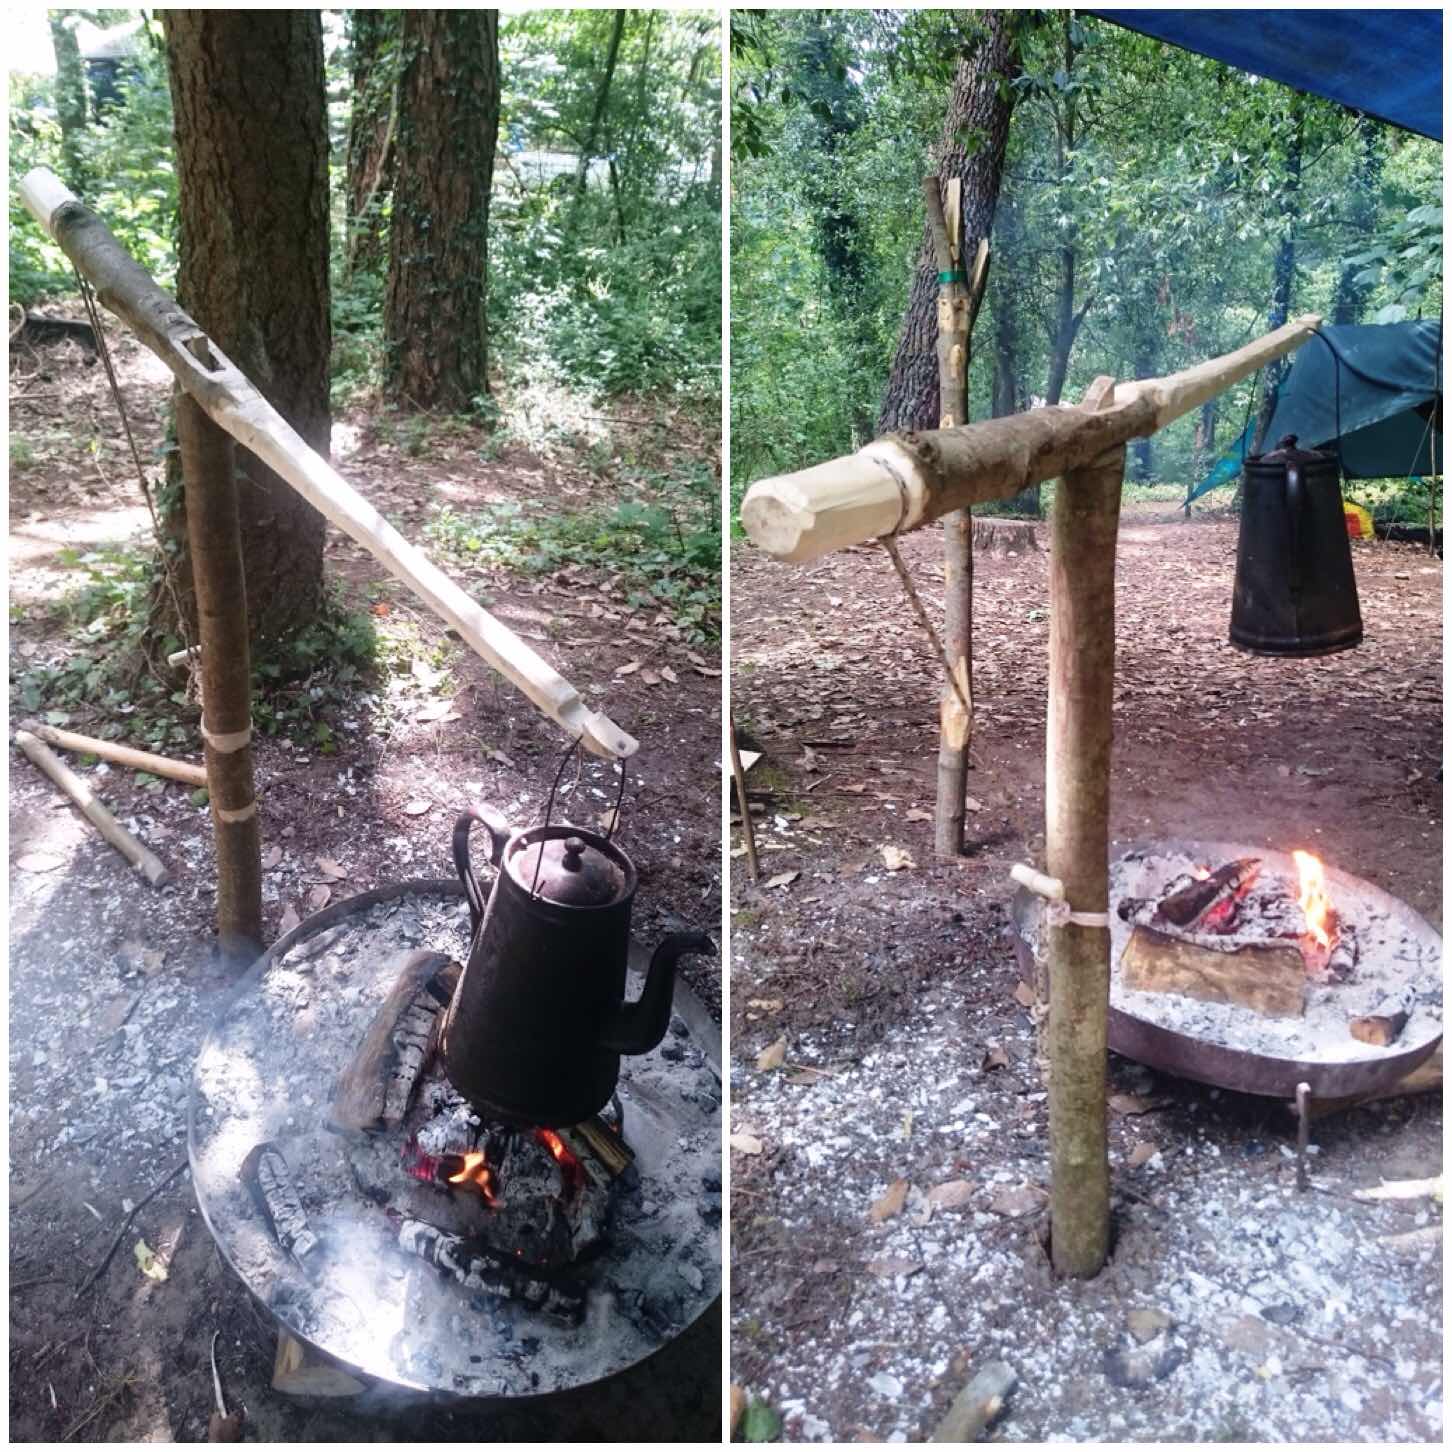
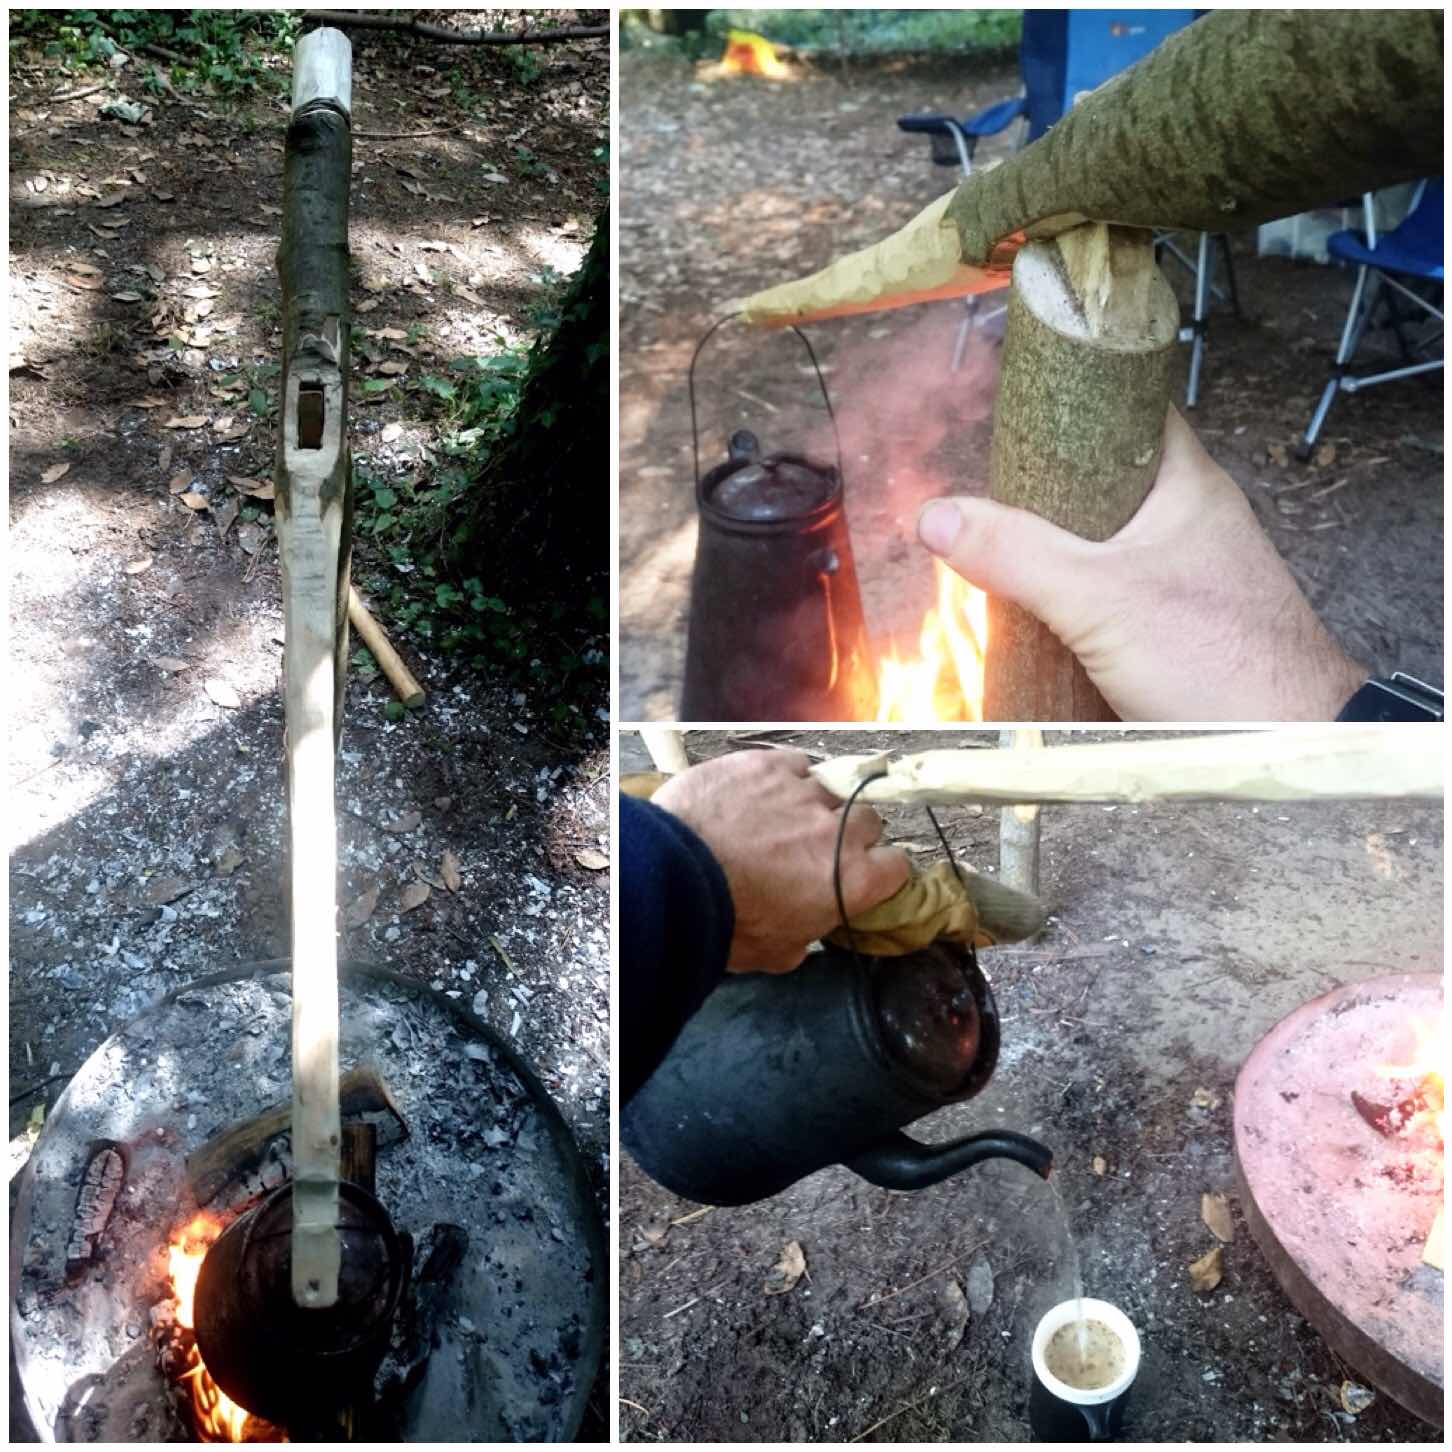
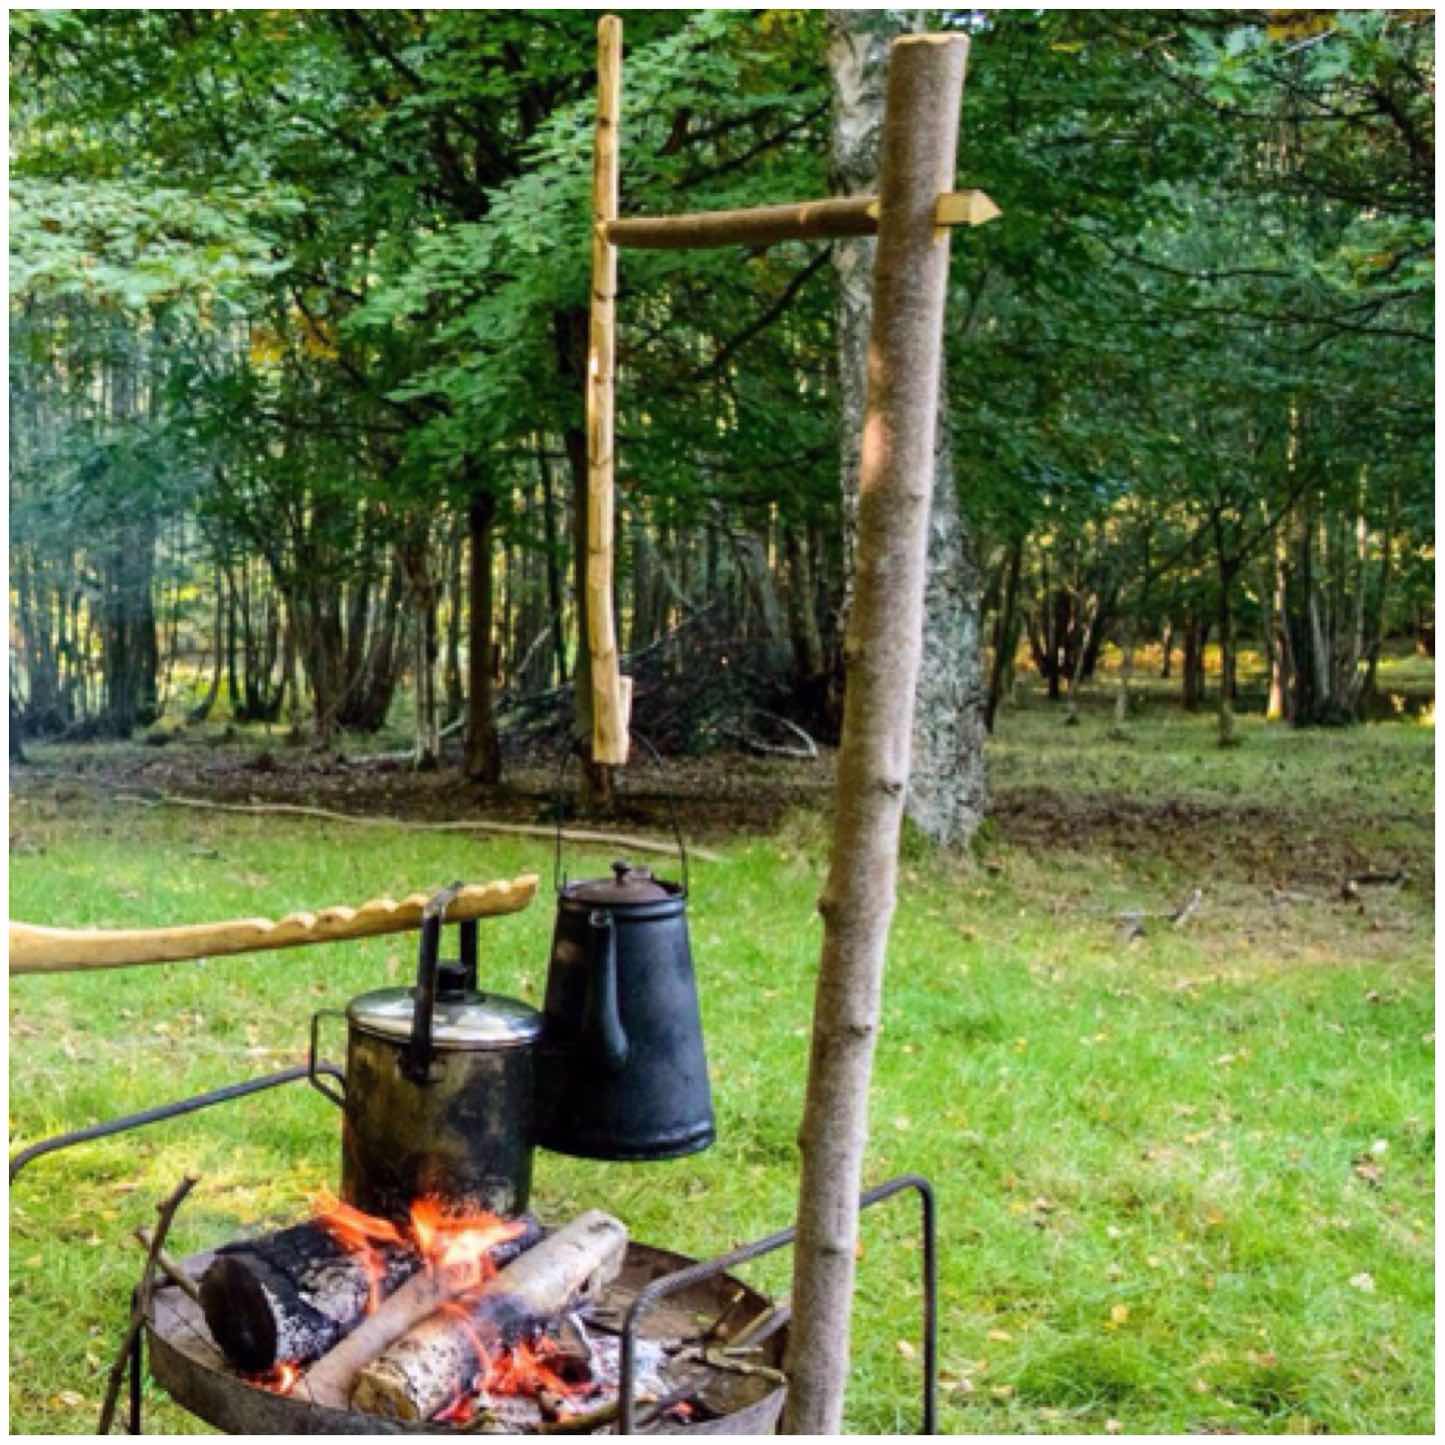
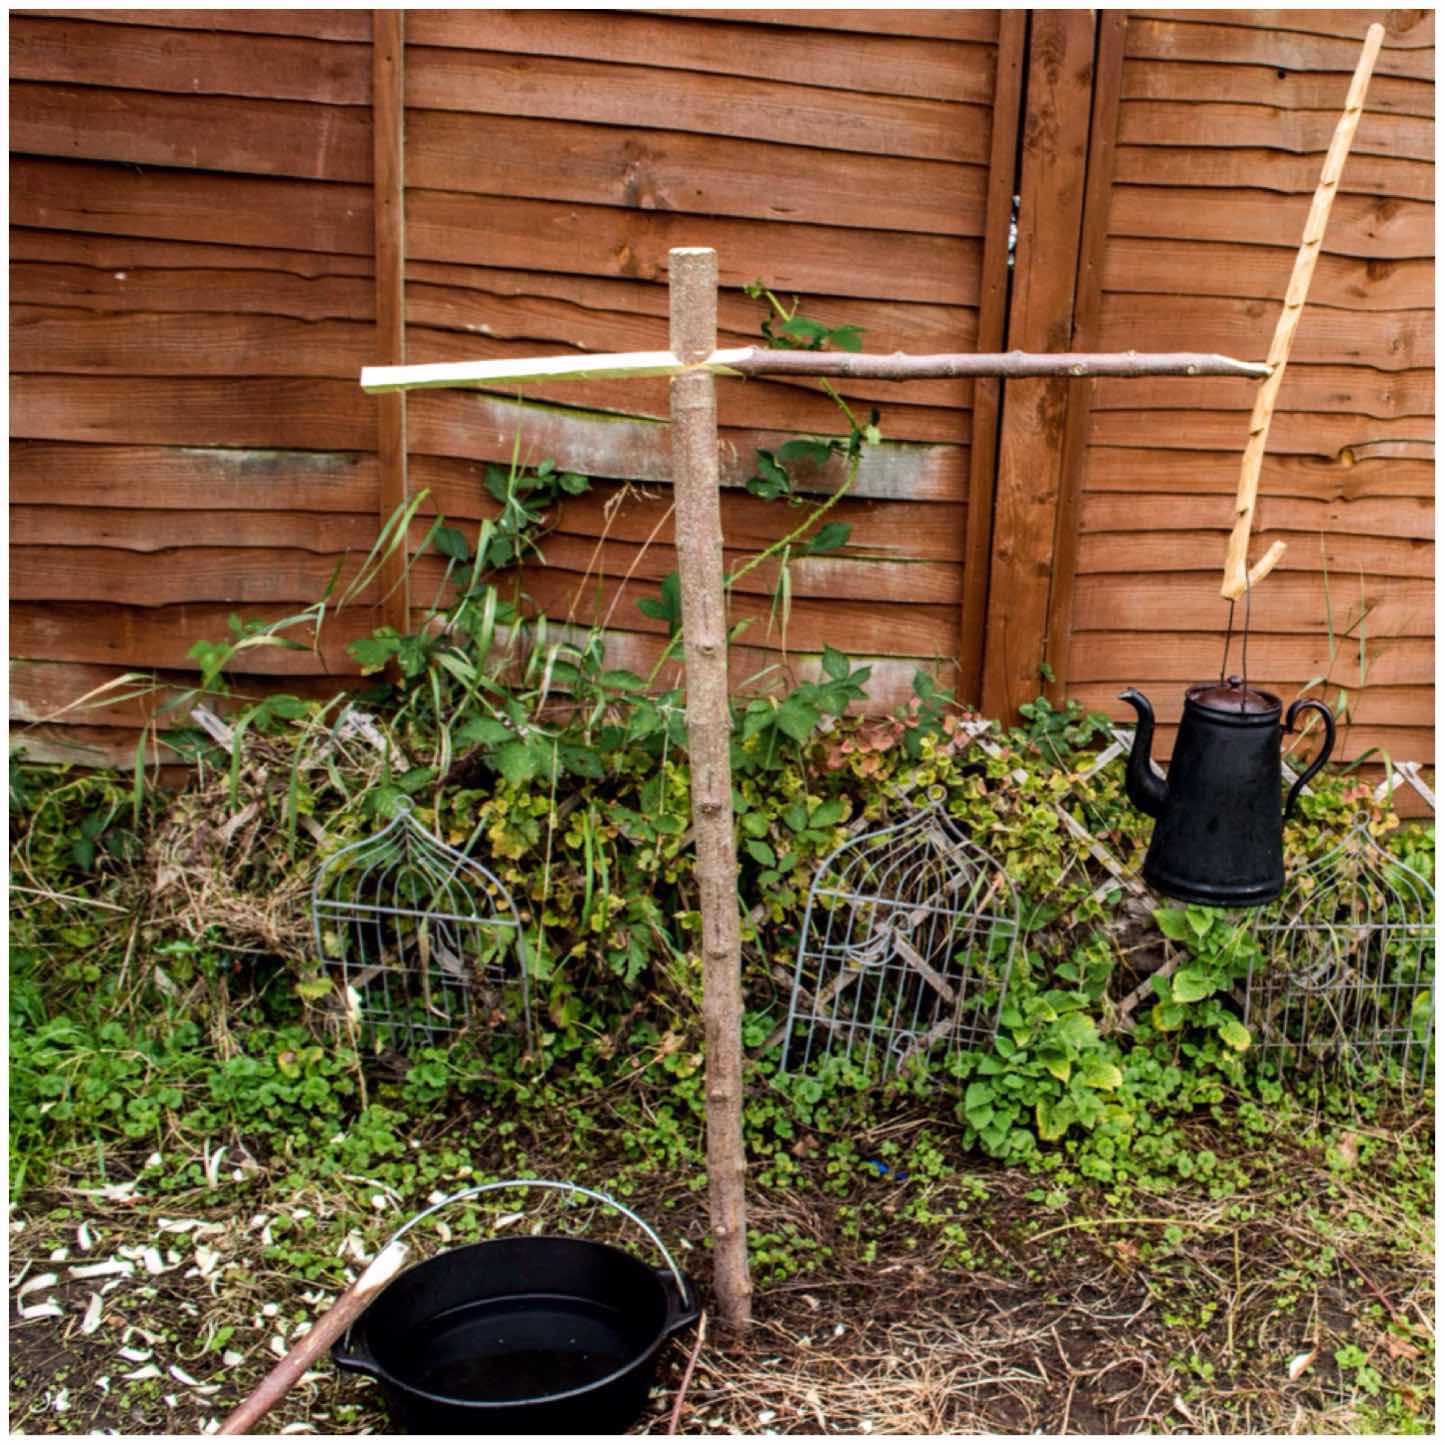
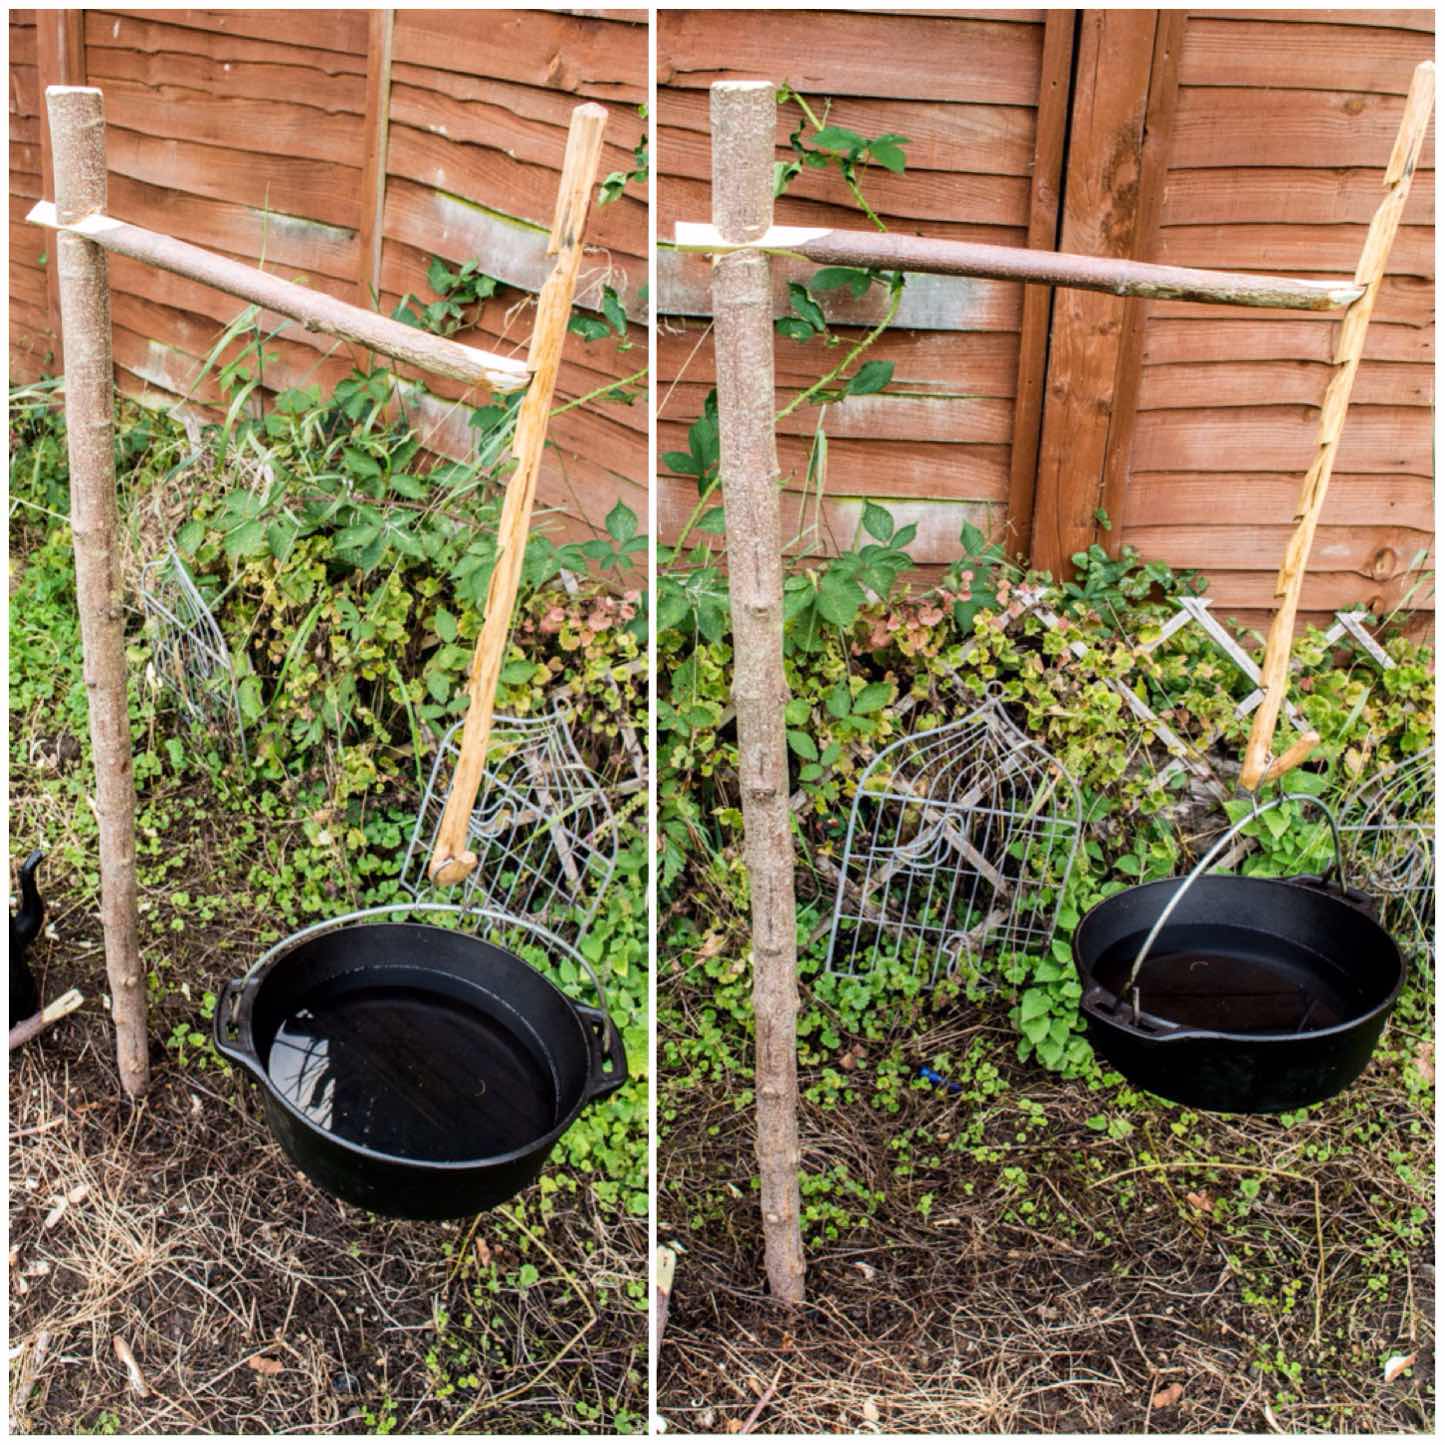
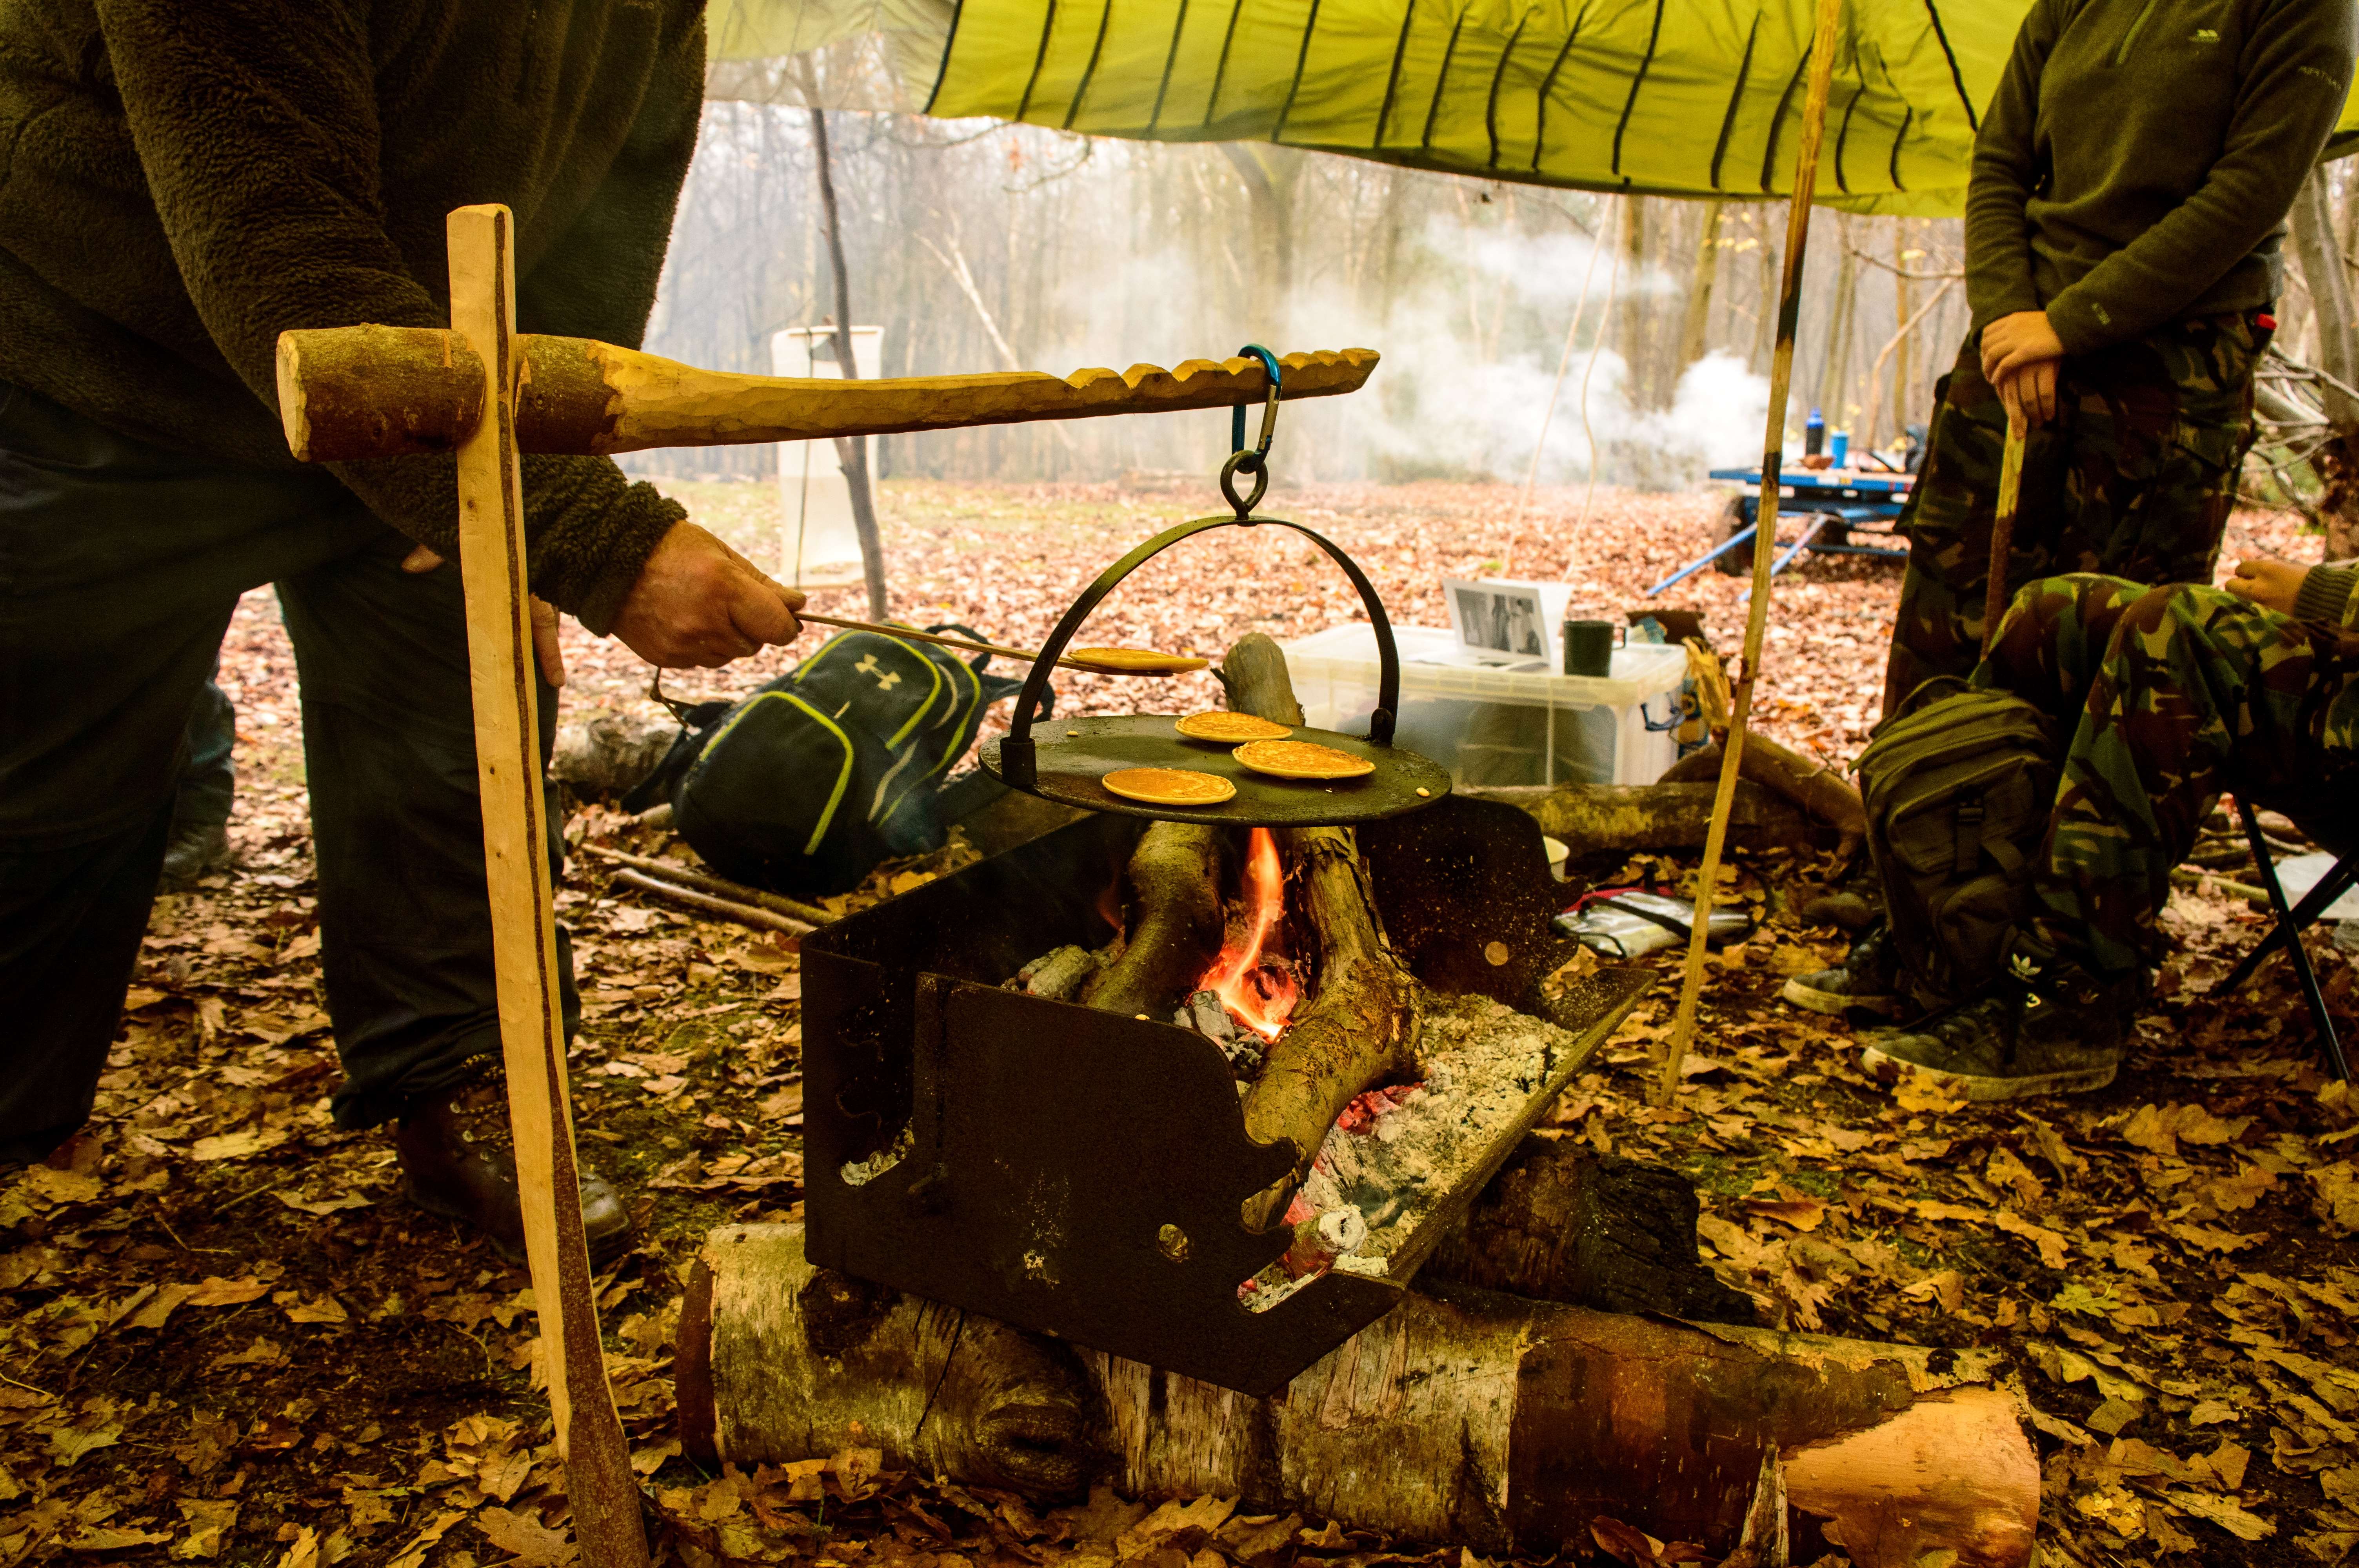
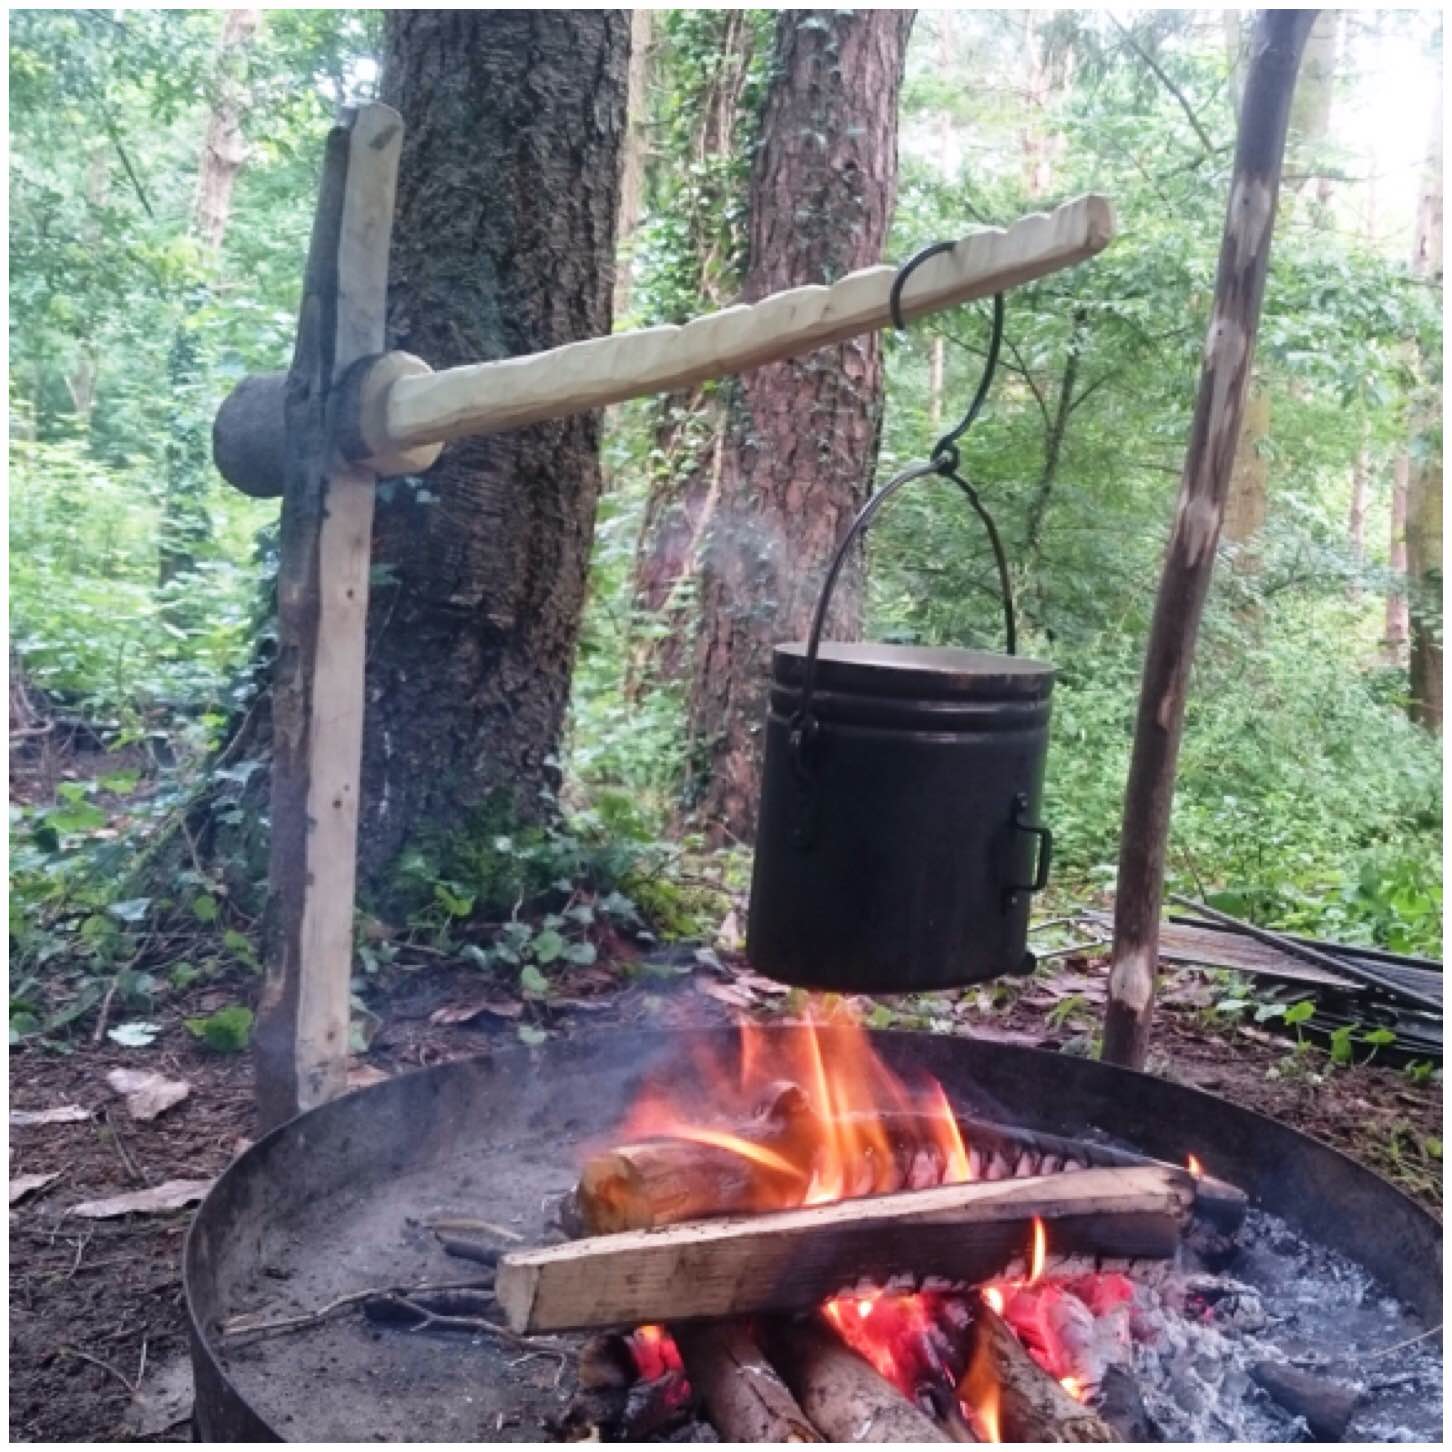
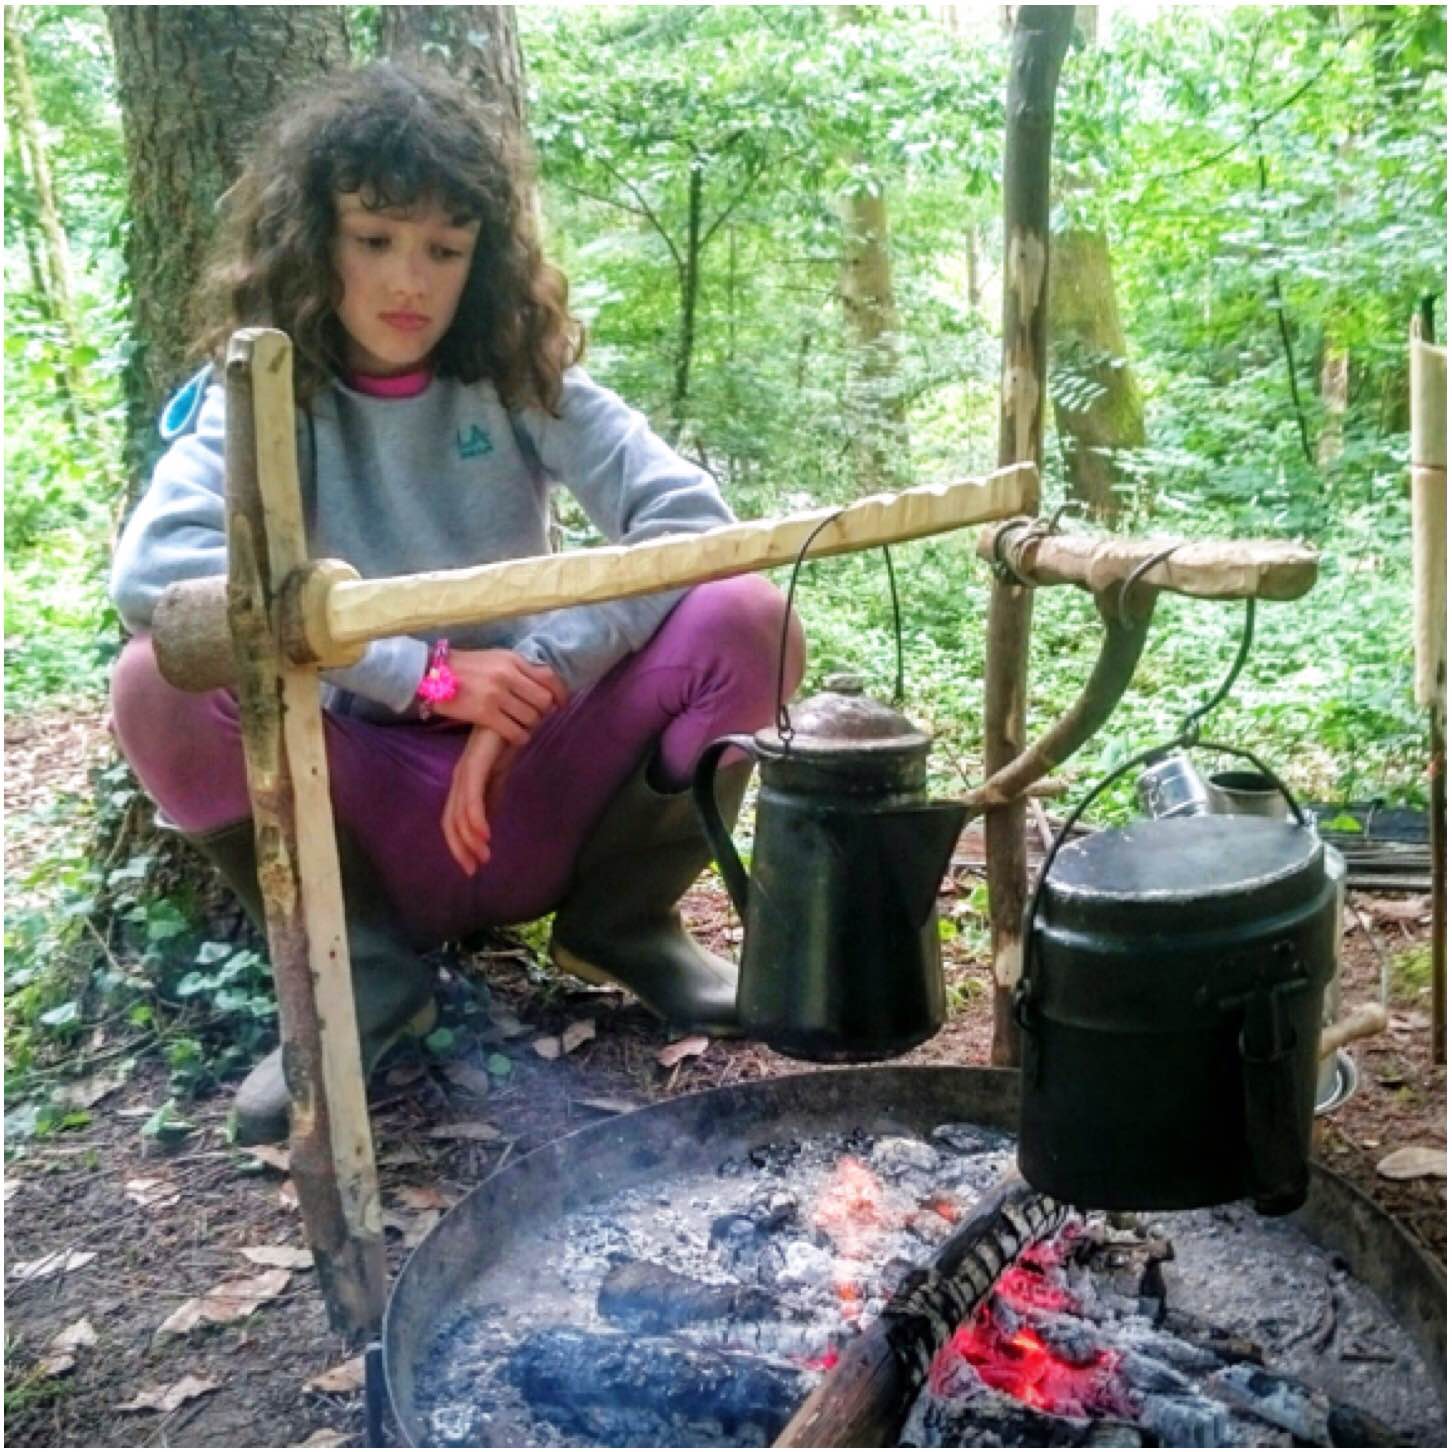
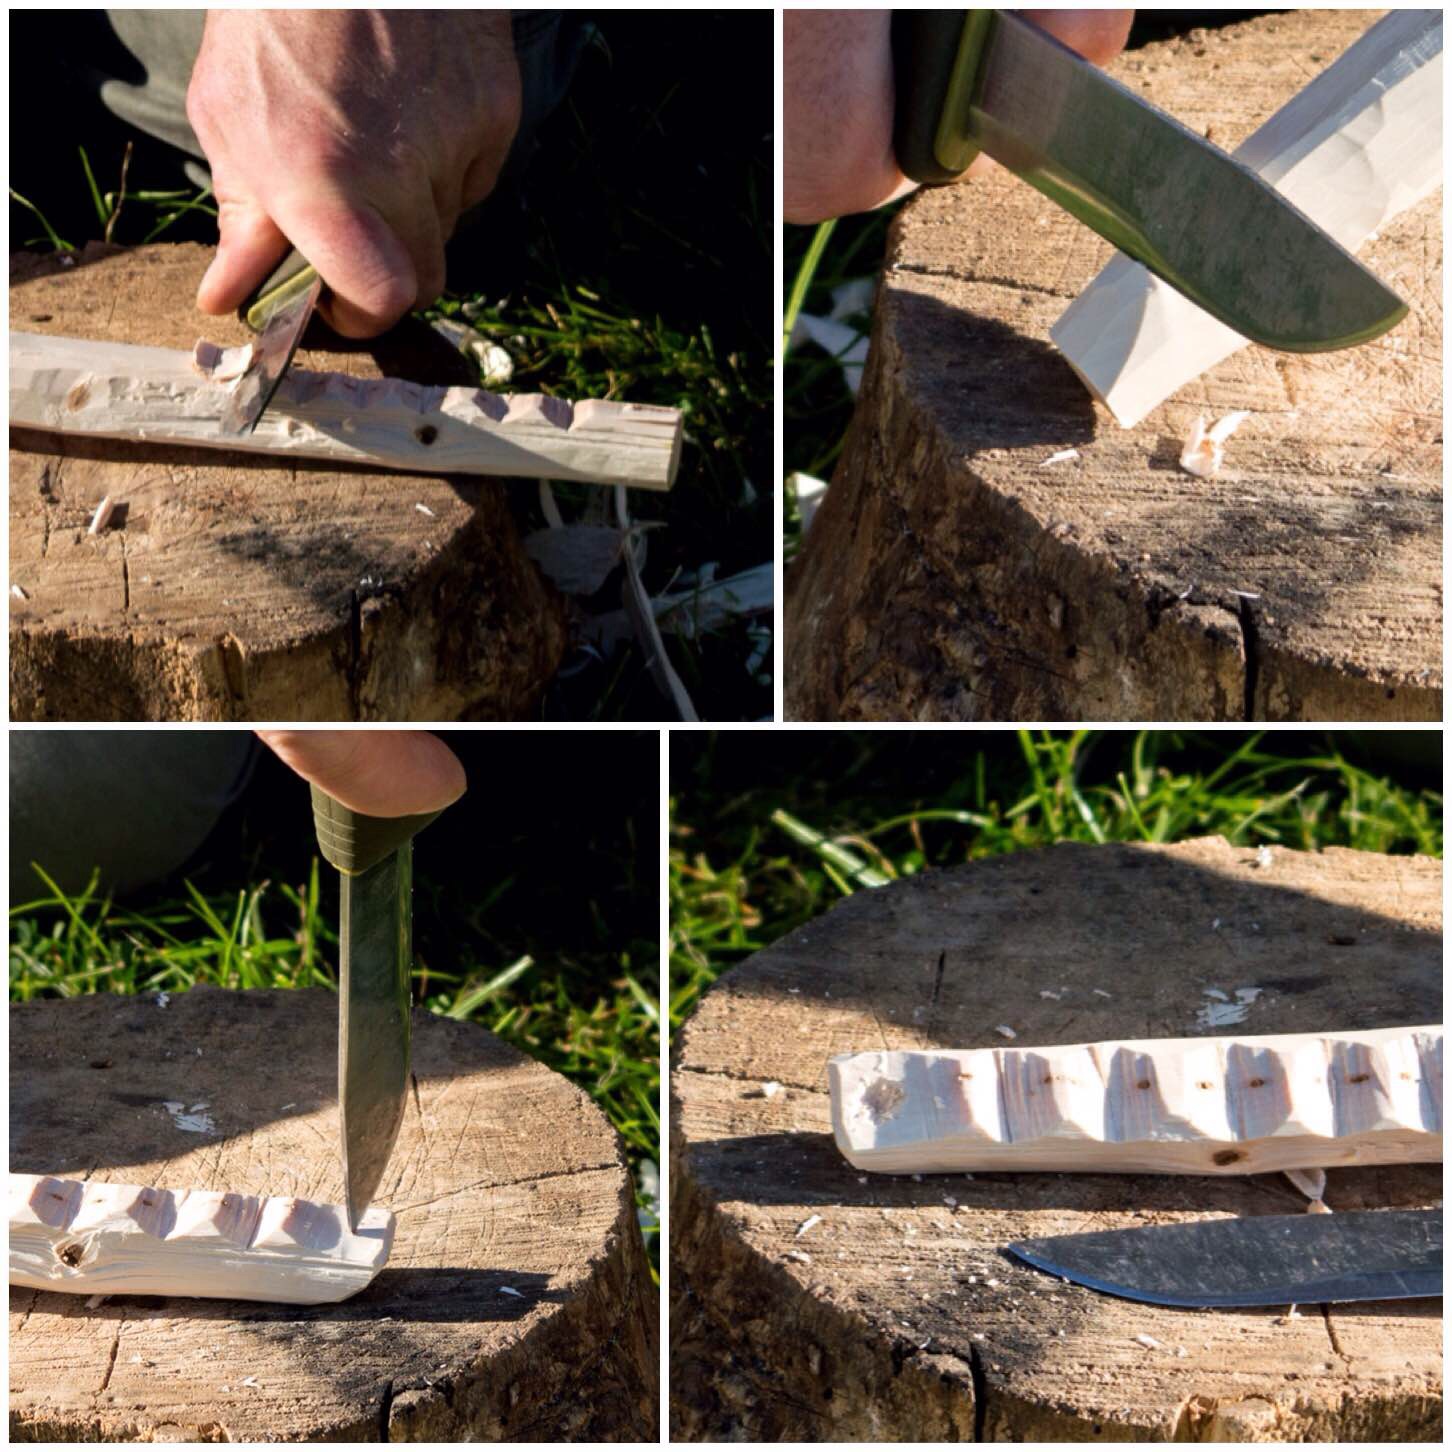
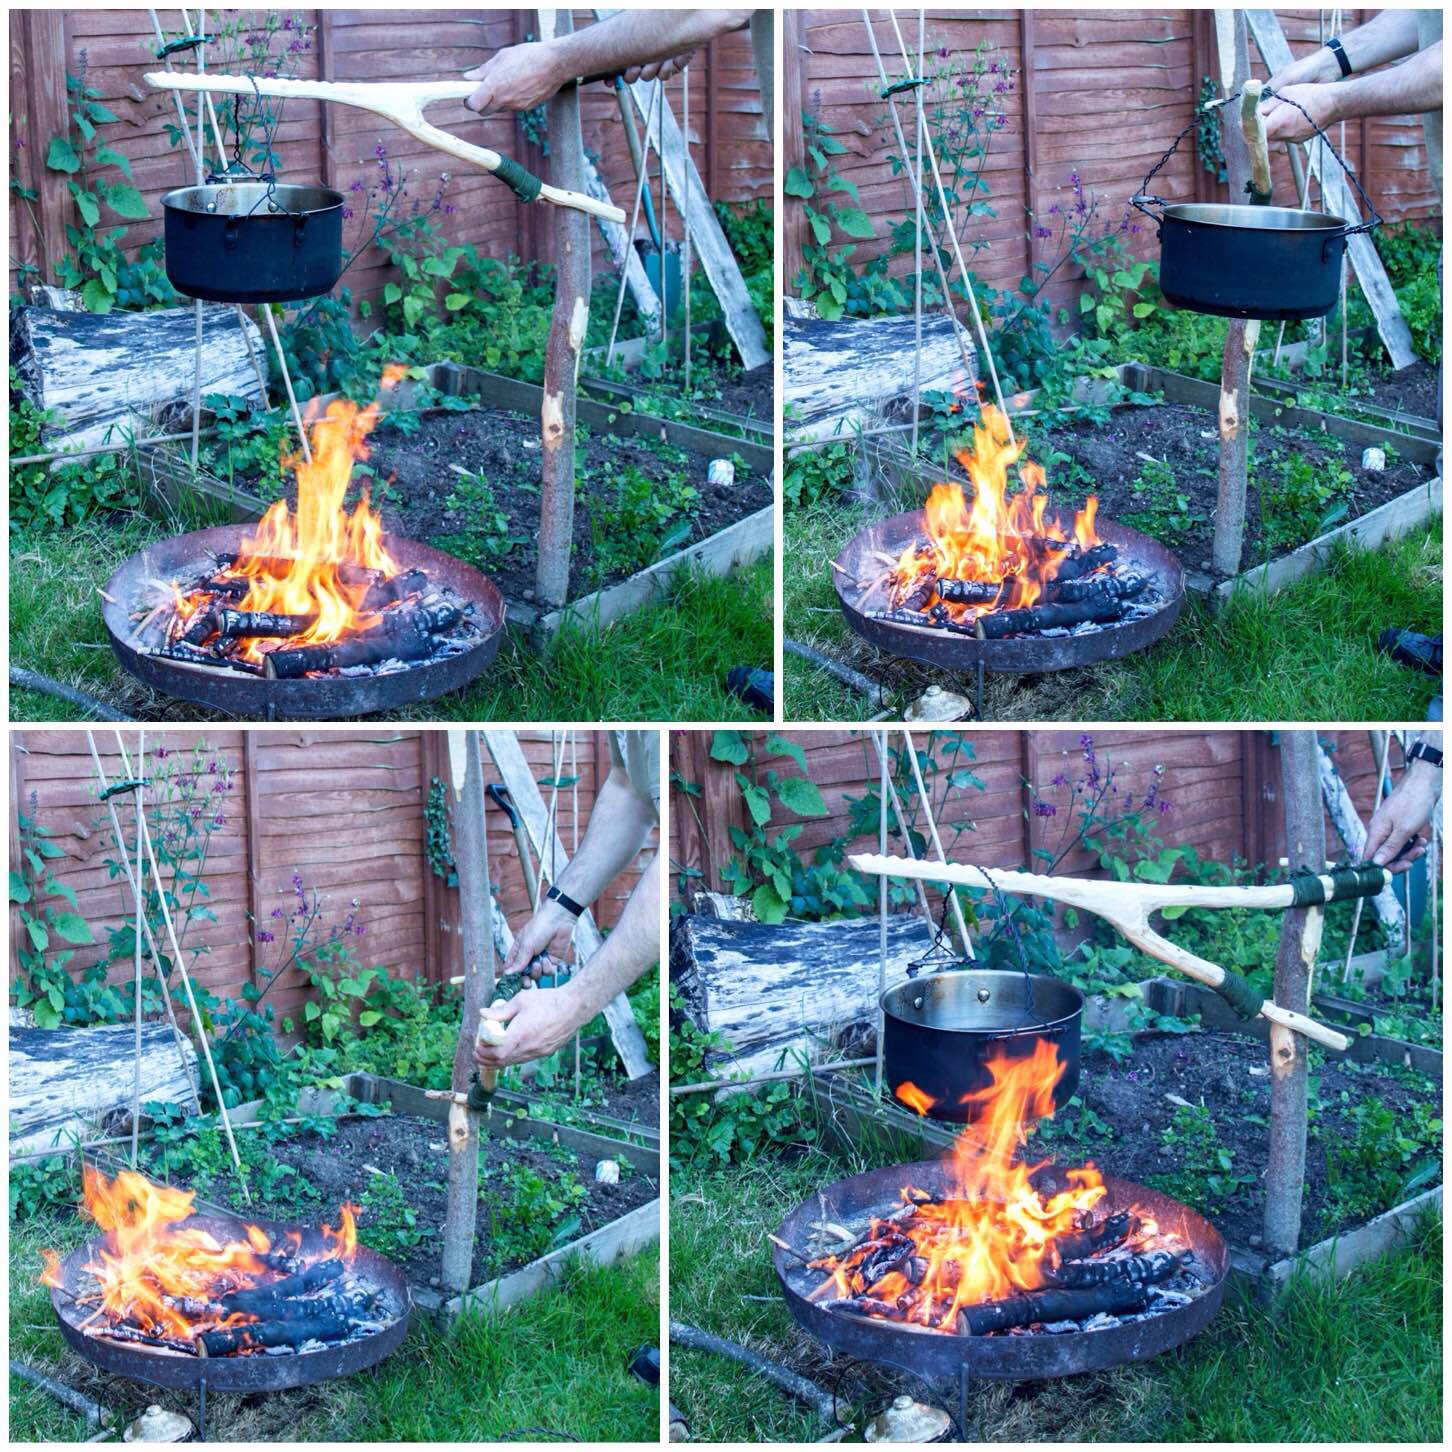
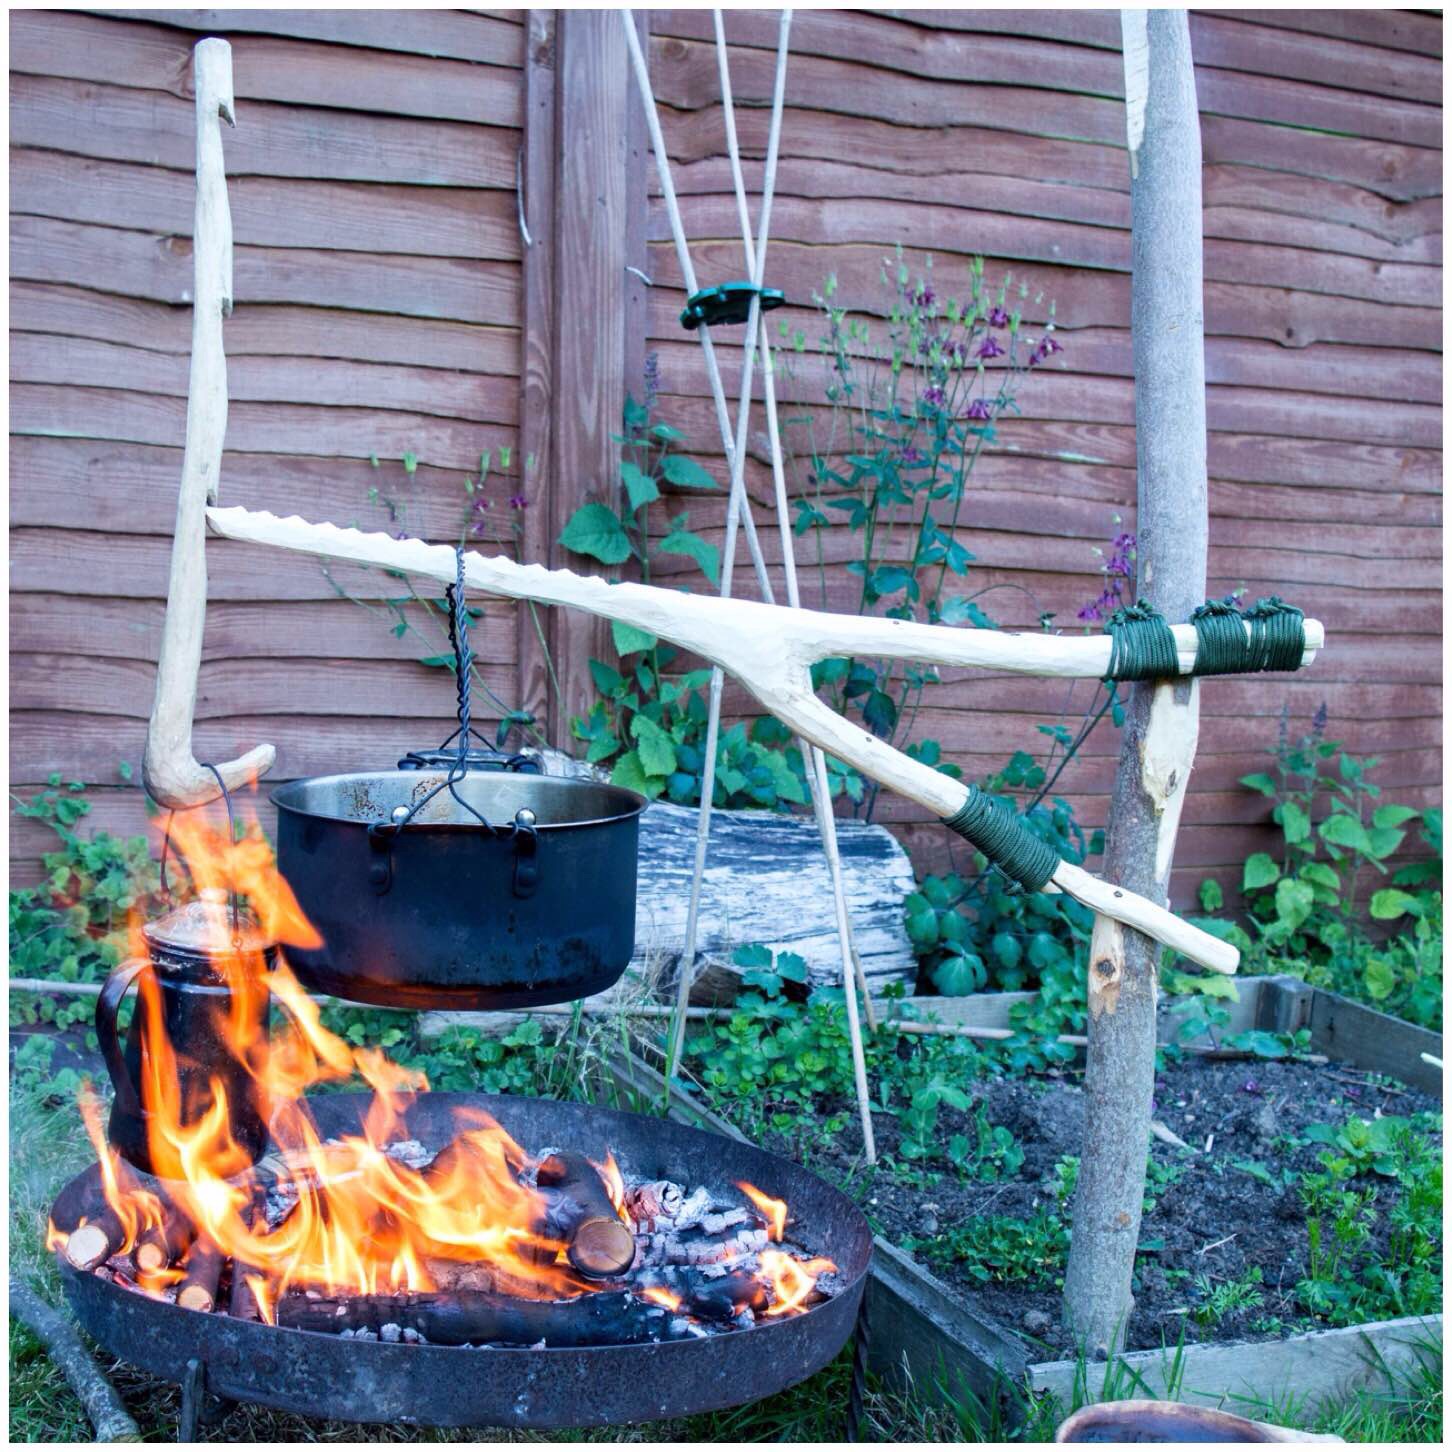
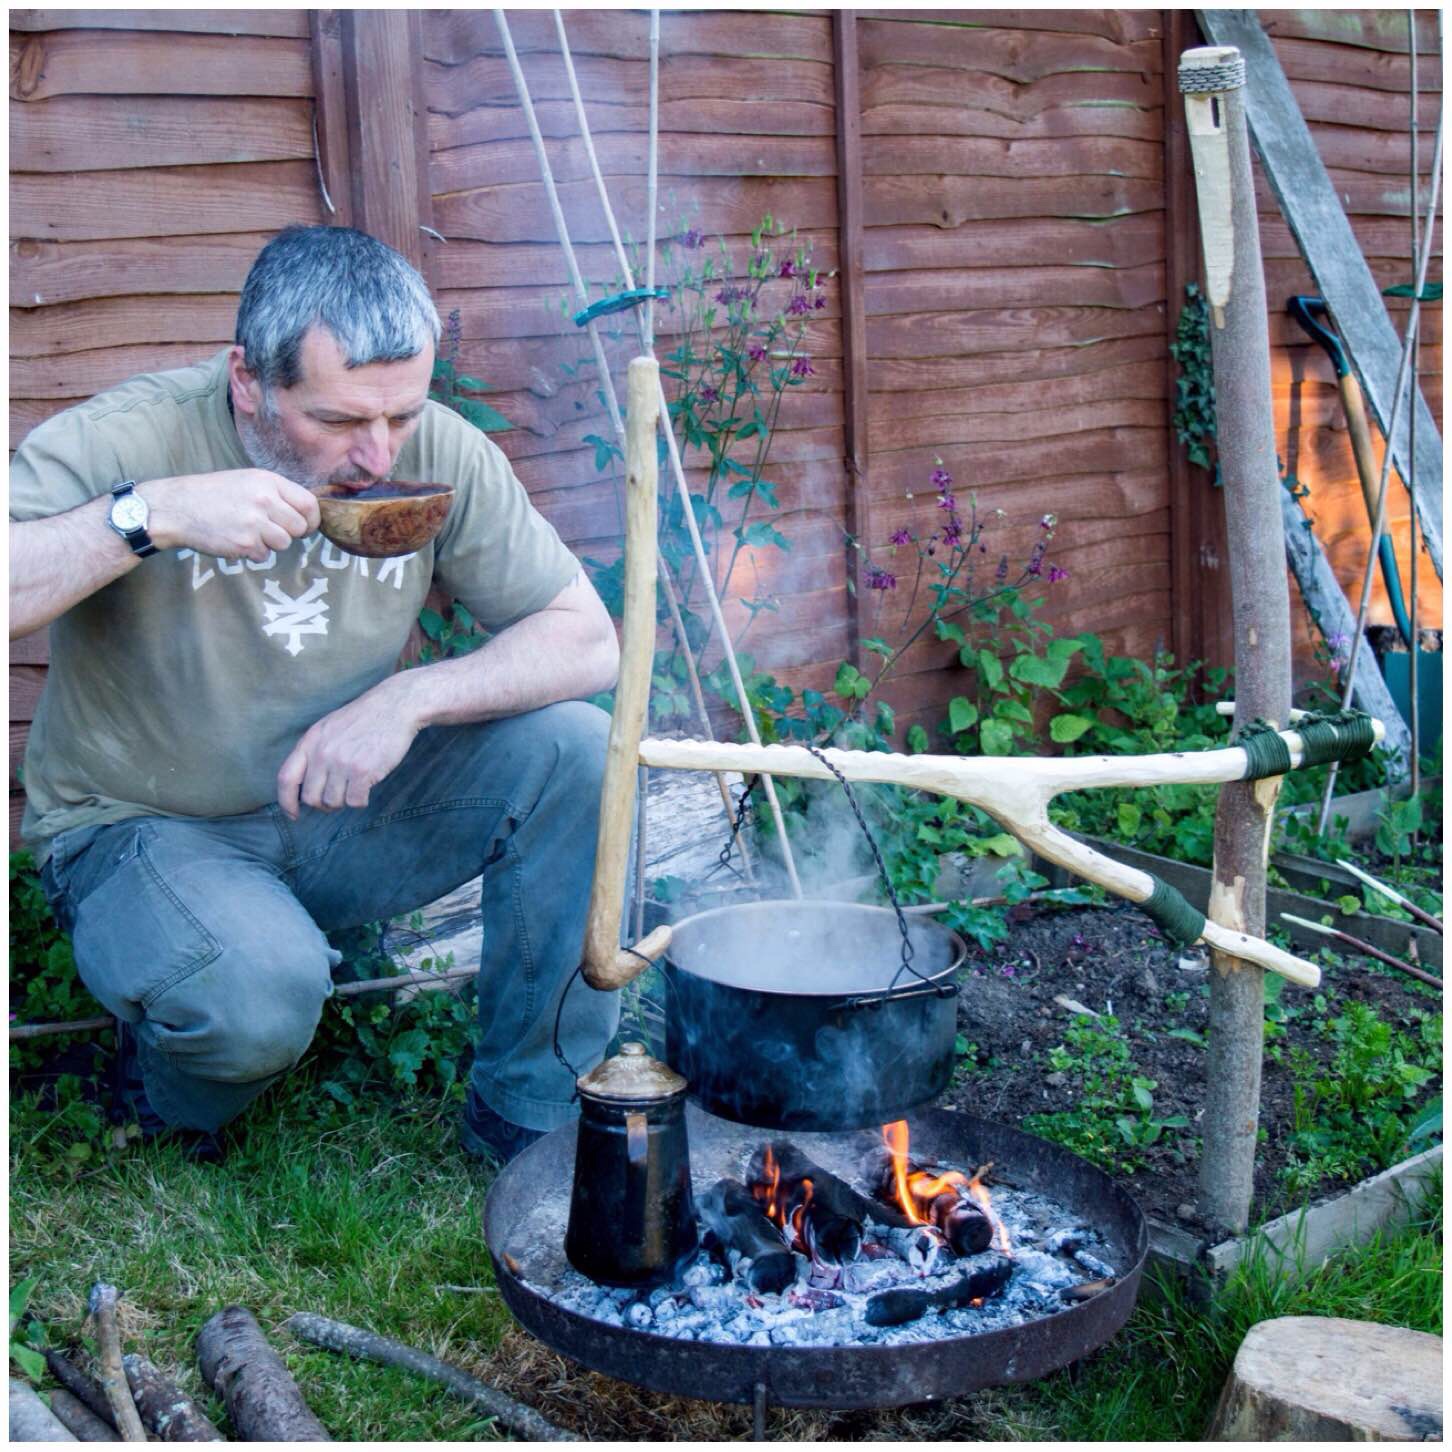
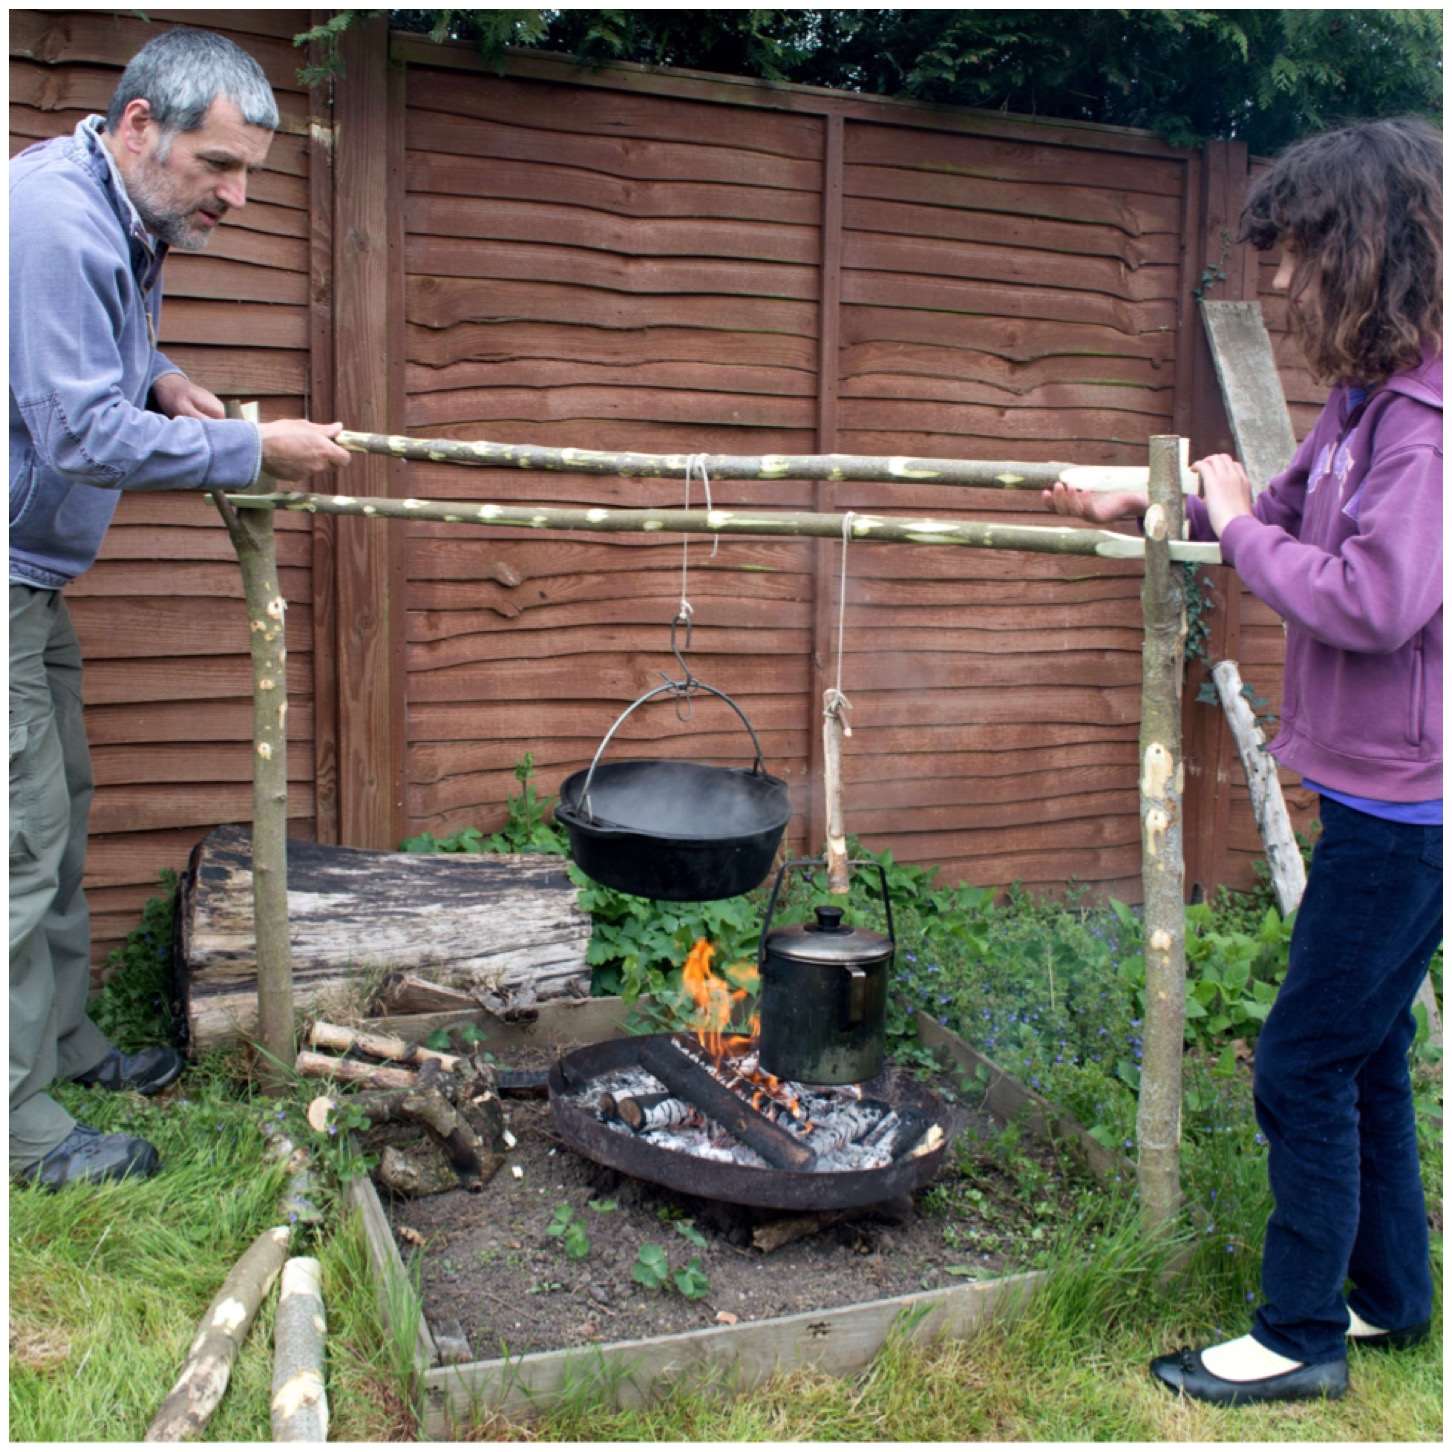
Wagon/Waugan Stick or Burtonsville Rig
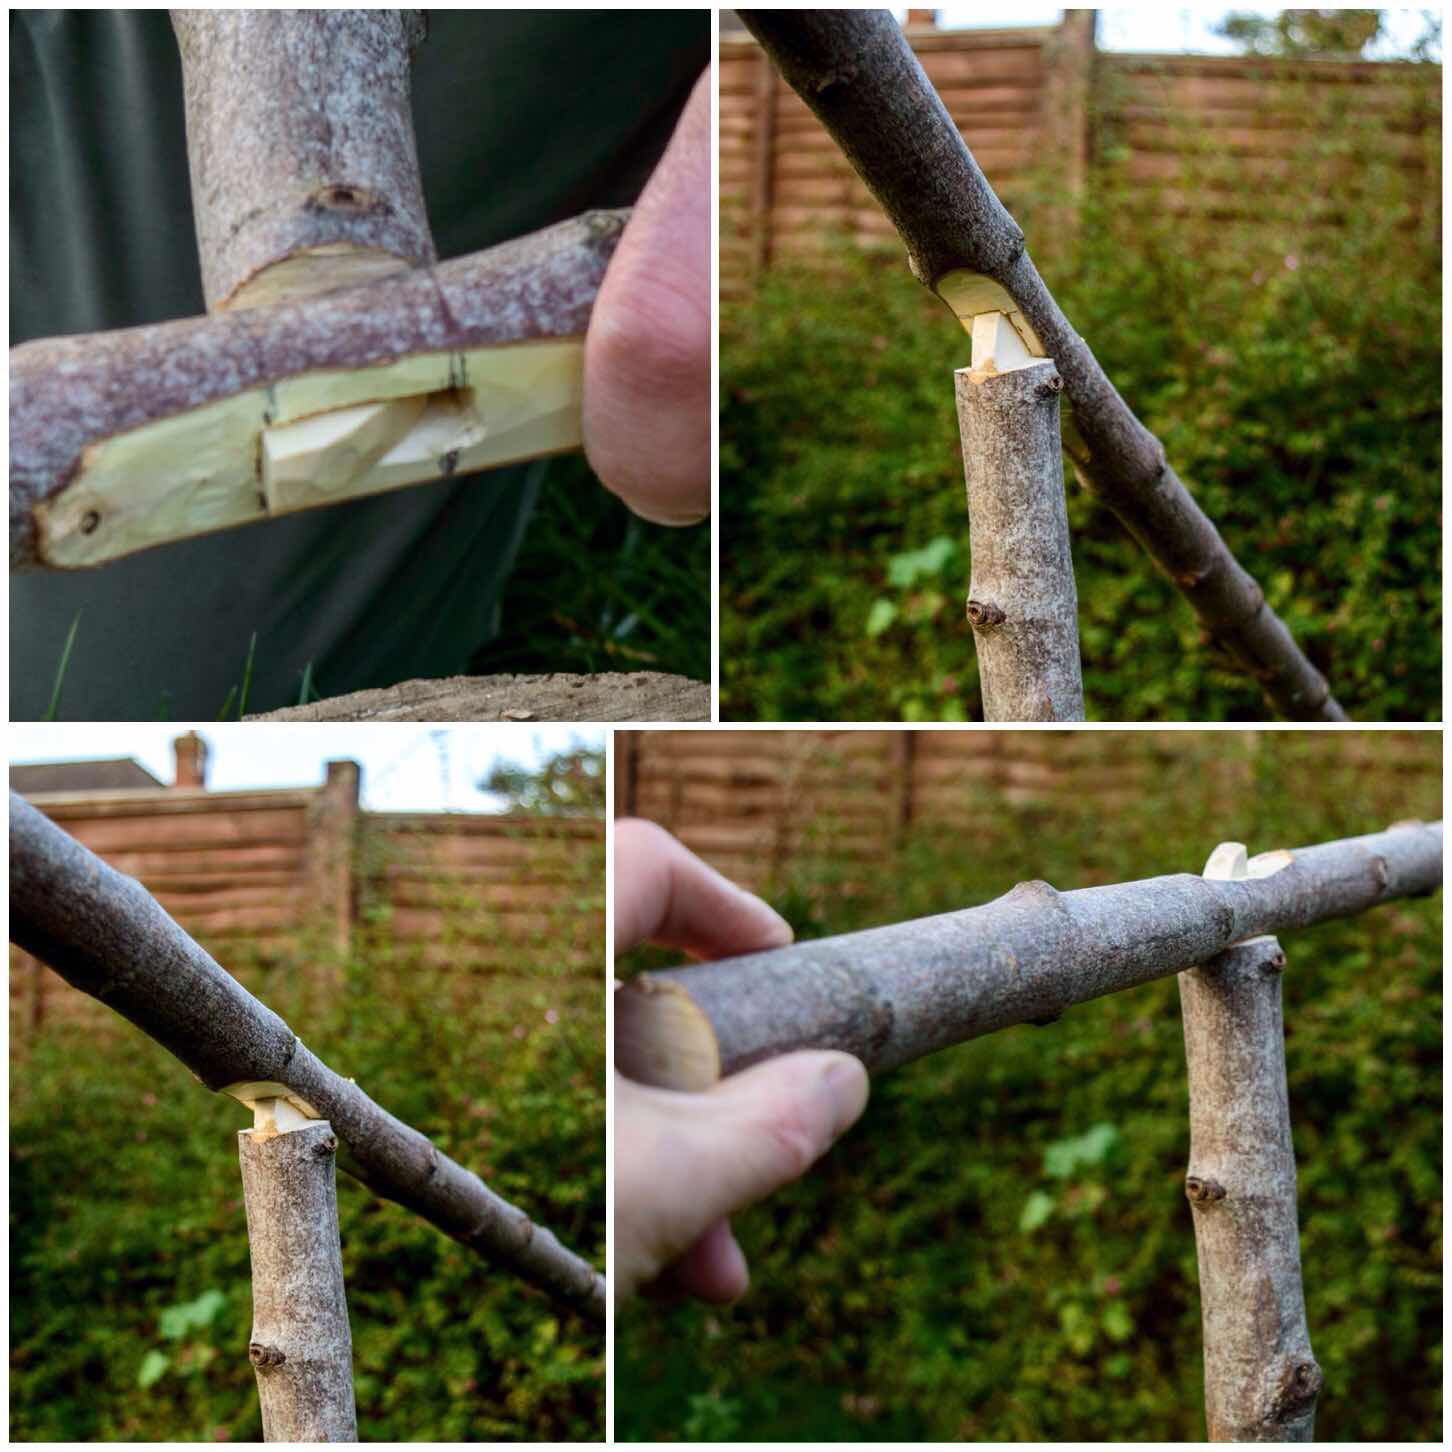
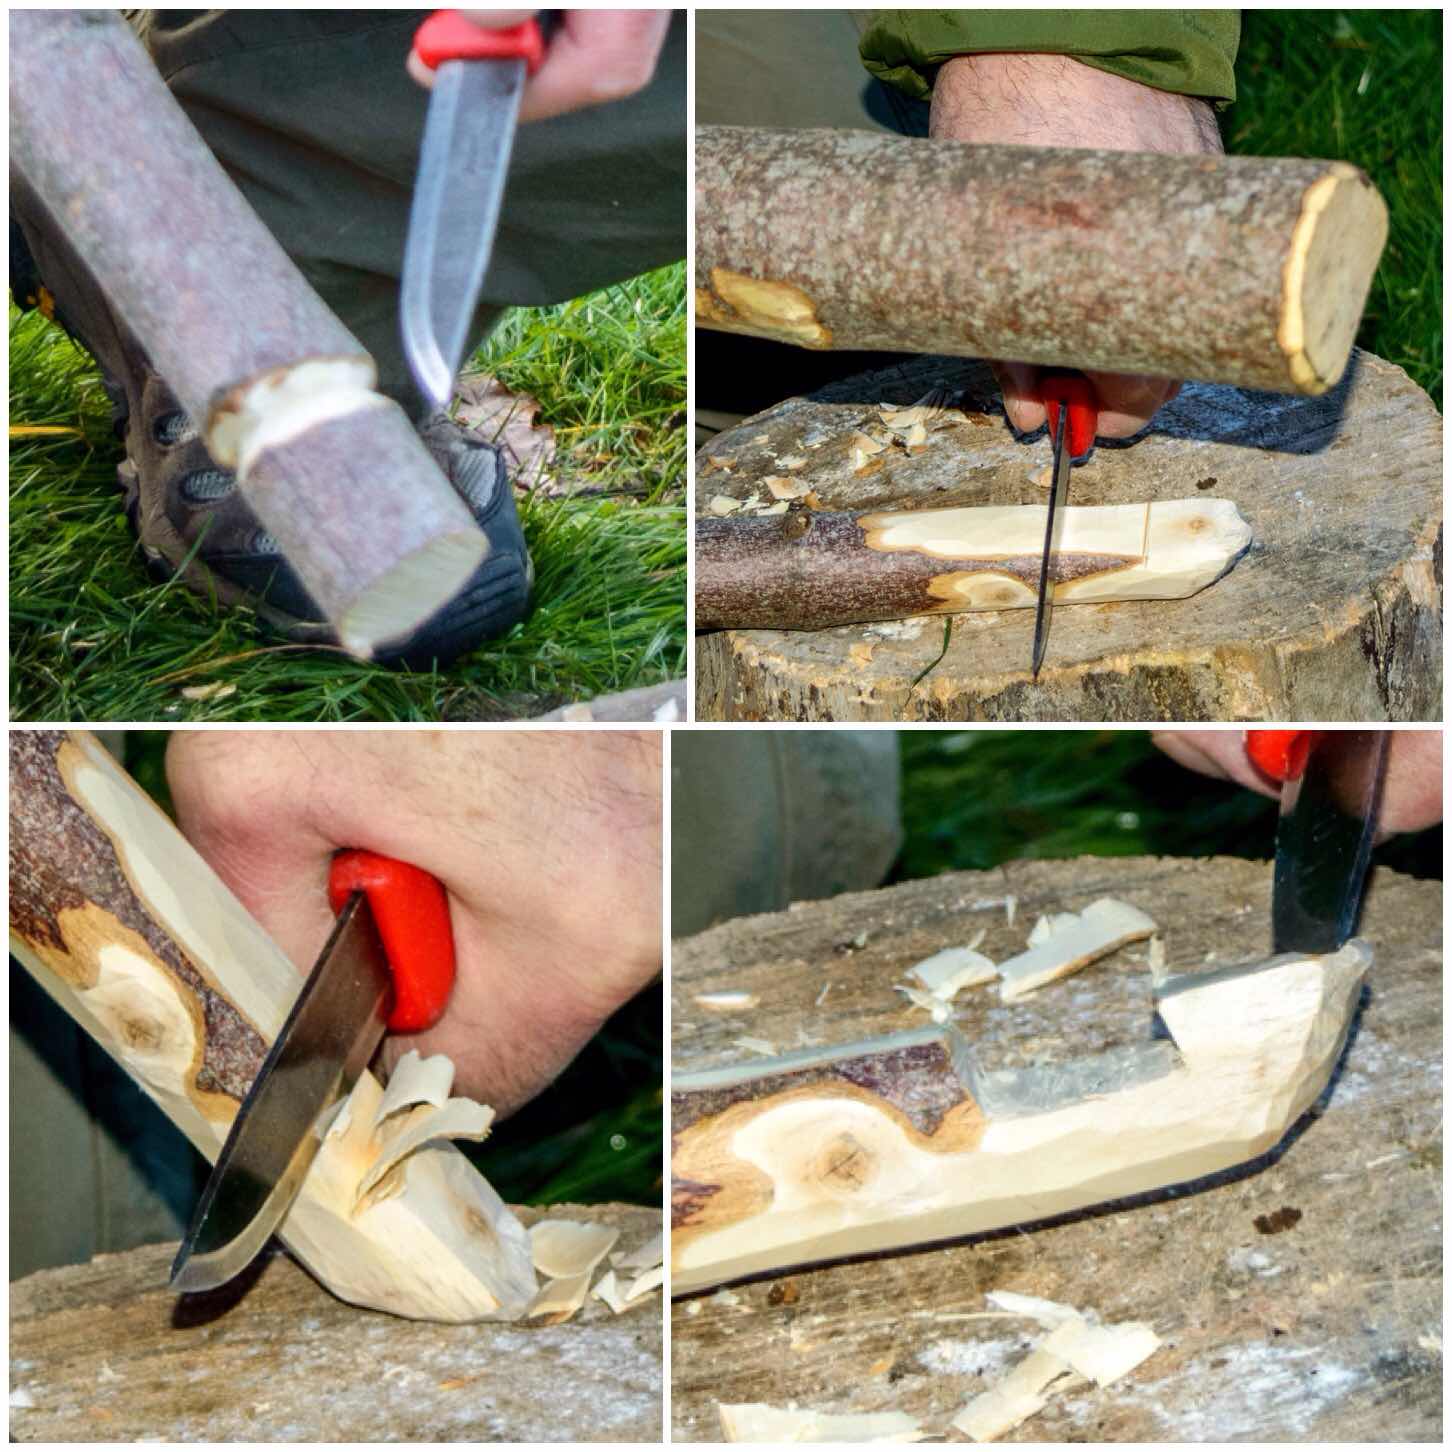
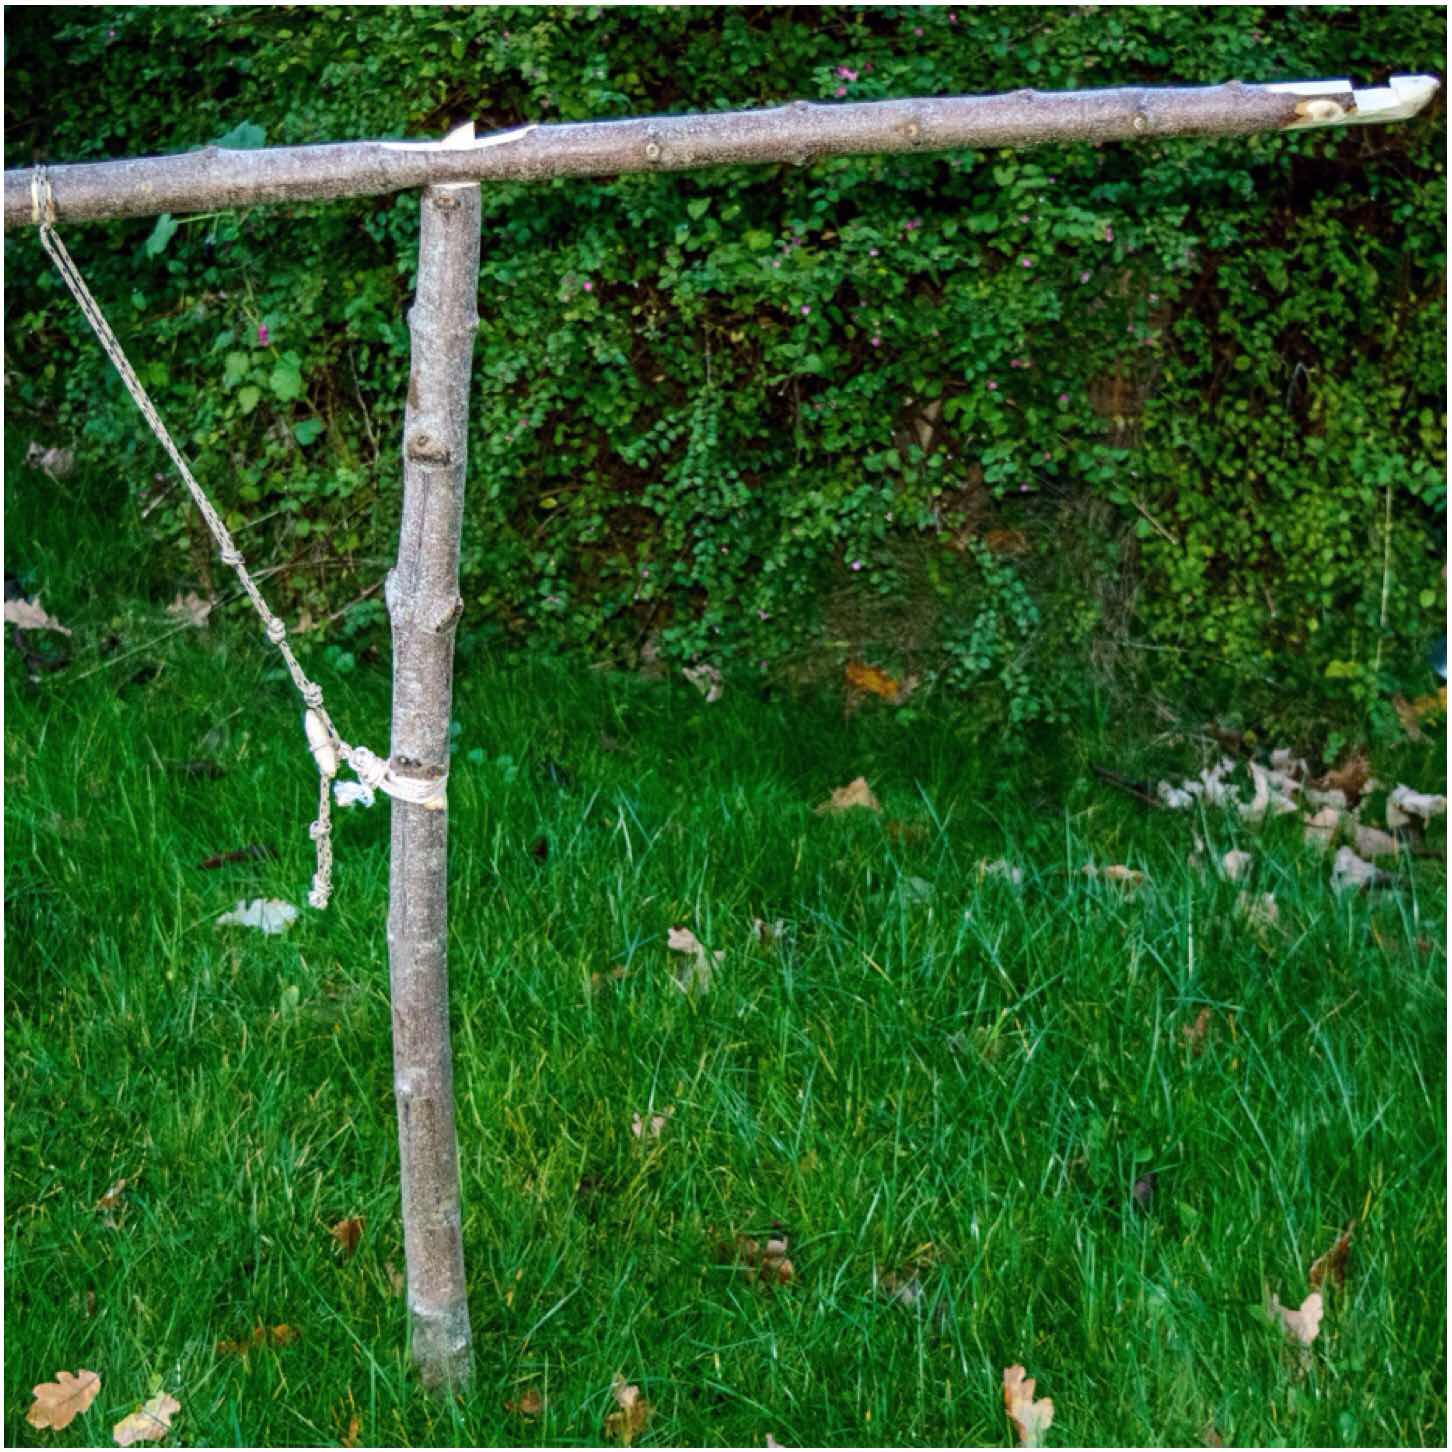
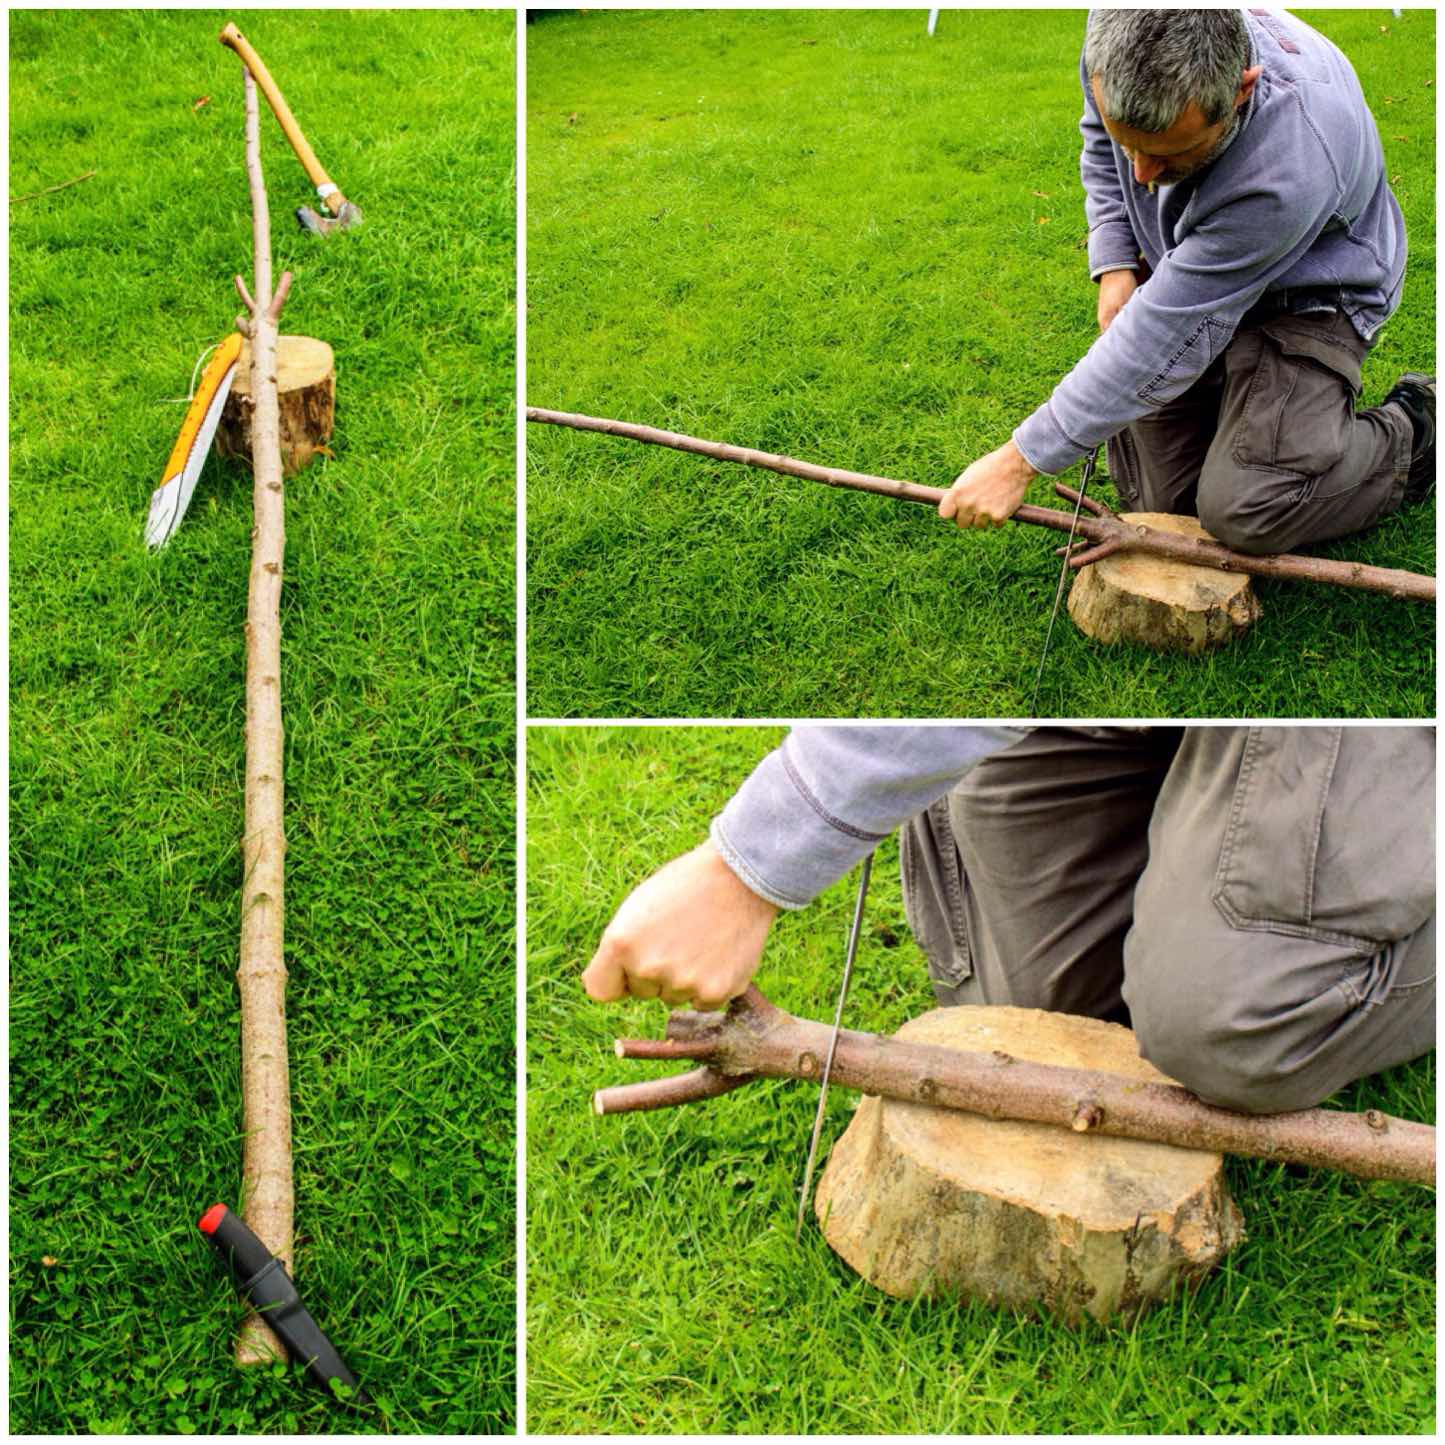
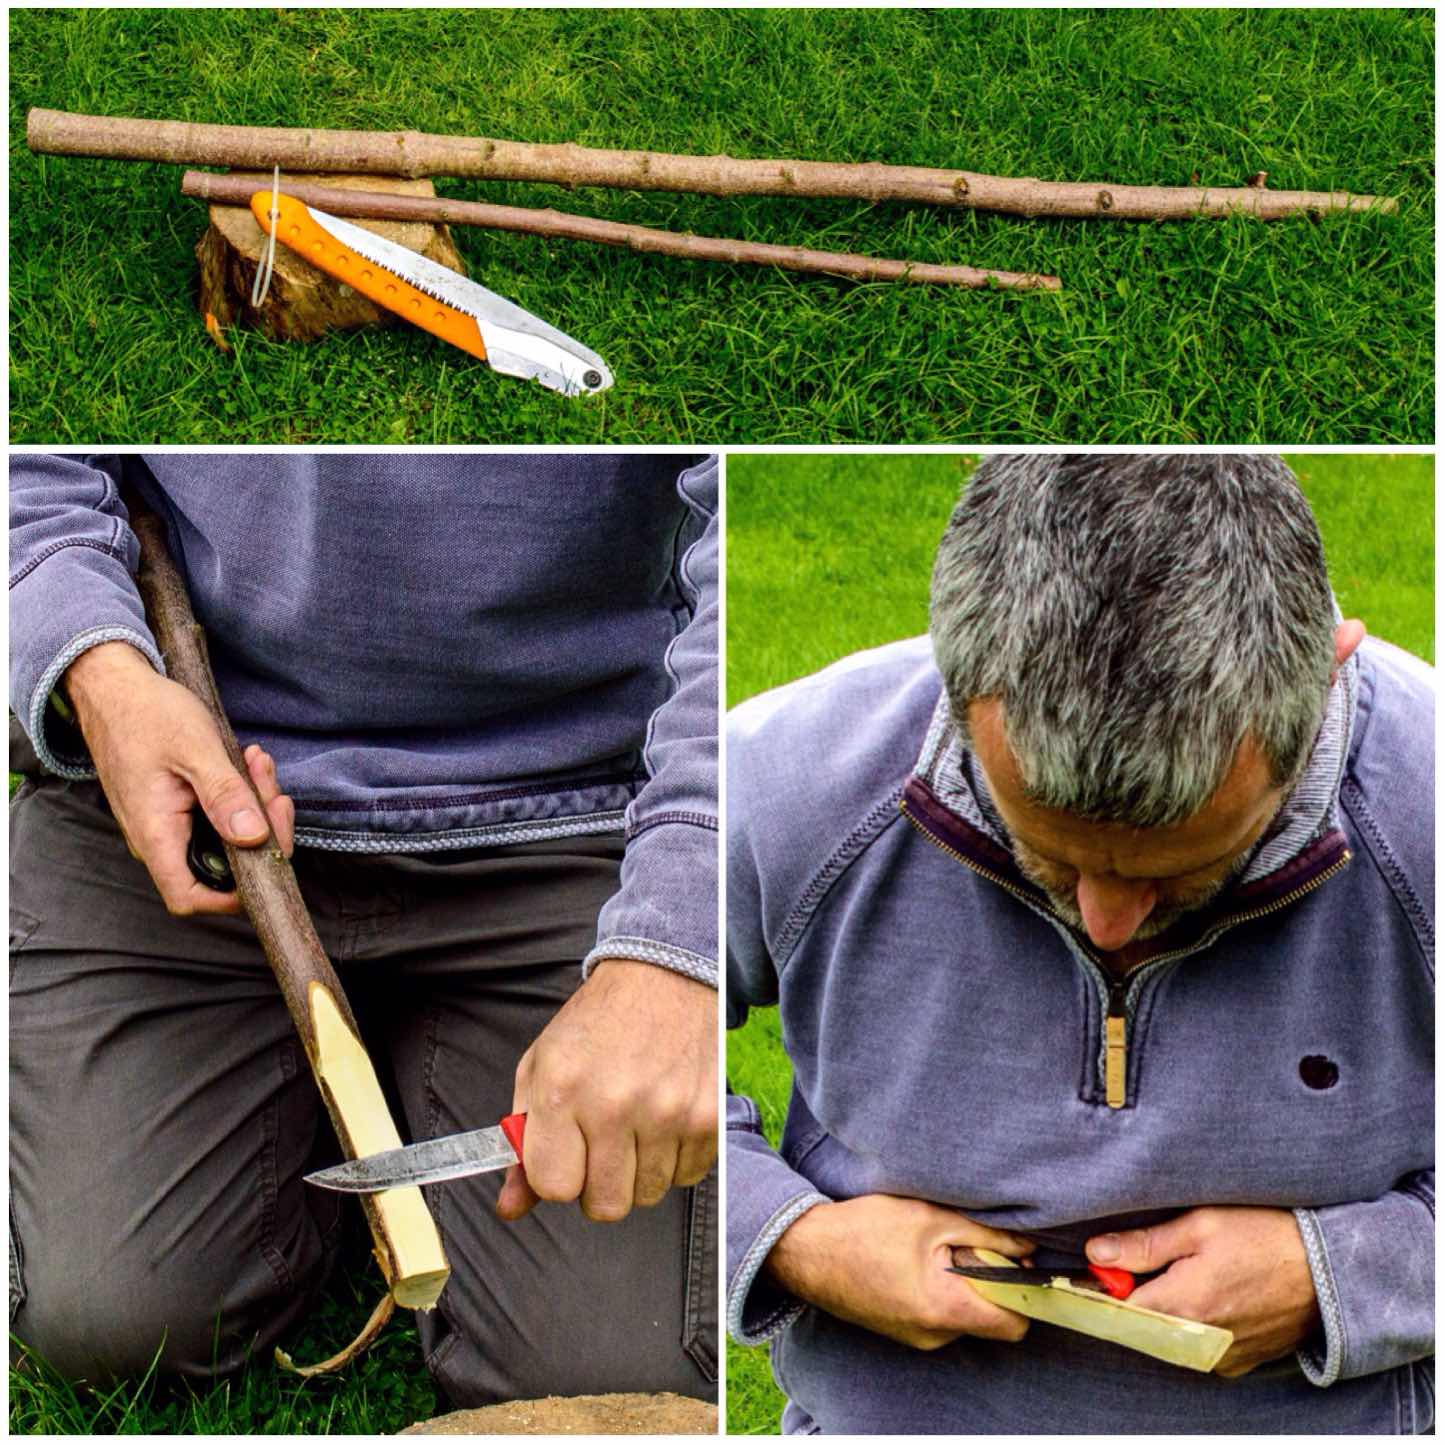
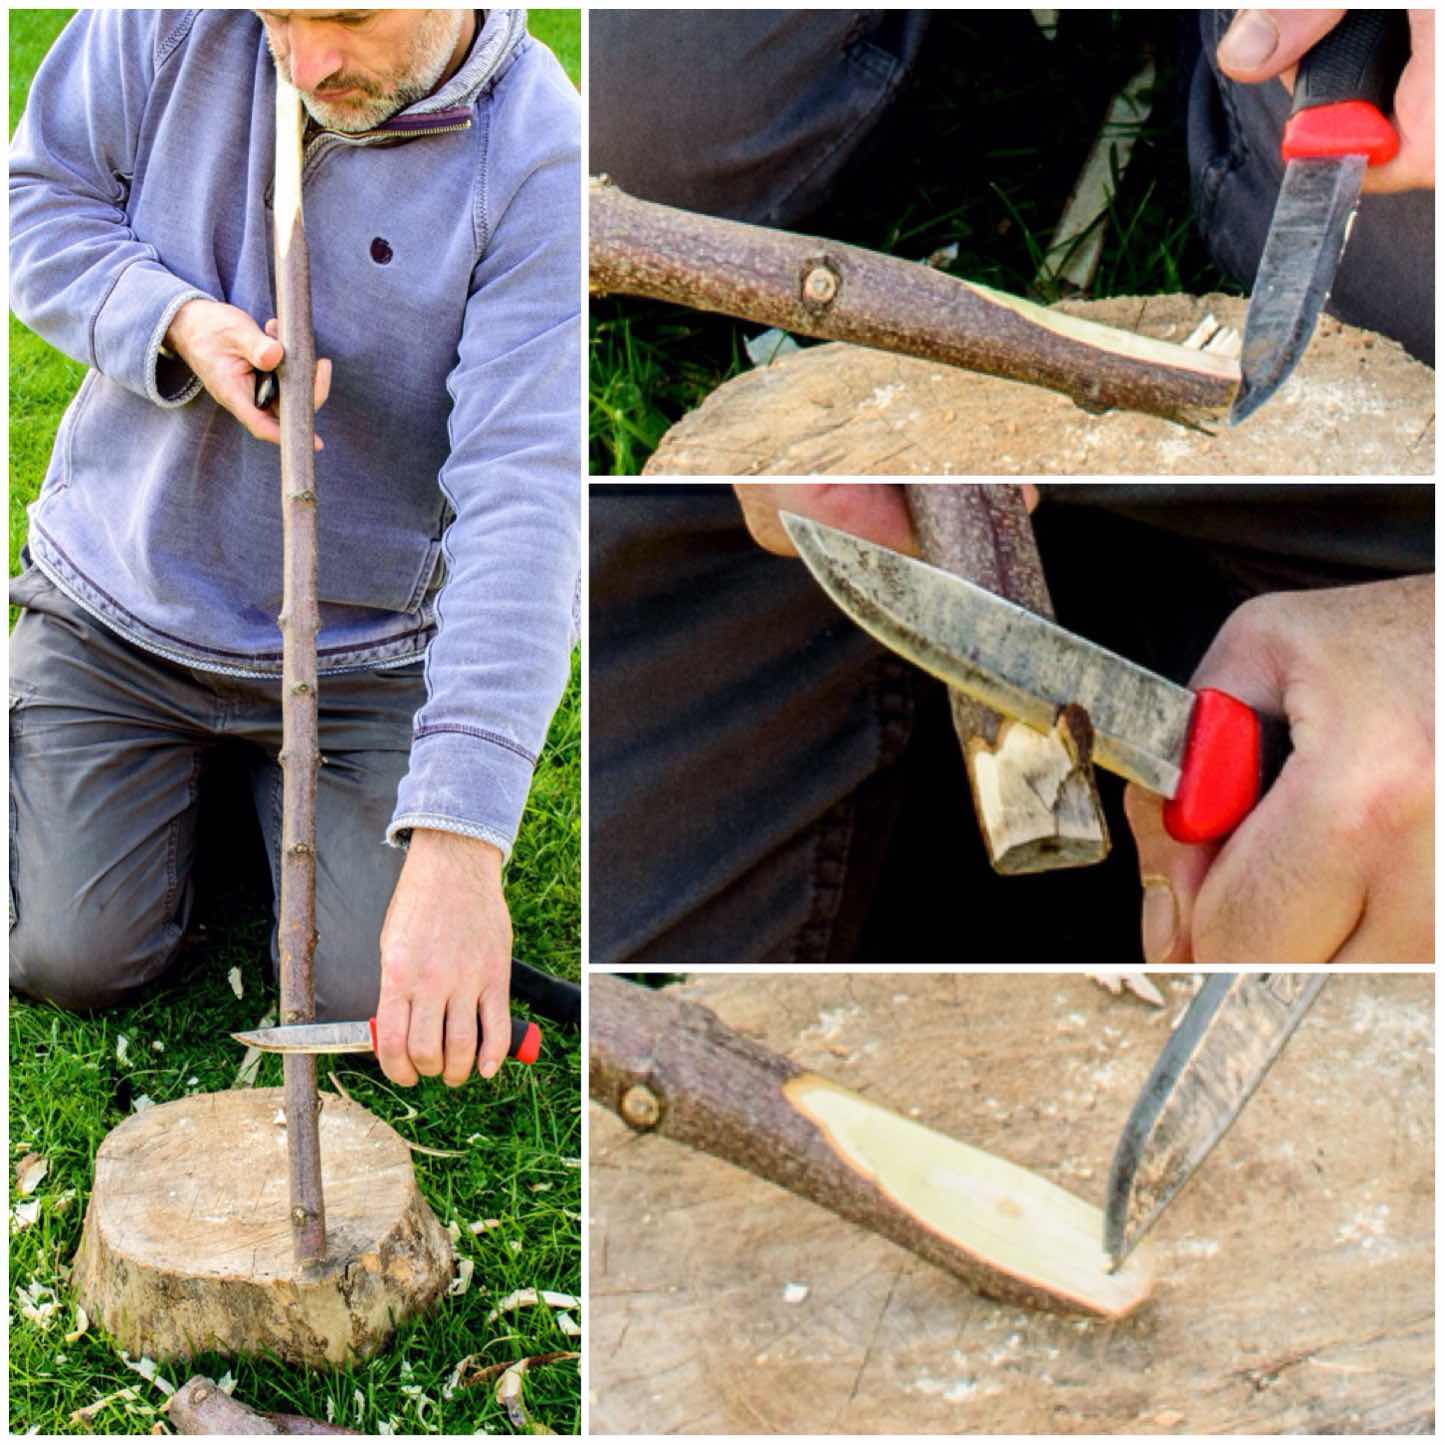
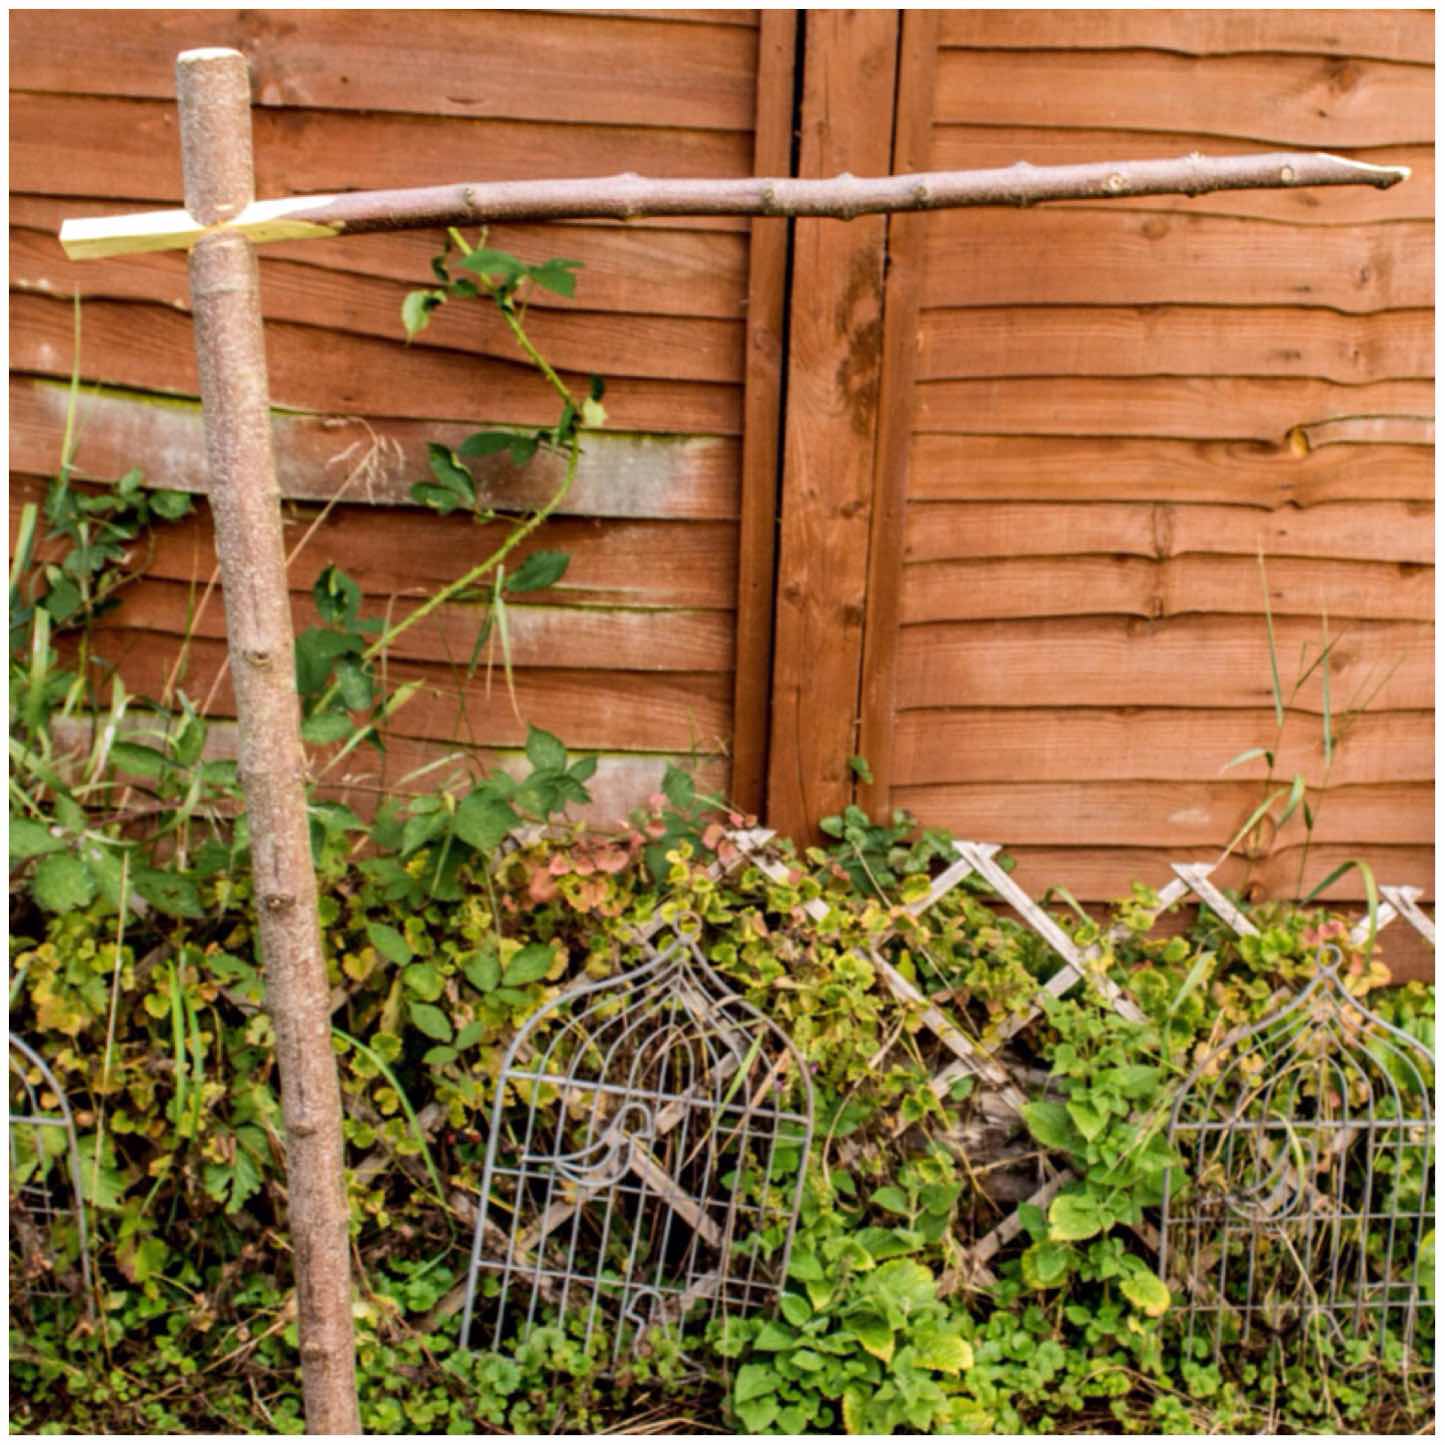
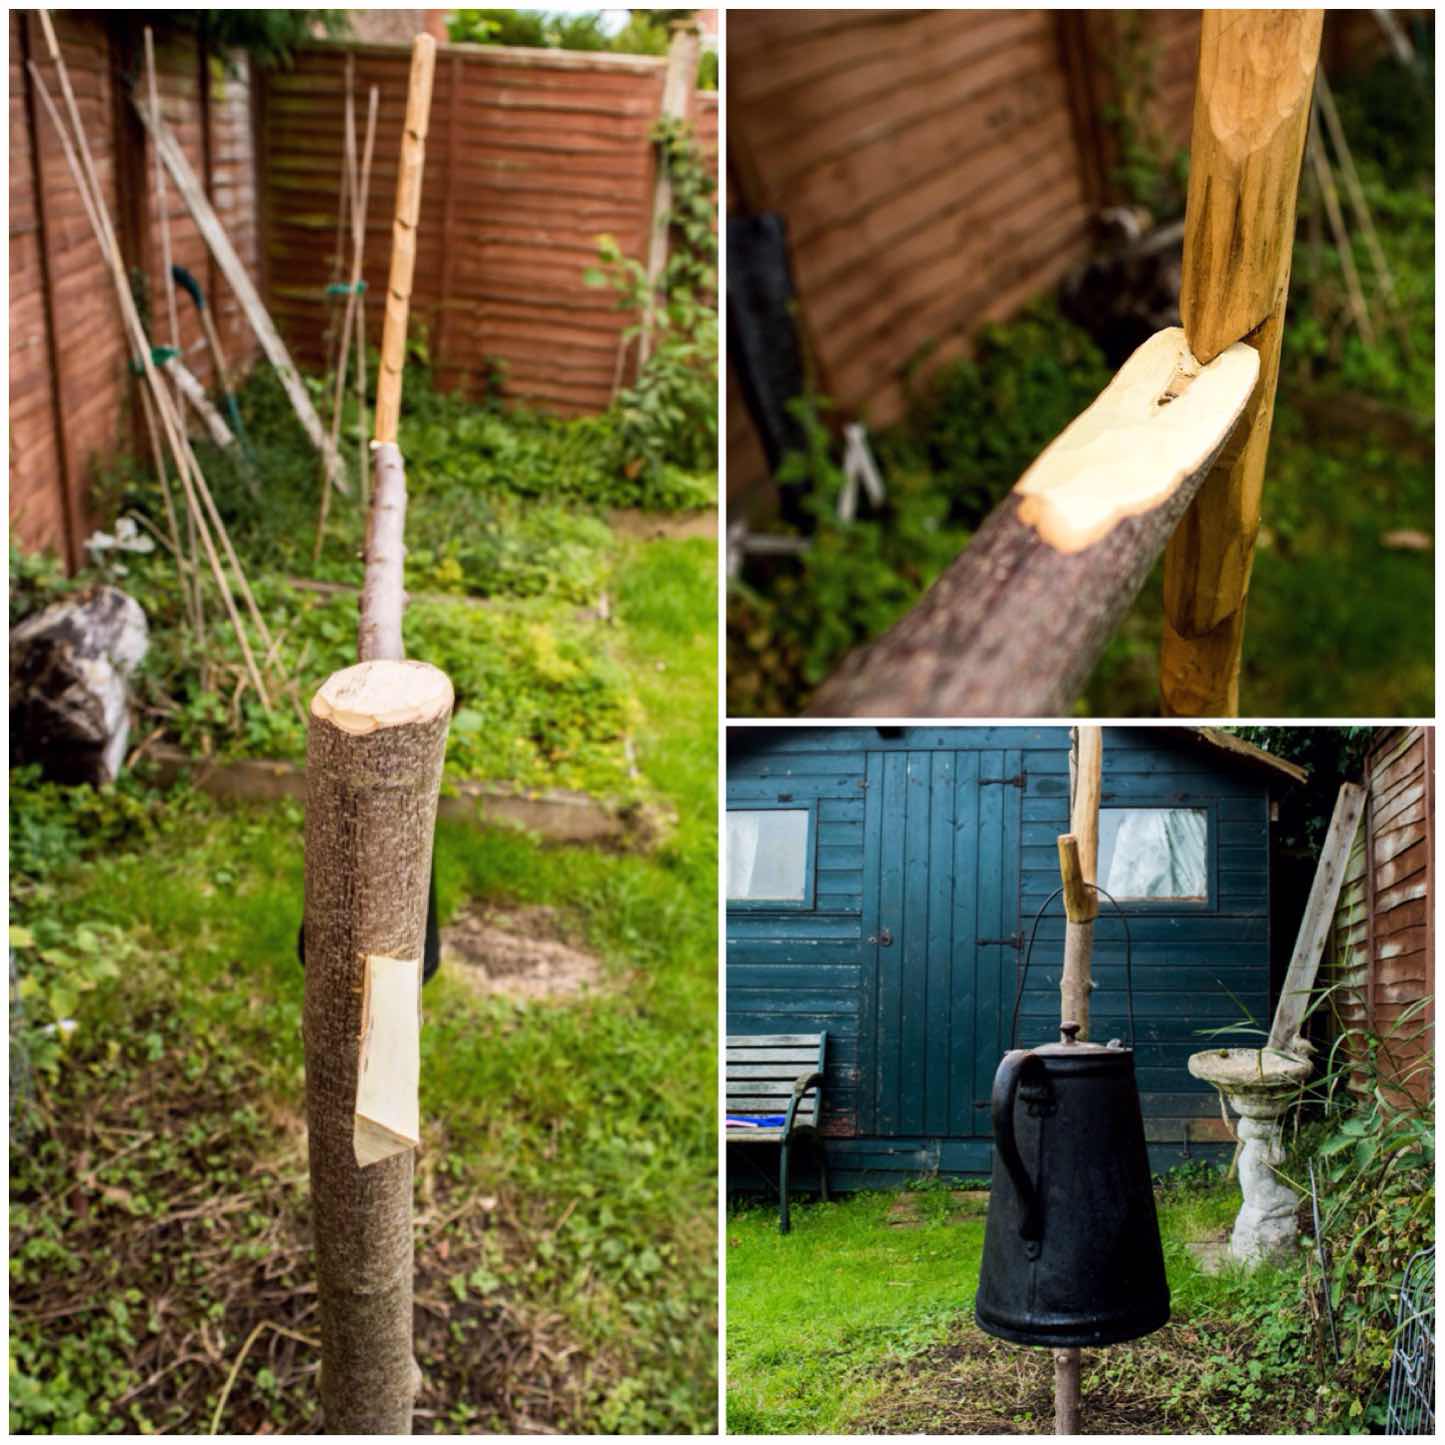
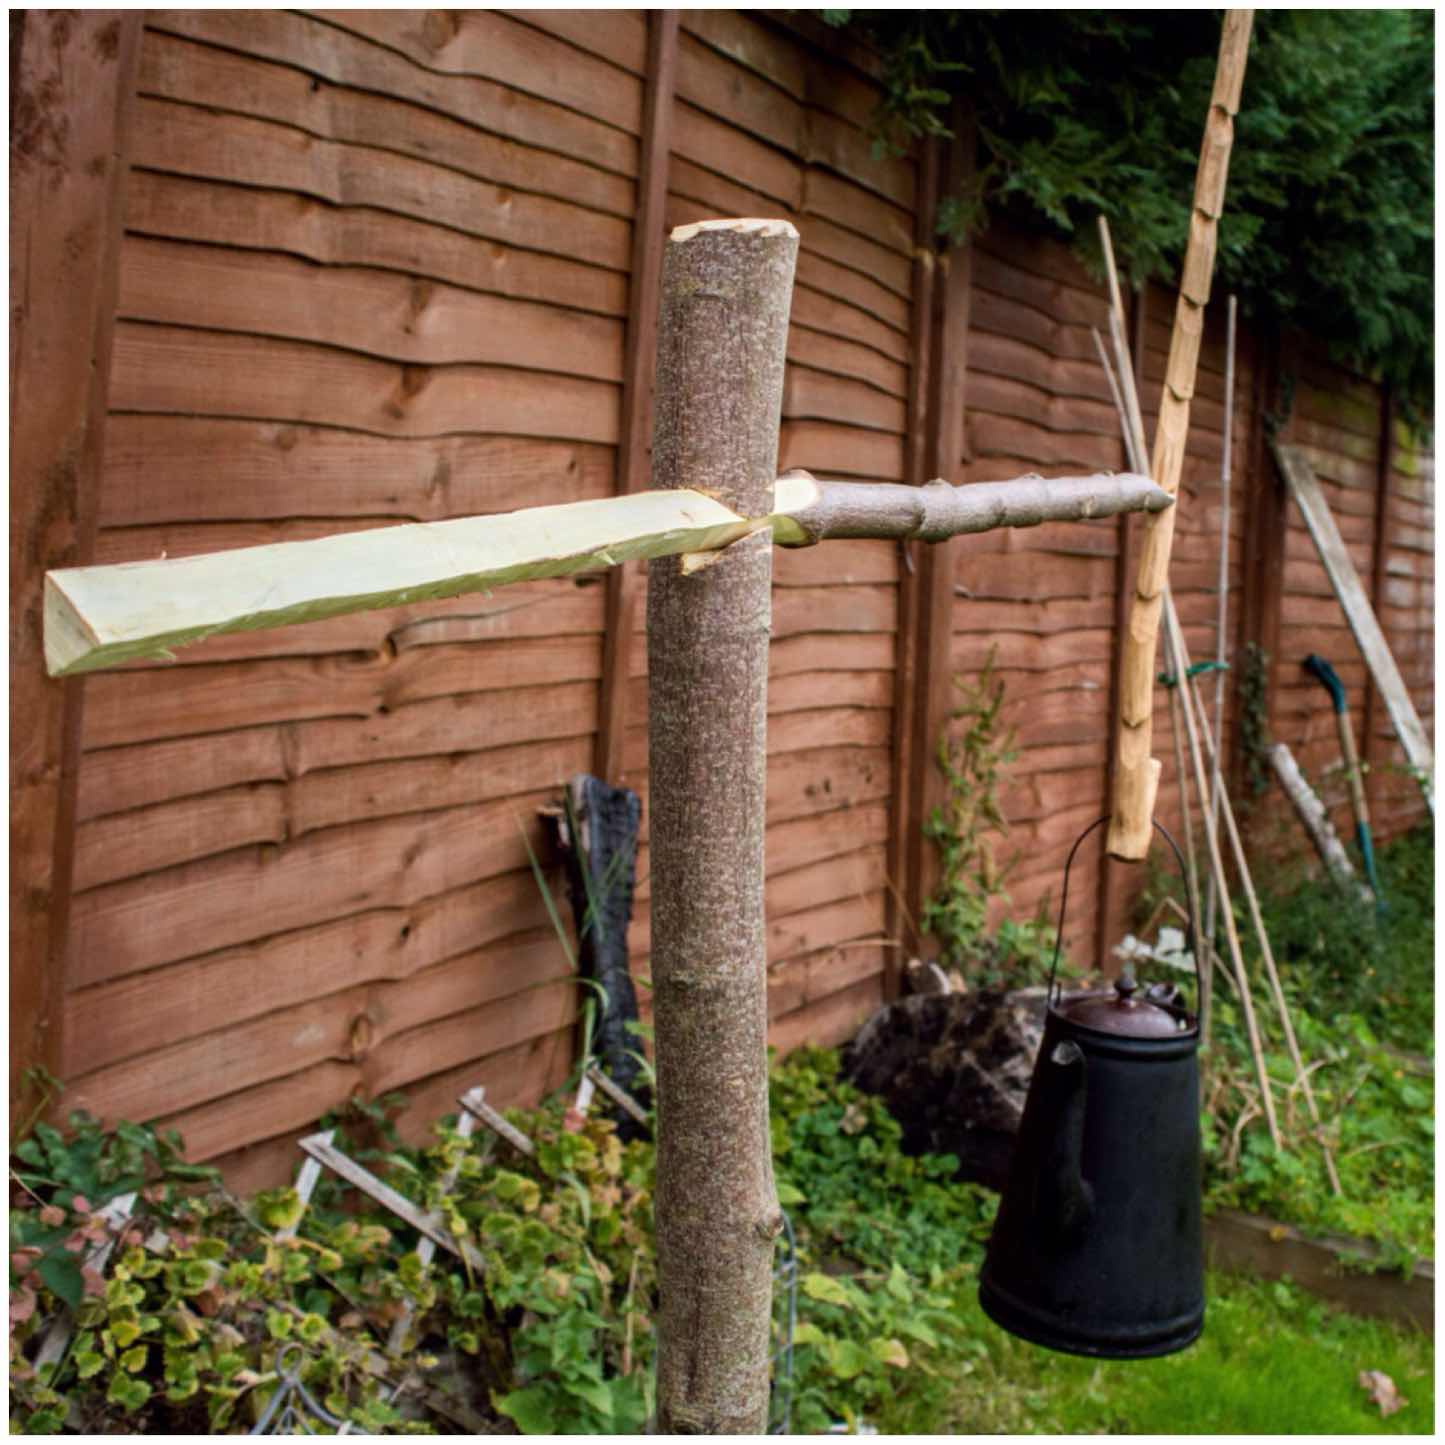
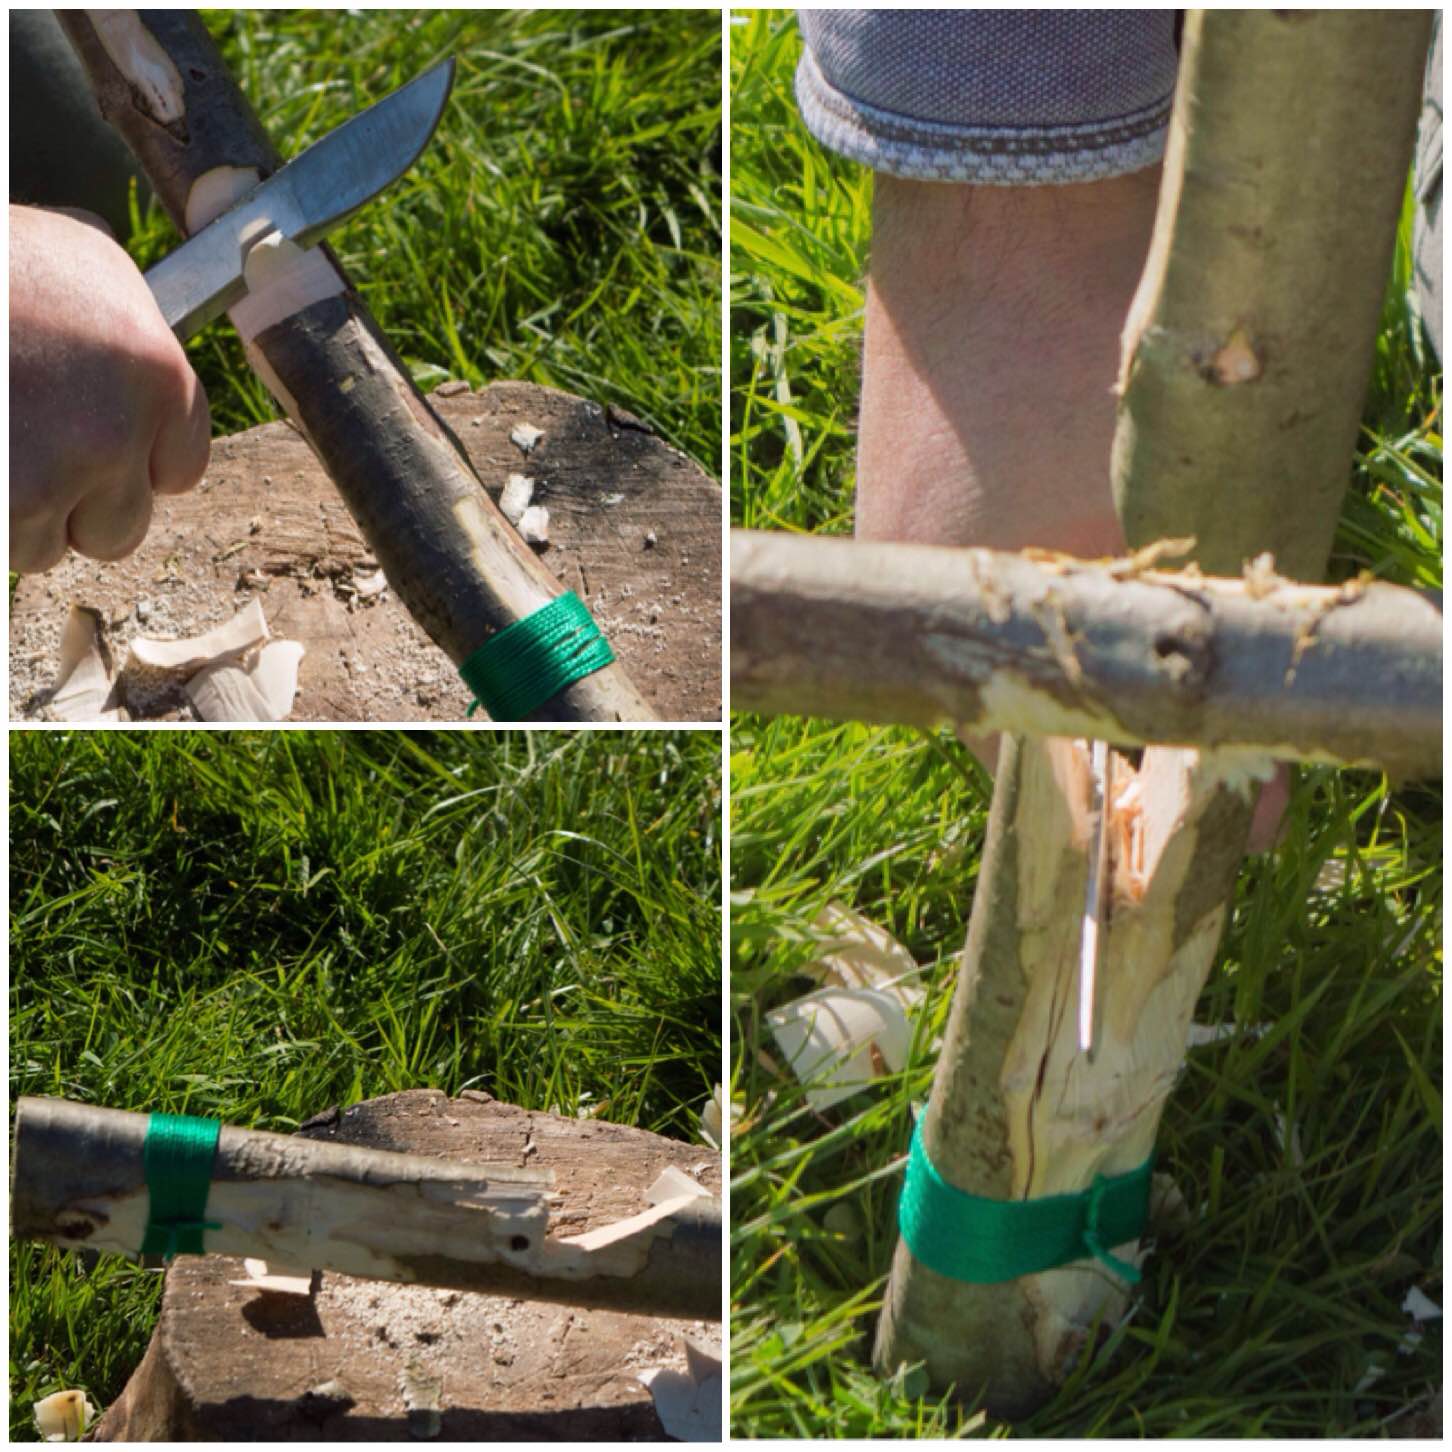
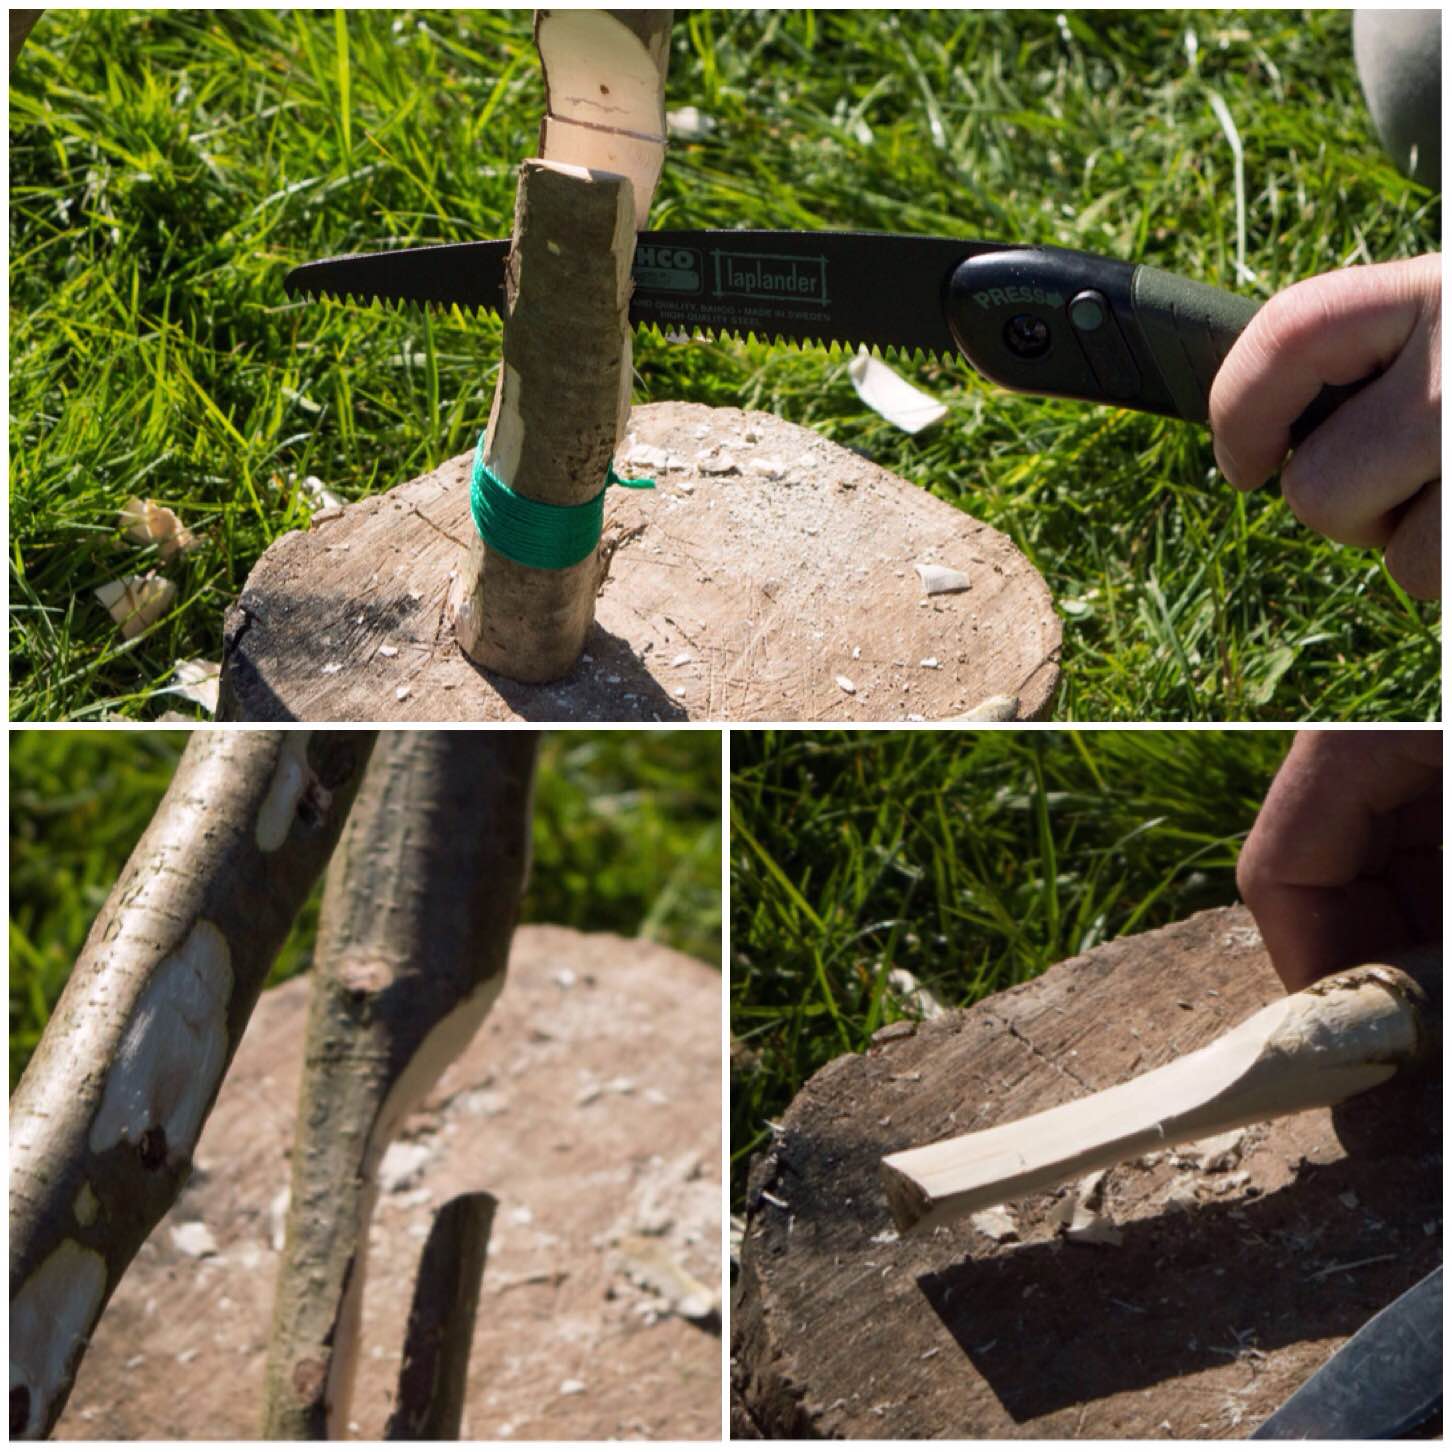
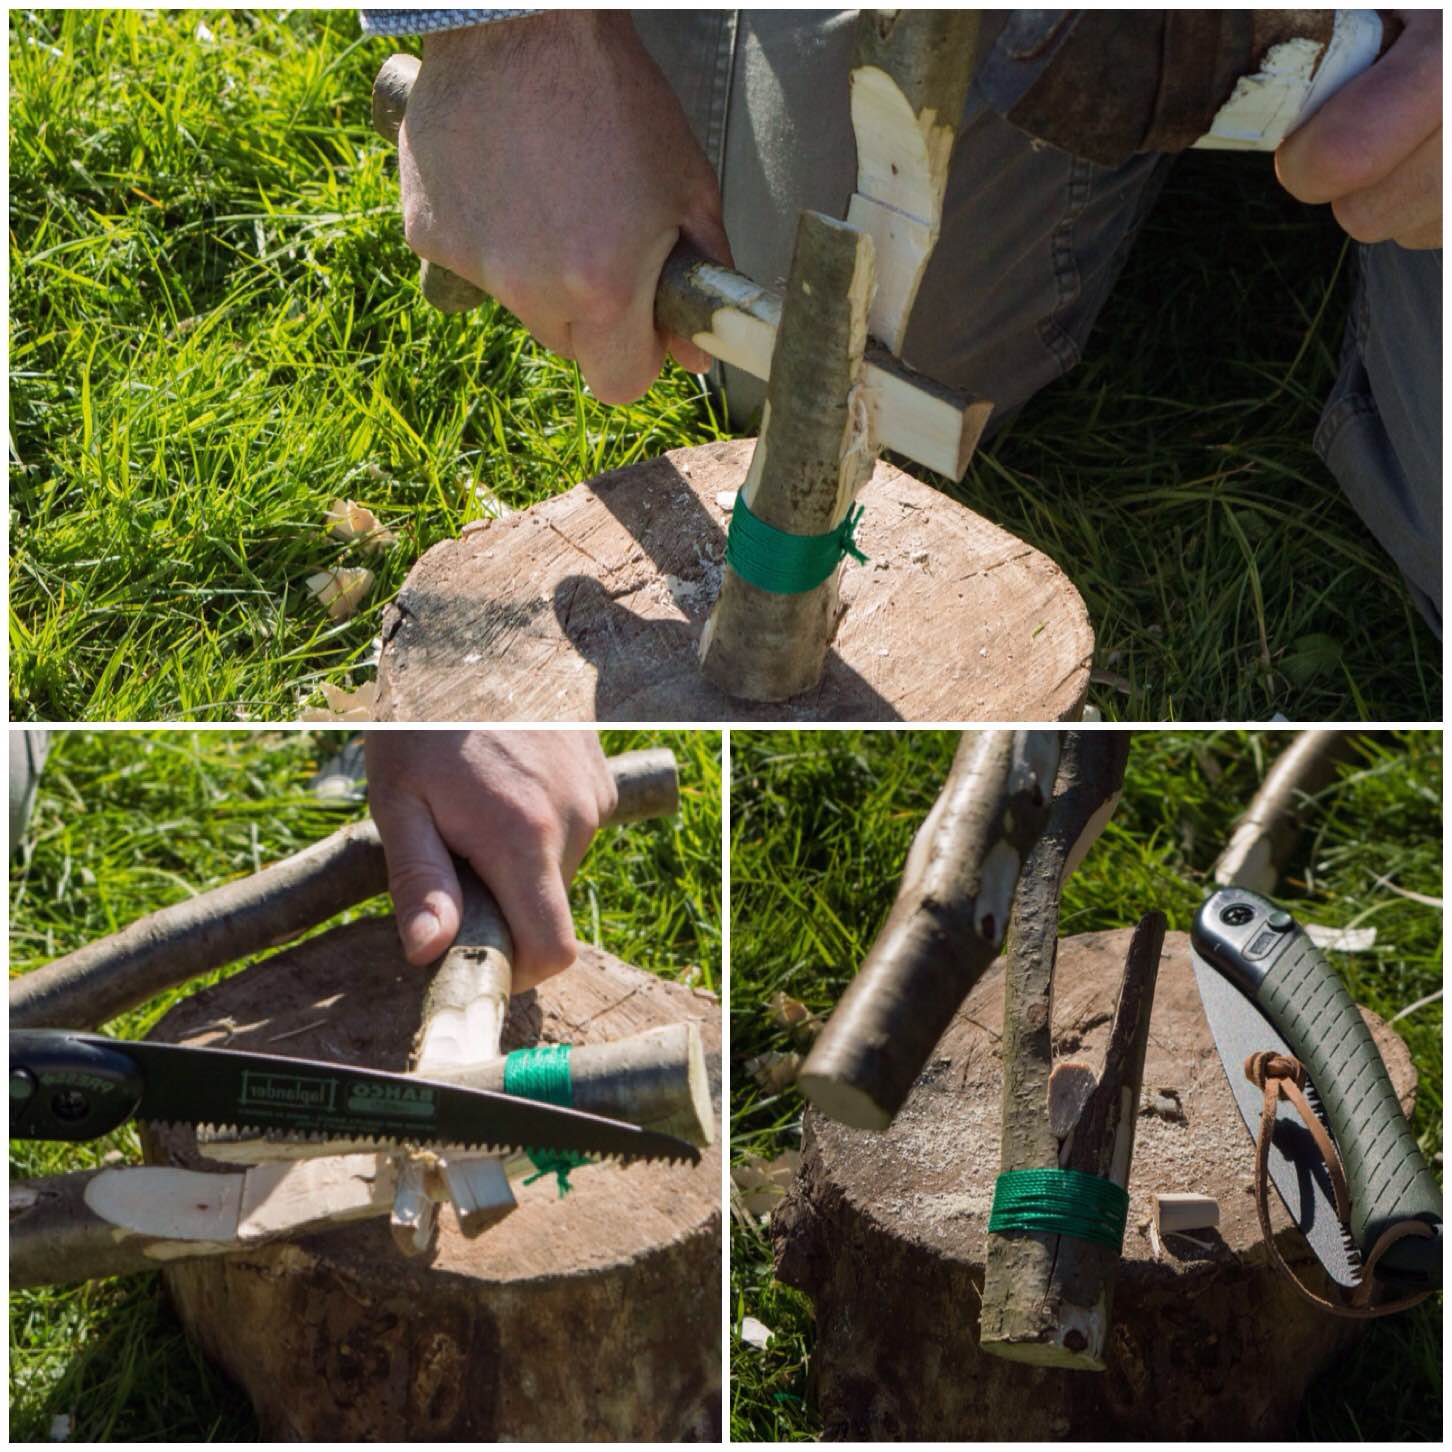
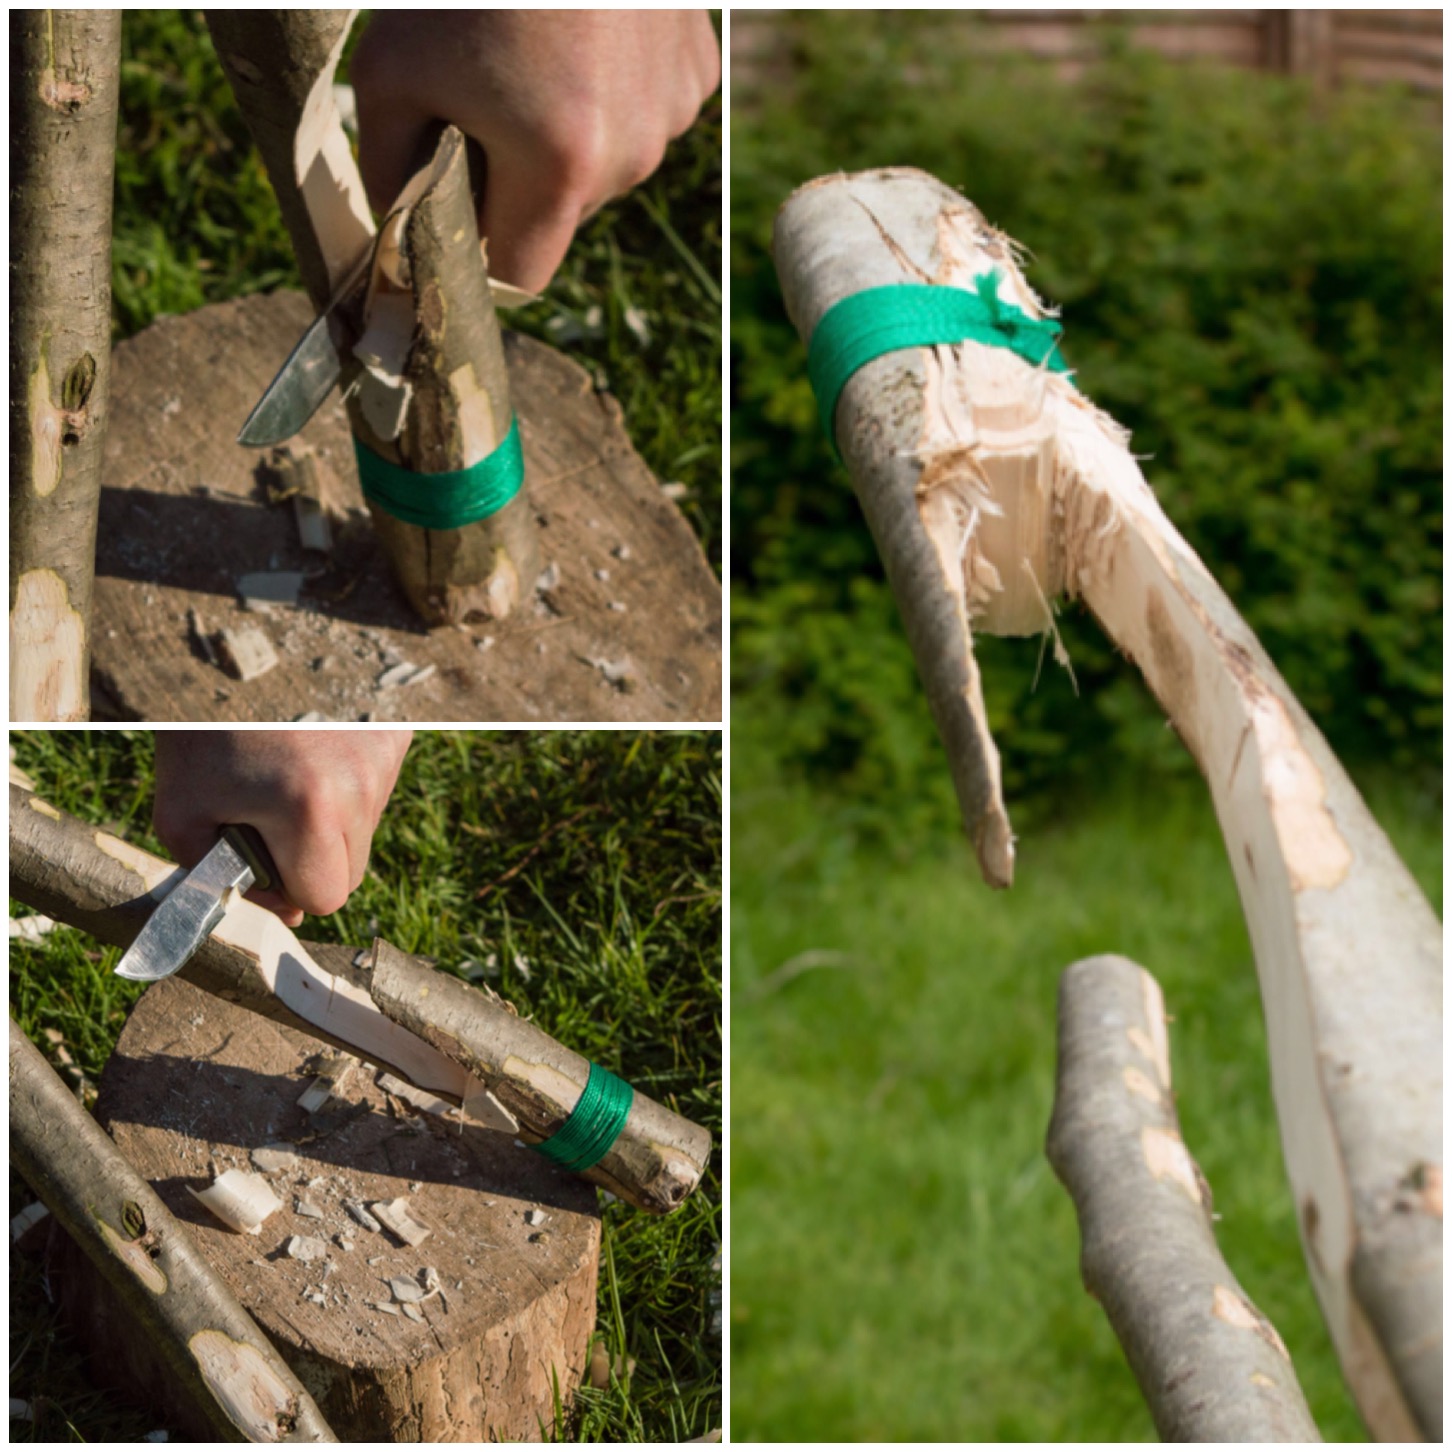
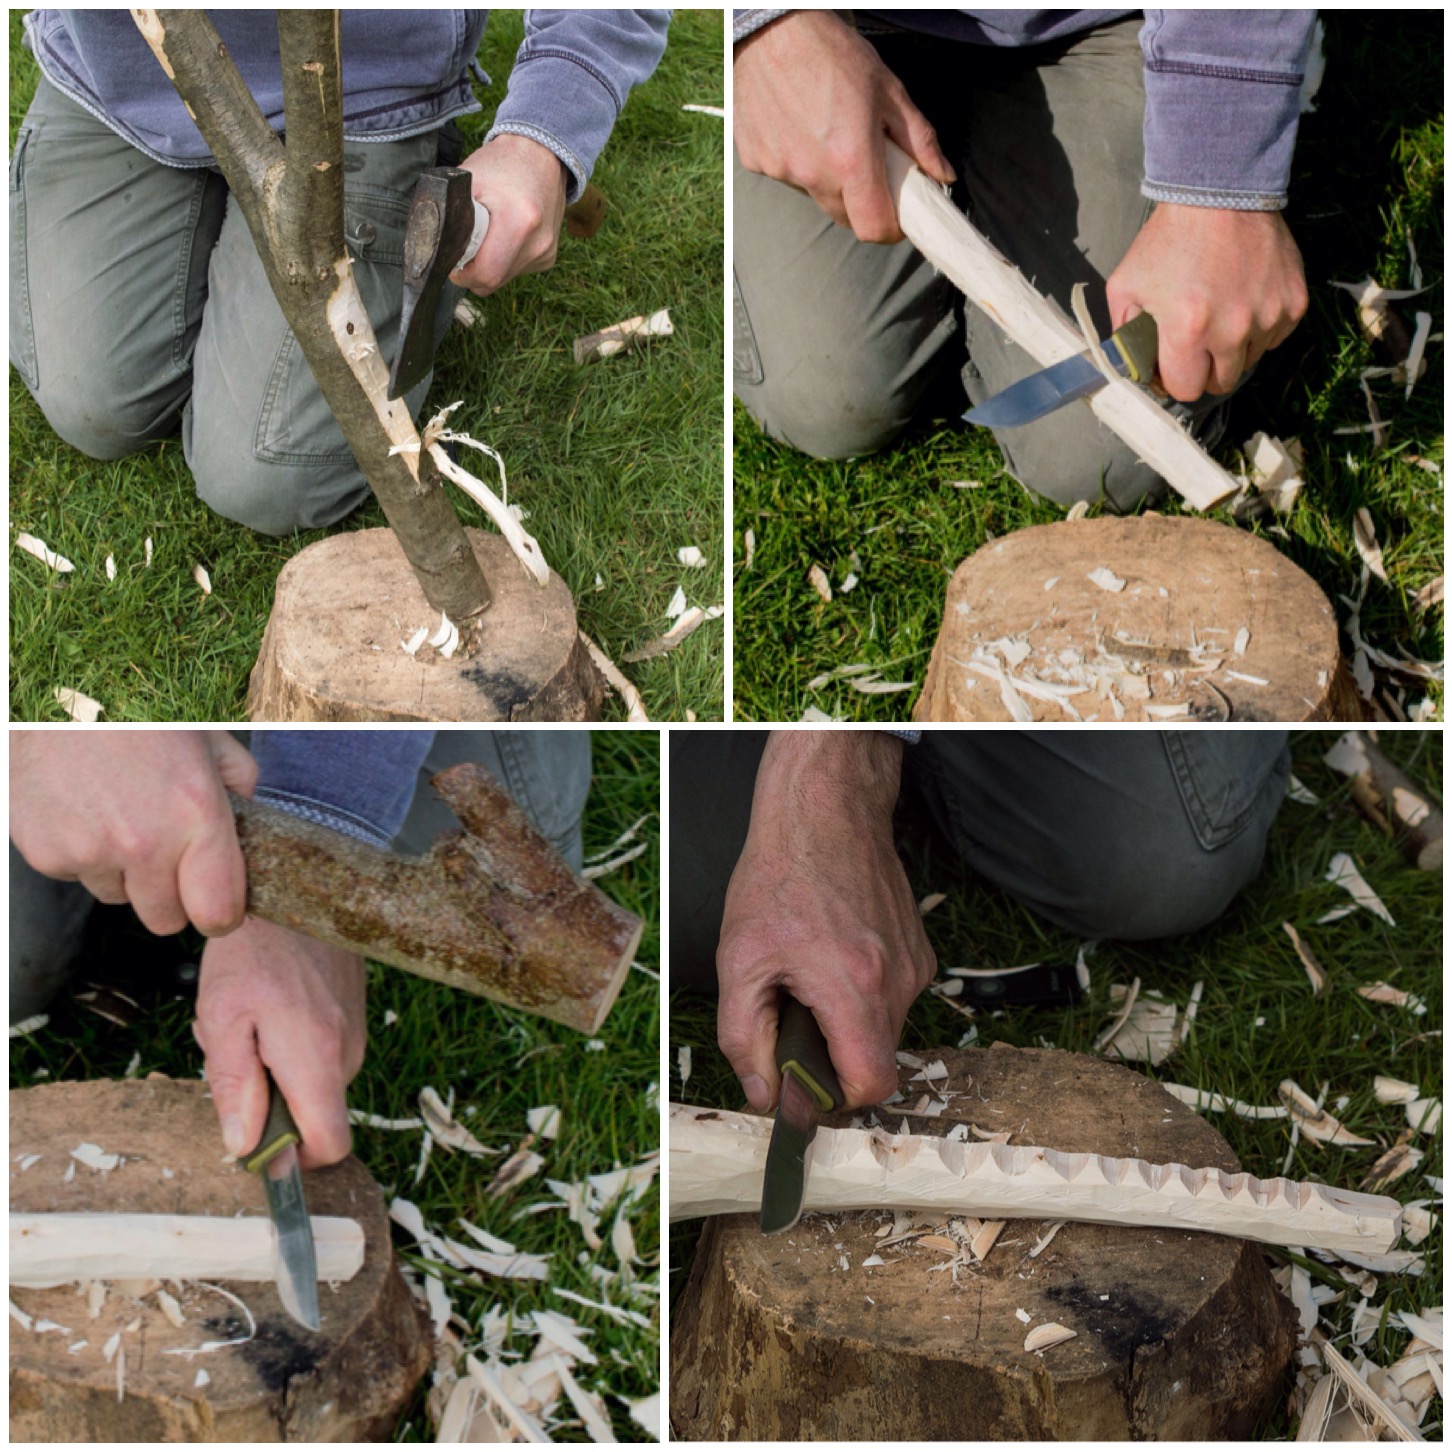
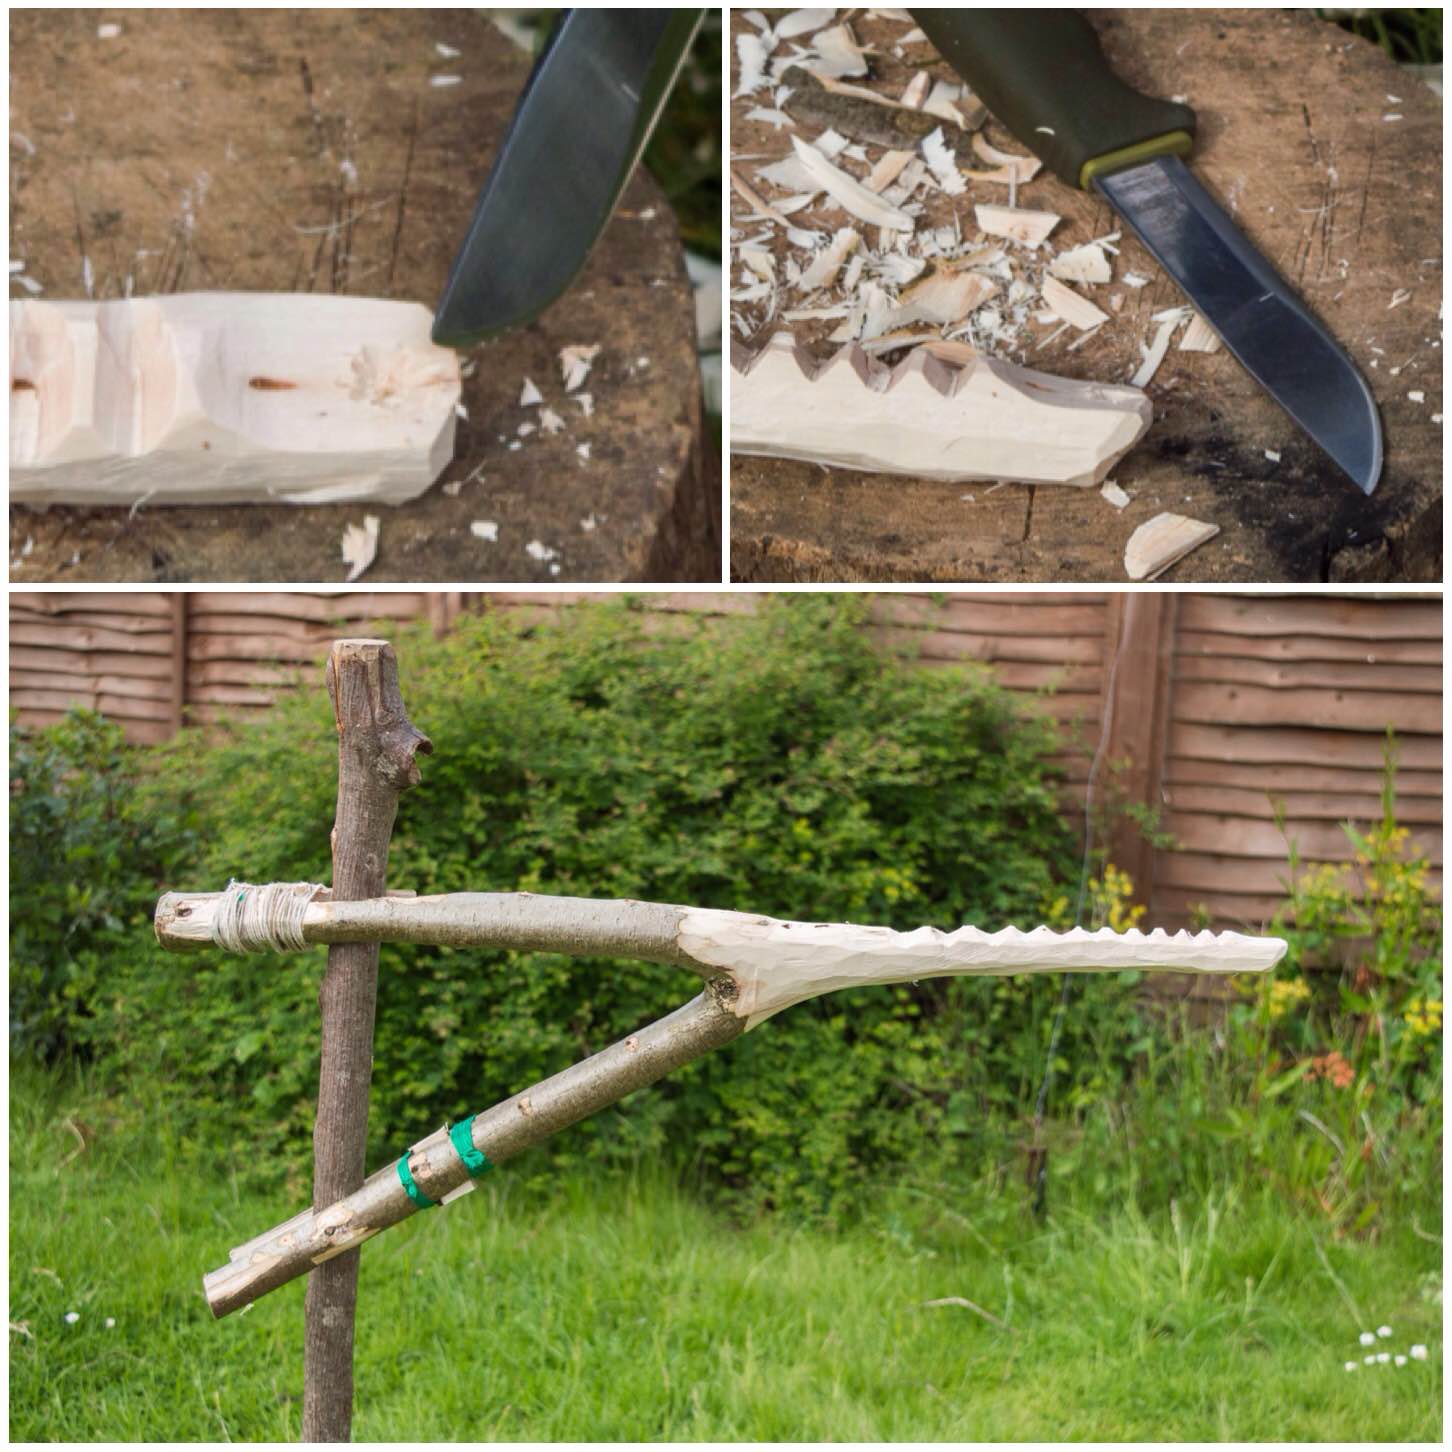
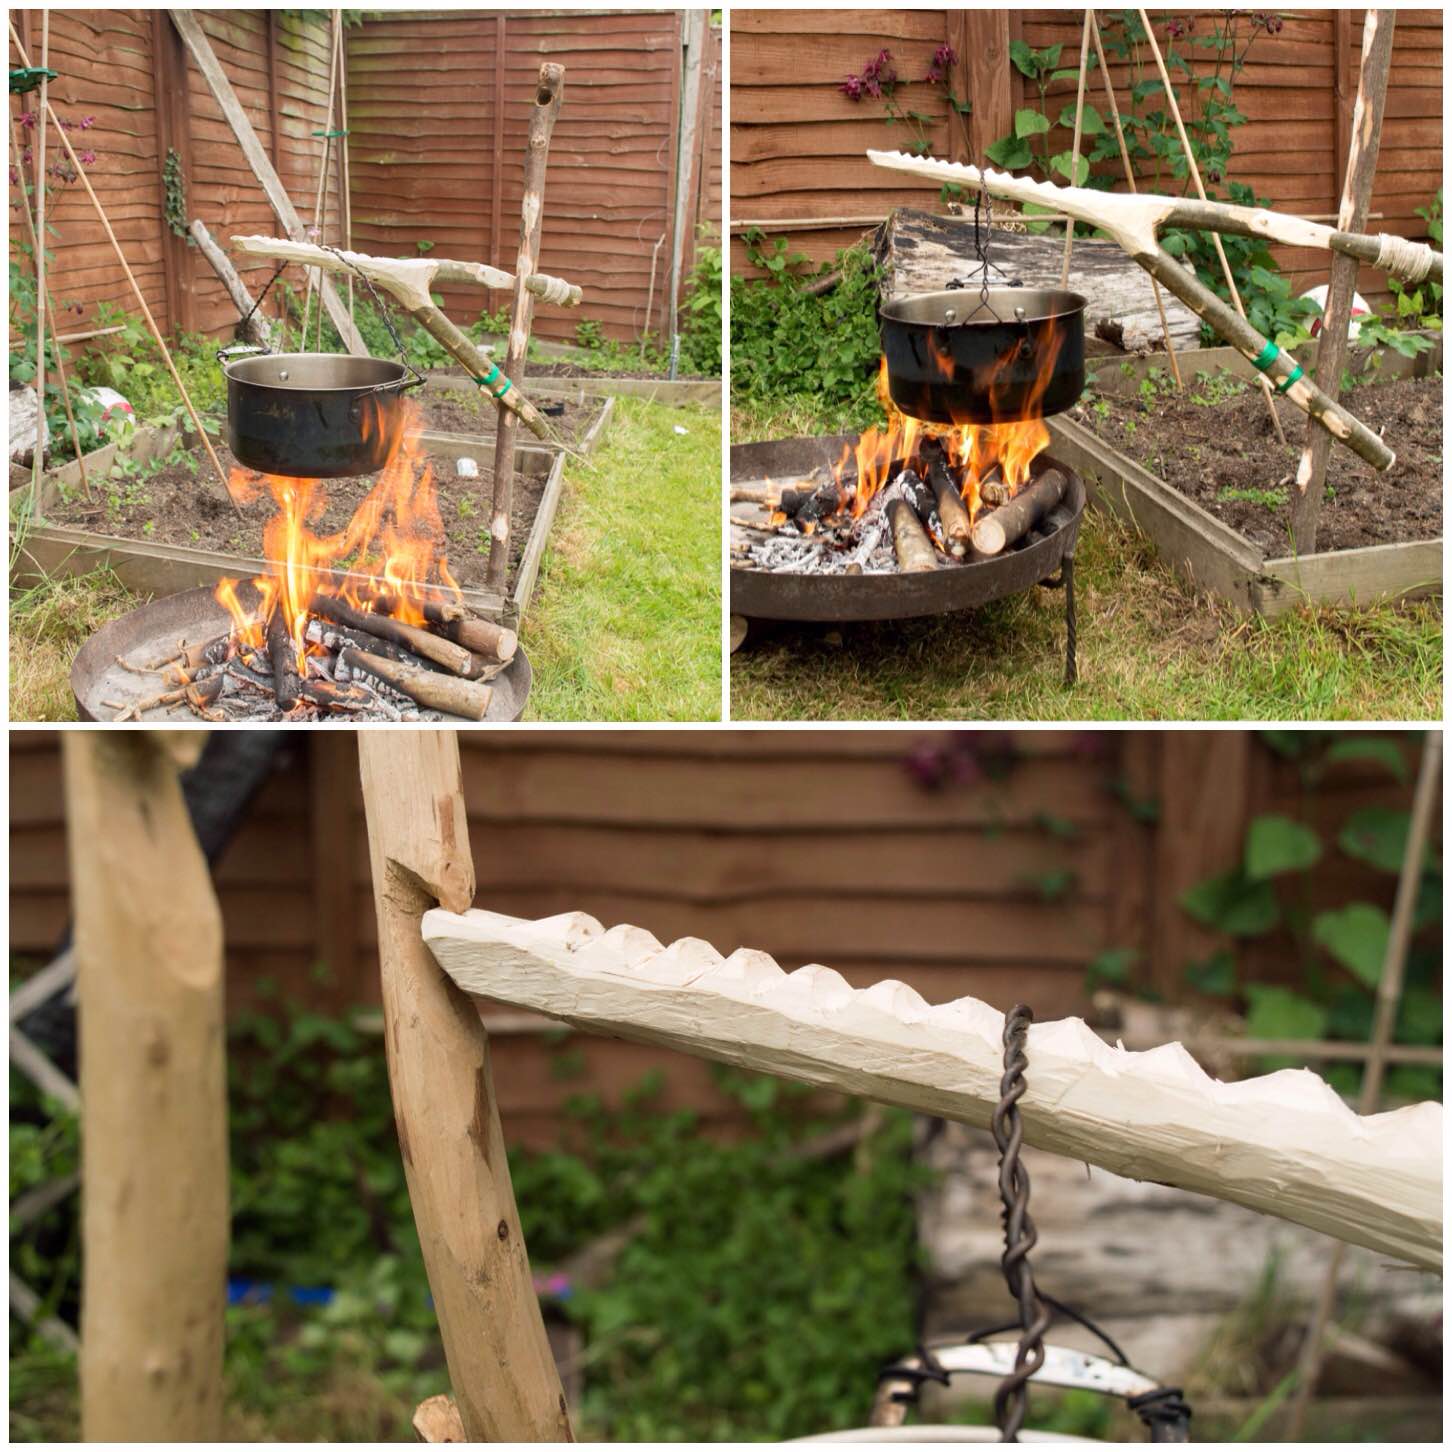
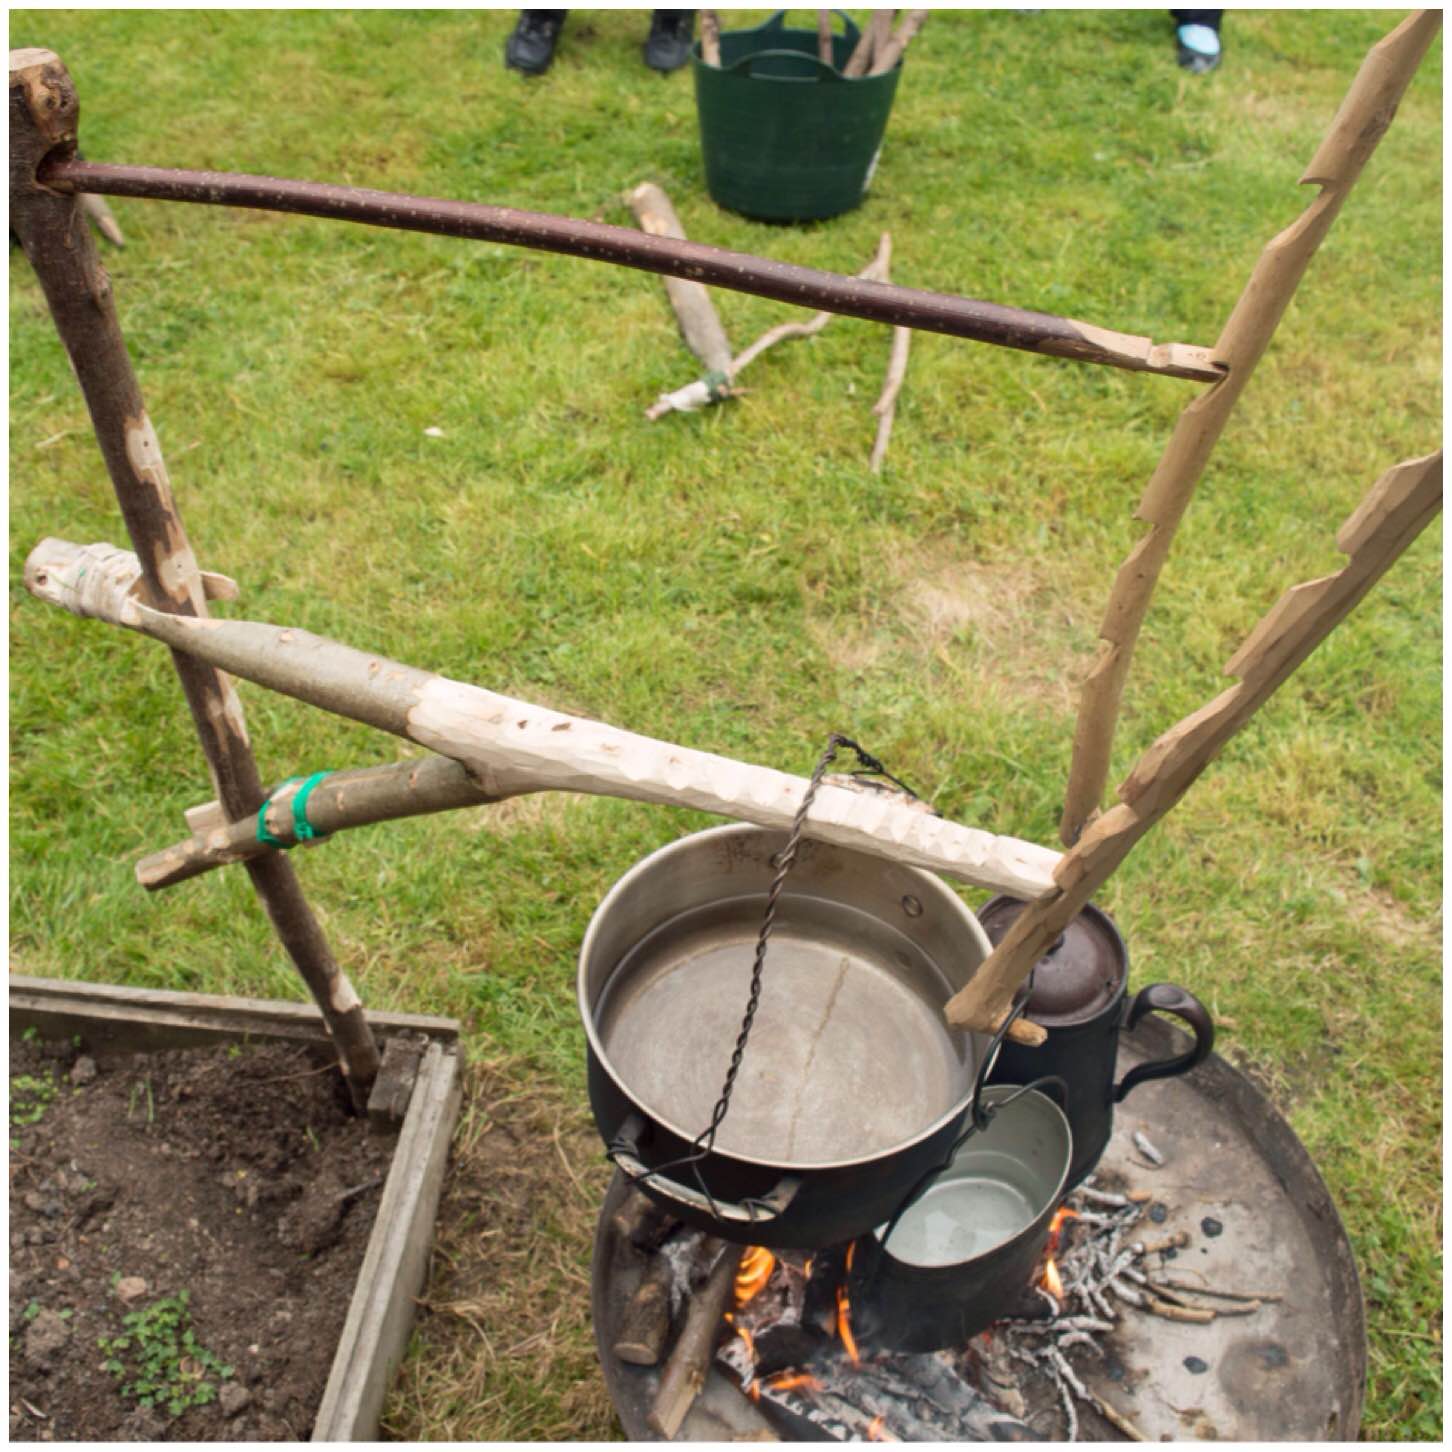
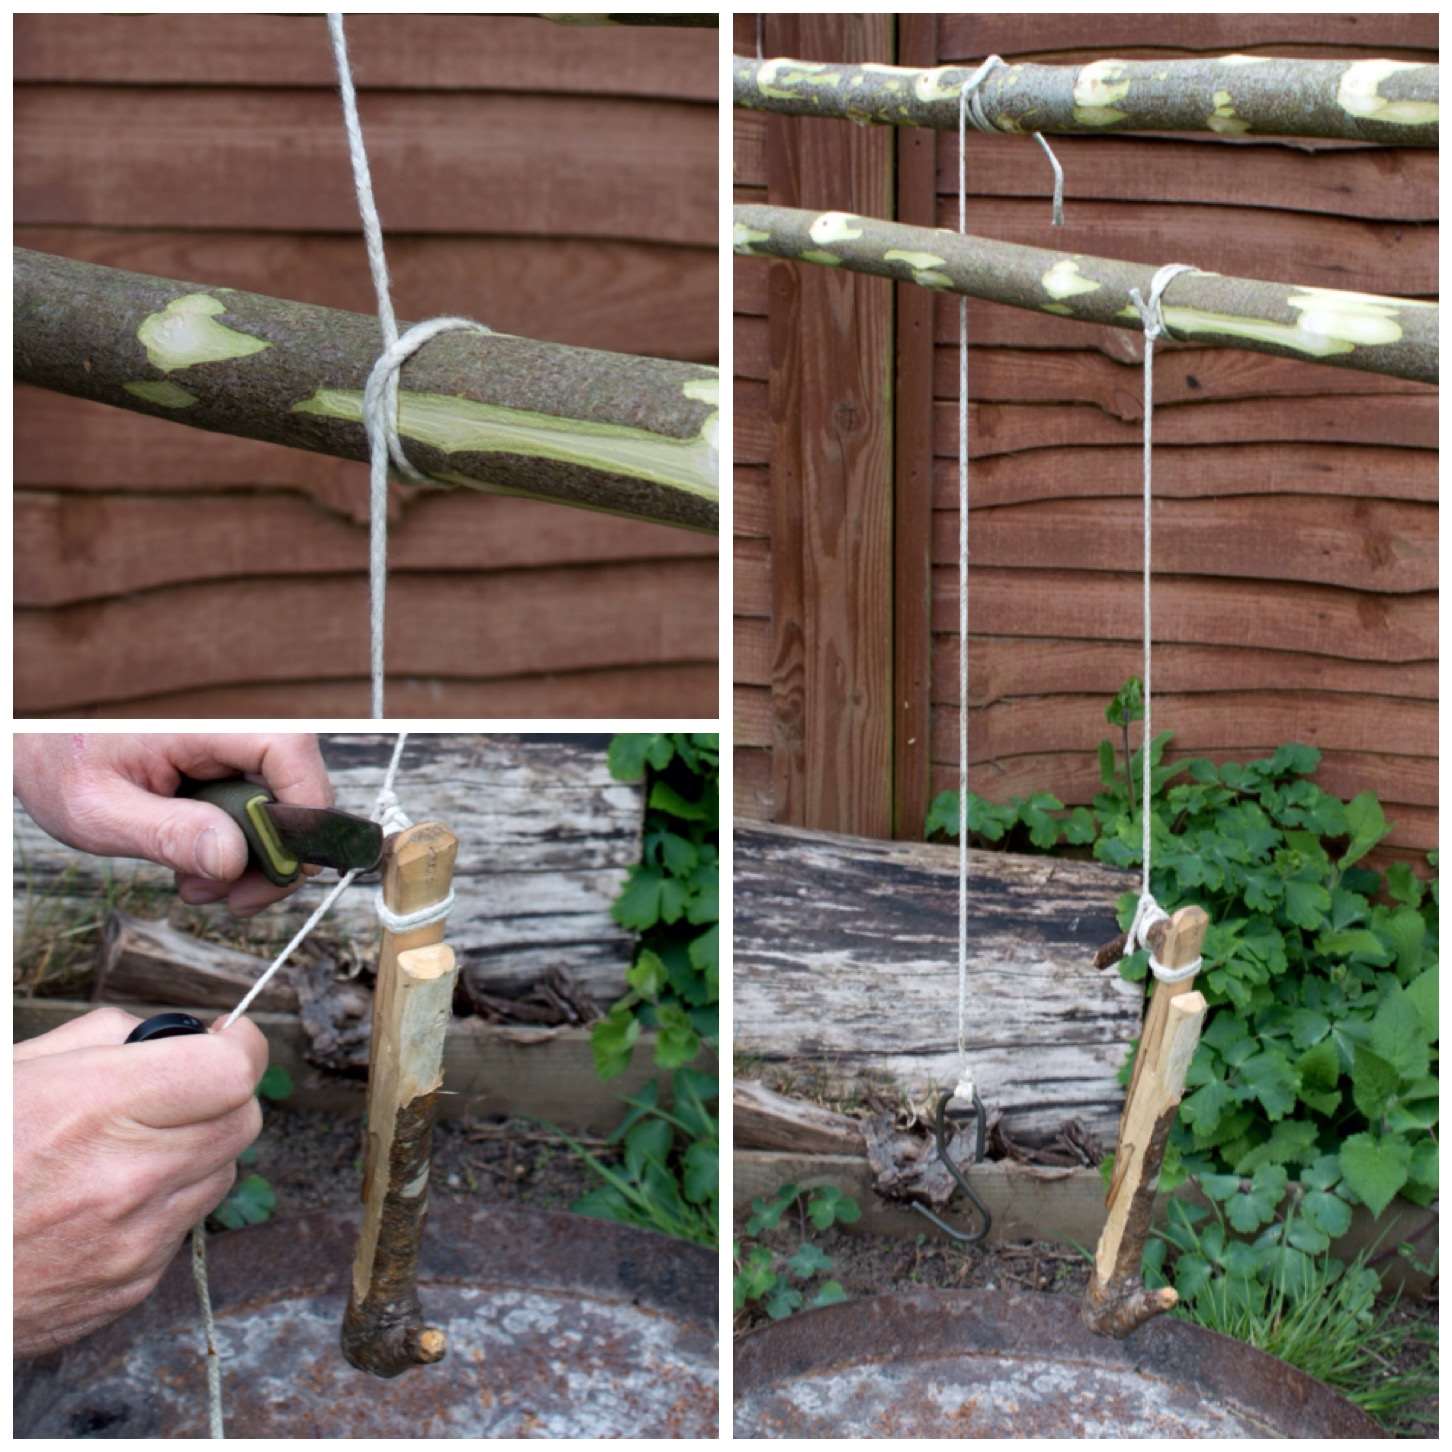
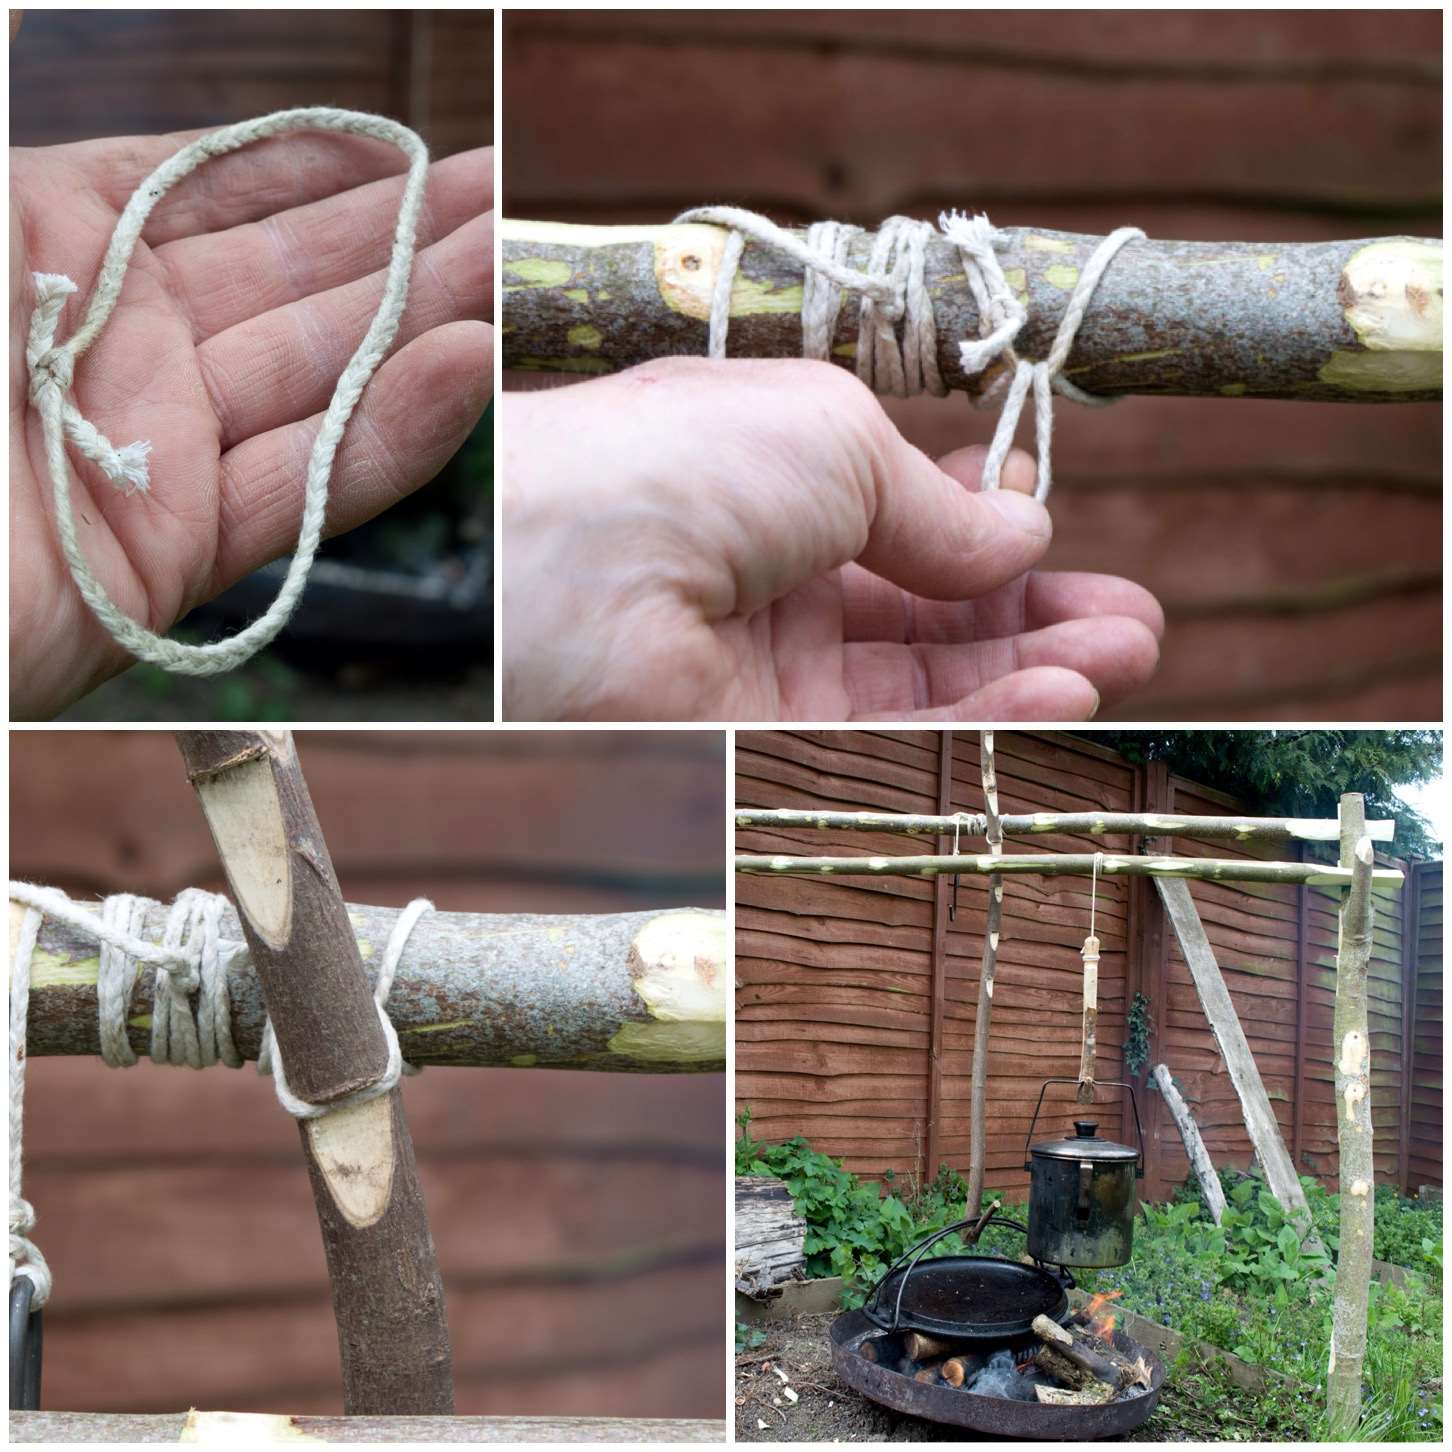
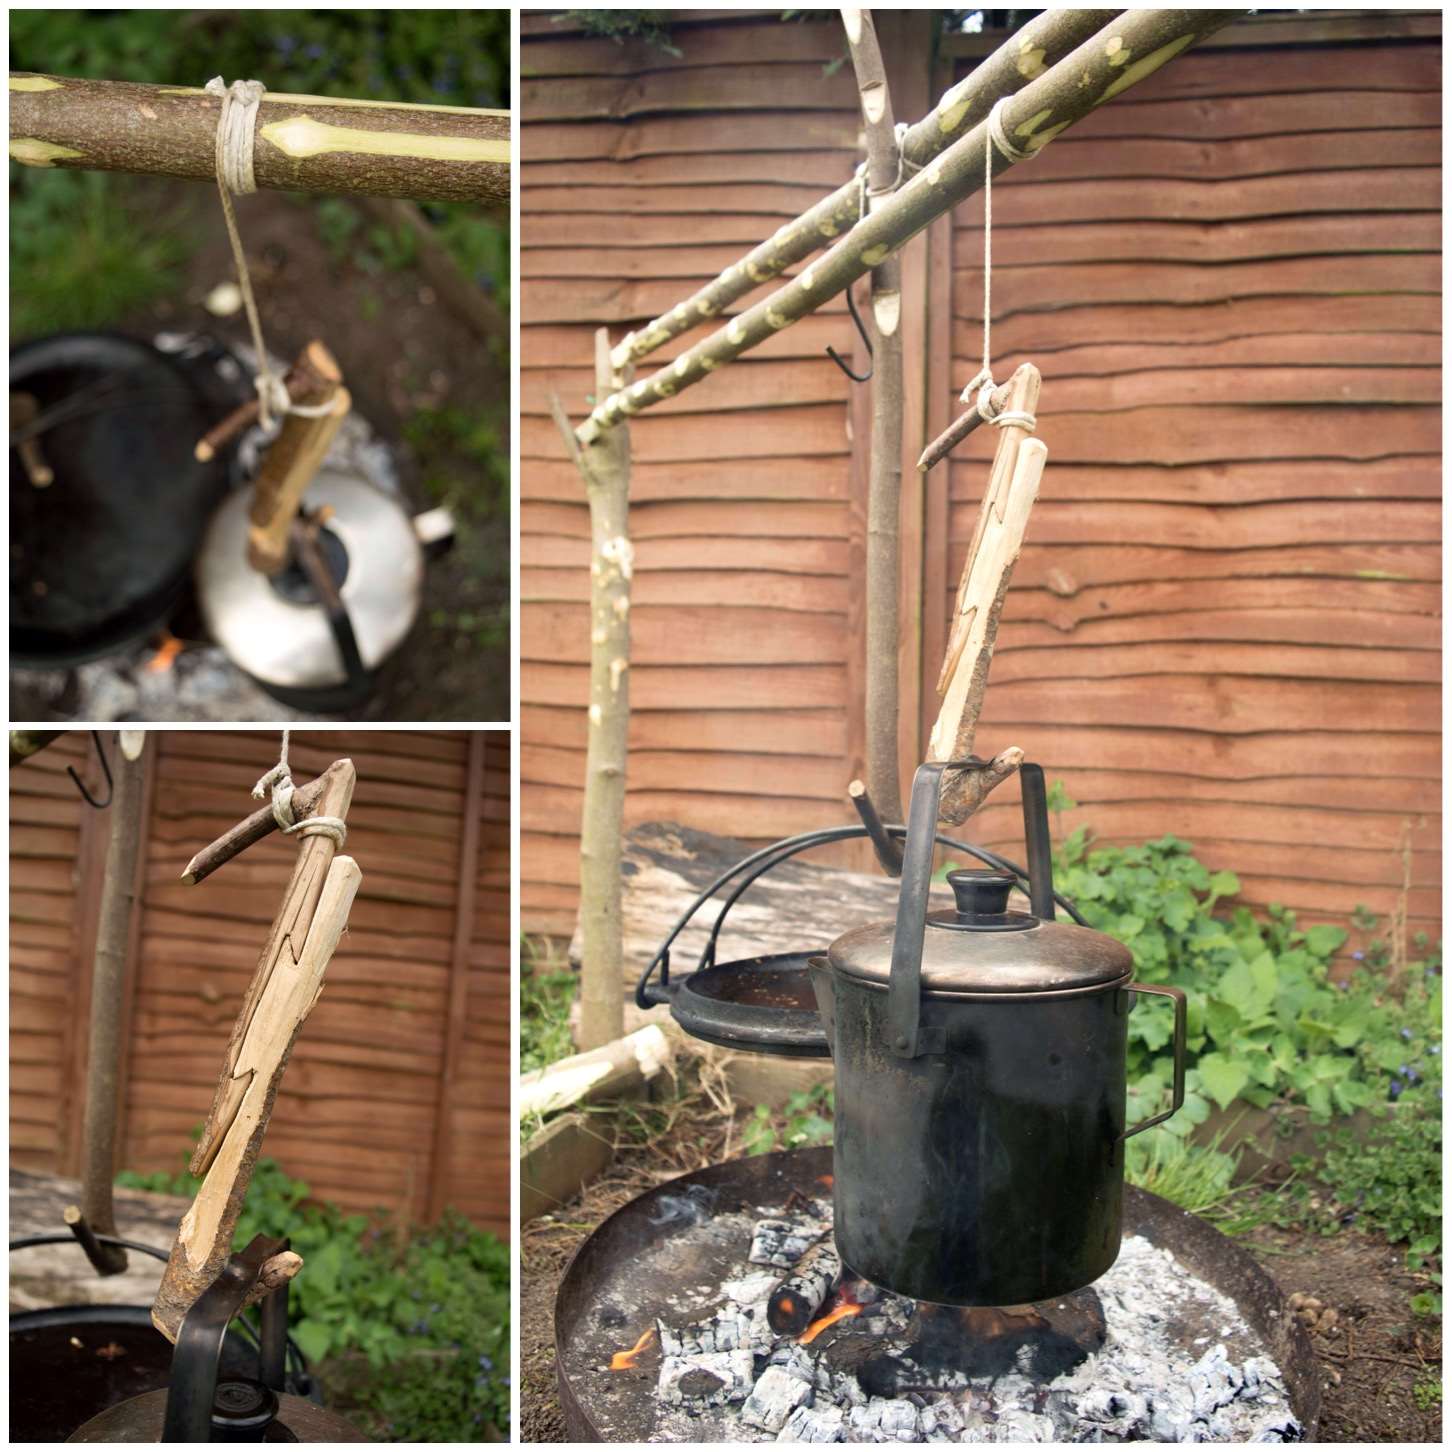
This is an excellent cooking rig for bushcraft beginners to learn. It has lots of different parts and requires a number of different knife cuts to produce the hanger and the hanging poles. I have heard this set up called many different names from Waygon or Waugan stick and Mors Kochanski refers to it as the Burtonsville rig. All have their own stories behind them however the common factor is that it a very easy set up and offers the bushcrafter a wide range of cooking heights.
Wagon/Waugan Stick or Burtonsville Rig
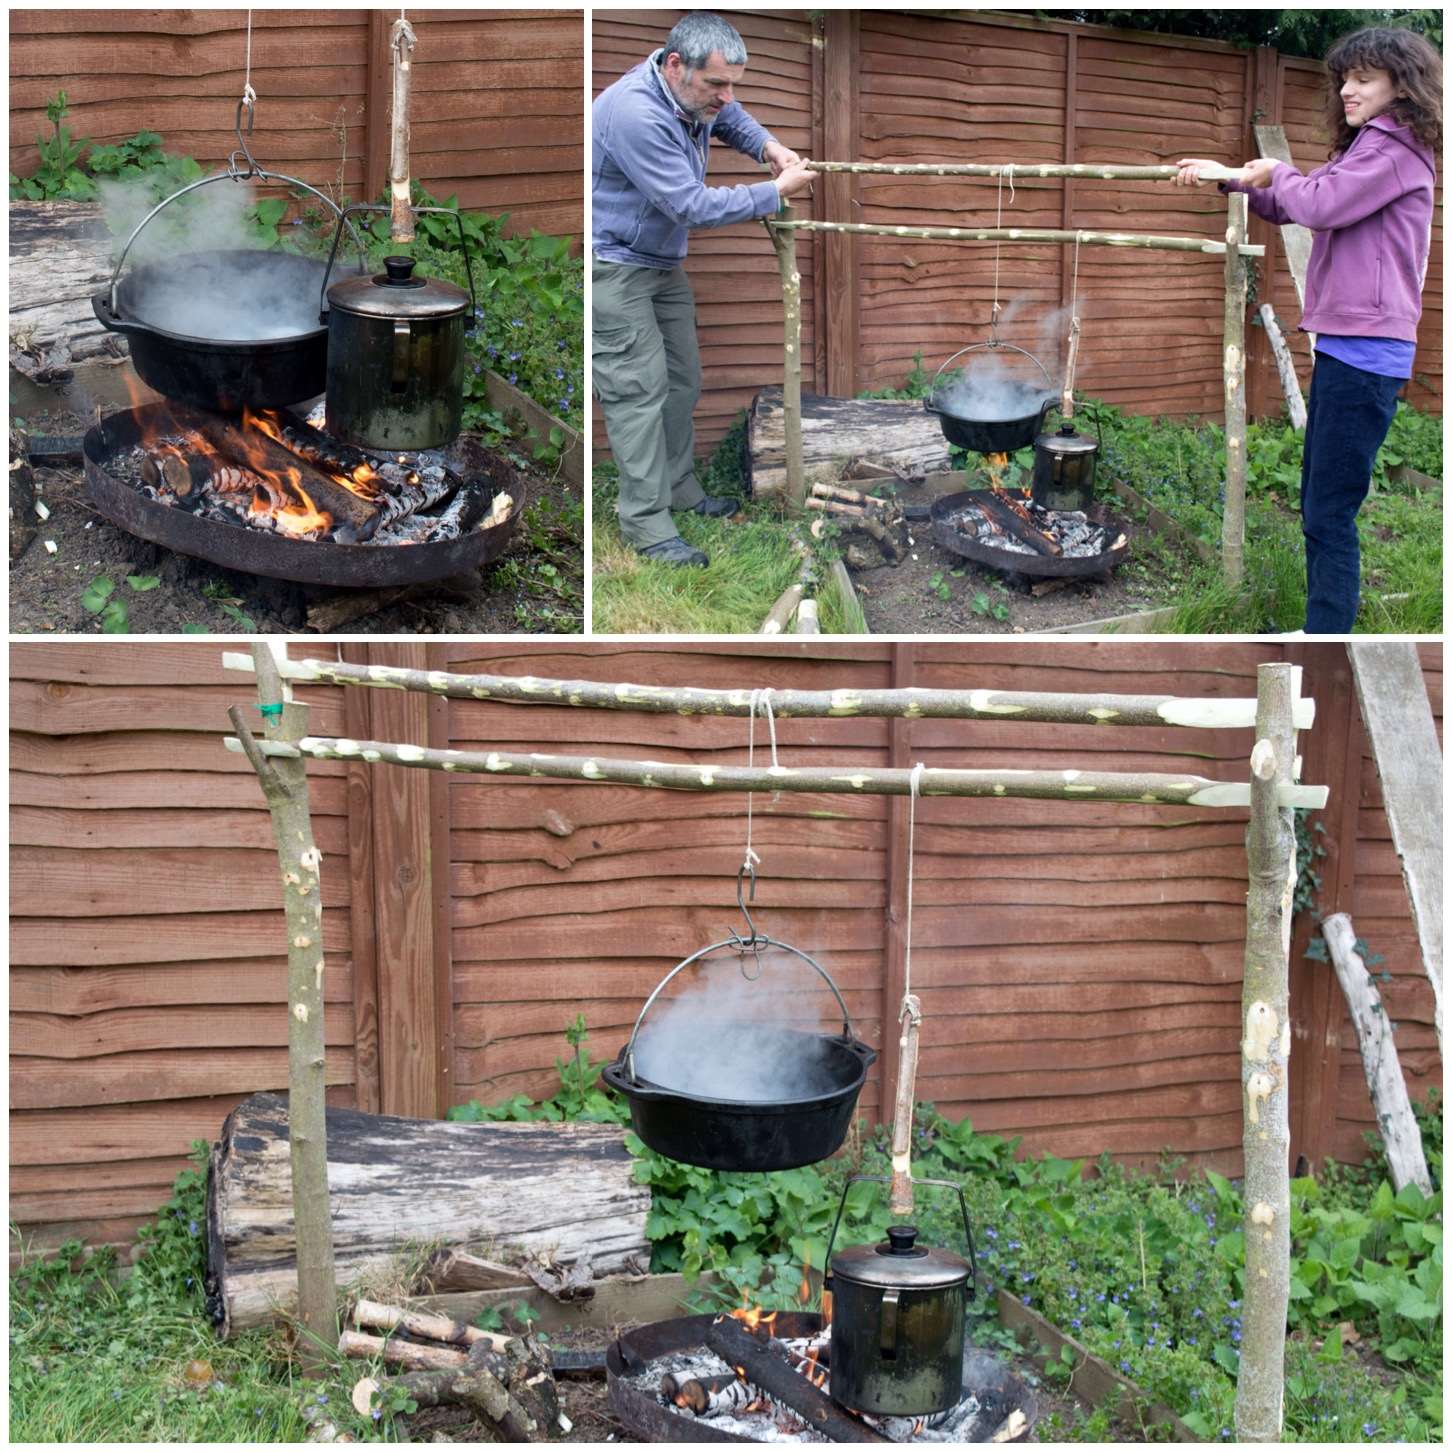
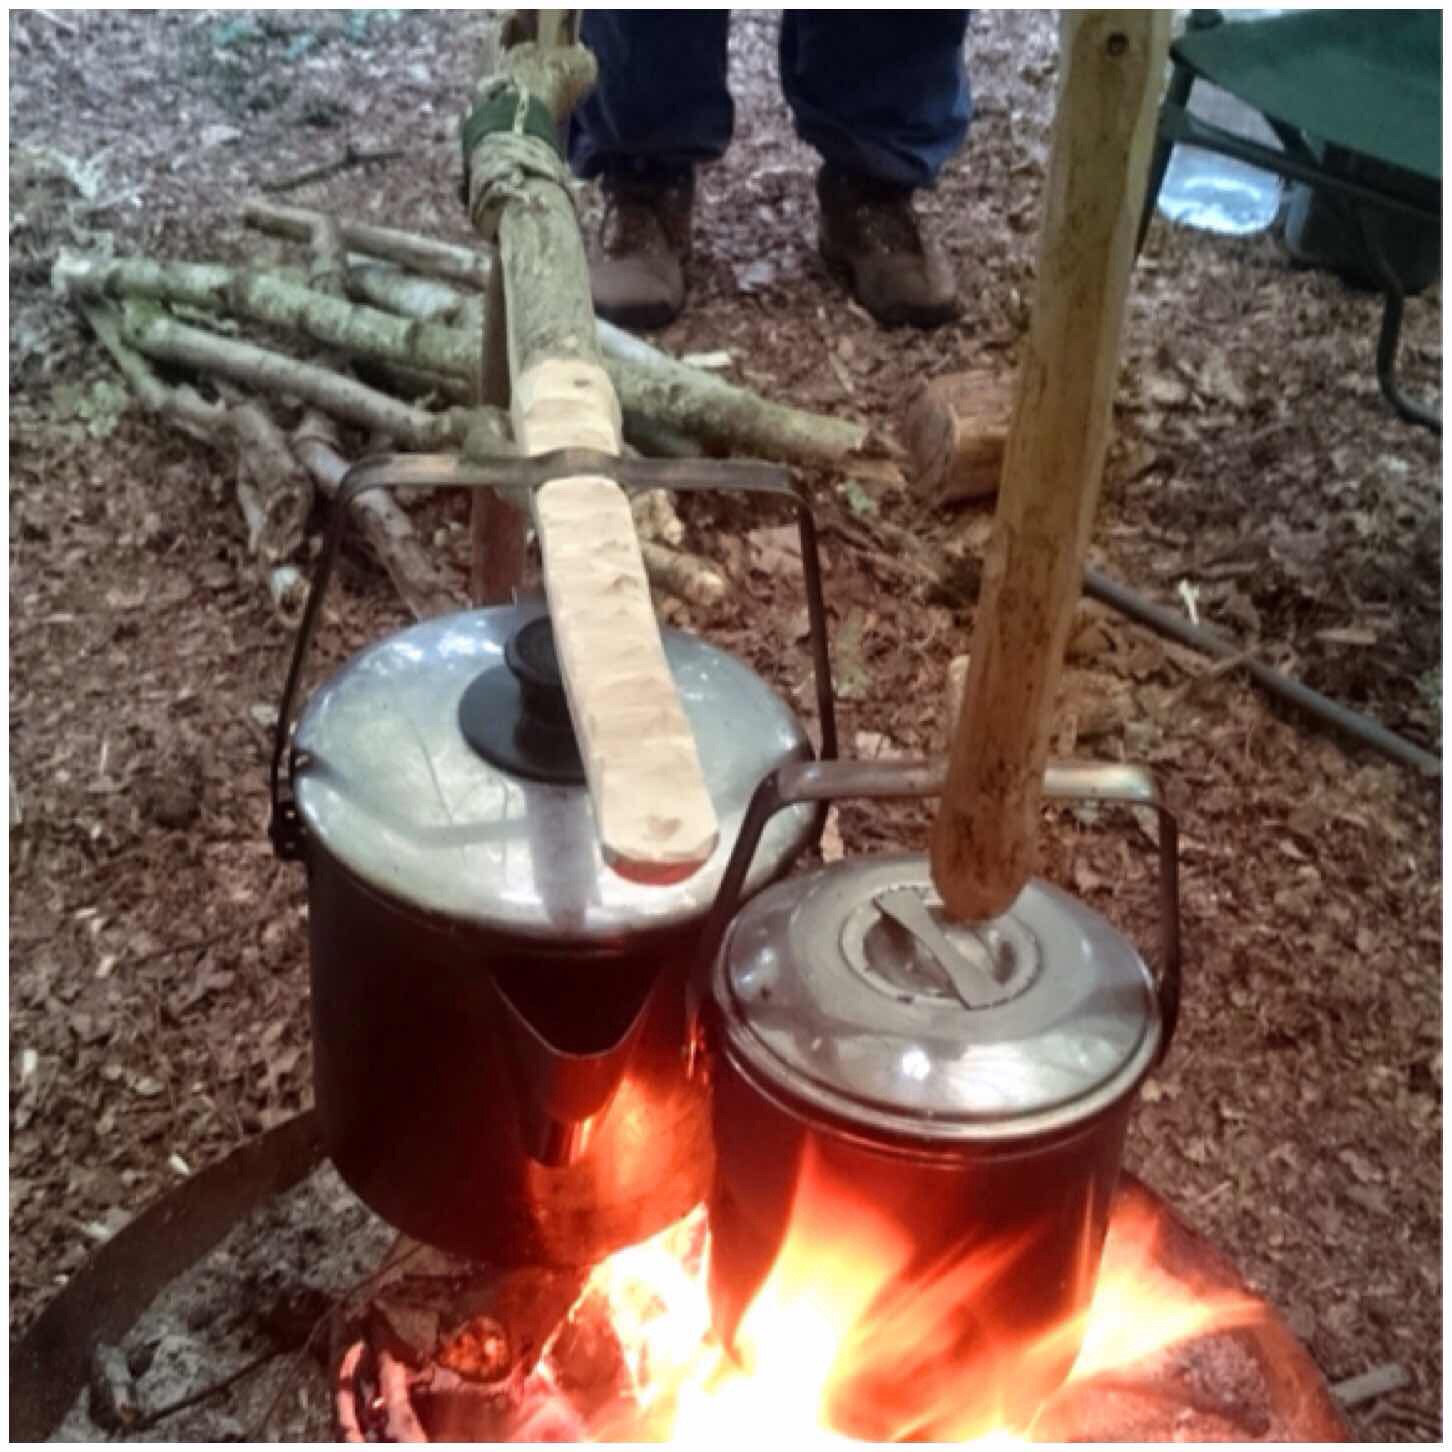
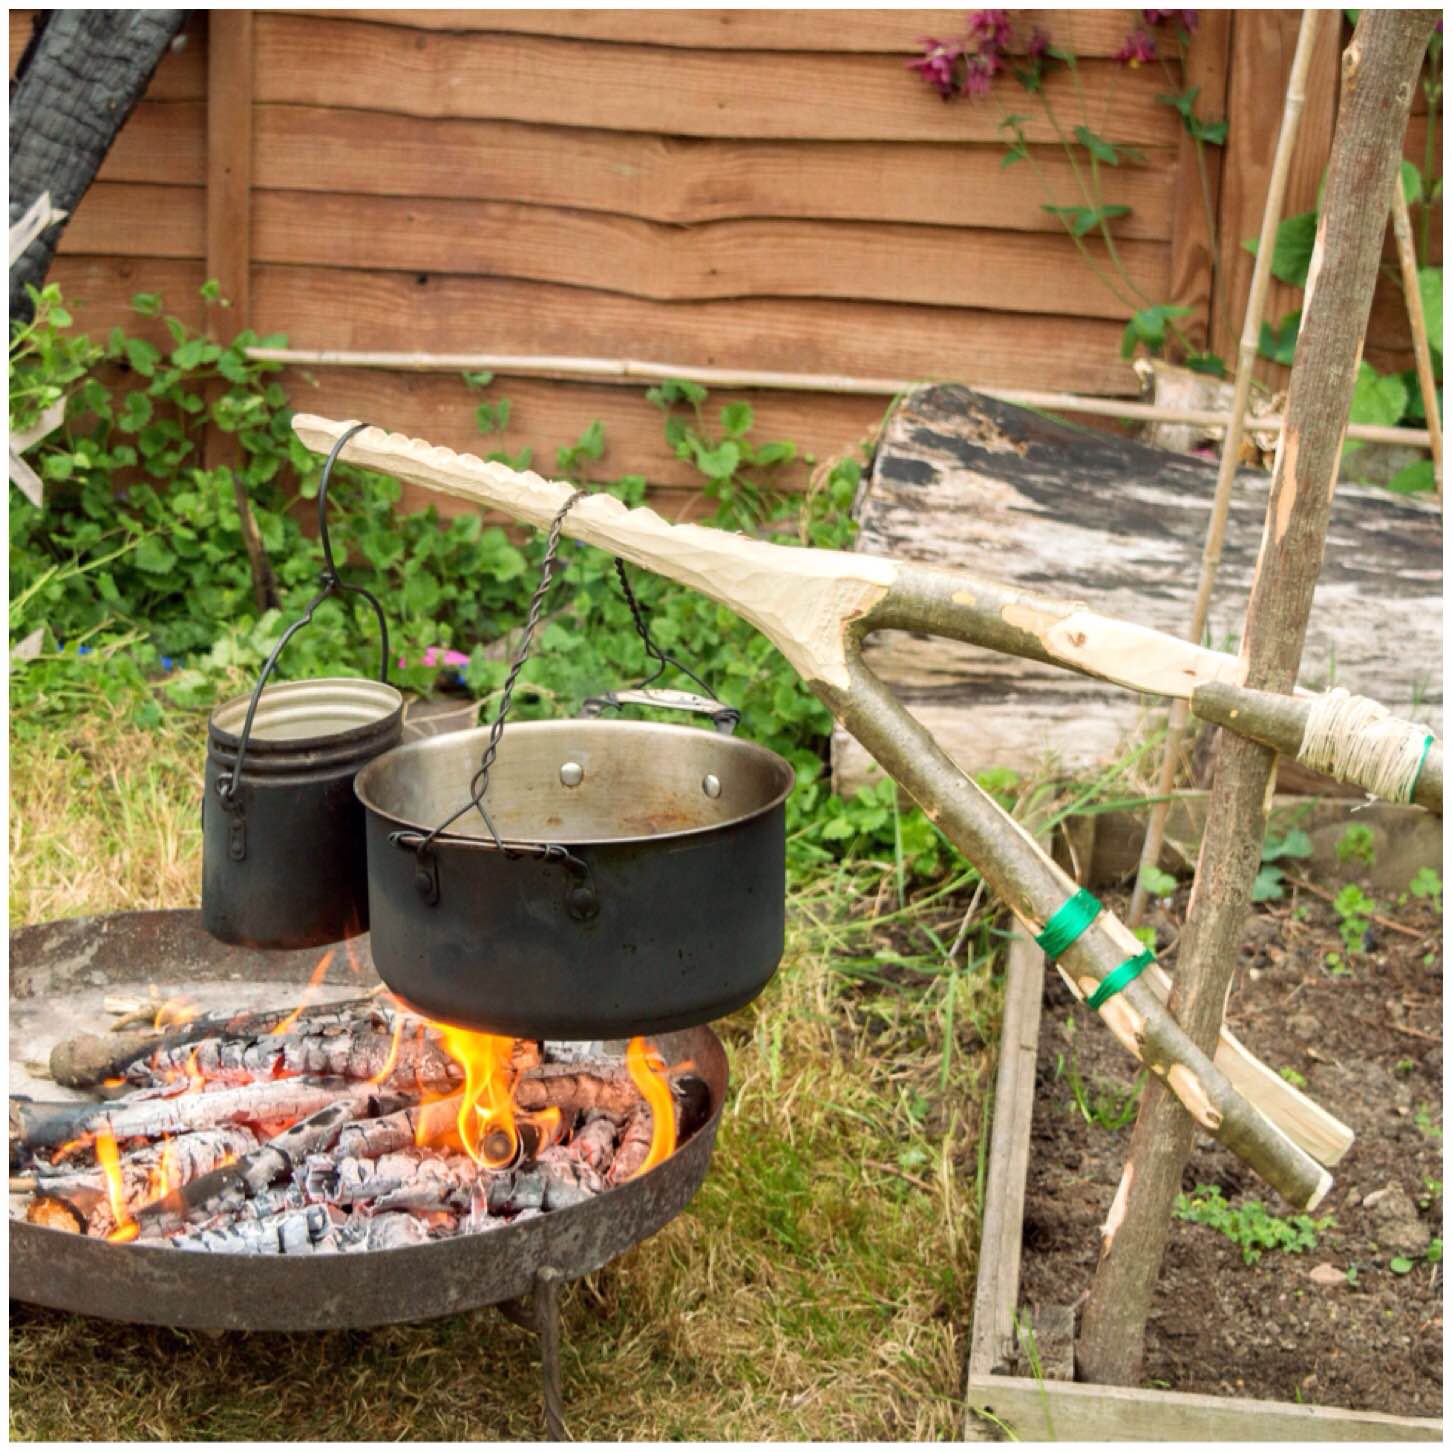
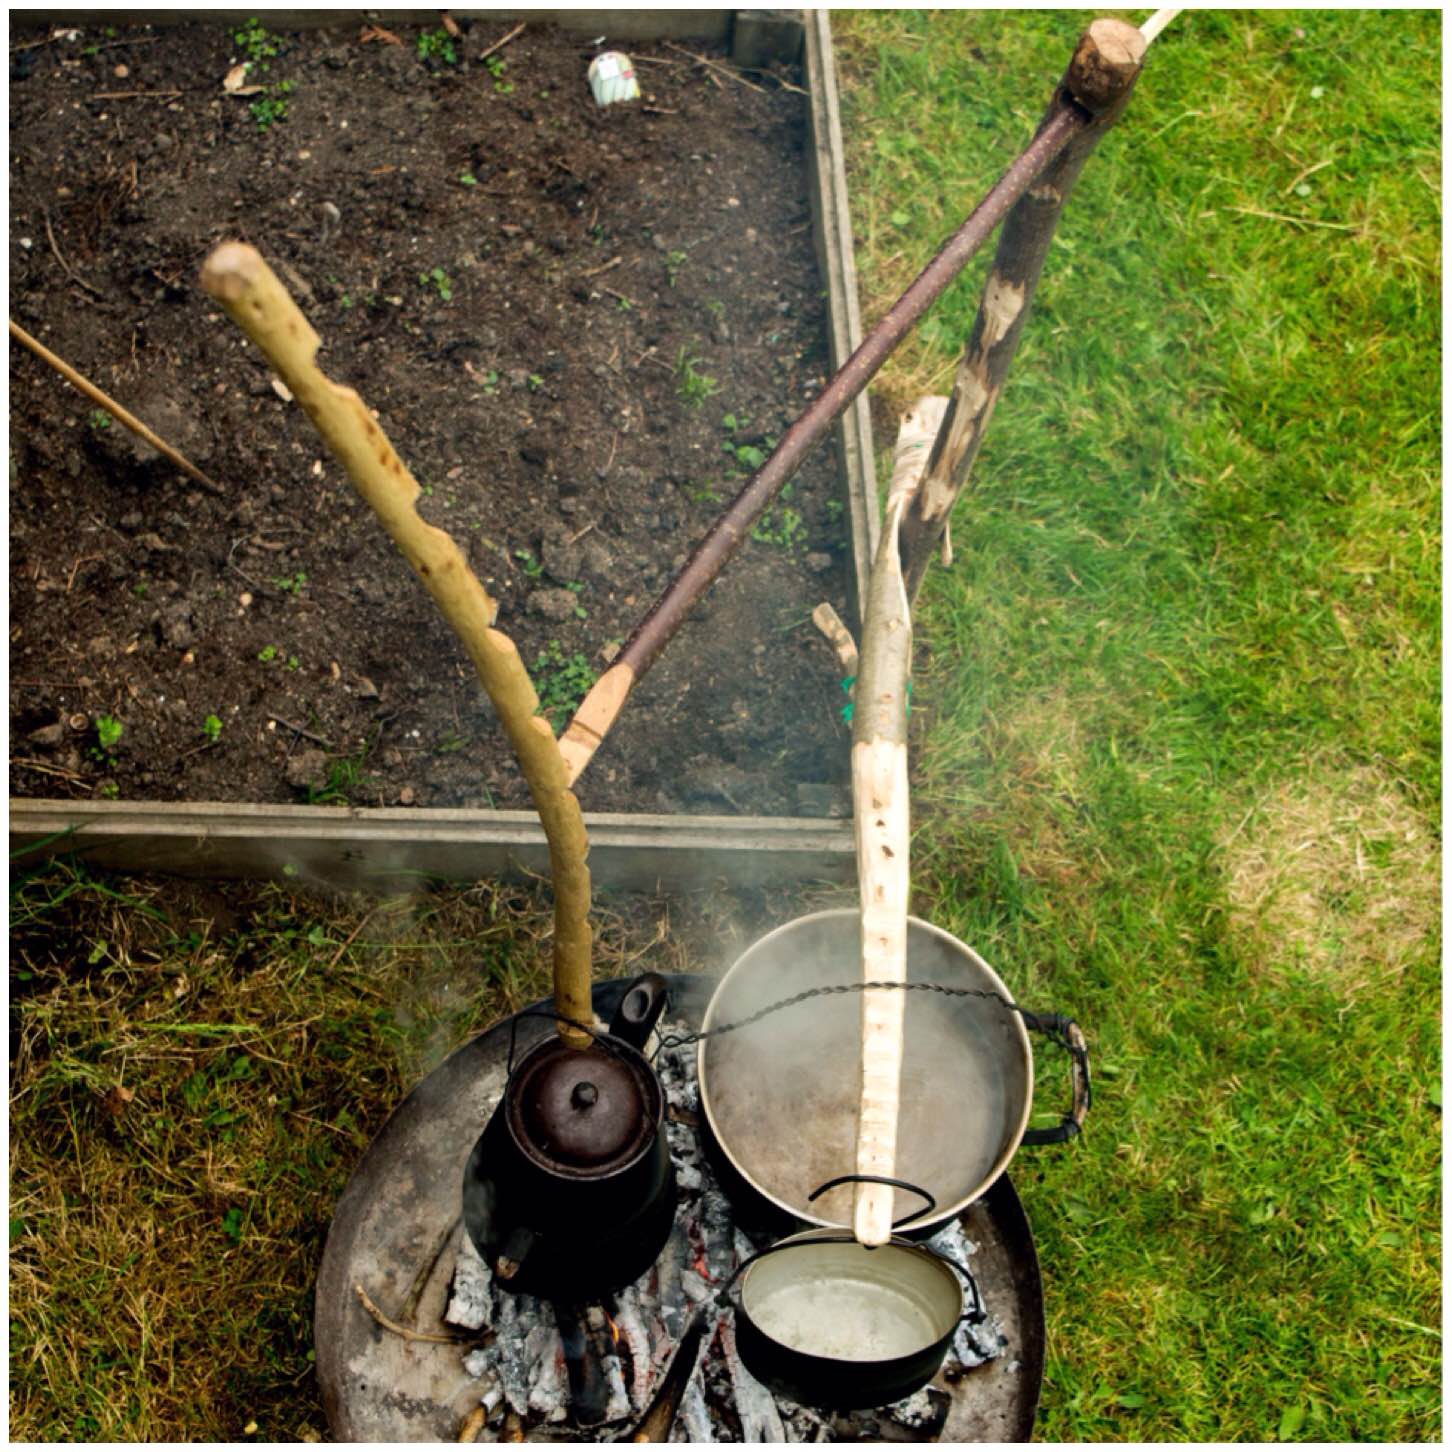
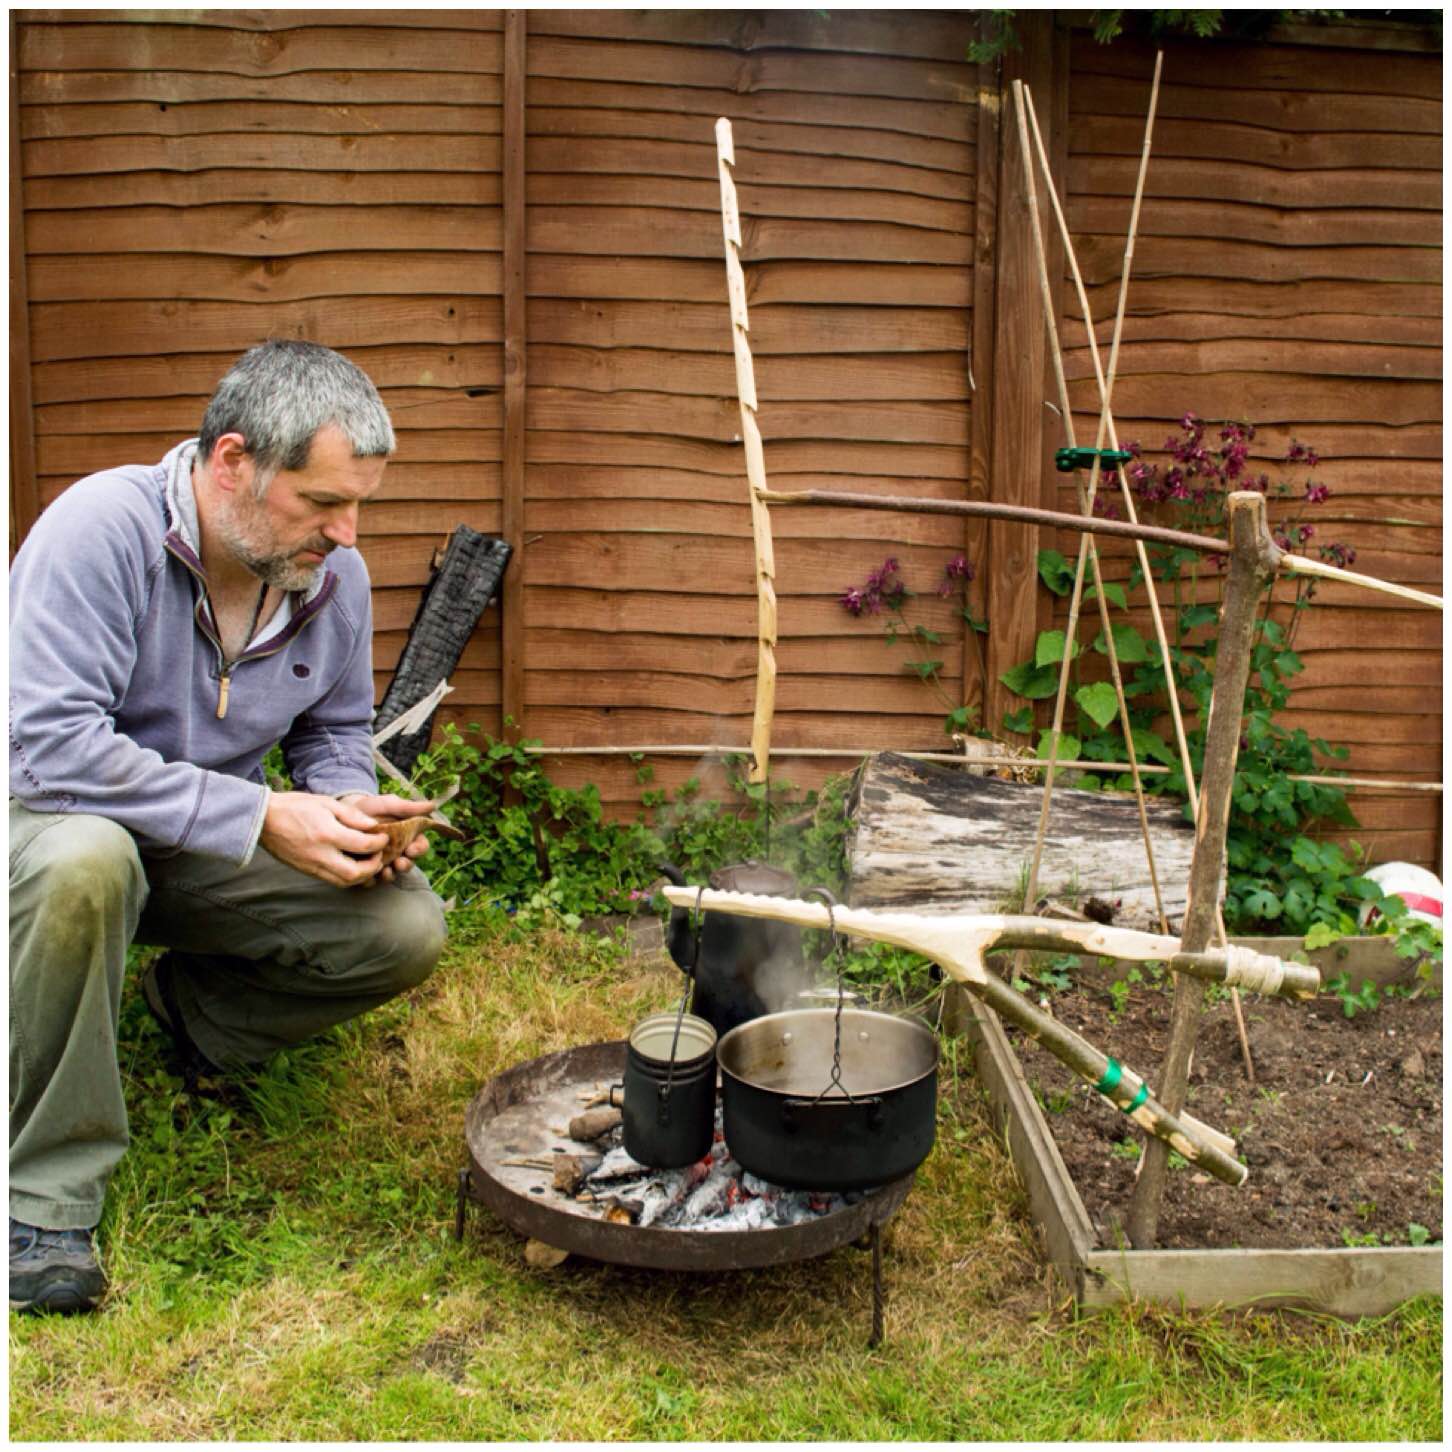
Double French Windlass
The Double French Windlass is a cracking cooking rig. I was taught this by my friend Steve ‘Mesquite’ Harral at the Bushcraft UK Bushmoot a number of years ago. I used it at this year’s Bushmoot for two weeks and it allowed me to cook with a number of different pots at one time with the ability to have them all at different cooking heights.
Double French Windlass
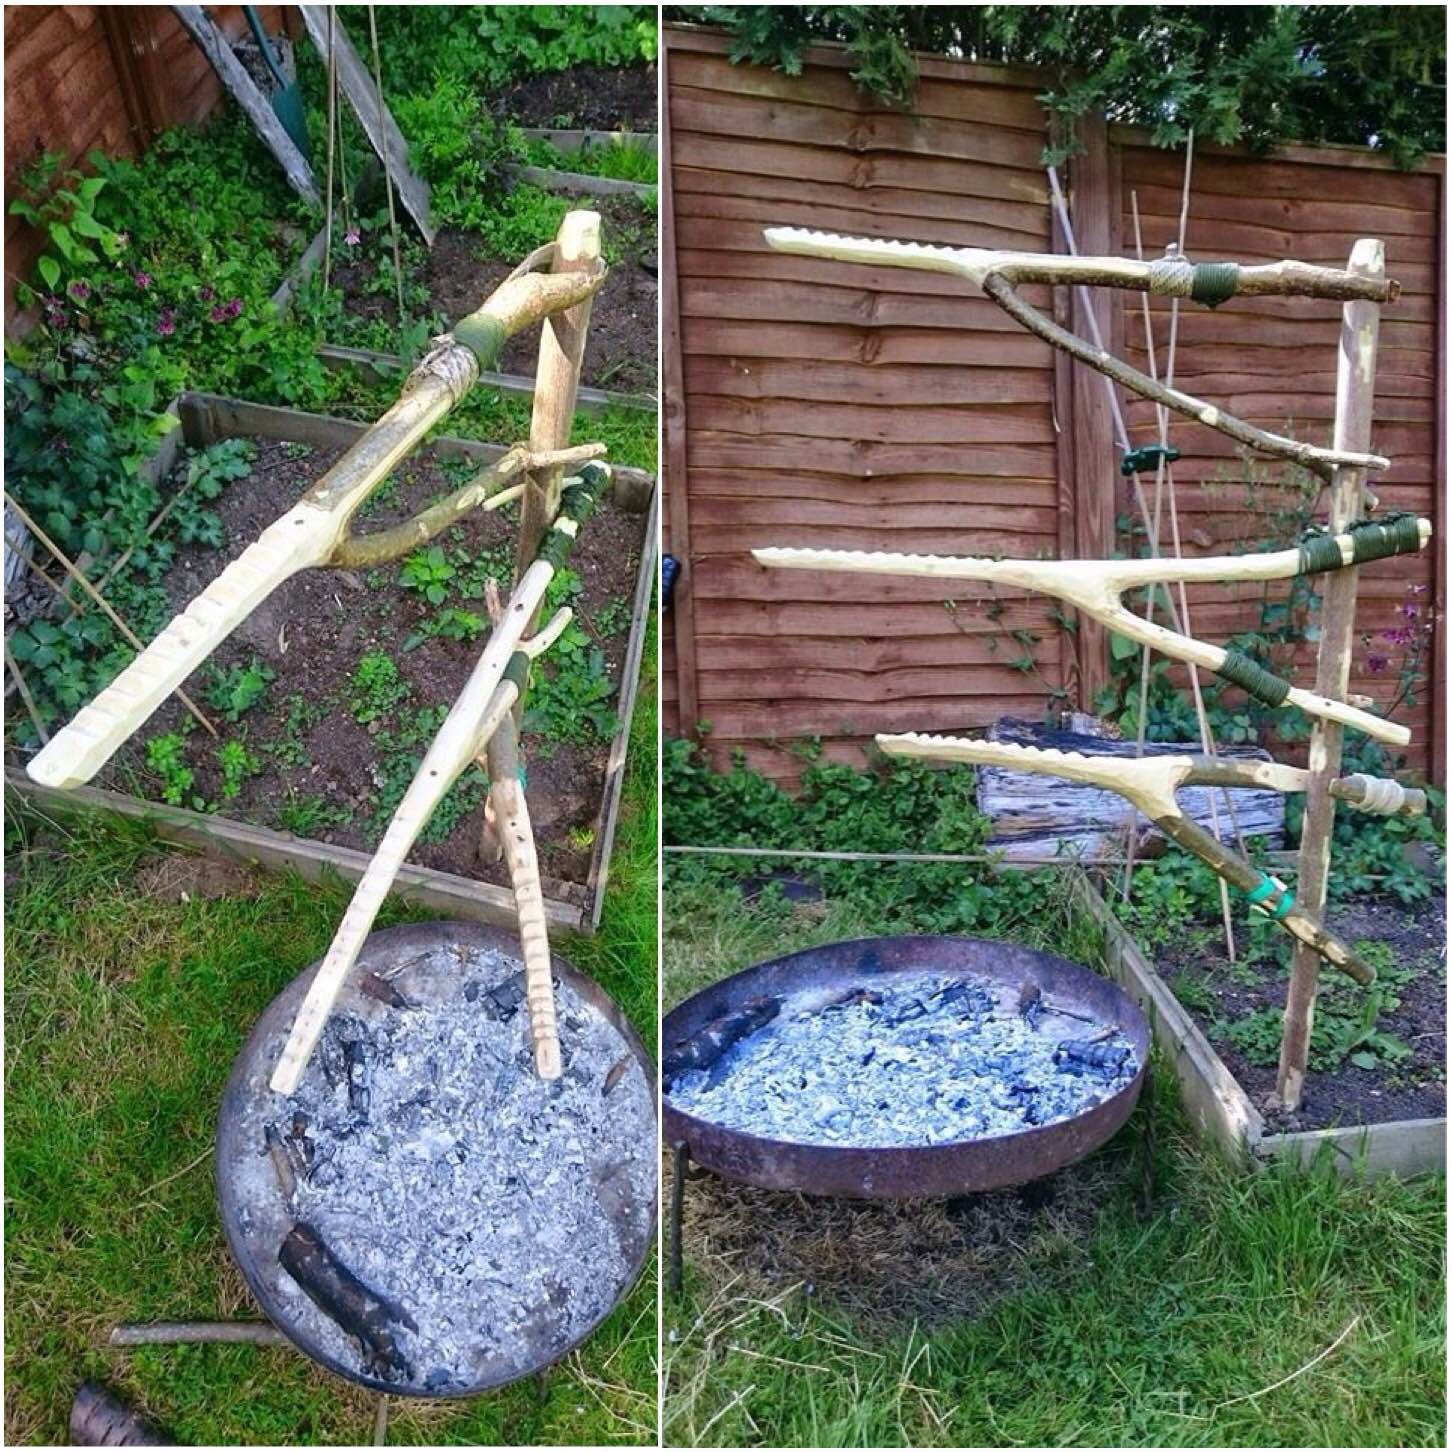
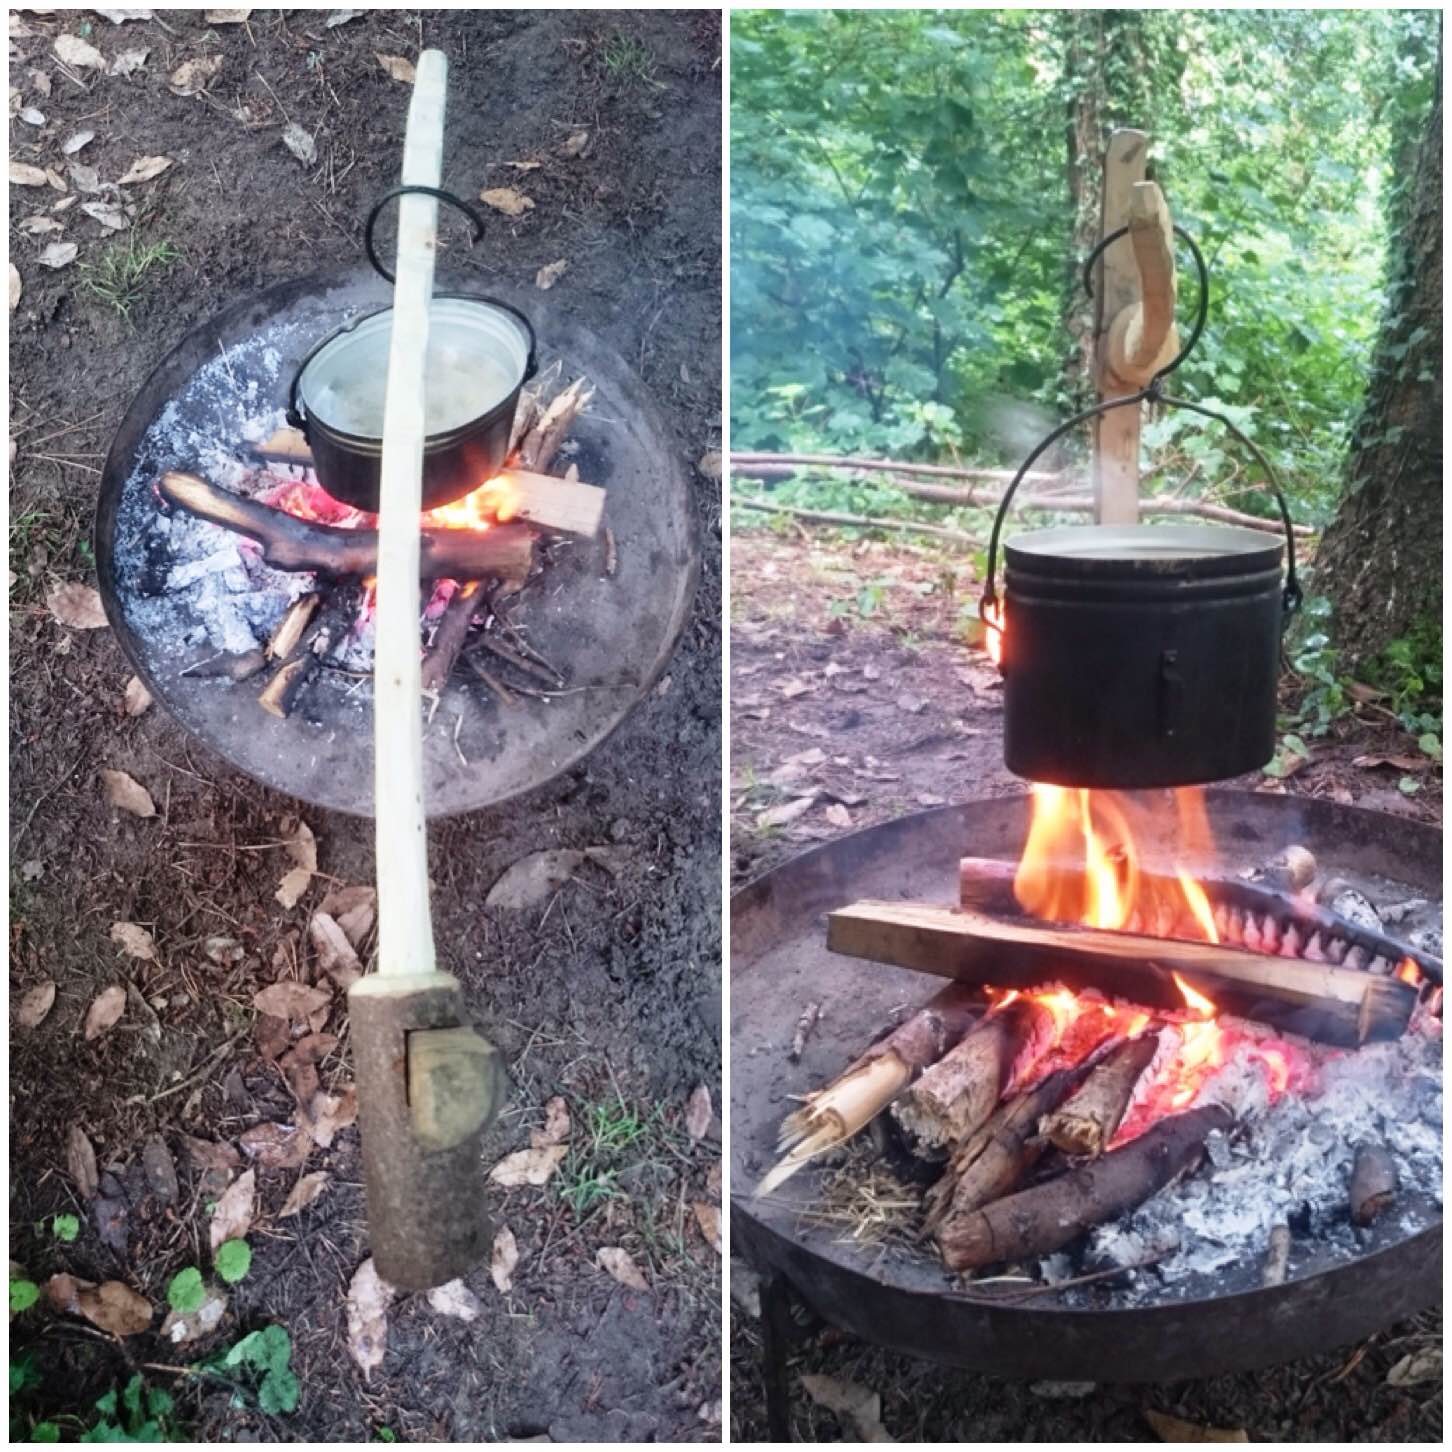
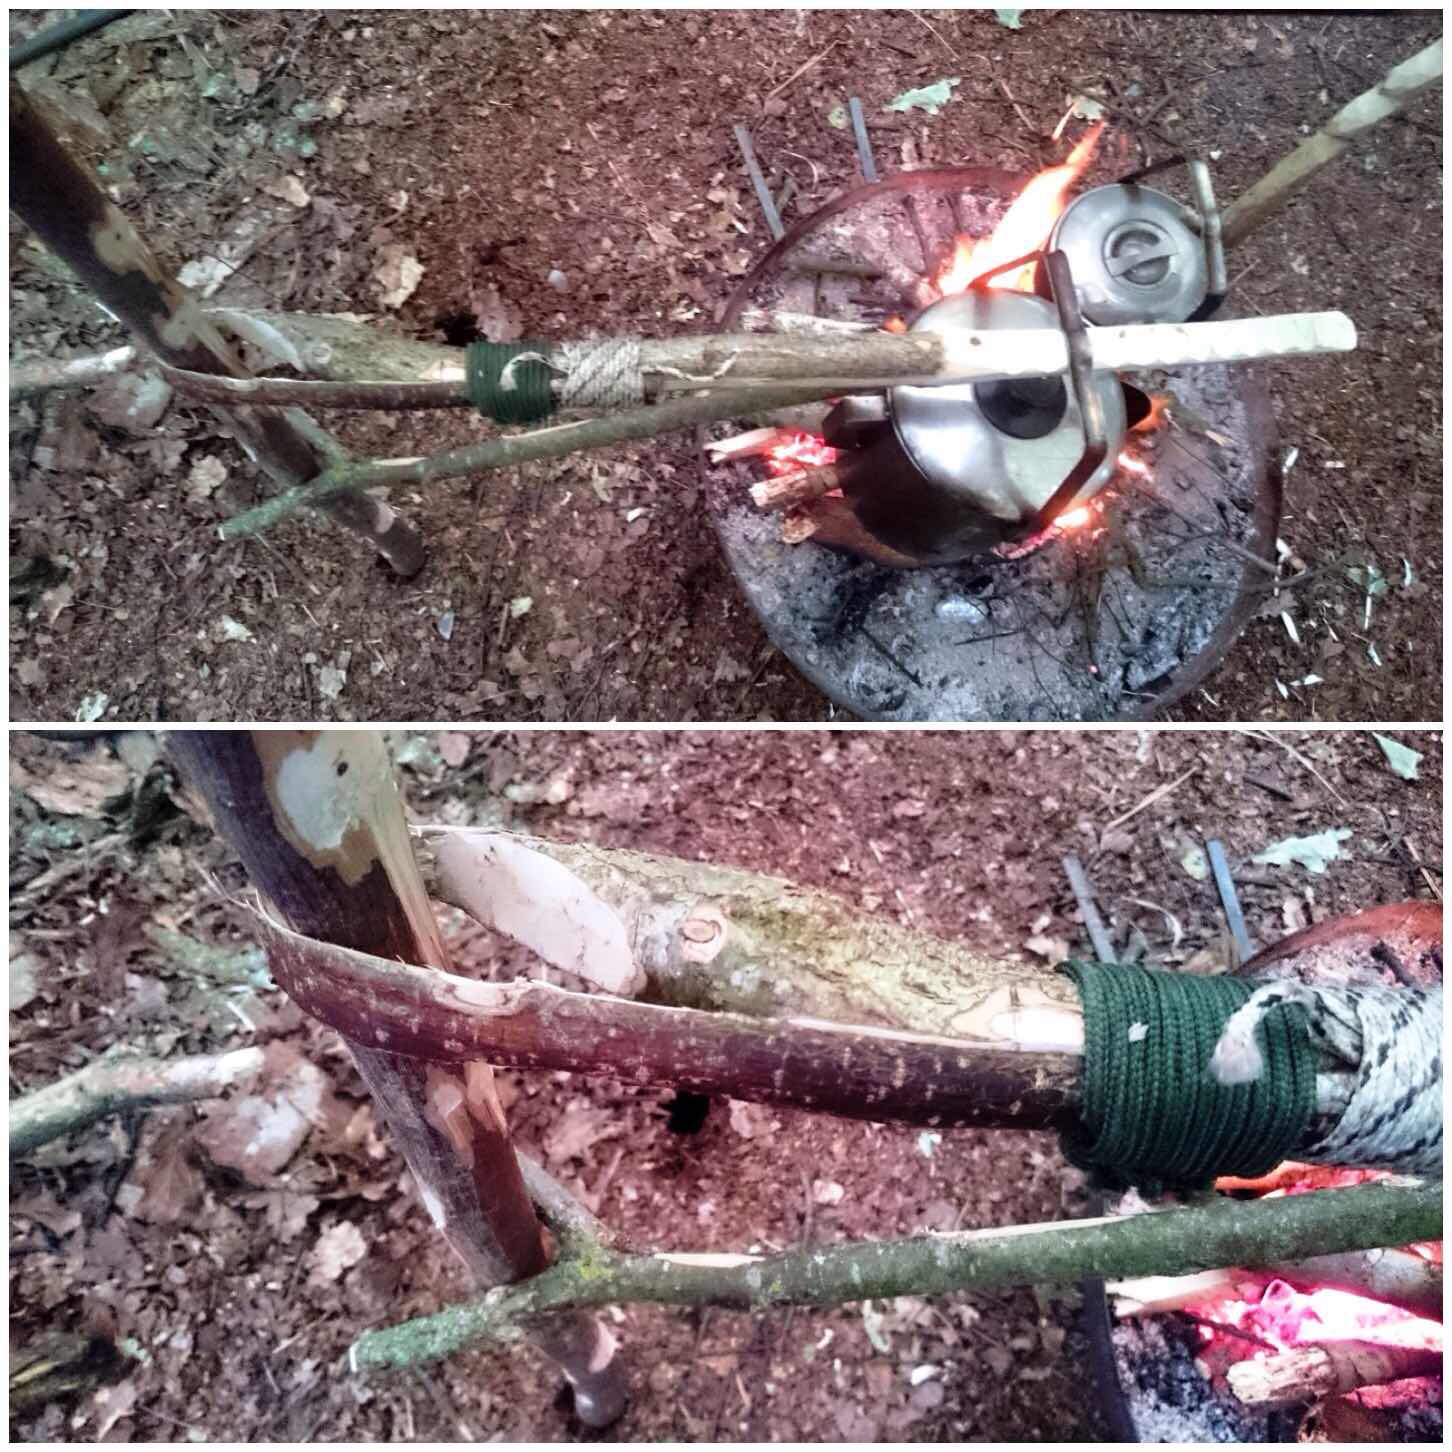
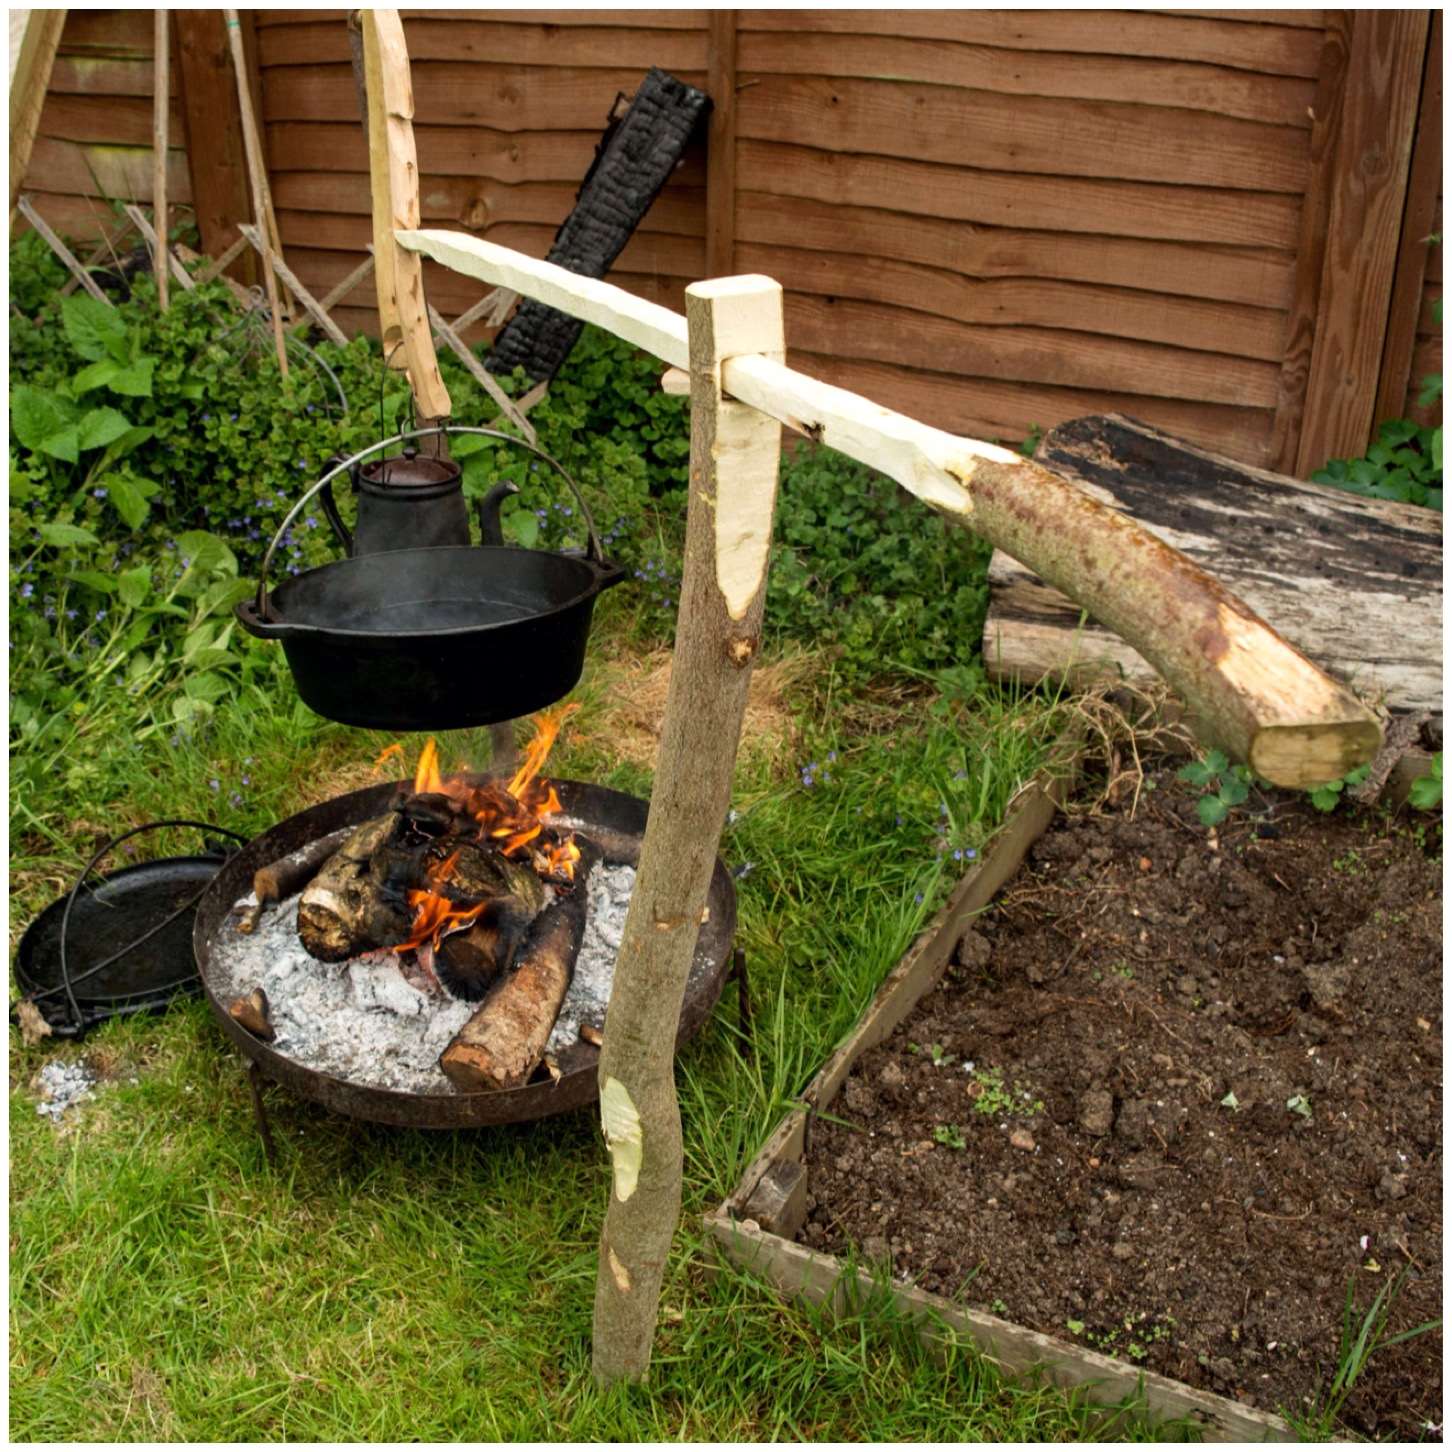
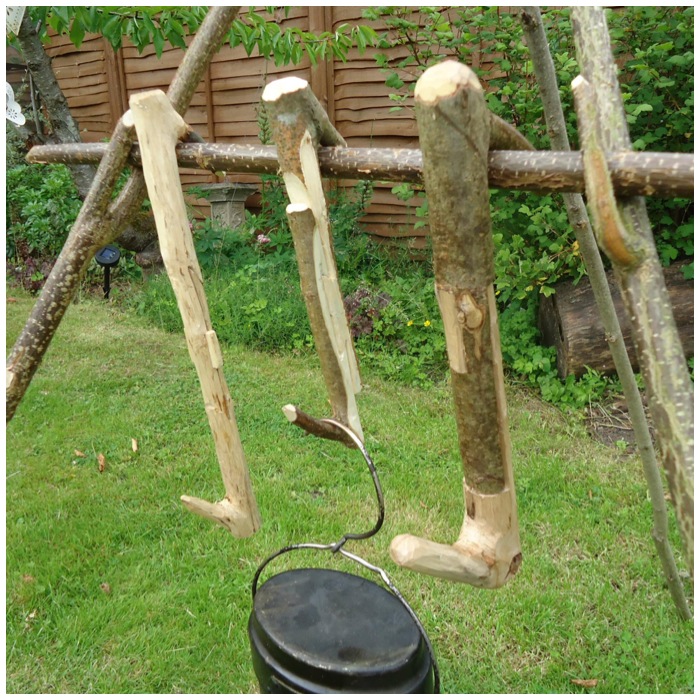
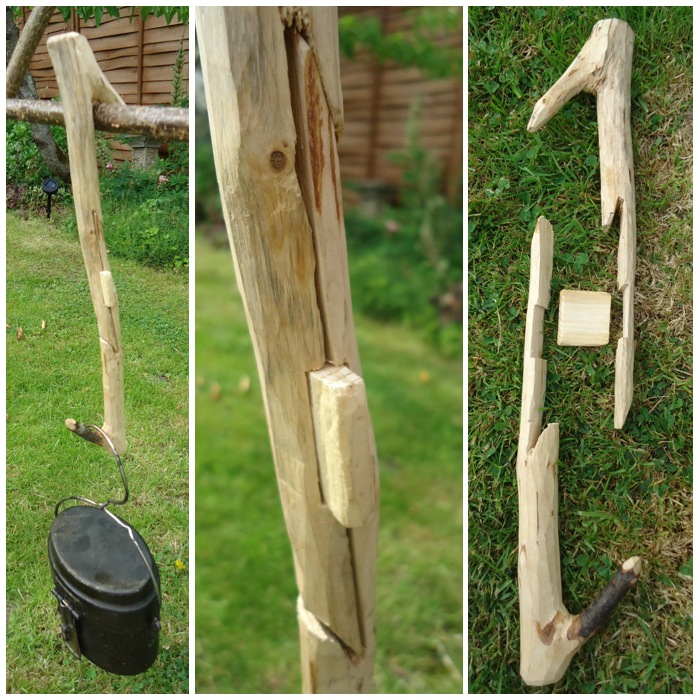
Single Fork Aures
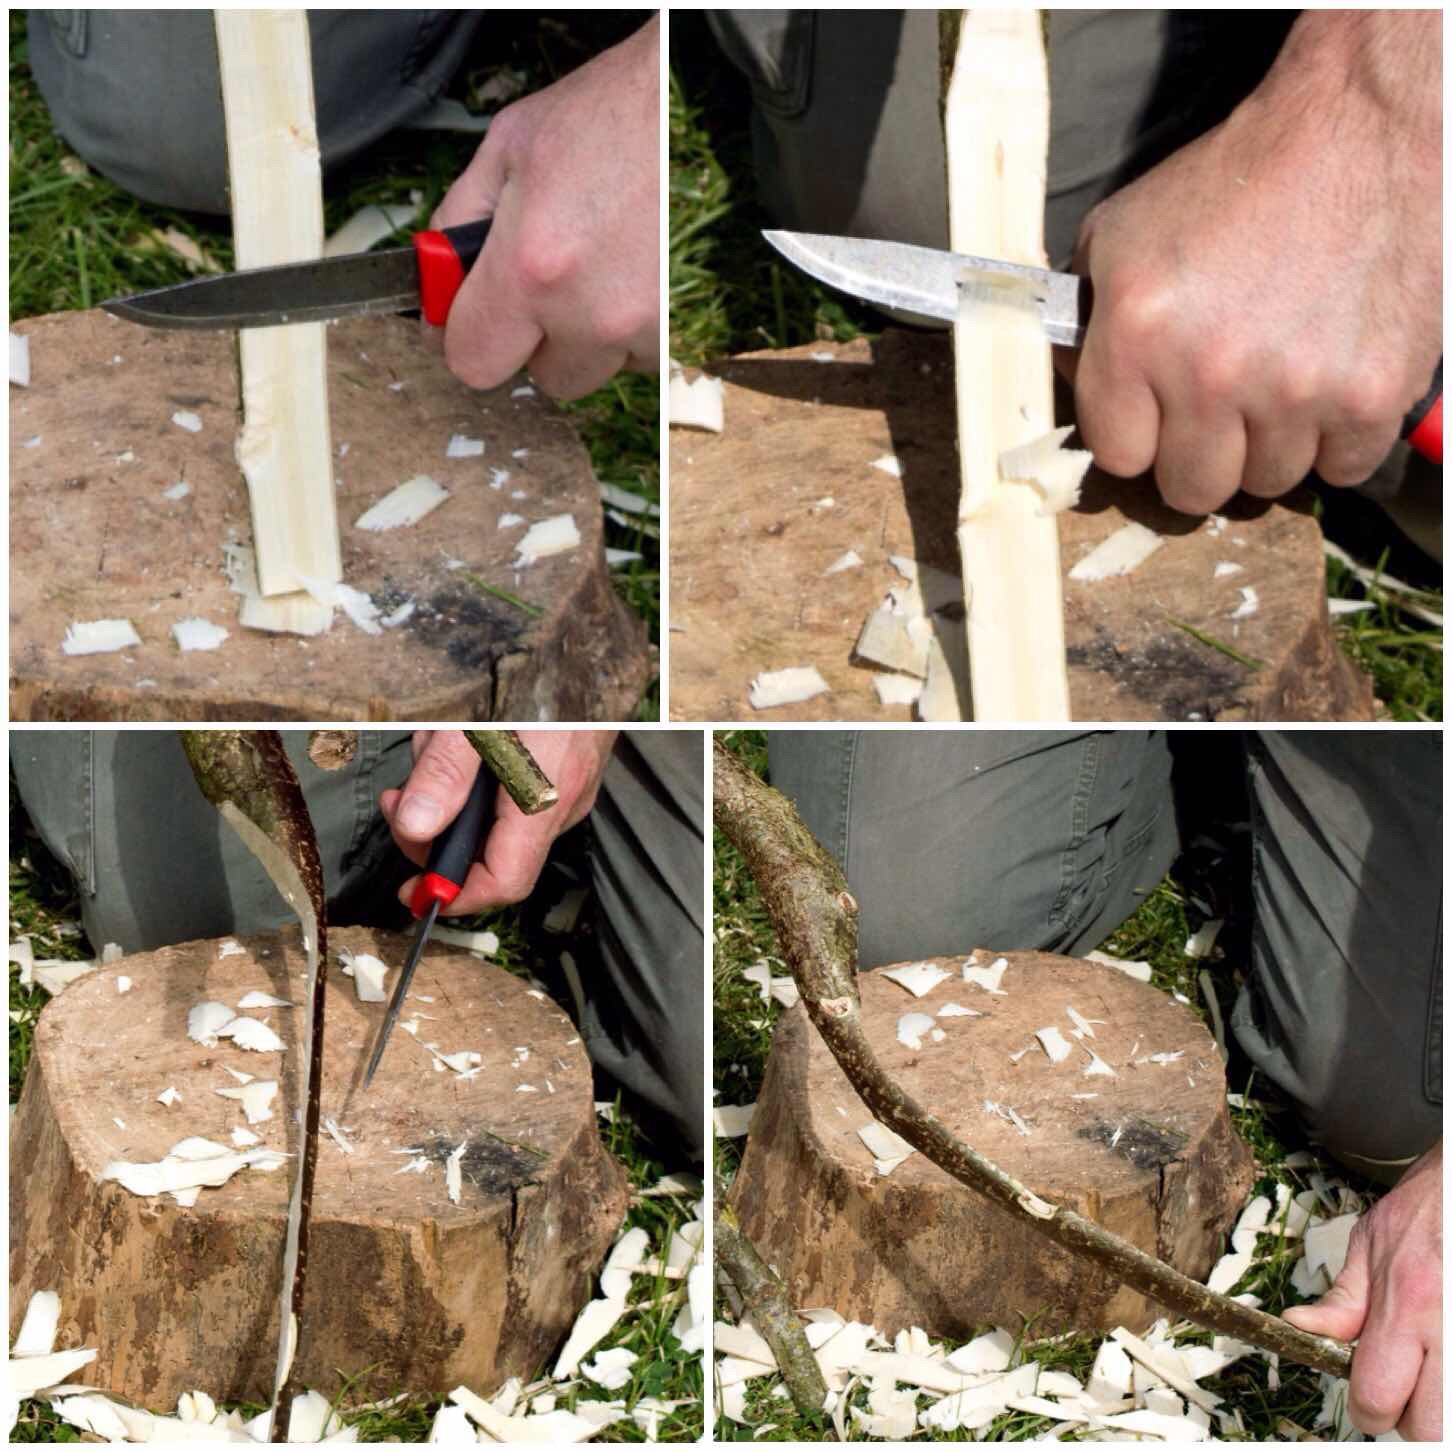
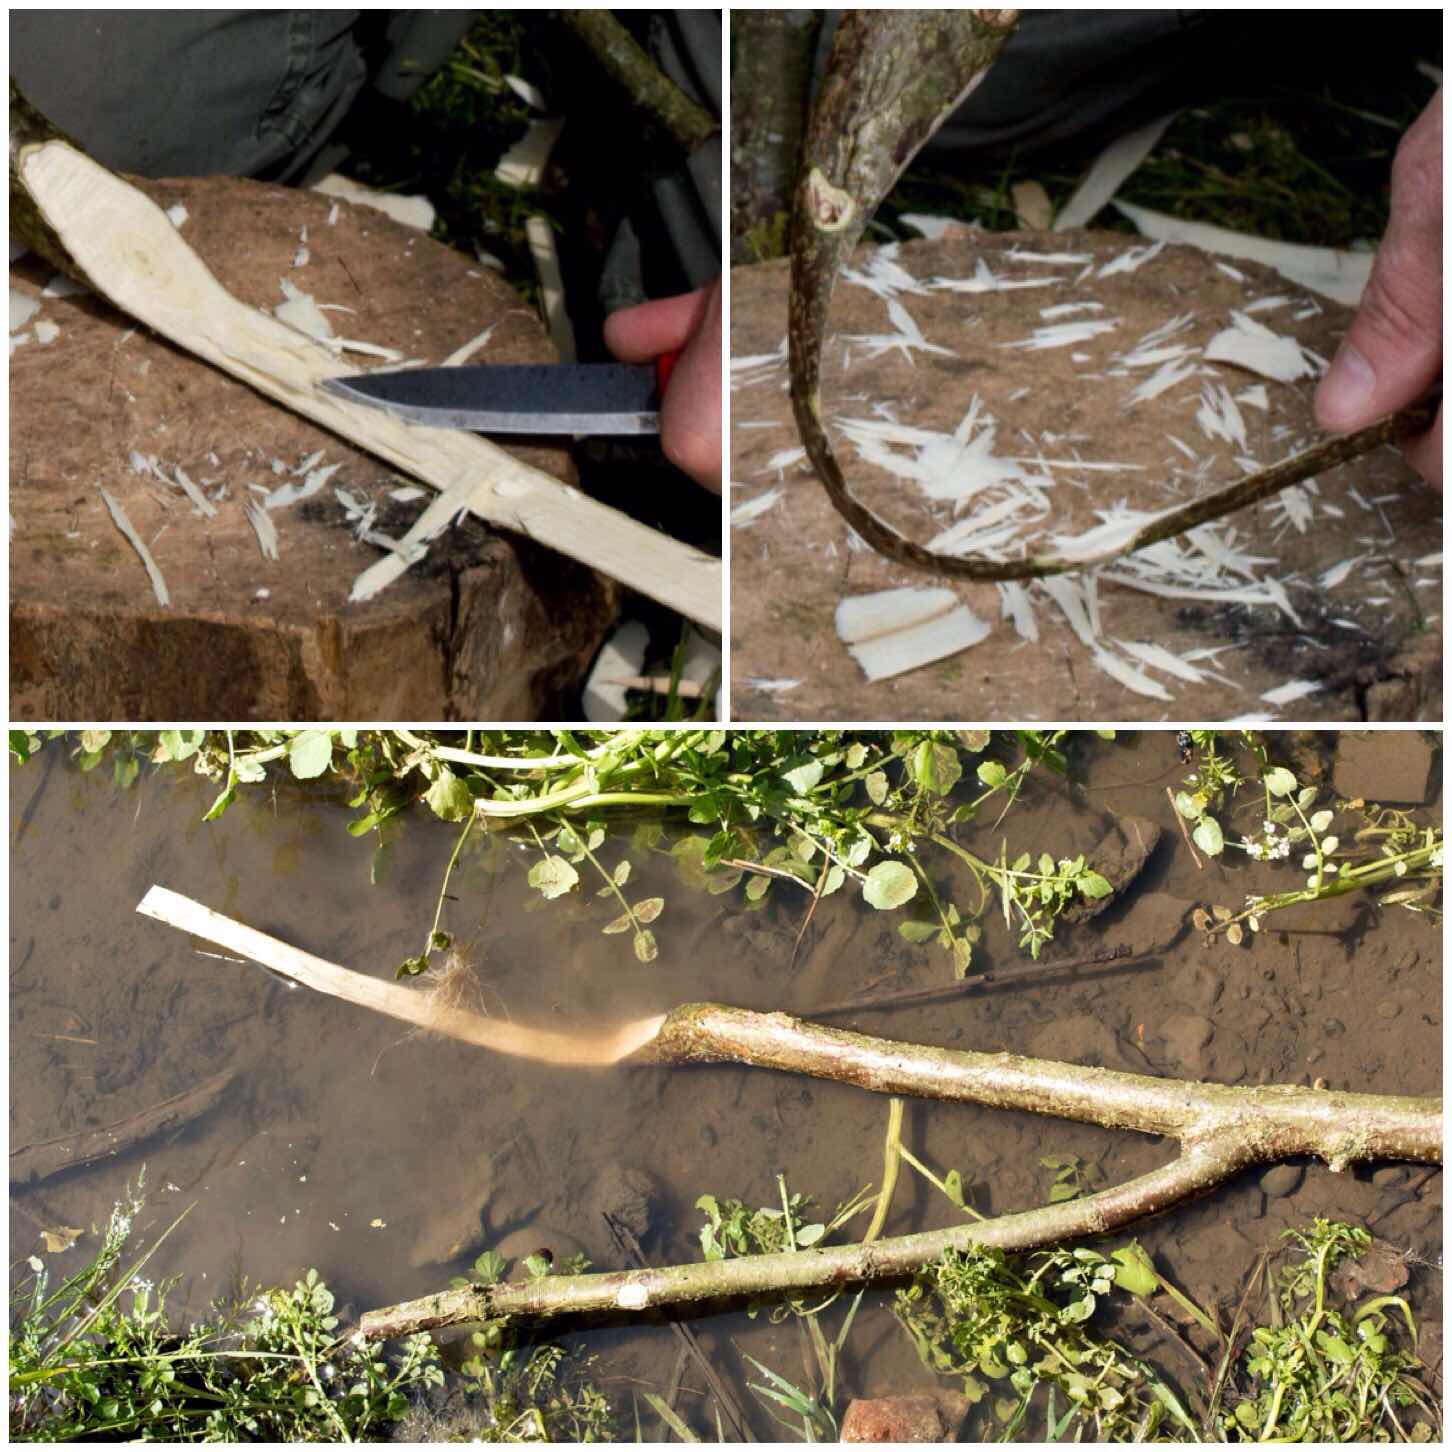
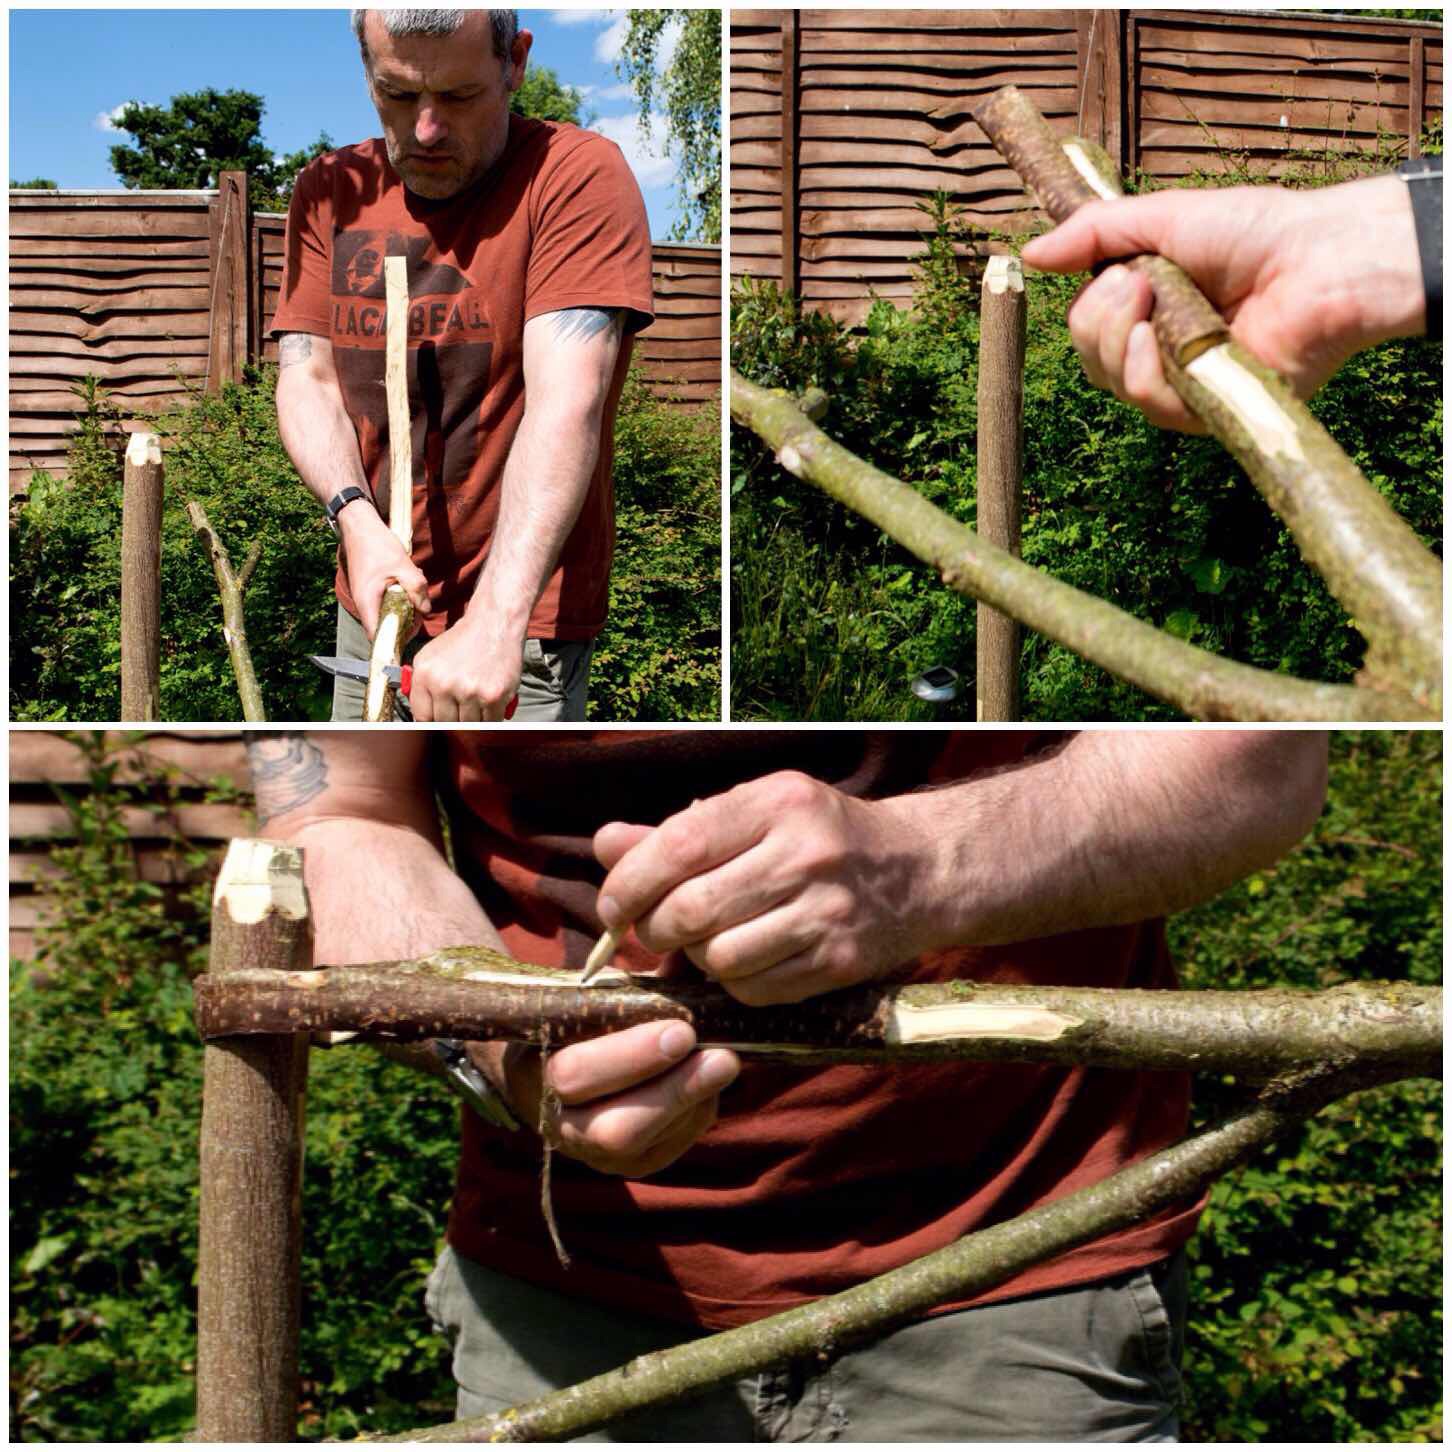
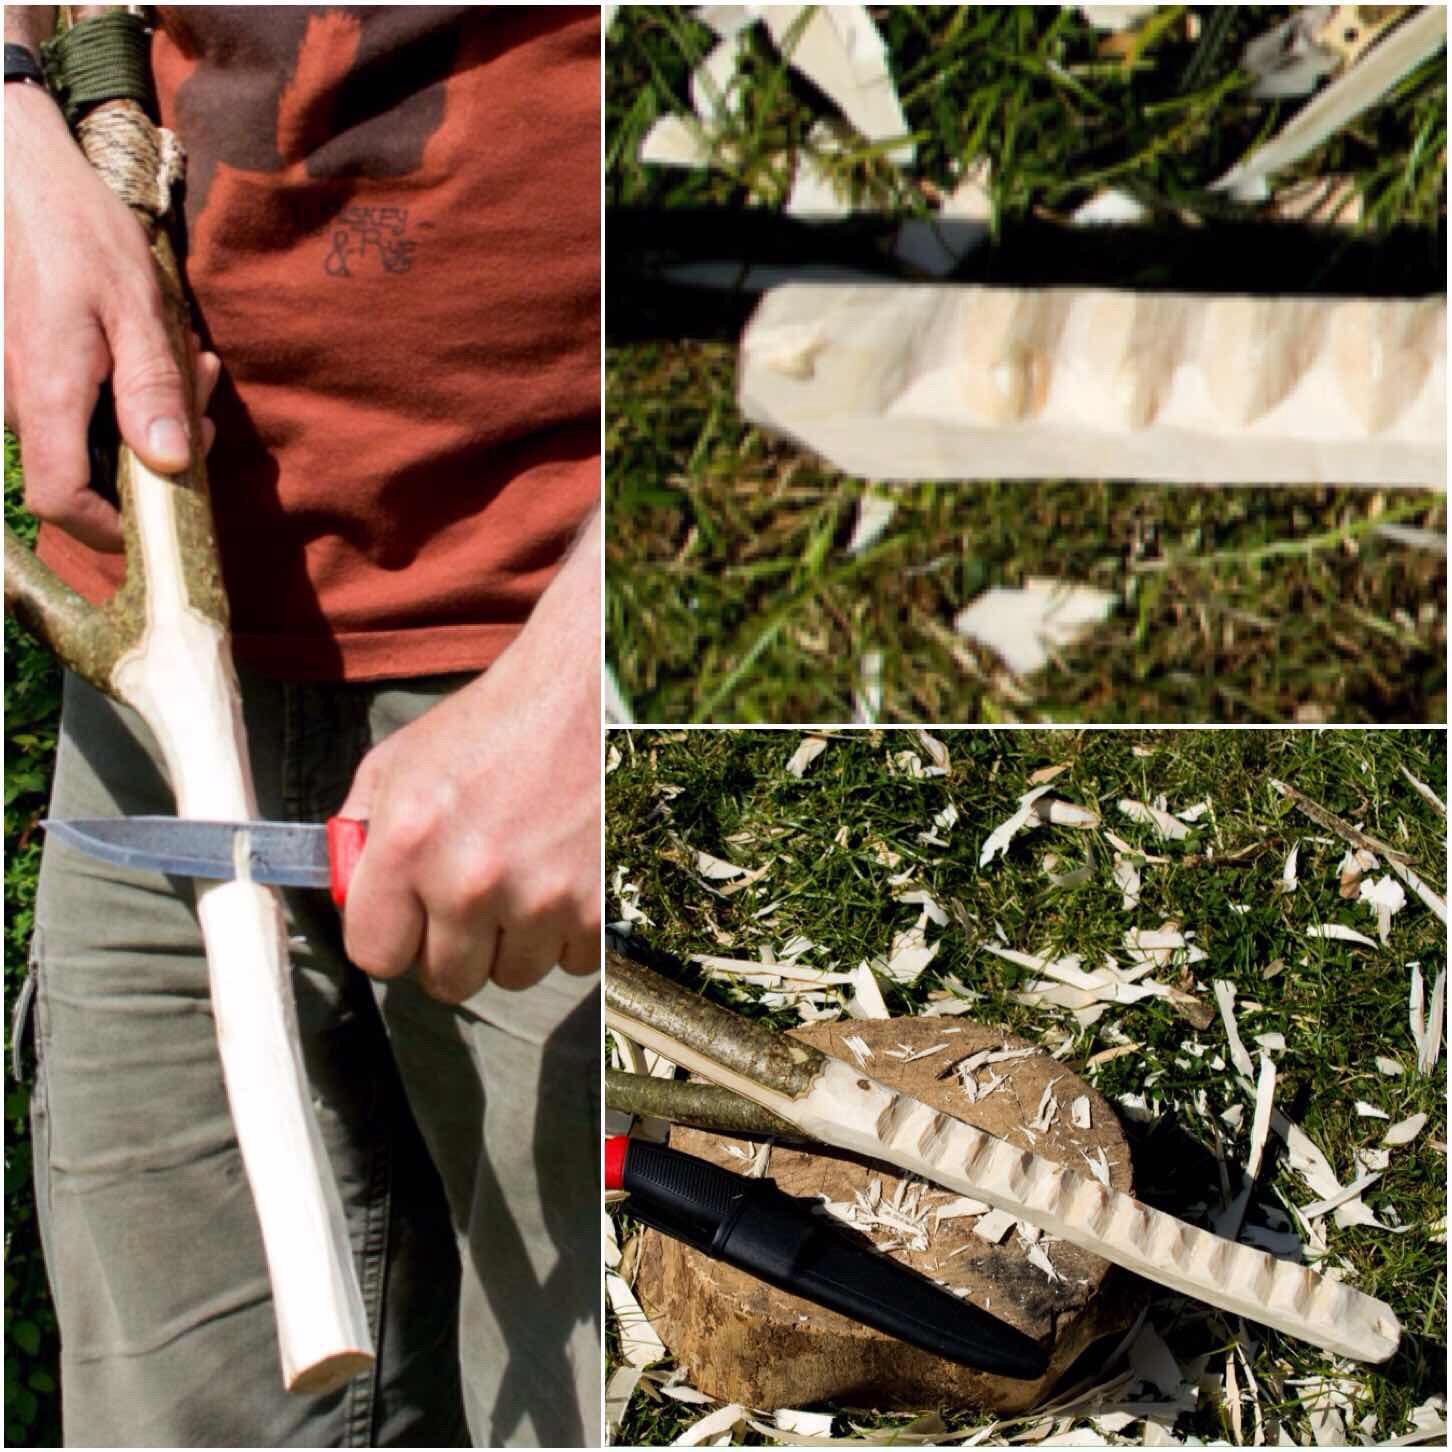
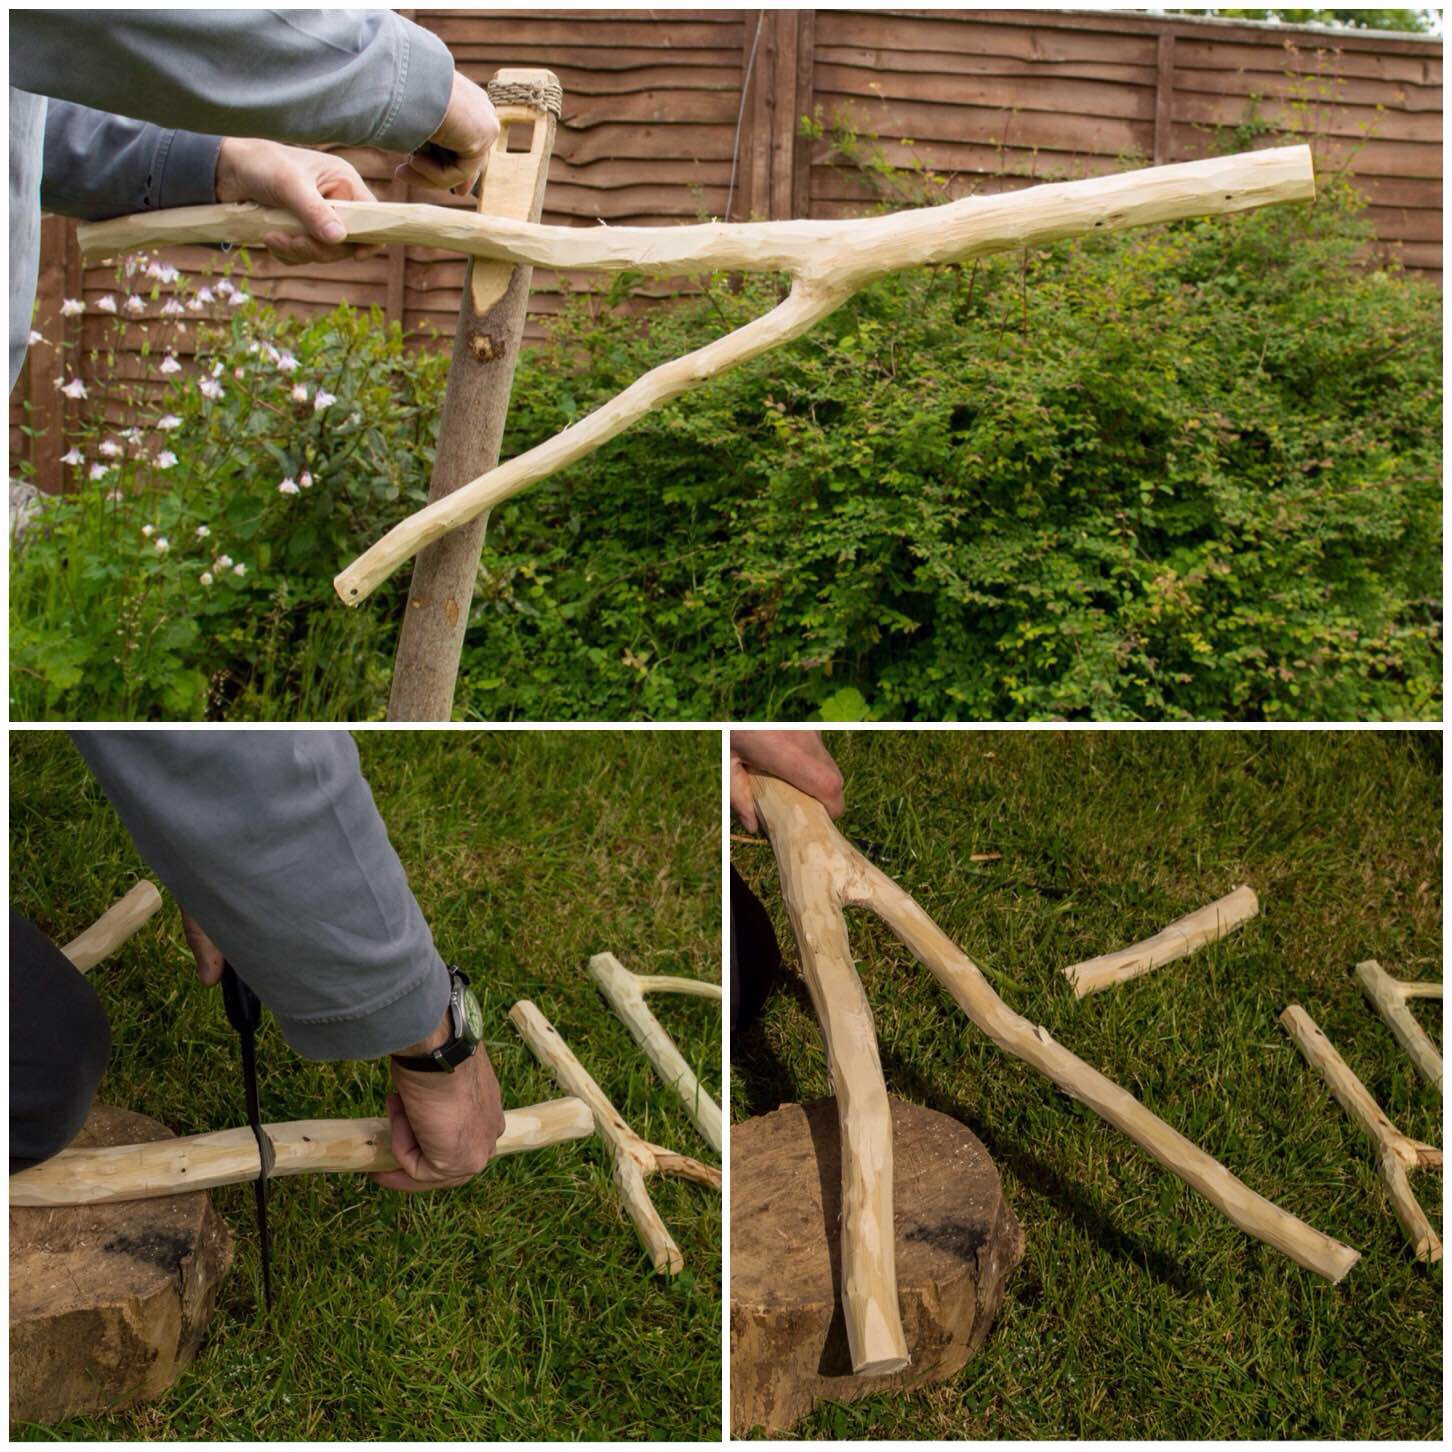
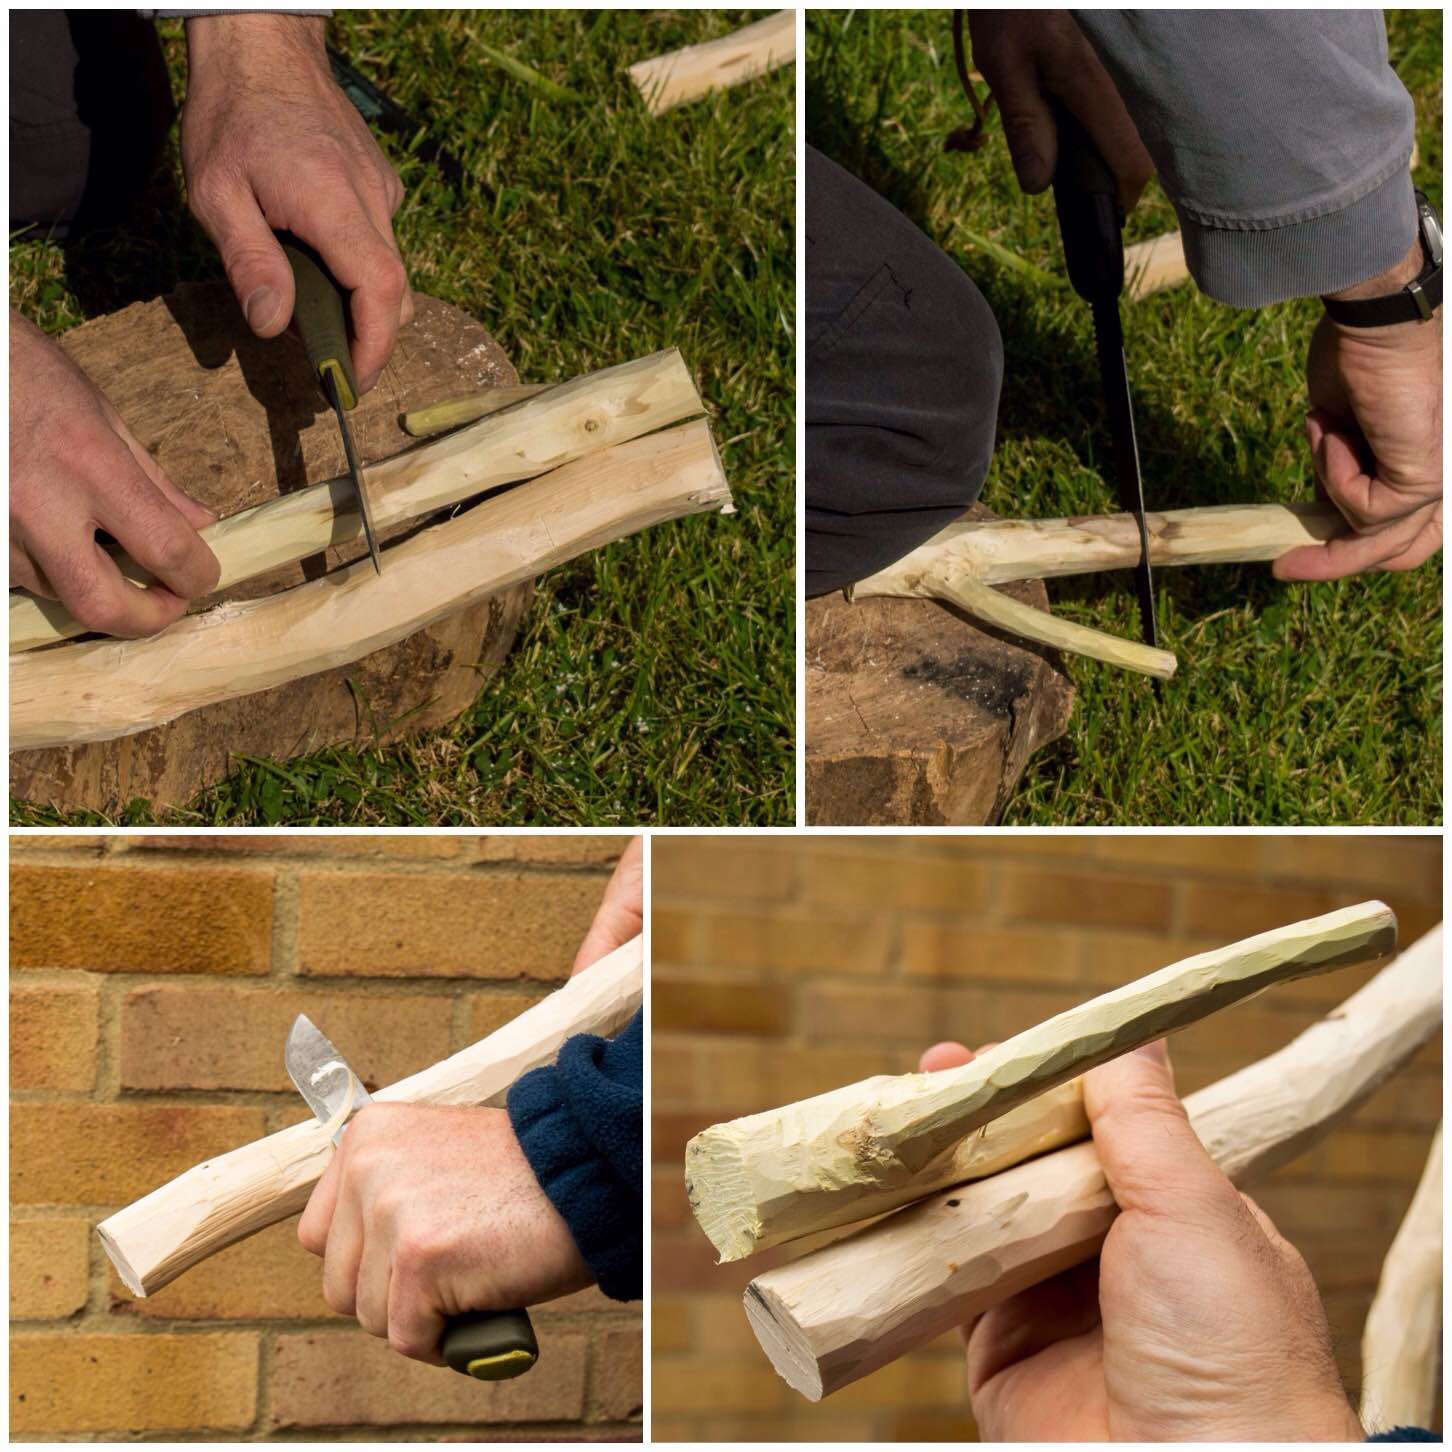
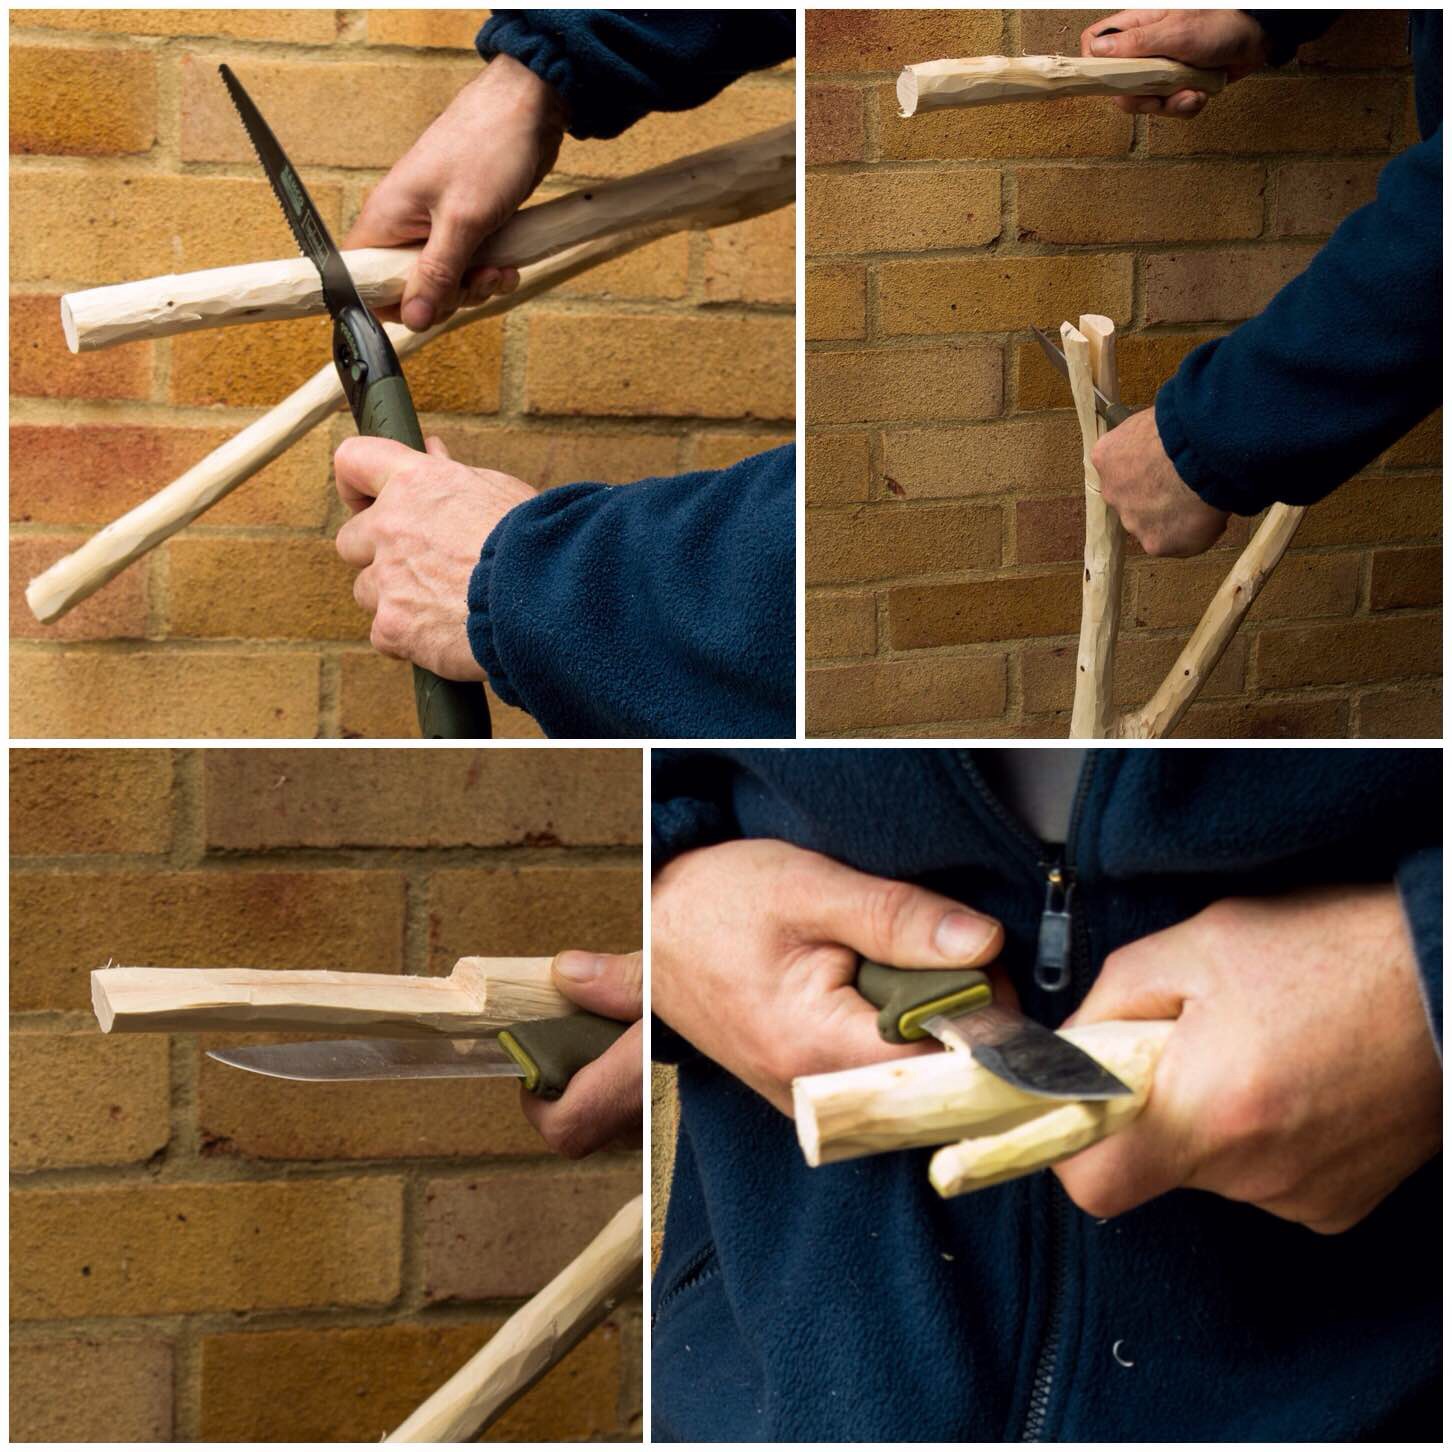
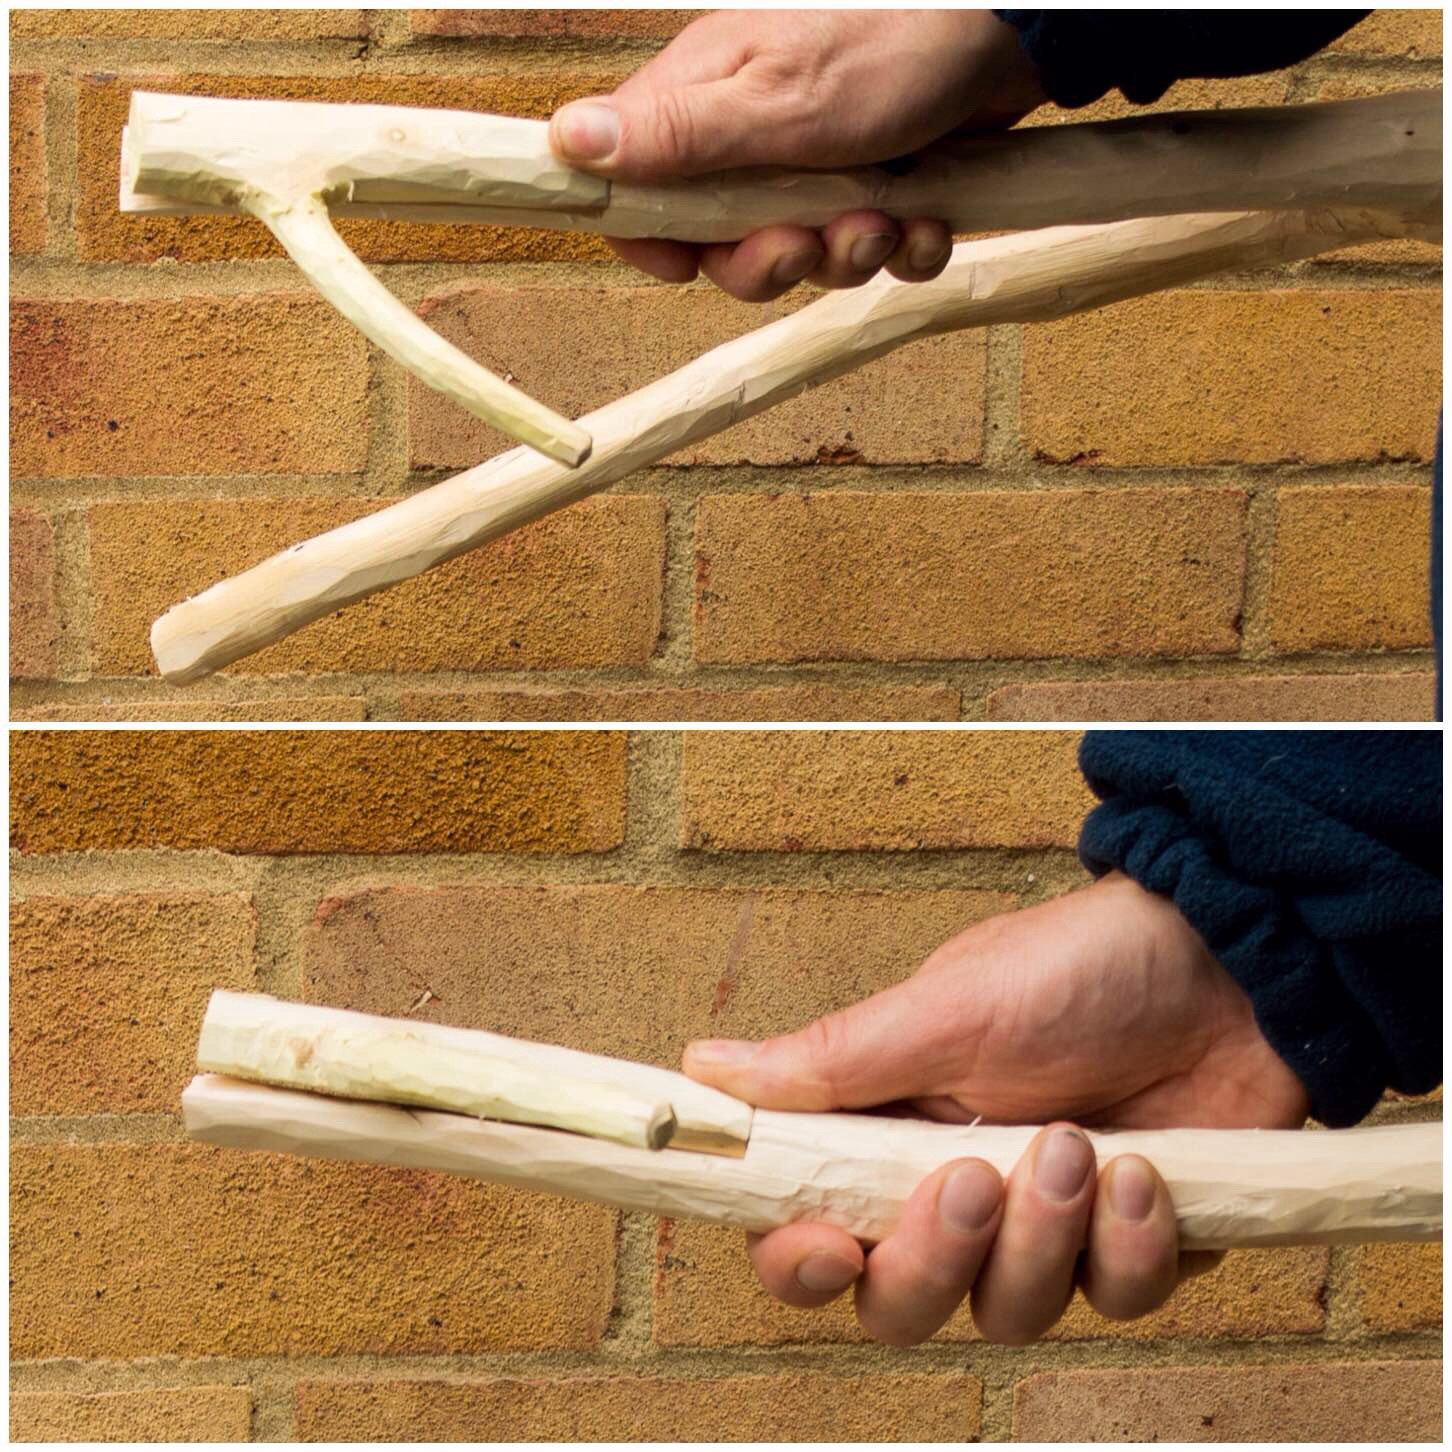
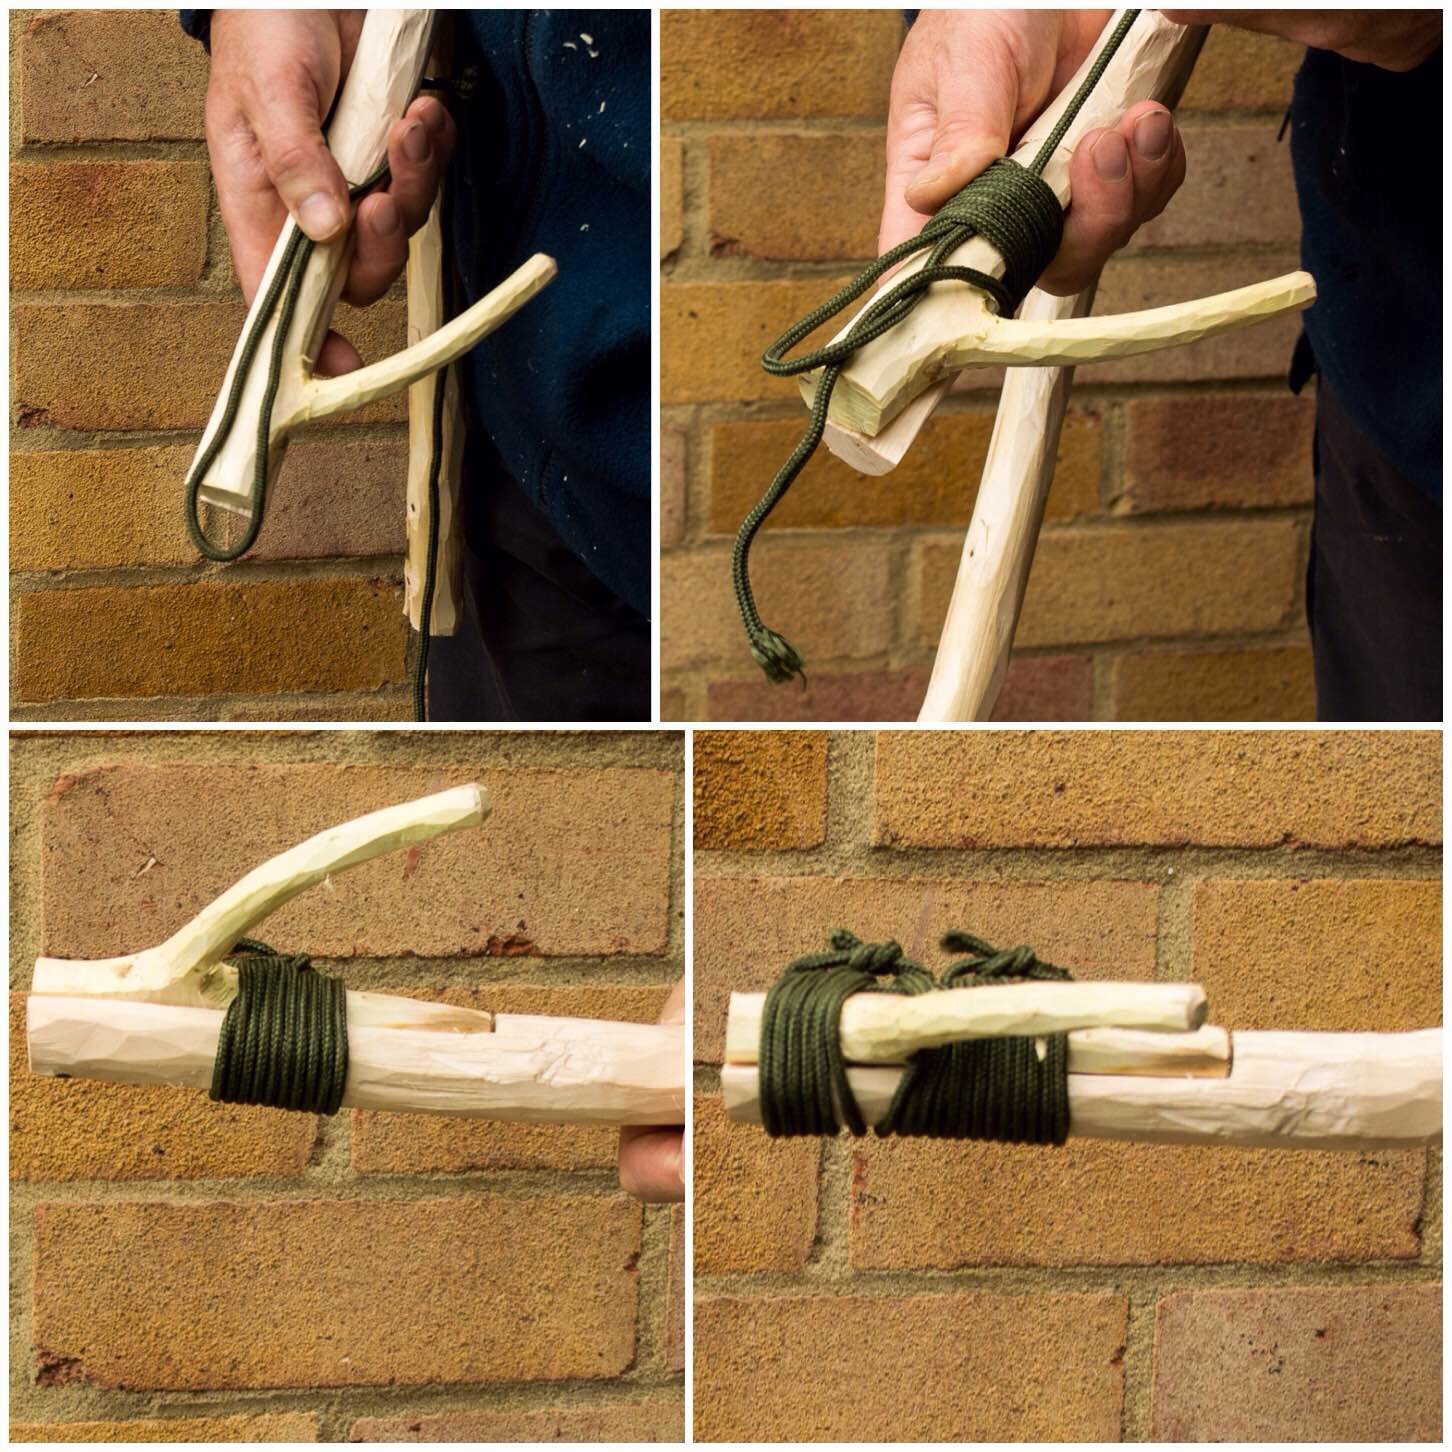
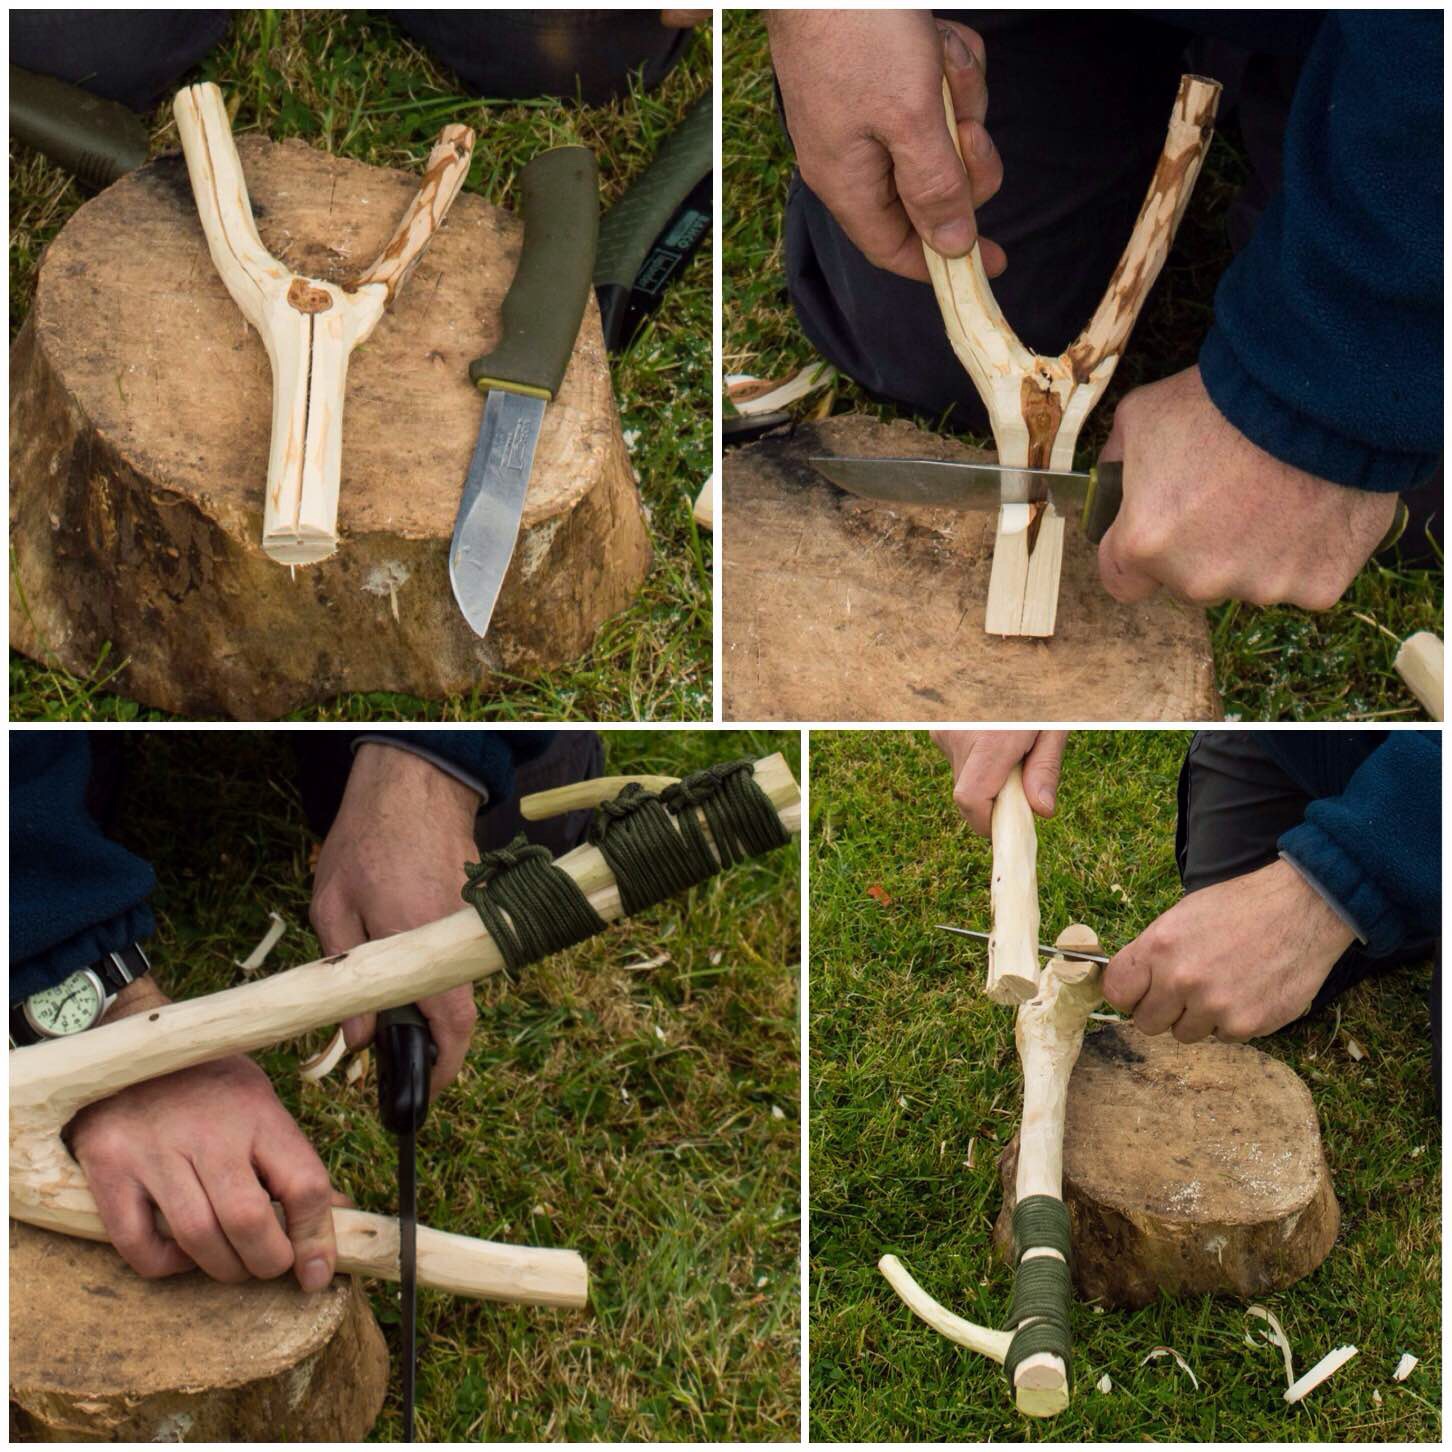
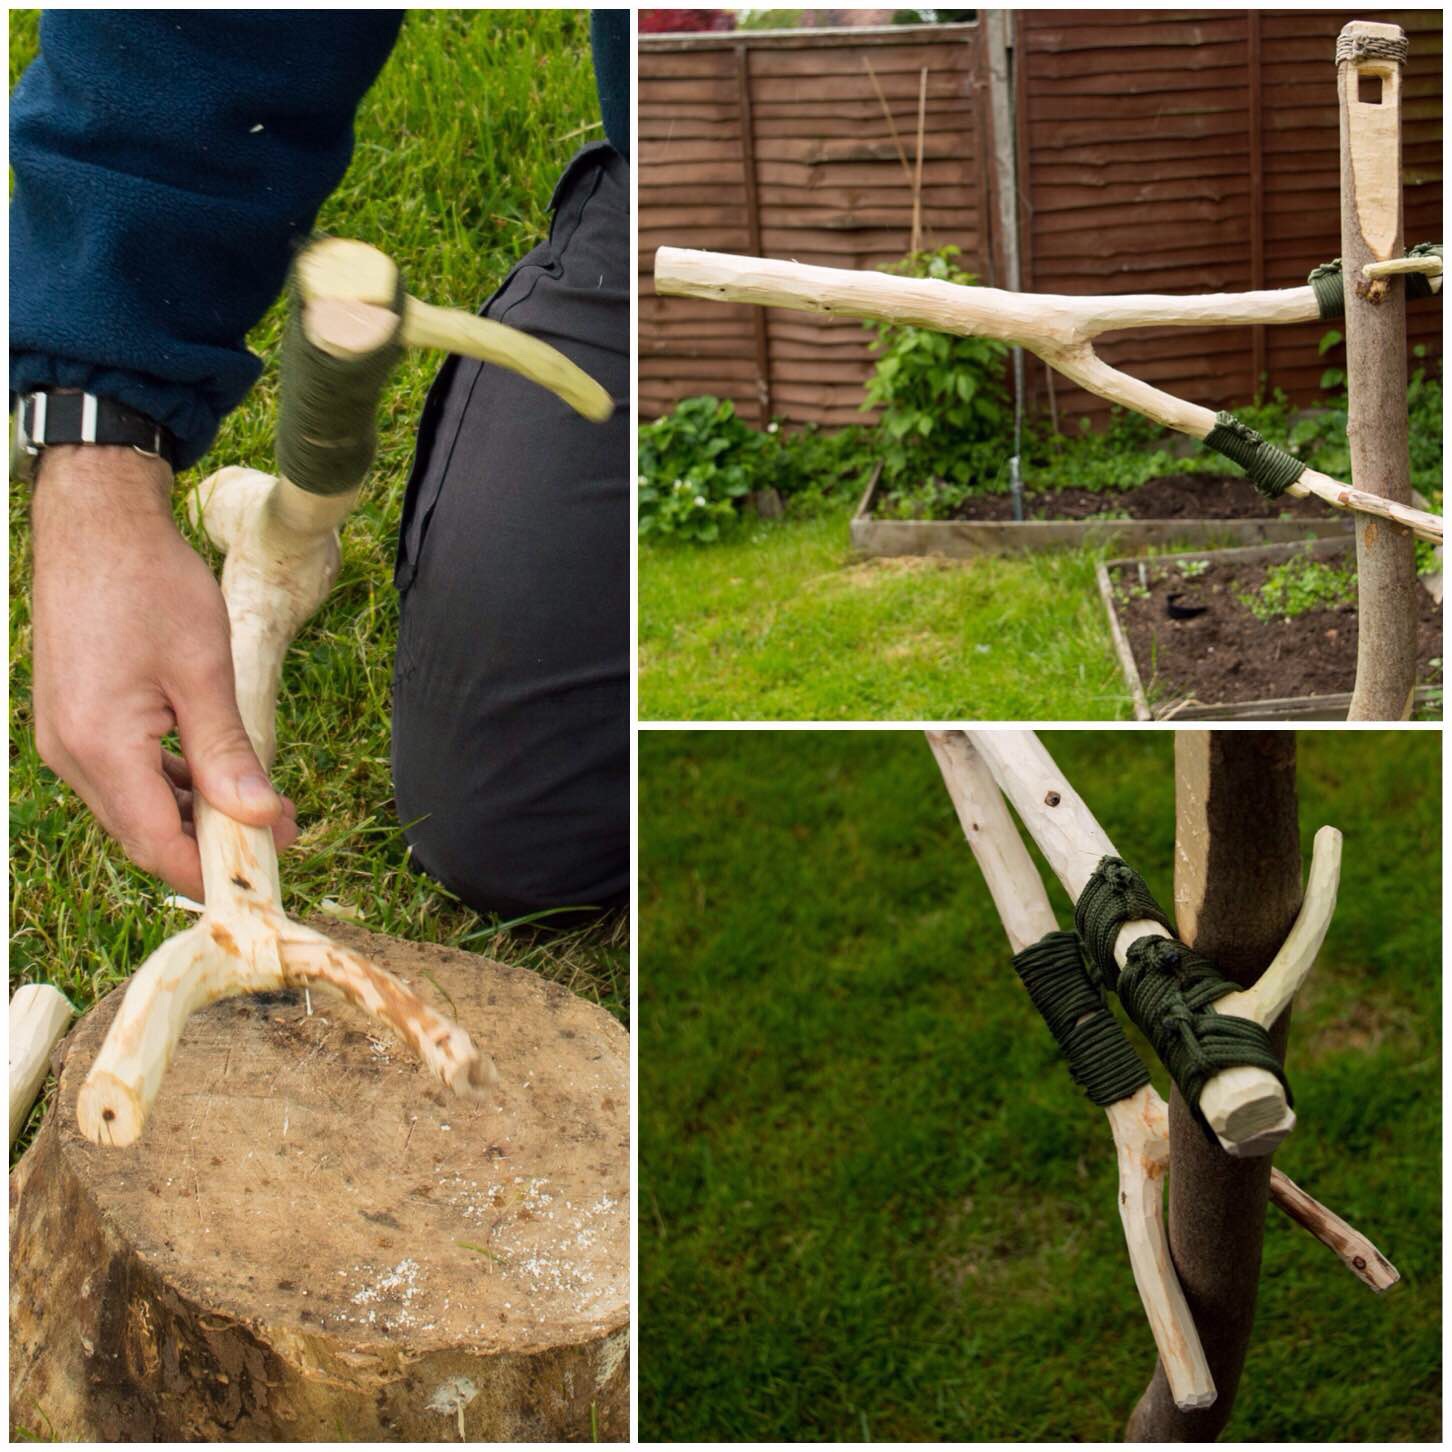
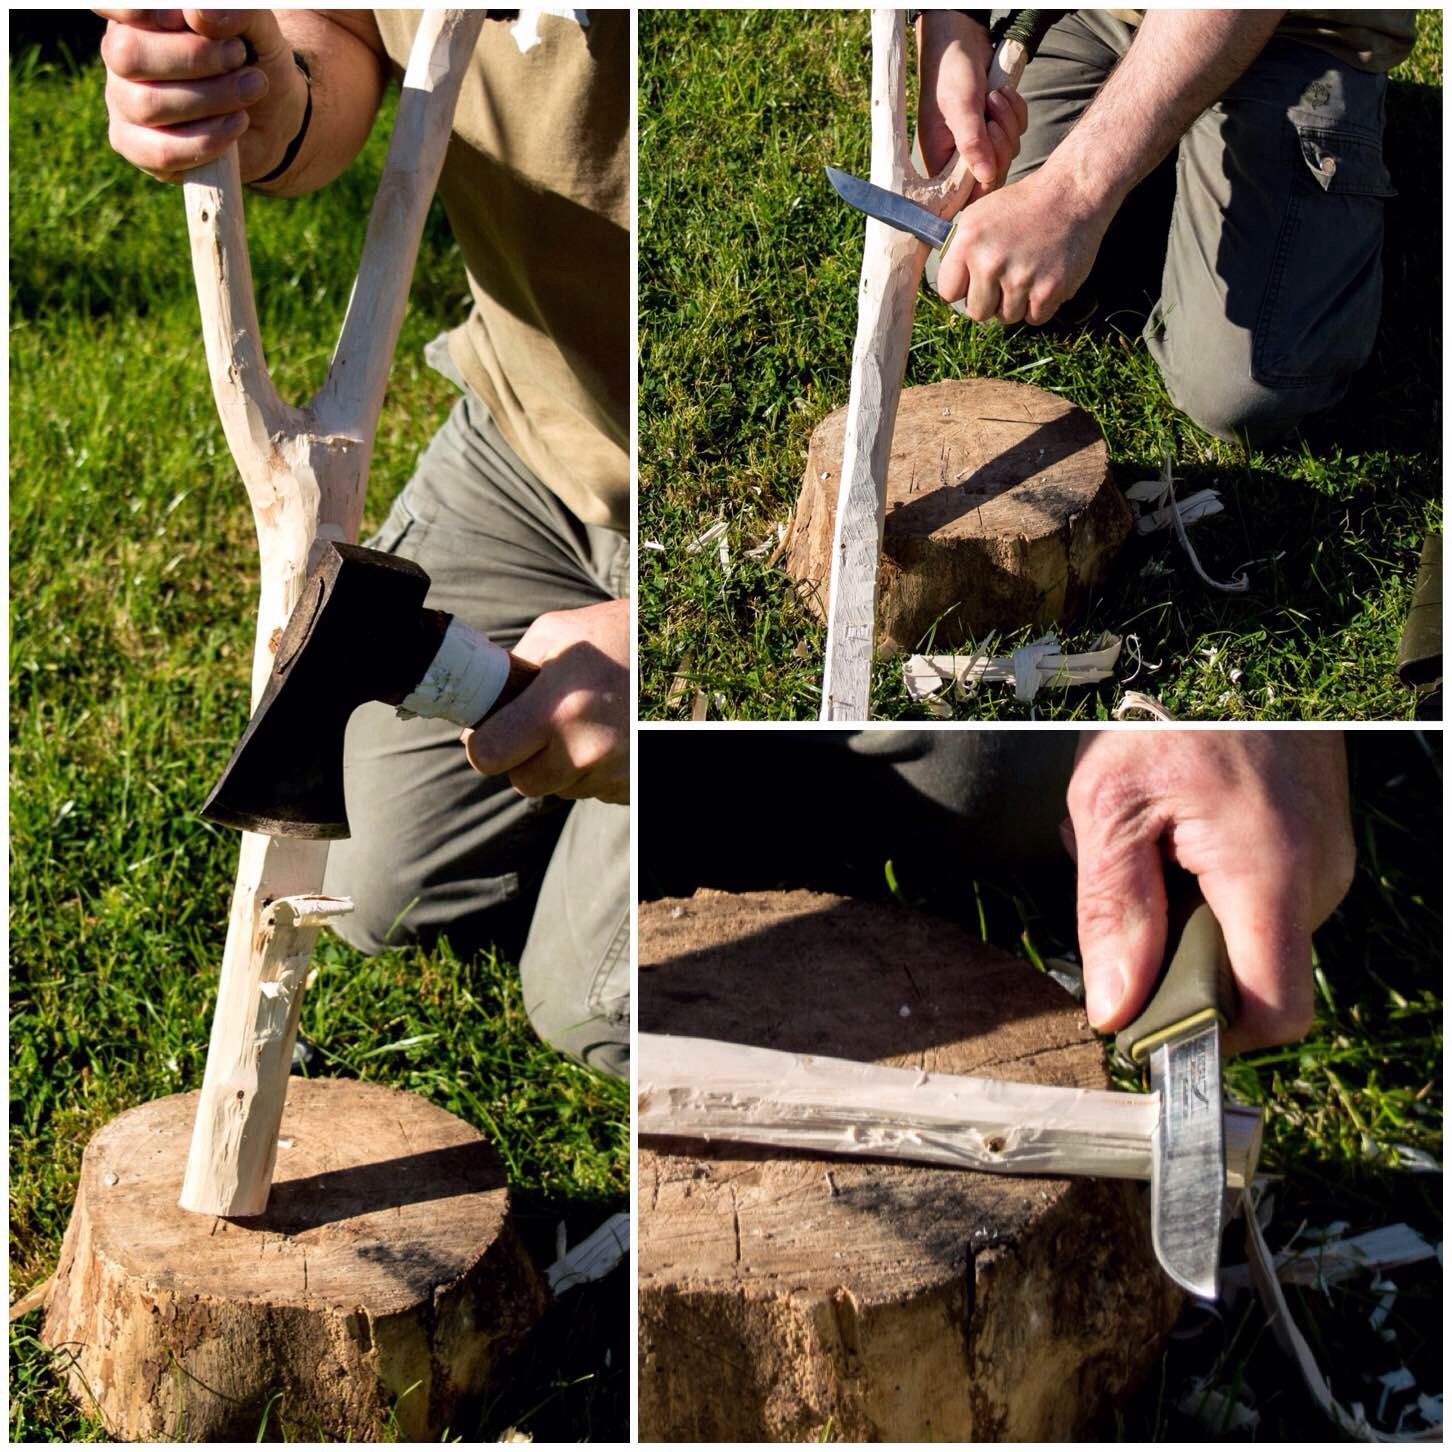
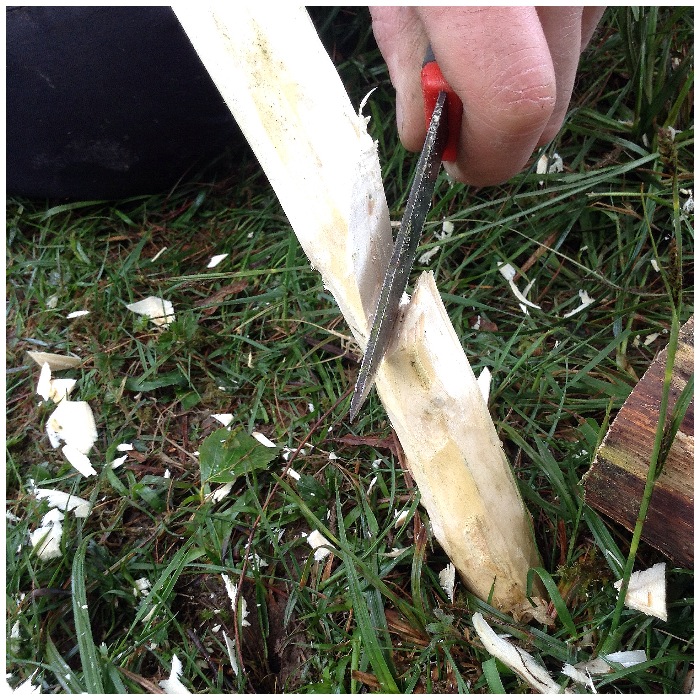
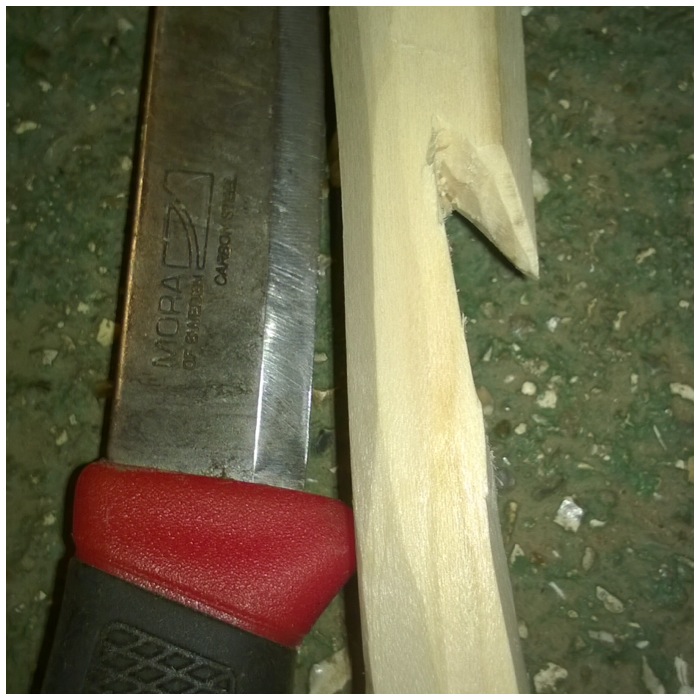
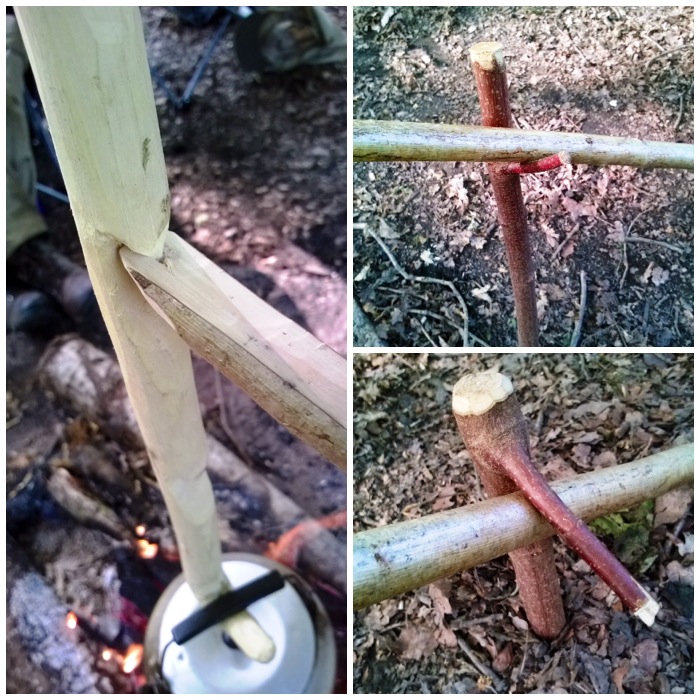
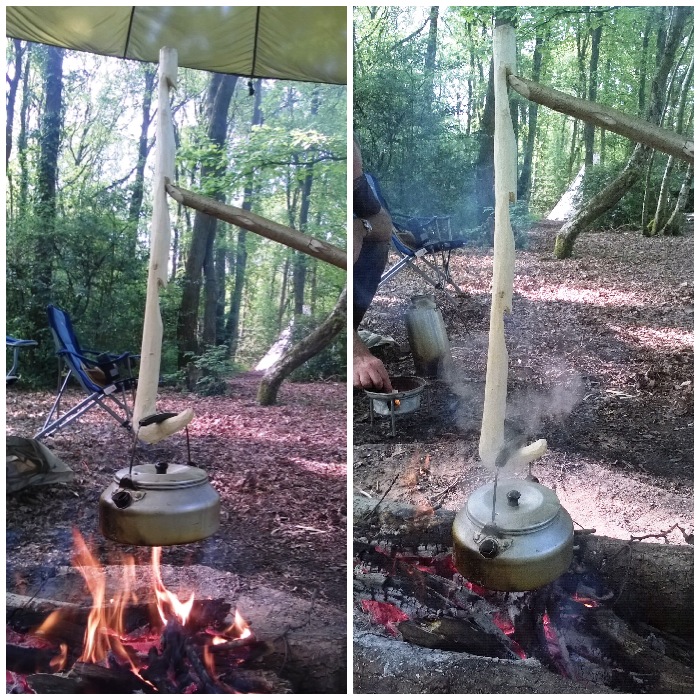
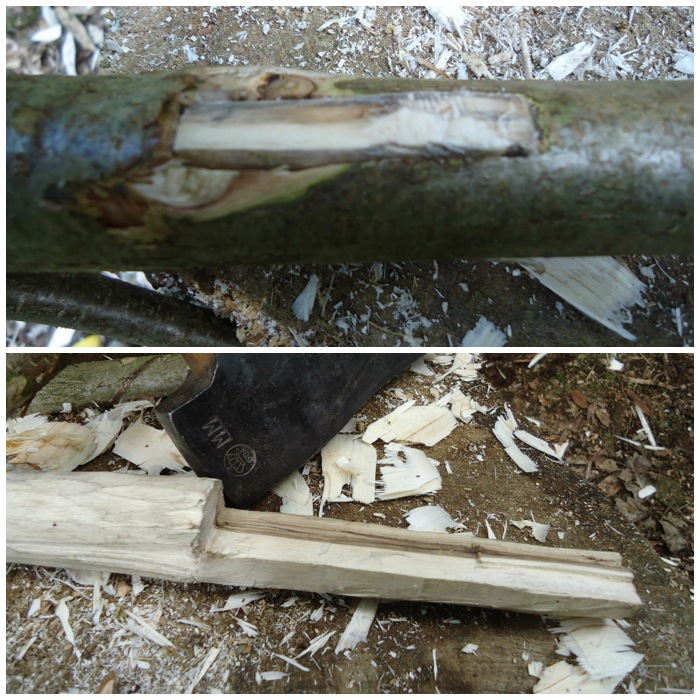
I read in the Wildwood Wisdom book of a type of adjustable crane first documented in the early 20th century by a Scout Master called Victor Aures. It is a simple device however it is reliant on finding a branch with a specific set of smaller branches off it. I discovered a variation on this crane a number of years ago that required only a single fork in the branch and after a bit of splitting and splicing you have a fully adjustable crane.
Single Fork Aures Crane
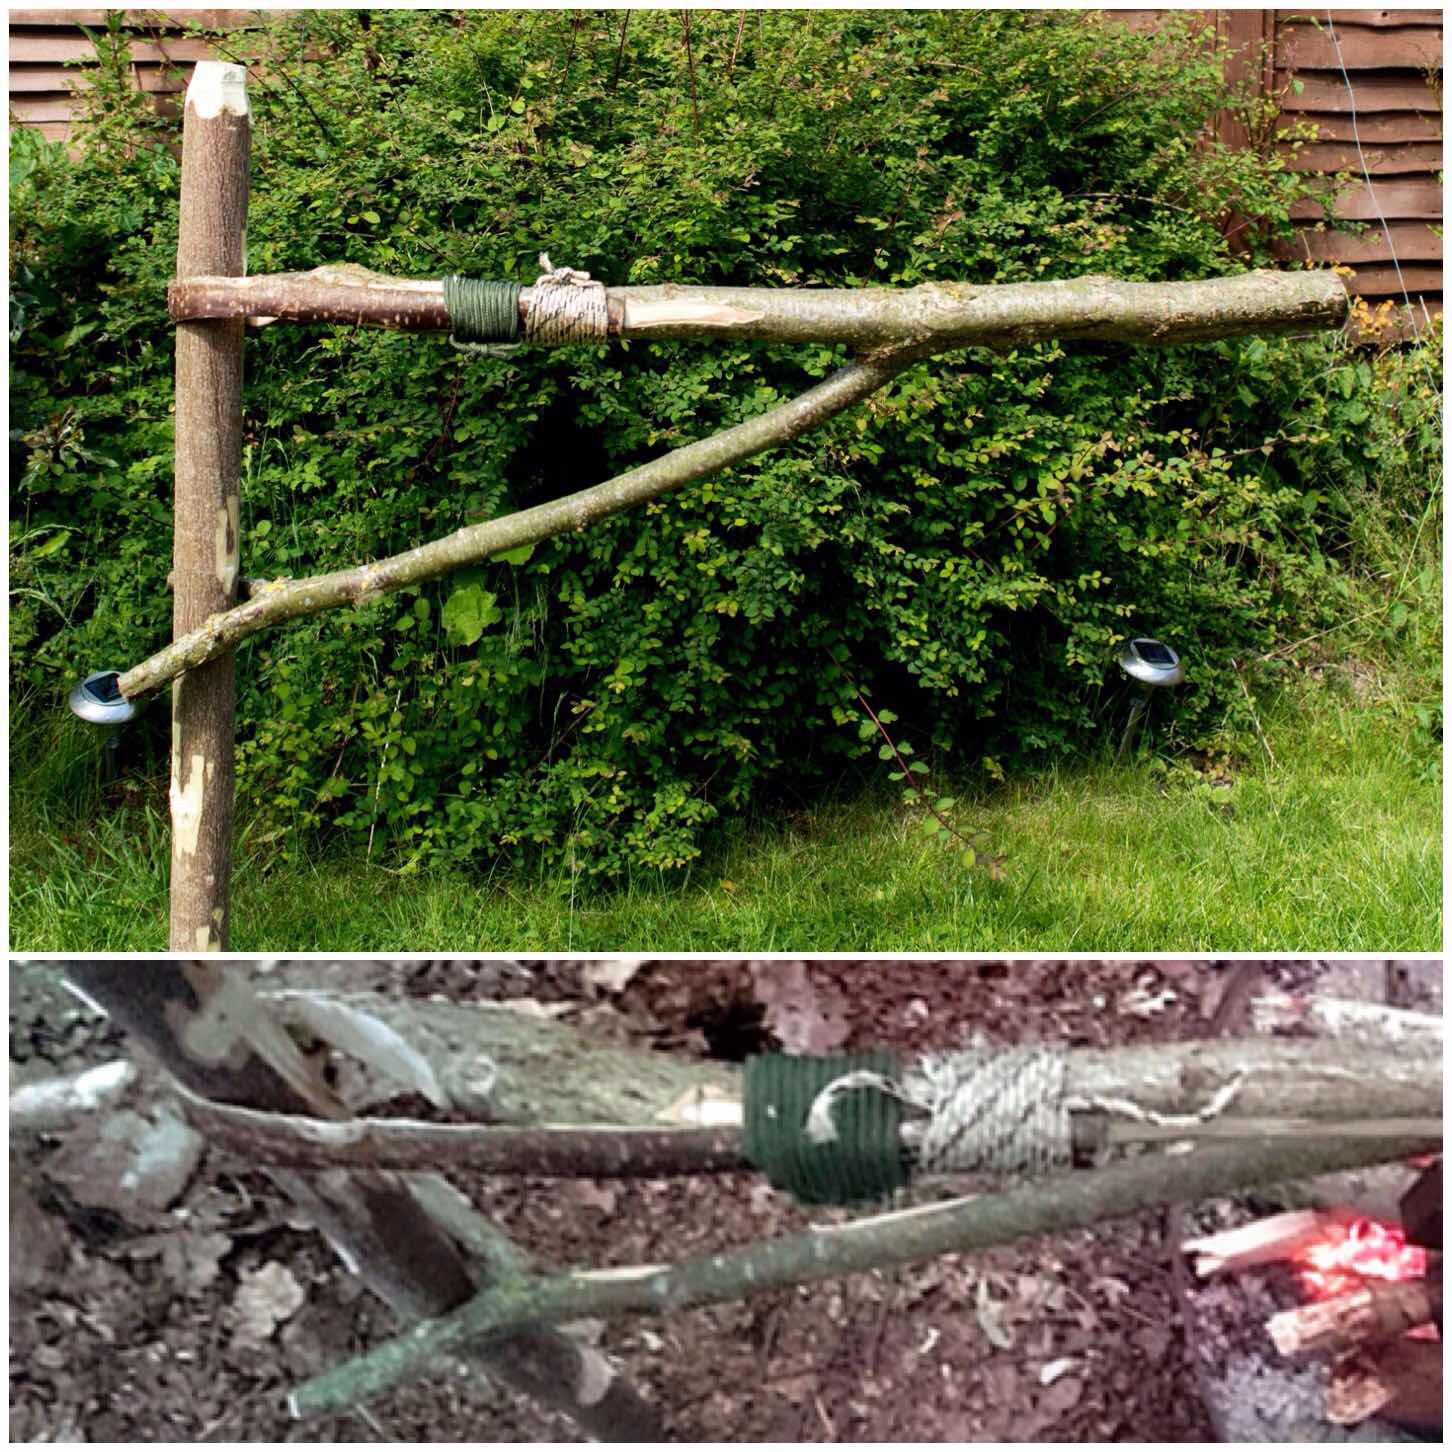
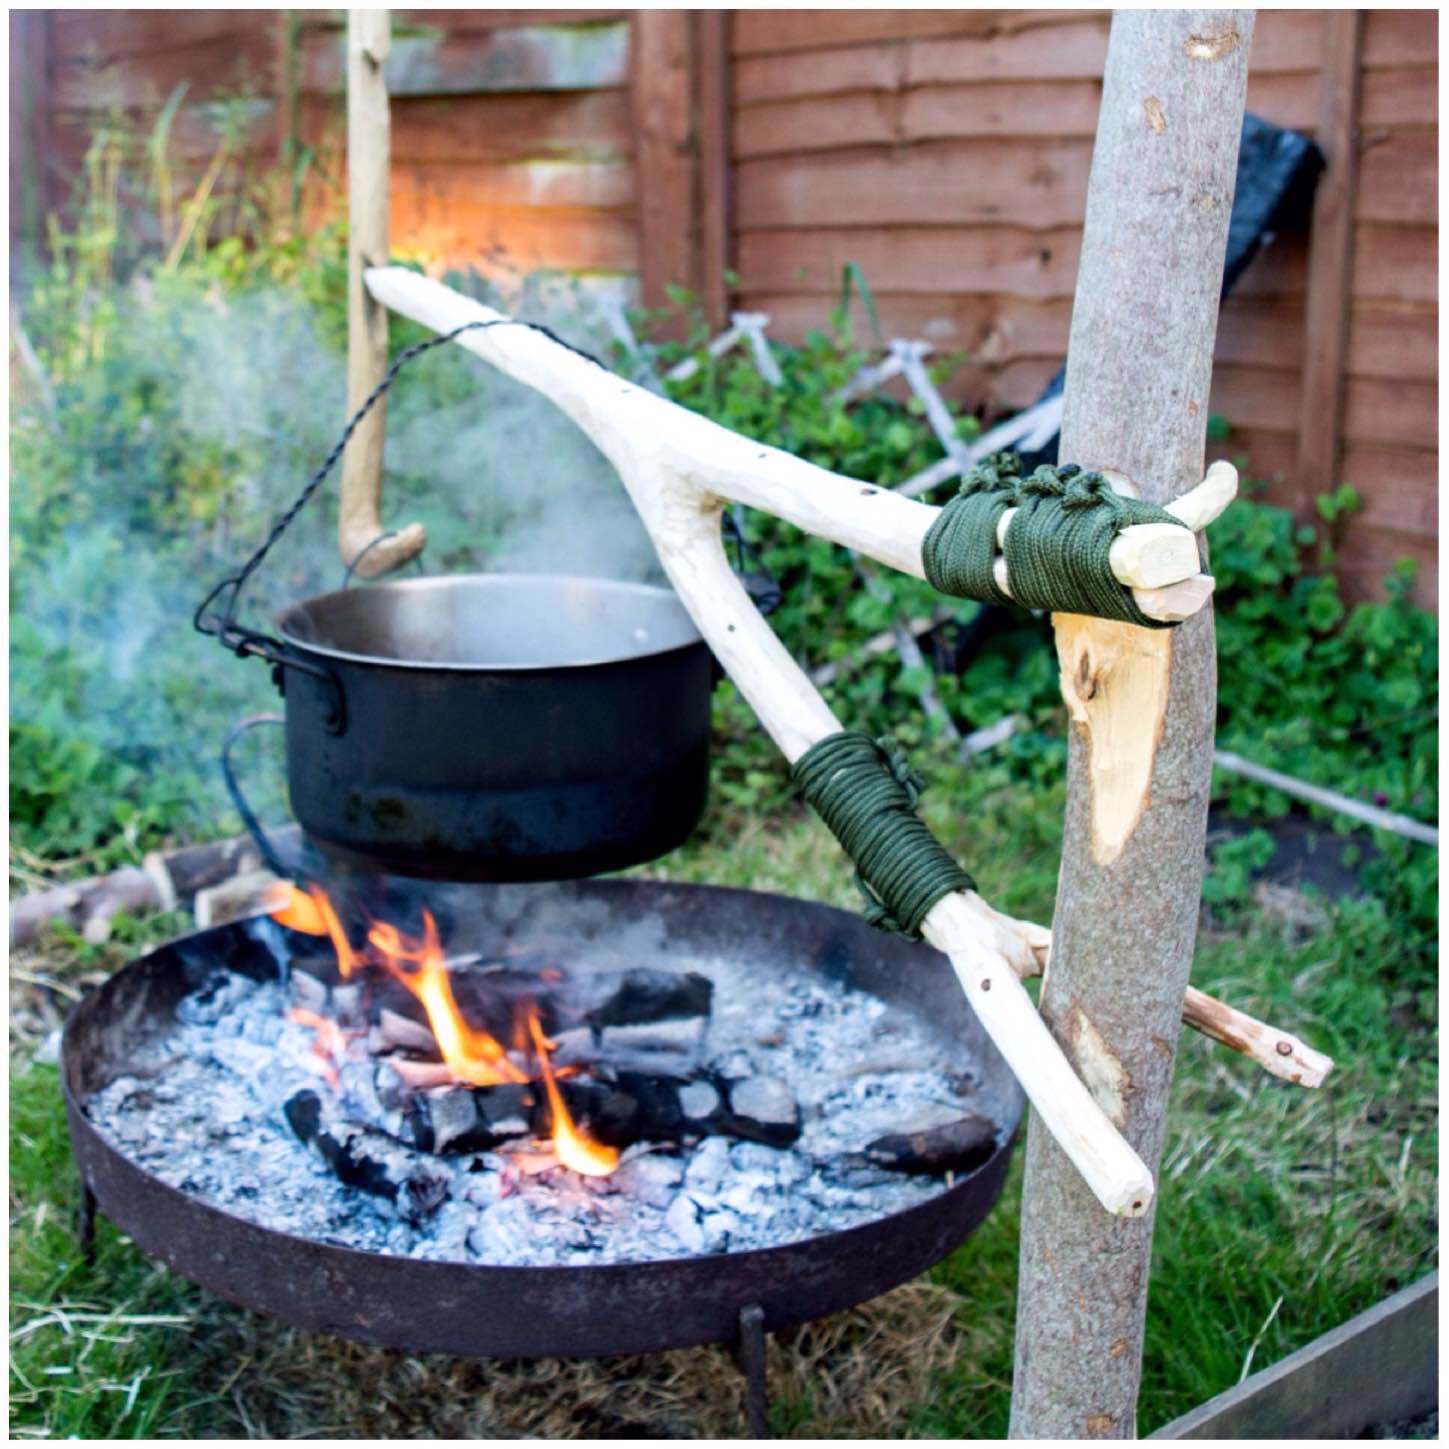
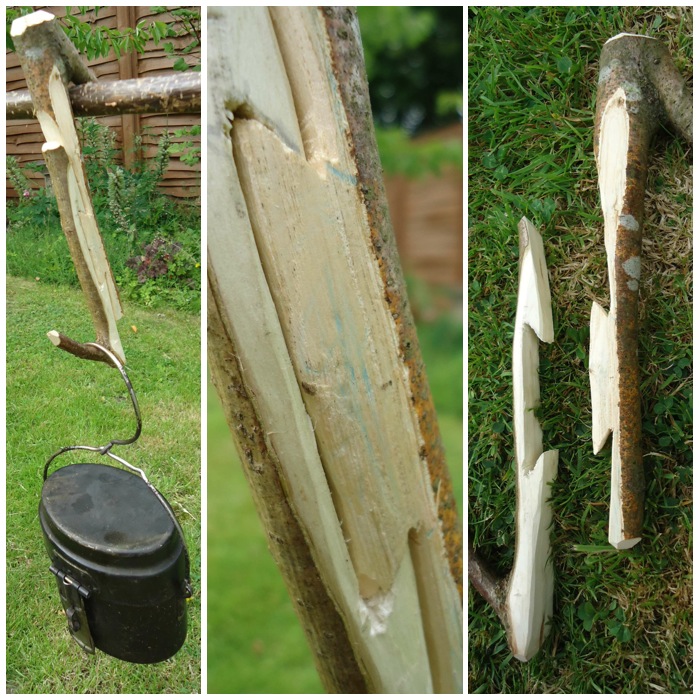
Gibbet Aures Crane
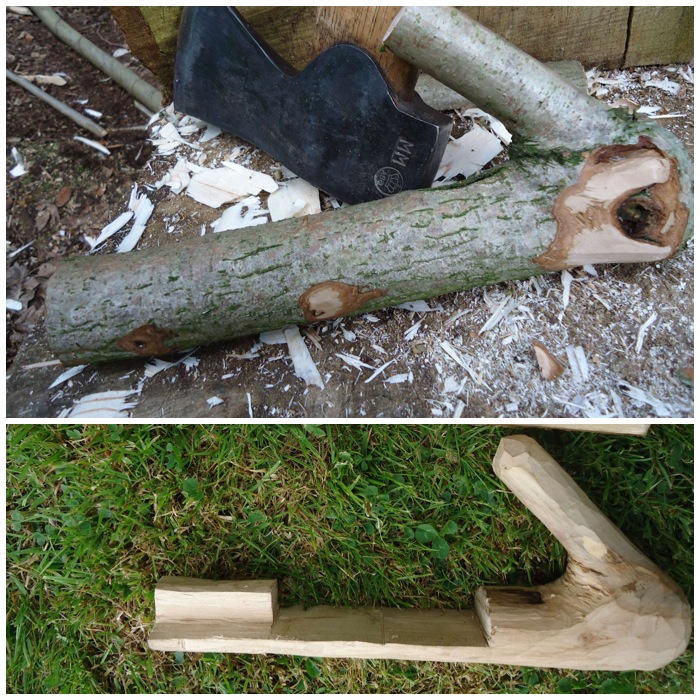
This variation on the Aures crane does not rely on splitting the wood but on the addition of other branches so that the whole thing hangs off your upright pole. It is easy to find all the parts which is probably why this is the version of the Aures cranes I most commonly see around campfires.
Gibbet Aures Crane
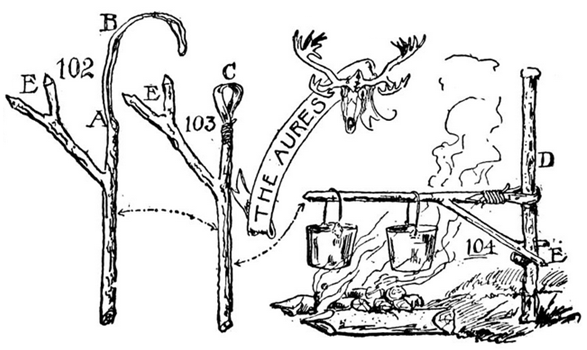
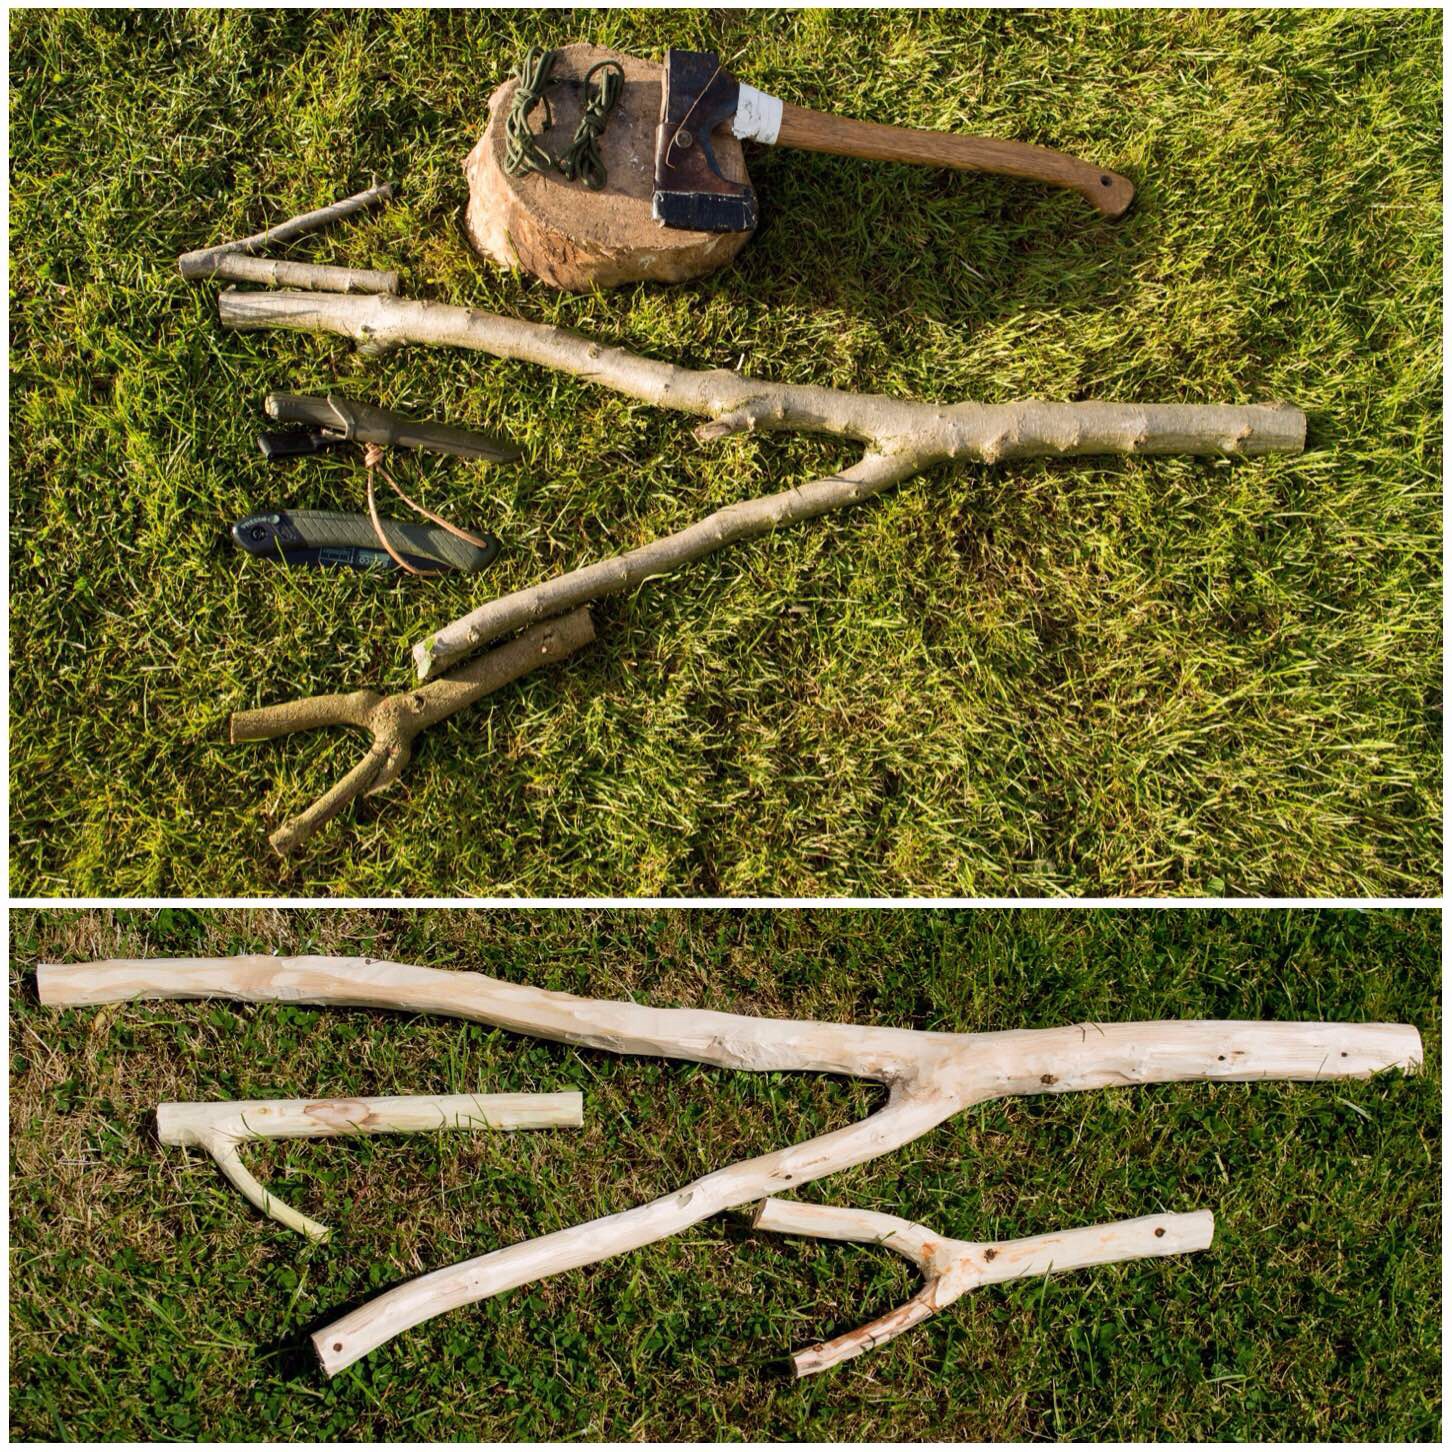
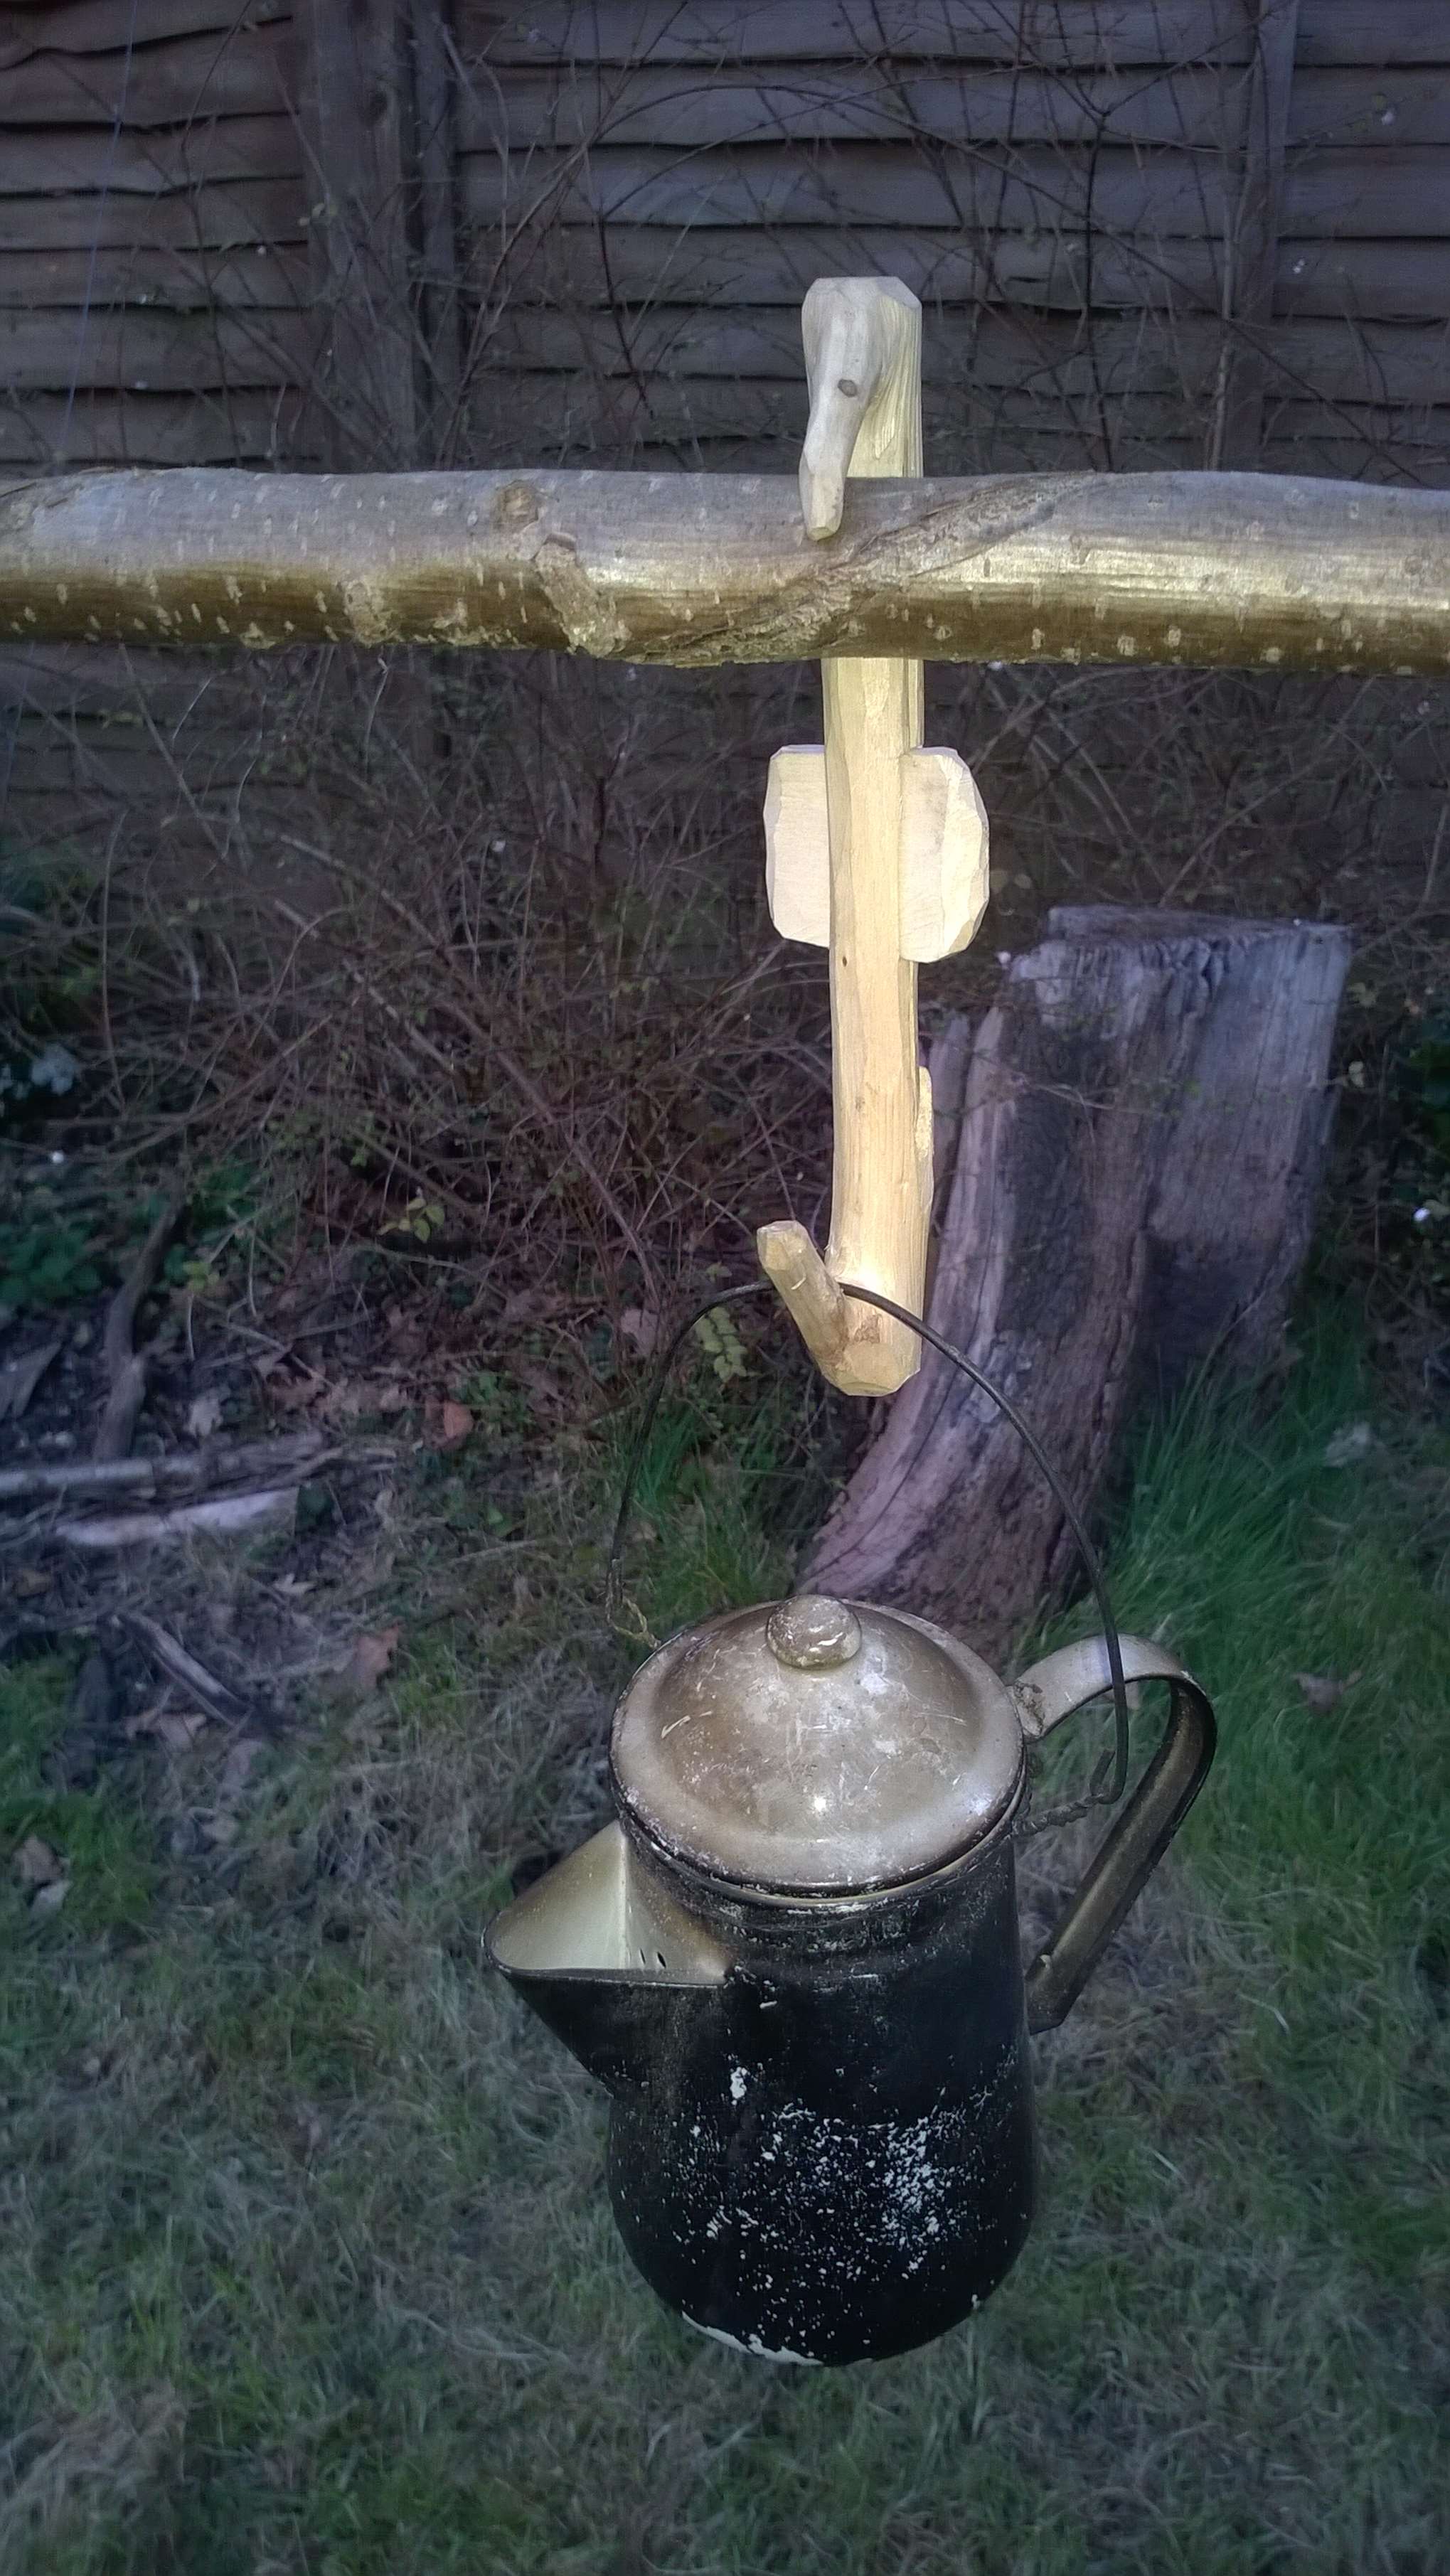
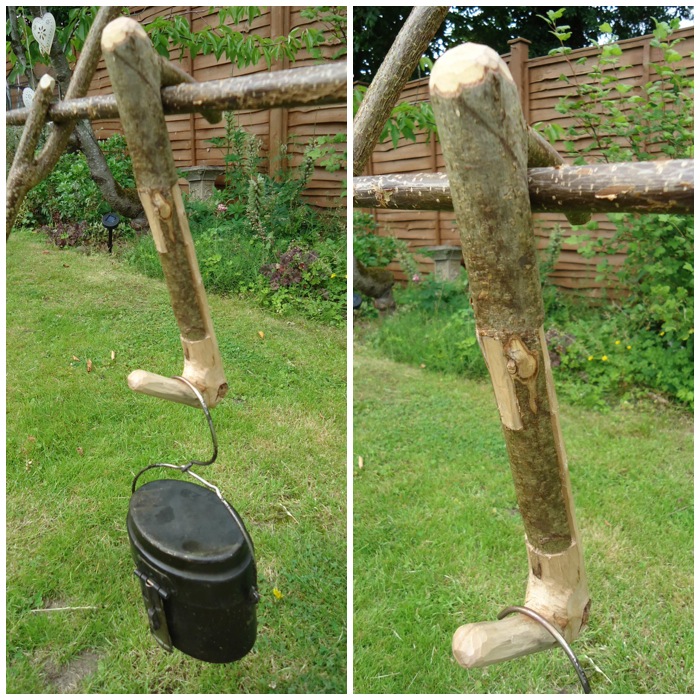
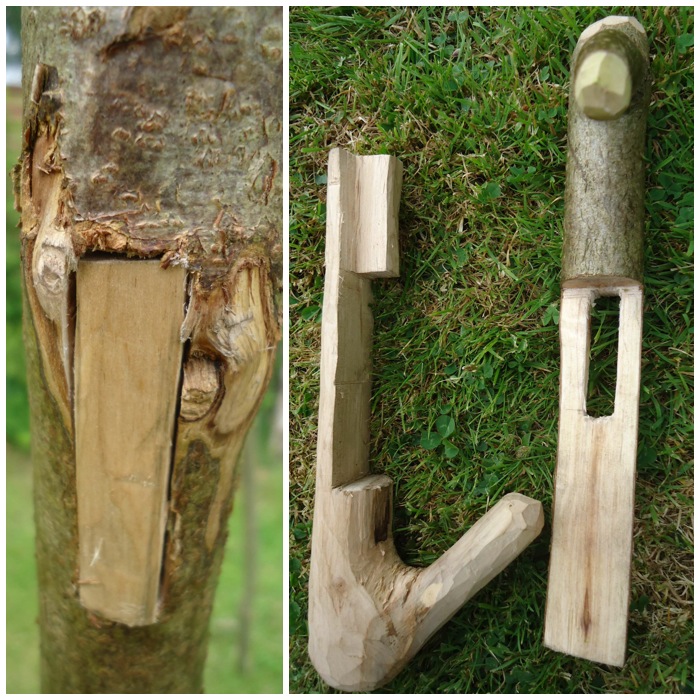
Classic Aures Crane
It took me a long time to find the perfect combination of branches for this crane. I have never seen another one before except as a drawing in the Wildwood Wisdom book. The hardest part in making this crane is the thinning of the wood to create the loop. It is a real challenge but also very enjoyable and satisfying.
Classic Aures Crane
The Three Cranes
I really liked making these cranes and would encourage you to have a go at them if you like campfire projects. They are not for you if you prefer simply to put your pot on the fire, but if you like to tinker and experiment, have a go.
The Three Aures Cranes
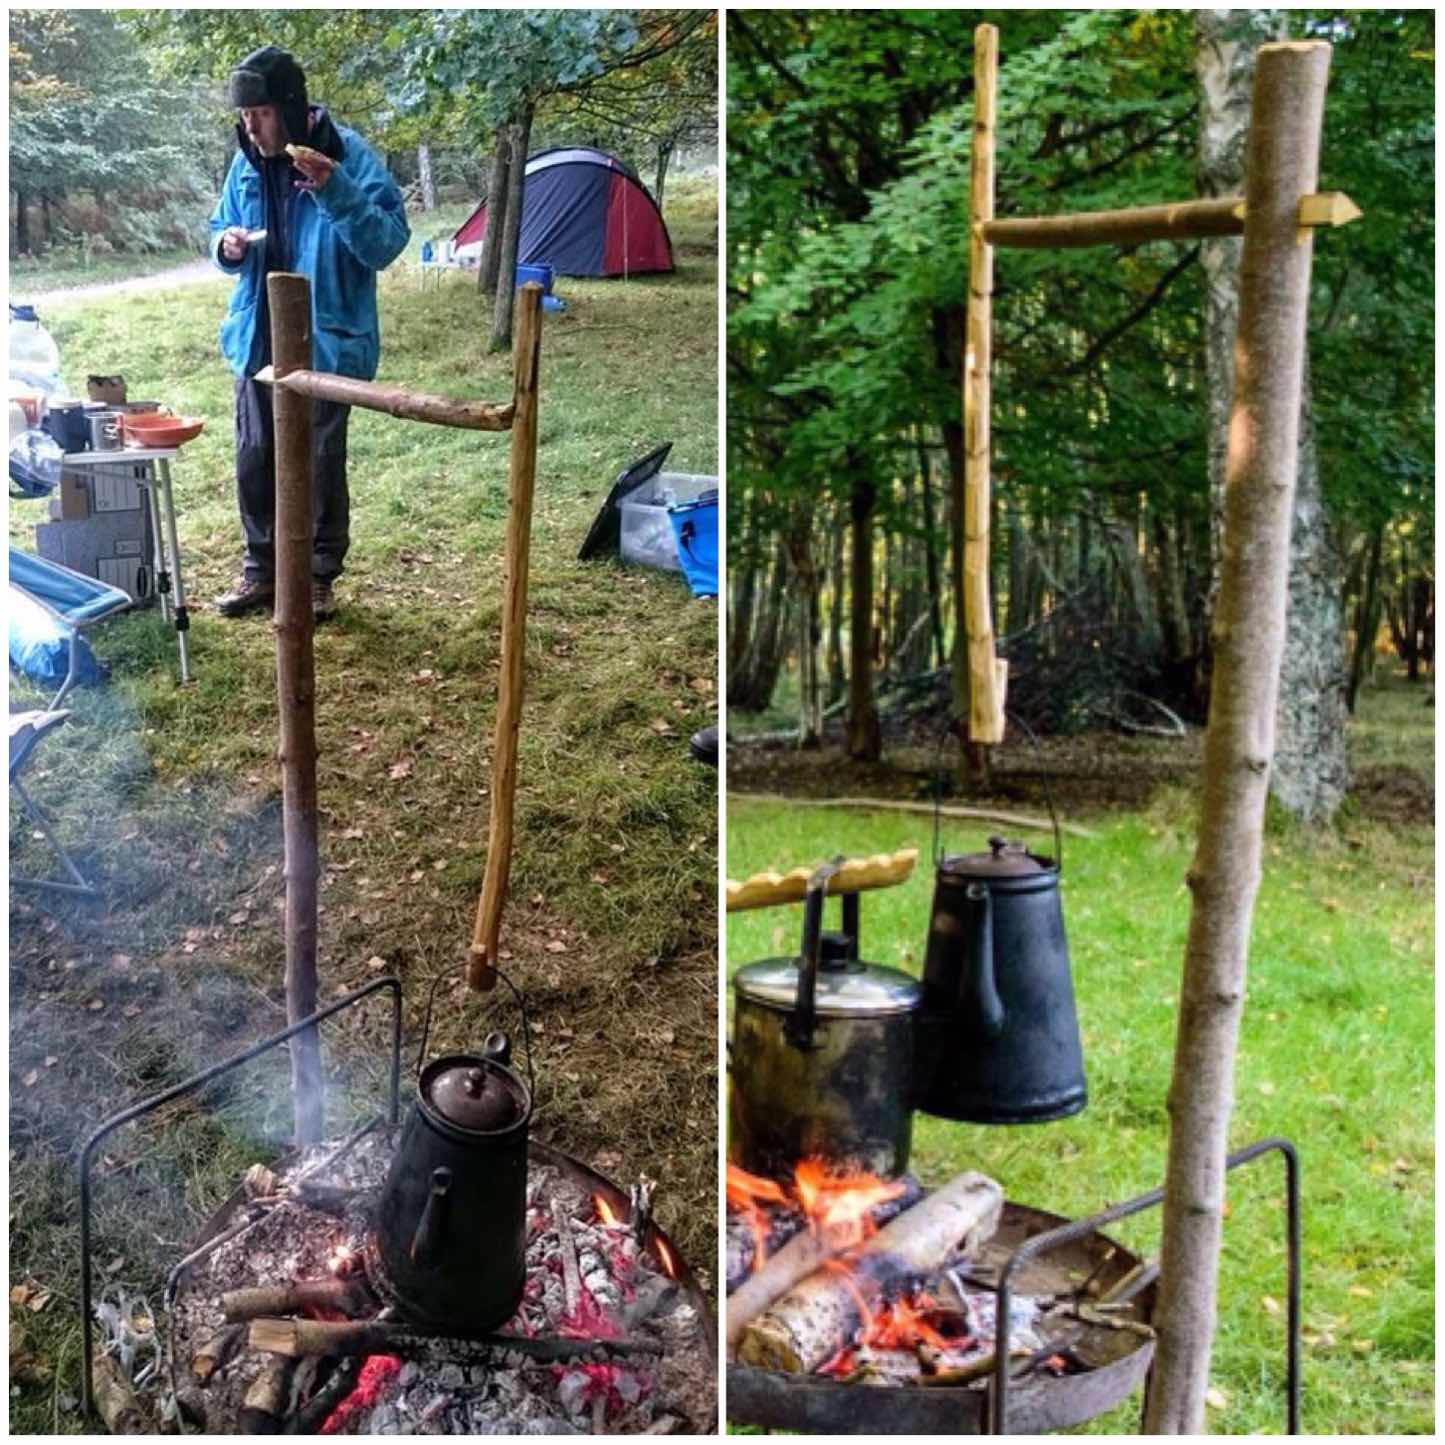
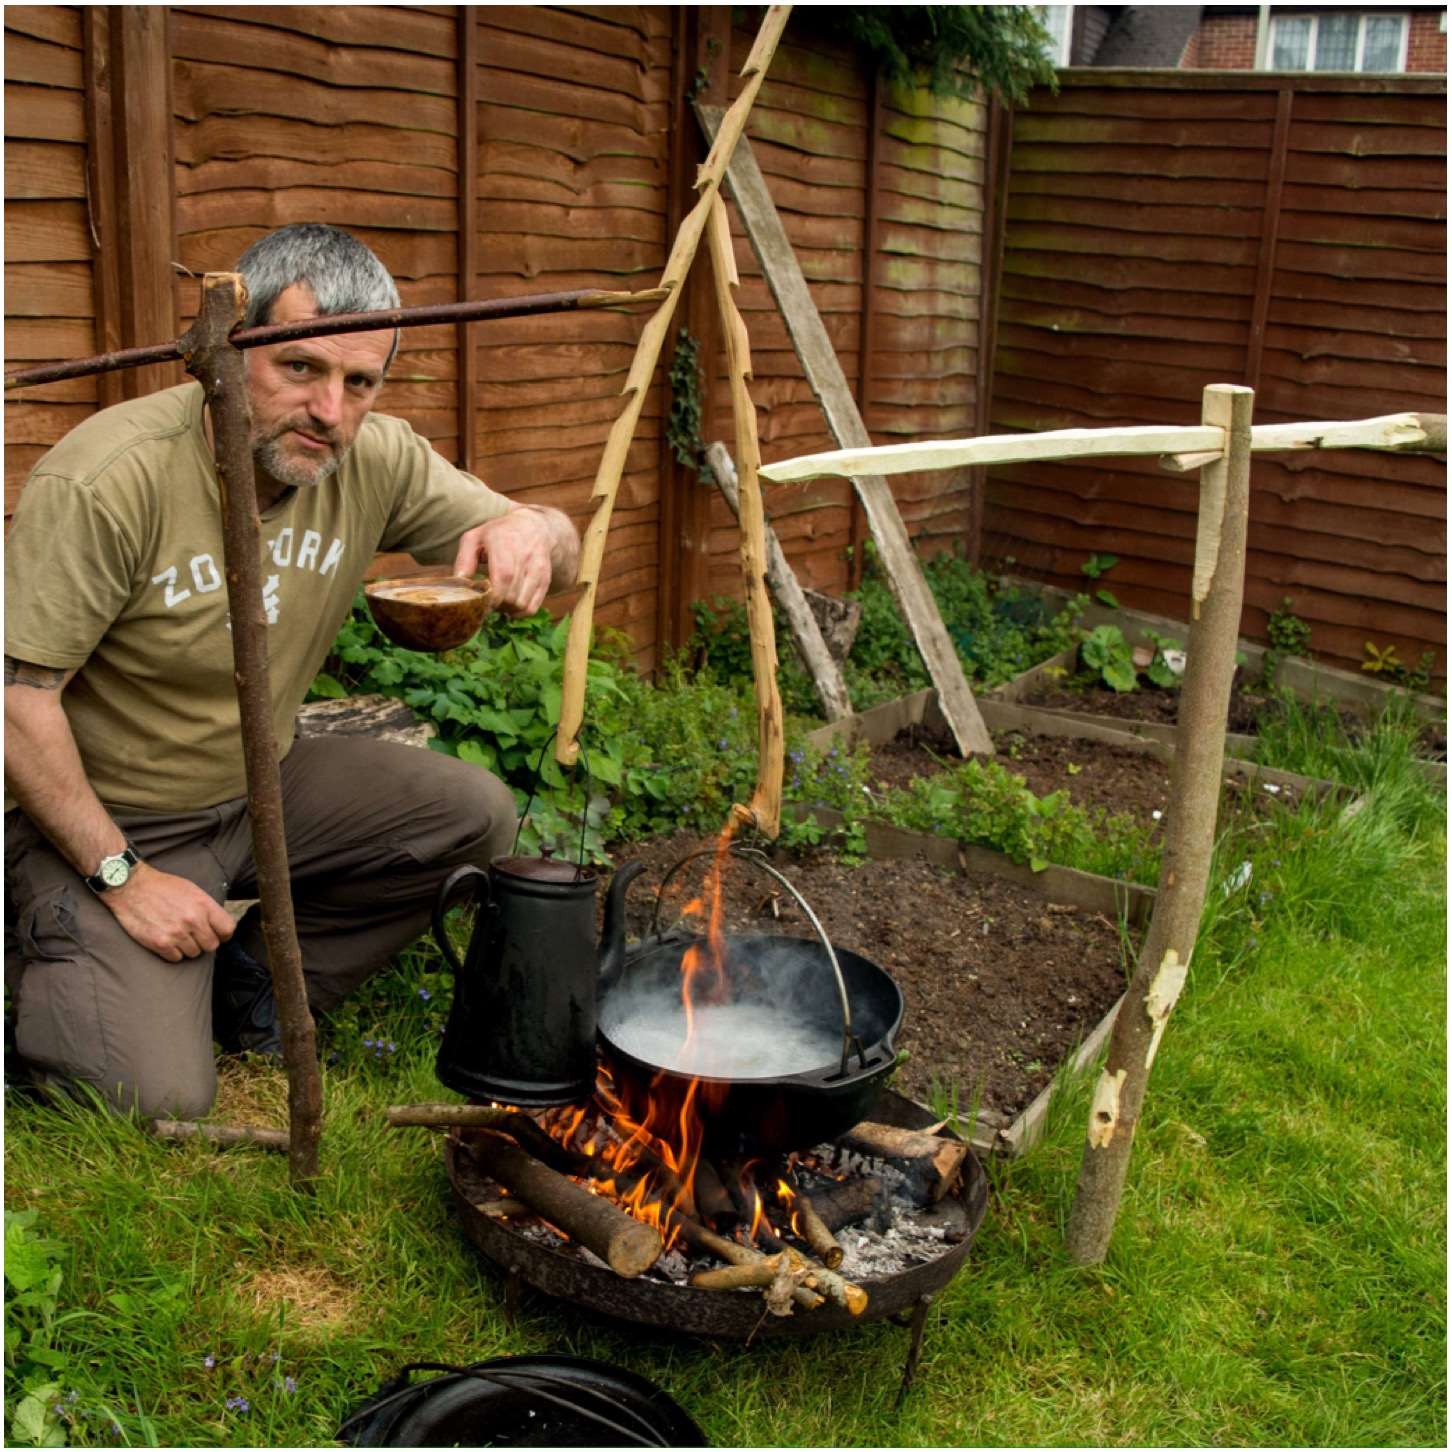
Notched Crane
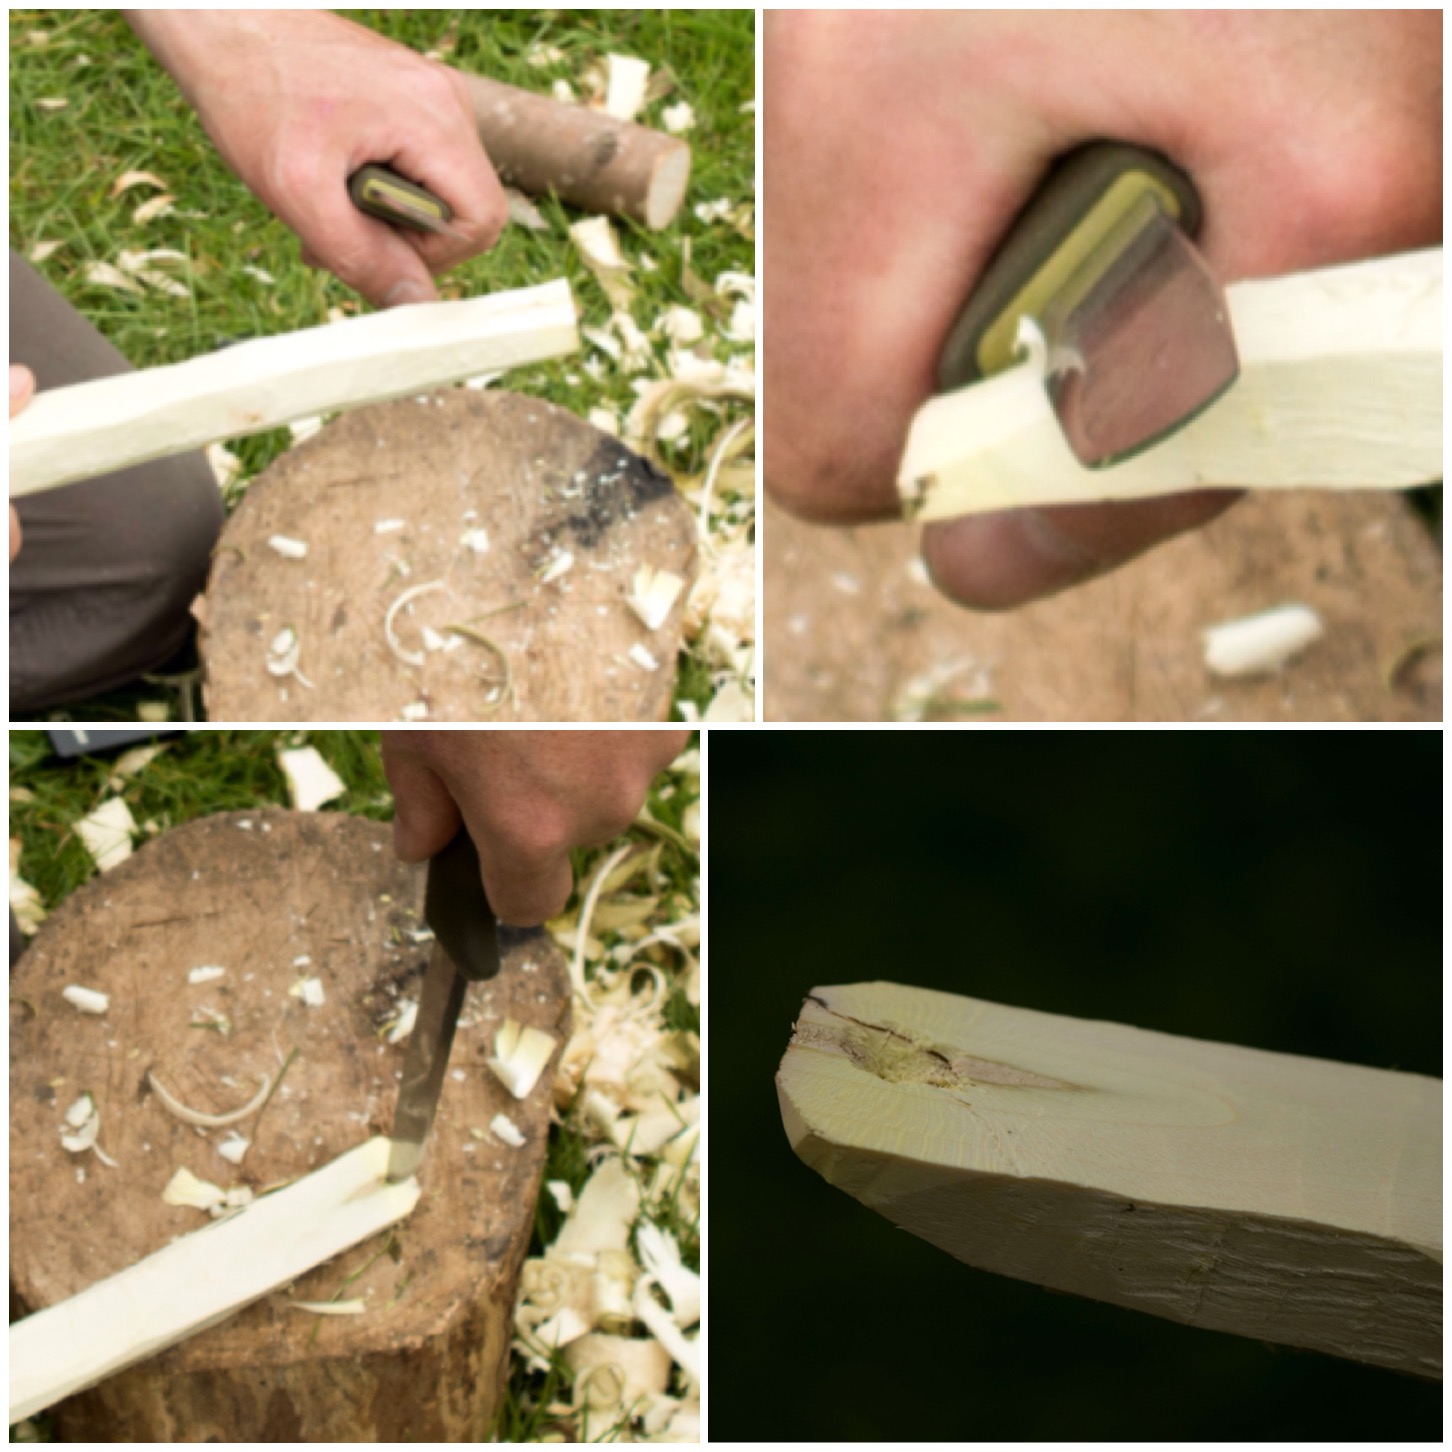
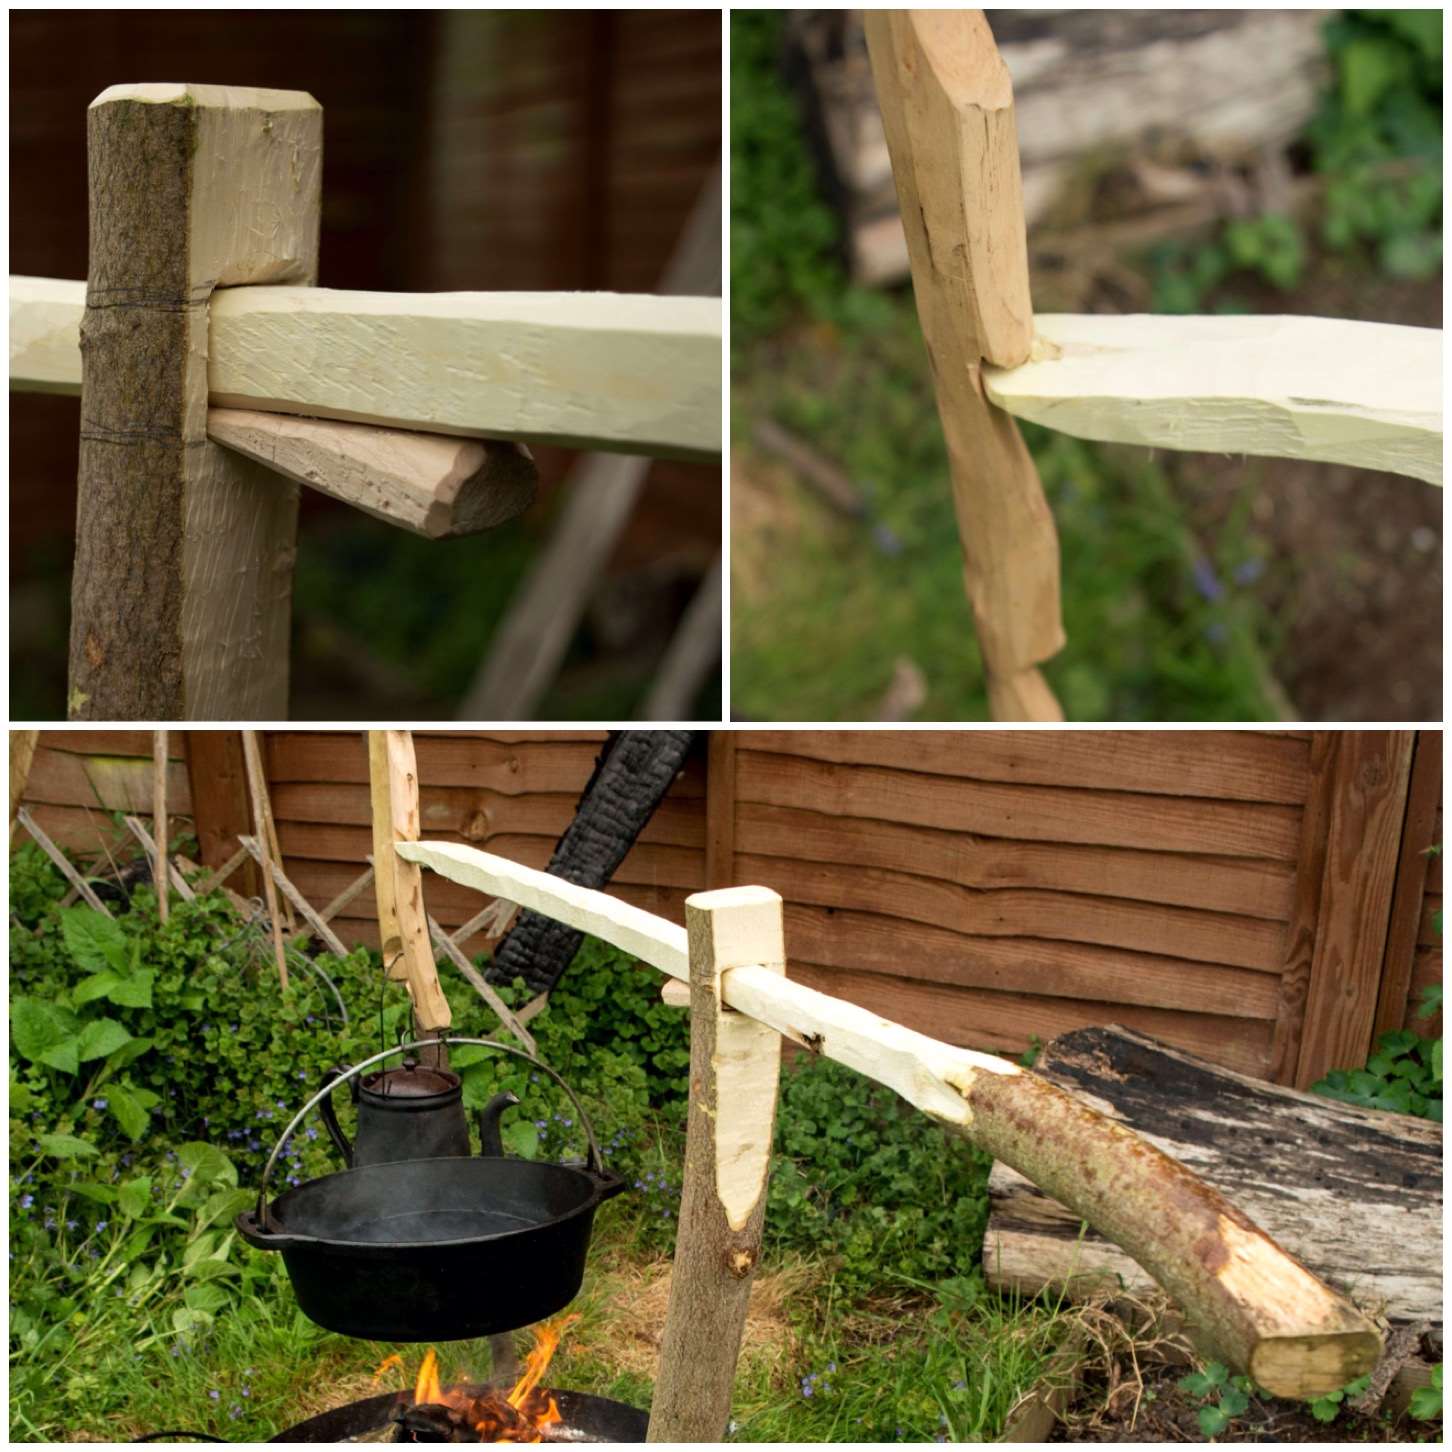
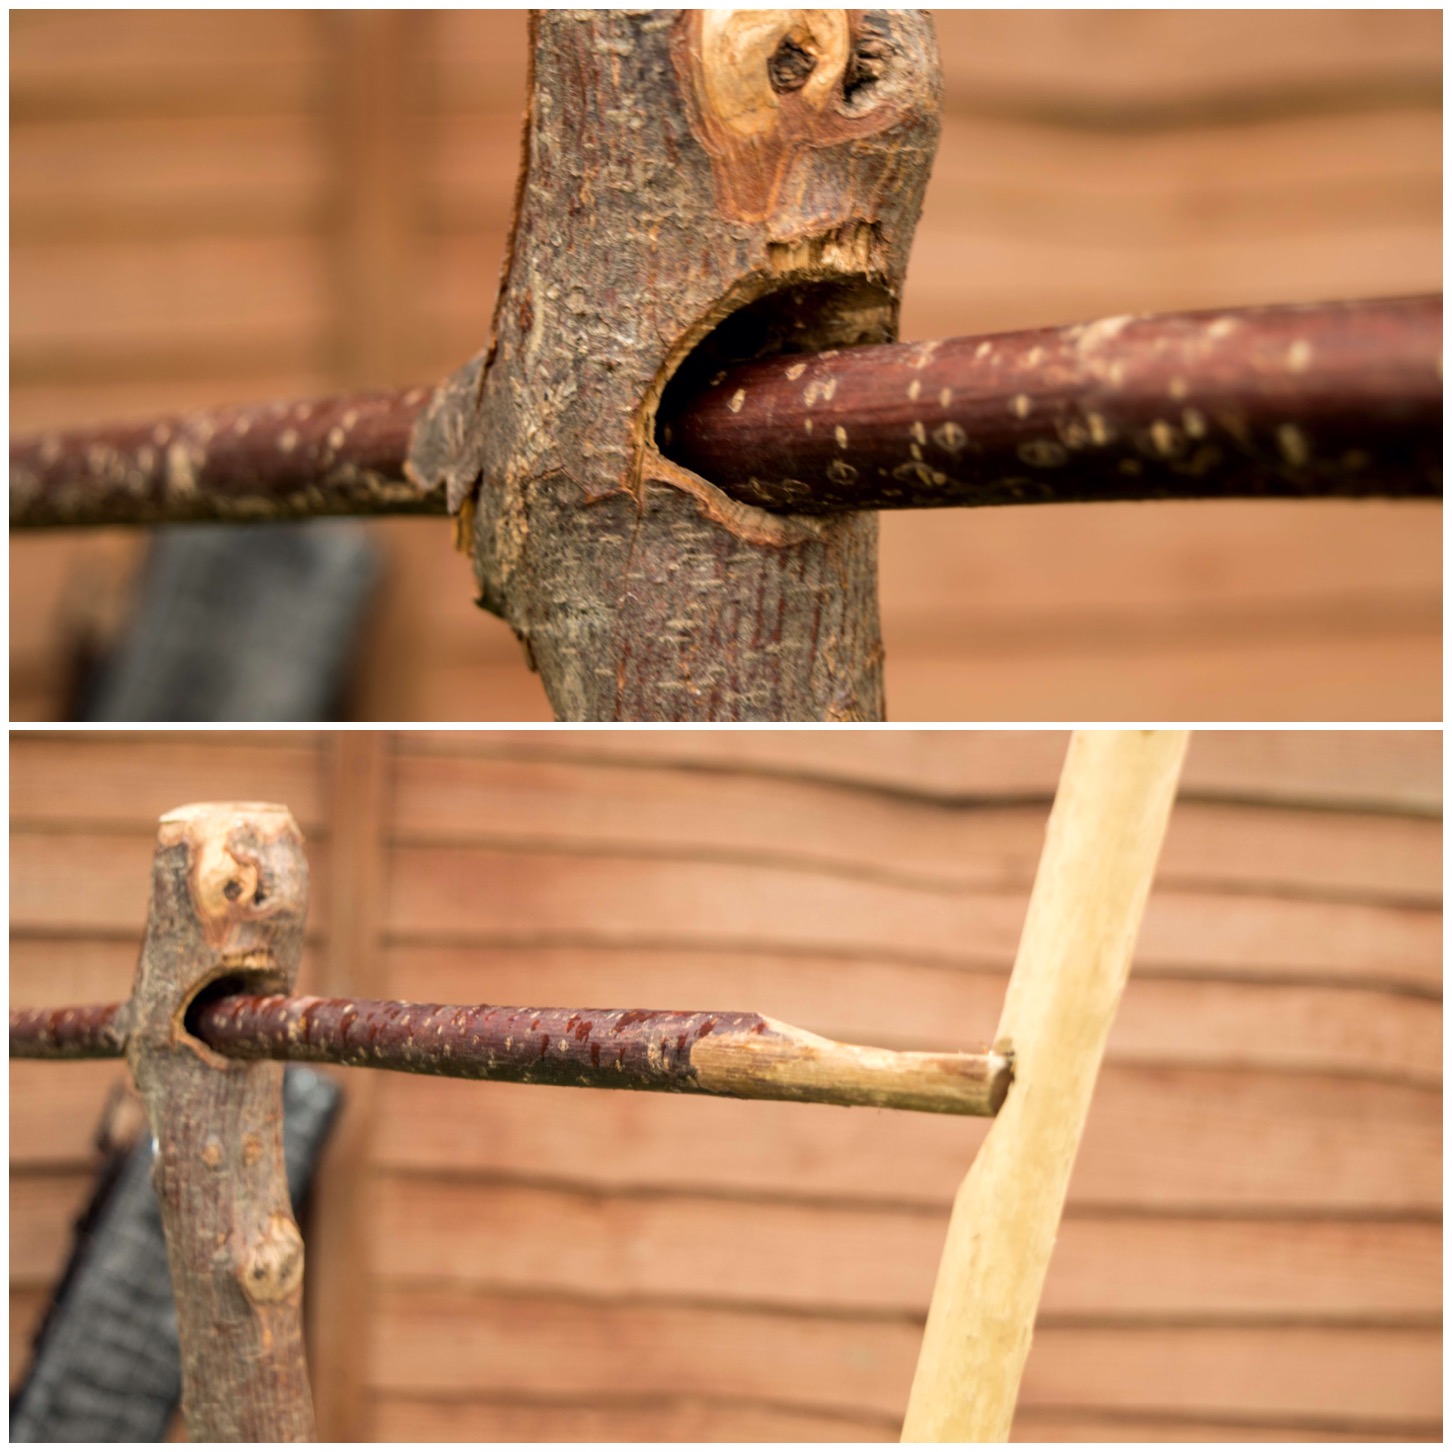
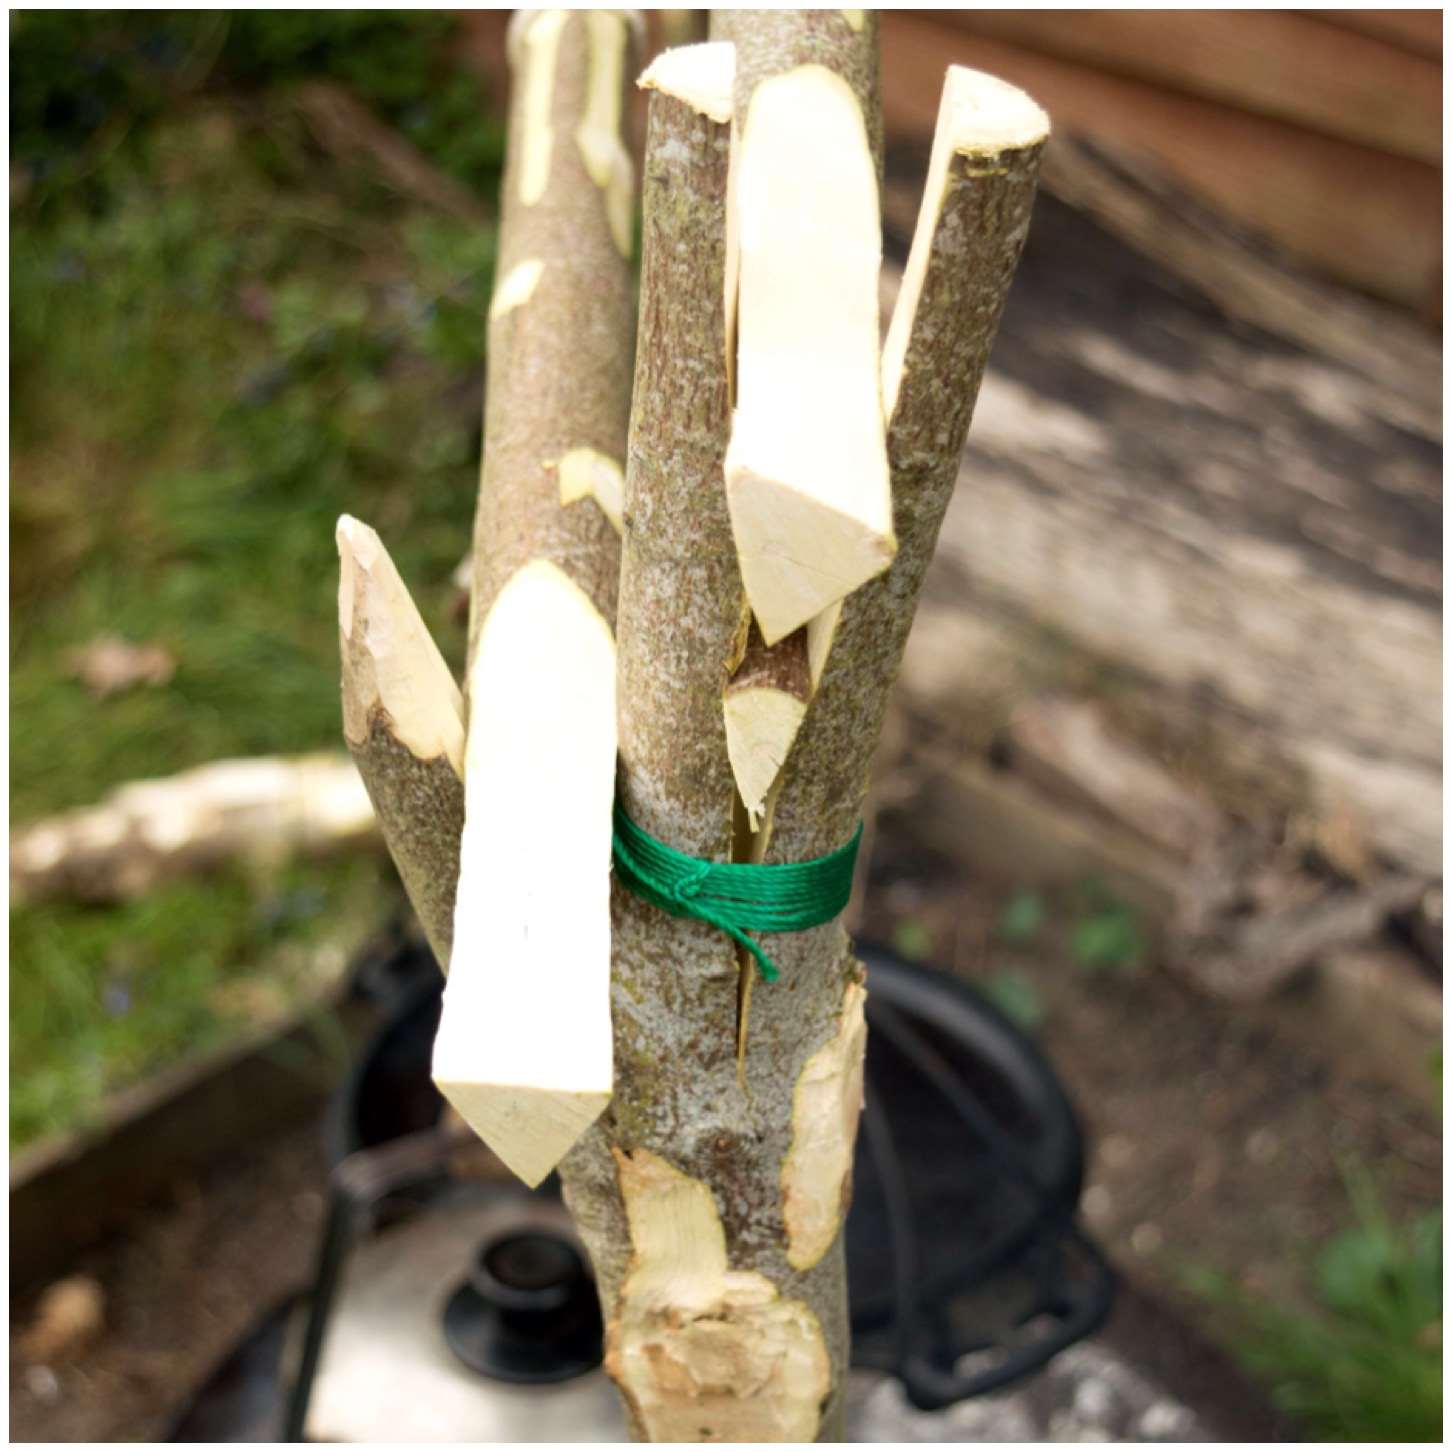
The idea for this crane came to me a number of years ago while making myself up a little squirrel cooker from some metal rods. I have cut the notch out using an auger in the past but nowadays I usually just use my knife. I like this set up as you can make your crane out of one pole. With the addition of an adjustable pot hanger you have a crane that offers a variety of cooking heights without having a bulky tripod set up over the fire.
The Notched Crane
Simple Dovetail Crane
I got this idea from a Scouting page a number of years ago and it is very simple and quick to carve. The part that takes the longest to make is the adjustable pot hanger. I would recommend if you decide to experiment with making these cranes that you start with this one as the dovetail notch is so easy to cut out.
Simple Dovetail Crane
Lap Joint Crane
Still sticking with the single pole theme, another easy crane to make is the Lap Joint crane. The main thing to remember is to make sure that the squared-off fit of the upright is consistent along its length with the notch in the arm.
Once weight (eg a pot) is applied to the end of the arm, everything locks together. I have found that this crane works best when the pot is hung off the very end of the arm. I have experimented with hanging the pot half way along the arm only to find it all collapses. It is a good and simple crane to make – treat this one with respect, though.
Lap Joint Crane
Dovetail Crane
This is my all-time favourite crane. With the dovetail notch the arm cannot fall off (unlike the Lap Joint crane) and it offers a wide variety of heights to choose from when cooking. The arm is very easy to adjust even when there is a pot attached and will take you no more than an hour to carve.
Dovetail Crane
Heavy Duty Crane
This one came about from an article I spotted in a Scouting site. Some of the Dutch Oven pans I use can be extremley heavy. This crane offers a number of different cooking heights and will not bend in the slightest even with the heaviest pot attached (well, the heaviest I have, at least). I have though learned to take the pot off the arm with this one before changing the height.
Heavy Duty Crane
Mortice and Tenon Crane
This was the last crane I worked on last year and the one that is the most technical, I think. The joint is a simple tenon and mortice set up however there were a lot of angles to consider (I have discussed then in the article) and the string I used to adjust the height could possibly do with further development. It is however an excellent crane with lots of movement up and down and side to side.
The Mortice and Tenon Crane
In time I hope to add a few more How To’s…. to this series as I find the whole subject of campfire contraptions so fascinating.
When the weather is inclement and the ground is really wet then the option of making a rocket stove needs to be considered.
This How To…. sets out the steps I took on a wet and windy December morning to make a Damp Wood Log Rocket Stove with only the tools I normally carry in my rucksack.
The damp wood log rocket
I have dabbled with making different types of Finnish Candles for cooking on and they are excellent for when the ground is wet. Over the years I have also experimented with making Log Rocket stoves but restricted my activities to the workshop as I used drills to make them.
I recently stumbled on an idea on Facebook from the 1st Facebook Scout Group by Paul Hasling. This is the first time I have seen a log rocket stove done without the use of drills so I was instantly taken with the idea. Another Scout instructor José Xavier put Paul’s pictures together into a quick helpcard called the Rocket Stove de Madeira. This is a very simple design where a log is split four ways, a chimney and firetray are carved out and it is all put back together again with string. I will certainly be showing my Sea Cadets how to make one.
First though I wanted to make one when out in the woods with only what was to hand. It being December, there was nothing that was bone dry so I found a dead Birch and cut a section off. It was still damp to the touch, however it had been dead for over a year so it was slightly seasoned.
Splitting
For the job I had my knife, saw, axe and a pen. Using another round of wood I split the log in half by battoning it with my axe (keep the blade of the axe at 90 degrees to your body when you do this).
Tools and battoning
After splitting the log in half I split each half into three even sections. With very dry wood you only need halve the halves again to make four sections however my wood was damp so I wanted to produce as much surface area as possible which is why I opted for six sections.
The splits
Stop Cuts
Using a stick and a pen I marked a line on each section about a quarter of the way from the bottom and also numbered each section. These marks were put in so that I could cut in stop cuts so to make it easy for me to cut out the chimney section.
My friend Keith Coleman suggested using tape as a depth gauge for this and it worked a treat, with each stop cut ending up the same depth.
Stop cuts
Creating the Chimney
Using the tape as a gauge again I marked a line at the top of each split section and then, using my knife, battoned off the excess wood.
The stop cuts help as the split does not travel all the way to the bottom and so creates a lintel that the fire will sit in.
Battoning out the chimney
After a little bit of whittling with my knife each segment had the wood removed so that the chimney would be formed when it was all put back together.
It is important to keep all the shavings and little chunks of wood from this process as it can be used as kindling for the stove.
Trimming the chimney
The Raappanan Tuli style
Now the secret of making damp wood burn is to produce as much surface area as possible for the flame to catch. I learnt this from researching and making the Finnish Raappanan Tuli candle.
On the inside of each segment cut as many burrs as you can so that the flame from your kindling has something to catch onto. I tried out different types of cuts here and some were easier to carve than others – your wood will soon tell you what works well.
The Raappanan Tuli style
The Firebox
Next up is the opening for the firebox. I selected two segments that fit together (having them numbered really helped here) and marked out with a pen two rectangular areas just above the sill I’d created. I made sure the marking went all the way round to the other side of each segment.
I then used a saw to cut into the wood in the shaded area. Do as many cuts as you can as this makes it easier to remove this waste wood.
Carving the firebox – stage 1
I then used my saw at an angle to cut out the wood and finished the job off with my knife.
Carving the firebox – stage 2
When finished the idea is that you want an access point big enough to put your kindling into the firebox area at the bottom of the chimney.
I found some old sisal string tied to a tree and used that to tie everything back together. It was pretty damp anyway and I hoped that would last longer than the copious amounts of paracord I tend to carry around with me. I think some thin wire would be the ideal thing to use though.
Firebox and all wrapped up
From the top you can see how wide the chimney was. I have no idea what would be the optimal size to have so you may need to experiment for yourself.
The chimney
Firing Up
As the wood was so damp I decided to go for the sure-fire method of lighting the stove up – good old cotton wool and Vaseline. This worked well however I needed to use 4 Vaseline-coated cotton wool balls to maintain the fire.
I have used shredded birch bark mixed with spruce resin on a number of occasions to light Finnish candles before but I didn’t have the time to collect the resin this time.
Once the fire had started I added tinder/kindling down through the chimney and in through the firebox. The main thing at this stage is to not over-fill the firebox but allow the airflow to be maintained. It means about 10 minutes of work but the damp wood inside the chimney area will dry out and the overall heat of the fire will increase.
Firing up
Maintaining the Fire
I placed three pebbles on the top of the stove for the kettle to sit on securely.
The gap created by the pebbles also allows you to drop tinder/kindling down the chimney. I like to use strips of birch bark here as it is so pliable and flammable.
If the wind is low or changes direction you may need to get down low and blow directly into the firebox to keep the fire going. Once the wood has dried out a bit you will not need to do this so much.
Maintaining the heat
I gave the stove about 10 minutes before putting the kettle on and then in about 15 minutes the kettle was boiling. Not as fast as modern stoves but for what is in effect a wet log not bad.
Waiting for the kettle to boil
I have to thank Jess Edwards for a number of these pictures at the end. Jess is a great photographer and keen bushcrafter so it was great to concentrate for once on the tinkering and leave the photography aspect in someone else’s capable hands.
Brew time
Observations
Once the coffee was made I was able to have a good look at what was happening with the stove. As I looked closely I could see the moisture in the wood boiling off. If you look in the bottom picture you can see the water boiling away on the surface.
Drying off
The stove kept going for another hour before I had to put it out as we were leaving.
Overall I was very impressed with this Log Rocket stove with the Raappanan Tuli twist and I will be using it again on my courses.
A glorious farewell
Thanks again to the Scouts for documenting this stove – I hope you like my little twist on it?
Let me introduce you to what I call the Mortise and Tenon Campfire Crane. This is a crane I made up at the the BCUK Bushmoot this Summer.
The idea came about as usual in a discussion around the fire with my good friends Charlie Brookes and Ian Woodham.
As you can see the arm of the crane can be set high or low (and ranges in between) and if set up correctly the upright can be easily rotated to swing your pot away from the fire.
Mortise and Tenon Crane
I would classify this one as more Pioneering than my usual constructions as it relies on some string to work. It is one for the long term camp however if you were on an overnighter with a couple of hours spare it would make a good project for an evening.
I will be describing the construction of the crane as I go through the post however I thought it would be helpful to have a completed picture of the crane marked up with the relevant work areas for you. Please refer back to this overview at any stage.
My tools for the job included my knife, a small saw and and axe but you may find having a pen or pencil to hand will be useful.
I took a rod of Sycamore (fairly well seasoned) and sawed it in two. In the picture you can see I have left the thicker end longer than the thinner end. The thicker pole will become the upright and the thinner pole will become the arm.
The Makings
Carving the Upright
On the thinner end of the thick pole that was to be the upright I marked out the shape of the Tenon tongue and then cut two stop cuts into the side of the pole.
The stop cuts are put in to so that when I batton the waste wood off the split does not run on down the upright.
Creating the Tenon Tongue – Stop Cuts
I used my knife to batton off the waste wood (make sure your knife blade is at 90 degrees to your body when you do this).
Once I had the Tenon tongue shape split out I carved one side of it into a curve. This is important to allow the arm of the crane to be raised up and down.
Creating the Tenon tongue – batton and carve
To finish the upright I axed out a point at the bottom and about half way down it I carved a small wedge-shaped recess. This wedge-shaped recess needs to be on the opposite side of the curve to the Tenon tongue.
The recess does not need to be that deep, just enough to allow some string to catch in it.
Little extras on the upright
Carving the Arm
About a third of the way along from the thicker end of the arm flatten the wood with your knife on opposite sides. This gives you a decent working surface to carve out your Mortise hole.
In the bottom left picture you can see how I used the top of the upright to help me gauge how big to make the Mortise hole. Mark out your Mortise hole with a pen or pencil (mark out both sides of the arm).
Flattening the arm and marking out the Mortise hole
I used my knife and a piece of waste wood as a batton to cut out the Mortise hole. I took my time here so I would not split the wood along the length of the arm.
Once I got about half way down the depth of the Mortise hole I started on the other side.
Creating the Mortise hole – First Side
As I use the tip of my knife for this work I always ensure the work piece is secured on a flat surface. I have seen the after effects of a knife going through someone’s hand and it is not a pretty sight I can assure you.
Soon I had my Mortise hole cut through and tidied up. As I did not want to make the Mortise hole too large I tested out the Tenon tongue in it and trimmed the tongue down slightly so that it would fit in the Mortise hole easily.
Creating the Mortise hole – Second side
The Tenon tongue when fitted should sit slightly proud. You will probably find you will make lots of little adjustments here as you test the action of your crane at this stage.
Testing the joint
To finish the arm off I carved a groove near the thick end of the arm (for the string to grip), chamfered the thick end to tidy it up and cut out a groove at the thin end of the arm for attaching a pot handle (I will show this in detail in a further picture).
Finishing the arm
The Mortise and Tenon Crane
I spent a long time working out a way of making the arm fully adjustable with just the usual items in my rucksack. After discussing this with Ian and Charlie I opted for a simple system with string and a wooden toggle.
Below you can see that the upright and the arm are connected by string and a toggle on the left hand side.
In Profile
I tied off some doubled-up string to the arm groove and knotted it along its length with some simple overhand knots. This produced lots of little loops the toggle could fit into.
I attached a toggle to the upright groove and inserted the toggle into one of the loops in the string from the arm. Depending on what loop I put the toggle into I could adjust the height of any pot hanging off the other end of the arm.
The groove for the pot handle I made with a backstop and a slightly angled forward section. This shape allows the pot to remain secure when the arm is either raised or lowered.
In detail
To insert the upright I had a separate pole to act as a pile driver. I hammered this into the ground first and then inserted the upright into the hole I’d created.
The upright can then be rotated quite easily to move your pot off the fire. I found that I could pour water from the kettle while it was still attached to the arm as the handle sat snugly in the angled section of the pot handle groove.
In use
I like this crane for the challenges it set me and the fact that I could overcome them with just the kit I would normally carry.
I plan to re-visit the string set up as there must be a simpler method to keep the arm securley attached while giving me the ability to adjust its height.
Feel free to suggest an alternative method for this but remember it needs to be created with what you would normally expect to carry in your rucksack or about your person while out in the woods.
Up and Down
This will be (for the moment at least) the last How To…. on building campfire cranes however I have really enjoyed exploring this very diverse and little documented area of Bushcraft.
My search to find and document as many different campfire cranes brought me to this simple type of dovetail crane. I first came across this idea from a blog post by Ken Cole Jr on the Scout Pioneering site. I expanded on their idea with adding an adjustable pot hanger to the crane.
It is similar in concept to the Cooking Crane I documented previously except that the socket on the upright is created by cutting into the side of it instead of through the middle of the upright. This leads to a far quicker construction time.
Simple Dovetail Crane
I also like these vertical campfire cranes as there is little for people to trip up on around the campfire and like my previous post on the adjustable dovetail crane this simpler version is built using just a single pole.
Trimming
I used a sycamore pole on I had on hand trimmed it into two pieces using my folding saw.
One pole trimmed to size
The larger pole you can see below was destined to be the upright and the thinner piece was to be the cranes arm.
The arm
I started work on the arm first carving a triangular end on one side. I took my time here to make all the sides even in shape.
Carving the triangular bed of the arm
Once the arm had the correct shape carved out I used it as a template to mark out the dovetail socket I would cut into the upright.
The upright
It is worth the time doing this as you want to produce a socket that the arm will fit into snugly.
Using the arm to score out the shape of the socket
Once the shape had been marked out with my knife I used my saw to cut into the upright, one on each side and then a couple of cuts through the middle.
Roughing out the socket
I used my knife then to carve out all the loose excess wood and to smooth all the sides out.
I continually kept trying to insert the triangulated end of the arm to see if it would fit. As I wanted to keep as much wood on the arm I just used my knife to keep carving of more wood from the socket area on the upright to enlarge it. Eventually the arm was able to be inserted into the socket and released without too much force but still fitted snugly.
Finishing with the knife
To finish the upright I chamfered the top so that it would not split when I hammered it into the ground and carved a strong point on the other end.
Chamfering and pointing the upright
I hammered the upright and checked to make sure all the angles looked good. I like to have my crane uprights to have a little lean away from the fire but not too much as this could cause the arm to swing when it had a heavy load.
Checking the angles
Hanging the pot hanger
The arm needs a little flat platform carved on the end with a little dimple in it the pot hanger to balance on. I have explained in a previous post on carving an adjustable pot hanger on how to make one of these.
Just make sure that you carve the flat platform on the correct plane in relation to how the arm fits into the upright – I used the triangular end as a guide for this.
Carving the pot hanger end of the arm
You can see in the picture below the end of the arm has a slightly flattened surface and a slightly curved surface underneath it.
Completed
If your pole is long enough you could carve your pot hanger from it. In this case I had plenty on hand so just used one I had made before.
Testing
You can see in the picture below how the pot hanger sits on the tip of the arm in the little dimple. It looks very fragile but it can hold a lot of weight if everything is carved properly.
Attaching a pot hanger
I decided to shorten the arm of the crane as it bent a bit with the weight of the full kettle so rather than cut the end with the dimple I just extended the triangulated area of the arm so that it could be adjusted easily(I did trim the back of the arm later).
Shortened arm
I was quite happy with the arm being this length for the weight of the full kettle.
I also brought out one of my Dutch Ovens and filled it with water to test out the crane. I decided though to carve another shorted arm so that it would stand up to the extra weight better.
A full kettle – little bend in the arm
This shorter arm did bend a little bit but it did not break. Just to make sure I left the pot hanging off the crane for two days without any problems.
Shorter arm for a heavy pot – more pronounced bend but still workable
I took the crane to a Sea Cadet camp last weekend and it was used all weekend to keep the kettle on the go. There were a lot of staff around the campfire most of the time but due to its minimal footprint the crane did not get in anyone’s way.
Kettles on
I really like this crane for various reasons, these being it is simple, quick to make, tidy and strong.
If you have never made a crane before I recommend this type as one to experiment with.
While I was writing my post on the Single Fork Aures crane I got a message from a Bushcraft USA member called Alukban about another type of campfire crane, which was made out of a single piece of wood and looked quite straightforward to carve.
The connection between the arm and the upright is a type of Lap Joint. It is easy to adjust and can take the weight of a decent-sized pot.
Lap Joint Crane
Trimming
I had some sycamore lying around, about a metre and a half long. I trimmed the fork off the end as it was not needed and then cut the pole into two further pieces.
In the picture below all the wood to the left of the folding saw became the arm and the rest became the upright for the crane.
Single Pole
The upright
I squared off three of the sides of the upright along two thirds of its length and formed a point on the bottom third.
I took my time doing this so that it was as even and as smooth as possible along its length where it was squared.
Square the top – Round the bottom
Once I was happy with the upright I moved onto the arm. The whole crane works on the principle that the weight of a pot hanging on it will create enough friction to hold the arm against the upright.
Line up to Mark up
The arm
I used the upright as a guide to measuring where I need to cut out the lap joint on the arm (I measured it so that the lap joint would be very tight initially). I did not make this a 90 degree angle but about 100 degrees, so that the tip of the arm would be pointing slightly upwards.
Once I had marked the width on the arm I cut some stop cuts to half the depth of the arm and then added some more to make it easier to carve out.
I also used my saw to carve out some of the excess wood from the joint area.
Stop cuts and Sawing out
Once I had taken out most of the excess wood with the saw I used my knife to remove the rest and make it all smooth.
Trim with a knife
I locked the two pieces together and started to move the arm up and down the upright. This allowed me to spot rough areas still on the upright and then I was able to easily trim that wood off with my knife.
Continually check the fit
Once I was happy that the arm could move easily up and down the upright I trimmed of loads of excess wood from the arm to make it easier to attach a pot.
I put a stop cut about a quarter of the depth of the arm all the way around it to protect the wood around the lap joint.
Trim the limb
You can see the general shape of the arm appearing now. I likened it to the shape of an old-style naval cutlass.
The arm
In use
I added a few ridges along the length of the arm to hold pots securely and then started trying it out.
Carve the notches
I used this crane for two weeks at the Bushcraft UK Bushmoot in South Wales over the summer and was quite impressed with it. It holds pots well under tension but it needs to be treated with respect when moving the pot up and down.
I found that the crane works best with the pot hanging from near the end of the arm. If you move the pot closer to the upright along the arm it has a tendency to slip.
It is all in the friction
I will be making a variation of this style over the next few days with more of a dovetail joint so that the arm cannot come off so easily.
A great crane
I like this crane due to its simplicity so give it a go.
The final part of the Aures Crane Trilogy – The Classic.
I call this one the Classic as it is the design laid out in the book Camp-Lore and Woodcraft. The author Daniel Beard called it a rustic crane fashioned along similar lines as the iron cranes found commonly over 100 years ago over open fireplaces.
The crane is named after Victor Aures, a Scout Master from Buffalo, NY. I found a good article on this from an issue of the Boy’s Life from 1915.
The Classic Aures Campfire Crane
You do not see the classic crane often since it requires a specific configuration of angles on the forks and it’s all too easy to cut through the thin layer of bark and sap wood needed to form the loop on one end.
The Aures – Picture from Camp-Lore and Woodcraft
Measuring
I stumbled upon a good piece of hazel recently with a strong main fork and the necessary secondary fork at right angles to the main one.
The basic parts & measuring up
I had a good pole that I was going to use as the upright and measured the top limb for trimming. I estimated with my eye the amount of wood I would need on the top limb to form the loop (I call this section the tail before it is formed into a loop).
Trimming the excess
Trimming
After sawing off the excess I started the slow process of removing all the excess wood on the tail. It is easy to remove the wood at first but try and remove it evenly as you work.
Removing the excess wood from the wrap
I tend to work from the end of the tail and work up the crane towards the fork. This helps in reducing the chance of chunking through the wood and destroying the crane.
In the pictures below I have worked my way down to the pith and then just passed it. I forced myself at this stage to take my time and work methodically.
Important to trim evenly from bottom to top
Eventually I could make the wood bend slightly (it was only a couple of centimetres wide now). I scared myself when the bark cracked but that is OK – it is the sapwood that needs to bend.
When bending down the wood do it slowly and do not try and force it.
Trimming and flexing
I finally had just a thin piece of sap wood left that could be bent a bit more but not fully. To help this process along I used the tip area of my knife to cut out some more of the wood without making it any thinner than a couple of centimetres.
To help the bending process I left the crane in a stream to soak up some water. If you have the tools to steam bend wood the job would be much easier.
Last few scrapes and softening
Once the tail was very pliable I flattened an area where the tail would be whipped to the crane then marked the tail and the main body of the crane with a pencil so that I retained the size of loop I wanted while I whipped it.
Prepping for some whipping
Whipping
In the book Camp-Lore and Woodcraft, Beard’s drawing shows the tail being tied off with strips of bark. I will use bark when the crane has fully seasoned (it will shrink in the process) but for now I whipped it with some old paracord. I whipped it twice with different cord as that is what I had to hand.
Whipping the wrap
The loop should be big enough for your upright and positioned so that when the crane is hung on it and braced on the fork, the pot arm is level and pointing slightly upwards.
Hangs well
The Pot Arm
I then went to work on the pot arm, carving out little notches so that I could adjust the position of the pot easily along its length.
I also put my usual dimple on the end for hanging another adjustable pot hanger off it.
Carving the pot arm
I took the crane out on a Bushcraft course with the Royal Marine’s Cadets and it was soon in action.
In use alongside another pot hanger
It is very easy to move the crane up and down with light pots (I advise removing heavy a pot from the crane before adjusting the height then replacing it).
The crane also swings easily away from the fire. If you do not trust the loop to hold a heavy pot, you can back it up with a loop of cord.
From above
The Three
I really enjoyed making these three Aures Cranes and hope to see a few more over fires at Bushcraft meets in the future.
All three versions – Classic, Gibbet and the Single Fork
That is it for me on the Aures Crane (I am sure you can come up with some more variations on this), however in the course of my research I discovered a Single Pole Crane – that is next on the list.
This is the second of my blog posts on the Aures campfire crane trilogy. I call it the Gibbet crane based on a pot hook I found mentioned in the book Camp-lore and Woodcraft. The crane does look a bit like a traditional gibbet but the name apparently refers to the overlapping joints used in its construction rather than its likeness to an instrument of execution.
This is a great project for the longer-term camp or if you want a bit of practice carving joints and whipping.
The Gibbet Aures Crane
As usual the tools for making the crane are to be found in most bushcrafters’ backpacks – a knife, saw and axe. I saw this crane set up many years ago at a camp however I have seen little written up about it in books or online.
I found one piece of wood with a strong fork and a smaller catapult-shaped fork (bottom left below) and I cut a limb with a branch coming out (top left below).
The first job I did was to strip off all the bark from all the pieces.
Tools and basic parts
I placed the large fork up against the pole it would hang off to measure where I needed to trim each limb. To do that I just used my knife to mark the limbs. The top limb needs to be marked to the left of the pole (as you see in the picture below) and the bottom limb needs to be marked to the right of the pole as you see it below.
Carving the top limb
To begin with I trimmed the top limb at its mark with my saw, leaving the bottom one for the moment.
Measuring and trimming the top limb
I laid the small hook beside the end of the top limb so that the hook was pointing towards the big fork and marked where I wanted to trim it. I did not want to leave it too big – just big enough to be whipped to the big fork.
Measuring and trimming the top hook
I wanted the joint to be strong so I put a stop cut into the top of the upper limb so I could cut out a lap joint (also known as a Gib joint).
I then battoned off the excess so I was left with one half of the lap joint, then I trimmed the bottom of the small hook flat to fit snugly against it.
Cutting out the Gib cut on the top limb and hook
Not a perfect fit but good enough.
Putting them together
I then used paracord to whip the two together, on both sides of the hook. I left excess string tied in a knot as the wood was green. As it dries out the wood will shrink and I will have to redo the whipping.
Whipping The Gib joint
Carving the bottom limb
I flattened the upright of the ‘Y’ piece and split out a Gib joint on the lower limb. You have to make sure all the cuts are done on the correct planes so that the hanger will fit on the upright pole without twisting.
Cutting the Gib joint on the bottom limb and fork
After a bit of whipping it was time to set it up and make sure it worked correctly. In the bottom right picture you can see clearly how it all comes together.
Fitting and splicing
Carving the pot arm
I have a particular way of carving the hanging arm (you be as creative as you like). I axe out the basic shape I want, trim it smooth with my knife and cut in lots of grooves along the upper part to allow the pot to be hung on various areas of its length.
Carving the pot arm
Once all the grooves are cut I tend to put a dimple in the end so I can attach an adjustable pot hook. This allows me to hang two or three pots from the crane.
Finishing touches
Using the Crane
This sequence of shots shows the method I use for adjusting the height of the crane when it has a heavy pot attached to it. I swing the crane away from the fire, remove the pot, adjust the height of the crane, attach the pot again and swing it back over the fire.
With light pots you do not need to remove the pot but just lift the crane slightly so it detaches from the upright and then just move it up and down.
In use
In this picture you can see how the arm works with an adjustable pot hook attached to the end of the crane arm.
It looks precarious but with the usual level of care you take around any fire I have found this system works well.
Added adjustable pot hook
Dinner could be in one pot and the kettle on the other leaving plenty of room to sit comfortably around the fire without having lots of uprights protruding out (which can be a problem with other campfire cooking rigs).
Works a treat
I took the set up out on a recent bushcraft course I was running to show some colleagues and set it up with a fixed crane. All in all it worked a treat.
I could never call myself a chef however I could call myself a campfire engineer. I love to make different cooking rigs that I can use around the fire depending on the circumstances I find myself in.
The Aures crane is one of these projects for the more long-term camp and is so easy to make. The crane is named after Victor Aures, a Scout Master from Buffalo, NY. I found a good article on this from an issue of the Boy’s Life from 1915.
The Aures Crane – a version using a single-fork branch
I also found a book called The Book of Camp-Lore by Dan Beard on the Project Gutenberg website that shows the original idea of wrapping the bark of one limb around an upright and a forked lower limb.
The Aures Crane – Picture courtesy of The Book of Camp-Lore and Woodcraft, by Dan Beard – Sourced from Project Gutenberg
I have been making these cranes for many years now but it was only once I started researching them that I discovered its correct name. This post does not cover the making of the Aures crane as shown in the Boy’s Life magazine or on in the Book of Camp-Lore (I will do that one later) but a variation of it.
The picture below shows a classic Aures crane with a good secondary fork to rest against the upright. It’s not easy to find the exact combination of forks needed for this classic style so I set out to re-create the Aures crane using a branch with only one fork, as these are so much more common.
The ideal Aures Crane with a perfectly placed fork
I chose a sturdy green piece of hazel wood with a single fork. After trimming the ends to the size I wanted I used my axe to get rid of all the lumps and bumps on the wood.
In the bottom right picture the limb on the left I will be calling the upper limb and the one on the right the lower limb.
The not-so-ideal single fork – much easier to find
Top Limb
Next I whipped some strong non-stretchy string onto the top limb of the crane. Grogs knots have a good tutorial on this, however it’s not necessary to whip in any particular way- just do it in whatever way works for you and binds that end of the limb tightly.
Whip the end of what will be the top limb
One of the reasons I selected a fairly sturdy fork was that I needed to put in a stop cut about a third of the way down the top limb. This stop cut will help you greatly in controlling the split you need to make to form the hook.
I sawed my stop cut to about two thirds of the diameter of the limb.
Put a stop cut into the limb
Using small cuts I then cut out a groove just above the stop cut towards the fork to the depth of the stop cut (the two bottom left pictures). This allowed me enough space to get my knife blade in to start battoning down to split the wood.
I was very careful when battoning not to let the blade touch the string that I had whipped onto the limb. Take care to wiggle the knife to remove it, keeping your non-knife hand well clear. I battoned a number of splits so as to easily carve them out.
Carve and batton
I also found that sawing down into the split helped with removing the wood. Once I had sawn or battoned down a number of times I carved out the excess wood by pressing down with my knife at a slight angle (you can just see the carved out area in the bottom left picture).
Next I took a small stick and carved it into a wedge shape to batton into the fork to expand it further.
Use a saw and knife then make a small wedge
Double check that your whipping is secure and batton the wedge into the fork to expand it. Once it is securely fixed, trim the wedge so it fits neatly.
Insert to widen and trim
I used my knife to carve some more wood from the inner part of the fork to expand it a bit more. At this stage I was trying the fork out on the upright pole to see how it fitted. Don’t take off too much wood as you need to maintain strength in the fork so it will hold a heavy pot.
Use a knife to carve out more wood
Bottom Limb
I split the lower limb nearly all the way down to the main fork. Do this slowly so that the split remains even on either side.
Make sure you get your angles right so that when the crane is placed on the upright everything fits neatly without twisting.
Split the lower limb by battoning
I carved another wedge to fit the lower limb split and whipped string on either side. To finish this section off I trimmed the wedge with my saw.
Insert another wedge and whip
Pot Holder Limb
I removed a lot of wood with my axe and knife from the limb that would become the pot holder bar. I also battoned out some little grooves so as to hang pots safely.
Carving the pot holder bar
At the end of the bar I also carved out a little recess on which to hang an adjustable pot hook.
After that I added some more binding to the top bar to make it really bomb proof.
That’s it in terms of construction.
Pot holder bar in detail
Aures crane in action
All the hard work is done now so all you have to do is light your fire, insert the upright, attach the crane and pot, adjust the height for optimum cooking and sit back.
The picture at the bottom shows how you can also attach an adjustable pot hook to the end if you want.
High, low and balanced
I have attached the Aures crane to the upright for my fixed crane allowing me to hang multiple pots. I have discussed how to make a fixed crane in my previous post How To…. Build a Campfire Cooking Crane.
The adjustable pot hook is only needed if you want different temperatures for the pots hanging off the Aures crane.
Top down with fixed crane above
If you are happy for both pots to be at the same height both can be hung directly off your pot bar if it is long enough.
The crane is easy to adjust for height with the pots attached and you can easily swing it away from the heat when required.
Heavy duty
A view from above – one upright – two cranes – three pots
One upright – two cranes – three pots
Do not be put off by the length of the instructions: this crane is very easy to make. Some of my bushcraft friends say that it’s not worth the bother – that may be so for a short term camp but if you want to practice your carving skills it’s perfect for the job.
The ultimate aim – to have a brew
I have a feeling I may be writing about a few of the other variations of the Aures crane in the near future.
Sometimes you want an adjustable pot hook without a tripod set up.
Sometimes you want to pour your coffee without getting burnt by the flames.
If that’s what you want then build yourself a crane – It’s easy.
A robust and versatile campfire crane
There are a number of different ways to build a crane set up however I decided to try just with the general tools I would carry in my rucksack. These included an axe, a saw and a general bushcraft knife.
The wood I used was some sycamore I had recently polarded in my garden. The crane is made up of a thick upright and smaller pieces to act as the arms. I decided to make two different types of arms, one for small pots and one for bigger Dutch oven type pots.
Sizes and dimensions will vary depending on how high you want your crane to be and what weight you want it to hold.
Carving the upright
I decided which part of the upright would be the top and then flattened it to give me a working area. You do not need to do this however I find it gives me a stable working surface. You can see in the pictures below that the girth of the upright is just larger than my hand as my fingers do not fully close around it.
Basic parts and flattening the top of the uprght
For the crane to work you need a hole at the top of the upright. The size of the hole will depend on the size of the arm you will put through it and how much wood you want left around the hole for strength.
As I was going to carve this with my knife I opted for a square hole as this style is easier for me to carve. Once I had pencilled out one side I marked up the opposite side. In this crane I made the hole at 90 degrees to the upright (makes life easy) but you can angle it if you want so that the arm will be pointing upwards more when inserted.
Marking out the socket
I used my knife to score lines into the wood I wanted to remove. You can do this by gently tapping your knife handle with a batton or rolling the curved part of the blade. You need to do this gently so as not to cause unwanted splits in the wood. Also make sure that the work piece is secure on the ground and that your free hand (if not battoning) is well clear of the knife edge.
Scoring
To remove the wood I just pushed the tip of my knife inbetween the scores and prised it out. Again I did this gently alternating between pushing on the handle with my hand or doing light taps with a batton. When I twisted the point I did so gently so as to not cause any unwanted splits or worse still – snap off the tip of my blade.
I did another set of scores and chipping until I was about halfway through the upright.
Chipping
I then repeated the exact same procedure on the other side until my knife popped through the other side.
Repeating the scoring and chipping
Once the plug of wood was removed I trimmed the internal walls of the hole (using the wood I would use as an arm as a guide) and chamfered the edges off.
Finishing the socket
The upright was finished off with all the knobbly/sharp bits being removed and a point was axed out at the bottom of it.
Trimming and pointing
Carving the lightweight arm
I made the arm for the lightweight pots from a thin piece of sycamore. I trimmed a flattened piece near the end and carved a small dimple with the point of my knife in it.
The small dimple is needed to keep the adjustable pot hanger in place. I have covered the making of the making of an adjustable pot hook in my post How To…. Carve and use an Adjustable Pot Hanger.
Lightweight arm
Set up
In my previous post on making a Double French Windlass Cooking Rig I explained how to make a pile driver. I used this pile driver to make a hole for the upright to sit in.
Once you have created the hole it is just a case of gently tapping the upright into place. If you did not use the pile driver you would need to hit the upright hard to drive it into the ground and very quickly the wood around the hole would crumple or snap.
Using the pile driver to place the upright
As I had not made the hole at an angle I carved a small wedge to hold the arm securely and also to raise the tip up slightly.
When the arm is in place in the hole just tap the wedge into place gently. Do not ram it in as this could cause undue pressure and split the wood.
Create a wedge to secure the arm
Then it is a simple case of attaching the hanger with your pot or kettle onto the arm.
I like this system as it is easy to adjust the height of the pot and the whole crane can be swivelled to move the pot away from the fire easily.
In the picture below I have left the back of the arm overly long but I will trim it shorter eventually.
Ready to go
Carving a strong arm
As I had made a square hole I got a bigger piece of sycamore and squared it off along its length to fit exactly in the hole. This arm was designed to take bigger pots like a dutch oven.
Creating the heavyweight arm
The end was shaped to fit the pot hanger.
Finishing the tip
Then set up exactly as the first arm.
This time though I tested it out with a dutch oven half full of water.
Heavy Duty Cooking
I have a few of these cranes so I set up another one to put the kettle back on.
Multiples
I had used an auger and a palm gouge to carve this one out so you can see it ended up with a round hole. No wedge was required as the hole was set at a slight angle.
The crane made with an auger and palm gauge
After the water in the dutch oven had boiled it was easy to raise it all up off the heat.
Easy to adjust the pot height
If you plan to use these cranes on a longer term basis they may develop a crack if you are using green wood. This happened to this crane about a week after I made it but I secured it with a bit of whipping. You can do this right at the beginning if you wish or when you see a split start to appear.
The whipping will be well clear of the flames so I am not worried that it will be burnt through.
Some Whipping
If I had not being taking pictures along the way I would have completed this rig in about an hour or so.
There are other ways of doing this and other tools you can use so I will leave it to your imagination but if you are someone who likes to tinker around the campfire then I would give this one a go.
A few years ago at the BCUK Bushmoot in South Wales I ran a class looking at different campfire cooking set ups. As well as showing the students my set ups I had asked them to bring along examples of their own if they could. One that caught my eye was from my friend Steve Mesquite Harrall. It consisted of two forked uprights and a top bar that could be turned to raise or lower a pot that was suspended beneath it on a piece of string.
Steve had learned this from Wayland of Ravenlore Bushcraft and there is a good picture of the set up on Wayland’s Ravenlore site – Hang up your Billy. Wayland told me he’d got the idea from a book by the French adventurer Nicolas Vanier called ‘North’. The rig did not have a name and it was Wayland who used the term French Windlass (Windlass meaning to ‘haul or lift’). I have just added the ‘Double’ so I can cook with more than one pot.
I really liked this rig when I first saw it but soon felt the need to be able to adjust the height of more than one pot at a time. You do not easily find two decent poles with a double fork in the right place to do this so I had to come up with another idea. The solution in the end was so simple that I had to laugh at my own stupidity for not thinking of it quicker – just make a new fork by splitting the pole above the natural fork.
Double French Windlass Cooking Rig
The basic parts I used were one small piece of wood to make a pile driver (I’ve heard this called an El Salvadorean pile driver) to create holes for the uprights, two forked uprights and two poles to act as spars.
I trimmed a point on the piece I was going to turn into my pile driver first. I used a small round of wood to act as a work surface and kept my axe work to the far side of the round for safety.
The basic parts and the start of the El Salvadorean pile driver
Once the point was finished I put a chamfer on the top of the pile driver by cutting out little pieces of wood all around it. Doing this helps stop the pile driver from splitting as you hammer it into the ground to create your hole.
Carving the pile driver
As the pieces I picked for the uprights were fairly thick I had plenty of wood to split to create my second fork. You need to ensure that the split you create is on the same plane as the natural fork.
To batton safely, make sure the bottom of the upright is secure and hold the axe so that the blade is at right angles to your body. I used the pile driver as a batton to create the split. Once the split reached the level of the natural fork I stopped.
Battoning out the second fork
To stop the split going any further I whipped some twine around the upright at the base of the split. To keep the fork open you will need to add a wedge and the whipping will stop the split travelling down the upright when it is inserted.
A little whipping
I took one of the spars and carved a triangular end to it – the thin end of this will be the wedge to hold open the split in which the spar will sit.
Carving the wedge
I used the pile driver to batton the wedge down into the new fork until it reached the whipping. Then it was a case of just trimming the wedge to finish.
Inserting and trimming the wedge
I felt that my fork needed to be a little bit wider still so with my knife I cut out some wood from inside the fork. Once that was done it was a case of giving the upright a pointed end and trimming off any knobbly/sharp pieces from it.
Widening the fork, pointing and trimming
The second upright was produced in the exact same manner and they were soon both ready to go.
Finished uprights
The rig works on the principle that the weight of the pot locks the spar into the forks on the uprights. To make this work you need to carve triangular-shaped ends to your spars (Wayland likens this to a prism shape on his blog). I ensured that the points of the triangles at each end of the spars matched up with each other. Take your time with this and before each cut ensure they are lined up.
Carved triangular shaped ends on both spars
The ground where I was testing this out was at the back of our garden in an area that was about to be weeded and planted so it was a little soft but even so if I had just hammered the upright into the ground it would have split the top fork. The pile driver came into its own here as I was able to really hammer it into the ground (try and make your pile driver slightly smaller in diameter to the upright to get a snug fit) and create a hole for the upright.
Use the pile driver to create a hole for the first upright
Once the first upright was in I gauged the distance to where I needed to put the other upright in using one of the spars and repeated the process starting with the pile driver and then gently tapping in the upright.
Gently tap in the first upright and repeat the process for the second upright
Check your alignment is correct by lining up the forks and place both spars into their forks. I tested the spars were locked in place by trying to turn them gently. No need to force them as the weight of your pots will lock them down further.
Check your alignment, place the second spar and ensure they lock well
I took this shot to show you how the spars fit into the forks. All very basic but works surprisingly well.
Locked in
To suspend the pots I used some old string and tied it on with a clove hitch and then a couple of overhand knots to finish. I did not make them overly tight because I wanted to be able to release them easily to re-position them. Once that was done I attached the hooks. Use whatever knots you are comfortable with but make sure they and your string will hold the weight of your pots when full.
If you are worried that the string will burn then dampen it with some water (avoid string that will melt easily). I have never had the string burn through as when I am cooking I do not let flames grow big enough to go near it. Also when starting your fire ensure that the spars are not in place so that the initial flames do not burn the string.
Use a clove hitch and tie on your hook. Add one to both spars.
Once you are cooking it is very easy to lift and rotate one of the spars to raise or lower a pot by winding or unwinding the string. As we were boiling some water in the Dutch oven I got my daughter to help me but if the pot is light enough then you can do this easily by yourself.
To adjust the height lift the spar and turn it a few times
I also use another style of pot hook quite often (I learnt this from one of Ray Mears’s videos) which involves the use of a lark’s foot knot. All you need is a small loop of string that is able to go around the spar and through itself to leave a smaller loop to insert a traditional adjustable pot hook. To raise the pot all you need to do is loosen the lark’s foot and re-position it on another hook.
Alternative method with a larks foot and traditional pot hook
This is the set up from various angles so you can see how all works in more detail.
An angled view
I am glad I finished this little project as it has been on my list of things to do for a while now. It is a great set up that does not take long to do and it’s an easy way to cook foods that requires different temperatures at different stages.
The final project I was involved in during the working weekend at John Rhyder’s Woodcraft School Hampshire HQ was to build a raised firepit for the students to use. John wanted this placed inside the new cookhouse to protect it from the elements.
The raised firepit
I volunteered to do this with Jumbo Jim (he flies planes) and after a bit of a chat we decided to make it out of sweet chestnut logs that had been cut down to about 5ft lengths. There were plenty to choose from so after a bit of a trimming we lugged them back to the main camp.
Selecting the logs
We found a flat area to work on (to make the build easier) as its final placement was to be on a slope. After we finished the build we moved everything to its final location in the cookhouse.
We decided to lock the logs together by carving notches out near the end of each log to form a square. We used each log as a template for marking another one out before sawing in some stop cuts.
Marking up and putting in stop cuts
The axing and adzing out (these were the tools we had available) did not take long. I thought we might need to go for a square cut for each notch but we decided to try a curved notch at first as they are quicker to carve. Even though the curve would not lock the logs perfectly the curved notches worked surprisingly well, with no movement on the logs when they were locked together.
Axing and adding the connection points
Once we were happy with the style of the notch it was then just a case of repeating this on each end of the logs so that everything locked together well.
Repeating the process
I tested the strength of the locks between the logs by walking and jumping (with the odd jig) on each level as we built it up.
Initially we’d planned a 5ft square but after discussing this with Caron and John we went for a 5ft by 4ft rectangular shape. This was to allow the students easy access to most of the firepit without having to lean too far to reach the centre. You can see the excess wood at the ends in the bottom right picture that needed to be trimmed off.
Testing and re-adjusting the size
After some more notch cutting, locking together and jumping around we got John to trim the excess wood off with his chainsaw.
More testing and trimming
We positioned the firepit where it was to sit in the cookhouse and dug out a small trench on the upslope section to flatten the firepit out a bit and lock it in place. On reflection I think we could have dug the trench a bit deeper but the depth we dug held that top log well enough even though the firepit was not perfectly flat..
Digging in the firepit
When we had locked all the logs into place we had a chat with John and agreed that we would drive in four stakes to act as supports for the grill. We found four brackets to attach to the stakes to hold the bars of the grill in place and left enough room on the stakes to add another four brackets so the grill could be raised (we left John to attach these later when he got some more brackets).
Constructing the grill stand
The filling in of the firepit was the easy bit as we simply dropped about 5 wheelbarrow loads of earth into it. Nigel was on hand while we dug the earth to tamp it all down.
The top layer of fill was taken from the edge of a small stream where there was a high concentration of clay. I hope that over time this layer of clay will harden and make for a good surface to light a fire. I suggested to John that as the top layer dries out he could add a few more layers of clay to build the surface up a little more to be in line with the top of the logs.
Filling in the firepit
When we had finished tamping the soil down it was just a case of putting the grill back on and lighting a fire. I placed some dry off-cuts over the damp soil to give the fire a good chance to get going. With a little bit of waftage from Kev it was soon going nicely.
As soon as John adds a layer or two more the surface will get a bit closer to the grill for a fast cooking time and when the other brackets are added higher up they’ll allow for slower cooking too.
Topping off and first firing
The grill is as flat as we could make it although it appears to slope, because the ground isn’t level.
I had a great time building this firepit with Jim, figuring out how it would all link together and finally putting it all in place with the grill on top.
A happy team
There are two more posts on projects we did that weekend. They are:
I came across a fallen hornbeam tree one day while teaching my Sea Cadets some map reading. Attached to it was a burl that produced this beautifully swirled kuksa cup.
My kuksa
Before I could drink out of my new kuksa I had to sort the small matter of carving it. As I explained in my previous How To… on Carving a Small Noggin cup the name kuksa (also known as kåsa in Sweden) is probably not the correct term for the cup as it was not carved in a Scandinavian country by the Sami peoples. Also it was not carved out of a birch burl but I like the word kuksa and it was carved out of a hornbeam burl at least.
After cutting the burl section from the fallen tree I left it to season for 3 years in a cold but dry area (my garage).
I wanted to create a kuksa that had the swirl of the burl wood and the clean lines of the heart wood. I started trying to saw down the length of the heartwood but that proved too difficult for my hand saw.
Hornbeam Burl
In the end I inserted two of my log splitting wedges into the saw cut and hammered down on them with a wooden mallet.
Splitting out
Thankfully they split cleanly leaving me a fairly smooth surface to start axing out the shape of the kuksa.
Dark wood of the burl
The heartwood was well seasoned and required quite a bit of axe work to get it down to the level I wanted.
Axing out the blank
I stopped axing out the top of the kuksa when I started to reach the burl wood but kept the heartwood for the handle. I was inspired by Jon Mac with his kuksa handle in the style of an otter’s tail and felt that the heartwood would prove a stronger option to the burl wood.
I drew out my general shape and used my saw again to cut off the excess on the sides. All the excess burl was carved later into either a quaich or a bowl.
Making most of the burl
The burl was of a very good depth and even though there were some deep fissures I knew for once I would get a decent sized cup out of it.
Ready to carve the bowl
I did not take any pictures of me carving the bowl or shaping the kuksa as I was too busy carving and there was no one around to photograph for me.
I looked in my archive though and came across these pictures of the master craftsman John Arthur from the Woodlife Makers Guild at the 2011 Wilderness Gathering demonstrating how to quickly blank out a kuksa.
John Arthur – Master Wood Worker
After chopping out the basic shape, John used a saw to put some stop cuts in. Stop cuts allow you to remove wood from specific areas without any split running off into wood you want to keep (in this case the area that will become the bowl).
Stop cuts and blanking out the cup
Once John had the basic shape he used his crook knife to carve out the bowl. He kept the knife in his right hand and continually turned the kuksa to carve out the bowl.
Carving the bowl
Finally he used a small knife to shape the outside of the kuksa. He used a number of cutting styles cutting towards himself and away from himself but he was always in full control of the knife and soon had the basic shape of the kuksa made.
As this was green wood he then explained he would let it dry slowly over a number of weeks before finishing it off.
Deft knife work
Here are some of John’s finished kuksas on display at the Gathering. With this level of detail you can see why he is a master craftsman.
John’s creations
Back to my kuksa – the burl wood of the bowl came out very easily with a chisel and my crook knife.
I put lots of stop cuts into the sides of the blank so as to help get rid of the excess here in a controlled way (you can see all the pencil marks where I was to put them). I really took my time here to get rid of the excess wood and not damage the bowl.
Stop cuts
The whole process of removing the burl wood took quite a while as the outer bark was very hard and the burl wood underneath the bark because of its curving nature was very soft in places and very hard in others.
When I had formed it into the shape you see in the top picture (below) I started using different grades of sandpaper, working up from very rough to very fine, until it reached the smoothness you see in the bottom picture.
Carving the Kuksa shape
The inside of the bowl was very stable, smooth and did not contain any holes.
The underside was a different matter with small holes in a number of places.
Smooth bowl but imperfect base
In the up close pictures below you can see that they were fairly deep. I felt I needed to fill these holes to prevent any leakages (never a good thing when you are desperate for a brew).
Holes – big and small
To fill the holes I used a mixture of wood glue and sawdust from the sanding as a kind of filler. I rubbed the mixture all over the underside of the bowl, allowed it to dry, sanded it and repeated the process again. This all took a couple of days to allow for the drying process.
Wood glue and shavings on the base
There was still some roughness left over even after the sanding but I felt that went with the character of the kuksa.
Drying and sanding
To seal the cup I melted beeswax and poured it over the cup. I then re-melted the beeswax with a hairdryer so that as much of it as possible would soak into the burl wood to fill all the pores. I repeated this a number of times, covering the whole cup until no more beeswax would soak into the wood.
Beeswax filler
The beeswax did what the sanding alone never could; it smoothed out the wood and gave it a lovely shine as well. The swirls of the burl wood really stood out after this process.
Beautiful swirls on the sides
I particularly liked the contrast of the burl wood of the bowl with the heartwood of the handle. This is what I was hoping for and was very pleased with the outcome.
Contrasts – heart wood and burl wood
Next up was to test out the waterproofness of the cup. To begin with I poured cold water into the cup and let it stand for an hour. Thankfully there were no leaks.
Waterproofing test – cold water
Then it was time to add hot water. I started with warm water and in stages moved up until I was pouring just-boiled water into the kuksa. I was fairly happy that there would be no leakages now.
Waterproof test – hot water
Next up was to see how a brew tasted with all that beeswax in the wood. I poured myself a coffee and could taste nothing of the beeswax. I think the boiling water helped with removing any excess beeswax.
Taste test 1 – Coffee
A final test was at my friend Fraser’s place (of Coastal Survival) when he made me a beautiful cup of mint and blackberry tea.
Taste test 2 – Herbal tea
I used more of the burl to make a bowl to go with the cup and it too turned out quite beautifully (in my opinion at least!).
Alison had always wanted a one carved for her so I thought it was time to get on with it. These cups were traditionally made out of burls (I will cover this in more detail in my next How To…) however I did not have one available at the time and used silver birch wood instead.
Noggin carving is a skill that has been practiced for millennia but due to modern industrial practices it is now something generally limited to green woodworkers, bowl turners and bushcrafters. These are a few of my carvings, all utilitarian and nothing fancy. The cup at the bottom is the one I made for this How To…
Carvings
Wood selection and splitting
For this noggin I selected a green piece of silver birch that had no crack lines starting on either end. The log had a few knots in it but looked quite easy to carve.
I split the log on a stump with my axe and drew out the basic shape of the noggin with a pencil. My intention was to carve a shallow flat-bottomed noggin with steep sides as the log was not that big.
Beginnings – splitting the log and drawing
Tools & the bowl
As the sides were to be steep I opted to use a curved wood chisel and a mawl. I carved out the bowl first for various reasons:
To locate any cracks deep in the bowl area quickly
Working with the whole piece makes it more stable
There is less chance of the side of the bowl cracking
Mawl and curved wood chisel for the bowl
Carving the bowl
To begin with I worked my way around the edge of the bowl taking out small chippings. I tapped the chisel with the mawl quite gently at this stage. The work piece was placed on my lap with 3 thick layers protecting my legs – two jackets and a small day sack.
I positioned the log so that the chisel was always pointing away from me. A work bench with a vice would have been safer but not available at the time (we were working in the winter in a small roundhouse).
Fine work to begin with on the bowl
Going Deeper
Once the initial edge area was carved out I was able to use more force with the chisel. By this time I did not need to use the mawl but cut into the wood by just pressing down with force on the chisel. This seemed to work quicker than using the mawl all the time.
Working my way around the bowl I was able to take out a lot of wood rapidly until I had the basic shape roughed out.
Chunking out the bowl
Axing out the basic shape
Once the bowl was created I axed out the basic shape of the noggin. I used the saw to make ‘stop cuts’ first though so that when I was using the axe I did not cut out areas of wood that formed part of the cup.
I did this work on a stump placed on the floor. The work piece was always well in front of me so that the follow through from any slippage (from the axe) went to the side of me.
Here you can see the two stop cuts created by the saw coming in at either side of the work piece. I then used the axe to cut out the areas of wood I did not require.
Stop cuts and axe work
Carving with the Sloyd knife
After using the axe to blank out the basic shape of the noggin I then switched to using my Mora Sloyd knife. This small knife is ideal for more detailed, controlled carving.
I was able to carve in a very controlled and safe fashion with my thumbs pressing on the back of the blade. Even though the cuts were always small it did not take long for me to fine tune the shape as the blade itself was very sharp and the wood was green.
Knife work
The crook knife
When I had the outside of the noggin ready for sanding I decided to use the crook knife on the inside of the bowl.
This was to take out as many of the small ridges produced by the chisel as possible and also to try and flatten out the bottom of the bowl some more. The crook knife enabled me to smooth out a lot of the ridges that the Sloyd could not reach.
After finishing with the bowl I left the noggin in a paper bag to dry slowly over a two-week period as it is easier to sand down dry wood.
Finishing the bowl with the crook knife
Sanding the Noggin
I used a variety of different sandpapers on the noggin including:
Top left – 80 grit
Top right – 150 grit
Bottom left – 320 grit
Bottom right – 1200 grit
The sandpapers used
I started with the coarsest, 80 grit, ensuring I covered the whole noggin and that all the edges were rounded off. The bottom of the noggin did take a considerable period of time to roughly sand (I should probably have done more knife work) but I wanted to create a small flat area so that it would be stable when set down with liquid in it.
I did not sand the whole of the noggin smooth as I wanted to leave some of the tool marks showing but I did give the rim of the cup an extra bit of sanding as I wanted that bit particularly smooth.
Sanding
I really focused on making the rim smooth as I wanted that smoothness to contrast with the tool marks on the lower area.
Once I had finished with the 80 grit I worked my way up through the other sandpaper slowly smoothing the noggin down until I reached the finest, 1200 grit.
Smoothing the rim
Boning the noggin
After sanding I oiled the noggin lightly (I used vegetable oil as that was all that was available) then used the back of a spoon to really smooth the surface. This is known as boning and as well as smoothing the surface it helps to seal the oil into the wood (a small rounded pebble works just as well).
Boning
This whole process took a couple of hours and I added more oil as I went along. I find boning quite therapuetic, and it leaves a beautifully smooth satiny finish.
Lastly I carved a hole in the handle, fixed a leather loop and oiled the noggin once again.
Before and after oiling
Lovely carvings for lovely ladies (although sadly Alison couldn’t christen hers with a dram of whisky on Christmas Day: she was pregnant with our son Finlay, who was born just a couple of weeks later!).
This How To… is put together from my records of a Primitive Technology course I did with John Rhyder of Woodcraft School back in 2009. In particular I will walk you through the steps I took to brain tan a fallow deer hide into a piece of buckskin to make a bag.
Buckskin bag
Background info on Buckskin
Any animal hide that is left untreated will harden into what is called rawhide. This has many useful applications, such as making bindings for tools and inserting and holding stone tools in sockets, and these days it’s often used as dog chews.
If a hide is stretched out on a rack its surface area increases and it can be useful in making drum skins. However if a hide is stretched, manipulated, properly cleaned and soaked in a solution made up from the animal’s own brains and smoked it becomes buckskin. This is very useful in making clothing and bags.
Buckskin making will be discussed in this How To… but it is made differently to normal shop-bought leather. Traditionally processed or shop-bought leather is tanned in vats of tannic acid solutions. This could be from the tannins found in oak, willow and chestnut. Skins can be soaked in these solutions for periods of 8 months to 2 years. This produces a heavy leather which is good for making shoes, jackets, ‘possibles pouches’ and sheaths.
Also with modern commercially made buckskin the process is very polluting with the chemicals used and the grain layer (see below) is also left on. This does not allow perspiration to escape through the fibre so leads to degradation of the buckskin.
With hand-worked buckskin the grain layer is removed and due to the longer periods of stretching the fibres are more open so allowing perspiration to disperse. The skins are also lighter because of the stretching.
Due to hunting restrictions in this country since medieval times, much of the knowledge regarding tanning in this country has been lost. Most of the knowledge that we use now in relation to traditional tanning and buckskin production comes from studies with Native Americans.
It is estimated that there are 6 million hunting licenses issued in the States each year but only about 500,000 skins are tanned each year. This means skins can now be obtained more easily and information about tanning or making buckskin is becoming increasingly available on the web as people experiment more.
In the UK animal skins can be obtained from many sources including roadkill, game dealers and stalkers. It must be remembered that the quality of a skin relates directly to how the animal is skinned. Damaged skins from road kill may prove a challenge to the person treating the skin. Also nick marks from knives in the skinning process can produce cuts in the skin that expand when stretching the skin. The ideal is to get an animal that has a near complete hide and has been skinned with the minimum use of a knife.
If a skin is not processed properly it will either stay dry, hard and stiff as rawhide or, if it gets wet, it will go soft and eventually rot. The ideal with buckskin is that it will be soft when dry, and when wet will not rot easily but be able to dry out and remain soft.
In all leather or buckskin making the flesh and hypodermis membrane are removed. Hairs can be left on or removed depending on the final product. Commercial leathers also remove the hair but much of the epidermis and grain layer is left on.
To make buckskin the epidermis, grain level, much of the small fibres, hypodermis and flesh are all removed. Only the mature fibres are left to process.
Brain-tanning a hide in general
Skin the animal carefully
De-flesh the hide with a scraper
Remove the hypodermis membrane by scraping
Remove loose hairs if required by hand
Remove the grain level and stubborn hairs by wet scraping
Remove small fibres by dry scraping
Stretch the (moistened) skin initially to start opening the fibres so as to make the skin more pliable
Dress the skin in a solution such as brains and water, or eggs and water
Continue to soften and stretch the skin so as to manipulate the fibres and coat them in the oils of the dressing. This helps to keep the fibres separate from each other as the skin dries
Apply more and more dressing with continual stretching and manipulating. About 3 or 4 dips in the dressing mixture.
When the skin has finally dried out (it needs to be continually stretched until it is dry) it needs to be smoked. Smoking changes the skin chemically to stop the fibres glueing back together when it gets wet, hence keeping the buckskin soft. Smoking also locks the oils from the dressing into the fibres.
De-fleshing
Steve Lawson, the instructor, brought in a range of fallow deer hides for us to work on. There were not enough to go around so my friend Phil Brown of Badger Bushcraft shared one with me. Our skin was the one on the right of the line. Steve set up a pole at about 35 degrees to hang the skins on for us to de-flesh all the remaining muscle and fat (initially we used metal scrapers before moving onto primitive scrapers), The pole had been well scraped to make it smooth so the hide would not be damaged
The skins and set up
The skin Phil and I were working on was particularly thick so we guessed this was an older animal. There was an area of deep red where all the blood had pooled in the skin after it had been shot. By this stage we had moved onto using flint scrapers and they worked particularly well. The edges of the hide needed extra work as this was where a lot of the muscle and fat had been left.
De-fleshing
Splitting and removing the hair
After de-fleshing we decided to split the hide. The flint knife cut through the hide as easily as cutting through butter. The hide was placed on the bench so that it could be cut accurately and safely.
Flint knife work
After cutting the hide in two we noticed that one half of the hide had started to lose its hairs. This was due to the blood from the gunshot wound pooling into the skin and loosening the hair follicles but this was only in patches and the hair came away easily. As I wanted to make a buckskin bag I elected to use this half and Phil decided to keep the hair on his half to make a small cover.
Removing the hair
Once the loose hair came off (very easily) I started to use a scraper on the other hair. This did not come off easily at all so I used metal and flint scrapers on it. It took me several hours to remove the rest of the hairs from the healthy part of the hide.
Problems
Dry Scraping
While we were working on our hides John Rhyder had set up a dry scraping rack for another student to use.
Dry scraping set up
Once the hide is stretched out fully it is then left to dry and it is then scraped of all the excess muscle, fat and the grain layer.
Dry scraping with flint
As well as the metal and flint scrapers, the shoulder blades of the deer also make excellent scraping tools.
Scraping tools
During a break Steve showed us how to dry scrape an old fox hide. The hair and grain layer came off for him very easily, unlike the hide I was working on.
Getting down through the layers
If you do not remove the grain layer the oils from the brain or egg solution will not fully soak in and the buckskin will not become truly soft.
In detail
Tanning – eggs
We made up one pot of egg solution. For a fallow deer about 12 eggs are required per hide, well mixed with water in a ratio of about 4 parts water to 1 part egg.
Tanning using eggs
With a hide where the hairs are kept on it is best to apply the solution with a sponge or cloth until it soaks in.
Applying the mixture
Tanning – brains
Steve showed us how to take the brains out of a deer. The first method started with a vertical slit down the hide over the forehead. With the skull exposed a heavy knife could pierce the skull, allowing the brains to be scooped out.
The other method is to go through the area of the skull where the spinal column attaches to the skull. Again, a heavy knife is needed to hack away at the bone to open a hole big enough to get a small spoon into it.
Brain tanning – opening up the skull – front and back
Steve used an old knickerbocker glory ice-cream spoon (it has a very long handle) for the job, with the sides of the bowl bent upwards. To get all the brains out you need to mash the brains up with a spoon and scoop out as much as you can. Then add water to the brain casing and scoop or pour the last bits out.
Using a slightly bent knickerbocker glory spoon works well – A long handle and easy to bend up the sides.
Brains are mixed with water in the same ratio as the eggs. It is generally agreed that an animal’s own brains will tan its own hide but in terms of weight, for the average hide you need about half a pound of brains.
The brains we were using were supplied by Steve and they had been double bagged and kept in a freezer until we used them. In the pot in the bottom right picture are two sets of brains. The darker one was thought to contain blood from a head wound. In total four sets of brains were used.
Preparing the brains solution
Warm water was added to the brains and mixed vigorously. It was topped up again and re-whisked.
Preparing the brain solution
Soaking & Stretching
My hide had gone rock solid so I soaked it in a stream to soften it.
Re-softening
After wringing it out I popped it into the brain mixture for 10 minutes. Then began the stretching. I rigged a line up to help with this and I had to use my whole body weight to stretch the hide (it was very thick).
Dip and stretch
This process went on for a number of hours. I also twisted the hide every now and then while it was attached to the line with a stick to further stretch it. I re-dipped the hide in the mixture every now and then went back to stretching. This repetition of stretching and re-dipping opens up the fibres and allows the oils in the mixture to attach themselves to the fibres to keep them supple.
I alternated the stretching from the line to over my knees. When we could, we even worked in pairs to stretch the hide out. This is quite a tiring process and really works your finger muscles.
Stretch, stretch and stretch
The skins were left hanging overnight and we resumed stretching in the morning without adding any more mixture.
The plastic bag was used to keep the skin as clean as possible so it did not pick up dirt from my trousers.
Knee stretching
Here Phil had decided to use a post. The post is rounded smooth at the top. This allowed him to exert great pressure and really stretch the hide without damaging it.
Stretching on a post
To speed up the drying process we carried on stretching the hides over the warmth of the fire. This is a crucial period as you need to keep stretching the skin until it is completely dry to keep the fibres separated and coated with the oils.
Stretching and drying
Smoking
When it is dry it is ready for smoking. My skin was very soft and buckskin-like on the outer areas (which covered the stomach of the deer) but still stiff on the inner areas (which covered the hind quarters). This caused the rippling effect you see in the photo directly below.
To ensure the skin stays soft it needs to be smoked. If it is not smoked then as soon as it gets wet and dries out it will go rock hard. A small fire was set up with a pipe placed over it. Into this was placed a lot of dry rotten wood, which creates a lot of smoke but little flame.
Preparing for the smoking
I attached a line to a corner of the hide so I could hang it over the smoker.
Then, using hide glue, I formed the hide into a conical shape. I left a small opening by the string to let the smoke trickle out.
Sealing the skin for smoking
It was then hung over the pipe. I kept it in place here for about 15 minutes. The pipe did get very hot at one stage and singed the soft part of the hide, but slowly the hide changed to a slightly yellow colour.
Smoking
While doing this I also held the bottom rim of the hide over the smoke to try and get as much of it smoked as possible.
Thought about a hat as the final product.
Possibly a Gandalf hat………………………….
Even added a bow but have decided on making a bag.
With matching kit…………………
The bag
The top picture shows the smoked hide flattened out. It was still stiff in the central areas but the outer areas were soft like buckskin.
I trimmed off the ragged edges of the buckskin with my flint knife and used that as thread to make the bag. I attached the bag to my bark belt to hold all my flint knapping and fire making tools.
Decided in the end to make a bag for my primitive kit
I used an offcut of antler as a toggle to keep it shut.
Very happy with the bag in the end
This process took a full weekend but taught me a lot that I had only ever read about before.
I really appreciate now how long it takes to make buckskin and thoroughly recommend anyone to try it.
I was taught a few years ago by my friend John Rhyder of Woodcraft School about a version of bowdrill that uses an extended bearing block.
I found the bearing block to be particularly good for learners or for those who had injuries to their back, legs or arms. I call it the ‘assisted bowdrill’, not that you need assistance from someone else but because the bearing block is set up in such a way that it assists you in your stance while bowdrilling
Below you can see my friend David Jones using the set up on a piece of wood. Dave wanted to try this method out as he had (if I remember correctly) some problem with his knee. As he could stand straight on one leg and did not have to grip the bearing block too tightly, he quickly found he could get an ember and then flame.
Dave in action
To make the bearing block you need a decent length of branch. I used a decent sized piece of hazel just over a metre long to act as my long bearing block. I then axed out a point on one end of the bearing block, to be jammed into the ground when in use.
Select a limb and sharpen one point
I marked a slight cut with my knife one handspan (outstretched little finger to outstretched thumb) away from the other end of the bearing block. Then, using my saw, I cut into the bearing block a stop cut, about a third of the way into the wood.
Measure a full handspan and cut a stop cut
Being very careful and using small chopping motions I cut out the excess wood to make my recess for the drillpiece to be attached. As you can see from the picture below right, I have come back quite a way to the end but not all the way.
Please ensure that the sharpened tip is well dug into the ground when you do this axe work and always make sure you know where your fingers are in relation to the axe when working. I have had a few near misses doing this when I am not paying close enough attention.
An alternative method is to cut a longer limb to create a safety handle, which can be sawn off after you have axed out the area.
Gently axe out to the stop cut
While the bearing block is flat on the ground, use the tip of your knife to make a small hole near the stop cut. This hole will be used to keep the drill piece in place.
Having seen someone put a knife through their hand while doing this, I can tell you just how important it is to make sure that the bearing block is flat on the ground and the hand securing it is well clear of the tip.
On the ground, use your knife tip to make a hole for the drill
The rest of the set up is similar to a standard bowdrill. I commonly use this method with the Egyptian set up, assisting a person or as a relay race.
In the video below I show you the method where I am assisting someone and also as a relay race.
This method is one I would urge any bushcrafter to try out, whether it’s just to try something different, help someone learn the art, or if you (or someone you know) have an injury that makes the standard set up difficult.
Relay Bowdrill
As an instructor in the Sea Cadets, I find this is a stable platform for getting the younger cadets involved as well, be that with an instructor, as a group or on their own.
While we were on holiday in France at my friend Rick’s cottage he was telling me about some of the trees in his garden. He has an old, gnarly pear tree currently propped up by sticks as it was blown over in a storm a few years ago. It still bears fruit, but only on one side.
Rick agreed that I could trim a branch off the non-fruiting side as that would take some of the weight off the side that was being supported. I like to carve fruit woods when they are green as the wood is easy to remove.
Before and after
I cut the limb off very close to the trunk so as to minimise the chance of infection damaging the tree. I made a single cut as the branch was easy to support as I cut it. Also the cut was made as close to the Collar as possible so as to give the tree the best chance to heal itself.
De-limbing
The bark was easy to strip off with my axe – being very careful where my fingers were at all times – and then I used my saw to cut it down further so I had a piece I was happy to carve.
De-barking and trimming to size
One piece of the branch made a perfect hammer for battoning my work piece in two. I make sure that the blade of the axe is 90 degrees to my body so that if it slips the edge of the axe swings away from me.
This piece did not split evenly as the wood was quite twisted with its age.
Battoning
To make the split more even, I put the work piece on its side and split it further. A slower method but more controlled I think.
Splitting out
After splitting I cut out some wood from one of the halves to give it a flatter look.
Flattening
I used my axe to take of some of the excess wood around what would be the bottom of the platter. As the shape was going to be a shallow curve I did not put any stop cuts in but just chipped away, starting from the ends and chasing the wood back to the centre.
Axing out the back
To finish the flattening of the top part of the platter I finished with the axe and moved onto my knife.
Final flatten with the knife
Once the work piece was as flat as I wanted I drew the shape of the bowl area and used my crook knife to start removing the wood from this area. As the wood was very green this excess was removed very easily.
Using the crook knife
I also used my palm gauge and my bowl knife in this process. These are the only bowl-carving knives I have and I switch between them depending on what the wood is saying to me as I try and carve it out.
These tools make a real difference to carving the bowl area but are ones you really need to practise with a lot to be as safe and efficient as possible with when using them.
Palm gauge and bowl knife
Once I was happy with the amount of wood removed from the bowl area, I moved onto the back. I like to take my time when working on this area as it is all too easy to cut out large chunks of wood and suddenly reveal a great big hole in the bowl. I use a variety of cuts: brake cuts towards me, small pressure cuts using my thumbs and powerful but small chest lever cuts to name just three. With all cuts, the main thing to remember is that you must always be aware where the blade will end up if the knife slips.
Different knife cuts
I had a lovely time over a couple of evenings working on this carving – this is what I call relaxing.
Relaxation and fine work
I had kept a lot of the chippings from the carving and when I had removed enough wood I put the platter and lots of the chippings into a plastic bag and kept it in my garage (a nice cool area) for a month to slowly dry out. I added some water to the chippings every few days for the first week to keep them and the platter slightly damp.
This slow drying process allows the whole of the platter to dry in a much more even manner. The platter would potentially crack if the outside dried at a much faster rate than the inside (caused by pressure differences).
Roughed-out platter
After a month of drying I used different grades of sandpaper from rough to very smooth to get rid of most of the lumps and bumps.
Sanding
I coated the platter with 3 layers of olive oil (allowing each coat to dry fully before applying the next).
Oiling
Then over a couple of nights I used the back of a spoon to rub the surface of the platter so that it became silky smooth (known as boning). Sometimes you get a very shiny surface doing this but I think that this wood may need to season for a bit longer as although it became beautifully smooth it stayed a bit dull.
The fibres of the wood may raise up again over the next few weeks but a light sanding and boning will soon have it smooth again.
Boning
This is my 99th blog post and I am glad it was about something I was very happy to carve. The platter is destined to go back to France as a present to Rick for letting us use his cottage for what was a very lovely holiday – Brittany Adventures.
Part 3 in this series on fire by friction looks at my style of using what I classify as a modern bowdrill set up.
I use the term modern as I am using starter cord on the bow to spin the drill piece. I like starter cord as it does not stretch too much when the drill piece is attached and it is also very hard wearing.
I have focussed primarily on the way I tend to teach the bowdrill to someone who wants to create fire on their own
I filmed this last July in France at early evening time. I appreciate there may be similarities with this post and my previous one on the Egyptian method but I want each of the videos to be stand alone.
So here is the video on Modern Bowdrill – My Way
My next videos on this will start to look at methods for using a bowdrill in a group scenario. I have already added an extra video to Part 2 in this series on the Egyptian method but showing the set up being used by two people – The Egyptian method doubled up
I was at the BCUK Bushmoot in August and was asked by some friends if I could show them how the Egyptian method works.
Rather than me showing them I got the guys to double up and do it themselves to show them how easy it was.
They used two limpet shells as a bearing block (which they told me got eventually quite hot) and also watch out for the drill piece as they stop drilling. Notice how it does not spring away when it is released from the bearing block as the more modern single wrap method will do.
Part 2 of this series is a short video on a type of bow drilling I came across a few years ago called the Egyptian method (Egyptian hieroglyphs have depicted this method).
I like this set up as it does not put the cordage under a great deal of strain (the cordage is wrapped a number of times around the drill) and it is good for learners as the drill piece does not ping out if the set up becomes loose.
Have a look at the video and try it out for yourself.
My next video in this series will be on my technique I use with a more modern bowdrill set up.
I started researching this summer the recent history around Teine Eigin (Gaelic for ‘rubbing sticks together to make fire’) on the Western Isles of Scotland (where I grew up). Up until the early 19th century records have shown that in times of animal disease (such as cattle with Need Fire) and at particular times of the year, such as the Beltanefestival, fires were lit on these Westerly Scottish Isles using fire by friction methods.
Instead of writing full step-by-step articles on the different methods, I decided to experiment with video. I have read of many different set ups that were used for Teine Eigin so I will film some of the methods I use and explain the steps I follow to create fire.
Fire by Friction – The Handrill
This is the first video in the series and it covers how I use one of the simplest, yet sometimes seen as one of the hardest to master, methods of lighting a fire – the handrill.
Part 2 in the series will look at the bowdrill but focussing on the Egyptian method.
I finally got around to updating my Freestanding Hammock Stand (based on the post from Turtle Lady post on the Hammockforum) last weekend. I replaced two of the limbs on each tripod with stronger ones and devised a new attachment point at the top of each tripod for securely attaching a tarp.
Freestanding Hammock Stand Mk2
I have used the original hammock stand a number of times now and found it quite easy to transport in my van. I recently traded my van in for a car but I have obtained a large enough top box to fit the stand in. I wrote a blog post on this stand last March and it goes into detail on making the Mk1 version. If you have not read it and want the measurements you can find it here – How To…. Make a Free-Standing Hammock Stand.
Freestanding Hammock Stand Mk1
To fit a tarp to the Mk1 stand I made little caps to go over the top of each tripod (so that the tarp would not be ripped by the wood) but I found that the tarp would slip off if the wind got strong.
Loose Tarp attachment in the Mk1
I also noticed two weeks ago that one of the limbs that had a knot in it was looking a bit weak. I applied a lot of pressure to it to see if it would last and the wood failed (left hand picture). I am glad that this did not happen while it was in use. The lesson I’ve taken from this is to make sure I select knot-free wood wherever possible when making one of these stands. To build the new tripods I unbolted the old side limbs from the two hinges and decided to replace all of them with new stronger knot-free limbs.
Broken Limb in Mk1
I made a short video of the new set up to give you an overview of it first.
I bought some square tree stakes (2.4m lengths) and used the old limbs to mark out the bolt holes then drilled them out to re-build the first of my two tripods. The new limbs were 35mm by 35mm in diameter comparison to the old ones which were 47mm by 22mm.
Old limbs used to mark out the new limbs
I decided that just one of the new limbs (more on the other limb in a minute) on each tripod would be the same height as the old limbs so trimmed the excess wood off then used my rasp to roughly smooth all the surfaces and edges down.
Trimmed the short limb and rasped smooth
After a quick sanding (I just used a rough piece of sandpaper) the first limb was ready. I rasped the other limb (which was not trimmed to size as yet) and then sanded that one as well. You can see the two finished limbs for the first tripod in the right hand picture. it is important you do not trim the second limb to the same size as the first limb as this one will have the tarp attachment fitted to it.
A rough sanding
Using the original bolts I then attached the new limbs to the original limb that was fitted with the hinge.
Re-bolted
I set the tripod up as best I could with the new limbs spread out at about 1.4m width at the base (the limb with the hinge cannot be opened fully until the excess wood is removed). I then drew around the area on the larger of the limbs the piece of wood that needed to be removed.
Marked out the groove on the long limb
I unbolted the limb and put it into a vice to cut the excess wood out. I just used a small saw but a carpenter’s coping saw would have been far better suited to the job.
Removed the excess wood
After I removed the excess as best I could I used my rasp to smooth it all out before giving it a final sanding.
Rasped smooth
After re-bolting I checked to make sure there was enough clearance to open all the legs up fully. I actually used my knife at this stage to trim off a little bit more of the wood as the fit was very tight.
Snug fit
I had thought of lots of different ideas to add a hook to hang my tarp from but in the end remembered I had some of these cheap hooks you can buy to hang things from the rafters of your workshop or garage. They have a tip that allows you to screw it into wood and they can be bent into different shapes using a vice and hammer or pliers. I marked out where I wanted to put the hook, drilled a pilot hole and screwed the hook in.
Attached the hook
I trimmed the limb so that it finished just below the hook point to give the tarp some clearance. The final length of this larger limb was 1.8m.
Trimmed off the excess wood from the long limb
You can see the set up clearly now. I then repeated the whole process to make up the second tripod.
Ready for set up
To ensure the legs will always open to the correct distance from each other I attached string to them, secured with small nails. I have found that if the legs are not set far enough apart then there is the potential for the stand to tip over.
Splay lines attached
Eventually I had two stands ready for setting up. The overall height of each tripod is 1.6m and the front limbs on each tripod are spaced 1.4m apart from each other.
Repeated the process for the other tripod
I spent a few minutes getting the tripods well set up (I spread the legs then hung off each one to make sure they were secure) and getting them the correct distance apart (for this set up, about 2.8m apart from the base of the front limbs). The crossbars need to be raised up so that they just touch each other and the Amsteelstring that they are tied onto the tripods with is hanging vertically.
Raise the topbars
Once they are touching it is simply a case of sliding the connecting sheath over until it is centered.
Slide the sheath to secure
At this stage I tend to make slight adjustments to one of the tripods so that the string is hanging vertically from each tripod as that is very difficult to achieve first time. If you do not have the strings hanging vertically you could end up tipping the tripod over.
Hanging line should be plumb
The hammock I use for this set up is my DD Frontline one and I attach it to the Marlinspike Hitch using a quick release Karibiner. The first How To…. covers how I set all this up in more detail.
Karibiner clip around the Marlin Hitch
Once it’s finished I test the set up by sitting in it before lying down. All the compression forces I create by lying in the hammock are kept in the crossbar. The tripods take my weight but do not get pulled together using this method. As I move about in the hammock the crossbar moves slightly but the tripods stay still as the bar is suspended from each tripod.
Test by sitting then lying down
I then attached my Hennessy Hex tarp to the hooks and just used small wooden pegs on the ends and corners to peg it all out.
Attaching the tarp
This set up gives me good head room for sitting and doing my admin.
Good head room
The tarp is a snug fit as the ridgepole was cut to a length to ensure the tarp fitted perfectly. It seems quite strong and I am looking forward to trying it out in the near future at a campsite where I know good hammocking trees are not available. I weigh about 14 stone and I have sat in the hammock with my son who weighs about 4 stone so I am quite confident in this set up.
I have been bushcrafting on and off for most of my life. Growing up in a remote village on the Isle of Lewis off the west coast of Scotland I was free to get out and about as a boy and really explore my surroundings. I saw this sometimes then as a lifestyle that was stuck in the past: I remember wishing for all those modern gizmos and ways of doing things I saw advertised on the television.
But now, aged 47, I really appreciate that upbringing, even though we did struggle at times. When I teach outdoor skills to kids these days I see the effect on them; having been sat in front of a TV or computer for most of their lives they are afraid at first to explore or take risks outdoors, but with a little bit of encouragement and support it is great to see them discovering a whole new way of learning.
One of the tools I use in that learning process is the ‘force of fire’.
Happy Fire faces
That force of fire can be made in many different ways but my favourite is Teine Eigin – Gaelic for rubbing two sticks together to make fire. Nowadays bushcrafters know this as bowdrill or handrill (though there are many other techniques, such as the plough) but what many do not realise is that this method was used in certain areas of Scotland up until the middle of the 19th century. I wrote a recent article where I put some good links to this tradition – Bushcrafting at Lews Castle College.
This summer I plan to explore some different methods of making fire by rubbing two sticks together – Teine Eigin.
Here is my intro video to the subject.
This is my first video with commentary so I’d love to hear your thoughts or questions.
Cheers, and I will be back over the summer with more articles on these methods in detail.
I was trimming an ash tree in my garden recently with my friend Paul and I managed to save a few pieces for Atlatls and pot hangers.
I have previously shown you how to carve a collapsible pot hanger so that it can fit into a pot when not in use but on a lot of occasions I just whittle one when I need one.
The type of pot hanger I am talking about is shown below hanging off a ‘Wagon/Waugan Stick’ (pronounced waygone or worgan – I hear different variations on this from different people) campfire set up. The pot hook is adjustable in that the pot is easily raised or lowered by using the different hooks on the pot hanger.
A simple pot hook
I started off with a piece of ash that had a fork in it at a good angle (to form a hook) and finished up with something that allowed me to be able to quickly or slowly cook/boil something.
On the right you can see the finished pot hanger in action. To help stop any confusion I will refer to the large hook holding the small kettle as the ‘pot hook’ and the small hooks as the ‘adjusting hooks’.
Before and After
To begin with I trimmed off all the knobbly pieces using powerful chest lever and locked arm cuts. See my How To…. on knife Safety for more information on these types of cuts.
Powerful cuts
I then trimmed the bark off using a powerful shoulder cut. I had the work piece placed on the ground here off to one side so as to brace it and to work safely.
Braced
To strip the bark around the hook area I used a gentle chest lever grip.
Fine cuts
The bottom of the pot hanger was more difficult to trim as I had not left any excess wood to hold on to. The main thing I needed to consider here was keeping my eye on where my thumb was on the hand holding the pot hanger.
Work safely near the ends
As I needed to use the point area of the blade to trim around the hook I kept the pot hook resting on a small log so that if the knife slipped it would hit the ground. My friend Charlie showed me how to use the knife and the curve of the pot hook to create a fulcrum, making the stripping of the bark safer. I tried to photograph this but they did not turn out well.
De-barking the hook area
I also rounded the bottom of the pot hanger and then used the back of my knife to strip off the remnants of the inner bark.
De-barking with the back of the knife
To make the adjusting hooks I used a batton (a large stick) to carve a cross into the wood – an X cut. I placed my X cuts in line with the pot hook as much as possible. After a couple of good smacks with the batton the knife had cut well into the wood.
Batton in the first X cut
I then repeated the process for the other part of the X cut.
Then the second X cut
A simple X cut – this cut makes the carving of the adjusting hook much easier.
The X cut
So that the pot hanger can hang properly you must remove the wood at the bottom of the X cut first (the bottom being the quarter of the X cut closest to the pot hook).
I use very fine cuts here and the original X cut acts as a stopper point so that you only cut away the wood that you need to.
Fine cuts
I normally remove a small area of wood just below the point of what will become the adjustable hook.
Remove the bottom of the X first (nearest the hook)
Once I’d removed the wood from the lower quarter I then removed the wood from one of the side quarters.
Remove the sides of the X
Then I removed the wood from the other side quarter leaving only the top quarter to act as the adjustable hook.
Deepen the sides of the X
I kept carving down until I had exposed enough of the wood that I could carve out the final part of the adjustable hook.
Ready for the undercut
The final part I needed to do was to make an undercut below the point of the upper quarter. I kept reducing the wood until a nice point appeared.
Fine cuts again on the point
You can really see that undercut appearing in the picture below now. For safety I kept the pot hanger braced on the ground (a stump works as well) while I was carving it out.
For this pot hook I carved a further 2 hanging hooks along its length.
Carve deep but safely
This is the final rough shape you are looking for. Any further carving or sanding would be purely for decoration only.
A good point
This pot hanger is particularly suited to the Wagon set up – Wagon (‘way gone’) coming as far as I know from the old tale that if you leave this set up standing when you leave your camp, it points the way for the naughty wood spirits to follow you 🙂
Side view of the Way Gone set up
The hanging hooks attach to the Wagon stick by sitting in a small dimple on the end of it. In this set up I also used a forked stick to give the Wagon height and a smaller (Dead Man’s Finger) stick at the bottom of it to counterbalance everything.
In detail
The whole set up is very easy to adjust for a fast or slow boil/cook.
Adjustable height
This is a great project for any bushcrafter to keep their hand in with simple carving techniques. It looks very simple at first but there are some tricky cuts that if you are not careful can cause a nick or two but the main benefit is – that the tea gets made.
Pitch can be made with many different materials and I have covered some of these in that previous post. On this occasion I used spruce resin, beeswax and charcoal dust. Instead of a nice handy tin to prepare it all though I opted to try this out using more primitive materials: hot rocks. I touched on this method previously in the post How To…. Make a Flint-Tipped Arrow but feel it needs its own stand-alone post.
Hot Rock Pitch
I collected a lot of resin from some spruce trees in my local area with the use of a stick as I find that this does not damage the trees as a knife would do. Also I look for areas where the resin has pooled at the base of the tree as you can collect all of this without affecting the tree.
Spruce Resin
My other ingredients are charcoal dust to give the pitch body (I used the small rock to crush the charcoal) and beeswax to make it flexible. I used the sticks to make the finished pitch stick.
Preparation
While I was out collecting resin and preparing everything else I had a rock heating up in the fire. I used a rock that had been heated before so I could be sure it would not crack. (If there is any trapped air or moisture in a rock there is a chance it will crack or, in the worst case scenario, explode.)
To handle the rock I used some wooden tongs I had made up (sorry, no photo).
Hot Rock
The rock I had chosen had a slight hollow in the top surface which I thought would help stop the resin from flowing away instantly as it melted. I dragged the rock to the side of the fire, popped a piece of resin onto it and with a small twig moved it around until it had all melted. Some resin did run off but enough was kept in the hollow for me to use.
Melting the resin
I then moved the rock onto a piece of curved bark which held some water to act as a coolant as I built up my pitch stick.
Once this was all set up I popped a piece of beeswax into the melted resin and allowed it to mix in (experiment for yourself with ratios).
Melting the beeswax
Then I sprinkled a good-sized pinch of charcoal dust into the mixture and carried on mixing it up.
Adding the charcoal dust
As the rock was quite small I could only make a little batch of pitch at a time so it did not take long to all melt and mix together.
Mix it all up
I used a sliver of wood to scrape the hot, sticky pitch onto a squared-off stick.
Scrape onto a twig
The pitch you create using this method is a bit lumpy but still perfectly useable. As soon as I had some pitch on the stick I dipped it into the water to cool it down rapidly. This cooling-down process allowed me to use wet fingers to mould the pitch and smooth it out.
I kept repeating this process until all the melted pitch was on the stick and then mixed up another batch.
Cool rapidly in water
The rock was so hot that I was able to keep melting and mixing the ingredients several times to build up the pitch on the stick.
Mix more resin, beeswax and charcoal
I found that the curved piece of bark was very effective for storing water to cool the pitch.
Scrape onto the twig and cool again
The pitch stick on the right was made using hot rocks and the one on the left using a tin can. The primitive hot rocks method takes longer and produces a coarser pitch but in my opinion was far more satisfying to make.
Keep repeating until you build your own pitch lollipop
The pitch is great for waterproofing things like sinew on arrows. I prepared a ember stick to help melt the pitch so I could cover the sinew you can see in the picture below.
Ready to be used
To melt the pitch, simply blow on the ember stick while holding the pitch stick close to it.
Heat the resin with an ember stick to melt it
Drip the melted pitch onto what you want to cover and with wet fingers spread it around. Keep re-applying more pitch until you are happy everything that needs to be covered is covered. I sometimes re-heat the area I have covered with the ember stick to further smooth it out.
Drip it onto whatever you want to cover, fill or attach
With a little patience this primitive method can produce some very good pitch. I have seen some master primitive technology craftsmen makes some wonderful pieces with the use of pitch.
I have written various posts now on creating primitive tools and in my article on making arrows I showed you how to make some spruce pitch using hot rocks. This How To…. will lay out all the steps I take to make spruce pitch using tin cans. I find that when I want to make a lot of pitch quickly that this method works well for me however I do appreciate that there are many other methods for making pitch.
The resin produced using this method gives you a much finer pitch than the hot rocks method as you can see in the picture below. The pitch stick on the left was made using the tin method and the smaller rougher pitch stick on the right was made using hot rocks.
I took these pictures while out bushcrafting with my friend Mark Beer in the woods around Silchester in Hampshire (UK)
Pitch – Using a tin (left) – Using hot rocks (right)
I tend to use spruce resin when making pitch as this is more readily available where I am and do not tend to use pine resin as this is not so readily available to me. I normally use pitch as a filler material, for example, when fitting a flint axe head into its socket or use it as a covering to waterproof rawhide wraps.
The knife below has had the rawhide wrap covered in the fine pitch from the tin method and is very easy to produce. I am sure that with time I would be able to produce fine pitch using hot rocks but as yet I do not have that skill level.
Spruce Pitch – a wonderful material
I collect spruce resin using a flattened stick and a tin (or plastic bag). I use the stick as it does not damage the tree as a knife tip would do. Also it is a messy job to clean the resin of a knife blade and the stick also saves my fingers becoming covered in resin which can be hard to clean off when you do not have access to hot running water.
I collect the resin wherever possible where branches have been broken off and the tree has excreted the resin to protect the damaged area. I do not clean out all the resin but just take a little from many different sites. If you are lucky enough to find a spot where the resin has flowed away from the damaged area and pooled into a big clump then it is fine to collect it all. A good spruce tree will keep excreting the resin so if you are careful you can return at a later date to harvest more.
Collecting stick
It did not take long to collect this large tinful of resin as Mark and I managed to find spots where the resin had pooled into large clumps.
A good haul
To make pitch I use two baked bean style tins with a small improvised colander in one made out of half a beer can with holes punched through the bottom.
The sticks in the picture below are ready for rolling the pitch on to when it is ready. An alternative is to use a stick like elder with the pith taken out and the pitch poured into the cavity, which makes a kind of pencil.
The charcoal and the beeswax are for binding and tempering the pitch to make it strong but flexible.
Equipment
I packed the colander with resin then set light to it. The disadvantage of this method is that you lose a little of the resin but the big plus is that it melts quickly, collects quite cleanly in the bottom of the tin and leaves the detritus in the colander. Two good friends of mine Mark Oriel and Keith Coleman introduced me to this method: previously I’d just put the resin into a tin, placed it into some embers and scooped out the detritus when it had melted.
Packing and firing
As the resin burns and melts in the tin I then take the time to crush the charcoal down to fine dust with a small stone. This fine dust acts as a binding agent that the resin can cling to and make the pitch you produce stronger. There are many other materials that you can experiment with as binding material such as ash and rabbit droppings. The Primitive Ways website has an excellent article on making pine pitch using a tin but in a different way and discusses other binding agents.
Making charcoal powder
Soon all the resin had melted and dripped down into the tin (it looks black from previous pitch making). As the detritus is left in the colander the resin in the tin is very fine, which makes for very smooth pitch.
Liquid resin and remnants
I tend to put in as much charcoal dust as there is spruce resin and mix it all together while the resin is still hot.
Add some charcoal
I then added some lumps of beeswax. I have heard some folk say that they put in the same quantities for everything but I usually just put in a small block or two of beeswax. I also use beeswax balsam as this is easy to buy in shops and it seems to work just as well as pure beeswax. Experiment for yourself with quantities to see what works for you.
Then some beeswax
I then put the tin into the embers of my fire and mix it all up. Watch out that you don’t overheat it as it will froth up and spill over. I normally have some tongs nearby so that I can move the tin around the embers so as to better control the heat.
Melt and mix
I use the tongs to move the tin out of the embers when all the beeswax has melted and been thoroughly mixed in. The tin will be scorching hot and the liquid pitch will scald you badly if it comes into contact with your skin.
Remove from heat carefully
I let the pitch cool slightly and so it becomes a little bit tacky. While it is cooling down I make sure I have a little pot of water ready.
I then put one of the sticks into the mixture and roll it a few times (I try to square off the stick as this helps catching the tacky pitch) until I have some pitch on the stick. I then dunk the stick into the water to rapidly cool the pitch down. The pitch will not dissolve in the water due to the oils, charcoal and beeswax in it and but will bind to the stick.
Roll and dip
I then repeat the process again and again to build up more layers of pitch on the stick. You will find loose bits of pitch will float in the water so just fish them out and pop them back into the tin and they will melt back into the mixture.
Roll, dip and wet your fingers
After two or three times doing this you will need to use your fingers to mold the pitch into a tight blob on the end of the stick and also to smooth it out. As the pitch can still be quite warm and sticky you need to keep your fingers wet during this process. If your fingers are dry then the pitch will just stick to them.
Smooth the hot pitch down
In no time at all you will have a good amount of spruce pitch to help you with making primitive craft items.
Pitch Sticks
To use a pitch stick I just heat the end of it with a glowing ember until it starts to melt and then drip the liquid pitch onto whatever I am making.
To use just heat
I have used pitch for waterproofing bindings on arrows.
Great for arrows
It is also great as a filler as in this small hatchet. I filled the socket with pitch, inserted the flint axe head and then bound it all up with rawhide.
And great for axes
I have also published an article on making pitch in a primitive fashion using hot rocks instead of a tin – How To…. Make Hot Rock Spruce Pitch.
Sometimes a flint knife or adze is just not enough and you need something with a bit more clout. At times like these, what you need is a flint axe.
Here’s how I constructed the large flint axe you can see below, with a few pictures at the end about its little brother, the hatchet.
Two good tools
I made these tools on the Woodcraft School Primitive Technology course and had some excellent tuition from John Rhyder and John Lord.
John Lord gave an excellent demonstration on knapping a flint axe head. It was a joy to watch this master take a lump of flint and transform it into a work of art.
When it came to the turn of us students to knap out our axe heads John gave everyone lots of one-to-one tuition. If it hadn’t been for this (and John knapping the tricky bits) I would have been lucky to have ended up with an arrow head, never mind a large axe head.
Some tuition from the master Mr Lord
I like to think that this axe head has some of me in it but truth be told it’s more John Lord than me. I did however have a great time seeing this axe head appear out of the flint knowing at least part of it is me.
One knapped flint axe blade
I used a well-seasoned piece of yew for the handle as that was what I had available at the time.
Initially I used my flint adze to try and shape the yew, but although the bark came off easily enough it didn’t make much of an impression on the hard wood beneath.
You can see the tool marks left on the wood by the adze in the right-hand picture below. As a Time Team enthusiast I have watched the archaeologists discuss such marks on many ancient pieces of worked wood they have found so it was good to see it in action for myself.
Stripping the handle
At first I used short chopping motions to tear away at the bark and wood with the adze. Ever experimenting, I tried a few strikes with a bit more force and eventually took a chip out of the adze blade. I was able to re-sharpen the edge of the adze by pressure flaking it but decided that the yew was just too tough for the adze (notwithstanding my lack of patience and skill).
Too tough for the flint adze
I reverted to my modern axe which took the excess wood off easily. In the picture on the right below you can see the very different tool marks left by the iron axe in comparison to the flint adze marks.
Time for an iron axe
This piece of yew had a slight curve to it which I thought would give added strength to the handle. I left the handle fairly rough, just ensuring I would have a comfortable grip and not get any splinters.
One rough handle
I initially started using a discoid all-flint knife to cut out the socket for the axe head but I did not take any pictures of this part. I did not do this for long as the yew was just too hard and the flint blade kept slipping. A few of the other students did just use flint for this stage but since the woods they were using were slightly softer they had more success. I ended up using my little palm gauge for the job and it worked very well.
I did try and burn out the wood with embers but soon got put off this with the fumes (yew wood being highly toxic).
Carving and burning
The socket finished – front and back.
The finished socket
A good fit but too loose for use.
Test fit
I wrapped the flint axe head in a piece of rawhide to see if that would secure the axe head in the socket (apologies for the poor quality of the pictures), but with one piece wrapped around it the axe head would not fit into the socket.
Prepping rawhide
Instead I cut up some strips of rawhide and held it all in place with some string. As the rawhide dried out it really gripped the axe head and the wood of the socket.
Securing with rawhide
After that it was a case of wrapping a load more rawhide around the axe head and leaving it to dry for a couple of days.
Drying and adding more rawhide
After the rawhide had dried out it became almost translucent but it was a very strong hold.
Side profiles
Top and bottom profiles of the axe head.
Top and bottom profiles
I tested the axe out on an old stump in my garden. Like the adze, the axe tears into the wood as opposed to slicing into it as a modern iron axe would do. It was still very effective in its own way.
Leaves the wood torn
The blade edge is not particularly sharp and has a good shoulder area behind it. This shoulder area really supports the edge so that it does not break off when the axe is used.
Up close
I had a small flint axe blade I had made at the same time as the larger one, so I just scaled everything down to make a hatchet.
Hatchet blade jammed in with rawhide
As well as using rawhide I filled the socket with some spruce pitch to fill up any gaps and to help secure the head more.
Gaps filled with resin
I have never used this tool on anything – it would have been used mostly to dispatch small game that had been caught in traps. I do like it a lot though, in some ways more than the larger axe.
Rawhide wrap
This hatchet sits nicely on my primitive belt order.
When I want a bowl fast a modern adze is what I use, but if I have the time and I want to create something in a more leisurely fashion then I love to use a flint adze
Any self-respecting Stone Age woodworker would always have had a decent flint adze to hand. So to become that self=respecting Stone Age woodworker I had to go out and make myself one as they do not turn up in the shops that often.
I needed one to undertake my final project on my Woodcraft School Primitive Technology course: to create a bone bodkin and a bark sheath. The aim was to make them without the use of modern tools and I would need an adze to help me craft the sheath.
The adze I created for this has been extremely useful since then on other projects such as hollowing out this long bowl.
Chunking out a bowl
I ended up making two adzes out of flint, rawhide and curved branches.
Two well used adze’s
I took my inspiration from the Cheddar Gorge Museum where I came across this very basic but beautiful flint adze.
Cheddar Gorge Museum replica
I had kept some flint from the course I had done with John Lordand I got a couple of good strong blades from this chunk of flint. The flint axe blade shouldn’t be overly sharp as that will make it fragile. It needs to have a well-defined edge that has good strong shoulders.
Knapped adze blade
This piece of yew was cut down in my garden and then sawn to its basic shape with a modern saw.
The handle-to-be
I used the curve to give the flint blade a flat surface to sit on and carved out the notch to give the rawhide some additional surface area to hold on to. I did not cut so deep so as to weaken the handle as this tool was destined for some hard use.
Carving the shape
After shaping I stripped the bark off and roughly smoothed it with sandpaper. I did not smooth the handle down too much, as I wanted to retain some natural grip.
The platform for the blade
Traditionally rawhide was used to bind the flint to the handle alongside sinew, buckskin or other natural cordage. I like to use rawhide as it was commonly used and is easily obtained these days from dog chews (I buy the biggest I can find).
I boiled the dog chew in water for about twenty five minutes in order to soften it enough to be able to cut it into strips.
Rawhide from a dog chew
After laying the rawhide out flat I just used a sharp piece of flint to cut it into strips I could use to bind the adze together.
Cutting out strips
I wrapped thin pieces around the blade and the handle initially. Don’t pull too tight as this will snap the rawhide. Just tighten slightly, and tie off the ends when you are finished. I left this one to harden in a warm area for a couple of days. As rawhide dries out it shrinks and goes very hard (almost rock hard).
Initial rawhide wrap
For the next layer of rawhide I used wider strips, which allowed me to really pull them tight without worrying too much about it splitting. They were quite difficult to tie off but I settled for simple overhand knots to finish.
I left these adzes to dry out and tighten for a month until they were needed on the final part of the course.
Drying out
The first job I had to do with the adze was to take down a small sweet chestnut limb. I needed this to make bark strips for weaving a sheath out of the bark and the wood for carving spoons. I took the limb down using a rosette cut, chipping away at the wood all the way around the limb until it fell over. I did not use any large swings or try and gouge the wood out with it, just a steady chipping rhythm, and eventually worked my way through the limb.
First job – taking down a sweet chestnut limb
It took me about 20 minutes to fell the tree. (I used a modern saw to trim the stump, leaving a clean cut to help stop infection setting in and to help the stump re-grow a new limb.)
The Rosette cut
The next project I put the adze to was the shaping of a yew handle for a large flint axe. The yew piece I was using was well seasoned and proved too much for the flint adze. After about half an hour of chipping away at the bark and outer layer of wood I chipped the blade of the adze quite badly.
It was quite easy to re-profile the edge with a bit of pressure flaking but I resorted to using a modern axe for carving the flint axe handle.
Too tough for this adze
When working with green wood woods like this goat willow the adze worked very well. I used the adze here to create a wedge for my Split Stick Atlatl.
Chipping out a wedge for an atlatl
My friends have all been keen to try these adzes out. The silver birch that Angela is splitting was fairly well seasoned but still quite easy to cut with the adze.
Cutting into more seasoned wood as a test
When Angela had the branch weakened enough it was just a case of tap tap and…………………………………..
Final tap
…………we had two more logs for the fire.
Quite a beautiful finish
The adze really did come into its own when my friend Stephen Herries found this burnt-out log lying in a ditch. The adze was perfect for chipping out all that charcoal so that in the end I had a rather lovely long bowl to add to my collection.
Great for bowl work
In comparison to a modern steel/iron adze you have to invest more time in whatever you are creating when using a flint adze. Unlike a modern adze, which will slice wood off cleanly, a flint adze rips the wood off and leaves totally different tool marks.
When I want a bowl fast a modern adze is what I use, but if I have the time and I want to create something in a more leisurely fashion then I love to use a flint adze. It kind of takes me back in time I suppose.
It was at this point Spikey had his Eureka moment: ‘Why not try and find a piece of sycamore that’s oval shaped instead of round?’
This post is for my friend Spikey who had one of those Eureka moments that pop up out of the blue. It happened when we were experimenting with the building of a green-wood, free-standing hammock stand at the 2012 BCUK Bushmoot. If it hadn’t been for his inspired idea this hammock stand would never have worked. More on that later but to begin with I need to explain how I got into building these free-standing hammock stands and explain a bit more about what they are.
A free-standing hammock stand comprises a couple of tripods with a ridgepole hanging down between them. The ridgepole is not directly attached to the tripods but slung on some Amsteel cordage. I like to use Amsteel cordage as it is fantastically strong, does not stretch easily and is very rot resistant. The hammock is tied off to the ridgepole so that the compression forces from someone lying in the hammock are solely on the ridgepole. The tripods only take the vertical forces caused by the person’s weight. As the forces are separated there are no compression forces on the tripods that could cause them to topple over, which means you do not need ground anchors.
The two pictures below show two free-standing hammocks I made, one with green wood and one from machined wood.
Woodland-made and workshop-made free-standing hammock stands
To me there is nothing better than finding a nice spot with two perfectly placed trees where you can set up a hammock, have a great sleep and waken up in the morning to a great view. Sadly this is not always possible: the trees may not be placed perfectly, or may not be strong enough to support a hammock, or there may simply be no trees about.
At times like this you have to start thinking out of the box if you want to still sleep in your hammock.
Relaxing hammocking when the trees are perfectly placed
If you have the tools and the ability to transport your own hammock stand you can make something as good as my friend Mat made for displaying his UK Hammocks.
The deluxe version
I can’t transport or store a hammock stand like Mat’s so I started experimenting with what I called the one-tree hammock stand. I set up a tripod made of sycamore rods that had lots of wooden anchors to hold the tripod in place. I then tied one end of my hammock to the only big tree in our garden and the other end to the tripod.
The tripod was held in place by lots of anchor points and worked well until my wife Alison pointed out all the holes I was making in the garden, and muttering about ‘trip hazards’.
One-tree hammock stand with multiple ground anchors
Not only did I need anchors to stop the tripod from toppling over, I needed to set up further spikes on the tripod to give it extra strength and keep it in place. I suppose this was due to the fact I was using wooden pegs and ropes of different strengths which tended to stretch a bit.
A lot of rope is required for this set up, and backwards facing pegs
My friend Paul Bradley (Bardster) cracked all this with a hammock stand he made that had 10″ screw anchors and used top-quality non-stretch rope. Paul plans to experiment with delta anchors in the future. I however did not have screw anchors and had never heard of delta anchors.
I wanted something I could just put up in my garden for the kids to use, as and when required, something that did not take up much space, was not dependent on land anchors and could be easily transported in my van.
Paul Bradley’s single ground anchor hammock stand (Photo courtesy of Paul Bradley)
Turtlelady’s post gave me ideas for experimenting with just one tripod and a single tree. I suspended the ridgepole (two old army tent poles) between the tree and the tripod using Amsteelrope and then slung the hammock directly to the ridgepole. As the hammock was not tied directly to the tree or the tripod the ridgepole absorbed all the compression forces, meaning no ground anchors were required.
One-tree free-standing hammock
The tripod I made was from ‘Sawn Treated Softwood’. I bought a pack of 8 x 1.8m length pieces (47mm x 22mm) which cost just under £10. I cut the legs of the tripod to approx. 1m 70cm lengths so as to fit easily in my van.
To connect the tripods I used a ‘T’ Hinge (about 45cm in length) at a cost of about £2.50. I attached the hinge to one of the legs using bolts of about 4cms (cost about £3). As you can see in the top right picture below I shaped the wood as best I could so that when the tripod was open the tops did not touch each other.
I used Amsteel rope to connect the ridgepole to the tripod. As you can see the ridgepole is hanging off the centre tripod leg on a length of Amsteel. I bought 5 metres of Amsteel rope for this job costing me about £5.
The other end of the ridge pole I hung directly from the tree (I now use a hammock strap to go round the tree and tie the Amsteel rope directly onto the strap). This tree has a handy branch coming off the side to tie directly onto, allowing the rope to hang down directly. Where you have only the trunk of the tree, a strap grips the bark better than just cordage.
Finally I tied off some old guyline rope around the tripod legs to stop them splaying out when they were under load.
Make up of the one tree free standing hammock
After testing out the one-tree set up I made another tripod and changed the ridgepole.
I made the second ridgepole from two large tree stakes from from a local garden centre (cost about £3.50 each). Each stake was 1.8m x 40mm but I cut each one down to 1m 74cm to get rid of the points.
I connected the rods with an old army aluminium tent pole. I cut the ends off the tent pole to allow it to slip easily over the tree stakes. I saw these old army aluminium tent poles for sale on eBay for about £6 (a single ridgepole would never have fitted it in my van).
Below you can see both tripods collapsed and ready for transport and one of them set up. The little caps you can see in the left-hand picture are protectors for a tarp.
Freestanding – tripod set up
Below you can see a close up of the ‘T’ bar hinge set up and how the ridgepole is connected to the tripod.
I carved 3 grooves all the way round the the ends of the ridge poles to give the Amsteel rope something to grip onto. The ridgepole is attached by means of an adjustable loop that is hung from the tripod and around the first groove on the ridgepole.
The wrapping of Amsteel you can see on the ridgepole is a common whipping that is wrapped around the area where I had carved the other two grooves. This whipping has a tail on it that can be used to create a marlinspike hitch to allow the hammock to be hung off.
Free standing – tripod back
Below you can see the marlinspike hitch and the hammock clipped to it with a carabiner. This set up makes attaching the hammock very easy and the common whipping ensures that the Amsteel does not slip when I get into my hammock.
Free standing – tripod front
To put it all together I simply open up the tripods and place them roughly the correct distance apart from each other (the length of the two ridgepoles).
Free standing – set up part 1
I then connect the two ridgepoles with the tent pole sleeve. I usually re-position the tripods so that the two ridge poles are touching inside the sleeve and that the Amsteel rope attaching the ridgepole to the tripod is hanging vertically.
Free standing – set up part 2
As the tripods are not that far apart the tarp will actually lie on top of them, so I made a cap for each so that the wood would not damage the material. I took an old hessian sack and cut off two of the corners, then covered these corner pieces with duct tape to make them more durable.
Tri pod cap
Whenever I use a hammock, whether slung between trees or tripods, I always test it by pushing down on the material of the hammock first, then I sit in it gently before finally lying back into it. This tests all your knots, tightens them up and gives you confidence that everything is ok.
With the free-standing set up what you need to watch for is the ridge pole over-bending with the compression forces you are placing on it from lying in the hammock. In this set up the old tent pole sleeve is so strong that there is very little bend in the ridgepole. I weigh about 14 stone (including all the kit I generally wear while bushcrafting) so if it takes my weight easily I am happy for my kids to use this set up.
Testing and relaxing
Over a few months I used this hammock at various meets and got different people to test it out. After some initial trepidation most people got on well with it. You just have to remember not to bang your head on the ridgepole when you get up.
Further testing
Setting the tarp up on this is quite simple as I just lay it on top of the tripod caps and peg it out. The first night I slept in the set up I put it under our group shelter as it was very windy and wet. I figured if the tarp came off in the night the big shelter would offer me some protection from the rain.
I slept well that night apart from wakening a couple of times to the creaking of the ridge pole as I changed position in my sleep. I have got used to these noises now and trust the ridge pole to take my weight. Now I am happy to set this up with just the tarp for cover. In the bottom picture I had the hammock stand set up at the Wilderness Gathering last year for my daughter to use as a nest to go and relax in during the day and for visitors to come and see the design.
Tarp testing
Back in 2012 I had promised some of the guys at the BCUK Bushmoot I’d bring the stand along for them to look at. In all the usual confusion of preparing and setting off for the Moot I forgot to put the stand into my van. Undeterred, I decided to try and make a similar stand using sycamore poles, of which there are plenty on the site at Merthyr Mawr, so I set off to gather the wood I would need: this is when my friend Spikey spotted that I was up to something and asked if he could help.
After I explained the concept Spikey helped me cut the poles to make up two tripods. We lashed the tripods with Amsteel rope and made little adjustable loop danglers to hang from each tripod for a ridgepole. Also each tripod had rope tied around each leg to stop them from splaying out when put under load. We tested each tripod by both doing pull ups together on each one. Our combined weight is about 28 stone so we were quite happy each tripod would be up to the job.
Green wood tripod set up
I did not have a handy old army tent pole to act as a sleeve for the ridgepole this time so I had to find a length of sycamore that was long enough (about 3.5 metres) and strong enough not to bend with the compression forces. I wanted a piece that was fairly uniform in girth along its length and as straight as possible. Spikey and I spent quite a few hours trying to find this perfect pole but when we found a couple that seemed to be ideal they both bent horribly when a load was applied. I did not want to put a massively thick ridgepole above my head and was getting quite frustrated at this point.
It was at this point Spikey had his Eureka moment: ‘Why not try and find a piece of sycamore that’s oval shaped instead of round?’ I could see what he meant – an oval pole would have two sides with fairly flat surfaces and two sides with sharply curved surfaces. These sharp curves would take far more load without bending than the flat surfaces, so off we went to find this magical ridgepole.
As you can see below we found it, and set it up so that the ridgepole hung beneath each tripod. I attached more Amsteel with some simple whipping to each end of the ridgepole for the hammock to hang off and slung my tarp over it all. The ridgepole hardly bent as the sharply curved sides of the pole were very rigid. I got lots of different people to try this set up out and it took the weight of everyone who tried it out easily.
Green-wood free-standing hammock stand
I slept for 5 nights in this set up and had a great sleep every time. I like the fact now that if I am stuck for somewhere to sleep in my hammocks (if for example there are no lovely big trees around) I can now set up a system that will still keep me well clear of the ground.
As part of a primitive technology course I was taking with Woodcraft School back in 2009 I had to make various craft pieces. The aim of the course was to slowly take away our modern tools so that by the end of the course we would only be using primitive tools to make our craft items.
I was using hand-held flint tools such as discoidal knives in the beginning but about halfway through the course I decided something a bit better was required. This How To…. is designed to show you the simple steps I took to make my flint knife and show you some of the uses I have put it to since.
A simple flint knife
During the course (spread out over 5 months) I came across the knife you can see below left in the Museum of Prehistory at Cheddar Gorge. Not only was the knife beautifully constructed it also looked strong and practical. I knew I was to be taught on the next part of the course by top flint knapper John Lord so was keen to keep my eye out for a suitable piece while I was knapping flint with him. The knife I made on the course is on the right, not as strong or anywhere near as beautiful but for my needs very practical.
My inspiration
It was while I was knapping my flint axe head that I saw this piece pop off. The piece had a strong back, a sharp edge with good curves and a perfect point. I re-touched the back to smooth it down a bit and pressure flaked a groove where the sinew wrap to the handle would be.
The blank blade
I’m afraid I didn’t take many pictures of the handle preparation as it wasn’t going into my portfolio: I used a modern saw and knife for this part to save time. (As I said at the beginning of the post the course was designed to introduce me to primitive crafts by gradually reducing my reliance on modern tools.)
I selected a piece of dead standing wood that was well seasoned and had a slight curve in it, to make for a more comfortable grip and also to reduce the amount of carving necessary. I then used my saw to cut two stop cuts in a ‘V’ shape into the end of the wood. Since finishing the course I now know that a piece of serrated flint would have done this job just as well, if a bit slower.
The handle-to-be: starting the slot
Once I had the stop cuts in place I used the tip of my steel knife to cut out the centre of the ‘V’ for the tang part of the flint blade to fit into. Then using my steel knife I carved the wood down into the final handle shape.
Stop cuts in place
I filled the ‘V’ notch with some spruce pitch (see my article on arrow making for making spruce pitch) and slid the tang of the flint blade into the notch. I then bound the hilt of the handle with sinew to secure it and covered the sinew with more pitch to protect it. Within 24 hours this knife was ready to use.
Rawhide and pitch wrap
Not the best pictures I am afraid but as you can see this knife was the perfect size and shape to use on many of the jobs I would normally use a steel knife for.
A perfect size and very sharp
The purpose for which I created the knife was tanning some deer skin on the course. When splitting the hide of the deer the knife was comfortable to use and the top curve near the tip cut through the hide like a knife through butter.
First job – cutting a deer hide
My final craft item was to make a bark sheath for the small bone bodkin you can see on the right. The knife allowed me to easily cut out many strips of bark in a very controlled manner so that the strips were all of the same width. I added a wrap of rawhide at this stage to protect the pitch and sinew from general wear and tear.
Creating bark strips and a new rawhide wrap
When I was finishing the sheath I found the knife edge was brilliant for trimming off all the excess bark.
Perfect for trimming
Finally, to hang the sheath on my bark belt I cut up lots of buckskin with the knife to make some rough cordage.
Good for cutting up buckskin
Since the course I have used the knife on a few other projects. So long as I am respectful of the fragility of the flint edge, the knife has produced some wonderful results. It’s great for scoring lines in bark, shaving pieces of green wood down to points and for making rosette cuts in small branches to snap them.
Scraping, point work and splitting
When I was making my Split Stick Atlatl and had to batton open a piece of green wood I found that the thick back of the blade was able to withstand a lot of force from my wooden hammer, which was a pleasant surprise, although I was very nervous throughout the process.
Robust enough for battoning
Eventually I made the knife its own bark sheath and it now sits proudly as a well-used tool on my primitive belt order.
This How To…. illustrates some simple steps to carve a small spoon you can easily make when you are out and about.
A simple spoon
I was training on campcraft in Crowborough (Ashdown Forest in the UK) recently and in between classes decided to carve this simple spoon. A nearby willow tree had been felled a few years ago and lots of shoots had re-grown from the stump.
Local Willow
I selected a shoot and sawed it off near its base. Cutting the limb cleanly at the base will allow the tree to heal itself quickly and send out a replacement shoot the following year.
Cut right back
I selected the limb because of its curves, which help in making a strong spoon. I trimmed the limb in a safe position and used the live limbs as a vice to do the final sawing.
Trimmed safely
I took two pieces to make a couple of spoons and then trimmed off a couple of the smaller shoots from the top.
The spoons-to-be
These smaller pieces I re-planted around the base of the tree by pushing them into the ground, as willow has the ability to re-grow from these shoots.
Re-planting
The next job was to strip off the outer and inner barks. I tried to strip the bark off in one piece but as the sap had not yet risen it was very difficult to do. If the bark had peeled off easily I could have made some nice cordage from it.
I used the back of my knife to scrape off the remnants of the inner bark to get right down to the wood.
Taking off the outer bark
This inner bark does clog up on the back of the blade so you have to continually scrape it off. The whole process of stripping the bark took about 5 minutes.
Removing the inner bark
I flattened out the area of wood that would make the bowl of the spoon to give myself a little bit more area to work with.
Creating a working surface
I like to draw out my spoon leaving areas of waste wood at each end as these act as handles when carving. Also, I prefer to carve the spoon from the top down as this cuts through many different rings thereby making the spoon stronger. I also mark out at this stage all the stop cuts I will need. (The technique of leaving handles to work with was taught to me by my good friend Mark Beer a few years ago and I find they are particularly useful when you are teaching novices.)
Drawing out the spoon
I like to carve the bowl of the spoon first. To do this job I usually use a palm gouge (on the left) and a crook knife (on the right).
The bowl tools
I use the palm gouge first, tracking around the edge of the bowl to cut out the waste. Having the two handles in the wood means I can use the same hand to do this (I am left-handed). They also allow me to keep my other hand well away from the sharp edge of the gouge.
The palm gouge
The gouge makes short work of the waste wood but it does not leave a smooth surface.
Rough bowl
To smooth the bowl out a bit more I usually switch to the crook knife. I find that the crook knife helps to accentuate the curve of the bowl more than the gouge does. With both tools I always try and cut across the grain of the wood but this is not always possible near the ends so I need to be extra careful there not to lose wood on the edges.
Smoothing out the bowl with the crook knife
After the bowl is roughed out I saw all the stop cuts. These stop cuts help to stop splits occurring in the wood as I carve the rest of the waste wood away.
Creating the stop cuts
Stop cuts are particularly important when carving around the bowl; they act like small breaking points for the knife edge, stopping splits occurring.
Removing the waste
I take my time at this stage and make small cuts to remove each piece of waste wood between the stop cuts. In these two pictures I am using my thumbs on the back of the blade to apply pressure. You can push either with both thumbs on the back of the blade or with one thumb on top of the other.
Thumb pressure
When I am on a straight section like the handle I tend to use the chest lever grip. This is a very controlled and powerful cut. I have my hands tight against me and use my chest muscles to push my hands apart. This pushes the knife edge into the wood in small, controlled but powerful cuts.
Chest lever grip
Another cut that can be used here is the shoulder cut. With the work piece off to your side and the bottom of it on a log or on the ground (if the handle at the bottom is long enough), keep your arm locked straight and push down with your shoulder muscles to cut into the excess wood. You can cut big or very fine pieces with this technique.
Shoulder power cut
I learnt this technique from Mors Kochanski when he was over in the UK at the BCUK Bushmoot a few years ago. I pushed one end of the work piece (perfect when you have these handles on each end) and then, using the knife like a draw knife, cut slivers of wood towards me. This is one of the few cuts where the blade comes towards you. The key to this technique is to keep the arm that is holding the work piece bent and well away from the knife tip. Also the arm that is holding the knife is clamped against my side which stops any big movements. If my knife were to slip with this technique the blade would actually only move a few centimeters.
Mors Kochanski style
Using these techniques I quickly removed the waste wood around the spoon.
Top plane cut out
I then marked out the side of the spoon and started to remove the waste wood using the shoulder cut. I could have put stop cuts in at this stage but decided not to as there was not much curve to the spoon on this plane.
Side plane
Finishing the tail and the bowl requires a lot of fine work. You have to find how the grain of the wood is flowing and just chip away at it with small cuts to form your final shape.
Fine work
After some final work on the handle of the spoon I slowly carved around the tip of the bowl to remove one of the working handles. Take your time with this so that you get down to the last few fibres of wood before twisting the handle off. Any big cuts here can damage the bowl.
Trimming the handle and removing one handle
I then repeated the whole process at the other end to remove the other working handle.
Removing the other handle
The wood was green so full of moisture. Normally I would dry the wood slowly for a few weeks before sanding it down. Sanding green wood can be hard work and no matter how smooth you get it you will need to repeat the process in a few days as small fibres of wood will start to rise up again, giving the spoon a furry texture.
I accept that when making these spoons as I normally want to use it straight away. Ideally I should have used a piece of seasoned wood so that this would not happen but you sometimes have to use what is available. I left the spoon to dry out for a couple of days before sanding it down.
A blanked out spoon
I used sandpaper of different grades and luckily have some cloth sandpaper that works well when sanding the bowl out.
Sandpapers
I used the rough sandpaper first and you can see in these pictures how the fibres of the wood are being ripped out here rather than being sanded smooth. All the sandpaper is doing at this stage is flattening out the tool marks.
Rough first
Eventually the spoon started to take on a more smooth appearance. The bottom picture shows the bowl untouched but the handle is now smoother.
Taking shape
The cloth sandpaper is ideal for getting into the bowl and smoothing it out. I like this sandpaper as it does not break apart in the bowl as traditional paper-backed sandpaper tends to.
Smoothing the bowl
After sanding the spoon down using a mixture of grades from rough to very fine (about a half hour’s work) I added some oil to the spoon. I generally use vegetable oil as that is what I usually have in my cooking kit when out in the woods.
After the first coating had soaked in I applied a second coating and left the spoon to dry out.
First oiling
I like to add a finishing touch by boning the spoon. You can do this with the back of a spoon, a rounded pebble or with a rounded piece of bone. I rub the spoon with the rounded surface in a circular motion covering the whole of the surface area of the spoon. I normally do this for an hour or so as this seals the fibres of the wood down and adds a beautiful shine to the spoon.
Boning
This spoon will need to be re-sanded, oiled and boned again in a few weeks as the fibres rise up as it dries out. You can see that the bowl is not perfectly smooth and there are slight imperfections in it. Hopefully these will disappear with that second sanding but for now it is a spoon I can use.
Imperfections but a working spoon
The different profiles of the spoon.
Profiles
Ready to go.
Ready to do its job
Have a go and try out some of these different cutting techniques.
When I first started venturing into the world of bushcraft I got into carving spoons and bowdrill sets. It’s like a rite of passage with most bushcrafters to crack these skills. As time went on I began to explore the world of pot hangers and eventually these little devilish collapsible pot hangers.
This post will take you through the steps I went through to make a mortise-and-tenon collapsible pot hanger. I have included a couple of other types and links to show you how they are made or used. As you can see in the picture on the left, one of the hooks is pointing down and one is pointing upwards. This set up makes for a great pot hanger but sadly you don’t find many trees with this configuration of branches.
Mortise and Tenon Pot Hanger
Here are the three different types of pot hangers I will discuss here, from left to right: the wedge hanger, the dovetail hanger and the mortise-and-tenon hanger.
The trio
The wedge hanger
I call this the wedge hanger as the two pieces are kept in place by a single wedge of wood in the middle. There are a lot of angles to take into account with this hanger and as with all of the hangers in this post I would advise you to make it out of dead standing wood. If you were to use green wood you might find that the pieces do not fit together any more as it dries out. I found a good tutorial on making this hanger on the Bearclaw Bushcraftsite.
Wedge Pot Hanger
The dovetail hanger
This hanger replaces the wedge with a dovetail joint in the middle. I found it surprisingly easy to carve. The trick is to make the joint snug but not too tight. You want just enough friction between the two pieces to hold it all together but still be easy enough to pop apart when you are finished with it. A good video by GJohnridge11 on You Tube shows this hanger but I am afraid not how it is carved.
Dovetail Pot Hanger
All the hangers so far have hooks pointing in opposite directions and on opposite sides. I have had discussions with fellow bushcrafters on this and some argue that a pot may slip off if the hooks are on opposite sides. I have made a few hangers now with hooks on opposite sides and on the same side as in the picture below. As of yet I personally have not had problems with either method.
Wedge Pot hanger with both hooks on the same side
The reason I like these hangers is that they are easy to store and carry with you. Once broken apart they fit inside your pot or kettle snugly.
Neatly stowed away
Mortise-and-tenon hanger
I found two dead pieces of wood of similar widths with good strong branches leading off them. After stripping the bark off one I noticed there was a fungal infection inside it. I decided to try using it anyway as the wood still felt strong. I left the bark on the other piece of wood as it had attractive honeysuckle markings going around it.
I trimmed the bottom piece so it was the same length as the top piece.
Trimming to size
The tenon limb
Using a pencil I marked out all the areas of wood I was going to cut out. (I should have shaded the areas of wood I would be cutting out with my pencil for the camera, see the bottom picture for how this limb will finally look.) This limb is called the tenon limb.
Mark out the shape of the tenon
I used a small hand saw to make some stop cuts on the pencil marks. These stop cuts are particularly useful when you start carving with your knife to stop any splits running off into areas of wood you want to keep.
Stop Cuts – Part 1
The stop cuts done, I used my knife to start carving the excess wood away. I used small cuts all the time, my thumbs on the back of the knife for fine control. This is a great activity to do while sitting around the campfire where you can relax and take your time.
Stop Cuts – Part 2
Once you get one block out it is time to take out the next block of excess wood. I am keeping the wood that is under the blade and removing the wood directly to the right of it.
Forming the tenon – Part 1
Finally I used my saw to cut out the tenon at the end of the piece of wood. This is a small rectangular piece of wood at the end of the limb as you can see in the bottom picture.
The finished tenon
The mortise limb
I cut a stop cut into the mortise limb where I had measured that the tenon limb would fit snugly against it. You have to judge this by using the tenon limb as a measuring stick and saw to a depth that will make the limbs fit together well.
Mark a stop cut
Once the stop cut is in place you can easily batton the excess wood out with your knife. I am using the tenon limb as a hammer at this stage.
Batton out the waste wood
You can see in the top picture that the two pieces fit well together now so I marked out the area of the joint I needed to cut out on the mortise limb. I used the protruding rectangle of wood on the tenon limb to mark out the corresponding section of wood I needed to carve out of the mortise limb.
Once marked out I used the tip of my knife to start carving out the rectangular hole I needed to make in the mortise limb.
Draw out the mortise
Again this was a piece of carving I took my time with. I placed the mortise limb on a work surface rather than holding it in my hand, where any slip of the blade could have meant a nasty cut.
Carve out the mortise
Eventually I worked my way through the limb and carved out a rough rectangular shape.
Form a neat rectangle
If you have taken your time and not cut outside of the pencil markings the fit of the Tenon and the Mortise should be snug. If it is too tight make some cuts where you feel there is resistance and keep trying to see if both pieces will fit together.
The fit should be snug but not overly tight
Eventually both pieces fitted well together but disaster struck for me here. I was showing the hanger to a friend and was explaining it is very strong on the vertical plane, ie when holding a pot, but very weak on any other plane, ie if you twist this hanger it will break.
Just as I was explaining this my friend did indeed twist the hanger as he tried to pull it apart and the tenon joint simply snapped. The fact that the tenon had some rot in it did not help but I had tried it out earlier and it did take the weight of a heavy Dutch Oven. To separate the limbs you need to push on the rectangular tenon so it pops out of the mortise slot: do NOT twist!
A trimmed but flawed tenon
Still, it didn’t take long to make up another tenon limb to fit the original mortise limb.
Tenon Mark 2
All that was left to do was tidy up the hooks, put the limbs together and hang a pot.
Mortise-and-tenon hanger in use
I can’t remember where I came across this hanger (somewhere on the internet) so if anyone knows where this hanger originated please drop me a message. Even though it looks complex to begin with, once you get working on it it is easy enough to do and a joy to craft as long as you take your time with the fiddlier saw and knife tip bits.
Closed and open
I filled this Dutch Oven with water and got my two little helpers to show you how strong this hanger can be.
One very strong pot hanger
Some other sites on the wedge hanger you might find interesting: