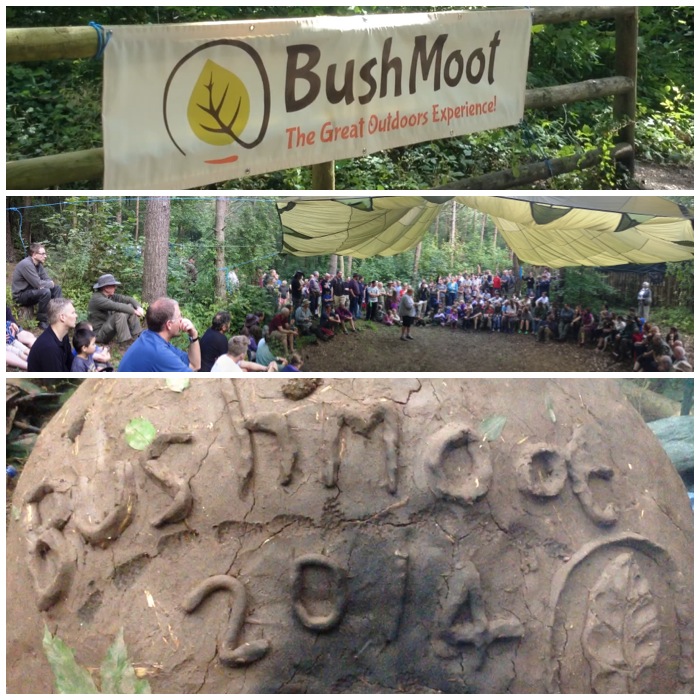
The Bushcraft UK (BCUK) Bushmoot was supposed to be held this August however like many other big events had to be cancelled due to worries around Covid.
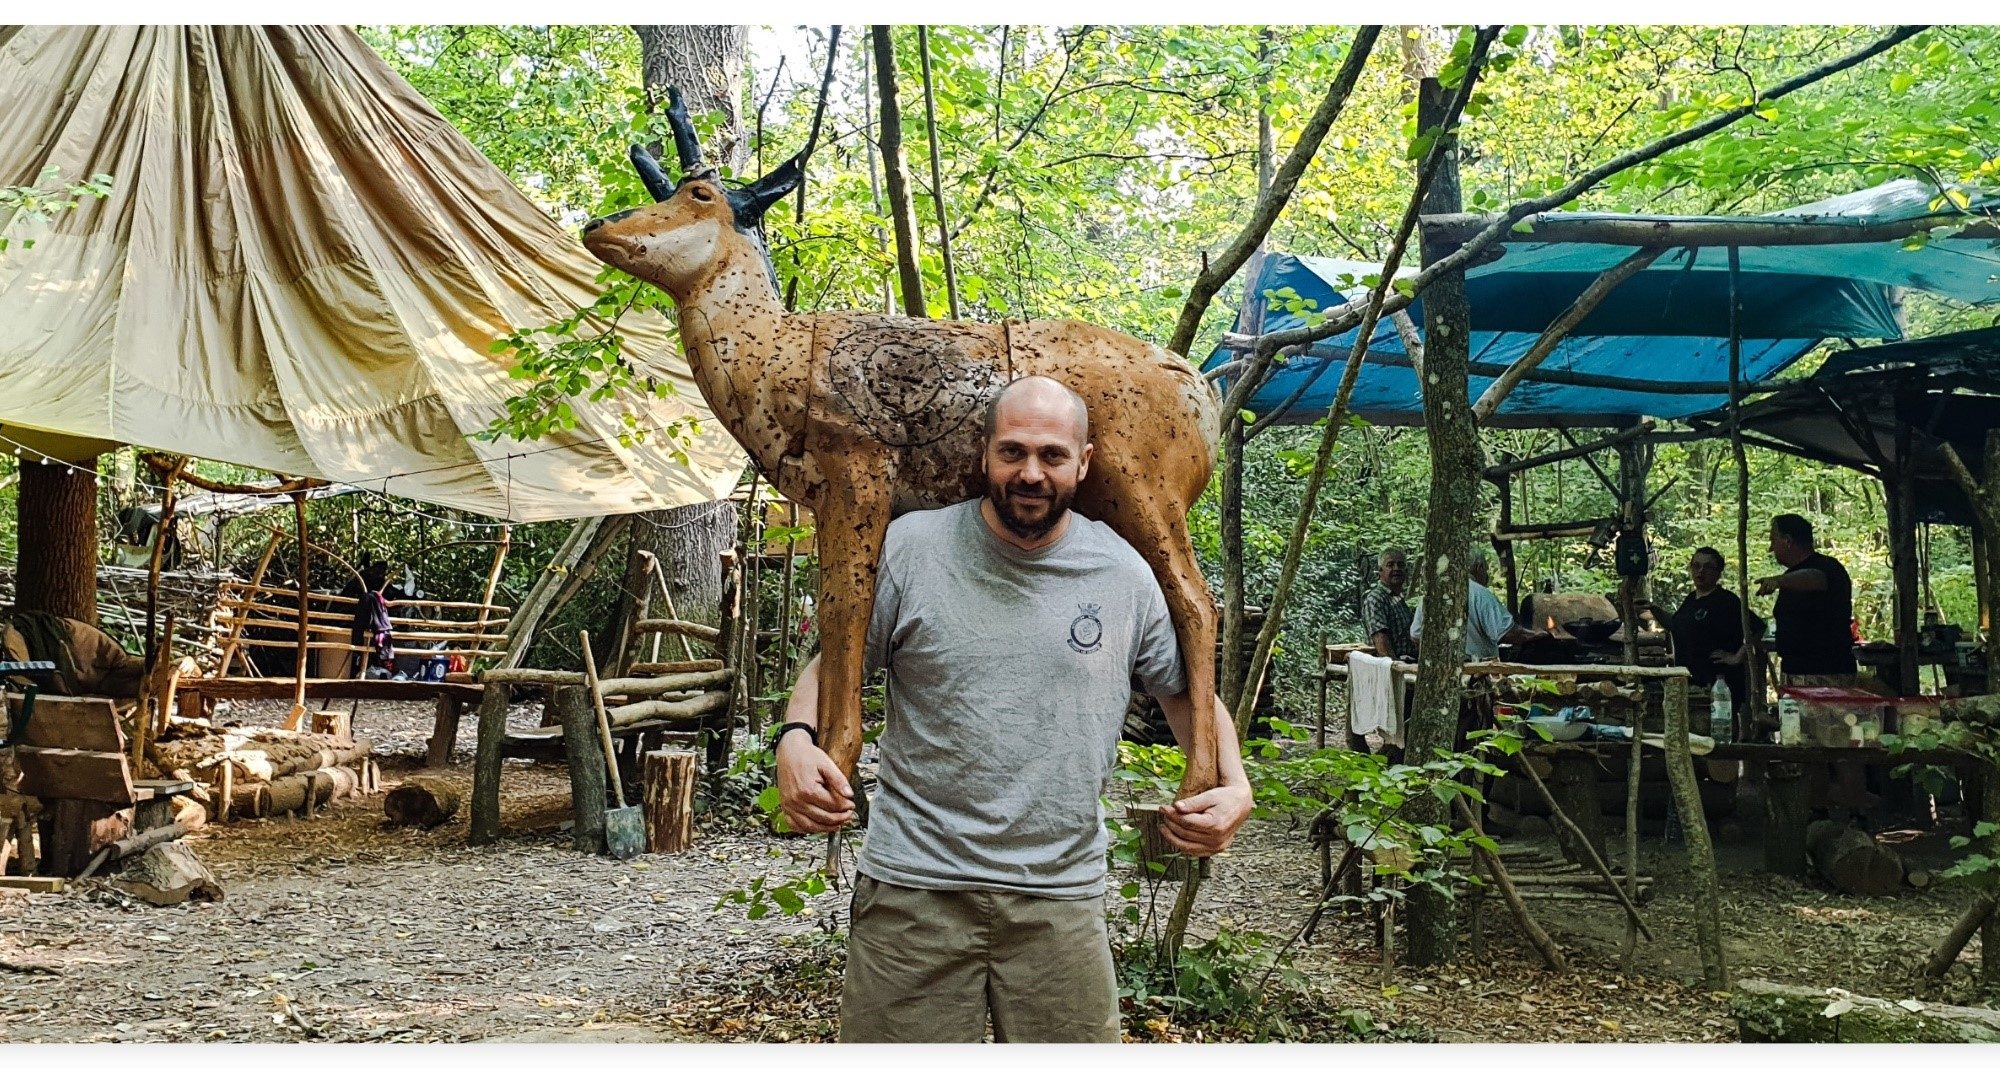
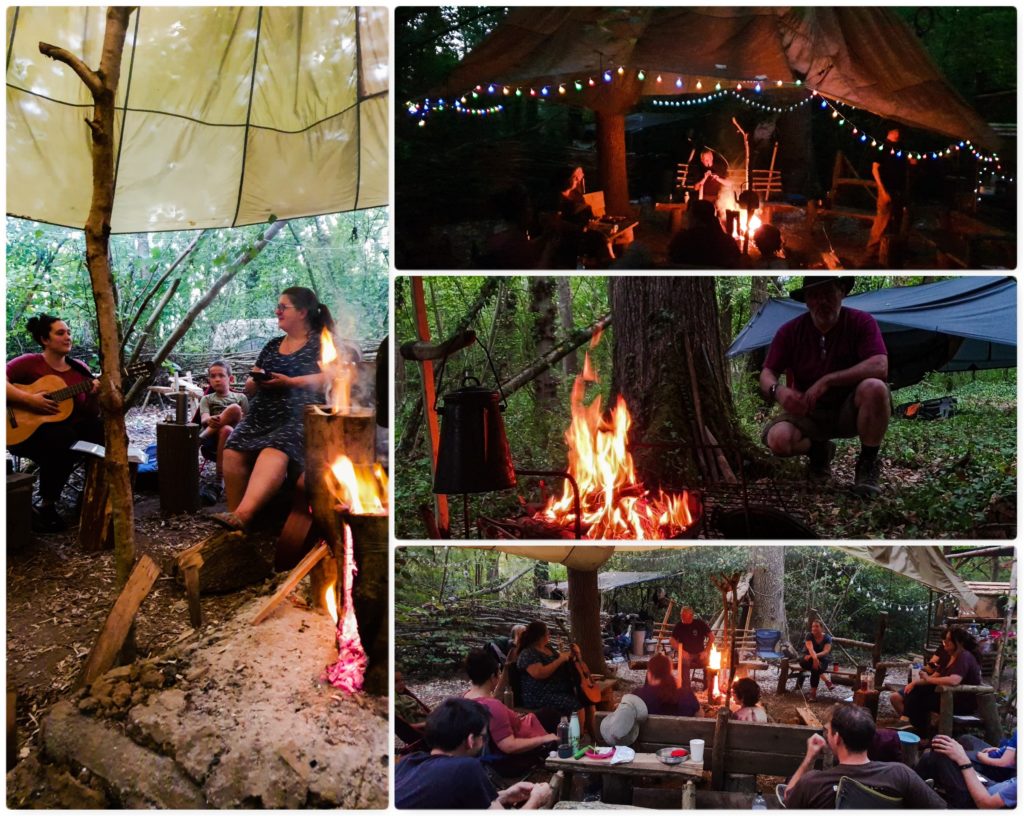
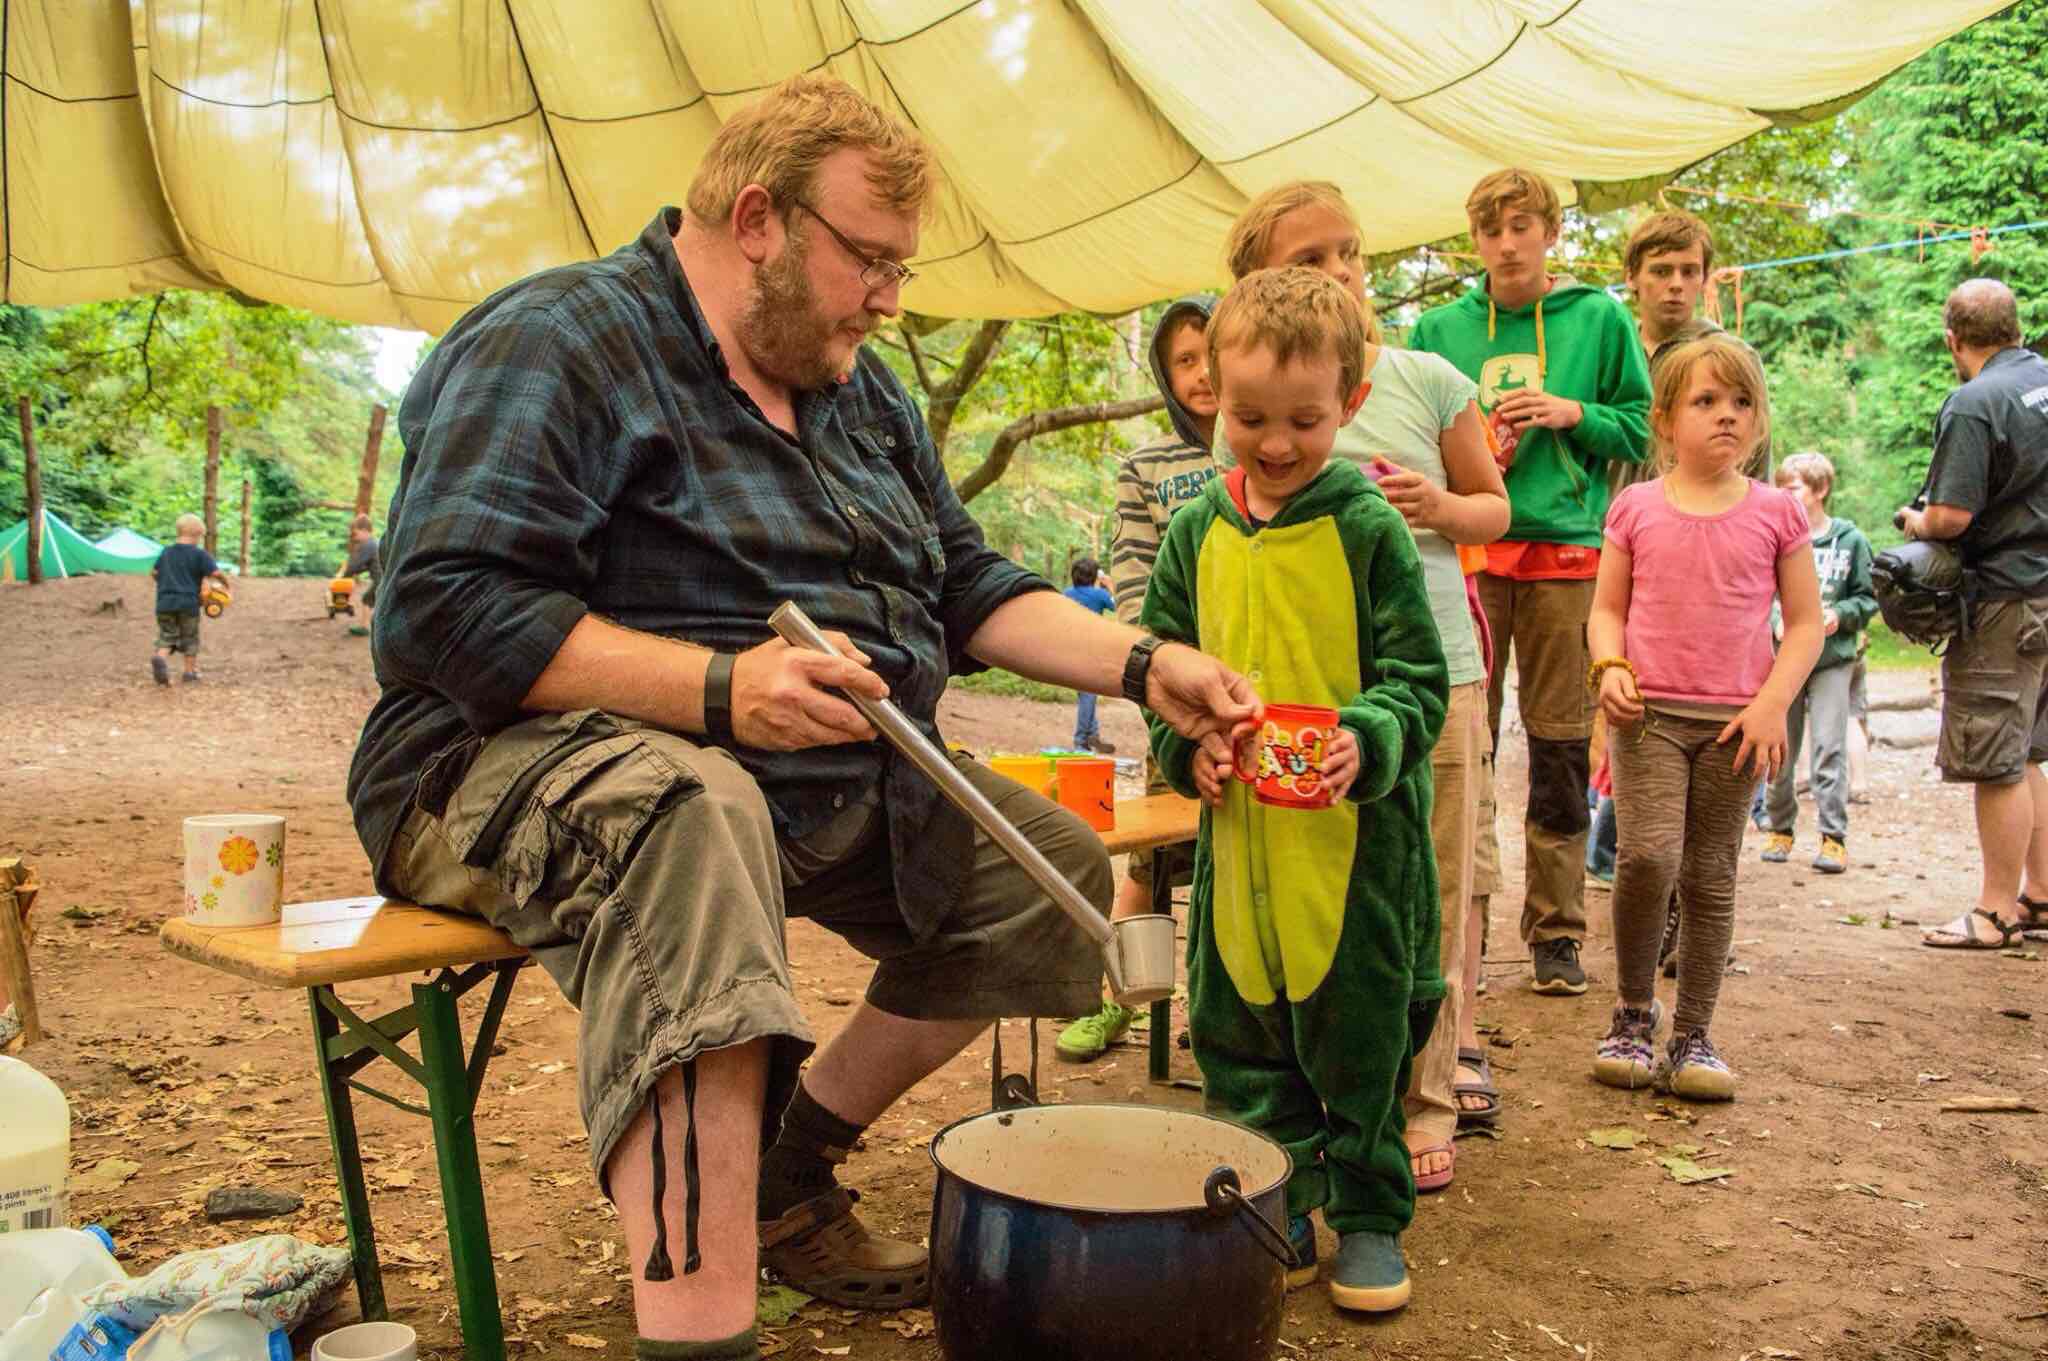
Wayne Jones from Forestknights Bushcraft (a fellow BCUK Moderator) along with his co-worker Beth Shepheard offered to run a small (for 20 to 30 people) Minimoot at his woods near Arundel for anyone who felt they could make it.
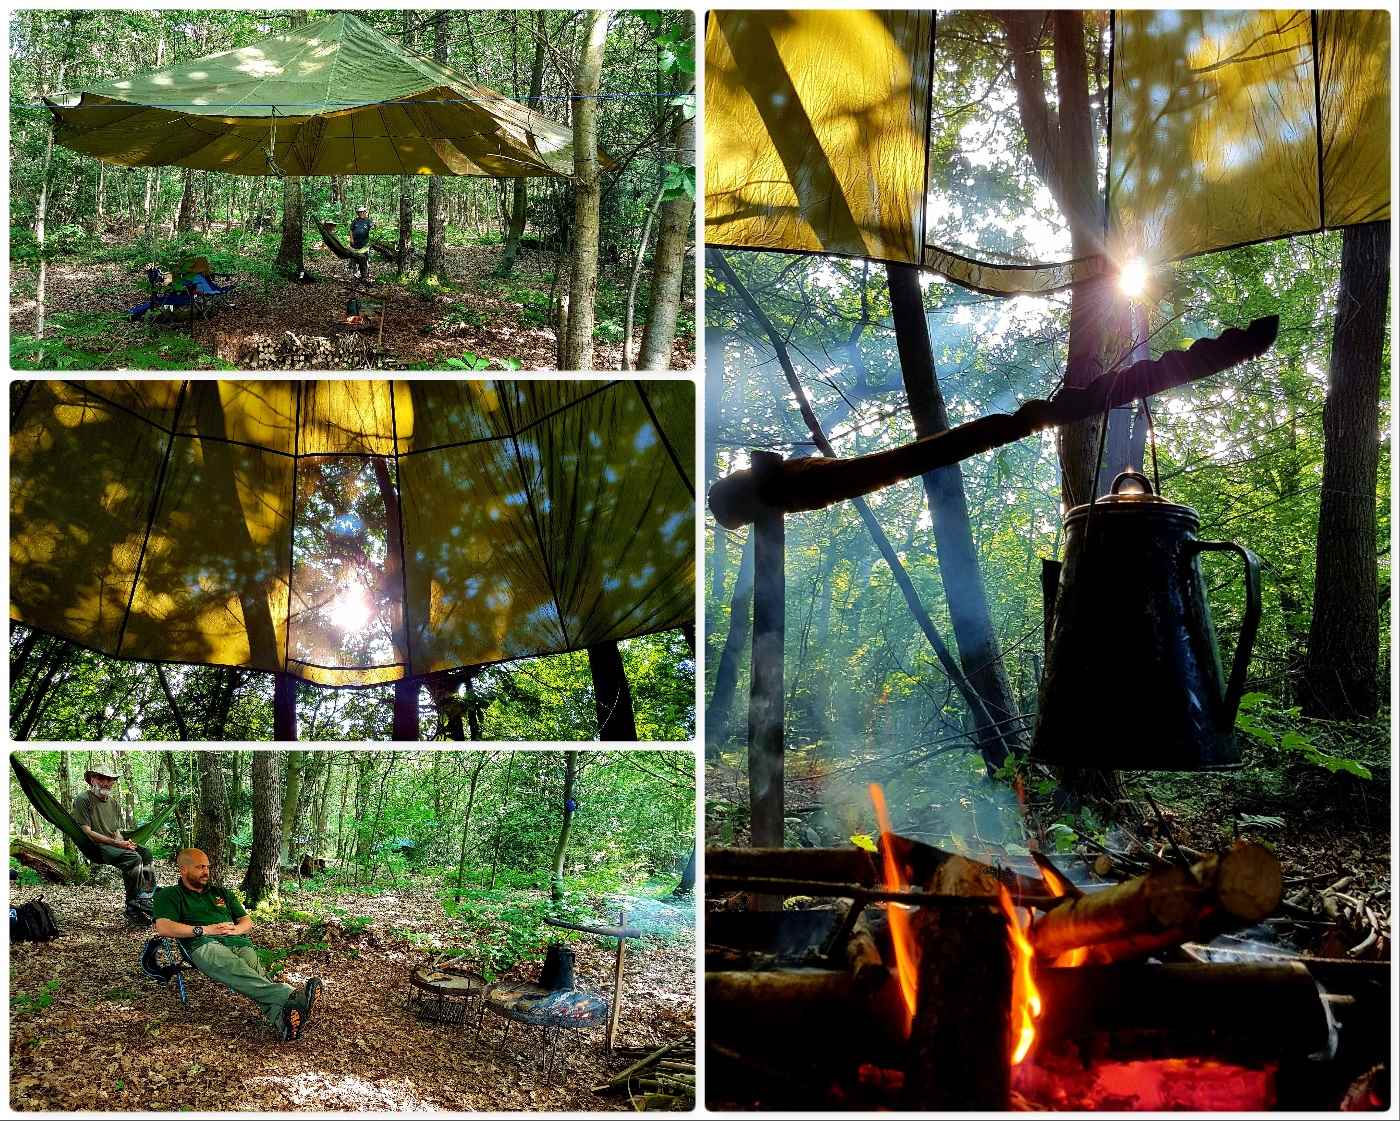
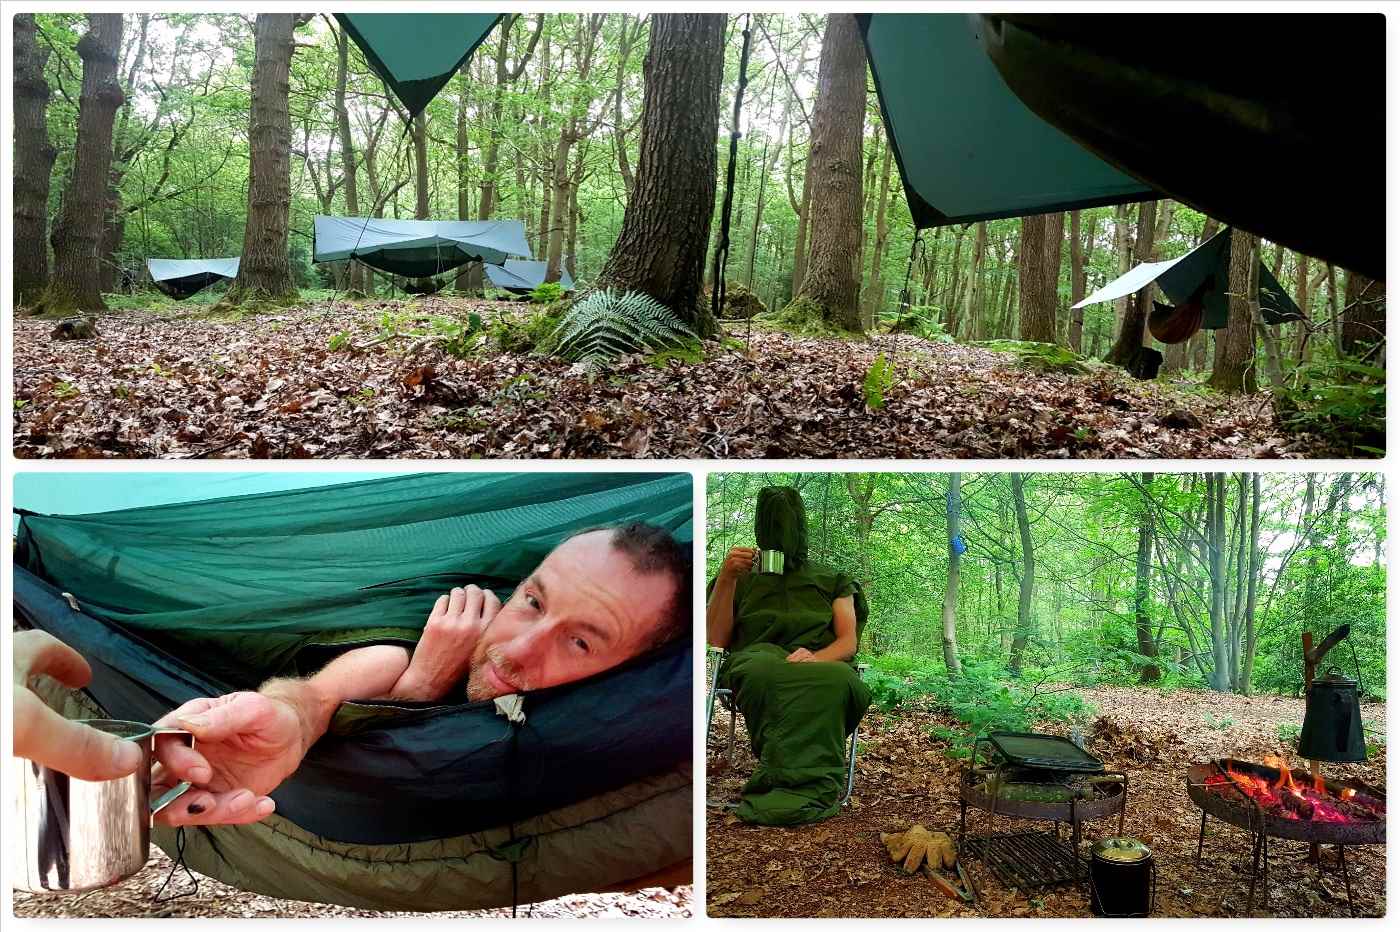
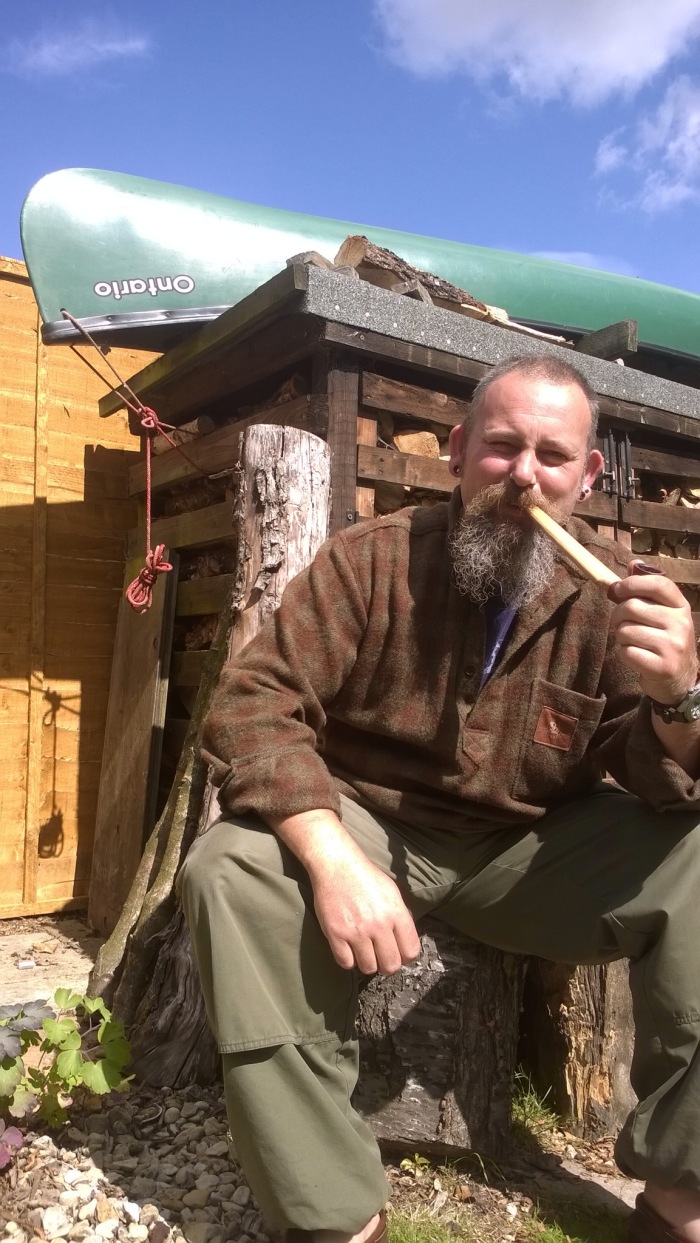
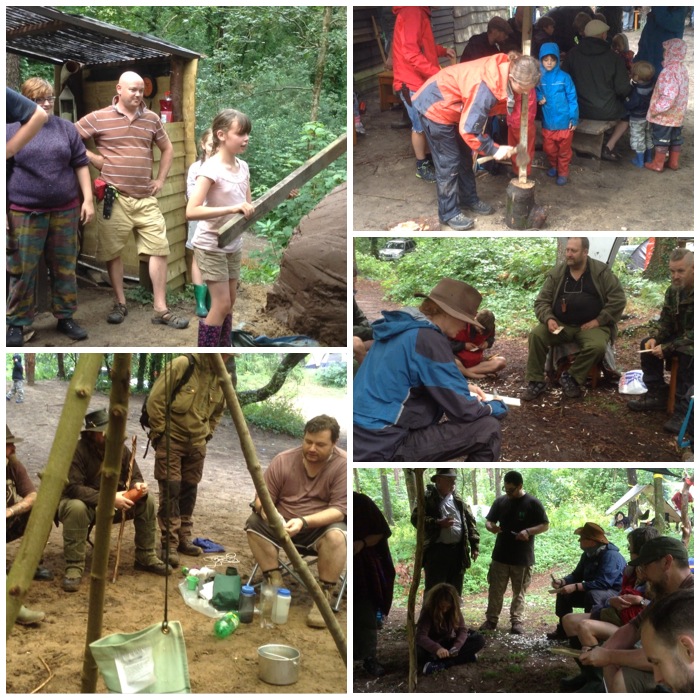
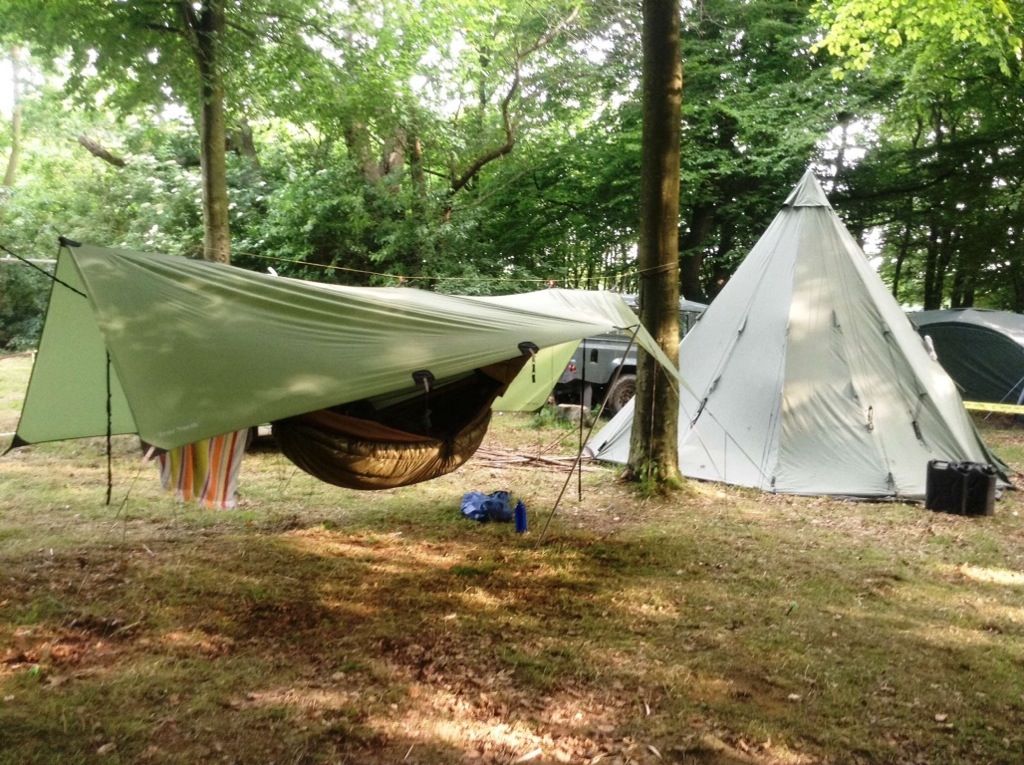
Home in the woods
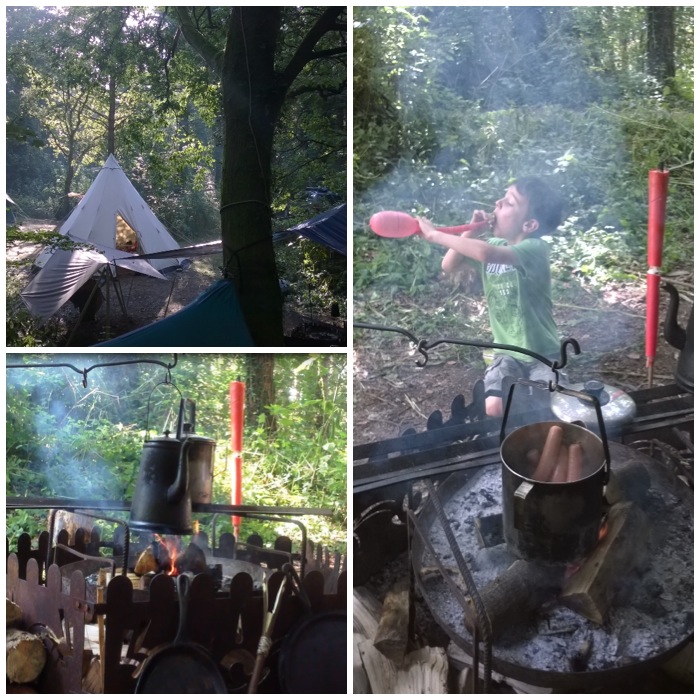
This was proper camping (no cars anywhere in the woods) and after a few trips back and forth with the trolley we soon had our hammocks up. I was joined by my son Finlay and our friends Dave and Alan.
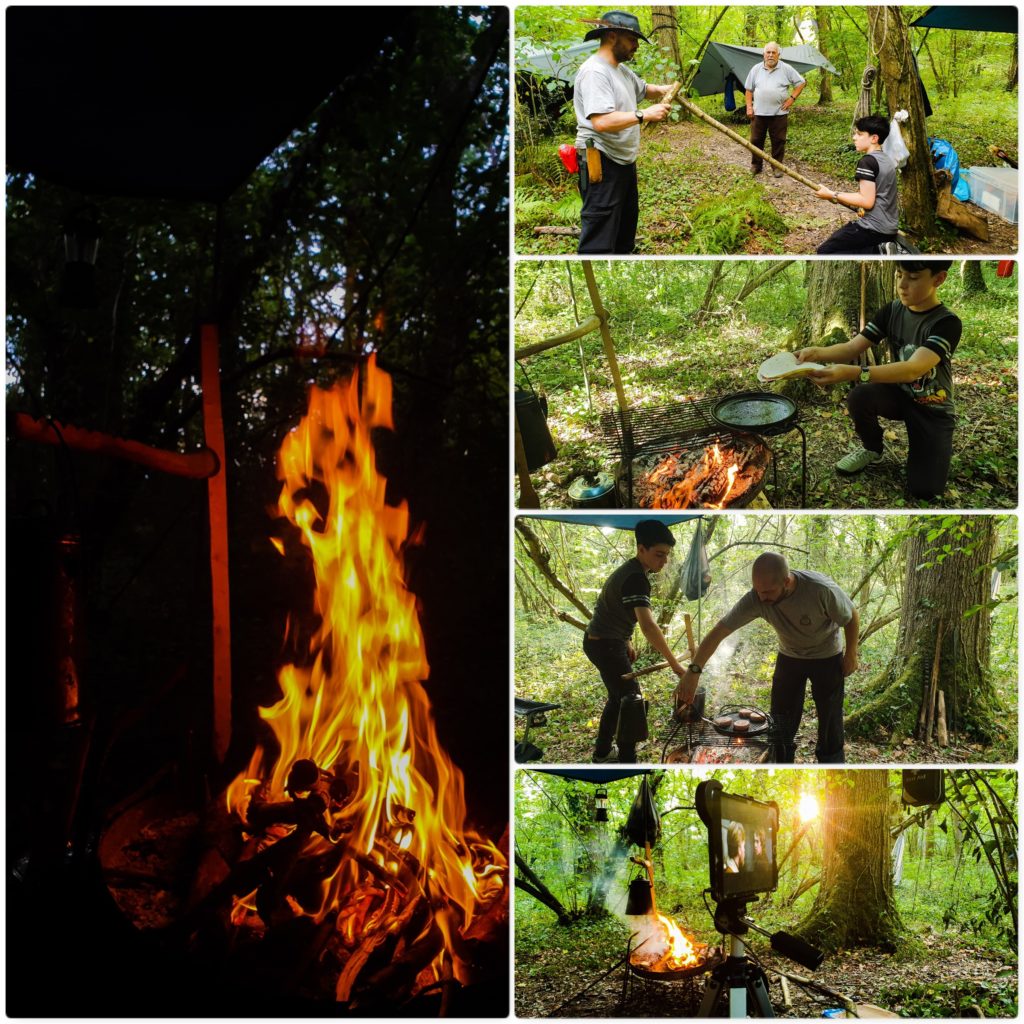
We had a communal cooking area and Fin managed to sneak a movie in each evening around the fire (got to make allowances for this day and age).
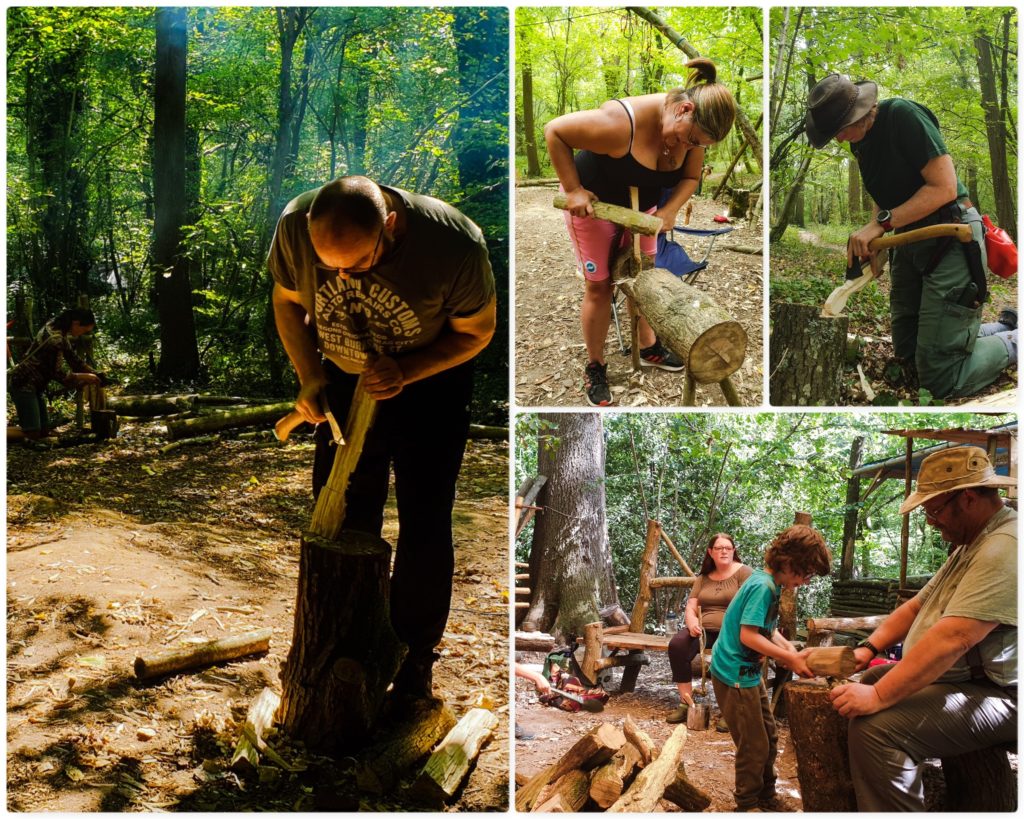
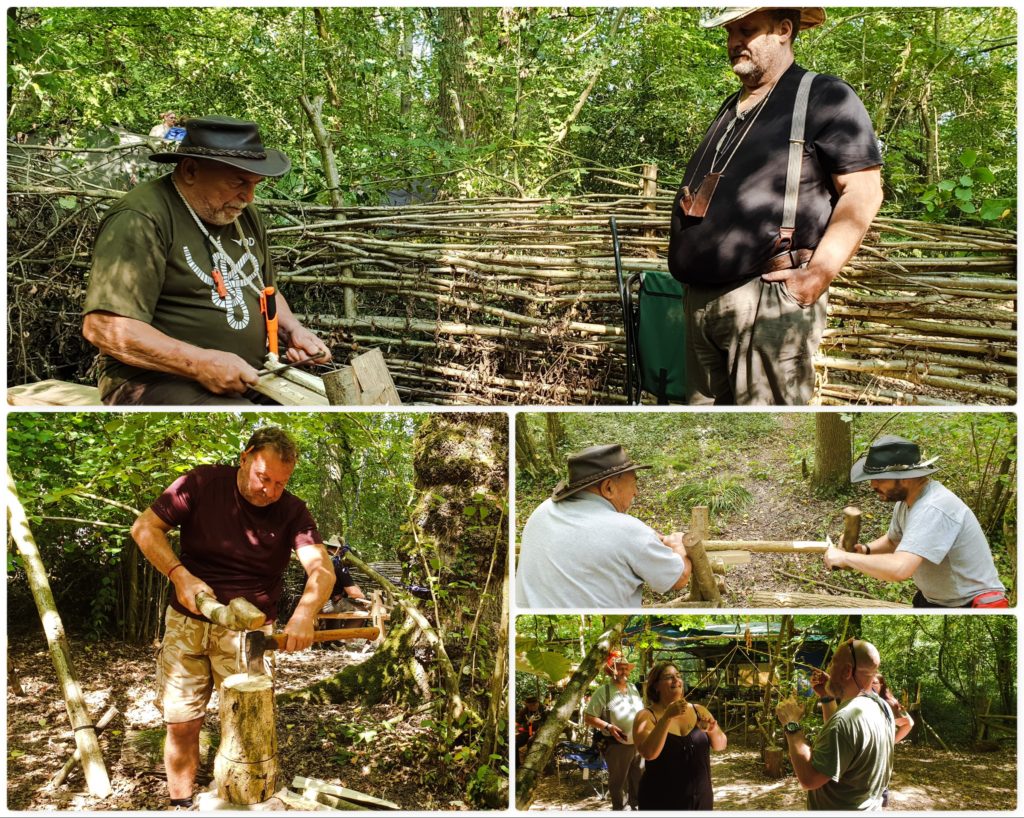
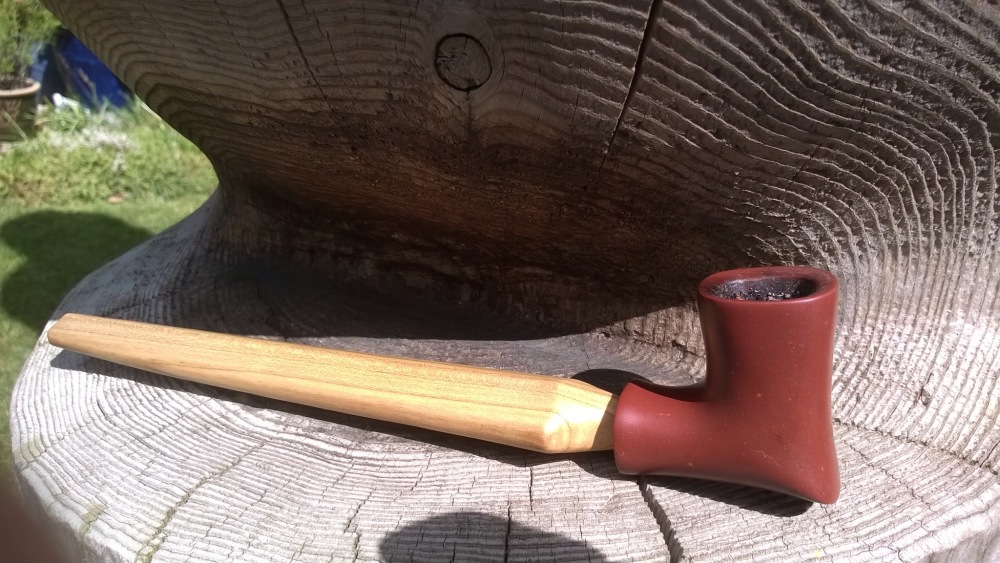
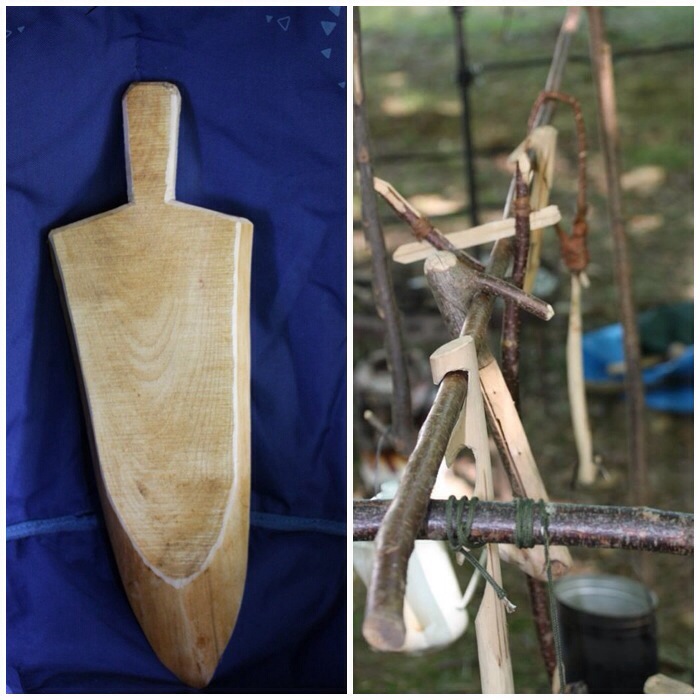
A little bit of whittling
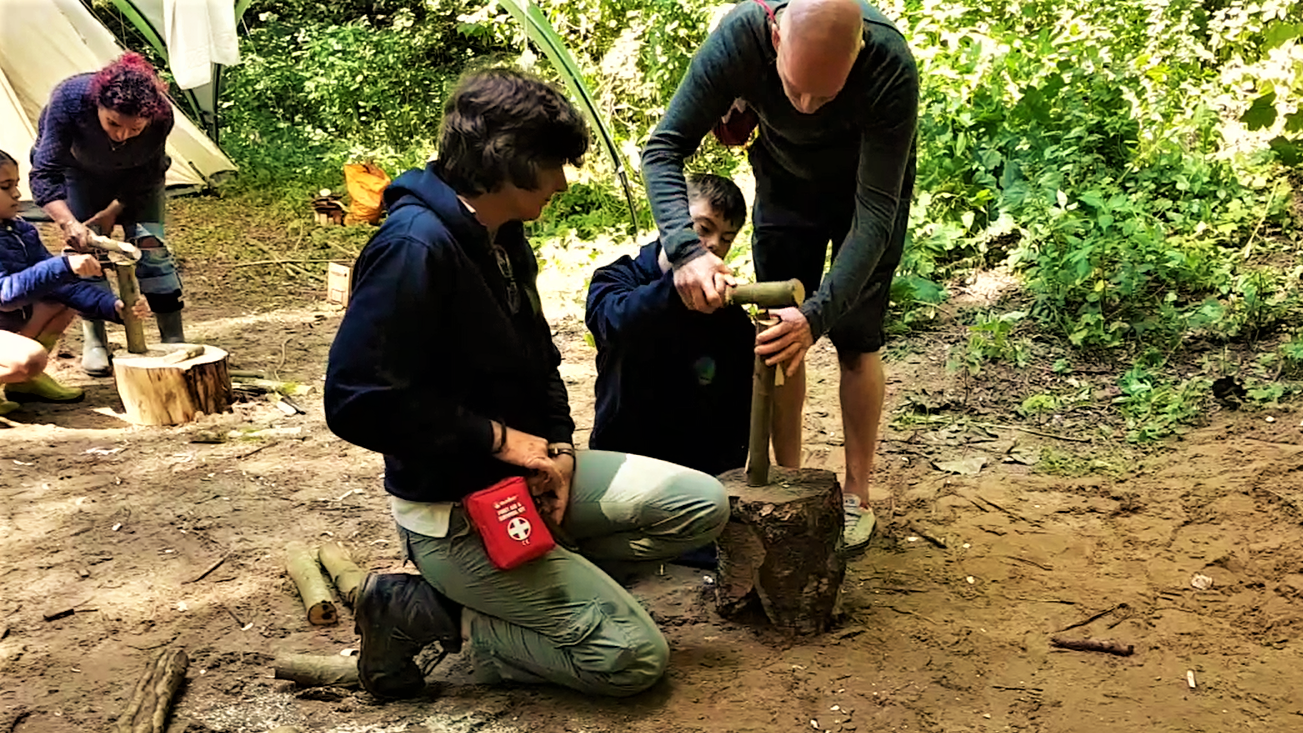
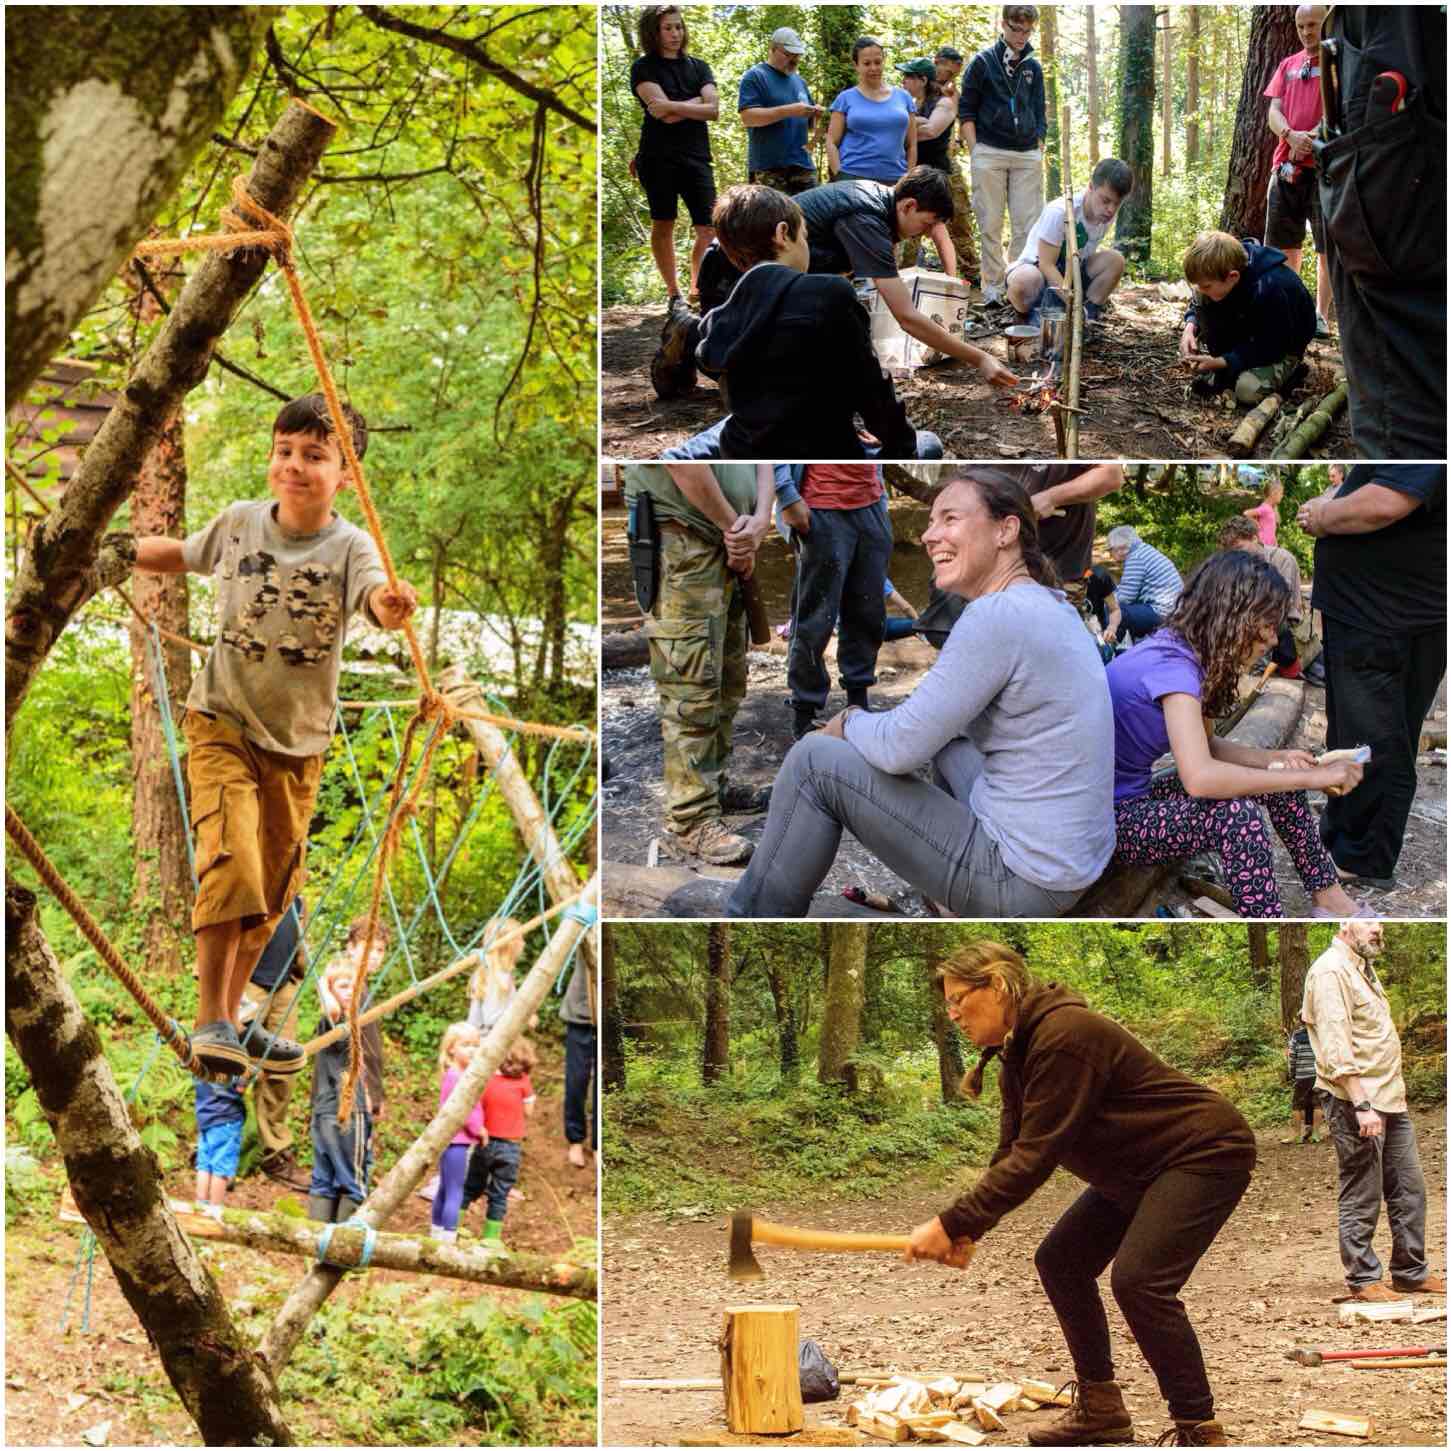
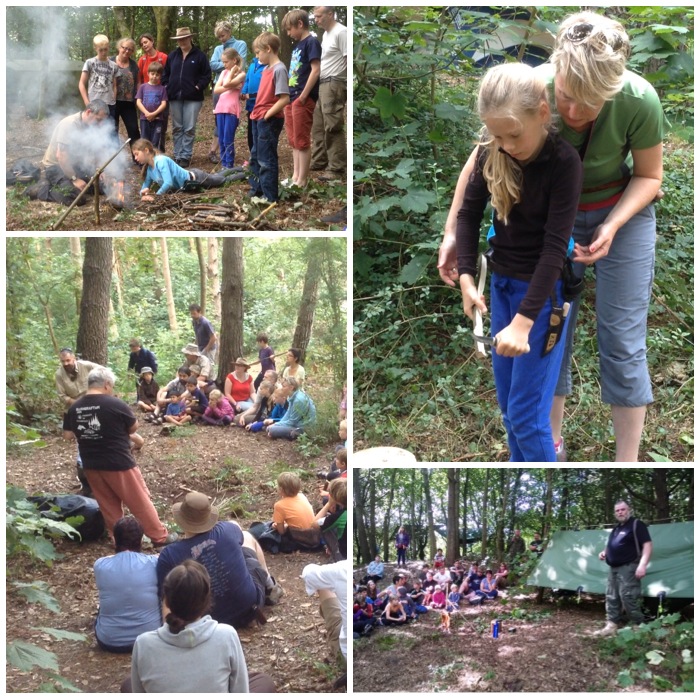
The Minimoot, like the Bushmoot, was a relaxed affair however there were a few classes. One of the first that many asked for was spoon carving – this one went to Wayne to organise with all ages involved – it was great to see all that knowledge being shared.
Multi activities
If spoon-whittling didn’t appeal, we had a lot more going on over the weekend including;
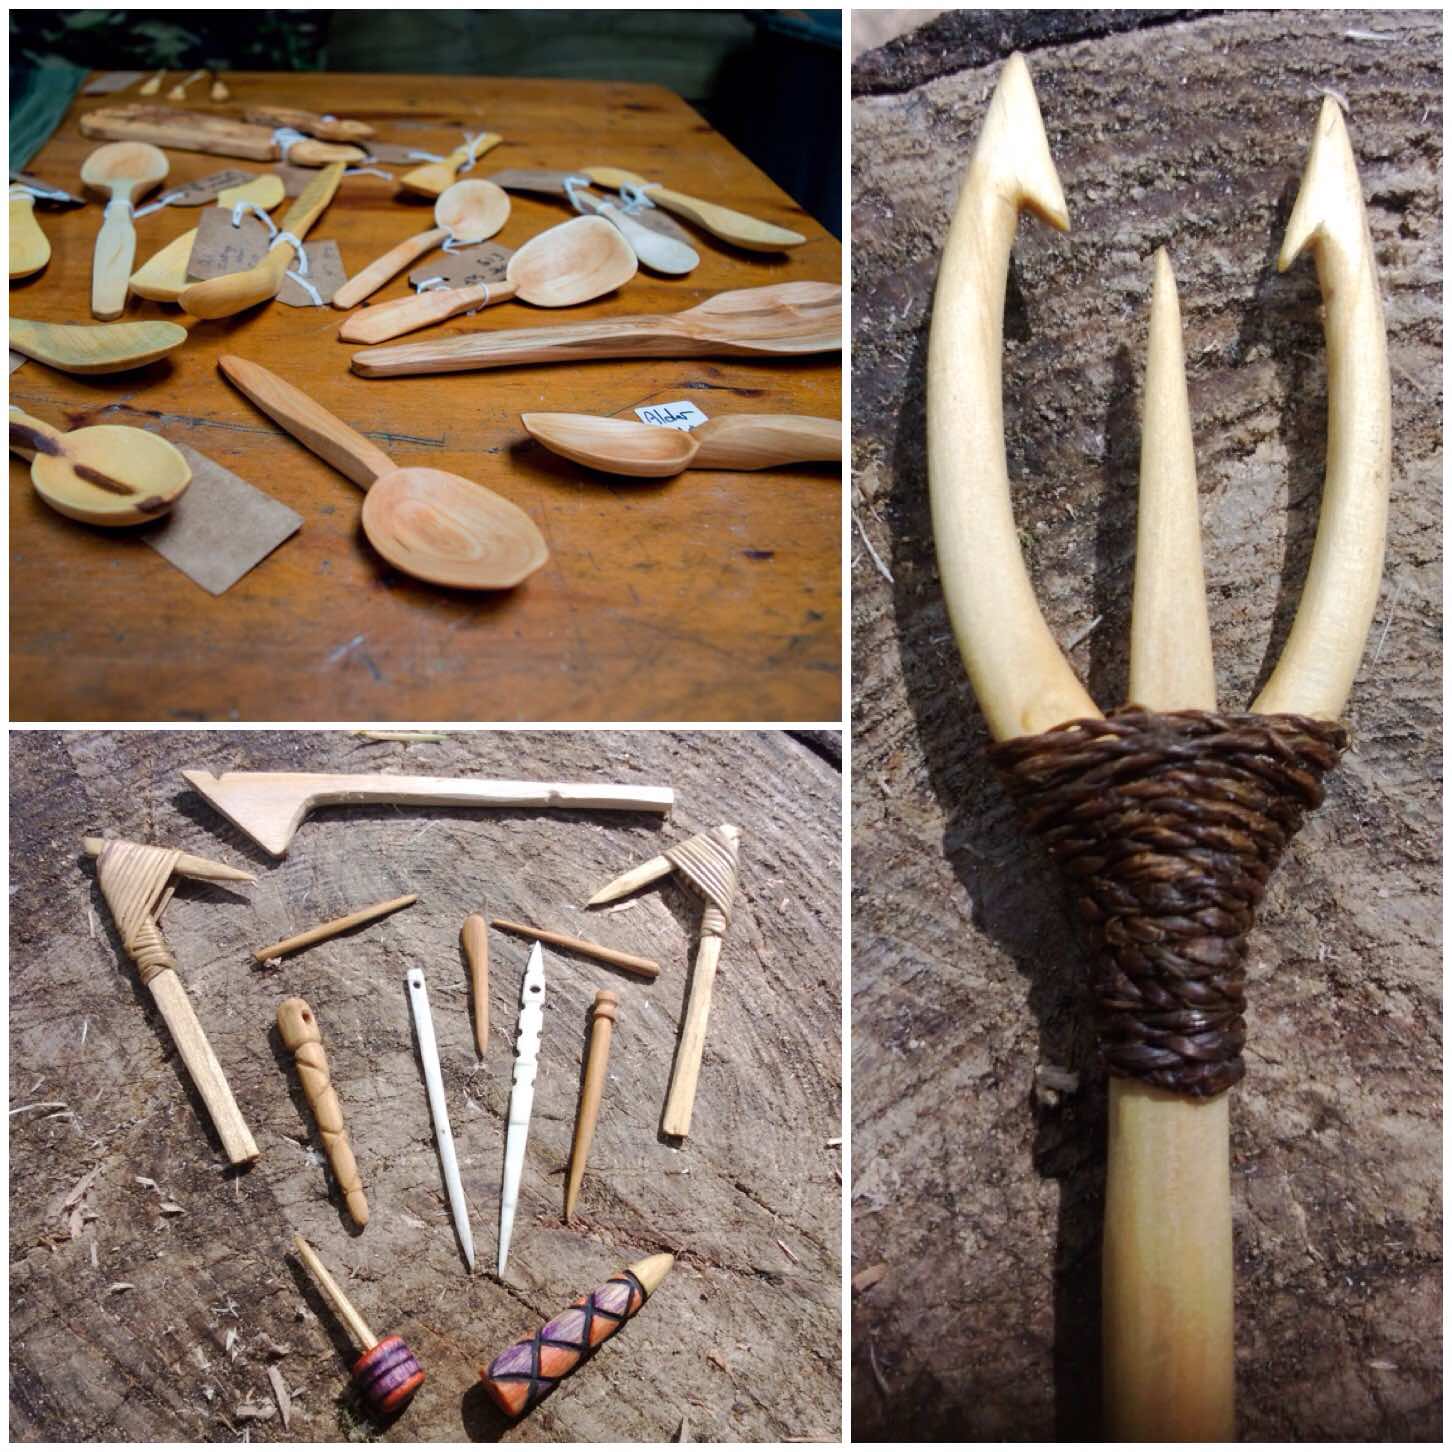
Net needle carving
Log rockets
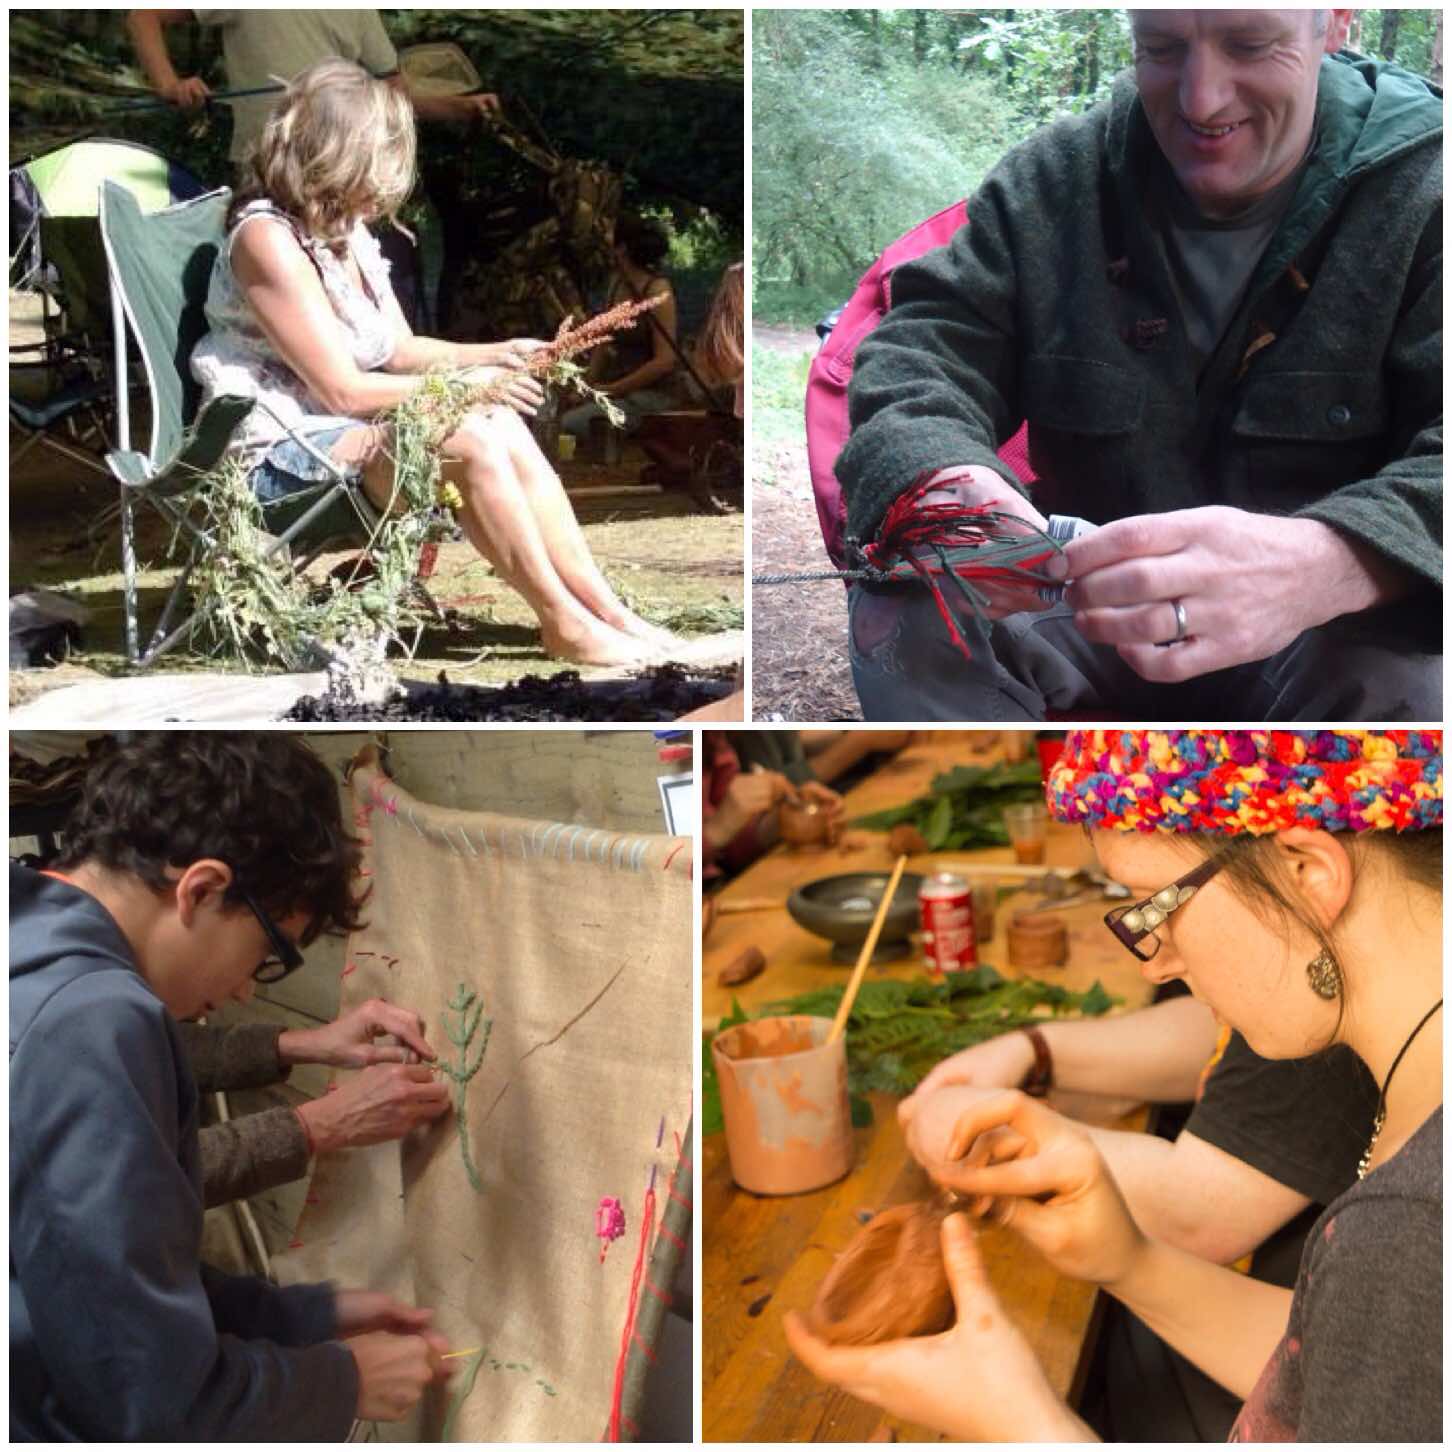
Nordic braiding
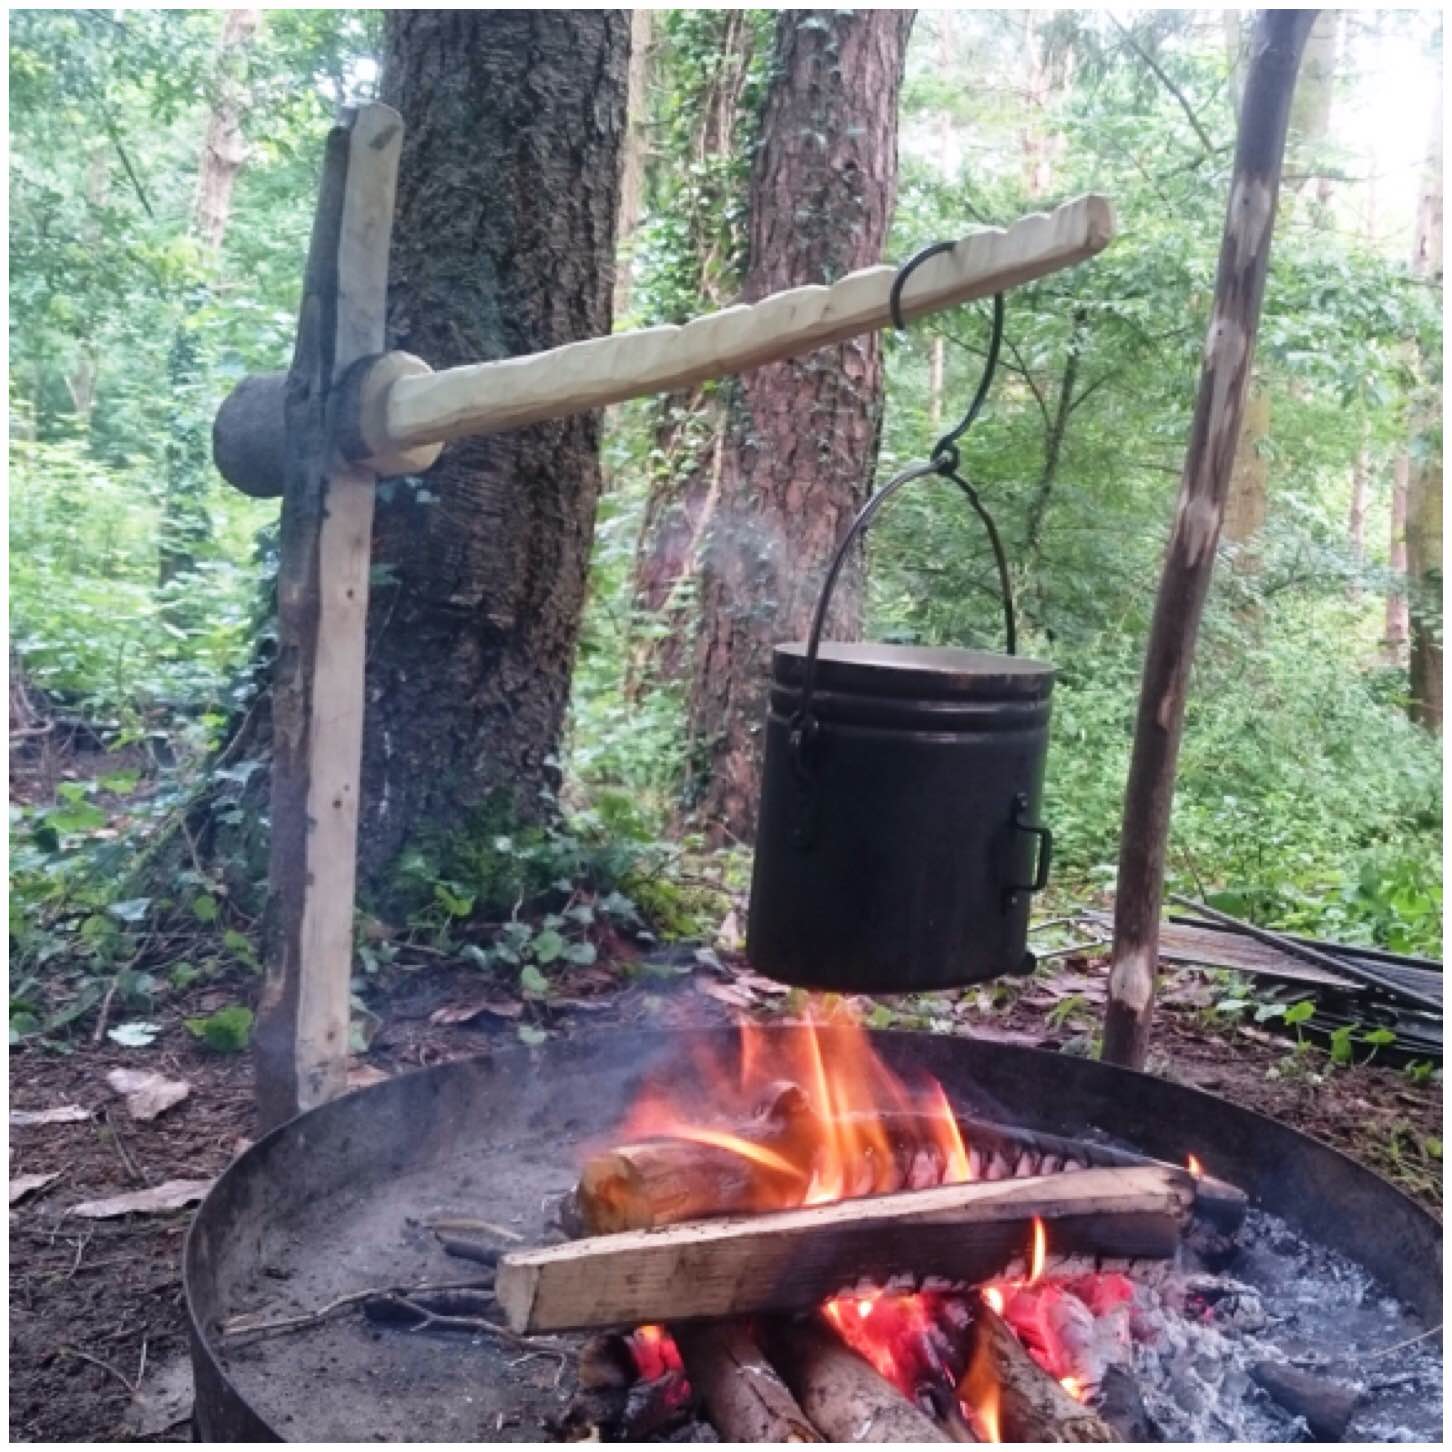
Campfire cooking constructions
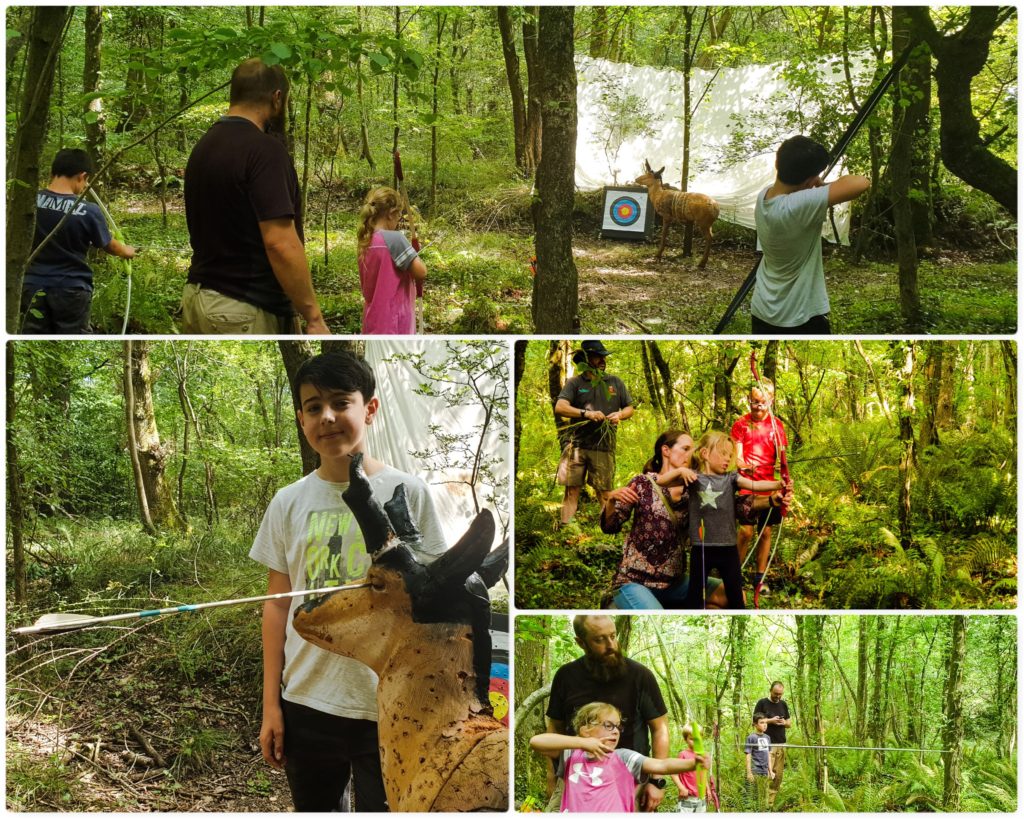
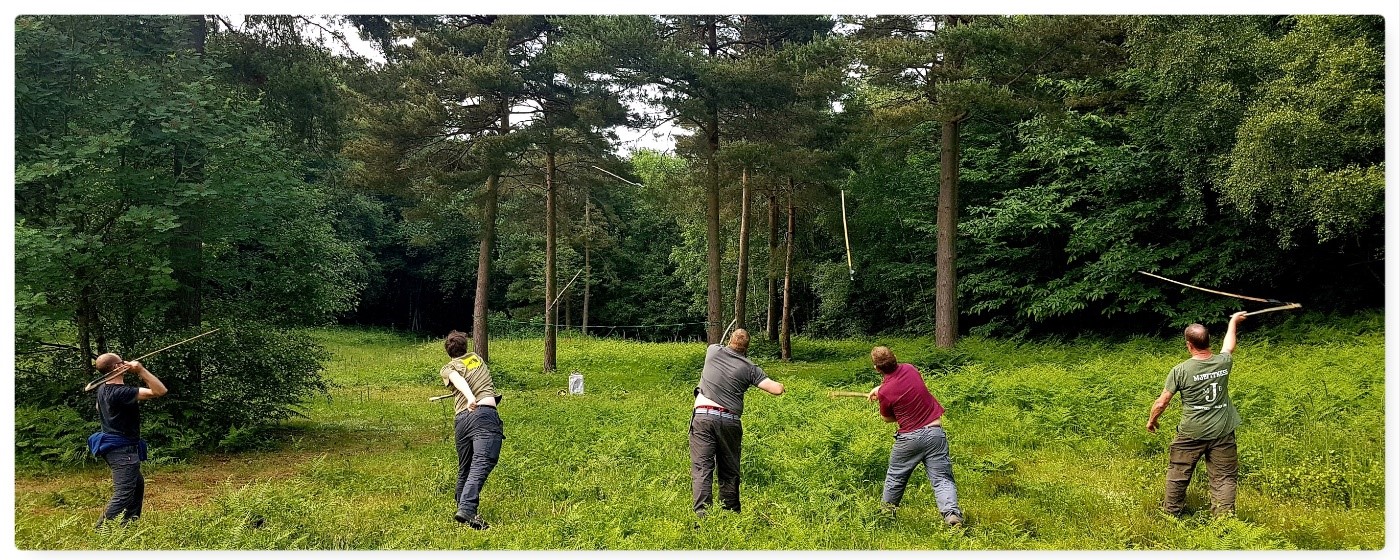
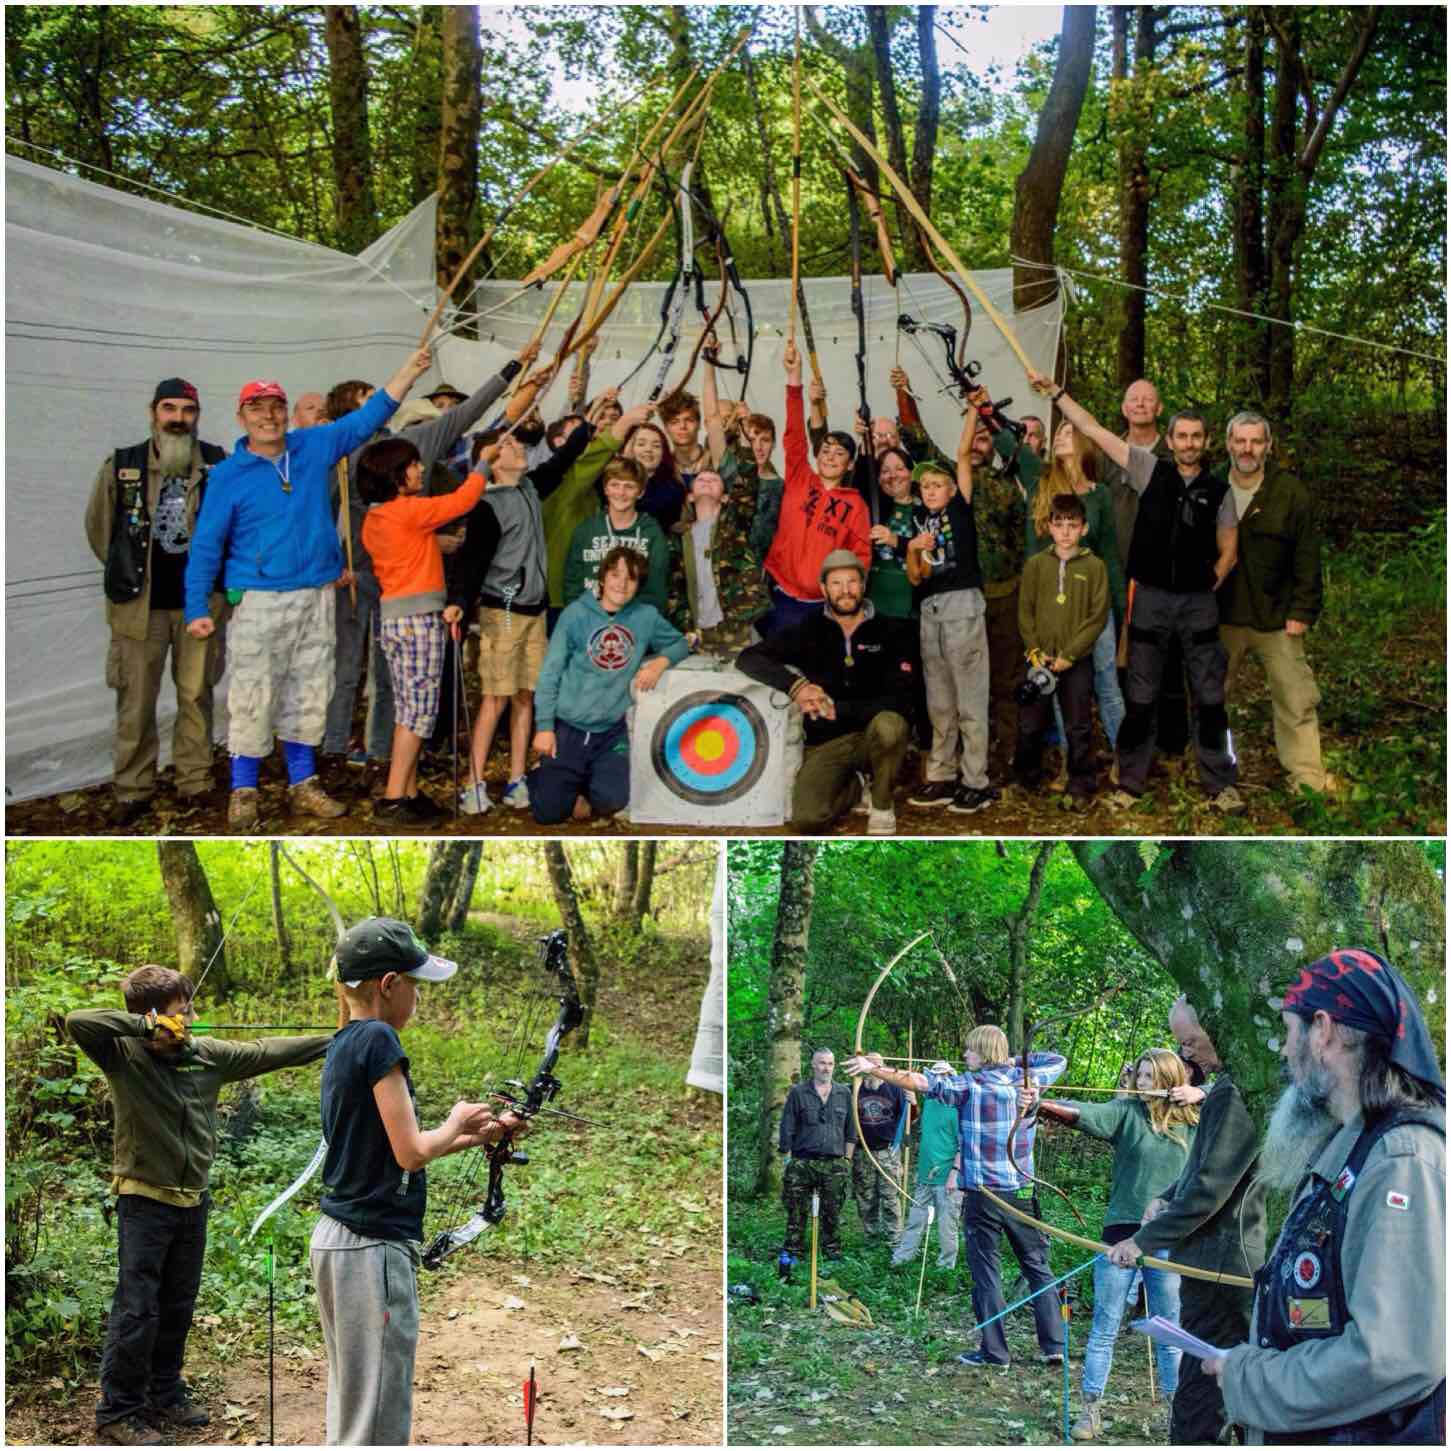
Down on the Range
Usually in the afternoon we had the range up and running – we had all sorts of bows to choose from and Finlay was happy to be shooting some Mint Imperials down the range from his catapult.
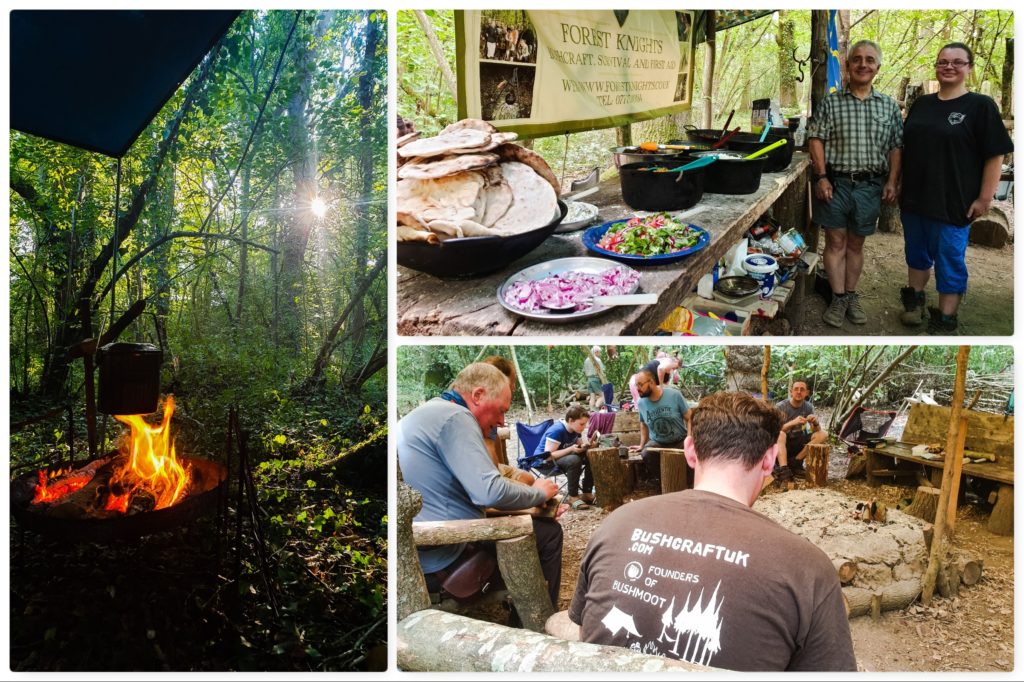
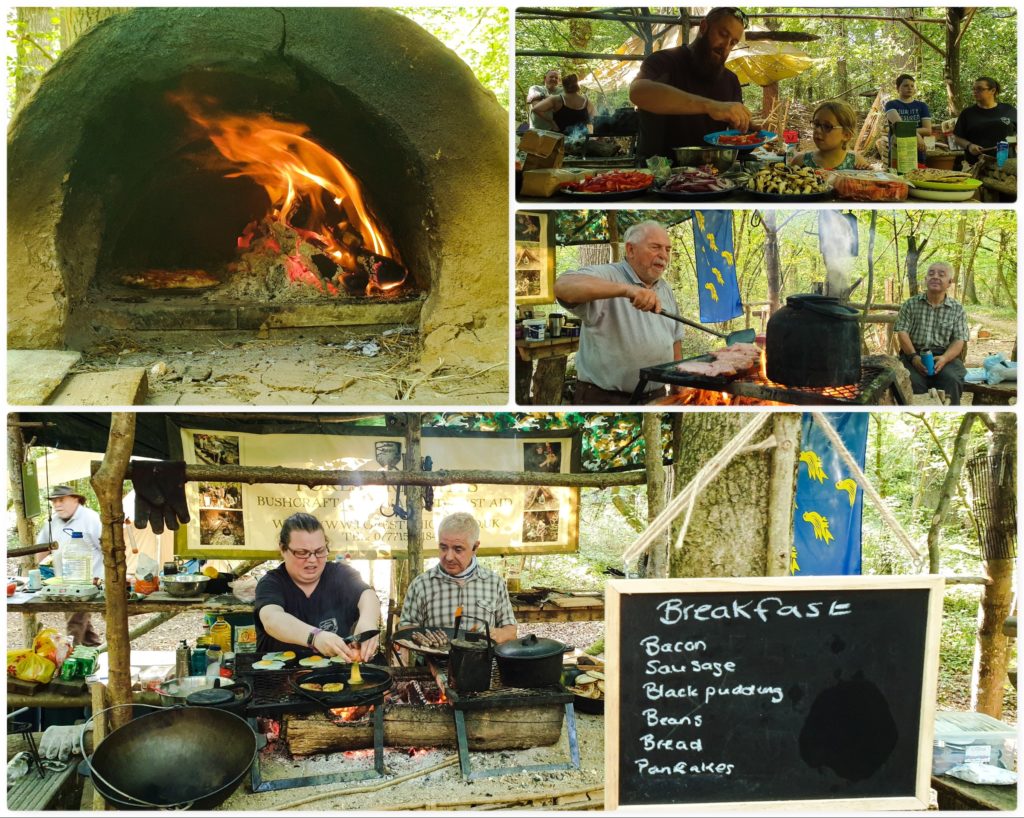
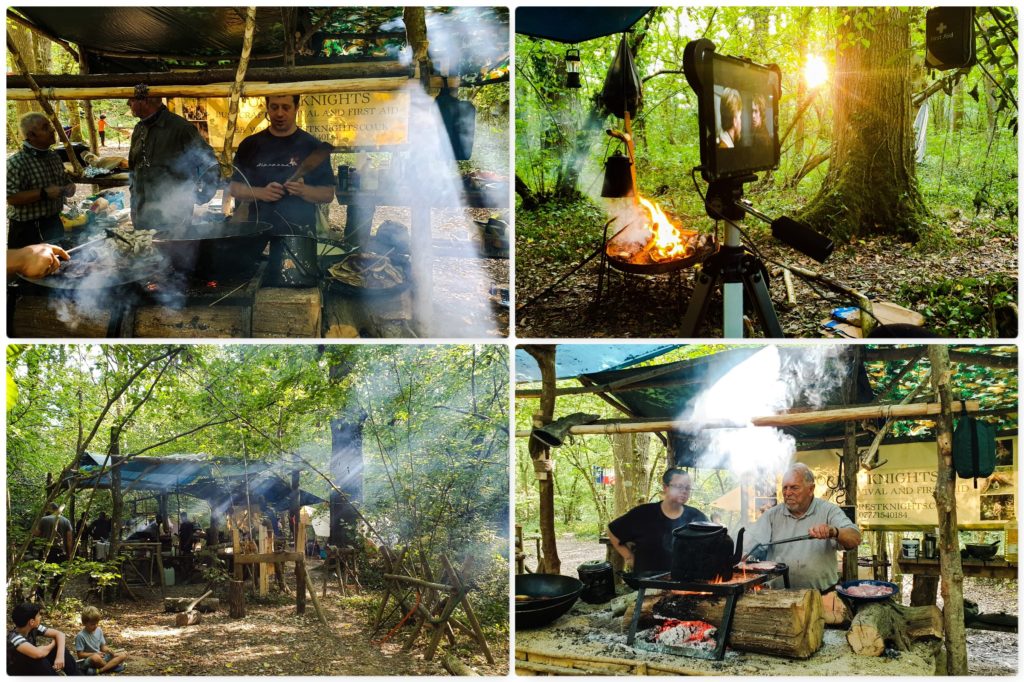
Food – Glorious – Food
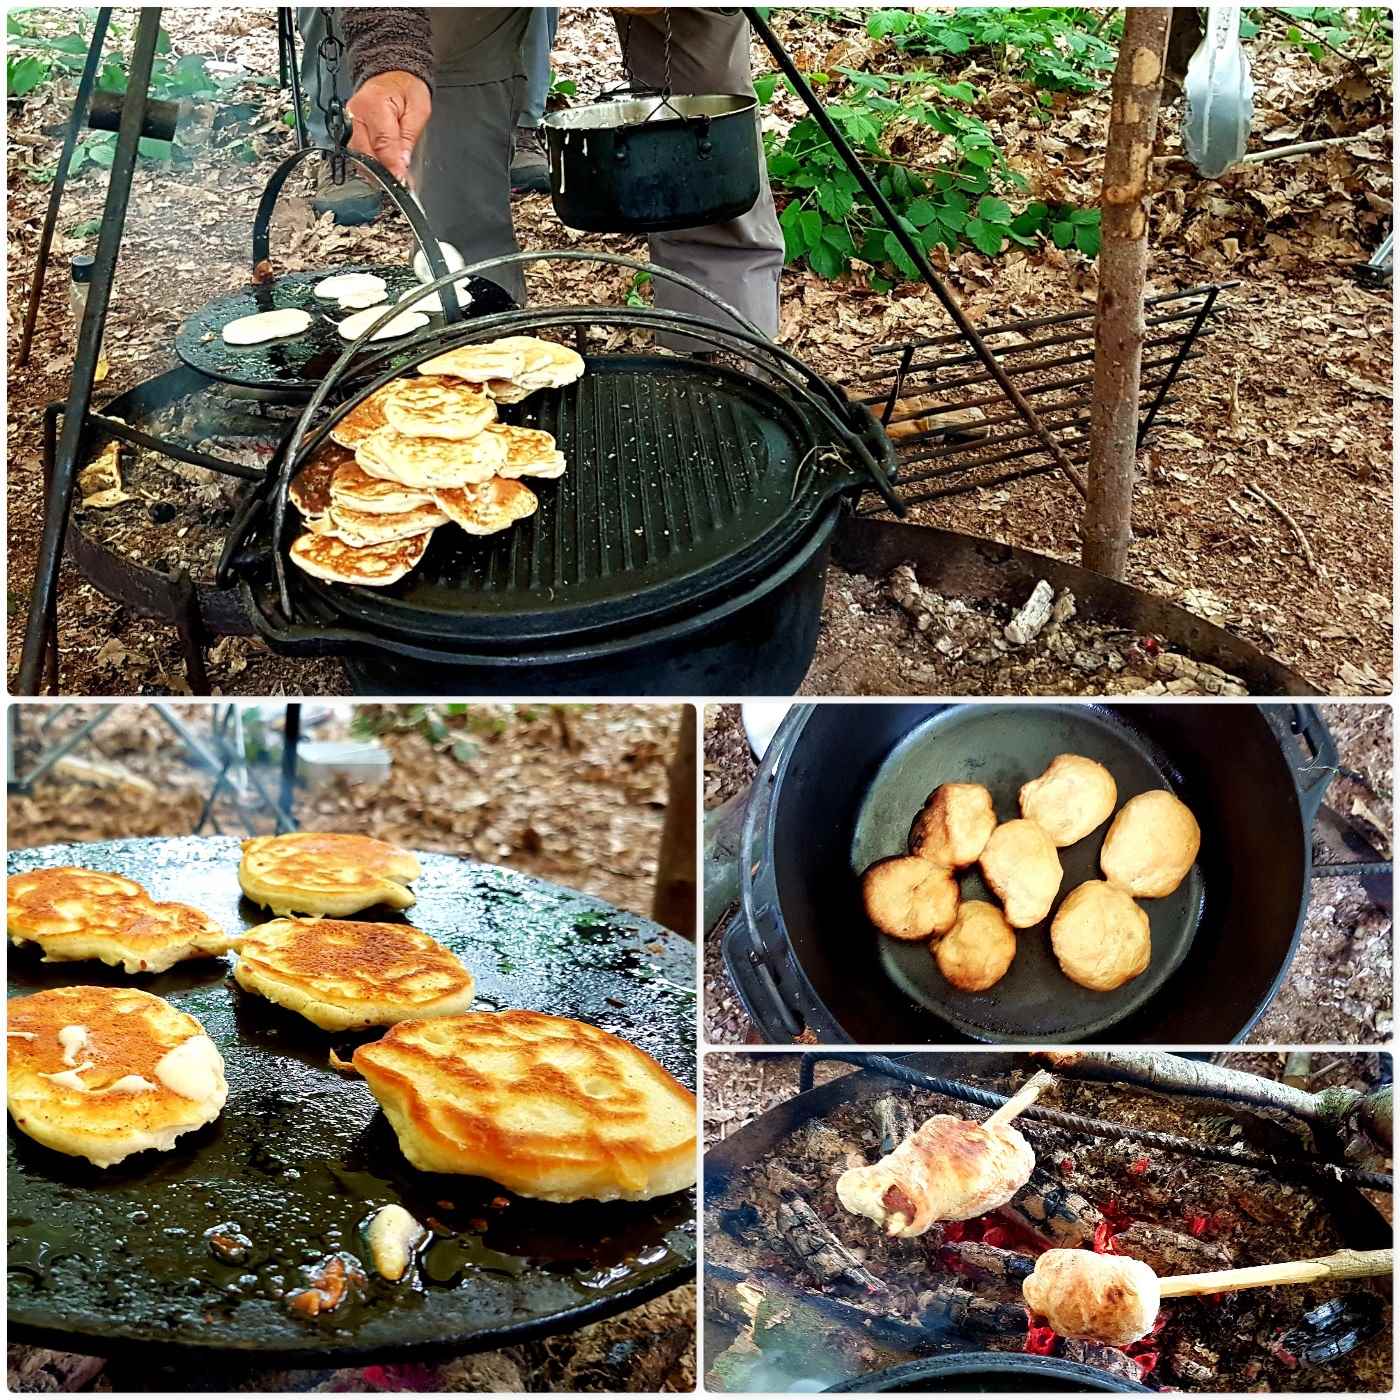
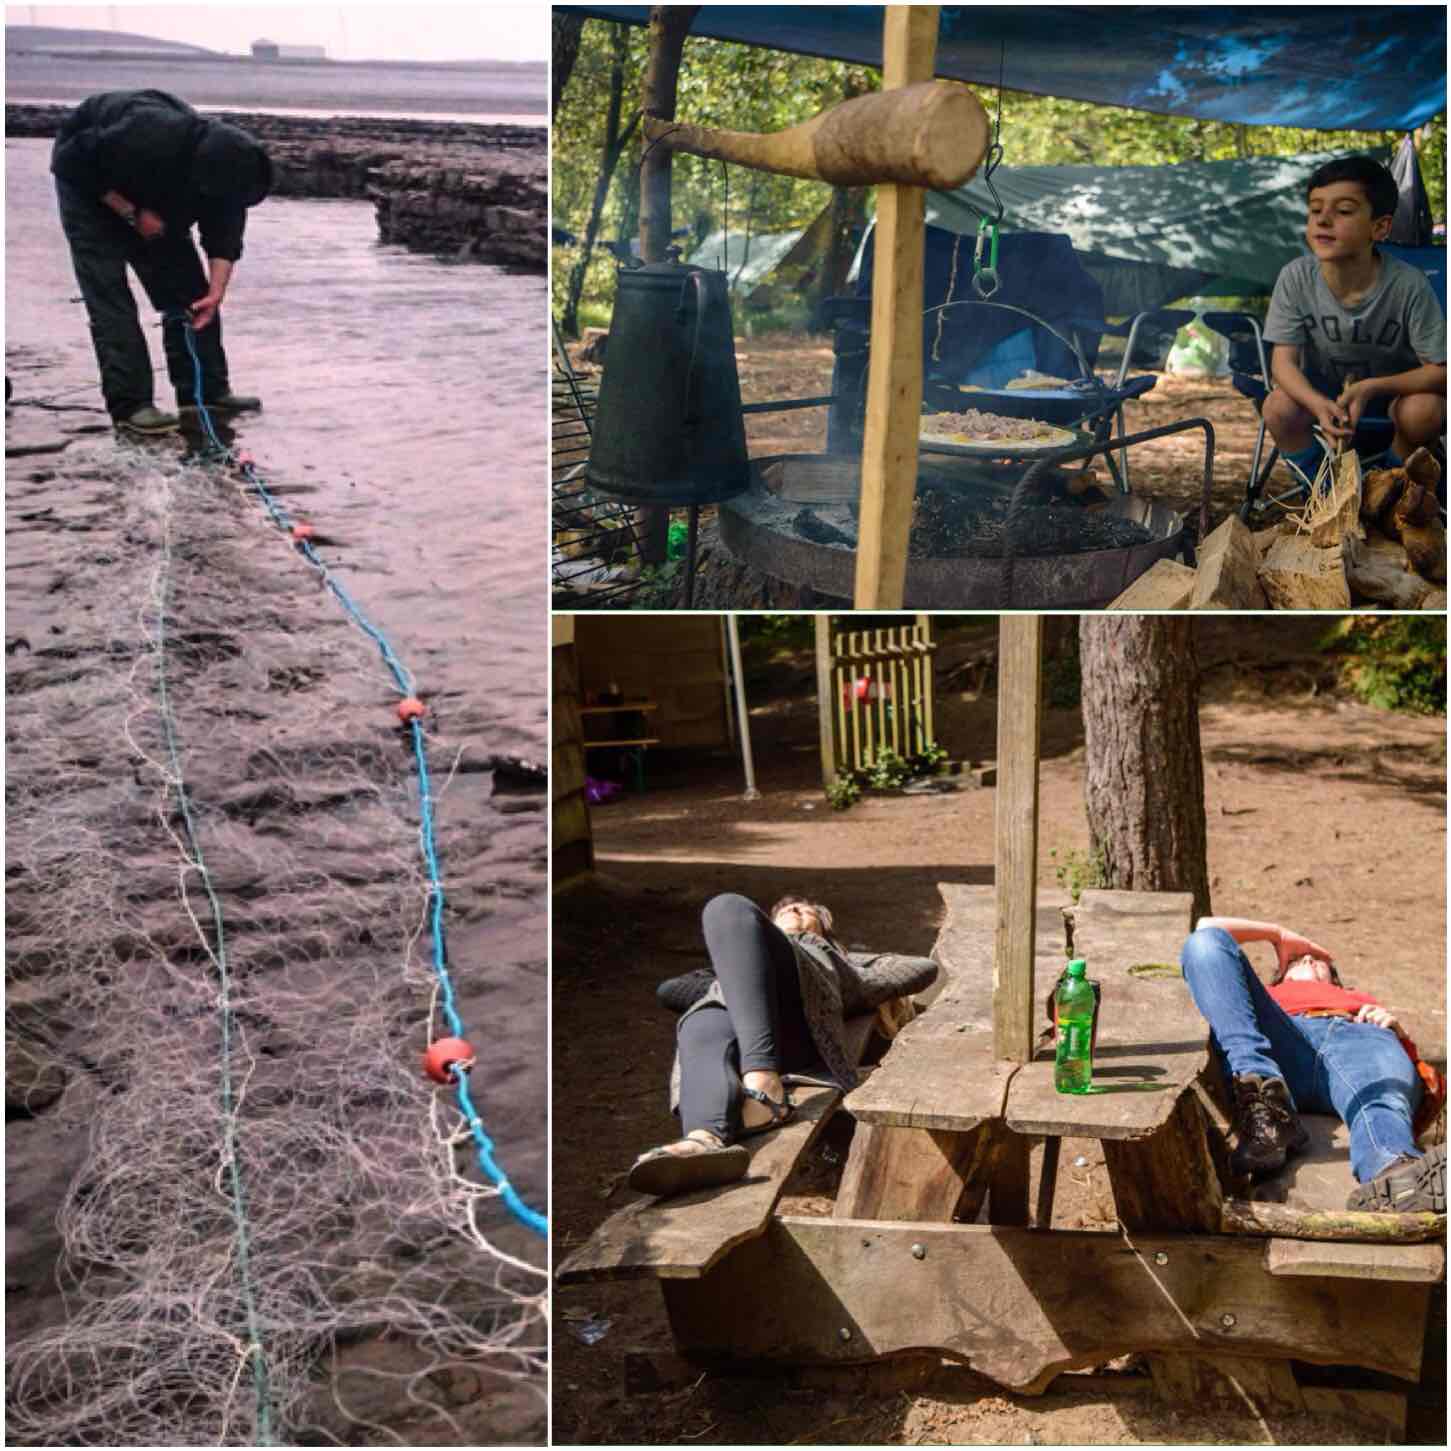
One thing that did not happen on this weekend was going hungry – Beth and Wayne (I will put them in order of priority here) are renowned for their cooking skills around a campfire. They cooked a mega breakfast every morning, a curry on the Saturday night and had the pizza oven fired up on a number of occasions.
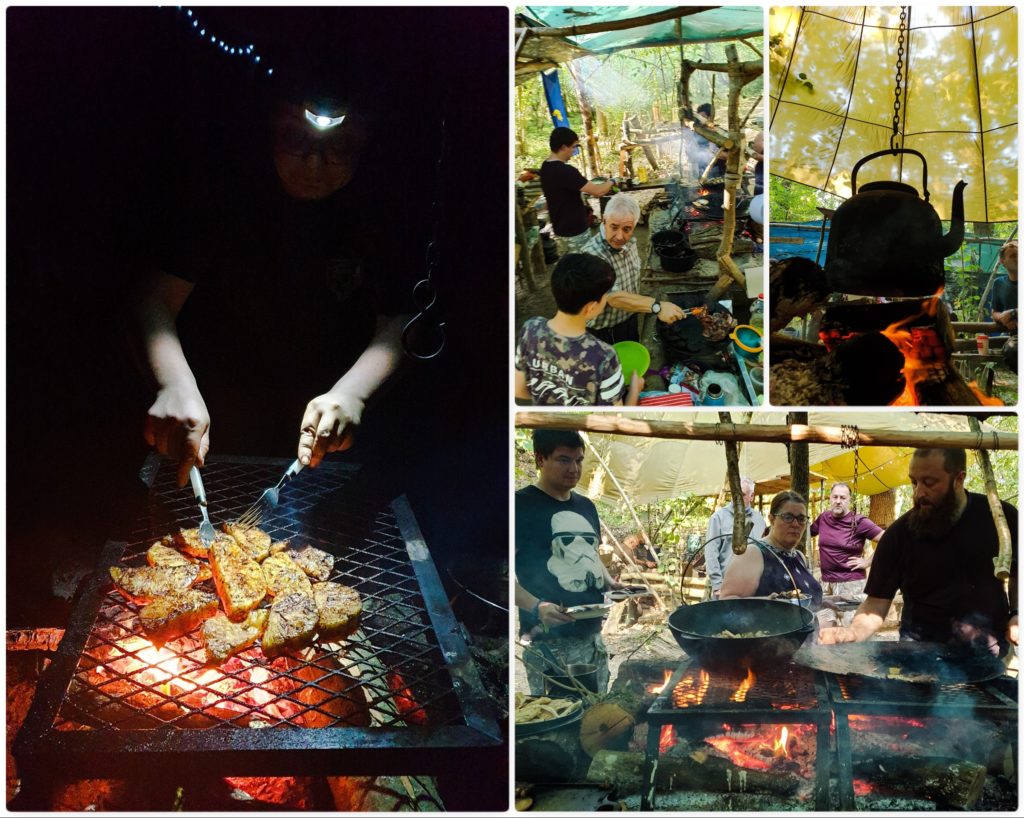
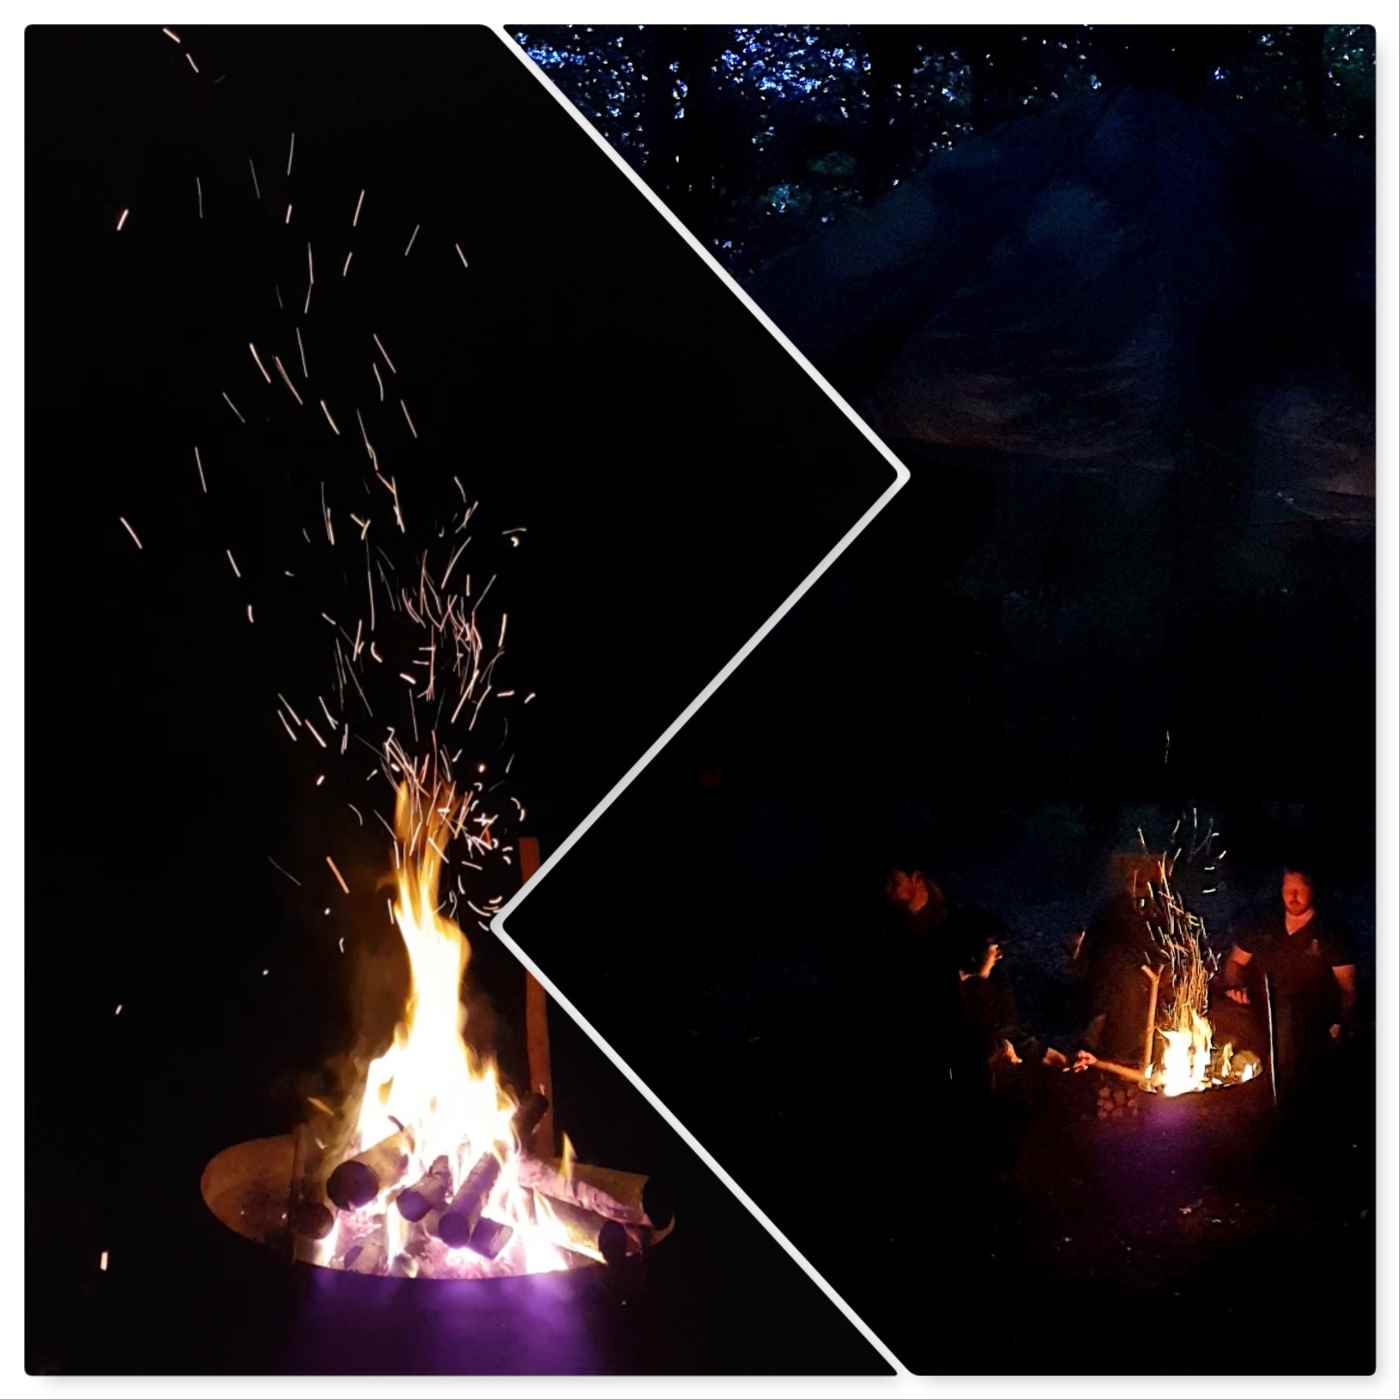
Life around the fire
It was not just Beth and Wayne around the fire – eveyone got stuck in. My son Finlay loved making pizzas and Alan (being a cheffy-type person) loved the raised firepit – I was happy to stick the kettle on every now and then 🙂
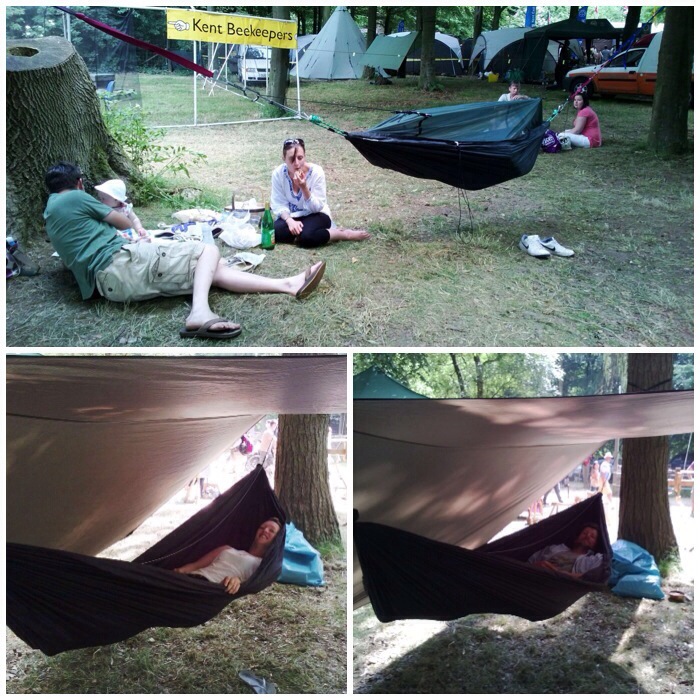
Evening Relaxation
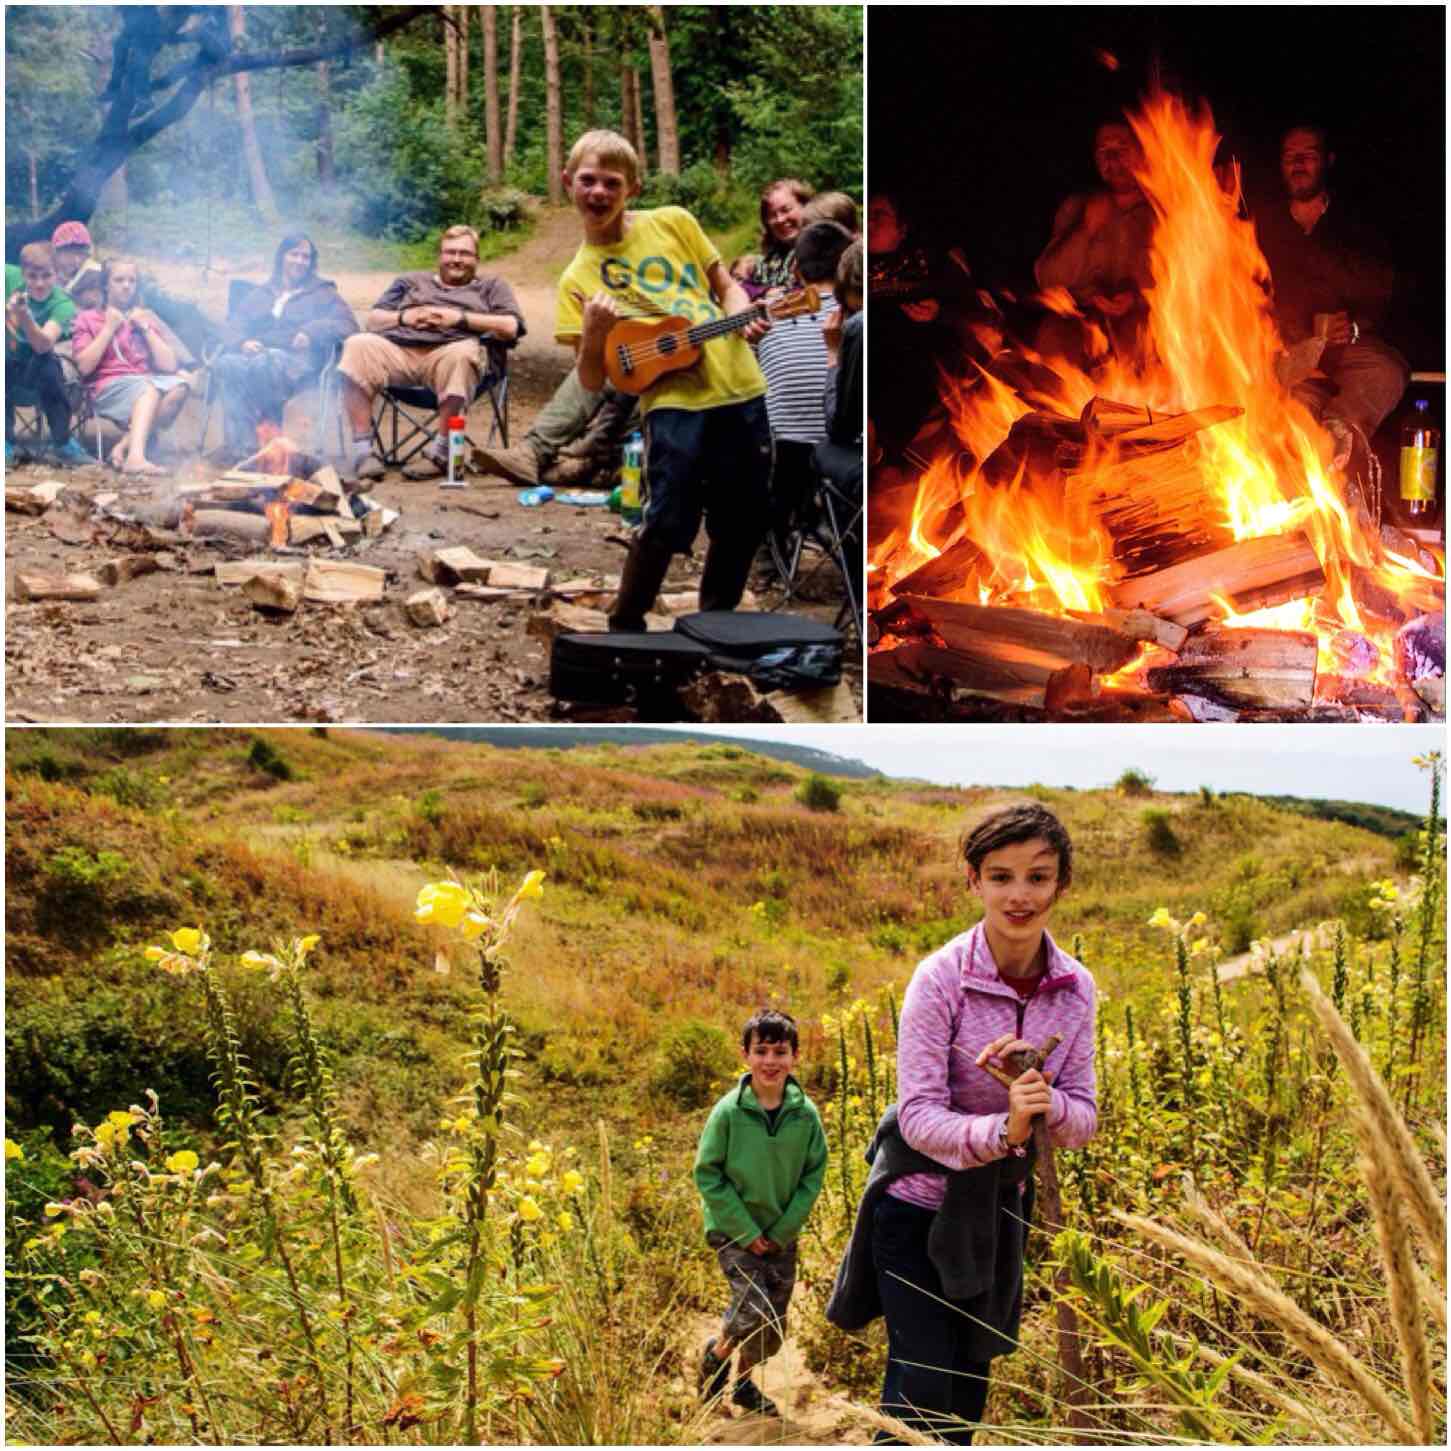
It was not all hard work (though that heat really made doing simple chores twice as hard as they actually were) and in the evening we would sit around our campfire before joining a socially distanced group fire when it was fully dark.
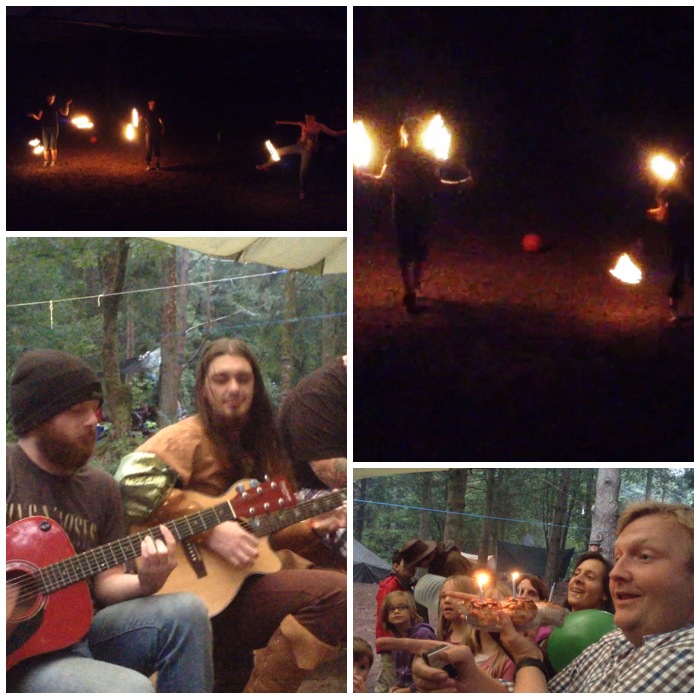
Most evenings you could hear the penny whistle from the likes of Stephen Crump and on the Saturday we had great singing (and guitar work) from Ruth and Mel.
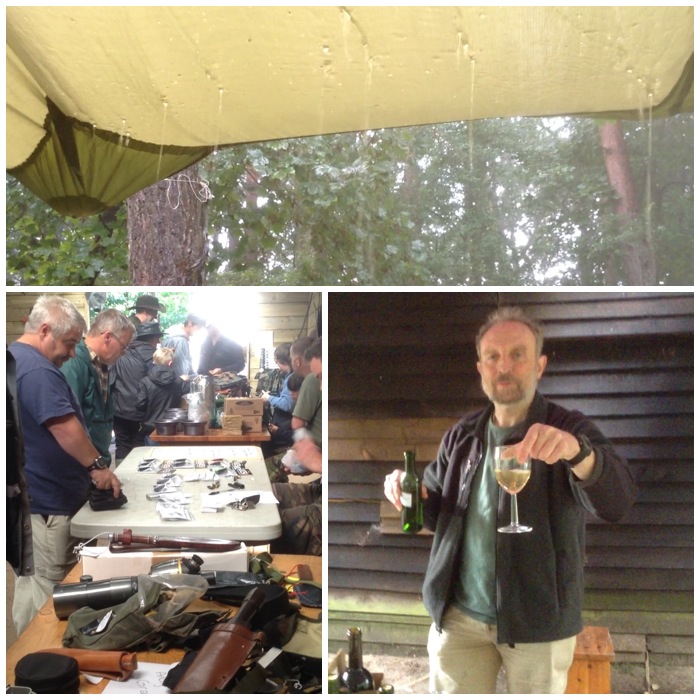
Glorious light
As a photographer I usually struggle to get good shots in the woods with my phone camera and have to rely on the big old DSLR. But on this weekend the light was fantastic, so my DSLR never left my rucksack. Loved seeing all these rays through the canopy with the smoke from the cooking fires.
Thanks again to Wayne and Beth for hosting the Minimoot – the first camp I had attended since lockdown. It was great to see some friends again in a relaxed and socially responsible way – there was plenty of room in these woods.
Cheers (and look forward to future Minimoots alongside the main Bushmoot), George
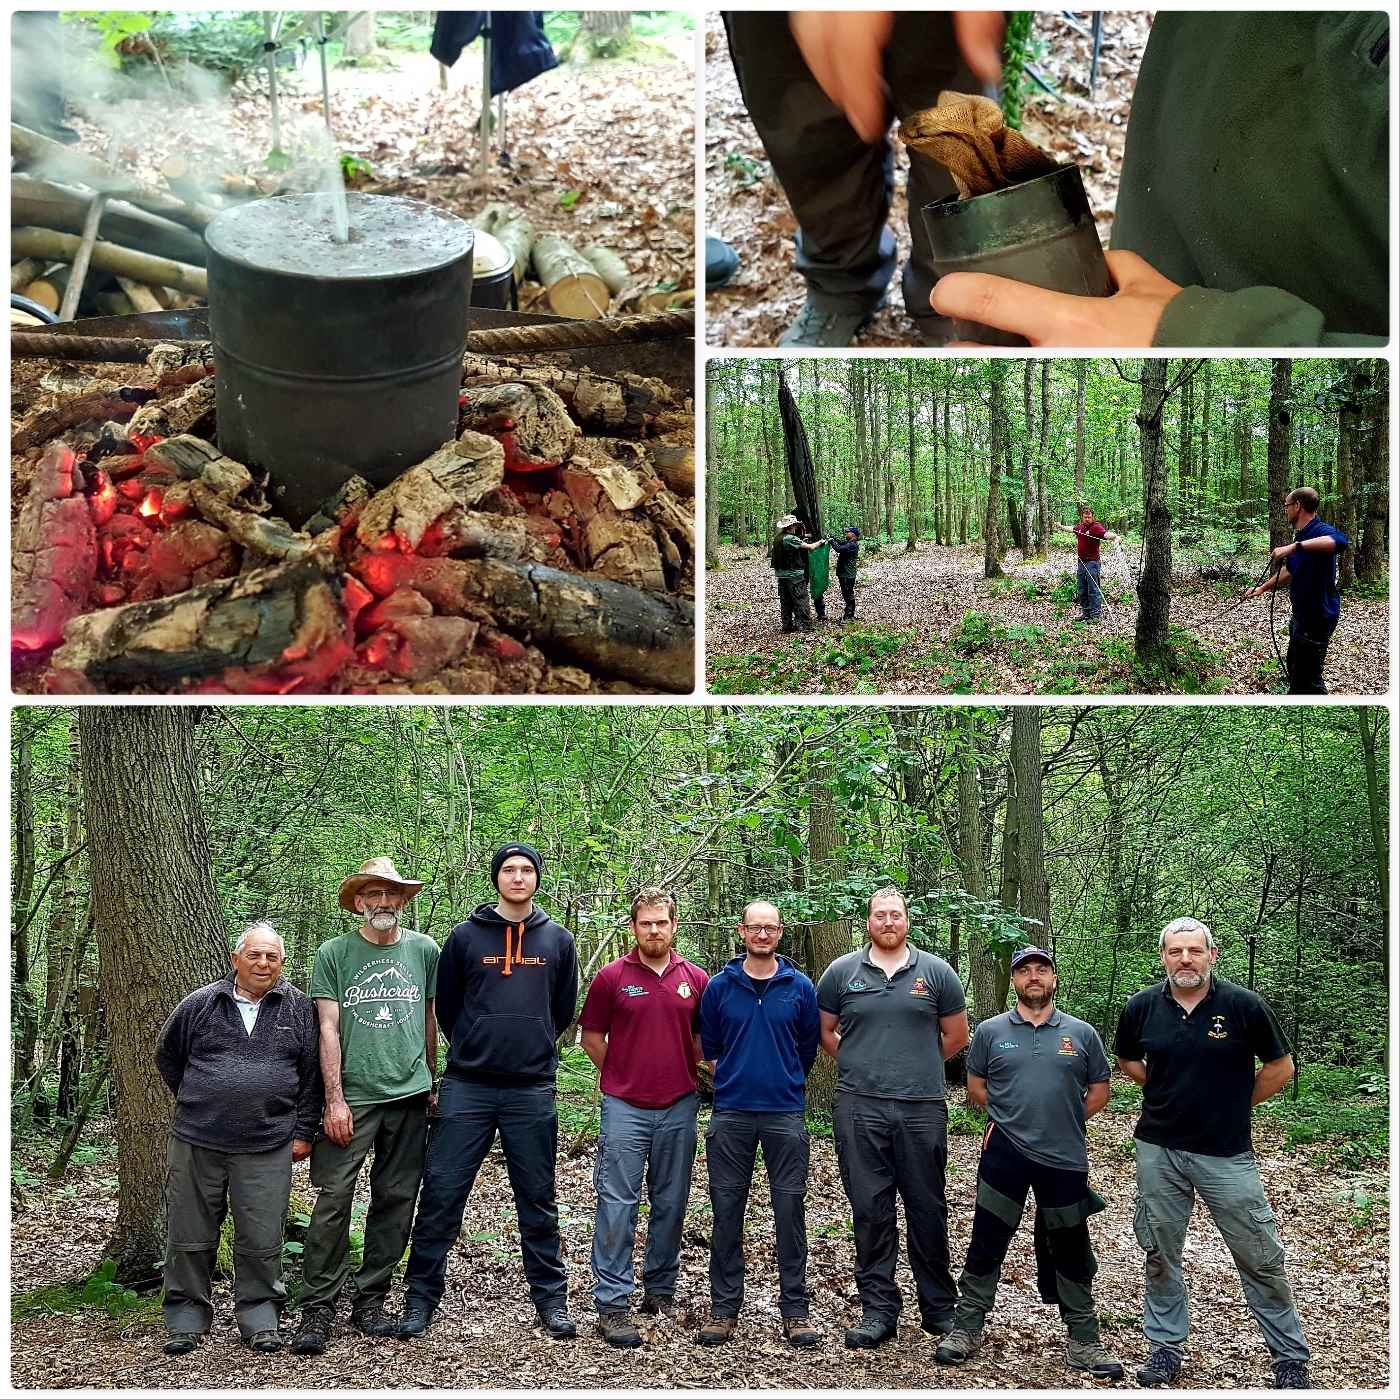
Over the last year or so I have found that my Bushcrafting has been taking a bit of a backseat to my other Adventure Training responsibilities so it was great to get back to some Bushcraft with fellow instructors from London Area Sea Cadets at one of our regular Multi Activity Staff Training (MAST) weekends.
It was a bit of CPD weekend for some and a bit of a new adventure for others. We took our time setting up camp on the Friday in the Mereworth Woods training area we had been given access to as the students were not due to join us until the Saturday morning – a kind of calm before the storm you could say.
Back to Bushcraft
Saturday
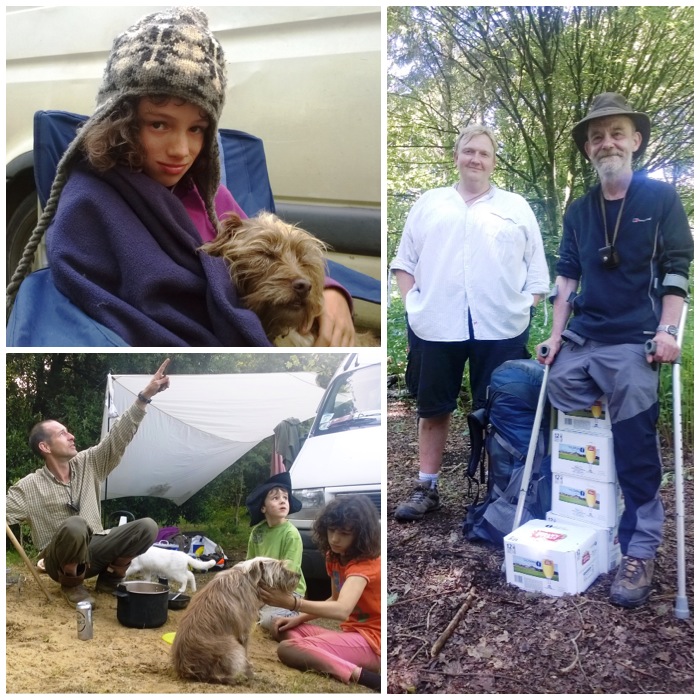
The weather was on the whole kind to us with no major showers but the tarps were up just in case. Graham got his cuppa in bed that morning (being an officer and all that) and then modeled his Buffalo sleeping bag for us by the fire – I have no idea why the thing has a full face zip – weird 🙂
Morning Sir
Along to help out and do some CPD were Dave, Alan, Charlie and Graham. The instructors from the Adventure Training team looking to learn the basics of Bushcraft were Ben, Lee, Sam and Gary. We like to run these Bushcraft courses from time to time to expand out Expedition Leaders skill set so that they can pass the knowledge onto their cadets.
Time for Tea
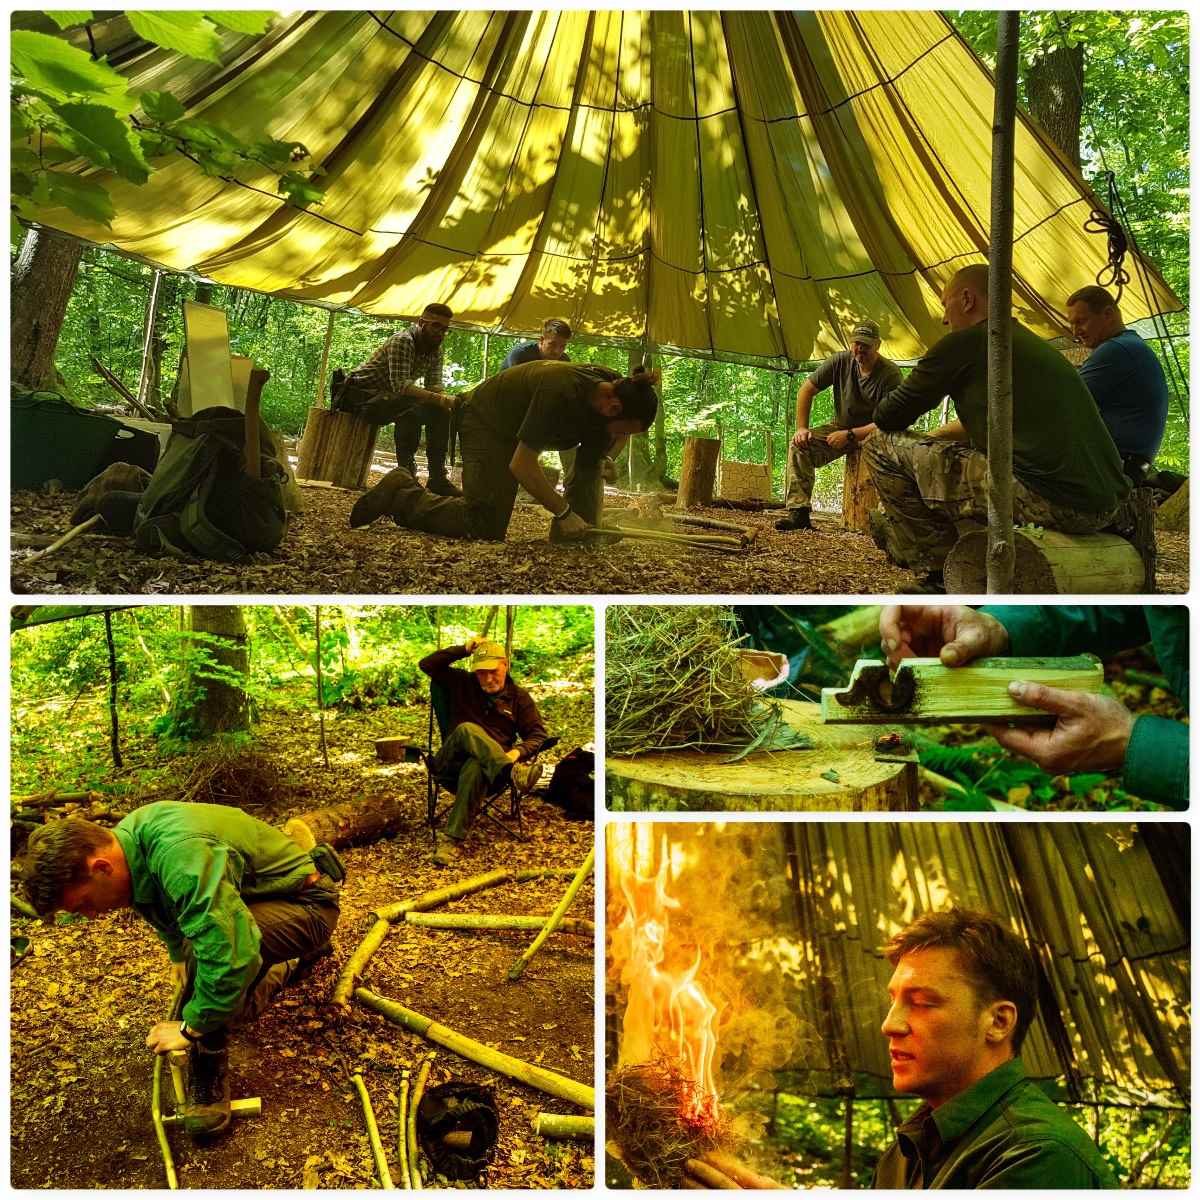
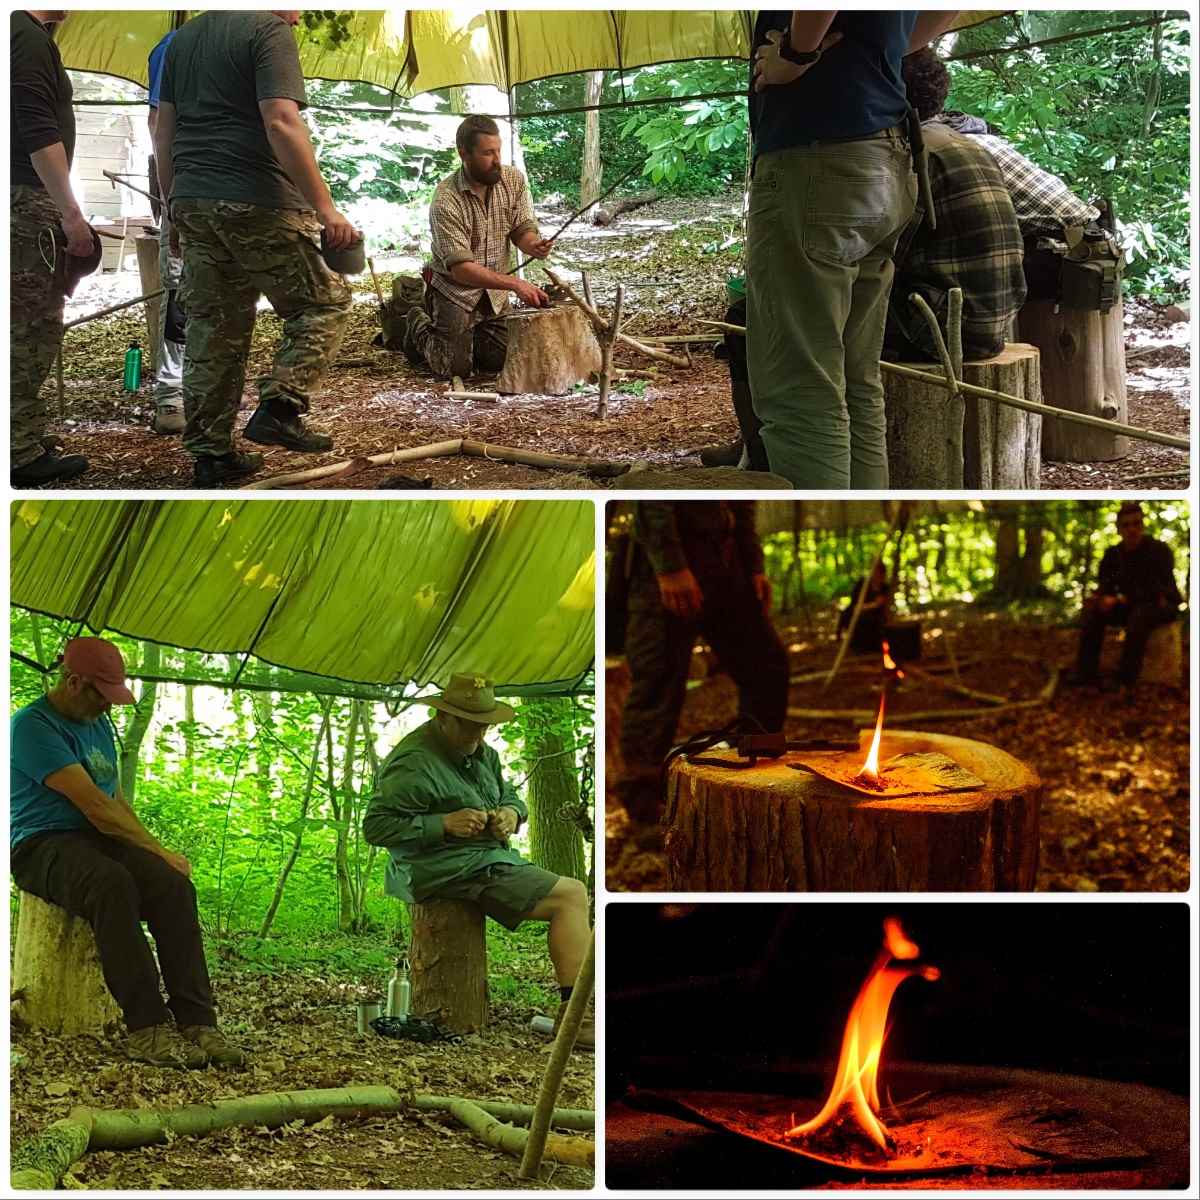
Before they were allowed to have a cuppa on the Saturday morning the students had to learn about lighting a fire. Off they went to learn about gathering dead standing wood, processing and grading it before learning to use firesteels – needless to say the tea and coffee was soon brewing.
Brew Time
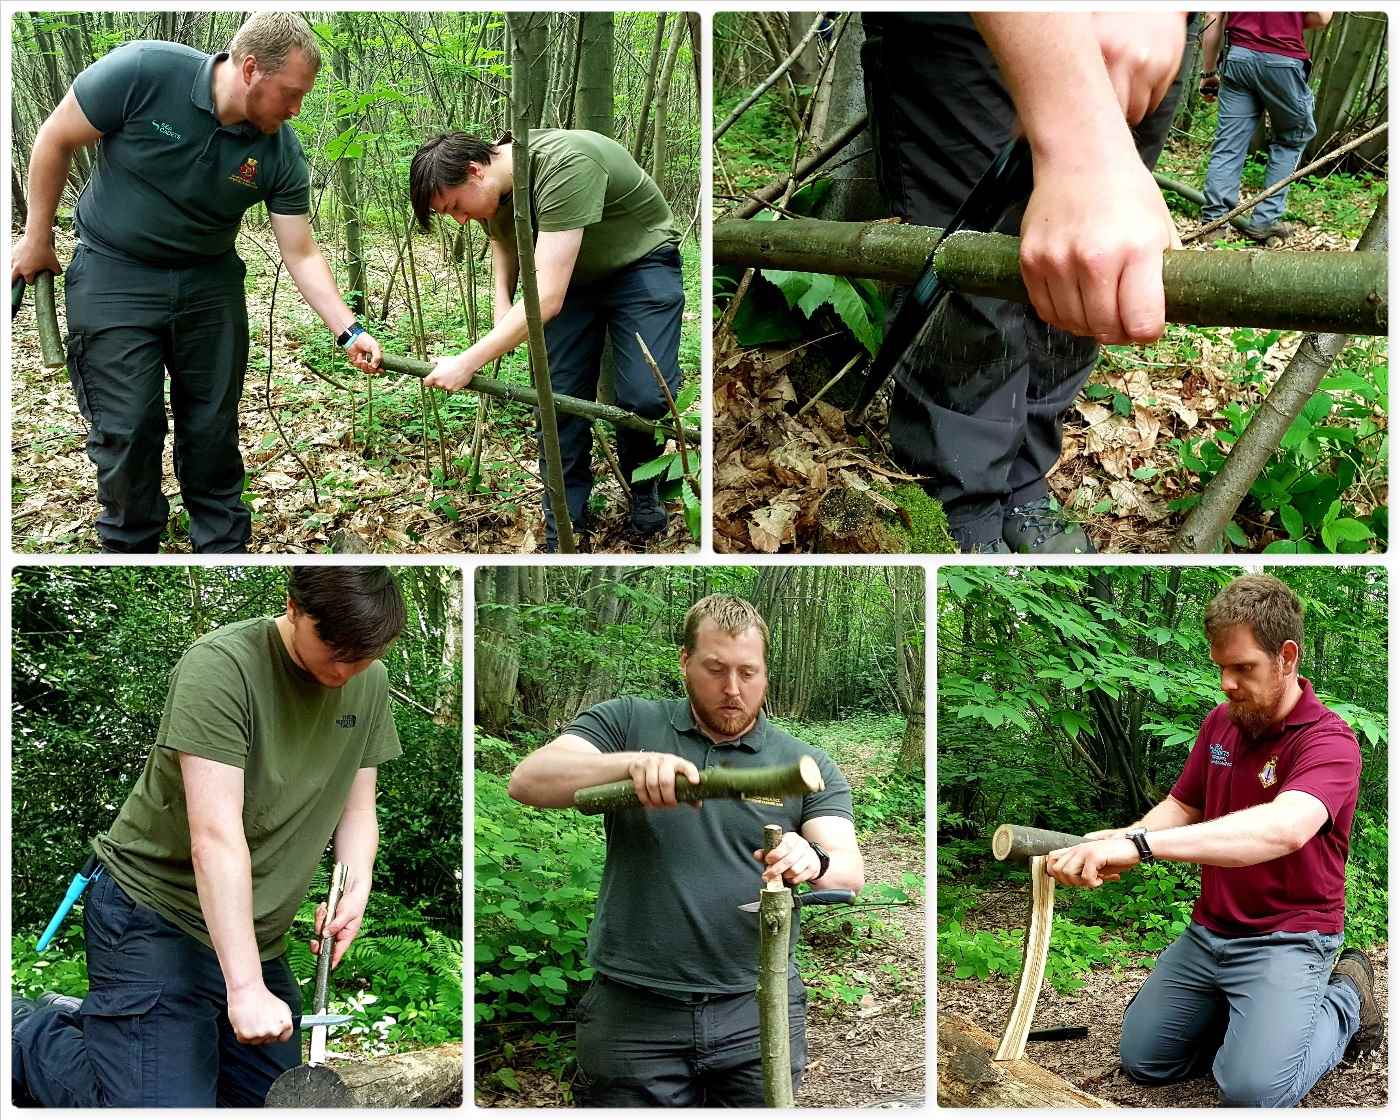
Saw and Knife use
After their brew it was time to learn how to use saws and knives safely. Once the wood was gathered they learnt about safe knife cuts and battoning. I like teaching in this way as there is no need to get axes out (and we did not have time to cover them anyway). The students produced some strong tent pegs and looked at the techniques for making feather sticks for fire lighting.
Saws and Knives
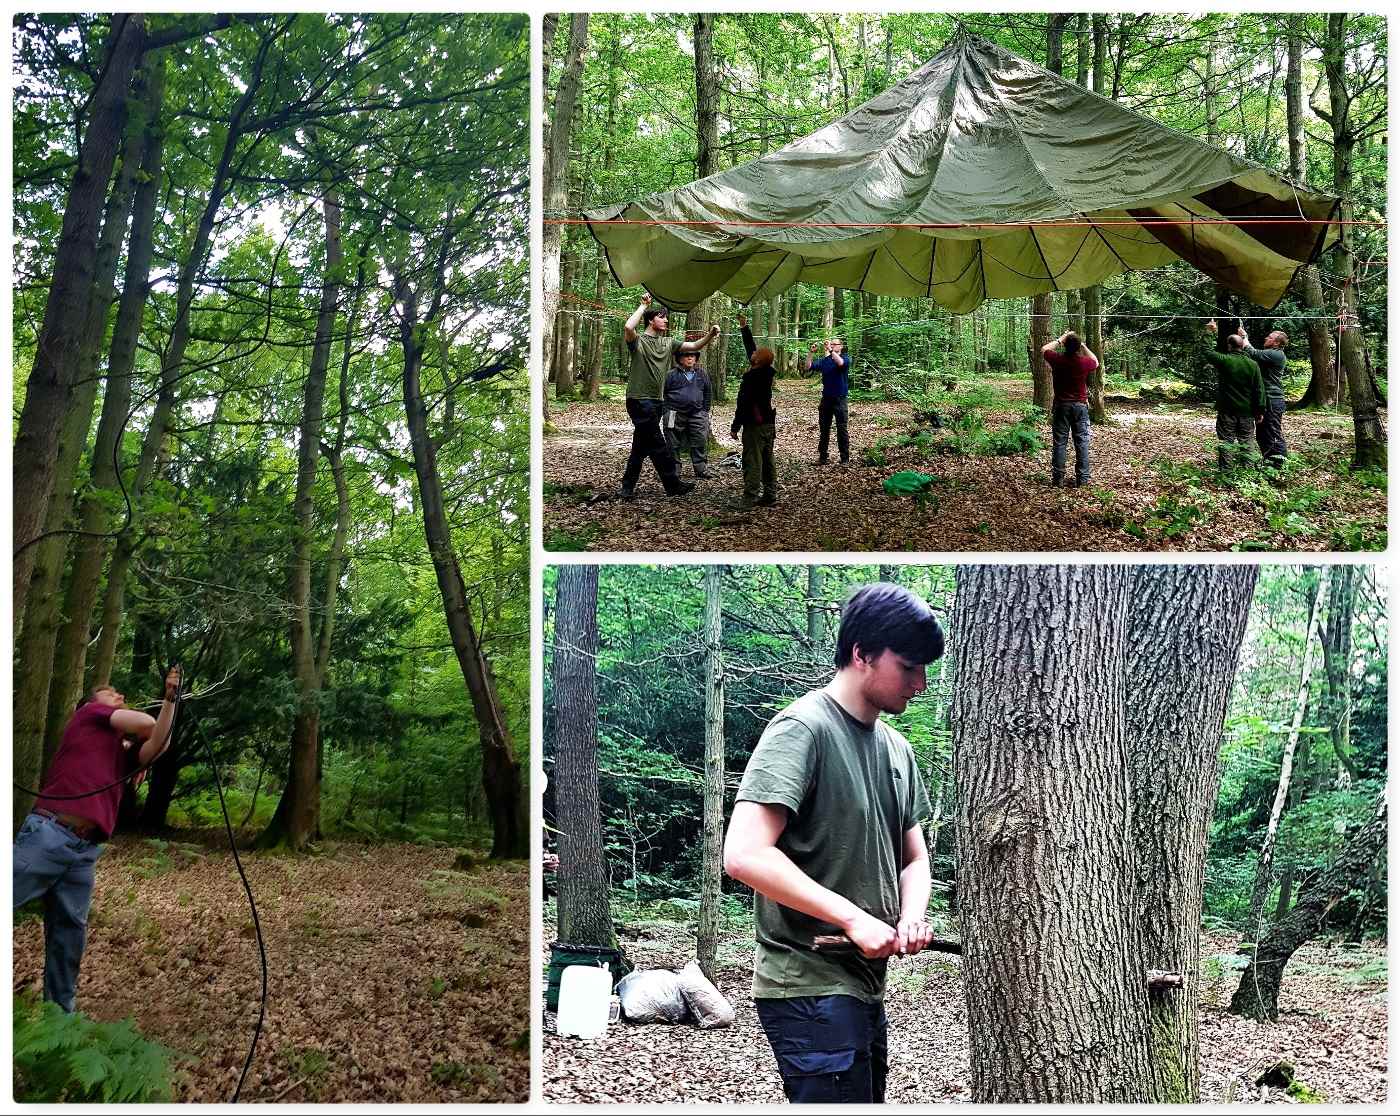
Camp Set Up
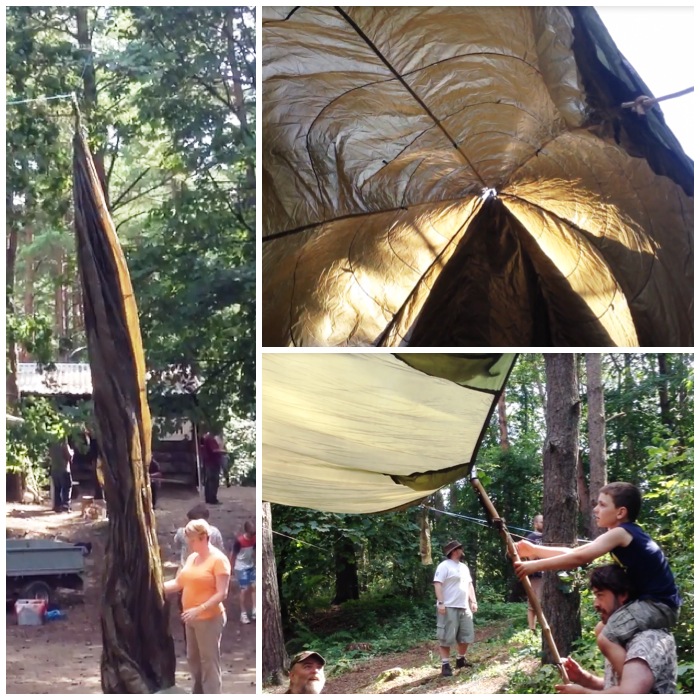
One of the things I wanted the students to do over the weekend was to set up their own camp. They learnt some of the basic Bushcraft knots with Charlie and how to throw a line through the trees. Soon they had their parachute up and firewood collected. Once that was all done they spent time with Dave and Graham learning how to put hammocks and tarps up (no ground dwelling on this weekend).
Camp Set Up
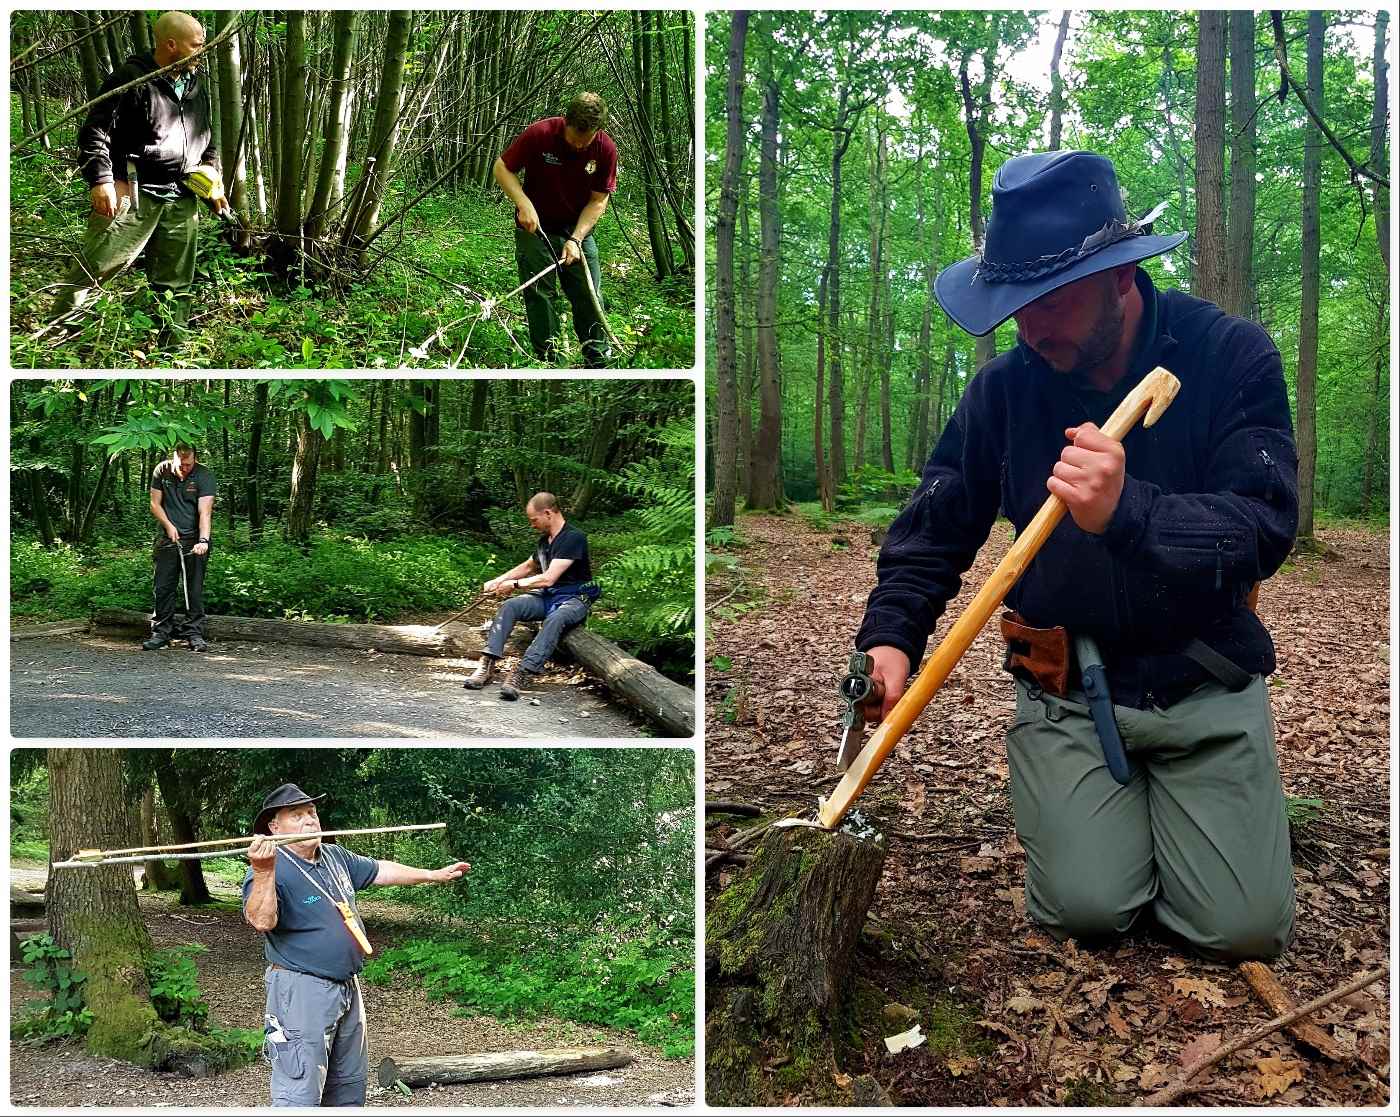
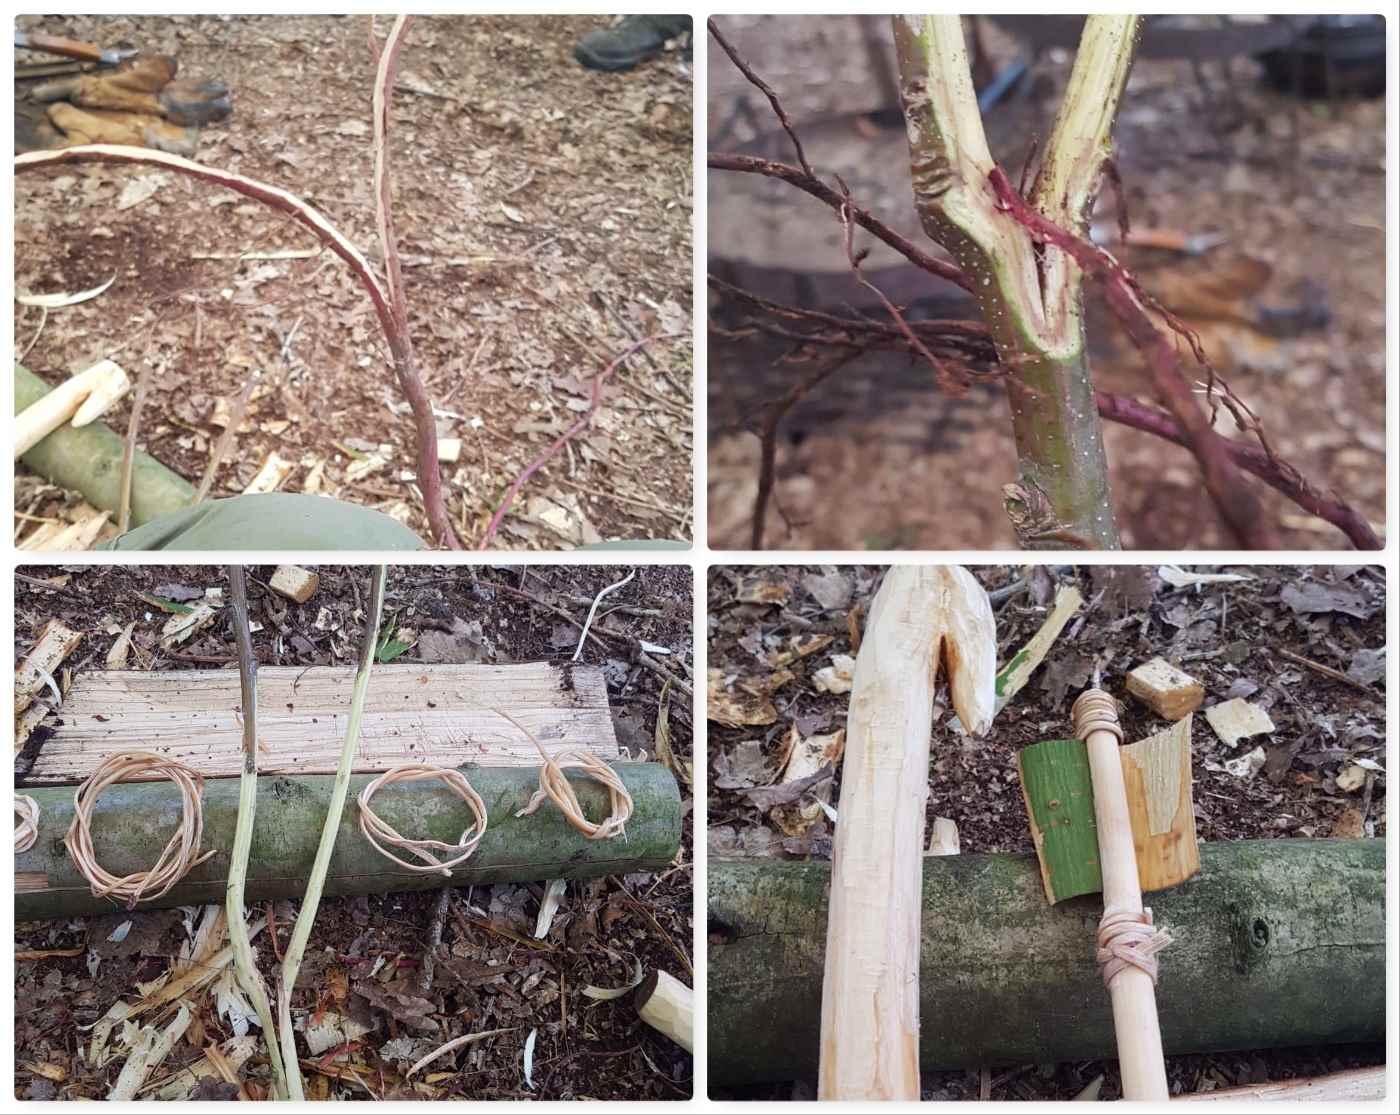
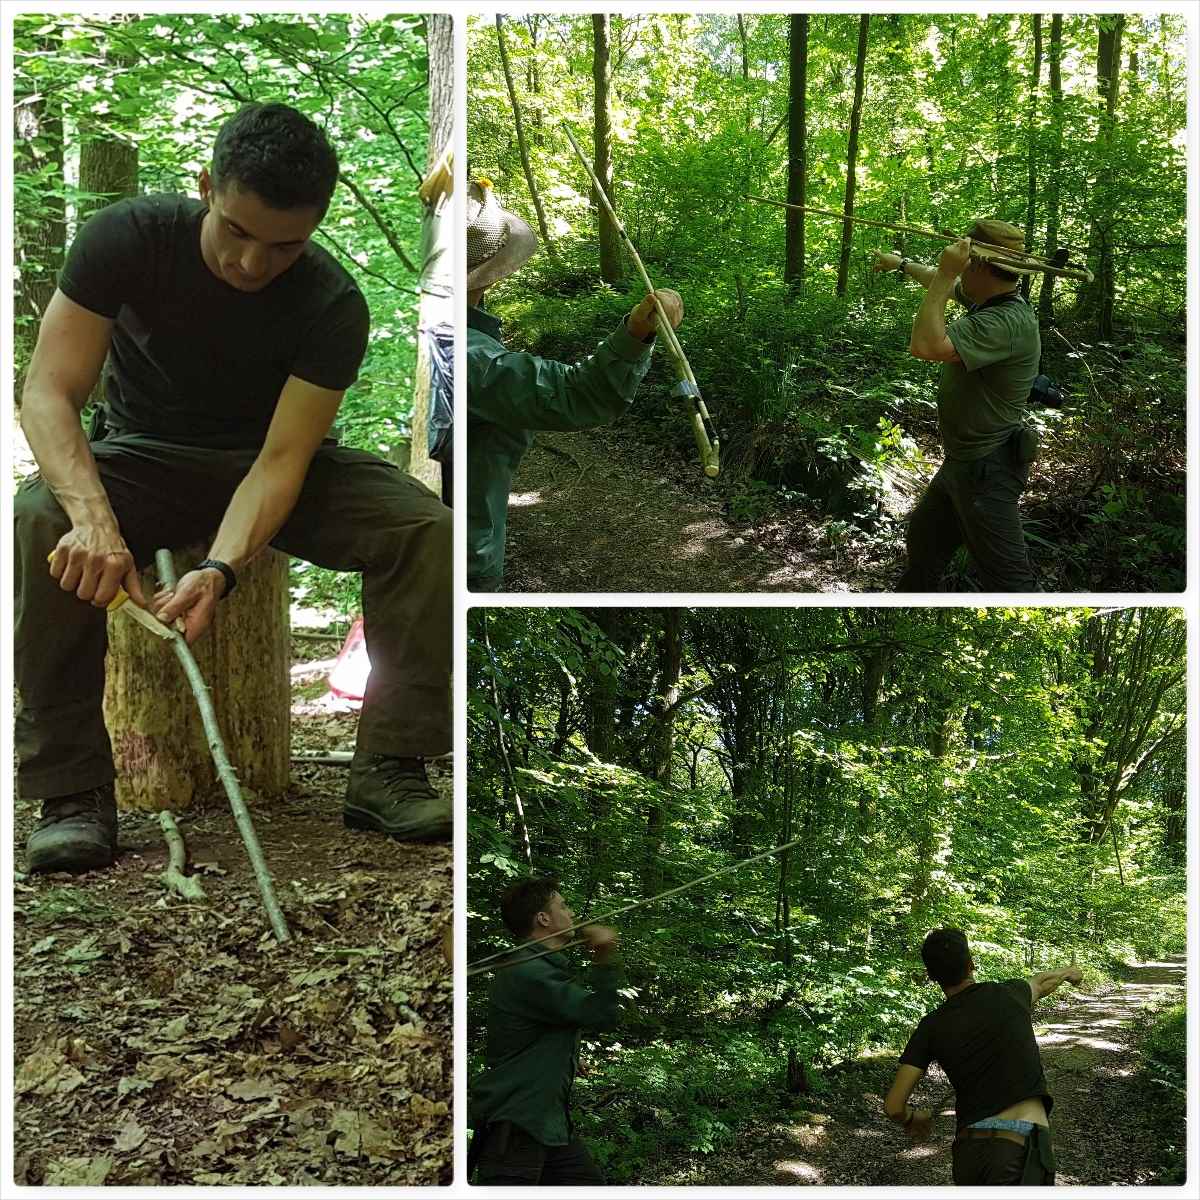
Atlatl Carving
A popular activity at cadet camps is Atlatl dart throwing so Dave and Alan spent a couple of hours with the students getting them to carve their own Atlatl throwers. All the skills that they had learnt in the morning with the saws and knives were used here with some finer knife cutting technique thrown in to get the points done.
Atlatl Carving
As this was CPD time for the experienced instructors Dave went off earlier on the Saturday and experimented with Spruce roots as cordage. After digging up a little he split them down and removed the bark (with the forked stick) before using it to bind his demonstration Atlatl dart for his class. He also used Sweet Chestnut bark as a flight for his dart – worked perfectly well.
Natural Cordage -pictures courtesy of Dave
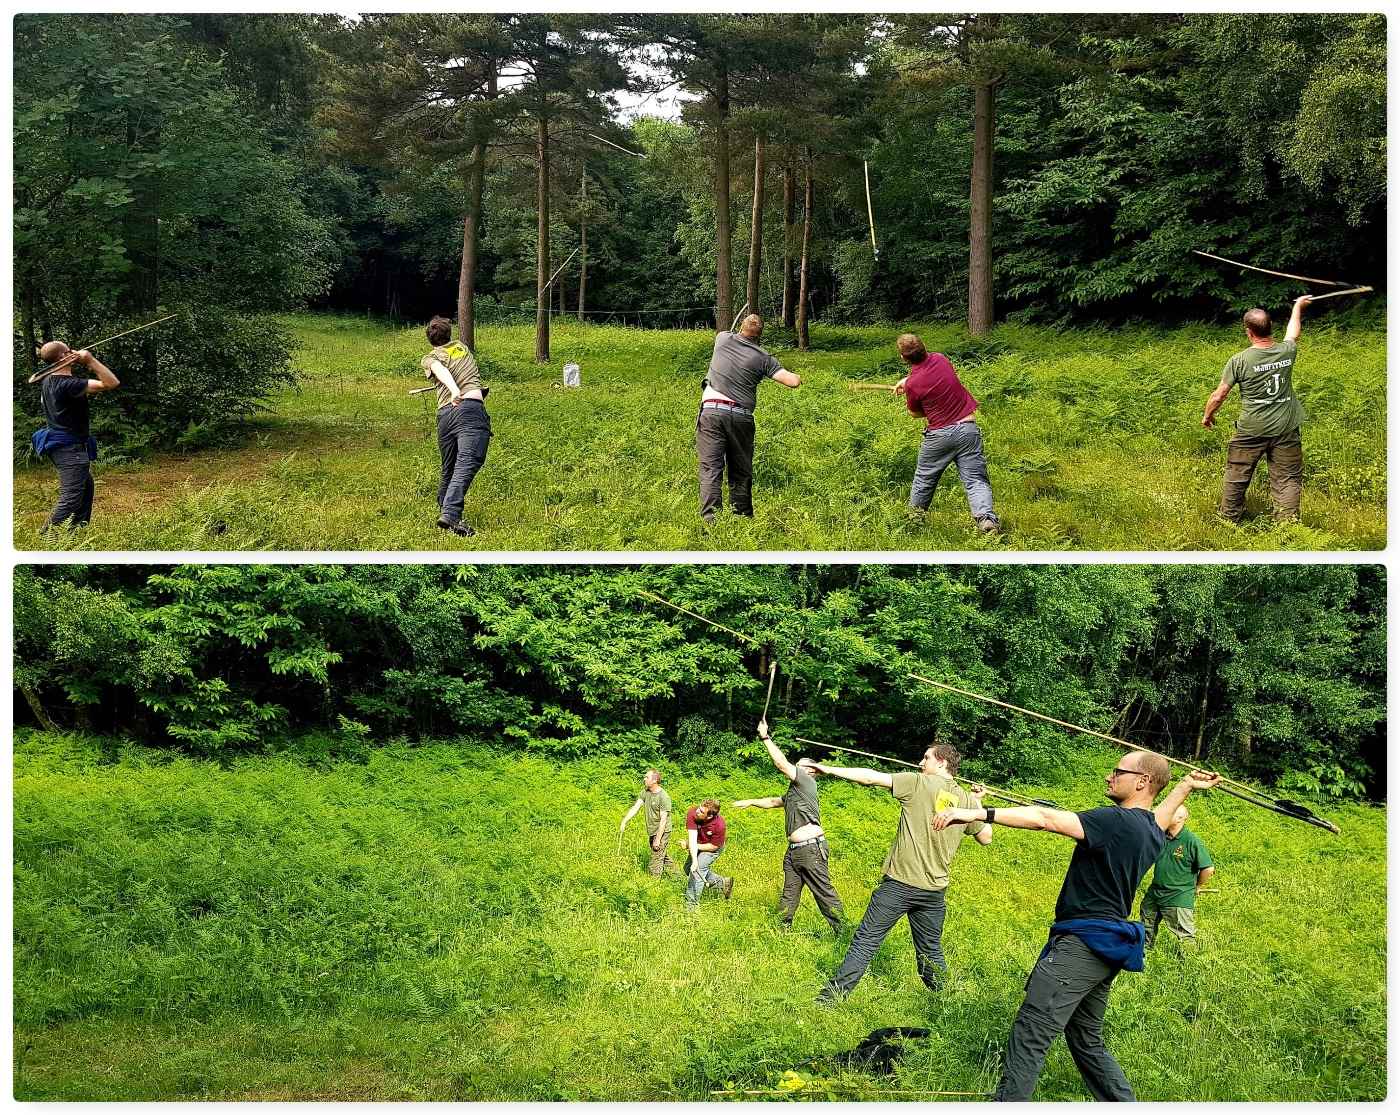
We had a nearby glade that was soon set up as arrange and the darts were soon pinging away. I have used Atlatls for years and shown hundreds of people how to use them – they never fail to intrigue people and offer hours of fun either in their construction or use.
Time on the Range
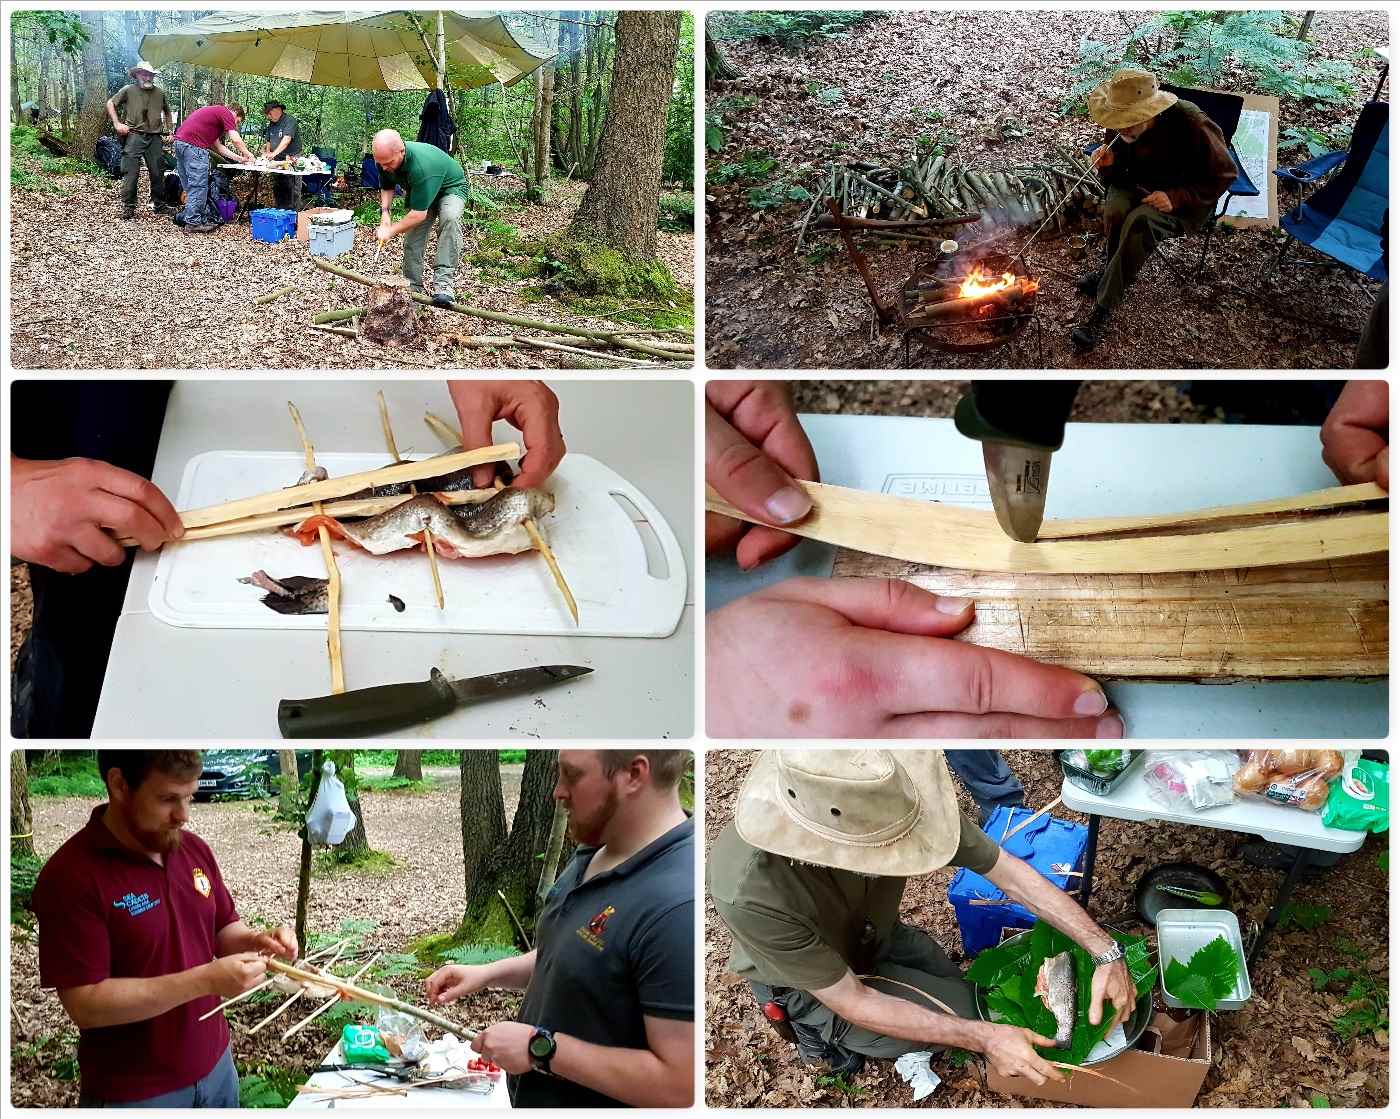
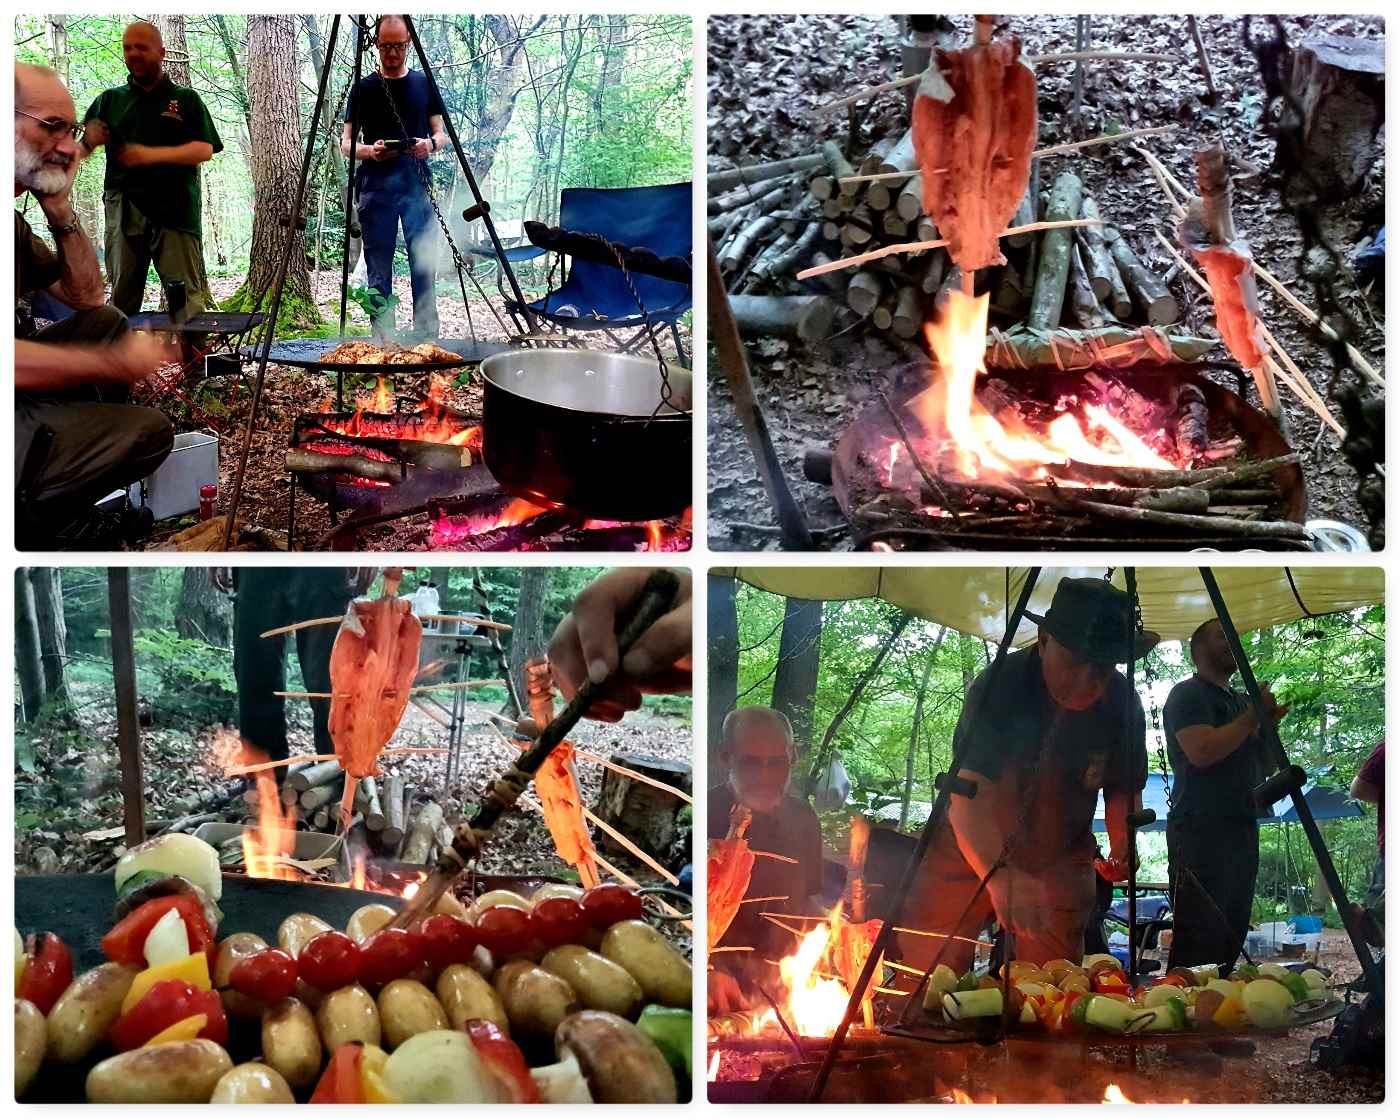
While Dave and Graham ran the range I went back with Charlie and Alan to help gather the material for ponassing some fish. Dinner was to be Trout, Chicken and Vegetable Kebabs. As well as ponassing we wrapped and bound one Trout in Sweet Chestnut leaves (these were the biggest we could find) and its inner bark. The fish was then cooked over the open fire when the coals were nice and ready.
Dinner Prep
Alan ran our little galley and had the students helping him out on all the stages. It was not long before everything was cooked and even less time until everything was eaten.
A Busy Galley
We retired to the students parachute for the evening to watch the fireworks display – Sweet Chestnut wood sparks fantastically. Luckily we did not get one of the many thunderstorms we could hear nearby pass over us, so we remained dry while we watched the fireworks.
Kick Back Time
Sunday
After a good nights sleep it was time for the breakfast feast. My wife Alison had made me up a pancake mix and Alan soon had the skillet working hard cooking pancakes (with a few rolls baking away on the side in the Dutch Oven). As well as pancakes we had the students cooking fresh sausage rolls over the fire (another great cadet pastime.
Breakfast Delights
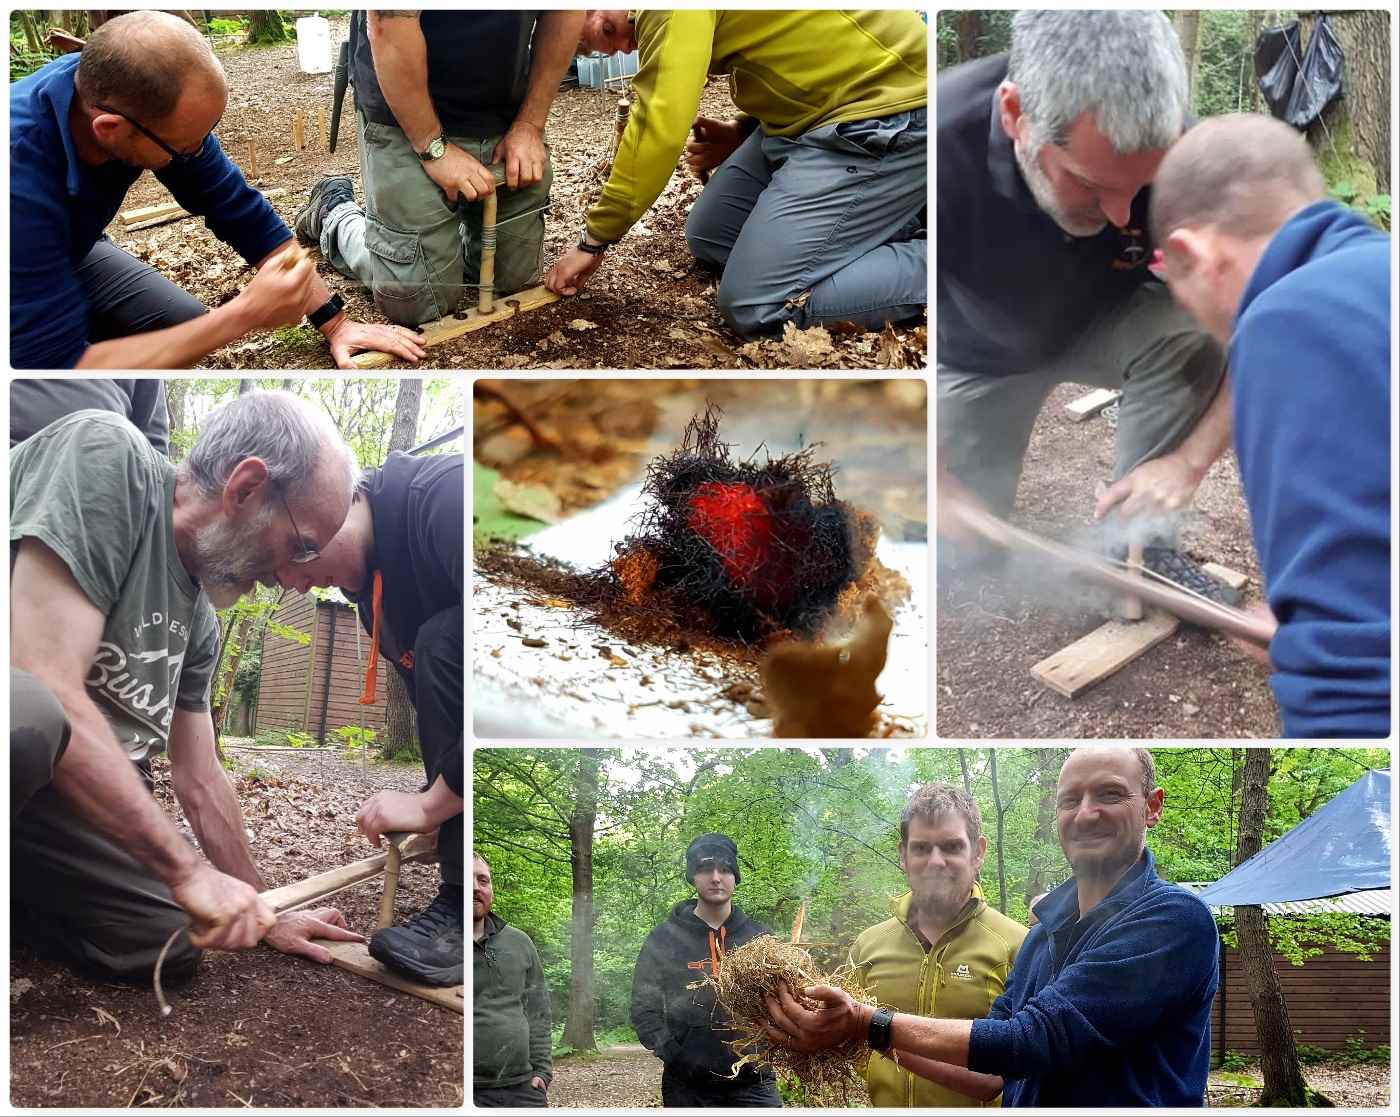
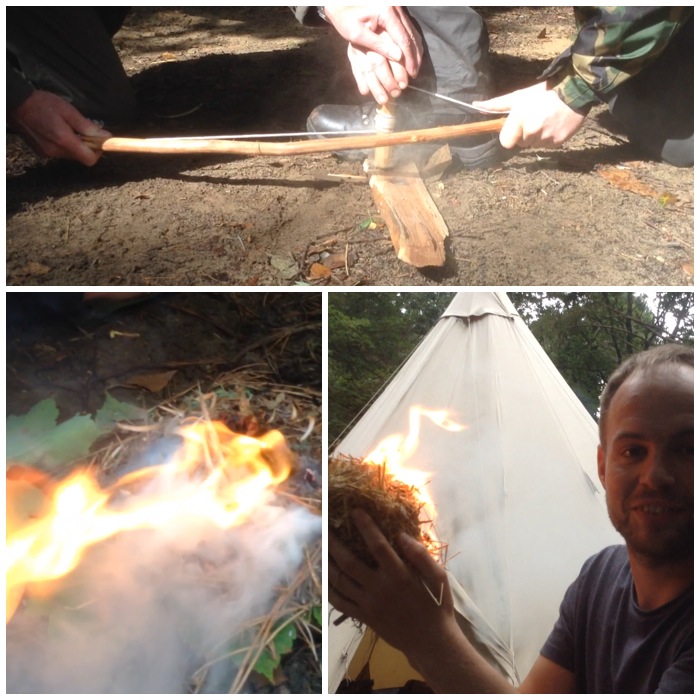
Bowdrill
Straight after breakfast – out came my bow drill kit. This was not a full on bowdrill workshop but a taster to show how ‘assisted bowdrill‘ works. When we do this activity with cadets we always do it with the assistance of an instructor (or as a group of four or five) due to a lack of time usually. We used a couple of different methods and got good embers every time.
Bowdrill Techniques – pictures courtesy of Dave and Ben
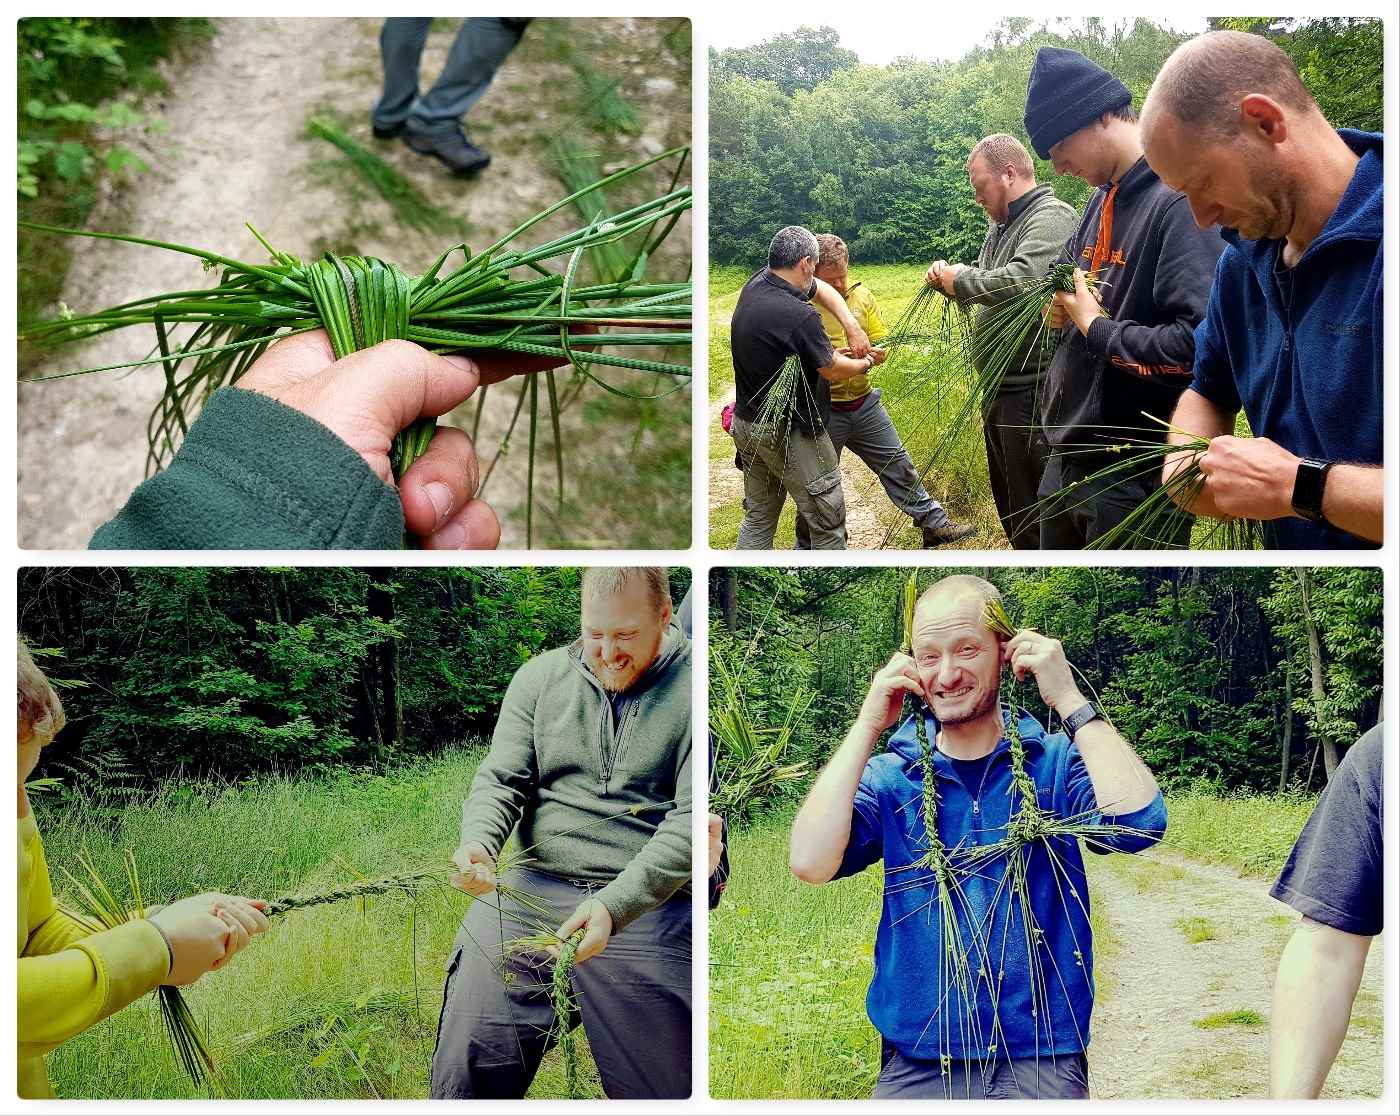
Grass Rope Making
In the Sea Cadets we work with ropes a lot (seamanship and all that) so I showed the guys how to make rope using grass. This is a fast rope making technique and we can create enough (with the right material) to make enough rope to do a seamanship class if needed (or just make earrings).
Rush Rope
Char Cloth
To finish Dave showed the students how to make some char cloth in a tin – we did not have time to finish it all off but they got the principles.
It was soon time to pack everything up and head home. Normally it is just the instructors that do most of this work so it was great to see all the students getting stuck in to put everything away in the correct manner so that it can be deployed quickly the next time we run a course.
A bit of Charcloth and Wrap Up
It was great to be back out doing Bushcraft again and sharing knowledge on the subject. I hope some of the guys are with us in a few years helping to deliver this course as having a good understanding of Bushcraft really enhances their skill set for teaching cadets. I hope to be back running another course at MAST next year.
Catch up time again – this post is the one I think that caused me to stop blogging for a bit last year – just too much to capture and show I thought. As you can see I have finally gotten off my backside and written it up.
Chosin is the is the one cup any Sea or Royal Marines cadet who does adventure training in the London Area wants to win. It is a tough weekend where all their skills are tested.
Friday happenings
Our new Area Staff Officer Ben McDonald managed to get the training area around Pirbright Ranges booked (they were not in operation thankfully) for a weekend in late September last year. We found a great little woodland to set up the staff camp and an open field for the cadets to use on the Friday night.
The Friday is always a hectic one with setting up camp, sorting the teams out as they arrive and planning for the Saturday and Sunday events.
I took a fair bit of video on this weekend so have made up a number of short videos for the post (hence the delay in writing this up). This post will focus on the Friday and Saturday only with a further one with the Sunday Shenanigans.
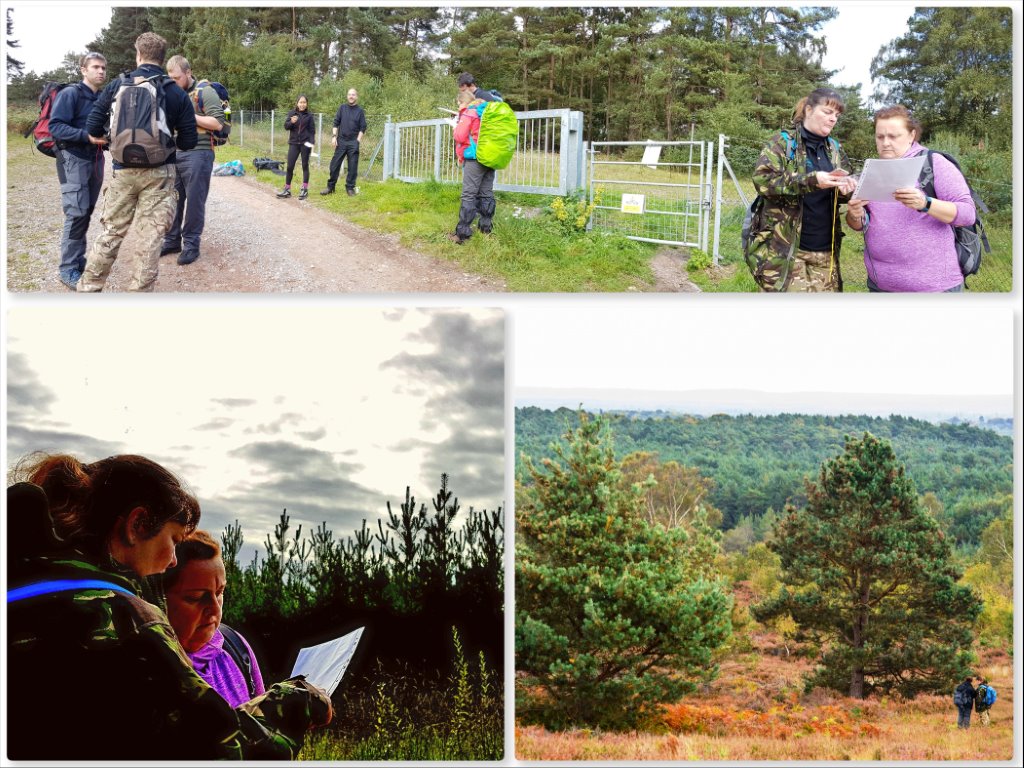
Saturday morning got off to a quick start with some staff heading out to check points and some to act as a roving assessment team. I was part of this roving team and had along with me Sharon Selby and Kim Pybus. Sharon and Kim were under training for their Basic Expedition Leaders qualification (now known as the Lowland Expedition Leader Award) and they were using the weekend to help hone their navigation skills.
My fellow colleagues Dave Lewis and Dan Keefe each had a team of trainee instructors as well to take out making for one of the best staffed Chosin Cups I can remember.
Staff training
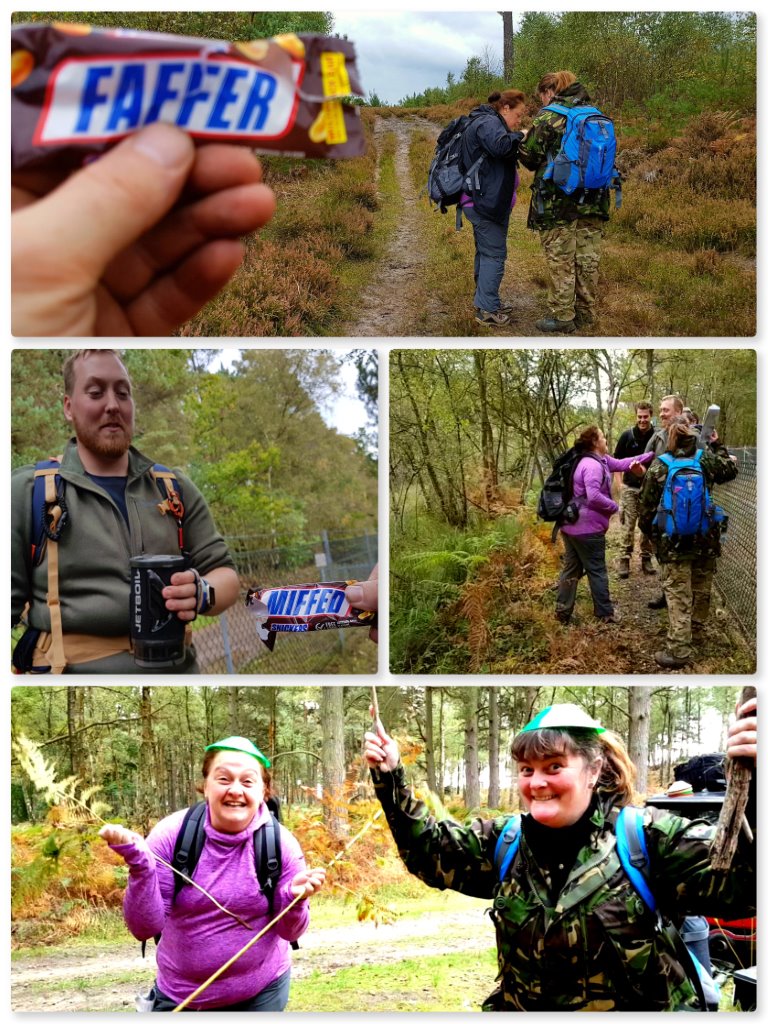
Sharon and Kim were soon off navigating and I kept a discreet distance away most of the time. We were hunting the cadet teams that had headed out earlier however they bumped into Dan’s team where one of his trainees – Gary 🙂 put a seed of doubt into their minds as to their location. Needless to say this caused a moment of two of Faffing to happen but they soon got on with things again. They did get their revenge later when we bumped into them again :-).
Fun along the way
It was not all study on the day – Kim and Sharon are a little bit mad but great fun to be with – that is what makes them great instructors.
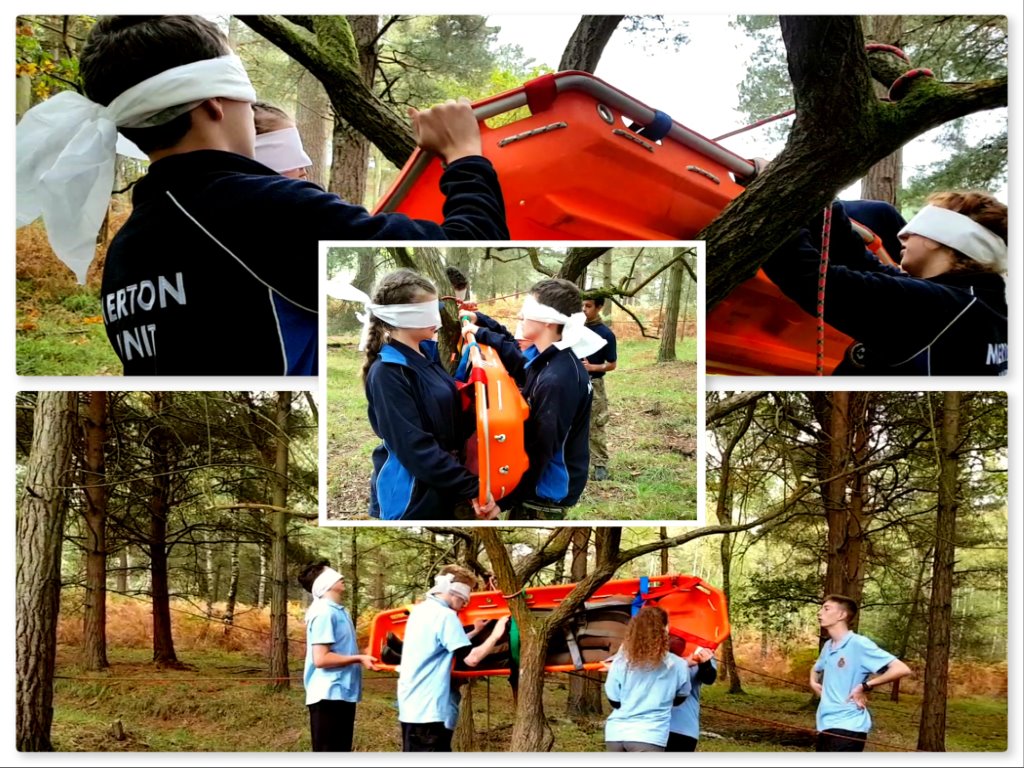
The teams were set tasks along the way and we came across units having their team work assessed at the First Aid stand. Not the usual First Aid but a blind fold carry through the woods – a lot more difficult than it looks – only one team member could see and they were not allowed to touch the other team members in any way.
Testing times
Another stance was about communications. Instructions were given to a runner behind a tarp, the runner had to pass the info to the others who had to then navigate through a pretend minefield. Their were plenty of other stances including erecting an antennae in a tree and a navigation quiz.
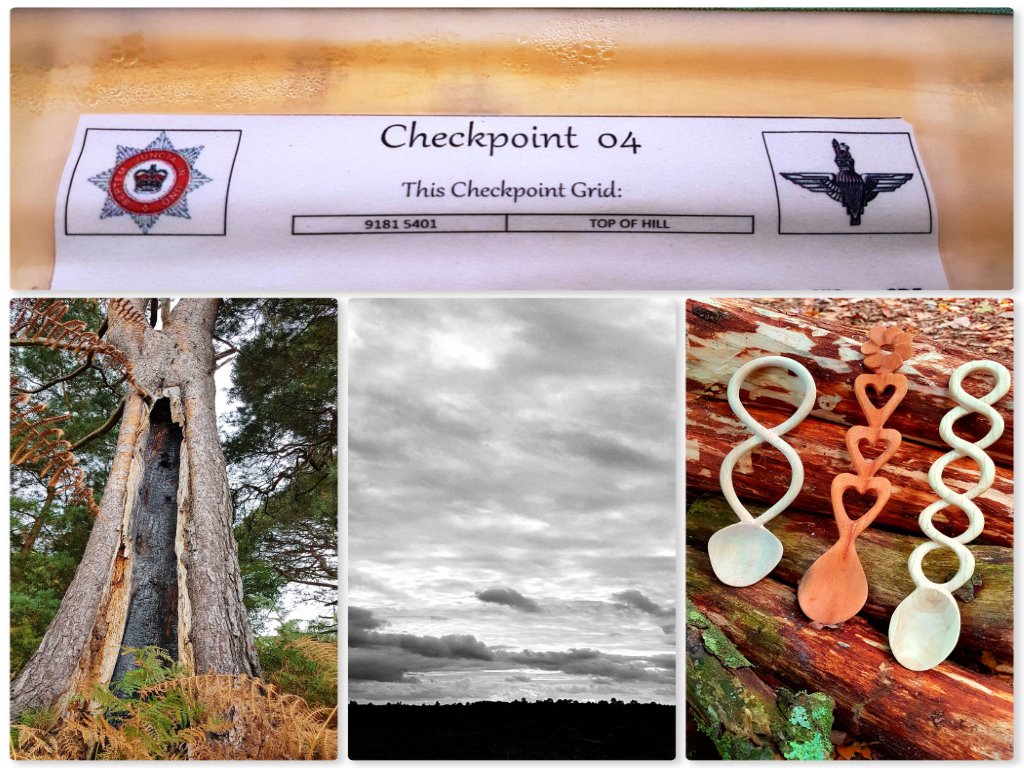
Along the way I did come across some intriguing spots, including checkpoint markers (hope the Paras won), a Pine with its inner trunk burnt out, beautiful Welsh Love Spoons carved by Phil Dent and some great skies.
Odd spots
Looking back on my videos there were some more silly scenes apart from Sharon and Kim.
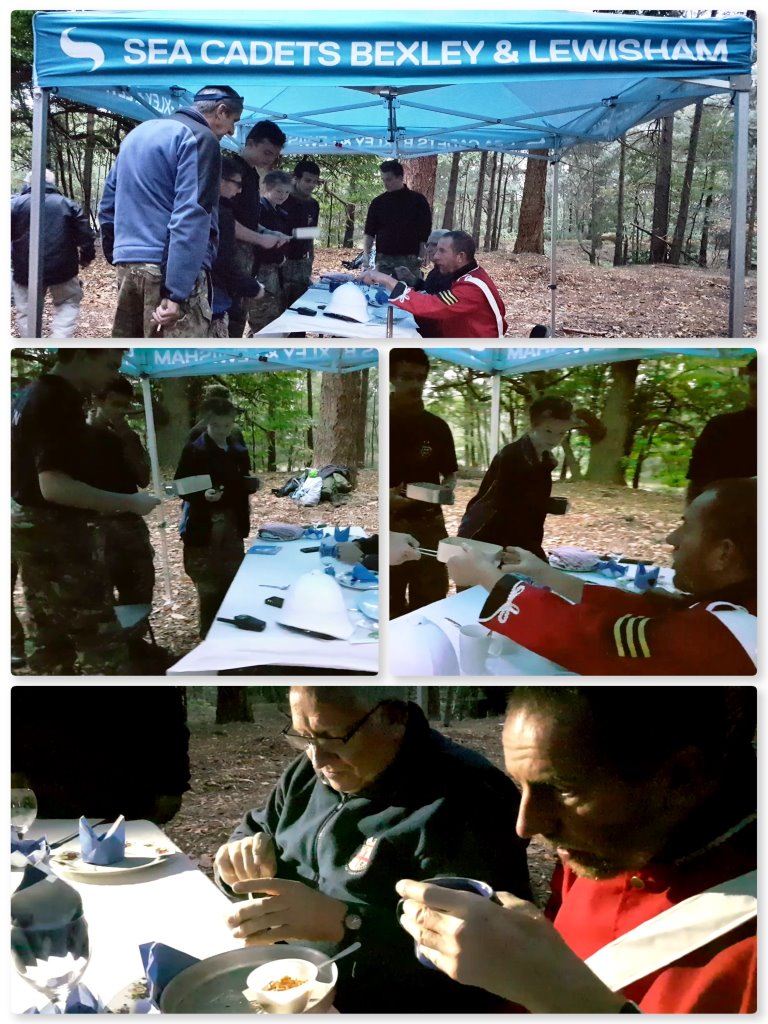
Once the teams had finished the navigation for the day they had to set up camp and cook a meal from the food they had brought and present it for inspections. Paul Townsend and Graham Brockwell volunteered for this duty – brave men 🙂
Did not get to try out the delights myself however they did manage to stagger away from the tasting session and live to tell the tale.
Tasting
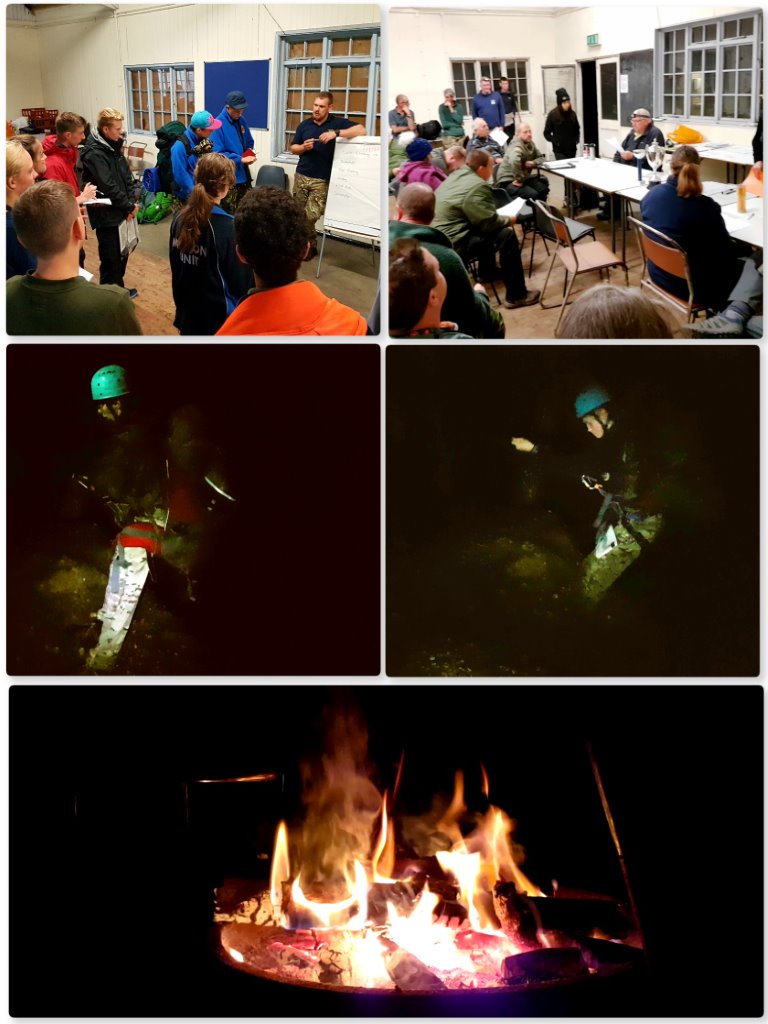
The cadets thought that was it for the night but they were told to strike camp in the pitch black and pouring rain, then given some co-ordinates to head for (with all their kit). Thus involved having to scramble down a steep slope using descending gear and navigating from point to point in the darkness and rain.
Nightime
This did not take long and after a debriefing they soon had their tents up and got their heads down ready for a busy Sunday the next day.
It only seems a short time ago I was havering about making videos – I plucked up the courage eventually to load a video onto YouTube and now here I am on my 100th YouTube video 🙂
it was about 9 years ago or so that I was coming to the end of my Bushcraft Leadership course with John Rhyder at Woodcraft School. With my fellow students we had to prepare a couple of weekends training to visitors to prove we had mastered our bushcraft skills and also that we could pass these skills onto others – in May of this year I was back down at Woodcraft School but as a visitor this time with this years students.
Fire By Friction
I had received an invite and so popped down one morning in late May. All the classes had been set up and after a quick chat catching up with John it was time to get cracking. There was a class on bowdrill by Jack which was great but I was not. I failed to get an ember – excuse – I was not allowed to use my knife to make adjustments as I had not done that class yet 🙁
There were classes on campfire cranes (a particular favourite subject of mine loyal readers will know), safe carving techniques and different methods of using a firesteel.
Cranes, Carving and Birch Bark
Another favourite of mine is the Atlatl (I think I was one of the first students on John’s courses to teach this). We carved our own Atlatl and were soon pinging darts down the range.
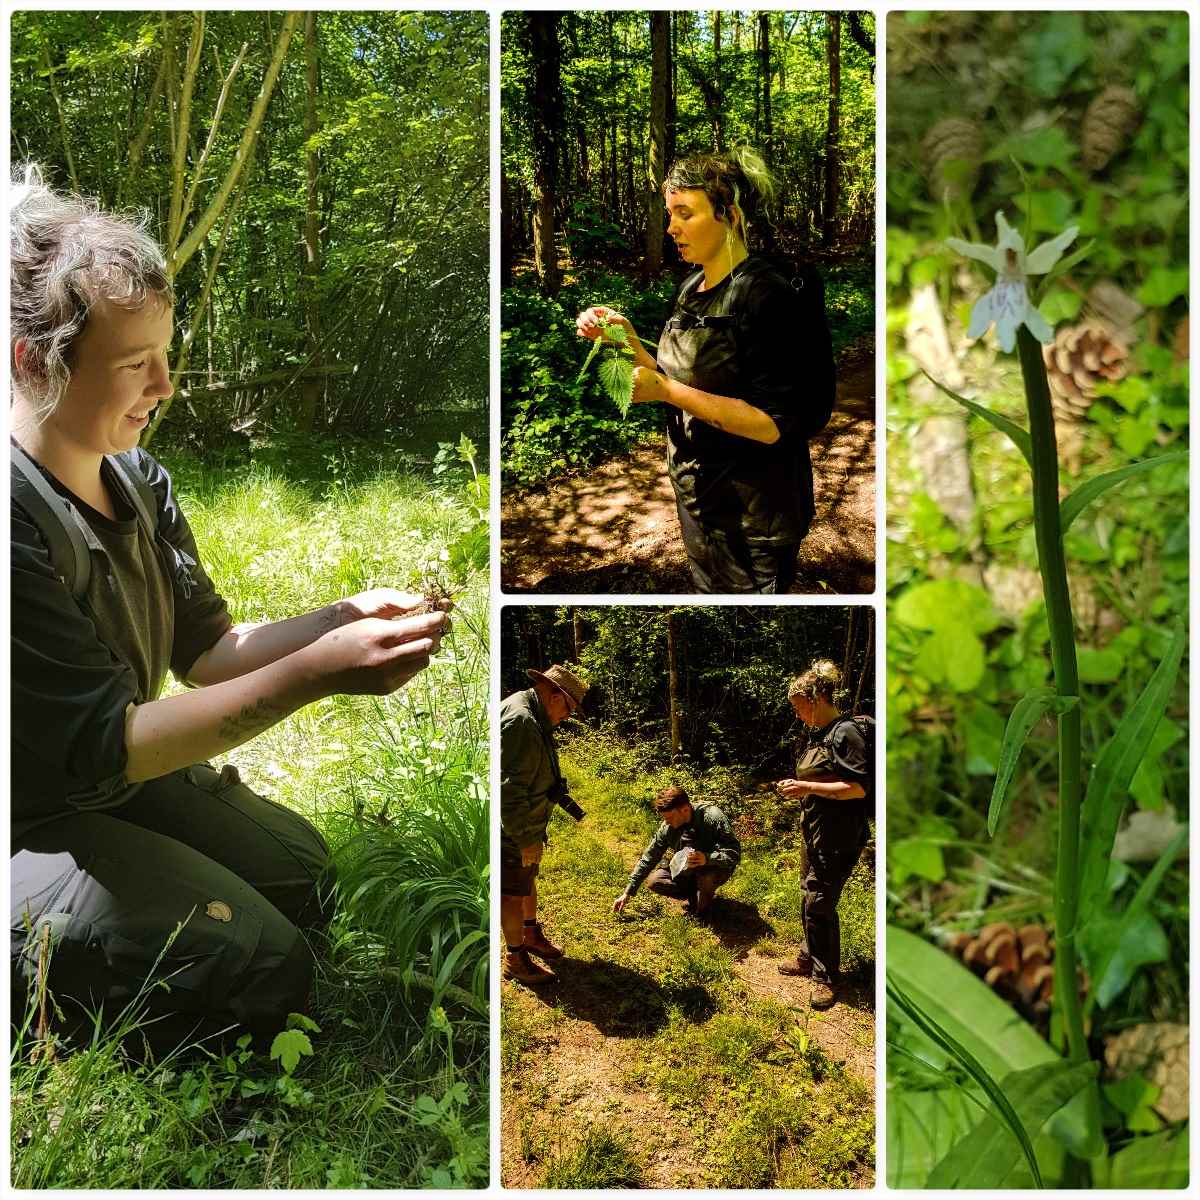
Then it was time for a stroll in the woods looking at useful plants. John runs an Ethnobotony course (which I hope to attend one day) and Lucy our instructor had completed this very in depth course previously – her knowledge on plants and their uses really came through on the day.
Ethnobotony
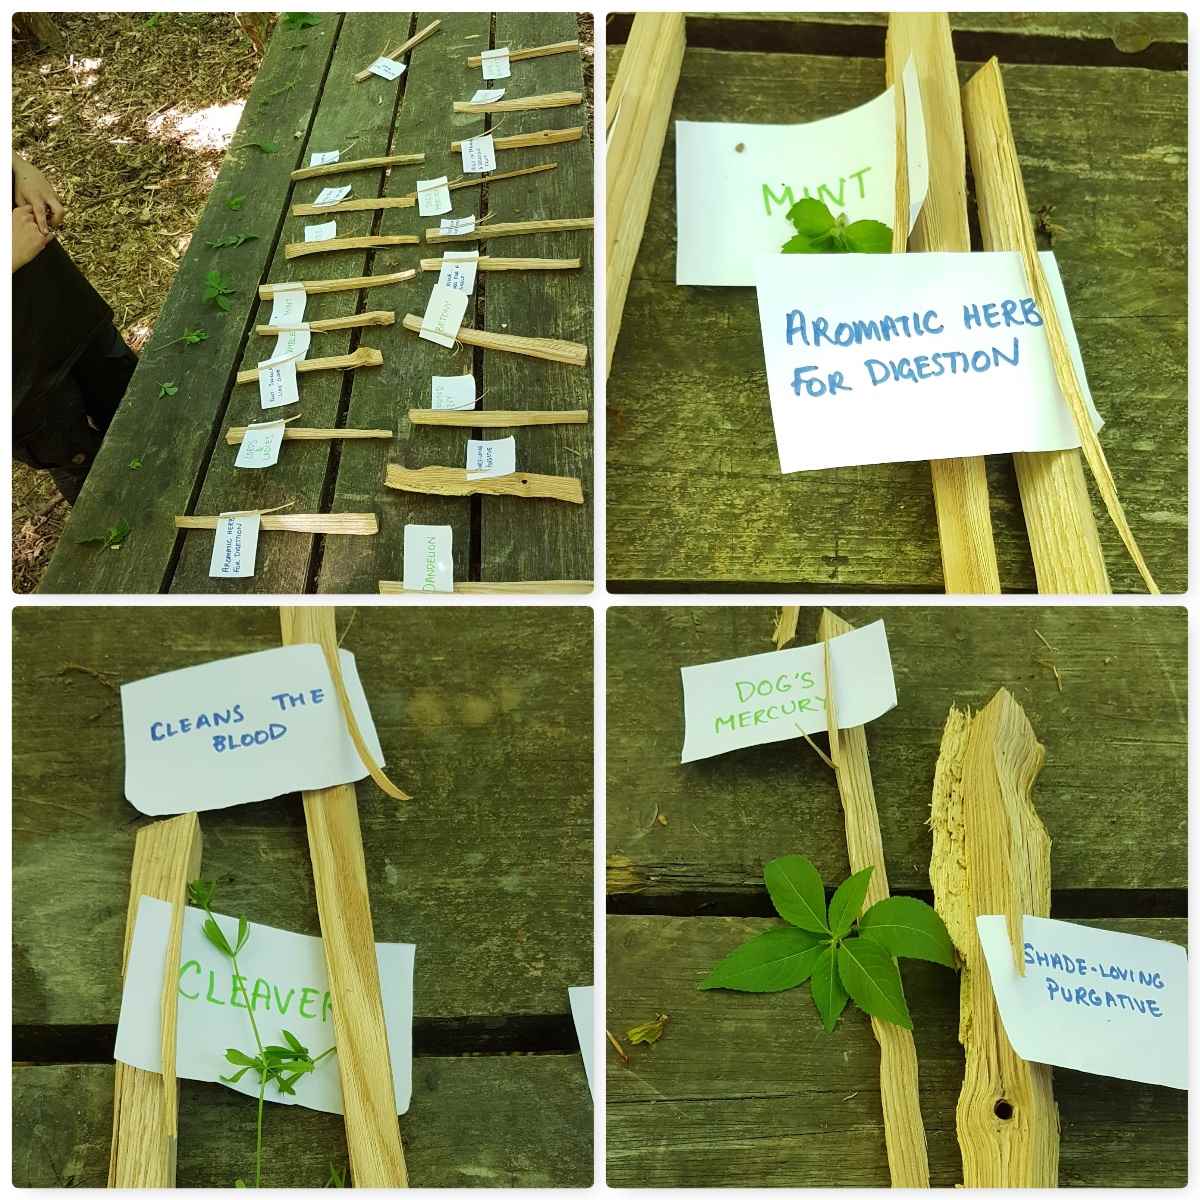
Back at camp Lucy had prepared about 15 plant specimens and we had to identify each plant and note its use correctly – tough but we got 100% after a bit of conferring 🙂
Time for a test
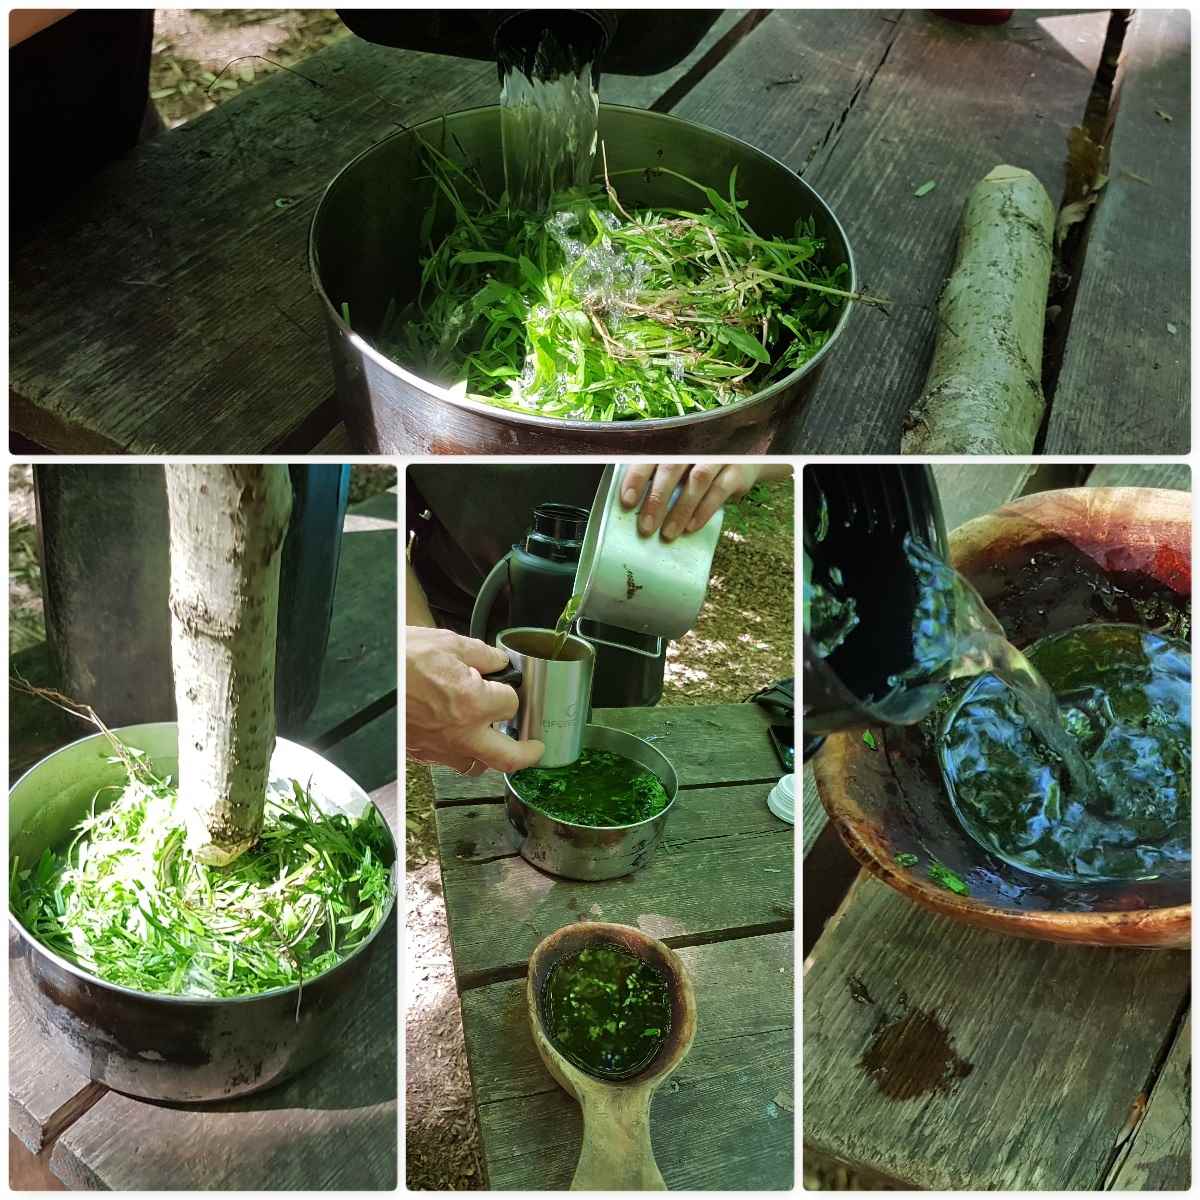
Lucy had also collected up some cleavers which she crushed up and boiled to make a green tea – this was really enhanced with some Elder flower cordial she had made earlier.
Cleaver Tea with a twist of Elder Cordial
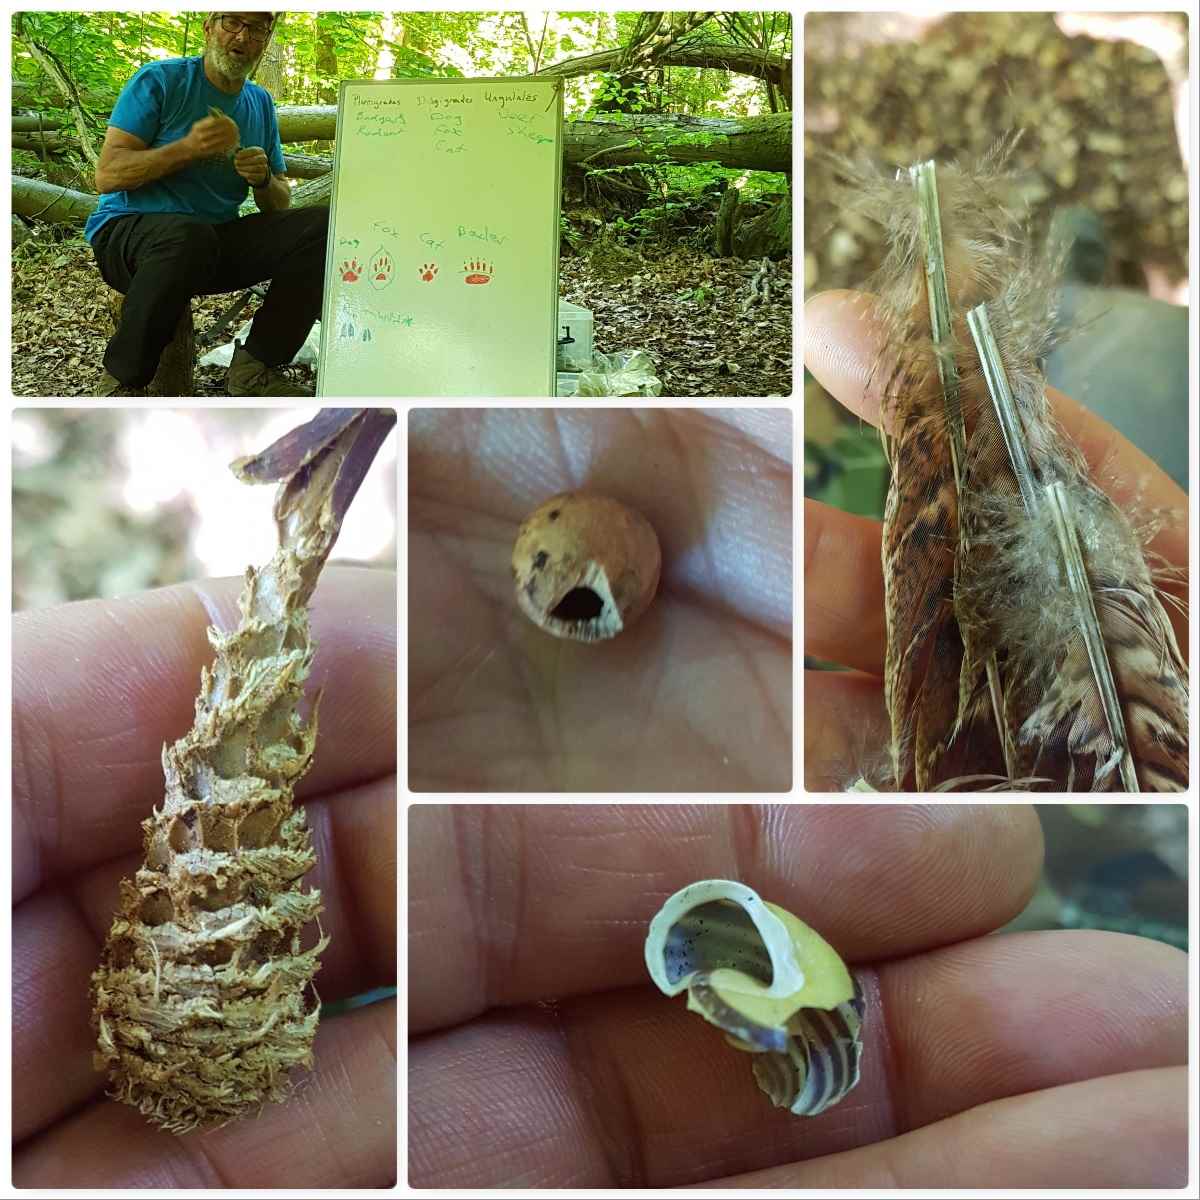
My final class was with Lee looking at animal tracks and signs. Lee certainly knew his subject however I had to leave (to run one of my own courses) early and did not get out on the tracking walk he had planned.
Tracking & Signs
It certainly was great to get down to see John and the students at Woodcraft School and I wish all the students well for the future – as to you John, thanks for the invite and as per usual a job well done I think.
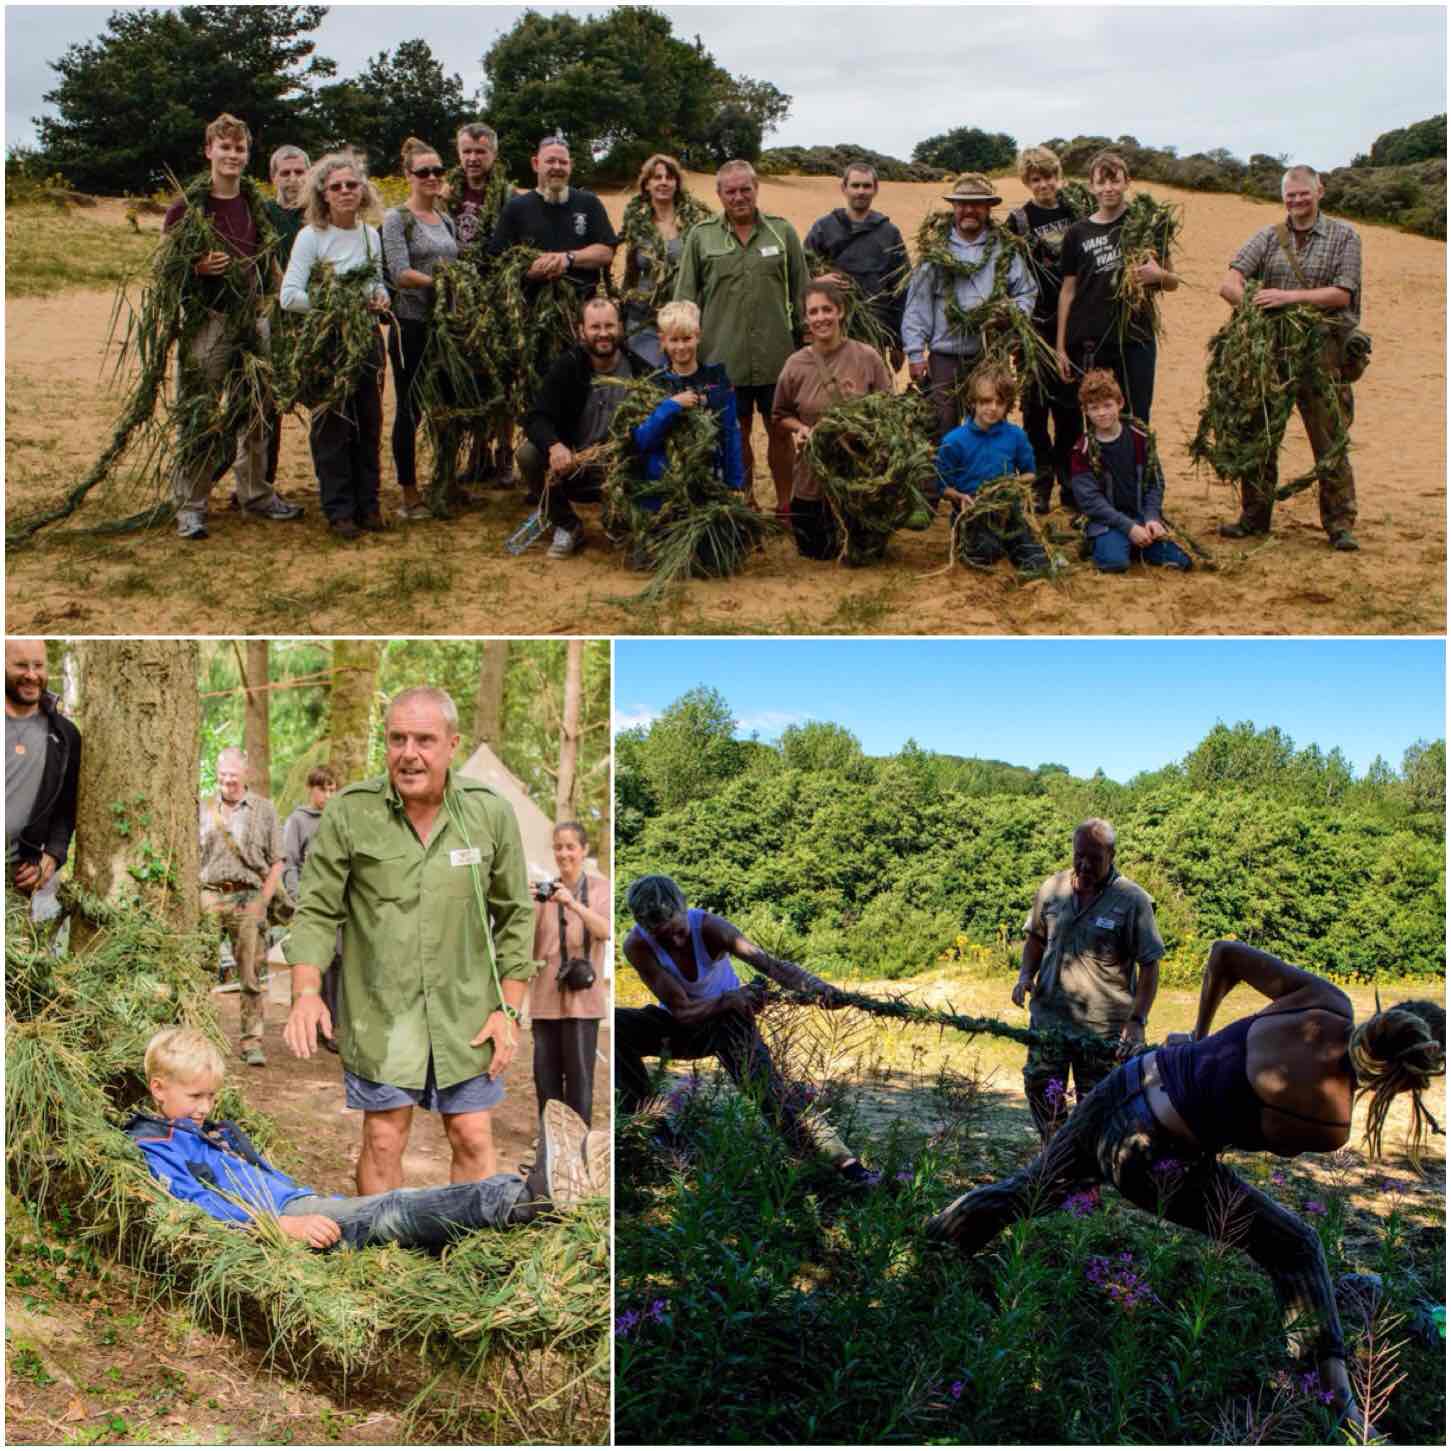
As family holidays go the BCUK Bushmoot is hard to beat. It has it all, with activities for all ages, a stunning location and people who are happy to share their knowledge with you.
The week started with three days of wet weather however that did not stop us getting out and about. I spent one day with my friend Fraser Christian (Coastal Survival) setting nets and lobster pots out on the coast for a class he was running.
Beginnings
My family spent two weeks at the Bushmoot in early August and the kids cannot wait until next years return trip. The Bushmoot is held on the Ogmore Estate by the beautiful Merthyr Mawr sand dunes in South Wales here in the UK.
While the kids were off playing I was busy with running or attending classes. Once again this year we ran a Starter Course for anyone new to Bushcraft. Alison decided though to crack on with some more spoon carving this year with our daughter Catherine under Deans watchful eye while Finlay got on with climbing everything he could find..
Play for some – Work for others
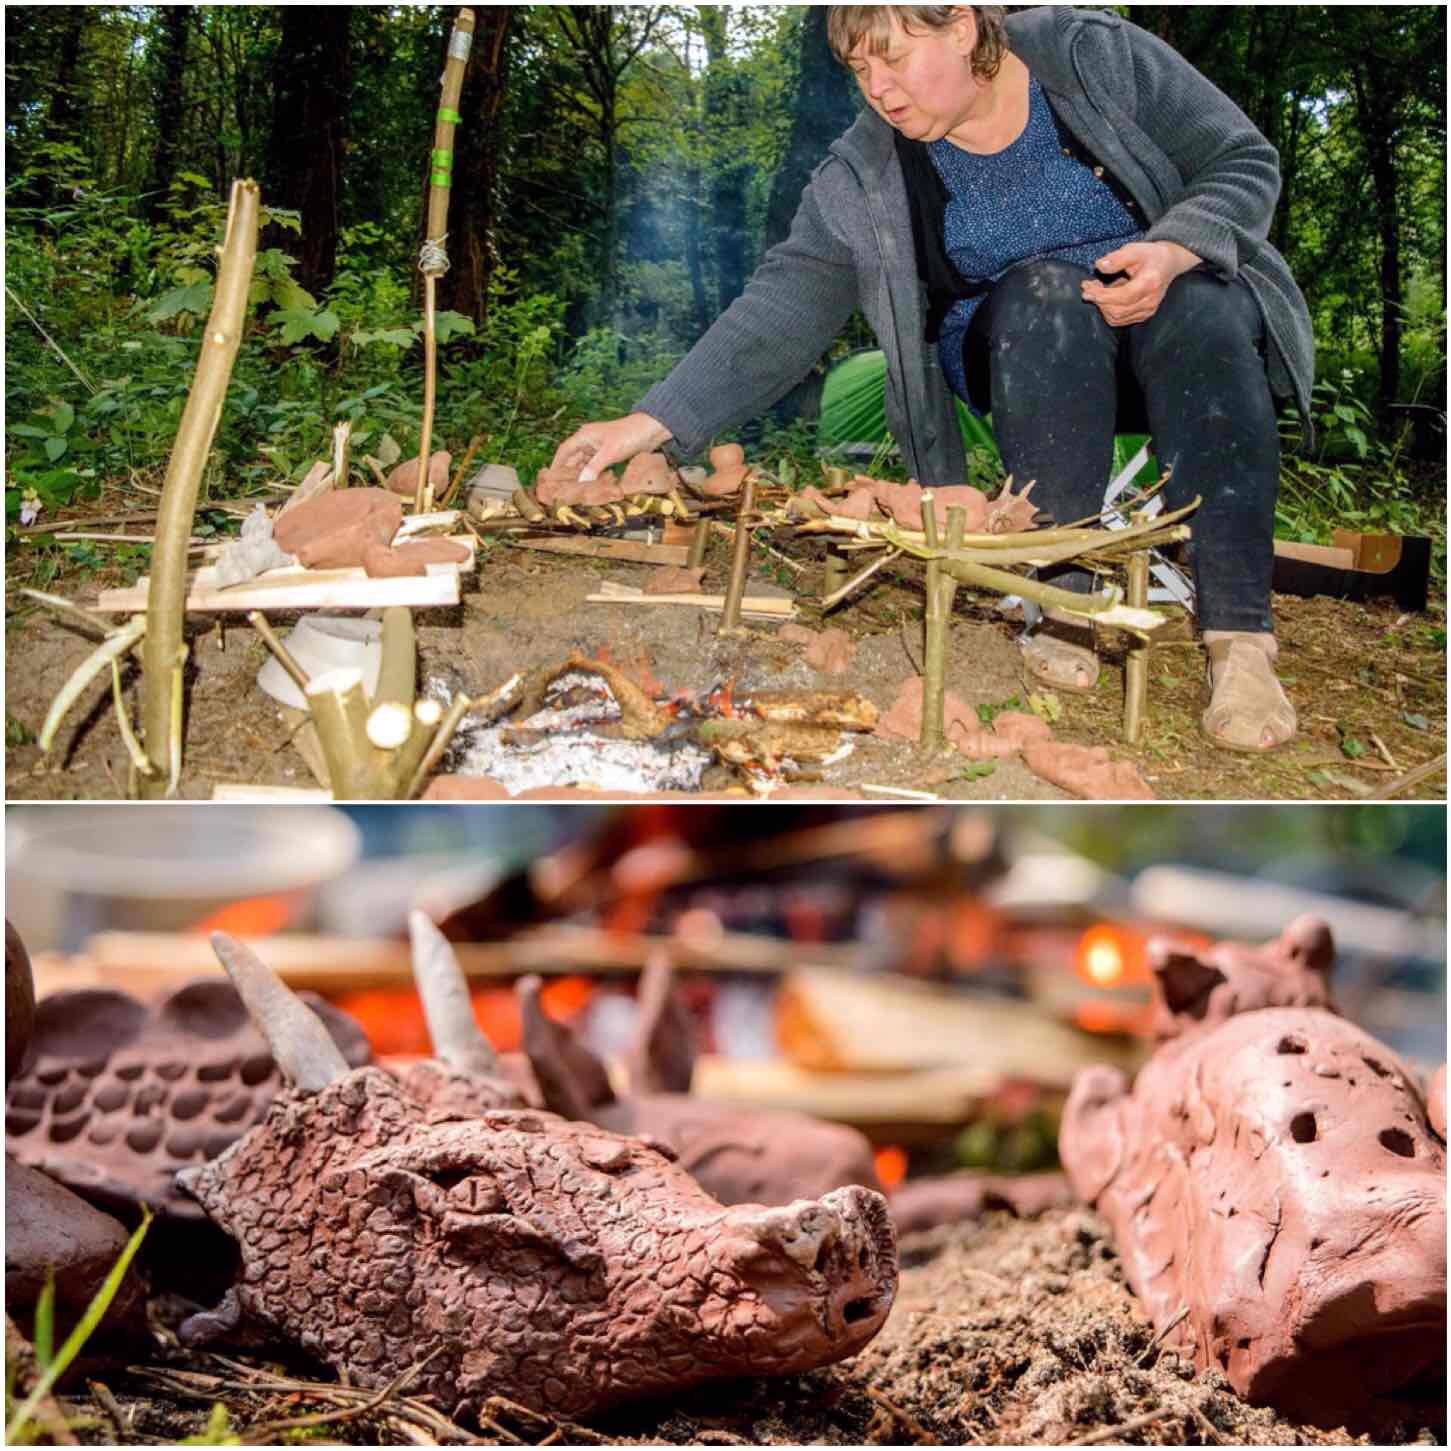
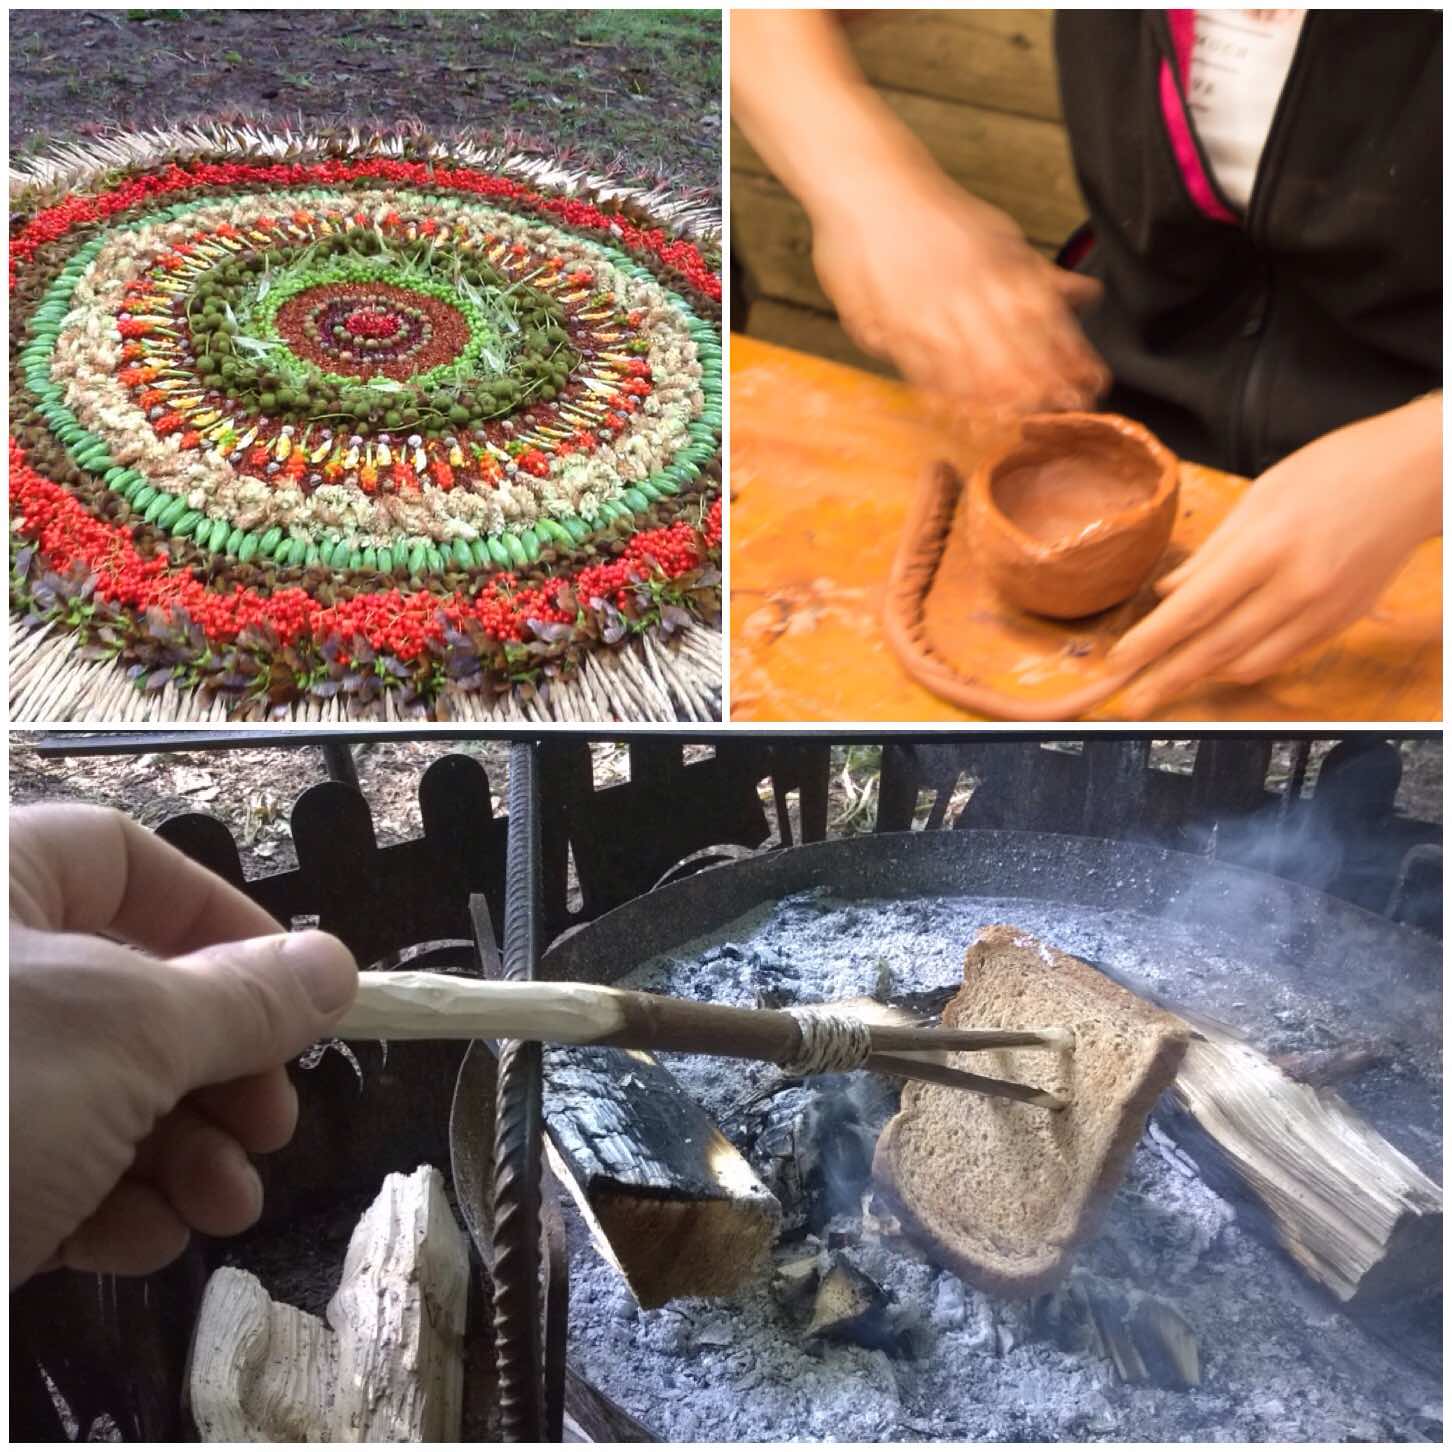
This year I spent some time with Anita (our resident potter) discussing how to make a primitive pot for extracting birch bark oil. Anita came up with a design for me which I am hoping to try out in the winter. Anita ran a number of sessions and a particularly popular one was making clay whistles.
The picture of the clay dragon whistle shown below won the August heat of the BCUK Bushmoot competition – It was a cracking bit of craft
Pottery Art
A course I thoroughly enjoyed this year was Perry McGee’s (National Tracking School) grass rope making (I had attended last years one as well). I really like Perry’s style of teaching – it is relaxed in one way however he really does make you work :-).
The whole group made enough rope from grass to make a hammock that took the weight of anyone in the group, This is a skill I have been looking into more after seeing rope that was made out of heather recently up on the Isle of Lewis.
Grass – comfy and tough
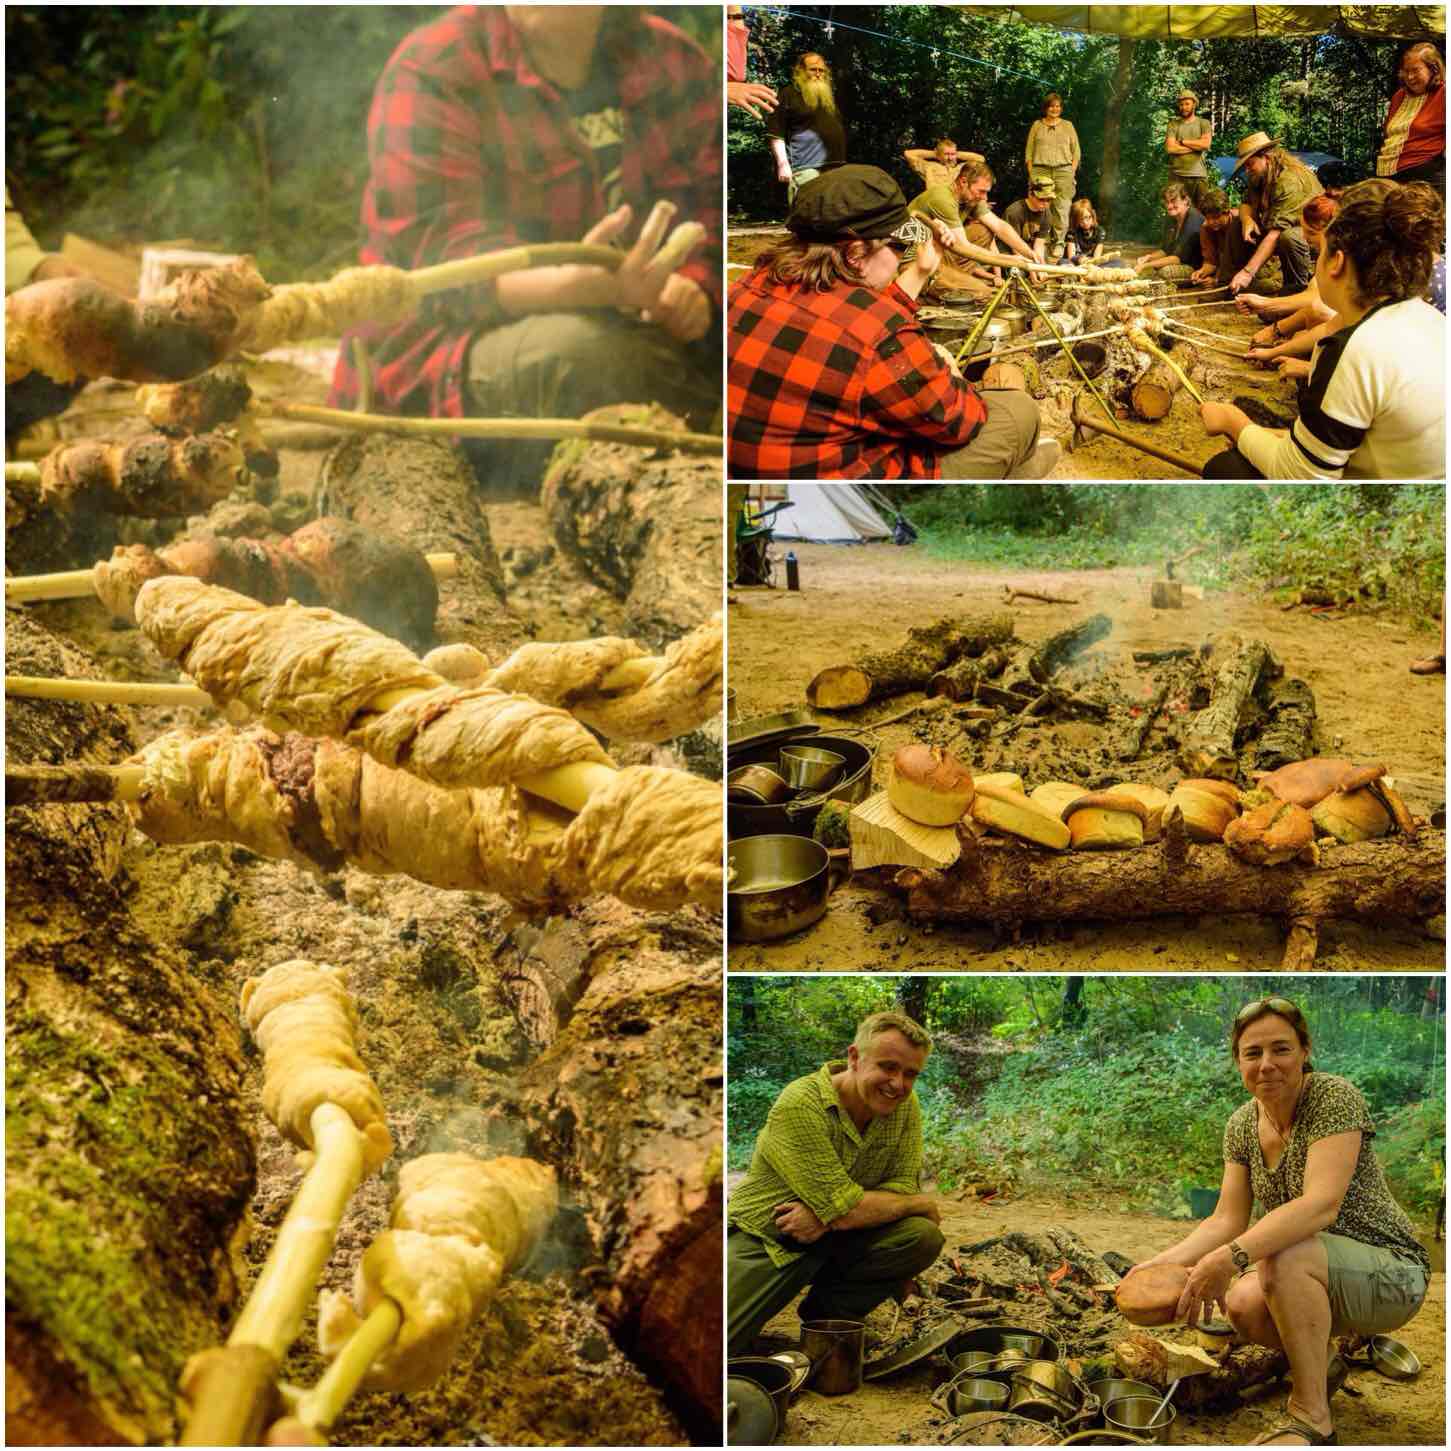
David Willis (Bushcraft with David Willis) attended once again this year and his class was packed. The smell of fresh baking bread could be detected from afar and I made sure I swung by the class a few times.
Alison attended the class and we were well set up for bread for the next couple of days.
Beautiful Bread
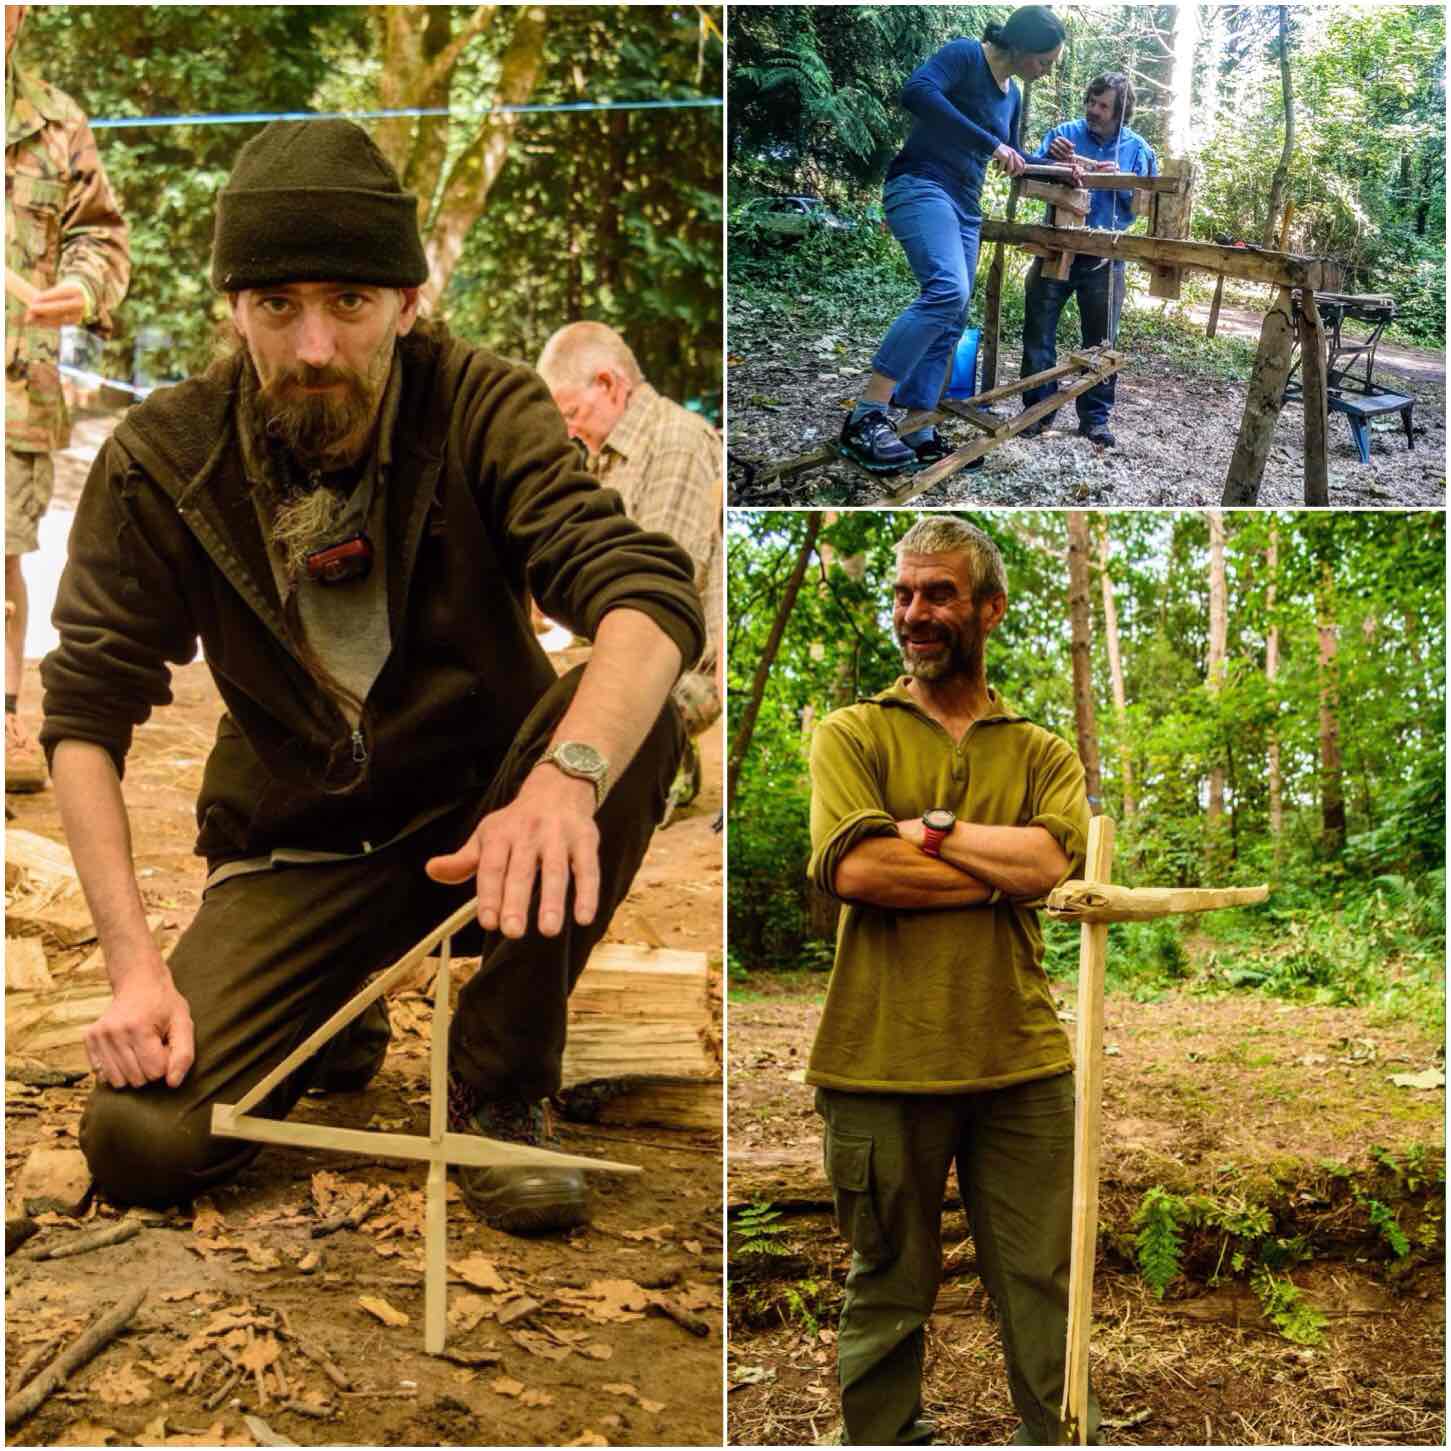
There was plenty of wood working going on as usual this year. Ed Livesy ran a busy class on carving a Figure Four Deadfall mechanism, Roy Budd was running the pole lathe continuously every day (where he got the energy I do not know) and I ran for the first time the Dovetail Campfire Crane class.
This class on the crane I will run again next year as a lot of people have never heard of it and became very interested in it after seeing what my students created. It is basically an adjustable crane made out of one pole.
Wood Skills
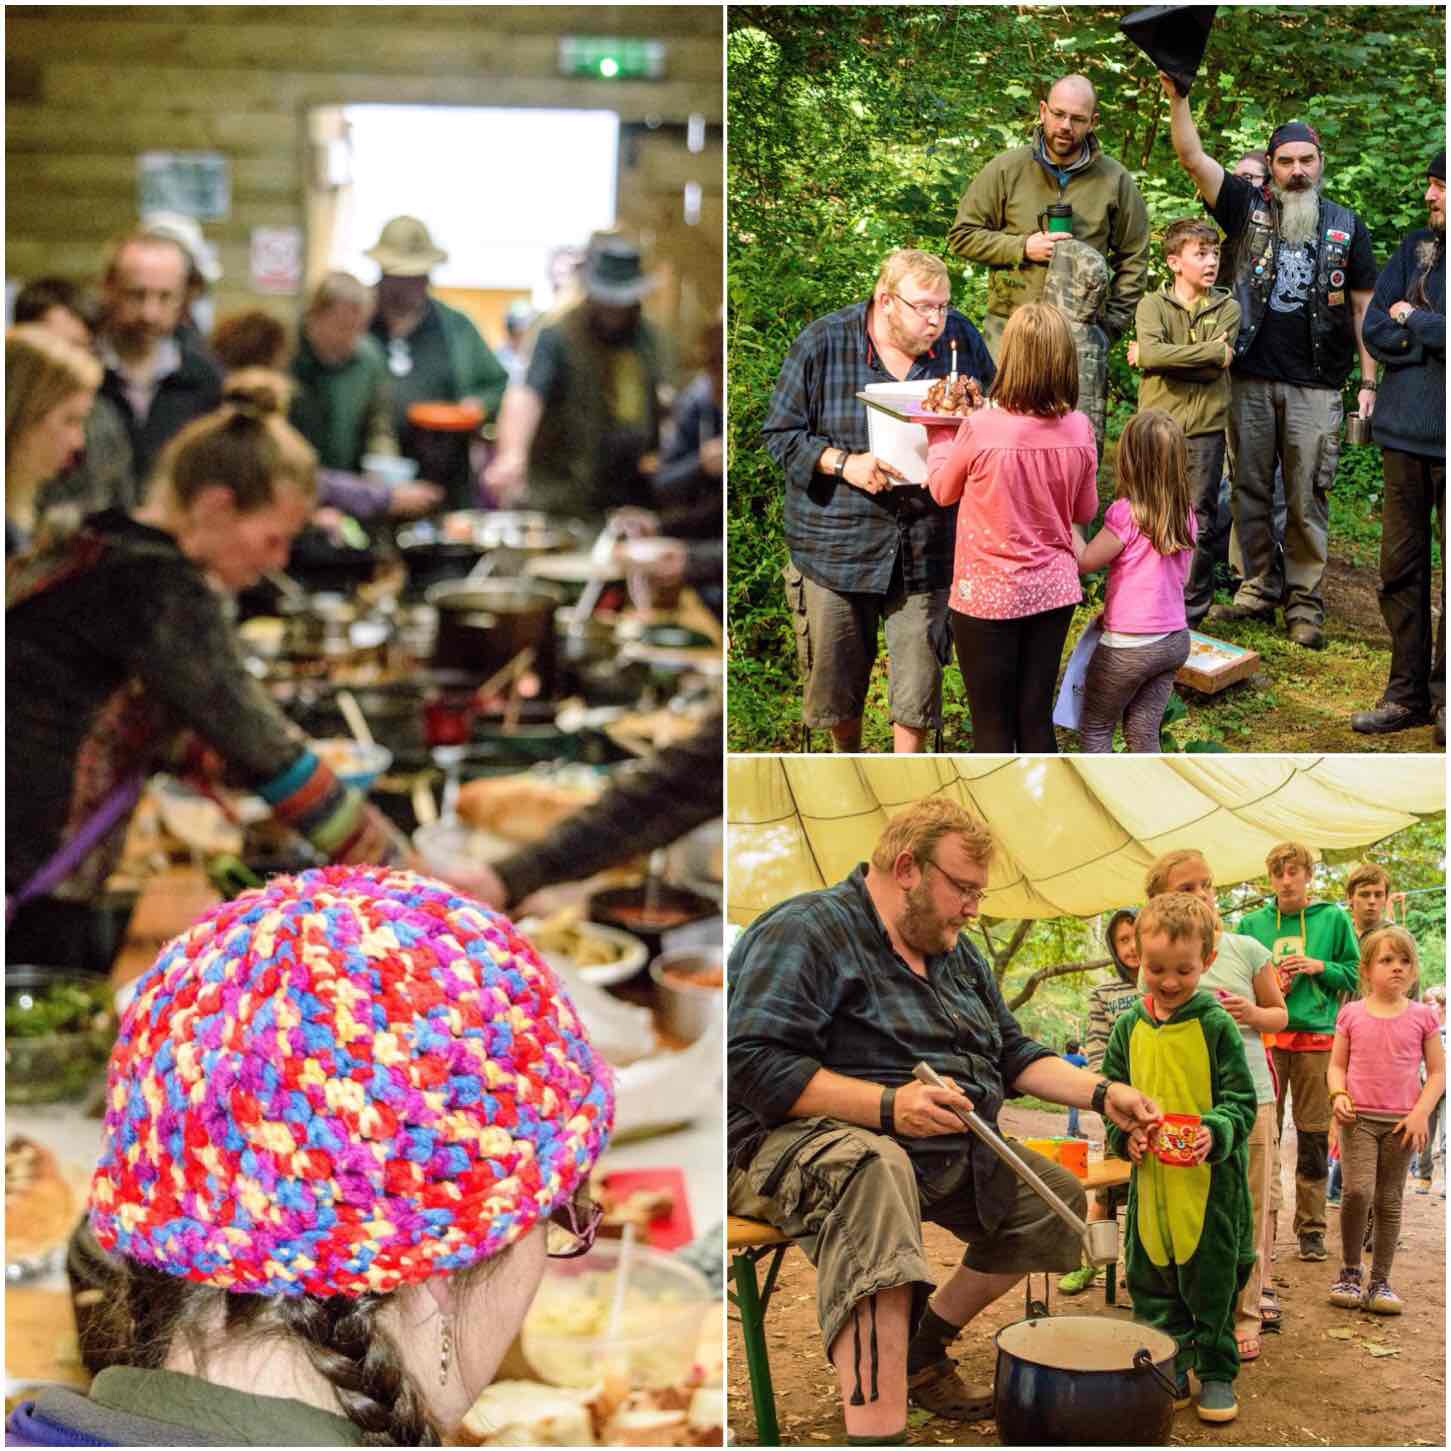
Food as usual plays a big part in the life of the Bushmoot. The communal meal was a great success again, Tony got himself a lovely birthday cake and the kids enjoyed a few evenings supping hot chocolate around the fire.
Top Scoff
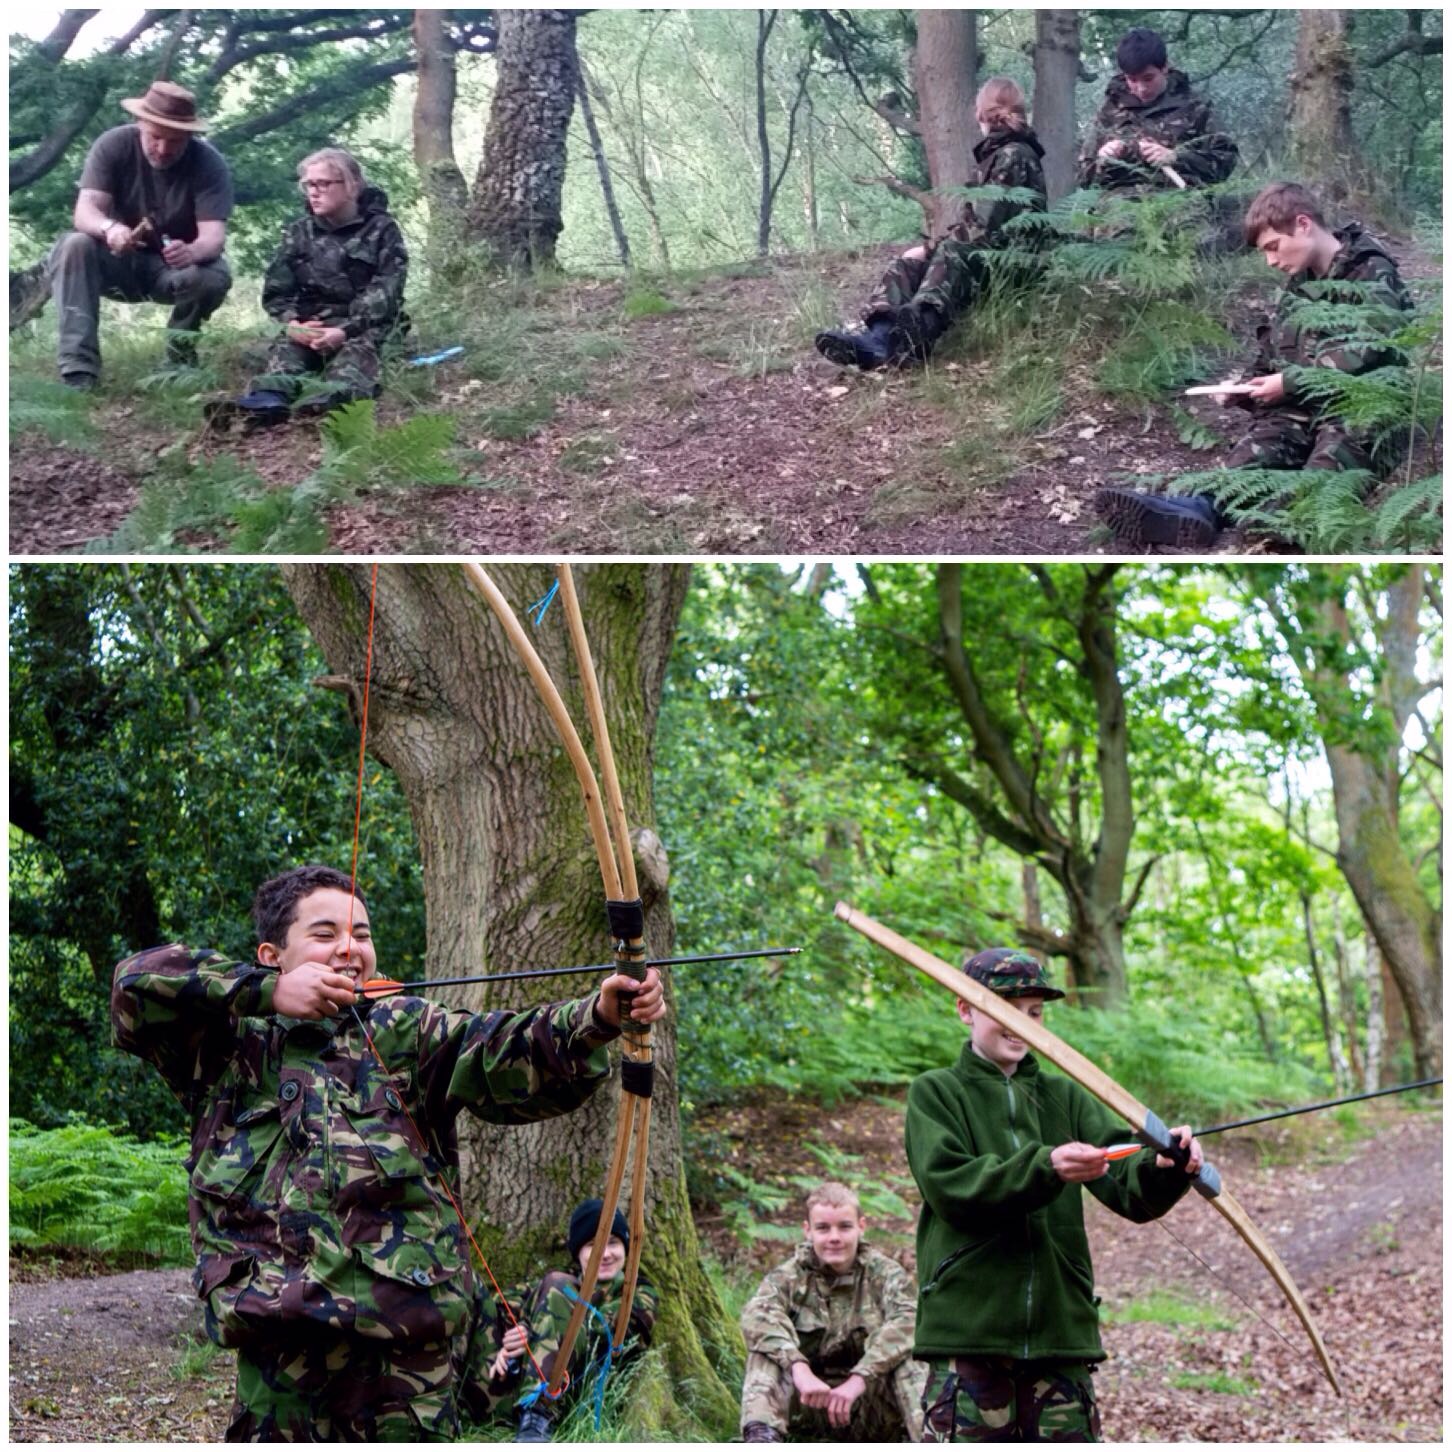
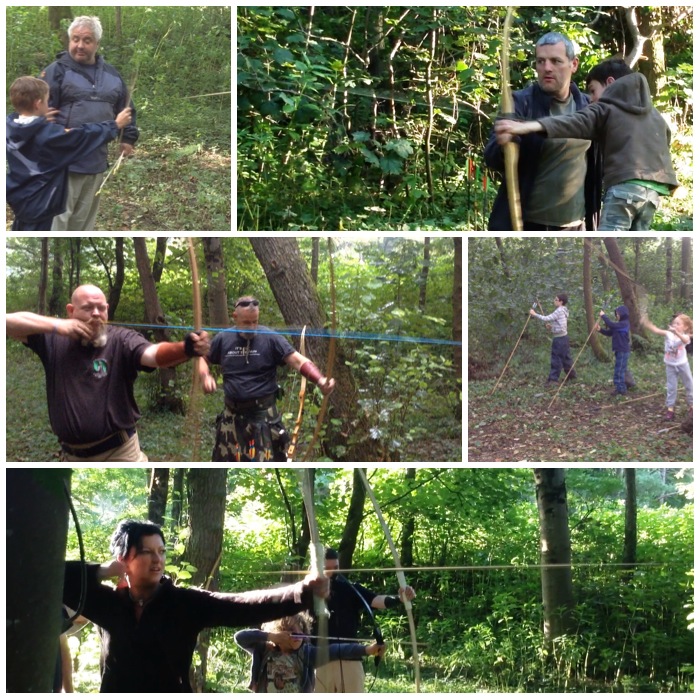
It must be getting on 6 or 7 years we have run the archery range with the competition later in the Moot.
We have sessions run most evenings and the competition is broken into two parts (kids and adults). I received many great presents to give away as prizes so thanks to all who donated. The winners are each to receive a handmade bow from Wayne Jones (Forest Knights).
On a down side my Holmegaard bow snapped this year at the Moot. It has been a trusty bow since I made it 8 years ago and it has been used by hundreds of people on my courses. I did though get an Elm stave from Chris Claycomb – so that is a project for the winter.
Down on the Range
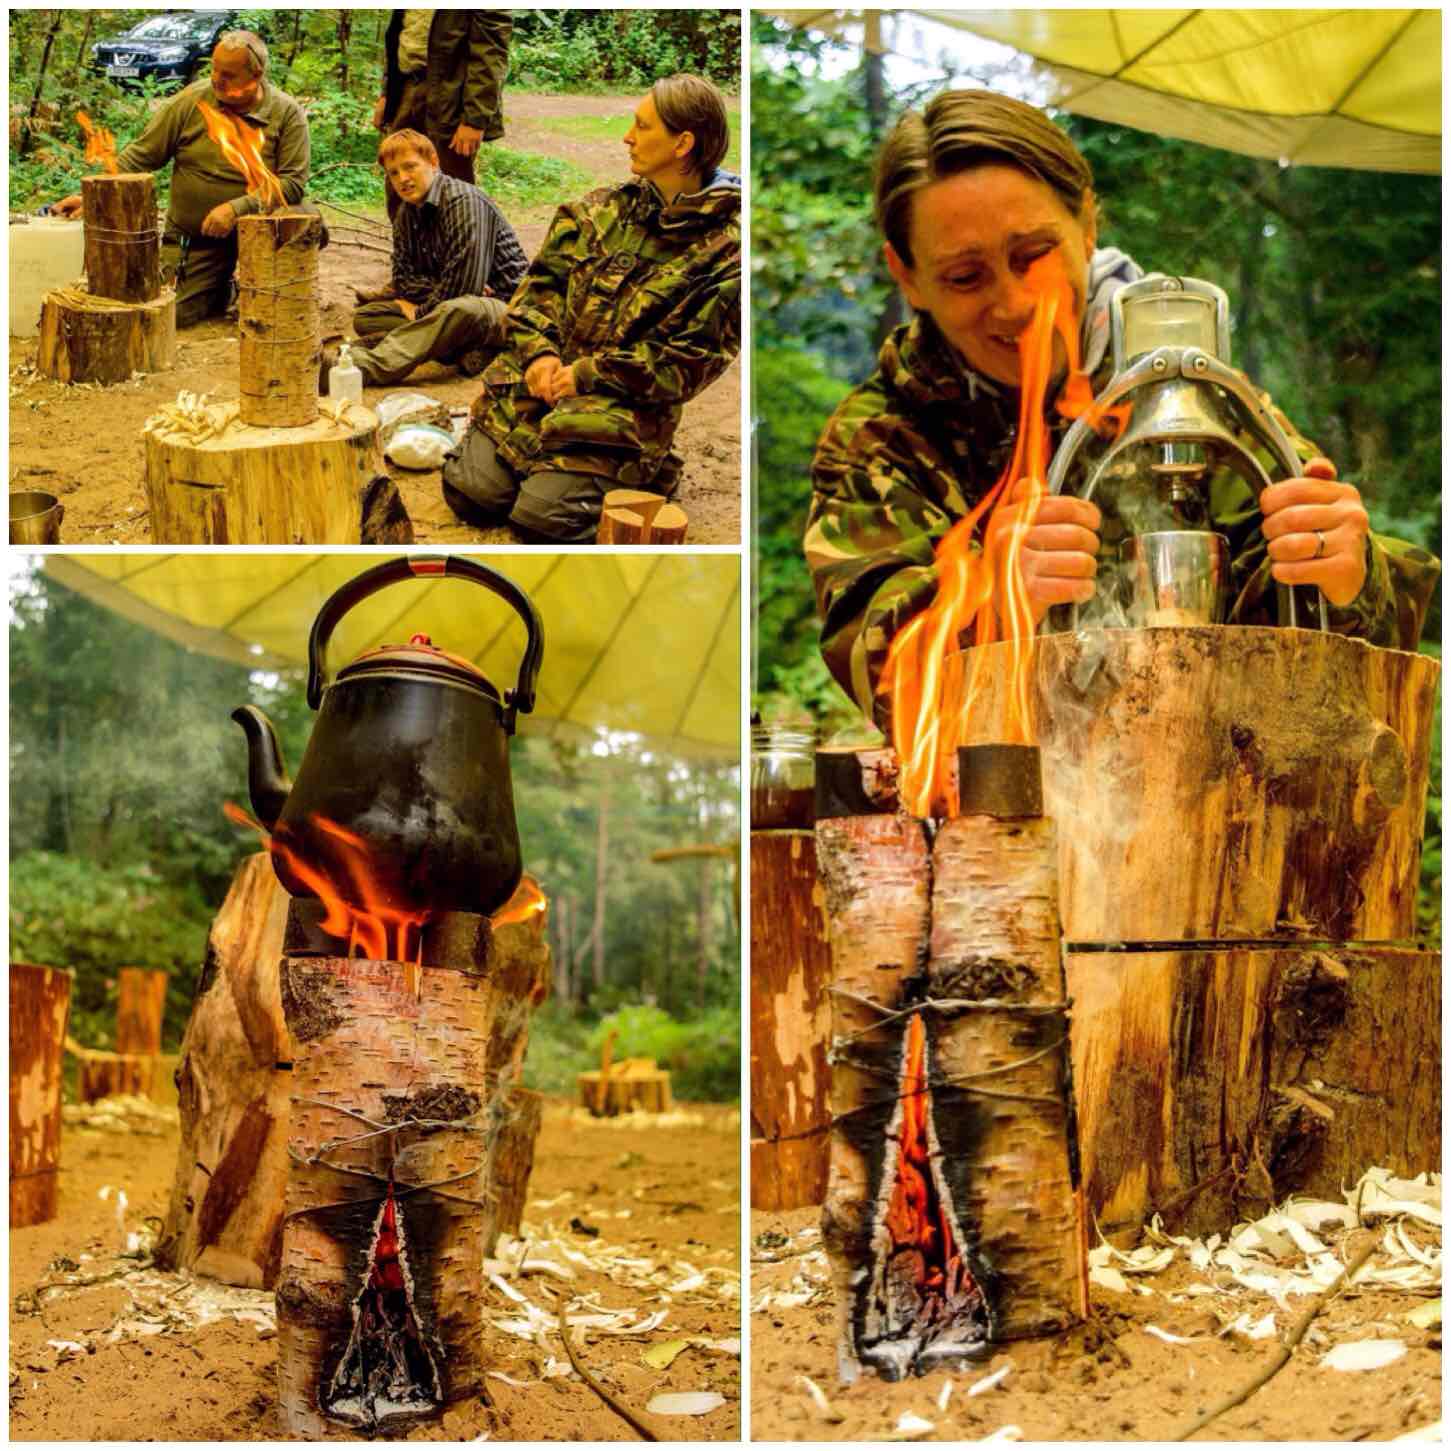
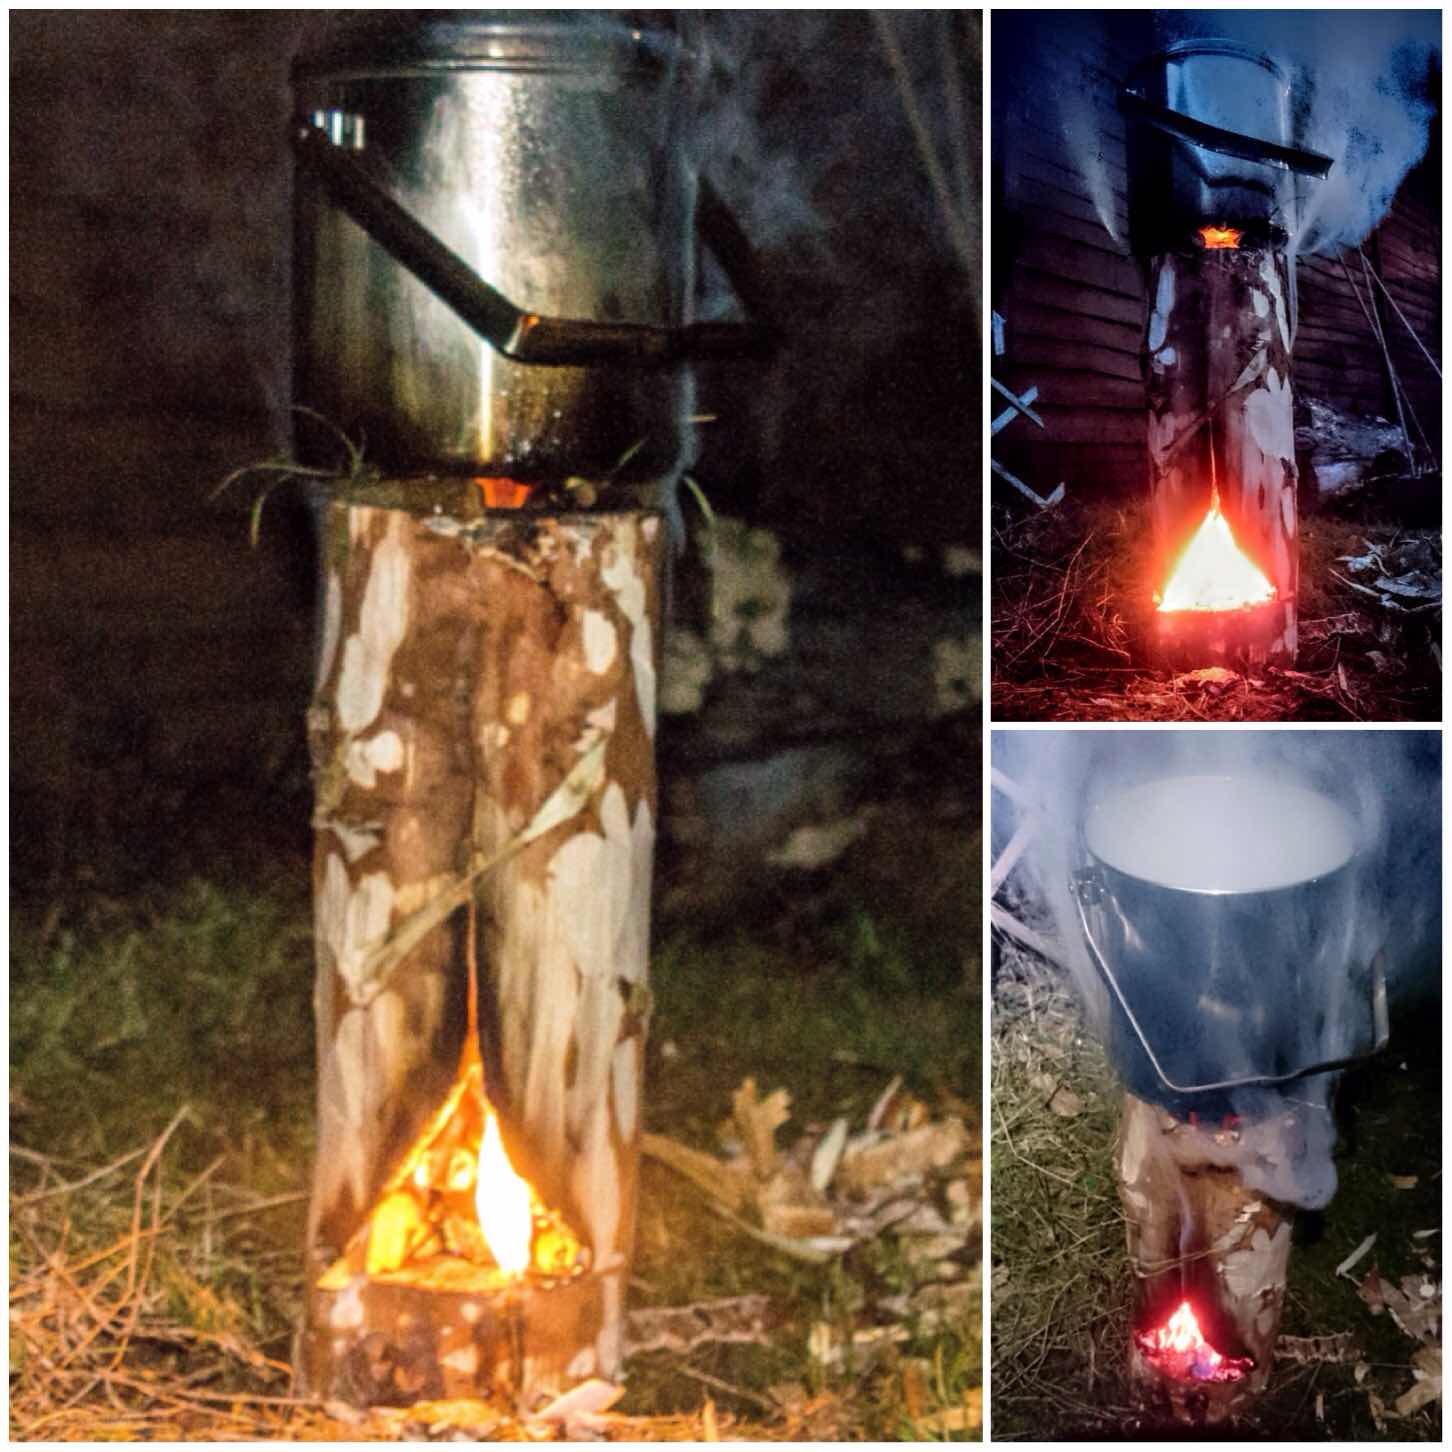
Another first for me was running the Damp Wood Log Rocket stove class. The rain we had earlier meant that all the logs were damp (the spray was hitting us in the face when we split them) so it was great to see after all their hard work all the students managed to get their log rockets fired up.
The coffee I can tell you was brilliant 🙂
Proper coffee from Damp Log Rockets
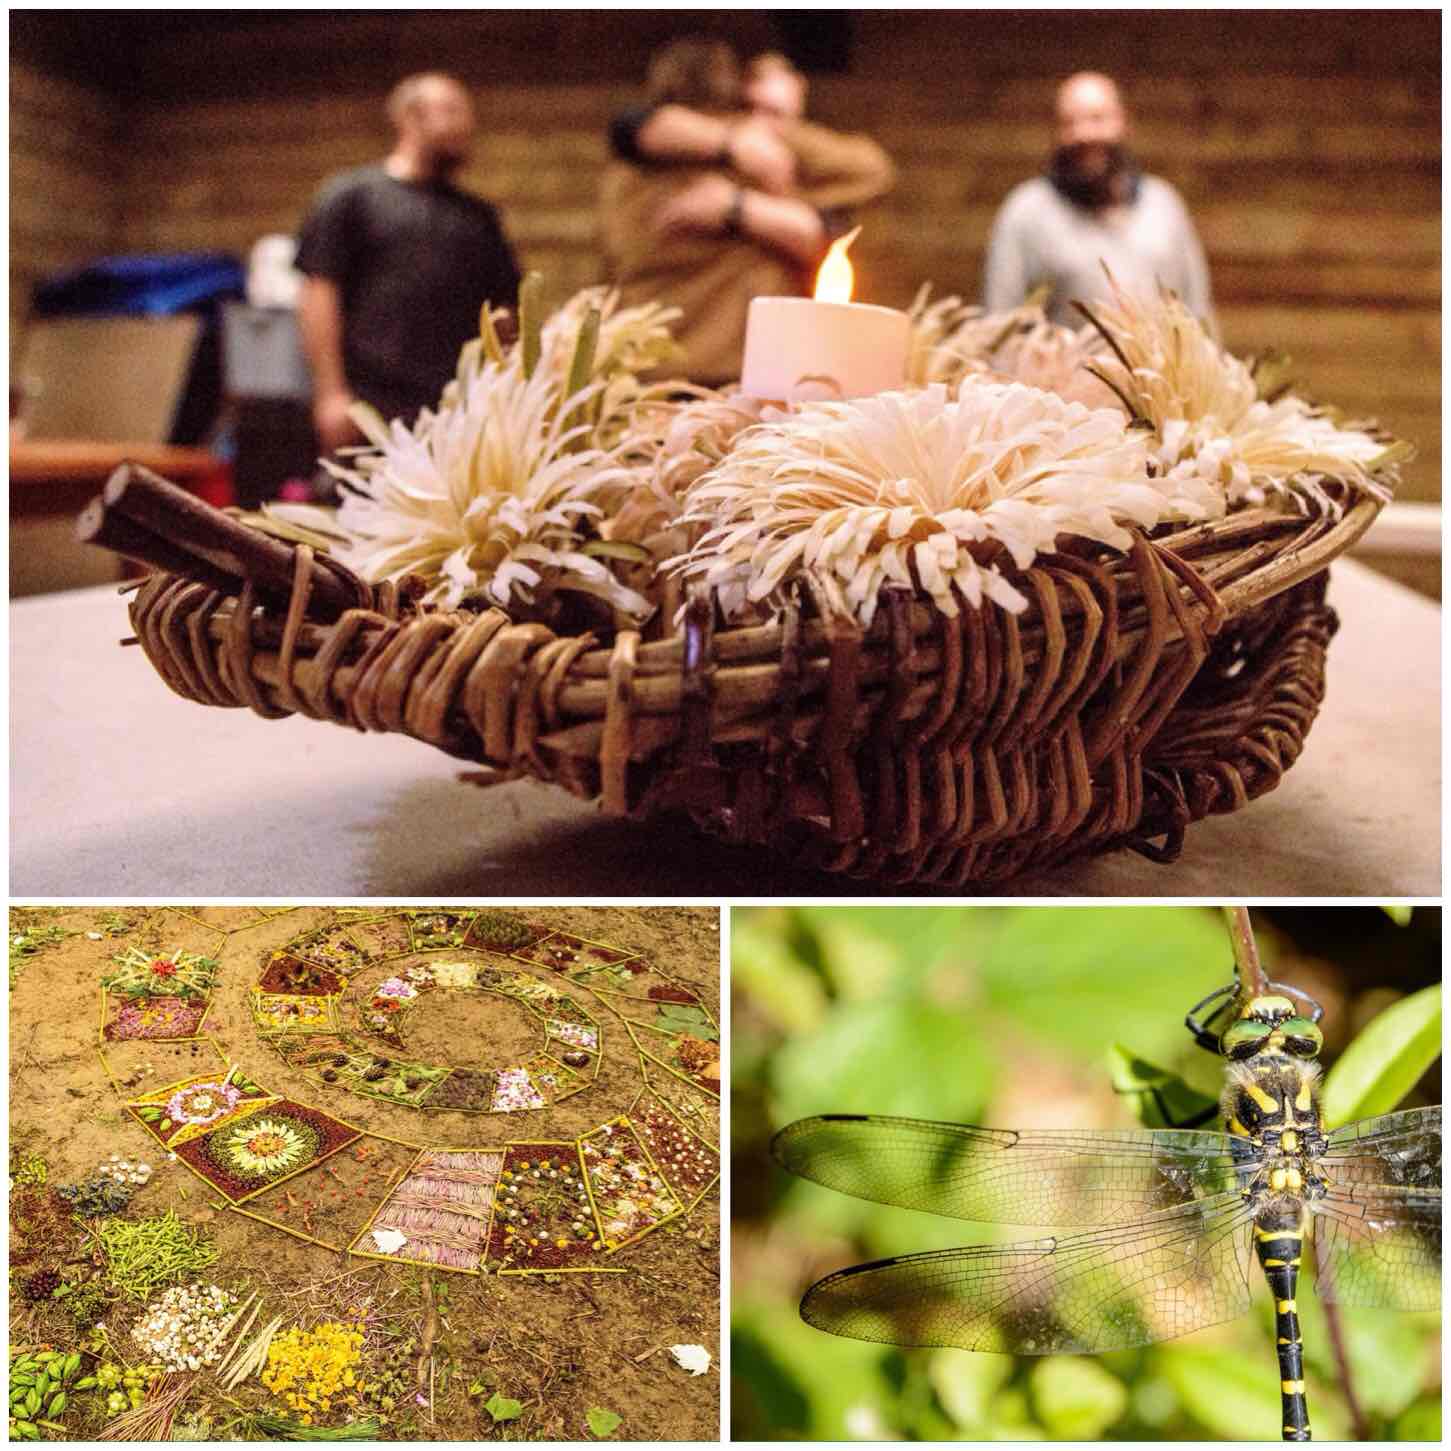
As you can see I did take a few pictures at the Bushmoot however there were a few special ones to me. Below are three that I really was glad they turned out so well.
The first one was a moment I captured when taking a picture of the battery candle sitting in basket of carved flowers. Mark was just saying goodbye to Tony with a manly hug when I pressed the shutter.
Next was sitting beside the beautiful artwork created by Keith Beaney. Every year Keith comes along and patiently creates these works of art for us all to enjoy.
And finally one day someone pointed out to me a dragonfly sunning itself next to the shower block. This little fella was not moving for anyone and really let me get up close and personal to photograph him.
Special Moments
There were too many workshops run to be able to attend them all (approx. 110 were run over the core days) however keeping my trusty Nikon with me I managed to capture a few moments from just some of them.
Wayne was busy teaching knife throwing, Theresa ran a very busy workshop on flint knapping and Stuart spent two days splitting the most twisted trunk in the world without using metal wedges. There were many, many more workshops run by different instructors, I saw some, photographed some but missed many – that is the nature of the Bushmoot for you.
Passing On By
After the core days were over we spent time dismantling lots of the classrooms, mooching by the fire and taking long relaxing walks down to the beach,
Winding Up
During the Moot I finished off doing my 22 Day 22 Push up challenge and videoed it each day. In the video below you will see in the second half of it lots of Bushmoot locations, finishing up with pushups in the swash zone in the sea at Merthyr Mawr,
So if you are into activity holidays that do not cost the earth then head on down to the Bushmoot next year.
In my continuing research into Log Rocket Stoves I came across a Wikipedia page called the Schwedenfeuer and in it details of a type of log rocket stove I had not come across before, with a built-in fire tray and a chimney formed by simply cutting away the inner corner of one section.
Clever though it was, though, this stove still relied on string or wire to tie the sections together. As these stoves have been around for a long time I figured there must be other ways of holding them all together. I thought perhaps that green wood dovetail wedges might do the job, so I set out to test this.
The Dovetail Log Rocket Stove
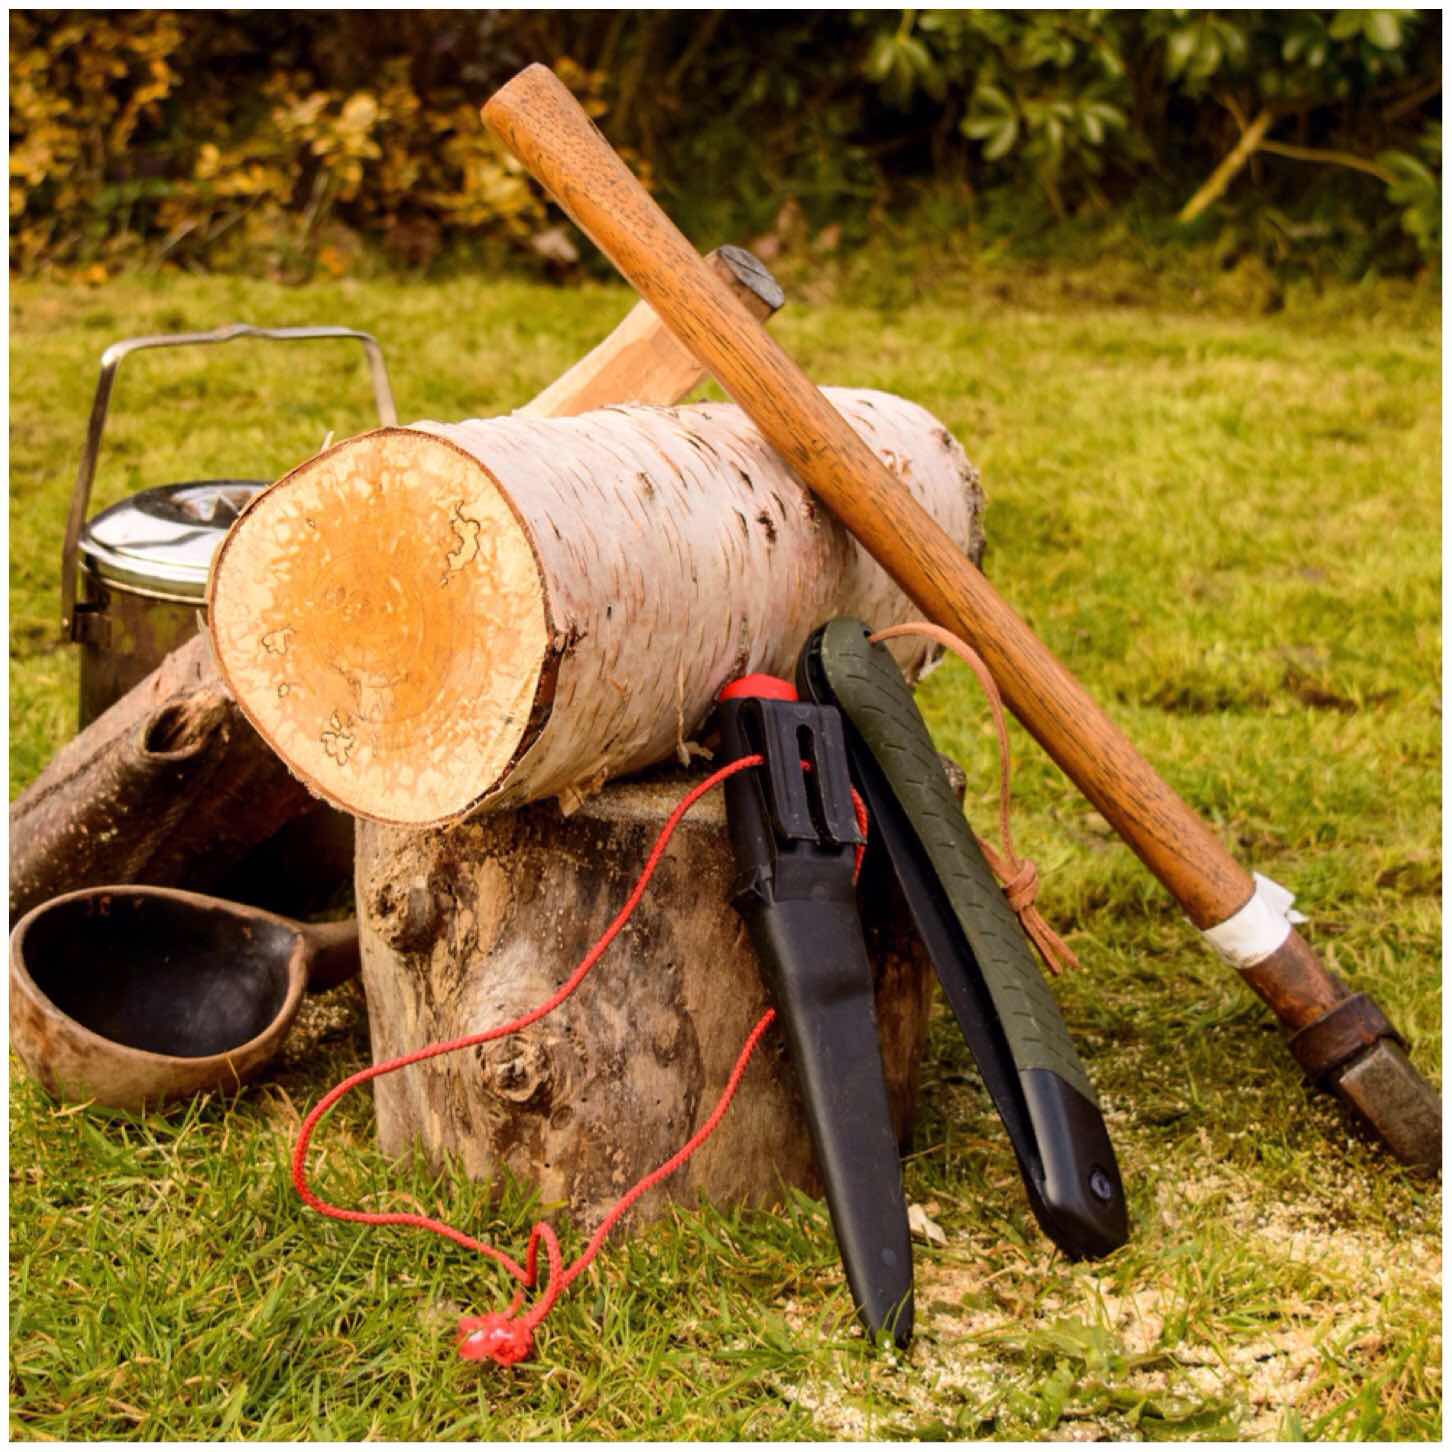
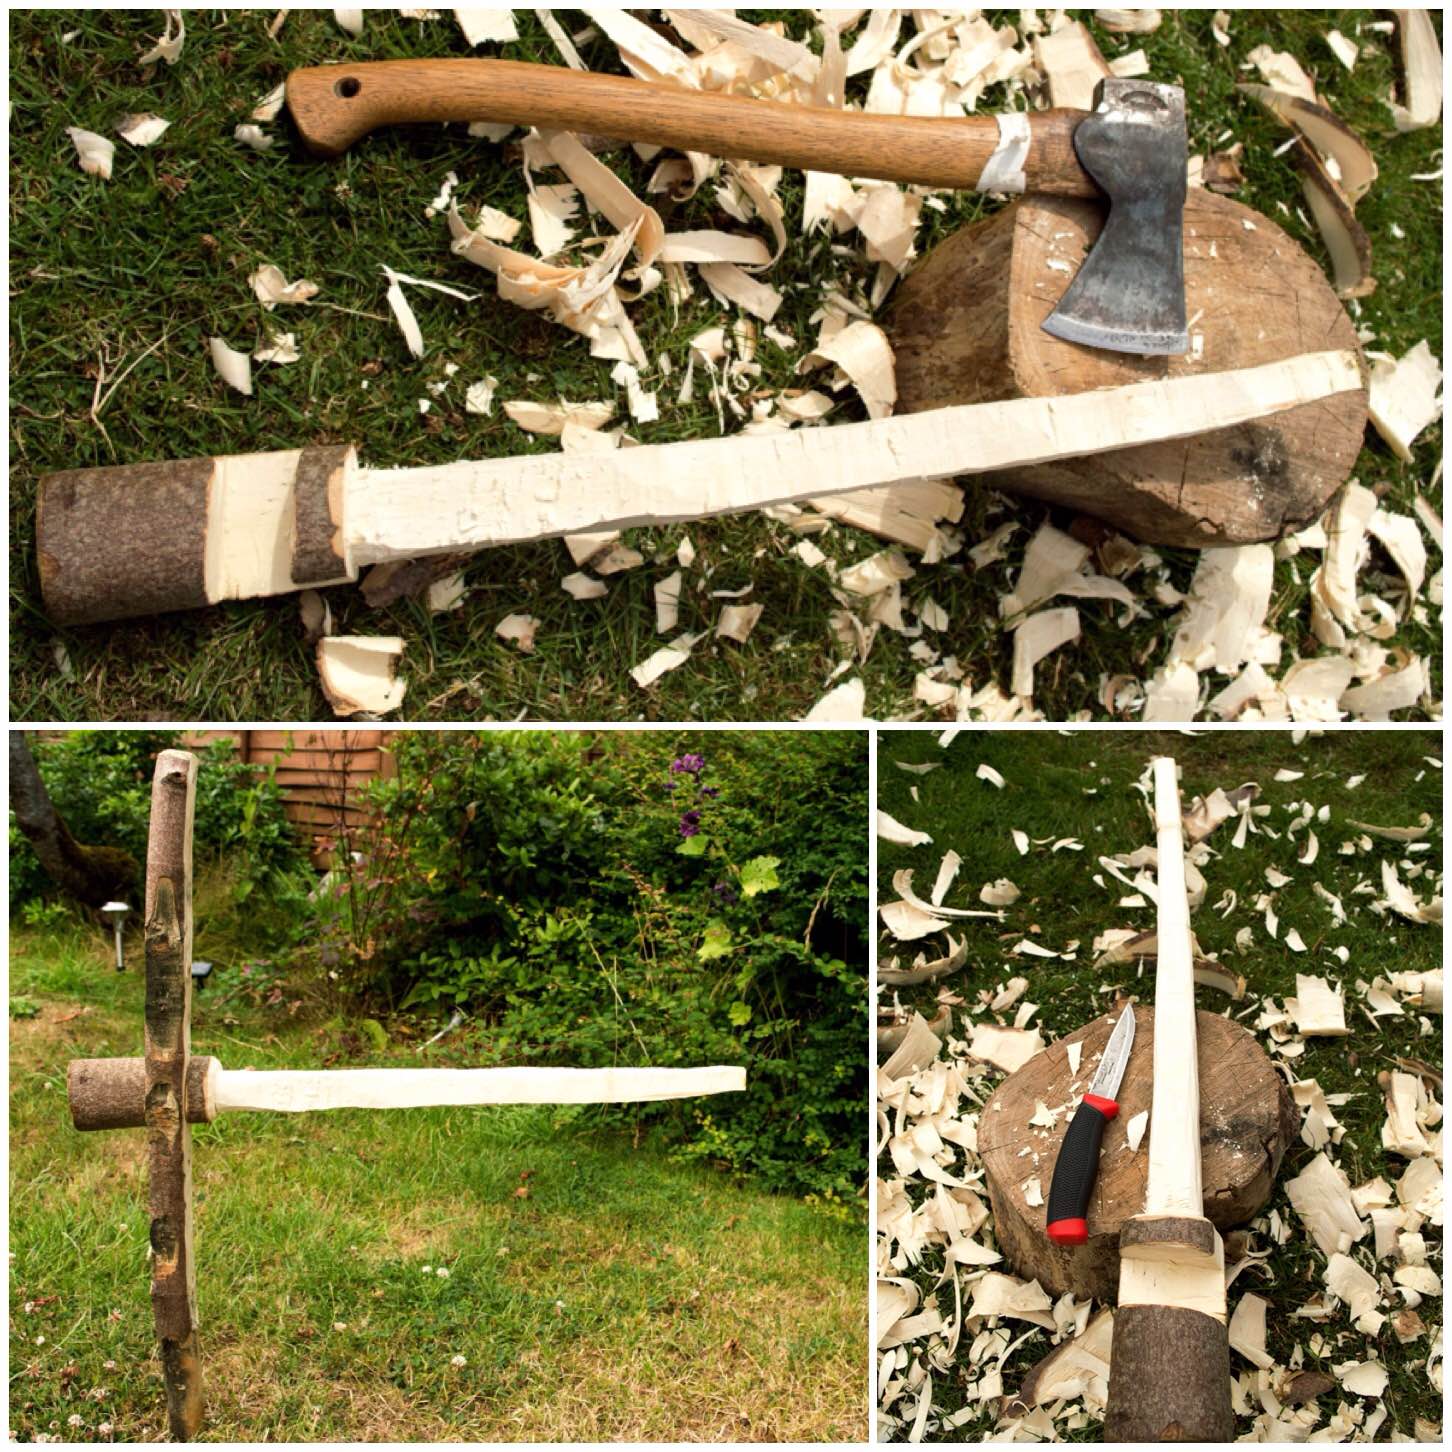
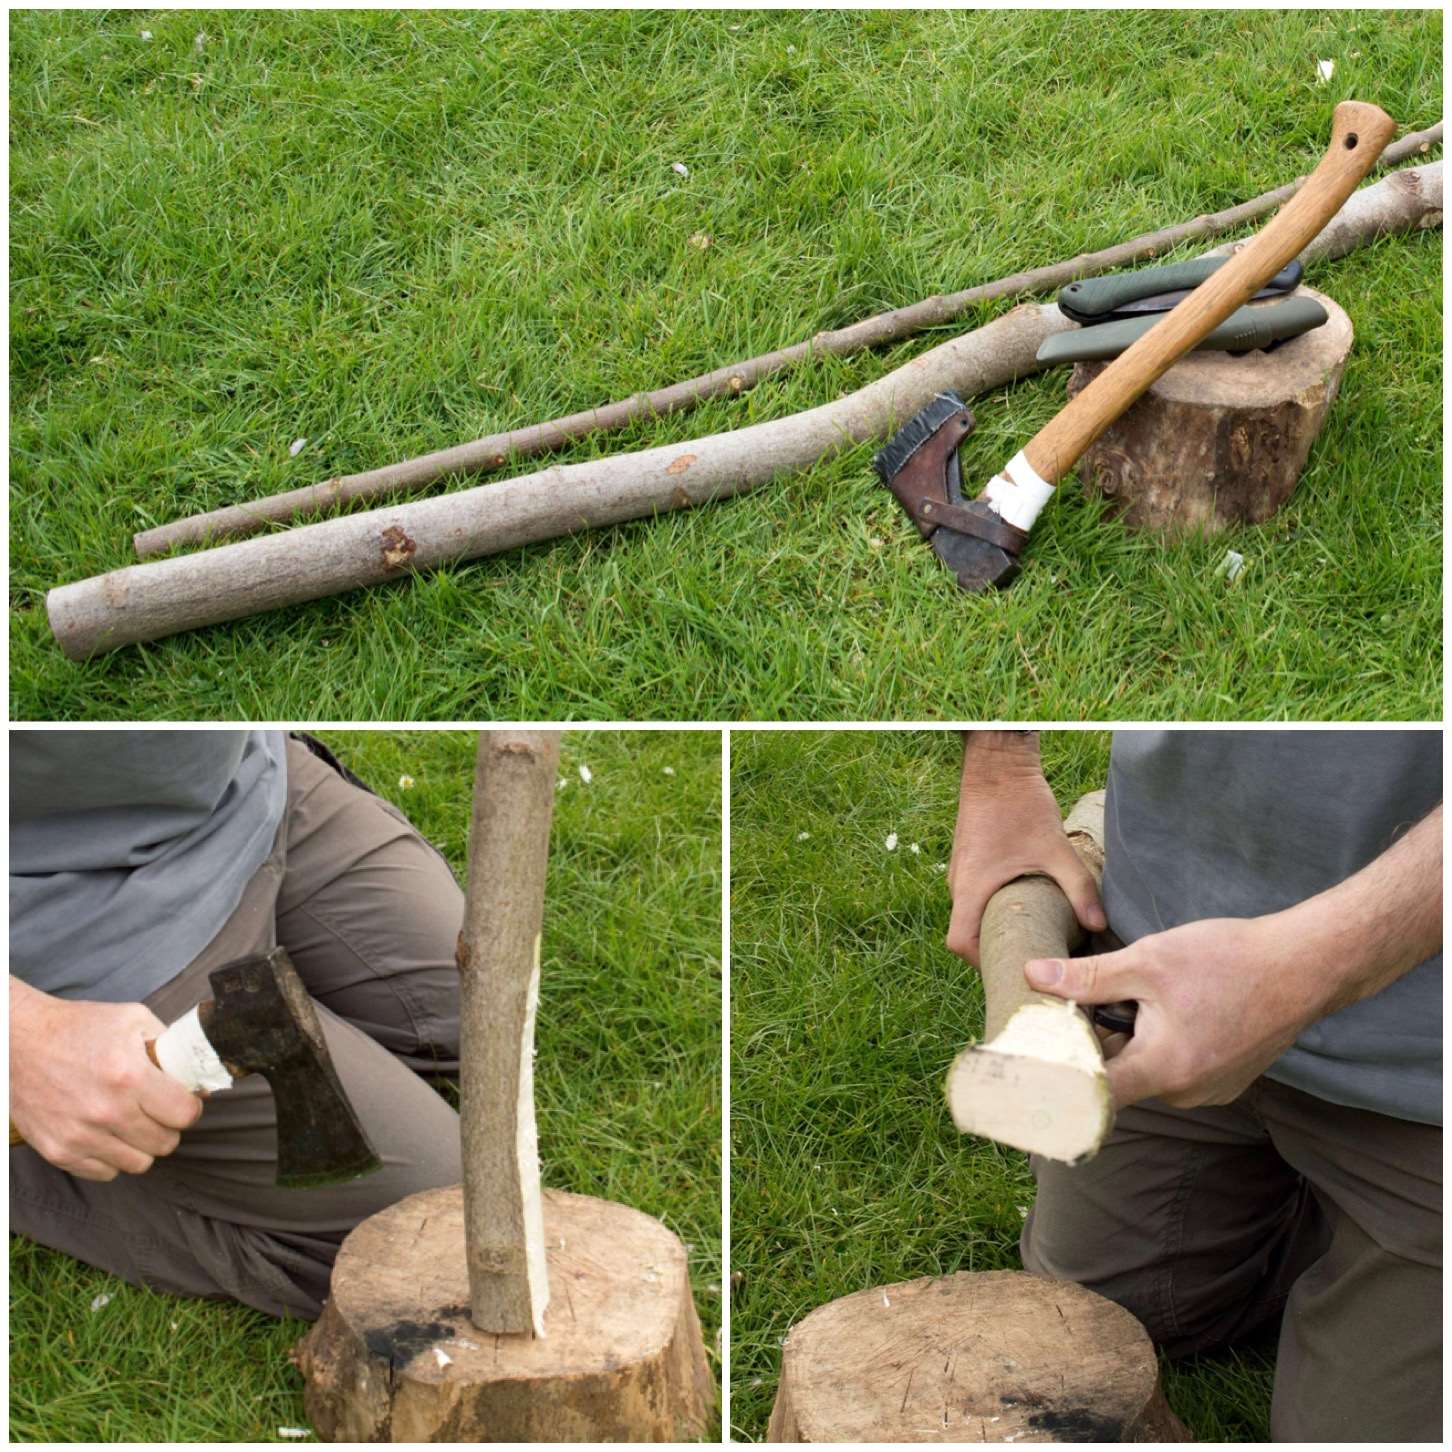
Tools and Material
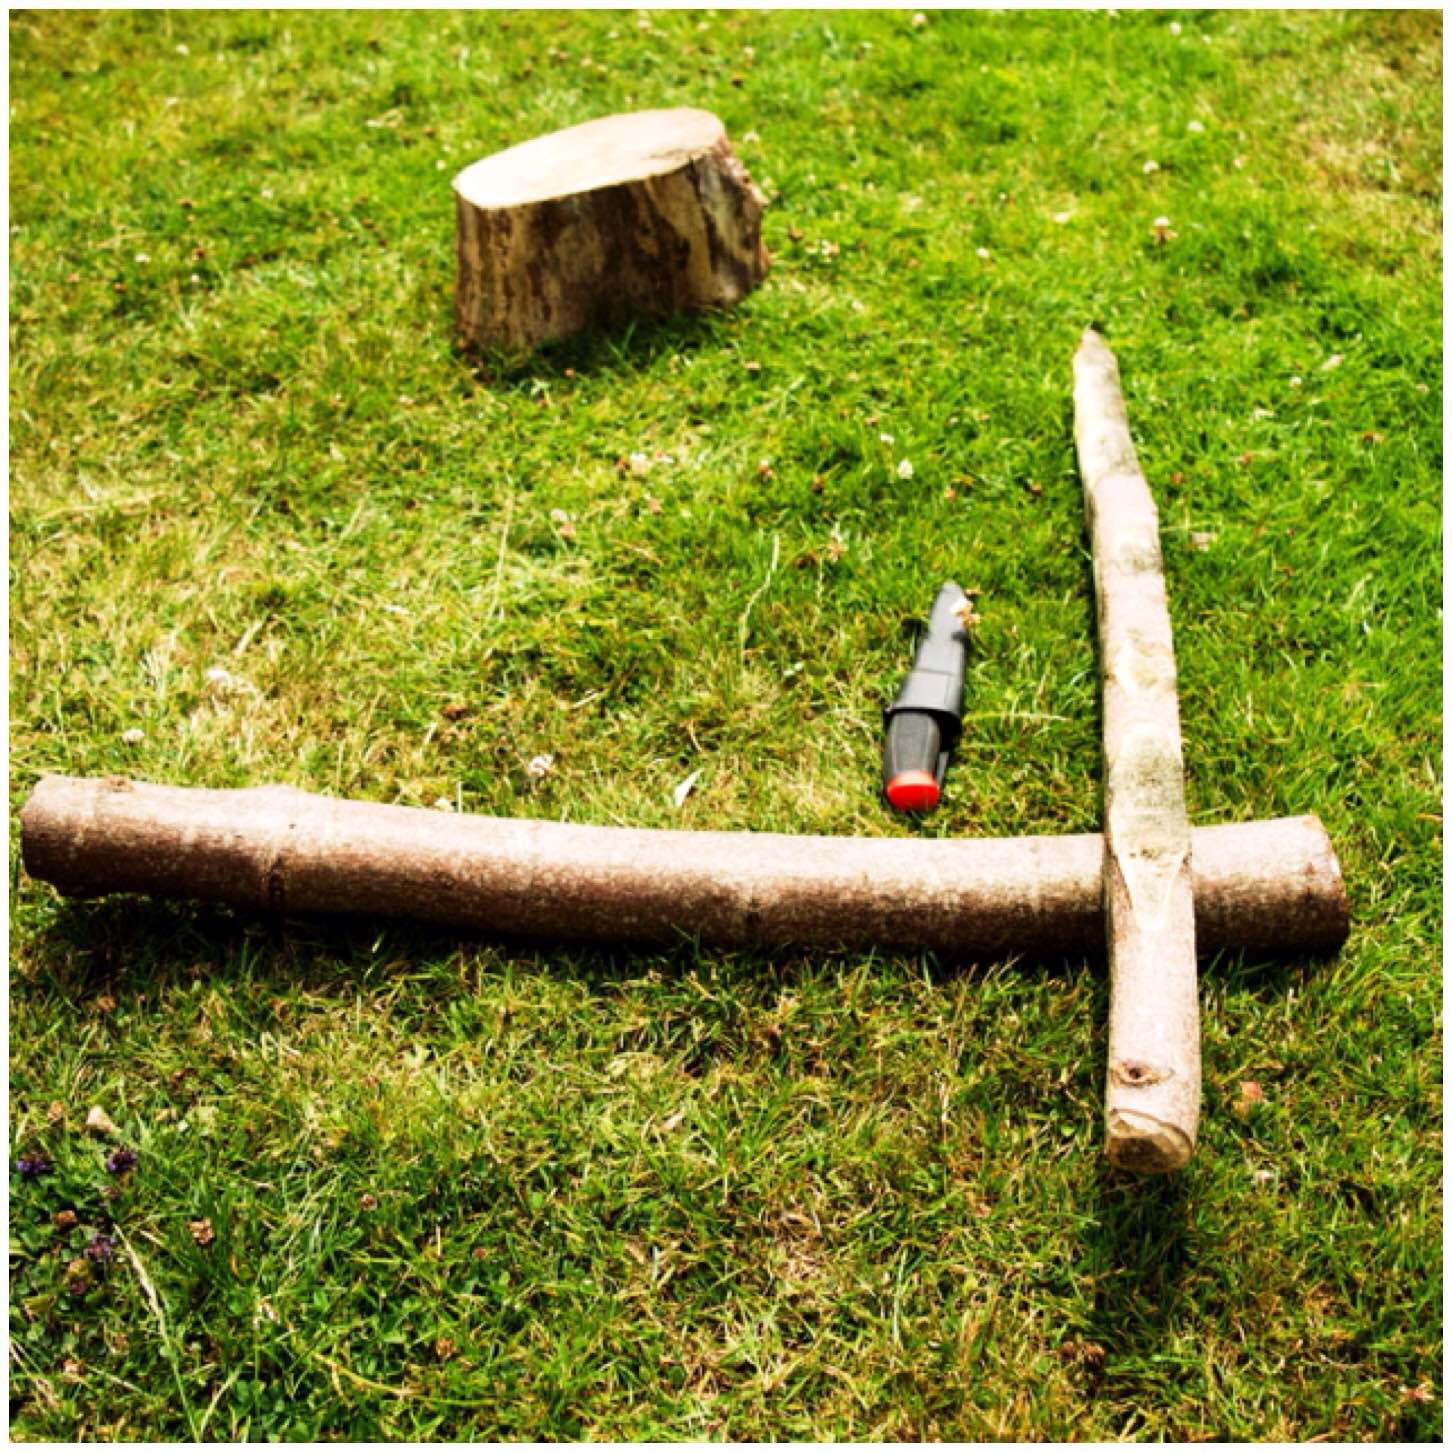
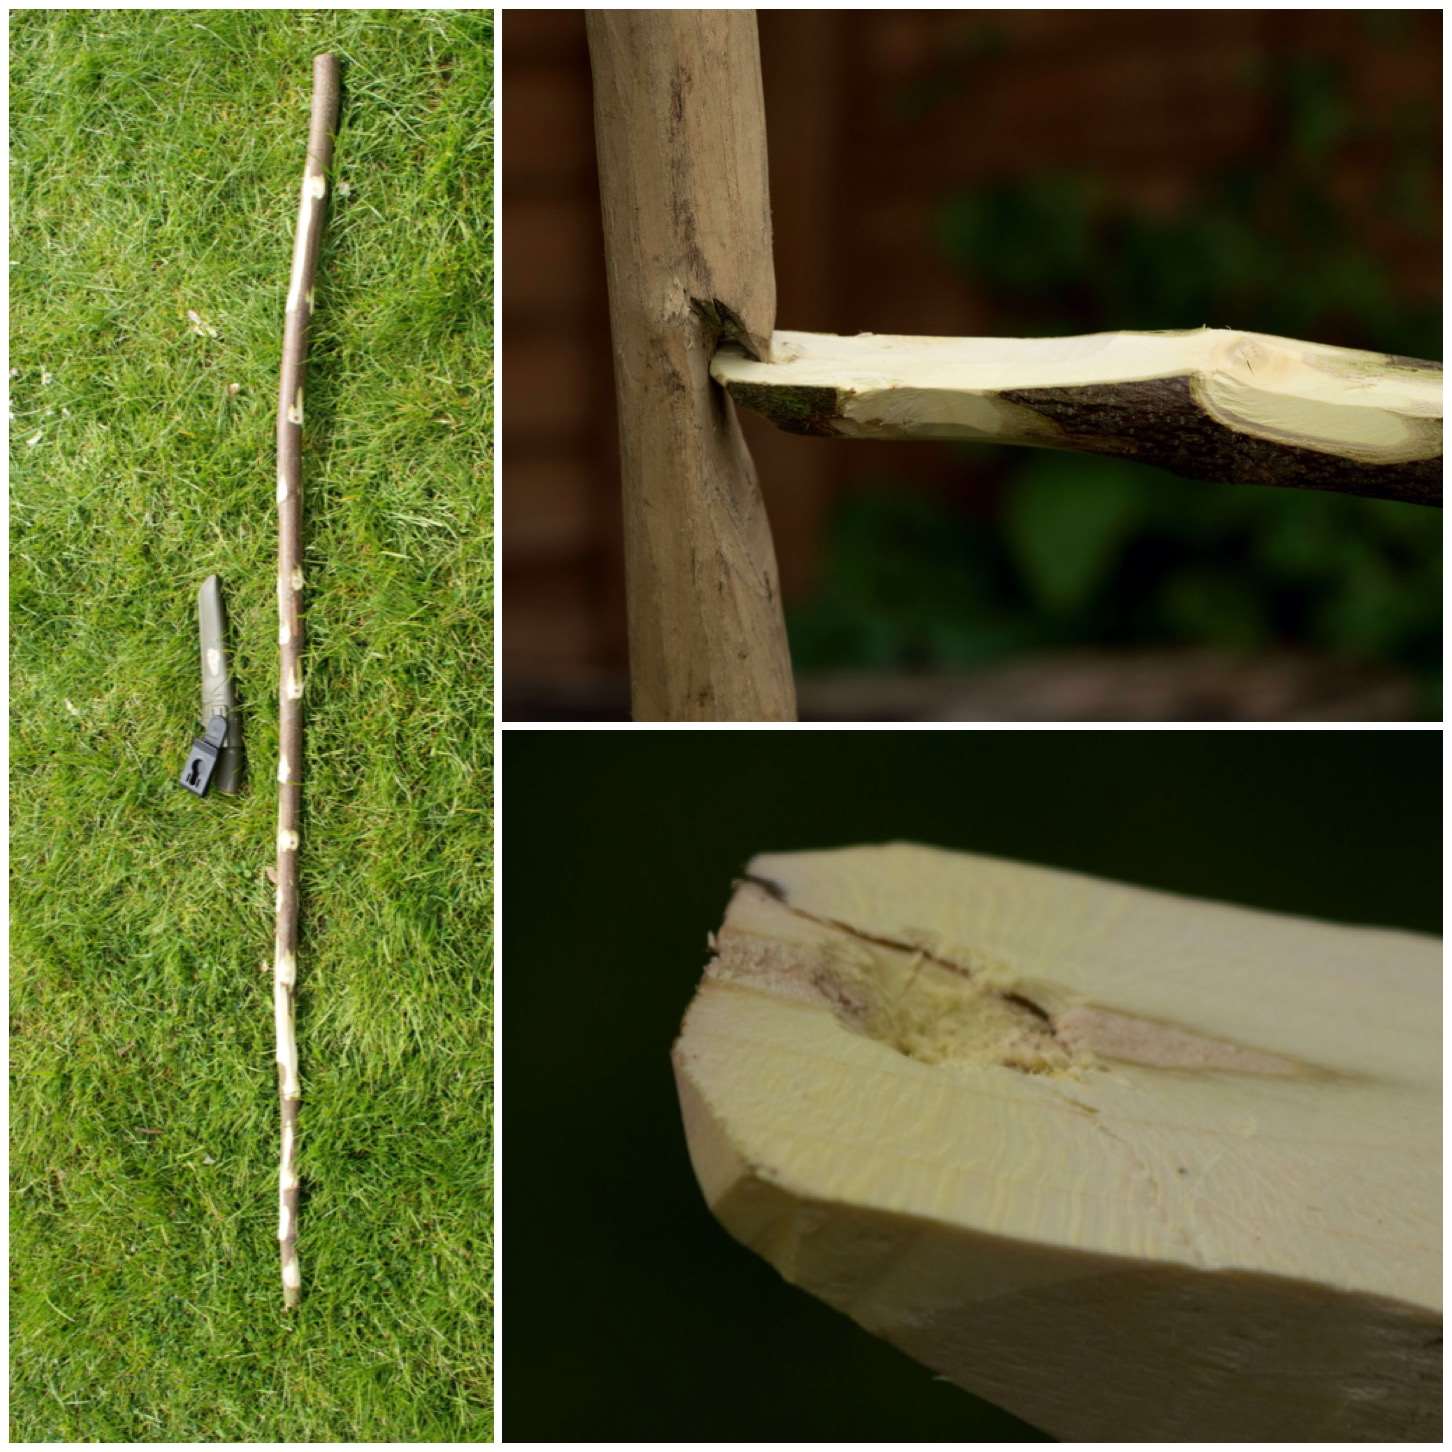
As usual I limited myself to the tools I would usually carry in my backpack, including a knife, saw and axe. A pen or pencil is handy for this project as well.
I’ve had a piece of birch stored in my garage for over a year however it had absorbed moisture over the winter and was fairly damp in its core.
Tools
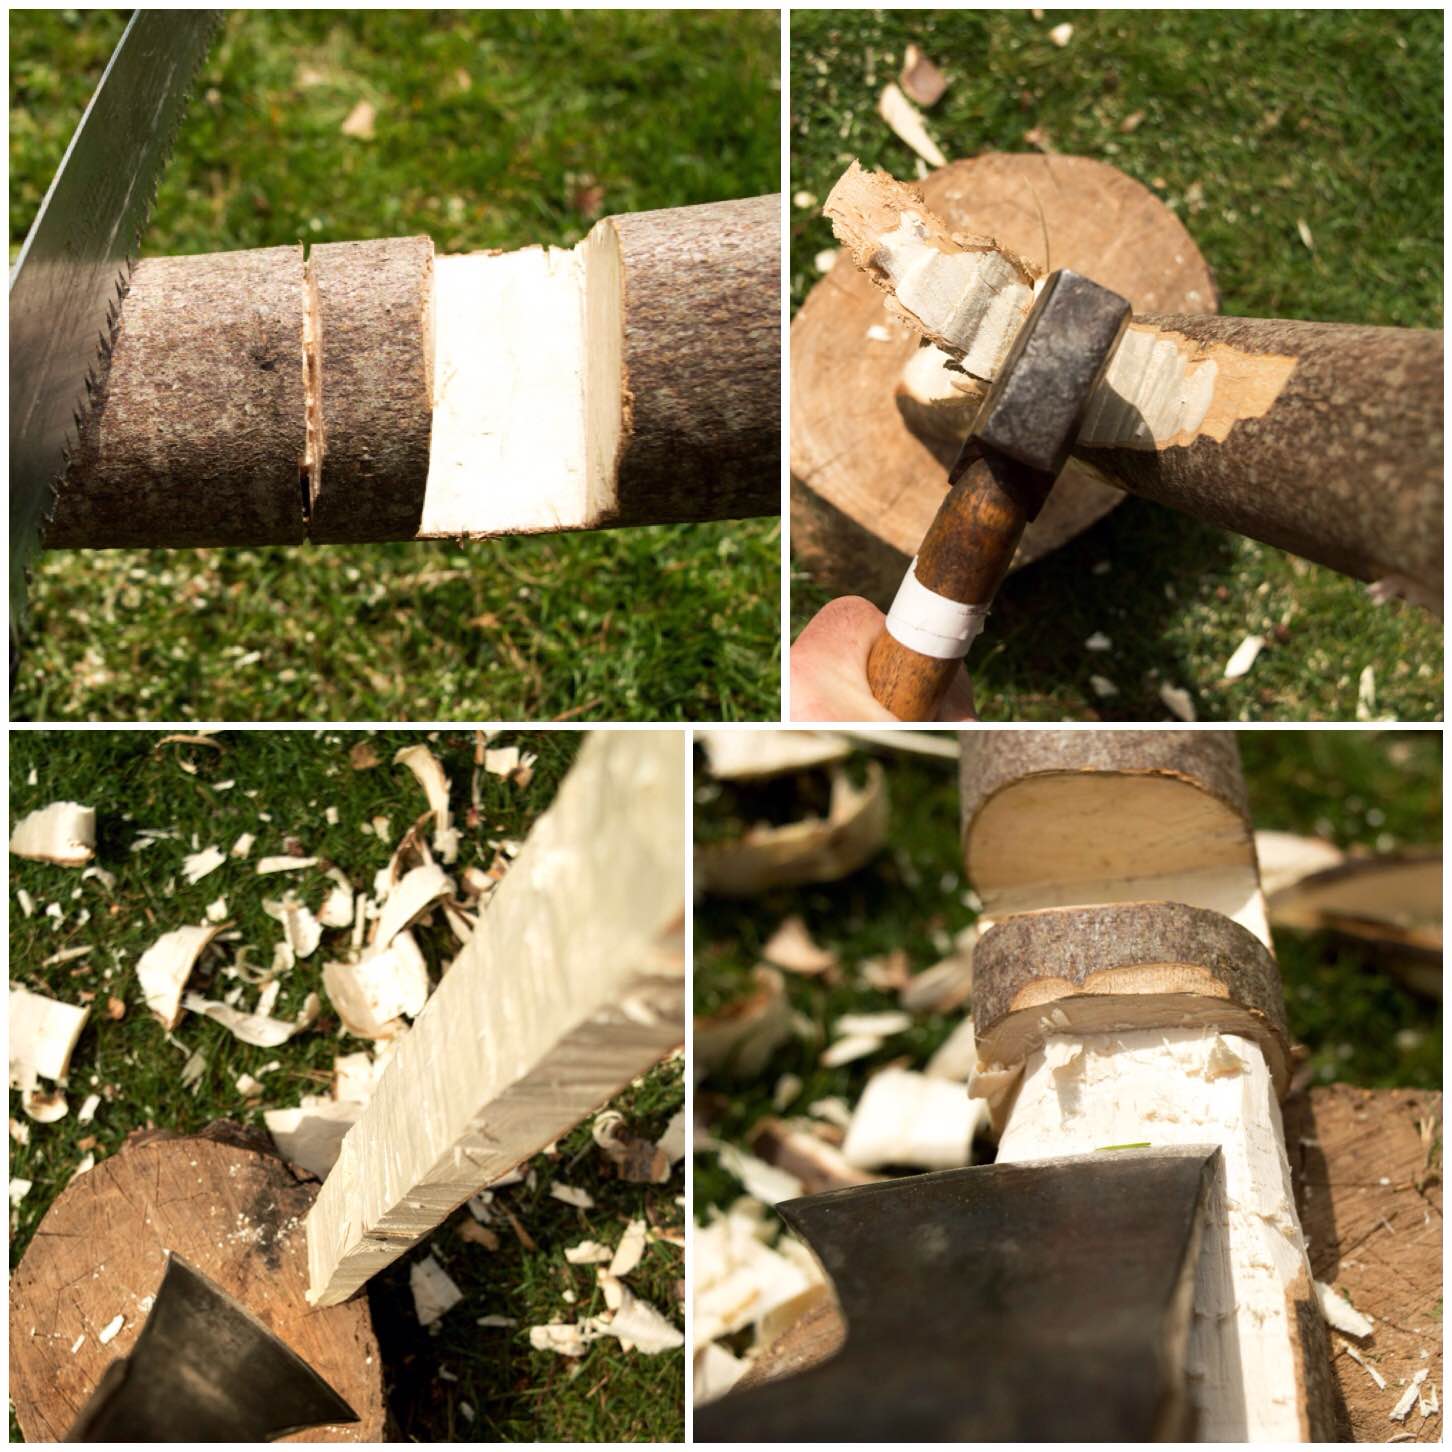
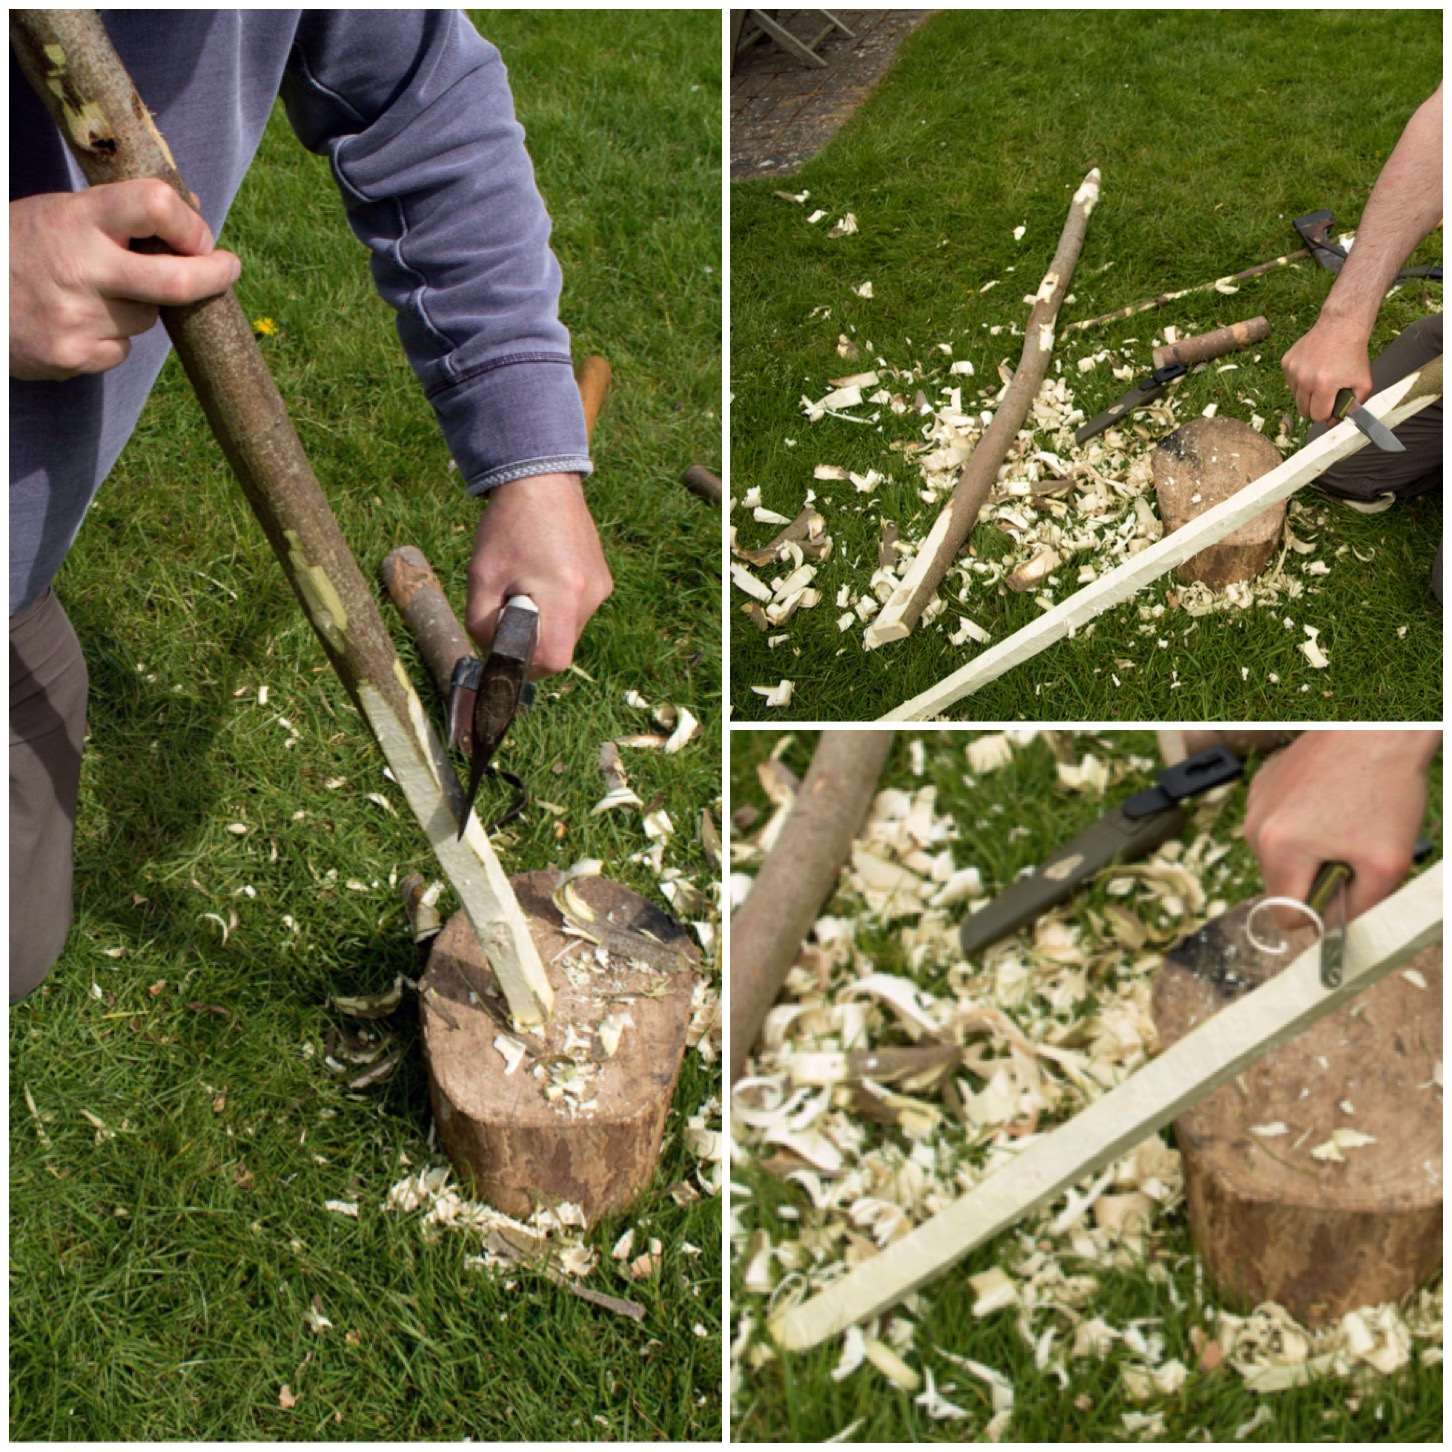
Splitting Out
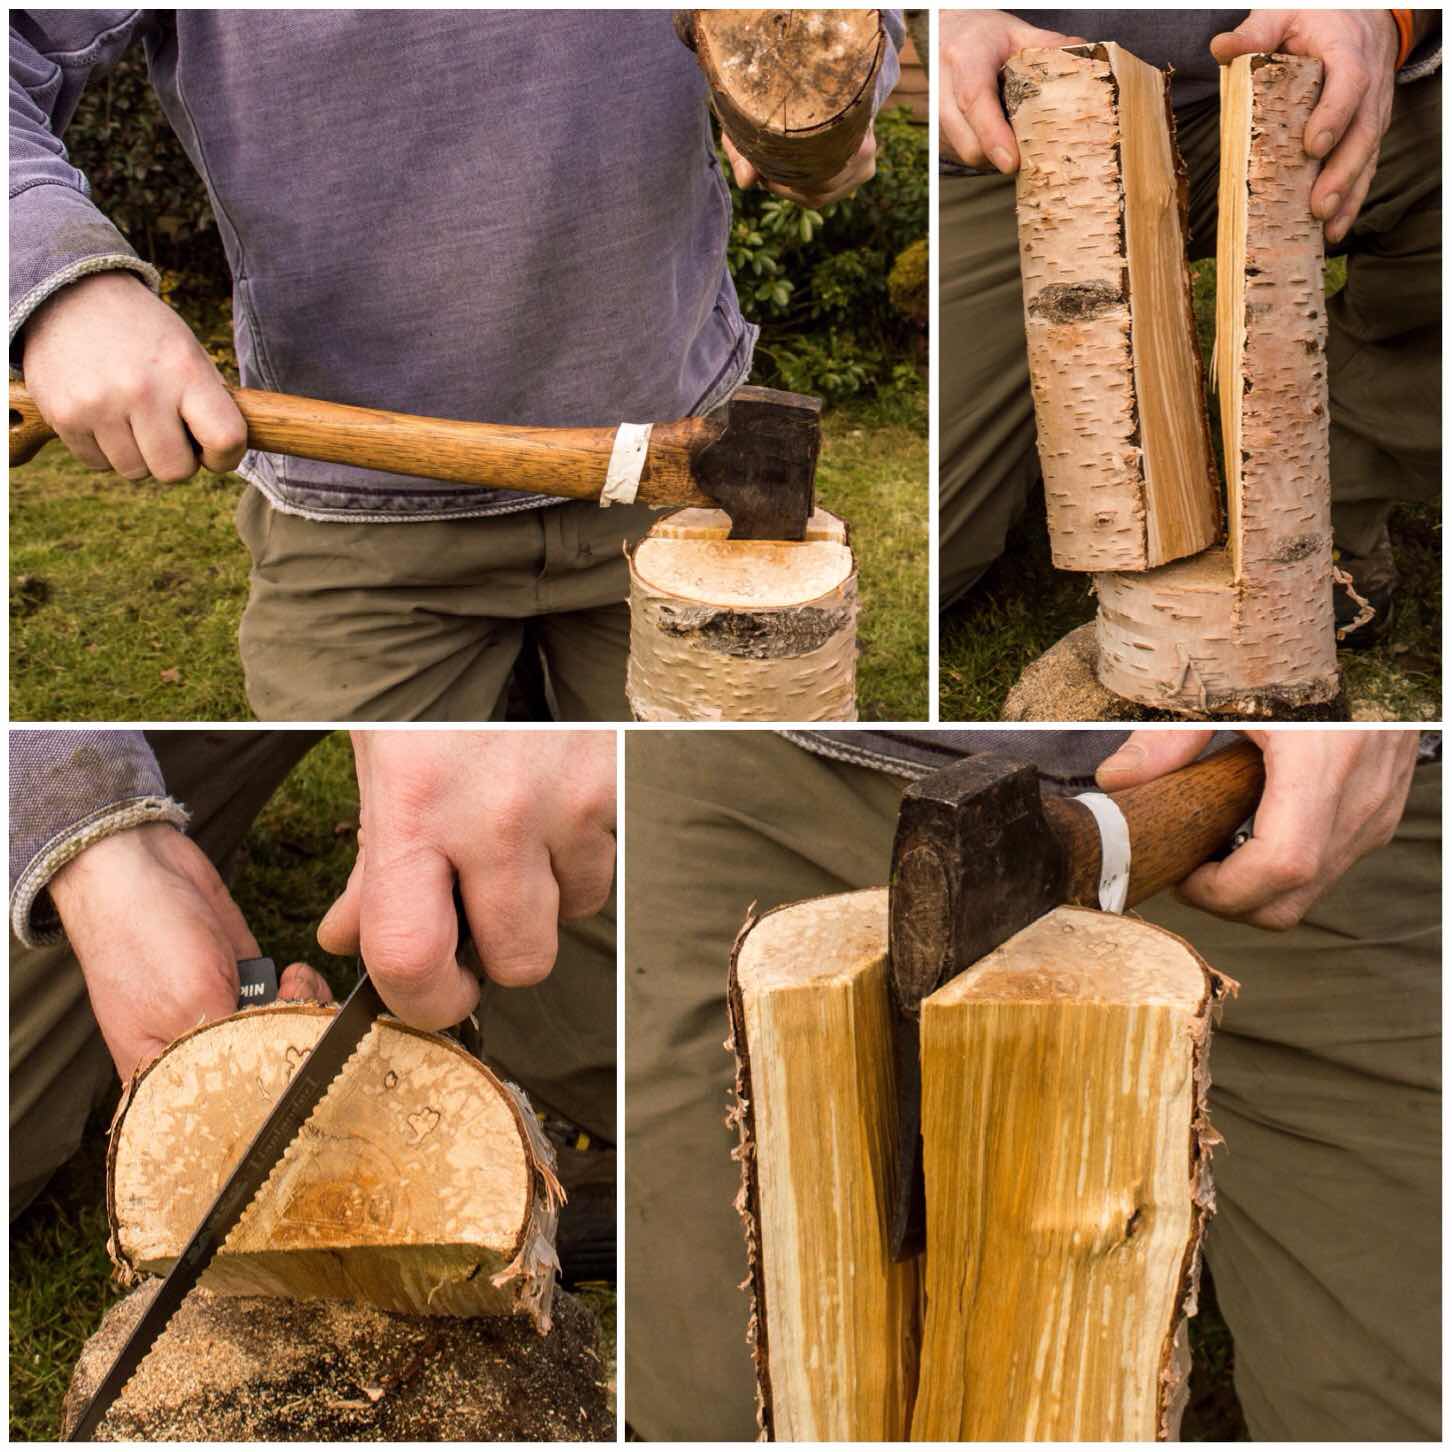
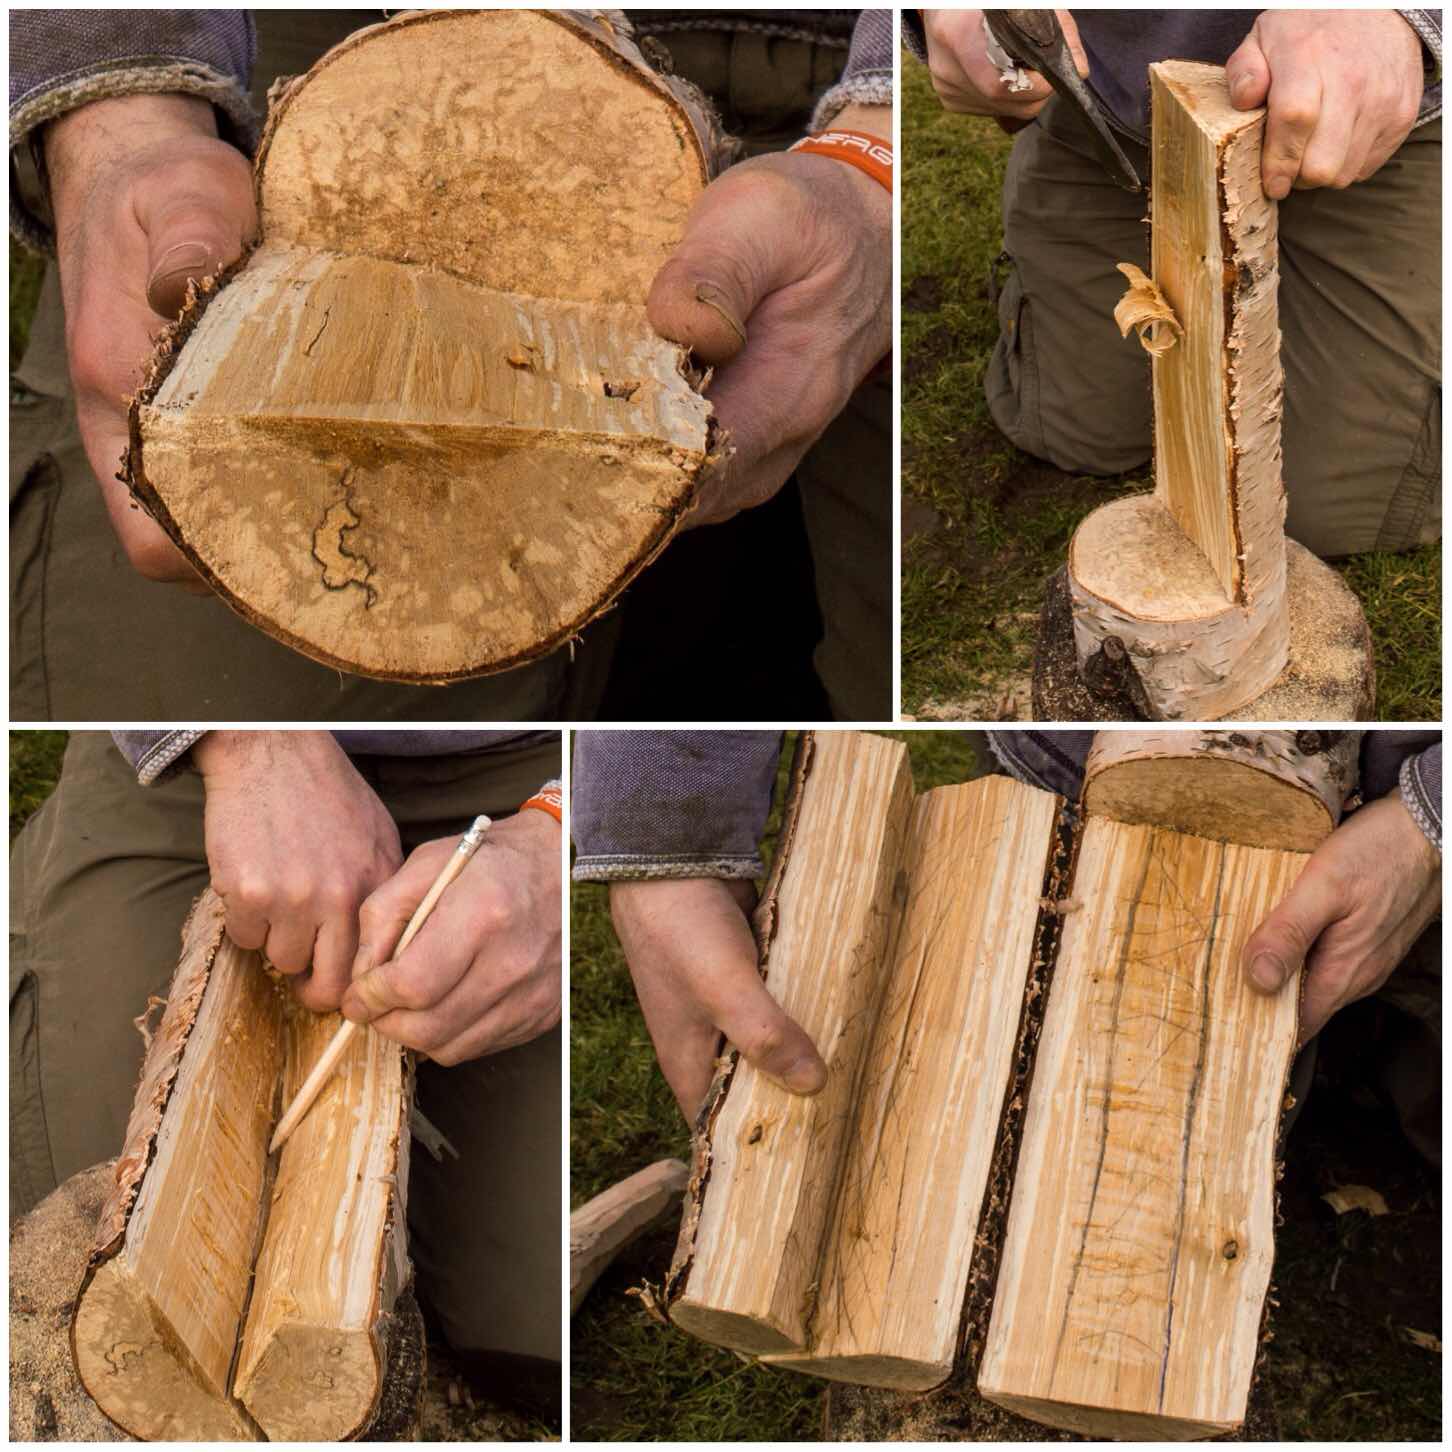
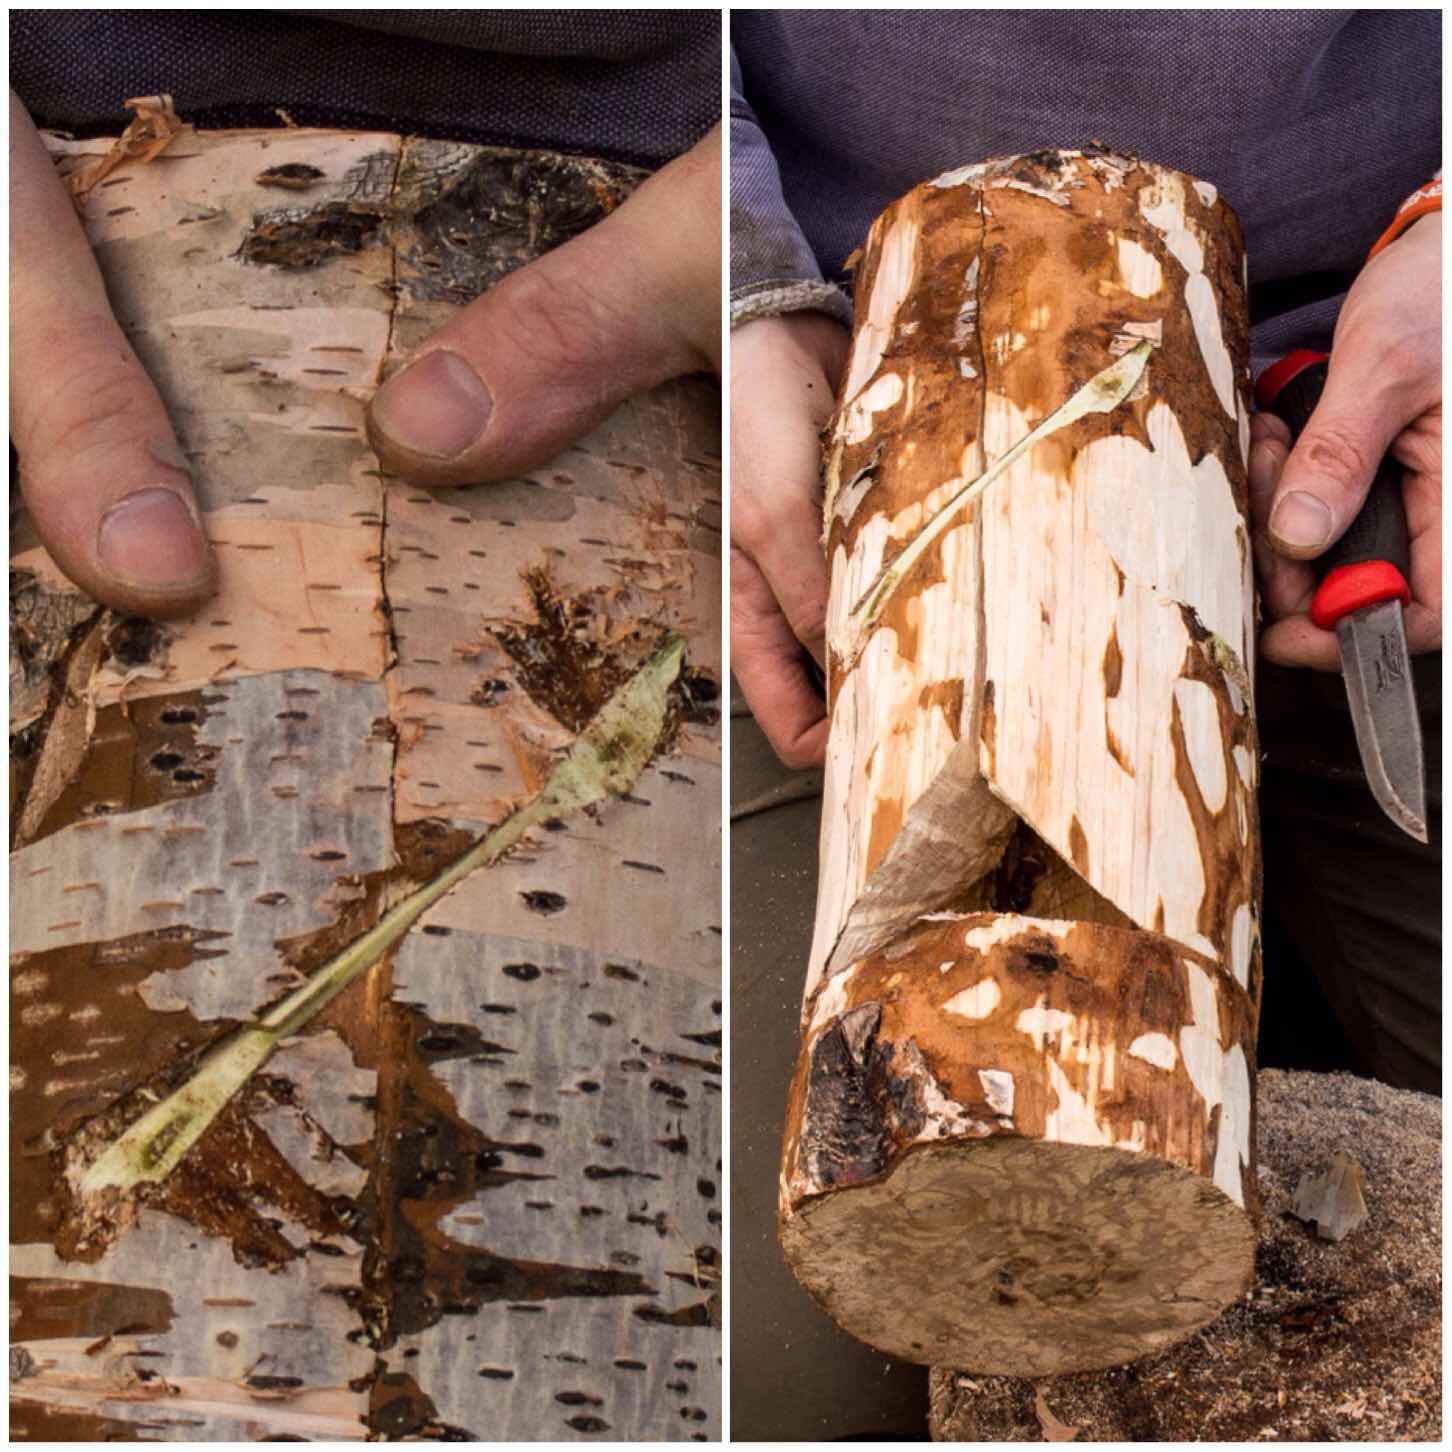
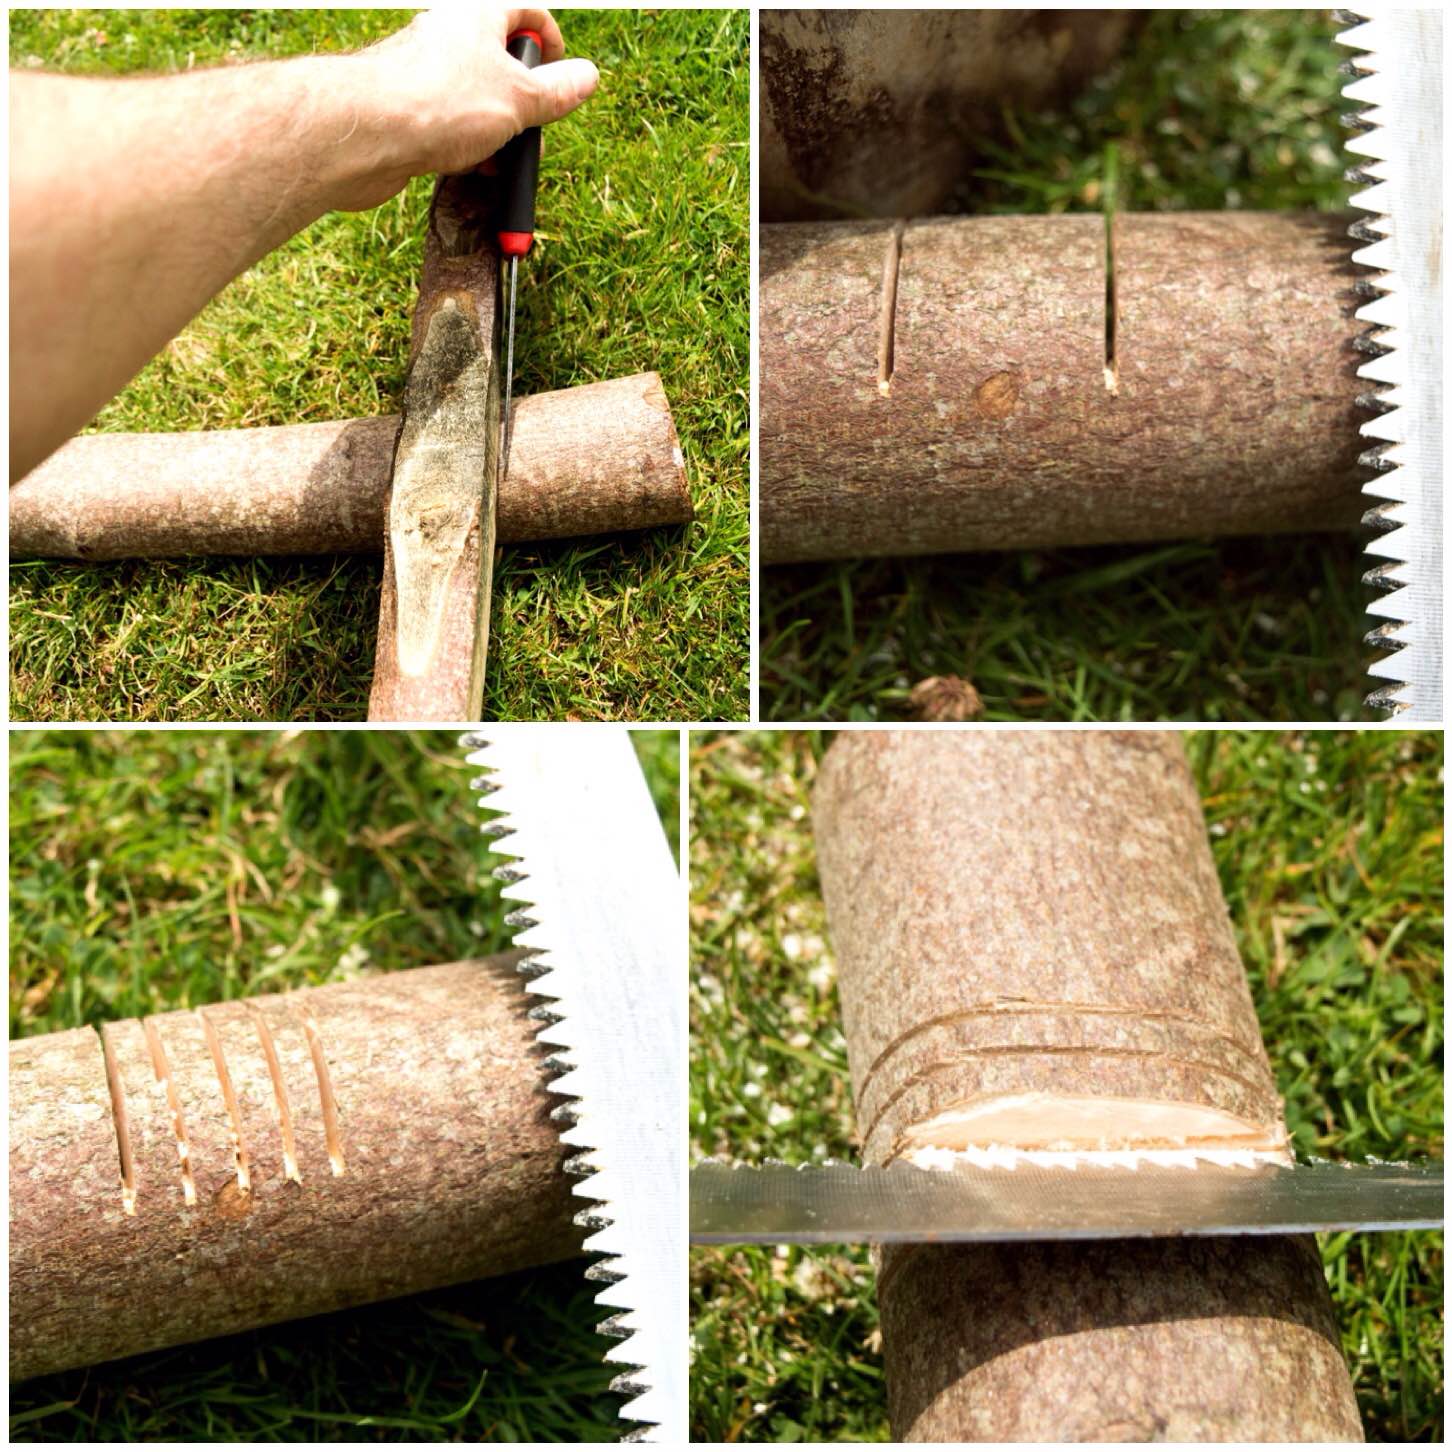
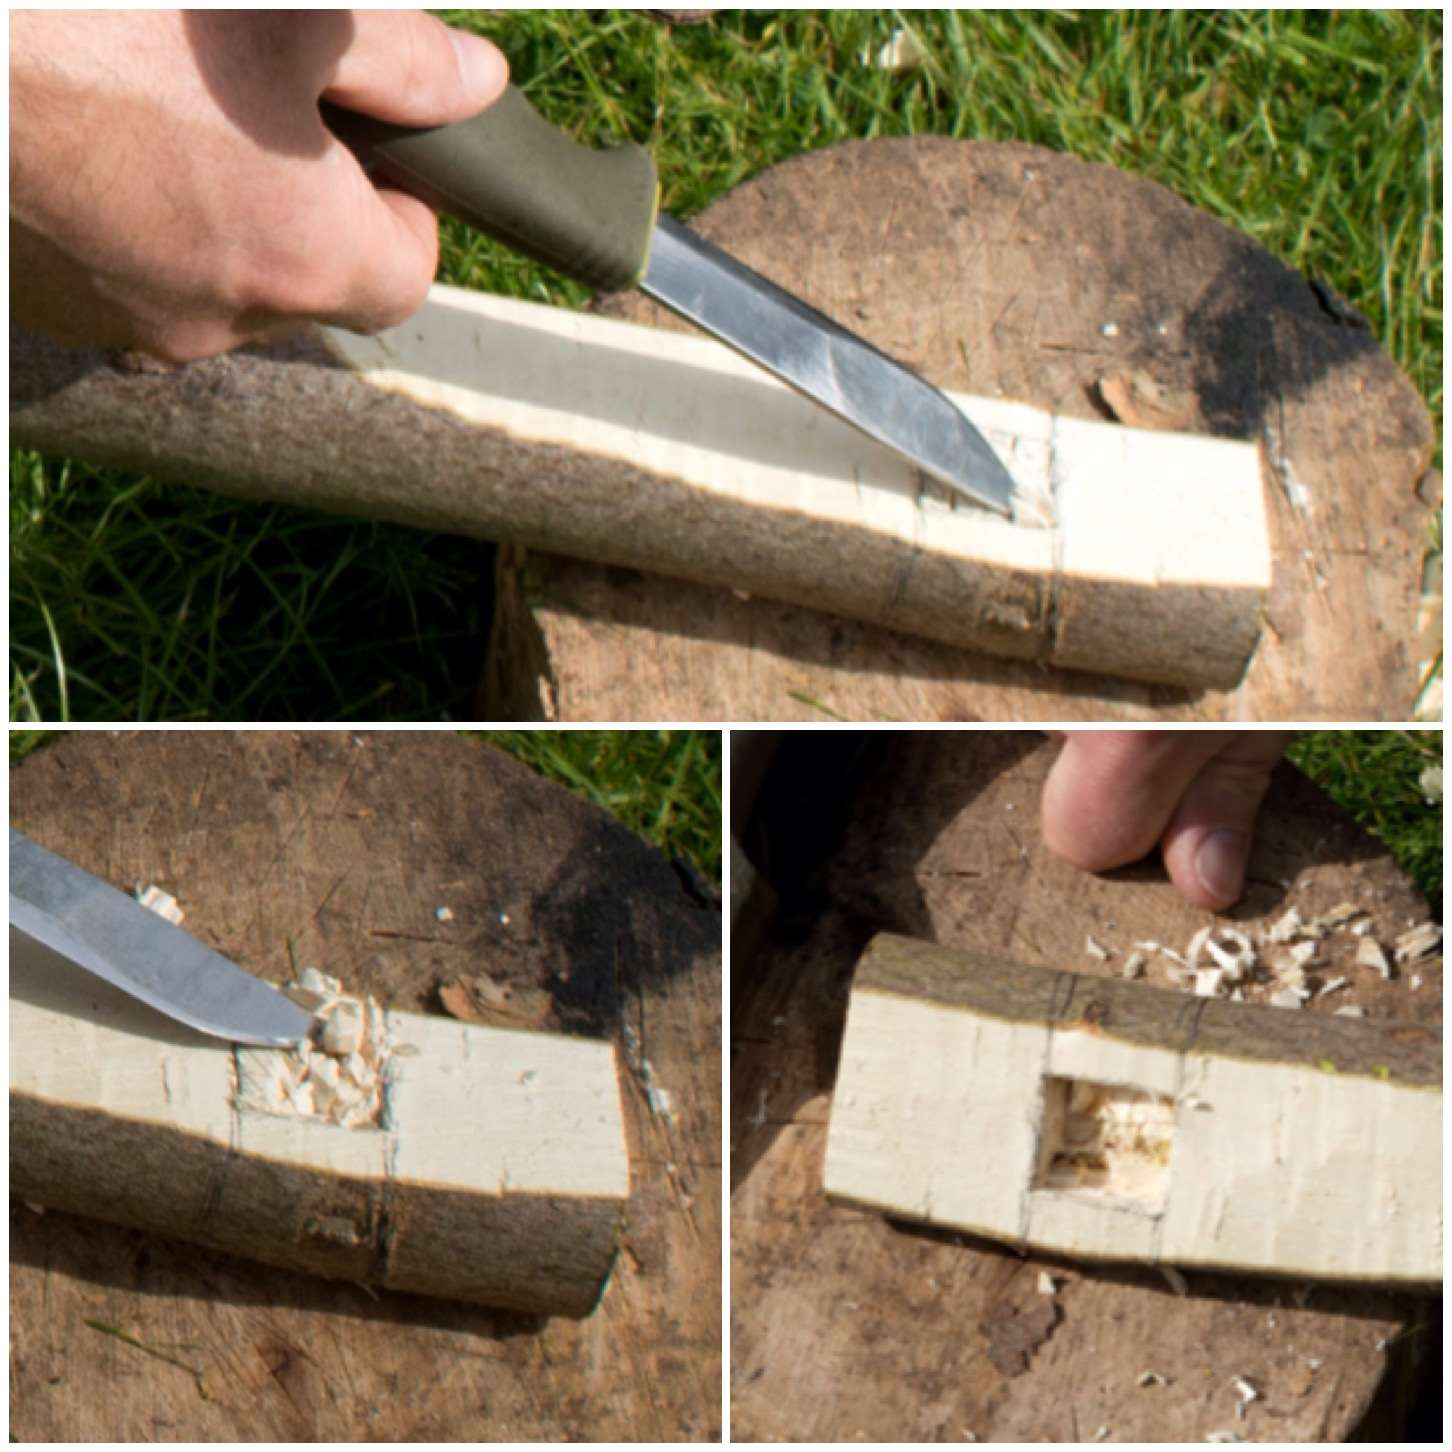
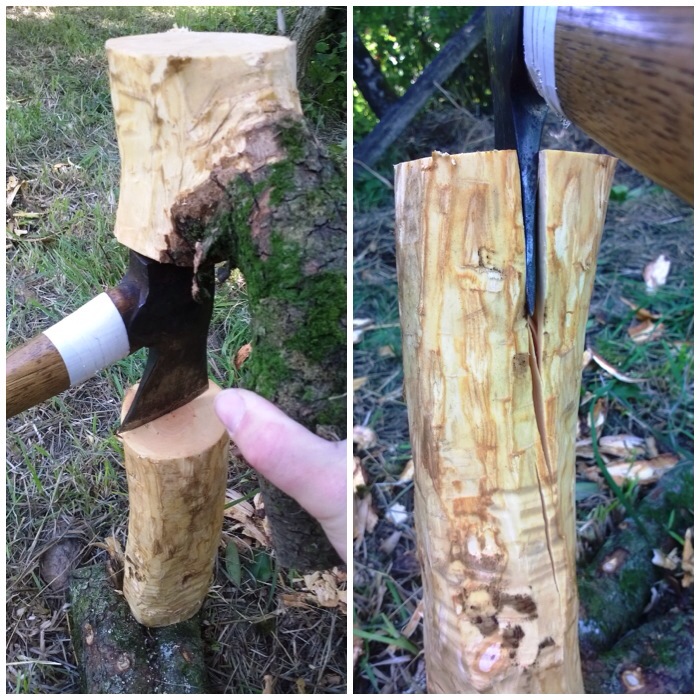
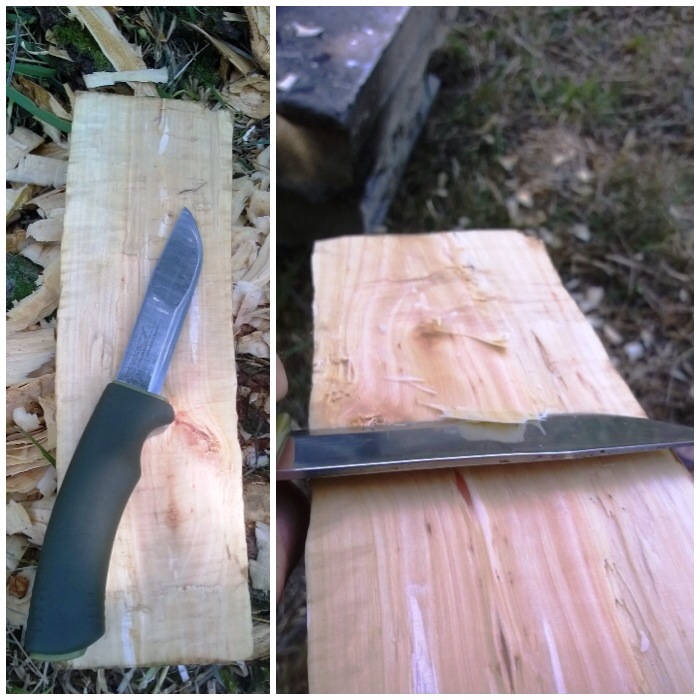
This style of log rocket requires you to put a stop cut into the bottom of the log to about two thirds of its width. You can see in the top left picture below the cut is about 10 to 15 cms from what will be the bottom of the stove.
The top right picture below shoes you how far I put my stop cut into the log. The bottom two pictures show me marking out with my saw the approximate area I would be battoning out.
Bottom cut and marking out
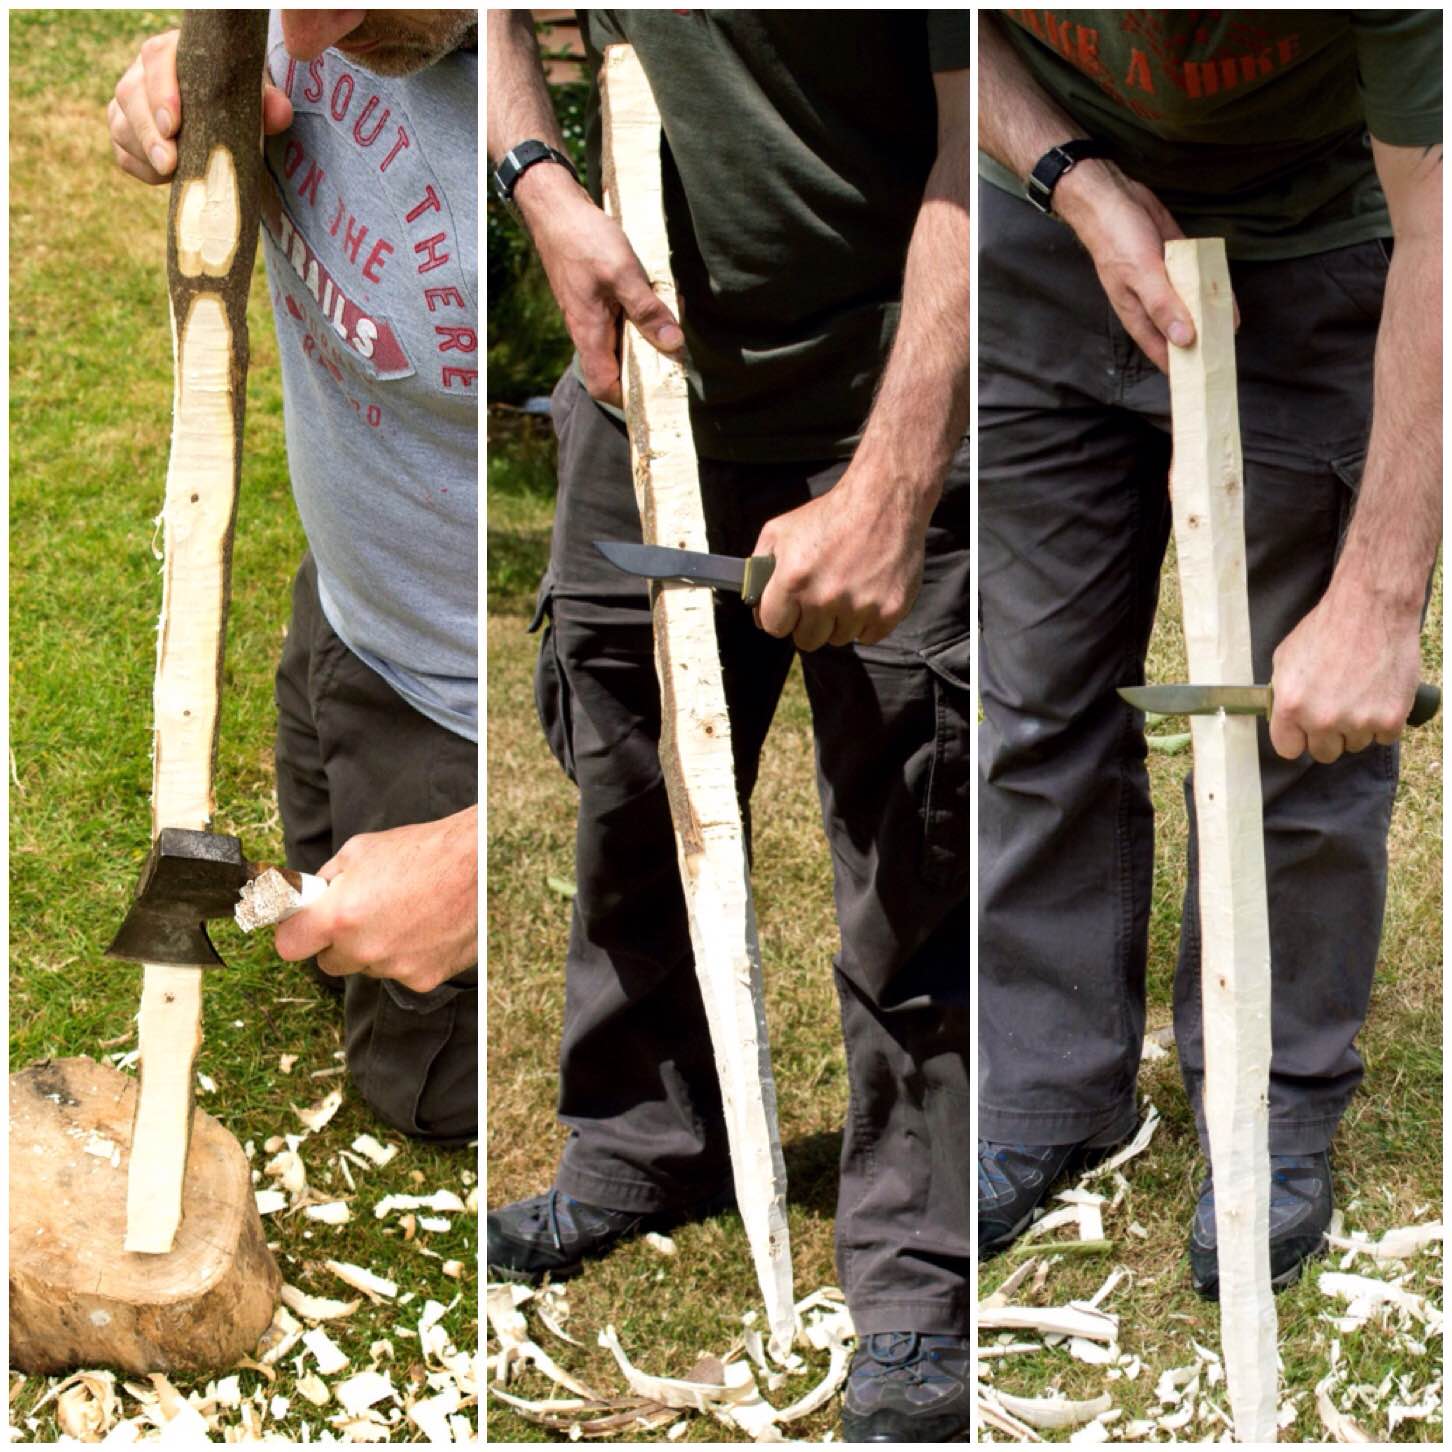
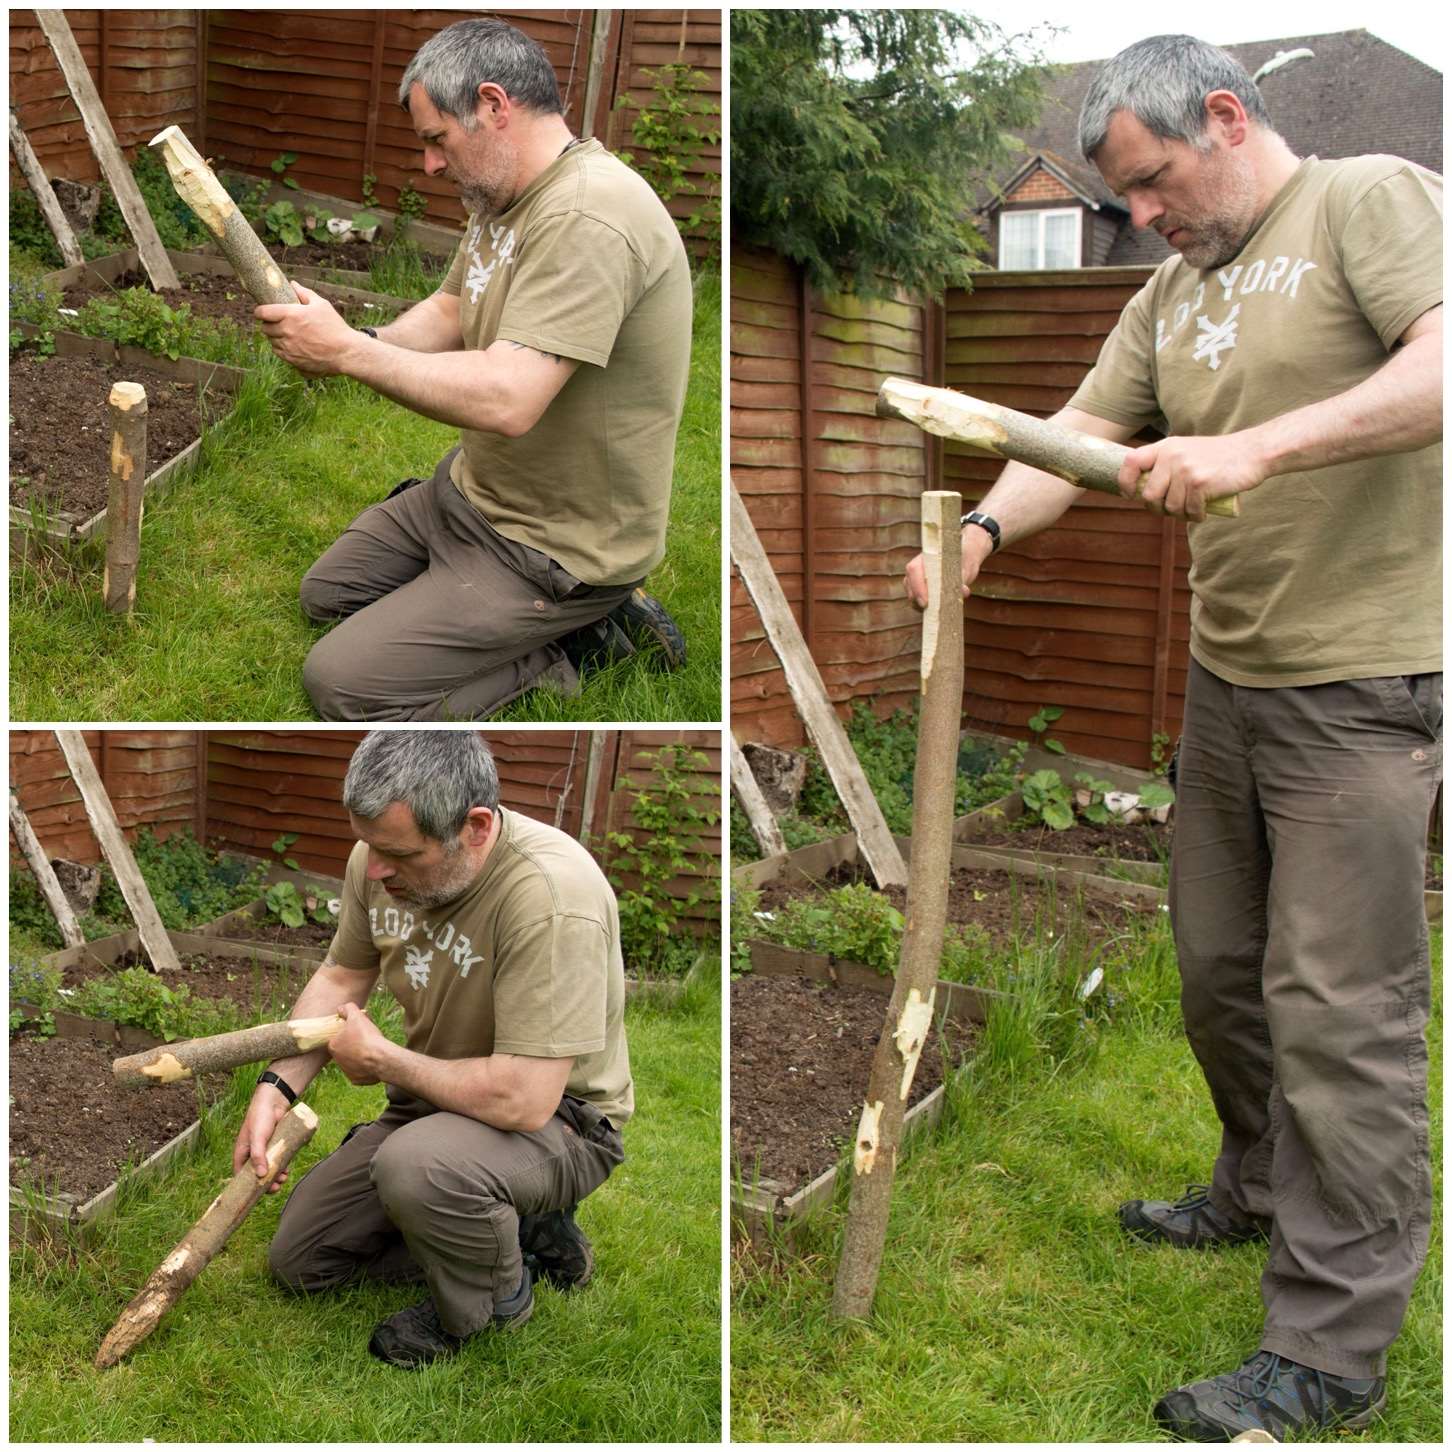
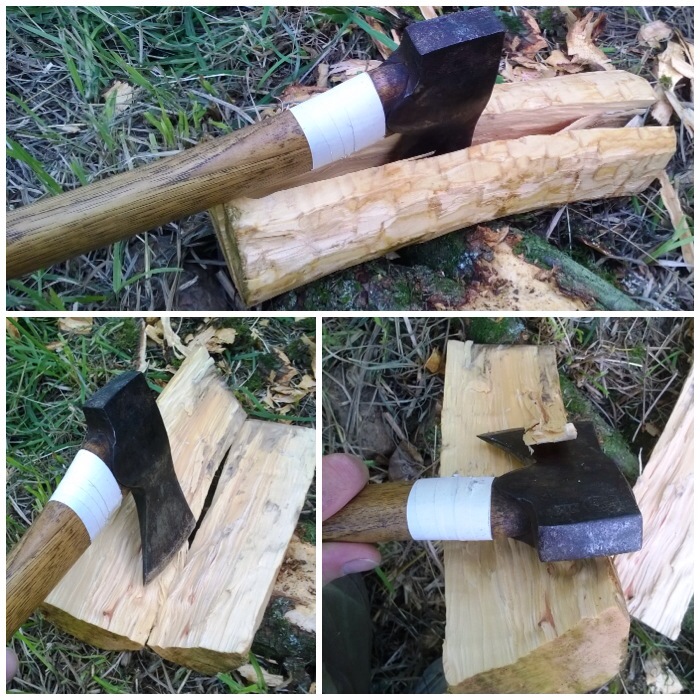
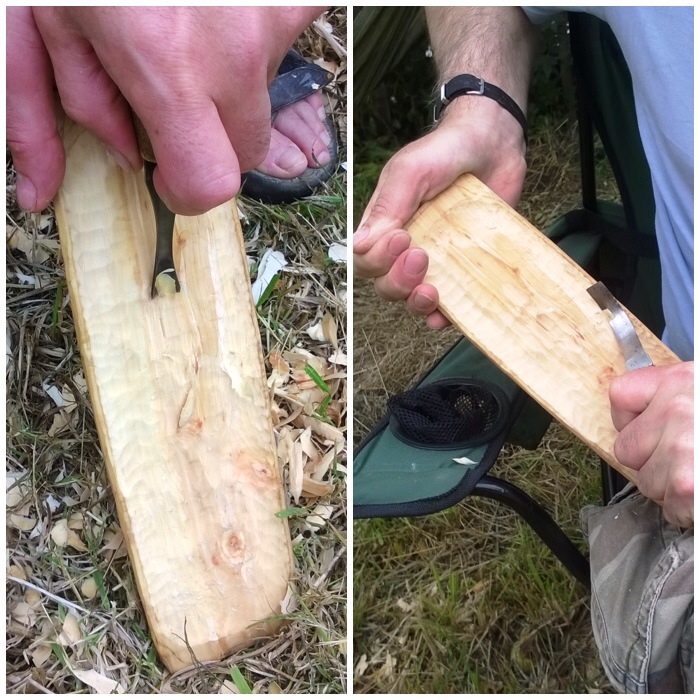
I used my axe and a large piece of wood to batton out the the wood. You can see the shape of the stove at this stage with one segment in an inverted ‘L’ shape (Segment 1) and a smaller piece (Segment 2).
The bottom two photos show me marking out the smaller piece for further splitting. This piece is not split exactly in two as this configuration allows you to form the chimney very quickly.
Splitting
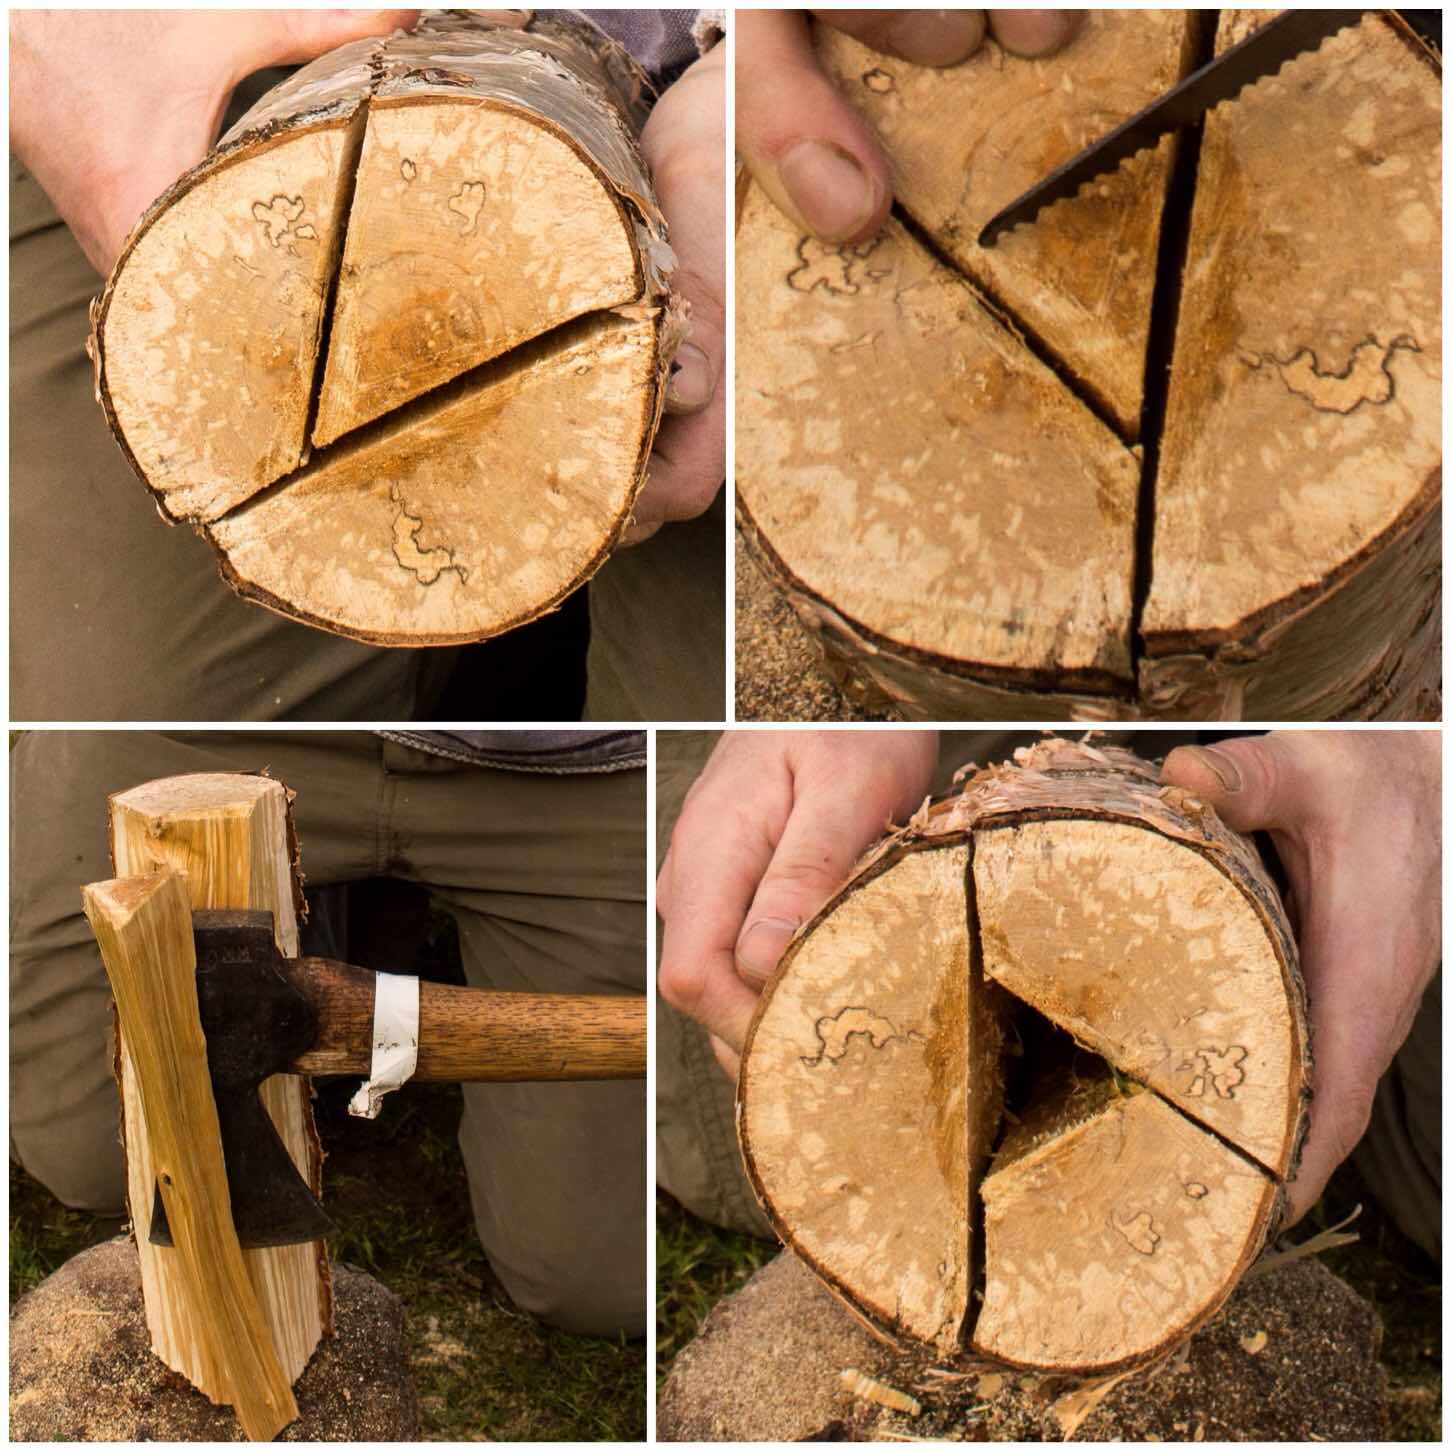
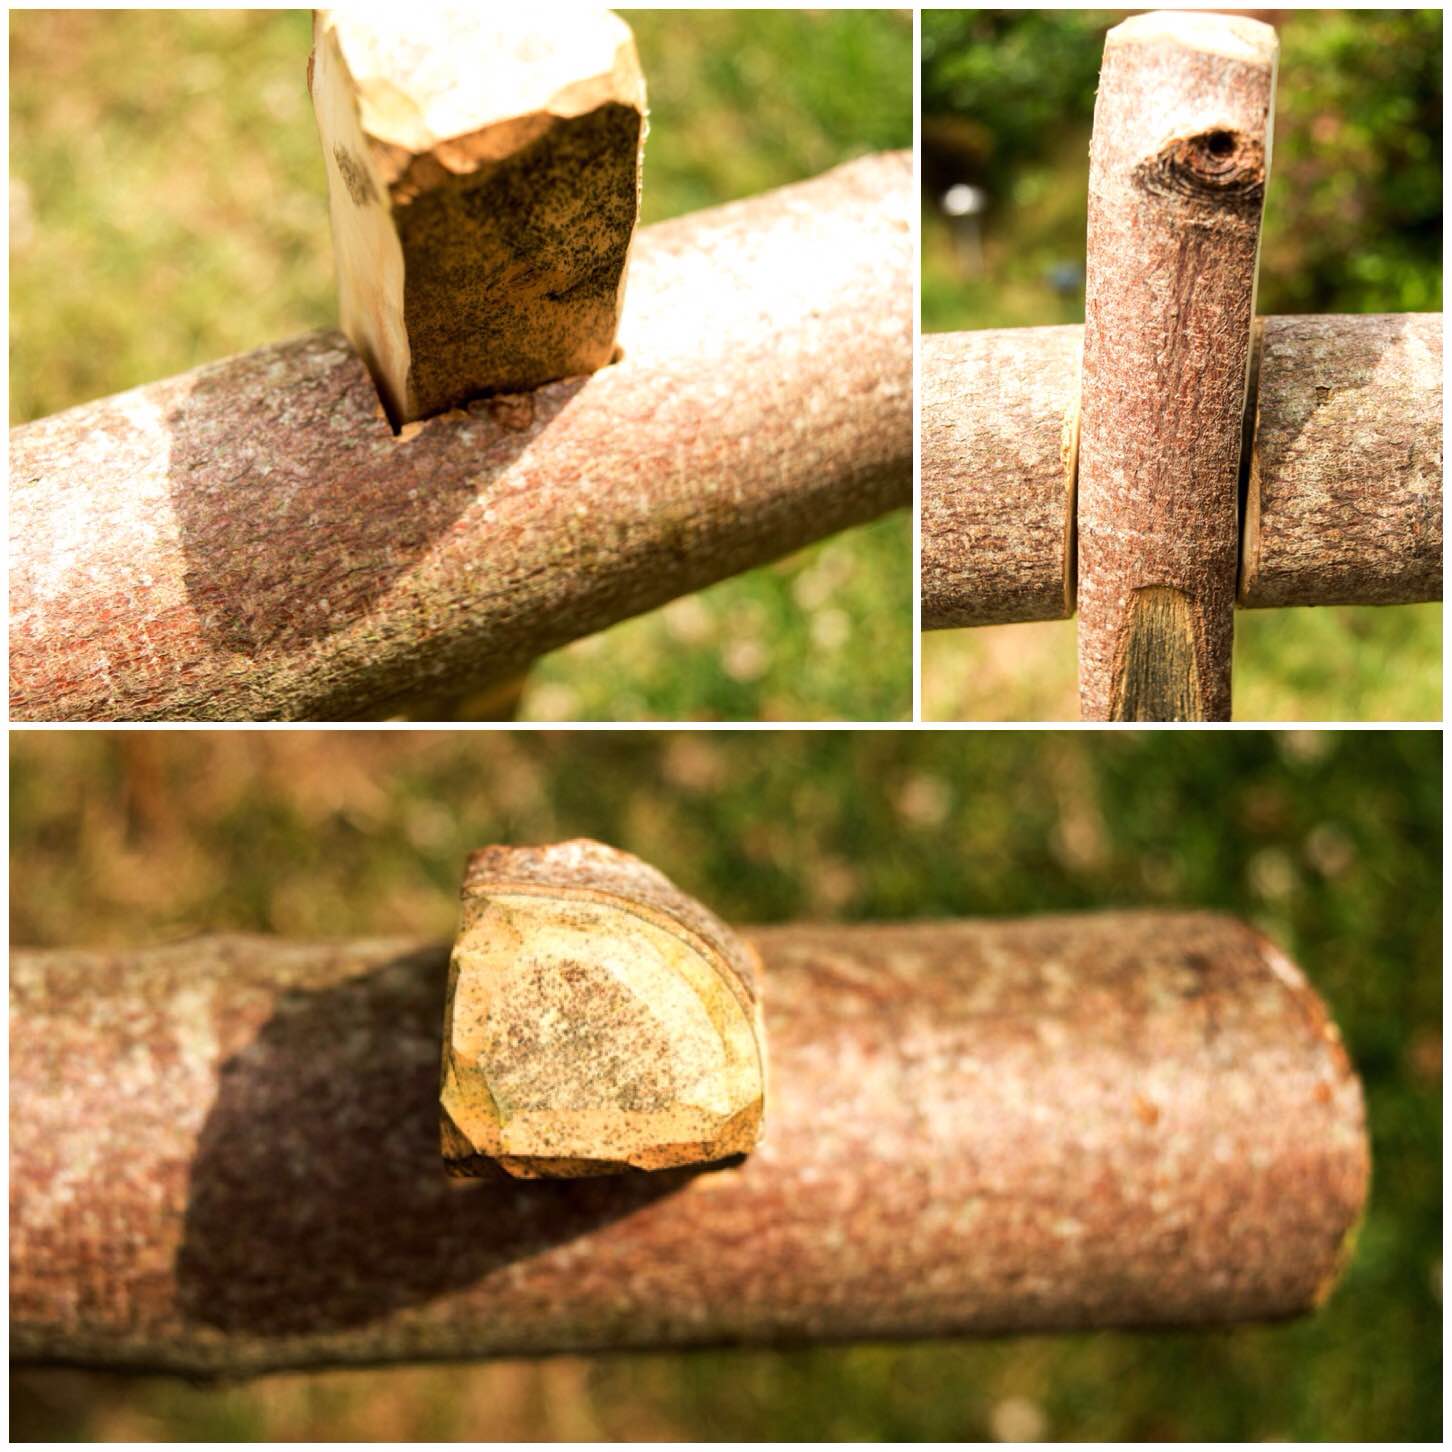
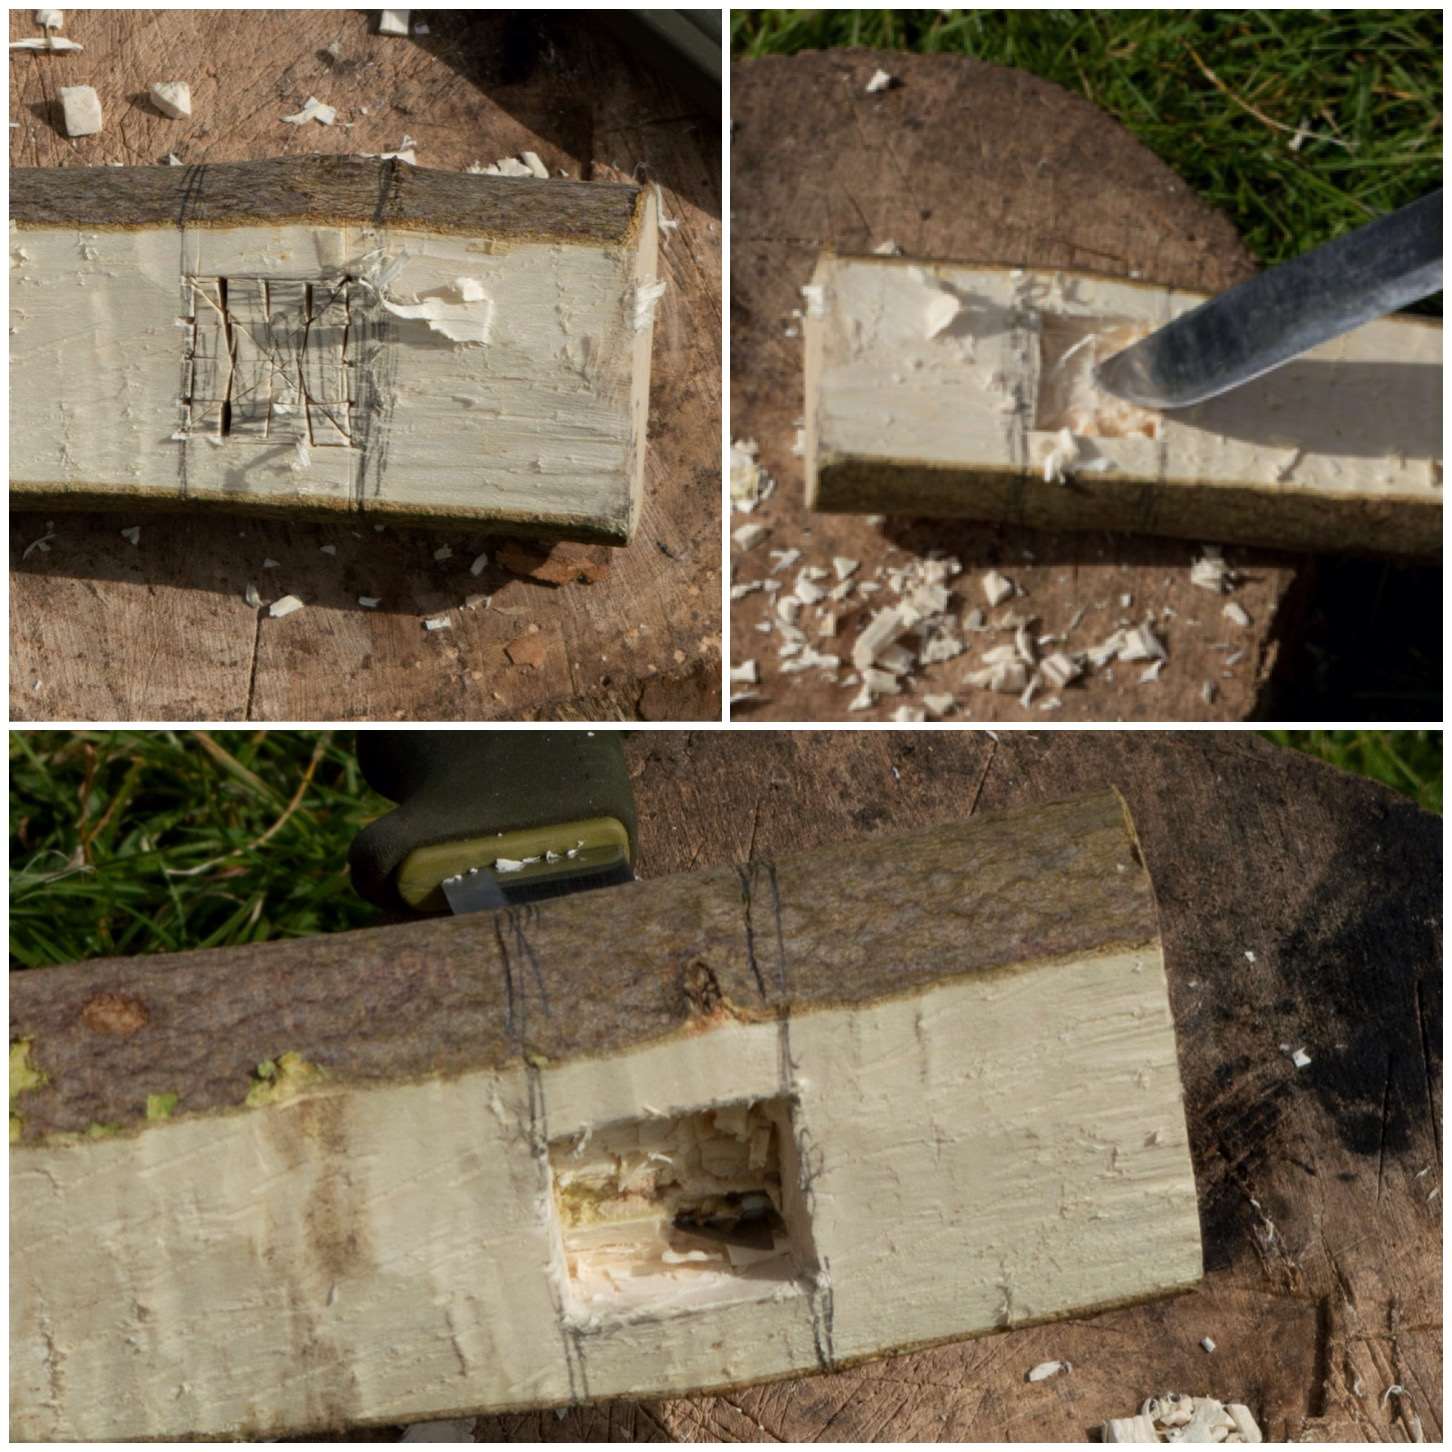
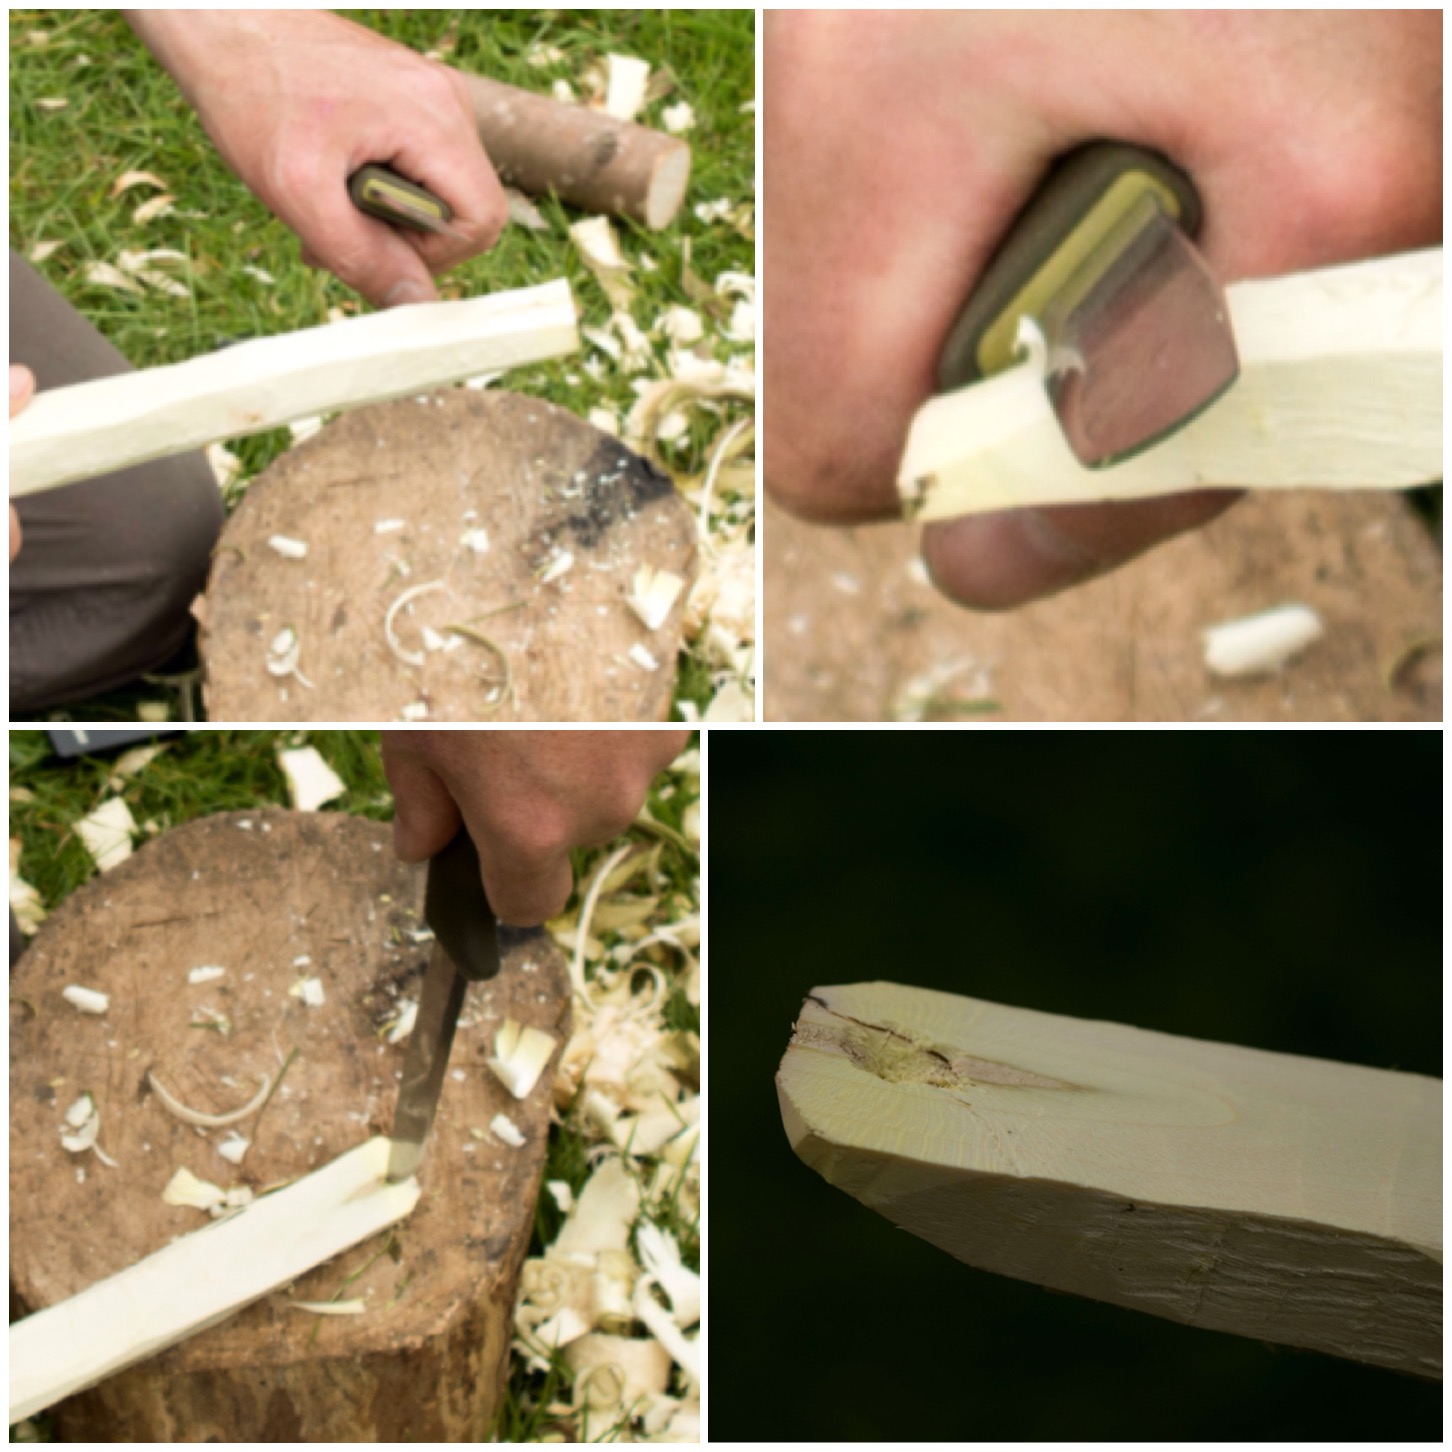
The Chimney
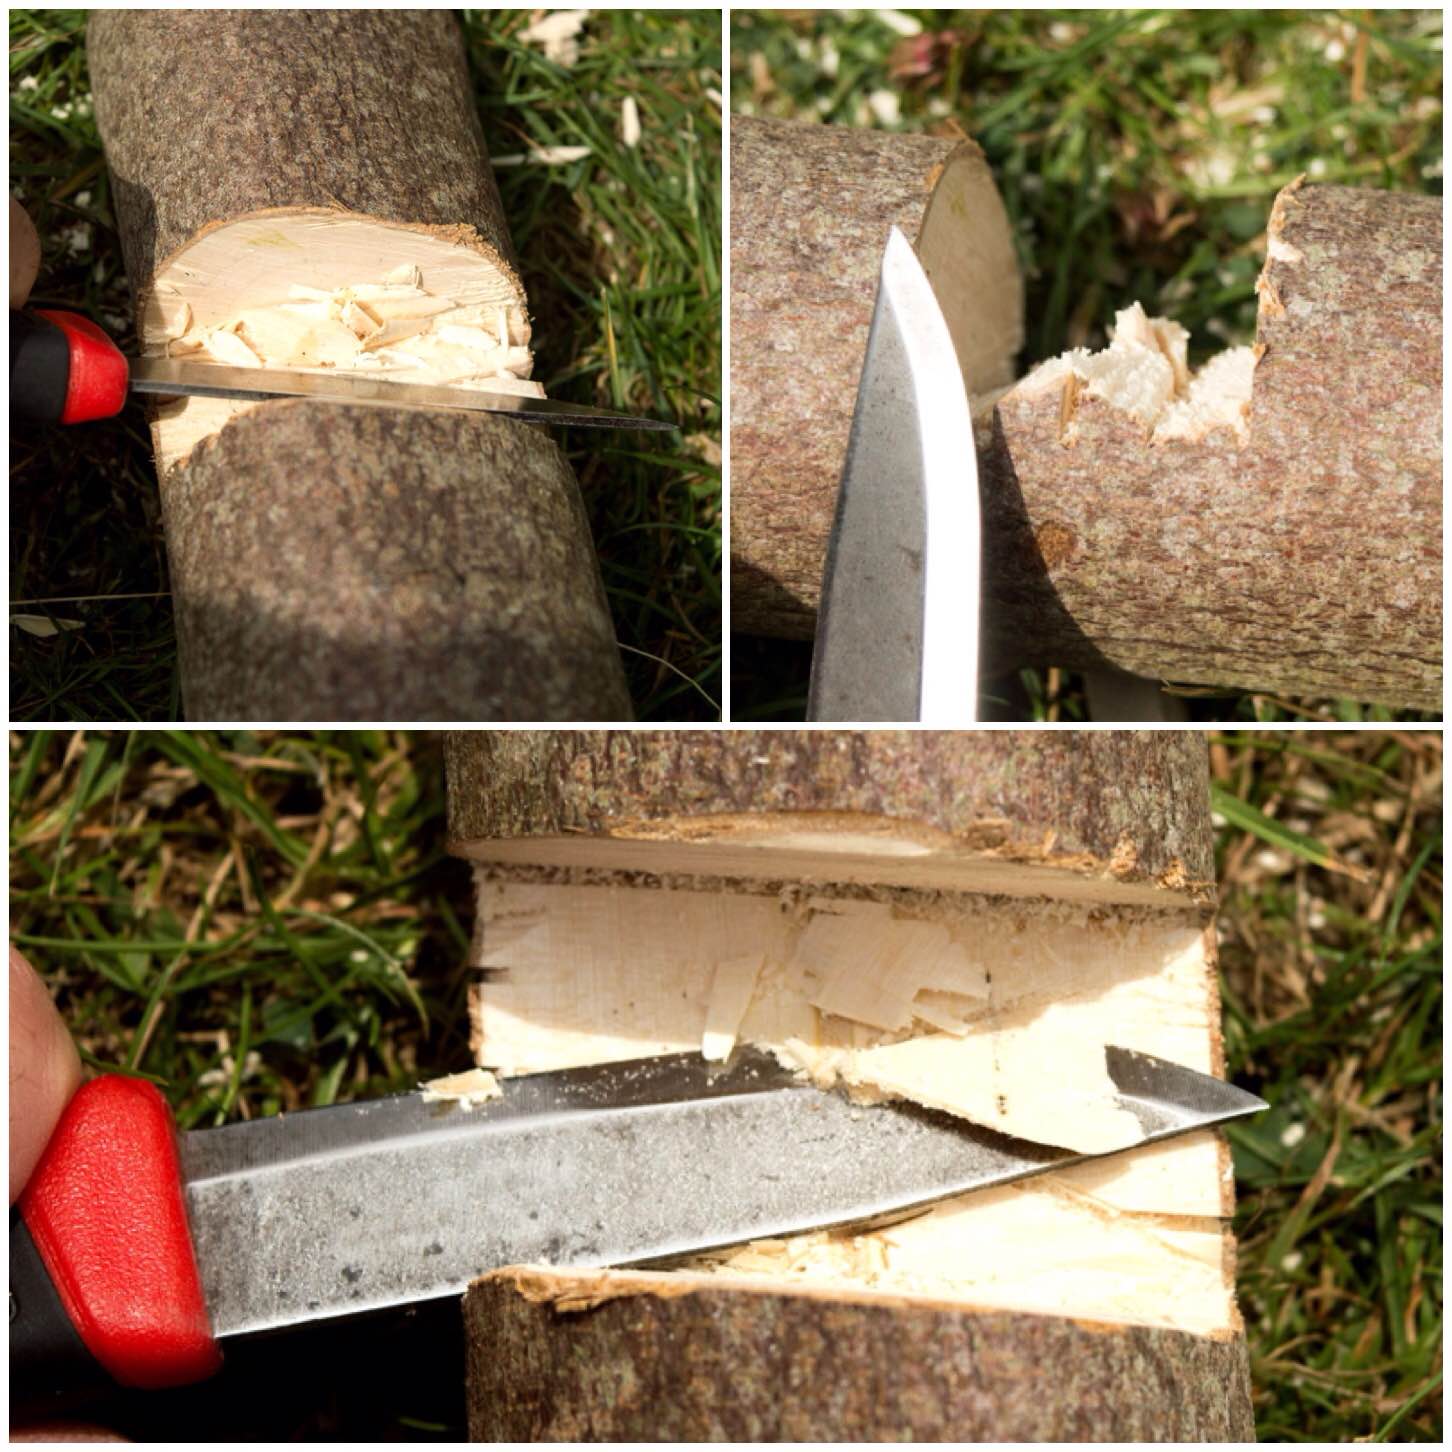
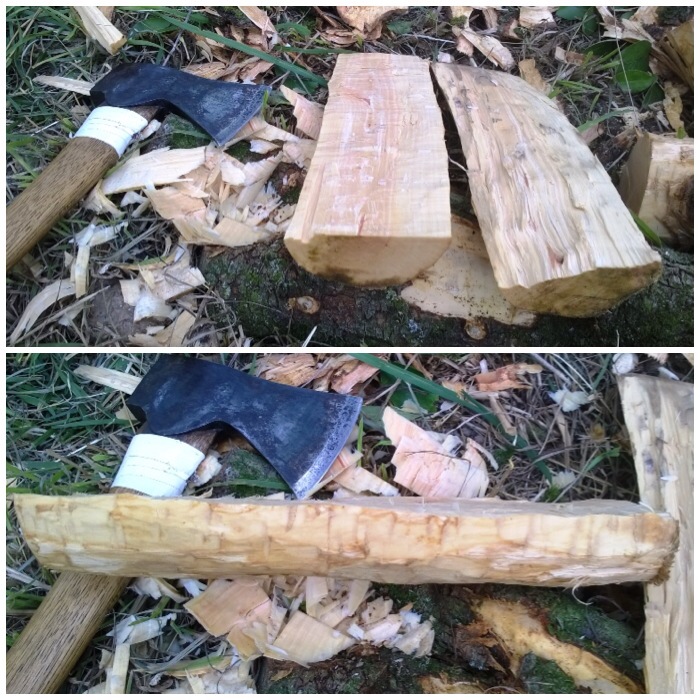
Below you can see the shape of all the pieces when they are put back together . I then battoned off the tip of the larger piece from Segment 2 so that a chimney would be formed. This piece of battoned-out wood I further split into fine pieces to act as kindling for the stove.
The One Cut Chimney
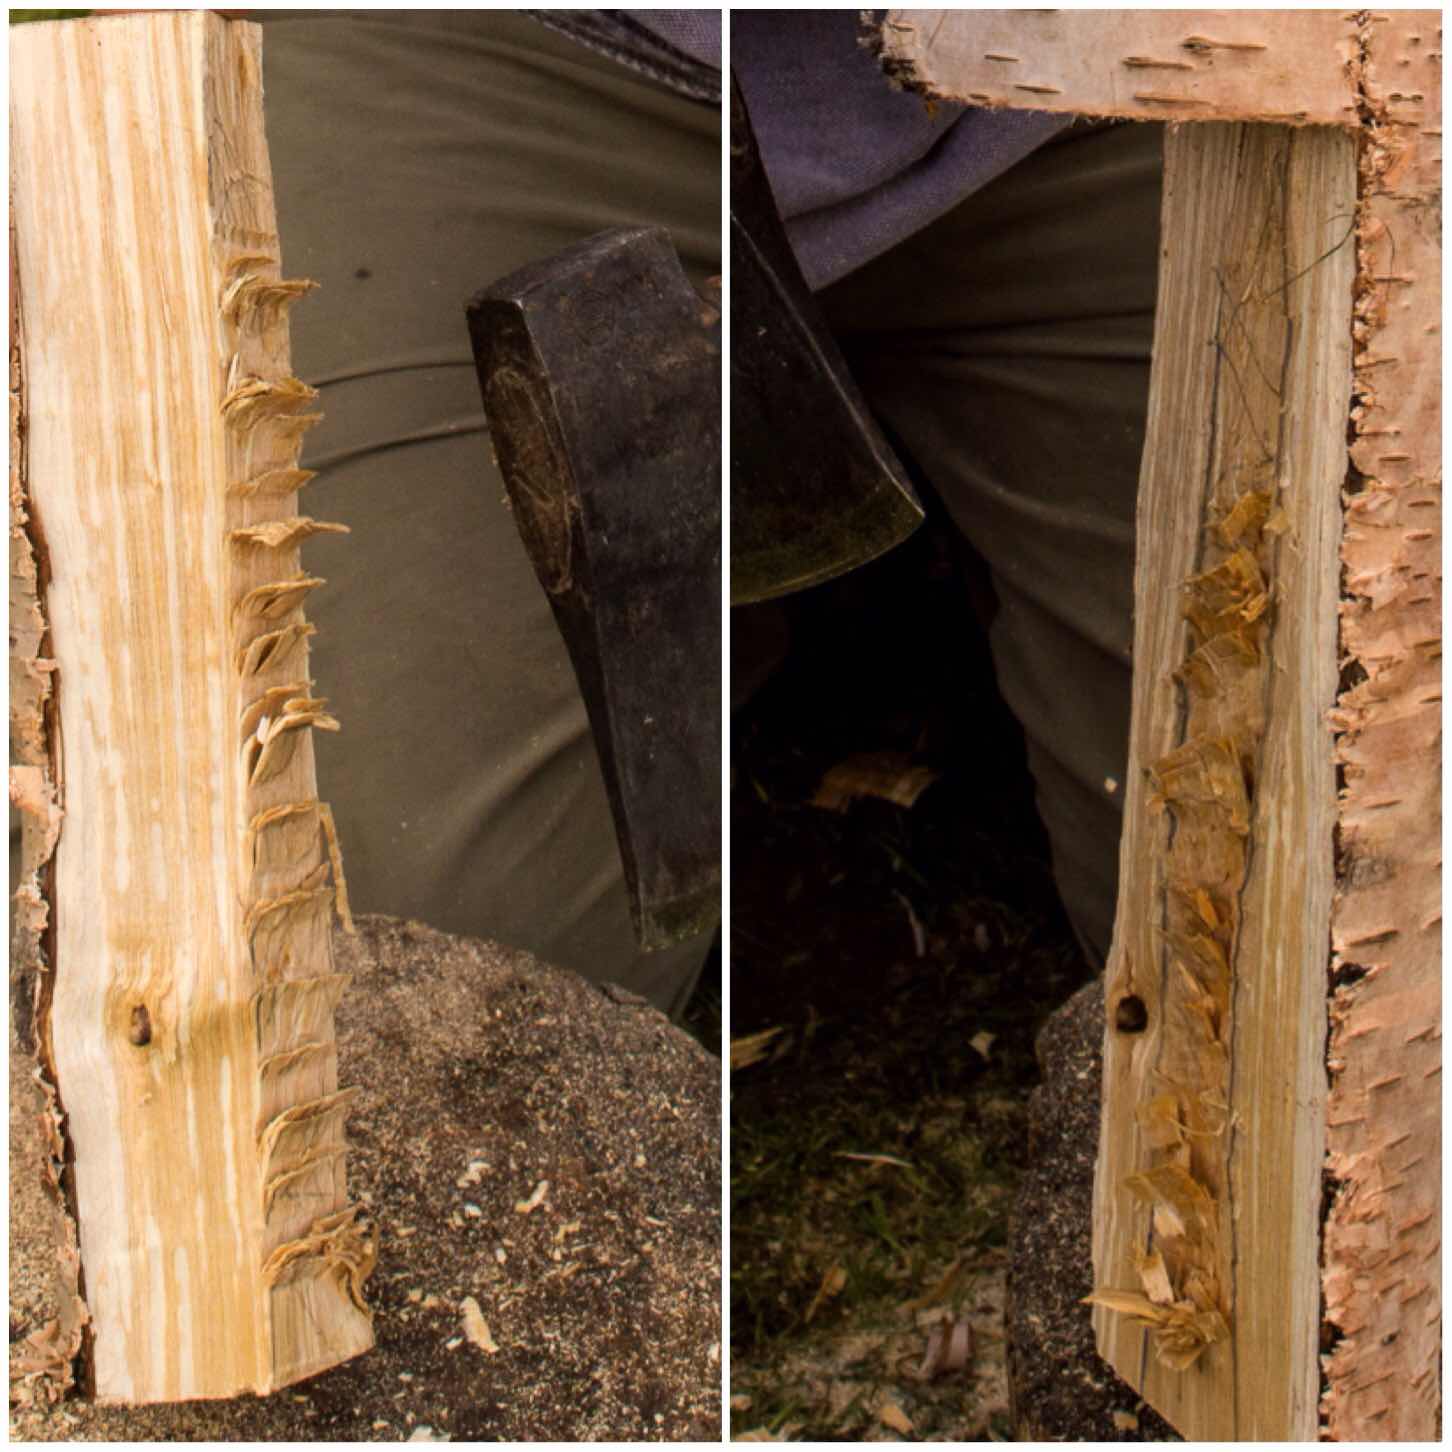
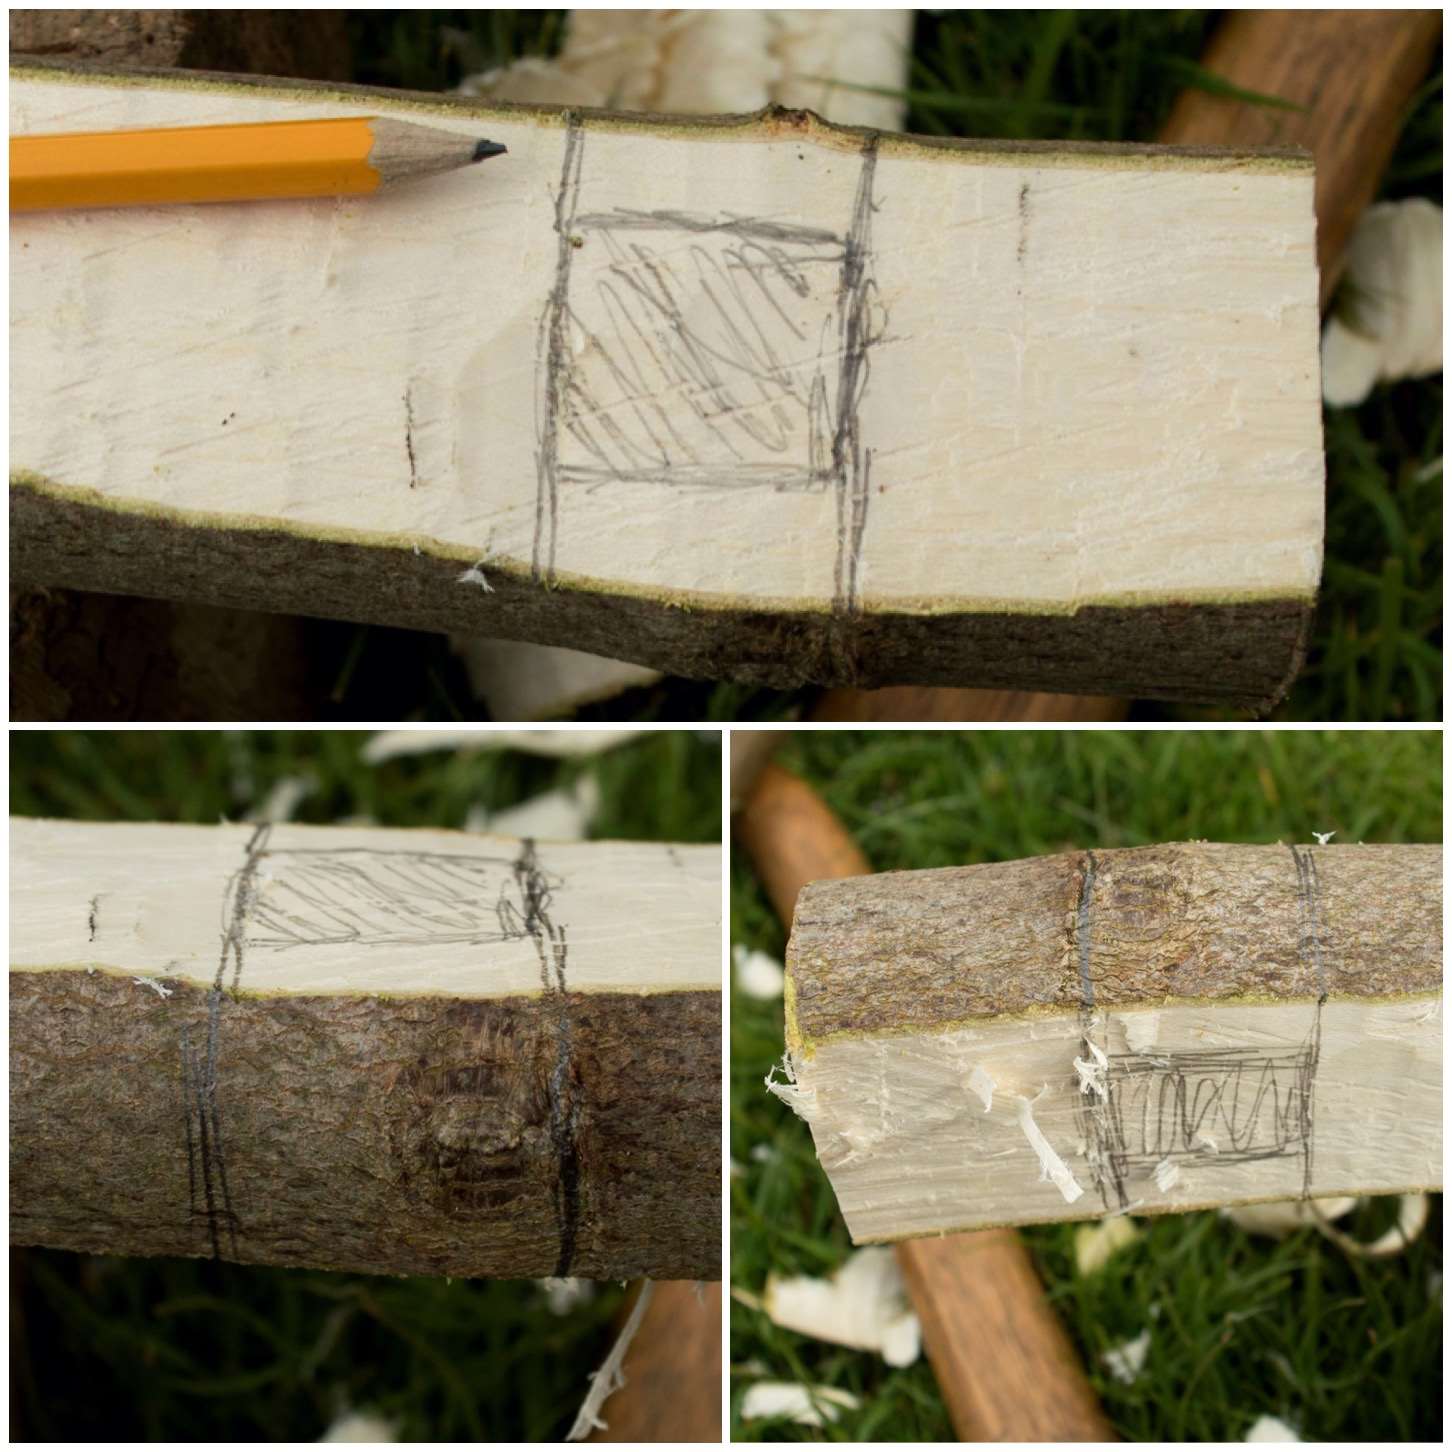
Once I had the chimney battoned out I trimmed off some excess wood from Segment 1 and then used a pencil to mark out the chimney area.
I did this so I could put some Raappanan tuli cuts into the chimney area. It is important to keep the sections of the log rocket that join together as smooth as possible for a good fit so marking out the chimney area ensures I do not cut into the wrong area.
Trimming & Marking out the chimney
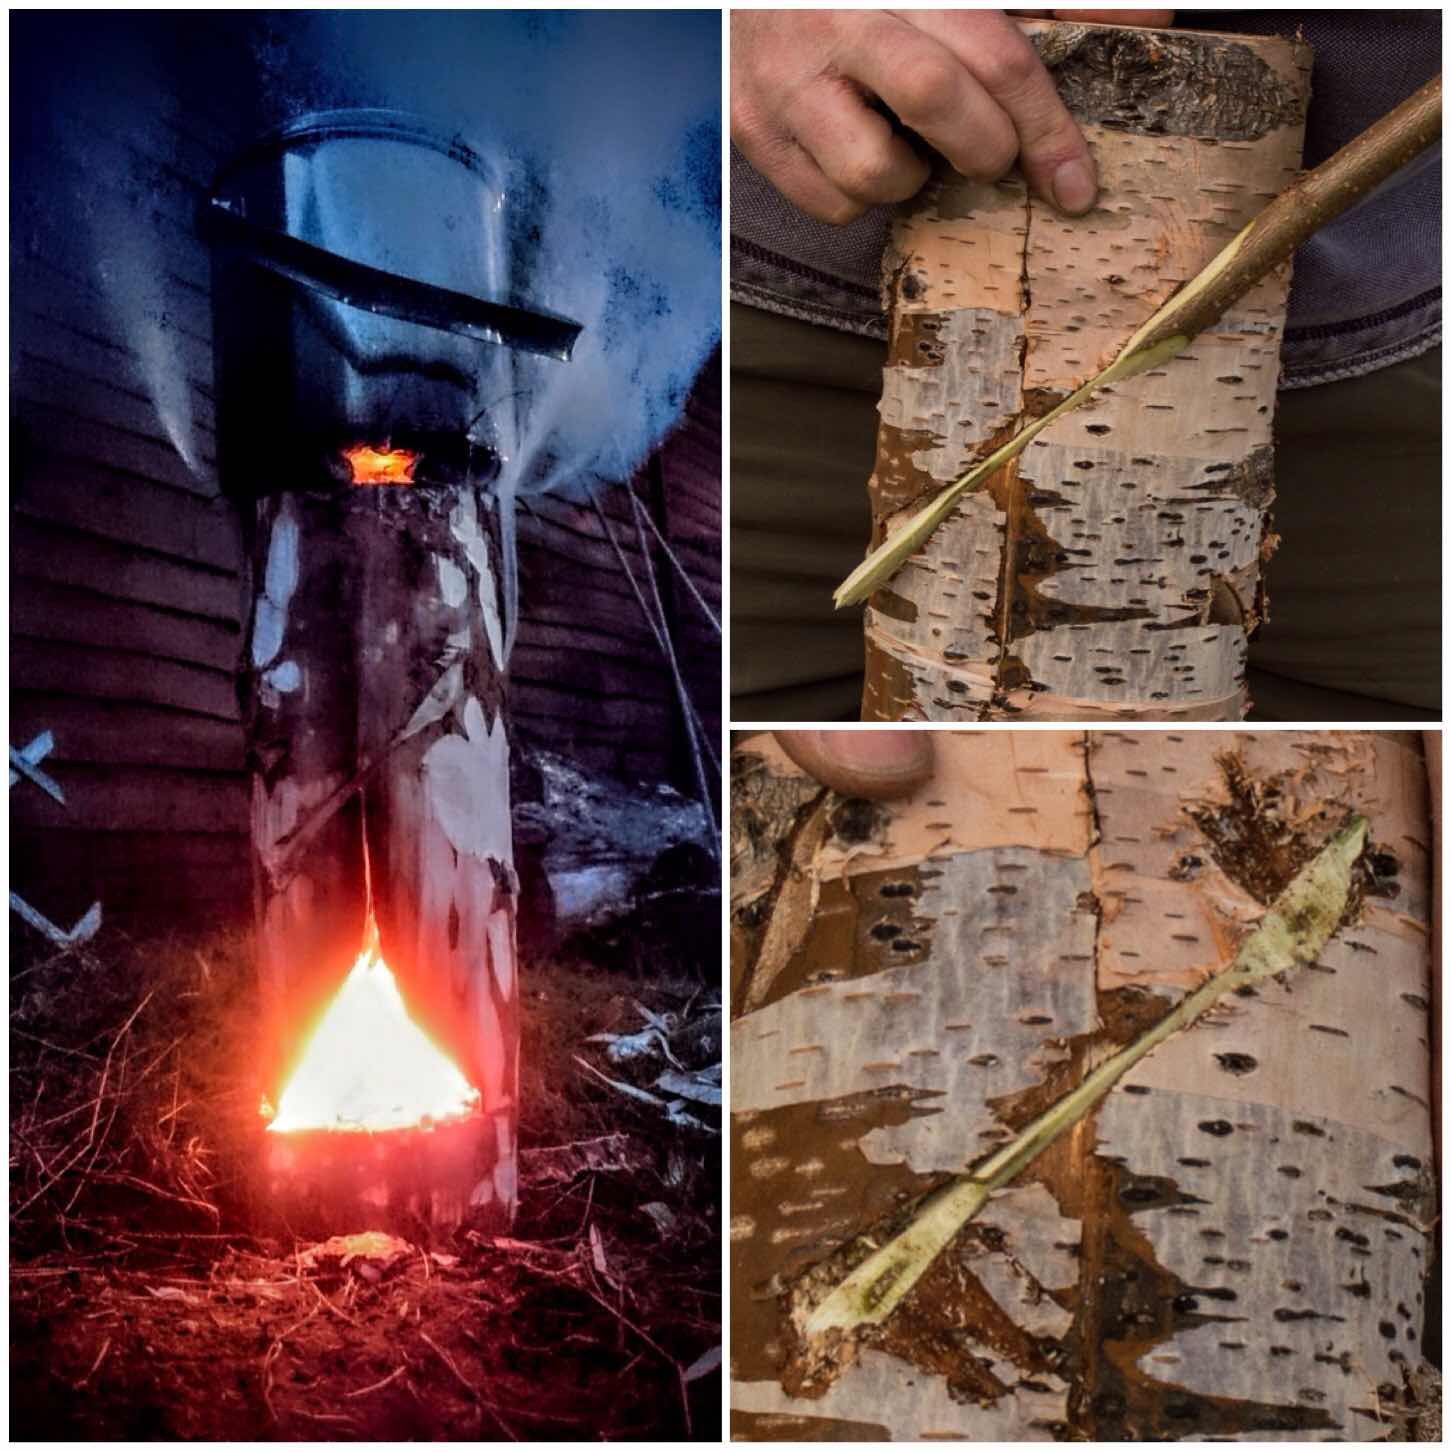
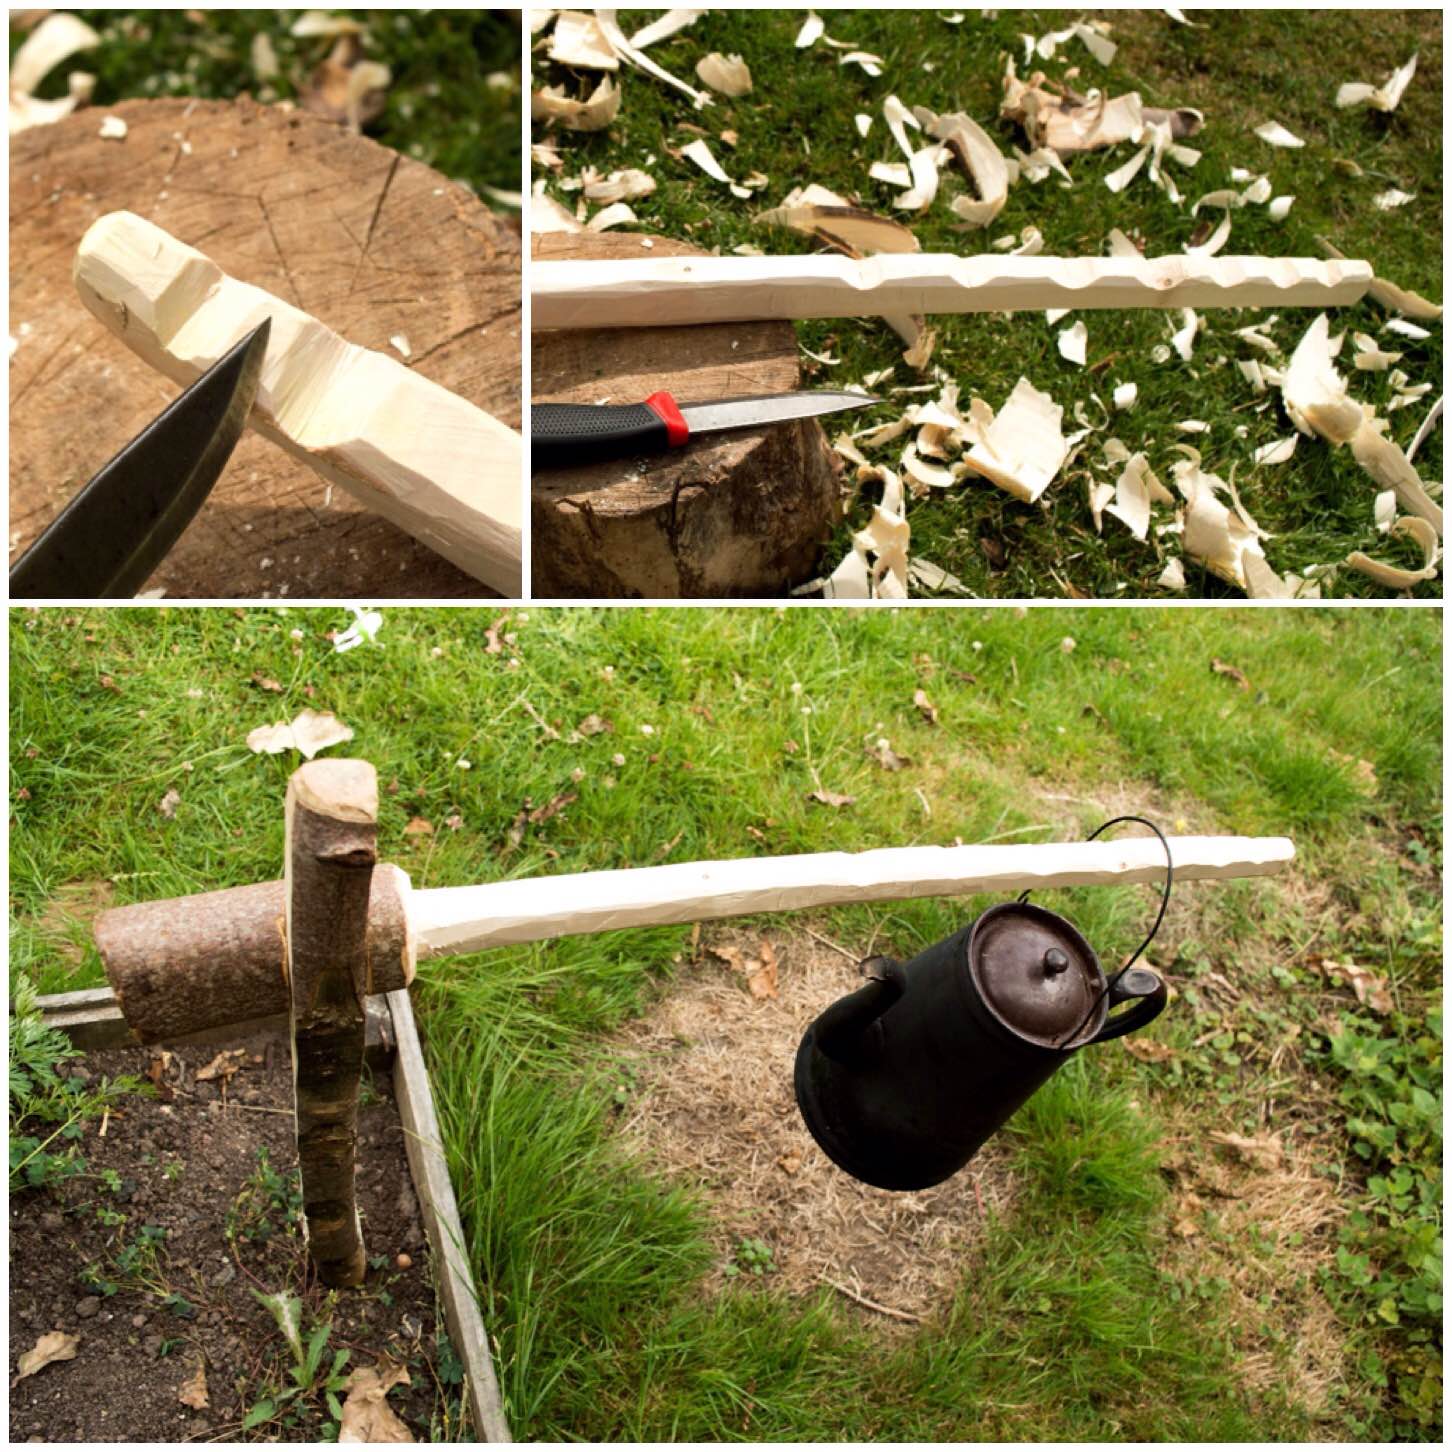
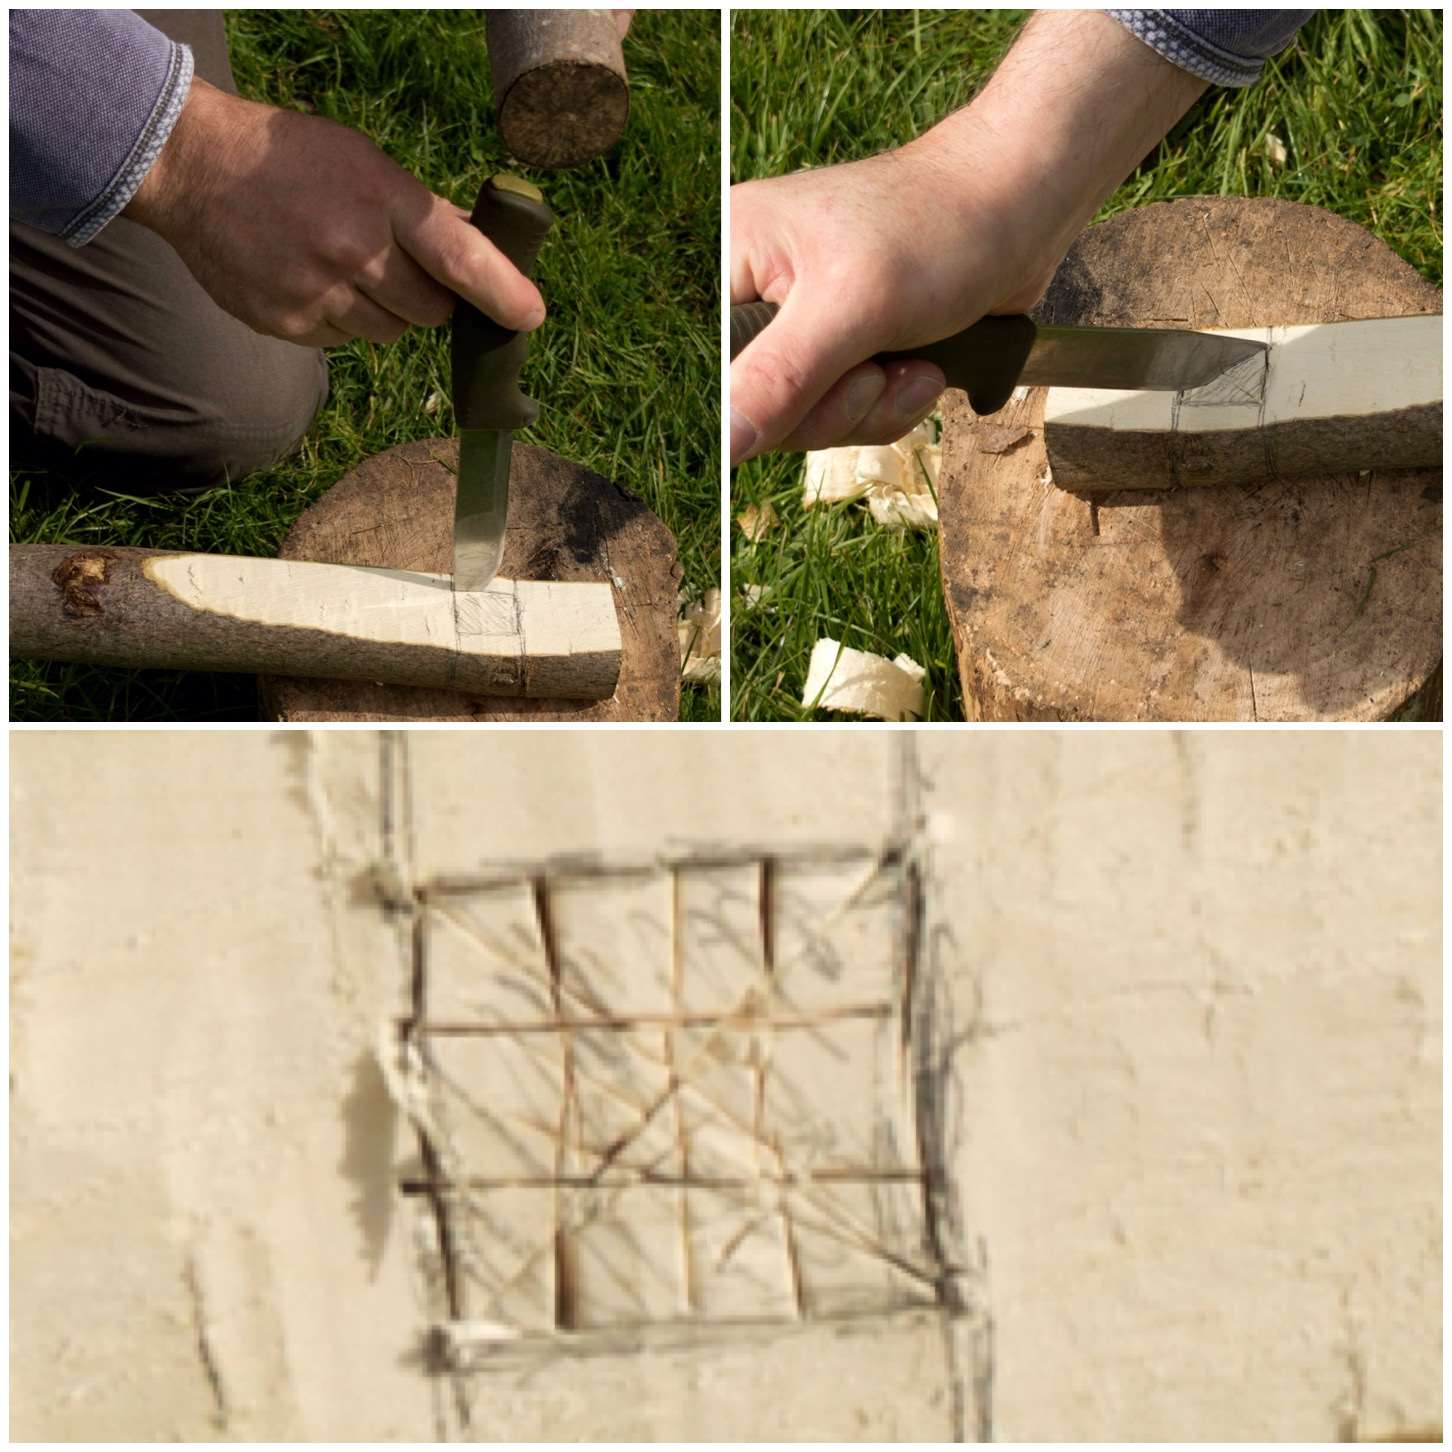
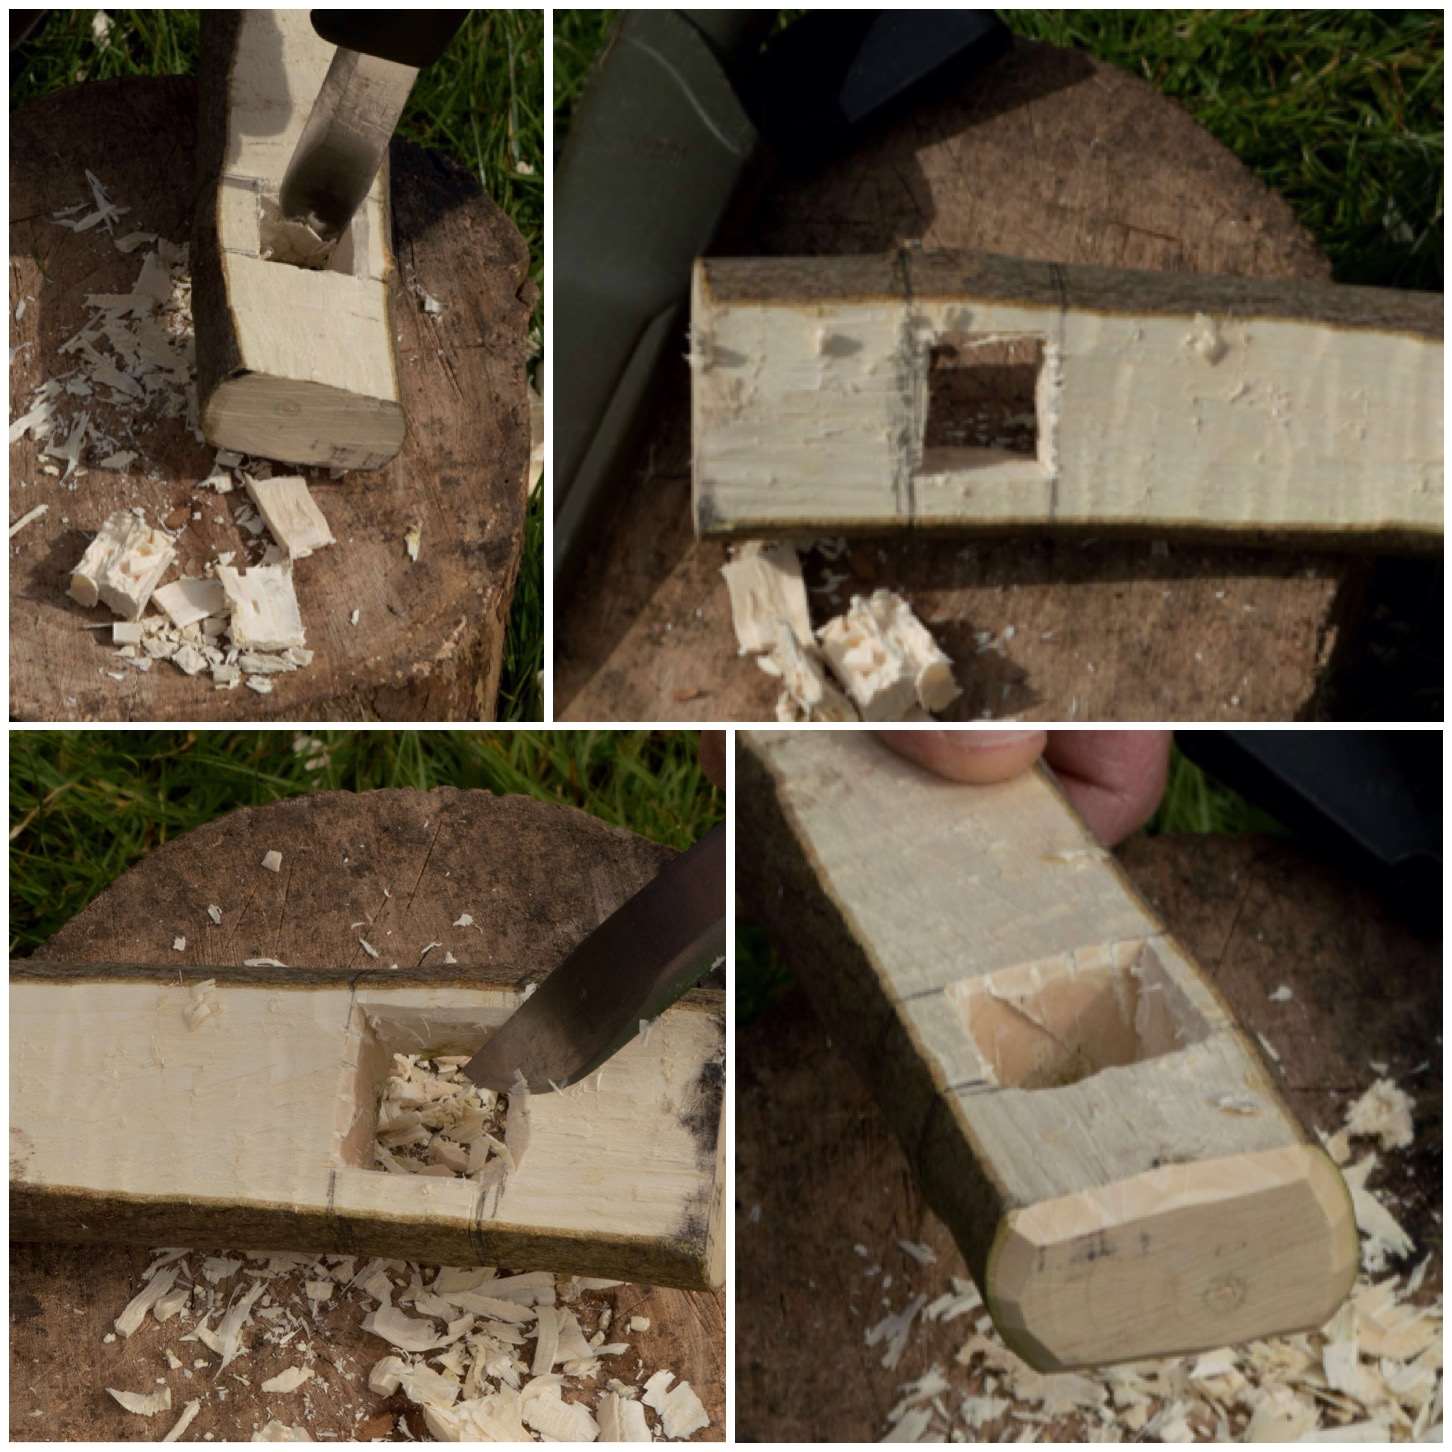
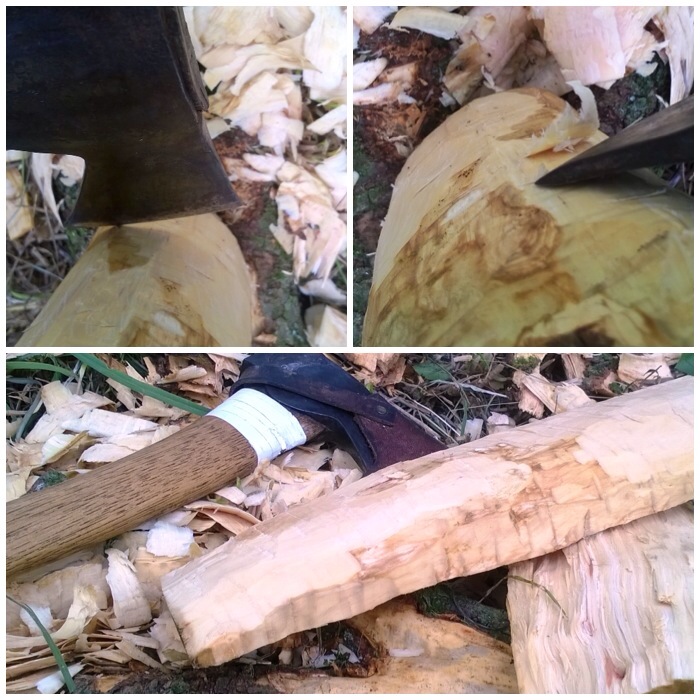
The Raappanan tuli cuts are fairly simple to make with my axe. I just ensured I cut only into the wood in the chimney area and that the cuts were made upwards, towards the top of the chimney.
These cuts are particularly helpful when using damp wood as it offers far more surface area to the initial flame, allowing it to catch more quickly, and also it helps to dry the damp wood out.
Raappanan tuli cuts
The Firebox
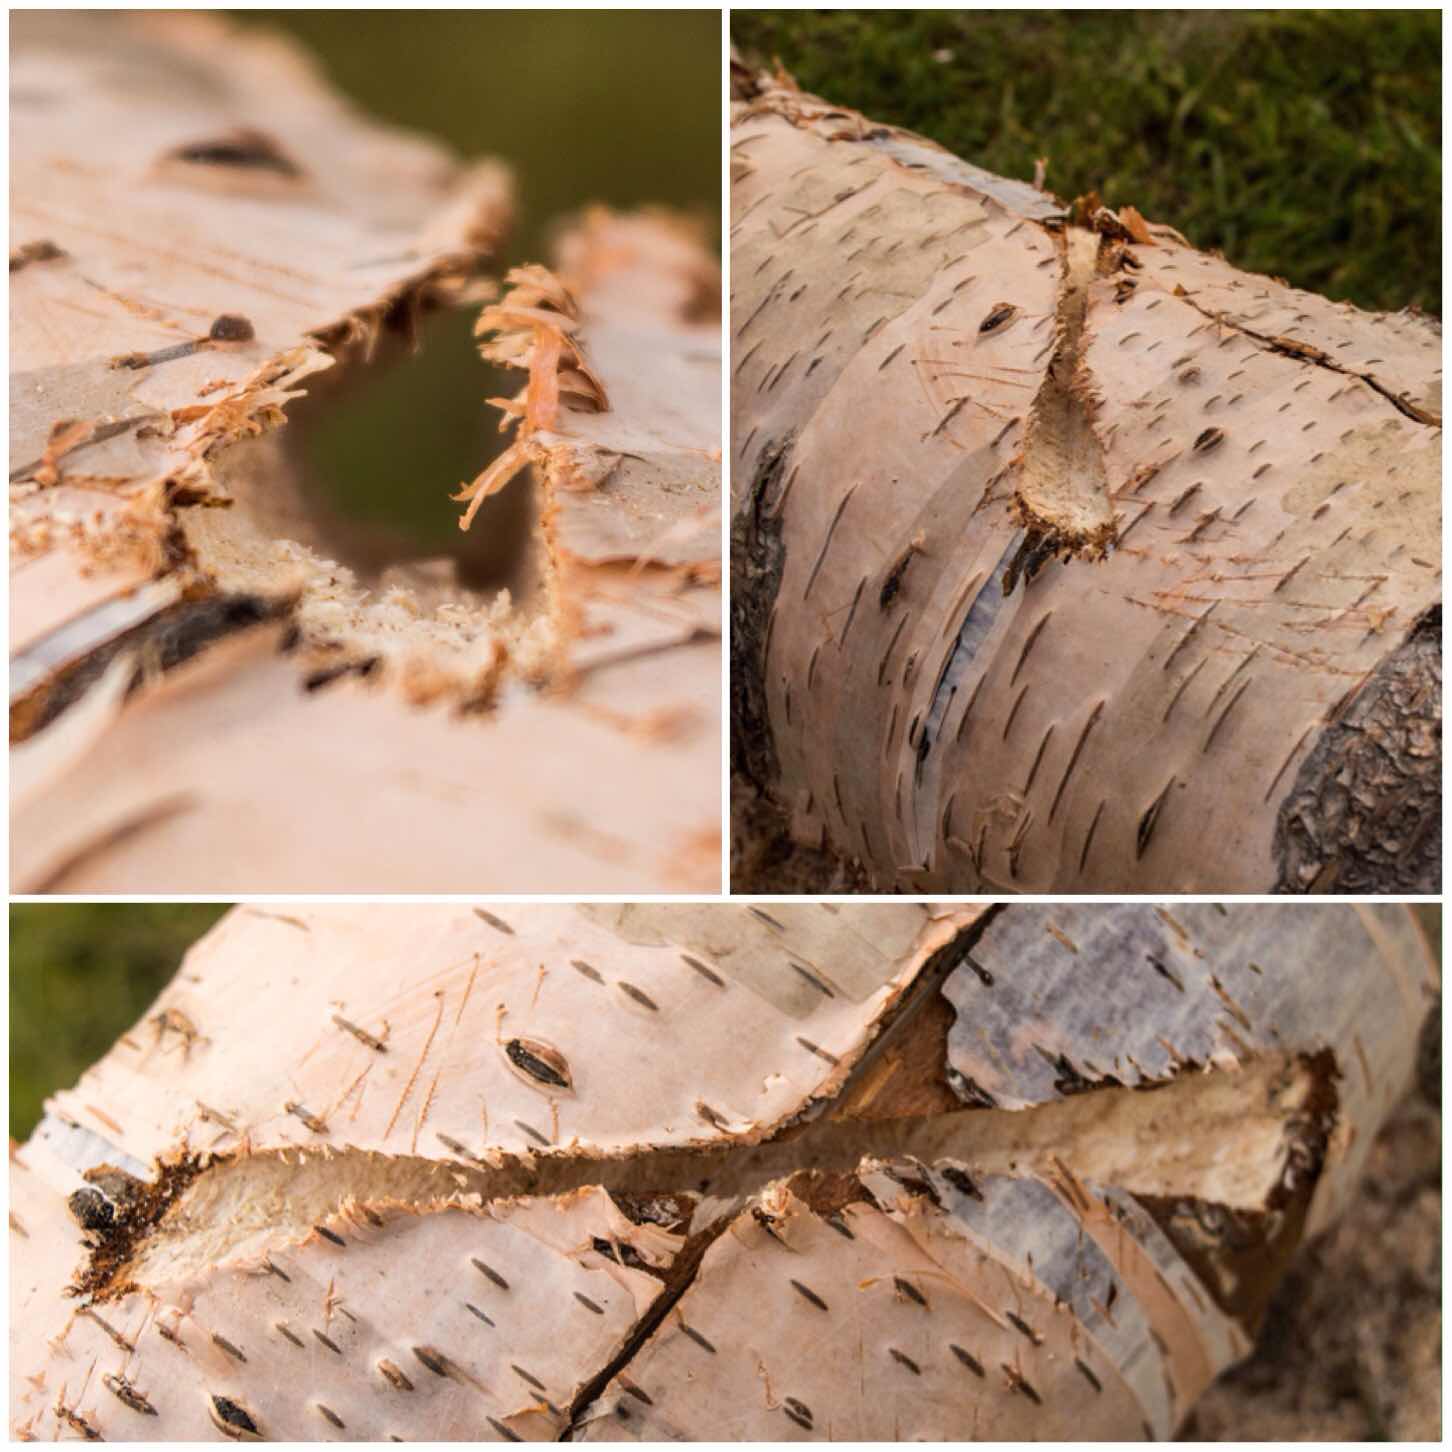
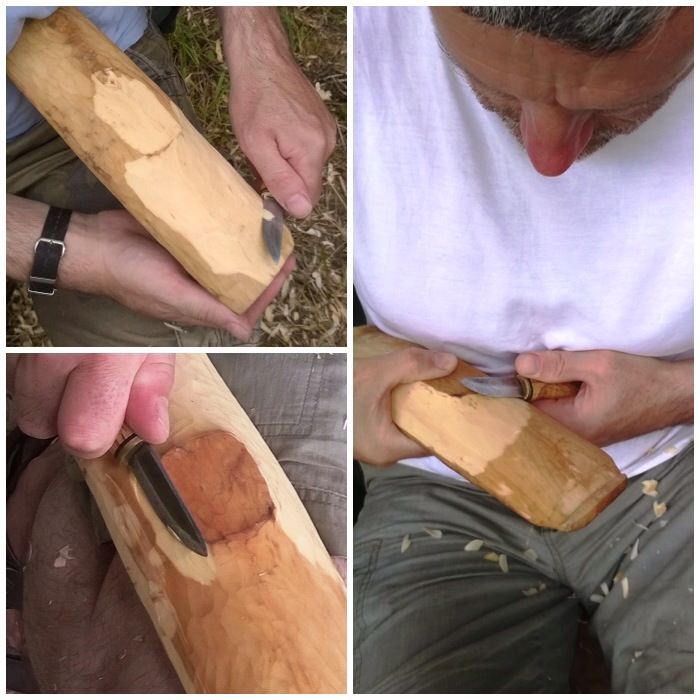
The next stage I worked on was the firebox opening. This can be done in a number of different way however I elected to go for a triangular opening.
I formed the opening by cutting a small triangle at the base of both pieces from Segment 2. I also tapered the inside of the cuts to open the firebox up a bit. I made this firebox slightly larger than normal as the wood was very damp. My thought was that the extra air intake would help to keep the fire going at the start before the insides of the stove became fully lit.
The firebox opening
The Dovetail Joints
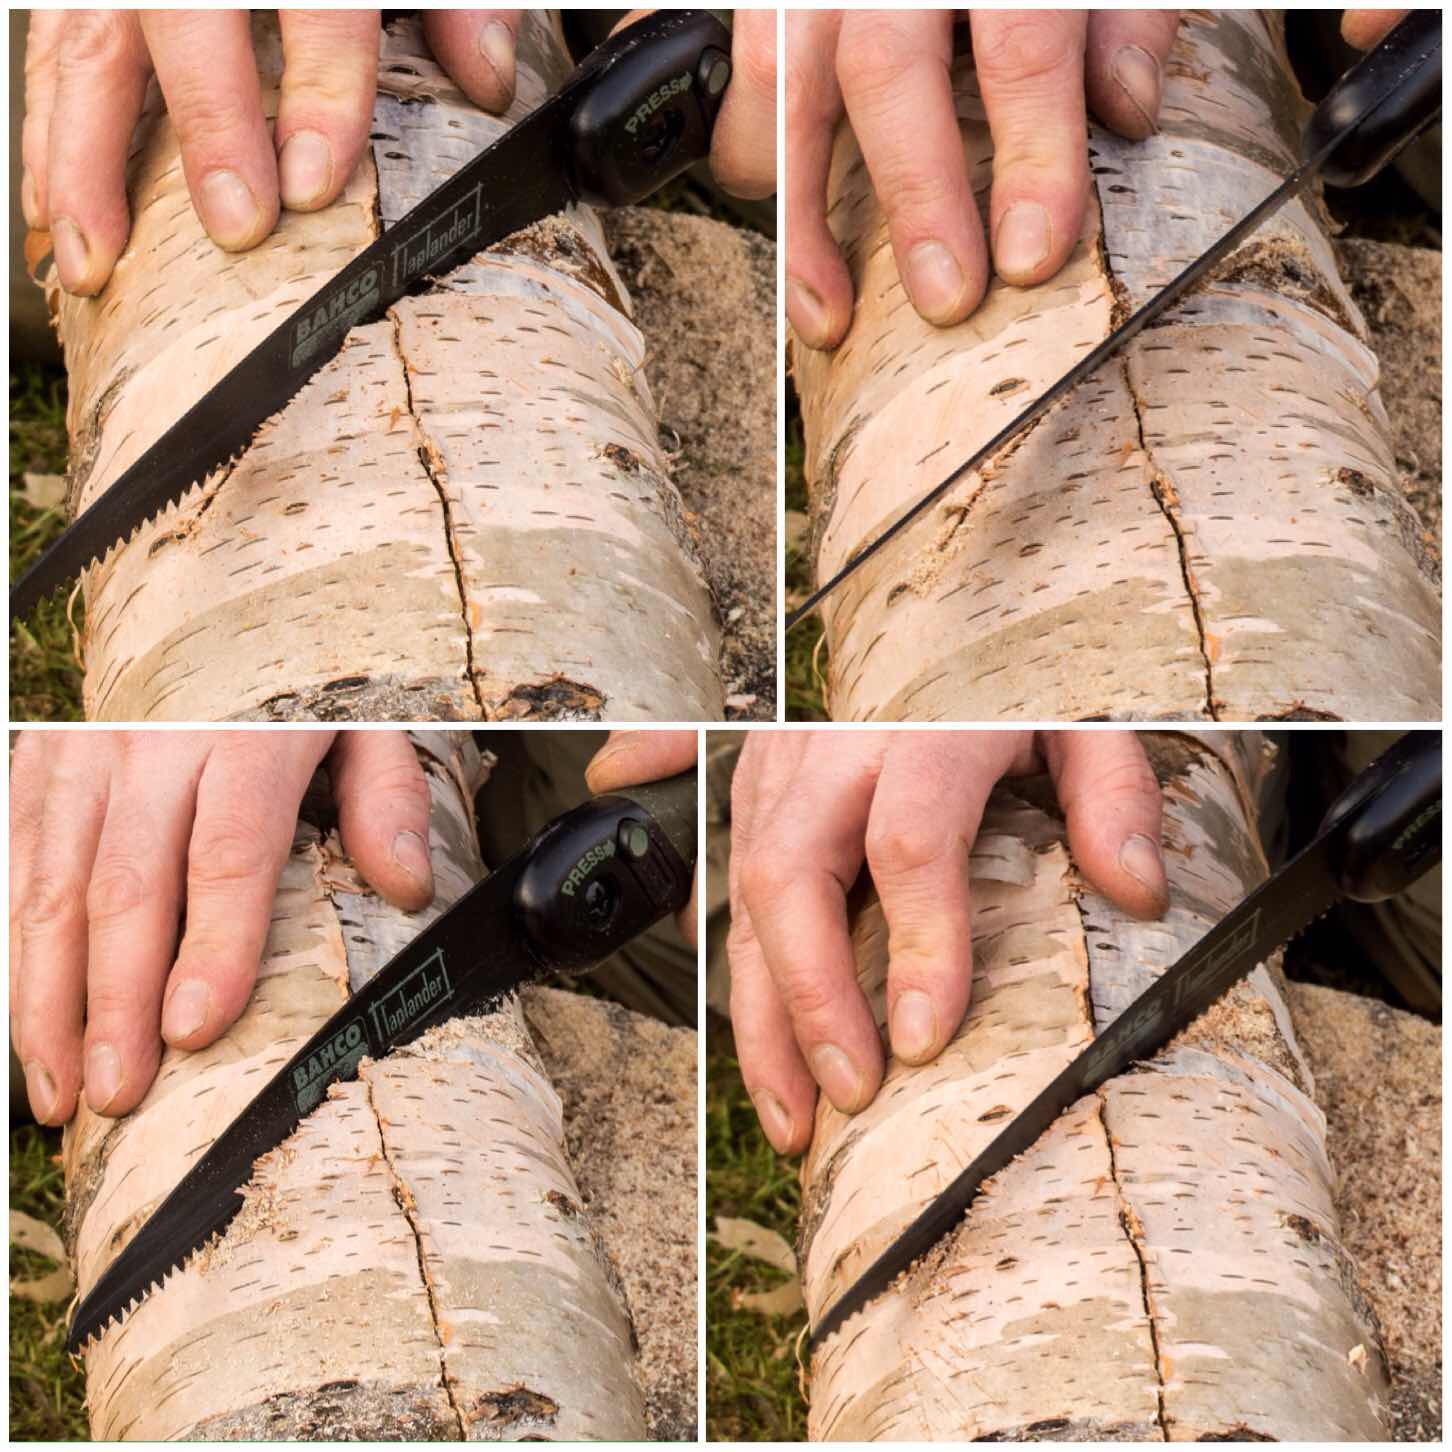
These joints were a total experiment. I put all the pieces together again and, holding them tightly, sawed a line to the depth of a centimetre across two of the joints. (I recommend you use some string or maybe a belt to hold everything together as you make the cuts – I didn’t and I wished I had.)
I then did the same cut but flared my saw out slightly (about 45 degrees) to the same depth. I then repeated the cut with the saw flared out 45 degrees in the opposite direction to the original cut to the same depth (there will be a picture of the cut further down the post).
Once that was done I used my saw like a rasp to carve out all the excess wood to form what is called the dovetail ‘Tail’.
Cutting out the ‘Tails’
Below you can see this ‘Tail’ part of the dovetail joint. It forms what I think of as a bow tie shape when done properly. The important point is to start each cut from the same place, saw to the same depth each time and ensure that the middle of the tail is centred over the split in the segments.
I found that as I had not strapped the segments together I had to really hold them firmly together – this is where you will appreciate your belt or piece of string. Also while sawing these ‘Tails’ in be aware at all times where the saw is in relation to your thumb and forefinger on the hand holding the stove.
I made three of these tails (one over each split) to hold all the segments together.
The Tails
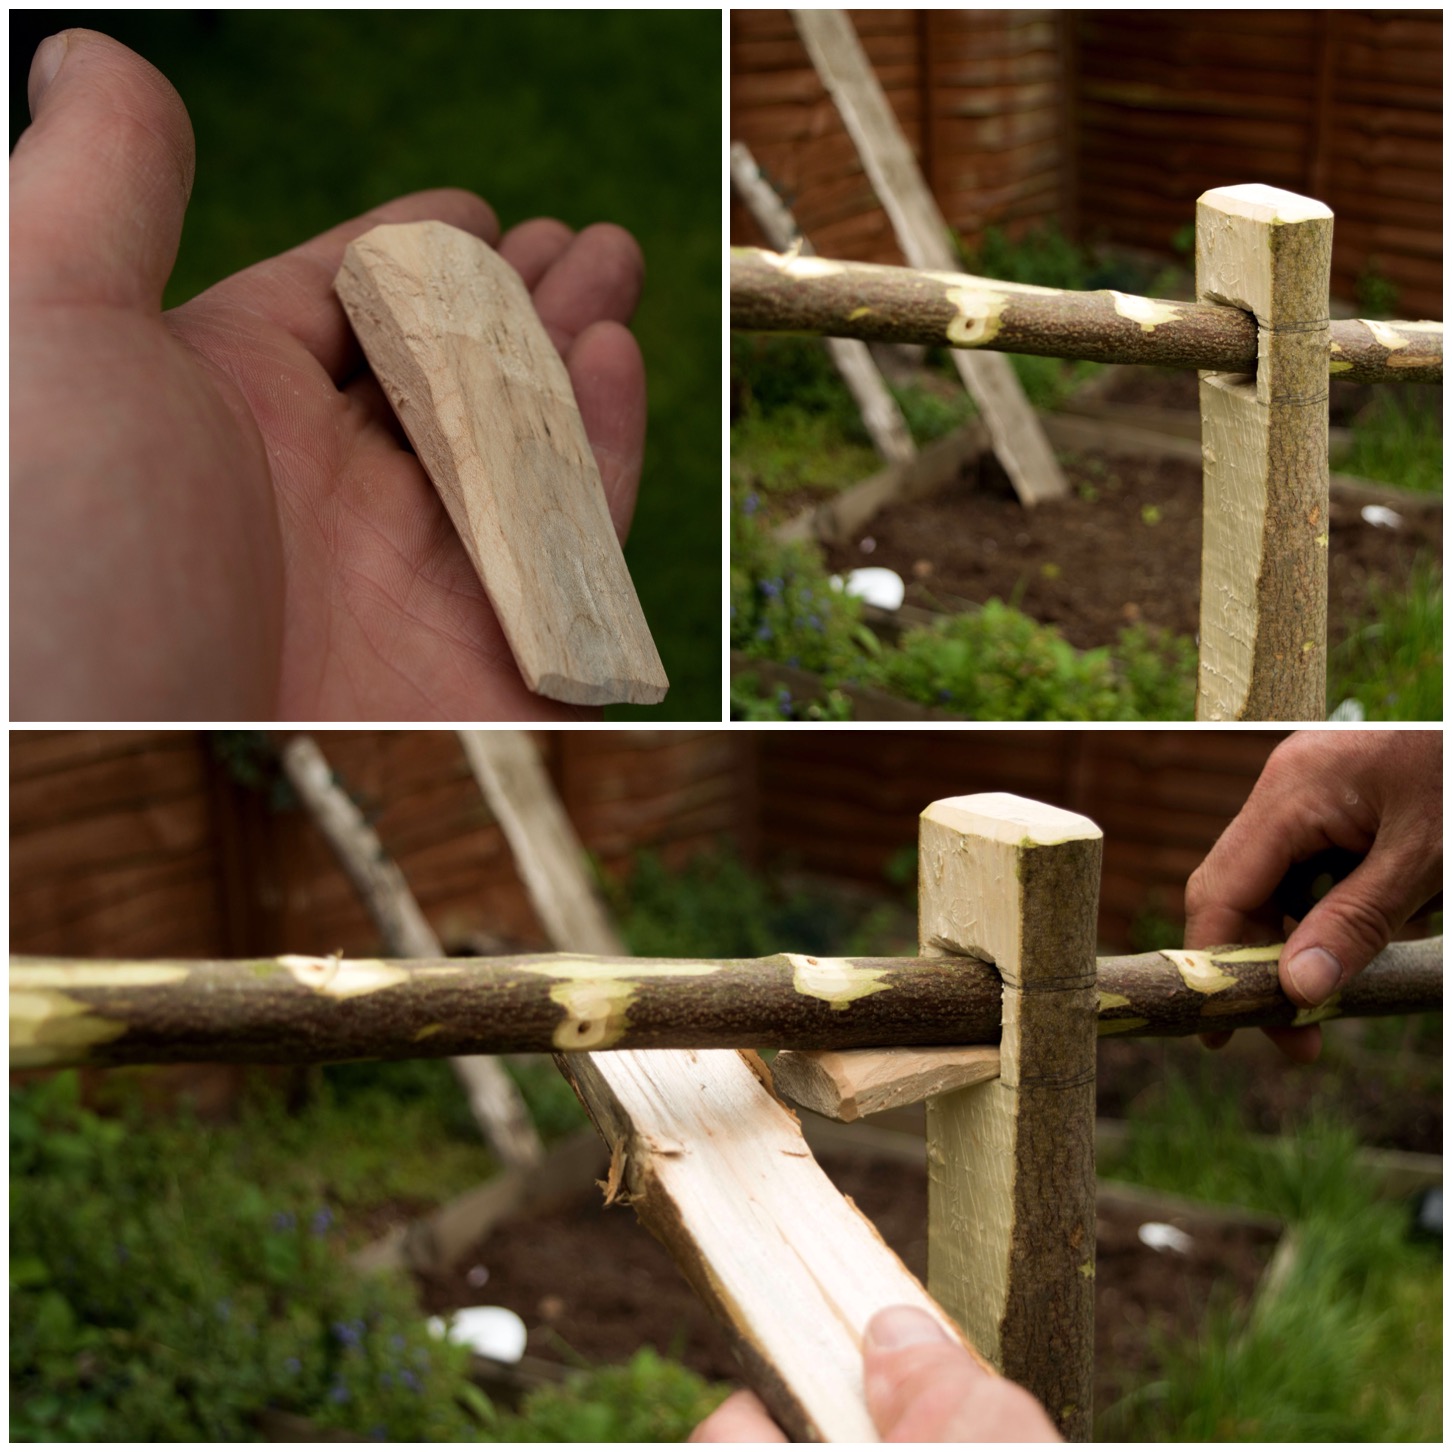
To hold the segments together you need to carve some ‘Pins’ to insert into the ‘Tails’. I used green hazel wood to make the pins and made sure that they were carved into a triangular shape but initially too big for the tail.
Carving in this manner allowed me to insert the pin into the tail and then progressively carve off smaller pieces from the pin until it started to slide in. I also used my large piece of wood to hammer the pins in to ensure a very tight fit.
If you find that your pin is too small just get a fresh piece of green wood and try again. They only take seconds to make. To finish the pins off I trimmed the ends with my saw.
Cutting and inserting the ‘Pins’
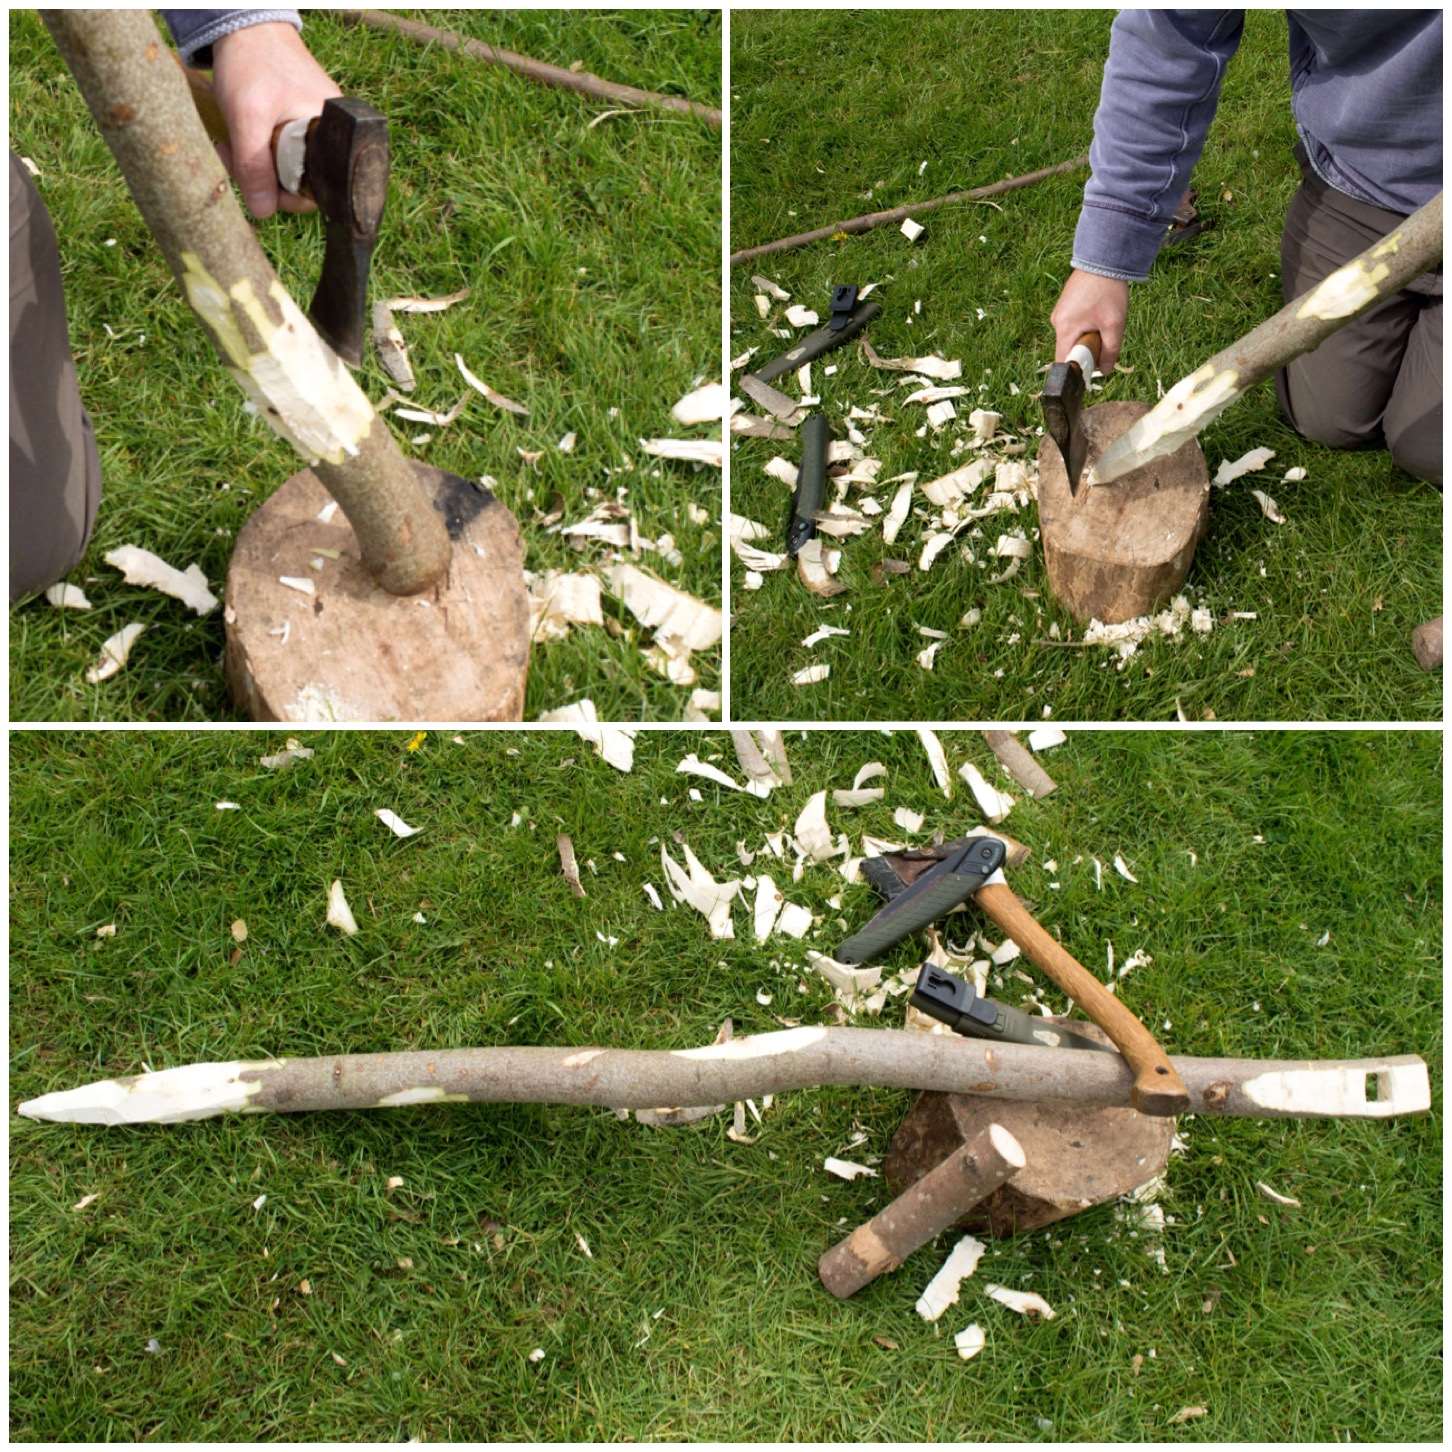
As the bark of the birch tree is very flammable I stripped it all off and kept it to the side to use later as kindling to get the fire started. The dovetail joints if fitted snugly will keep all the segments locked together tightly.
Trimming
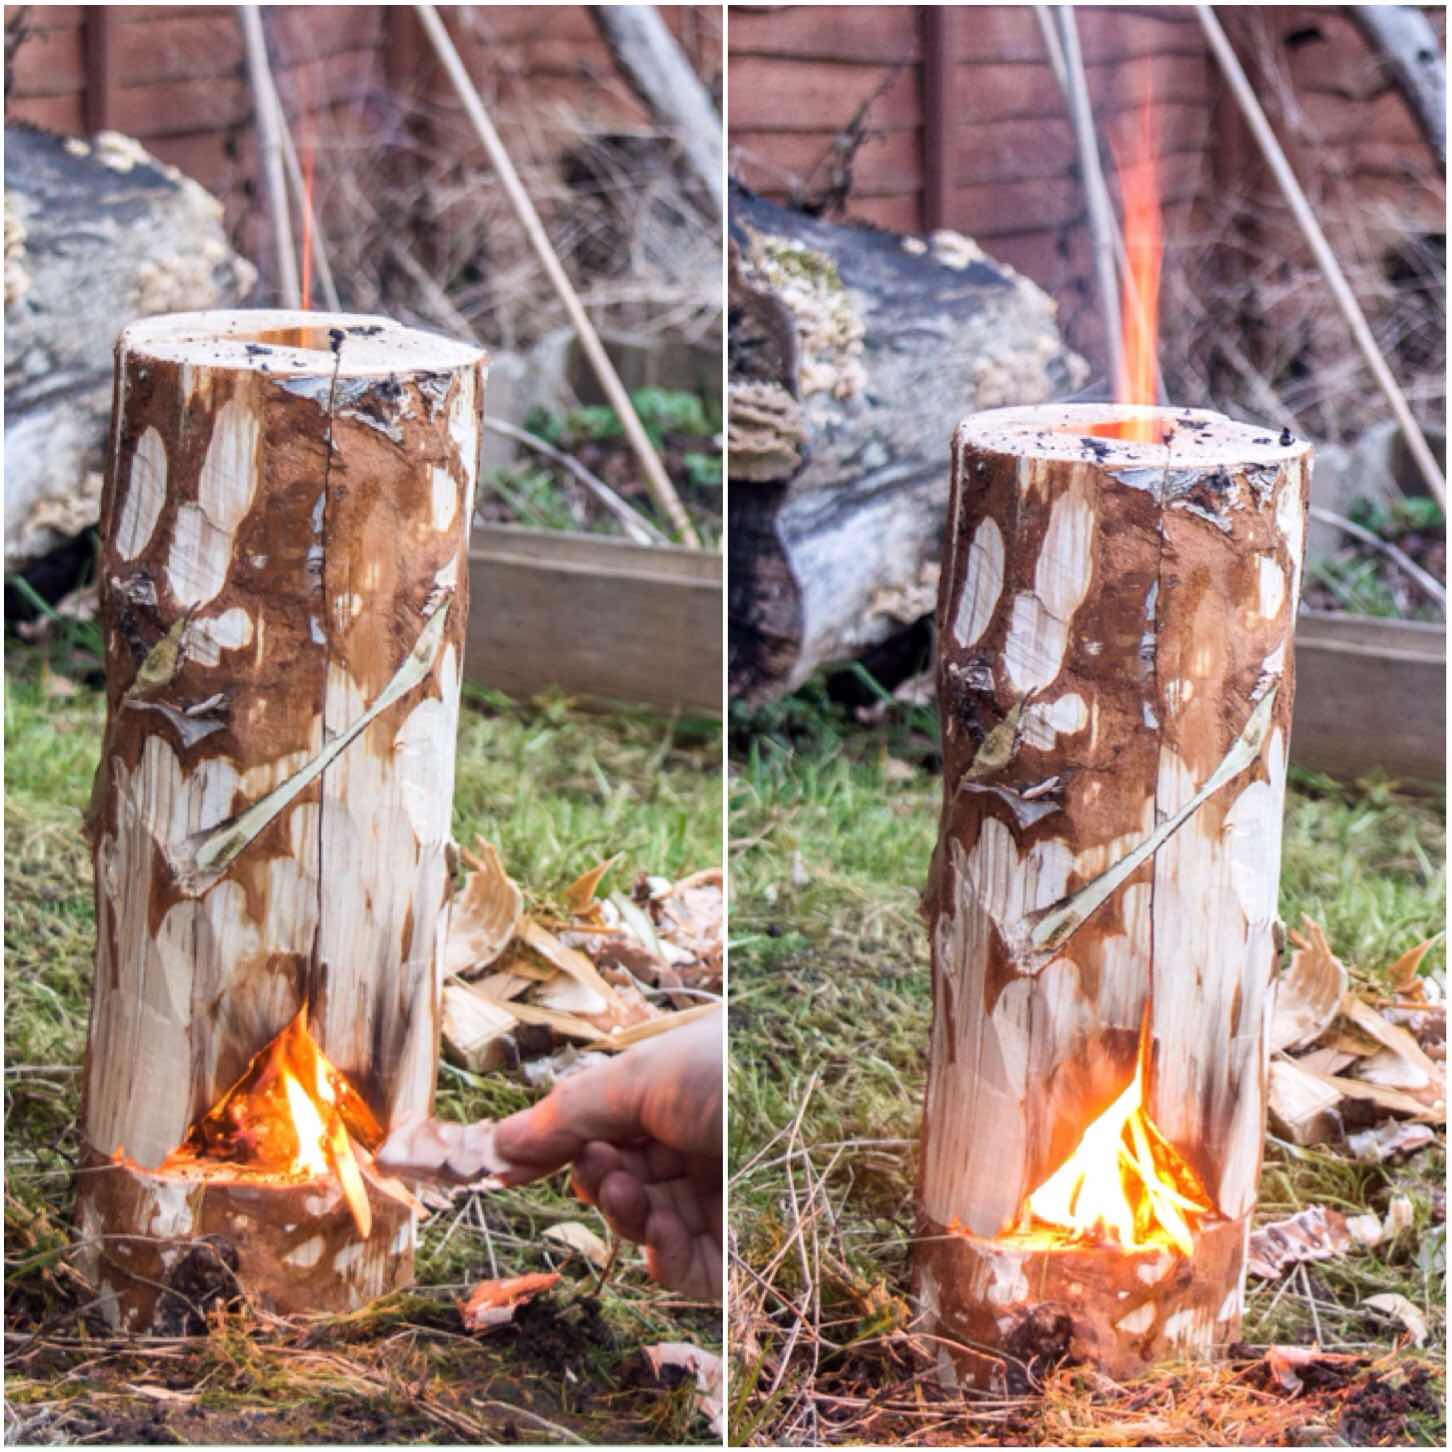
Firing Up
I lit the stove with some Vaseline-soaked cotton wool balls (which I always carry with me) because everything was so damp. The wind was non existent that day so it took me a while to get the stove going well.
Normally these stoves fire up really easily when there’s a little bit of wind to create the rocket effect up through the chimney
Firing up and drying out
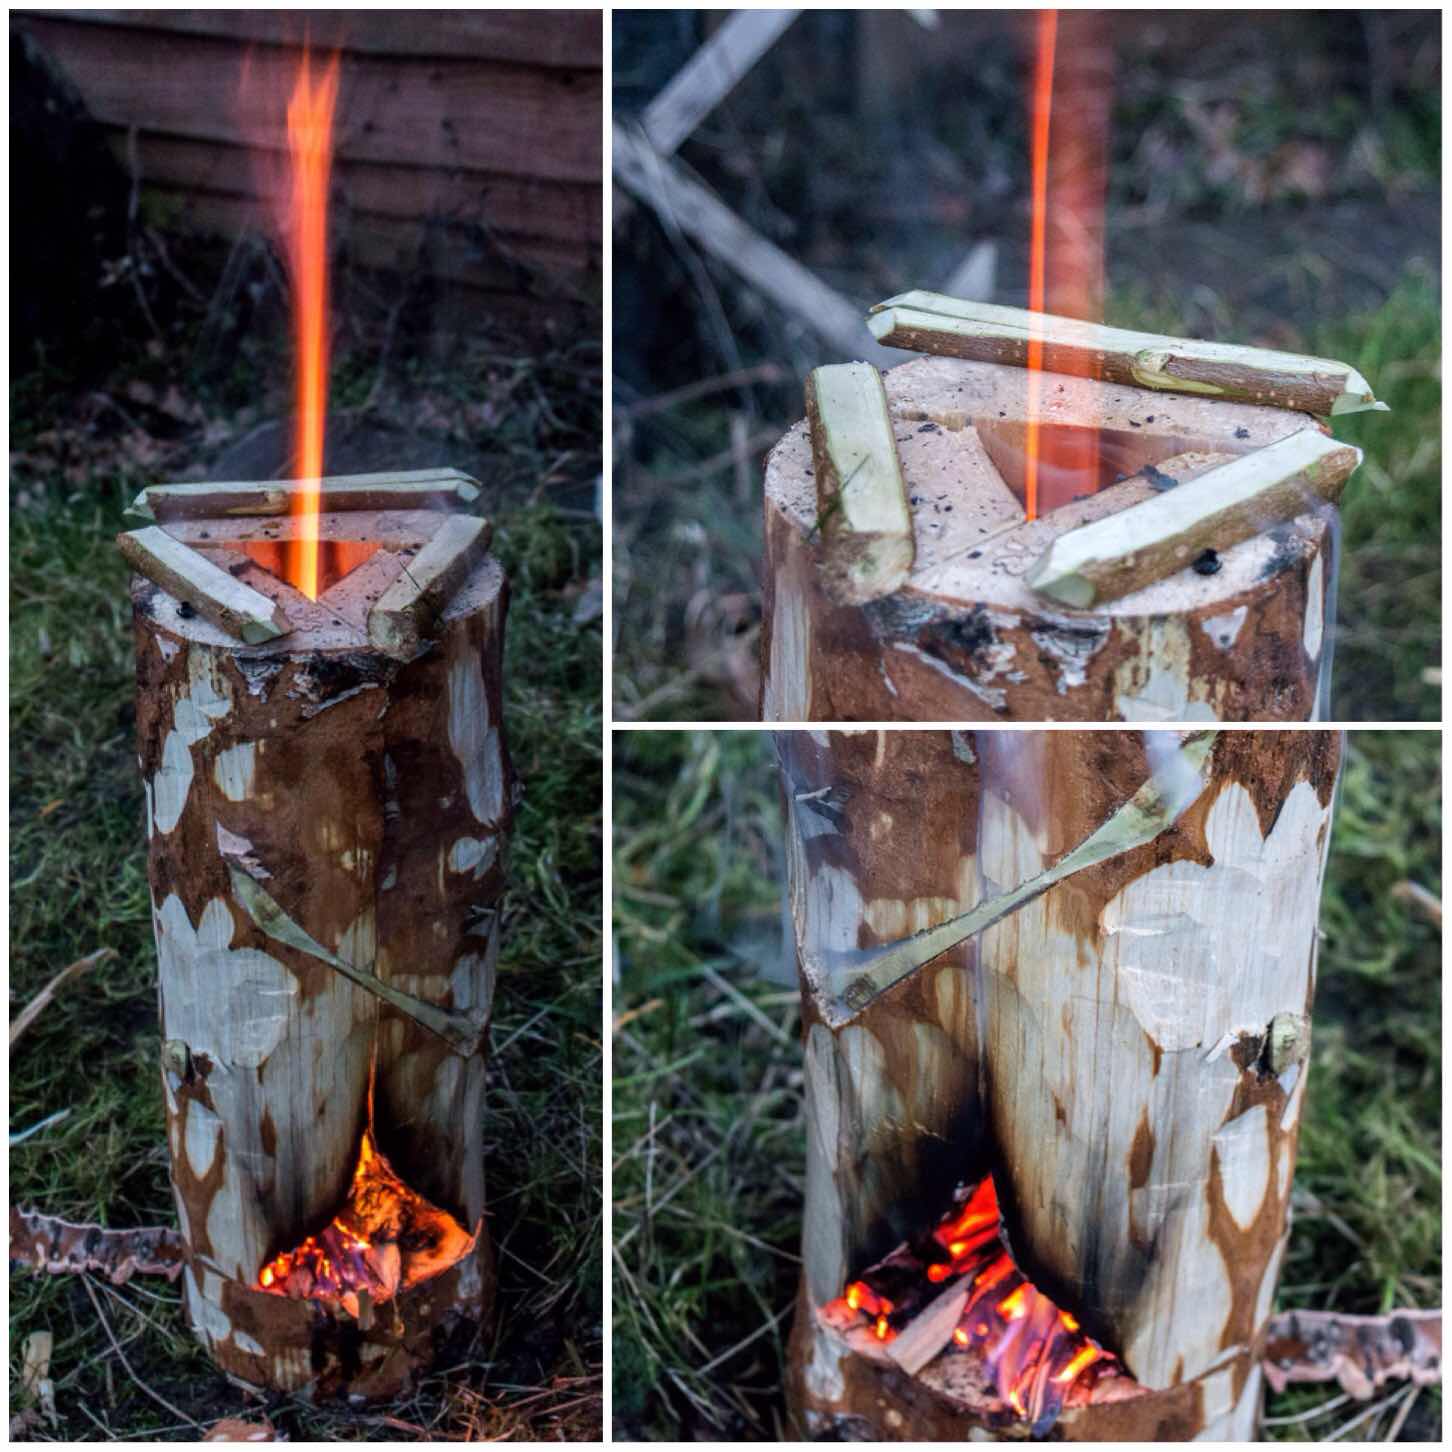
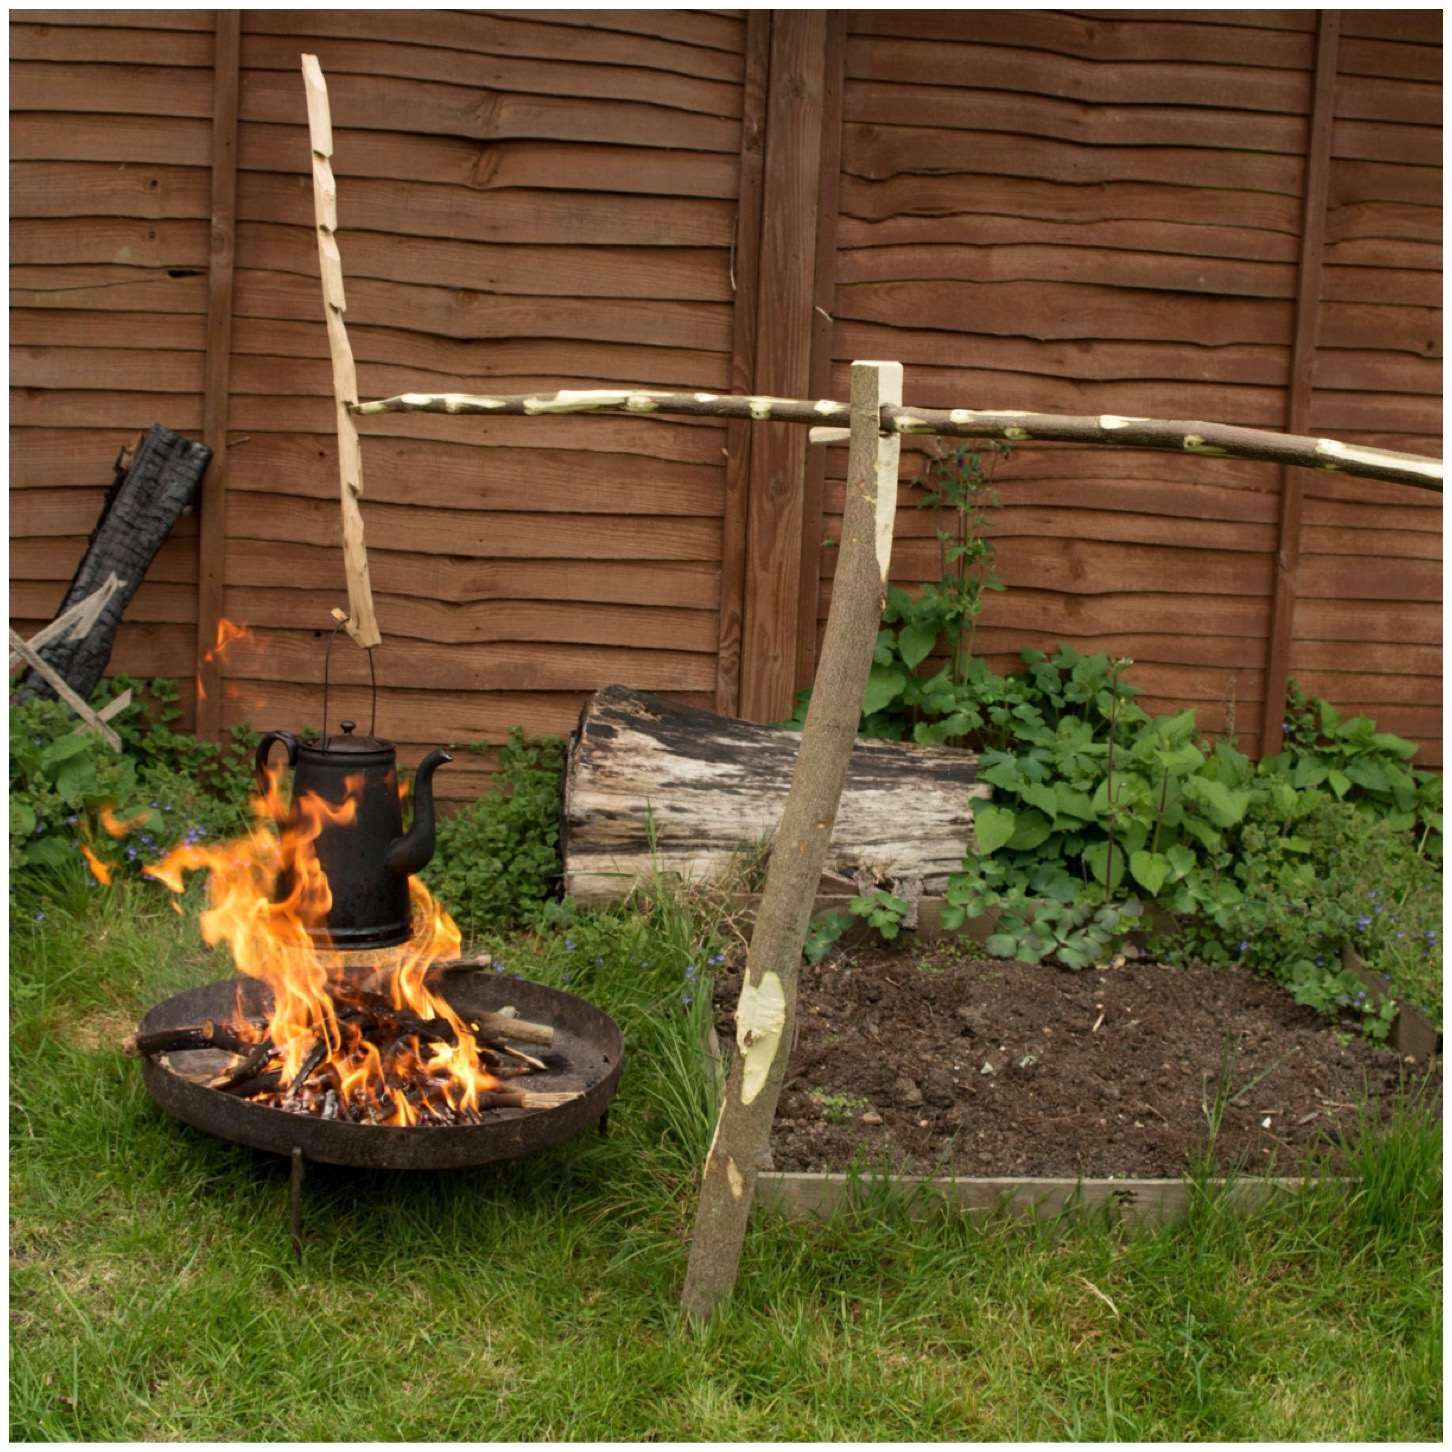
Eventually the rocket effect started and I placed three pieces of green wood onto the top for my pot to sit on. These were fairly thin pieces but would last long enough to boil some water. Have a few pieces spare on standby though if needed.
Green wood pot stand
Once the pot was on (about 10 minutes after initial burn) I needed to keep popping small pieces of wood into the fire box to keep the fire going. If your wood is really dry or resinous (like spruce or pine) you may not need to keep tending the fire as the internal walls of the chimney will probably be well lit.
Now it is a stove
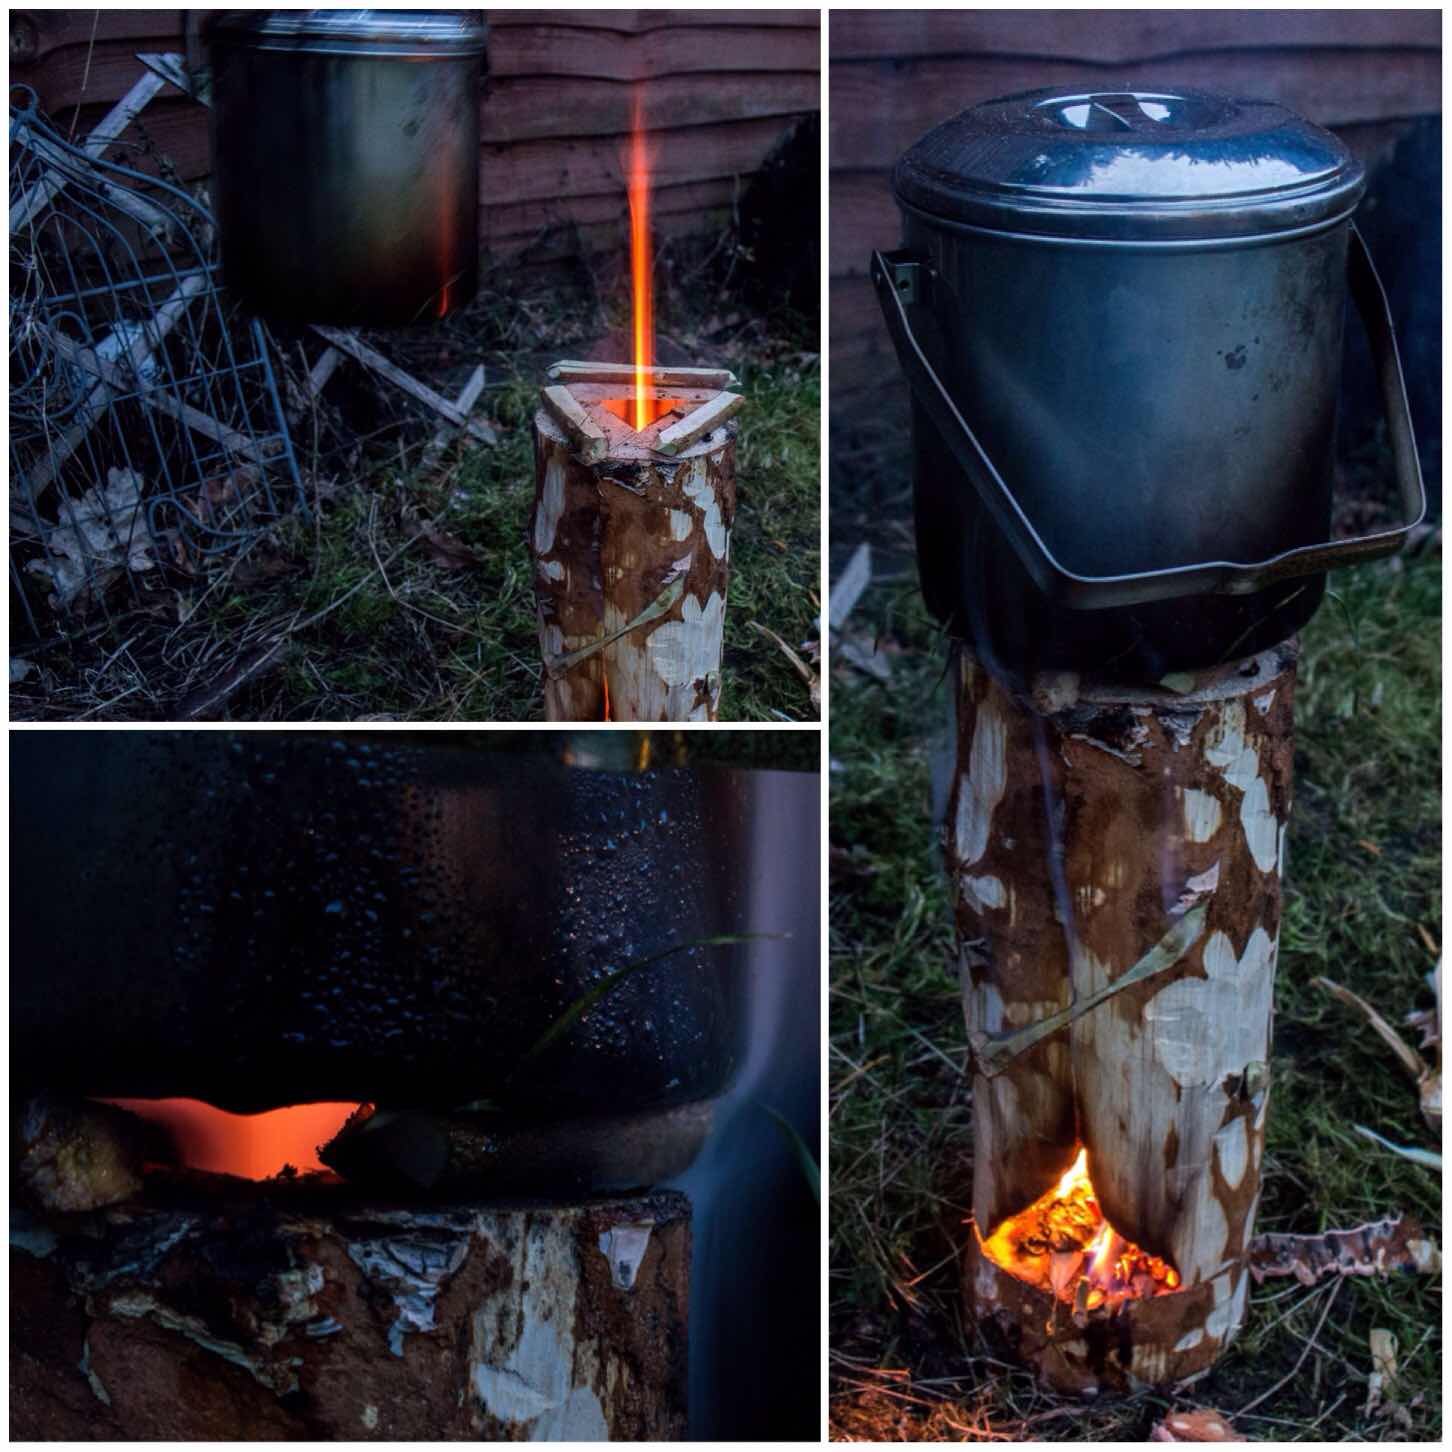
It took me just under 15 minutes to boil this pot of water (enough for approx 3 cups of coffee) and the dovetail joints remained strong throughout.
Roaring
After 45 minutes the first of the joints burnt through however the stove remained standing until it burnt out. Due to the lack of wind the majority of the wood did not burn through.
I made this short video of another Dovetail Log Rocket Stove to show it in action.
I like to experiment with log rocket stoves and this reliance on using string or wire to hold them together (although you can dig the segments of some types directly into soft ground) has always bugged me.
This Schwedenfeuer type of stove lends itself well to the dovetail joints I think, and once you have practised making a couple you will be able to knock together a stove very quickly with just natural materials.
As usual I am open to ideas and suggestions on creating more log rocket stoves and Scandinavian candles. If you have not seen my other posts on this subject have a look at my summary post on this subject titled – Candles, Rockets and Long Fires.
For ten years now I have been going to the BCUK Bushmoot and I have had great fun learning new crafts, making some amazing constructions and occasionally dabbling in a bit of art.
Craft, art and constructions
This post cannot do justice to the wide variety of crafts, constructions and artistic endeavours that are undertaken however I have trawled through my picture library to try my best.
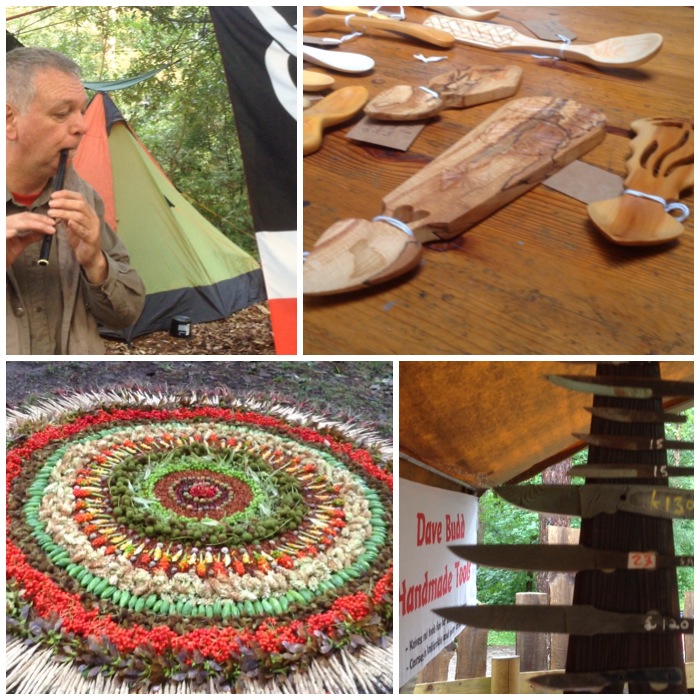
One of the most talented carvers who attends the moot regularly is Dean Allen. Dean makes beautiful spoons (particularly Welsh Spoons) and some fine primitive crafts as well.
Carving craft from Dean
Hands are always busy doing something at the Moot – twisting grass rope, weaving beautiful tablet bands, embroidering flags and constructing clay pots – to name just a few activities.
I have attended the classes with Perry McGee on grass rope making and tablet weaving with Susannah Parsons. Both classes were hugely enjoyable as these instructors are experts in their craft.
Hands on with it all
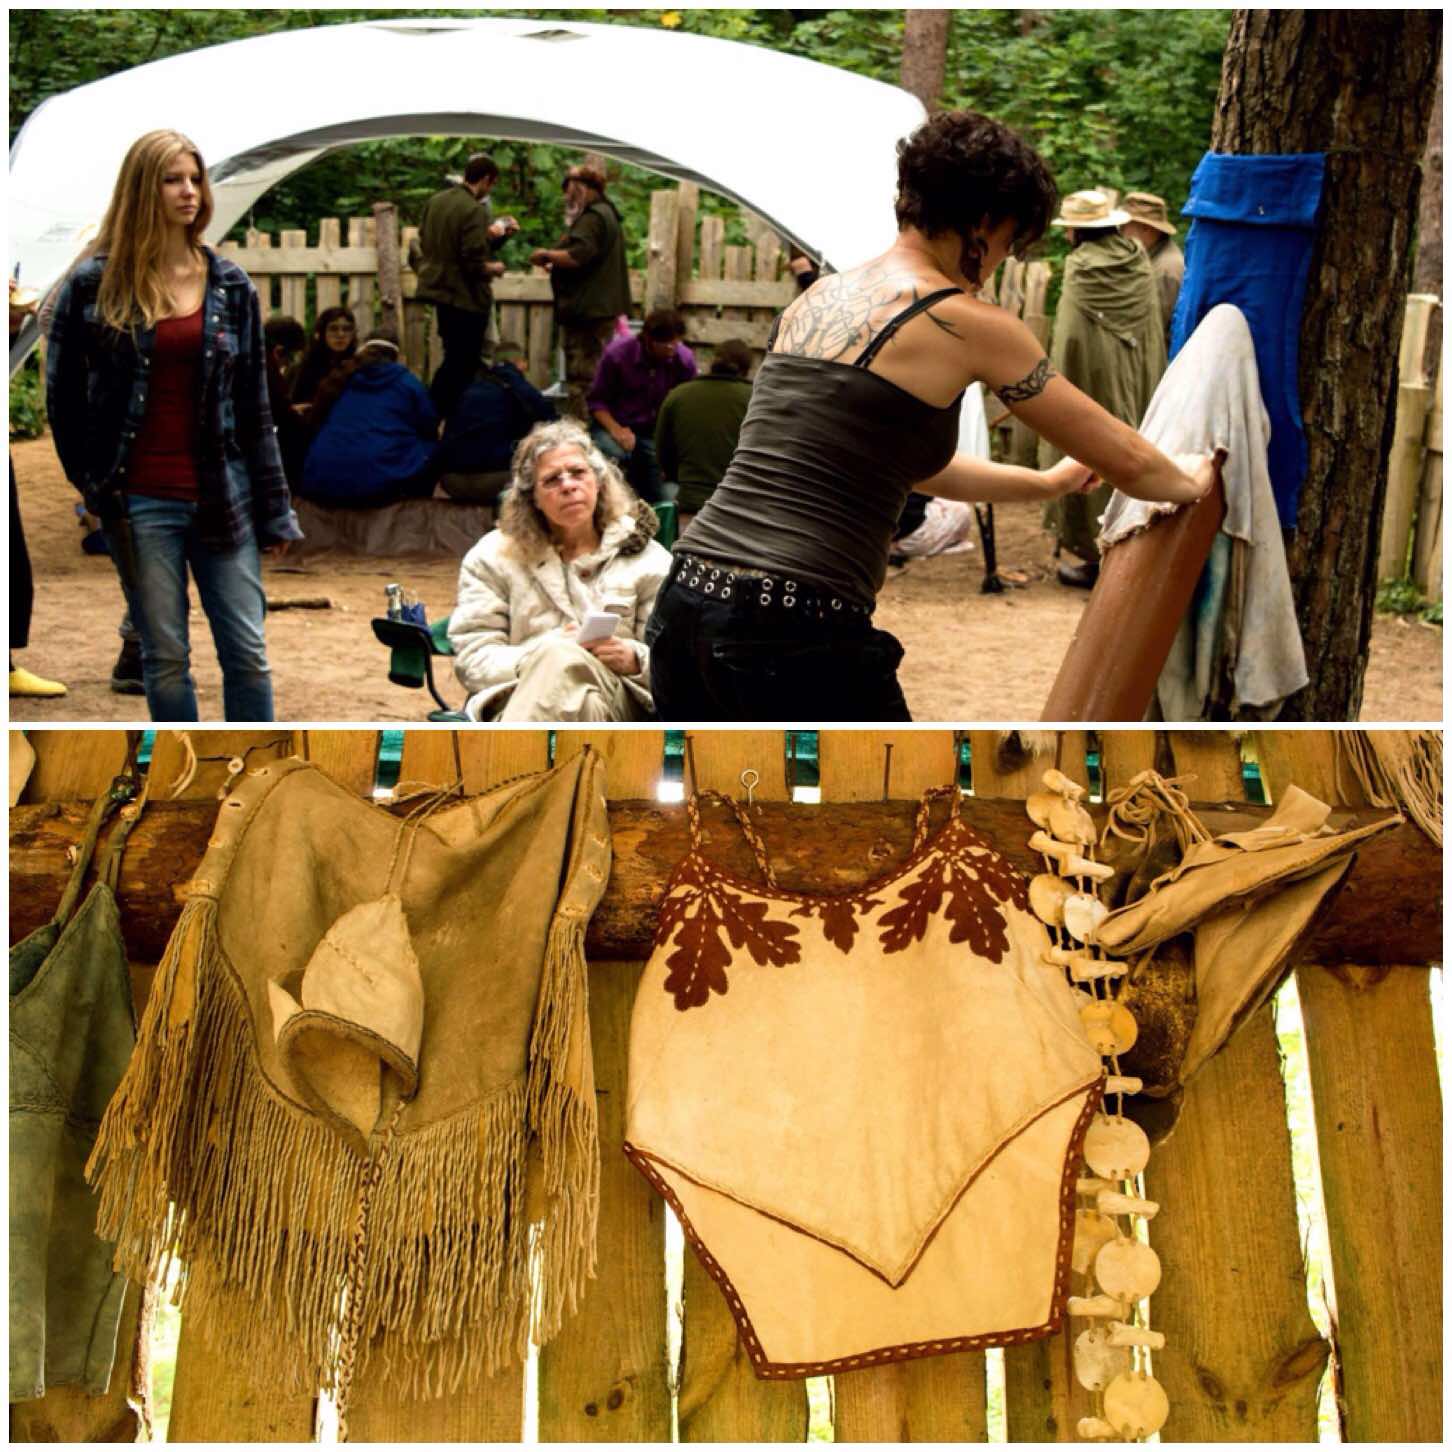
I have dabbled in animal hide work from scraping to tanning, and I know it is hard work (see my earlier blog How To….Make Buckskin from a Deer Hide). Theresa Kamper however makes it look so easy. She studied everything to do with working with animal hides for her PhD and is fantastically knowledgeable on the subject of everything we regard as ‘Primitive Skills’, and is happy to share that knowledge at the Moot.
Primitive skills craft from Theresa
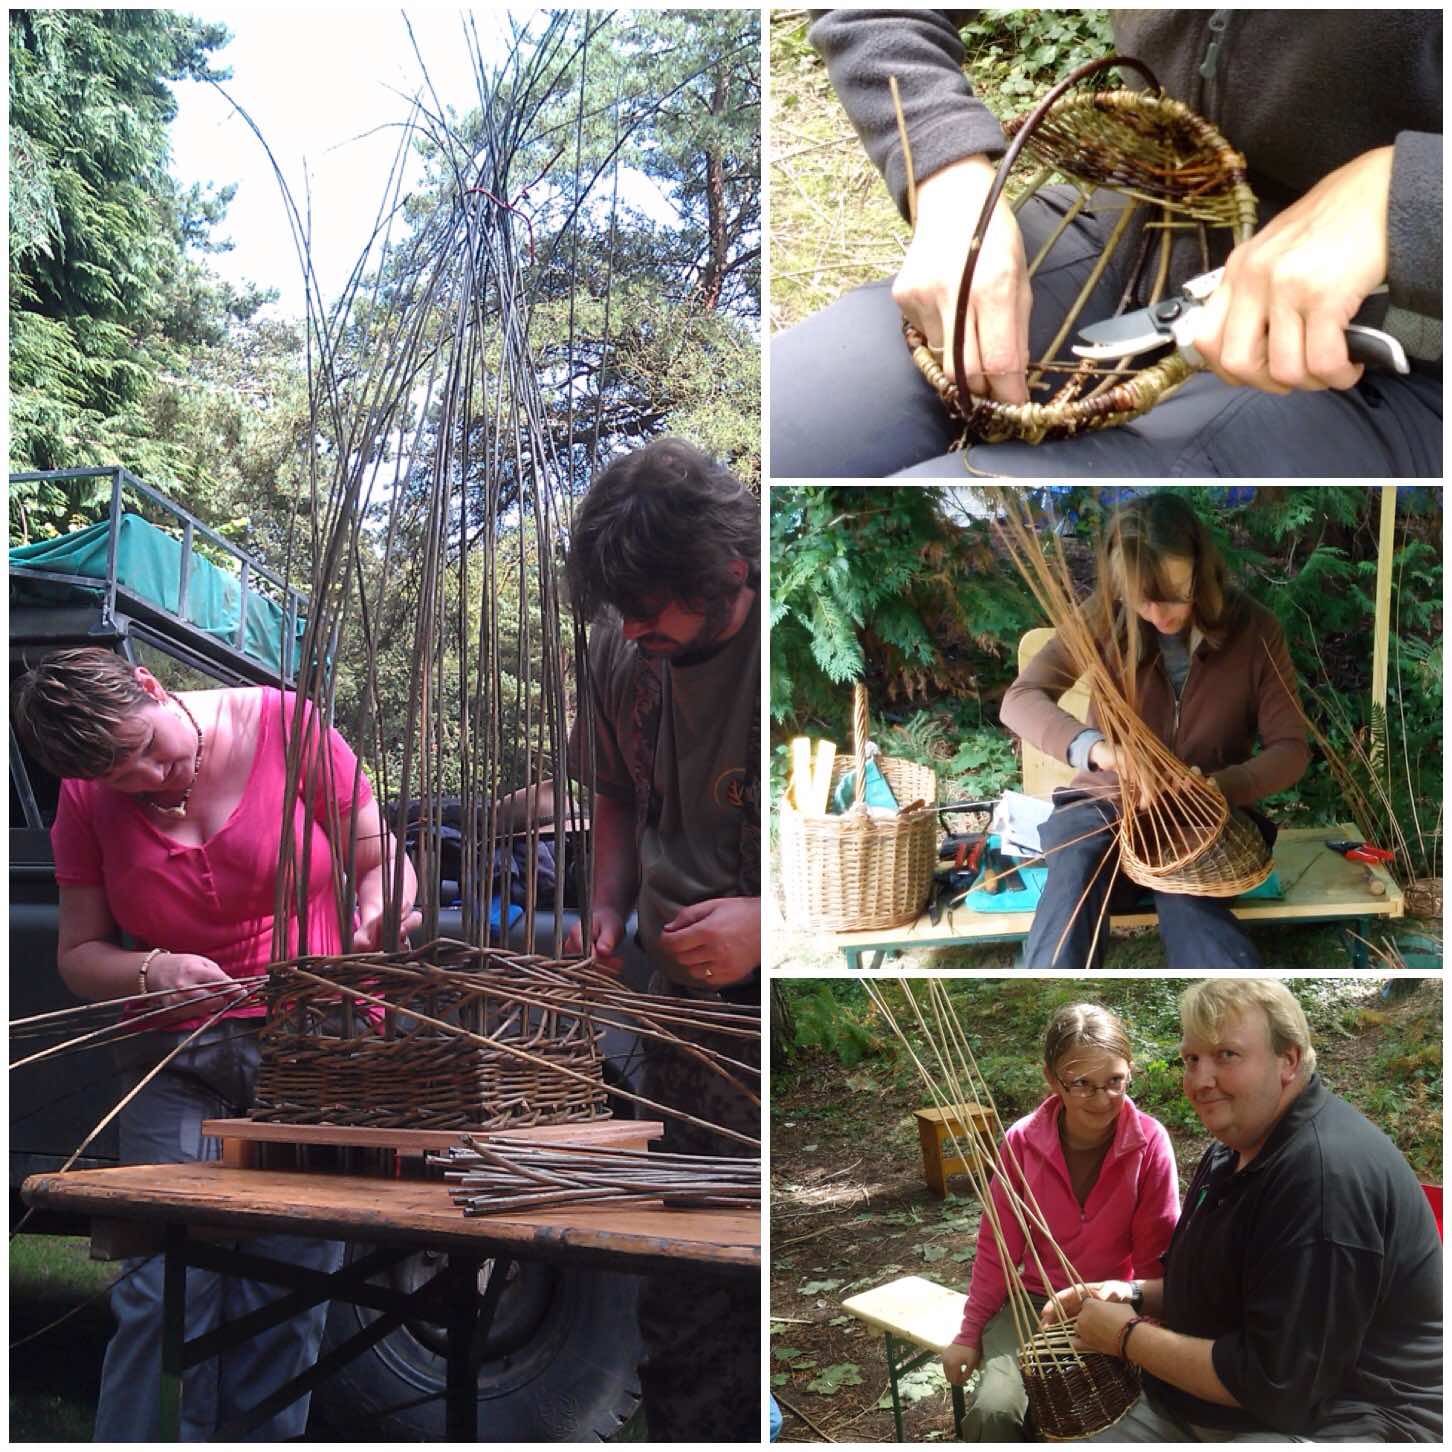
Basket- and lobster-pot making is very popular at the Moot. Our regular instructor on this is Julie Wagstaff from the Welsh Willow Works.
I have never had the time to do one of Jules’s classes however everyone I have spoken with has really learned a lot from her. Jules has a really patient nature and a very creative pair of hands.
Basket making
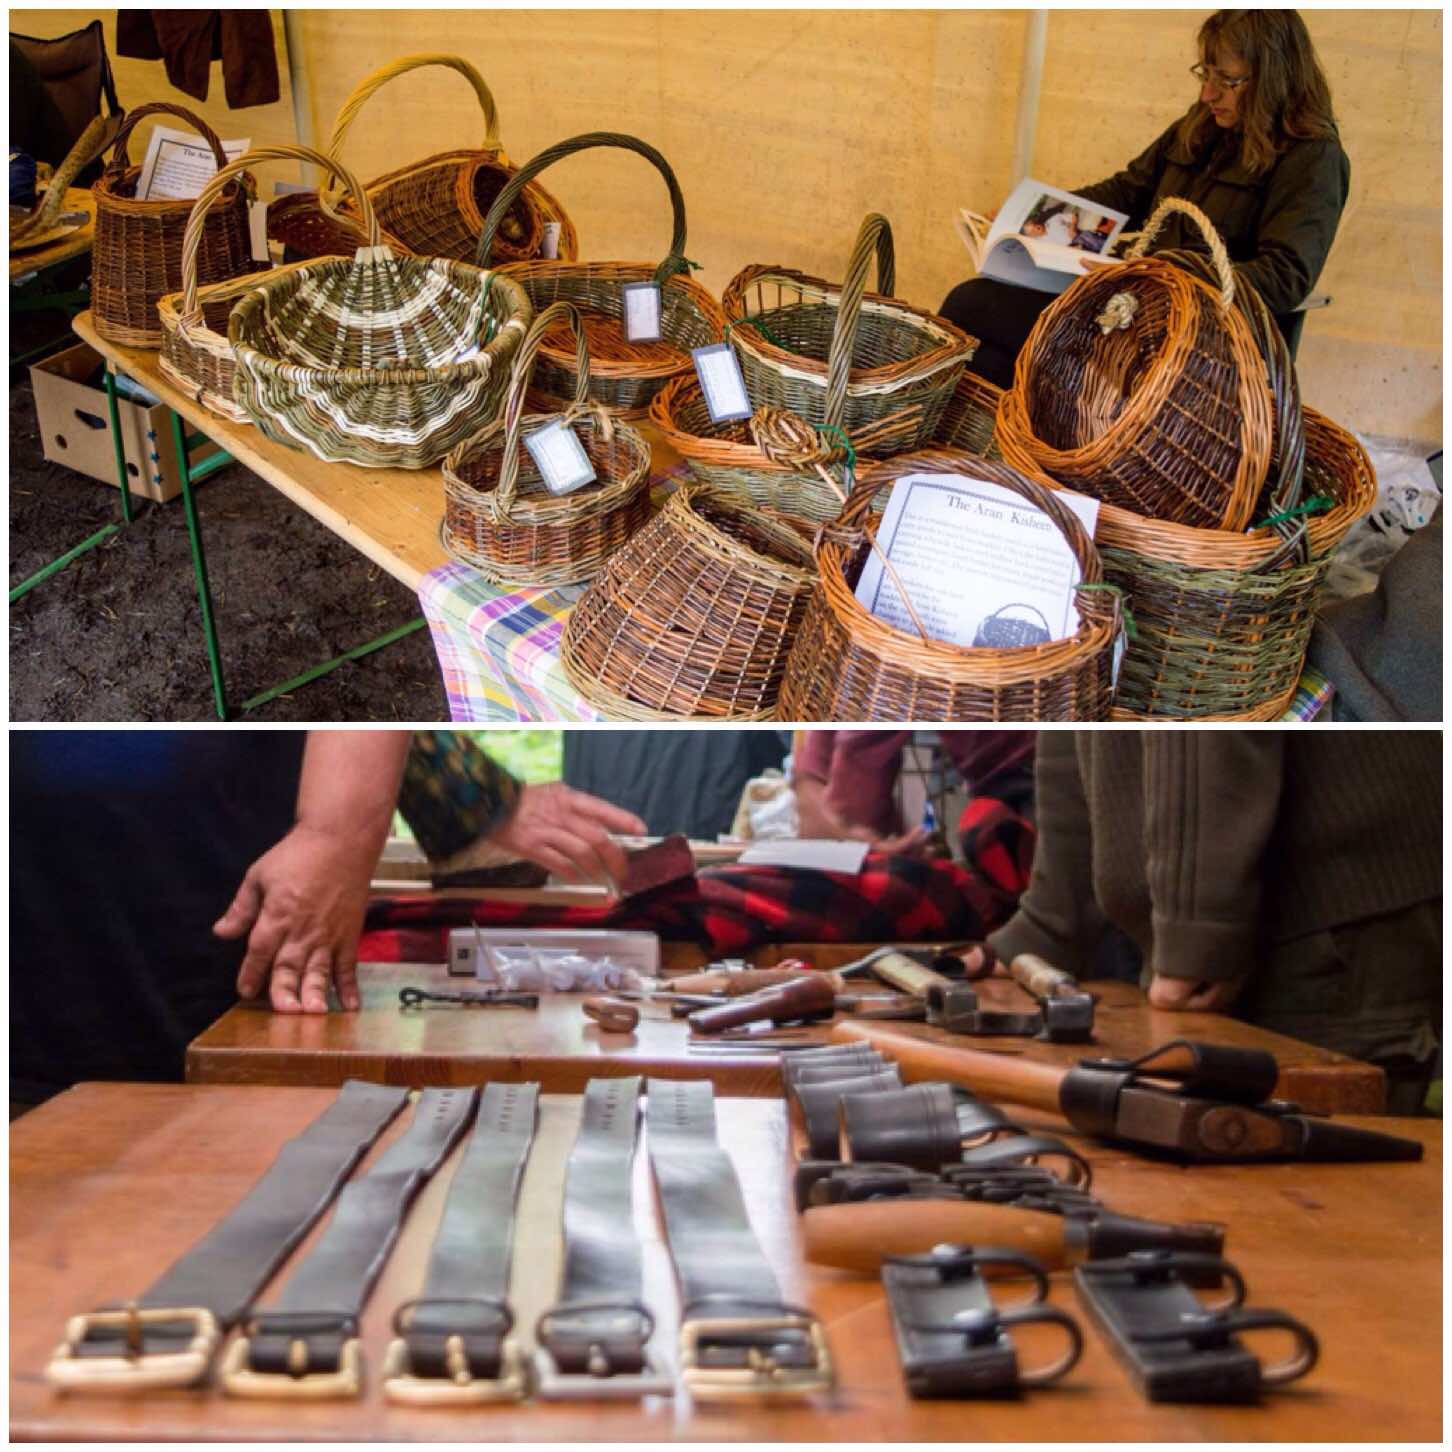
One day of the Moot is set aside as Traders Day. The Moot is not a particularly commercial event for traders however we do have a small shop open most days with a bring and buy stand.
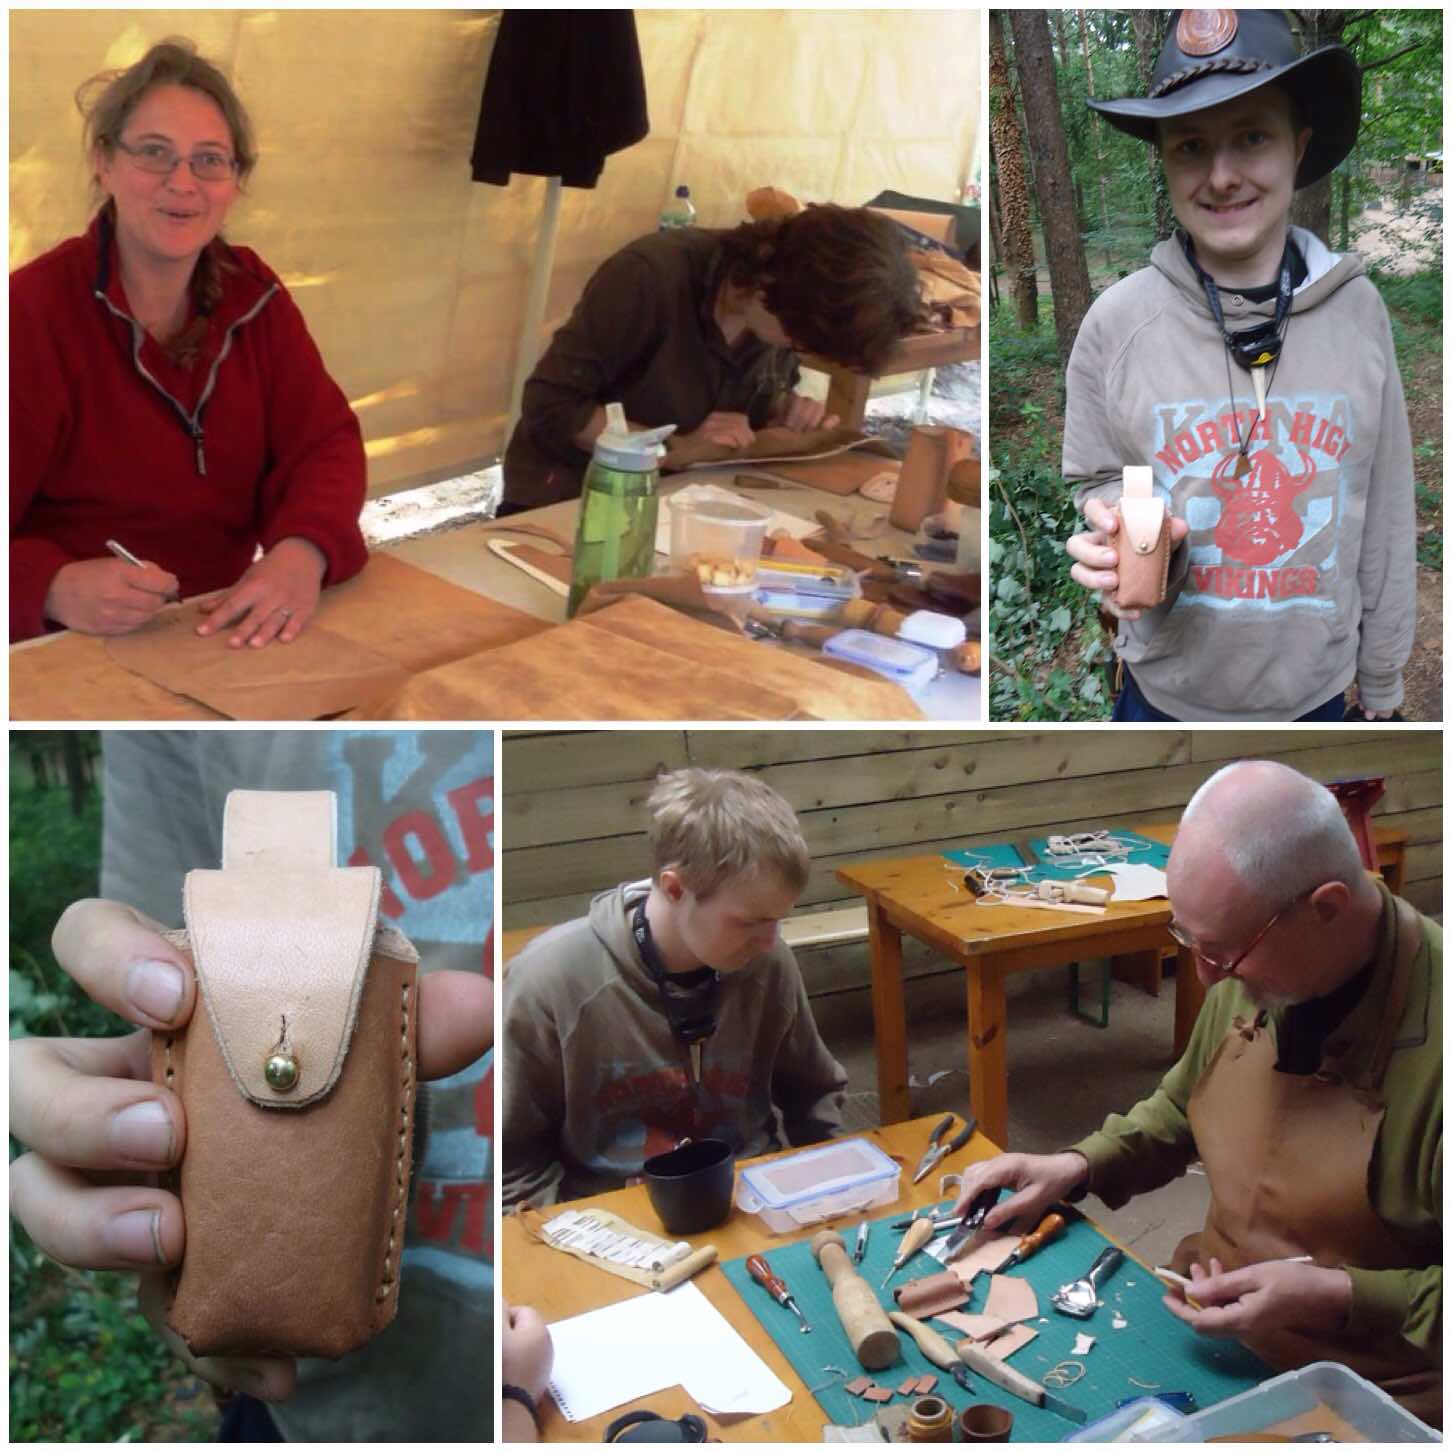
On Traders Day many of the members set up a stand to sell their ‘wares’. Some of this is second hand, others have brand new bought-in goods, and a few sell their own creations. Some of these items like the baskets and the leather work you can see below are highly crafted and intricate.
Traders day
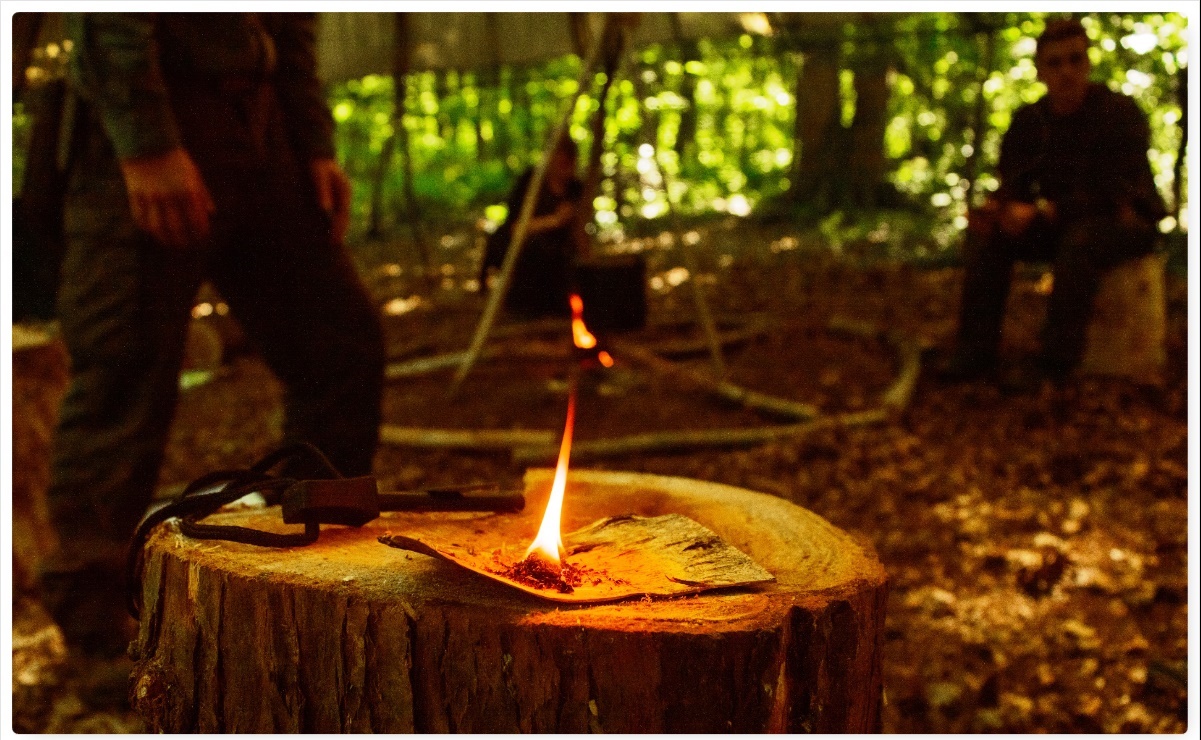
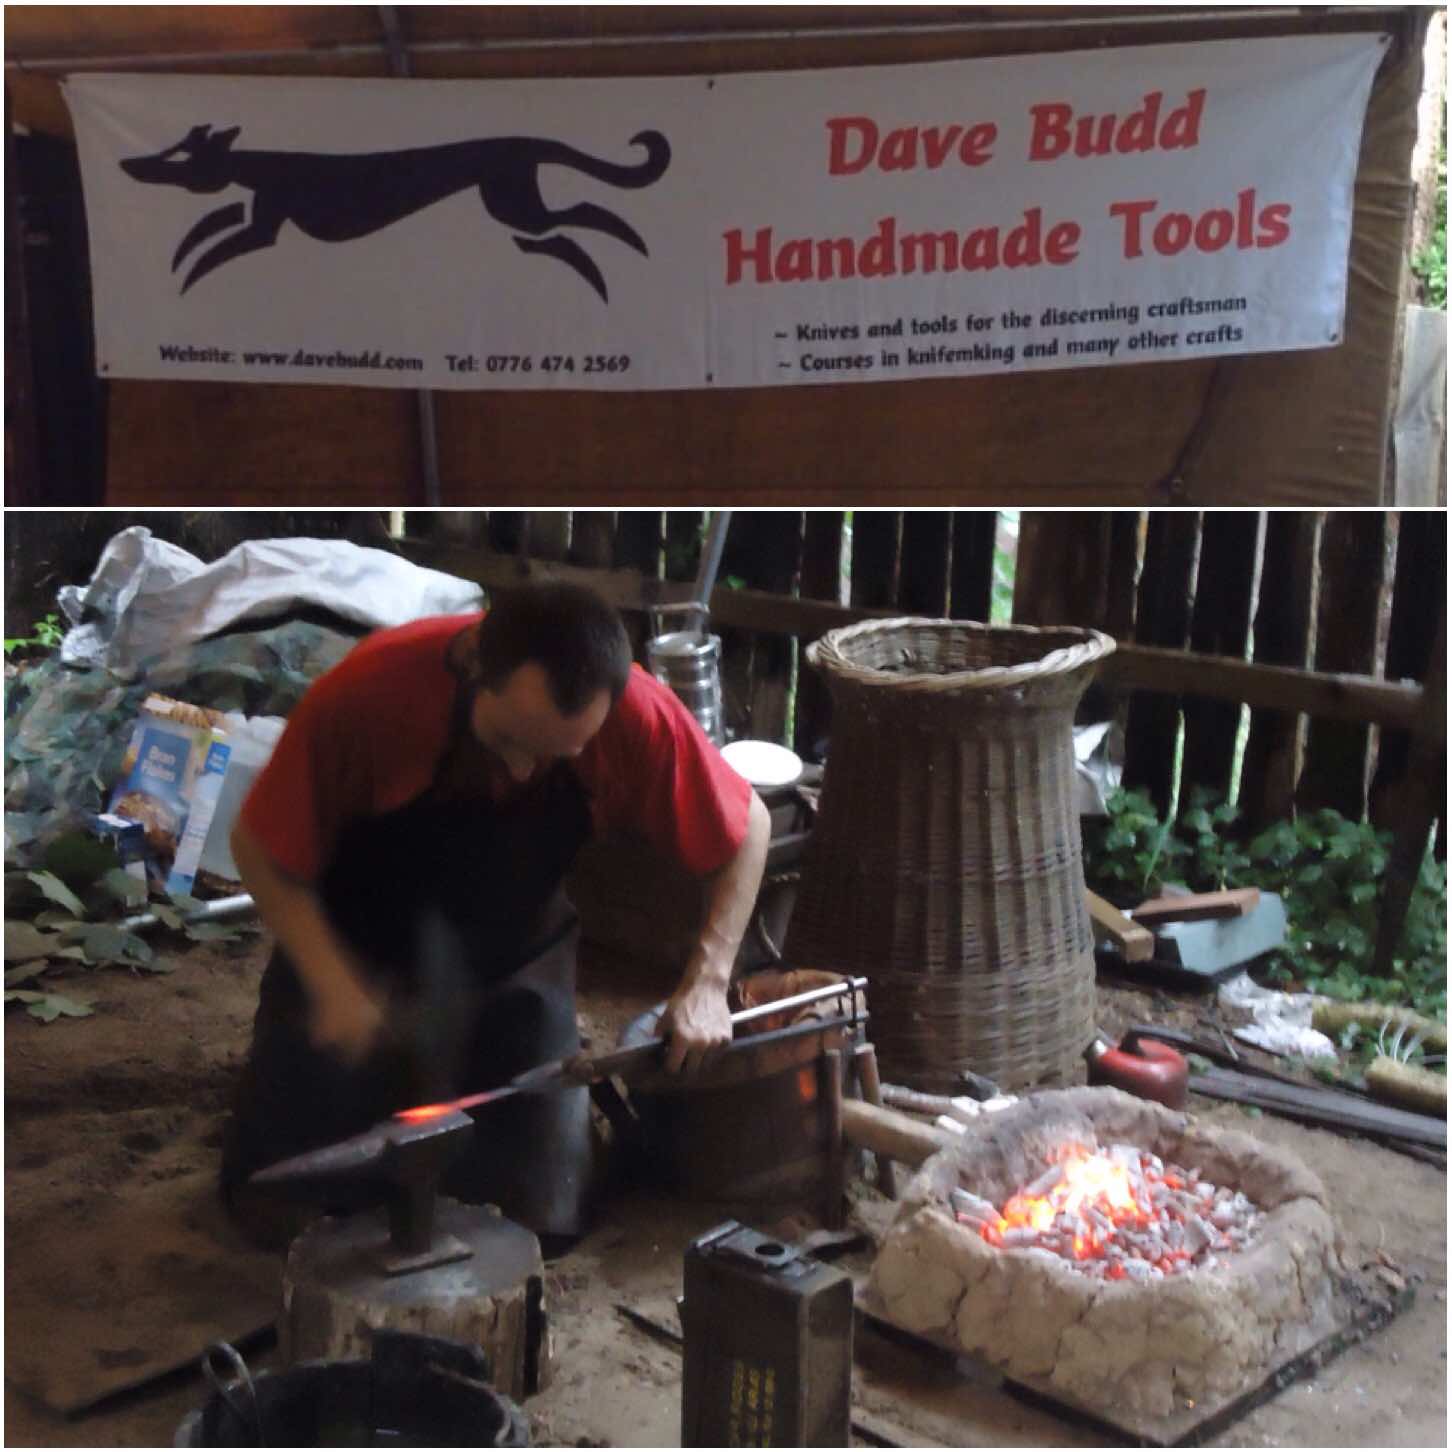
A post on craft cannot be complete without mentioning Mr Dave Budd. Dave is a master craftsman when it comes to metalwork, Using only the most rudimentary (but highly suited to the job) equipment he runs his own forge for us every year.
Dave makes excellent knives and other woodland working tools. My daughter Catherine enjoys being the ‘Pump Monkey’ – keeping the pump going to heat the forge. Dave also donated this year a beautiful knife and a bodkin arrow point as prizes for the archery competition.
Dave Budd iron craft
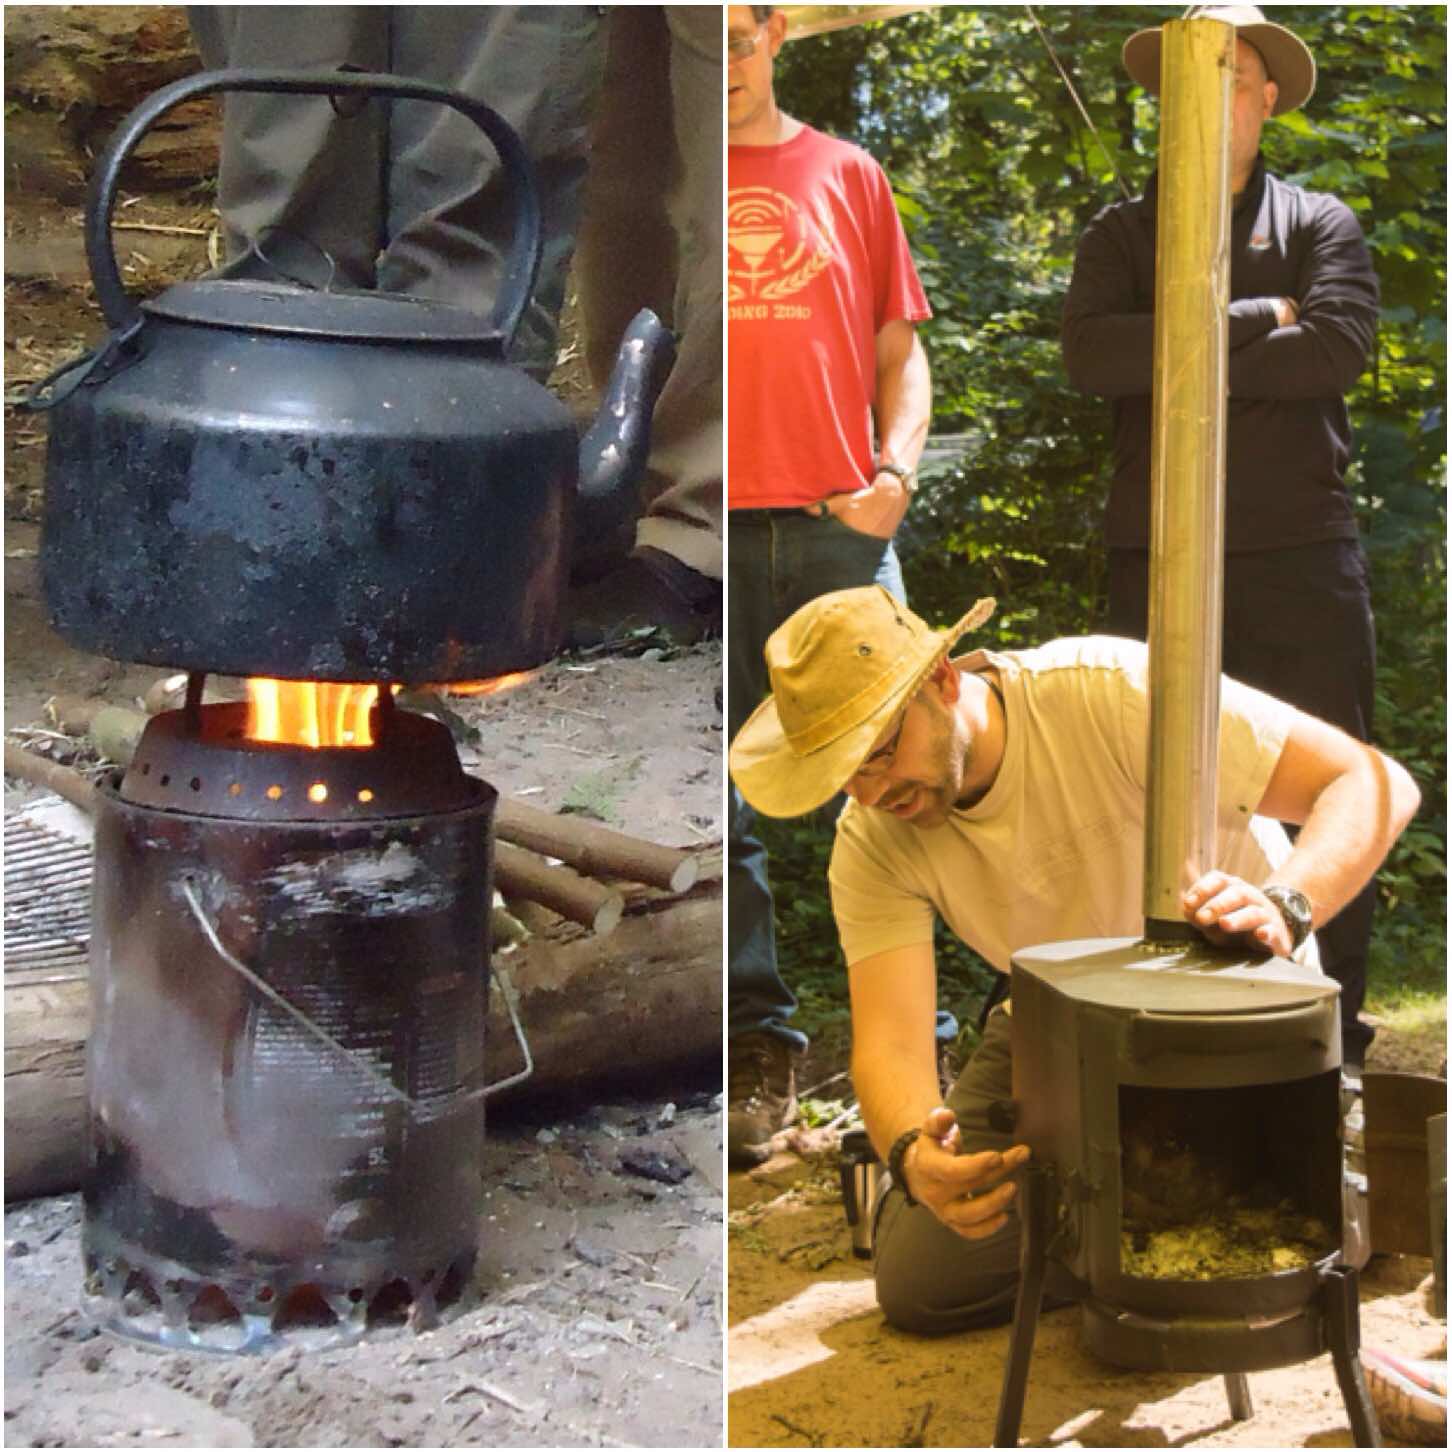
Another metalworker who is starting to experiment with this material is my Bushmoot neighbour Ian Woodham. A few years ago Ian showed a class I was running how he built a gas wood-burning stove out of a paint can. I was so impressed with it that I made one myself and wrote a tutorial on it – How To….Build a Wood Gas Stove.
This year Ian brought along a new stove he had built out of two gas bottles. The stove had a burner on one side and an oven on the other and I can confirm it did make excellent pizzas and cakes. Since then he has built another one which I am hopefully going to be trying out soon (as soon as I can figure out how to transport it from Yorkshire to Hampshire).
Cooking construction from Ian
We have had a number of leatherwork instructors over the years however Eric Methven has been teaching this art at the Moot the longest. Eric can turn his hand to most things when it comes to working with leather from water bottles, tankards and sheaths to the likes of beautiful arm guards for archery (we got one of these guards as a prize for the archery competition one year).
Our good friend Drew passed away a few years ago and he was a keen student of Eric’s. I still remember clearly Drew coming up to my camp to show me the new sheath he had just made for his Leatherman multitool.
Leather craft from Eric
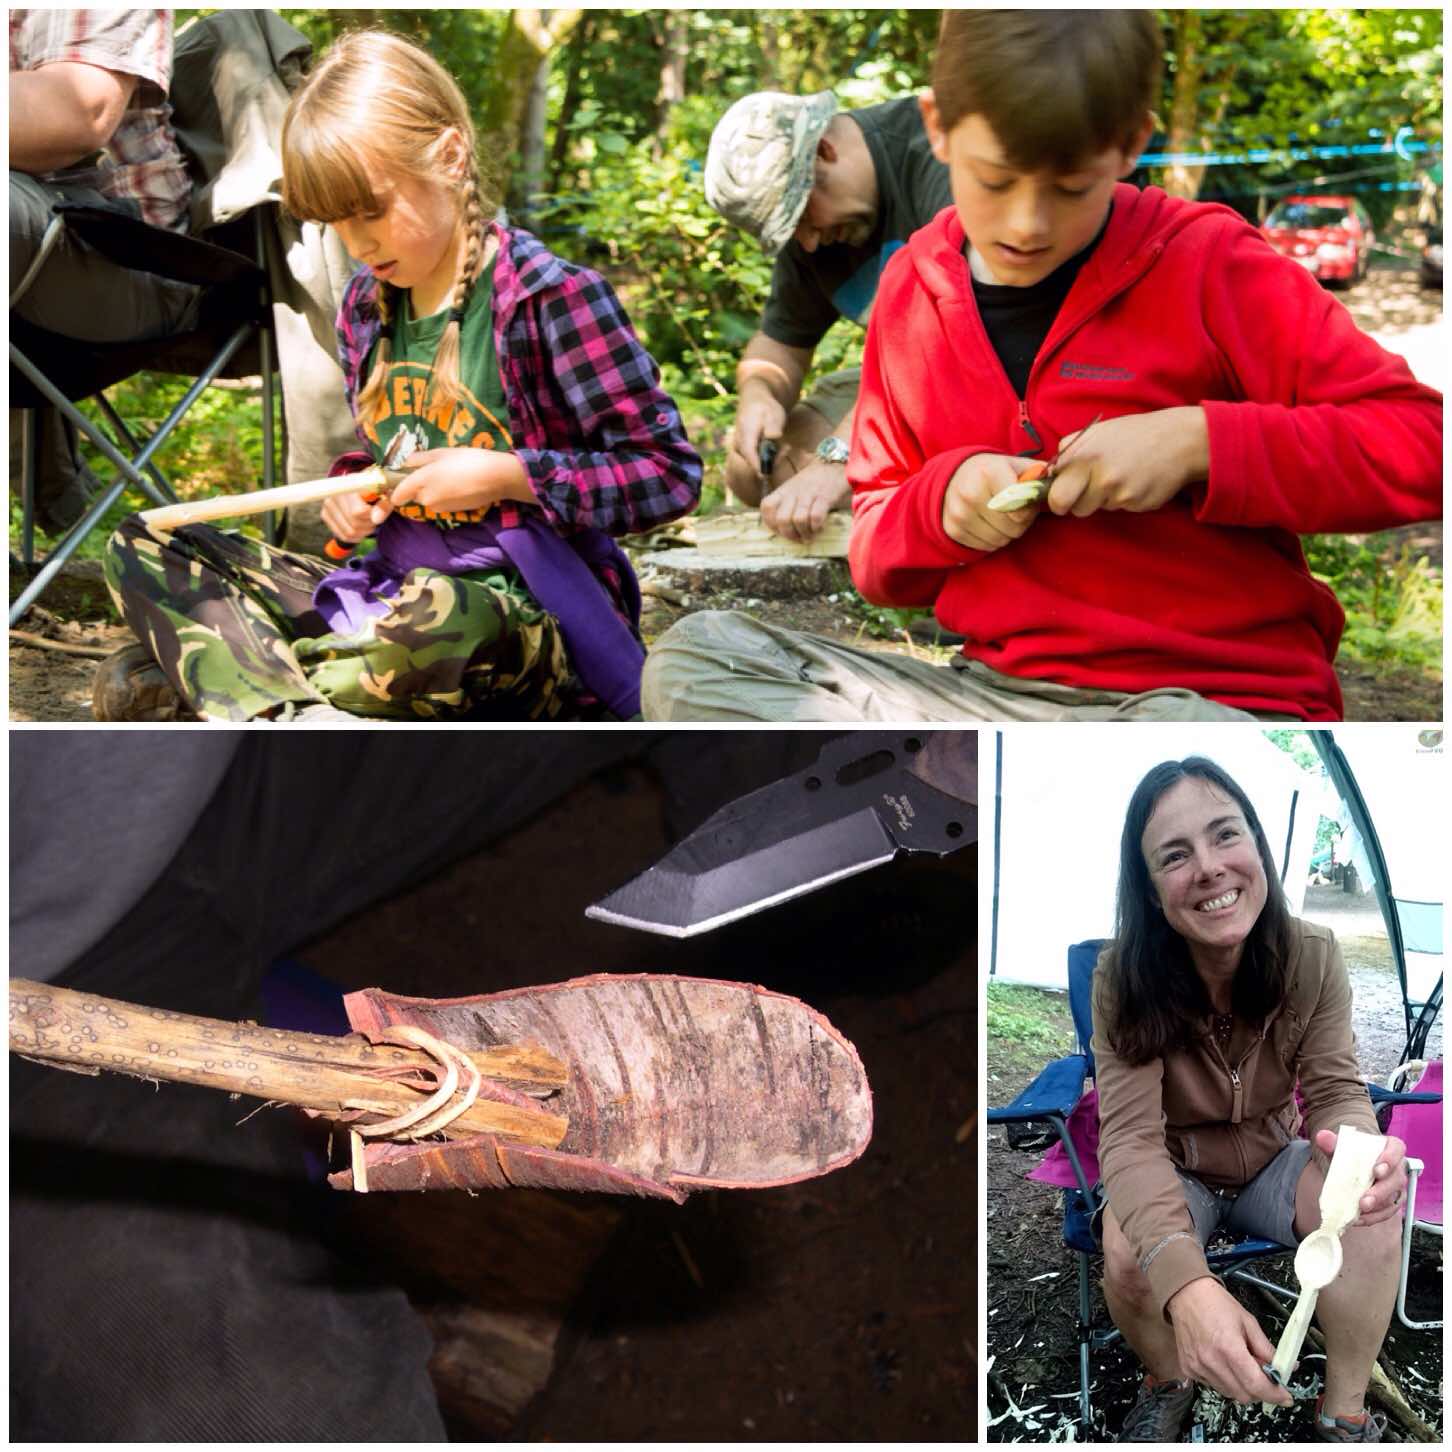
No Moot would be complete without some spoon carving. Our expert carver is Dean however quite a few of us lend a hand with this class. It is great to see all the kids learning to carve their first spoon (and adults too – that is my wife Alison with her first spoon below).
My first spoon at the Moot (way back in 2005) was quickly constructed from birch bark. It did not take long to make but it did impress me.
Spoonage
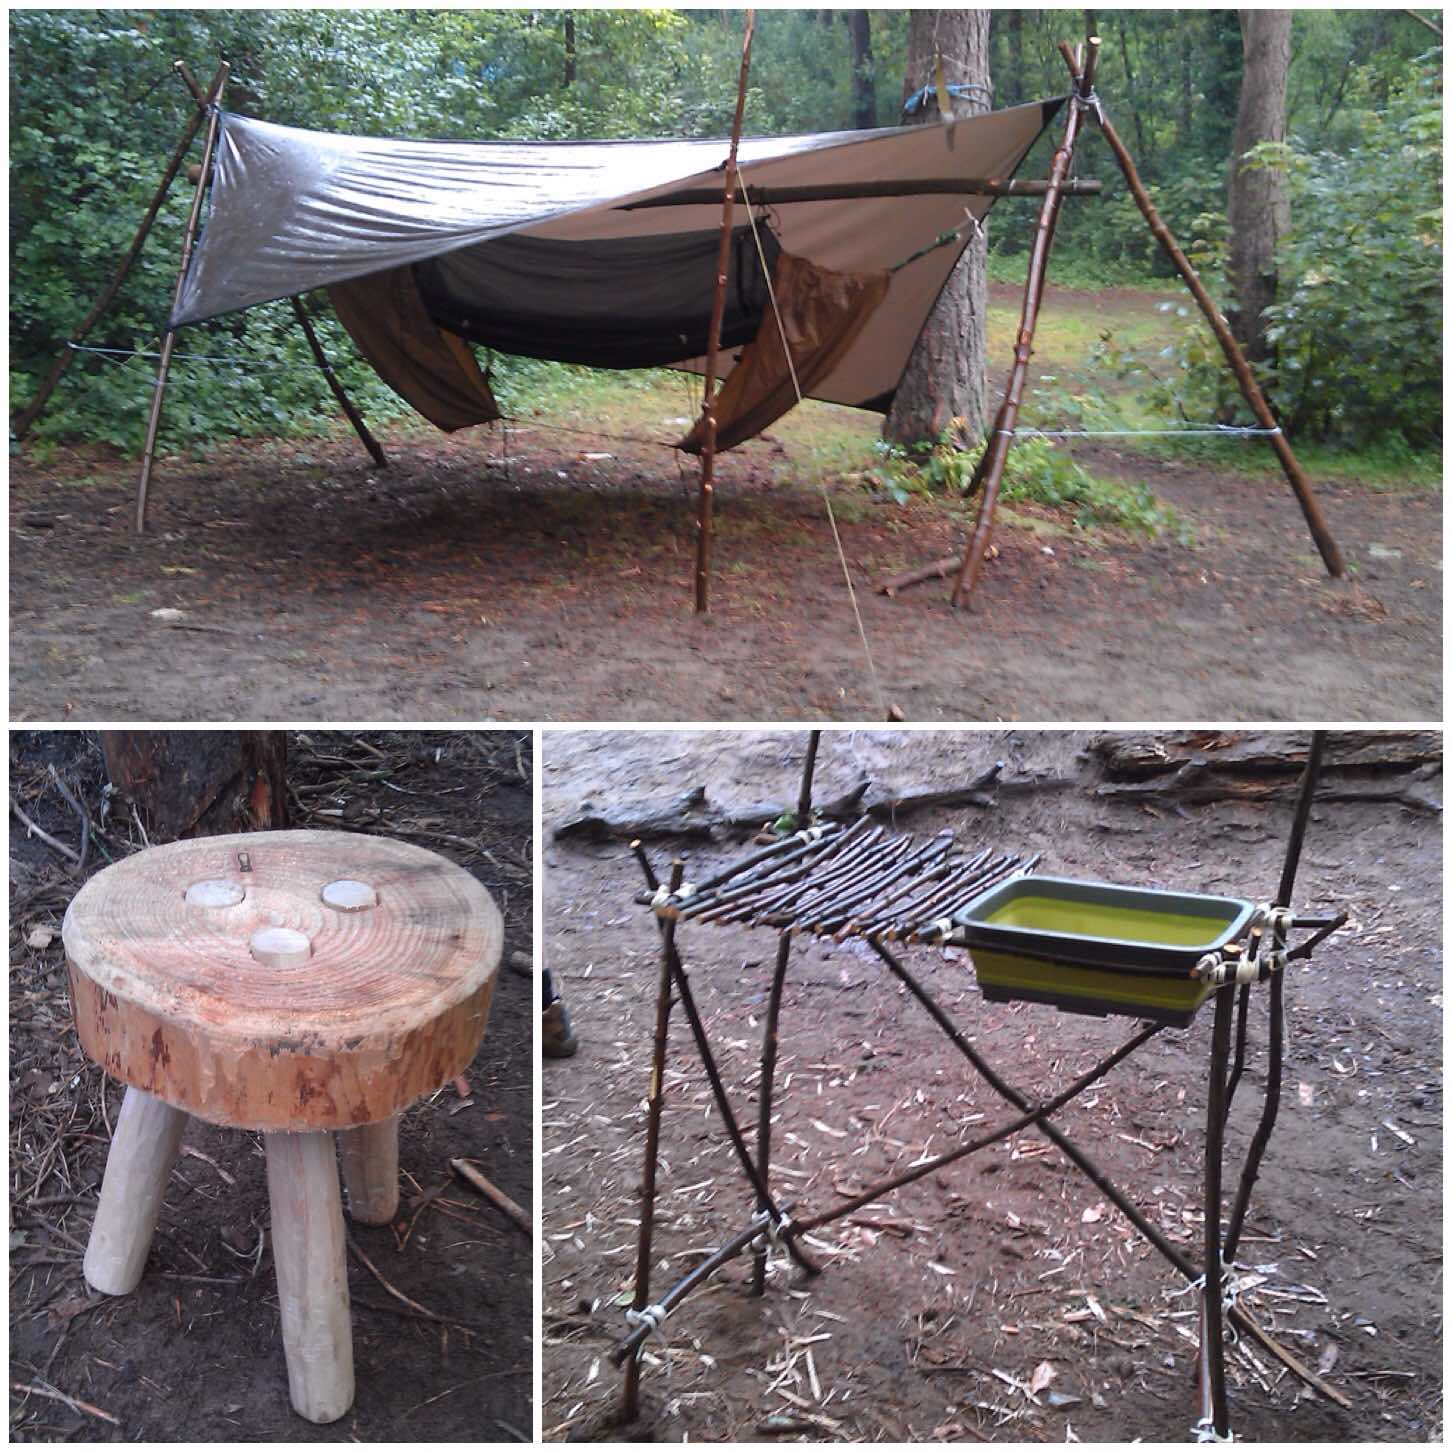
I ran a competition one year where everyone was tasked with constructing something for a bushcraft camp. There were many entries and you can see three below.
I loved the little stool and the washing rack, which had a lot of love and care put into its construction. My entry was this freestanding hammock stand (no land anchors were needed) .
Camp constructions
A couple of other construction projects have been around the theme of cooking. Tim Neobard built this fantastic pizza oven out of clay and straw last year. It baked some excellent pizzas (sadly some idiots smashed it up after the Moot finished).
Happily the oven was re-built by Neil this year using bricks as a skeleton so hopefully it will last for a few years.
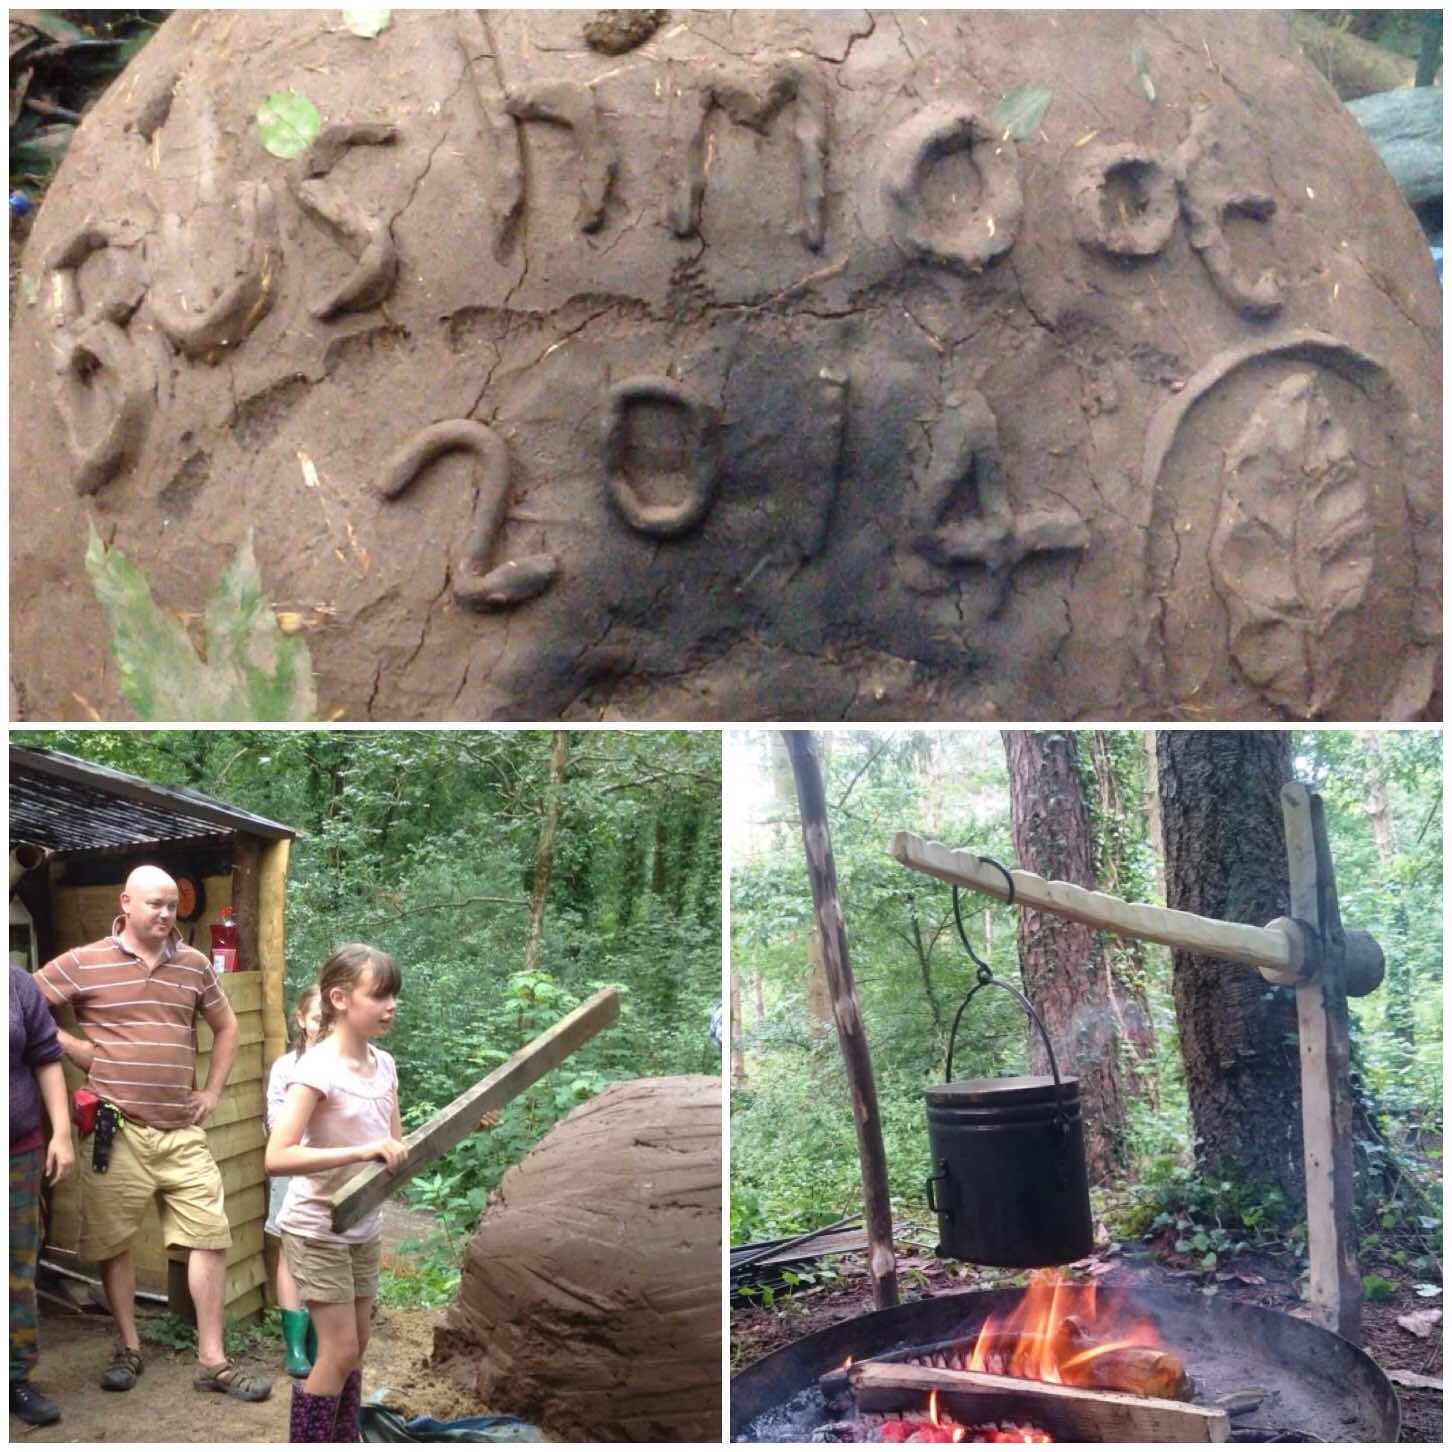
My project this year has been on building campfire cranes and I tested out my Lap Joint crane at the Moot. It is a very simple device made out of one pole and I am happy to say it passed with flying colours. Since then I have been busy building other cranes with as many variations as I can think of.
Fireside constructions
One thing you can be guaranteed about at the Moot is being astonished by the numerous things you can do with string, be that Dream Catchers, crochet or making whoopie slings.
We also had David Colter making Balearic slings out of string at the Moot and running a competition with them. Most bushcrafters are quite happy at the Moot to show you what they think are the best knots to use in any given situation.
String craft
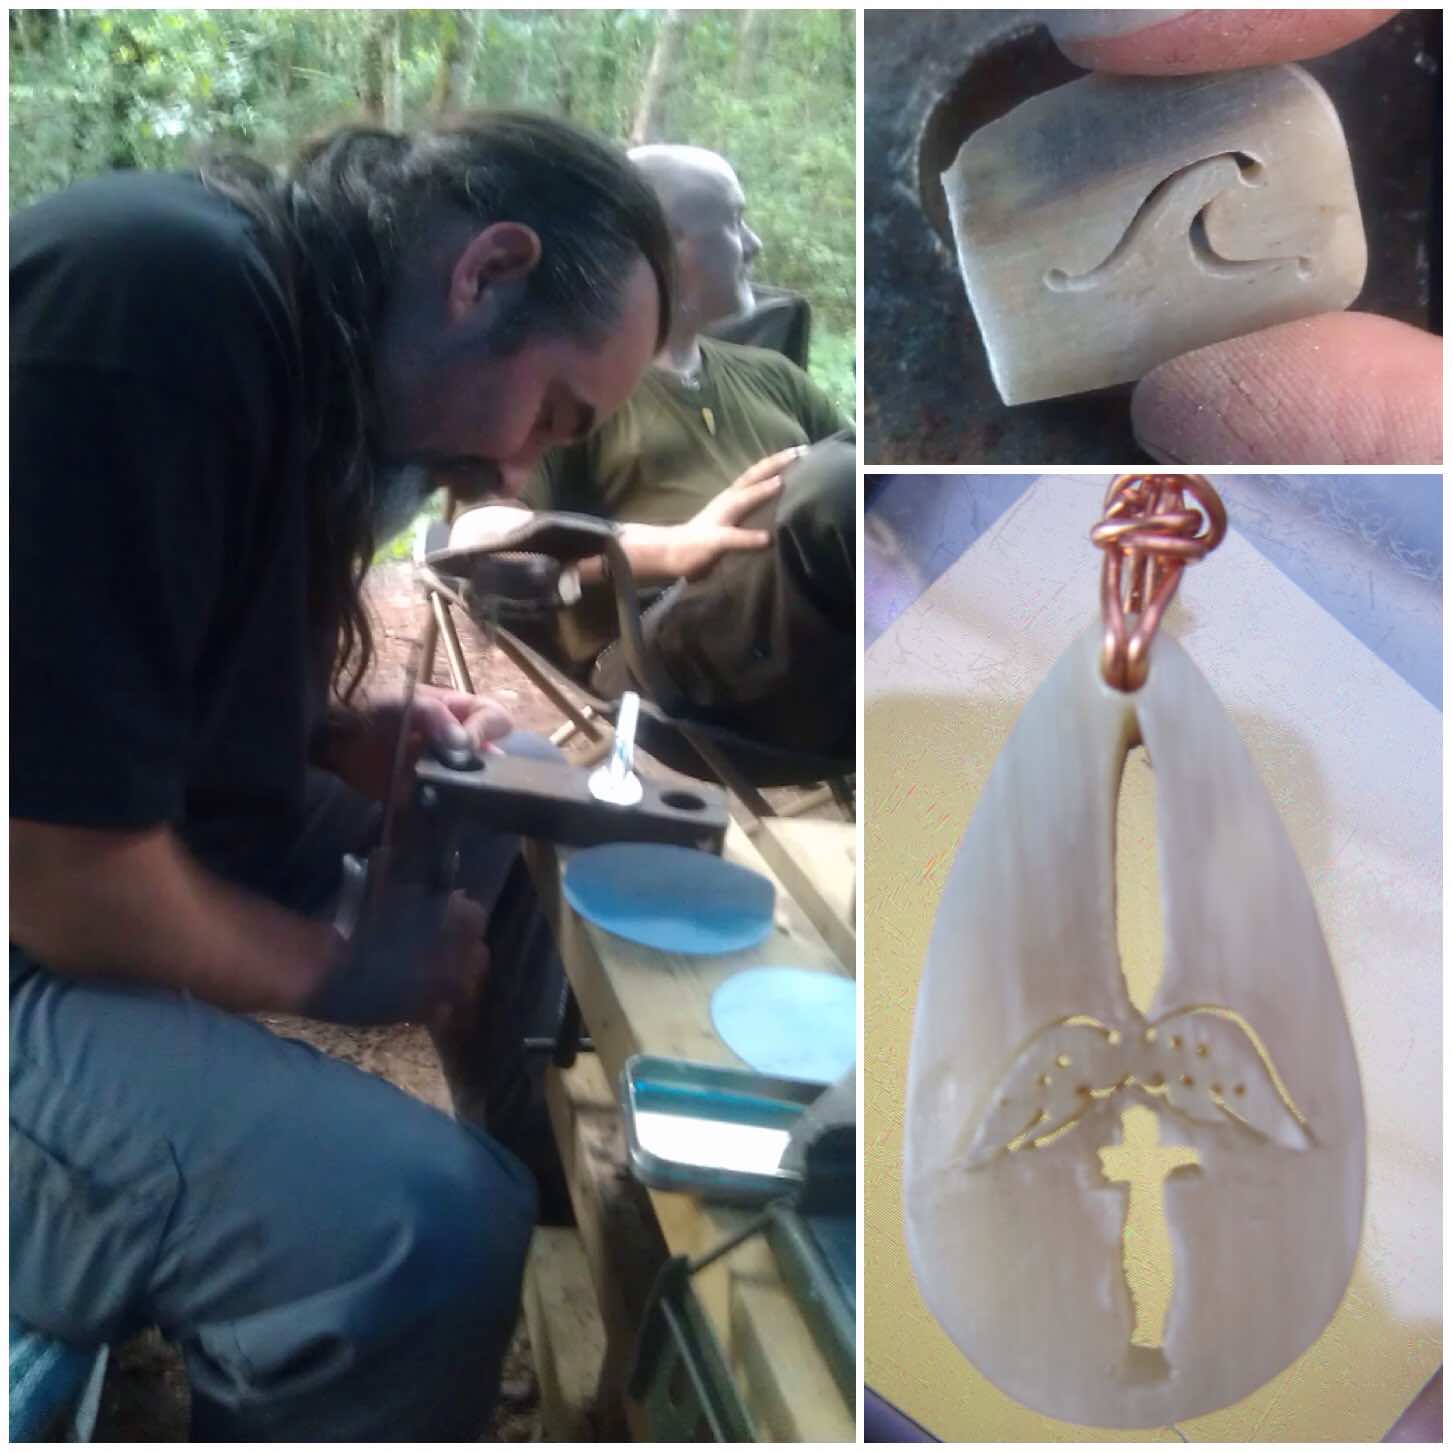
A very quiet craftsman is our very own Cap’n Badger. He uses a fine saw to carve bone and antler into beautiful pendants. You can see a couple of his designs in the picture below.
The pendant on the bottom right is the one he carved for me a few years ago. The design was very intricate (a Royal Marine dagger and parachute wings). Badger also made some more pendants this year and donated them to the archery competition where they were quickly snapped up by the competitors.
Fine bone craft from Cap’n Badger
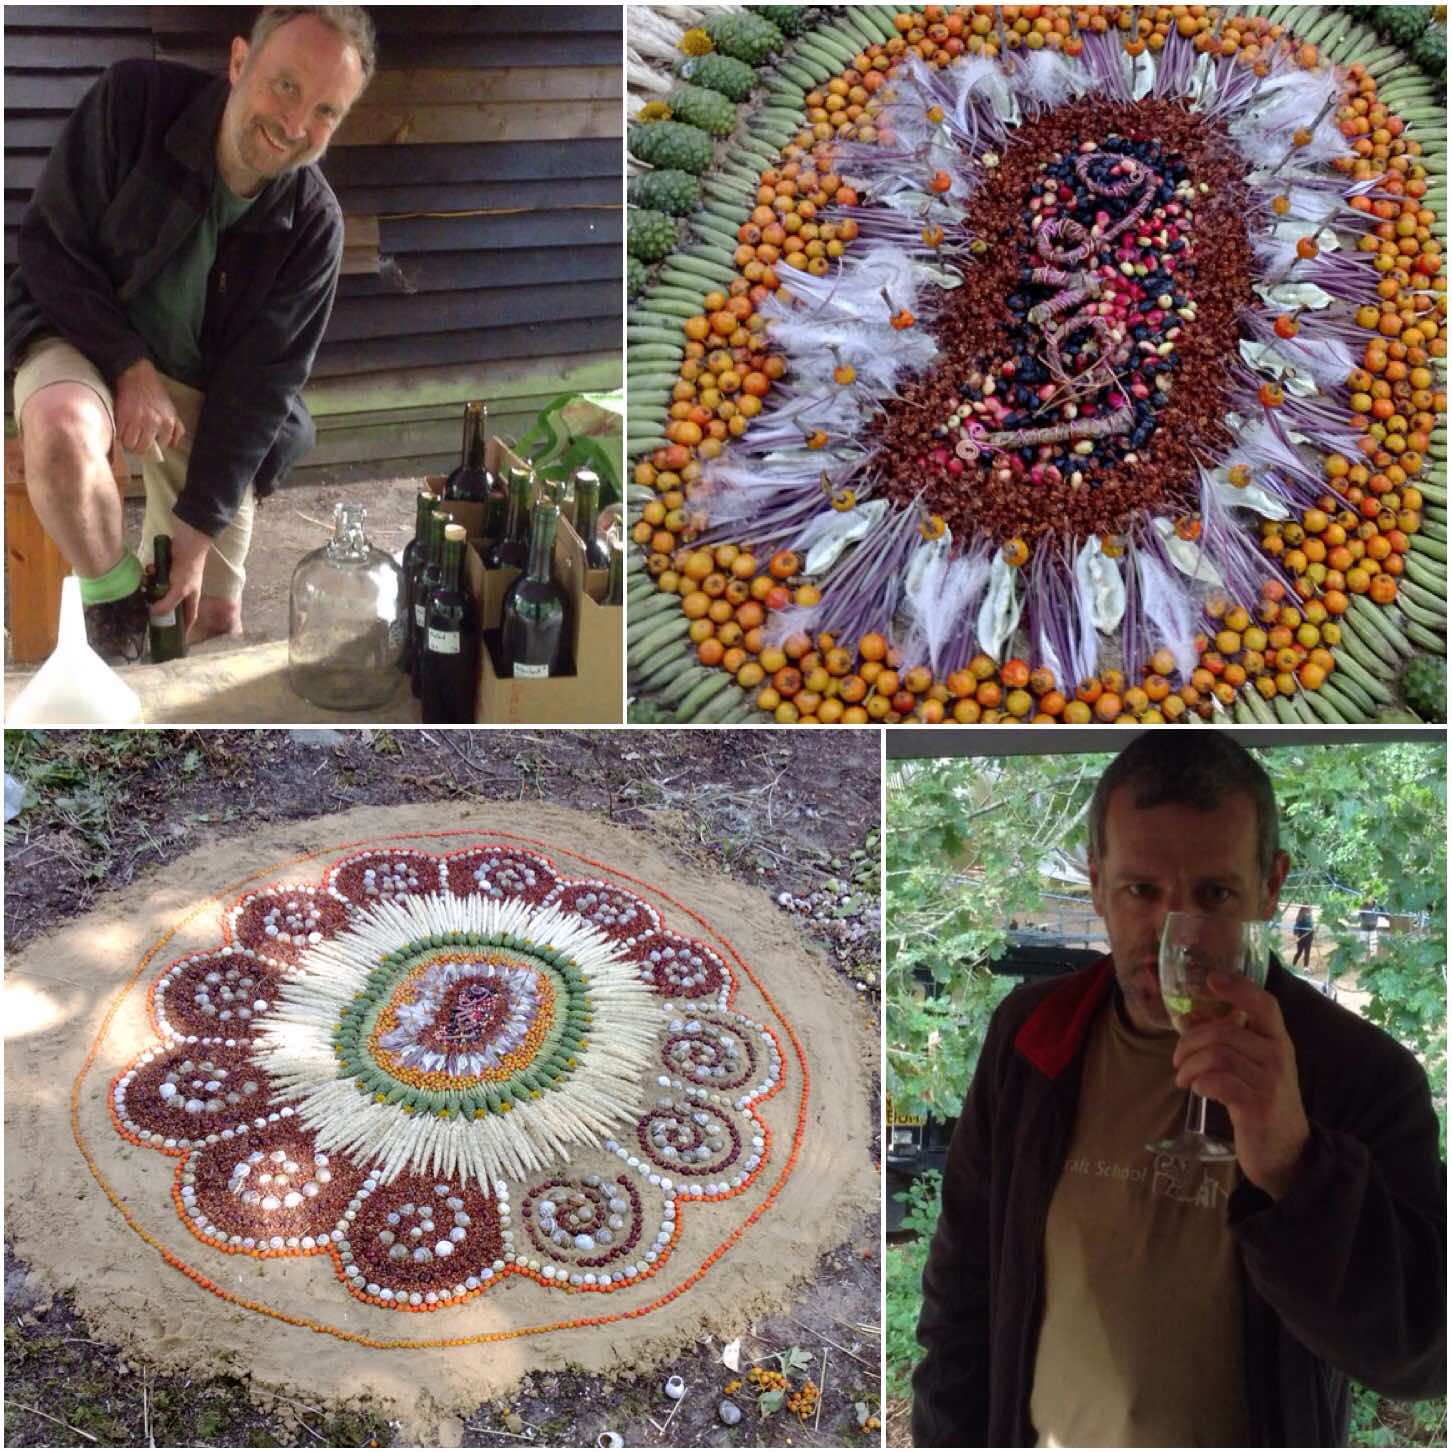
Now it is not all hard graft when it comes to the Moot. Last year my friend Richard brought along a number of his bottles of white elderberry wine. I managed to get a private tasting session and I was very impressed with the quality of the wine that he had produced.
Richard has managed to cultivate his own ‘orchard’ of elder trees that produce white elderberries. This has taken him years to do and it has paid off for him with some excellent wine.
I think though that the most beautiful sight you will come across at the Moot must be the fantastic mosaics of plants made by Keith Beaney (Keith refers to them as Land Art and you can see why clearly). Keith will spend hours producing these wonderful spectacles for us to marvel at. Many of the children head off to collect materials, inspired by his creations, and leave their own mosaics dotted around the woods.
Liquid art from Richard and plant art from Keith
I could have added lots more on this subject but I have to end somewhere.
I am looking forward to next year when I can practice some of these arts and crafts again and learn new ones.
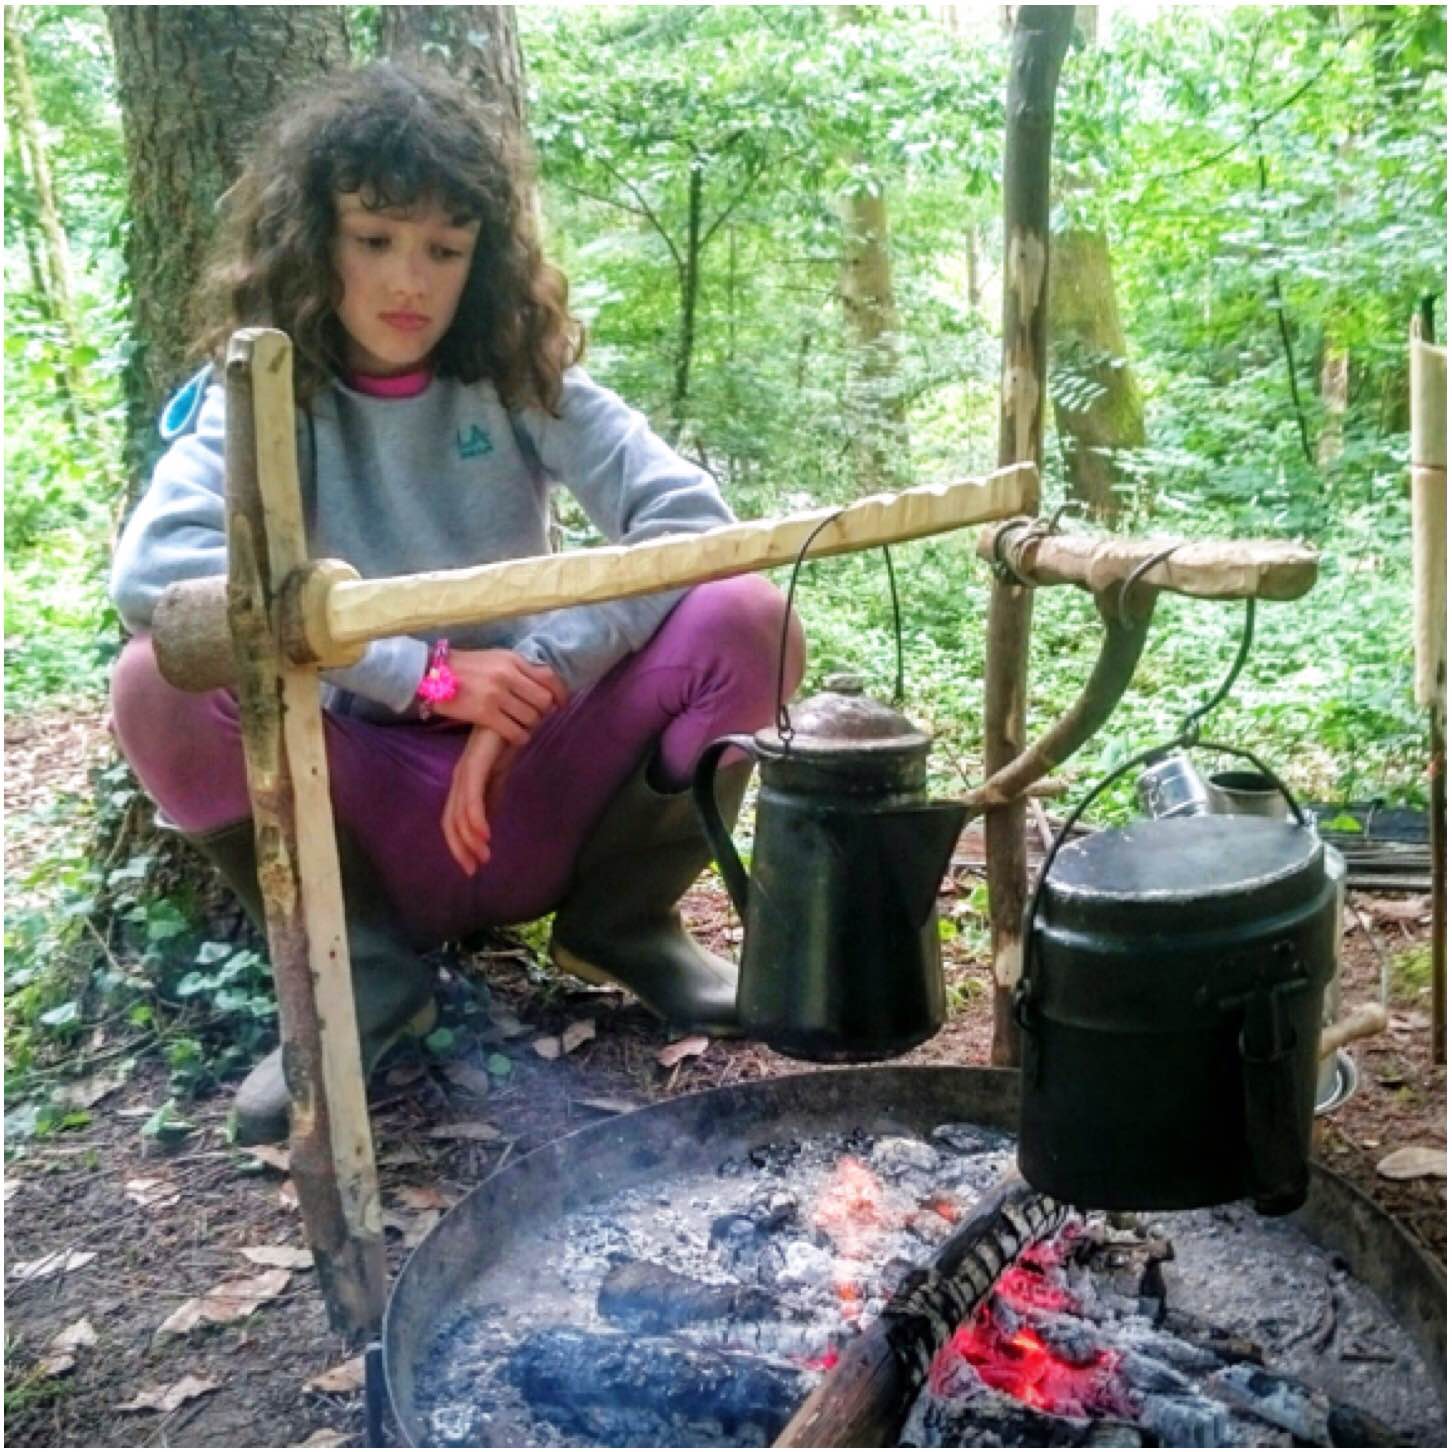
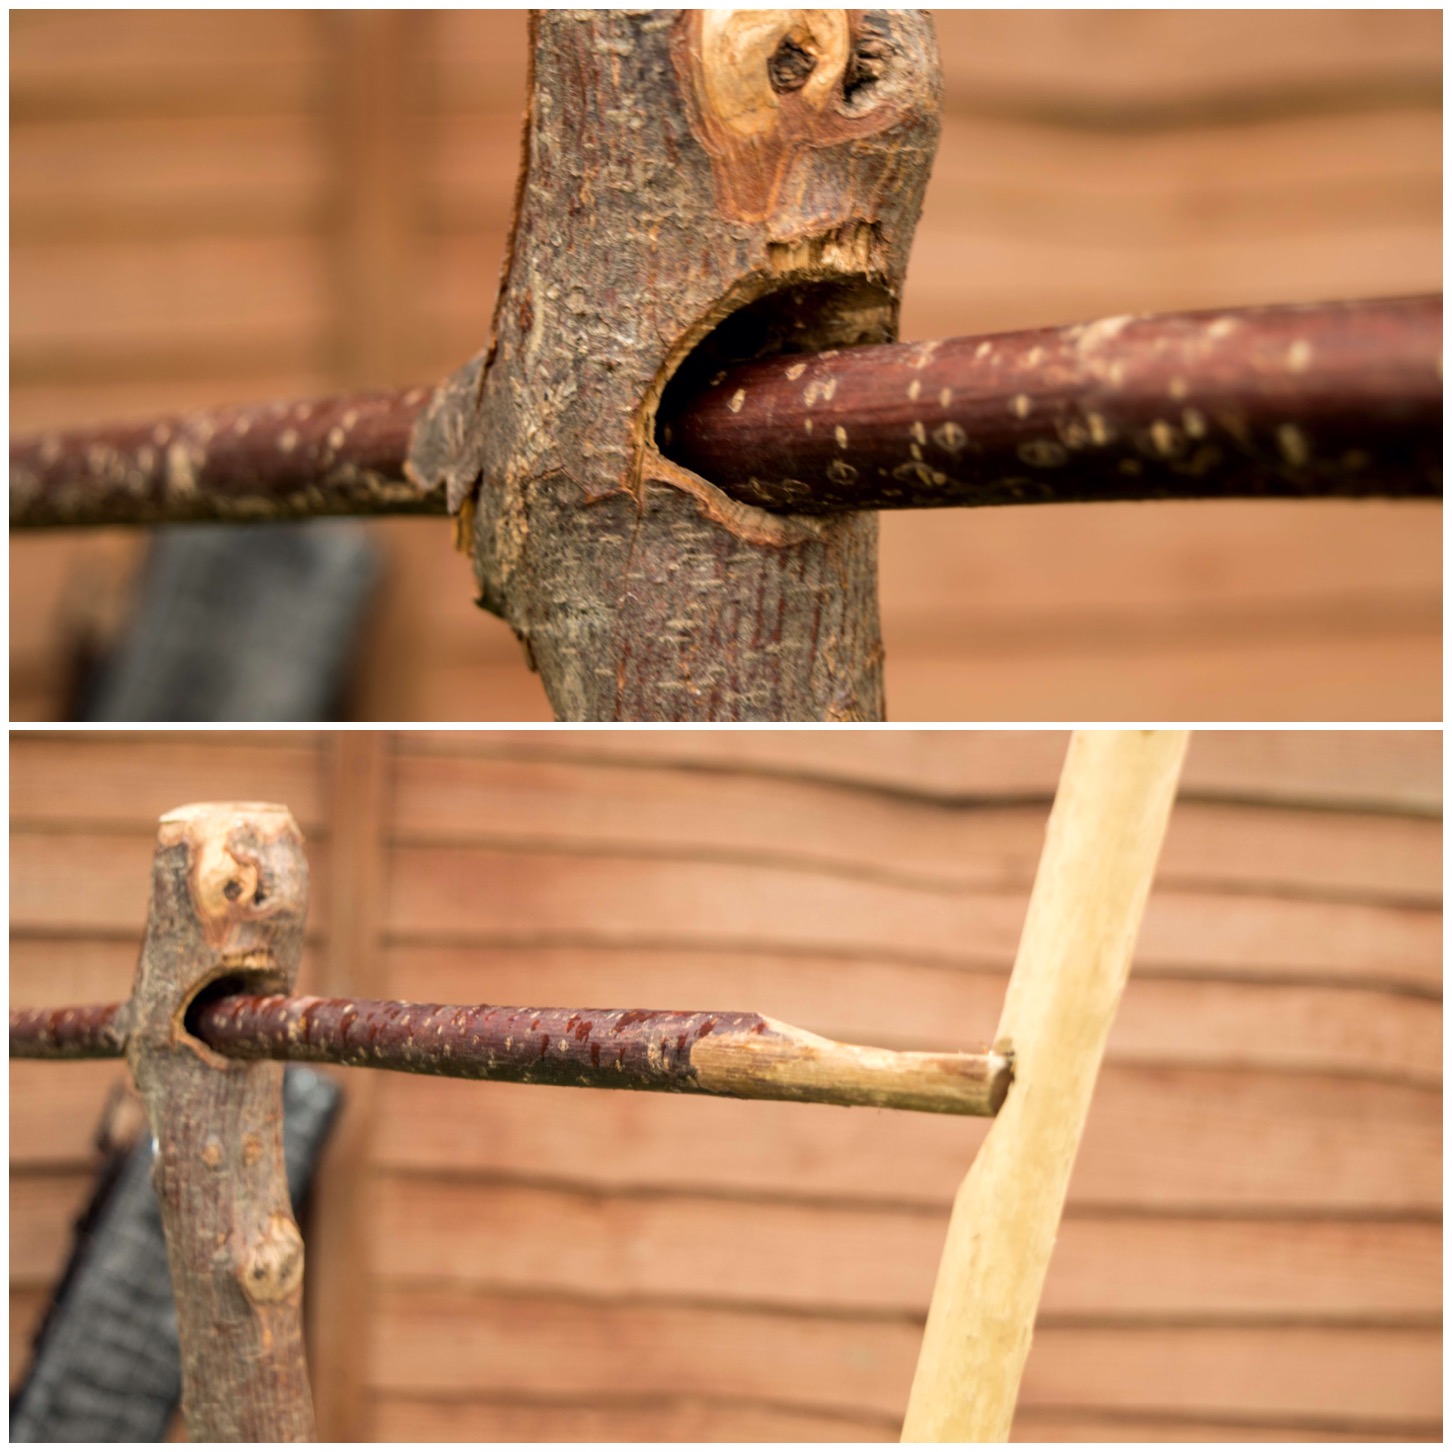
While I was writing my post on the Single Fork Aures crane I got a message from a Bushcraft USA member called Alukban about another type of campfire crane, which was made out of a single piece of wood and looked quite straightforward to carve.
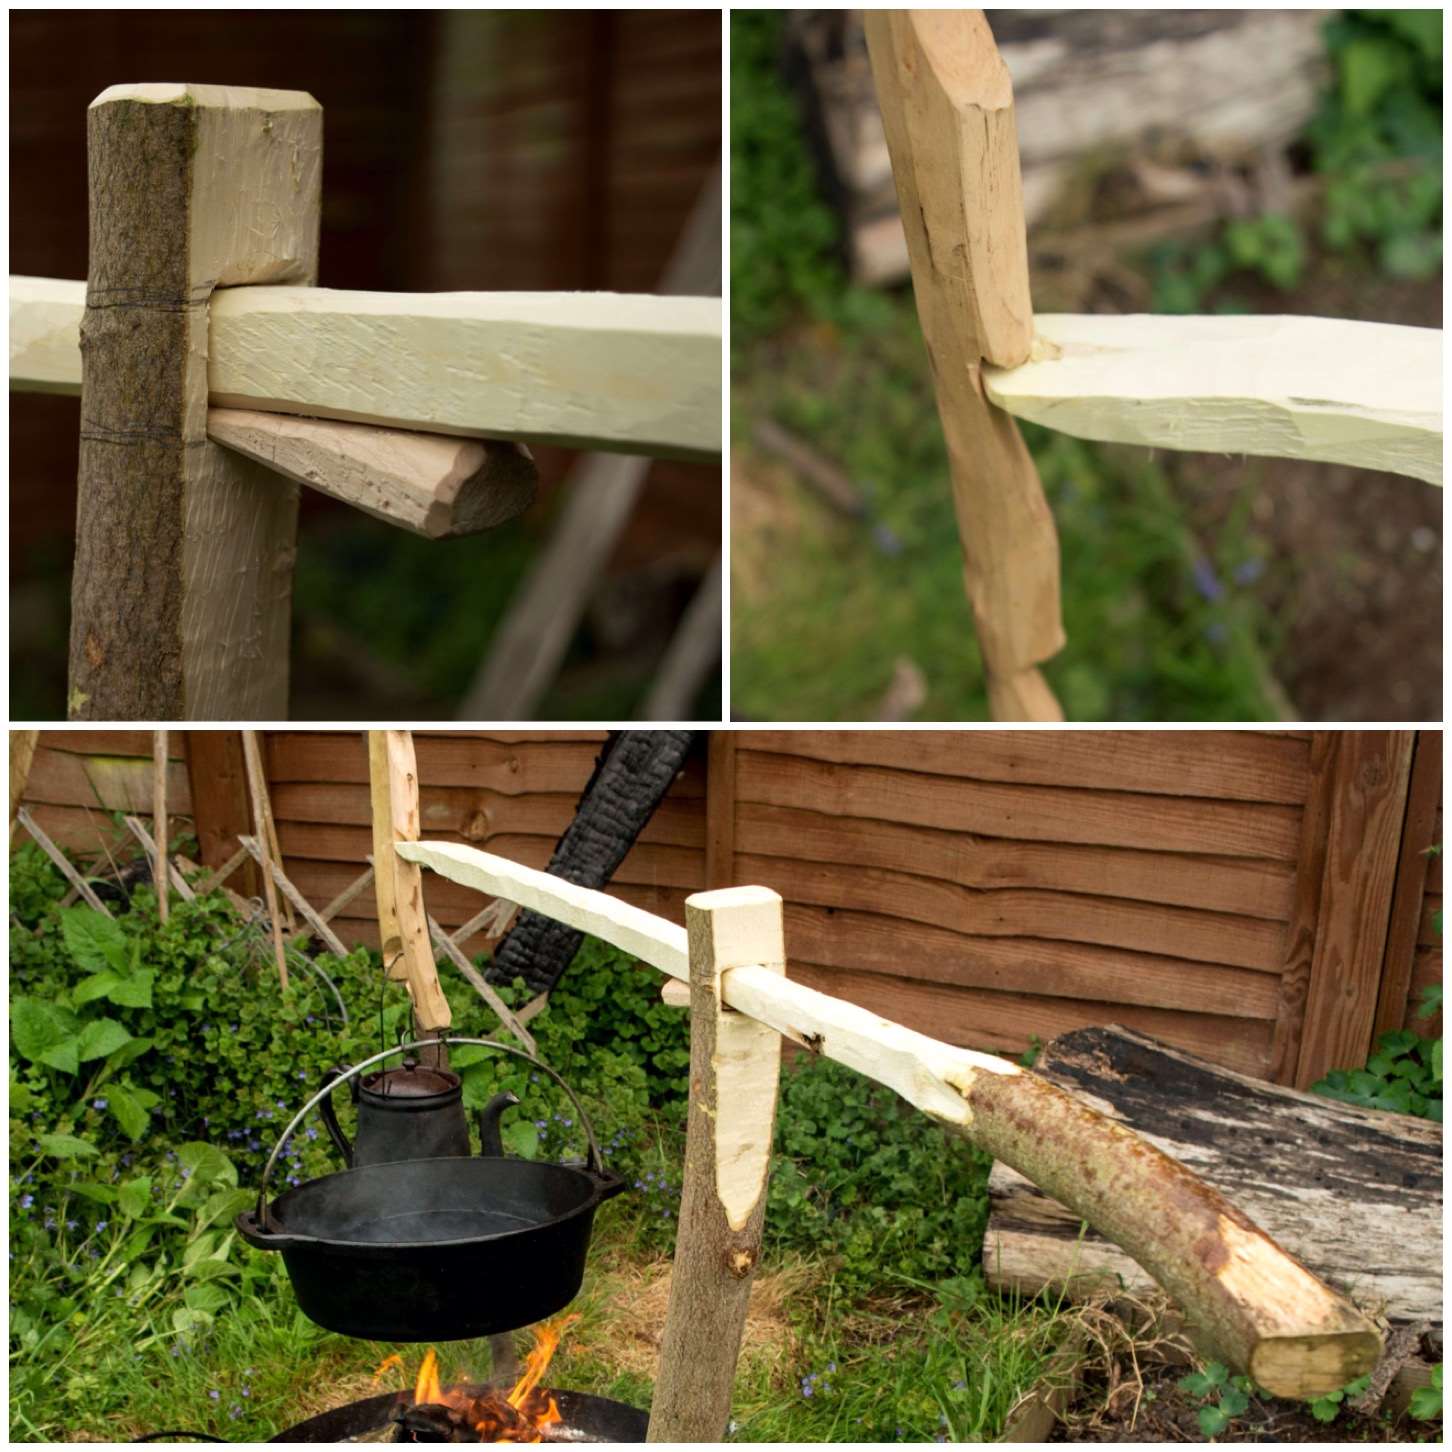
The connection between the arm and the upright is a type of Lap Joint. It is easy to adjust and can take the weight of a decent-sized pot.
Lap Joint Crane
Trimming
I had some sycamore lying around, about a metre and a half long. I trimmed the fork off the end as it was not needed and then cut the pole into two further pieces.
In the picture below all the wood to the left of the folding saw became the arm and the rest became the upright for the crane.
Single Pole
The upright
I squared off three of the sides of the upright along two thirds of its length and formed a point on the bottom third.
I took my time doing this so that it was as even and as smooth as possible along its length where it was squared.
Square the top – Round the bottom
Once I was happy with the upright I moved onto the arm. The whole crane works on the principle that the weight of a pot hanging on it will create enough friction to hold the arm against the upright.
Line up to Mark up
The arm
I used the upright as a guide to measuring where I need to cut out the lap joint on the arm (I measured it so that the lap joint would be very tight initially). I did not make this a 90 degree angle but about 100 degrees, so that the tip of the arm would be pointing slightly upwards.
Once I had marked the width on the arm I cut some stop cuts to half the depth of the arm and then added some more to make it easier to carve out.
I also used my saw to carve out some of the excess wood from the joint area.
Stop cuts and Sawing out
Once I had taken out most of the excess wood with the saw I used my knife to remove the rest and make it all smooth.
Trim with a knife
I locked the two pieces together and started to move the arm up and down the upright. This allowed me to spot rough areas still on the upright and then I was able to easily trim that wood off with my knife.
Continually check the fit
Once I was happy that the arm could move easily up and down the upright I trimmed of loads of excess wood from the arm to make it easier to attach a pot.
I put a stop cut about a quarter of the depth of the arm all the way around it to protect the wood around the lap joint.
Trim the limb
You can see the general shape of the arm appearing now. I likened it to the shape of an old-style naval cutlass.
The arm
In use
I added a few ridges along the length of the arm to hold pots securely and then started trying it out.
Carve the notches
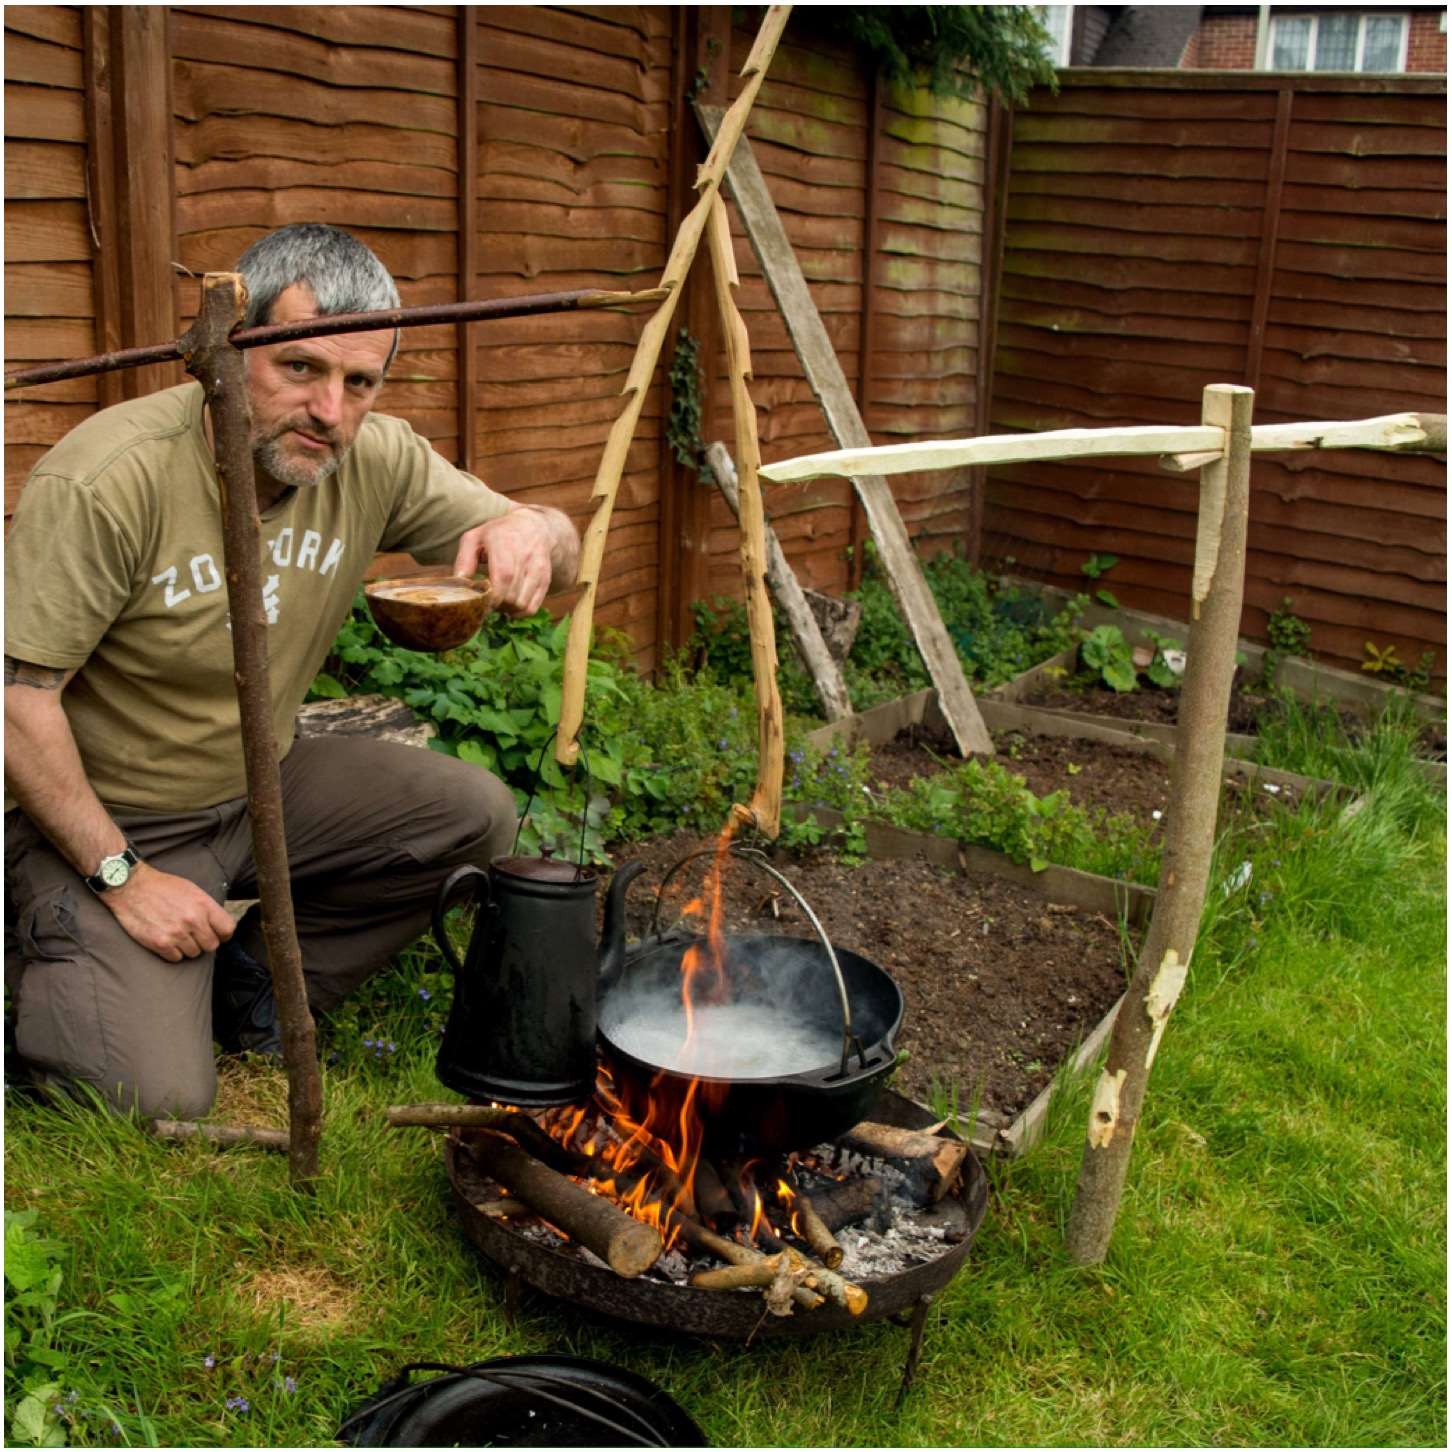
I used this crane for two weeks at the Bushcraft UK Bushmoot in South Wales over the summer and was quite impressed with it. It holds pots well under tension but it needs to be treated with respect when moving the pot up and down.
I found that the crane works best with the pot hanging from near the end of the arm. If you move the pot closer to the upright along the arm it has a tendency to slip.
It is all in the friction
I will be making a variation of this style over the next few days with more of a dovetail joint so that the arm cannot come off so easily.
A great crane
I like this crane due to its simplicity so give it a go.
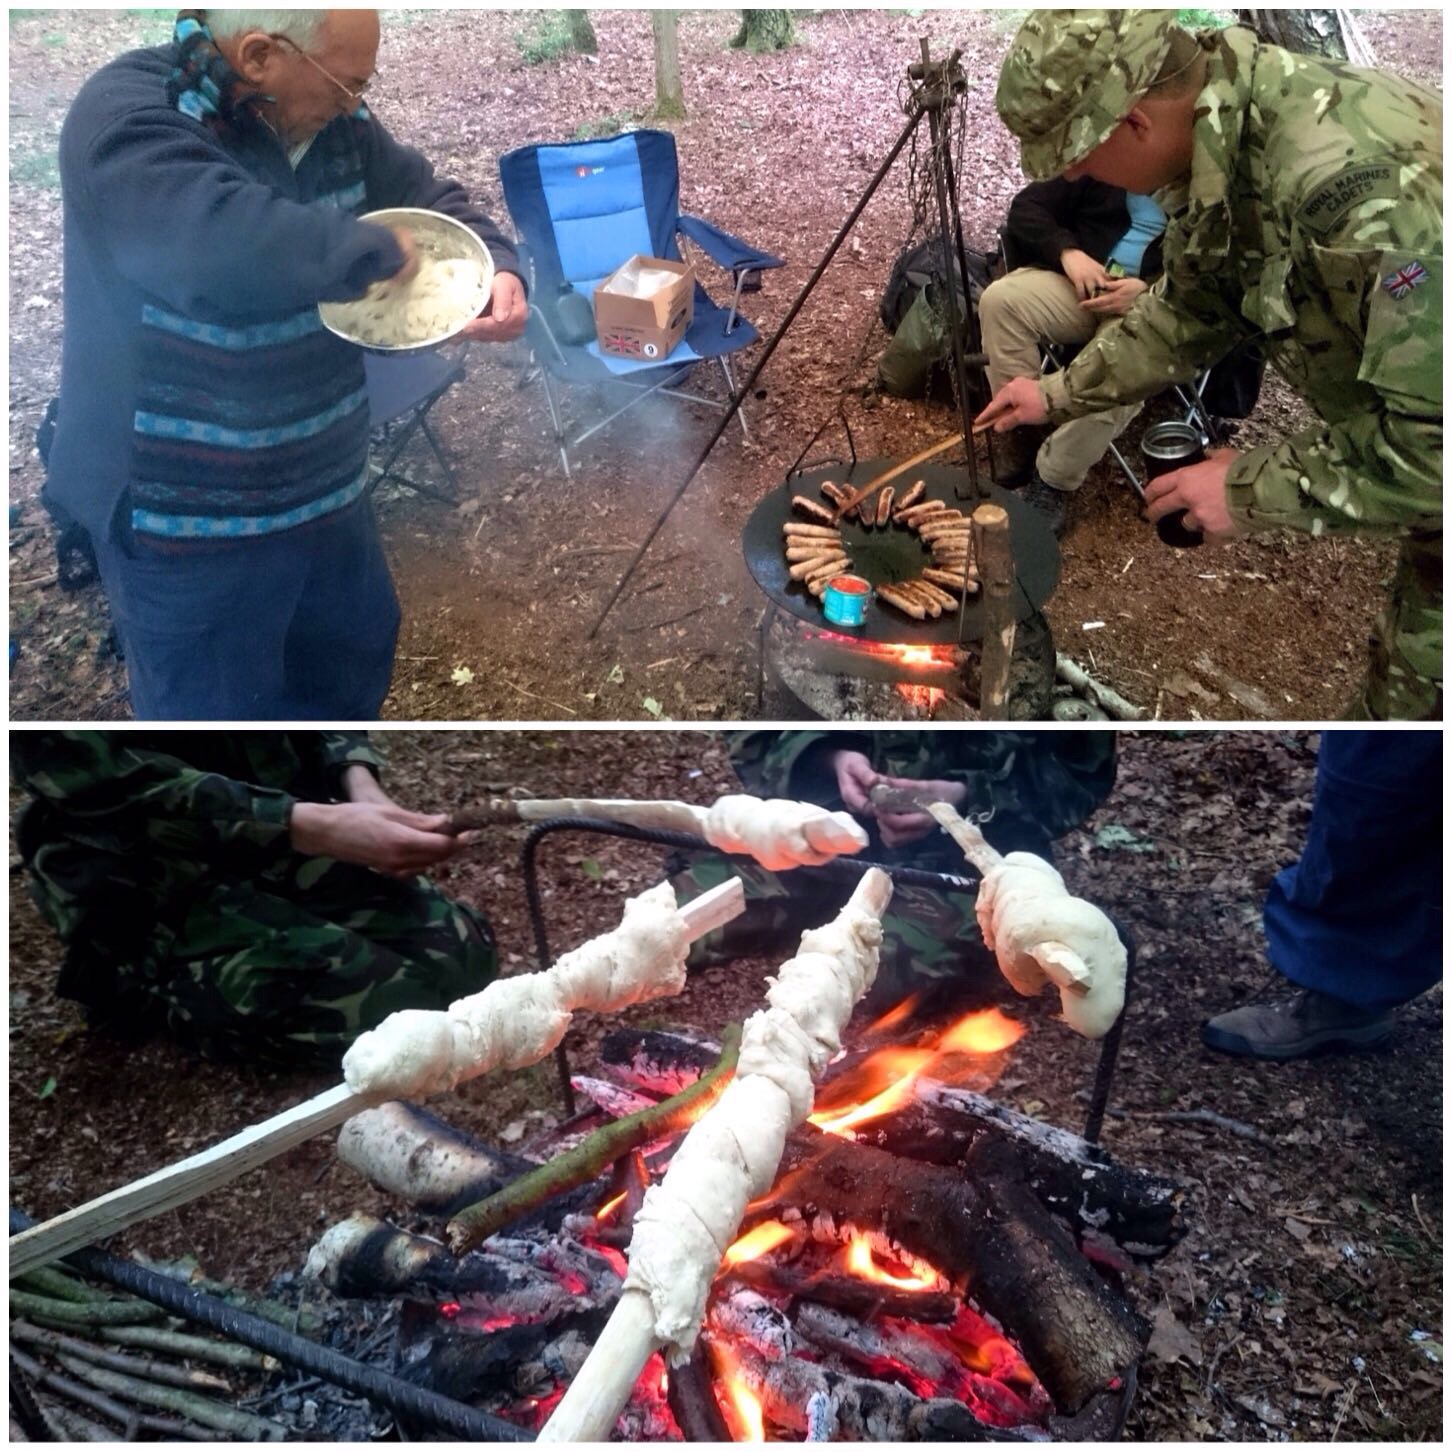
Day 12 of the 30 Day Challenge was one of rush, rush and rush from morning till night.
The Royal Marines Cadets we were training had the task of lighting the fires to cook the breakfast but thankfully we had our very own chef Alan Lewis to oversee all the cooking.
I tried to spend as much time as possible baking twizzle stick bread to get out of doing the many chores that were needed doing on this last morning of the camp (not very successfully may I add).
Busy Breakfast
We ran various classes that day including bread making, archery, stalking games and group bowdrill. London Area Sea Cadets have a brilliant Bushcraft team and this weekend showed that clearly – thanks to Dave Lewis, Charlie Brookes, Cliff Lewis and Alan Lewis for being that team.
Sunday Stances
Wrap up was a fast affair with everyone helping out. So fast I was home at 2pm – just in time to start on all my home chores 🙂
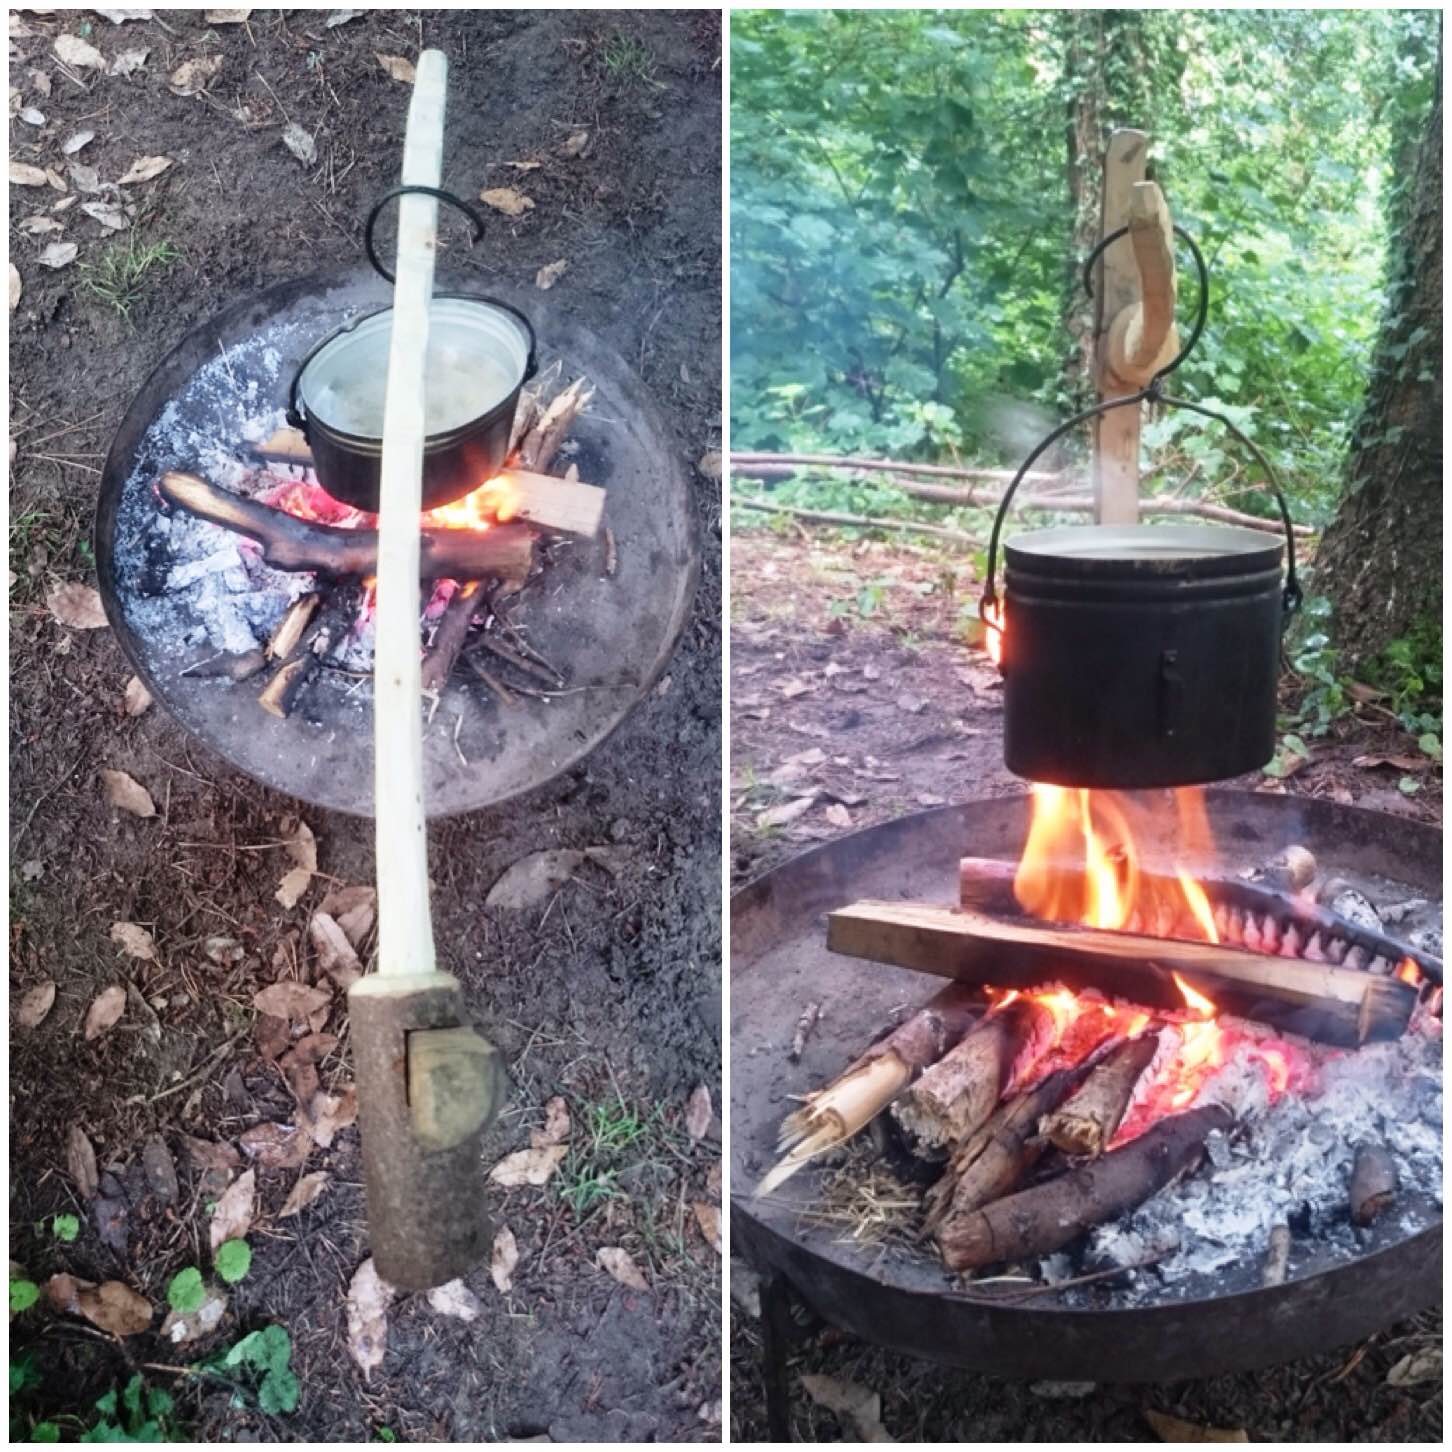
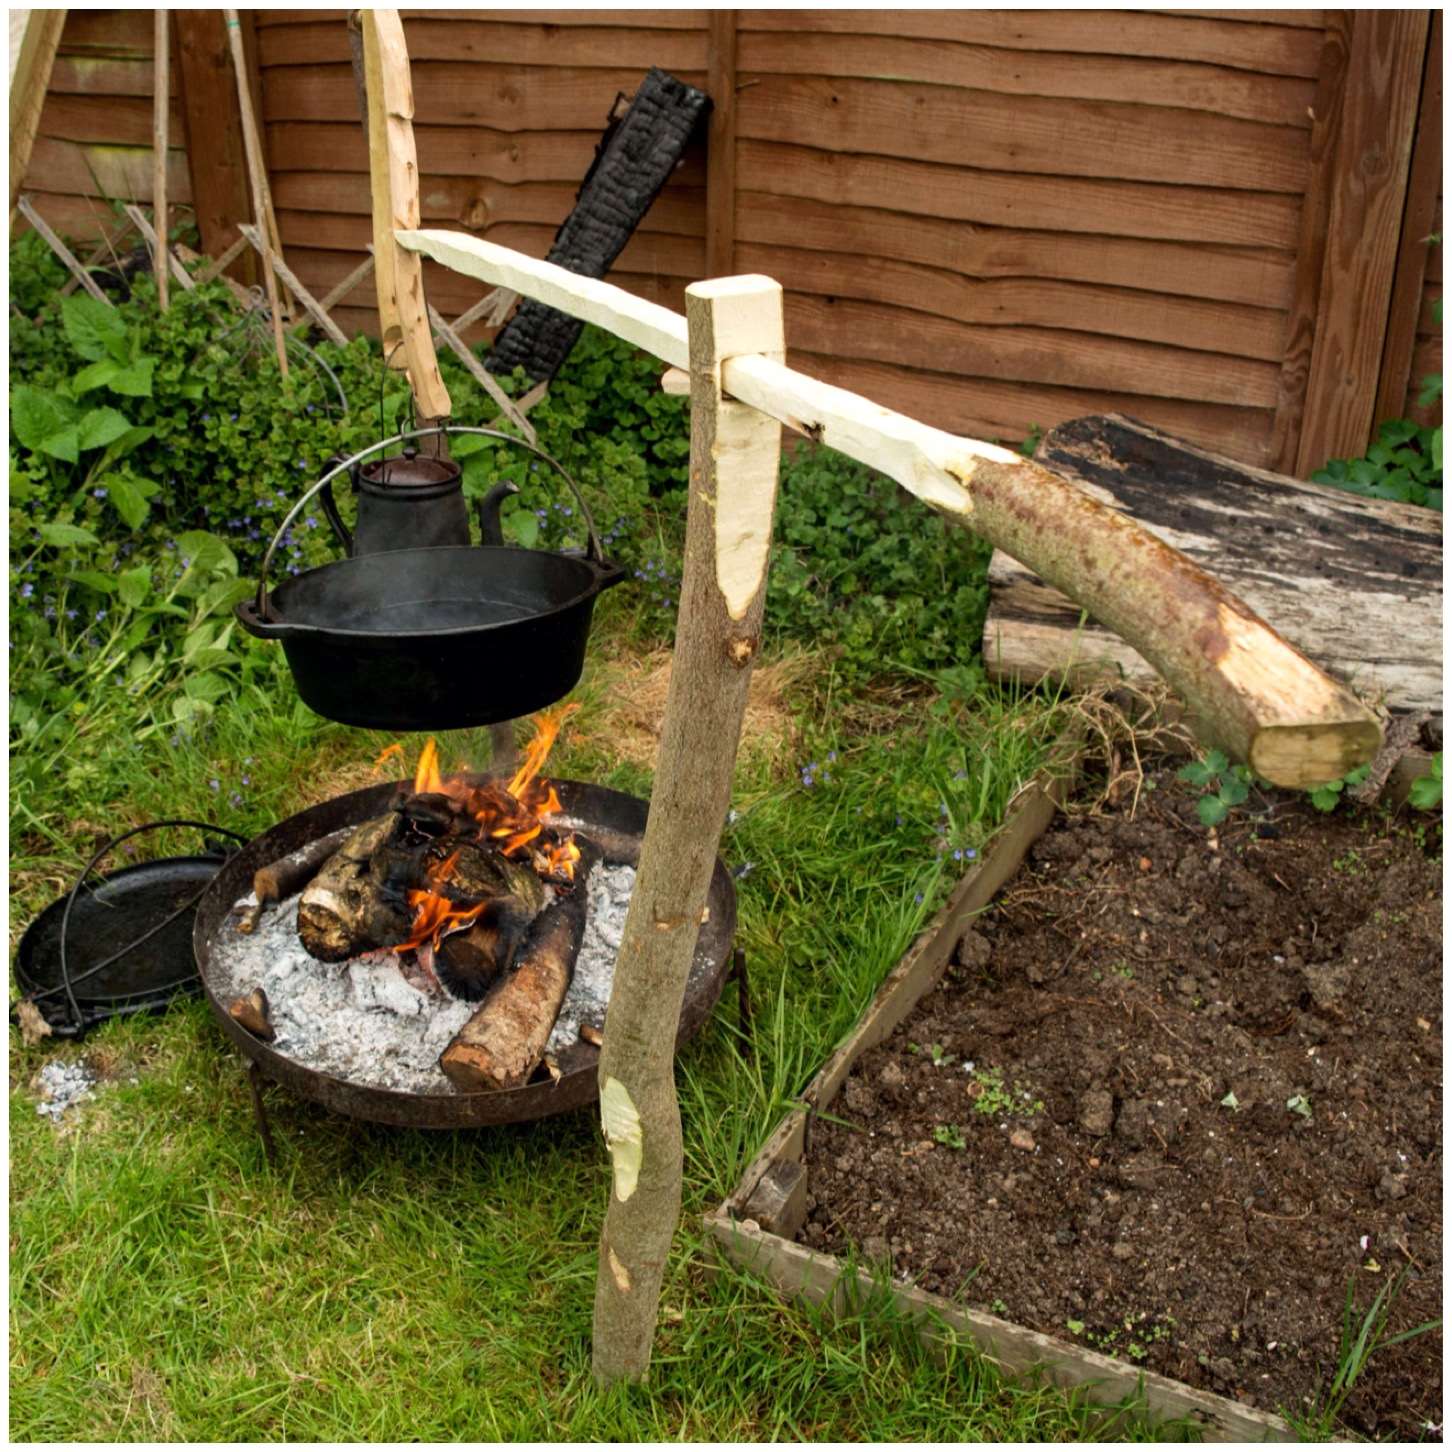
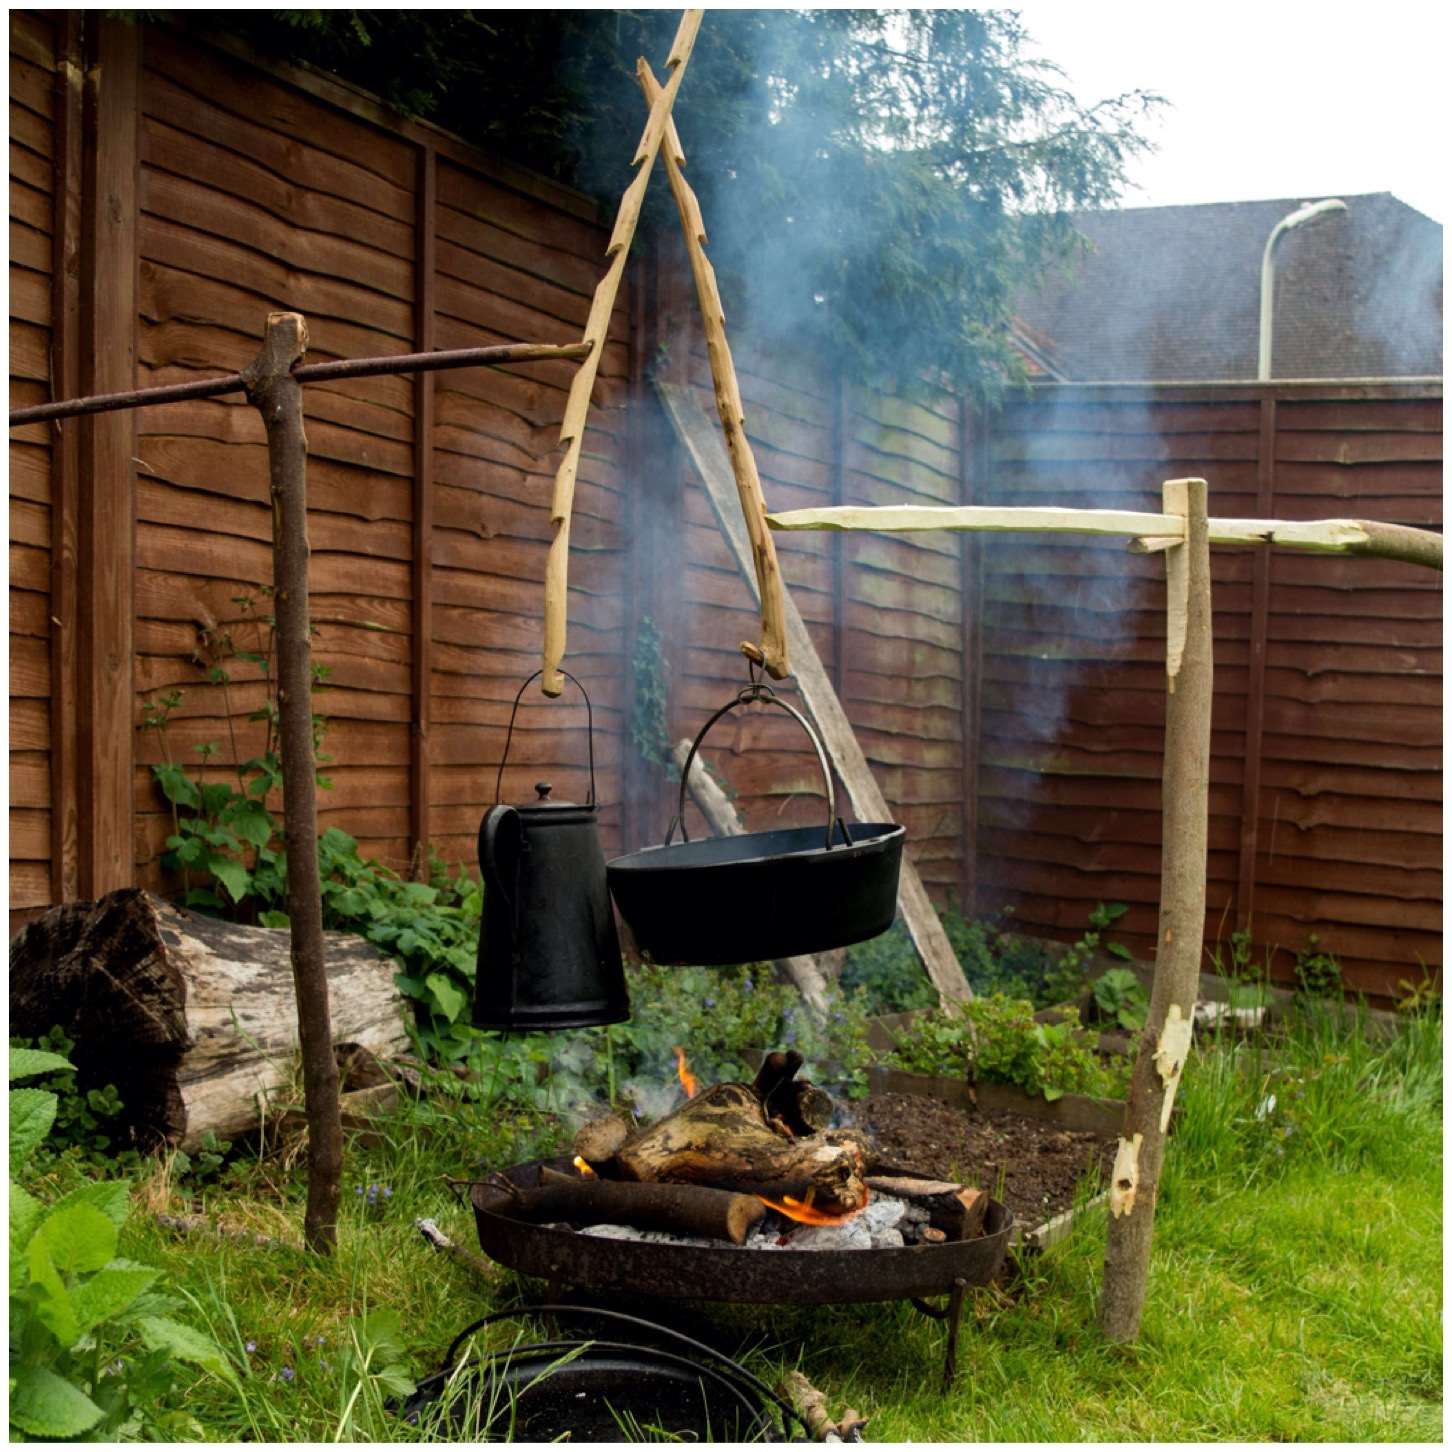
Sometimes you want an adjustable pot hook without a tripod set up.
Sometimes you want to pour your coffee without getting burnt by the flames.
If that’s what you want then build yourself a crane – It’s easy.
A robust and versatile campfire crane
There are a number of different ways to build a crane set up however I decided to try just with the general tools I would carry in my rucksack. These included an axe, a saw and a general bushcraft knife.
The wood I used was some sycamore I had recently polarded in my garden. The crane is made up of a thick upright and smaller pieces to act as the arms. I decided to make two different types of arms, one for small pots and one for bigger Dutch oven type pots.
Sizes and dimensions will vary depending on how high you want your crane to be and what weight you want it to hold.
Carving the upright
I decided which part of the upright would be the top and then flattened it to give me a working area. You do not need to do this however I find it gives me a stable working surface. You can see in the pictures below that the girth of the upright is just larger than my hand as my fingers do not fully close around it.
Basic parts and flattening the top of the uprght
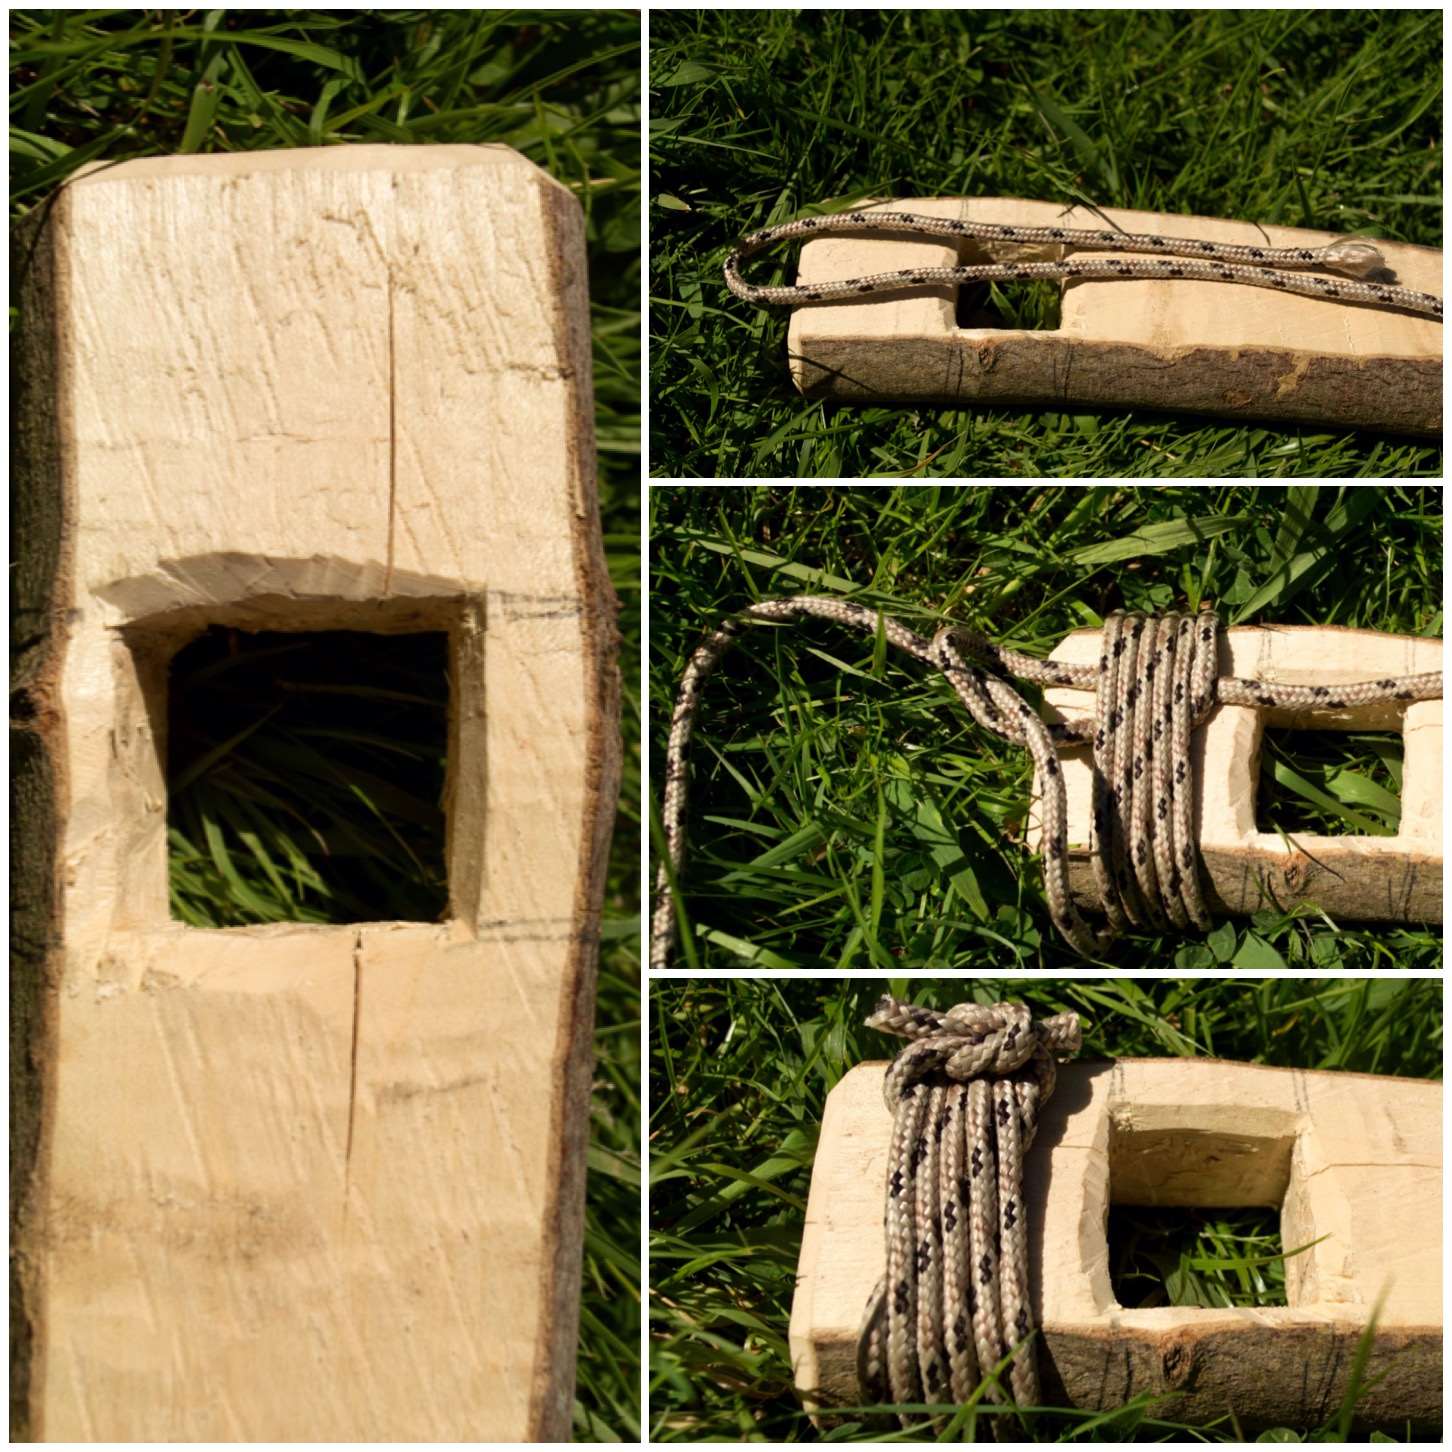
For the crane to work you need a hole at the top of the upright. The size of the hole will depend on the size of the arm you will put through it and how much wood you want left around the hole for strength.
As I was going to carve this with my knife I opted for a square hole as this style is easier for me to carve. Once I had pencilled out one side I marked up the opposite side. In this crane I made the hole at 90 degrees to the upright (makes life easy) but you can angle it if you want so that the arm will be pointing upwards more when inserted.
Marking out the socket
I used my knife to score lines into the wood I wanted to remove. You can do this by gently tapping your knife handle with a batton or rolling the curved part of the blade. You need to do this gently so as not to cause unwanted splits in the wood. Also make sure that the work piece is secure on the ground and that your free hand (if not battoning) is well clear of the knife edge.
Scoring
To remove the wood I just pushed the tip of my knife inbetween the scores and prised it out. Again I did this gently alternating between pushing on the handle with my hand or doing light taps with a batton. When I twisted the point I did so gently so as to not cause any unwanted splits or worse still – snap off the tip of my blade.
I did another set of scores and chipping until I was about halfway through the upright.
Chipping
I then repeated the exact same procedure on the other side until my knife popped through the other side.
Repeating the scoring and chipping
Once the plug of wood was removed I trimmed the internal walls of the hole (using the wood I would use as an arm as a guide) and chamfered the edges off.
Finishing the socket
The upright was finished off with all the knobbly/sharp bits being removed and a point was axed out at the bottom of it.
Trimming and pointing
Carving the lightweight arm
I made the arm for the lightweight pots from a thin piece of sycamore. I trimmed a flattened piece near the end and carved a small dimple with the point of my knife in it.
The small dimple is needed to keep the adjustable pot hanger in place. I have covered the making of the making of an adjustable pot hook in my post How To…. Carve and use an Adjustable Pot Hanger.
Lightweight arm
Set up
In my previous post on making a Double French Windlass Cooking Rig I explained how to make a pile driver. I used this pile driver to make a hole for the upright to sit in.
Once you have created the hole it is just a case of gently tapping the upright into place. If you did not use the pile driver you would need to hit the upright hard to drive it into the ground and very quickly the wood around the hole would crumple or snap.
Using the pile driver to place the upright
As I had not made the hole at an angle I carved a small wedge to hold the arm securely and also to raise the tip up slightly.
When the arm is in place in the hole just tap the wedge into place gently. Do not ram it in as this could cause undue pressure and split the wood.
Create a wedge to secure the arm
Then it is a simple case of attaching the hanger with your pot or kettle onto the arm.
I like this system as it is easy to adjust the height of the pot and the whole crane can be swivelled to move the pot away from the fire easily.
In the picture below I have left the back of the arm overly long but I will trim it shorter eventually.
Ready to go
Carving a strong arm
As I had made a square hole I got a bigger piece of sycamore and squared it off along its length to fit exactly in the hole. This arm was designed to take bigger pots like a dutch oven.
Creating the heavyweight arm
The end was shaped to fit the pot hanger.
Finishing the tip
Then set up exactly as the first arm.
This time though I tested it out with a dutch oven half full of water.
Heavy Duty Cooking
I have a few of these cranes so I set up another one to put the kettle back on.
Multiples
I had used an auger and a palm gouge to carve this one out so you can see it ended up with a round hole. No wedge was required as the hole was set at a slight angle.
The crane made with an auger and palm gauge
After the water in the dutch oven had boiled it was easy to raise it all up off the heat.
Easy to adjust the pot height
If you plan to use these cranes on a longer term basis they may develop a crack if you are using green wood. This happened to this crane about a week after I made it but I secured it with a bit of whipping. You can do this right at the beginning if you wish or when you see a split start to appear.
The whipping will be well clear of the flames so I am not worried that it will be burnt through.
Some Whipping
If I had not being taking pictures along the way I would have completed this rig in about an hour or so.
There are other ways of doing this and other tools you can use so I will leave it to your imagination but if you are someone who likes to tinker around the campfire then I would give this one a go.
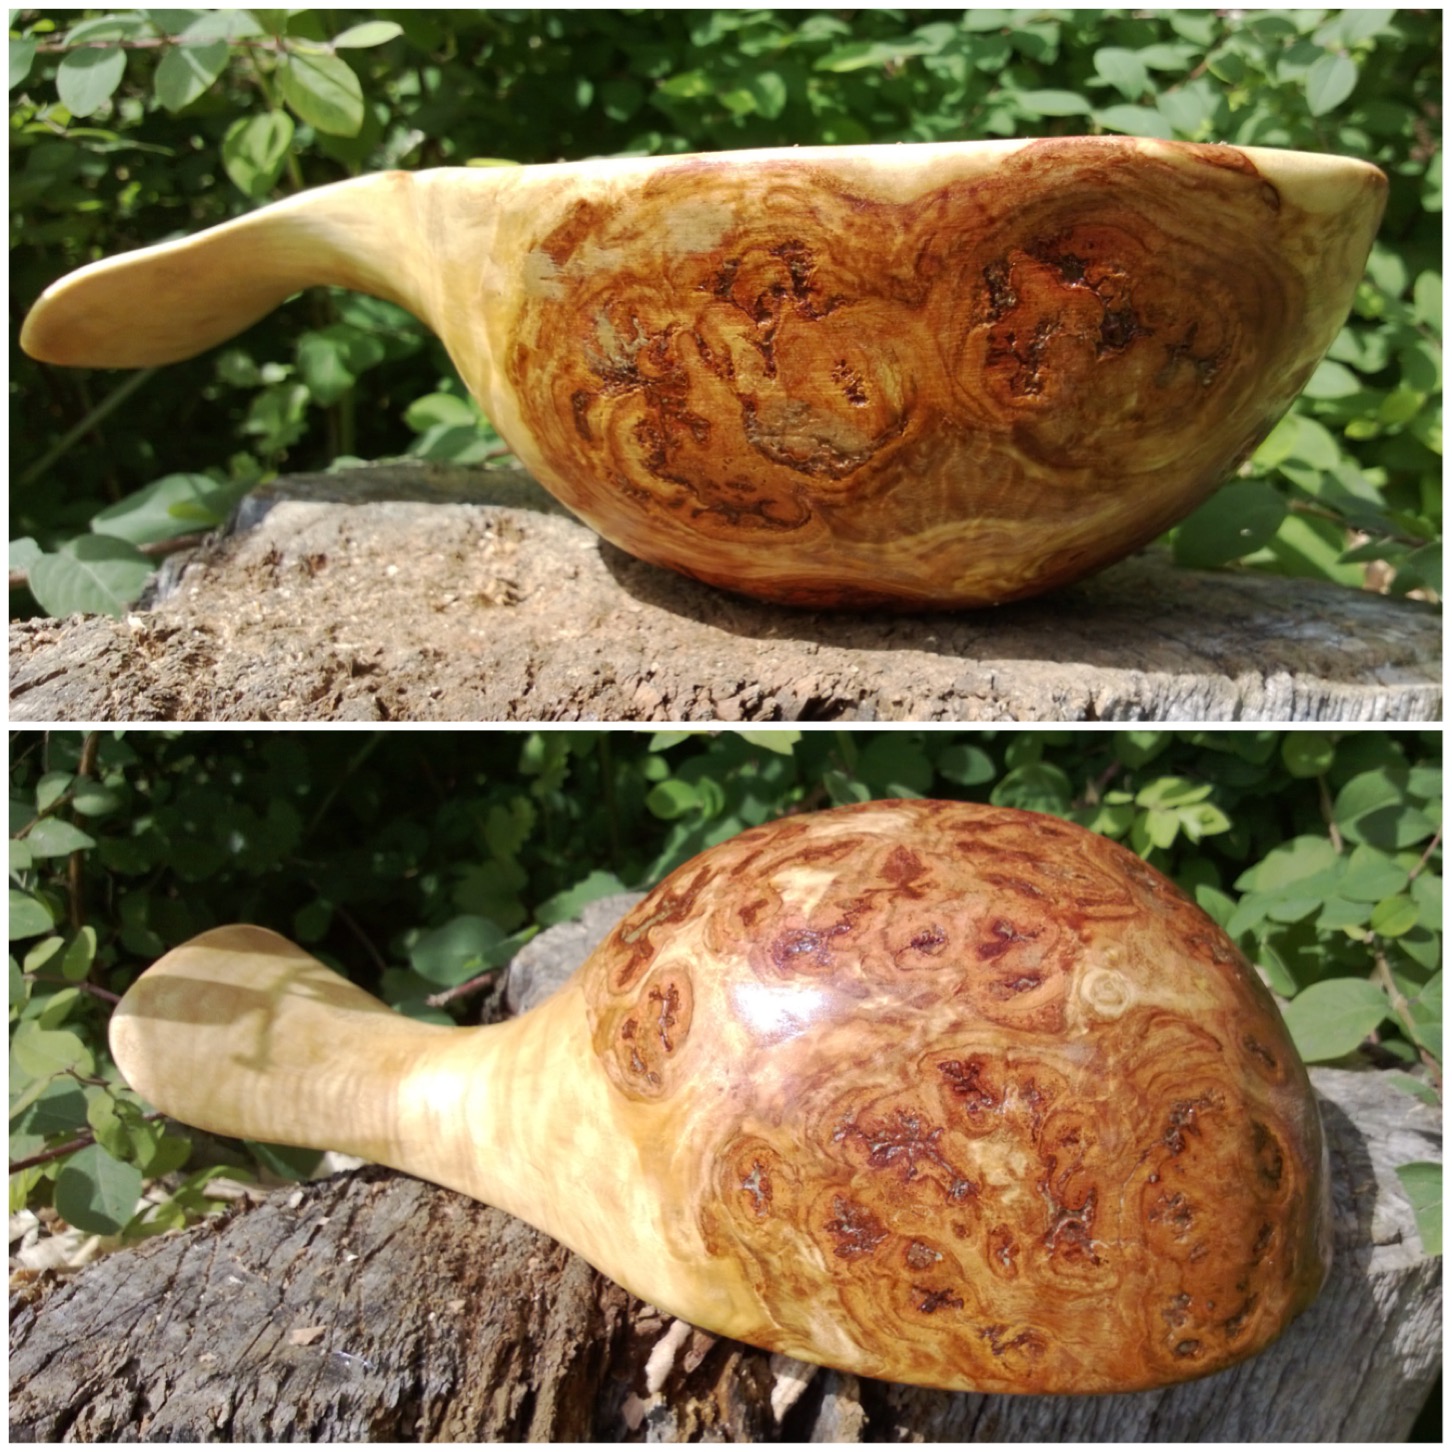
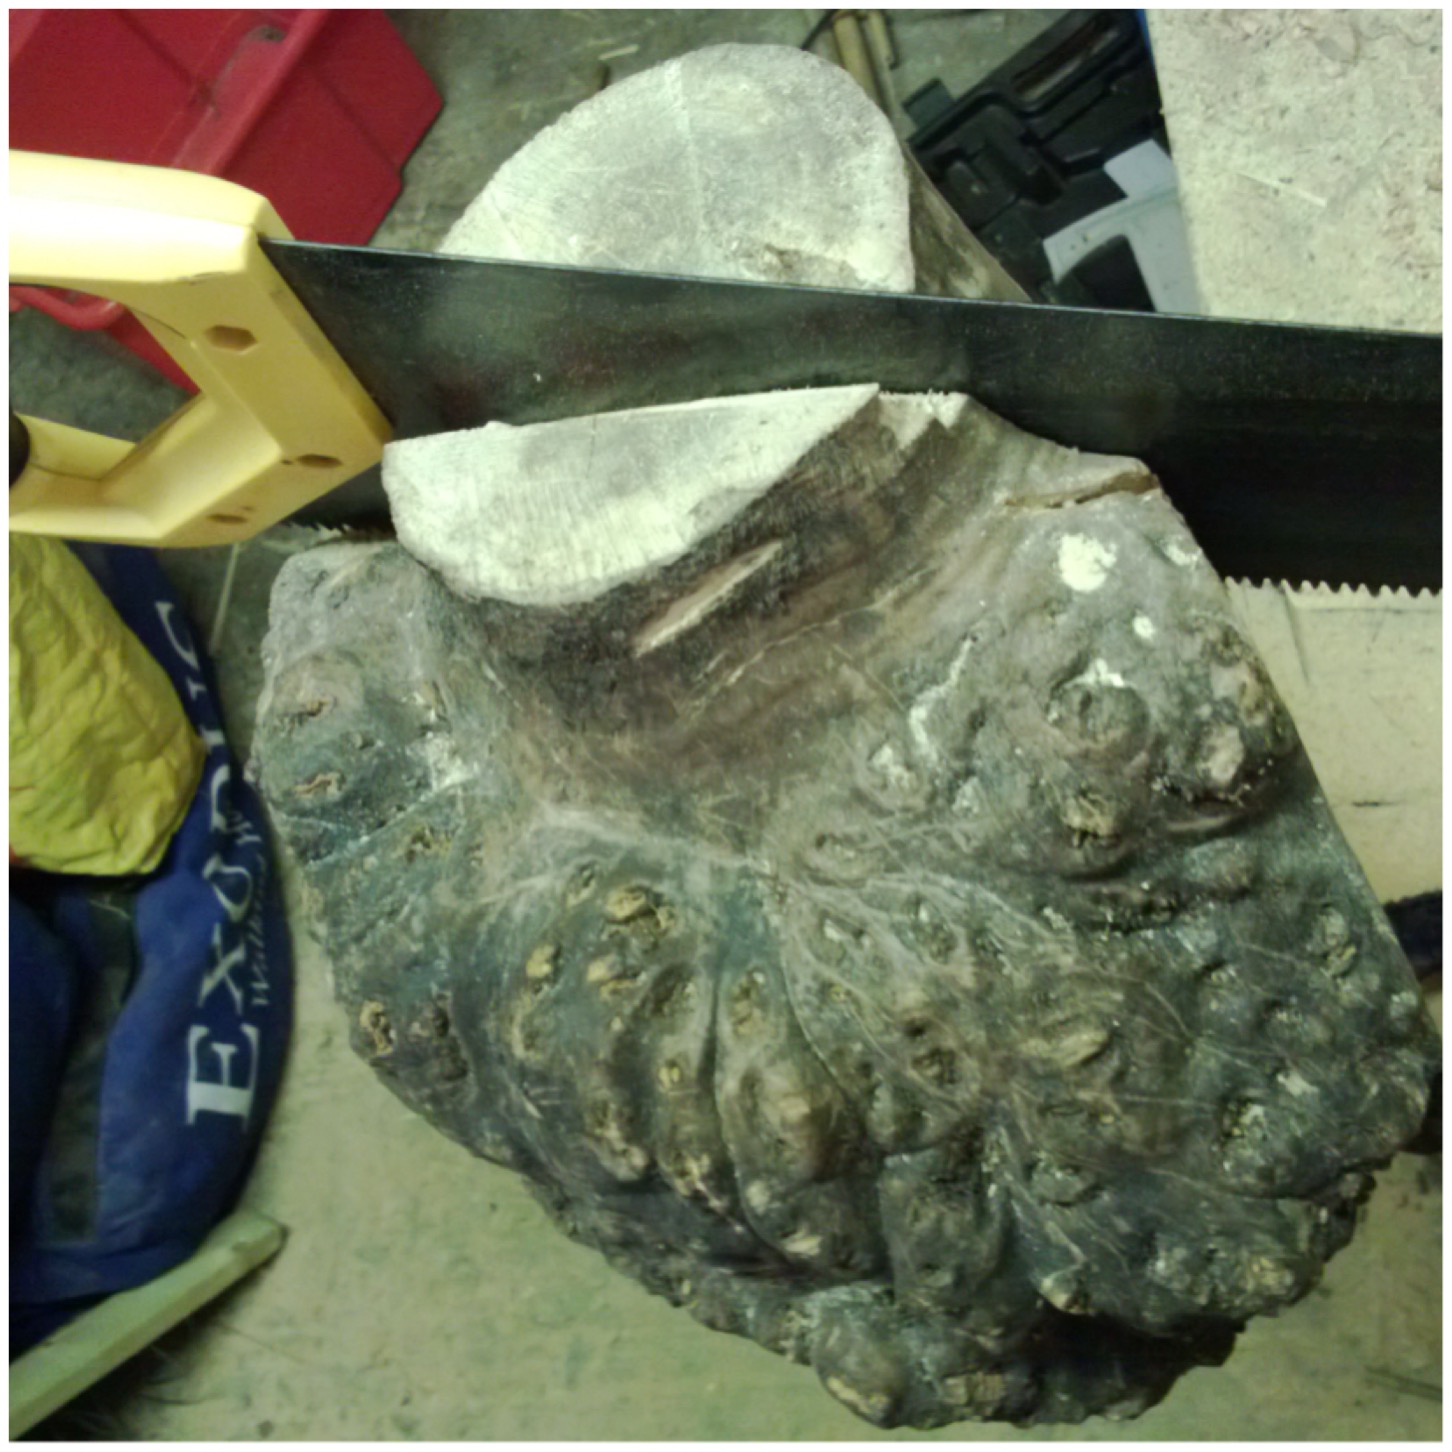
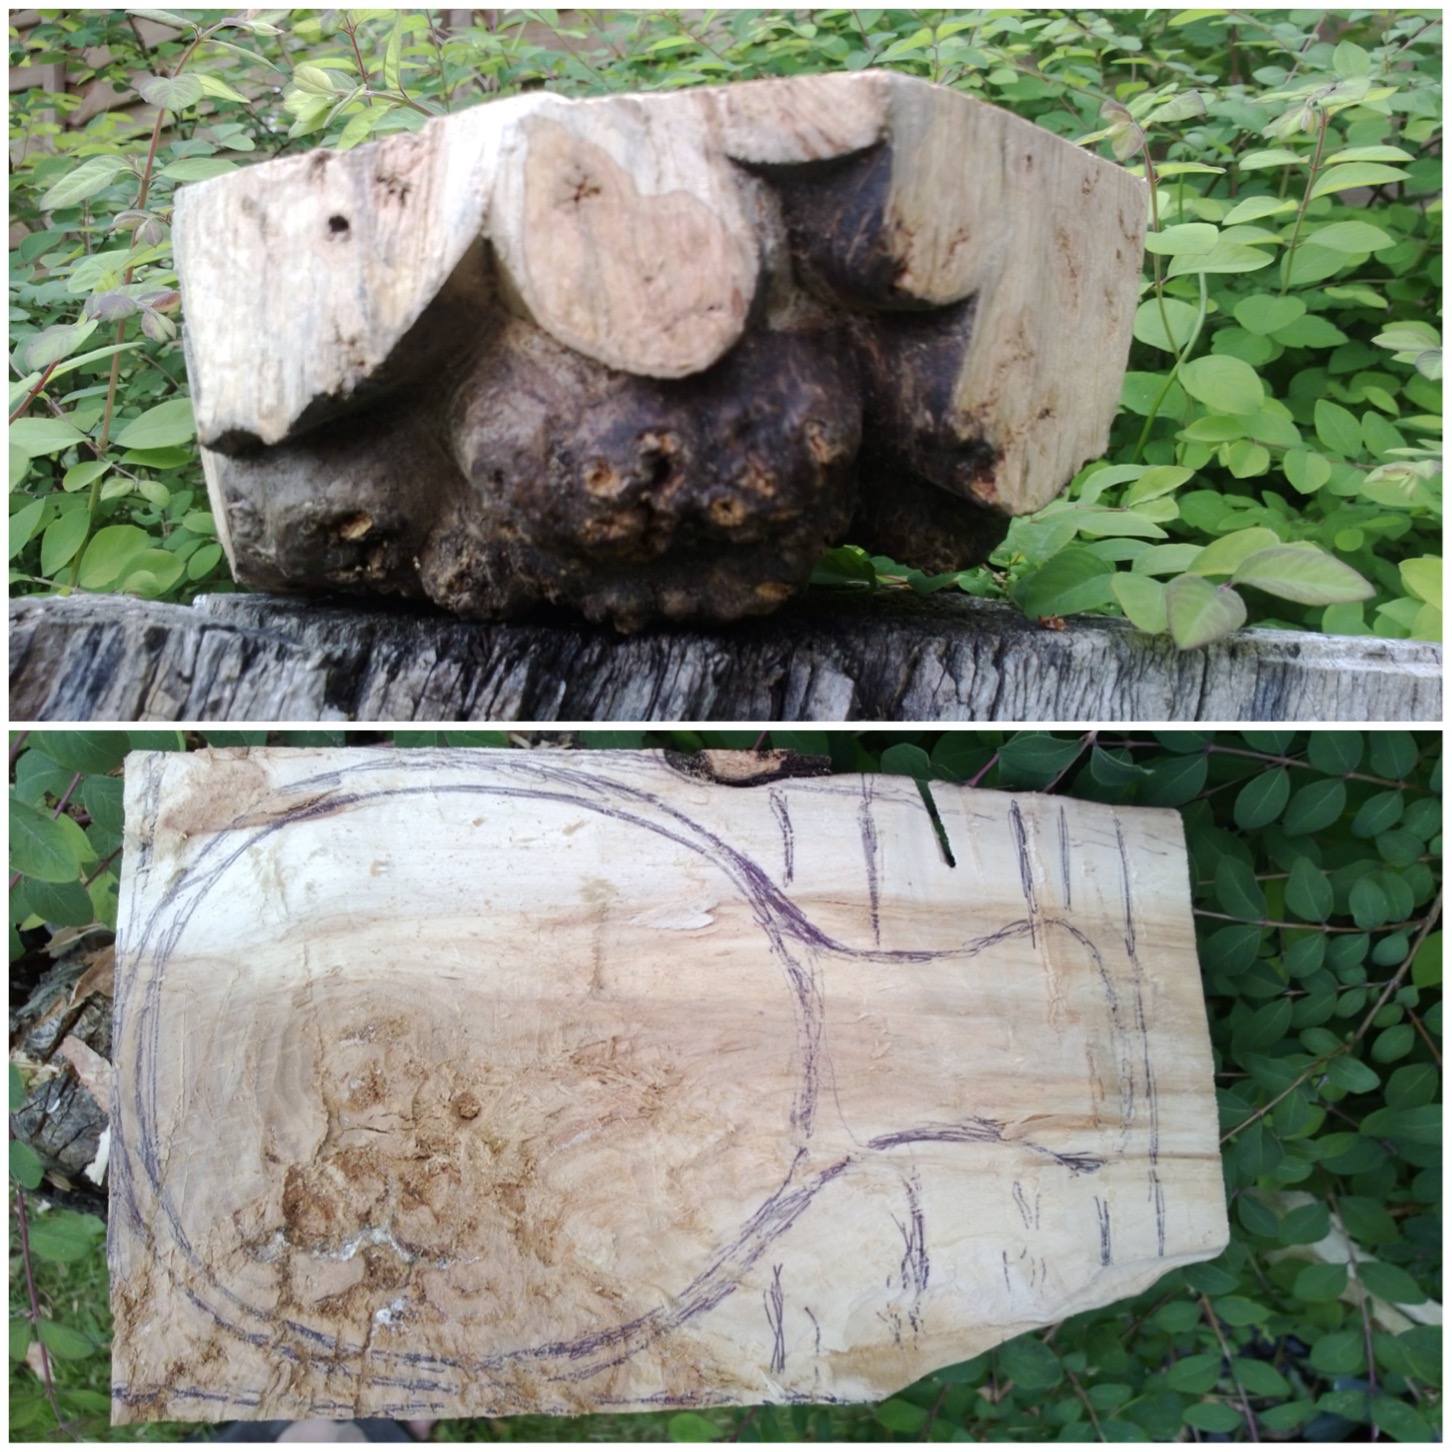
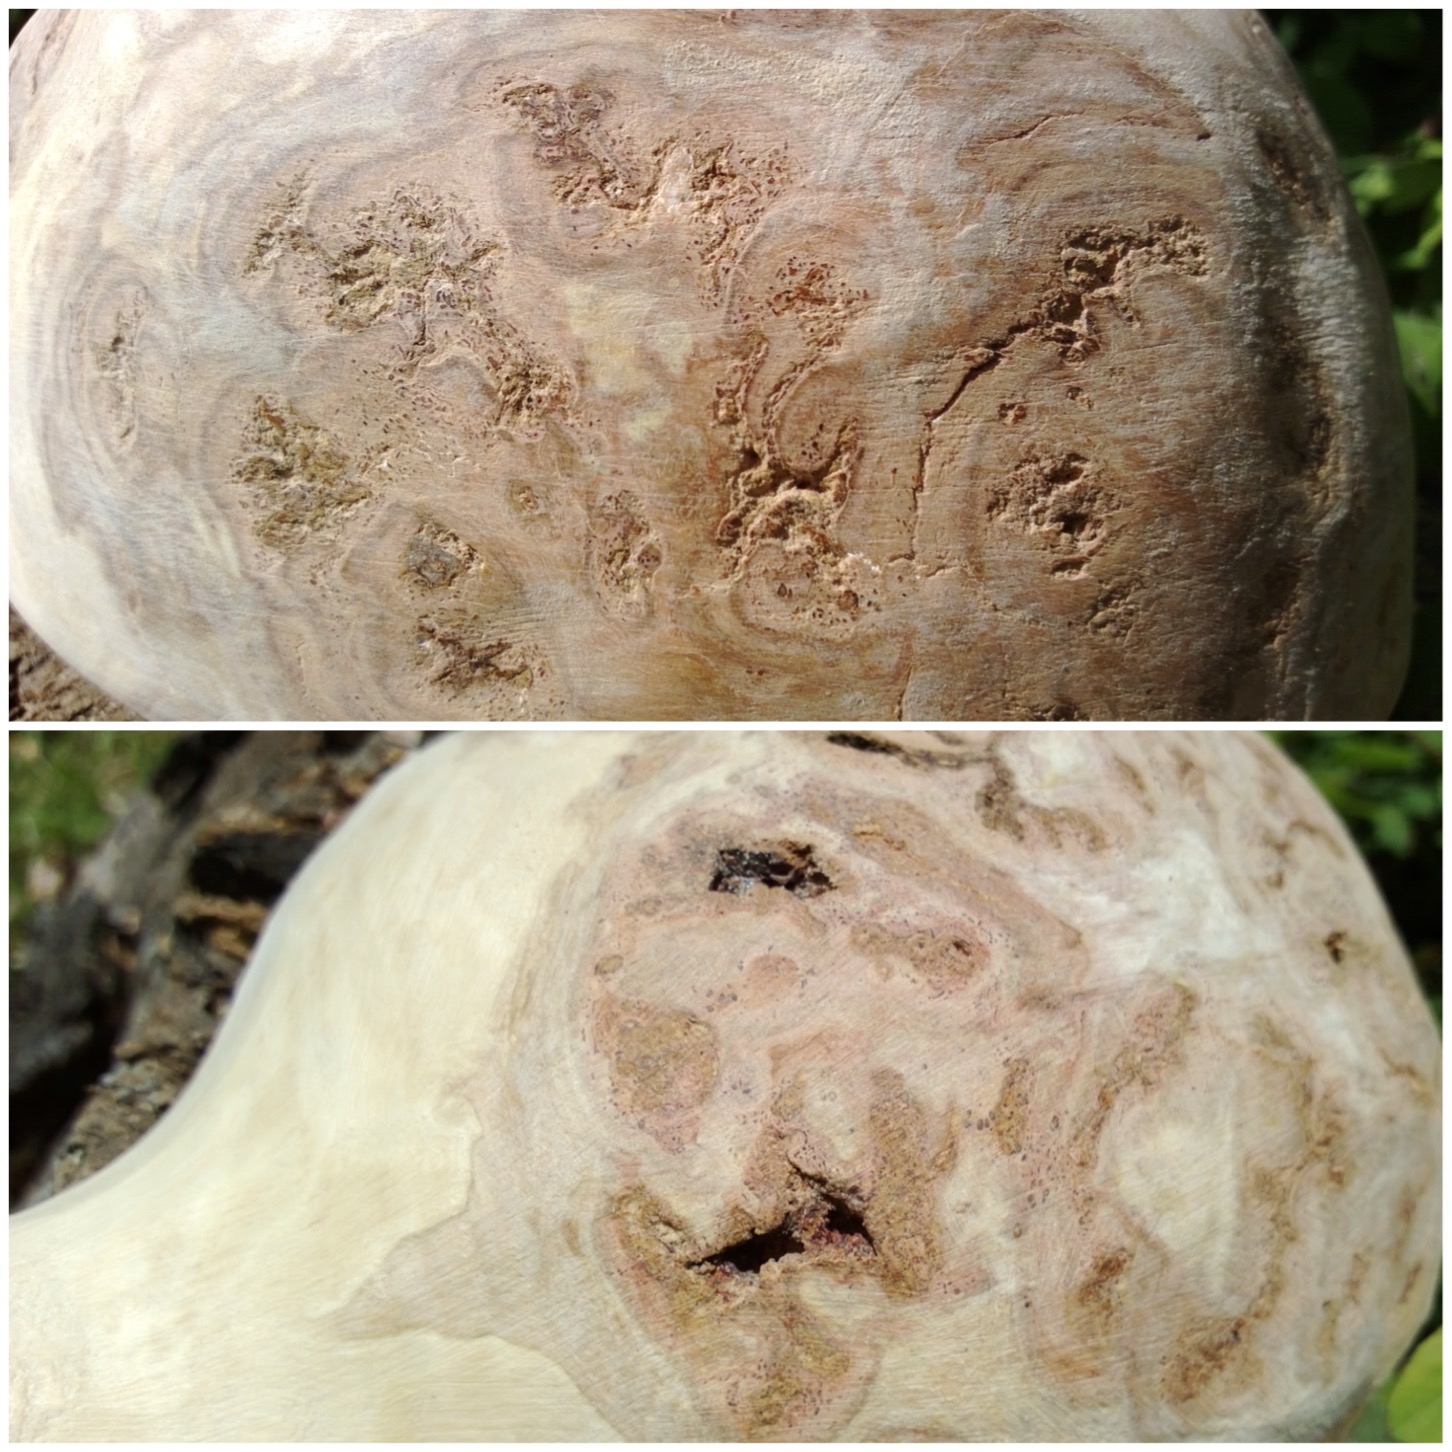
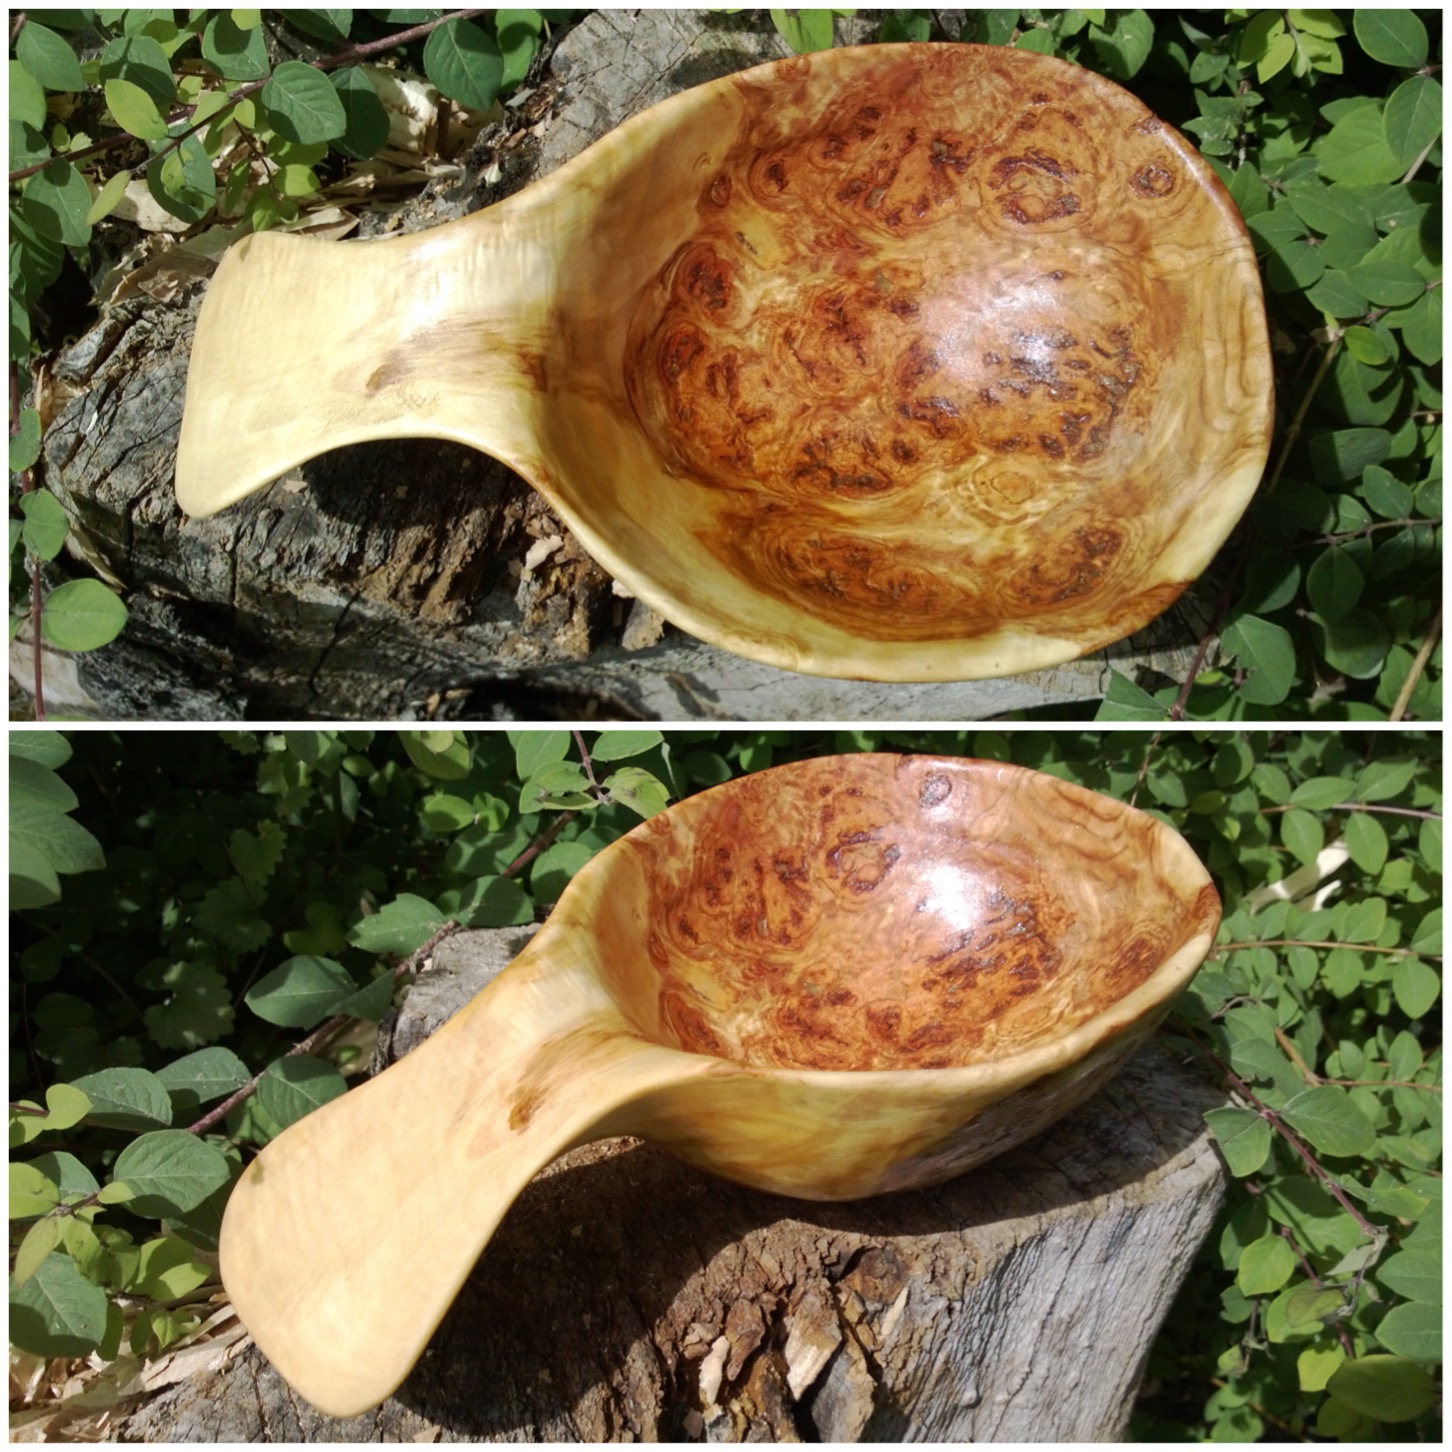
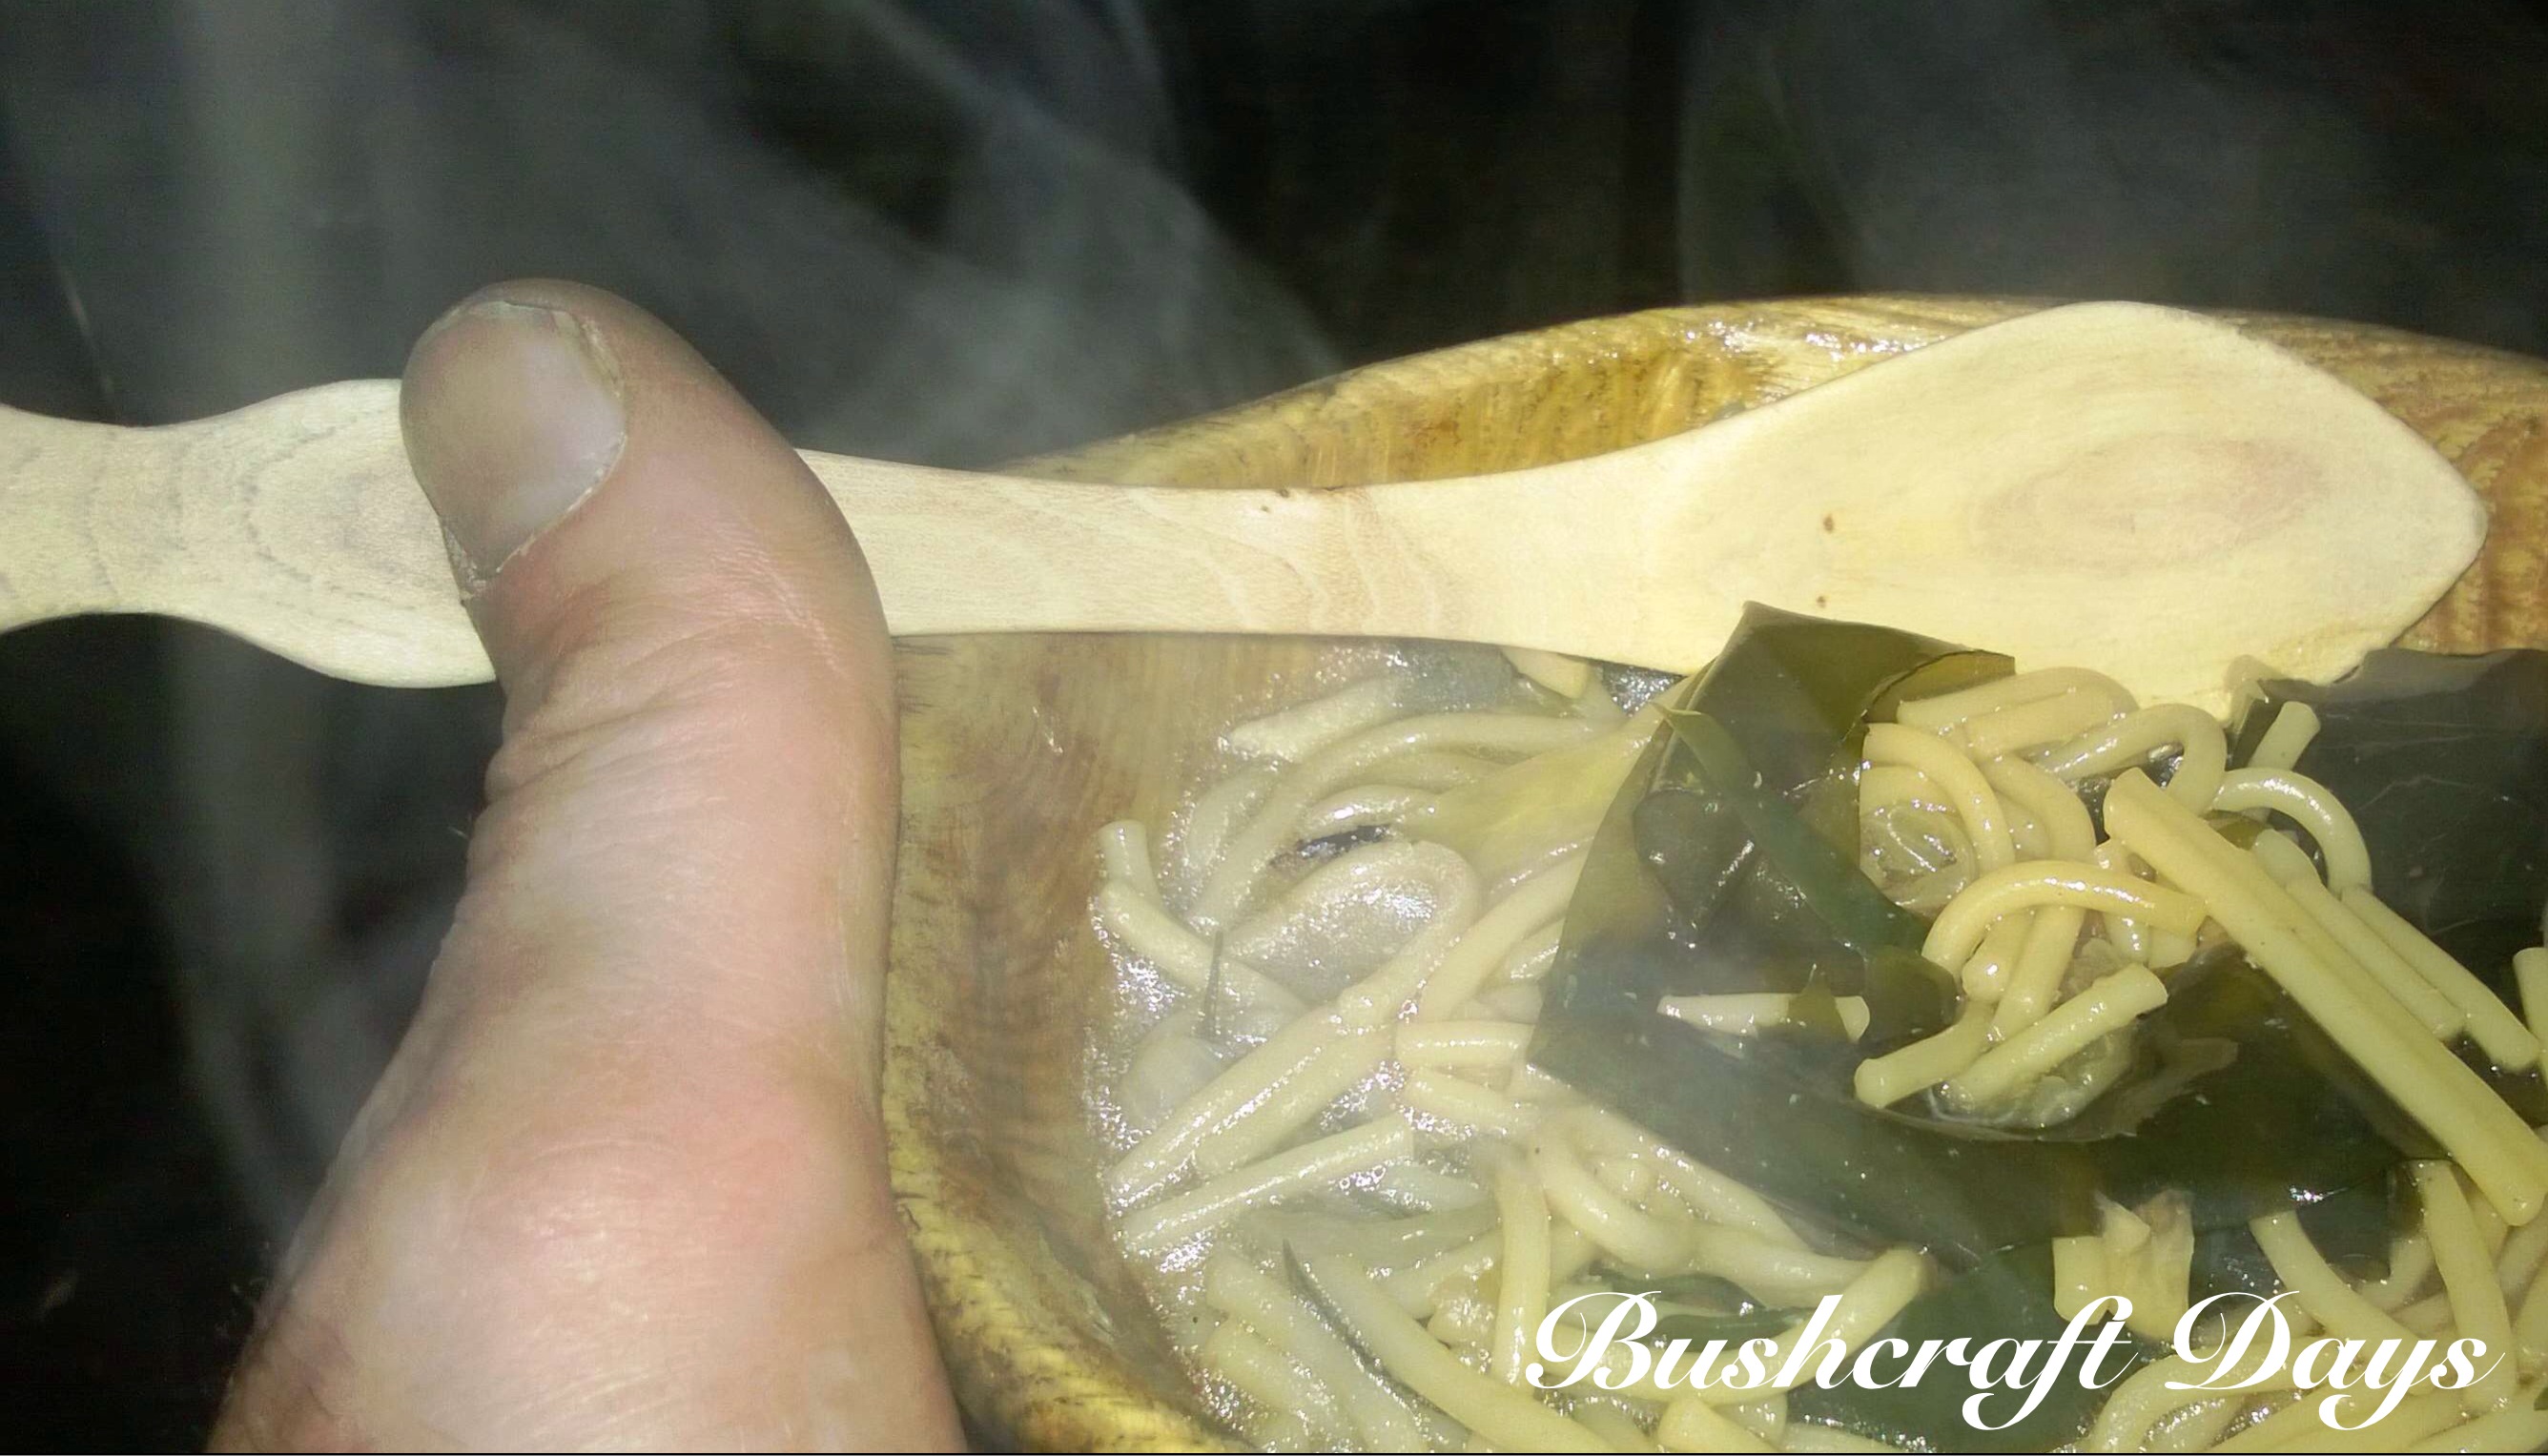
I came across a fallen hornbeam tree one day while teaching my Sea Cadets some map reading. Attached to it was a burl that produced this beautifully swirled kuksa cup.
My kuksa
Before I could drink out of my new kuksa I had to sort the small matter of carving it. As I explained in my previous How To… on Carving a Small Noggin cup the name kuksa (also known as kåsa in Sweden) is probably not the correct term for the cup as it was not carved in a Scandinavian country by the Sami peoples. Also it was not carved out of a birch burl but I like the word kuksa and it was carved out of a hornbeam burl at least.
After cutting the burl section from the fallen tree I left it to season for 3 years in a cold but dry area (my garage).
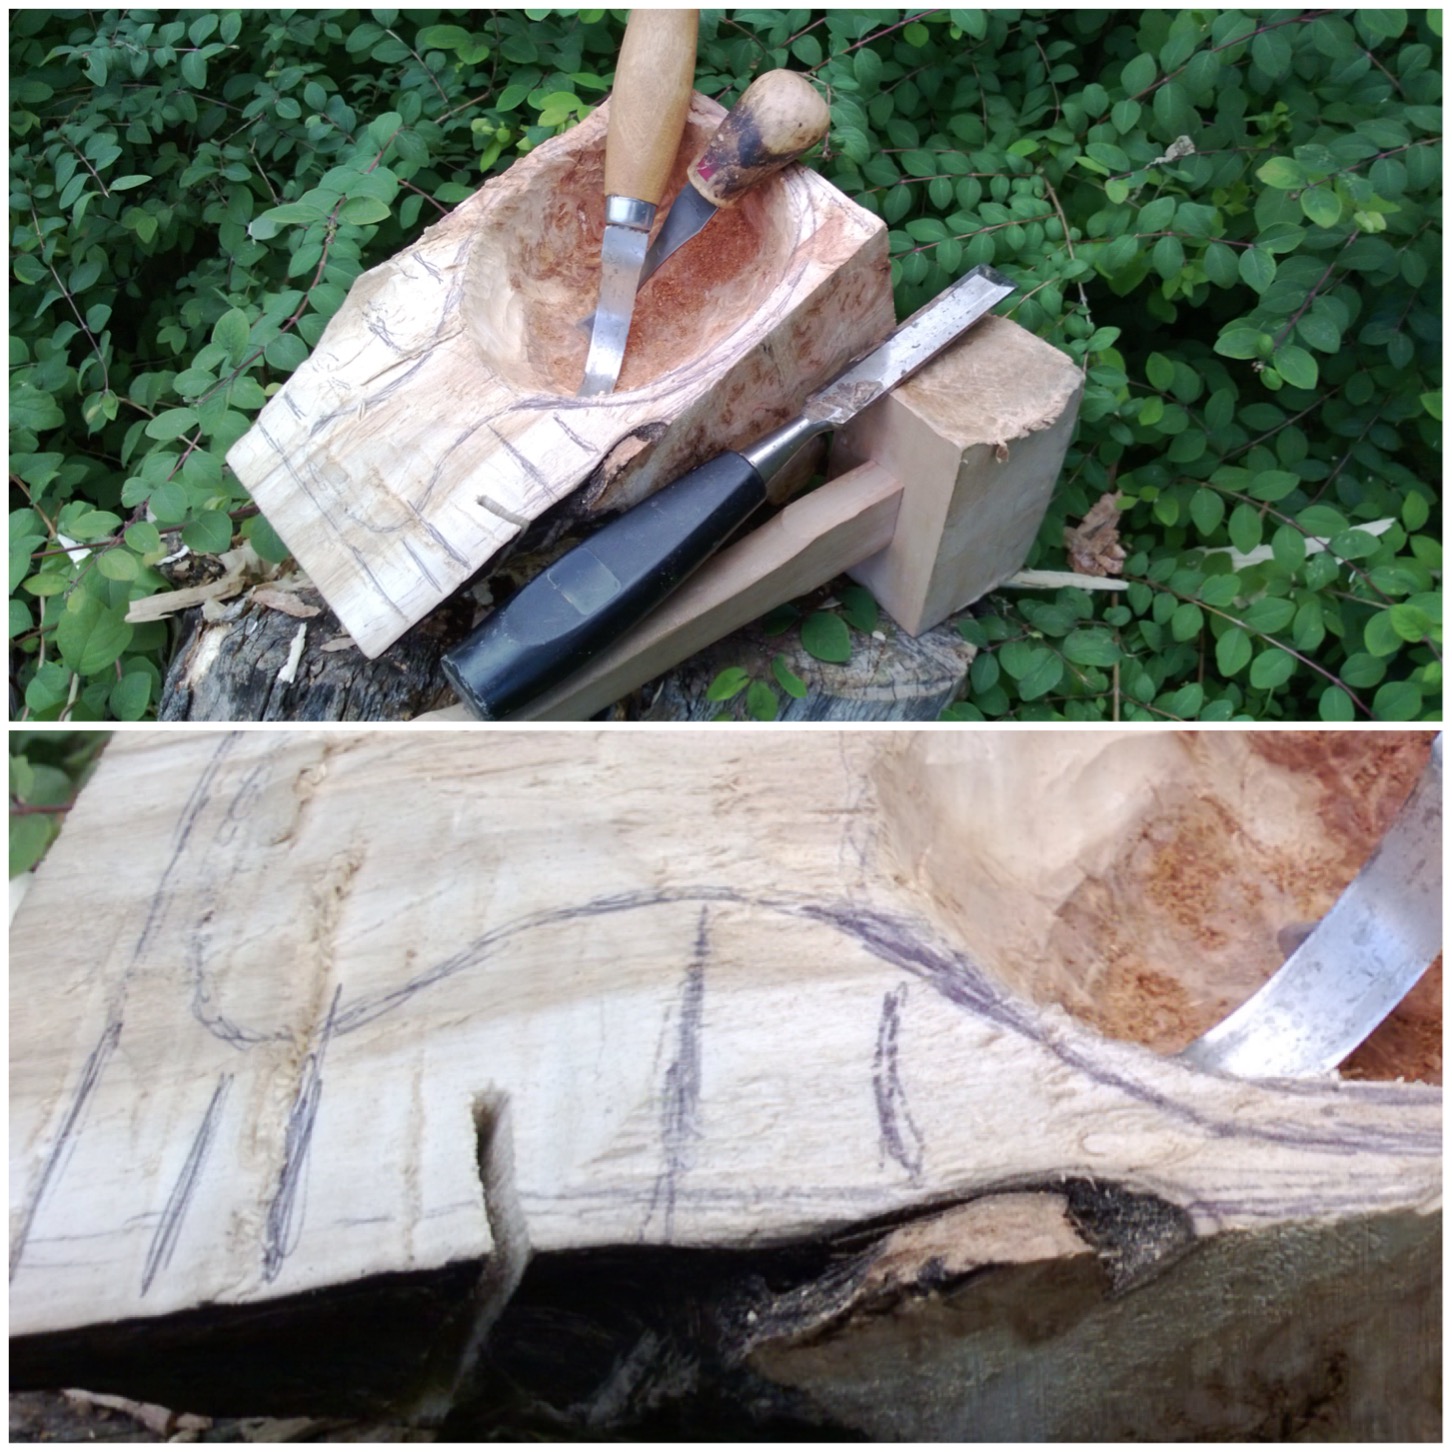
I wanted to create a kuksa that had the swirl of the burl wood and the clean lines of the heart wood. I started trying to saw down the length of the heartwood but that proved too difficult for my hand saw.
Hornbeam Burl
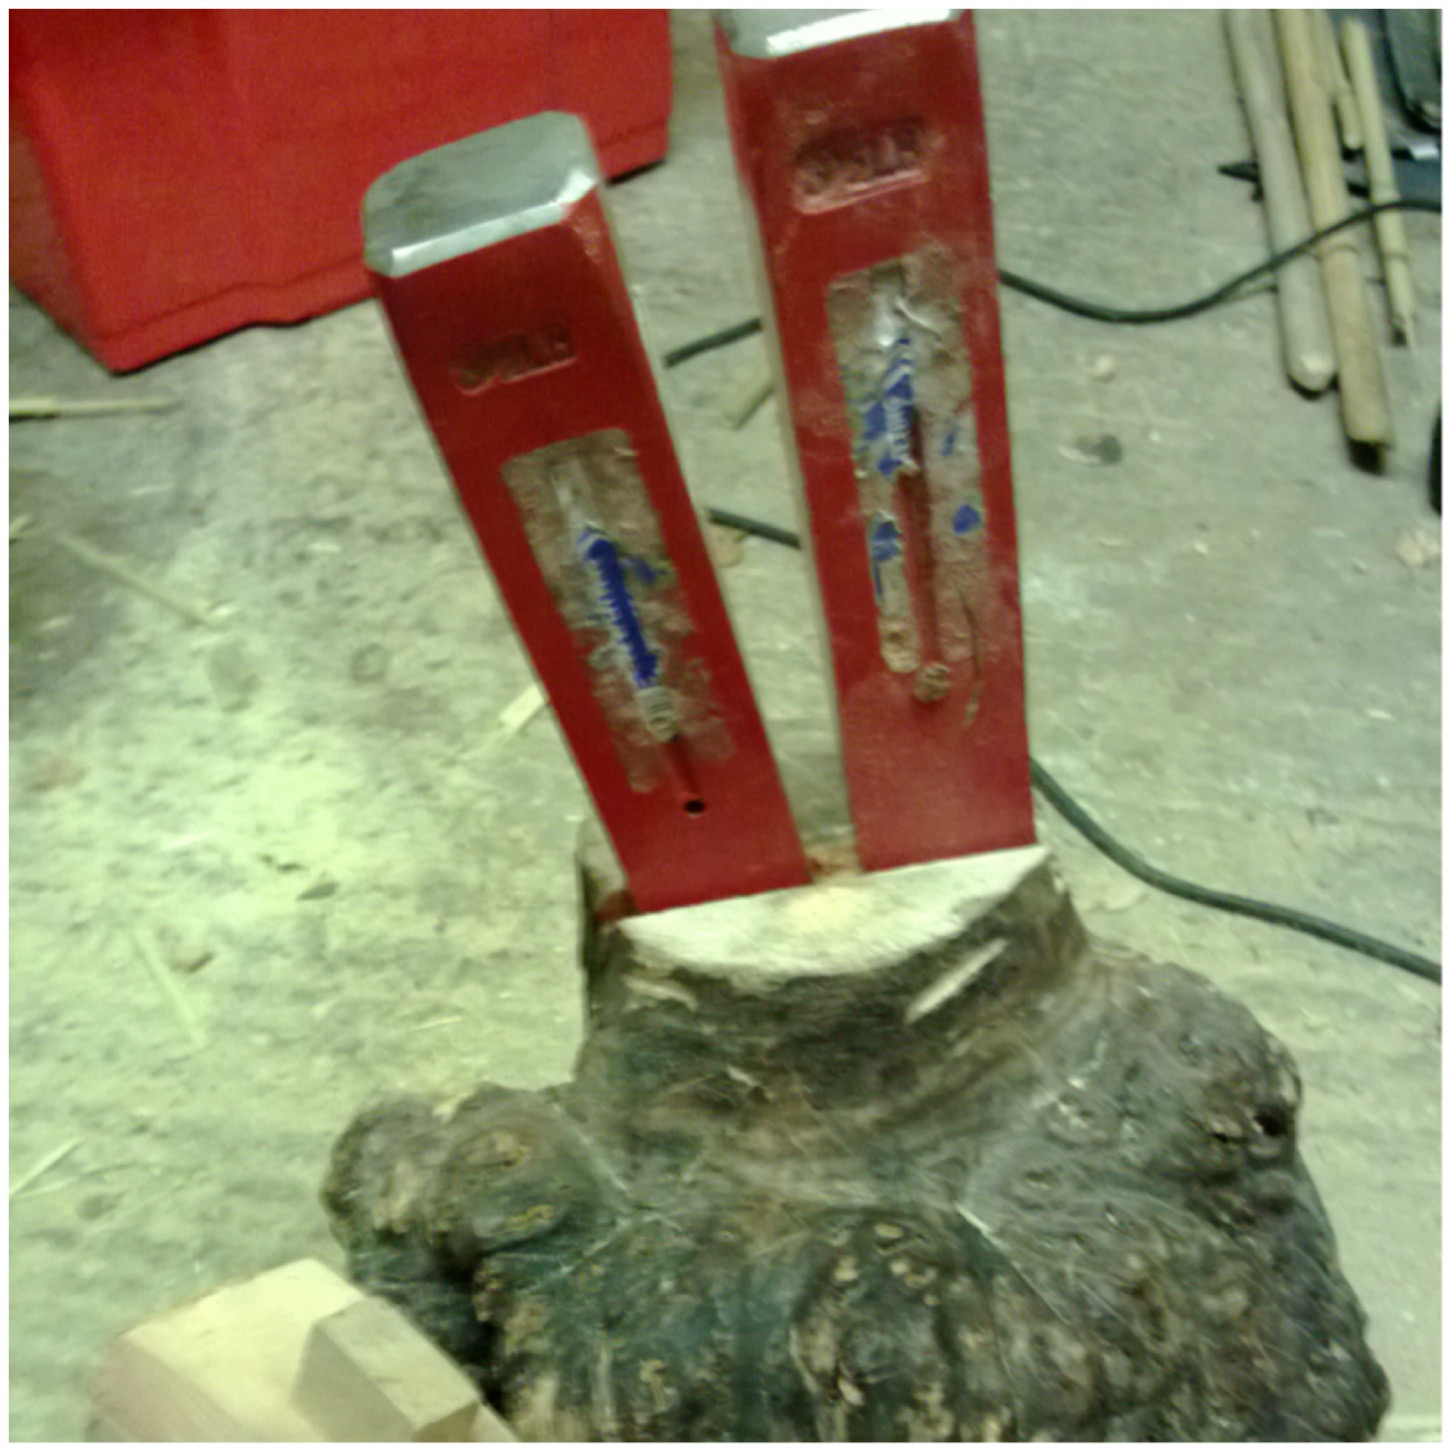
In the end I inserted two of my log splitting wedges into the saw cut and hammered down on them with a wooden mallet.
Splitting out
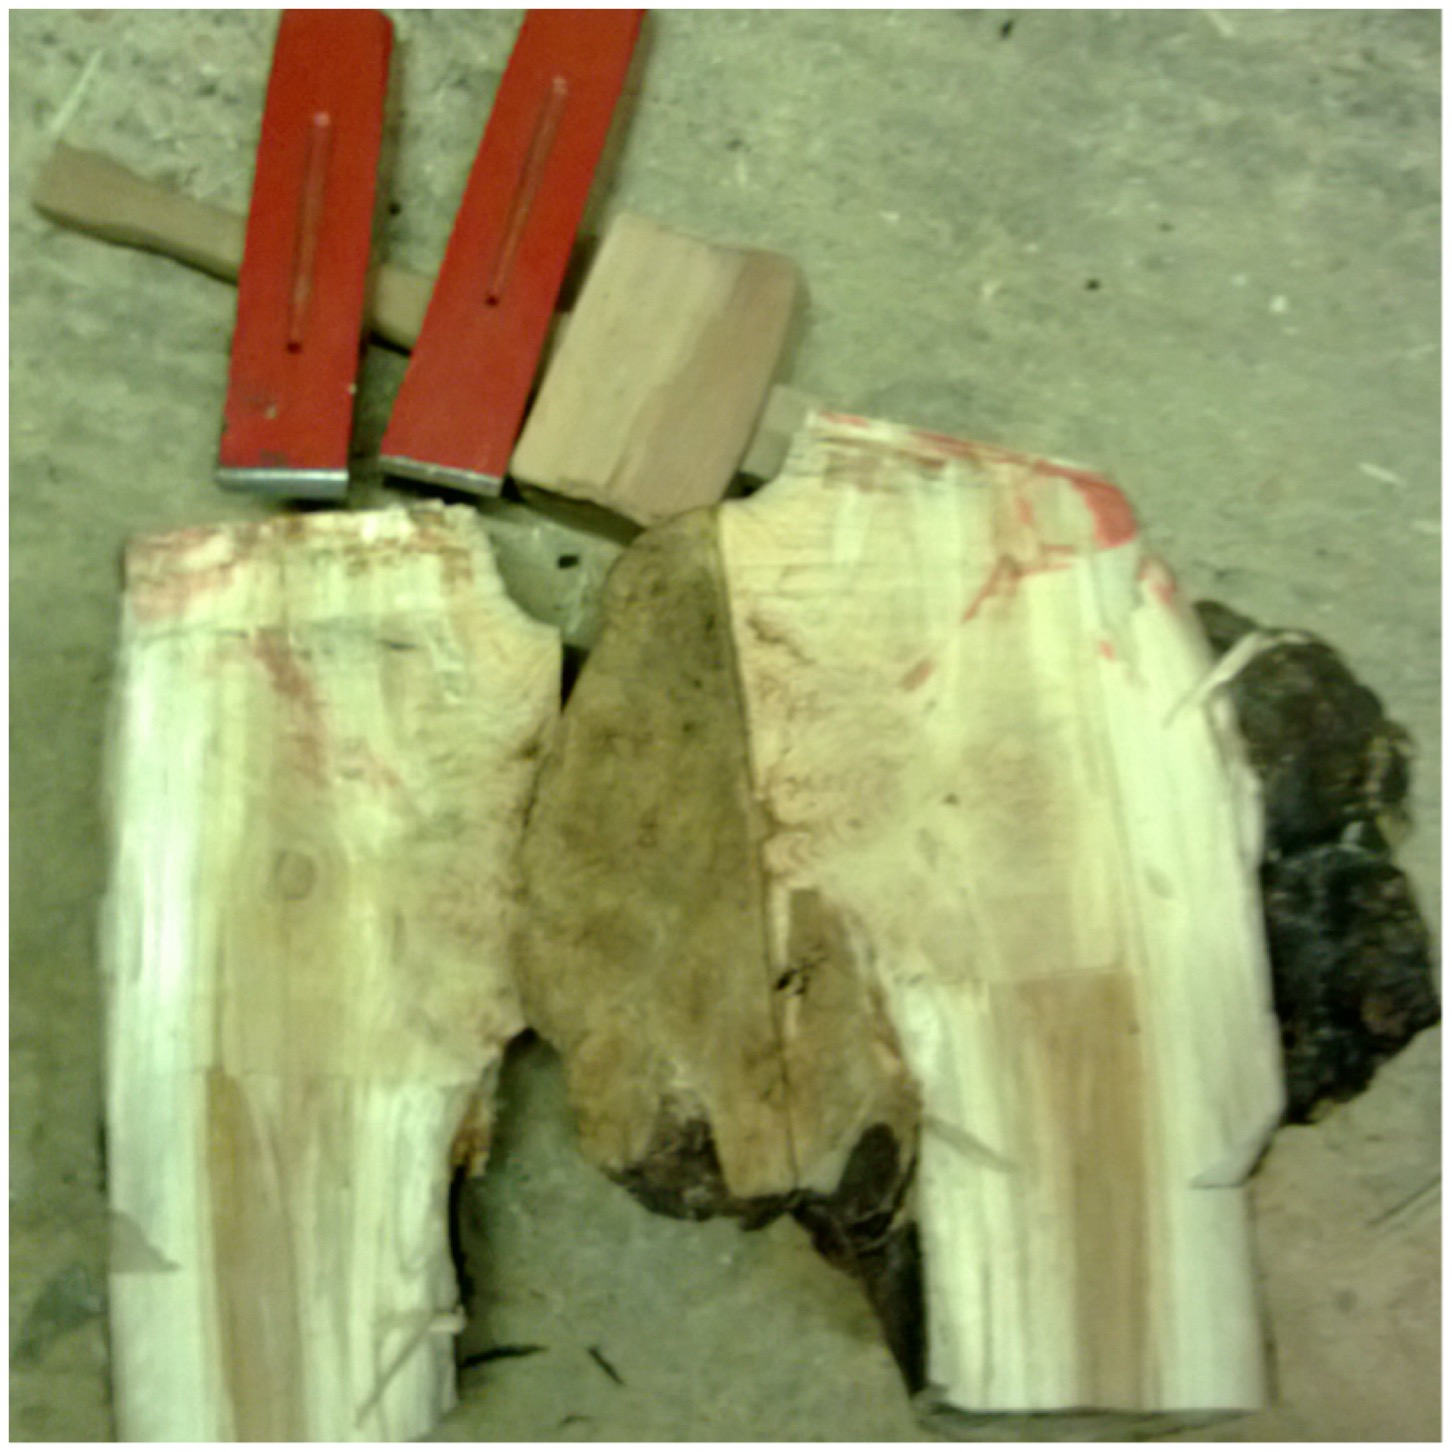
Thankfully they split cleanly leaving me a fairly smooth surface to start axing out the shape of the kuksa.
Dark wood of the burl
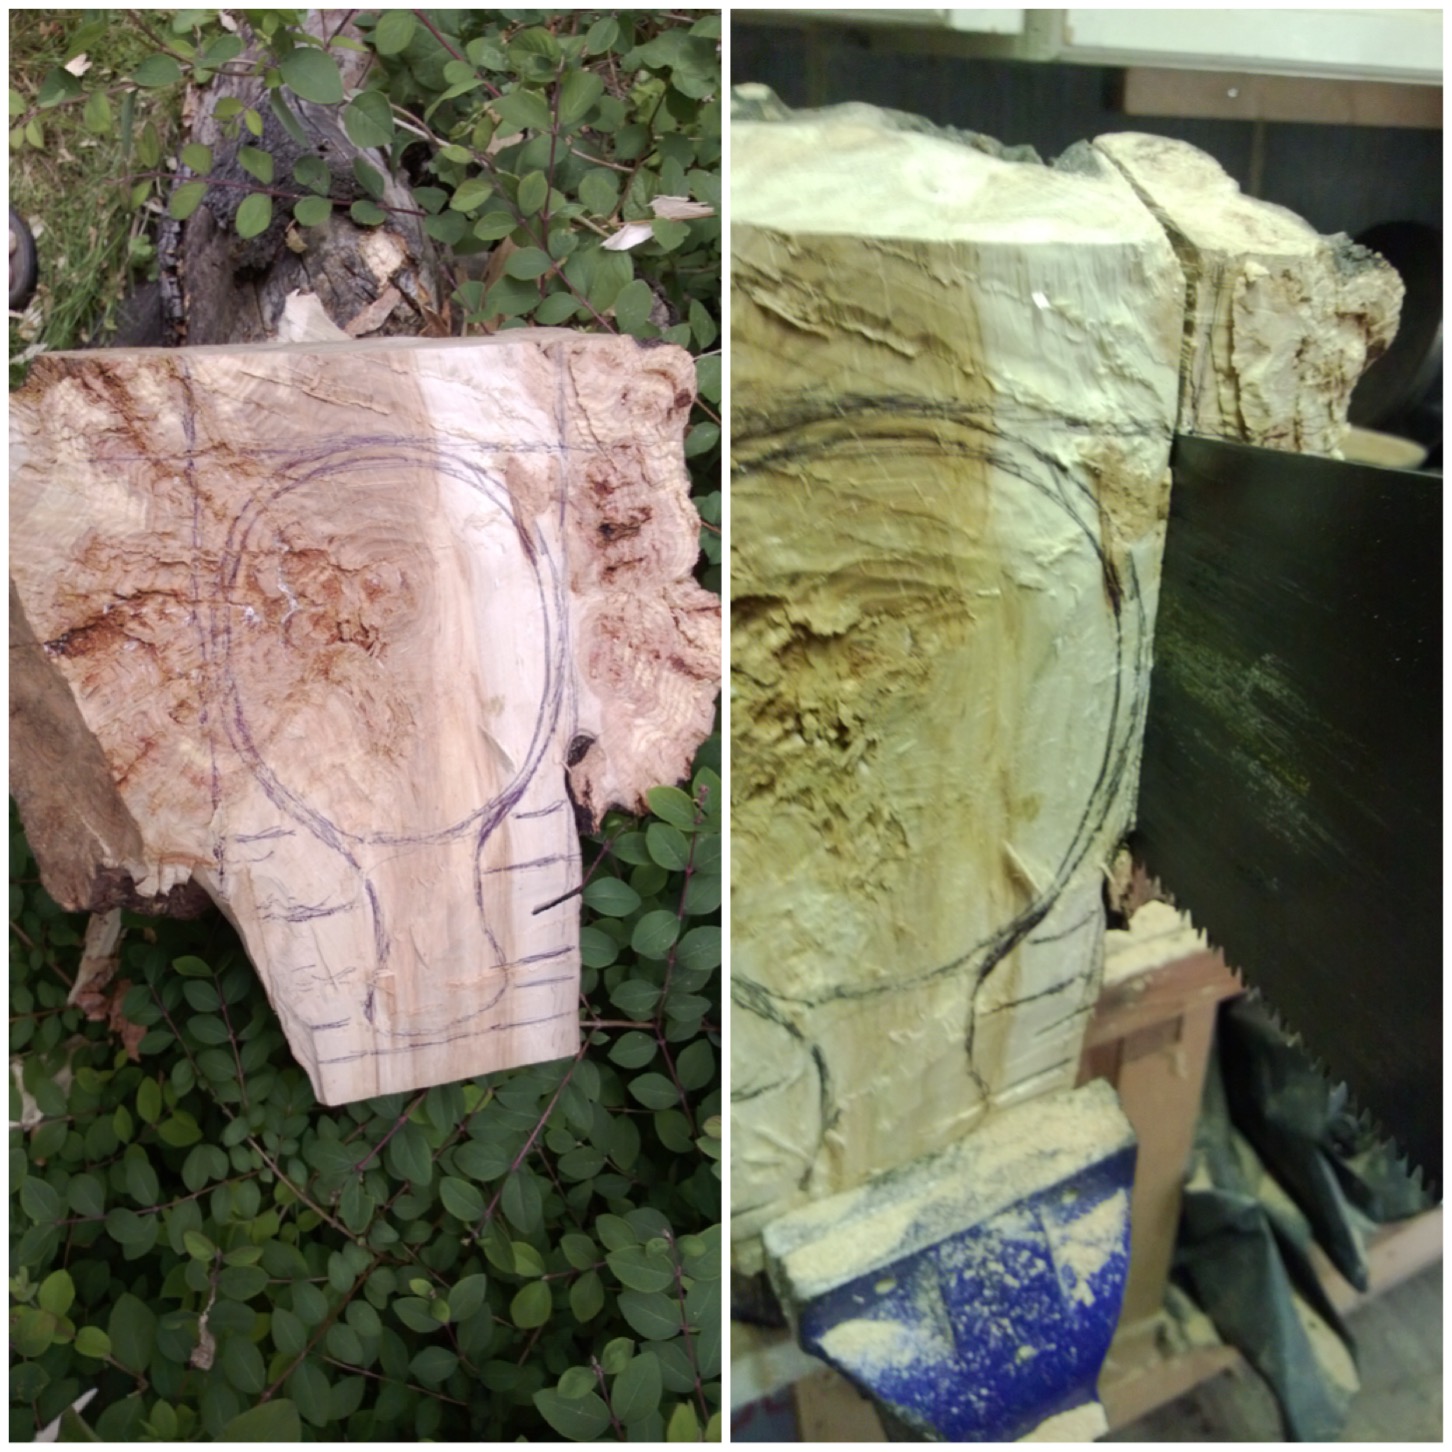
The heartwood was well seasoned and required quite a bit of axe work to get it down to the level I wanted.
Axing out the blank
I stopped axing out the top of the kuksa when I started to reach the burl wood but kept the heartwood for the handle. I was inspired by Jon Mac with his kuksa handle in the style of an otter’s tail and felt that the heartwood would prove a stronger option to the burl wood.
I drew out my general shape and used my saw again to cut off the excess on the sides. All the excess burl was carved later into either a quaich or a bowl.
Making most of the burl
The burl was of a very good depth and even though there were some deep fissures I knew for once I would get a decent sized cup out of it.
Ready to carve the bowl
I did not take any pictures of me carving the bowl or shaping the kuksa as I was too busy carving and there was no one around to photograph for me.
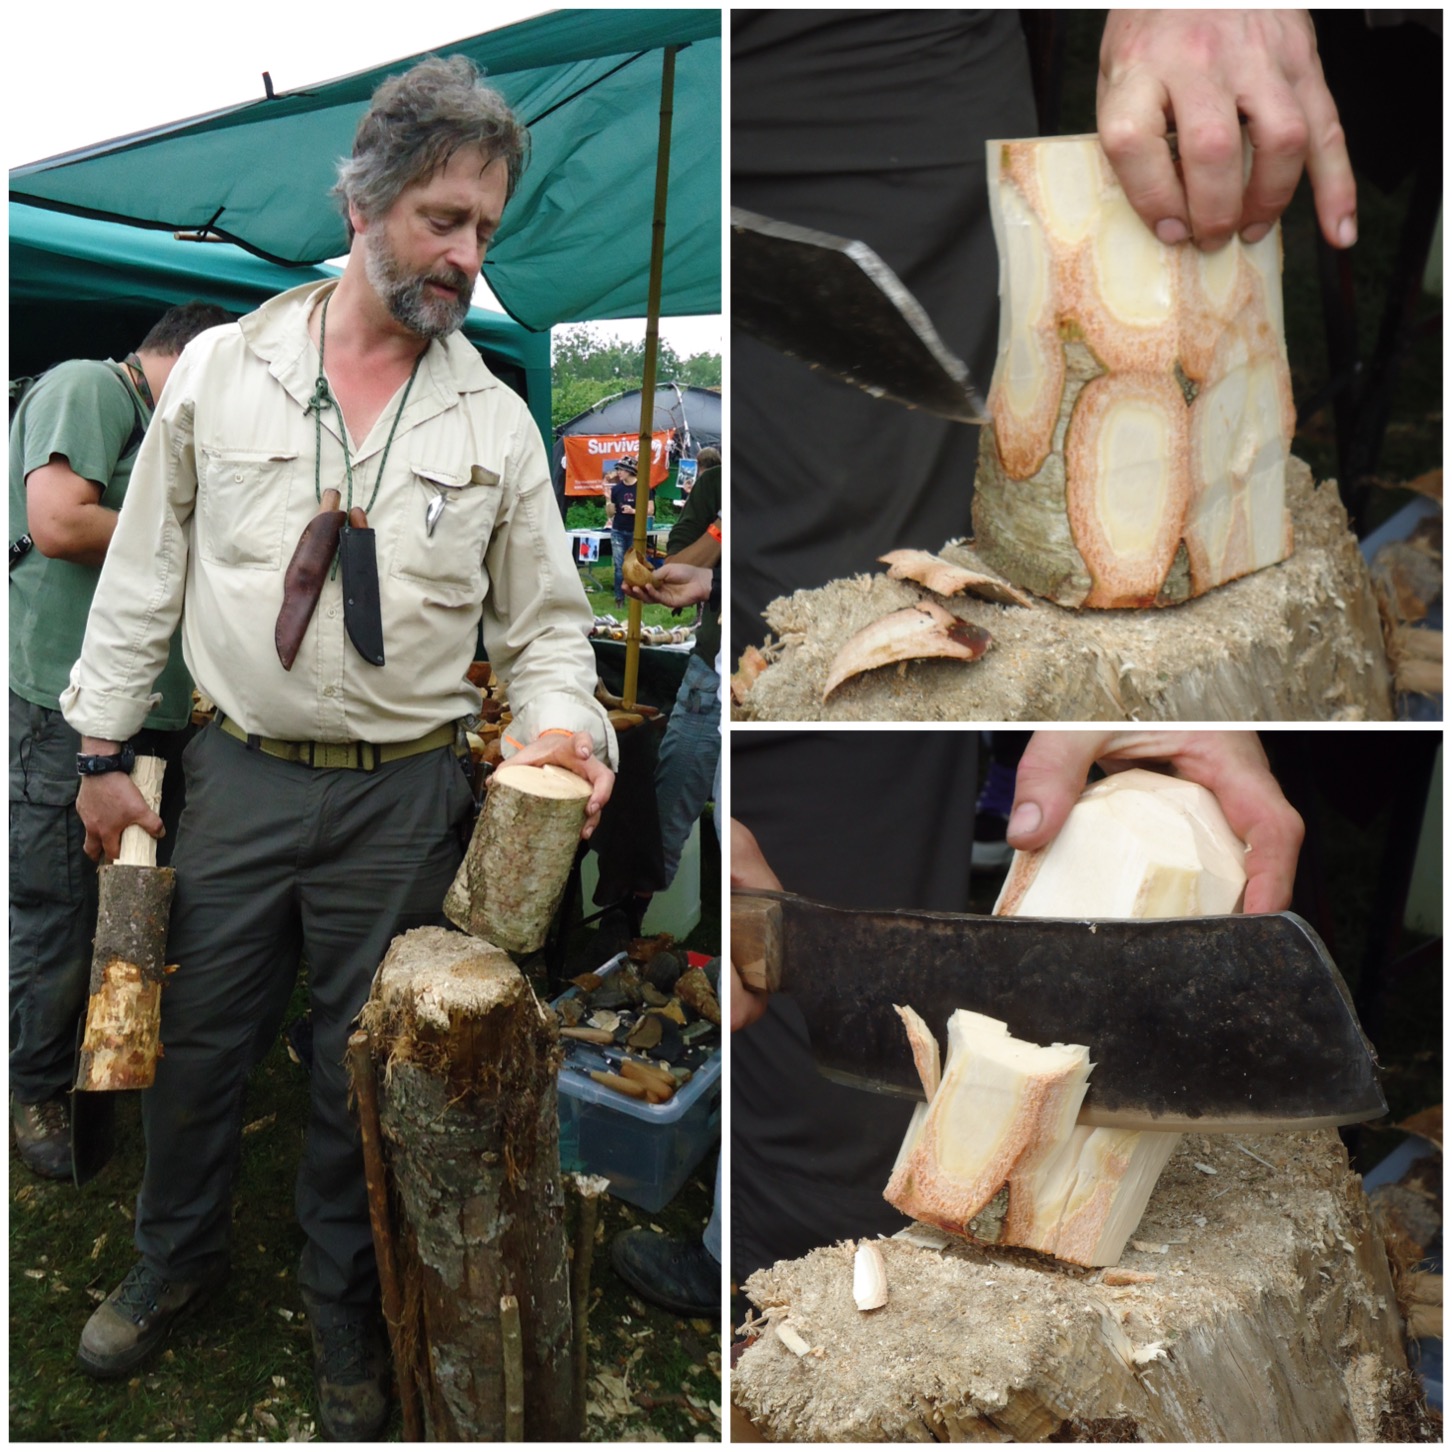
I looked in my archive though and came across these pictures of the master craftsman John Arthur from the Woodlife Makers Guild at the 2011 Wilderness Gathering demonstrating how to quickly blank out a kuksa.
John Arthur – Master Wood Worker
After chopping out the basic shape, John used a saw to put some stop cuts in. Stop cuts allow you to remove wood from specific areas without any split running off into wood you want to keep (in this case the area that will become the bowl).
Stop cuts and blanking out the cup
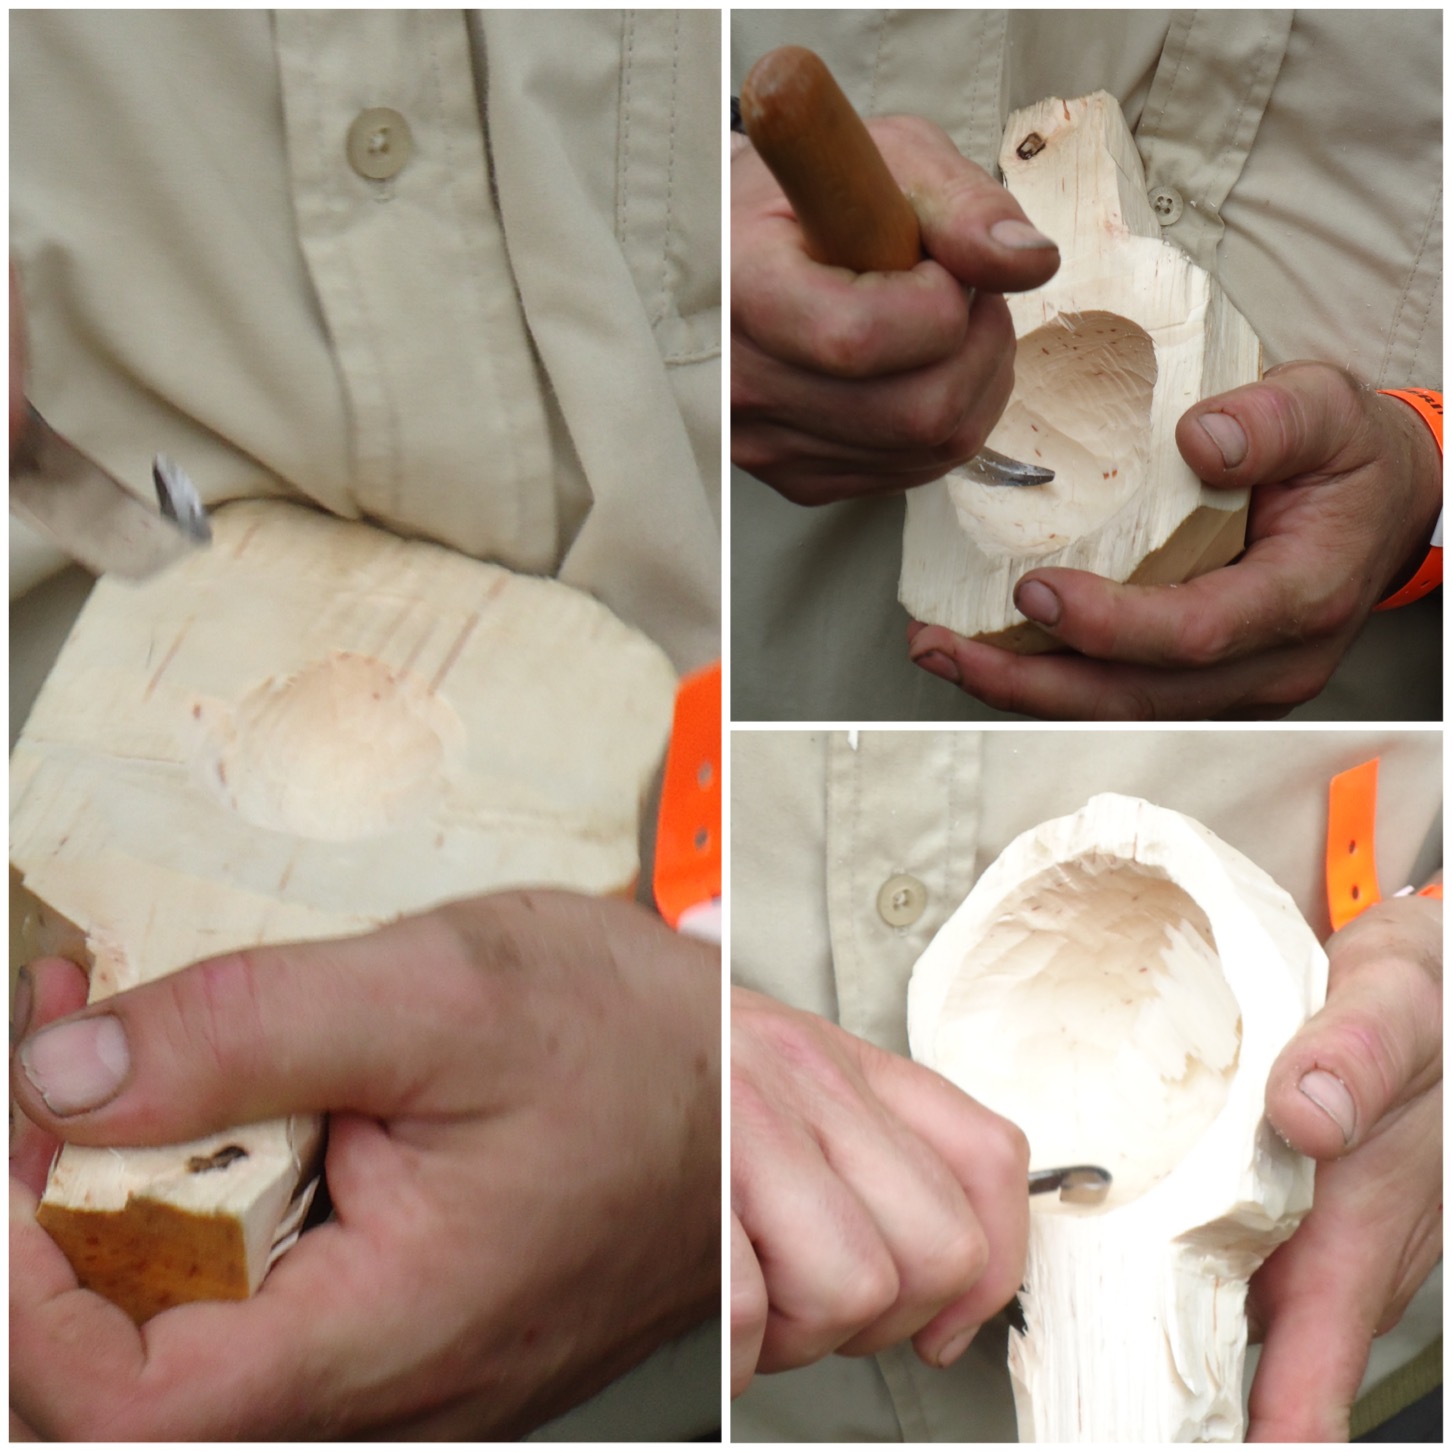
Once John had the basic shape he used his crook knife to carve out the bowl. He kept the knife in his right hand and continually turned the kuksa to carve out the bowl.
Carving the bowl
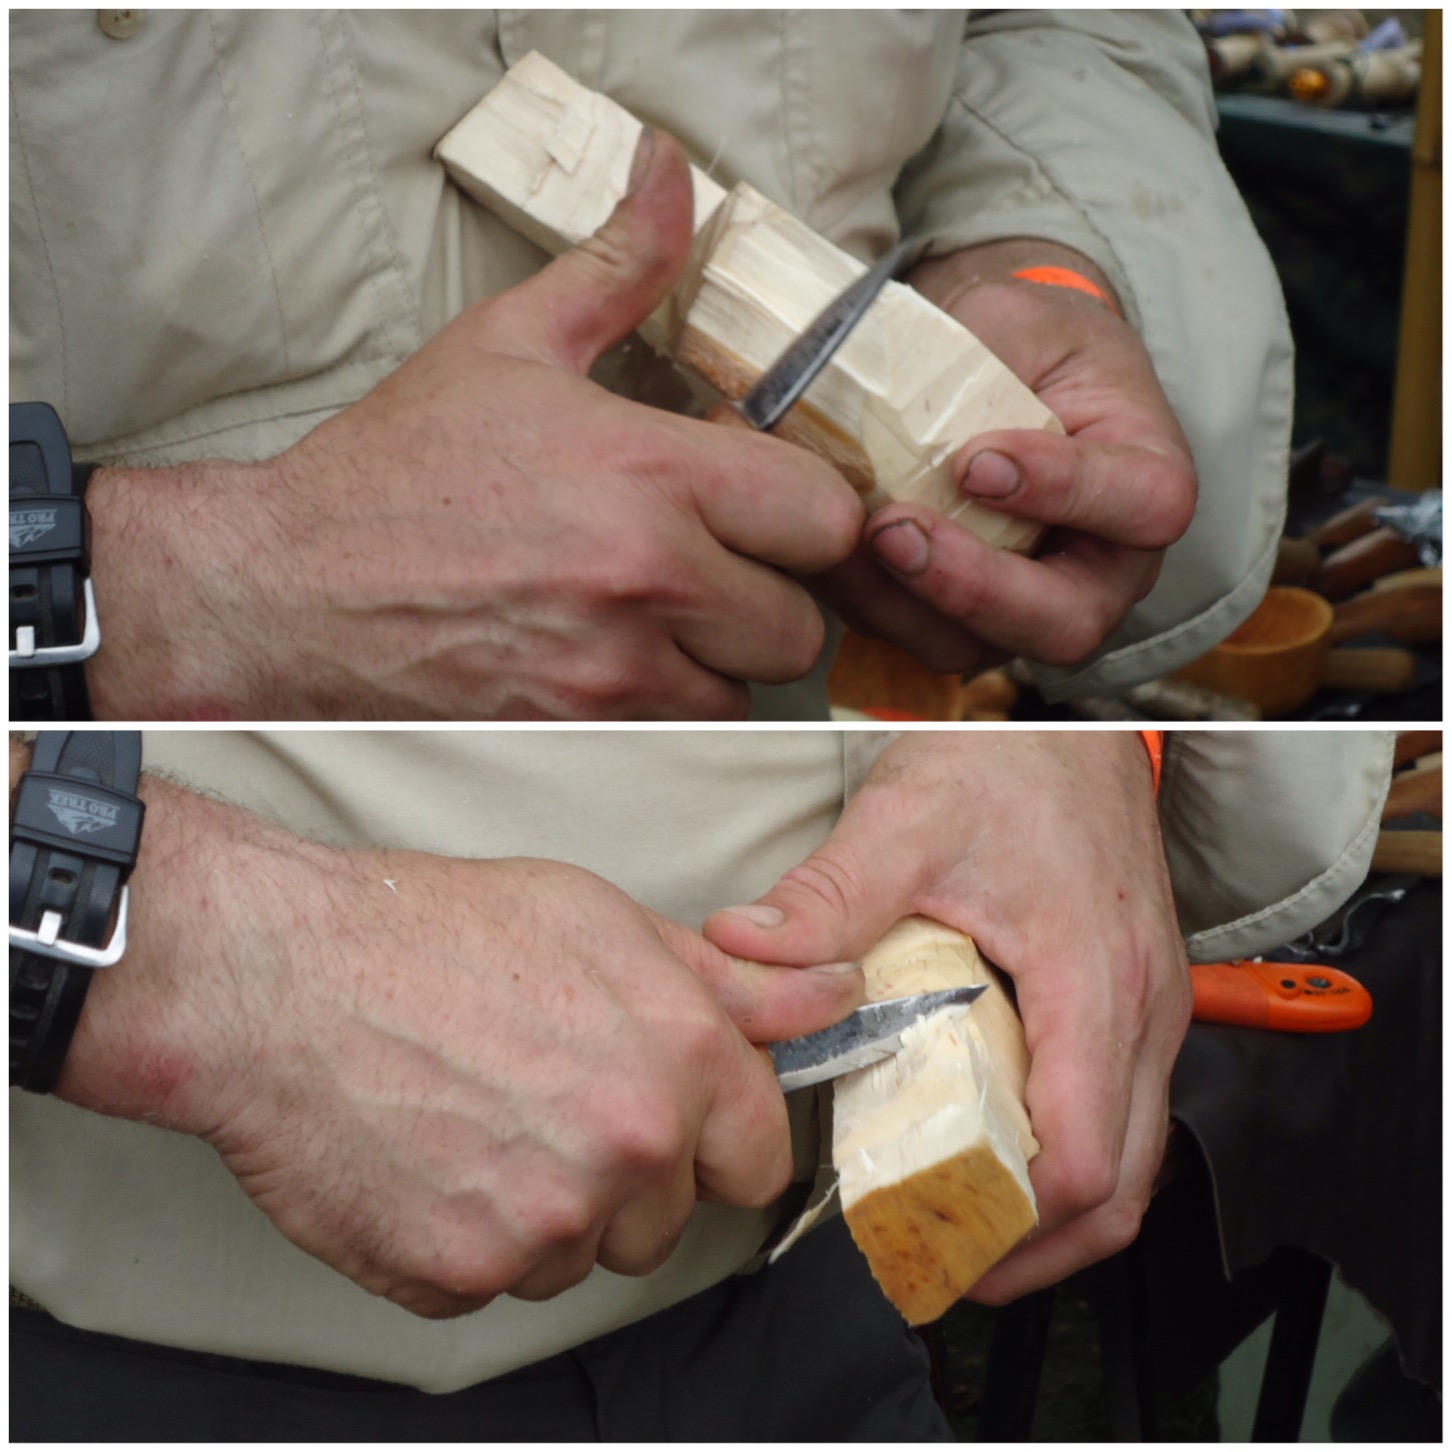
Finally he used a small knife to shape the outside of the kuksa. He used a number of cutting styles cutting towards himself and away from himself but he was always in full control of the knife and soon had the basic shape of the kuksa made.
As this was green wood he then explained he would let it dry slowly over a number of weeks before finishing it off.
Deft knife work
Here are some of John’s finished kuksas on display at the Gathering. With this level of detail you can see why he is a master craftsman.
John’s creations
Back to my kuksa – the burl wood of the bowl came out very easily with a chisel and my crook knife.
I put lots of stop cuts into the sides of the blank so as to help get rid of the excess here in a controlled way (you can see all the pencil marks where I was to put them). I really took my time here to get rid of the excess wood and not damage the bowl.
Stop cuts
The whole process of removing the burl wood took quite a while as the outer bark was very hard and the burl wood underneath the bark because of its curving nature was very soft in places and very hard in others.
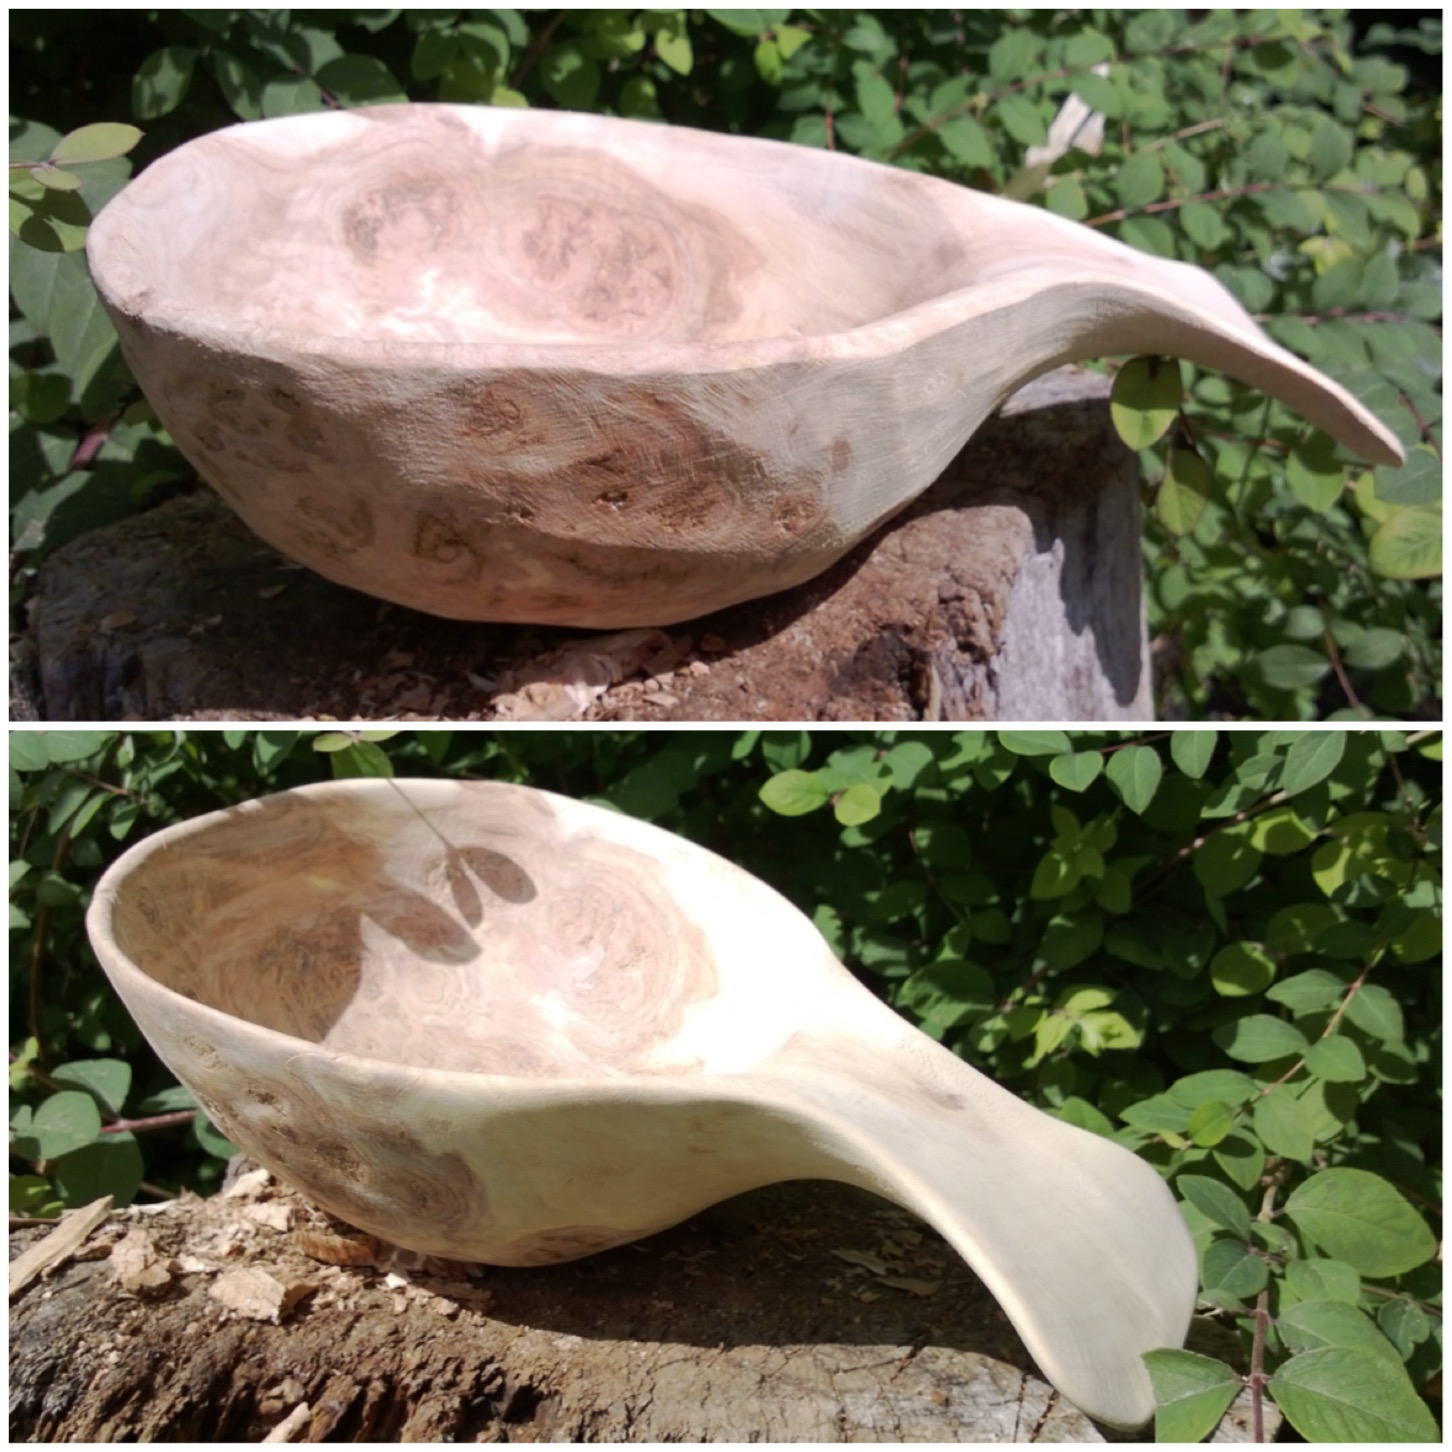
When I had formed it into the shape you see in the top picture (below) I started using different grades of sandpaper, working up from very rough to very fine, until it reached the smoothness you see in the bottom picture.
Carving the Kuksa shape
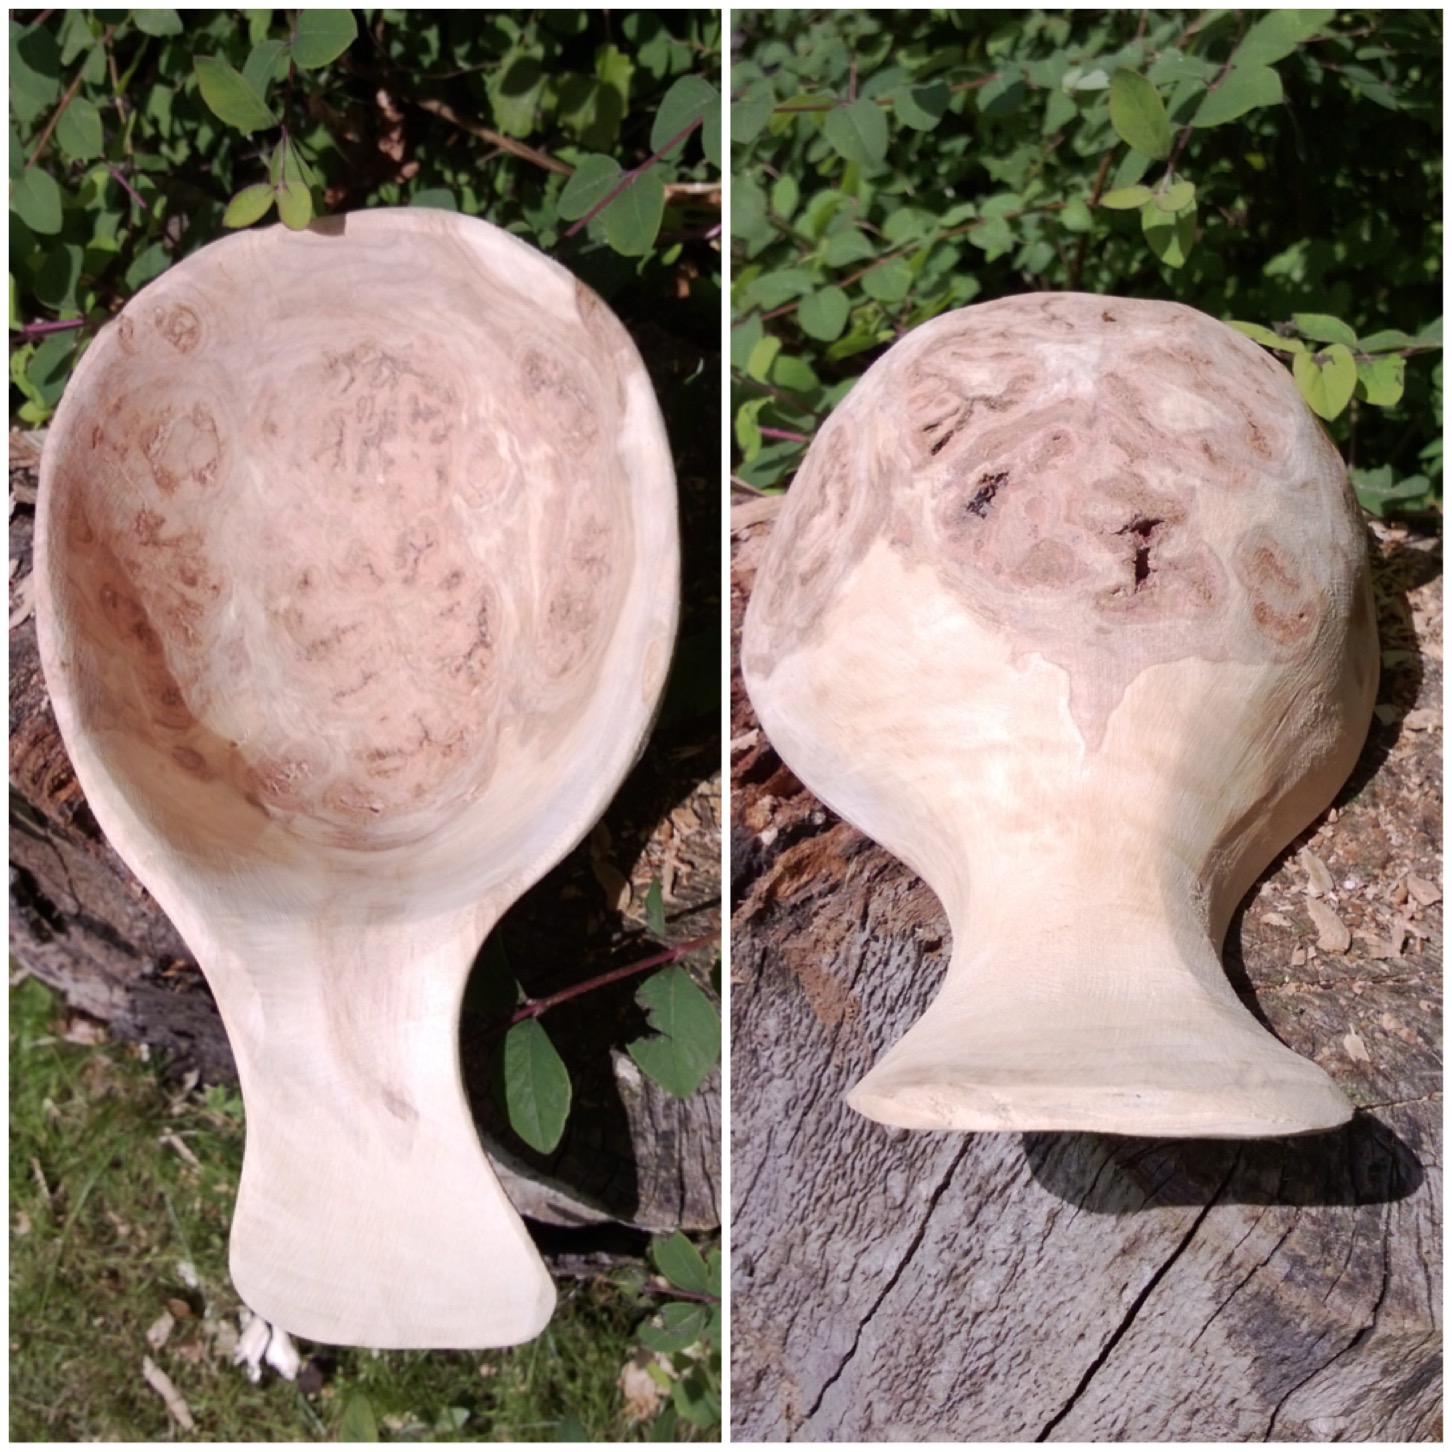
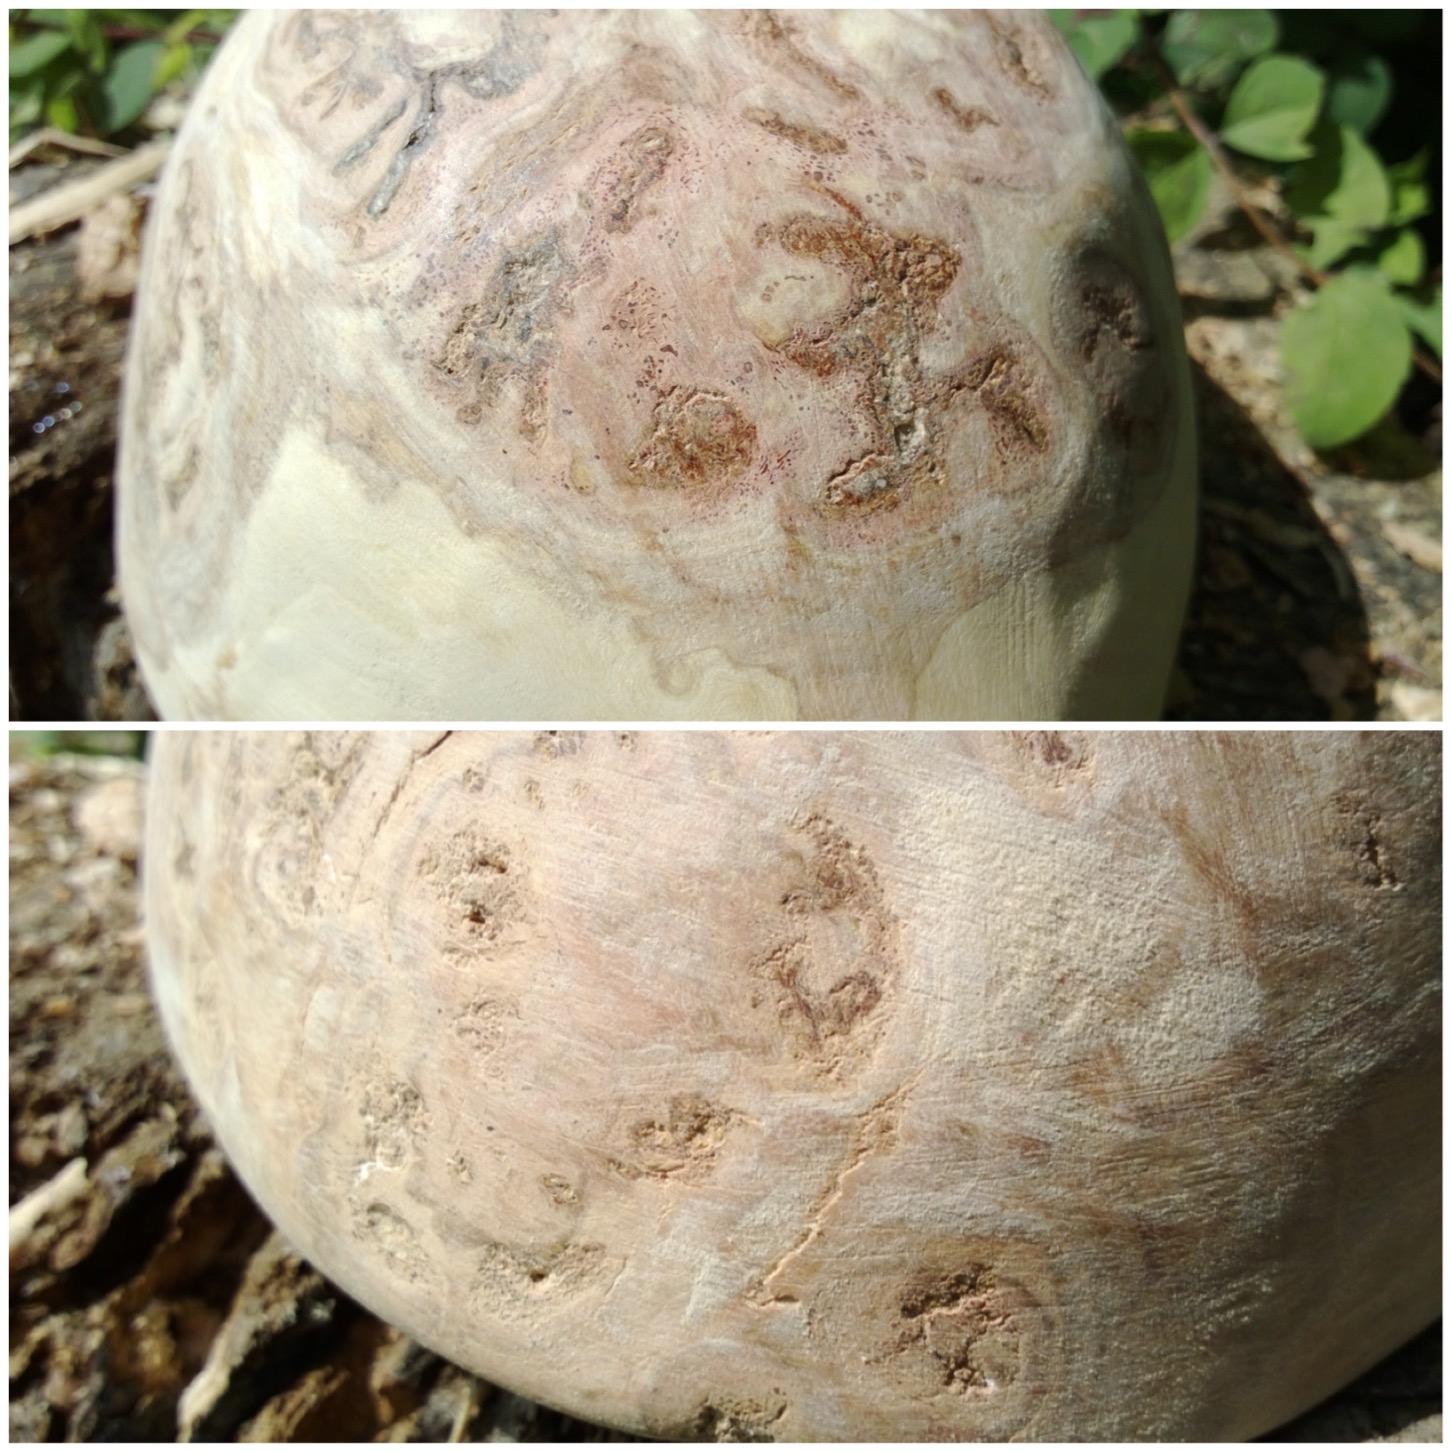
The inside of the bowl was very stable, smooth and did not contain any holes.
The underside was a different matter with small holes in a number of places.
Smooth bowl but imperfect base
In the up close pictures below you can see that they were fairly deep. I felt I needed to fill these holes to prevent any leakages (never a good thing when you are desperate for a brew).
Holes – big and small
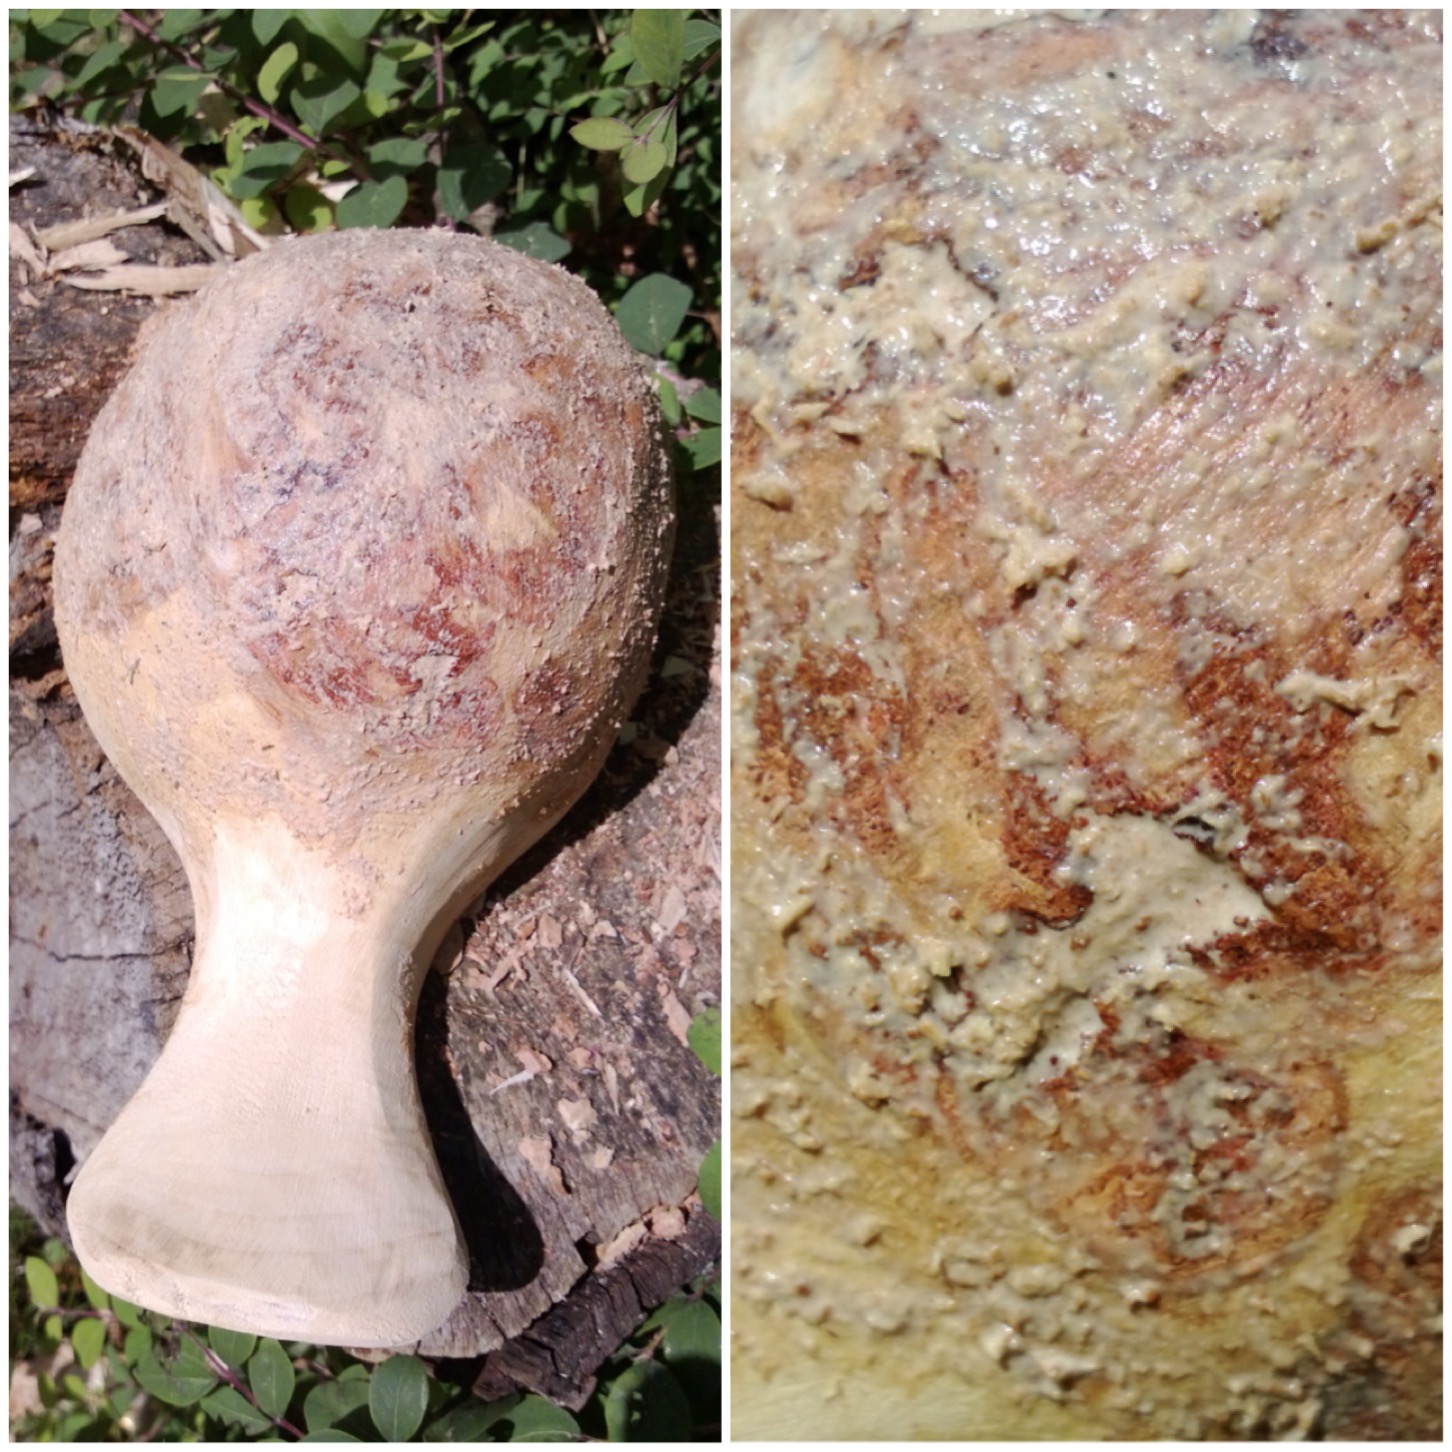
To fill the holes I used a mixture of wood glue and sawdust from the sanding as a kind of filler. I rubbed the mixture all over the underside of the bowl, allowed it to dry, sanded it and repeated the process again. This all took a couple of days to allow for the drying process.
Wood glue and shavings on the base
There was still some roughness left over even after the sanding but I felt that went with the character of the kuksa.
Drying and sanding
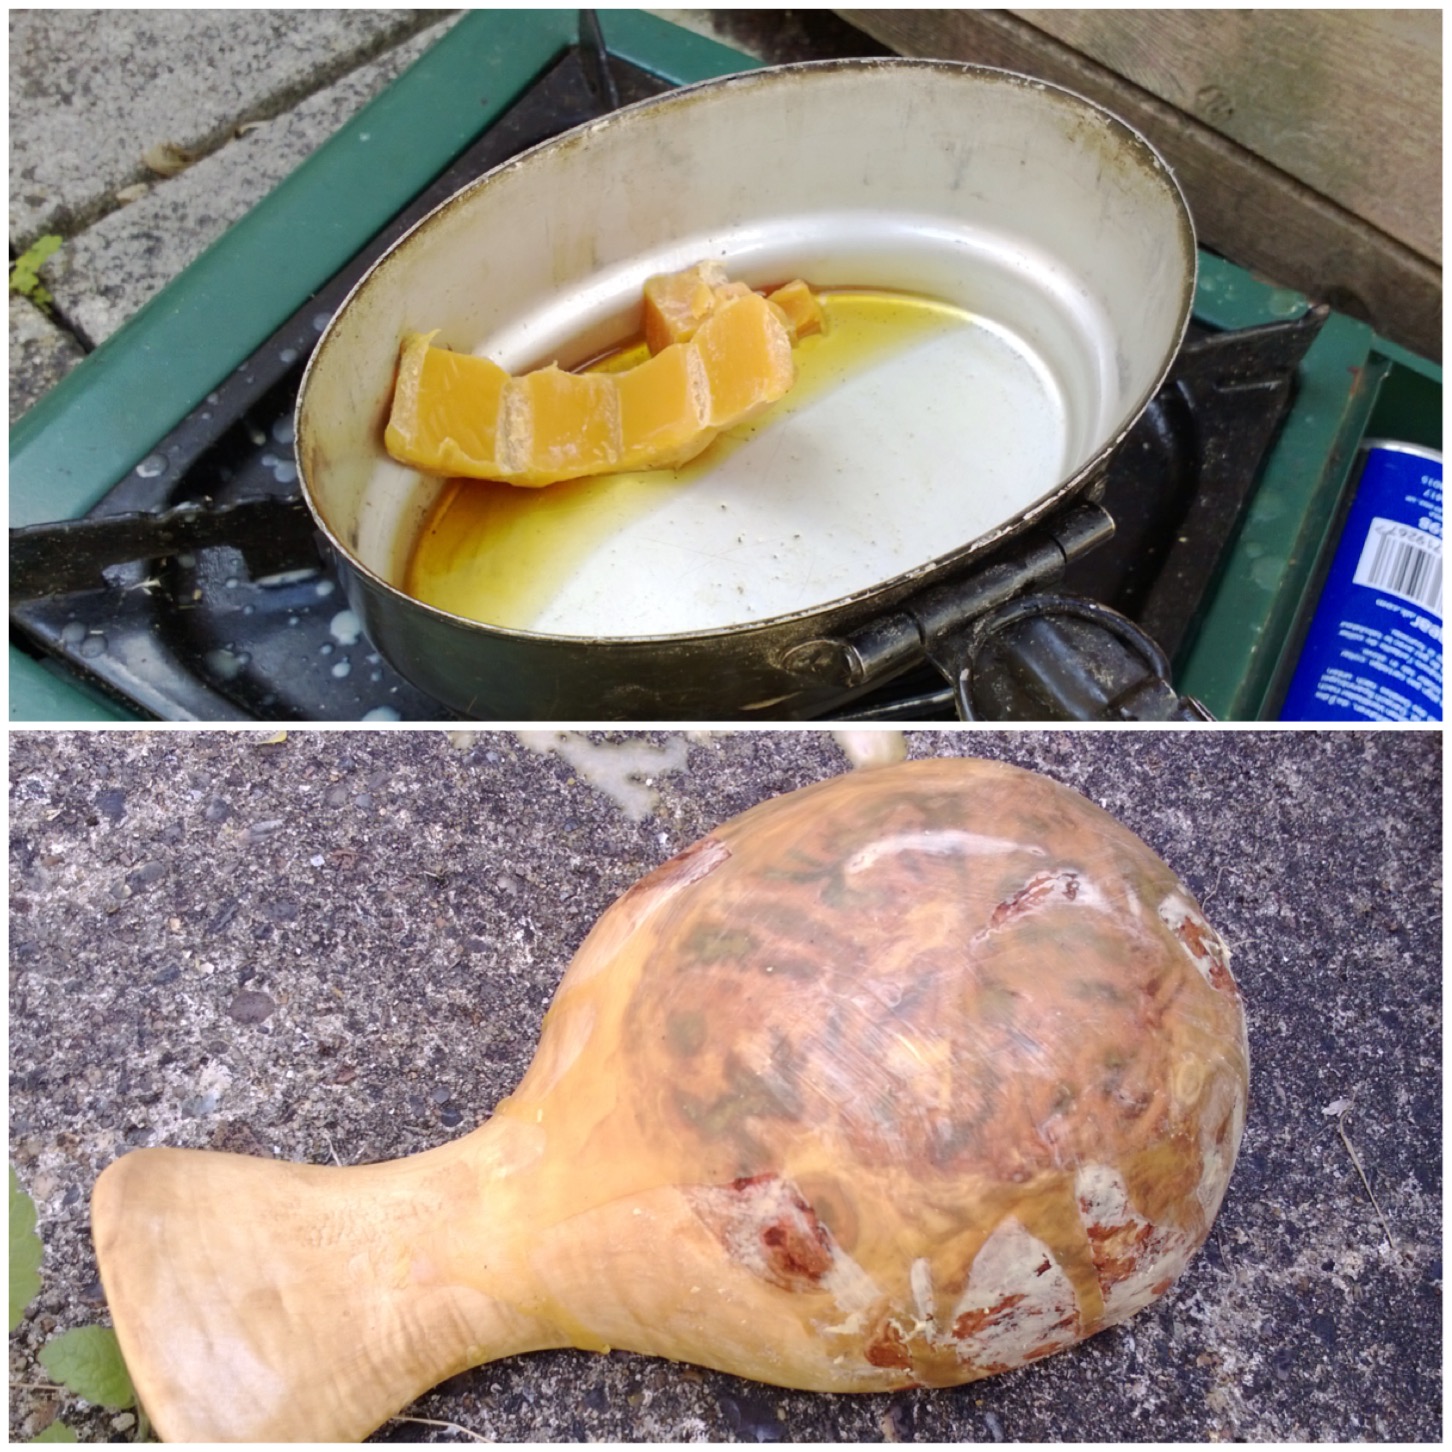
To seal the cup I melted beeswax and poured it over the cup. I then re-melted the beeswax with a hairdryer so that as much of it as possible would soak into the burl wood to fill all the pores. I repeated this a number of times, covering the whole cup until no more beeswax would soak into the wood.
Beeswax filler
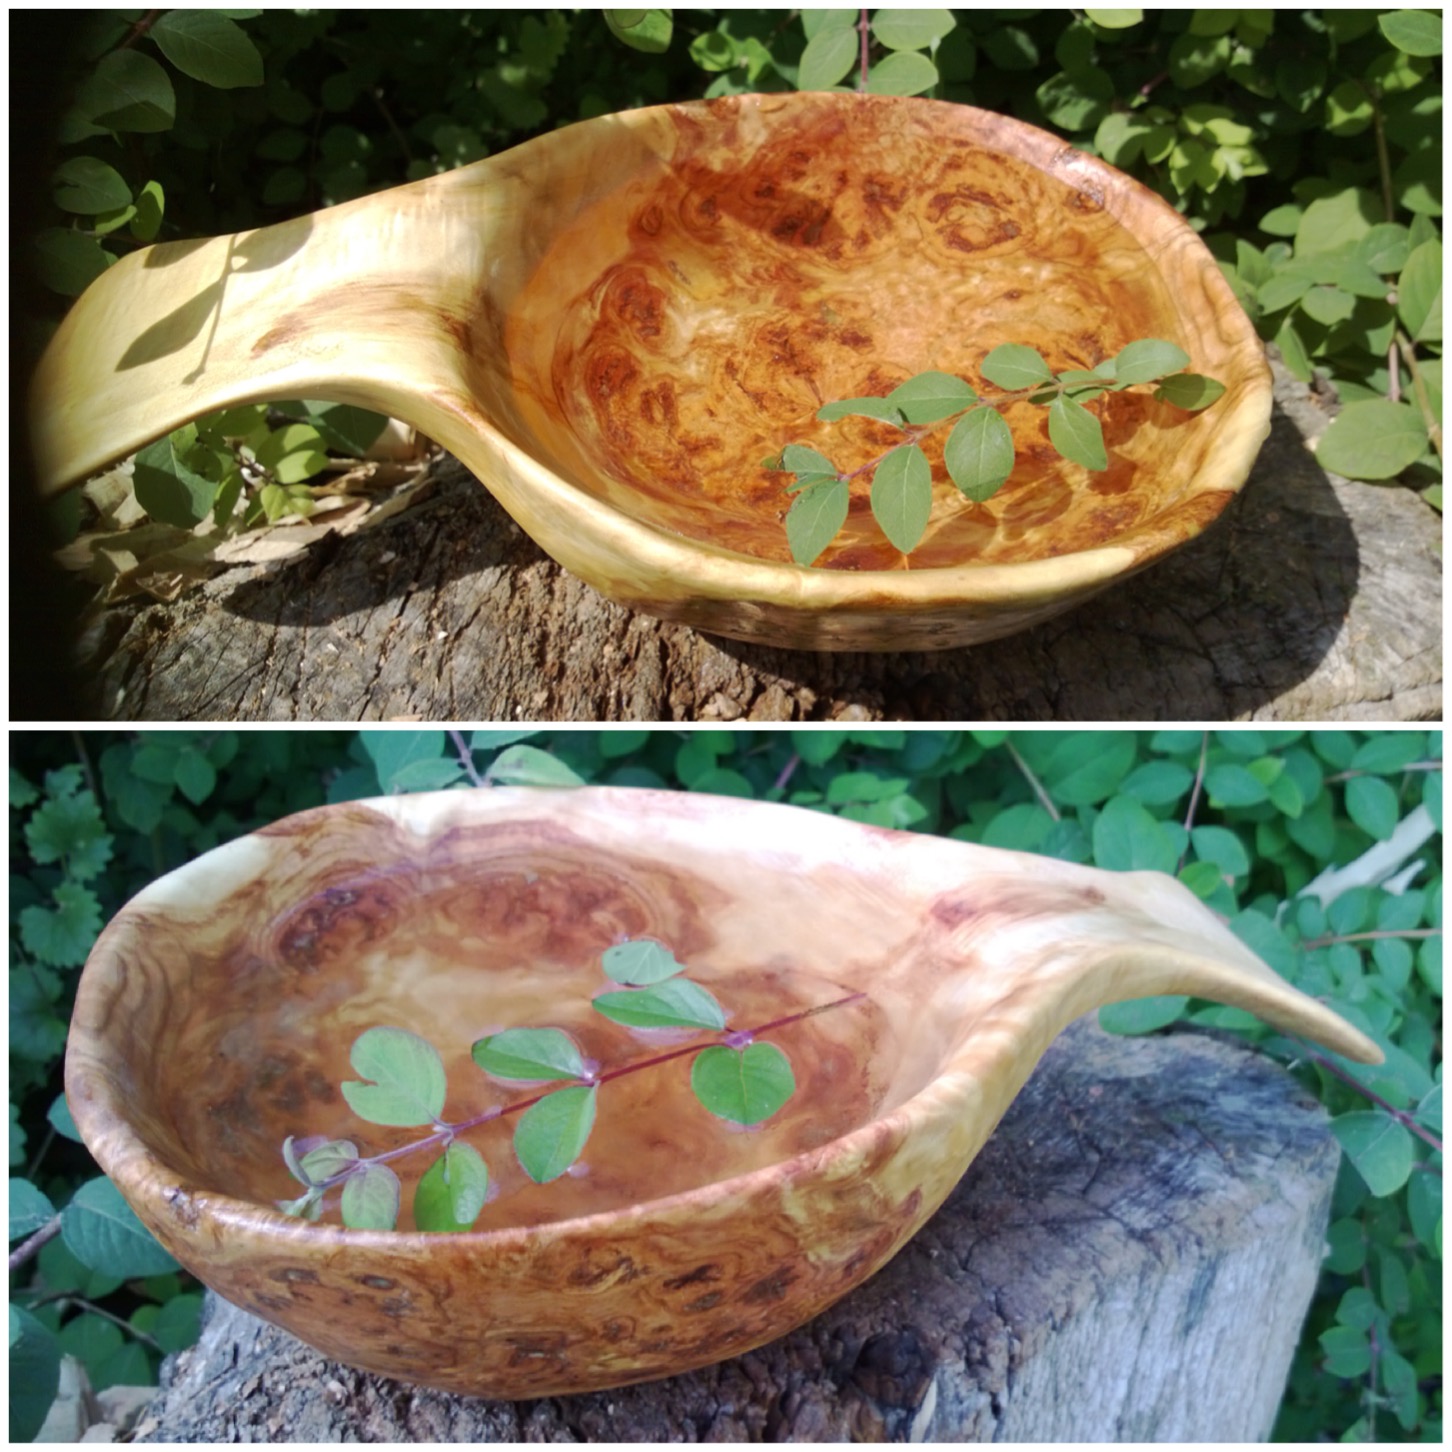
The beeswax did what the sanding alone never could; it smoothed out the wood and gave it a lovely shine as well. The swirls of the burl wood really stood out after this process.
Beautiful swirls on the sides
I particularly liked the contrast of the burl wood of the bowl with the heartwood of the handle. This is what I was hoping for and was very pleased with the outcome.
Contrasts – heart wood and burl wood
Next up was to test out the waterproofness of the cup. To begin with I poured cold water into the cup and let it stand for an hour. Thankfully there were no leaks.
Waterproofing test – cold water
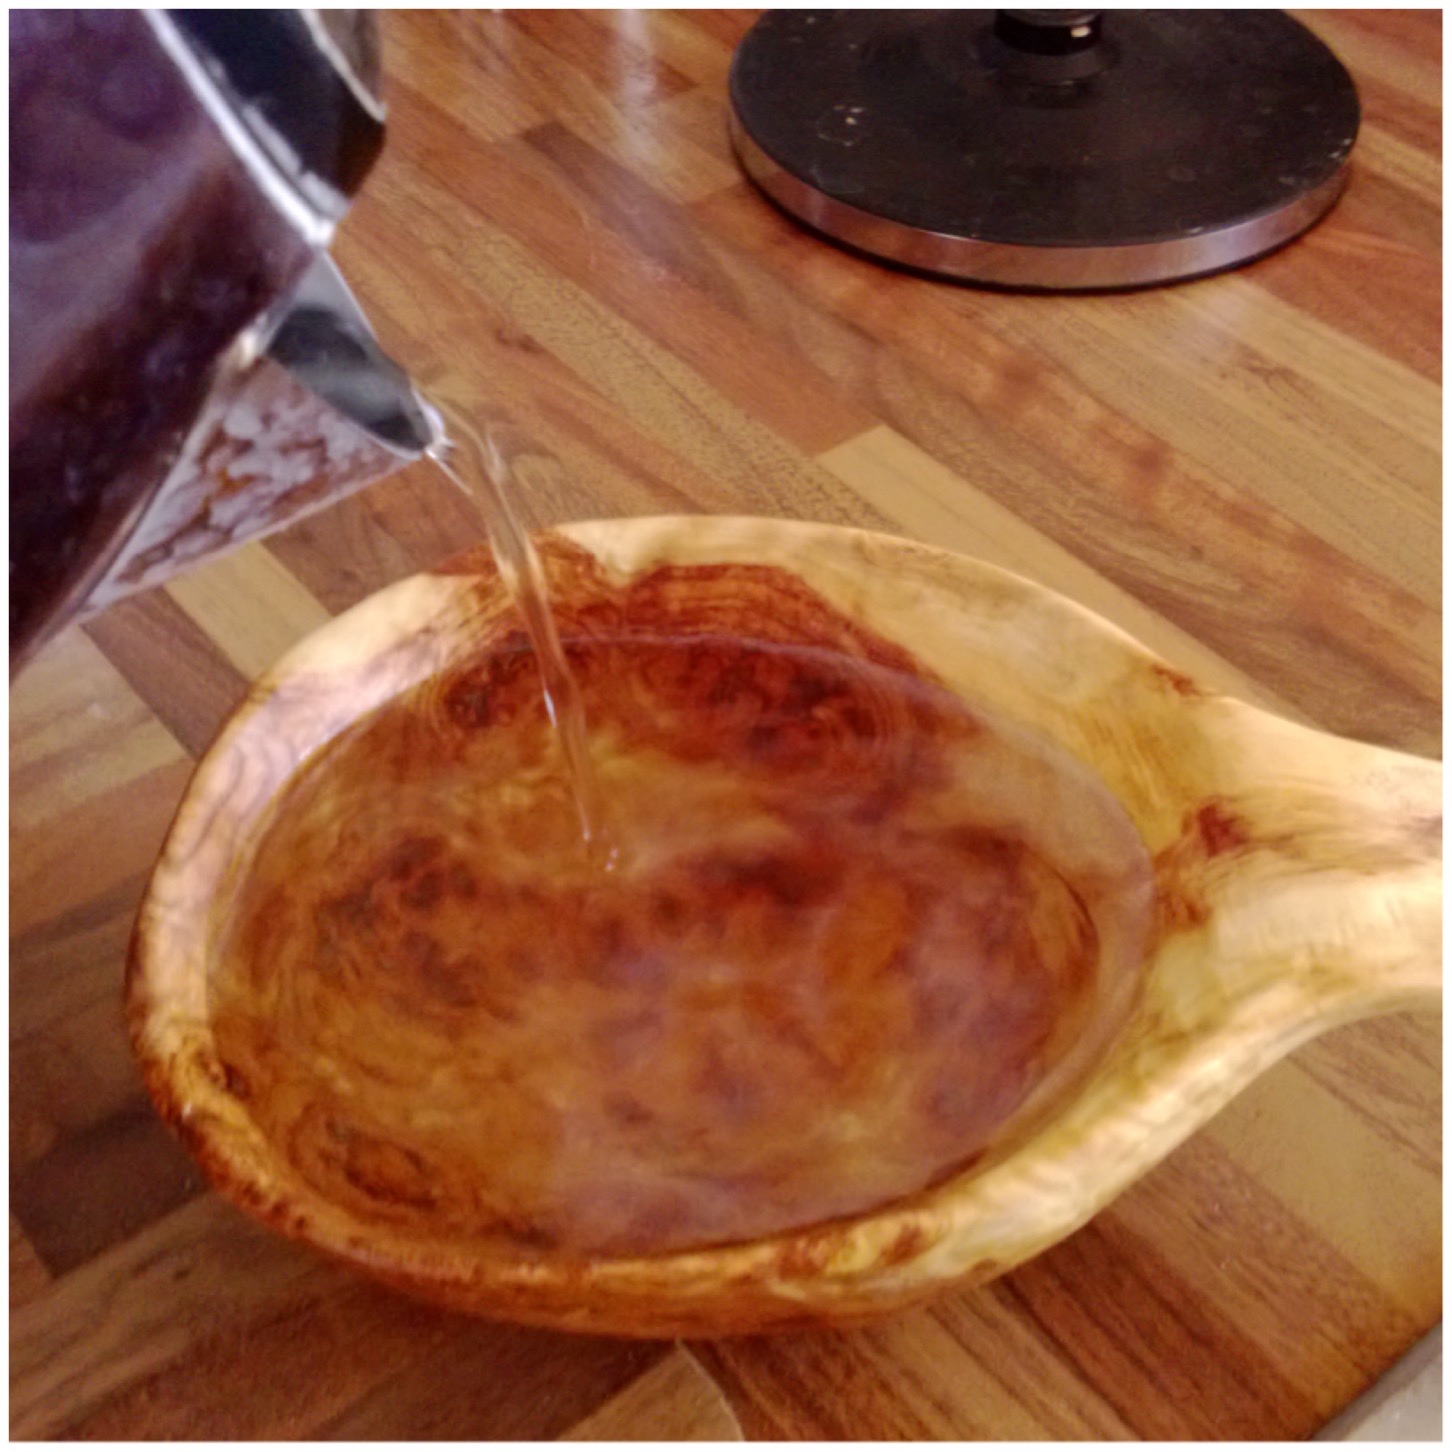
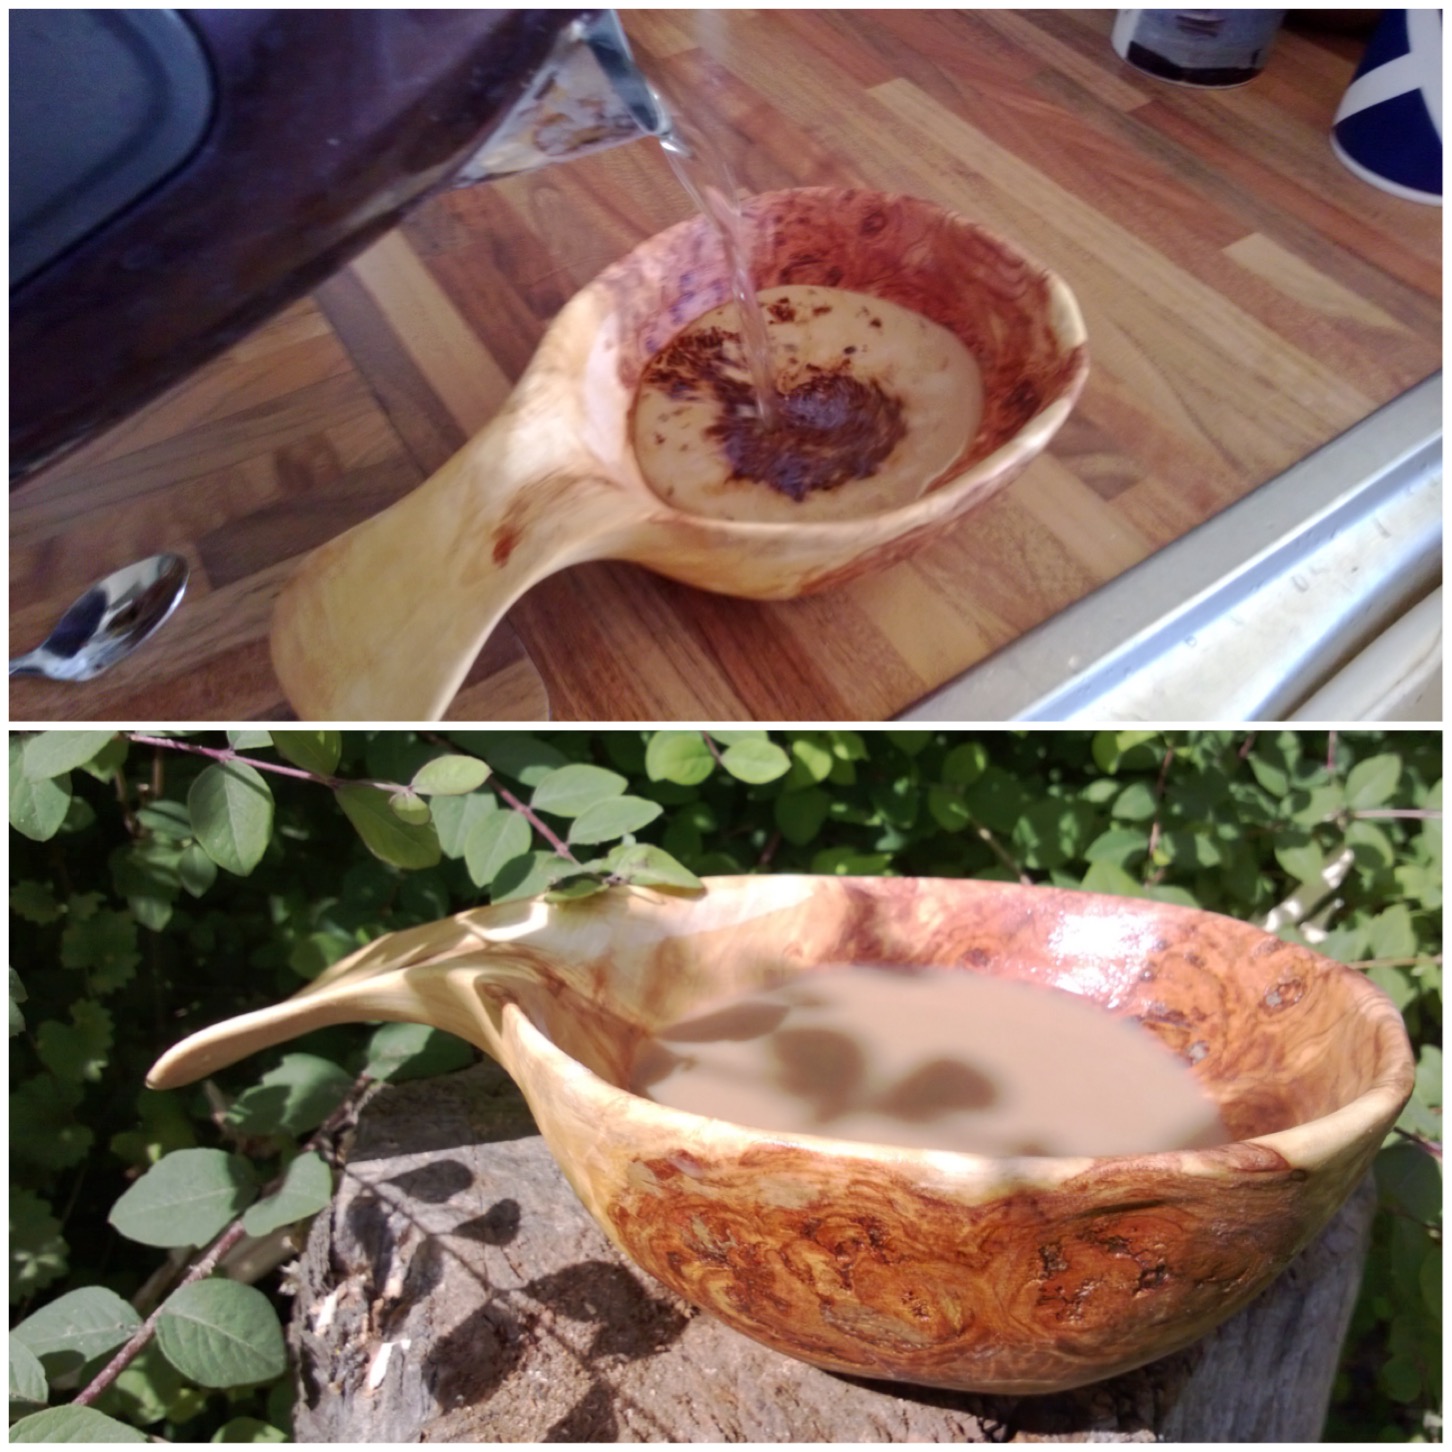
Then it was time to add hot water. I started with warm water and in stages moved up until I was pouring just-boiled water into the kuksa. I was fairly happy that there would be no leakages now.
Waterproof test – hot water
Next up was to see how a brew tasted with all that beeswax in the wood. I poured myself a coffee and could taste nothing of the beeswax. I think the boiling water helped with removing any excess beeswax.
Taste test 1 – Coffee
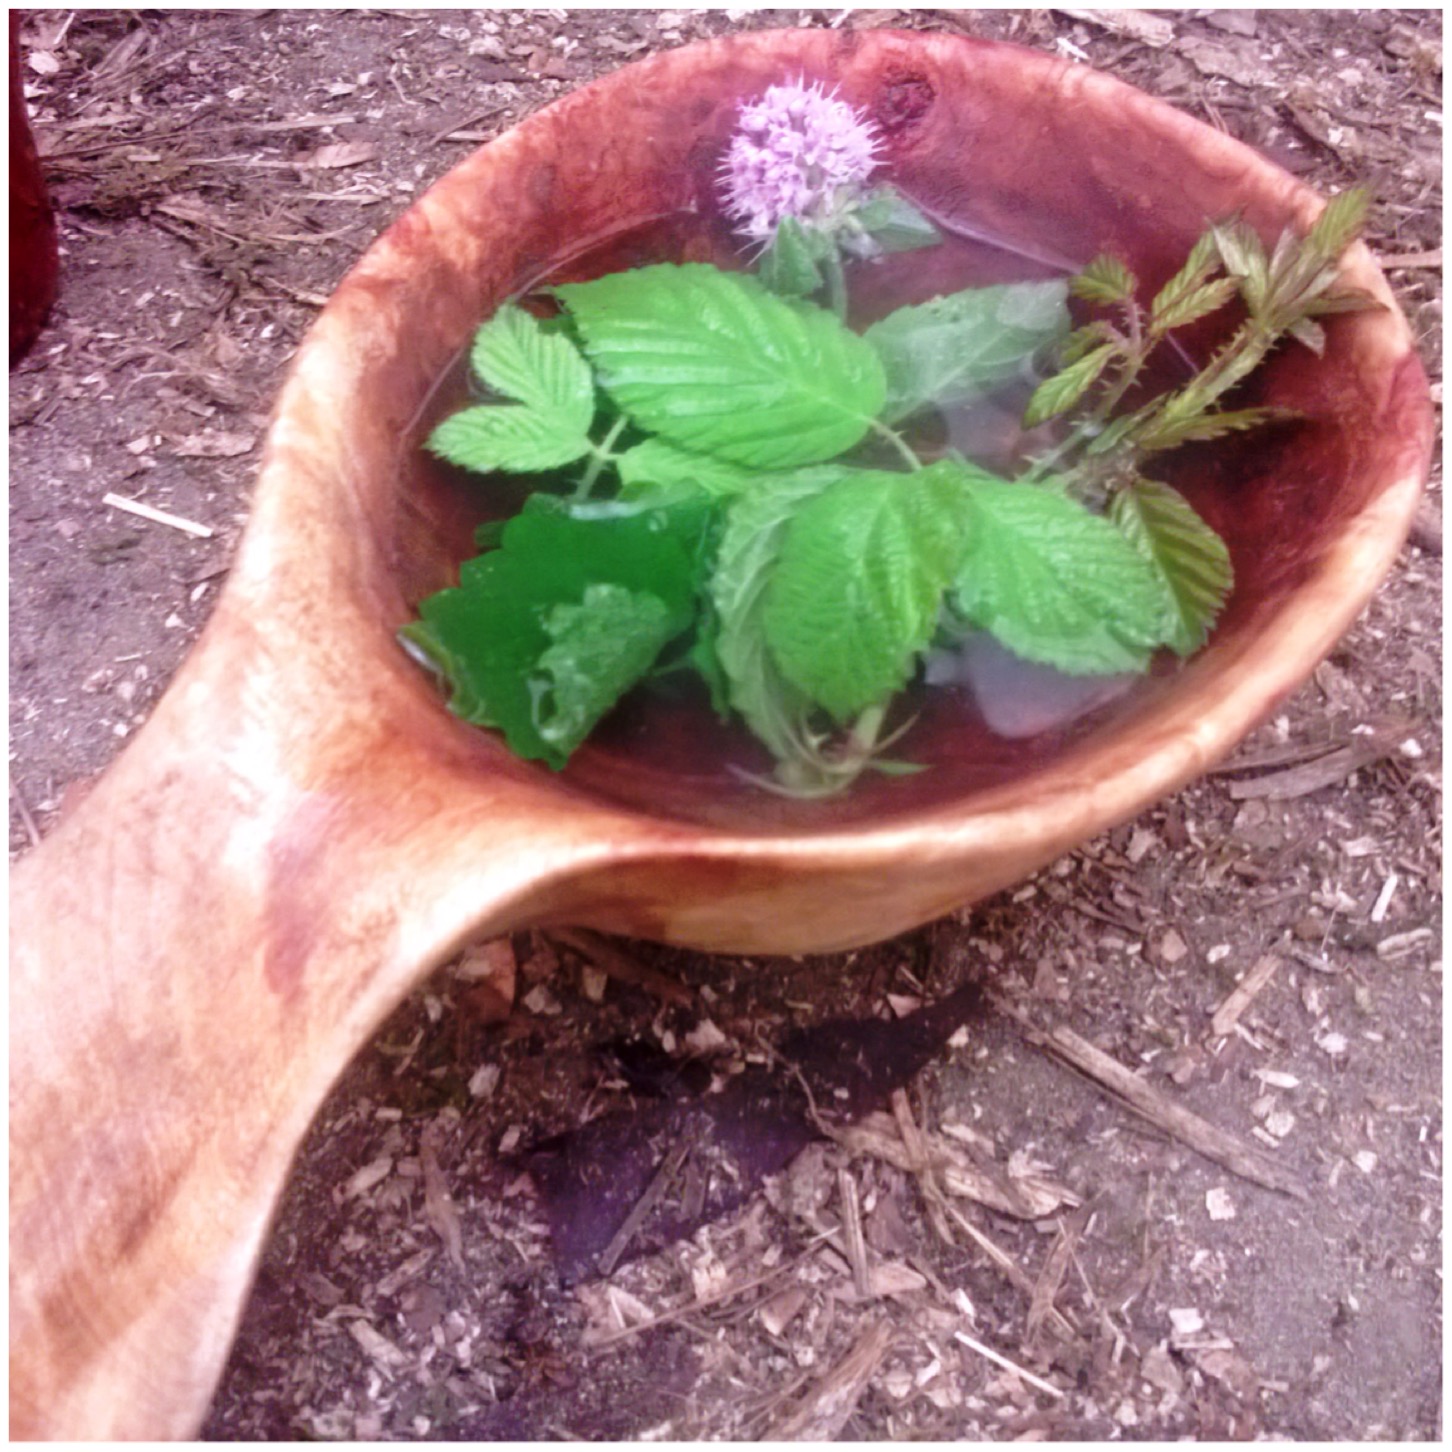
A final test was at my friend Fraser’s place (of Coastal Survival) when he made me a beautiful cup of mint and blackberry tea.
Taste test 2 – Herbal tea
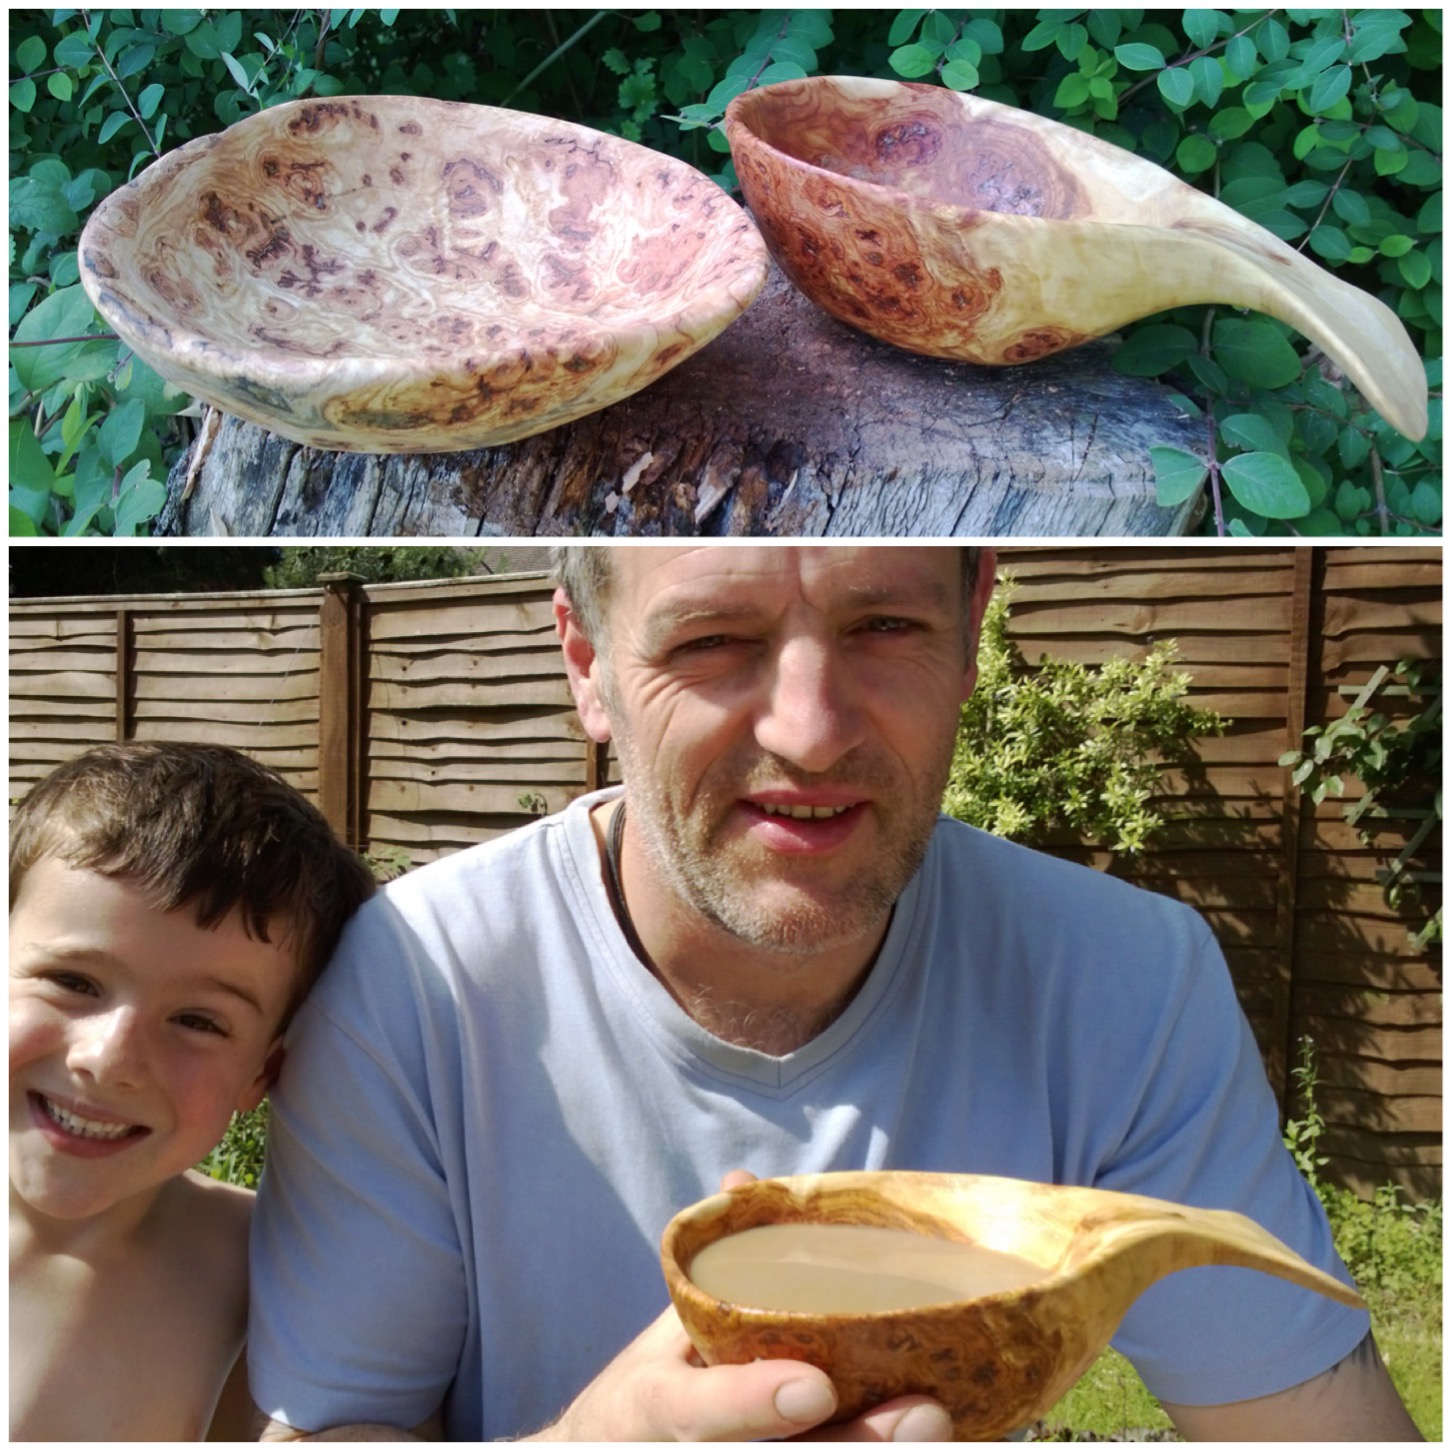
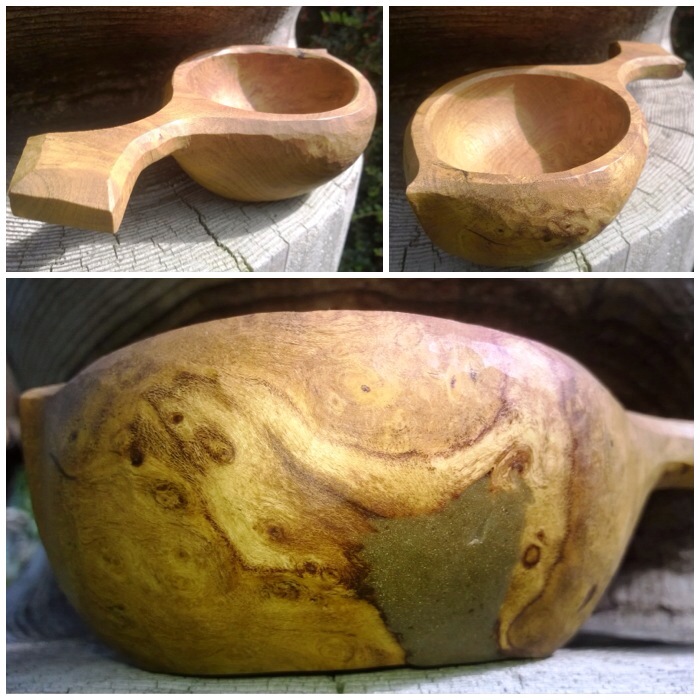
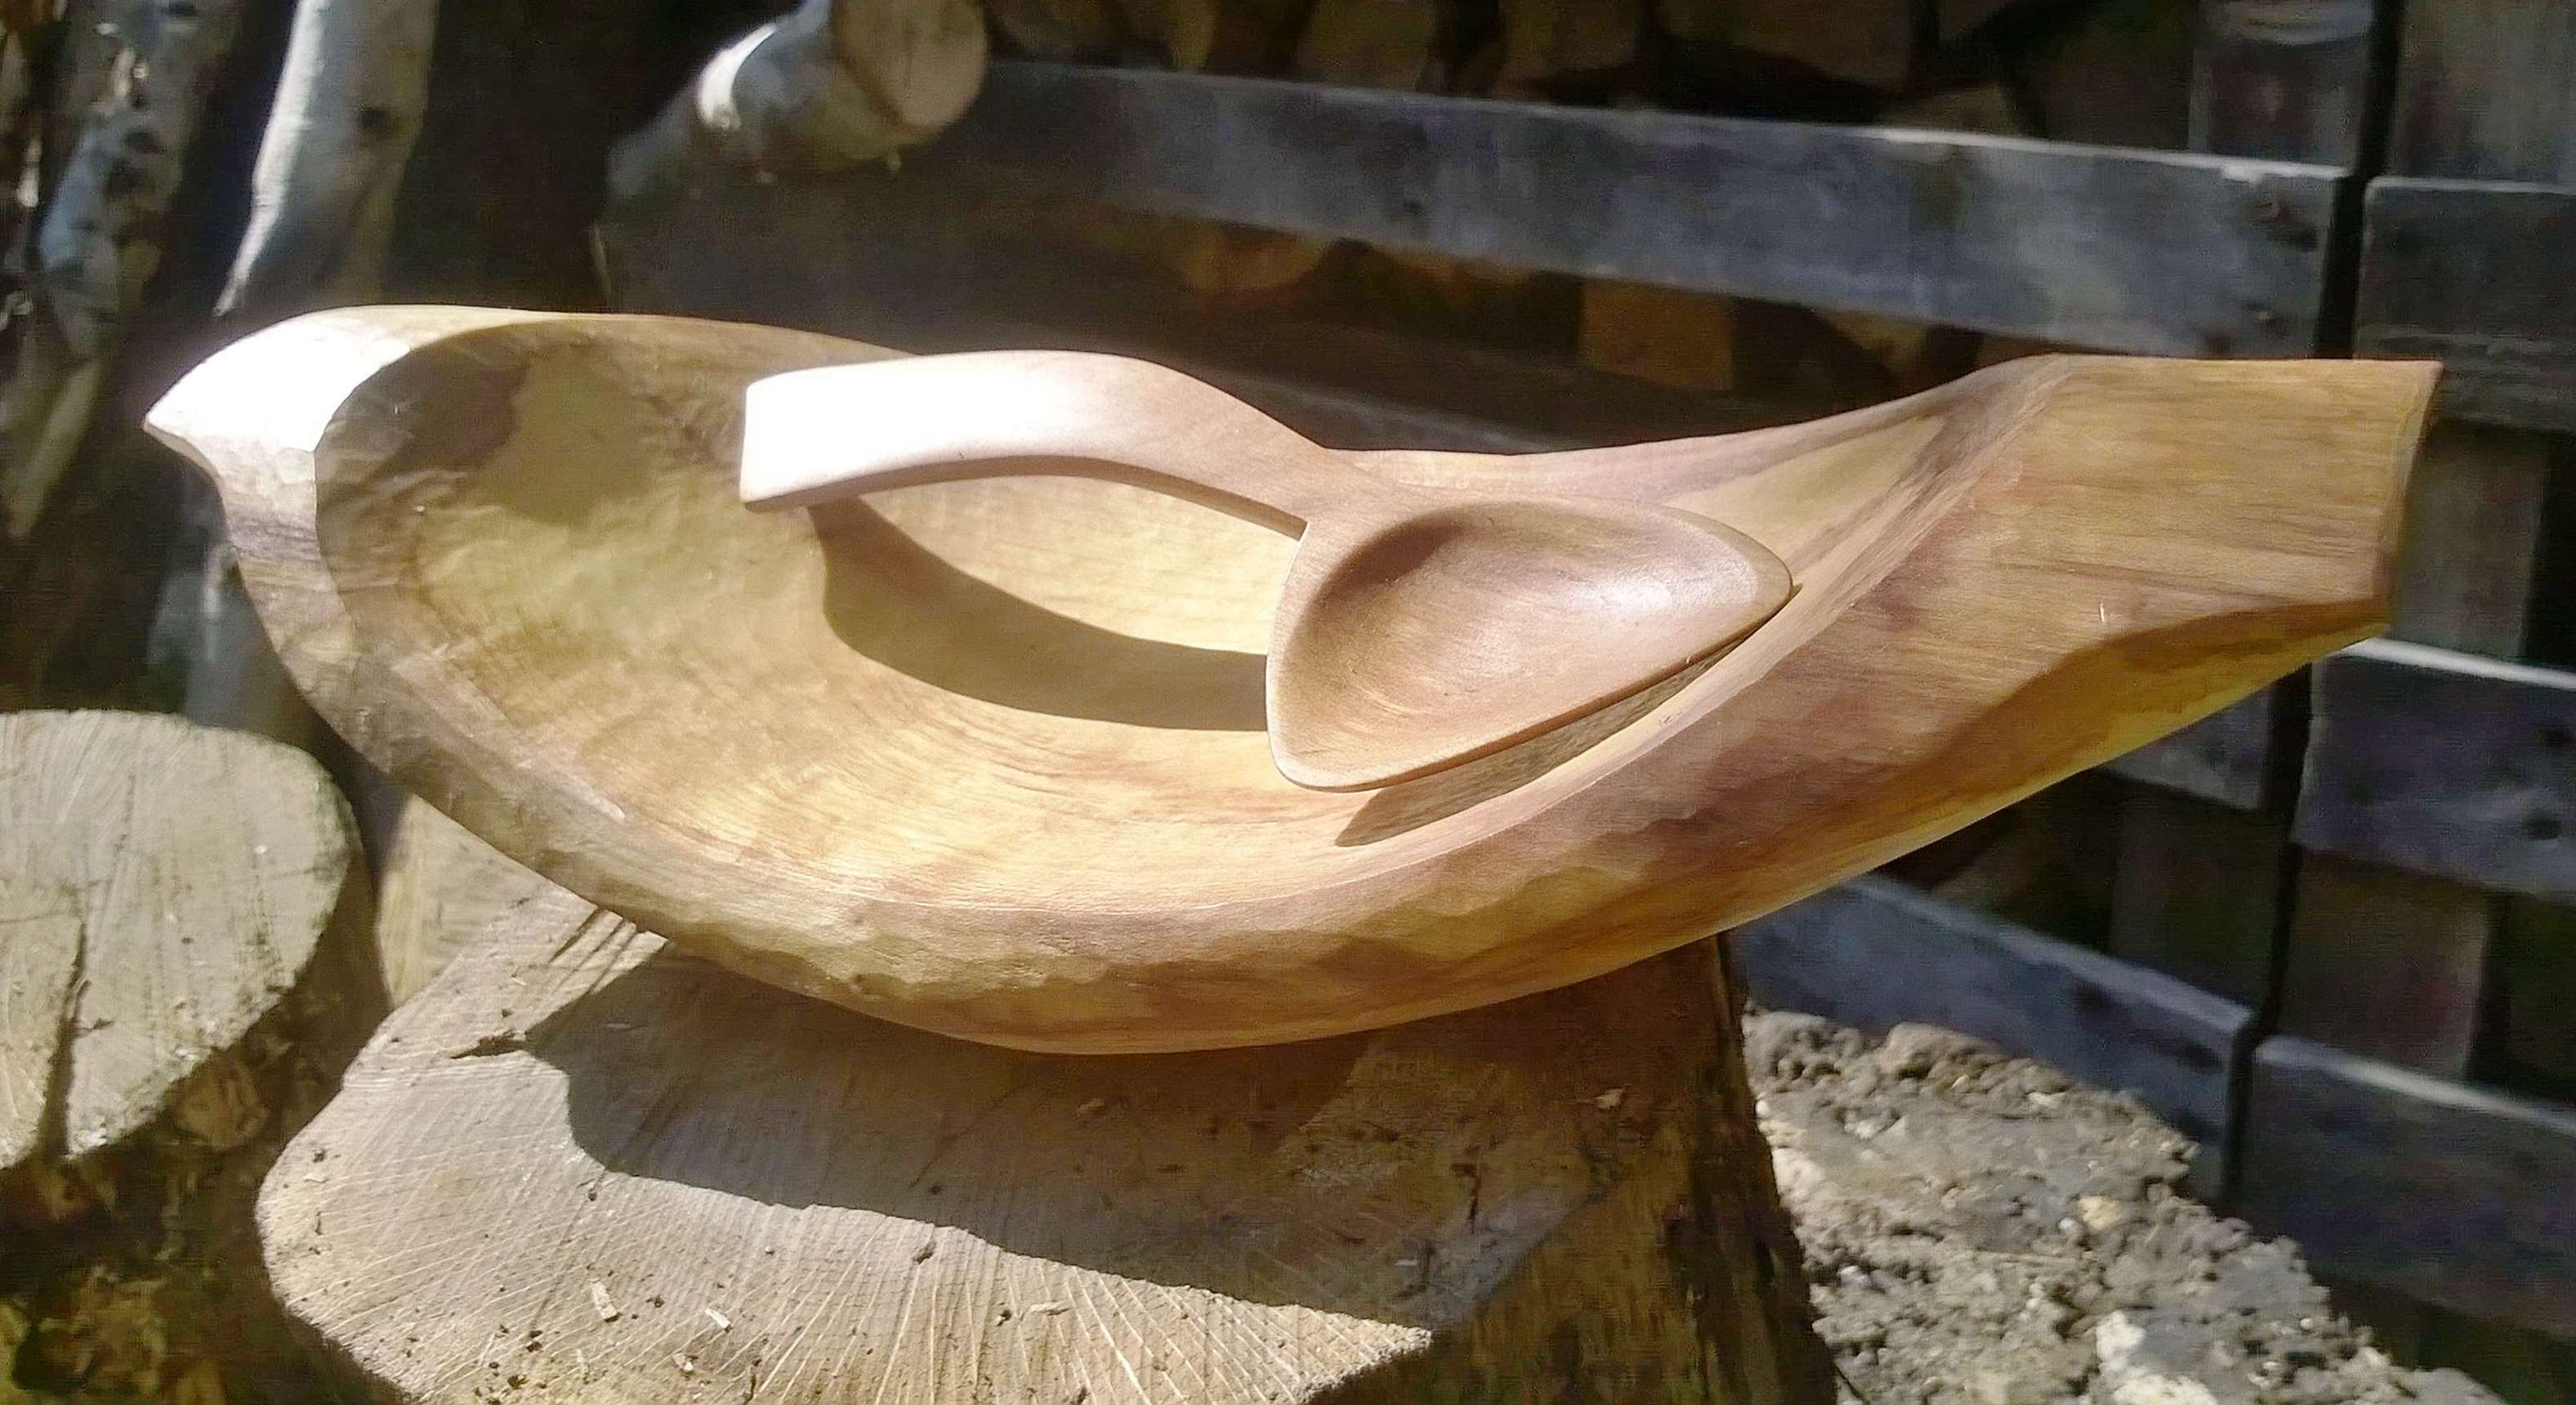
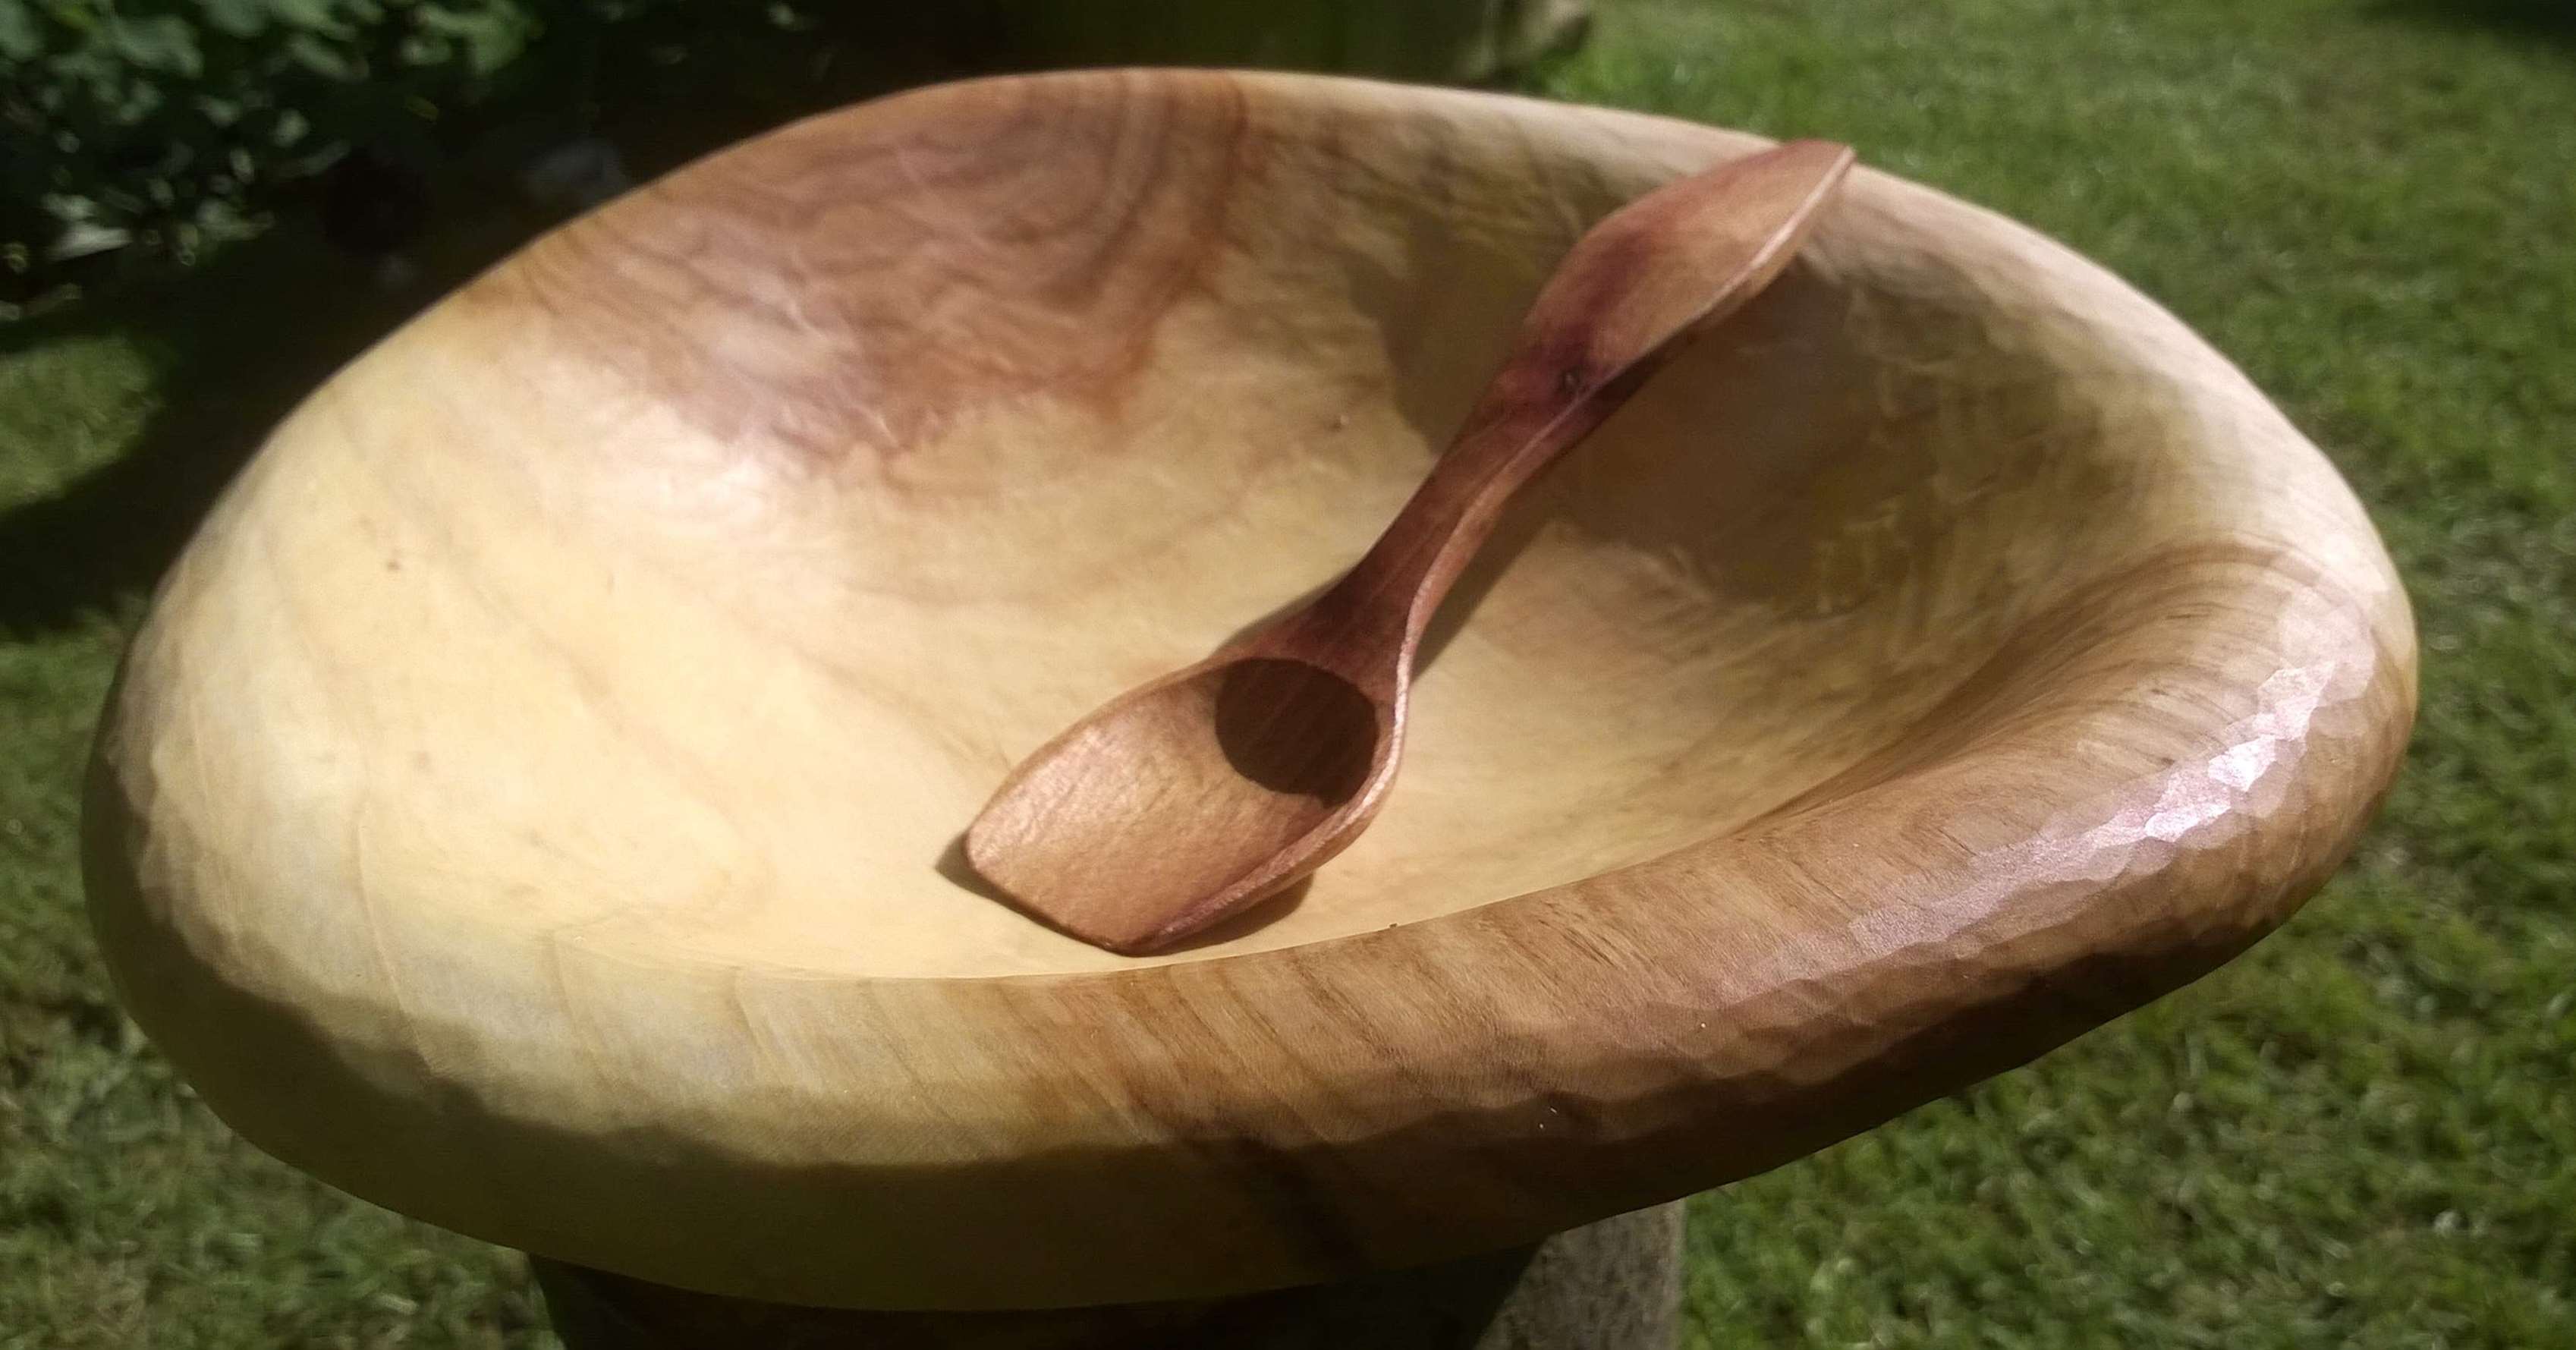
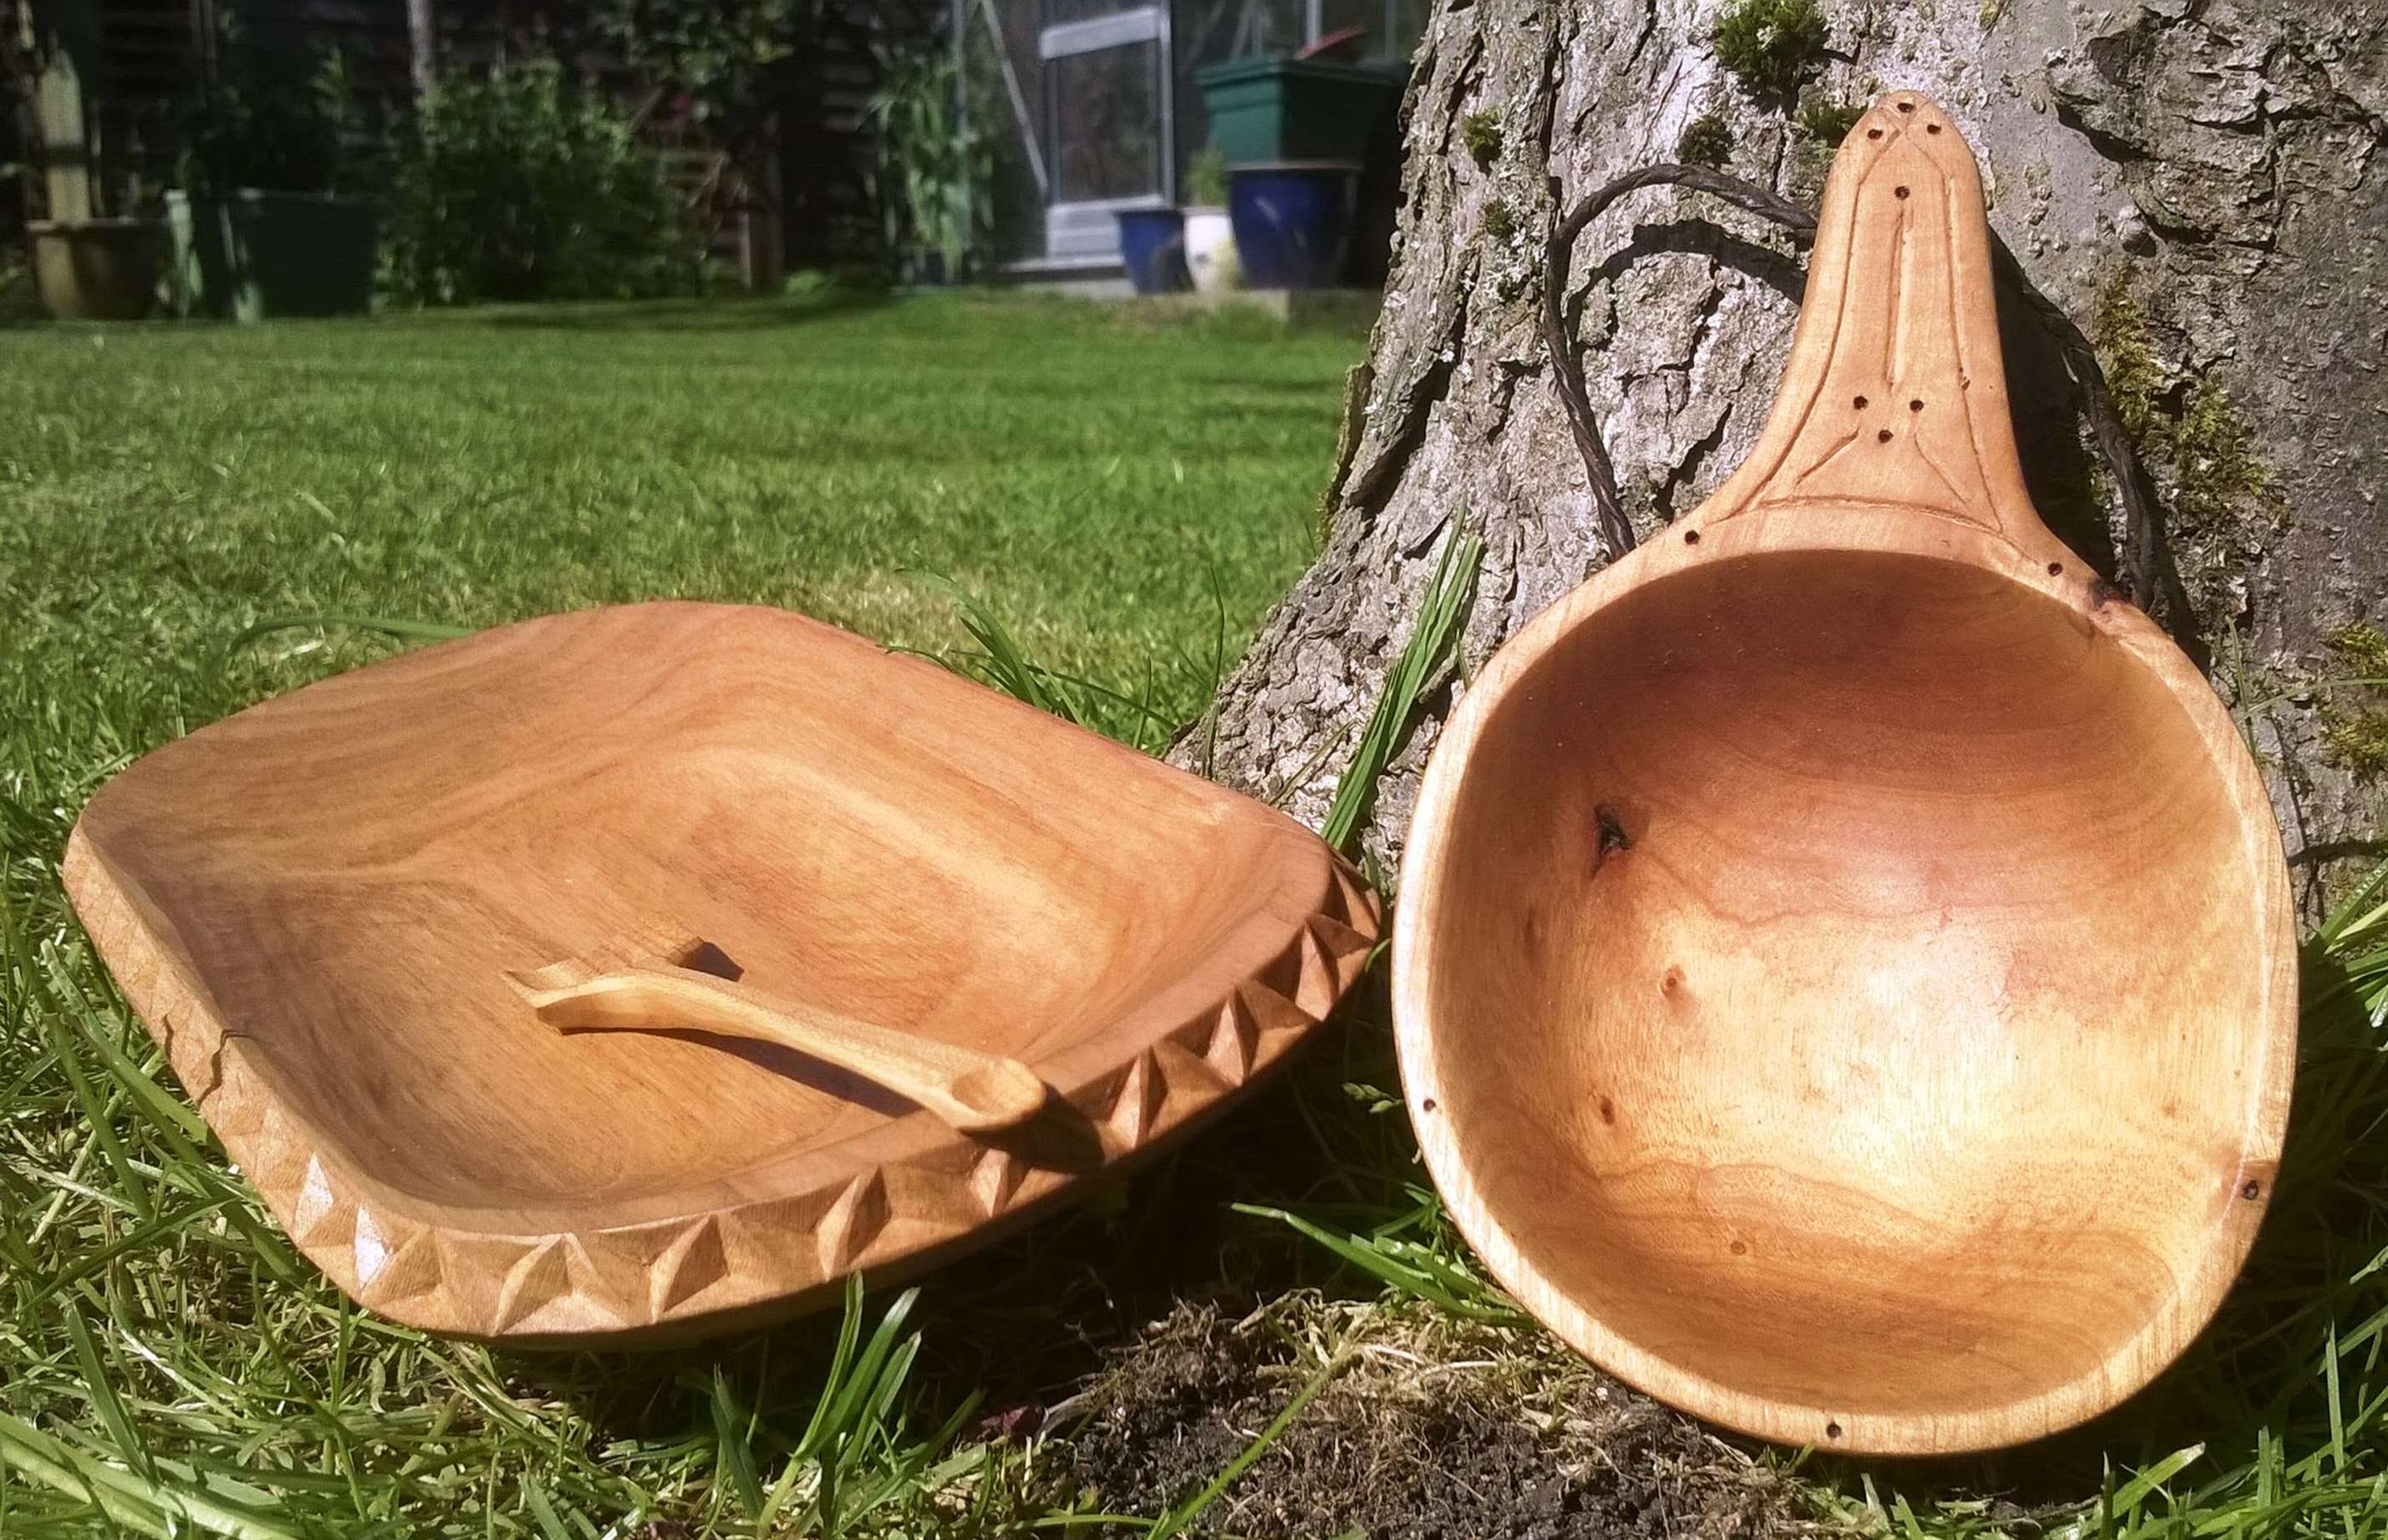
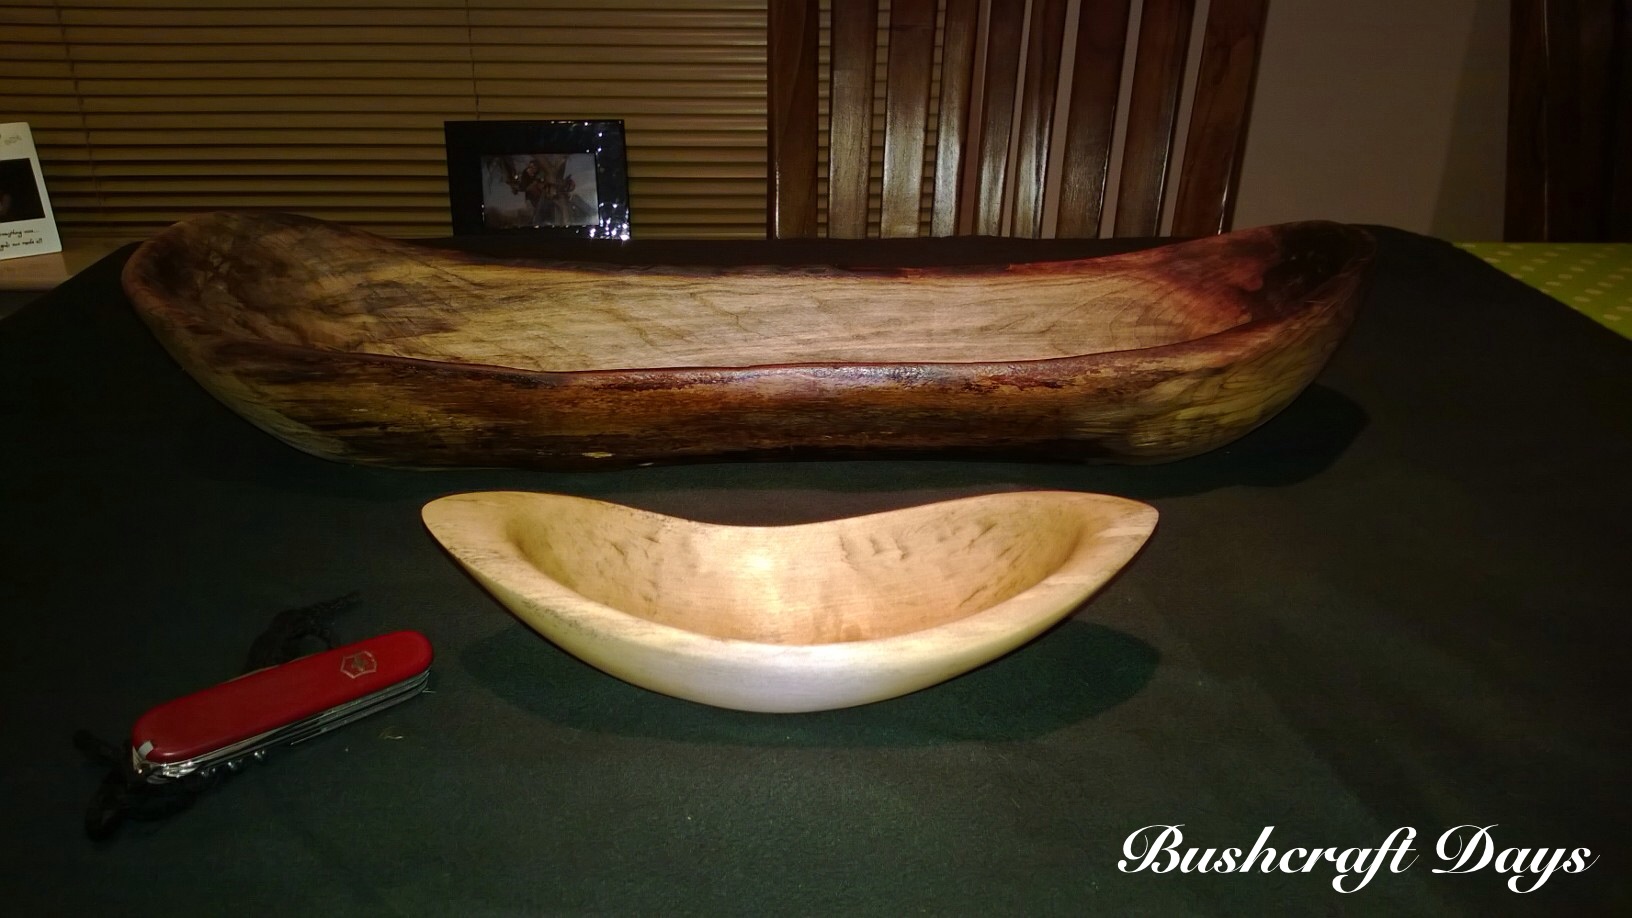
I used more of the burl to make a bowl to go with the cup and it too turned out quite beautifully (in my opinion at least!).
I like to think I can carve the odd decent spoon, bowl or cup from time to time but I know my skill level is only fair to middling as I do not spend enough time practising the art, but I do have a number of good friends who are absolute expert carvers and from whom I can get inspiration.
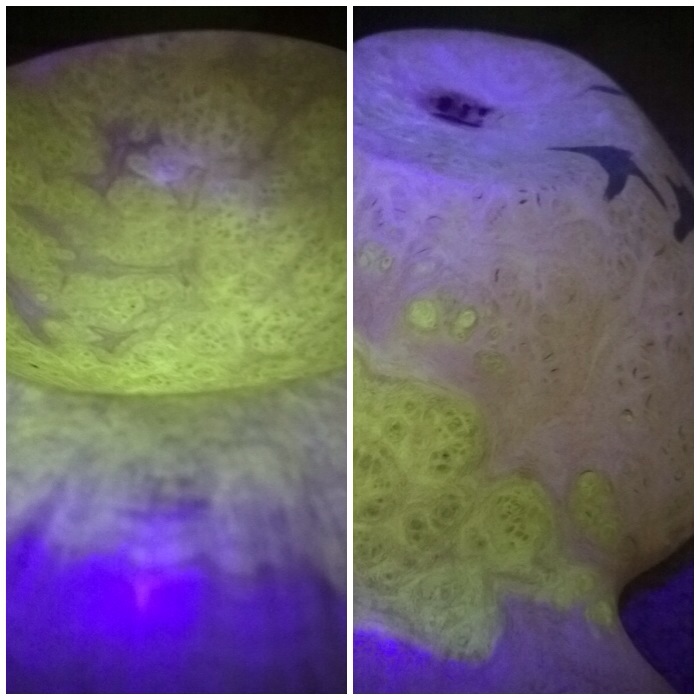
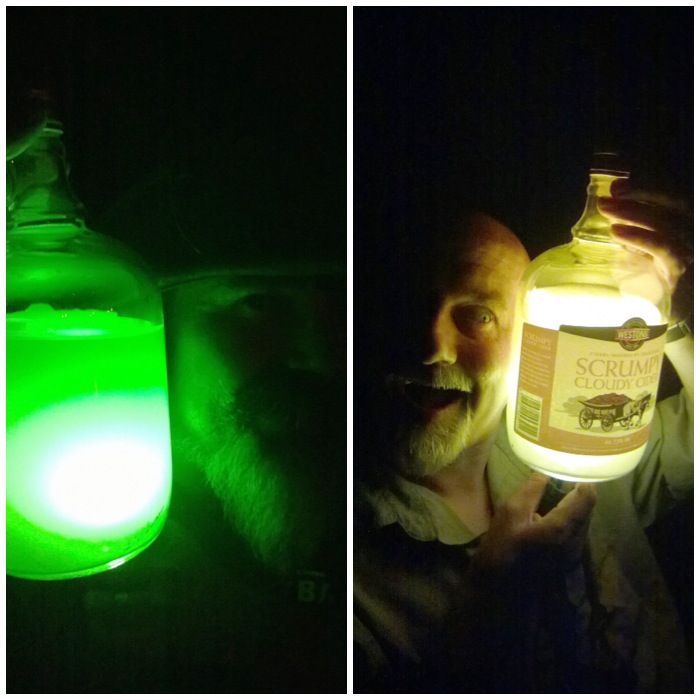
Mark Beer is one of them. He is an excellent all-round woodsman and carver and on a recent visit to his place I was quite taken aback by his latest creations. As usual I insisted on taking loads of pictures of his work and when he explained the fluorescent properties of Robinia (False Accacia) wood the photographer in me became quite excited.
The cup on the left is carved from Robinia and the other two are from mulberry.
Robinia and mulberry make for beautiful carvings
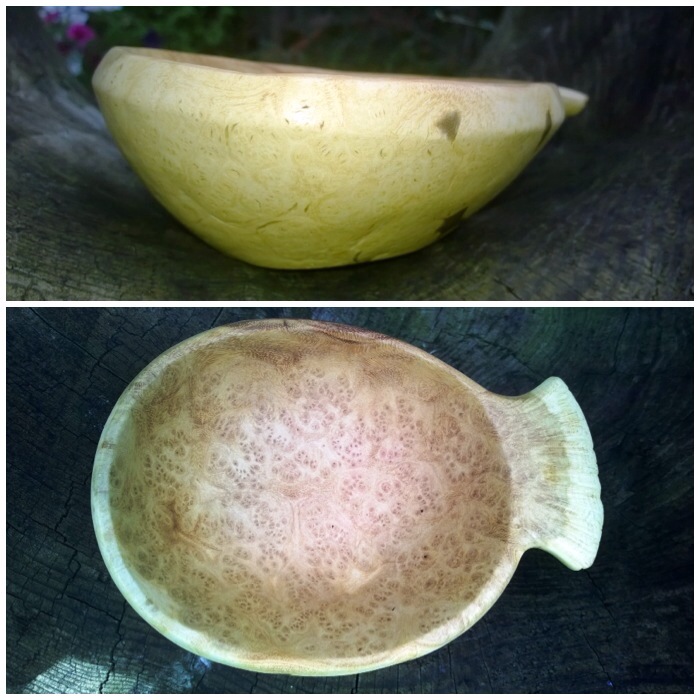
The cups were carved from burls found on the trees so you can see lots of swirls in the wood. The robinia under normal light is a light cream colour that contrasts well with the darker parts caused by the haphazard growth of the burl.
Robinia under natural light
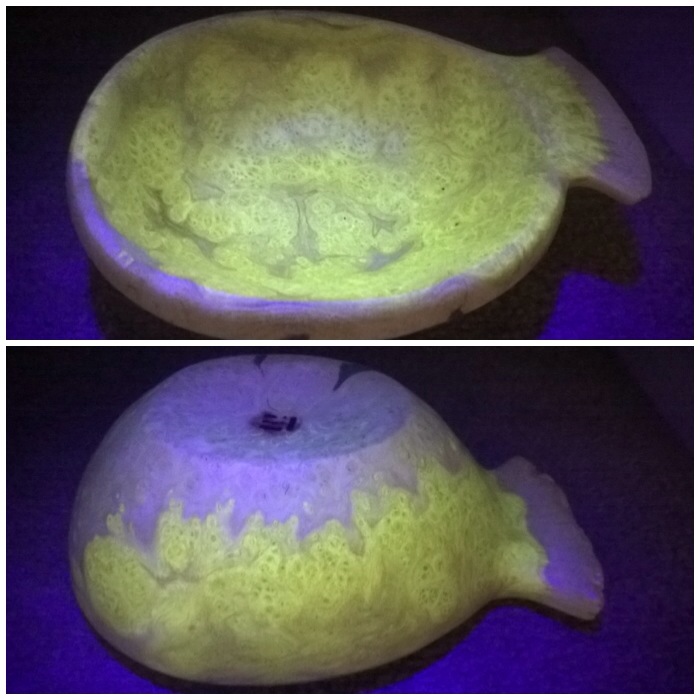
Under an ultraviolet light (I made an impromptu studio in his closet) the wood is transformed into a magical range of colours. I was as usual only taking pictures with my phone but I think you can really see the green, yellow and purple coming through.
Robinia under infrared light
And up very close – quite psychedelic really.
Robinia up close
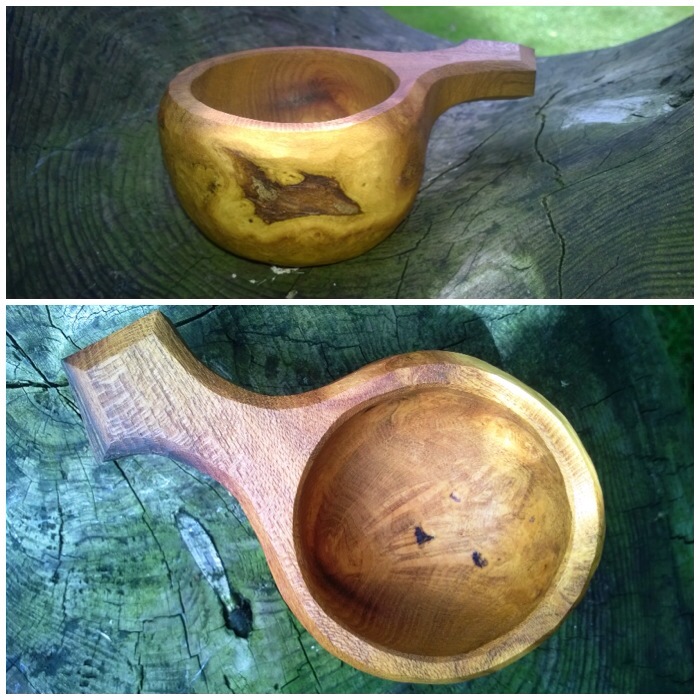
The smallest of the cups was made from Mulberry. I find carving small cups quite difficult as you need to carve deep but have so much less wood to hold while carving. This small cup is simple in its design but because of the growth of the burl is rather beautiful with shades of light and dark.
Mini Mulberry
The third cup also made out of mulberry has a larger bowl with a pointed tip. The inside of the bowl was finished using his knife only with very fine cuts to make it smooth but the outside still had the tool marks clearly showing. These tool marks blended in well with the swirls of the burl.
All angles and curves
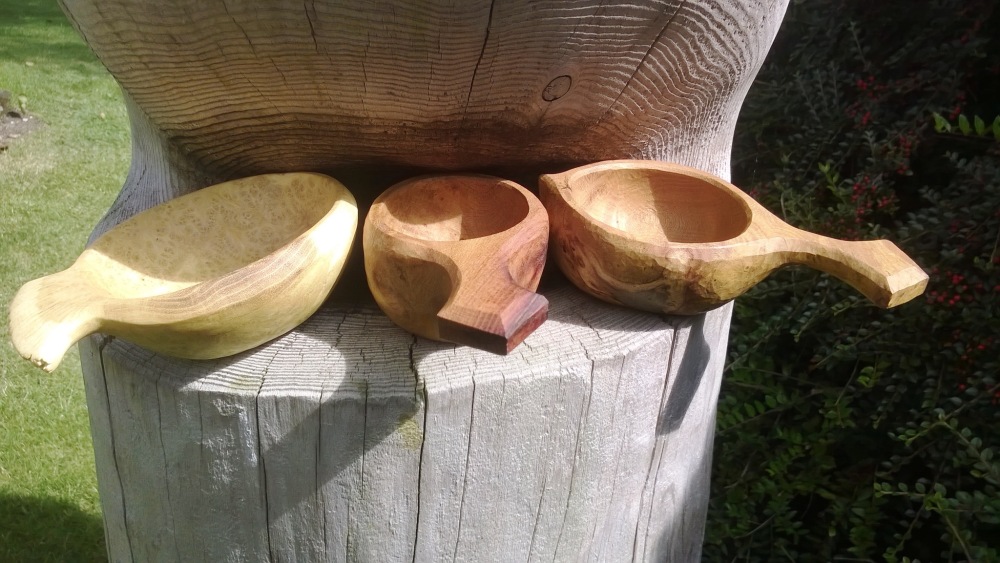
In terms of function these cups perform the exact same job but in terms of form each is a unique piece of beautiful art.
Contrasts
Mark had also purchased pipestone (catlinite) to make a Traditional Ceremonial Elbow Pipe and carved and shaped the bowl himself. The pipestone is only allowed to be quarried by members of recognised Native American Tribes. The wood Mark used for the stem was cherry.
A pipestone elbow pipe with a carved cherry stem
The man himself.
Mark the Carver
Thanks for letting me look at your latest work Mark, and allowing me to photograph these beautiful pieces.
My 100th post – it seems like only yesterday that I was tentatively writing my first post way back at the end of last September.
For this 100th post the subject couldn’t be anything other than this year’s Bushcraft UK Bushmoot.
BCUK Bushmoot 2014
I came back from holiday in France on Saturday the 2nd of August, unpacked then re-packed and headed out with my two kids Catherine and Finlay to Merthyr Mawr in South Wales on Sunday the 3rd of August. Unluckily I had been beaten to my usual camping spot at the Moot by another family but managed to set up nearby with my tipi, kitchen tarp and my hammock stand.
I found a fire guard lying in the sand and after digging it out used it around my fire. It was quite a well engineered piece and I could not understand why anyone would have discarded it.
My camp
The first few days were mostly spent chilling out with the kids before eventually getting around to putting up the workshop tarps and parachutes. This was the first year I had taken my children to the Moot and they took to it like ducks to water.
Set up
For the first few evenings we had dinner with Fraser from Coastal Survival over in the sand dune area so preparing the evening meal was never an issue for me, thankfully.
I could not resist taking this shot of Stu when he arrived in a taxi and we unloaded his supplies for the Naughty Corner.
It was at this time that my daughter started feeling unwell with a high temperature and feeling very faint. For the next few days she would sleep a lot in her hammock and eat very little. I thought it was just one of those 24 hour bugs but it turned out to be quite a nasty virus and really laid her out.
Settling in and arrivals
This is the first of five videos I took while at the Moot and shows the set up and some of the first courses that were held.
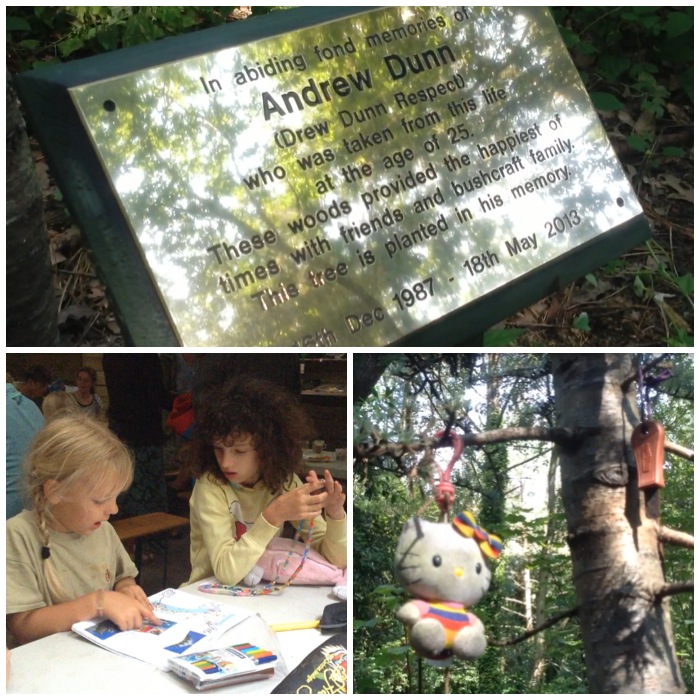
It was good to see all the new growth on Drew’s tree that had been planted last year. People have been leaving little tributes on the tree over the year which I thought made it look very special. While Catherine was feeling a little better she would come out and play with the other kids while she could. She never met Drew but I am sure that they would have gotten on with him like a house on fire. Drew loved to run role-playing games with the kids at the Moot and Catherine and Finlay love these types of games.
The first course I was involved in was the Starter Course. I have written a separate post on this course on the BCUK forum and you can read about it here – Bushmoot Starter Course. This is the second year we have run the course and it is starting to prove very popular now.
Starters Course
Over three of the nights I was at the Moot there was some great entertainment. On one night some of the lads from the Naughty Corner came down to the main sandpit area and had a great jamming session. Apart from filming them I recorded a couple of their tracks and then used them as backing music for my second video. Tony, the organizer of the Moot, even got himself some birthday cake on the night.
The other two nights we were treated to an amazing fire display by Emily, Liesl and Naomi Cook. These three young ladies are very talented and brave.
Evening Entertainment
Here is the video of Emily, Liesl and Naomi doing their fire show on both nights.
One of the things that has struck me about the Moot is all the different art that you can experience there. Art in the form of music from Stephen Crump (recorded for my third video), Welsh love spoons from Dean Allen, Woodland Plant Art from Keith Beaney and art in the form of iron from Dave Budd.
Bushcraft Art
Needless to say Spikey and Badger managed their own version of art up in the Naughty Corner with the use of torches and some evening spirit.
Ye Old Naughty Corner
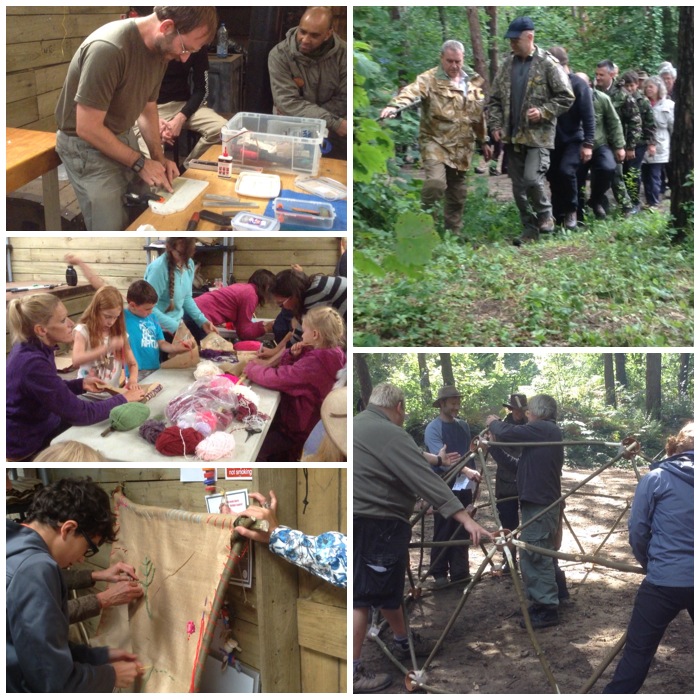
The main Moot kicked off with lots and lots of courses. I have posted pictures from just a small selection of what was on offer: making the pizza oven with Tim, mini bows with Wayne, water purifying with Richard, net needle making with Steve and spoon carving with Dean. There were lots more courses going on but I did not get to see them as I was on the Starter course all day. My wife Alison arrived on the first day of the main Moot and took a lot of the pictures of the day.
It was at this stage that we decided that Catherine was best off at home, so instead of staying, Alison took her back that day with Finlay.
Workshops – 1
The next video is of many of the first day’s workshops, with backing music from the Naughty Corner band.
The Sunday was another day of workshops and I tried to get around to as many as possible. These included knife sharpening with Chris, making tapestries with Shelly, tracking with Perry McGee of the National Tracking School and making a geodesic dome with Tony. There were plenty of other courses going on such as plant walks with Robin Harford and willow basket trap making with Fraser from Coastal Survival.
Workshops – 2
My video of the day has as its soundtrack Stephen Crump playing a tin whistle on a wet afternoon.
Needless to say I spent a lot of my time down on the archery range shooting arrows or atlatl darts. With all the bows Wayne had been helping people to make we were kept very busy.
Down on the Range
I made a short but very funny video of Mad Dave and Cap’n Badger helping me to clear the range of a hung up tree.
At this stage I had not run any bowdrill classes but I had done a couple of one-to-one sessions. My neighbour Matt Baillie went off after one of the sessions and persevered until he got the bowdrill cracked – well done mate.
A Little Fire Fix
I also did a quick session on the Egyptian bowdrill method and made a short film of it.
The Monday was a bit of a damp affair but the Traders’ Day went well and I managed to try some more of Richard’s excellent elderberry wine.
Traders’ Day and a Private Wine Tasting
I managed to get a little bit of food at the group meal before it was devoured. This is becoming a bit of a tradition now since we stopped doing the hangis, and it is amazing to see all the different dishes that can be cooked over an open fire in a Dutch Oven.
Group Meal
My last video of the Moot is of the Traders’ Day and the group meal.
I spoke with Alison that evening and decided to head home in the morning as Catherine was still very poorly. I got home by lunchtime on Tuesday and thankfully over the next few days Catherine started to recover and was soon back to her usual self.
I really enjoyed the half of the Moot I attended this year and my kids are desperate to come back again next year. There were another couple of days of workshops that I missed but I think this post will give you a feel for how the Bushmoot works.
I hopefully will see you all again next year and meet a few new faces as well.
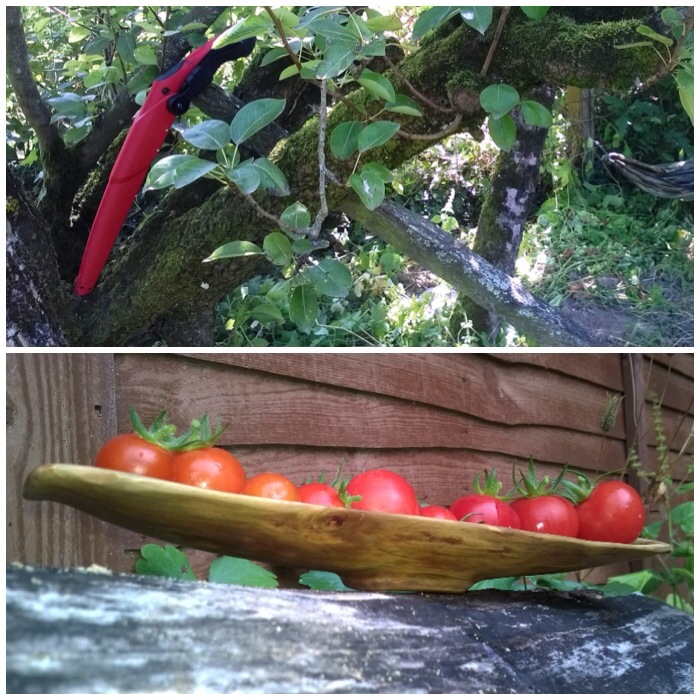
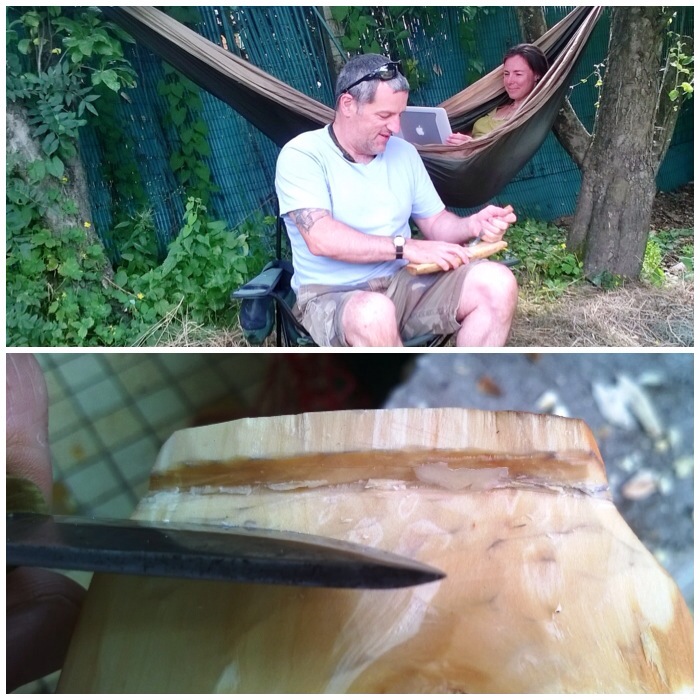
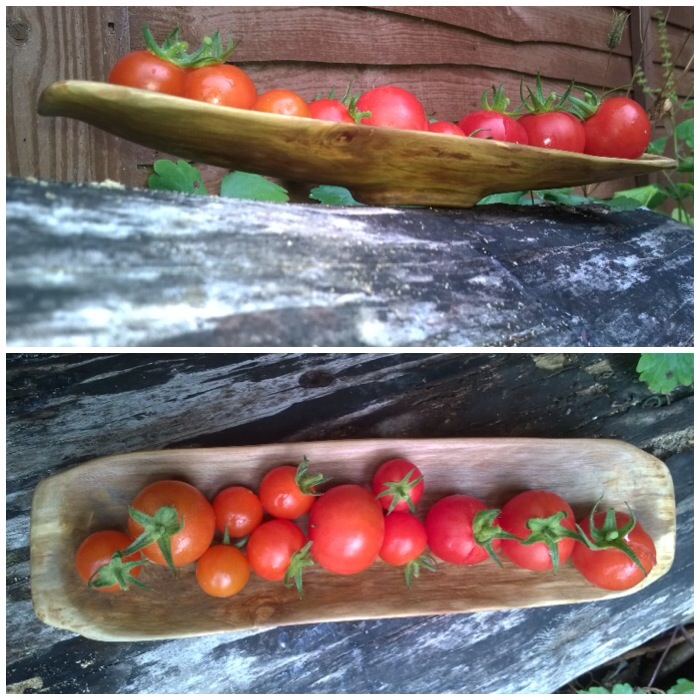
While we were on holiday in France at my friend Rick’s cottage he was telling me about some of the trees in his garden. He has an old, gnarly pear tree currently propped up by sticks as it was blown over in a storm a few years ago. It still bears fruit, but only on one side.
Rick agreed that I could trim a branch off the non-fruiting side as that would take some of the weight off the side that was being supported. I like to carve fruit woods when they are green as the wood is easy to remove.
Before and after
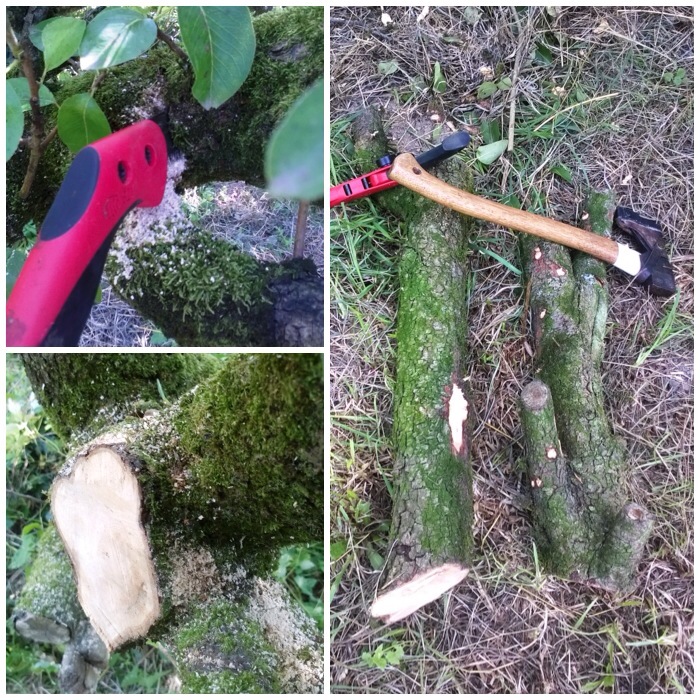
I cut the limb off very close to the trunk so as to minimise the chance of infection damaging the tree. I made a single cut as the branch was easy to support as I cut it. Also the cut was made as close to the Collar as possible so as to give the tree the best chance to heal itself.
De-limbing
The bark was easy to strip off with my axe – being very careful where my fingers were at all times – and then I used my saw to cut it down further so I had a piece I was happy to carve.
De-barking and trimming to size
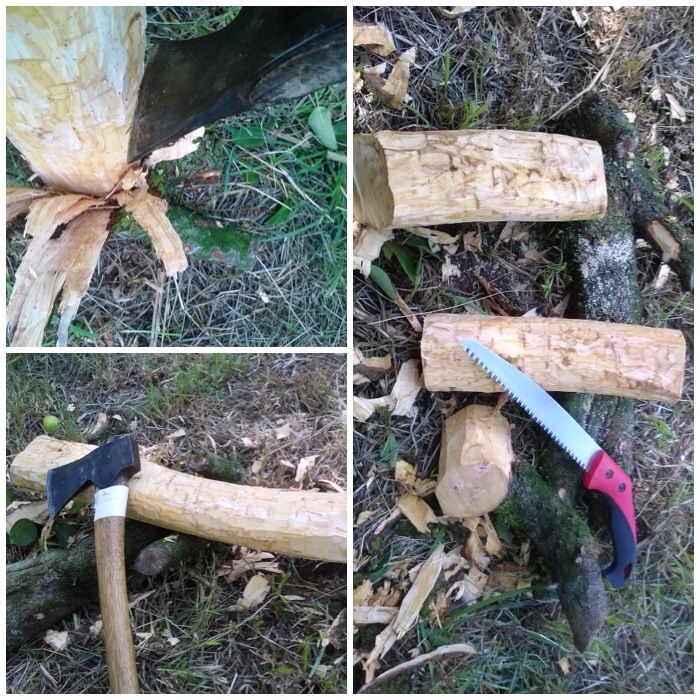
One piece of the branch made a perfect hammer for battoning my work piece in two. I make sure that the blade of the axe is 90 degrees to my body so that if it slips the edge of the axe swings away from me.
This piece did not split evenly as the wood was quite twisted with its age.
Battoning
To make the split more even, I put the work piece on its side and split it further. A slower method but more controlled I think.
Splitting out
After splitting I cut out some wood from one of the halves to give it a flatter look.
Flattening
I used my axe to take of some of the excess wood around what would be the bottom of the platter. As the shape was going to be a shallow curve I did not put any stop cuts in but just chipped away, starting from the ends and chasing the wood back to the centre.
Axing out the back
To finish the flattening of the top part of the platter I finished with the axe and moved onto my knife.
Final flatten with the knife
Once the work piece was as flat as I wanted I drew the shape of the bowl area and used my crook knife to start removing the wood from this area. As the wood was very green this excess was removed very easily.
Using the crook knife
I also used my palm gauge and my bowl knife in this process. These are the only bowl-carving knives I have and I switch between them depending on what the wood is saying to me as I try and carve it out.
These tools make a real difference to carving the bowl area but are ones you really need to practise with a lot to be as safe and efficient as possible with when using them.
Palm gauge and bowl knife
Once I was happy with the amount of wood removed from the bowl area, I moved onto the back. I like to take my time when working on this area as it is all too easy to cut out large chunks of wood and suddenly reveal a great big hole in the bowl. I use a variety of cuts: brake cuts towards me, small pressure cuts using my thumbs and powerful but small chest lever cuts to name just three. With all cuts, the main thing to remember is that you must always be aware where the blade will end up if the knife slips.
Different knife cuts
I had a lovely time over a couple of evenings working on this carving – this is what I call relaxing.
Relaxation and fine work
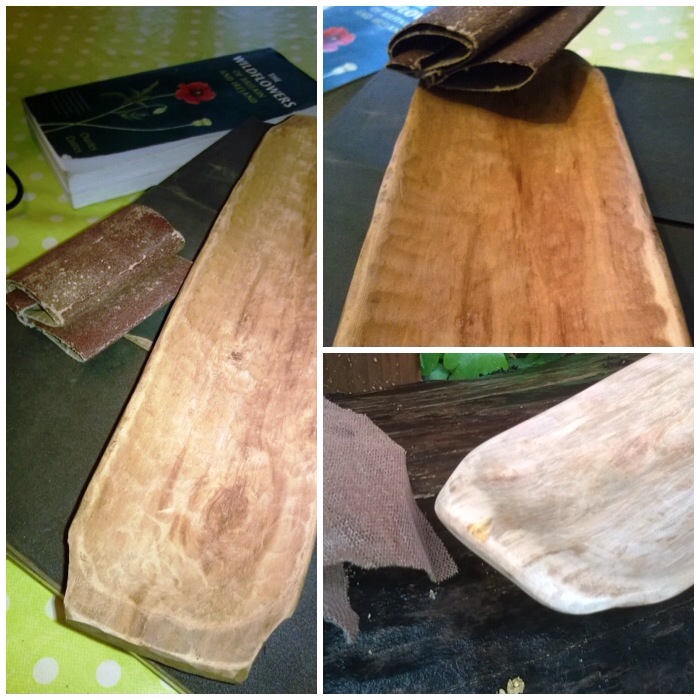
I had kept a lot of the chippings from the carving and when I had removed enough wood I put the platter and lots of the chippings into a plastic bag and kept it in my garage (a nice cool area) for a month to slowly dry out. I added some water to the chippings every few days for the first week to keep them and the platter slightly damp.
This slow drying process allows the whole of the platter to dry in a much more even manner. The platter would potentially crack if the outside dried at a much faster rate than the inside (caused by pressure differences).
Roughed-out platter
After a month of drying I used different grades of sandpaper from rough to very smooth to get rid of most of the lumps and bumps.
Sanding
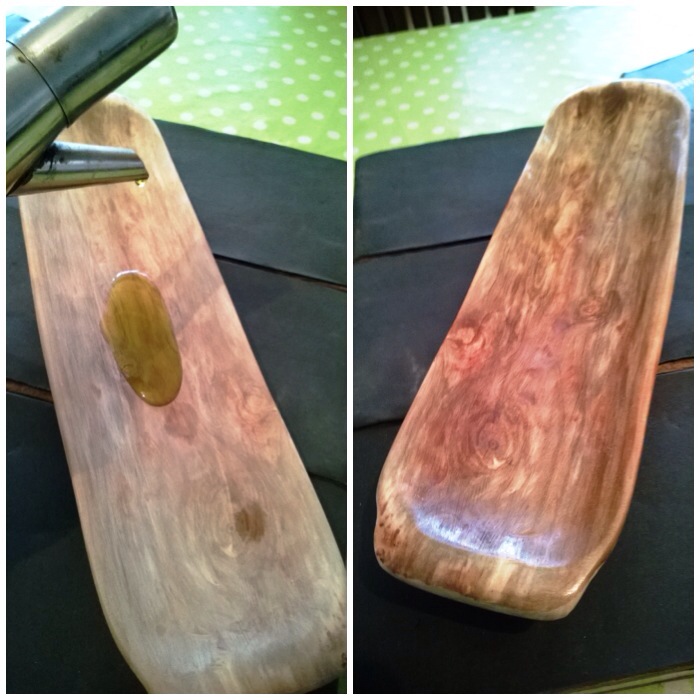
I coated the platter with 3 layers of olive oil (allowing each coat to dry fully before applying the next).
Oiling
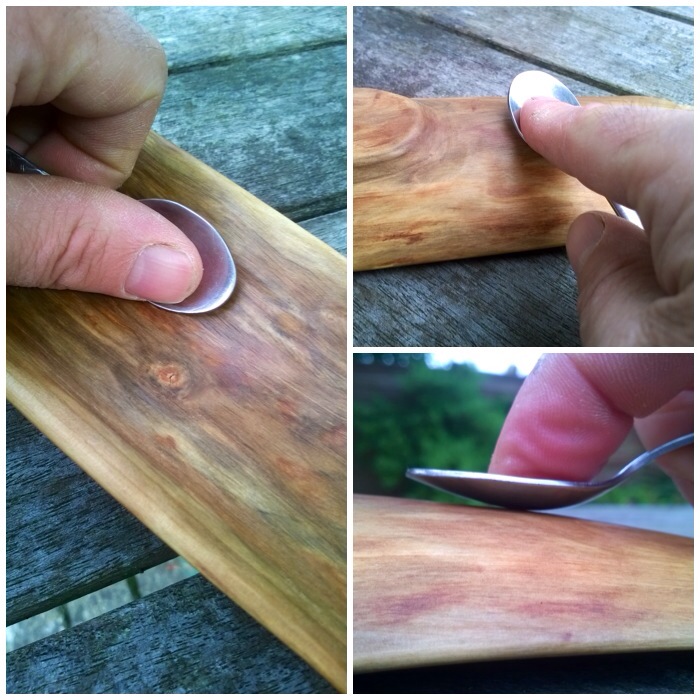
Then over a couple of nights I used the back of a spoon to rub the surface of the platter so that it became silky smooth (known as boning). Sometimes you get a very shiny surface doing this but I think that this wood may need to season for a bit longer as although it became beautifully smooth it stayed a bit dull.
The fibres of the wood may raise up again over the next few weeks but a light sanding and boning will soon have it smooth again.
Boning
This is my 99th blog post and I am glad it was about something I was very happy to carve. The platter is destined to go back to France as a present to Rick for letting us use his cottage for what was a very lovely holiday – Brittany Adventures.
Meet my friend Mark Beer – a good friend and excellent craftsman.
Mark Beer – Top Craftsman & Good Friend
Mark has been a woodsman all his life and I met him about 8 years ago. I like to carve and since Mark has such skill in wood carving I always keep an eye on what he is producing so as to help develop my own skills.
I plan to spend some time with him this summer and pictorially document him creating one of his bowls at his wood carving studio.
Bowl carving
In the meantime here are some pictures of just a few of the carvings he has done over the years.
Mulberry Cup
Mulberry Cup
Spalted beech bowl with curved cherry spoon
Large cherry bowl with mulberry spoon
Chip carved cherry dish with cherry snuff spoon and birch cup
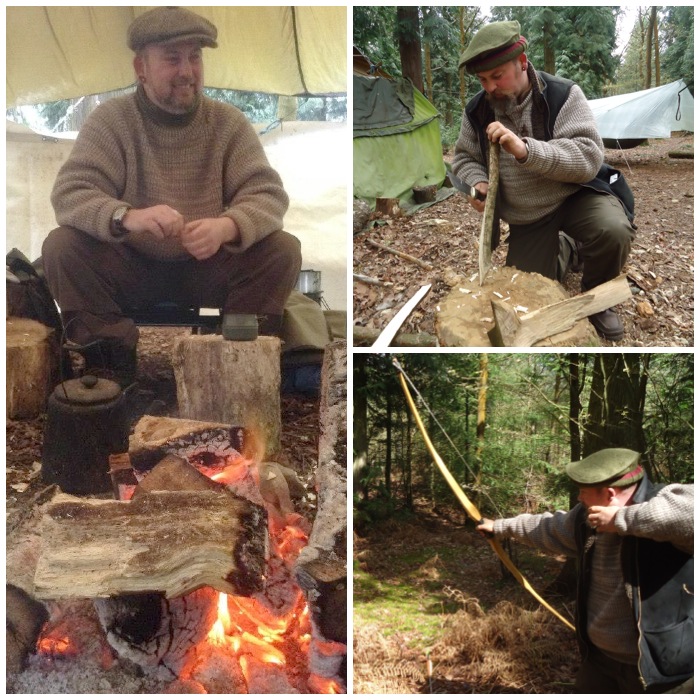
I do love to sit by a campfire and do a spot of carving. To me it is a very therapeutic pastime but often I don’t get much chance to do it when I’m out running a course. Thankfully though this year I managed to squeeze in a spot of carving on a few trips.
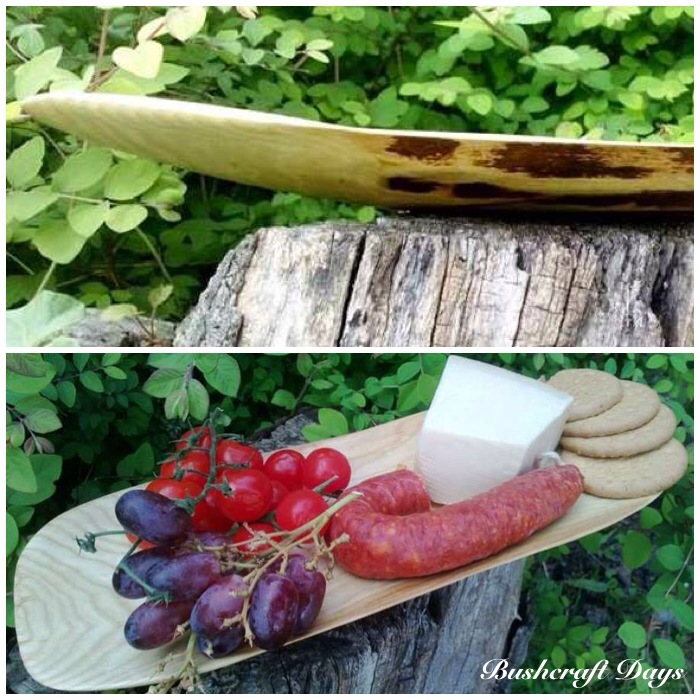
Ash Platter
Early this year I had been helping out at my friends Phil and Philippa’s farm. We were cutting up an old ash tree that had been blown over in the winter gales. I spotted a piece of wood that had been split open down its length and so was fairly easy to carve into a thin platter.
Ash platter from a wind blown tree
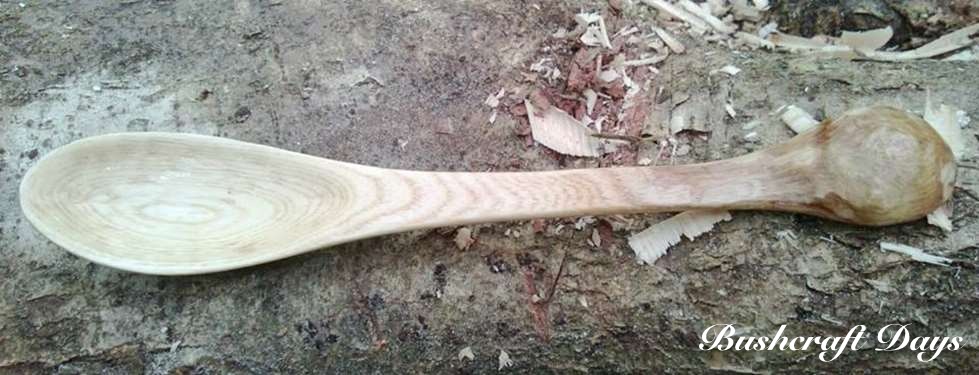
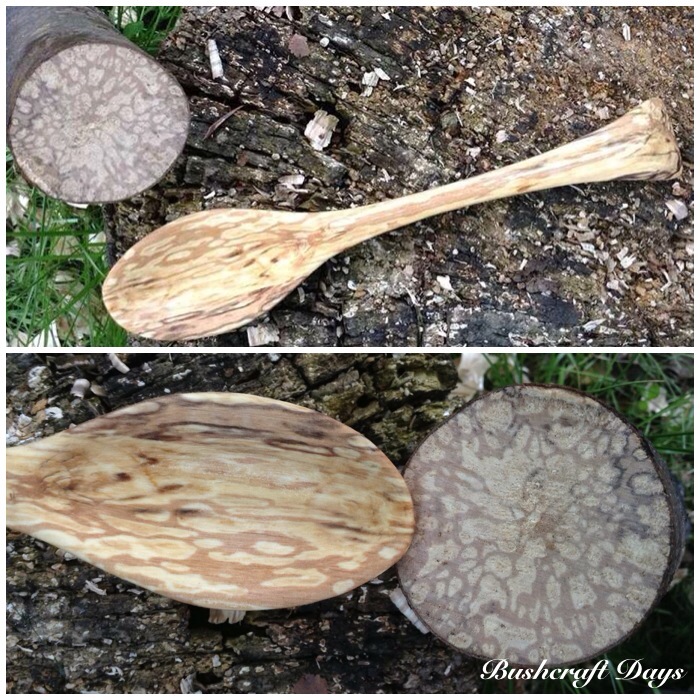
Pointed Hazel Spoon
This spoon was made when I realised I had come away with no eating utensils for the weekend – but thankfully I had remembered my knife 🙂
Pointed Hazel spoon
Birch Bowls
The large dark bowl was from a piece of birch my friend Stephen found in a hedge at this year’s Wilderness Gathering. The log was partially burnt out and then dumped when no longer required. It was very spalted and rotten in places. I carved out the charcoal with a flint adze and scooped as much of the wood from the bowl as I could with a crook knife.
I left this bowl to dry very slowly over four months. I also painted the ends with gloss paint to try and stop any cracks from happening. So far it seems to be crack free.
The smaller bowl was a demonstration piece I carved at the Kent County Show with Phil Brown of Badger Bushcraft. Again the wood is birch and this one is destined to be a Christmas present.
Burnt Birch bowl & a Scooped Birch bowl
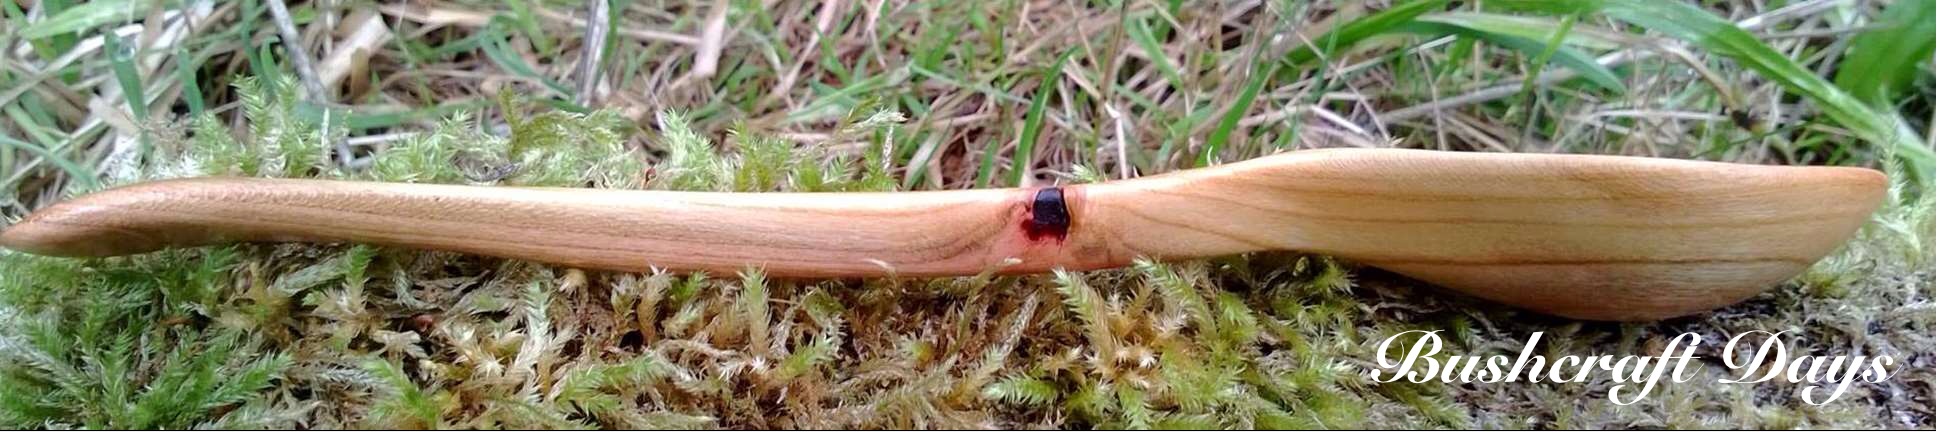
Cherry Spoon
I was given a piece of cherry wood by my friend Charlie Brookes earlier this year. On holiday in the summer in Cornwall I decided to pass an evening around the fire carving a spoon for my friend Louise.
Cherry Spoon – side view
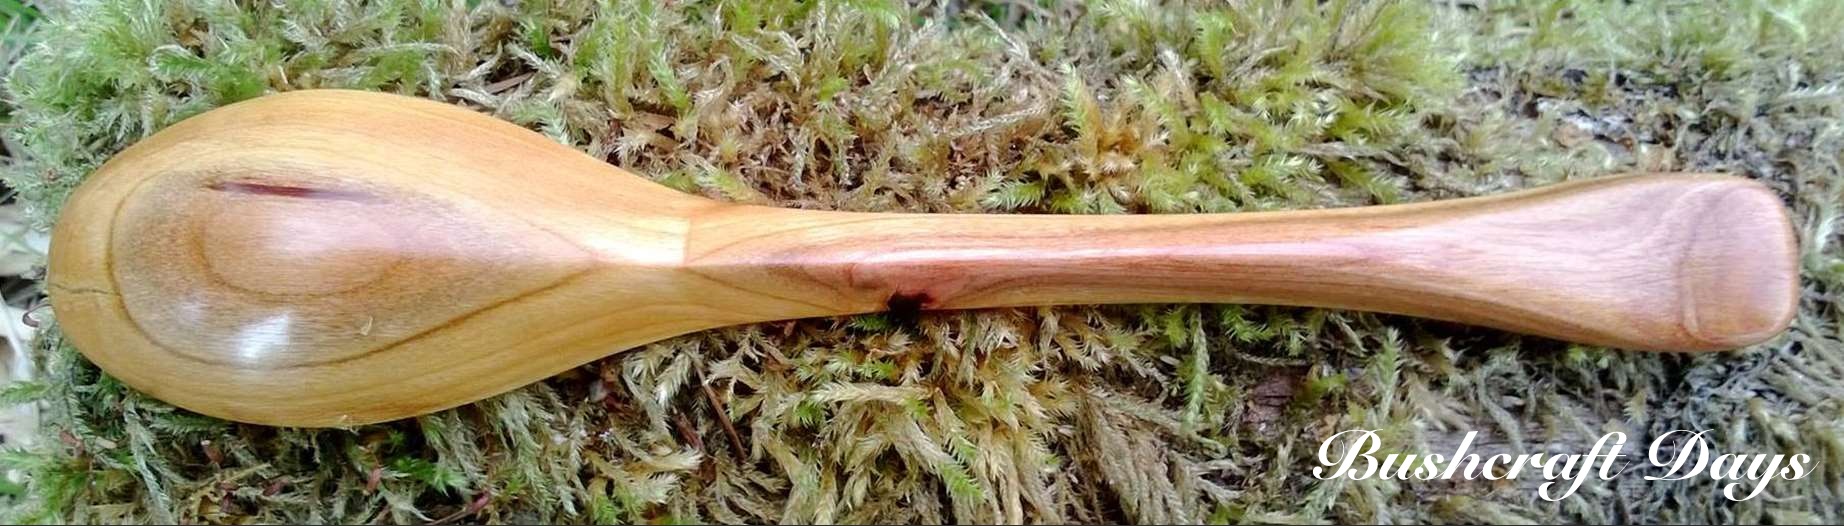
The wood was very dry but when it was finally sanded, oiled and boned it developed a small crack on the bowl. I was gutted but Louise loved it 🙂
Cherry spoon – underside
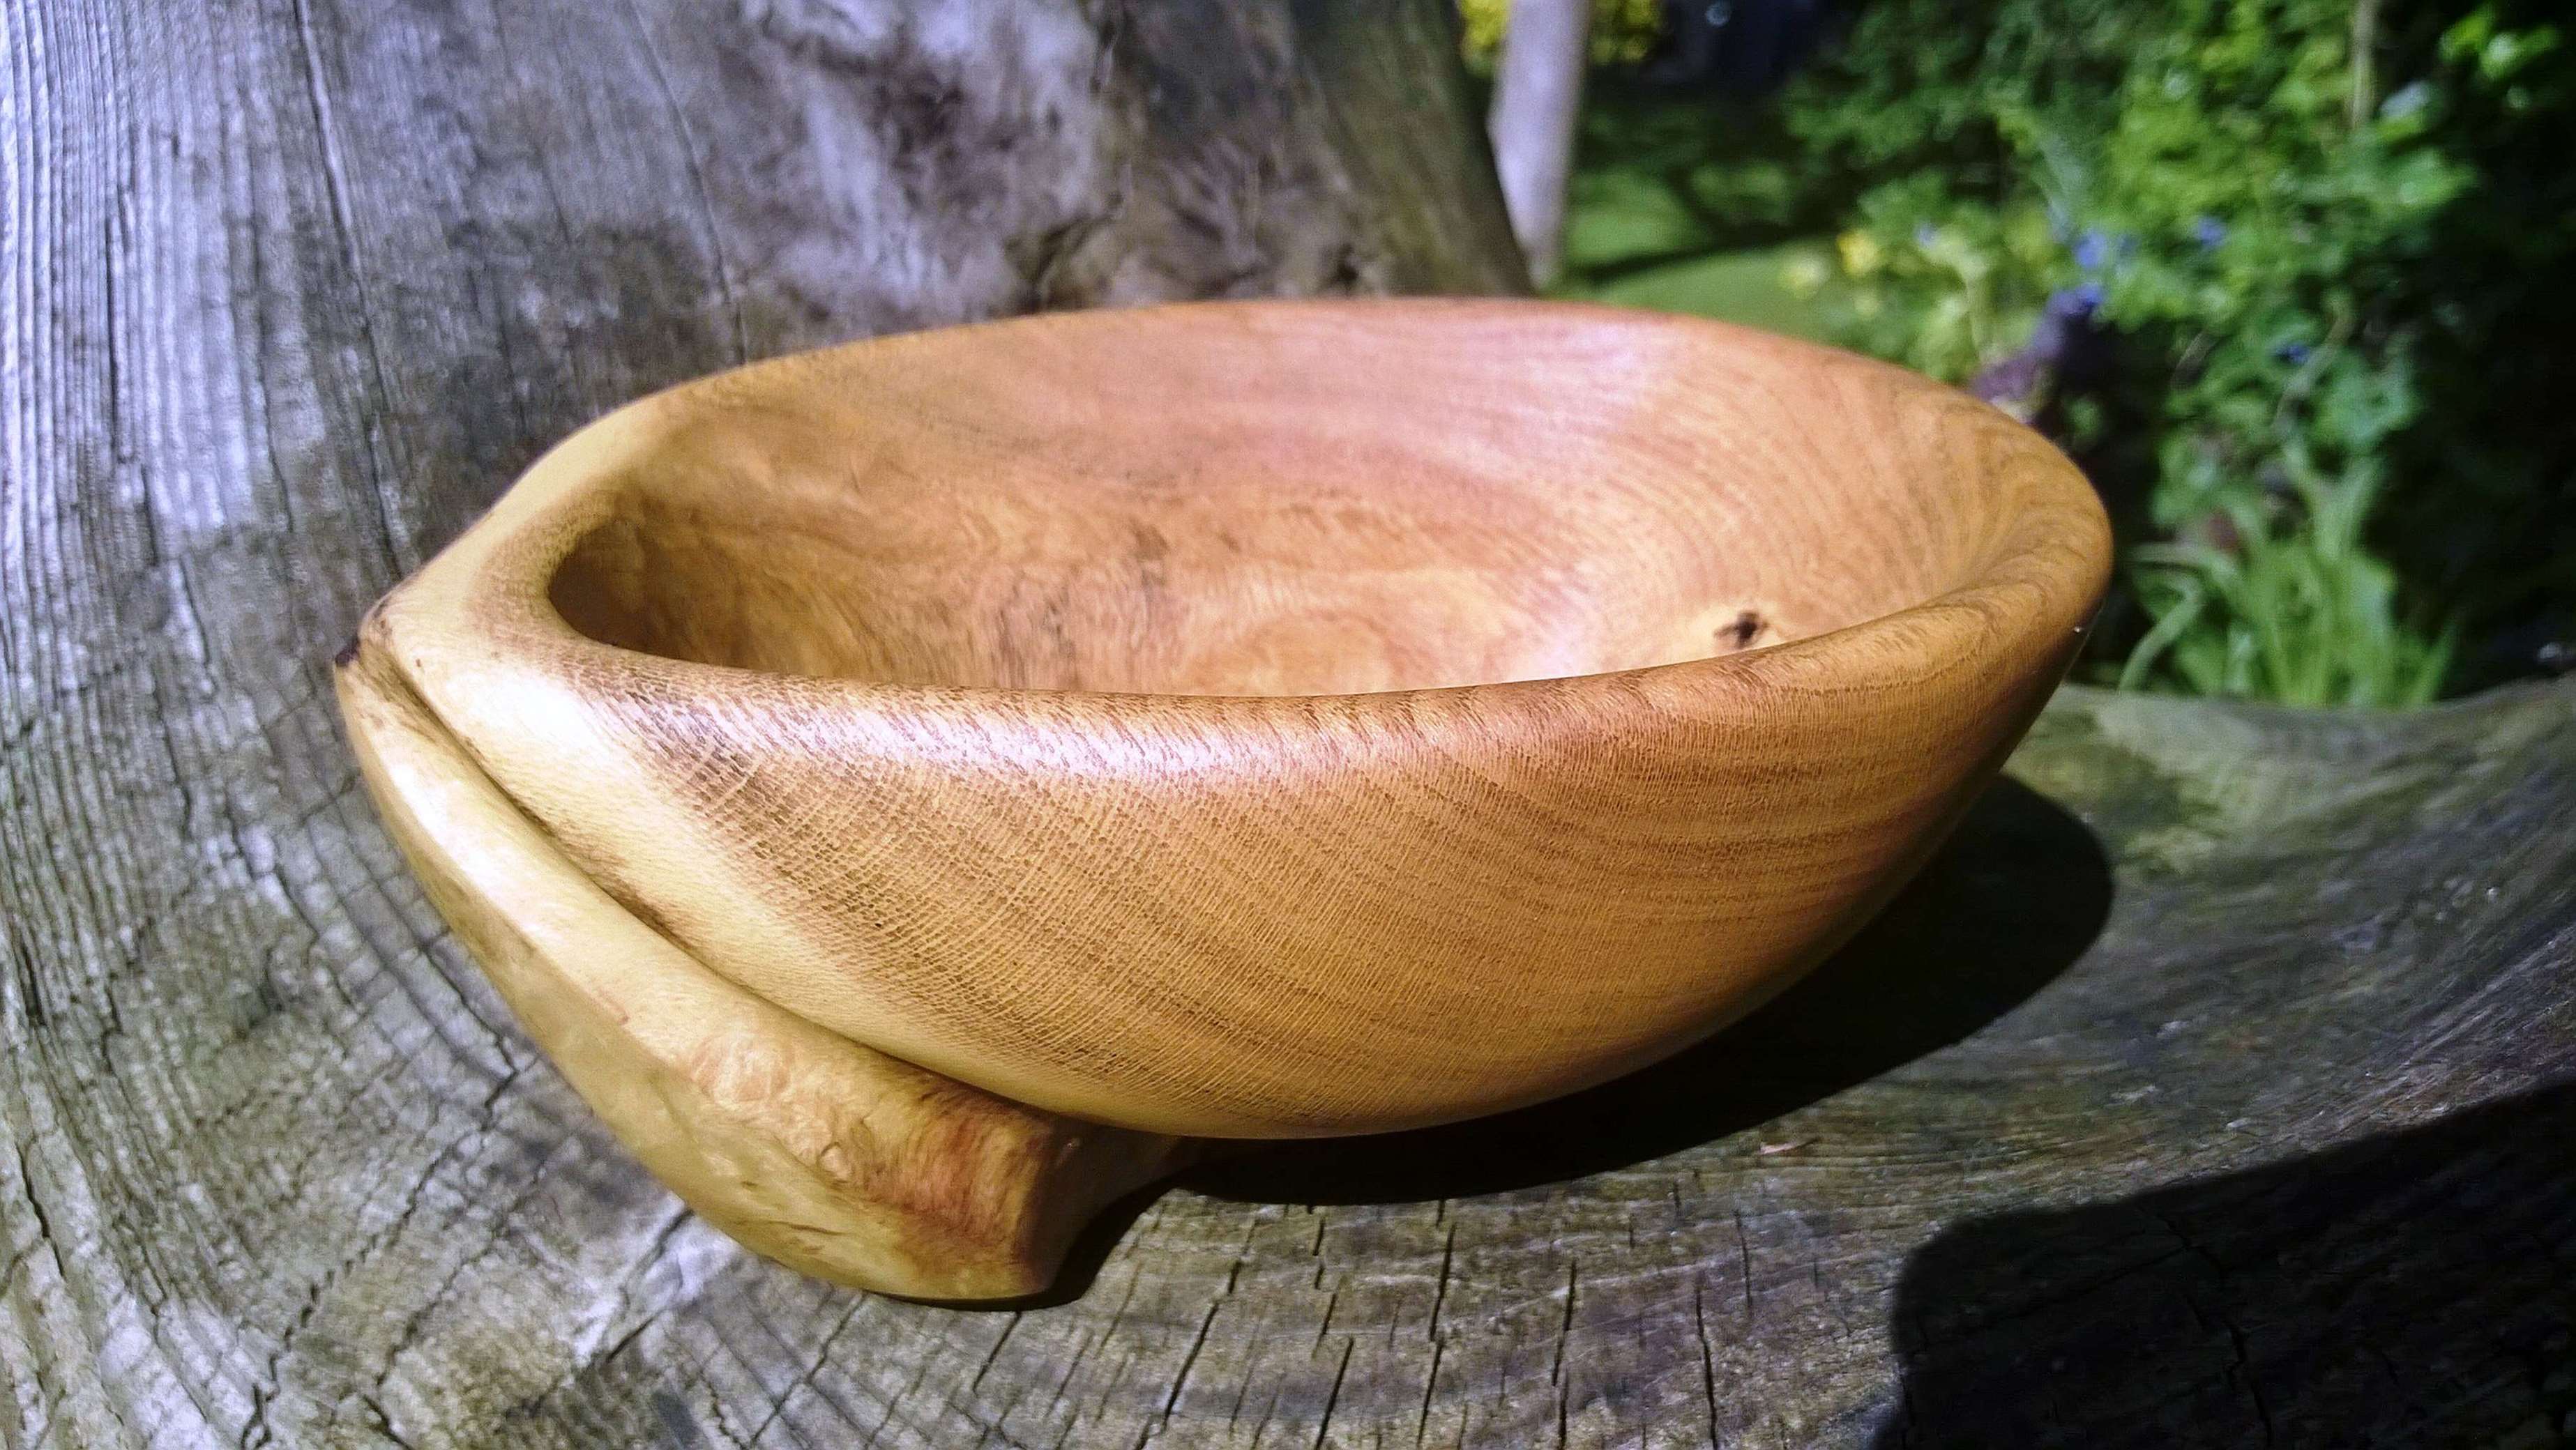
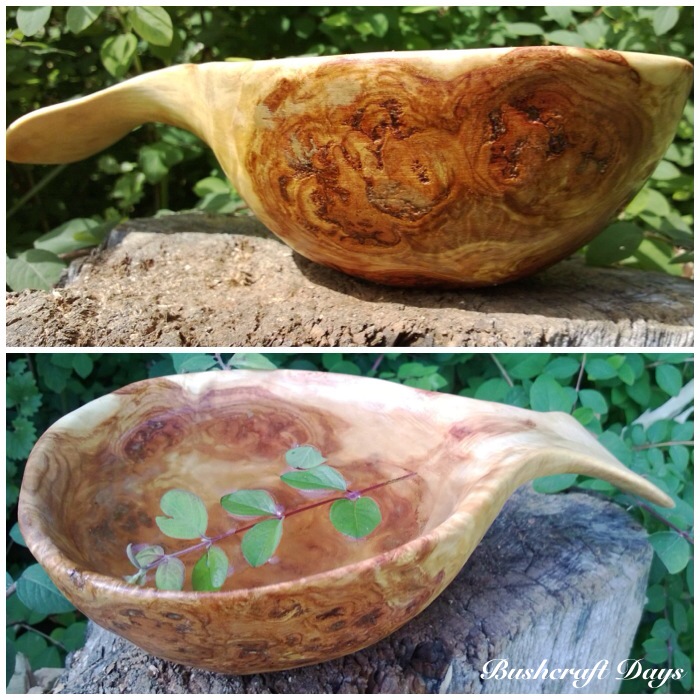
Quaich
A few years ago I came across a wind blown hornbeam with the most fantastic burl growth on it. The thing filled my rucksack after I had removed it from the tree (I had to give all my kit to the cadets I was with in order to carry the burl myself).
I made a number of items from it this year. This one is a Quaich which to any non-Scottish people I would describe as a communal drinking cup – in particular whisky.
Hornbeam Burl Quaich
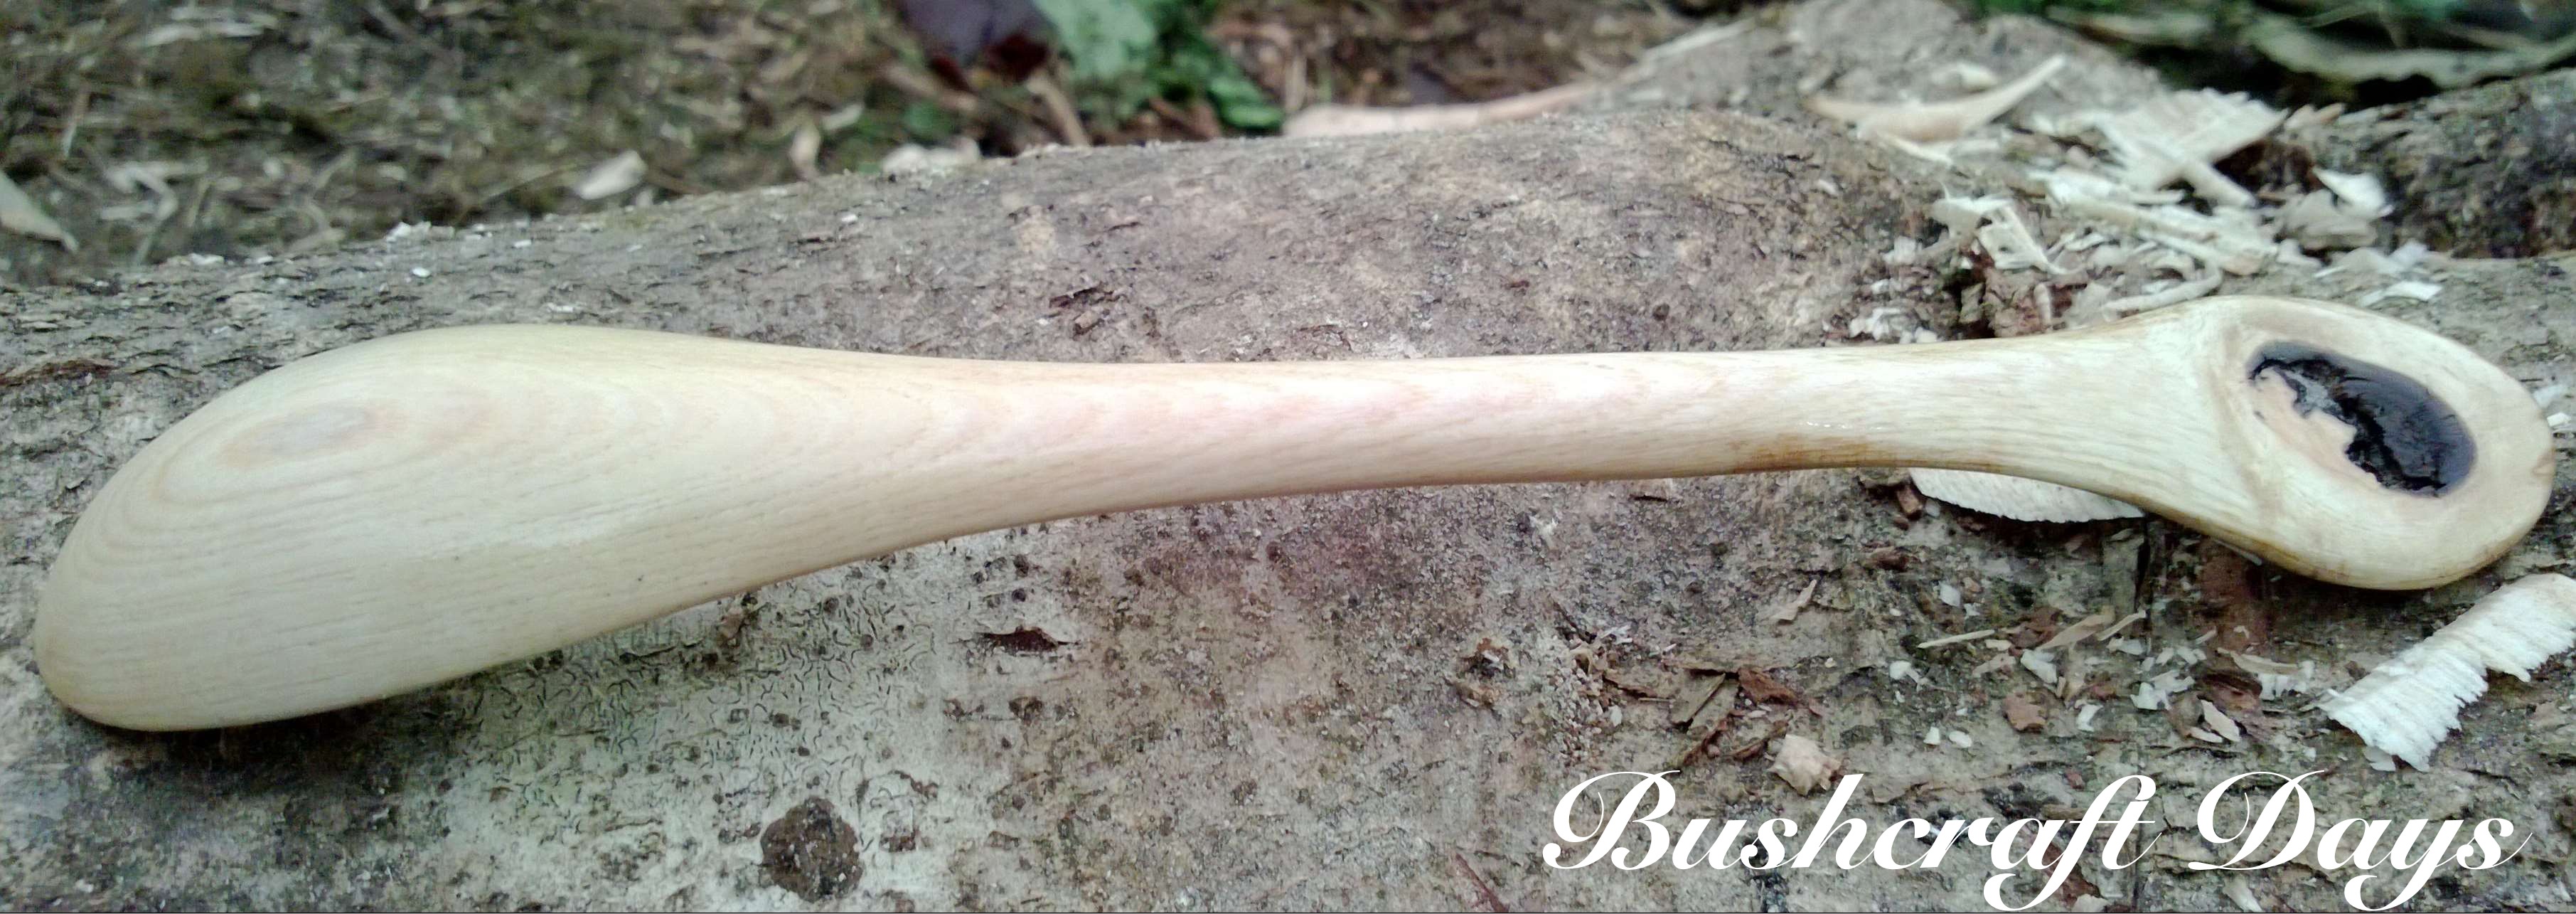
Knobbly Spoon
I made this spoon in the summer for my friend Jennifer while I was on the Coastal Survival Hunter Gatherer course. I just like the knobbly bit and thought it would make for a good handle.
Knobbly spoon (cannot remember the wood type)
The underside of the handle really showed up the gnarled wood.
Knobbly spoon – underside
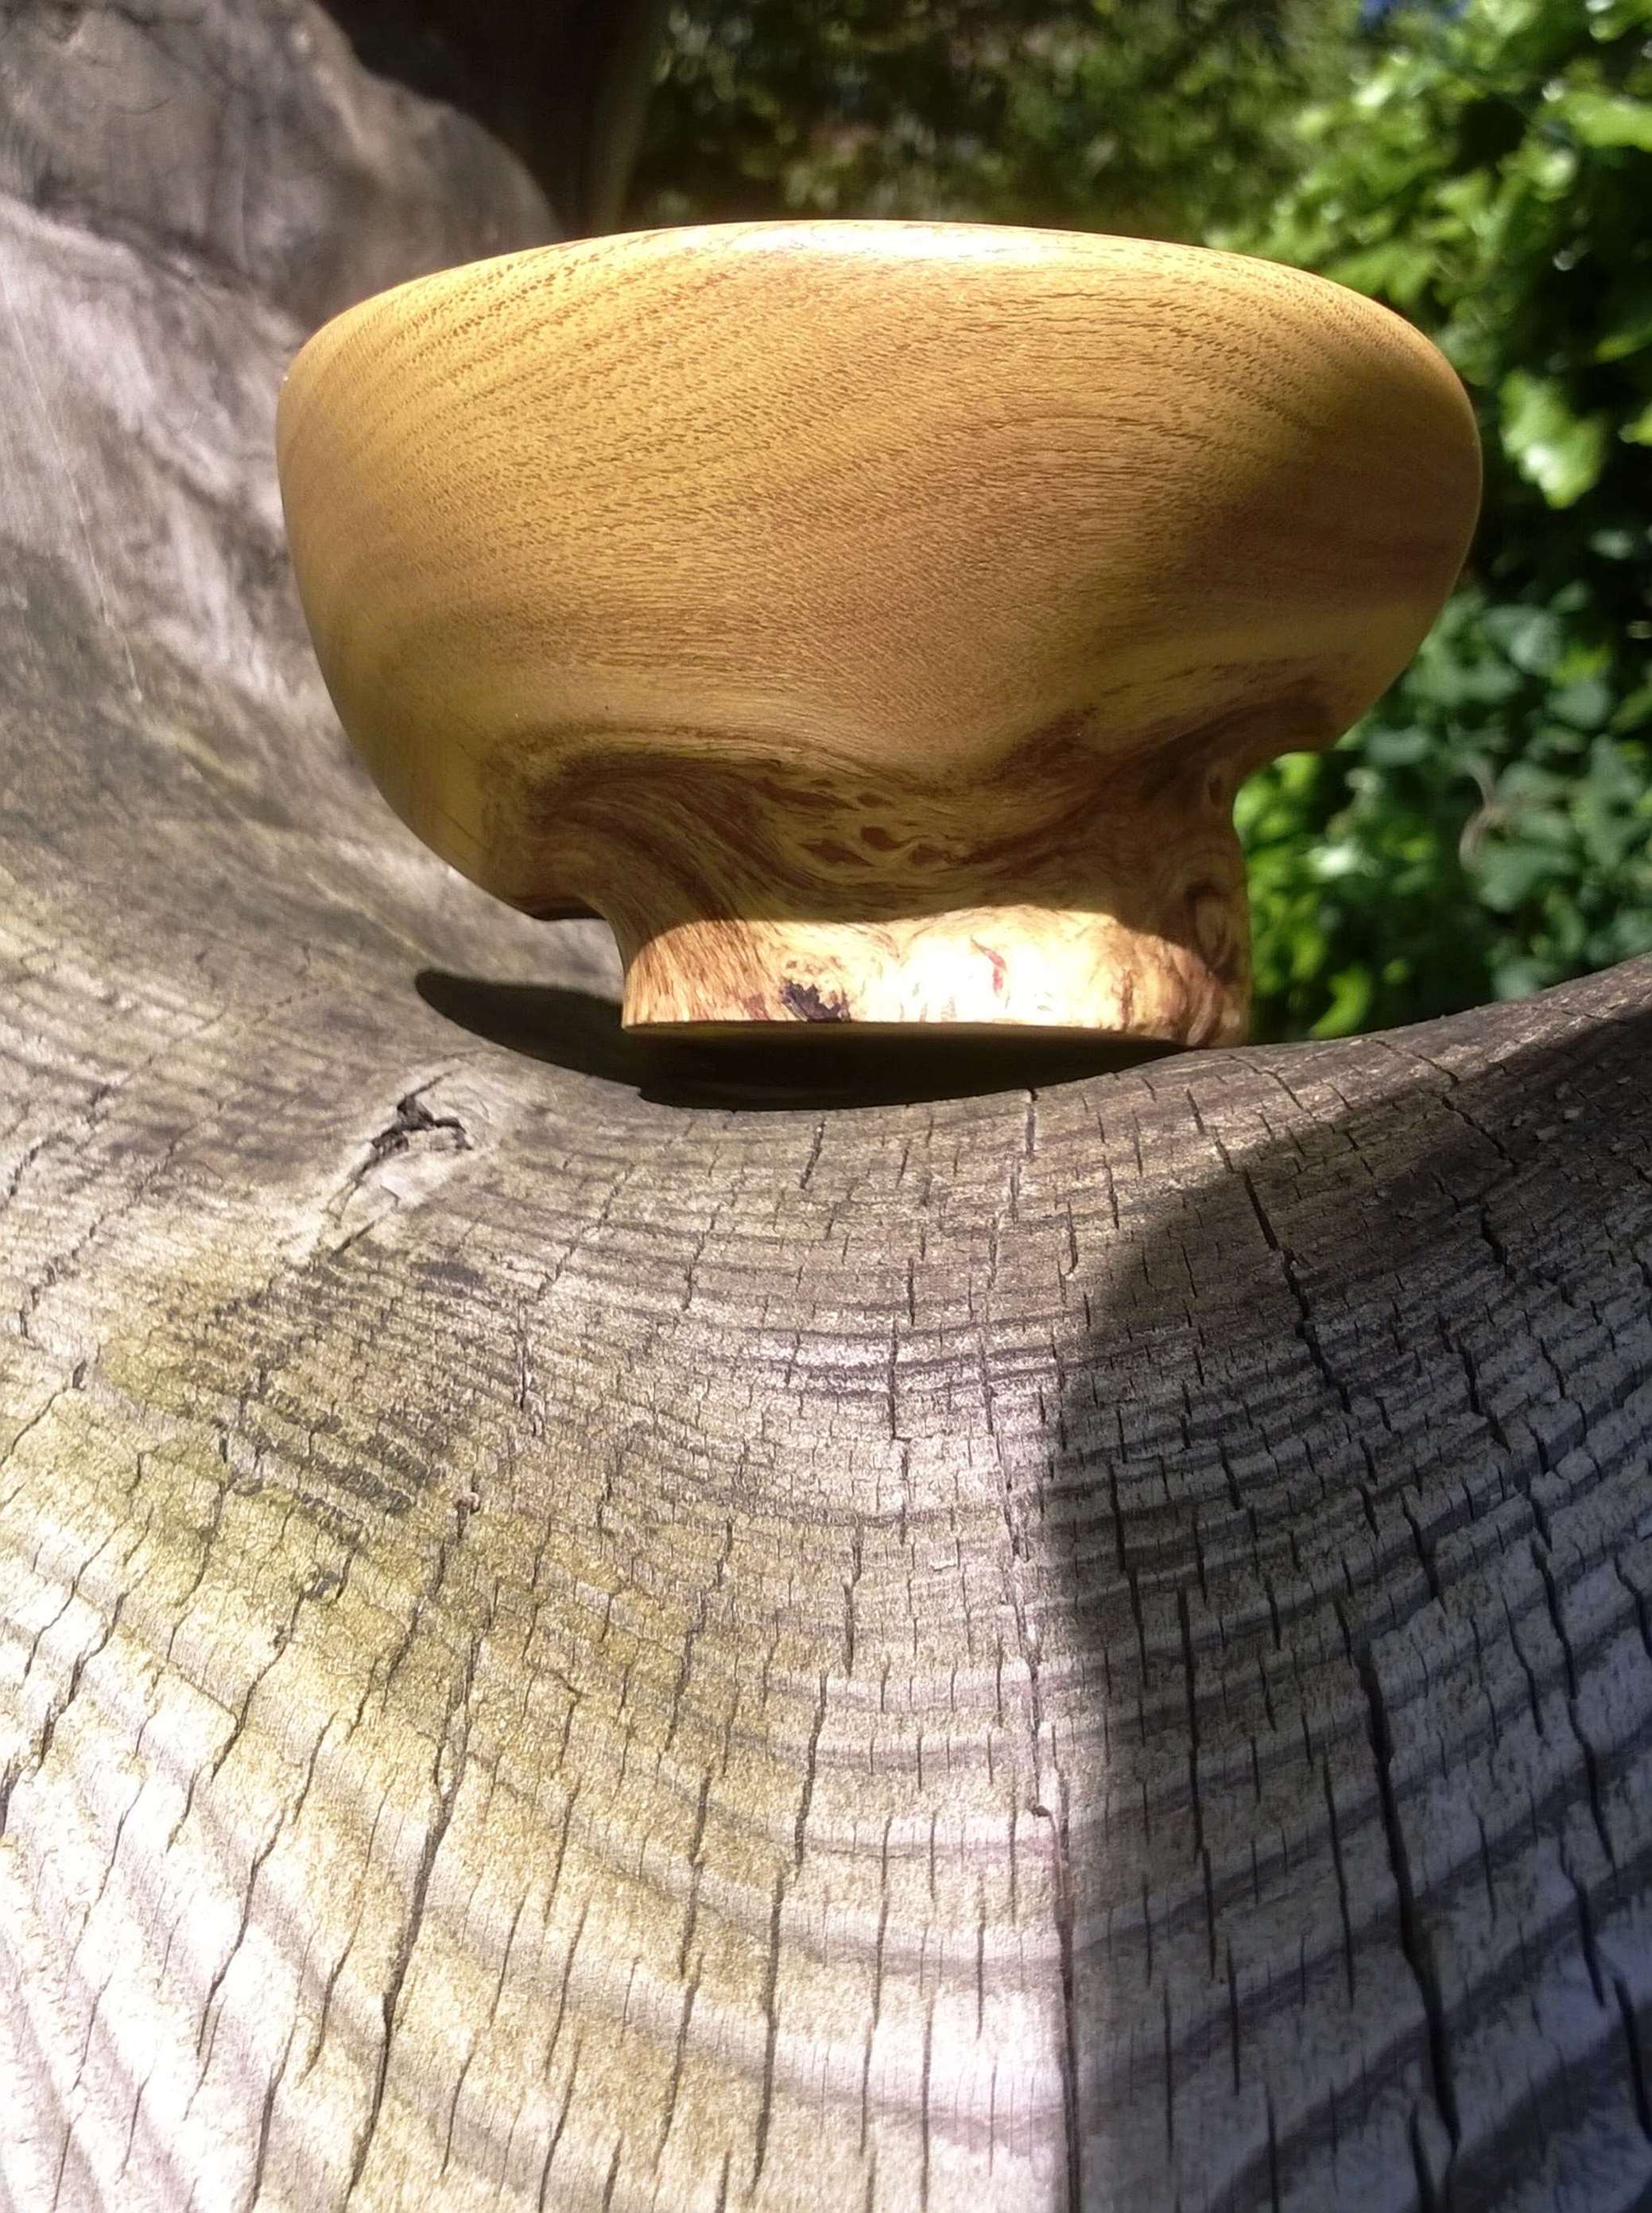
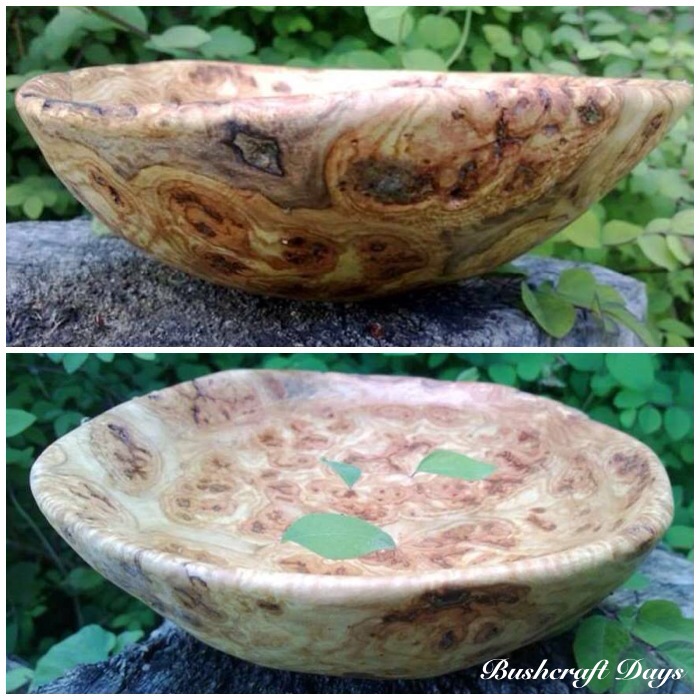
Burl Bowl
Another from the burl. This time I made up a large dinner bowl. It is very rough looking as you have to go with what the wood is saying to you. I gave this bowl away to the parents of a very dear friend of mine who passed away this year as he was a fellow carver.
Hornbeam Burl bowl
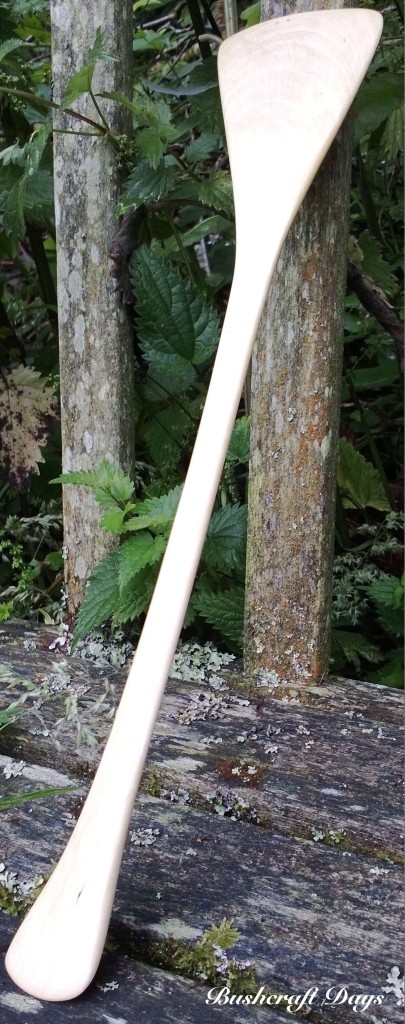
Spatula
Another implement for my friend Louise. A simple spatula but a pleasure to carve. We had a great holiday this year in Cornwall and camped in the front garden of a Georgian house. The house has been converted to a Youth Hostel and was managed by Louise.
Ash spatula
Spalted Spoon
I was sawing up some wood for a campfire this summer and picked up this piece. It had been left in an old fire that had not been cleaned up. The spalting looked too good for the fire so it provided a good hour’s carving for me.
Spaltef Hazel spoon
My Noggin
My last piece from the burl was this cup. In Scandinavia a popular name for this type of cup is a Kuksa or Kasa. I prefer the Old English name of Noggin myself.
My new Noggin
I am looking forward to the New Year and seeing what different woods I find to carve around the campfire.
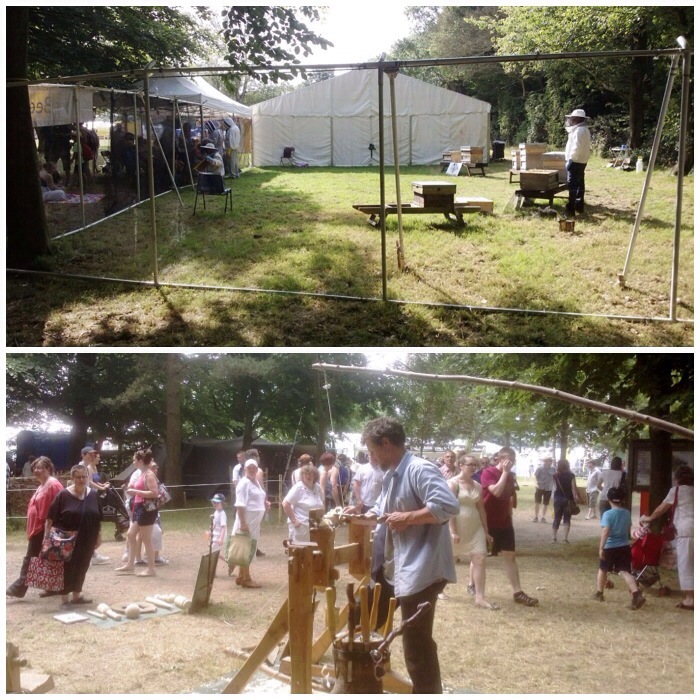
June and July are time for County shows all over the country. This year at the end of June I agreed to help my good friend Phil Brown out at the Kent County Show.
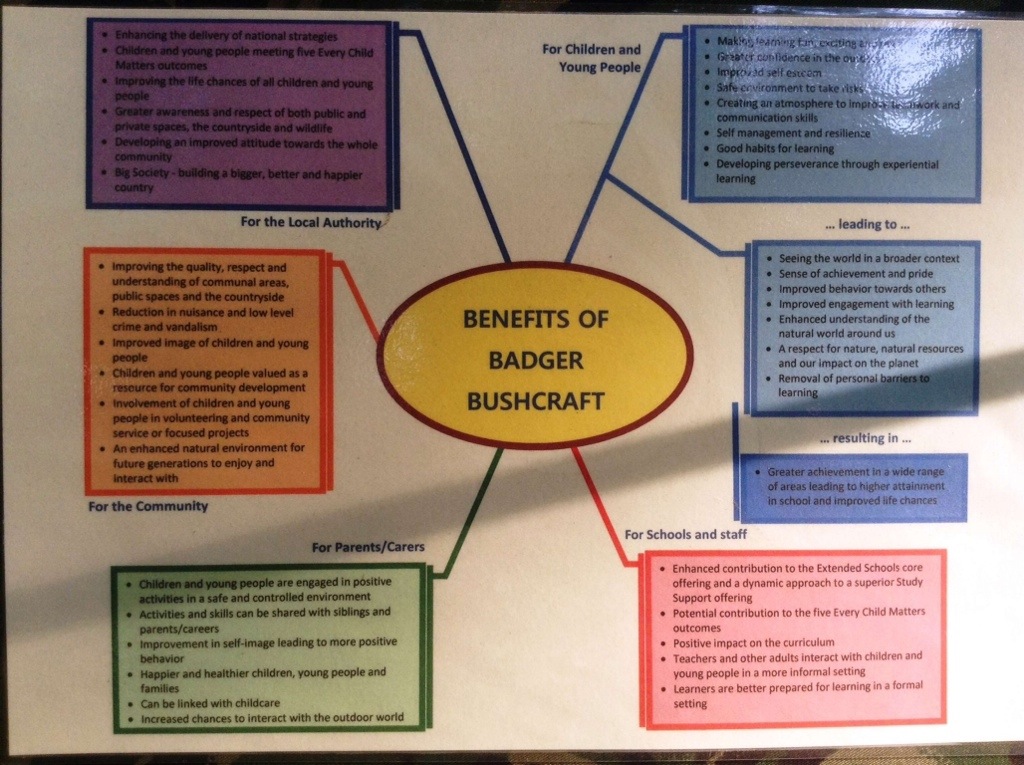
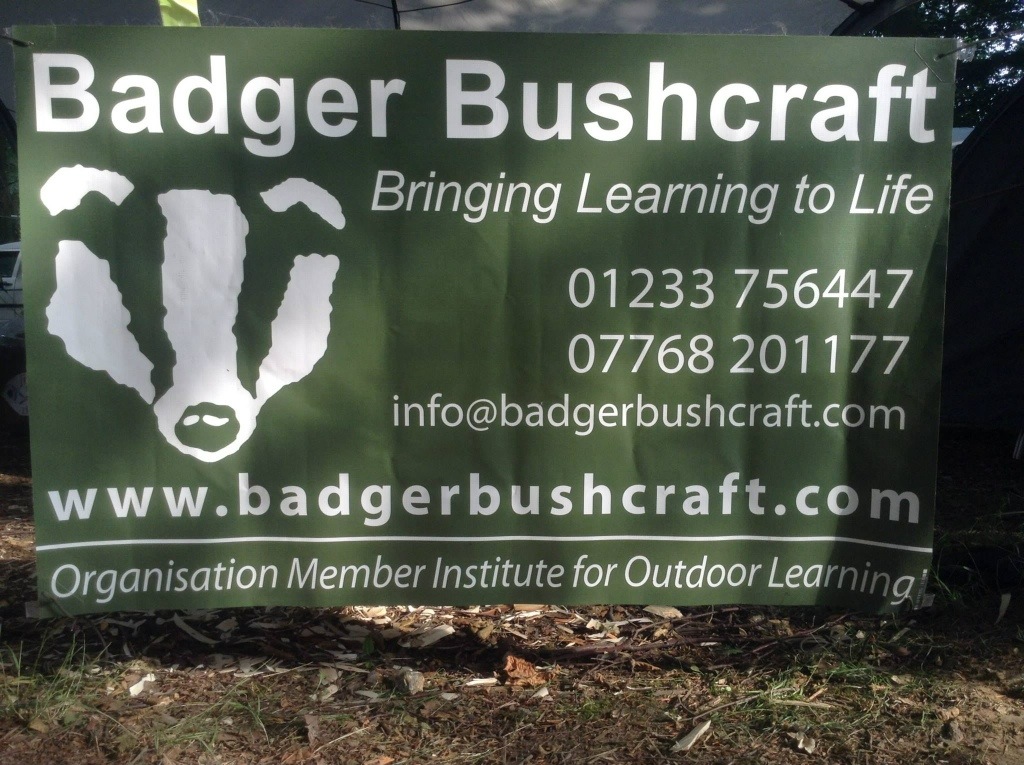
Phil runs his own bushcraft company called Badger Bushcraft. Phil is based in Kent and does a lot of work with schools in the South East of England. His website at Badger Bushcraft covers all the angles on how he works with schools so I will not go into depth on that here.
I have known Phil since about 2005 and we have both studied together under John Rhyder at Woodcraft School on a number of his courses. Just like in the forces you go on long courses, meet people, go through some pretty hard stuff (and good stuff) and come out at the other end with some good friends. Phil is one of these good friends and over the last few years has given up his time to help me out on my Sea Cadet courses so it was only right to help out where I could for him. Not difficult as we both share the same passion for teaching bushcraft.
Phil’s aim for the weekend was to network with visitors who had links with schools. All the craft items were for display purposes. My role was to demonstrate some activities. These included, using firesteels, bowdrill, hand drill, knots, carving and looking at hammocks set ups.
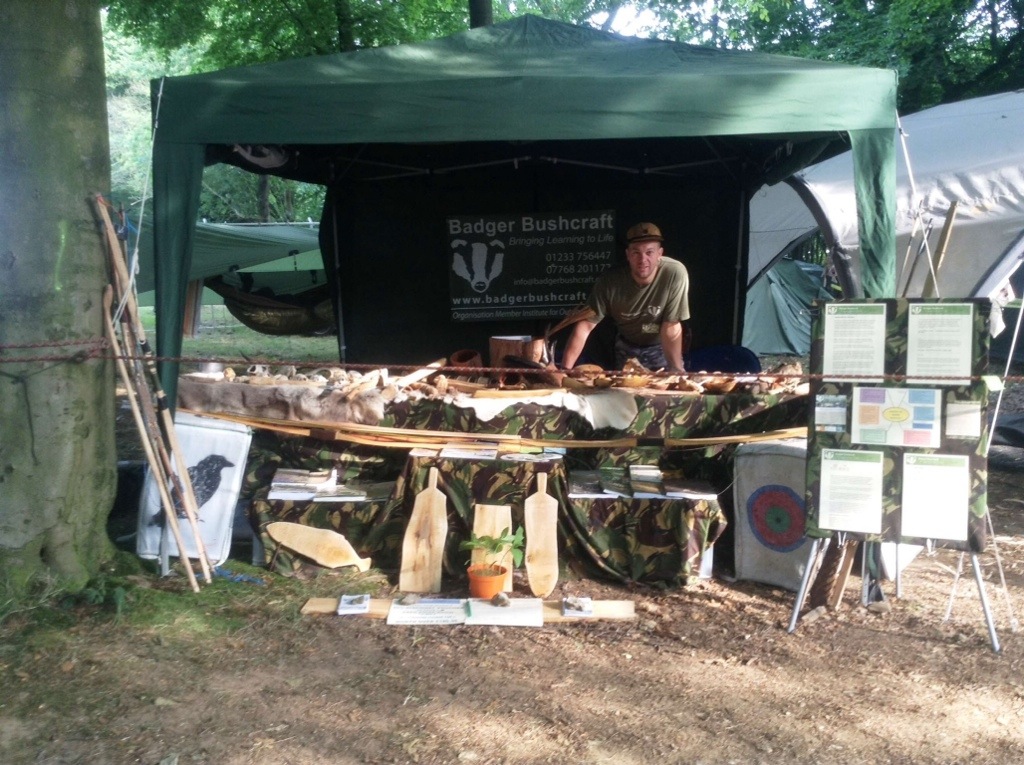
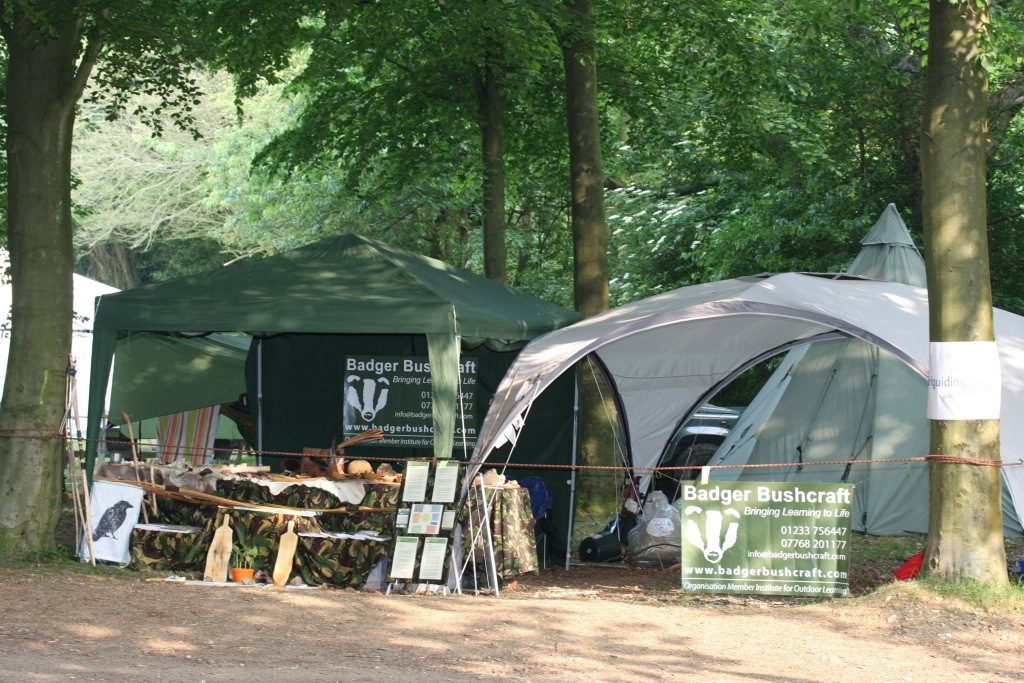
Phil of Badger Bushcraft
Phil had his own shelter for the craft items and I brought along our own Coleman Event shelter to do the demonstrations. I am glad I brought it along as the heat all weekend was very intense.
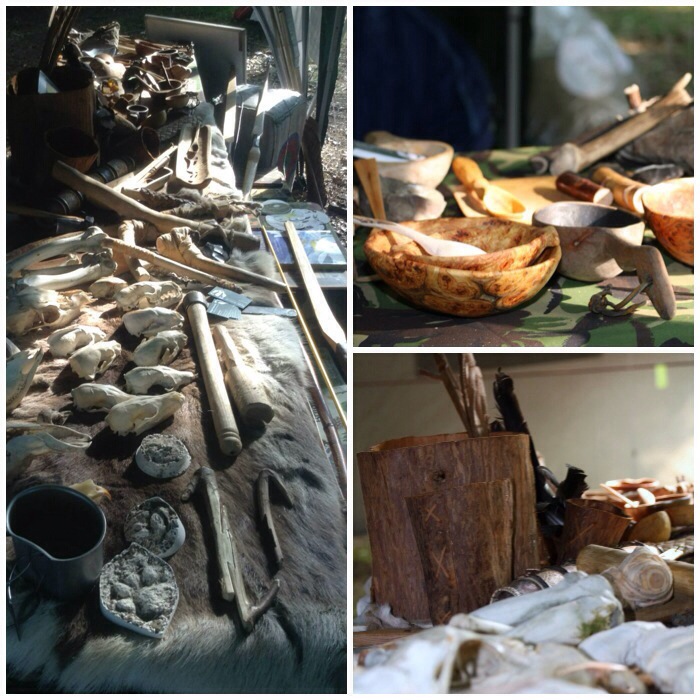
Stall and demonstration area
I brought along some of my craft items and so did Phil. We could hardly fit them onto our tables in the end. I lost track of the times people came up asking how much we were selling things for. Some could not believe that we were not here to sell stuff but to just network and demonstrate.
Nothing for sale here
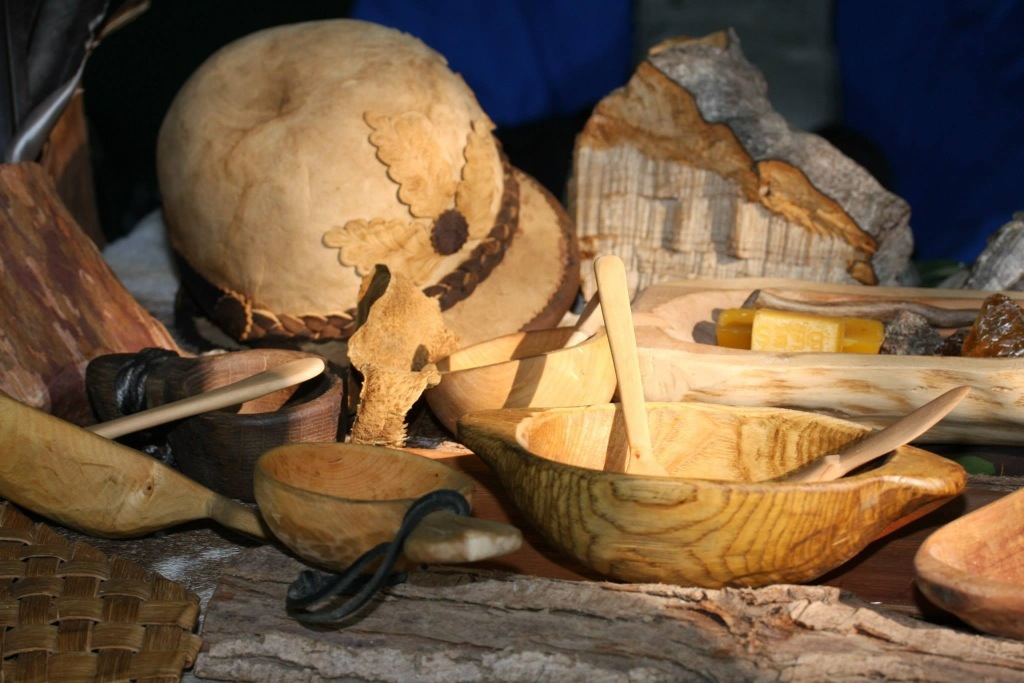
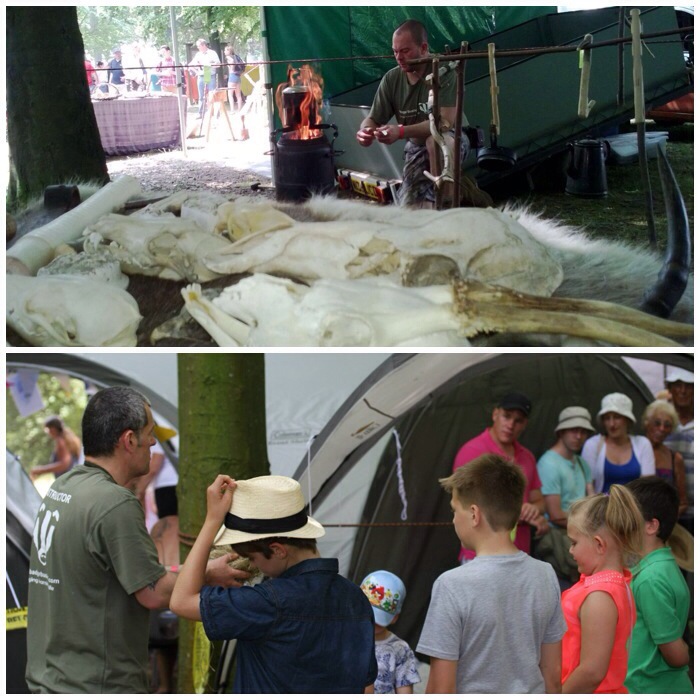
The hat you can see in the picture Phil found in Romania. It is made out of amadou from the bracket fungus Fomes fomentarius. A good explanation can be found here on Wikipedia.
Items for Education
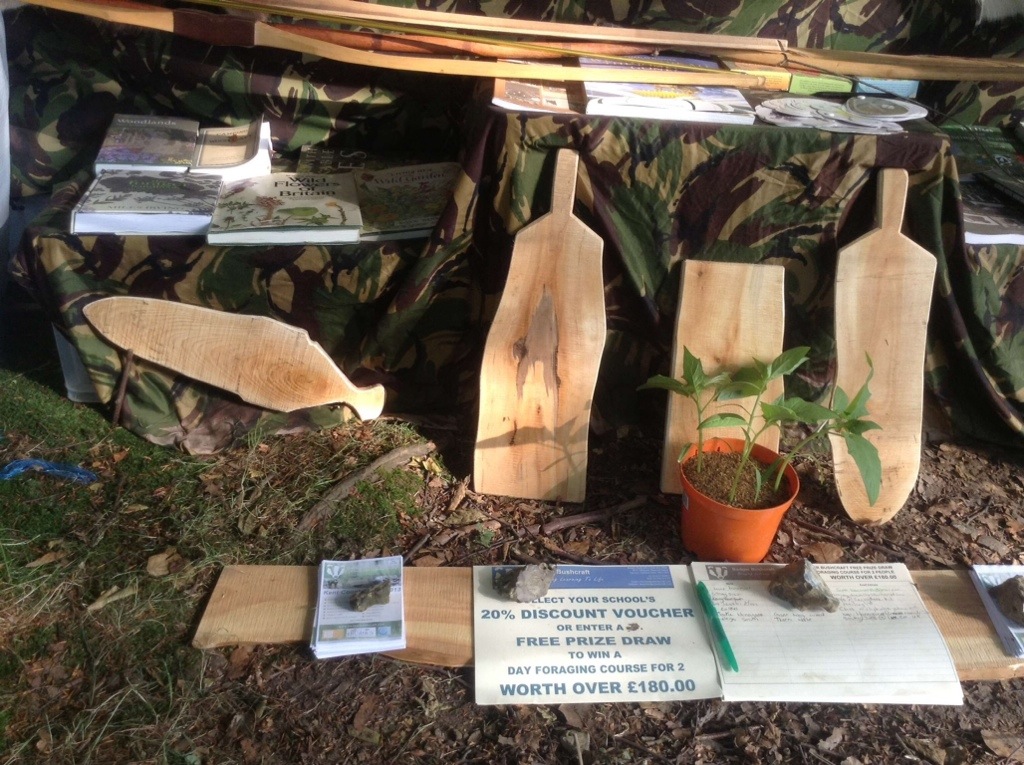
Running over the weekend was a small competition. It was to identify the plant shown here at the bottom of the table. It is highly toxic and was very hard to ID (I had no idea what it was until told). People got a chance to use some ID books to find out what it was and we got an eventual winner. The prize was a weekend course with Phil if I remember. The plant if you have not guessed it is a Thorn apple (Datura stramonium) More info on it can be found here at the RHS web page.
Plant ID competition
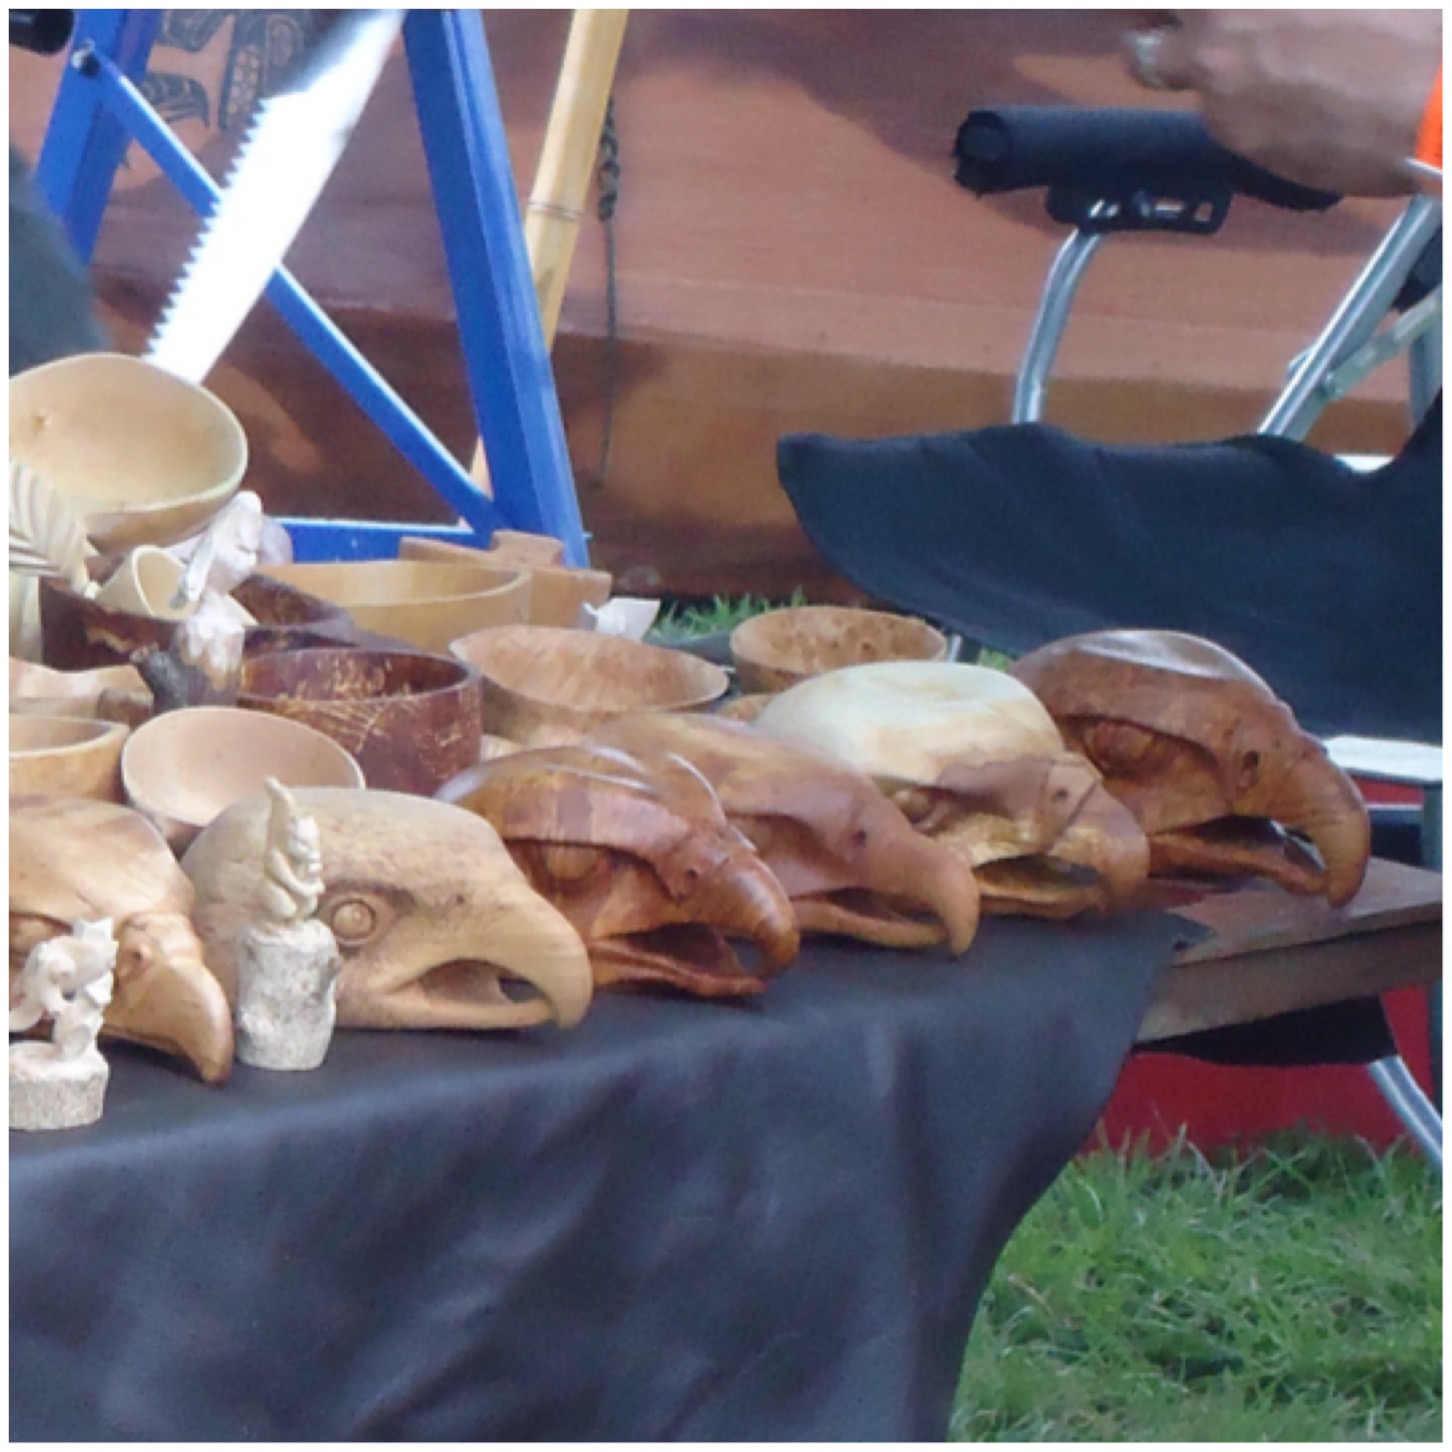
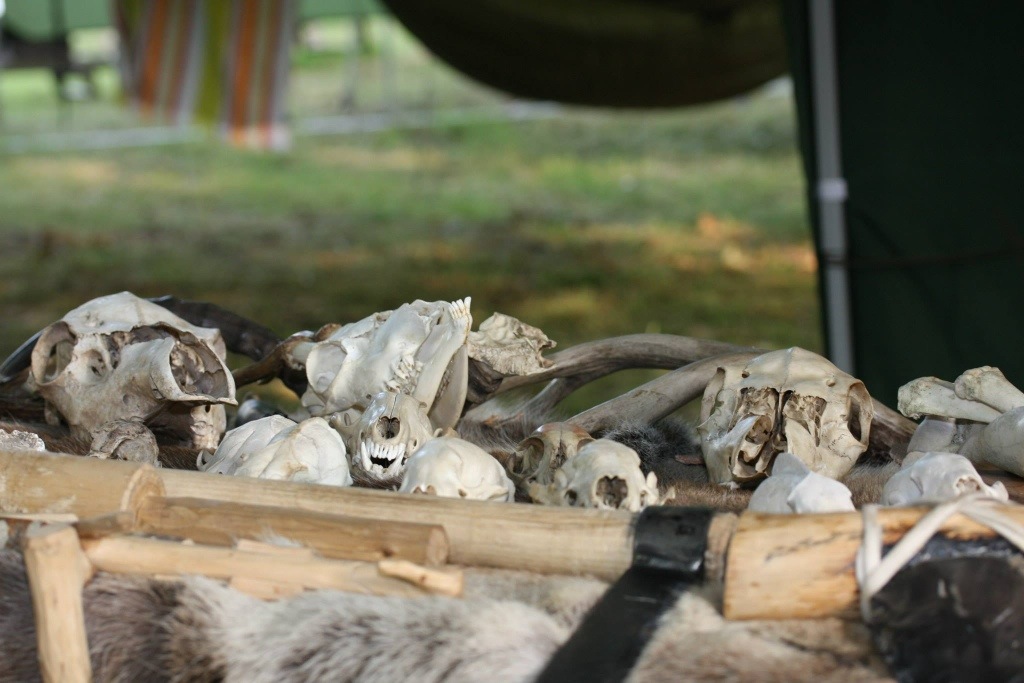
I must admit to being impressed with the skull collection that Phil now has. They were a real attraction to all the kids.
The Badger Bushcraft Skull Collection
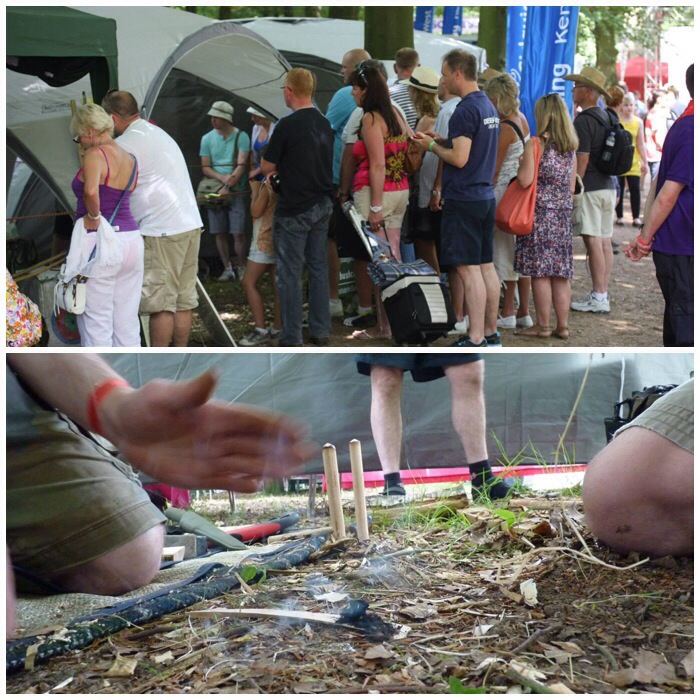
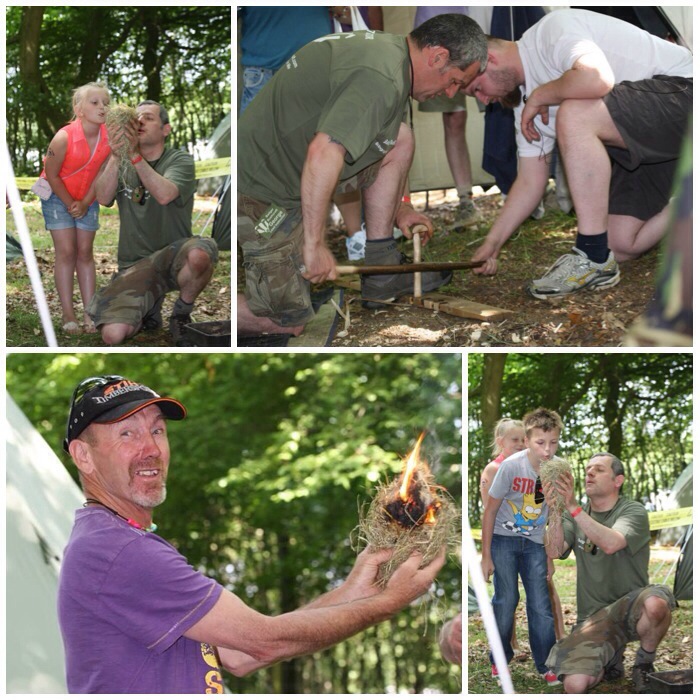
Much of my time was spent in the demonstration area. It got very crowded at times. I spent a lot of time working with adults and kids doing group bowdrill and practising using firesteels.
Whats happening here then?
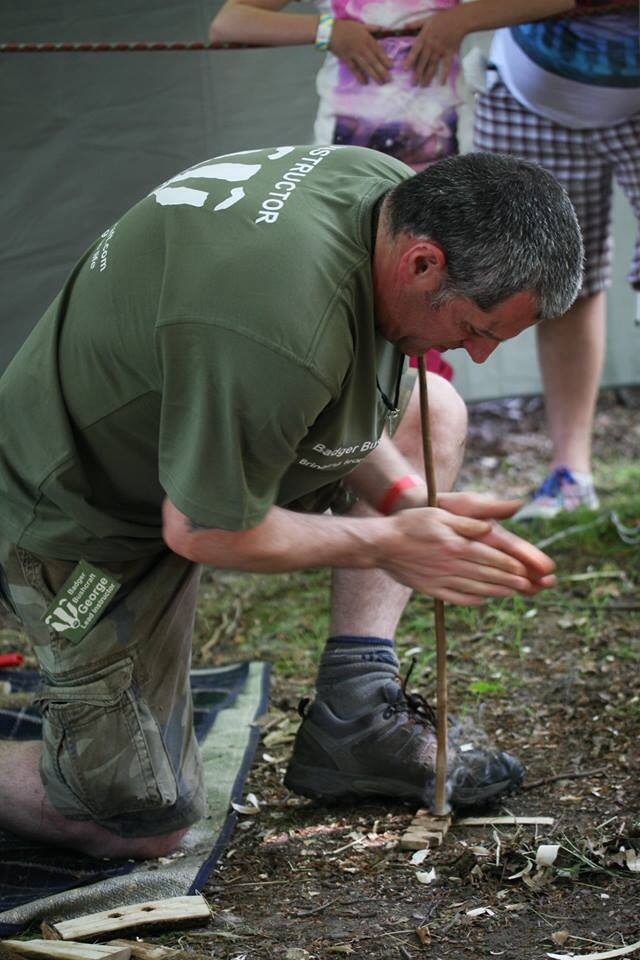
The demonstrations all went well apart from one time when I was working with a young lad. For whatever reason we just could not get that ember. Possibly due to my drops of sweat putting the ember out 😉
Bowdrill Heaven
The kids waited patiently until it was there turn and wherever possible I worked with groups of 3 or 4 at a time.
Waiting patiently for their turn
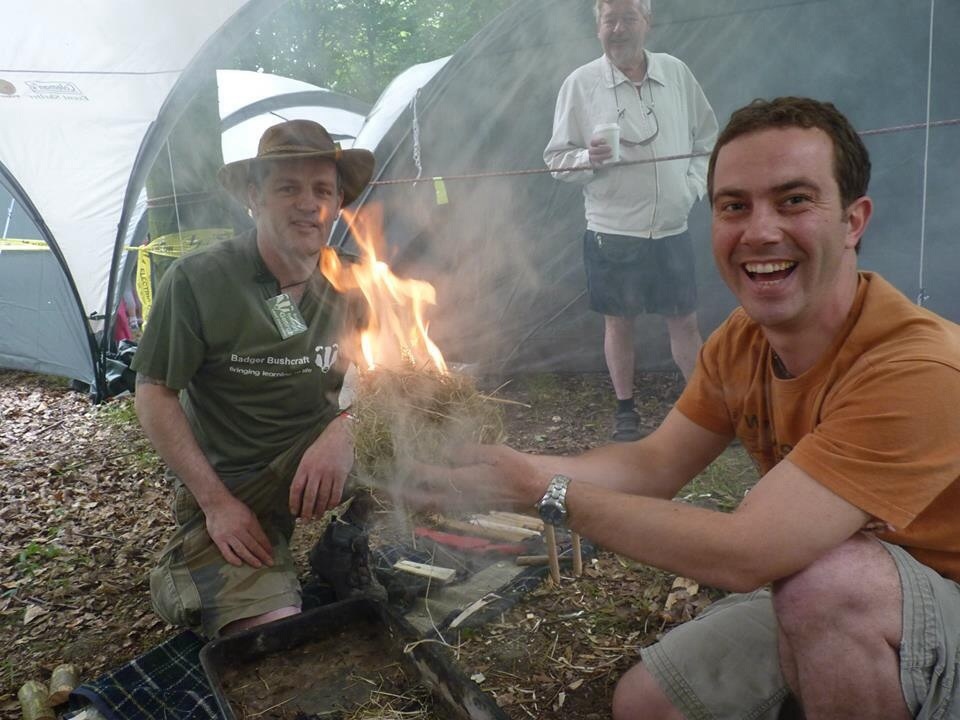
I did a number of one to one sessions with adults and a few got that final happy flame face I so love to see.
Now that is a happy fire face
Interspersed in between the bow drill I got the hand drill out. I think I did 4 demonstrations on the Saturday which thankfully were all successful (it was very hot and dry so ideal conditions) but I did collect a couple of blisters and my hands did feel bruised.
Handrill Demonstration
At the back of the shelters we had set up home. I had a few people asking about the hammock set up.
My home is the hammock – Phil has the tipi. No roughing it here.
Around the fire that evening we had a little visitor that wanted to dive bomb the fire but thankfully chose not to do so at the last moment.
A little visitor in the evening
On the Sunday i set up a couple of different hammocks for people to try. Everybody was a bit nervous at first trying them but those that did were converted. The hammocks that I set up were the DD Frontline and the UK Hammocks Woodsman.
Lots of hammock testing
I tried out one of Phil’s Ben Orford hook knives and it worked a treat. I quickly cut out the inside of a small bowl. I was working on a small birch log and explaining to people as they came by what I was up to. The bowl has seasoned now and hopefully will be a Christmas present. I demonstrated my gas wood burning stove and discussed various styles of pot hooks.
Carving Demos and time for tea
We had set up an area with some stoves and different types of pot hooks for people to look at. Also one of our neighbours had a mobile planing machine. He had been making planks out of Birch and the off cuts were donated to us. The sensible thing we could see was to carve some chopping boards out of them. I think we gave away a few in the end to people who stopped to chat and were really interested in what we did.
Cooking Kit
Other neighbours included the Kent Beekeeping Society and Steve who was an expert wood turner.
Our neighbors – The Beekeepers and Bodgers
Phil got his Eco Burner going. Really outshone my little gas wood burner. He has written a good write up about the Eco Burner here. Some of the time we had a quiet spell and we managed to get a brew going but much of the time we had quite a crowd.
Quiet times – Busy times
I took a picture of one of Phil’s boards showing the benefits of bushcraft within the community. Certainly makes you think about what this subject can do to help people both young and old.
Benefits of Badger Bushcraft
If you work in a school in the South East and are interested in teaching nature based activities to your students then drop Phil a line sometime.
Badger Bushcraft
I had a great weekend and look forward to hopefully going again next year.