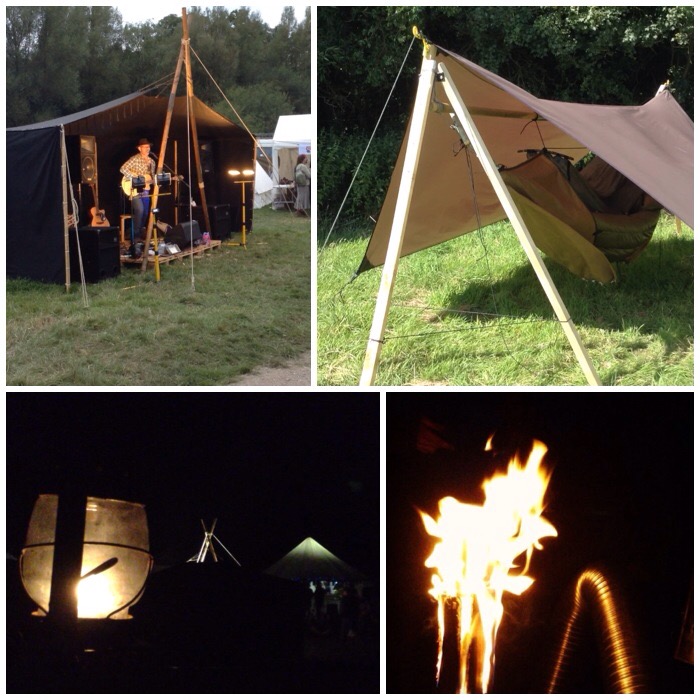
I have never seen a pram being used as a cooking stand but it worked 🙂
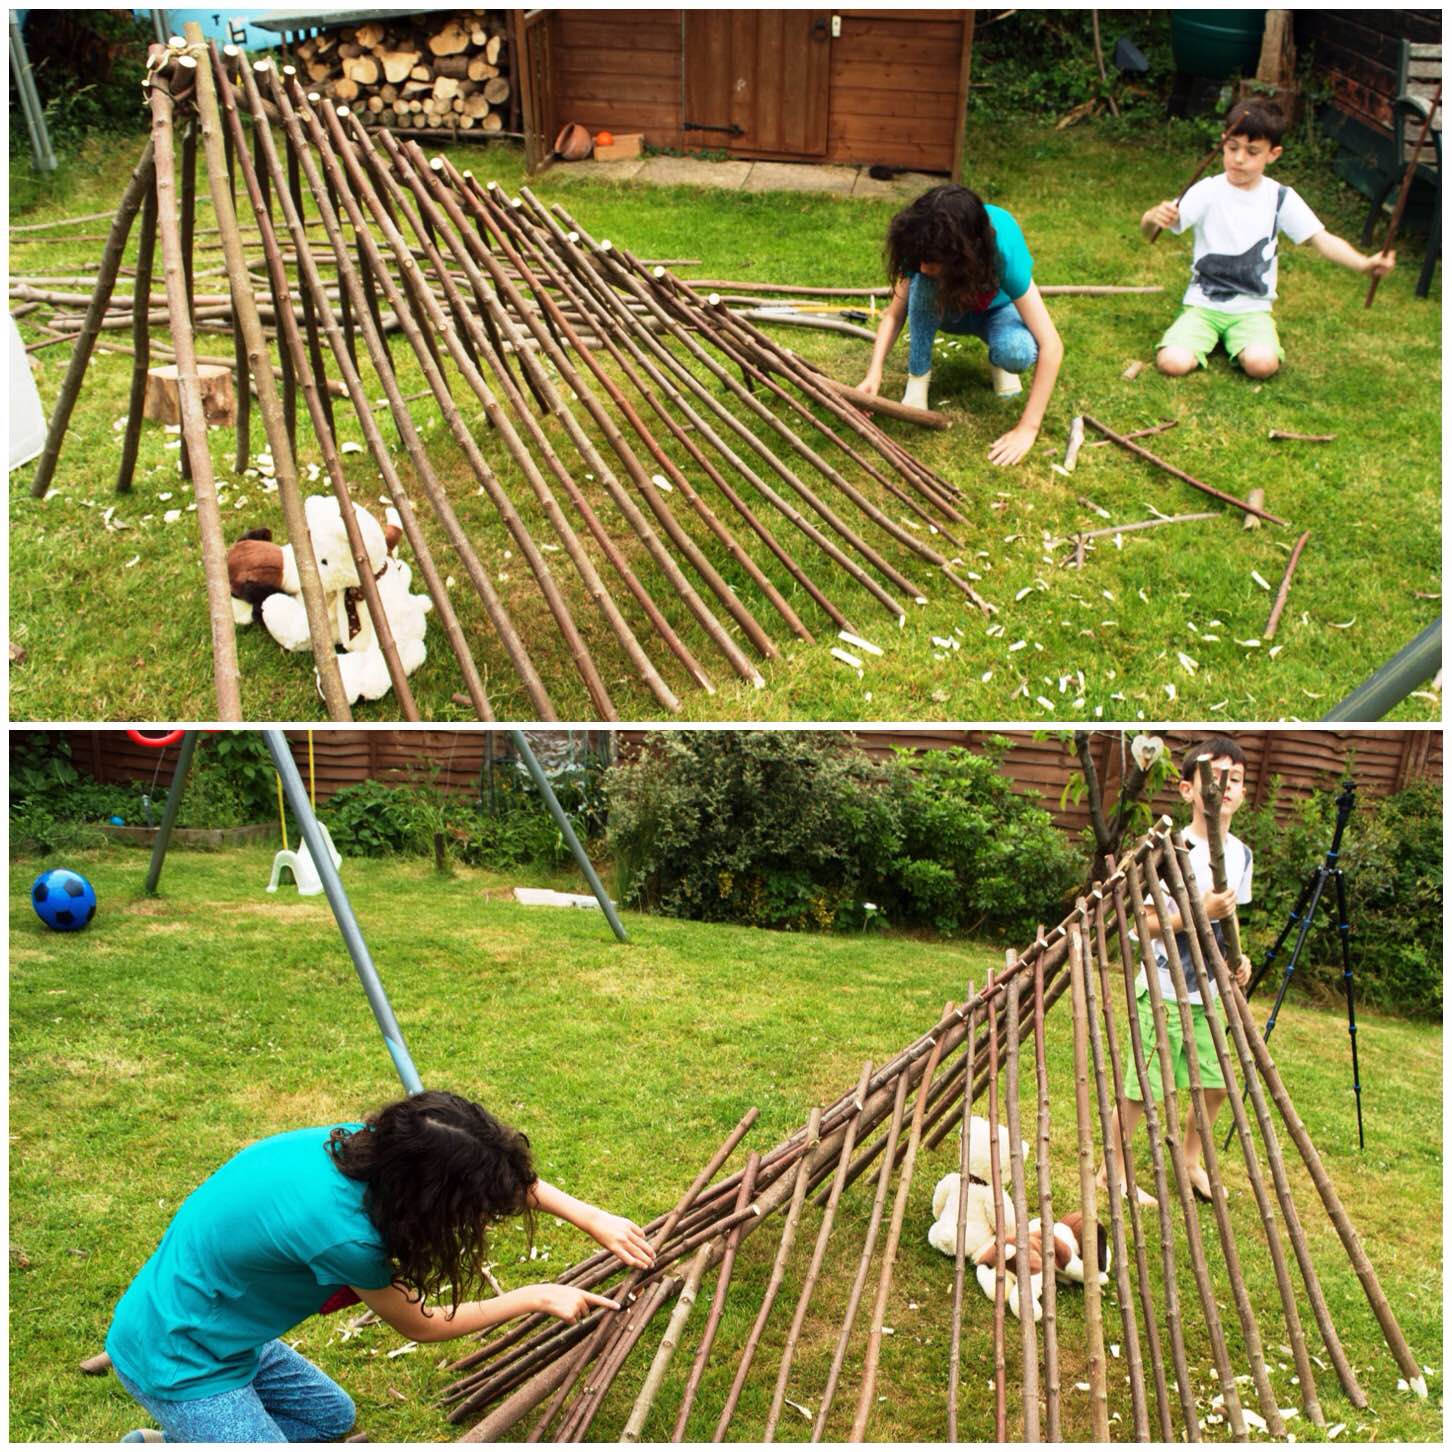
I was looking at the weather forecast for today and there was a possibility of thunderstorms in the afternoon. So for the 30 Day Challenge I thought a bit of shelter building learning was the order of the day.
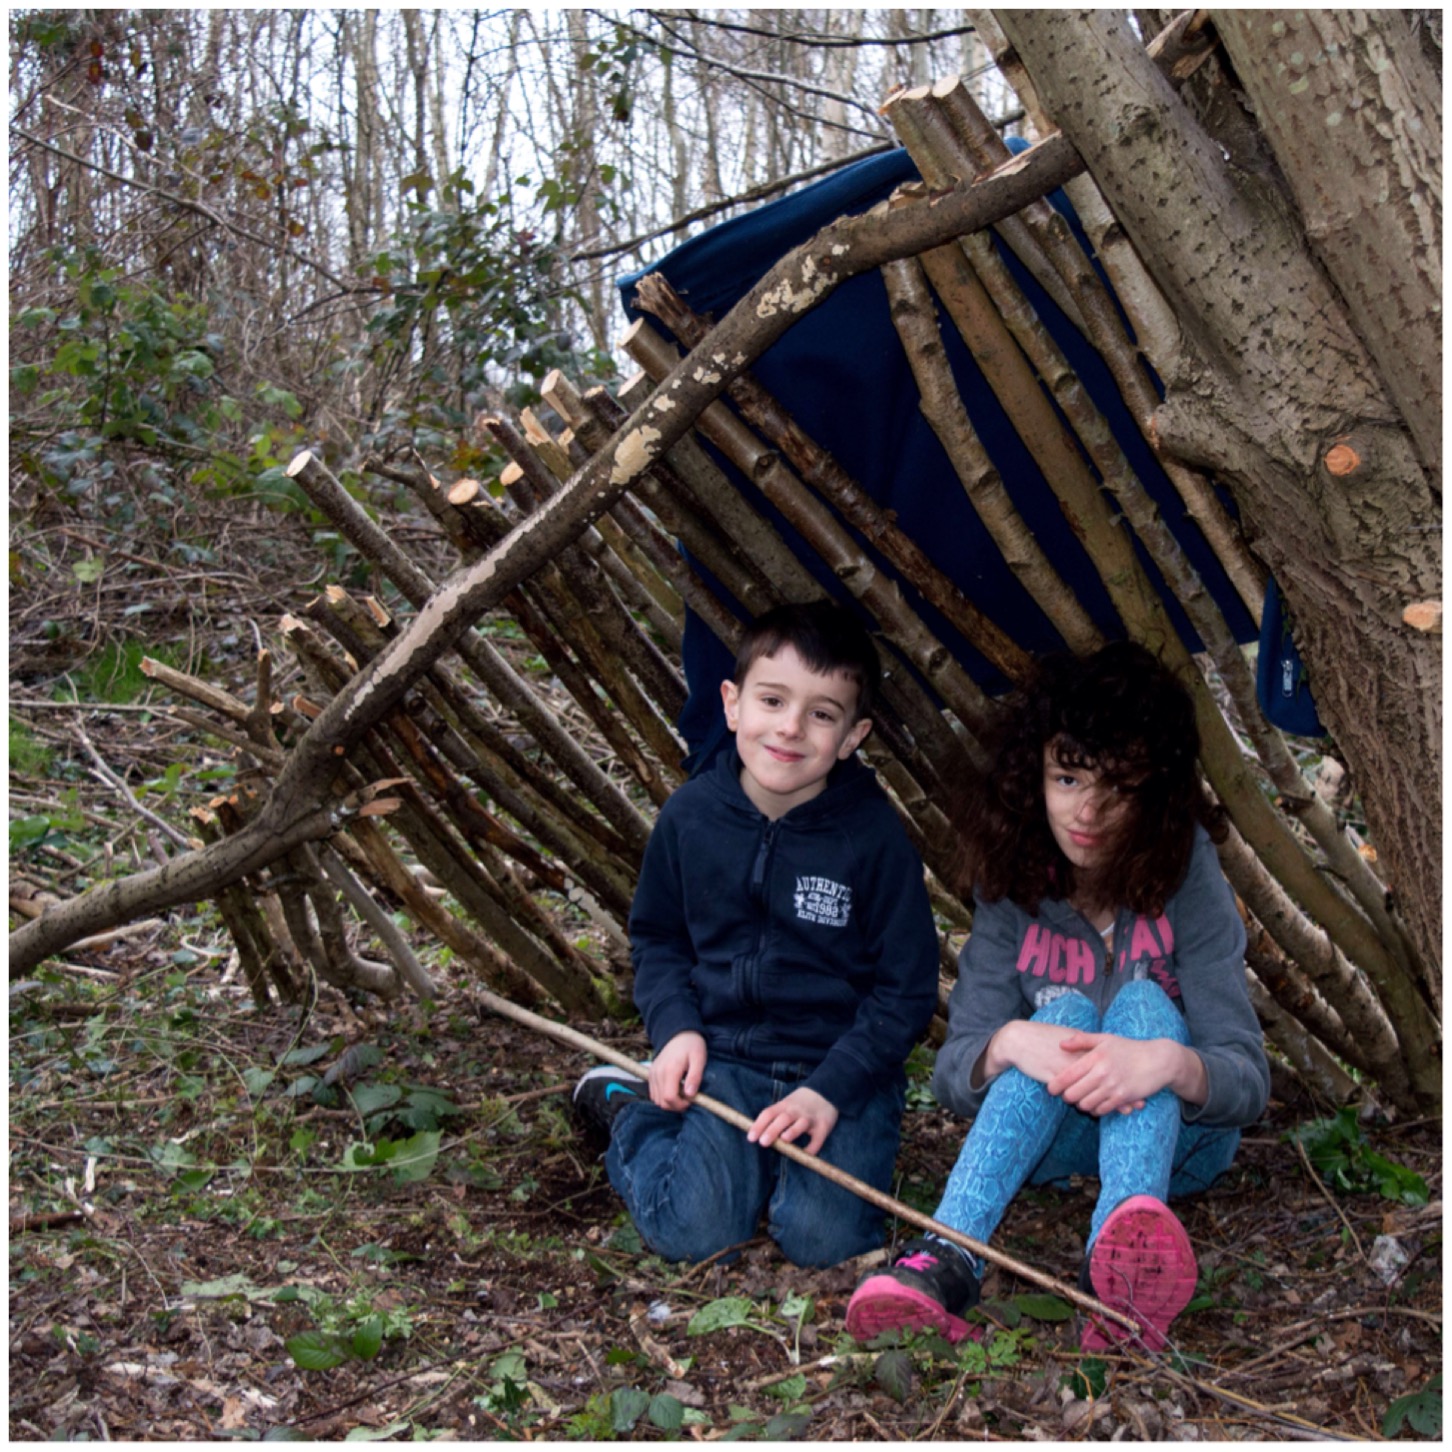
Proper playing
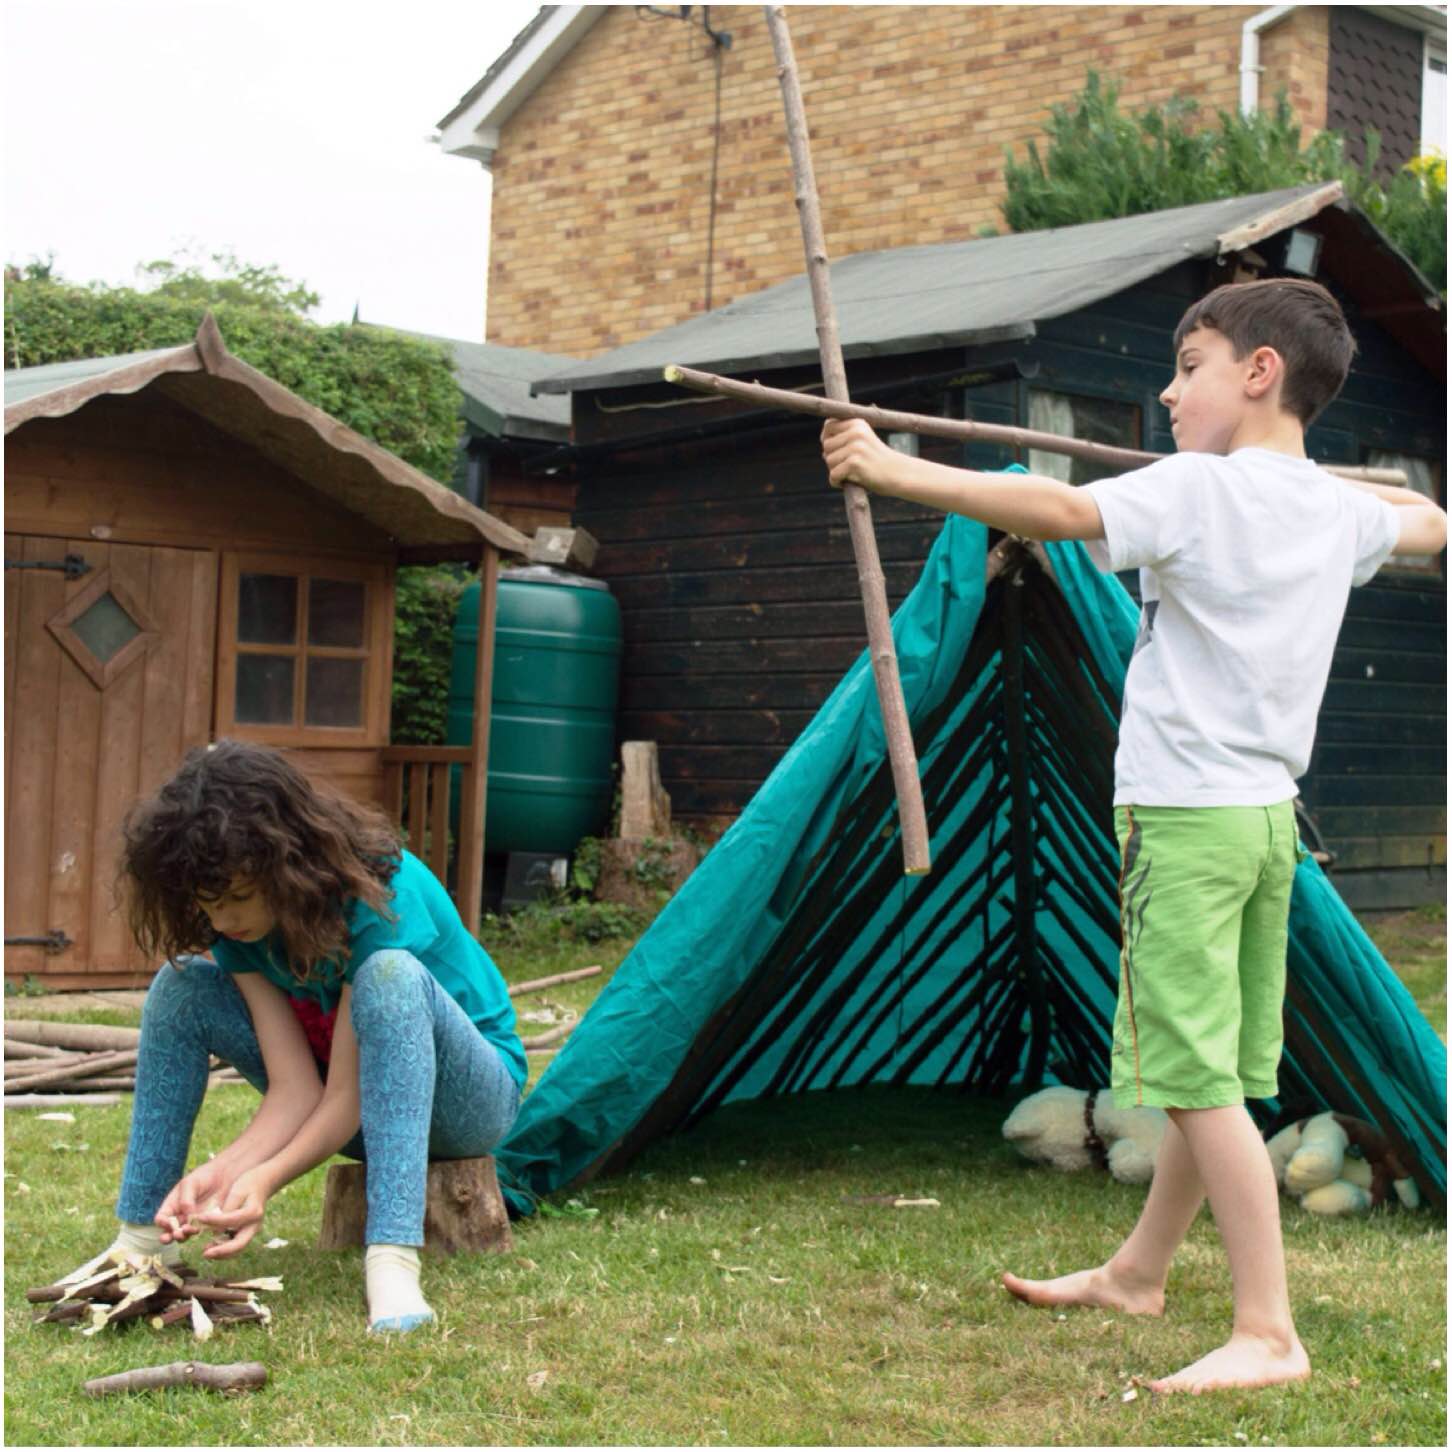
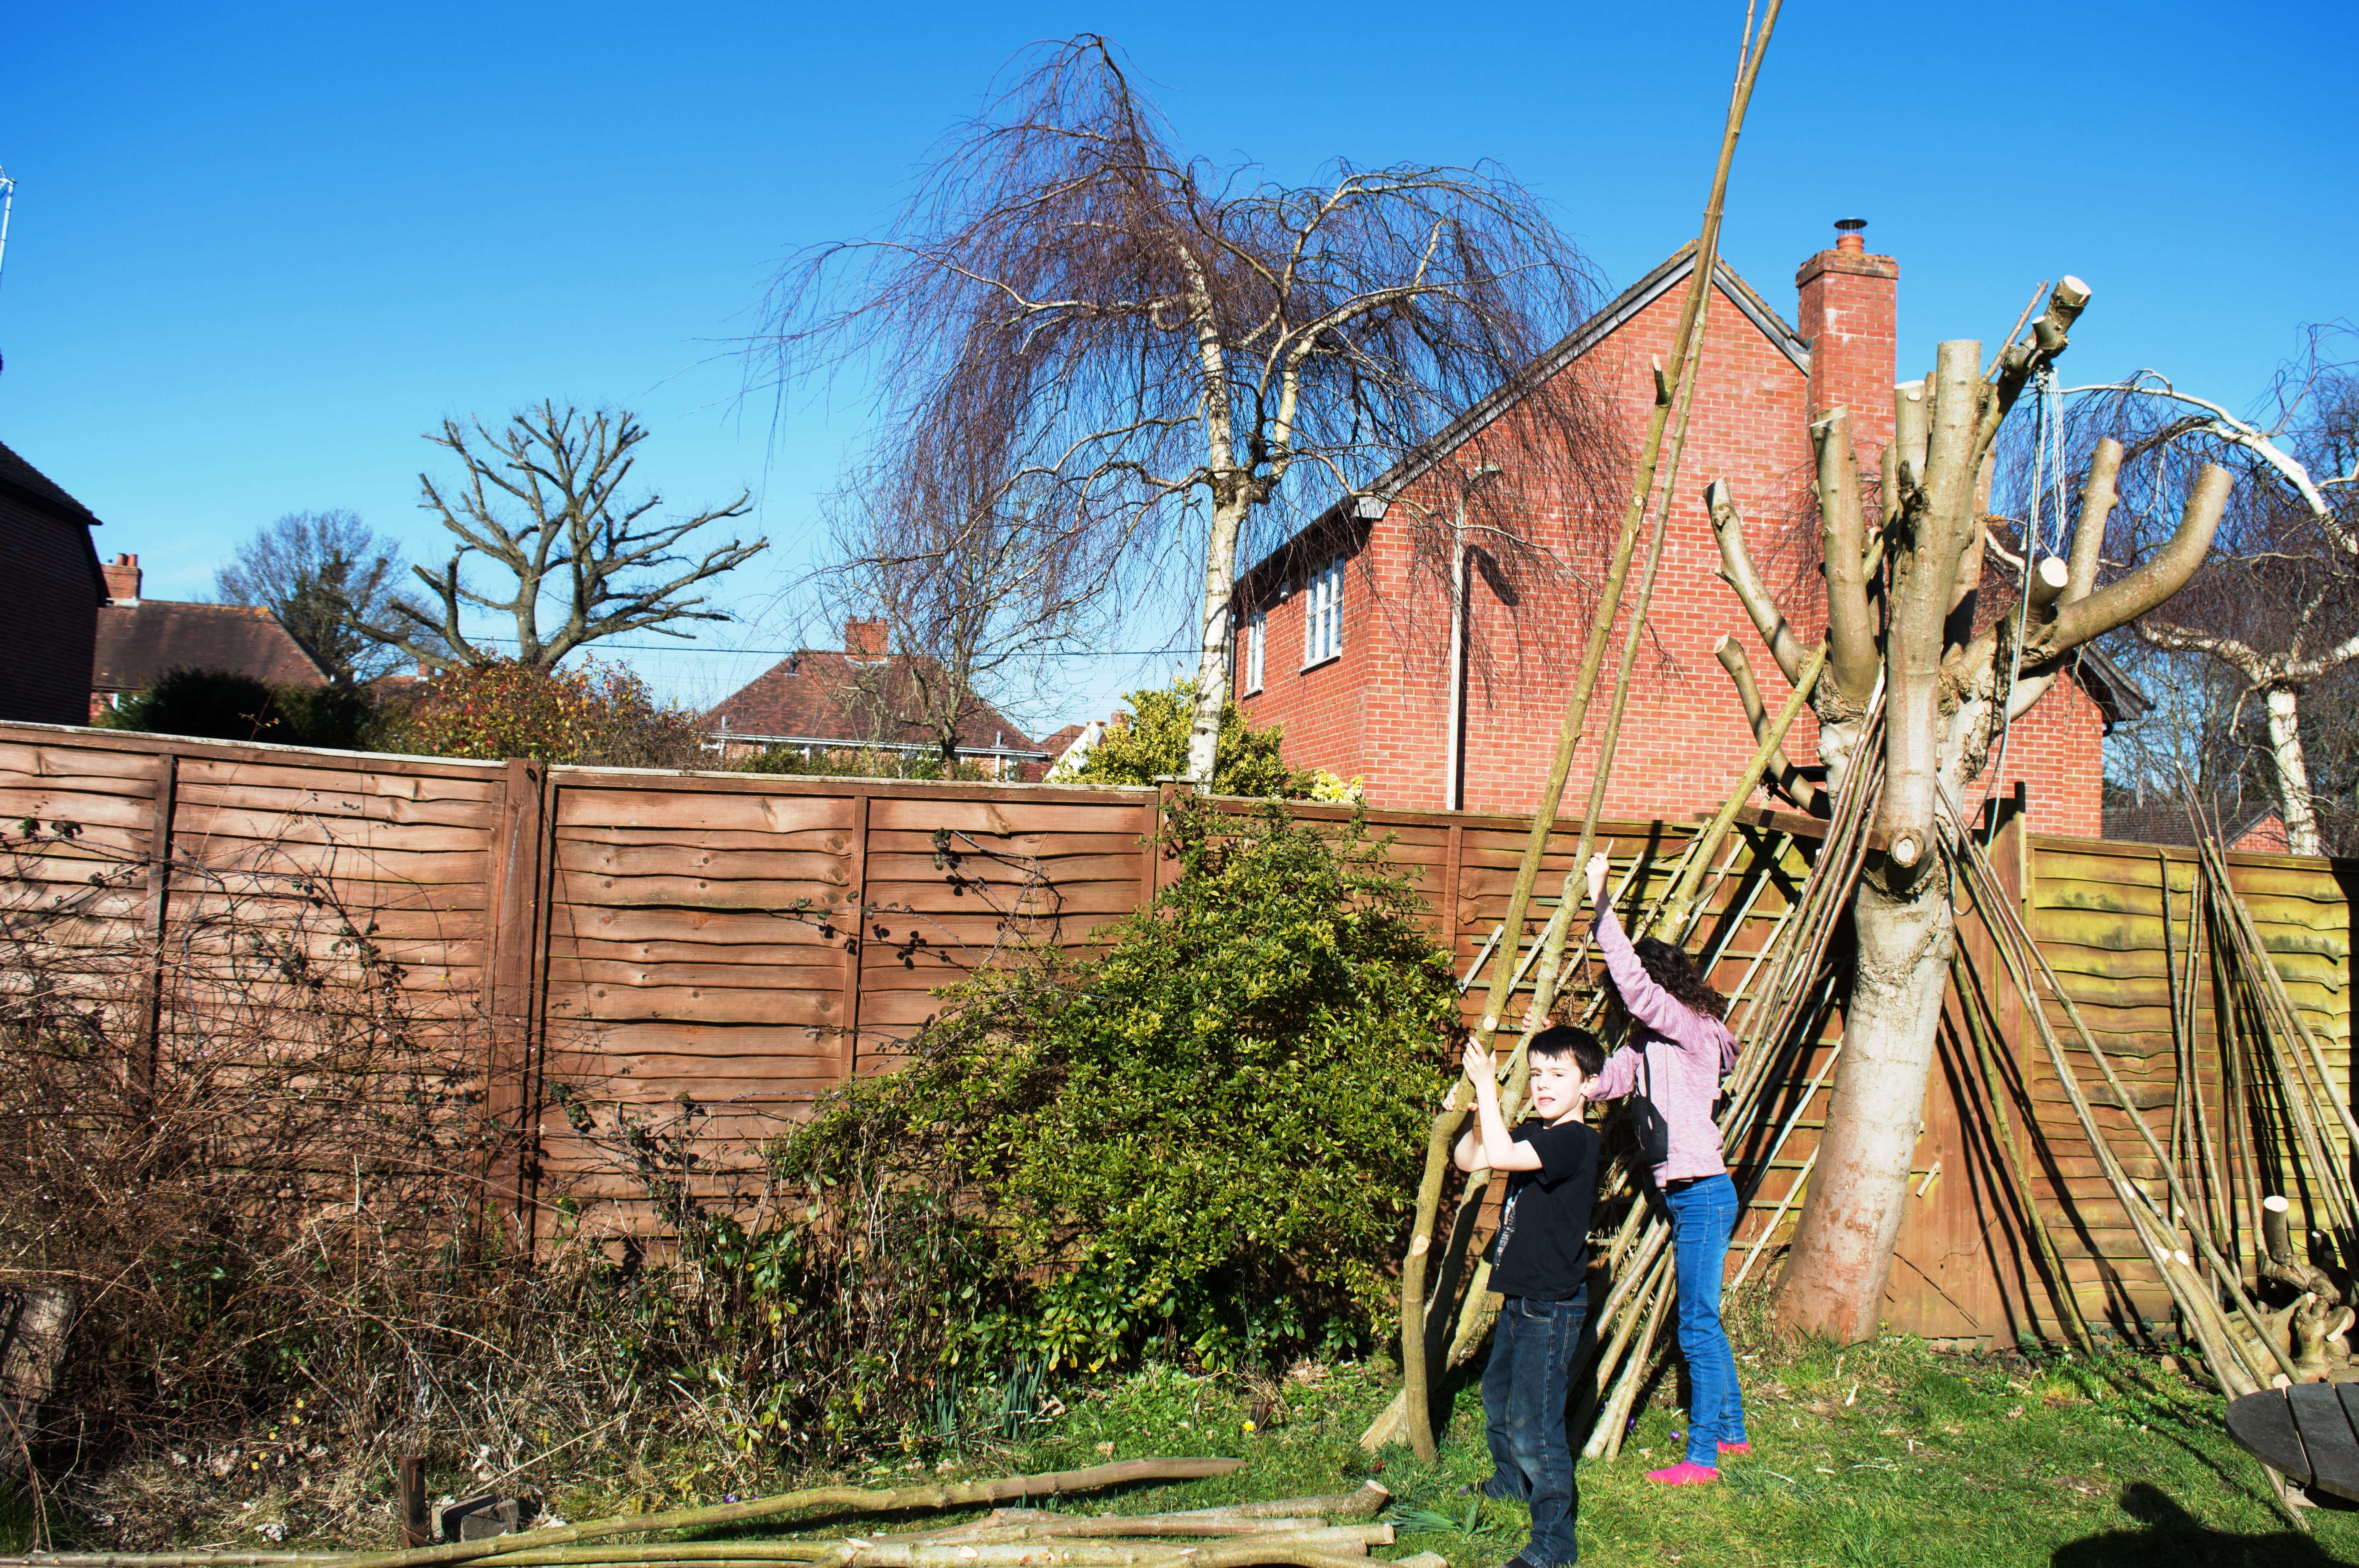
I have a load of sycamore rods in the garden from some pollarding I did last winter so decided to put them to use.
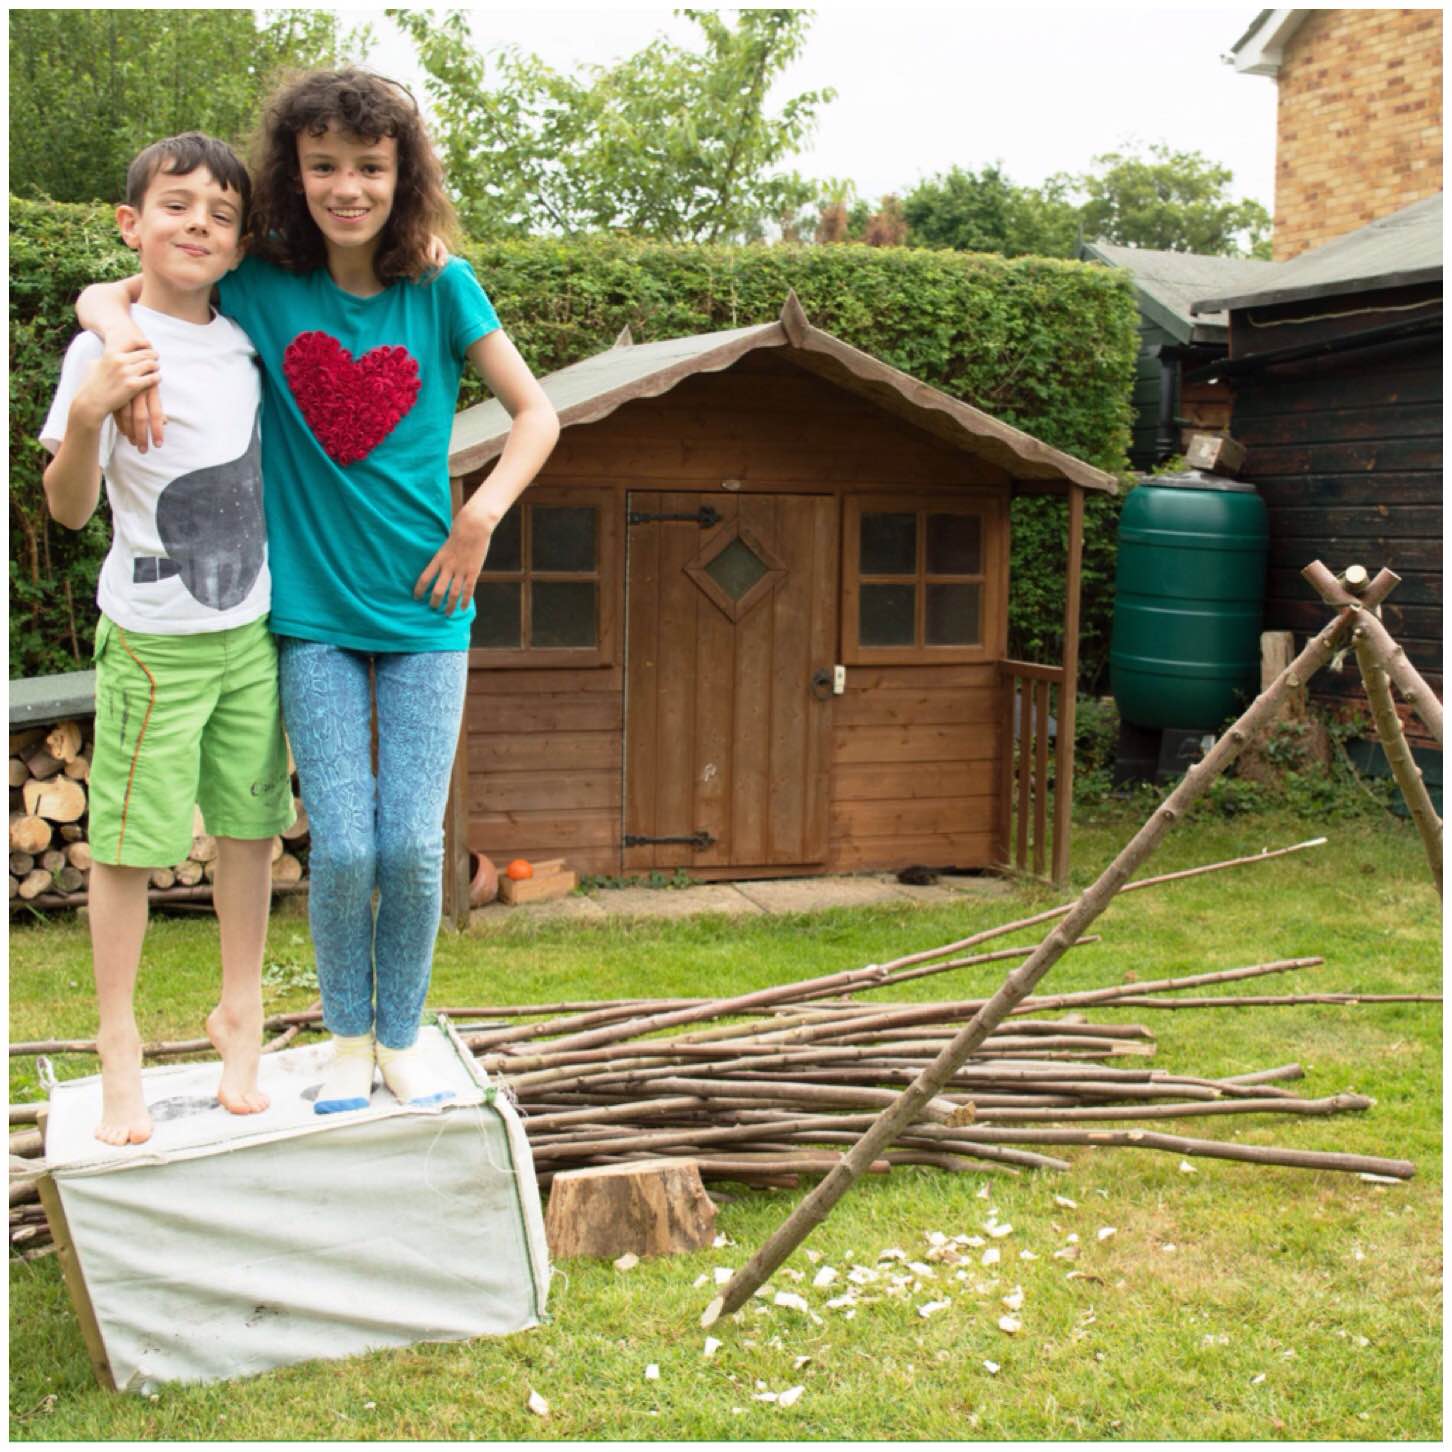
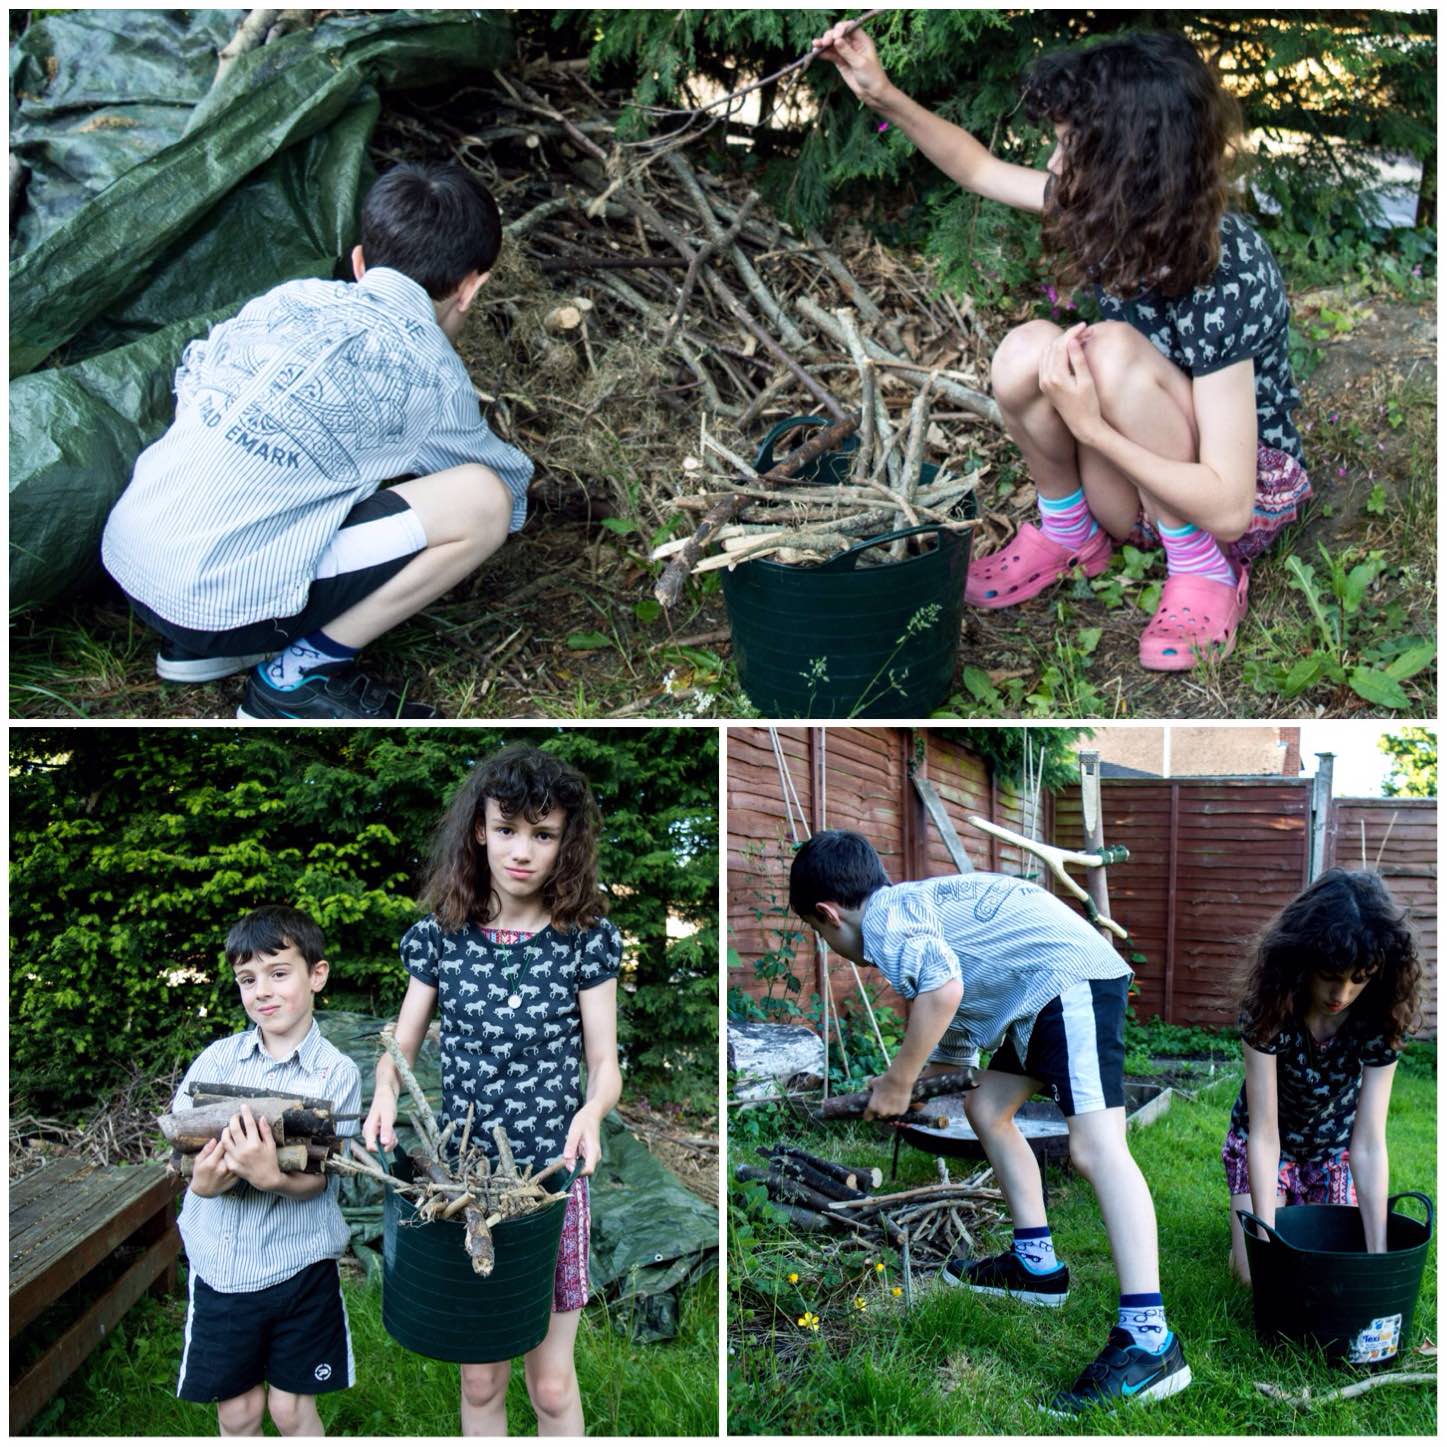
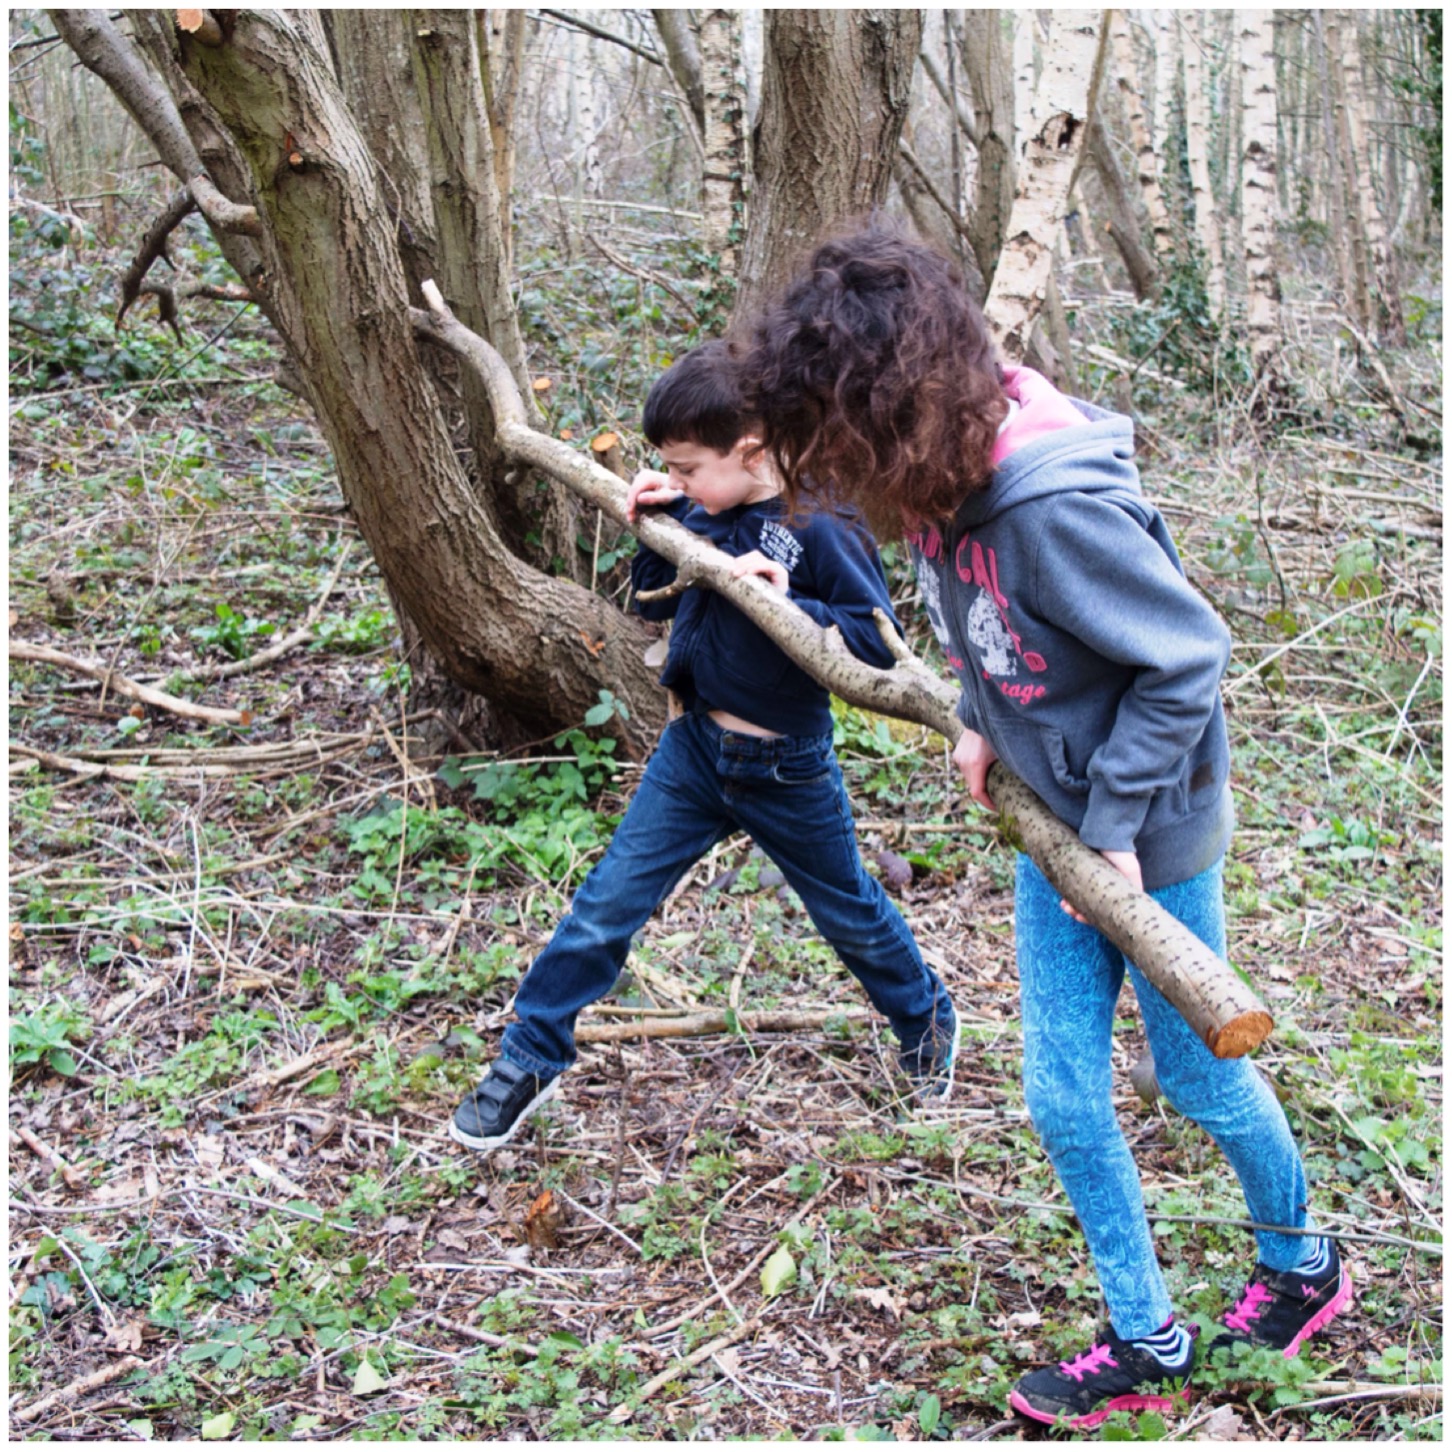
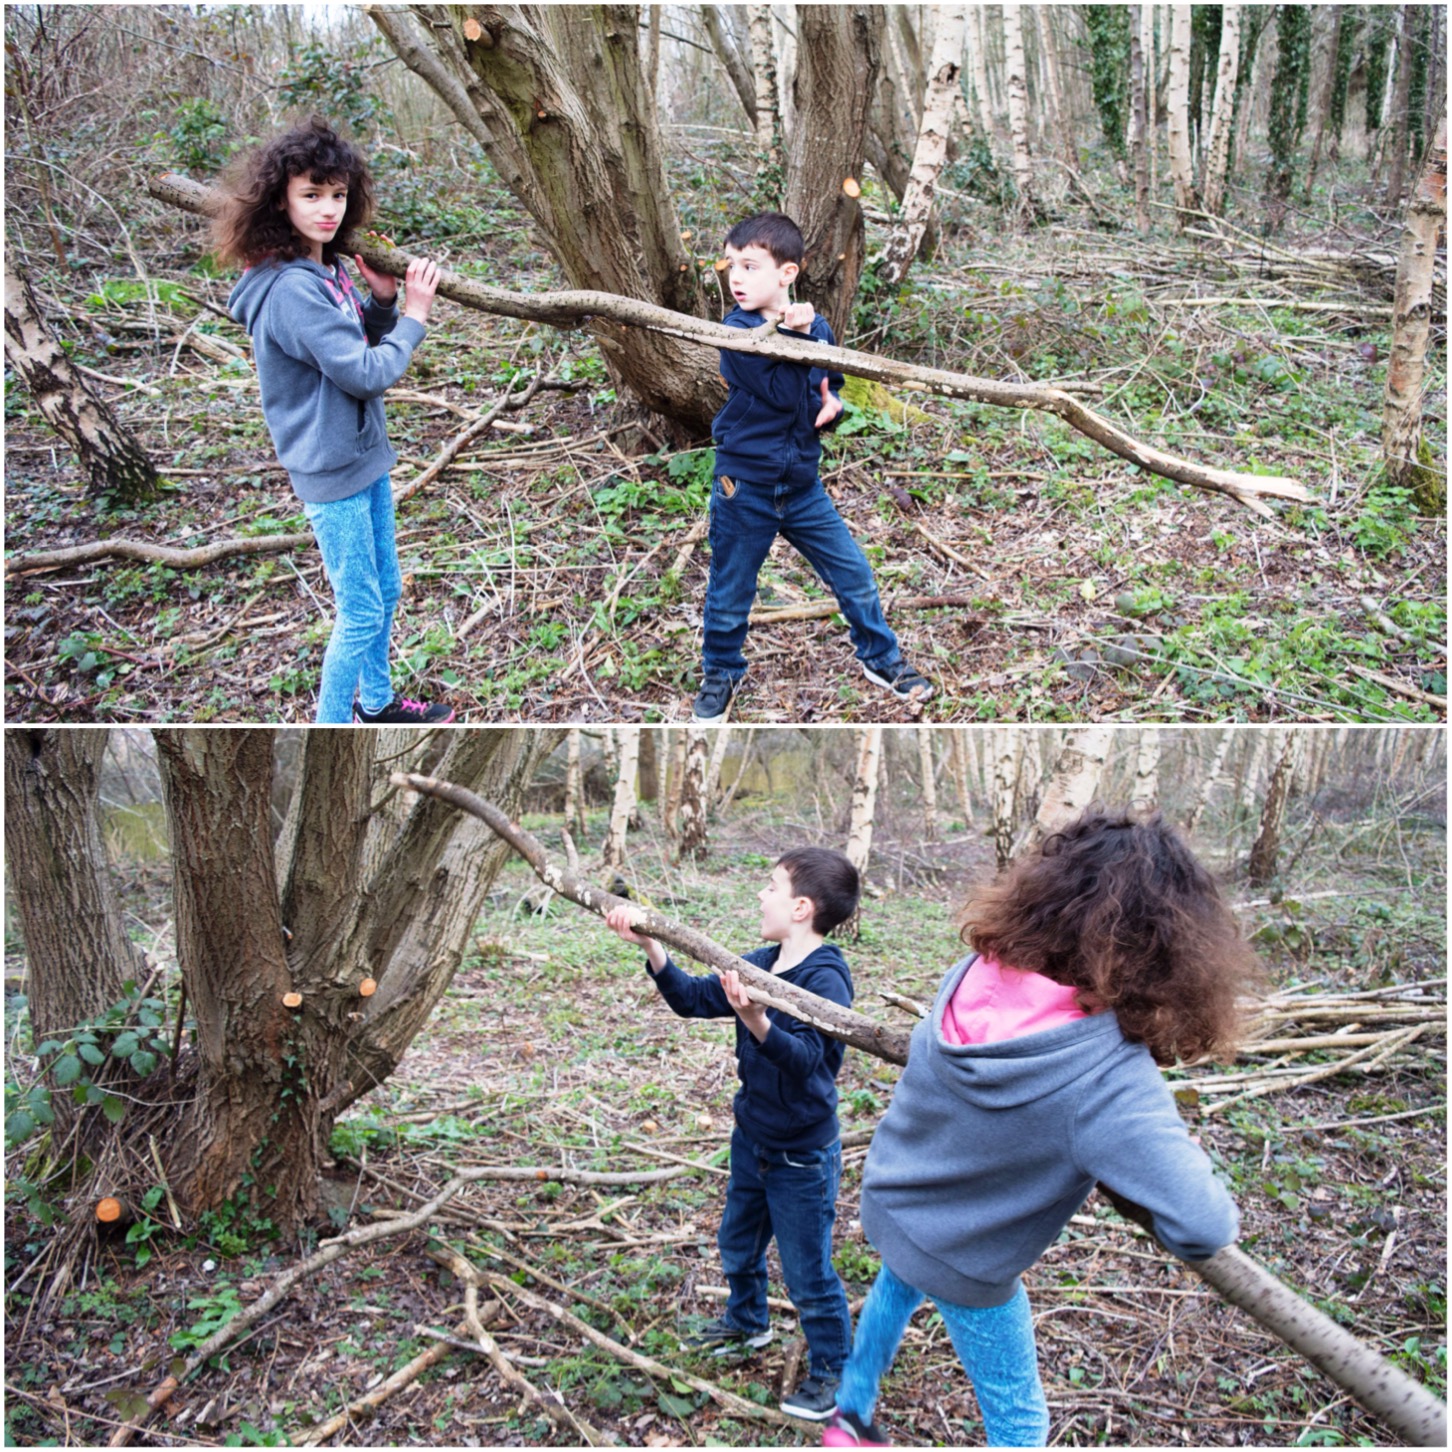
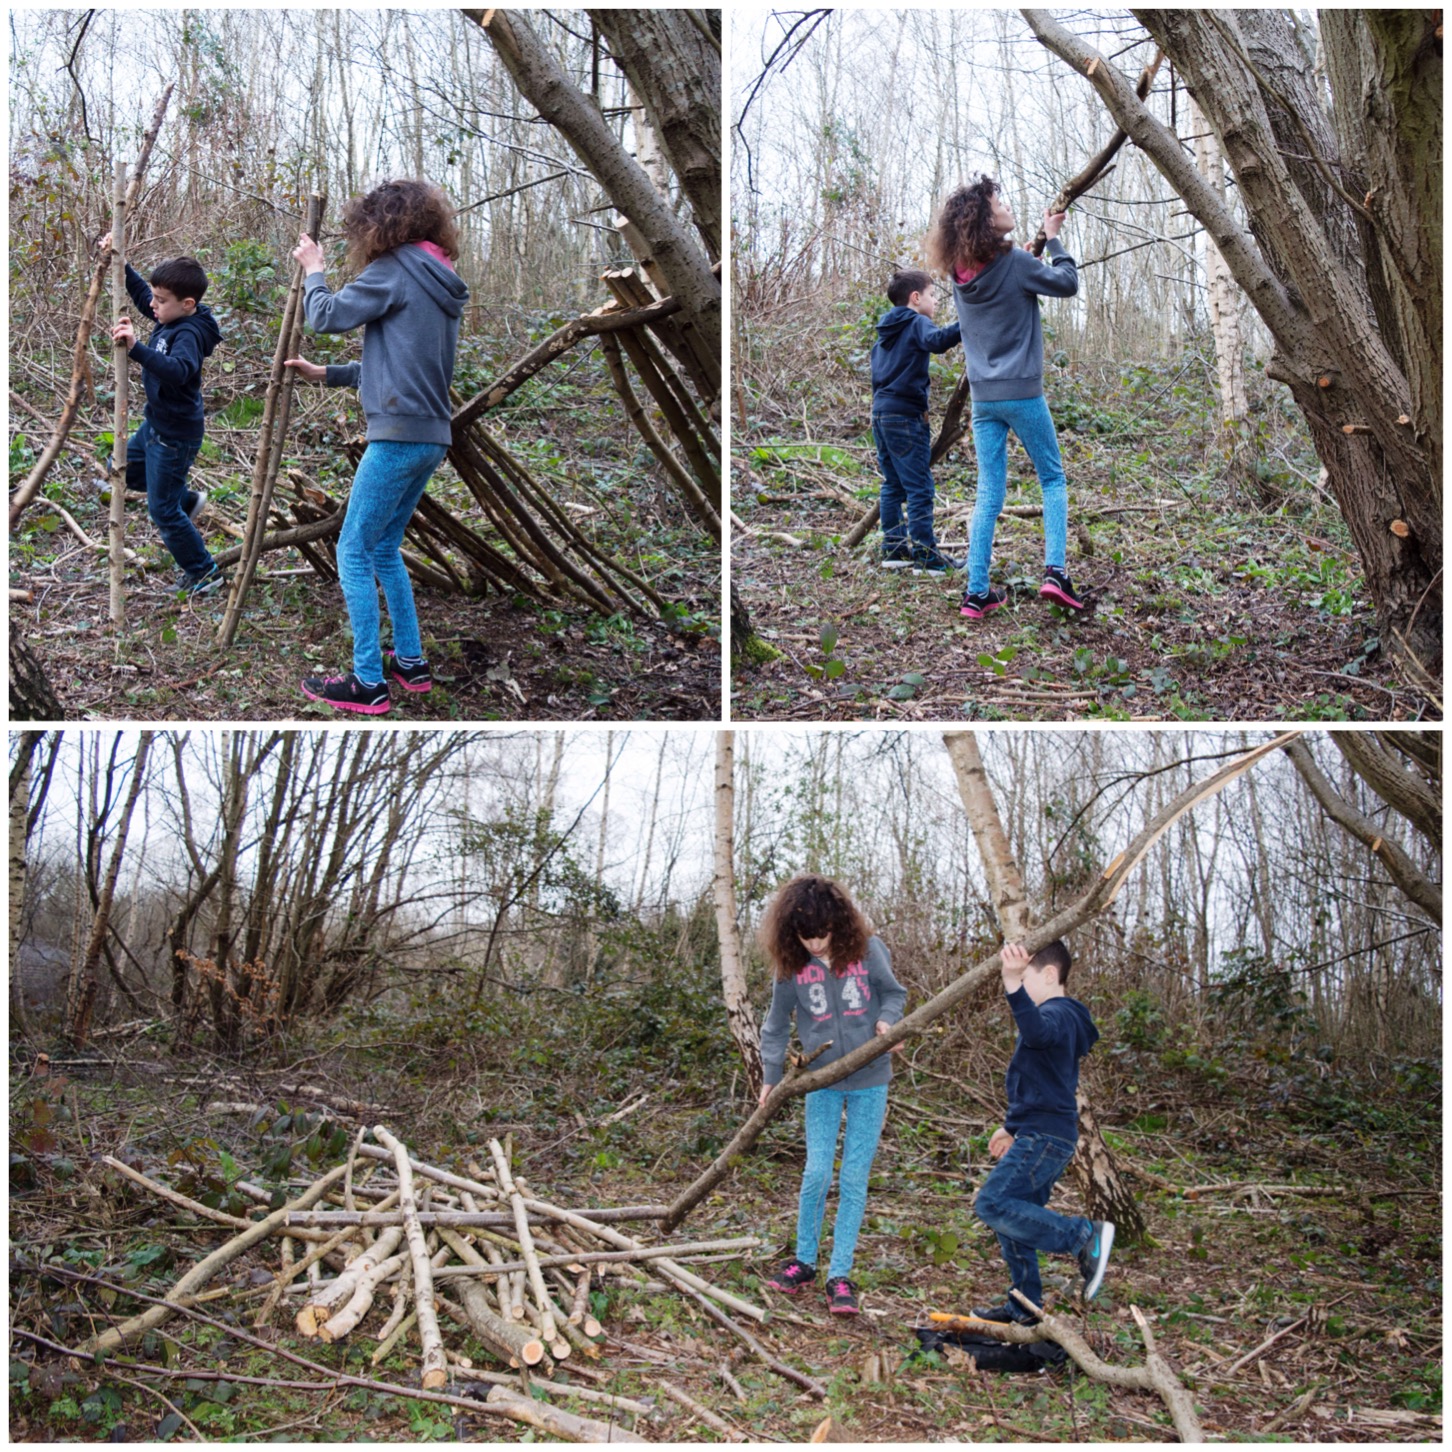
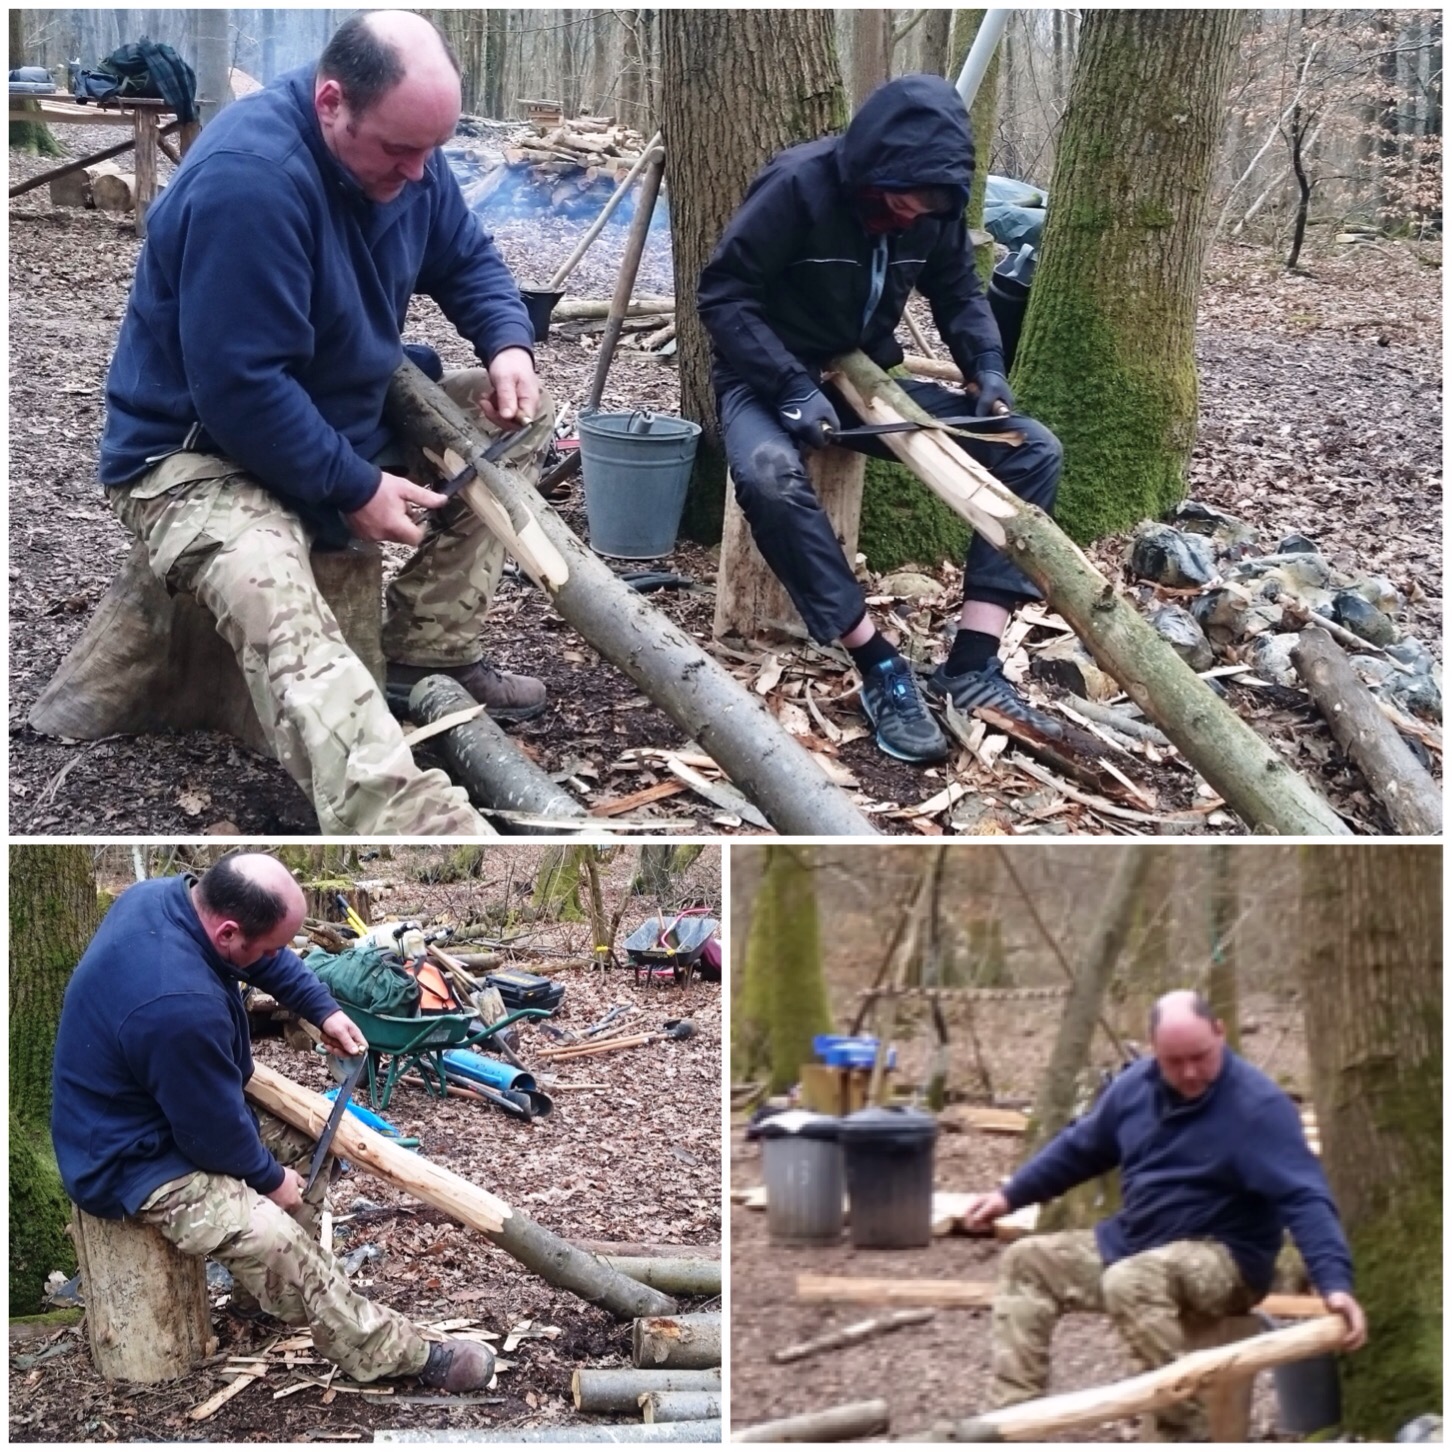
I prepared three interlocking poles for Catherine and Finlay to put up to start their shelter. Once they had locked them I got them to lash them together with a bit of paracord. Then they had to collect all the other poles together ready for constructing the shelter walls.
Set up and wood collection
I think you could say that they were happy with their haul 🙂
I think they are happy with their haul
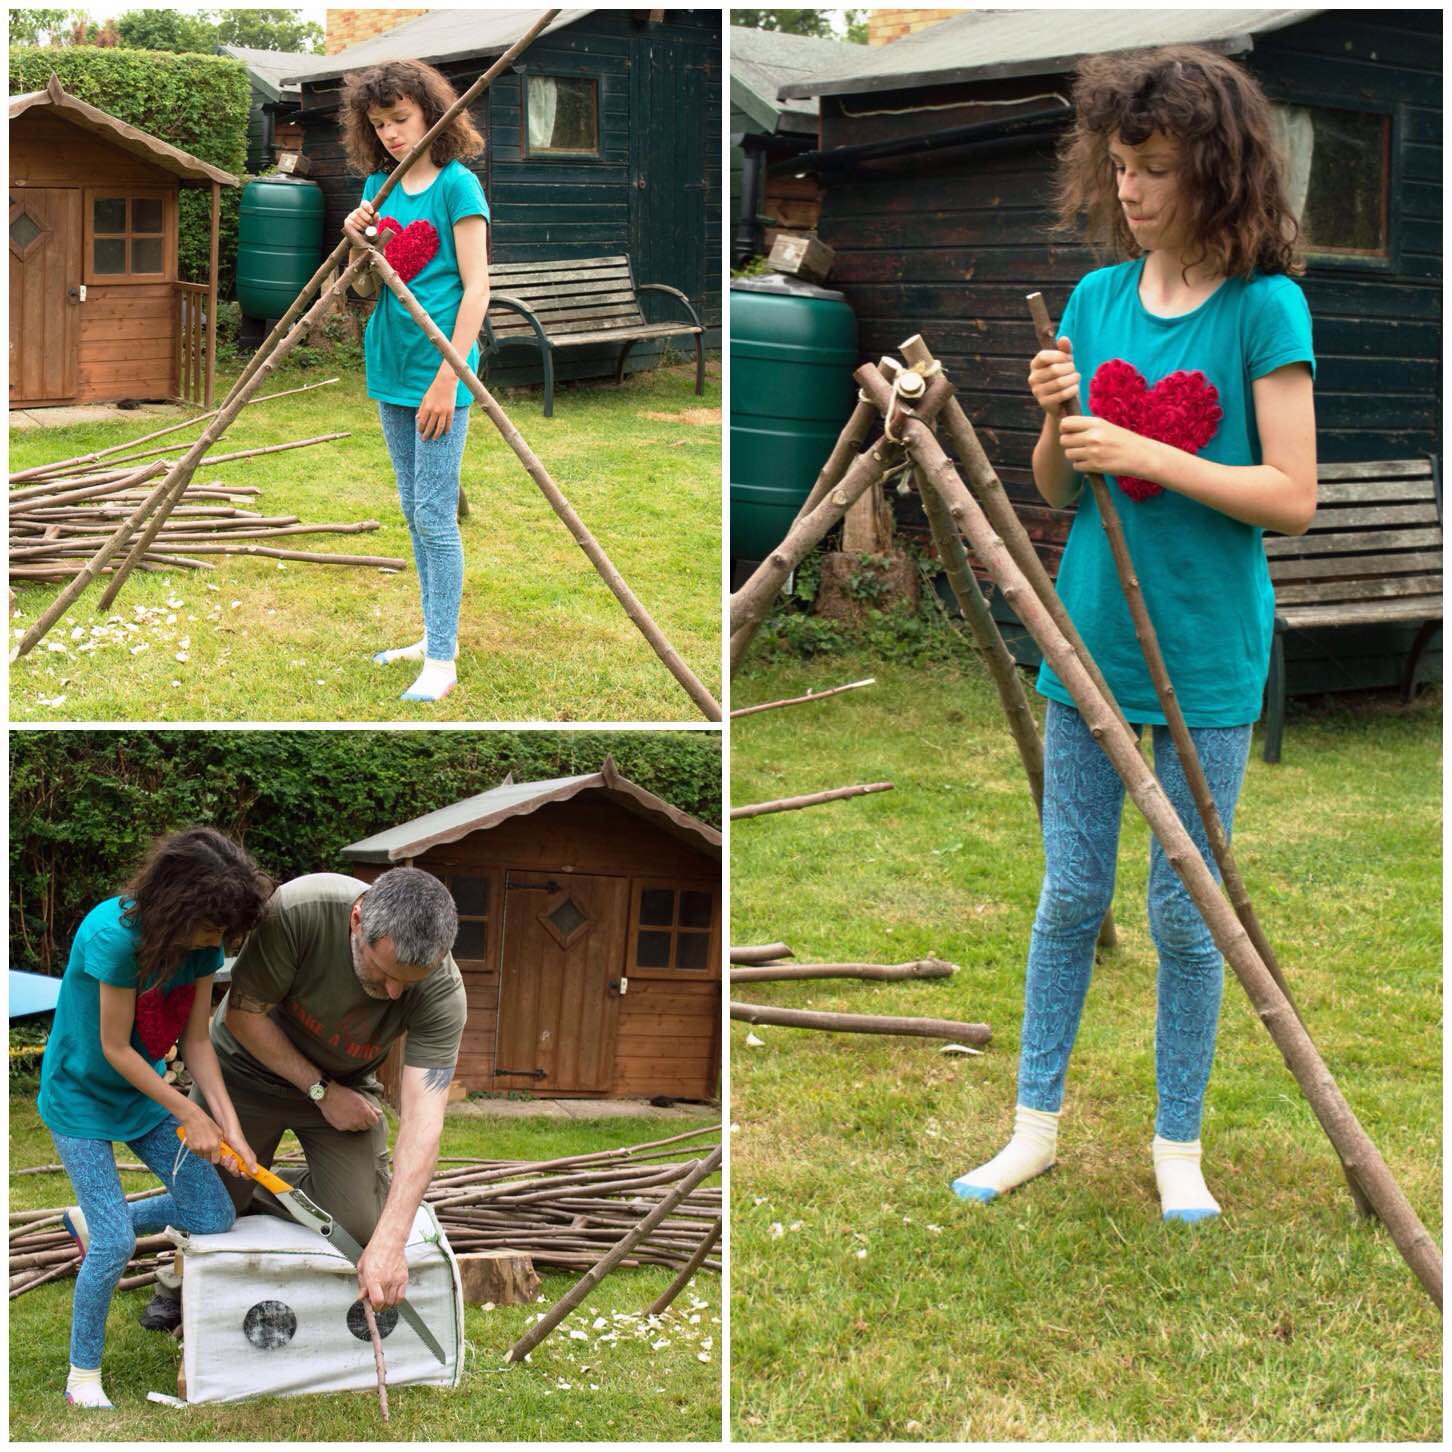
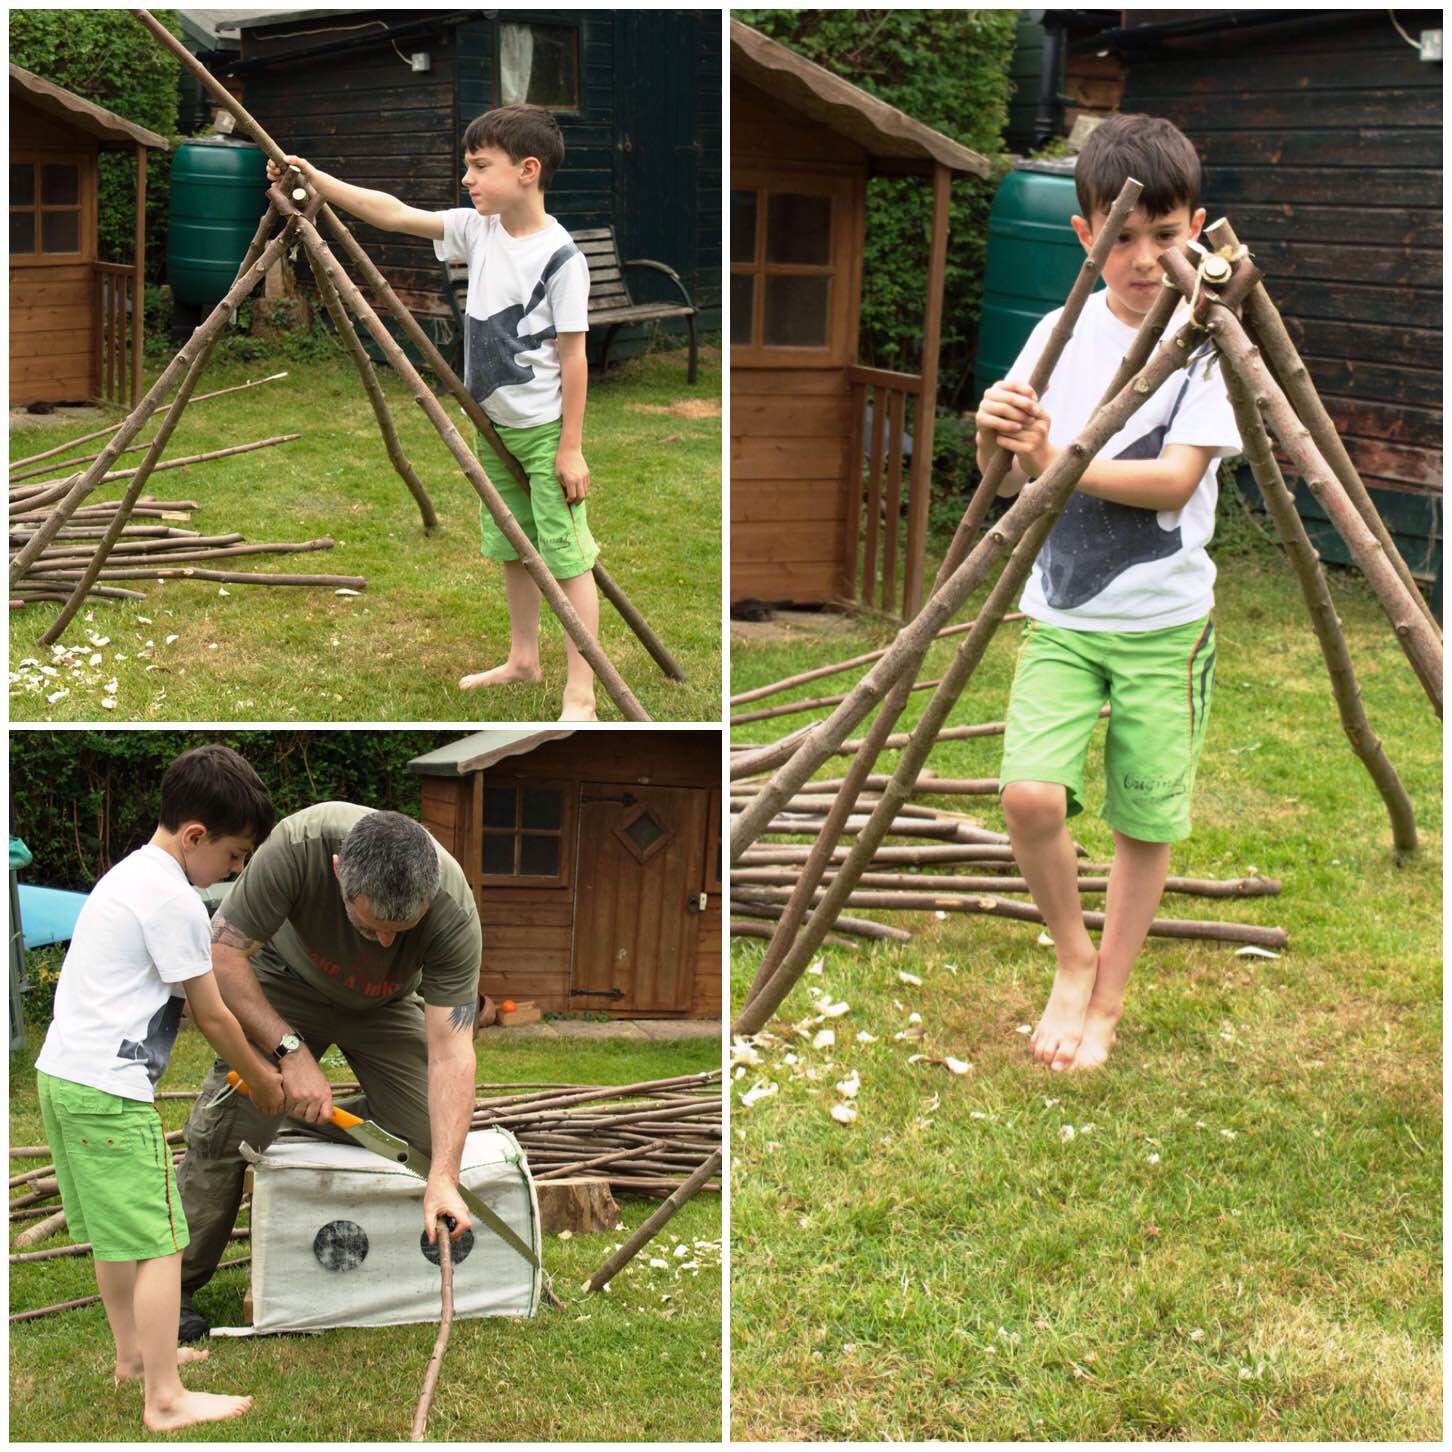
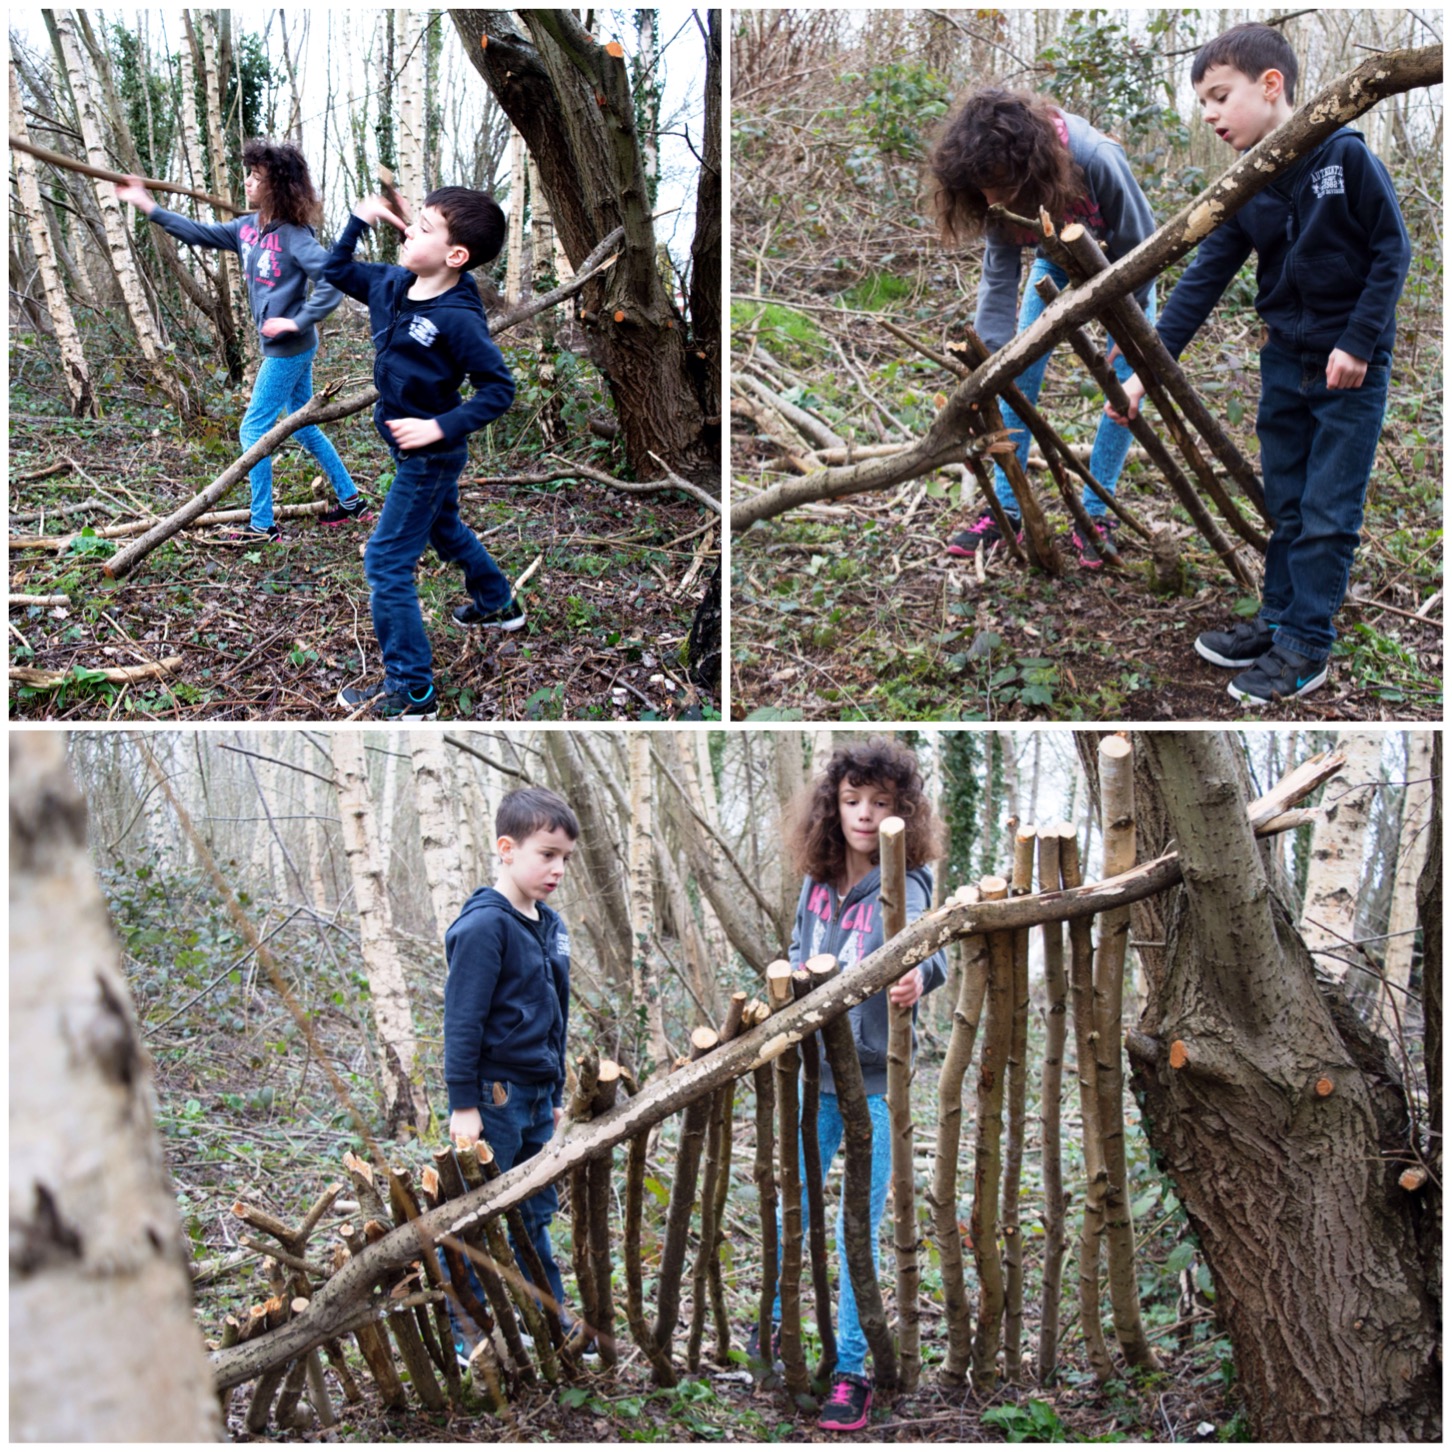
They took it in turns at first to select a rod, measure it, saw it with me and then place it in its correct position.
Catherine, measuring, sawing and fitting
This lasted for a little while alternating back and forth but I felt that this level of accuracy was testing for most adults never mind a couple of active kids so eventually I let them off to play elsewhere and cracked on with this bit myself.
Finlay , measuring, sawing and fitting
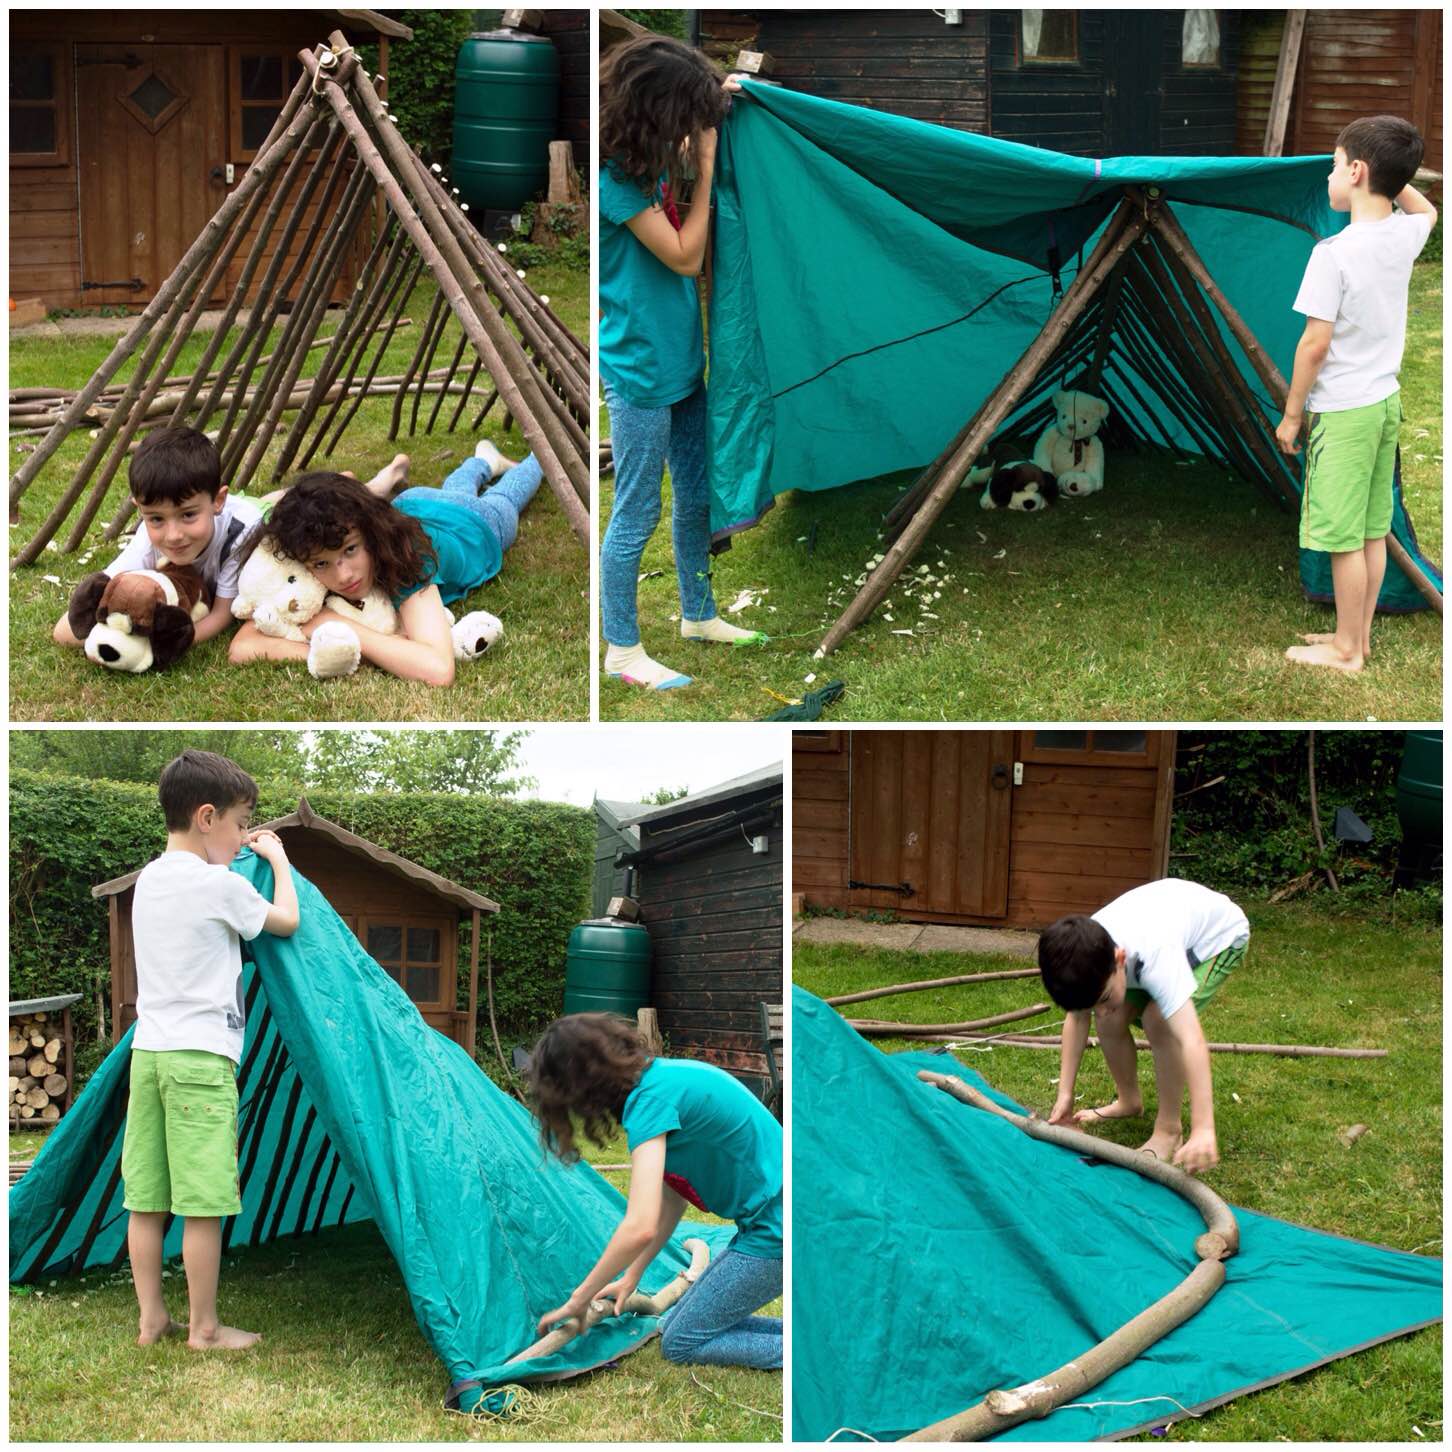
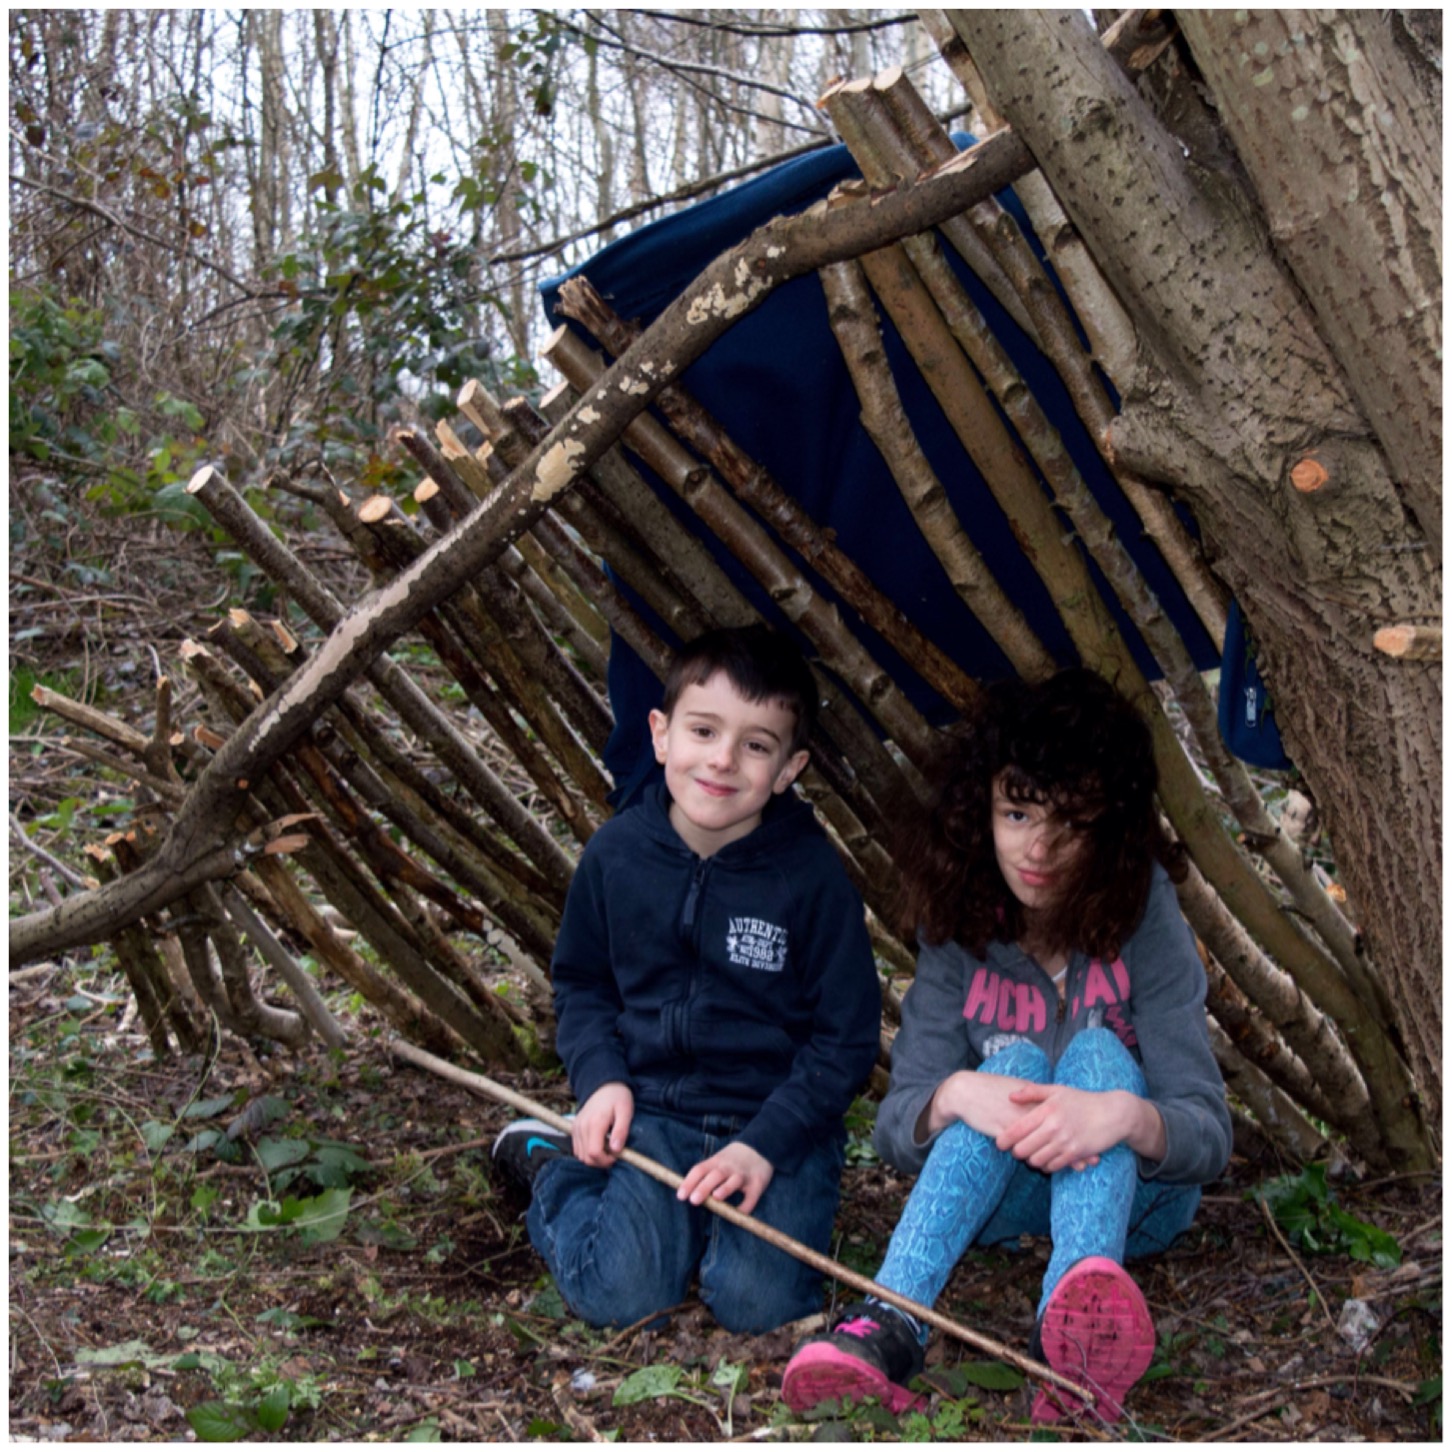
As I neared the end I got Catherine and Finlay back involved finishing the tail of the shelter off.
Eventually the final touches to the frame
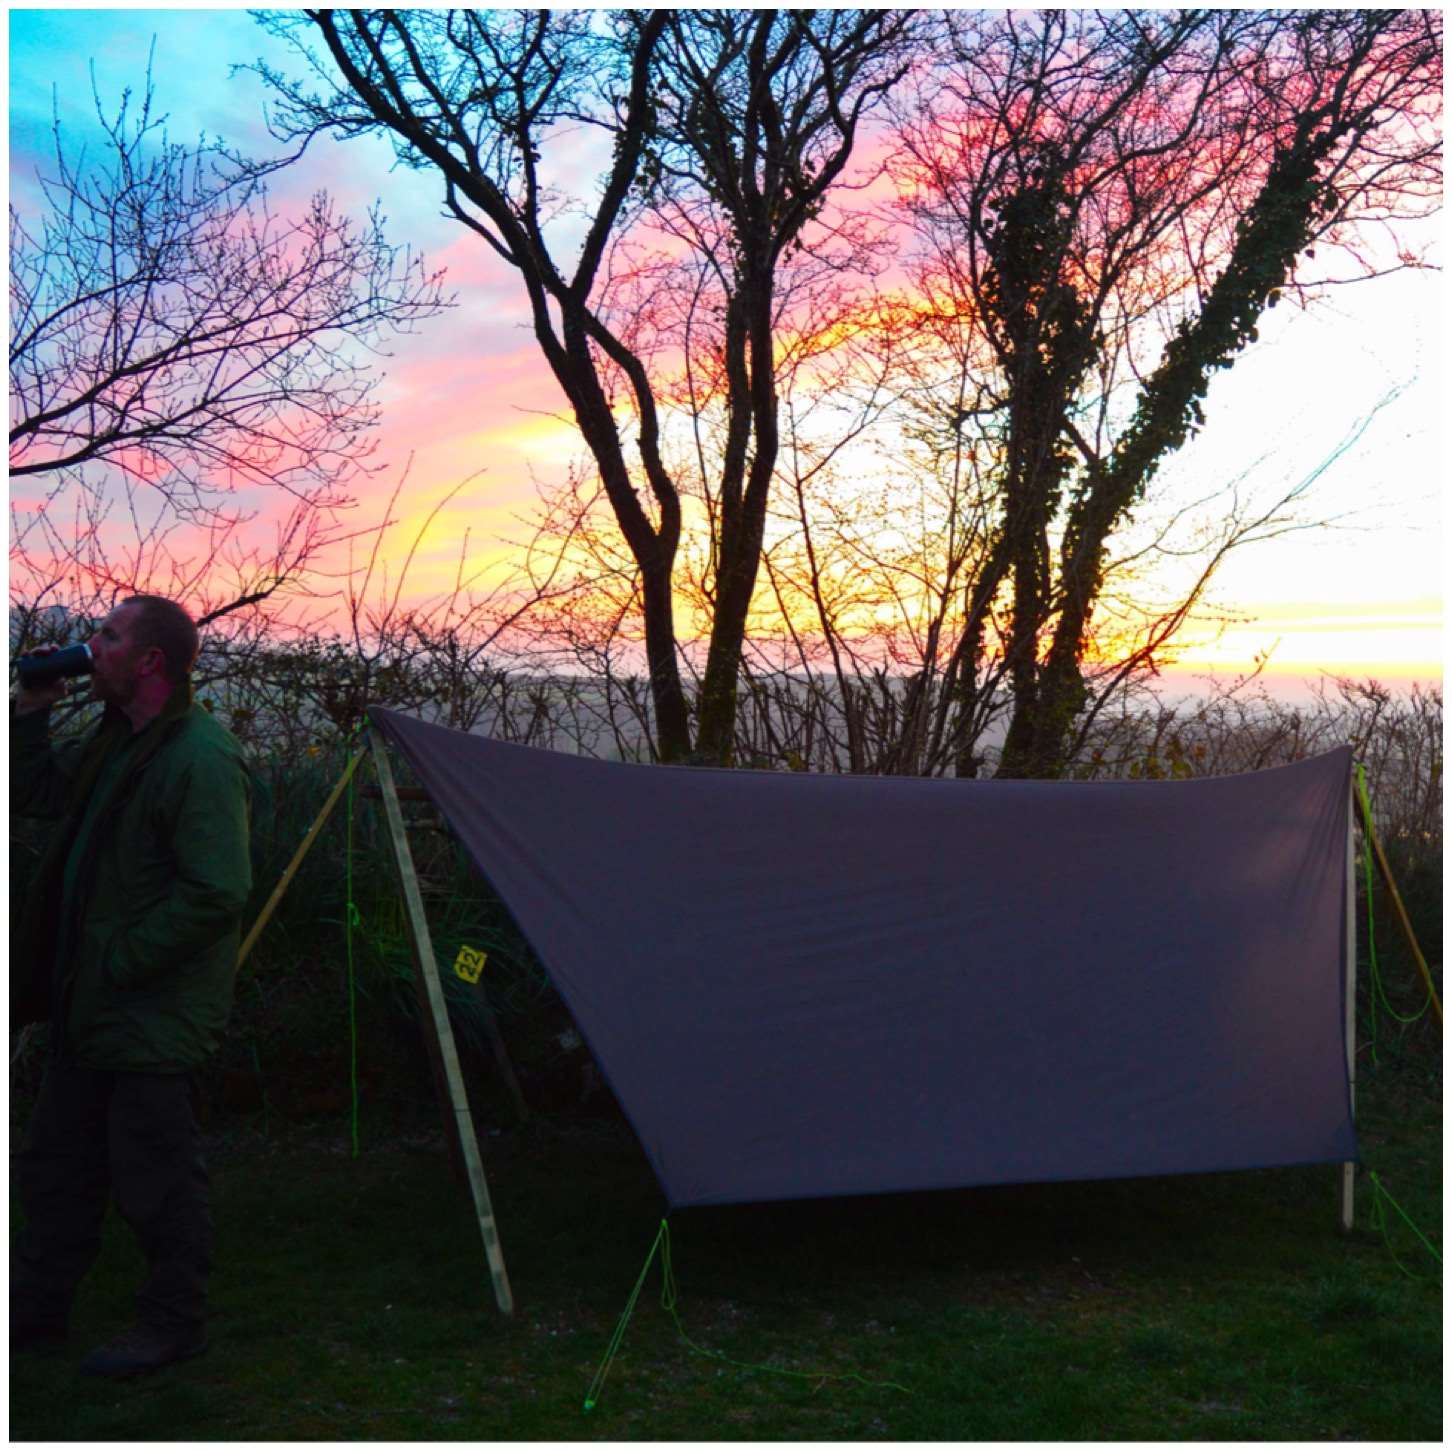
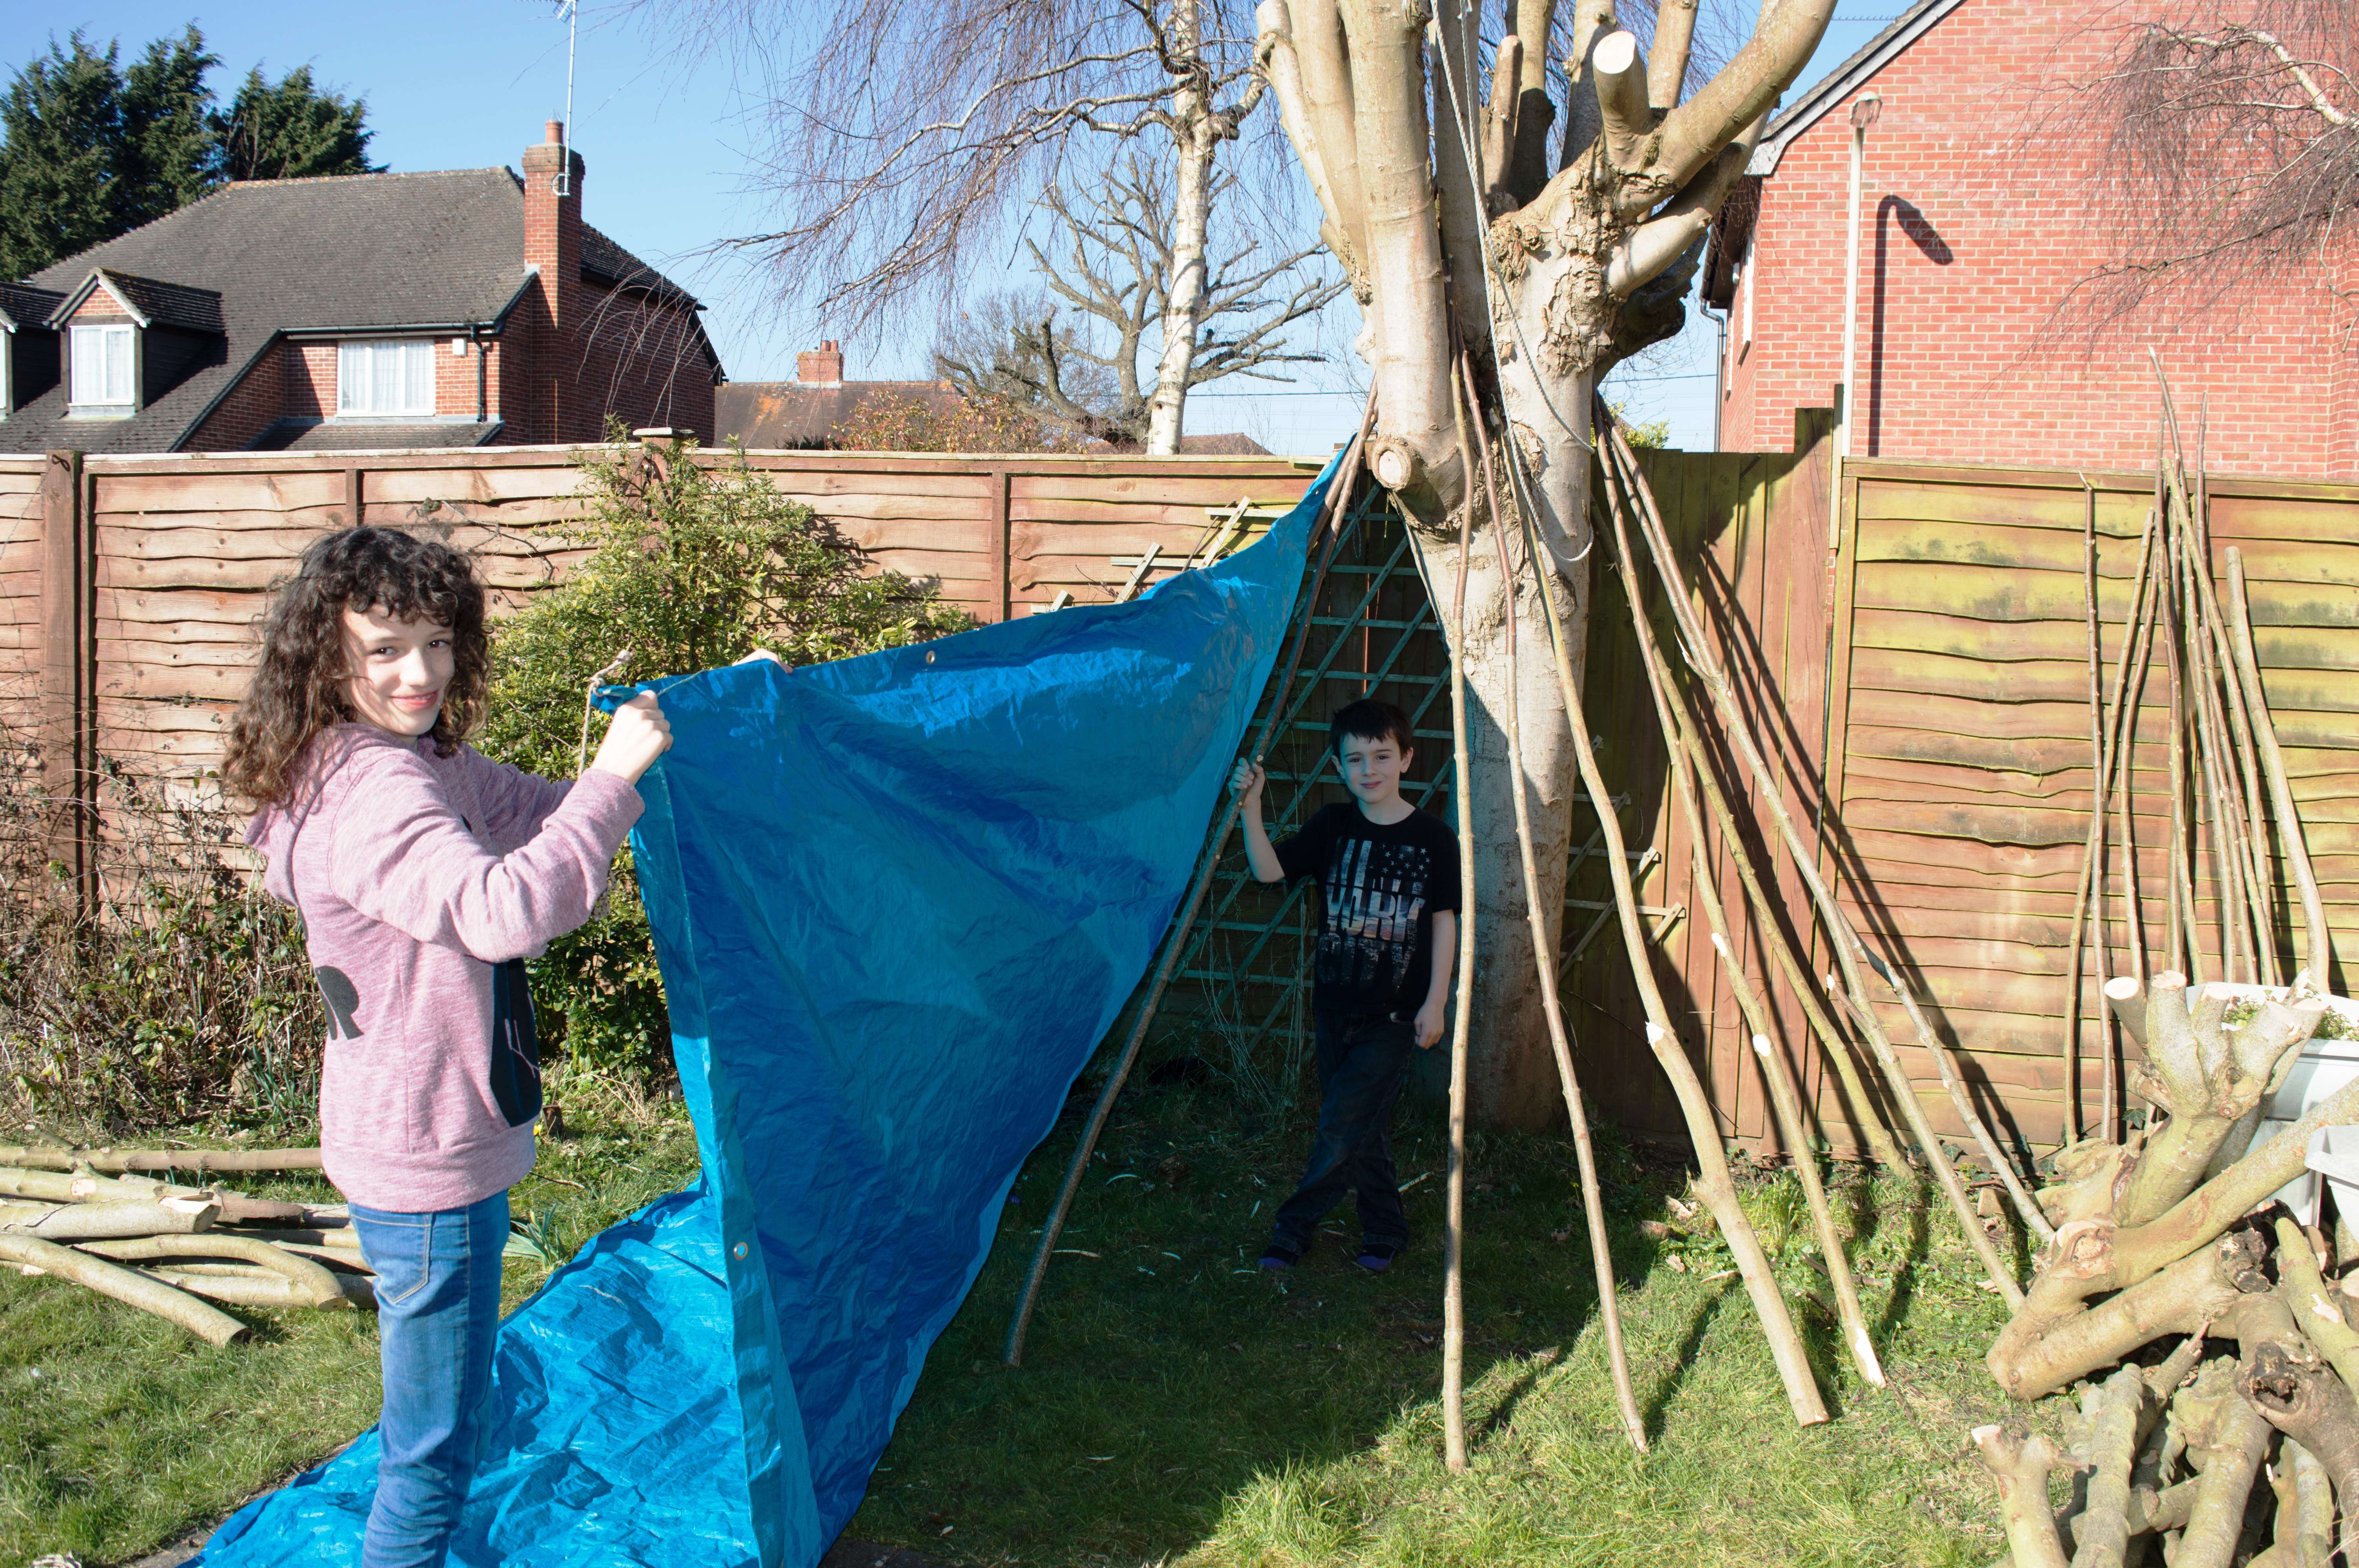
Shelter building takes time so for tonight we just put a tarp over it secured down with some logs. In a day or two we will cover the shelter with some spruce boughs and give it a soft bed – but that is for another post.
A tarp for tonight
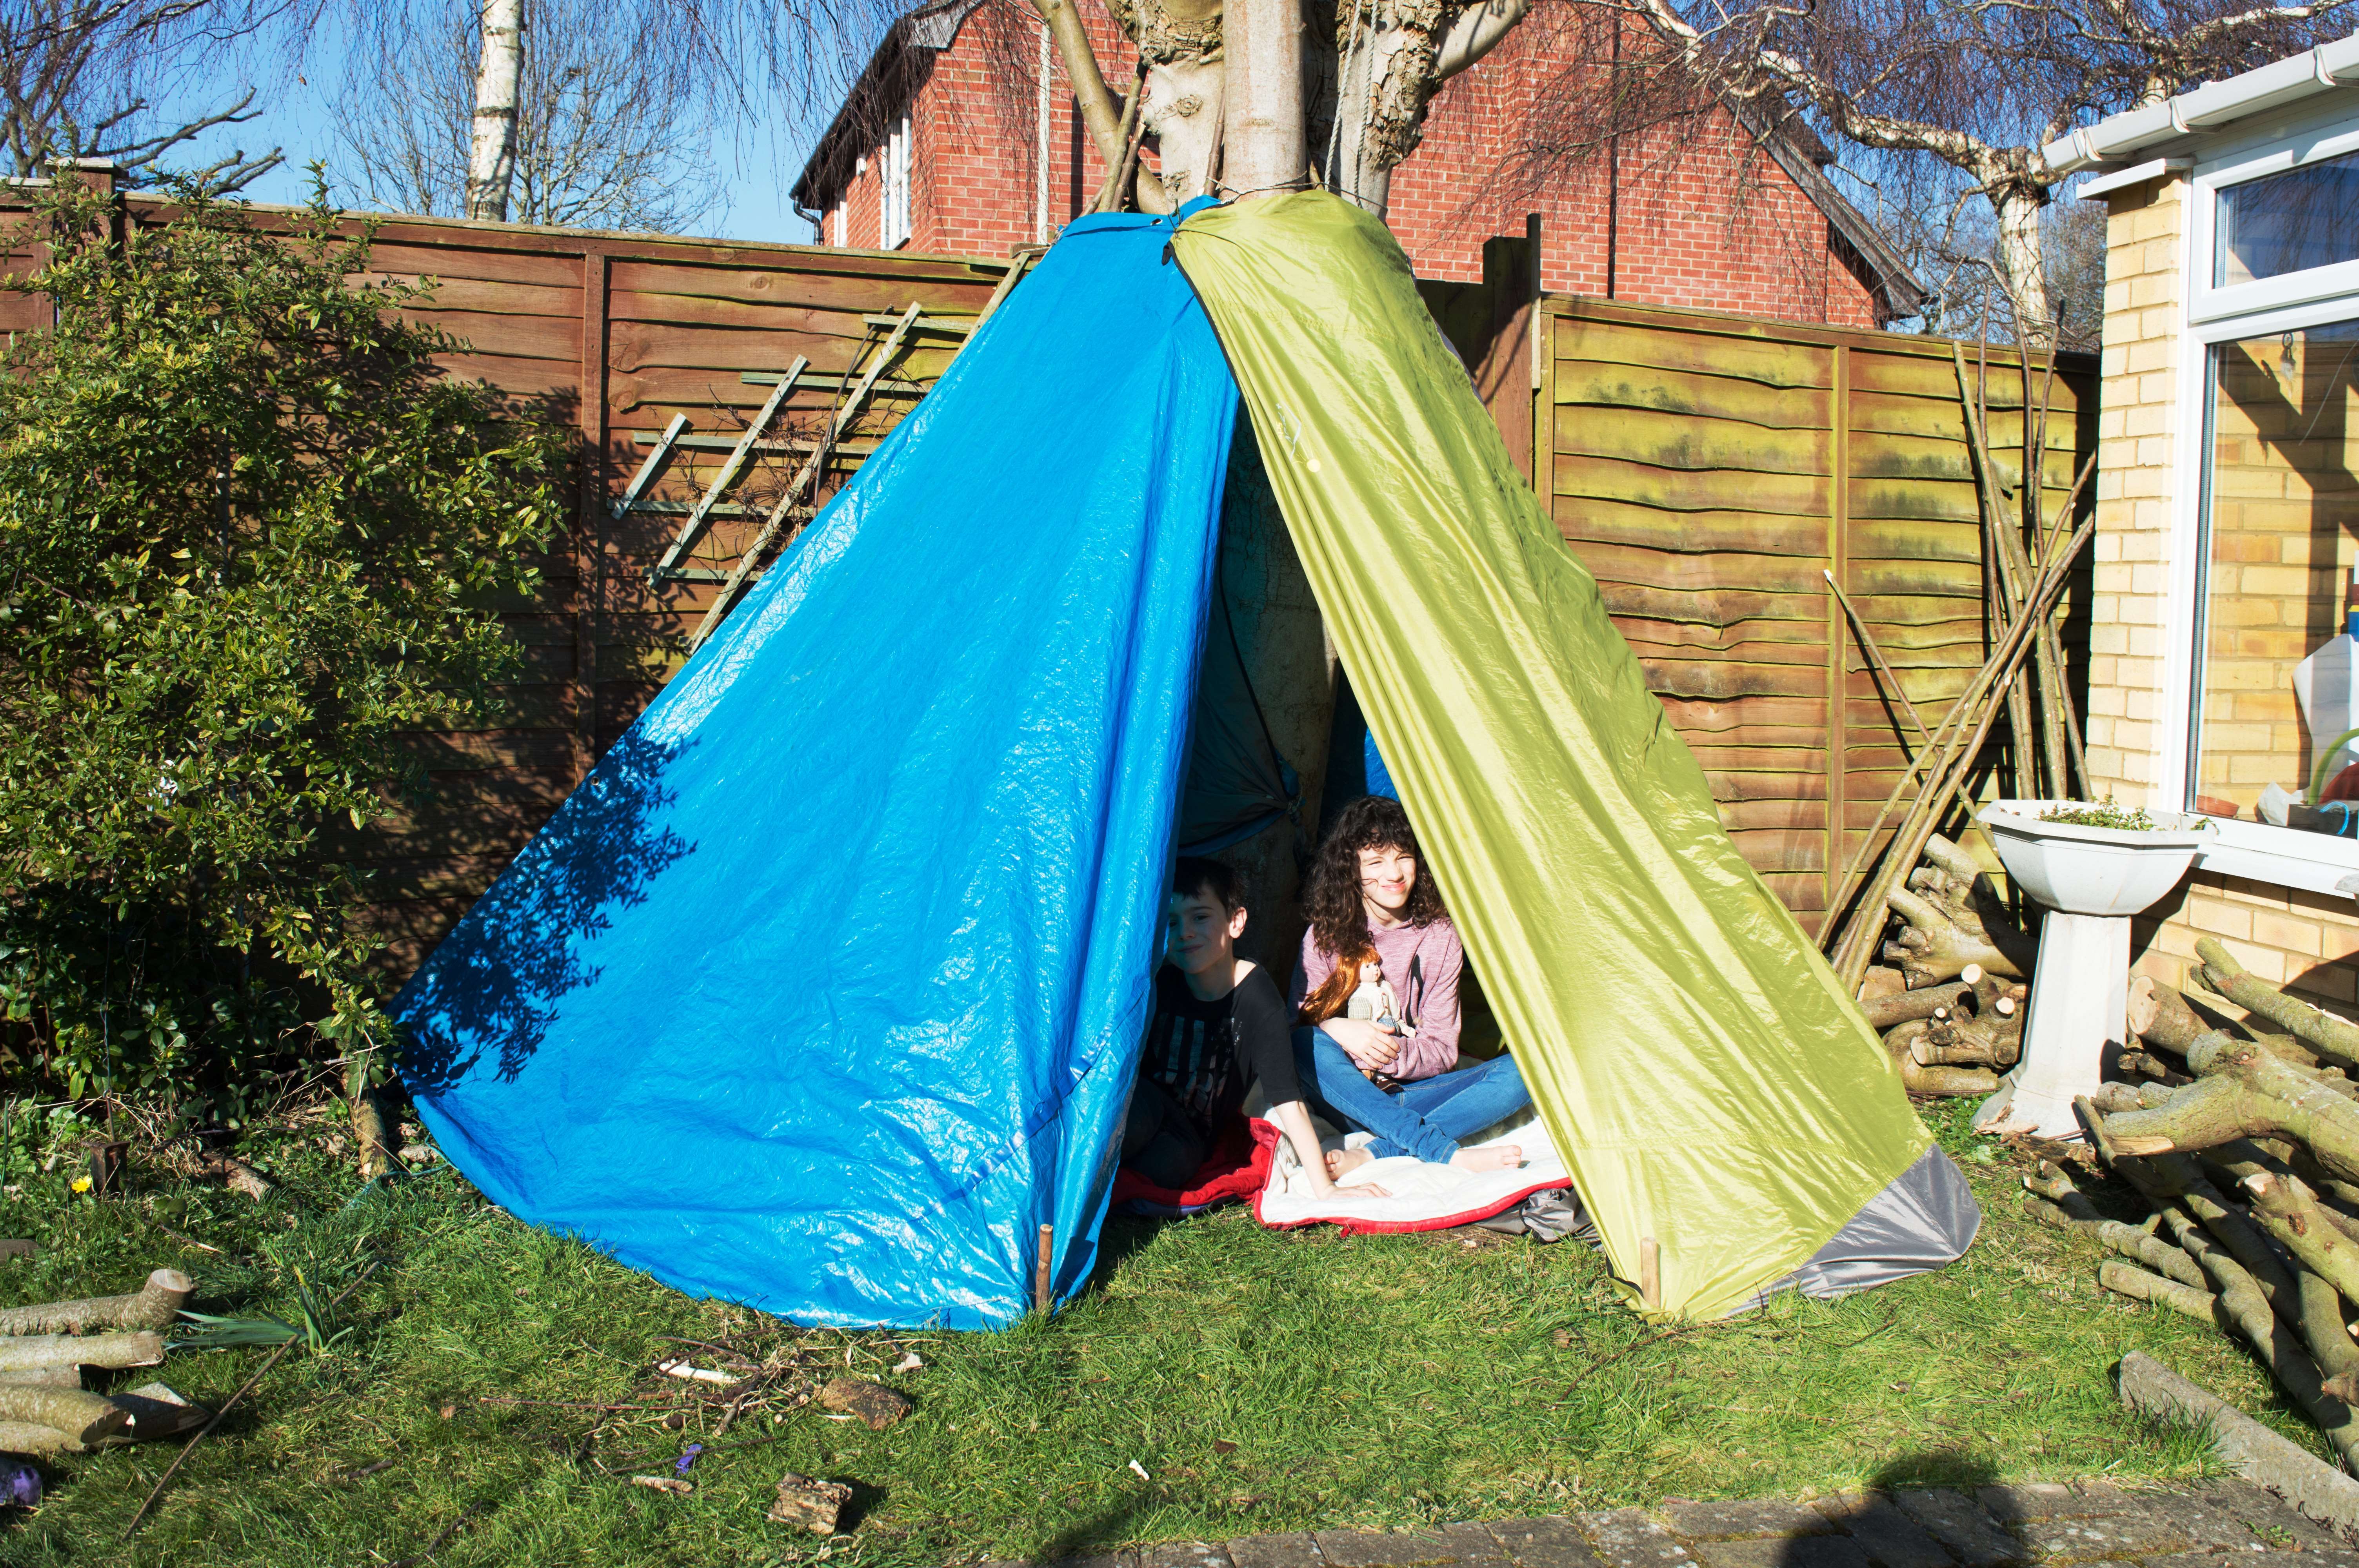
So the difficult bit began 😉 Time for play.
Time to play
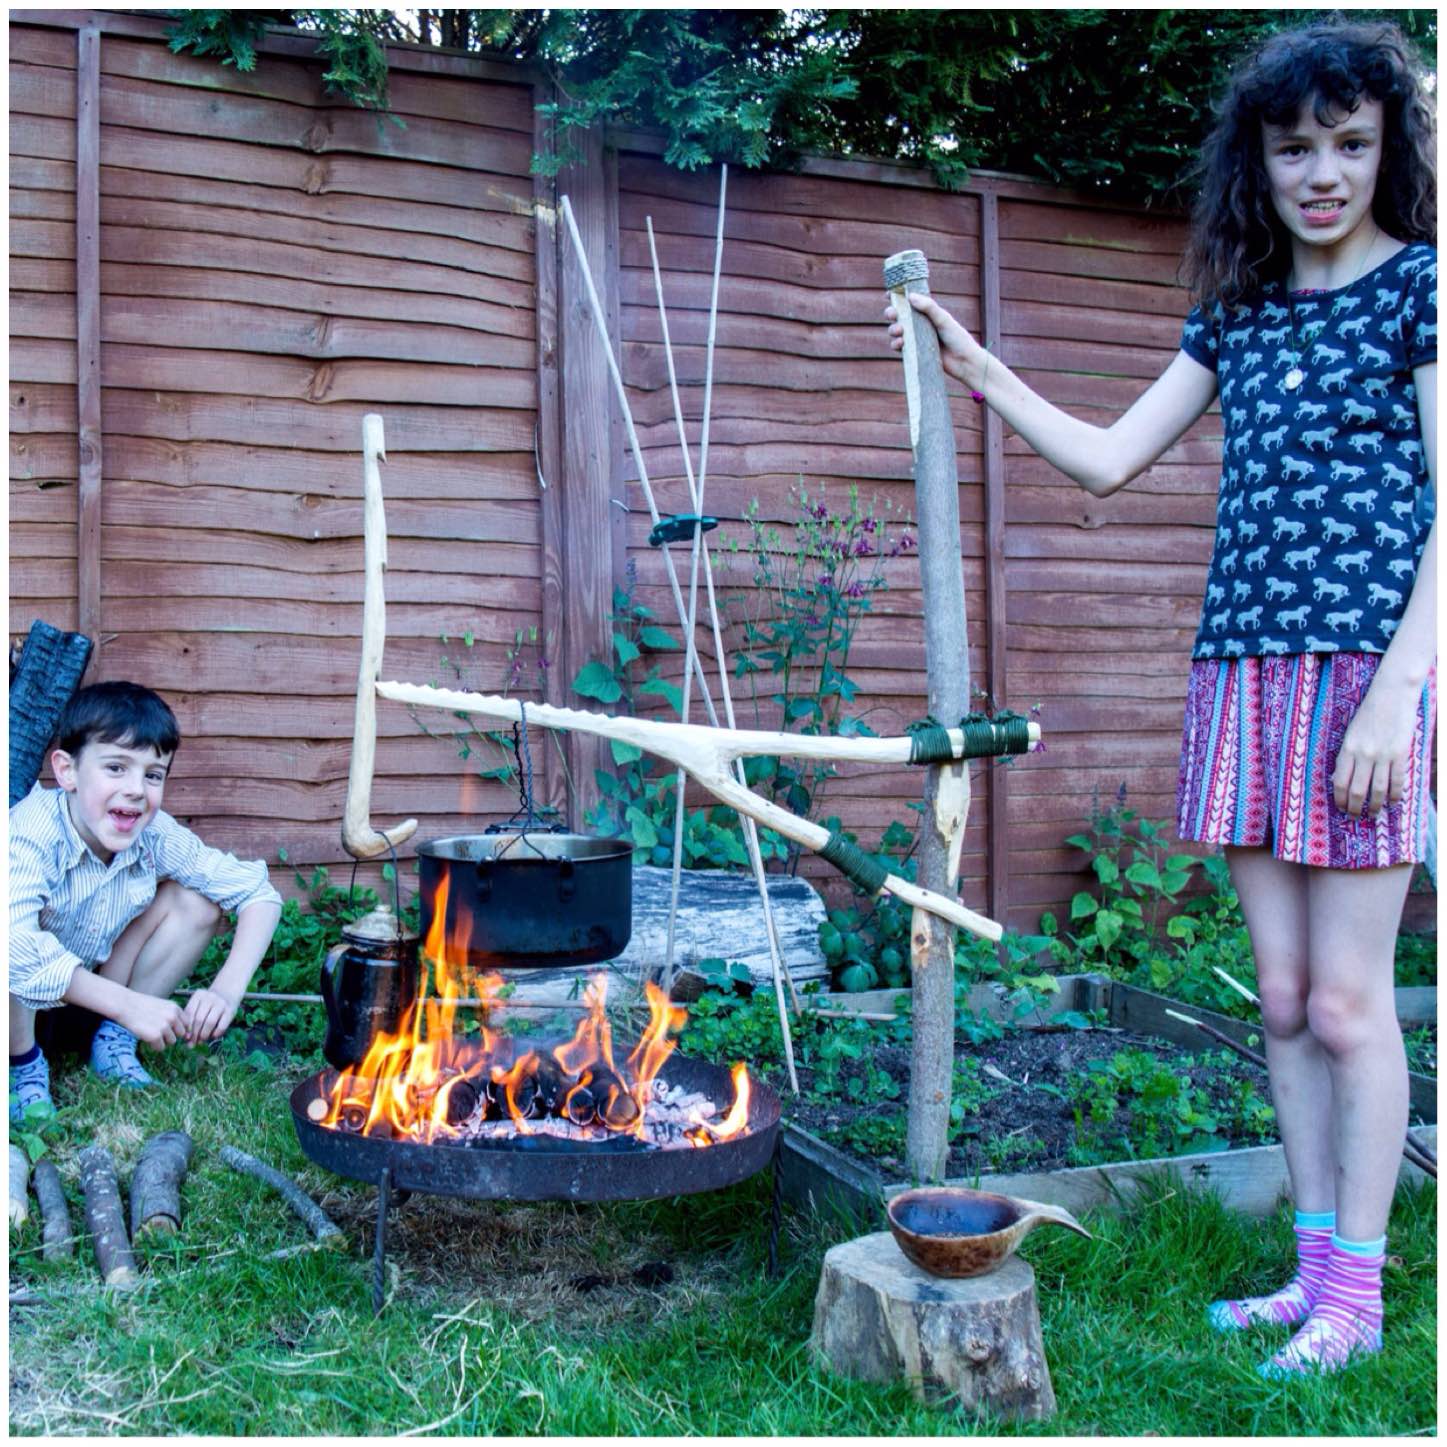
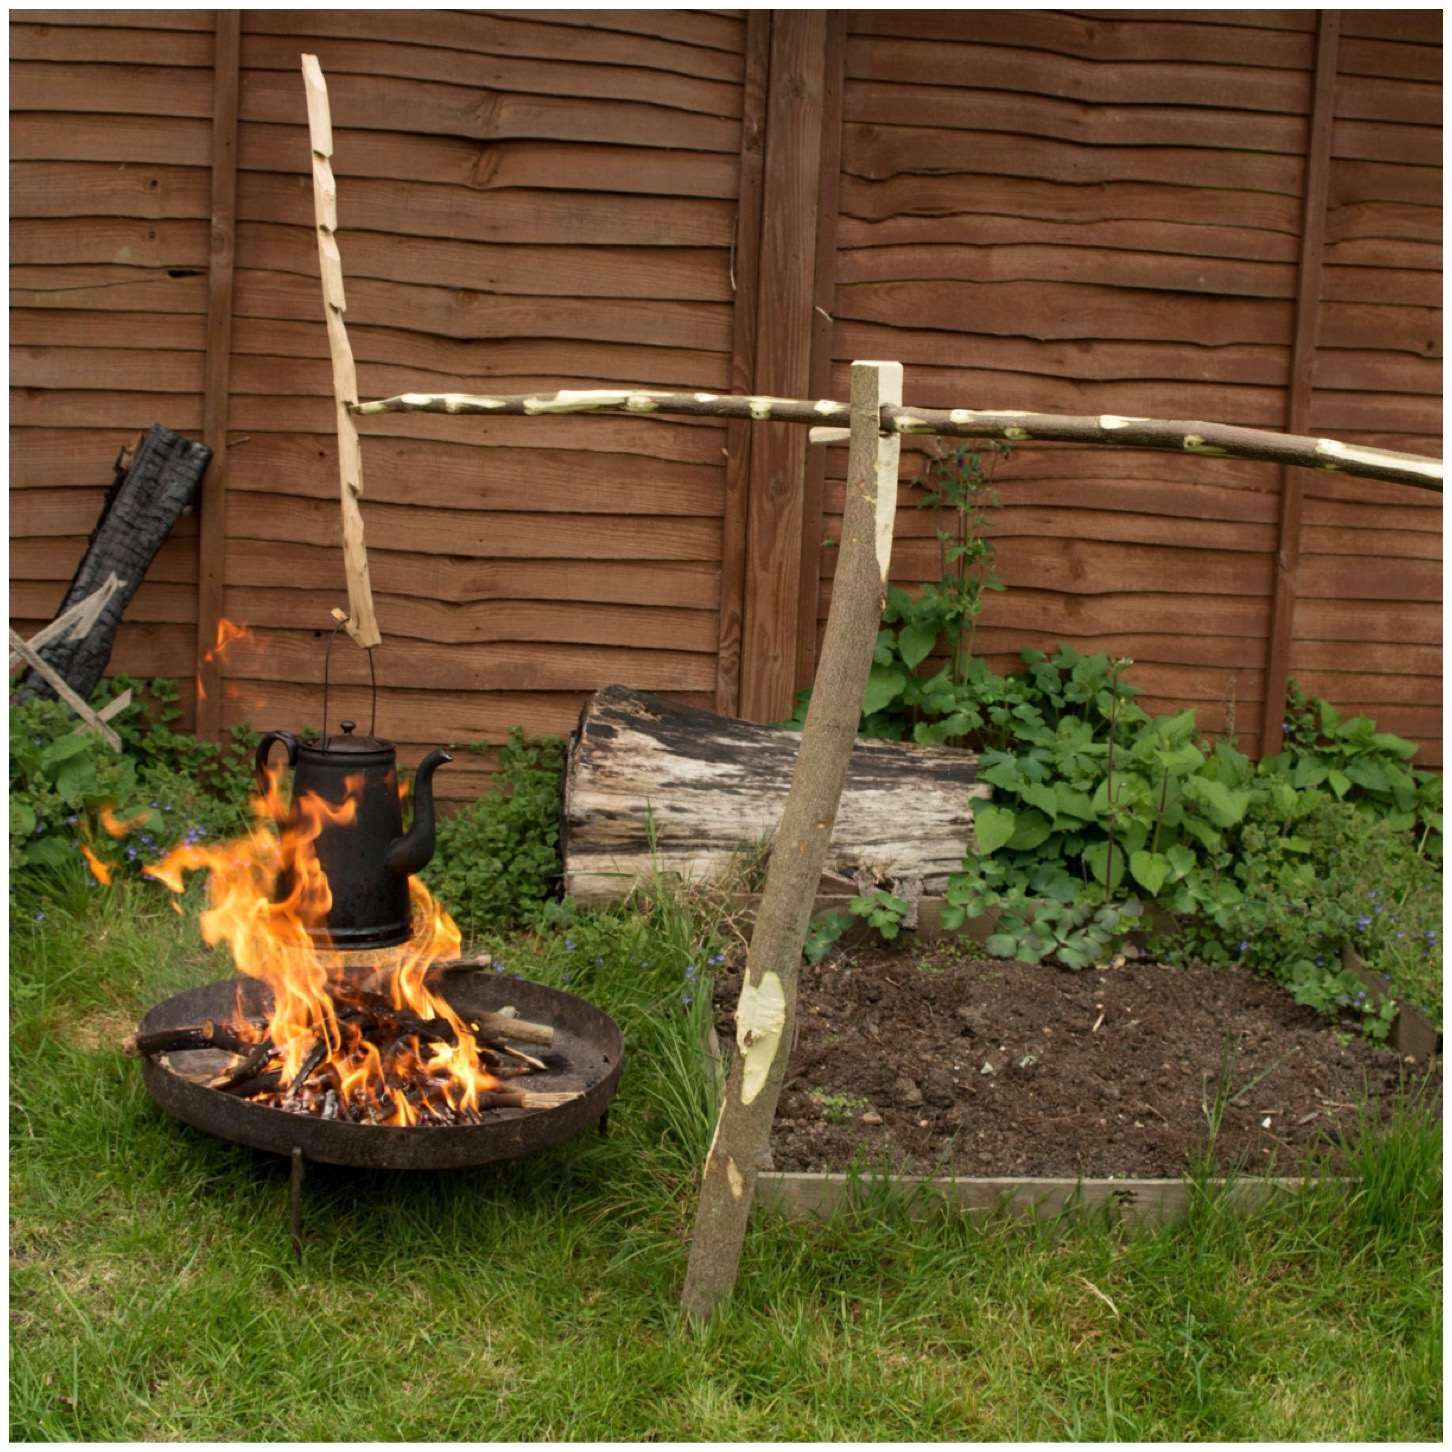
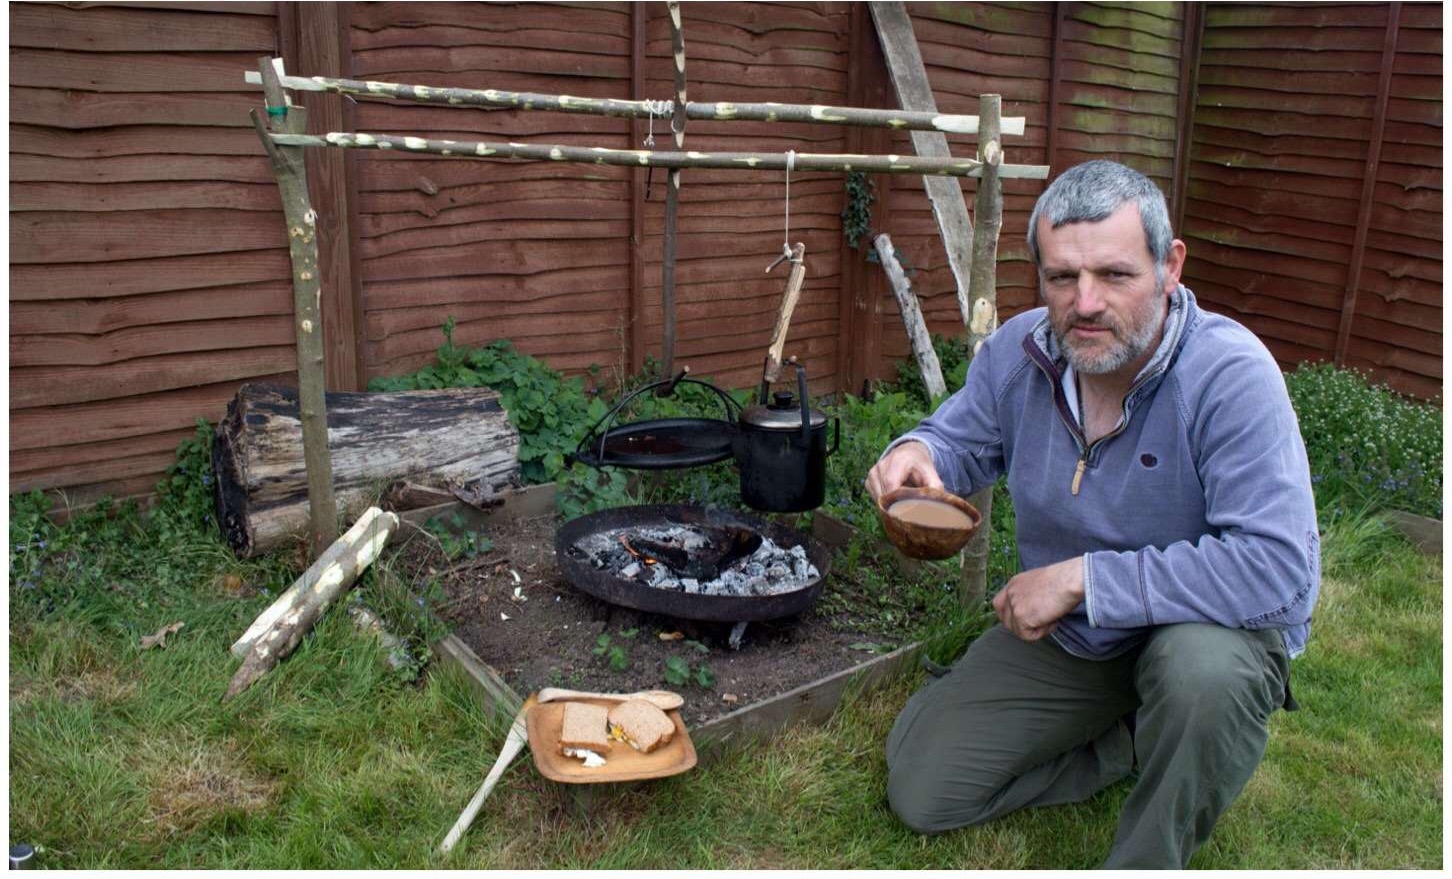
I must say that Catherine really got into the spirit of making a camp setting up her own play fire and rigging her own cooking rig (thankfully no thunderstorms appeared).
I have never seen a pram being used as a cooking stand but it worked 🙂
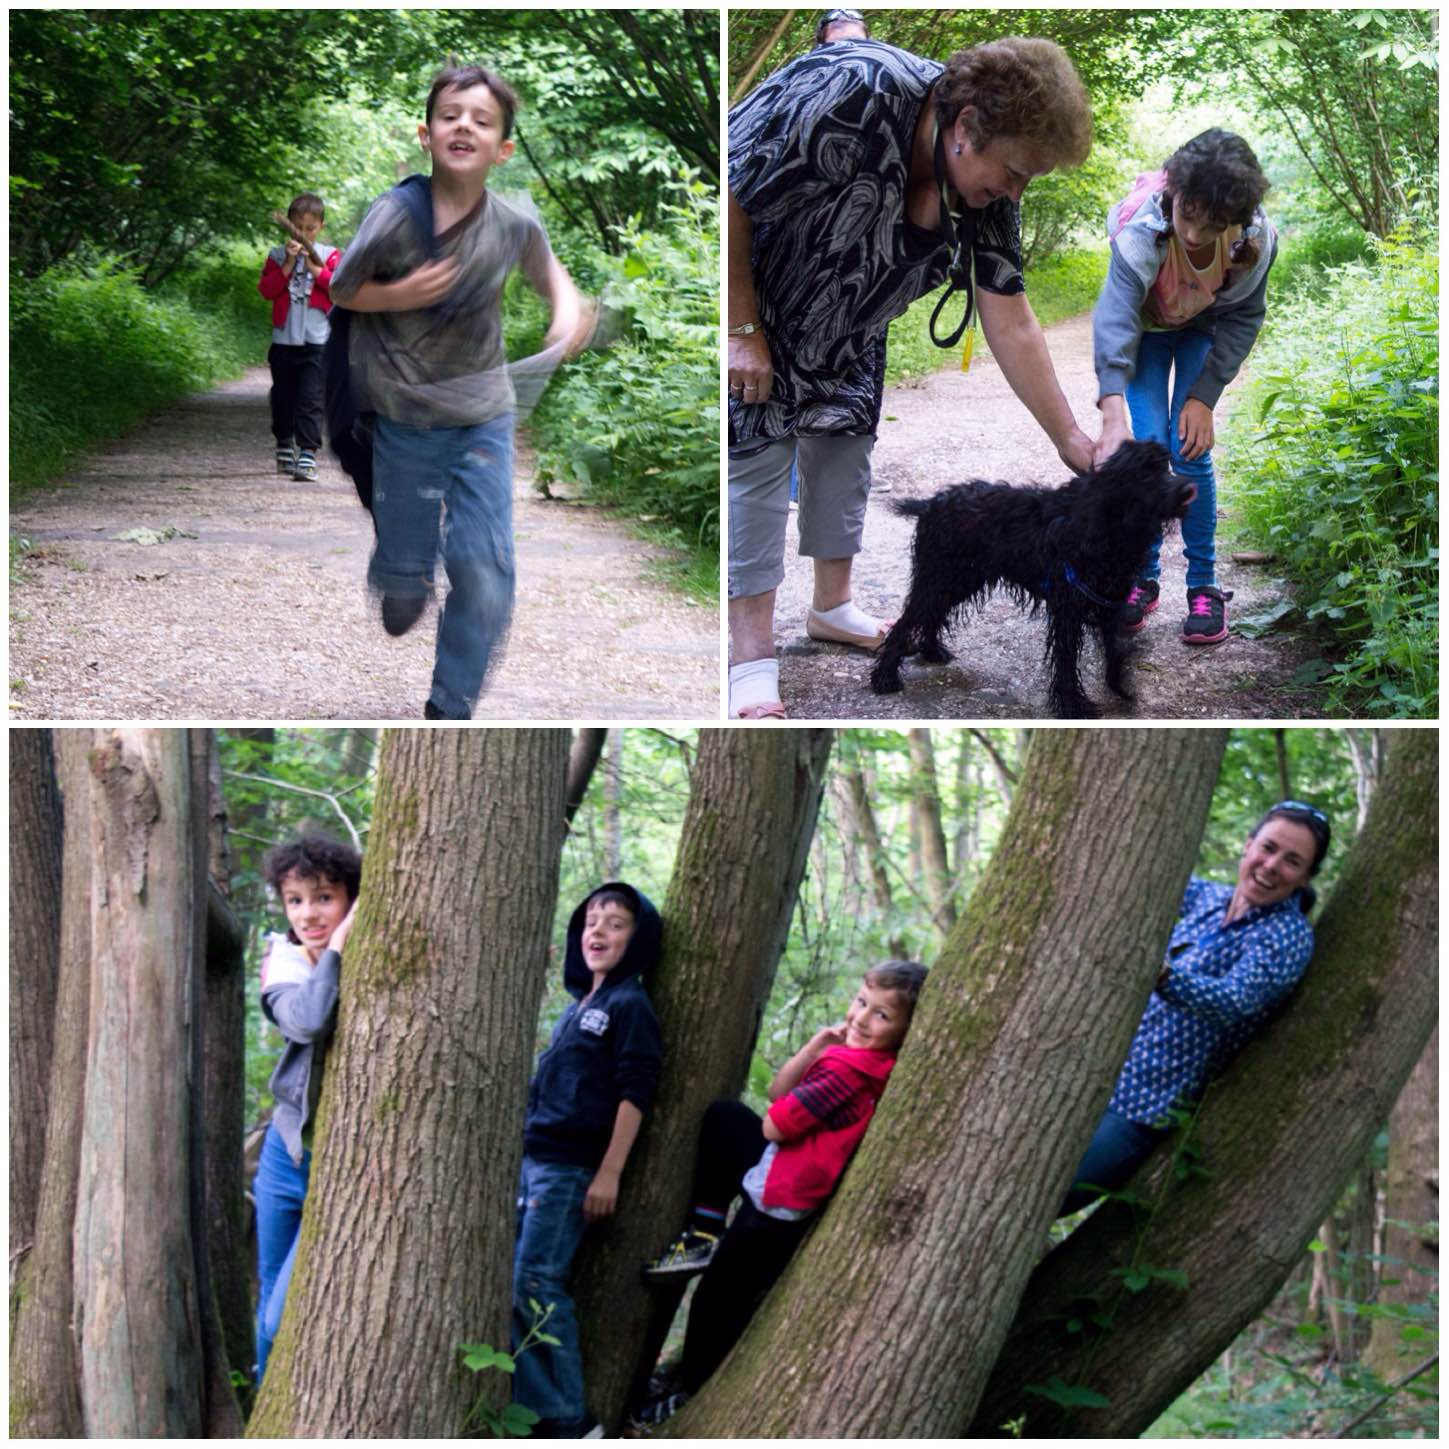
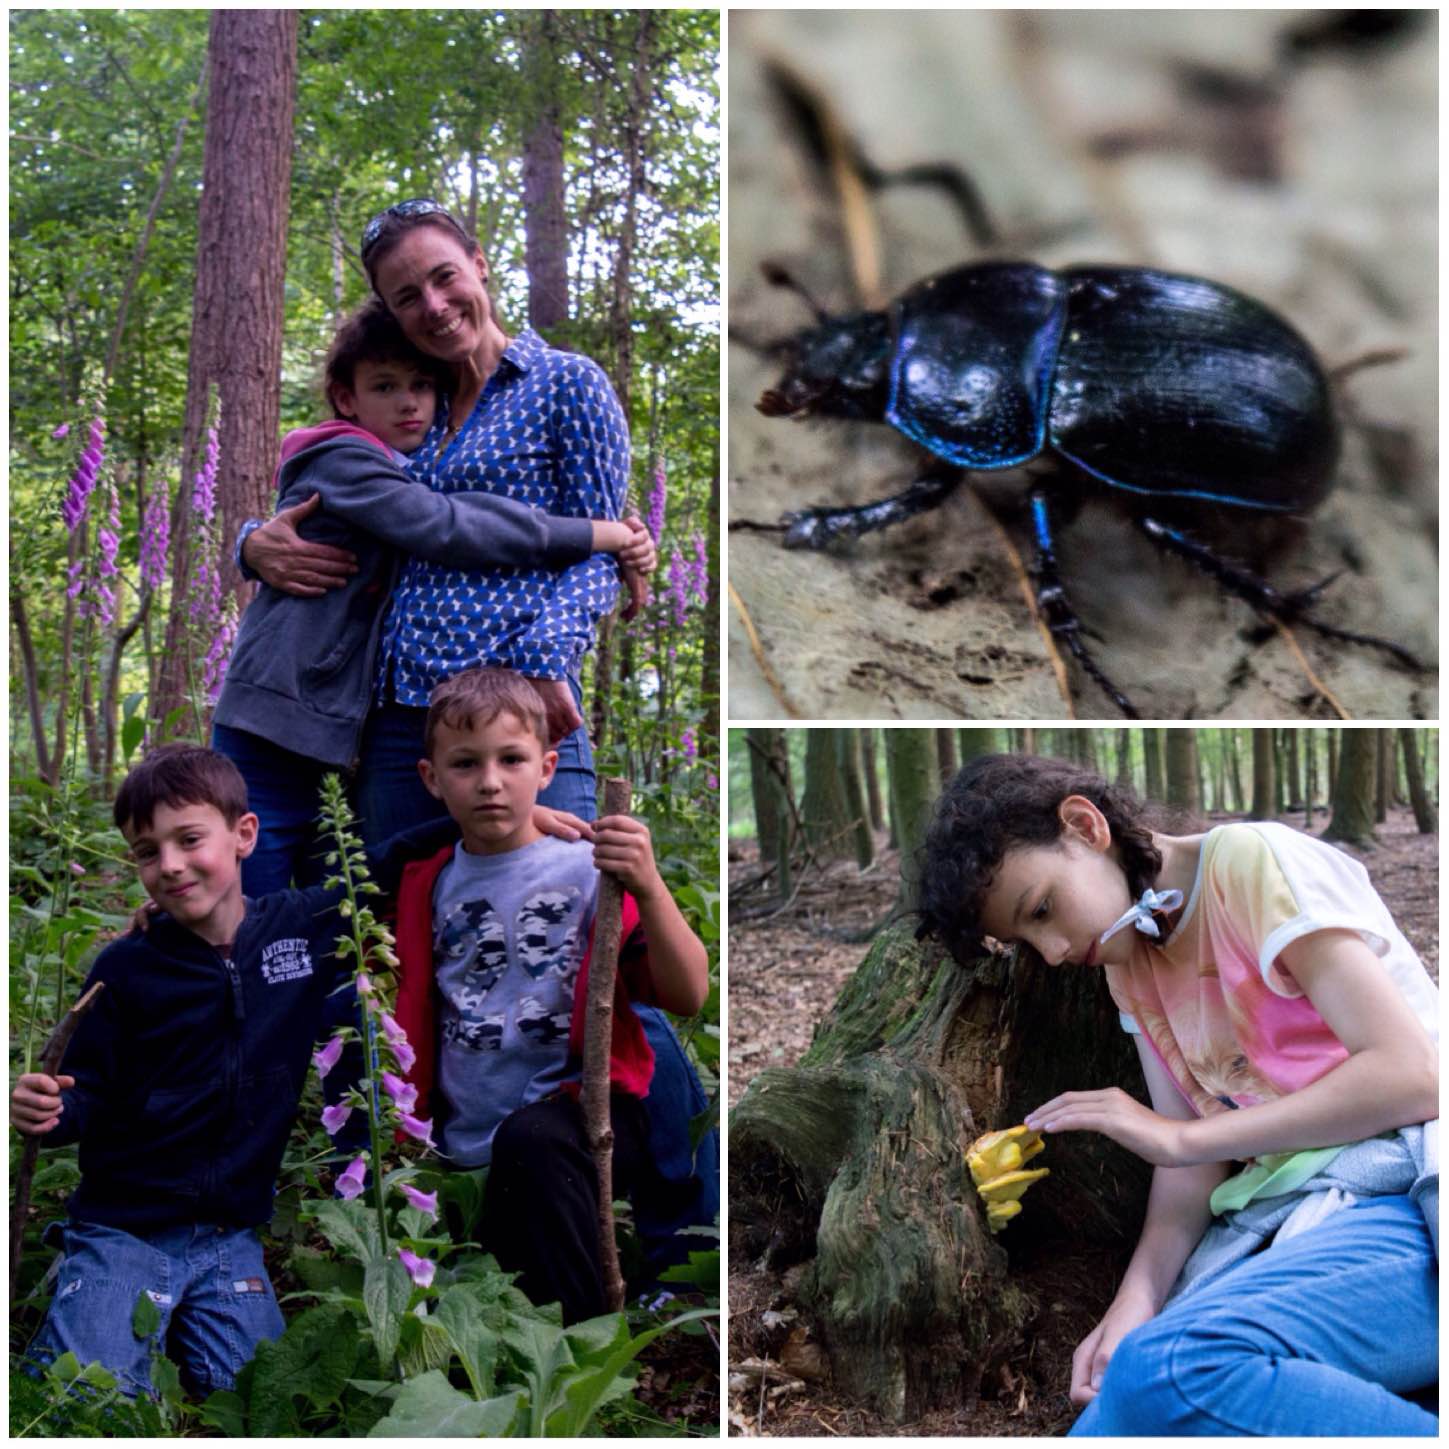
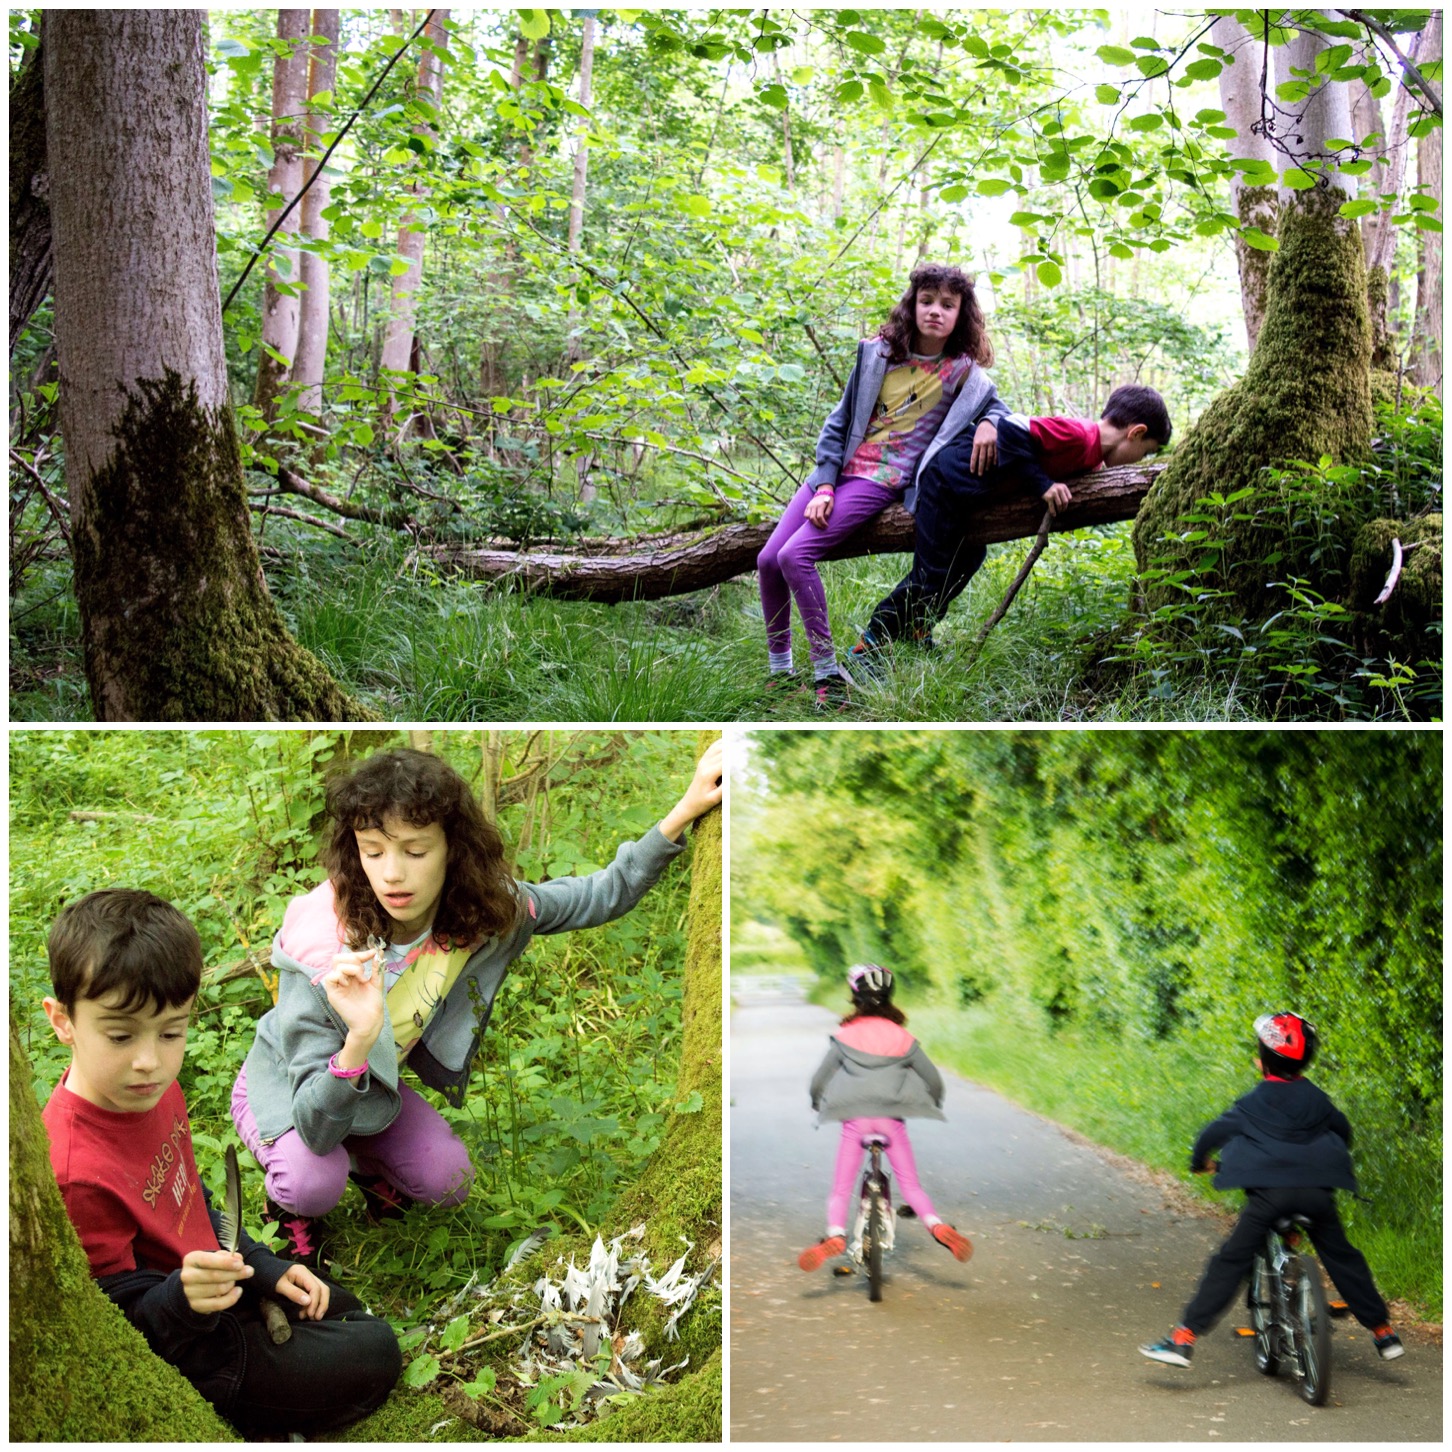
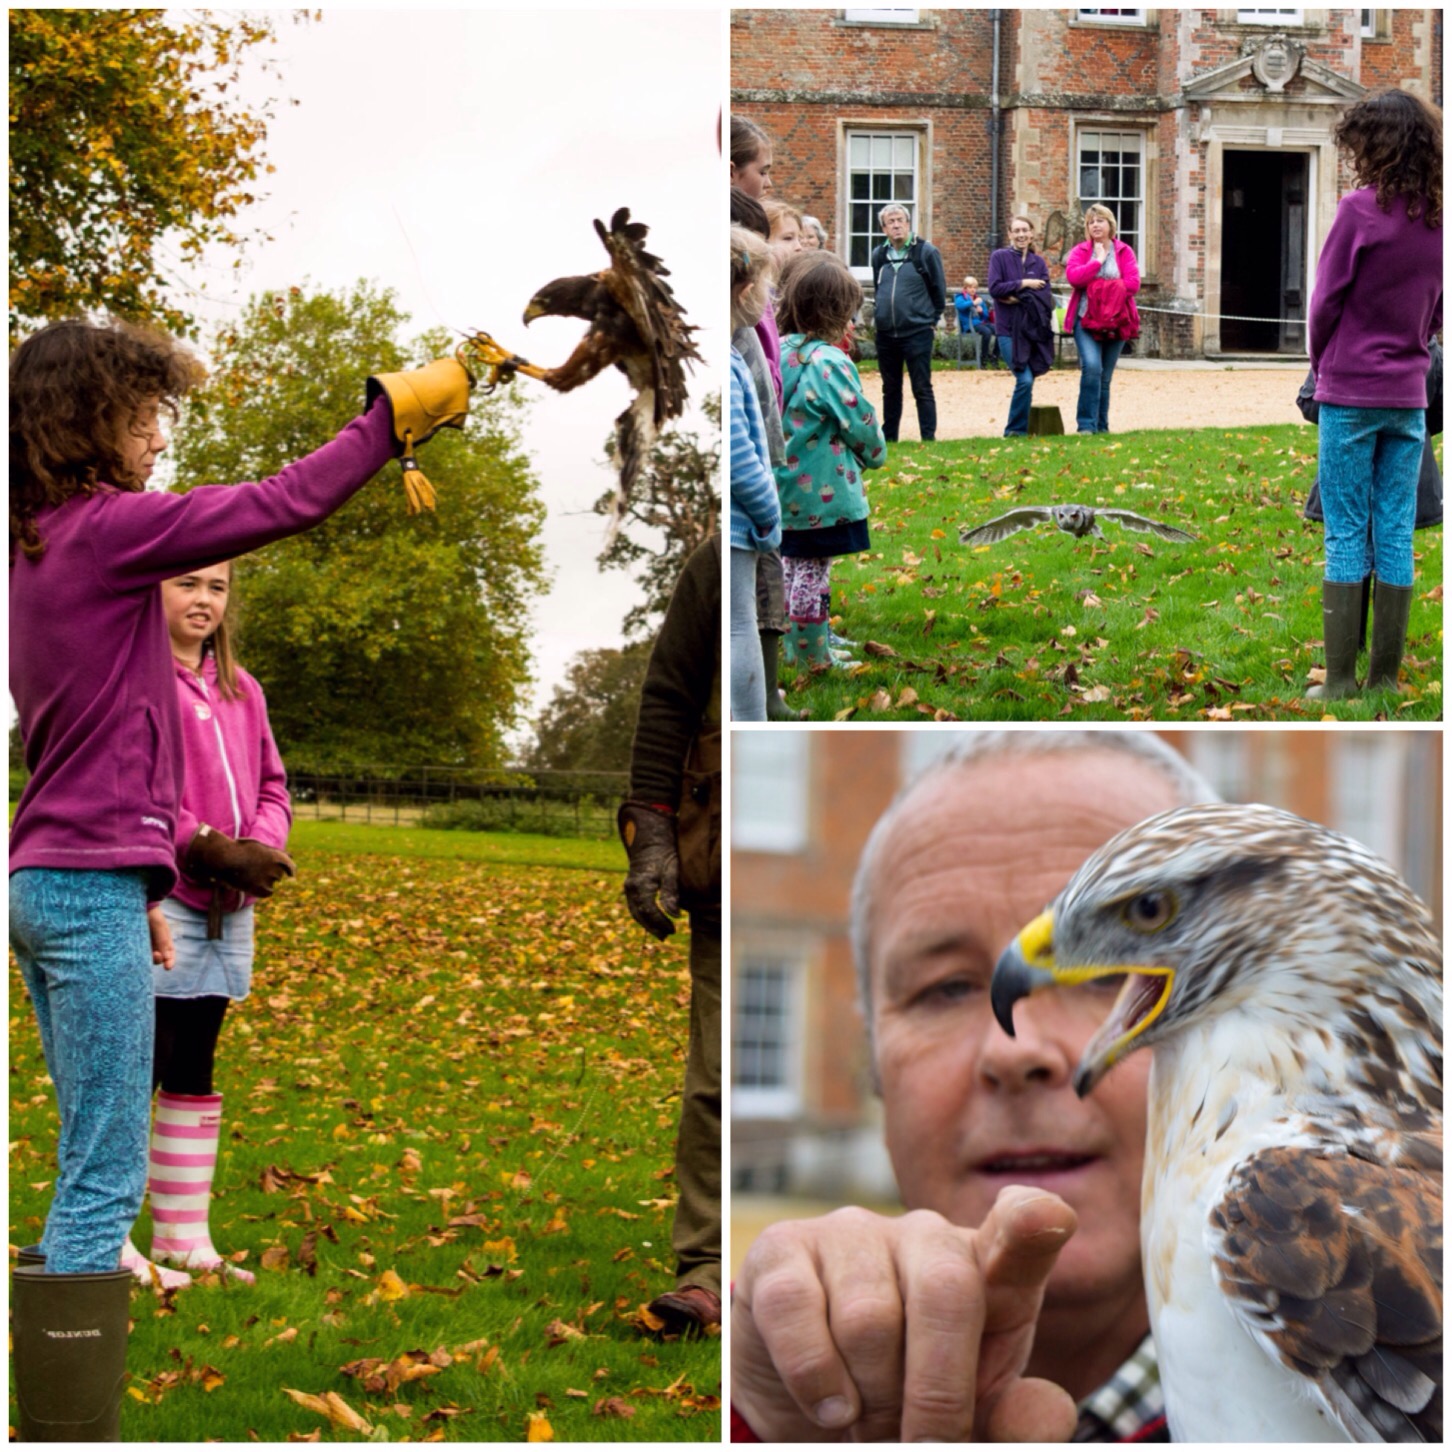
It was my wife Alison’s turn to choose our trip out for the evening and she chose a trip to Morgaston Woods for the 30 Day Challenge.
Alison chose this area for its good access and that there is a rather lovely bird hide on the edge of the wood near The Vyne National Trust property. We were joined tonight by Finlay’s friend Finlay (yup I did say Finlay’s friend Finlay)
Straight off and having fun
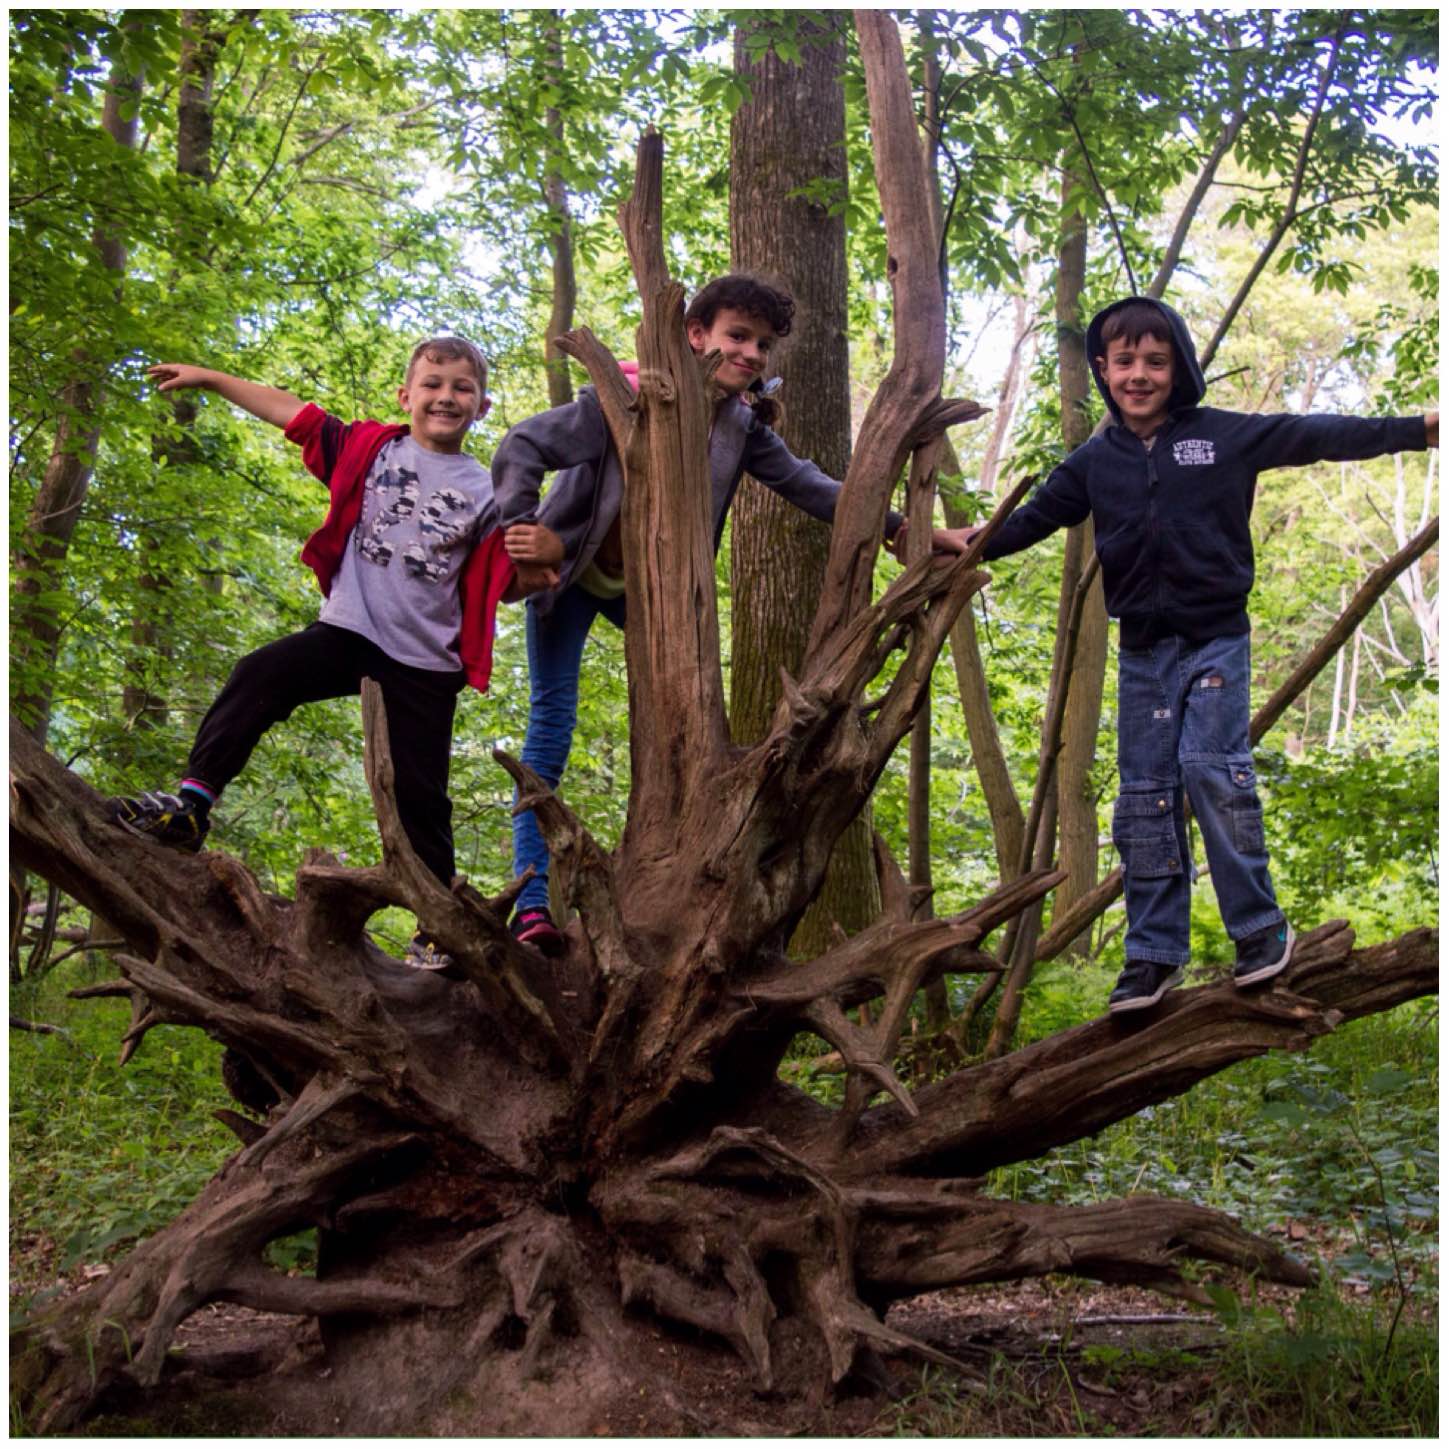
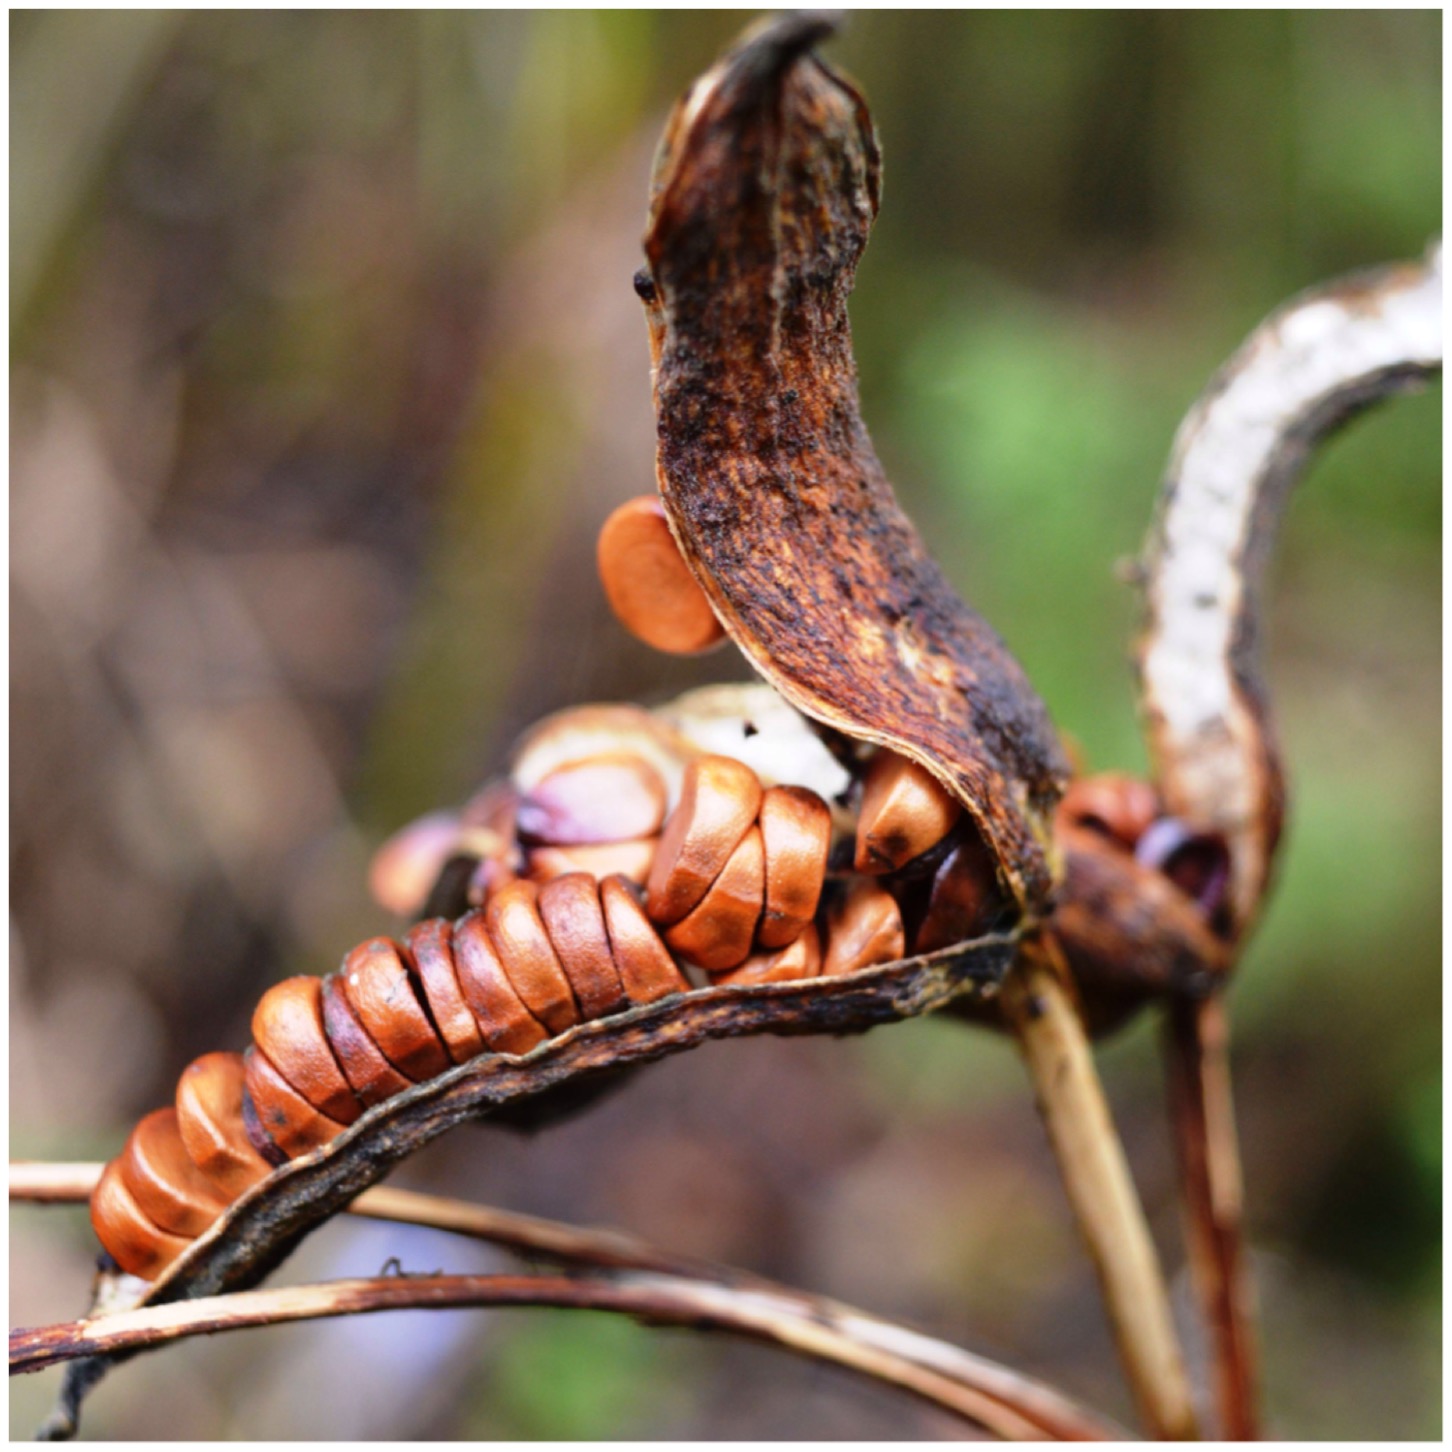
I spotted this rather beautiful looking dead root system. It looks dangerous but relatively easy to climb onto from the back – makes for a great picture.
Magic roots
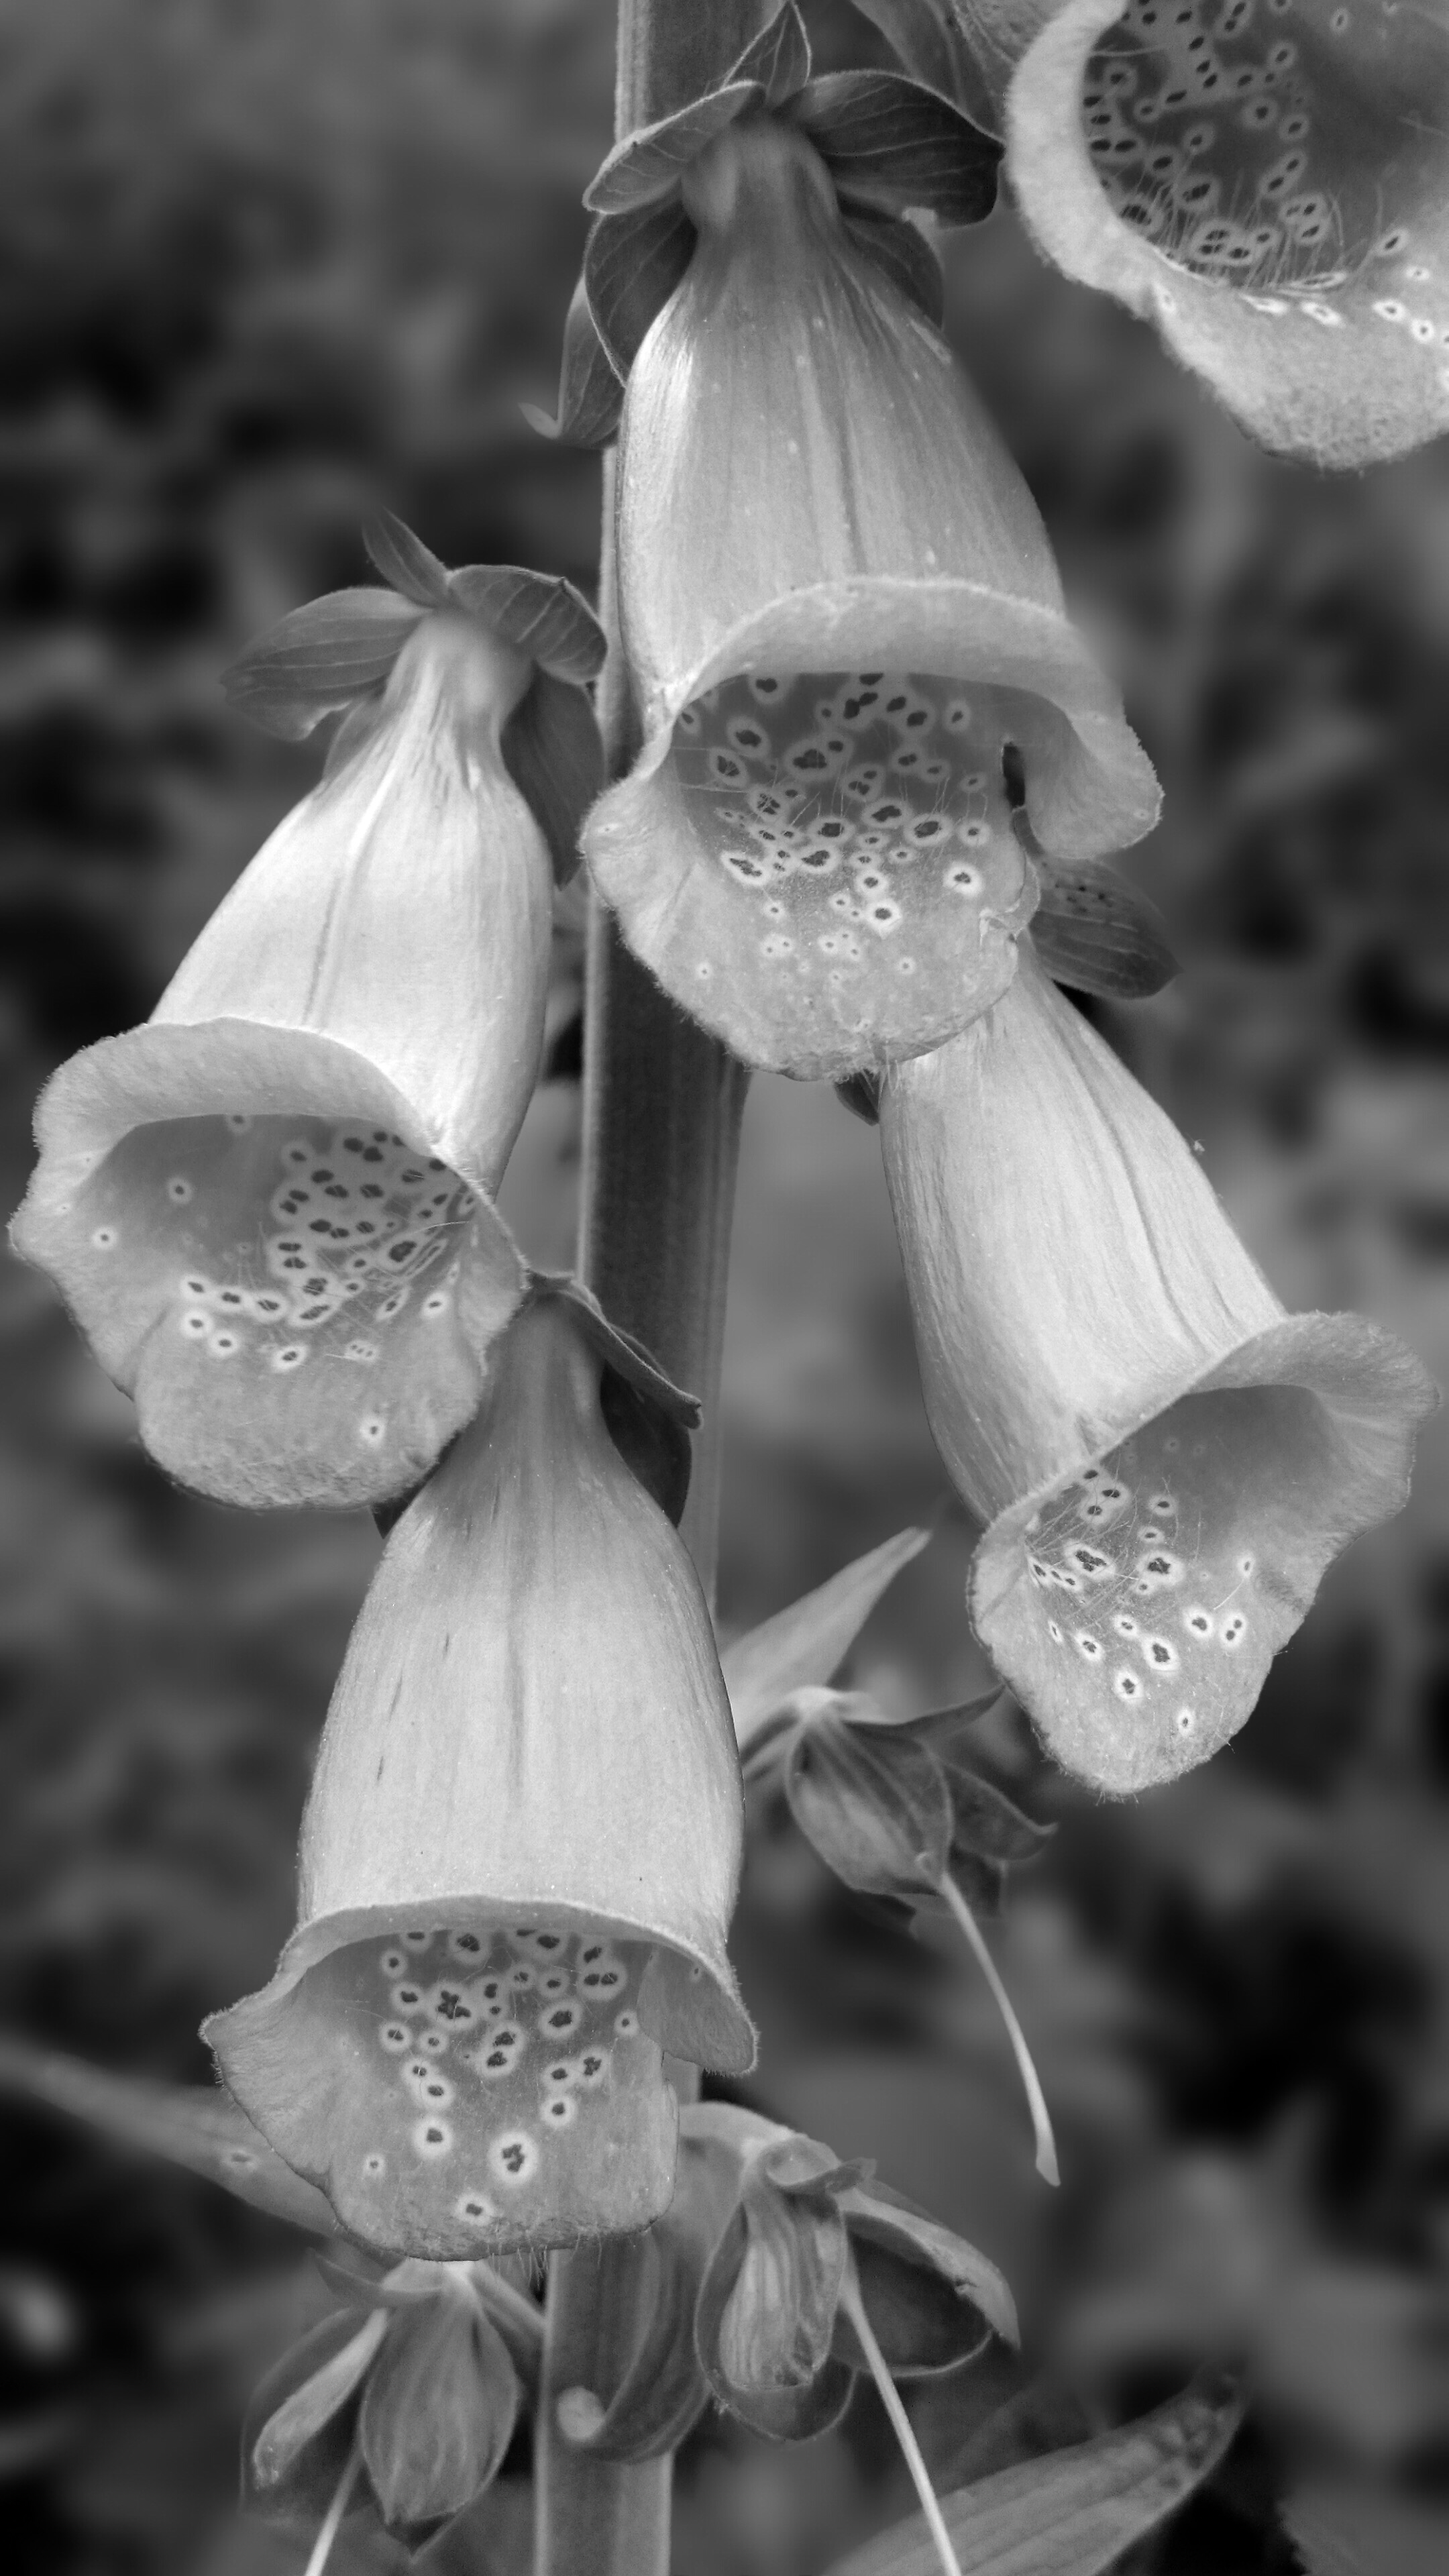
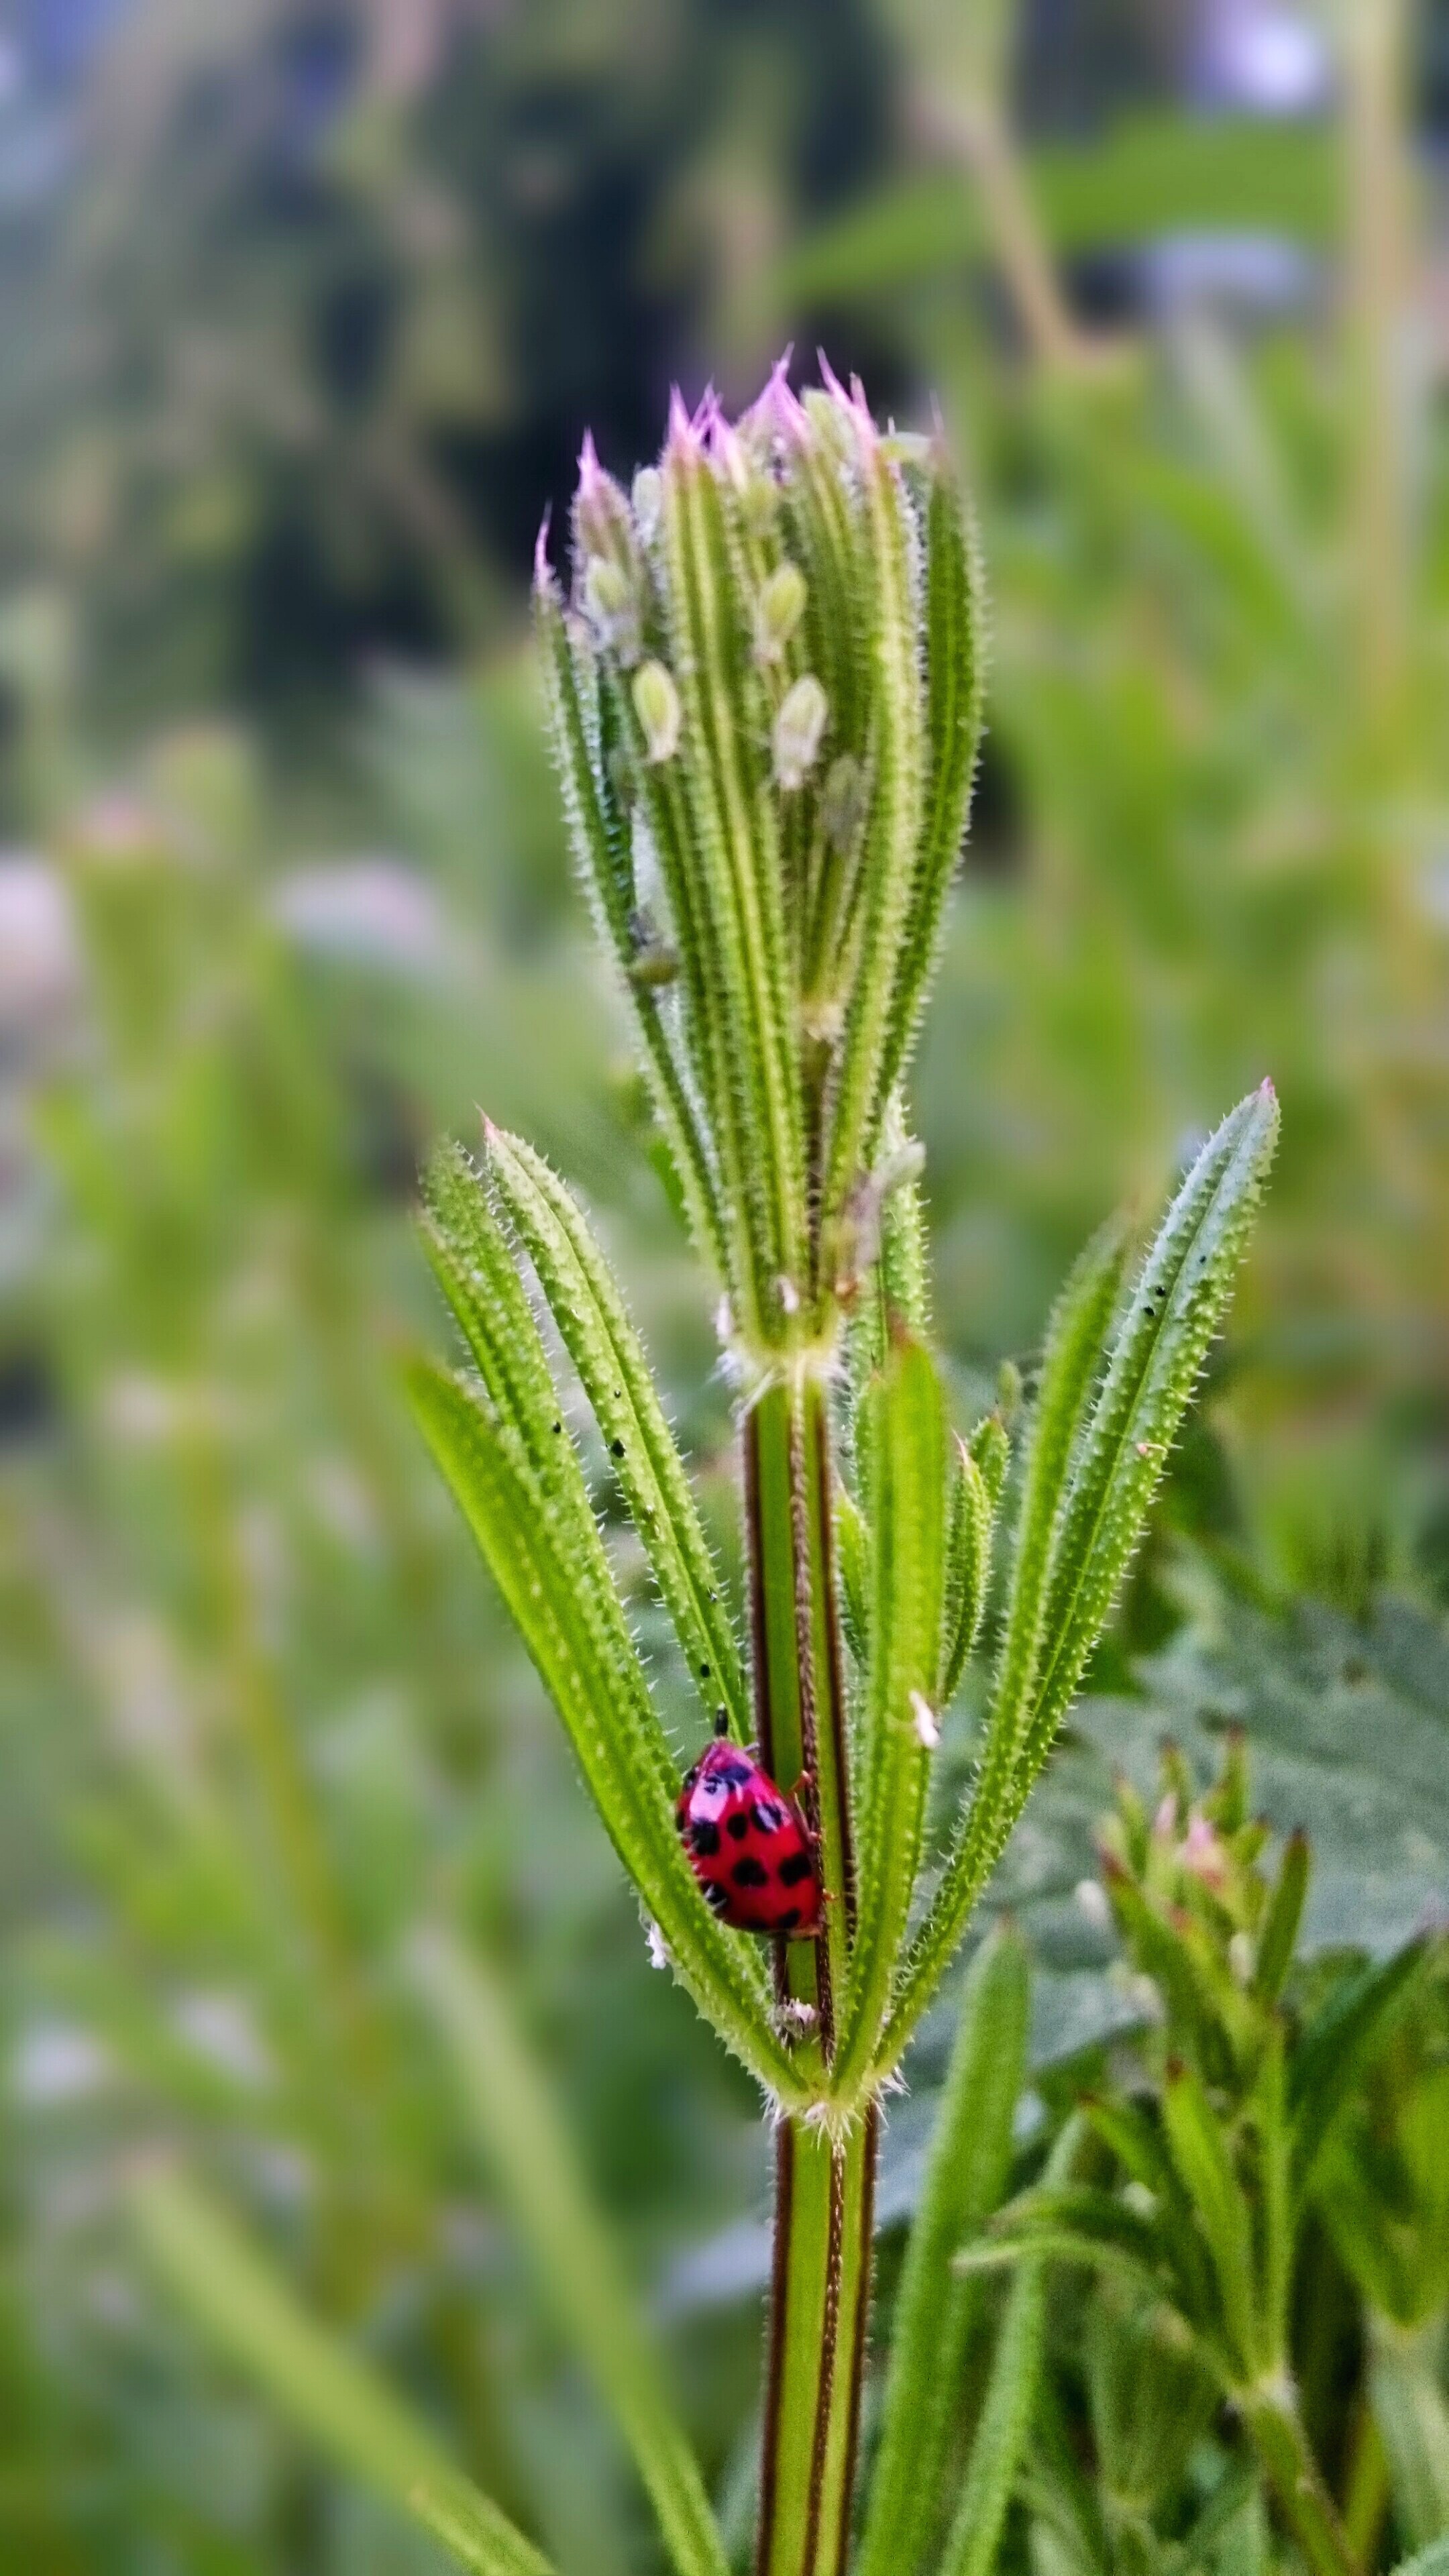
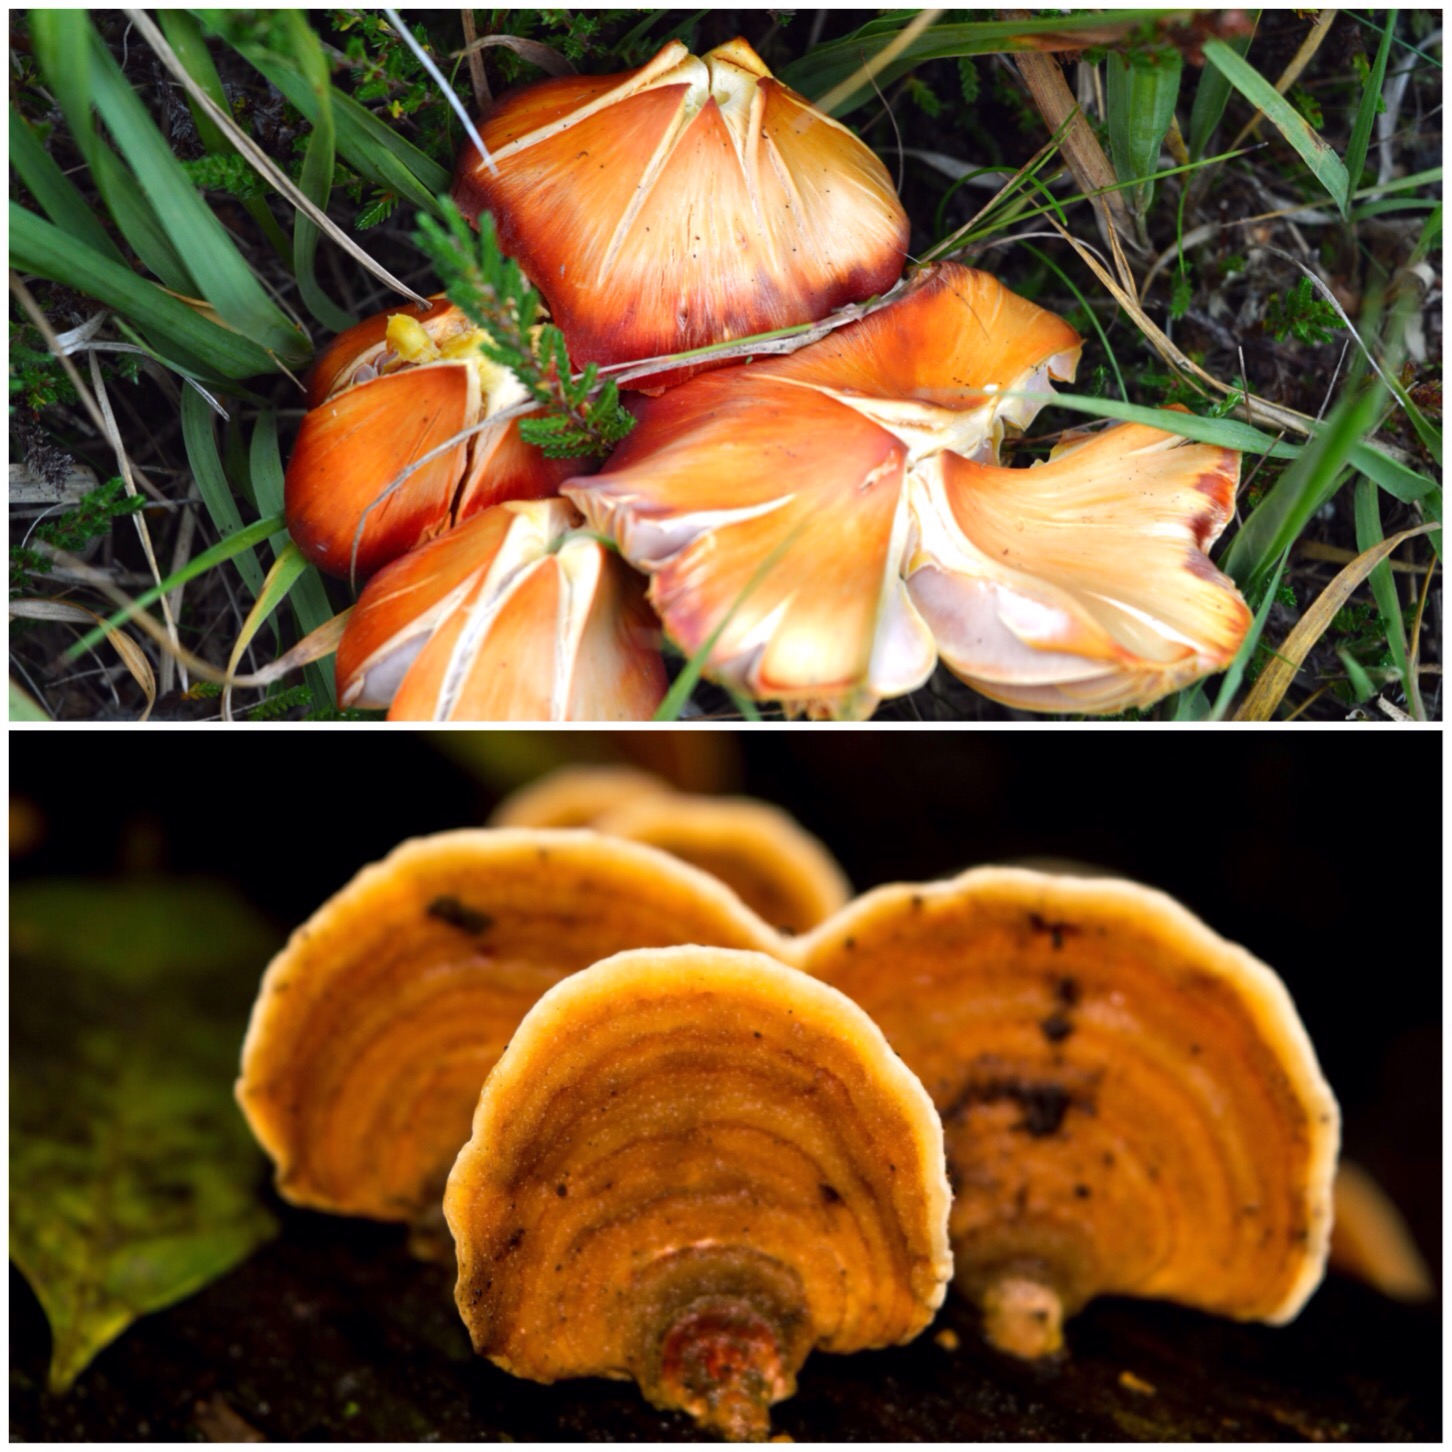
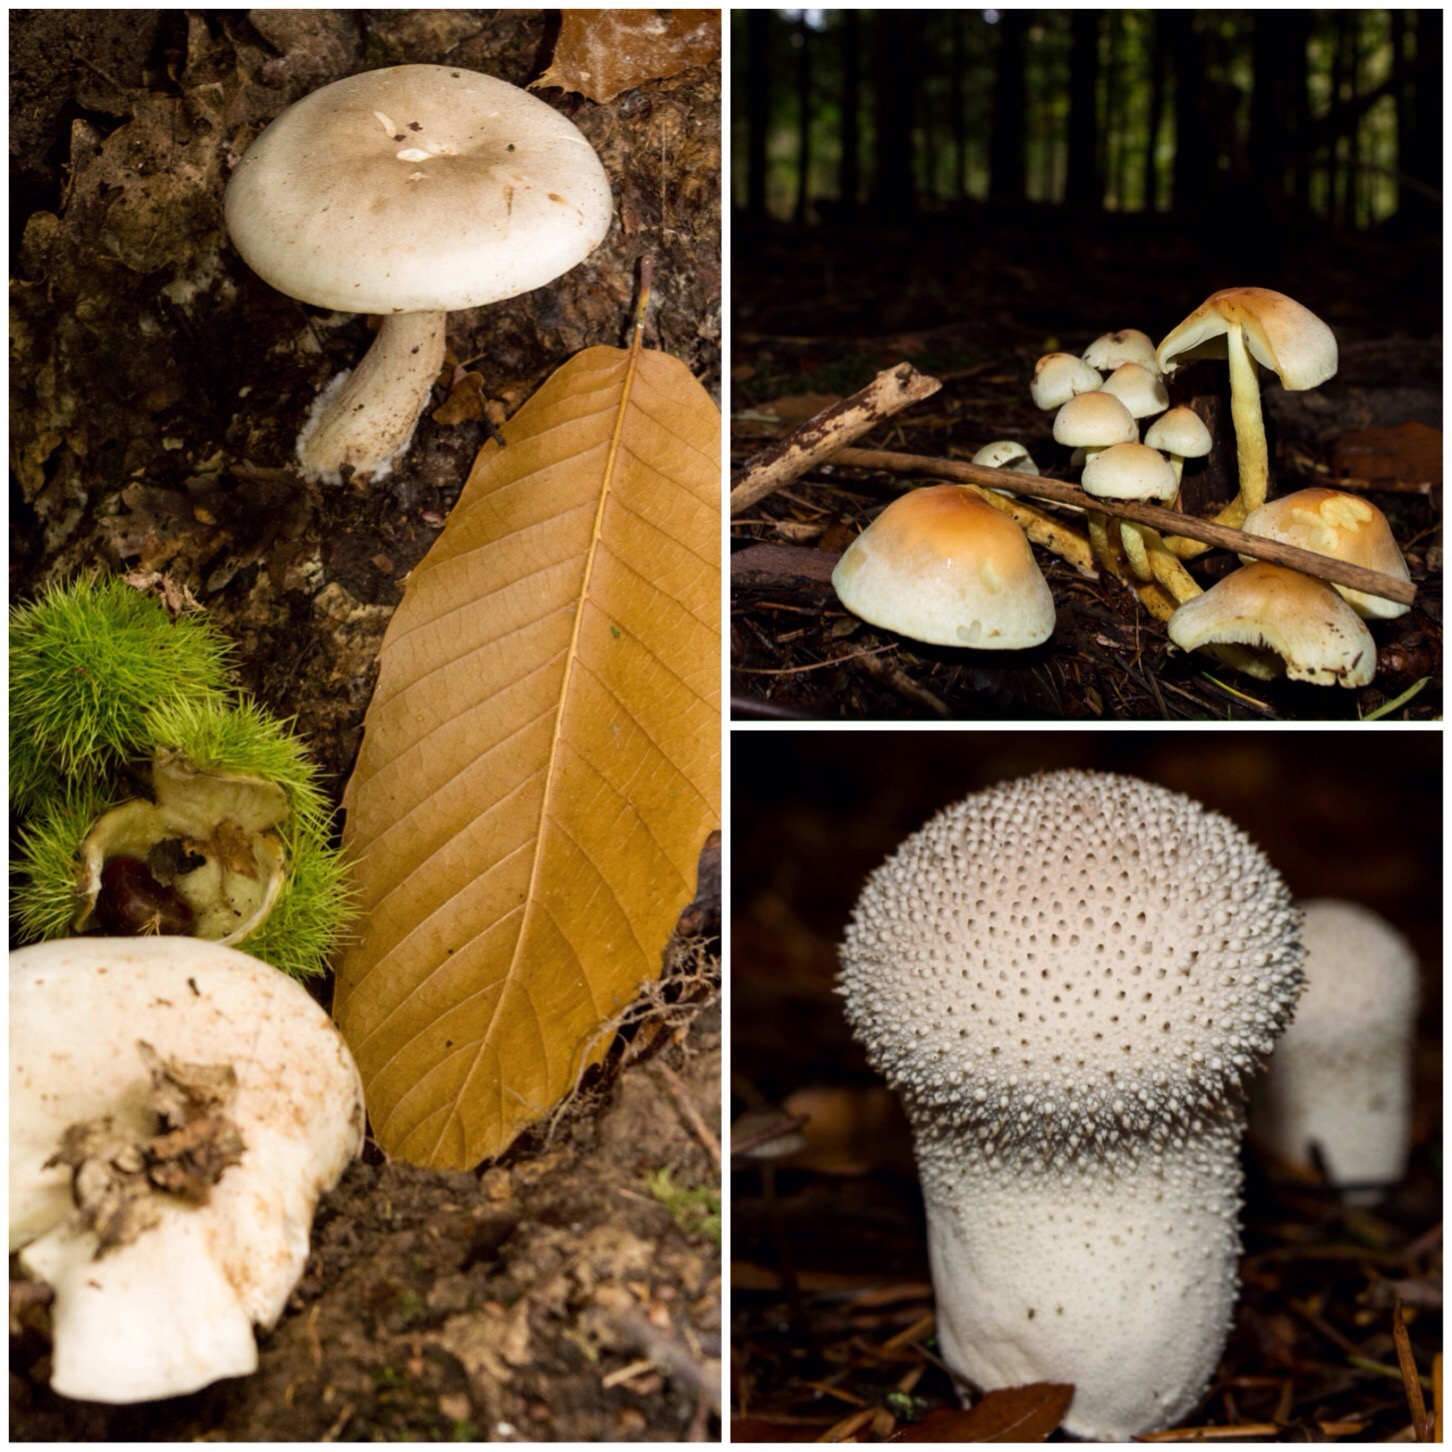
We had lots of spots tonight, from a lovely glade of foxglove, a little beetle and some chicken of the woods fungus. The kids are really getting their eye in now.
Foxglove, beetles and chicken of the wood
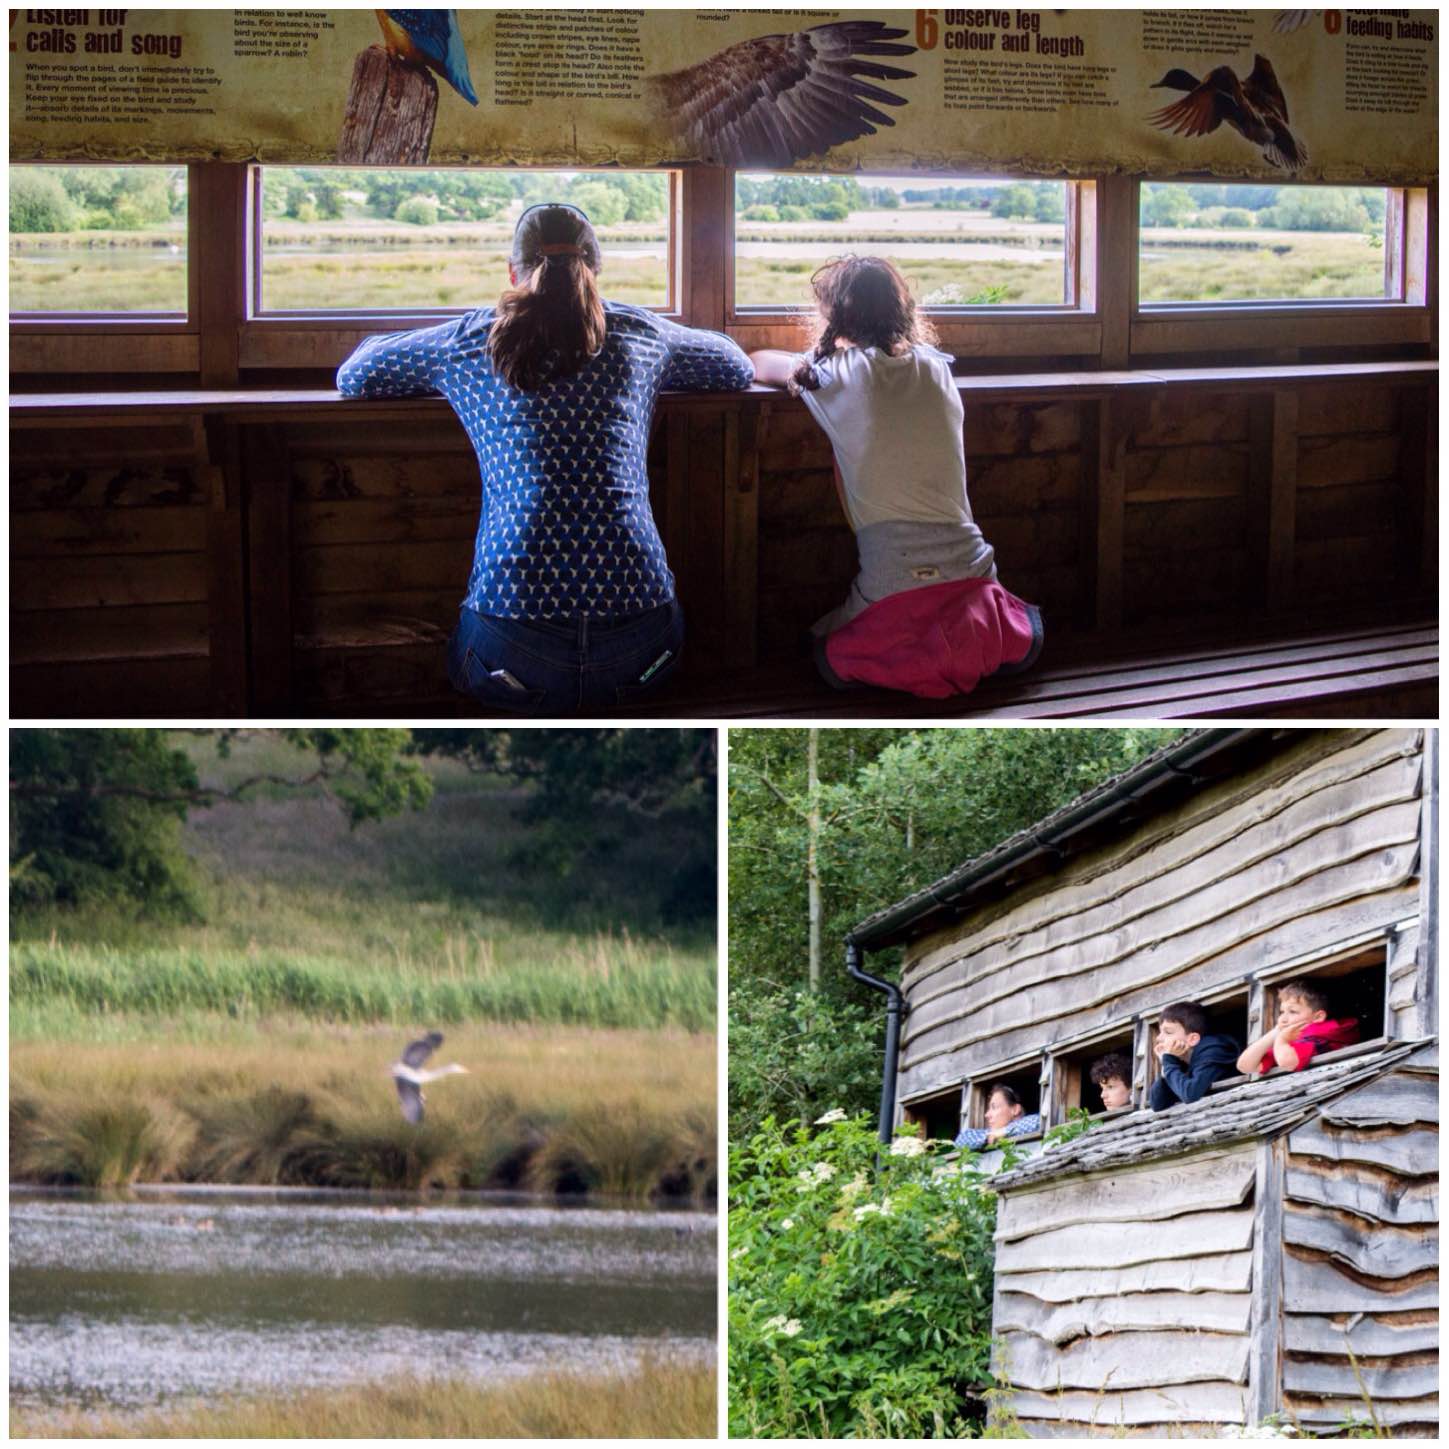
At the far end of the walk we came to the bird hide. Thankfully it was empty (we would have gotten some scowls from any serious bird watchers for our noise) and we had some good views.
I spotted a heron coming into land on the lake – my lens does not have great magnification I am afraid.
Quiet time – spotted a heron landing
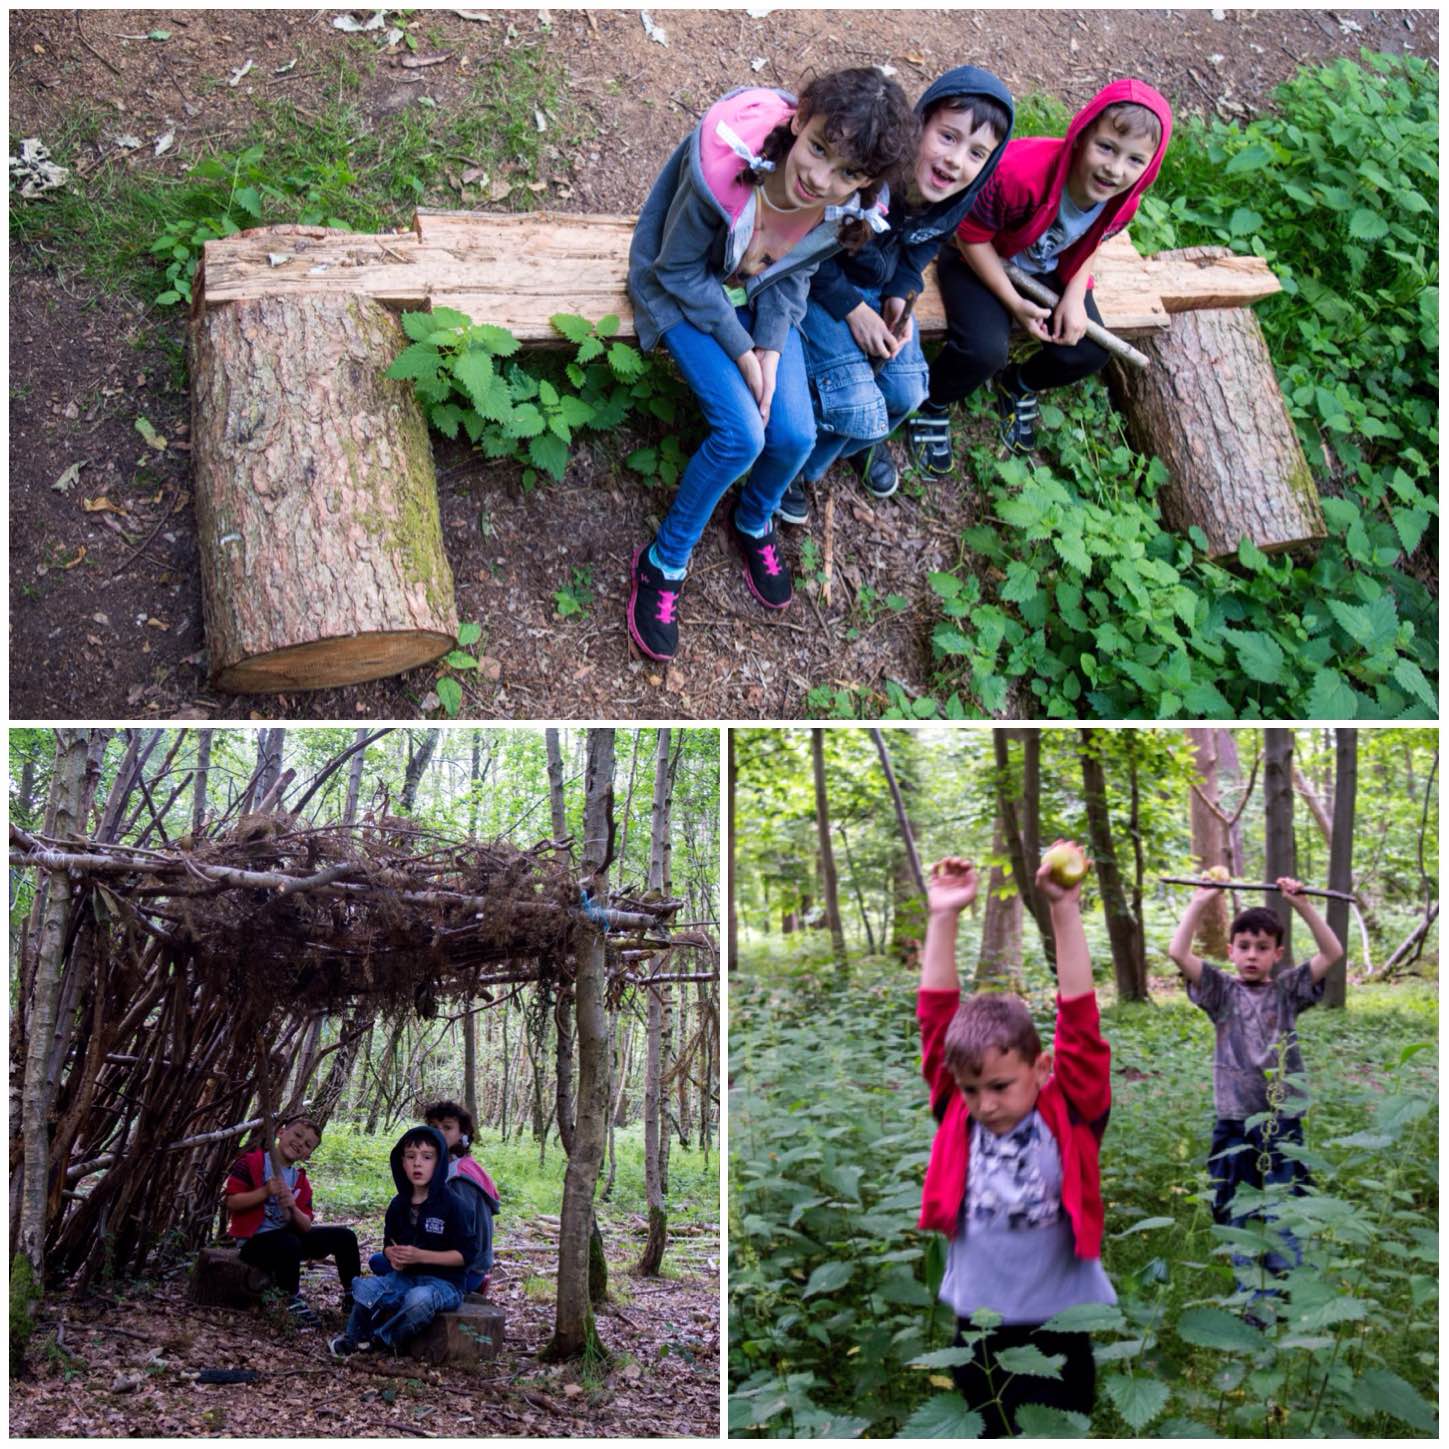
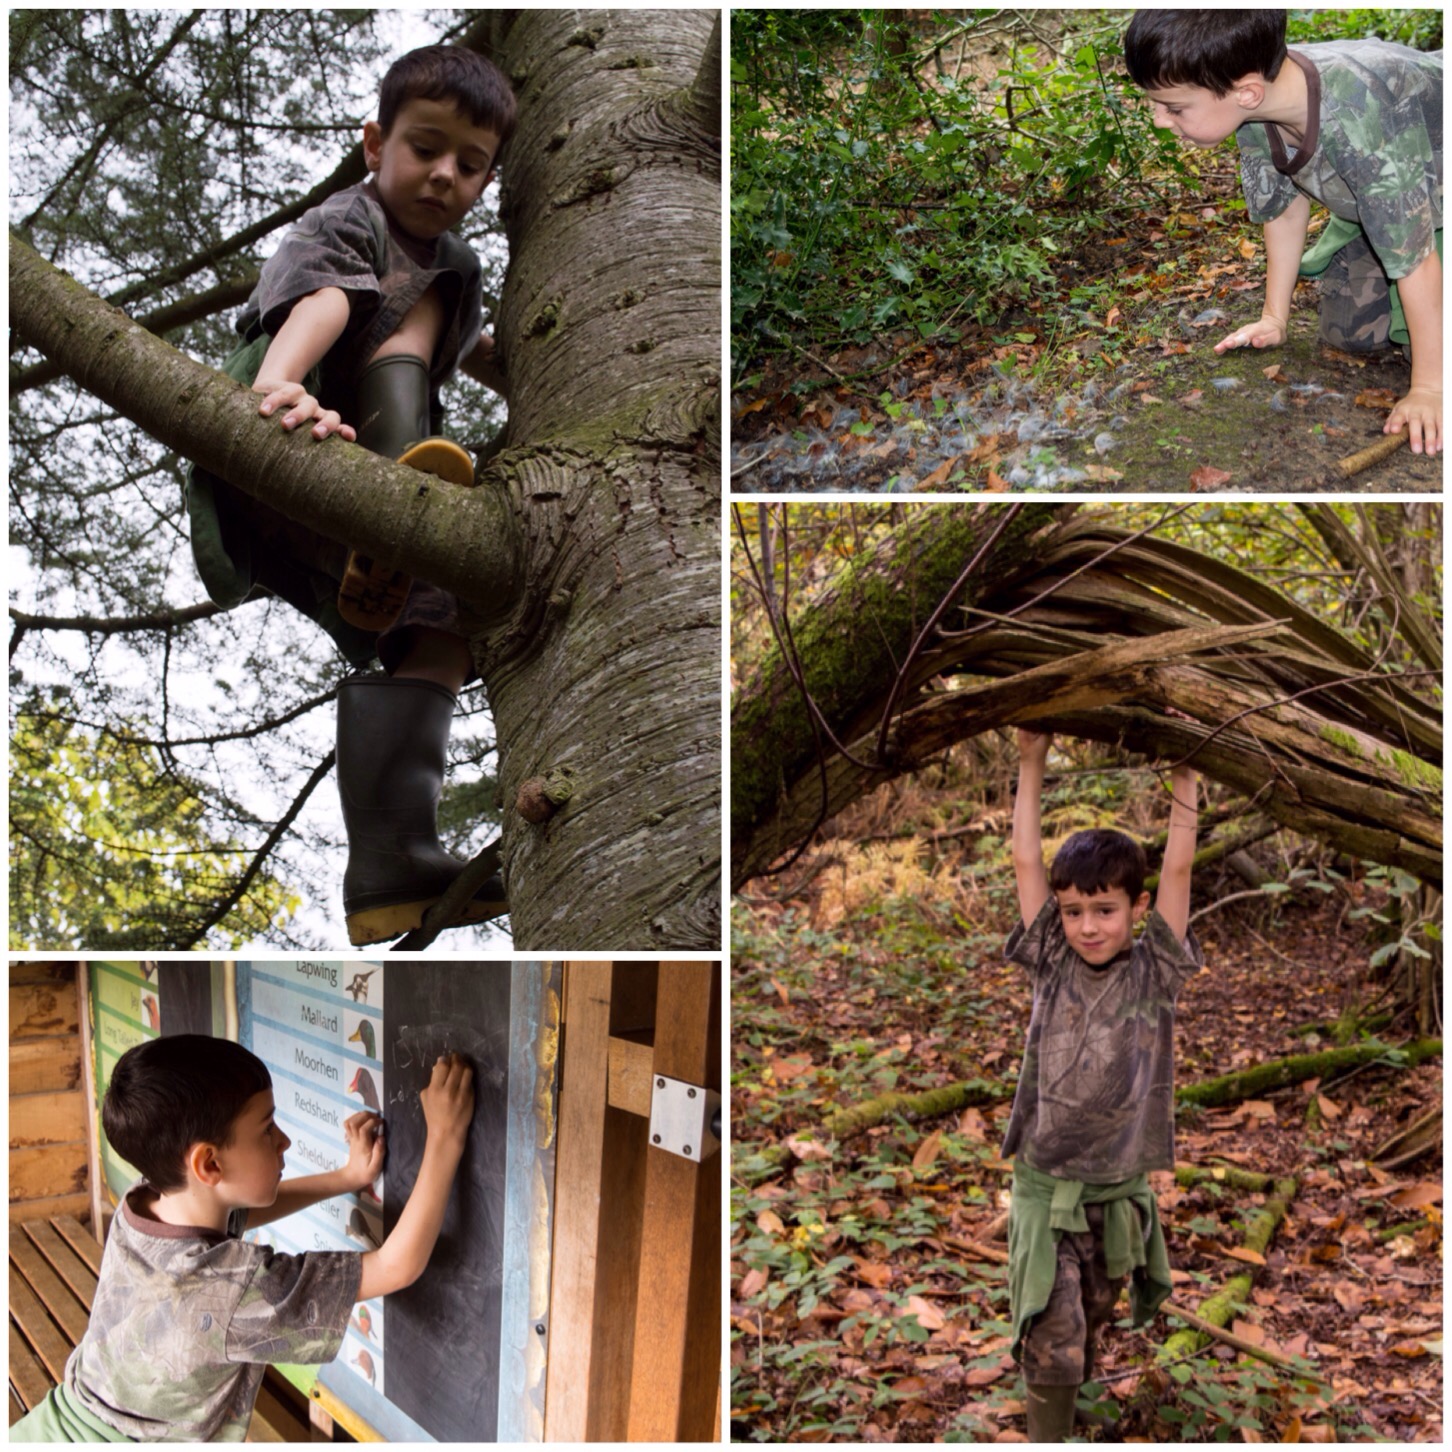
On the way back from the bird hide we came across lots of camps and chainsawed seats in the woods (I love this bench – rustic and simple). There were a number of nettle stings over the evening but with a few crushed up nettles rubbed onto them they were soon away (best cure for nettle stings is the juice of a nettle).
Camp set ups
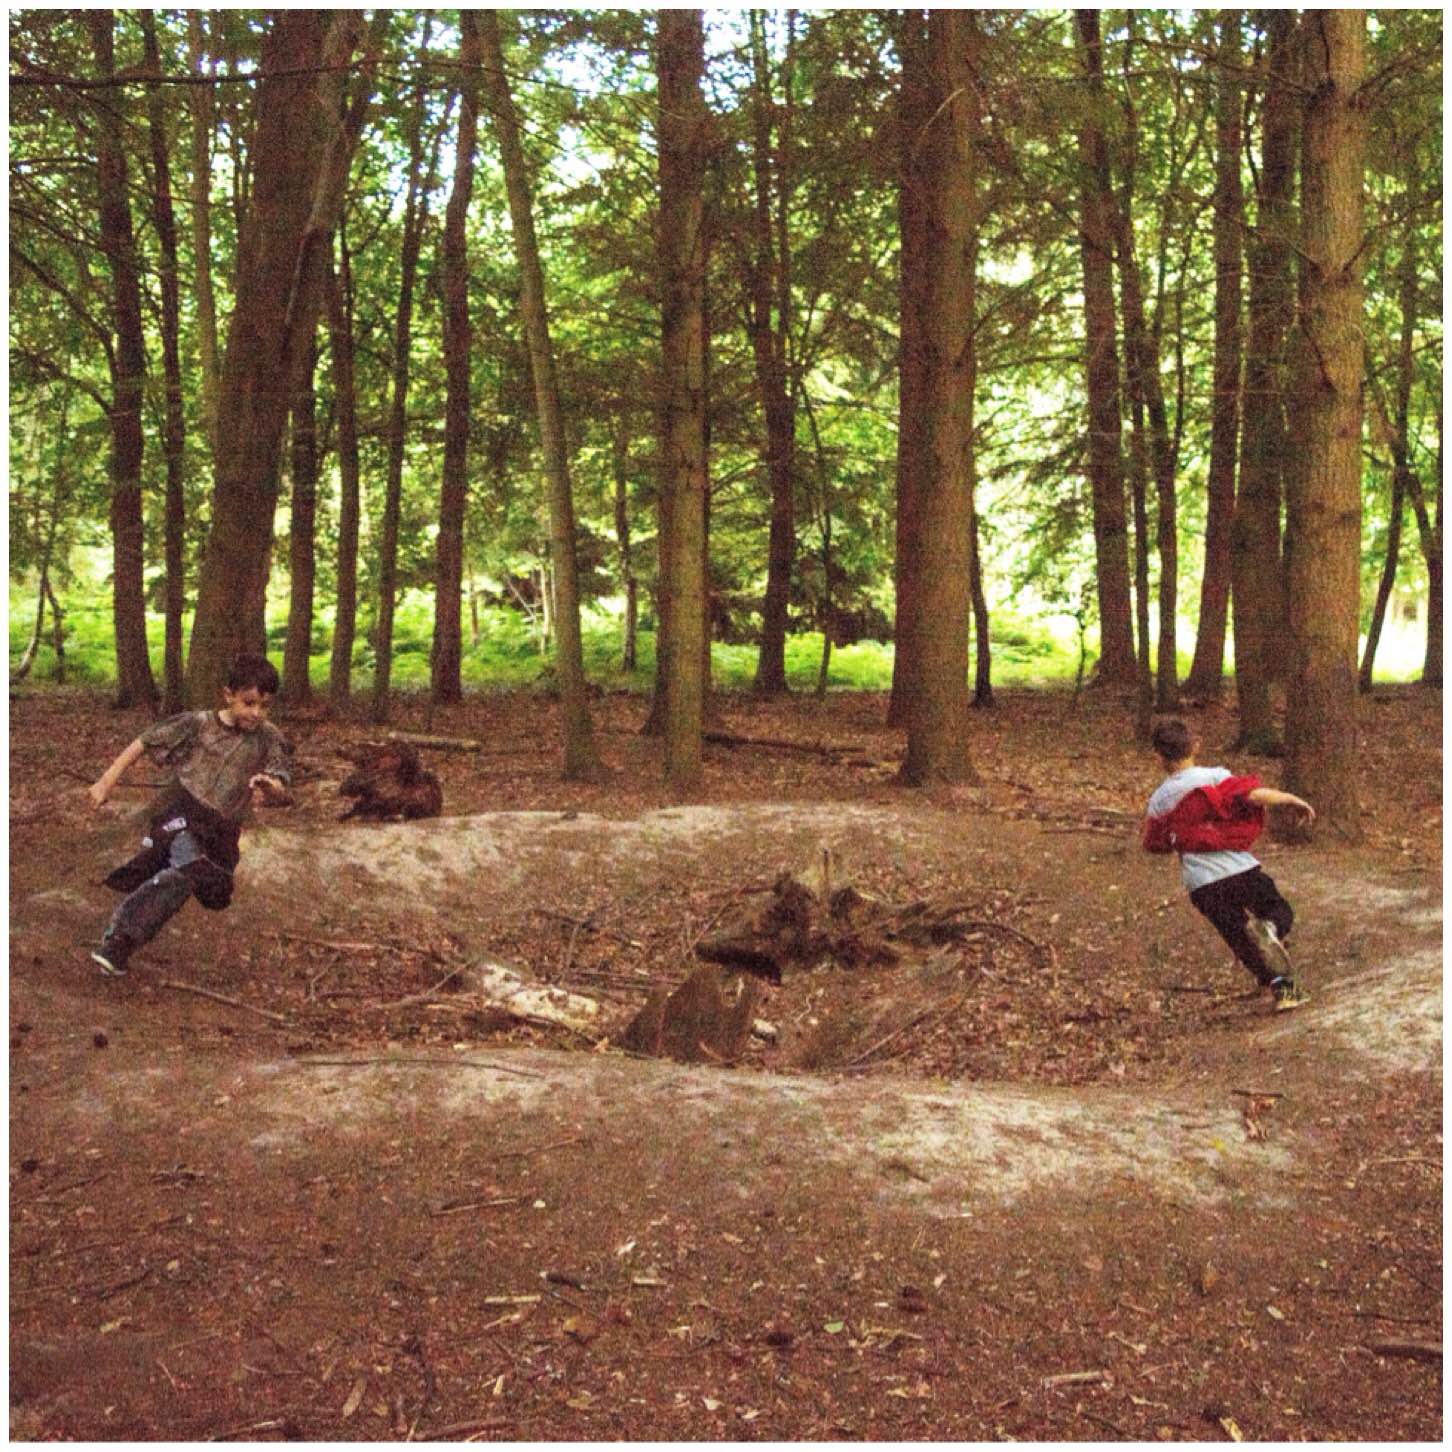
We found the old bomb crater in the wood and the lads ran themselves ragged around it trying to out do each other.
Running the crater
Looks like the weather is changing tomorrow with thunderstorms coming in so who knows what we will get up to then.
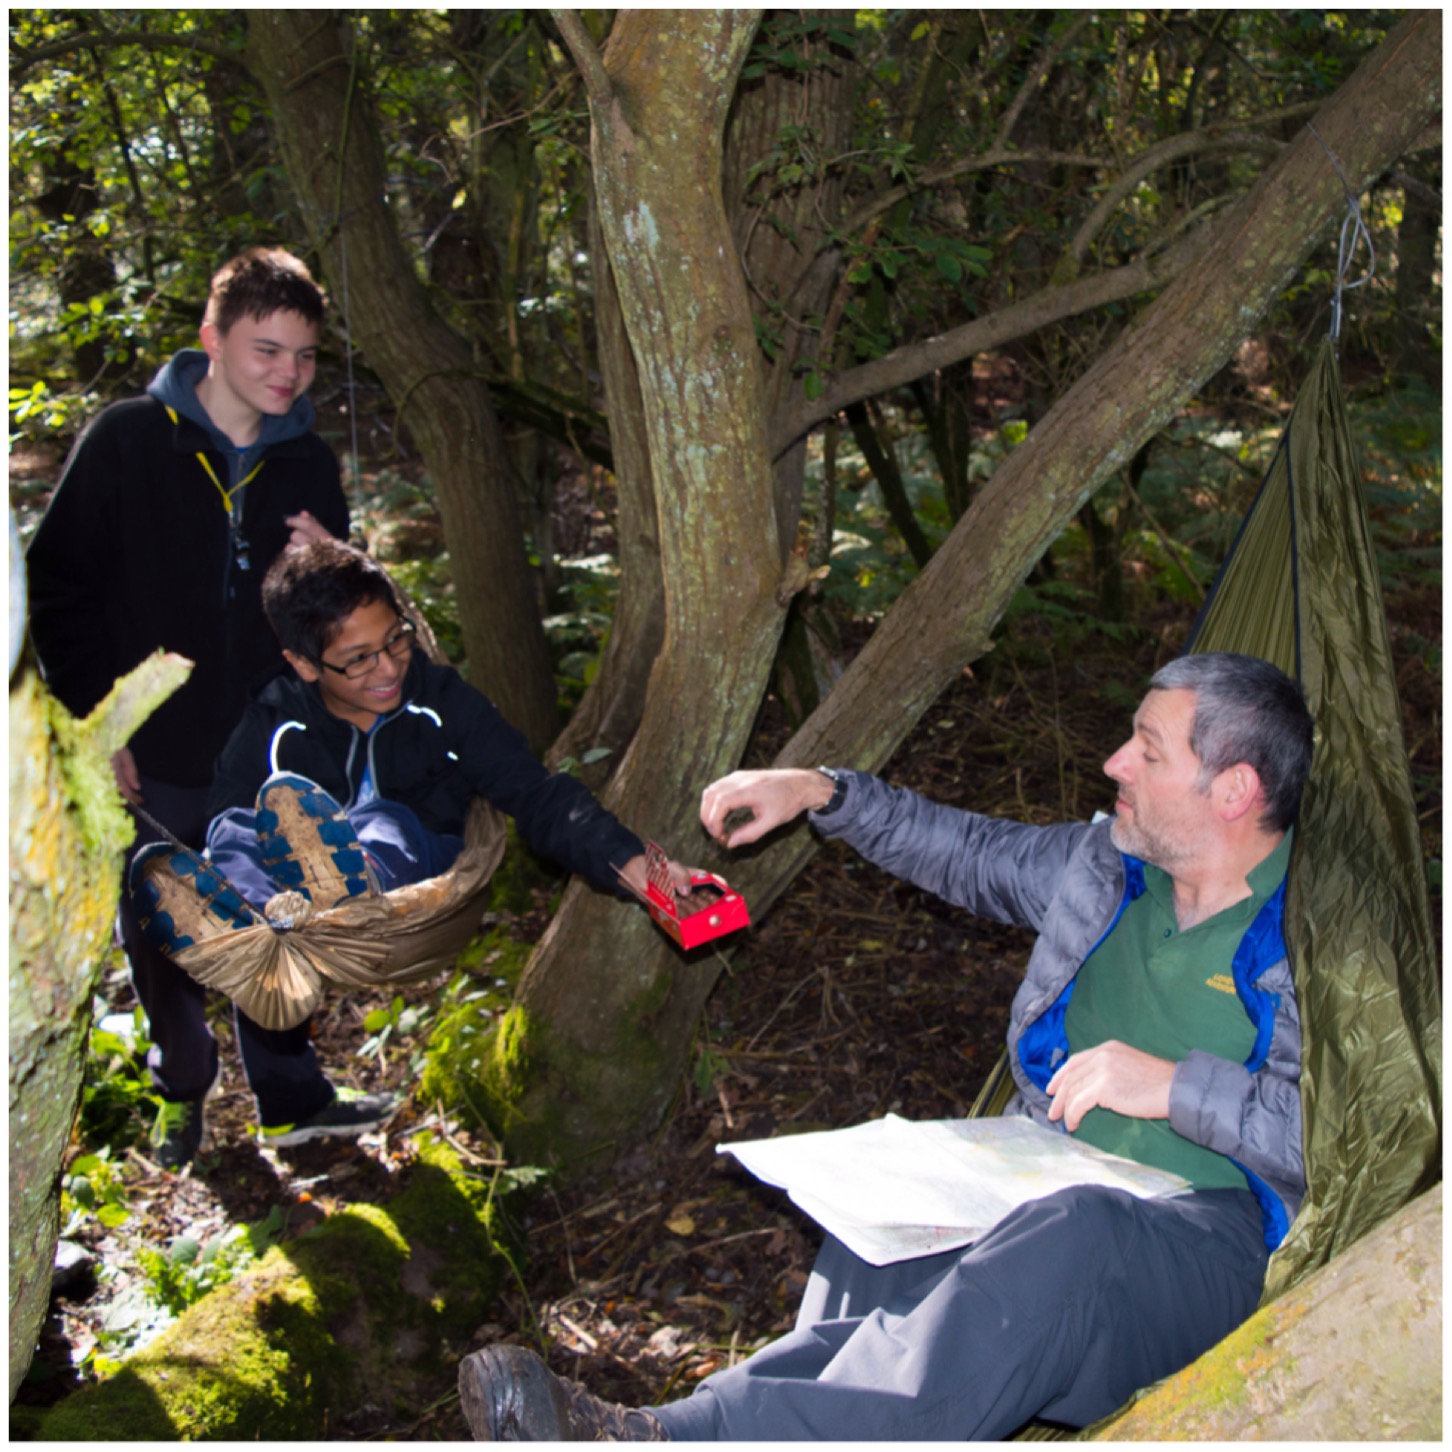
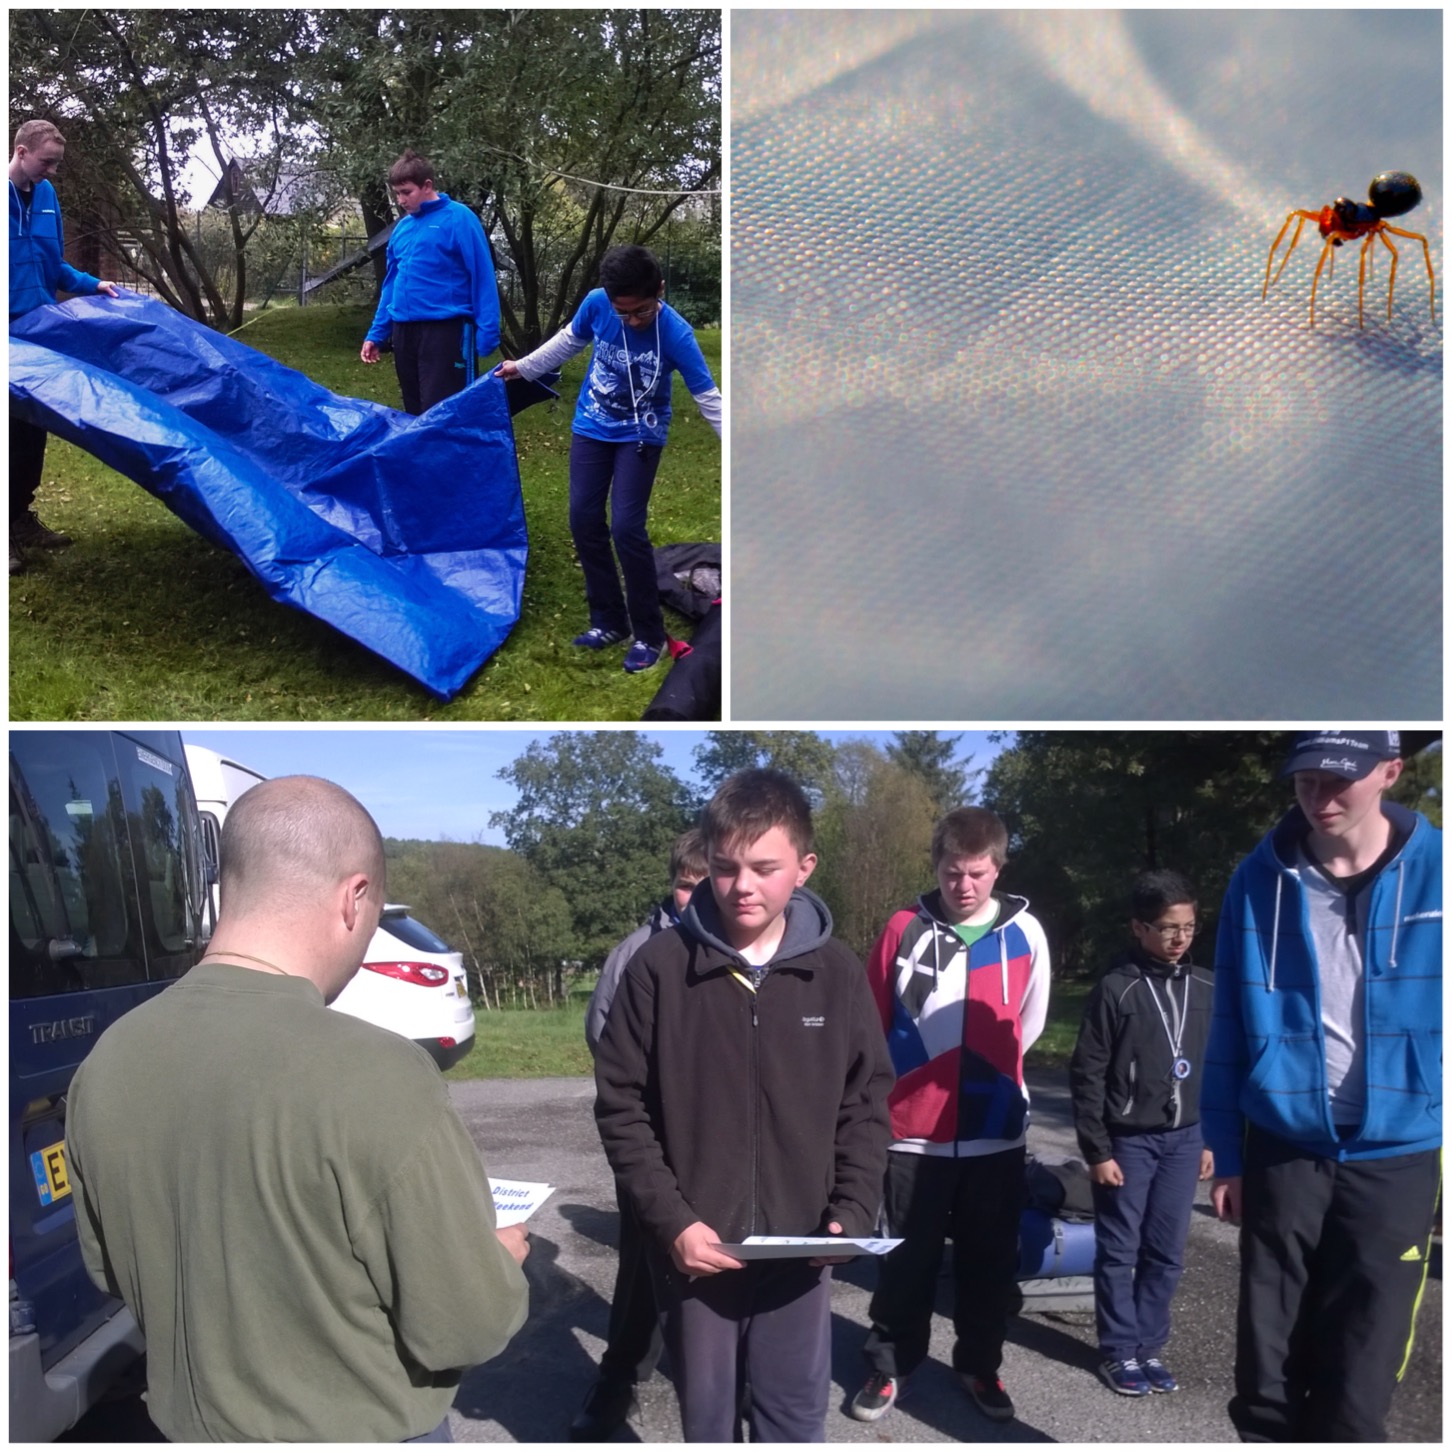
I am running a bushcraft evening for our local Beaver group in just over a weeks time and so I went out with the pack leader Amber to check out the woods we would be using.
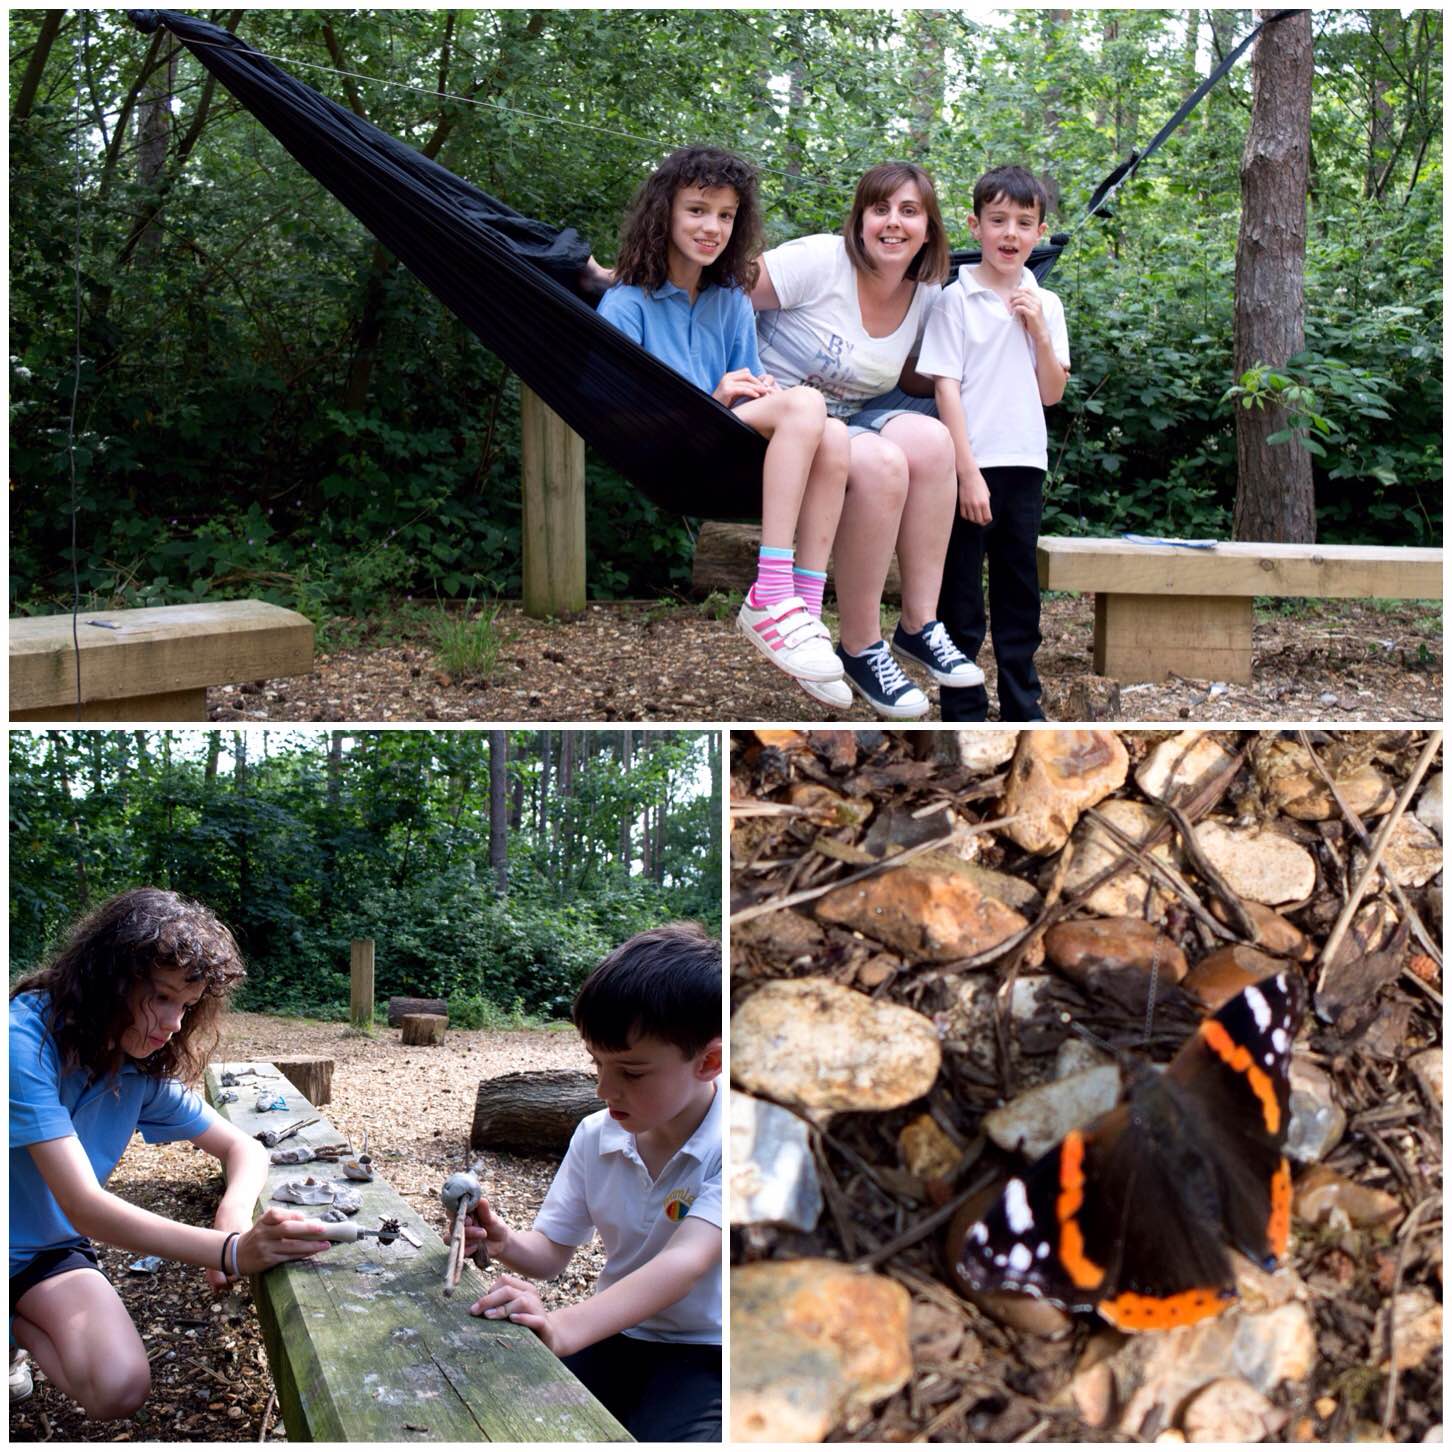
I took the kids with me as Alison is in London today and also took along a hammock to see if we could easily string a few up on the evening. Hammocks I thought was a good theme for the 30 Day Challenge.
After a good reccee of the site the kids found some clay blobsters the school children had made so they had fun playing with them. We also spotted a colony of ants with lots of flying ants among them (the pictures did not turn out well though).
Class Recee
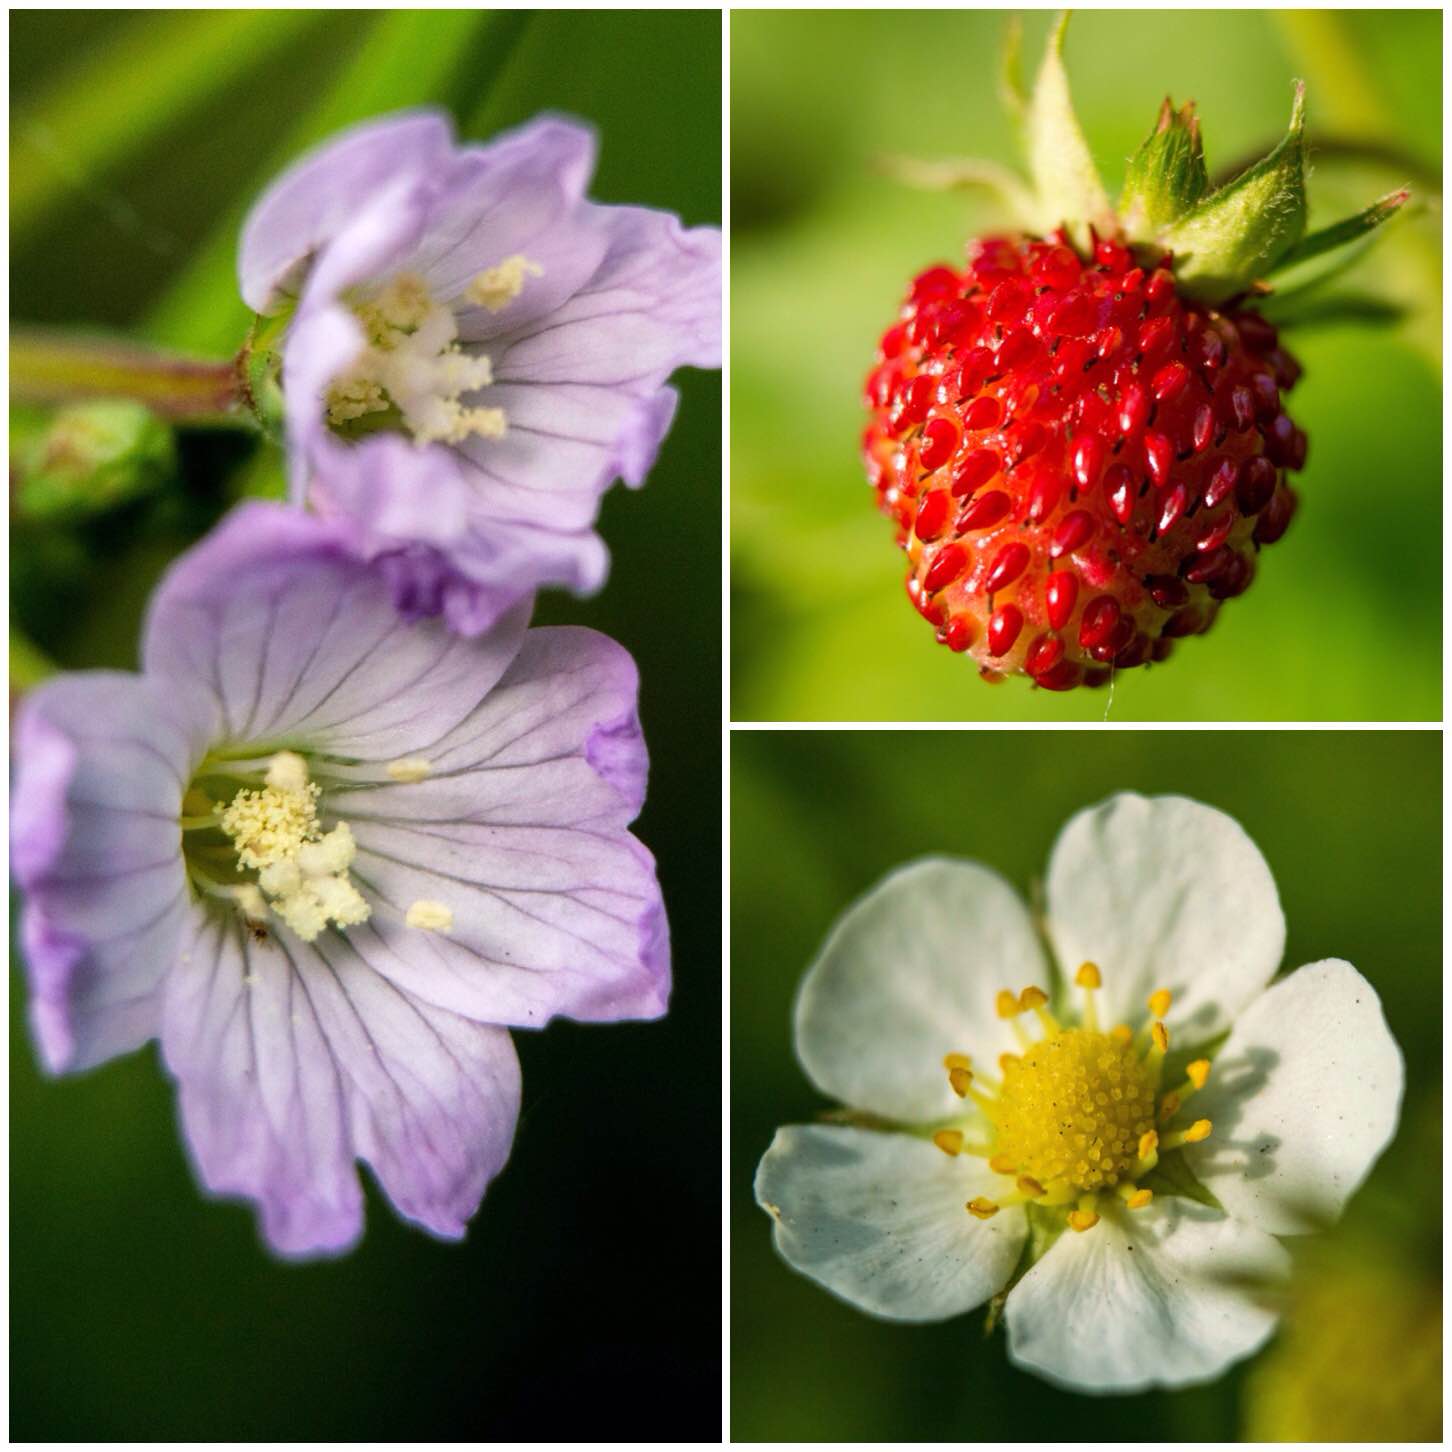
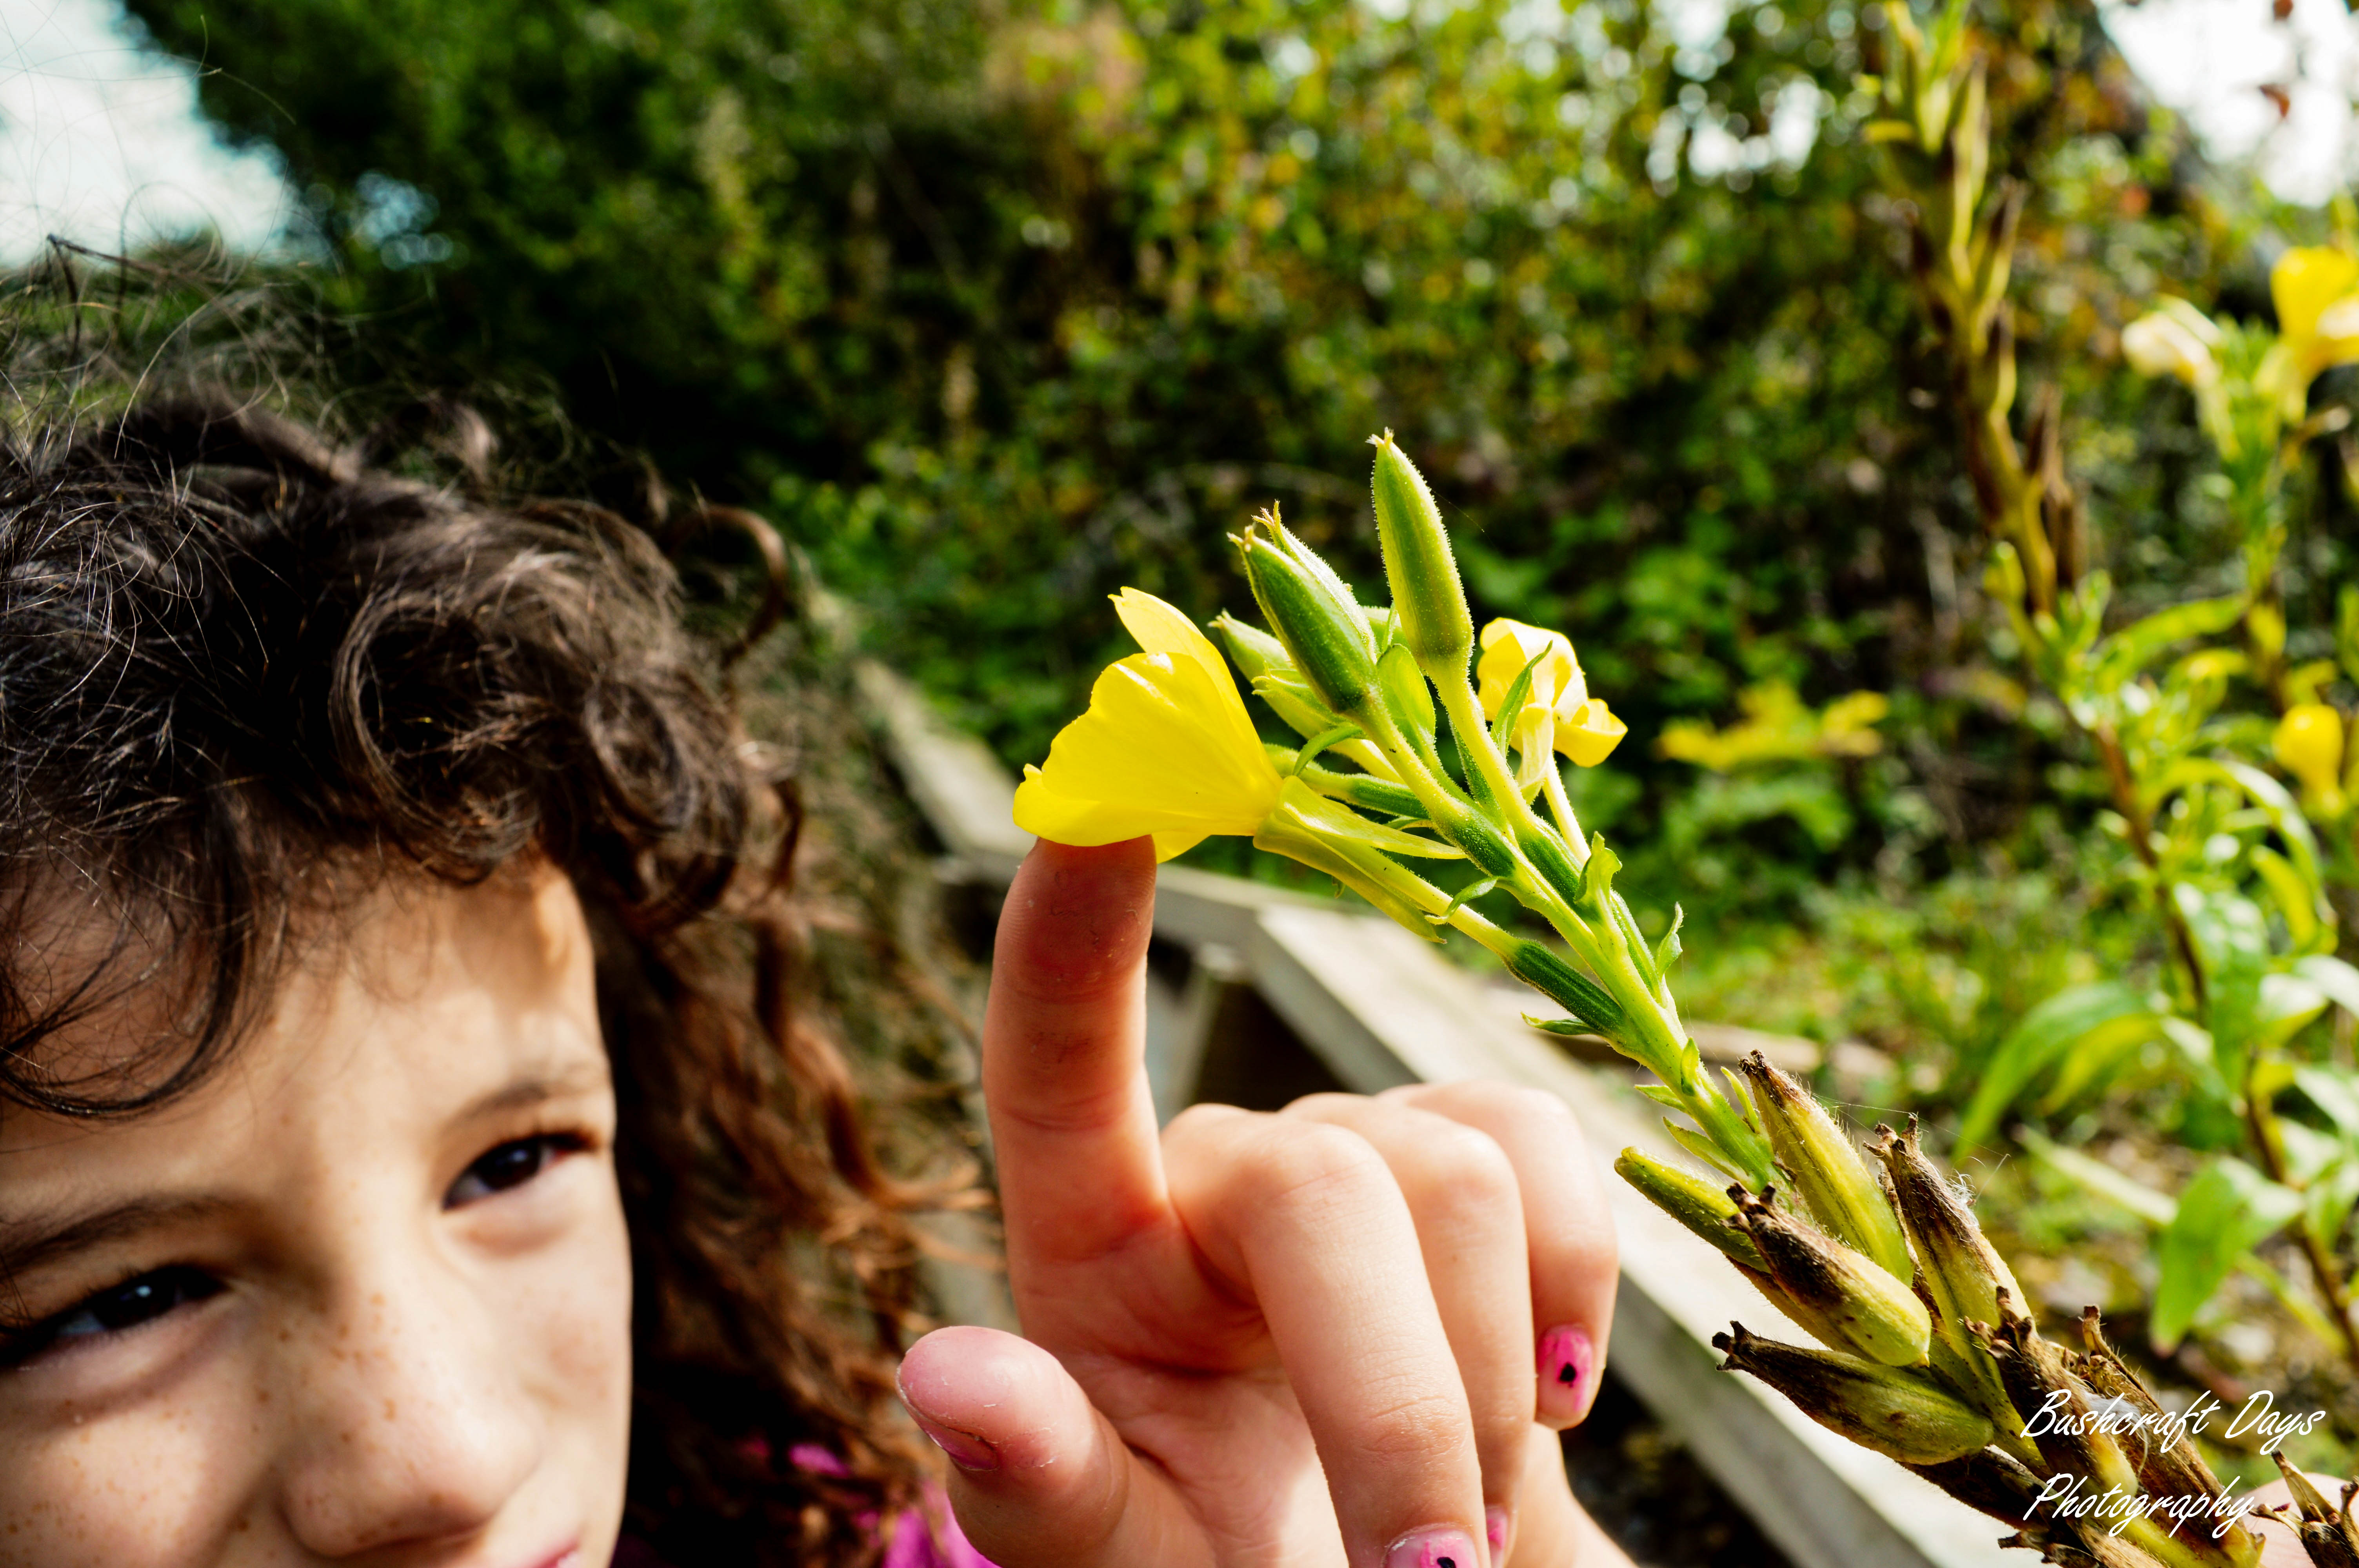
After tea we went for an evening bimble and spotted lots of small willowherbs and quite a few ripe wild strawberries.
Willowherb and Wild Strawberries
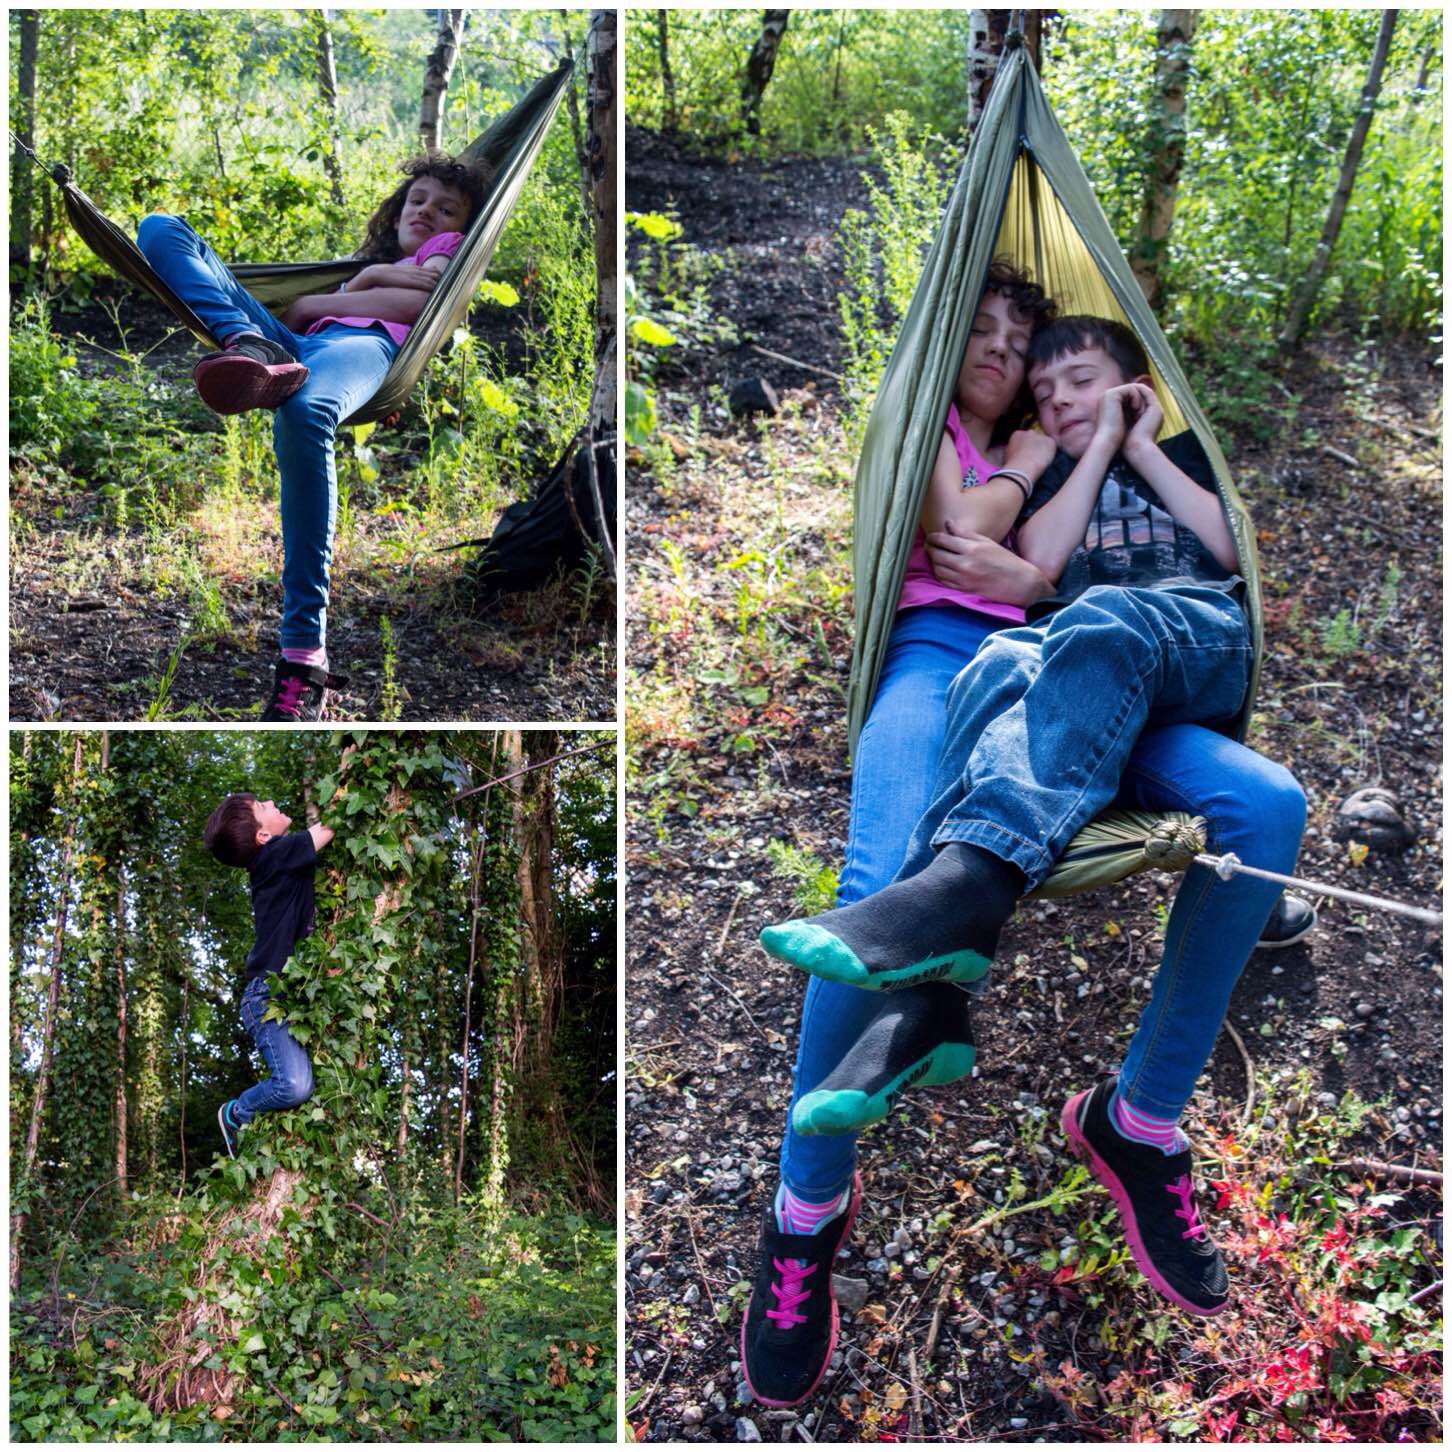
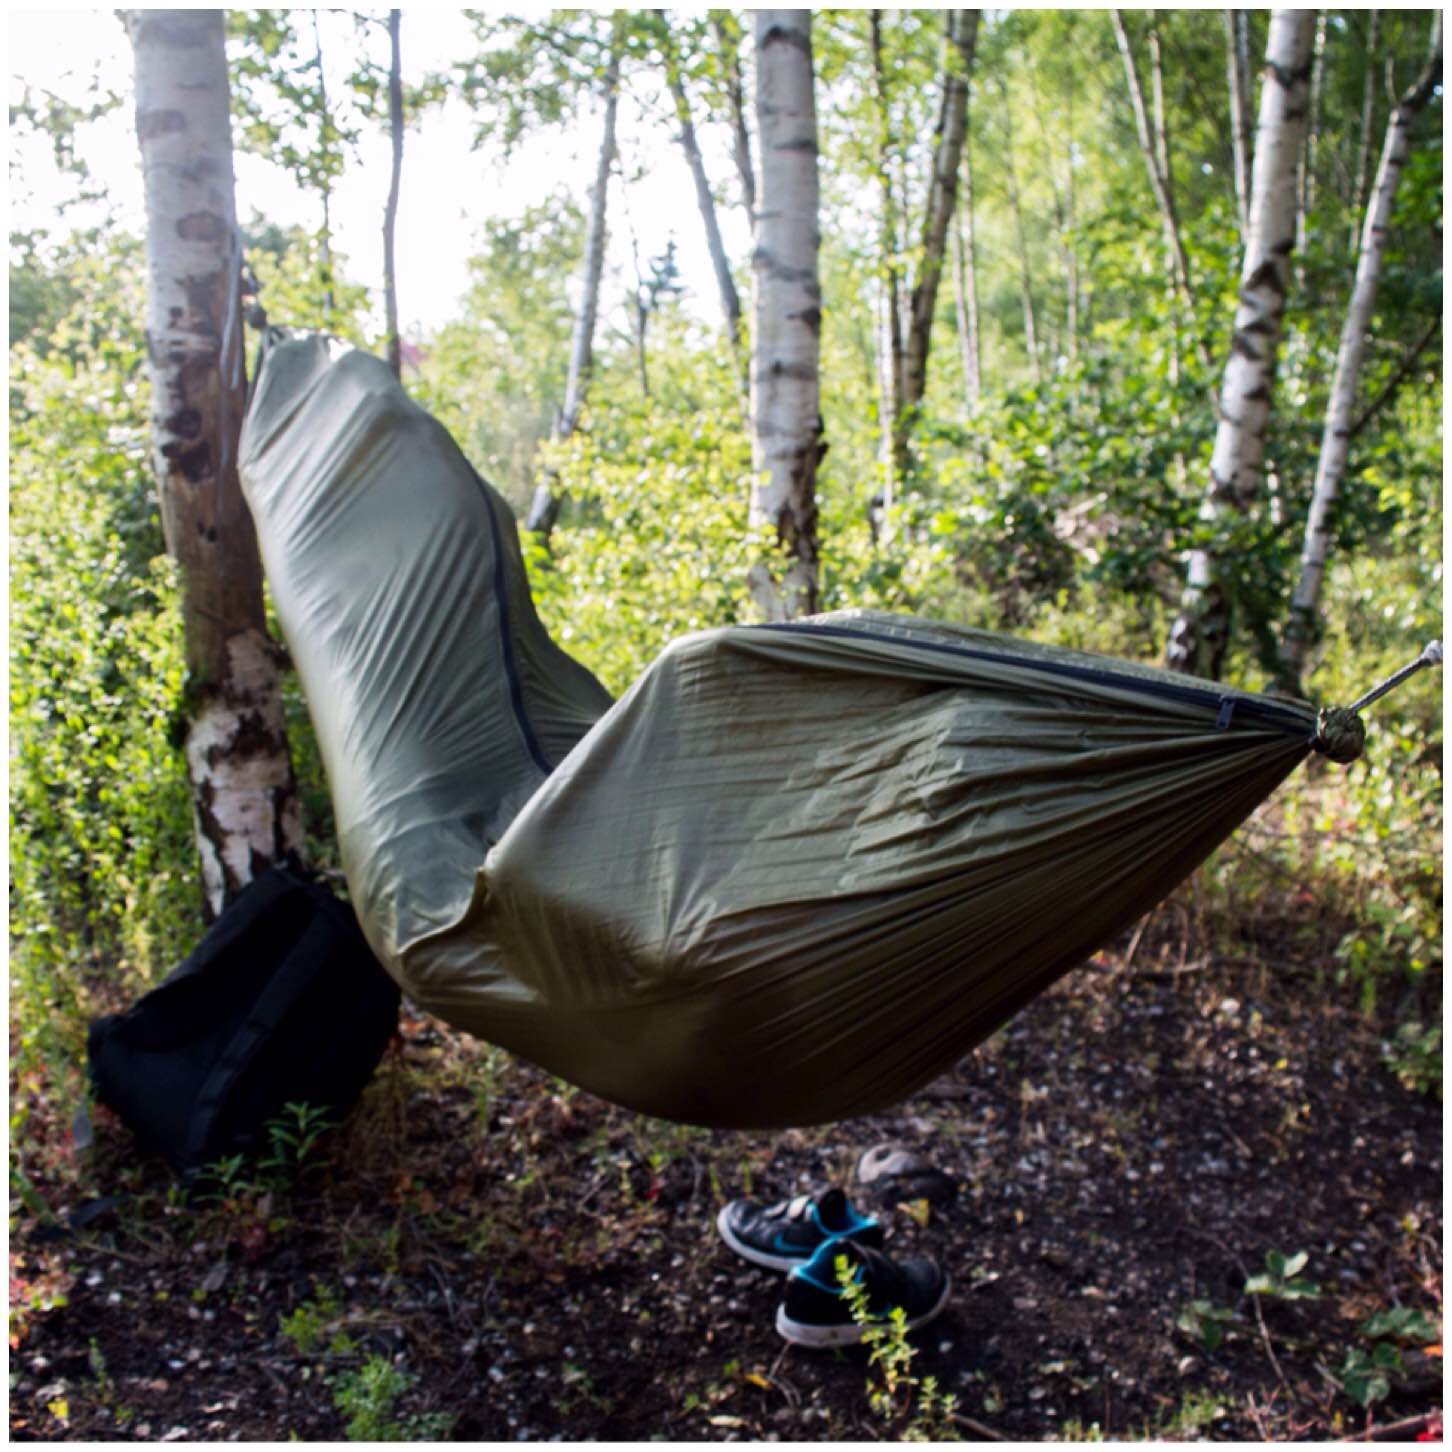
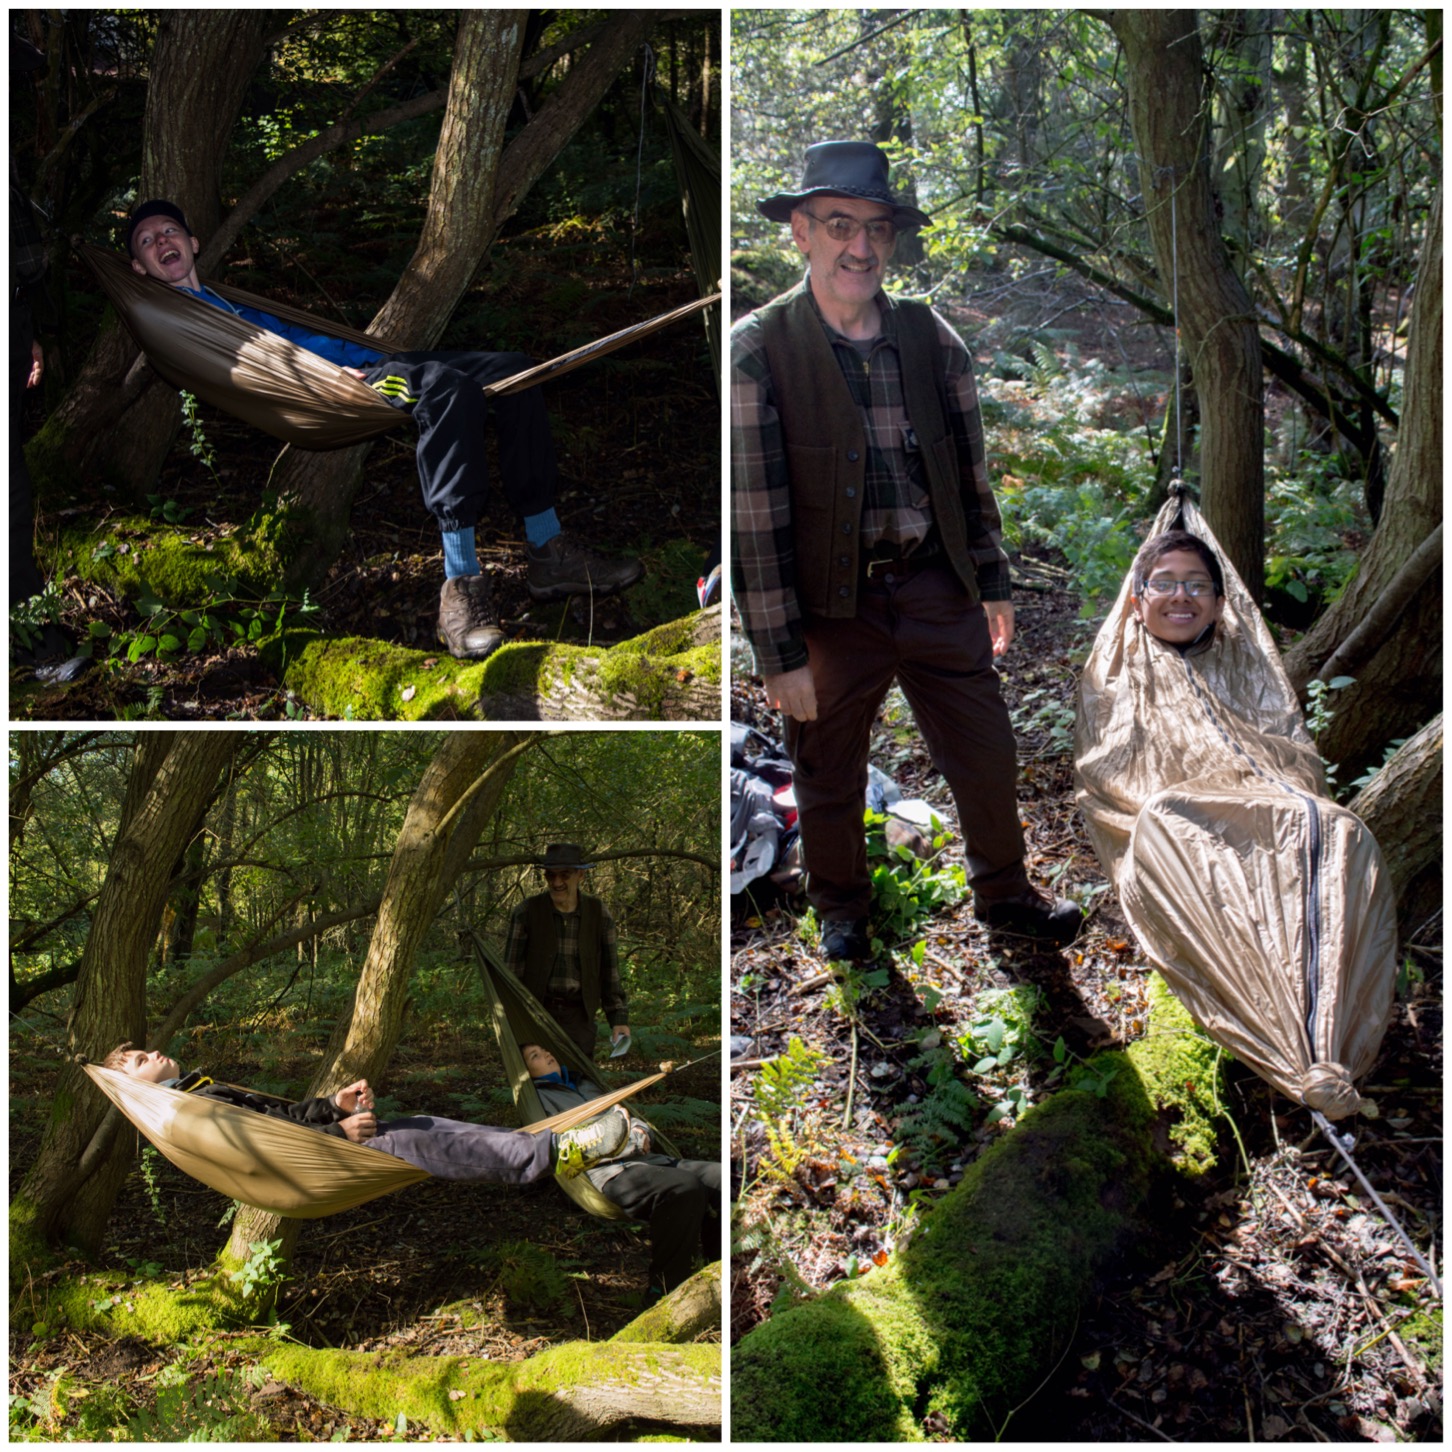
In keeping with the hammock theme I put up my small EDC hammock for Catherine and Finlay. This kept the kids happy while I wandered around looking for pictures. Finlay though could not help himself and was soon shimmying up a tree.
A bit more hammock time
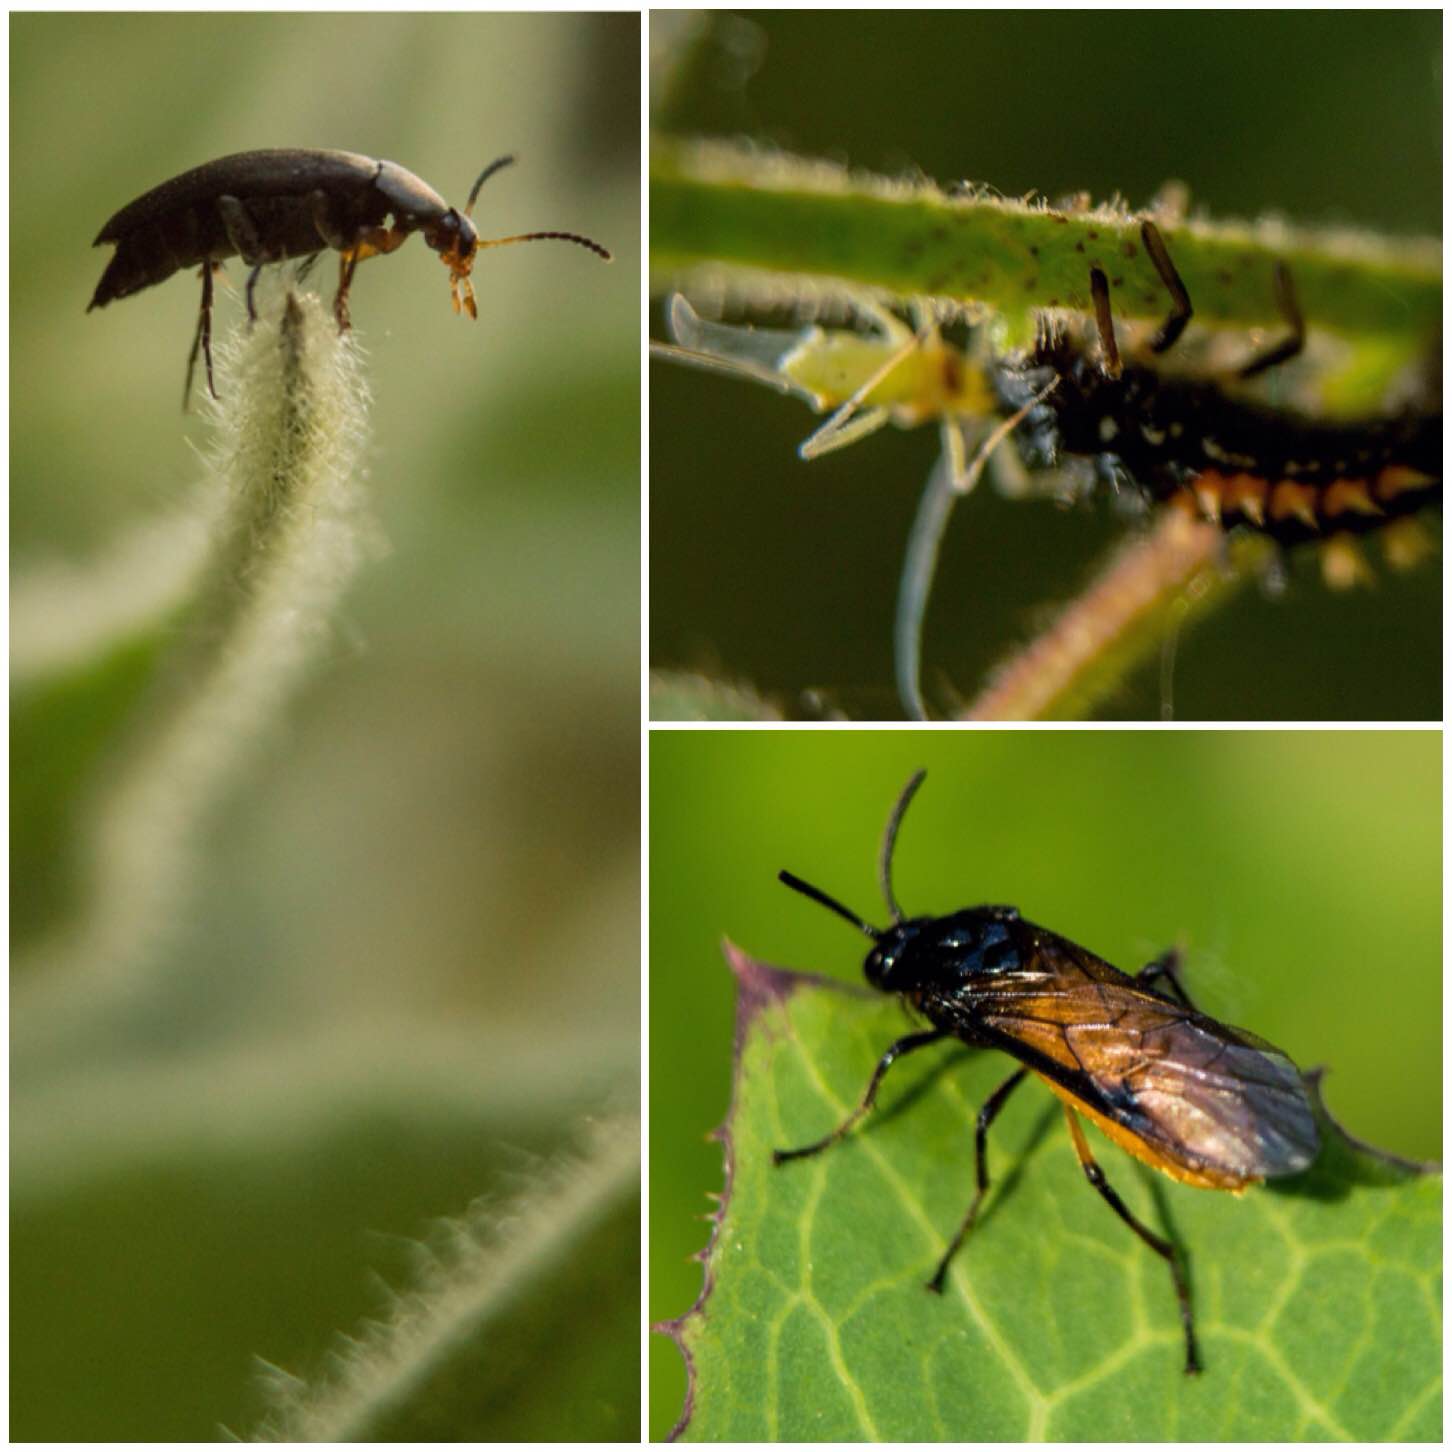
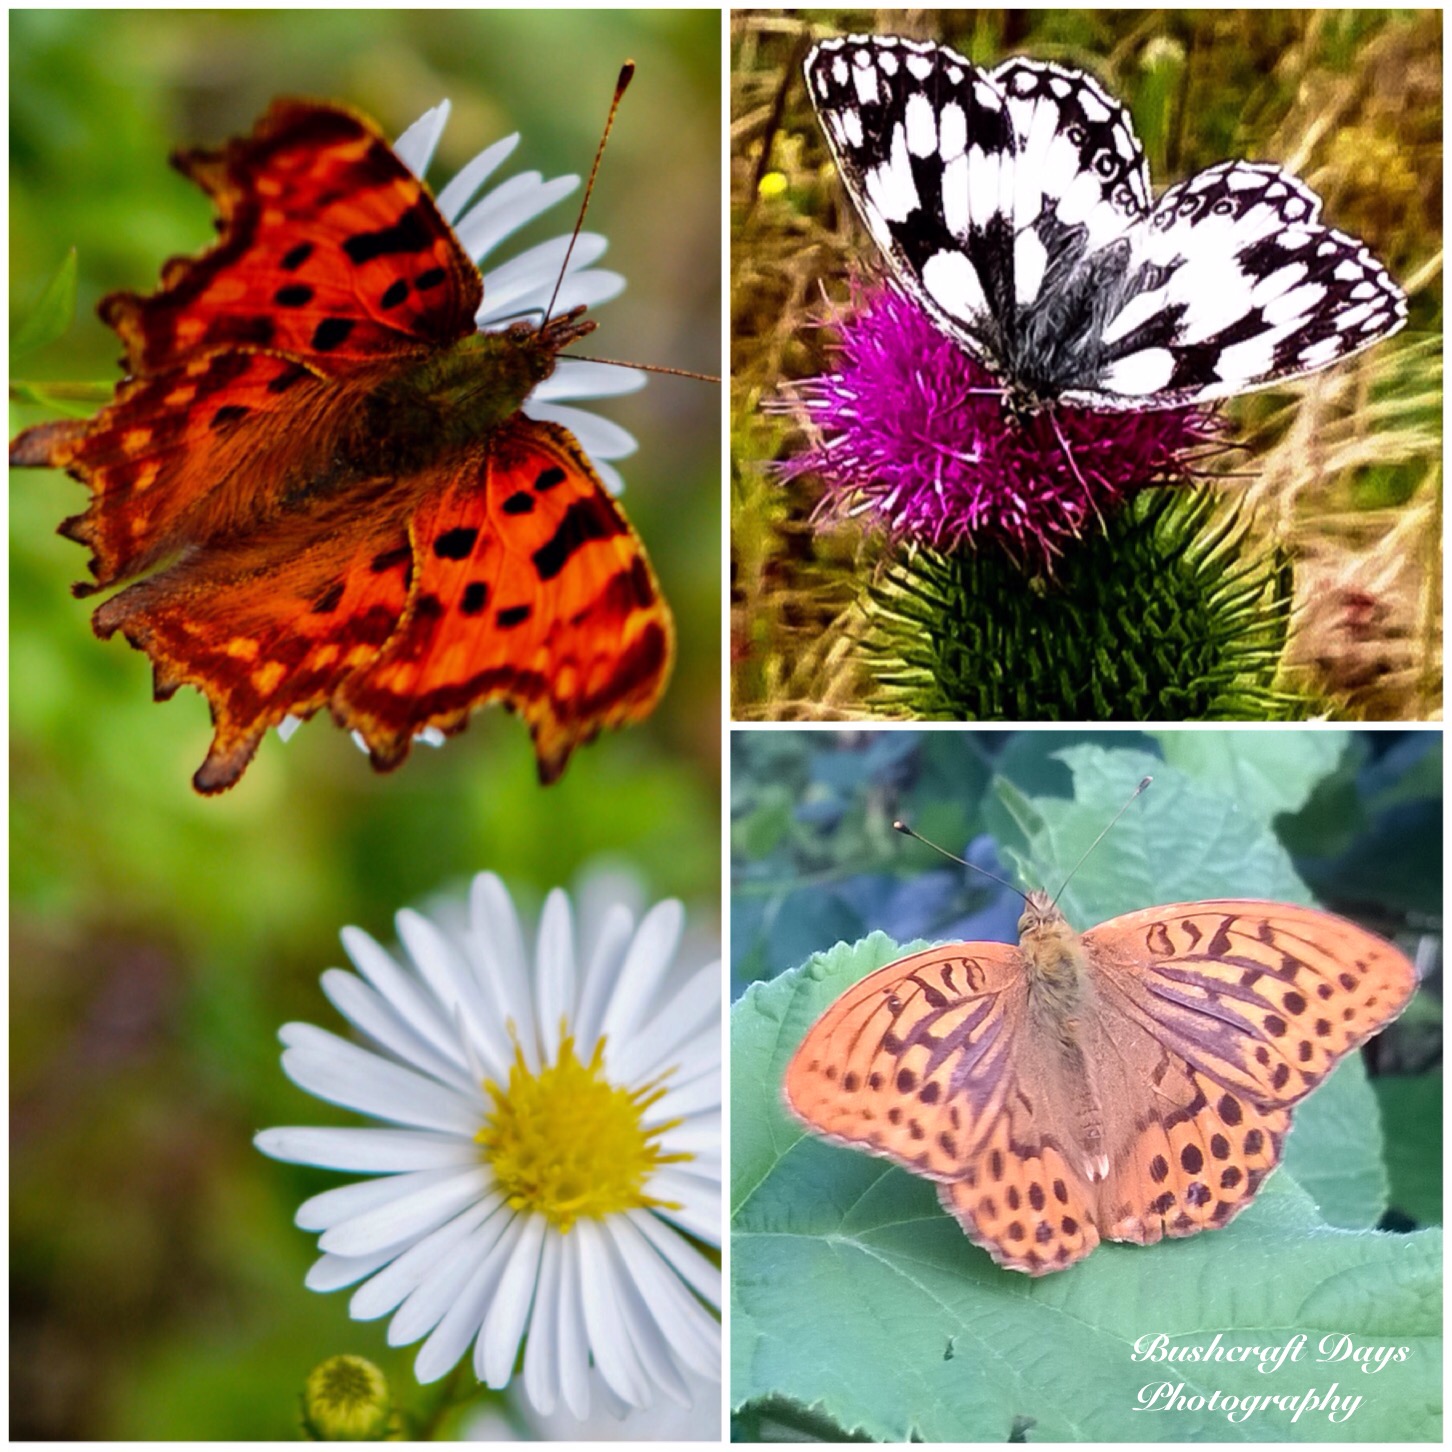
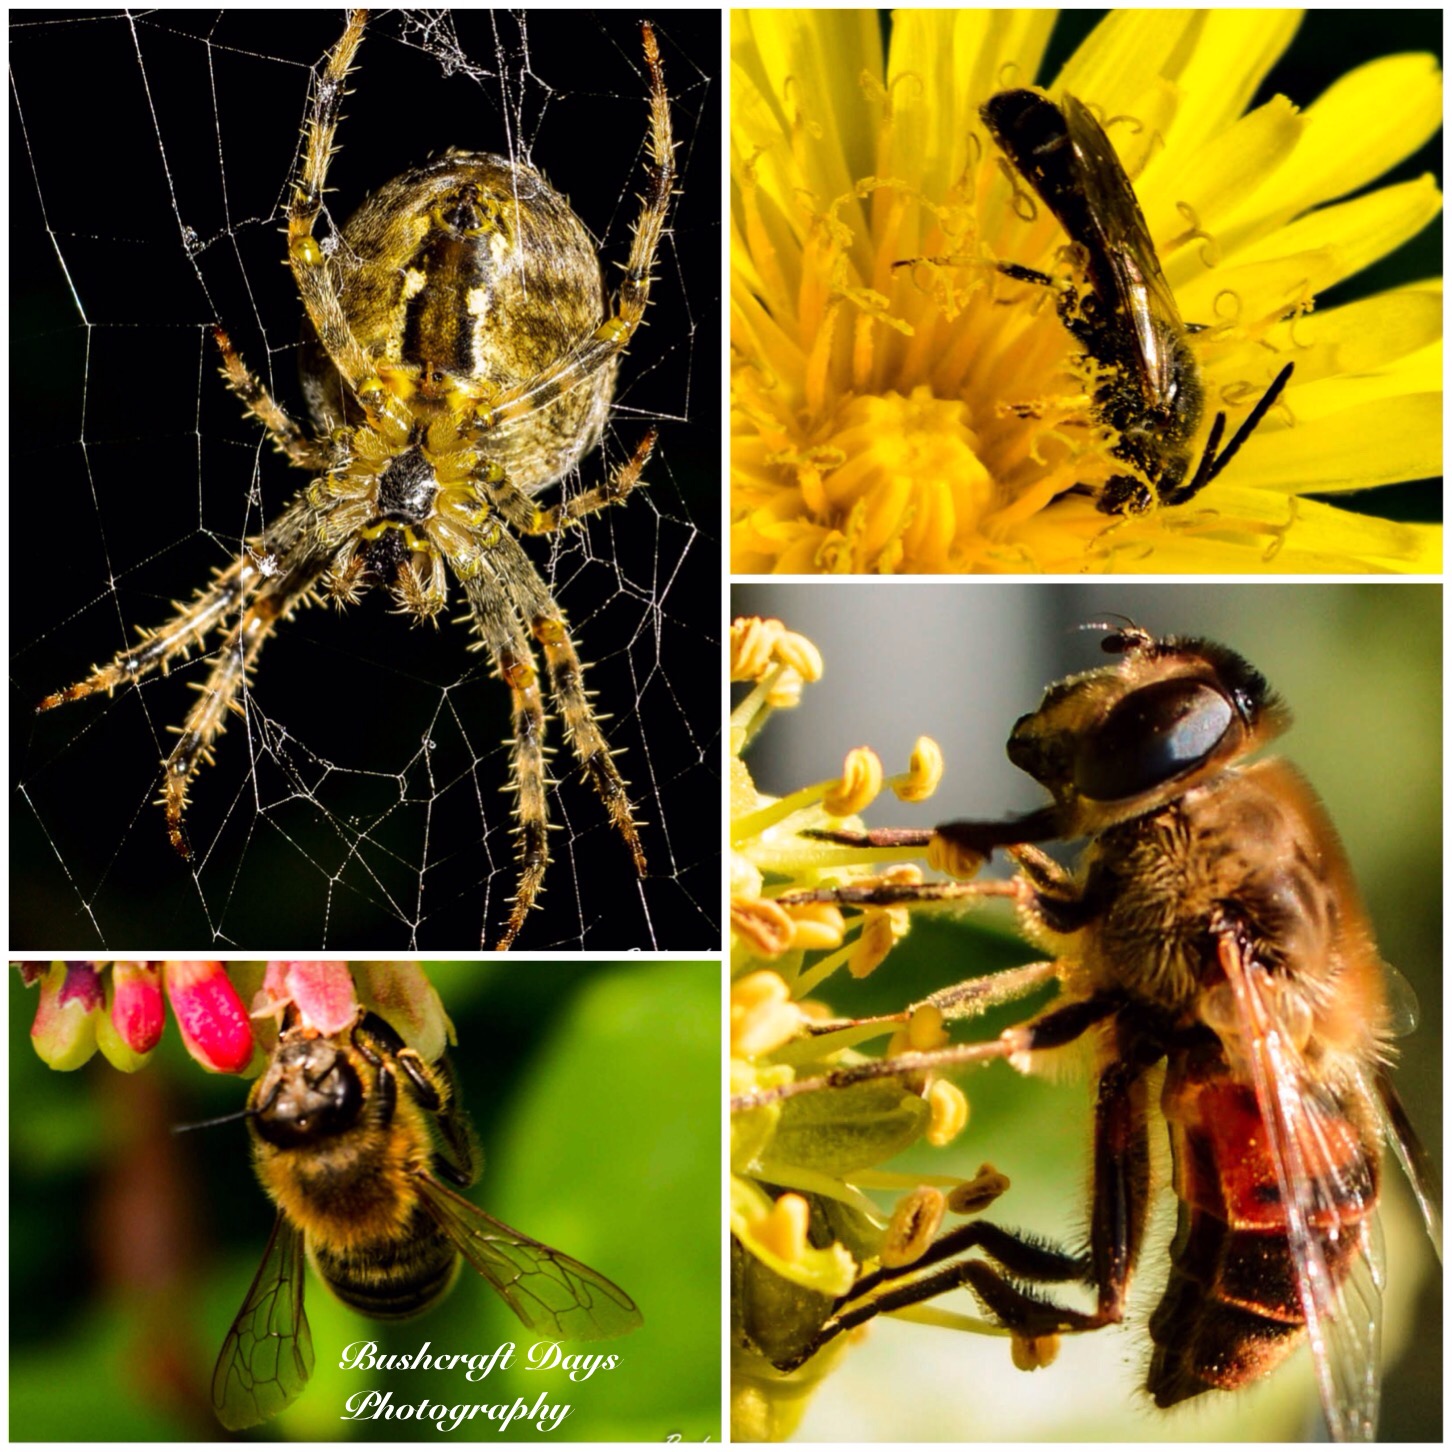
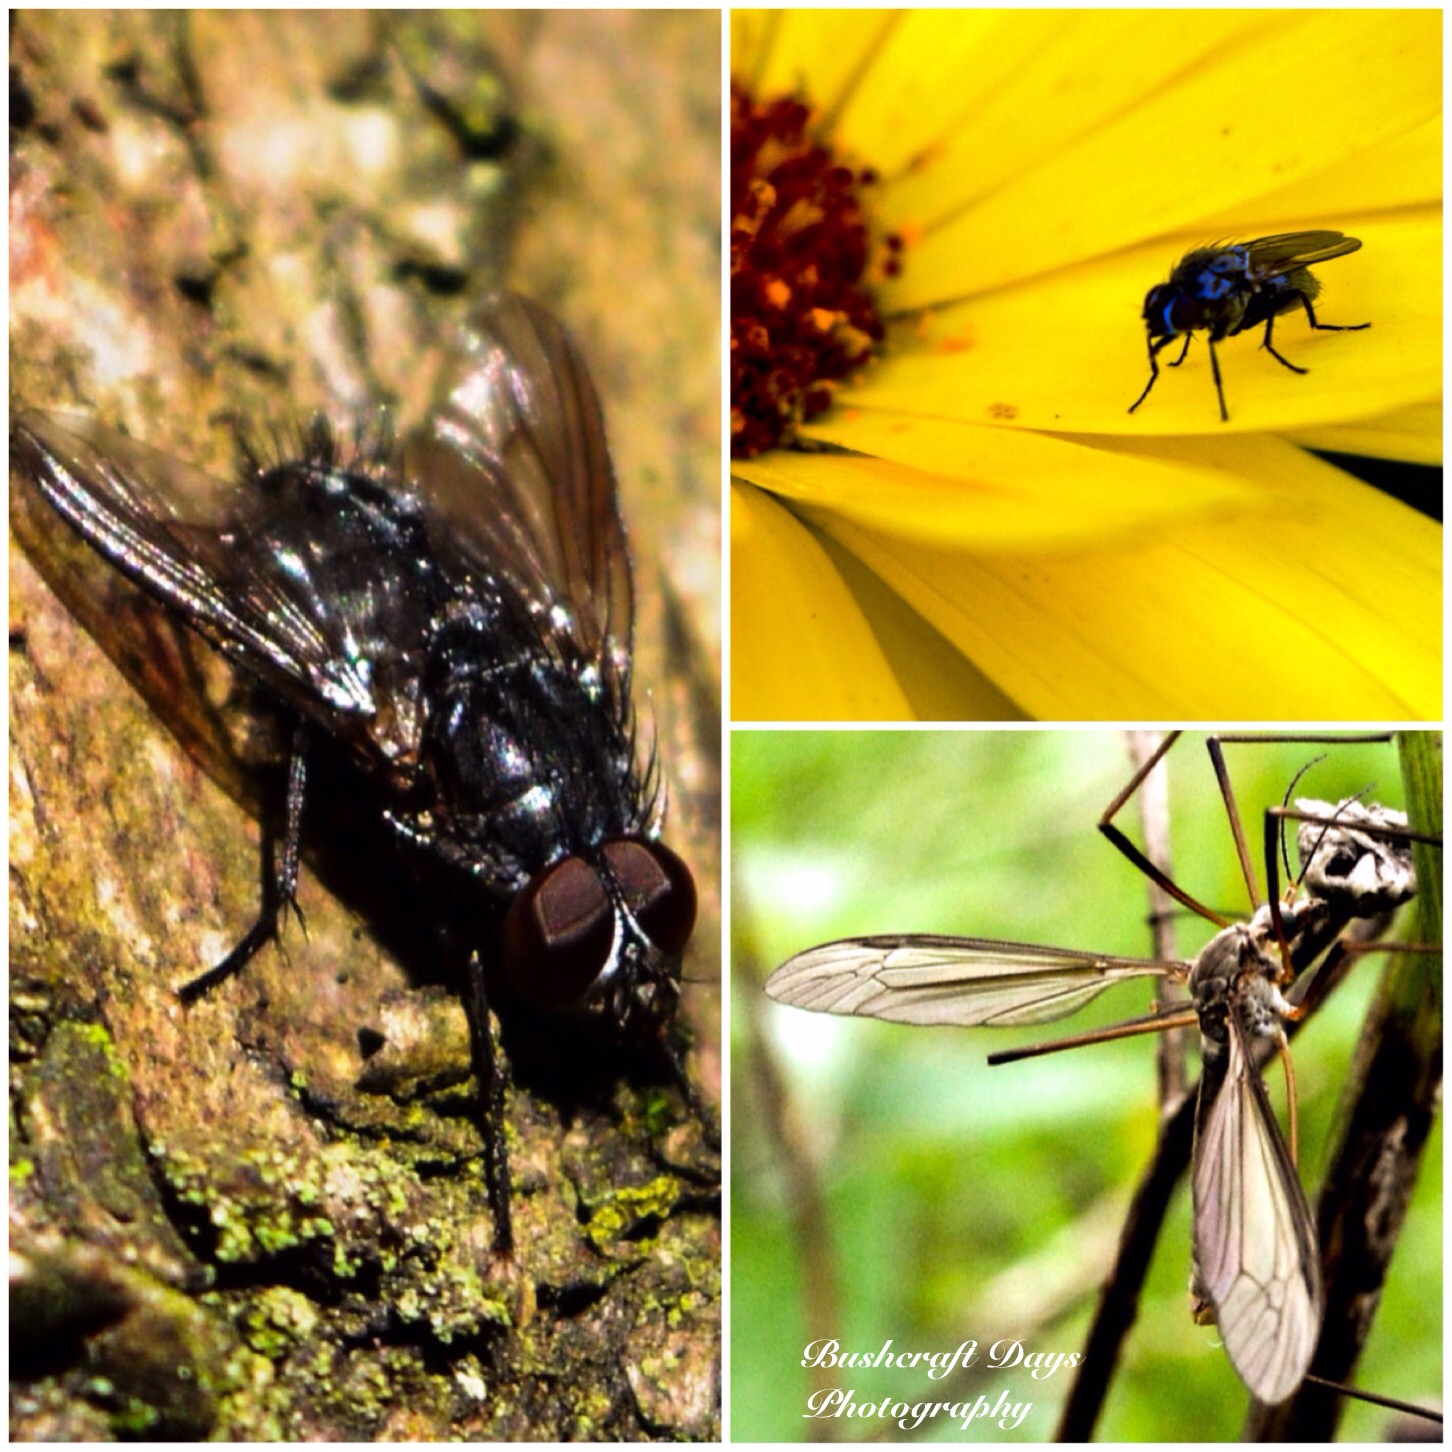
While the kids were in the hammock or up trees I spotted these little critters. The one on the left was sitting on the tip of a small mullein leaf. There was a fight going on in the top right picture and the chap in the bottom right was just sunning himself.
Bug spotting
The beauty of the EDC hammock is that it has a zip – great for containing the kids when out and about 🙂
EDC – Perfect for naughty kids
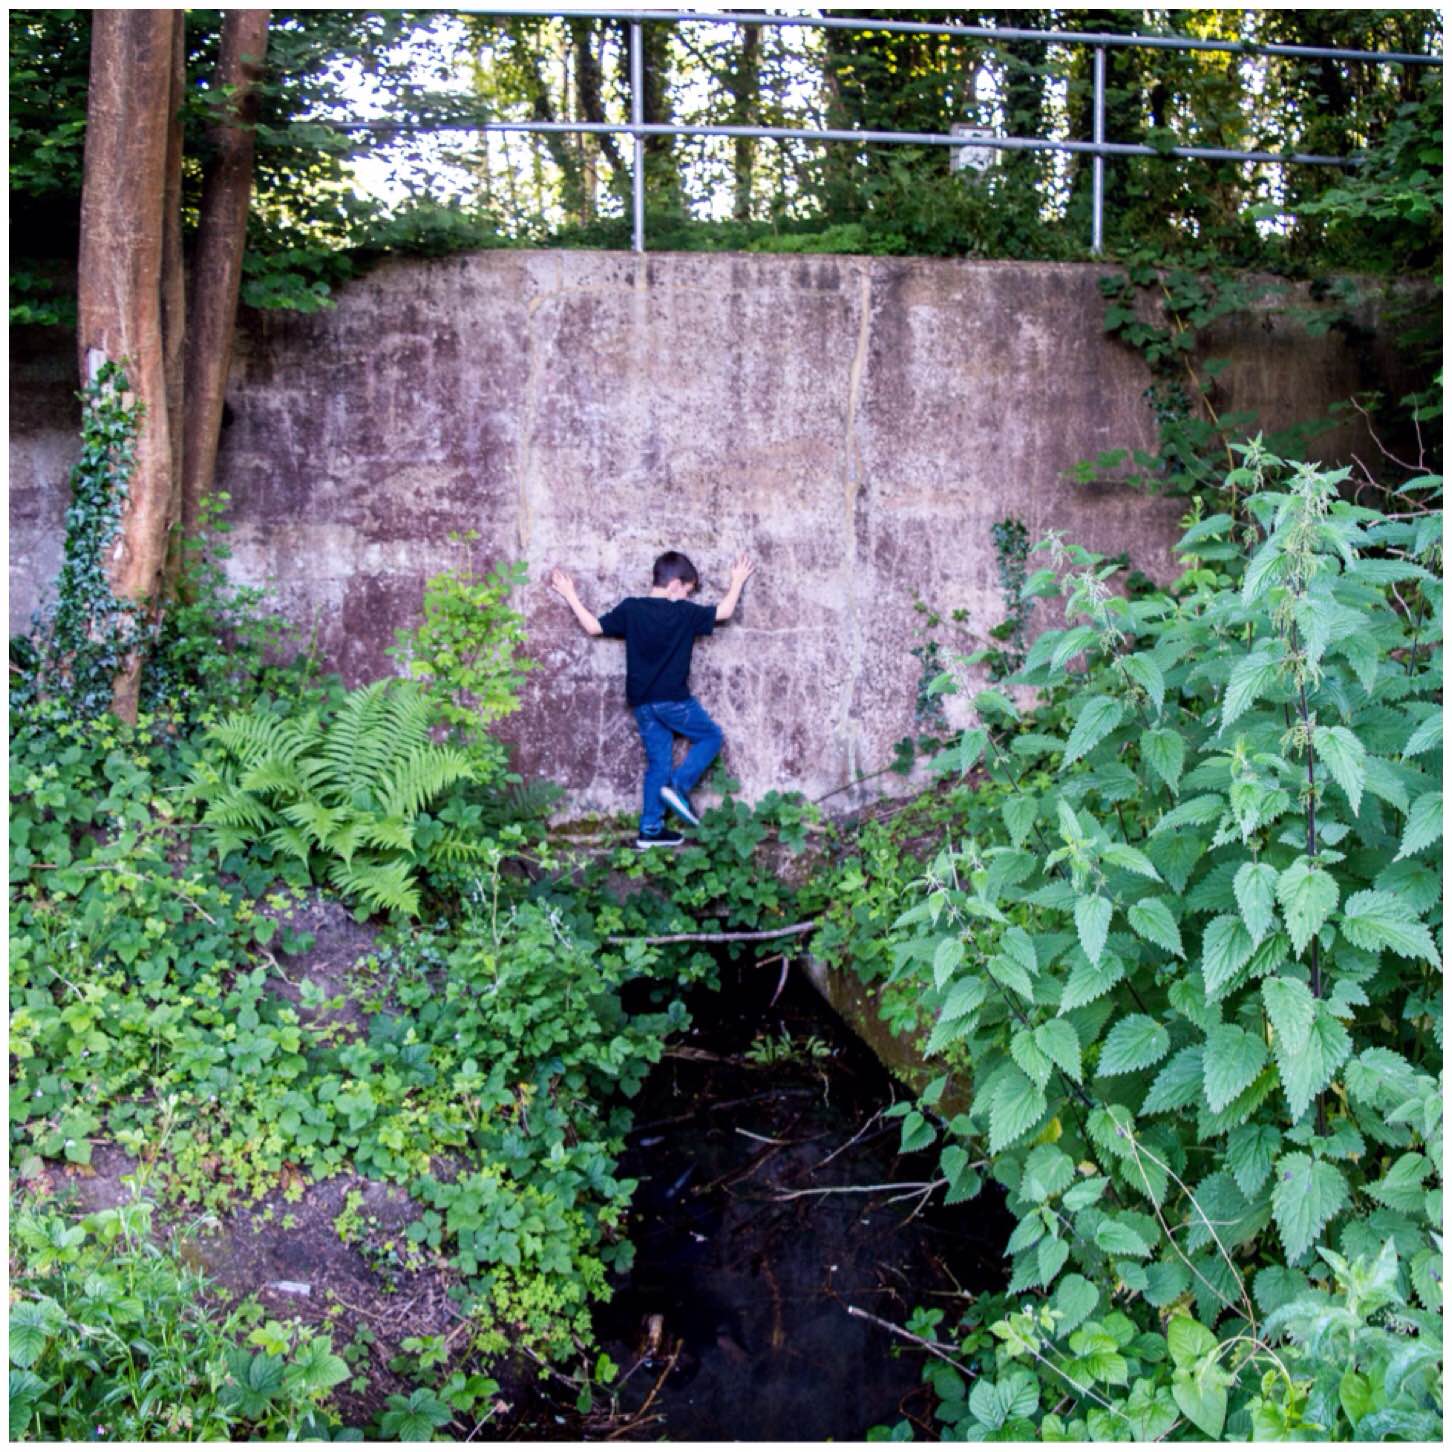
It was soon time to go home but Finlay could not resist one more shimmy across the narrow ridge over the stream.
Carefully does it
Another successful Wild Day I think and who knows what tomorrow will bring (need to think of something fast).
This 30 Day Challenge is reminding me very clearly what busy lives we lead. I got home from work, had a lovely tea cooked by Alison and then we were out to take Finlay to football practice at 6pm. Finding time for nature can be difficult however not impossible.
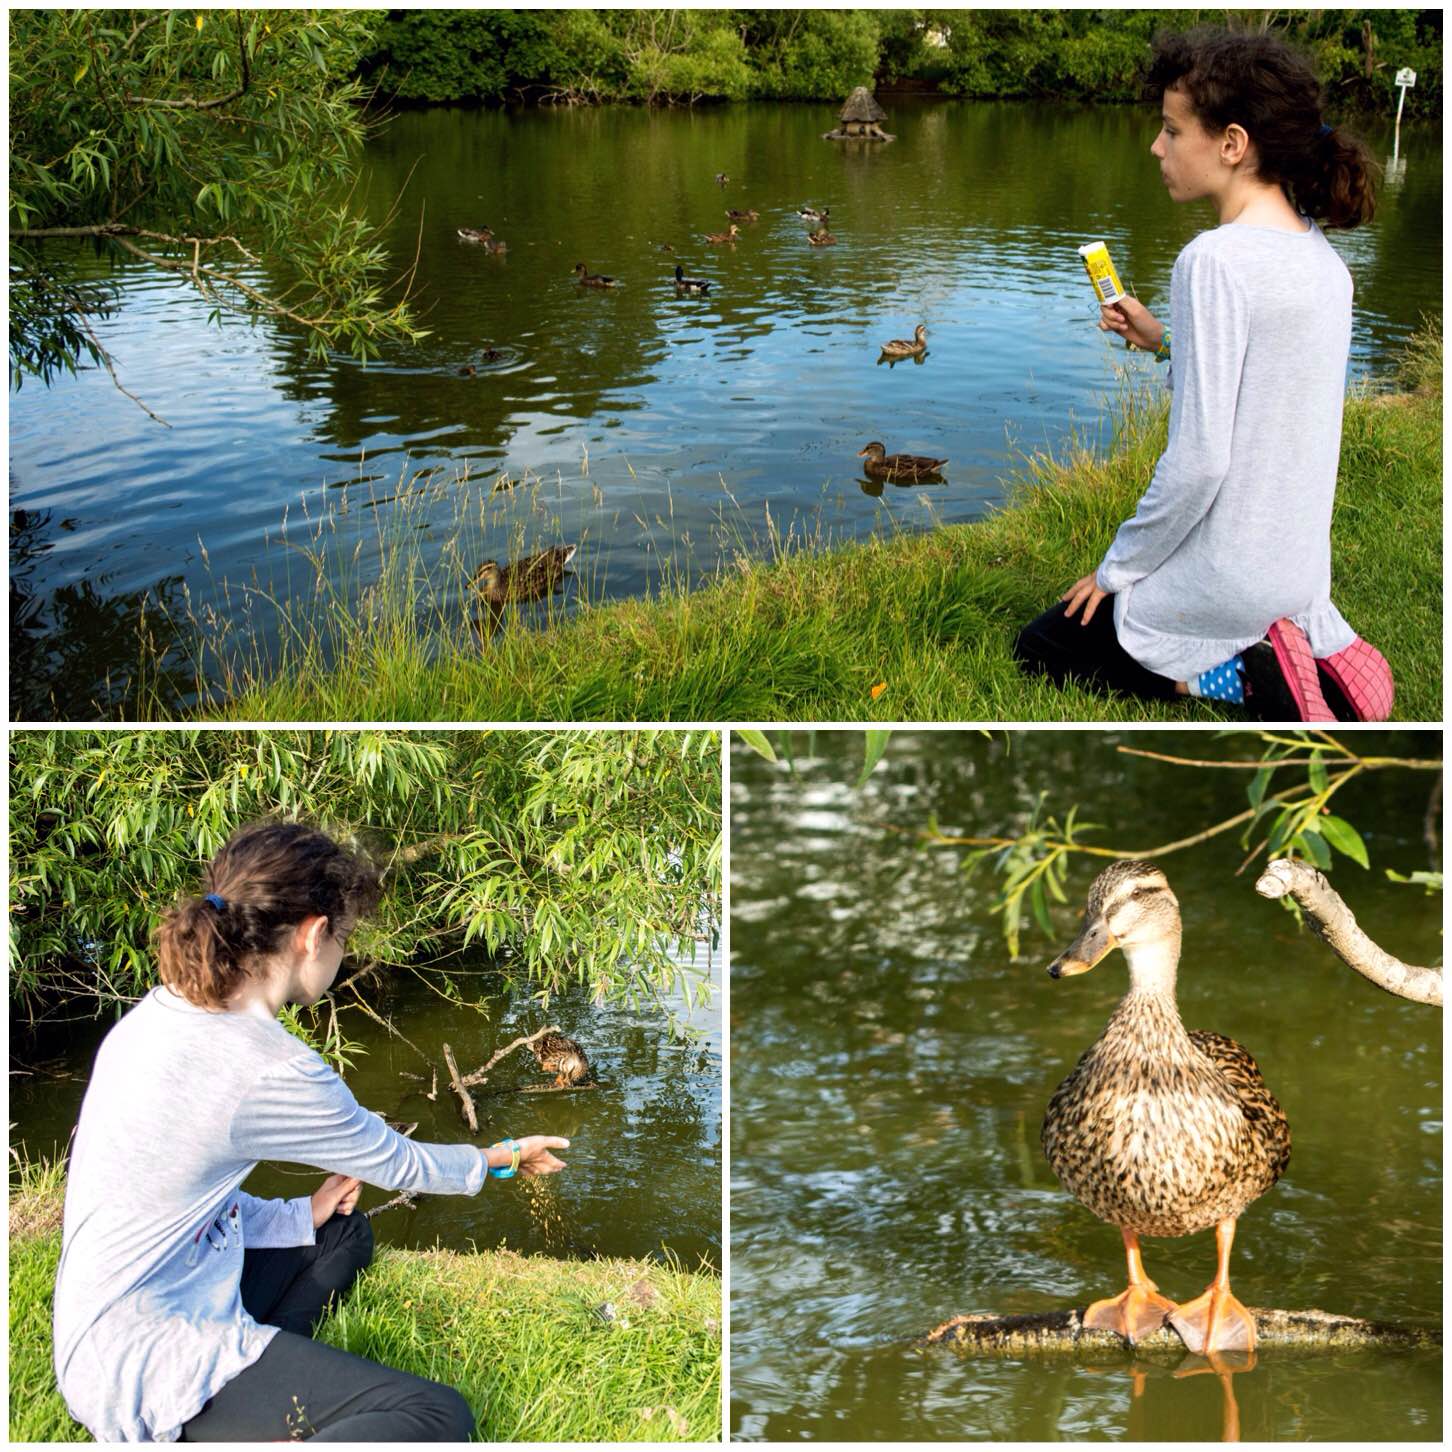
Alison decided to go for a run while Finlay was training so I asked Catherine what she wanted to do – Answer – Get an ice cream and go and see the ducks – So off we went.
We were in the lovely village of Sherfield on Loddon so after getting the ice creams we paid the ducks a visit.
Catherine’s choice
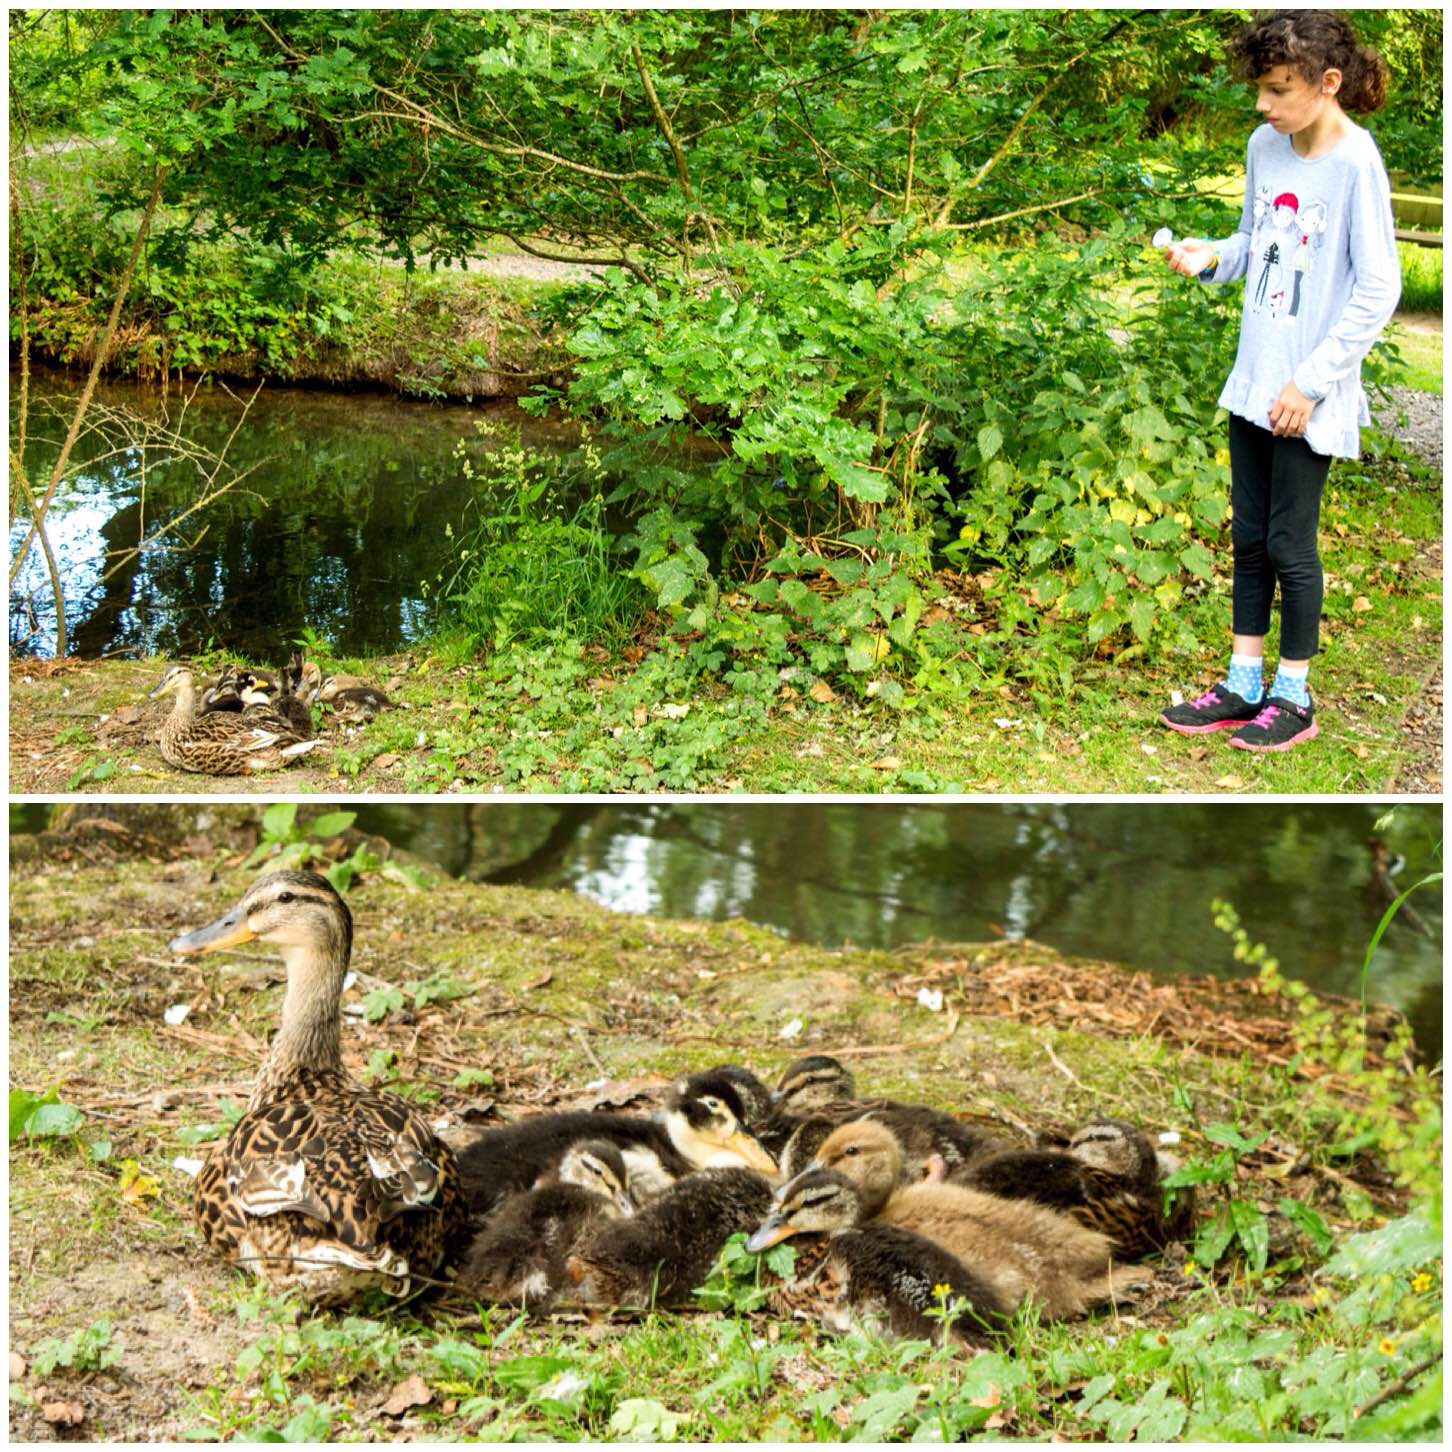
We sat for a while watching the Ducks and then wandered across to another pond where we got a lovely surprise of a nest of ducklings.
We observed for a few seconds and then backed away to leave them in peace.
A little surprise
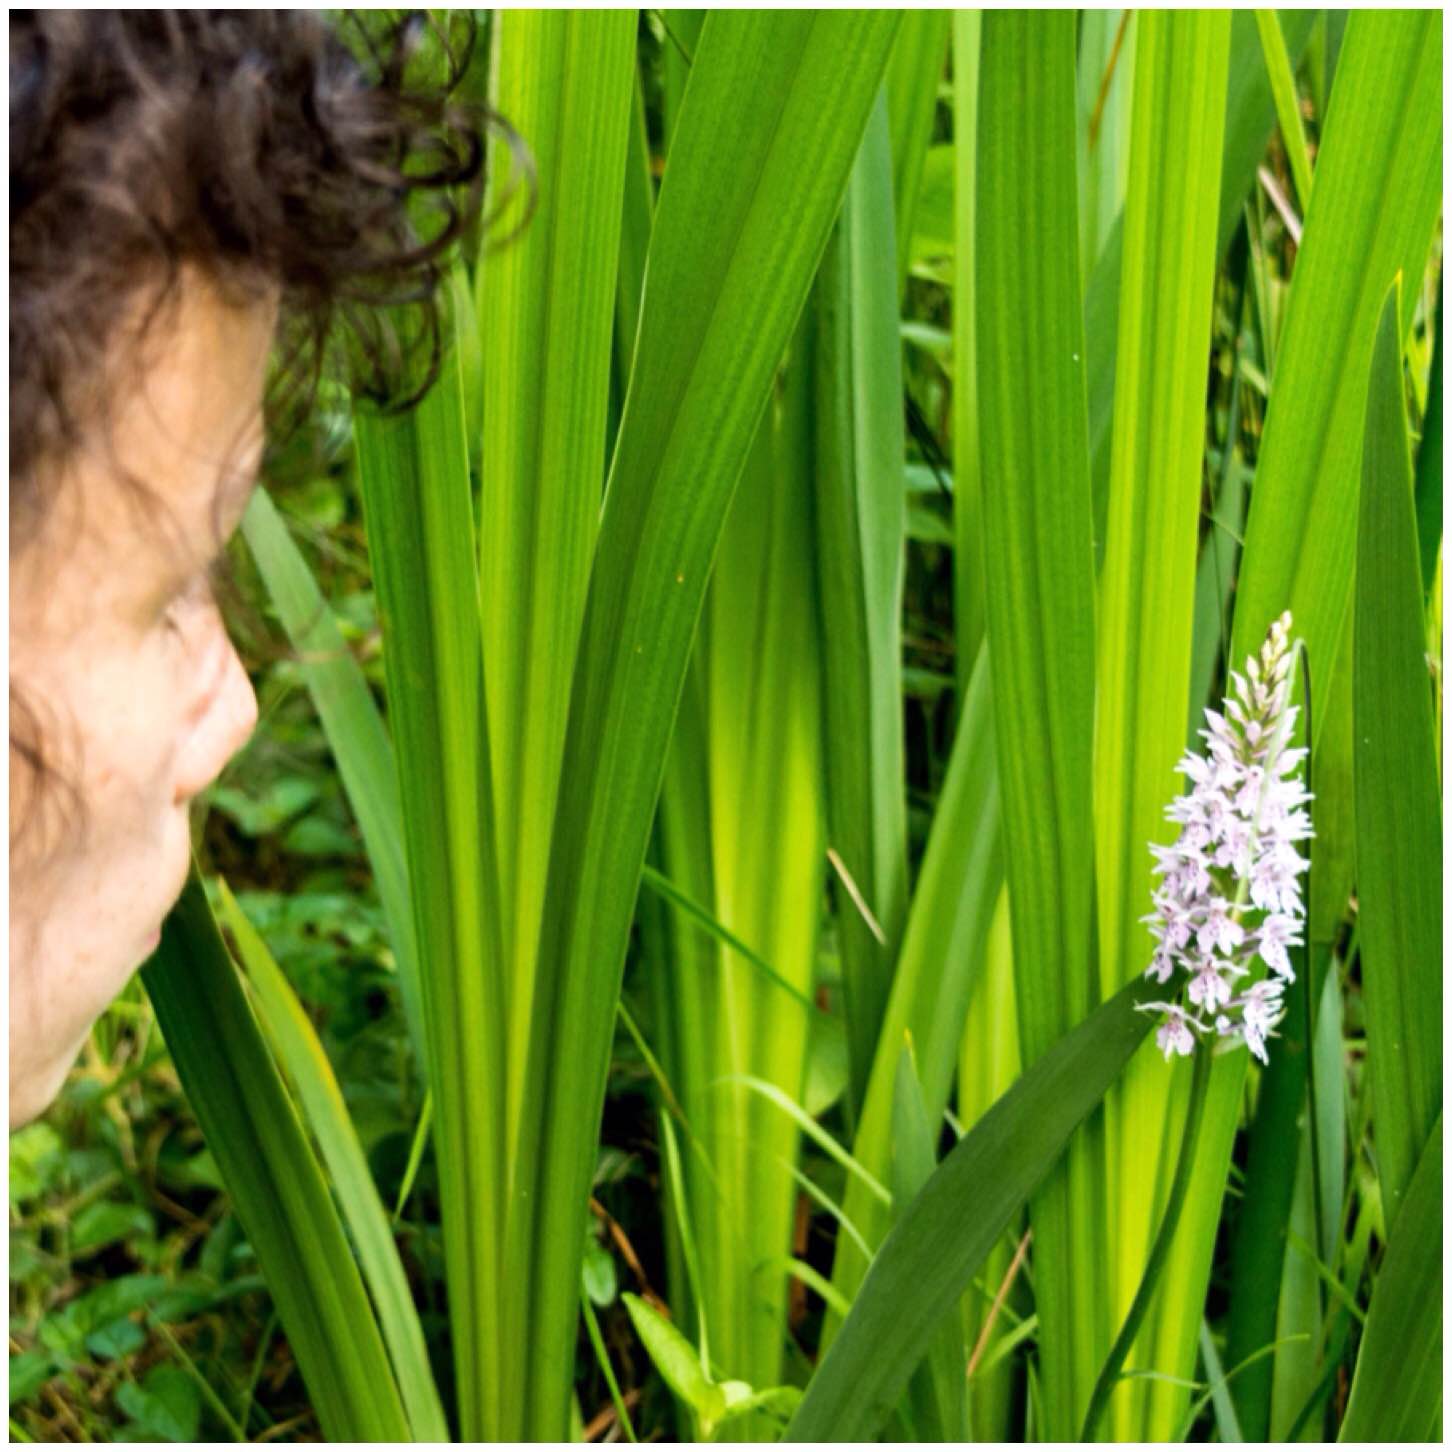
We tried to sneak up on some rabbits but they were too fast for us but we did spot a lovely little common spotted orchid beside a dried up pond.
Found an orchid
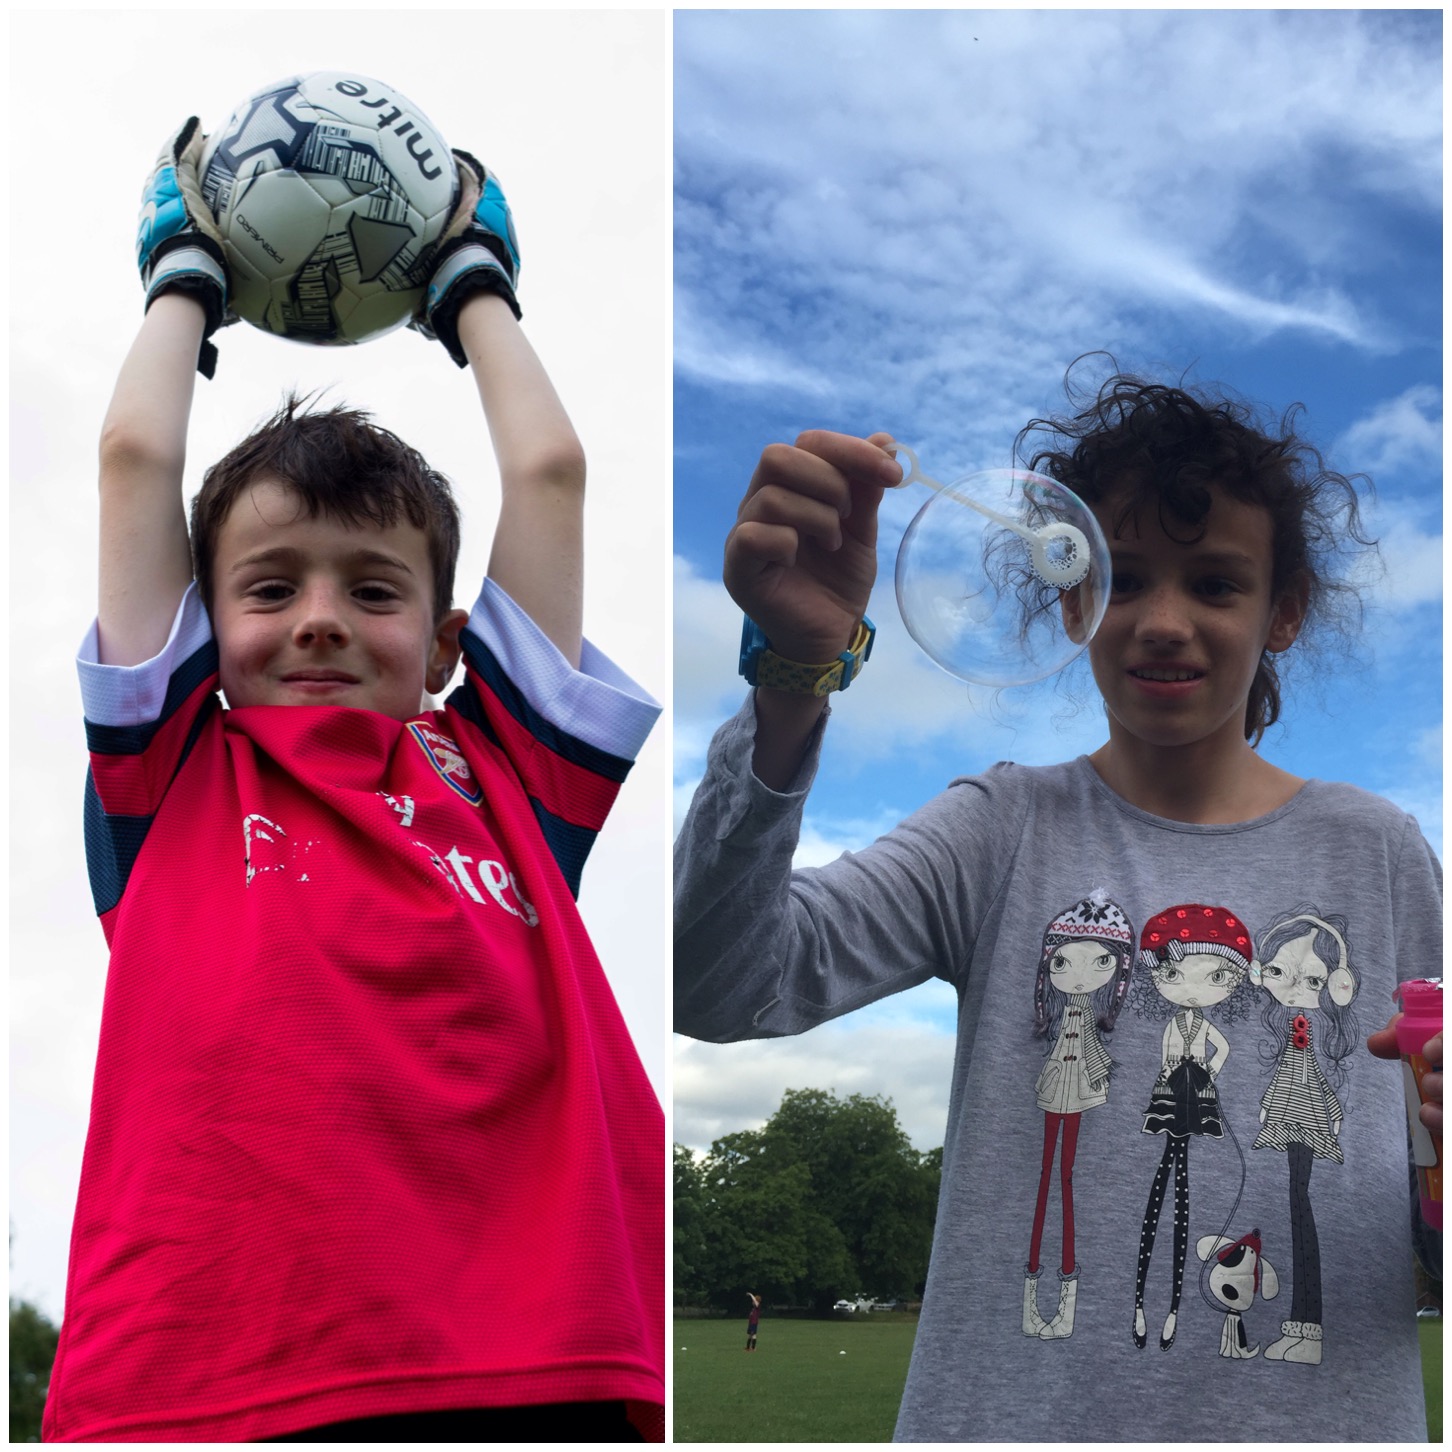
It was soon time to pick Finlay up but when we got there they were running over time a little. I laid back in the grass and got this picture of Finlay as he came by. Alison took the lovely picture of Catherine with the bubble.
Some ball control
Busy lives but a little bit of nature squeezed nicely in 🙂
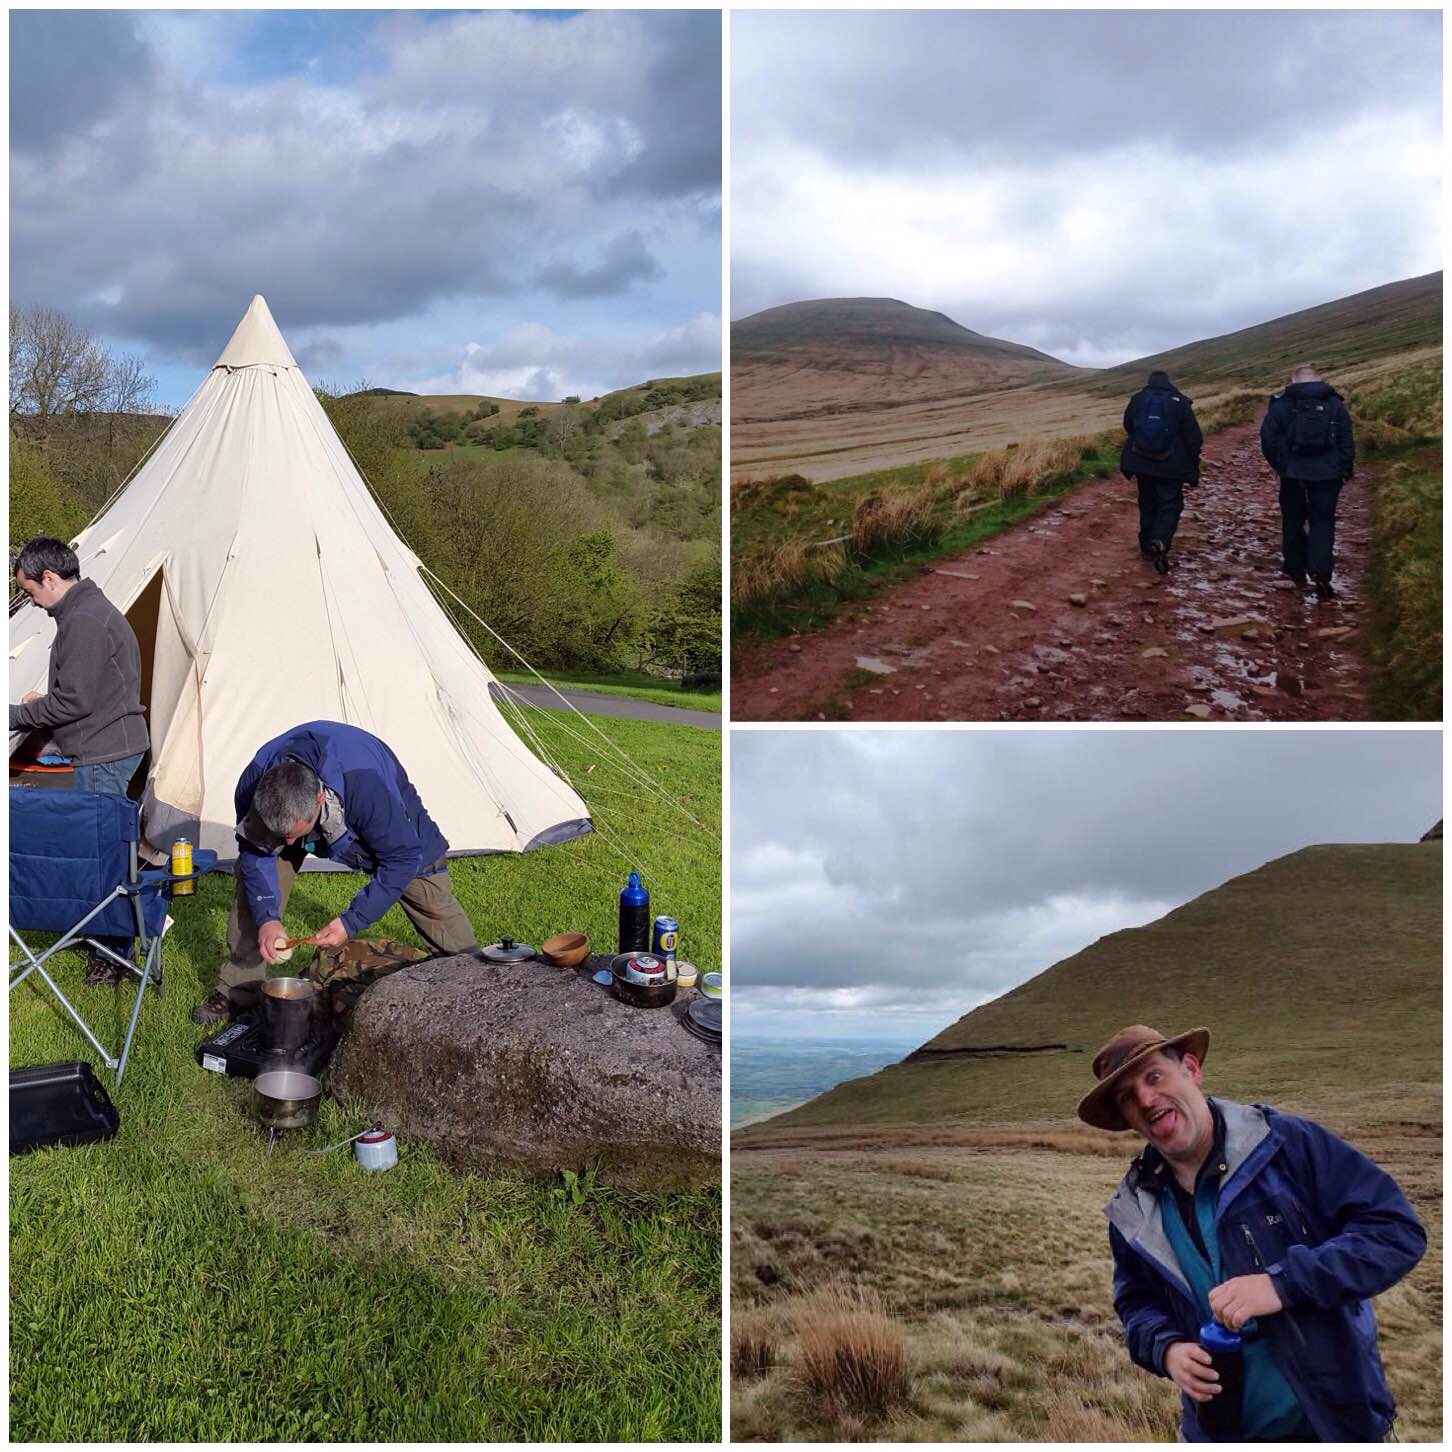
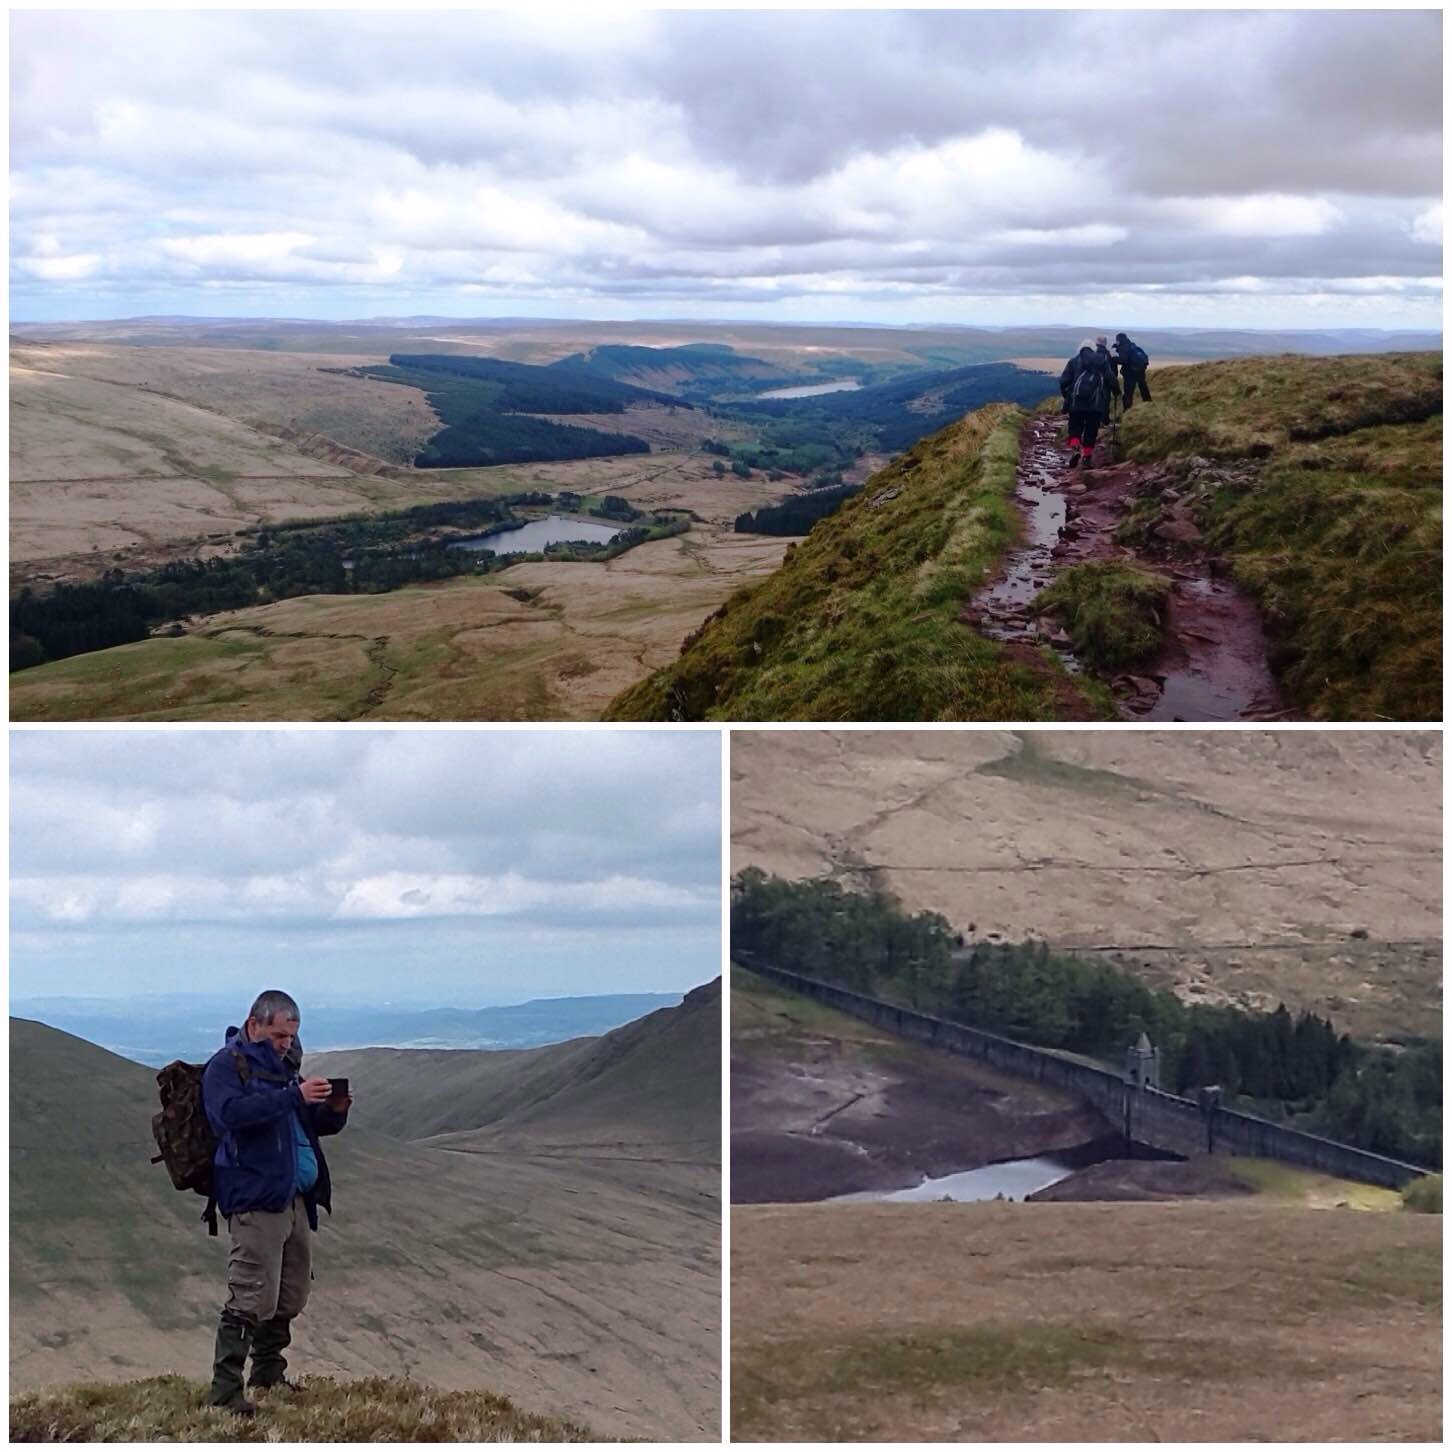
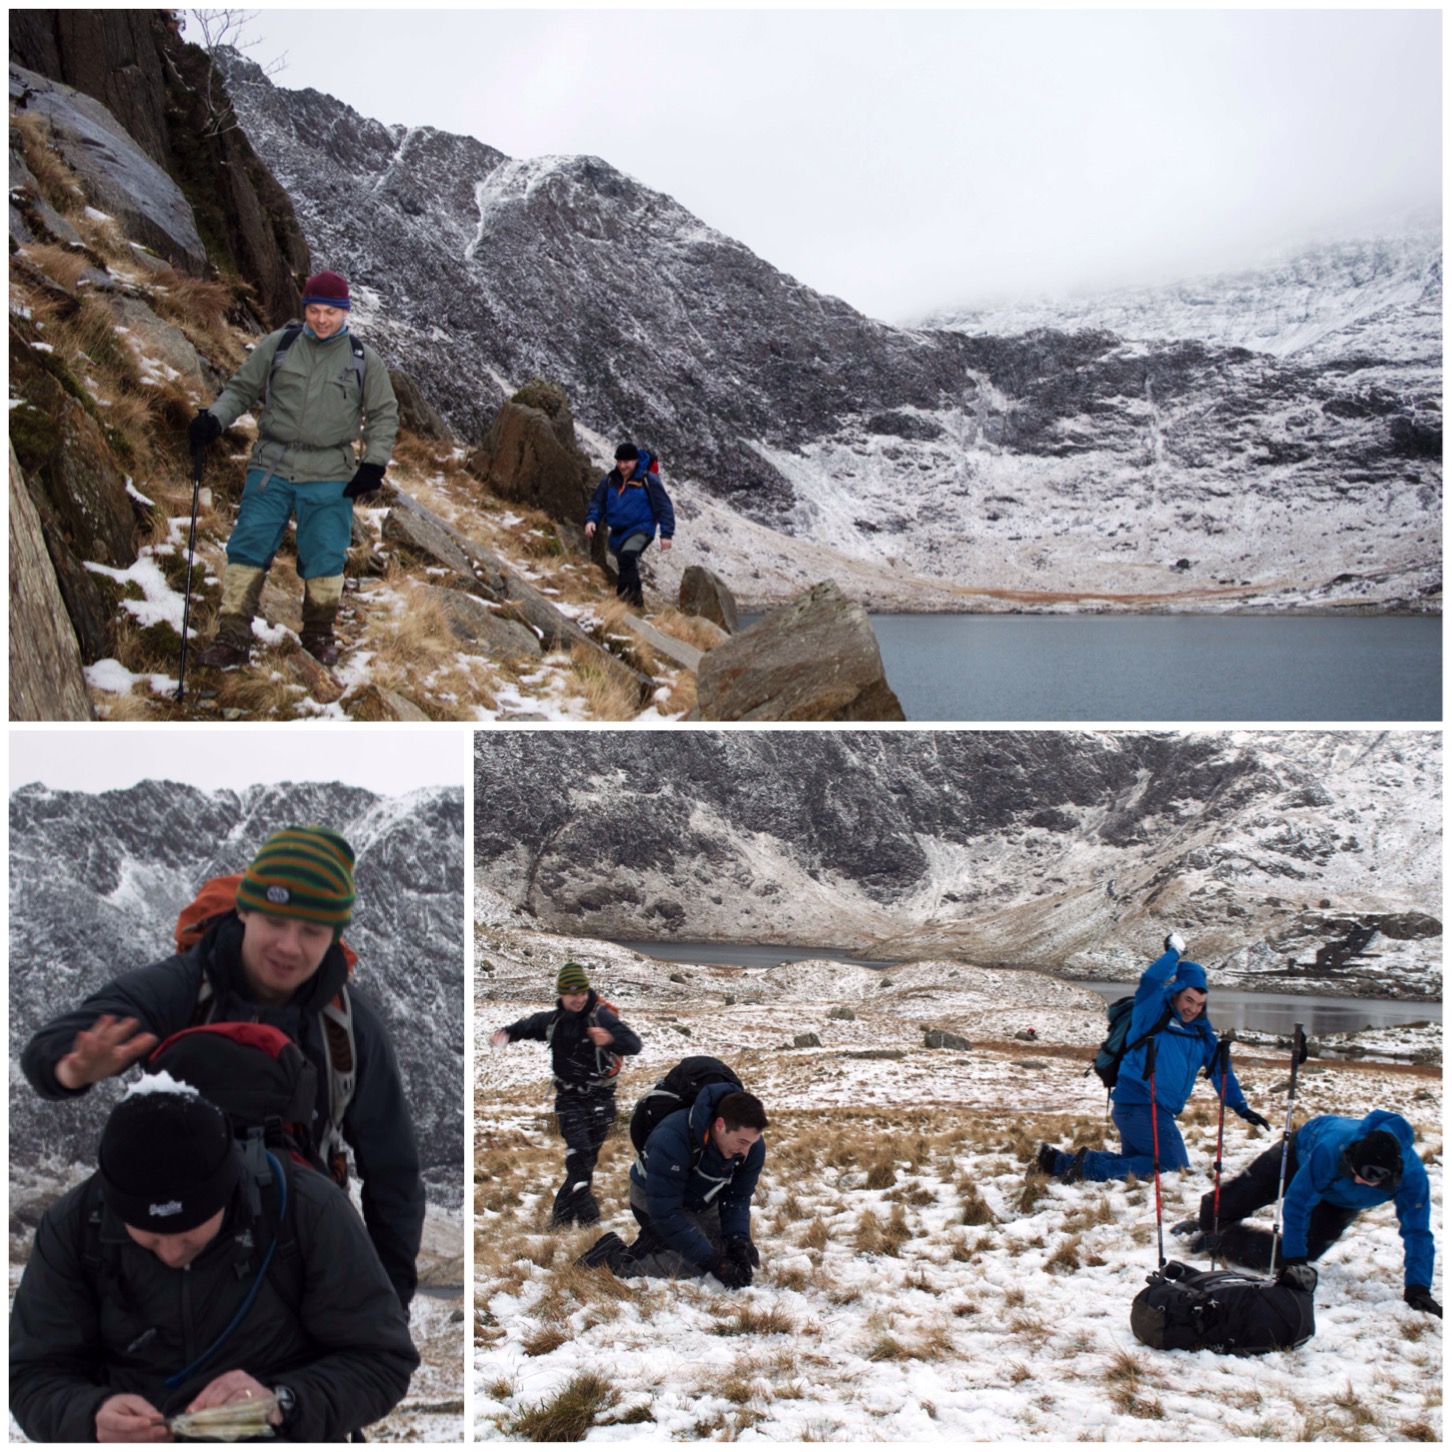
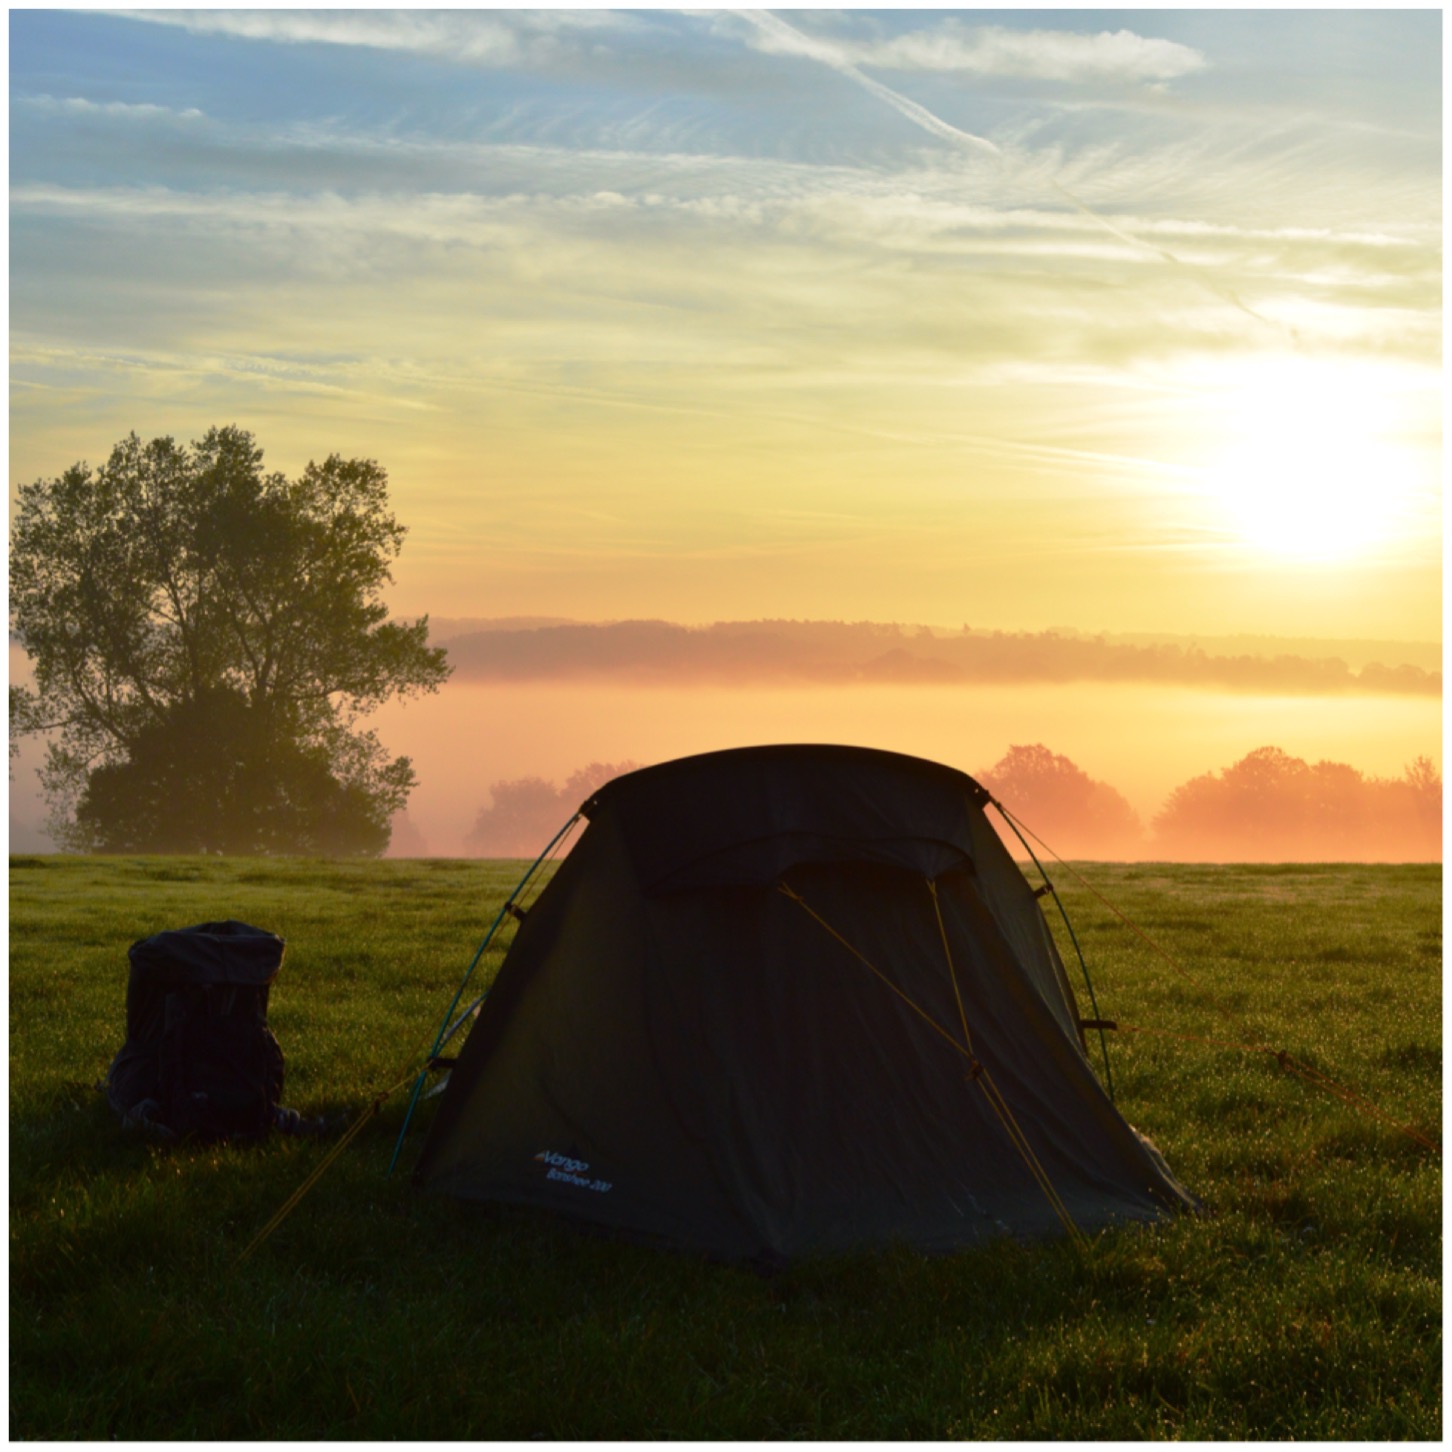
Mid May found me heading to the Brecon Beacons in South Wales with my good friends Gordon, Rick and Stu. We all have volunteered together with the homeless charity Crisis for nearly 20 years now and for a variety of reasons we are known as ‘The Grumpy Old Men’s Club’. We like to get away together once a year just to catch up and have a bit of fun (in our usual grumpy old way).
We camped by the Dan yr Ogof show caves in the lovely village of Glyntawe. On the Saturday morning we drove over to the car park in Taf Fechan Forest and walked up the track to the east of the Upper Neuadd resevoir onto the area known as ‘The Gap’. On the map you will see this as Bwlch ar y Fan.
Set up and away
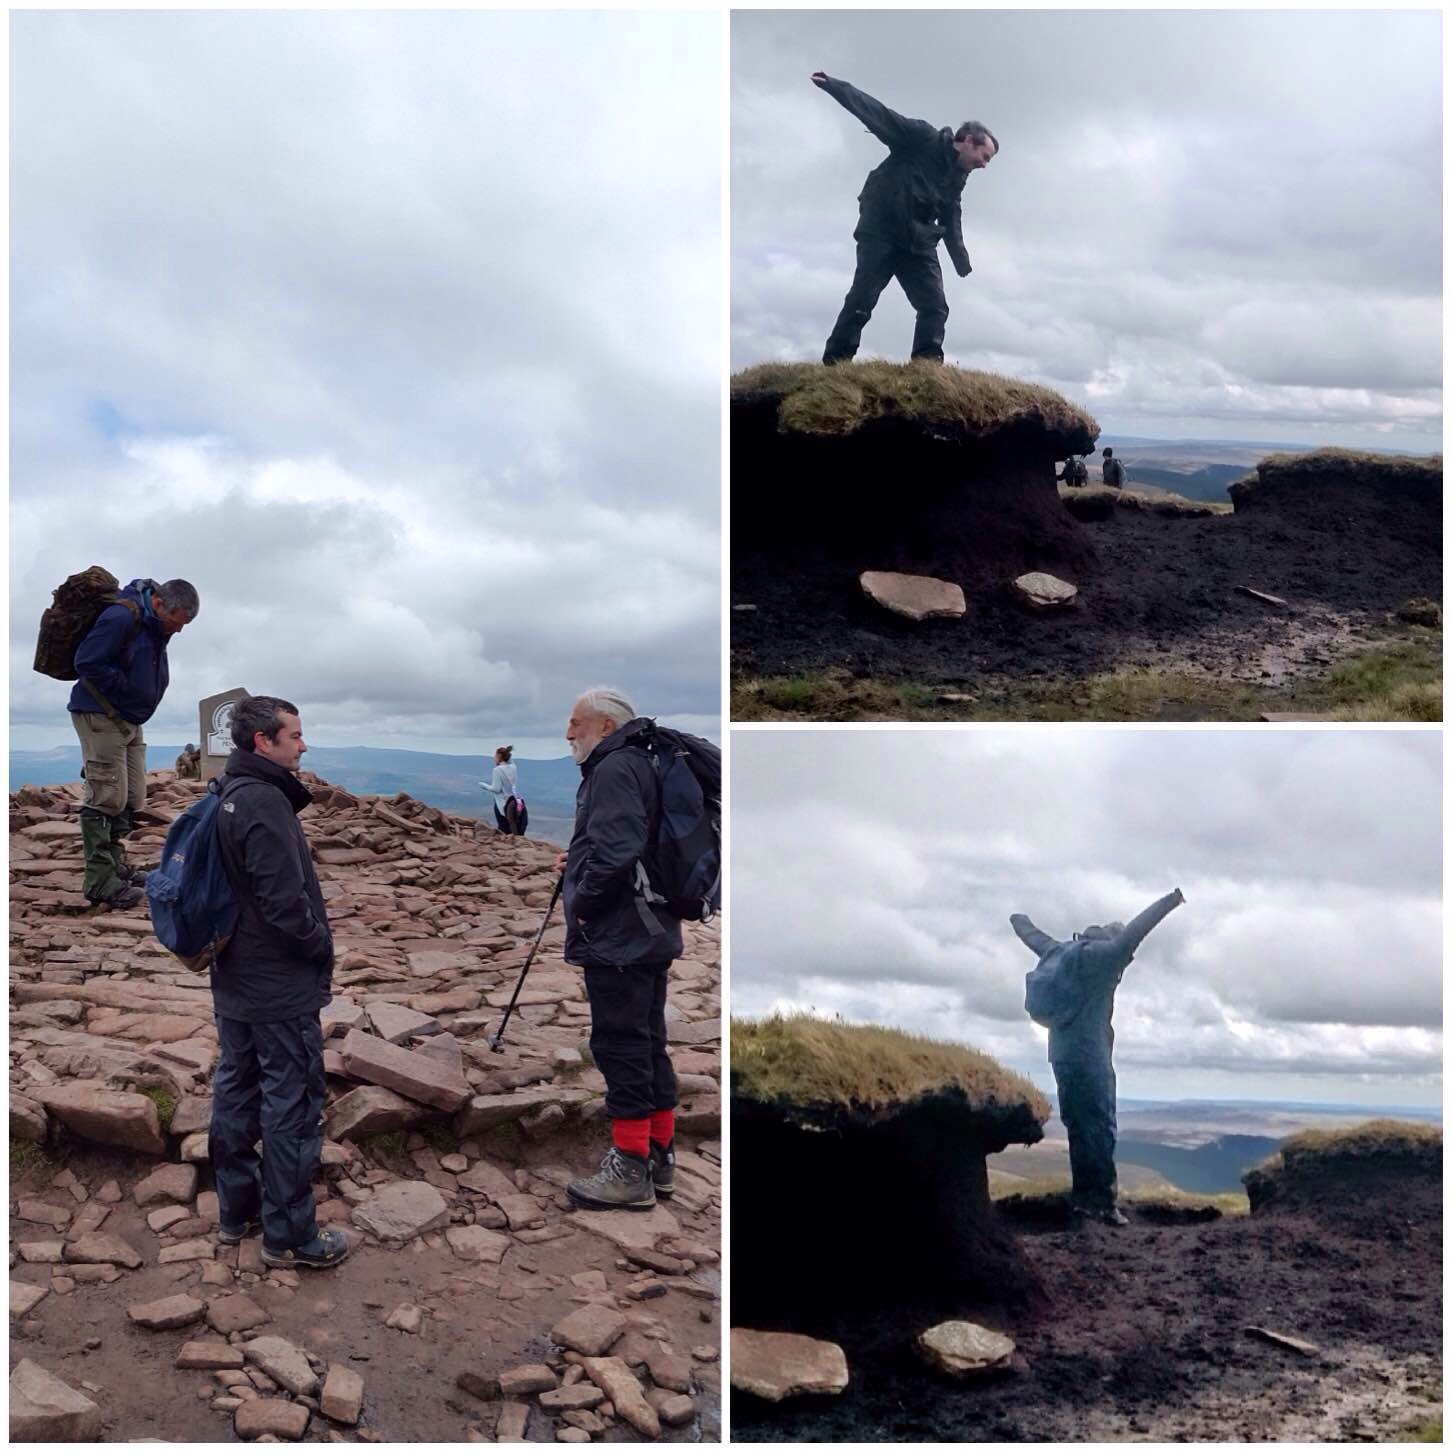
From The Gap we headed west around Cribyn and up onto Pen y Fan. There was little wind here and lots of cloud cover making excellent walking (I do not particularly like hillwalking in sunny conditions – must be a Scottish thing). We took our time but we were soon all at the top.
We did not hang around long and via Corn Du we headed South again by way of the ridge on Craig Gwaun Taf. This route has much less traffic on it and soon we were on our own again. The windswept peat banks made for a bit of fun along the way.
Pen Y Fan
As we moved down Craig Gwaun Taf we could see clearly now the resevoir at Upper Neuadd. It looked as though someone had pulled the plug hole in it.
South via Gwaun Taf
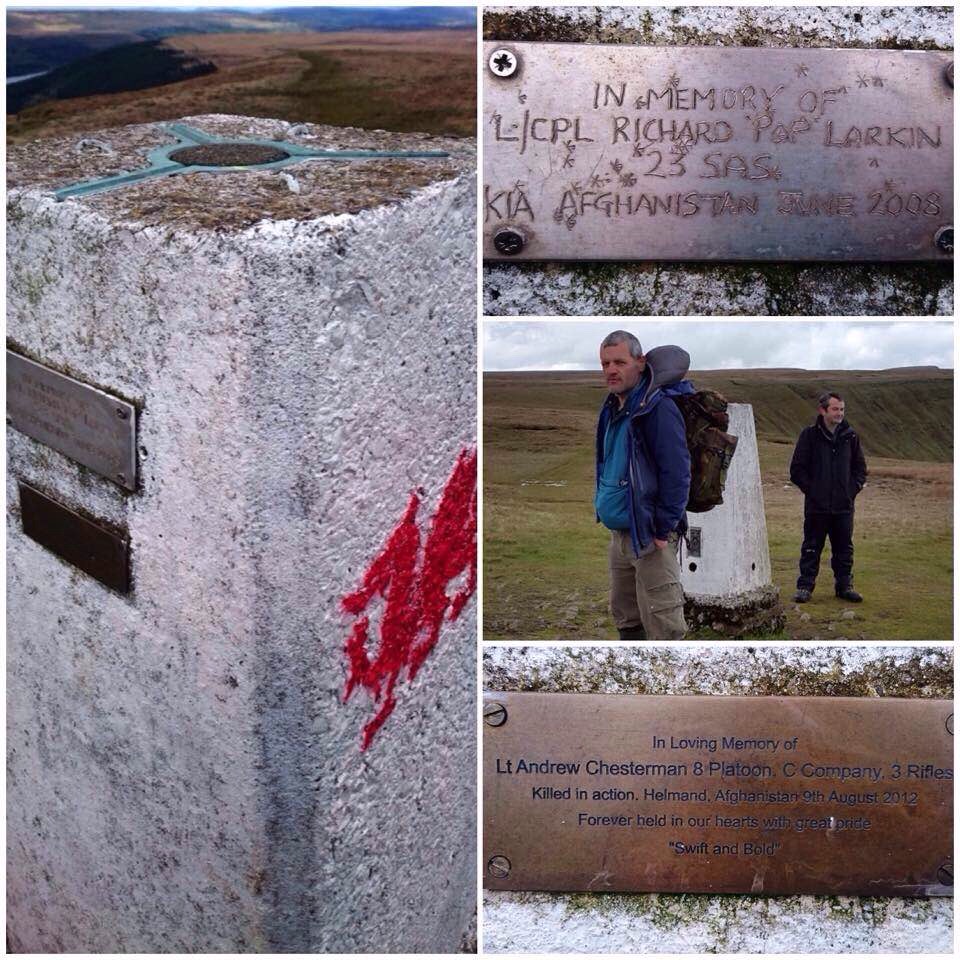
Further down the track near Twyn Mwyalchod (grid SO021176) we came across a Trig Point painted with a Welsh dragon and two little plaques dedicated to fallen soldiers from the Afghanistan war. Quite a moving site in such a beautiful location.
Commemoration Trig Point at Twyn Mwyalchod
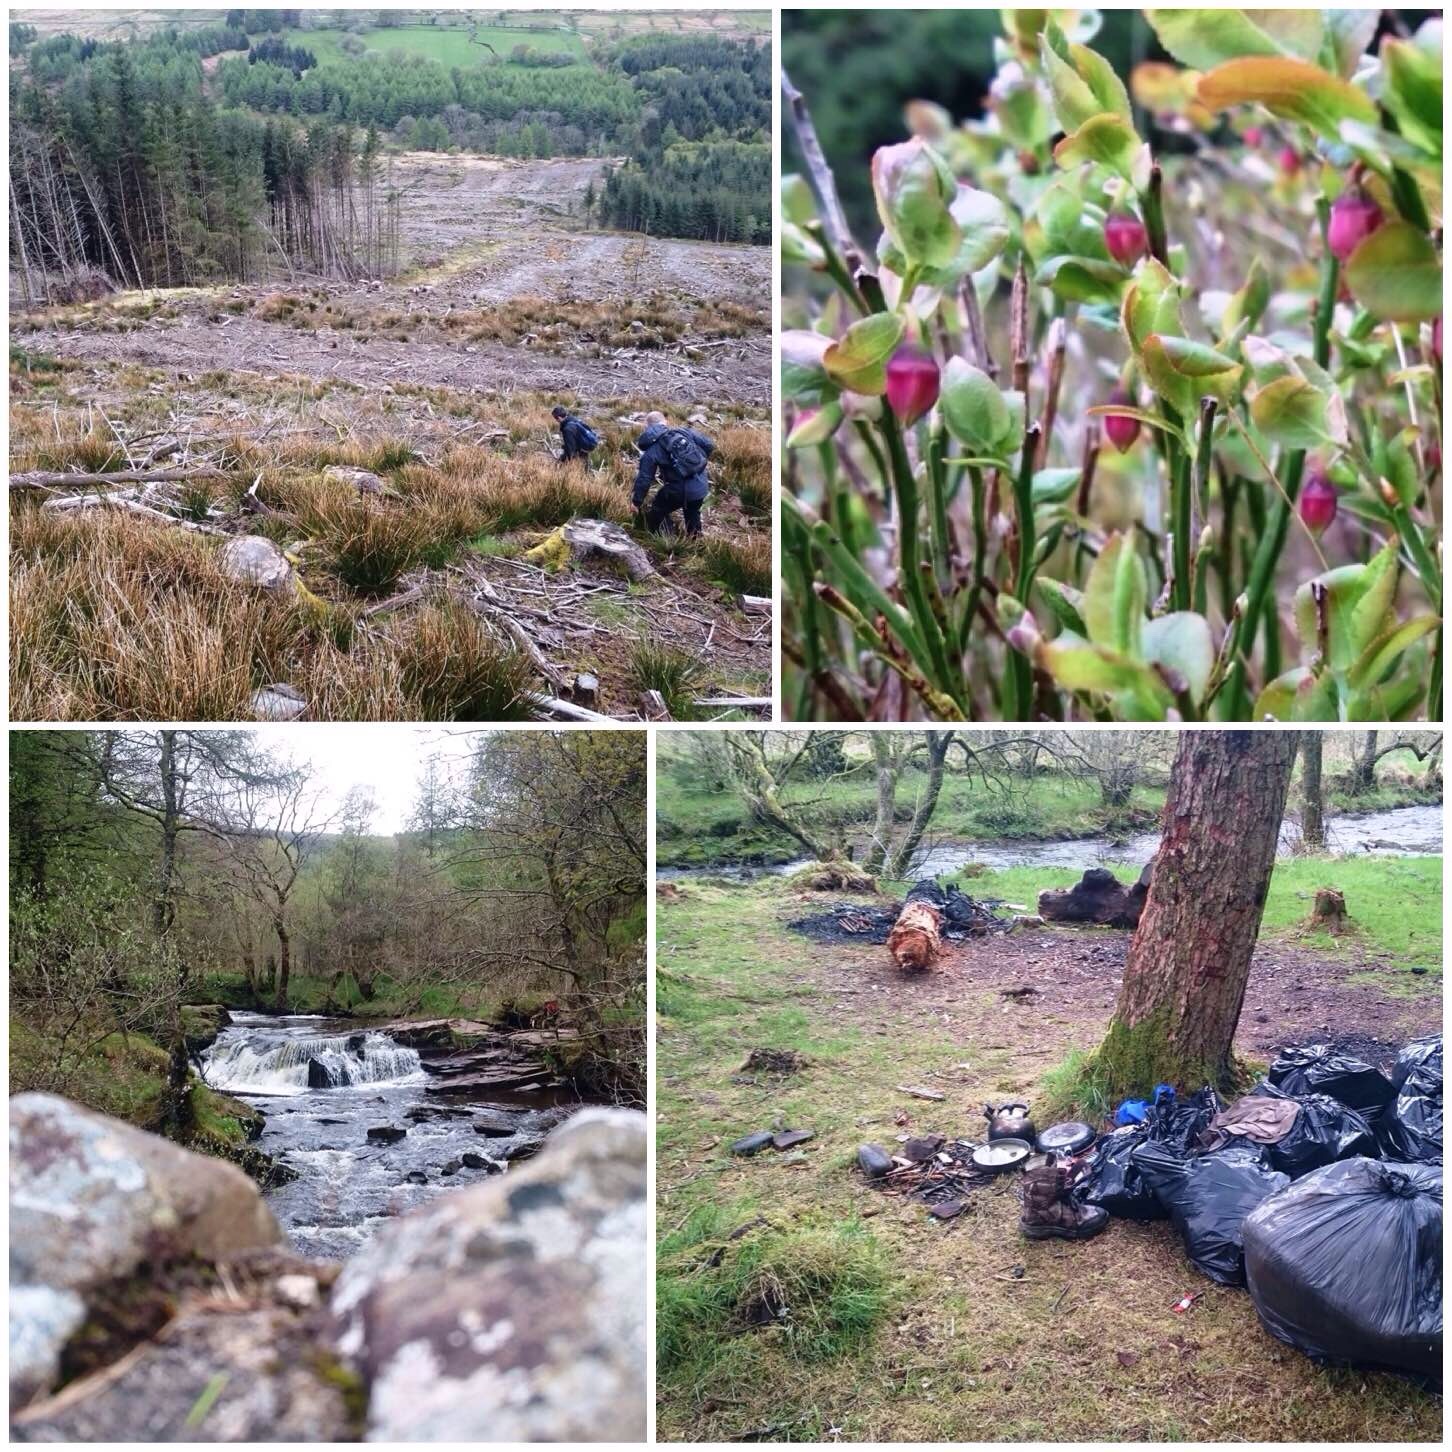
Our descent took us through a conifer plantation that had been felled a couple of years ago (there was significant re-growth). It was tricky going in places but we took our time and were soon by the Taf Fechan river (translates as the Little Taff).
We could not cross due to the high water level so we headed downriver to find a bridge near the road. By the road we came across an abandoned campsite that had been left in a poor condition. Everything had been bagged up but just left there. Also along the way we spotted that the billberries were coming through. Not ripe yet but definitely coming through.
Descending into Taf Fechan forest
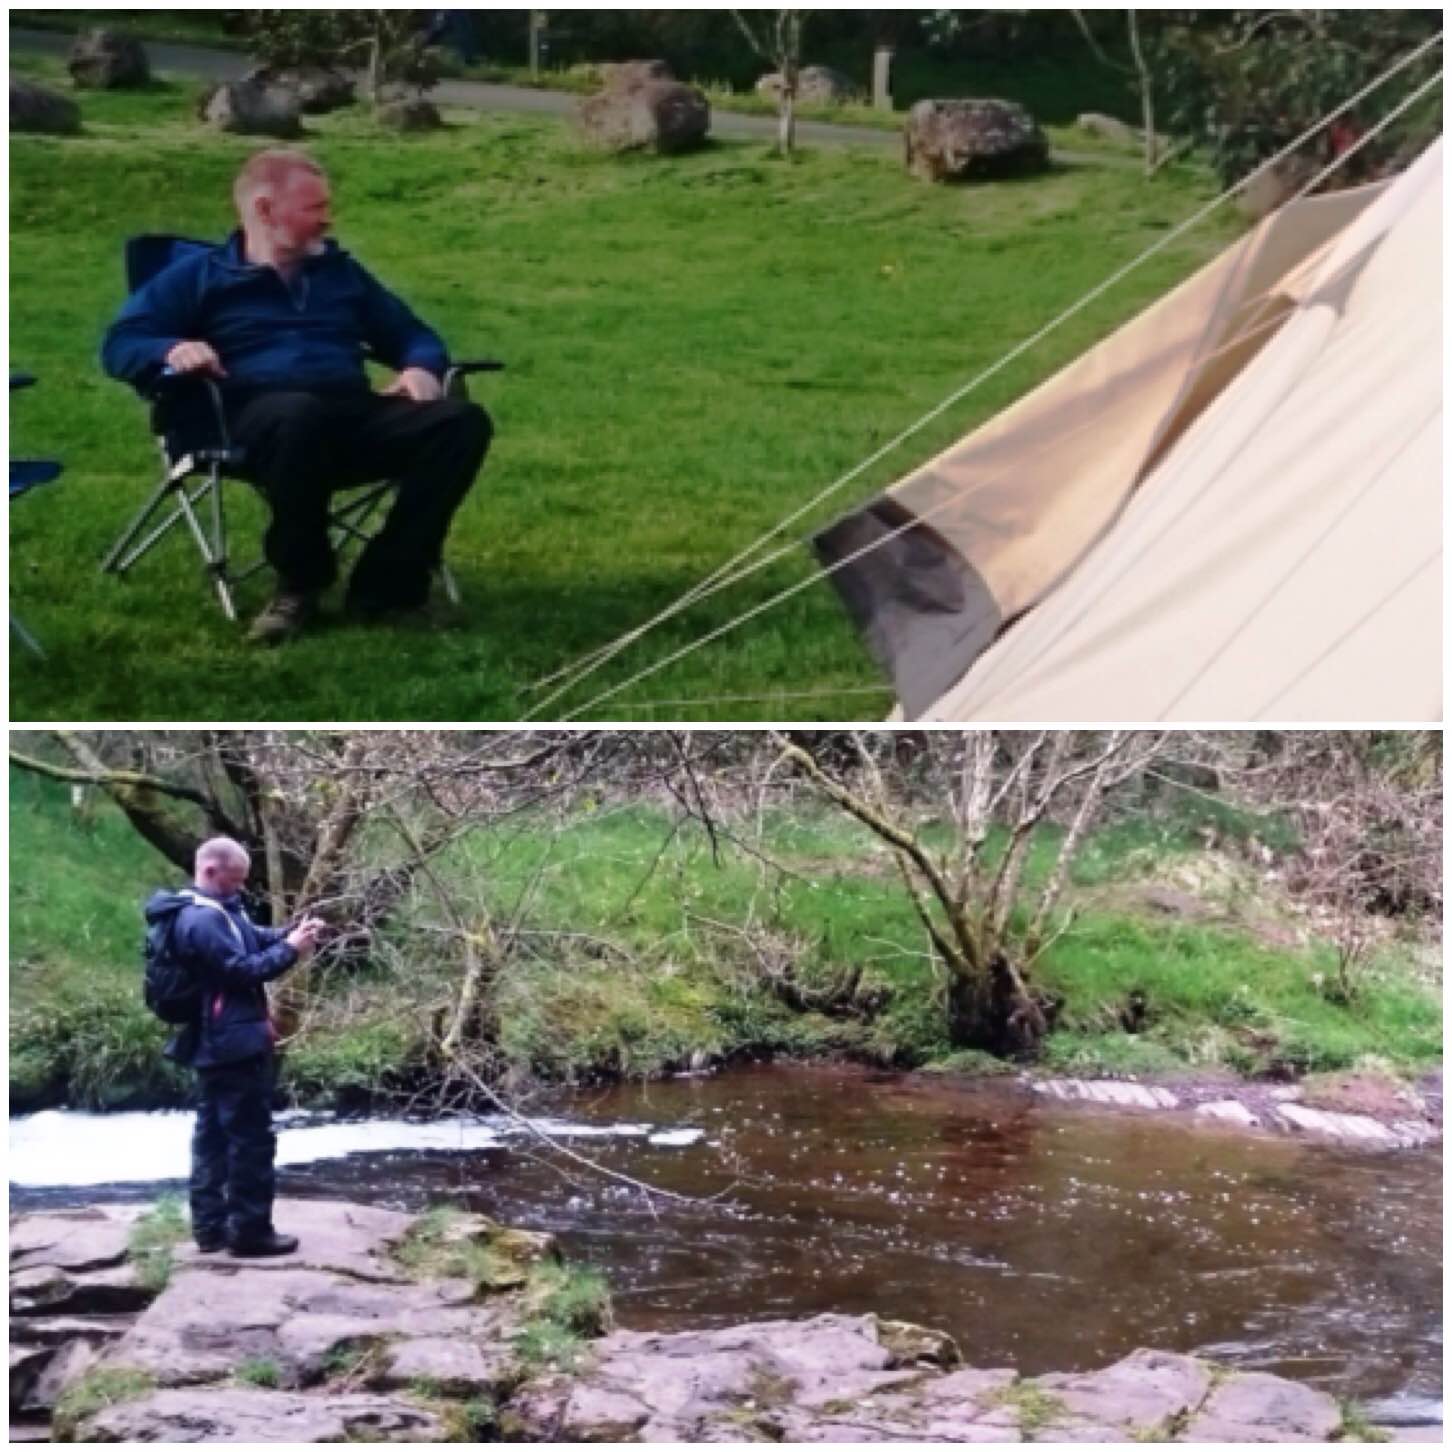
Needless to say there was plenty of time to sit and relax or as usual to stroll around and take pictures.
Chill time
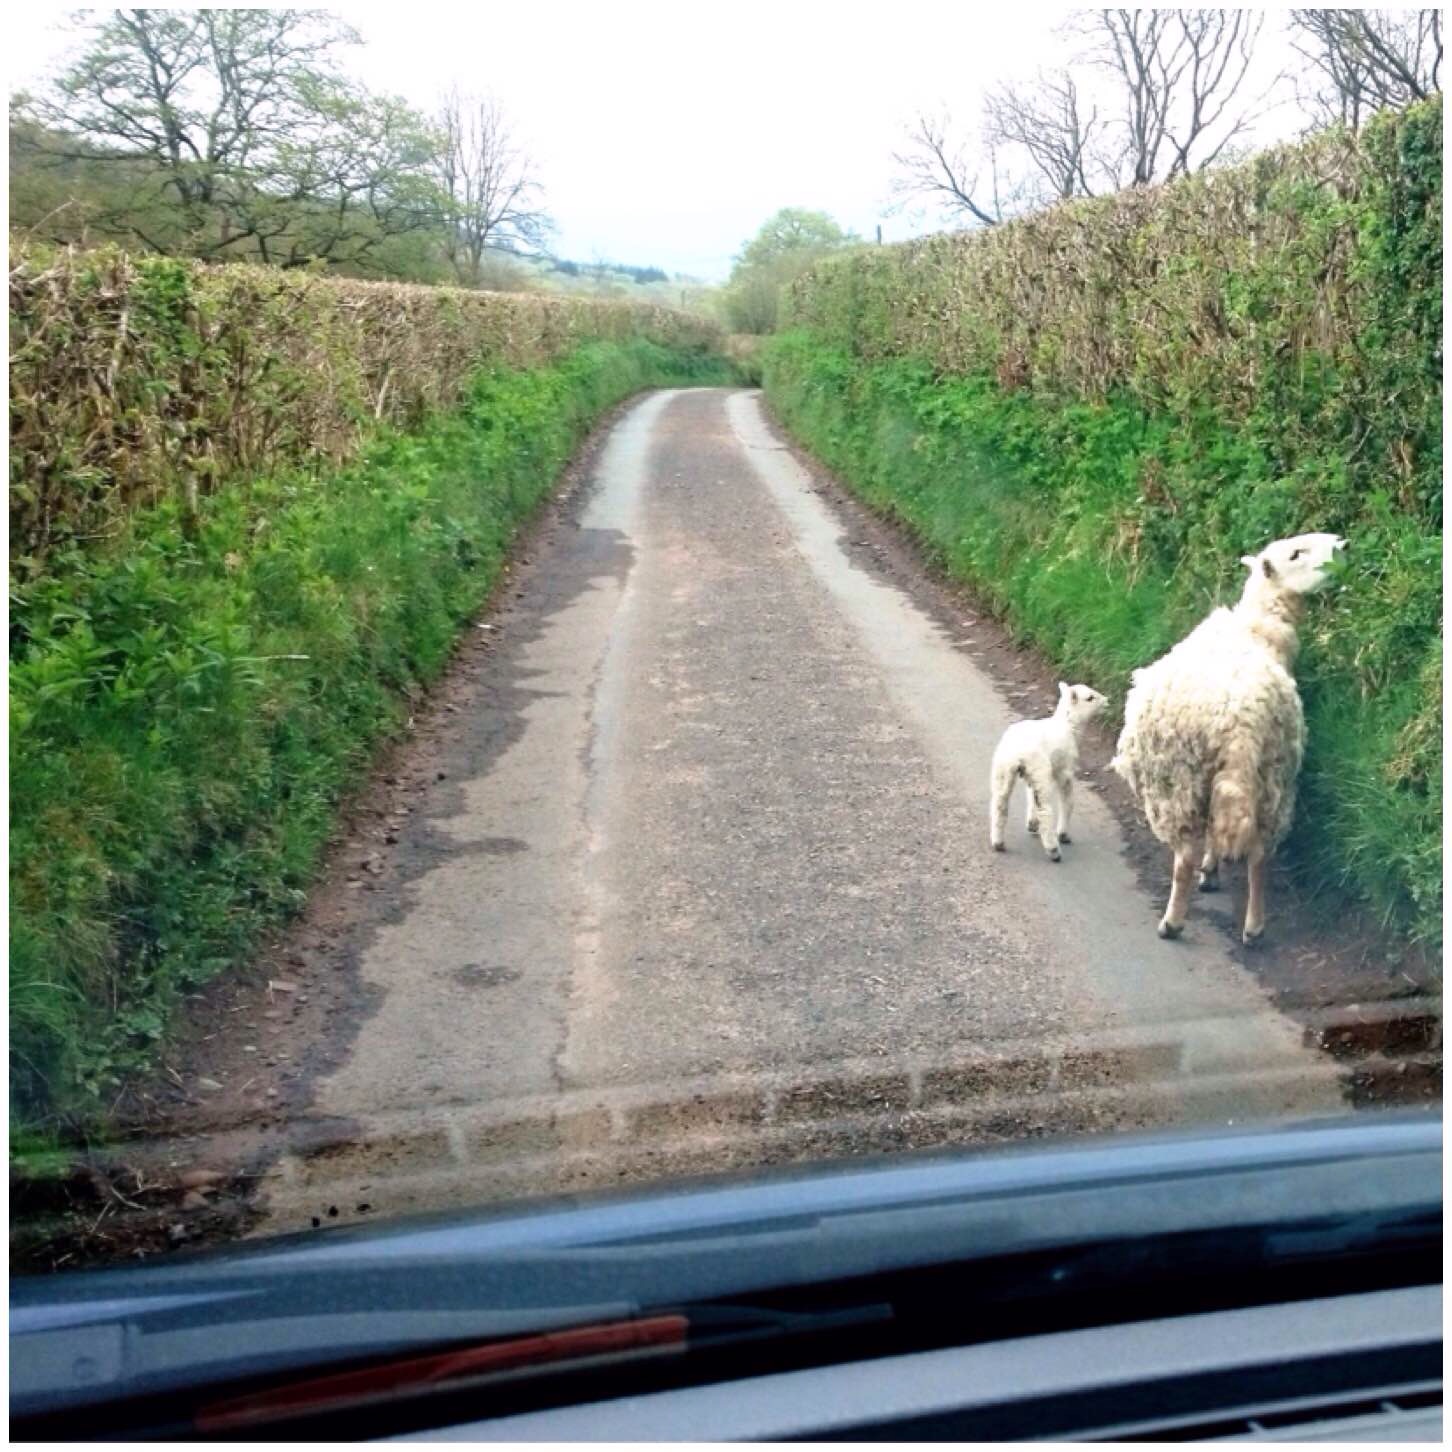
After an enjoyable evening and a night in my hammock (the other guys got the tipi) we packed up and drove over to Ystradfellte to walk the ‘Along the Waterfalls’ route.
As you can see the drive took us a little time but we were in no rush.
The road to Ystradfellte
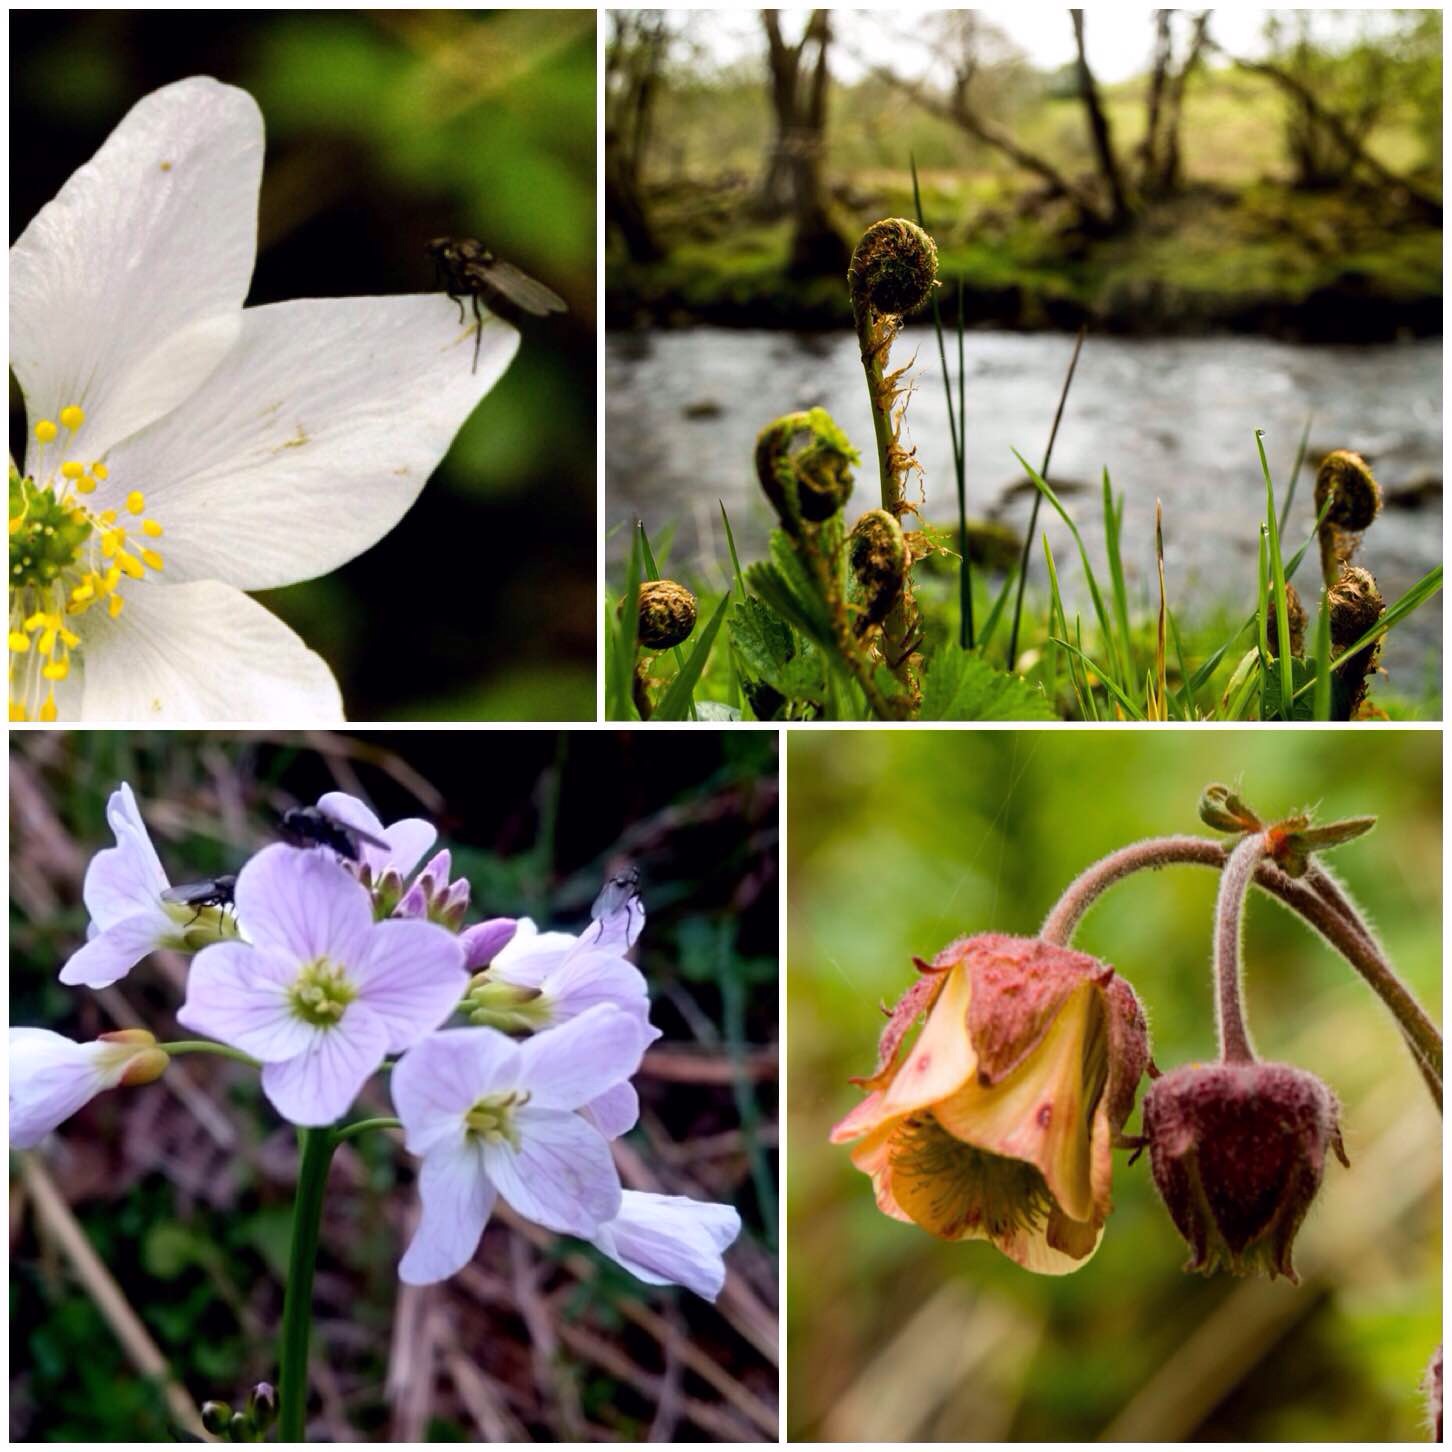
The spring flora was well displayed along the River Mellte. Wood anemones were in abundance ( top left below),’ the ferns were just unfurling, the cuckoo flowers (bottom left) were everywhere and I was especially happy to spot an area of water avens (bottom right) along the river bank.
Brecon in Bloom
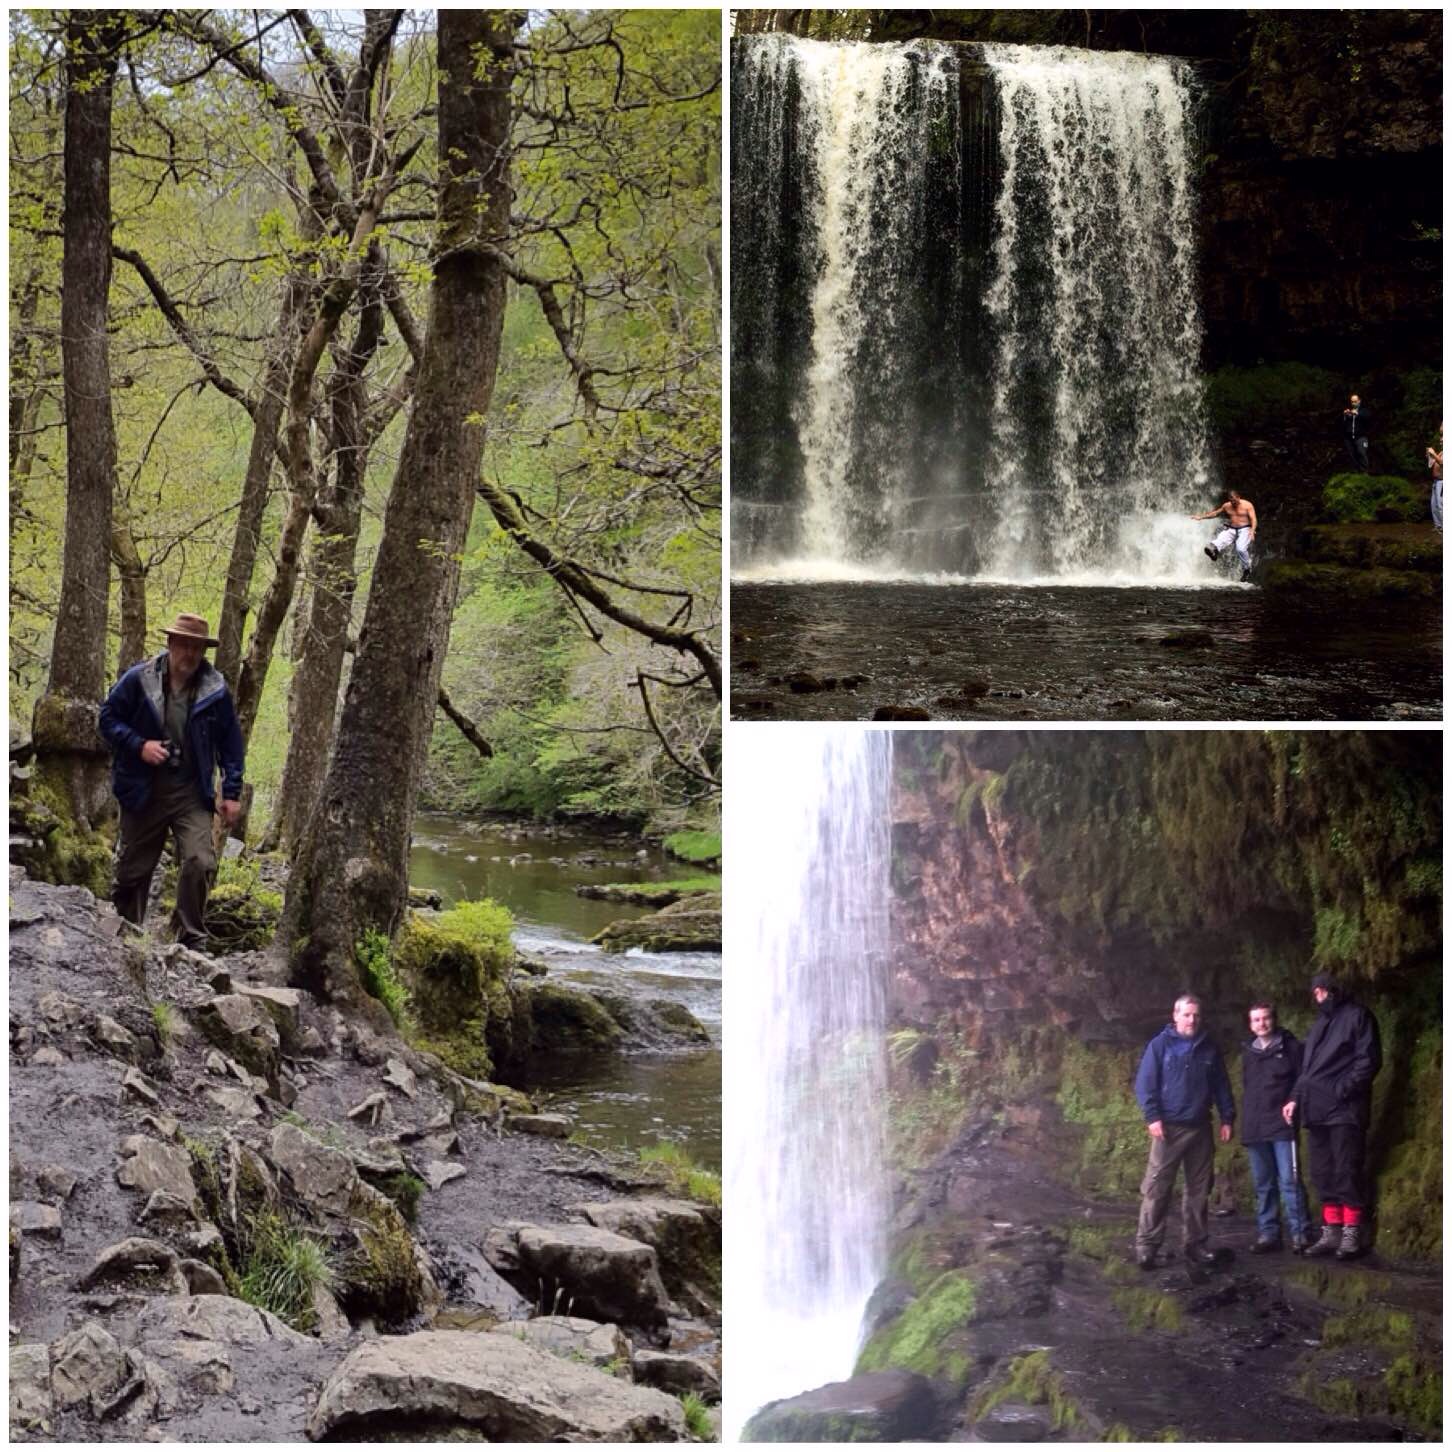
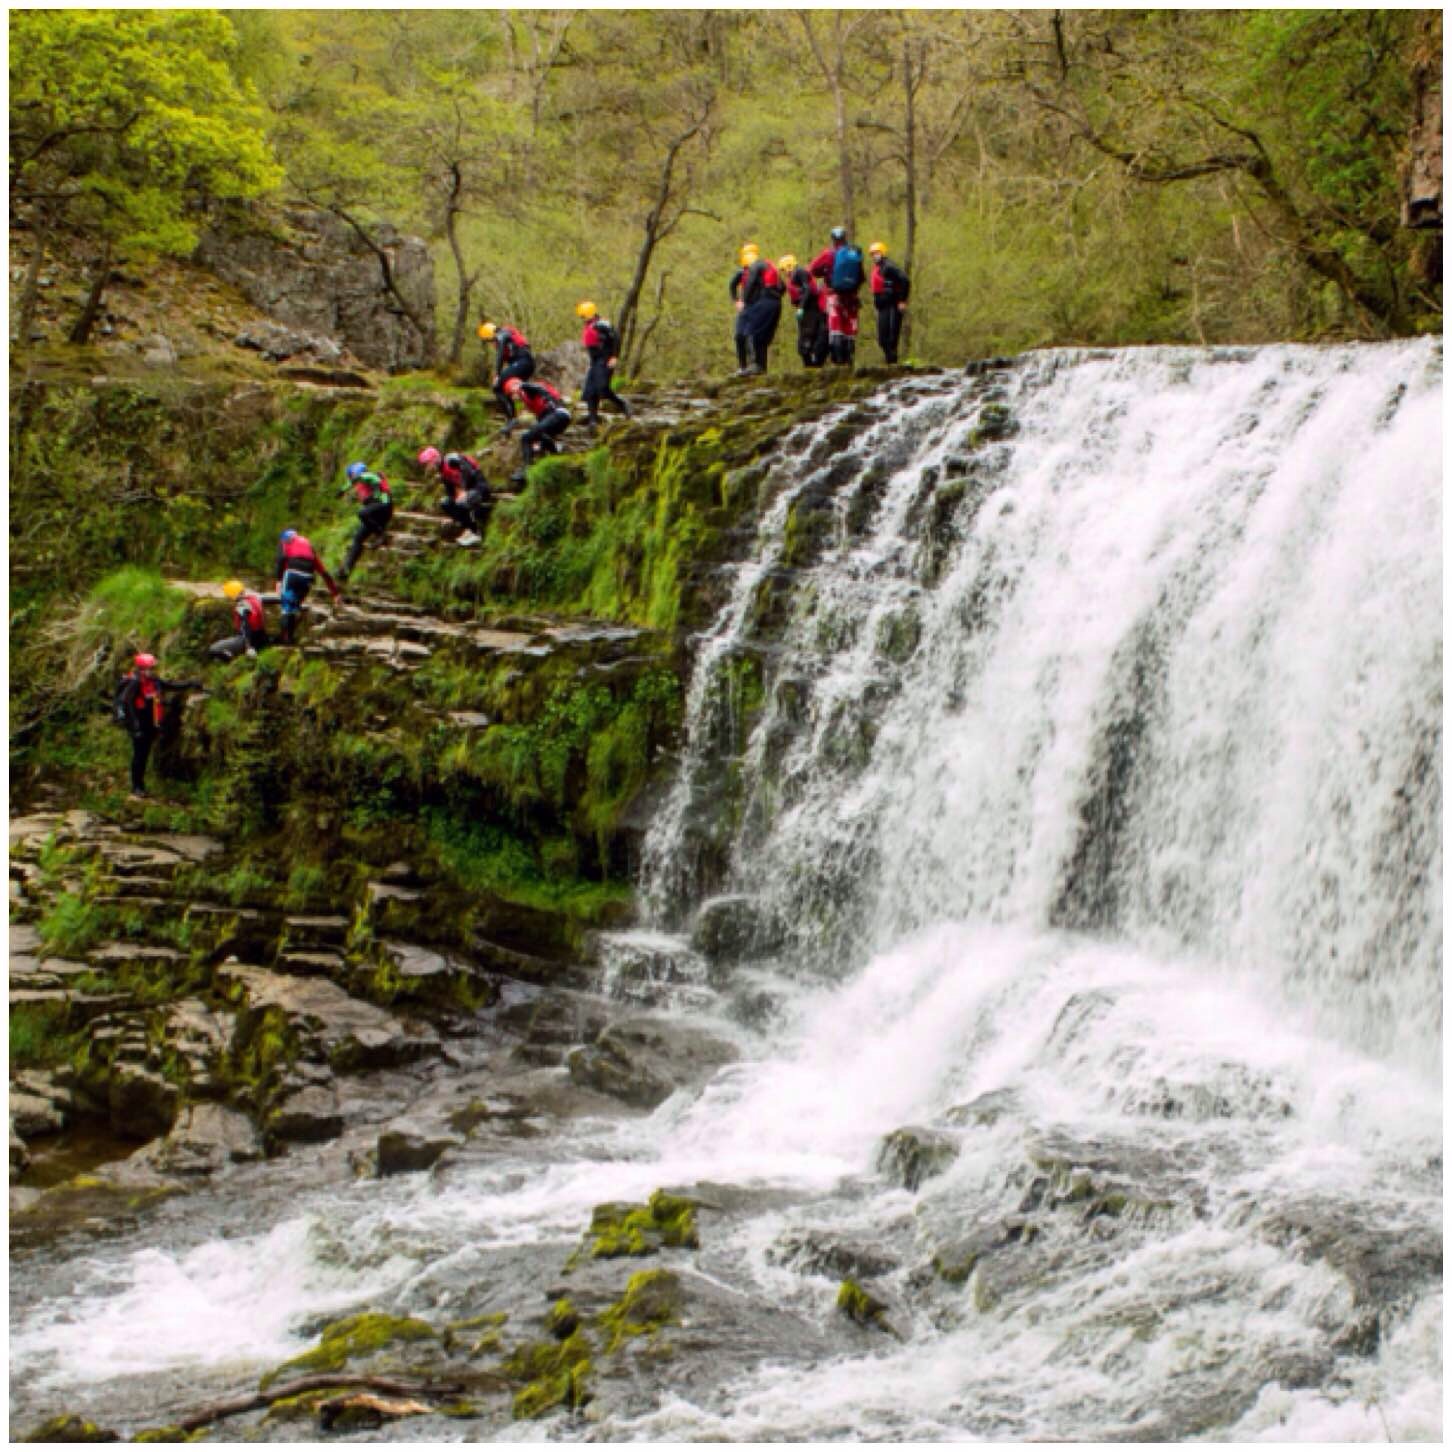
The biggest and most spectacular falls on the walk are to be found at Sgwd yr Eira (Waterfall of the Snow) and it is safe to walk underneath the overflow. When you near the falls you have to descend some steep steps and it was when we were nearing here we started to hear some shouting.
The shouting turned out to be a local Kyokushin Karate club doing waterfall training. They have been doing this since 1980 and come down every year. For a while we watched them doing training under the spray of the waterfall and then one by one, as you can see below, they jumped into the river. This type of training is common in Japan, apparently.
Finding the falls at Sgwd yr Eira
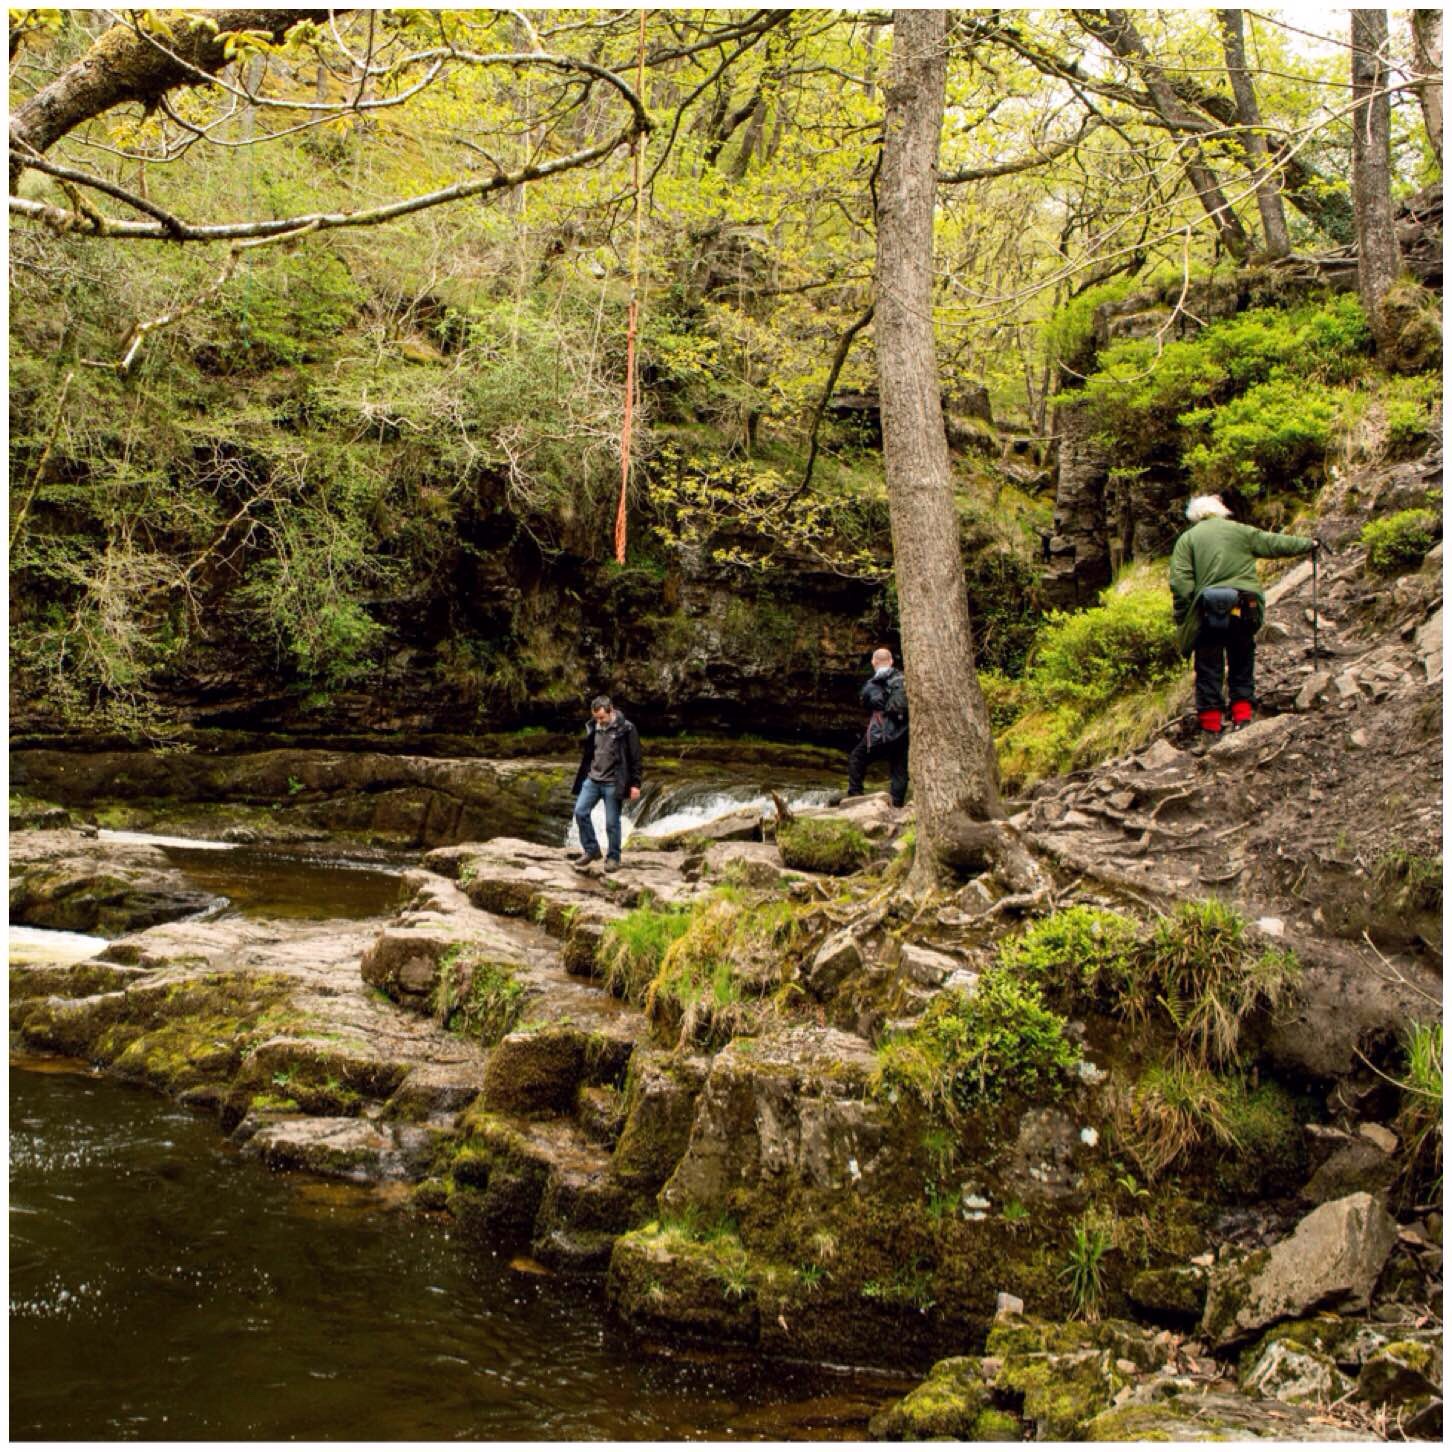
Once we had finished here it was a slow climb out of the ravine and we headed back upstream to find some of the other waterfalls.
Mooching upstream
There are quite a number of waterfalls on the river and I normally come to Sgwd y Pannwr (Fullers Falls) to sit and have lunch. It has a lovely flat area of rock to sit on and you can paddle in some of the shallow areas. Today however there were a lot of outdoor groups canyoning and I got some fantastic pictures of the guys leaping off the side of the waterfall.
Airborne at Sgwd y Pannwr
The last waterfall had a large group climbing down the side of it and when they got to the base of the falls, one by one they disappeared into it. We did not hang around to see them emerge, but as I heard nothing in the news all must have made it safely out 😉
The falls at Sgwd Clun-Gwyn
We were soon back at the car park ready for the trip home.
This was a great weekend with the Grumpy Old Men’s club and I look forward to many more.
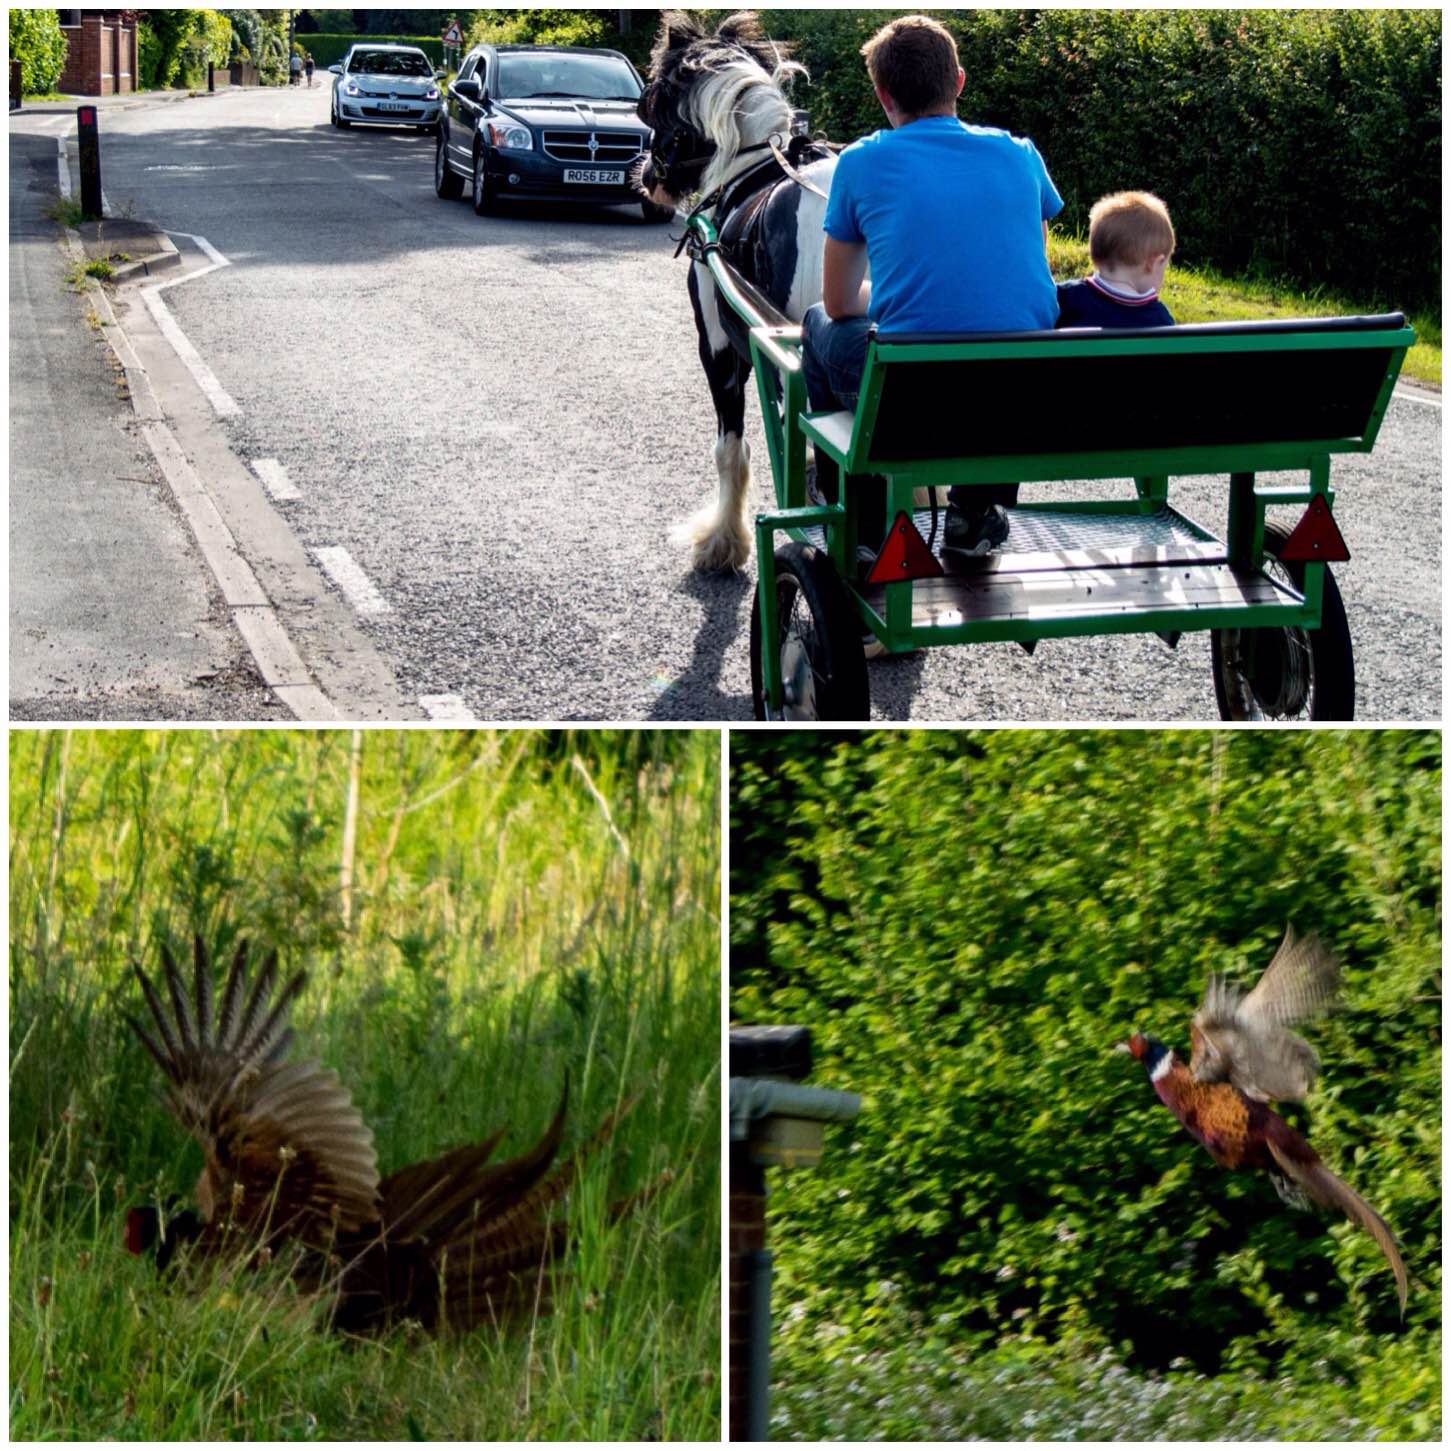
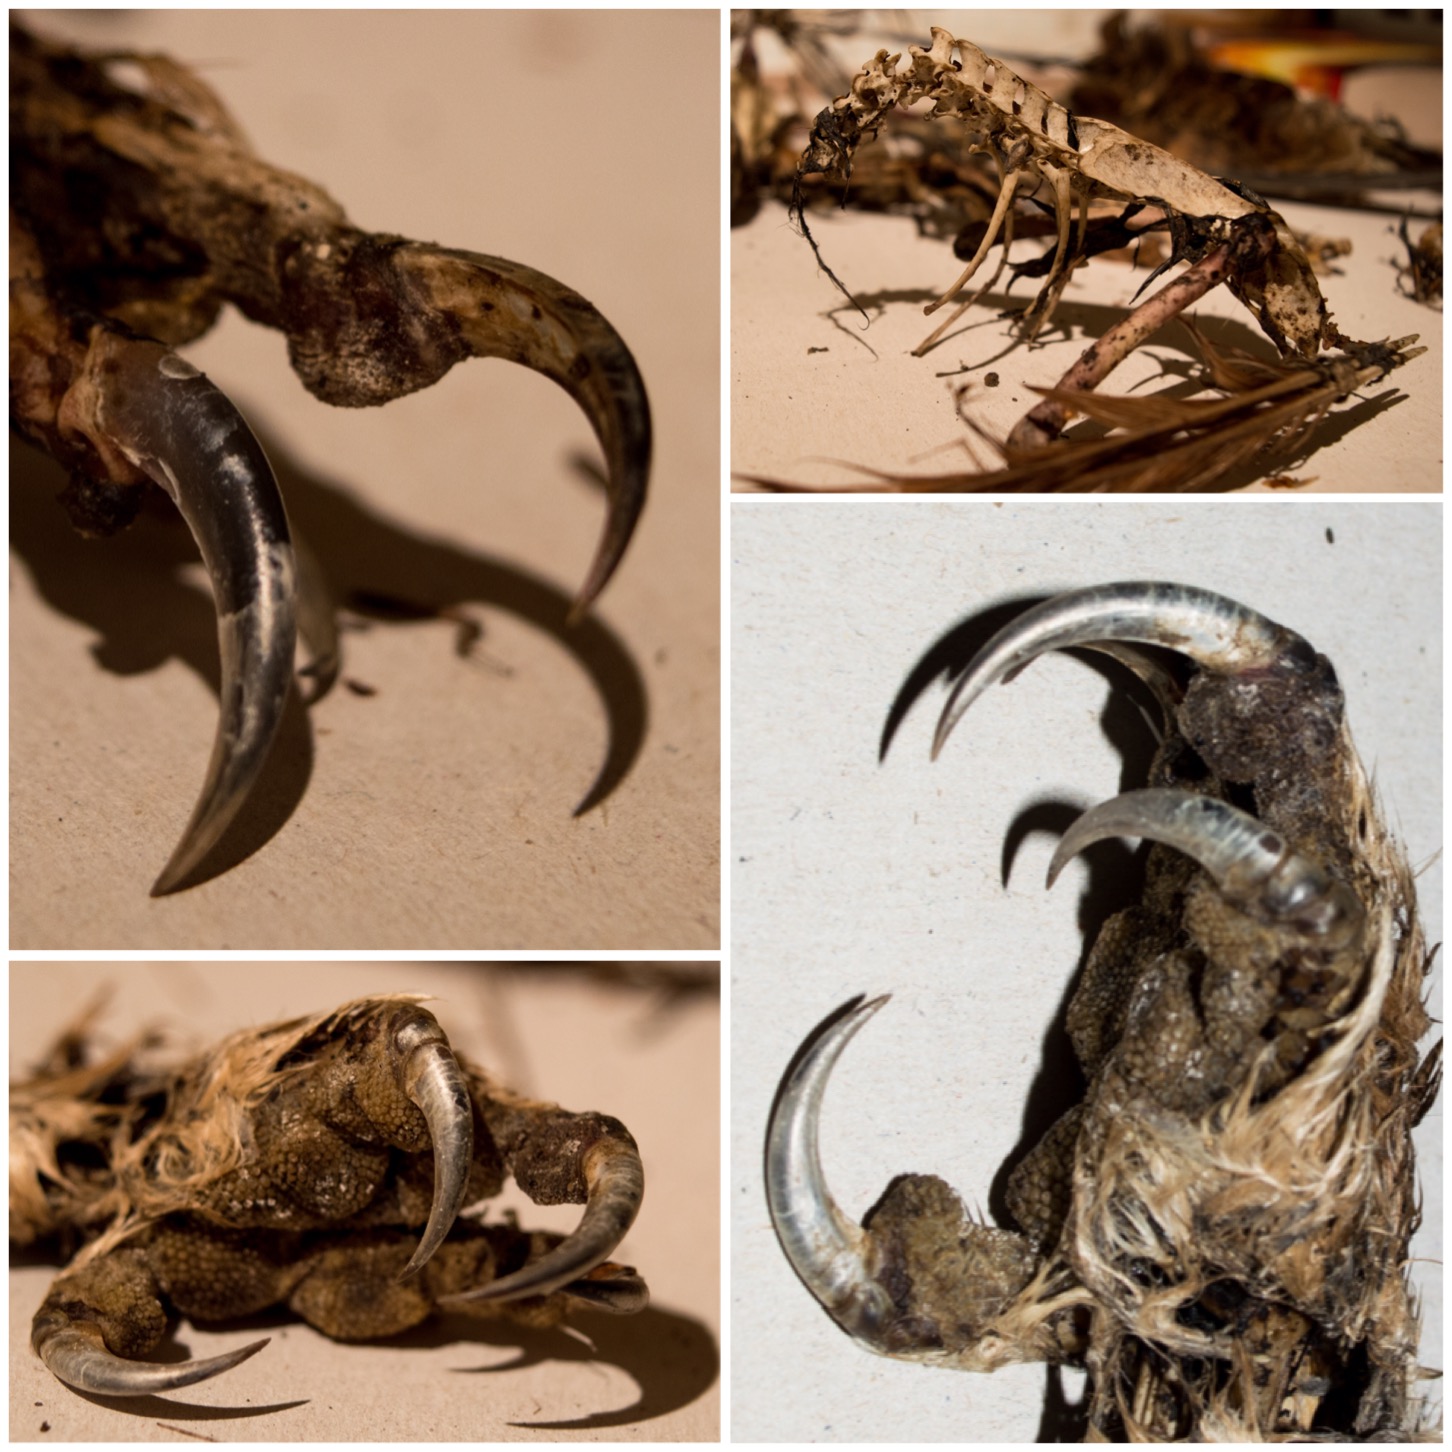
I set out on the 30 Day Challenge tonight on my own with an eye to do a bit of macro photography. I also took along my little tripod to get a steady shot if the light was not good.
On the way to a nice wild spot in the village this little trap passed me by and when I got to my spot the first thing I tripped over was a pheasant.
Heading out
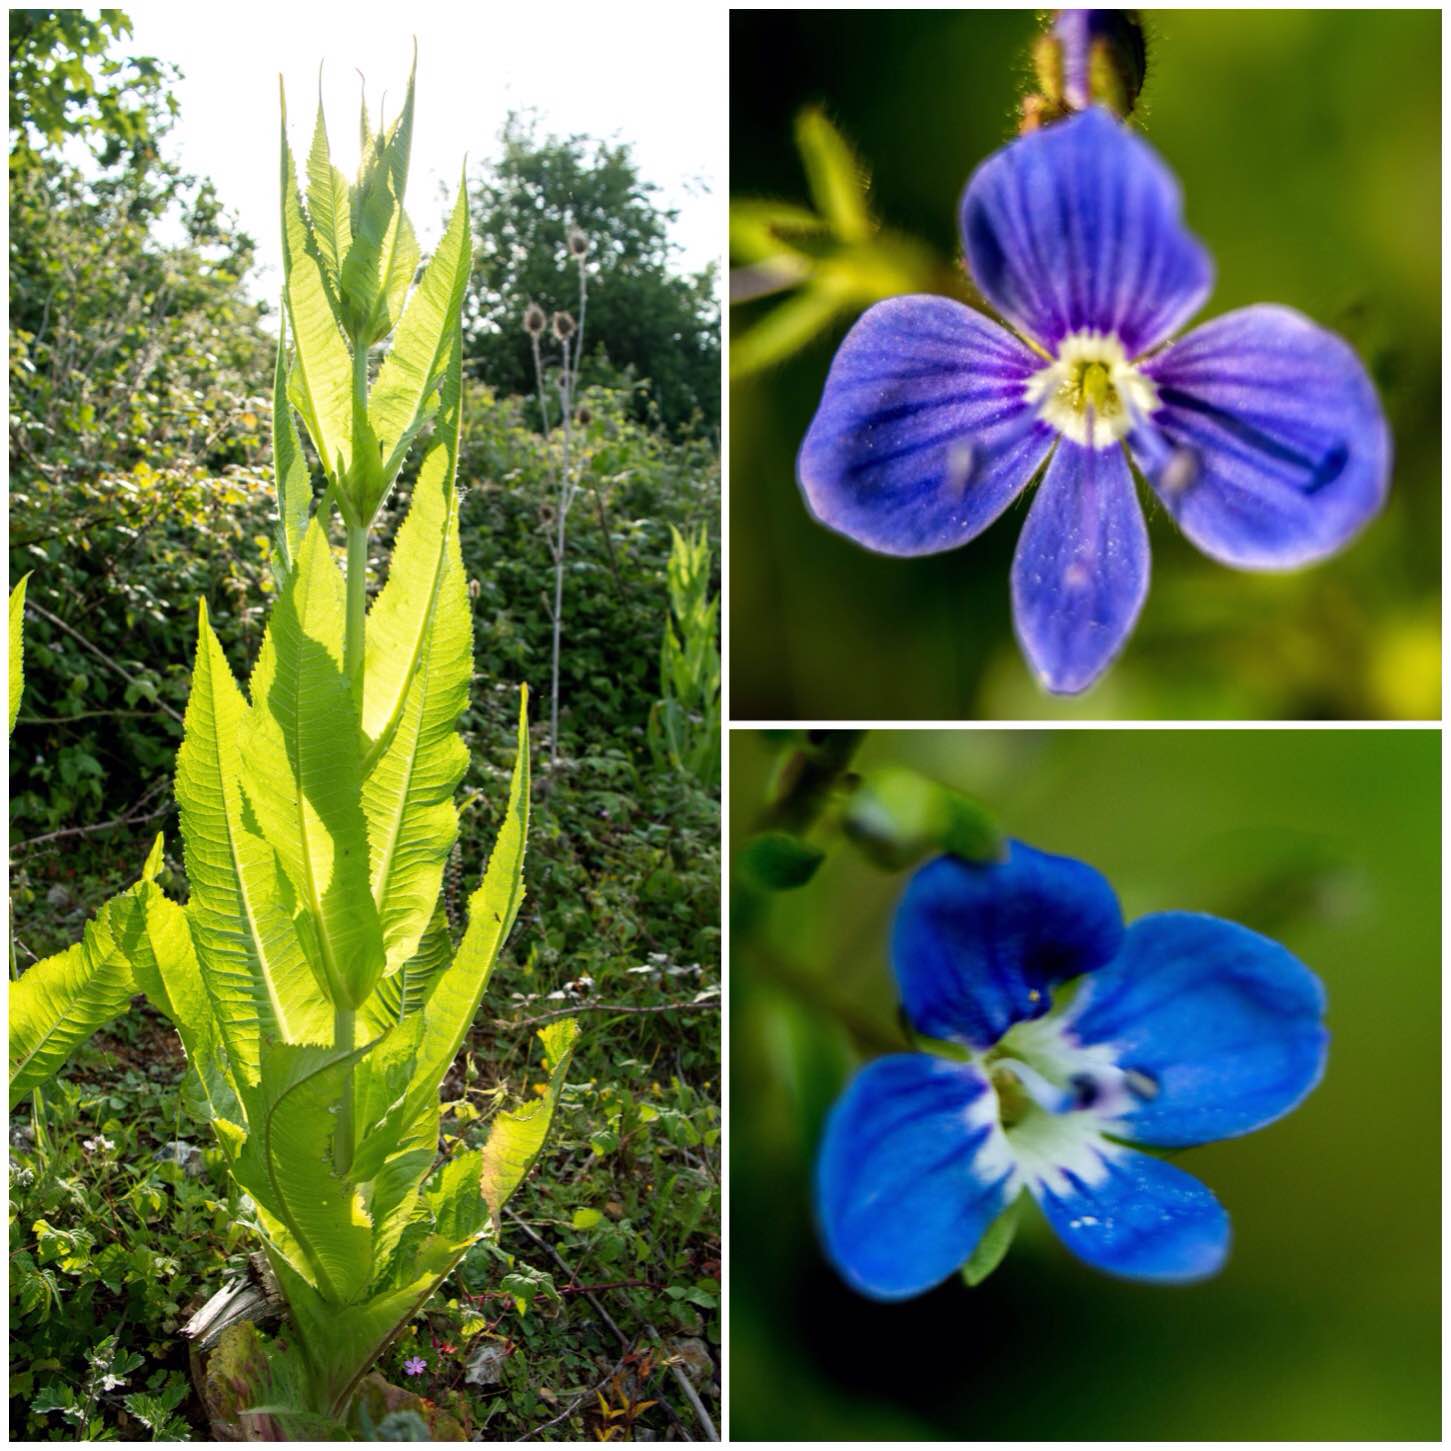
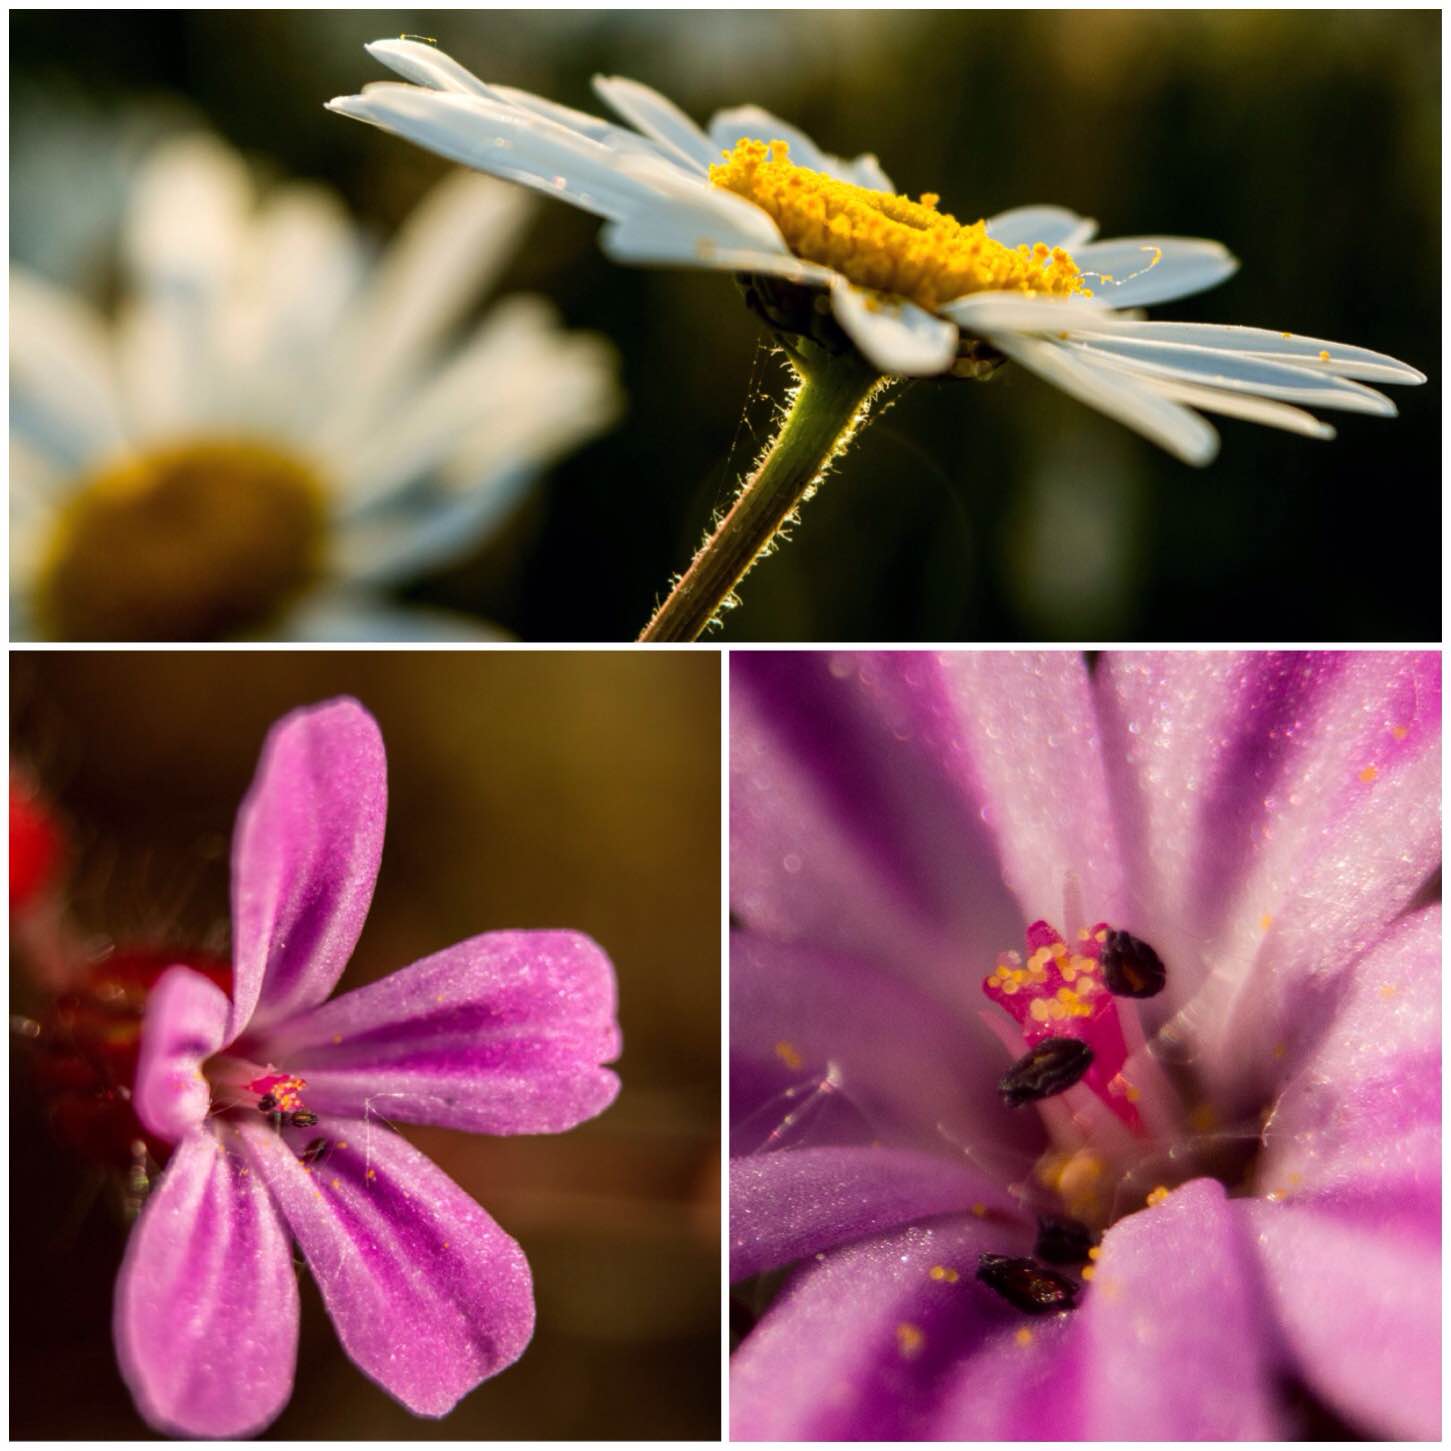
The area I was going to photograph is on a piece of waste ground near our old British Legion building here in Bramley. There is always some teasel growing here and I managed to get a lovely shot of this one backlit by the sun. The two pictures on the right are of speedwell and brooklime. Both of the flowers were tiny so I used my lens extensions to zoom in and my tripod to try and get a steady shot.
From big to tiny
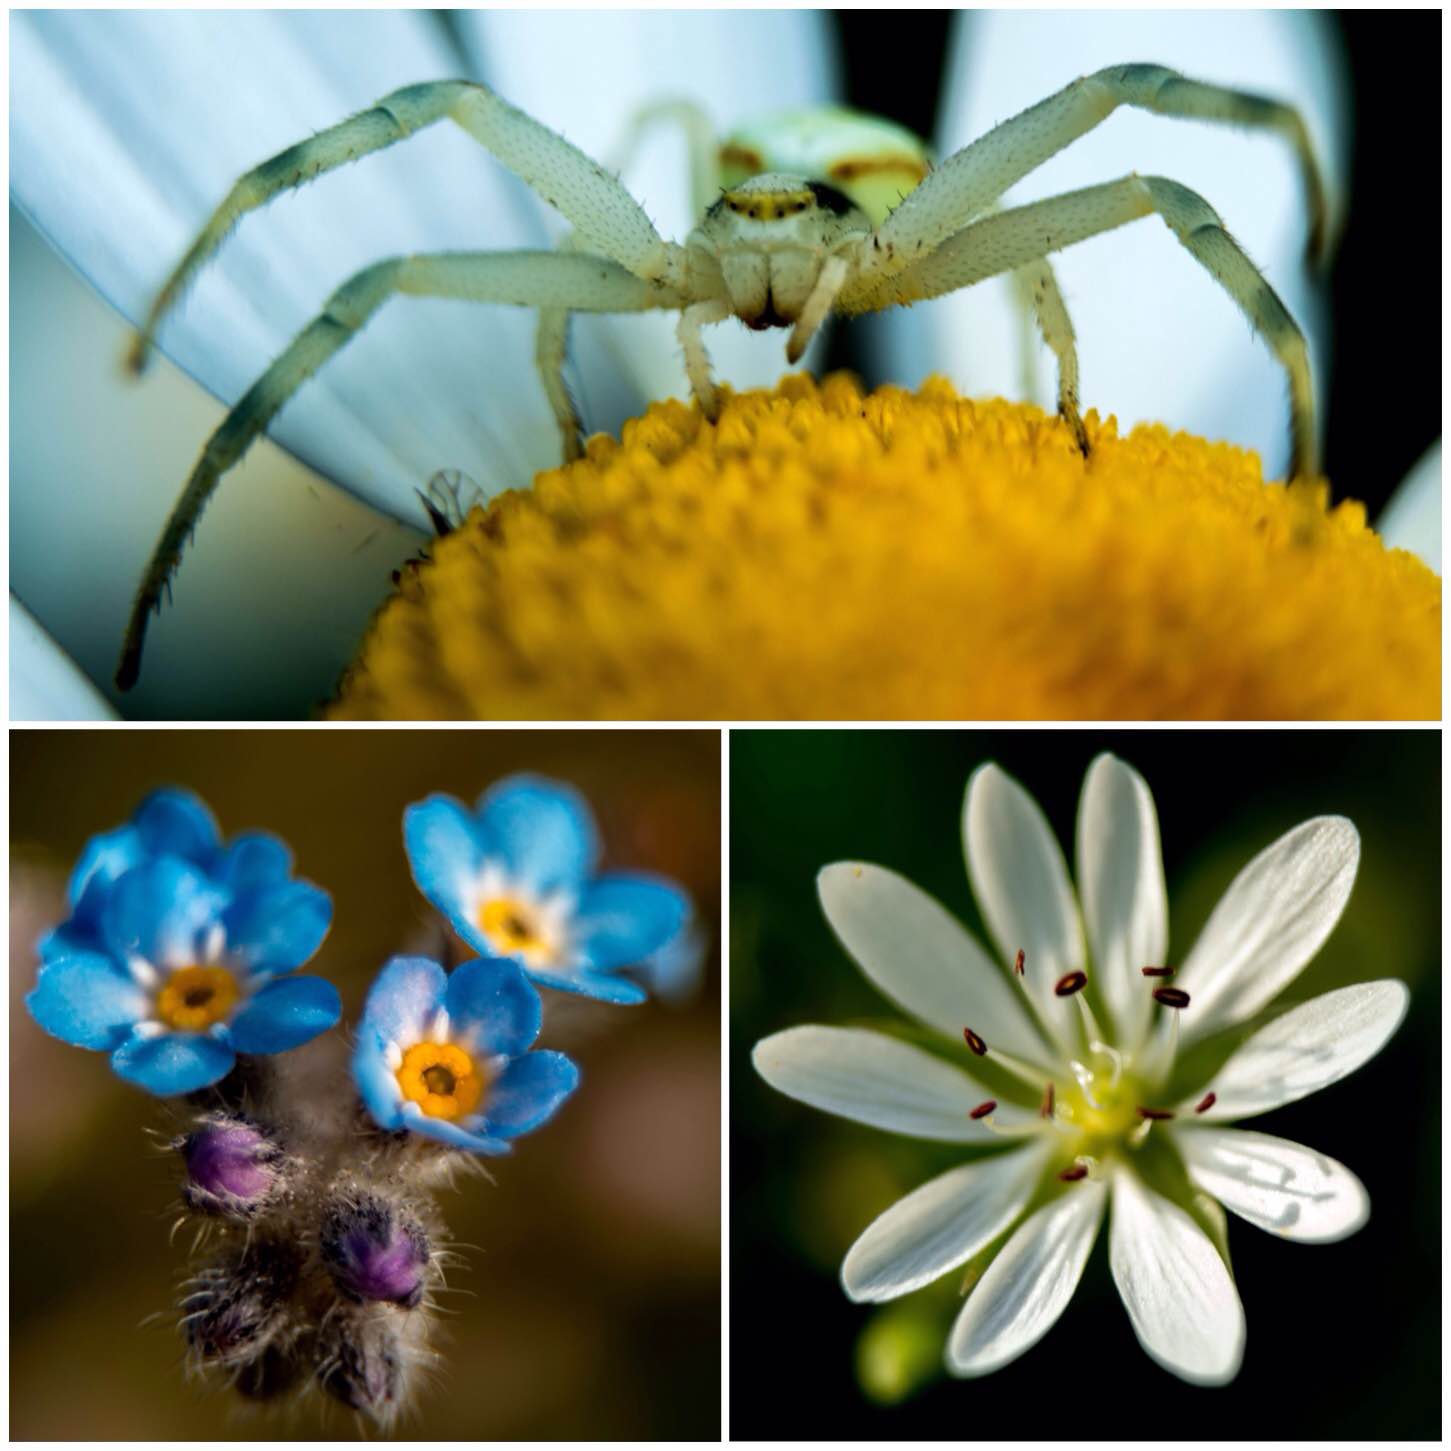
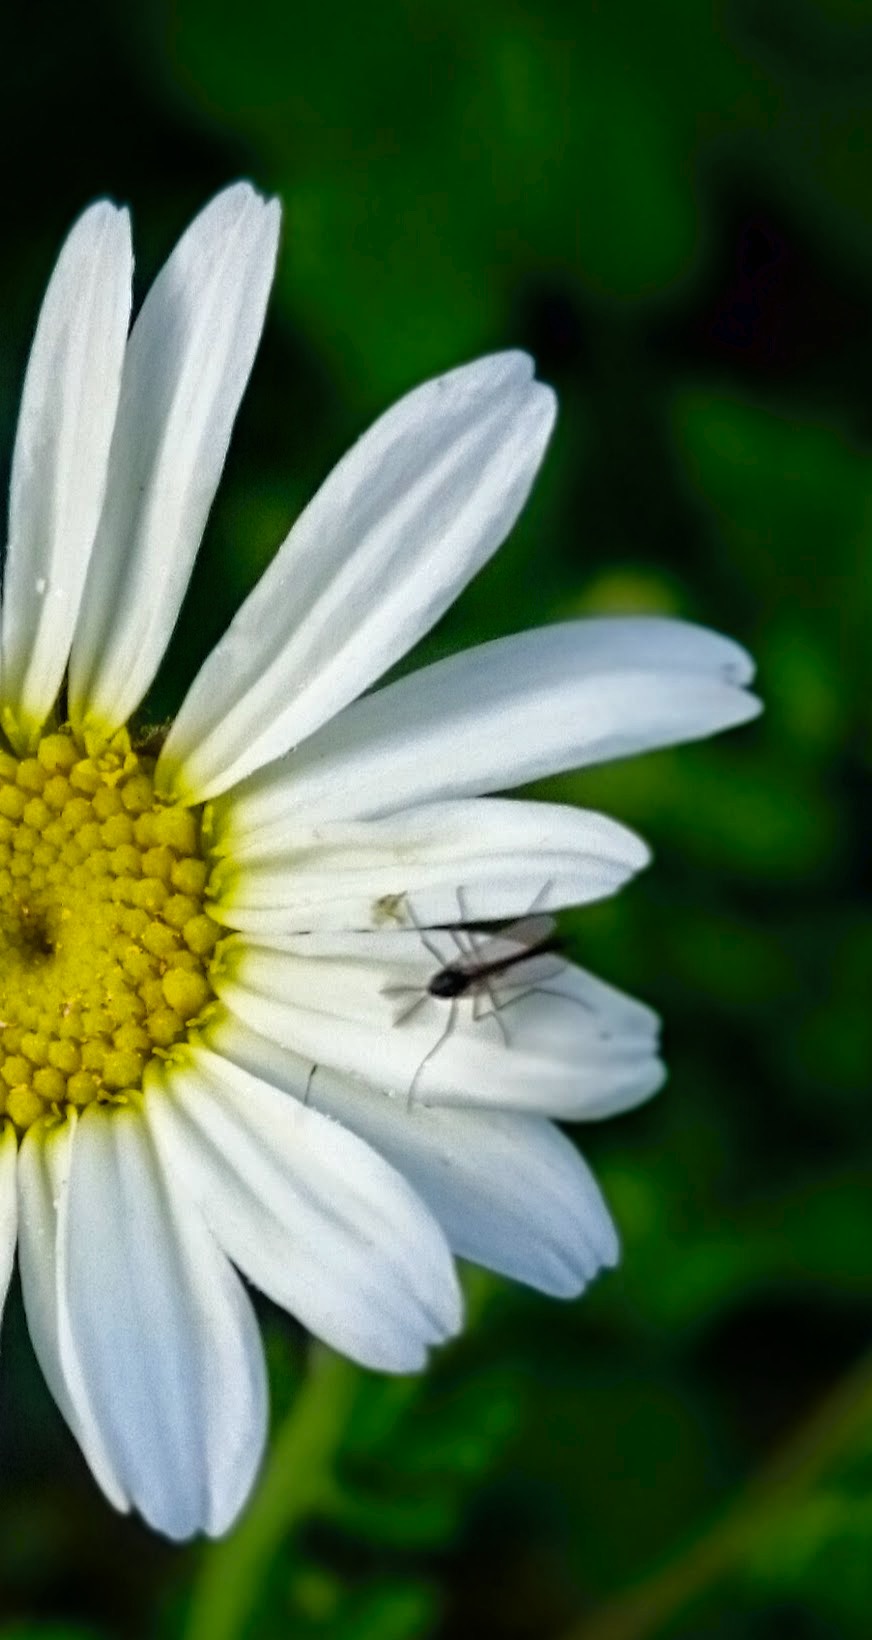
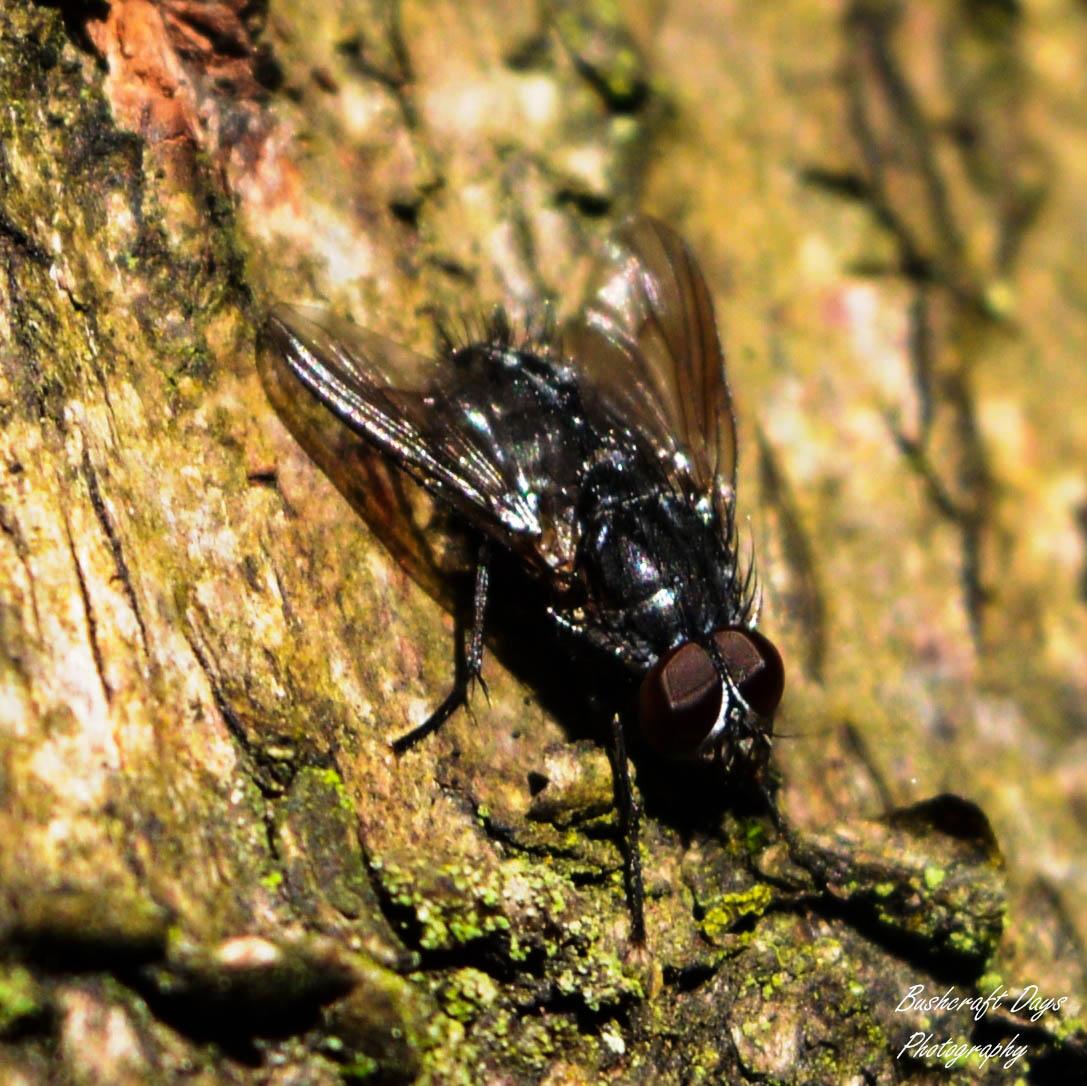
I was having a look at the oxeye daisies when I came across this little chap. He was raising his front legs every now and then to ward off the lens.
The bottom two flowers are forget-me-not and stichwort, both very dainty and beautiful. I love how you can see the shadows from the stamens on the stichwort.
Fine detail
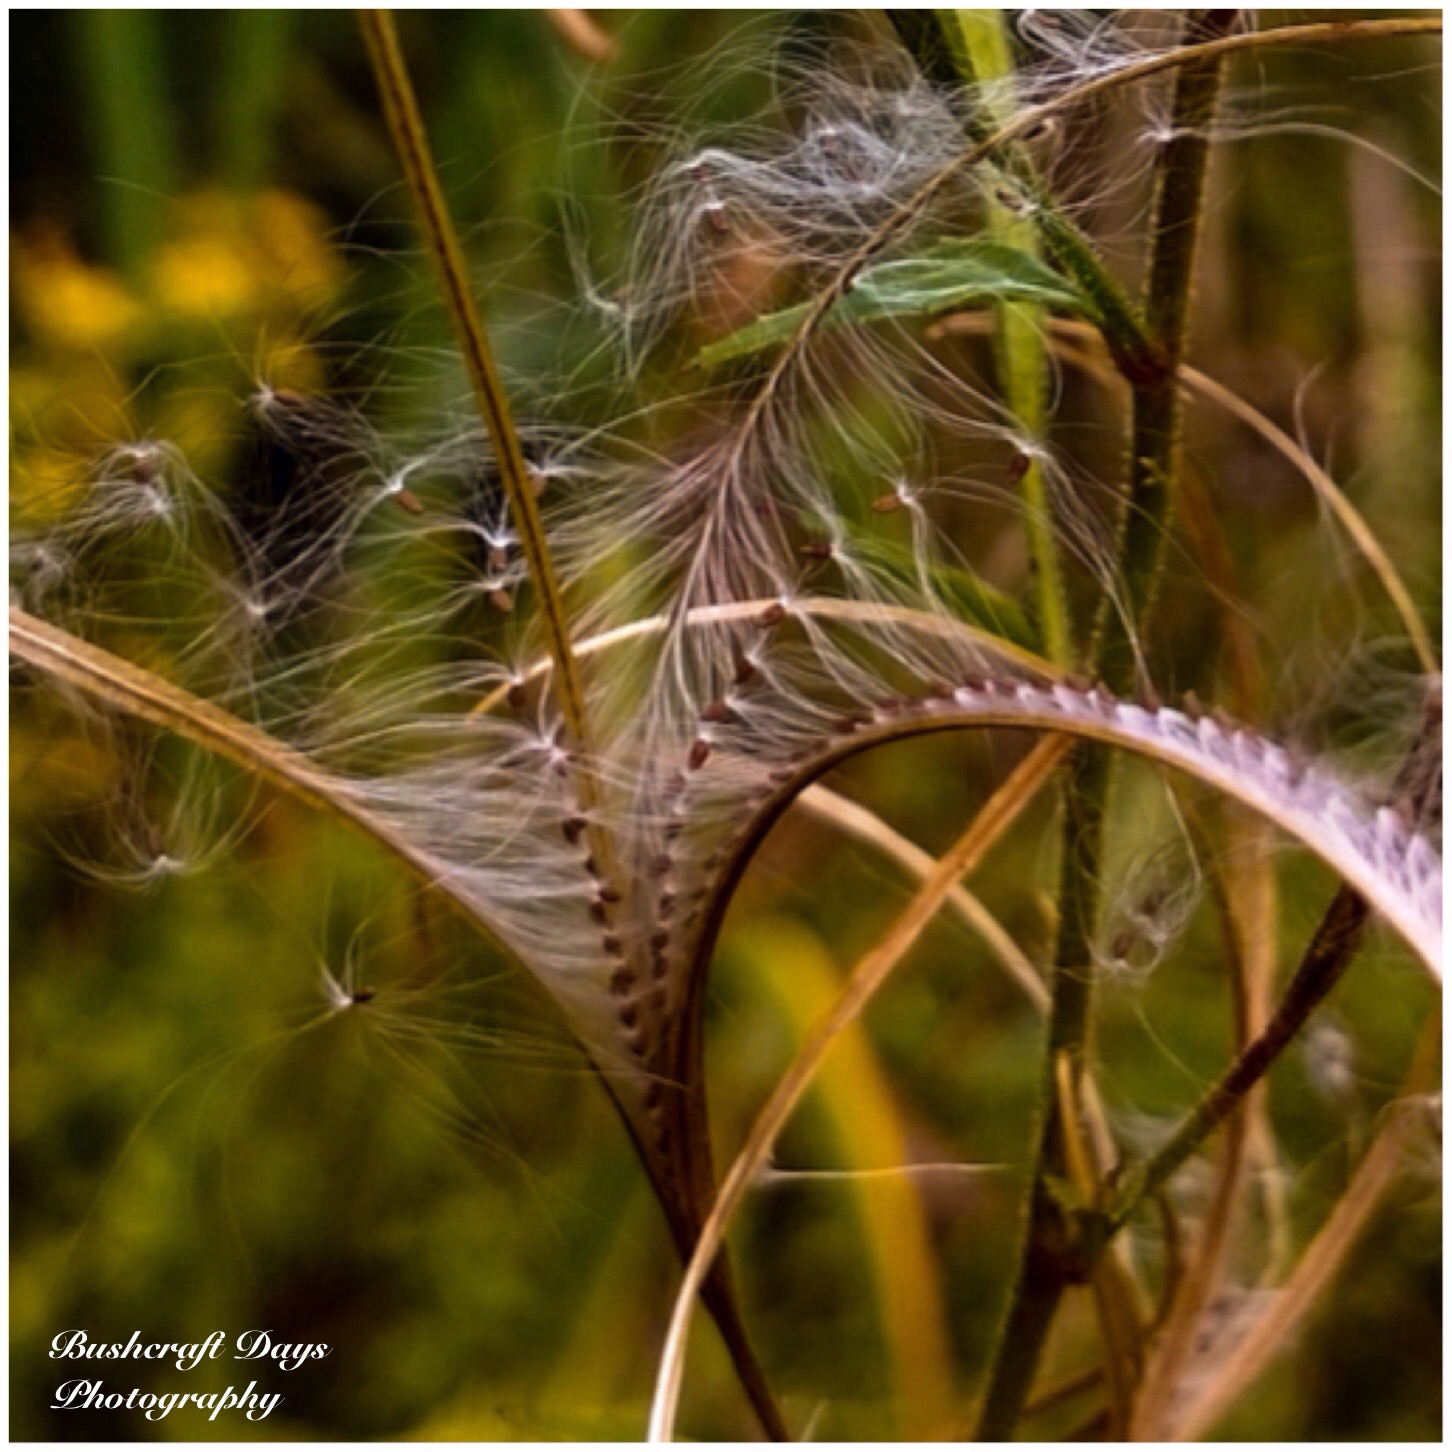
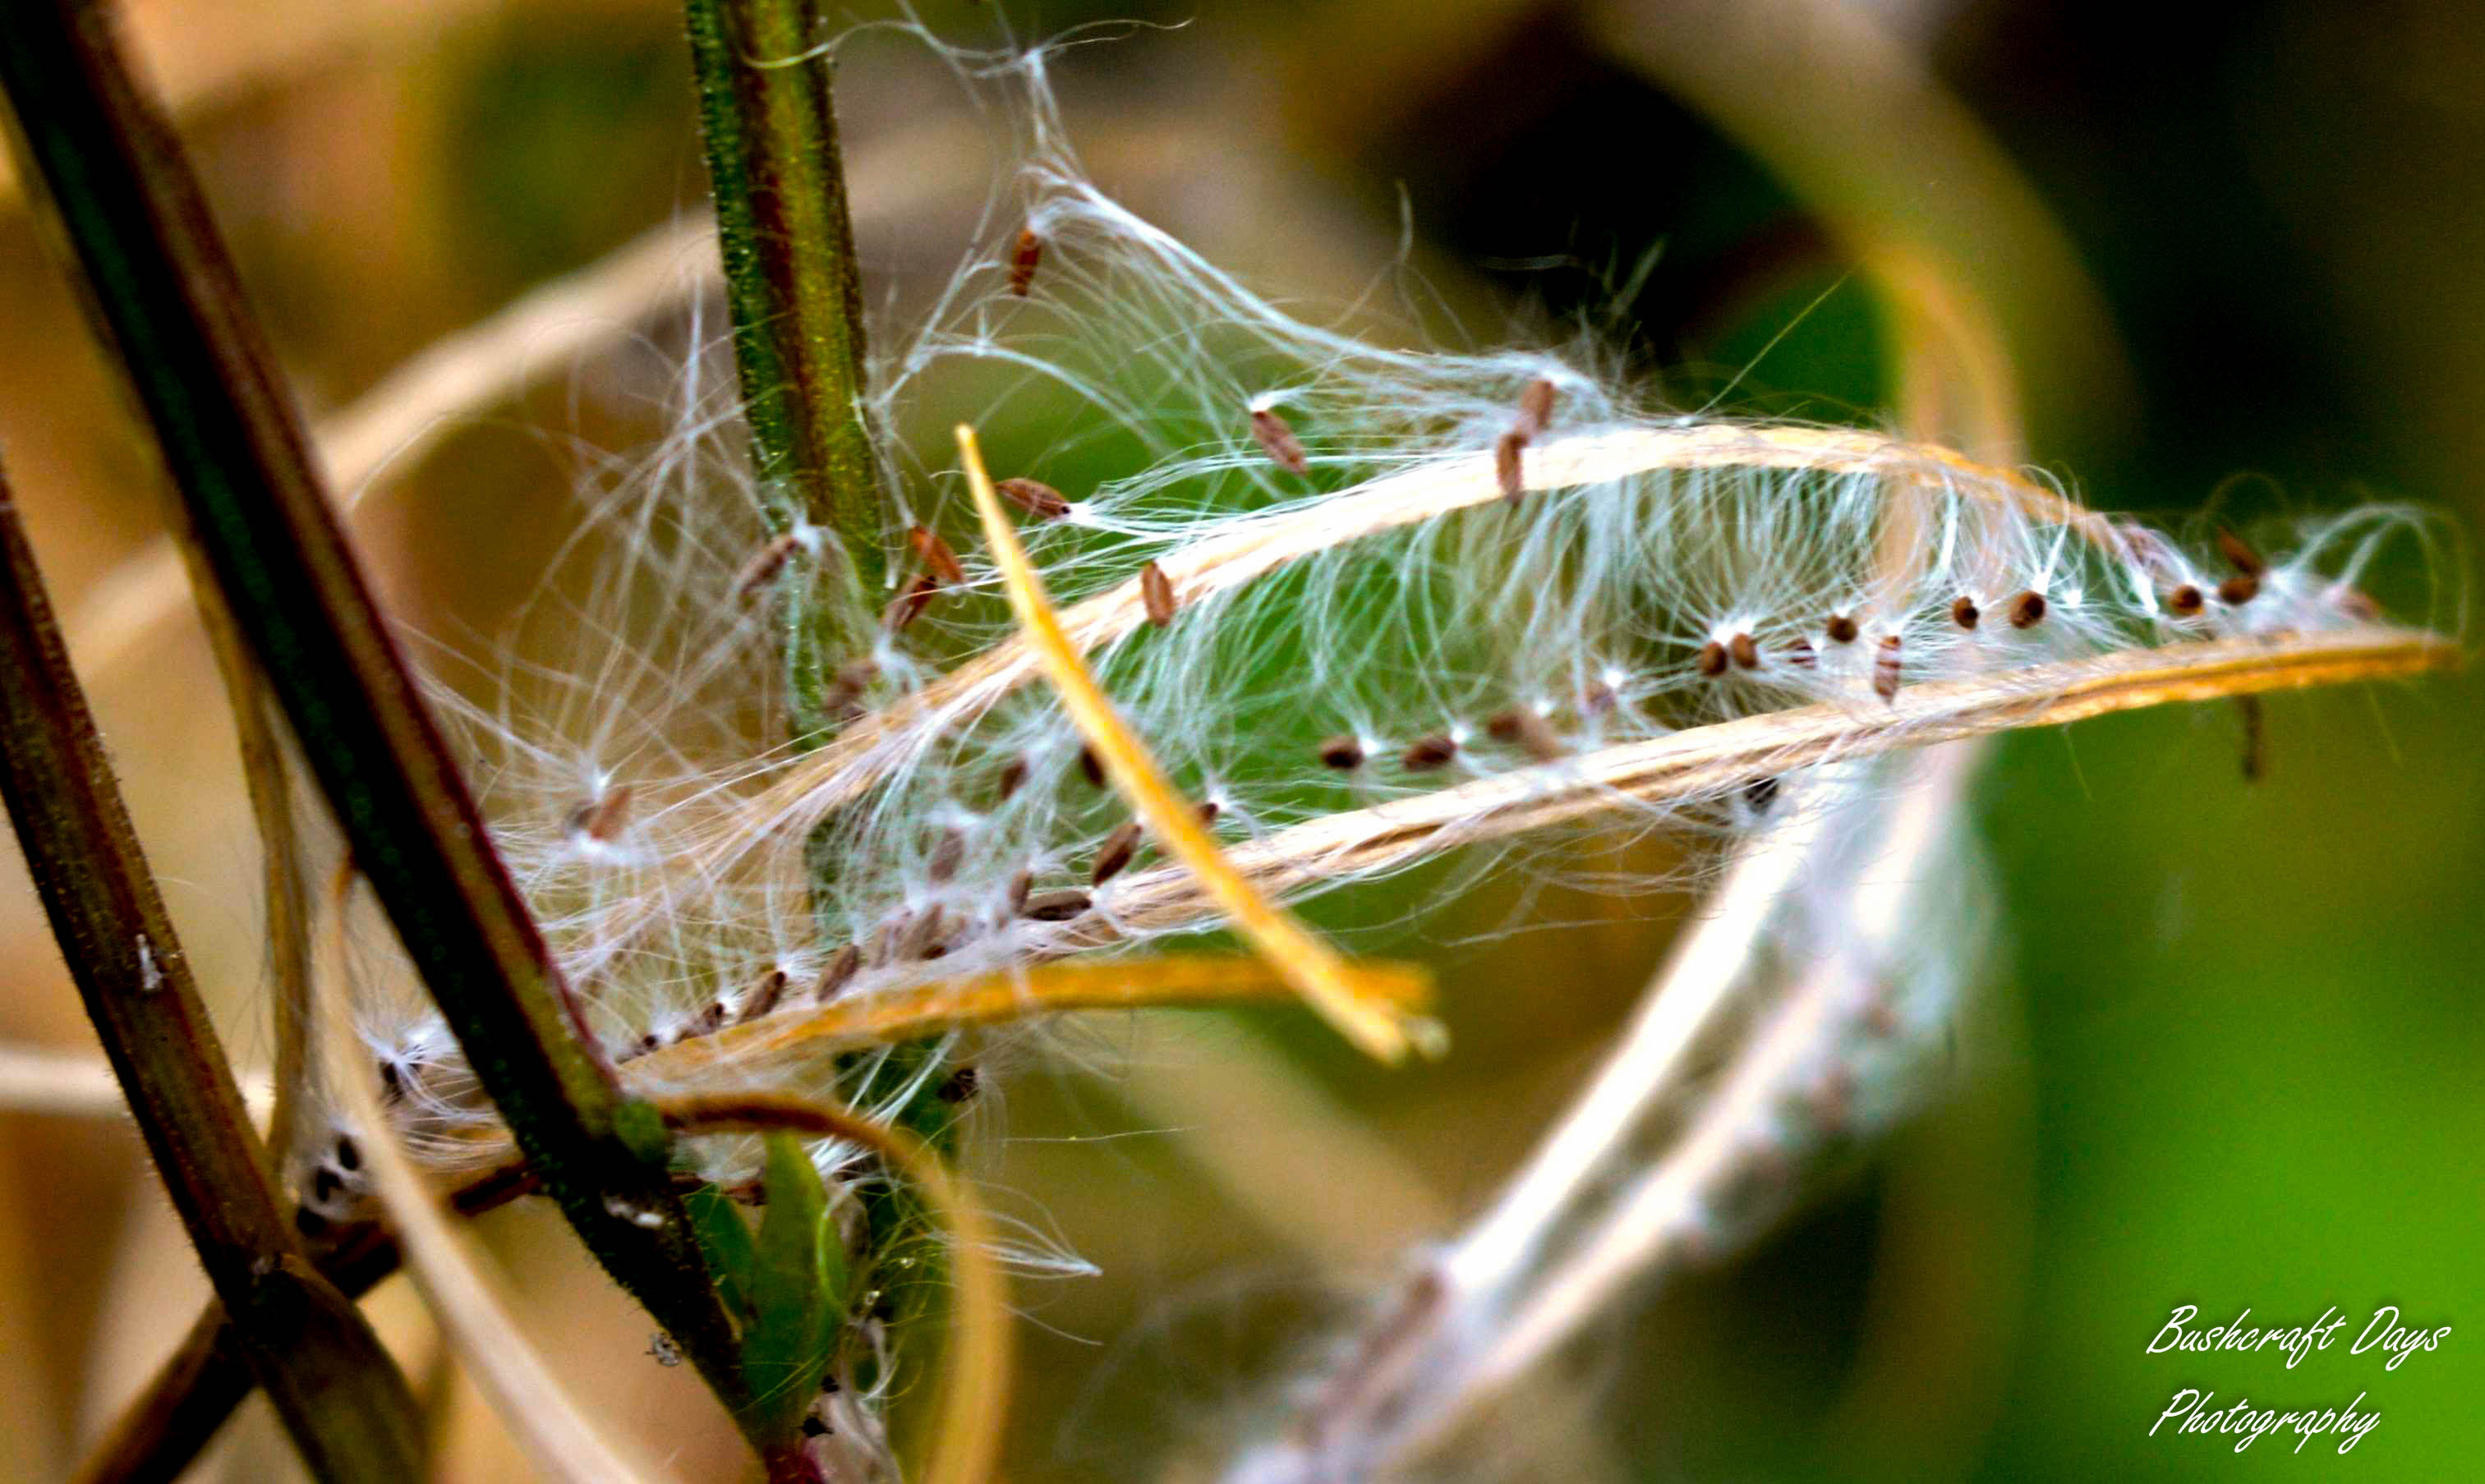
I decided to have a play around getting some shots of the seed heads of some grasses and was pretty happy with the results. The vetch and the down feather were less of a success as I could not get the depth of field to focus on everything (I need a course on this).
Points and curves
The hairs on the oxeye caught my attention as they were lit up by the sun but I was really taken with the herb robert in the two pictures at the bottom. I was impressed that I could make out the individual pollen grains.
A little bit of pollen
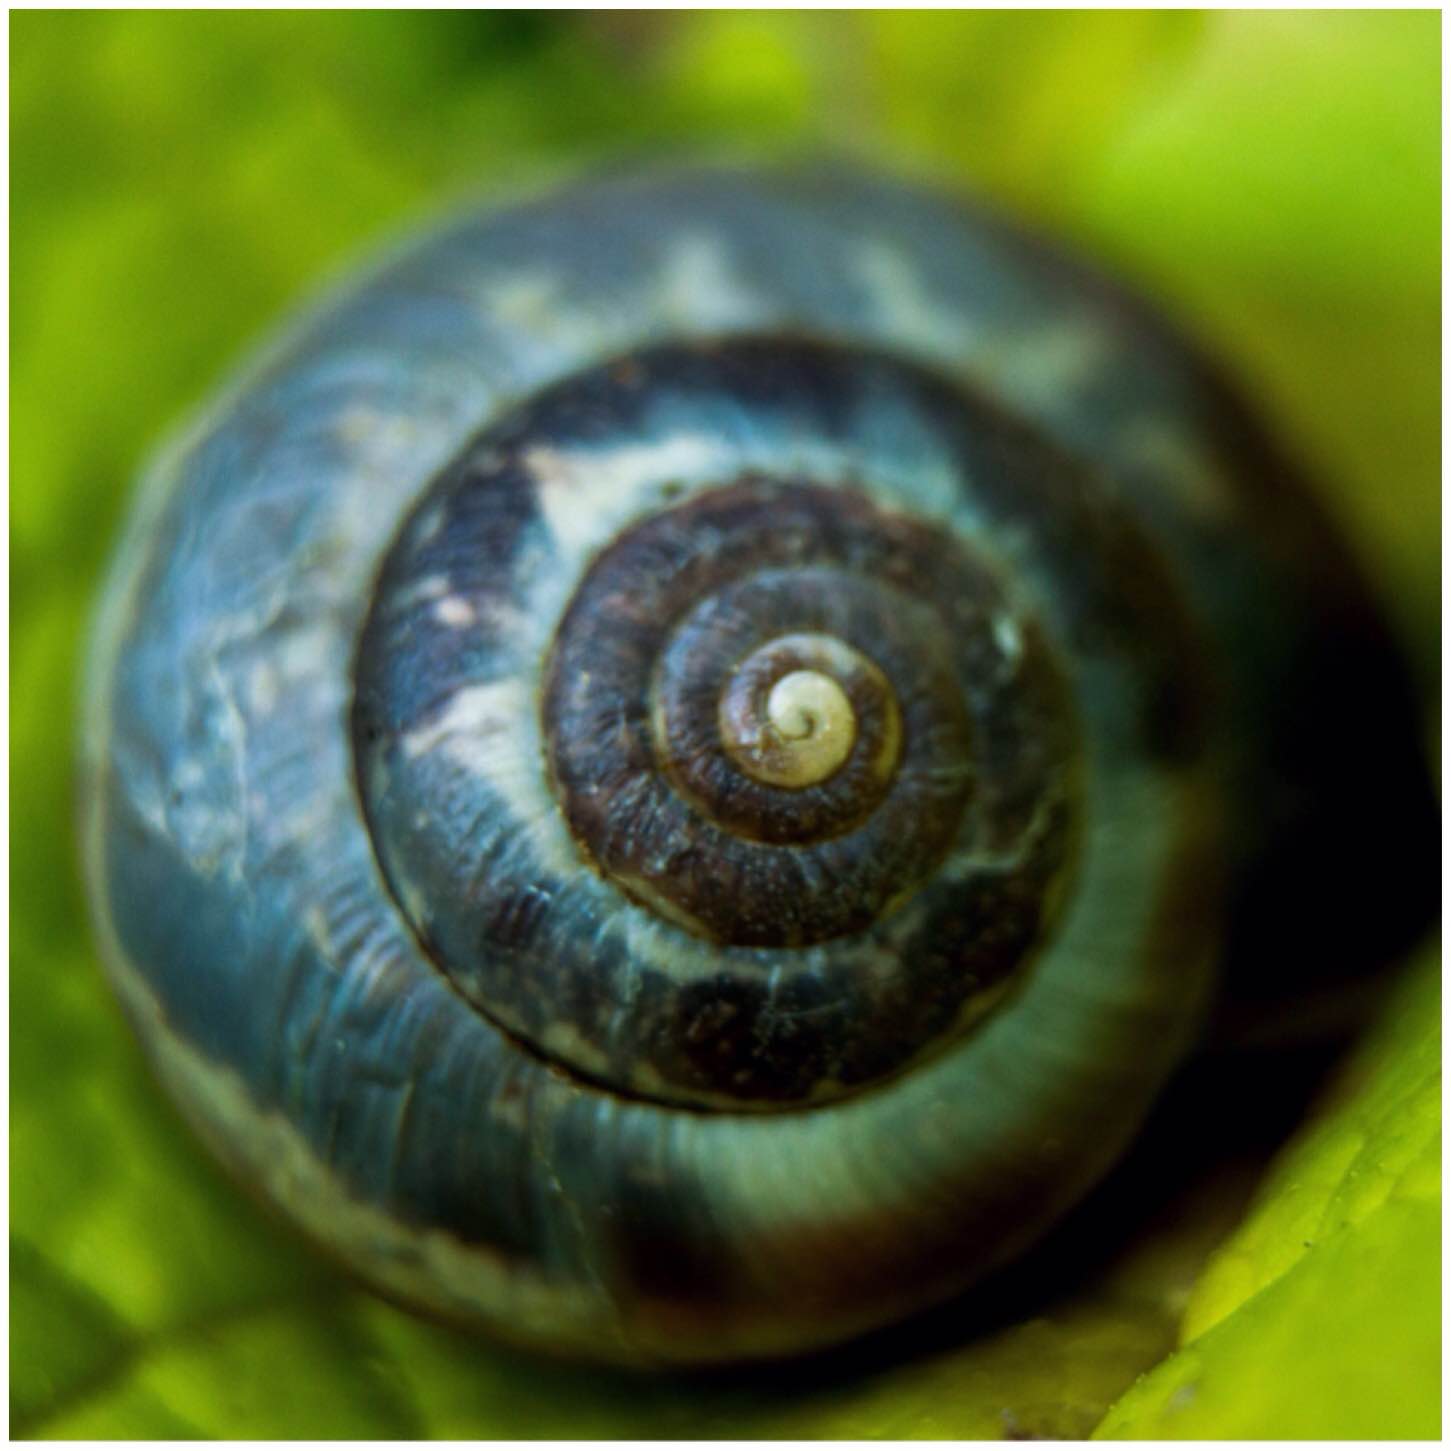
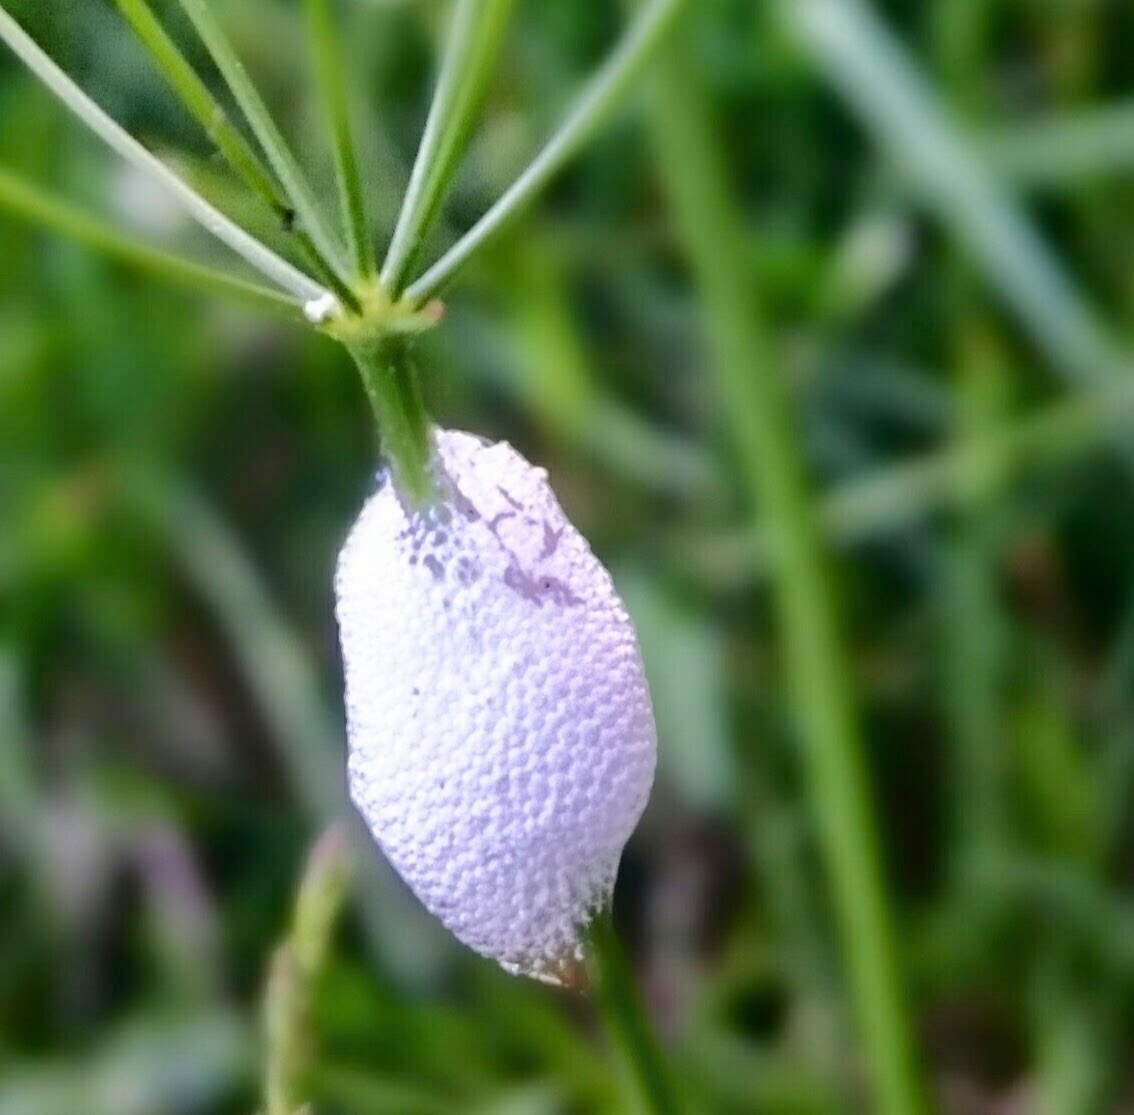
My last picture of the night was of a lonely little snail tucked up in the nook of a nettle leaf.
Snuggled in
Really enjoyed getting down to the macro level again.
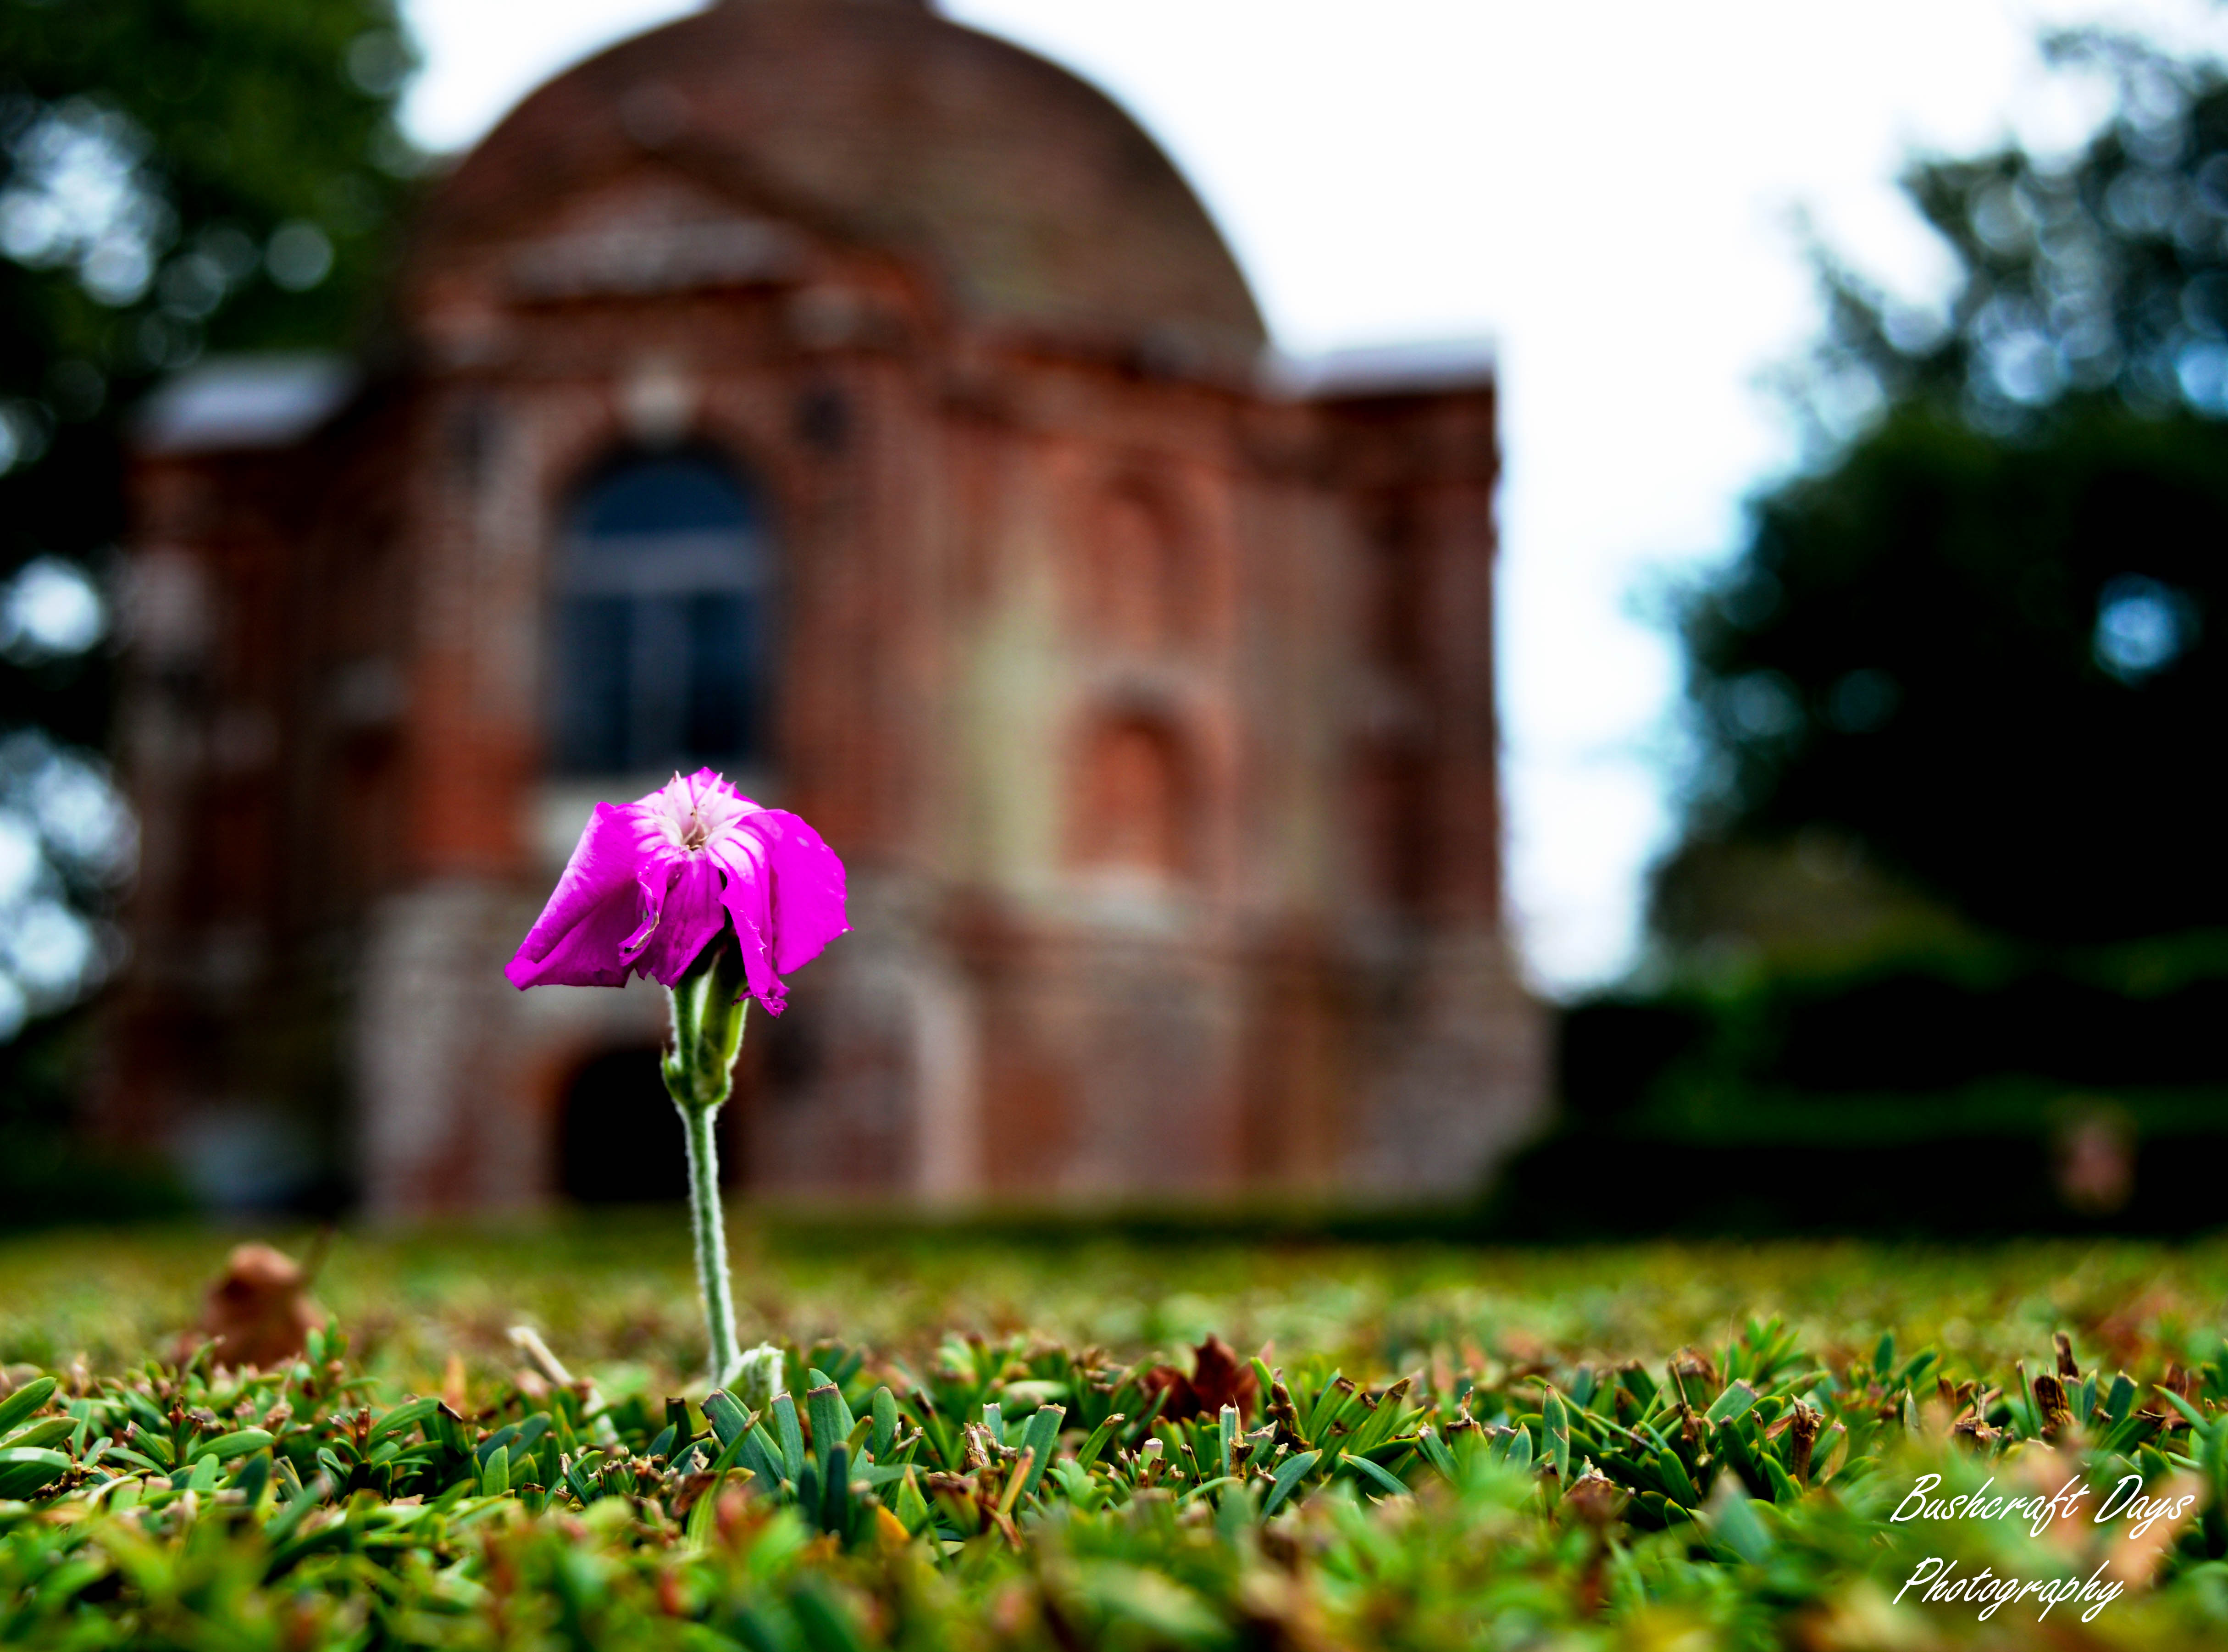
The thing I really like about this 30 Day Challenge is that it makes me get out of the house when I would normally stay indoors. Monday evening I got off the train from London and instead of flopping in front of the TV or computer I said to my daughter we were going out.
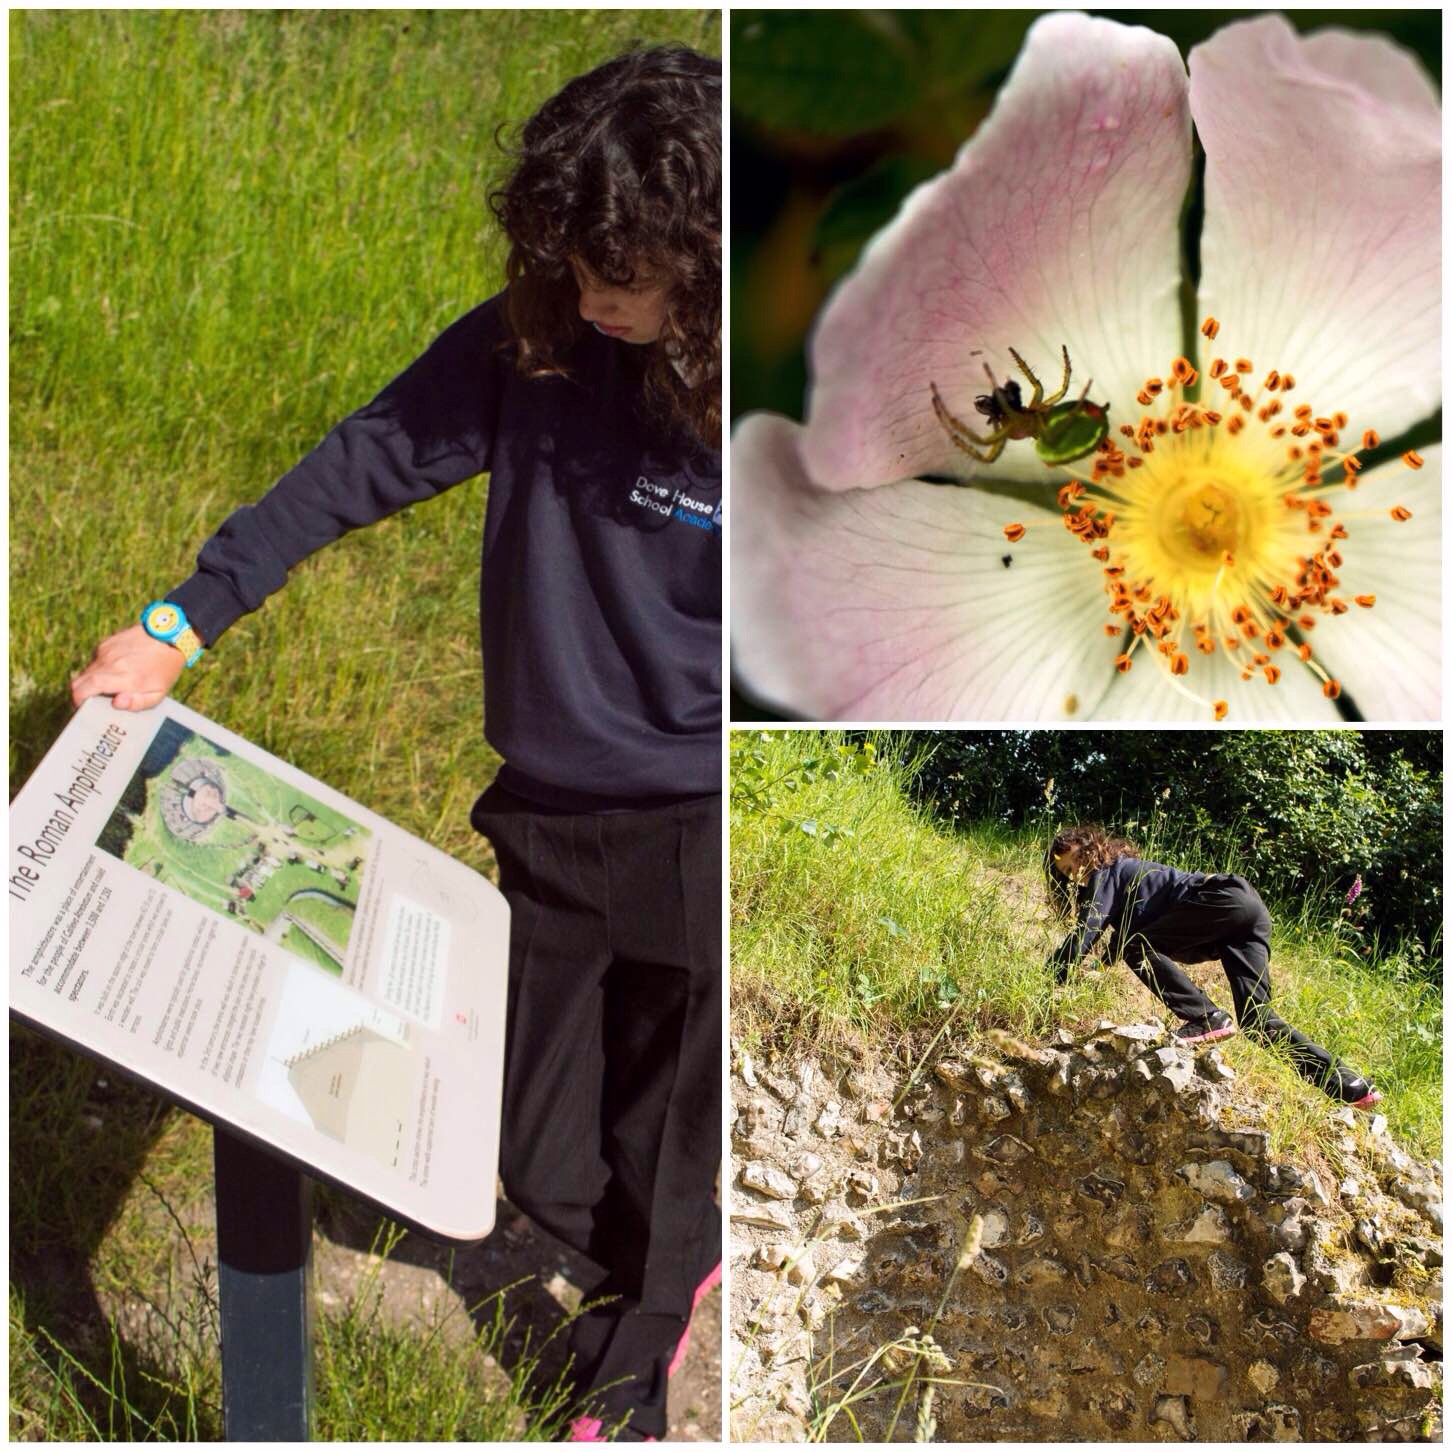
Now this was not taken well as there was the little matter of the iPad in the middle of this. Eventually after much grumbling (from both of us I admit) we were in the car heading up to the Roman amphitheatre in Silchester.
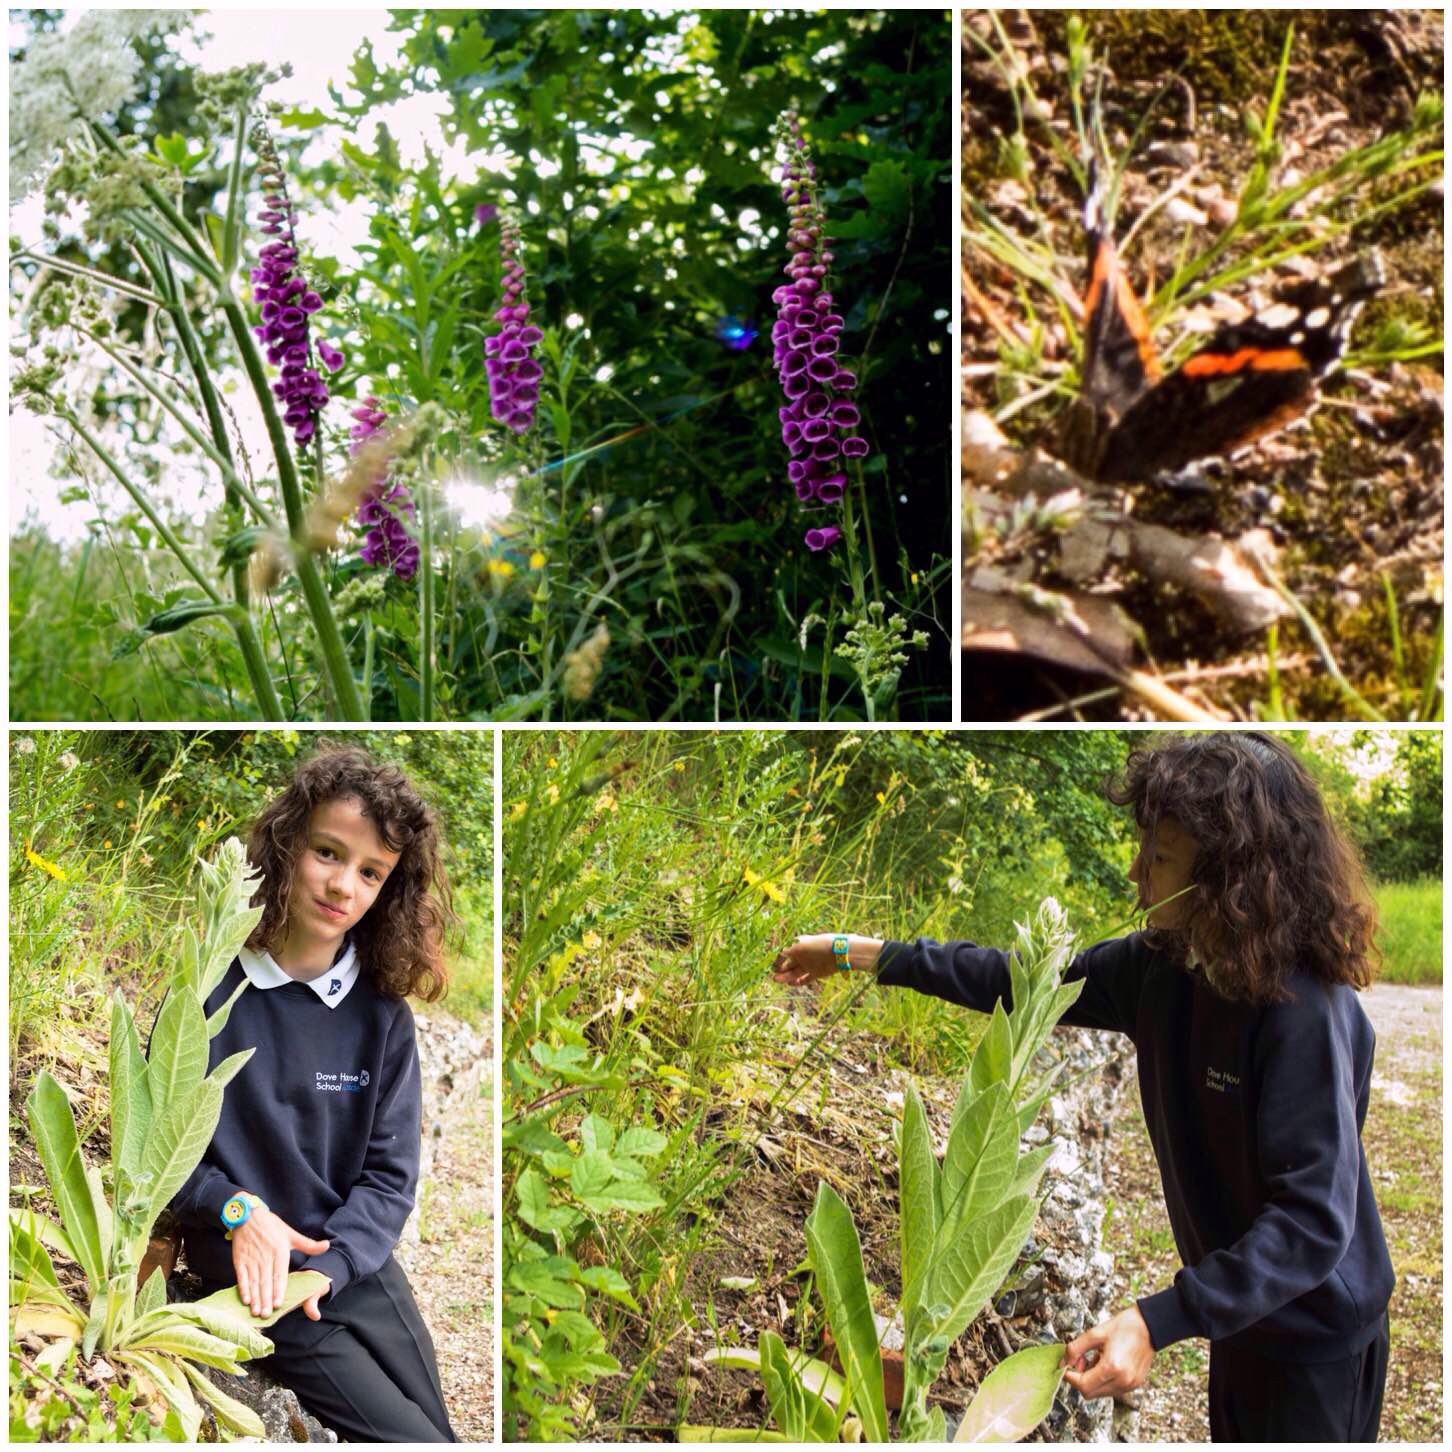
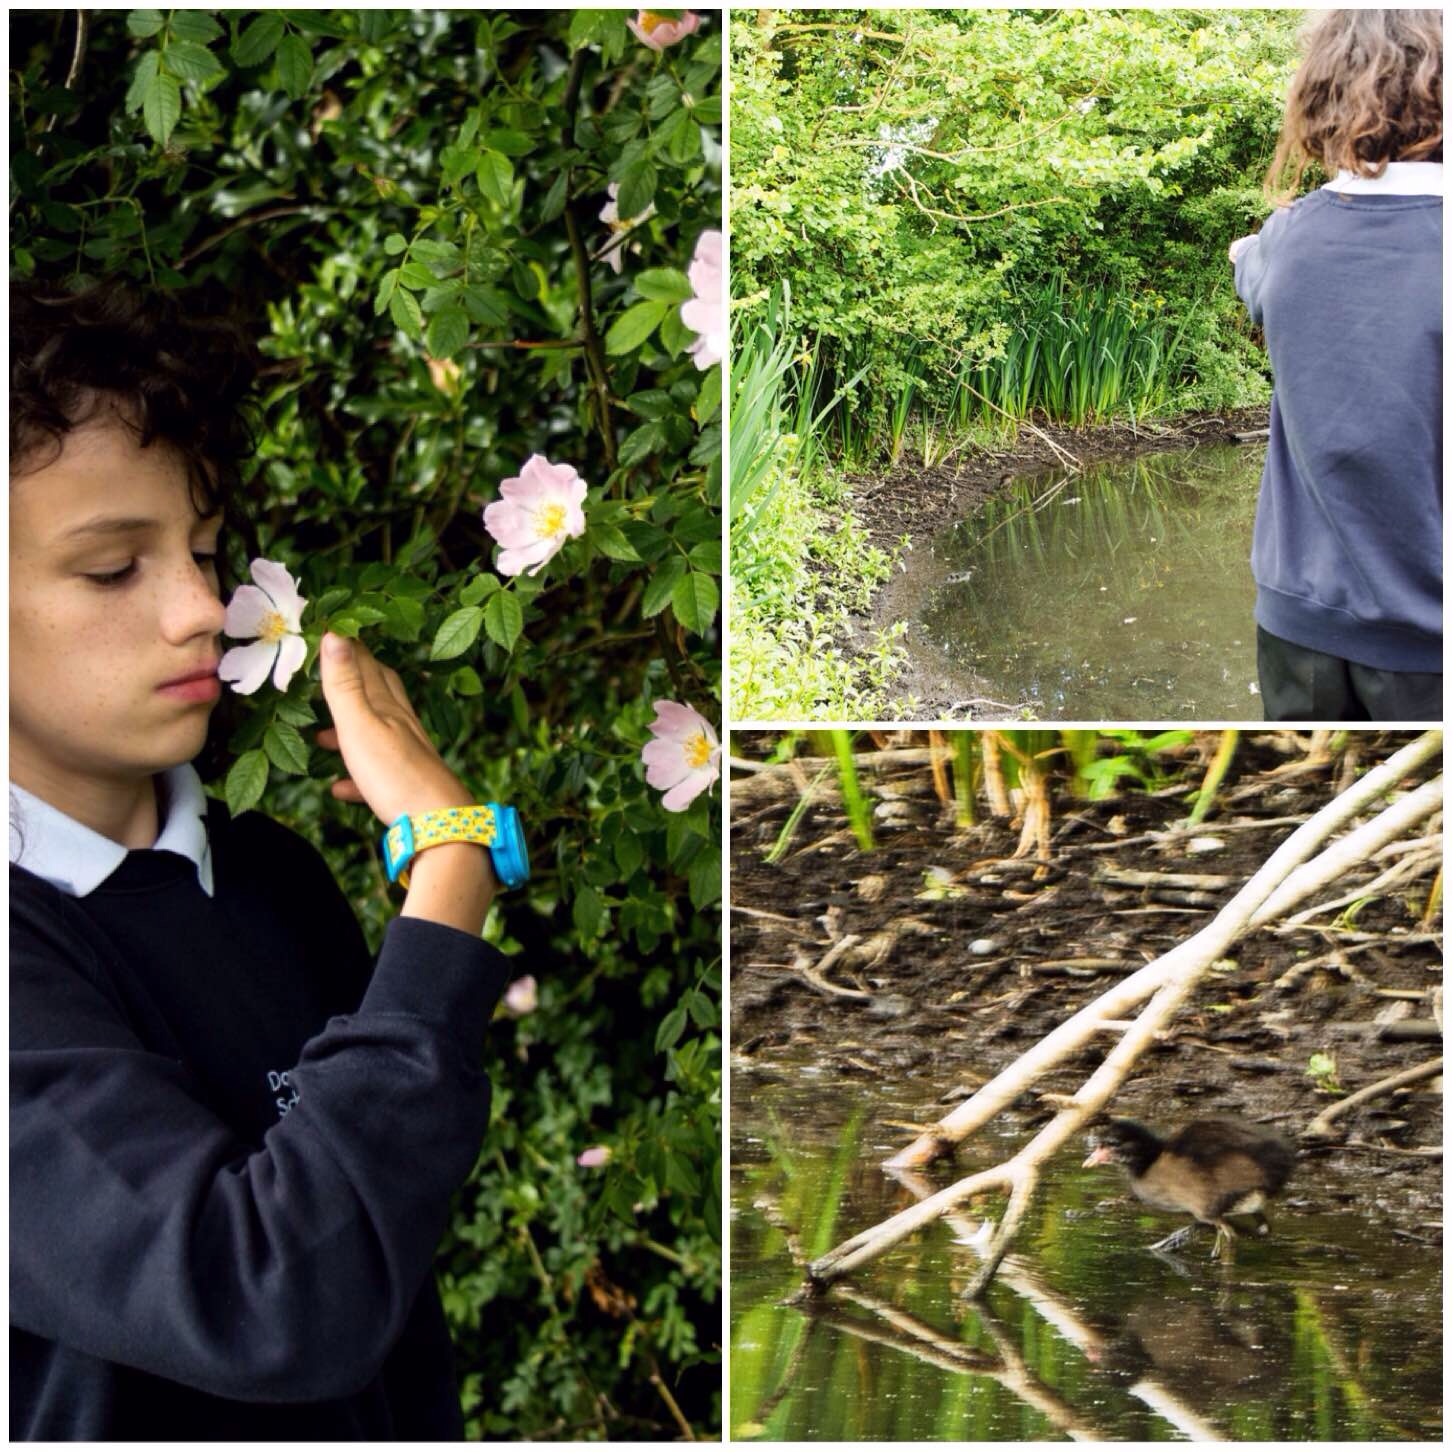
I remembered that there were many wild flowers growing there such as the dog rose flower you can see below. Needless to say Catherine was off climbing as soon as we got there.
Silchester Amphitheatre
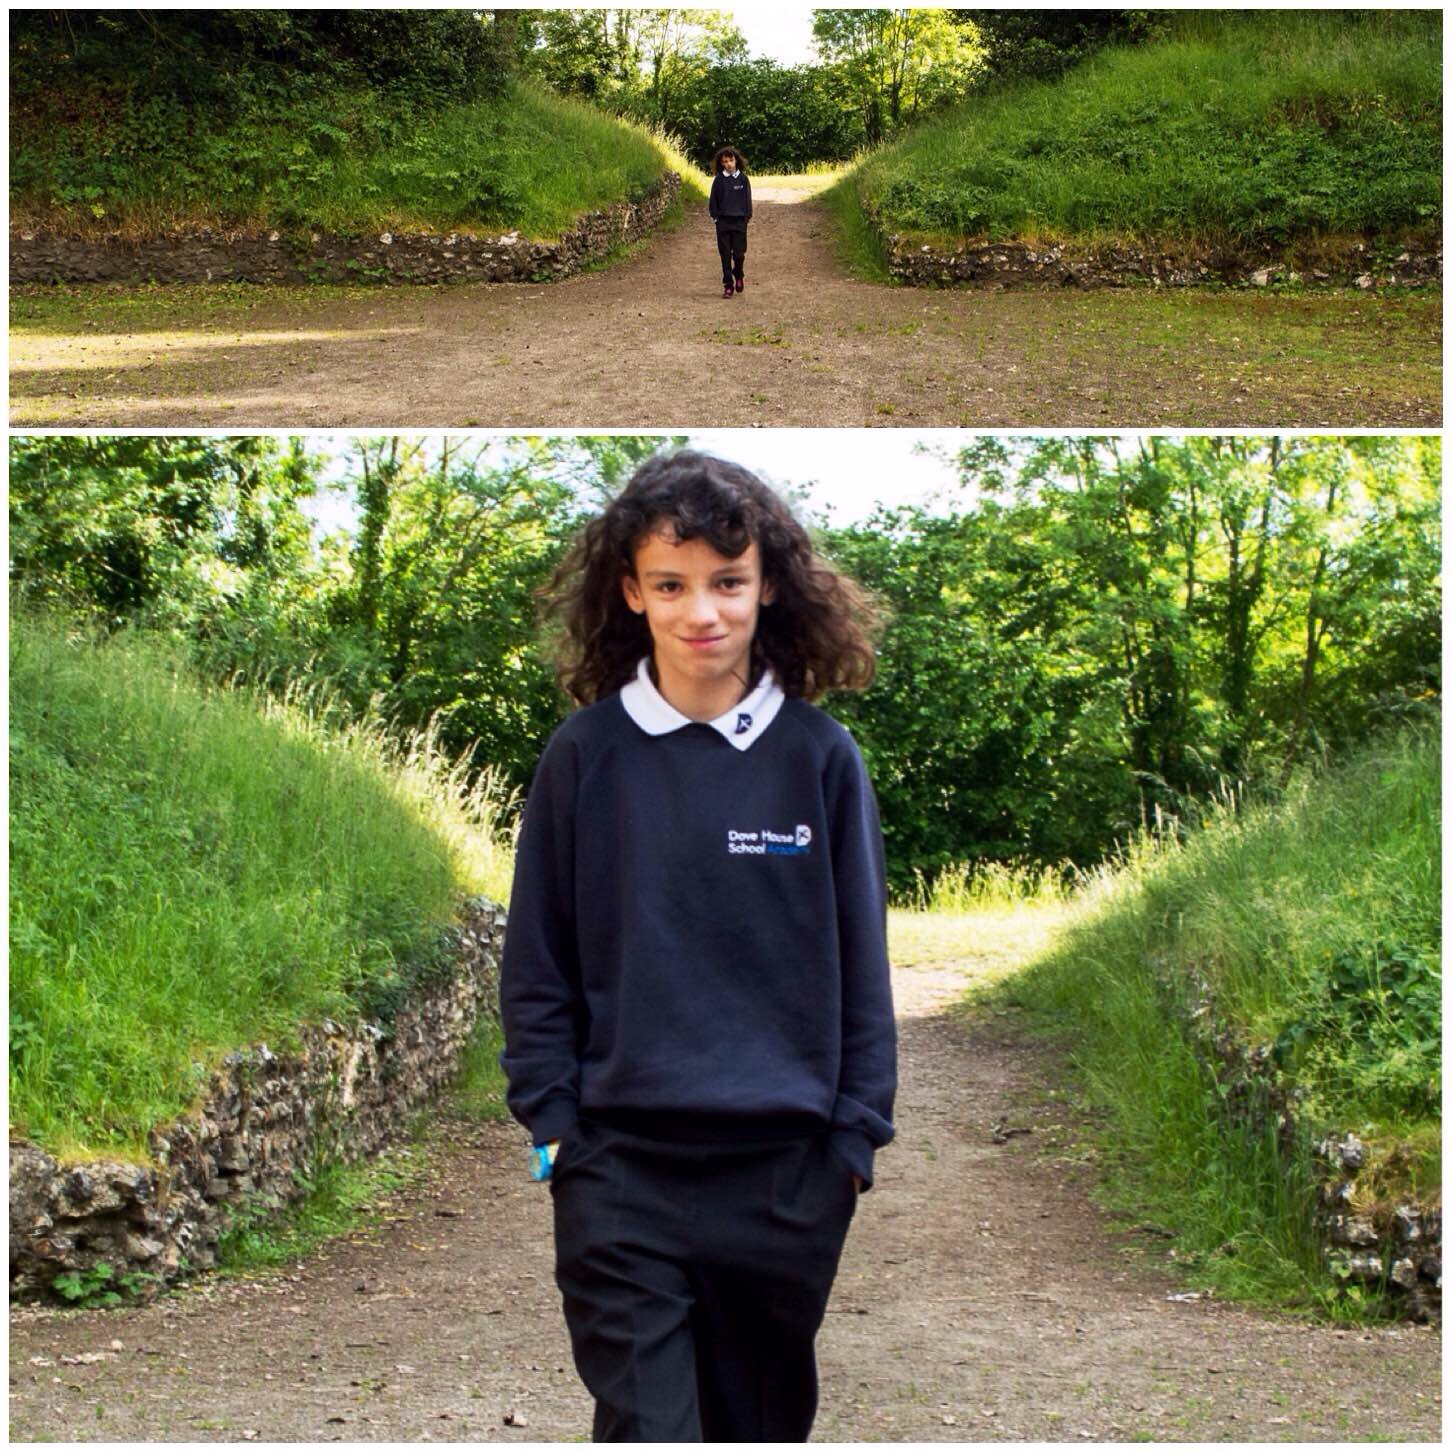
I took these two shots of Catherine as she entered the amphitheatre and as you can see all traces of grumpiness had gone – all it took was to actually get out there.
A Grand Entrance
Looking around the amphitheatre there were a lot of wild flowers and insects still out and about. Coming through lovely were the foxgloves and lots of buttercups.
I spotted a lone mullein growing and got Catherine to feel how soft it was in comparison to other plants. Needless to say the conversation got onto what type of plant leaf would be good for toilet paper and mullein came tops.
Light, Colour and Texture
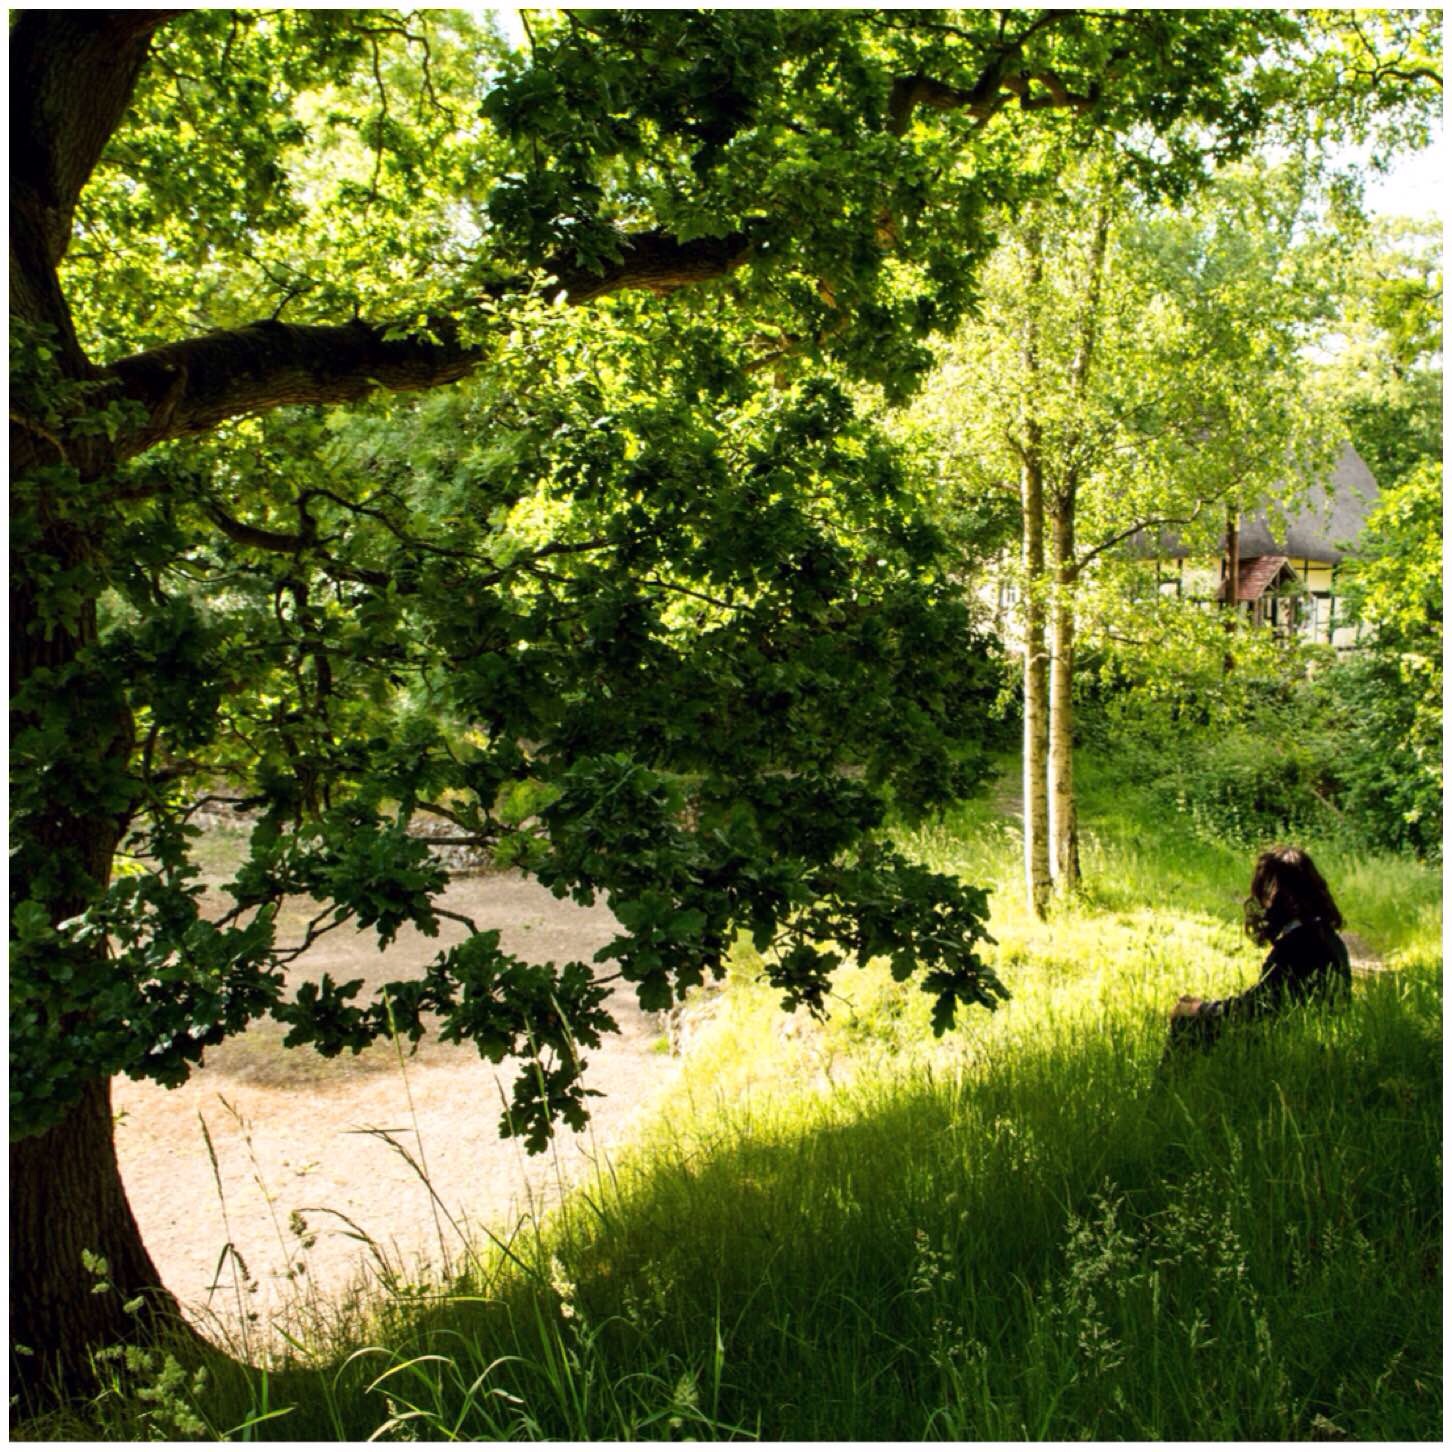
We climbed up onto the top of the amphitheatre to look at the view and spotted this lovely little thatched cottage at the back. A dream house as far as Catherine was concerned.
Postcard Picturesque
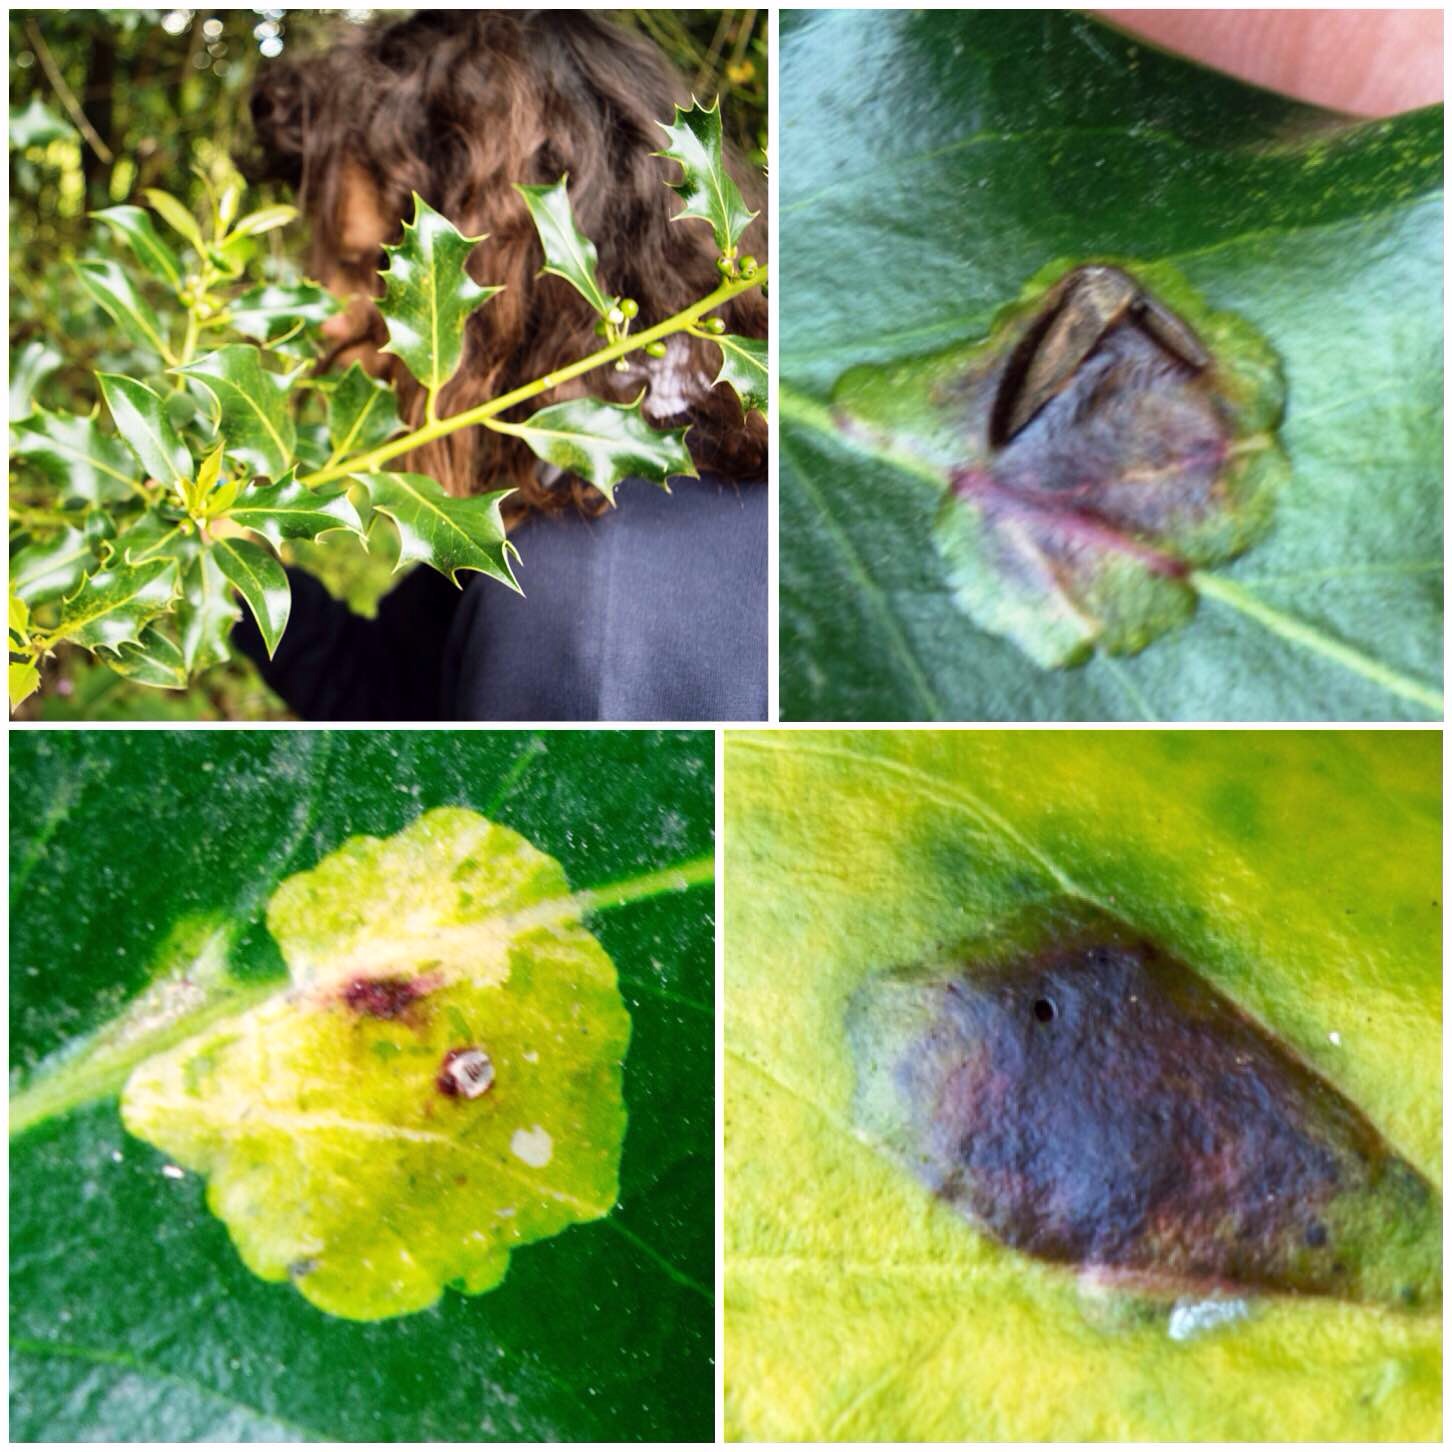
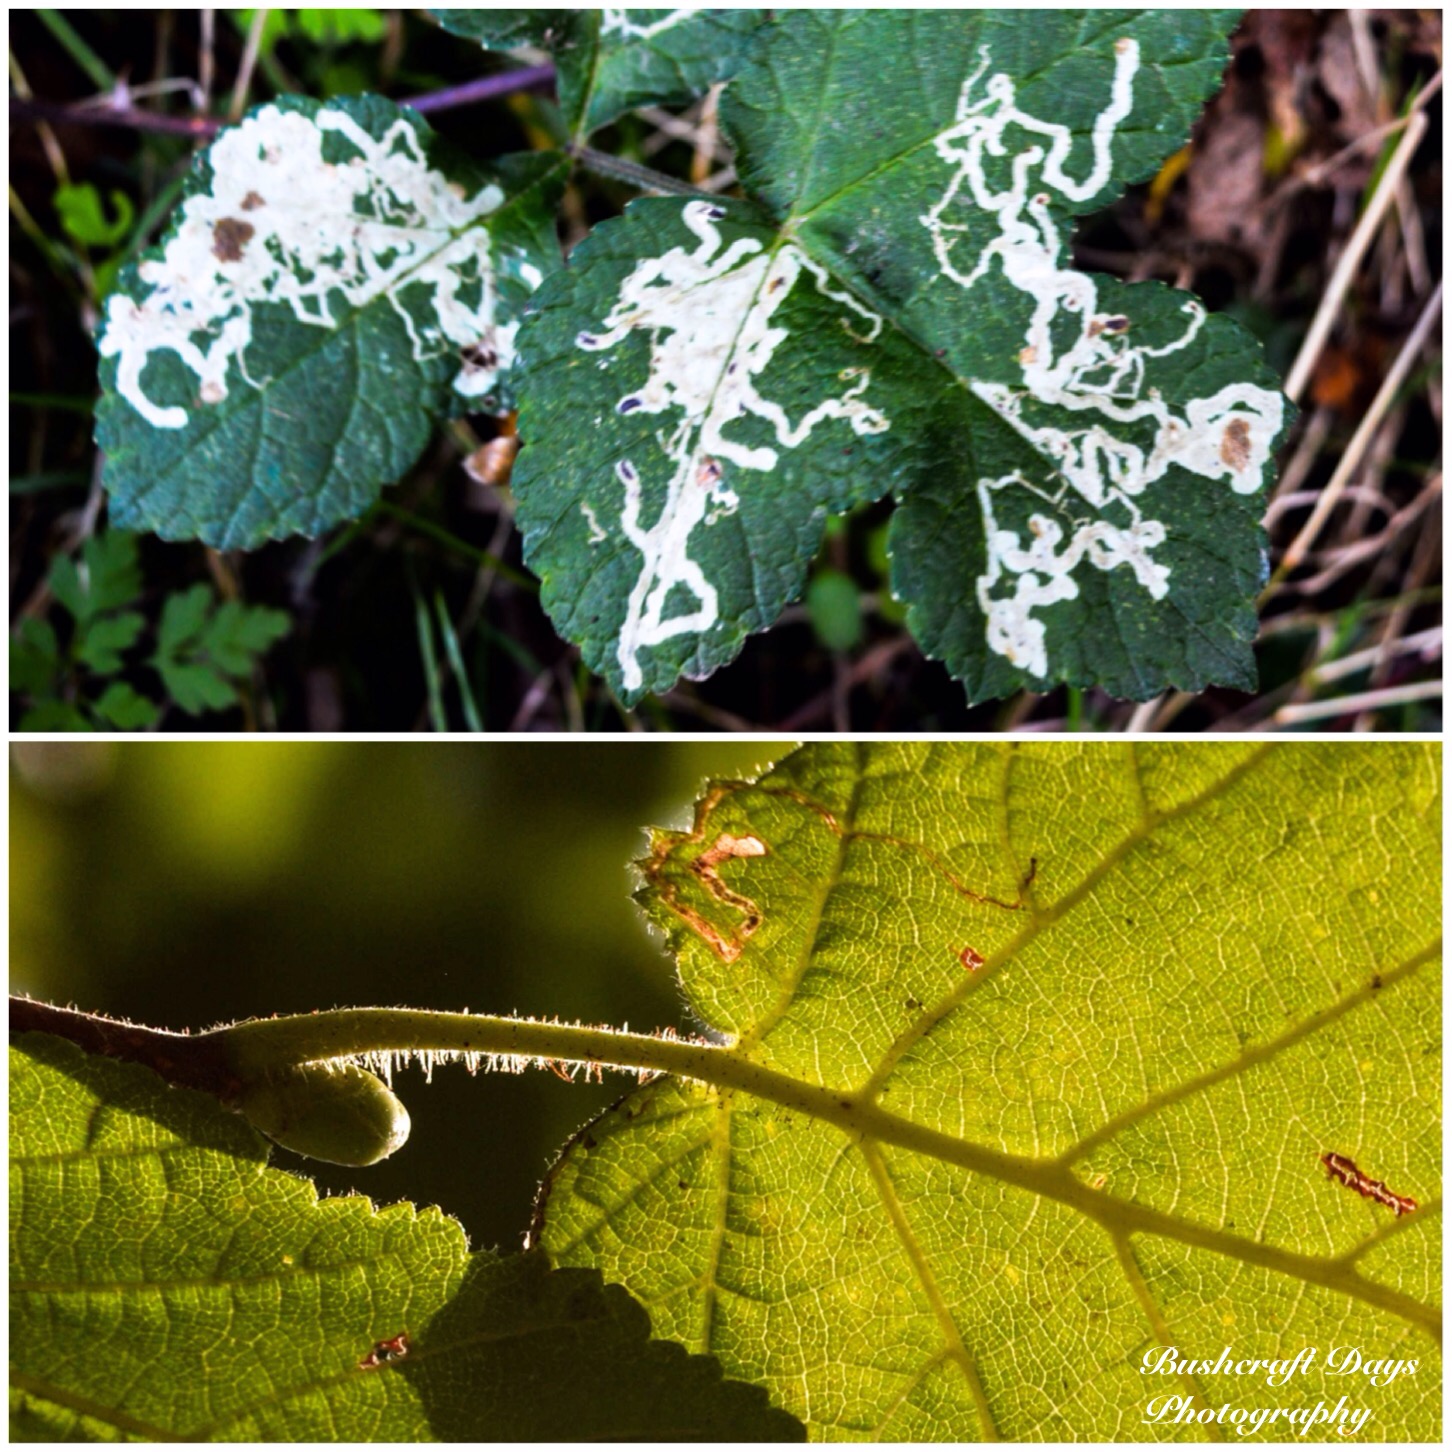
Carrying on around the rim of the amphitheatre we came across a holly tree covered in the larvae burrows of the holly leaf miner (Phytomyza illis). This larvae makes its home in a holly leaf and will burrow about as it eats leaving a space it can develop into an adult fly.
Other animals and insects will predate the miner including the blue tit (triangular scar in the top right picture below) or a parasitic wasp (bottom right). The picture at the bottom left I think shows a slightly larger round hole signifying a successful emergence.
The Holly Leaf Miner (Phytomyza ilicis)
As we left we spotted some more dog roses and some little ducklings in the local pond.
Dog Roses and Ducks
This spot is great to visit due to its historical nature, its quietness much of the time and its wide variety of flora and fauna. Hits all the nature tick points as far as I am concerned.
Day 12 of the 30 Day Challenge was one of rush, rush and rush from morning till night.
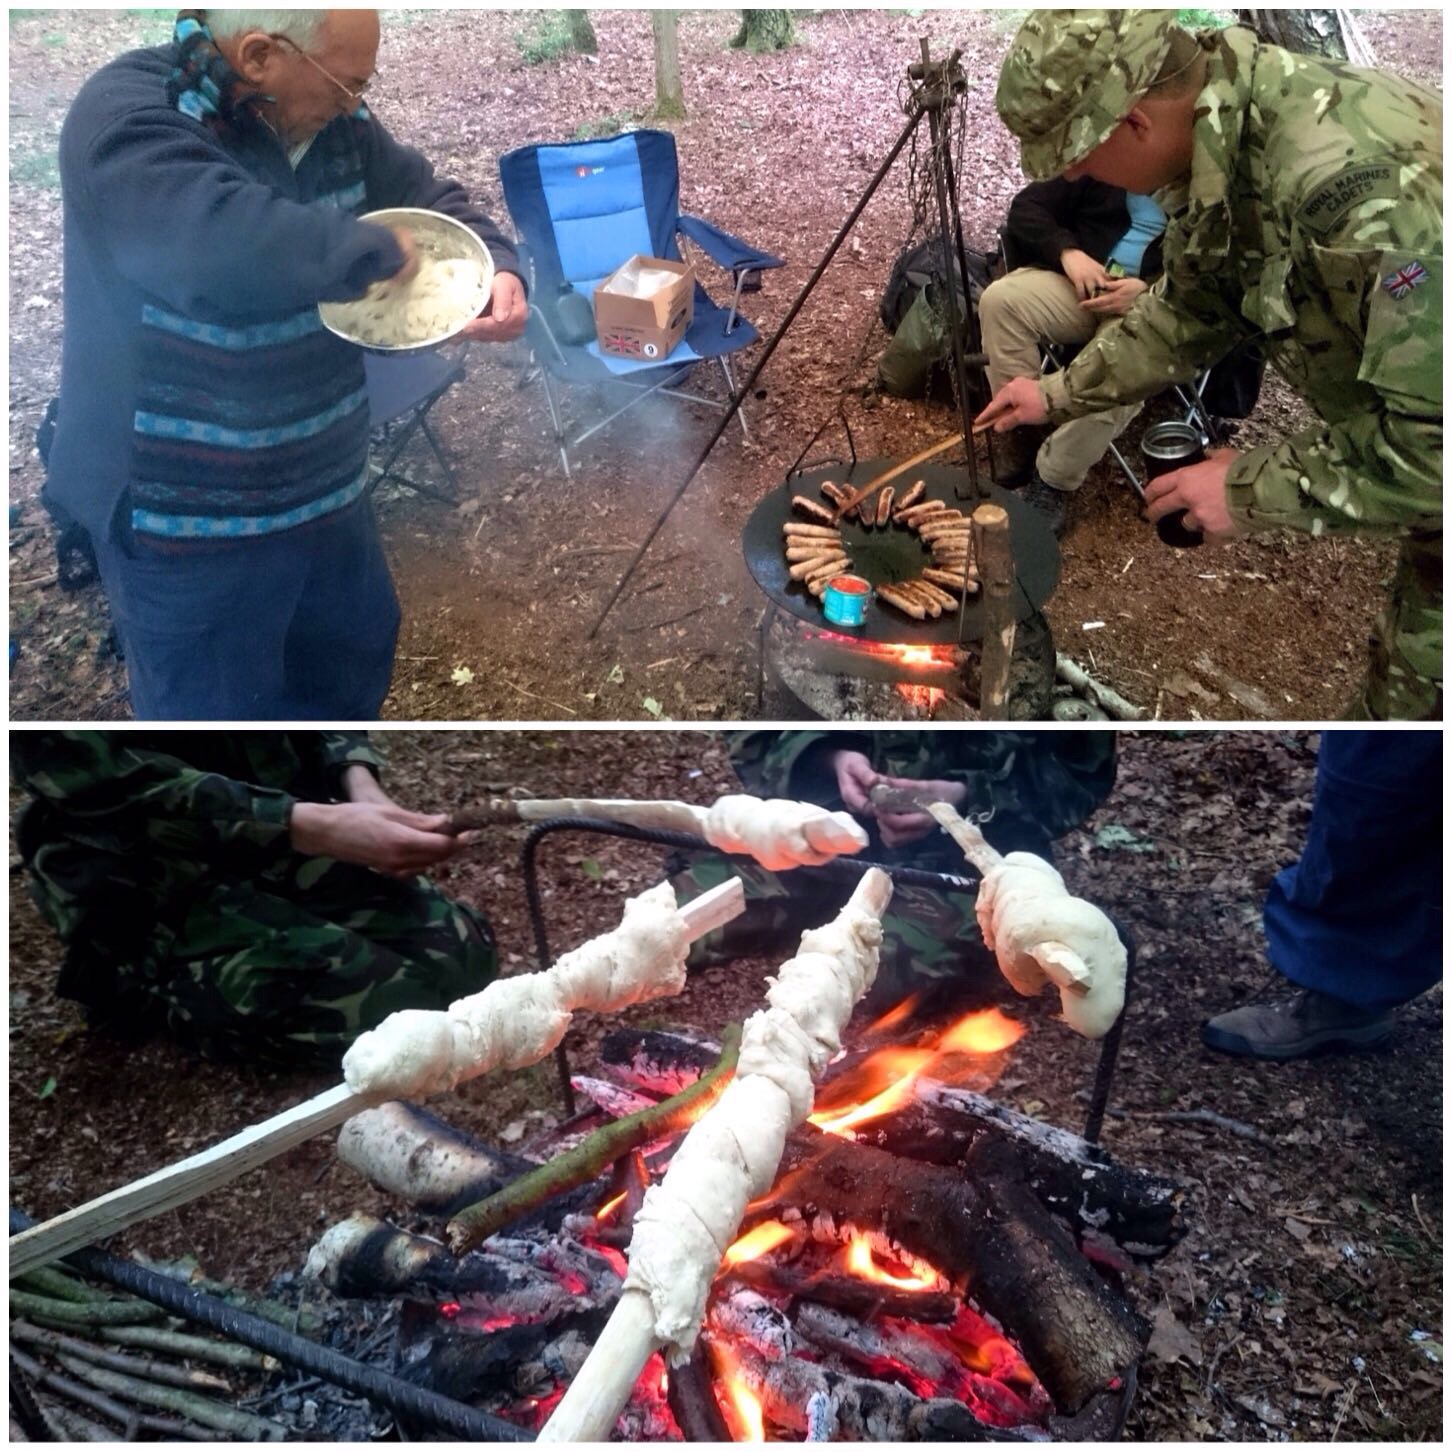
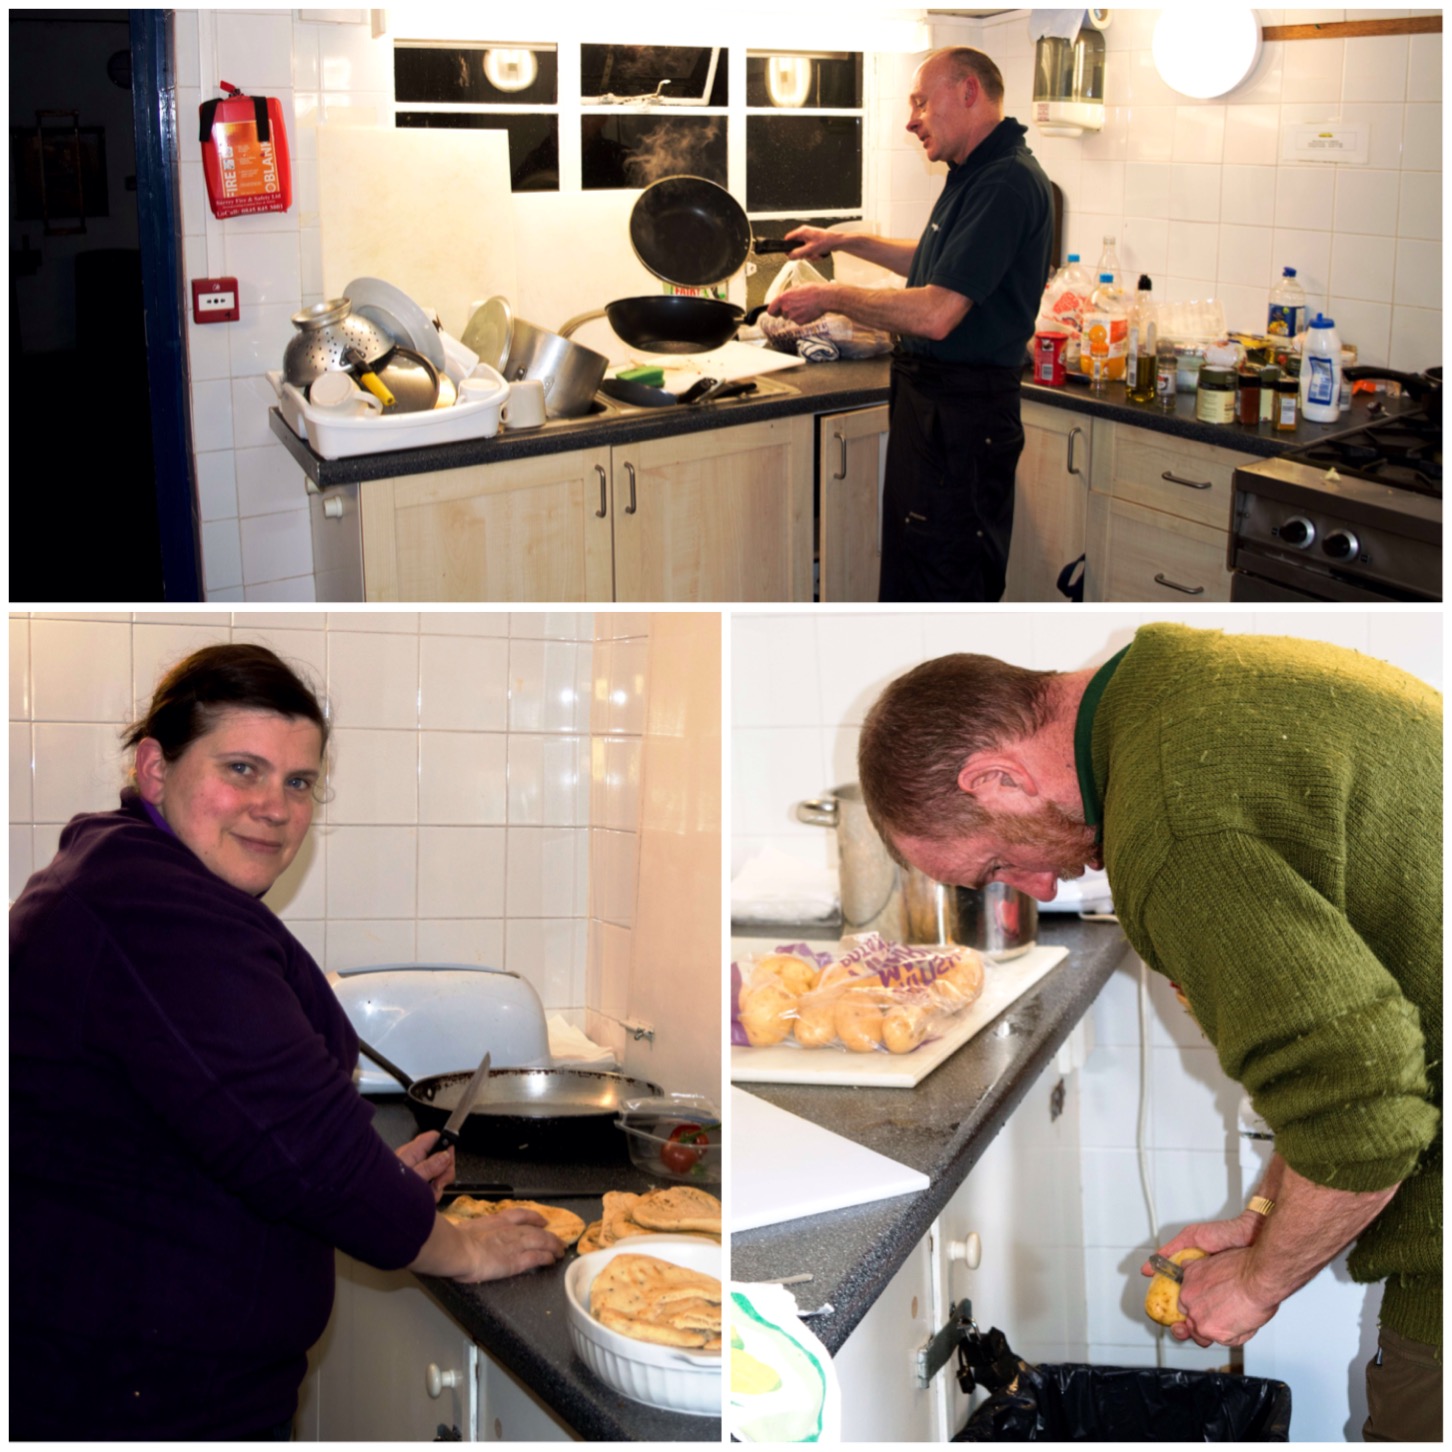
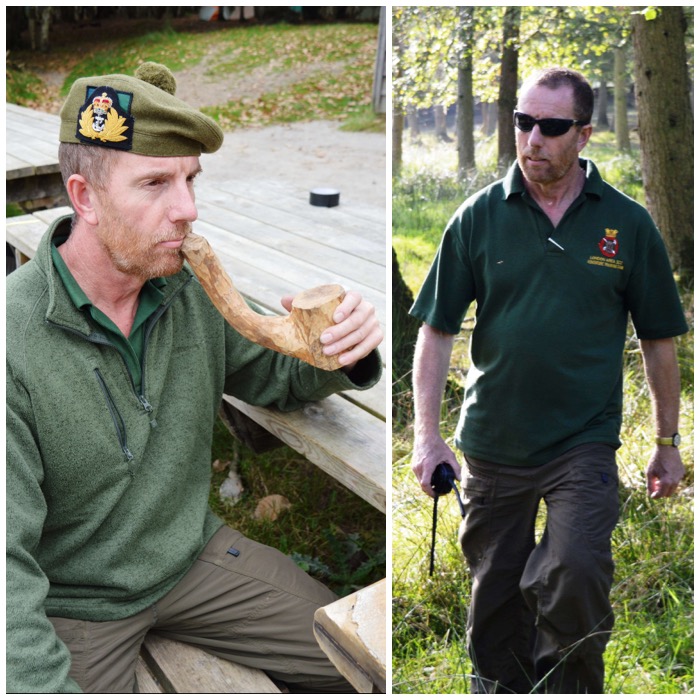
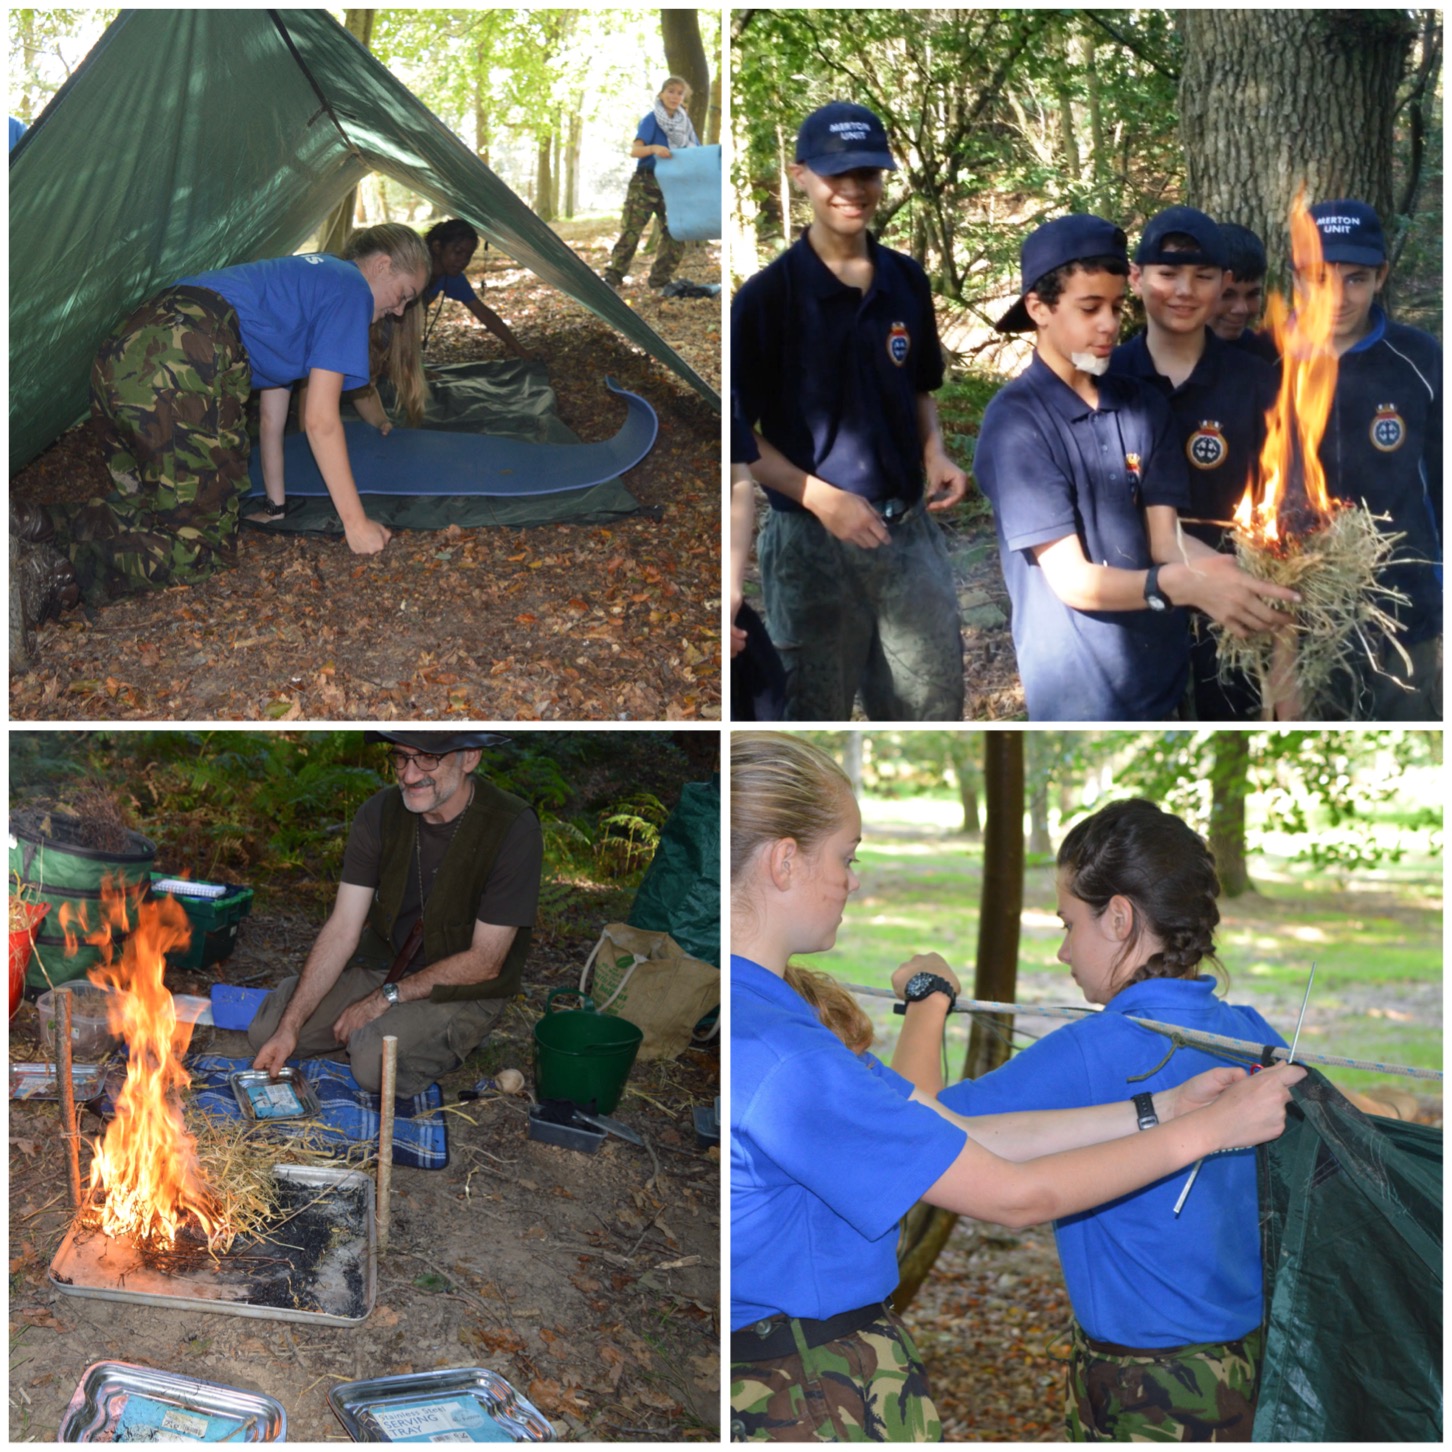
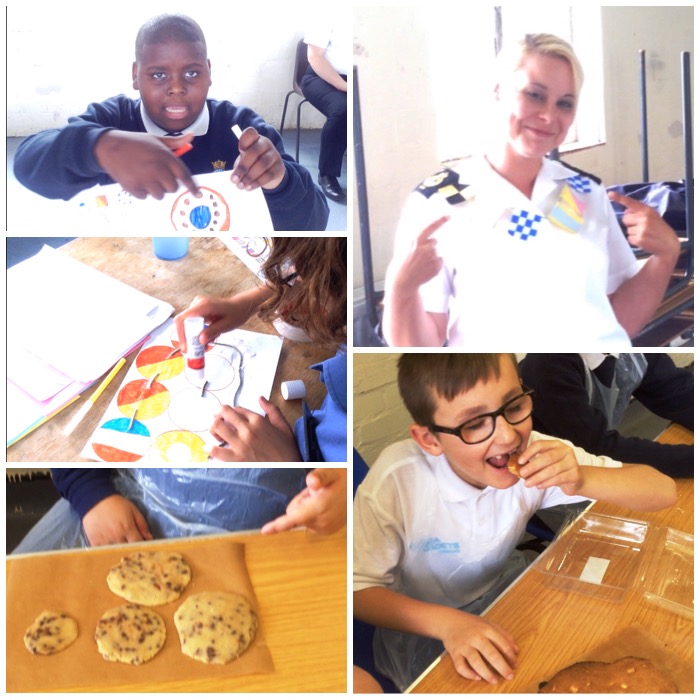
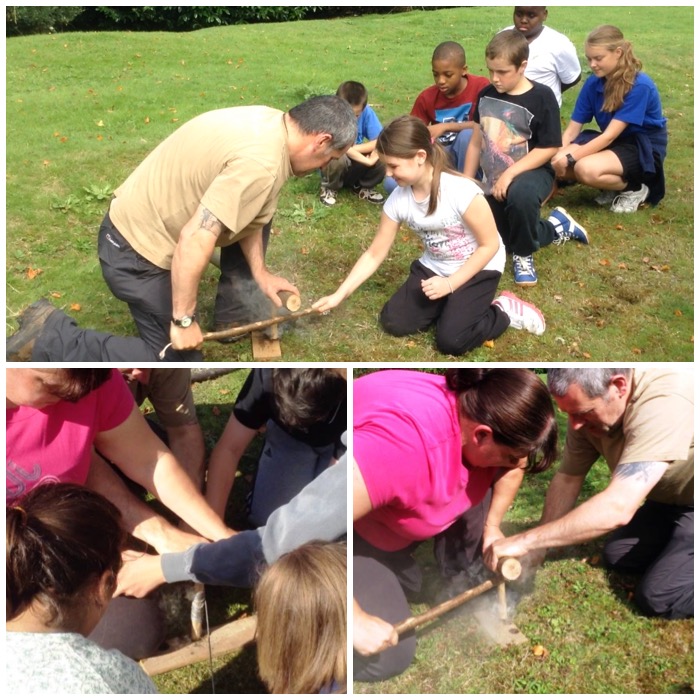
The Royal Marines Cadets we were training had the task of lighting the fires to cook the breakfast but thankfully we had our very own chef Alan Lewis to oversee all the cooking.
I tried to spend as much time as possible baking twizzle stick bread to get out of doing the many chores that were needed doing on this last morning of the camp (not very successfully may I add).
Busy Breakfast
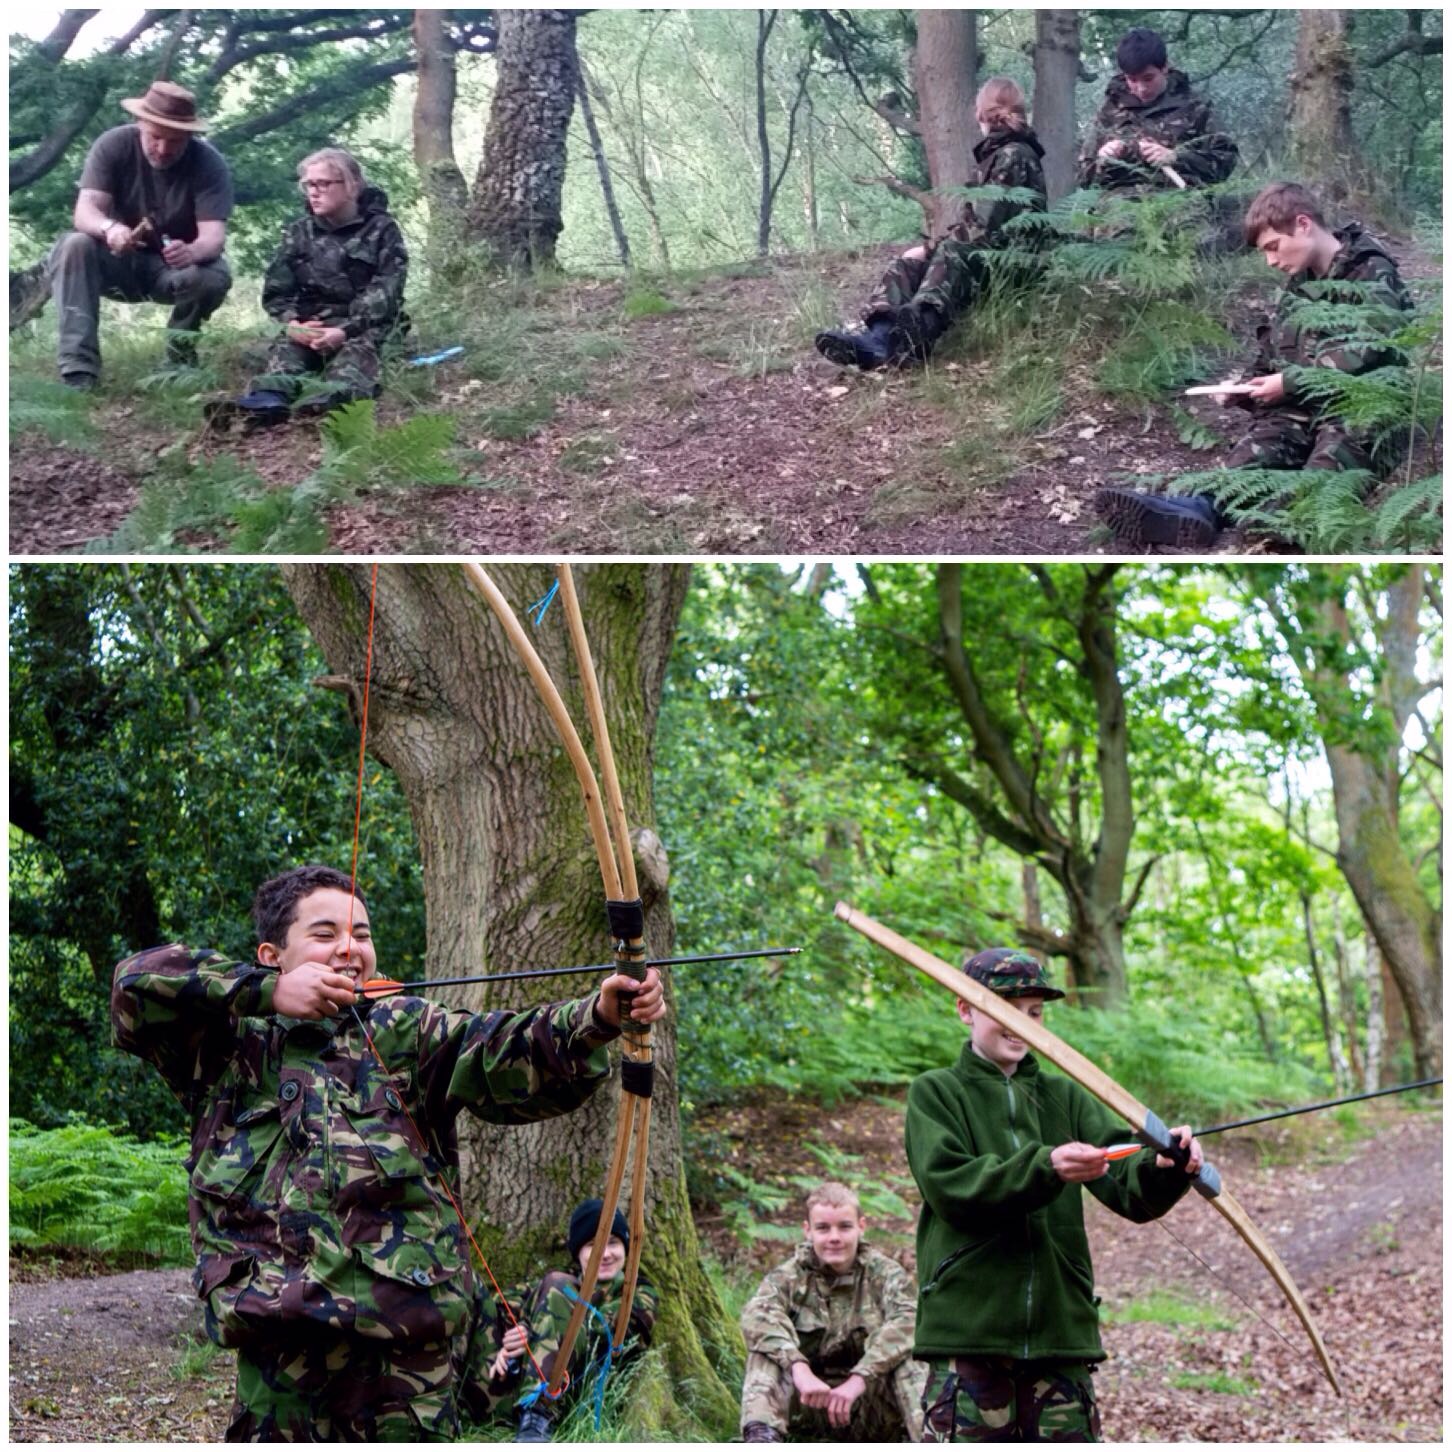
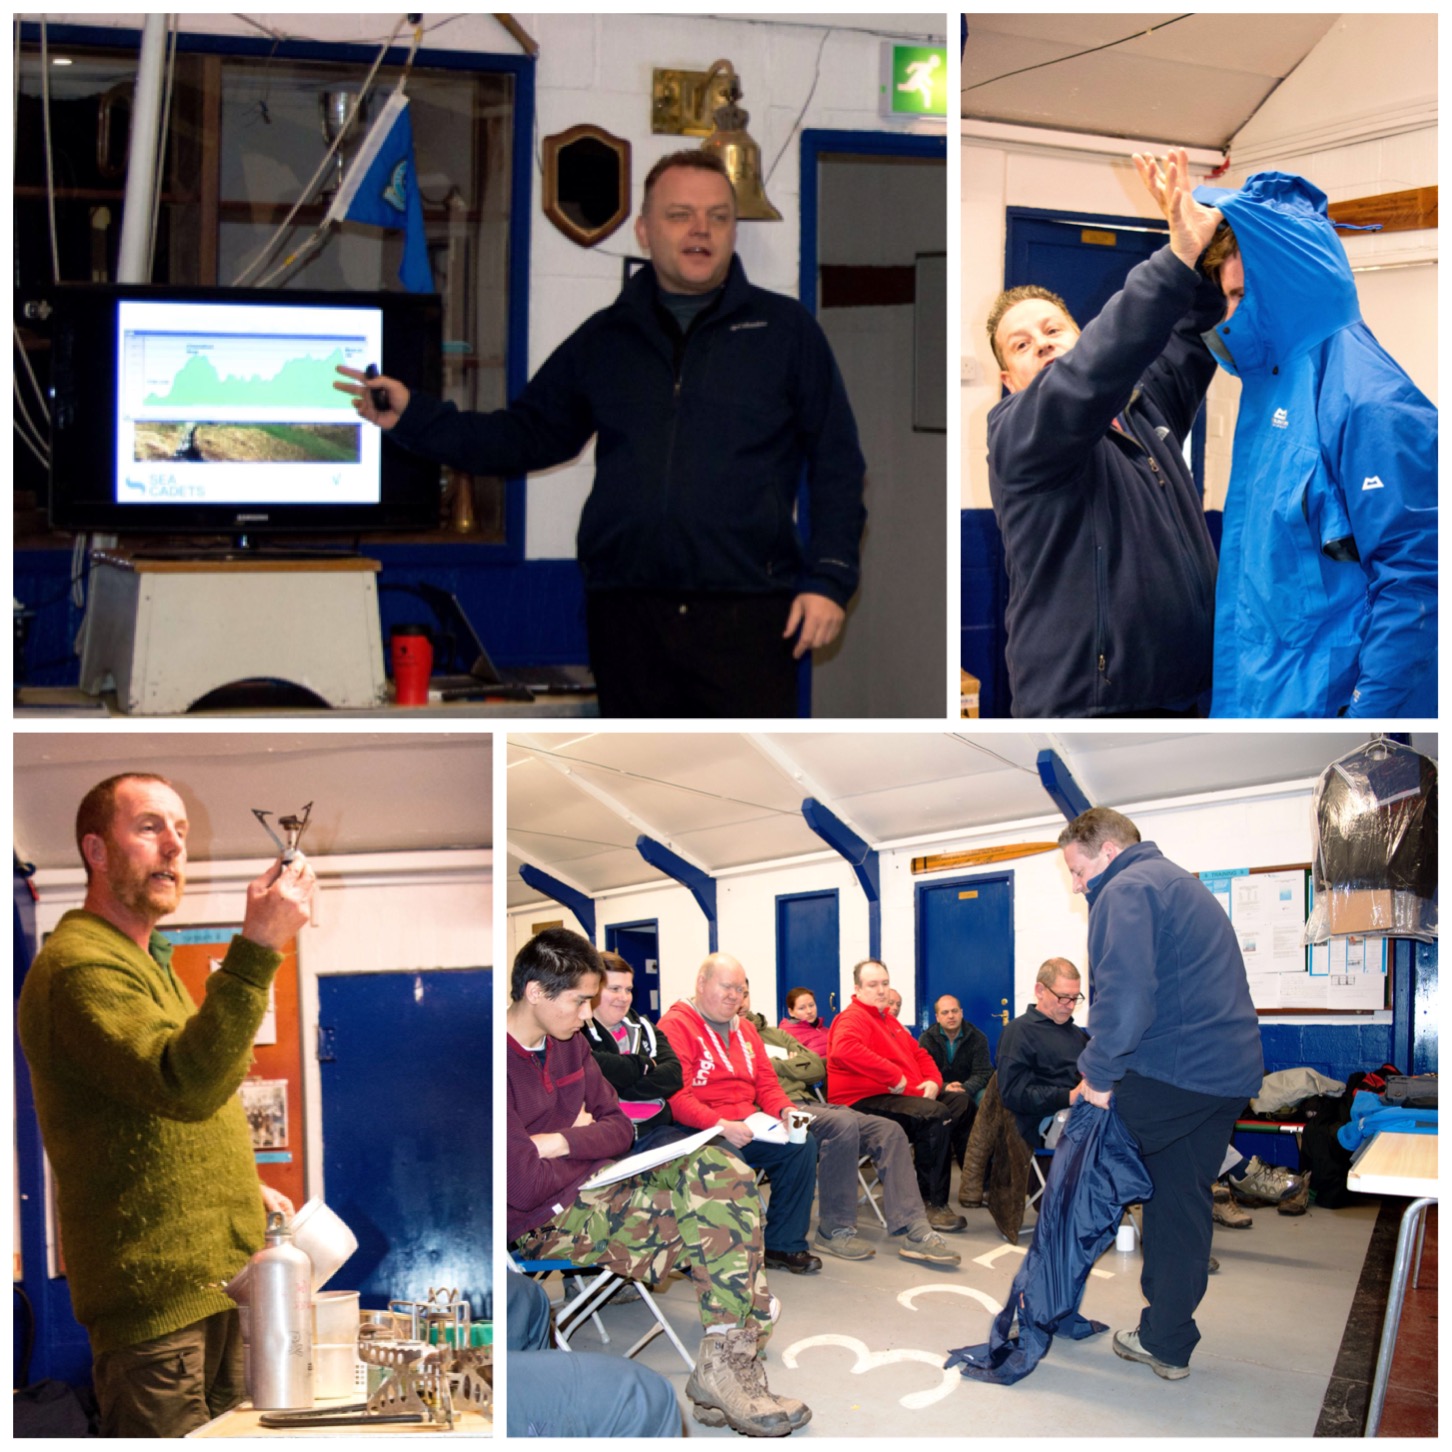
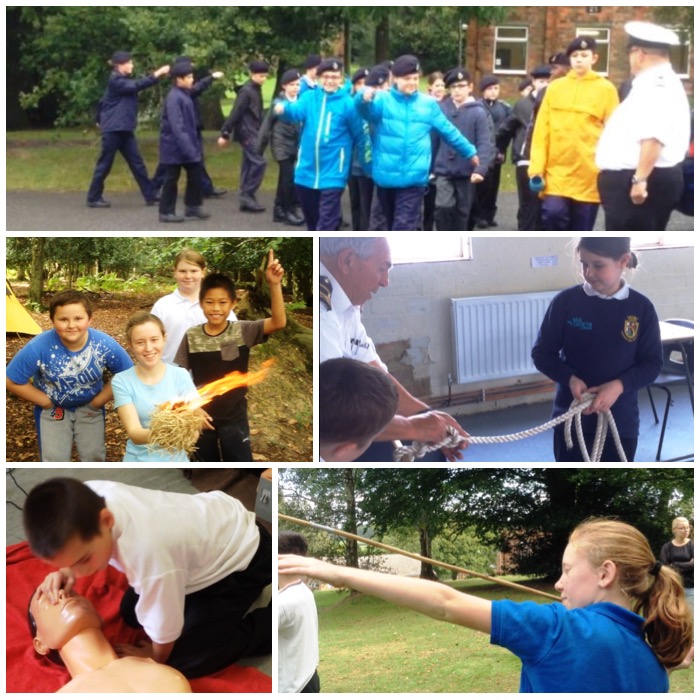
We ran various classes that day including bread making, archery, stalking games and group bowdrill. London Area Sea Cadets have a brilliant Bushcraft team and this weekend showed that clearly – thanks to Dave Lewis, Charlie Brookes, Cliff Lewis and Alan Lewis for being that team.
Sunday Stances
Wrap up was a fast affair with everyone helping out. So fast I was home at 2pm – just in time to start on all my home chores 🙂
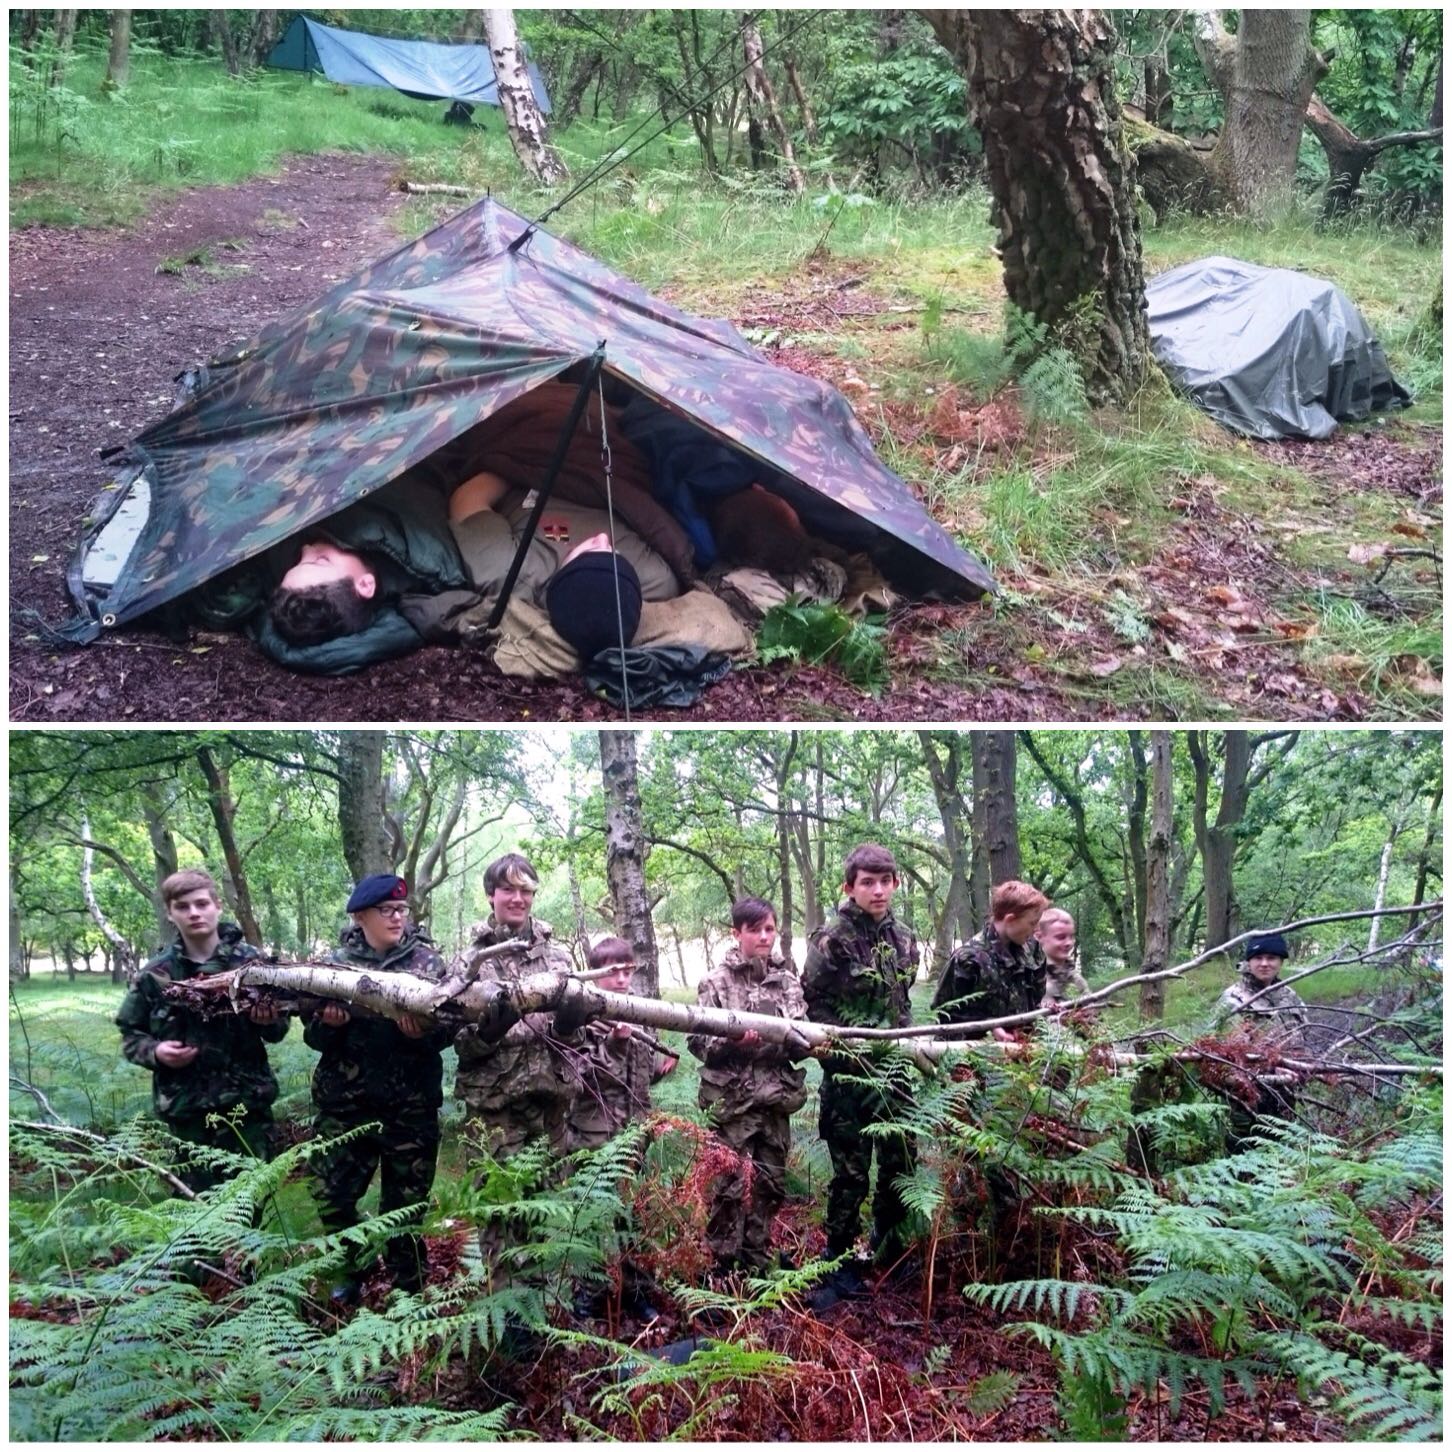
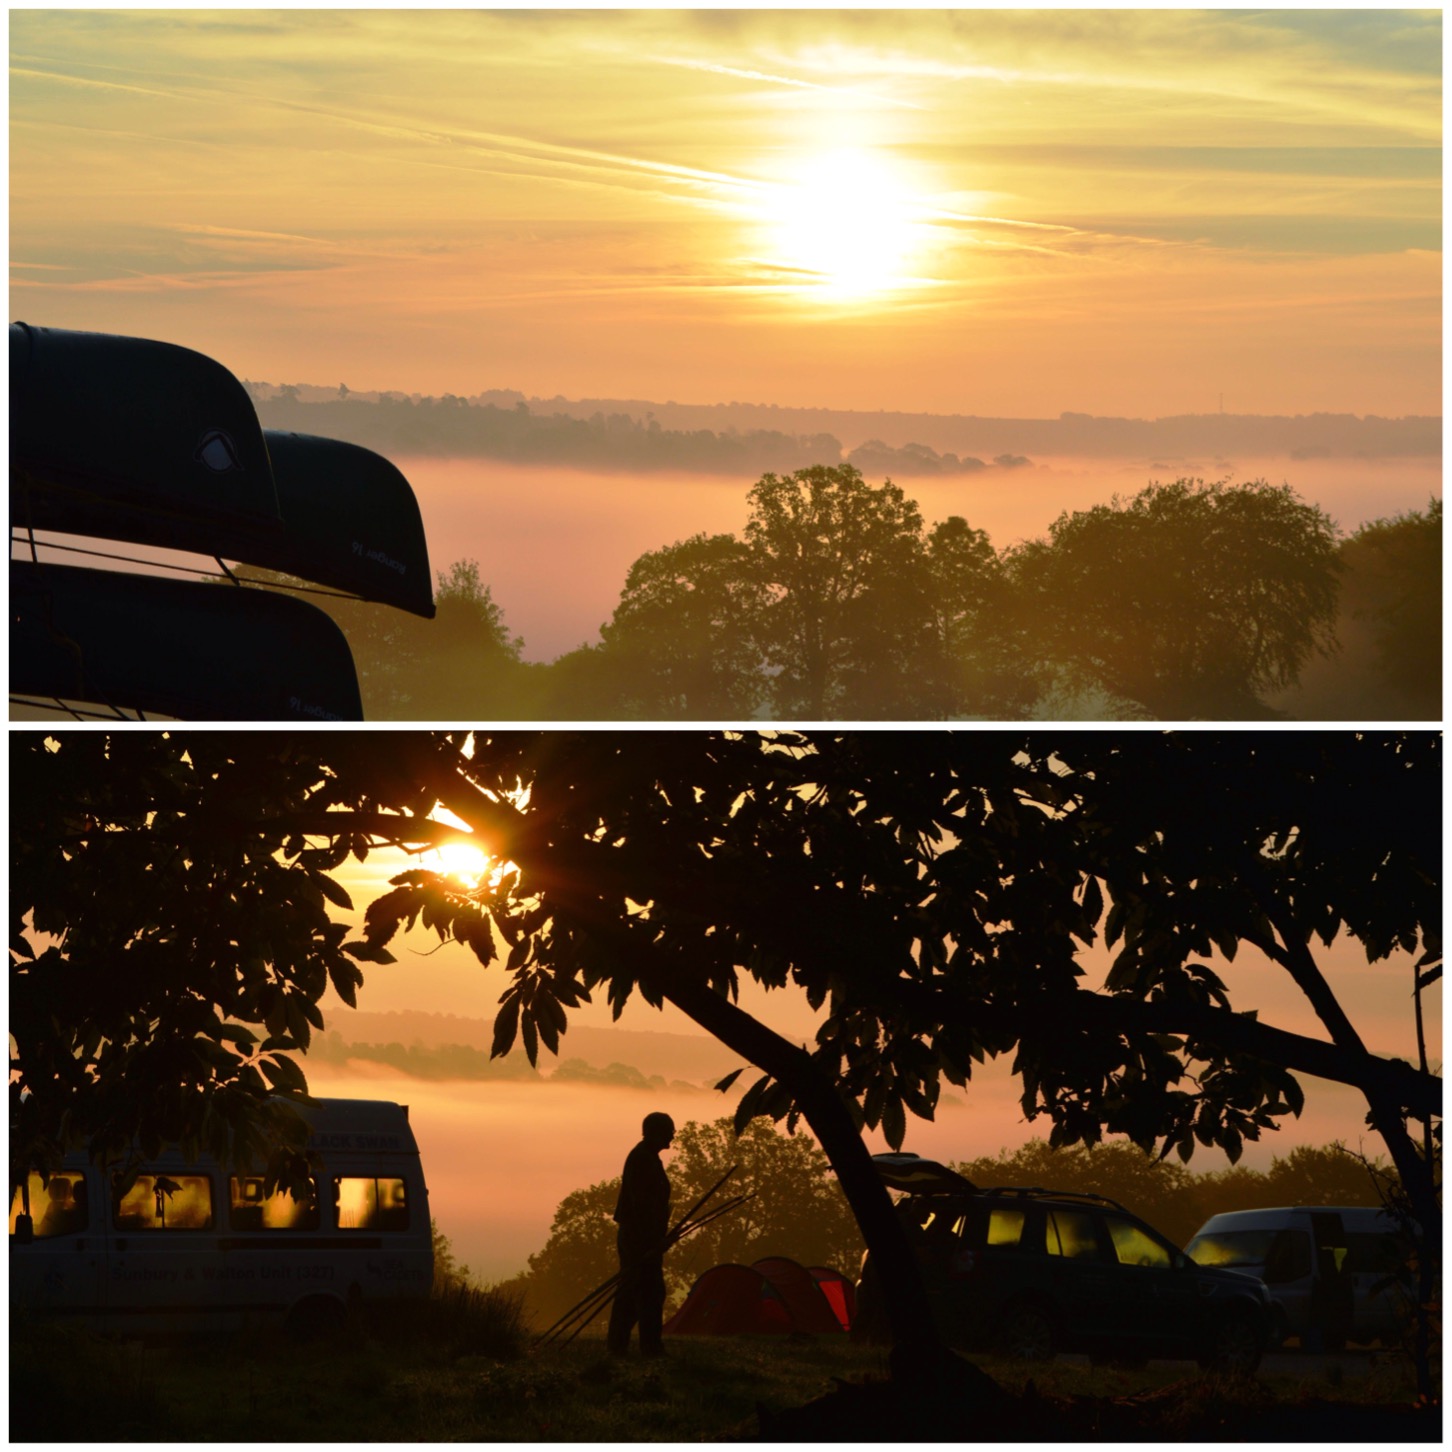
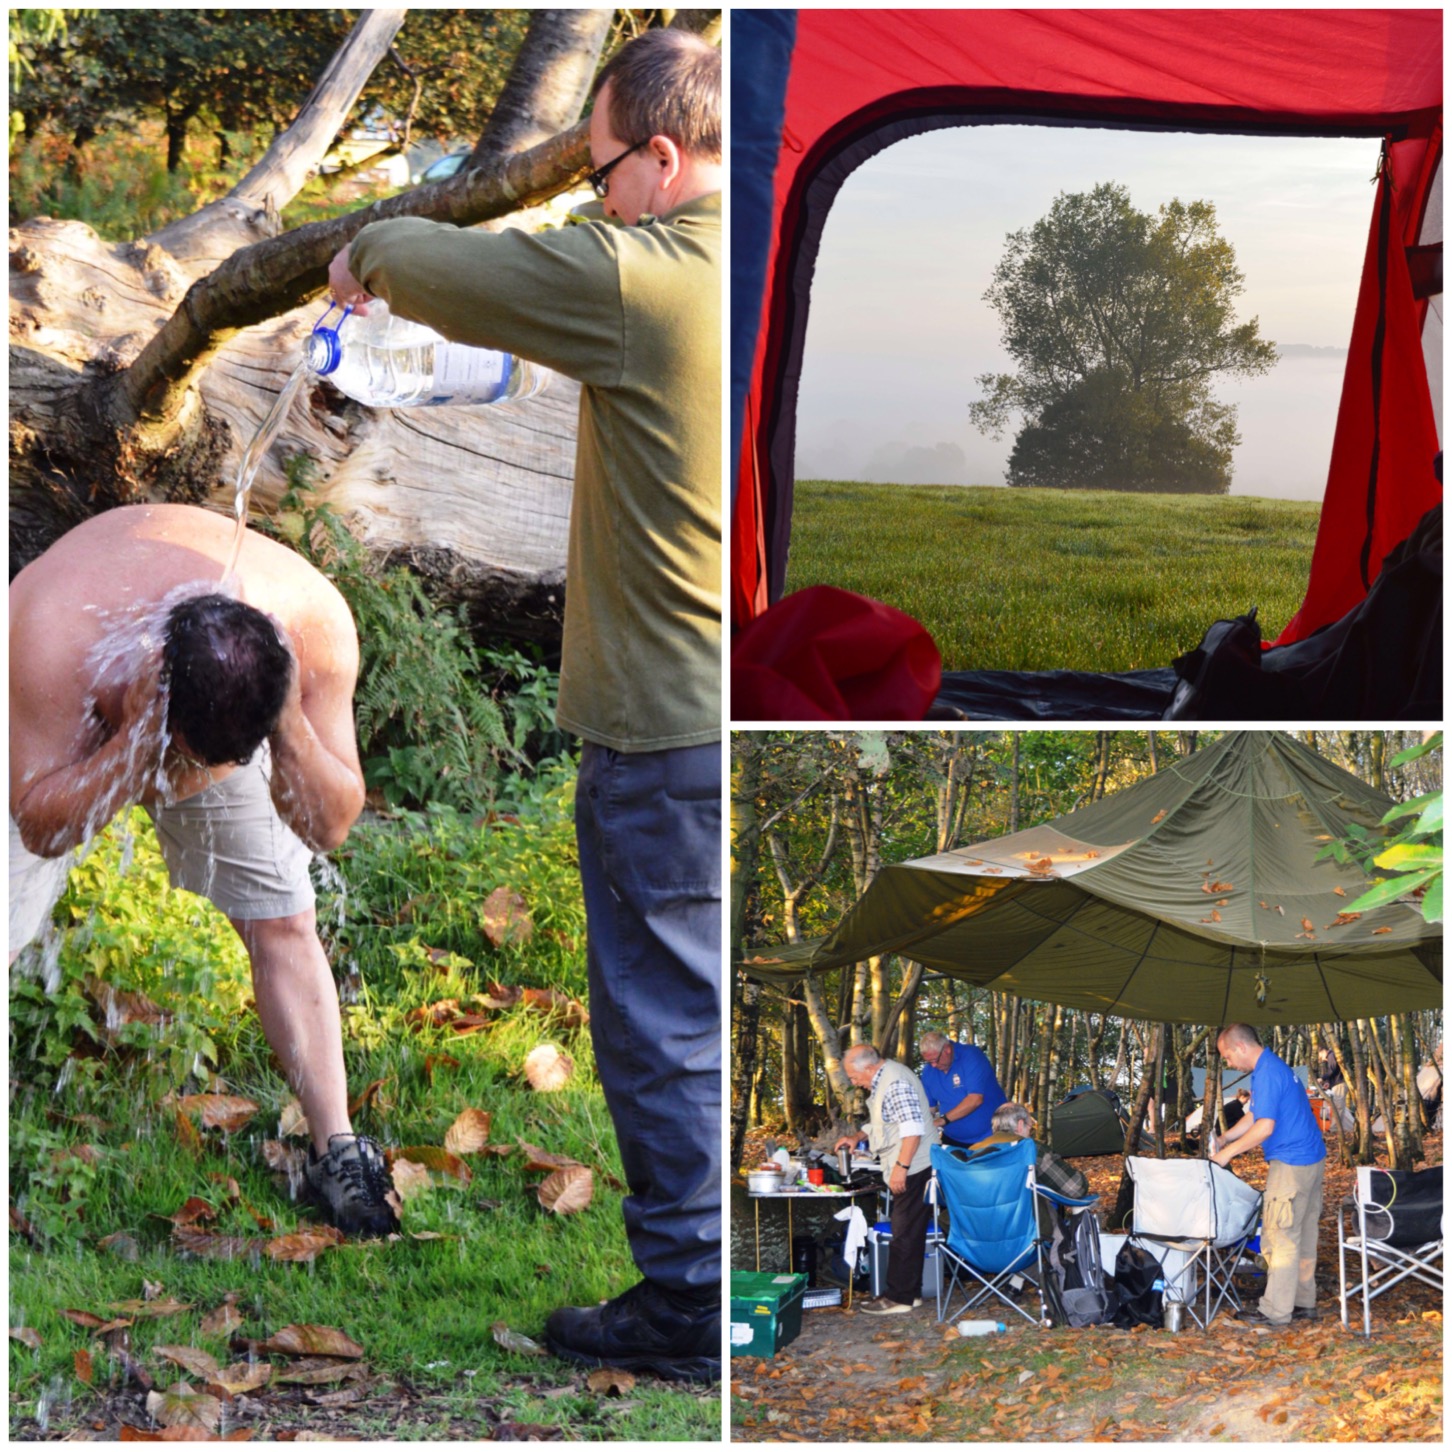
The early hours of Day 11 of the 30 Days Challenge brought us very heavy rain overnight and just in time for the tapes in my trusty old tarp to spring a leak.
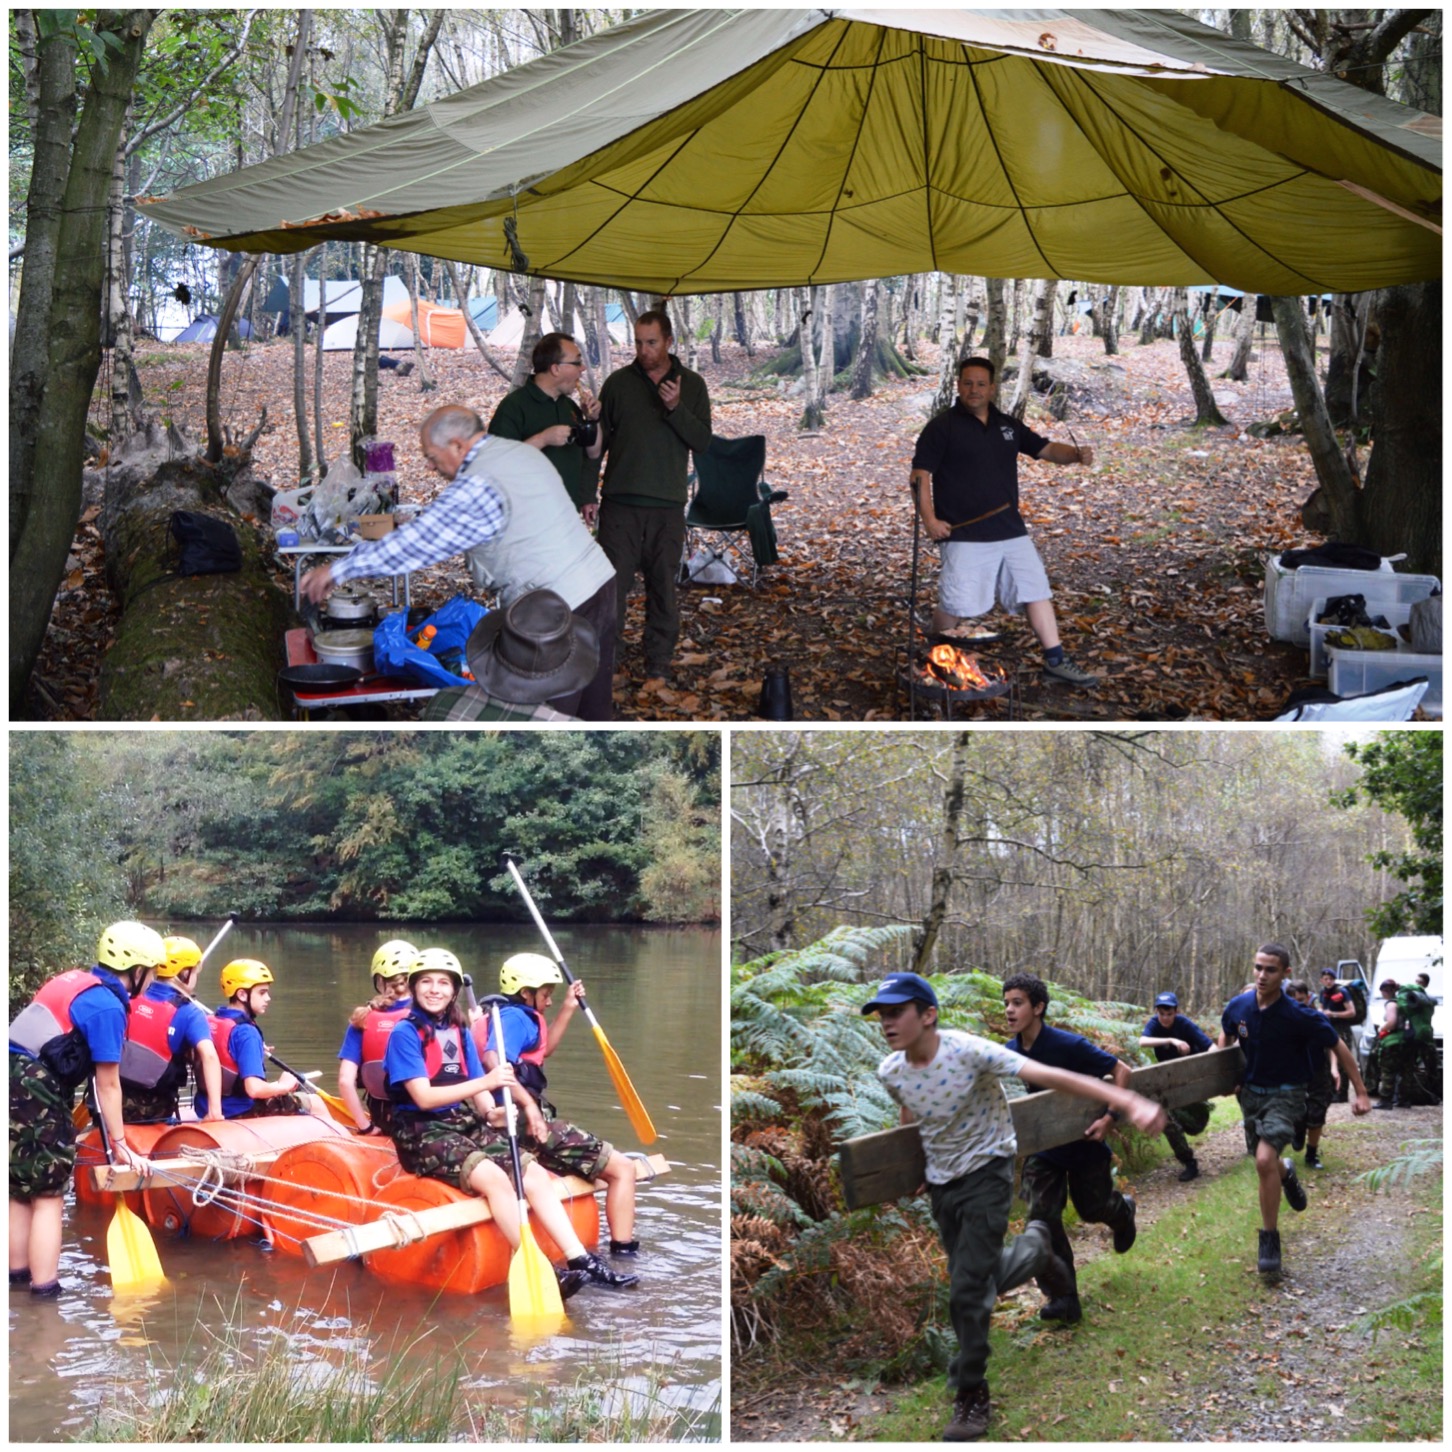
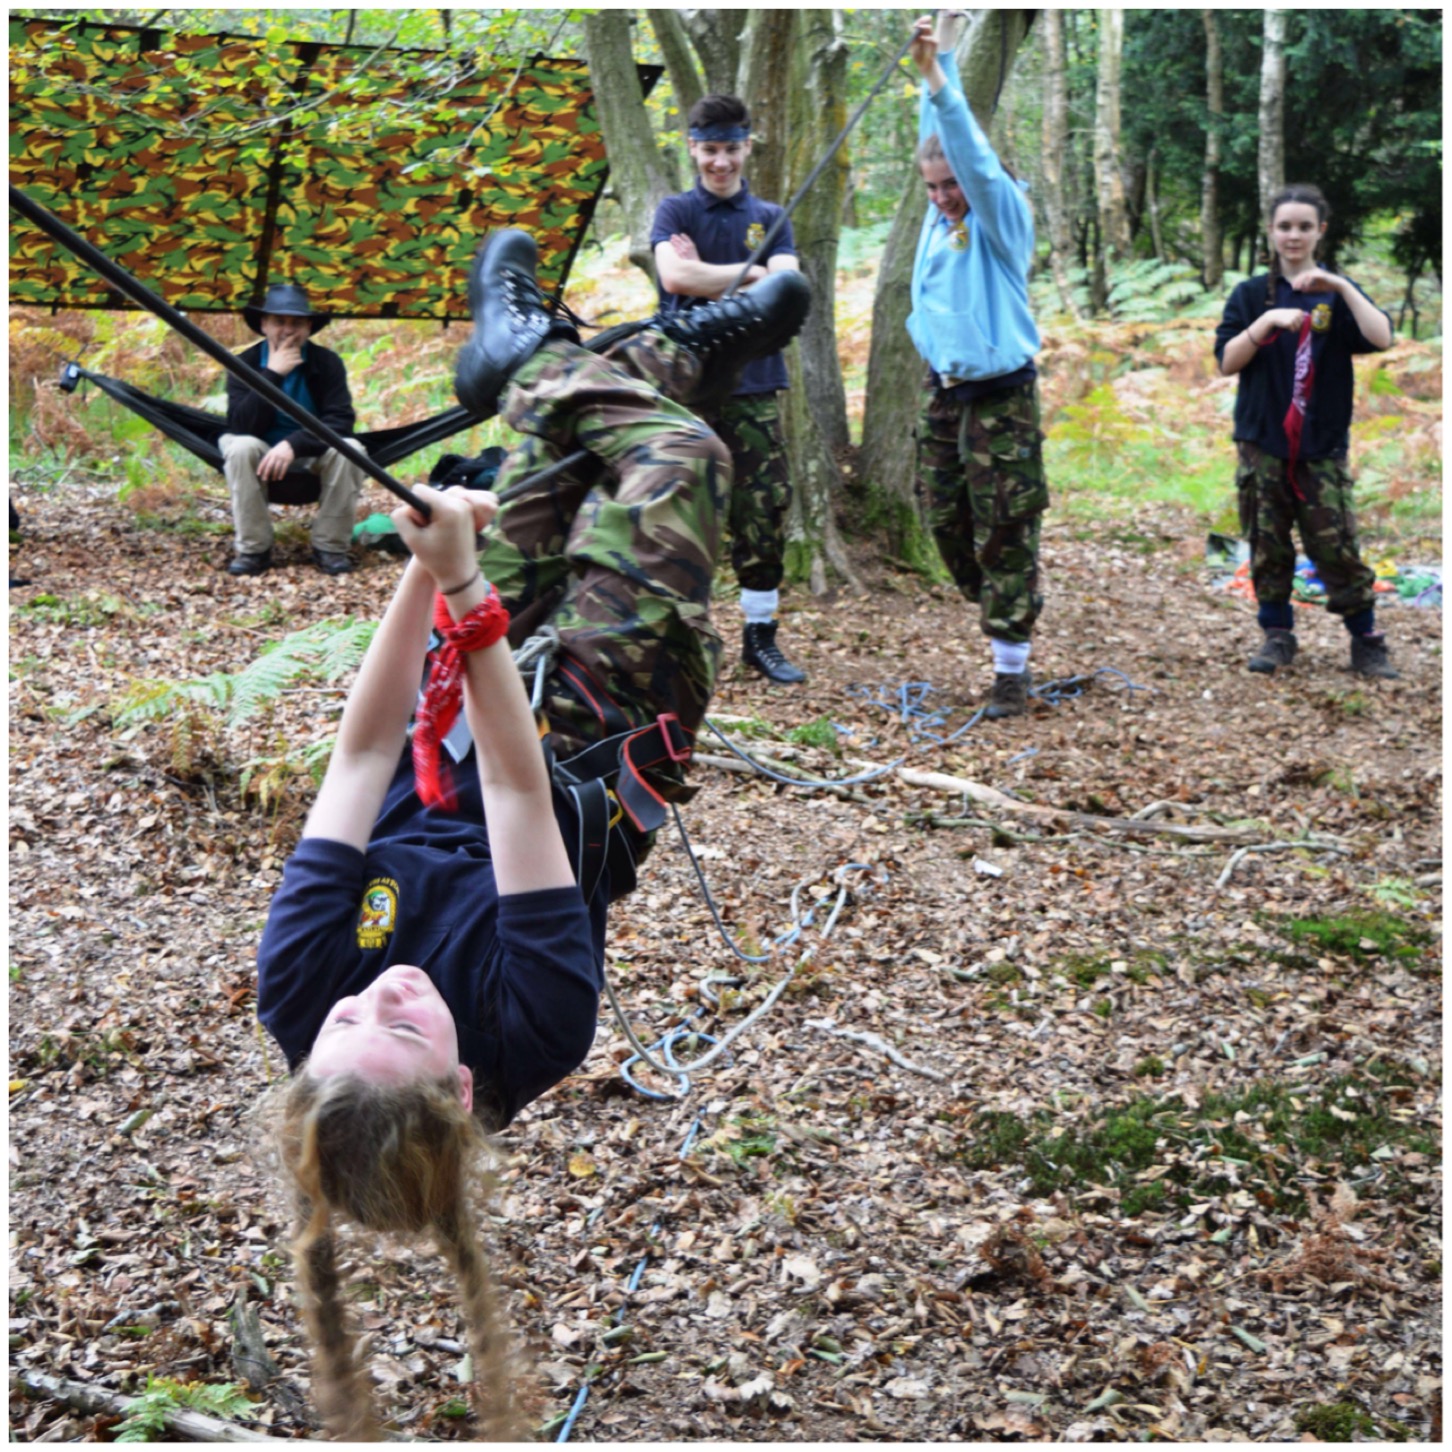
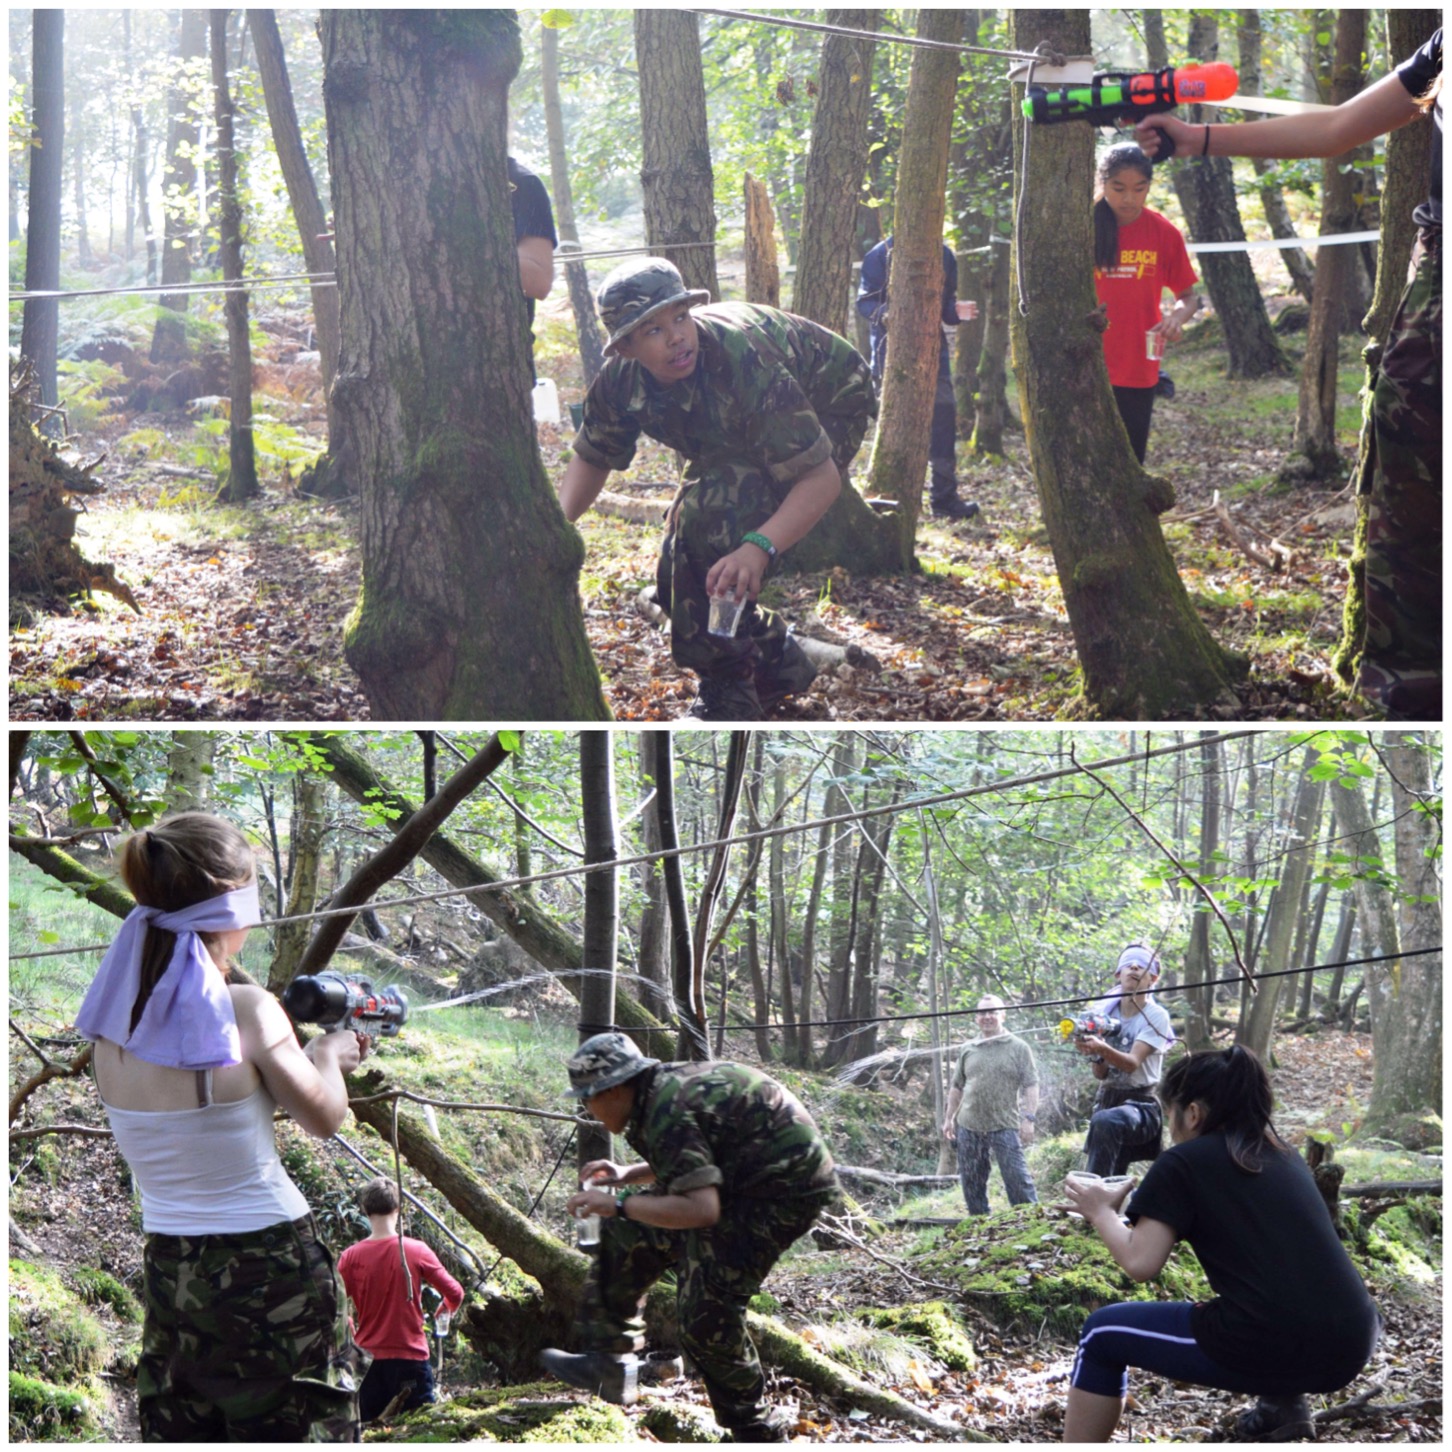
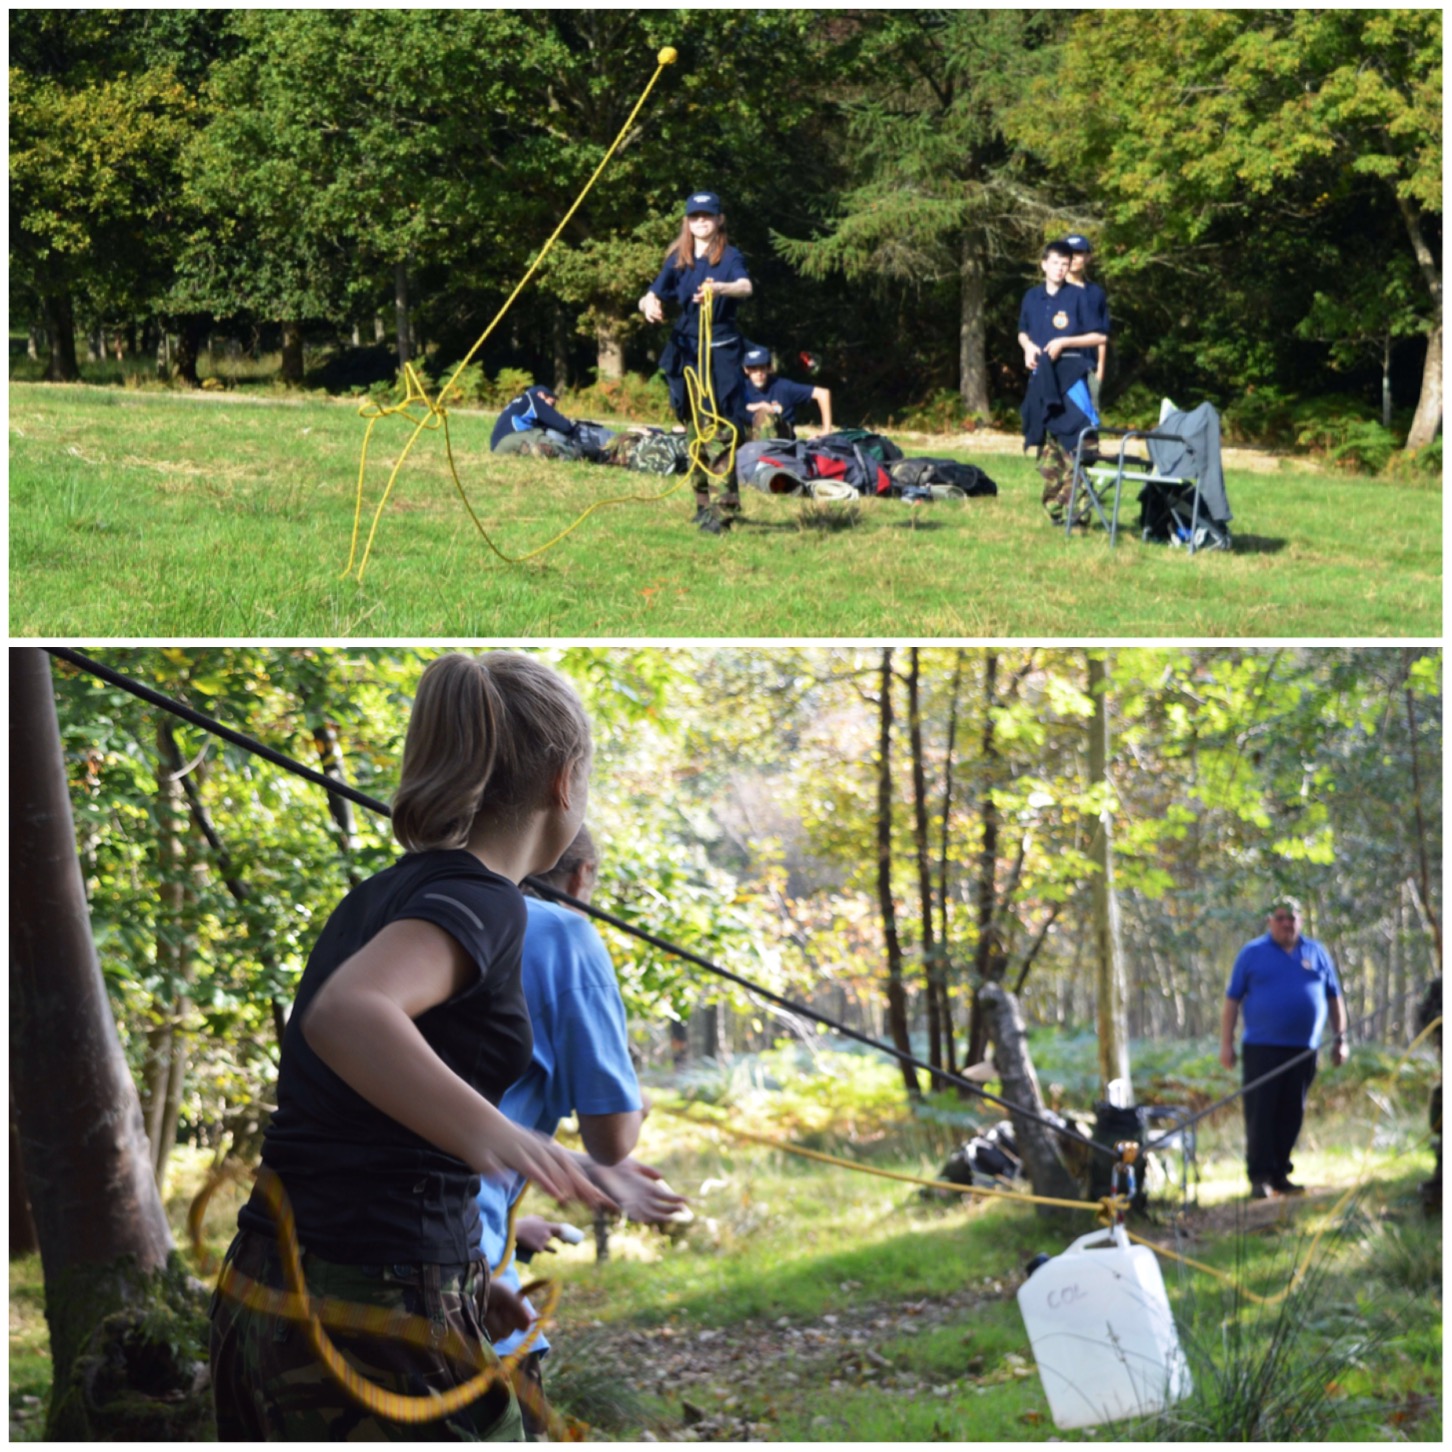
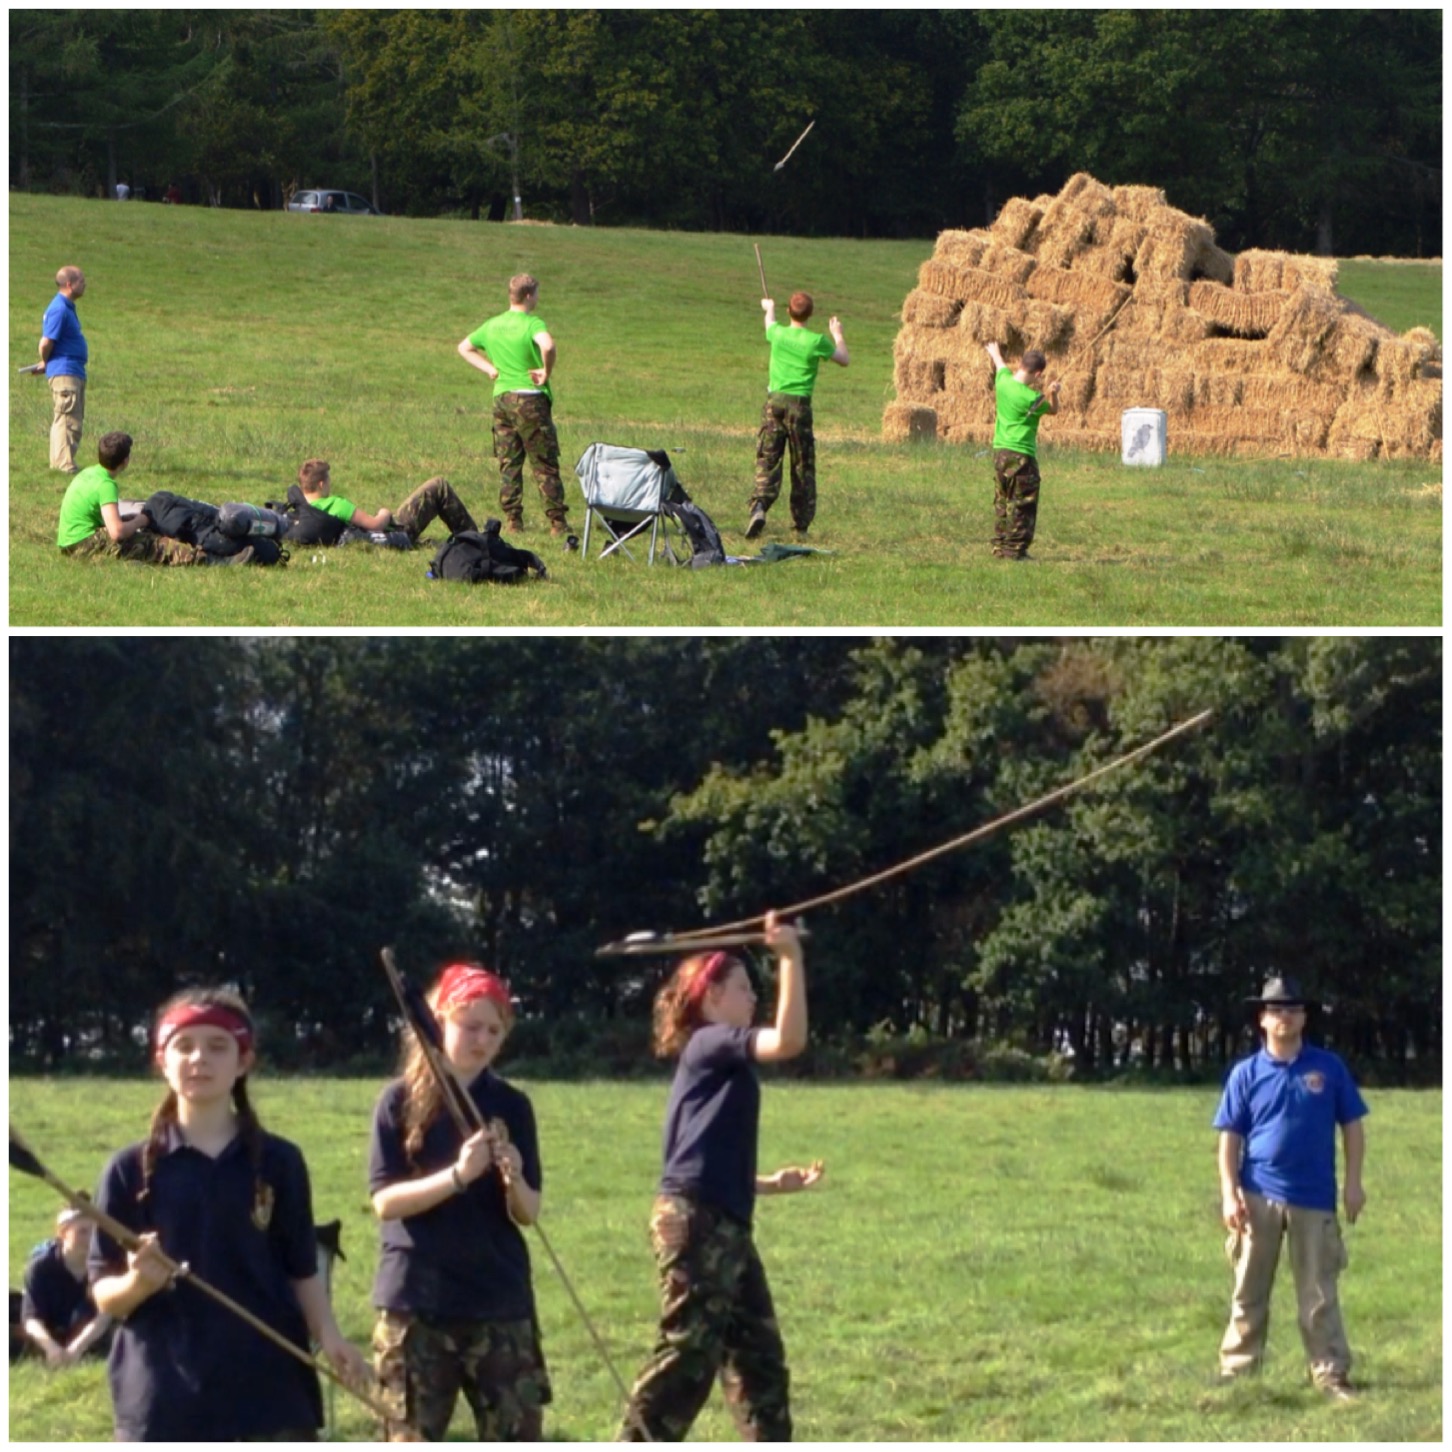
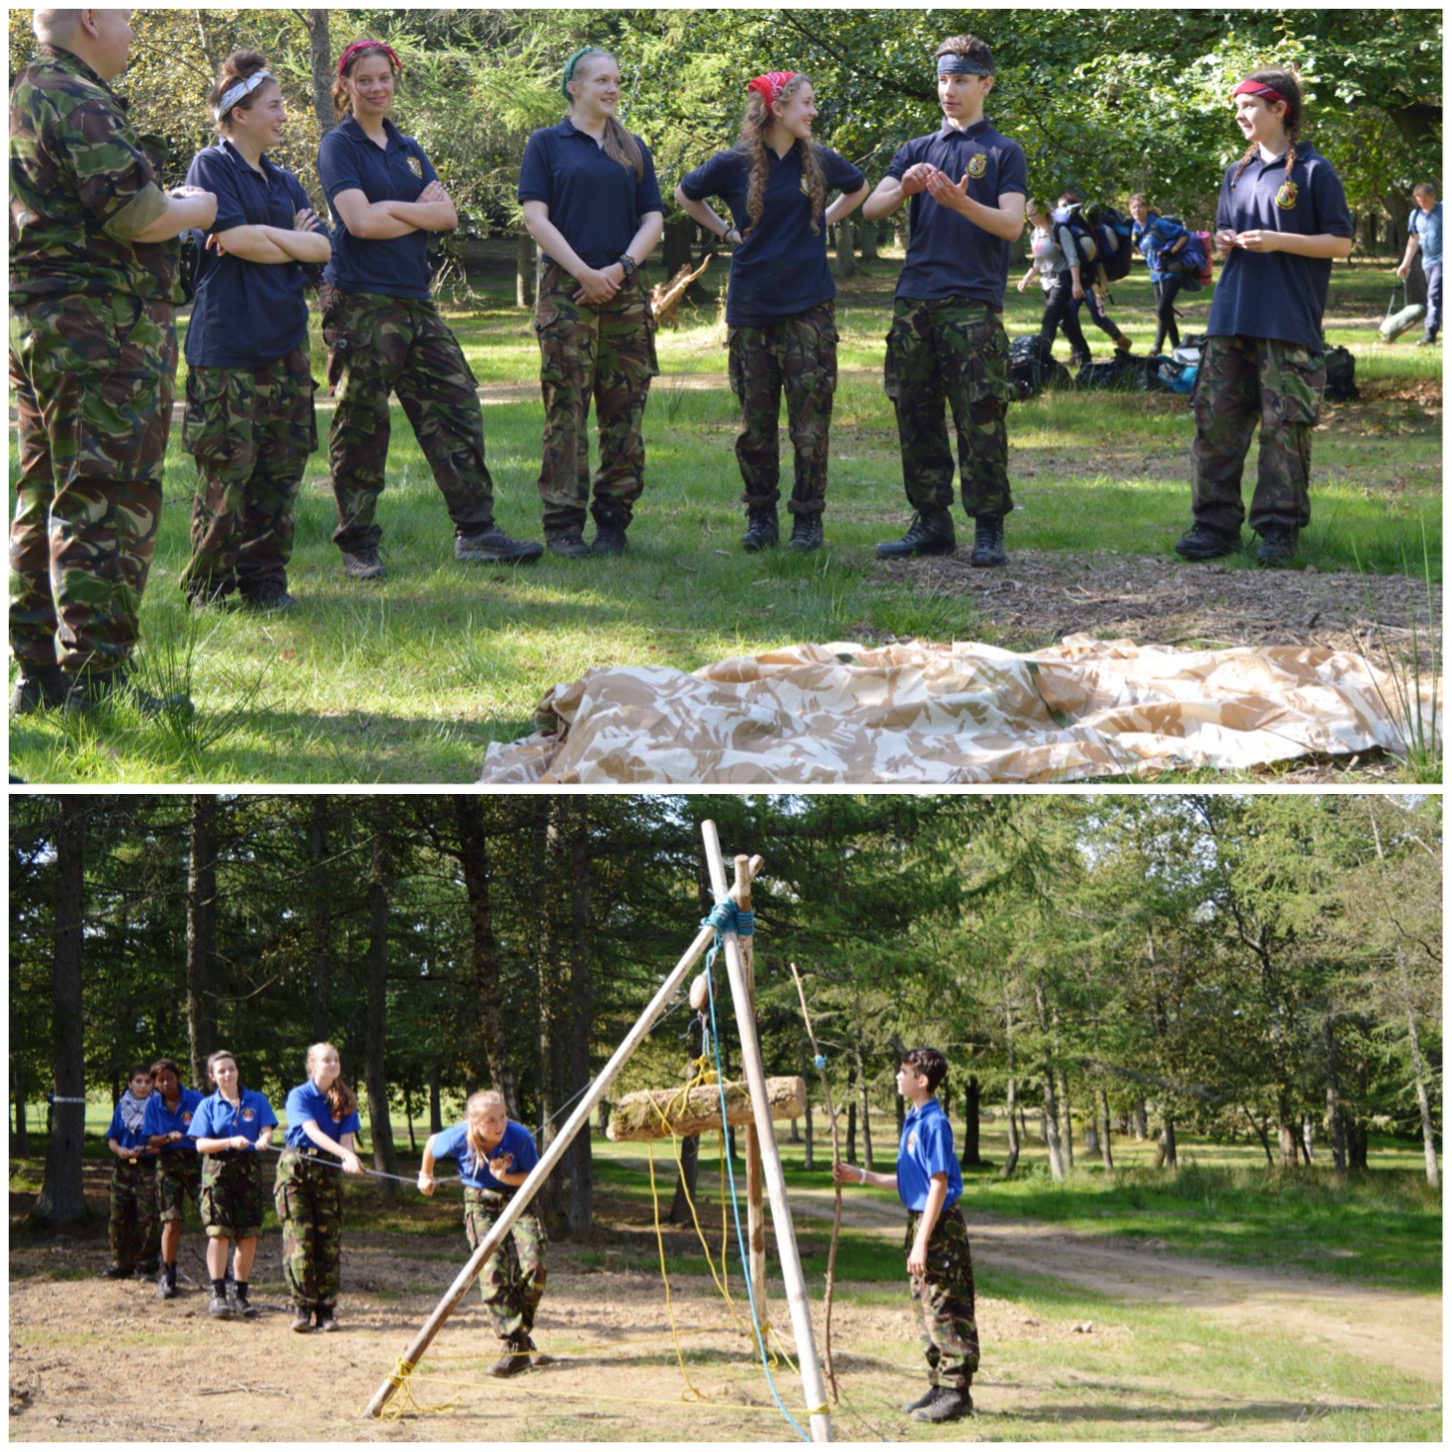
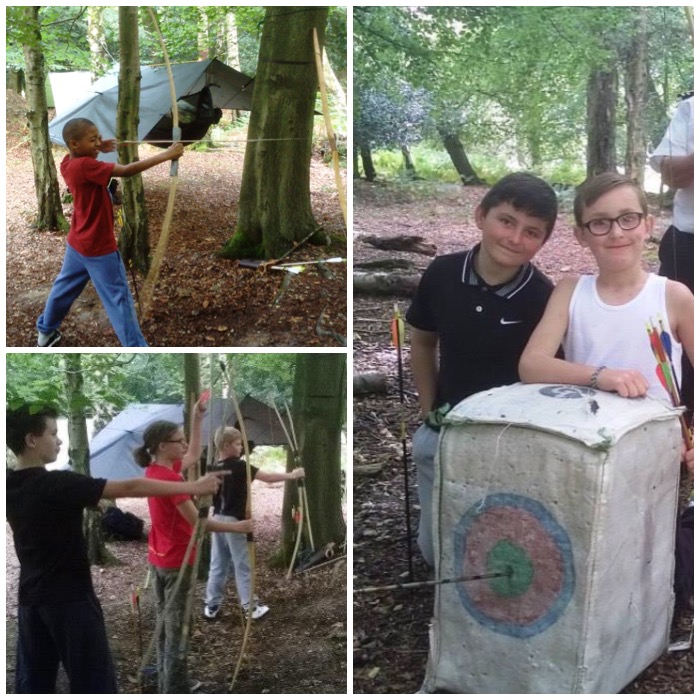
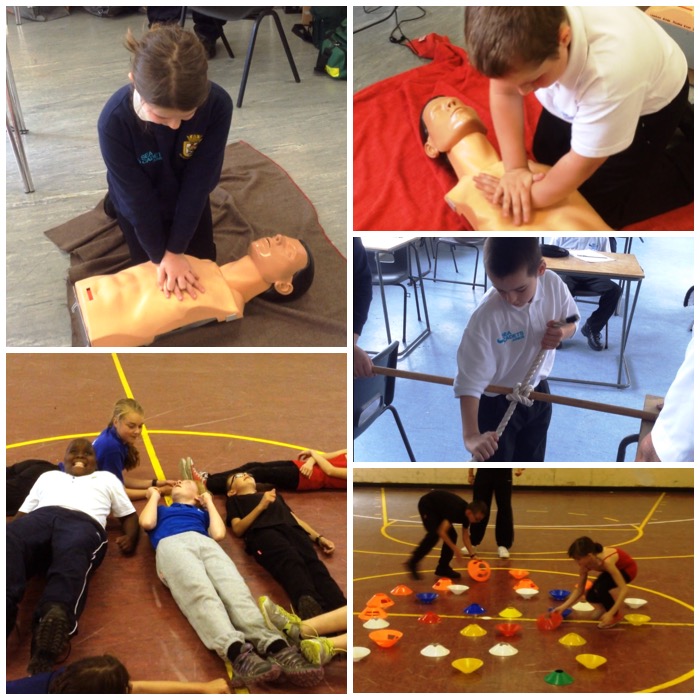
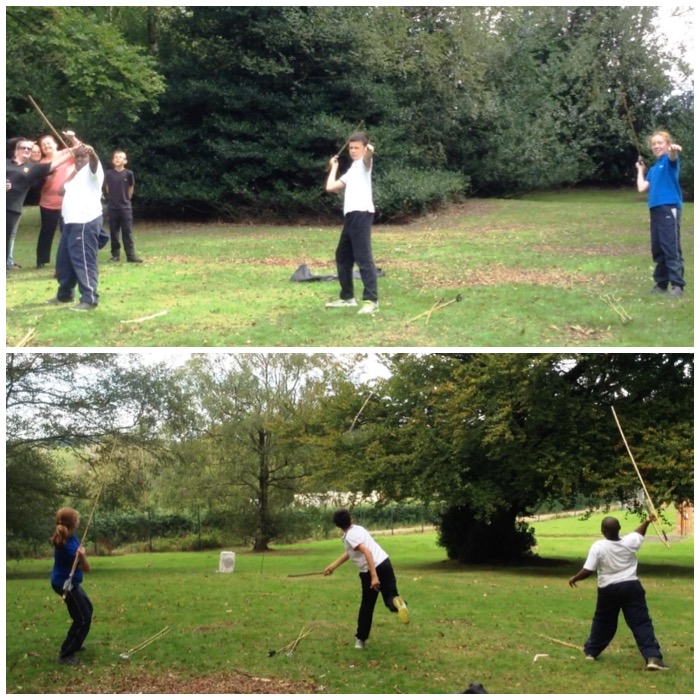
The day though turned out brilliantly with the Royal Marines Cadets and staff getting up to loads of activities including fire lighting, knife skills, shooting Atlatl darts, stalking games and learning about bushcraft knots.
A damp start
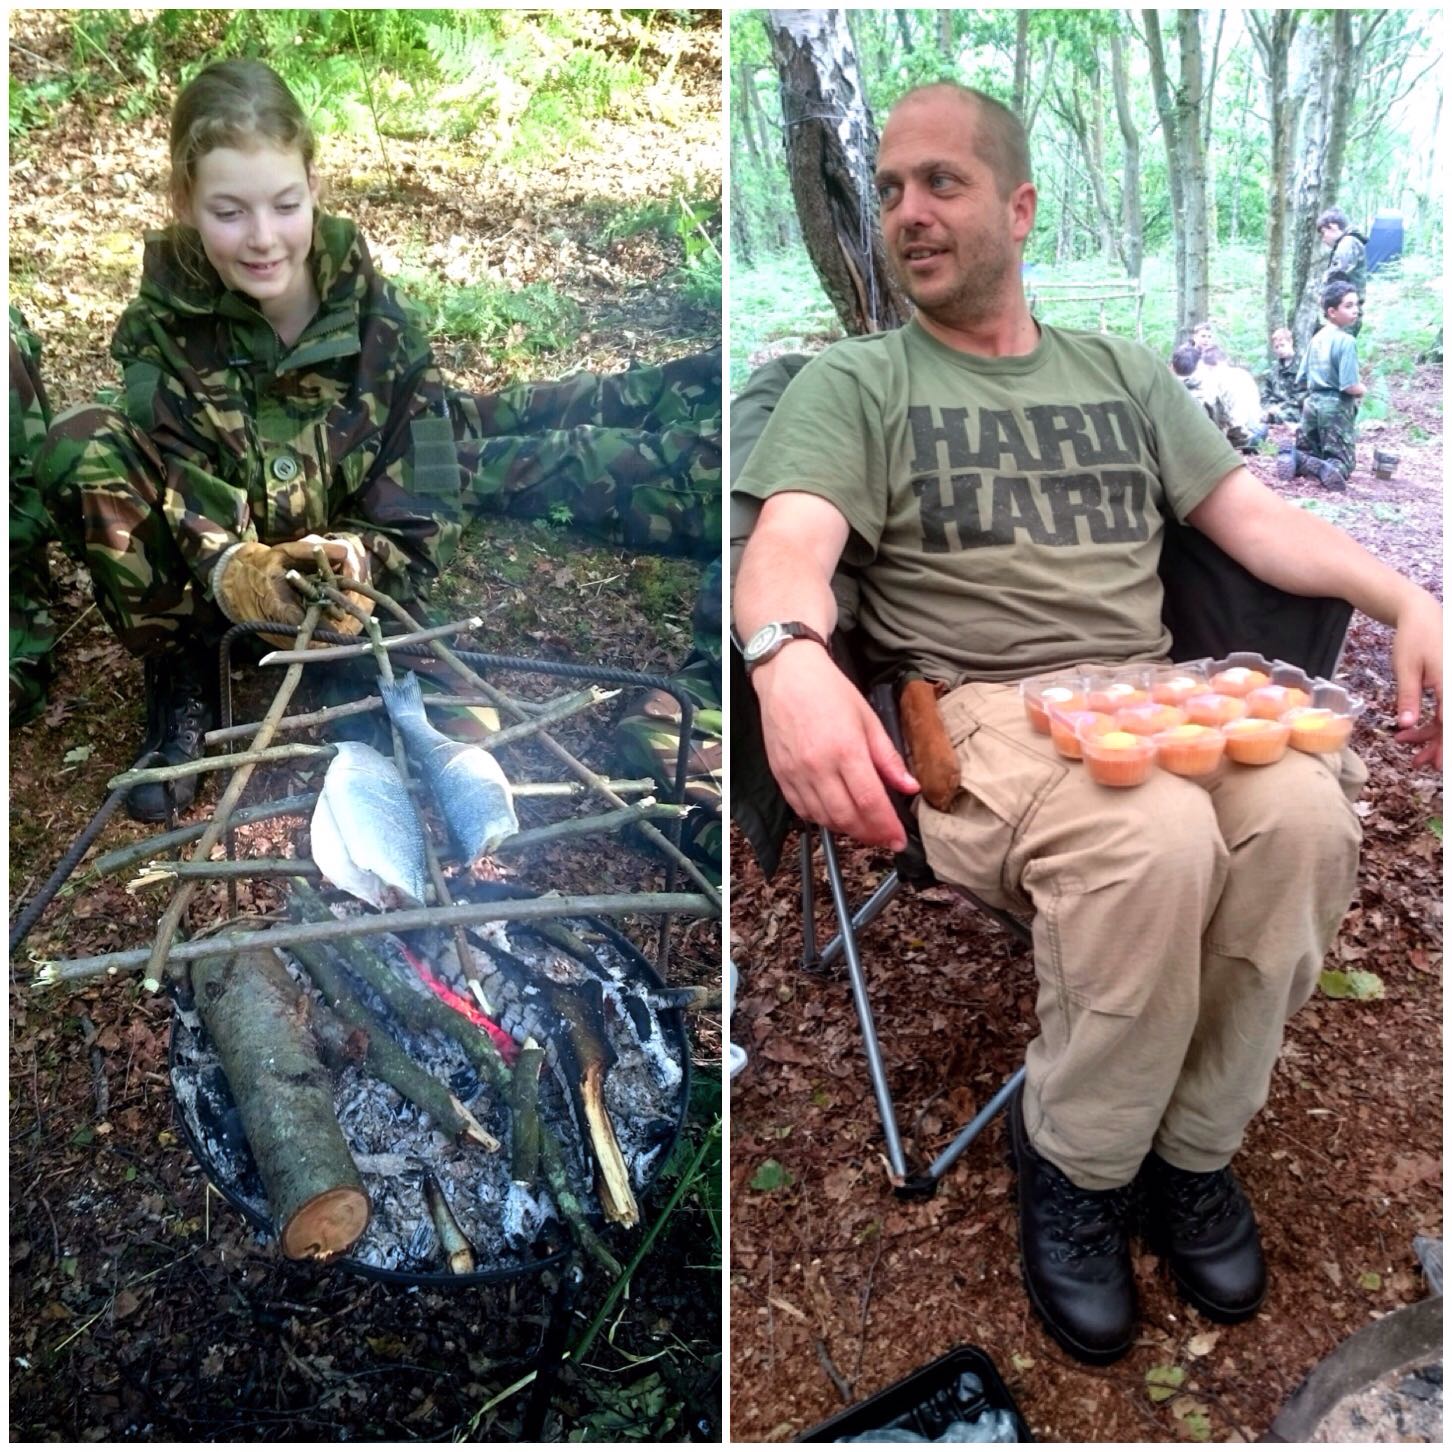
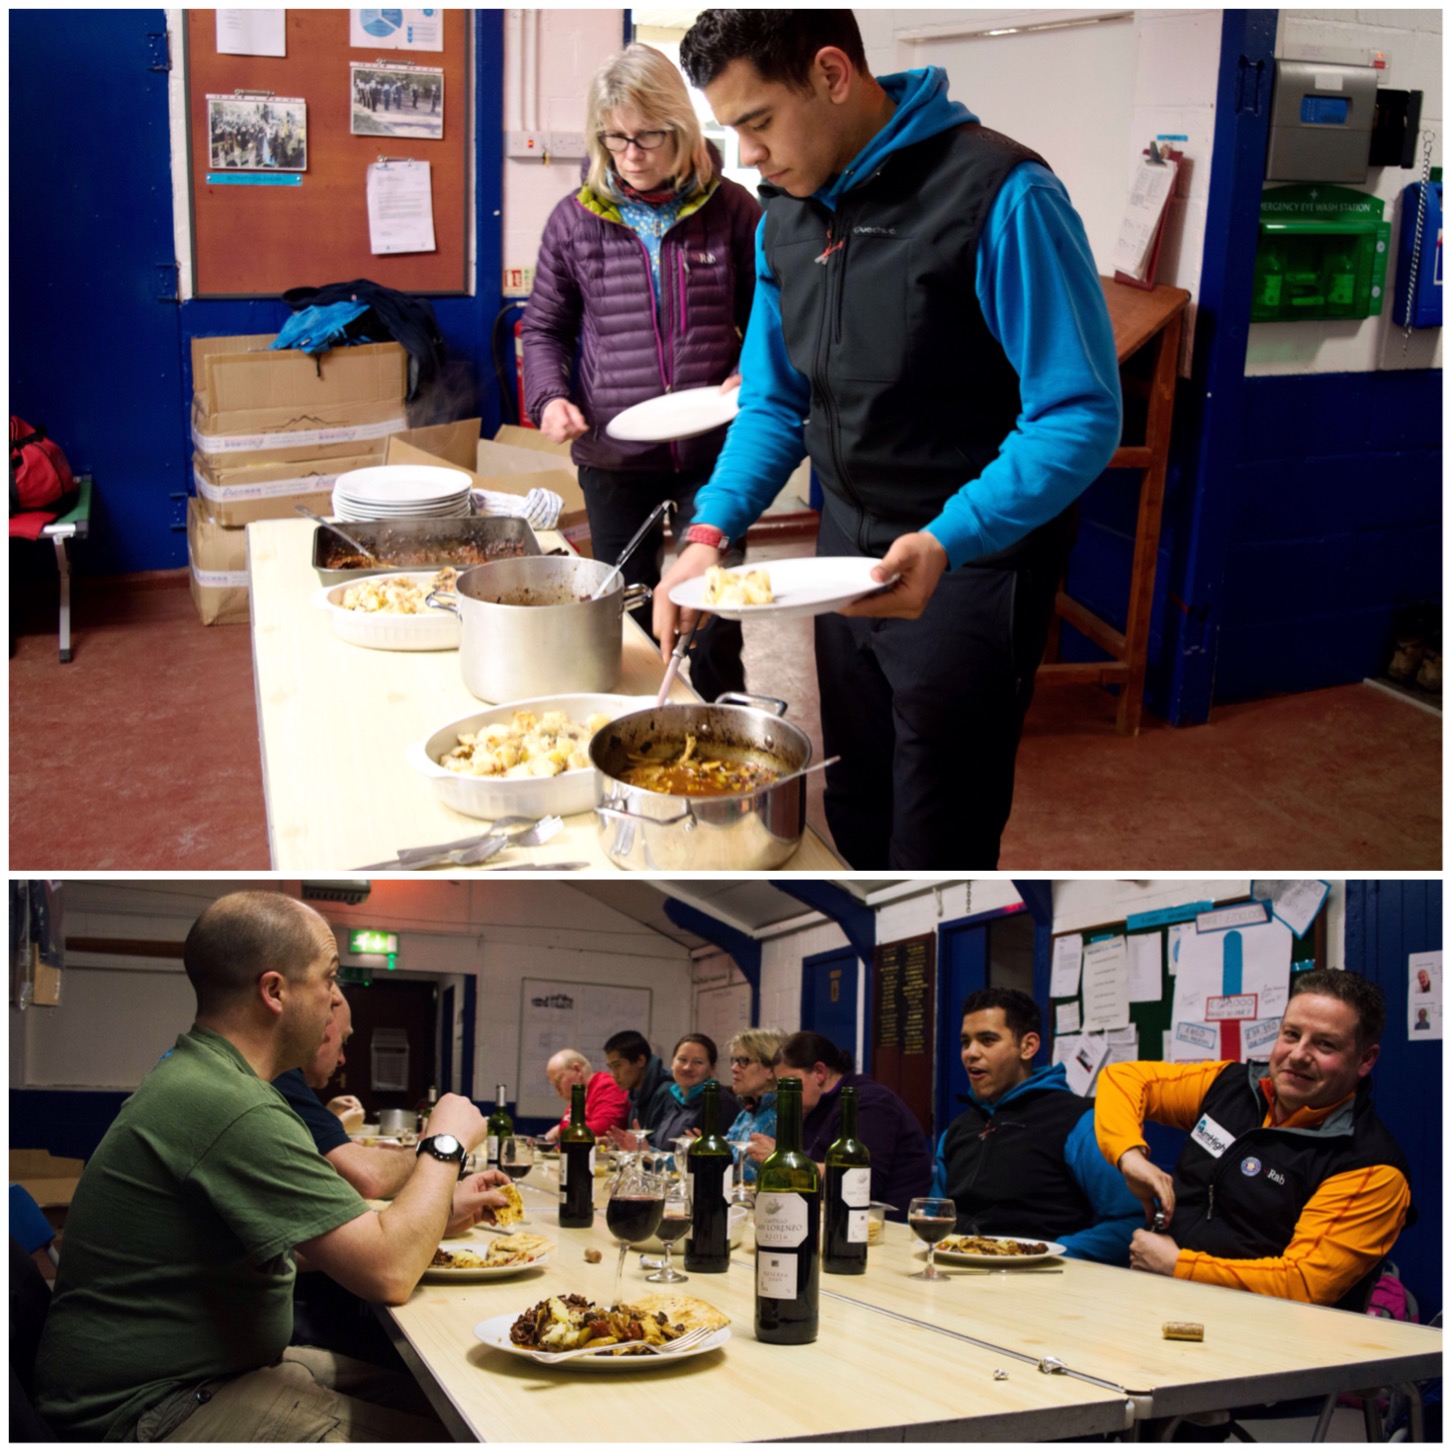
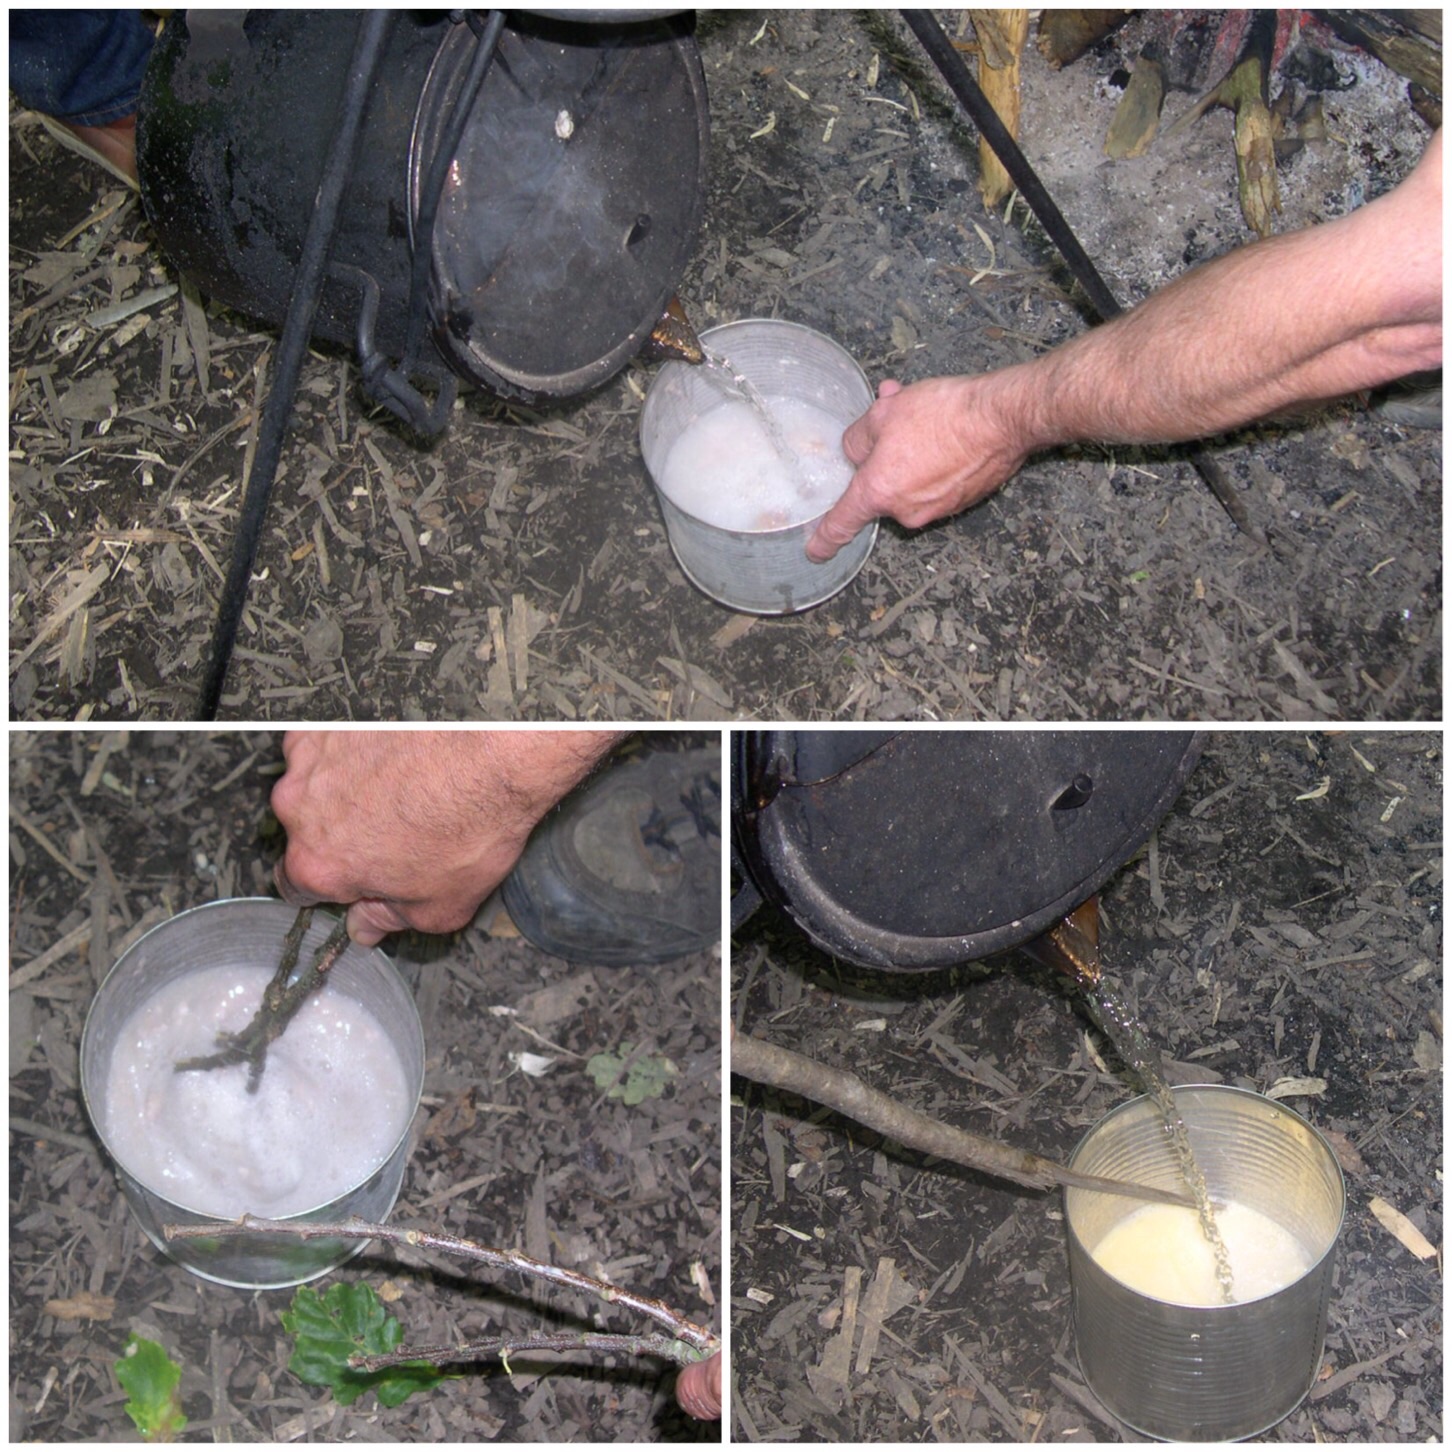
One of the main events of the day was cooking fish over the open fires (more on this in a later post) however there was plenty of other delights such as Dave’s favourite cupcakes 😉
Lots of food
This was a long day however an extremely enjoyable one for all the cadets and staff getting back in touch with nature and having a really wild day.
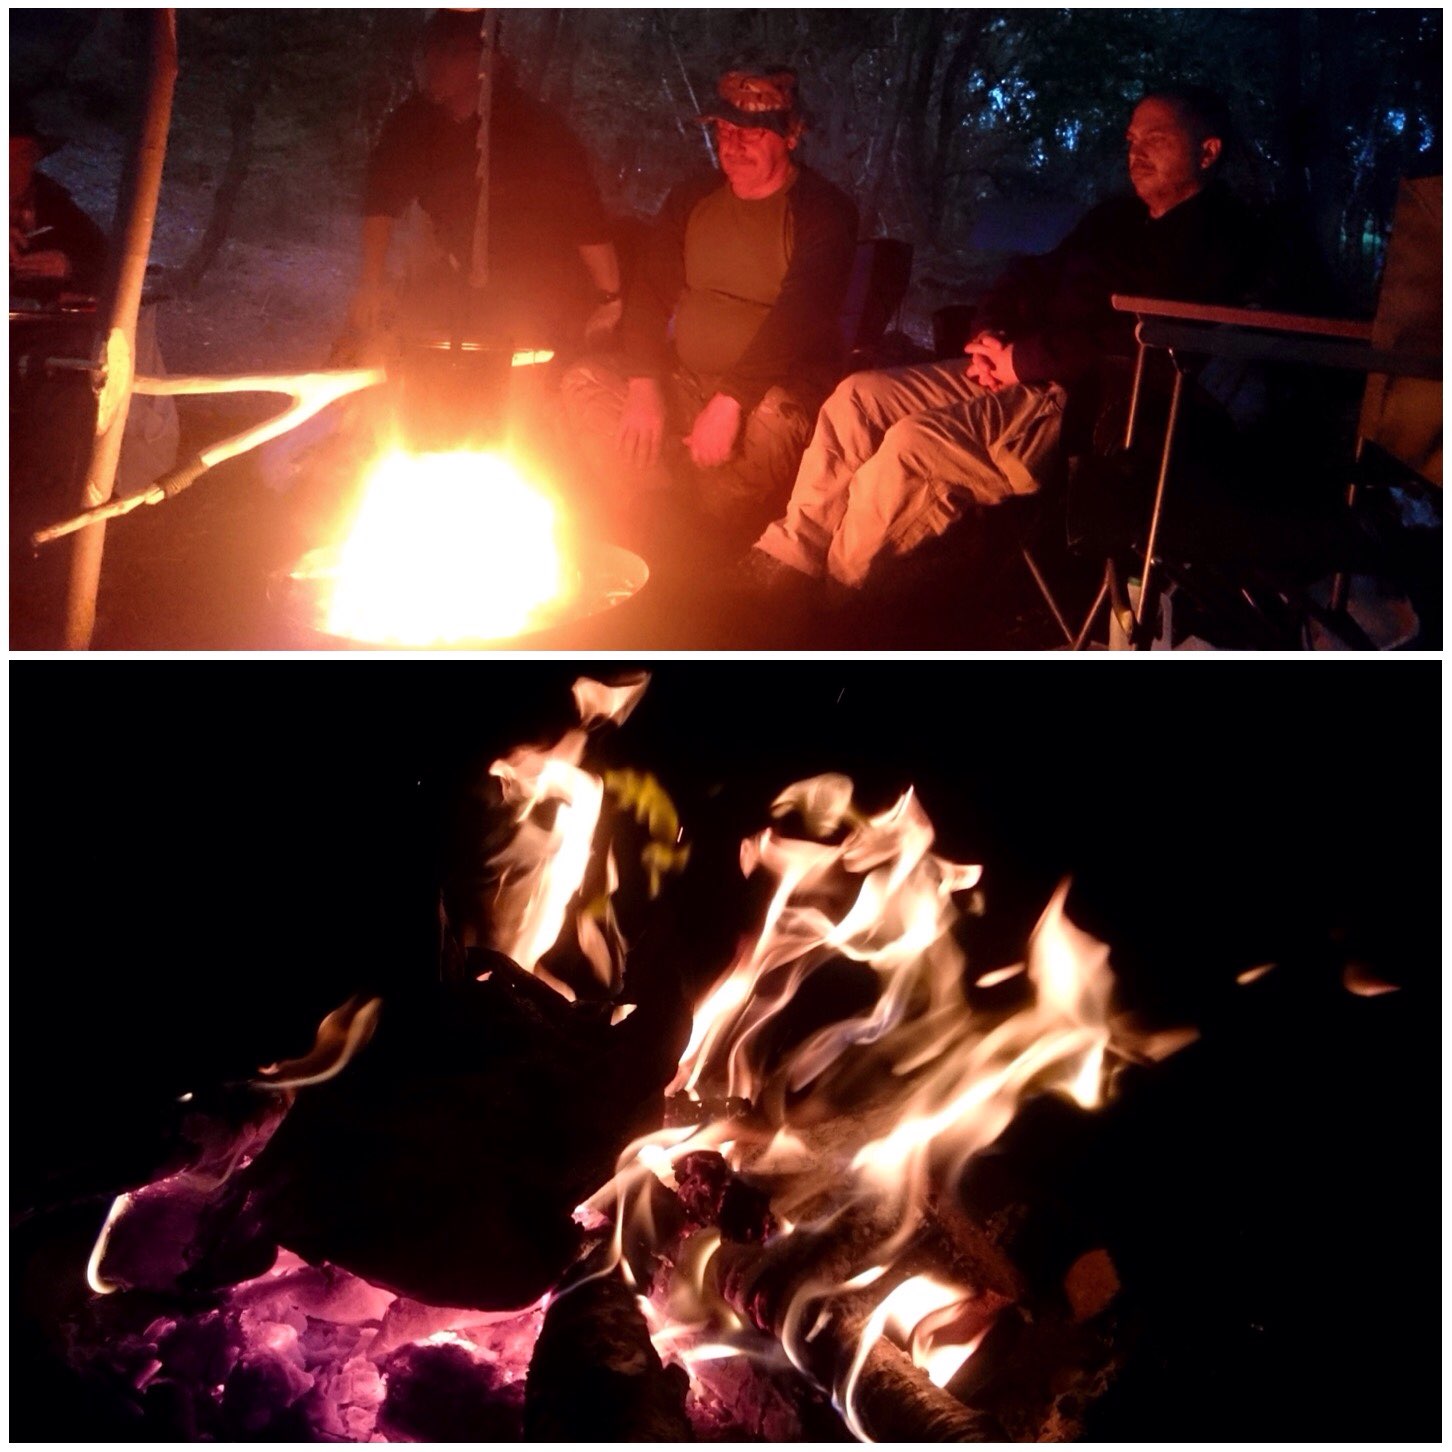
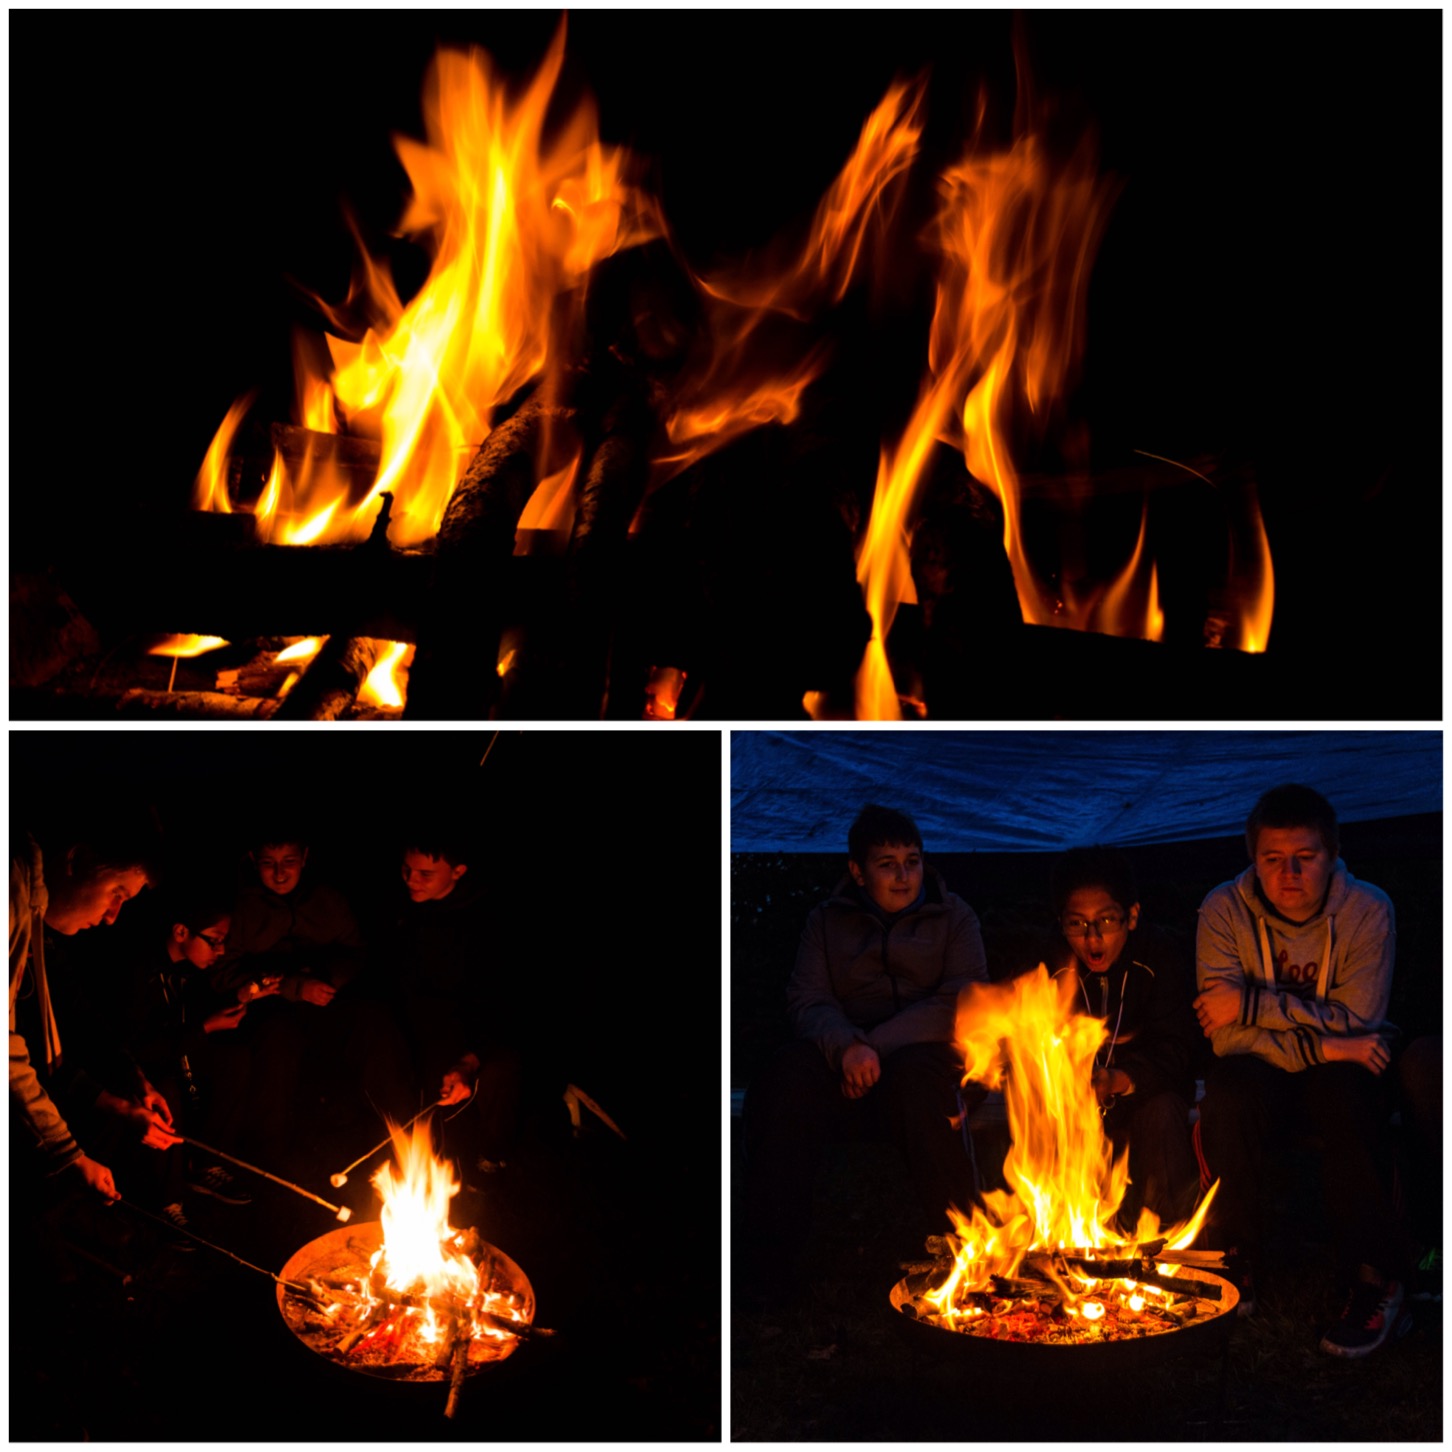
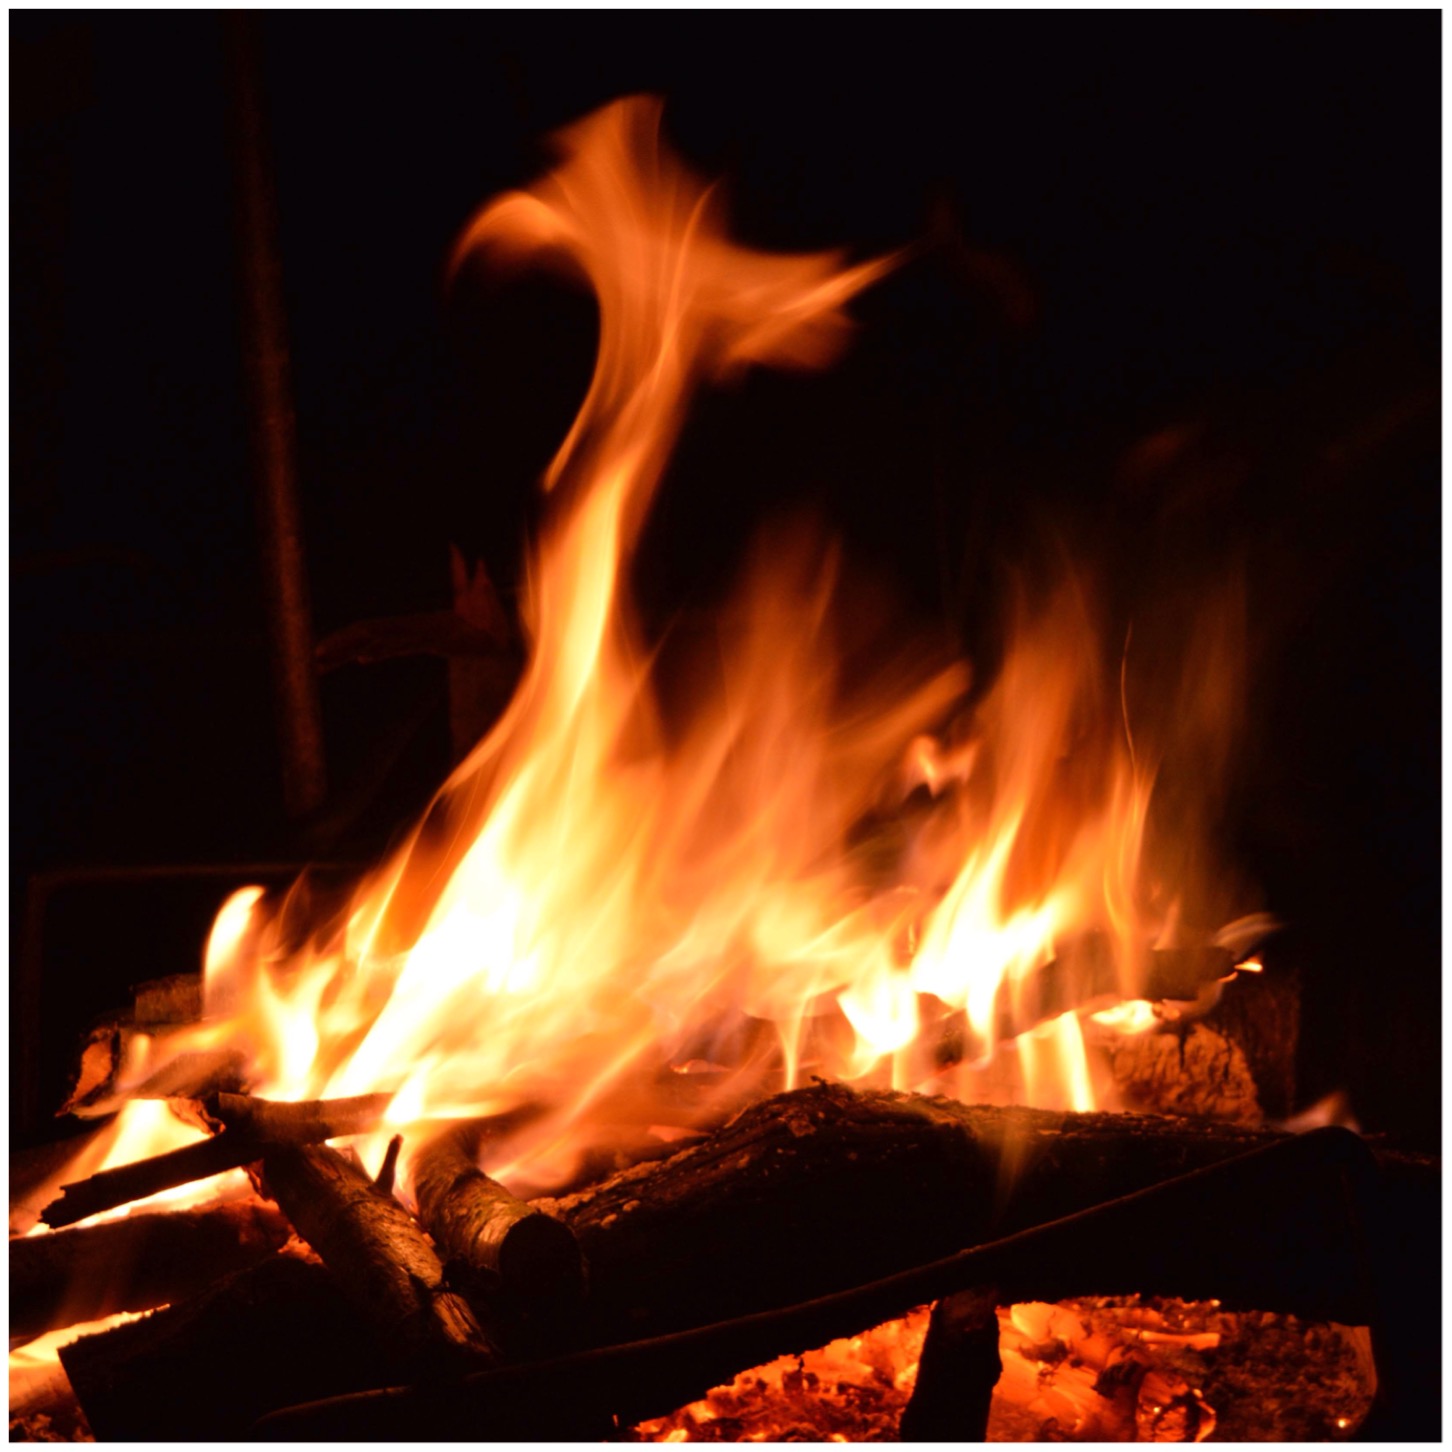
Another lovely evening watching a bit of woodland TV where I can definitely see two fire faces in our little campfire picture at the bottom.
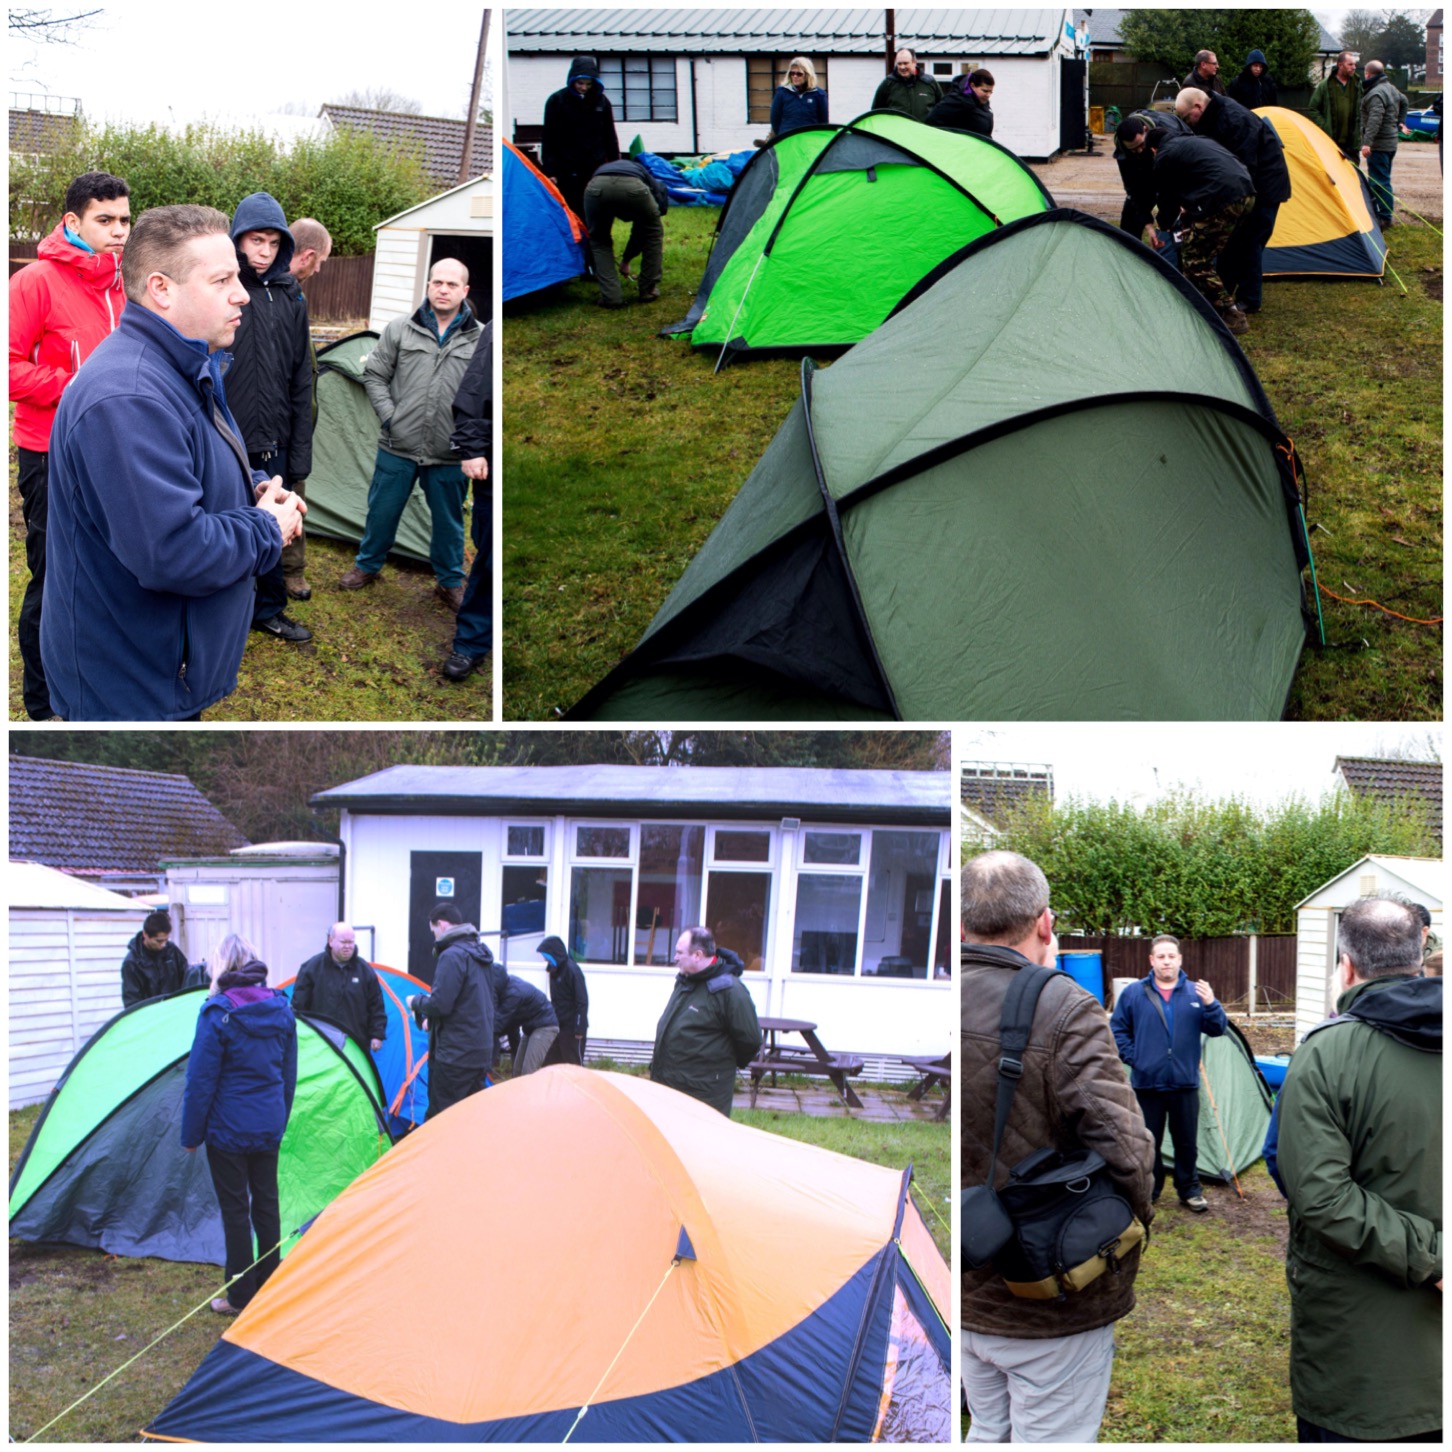
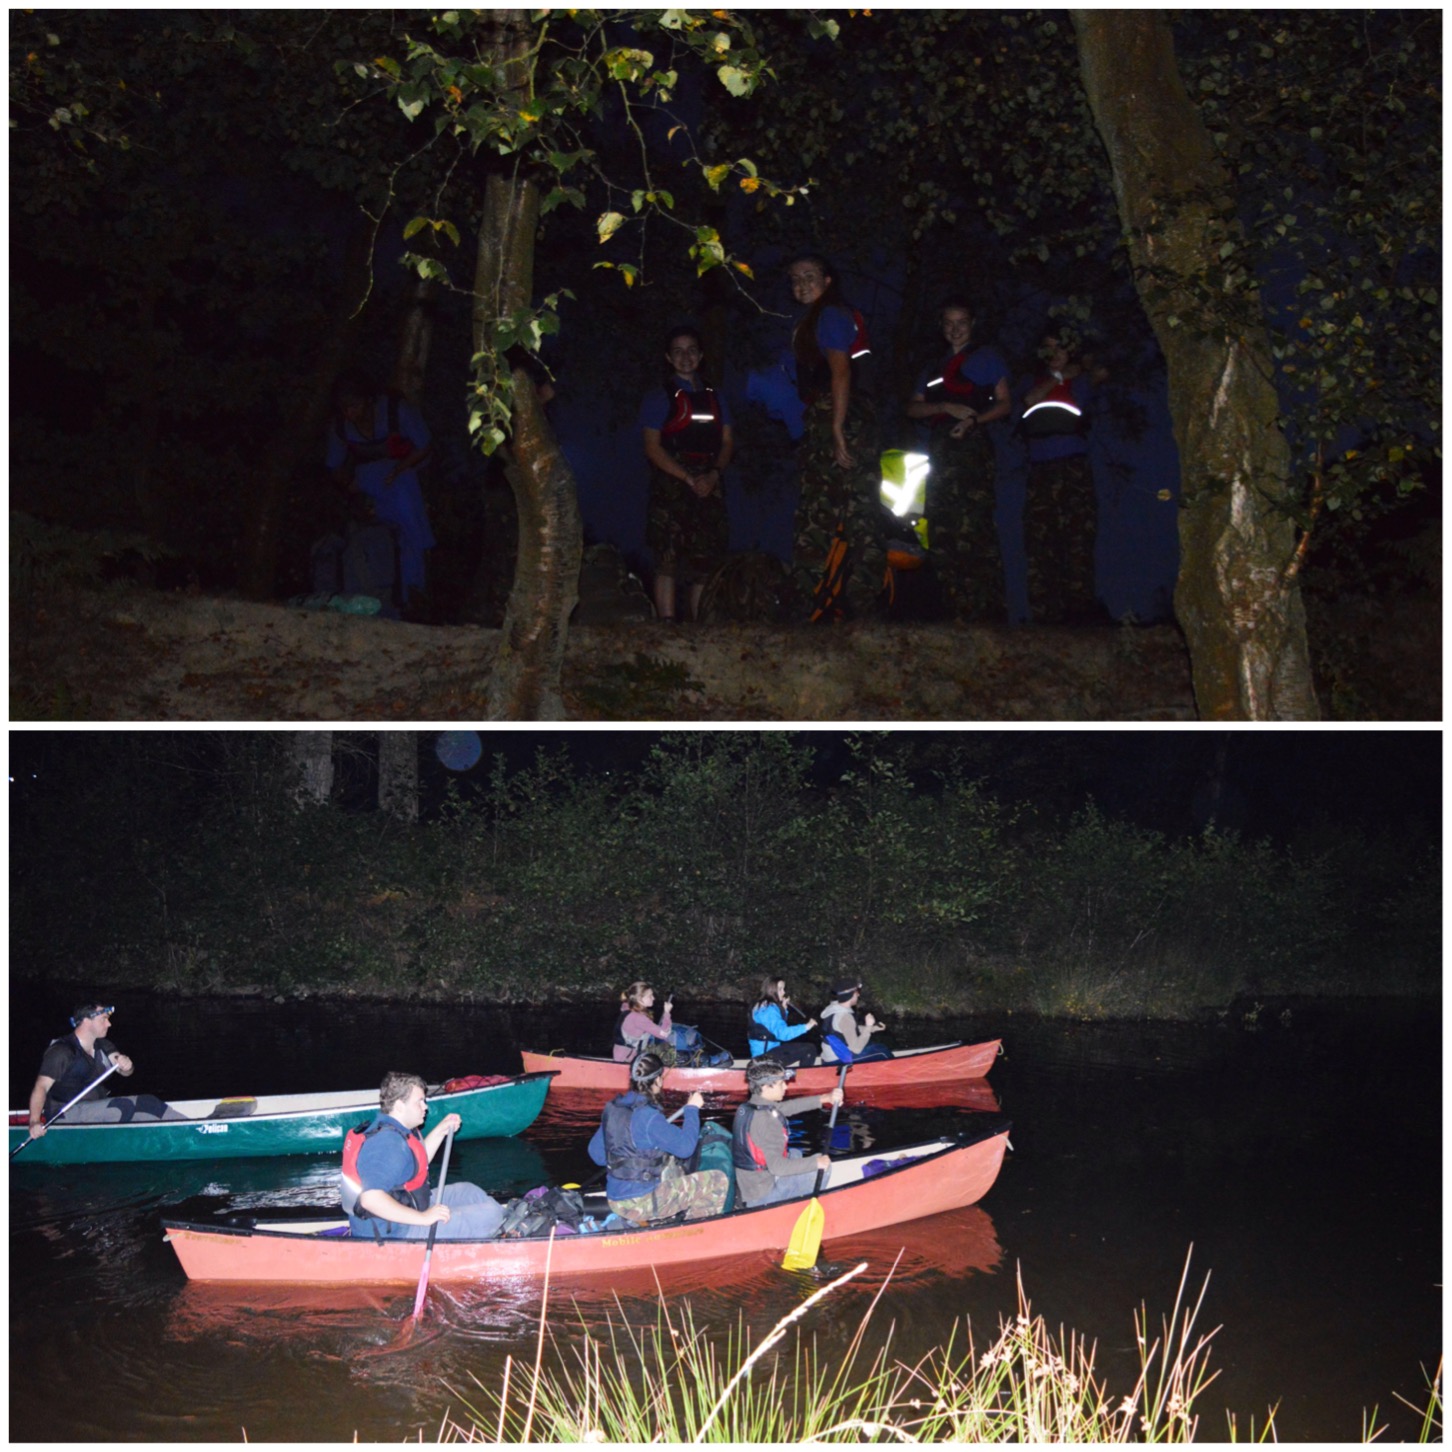
Day 10 of the 30 day Challenge found me in the military training area around Aldershot. I will write an in depth report on the weekend later but as this was where I was interacting with nature last Friday so I thought I would write up a little on what I got up to.
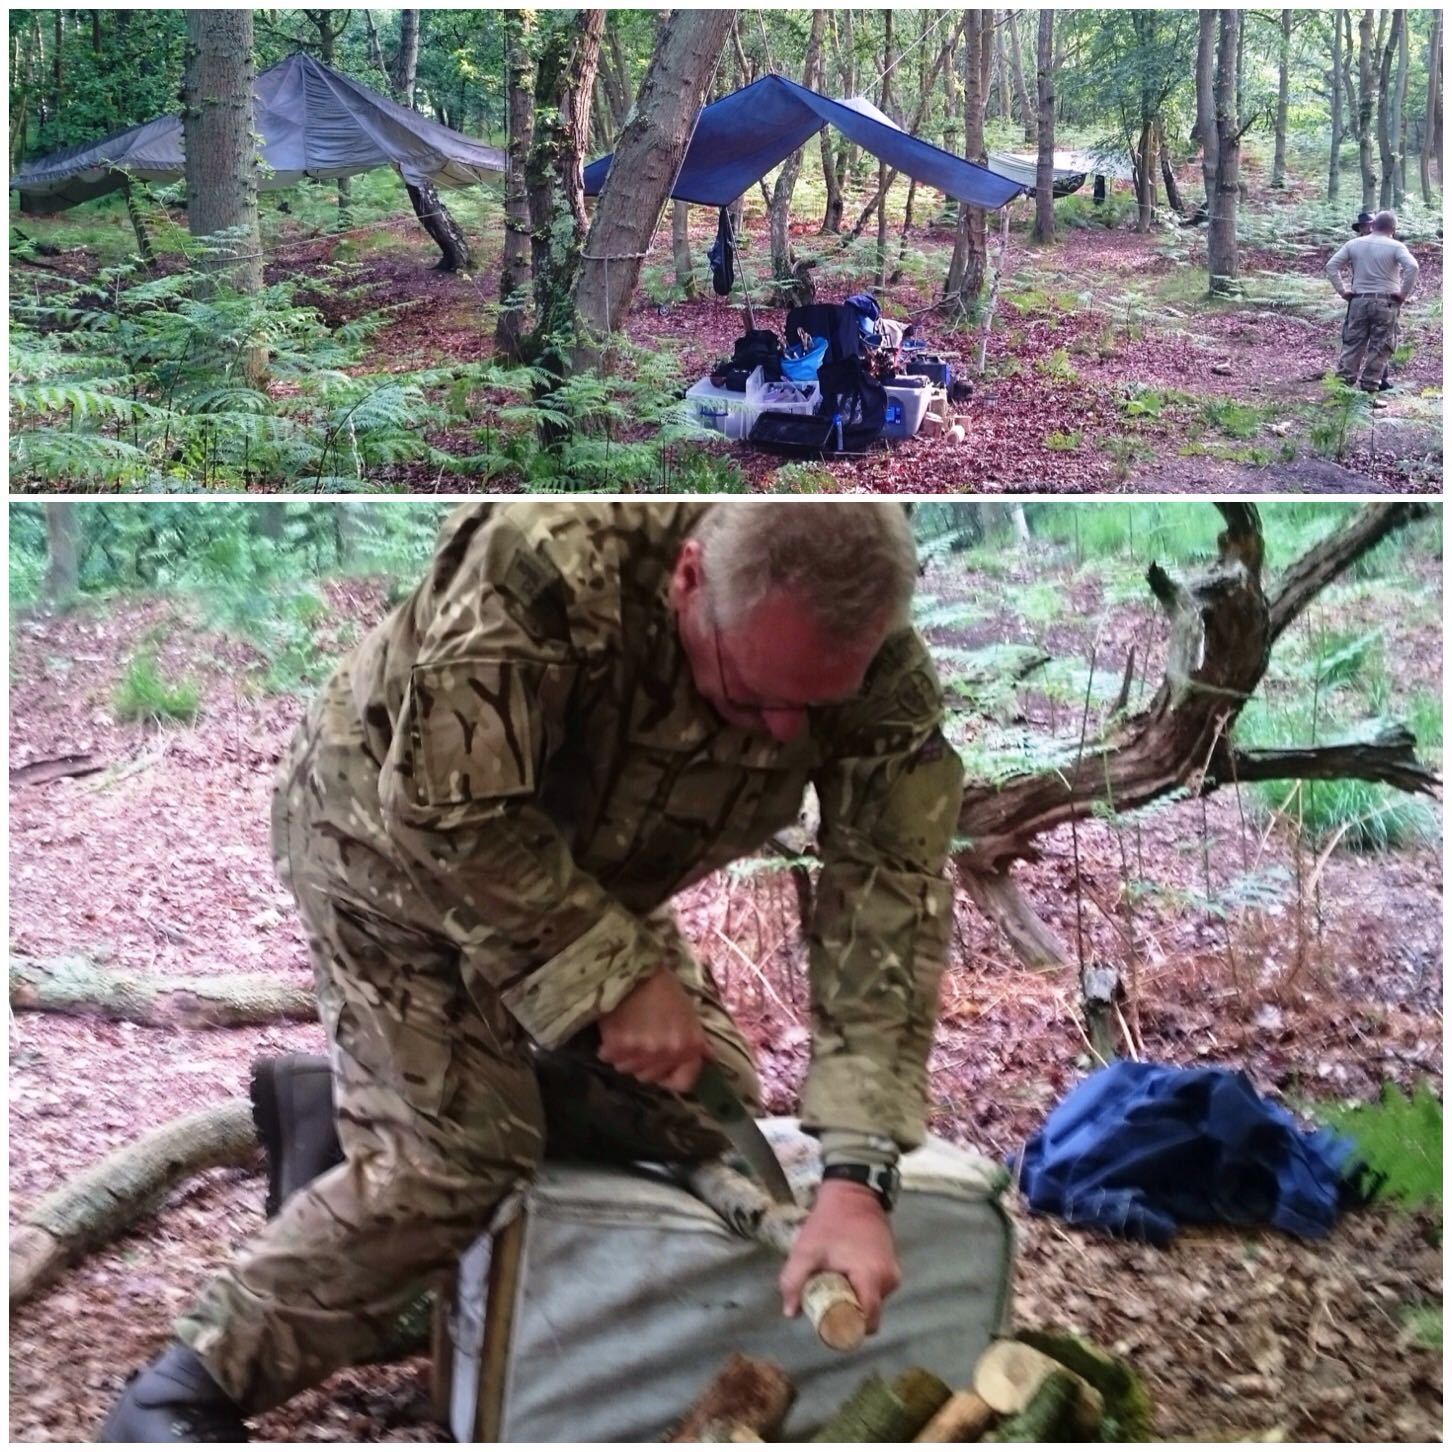
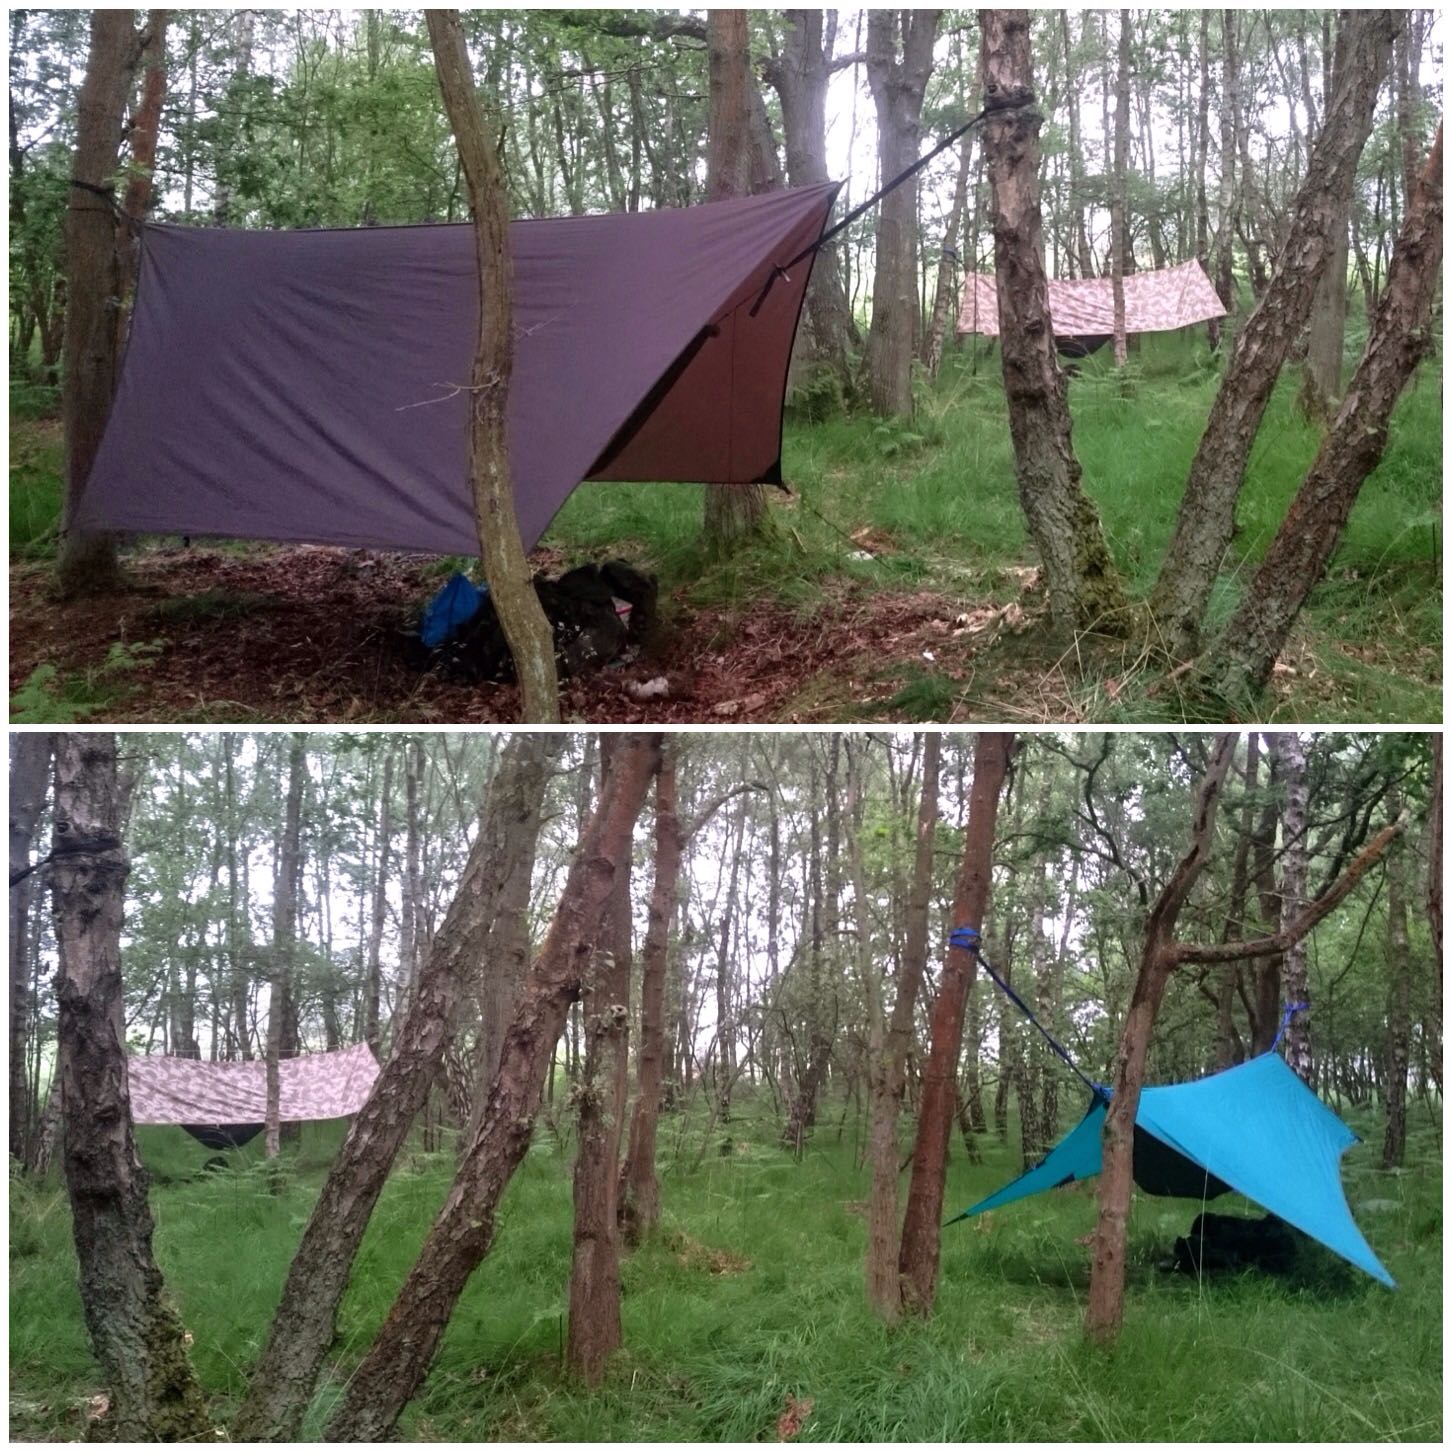
I had taken the day off work to prepare for a bushcraft course I was helping to run with the Royal Marines Cadets. As the advance party it was our job to set the camp up so it was mostly putting up tarps, a parachute and doing all the other chores needed to run a camp.
HQ set up
As I wanted to give the cadets a good bushcraft experience once the main HQ area was set up we spent the rest off the evening until the cadets turned up putting up 12 hammocks and tarps. This is not easy to do with only a few of you (thanks Dave and Charlie) so I was glad to see the last one finally up.
A dozen hammocks
The cadets turned up in the evening and some slept in the hammocks and some in bivi bags on the ground. The plan was then to allow them to swap over on Saturday night.
I finished the evening chatting with the guys around the campfire planning for the next day.
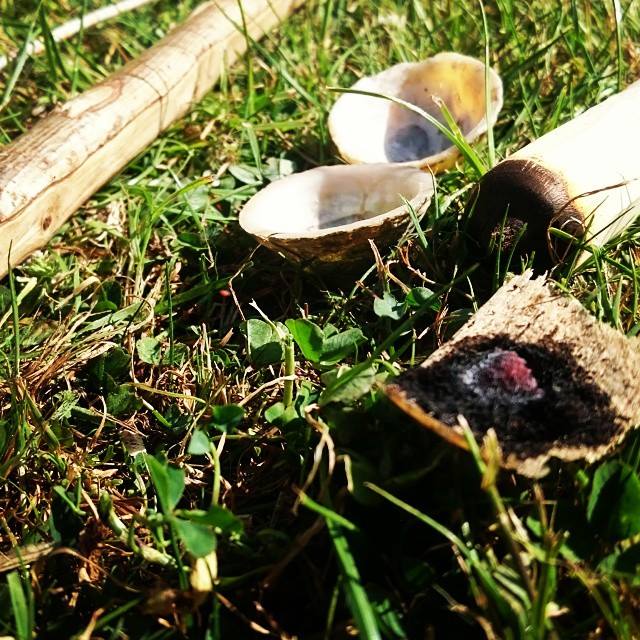
I have had a day off work today so I spent it prepping a load of kit for a bushcraft course I am running for the Royal Marines Cadets this weekend. Part of my prep for the weekend was to make sure my bowdrill sets were working fine. It was good to see the embers coming out well so I think that that part of my day comes under the 30 day Challenge.
Lovely ember
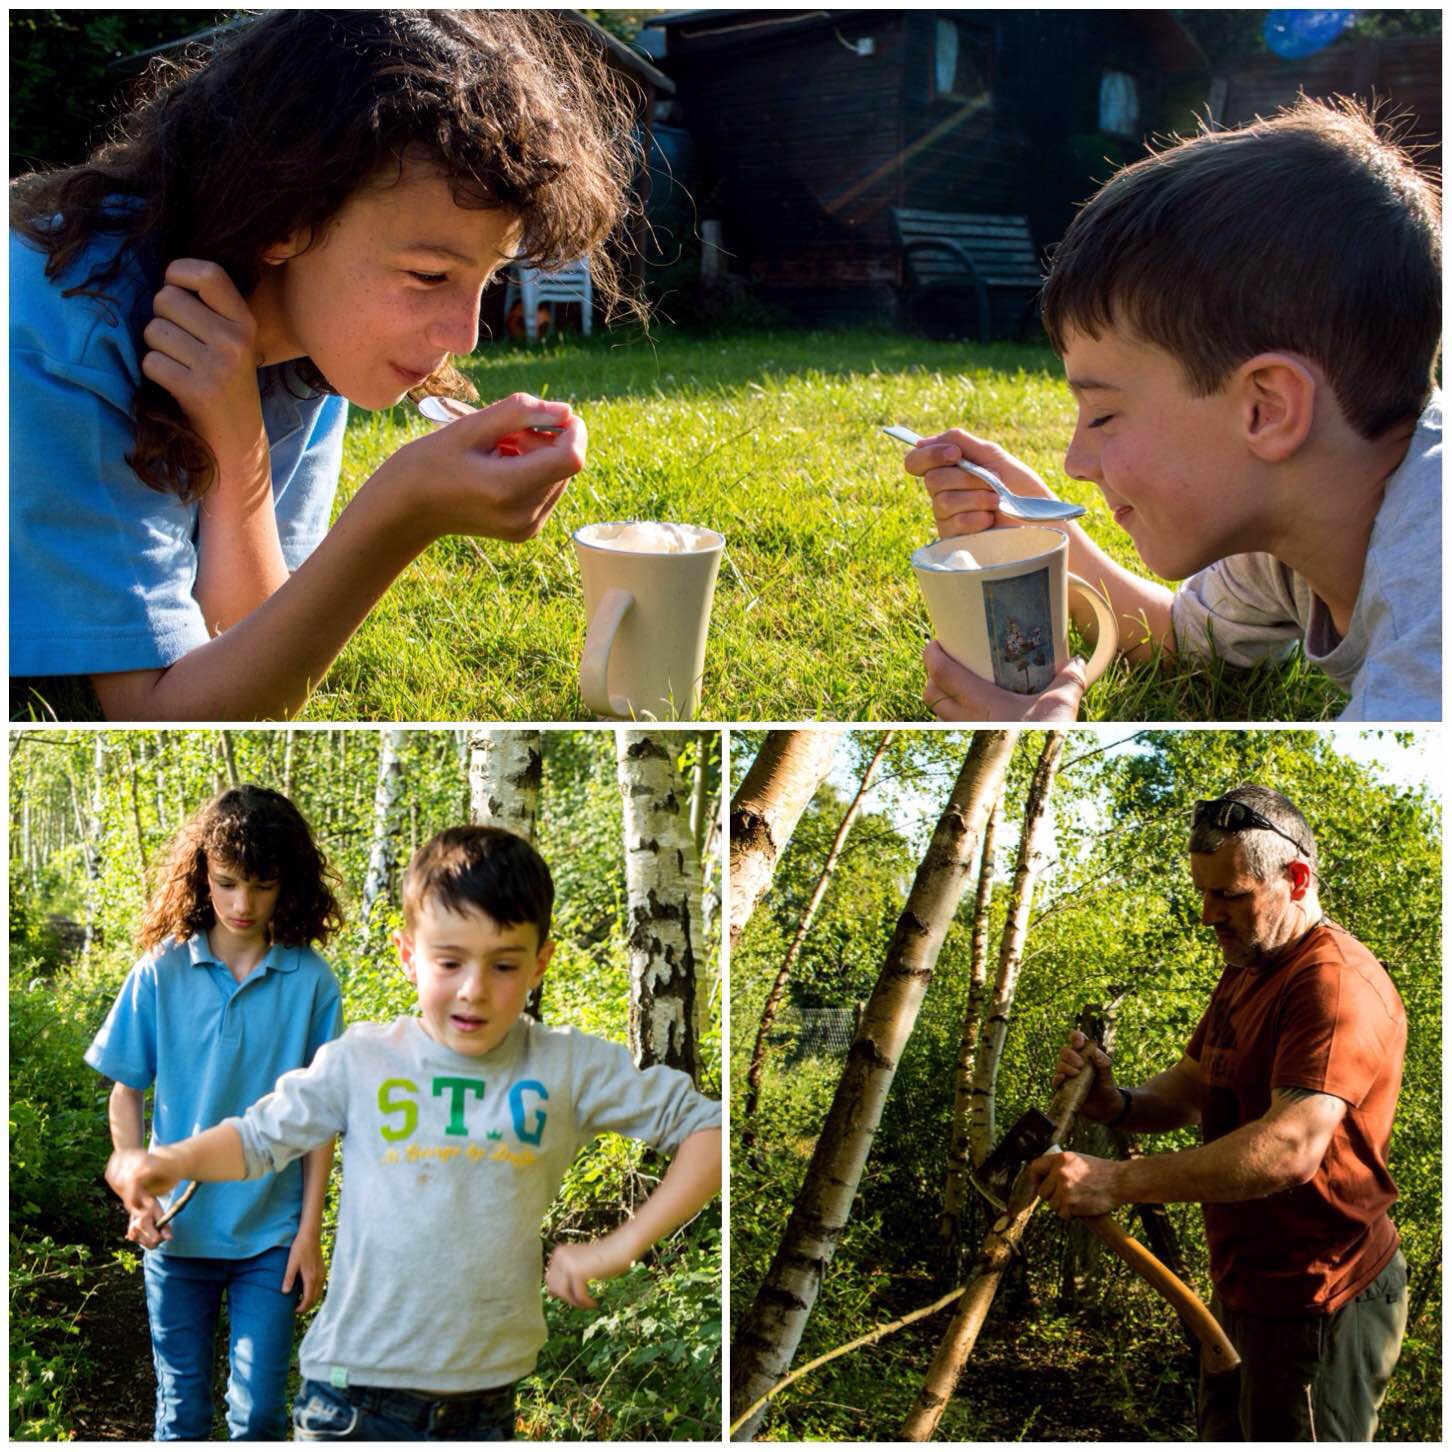
After school the kids asked for an ice cream drink (made with ice cream and lemonade). I readily agreed as they are one of my favourites as well and they laid out in the grass to enjoy it.
It was at this point that I let them know that there was a price to pay for the drink so it was off to the woods we went.
I needed to get some wood for the weekend and I knew where there were some brash wood piles of Silverbirch. There has been a lot of thinning work going on in the woods so it did not take long to find enough. I only took one or two pieces from each pile so as to not disturb too much any new habitats forming within them.
Ice cream drinks with a price to pay
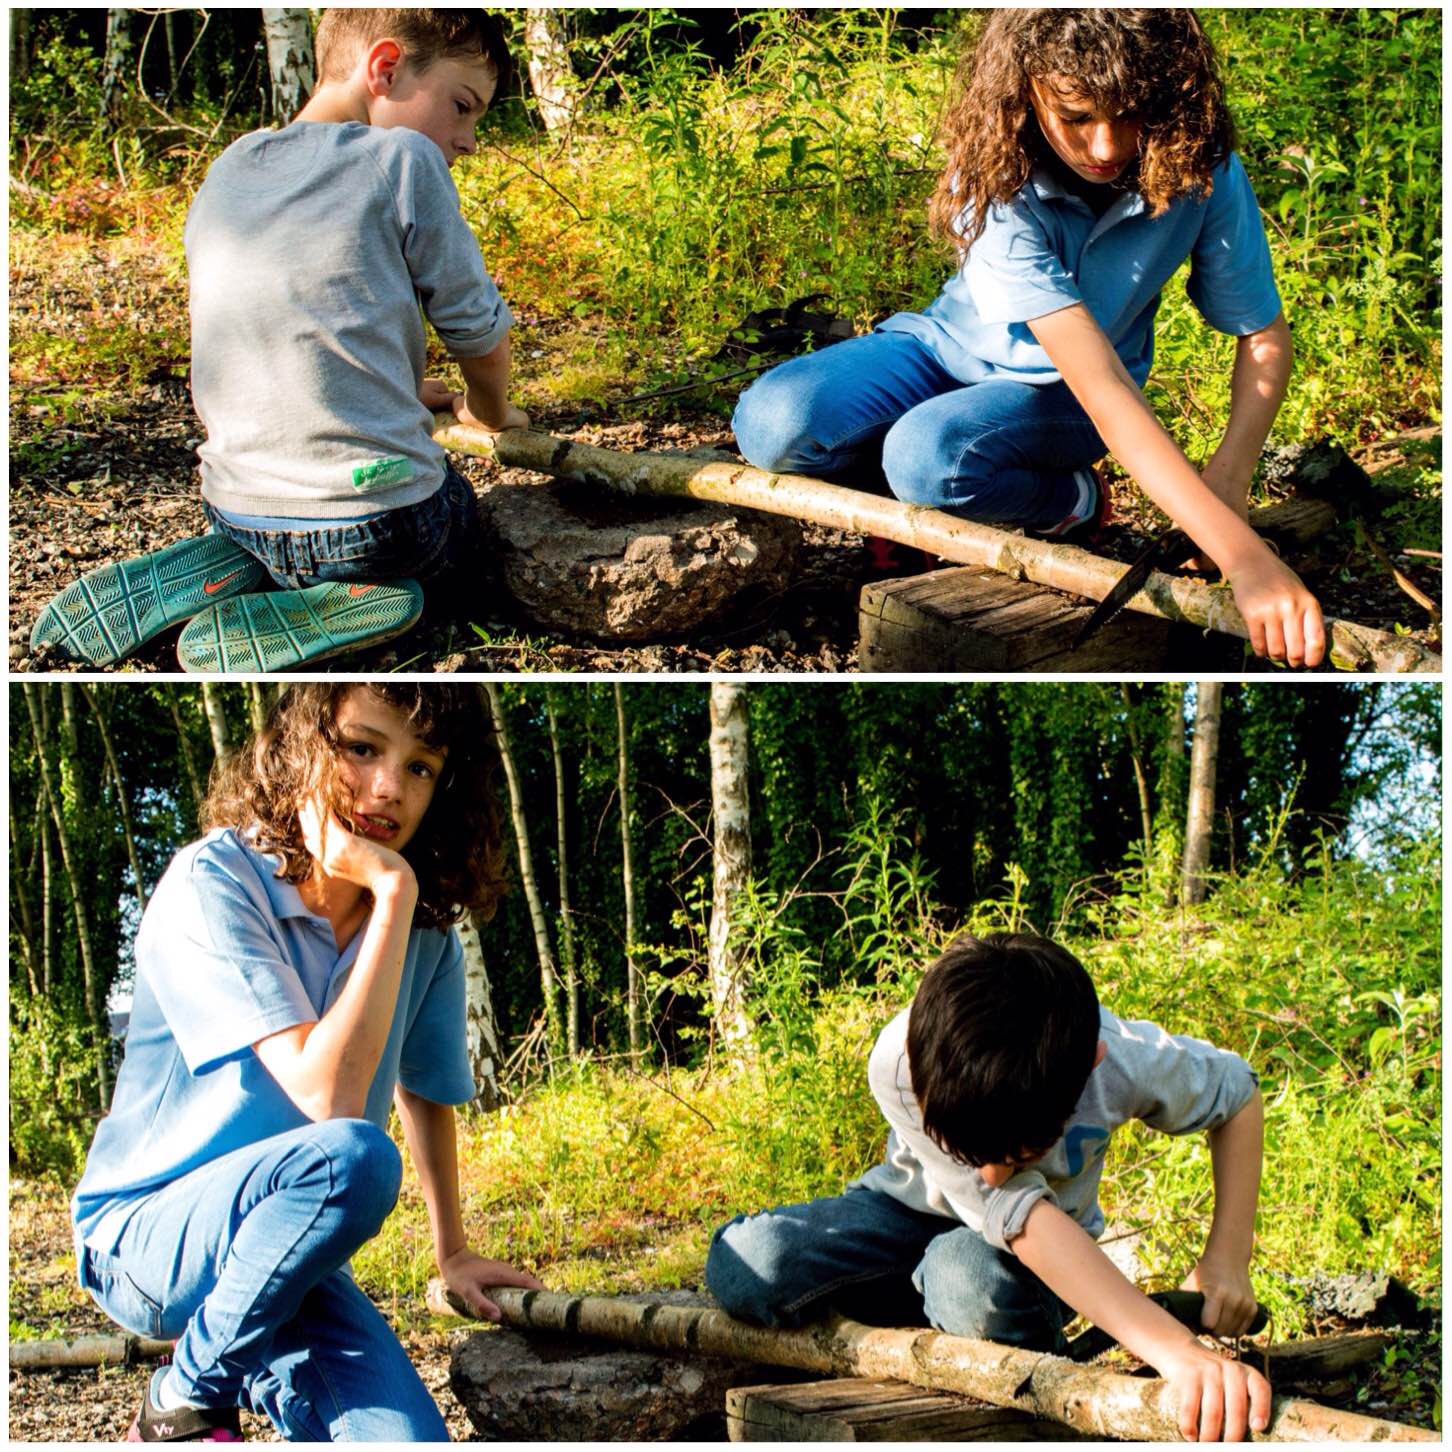
I had decided to introduce the kids to using a saw. The one I brought along was my little Laplander folding saw as I thought it would be easier for them to handle. It took a while as this is not something you can rush, however they enjoyed the experience.
Intro to the Laplander
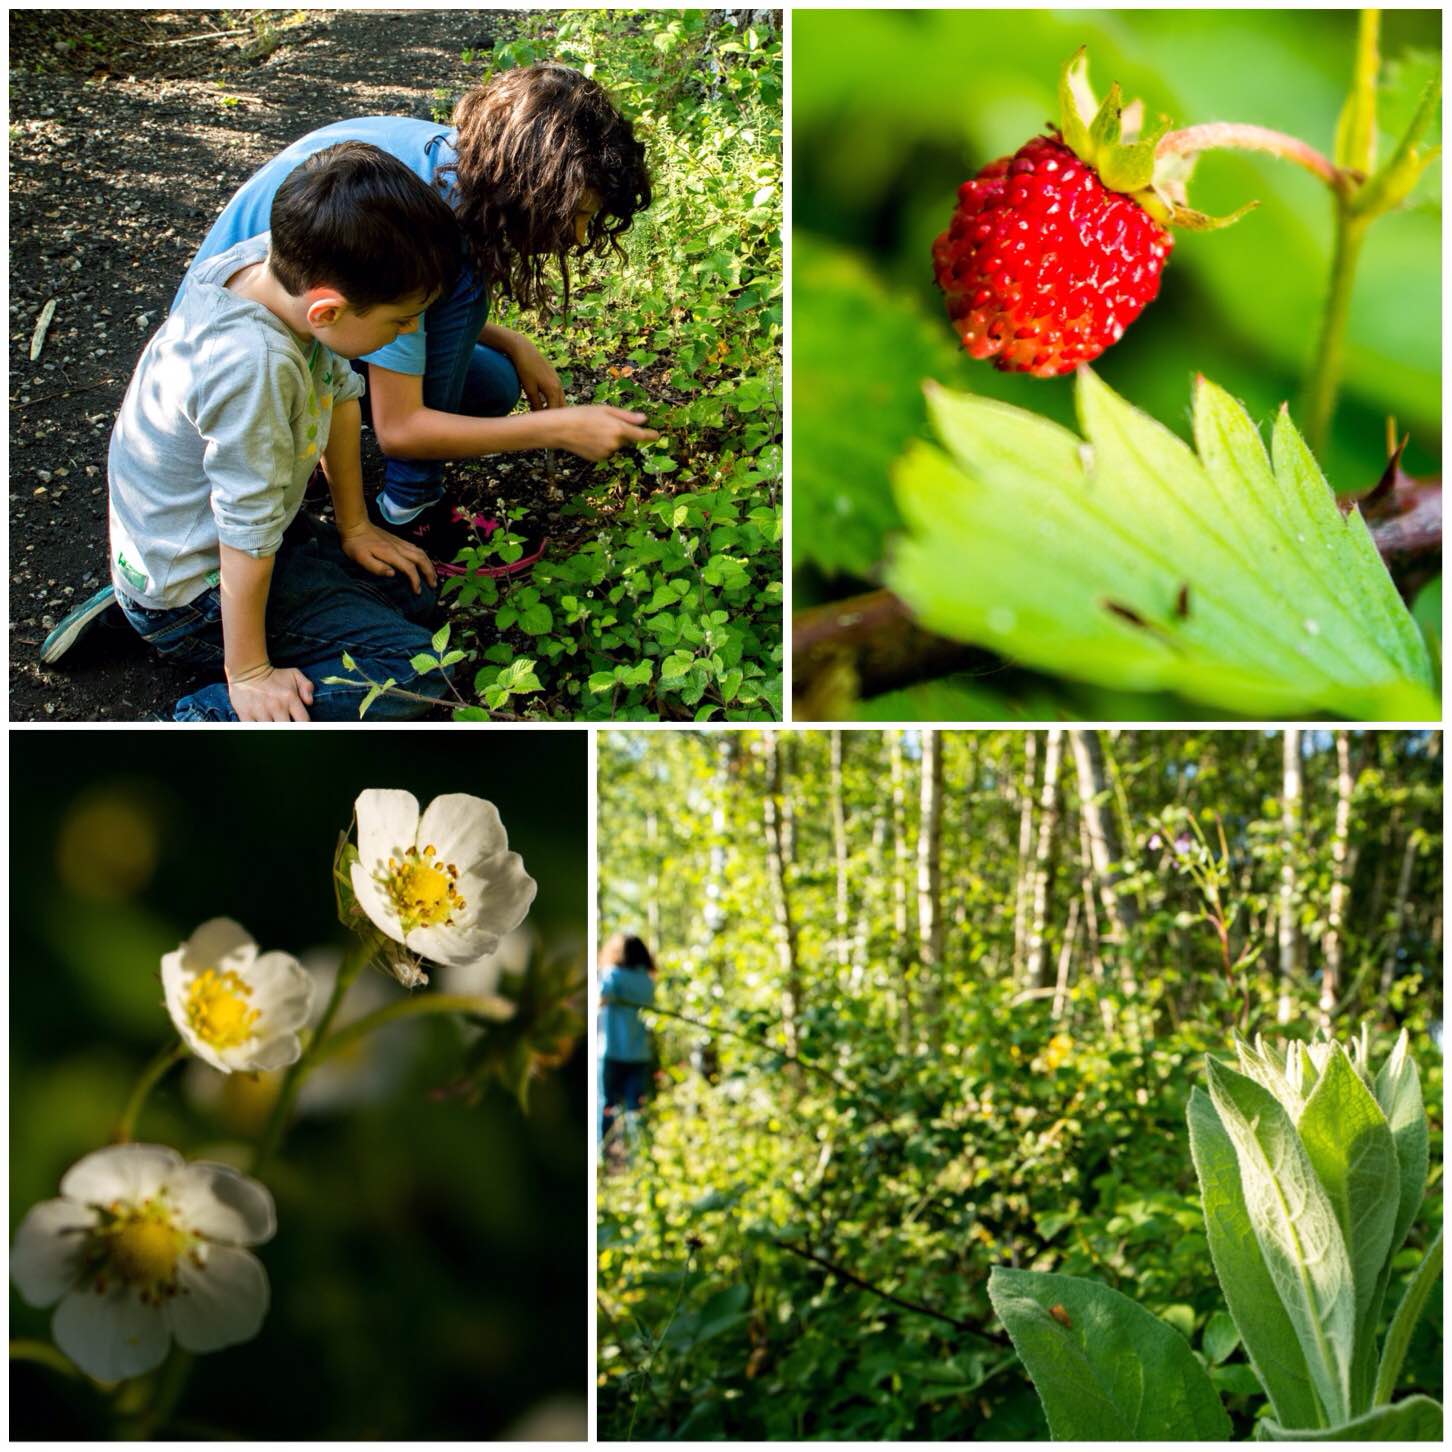
It was not all sawing though, nearby the kids spotted some Wild Strawberries coming through and enjoyed feeling the softness of the emerging Mullein leaves.
Strawberries and Mullein
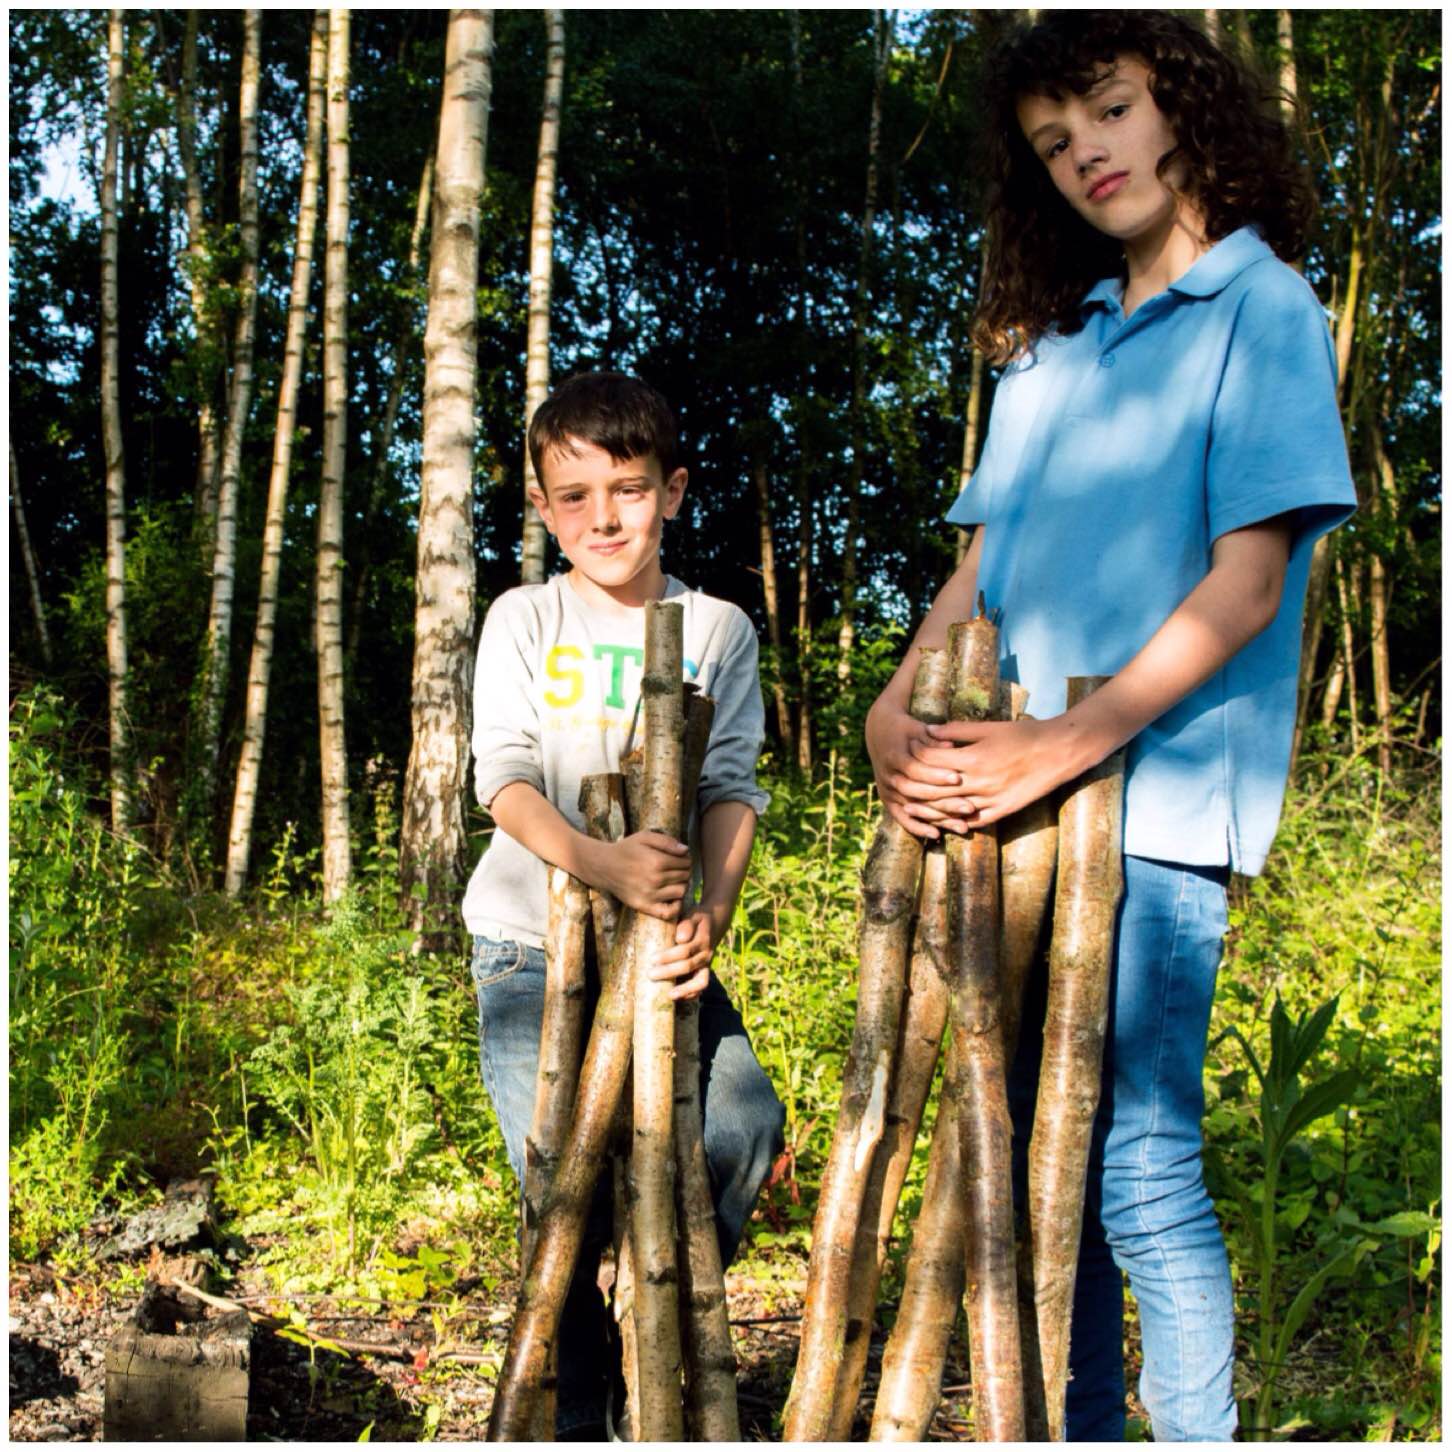
It was soon time to go back so after a quick pic of our harvest off we went – do not worry I carried most of them back :-), the kids carried two logs each. These logs will be used by the Marines this weekend to learn the art of carving.
Our harvest
I had promised them another ice cream drink when they got back and I added a few marshmallows as an extra treat.
Ice cream drinks to finish
As I will be in the woods for the next few nights I will not be posting up but rest assured I will be looking to carry the challenge on.
I got back from my travels from Cardiff this evening having been in class for most of the day and a few hours on the train.
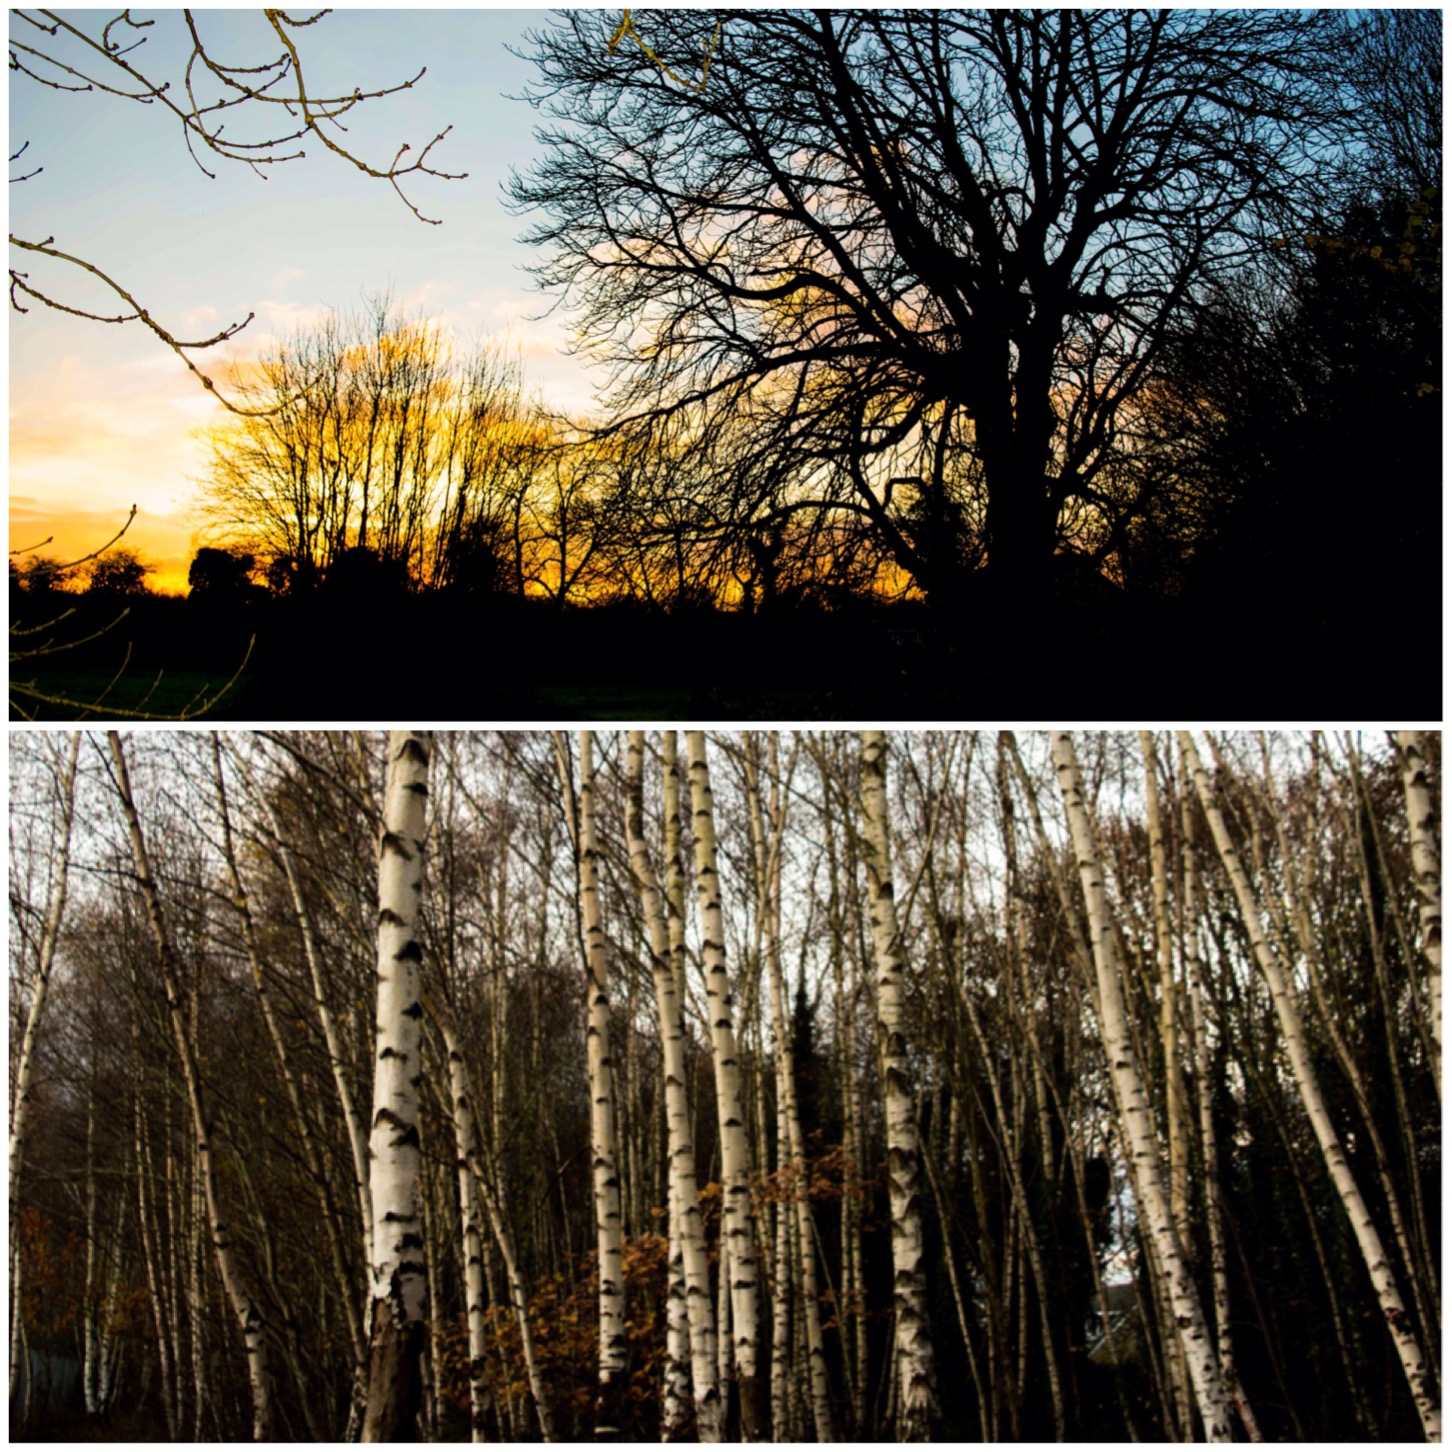
It was great to get home however it was too late to go out with the kids (being a school night). So once they were off to bed I took an evenings stroll to see if I could get any decent shots of the countryside as the sun was setting for the 30 Days Challenge.
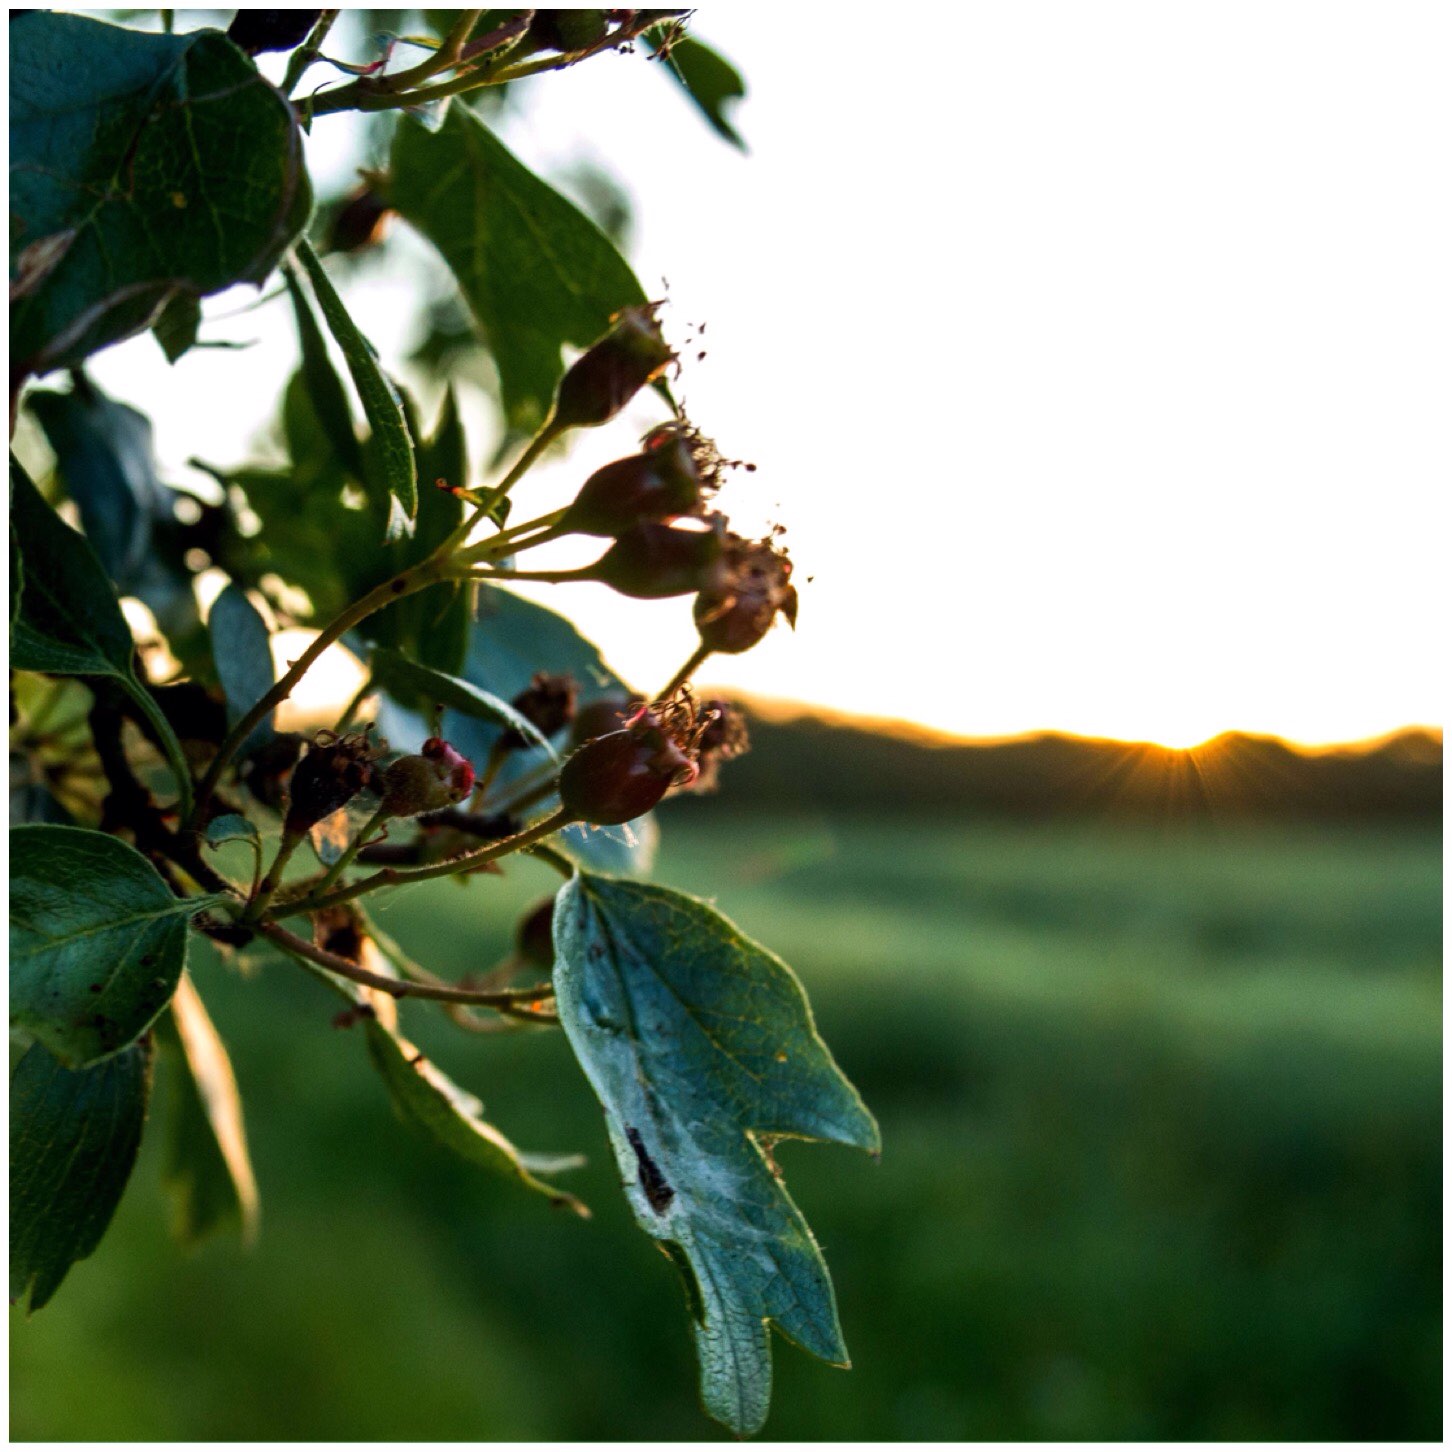
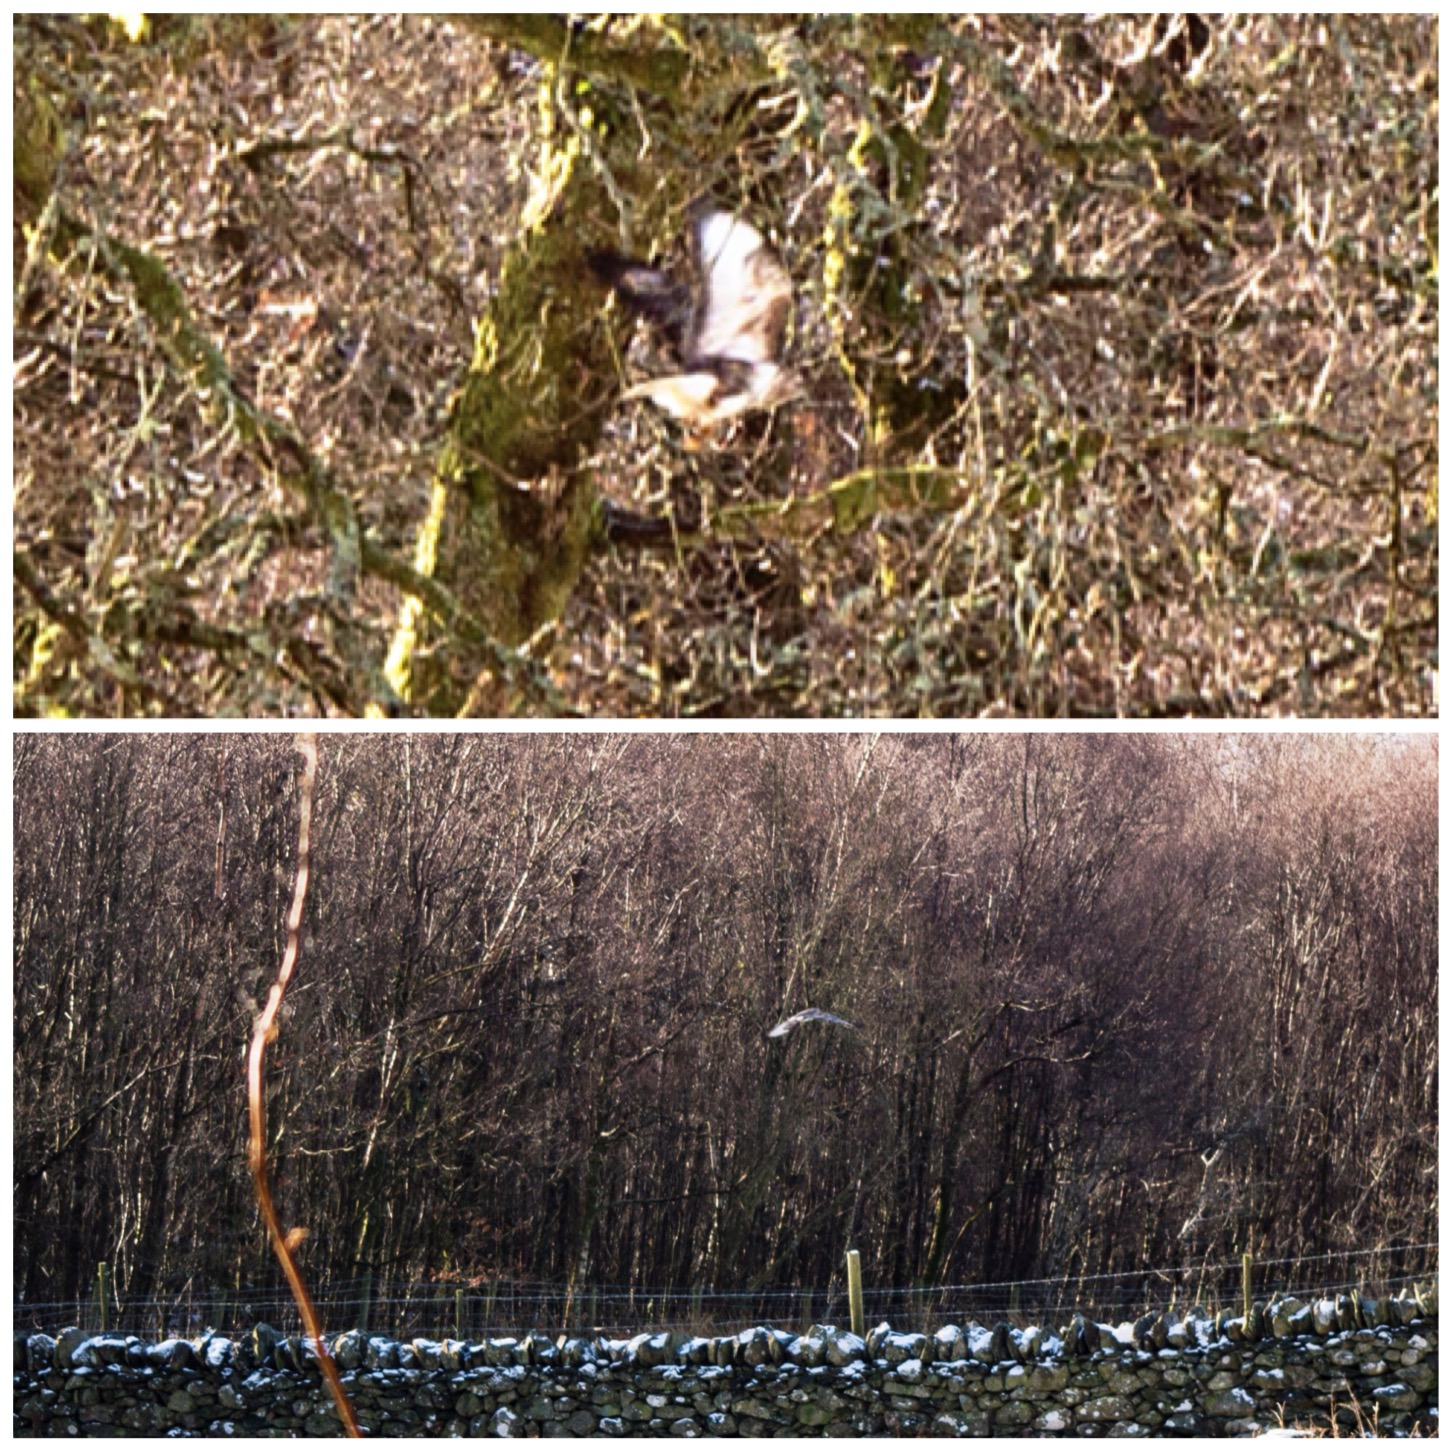
Just as the sun was setting over the Frith woods I got this nice shot of the Hawthorn Haws developing.
Hawthorn
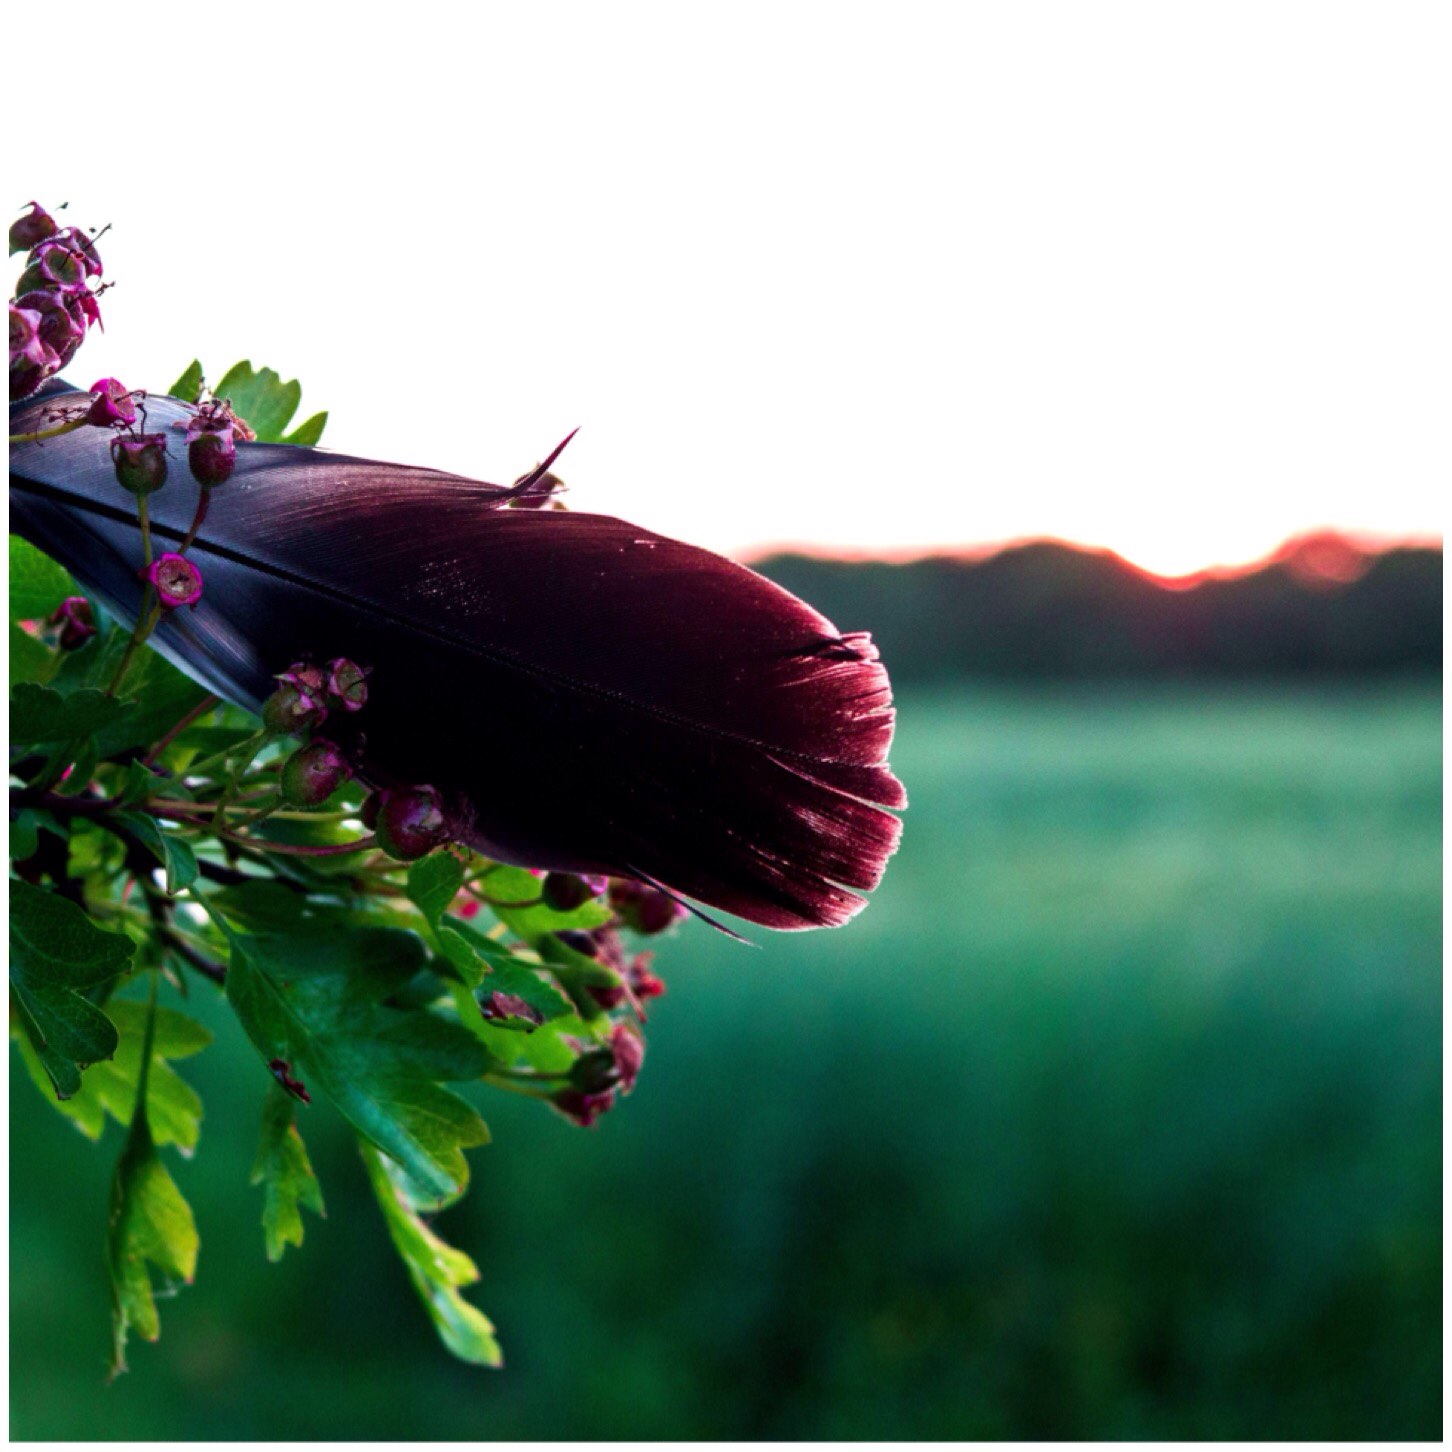
Caught up in the Hawthorn tree I spotted a small pigeon feather swaying in the breeze.
Feather trap
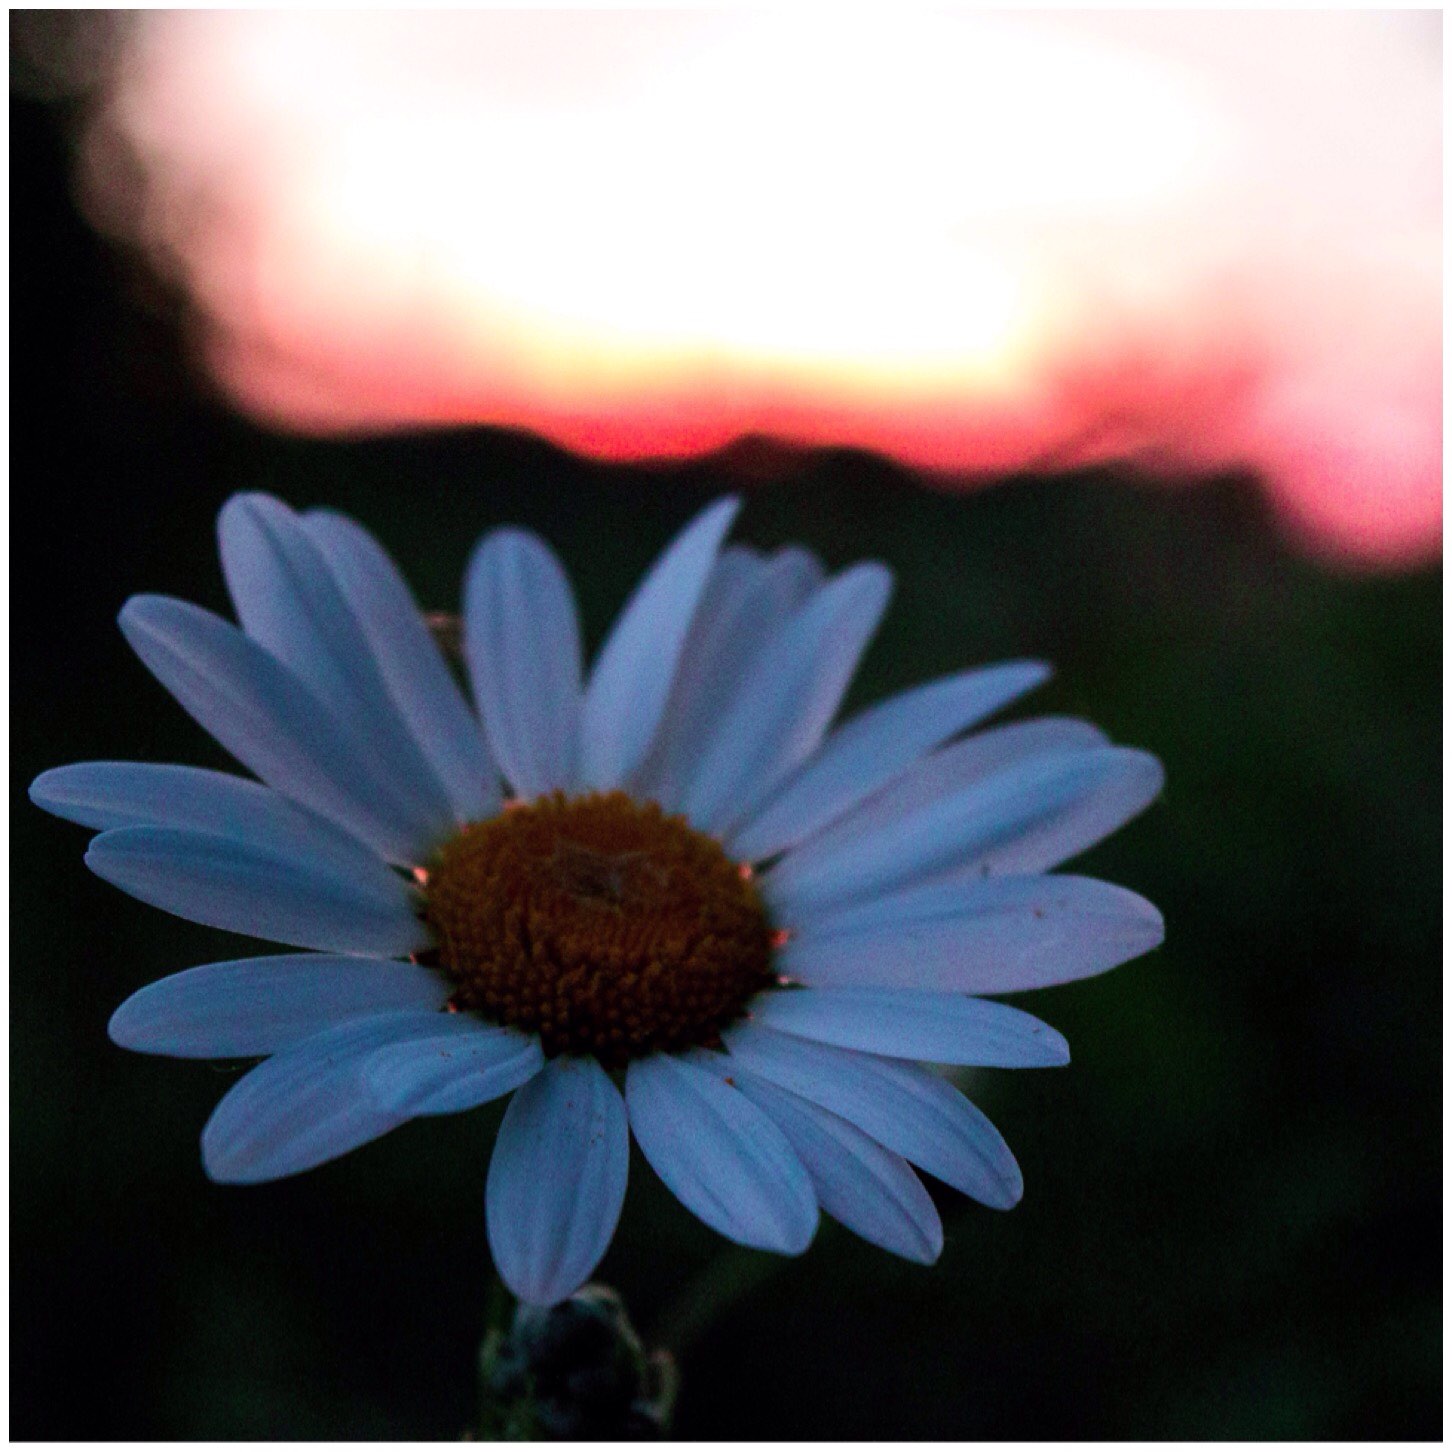
Below the Hawthorn were some Oxeye Dasies.
Oxeye Daisy
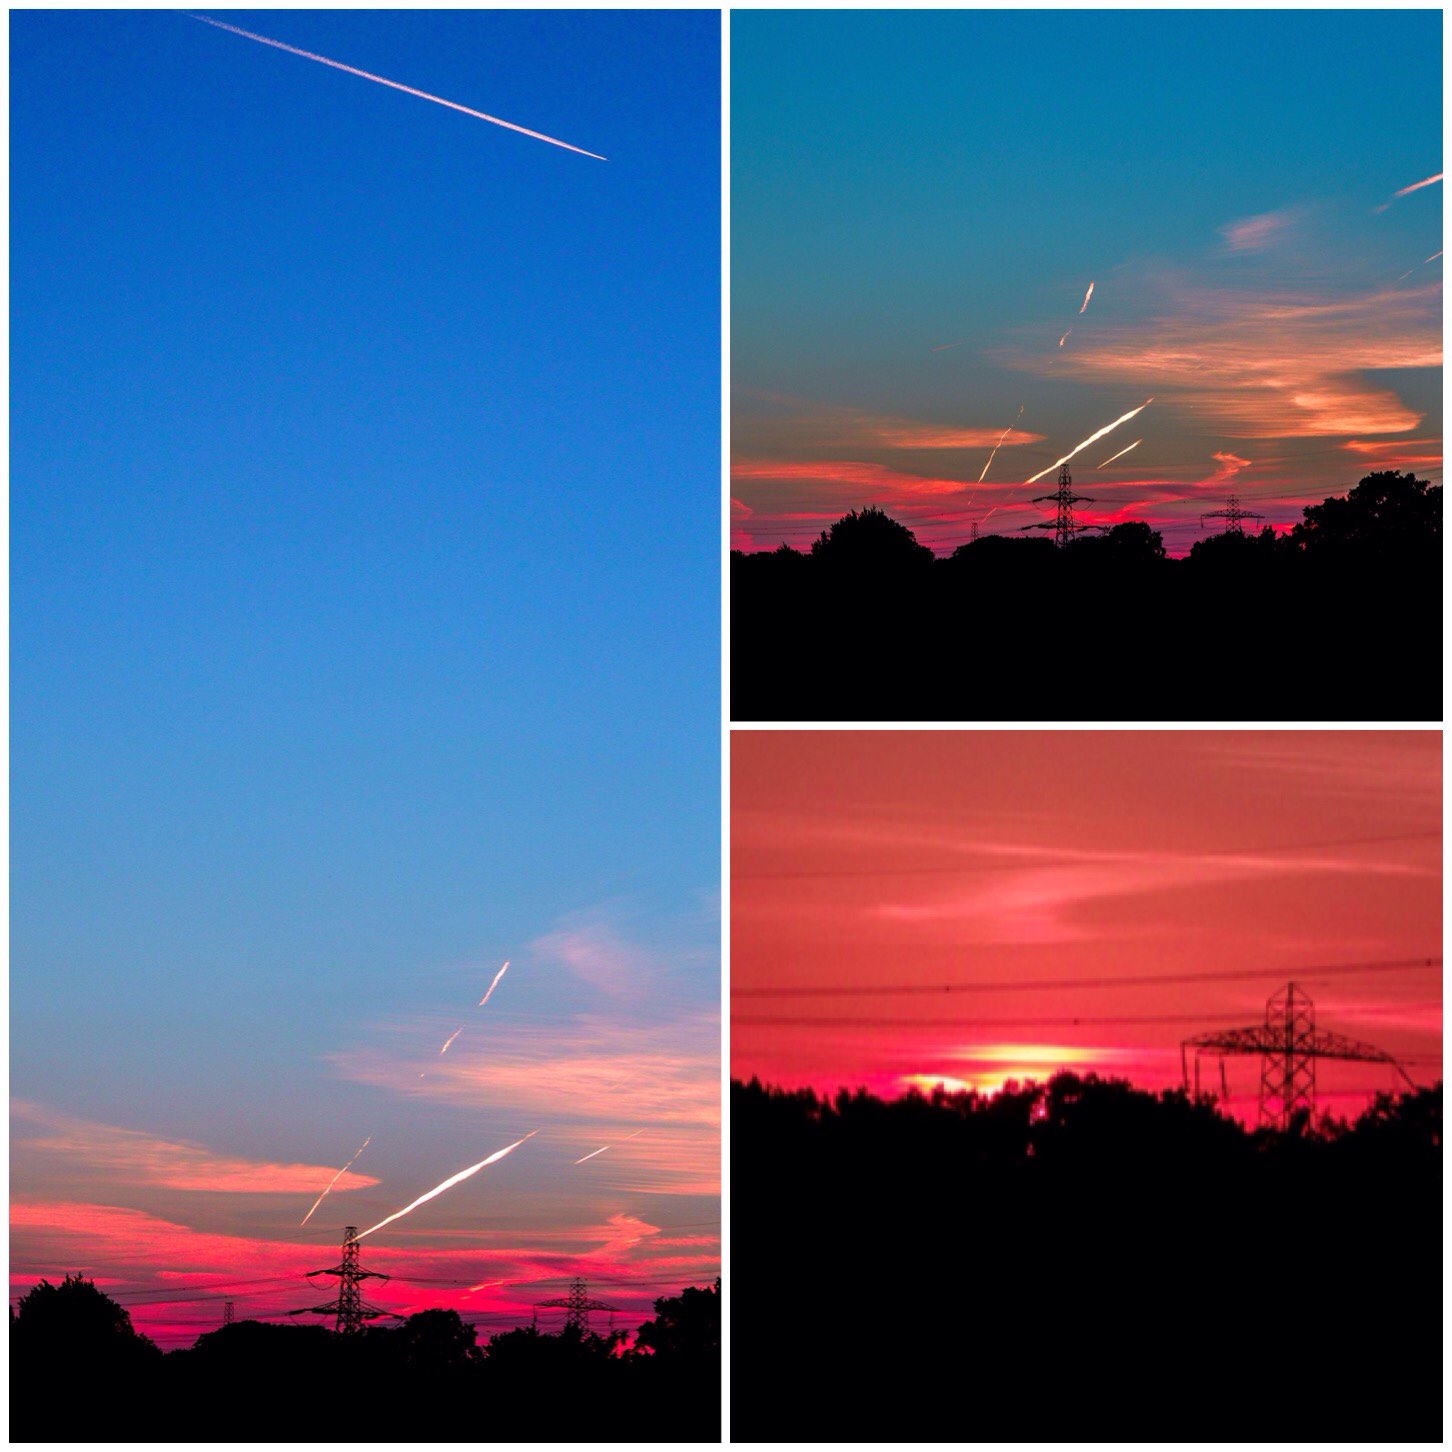
Slowly over the next little while the sun dissapeared with a lovely tinge off red. When I uploaded the pictures to my computer I increased the contrast to darken the shaded areas it had the effect of deepening the reds (I like the effect so decided to keep it).
Disappearing sun
Tomorrow night it will be time to get out with the kids again to see what we can find.
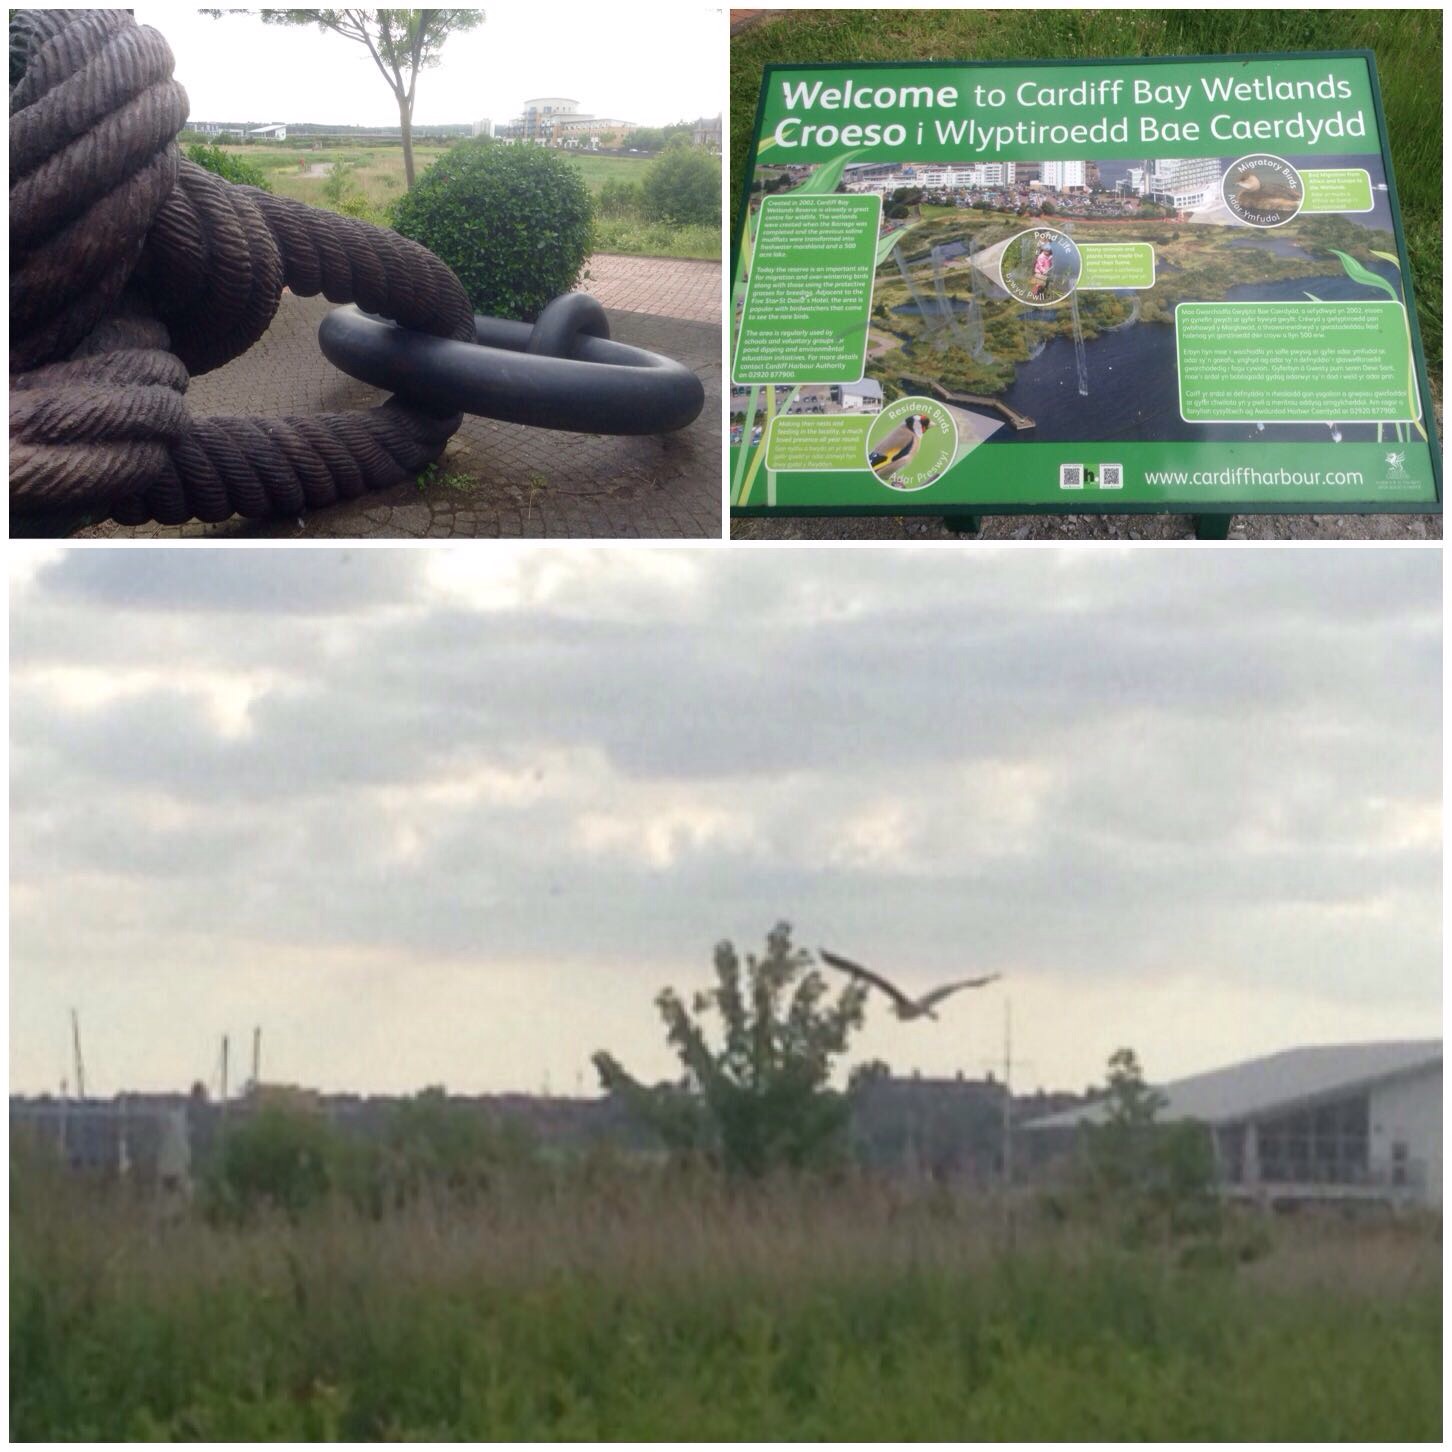
Day 7 of the 30 Day Challenge I found quite relaxing. I spent much of today cooped up in a very enclosed office training new staff. It was very warm and claustrophobic so a trip down to the Cardiff Bay wetlands was just the tonic I needed.
My day had been very enclosed up to this point so it was good to get out and about in this wetlands environment. As soon as I walked into the wetlands I caused a stir. I decided to have a look at one area and promptly disturbed a Heron which took flight instantly.
Cardiff Bay Wetlands
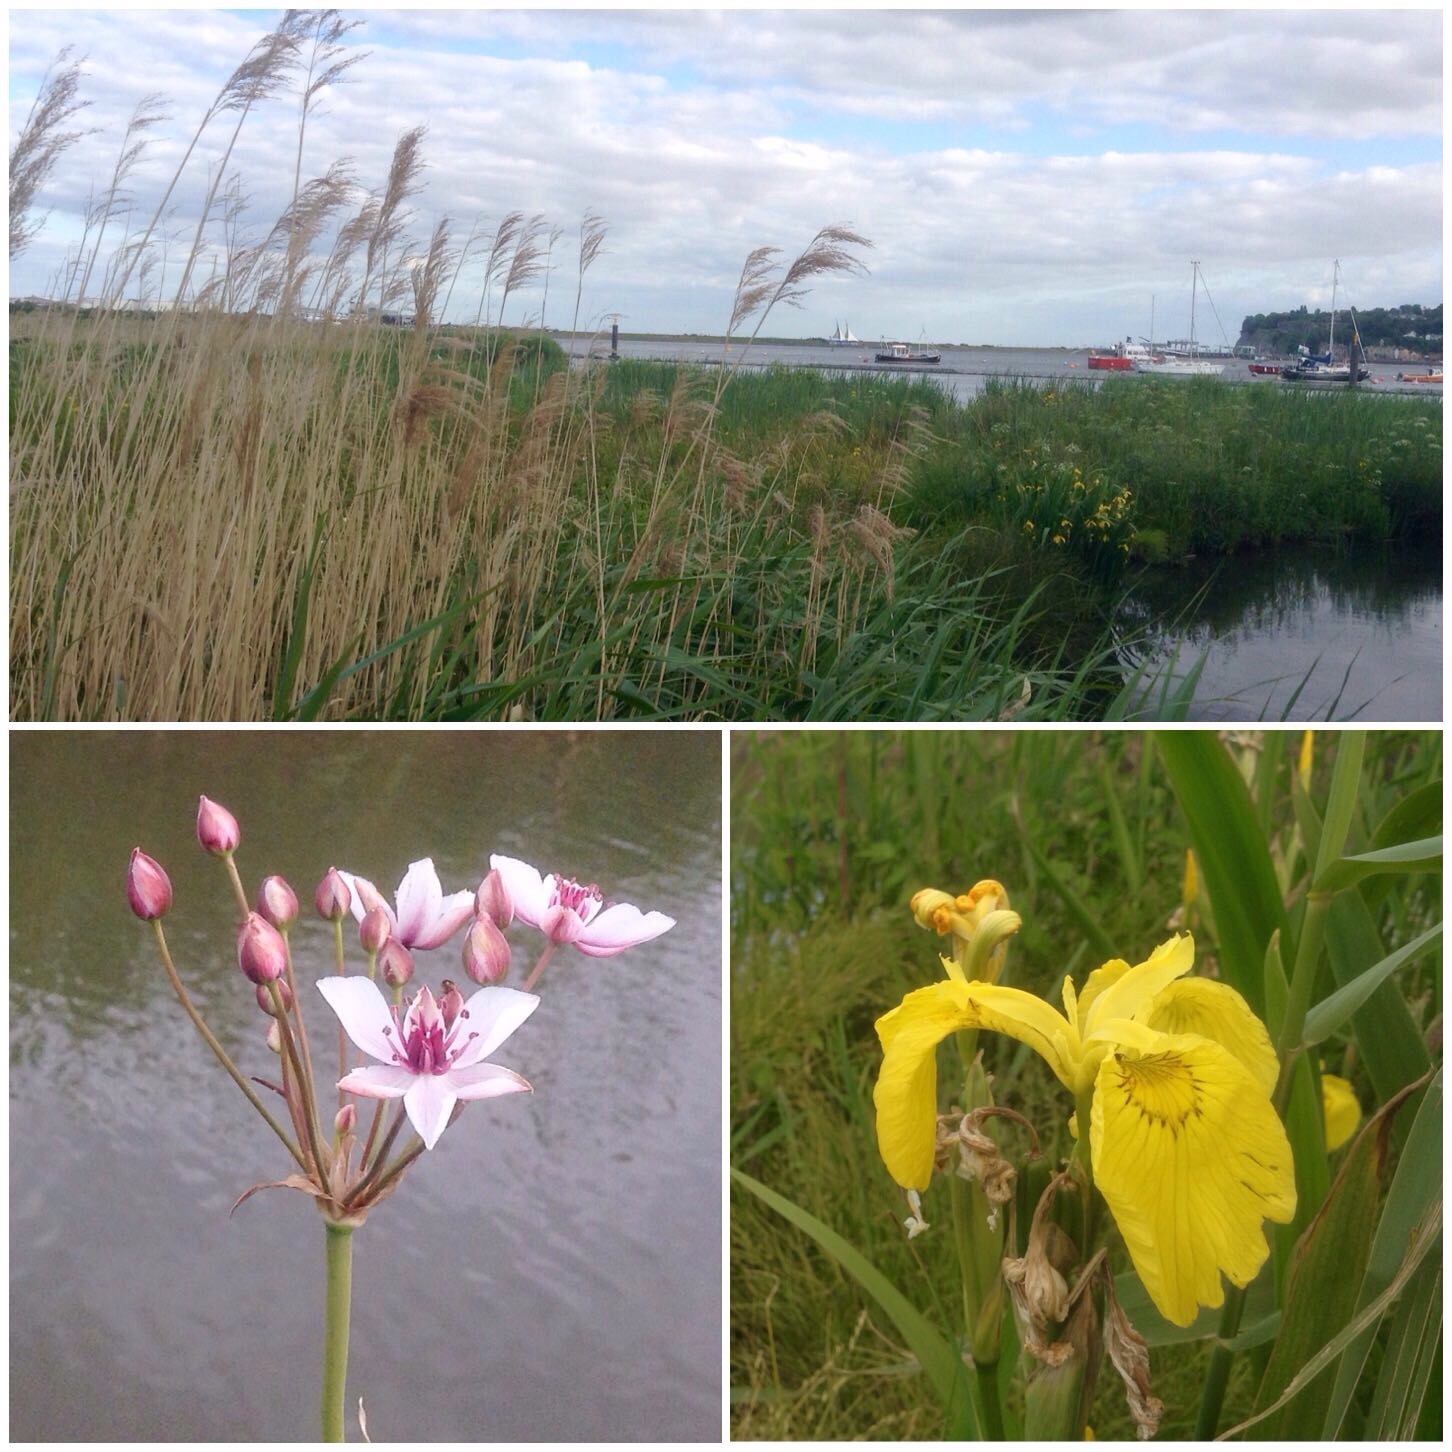
I hoped to get out into the wetlands themselves but it was not to be. On the outskirts of the wetlands there was plenty to see in terms of common reed, the flowering rush and the yellow iris.
Lovely flowers and reeds
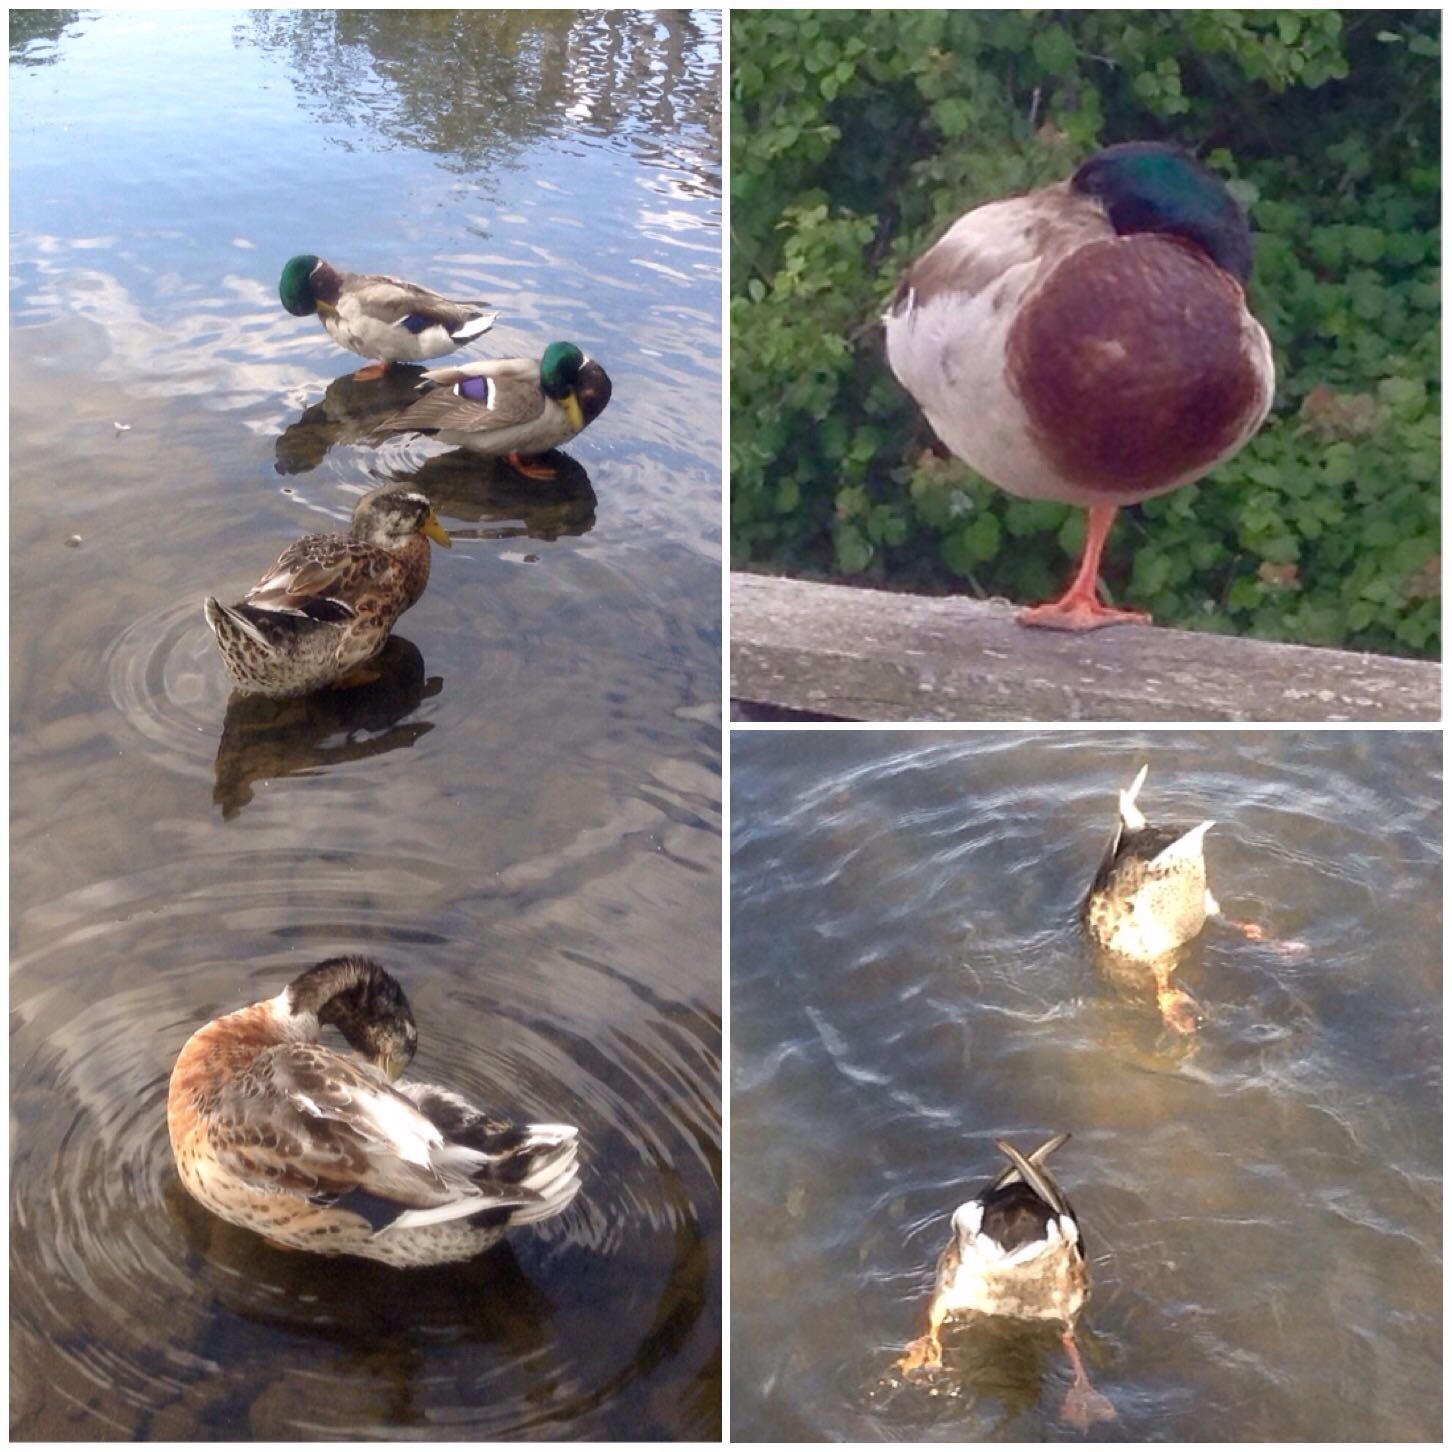
I spent a lot of time standing on the wooden walkway watching the ducks. They were very busy either preening themselves, resting on one foot or heads down and feeding.
The ducks were keeping busy
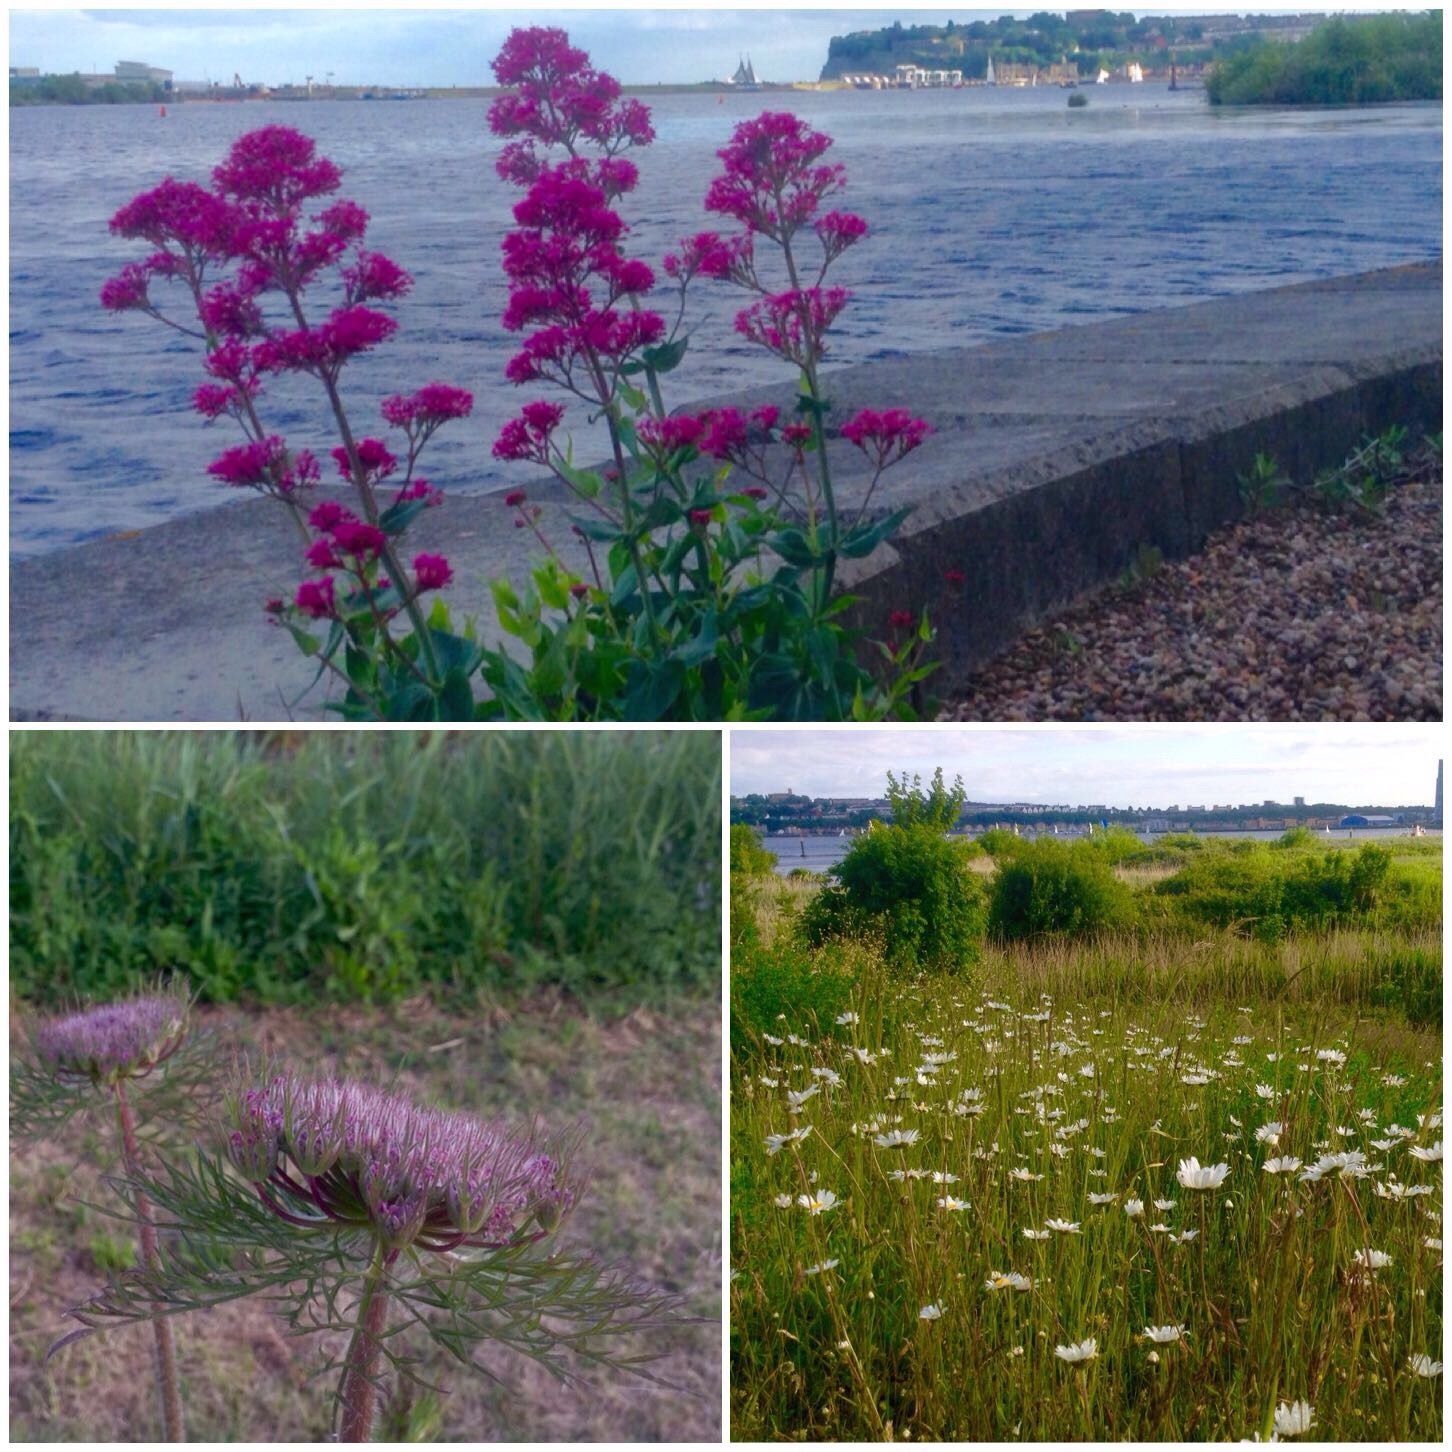
It was soon time to head back to meet some friends (Cap’n Badger and David Jones) in Cardiff town centre and I was given some spectacular views on the way.
A final few flowers
I needed these couple of hours to myself just to re-set my internal clocks.
Work has taken me to Cardiff tonight so for the 30 Day Challenge I am once again on my own.
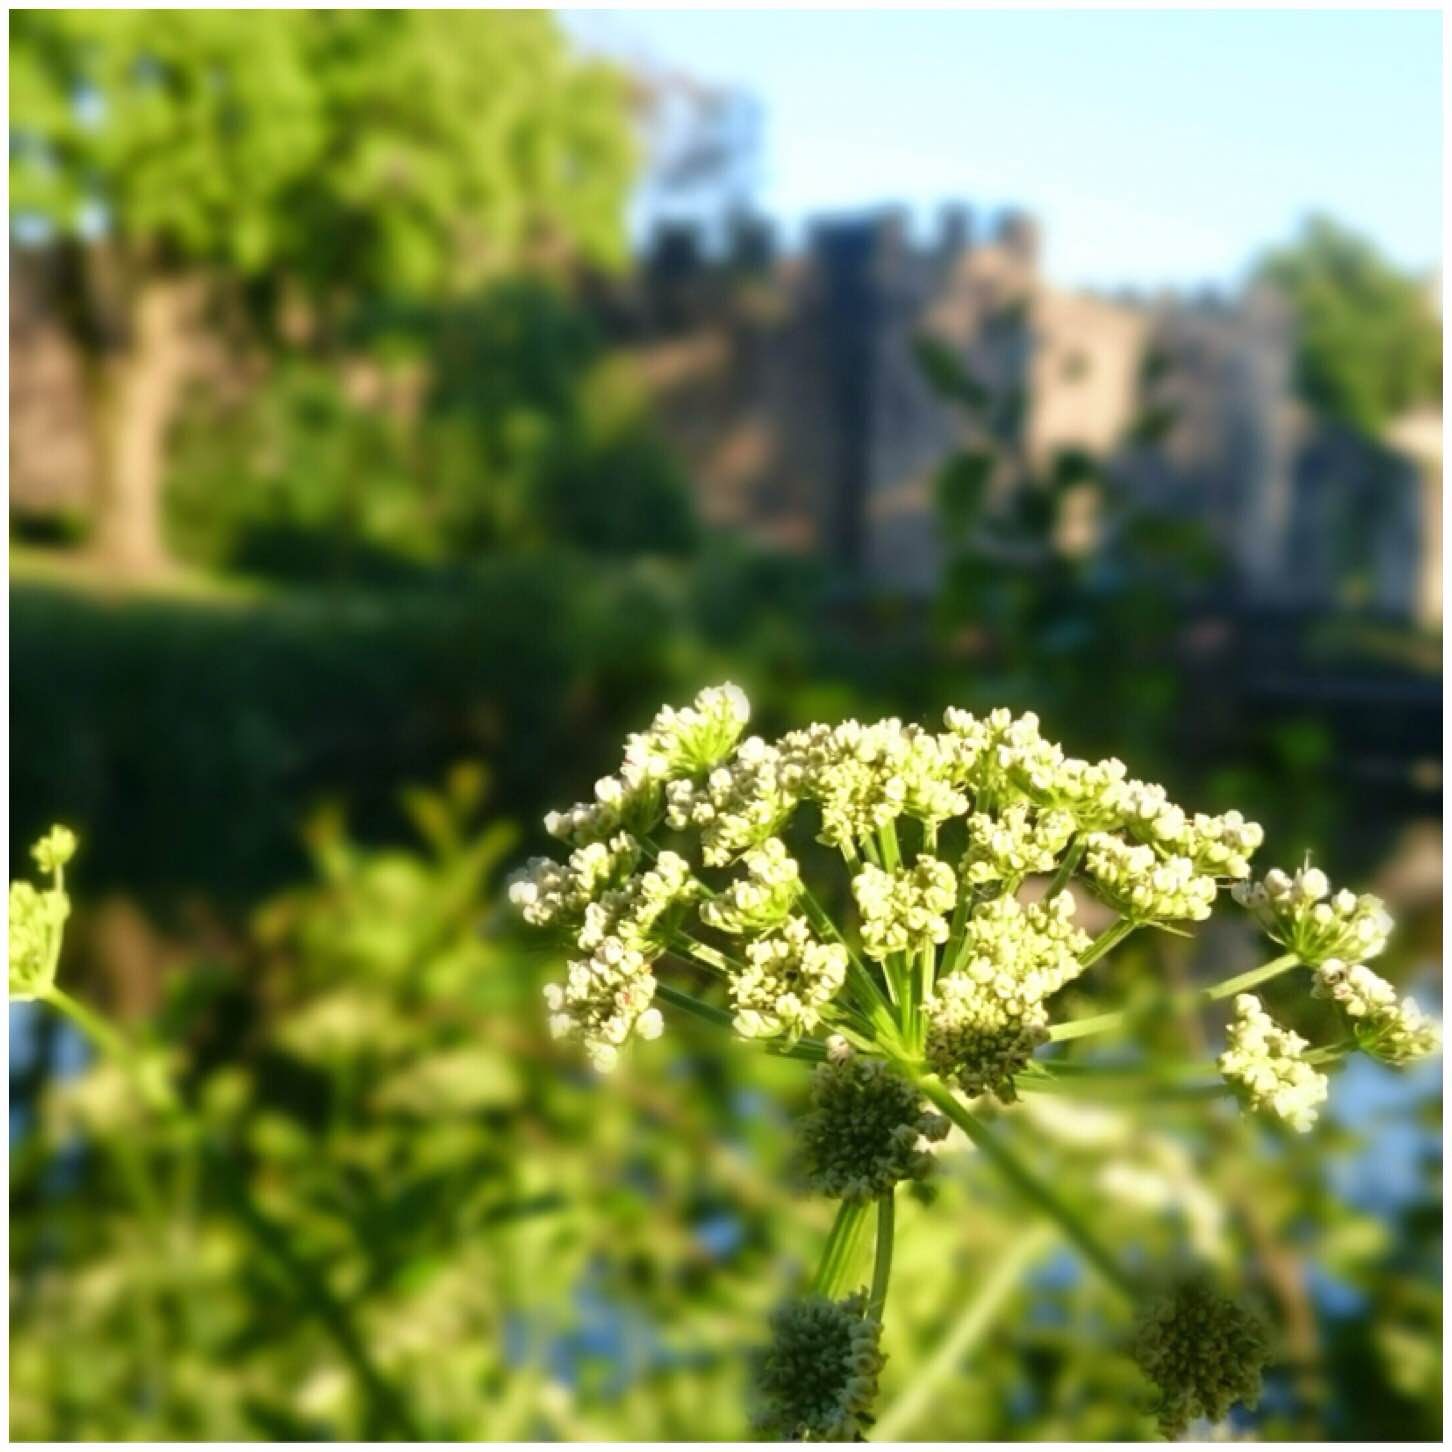
The hotel I am in overlooks Cardiff Castle so for tonights wander I decided to have a look at Bute Park which is located next to Cardiff Castle.
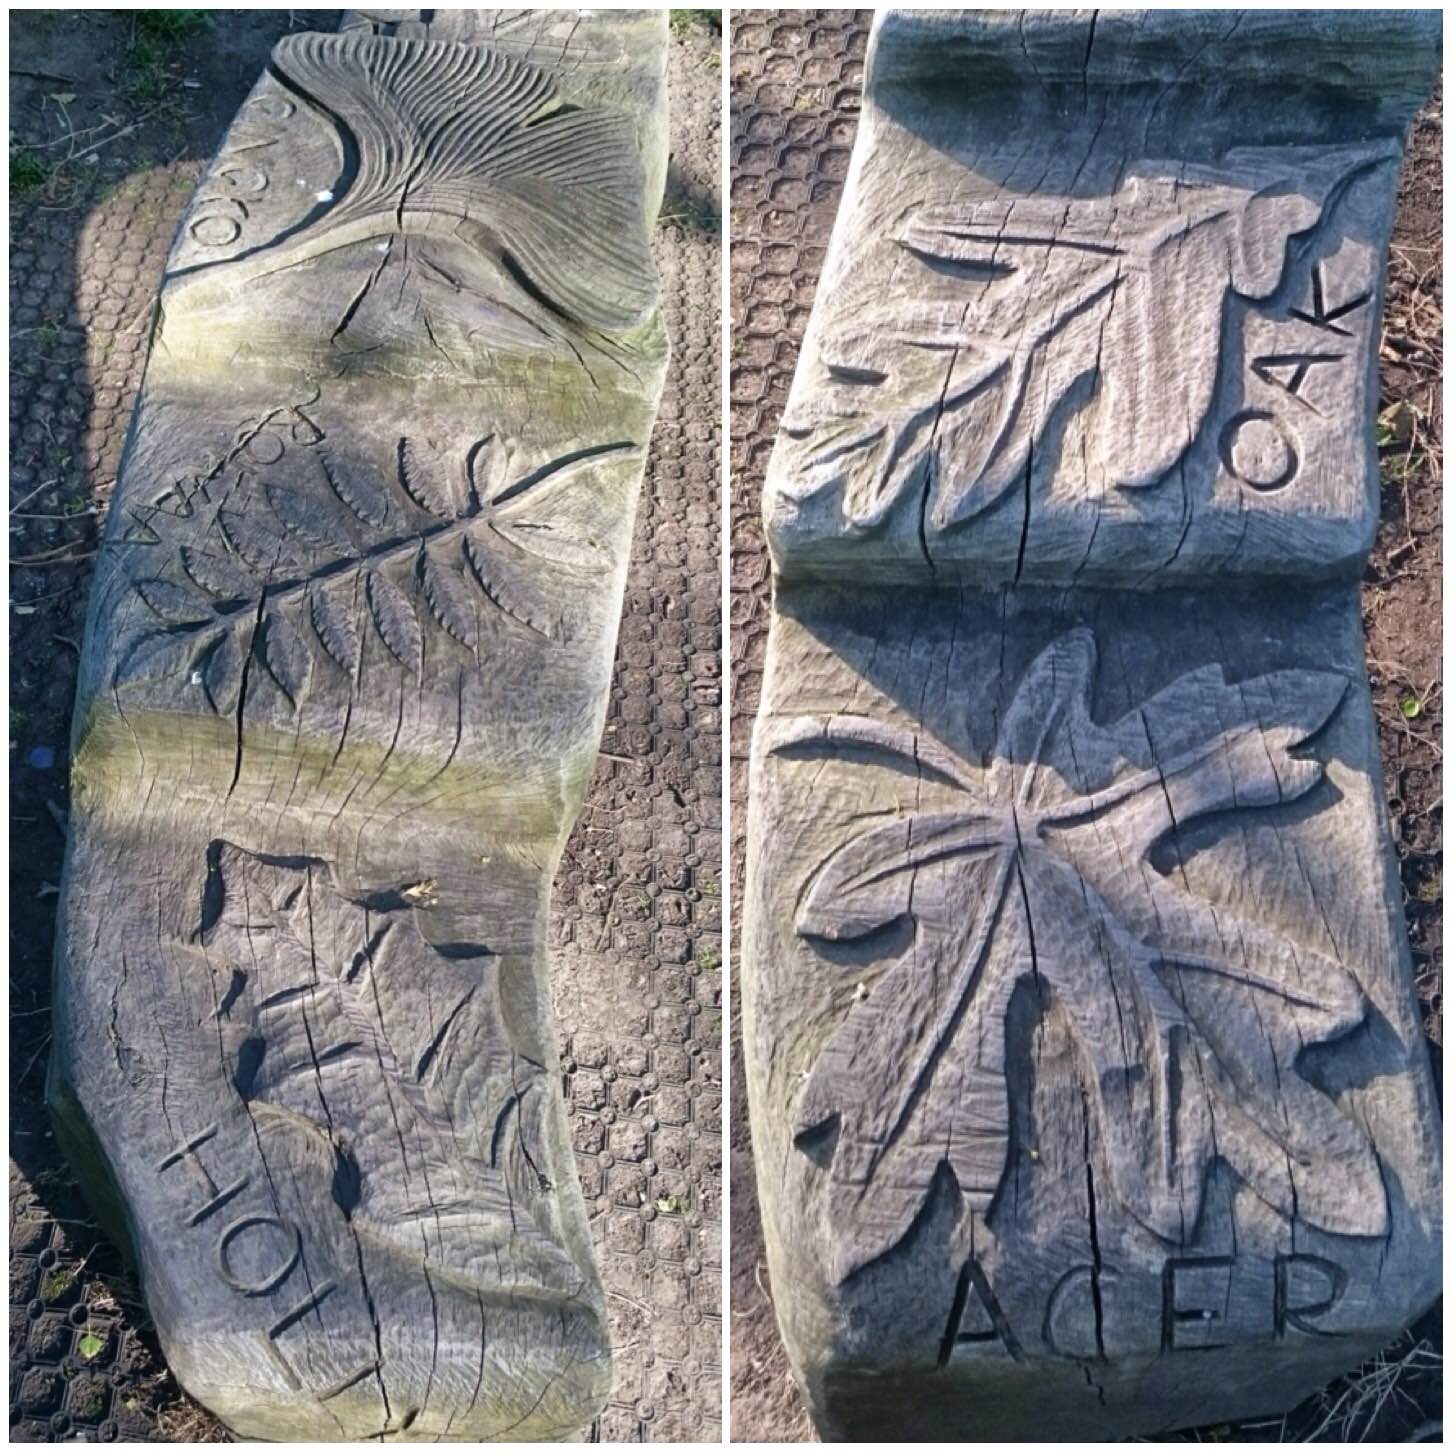
The first thing I found when I entered the park was this lovely carved bench identifying different trees by their leaves – better than any ID book.
An educating bench
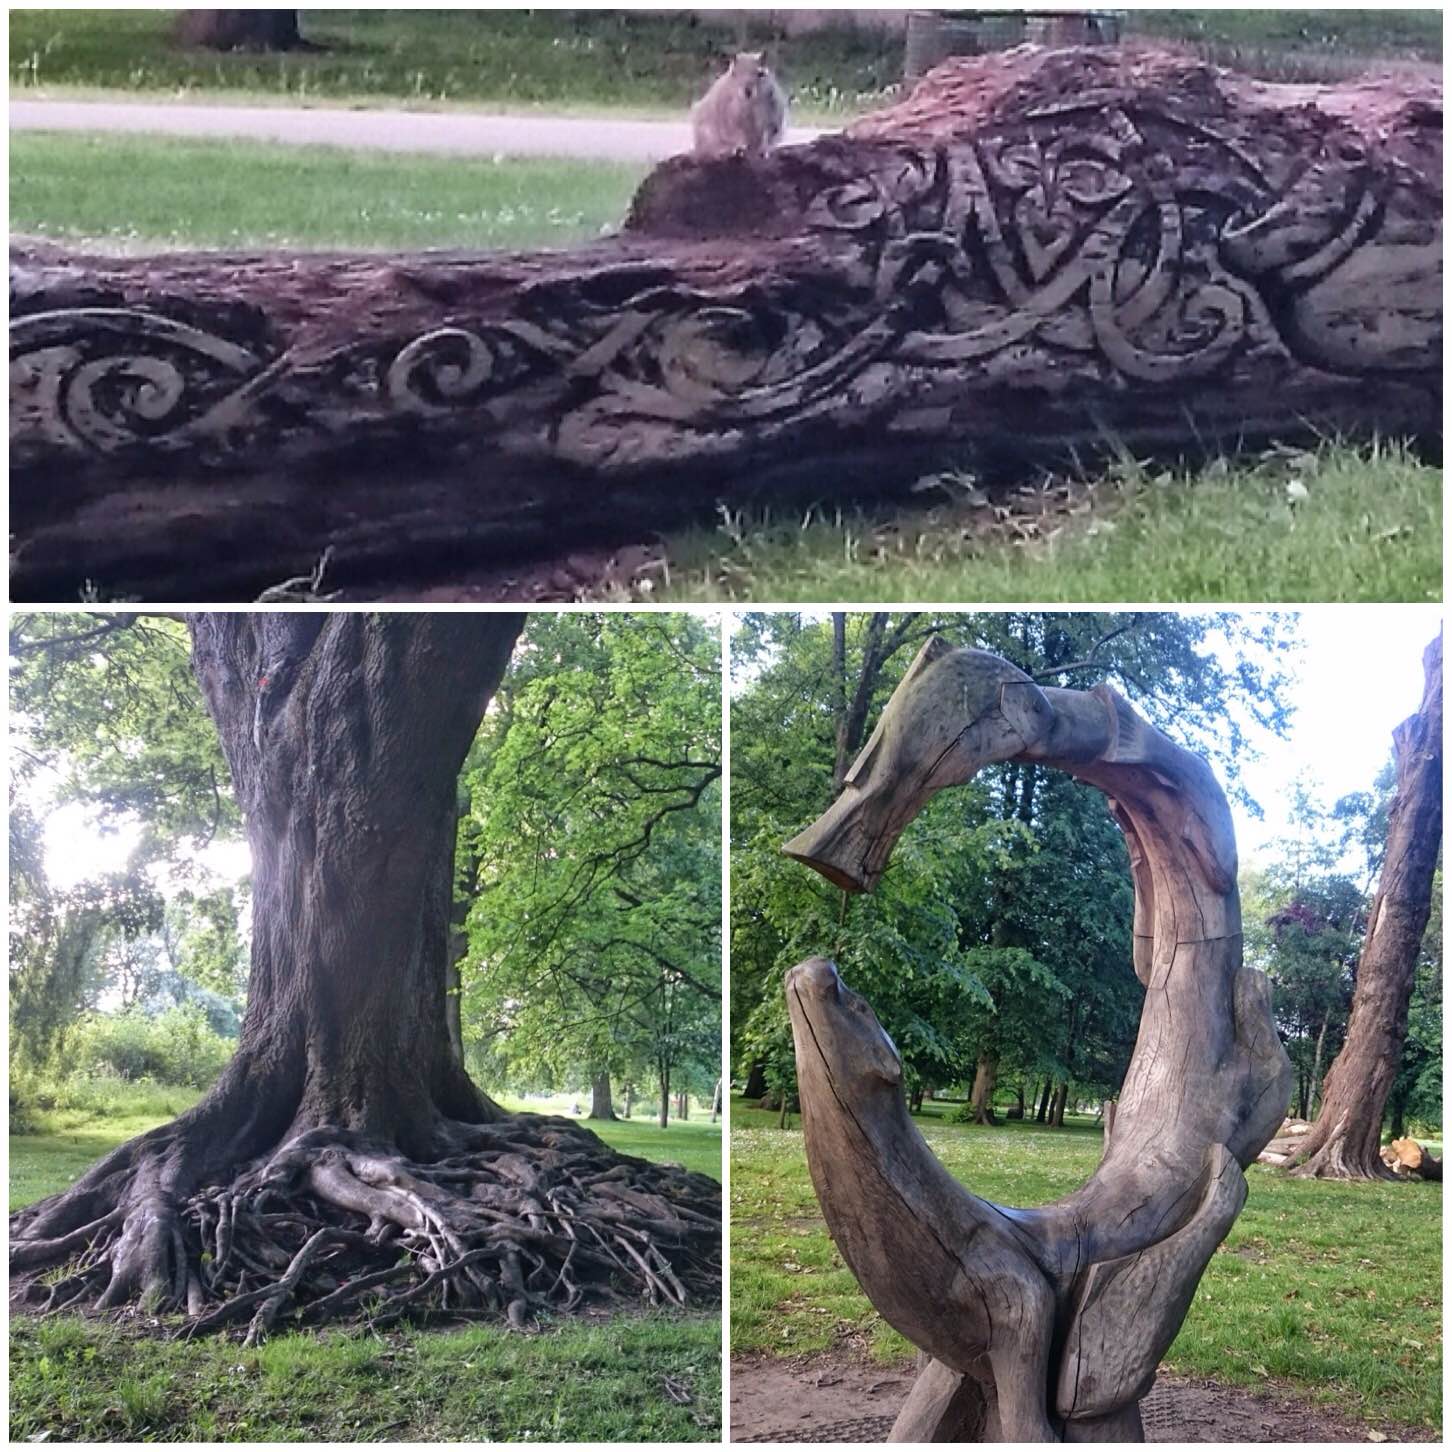
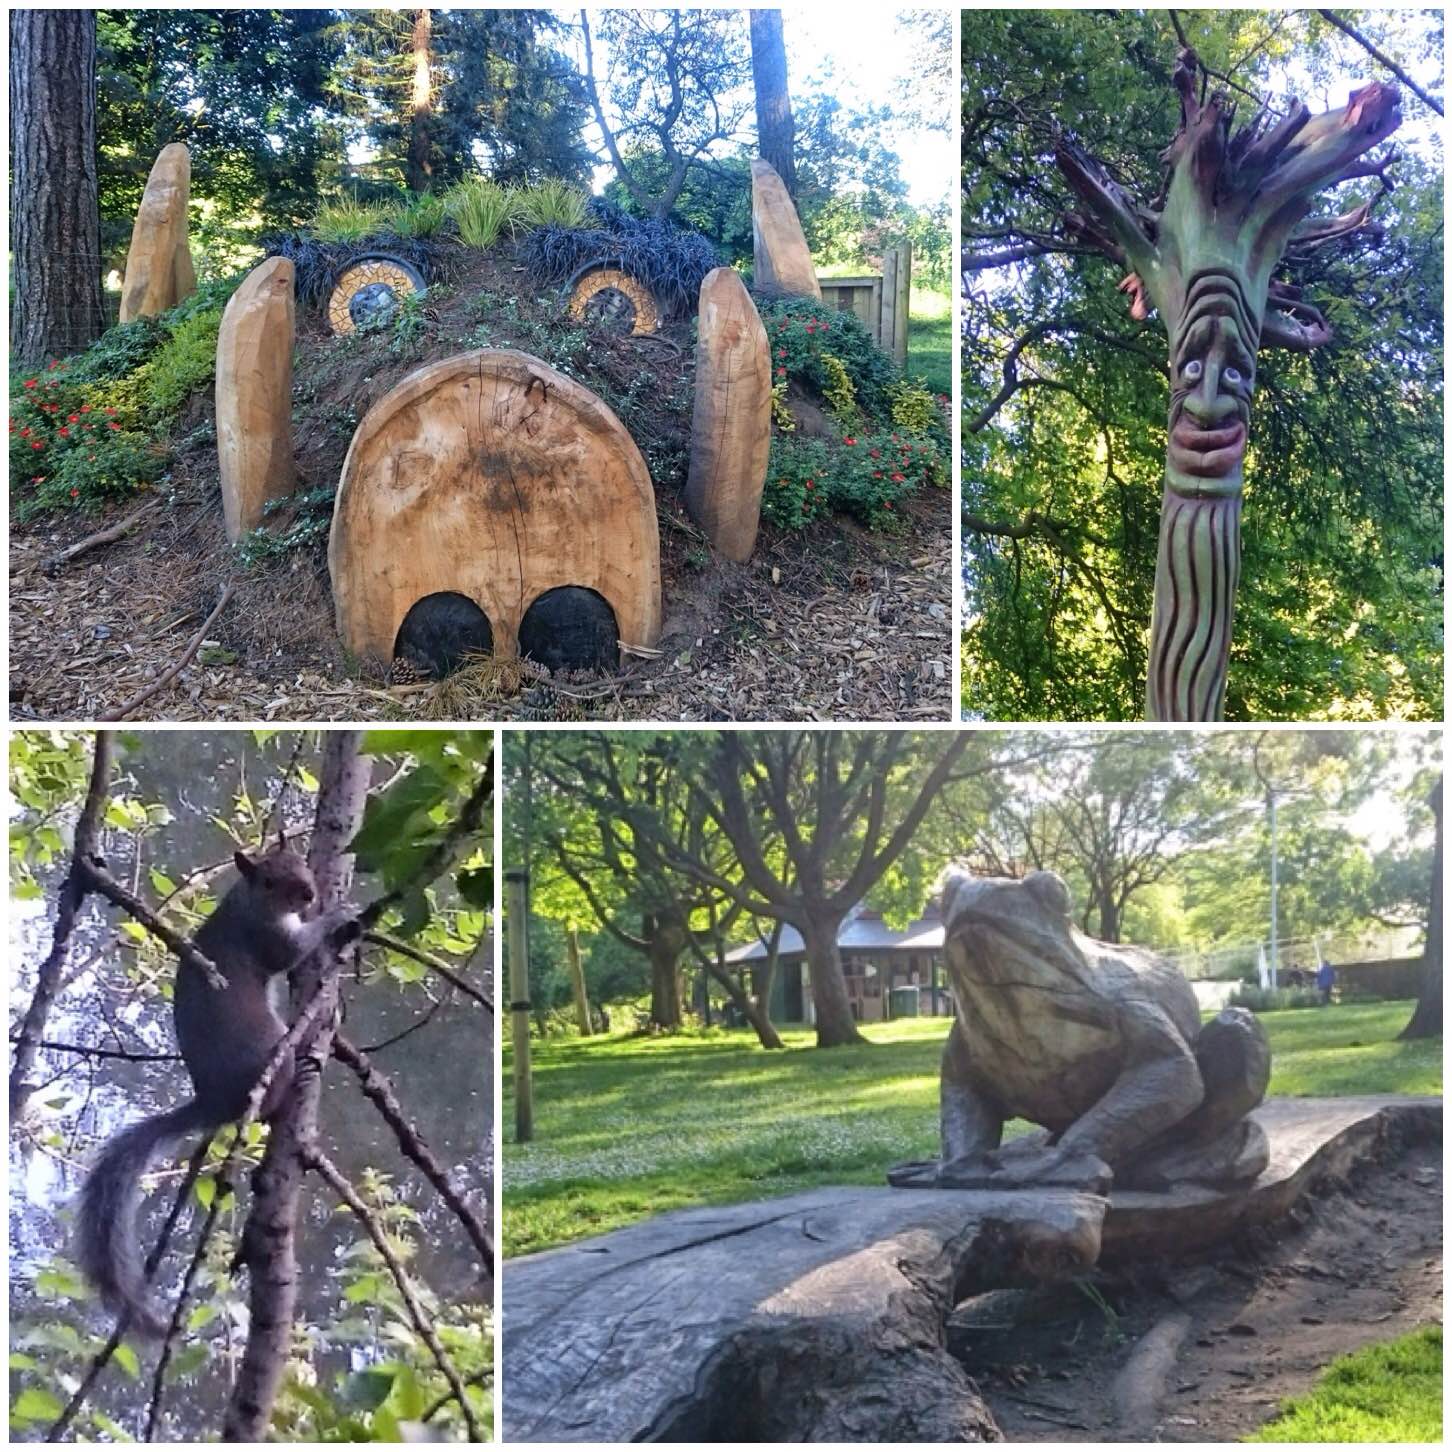
The park is a beautiful place to have a bimble in the evening. Before I knew it carvings (natural and man made) were popping up everywhere with the odd little squirrel staring me out.
Man made and natural sculptures
I took all the pictures with my phone camera (Sony Z3) and was quite chuffed to get close enough to the little fella in the bottom left picture to get a decent shot of him.
Spot the real one 🙂
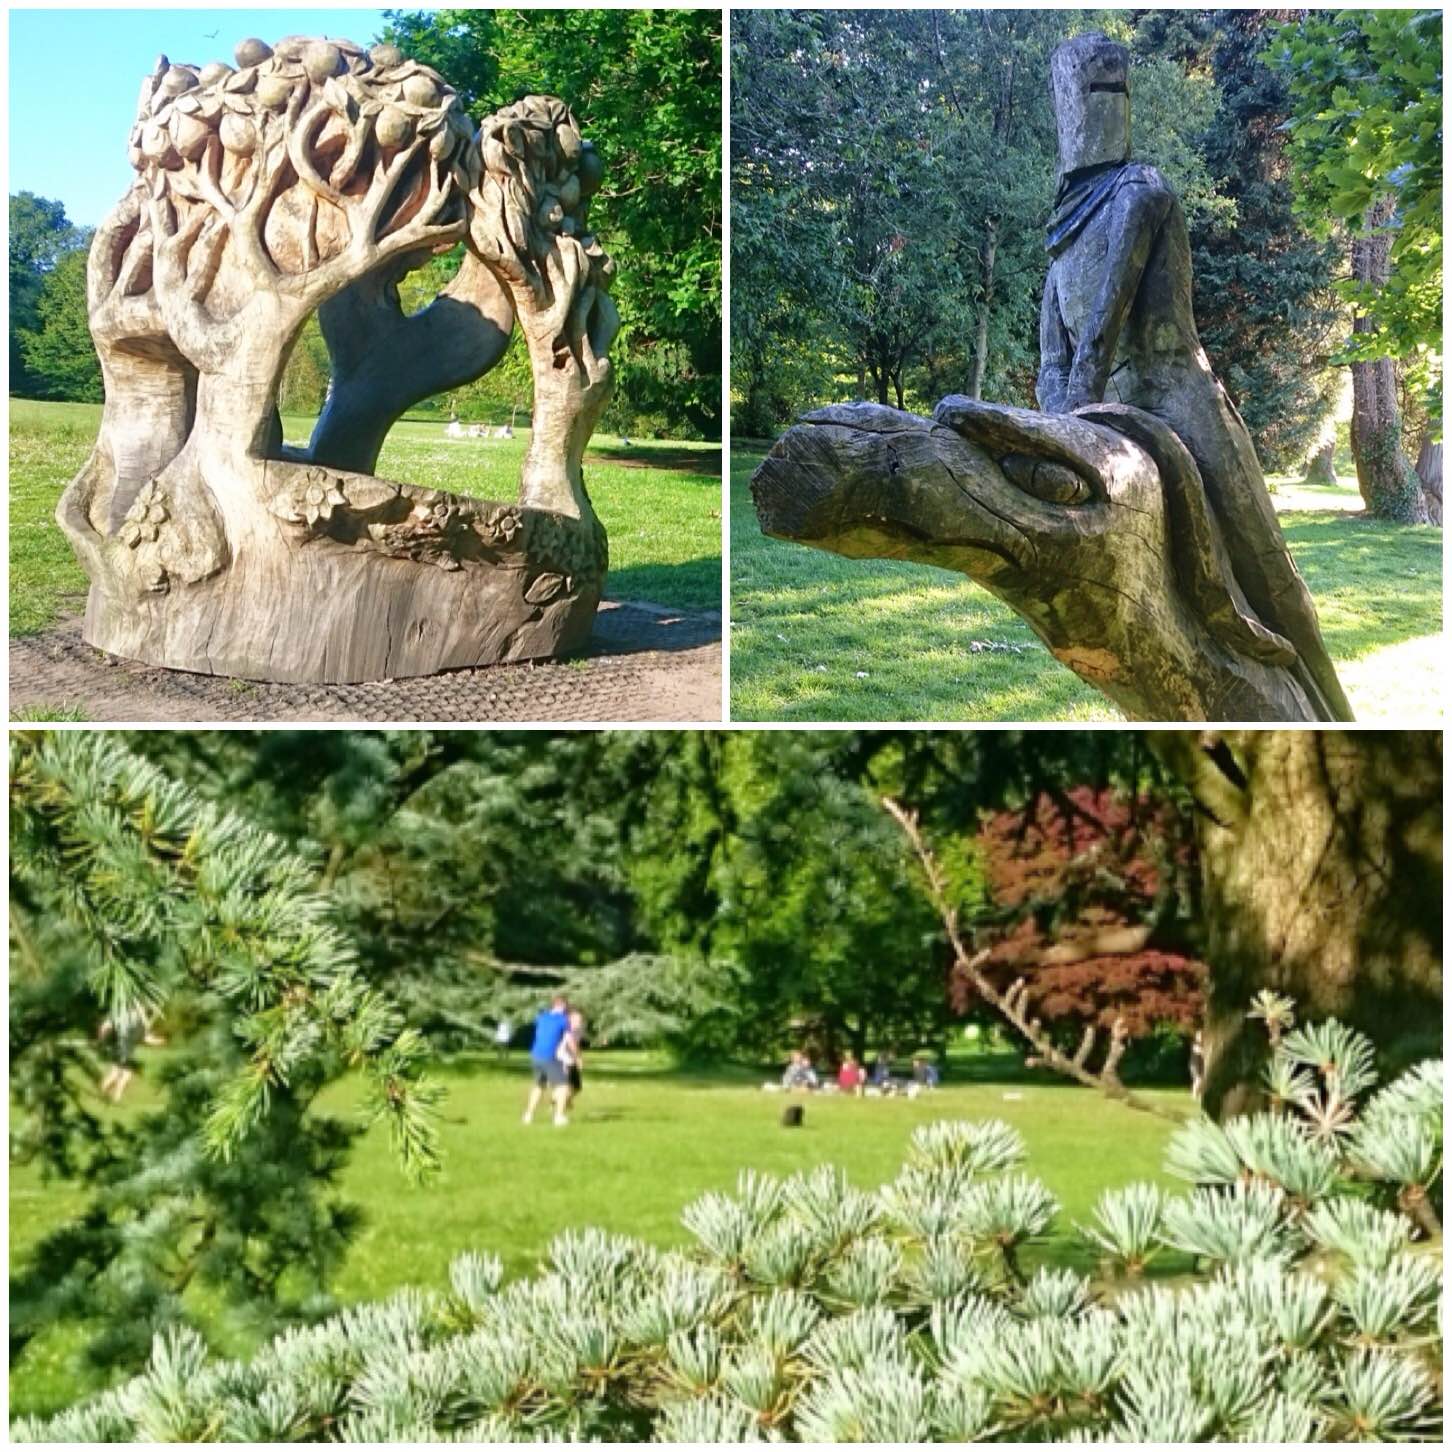
The park not only has beautiful sculptures it also has some stunning trees like the Cedar in the bottom picture.
A park to be proud of
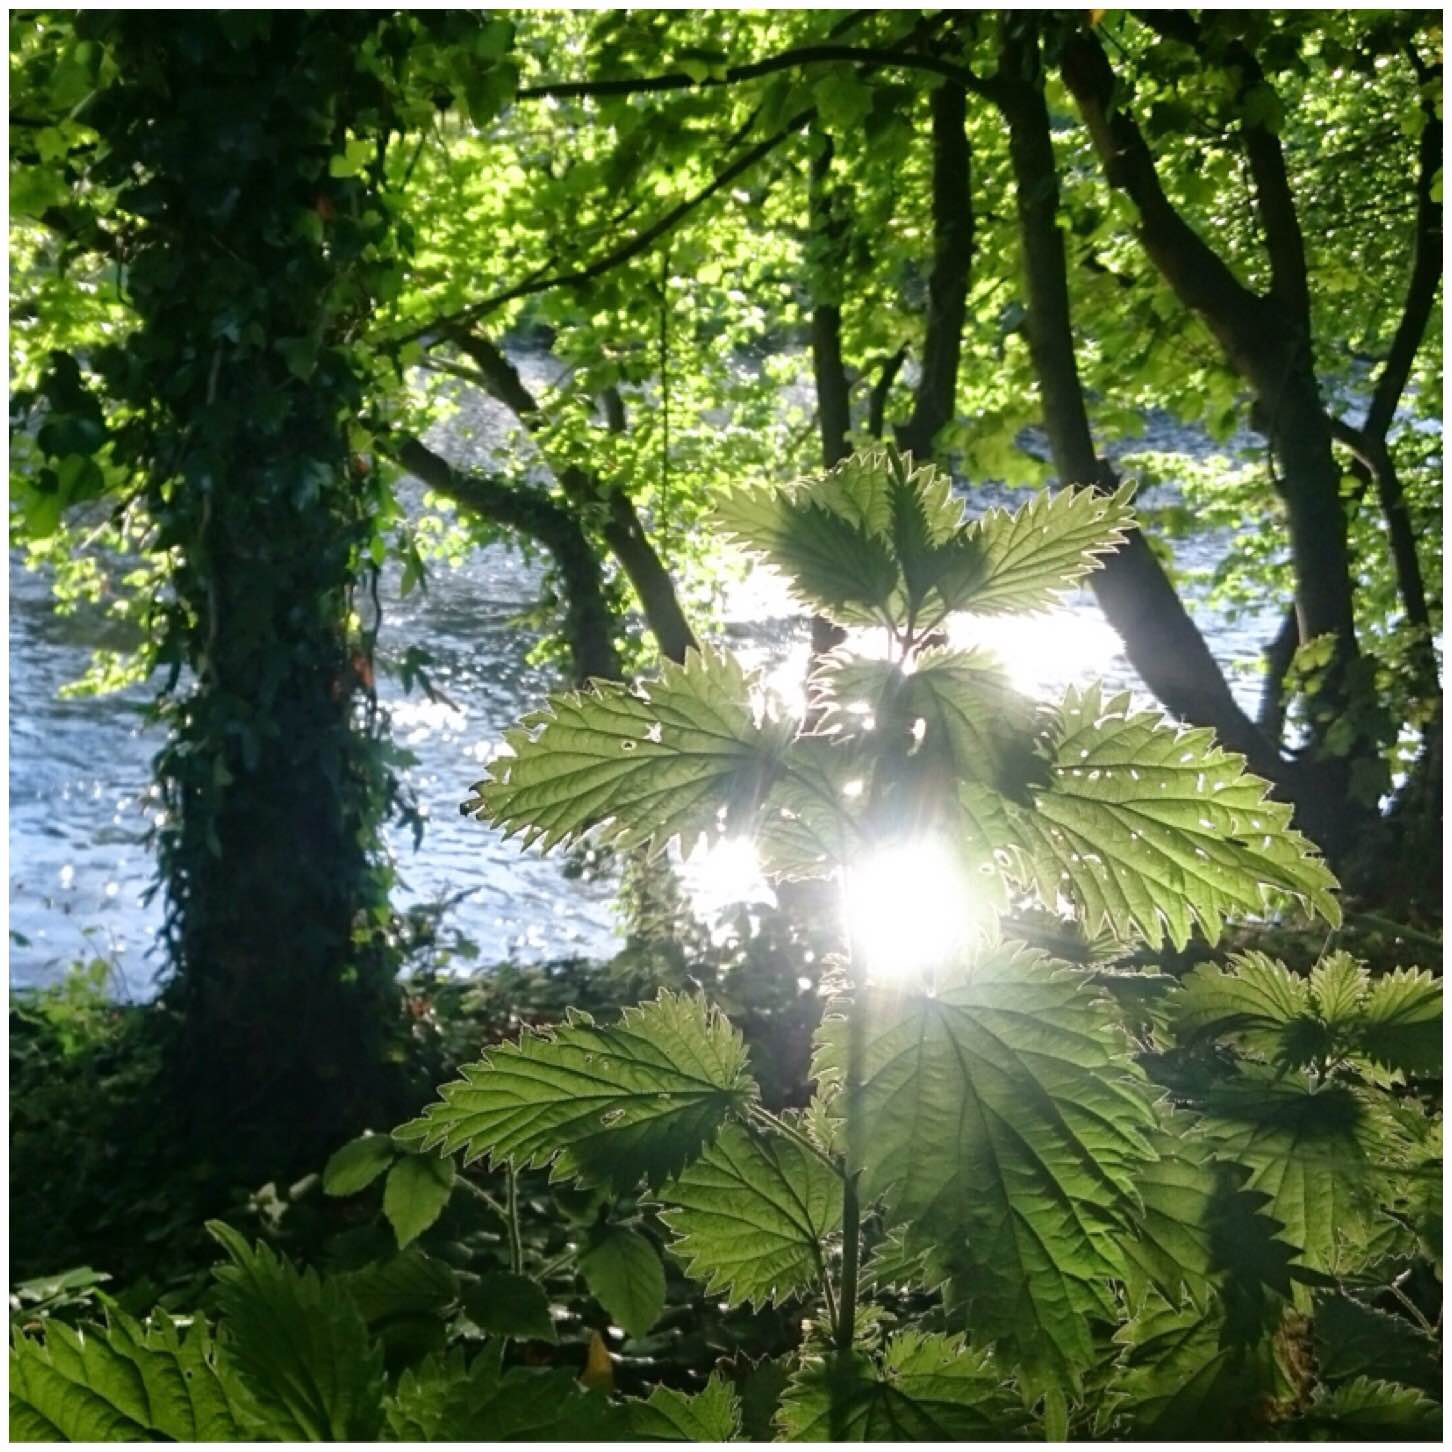
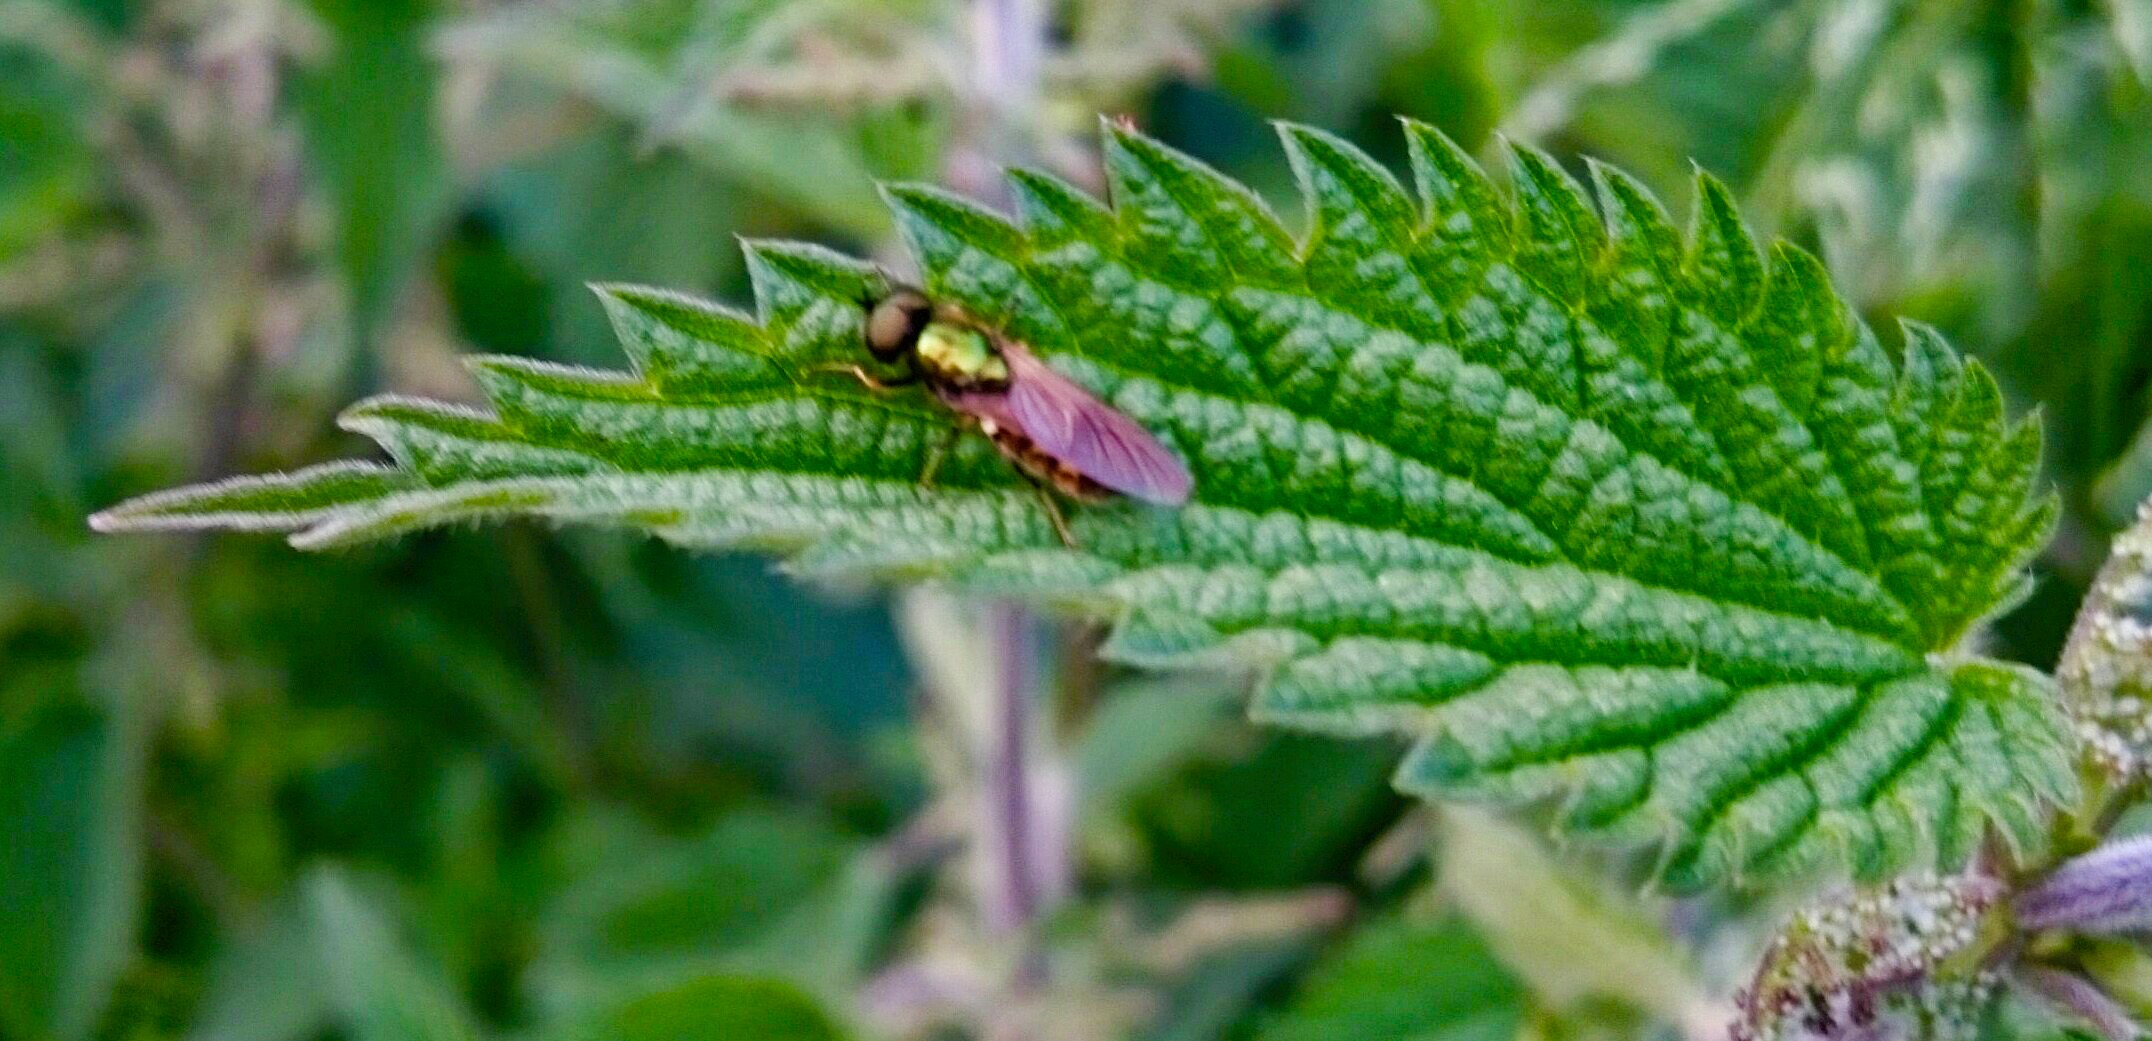
Eventually I found the River Taff and this mature nettle perfectly silhouetted by the sun’s reflection.
Riverside sculpture
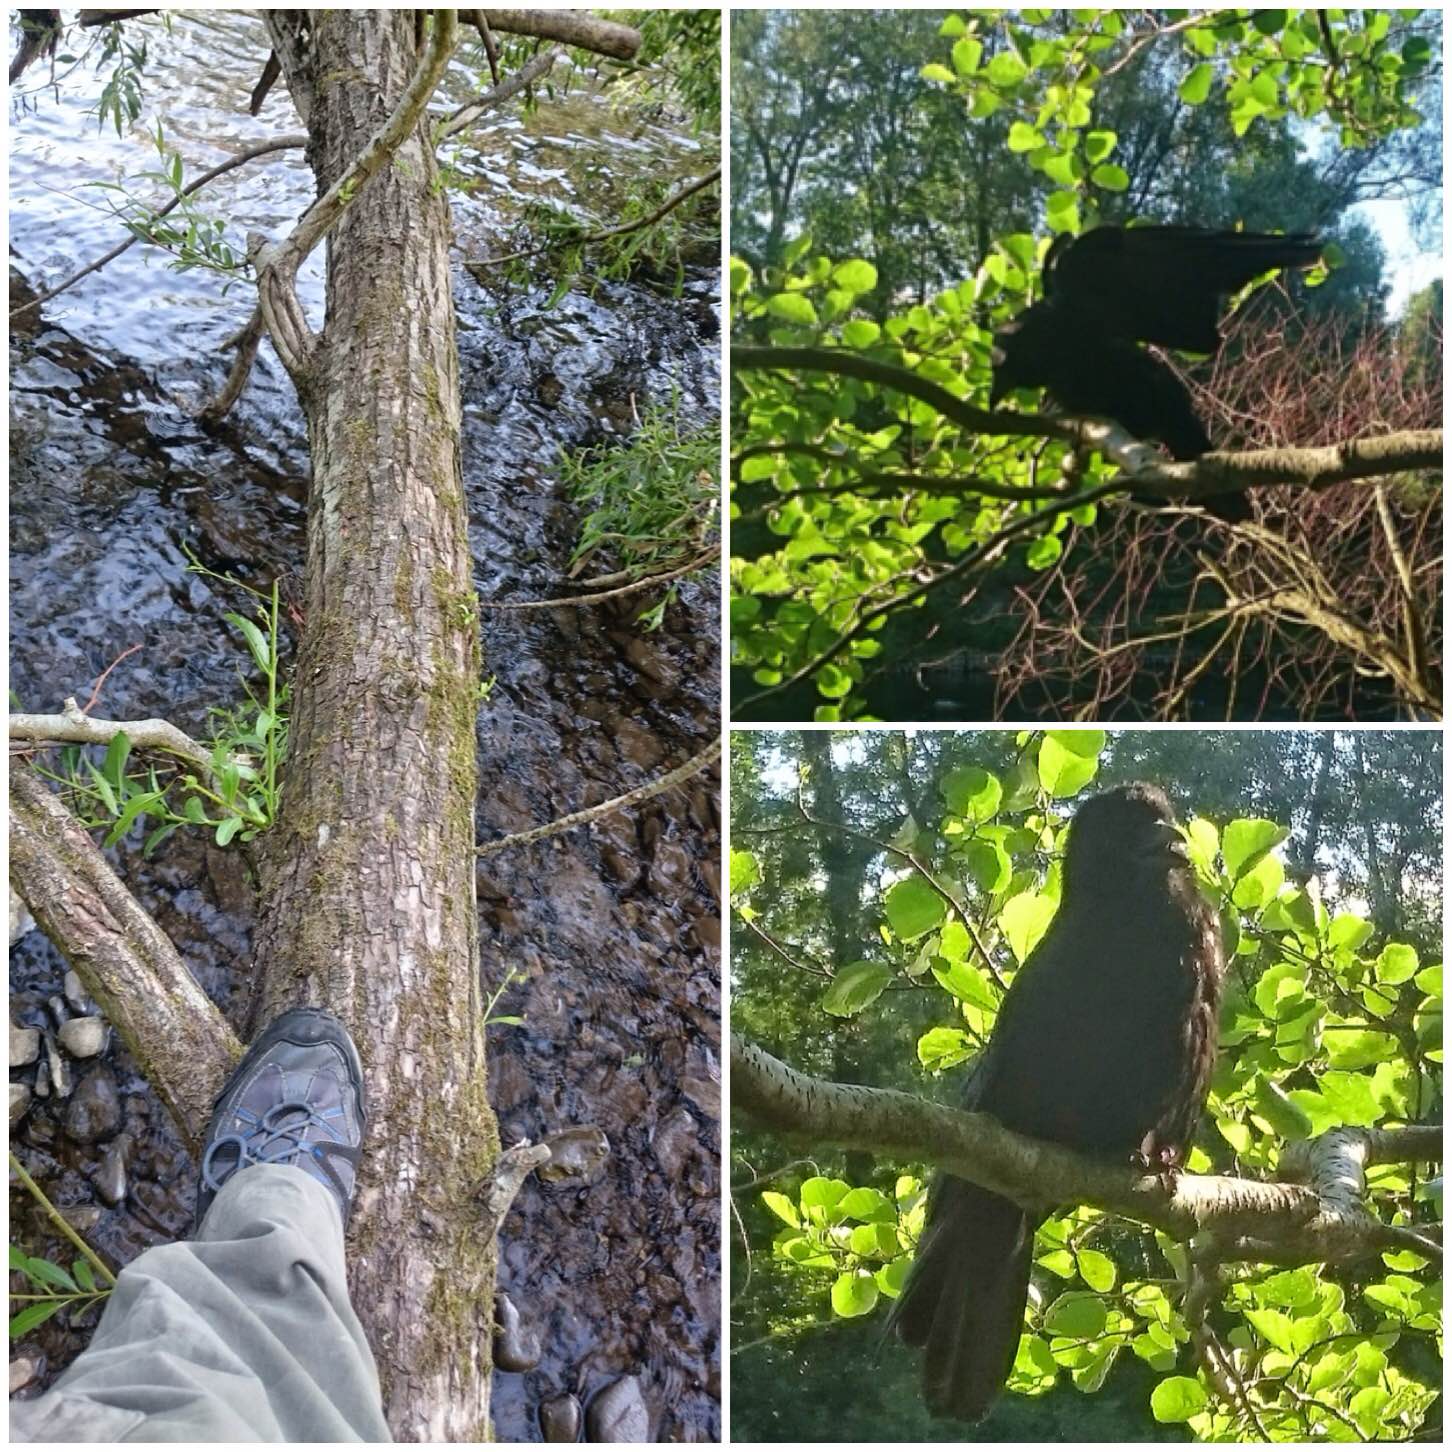
Further along the river bank I came across a downed Willow tree. The tree was over the river so as I scrambled over it I came across this little fella sitting on another tree by the bank. He was so chilled he let me get close enough that I could easily touch him.
Stepped out and spotted this chap
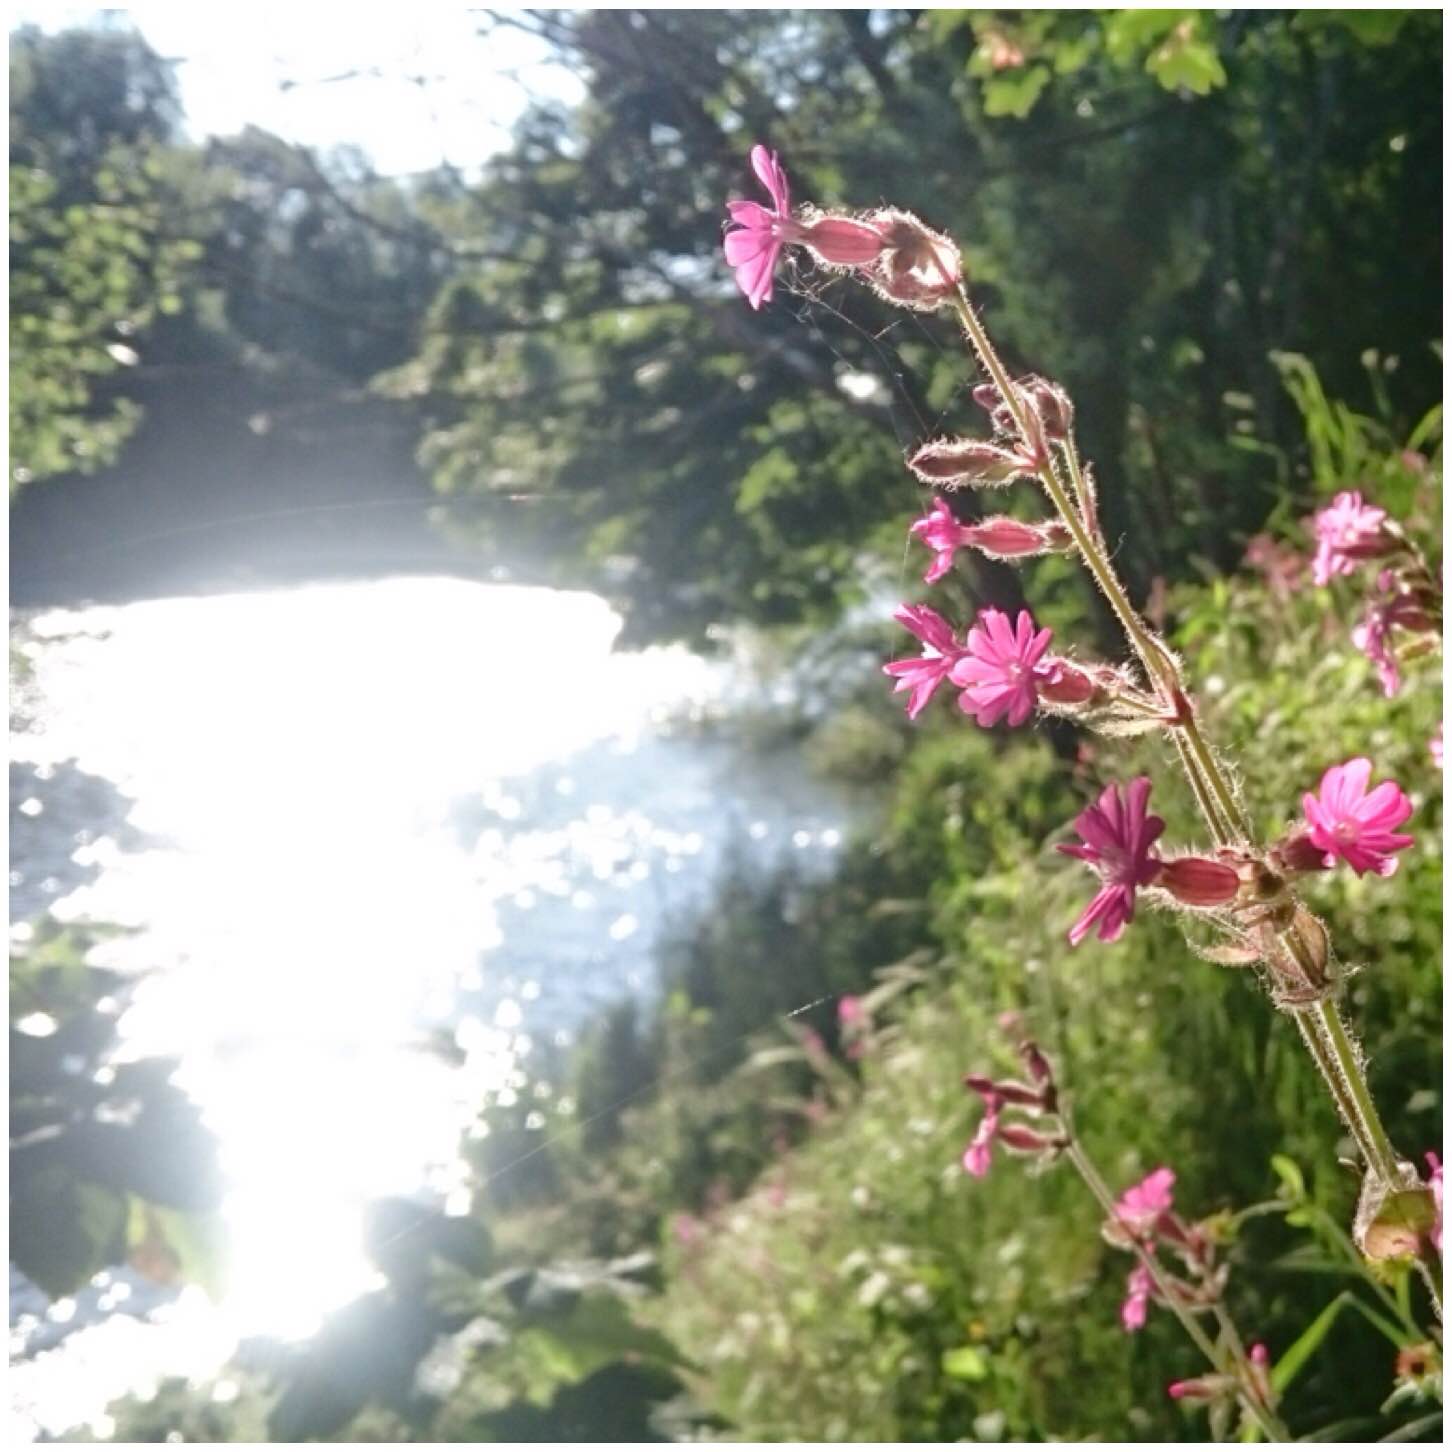
The dominant flower along the length of the River Taff I walked was the beautiful Red Campion.
Red Campion
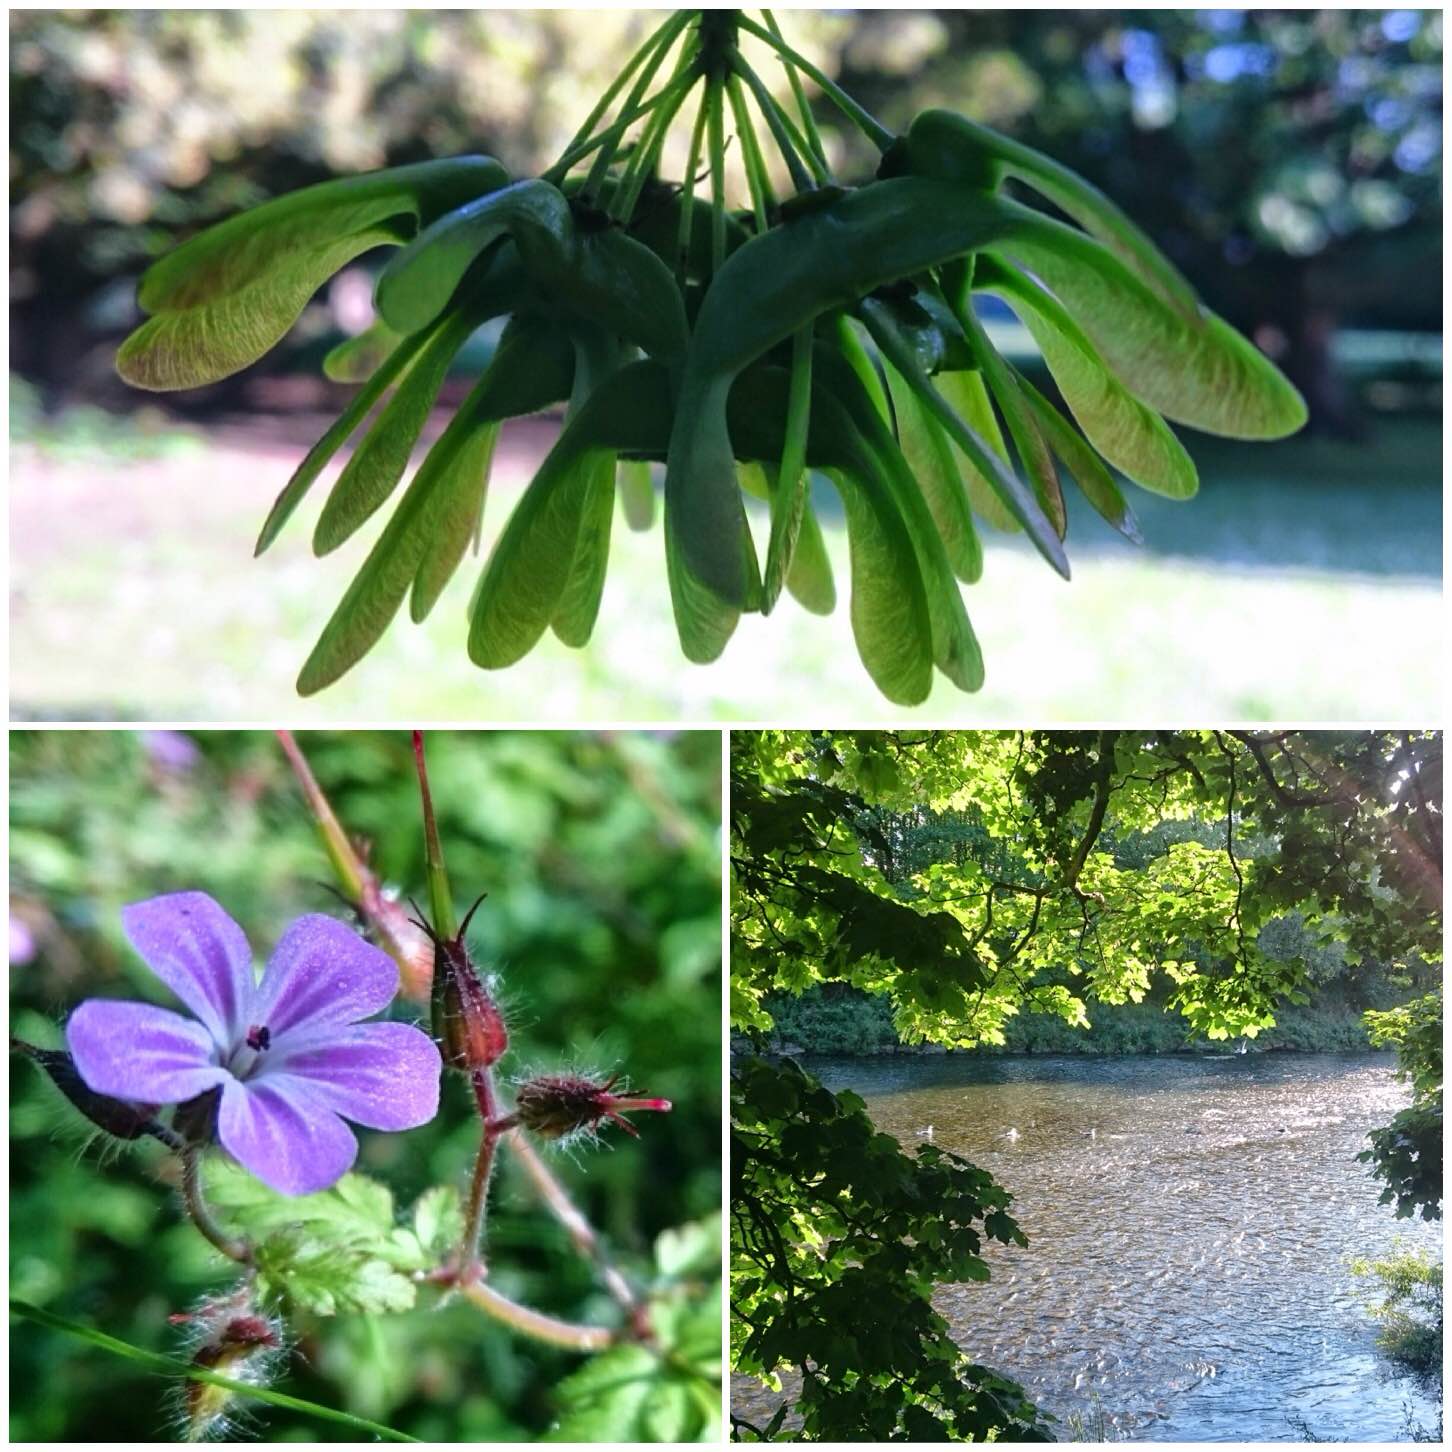
It was nice to walk through the park looking at and photographing both the fine detail and some of the bigger scenes.
Up close and far away
The walk finished up at the back of Cardiff Castle.
Cardiff Castle
I have never been to Bute Park before and I have to say it is probably the best city park I have ever come across.
It has been a busy day today with all the chores of most Sundays so the wildest we got today was the back garden to do the 30 day challenge.
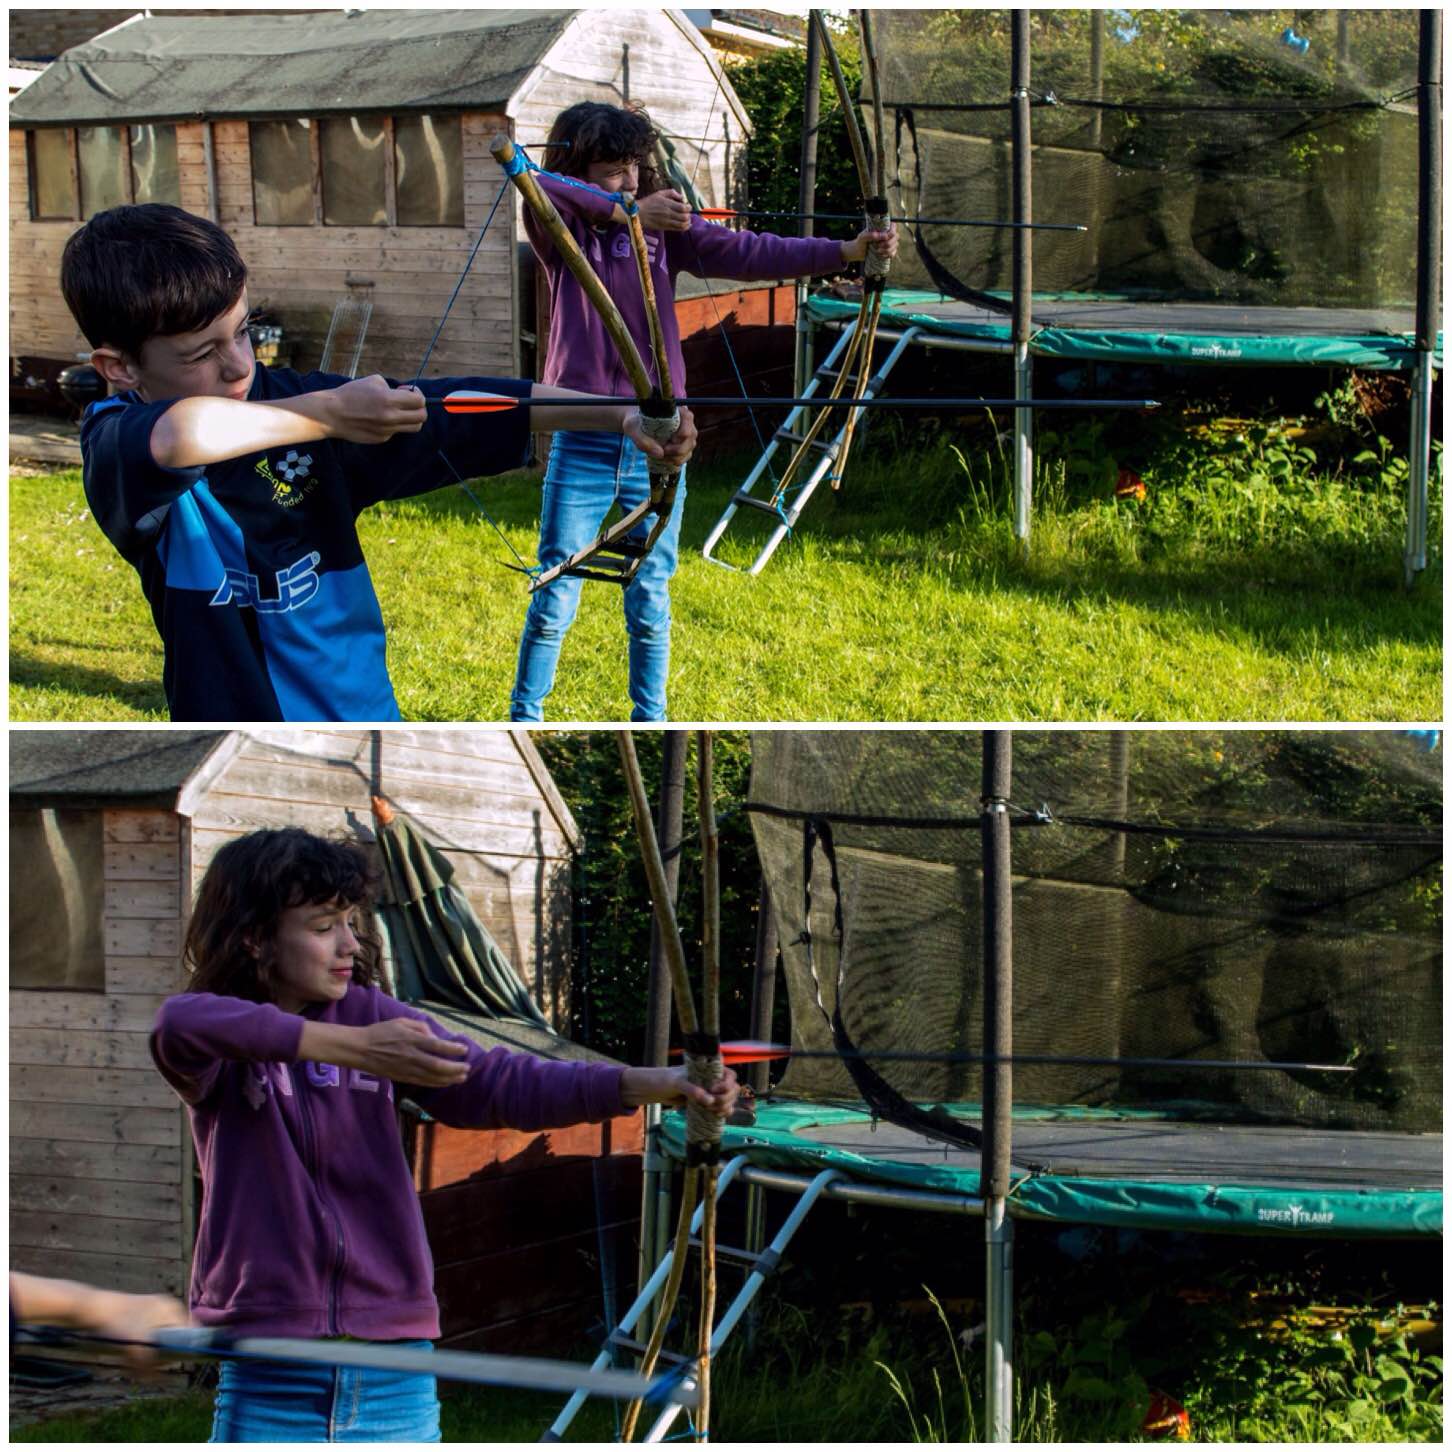
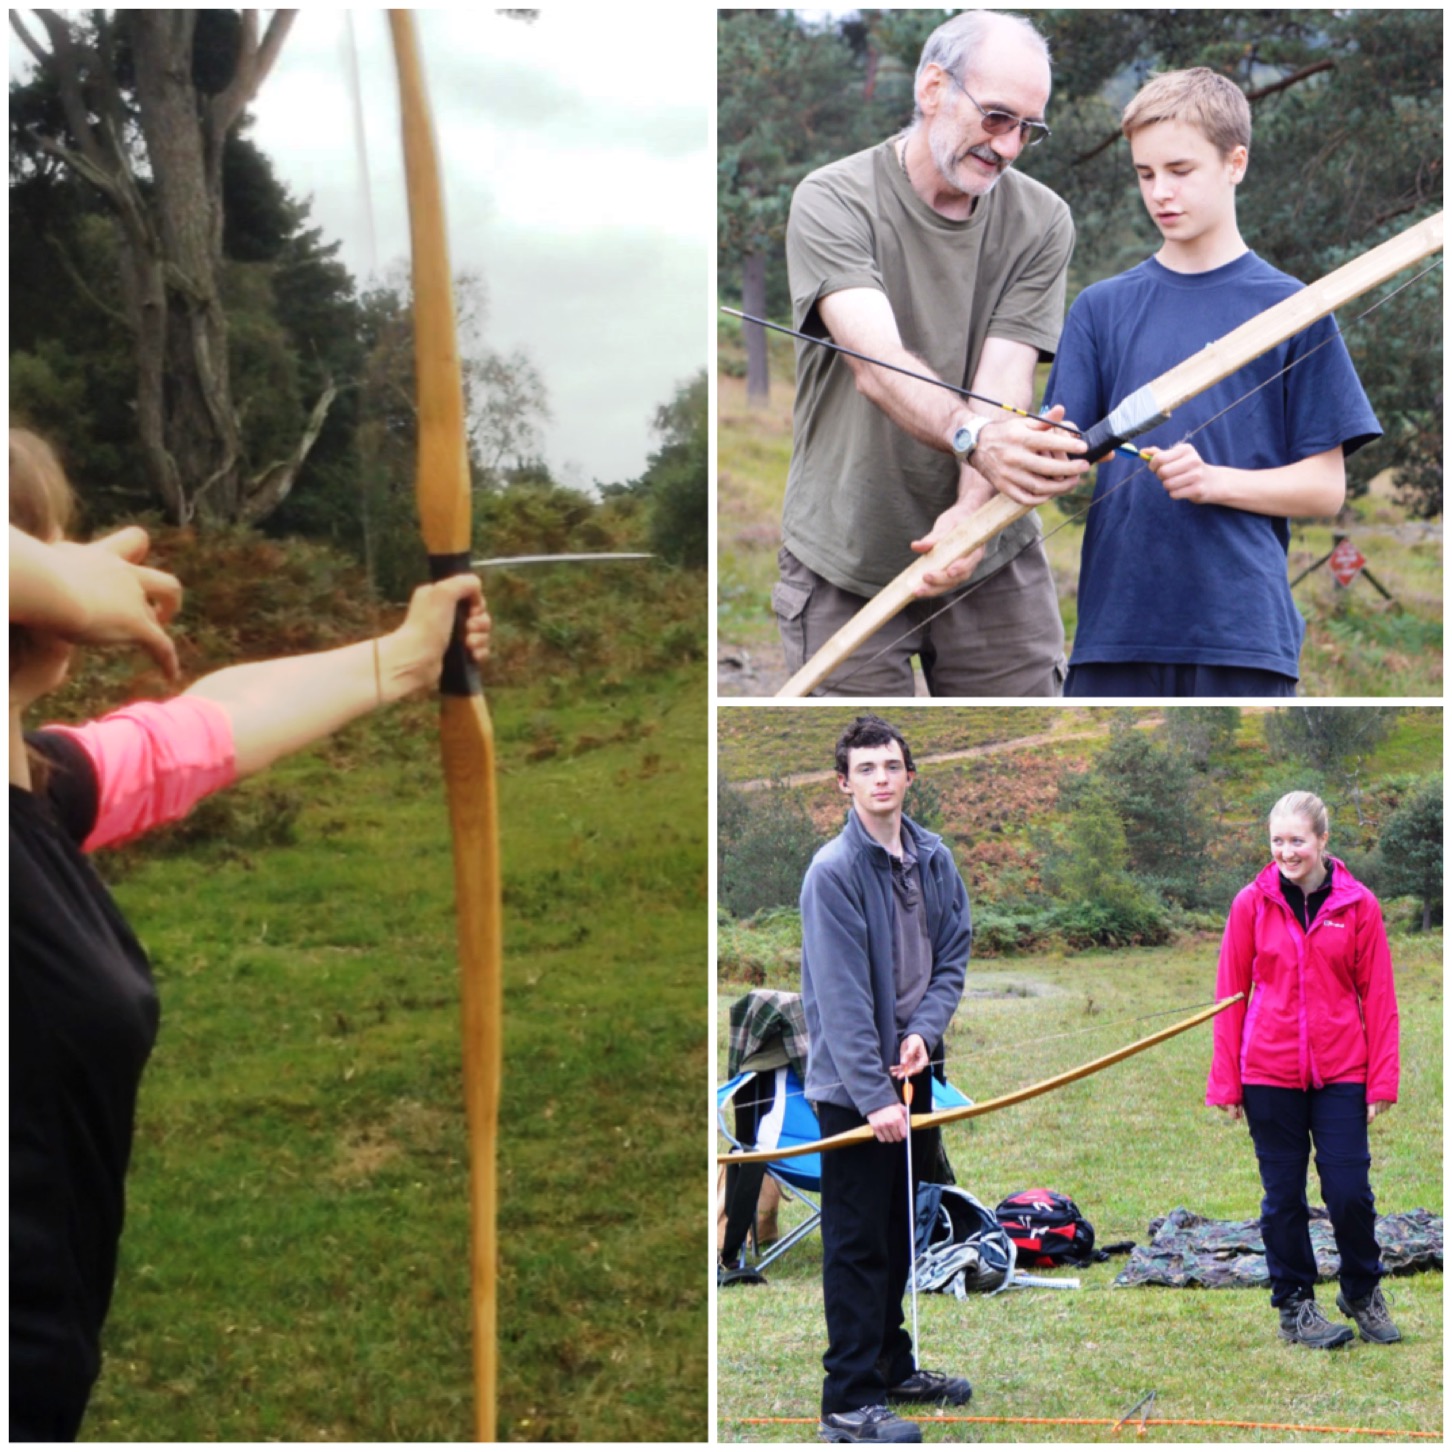
A couple of years ago the kids each helped me build their father and son bows. These quick bows are made from Hazel and shoot just as well as the day they were made.
Father and Son Bows
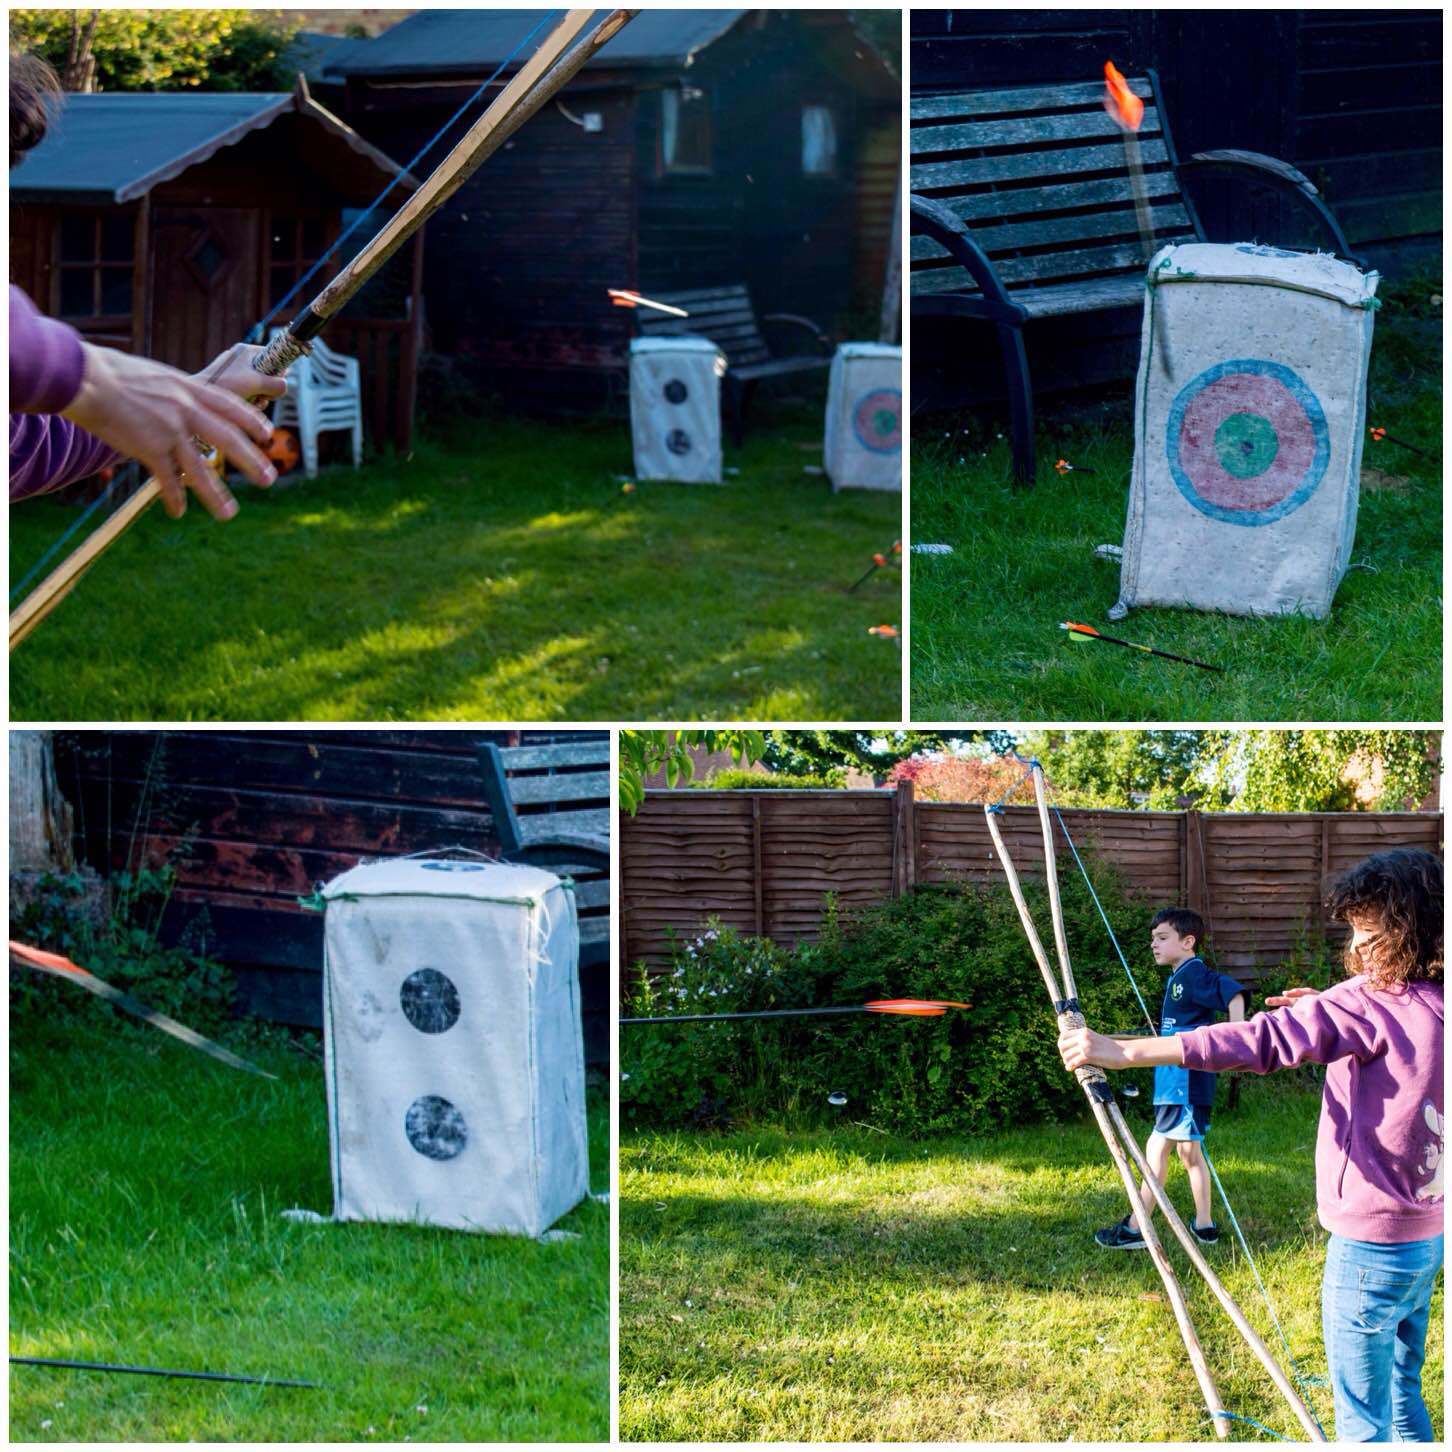
We have not had the bows out this year so after going through the basics again we had quite a few rounds shooting down the garden.
As the kids do not draw them back too far at the moment I was happy to have them shoot in the garden. Once they got their eye in they started to hit the targets.
Arrows Away
Not to be outdone I had a little shoot myself and thoroughly enjoyed spending my evening with the kids.
A Lovely Evening
I am off to Cardiff tomorrow for a couple of nights so there will be a couple of posts on what I can find in the city.
What a cracking day it has been. I had no problem getting out and about for the thirty day challenge as it was such a lovely day.
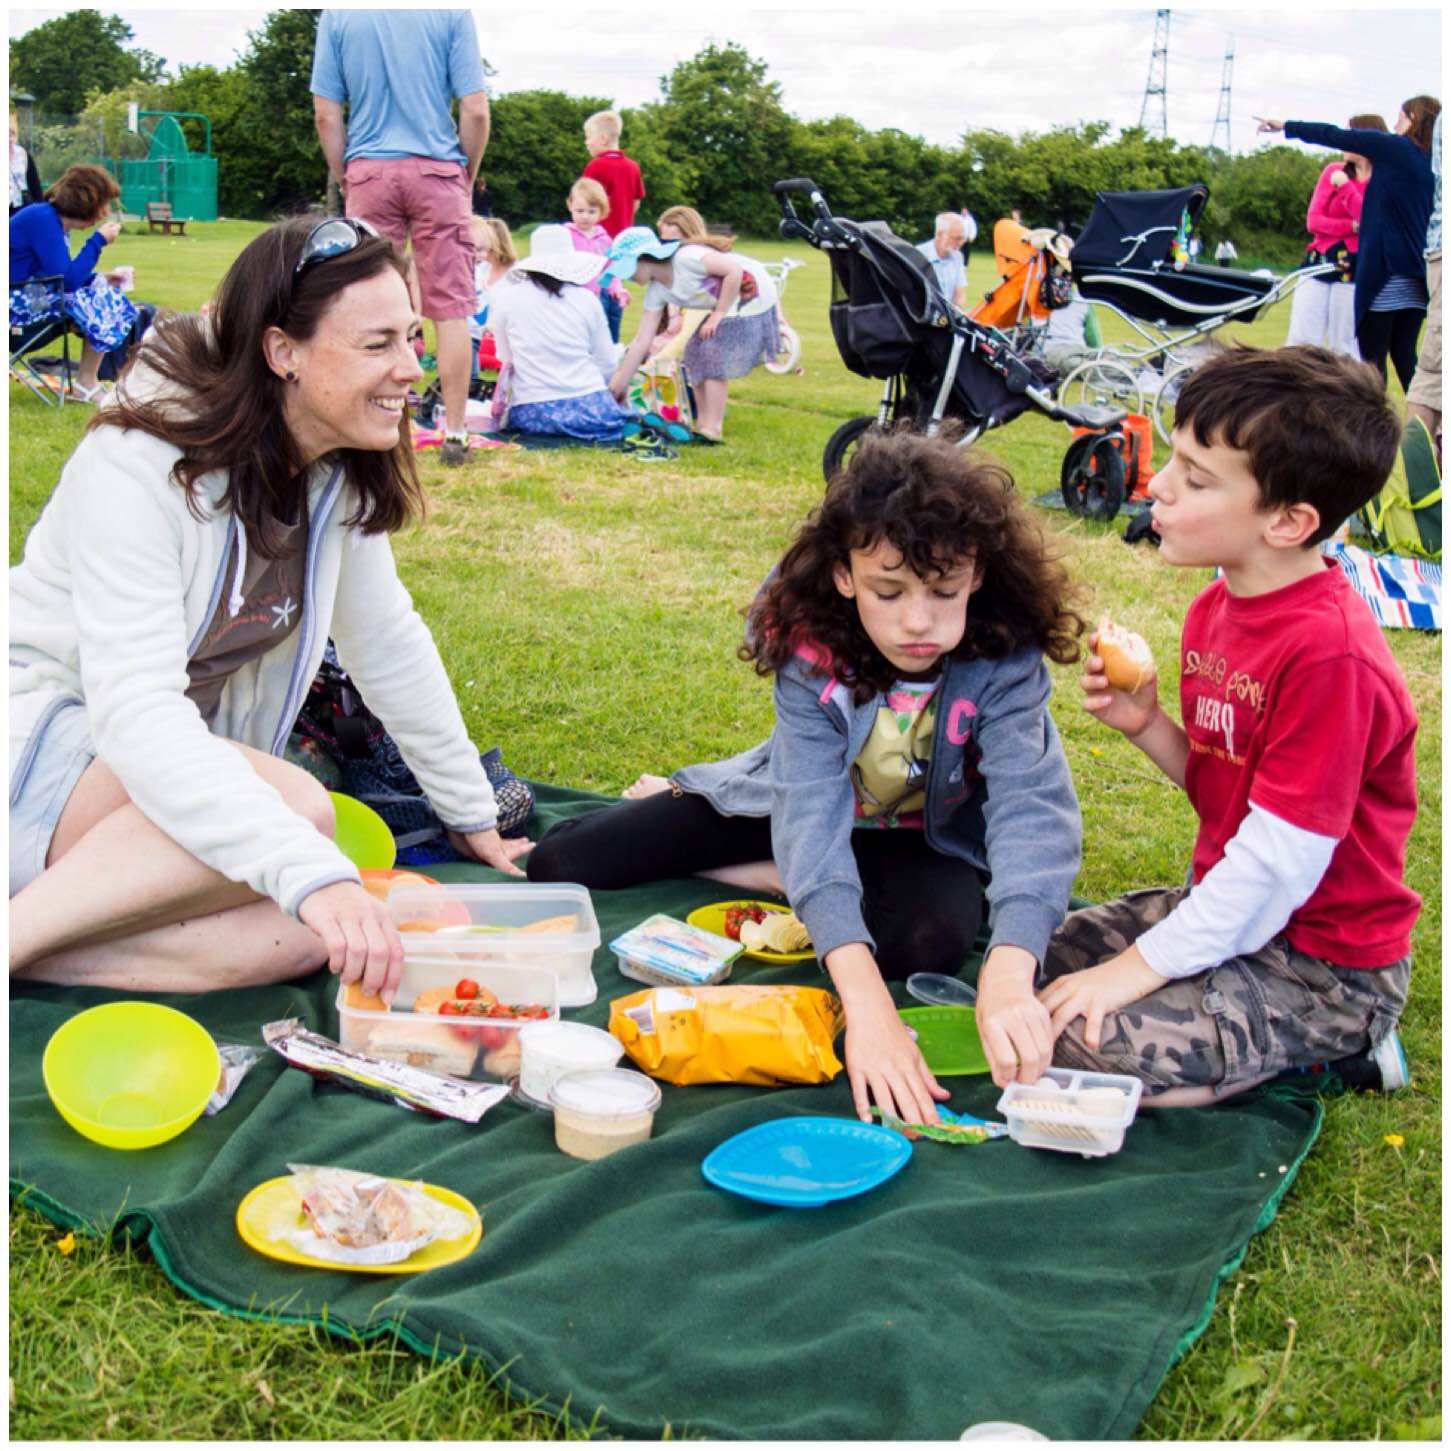
We popped out to Clift Meadow here in Bramley for the ‘Big Lunch‘ – my wife Alison had organised an excellent picnic for us. This is a one-day get together for neighbours to meet up and chat over a spot of lunch.
Picnic time
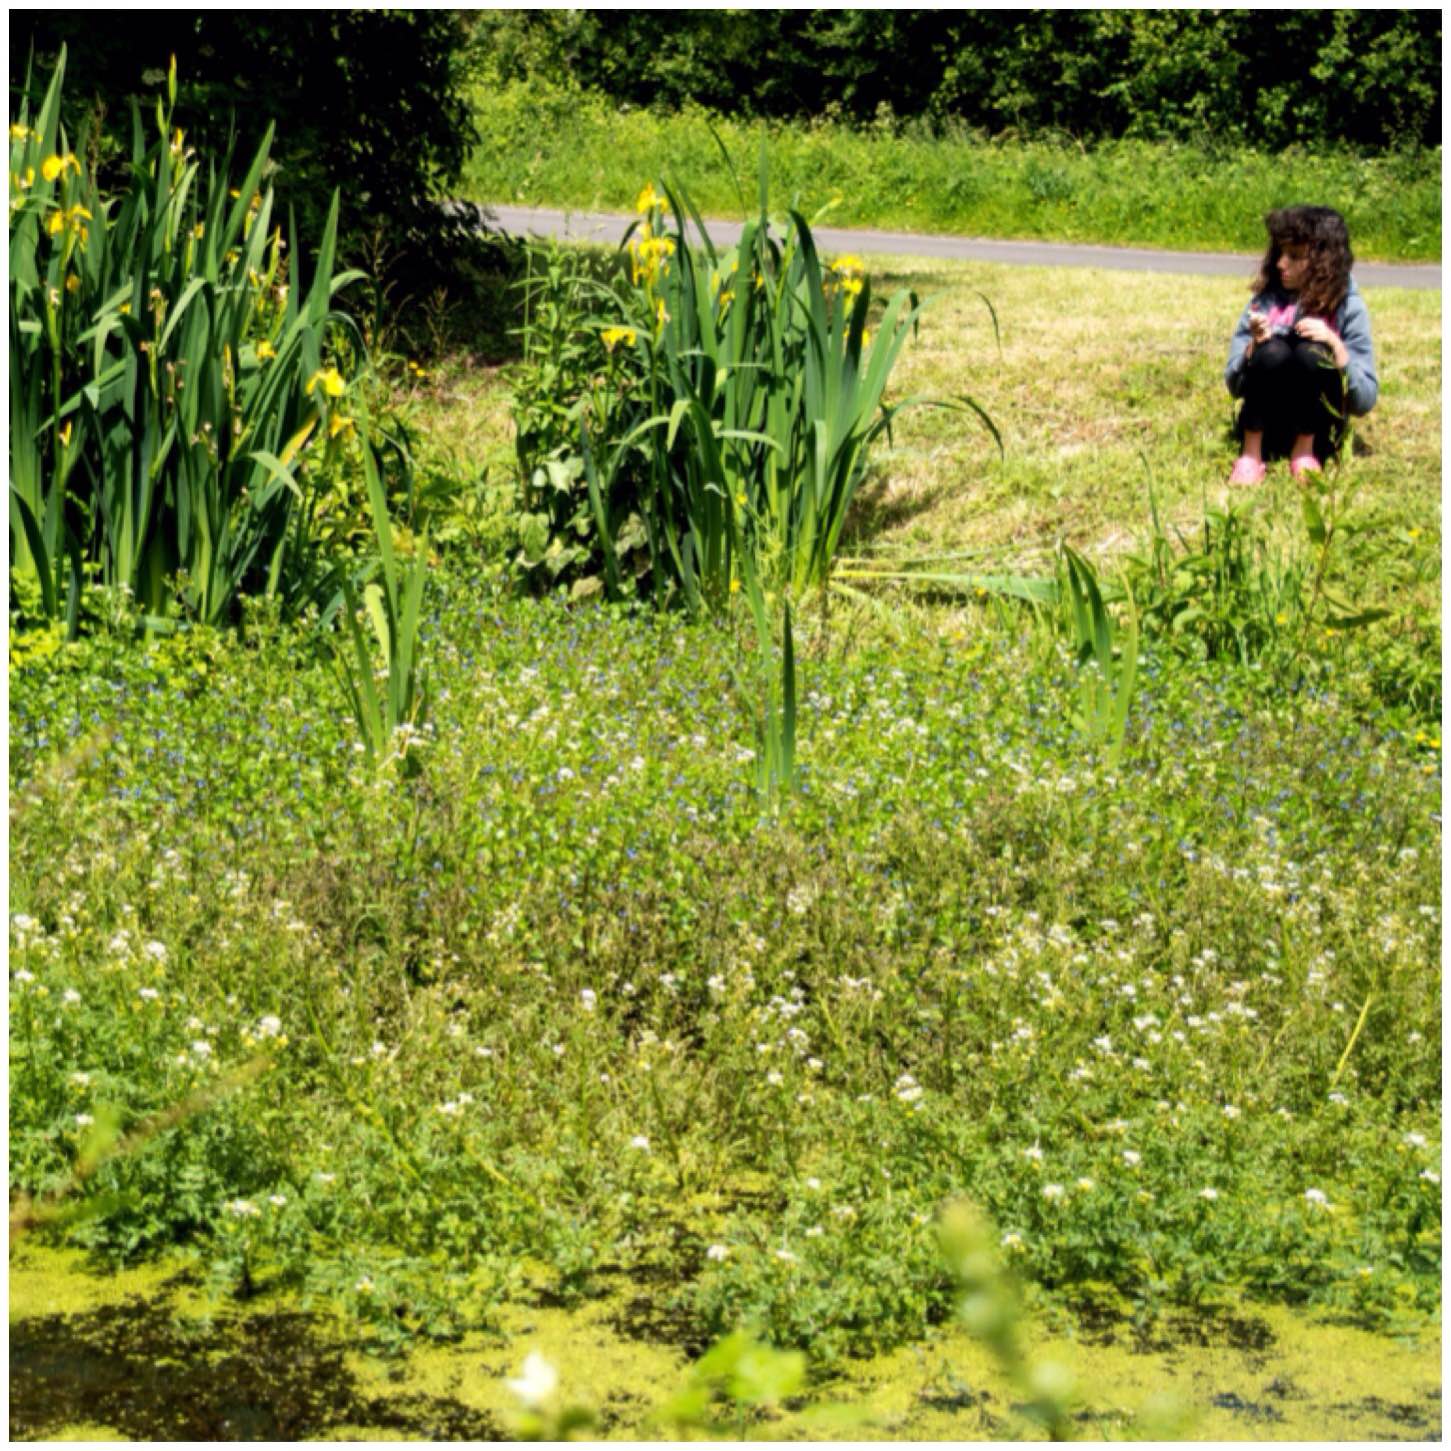
My son Finlay was off playing with his friends so after our picnic my daughter Catherine and I went off in hunt of some insects. We went to one of our favourite ponds that is full of Yellow Iris and Brooklime – a perfect attraction for insects.
Sit spot
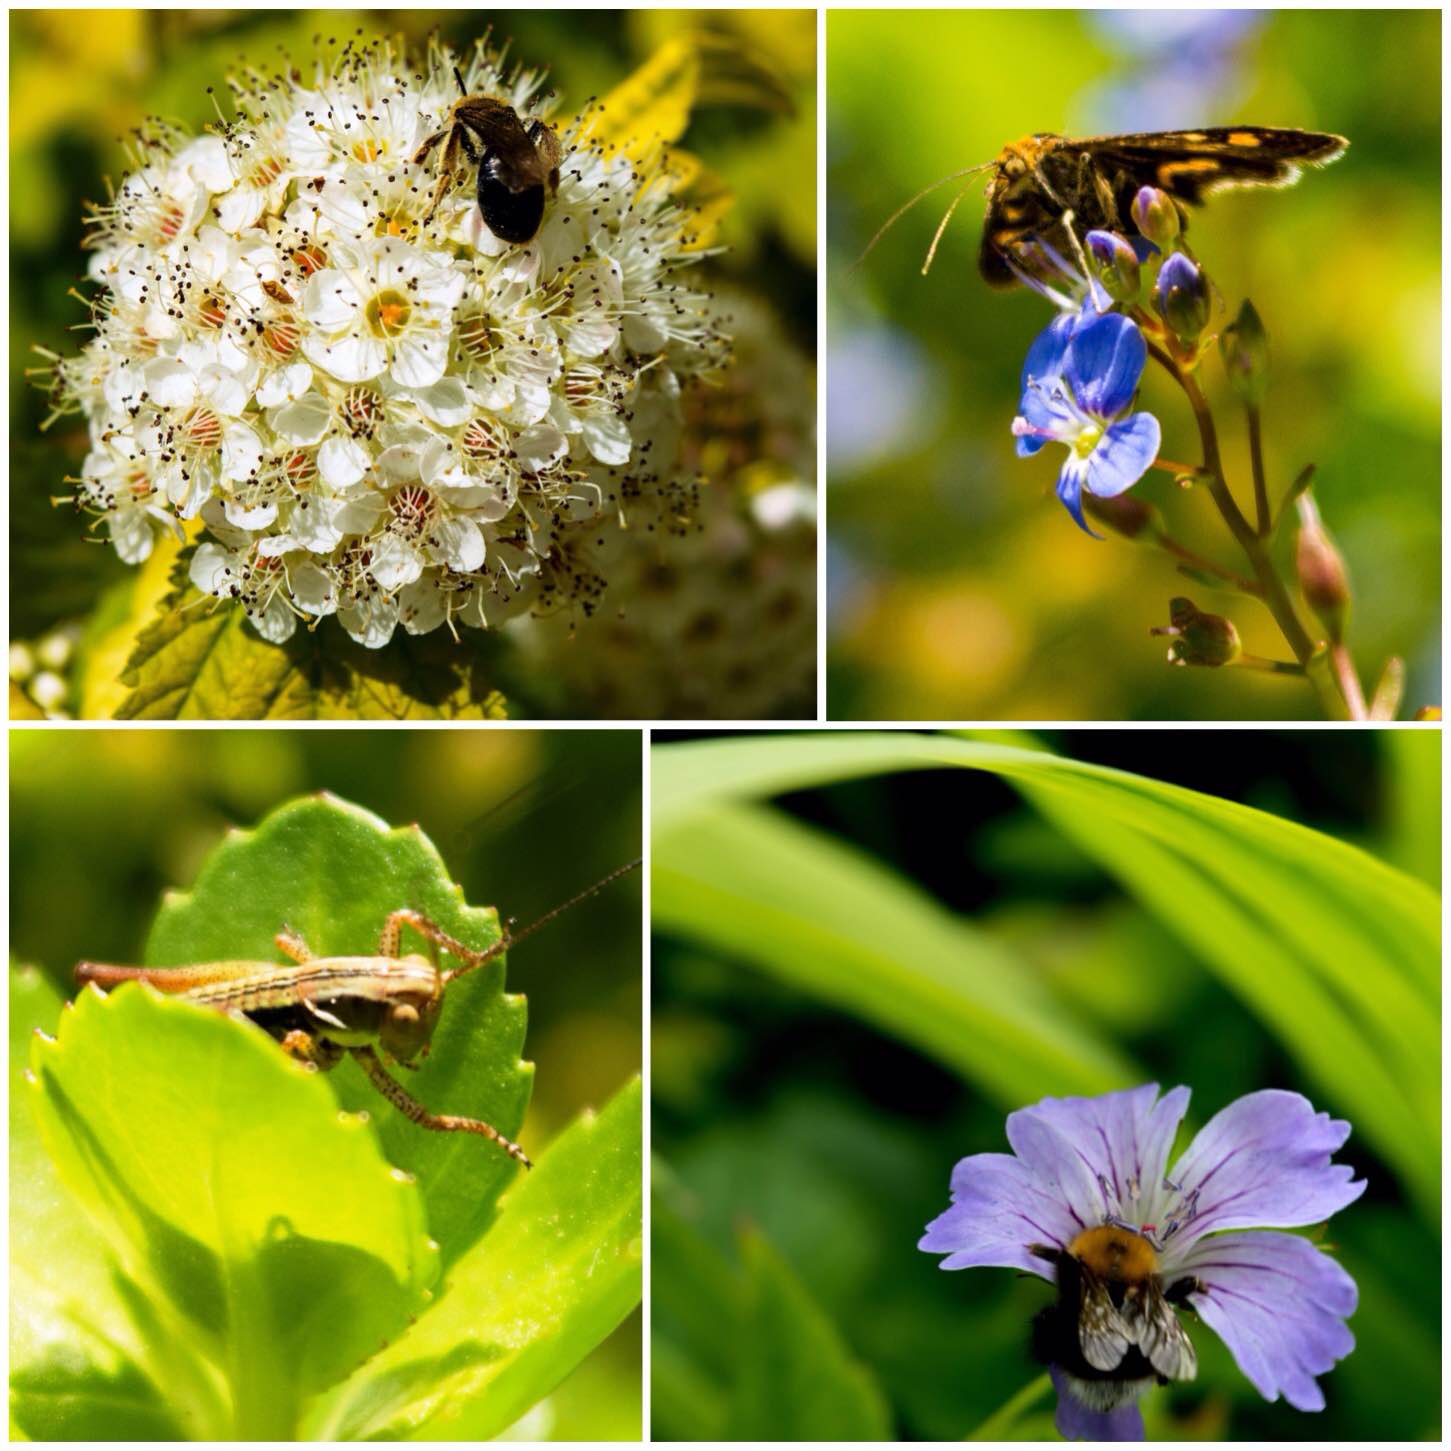
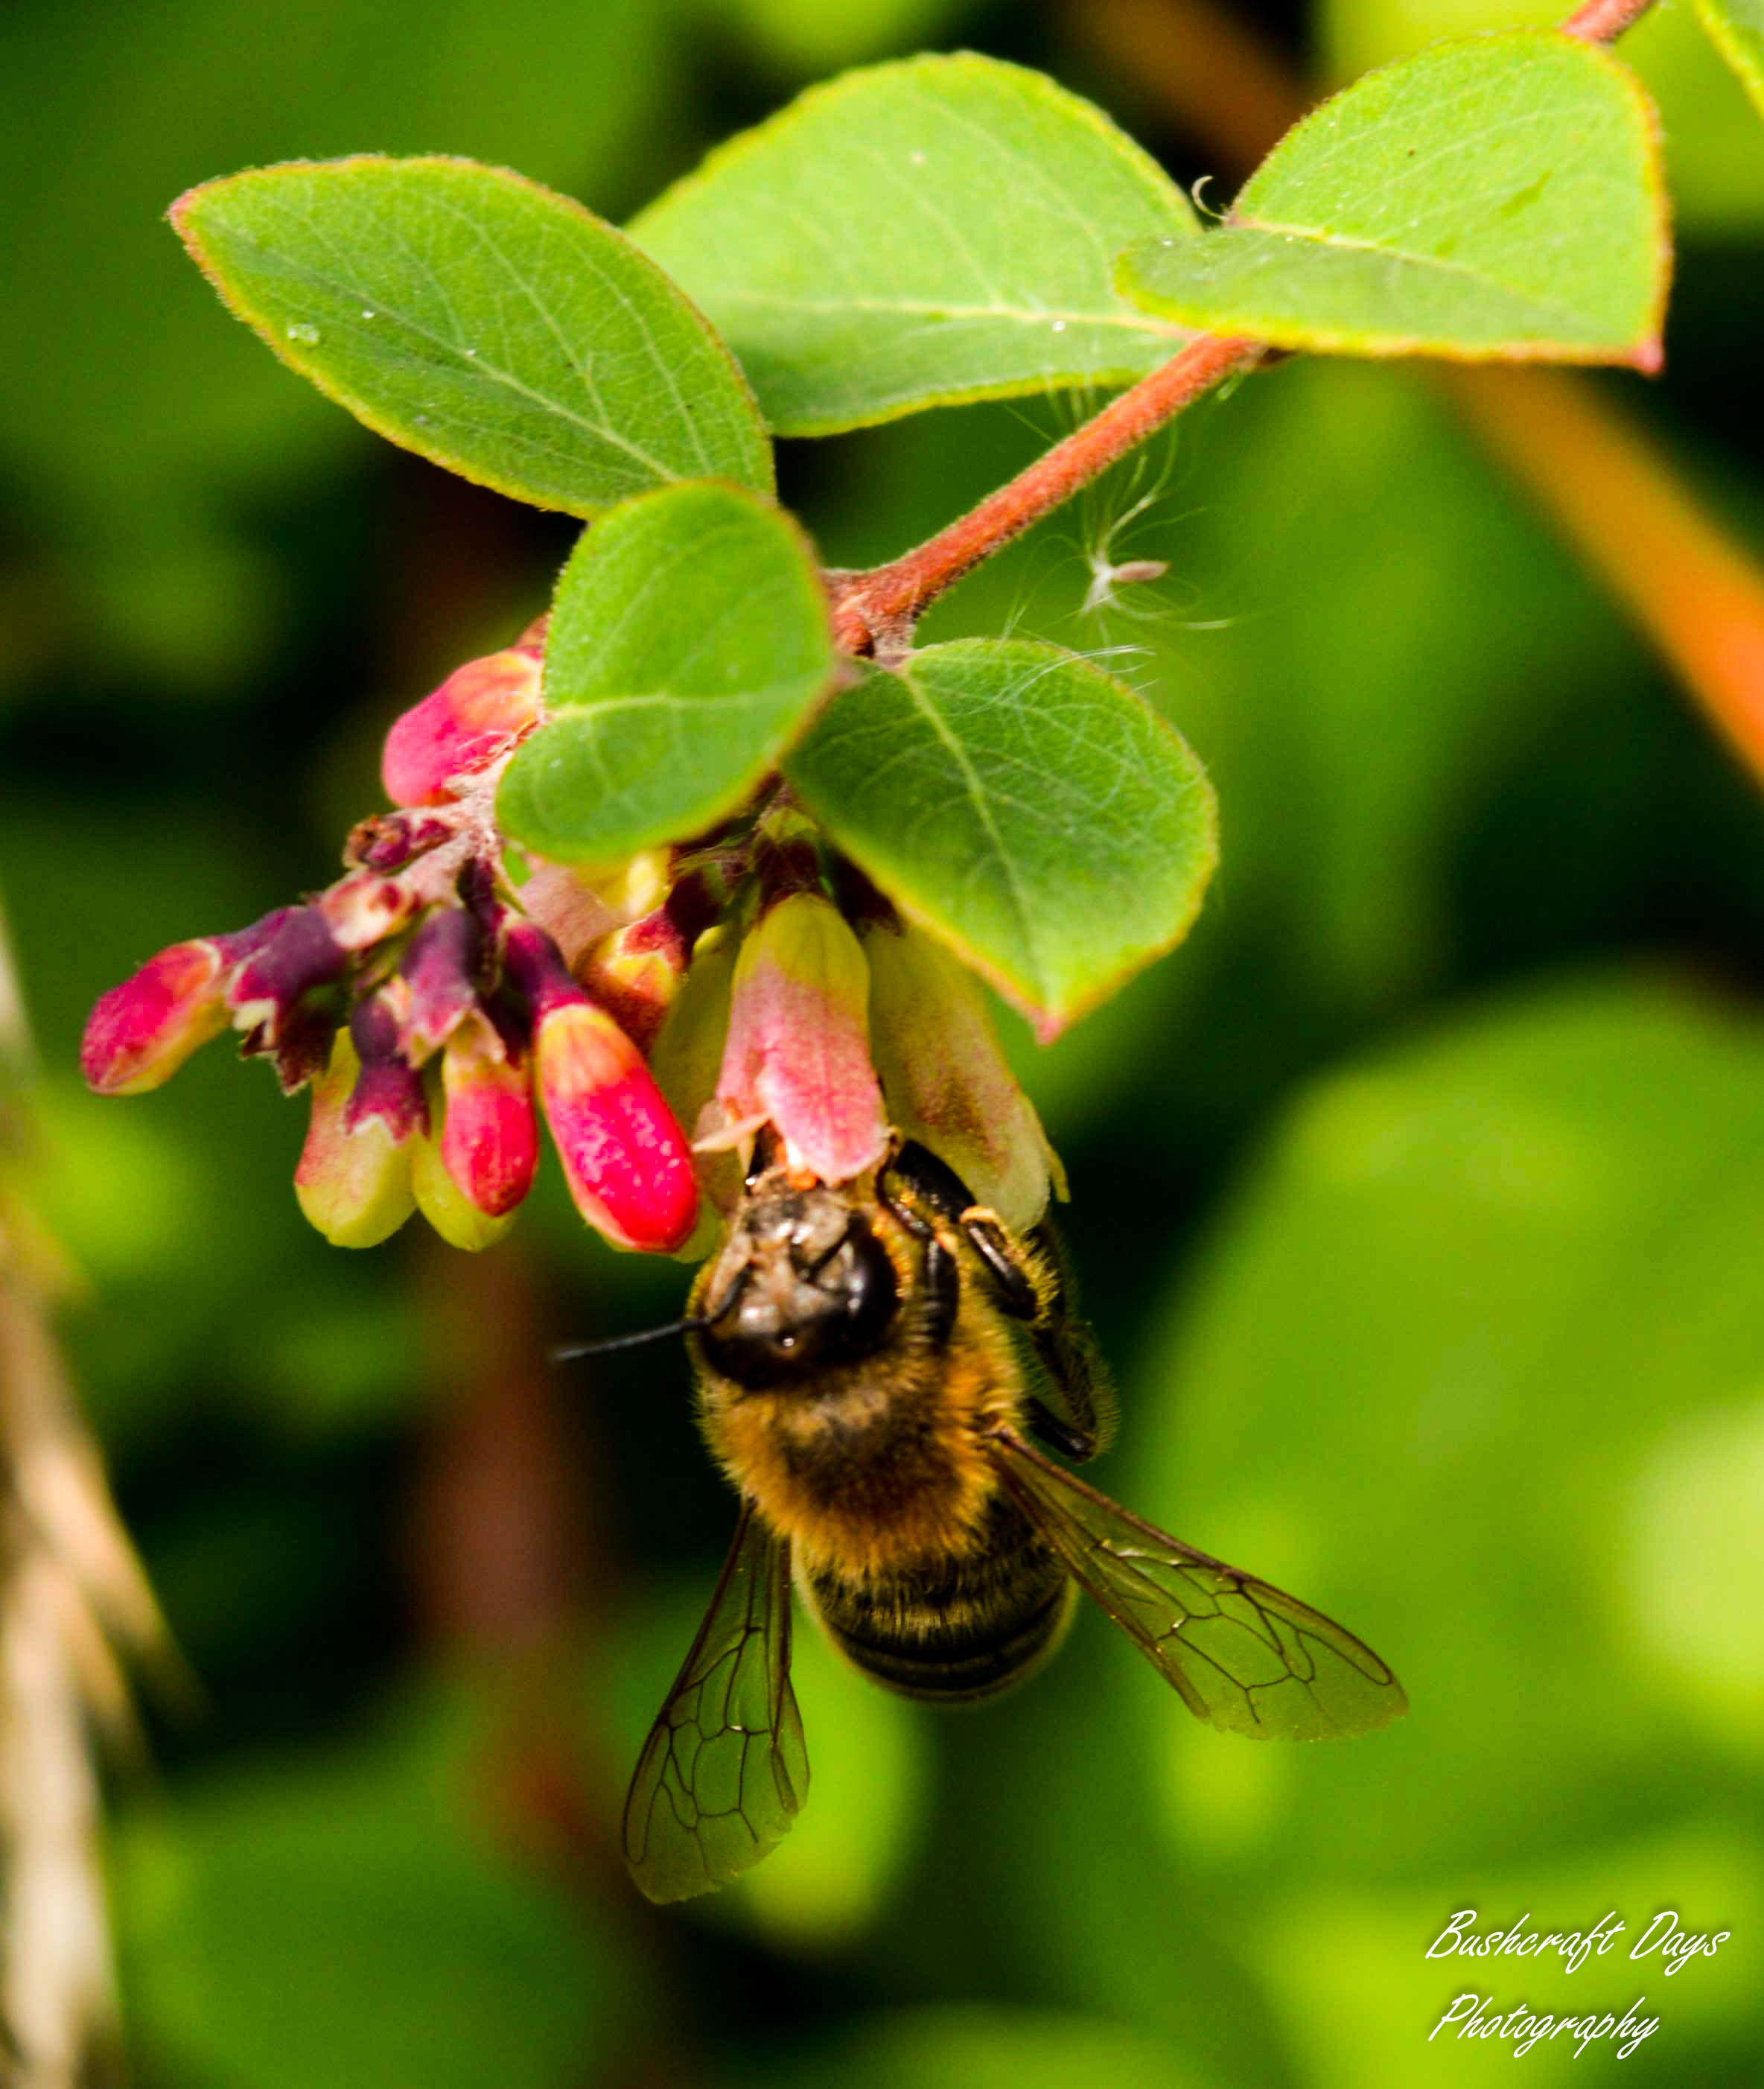
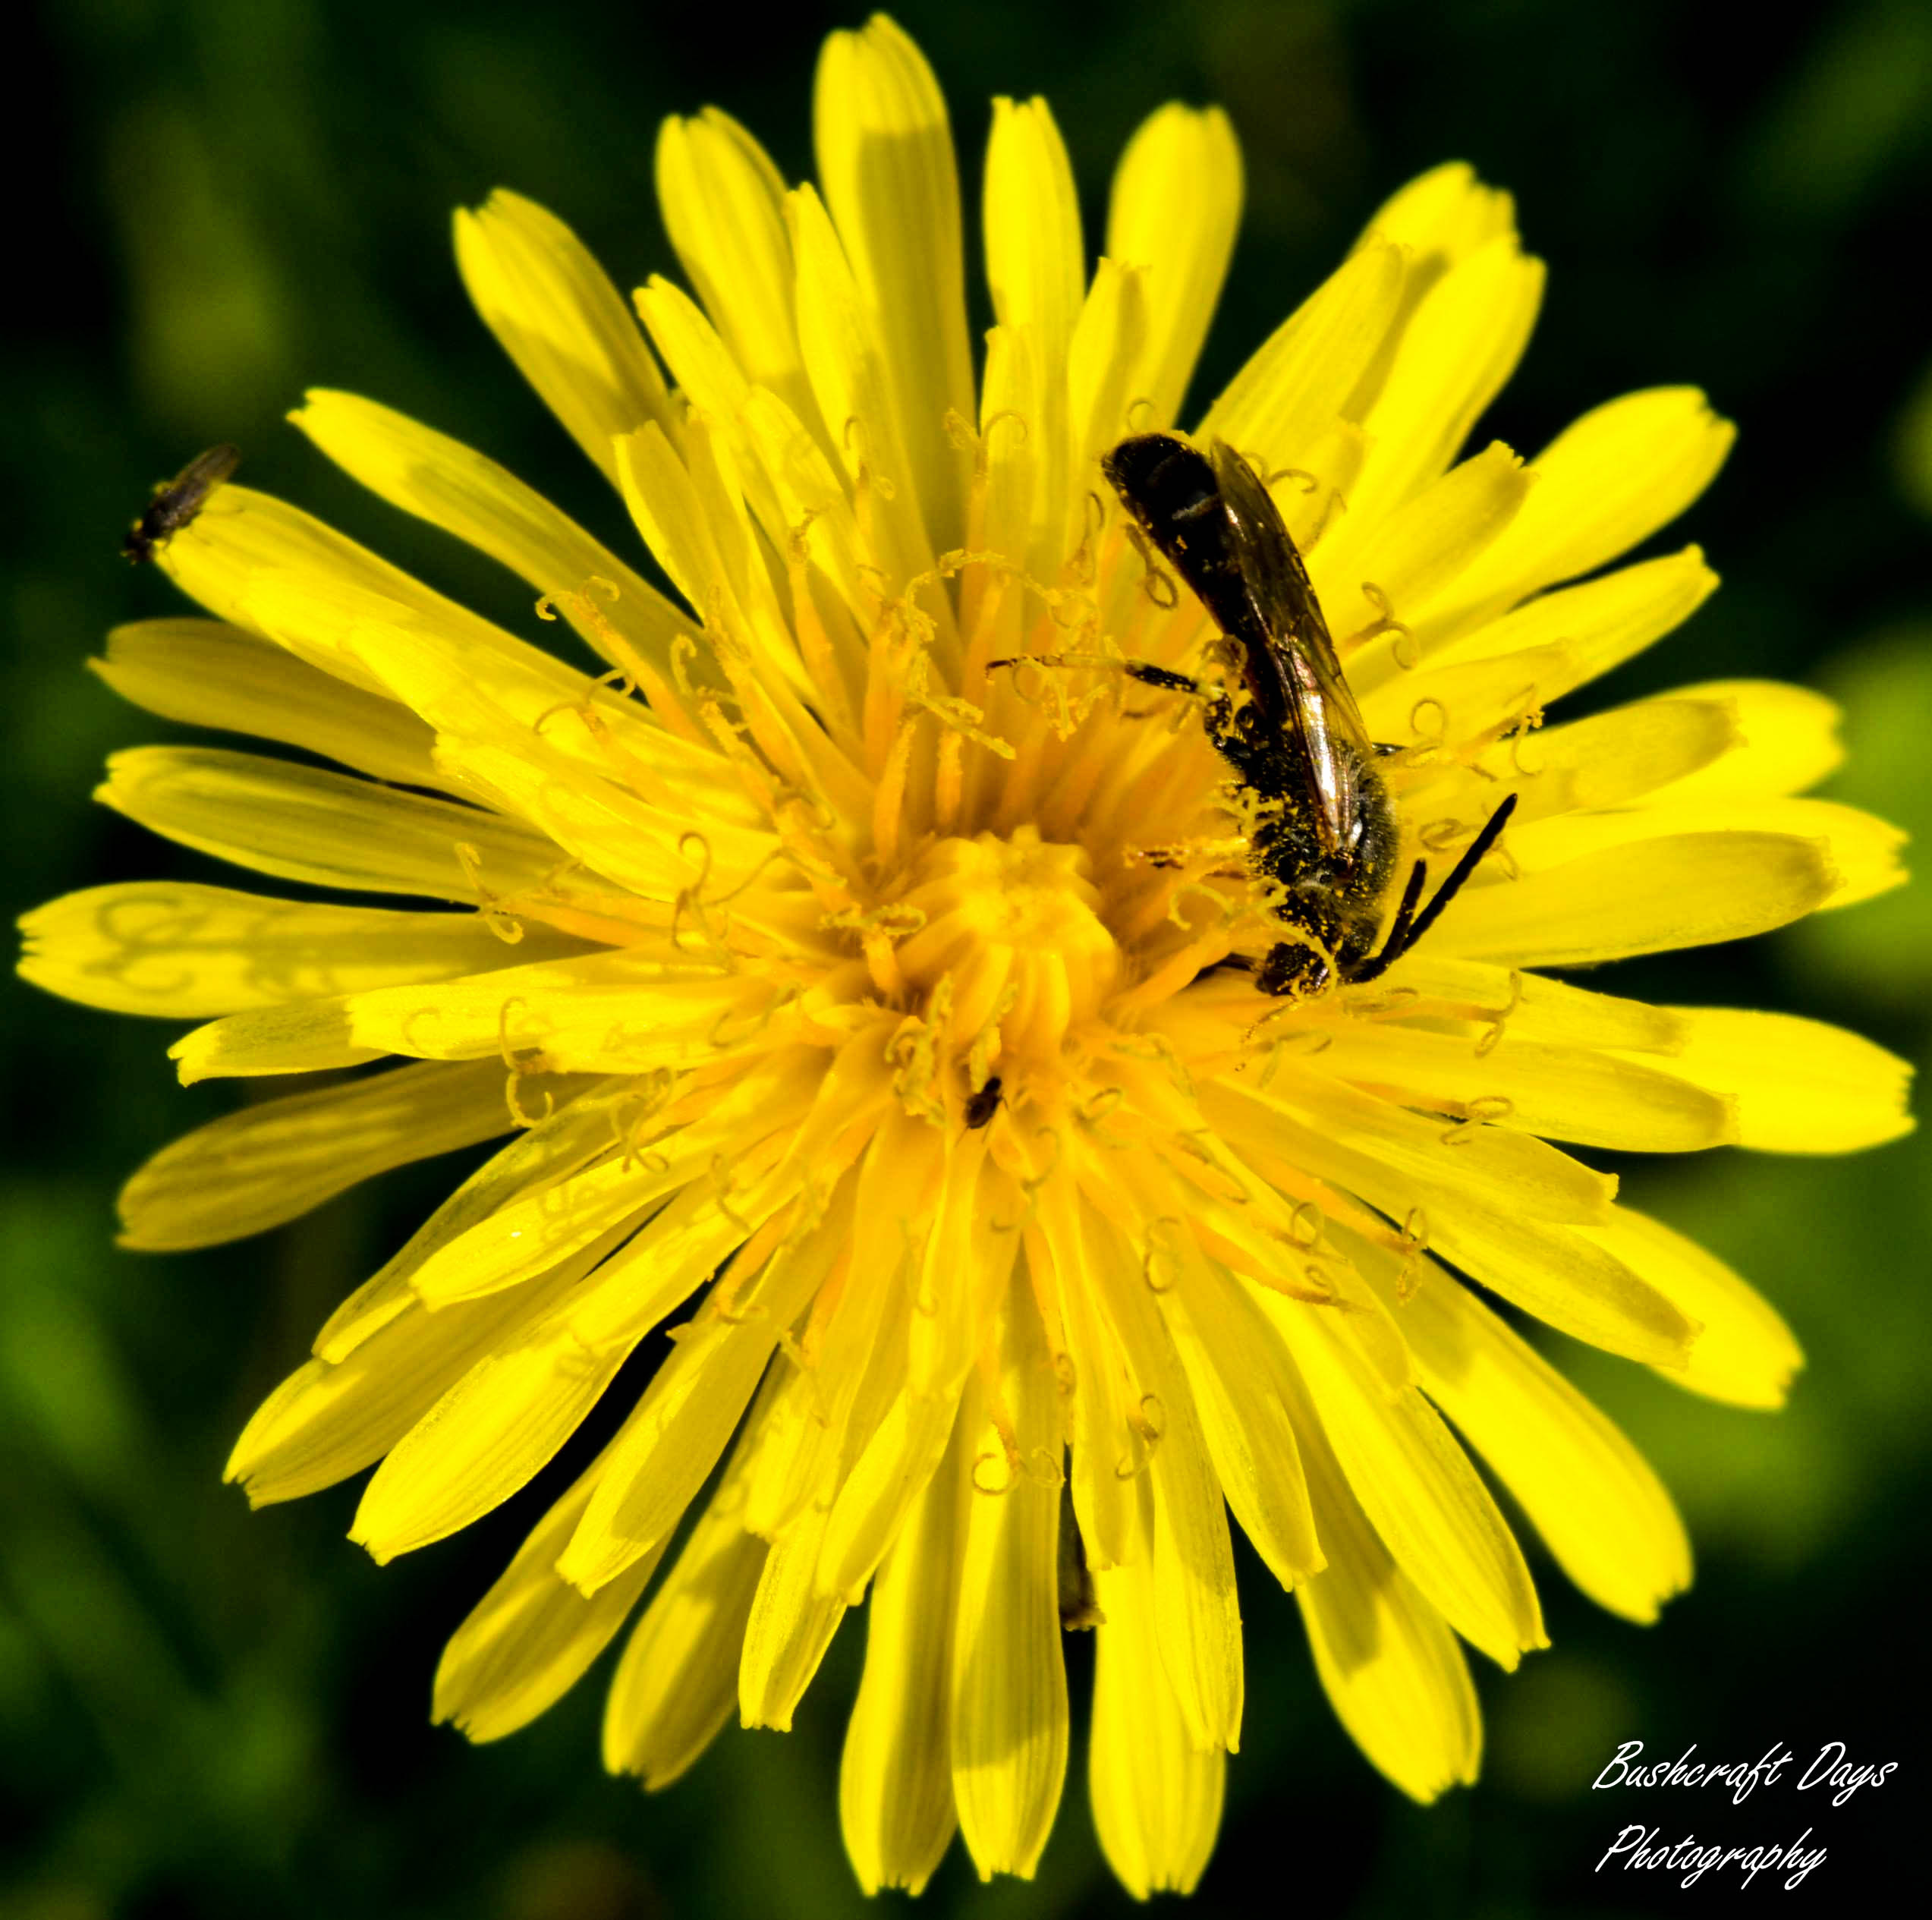
We were hoping to spot some Mayflies but it was not to be. We did though spot some bees on the flowers on the way and at the pond itself a cricket and a small moth on the Brooklime.
Our spots
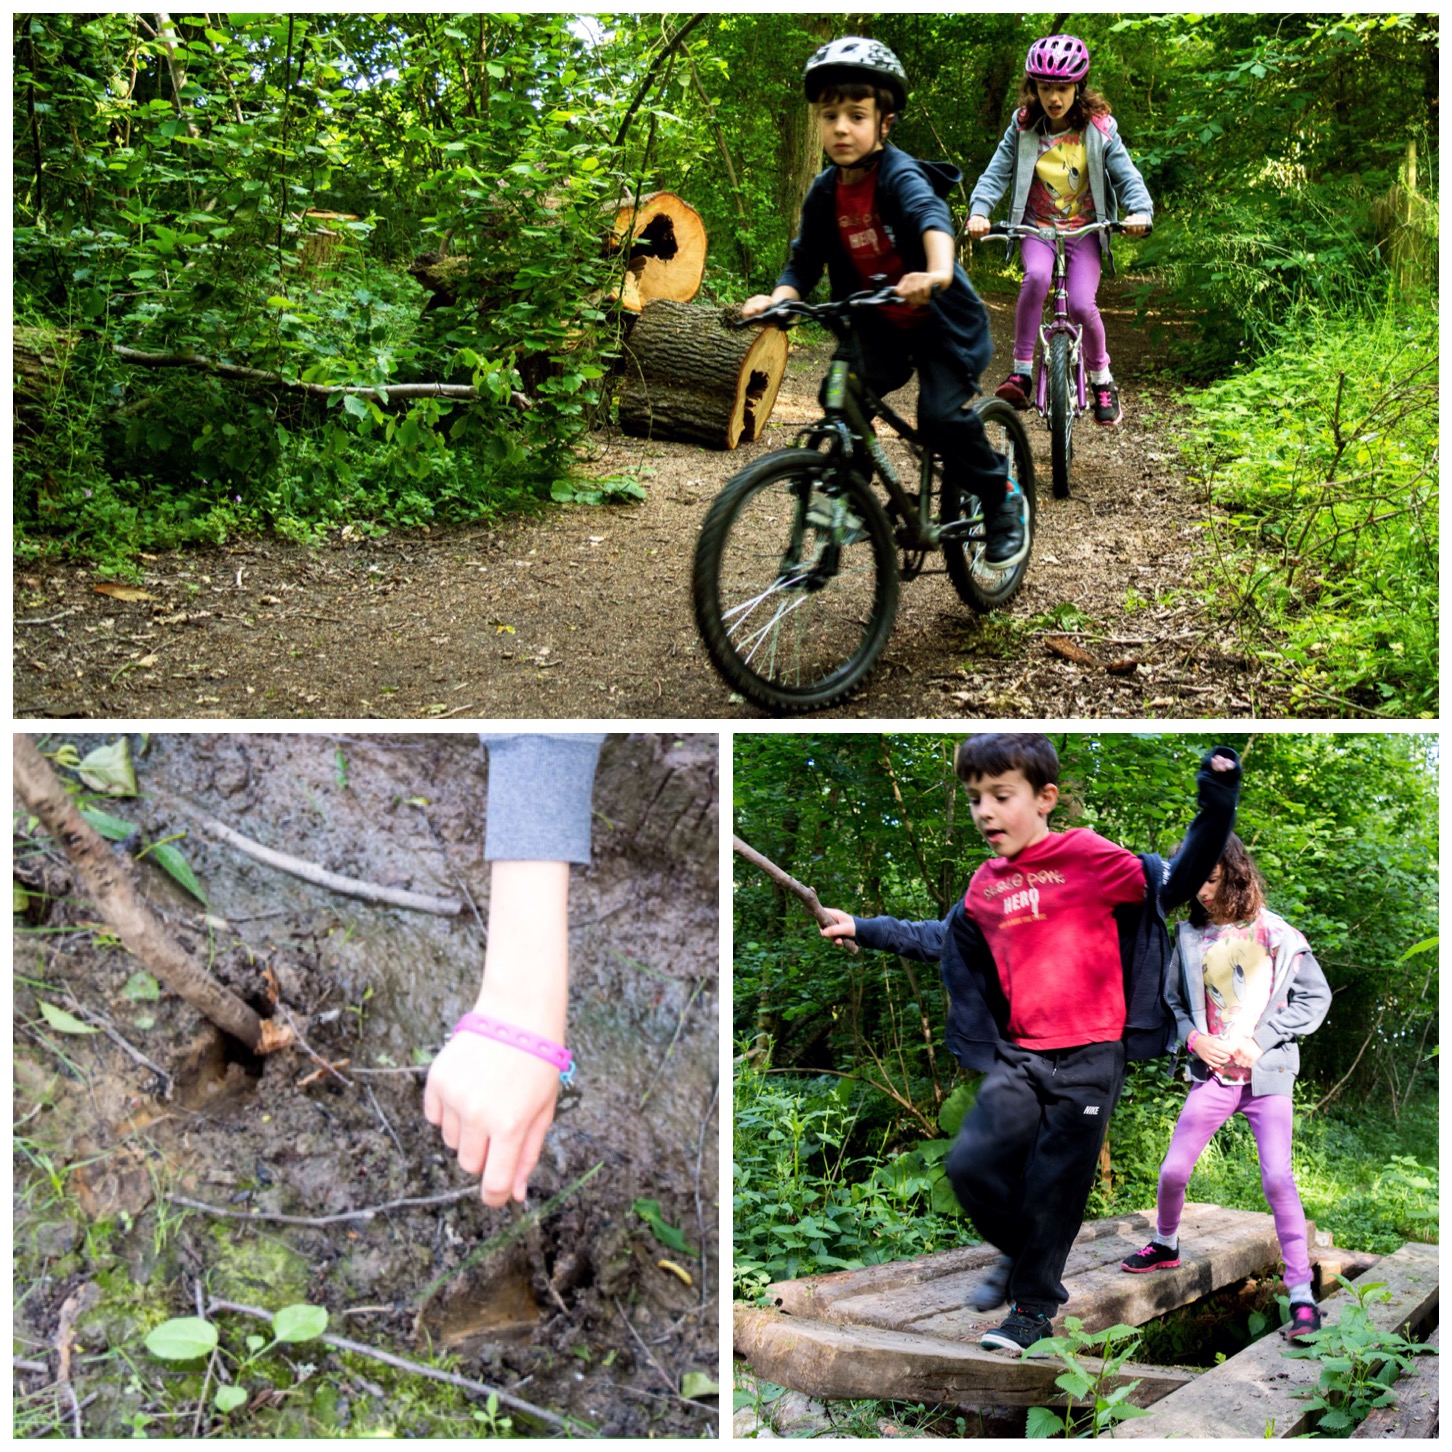
Later on in the afternoon we jumped on our bikes and headed out to our local woods.
After hiding the bikes we spotted lots of deer tracks and had some fun on the old bridges.
Woodland wanders
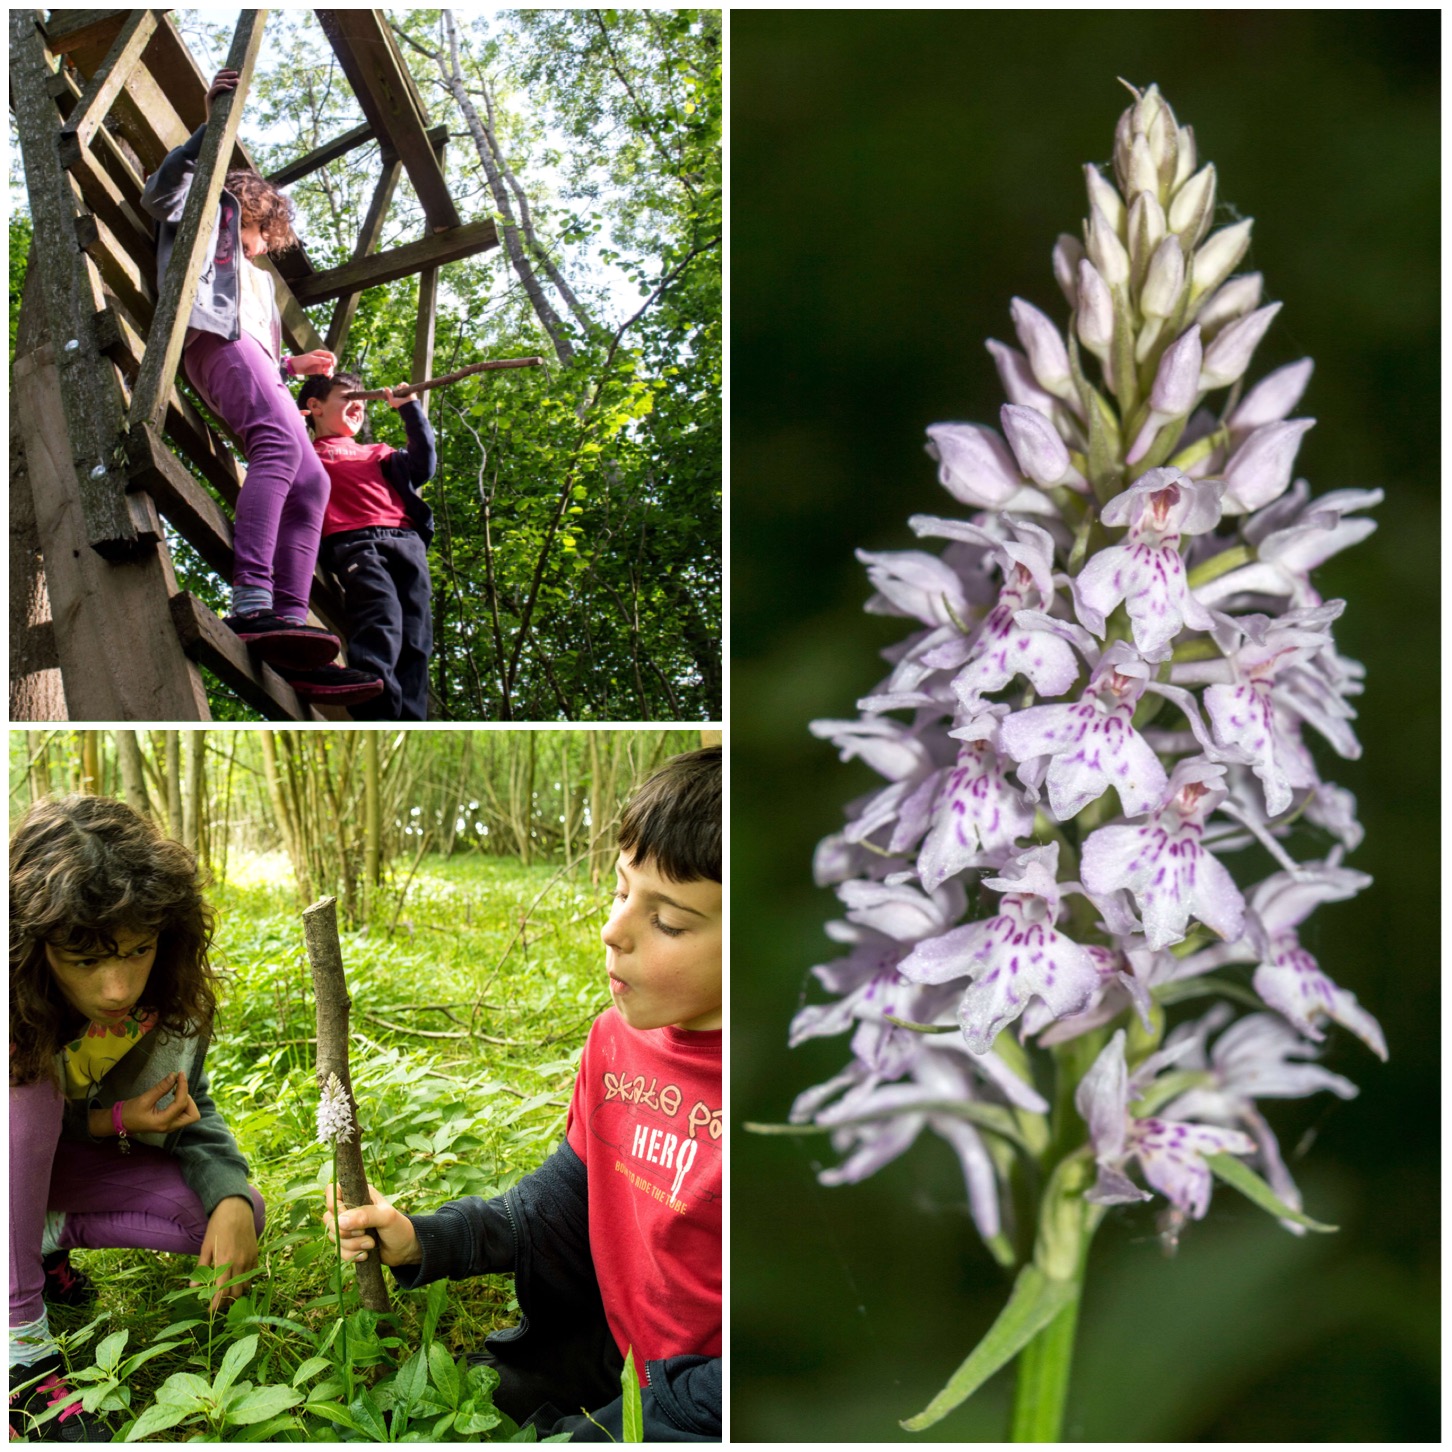
The main reason to go to this spot was to look for some of the Common Spotted Orchids I know grow here. After a quick recce we soon found them.
Orchid hunting
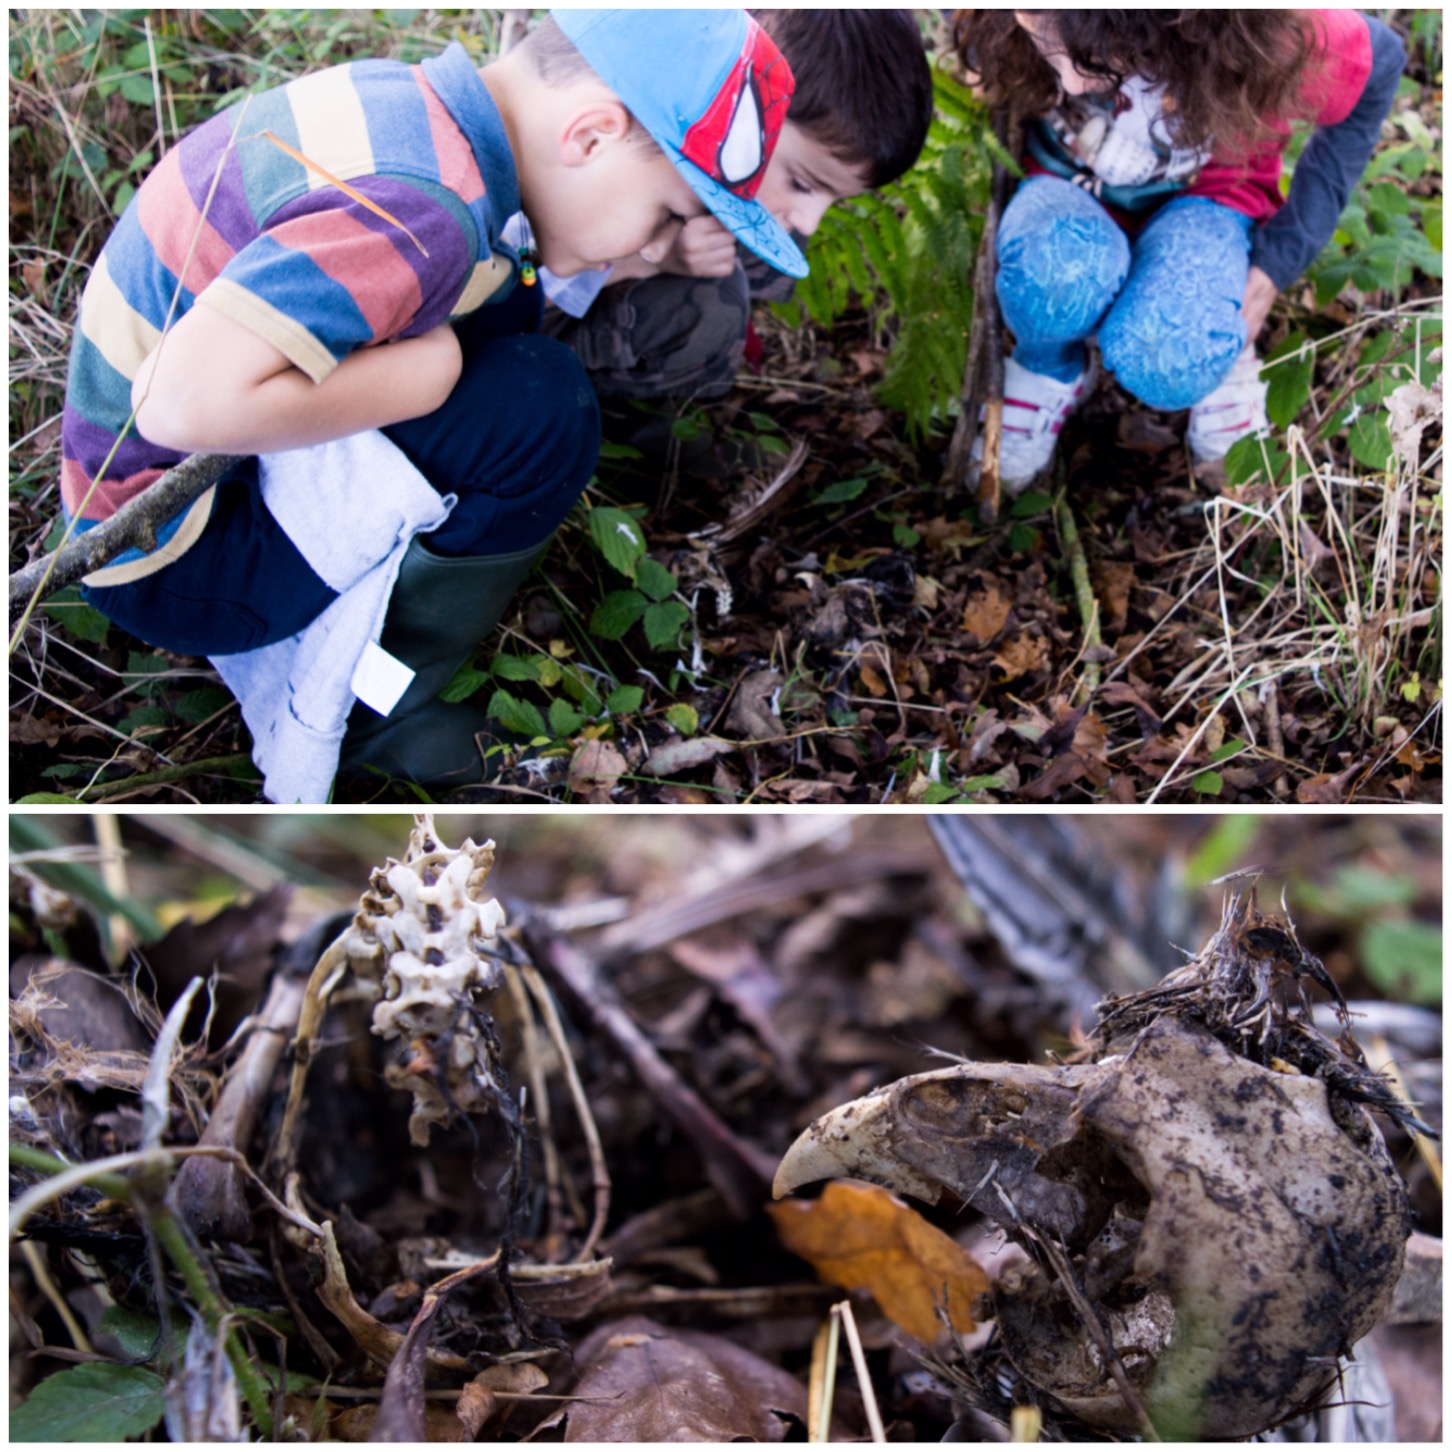
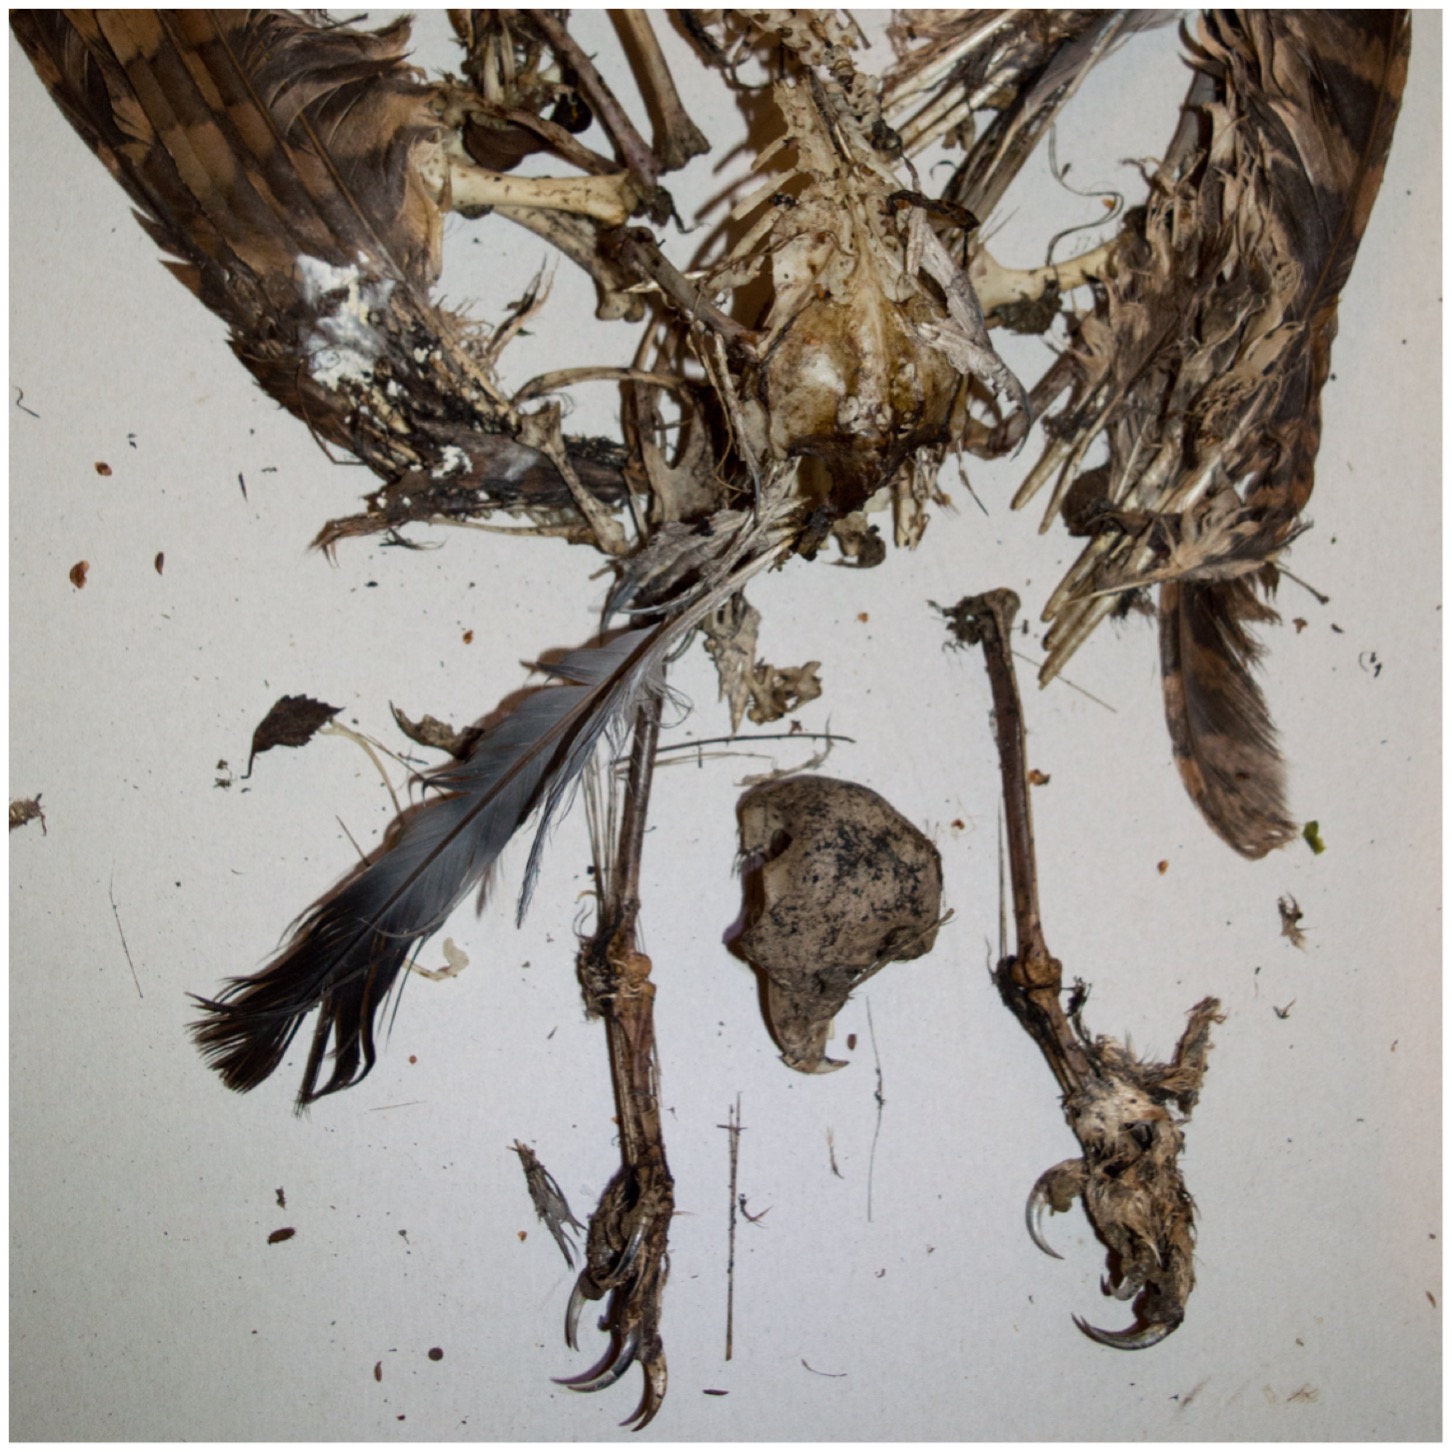
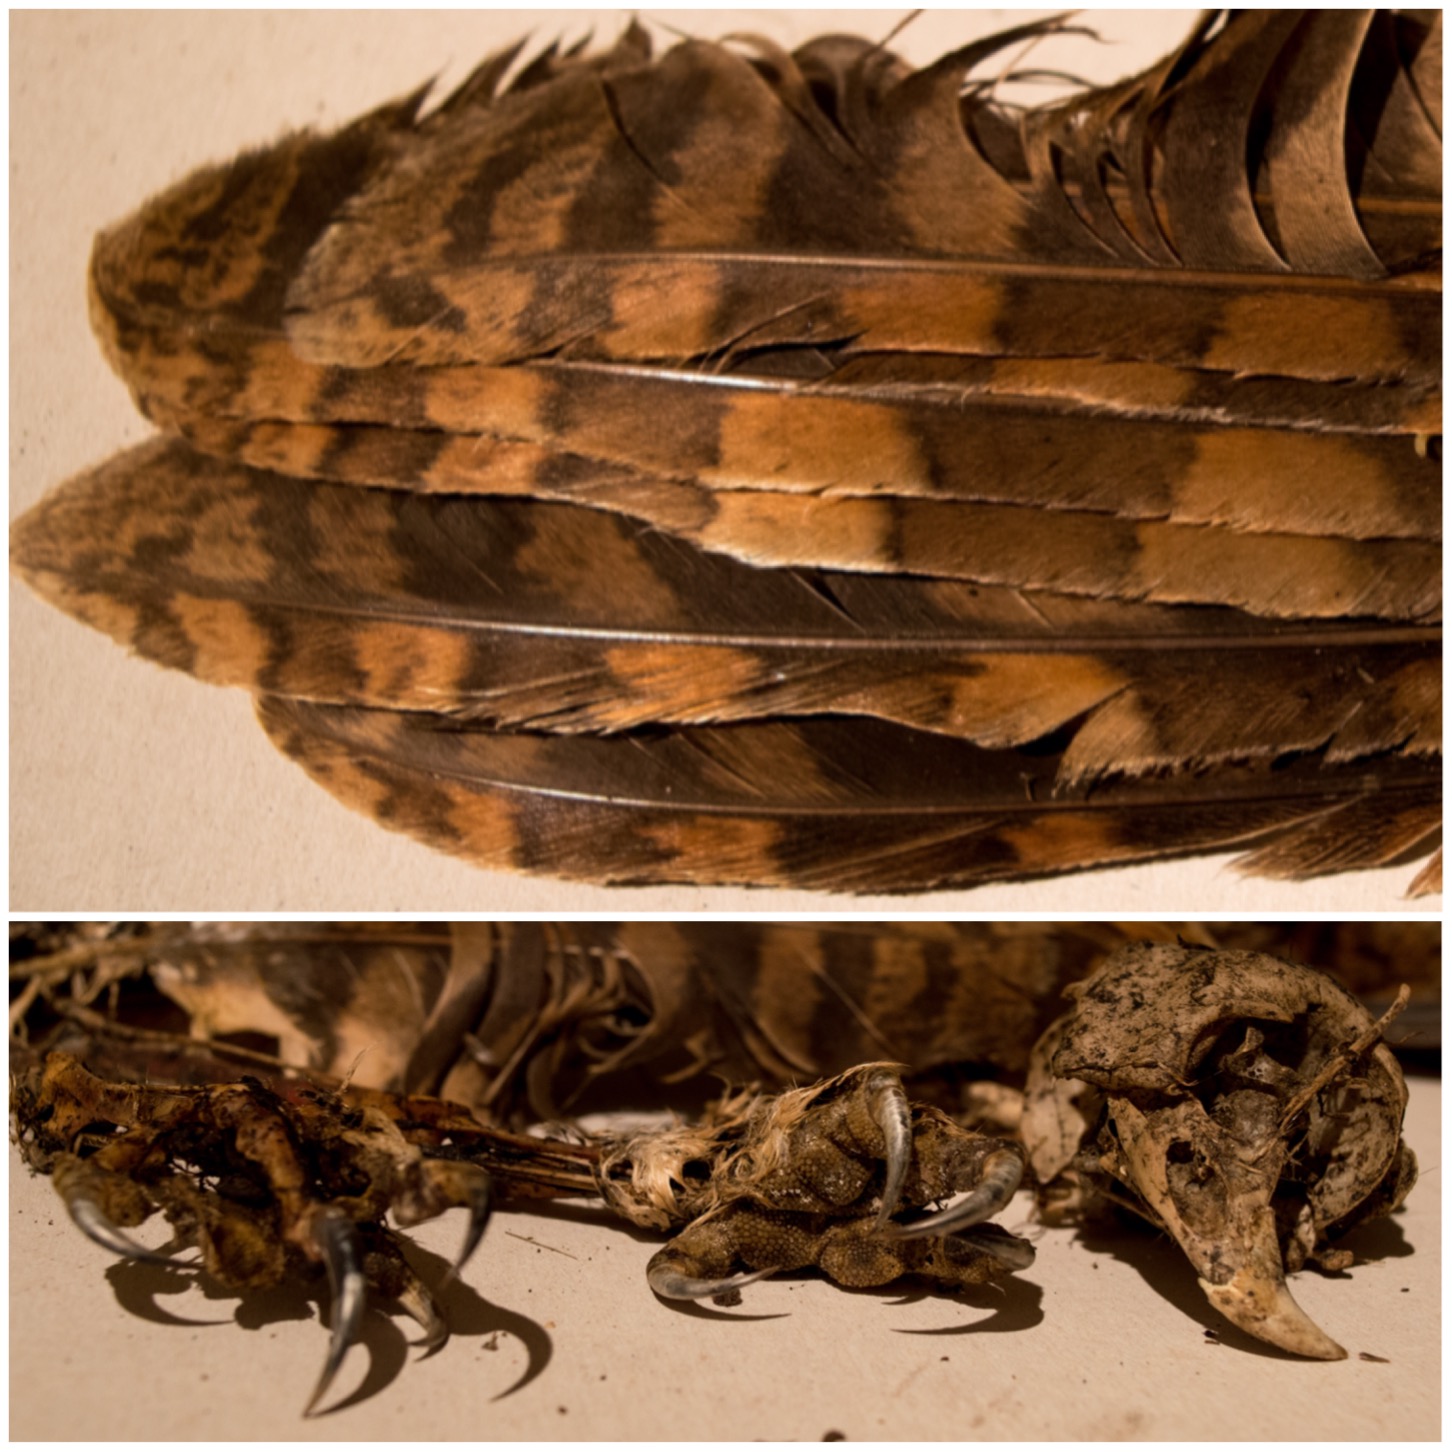
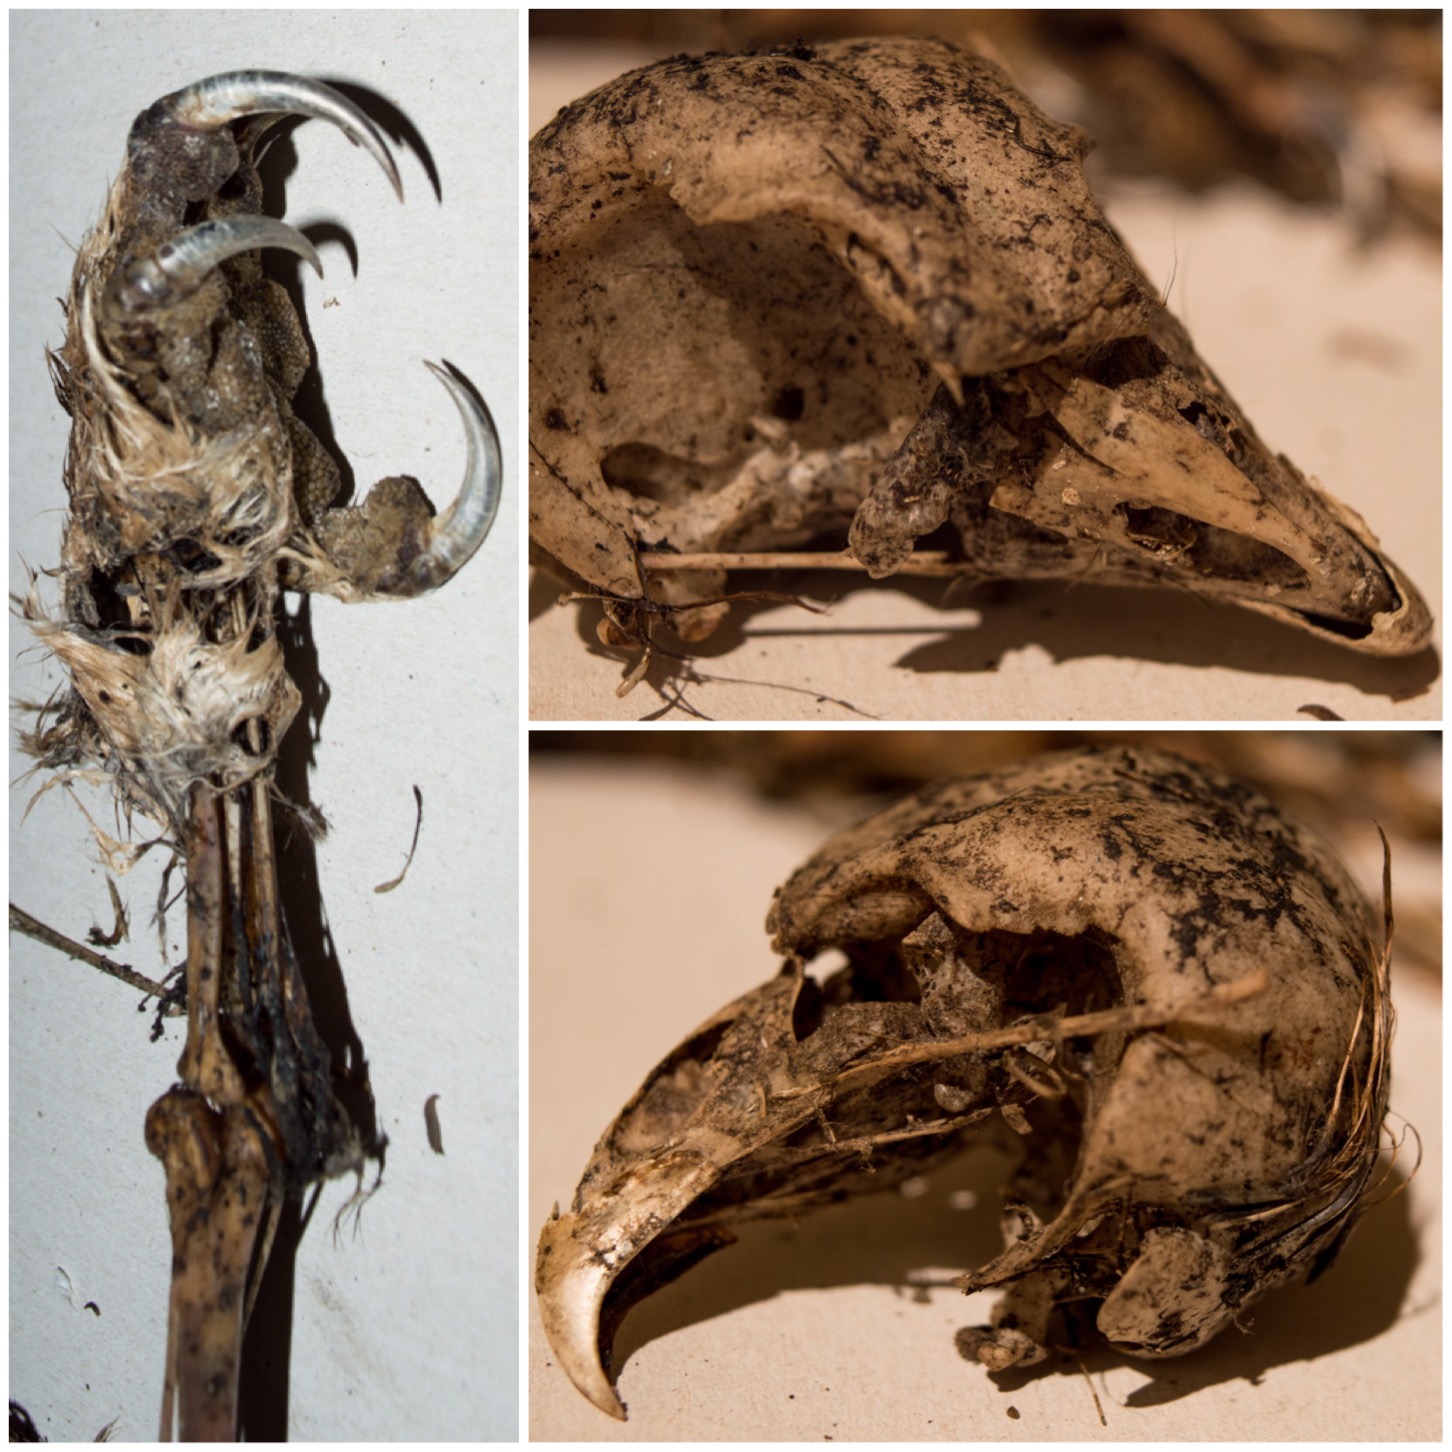
It was soon time for dinner so we headed back for the bikes. On the way back we spotted a pigeon kill site. I had a look at the quills and none of them had been ripped off so I imagine it was a bird of prey that had its dinner here.
This thirty day challenge is proving a bit of a challenge all right. Not for the activities but for just sorting the pictures. The kids are having a ball though.
Tonight I needed to finish building a Gibbet crane (more on this in a later post) and I needed a fire to test the crane out. So instead of cracking on with it myself I got the kids involved.
Our fire
First up we headed out to the wood pile and got a load of small twigs and small logs. Once collected Finlay and Catherine sorted them into different sizes by the firepit.
Collecting time
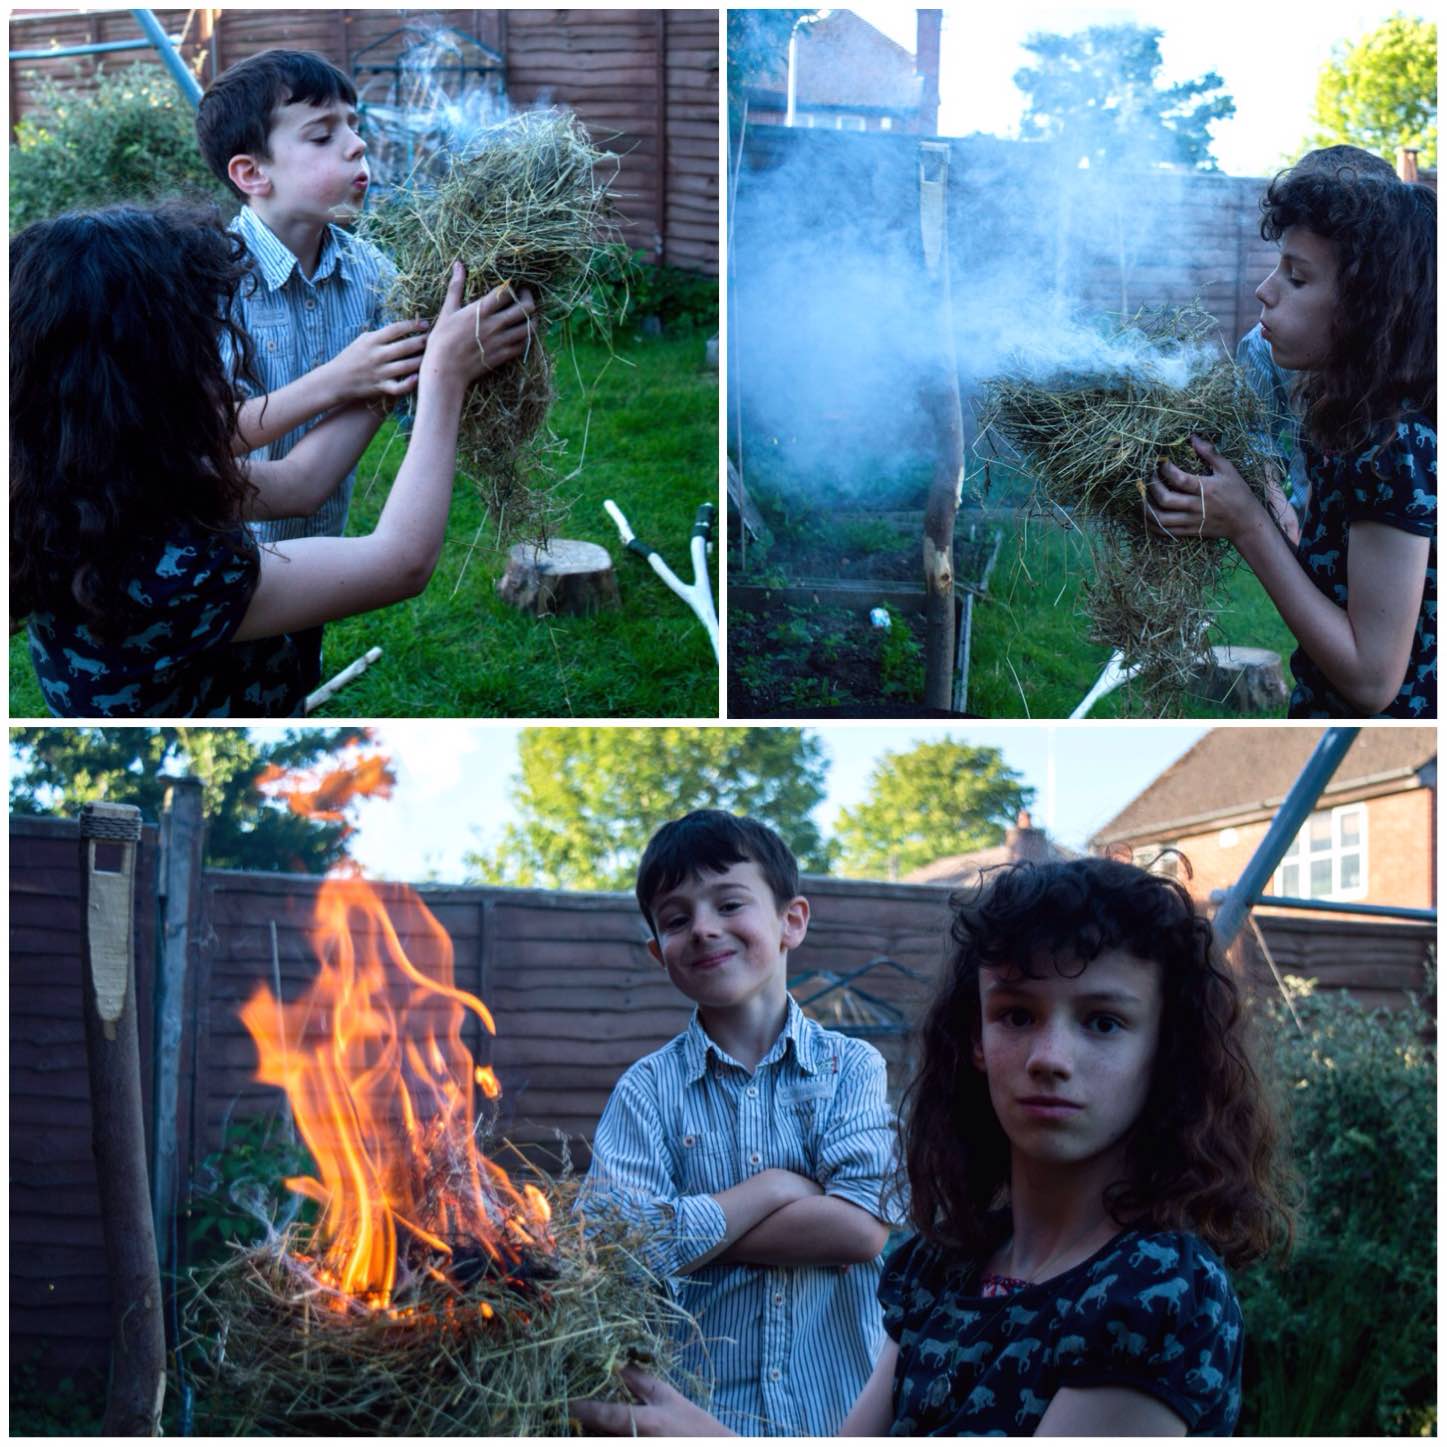
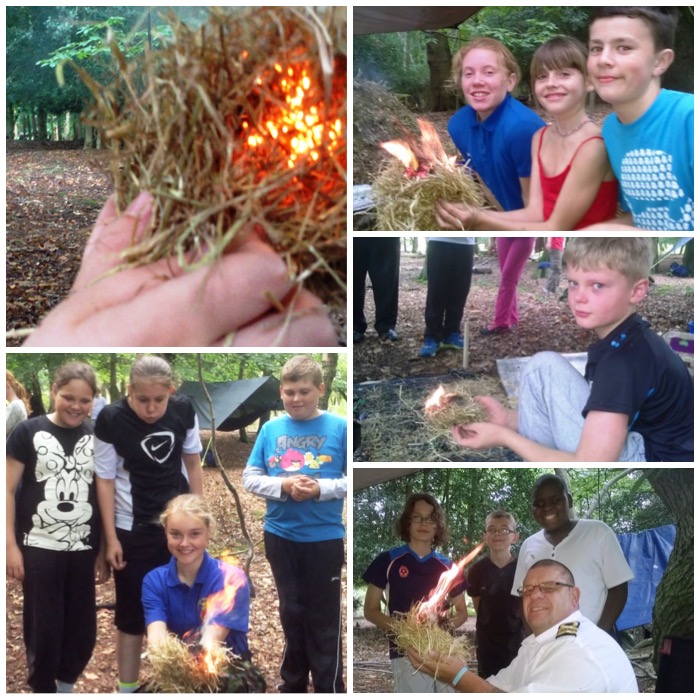
To light the fire we got a couple of firesteels out, had a little practice and then sparked up some char cloth.
Strike a light
The char cloth was popped into some hay and within a minute they had it well lit.
A huff and a puff
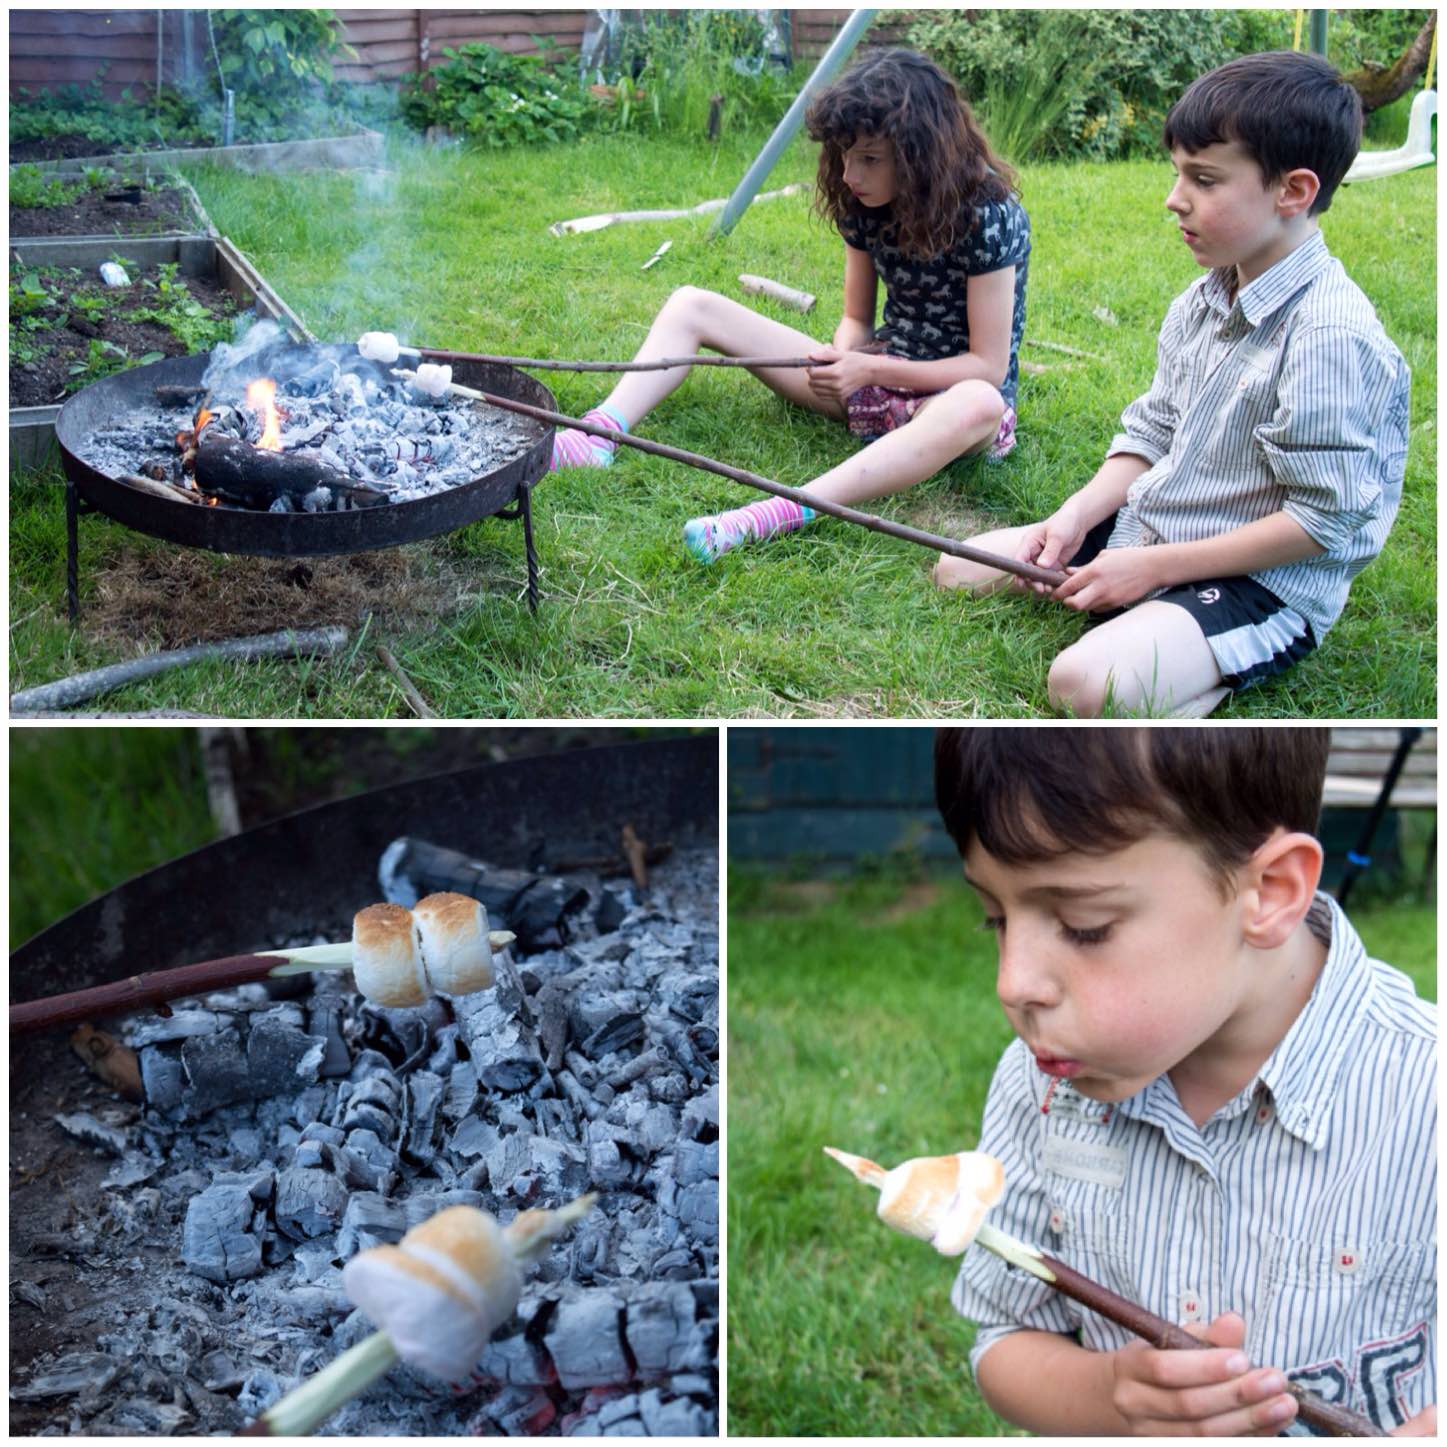
I got all my pictures of my crane sorted but the kids wanted the important stuff – marshmallows – could not disagree with them
Finally the important stuff
Quite happy to do this one tonight as I needed to light the fire but it was a nice change to get the kids involved in the fire making this time.
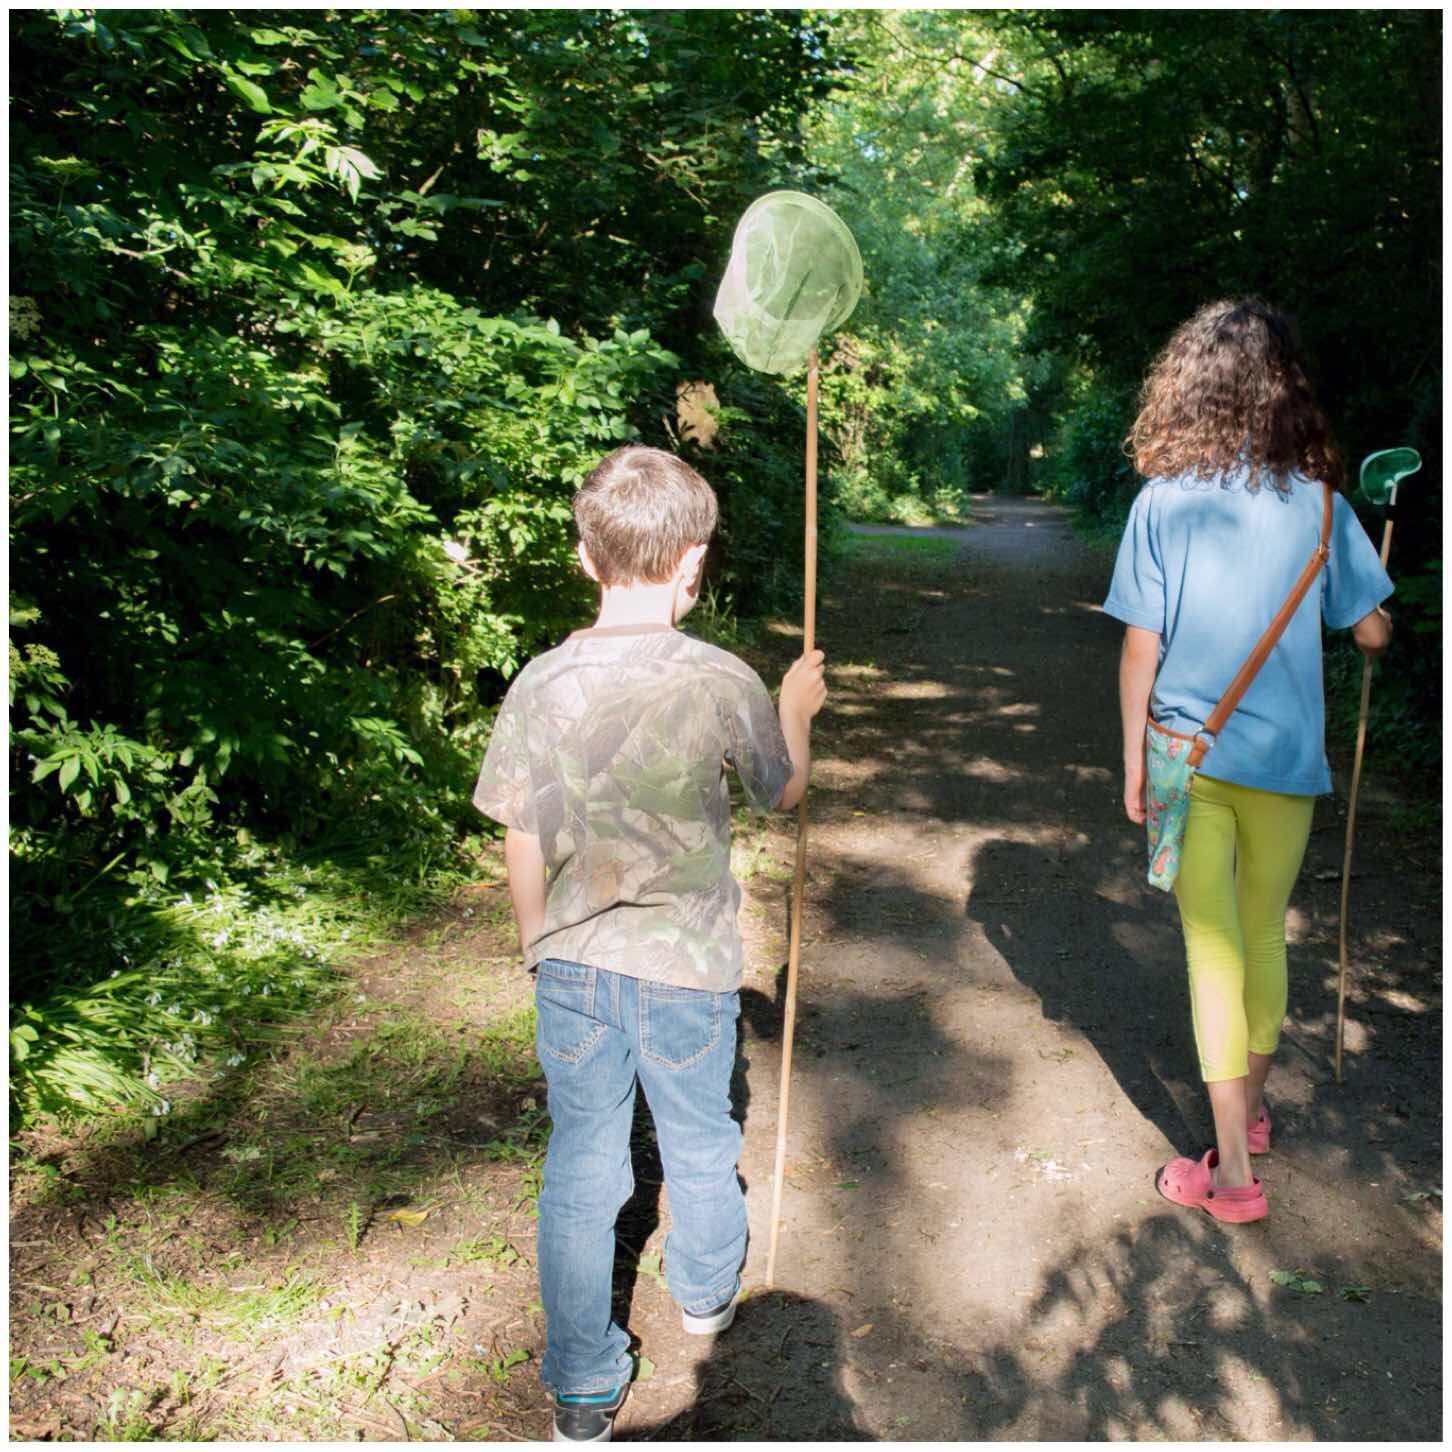
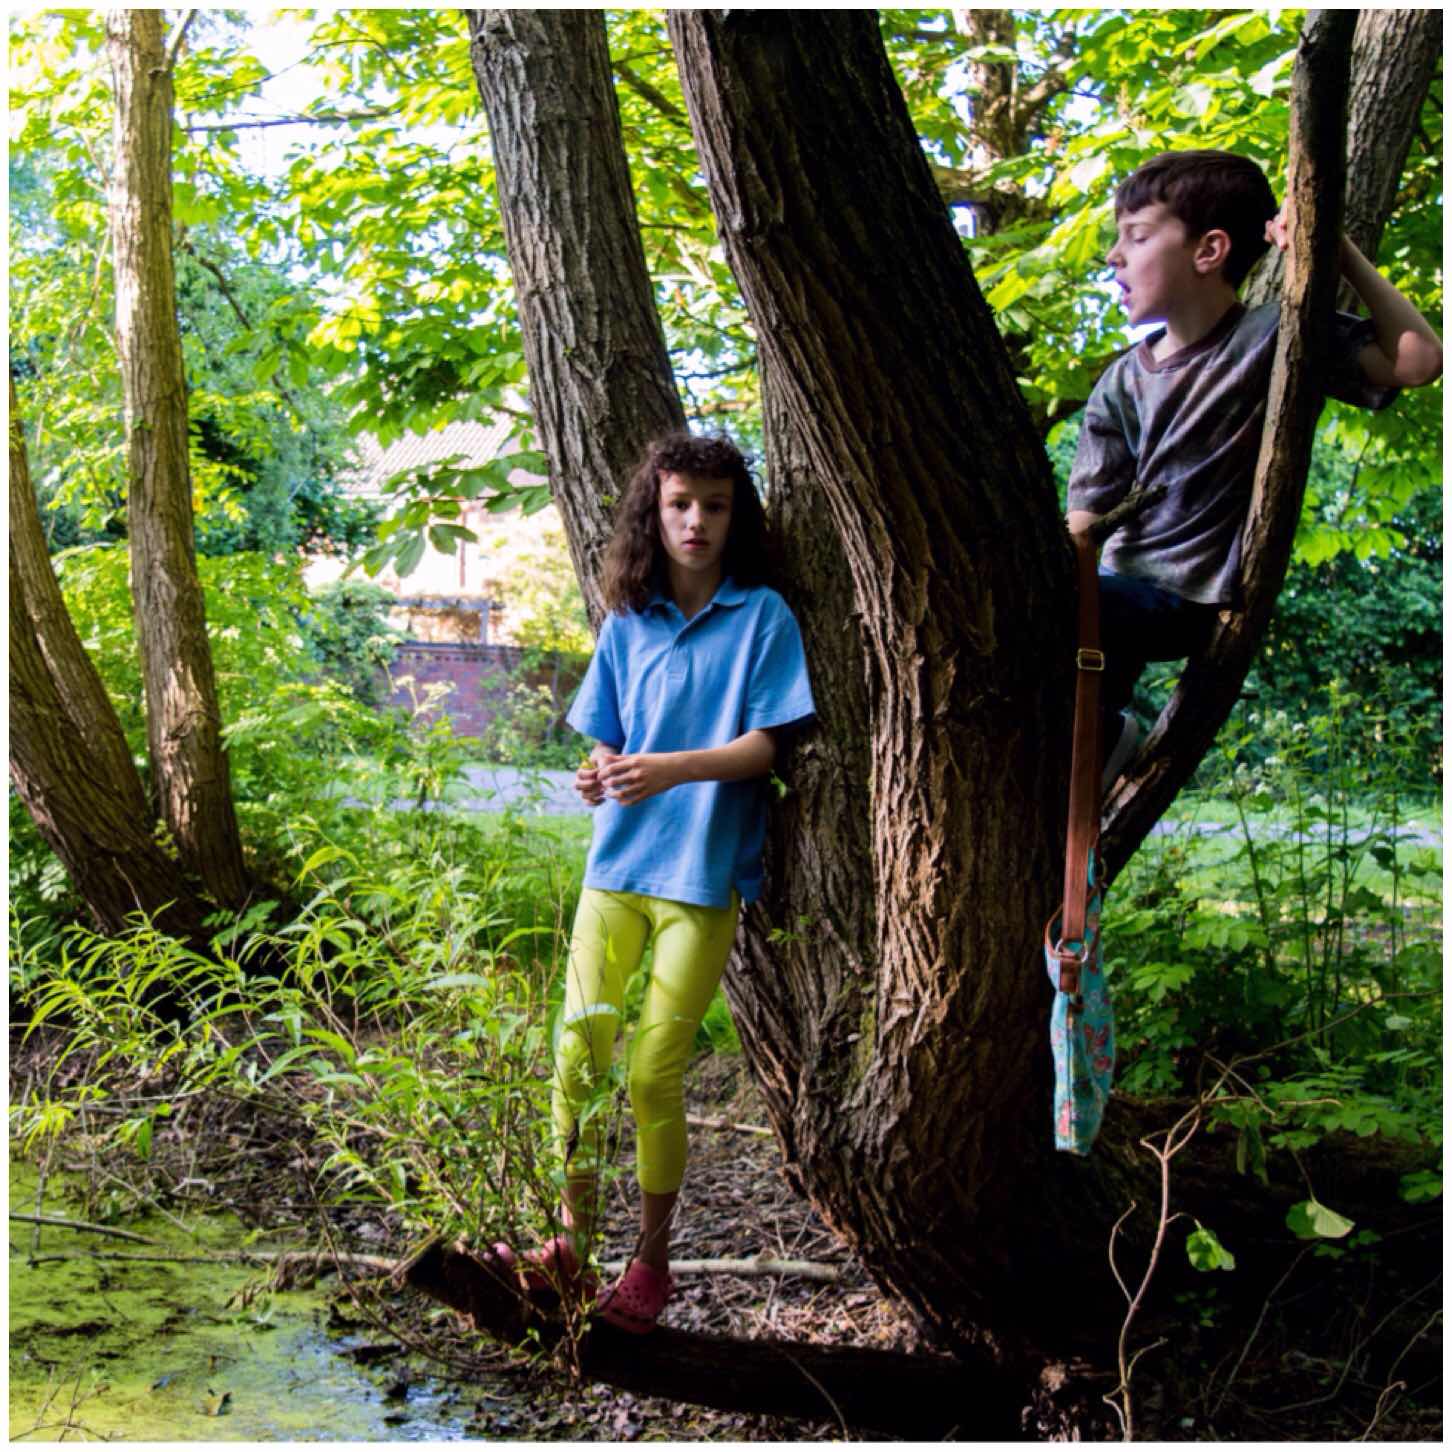
As I got home tonight from my trip away I had a chat with the kids about what we could do for the 30 day challenge and pond dipping was brought up.
We had a quick scrabble around for all the kit and were soon on our way.
Heading out
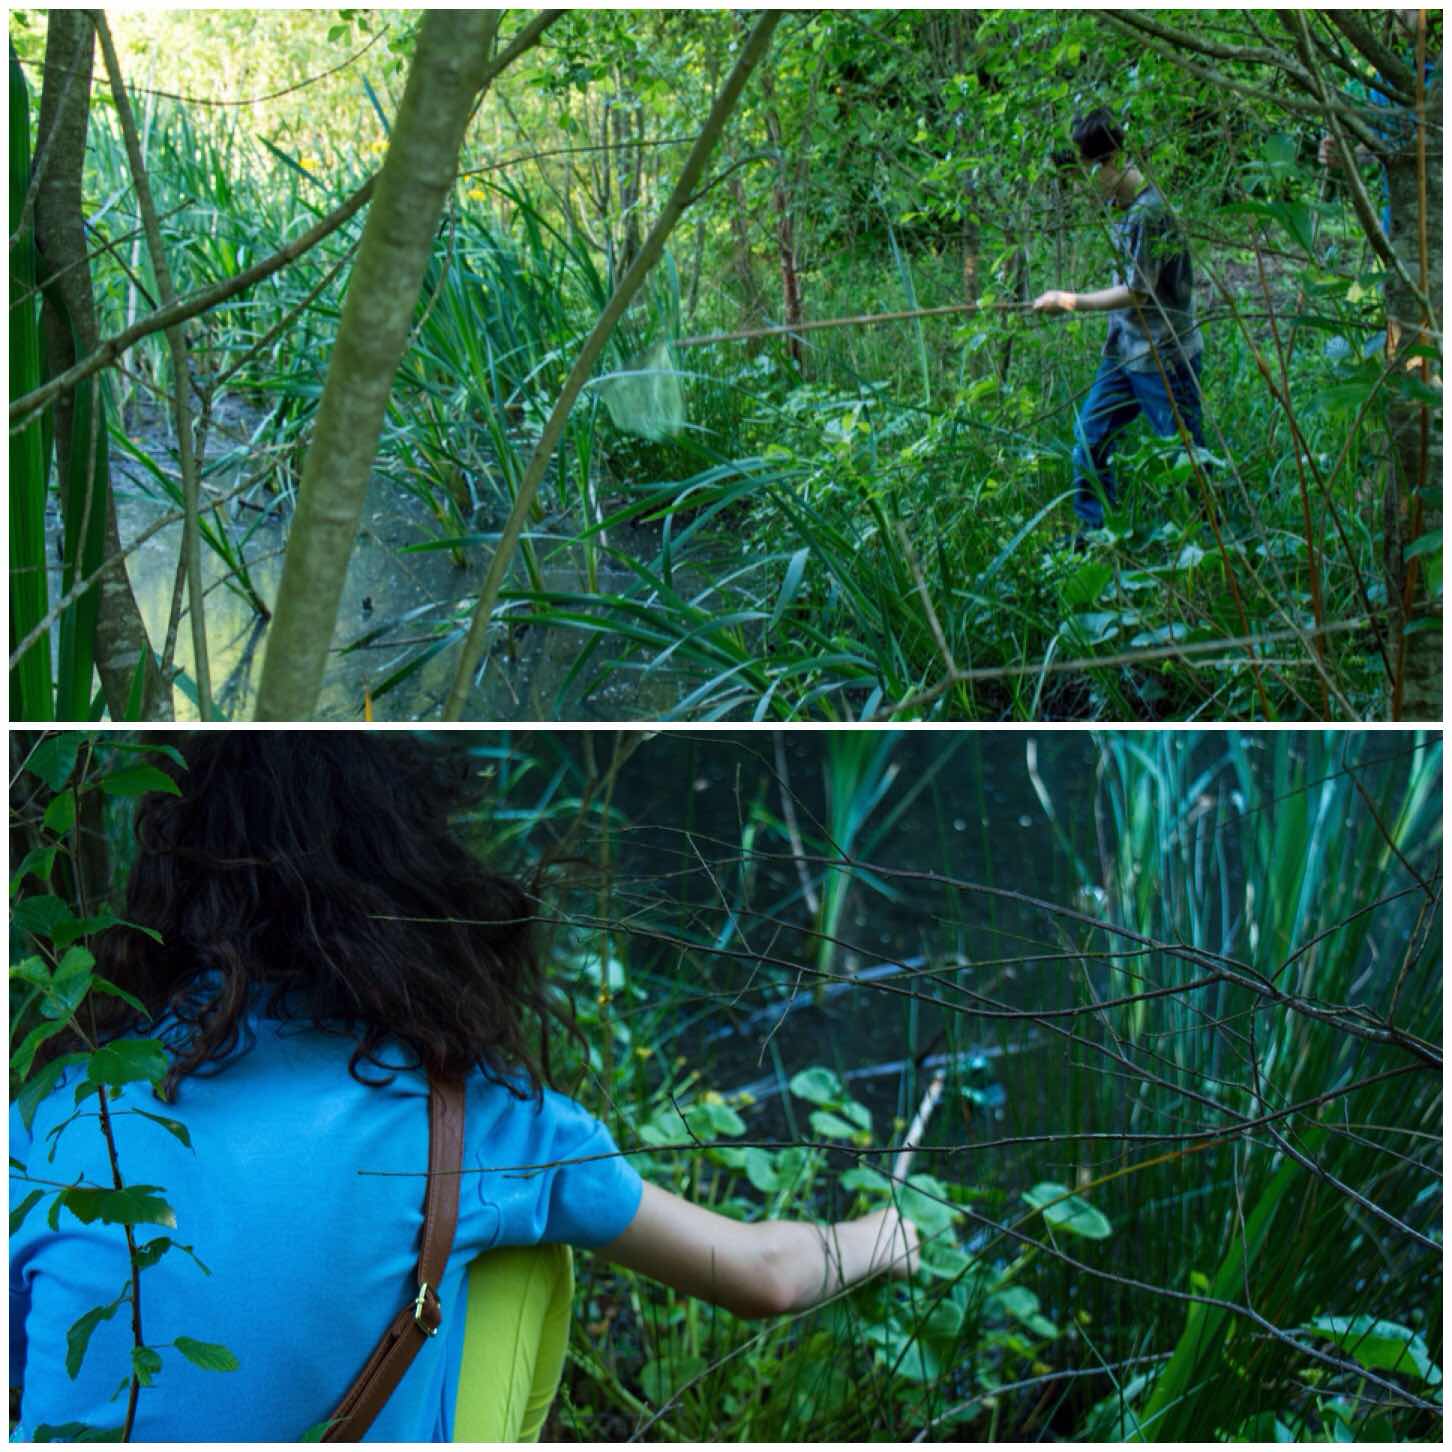
There are a number of ponds in the village and I was hoping that there would be enough water still standing from the heavy rain last weekend.
The first pond was very low and after a couple of dips we gave up as all we were bringing up was mud.
First pond – unsuccessful
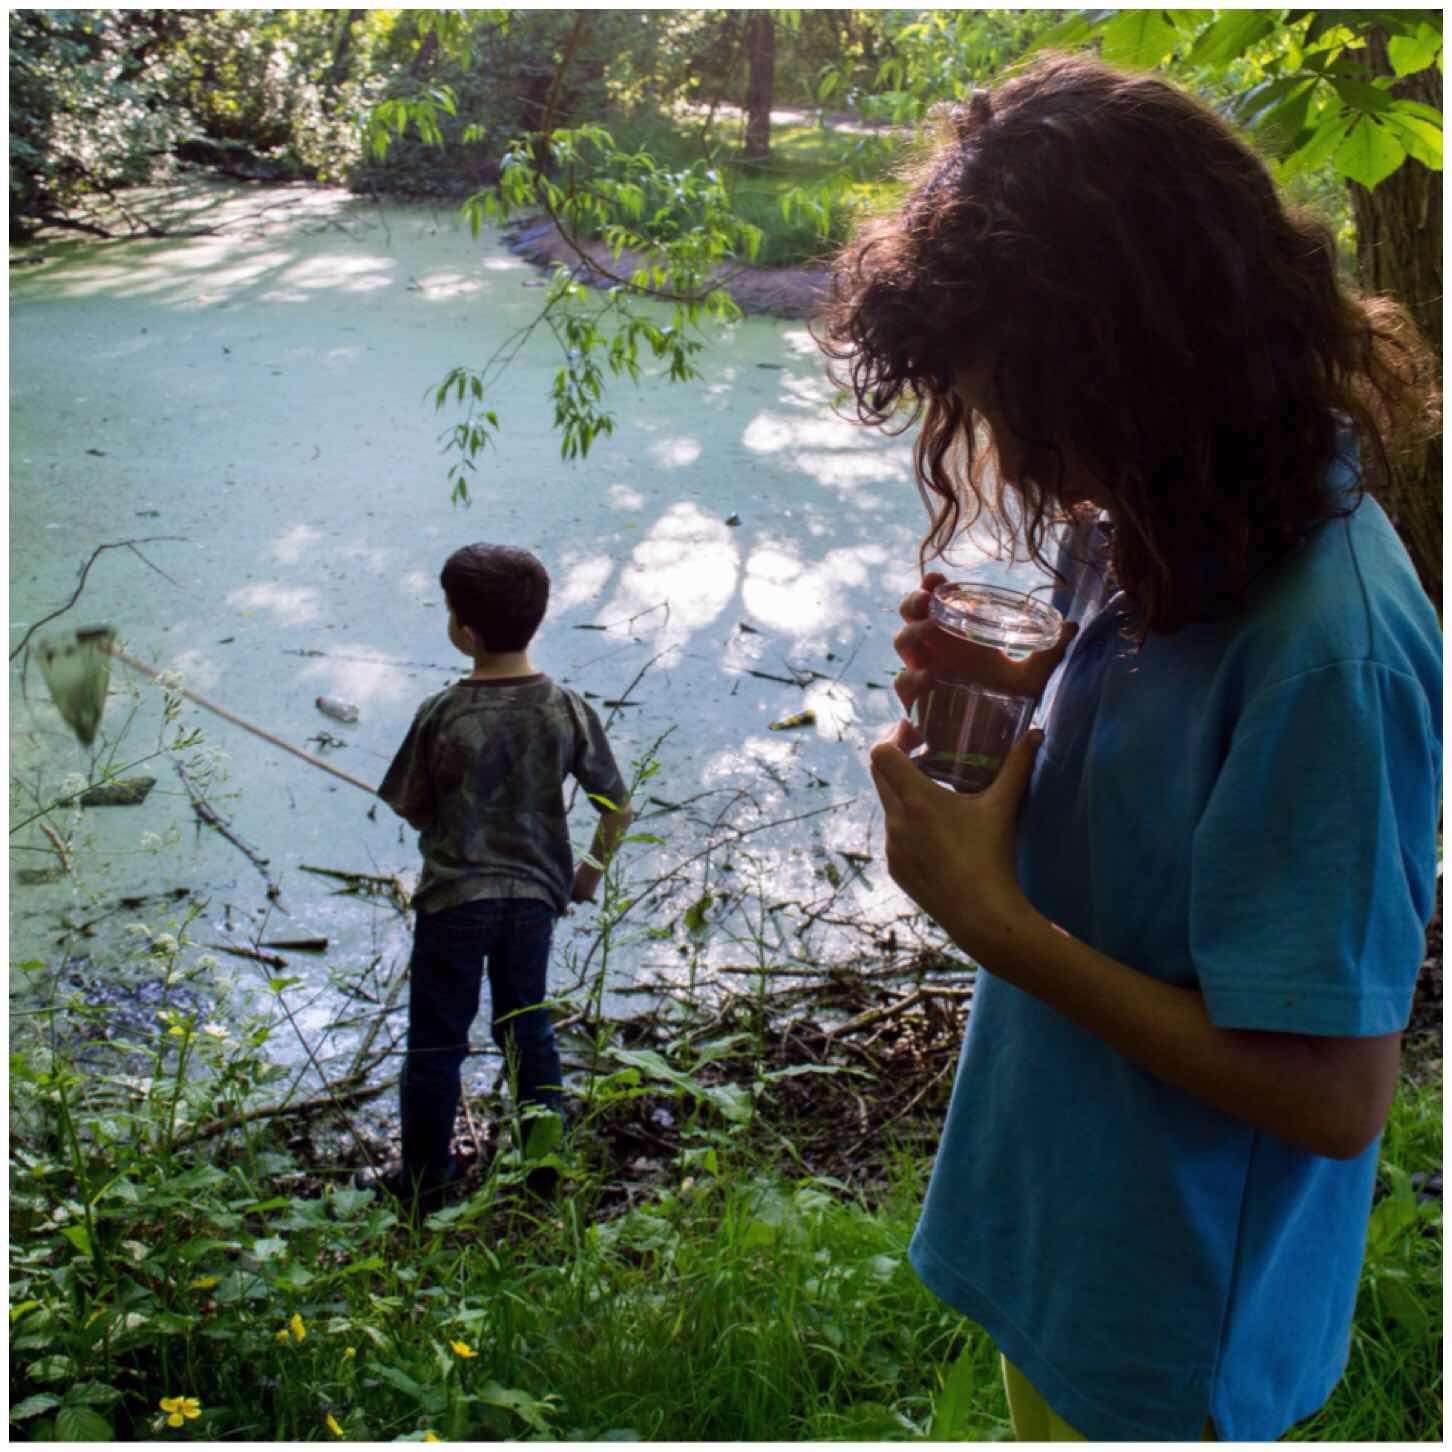
The next pond though covered with pondweed offered up a small ant (must have been on a stick), a small worm type animal, loads of mossie larvae and a few little shrimps.
Second pond – some success
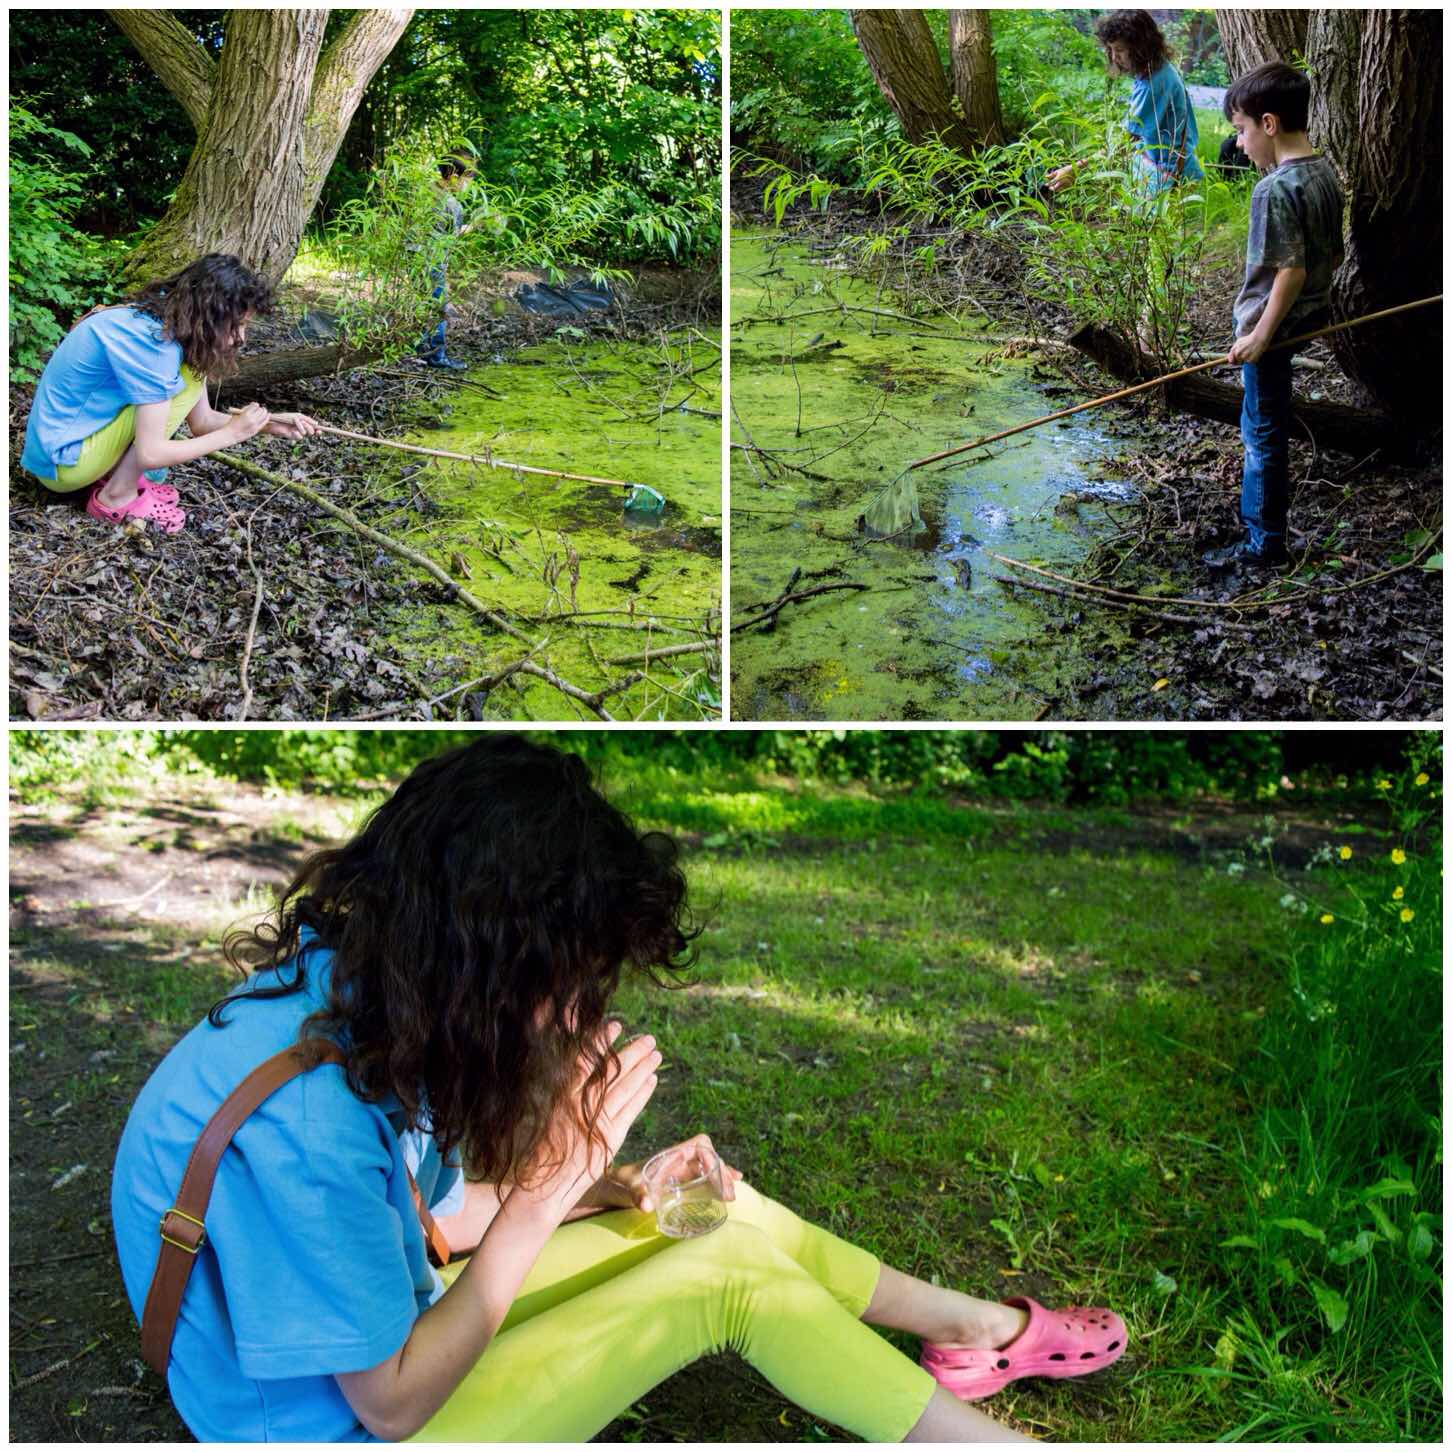
We visit this pond regularly as a family of coots nest here every year and this is the perch the kids use to watch them. They were not in sight tonight but we enjoyed the tree anyway.
Chilling in the trees
Finlay went back to dipping and Catherine to a bit of examining and it was at this point that a couple of lads came cycling by and insulted my kids not knowing I was sitting by the tree. They were off the opinion that they were crazy to be anywhere near the pond as they would get horrible diseases. It is sad to see that that is the attitude of many.
My kids know not to put their hands near their faces when pond dipping by a still pond like this and to wash their hands thoroughly when they get home. I know there is always the potential for Weils disease however the kids had no cuts and scrubbed well when they got home.
Needless to say I stepped out and soon they were scuttling away
Still at it
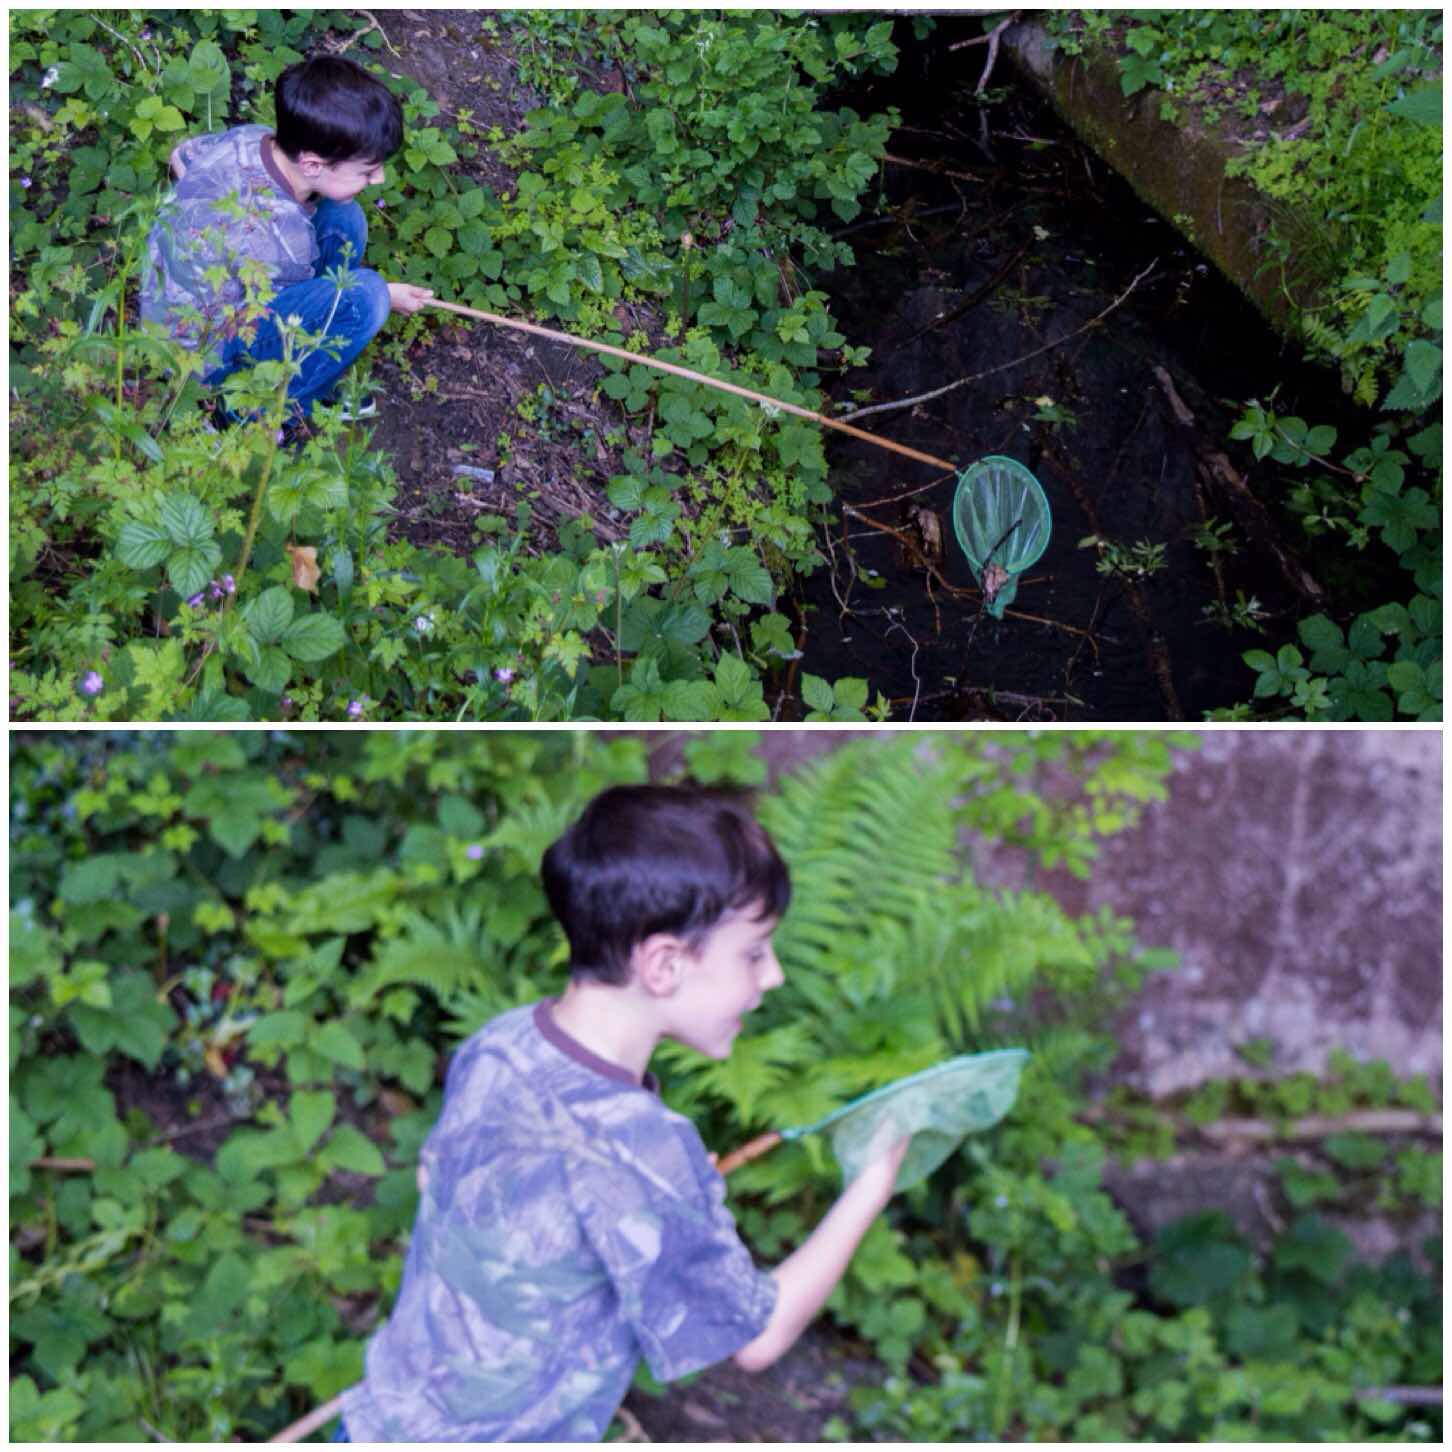
As we did not have much time (nearly 7pm on a school night) we headed back but had one more dip in another stream. Finlay was chuffed as he managed to get himself a pond skater in the net.
Found a stream – good haul
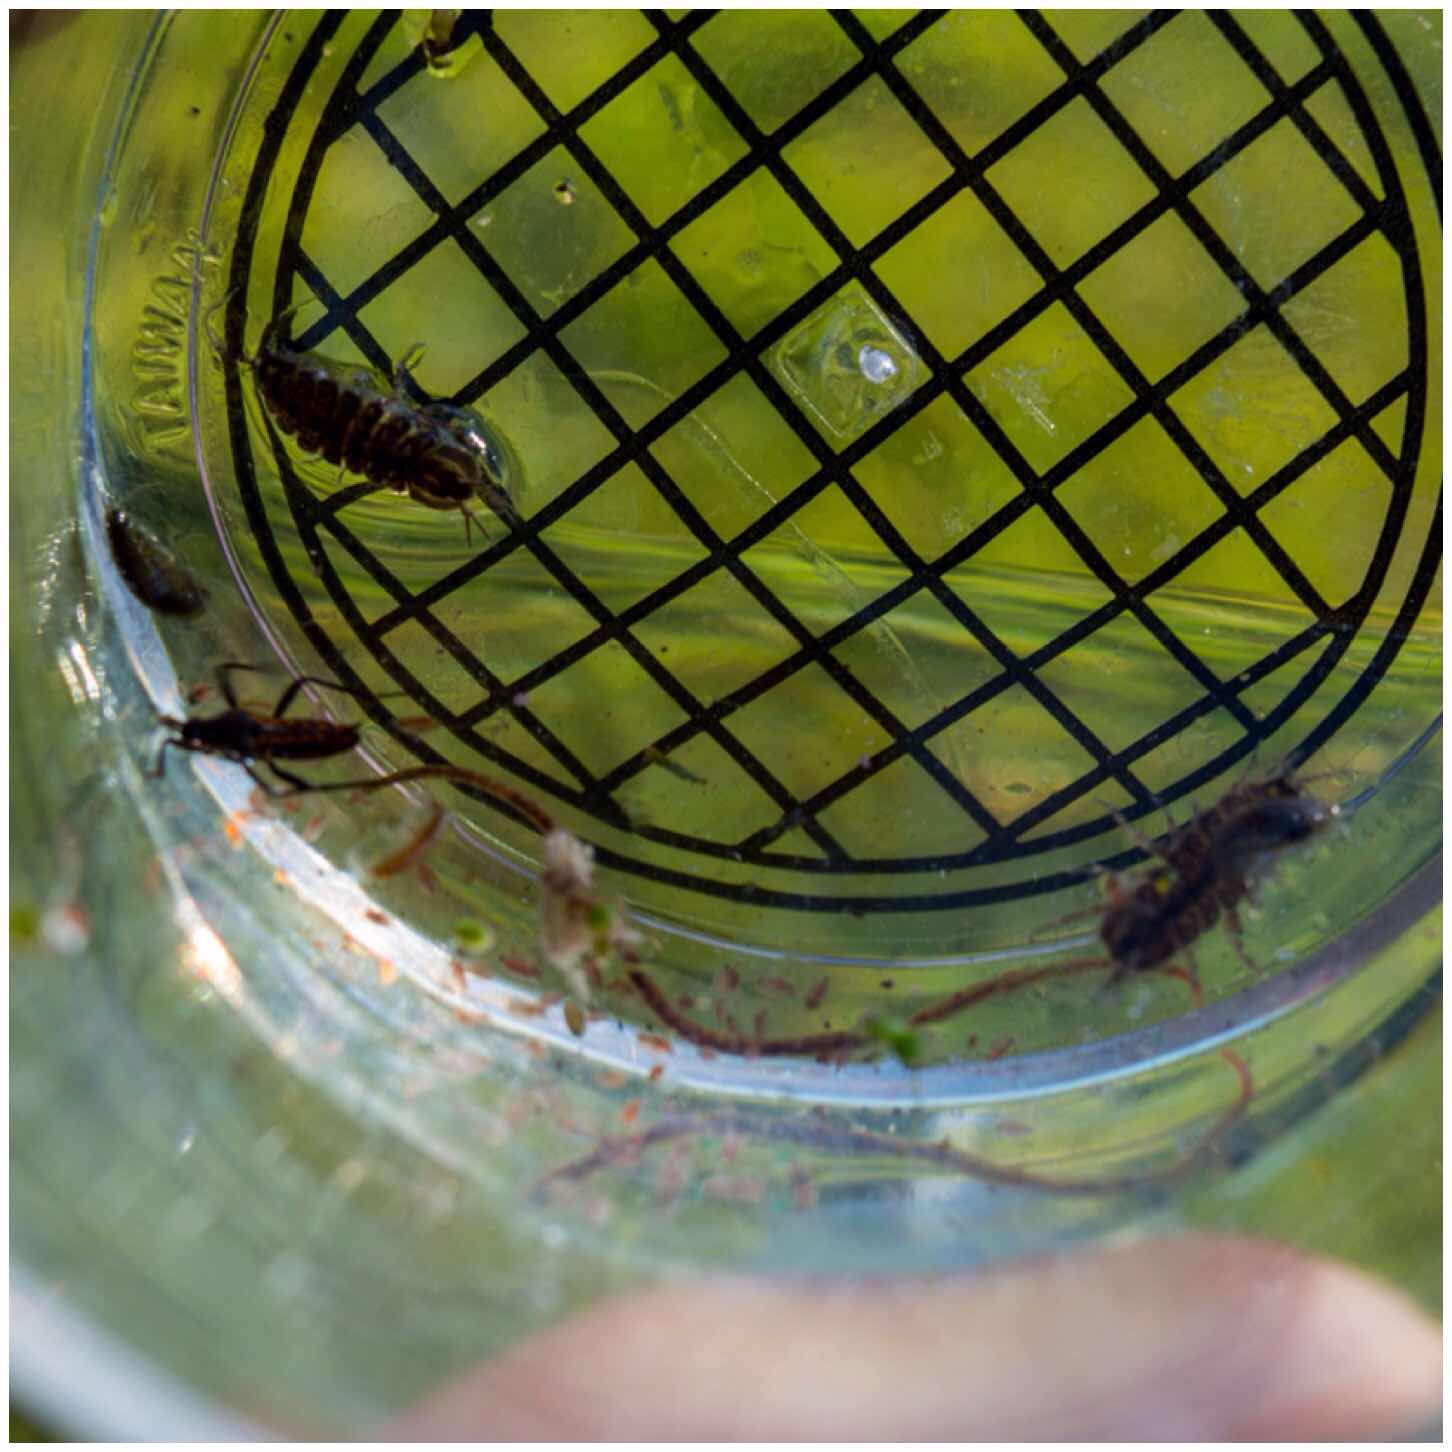
We did not get any fish however we did have a great evenings stroll.
Last catch – a pond skater, some small shrimps and a small worm
I was reading an article on Bushcraft UK tonight by my friend Tony Bristow on the June Nature Challenge set by The Wildlife Trusts.
It is aimed at – asking people, both young and old, to be creative and invent their own ‘random acts of wildness’. They could be as simple as following a bee to see where it leads you, smell a wildflower or make a wild work of art for others to enjoy.
The possibilities are endless.
Tonight I am away from home in the Black Country (west of Birmingham, UK) staying in a hotel and after watching the video decided to get out for a bimble. Over the rest of the month I will try and post up a bit about nature (with the occasional bit of wildness thrown in), be that on my own, with my family or with friends.
I did not have my DSLR with me on this trip so decided on my walk tonight to test my mobile phone to its limits and see what beauty I could find in this urban landscape I am currently staying in.
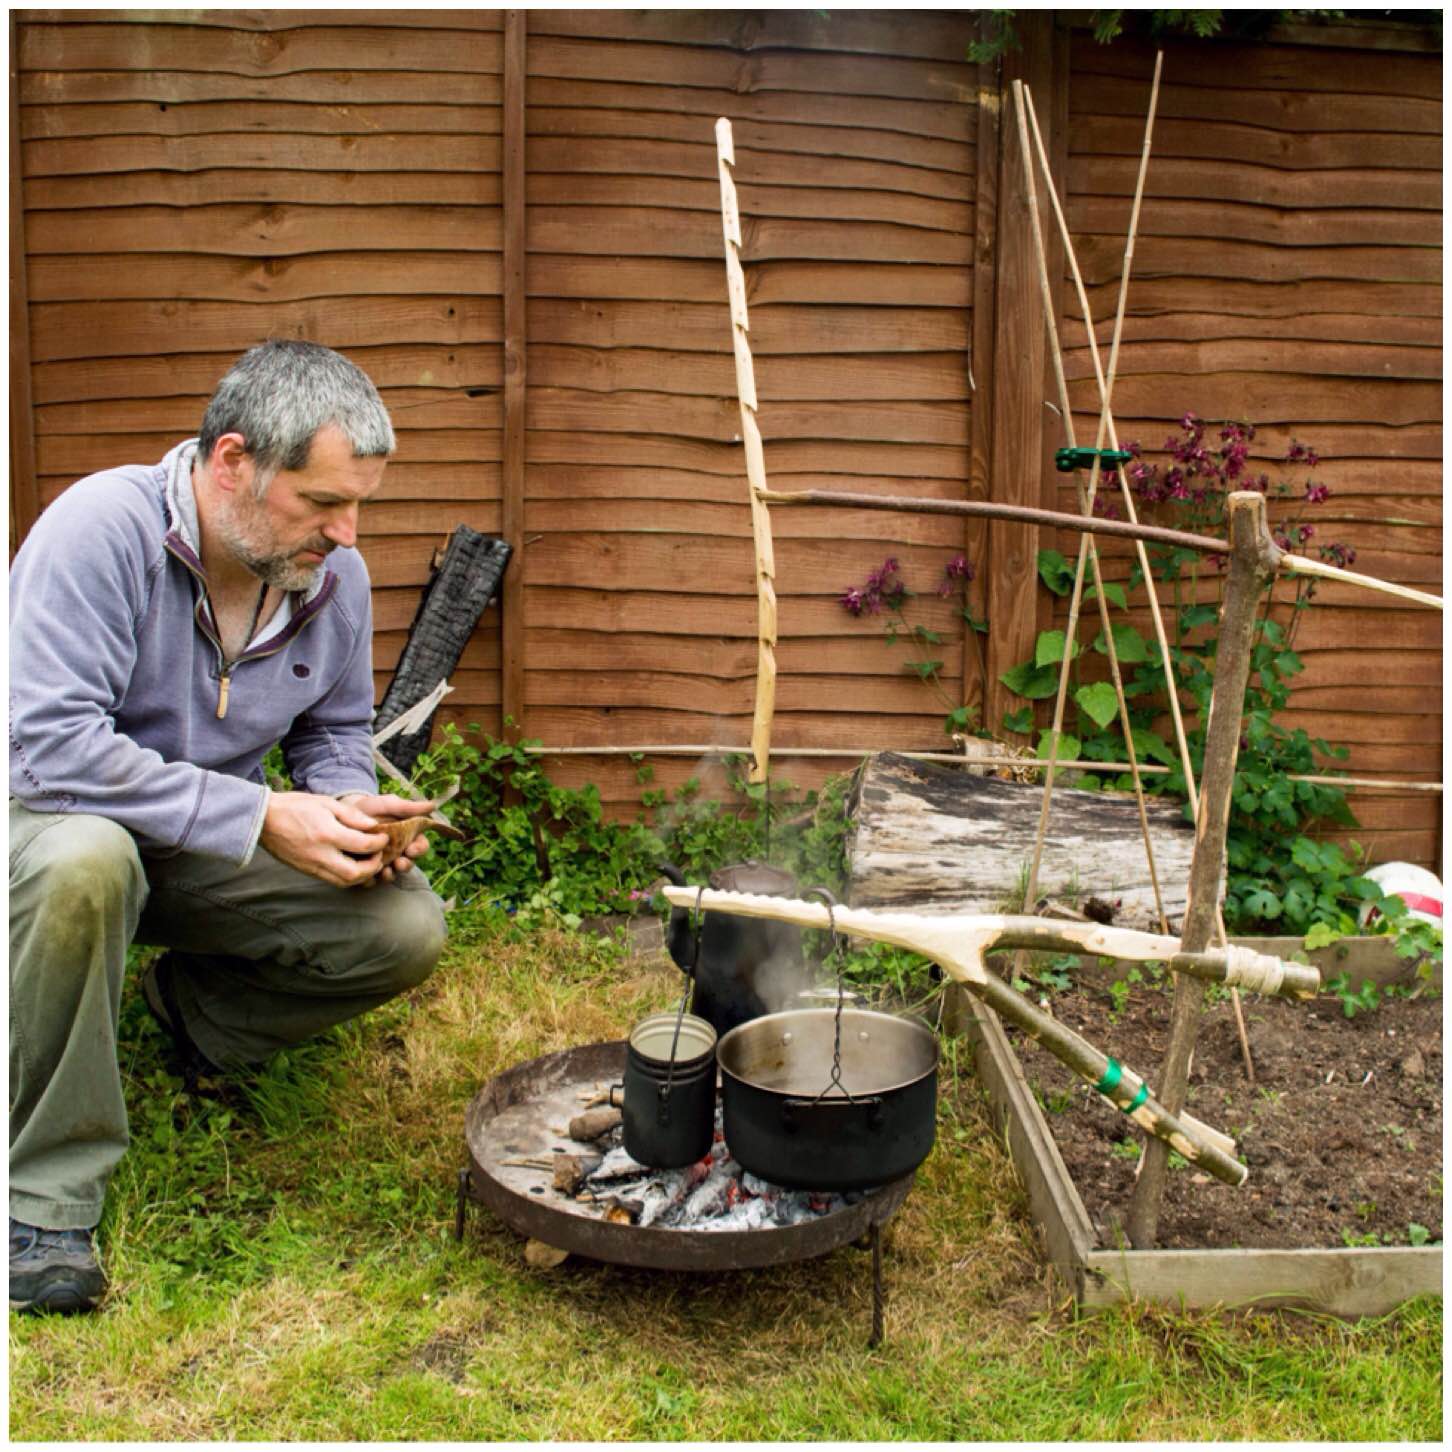
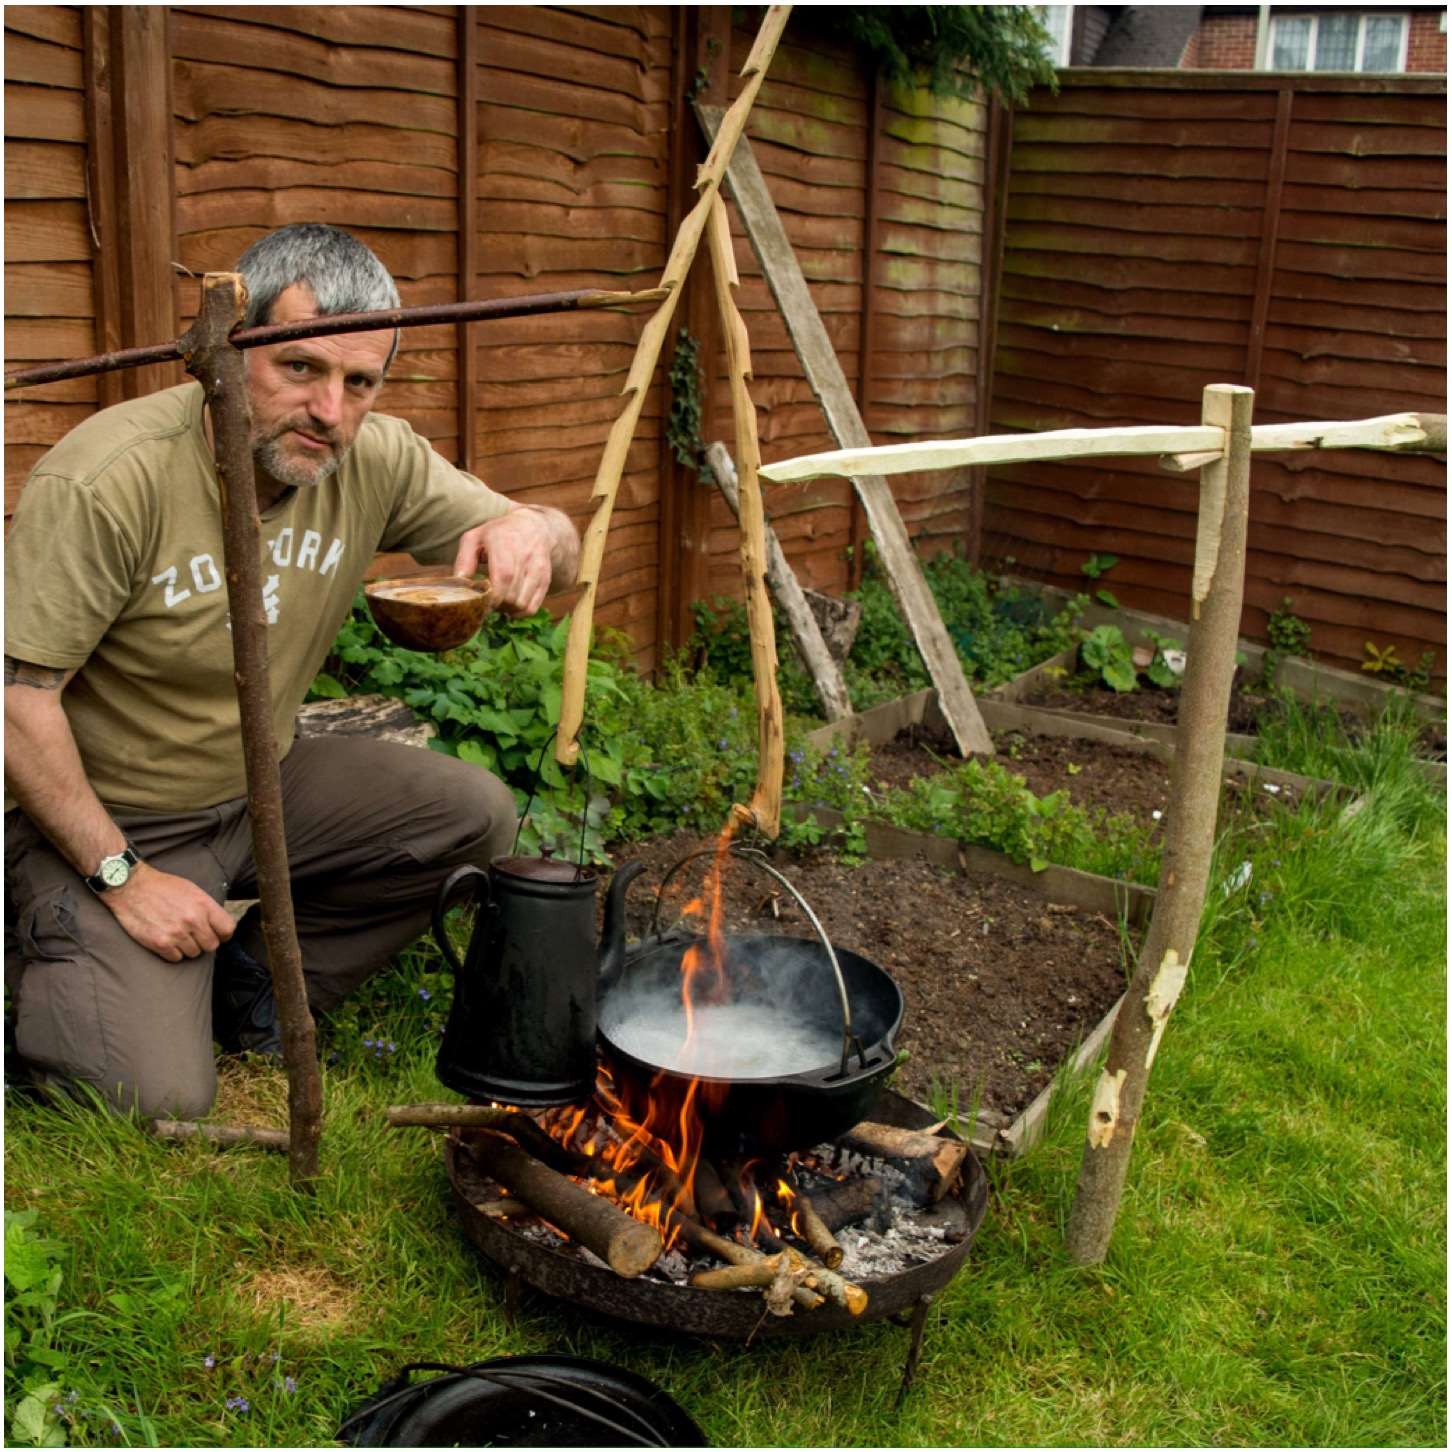
I could never call myself a chef however I could call myself a campfire engineer. I love to make different cooking rigs that I can use around the fire depending on the circumstances I find myself in.
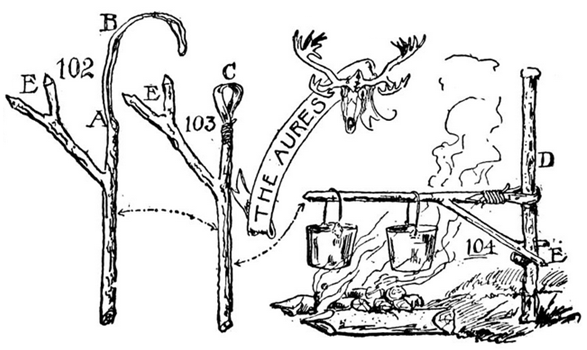
The Aures crane is one of these projects for the more long-term camp and is so easy to make. The crane is named after Victor Aures, a Scout Master from Buffalo, NY. I found a good article on this from an issue of the Boy’s Life from 1915.
The Aures Crane – a version using a single-fork branch
I also found a book called The Book of Camp-Lore by Dan Beard on the Project Gutenberg website that shows the original idea of wrapping the bark of one limb around an upright and a forked lower limb.
The Aures Crane – Picture courtesy of The Book of Camp-Lore and Woodcraft, by Dan Beard – Sourced from Project Gutenberg
I have been making these cranes for many years now but it was only once I started researching them that I discovered its correct name. This post does not cover the making of the Aures crane as shown in the Boy’s Life magazine or on in the Book of Camp-Lore (I will do that one later) but a variation of it.
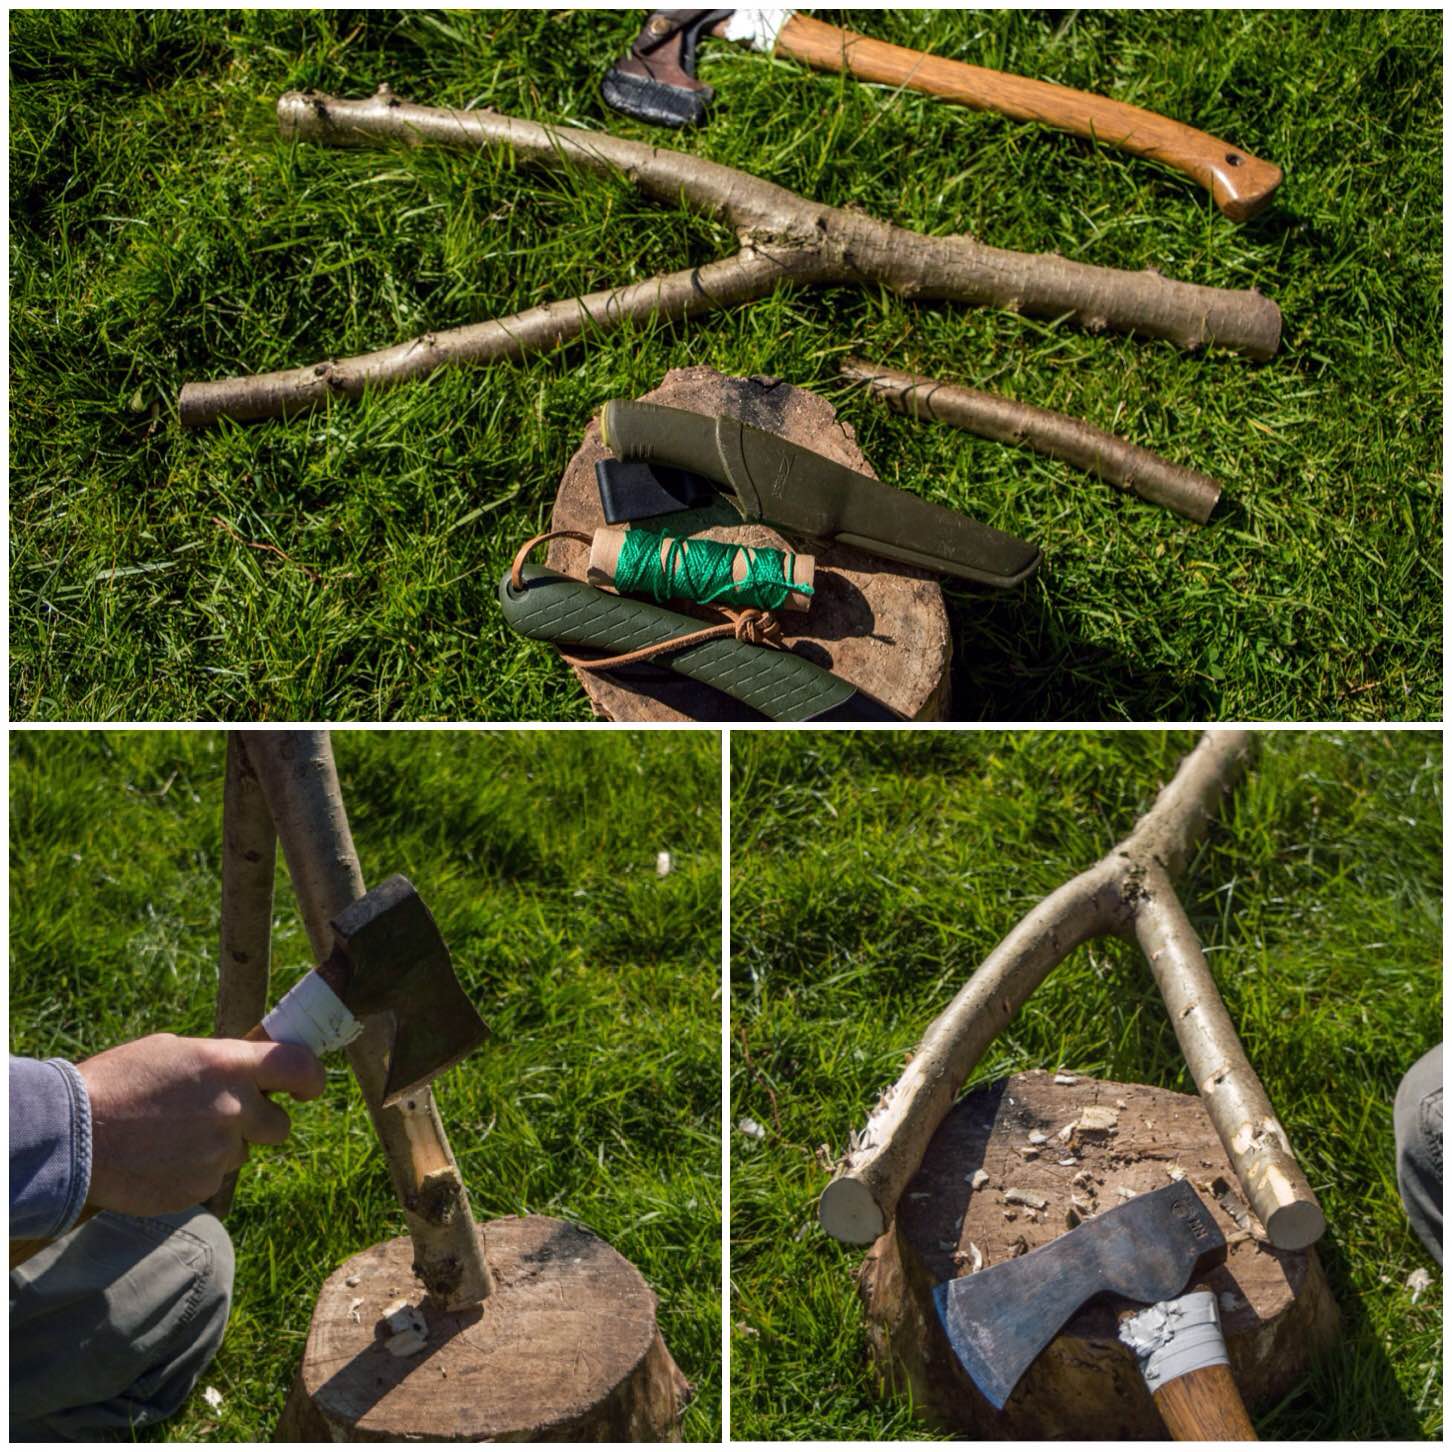
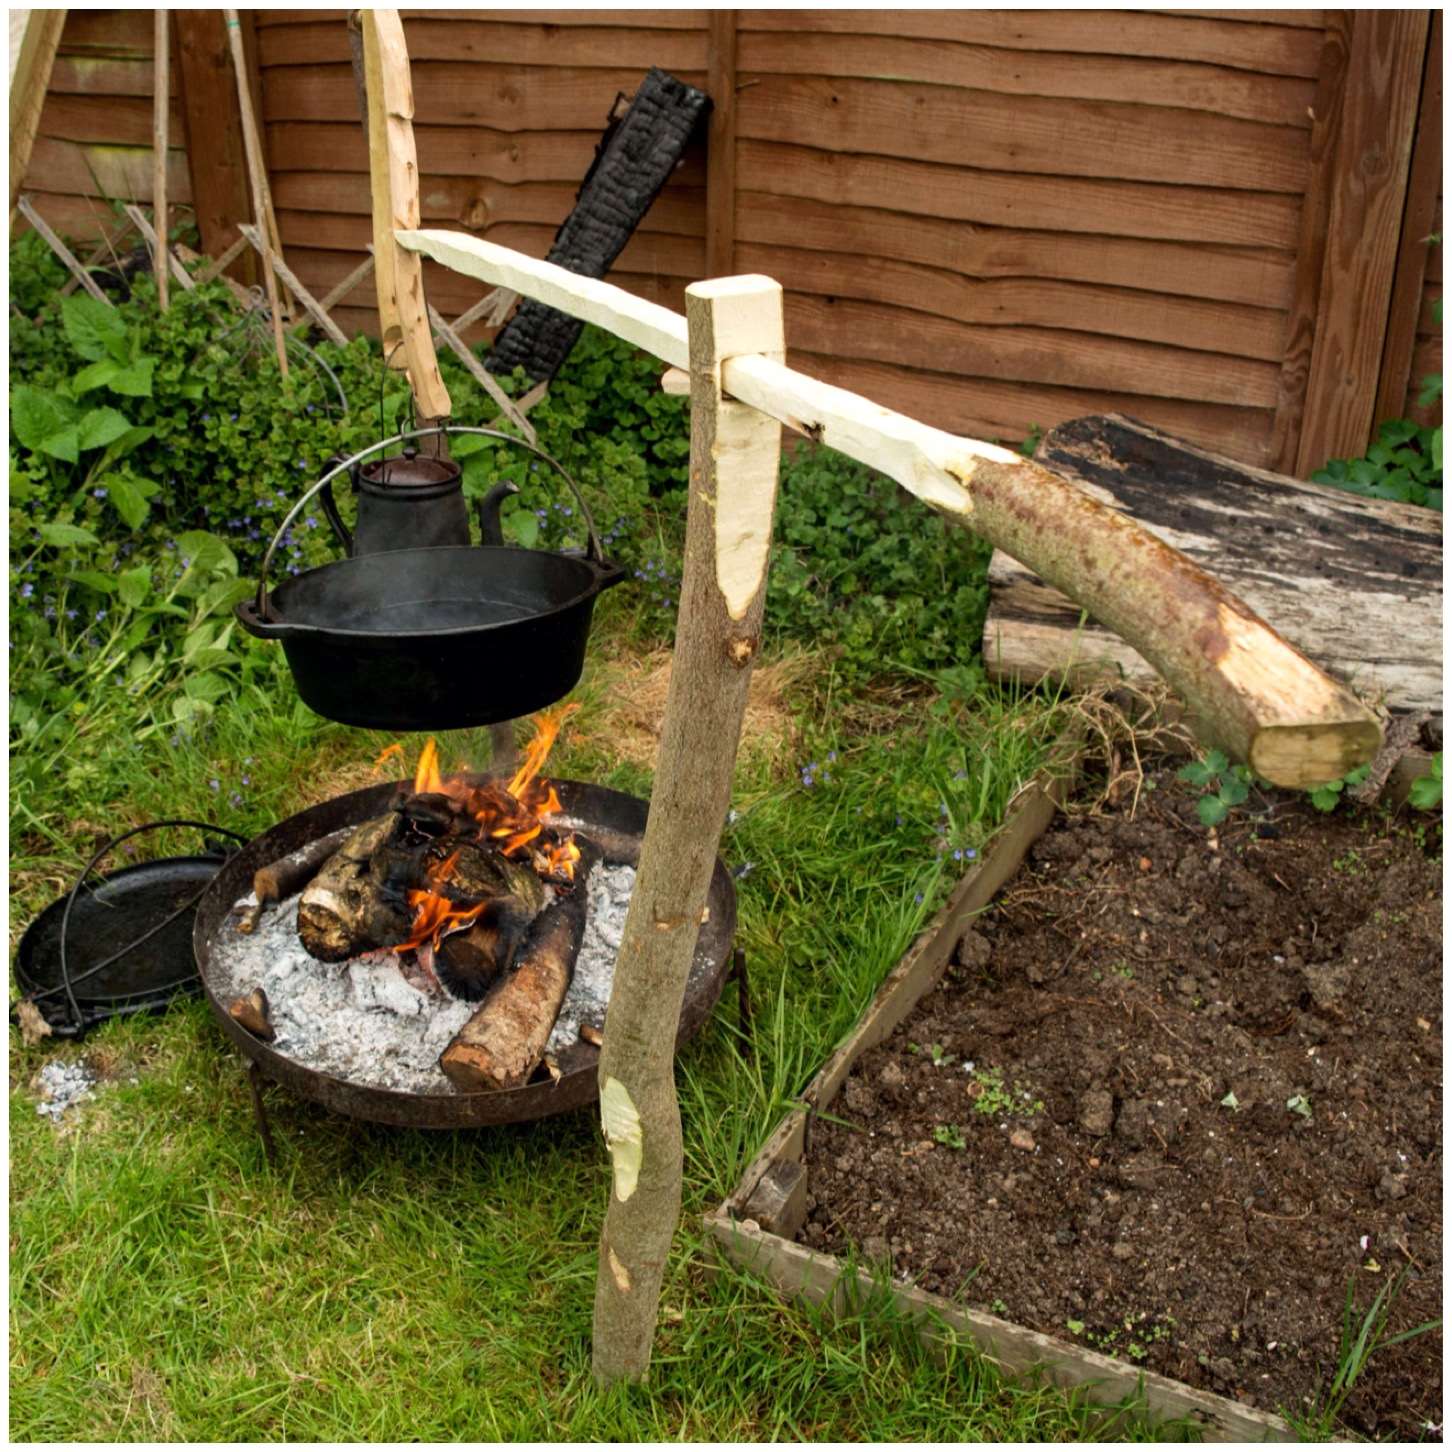
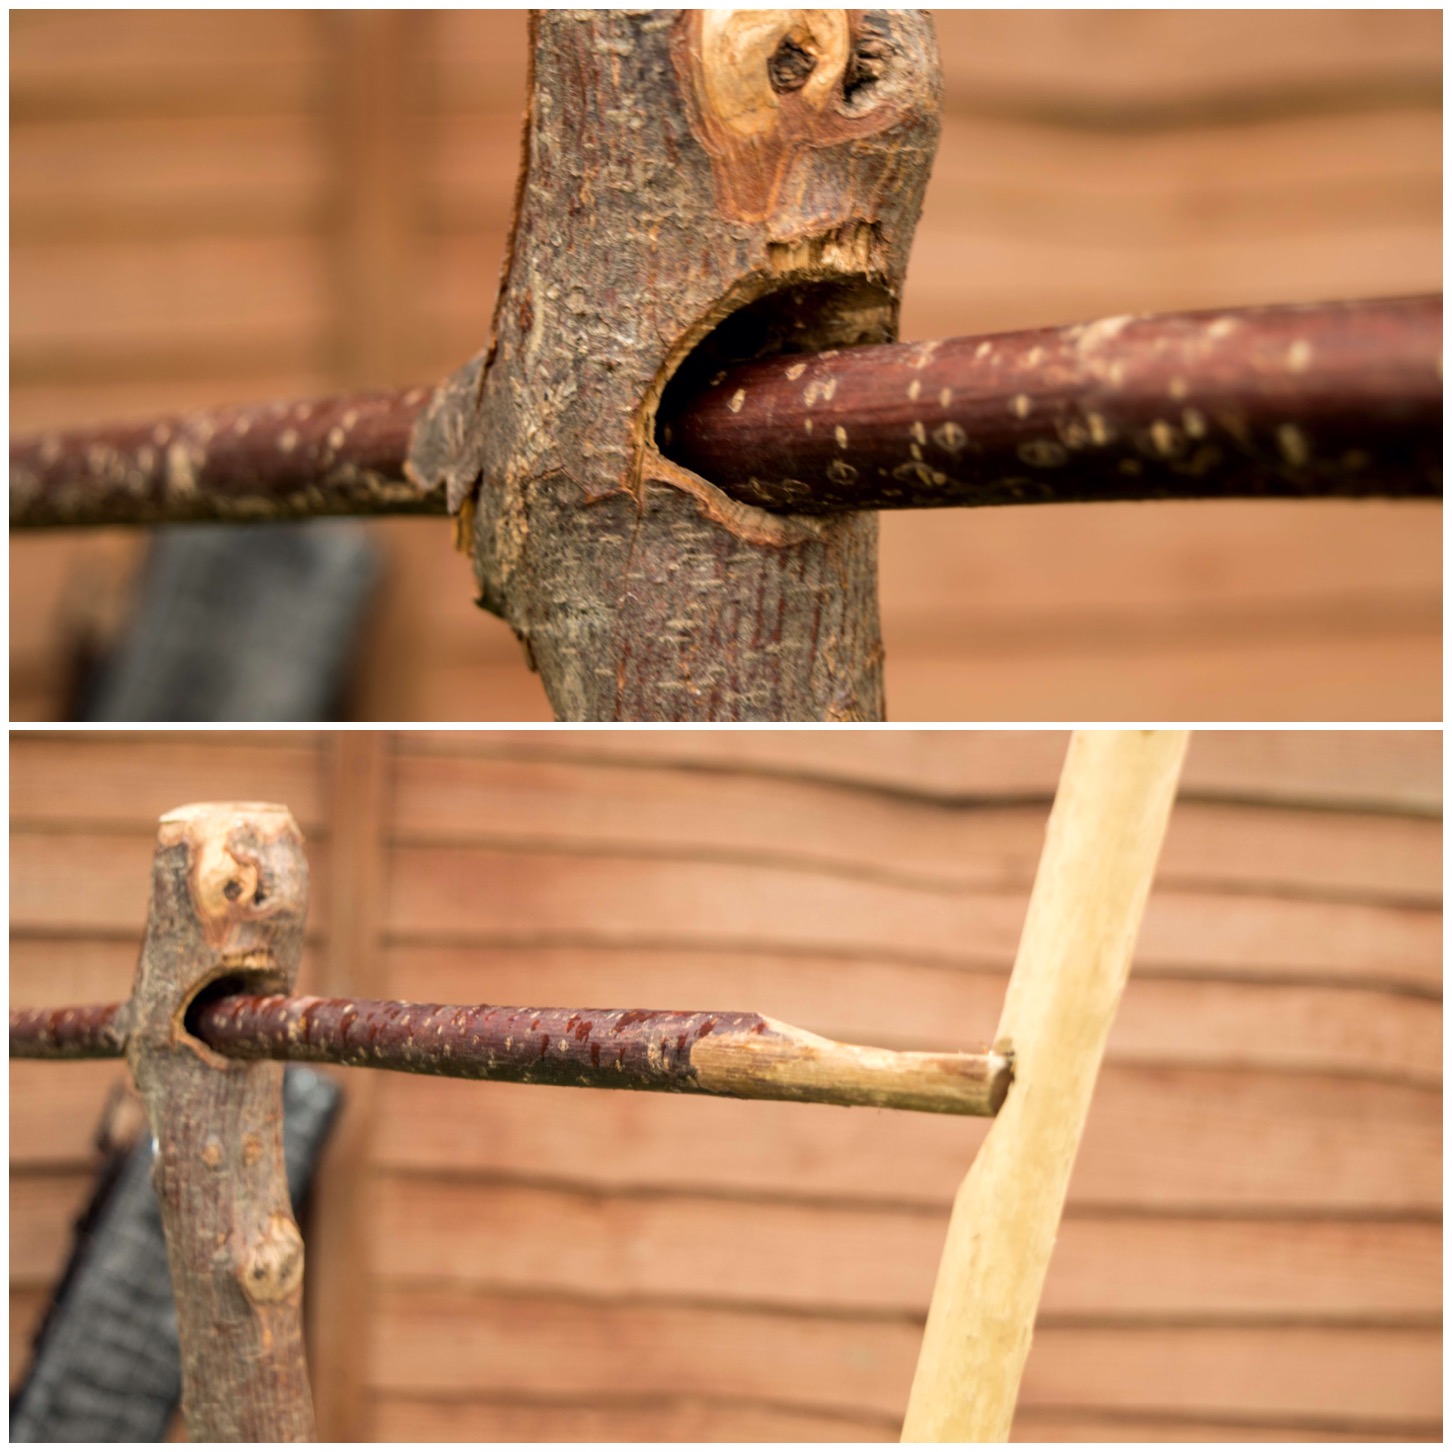
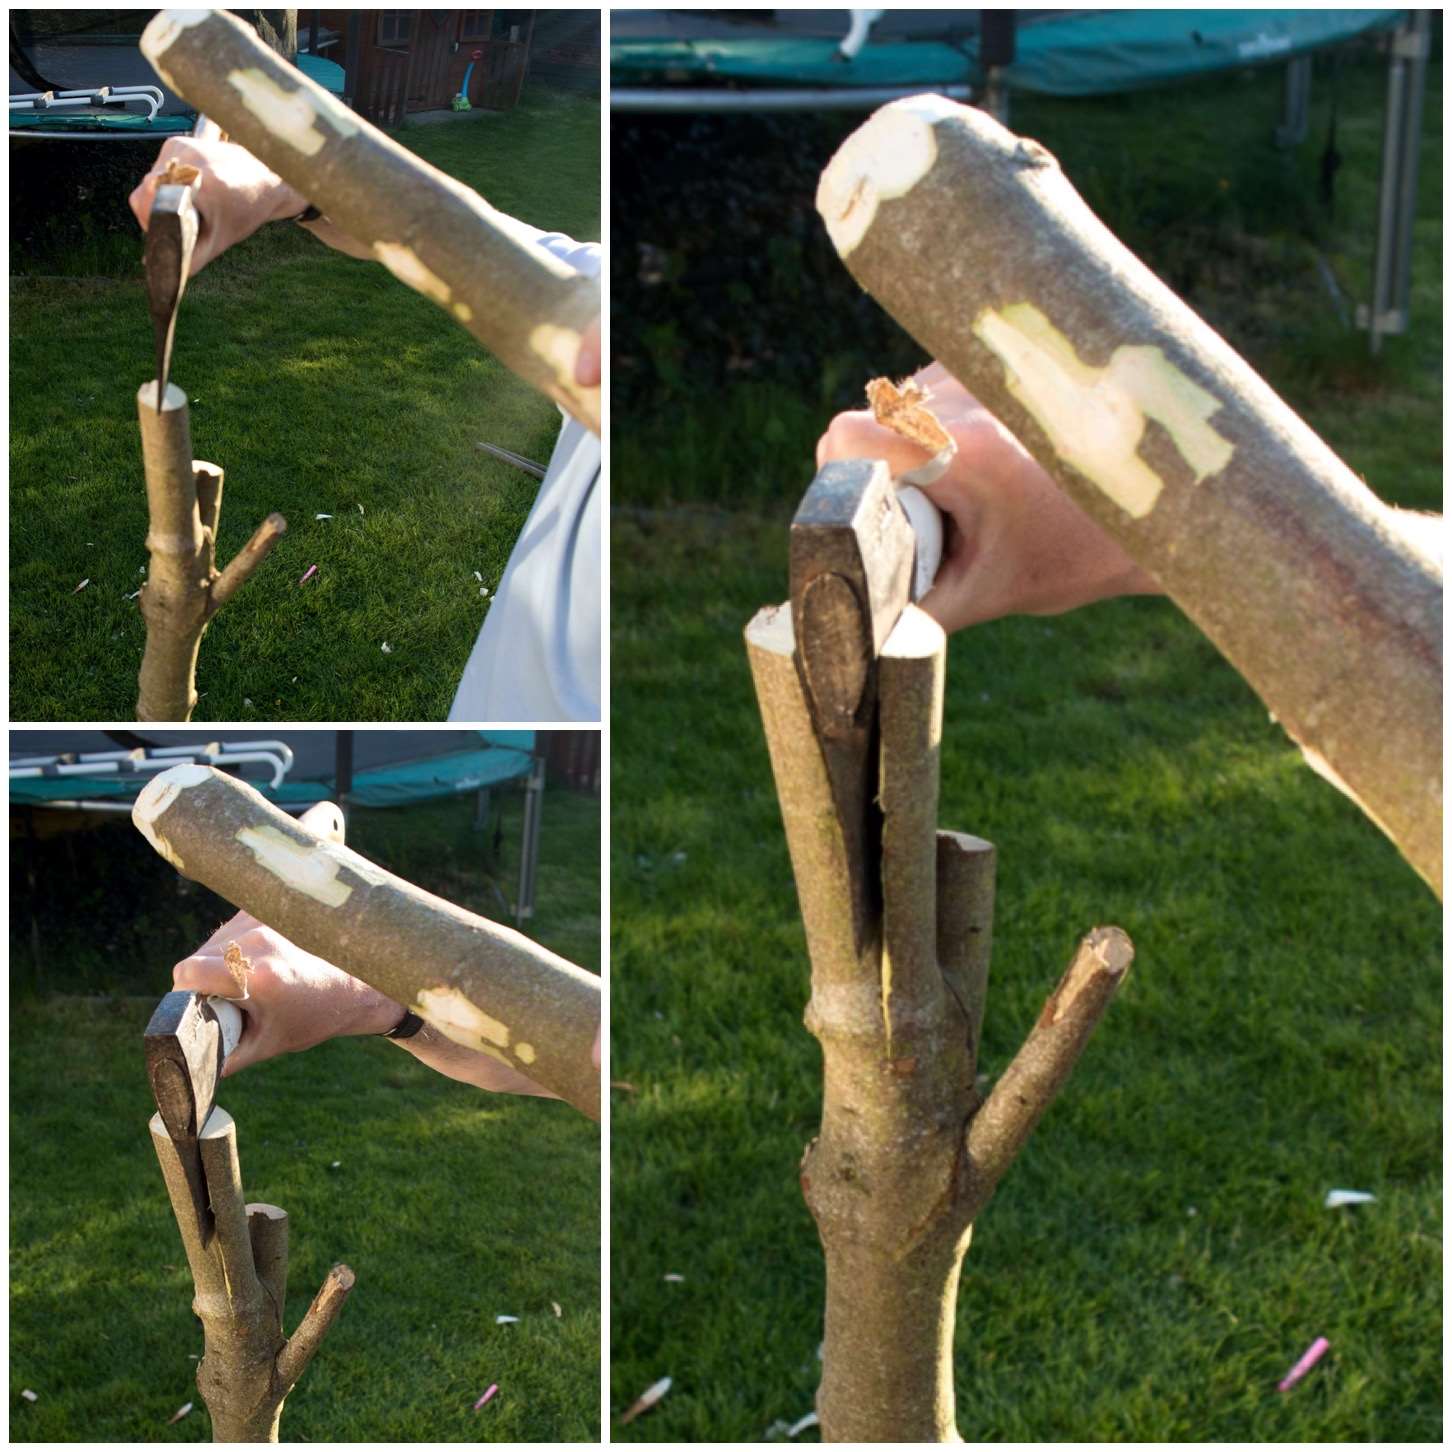
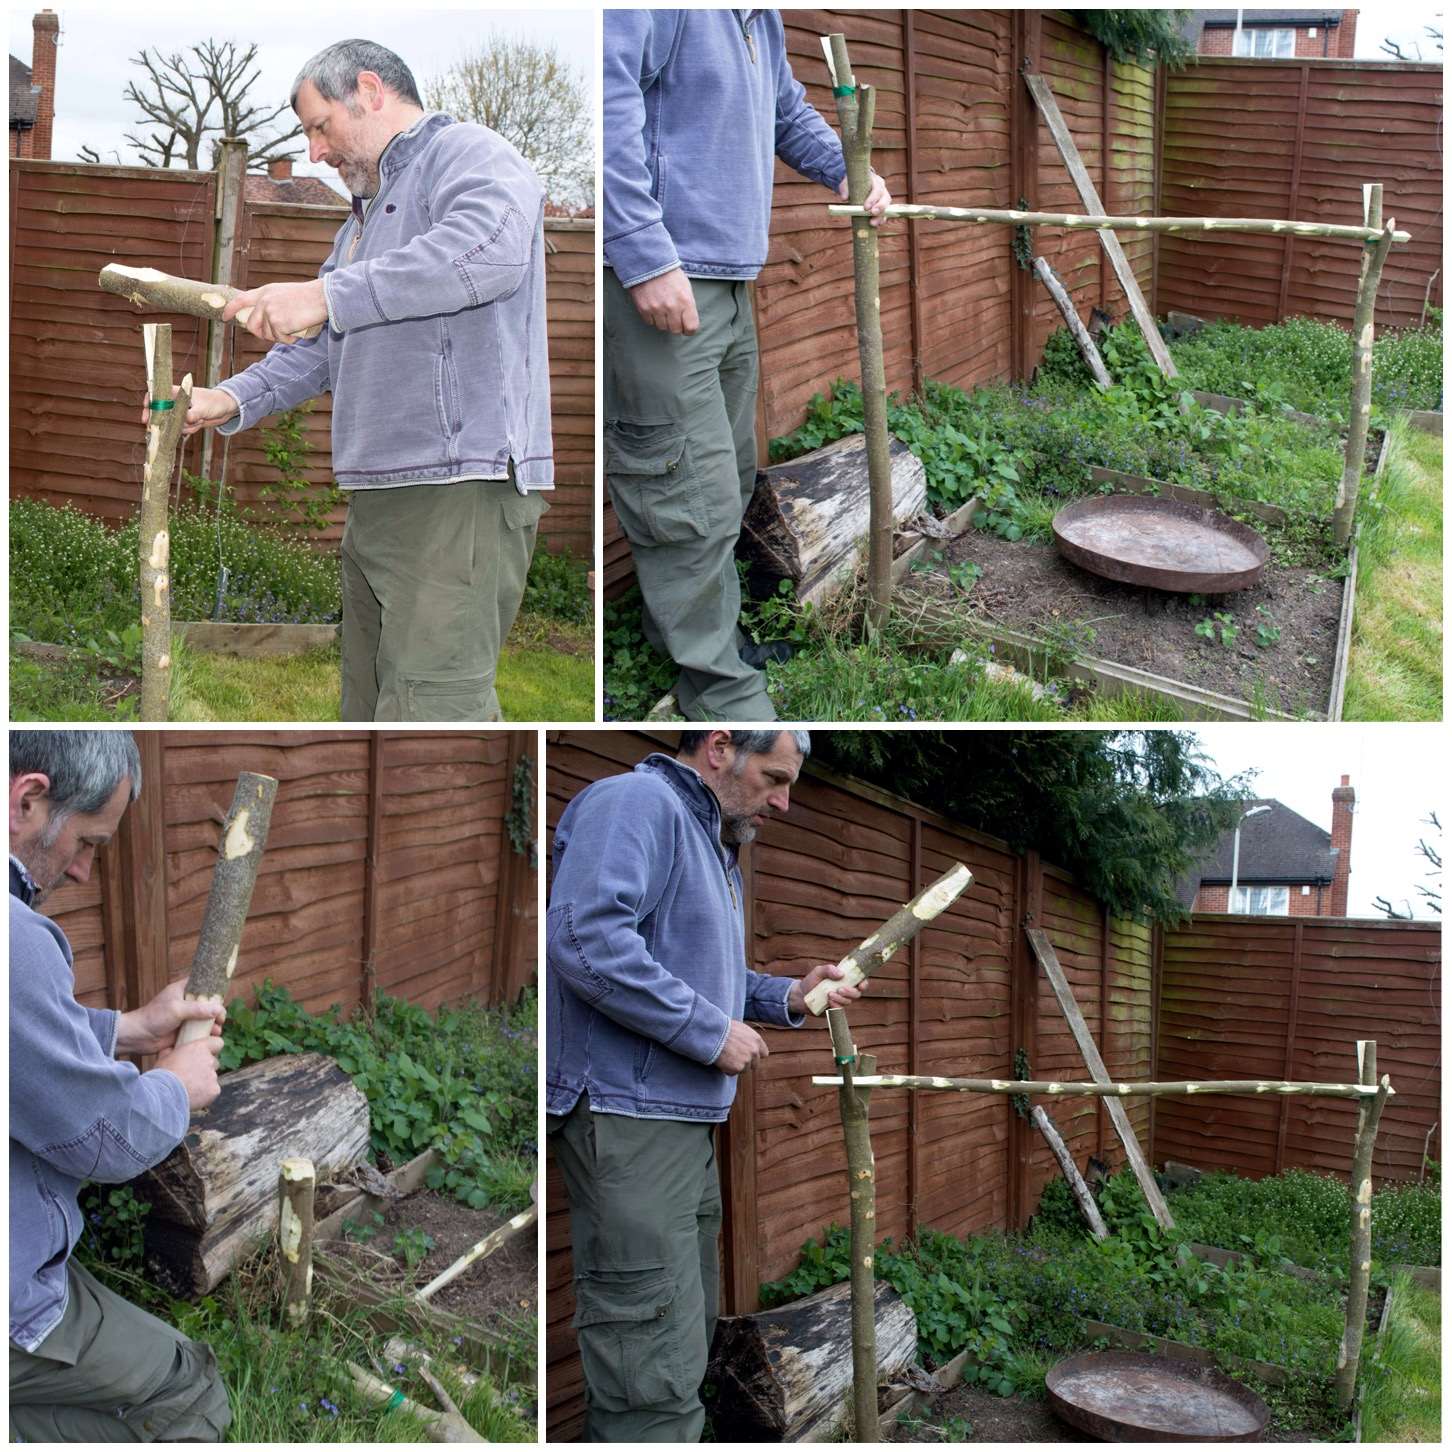
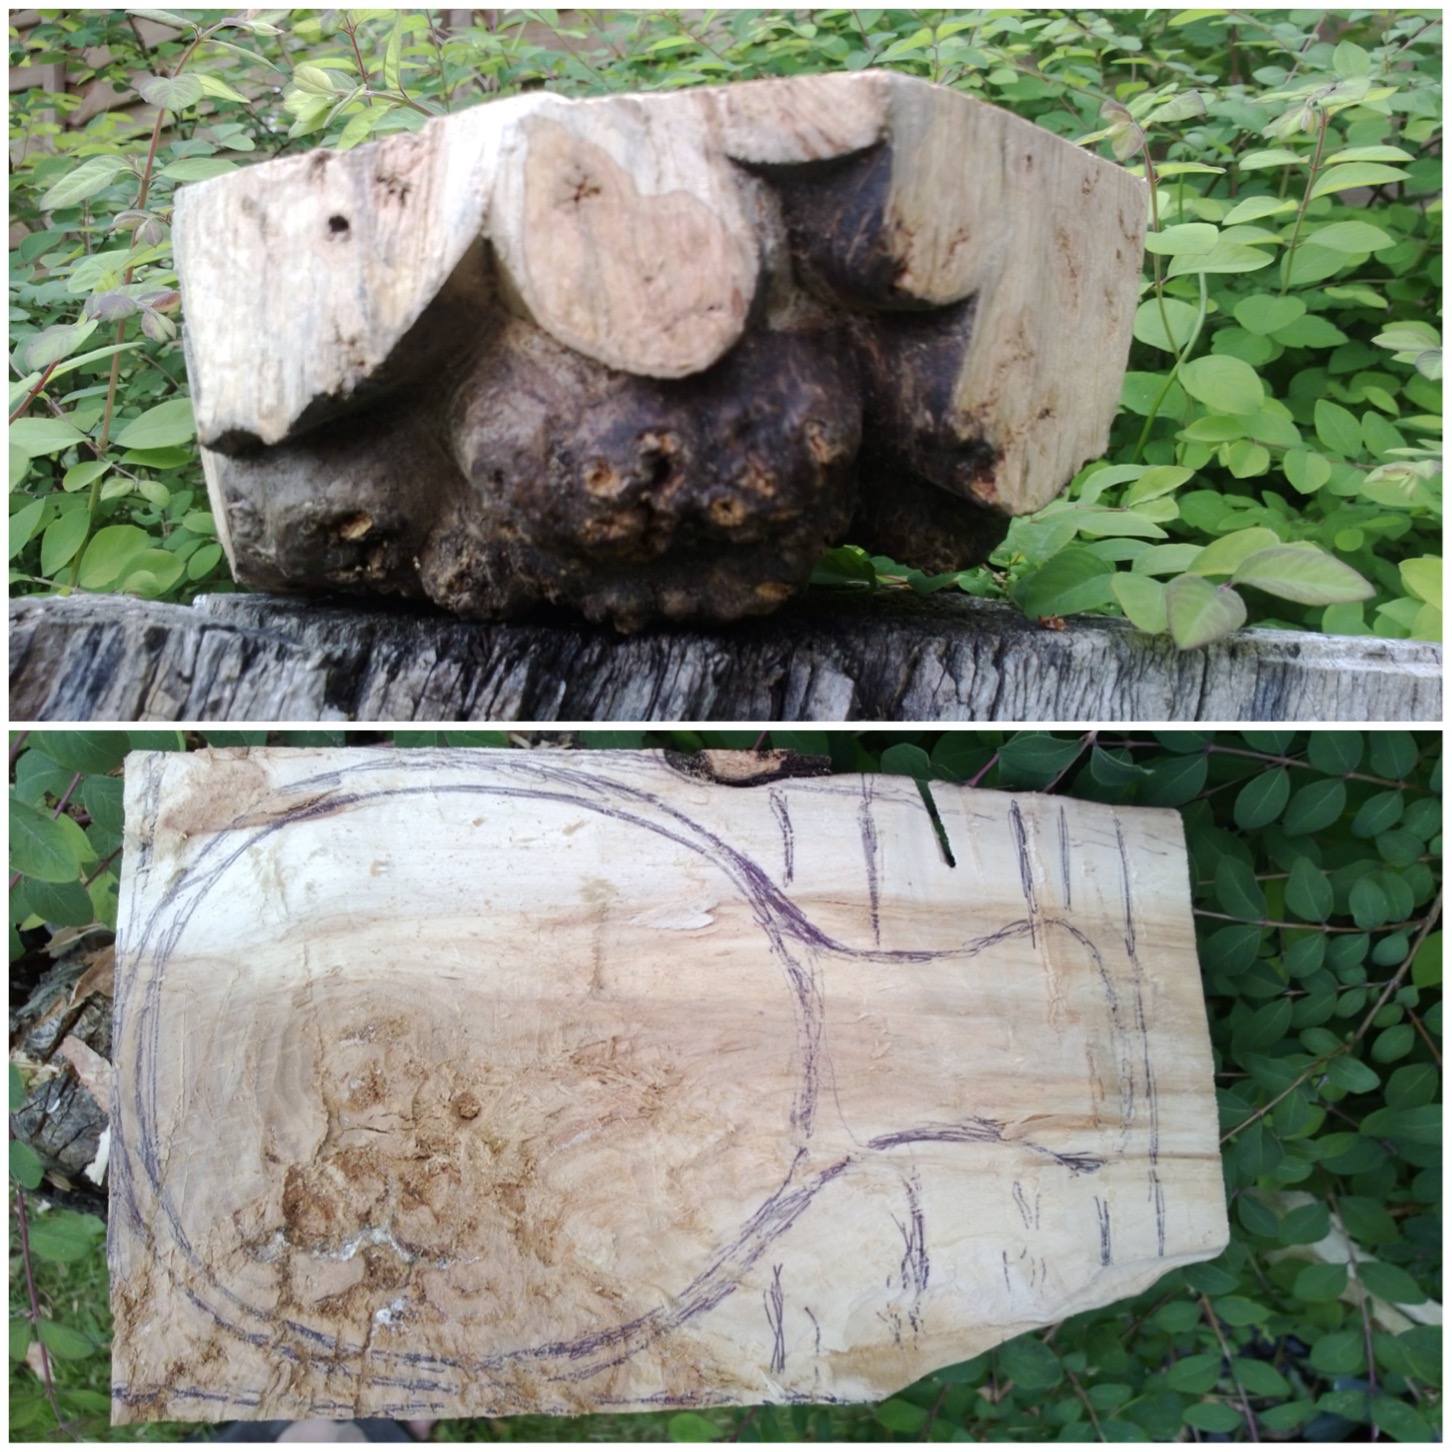
The picture below shows a classic Aures crane with a good secondary fork to rest against the upright. It’s not easy to find the exact combination of forks needed for this classic style so I set out to re-create the Aures crane using a branch with only one fork, as these are so much more common.
The ideal Aures Crane with a perfectly placed fork
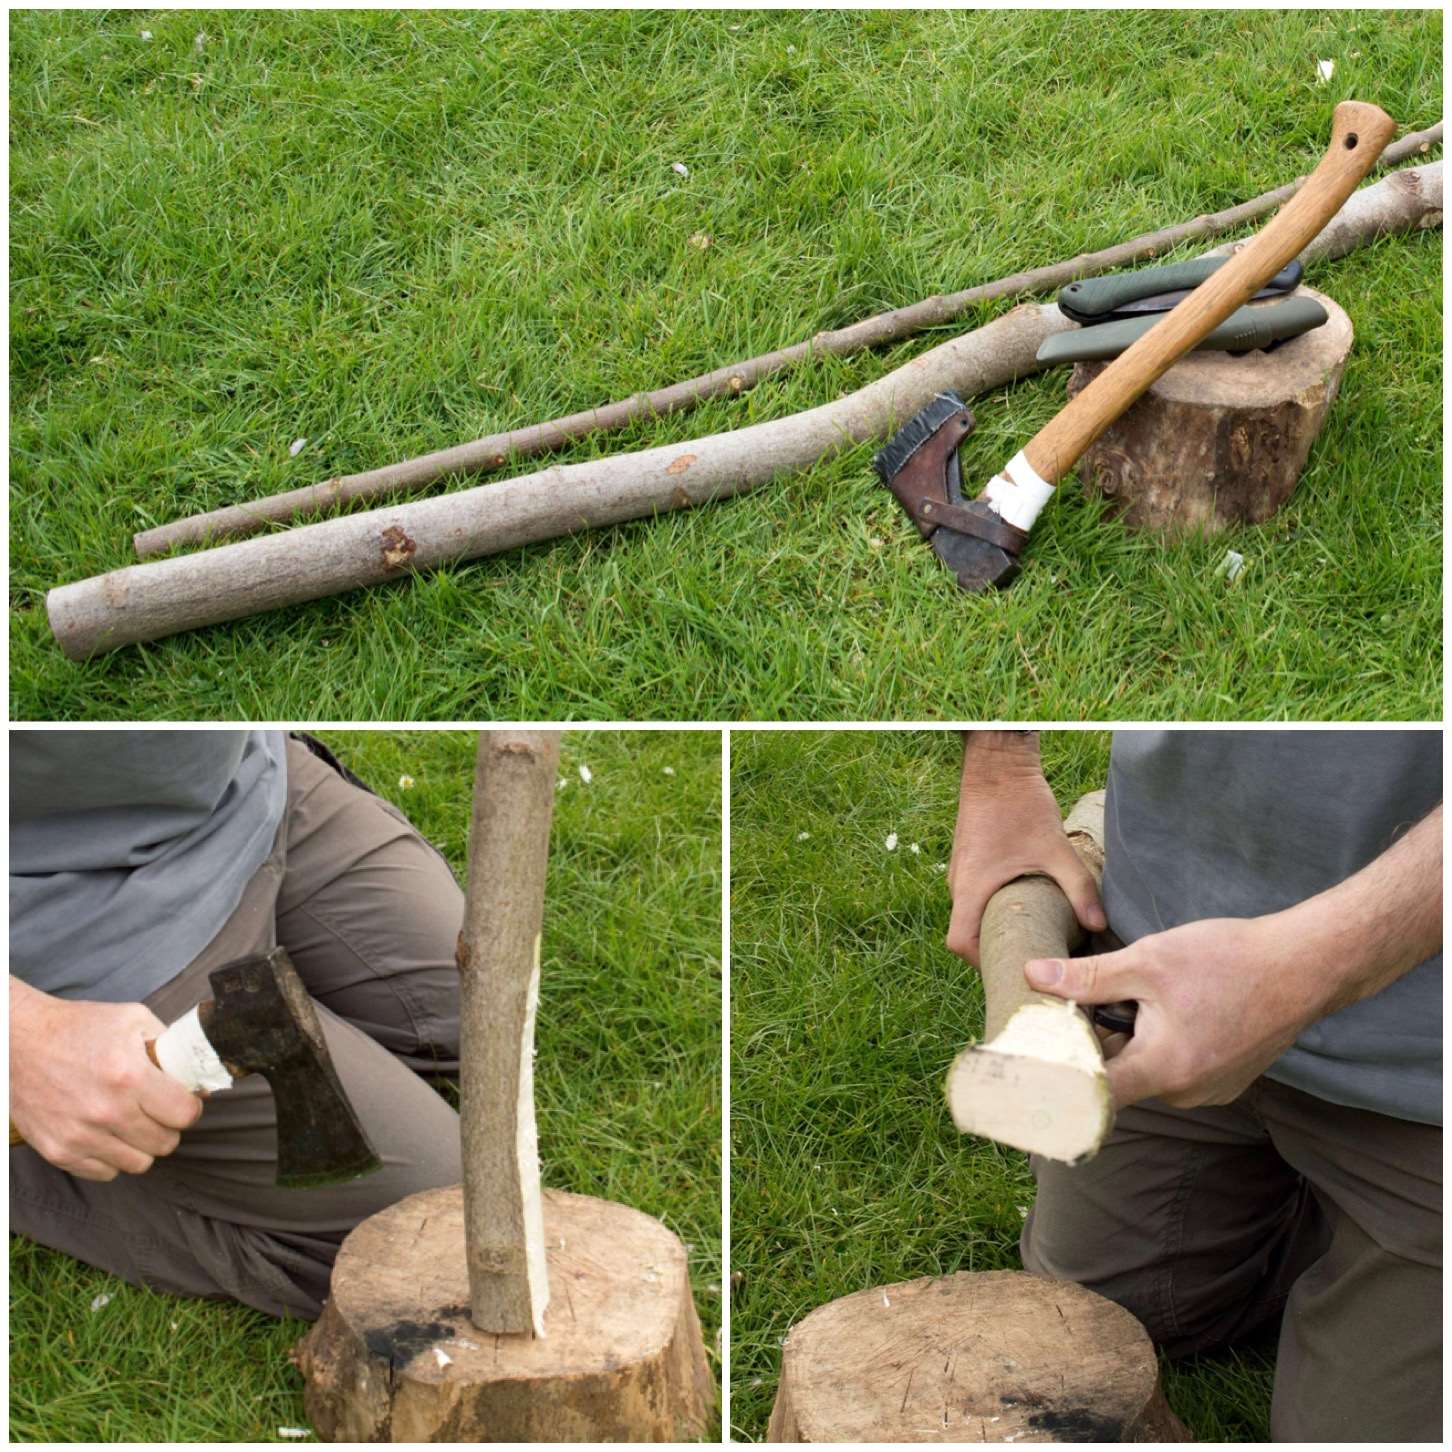
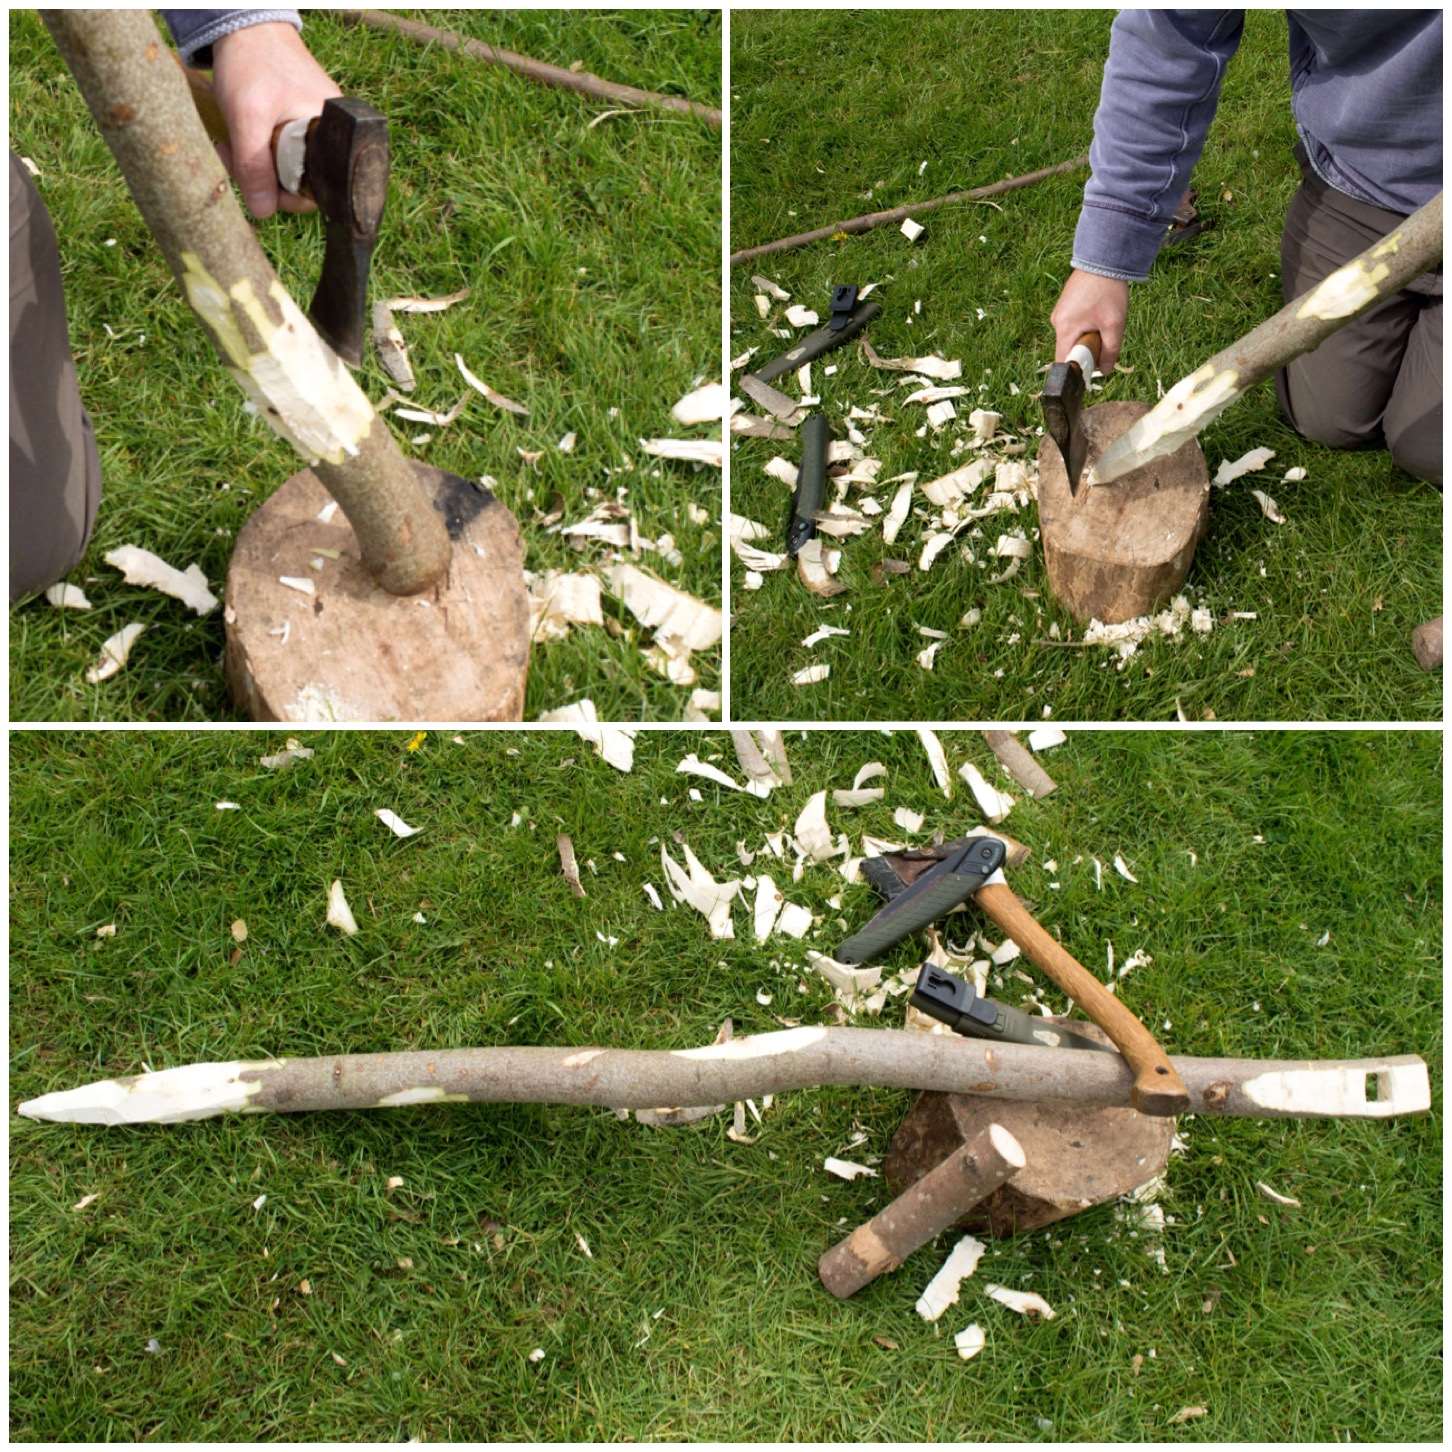
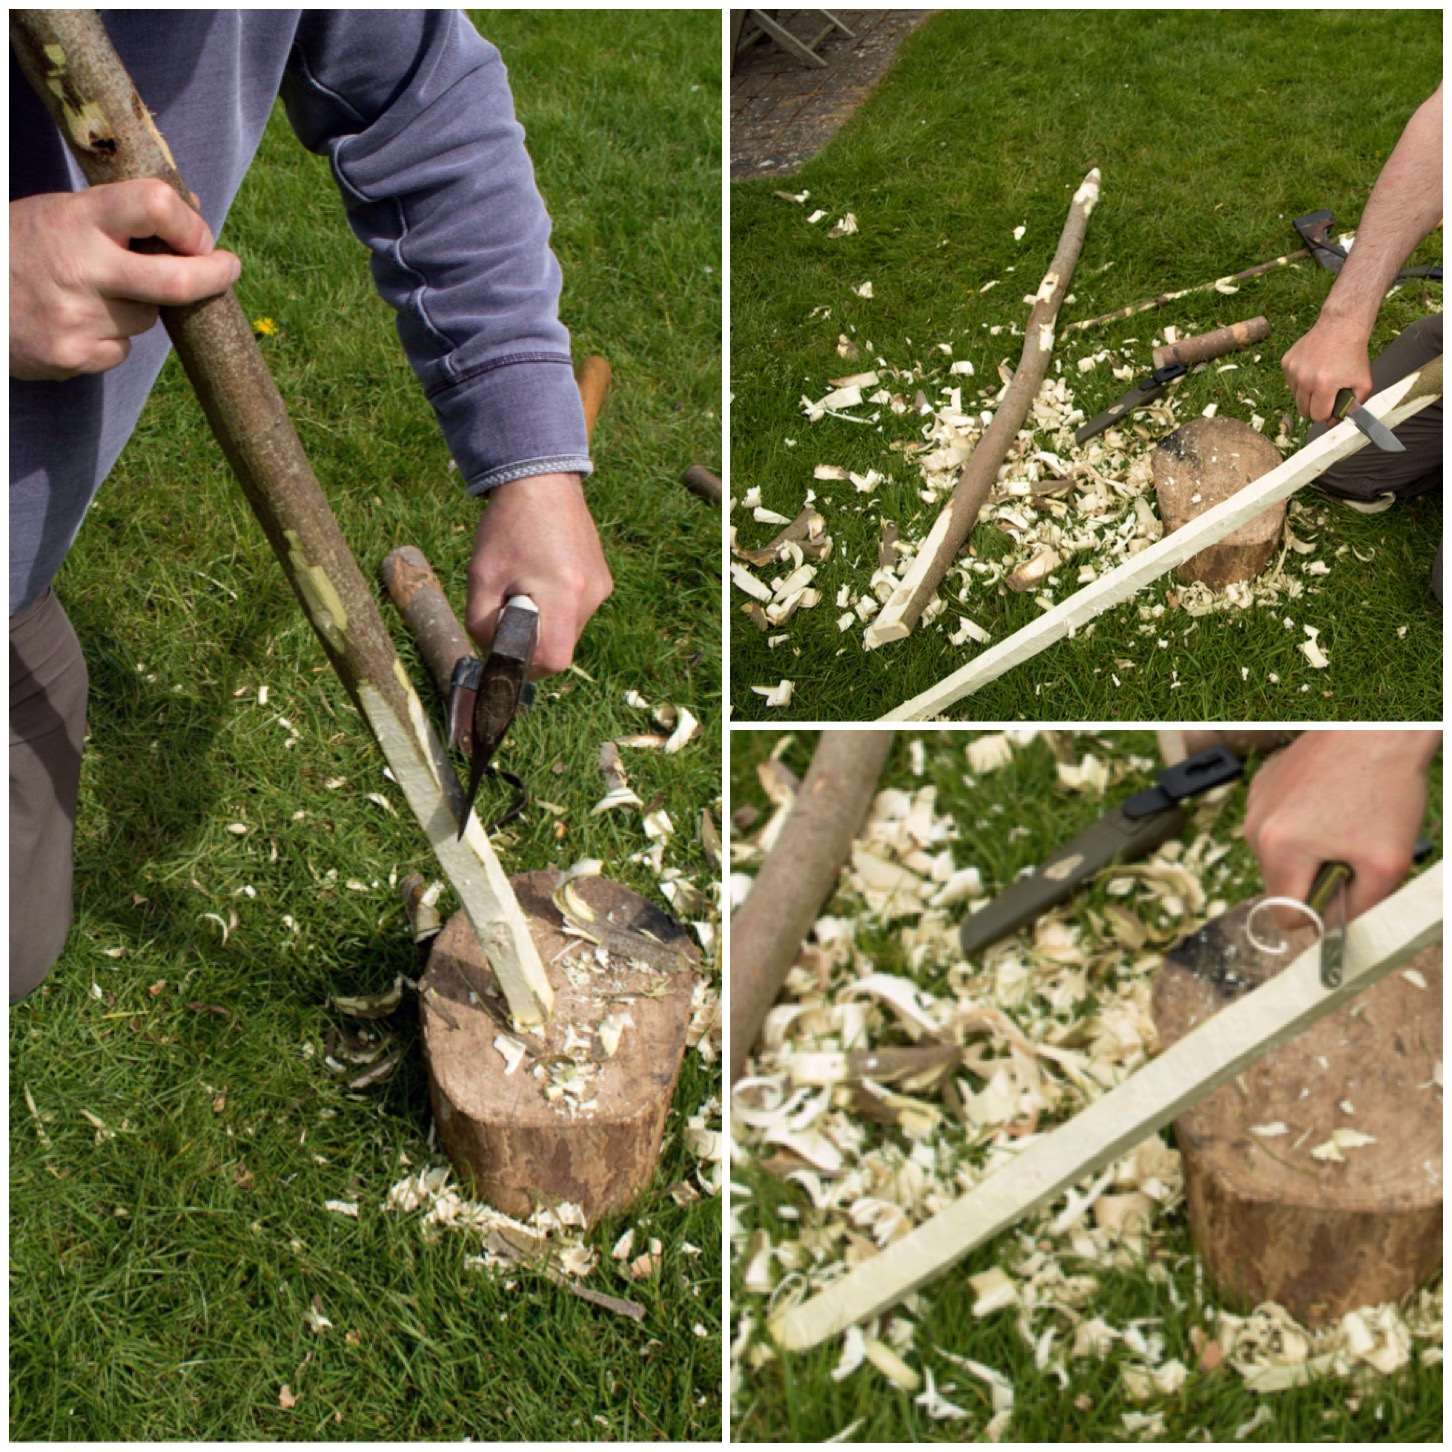
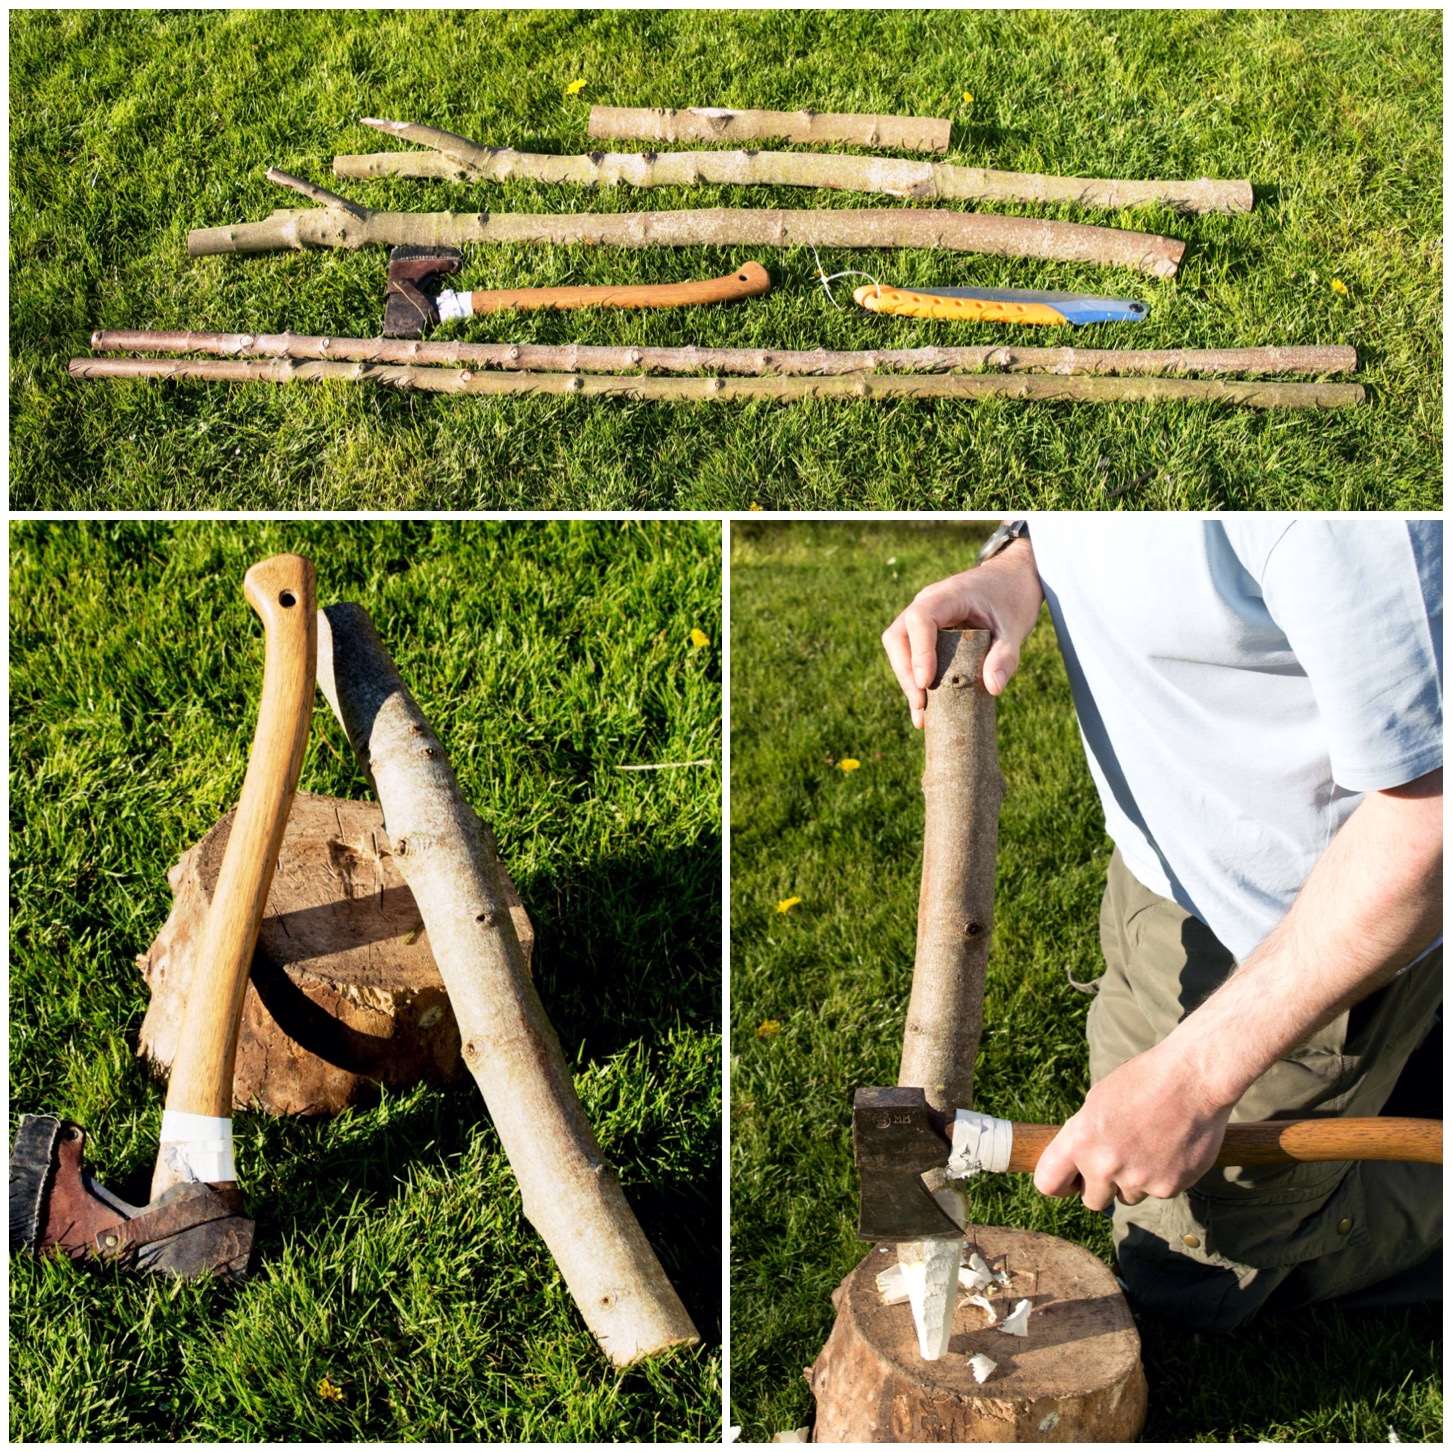
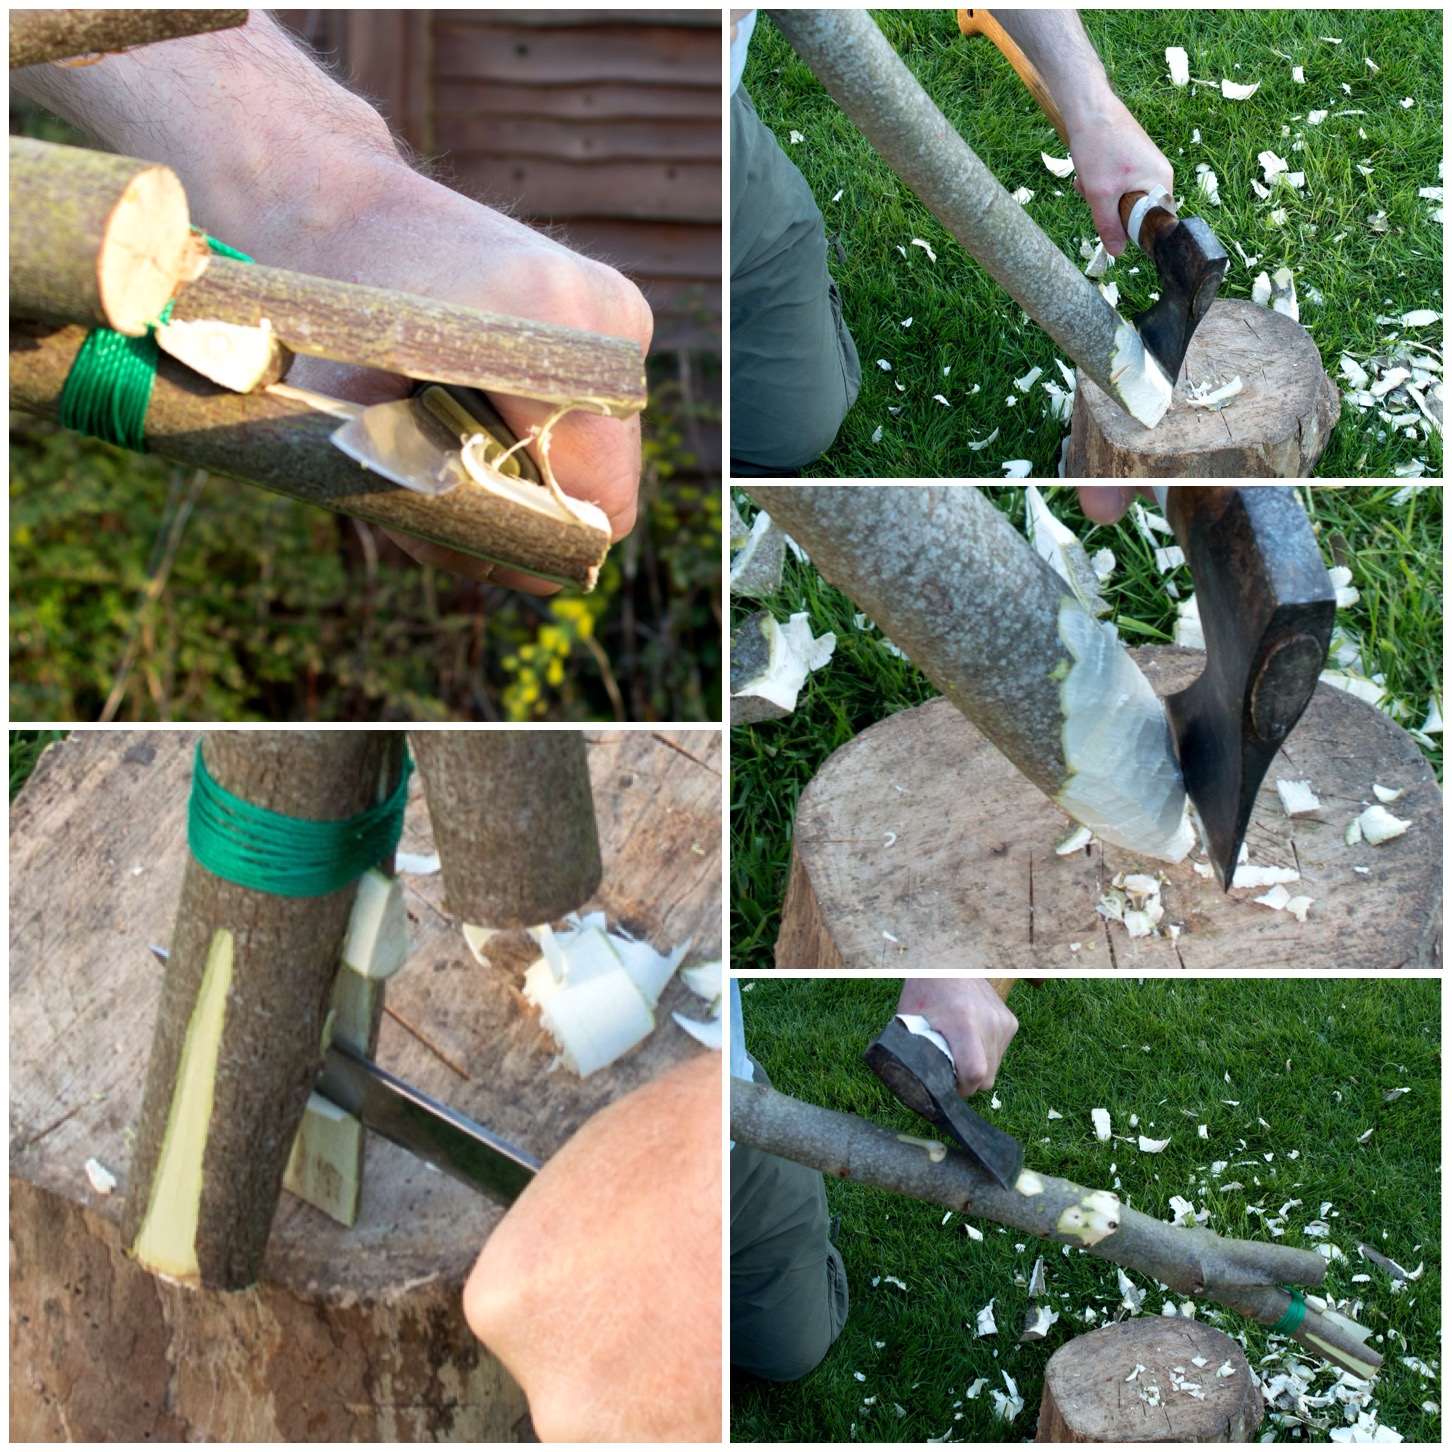
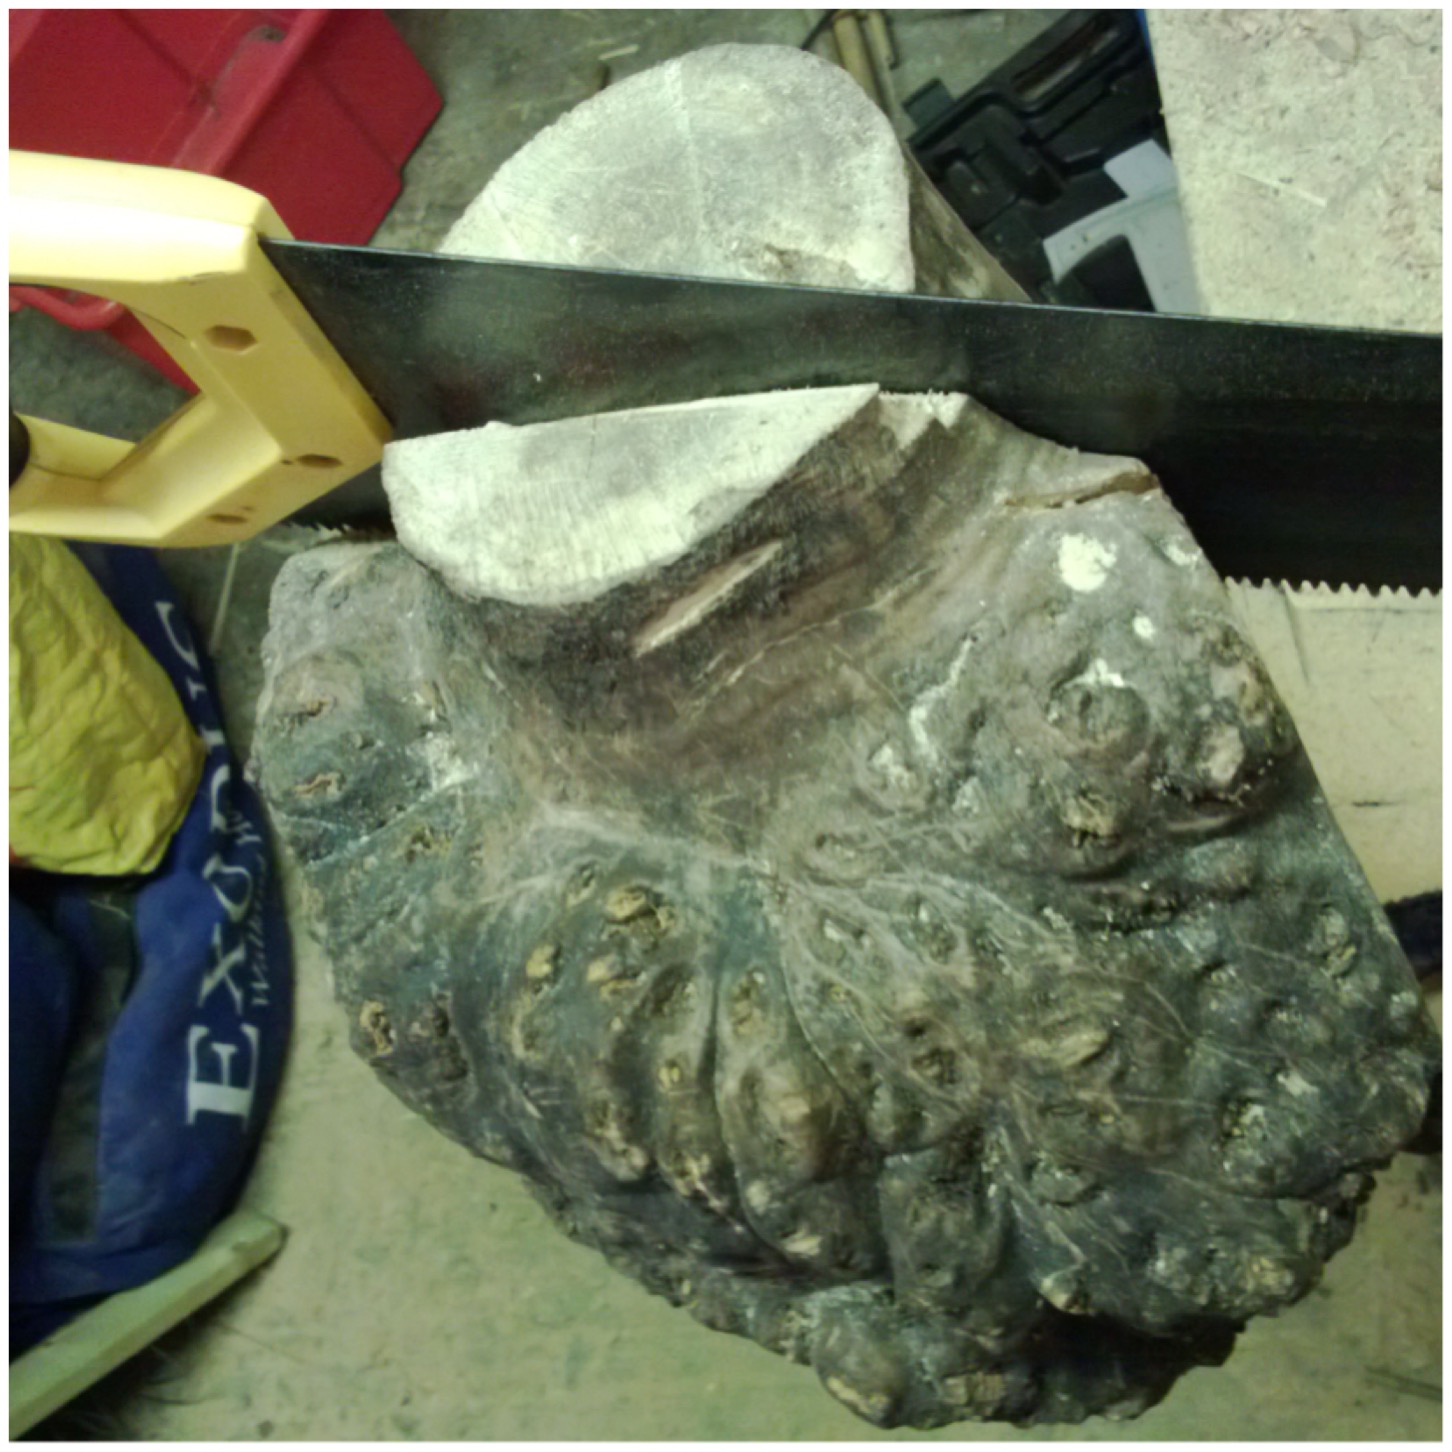
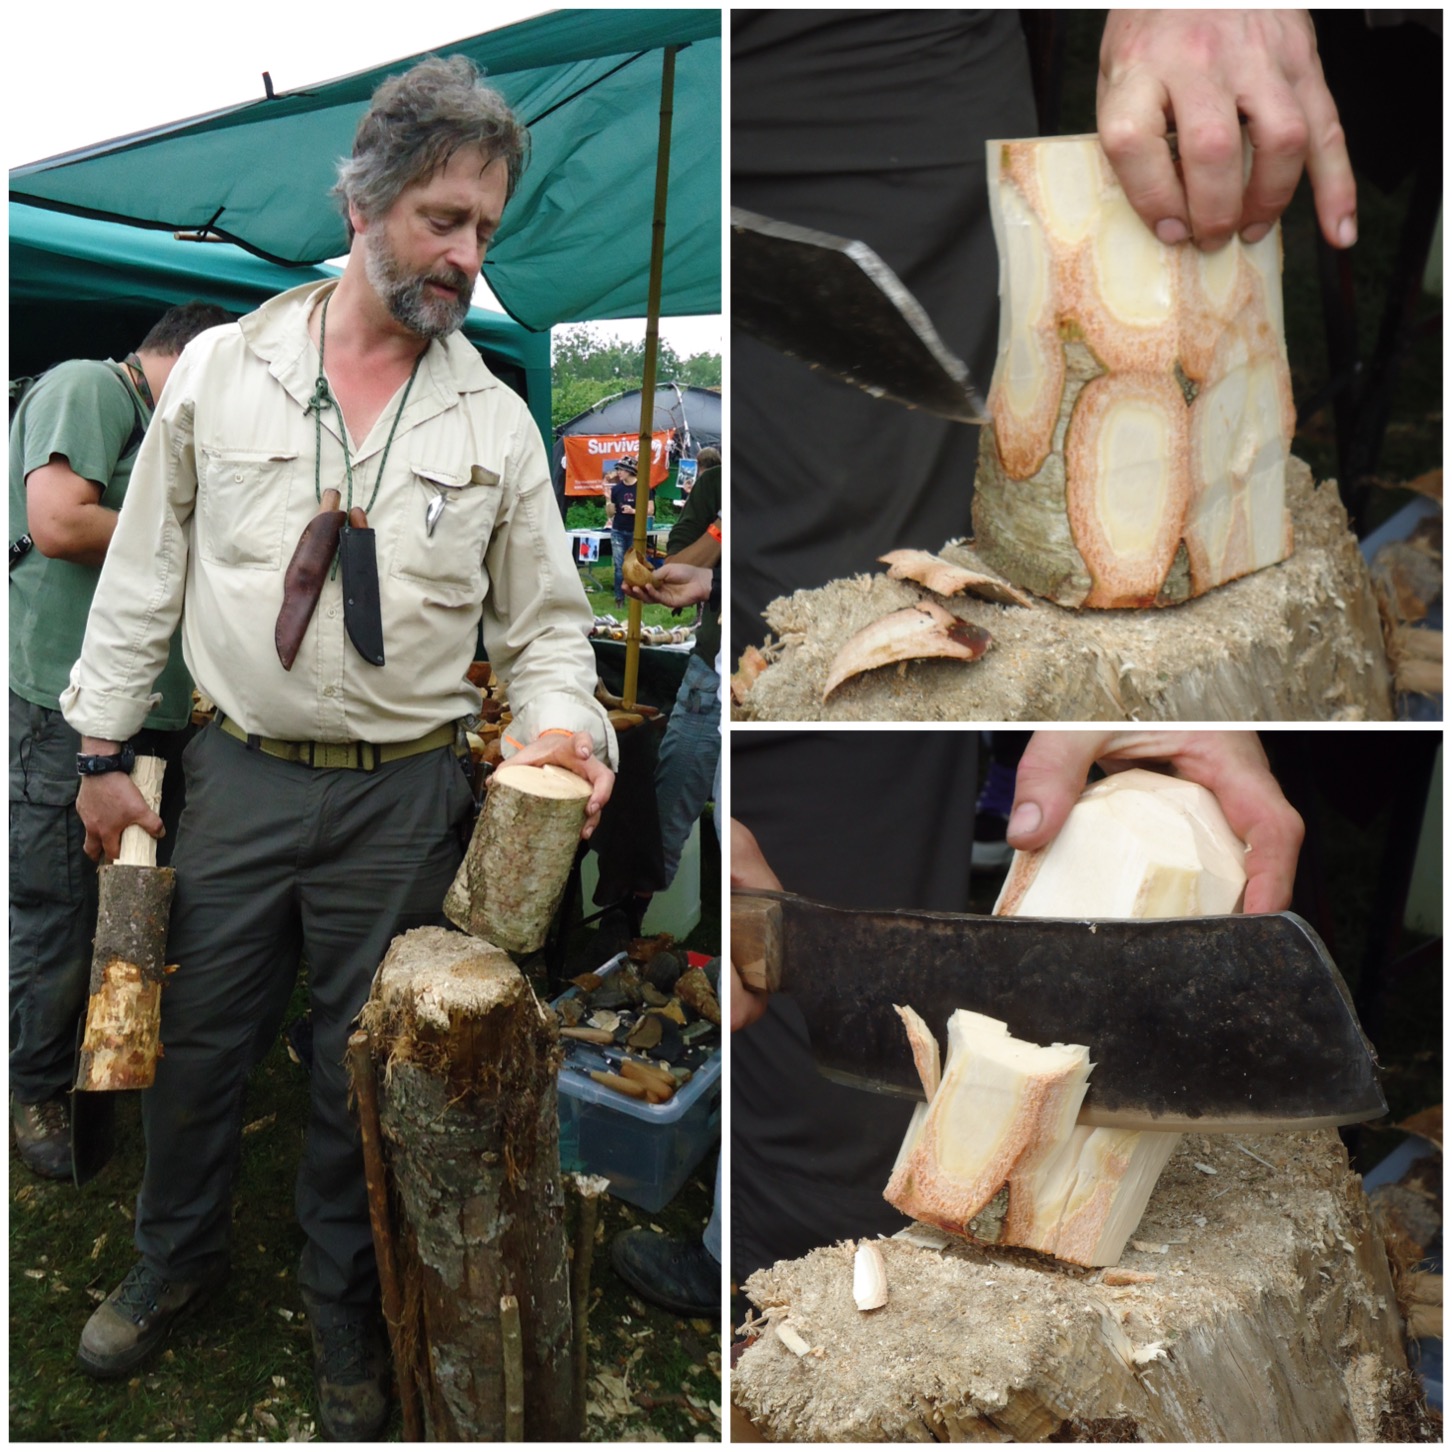
I chose a sturdy green piece of hazel wood with a single fork. After trimming the ends to the size I wanted I used my axe to get rid of all the lumps and bumps on the wood.
In the bottom right picture the limb on the left I will be calling the upper limb and the one on the right the lower limb.
The not-so-ideal single fork – much easier to find
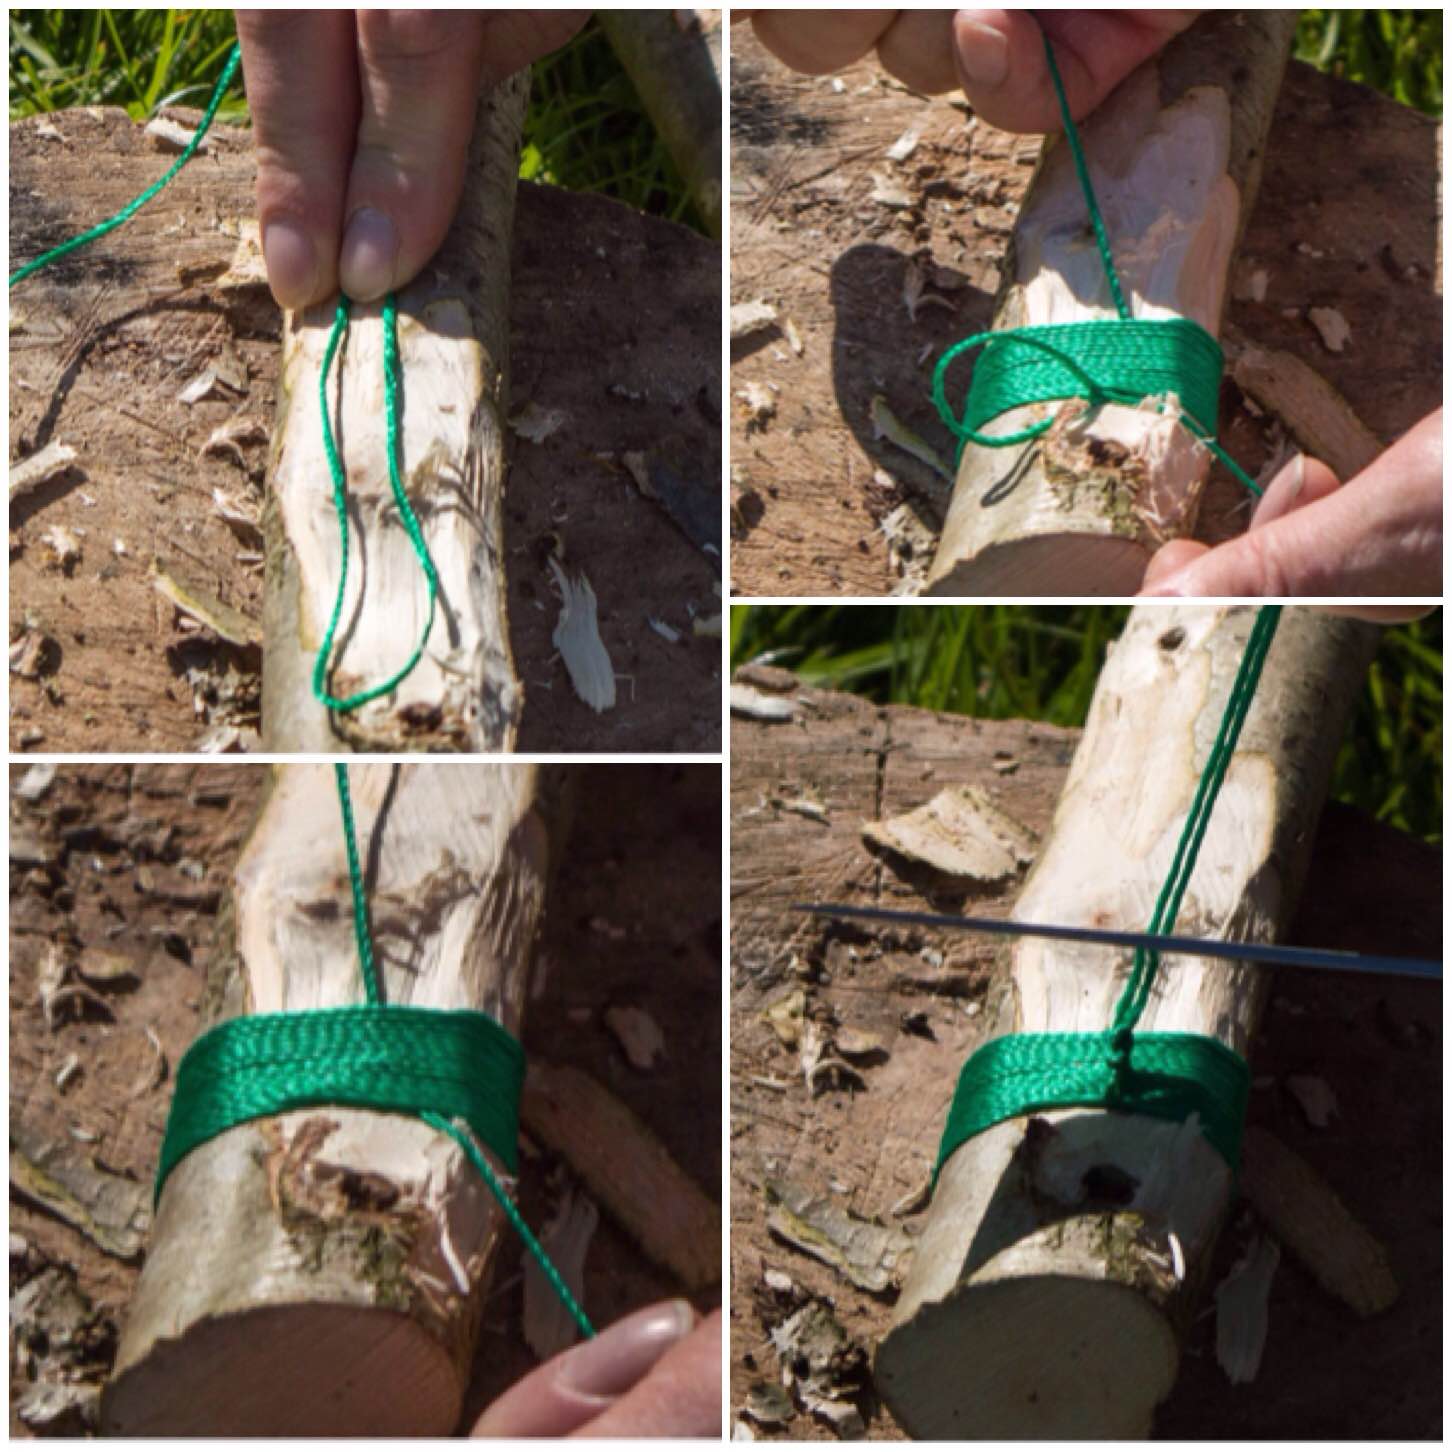
Top Limb
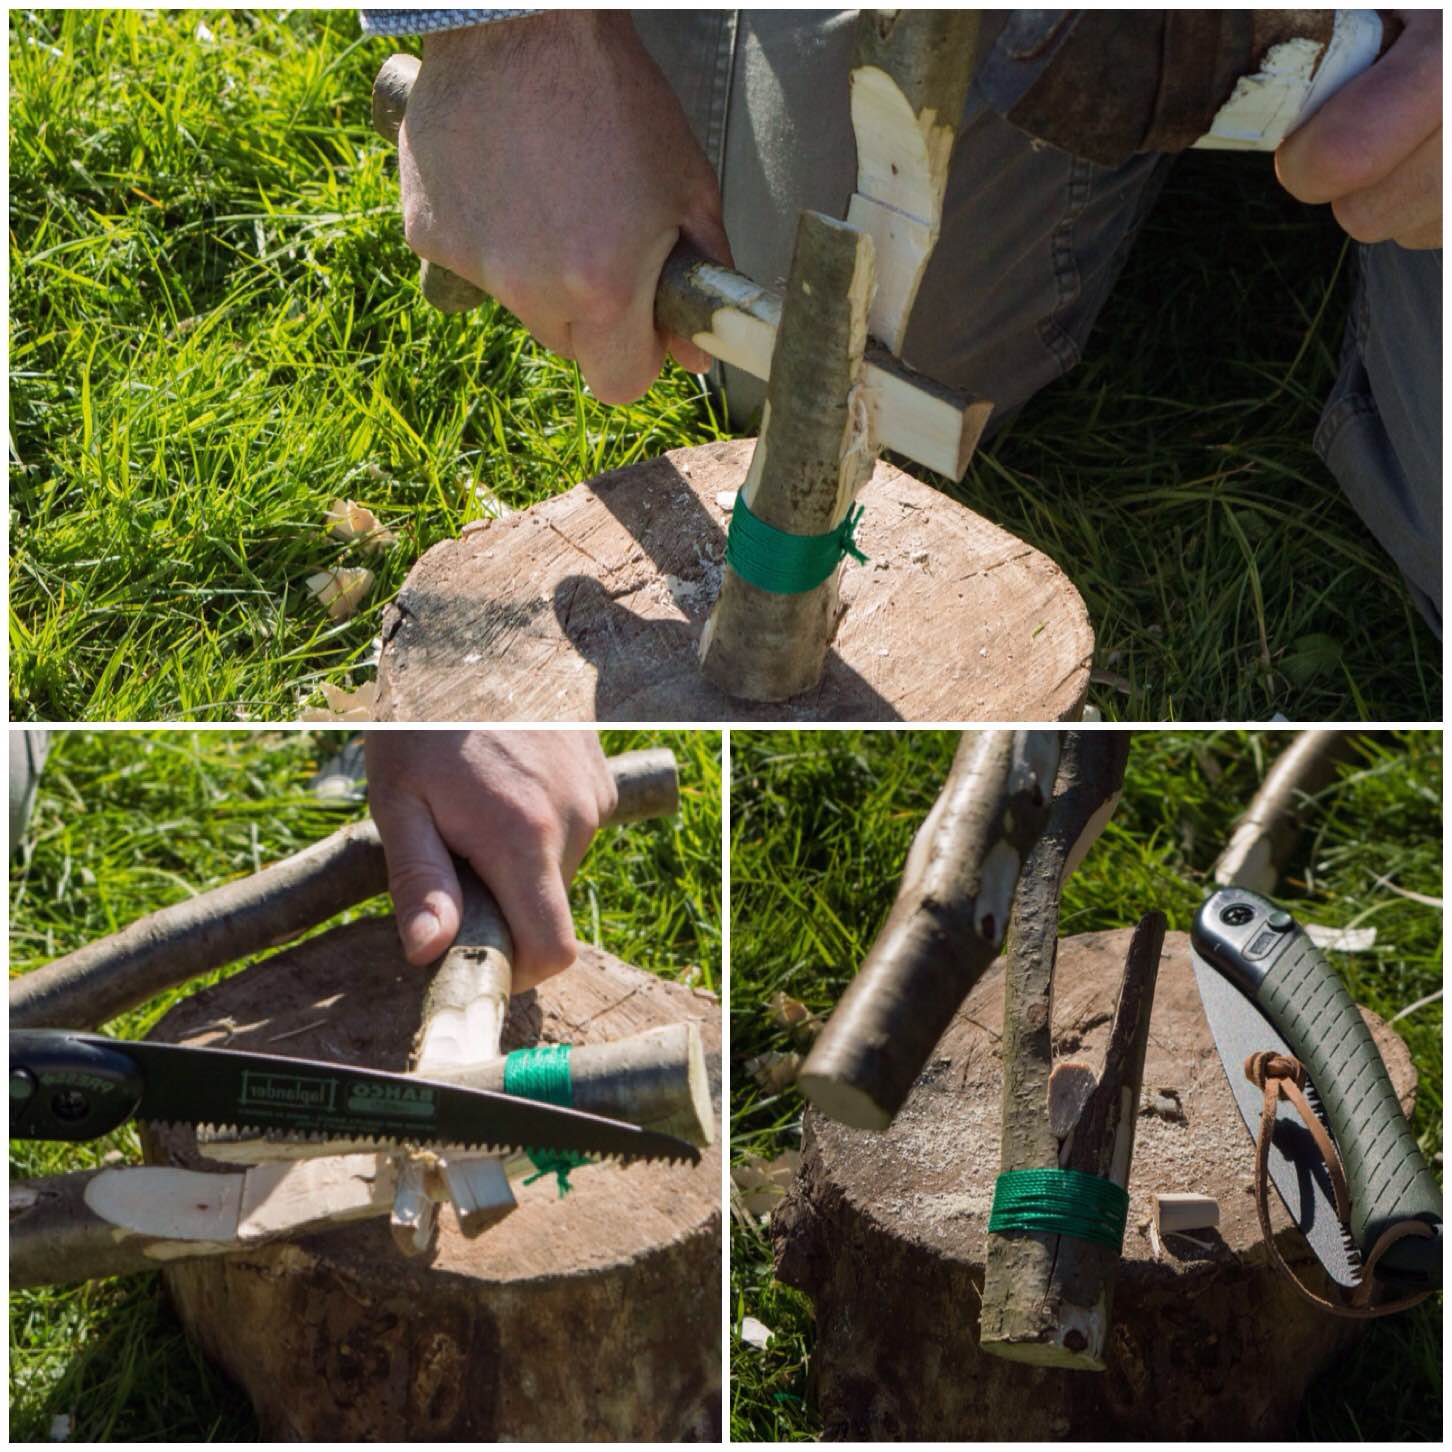
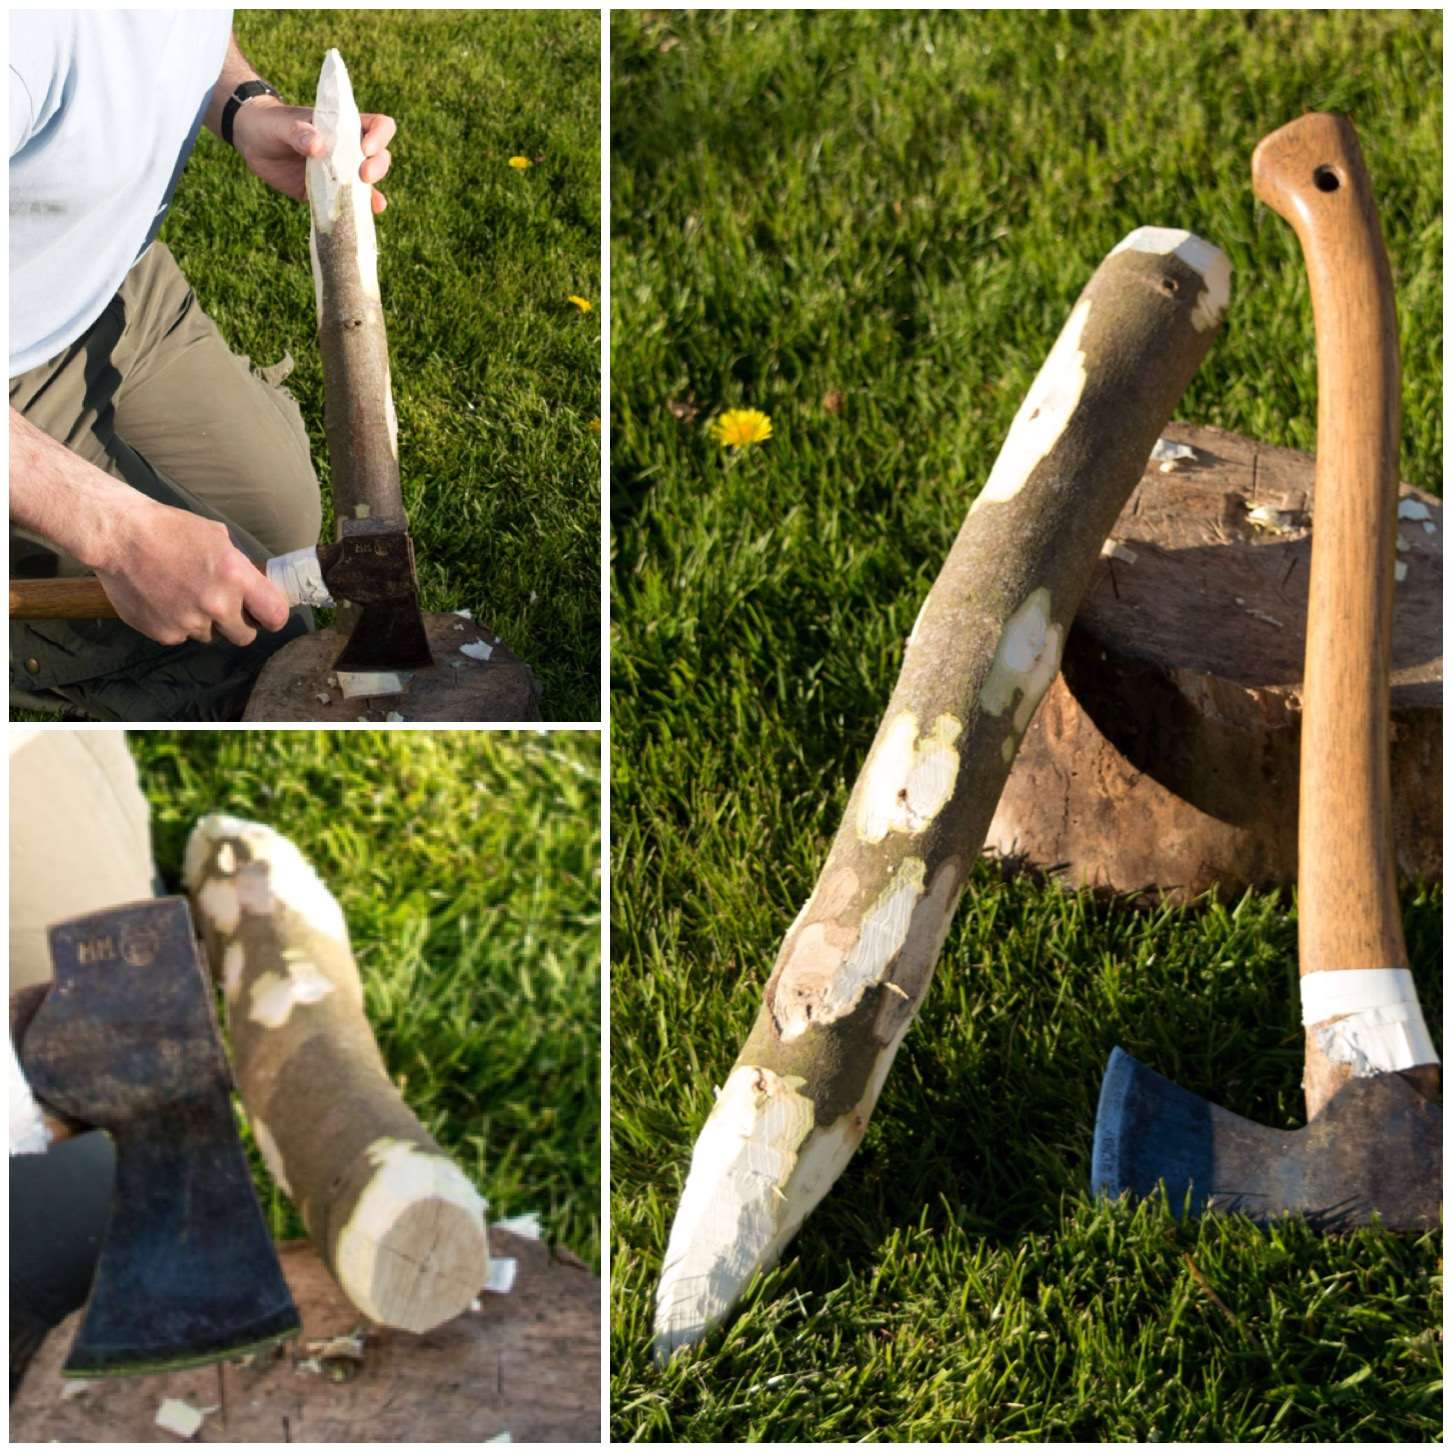
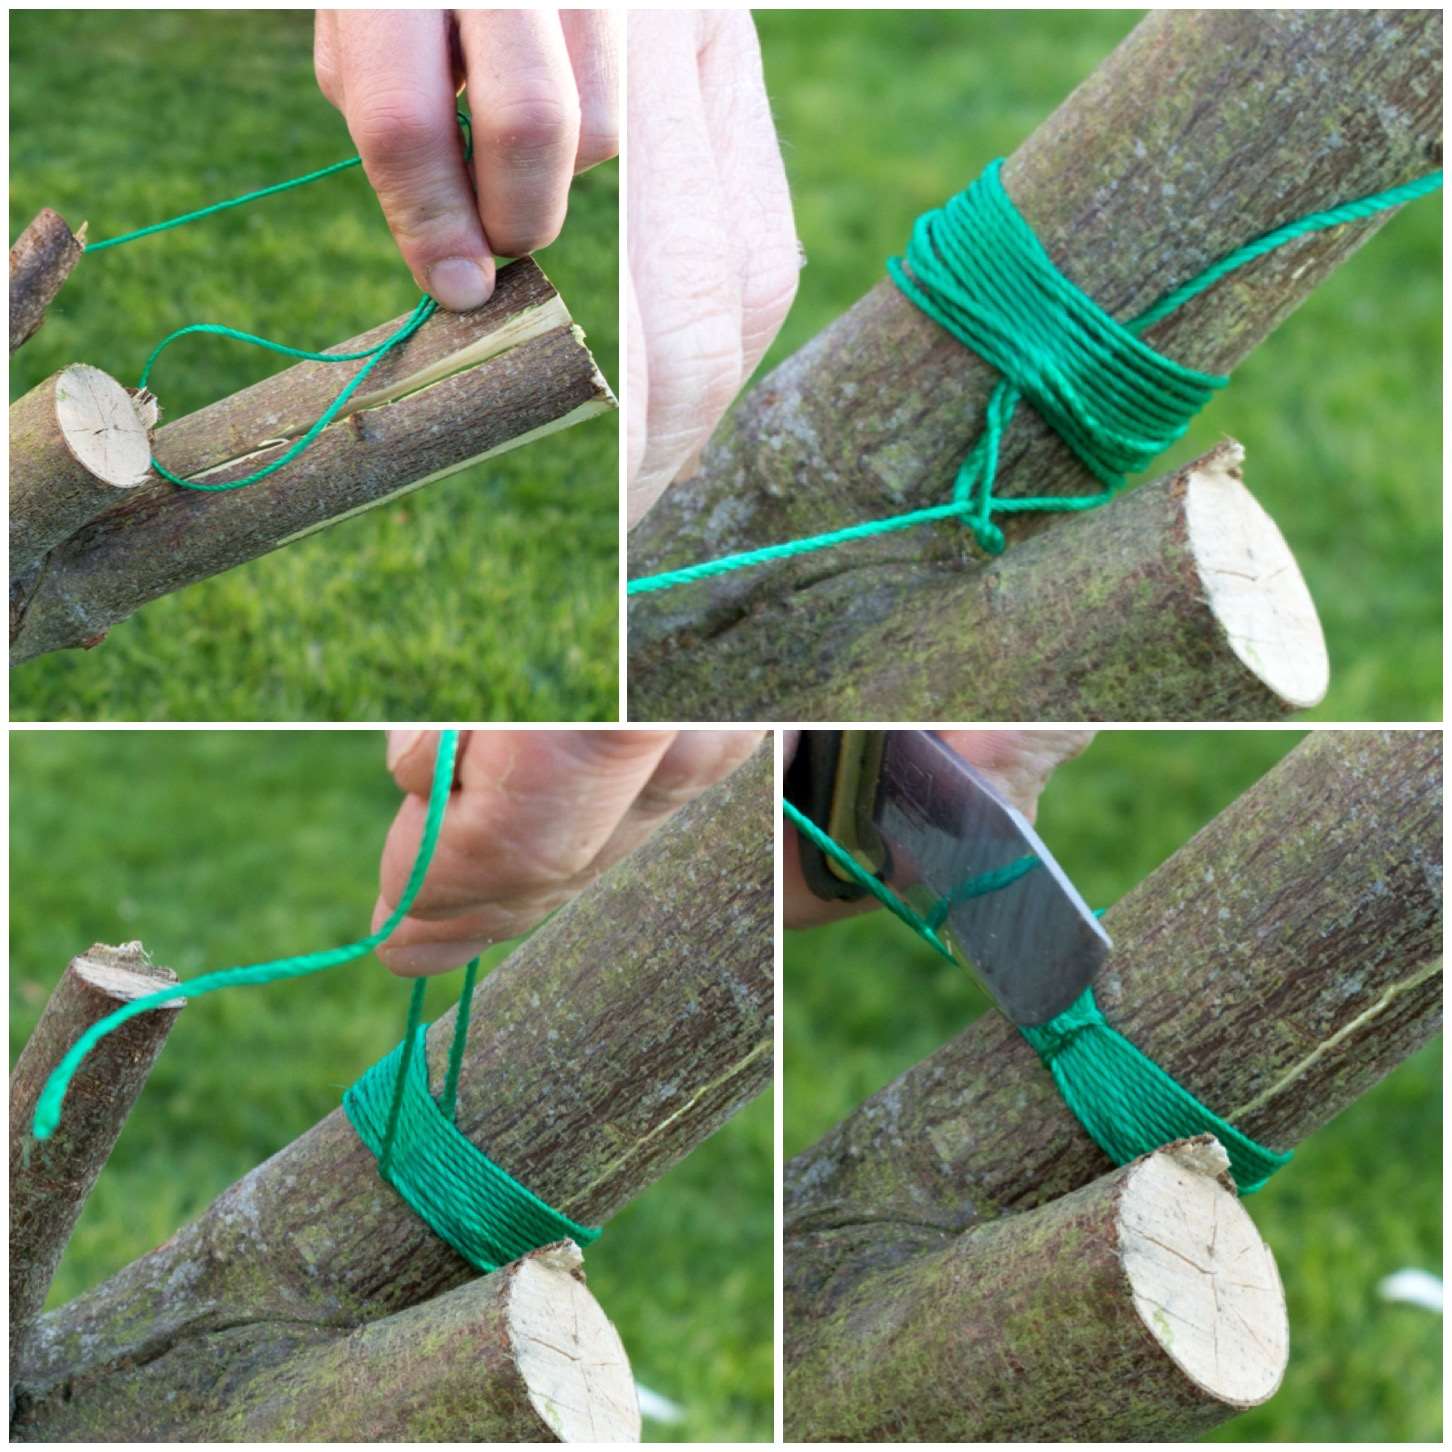
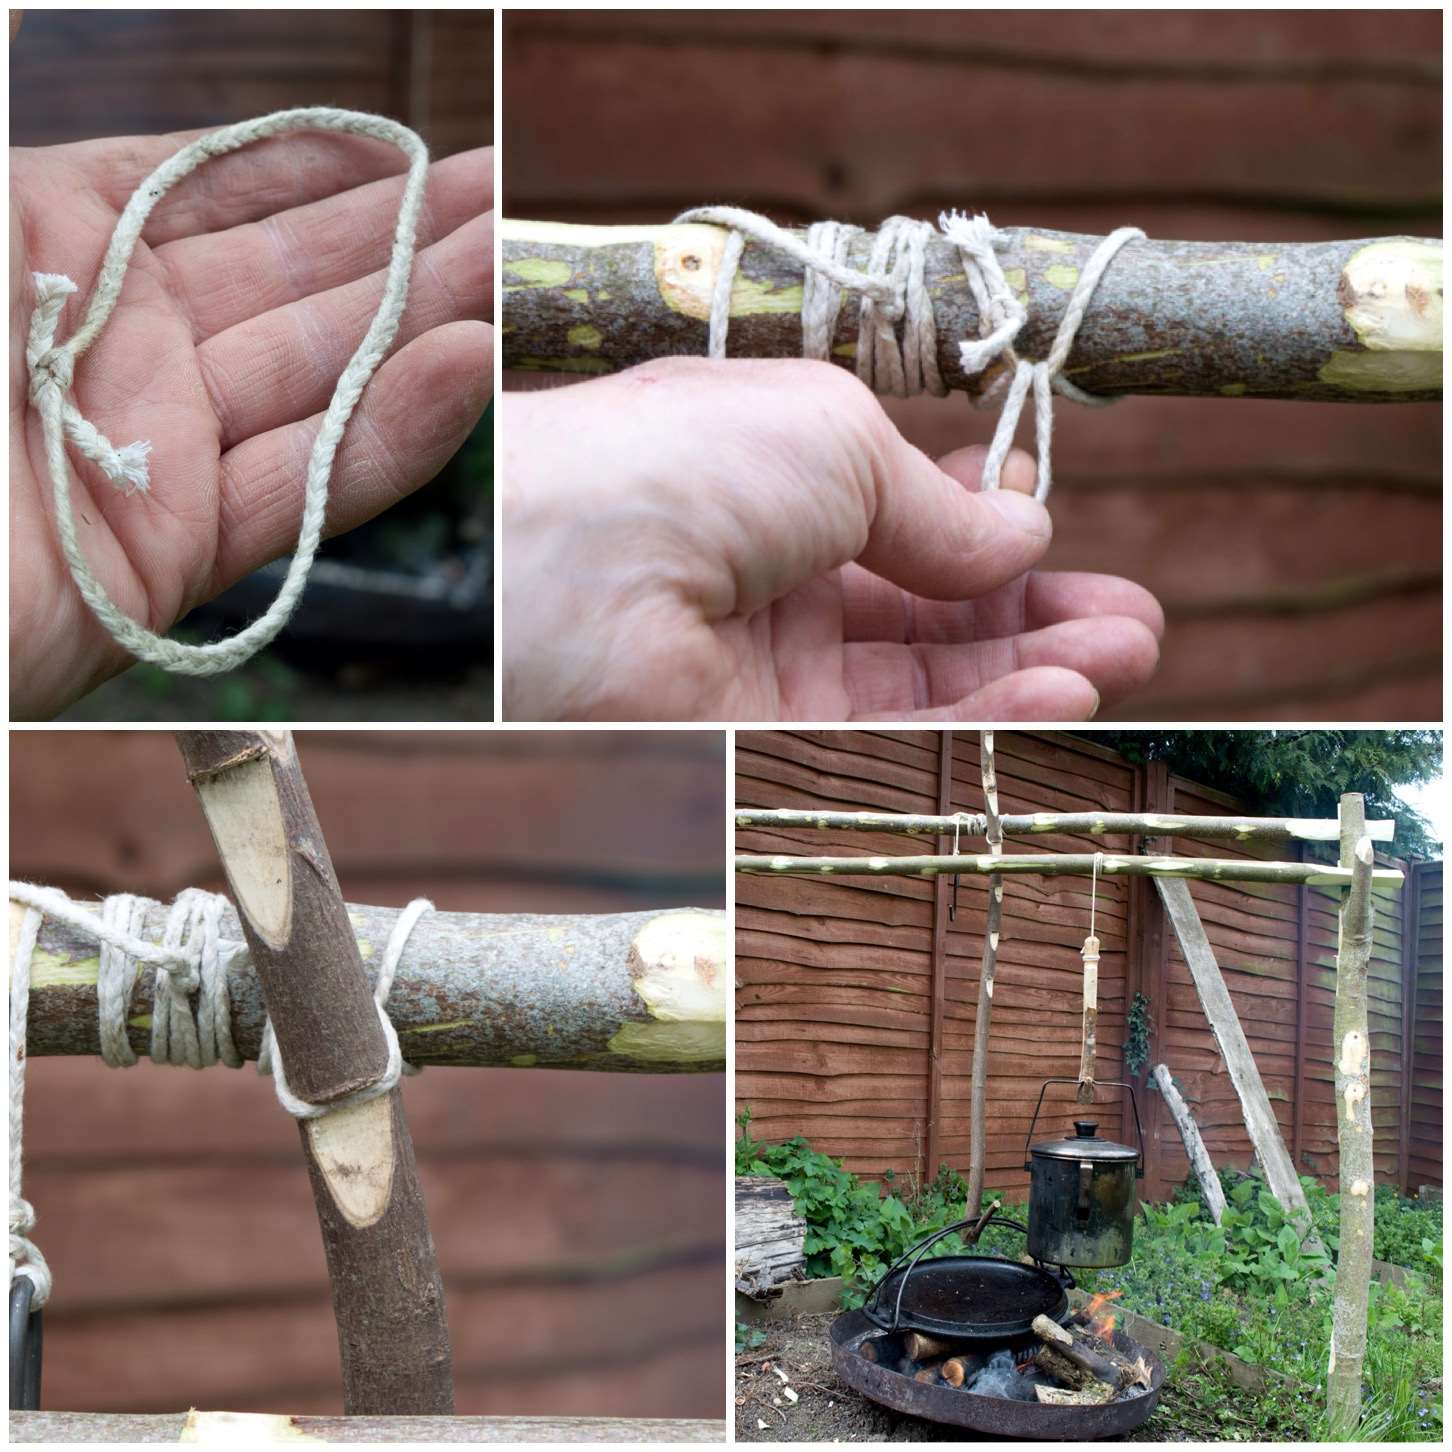
Next I whipped some strong non-stretchy string onto the top limb of the crane. Grogs knots have a good tutorial on this, however it’s not necessary to whip in any particular way- just do it in whatever way works for you and binds that end of the limb tightly.
Whip the end of what will be the top limb
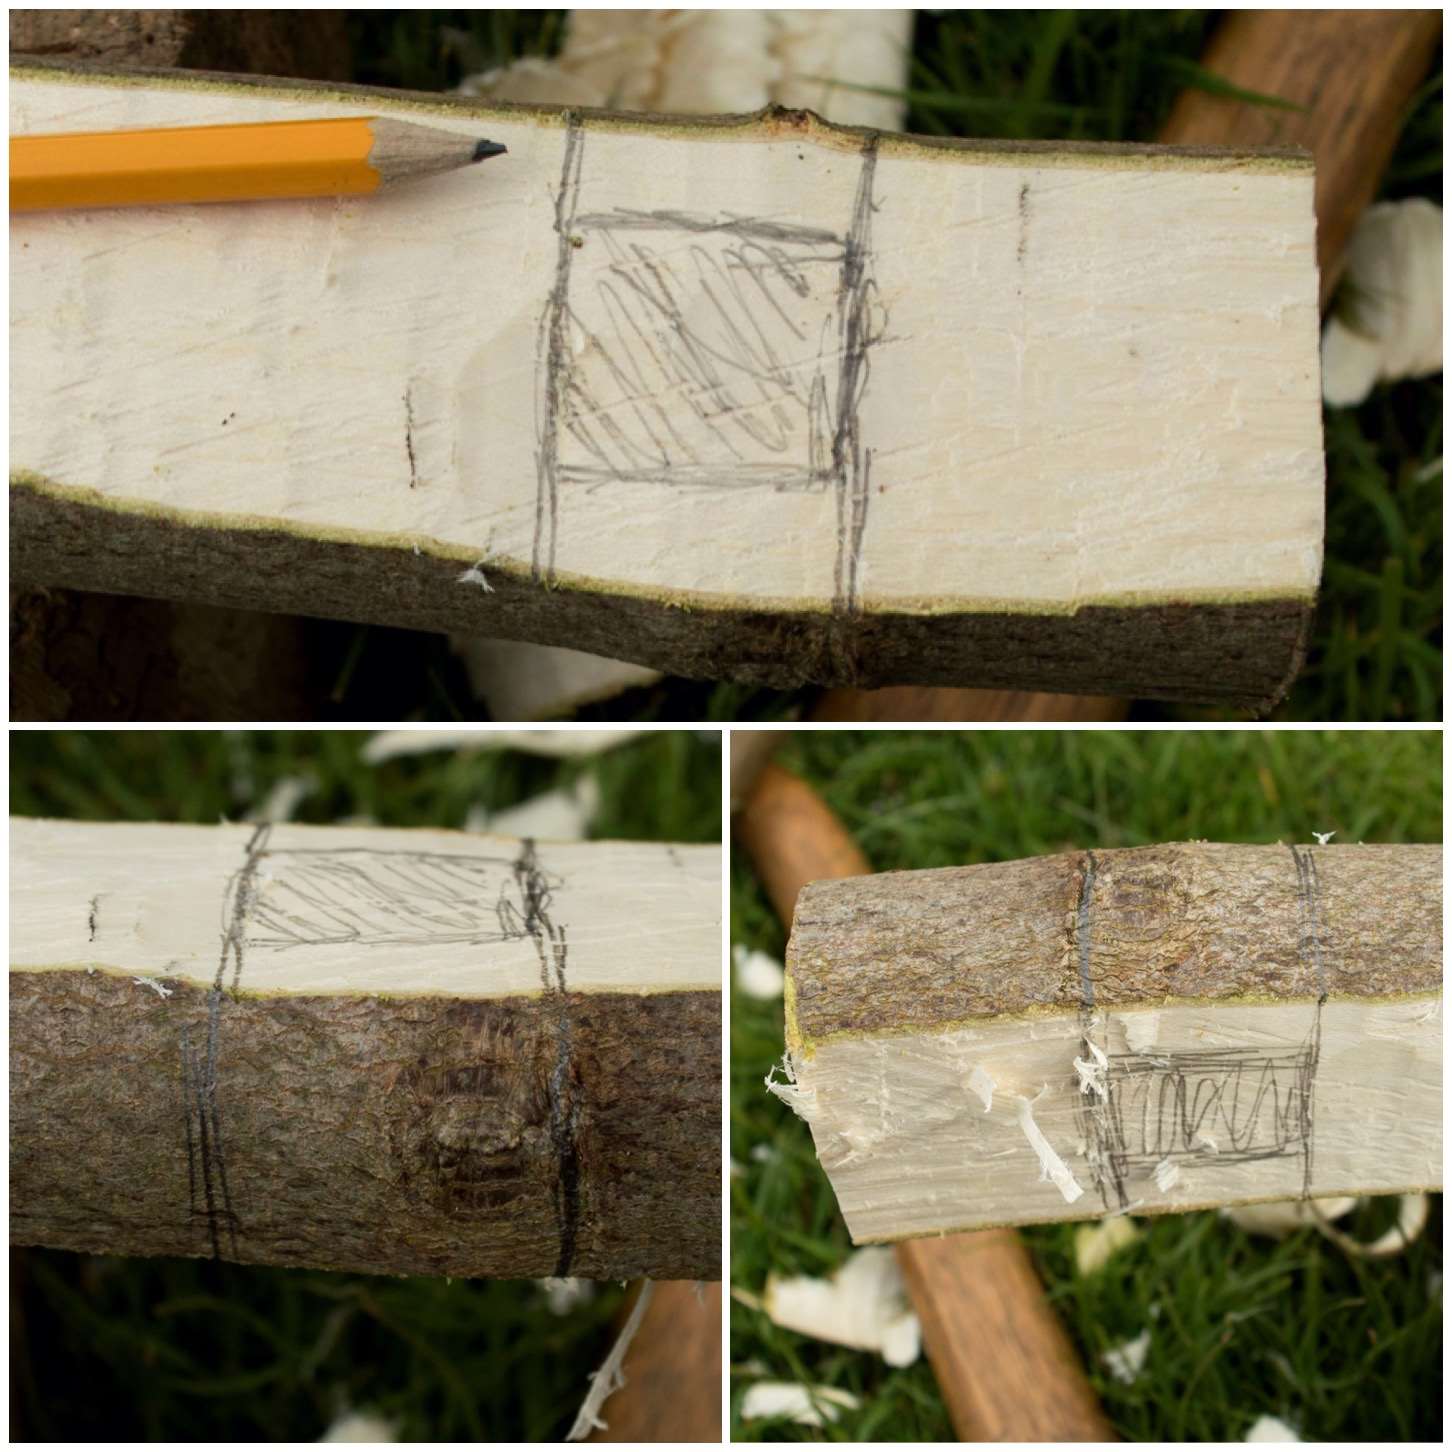
One of the reasons I selected a fairly sturdy fork was that I needed to put in a stop cut about a third of the way down the top limb. This stop cut will help you greatly in controlling the split you need to make to form the hook.
I sawed my stop cut to about two thirds of the diameter of the limb.
Put a stop cut into the limb
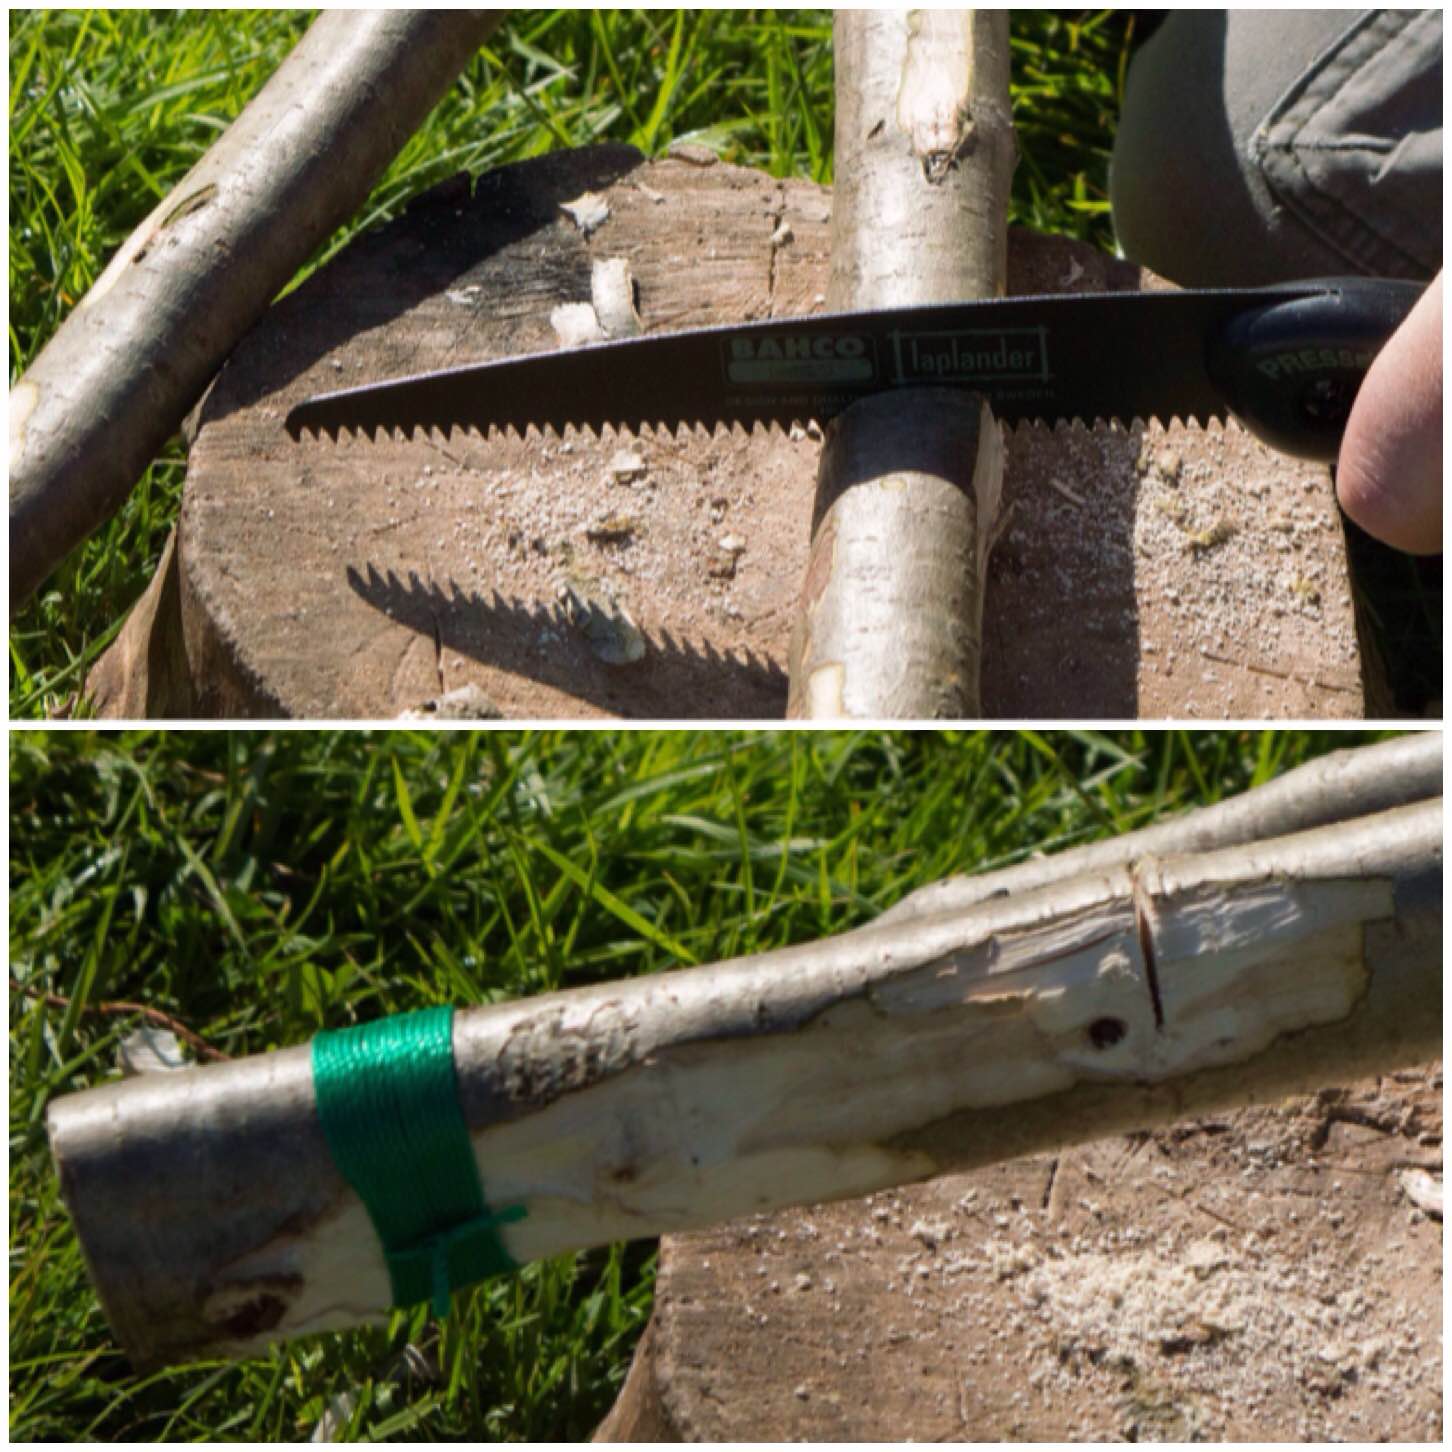
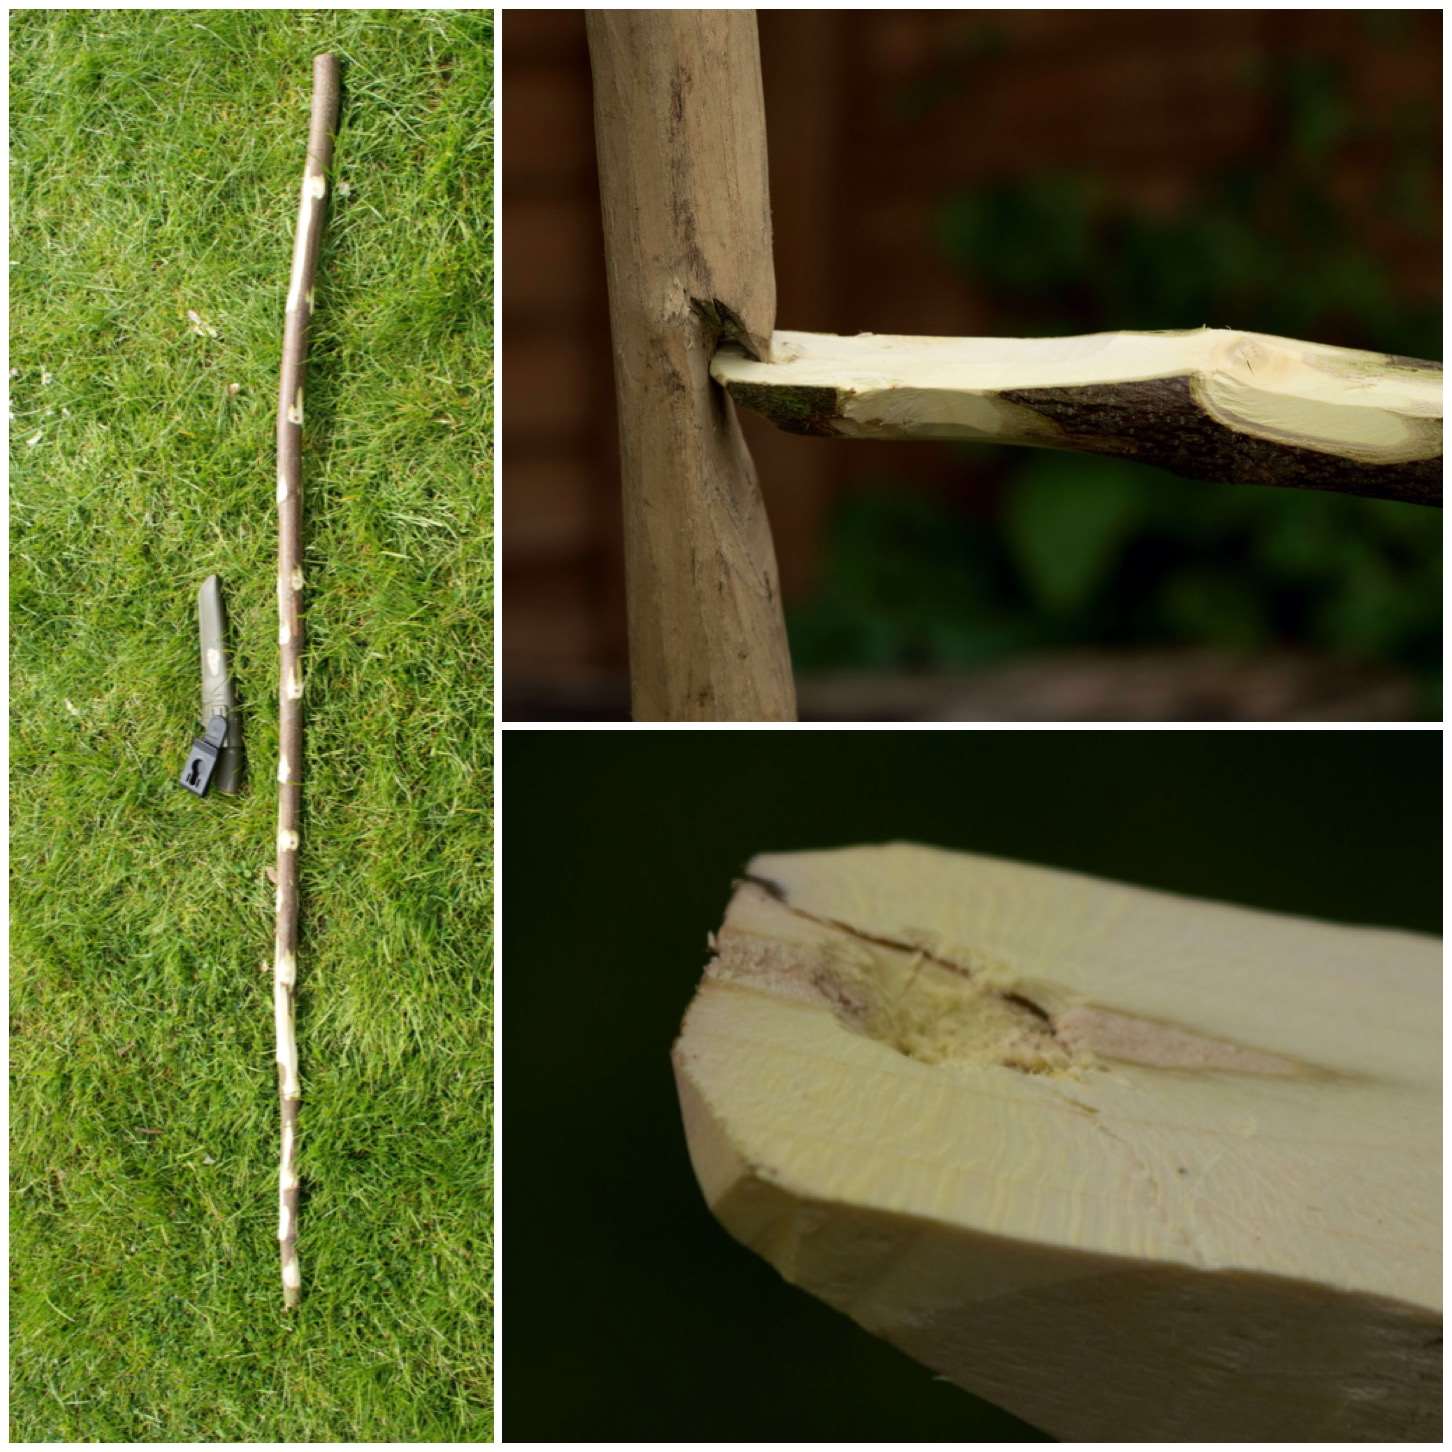
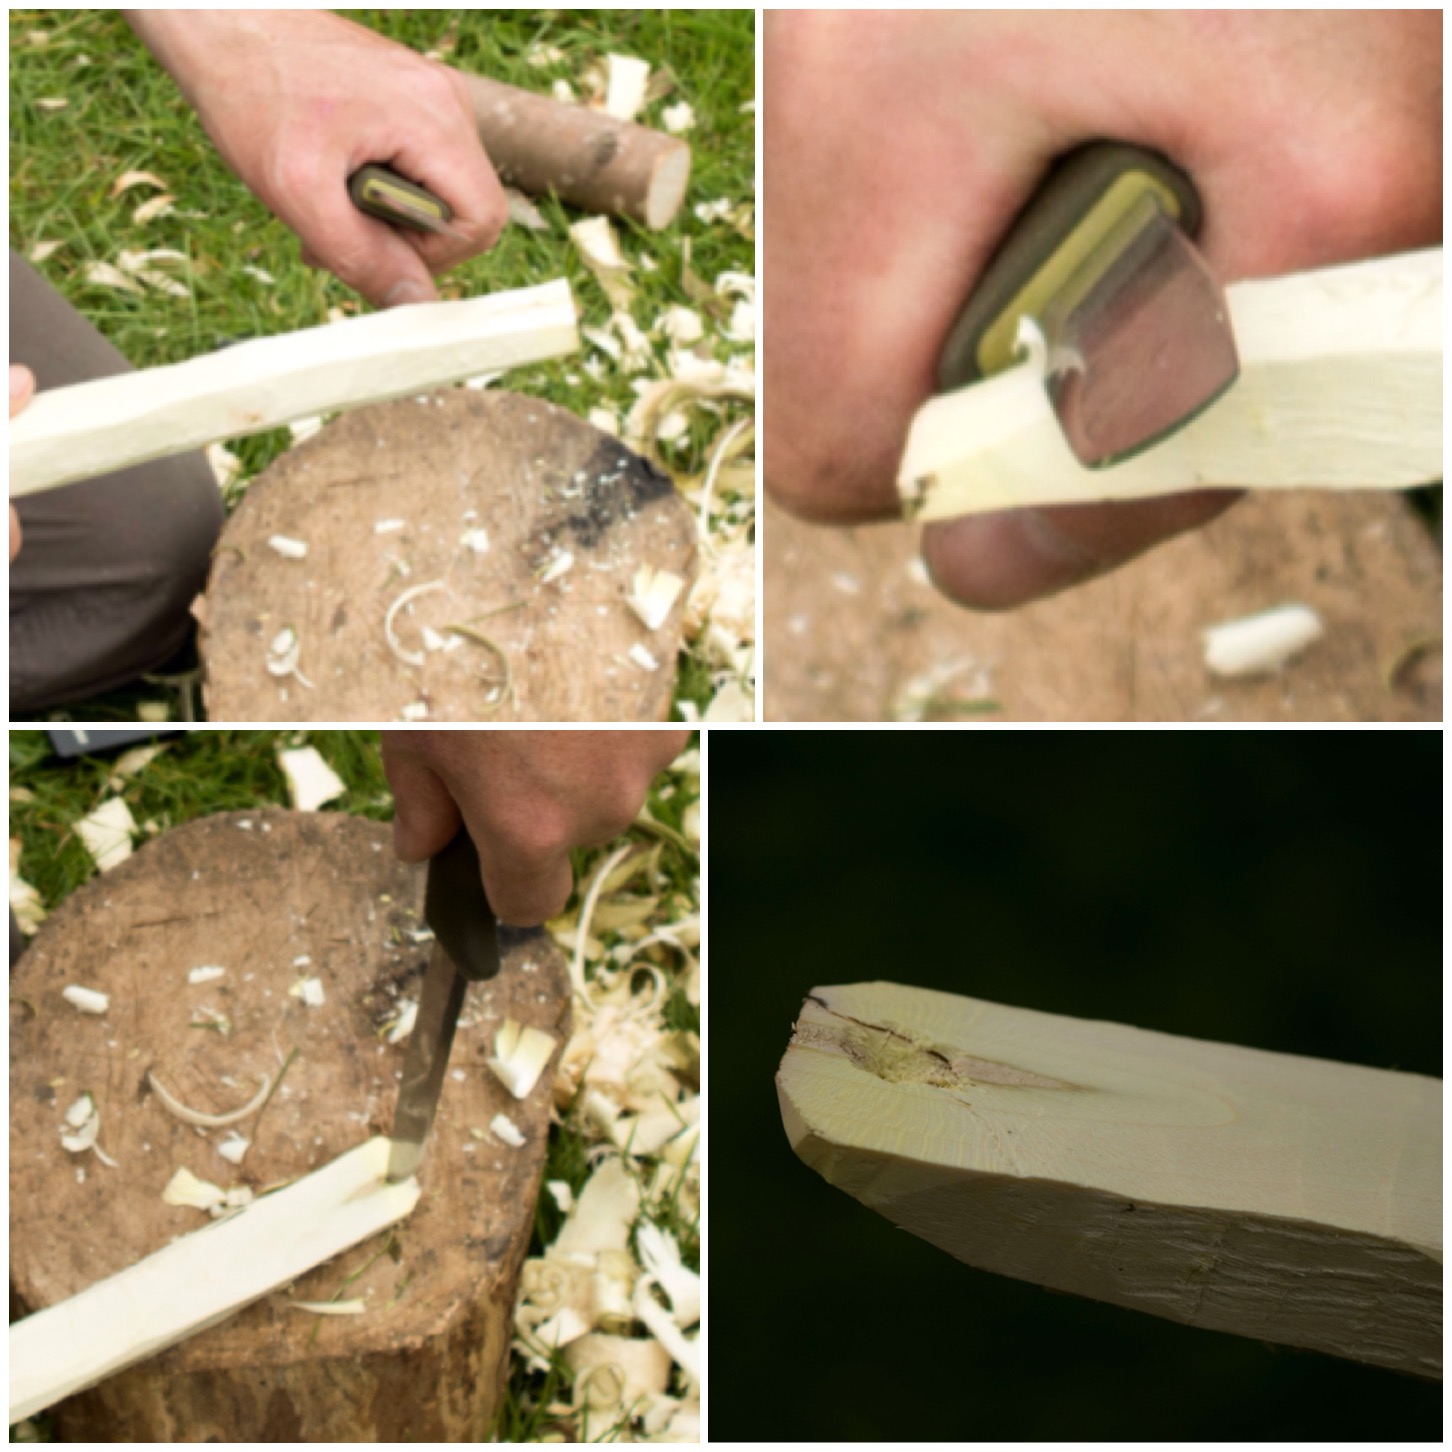
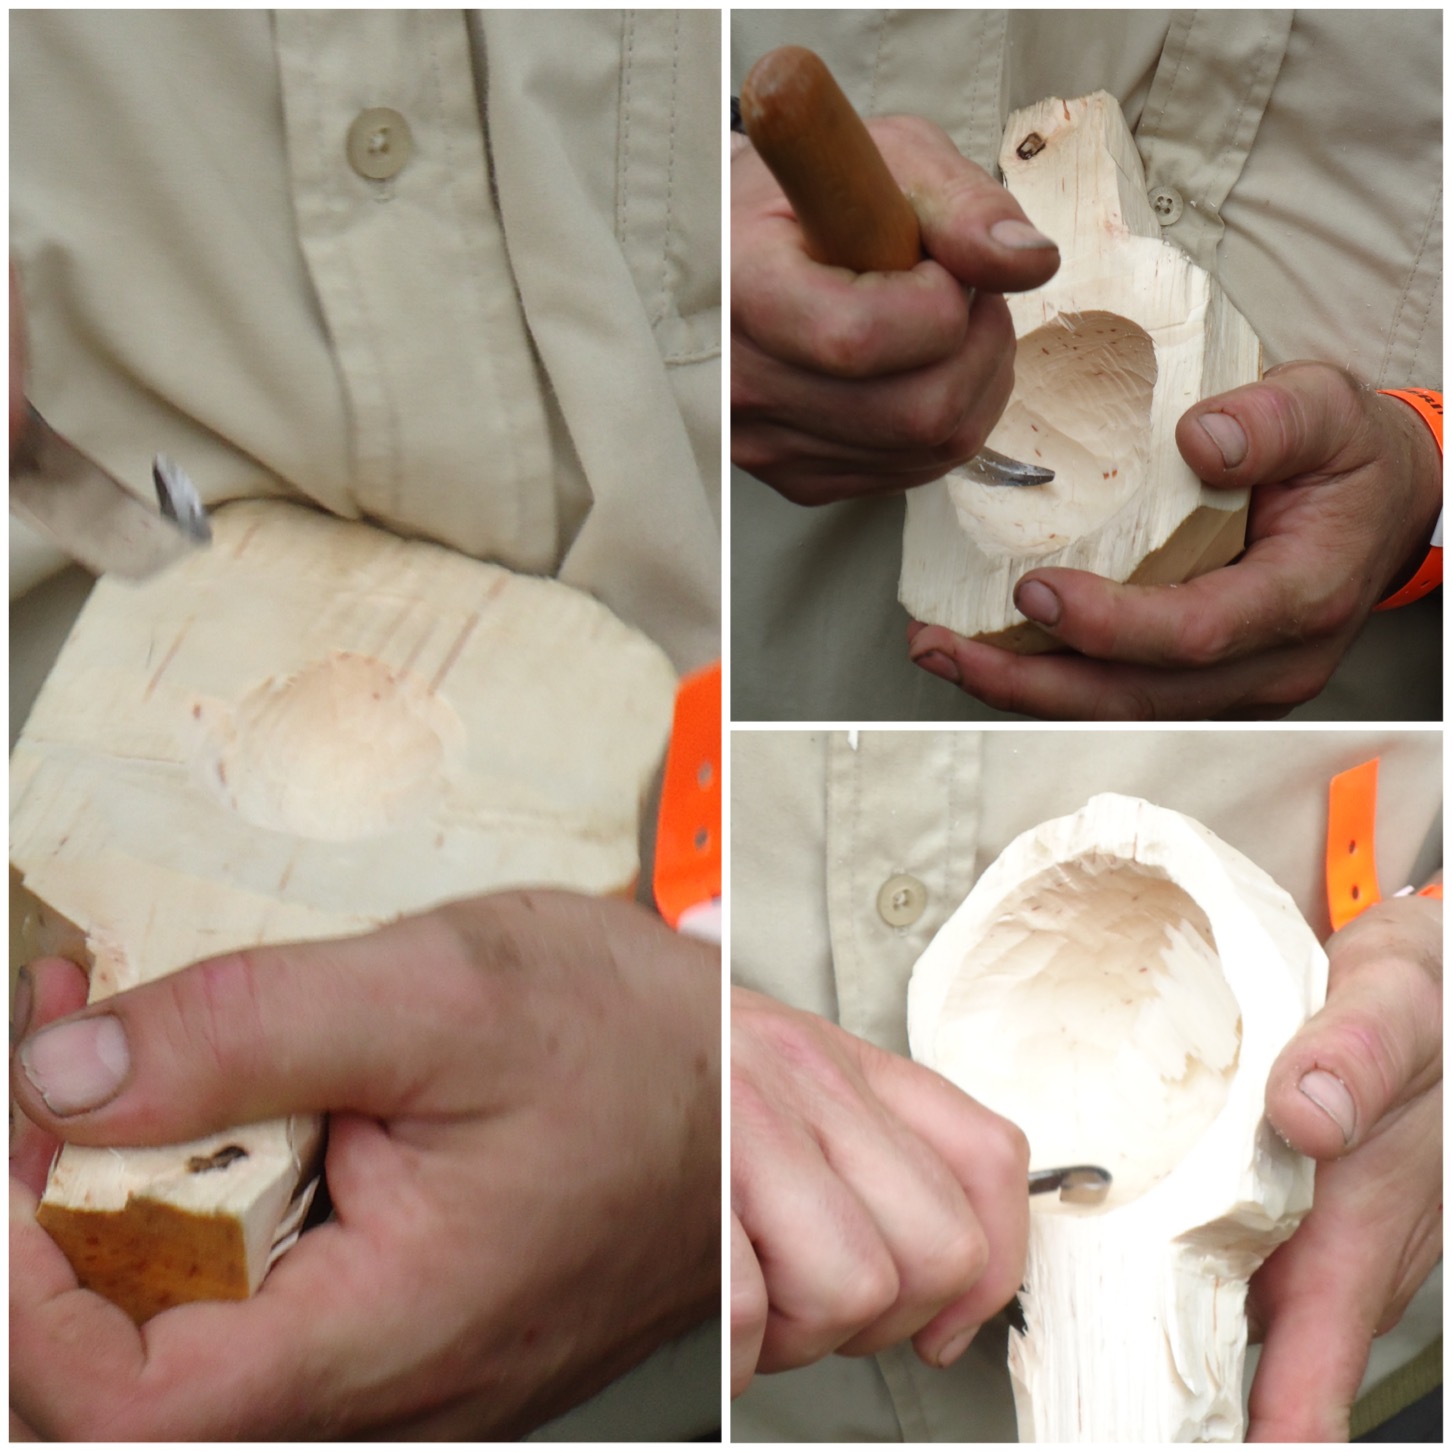
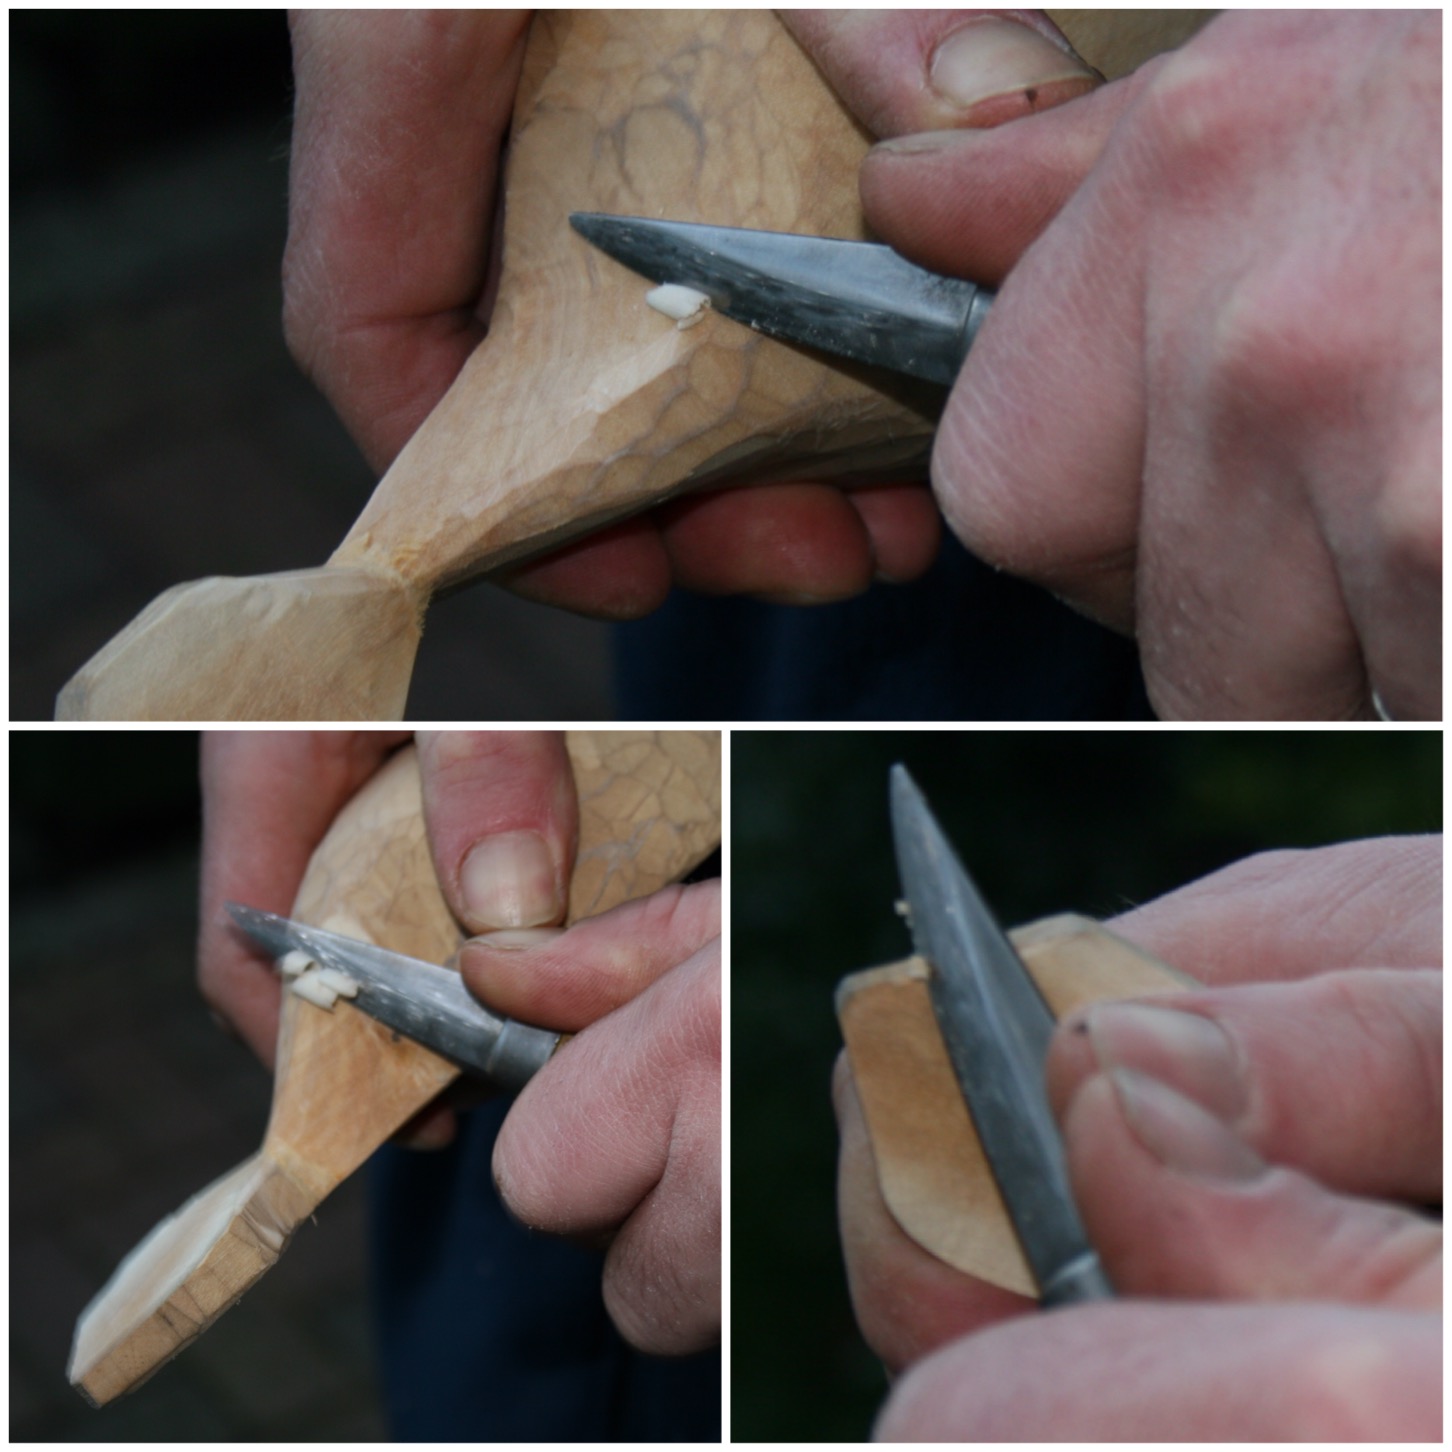
Using small cuts I then cut out a groove just above the stop cut towards the fork to the depth of the stop cut (the two bottom left pictures). This allowed me enough space to get my knife blade in to start battoning down to split the wood.
I was very careful when battoning not to let the blade touch the string that I had whipped onto the limb. Take care to wiggle the knife to remove it, keeping your non-knife hand well clear. I battoned a number of splits so as to easily carve them out.
Carve and batton
I also found that sawing down into the split helped with removing the wood. Once I had sawn or battoned down a number of times I carved out the excess wood by pressing down with my knife at a slight angle (you can just see the carved out area in the bottom left picture).
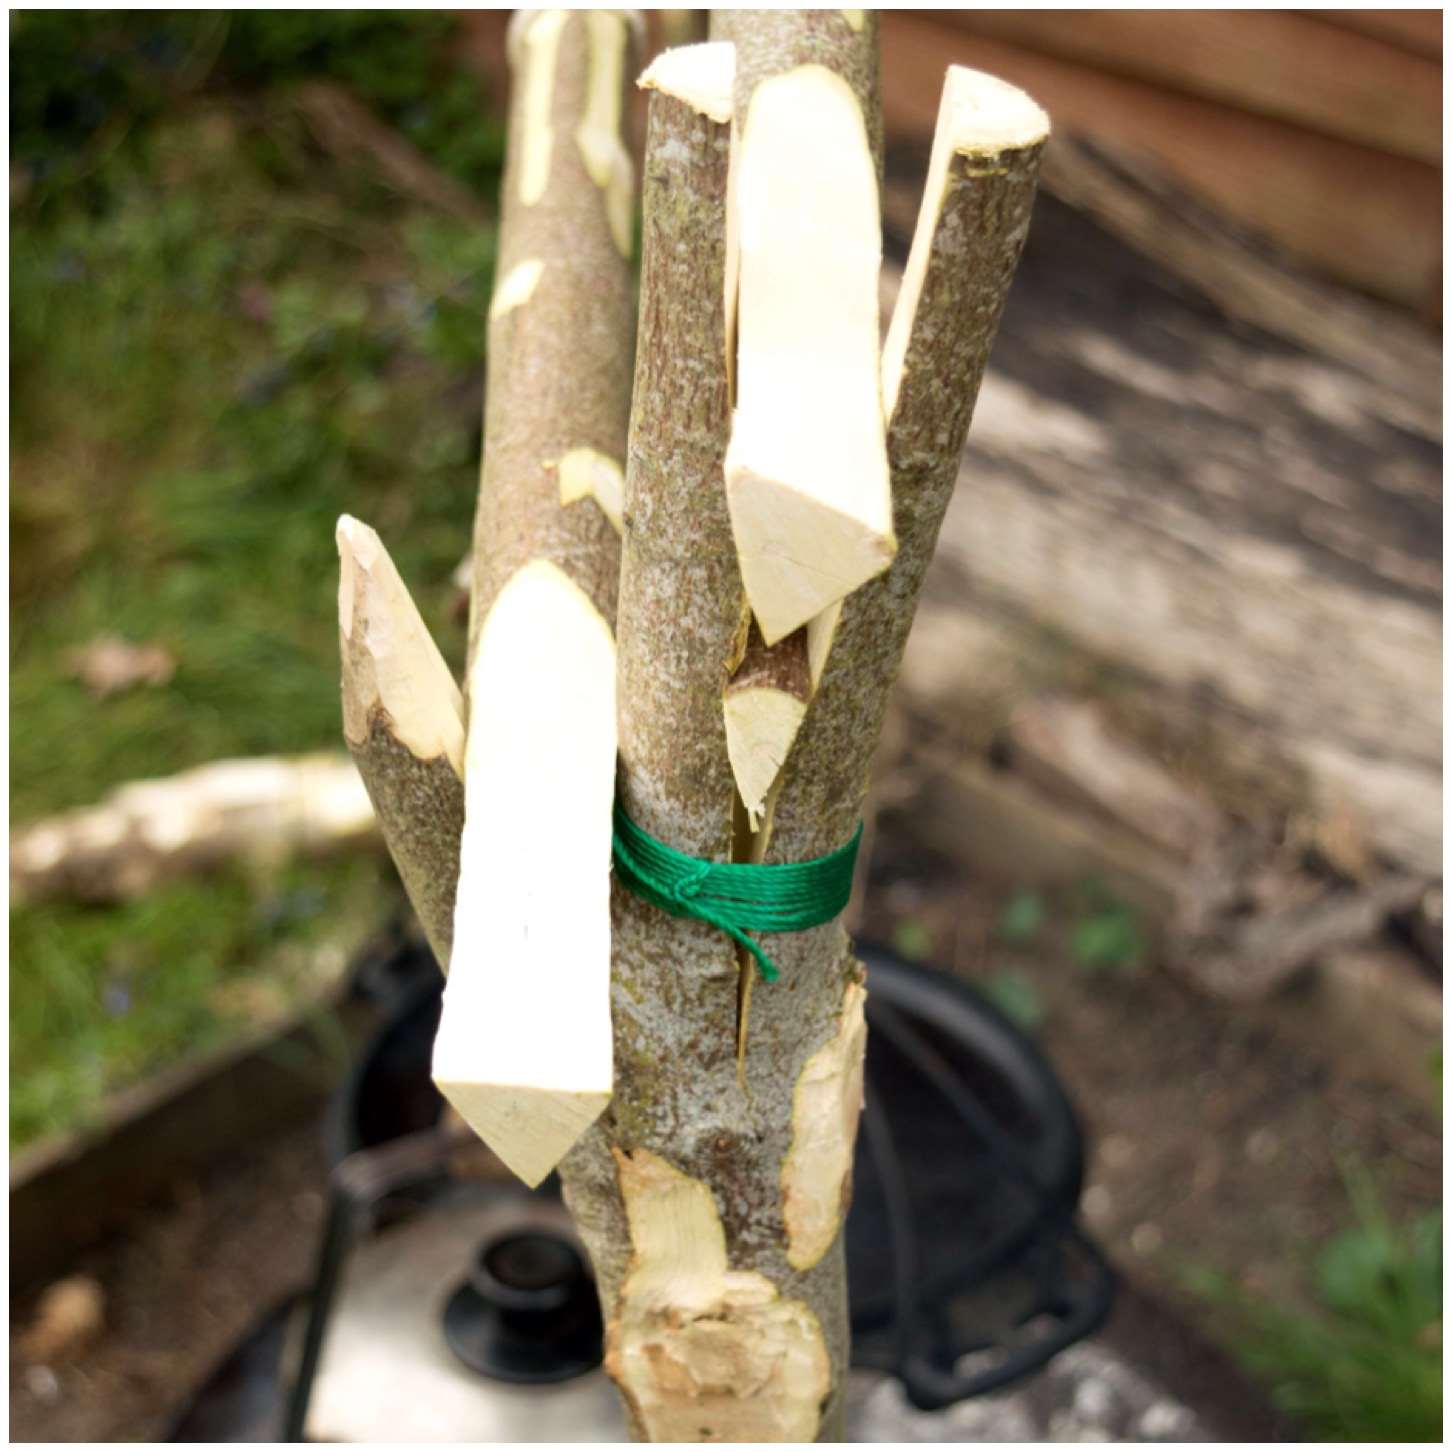
Next I took a small stick and carved it into a wedge shape to batton into the fork to expand it further.
Use a saw and knife then make a small wedge
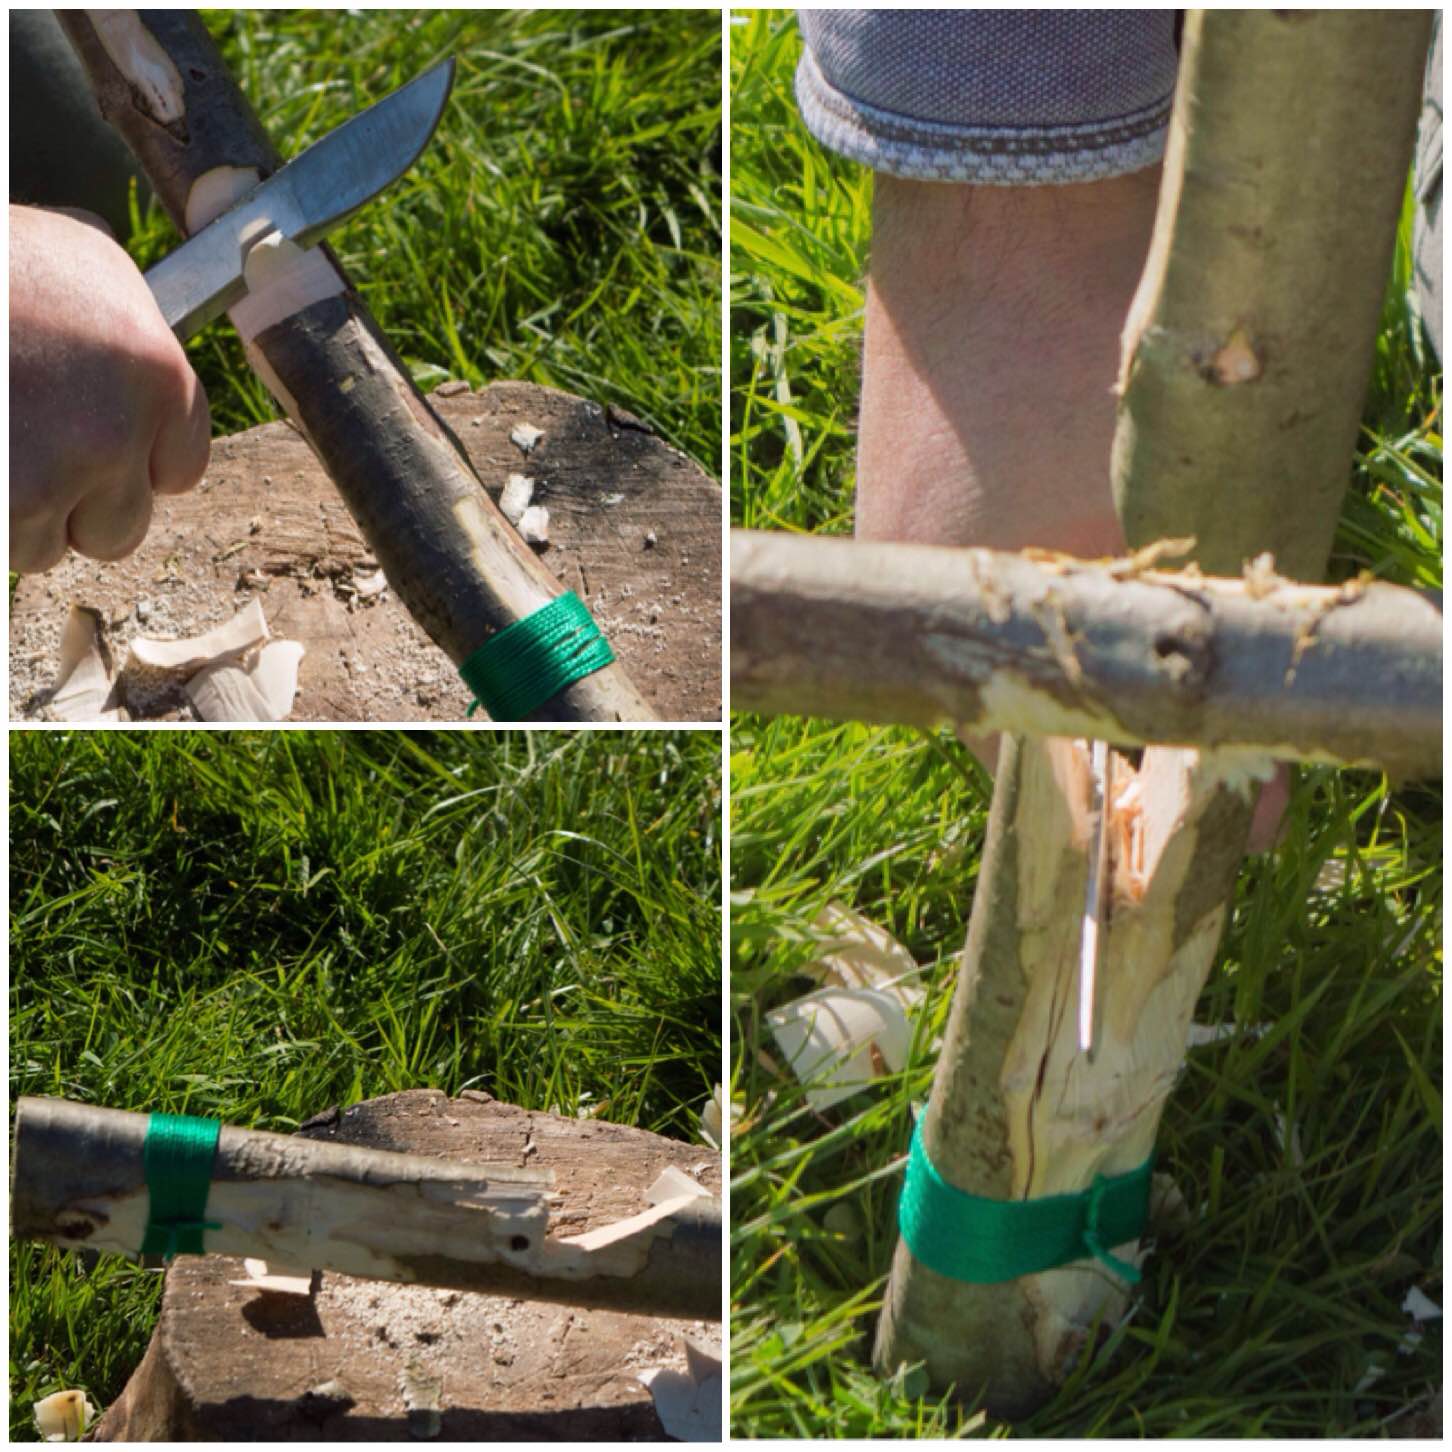
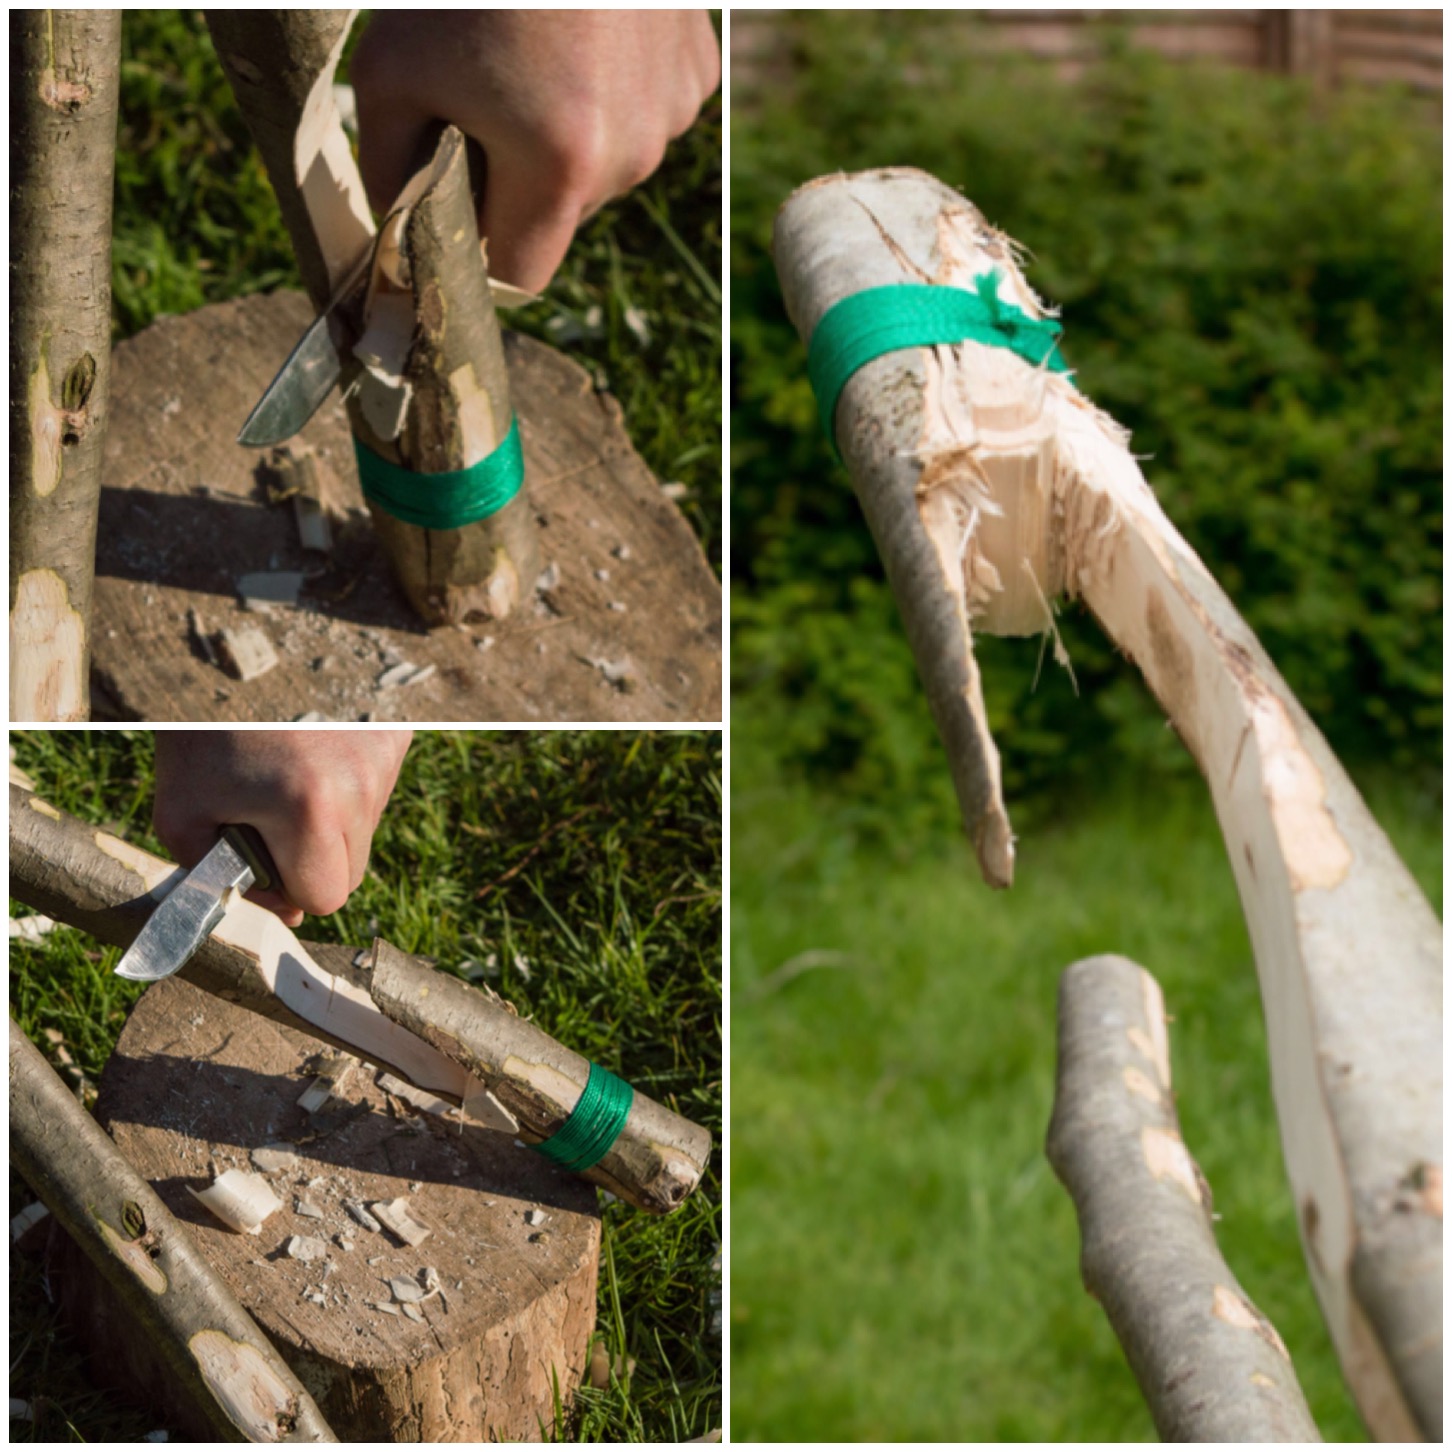
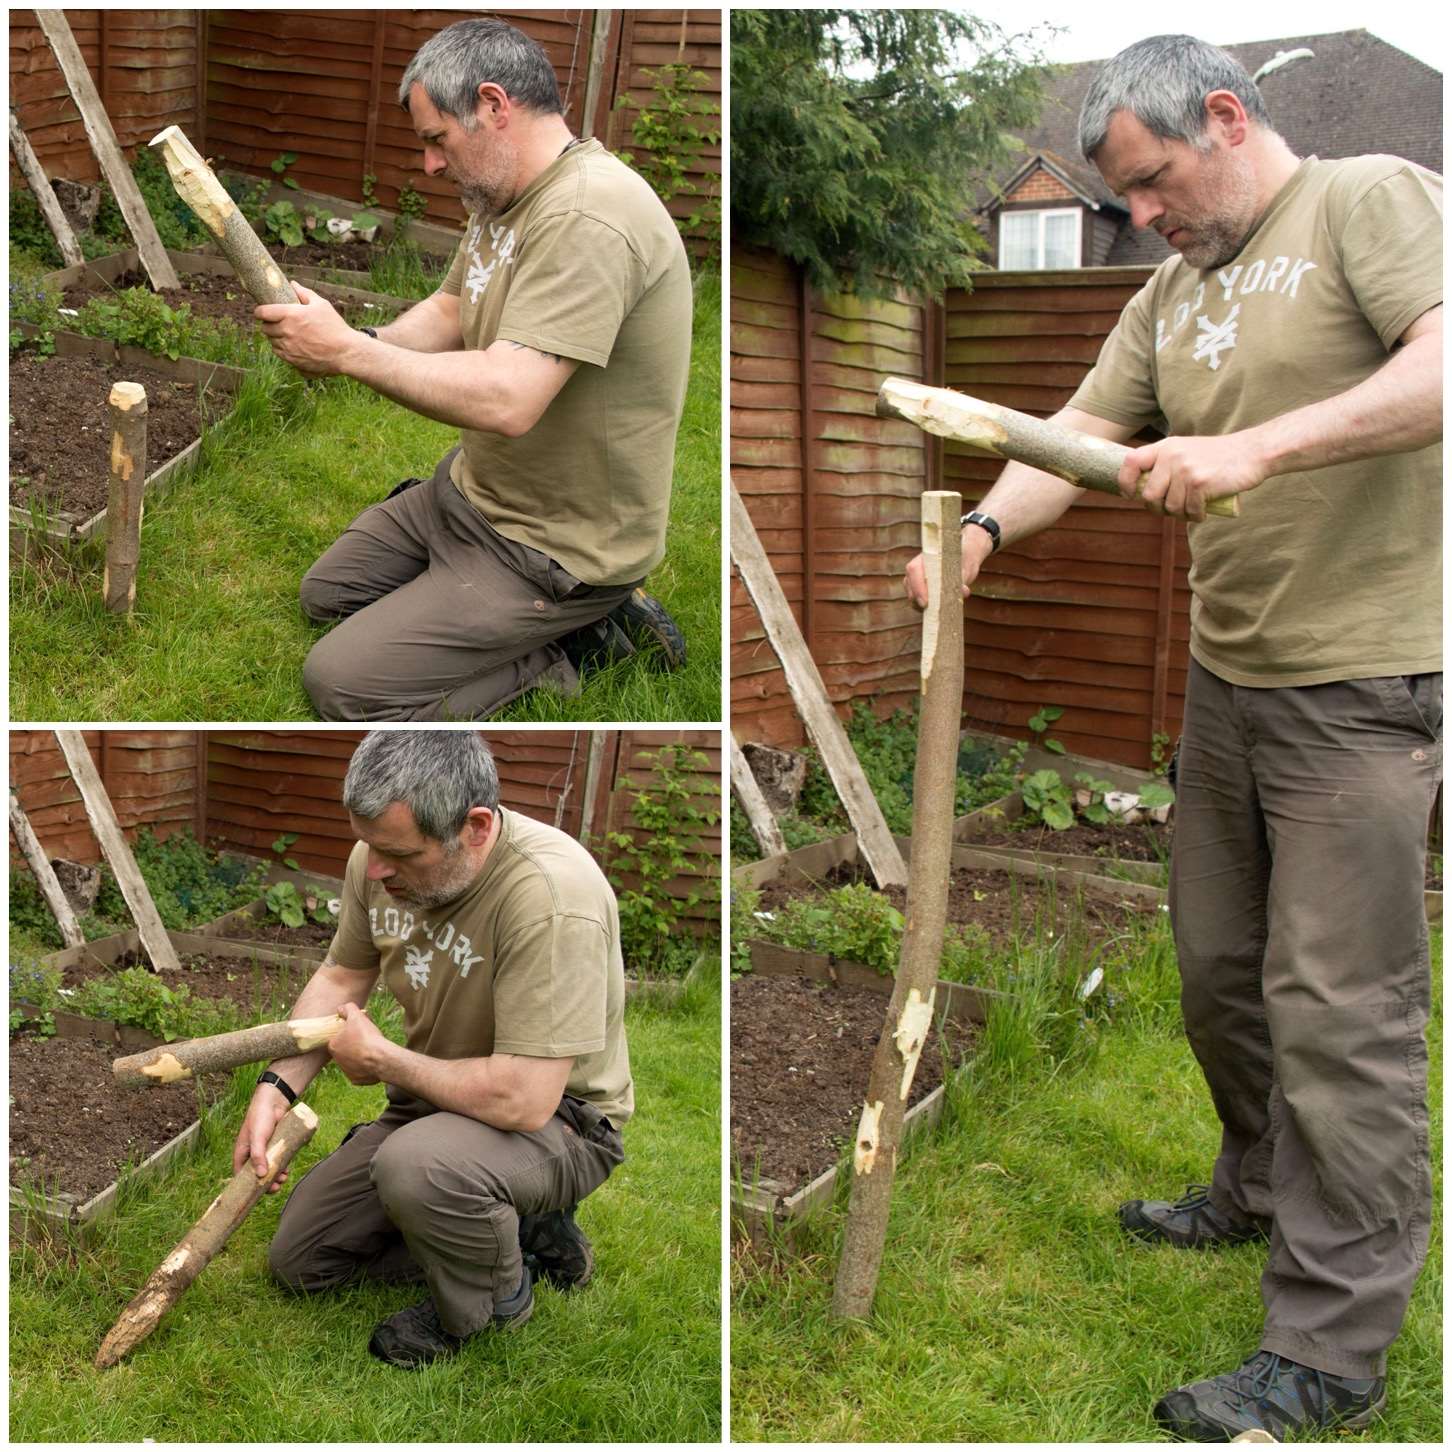
Double check that your whipping is secure and batton the wedge into the fork to expand it. Once it is securely fixed, trim the wedge so it fits neatly.
Insert to widen and trim
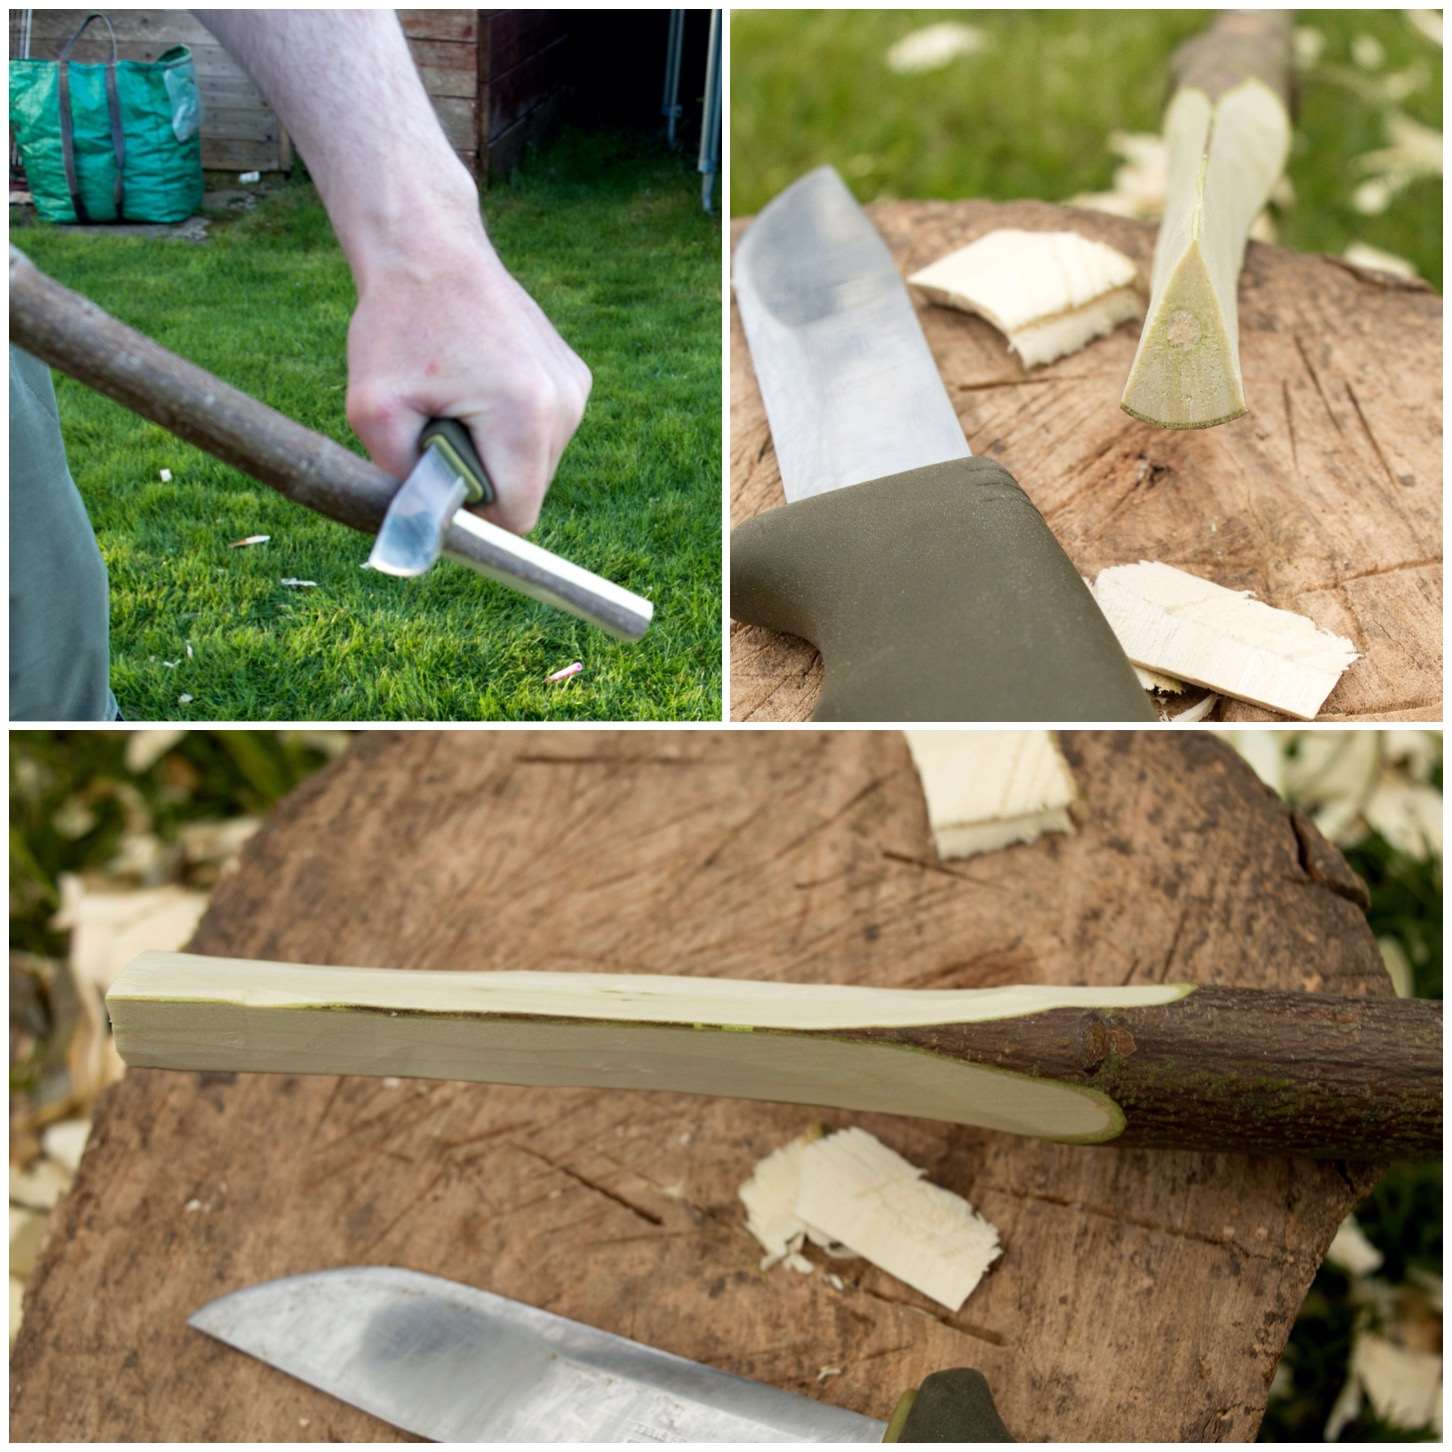
I used my knife to carve some more wood from the inner part of the fork to expand it a bit more. At this stage I was trying the fork out on the upright pole to see how it fitted. Don’t take off too much wood as you need to maintain strength in the fork so it will hold a heavy pot.
Use a knife to carve out more wood
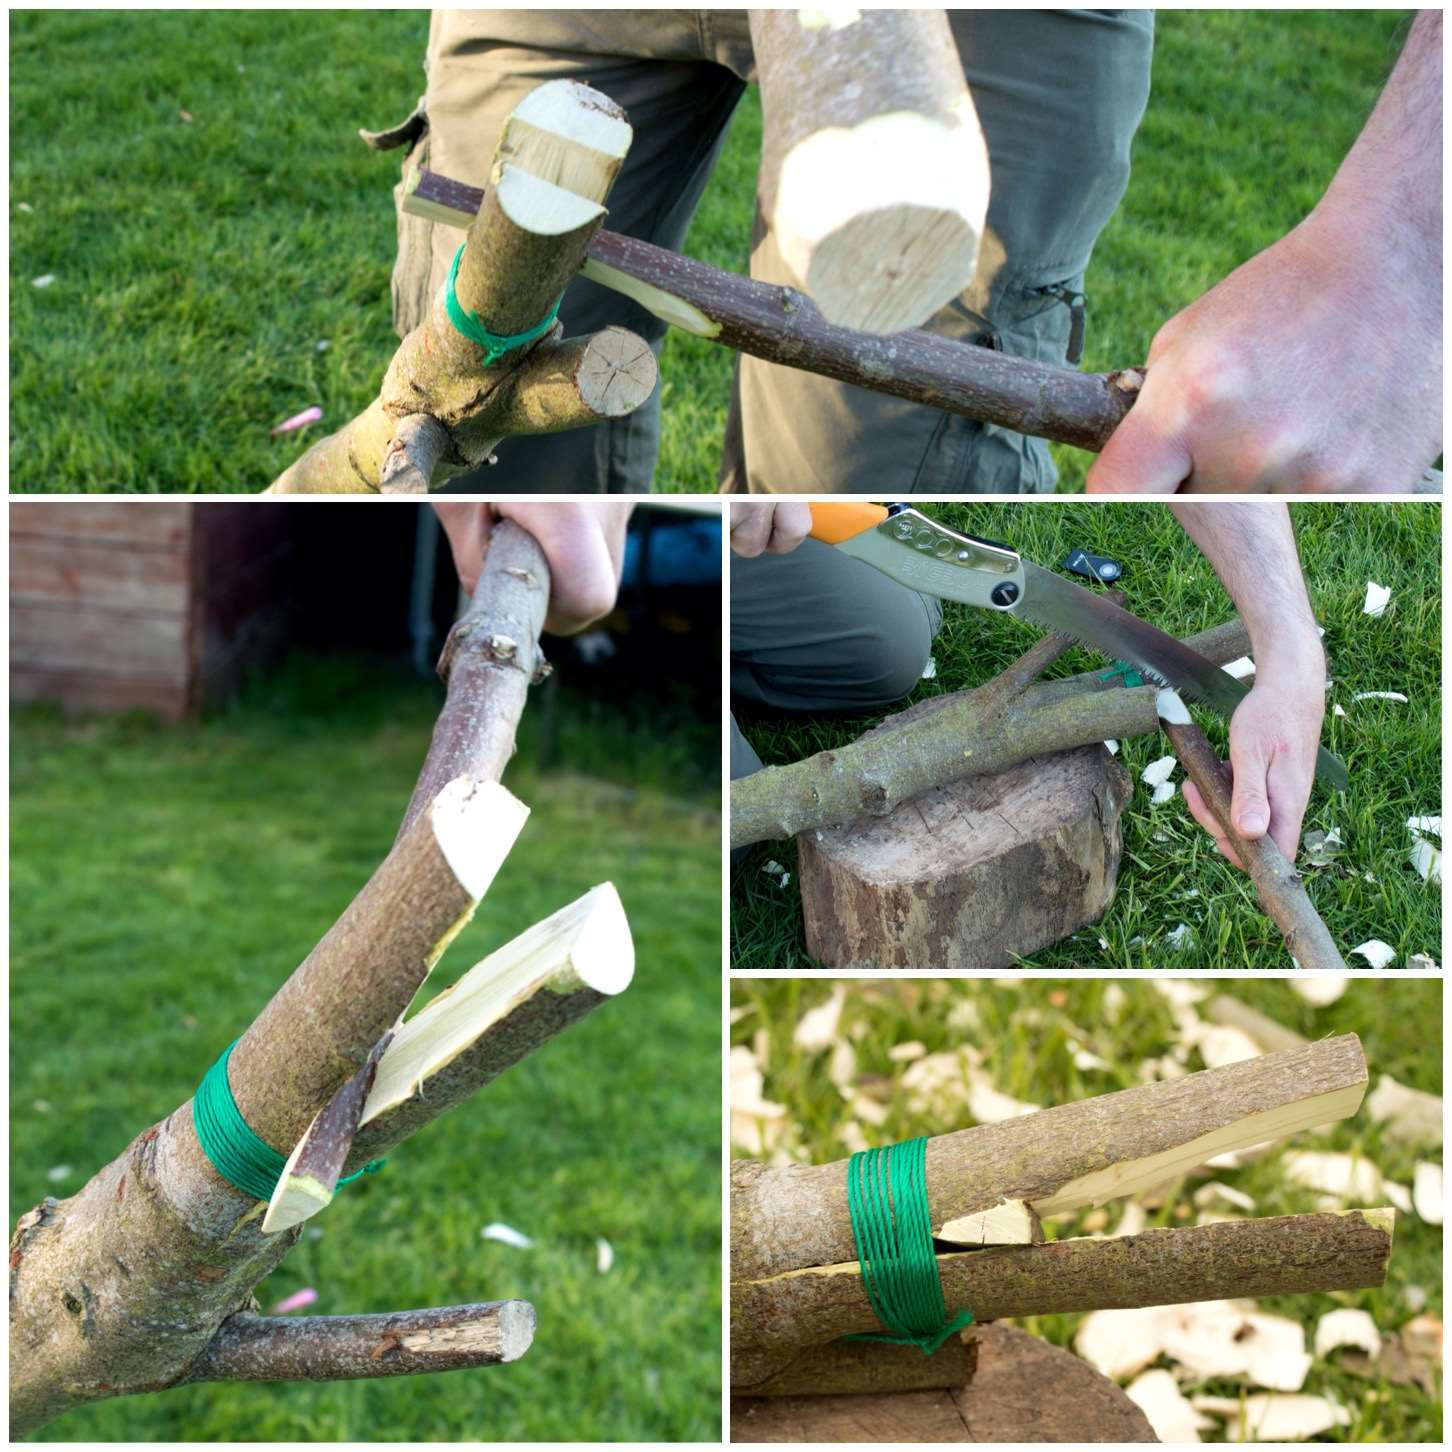
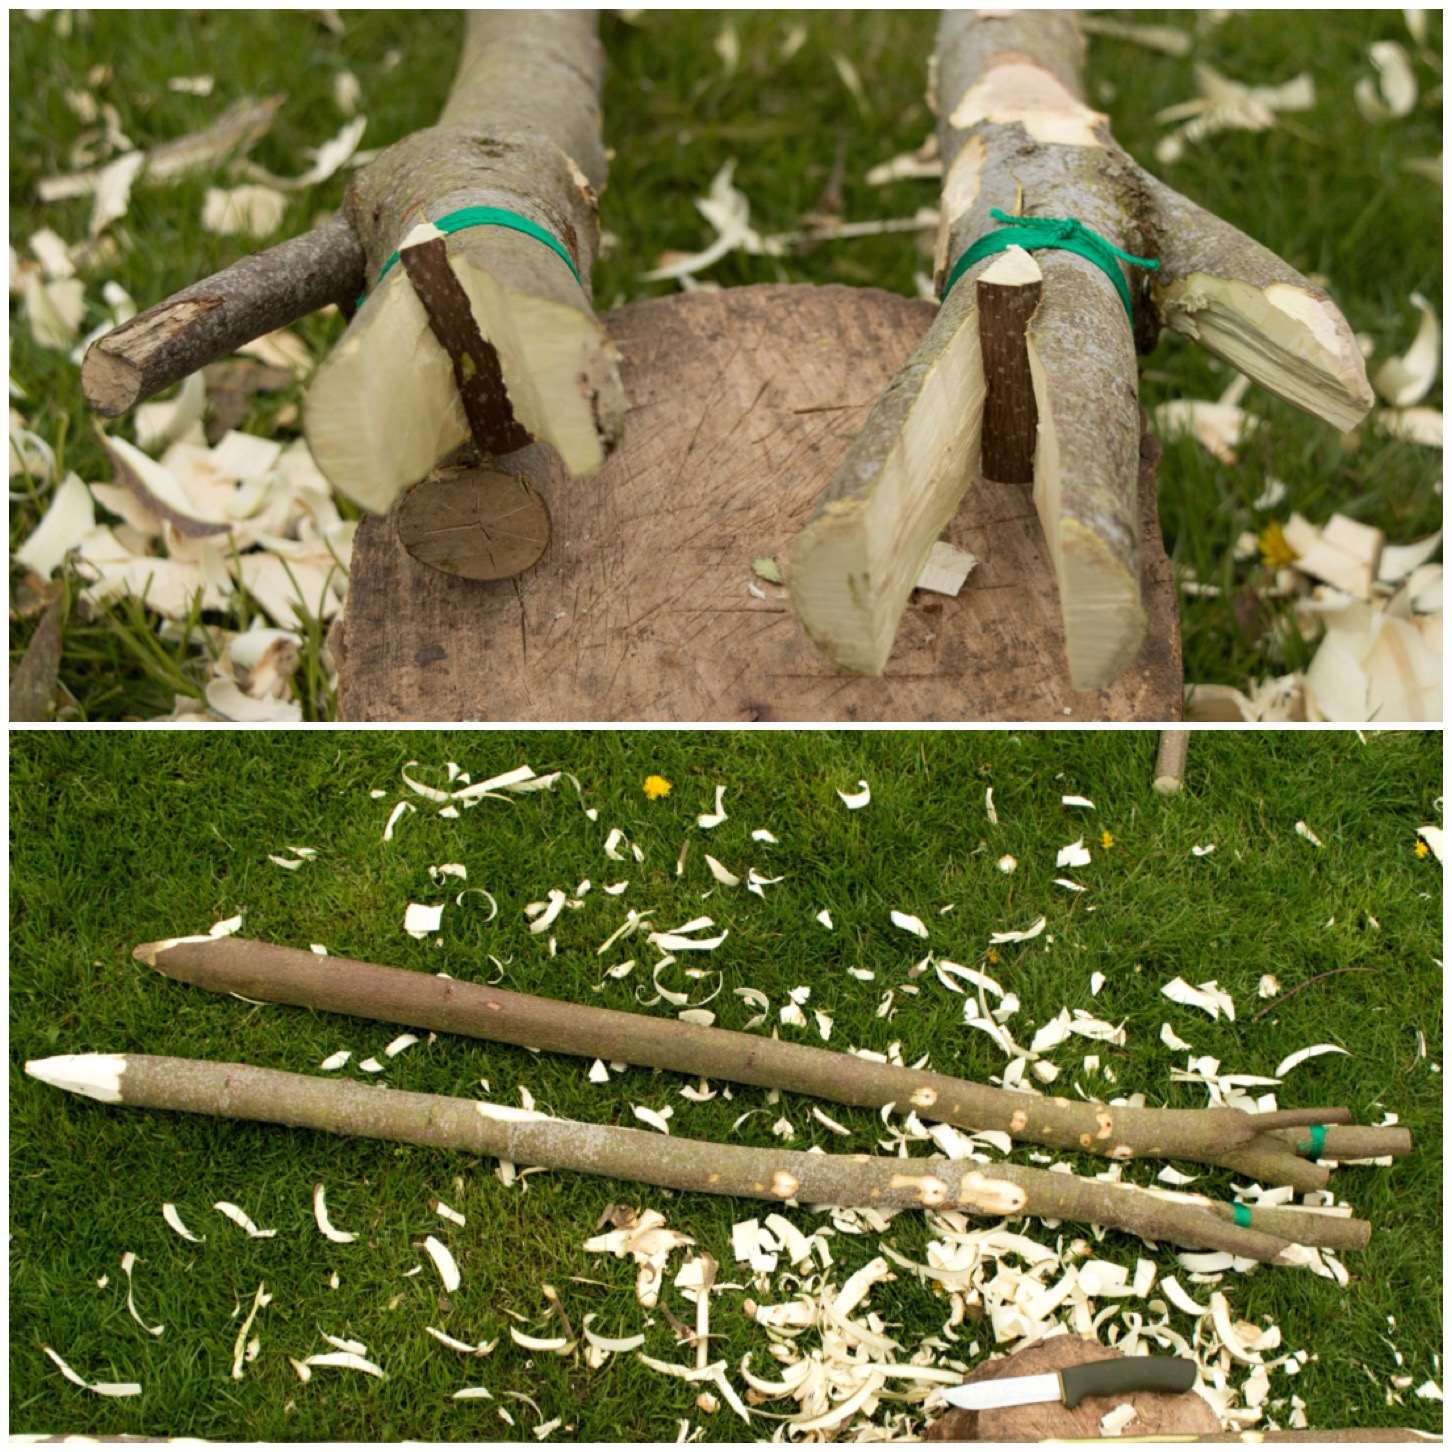
Bottom Limb
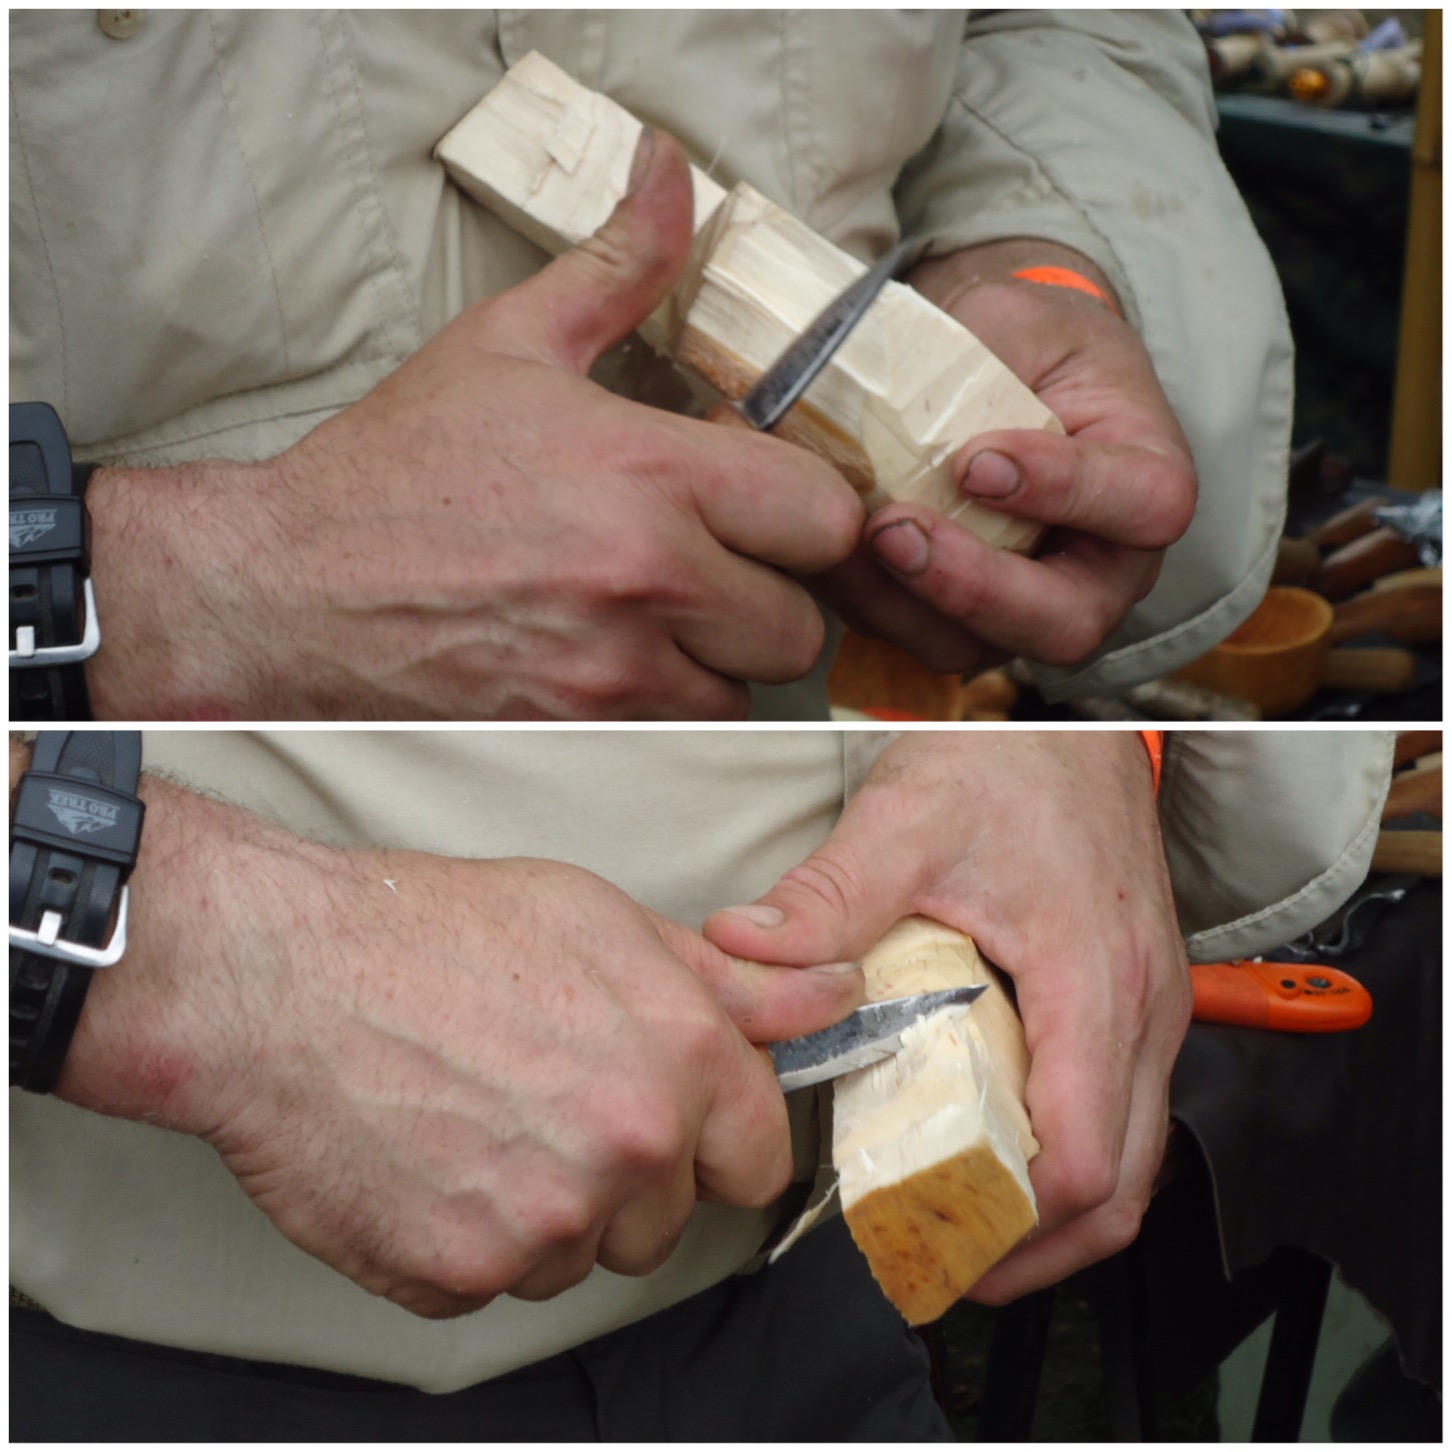
I split the lower limb nearly all the way down to the main fork. Do this slowly so that the split remains even on either side.
Make sure you get your angles right so that when the crane is placed on the upright everything fits neatly without twisting.
Split the lower limb by battoning
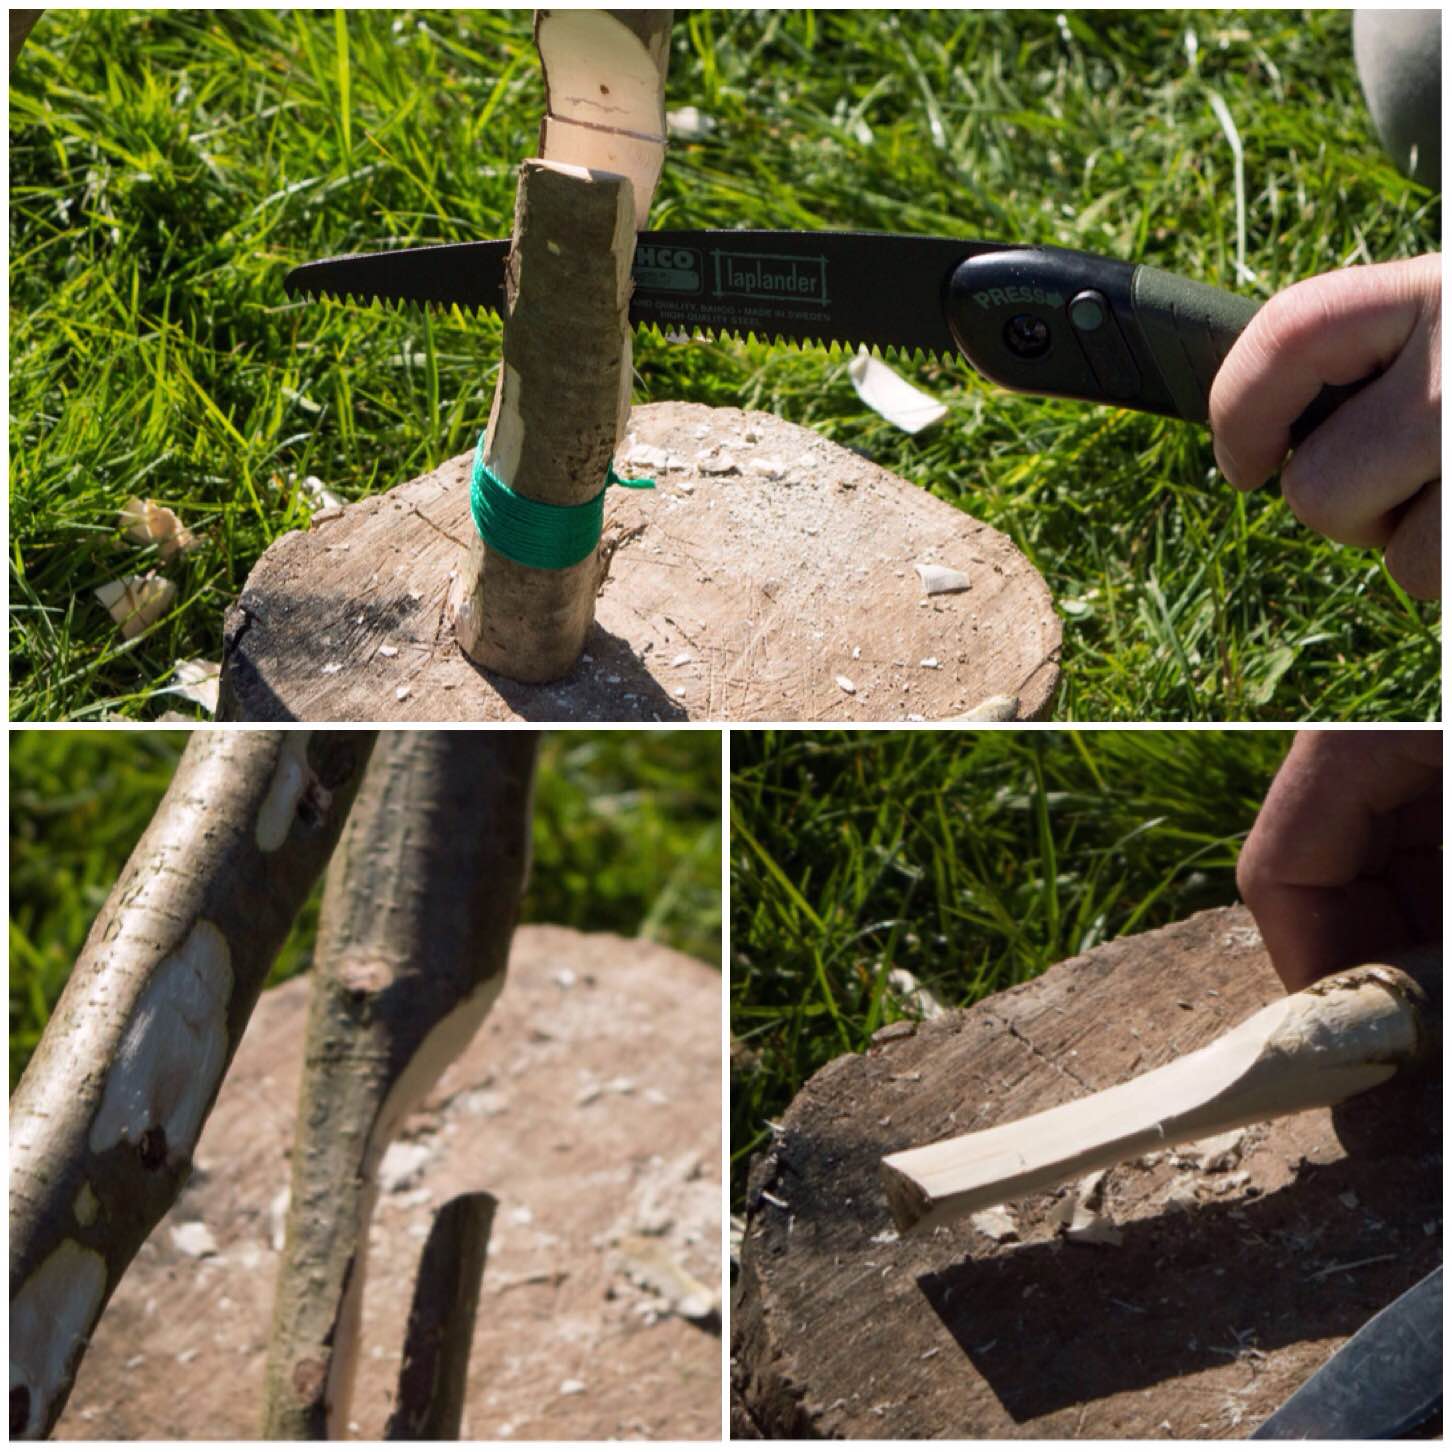
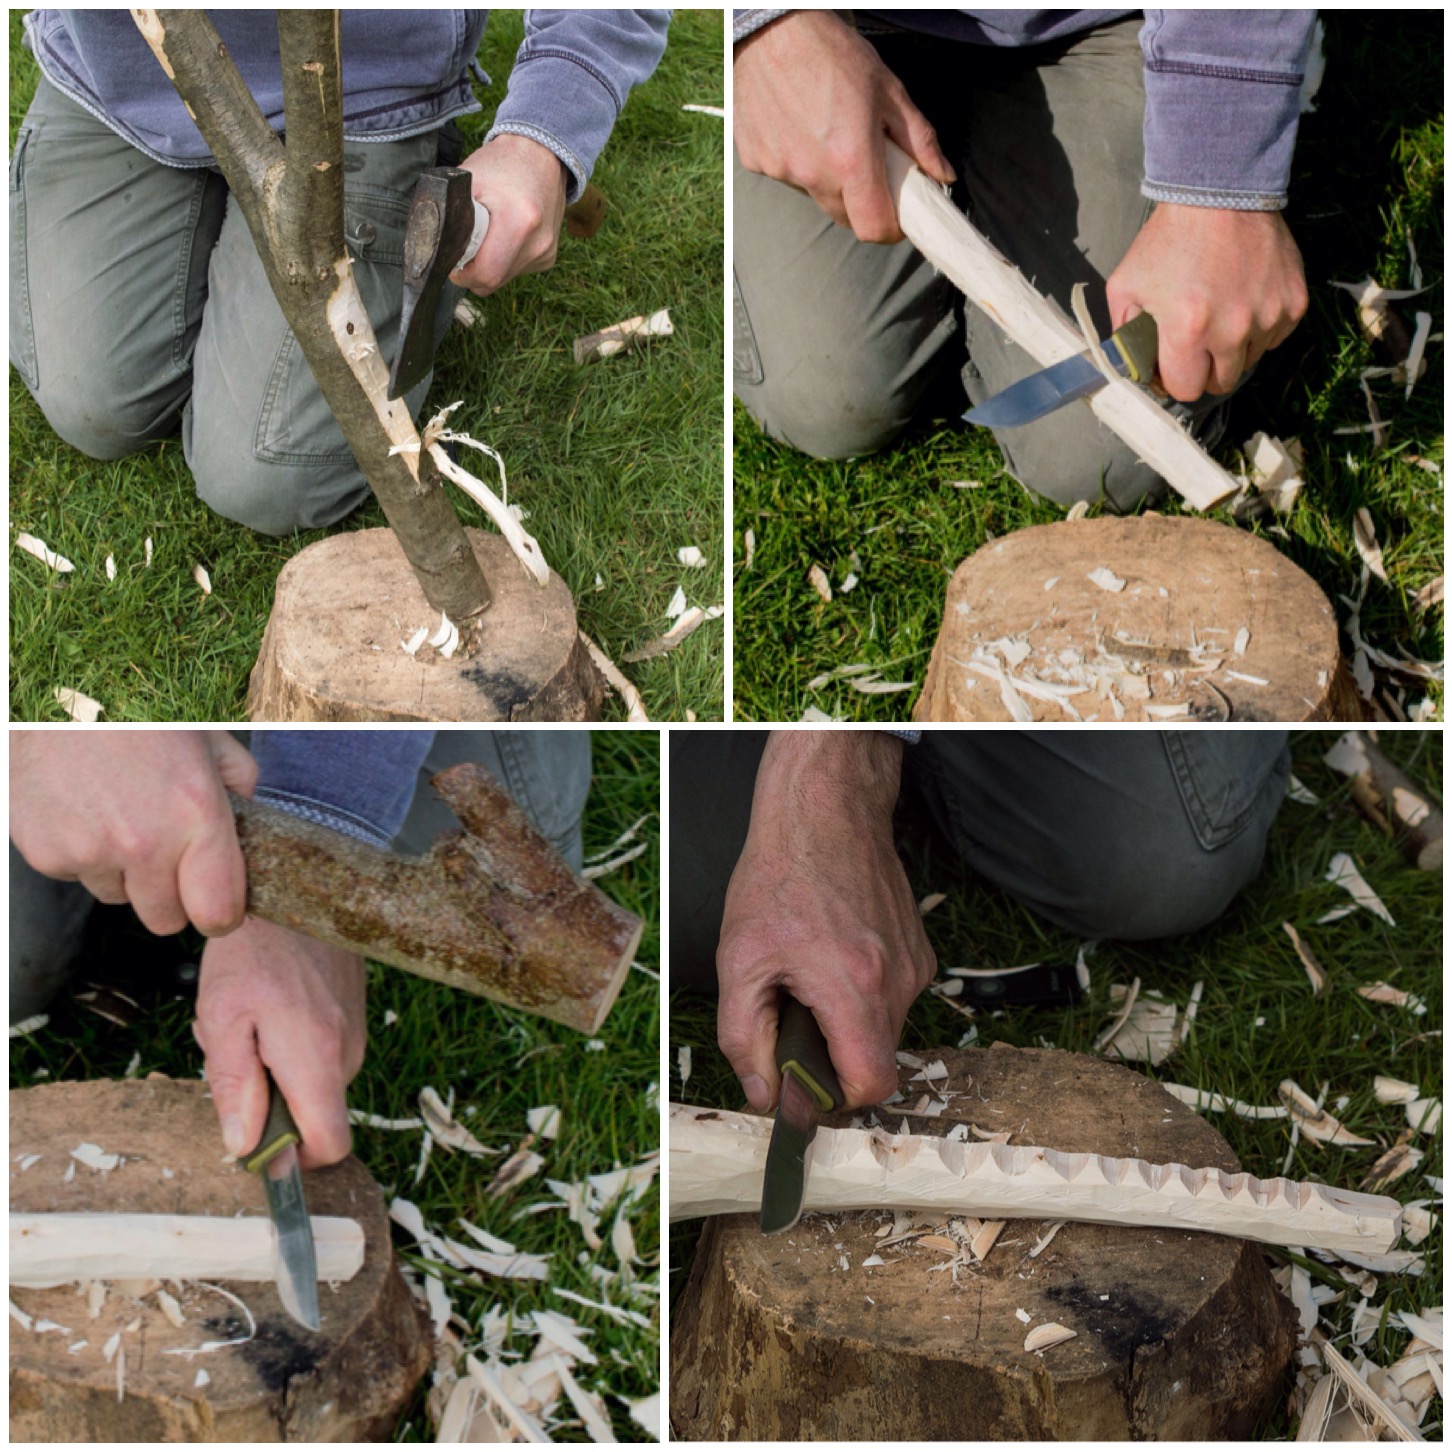
I carved another wedge to fit the lower limb split and whipped string on either side. To finish this section off I trimmed the wedge with my saw.
Insert another wedge and whip
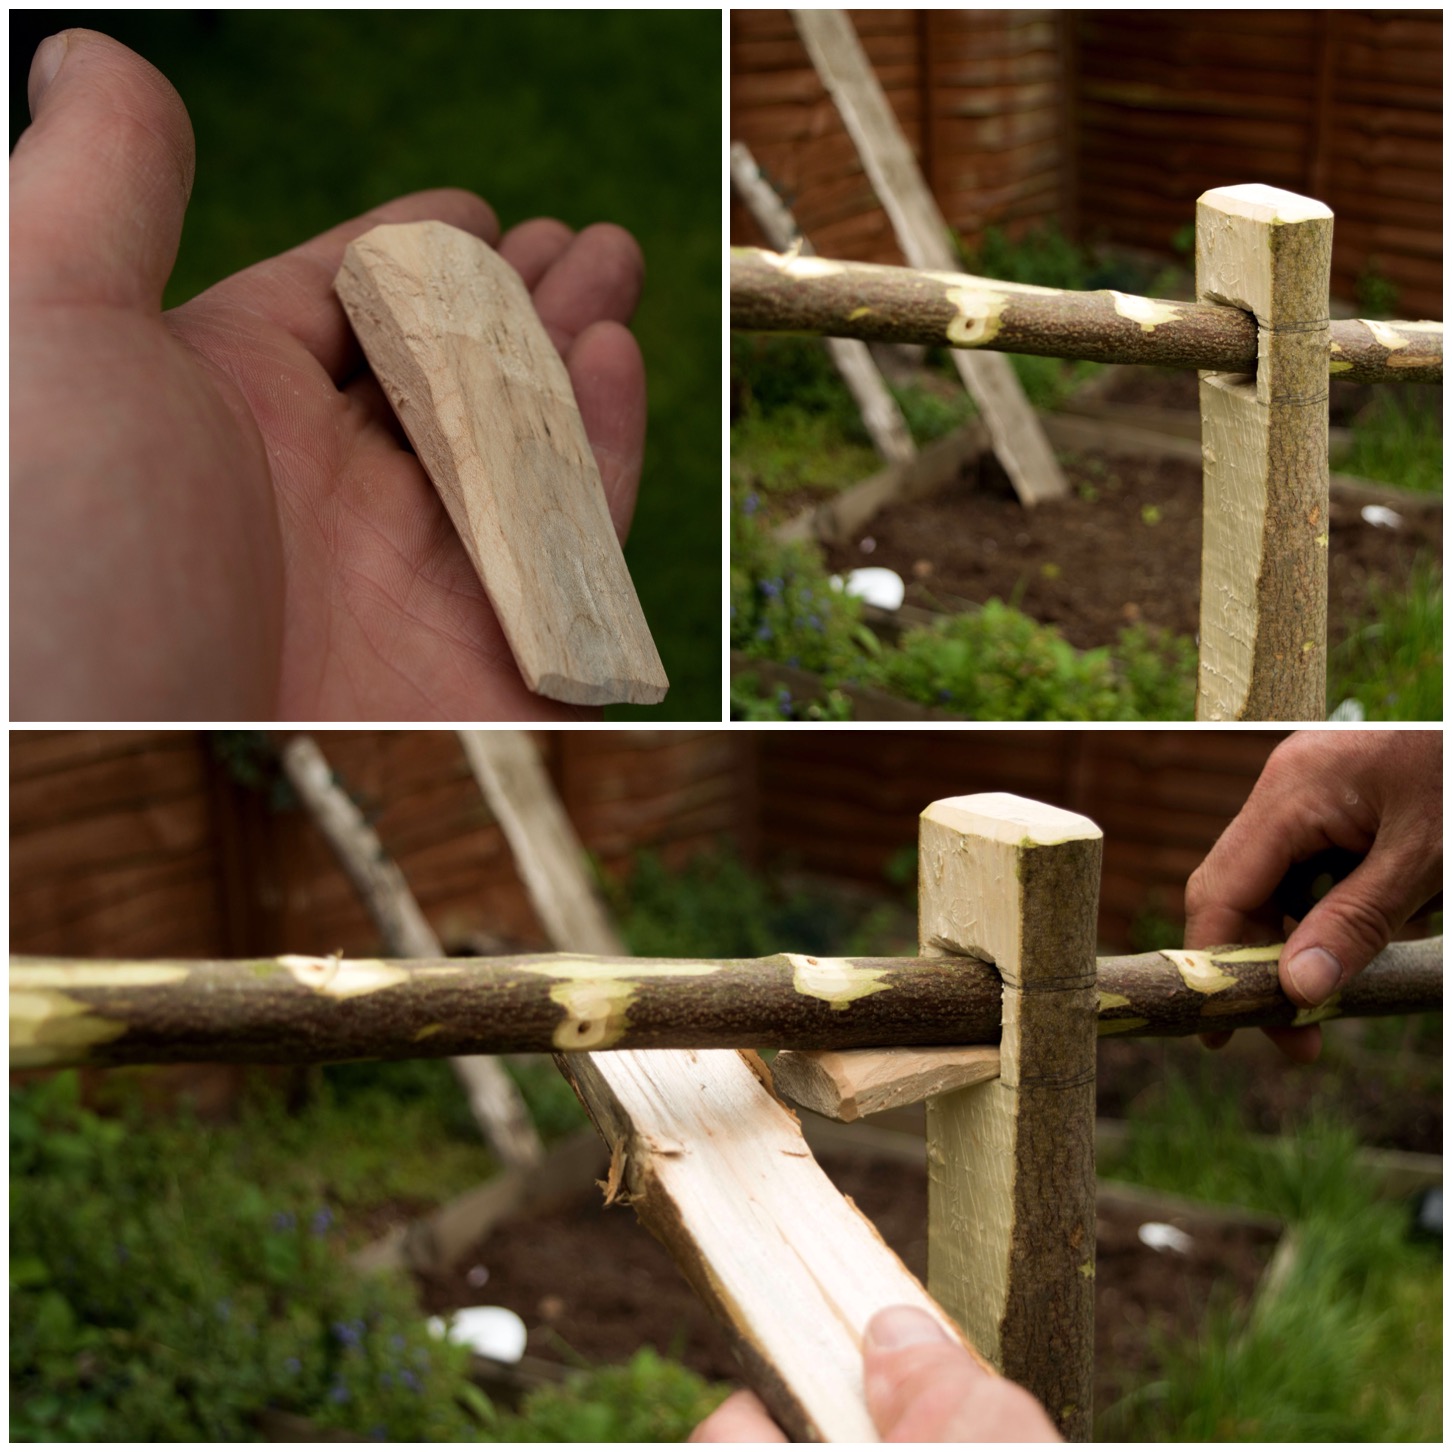
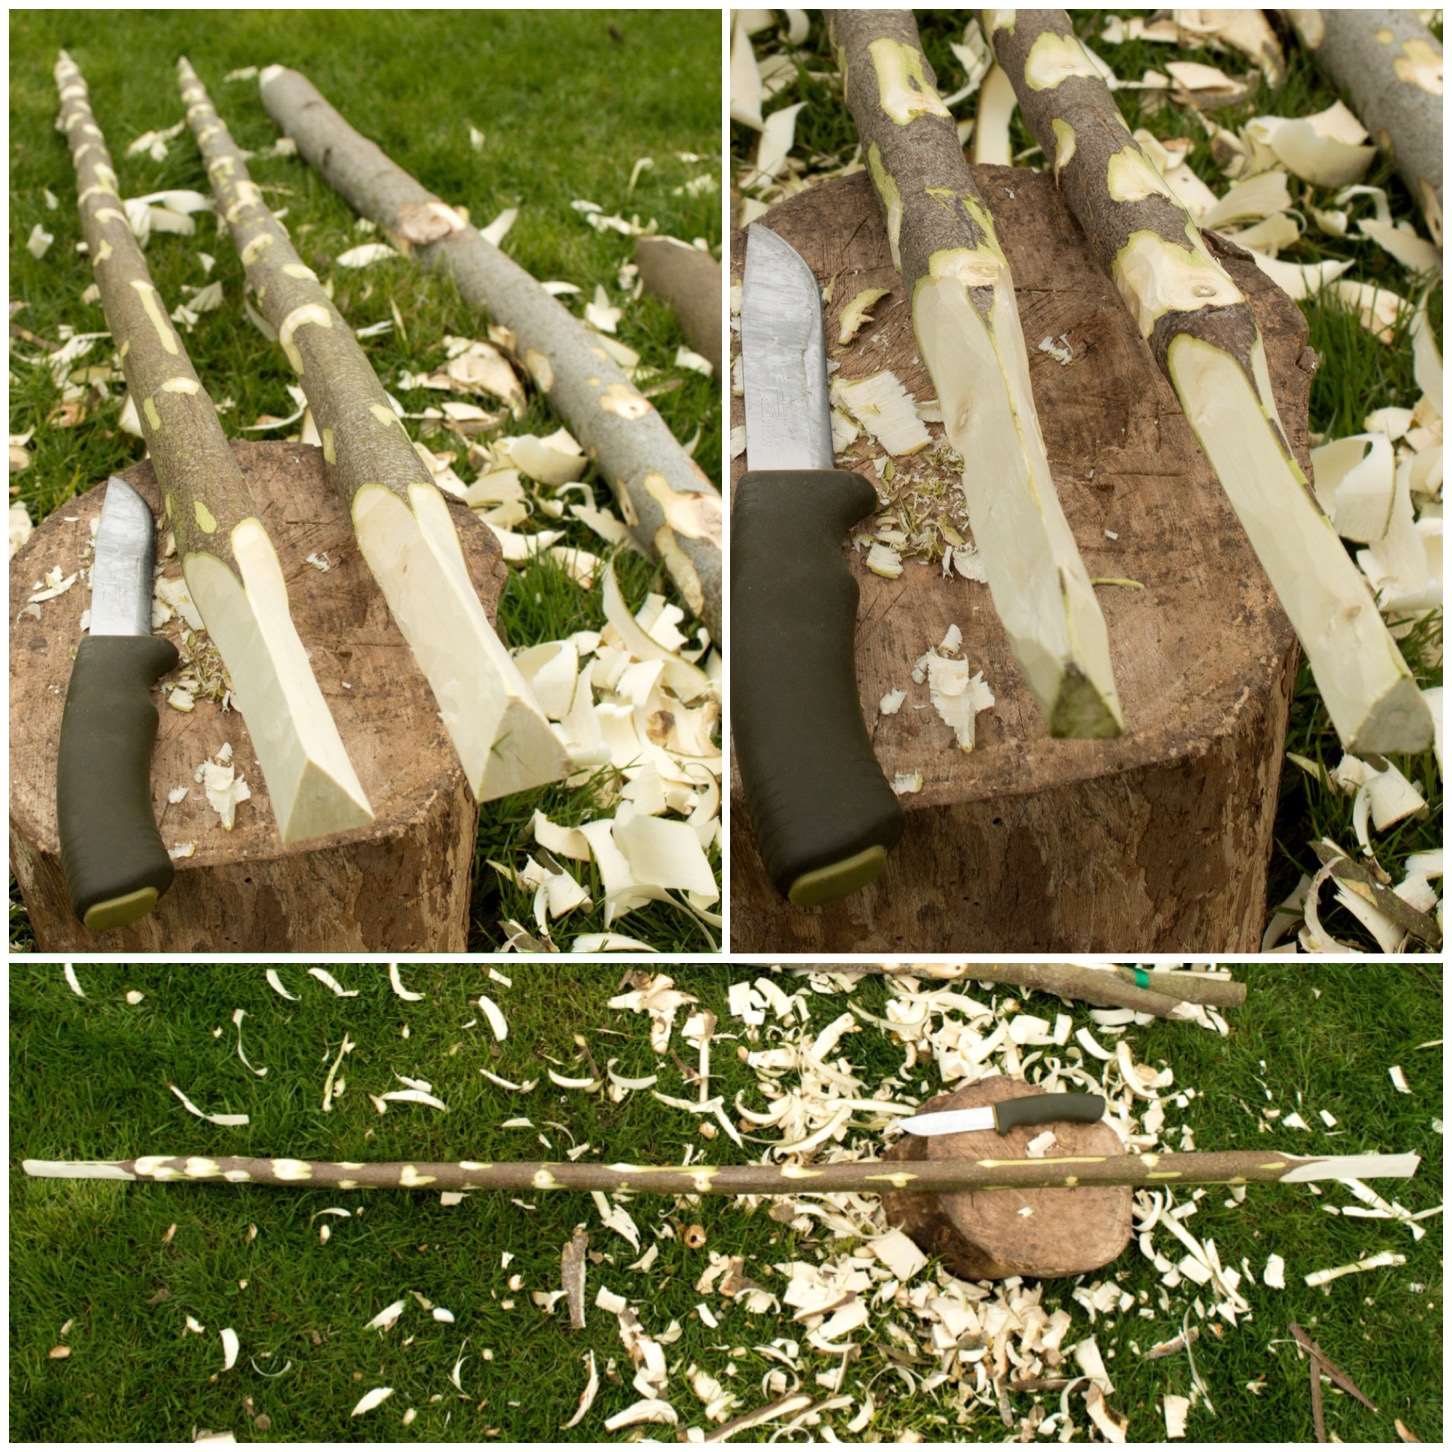
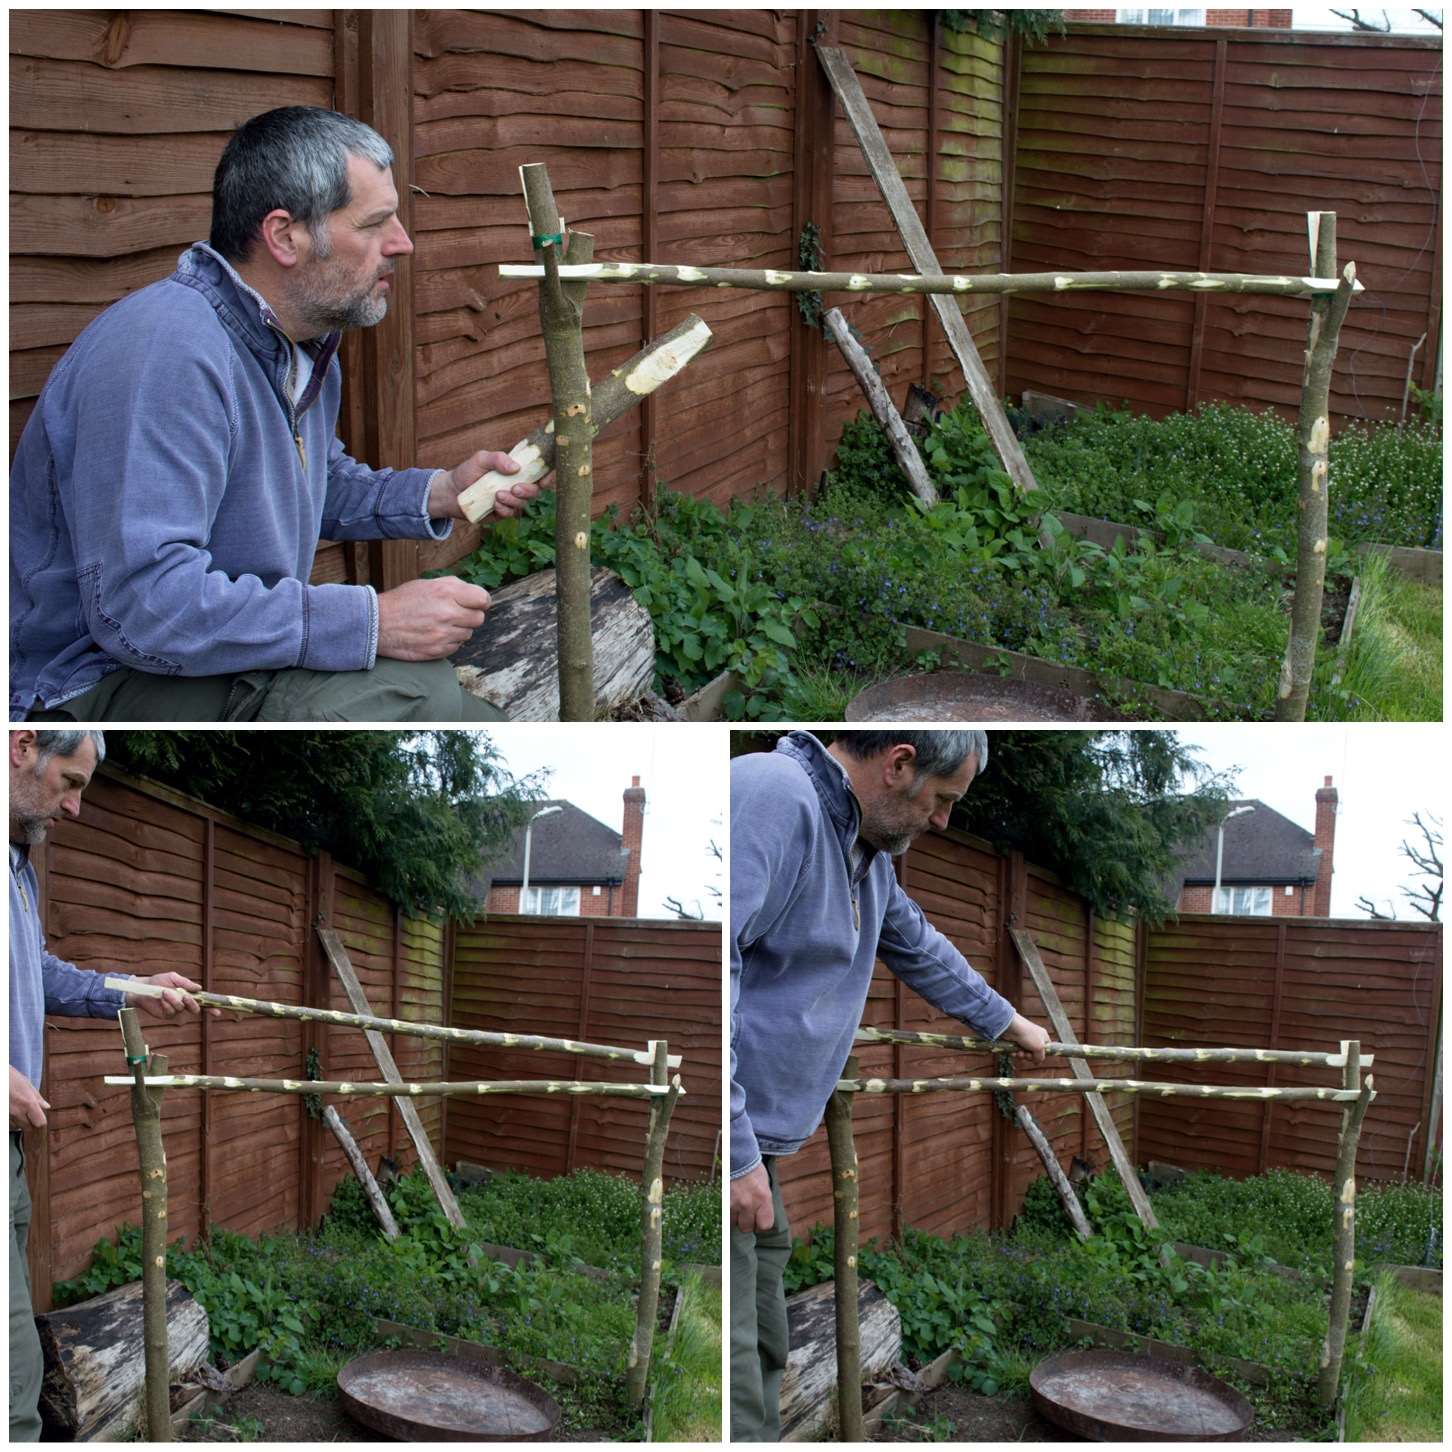
Pot Holder Limb
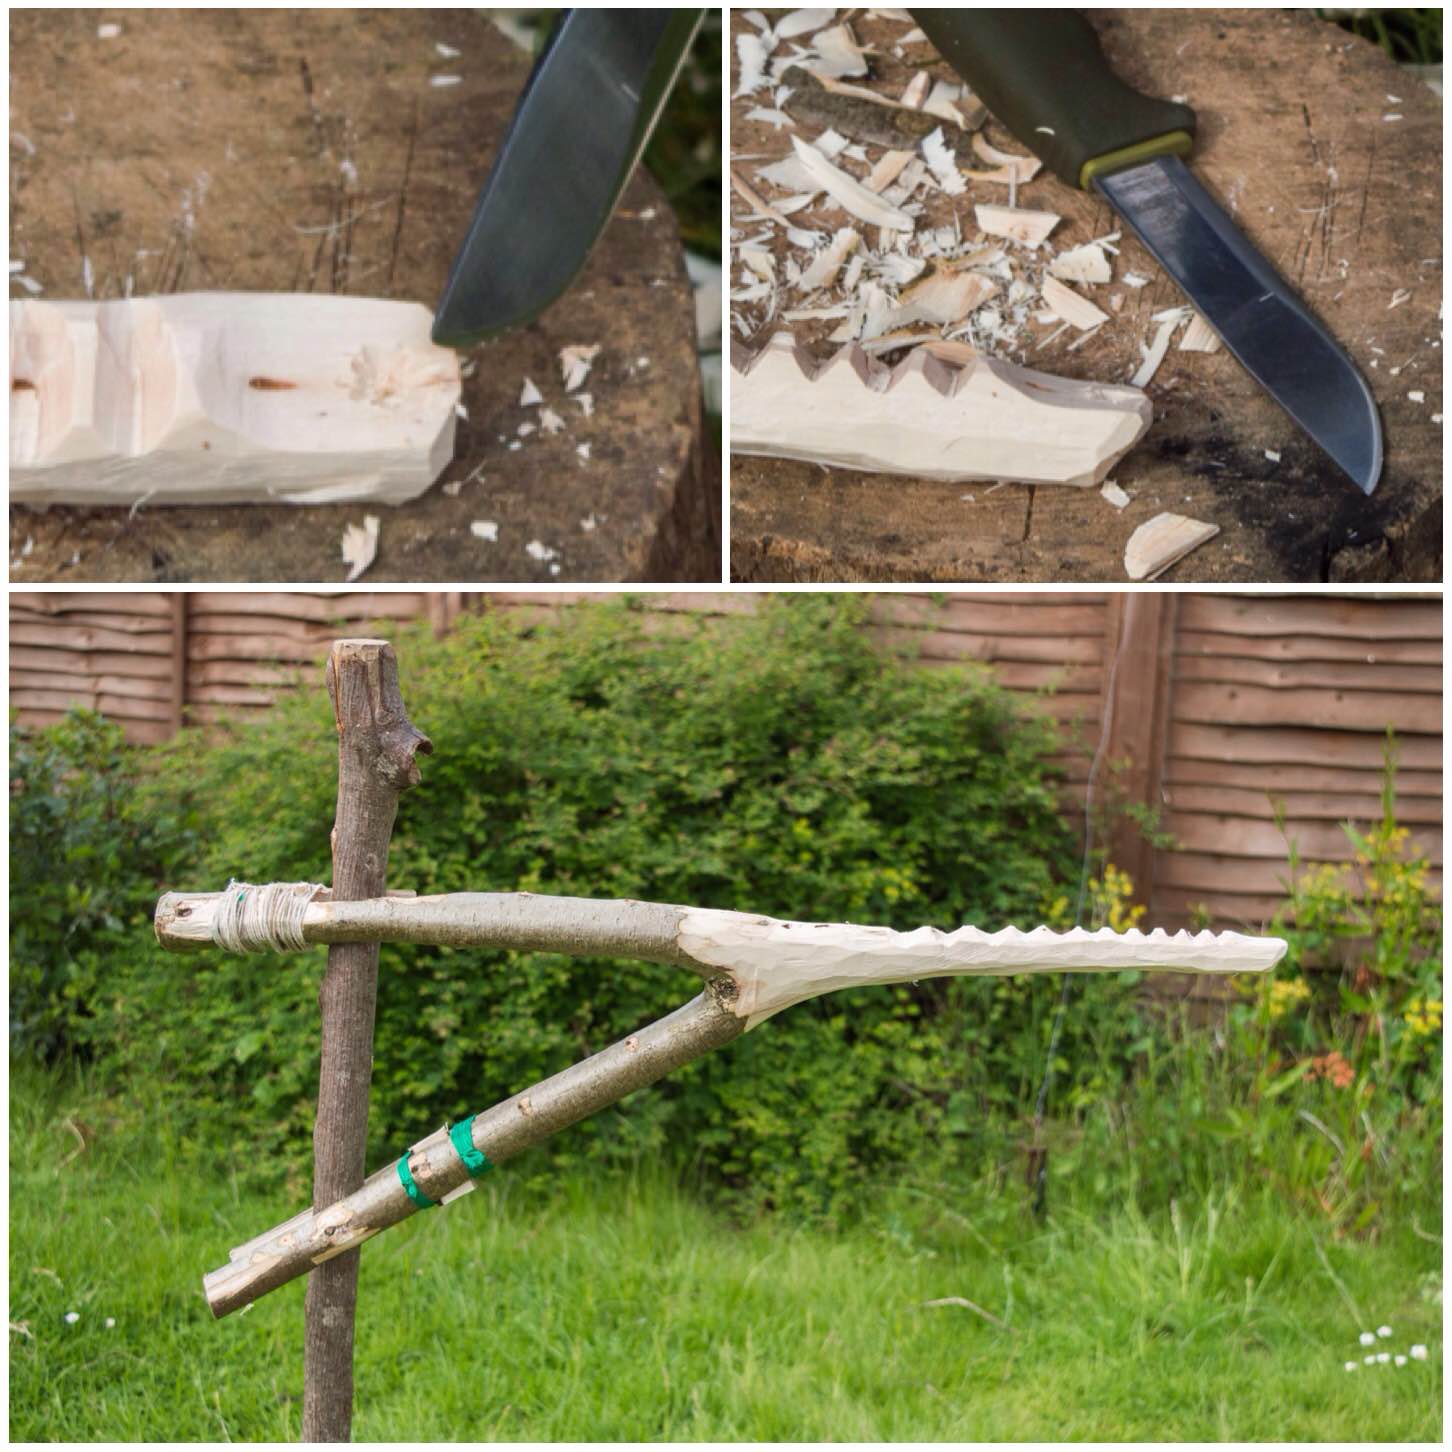
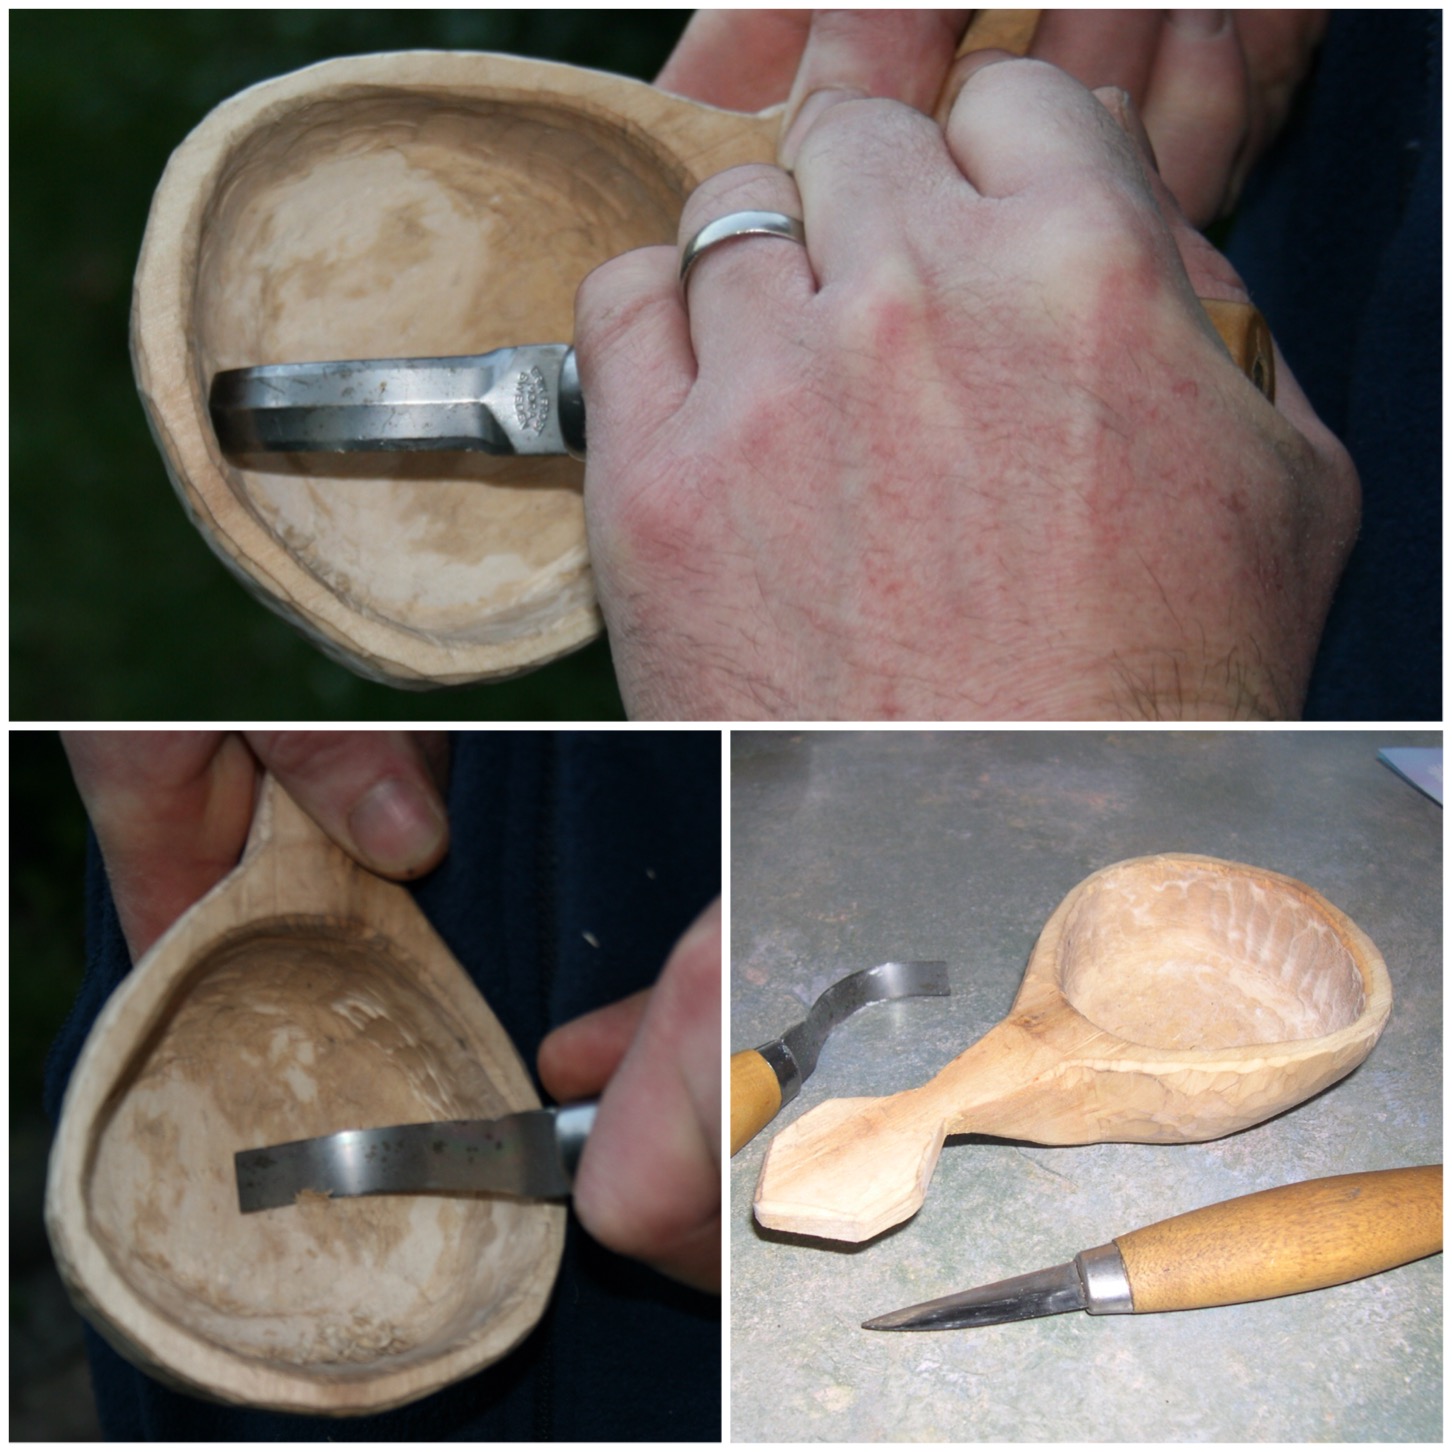
I removed a lot of wood with my axe and knife from the limb that would become the pot holder bar. I also battoned out some little grooves so as to hang pots safely.
Carving the pot holder bar
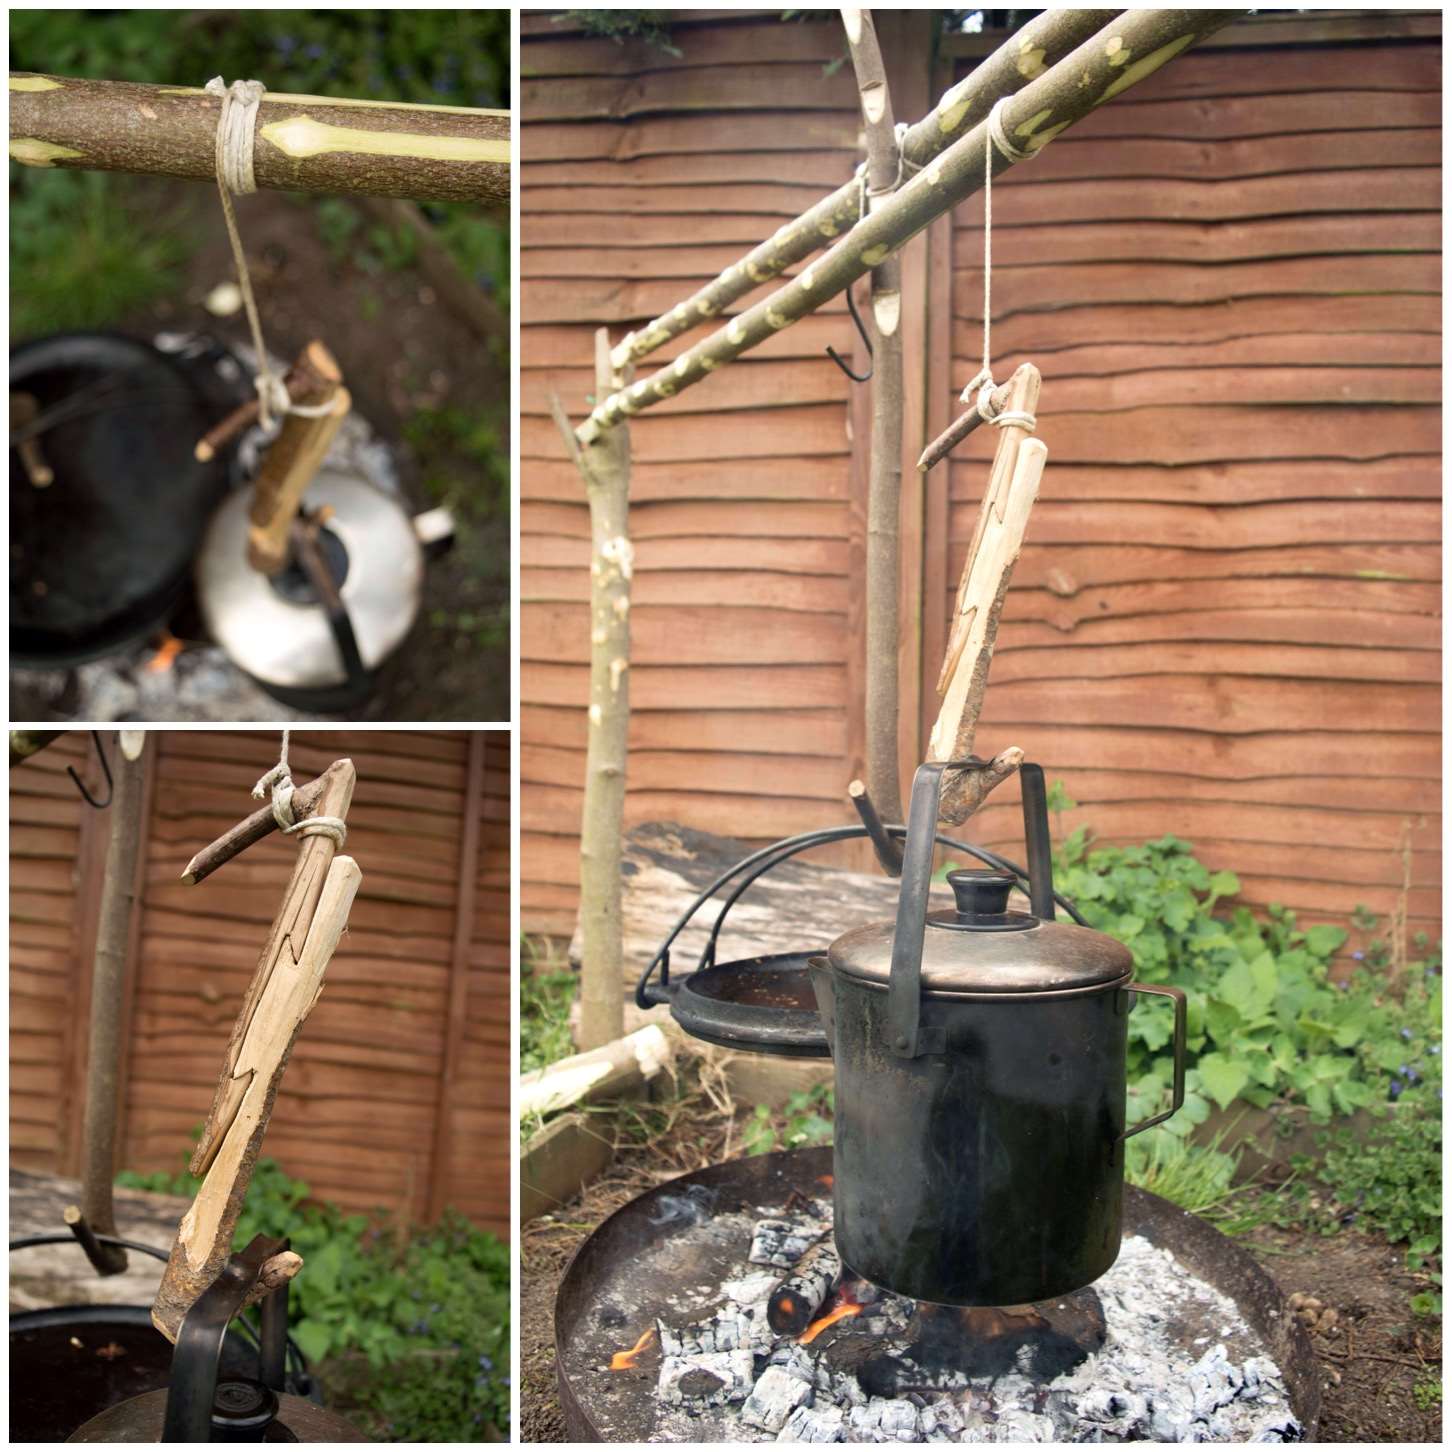
At the end of the bar I also carved out a little recess on which to hang an adjustable pot hook.
After that I added some more binding to the top bar to make it really bomb proof.
That’s it in terms of construction.
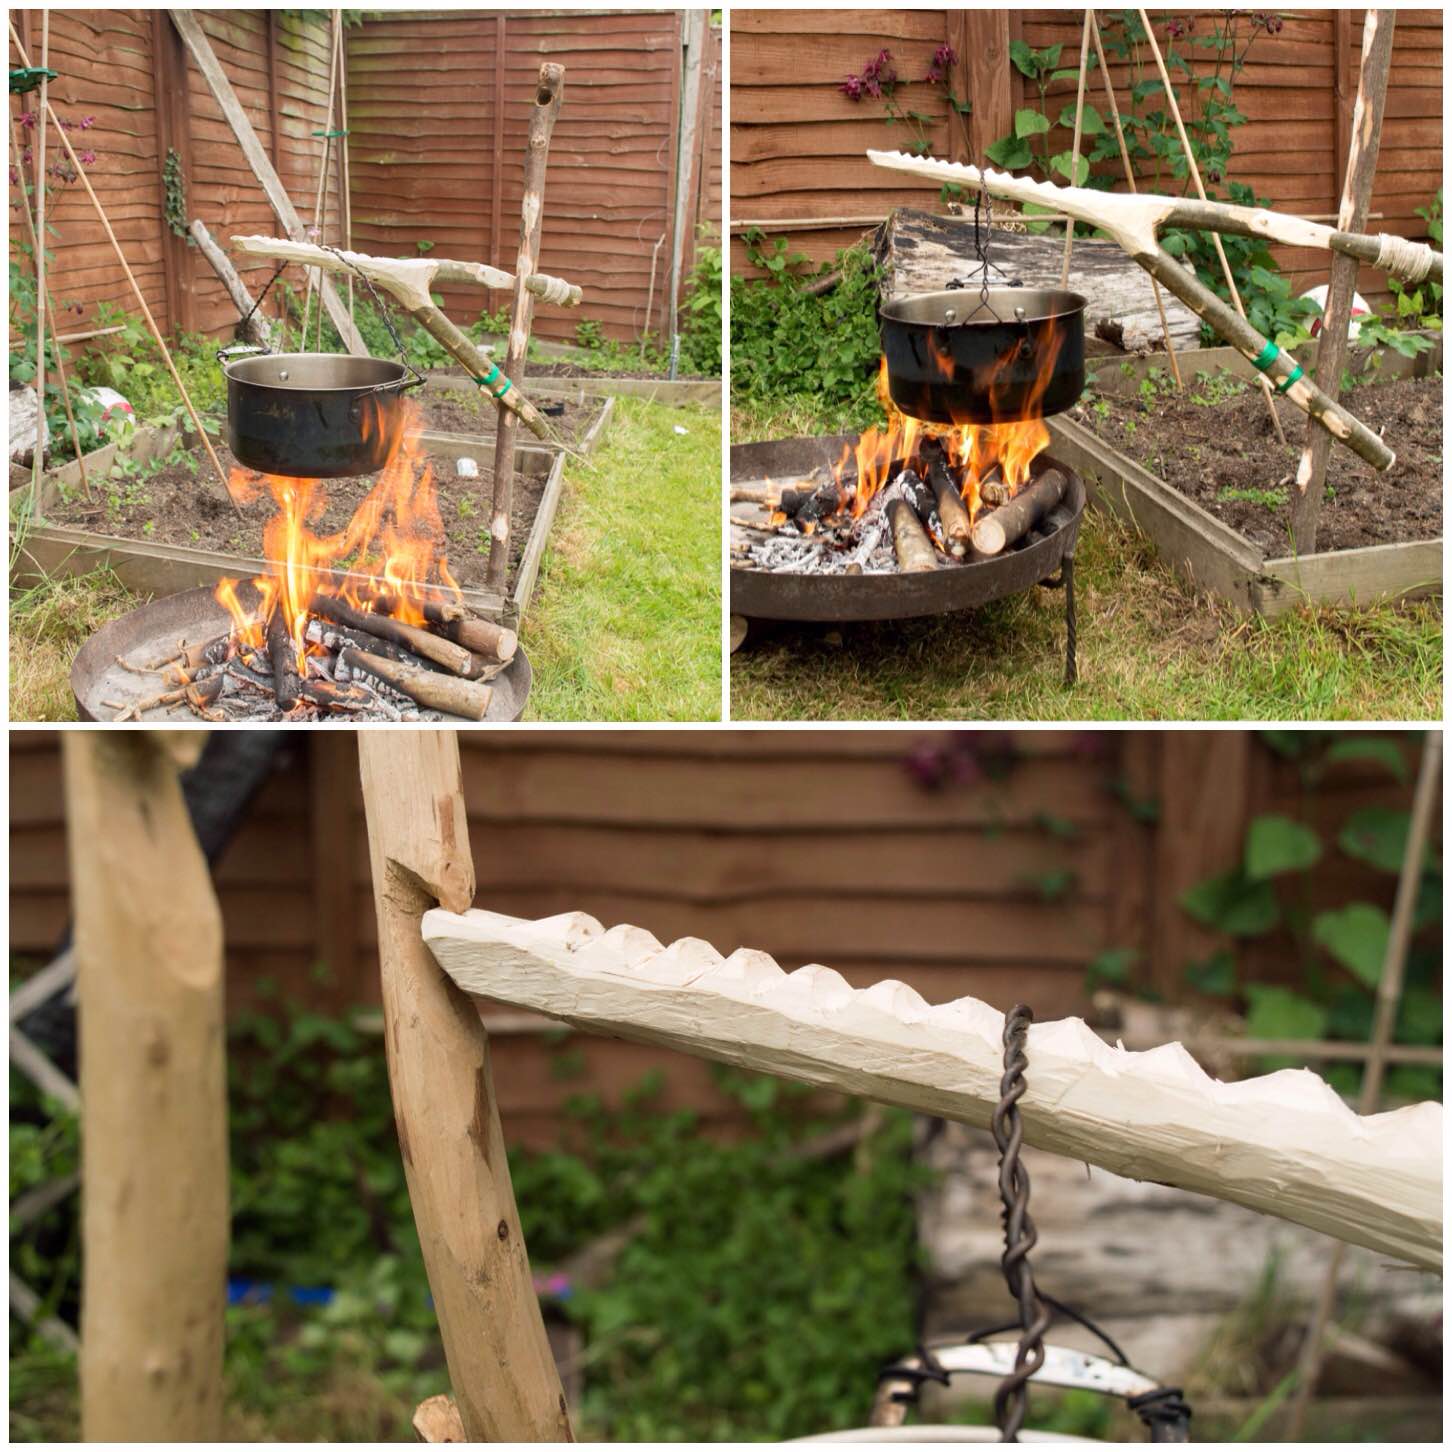
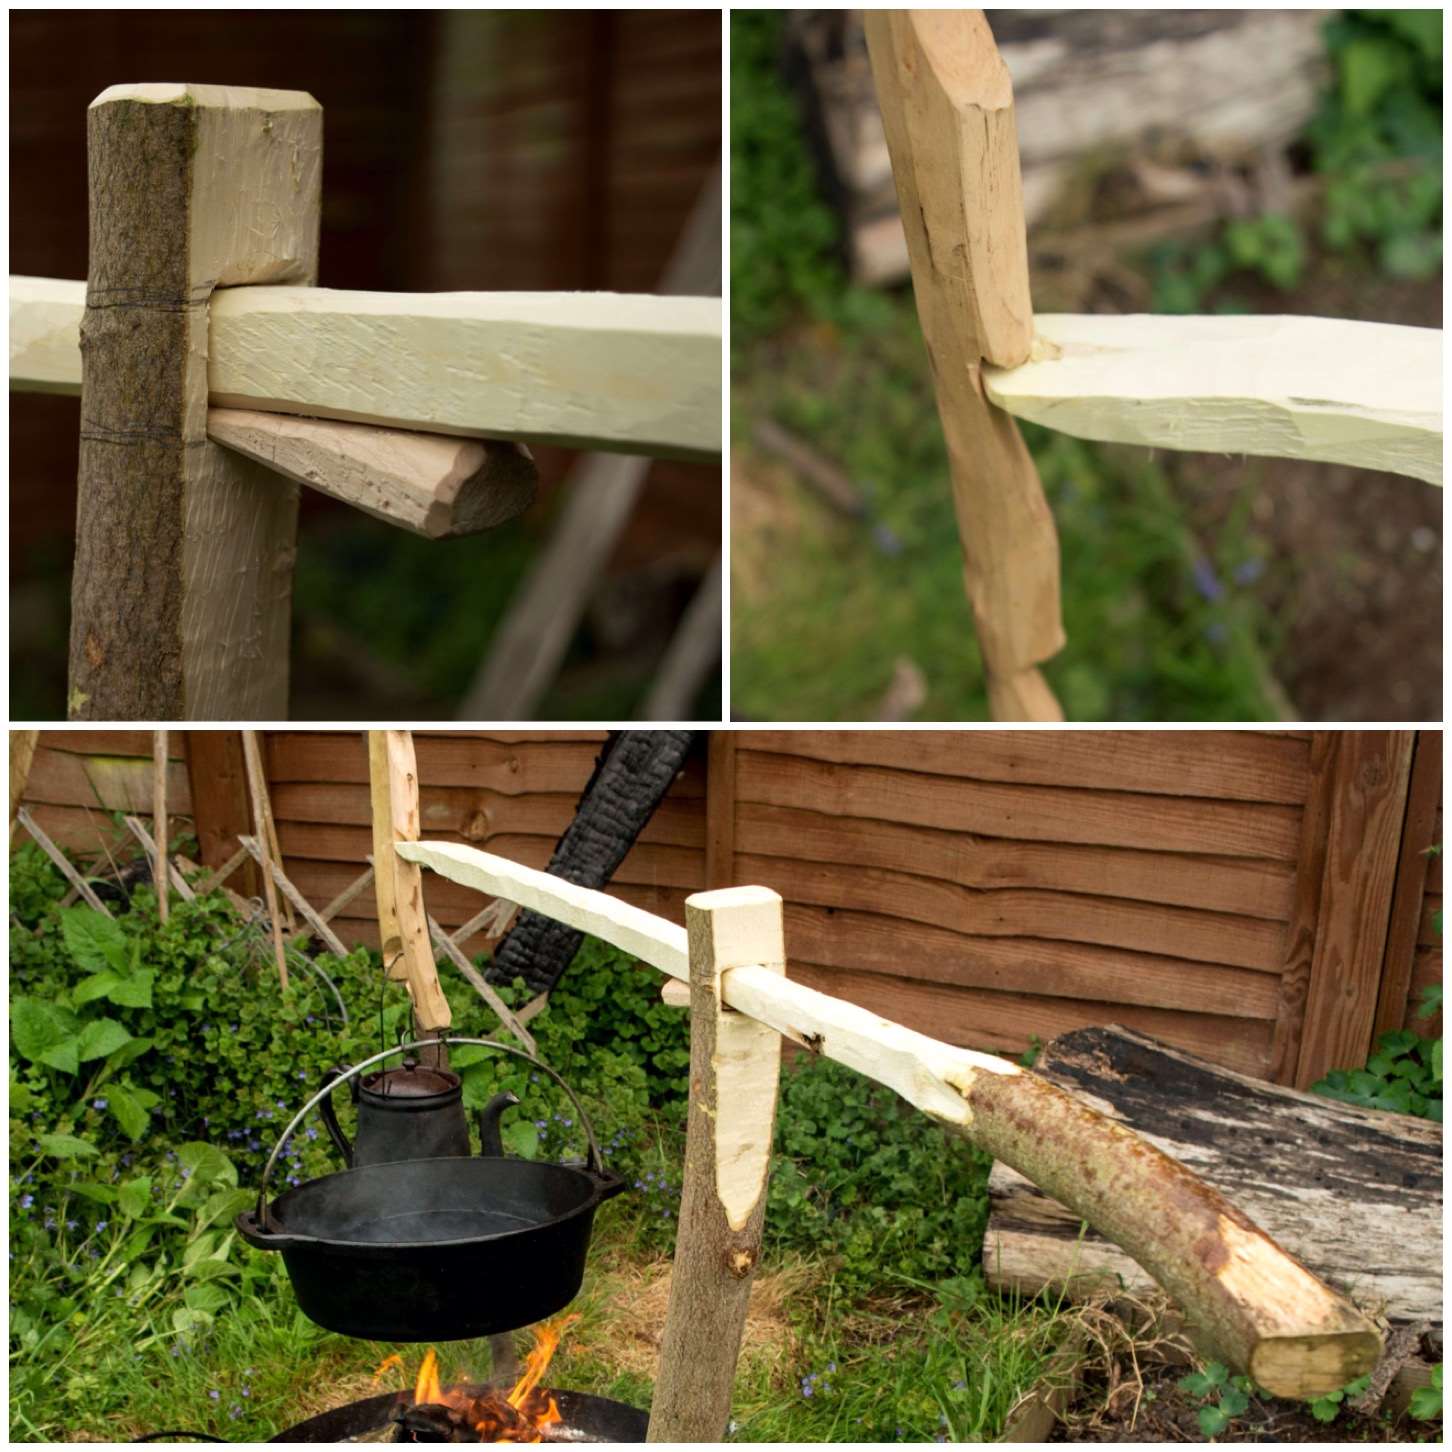
Pot holder bar in detail
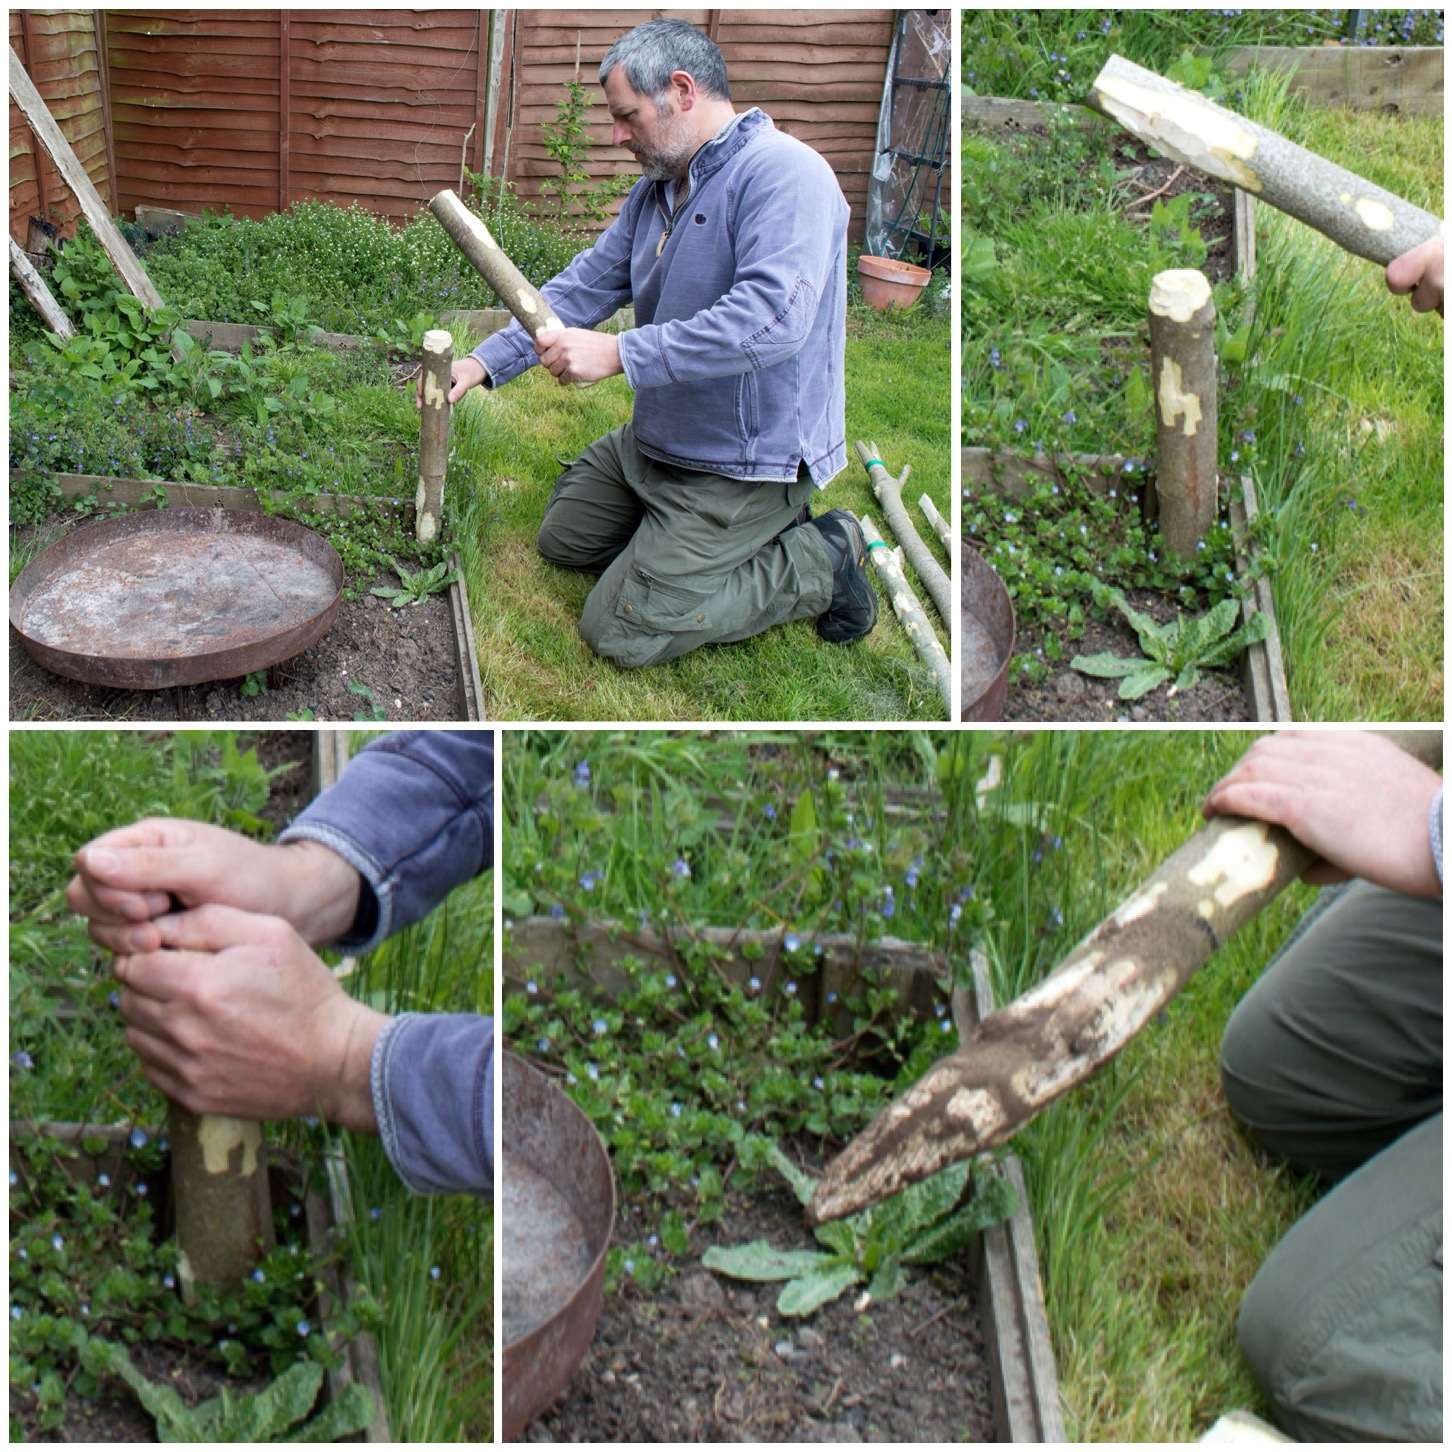
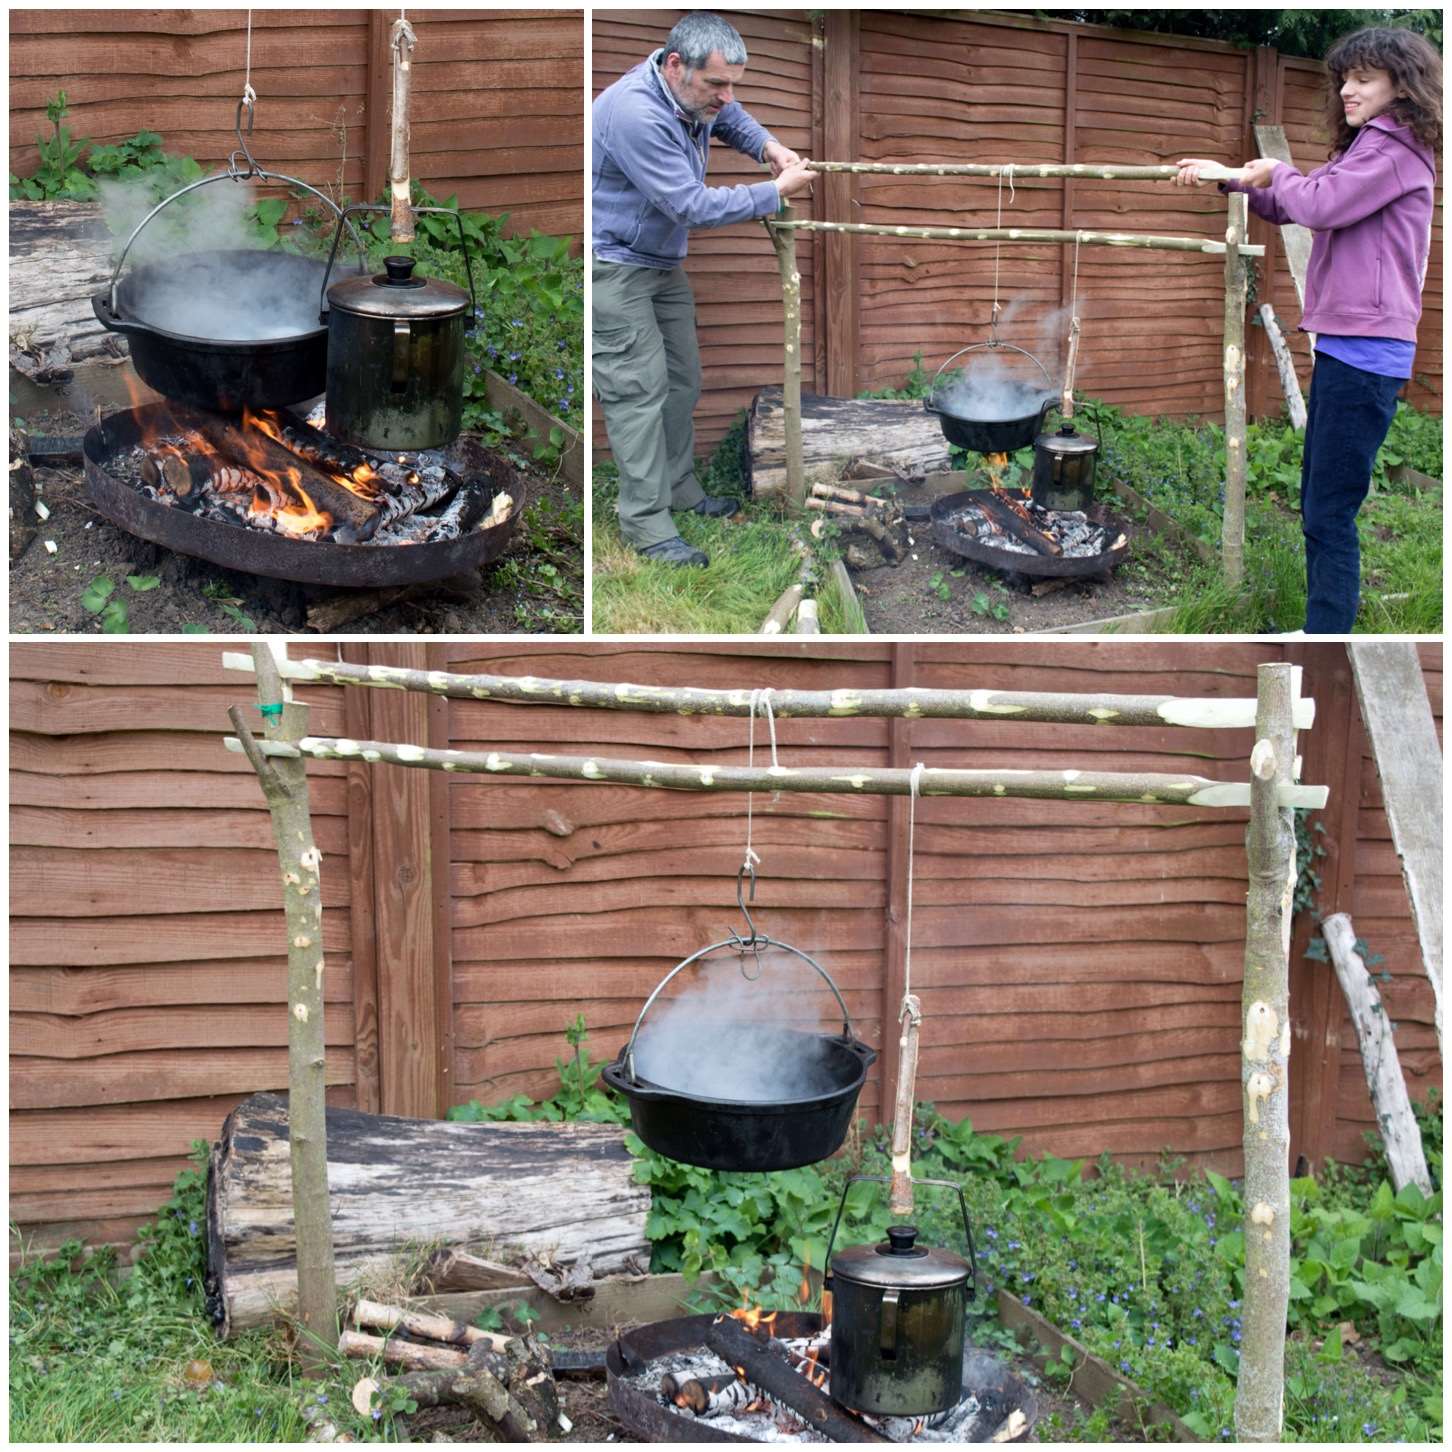
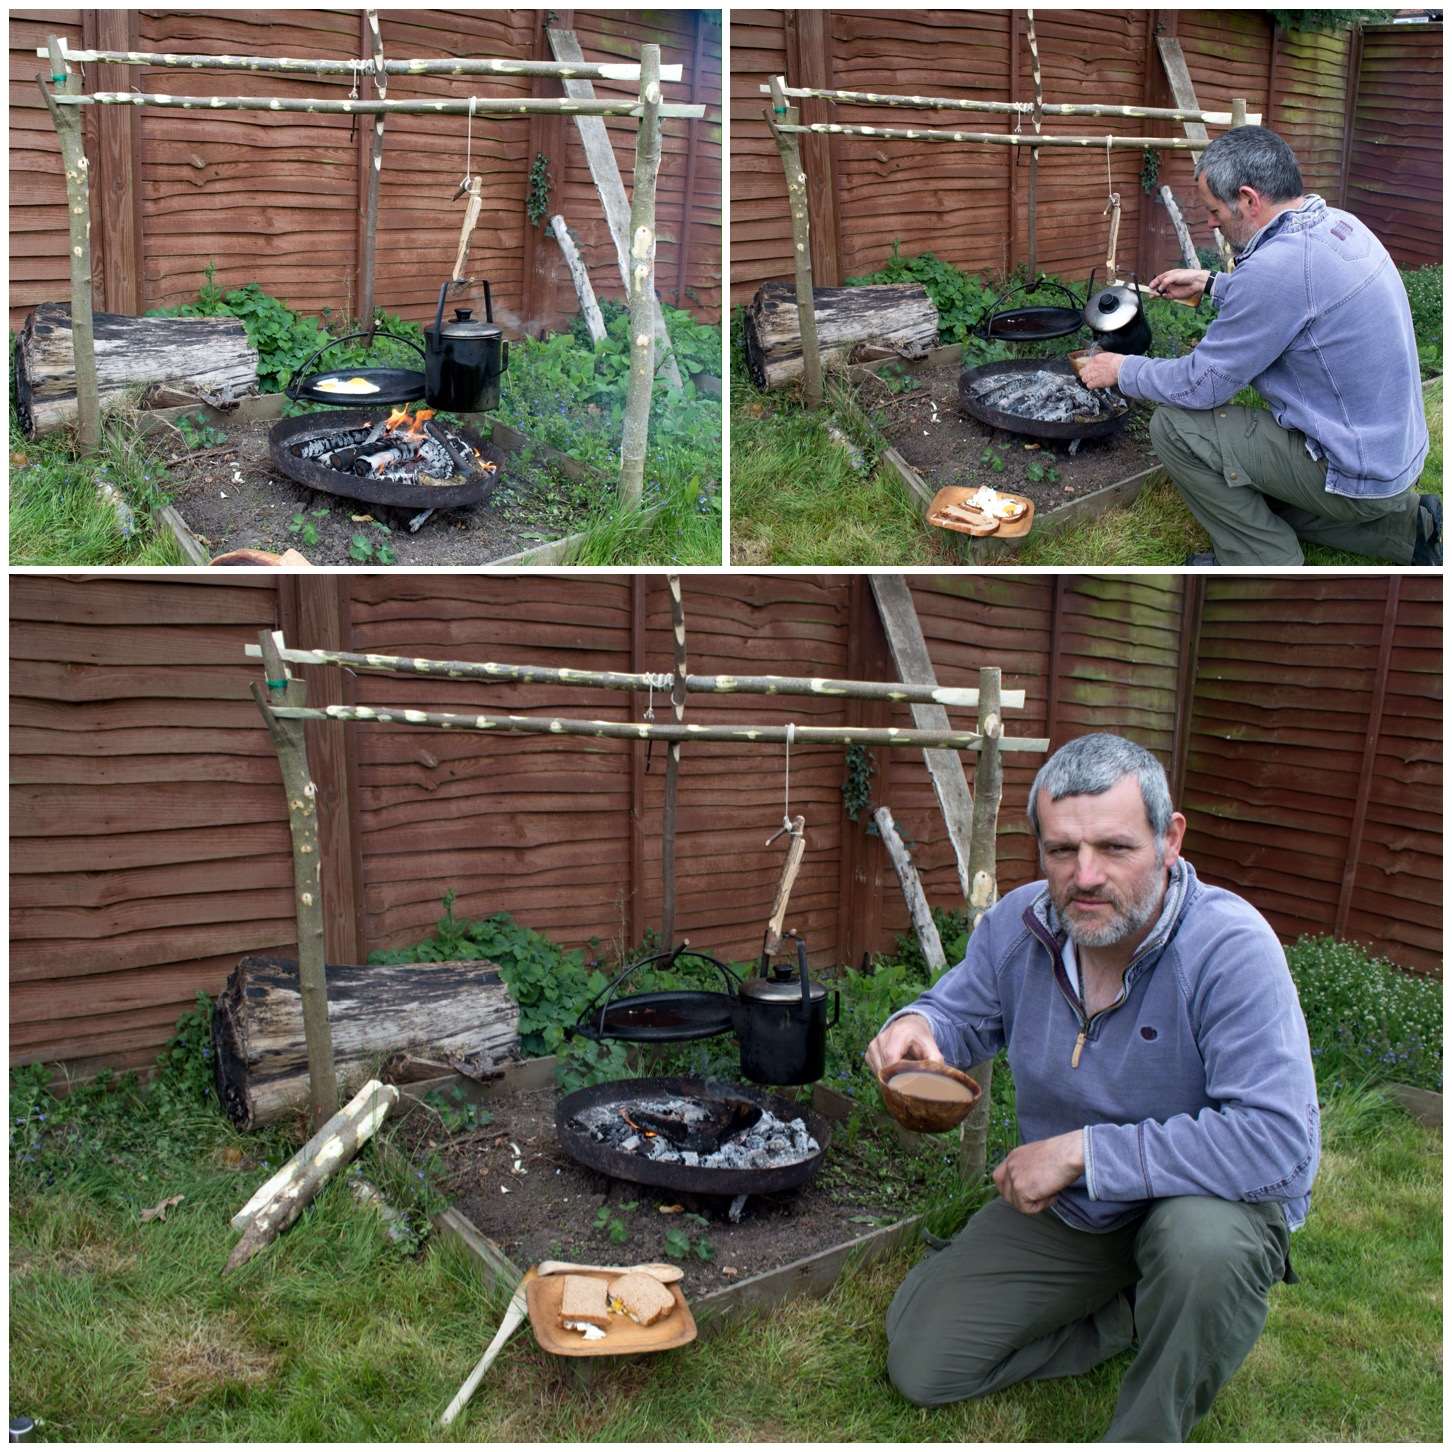
Aures crane in action
All the hard work is done now so all you have to do is light your fire, insert the upright, attach the crane and pot, adjust the height for optimum cooking and sit back.
The picture at the bottom shows how you can also attach an adjustable pot hook to the end if you want.
High, low and balanced
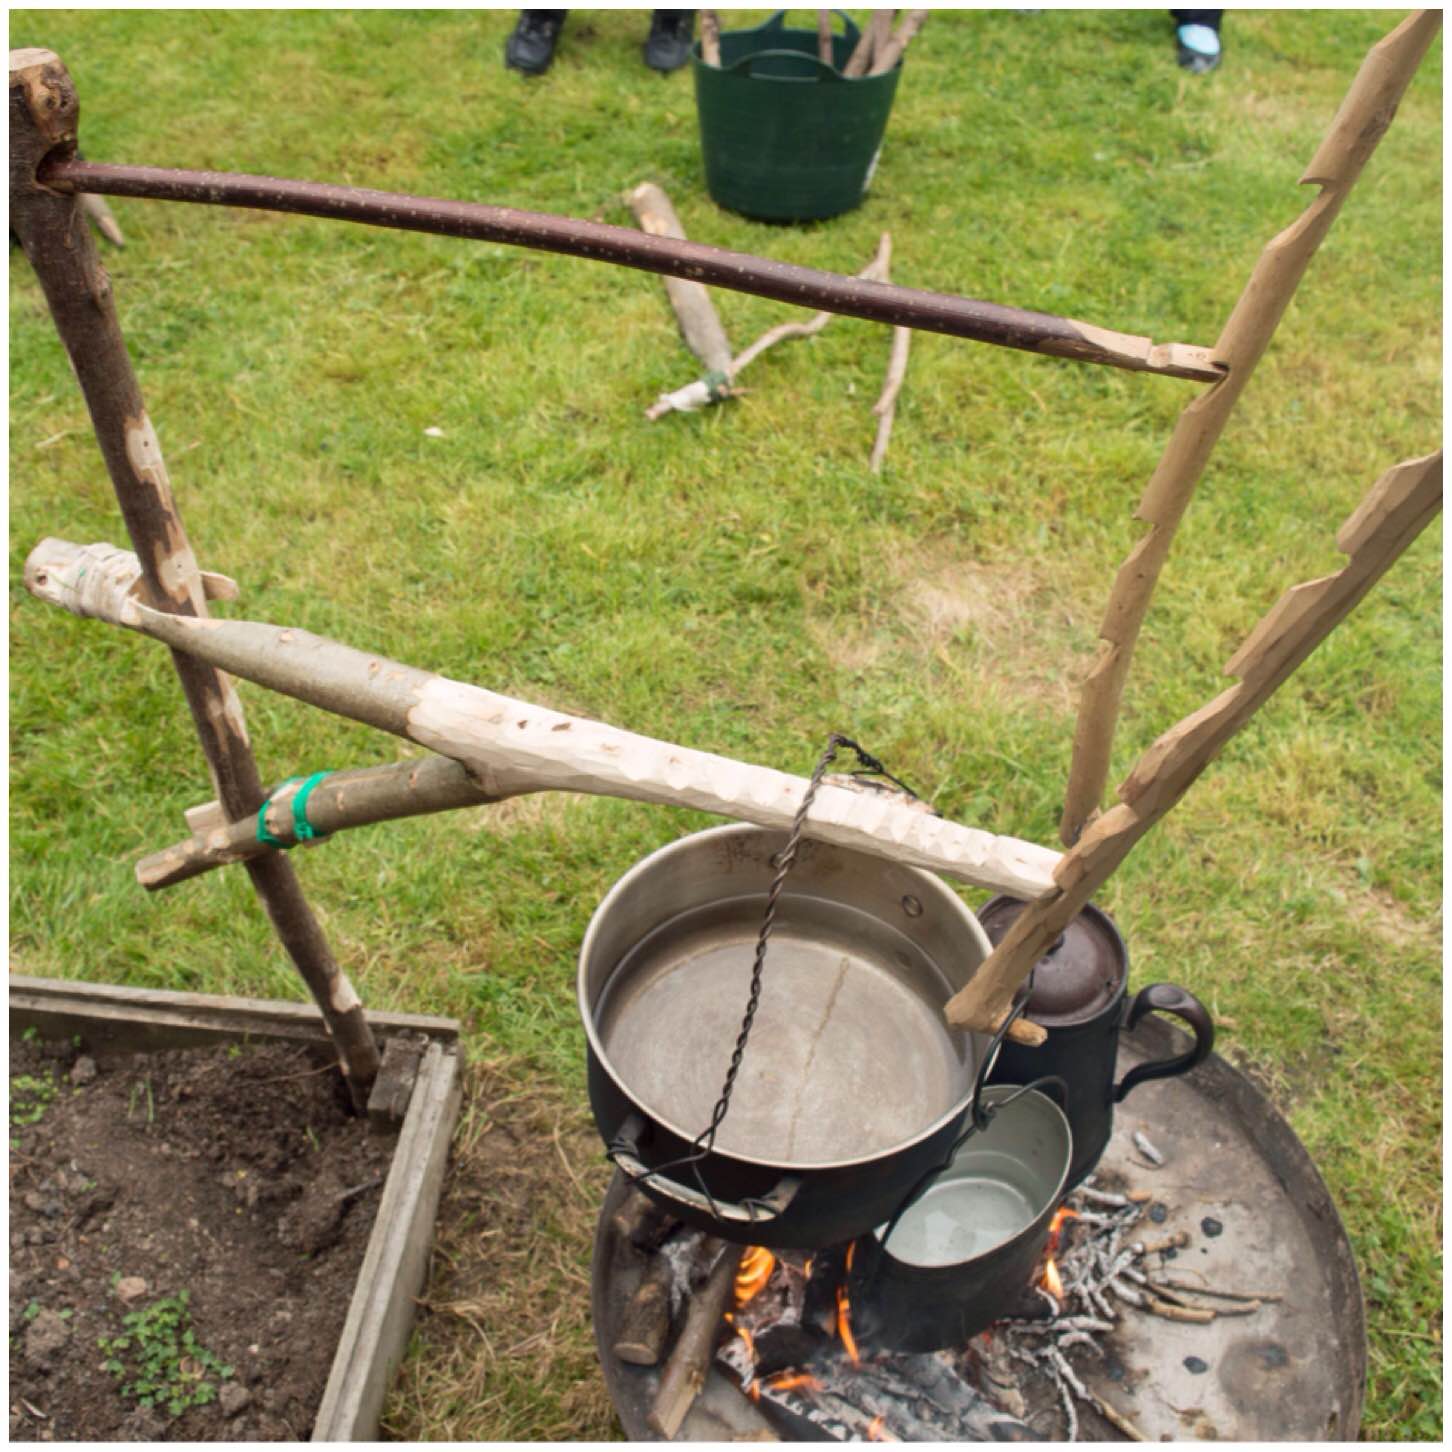
I have attached the Aures crane to the upright for my fixed crane allowing me to hang multiple pots. I have discussed how to make a fixed crane in my previous post How To…. Build a Campfire Cooking Crane.
The adjustable pot hook is only needed if you want different temperatures for the pots hanging off the Aures crane.
Top down with fixed crane above
If you are happy for both pots to be at the same height both can be hung directly off your pot bar if it is long enough.
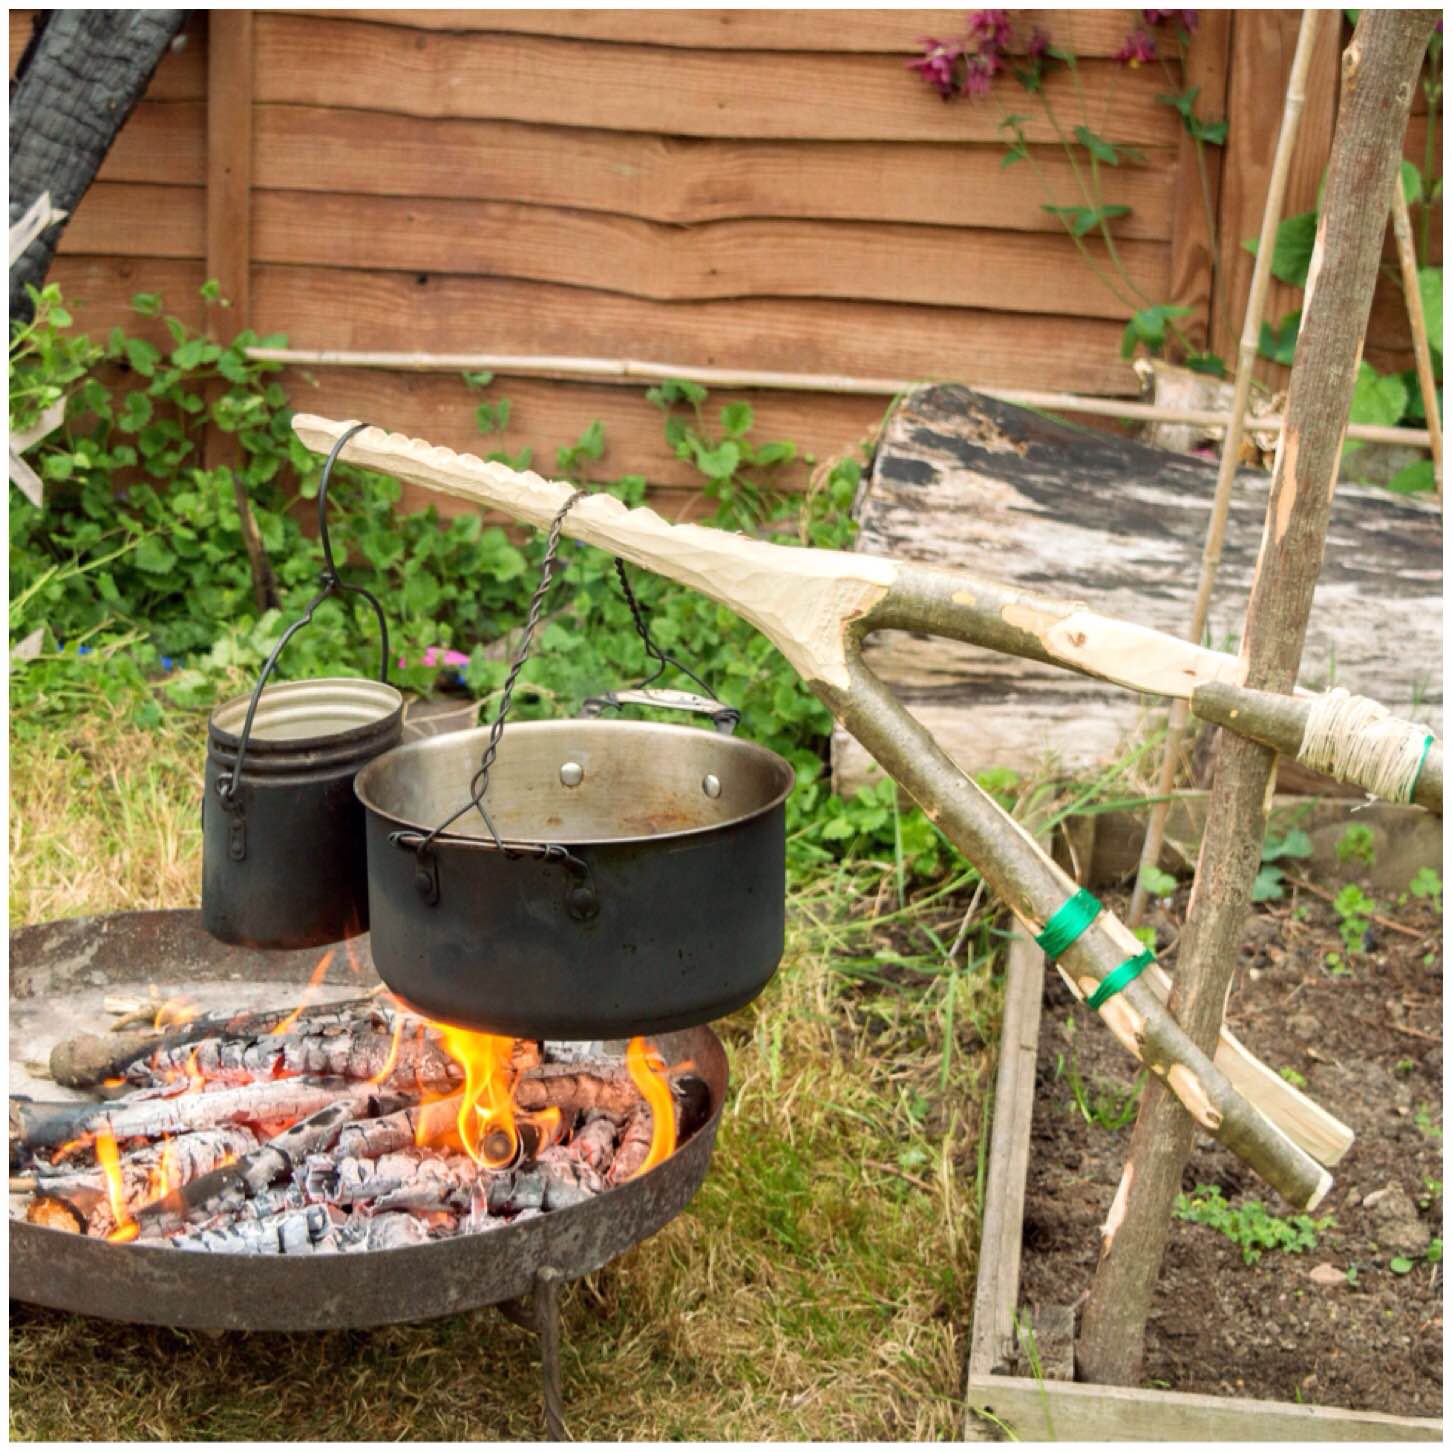
The crane is easy to adjust for height with the pots attached and you can easily swing it away from the heat when required.
Heavy duty
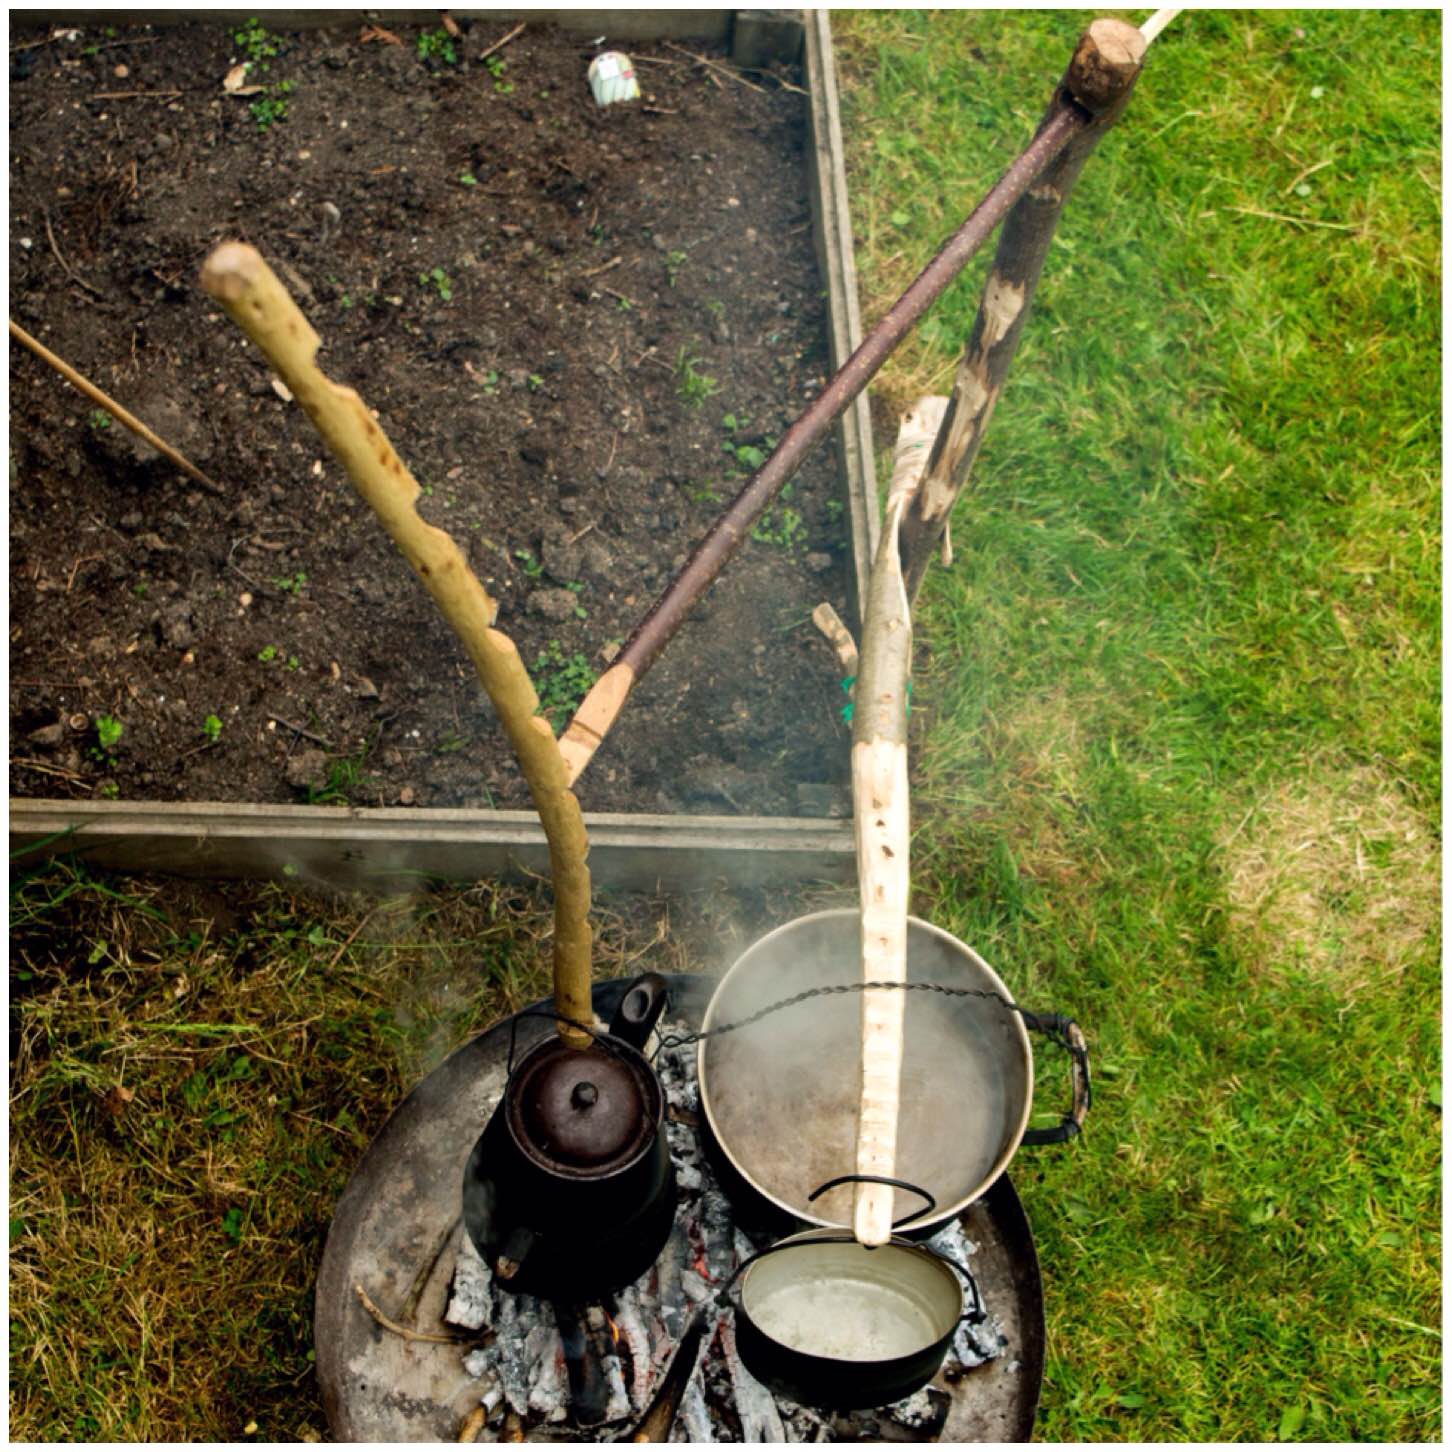
A view from above – one upright – two cranes – three pots
One upright – two cranes – three pots
Do not be put off by the length of the instructions: this crane is very easy to make. Some of my bushcraft friends say that it’s not worth the bother – that may be so for a short term camp but if you want to practice your carving skills it’s perfect for the job.
The ultimate aim – to have a brew
I have a feeling I may be writing about a few of the other variations of the Aures crane in the near future.
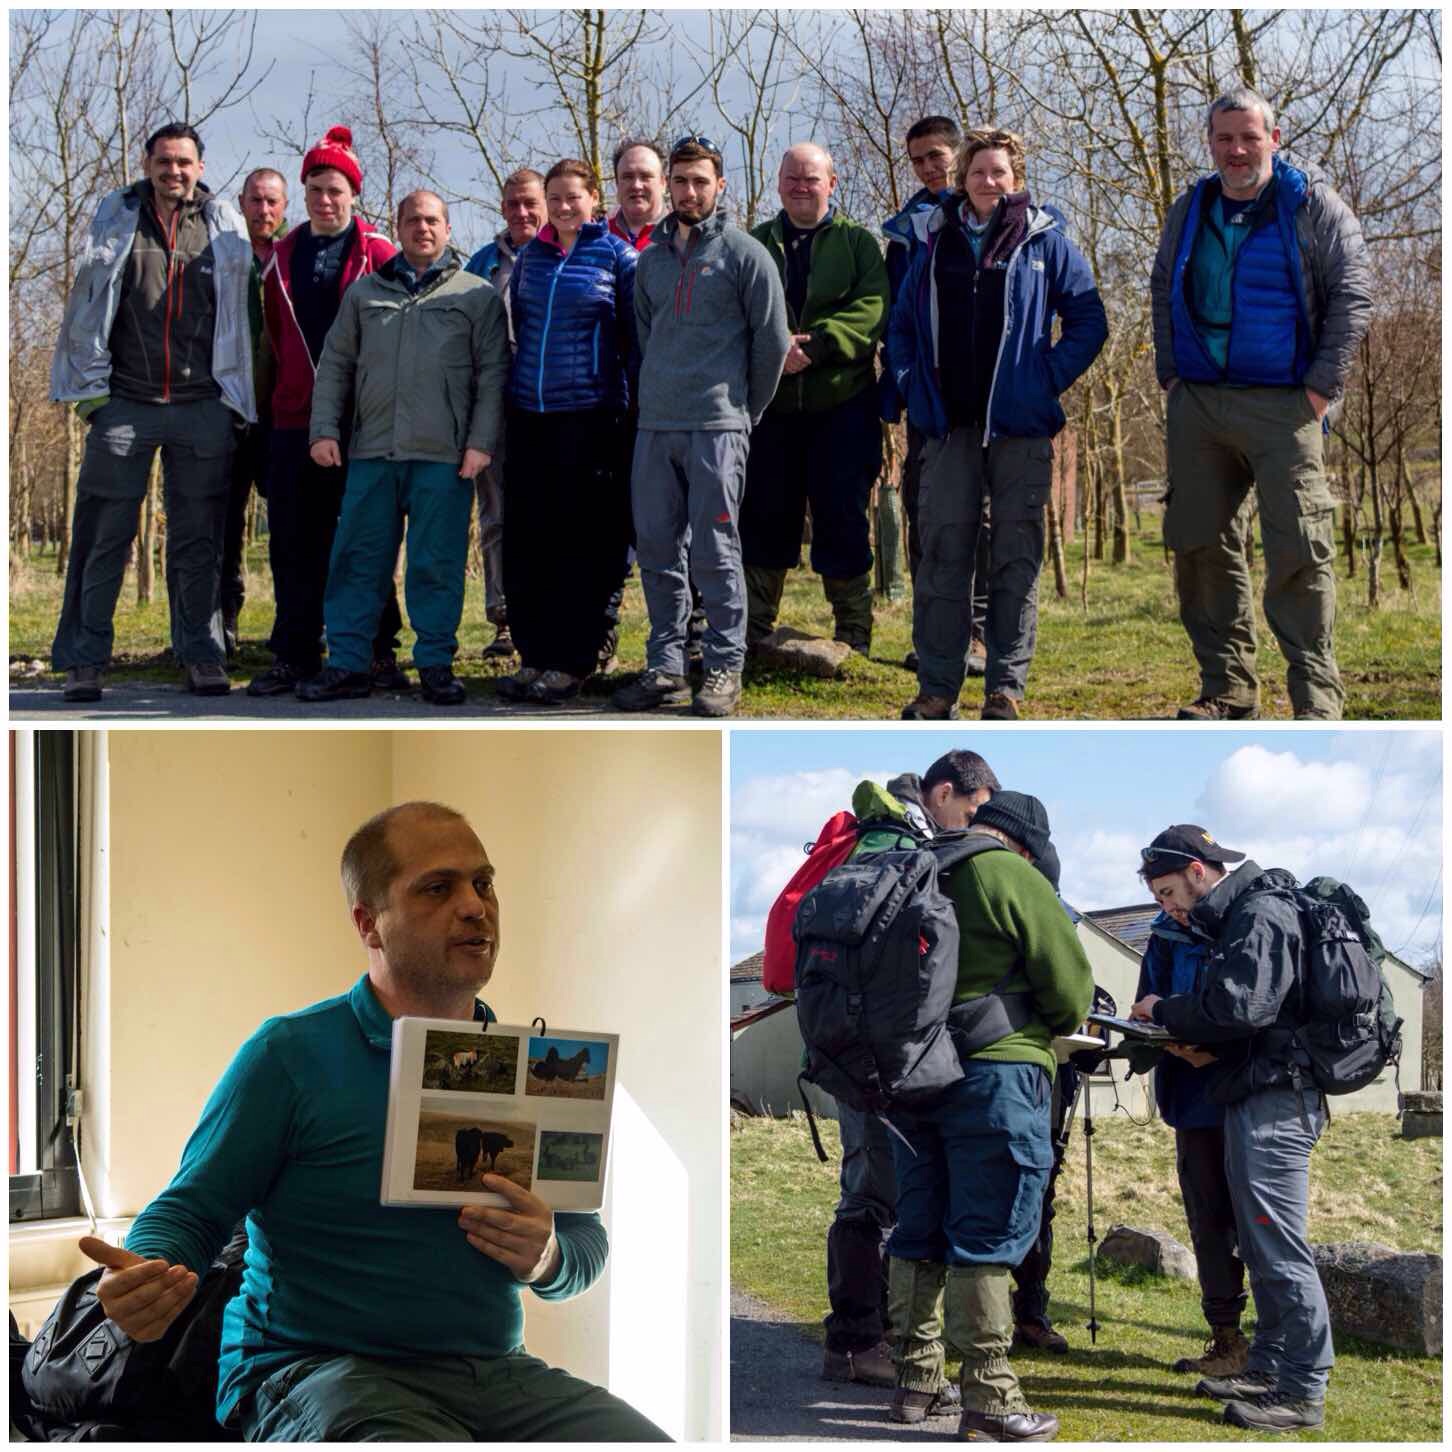
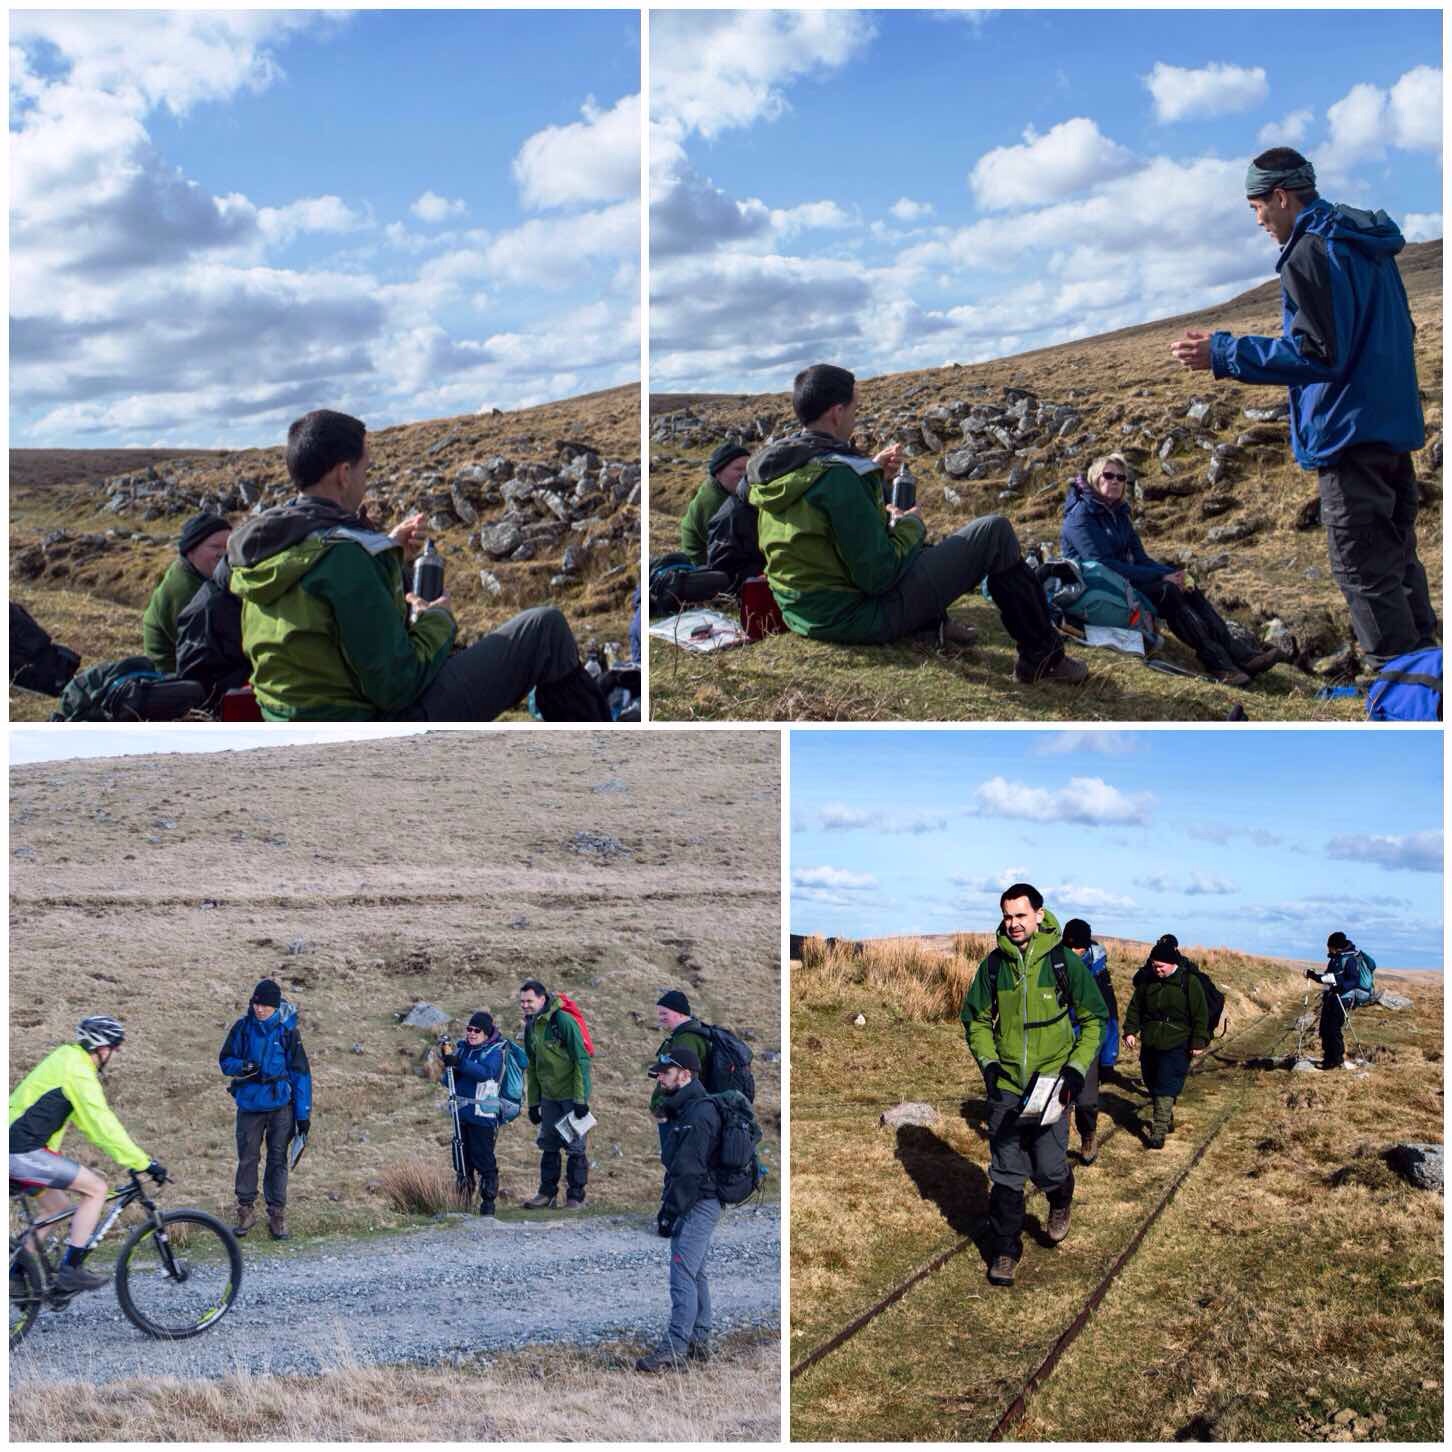
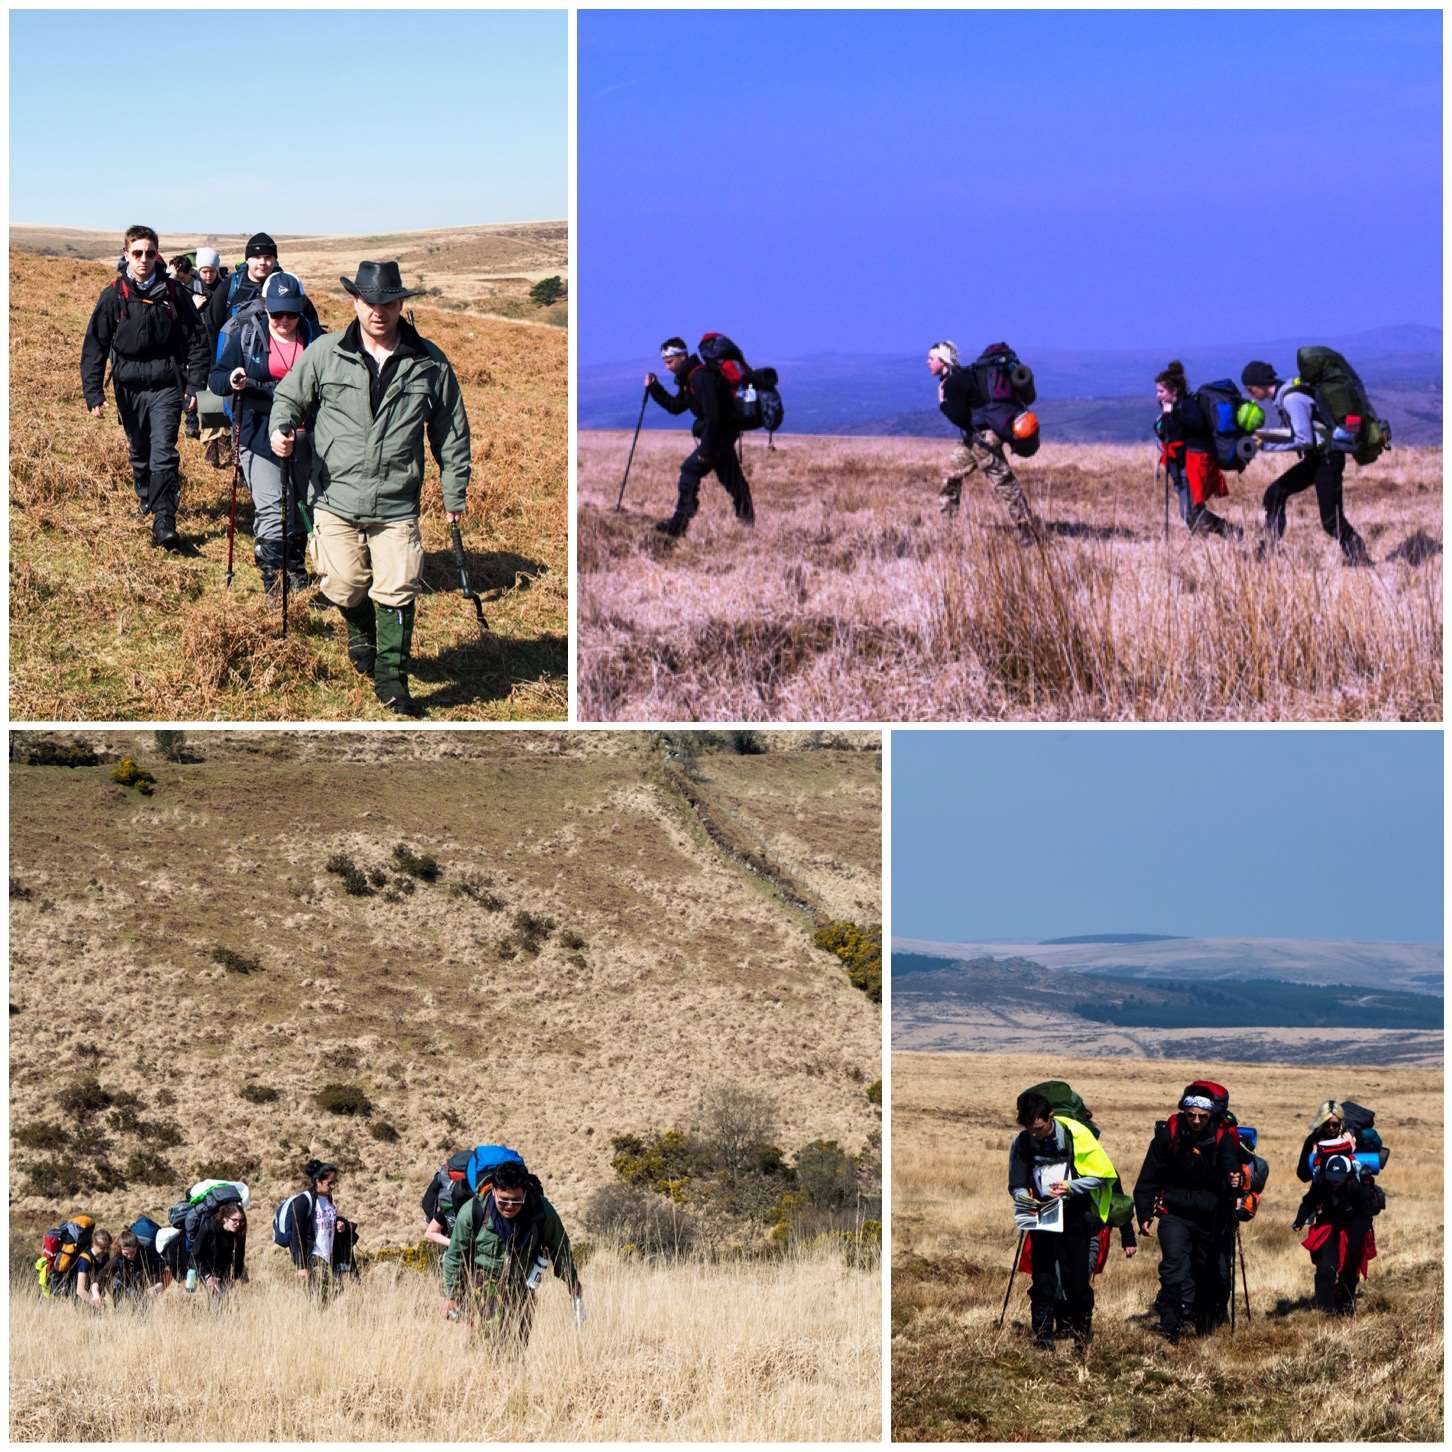
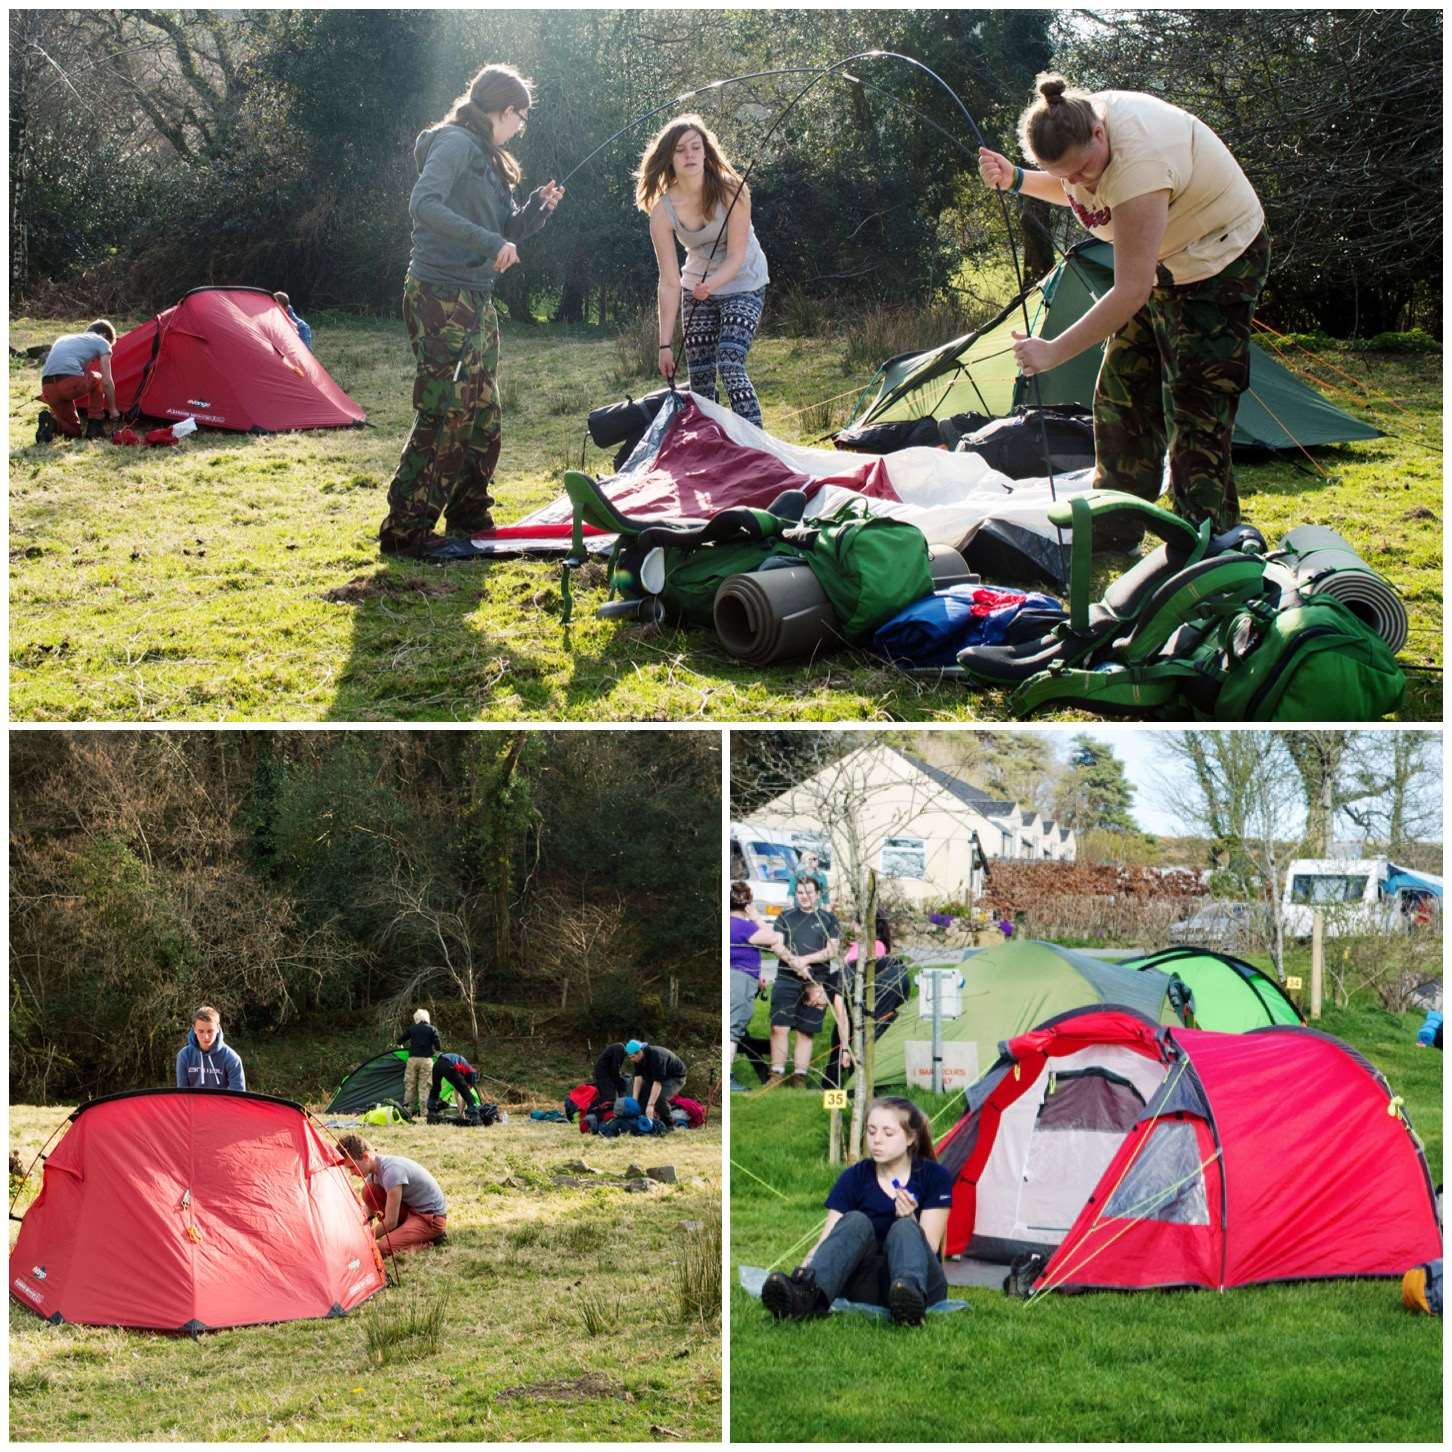
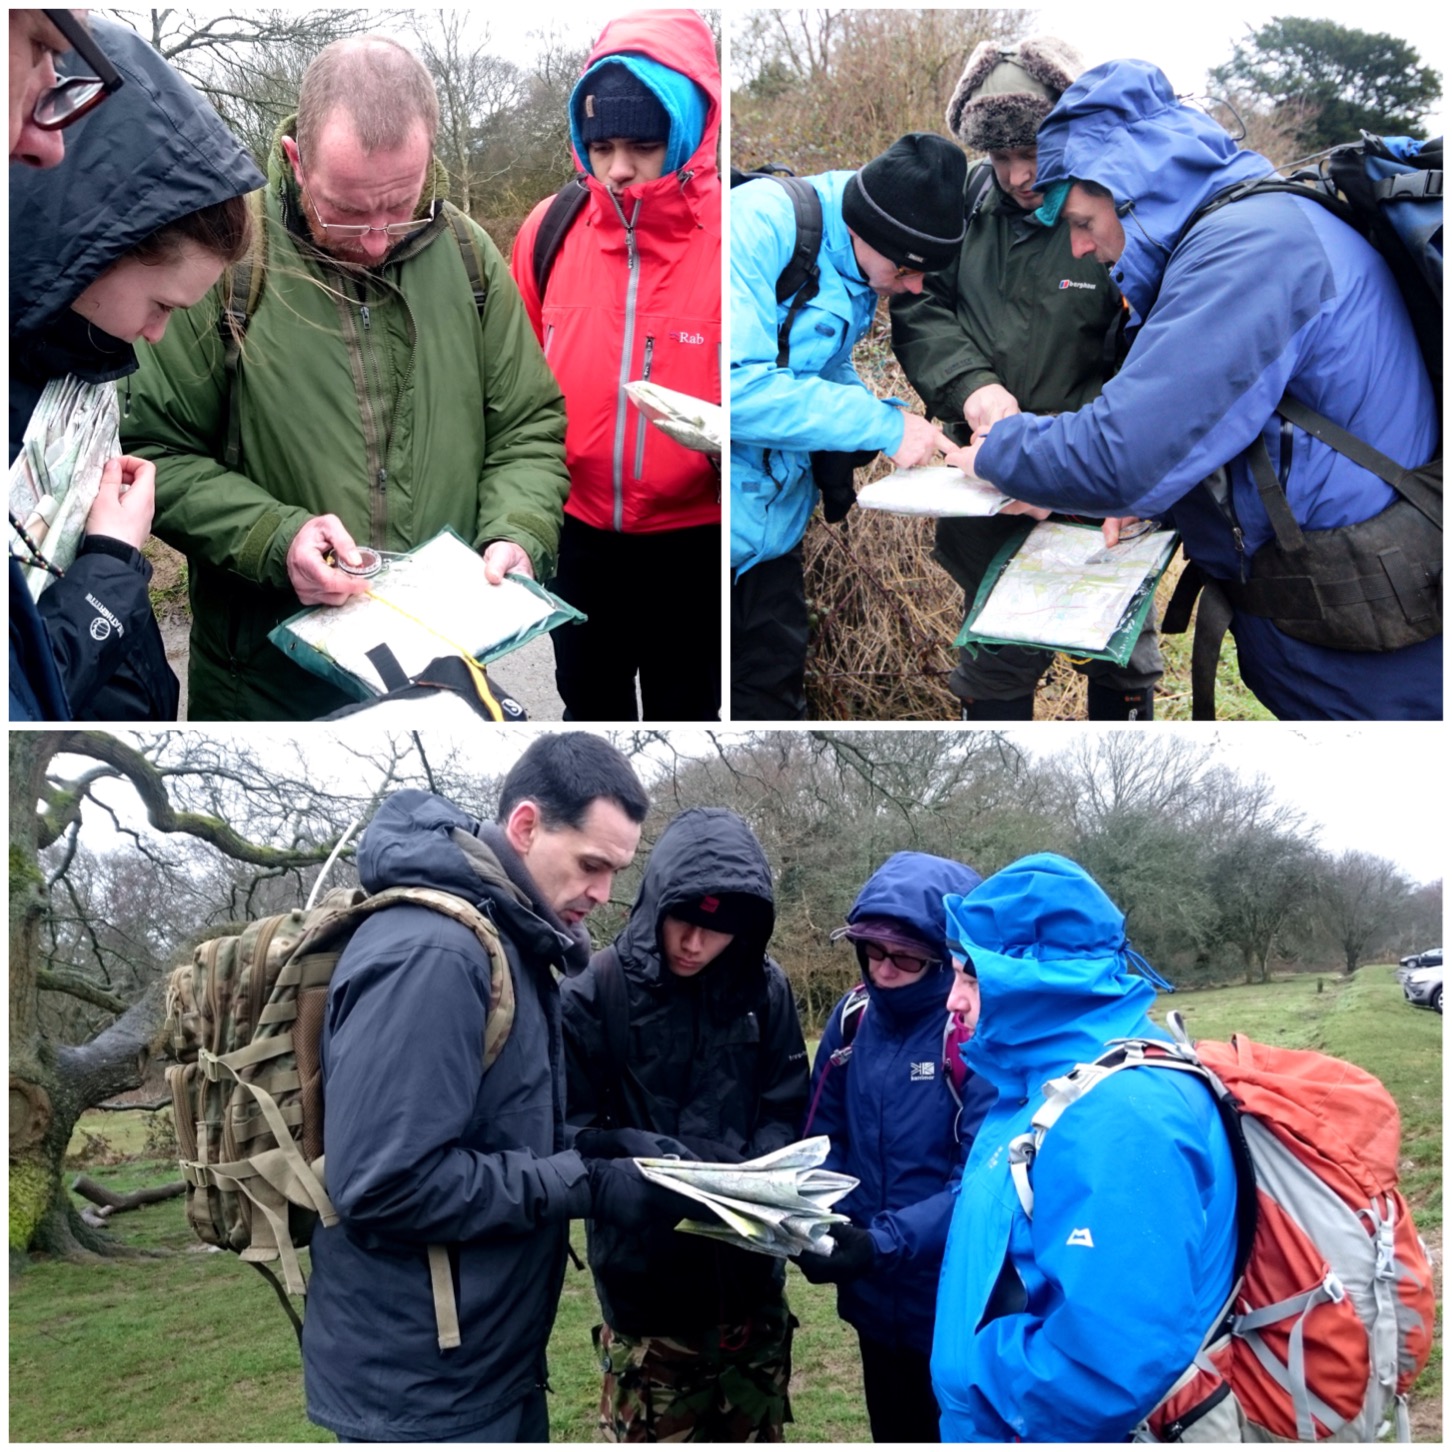
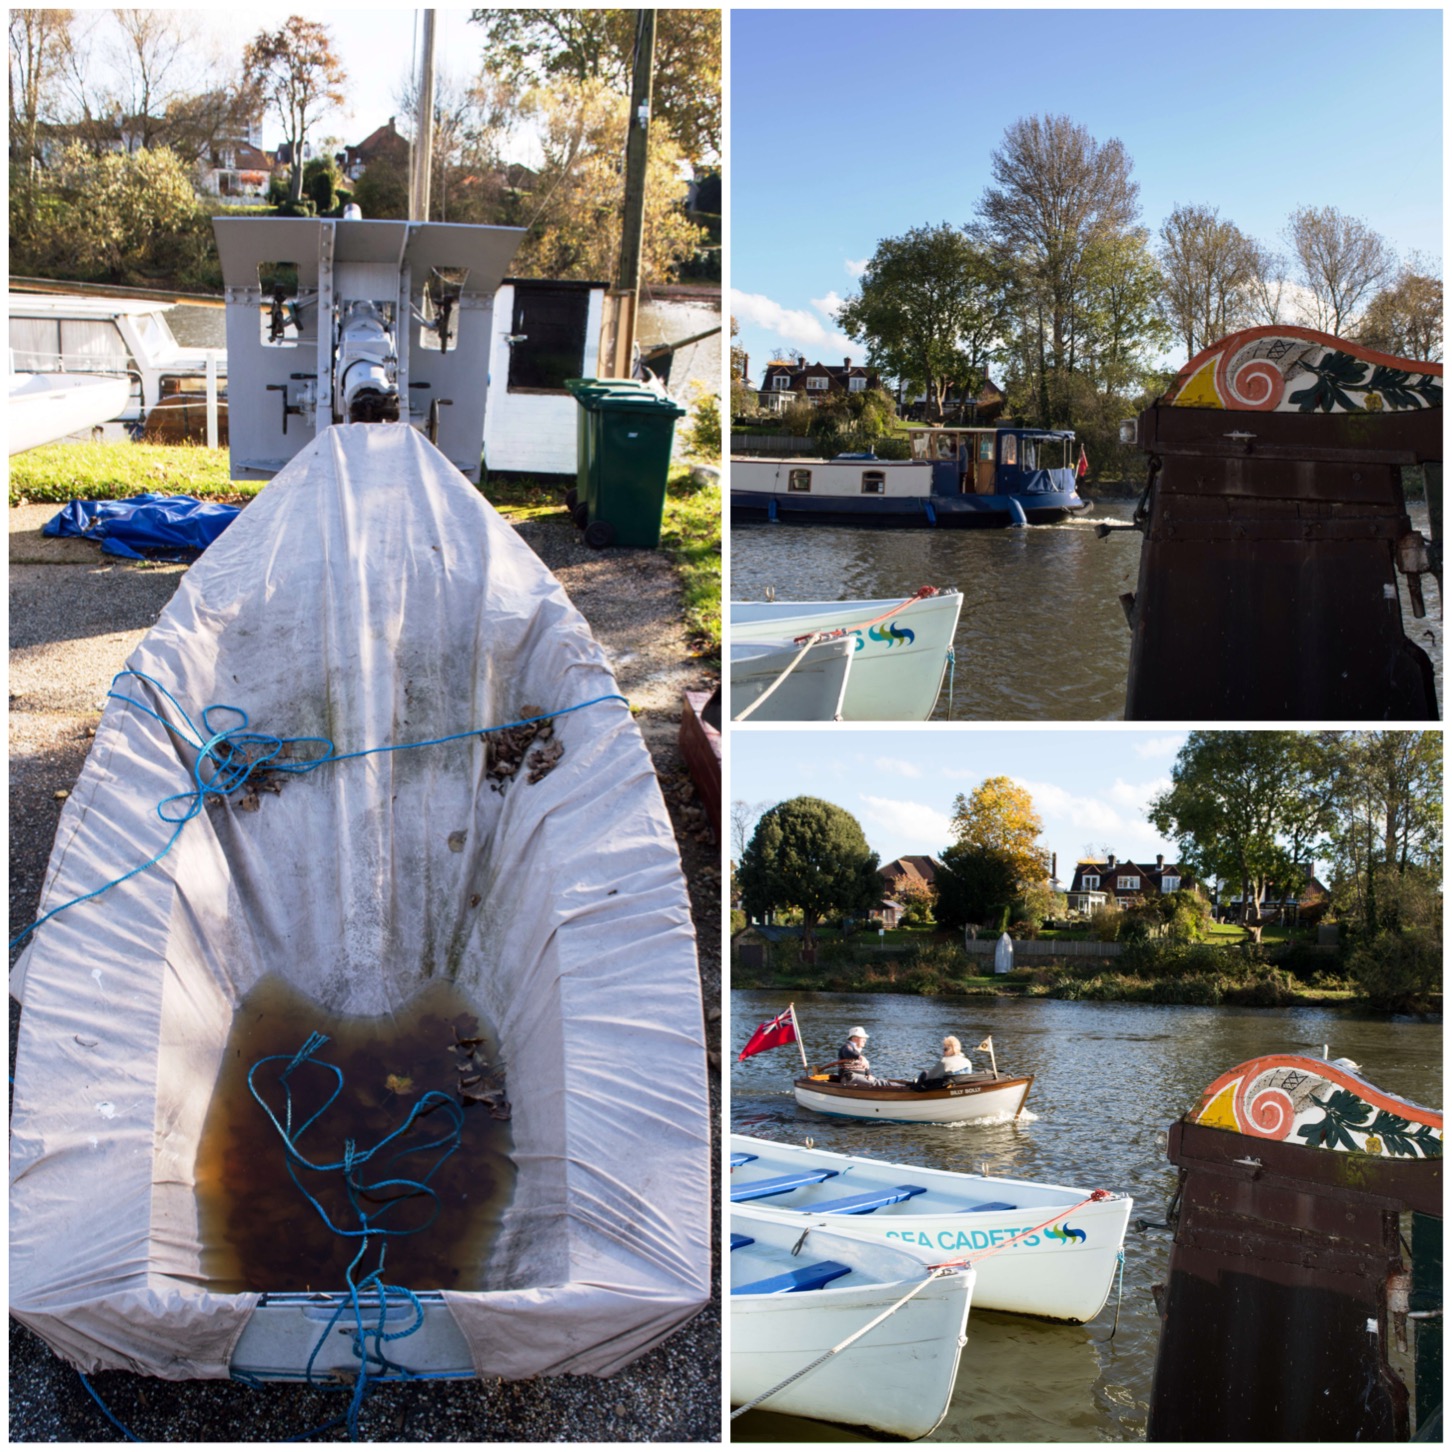
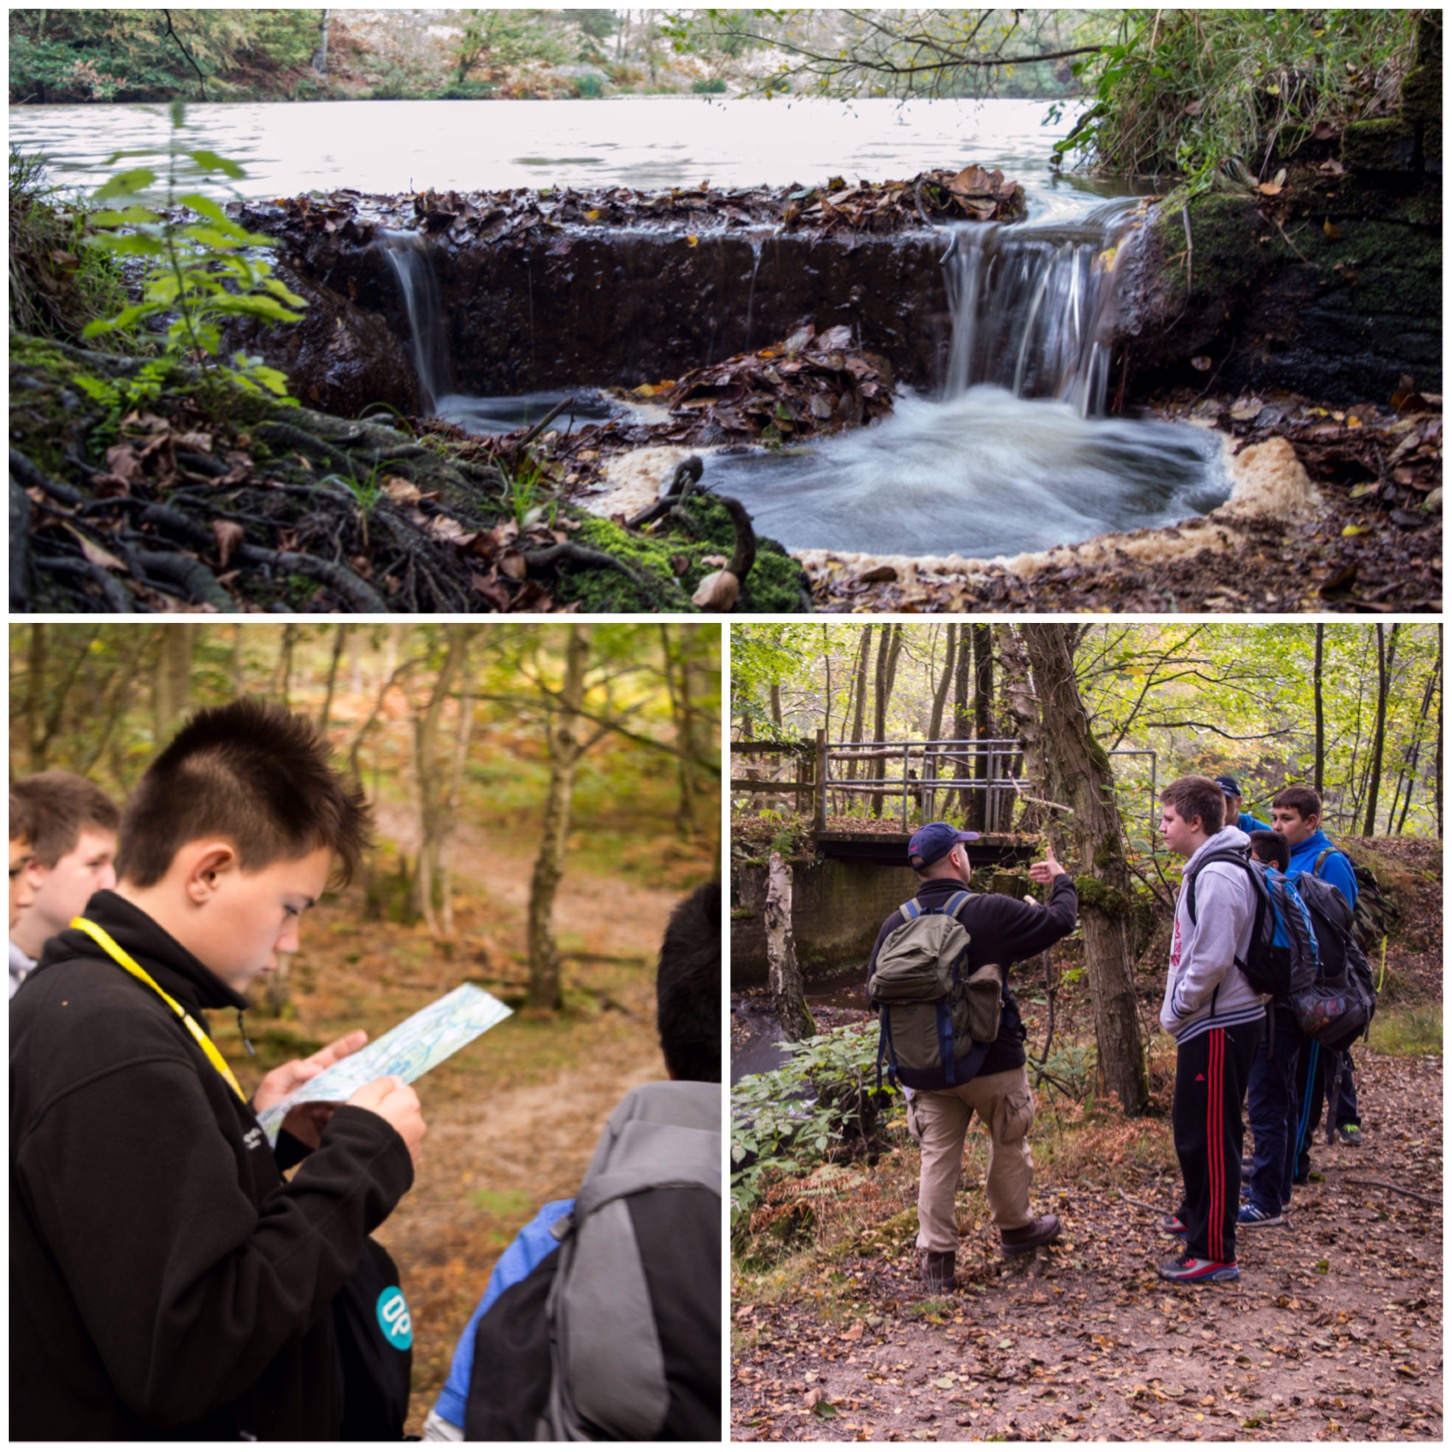
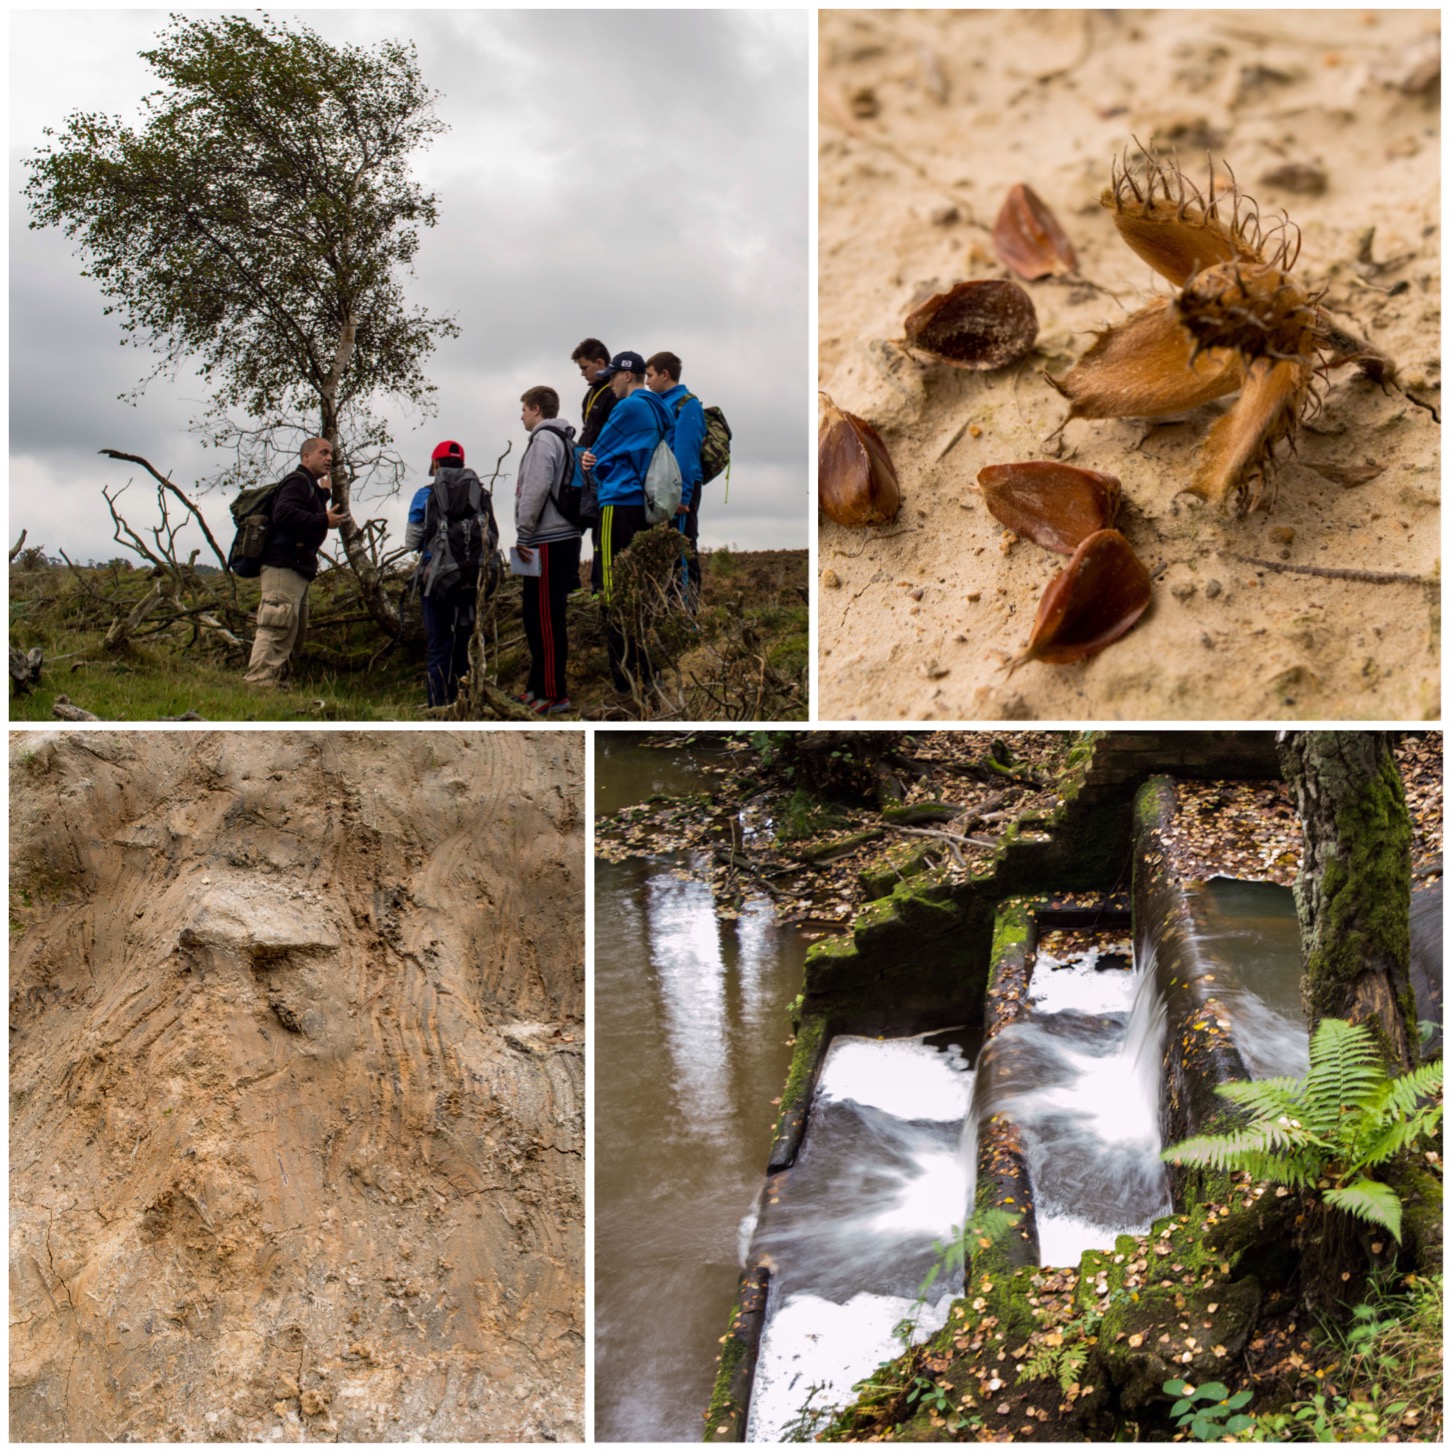
Early April found me back in one of my favourite locations – on Dartmoor. I was told recently by a friend that you need to say ‘on Dartmoor’ and not ‘in Dartmoor’ – seemingly that is something else entirely 🙂
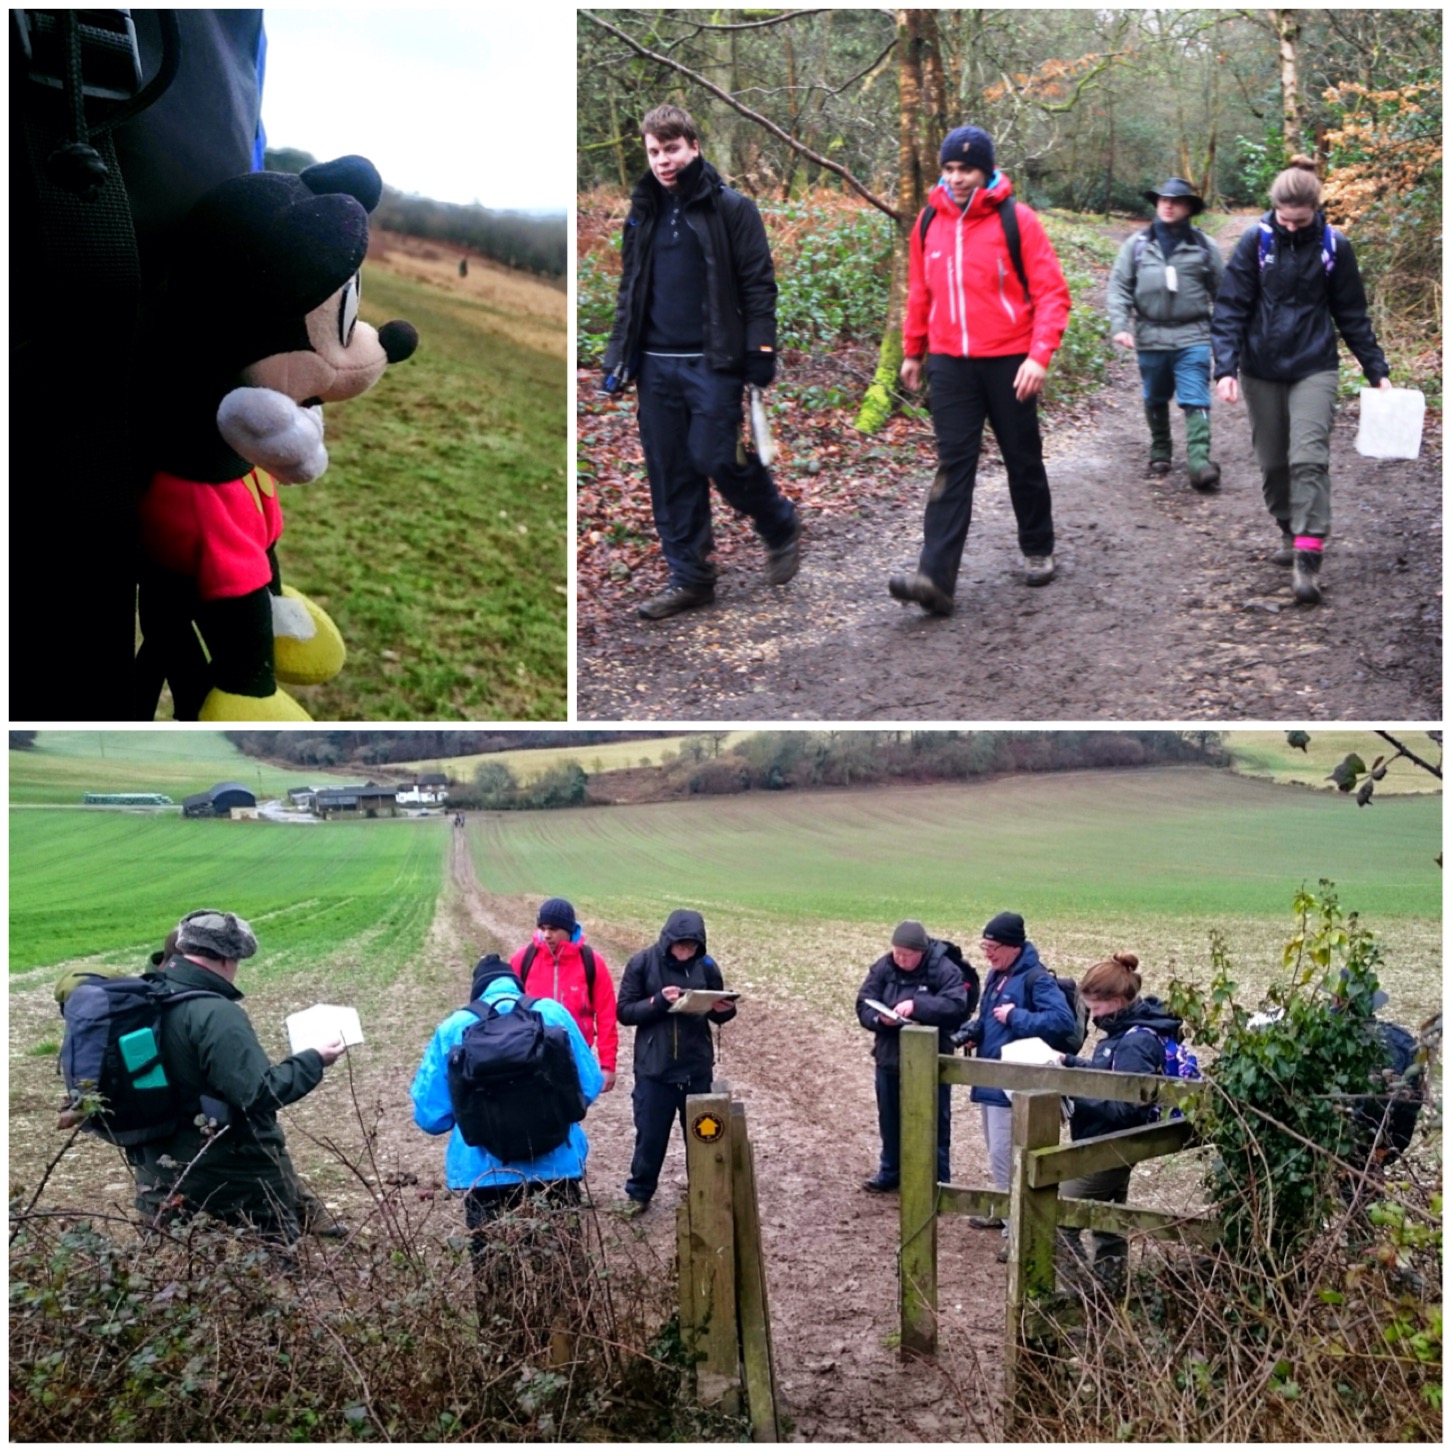
Dartmoor can be a very tough place to learn about the art of navigation but if you can crack it there then most other places will seem like a walk in the park in comparison.
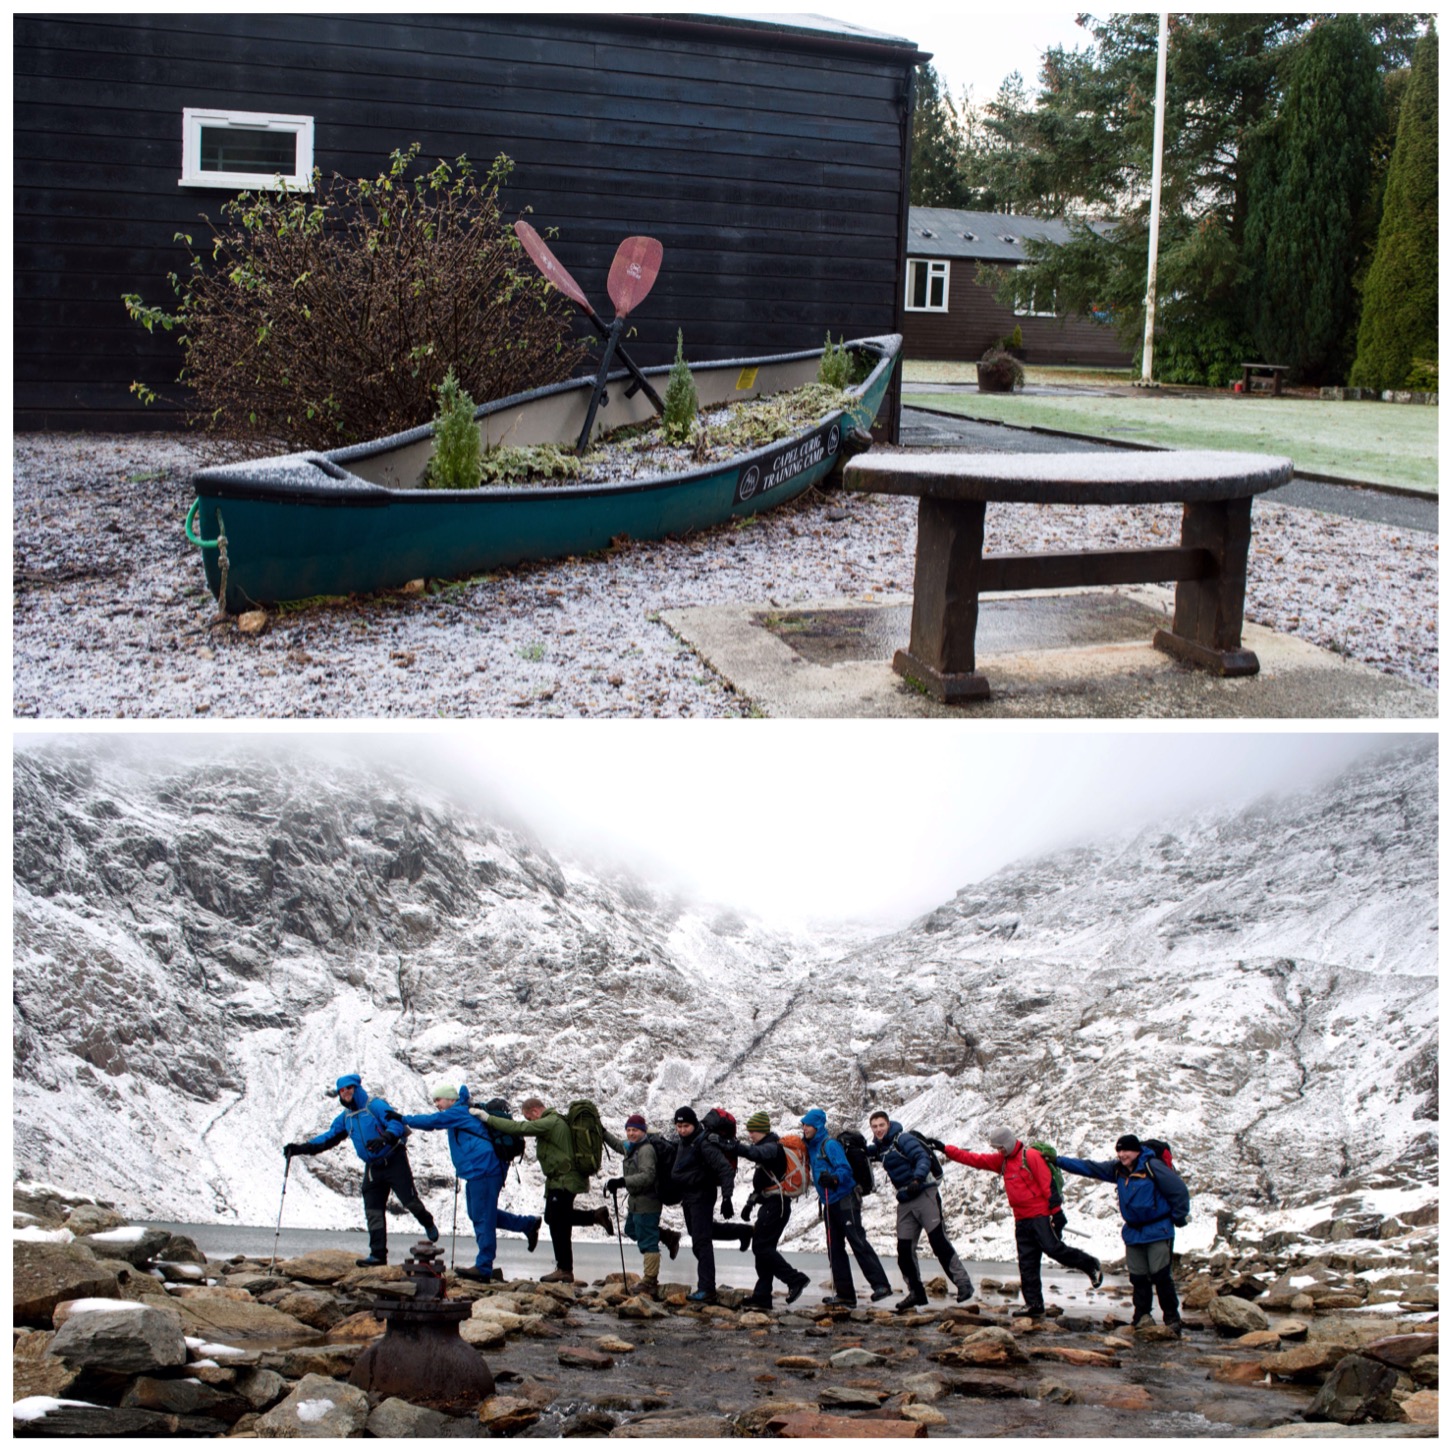
On the Friday night we stayed at Oakhampton Army camp on the northern edge of the moor and then camped out on the Saturday night.
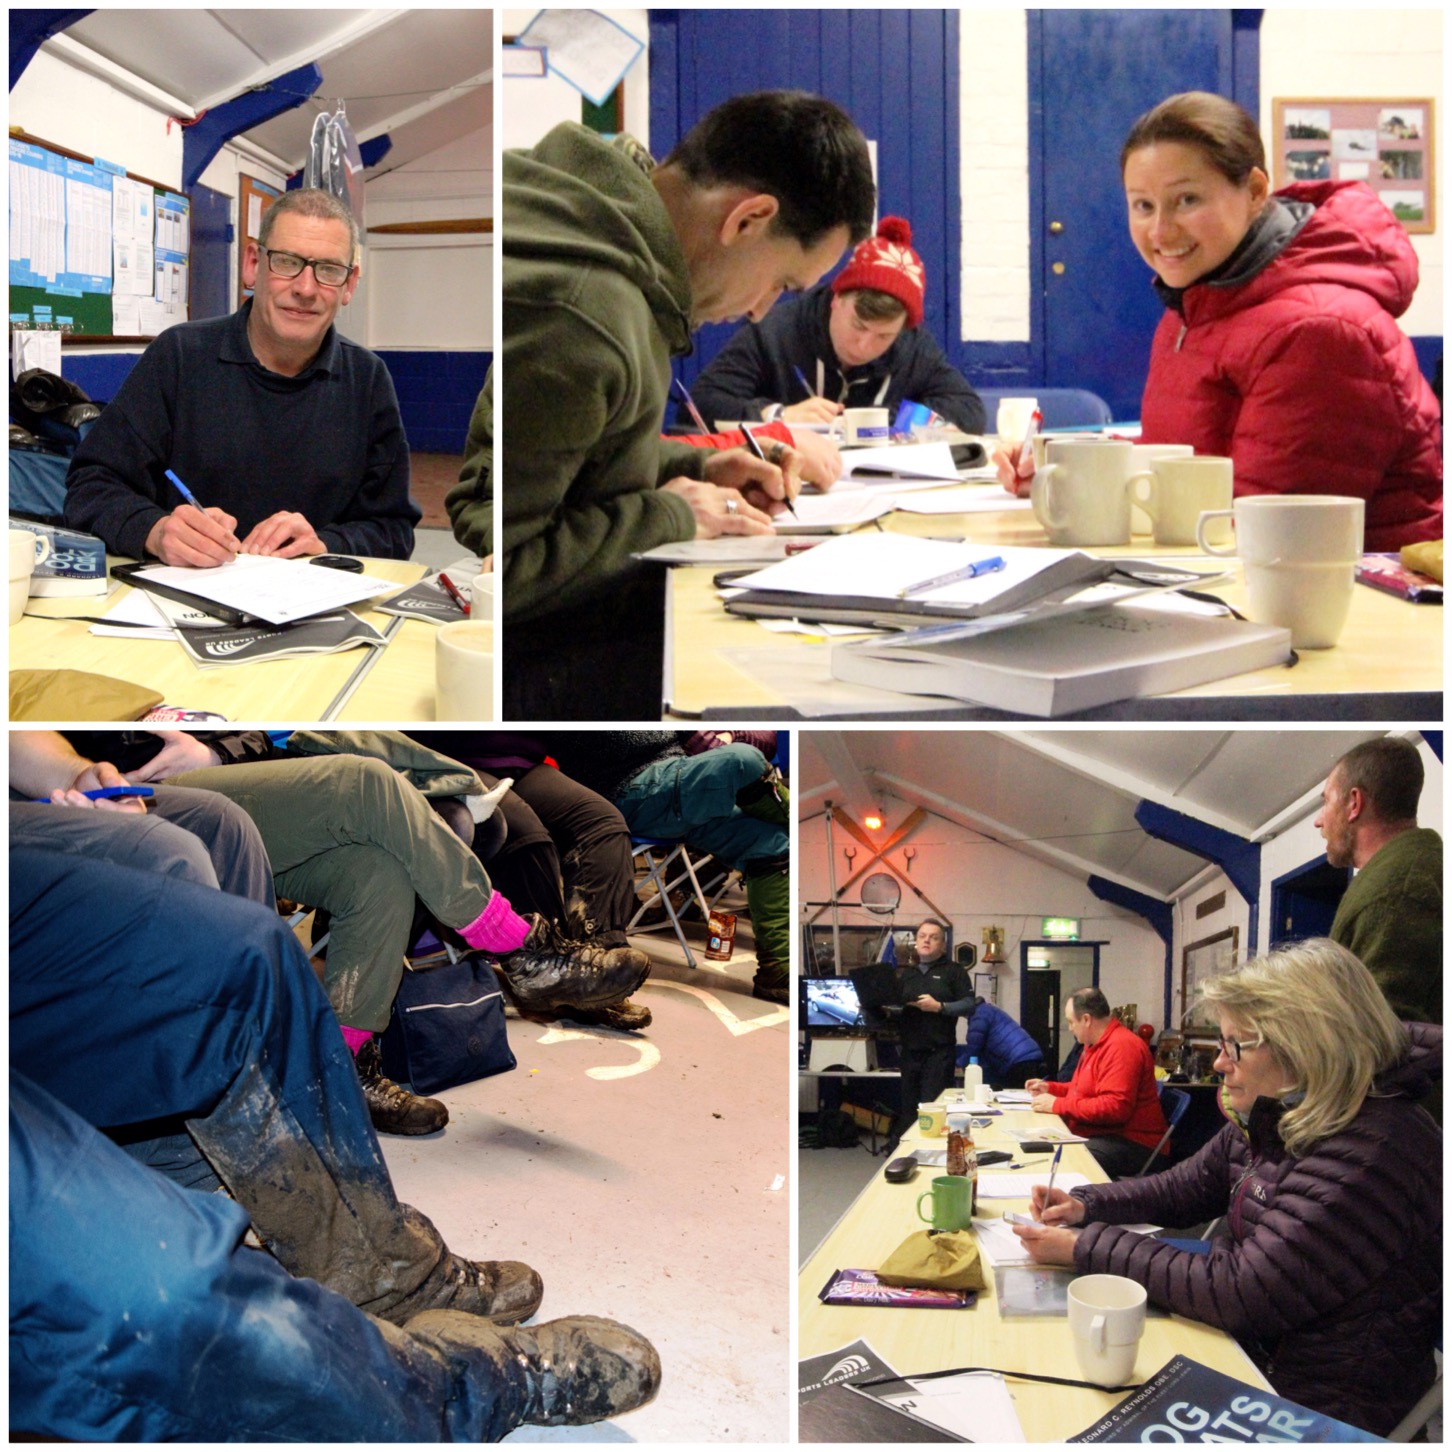
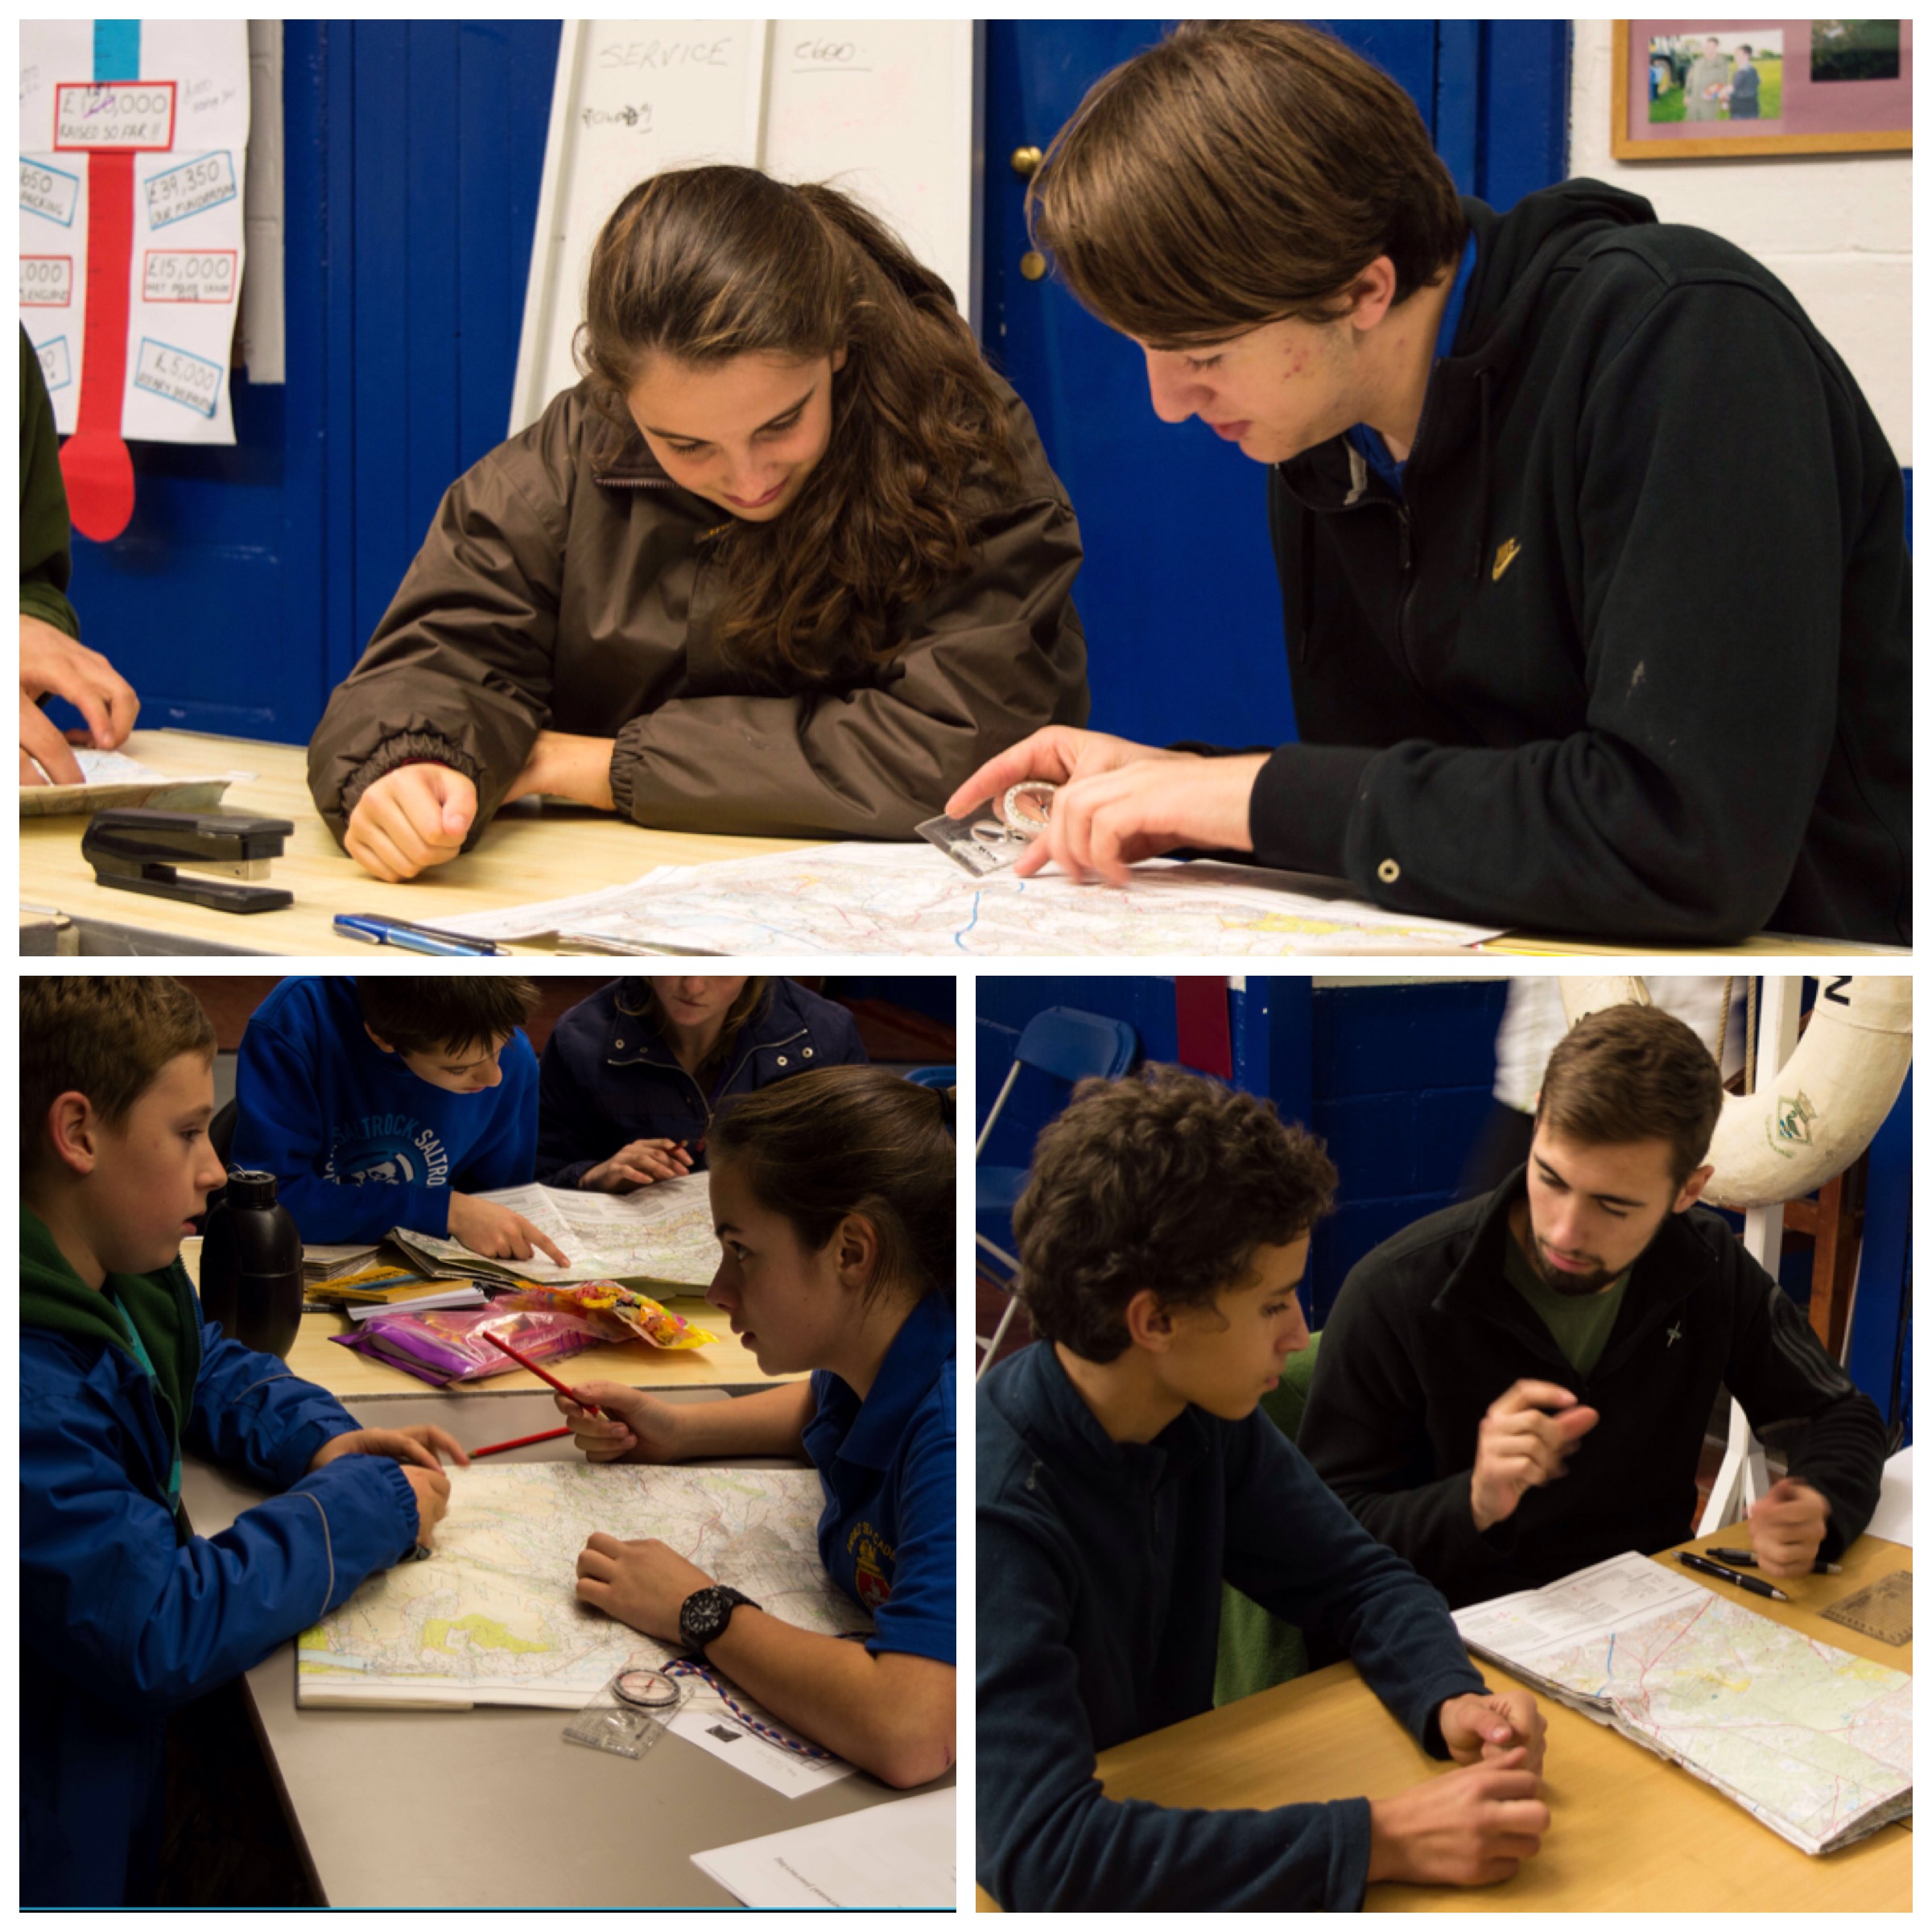
Each student had to give a ten minute presentation on a given outdoor pursuits subject and also a five minute ‘on the hoof’ presentation while out navigating. We managed to do a few of the presentations on the Saturday morning before striking out onto the moor.
Rugged Terrain – out of remit for BEL
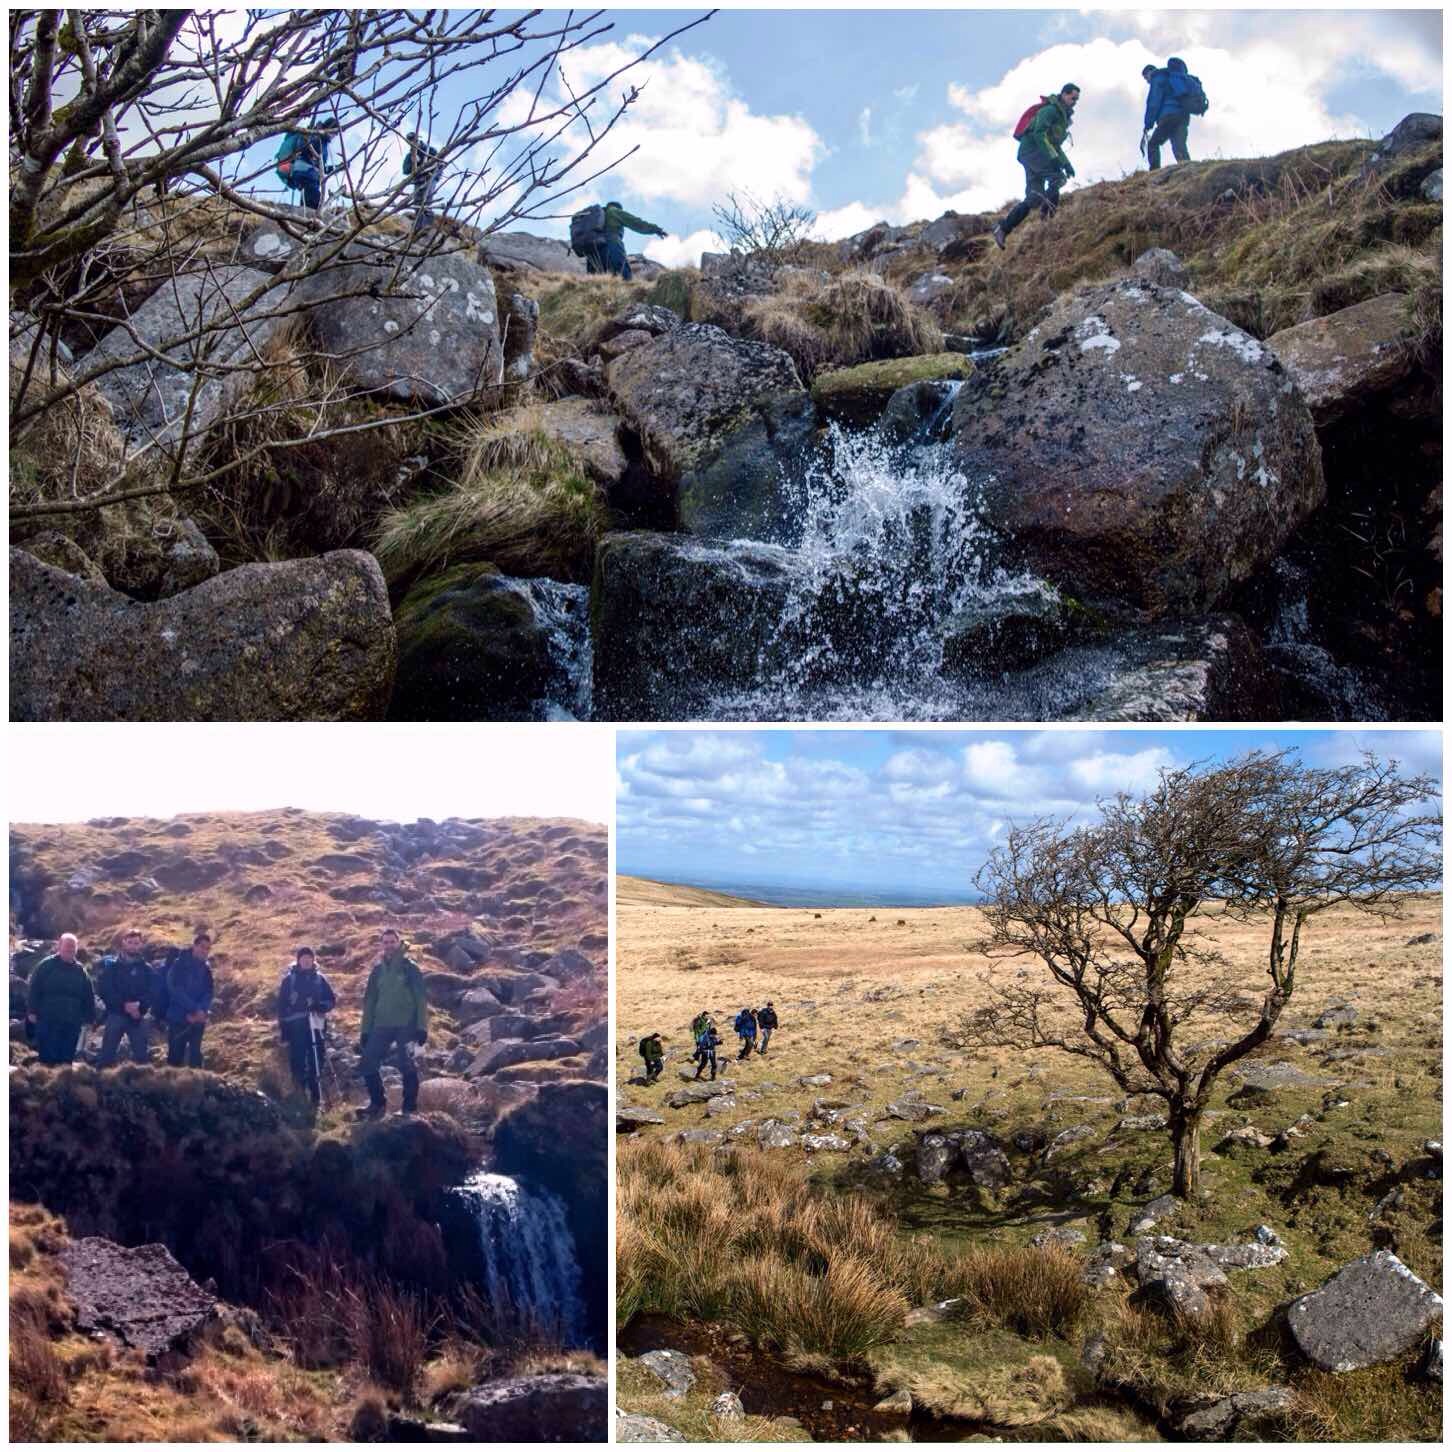
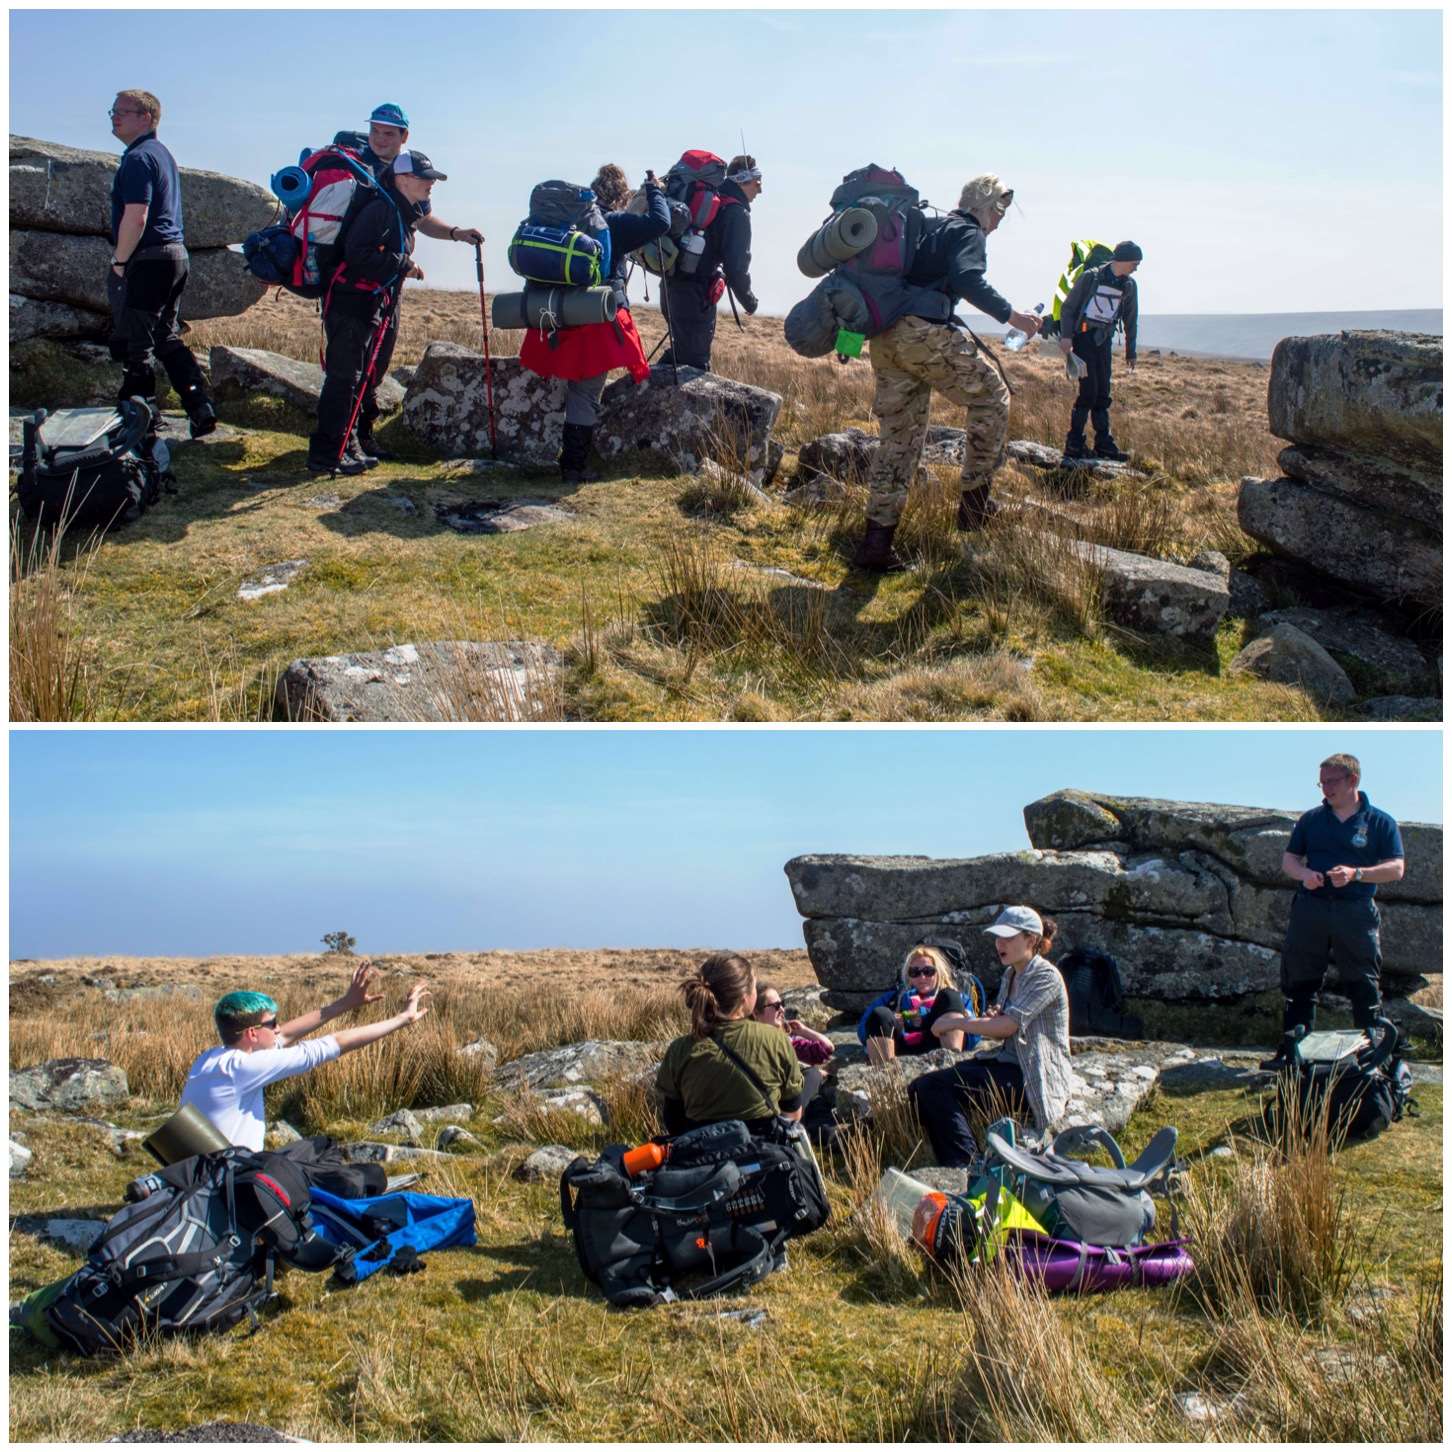
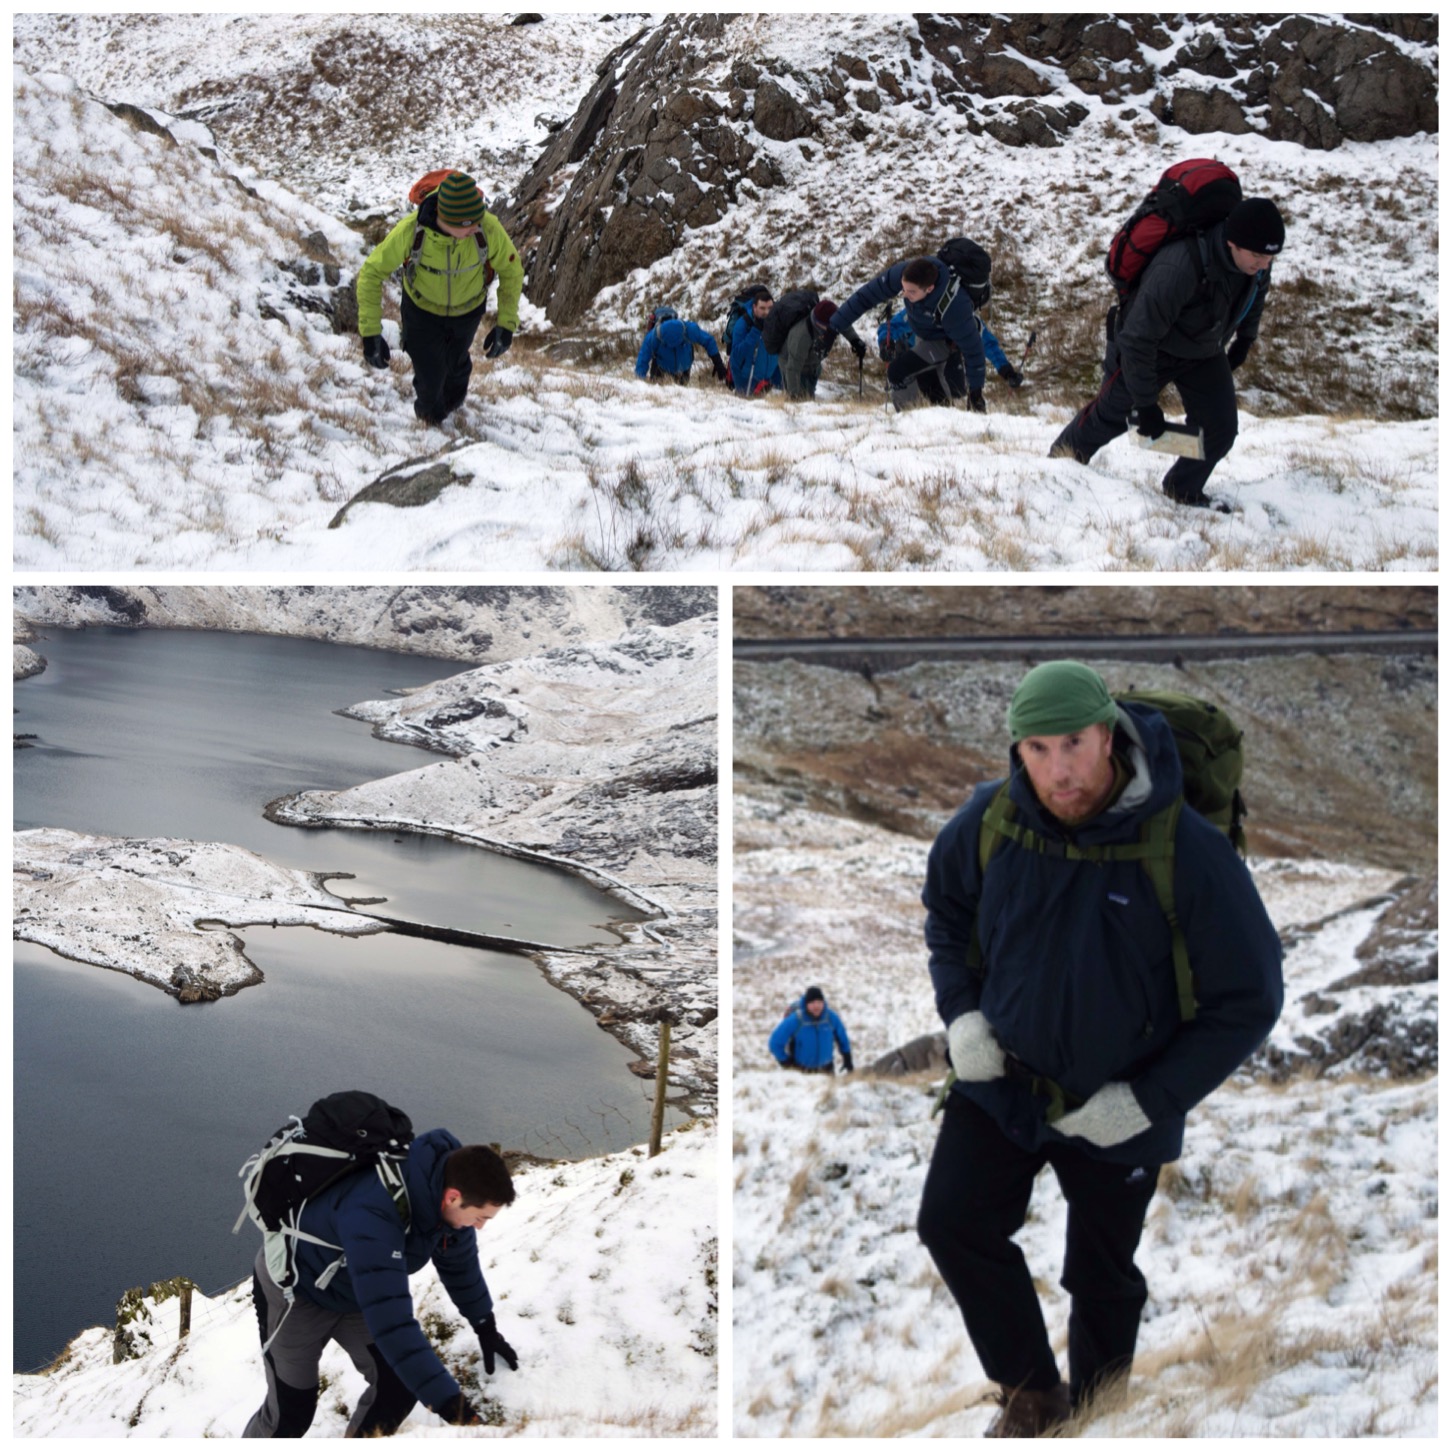
I was working with my good friend Graham Brockwell over the weekend so we split the students into two teams. My team headed up onto Yes Tor to work on our map and compass skills.
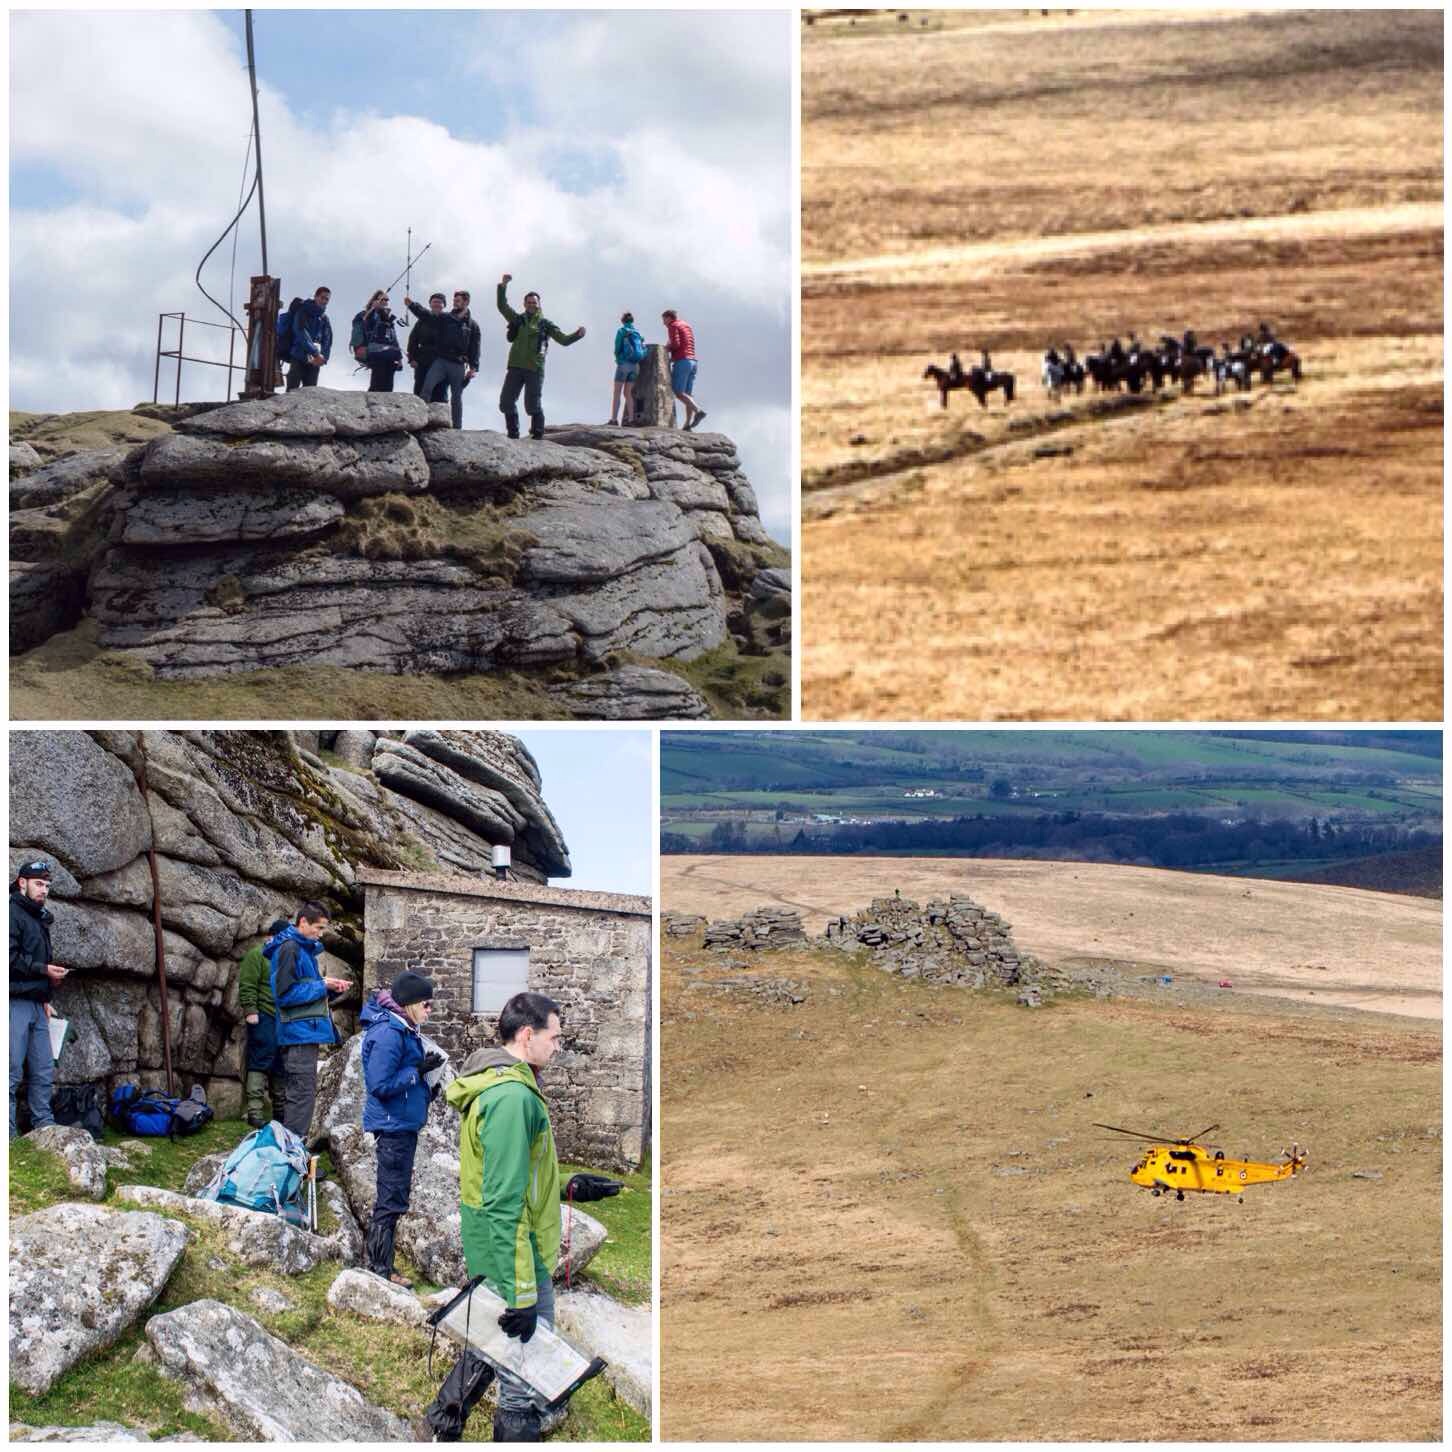
While up there we spotted the local hunt lower down on the moor. While watching them a Royal Navy Rescue helicopter came in below us and landed at Oakhampton Army camp. I always love being up high and seeing aircraft flying about below me.
Up high and looking down
It was soon time to come down of the Tor to navigate along the tracks in the valleys. The BEL qualification is a lowland award and the students have to show a high degree of accuracy while navigating on clearly marked paths.
After a few more presentations we found the old artillery range. The metal rails you can see in the picture on the bottom left were for the carriage that held a large target for the artillery to shoot at.
Down low – in remit for BEL
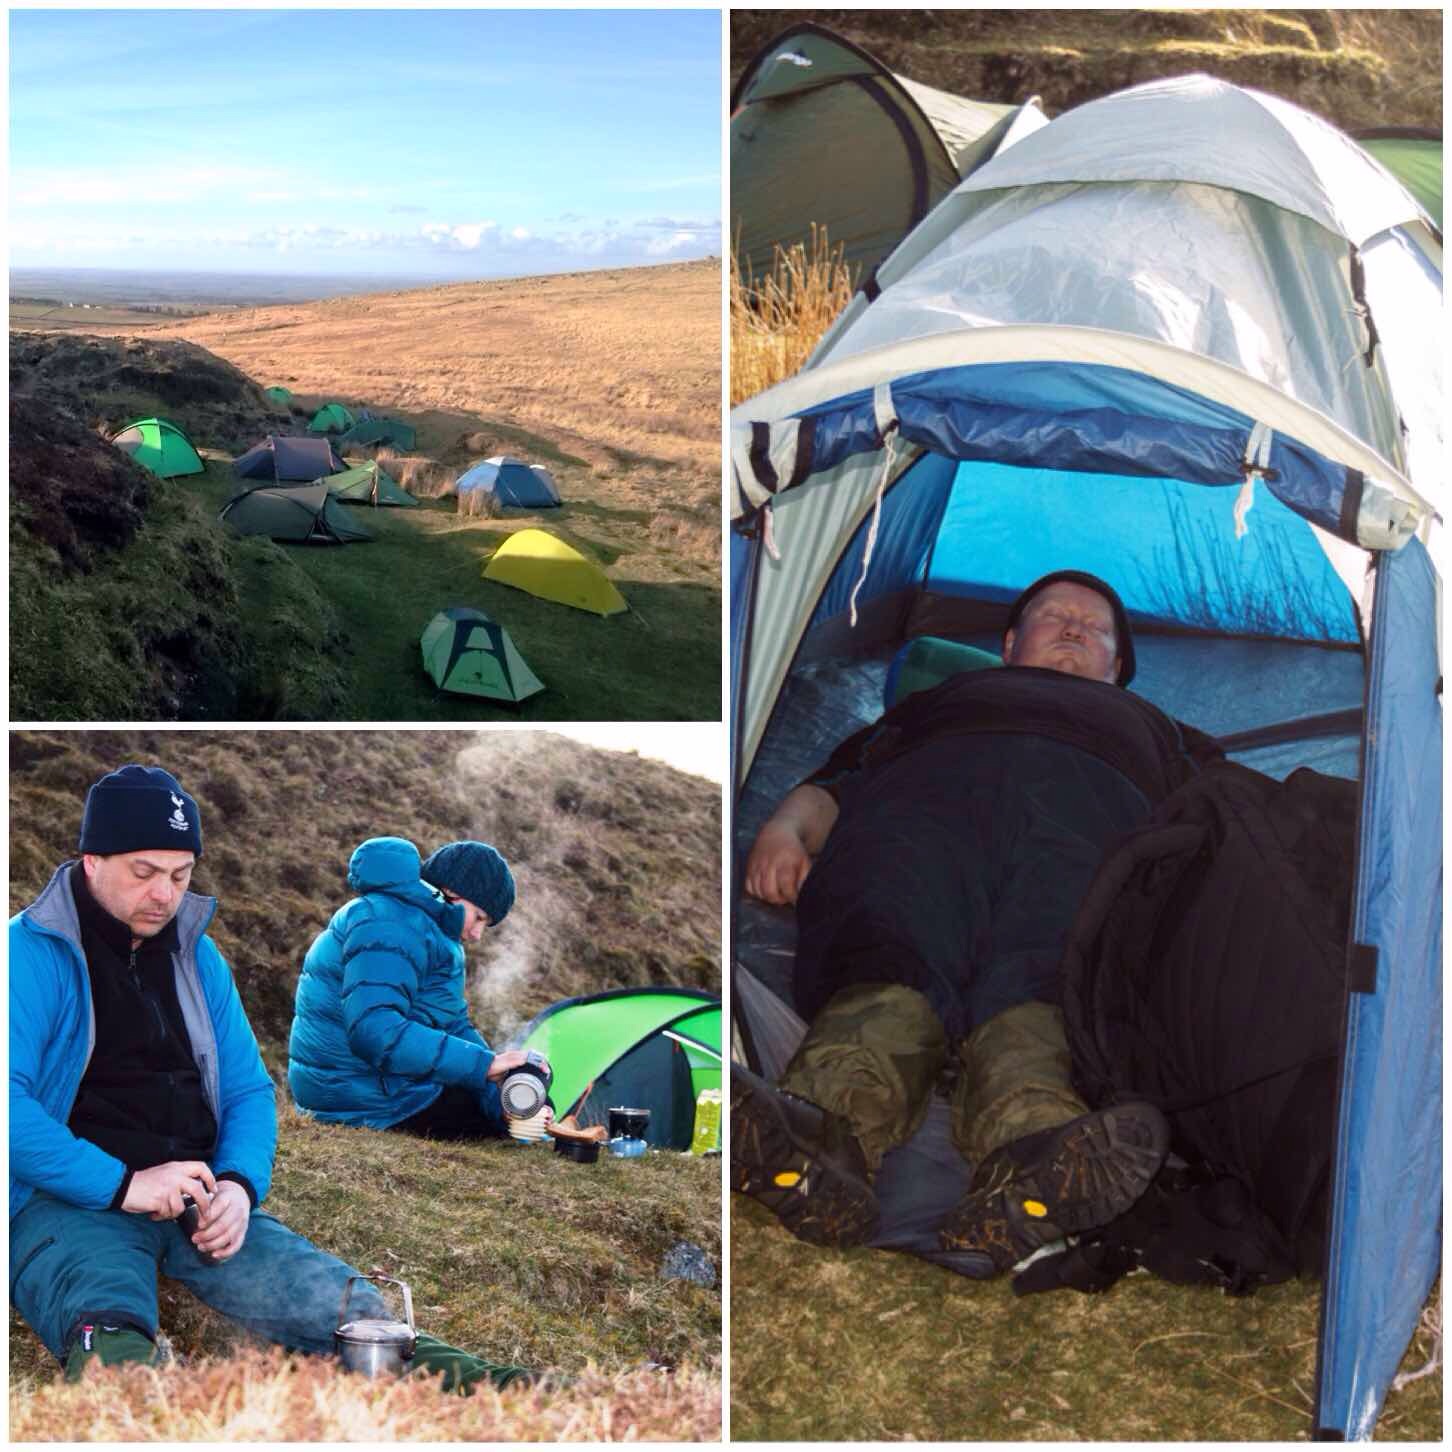
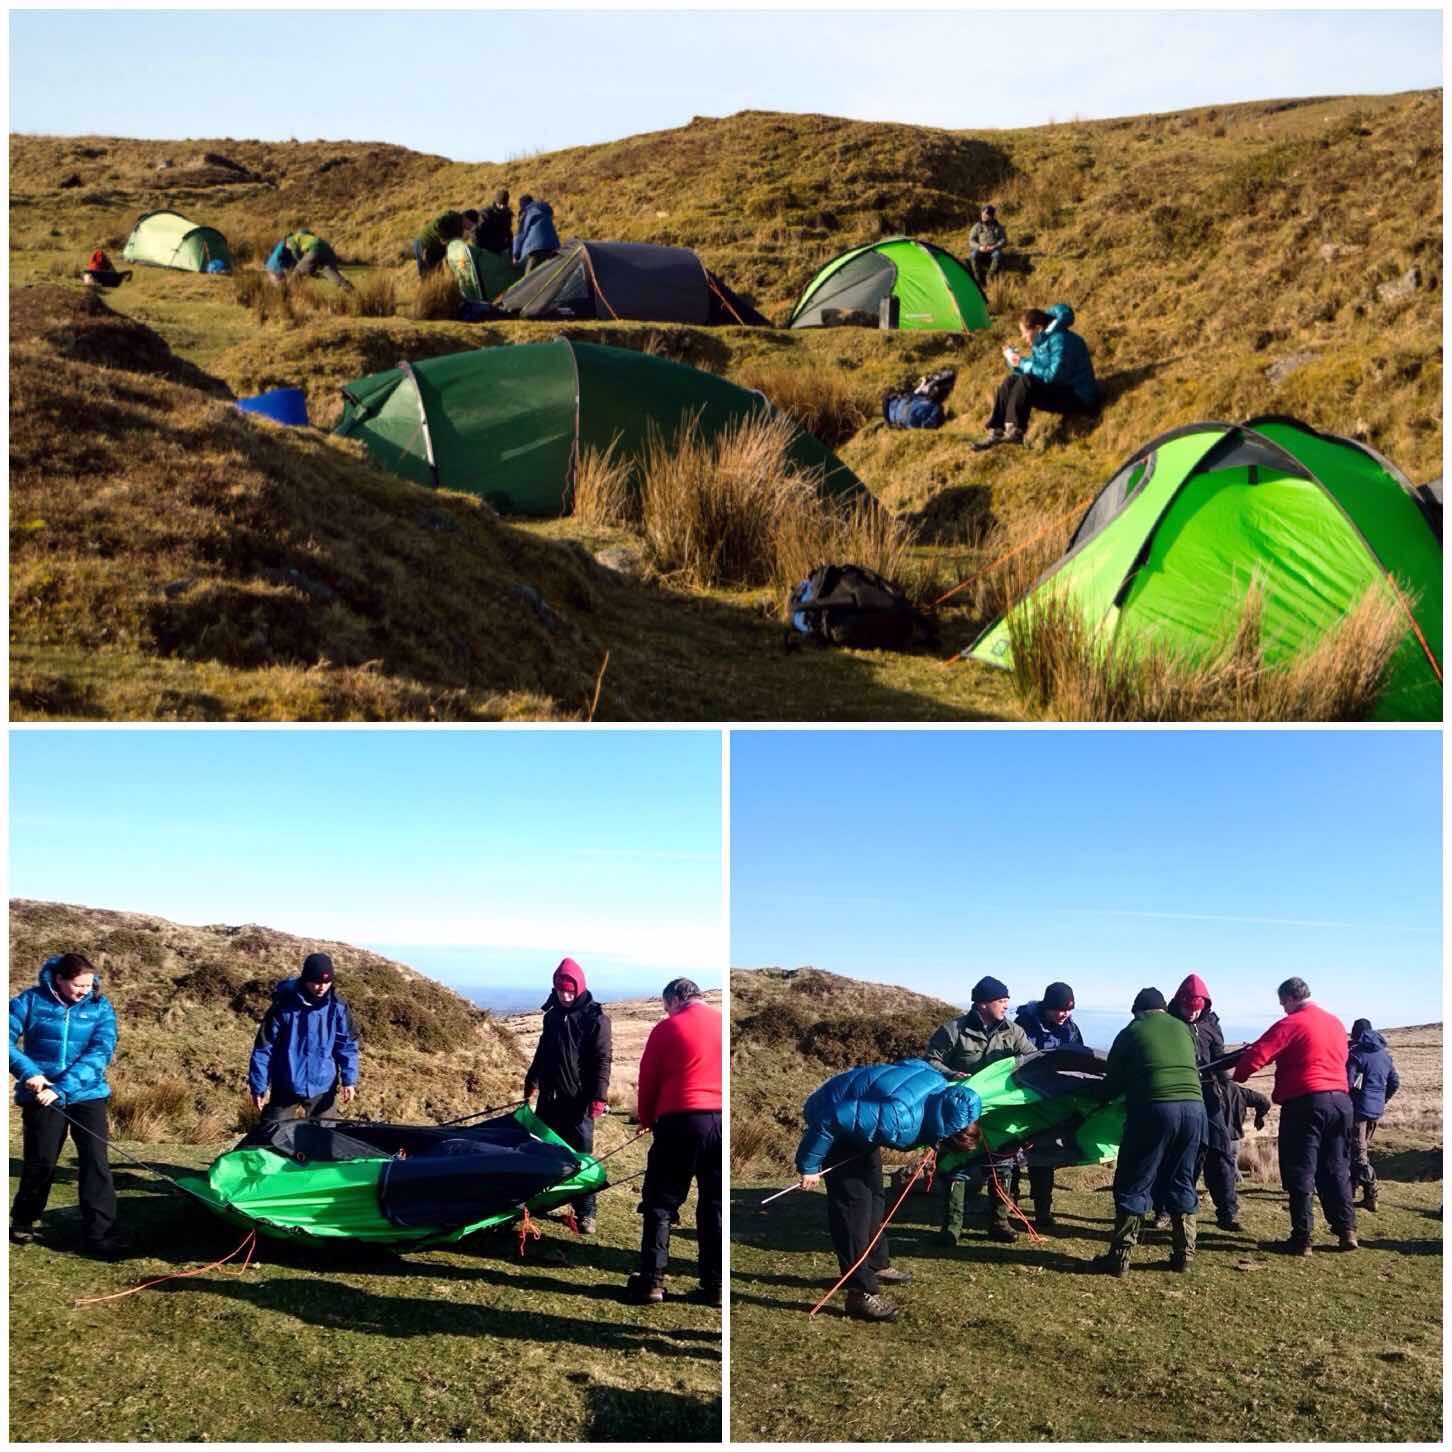
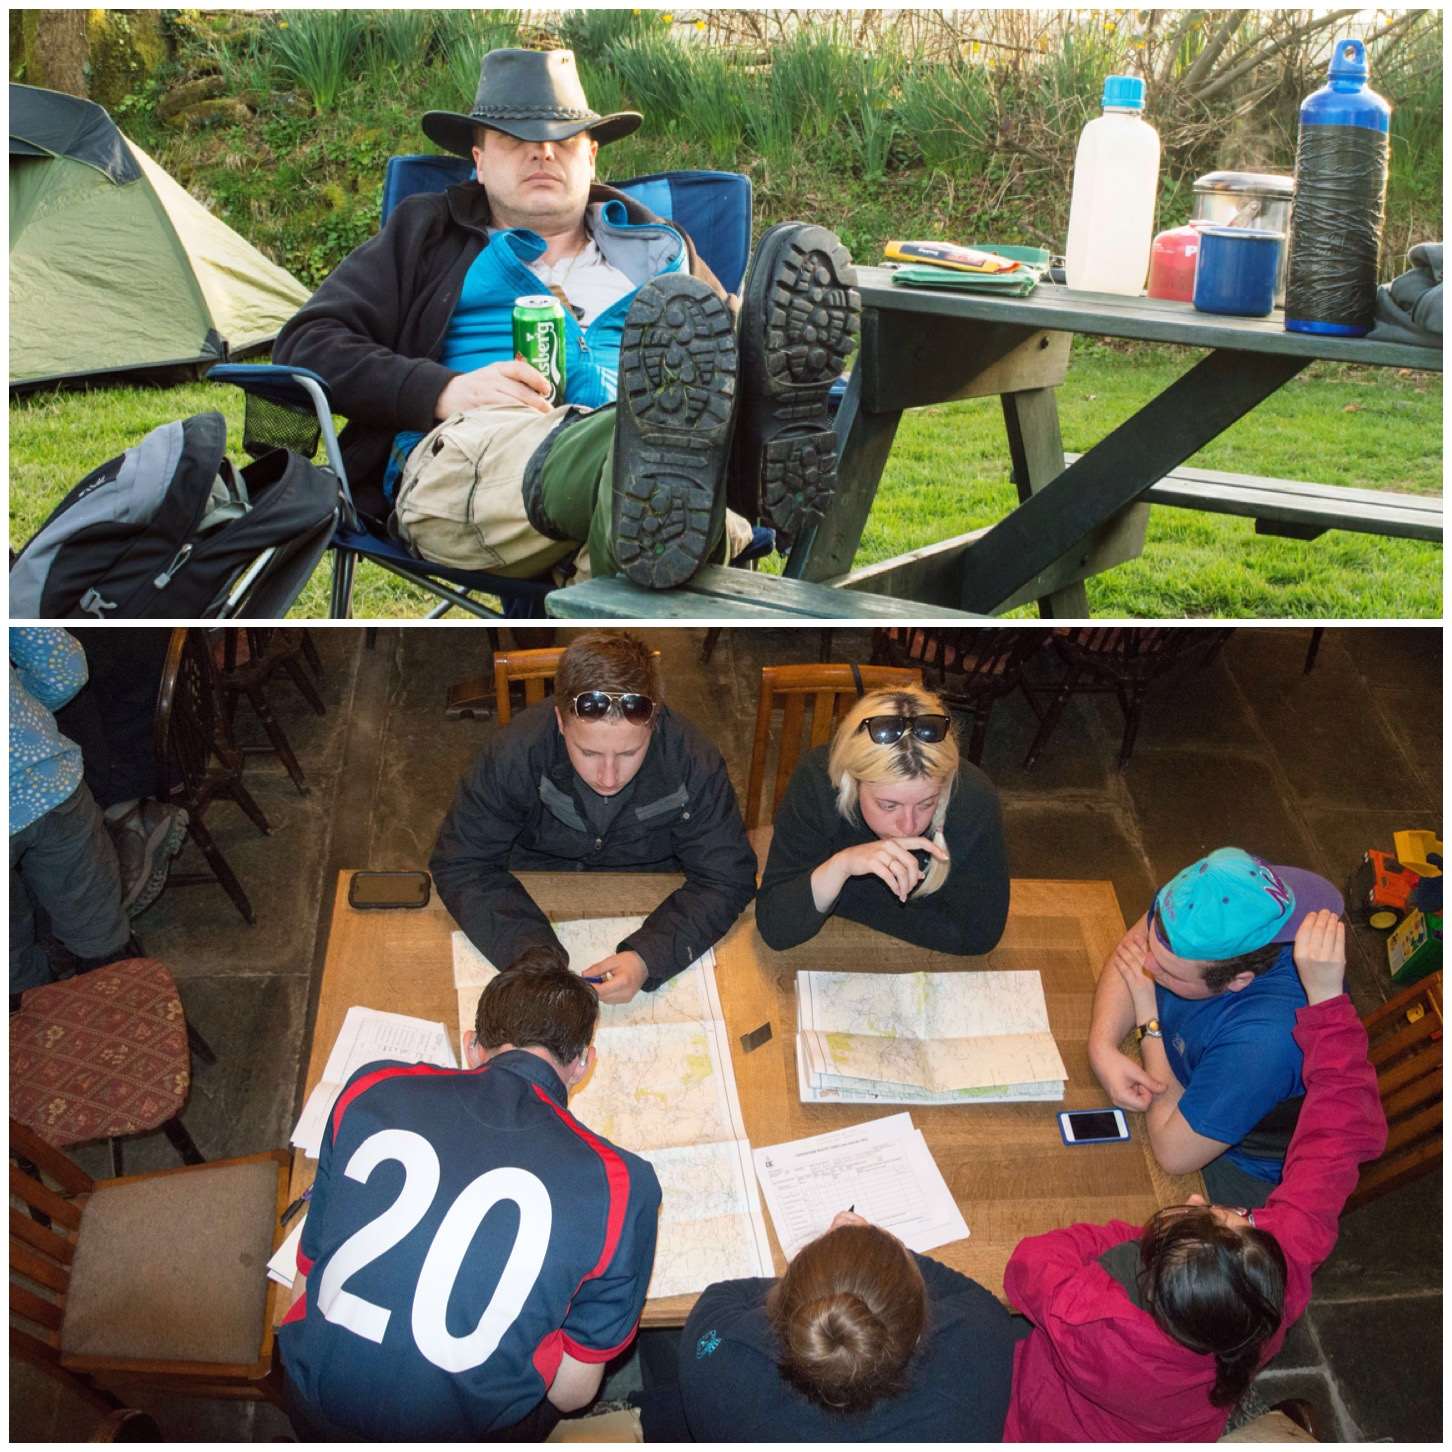
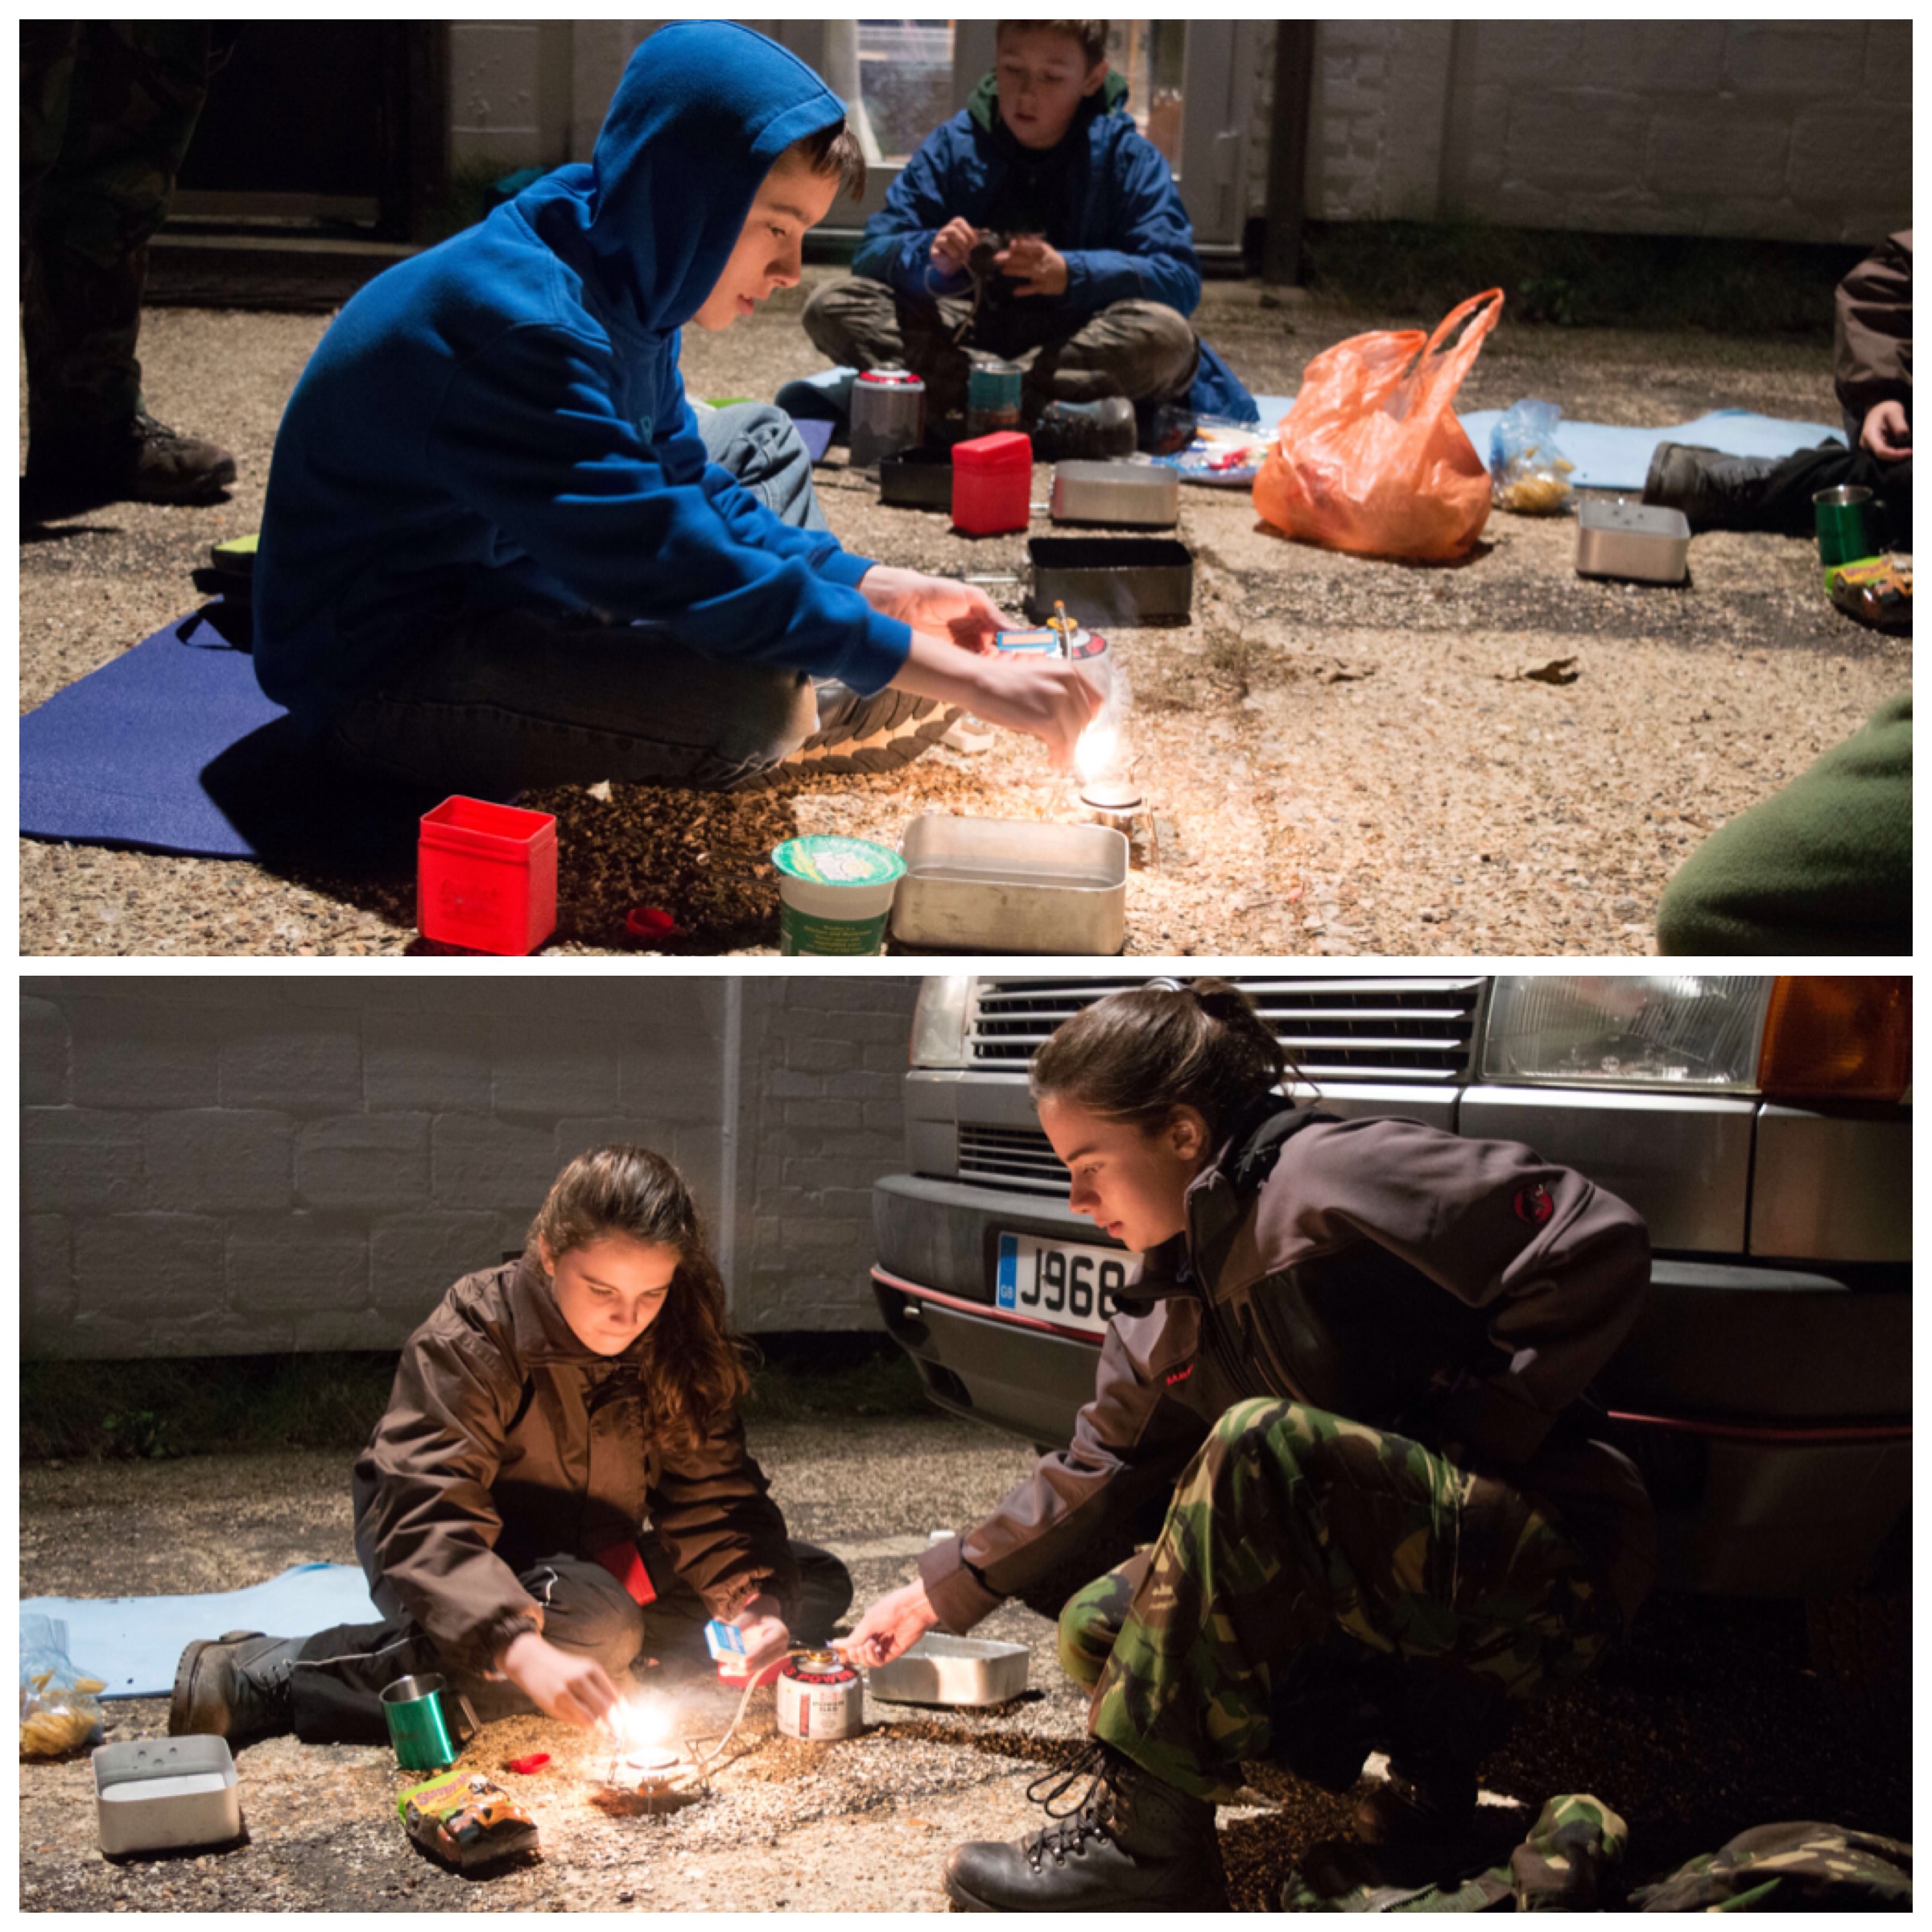
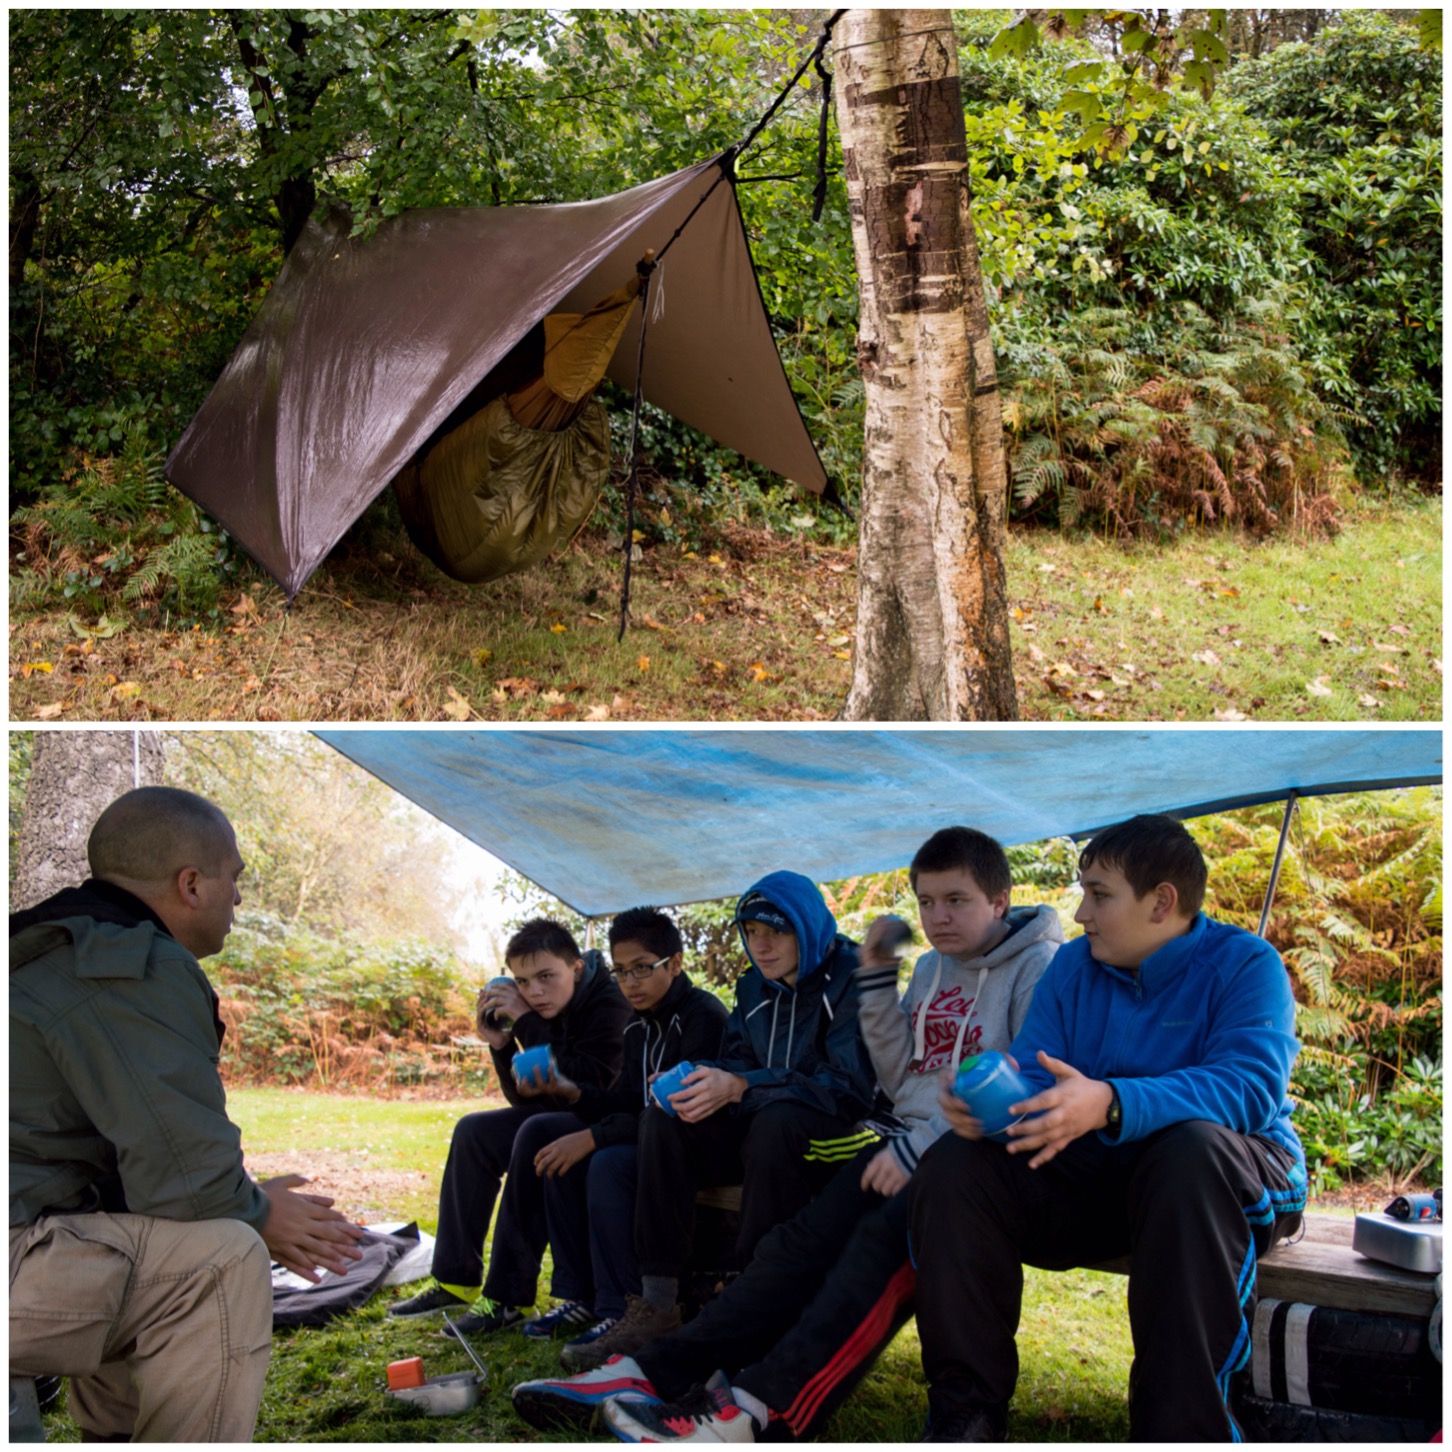
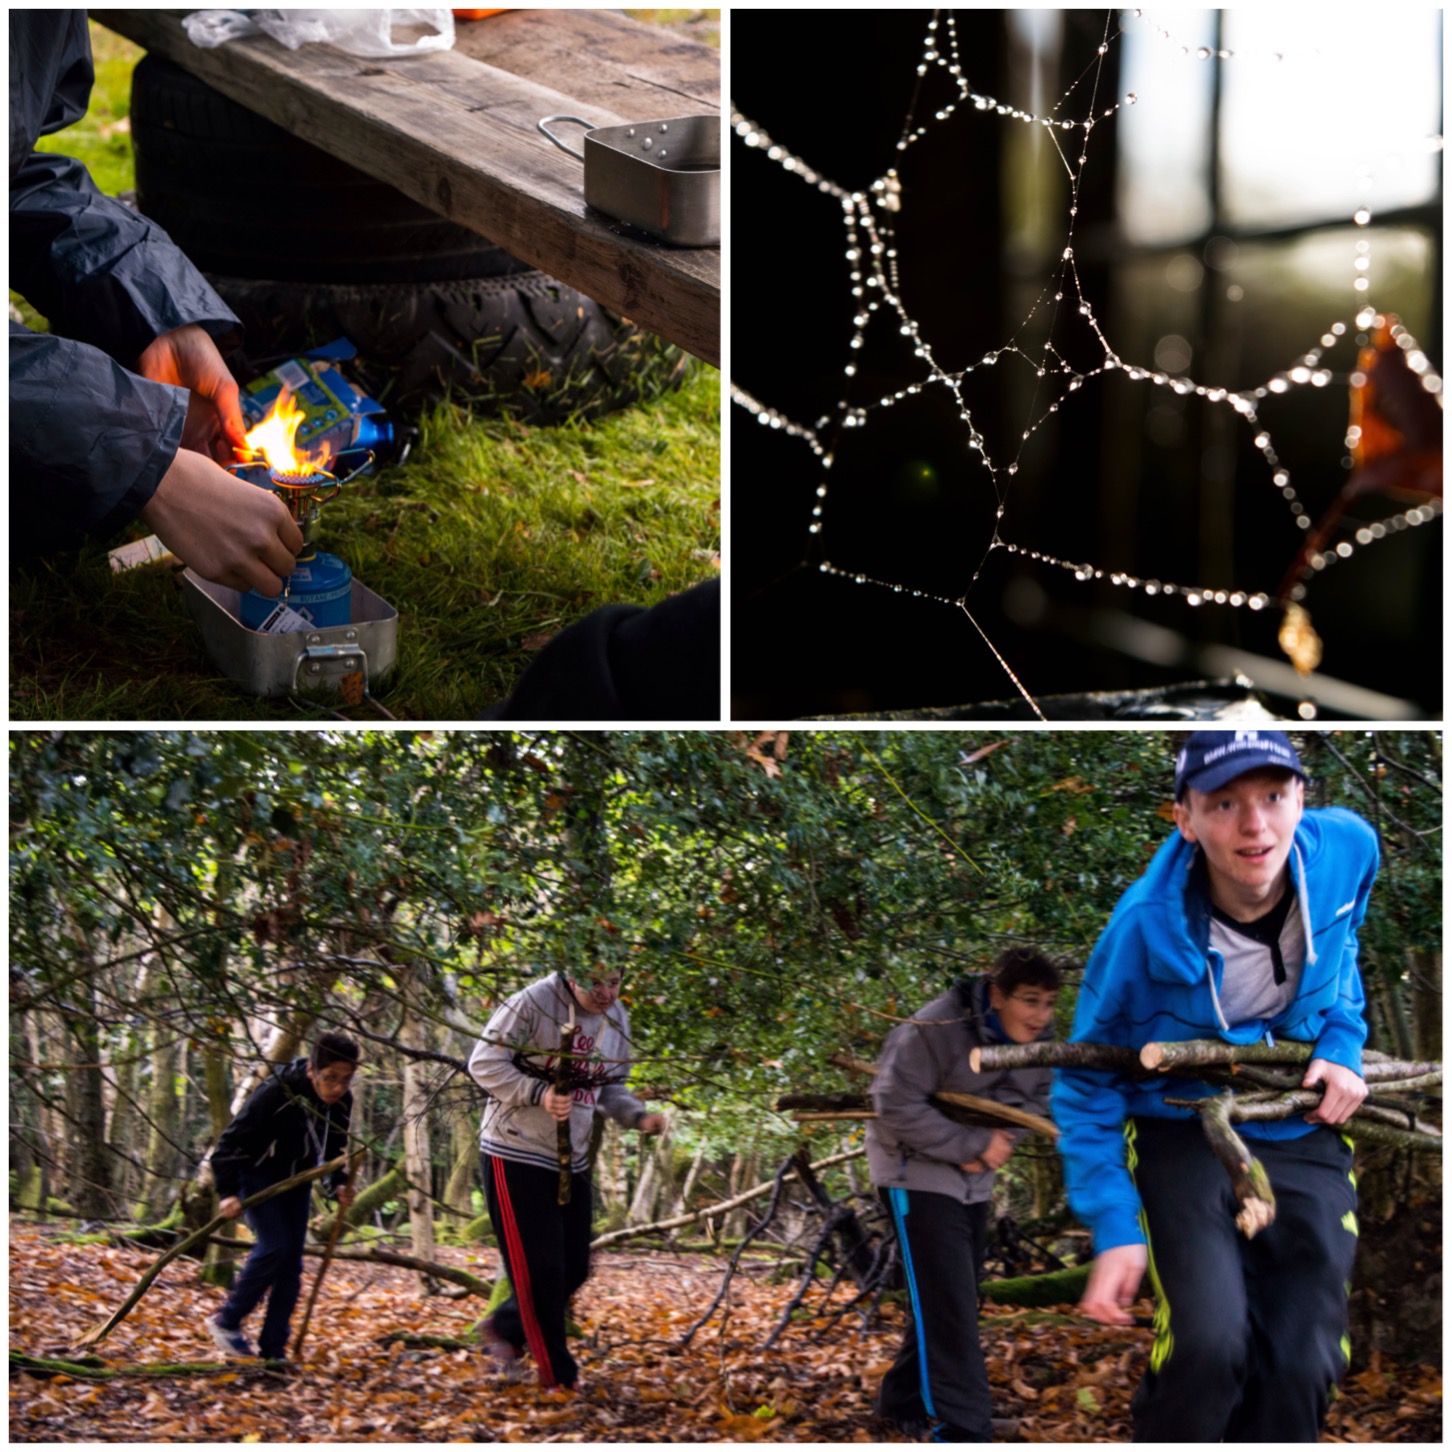
Camp on the Saturday night was quite high up but very near to a road where we had our minibus parked.
The students soon were sorted out both fed and rested 🙂
Camp, Dinner and Rest
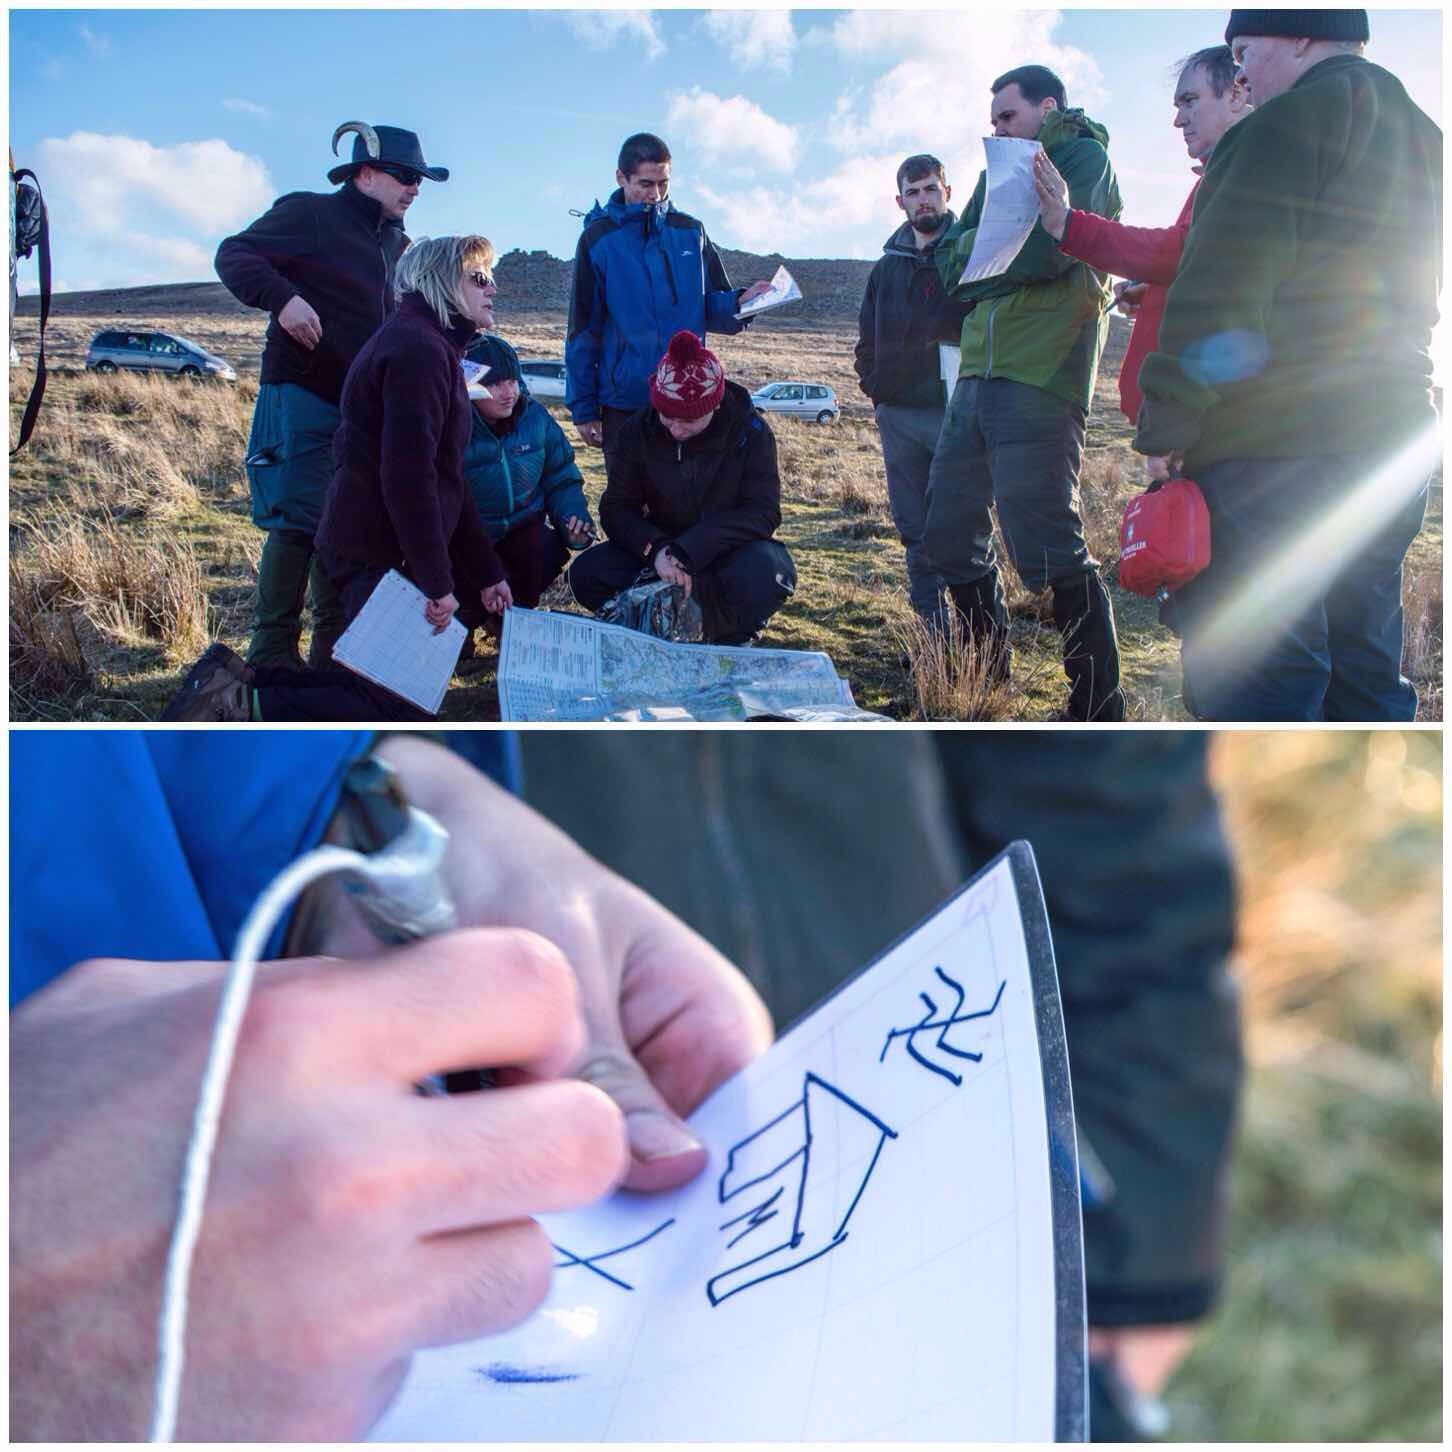
The last of the presentations were run that evening. It was still very bright but very windy. In this class Carol was doing a quiz on map symbols that involved a little artistic licence.
Once it got dark Graham and myself took everyone on a hike without torches onto one of the Tors. The skies were very clear and as everyone’s eyesight had adjusted to the dark the views of the stars were exceptional. There was a slight level of light pollution around the edges of Dartmoor but looking straight up was crystal clear.
Evening classes
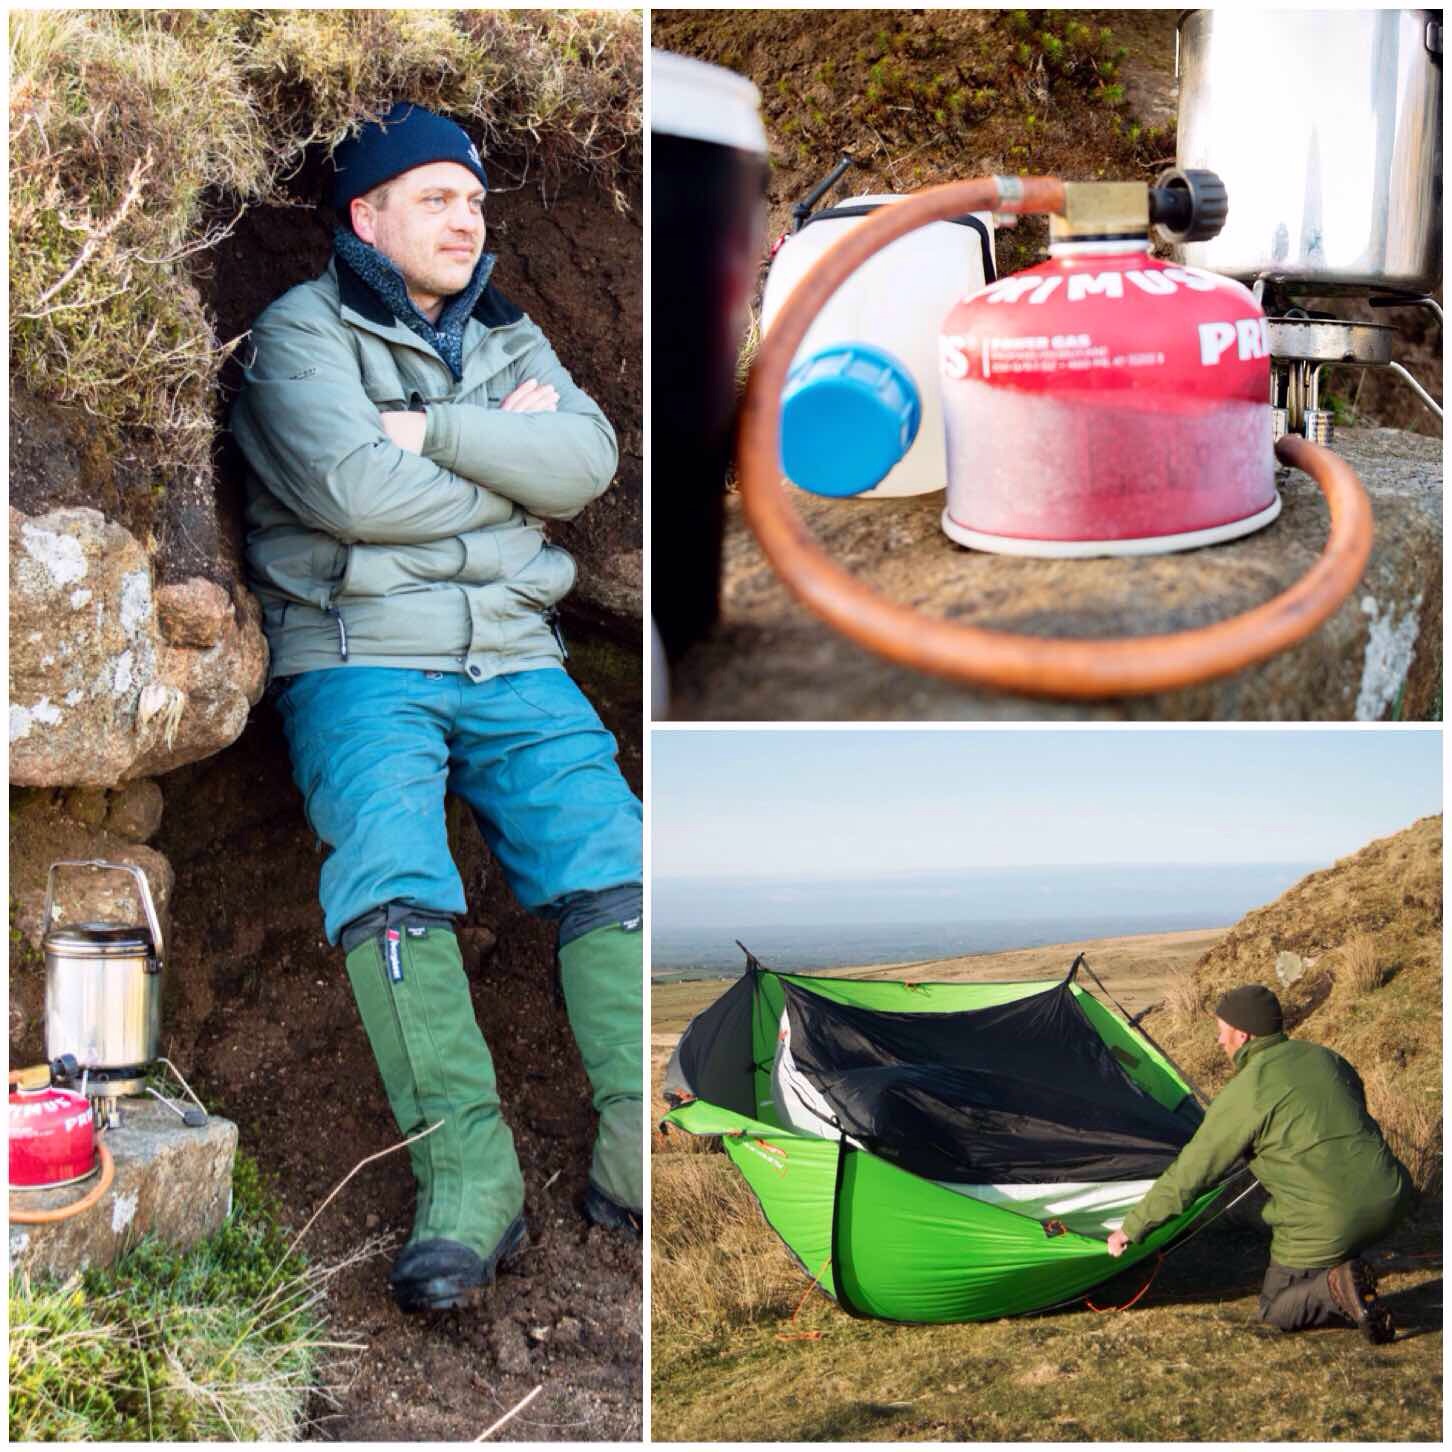
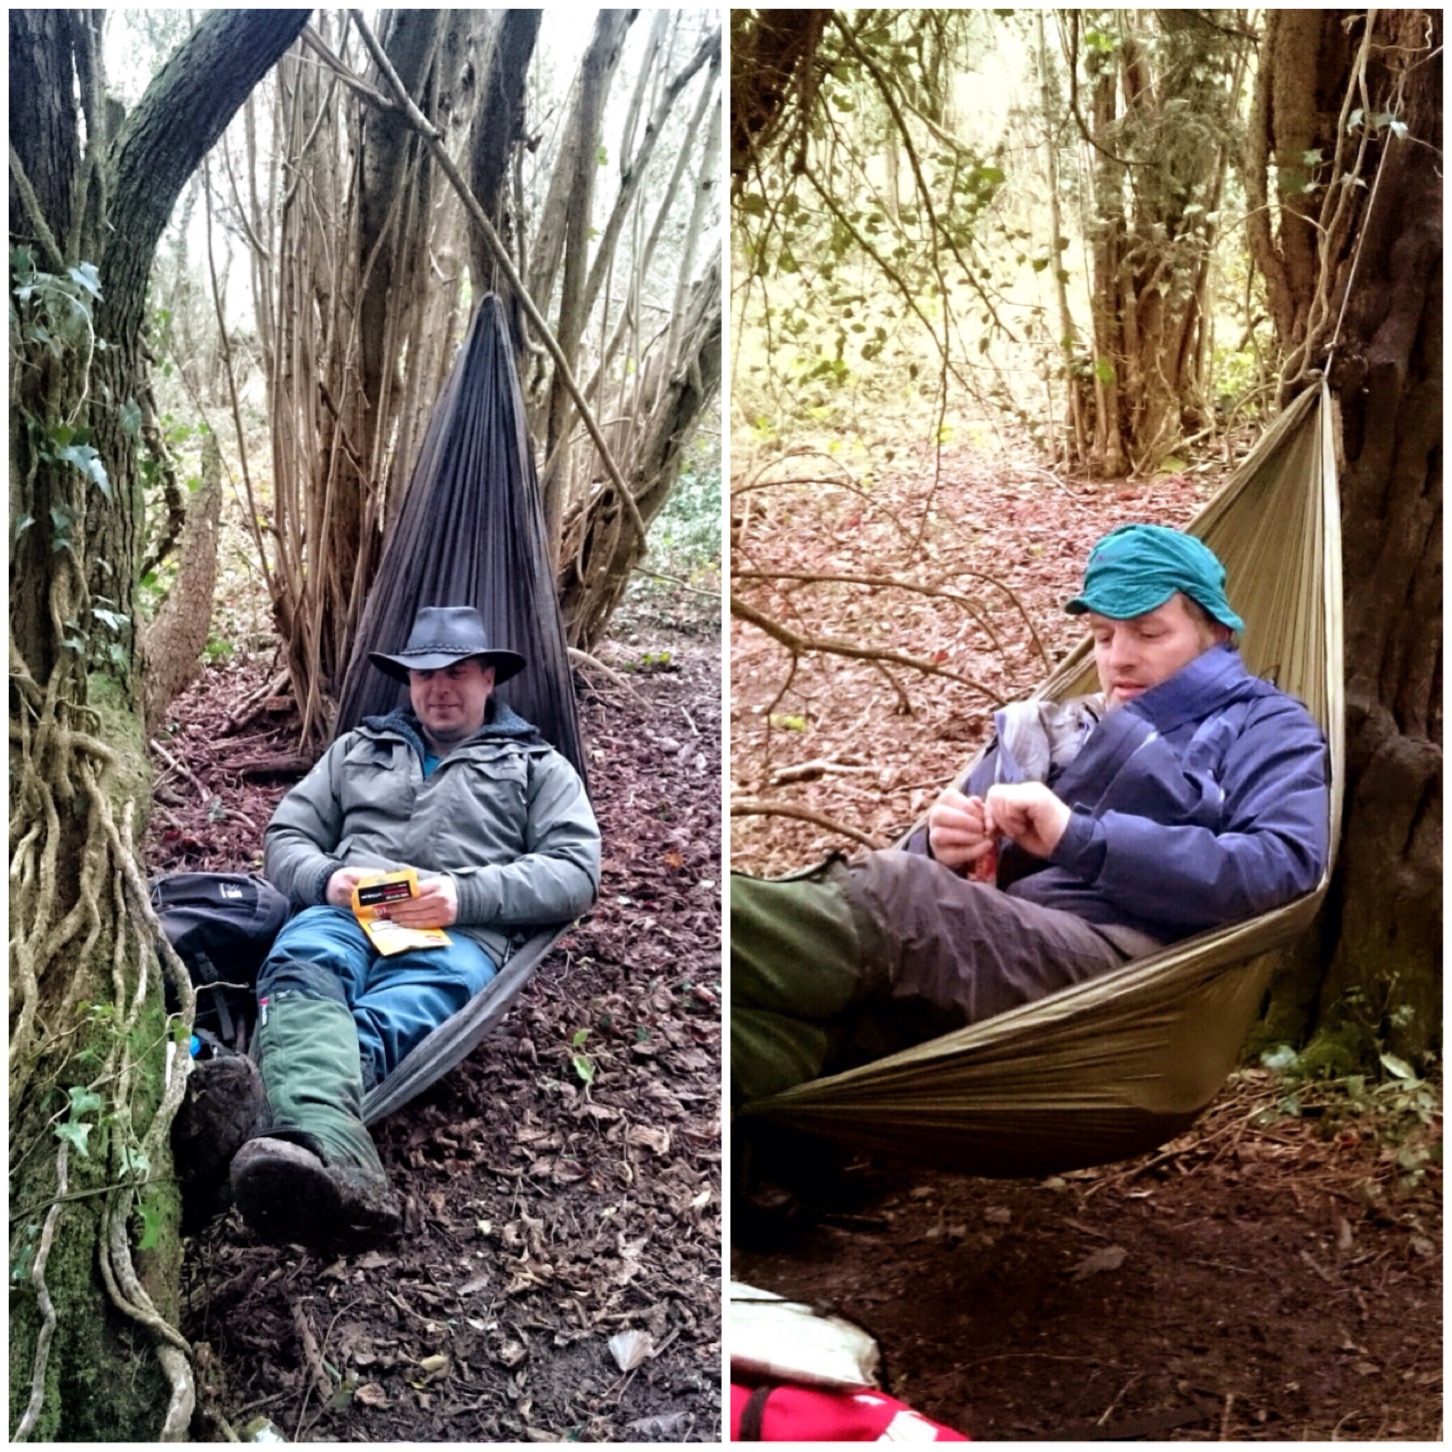
This weekend I had to sleep in a tent (contemplated the hammock stand but it was just a tad too windy) but it was surprisingly comfy I have to admit – the two roll mats helped!!
Cooking on the moor can be difficult with the wind but Dave soon found himself the perfect niche to get out of the wind to brew up.
The wind was really helpful though with drying the tents off quickly. It was just the undersides that needed drying so as long as you held on tightly to it, it was soon dry.
A windy breakfast
Now Graham managed this on his own as he is a bit of a pro however some of the student instructors (I did say some) needed to get a bit of teamwork going to get everything packed away without being blown away.
Packing and wrap up
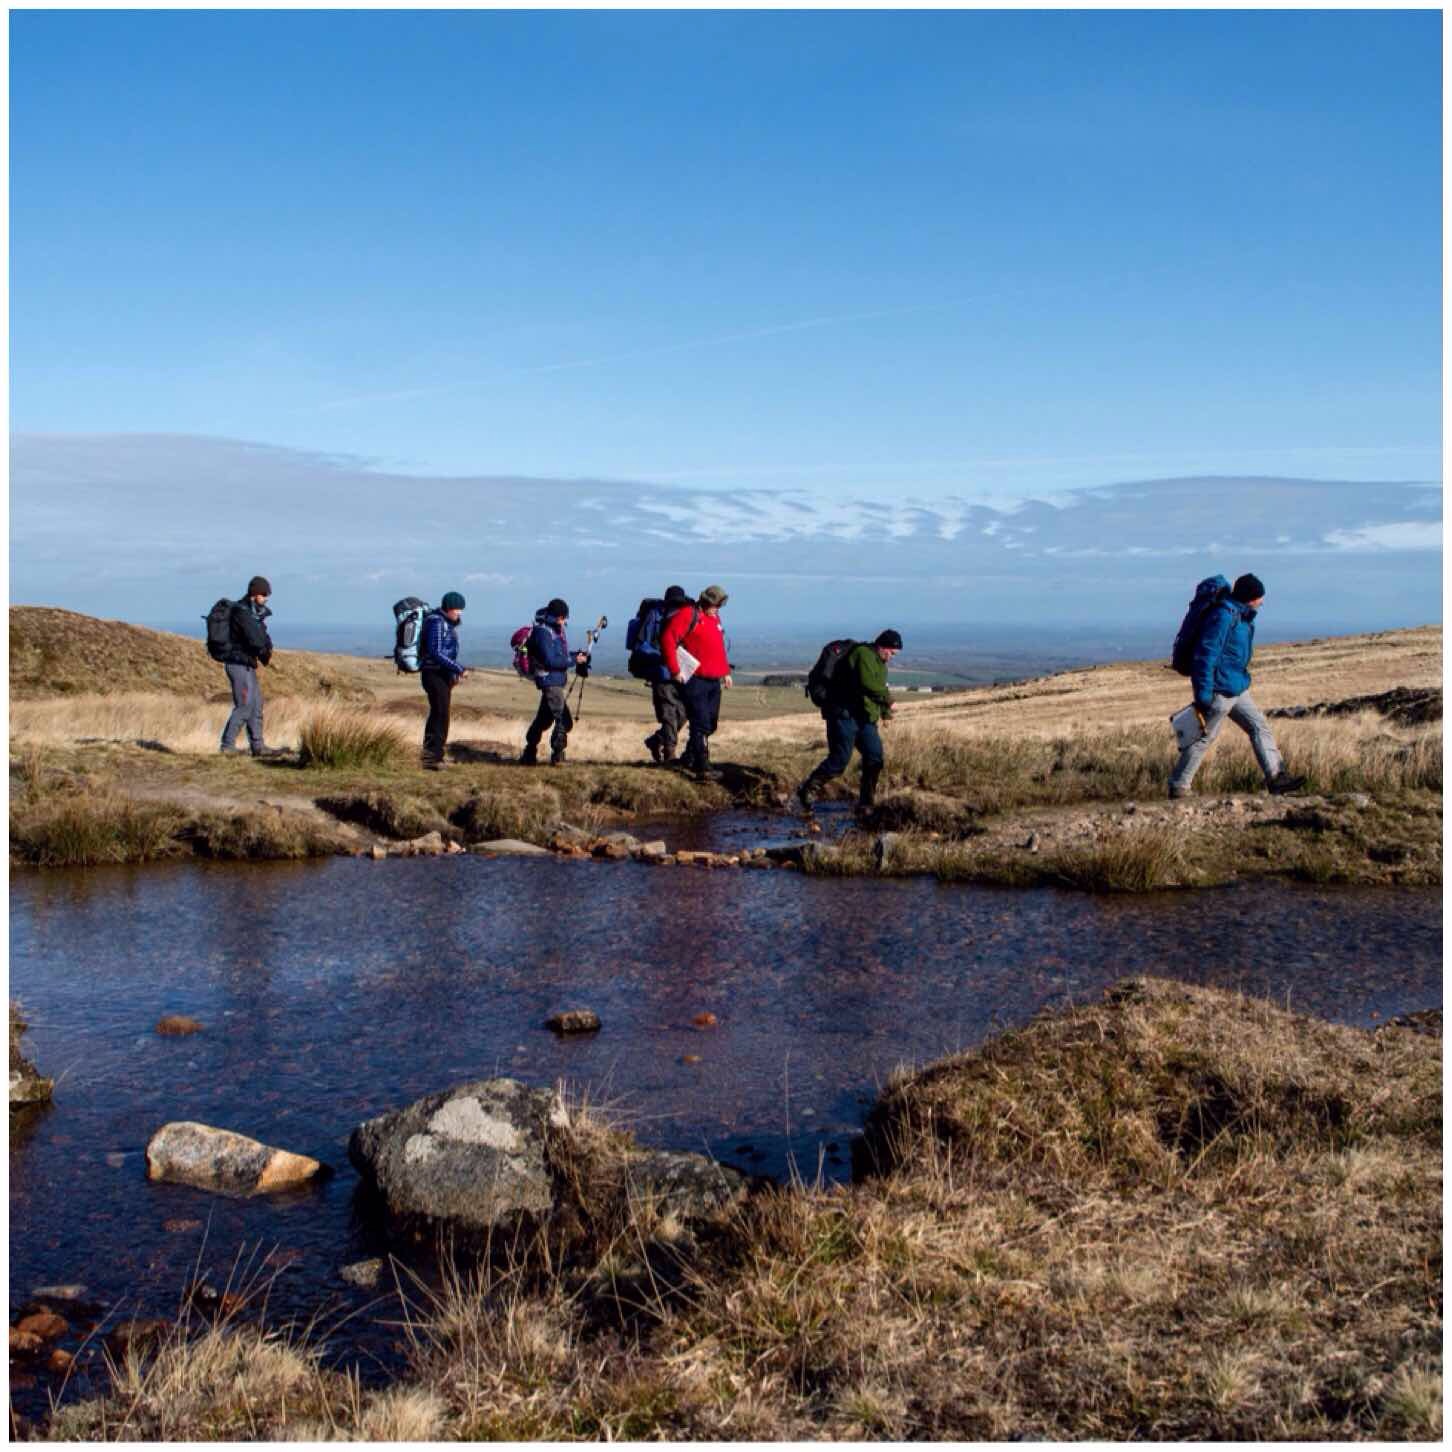
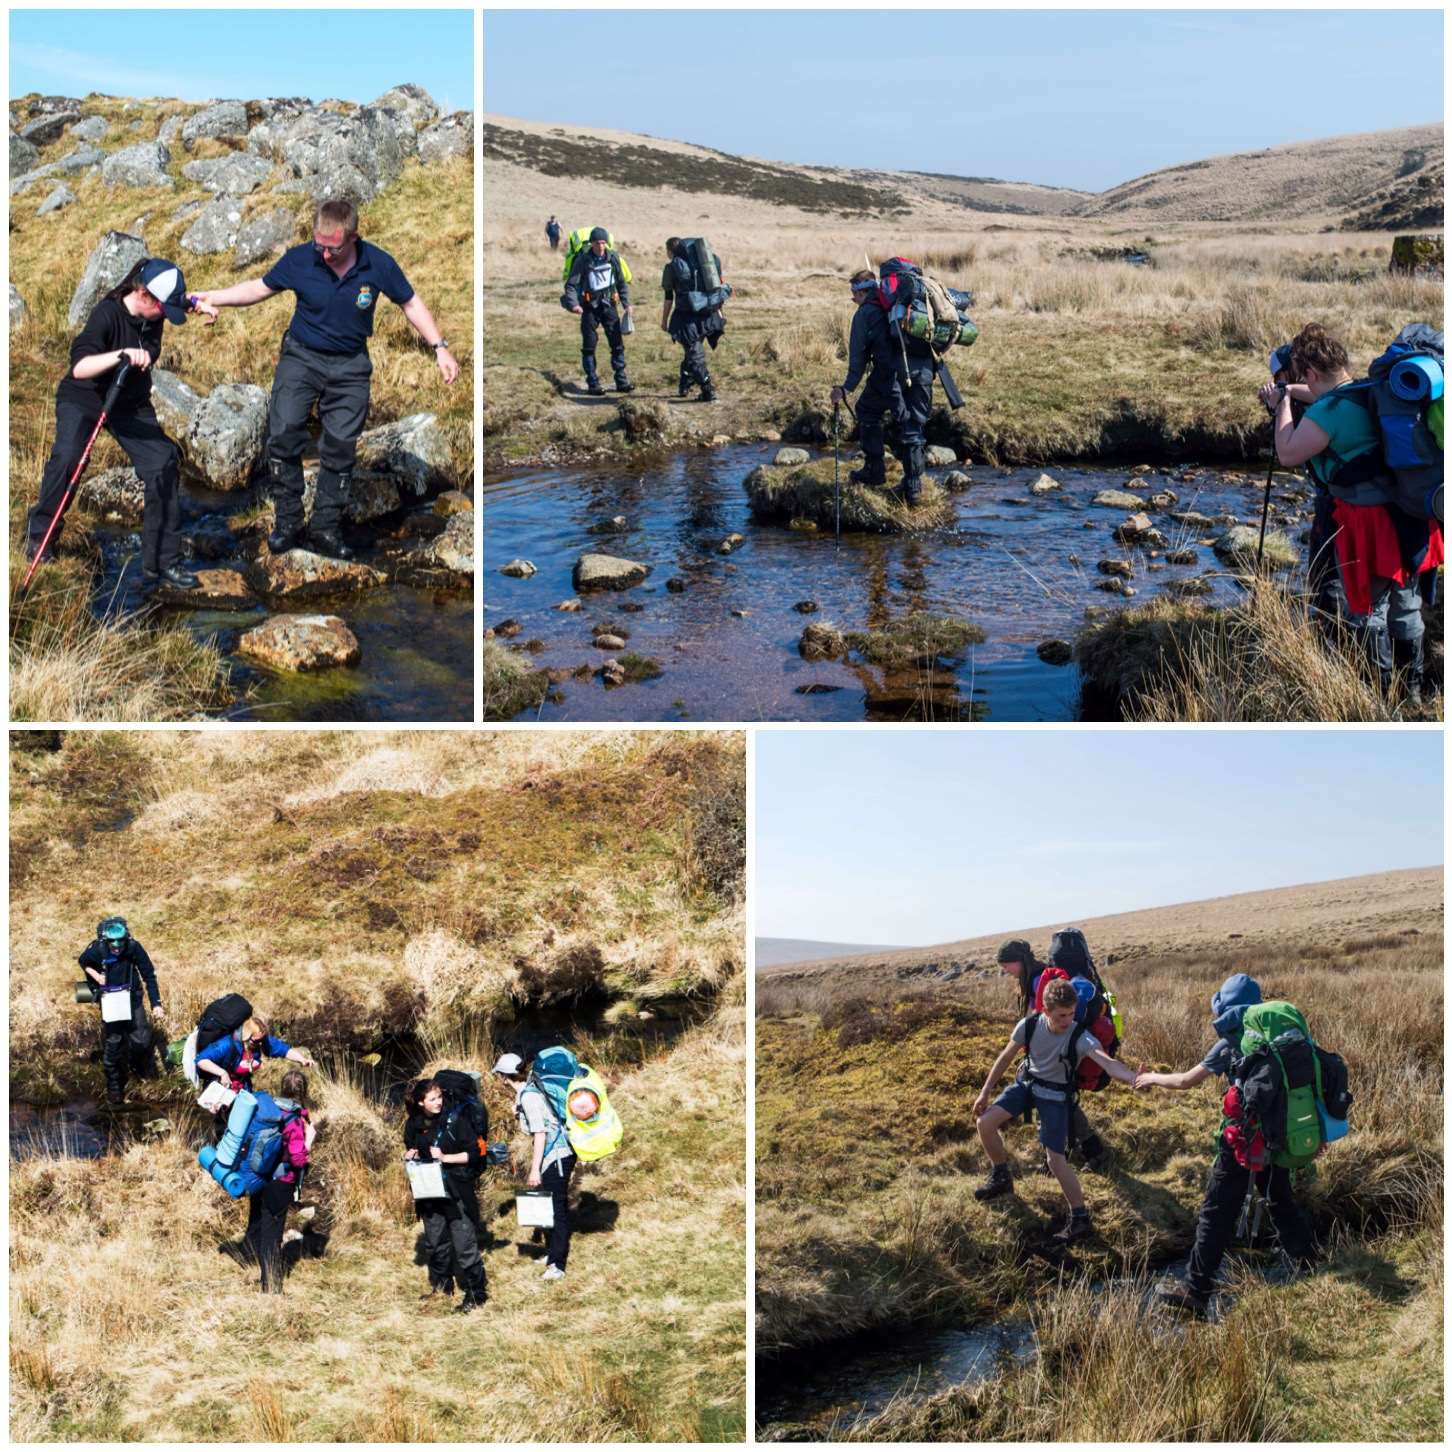
The Sunday morning was to be a short affair as we had a long drive back towards London. It was still a bit windy but brilliantly clear making the navigation slightly easier.
To begin with we did some compass work and were soon off.
Set off
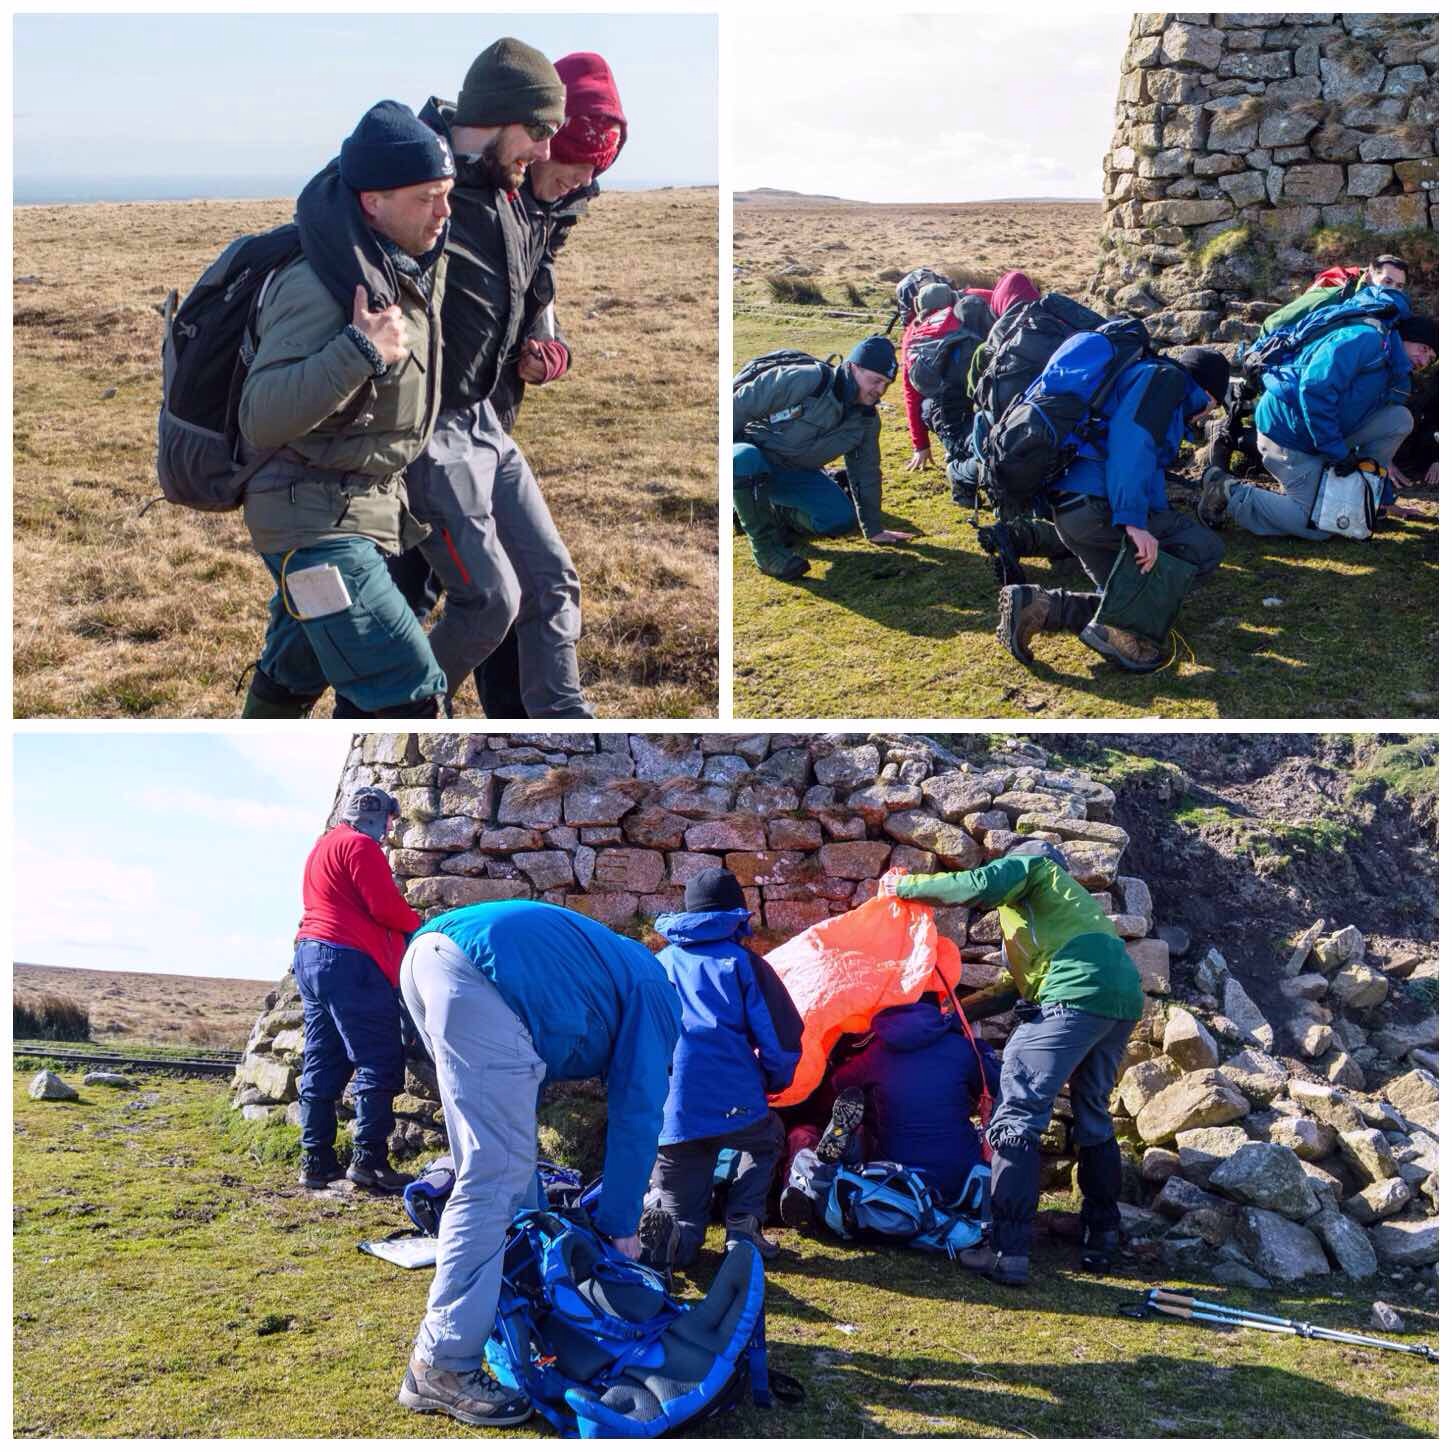
Along the way it was time to run a scenario – a first aid scenario.
It is quite common for someone to trip on the moor and pull a muscle or twist an ankle. I asked Jack to quickly lie down, set the scene for the students and set them to it.
The scenario was that Jack had hurt his leg, bad enough to find it very difficult to walk but not a broken bone. The students were briefed that the minibus was nearby (it was) and that as they had enough people in the team they could treat Jacks injuries and rig a seat to carry him out.
Casualty simulation
Jack was helped over to the side of a collapsed building for shelter to be treated to get him out of the strong wind.
In the picture above you can see the students placing their hands on the ground. This was to show them how cold the ground gets very quickly and the importance of protecting Jack from the cold ground.
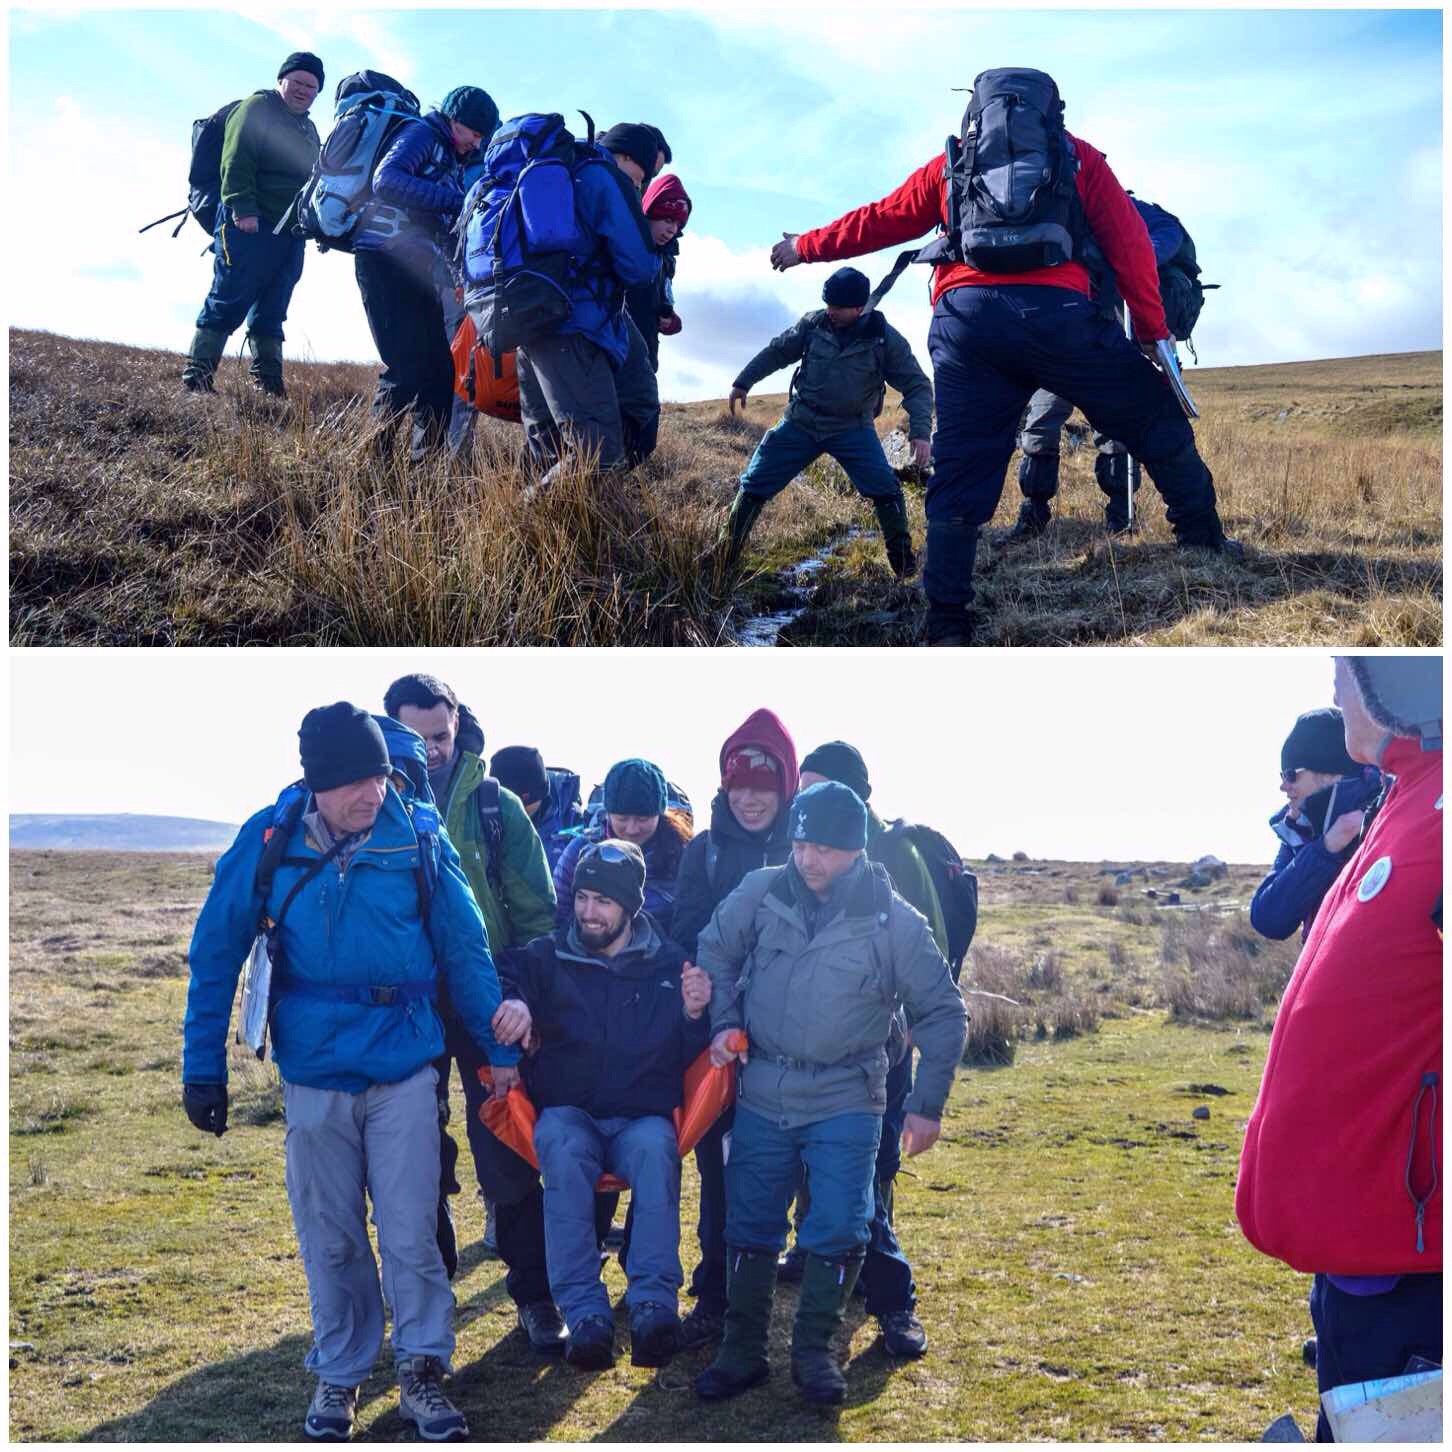
Once he was comfy a seat was rigged from a survival bag and slowly (everyone taking turns) Jack was transported about 100 metres or so off the moor.
Good teamwork
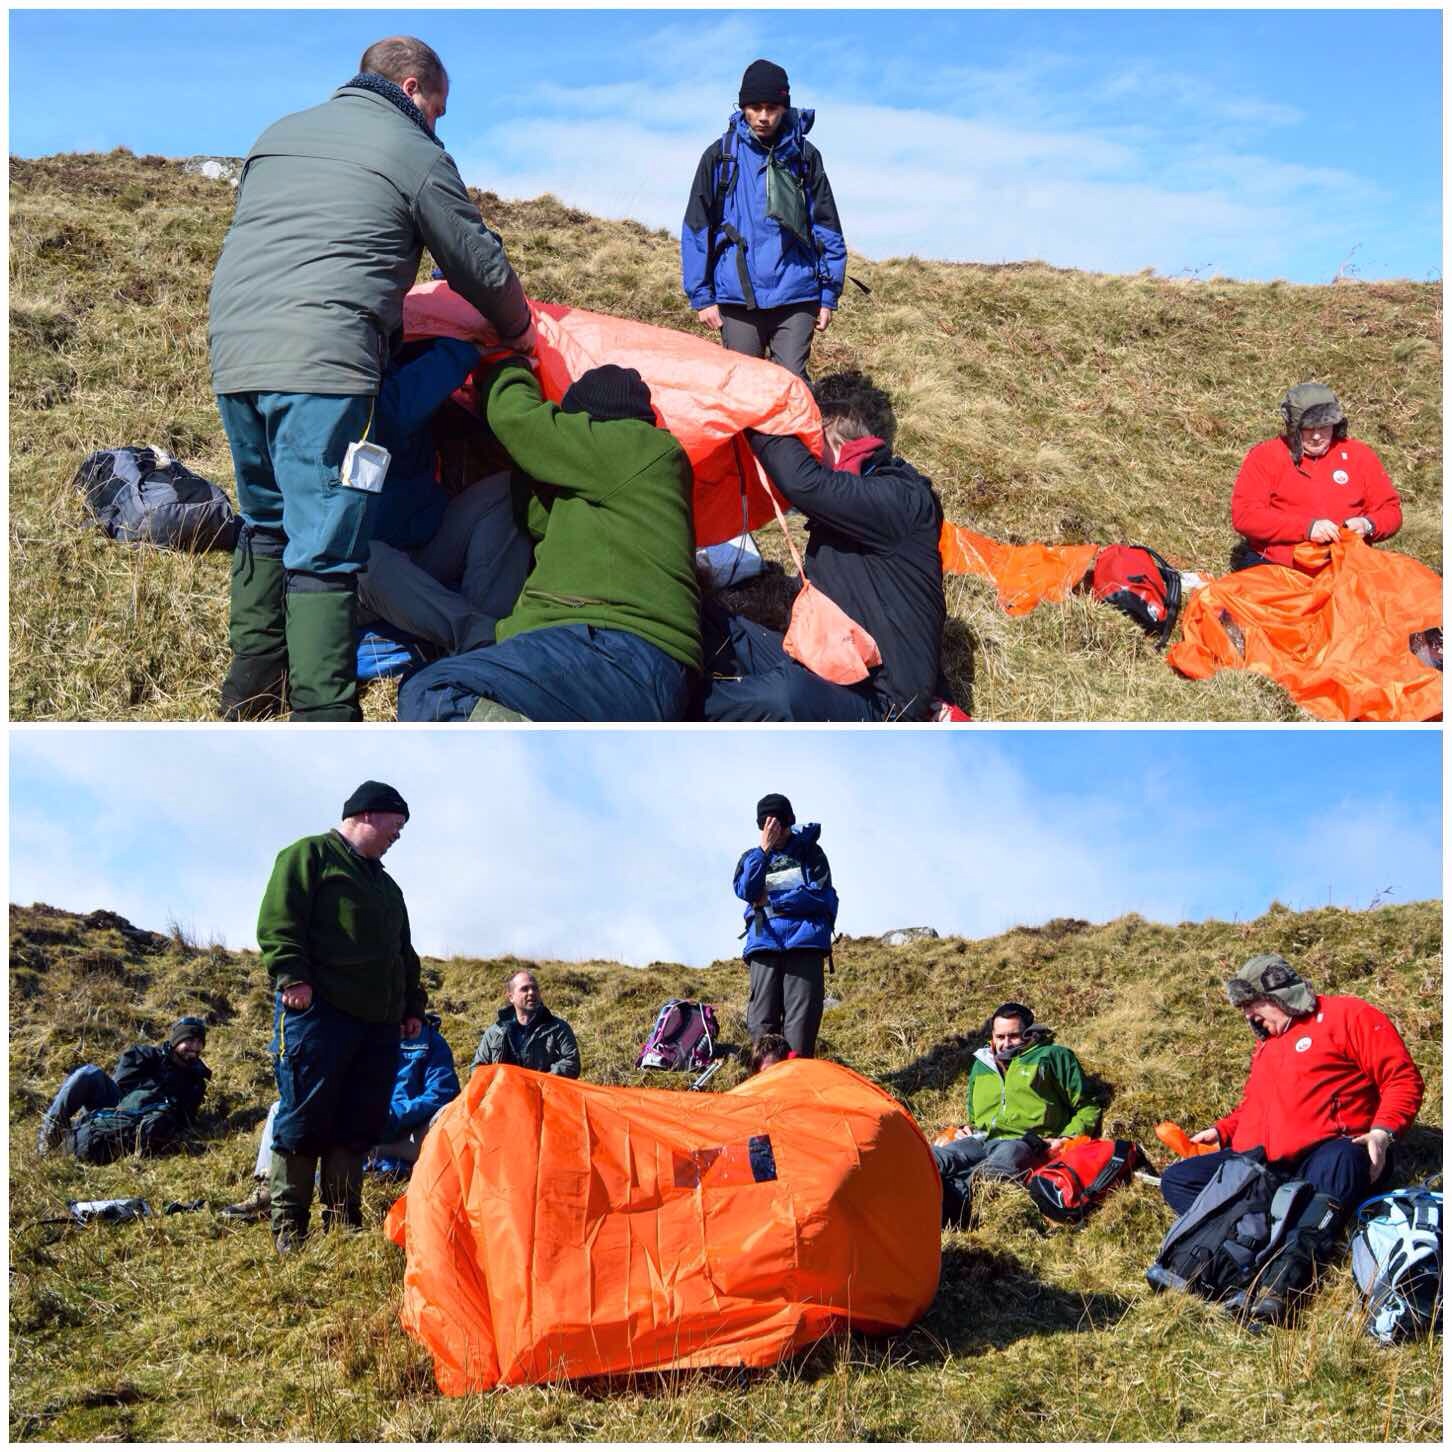
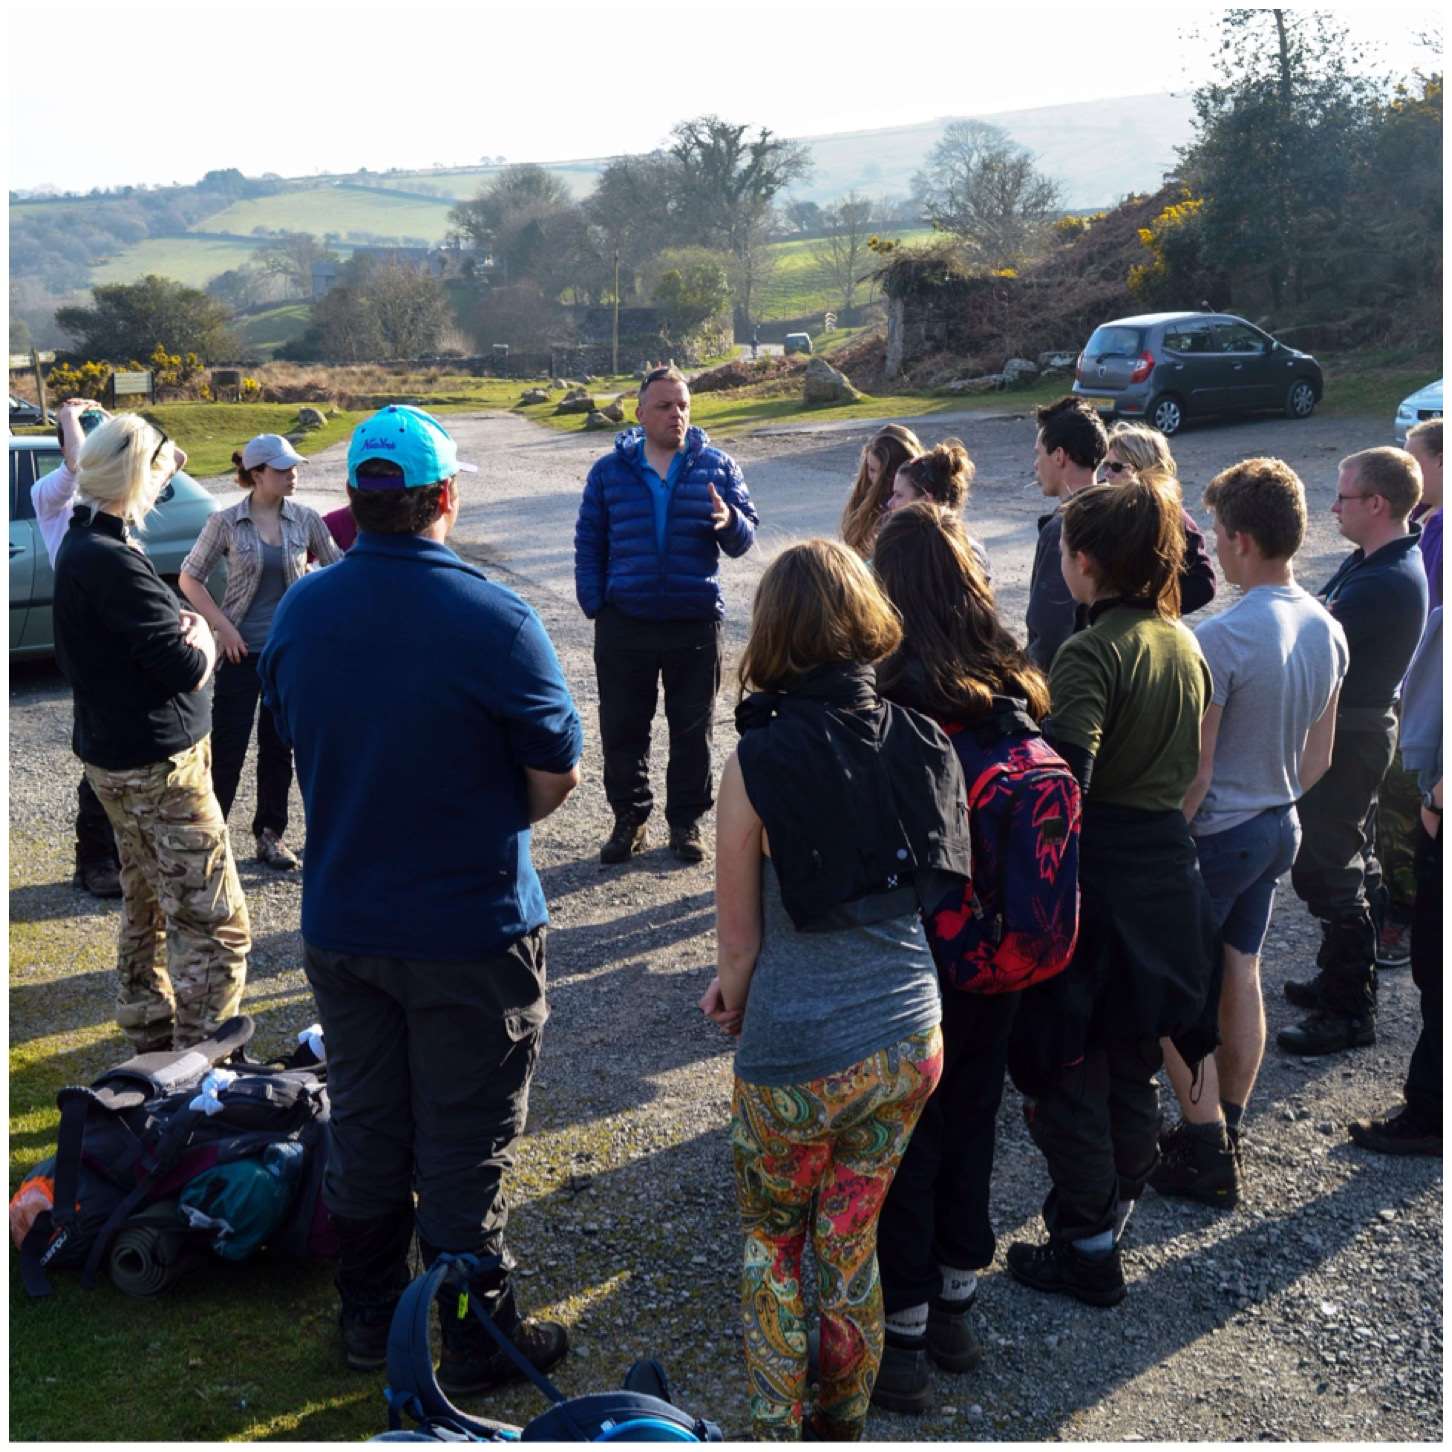
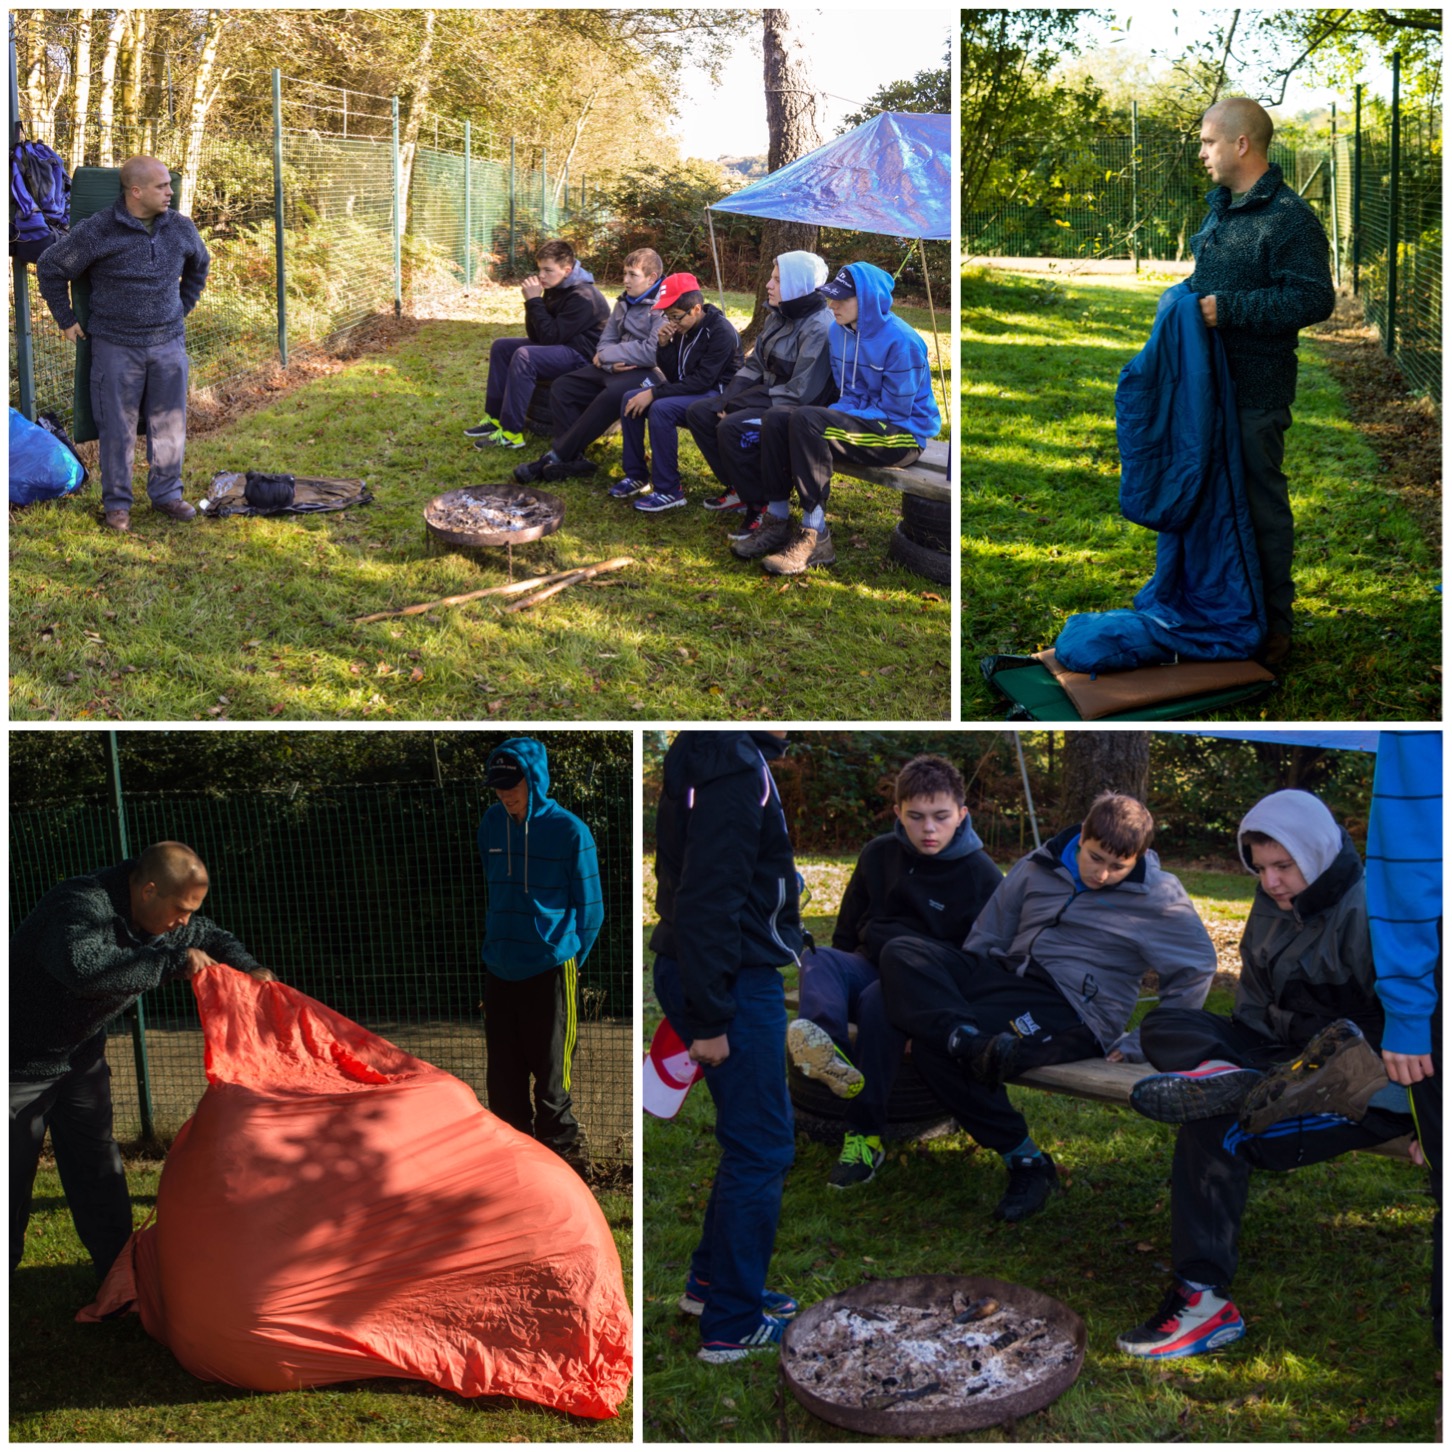
Dave got his bothy bag out for some of the guys who had never used one before to try out. This bit of kit is brilliant in an emergency to treat a casualty out of the wind or more commonly as a mobile shelter to each your lunch out of the wind.
Getting out of the wind
To finish some of us jumped into the minibus back to the camp while others enjoyed a nice walk down off the moor.
The whole weekend on Dartmoor was lovely in terms of the weather and the traffic on the A303 on the trip home ran really smooth – not often you can say that.
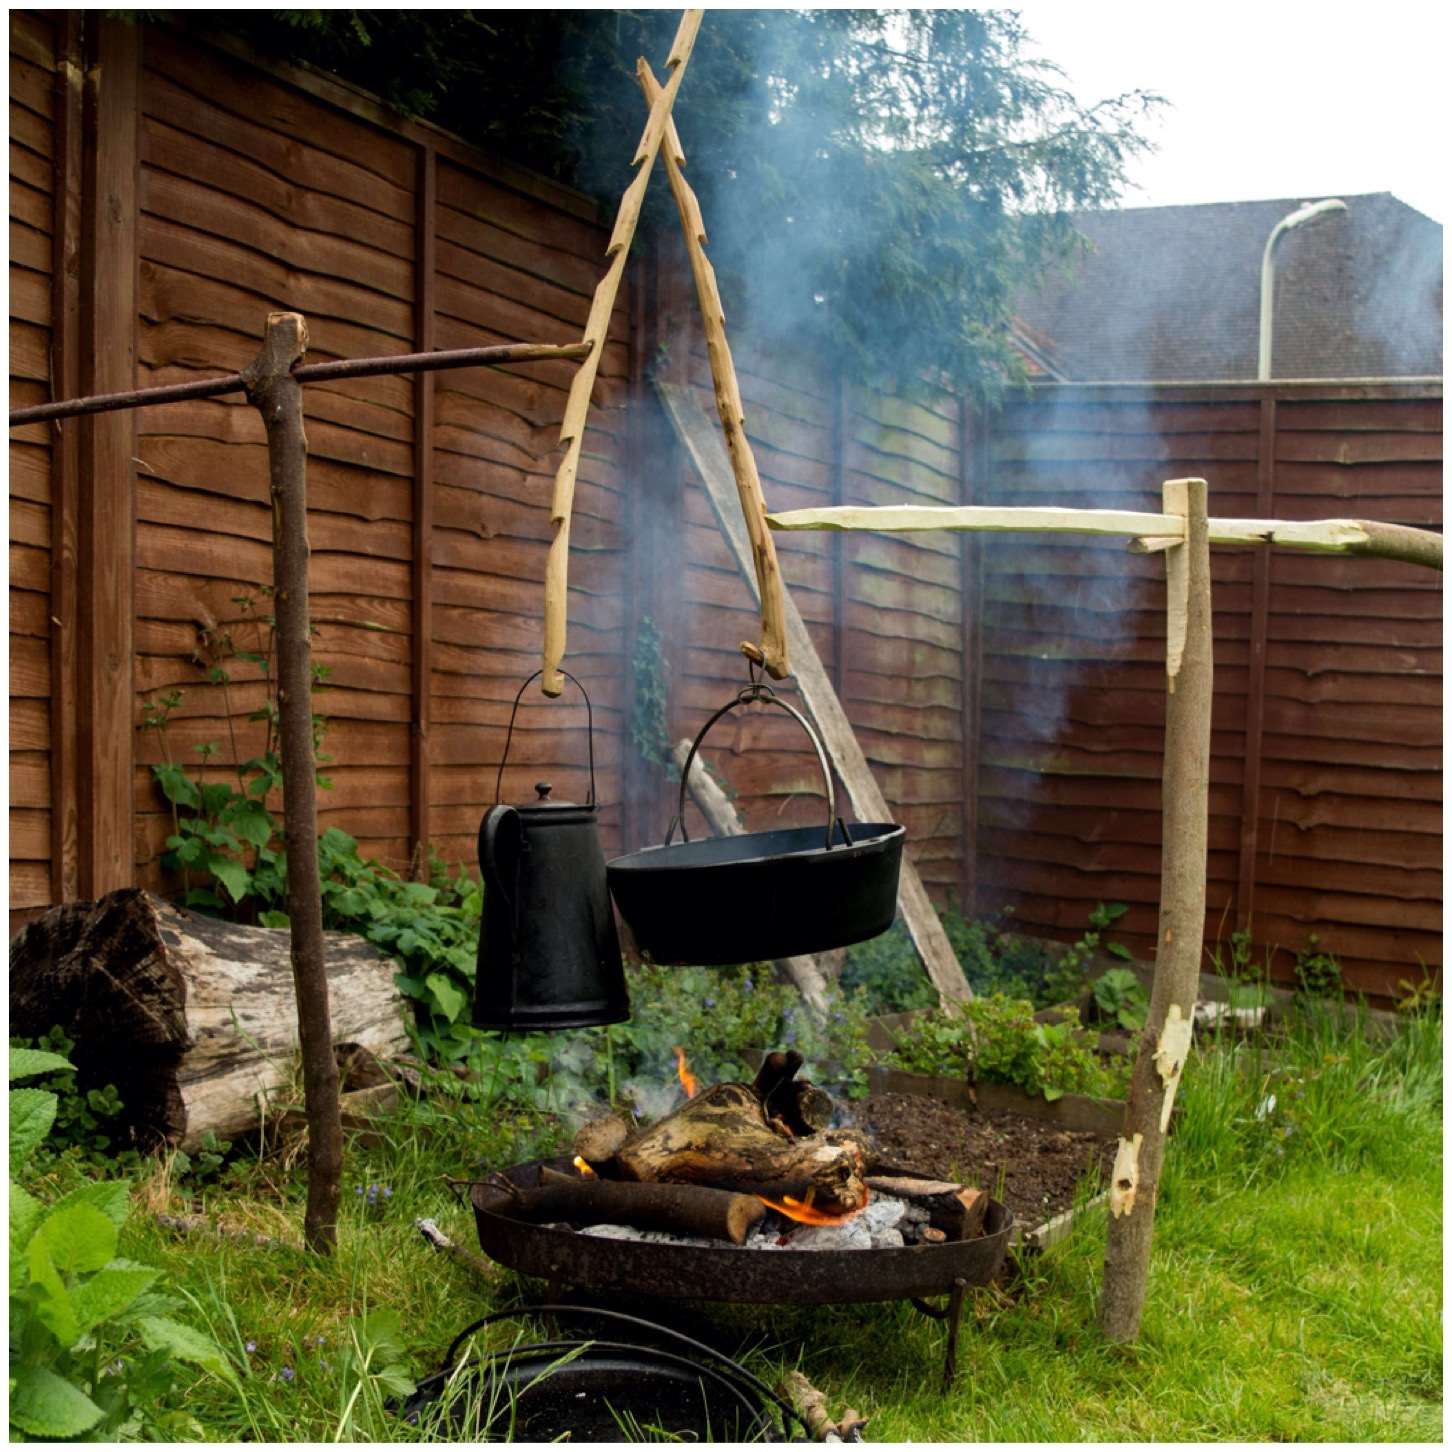
Sometimes you want an adjustable pot hook without a tripod set up.
Sometimes you want to pour your coffee without getting burnt by the flames.
If that’s what you want then build yourself a crane – It’s easy.
A robust and versatile campfire crane
There are a number of different ways to build a crane set up however I decided to try just with the general tools I would carry in my rucksack. These included an axe, a saw and a general bushcraft knife.
The wood I used was some sycamore I had recently polarded in my garden. The crane is made up of a thick upright and smaller pieces to act as the arms. I decided to make two different types of arms, one for small pots and one for bigger Dutch oven type pots.
Sizes and dimensions will vary depending on how high you want your crane to be and what weight you want it to hold.
Carving the upright
I decided which part of the upright would be the top and then flattened it to give me a working area. You do not need to do this however I find it gives me a stable working surface. You can see in the pictures below that the girth of the upright is just larger than my hand as my fingers do not fully close around it.
Basic parts and flattening the top of the uprght
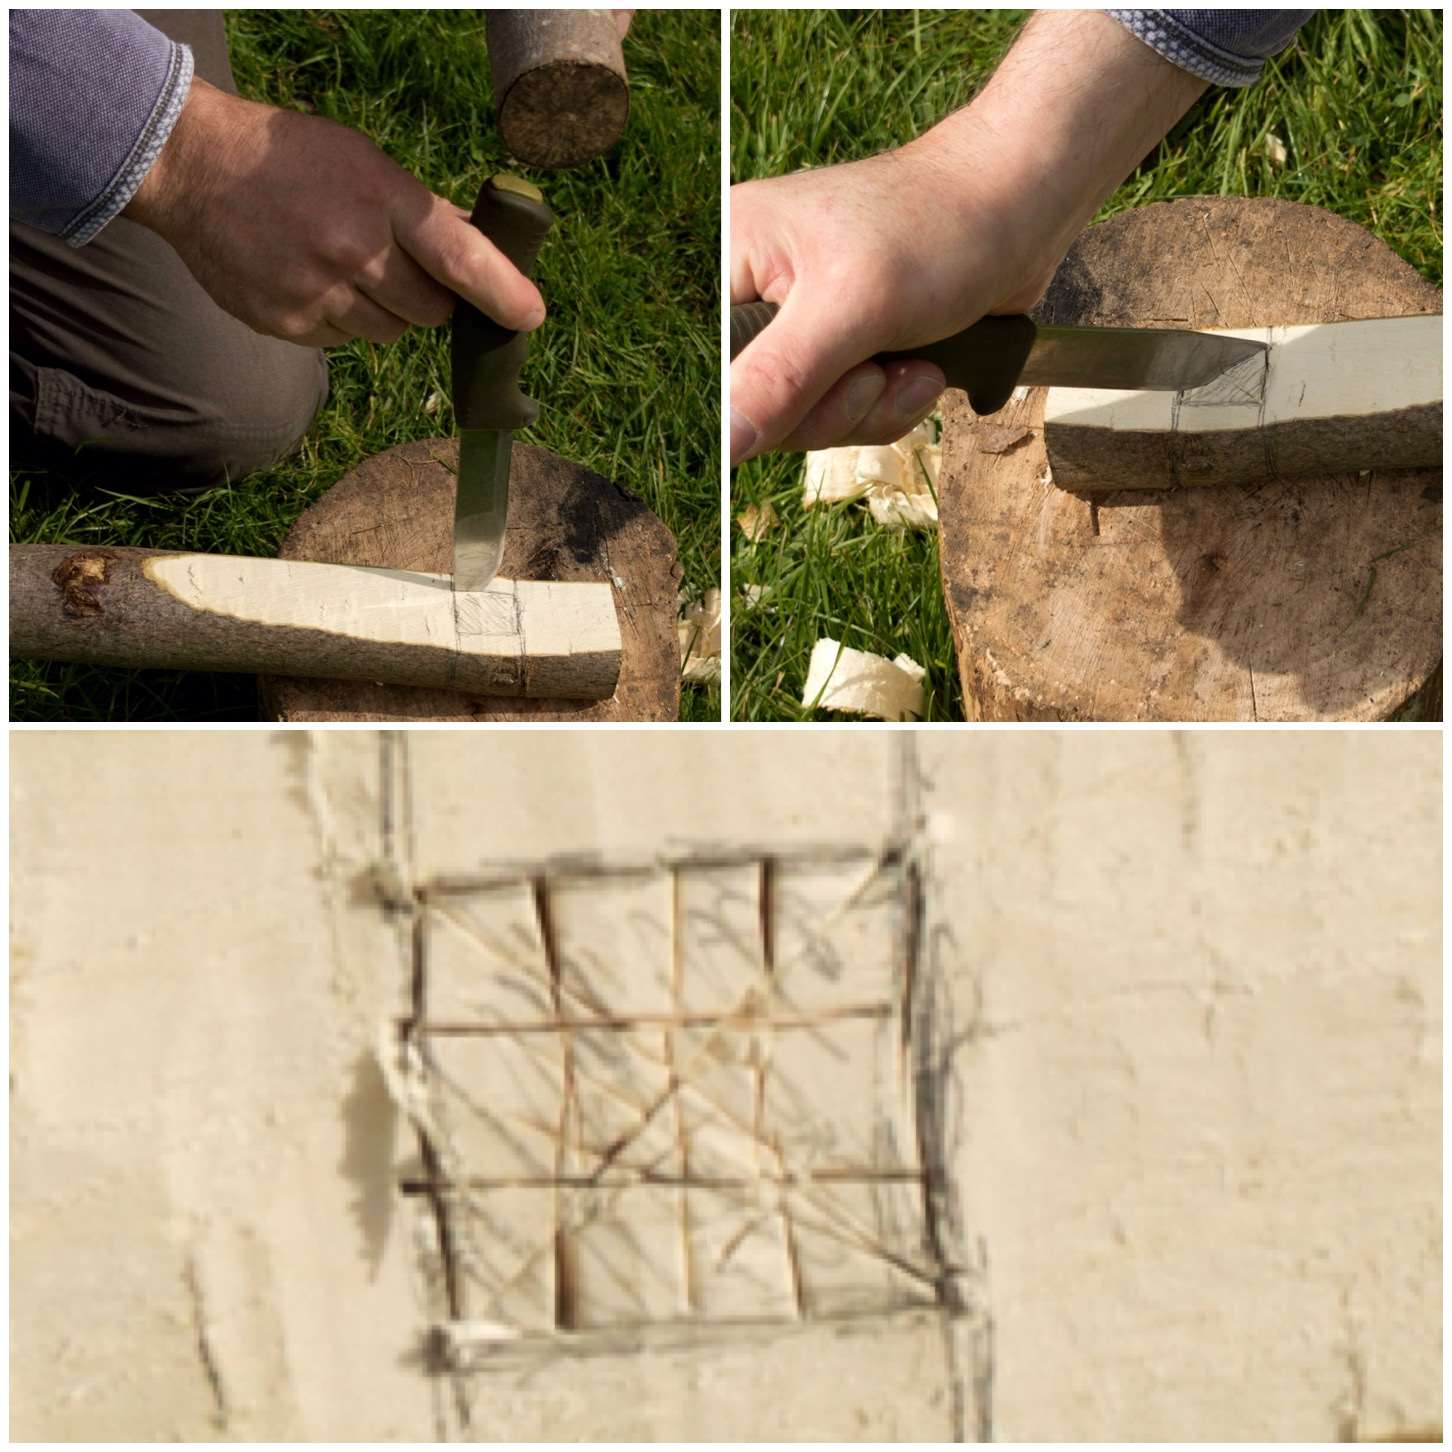
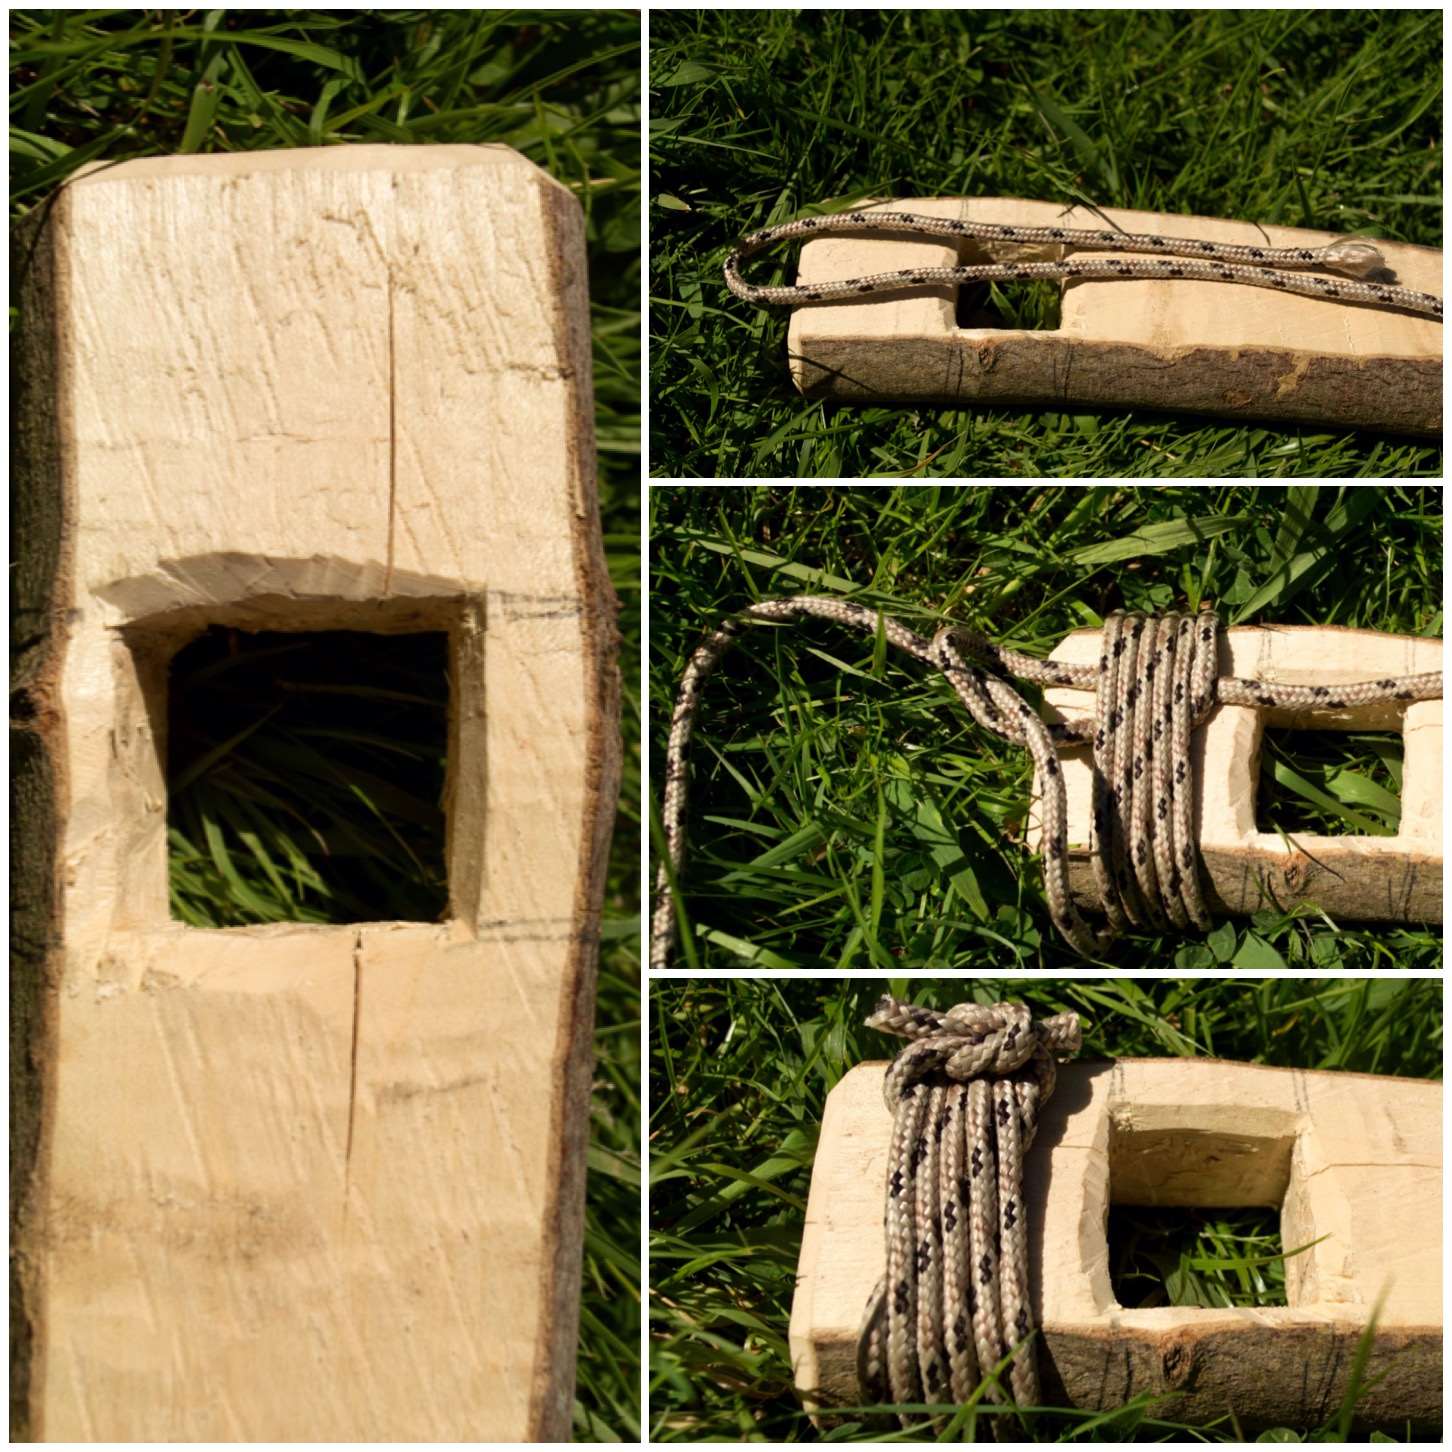
For the crane to work you need a hole at the top of the upright. The size of the hole will depend on the size of the arm you will put through it and how much wood you want left around the hole for strength.
As I was going to carve this with my knife I opted for a square hole as this style is easier for me to carve. Once I had pencilled out one side I marked up the opposite side. In this crane I made the hole at 90 degrees to the upright (makes life easy) but you can angle it if you want so that the arm will be pointing upwards more when inserted.
Marking out the socket
I used my knife to score lines into the wood I wanted to remove. You can do this by gently tapping your knife handle with a batton or rolling the curved part of the blade. You need to do this gently so as not to cause unwanted splits in the wood. Also make sure that the work piece is secure on the ground and that your free hand (if not battoning) is well clear of the knife edge.
Scoring
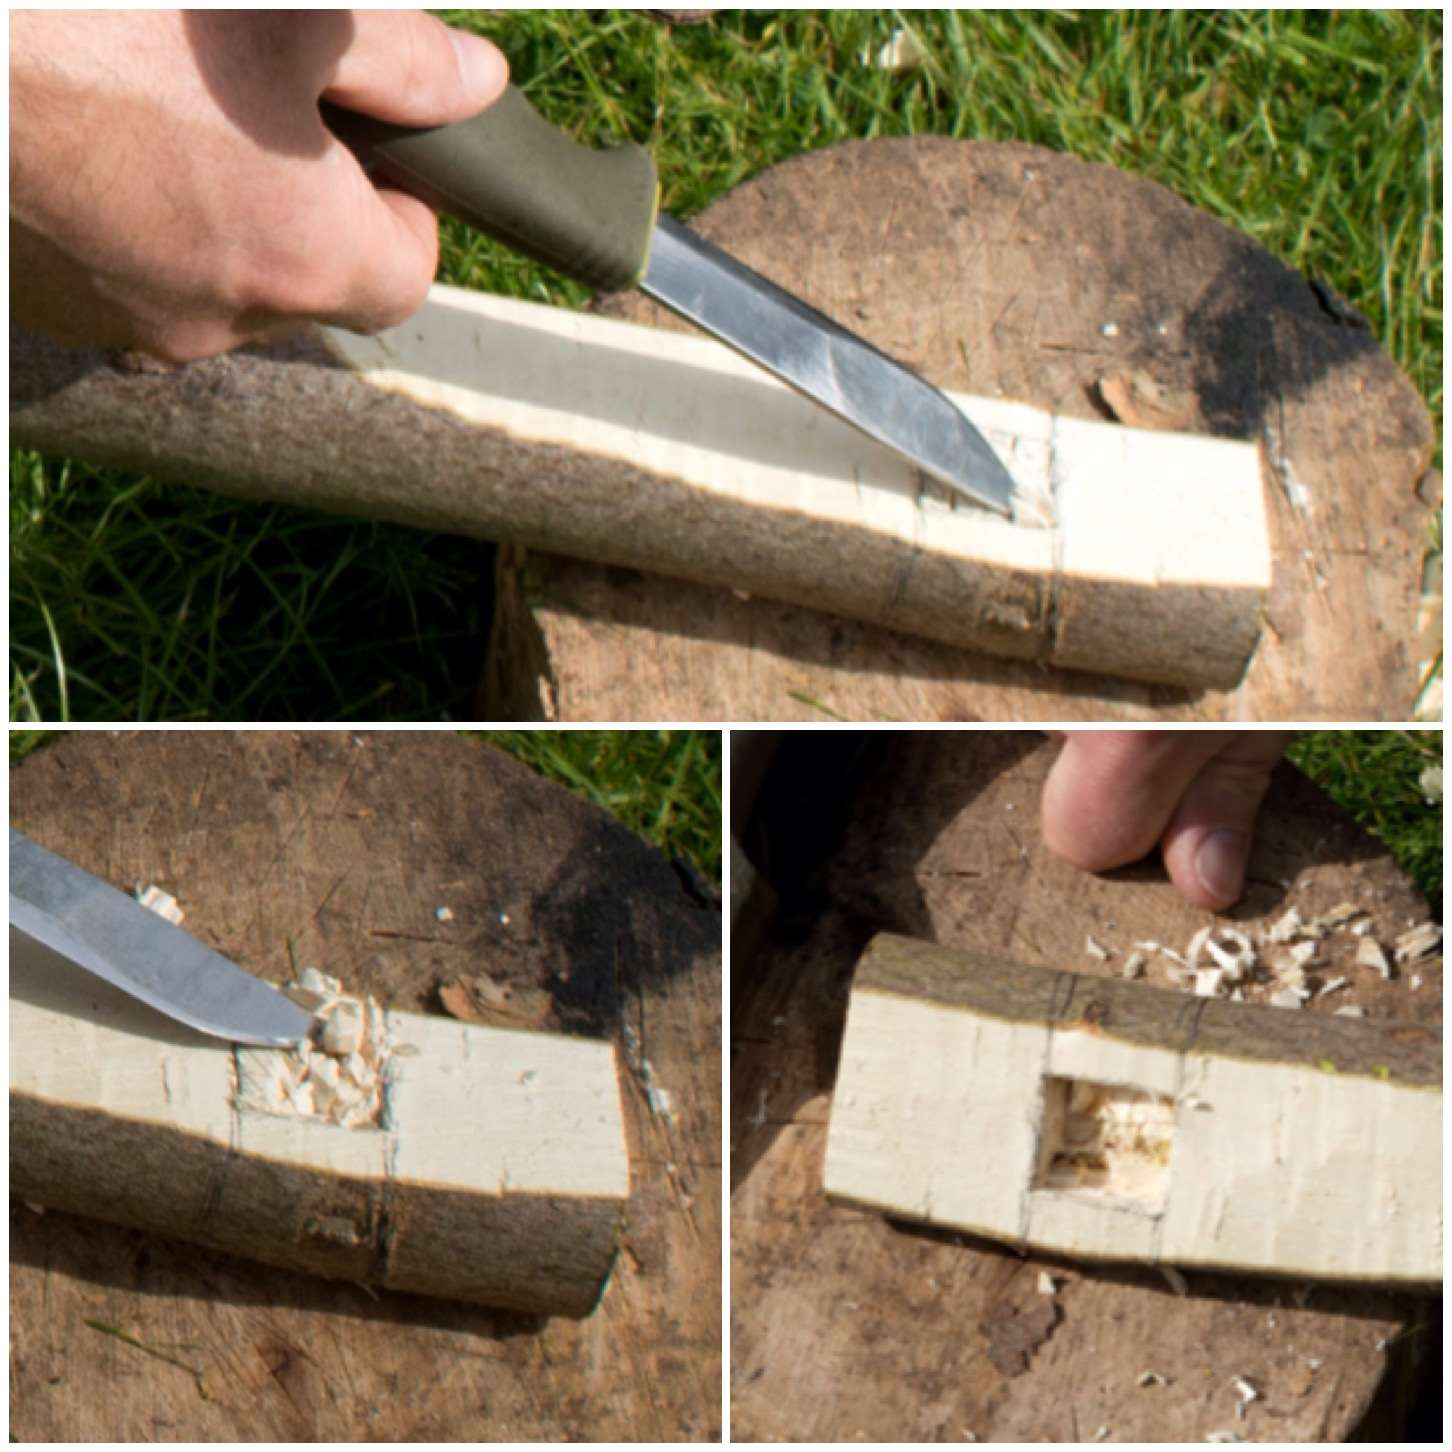
To remove the wood I just pushed the tip of my knife inbetween the scores and prised it out. Again I did this gently alternating between pushing on the handle with my hand or doing light taps with a batton. When I twisted the point I did so gently so as to not cause any unwanted splits or worse still – snap off the tip of my blade.
I did another set of scores and chipping until I was about halfway through the upright.
Chipping
I then repeated the exact same procedure on the other side until my knife popped through the other side.
Repeating the scoring and chipping
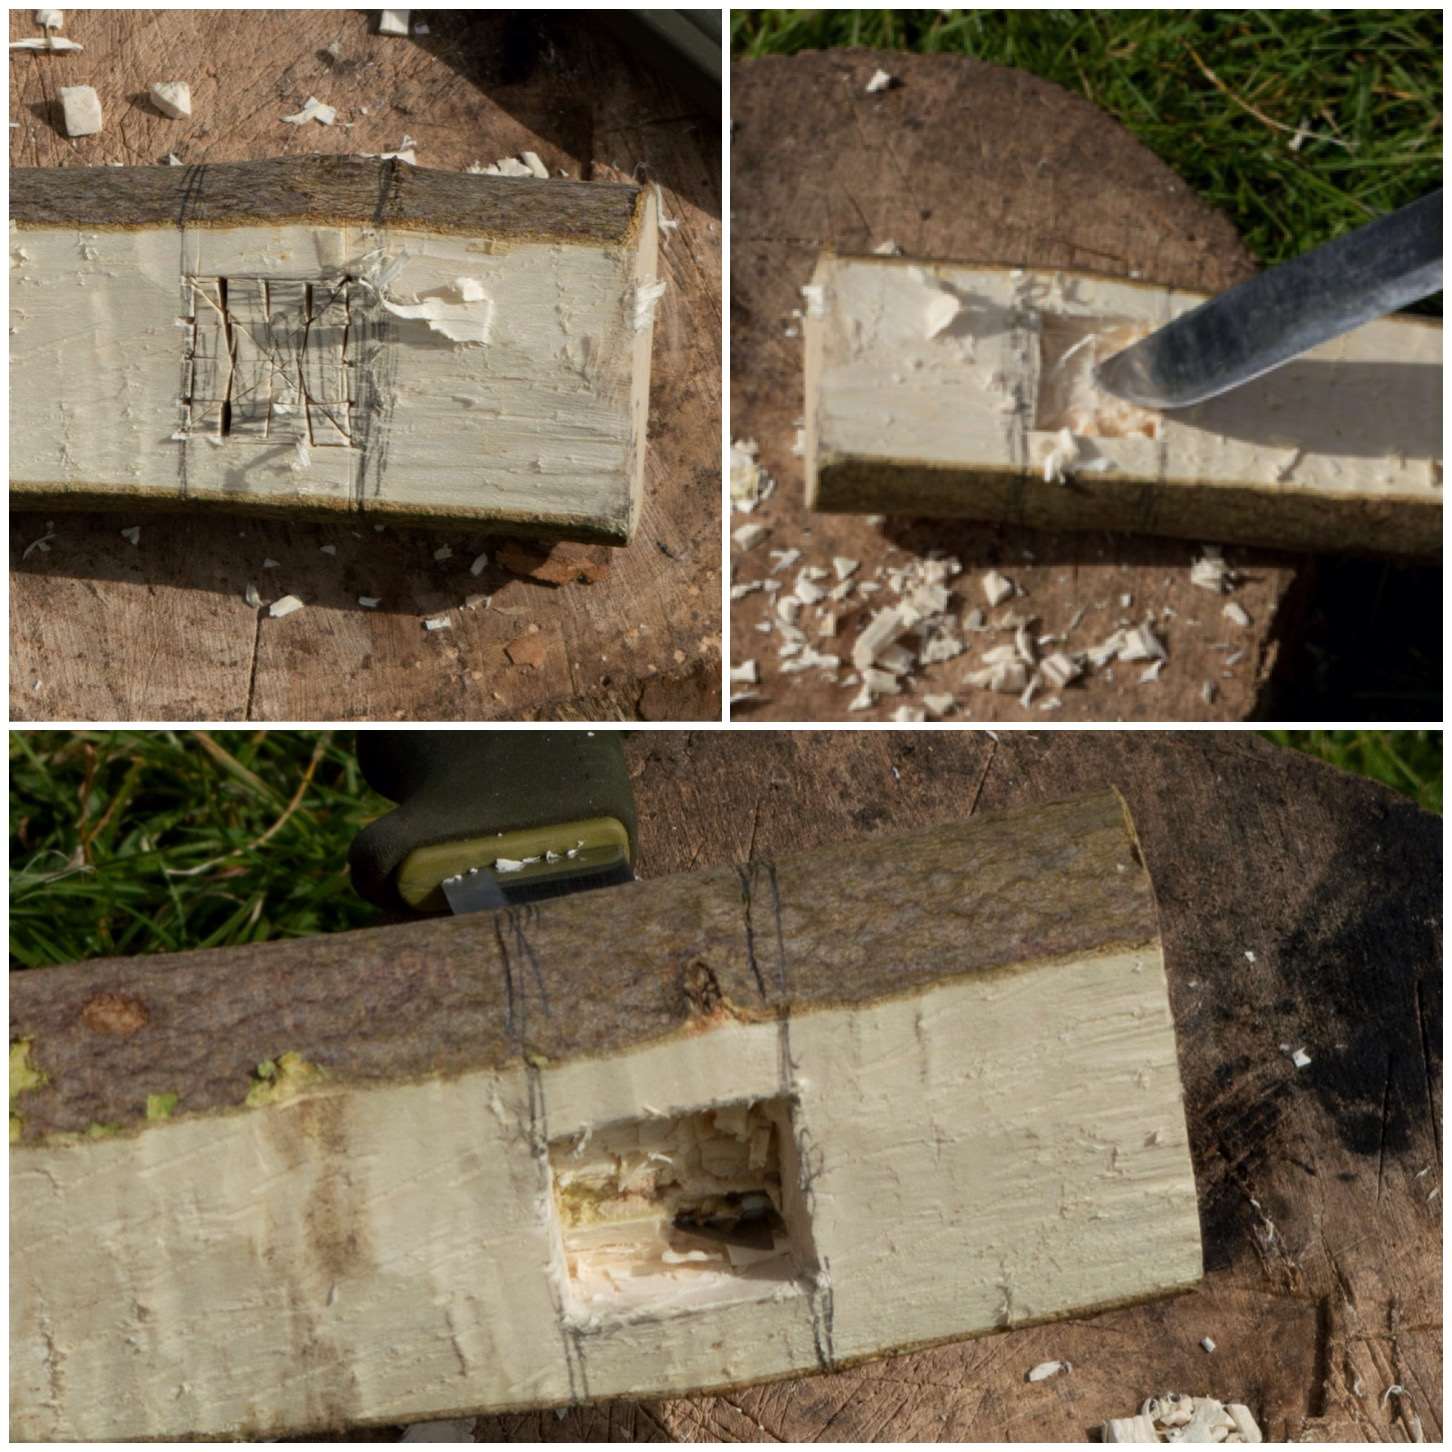
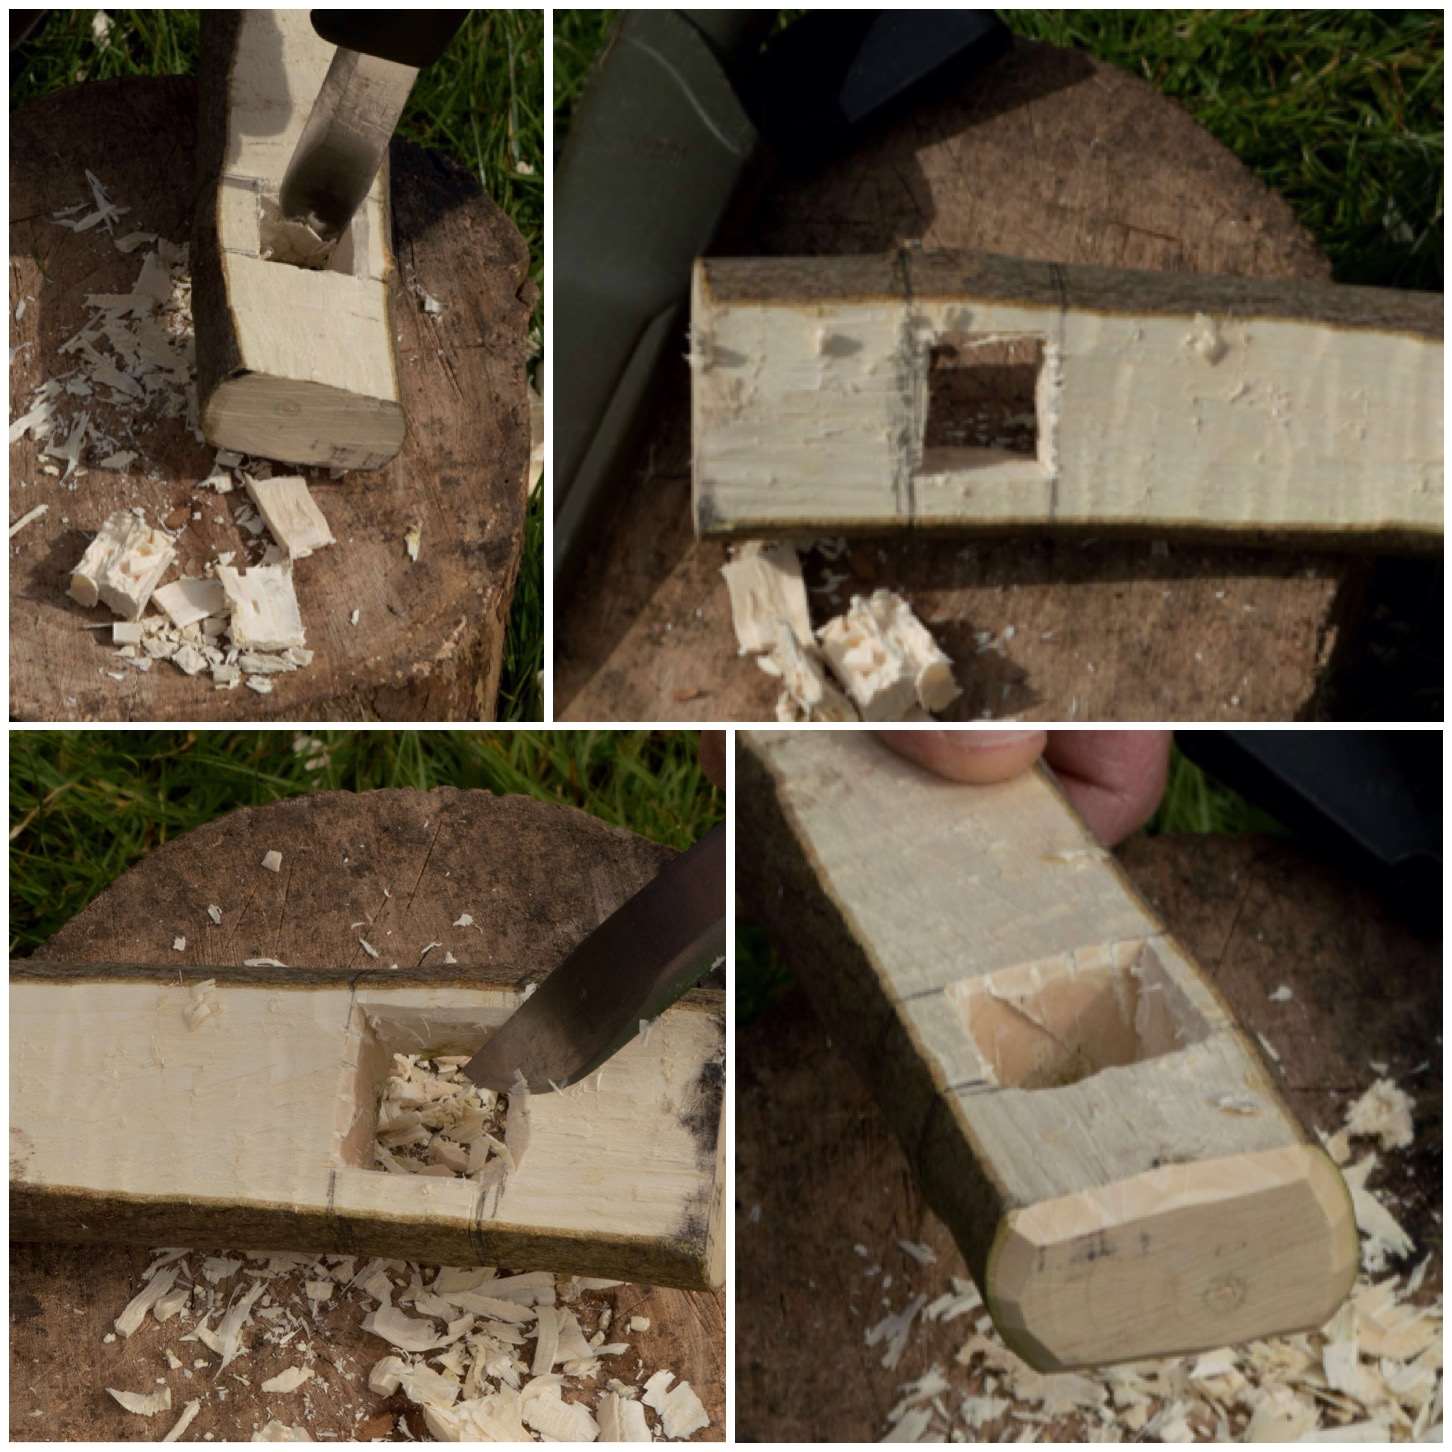
Once the plug of wood was removed I trimmed the internal walls of the hole (using the wood I would use as an arm as a guide) and chamfered the edges off.
Finishing the socket
The upright was finished off with all the knobbly/sharp bits being removed and a point was axed out at the bottom of it.
Trimming and pointing
Carving the lightweight arm
I made the arm for the lightweight pots from a thin piece of sycamore. I trimmed a flattened piece near the end and carved a small dimple with the point of my knife in it.
The small dimple is needed to keep the adjustable pot hanger in place. I have covered the making of the making of an adjustable pot hook in my post How To…. Carve and use an Adjustable Pot Hanger.
Lightweight arm
Set up
In my previous post on making a Double French Windlass Cooking Rig I explained how to make a pile driver. I used this pile driver to make a hole for the upright to sit in.
Once you have created the hole it is just a case of gently tapping the upright into place. If you did not use the pile driver you would need to hit the upright hard to drive it into the ground and very quickly the wood around the hole would crumple or snap.
Using the pile driver to place the upright
As I had not made the hole at an angle I carved a small wedge to hold the arm securely and also to raise the tip up slightly.
When the arm is in place in the hole just tap the wedge into place gently. Do not ram it in as this could cause undue pressure and split the wood.
Create a wedge to secure the arm
Then it is a simple case of attaching the hanger with your pot or kettle onto the arm.
I like this system as it is easy to adjust the height of the pot and the whole crane can be swivelled to move the pot away from the fire easily.
In the picture below I have left the back of the arm overly long but I will trim it shorter eventually.
Ready to go
Carving a strong arm
As I had made a square hole I got a bigger piece of sycamore and squared it off along its length to fit exactly in the hole. This arm was designed to take bigger pots like a dutch oven.
Creating the heavyweight arm
The end was shaped to fit the pot hanger.
Finishing the tip
Then set up exactly as the first arm.
This time though I tested it out with a dutch oven half full of water.
Heavy Duty Cooking
I have a few of these cranes so I set up another one to put the kettle back on.
Multiples
I had used an auger and a palm gouge to carve this one out so you can see it ended up with a round hole. No wedge was required as the hole was set at a slight angle.
The crane made with an auger and palm gauge
After the water in the dutch oven had boiled it was easy to raise it all up off the heat.
Easy to adjust the pot height
If you plan to use these cranes on a longer term basis they may develop a crack if you are using green wood. This happened to this crane about a week after I made it but I secured it with a bit of whipping. You can do this right at the beginning if you wish or when you see a split start to appear.
The whipping will be well clear of the flames so I am not worried that it will be burnt through.
Some Whipping
If I had not being taking pictures along the way I would have completed this rig in about an hour or so.
There are other ways of doing this and other tools you can use so I will leave it to your imagination but if you are someone who likes to tinker around the campfire then I would give this one a go.
I spent seven days this Easter on Dartmoor – seven glorious sunny days.
I never thought I could have said that with my previous experience of this often wet and windy but beautiful moorland landscape.
Day 1 on the Moor
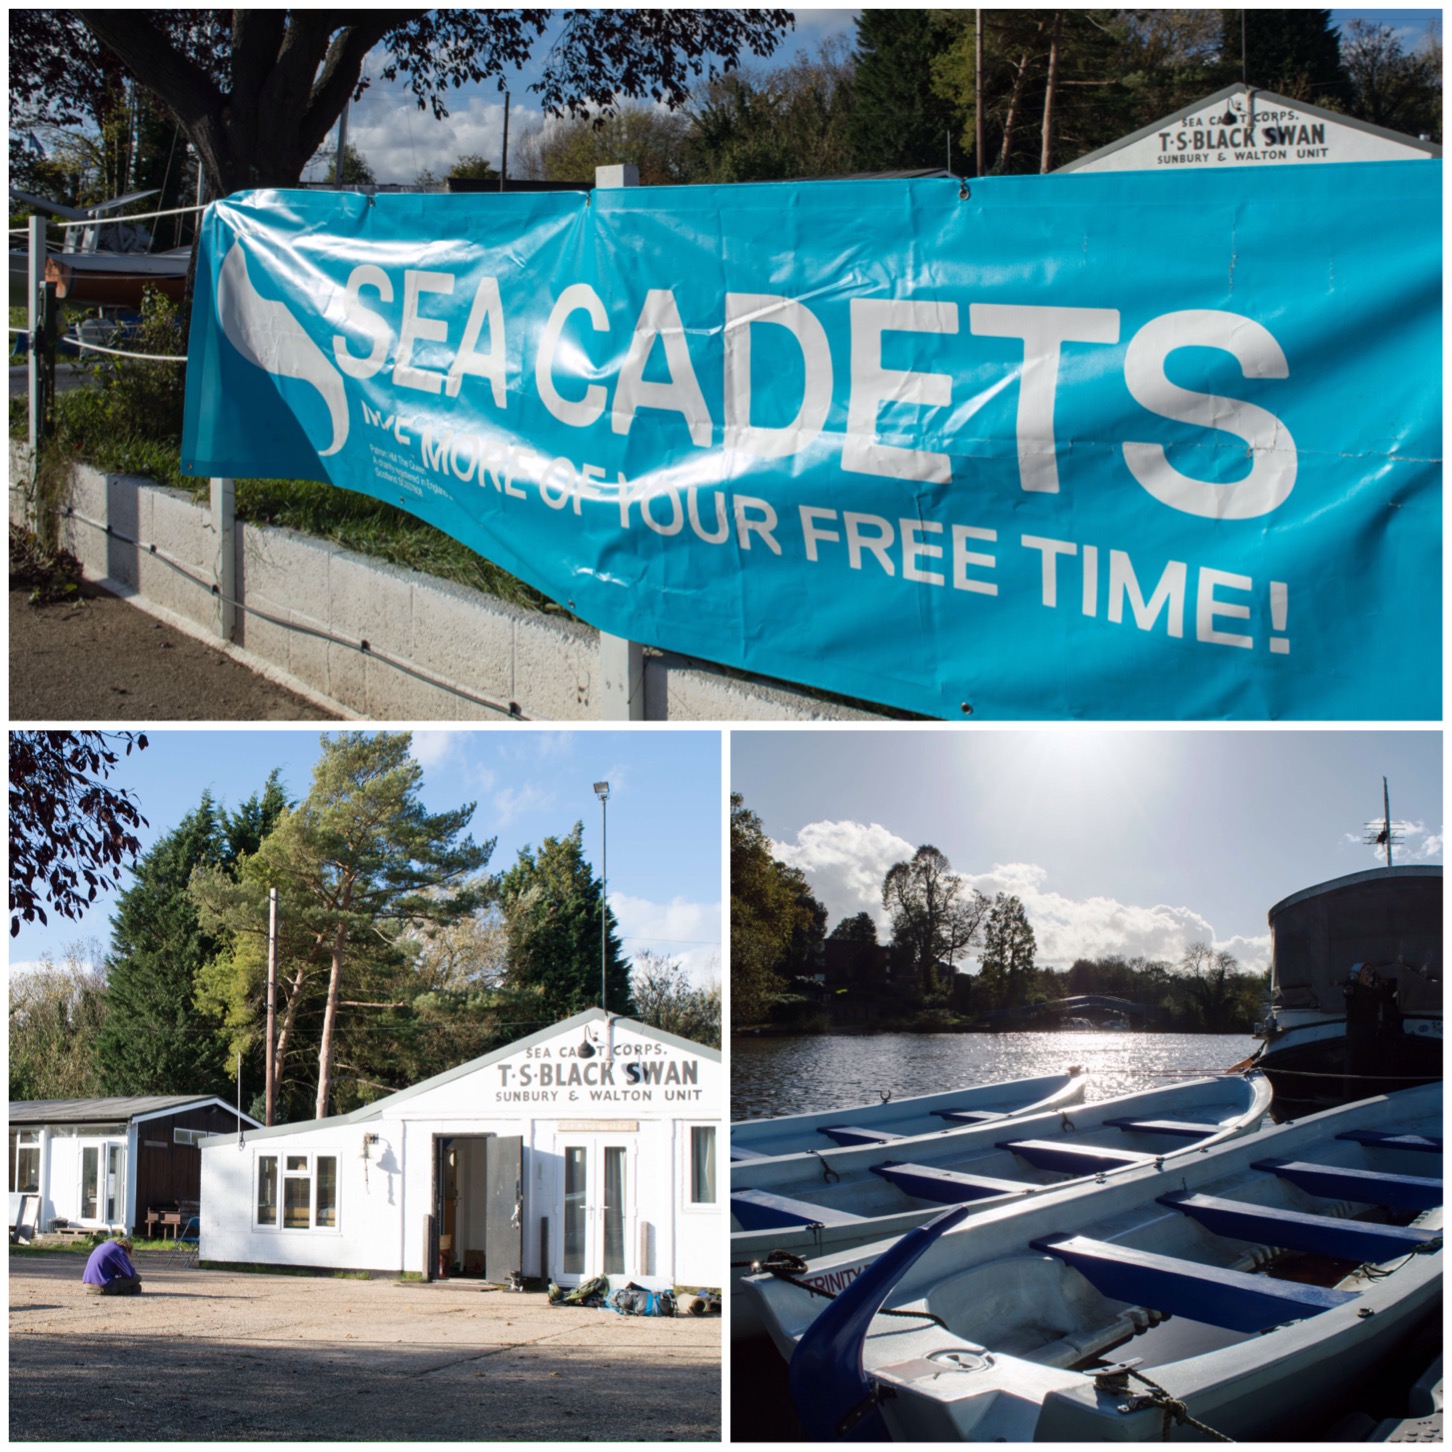
The first five days were with the Sea Cadets where my friend John Kelly was running a DofE Expedition on the moor. I was along as Mountain Leader safety and to help train the Gold training team.
John also had a Silver team under training, another Silver team under assessment and another Gold team under assessment – Quite a busy 5 days it turned out.
The first day was all about training for me as the Gold team were under my wing all day. We focussed on key map and compass skills so that the next day they could navigate under remote supervision safely.
The Gold Training team
Early on the first day my friend Dave Lewis managed to pull a muscle in one of his legs and had to retire early on from the walk that day. It was serious enough stop him from getting back on the hills for a few days and I insisted he put his feet up – to which I received no arguments (I needed Dave fit for another course straight after this one).
The evening of the first night was spent indoors learning all about route cards. Thankfully we were located at the Langstone Manor campsite near Tavistock where they have excellent facilities and allowed us to take over their dining area to run the classes.
R&R and Homework
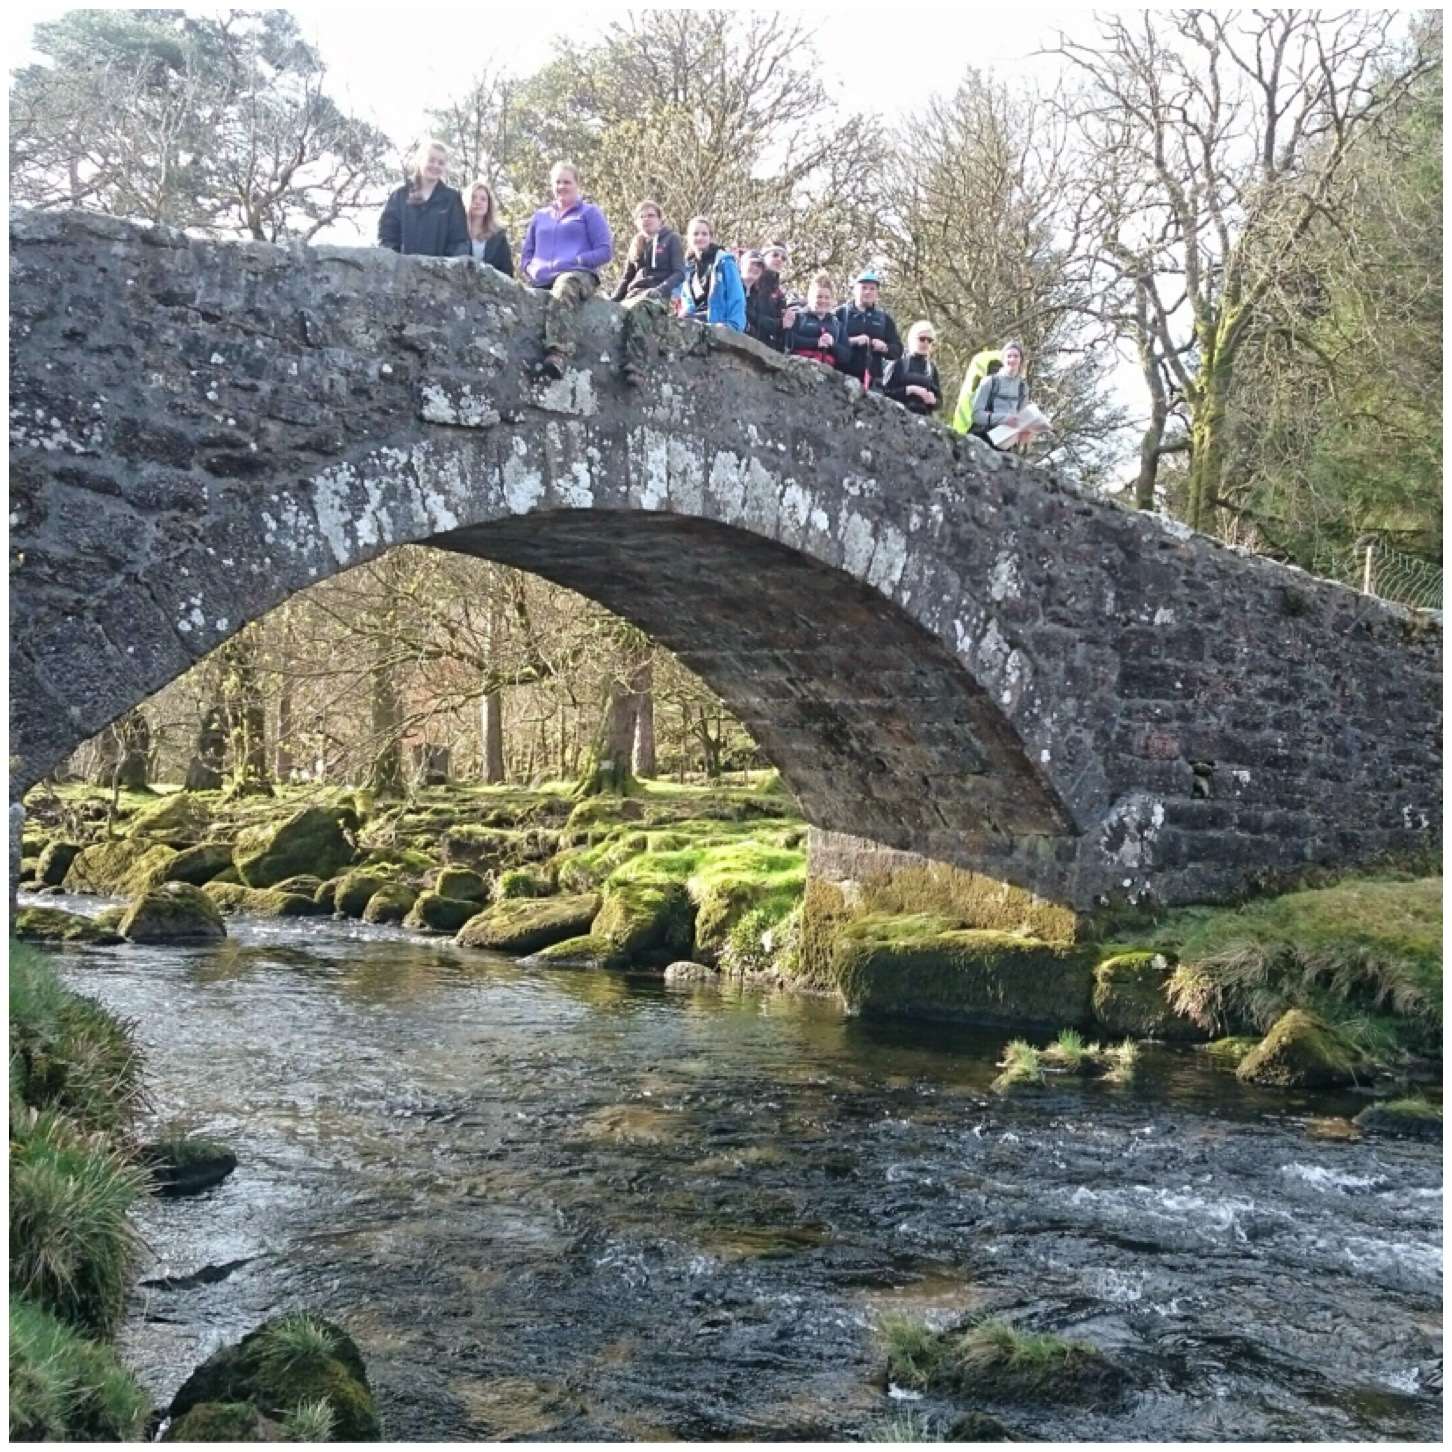
Day two saw some of the teams starting out at the beautiful hump backed bridge over the West Dart river near the Dartmoor Training centre. Never one to miss a photo opportunity I soon had them lined up for a quick shoot.
I spent the day monitoring these teams remotely, only meeting up with them occasionally.
Day 2 start at the Dartmoor Outdoor Training Centre
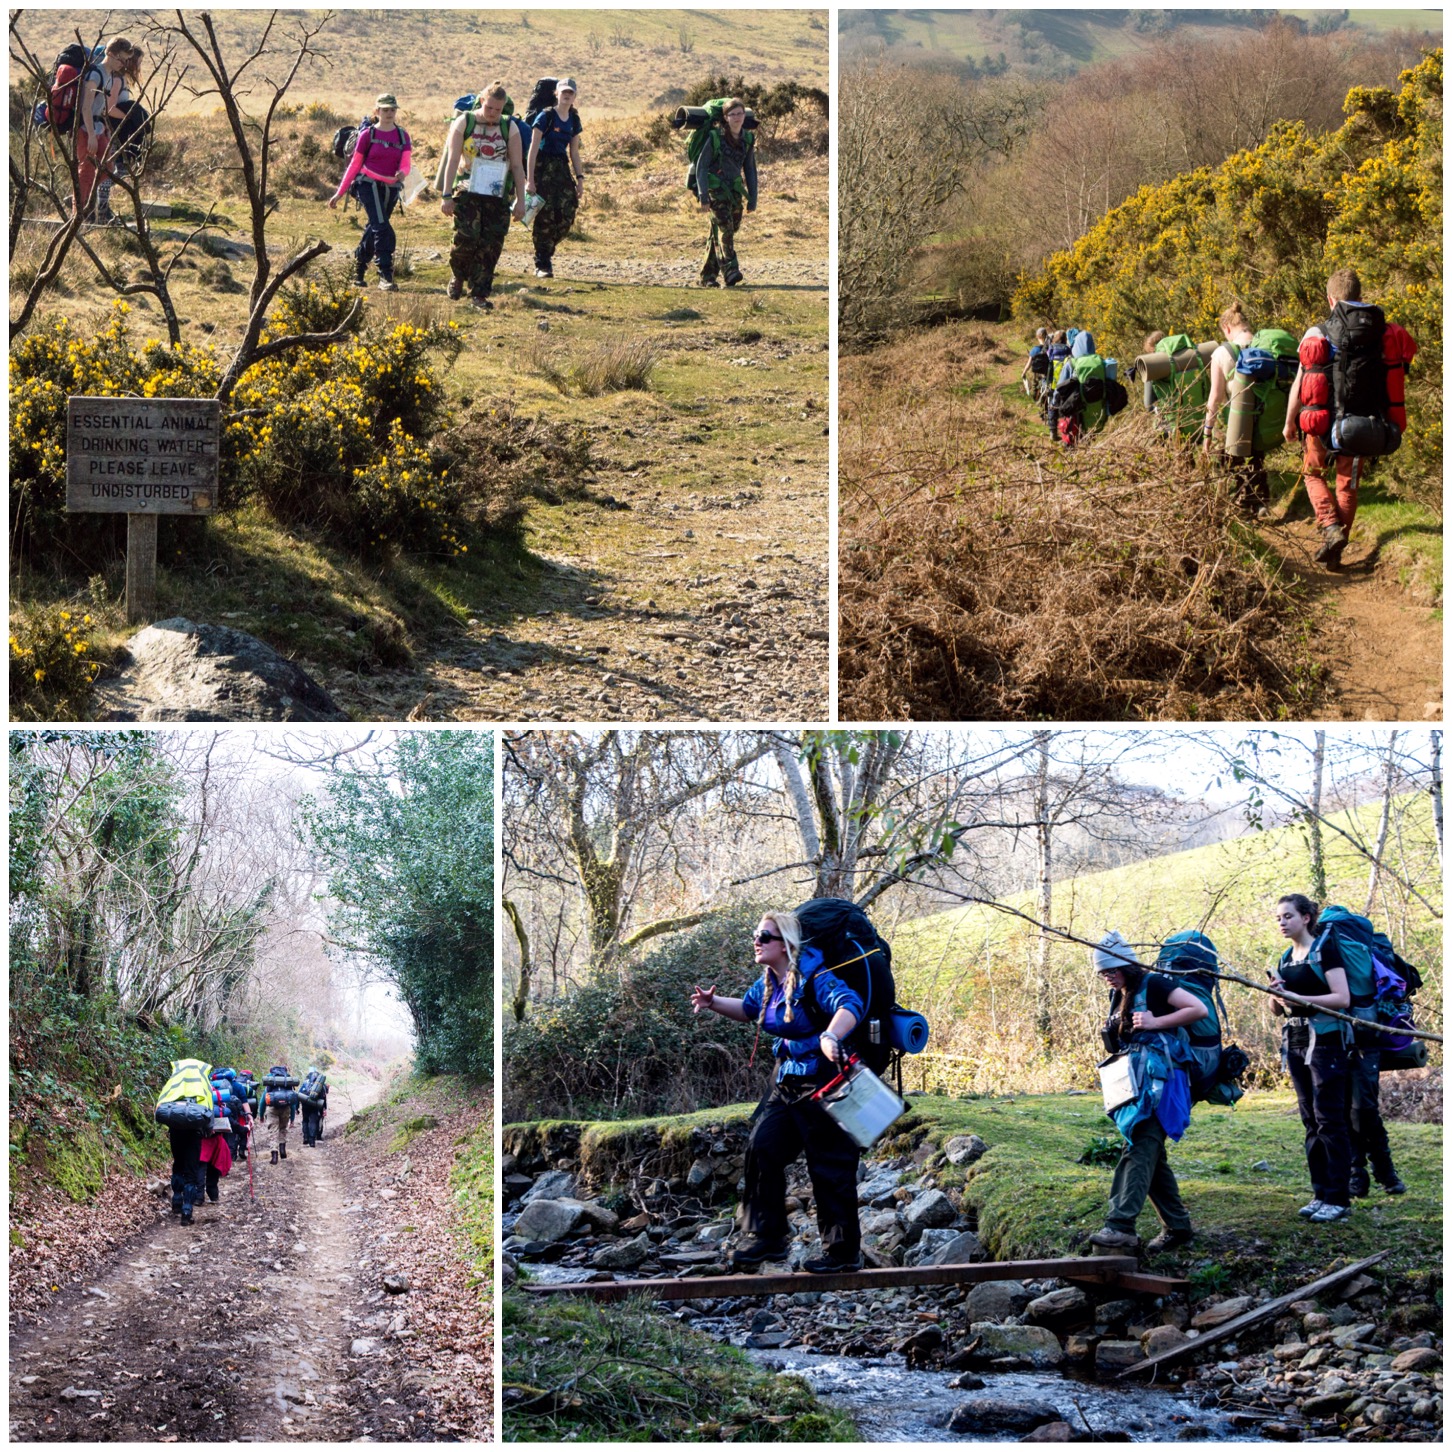
At the end of the day the descent off the moor was pretty steep but very beautiful. The footpath that took them off the moor into the village of Michelcombe was very hard to locate so after a little bit of map revision with the teams we were all soon rapidly making our way downhill.
Heading off the Moor
The campsites were varied from the relative luxury of Langstone Manor, to the basic beauty of camping in a field of new born lambs and finally the remote camping of a high moorland copse.
Sunny Camping
I really enjoy these trips as I get to wander the hills on my own and getting to sit back and relax while waiting for teams to appear. I have to try and anticipate where the teams will be at any given time and observe them from a distance or from time to time wander down to meet them.
As the teams I was observing were all under training I was able to spend some time with them at some of these rest spots making sure they knew exactly where they were and offering them advice when needed.
Meet ups
Near the end of the day on the Thursday one of the cadets (Jess) tripped and strained a muscle in her leg. As this was very near the end of the day I called all the teams in from the surrounding area and revised their walk to head off the moor on an easier path.
We really took our time so that every one including Jess managed to walk off the moor and arrive back at the minibuses together.
Final push
For those doing the Silver award this was the end of the expedition and after a de-brief they boarded a minibus to take them back to London.
Those doing the Gold assessment and training had to do one more day so it was back to Langstone Manor campsite for one more night and a final days trekking the next day.
De-brief
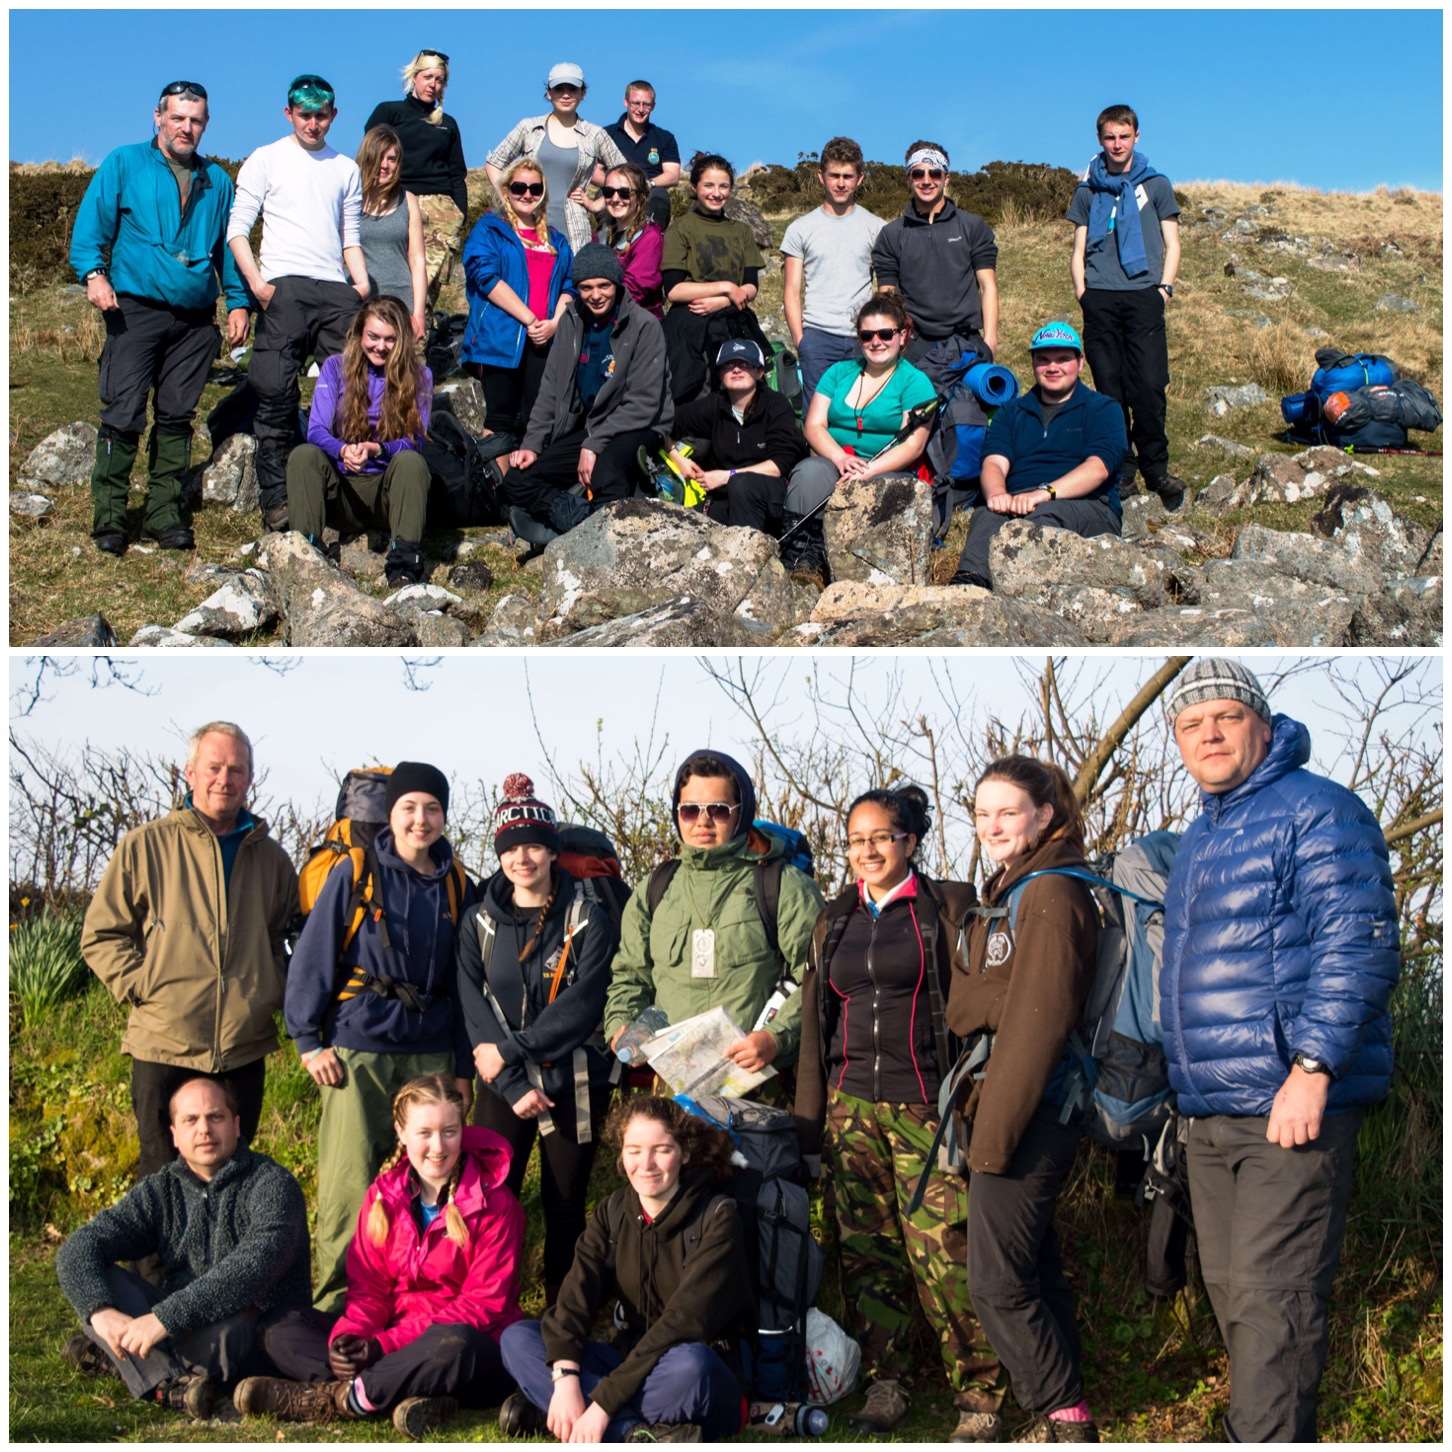
I did not manage to get everyone in one group picture but got these two in the end. The top picture is off the Silver teams and the gold training team.
The bottom picture is off the Gold assessment team prior to them heading off on their last days trek alongside some of the staff monitoring them.
The whole Gang
My final picture is of my hammock stand I had brought along for the week. I like tents but why sleep on the floor when you can hammock 🙂
My accommodation
I put together a short video of the trip.
The last two days of the week were spent on another course training up some Sea Cadet instructors to become outdoor pursuits instructors on the Basic Expedition Leader Award. That post will follow shortly.
Will I ever get so many sunny days on Dartmoor again I have no idea but I will certainly remember this trip because of it.
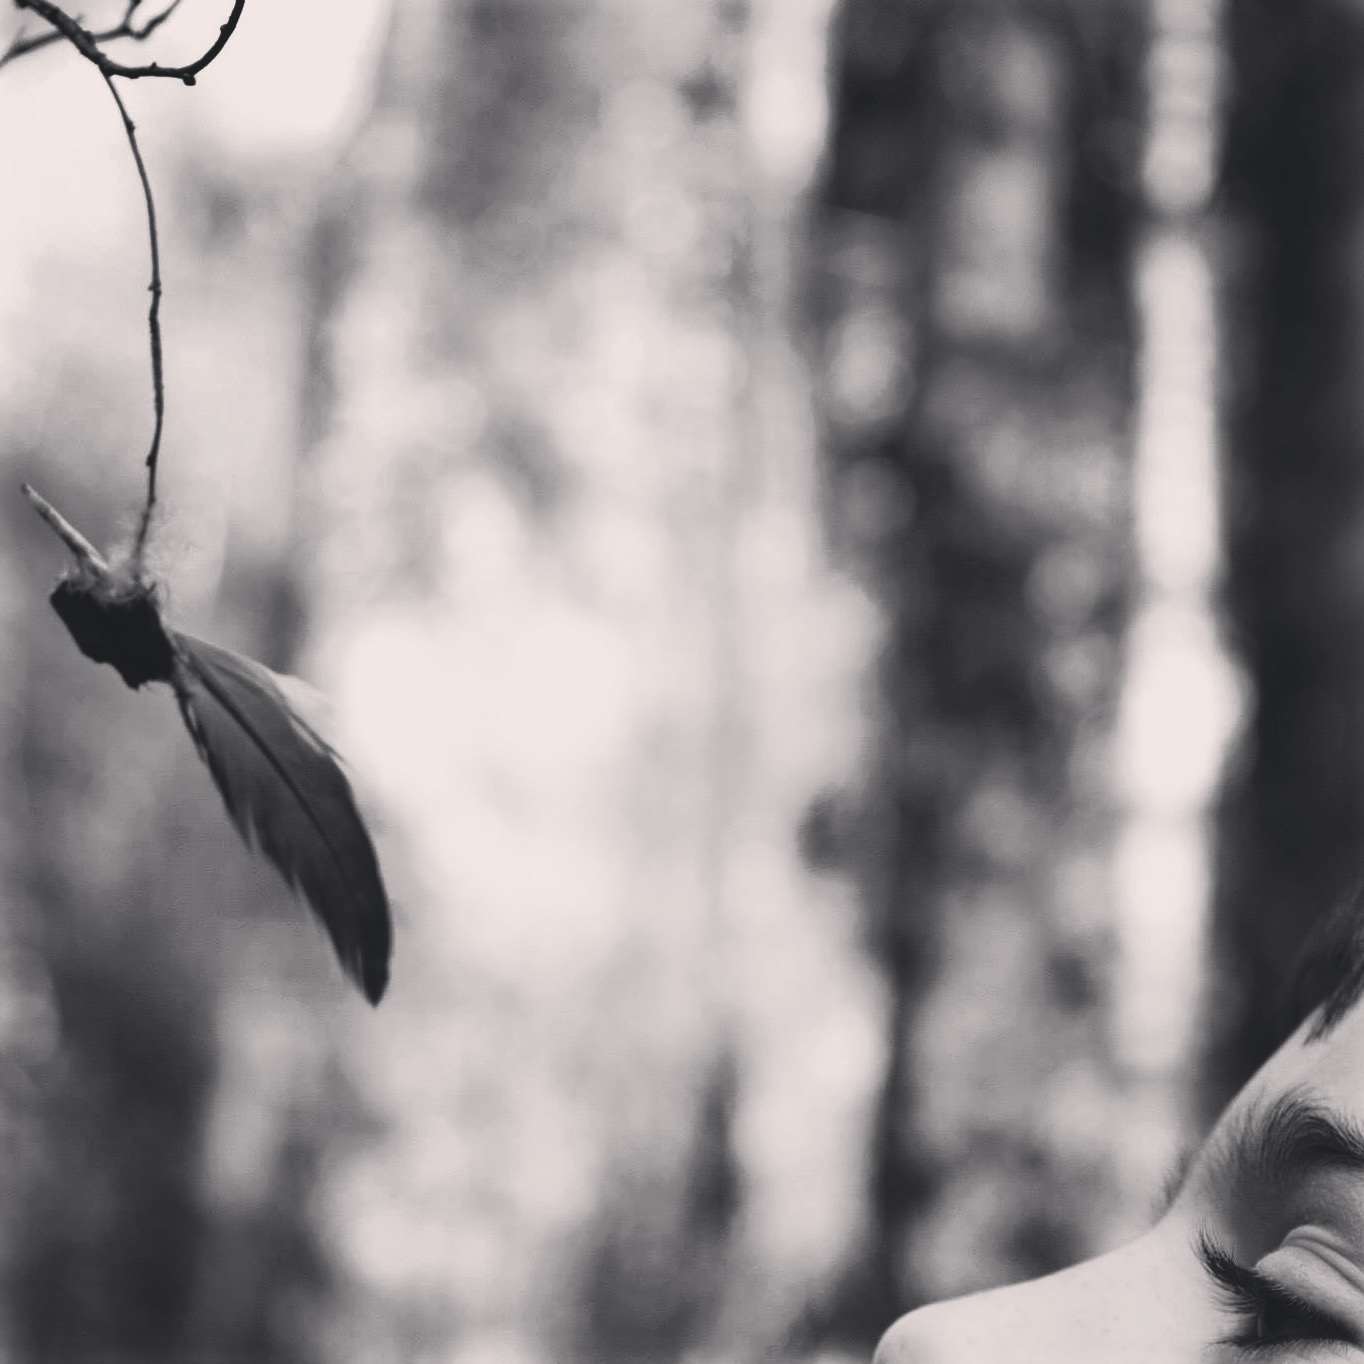
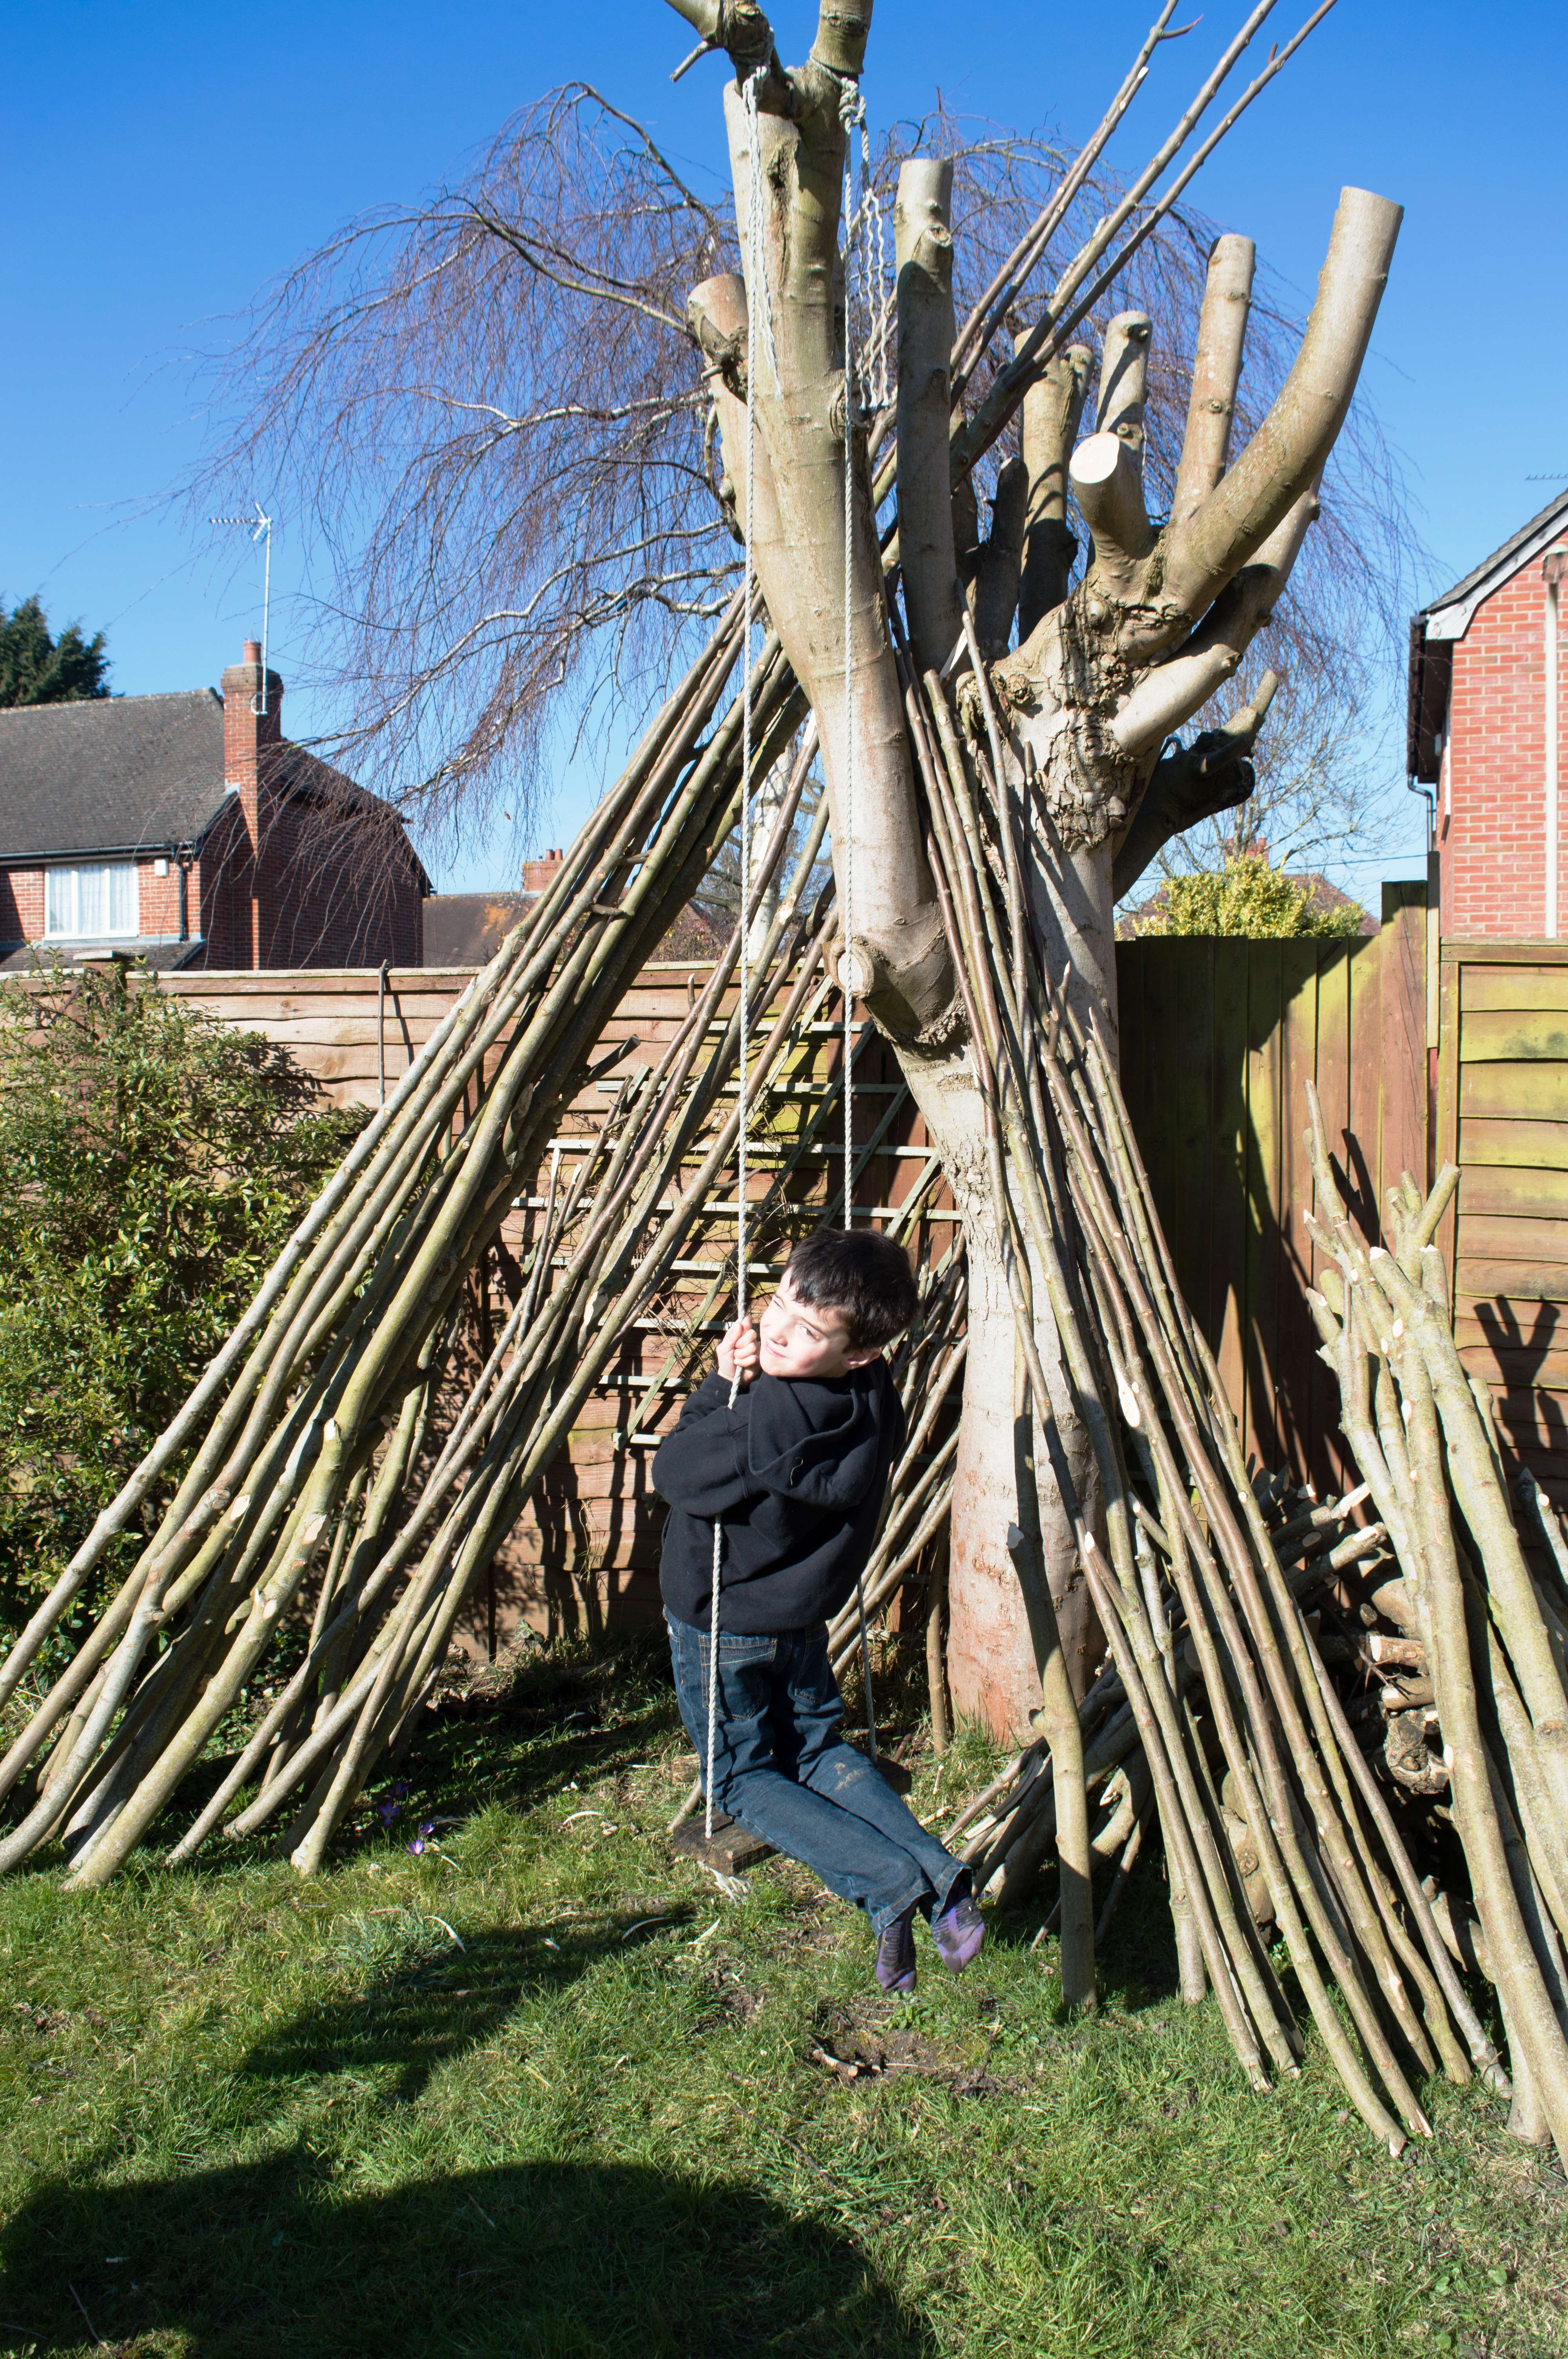
Spring is well and truly under way now and I have been getting out as much as possible either by myself, with my family or with friends.
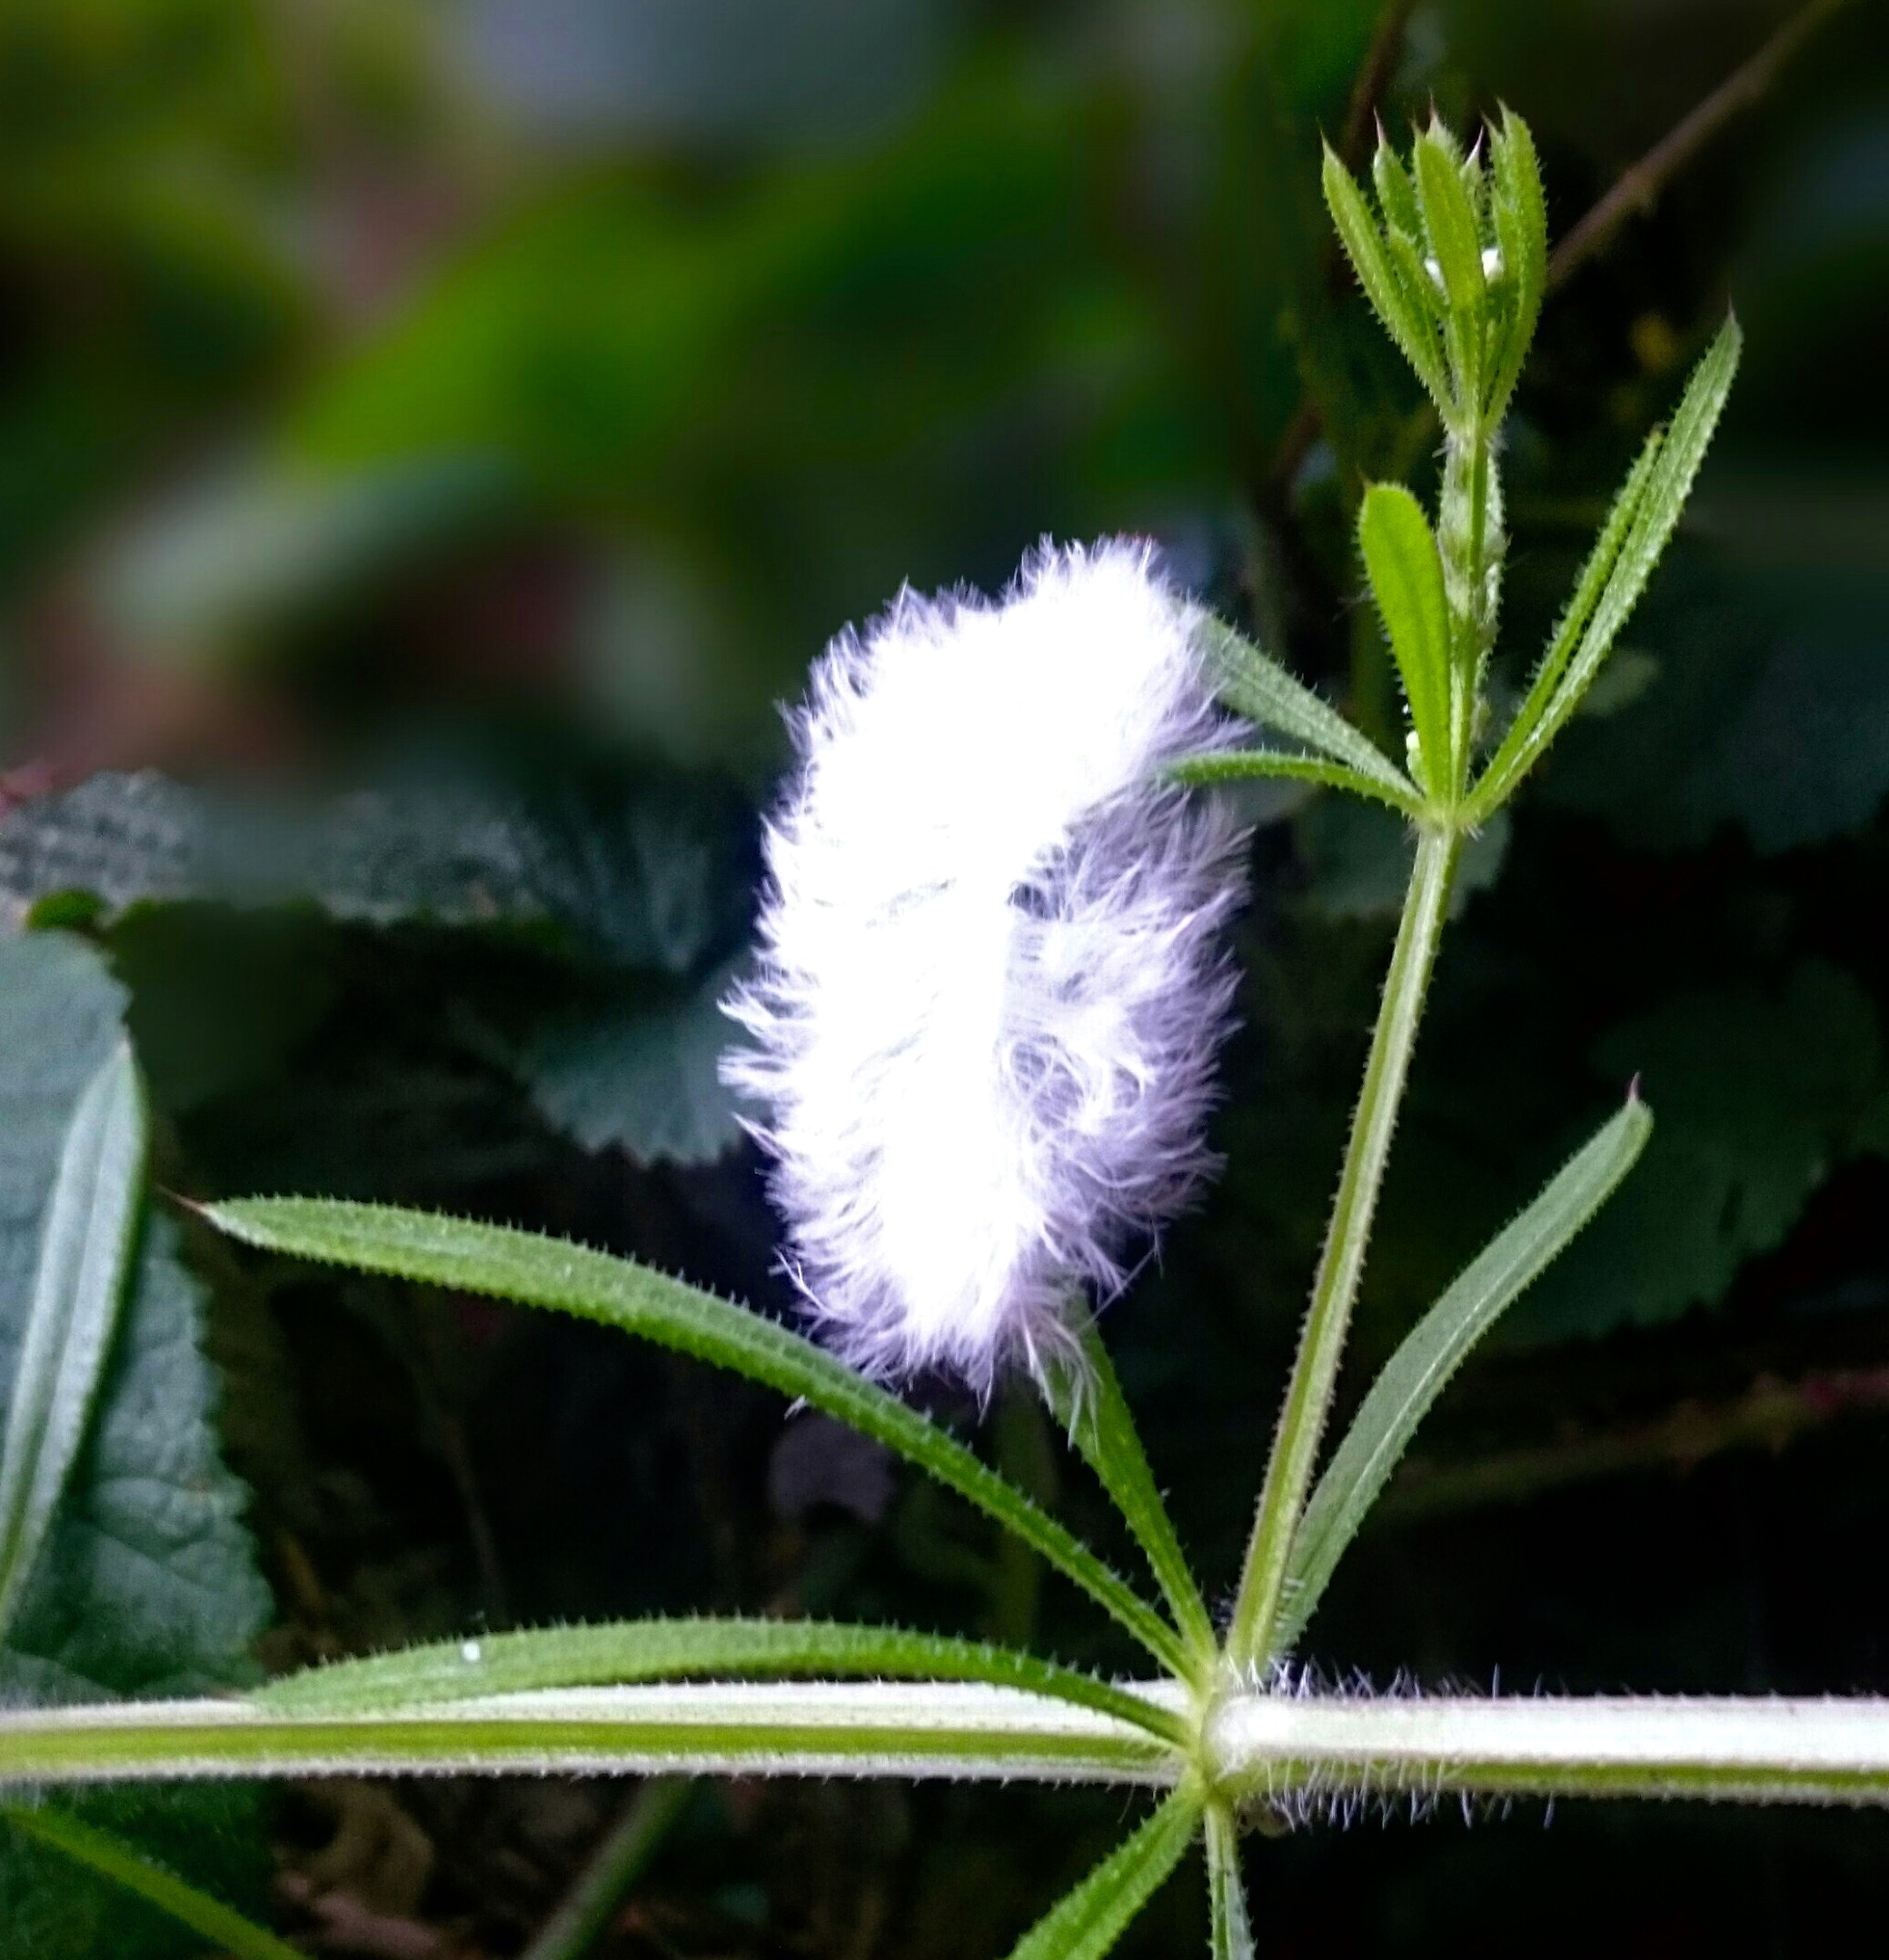
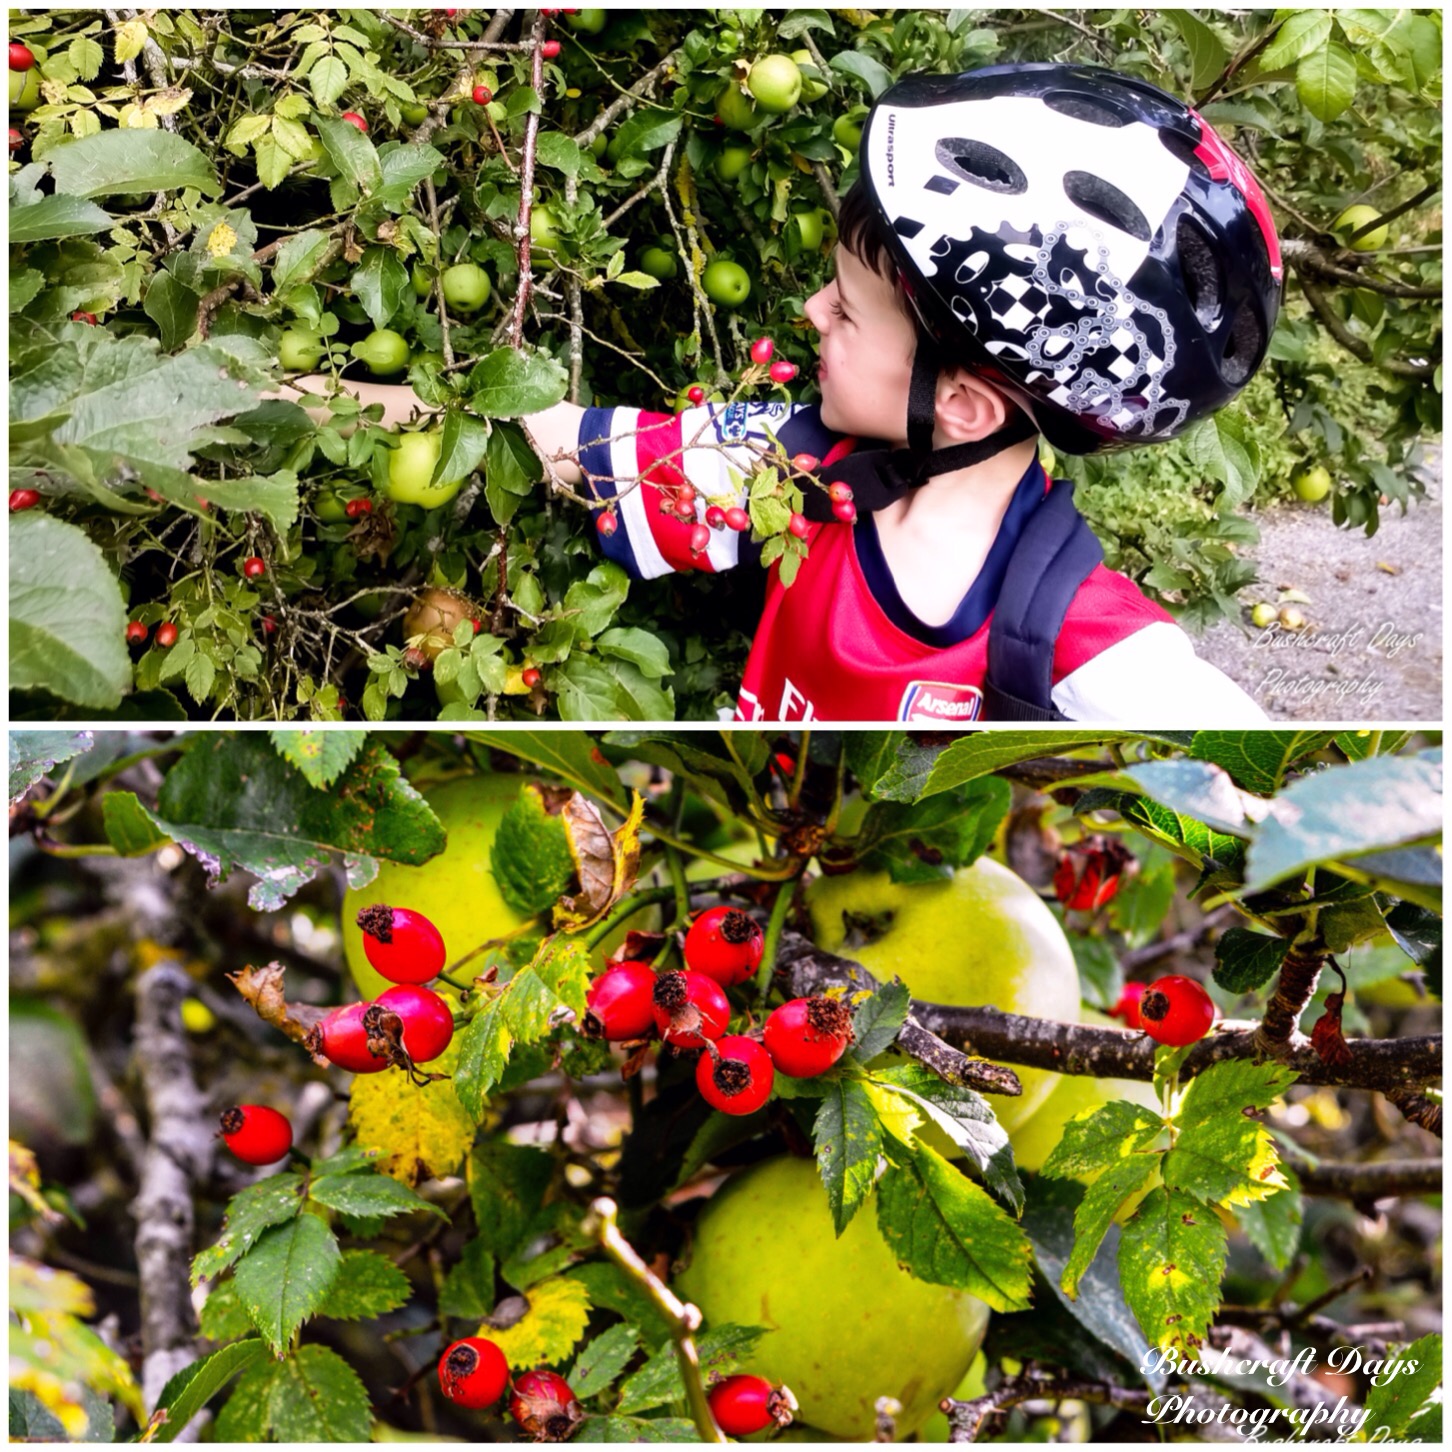
There is a lot to see if you look close enough as my son is with this suspended feather trap. I love feather traps (that is anything that catches a feather) as they make for beautiful pictures.
Feather Trap
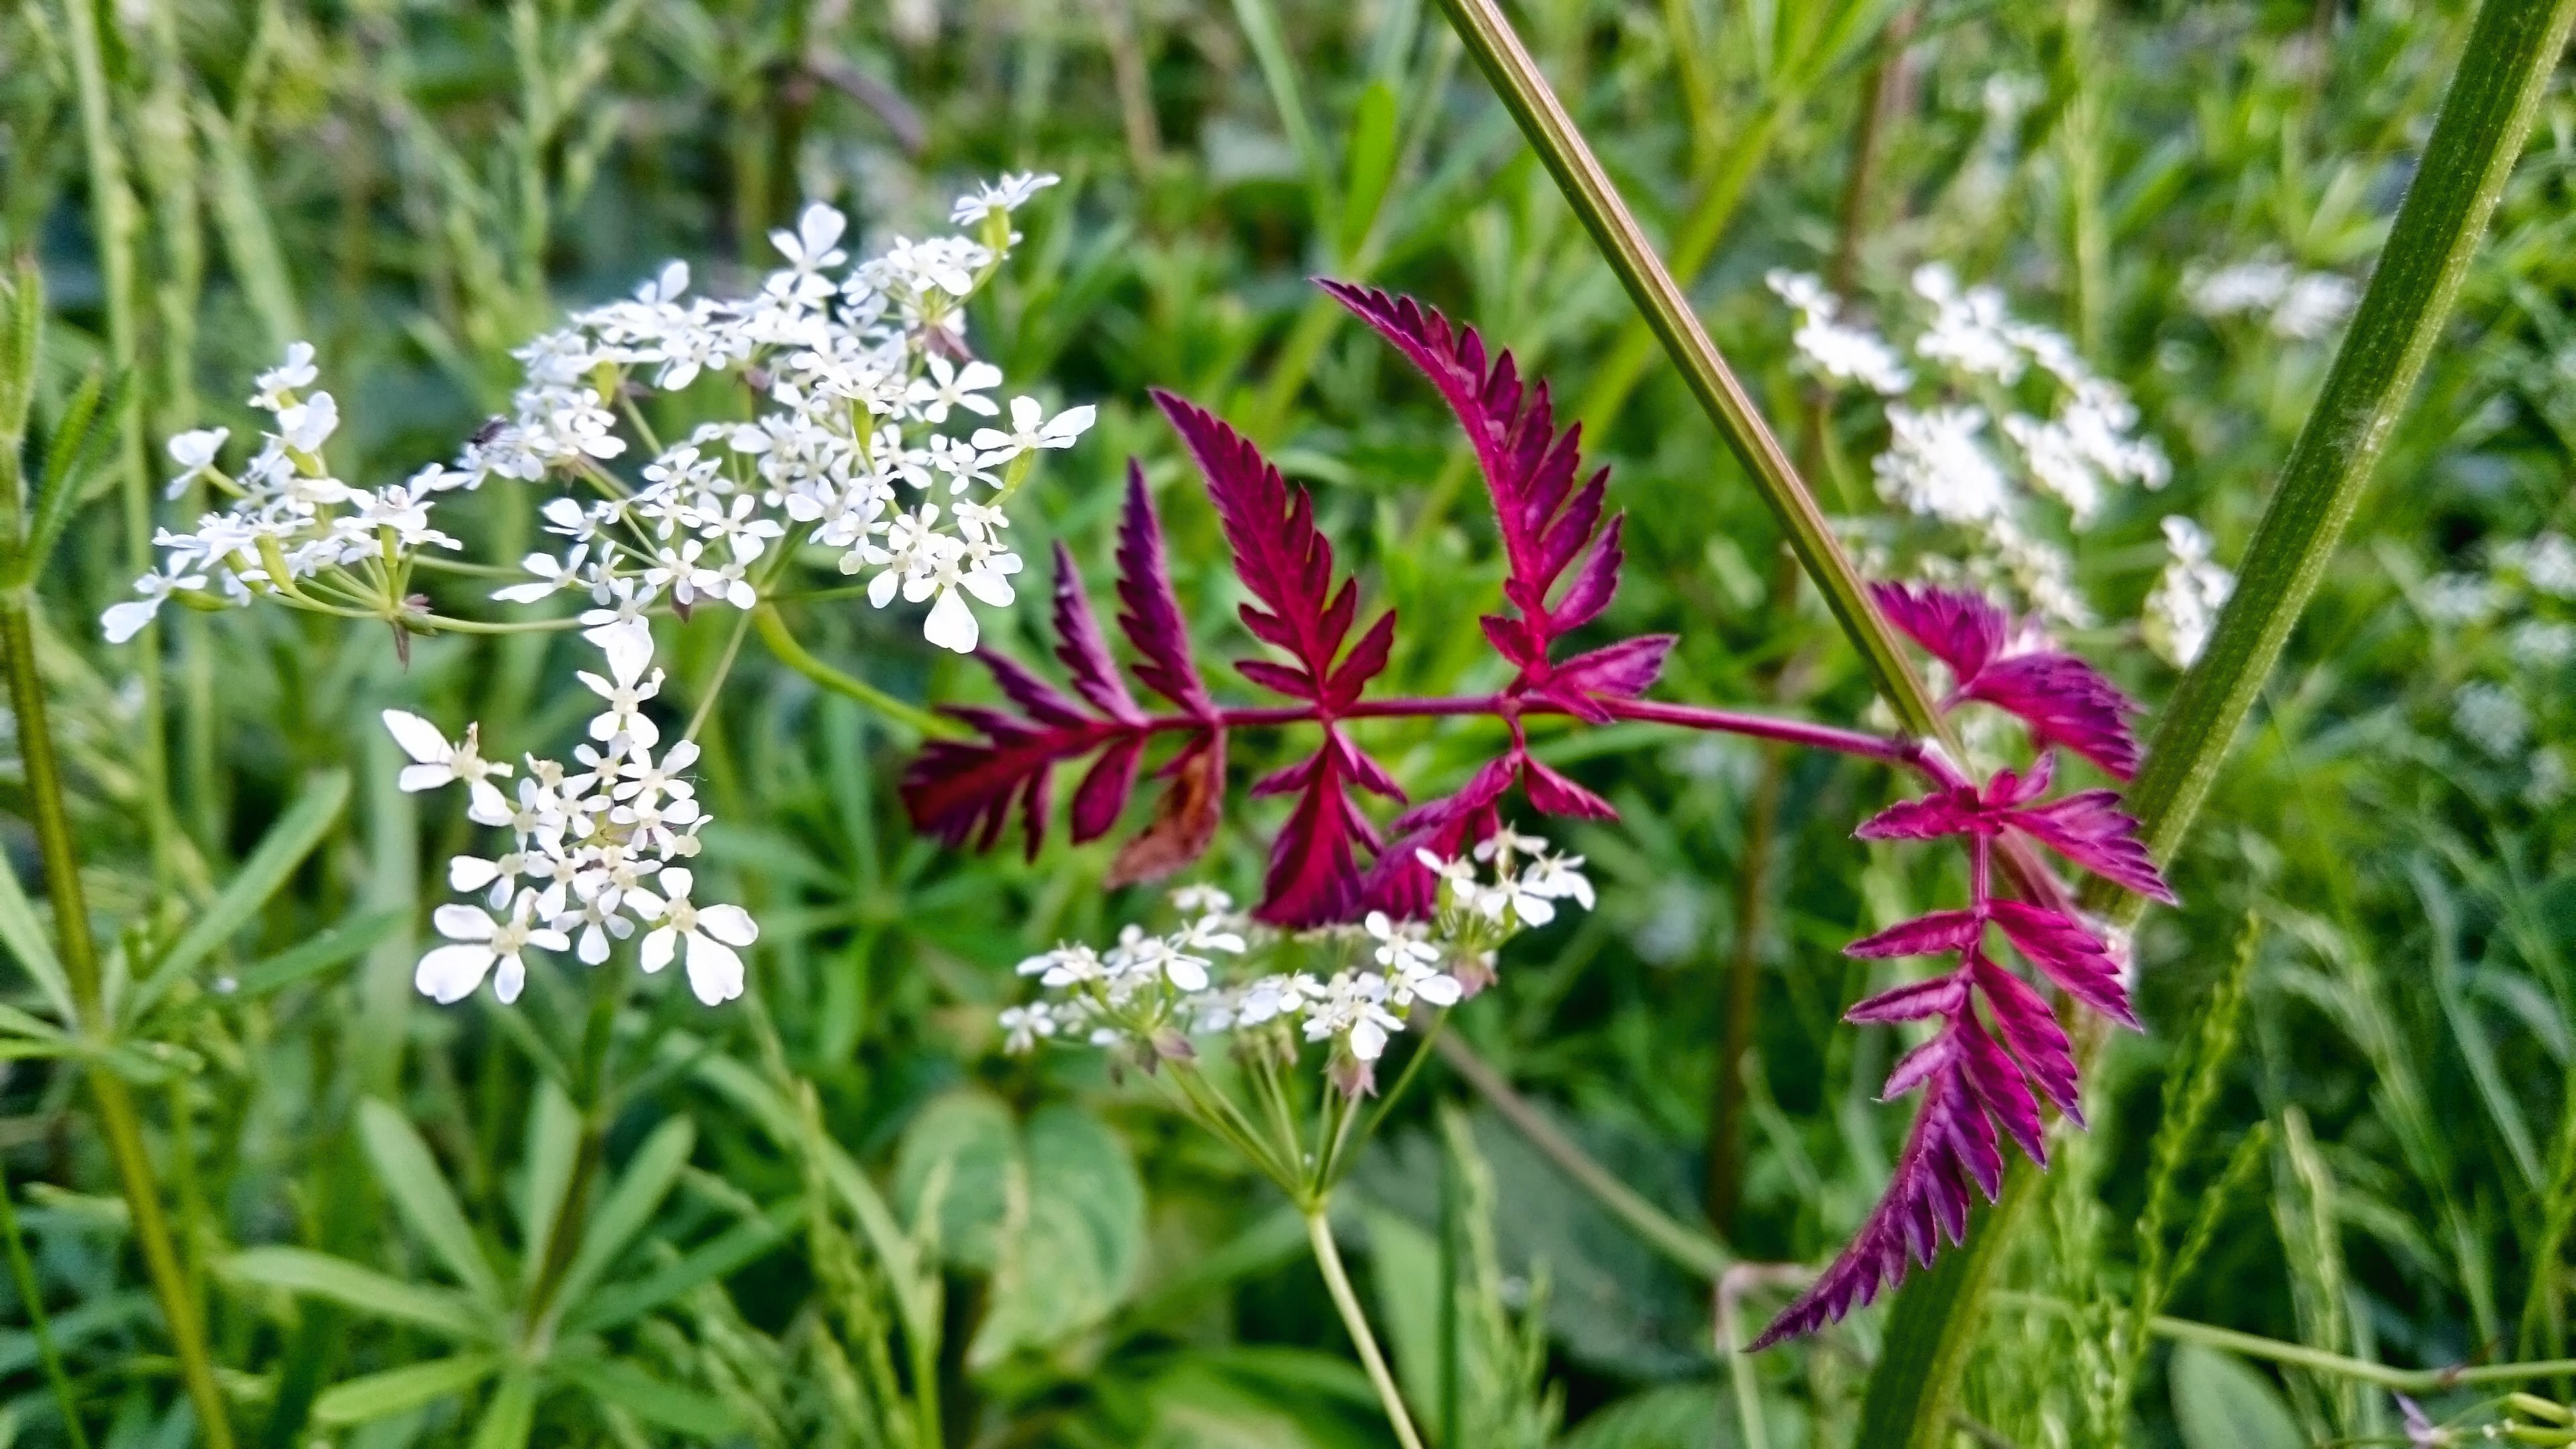
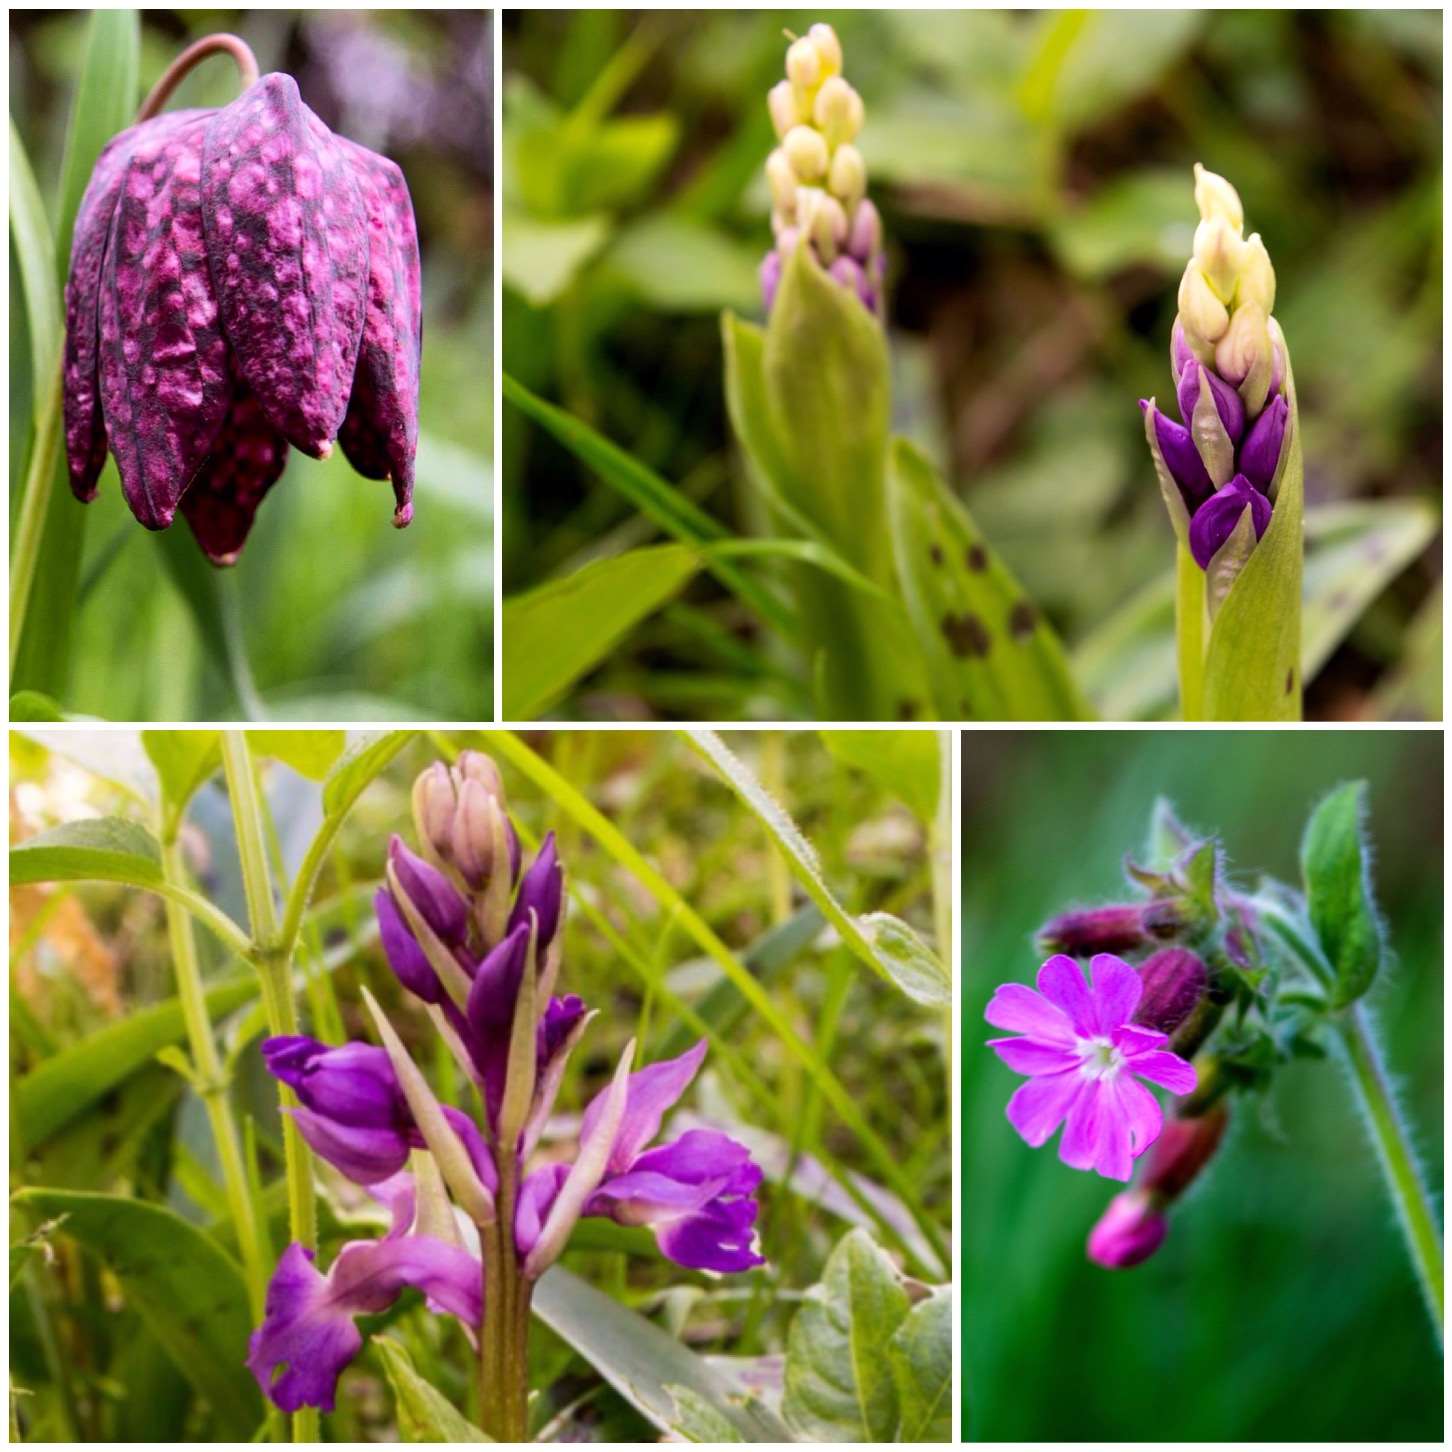
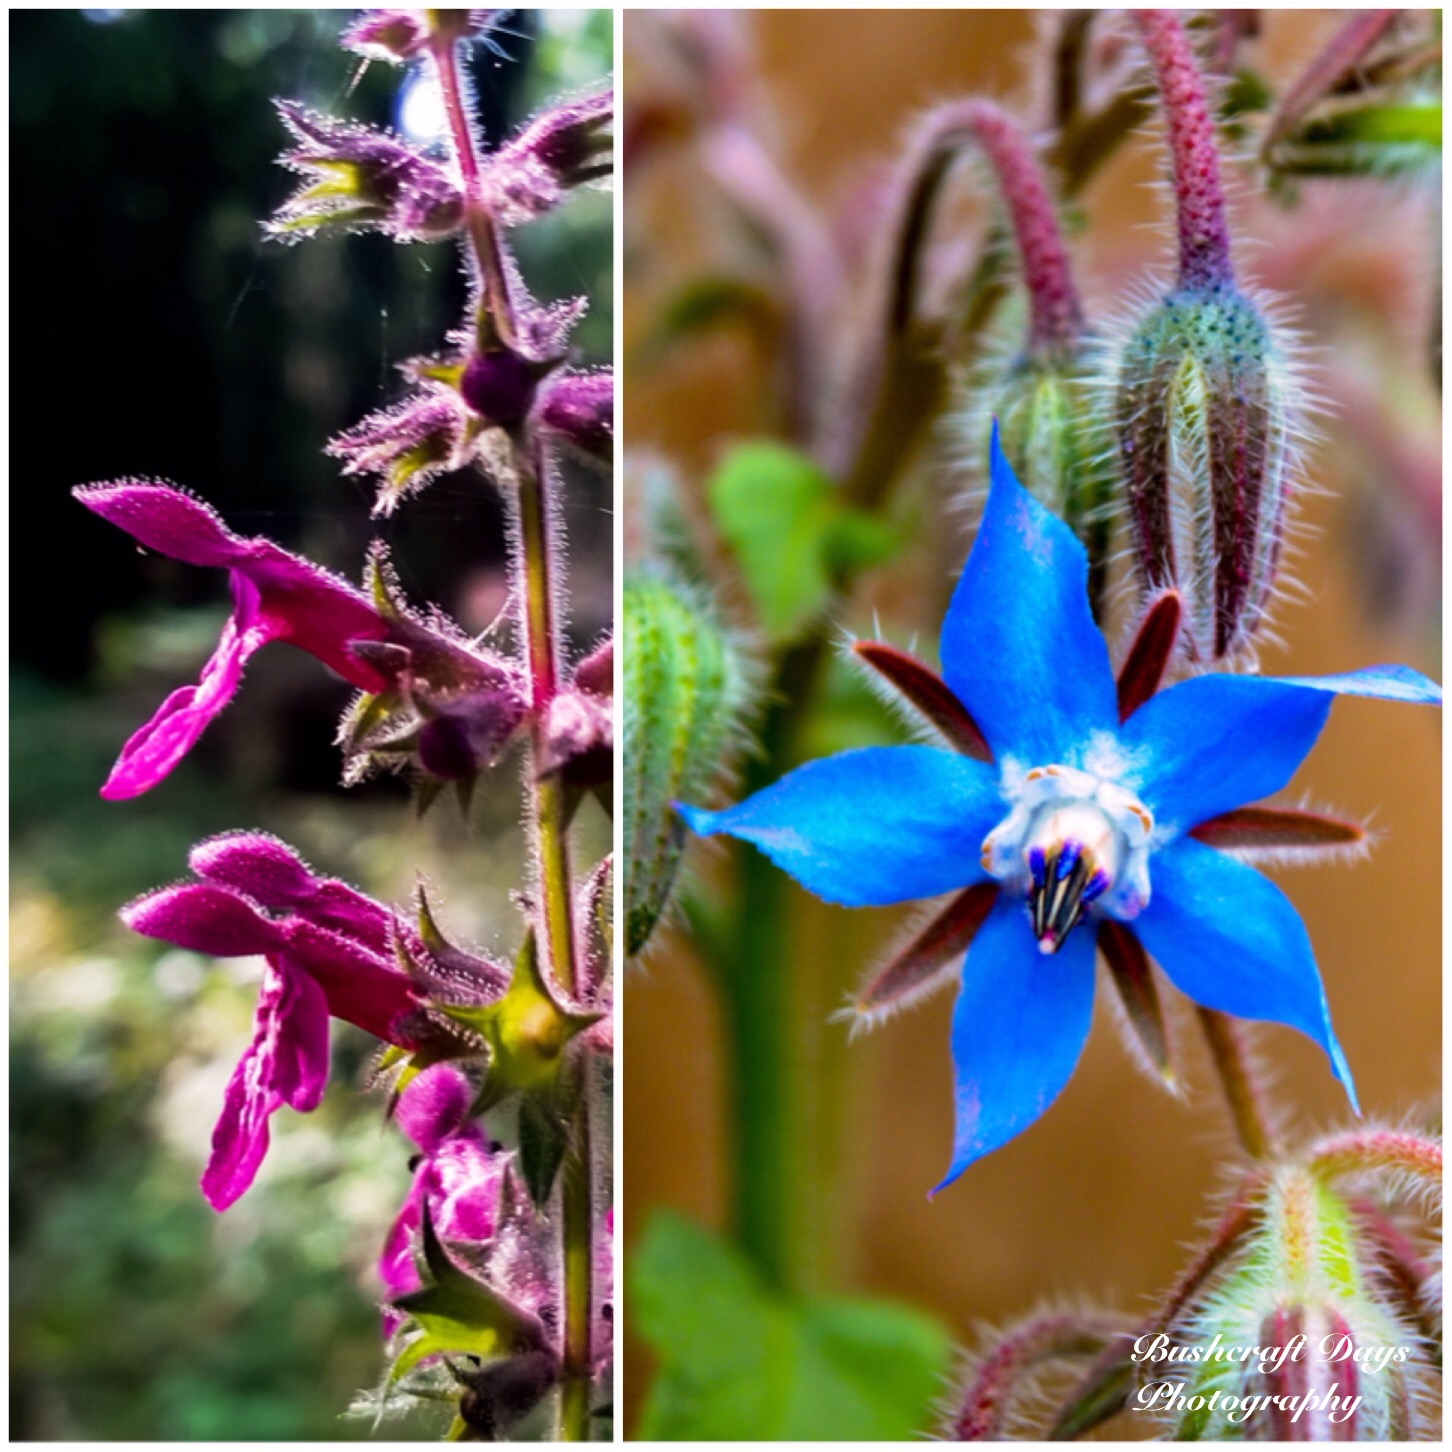
While reviewing my spring pictures I noticed there were dominant colours coming through. Below (from left to right) are the purples of the snakes head fritillary, two emerging and an emerged early purple orchid, and a lovely red campion.
I was particularly pleased to capture the orchids just emerging from their leaf sheath.
Purples
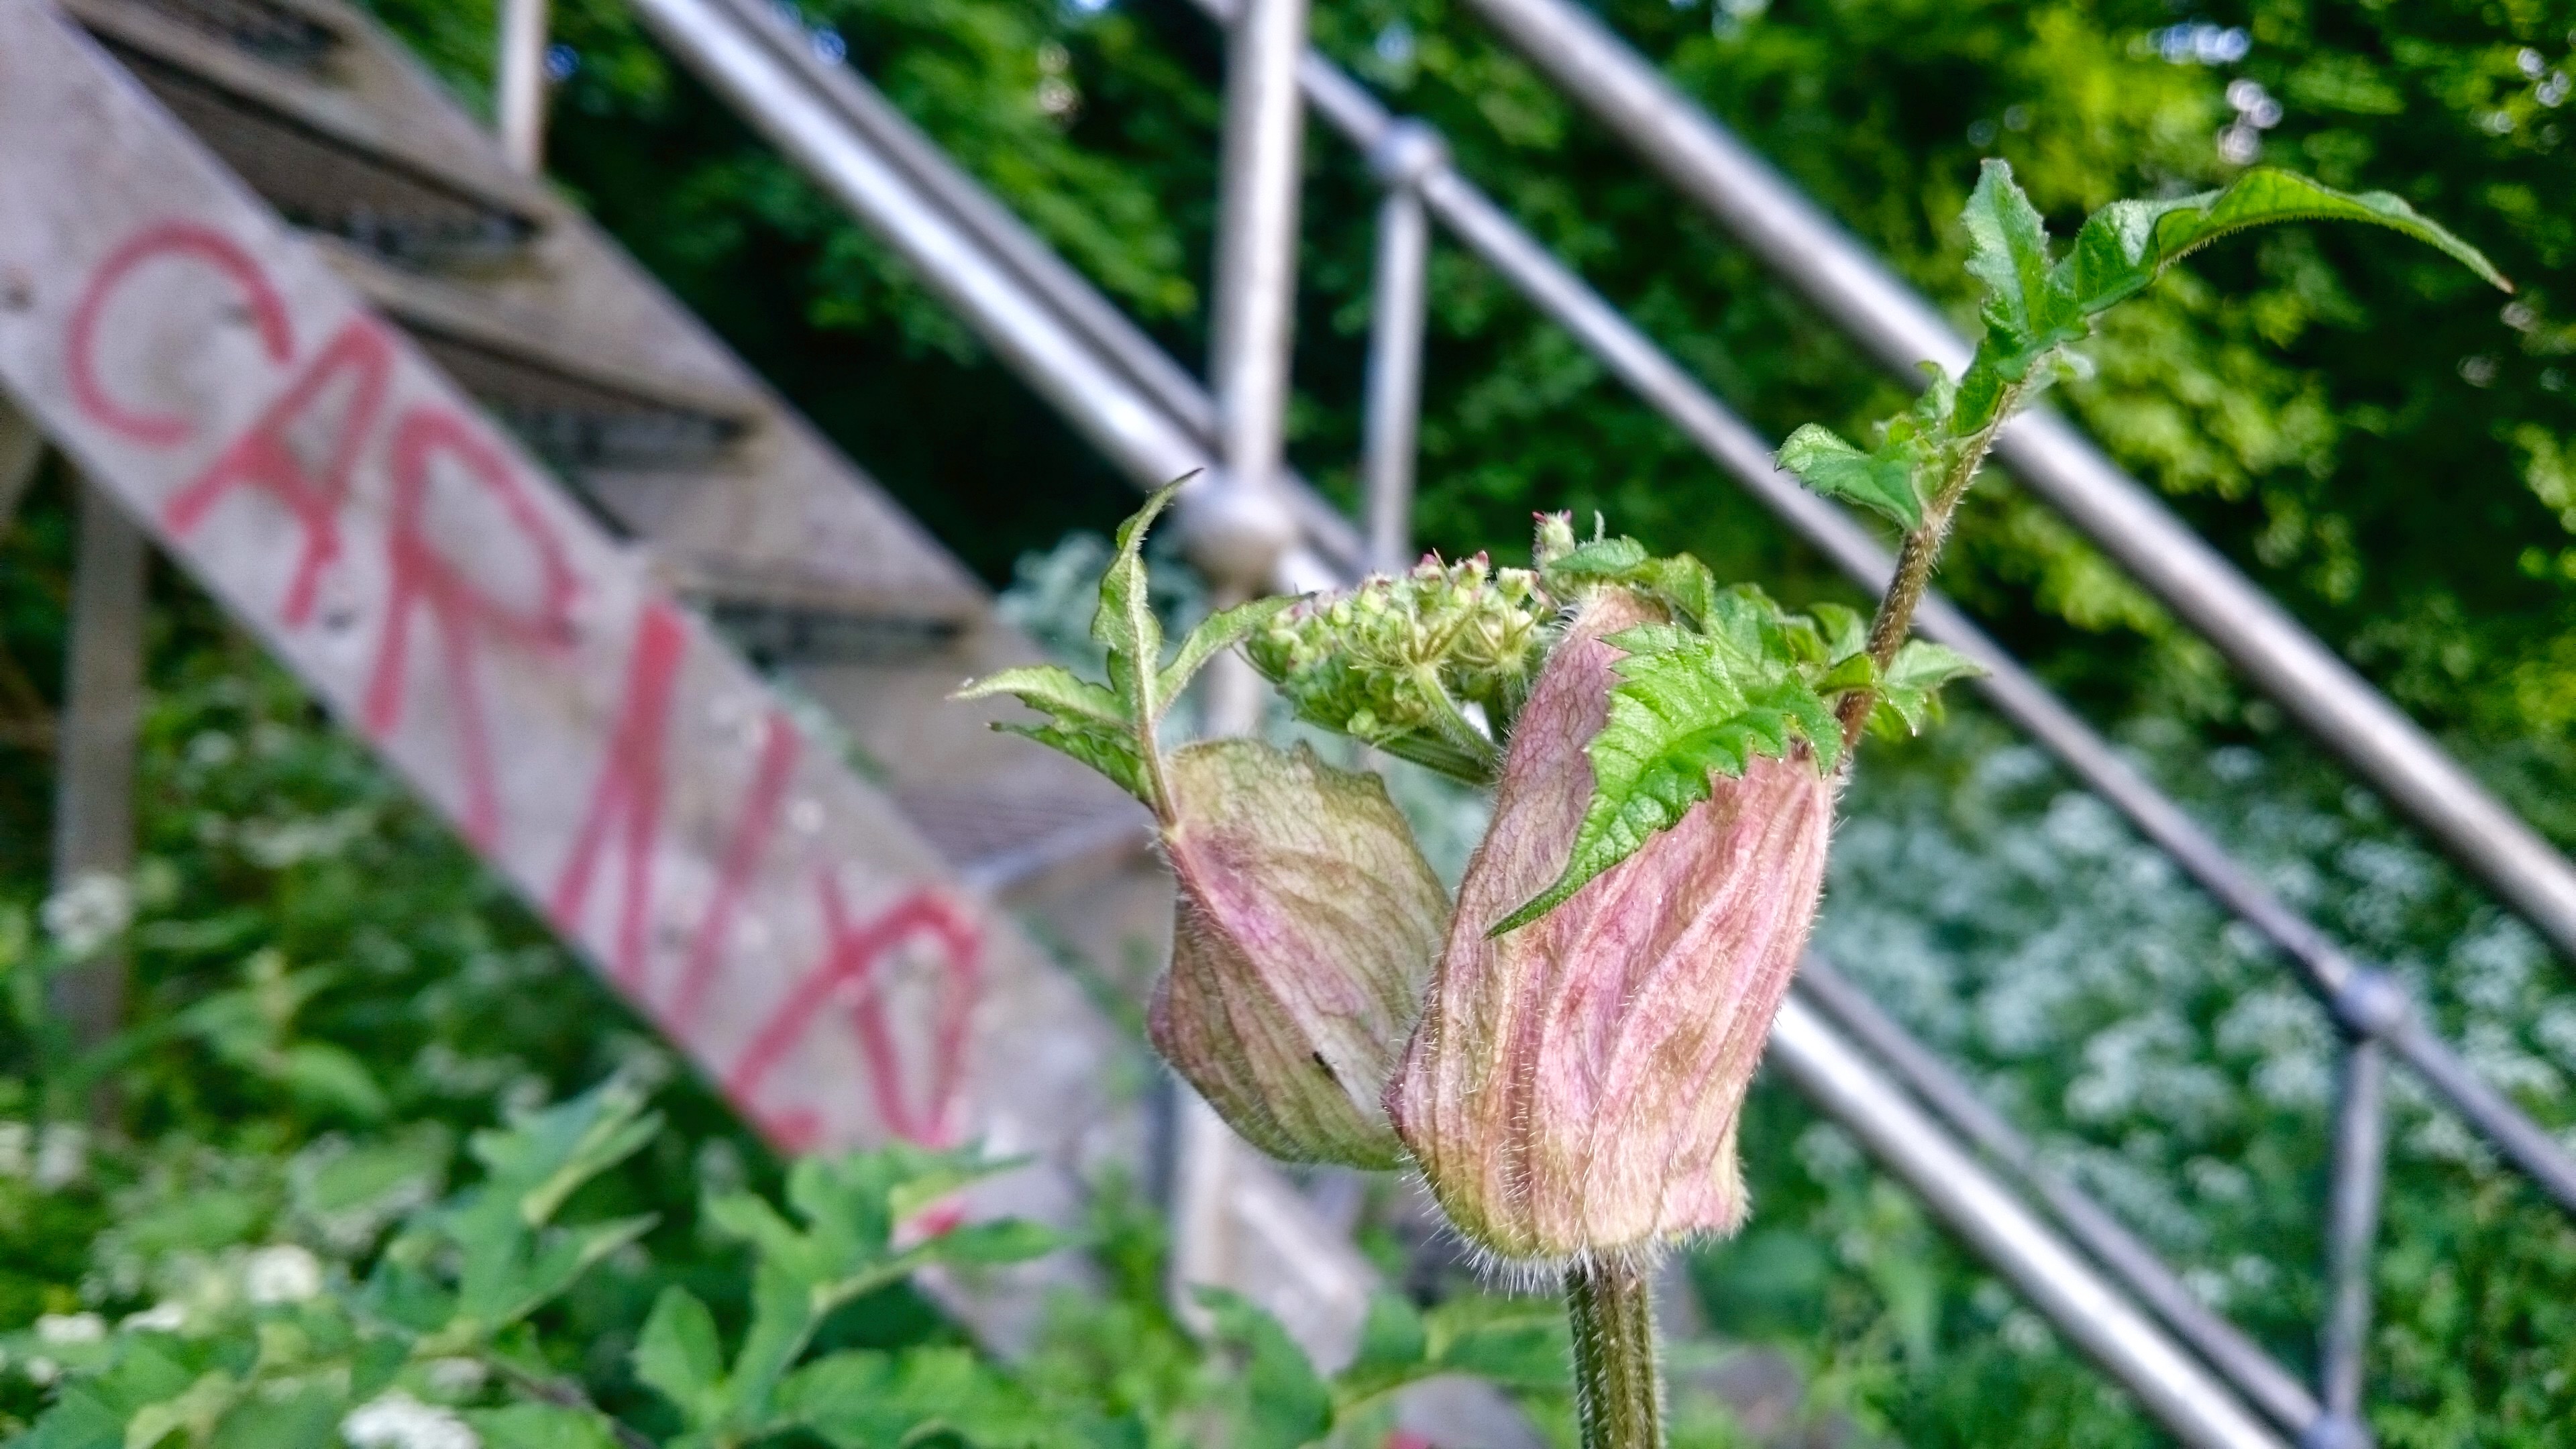
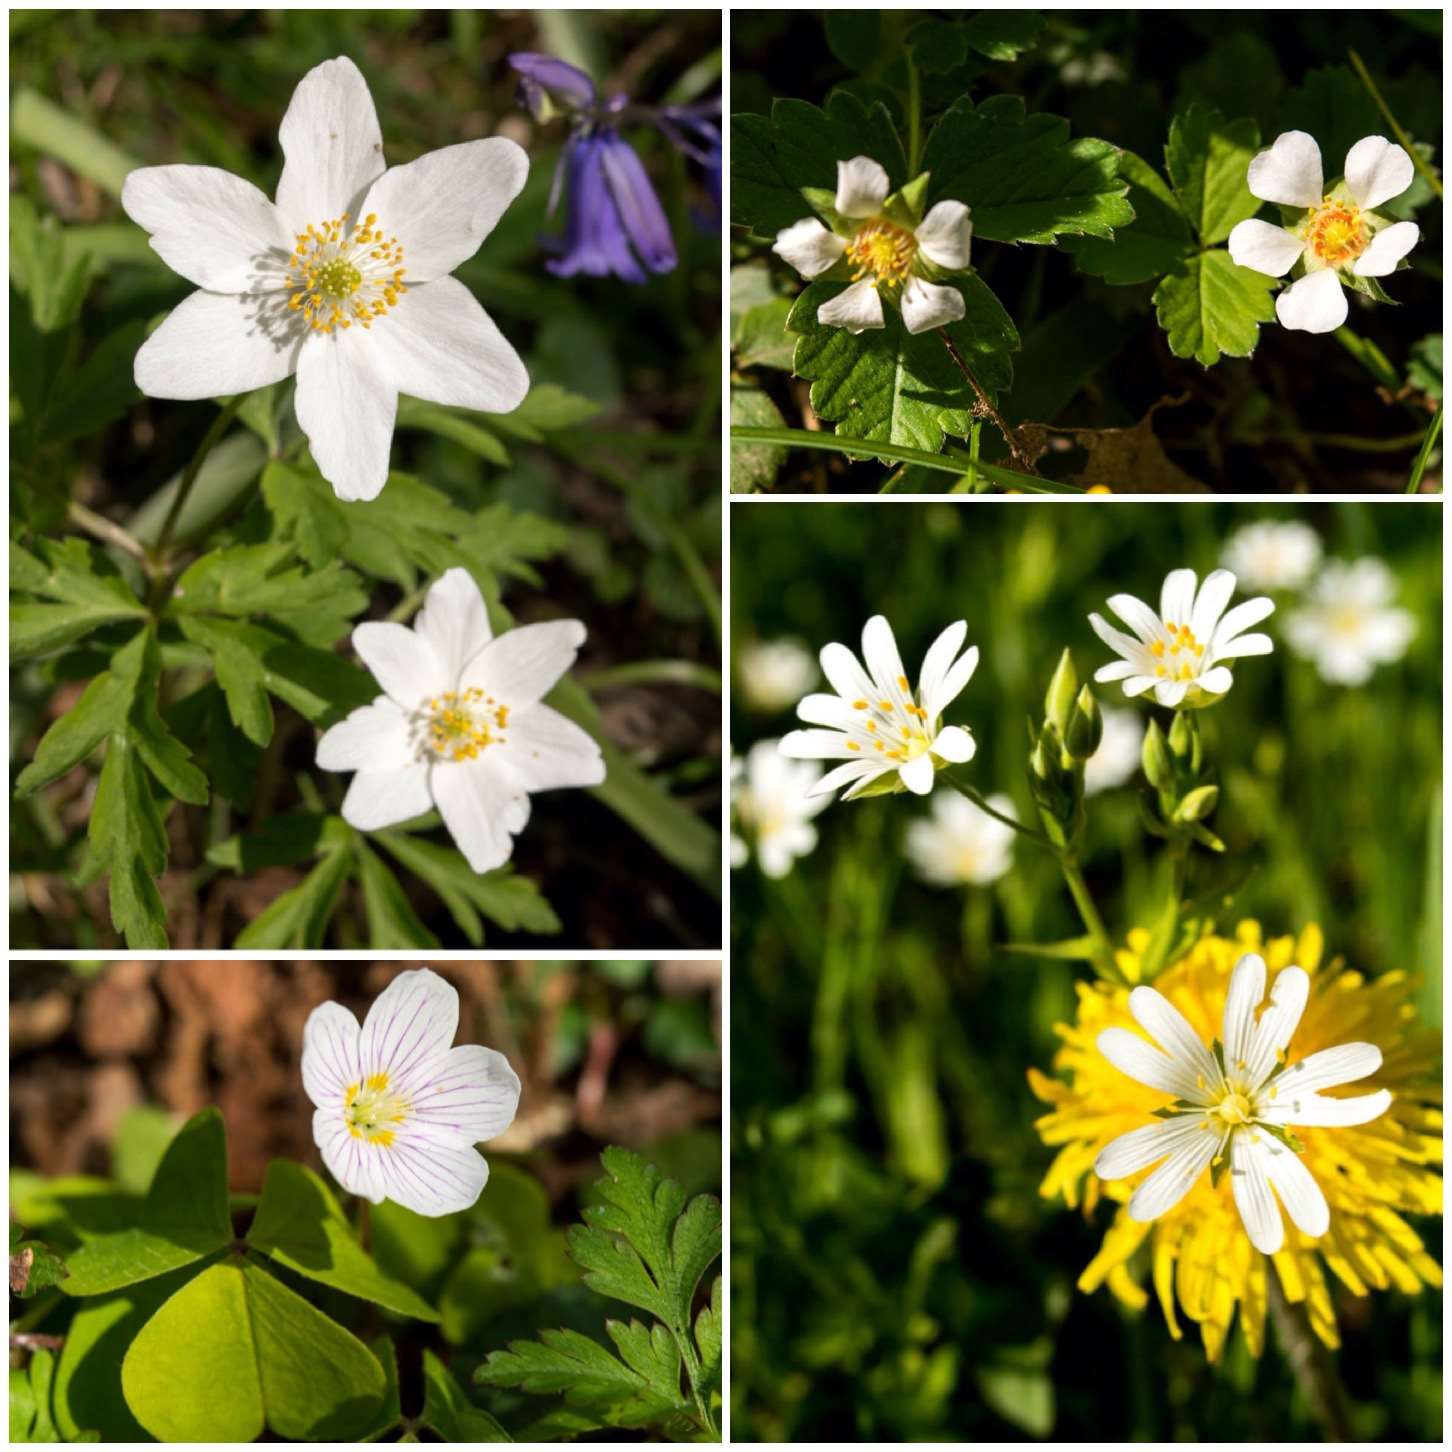
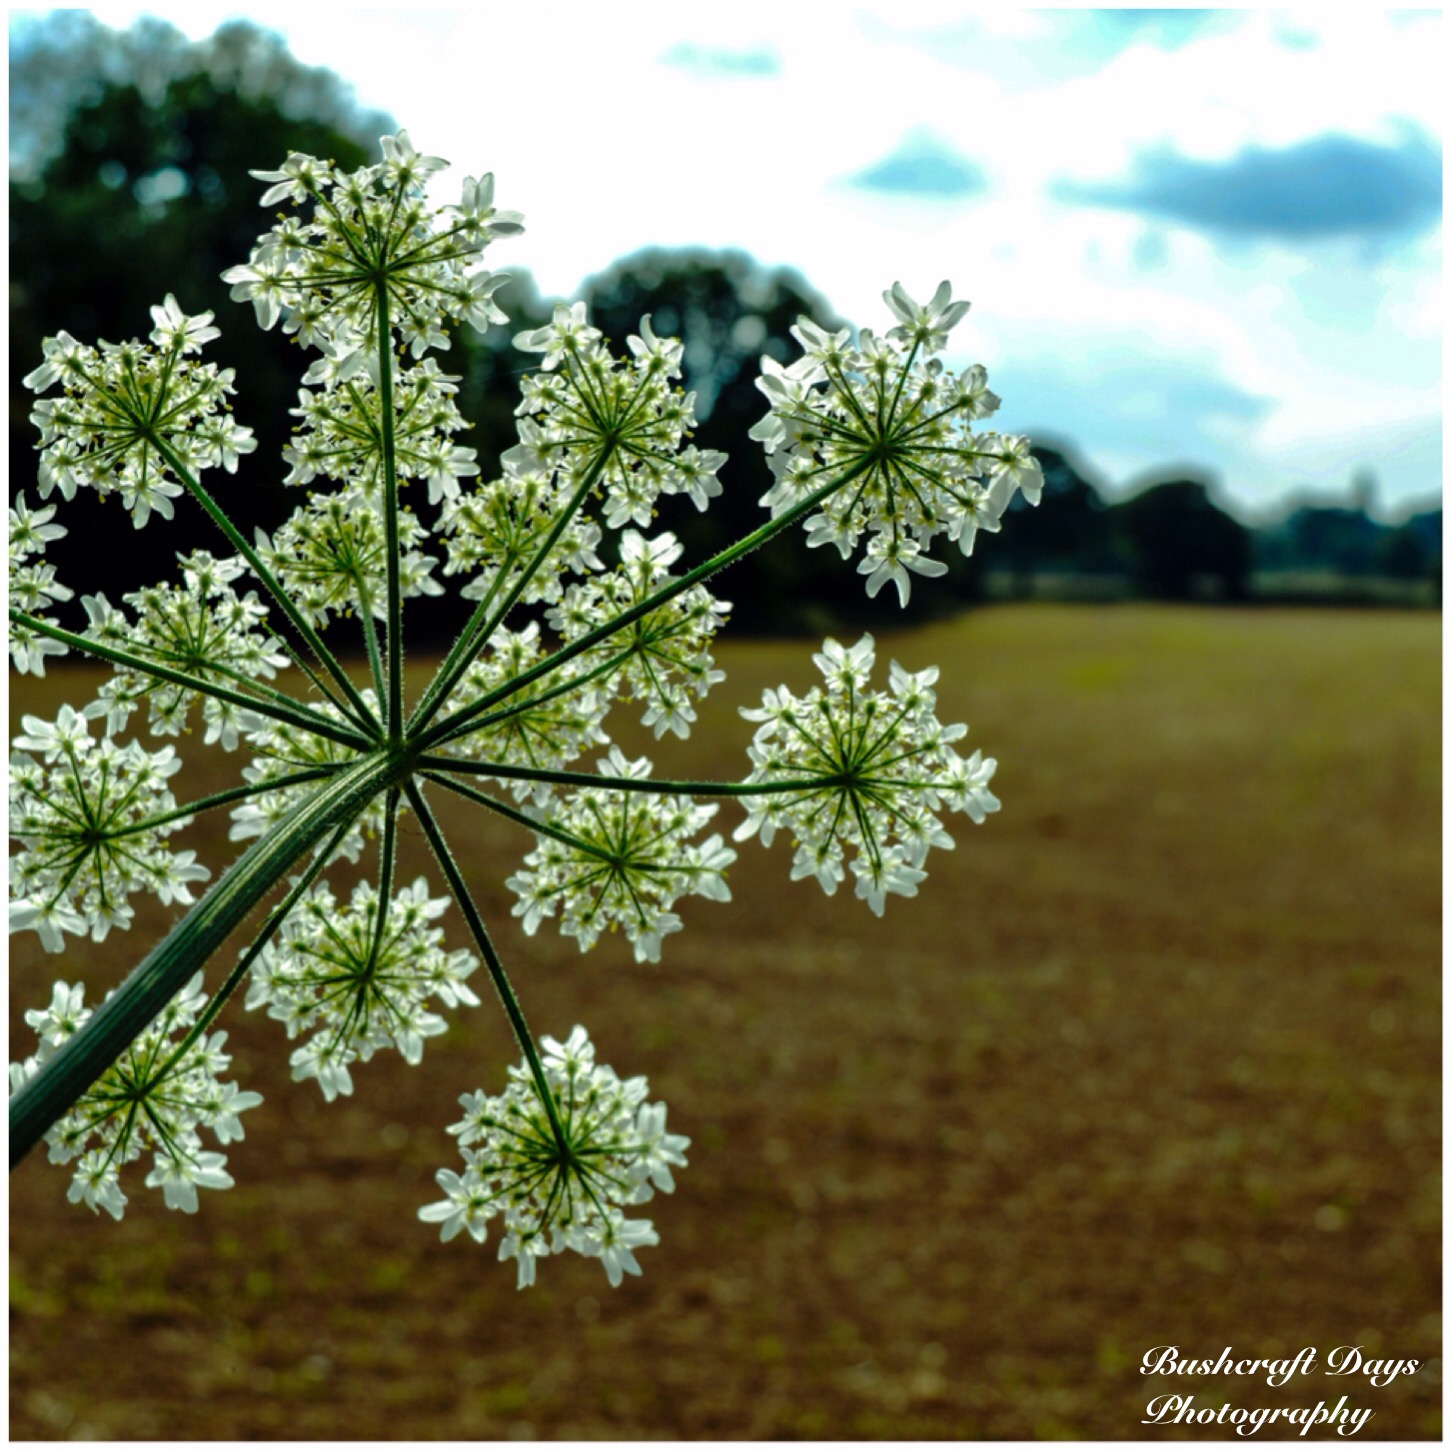
The woods and the hedgerows are awash with small white flowers at the moment. I was pleased to see that our local woods (The Frith near Bramley, Hants) sports such a wide range.
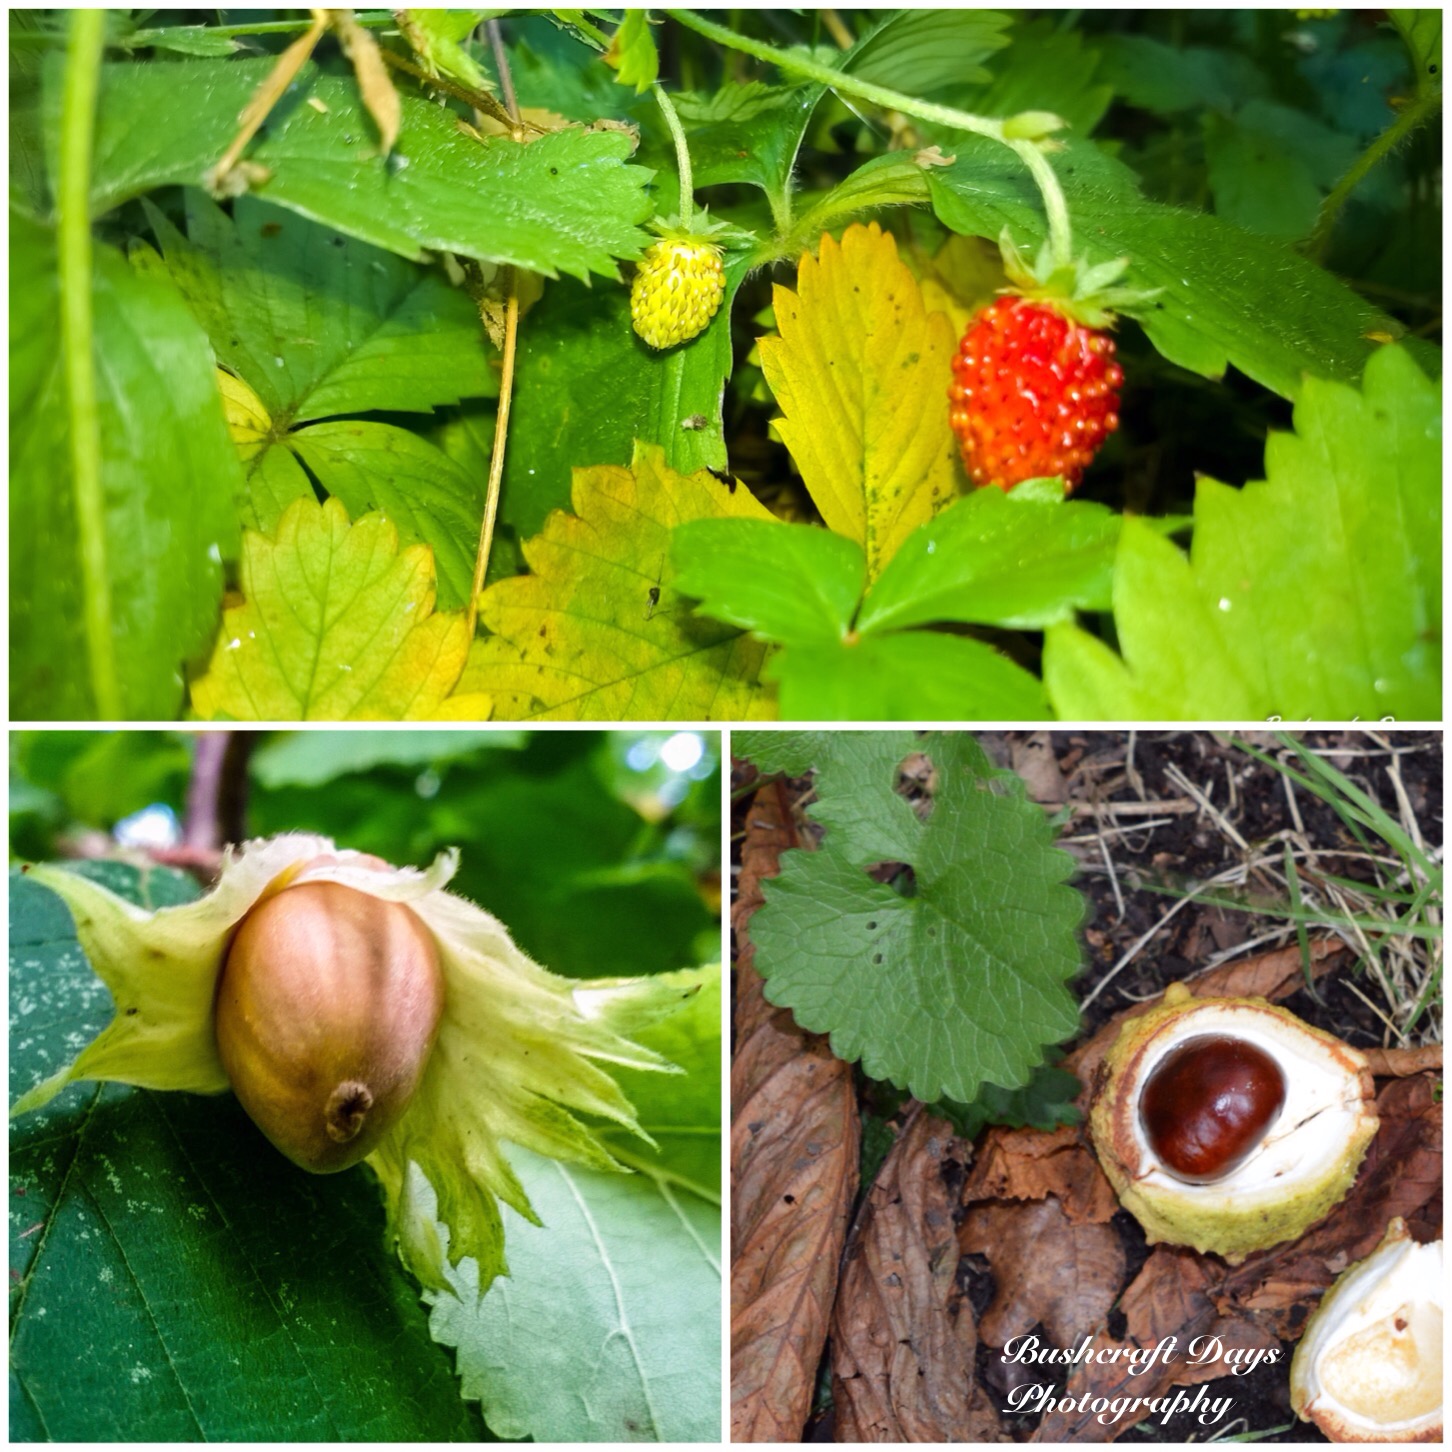
For a few weeks at this time the wood anemone’s can be easily spotted (top left) and if you look close enough you will spot the delicate wild strawberry flowers (top right) just coming through. One day I will take the time to work out whether they are the barren or the fruiting types.
Also hiding out in the woodland glades are the beautiful but tasty (the leaves that is) wood sorrel (bottom left). Like the wood anemone the wood sorrel is best viewed on sunny days while it is fully open.
Bottom right is stitchwort (‘greater’ I think). I have been finding this in great patches alongside hedges where they receive a lot of sunlight. I particularly liked this picture with the single stitchwort being framed by the dandelion.
Whites
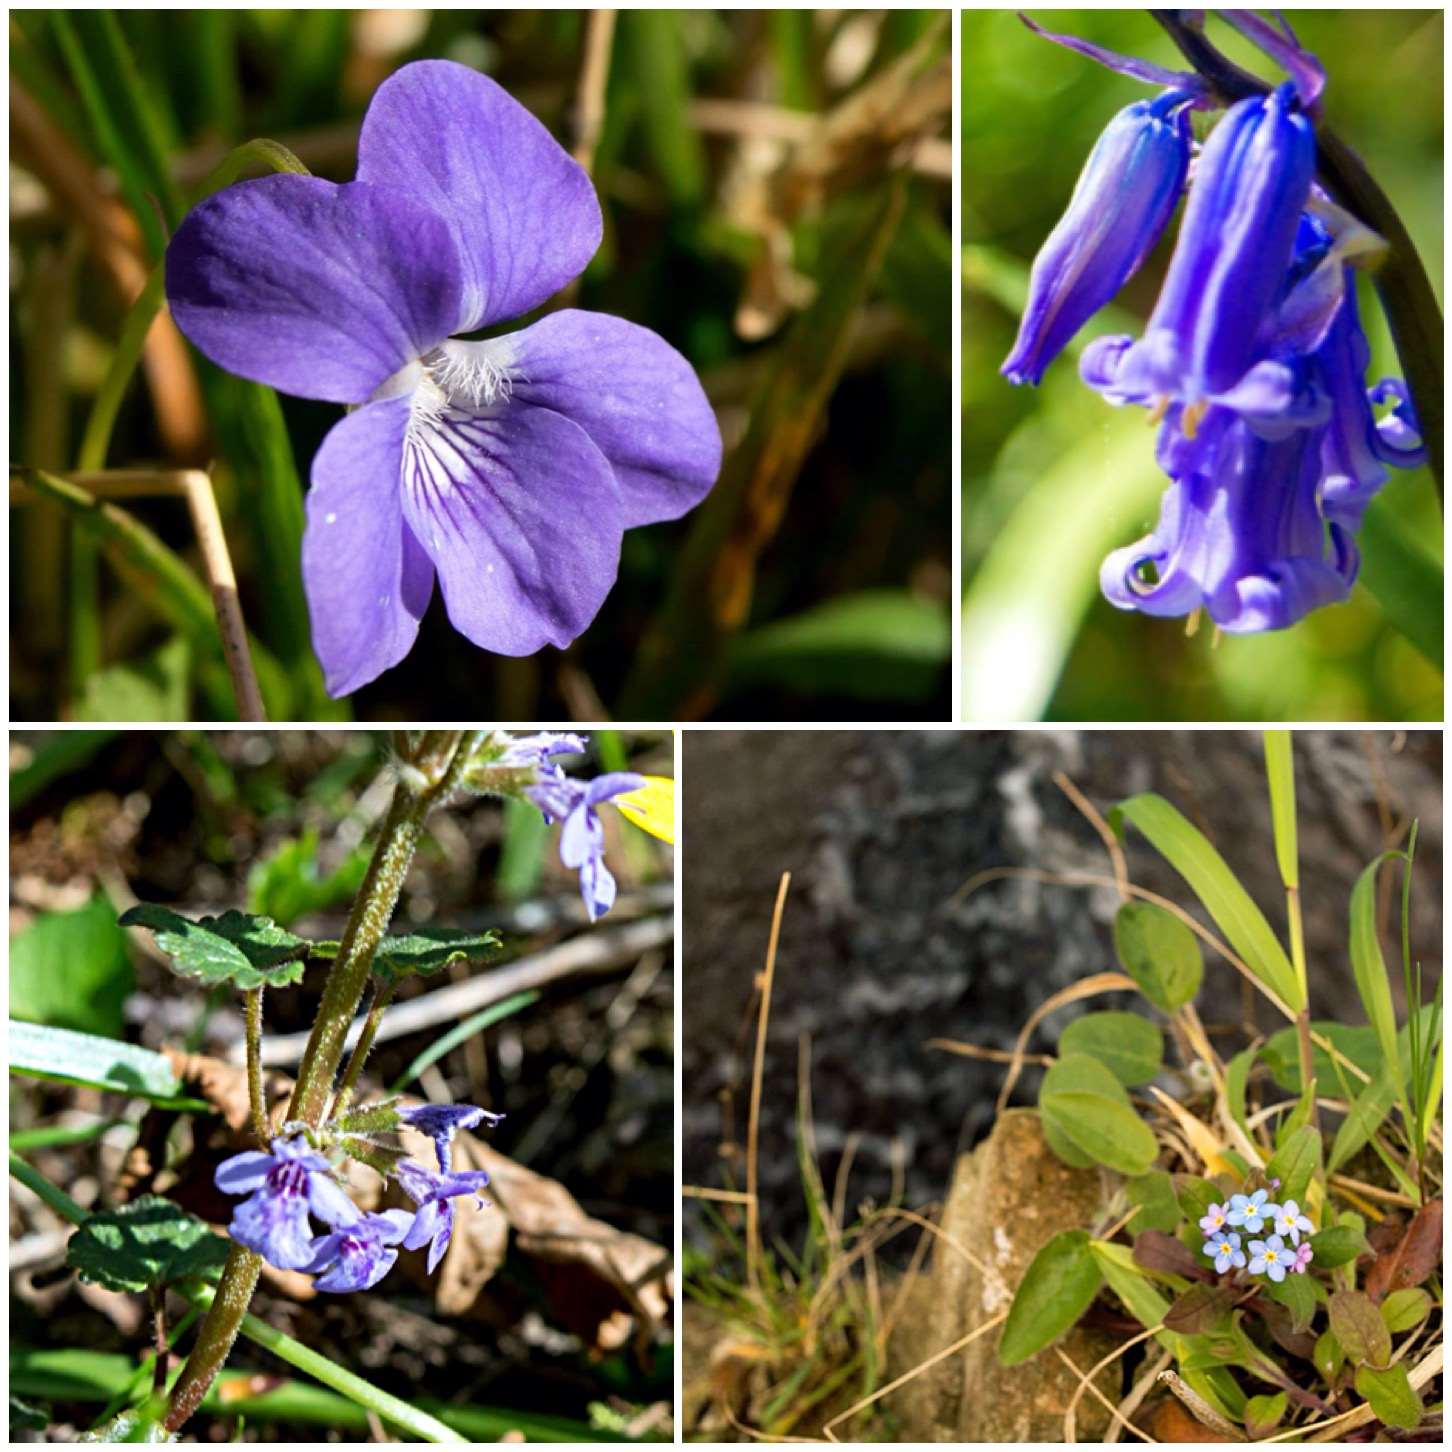
As I write this the early dog violets (top right) where I live are on the wane but the beautiful bluebells are really coming through now in great carpets.
Bottom left is the often overlooked blue flower of ground ivy. As this little plant grows easily on disturbed ground you find it in your vegetable patches if you do not clear it out regularly. I like it though as it does add a lovely tinge of blue to an otherwise mass of green.
One of the nicest blue flowers (even more than bluebells I think) out at this time is the forget-me-not (bottom right). I took this picture by a riverside outside Dundee as it clung precariously to an old stone wall.
Blues
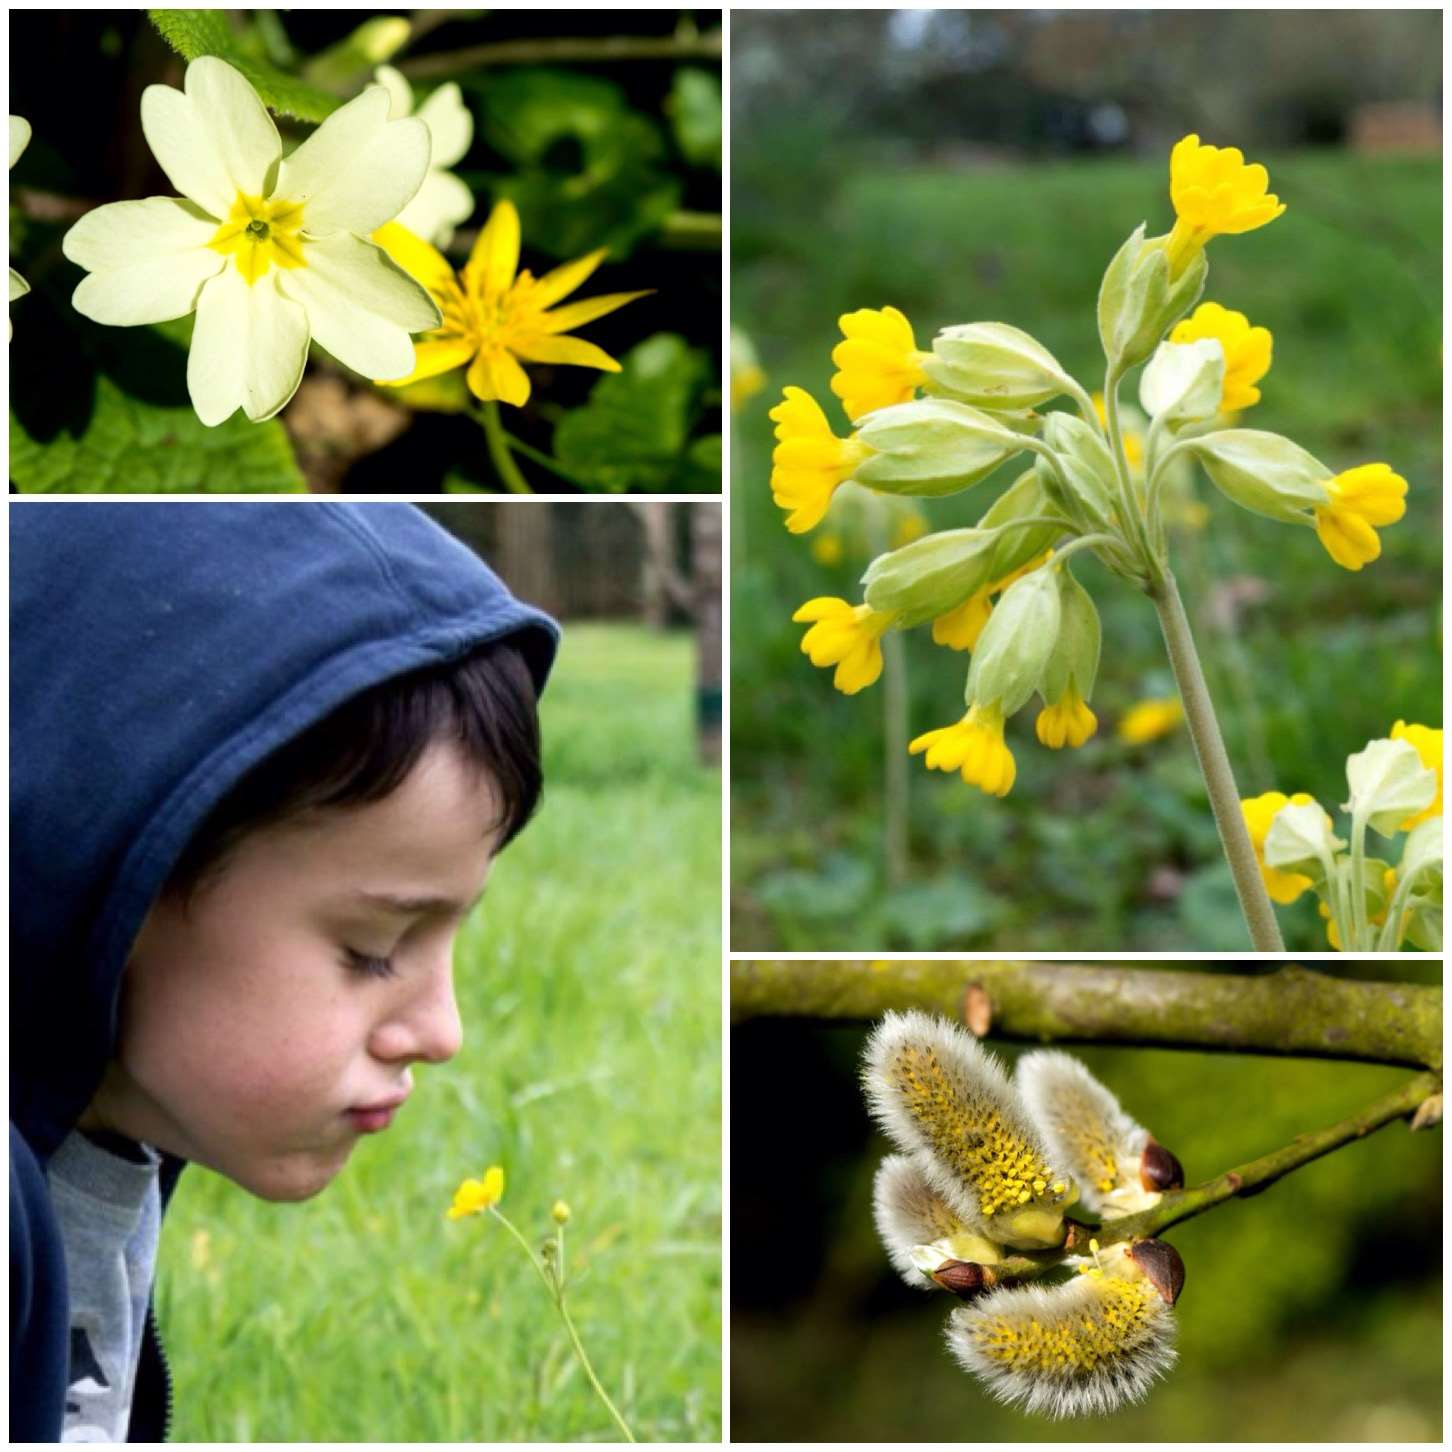
The last dominant colour I have noticed this spring is yellow. One of the earliest and for some reason this year one of the most abundant (top left) is the primrose. I am finding this delicious little plant everywhere.
The other three (top right), the cowslip, the buttercup and the male goat willow catkins are just coming out around here. There are so many dandelions out at the moment so it is good to see that carpet of yellow being broken up by other yellows.
Yellows
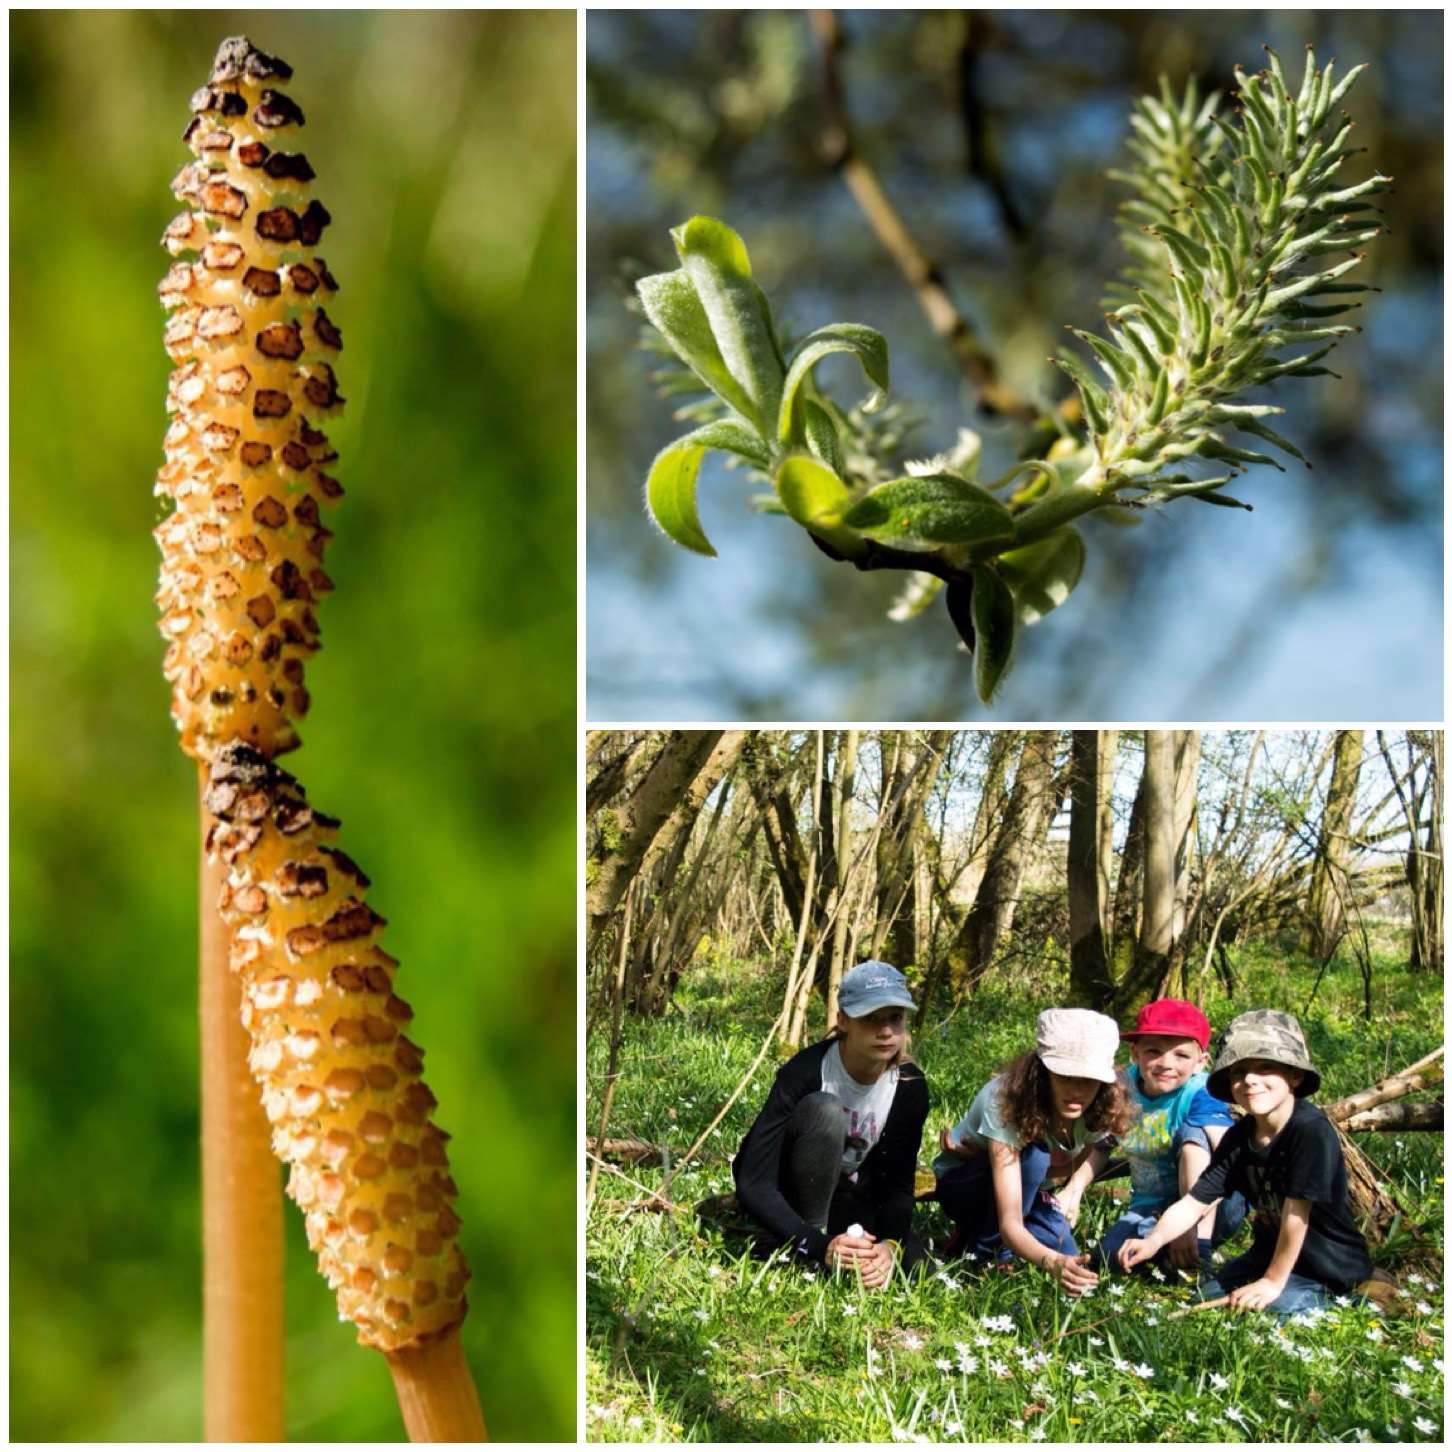
The final picture is of the odds and sods I have taken over the last few weeks. The horsetail and the female goat willow catkin up close look very striking but it is the picture of the kids getting out and about from their usual digital world and enjoying a bit of sun and flowers that I love the most.
A few years ago at the BCUK Bushmoot in South Wales I ran a class looking at different campfire cooking set ups. As well as showing the students my set ups I had asked them to bring along examples of their own if they could. One that caught my eye was from my friend Steve Mesquite Harrall. It consisted of two forked uprights and a top bar that could be turned to raise or lower a pot that was suspended beneath it on a piece of string.
Steve had learned this from Wayland of Ravenlore Bushcraft and there is a good picture of the set up on Wayland’s Ravenlore site – Hang up your Billy. Wayland told me he’d got the idea from a book by the French adventurer Nicolas Vanier called ‘North’. The rig did not have a name and it was Wayland who used the term French Windlass (Windlass meaning to ‘haul or lift’). I have just added the ‘Double’ so I can cook with more than one pot.
I really liked this rig when I first saw it but soon felt the need to be able to adjust the height of more than one pot at a time. You do not easily find two decent poles with a double fork in the right place to do this so I had to come up with another idea. The solution in the end was so simple that I had to laugh at my own stupidity for not thinking of it quicker – just make a new fork by splitting the pole above the natural fork.
Double French Windlass Cooking Rig
The basic parts I used were one small piece of wood to make a pile driver (I’ve heard this called an El Salvadorean pile driver) to create holes for the uprights, two forked uprights and two poles to act as spars.
I trimmed a point on the piece I was going to turn into my pile driver first. I used a small round of wood to act as a work surface and kept my axe work to the far side of the round for safety.
The basic parts and the start of the El Salvadorean pile driver
Once the point was finished I put a chamfer on the top of the pile driver by cutting out little pieces of wood all around it. Doing this helps stop the pile driver from splitting as you hammer it into the ground to create your hole.
Carving the pile driver
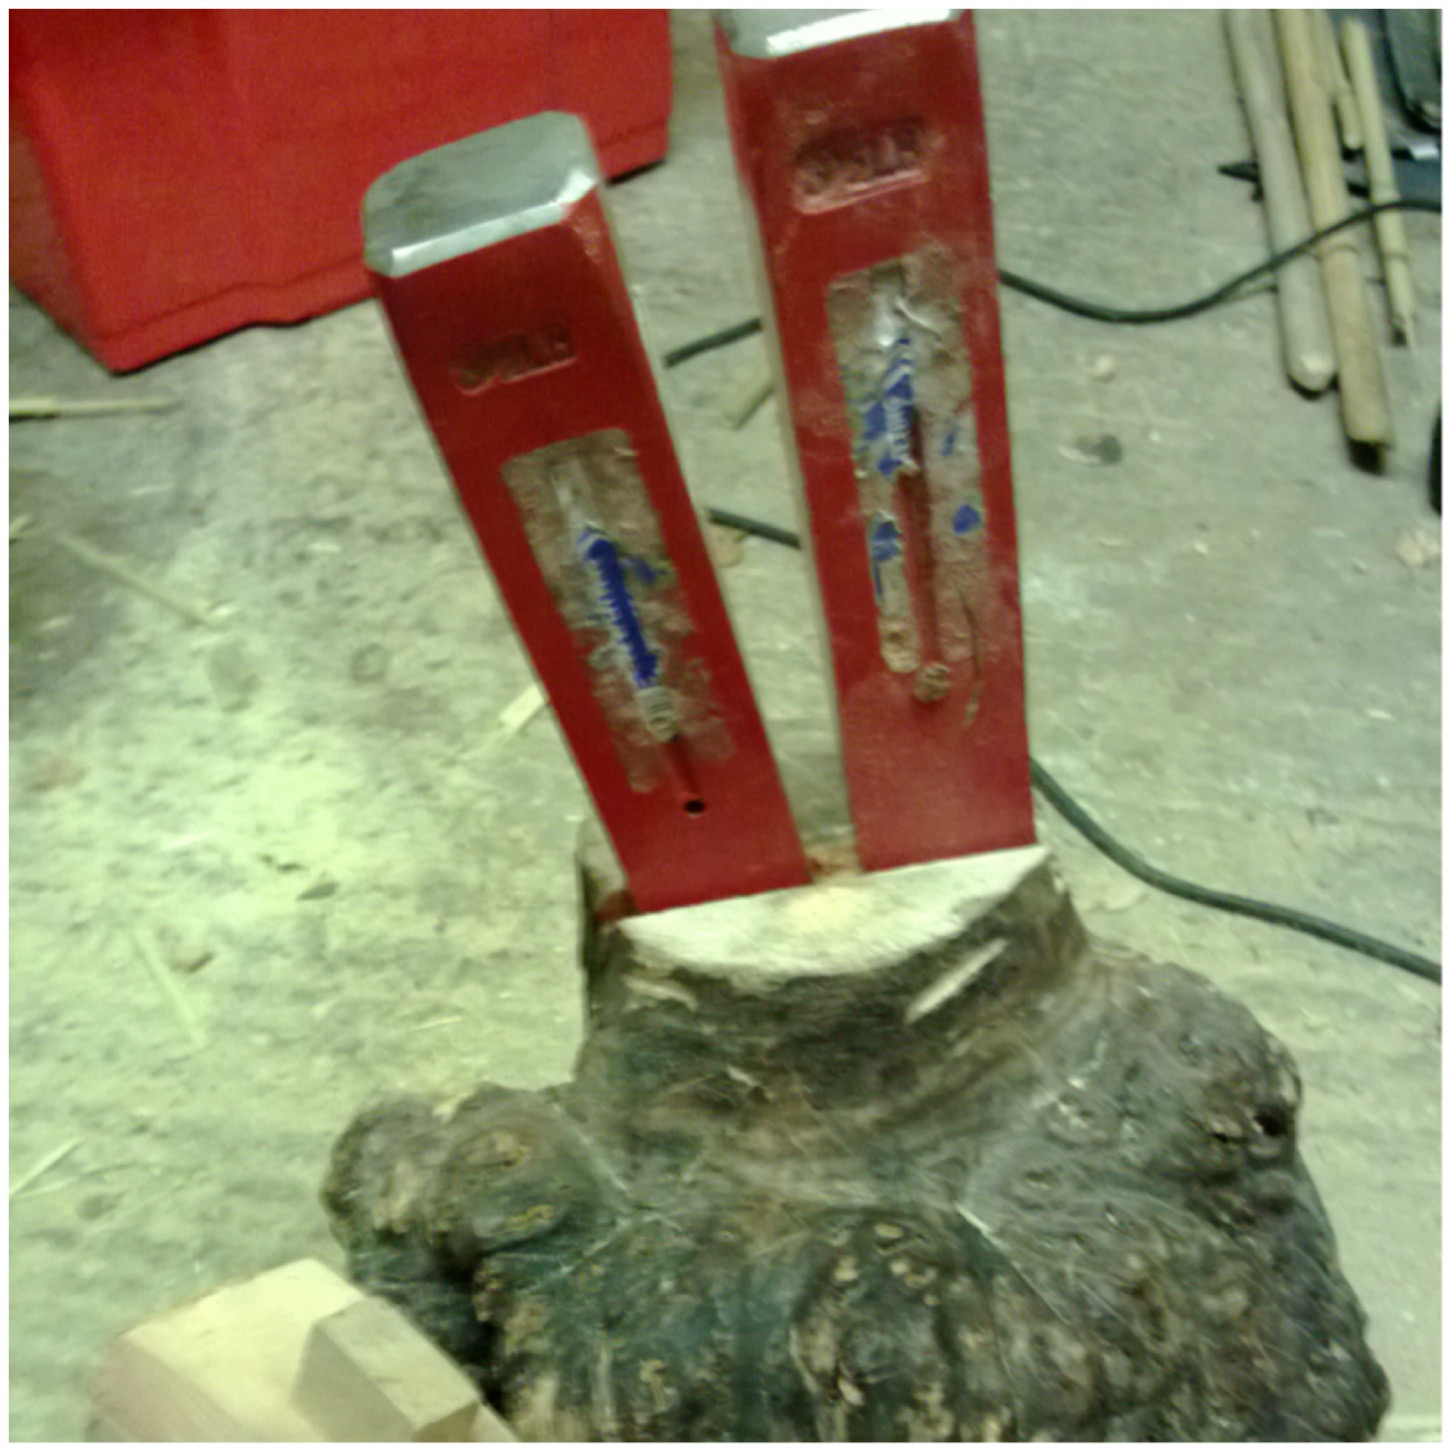
As the pieces I picked for the uprights were fairly thick I had plenty of wood to split to create my second fork. You need to ensure that the split you create is on the same plane as the natural fork.
To batton safely, make sure the bottom of the upright is secure and hold the axe so that the blade is at right angles to your body. I used the pile driver as a batton to create the split. Once the split reached the level of the natural fork I stopped.
Battoning out the second fork
To stop the split going any further I whipped some twine around the upright at the base of the split. To keep the fork open you will need to add a wedge and the whipping will stop the split travelling down the upright when it is inserted.
A little whipping
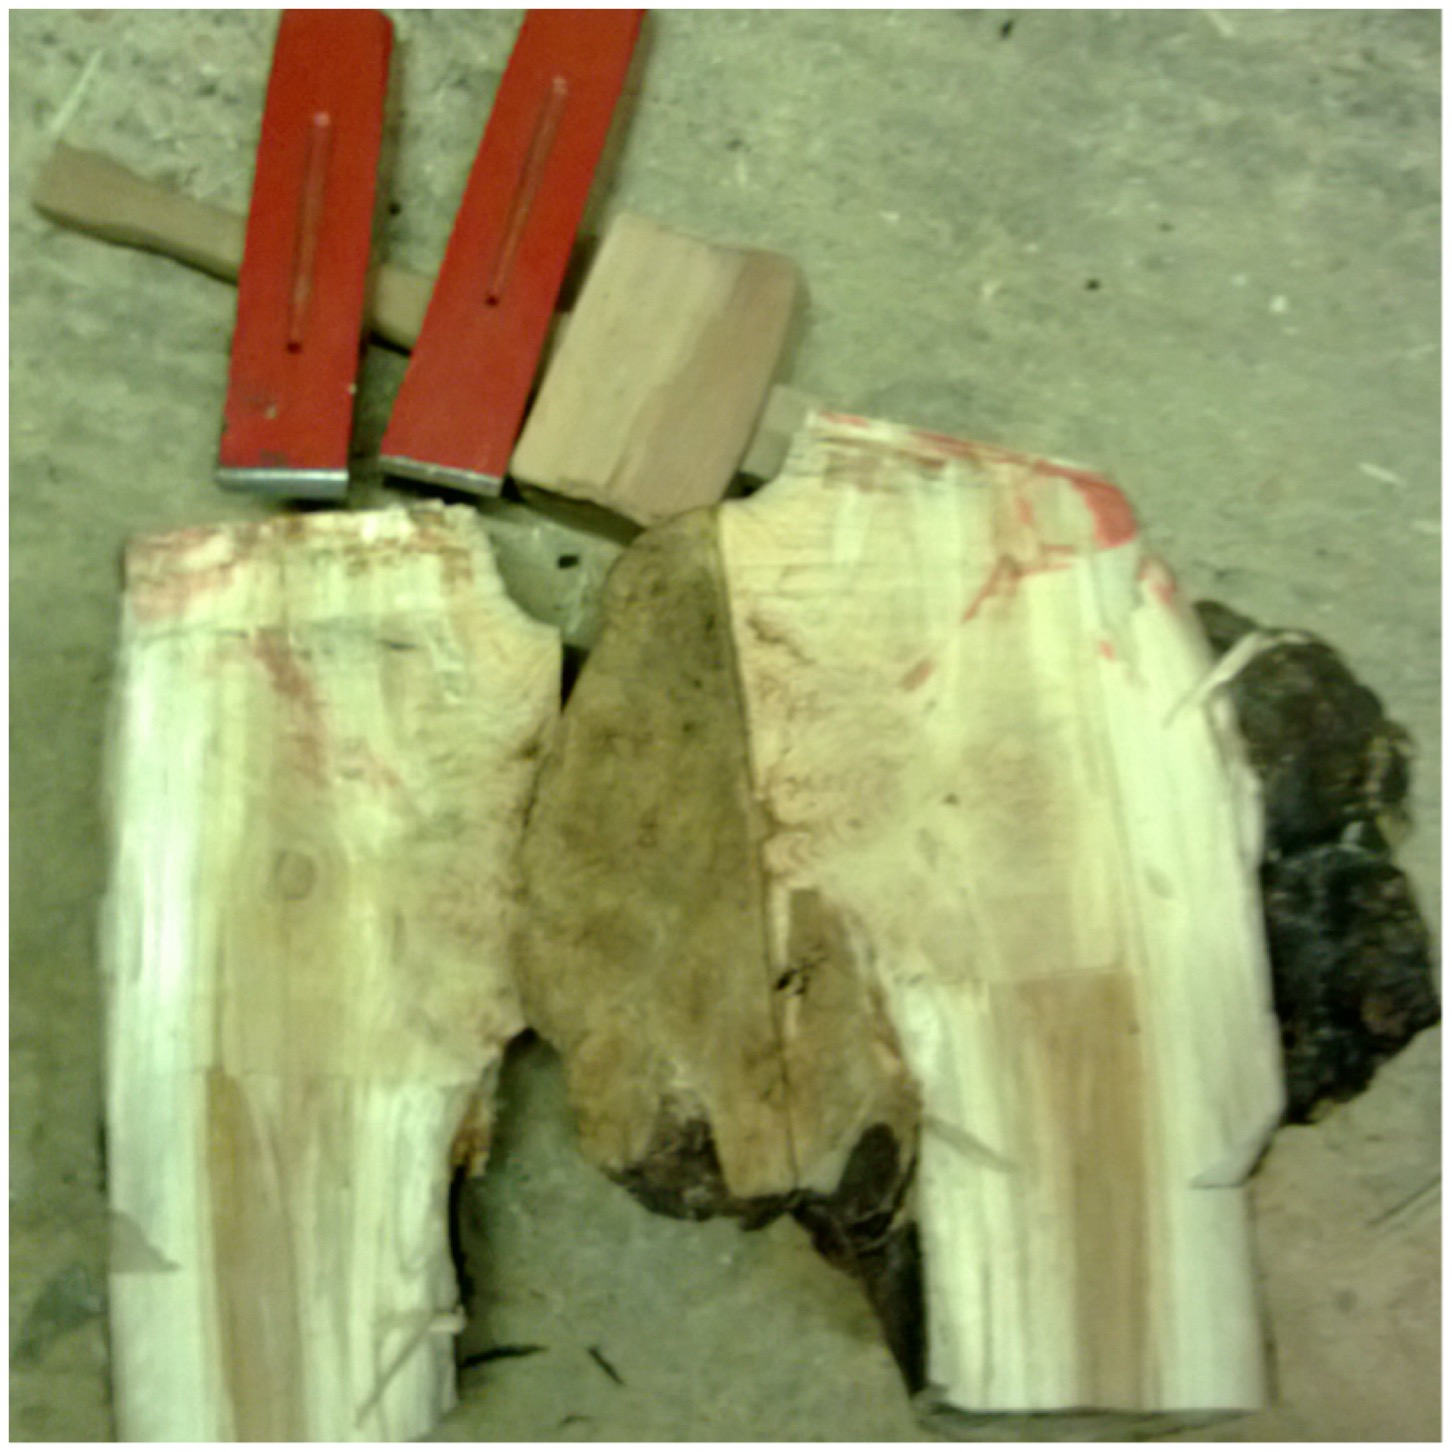
I took one of the spars and carved a triangular end to it – the thin end of this will be the wedge to hold open the split in which the spar will sit.
Carving the wedge
I used the pile driver to batton the wedge down into the new fork until it reached the whipping. Then it was a case of just trimming the wedge to finish.
Inserting and trimming the wedge
I felt that my fork needed to be a little bit wider still so with my knife I cut out some wood from inside the fork. Once that was done it was a case of giving the upright a pointed end and trimming off any knobbly/sharp pieces from it.
Widening the fork, pointing and trimming
The second upright was produced in the exact same manner and they were soon both ready to go.
Finished uprights
The rig works on the principle that the weight of the pot locks the spar into the forks on the uprights. To make this work you need to carve triangular-shaped ends to your spars (Wayland likens this to a prism shape on his blog). I ensured that the points of the triangles at each end of the spars matched up with each other. Take your time with this and before each cut ensure they are lined up.
Carved triangular shaped ends on both spars
The ground where I was testing this out was at the back of our garden in an area that was about to be weeded and planted so it was a little soft but even so if I had just hammered the upright into the ground it would have split the top fork. The pile driver came into its own here as I was able to really hammer it into the ground (try and make your pile driver slightly smaller in diameter to the upright to get a snug fit) and create a hole for the upright.
Use the pile driver to create a hole for the first upright
Once the first upright was in I gauged the distance to where I needed to put the other upright in using one of the spars and repeated the process starting with the pile driver and then gently tapping in the upright.
Gently tap in the first upright and repeat the process for the second upright
Check your alignment is correct by lining up the forks and place both spars into their forks. I tested the spars were locked in place by trying to turn them gently. No need to force them as the weight of your pots will lock them down further.
Check your alignment, place the second spar and ensure they lock well
I took this shot to show you how the spars fit into the forks. All very basic but works surprisingly well.
Locked in
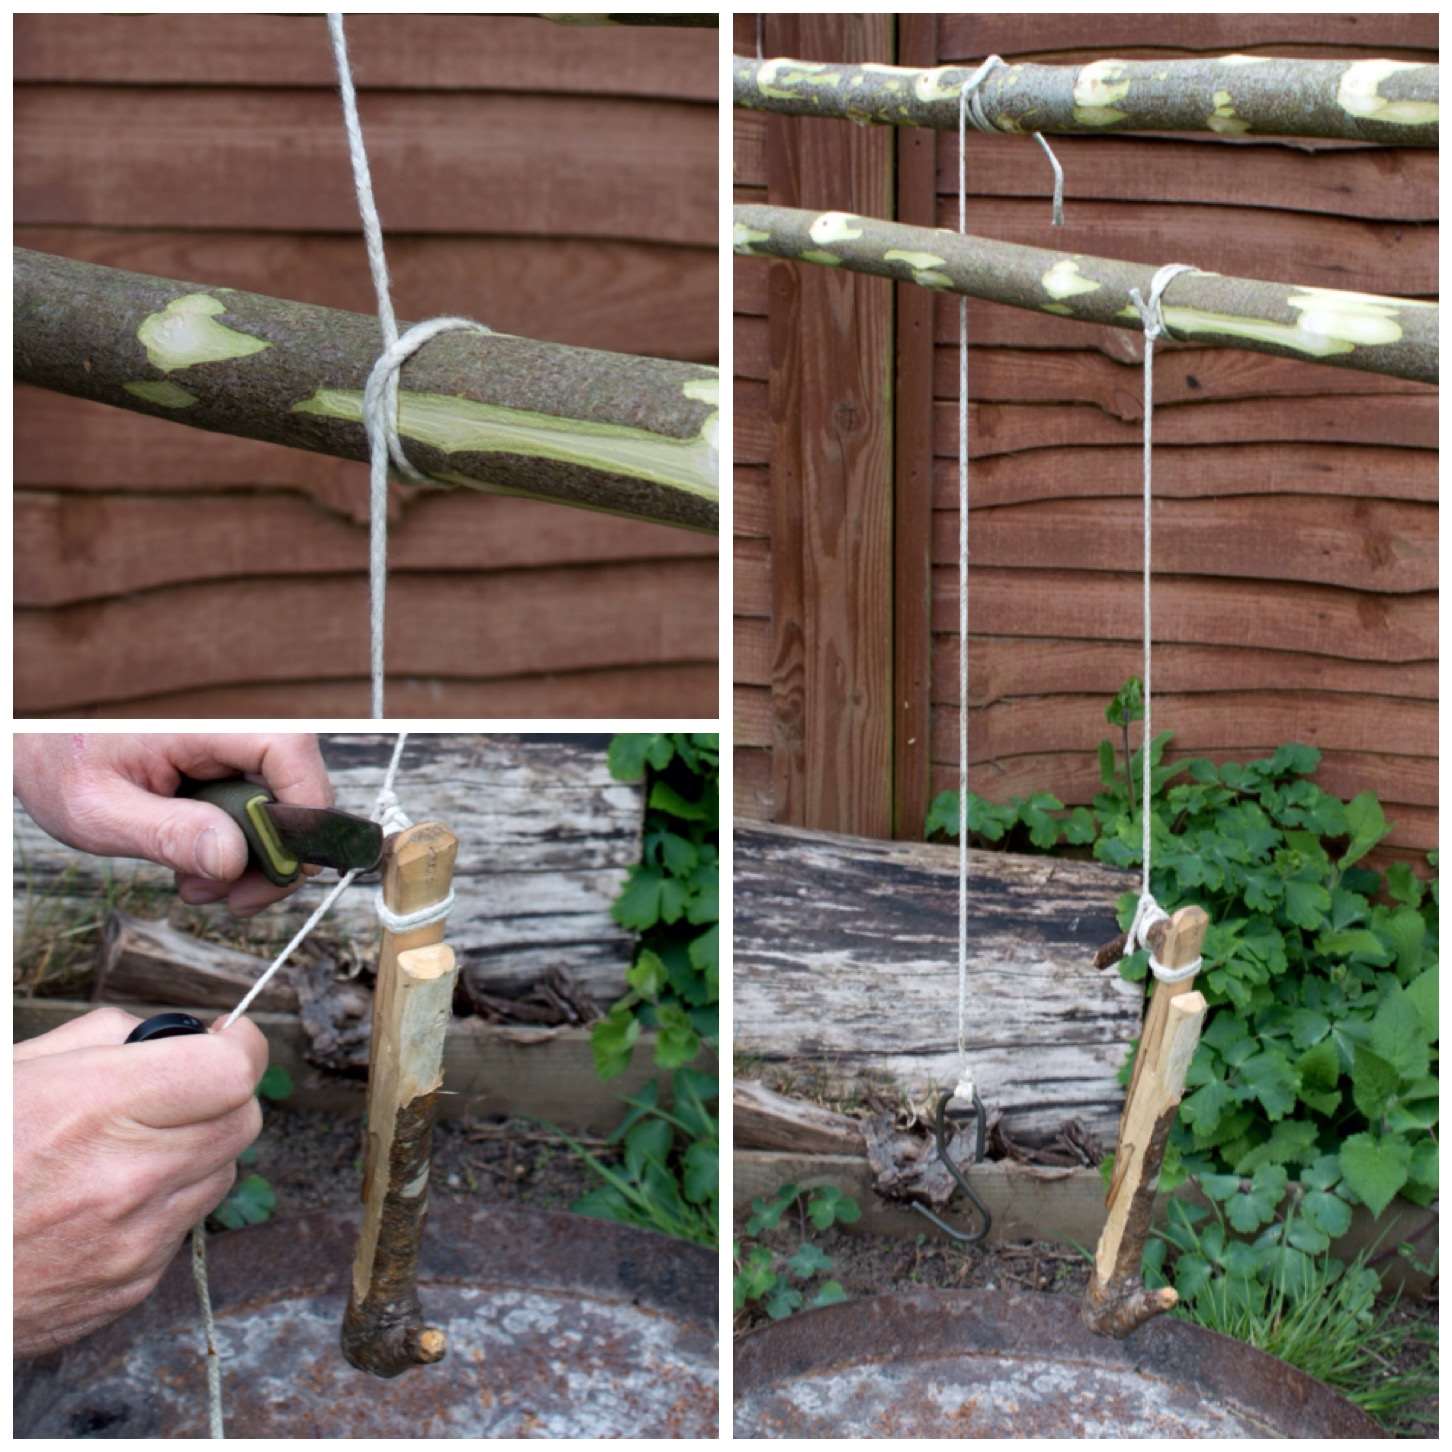
To suspend the pots I used some old string and tied it on with a clove hitch and then a couple of overhand knots to finish. I did not make them overly tight because I wanted to be able to release them easily to re-position them. Once that was done I attached the hooks. Use whatever knots you are comfortable with but make sure they and your string will hold the weight of your pots when full.
If you are worried that the string will burn then dampen it with some water (avoid string that will melt easily). I have never had the string burn through as when I am cooking I do not let flames grow big enough to go near it. Also when starting your fire ensure that the spars are not in place so that the initial flames do not burn the string.
Use a clove hitch and tie on your hook. Add one to both spars.
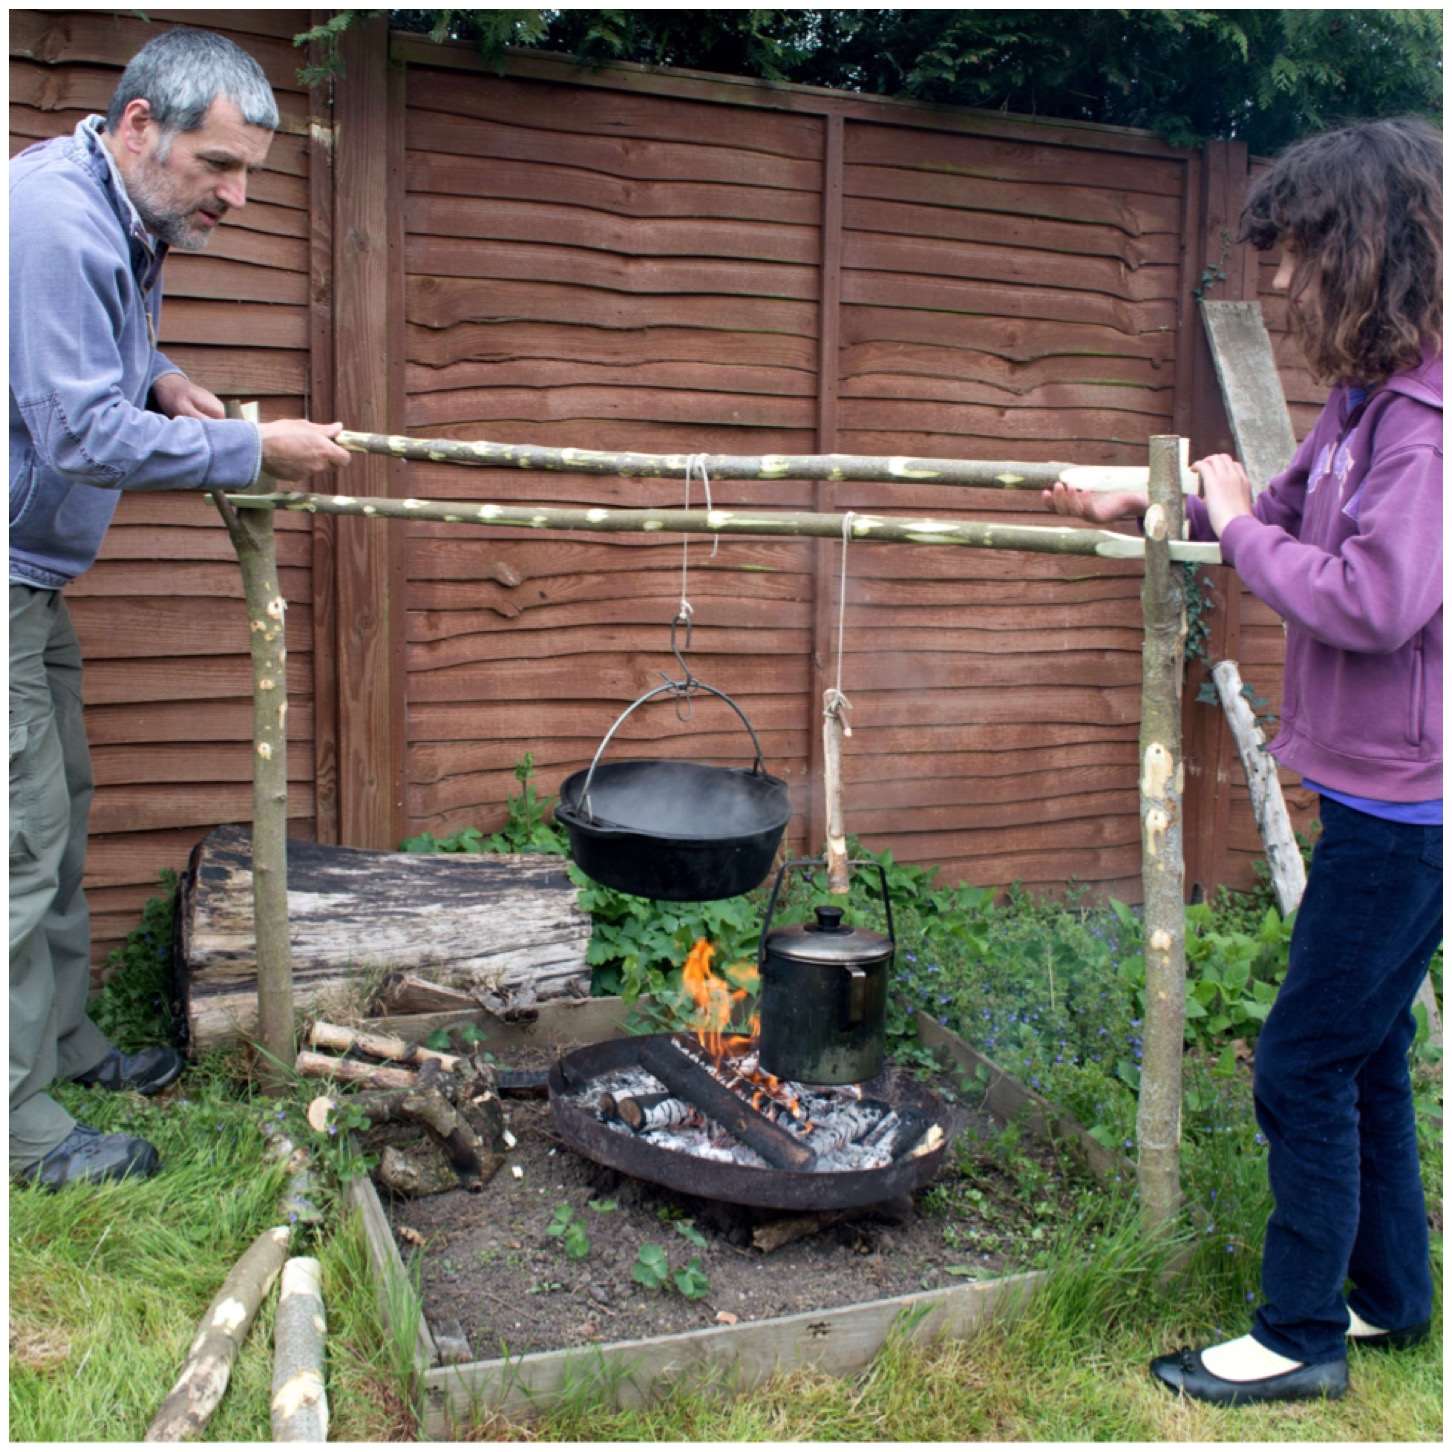
Once you are cooking it is very easy to lift and rotate one of the spars to raise or lower a pot by winding or unwinding the string. As we were boiling some water in the Dutch oven I got my daughter to help me but if the pot is light enough then you can do this easily by yourself.
To adjust the height lift the spar and turn it a few times
I also use another style of pot hook quite often (I learnt this from one of Ray Mears’s videos) which involves the use of a lark’s foot knot. All you need is a small loop of string that is able to go around the spar and through itself to leave a smaller loop to insert a traditional adjustable pot hook. To raise the pot all you need to do is loosen the lark’s foot and re-position it on another hook.
Alternative method with a larks foot and traditional pot hook
This is the set up from various angles so you can see how all works in more detail.
An angled view
I am glad I finished this little project as it has been on my list of things to do for a while now. It is a great set up that does not take long to do and it’s an easy way to cook foods that requires different temperatures at different stages.
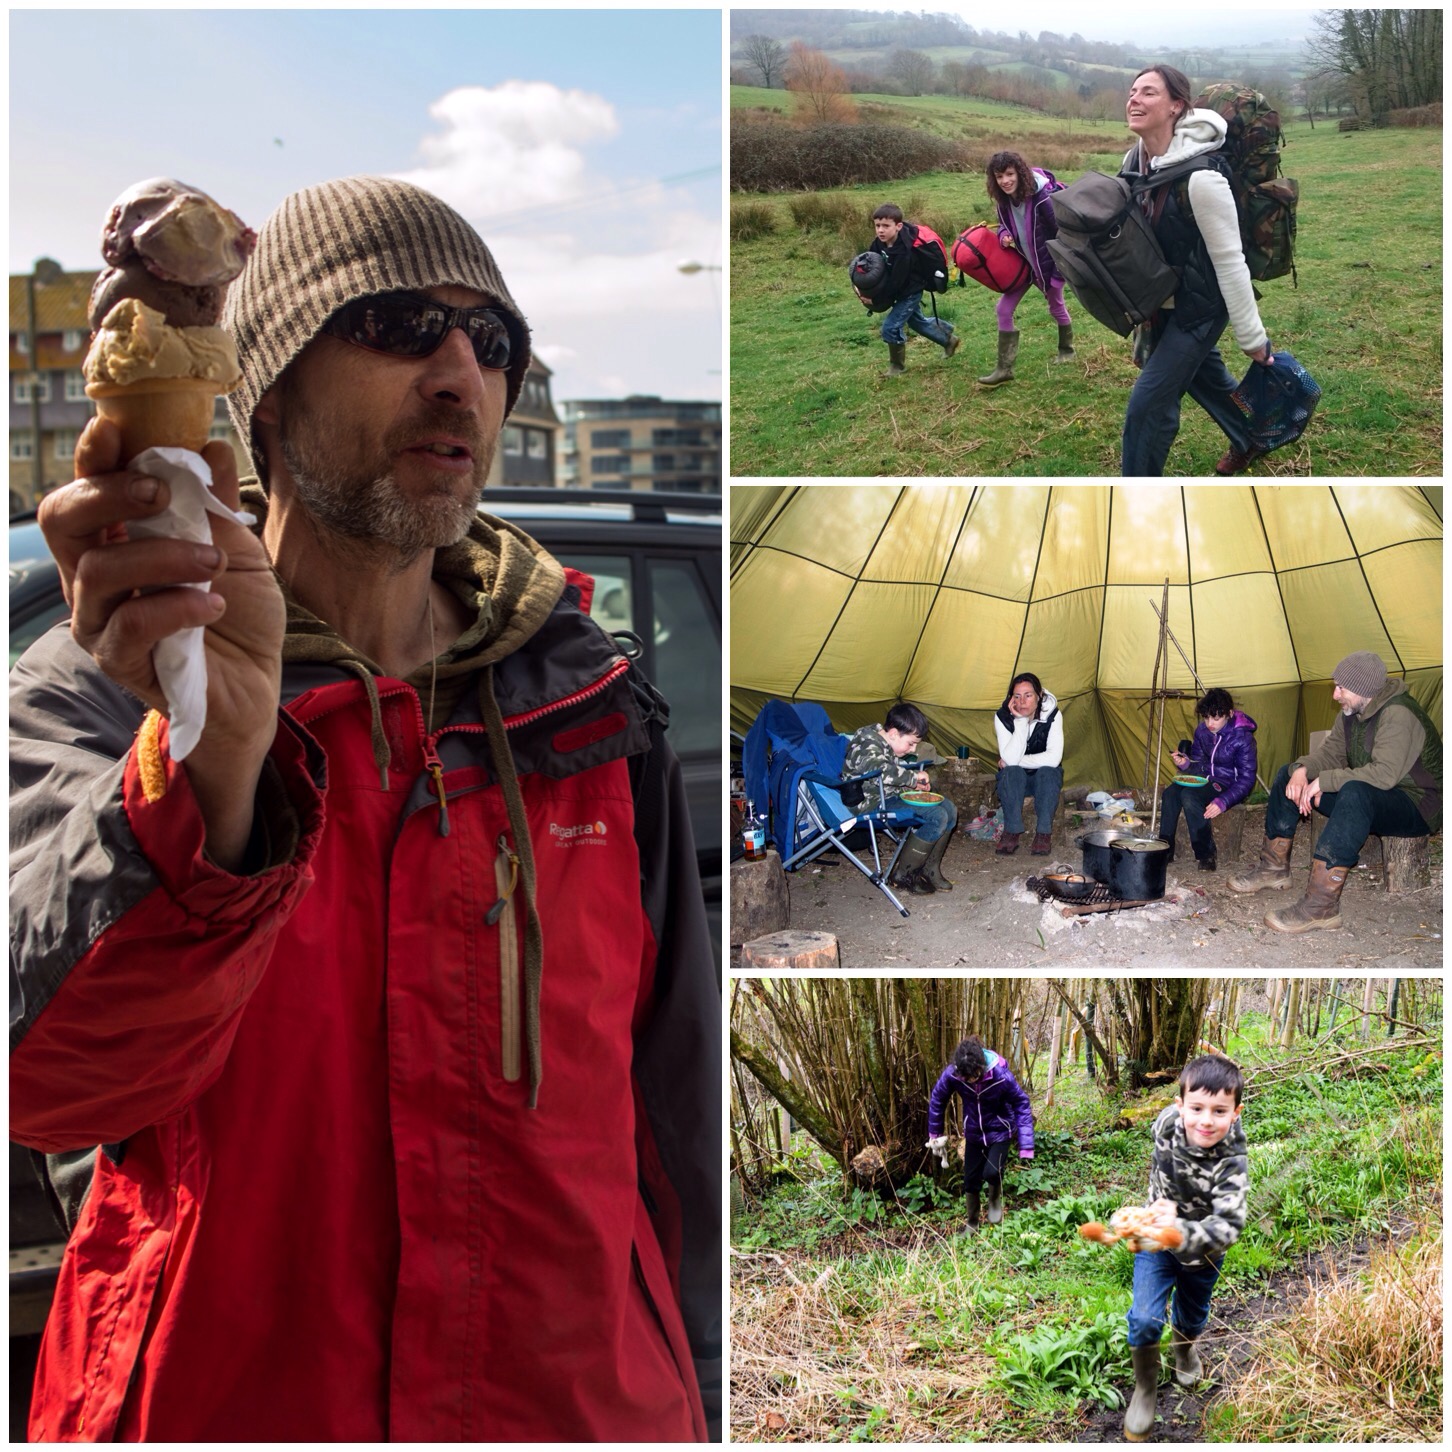
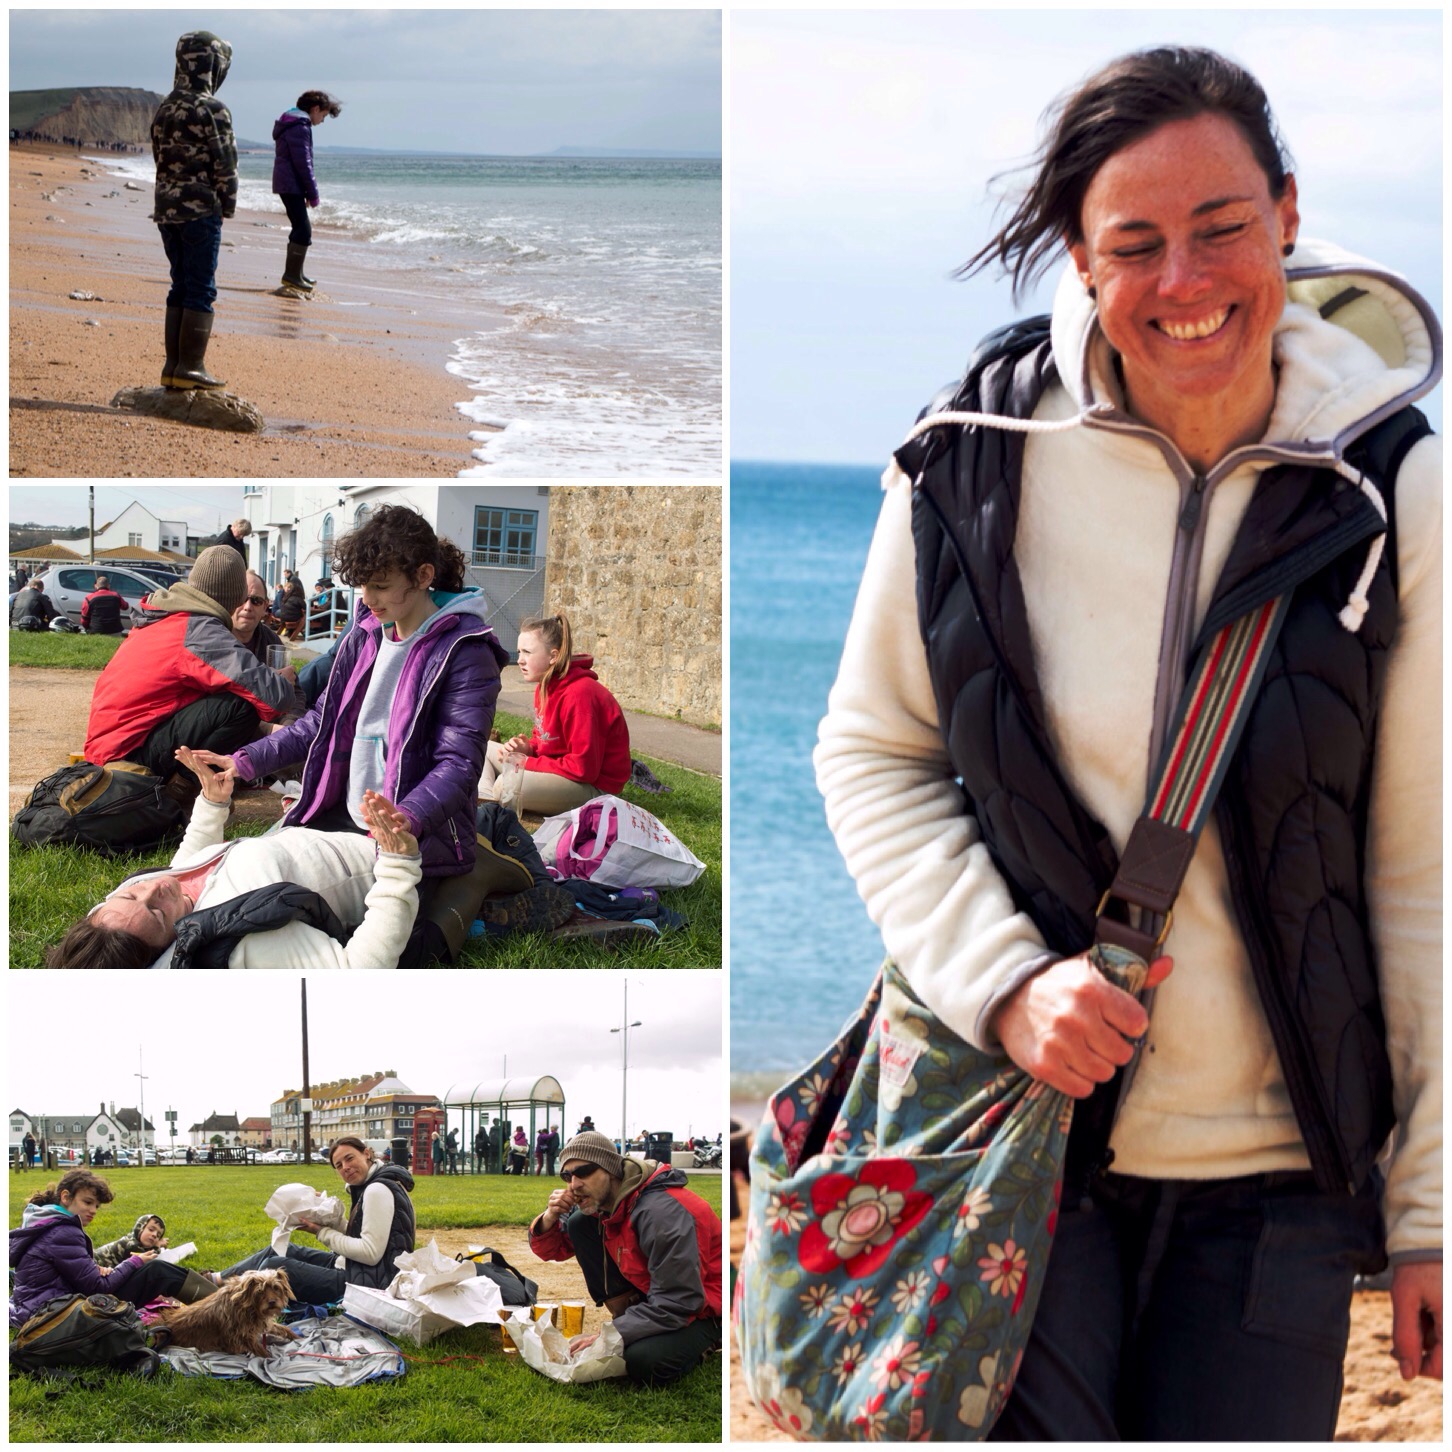
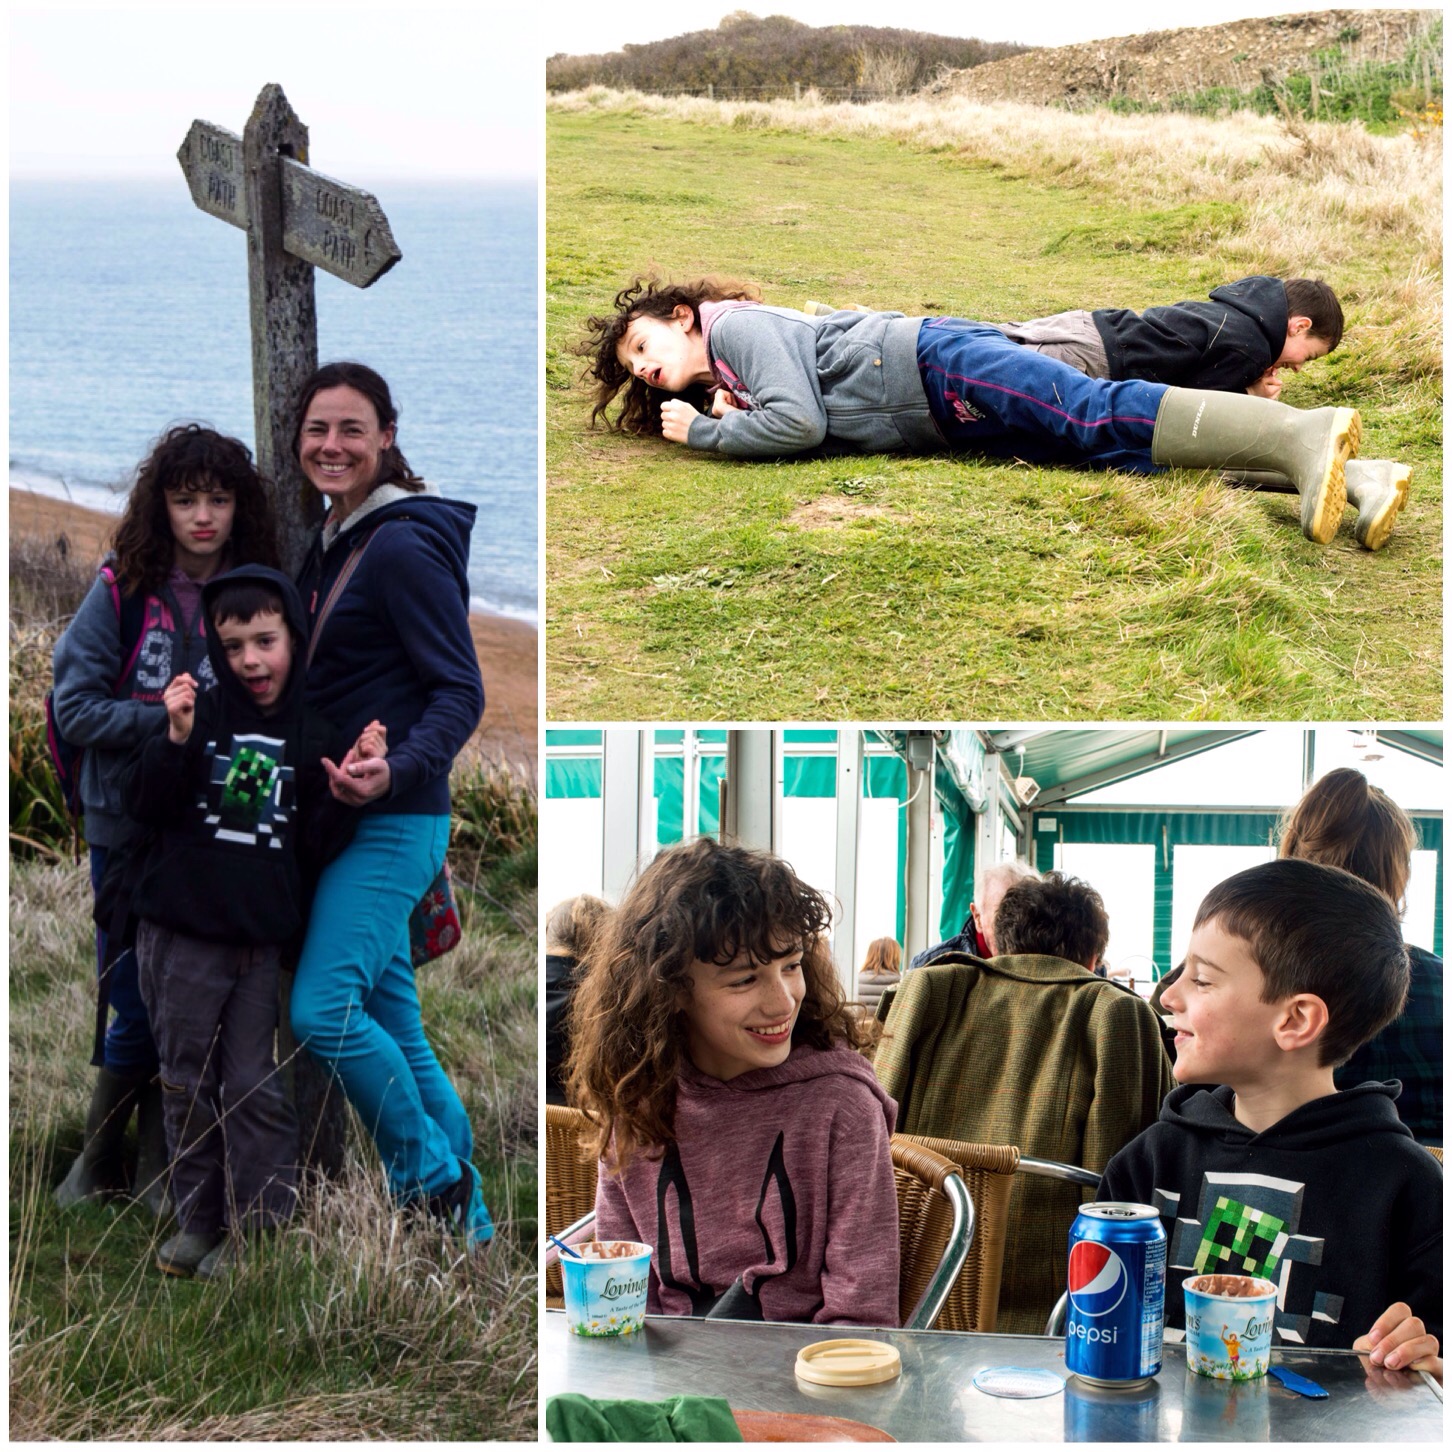
The Easter holidays were fast approaching and the question in our household was – where should we go? A camping trip was asked for but also a bit of seaside fun on the side.
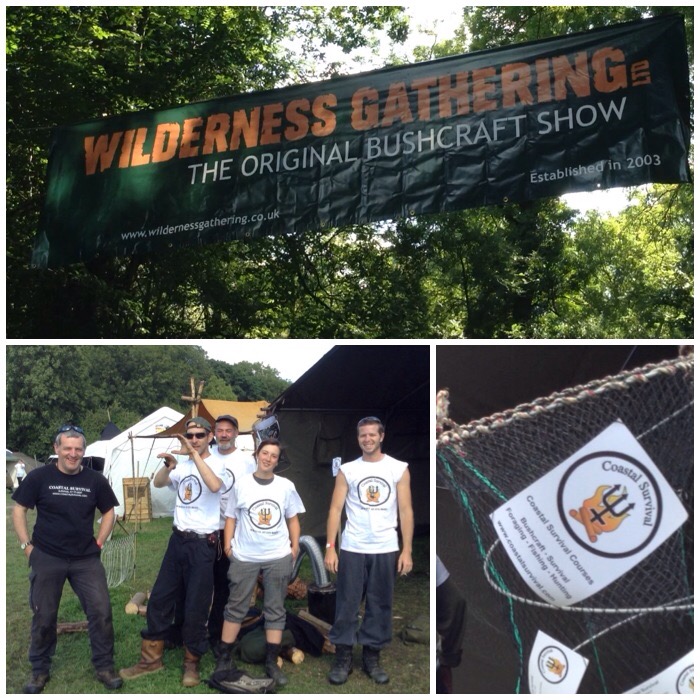
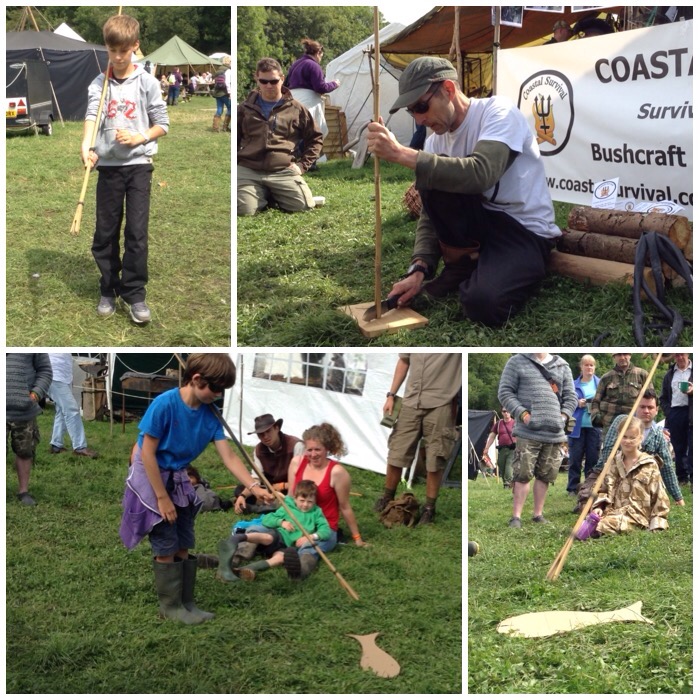
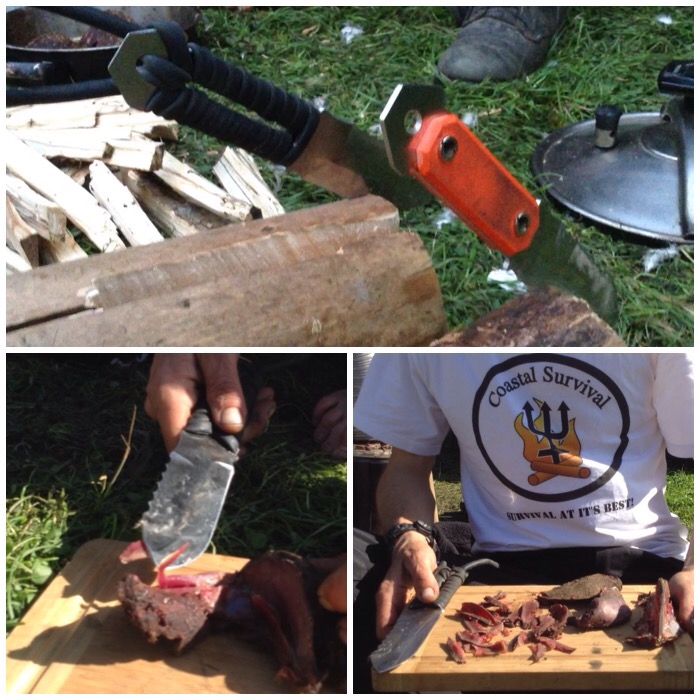
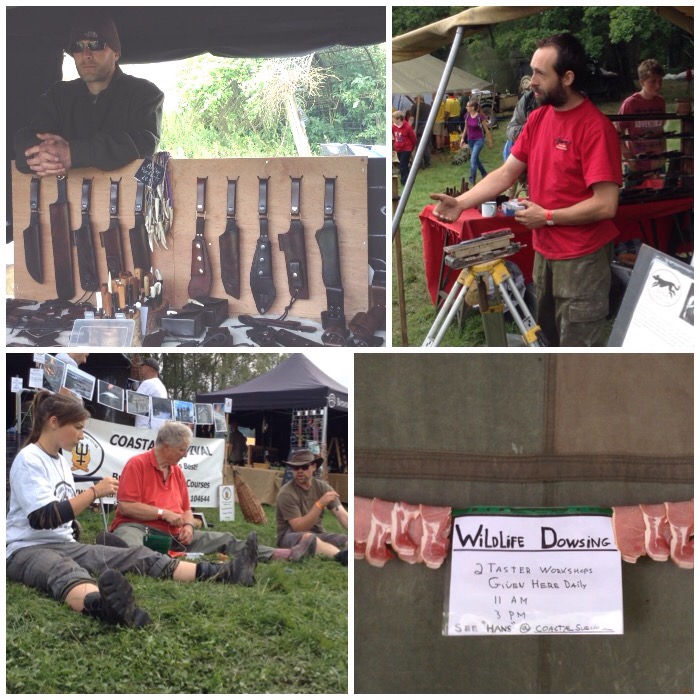
The answer was not difficult as my good friend Fraser Christian of Coastal Survival had been asking when we would come down to visit him in Dorset. Fraser lives off grid and runs excellent courses on the coast – All the boxes were ticked so off we went.
Family Fun at Fraser’s
I have written before about the food that Fraser collects and cooks up and this time there was no change in that high standard (Memorable Meals). My kids Catherine and Finlay had to be very careful in who they said was the best cook around the campfire – just for the record I was not included in any of that praise 😉
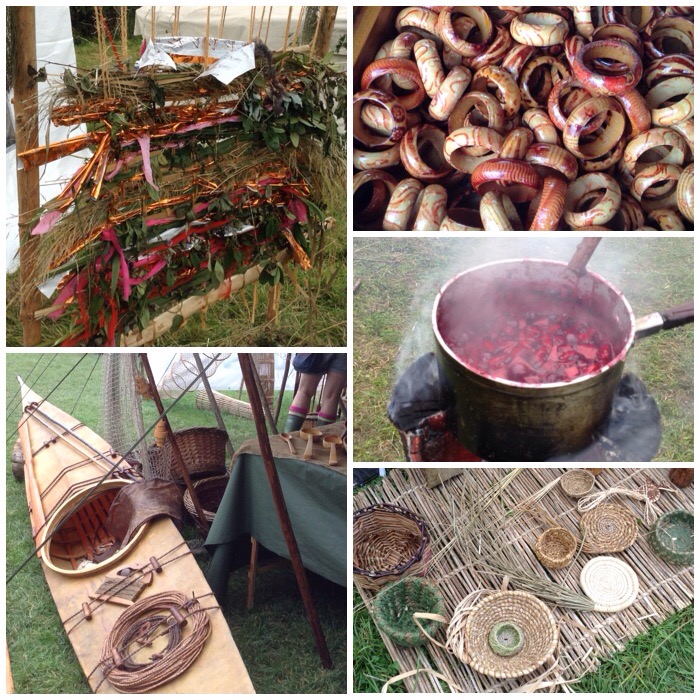
I did though collect the Sea Kale you can see in the top left picture below (the purple coloured stems).
Fantastic Food
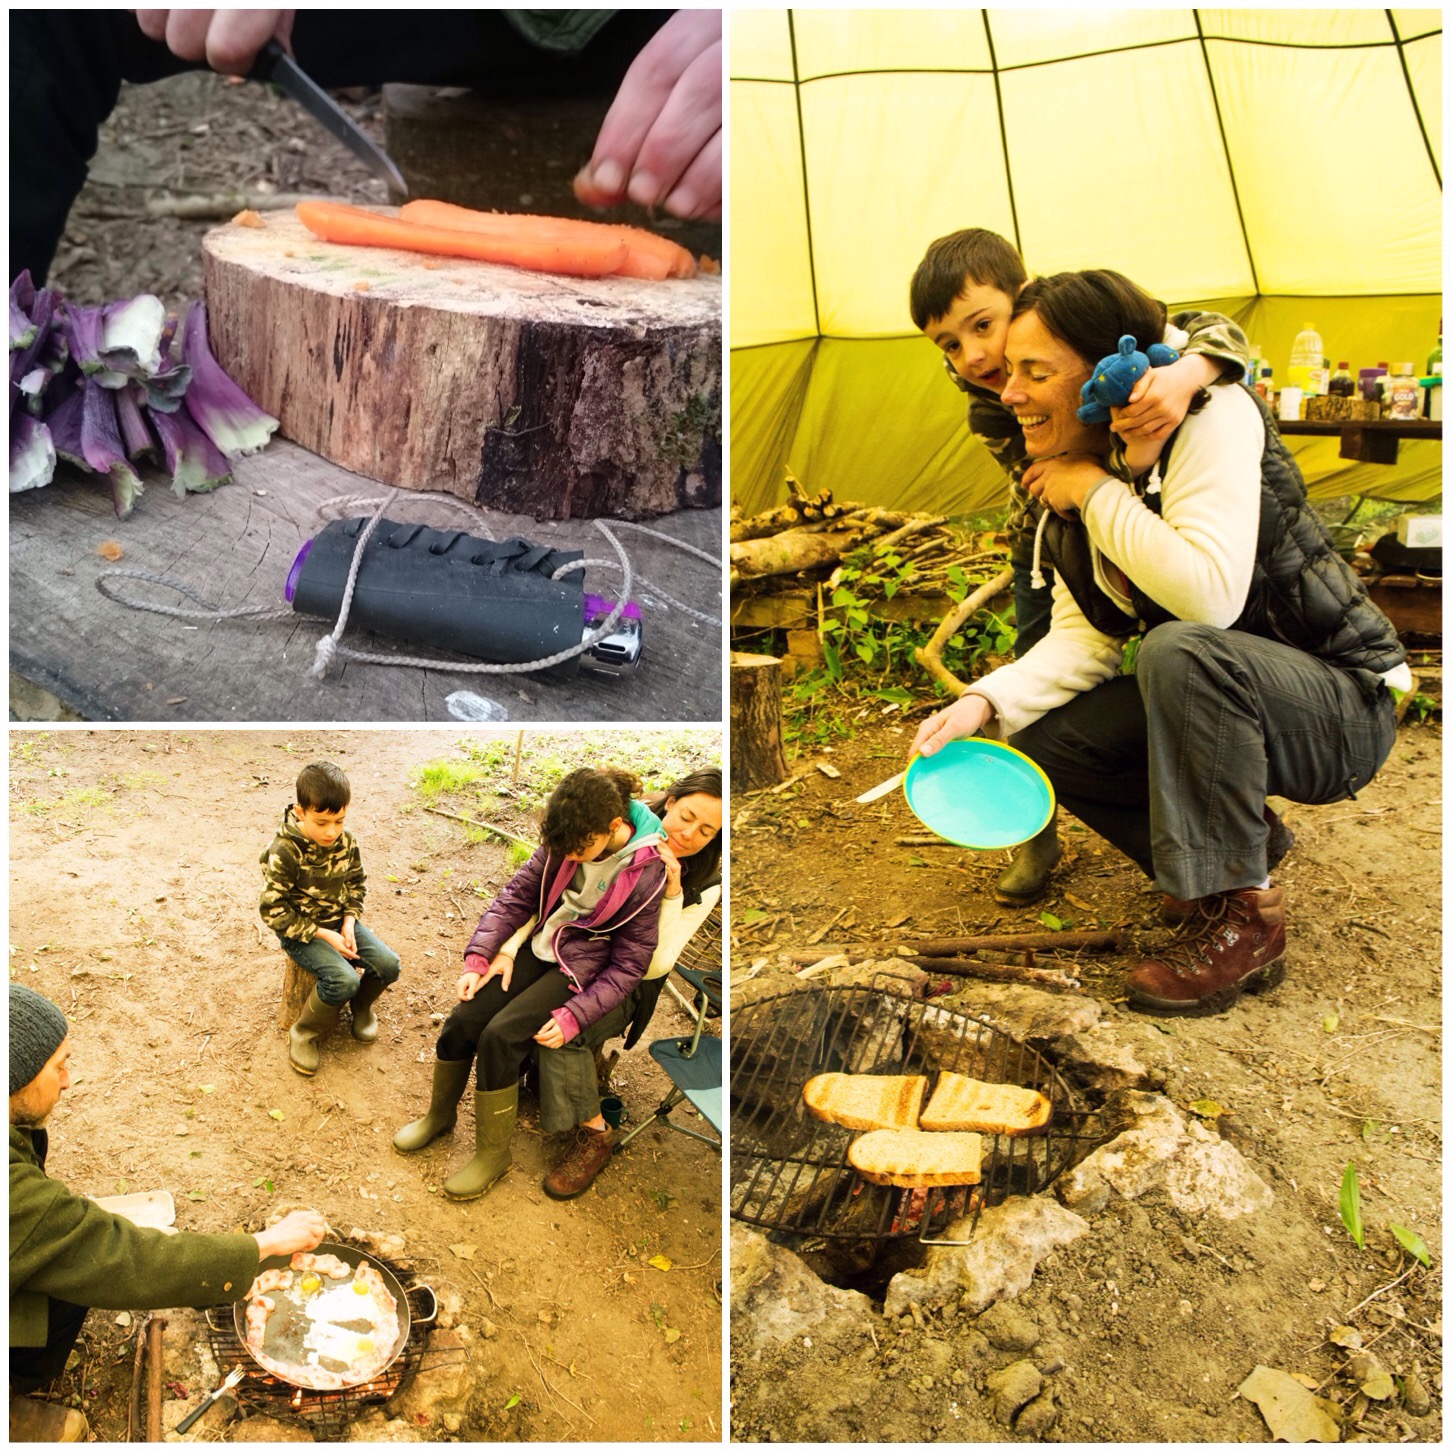
Last time I was at Fraser’s the weather was wet and windy, this time even though it was still windy it was dry (and warm when not in the wind). The sun was out and the skies were clear leading to cold but pleasant evenings around the campfire. Stories were told, woodland TV was watched, marshmallows were toasted and a relaxing time was had.
Fireside Fun
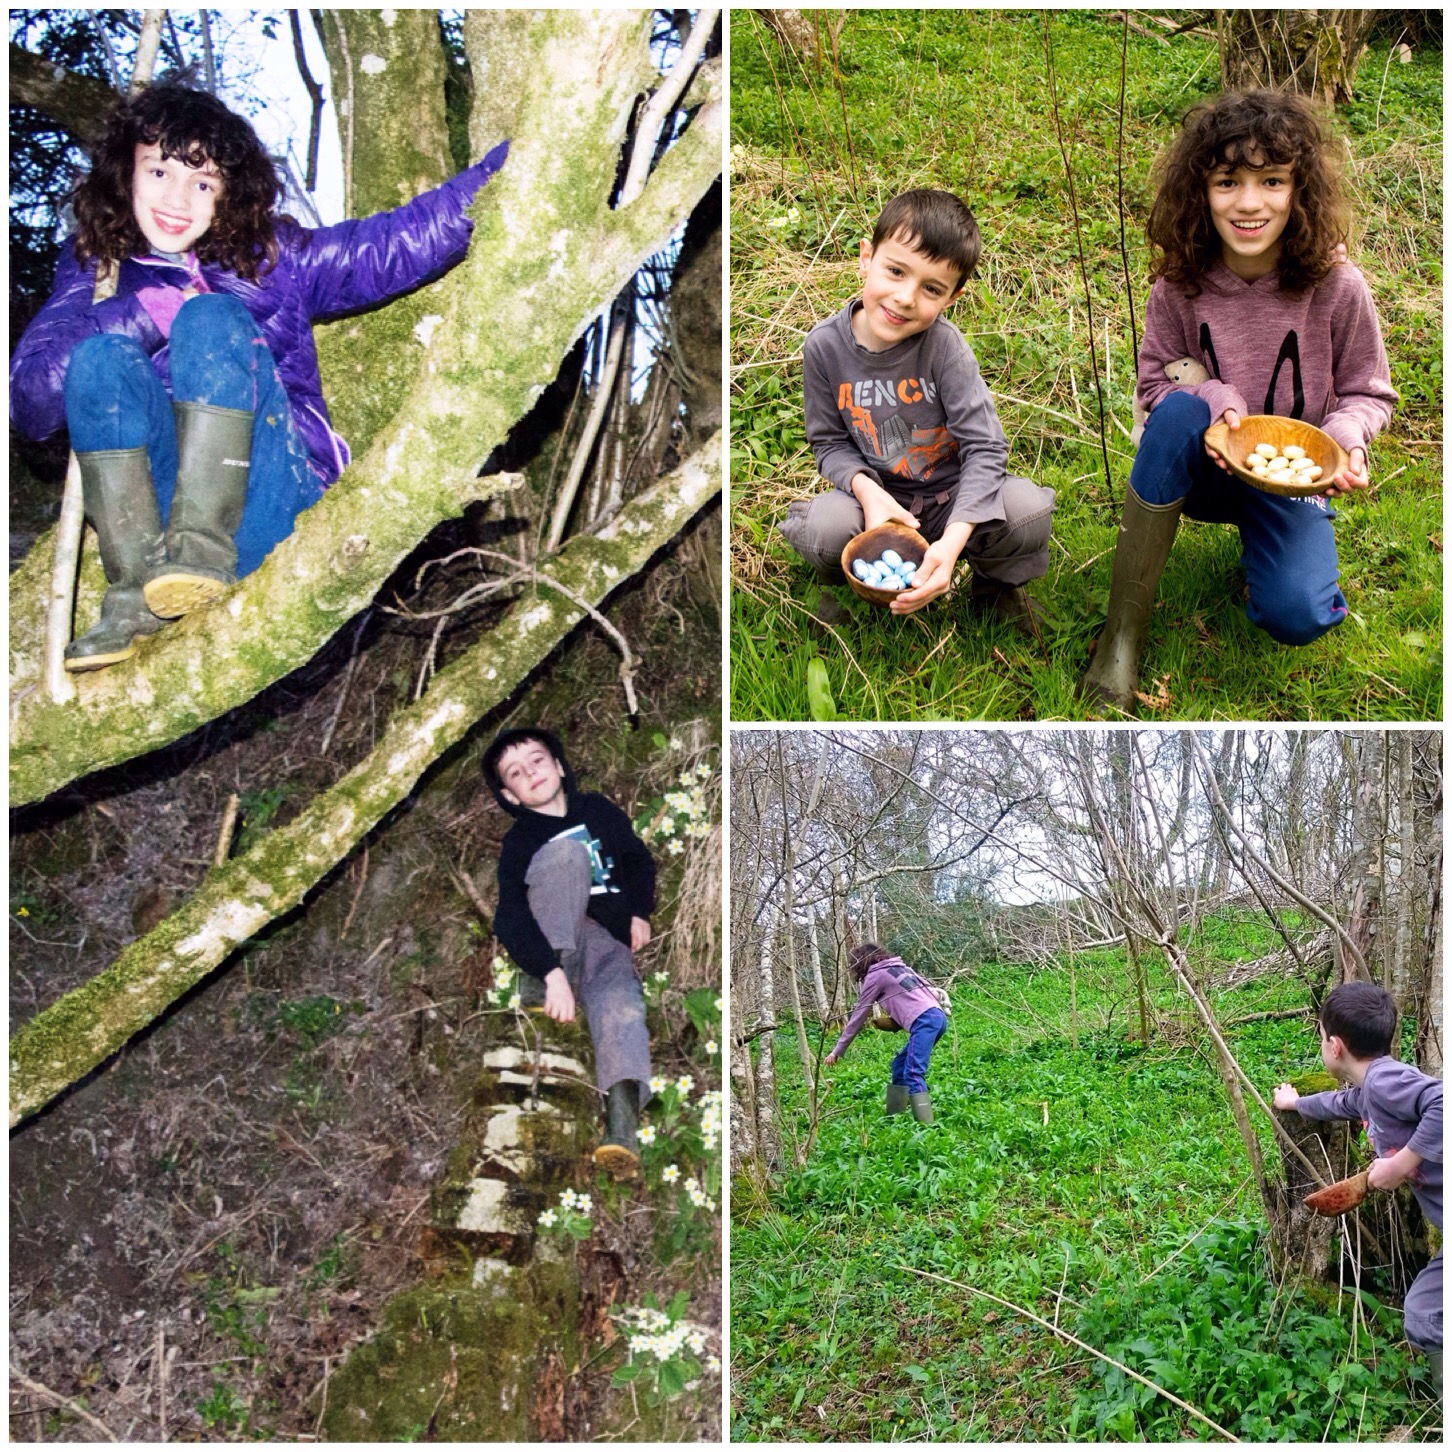
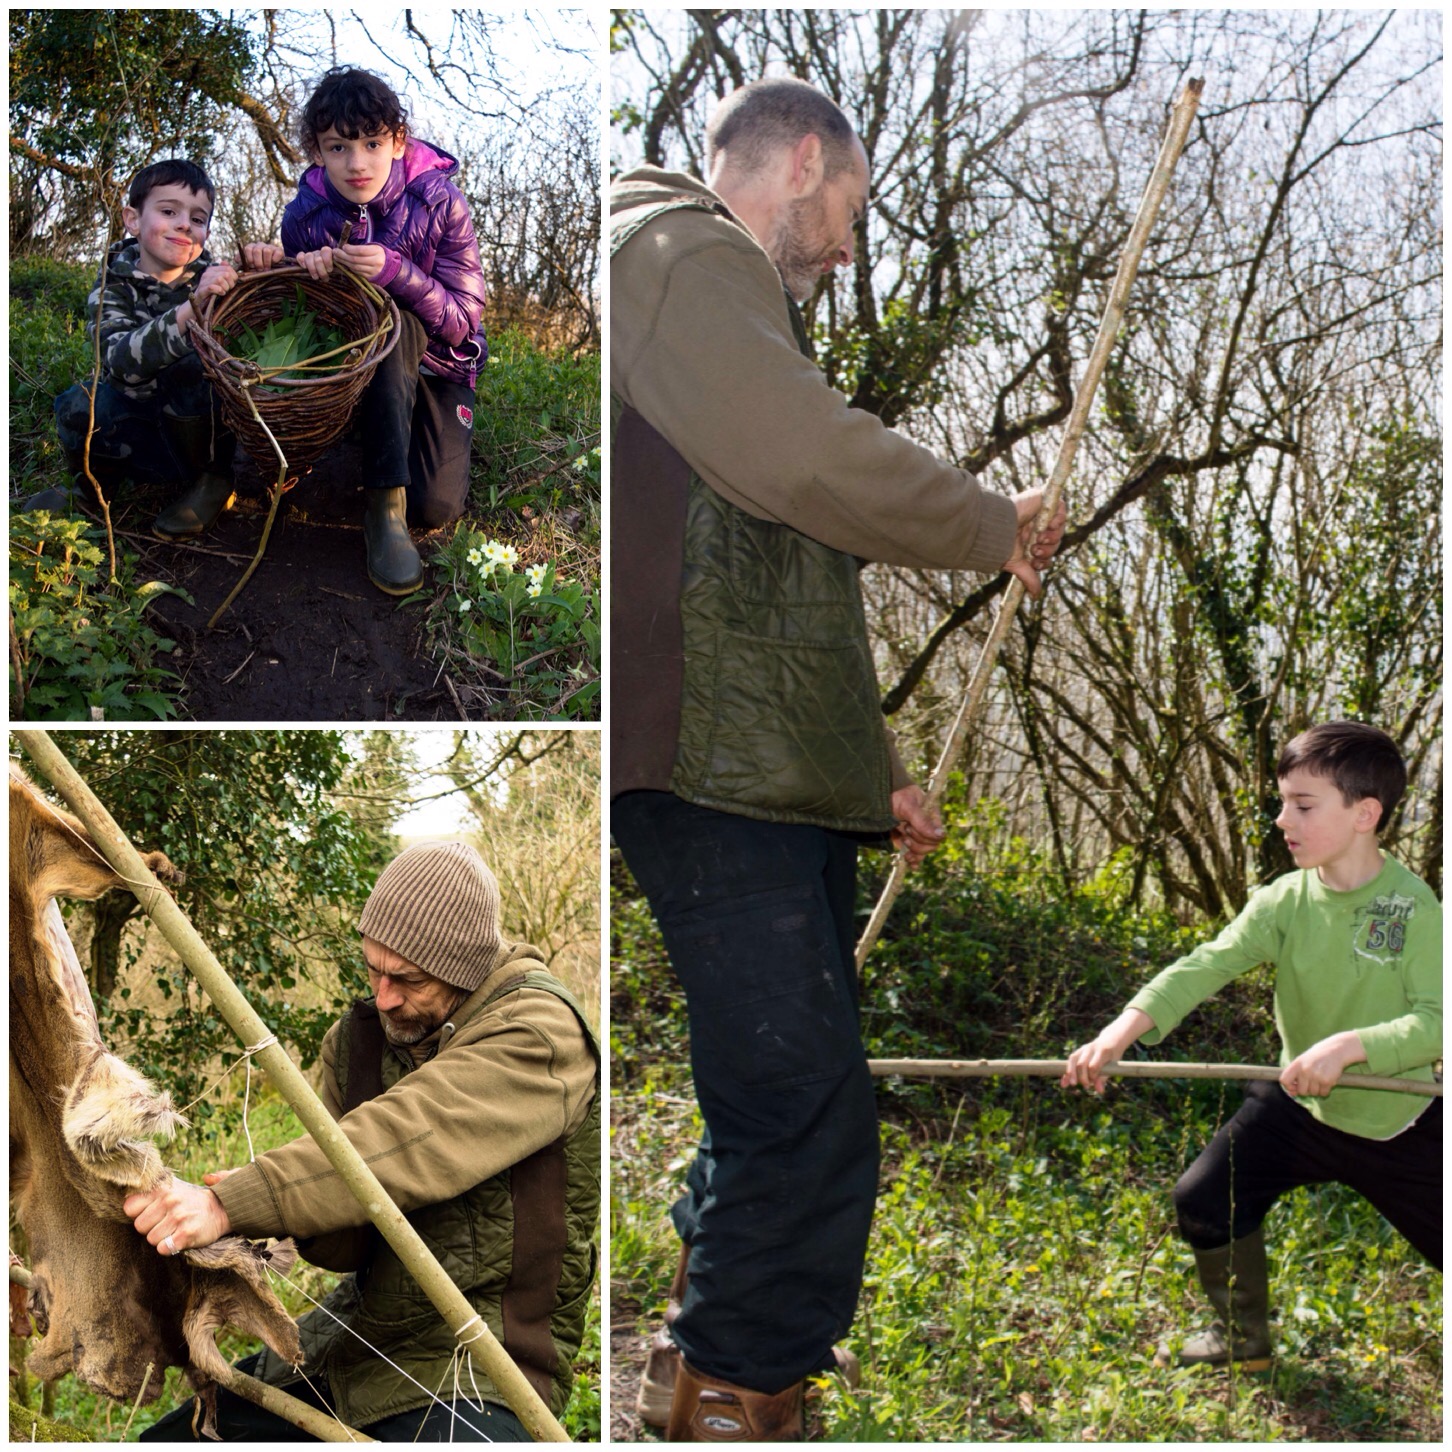
Catherine and Finlay had great fun all weekend – they made their own secret den (into which I was eventually initiated) and had great fun searching for lots of Easter eggs.
When I was a kid it was expected that I’d go out in the morning, return for lunch and dinner but otherwise do my own thing. Even though we live in a village my kids do not normally have that freedom but here at Fraser’s they experienced so much more freedom: off they went exploring the woods and every now and then they popped back to the main campsite to have cuts, bruises and empty tummies attended to.
Adventuring
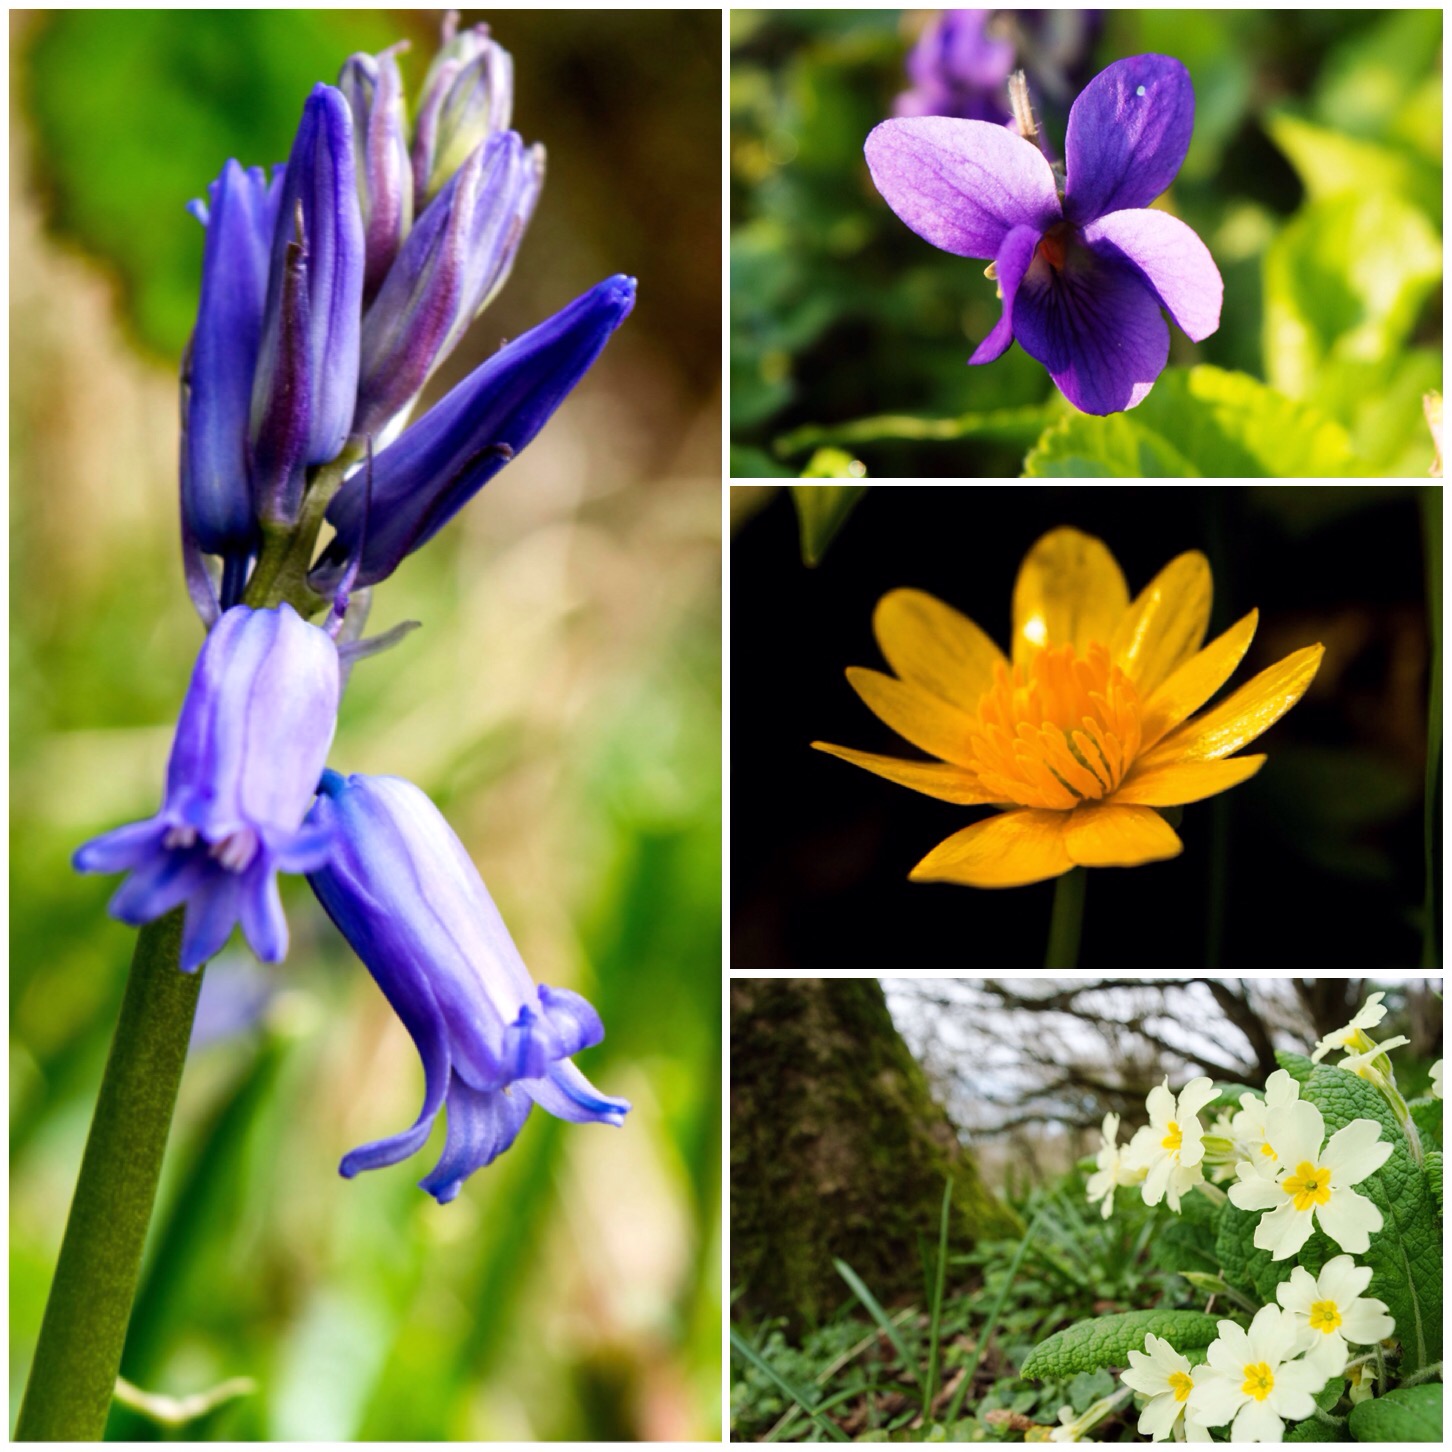
As usual I was on the lookout for some spring flowers and find them I did.
I found my first bluebell of the year at Fraser’s as well as plenty of primroses (is it just me or has this year been particularly good for primroses?). Also in evidence were plenty of early dog violets and lesser celandine.
Spotting Spring
One of the tick boxes for the weekend was time at the sea. I do not do beach holidays where you just sit about tanning yourself (my Scottish skin doesn’t like the sun too much) but like to spend time on the coast exploring and being generally active.
Our first day at the sea was sunny but very windy. The kids had their wellies on but were soon in paddling. We tried to fly a kite but it was just too windy: after nearly hitting a few people I put it away (quite grumpily) and we headed inland to find some of the best fish and chips I have ever had (washed down with a nice pint).
Seaside Snaps
The kids learned about wild garlic and went out on their own to collect a massive basket full. Finlay and Fraser had fun practising some woodland ninja techniques (they are both competitive types so this was fun to watch).
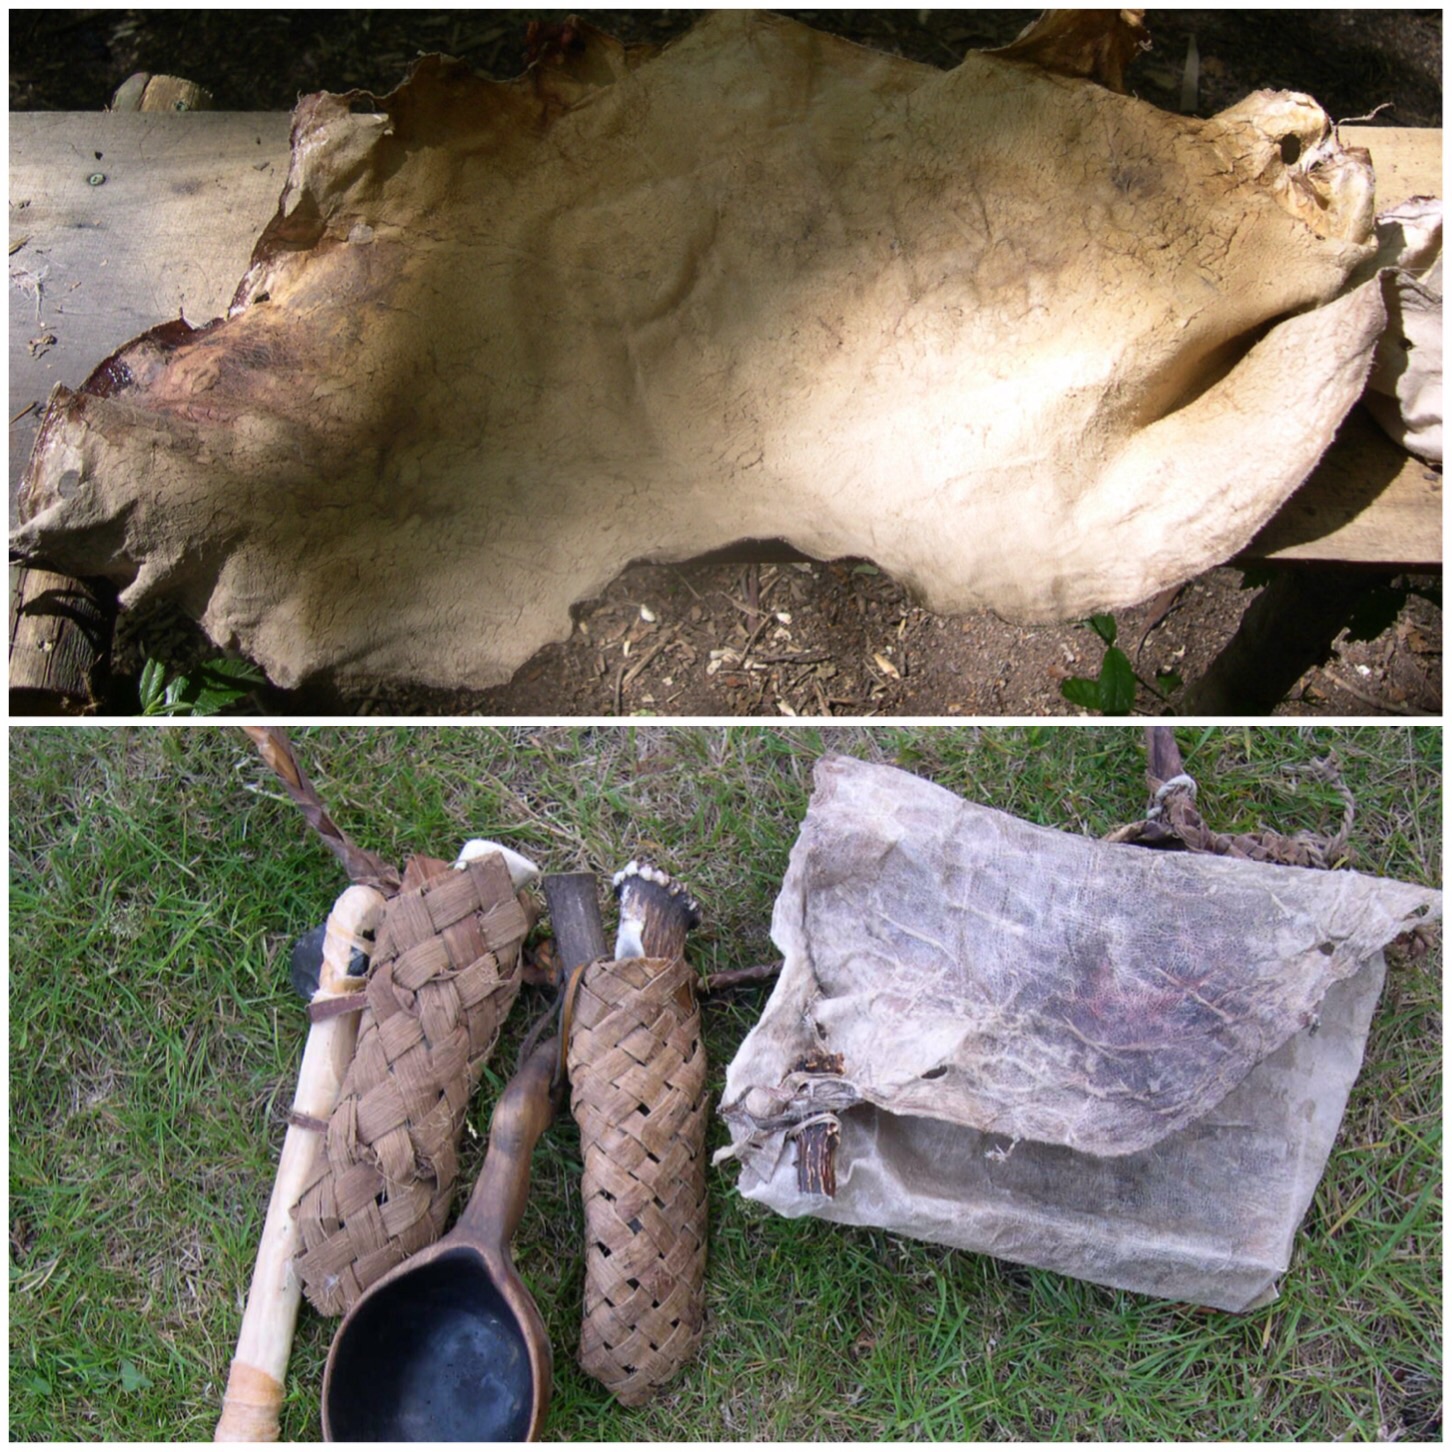
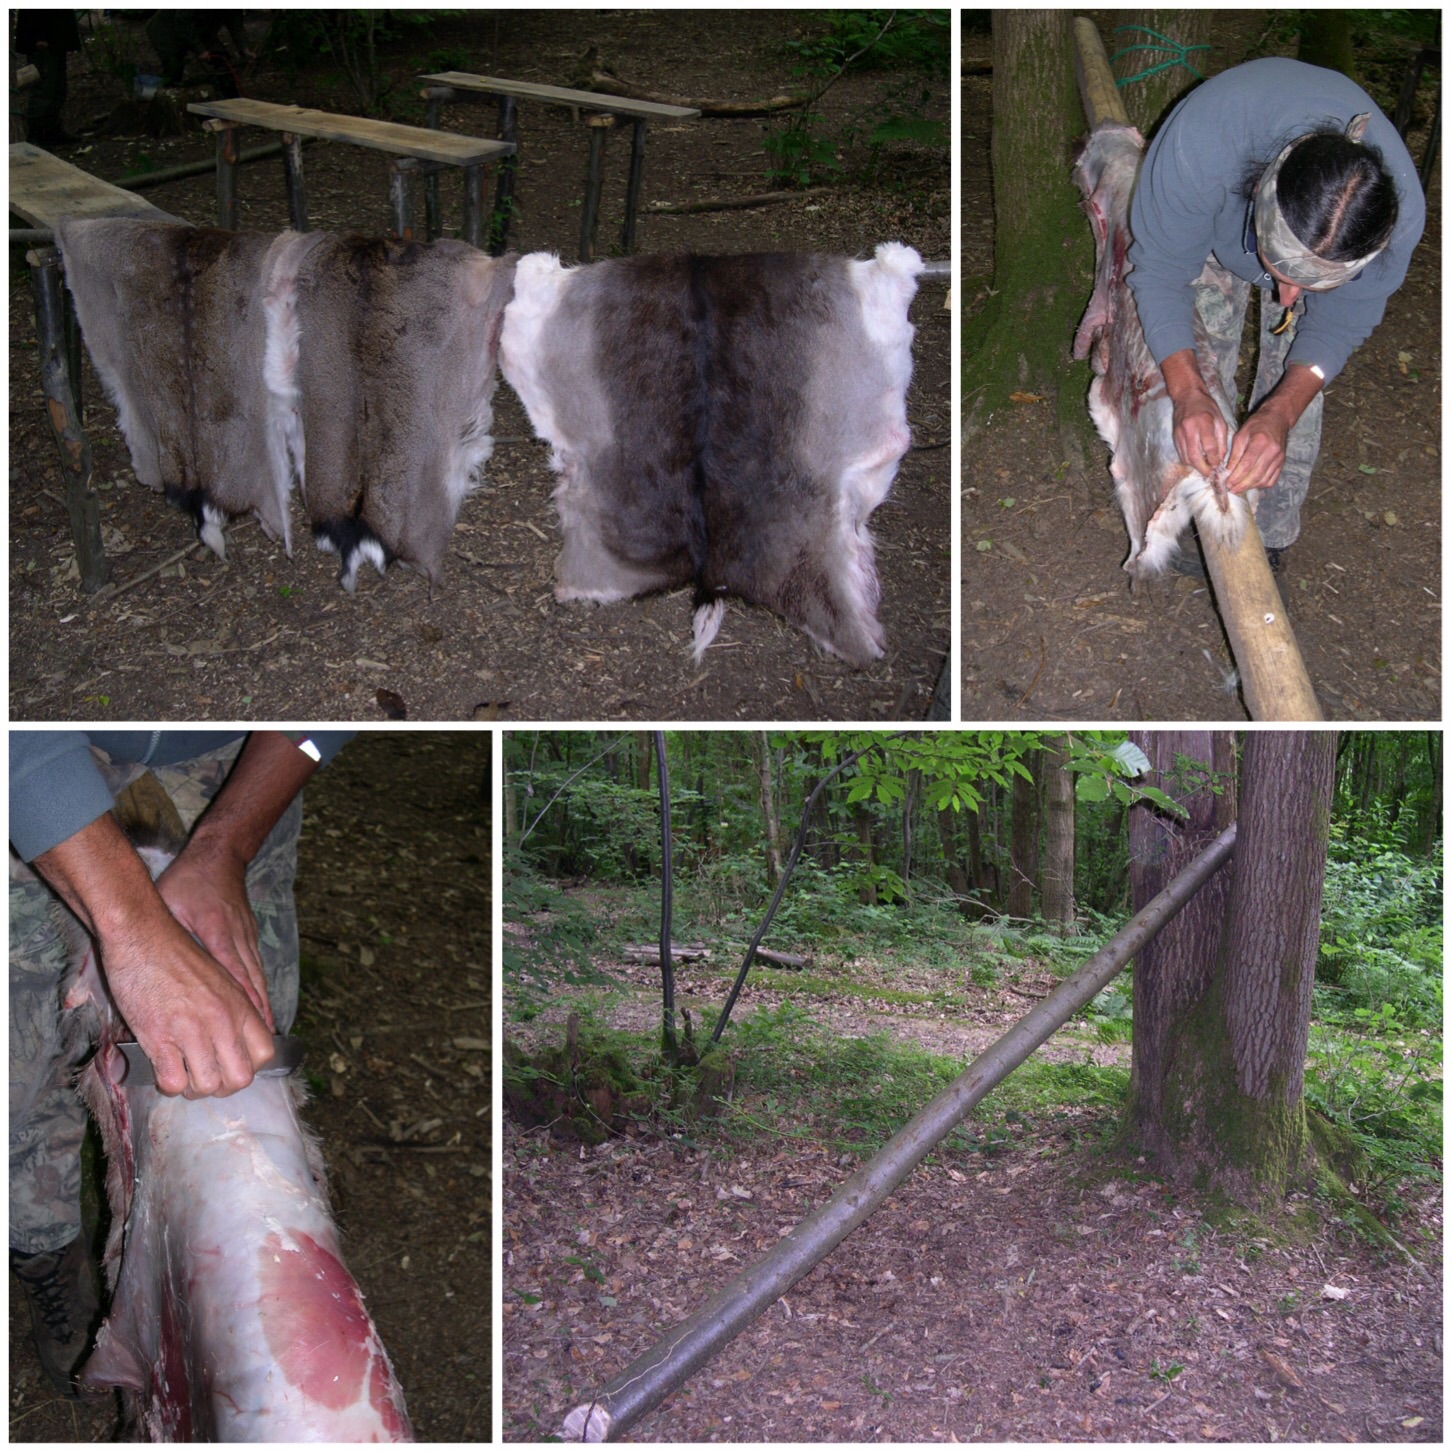
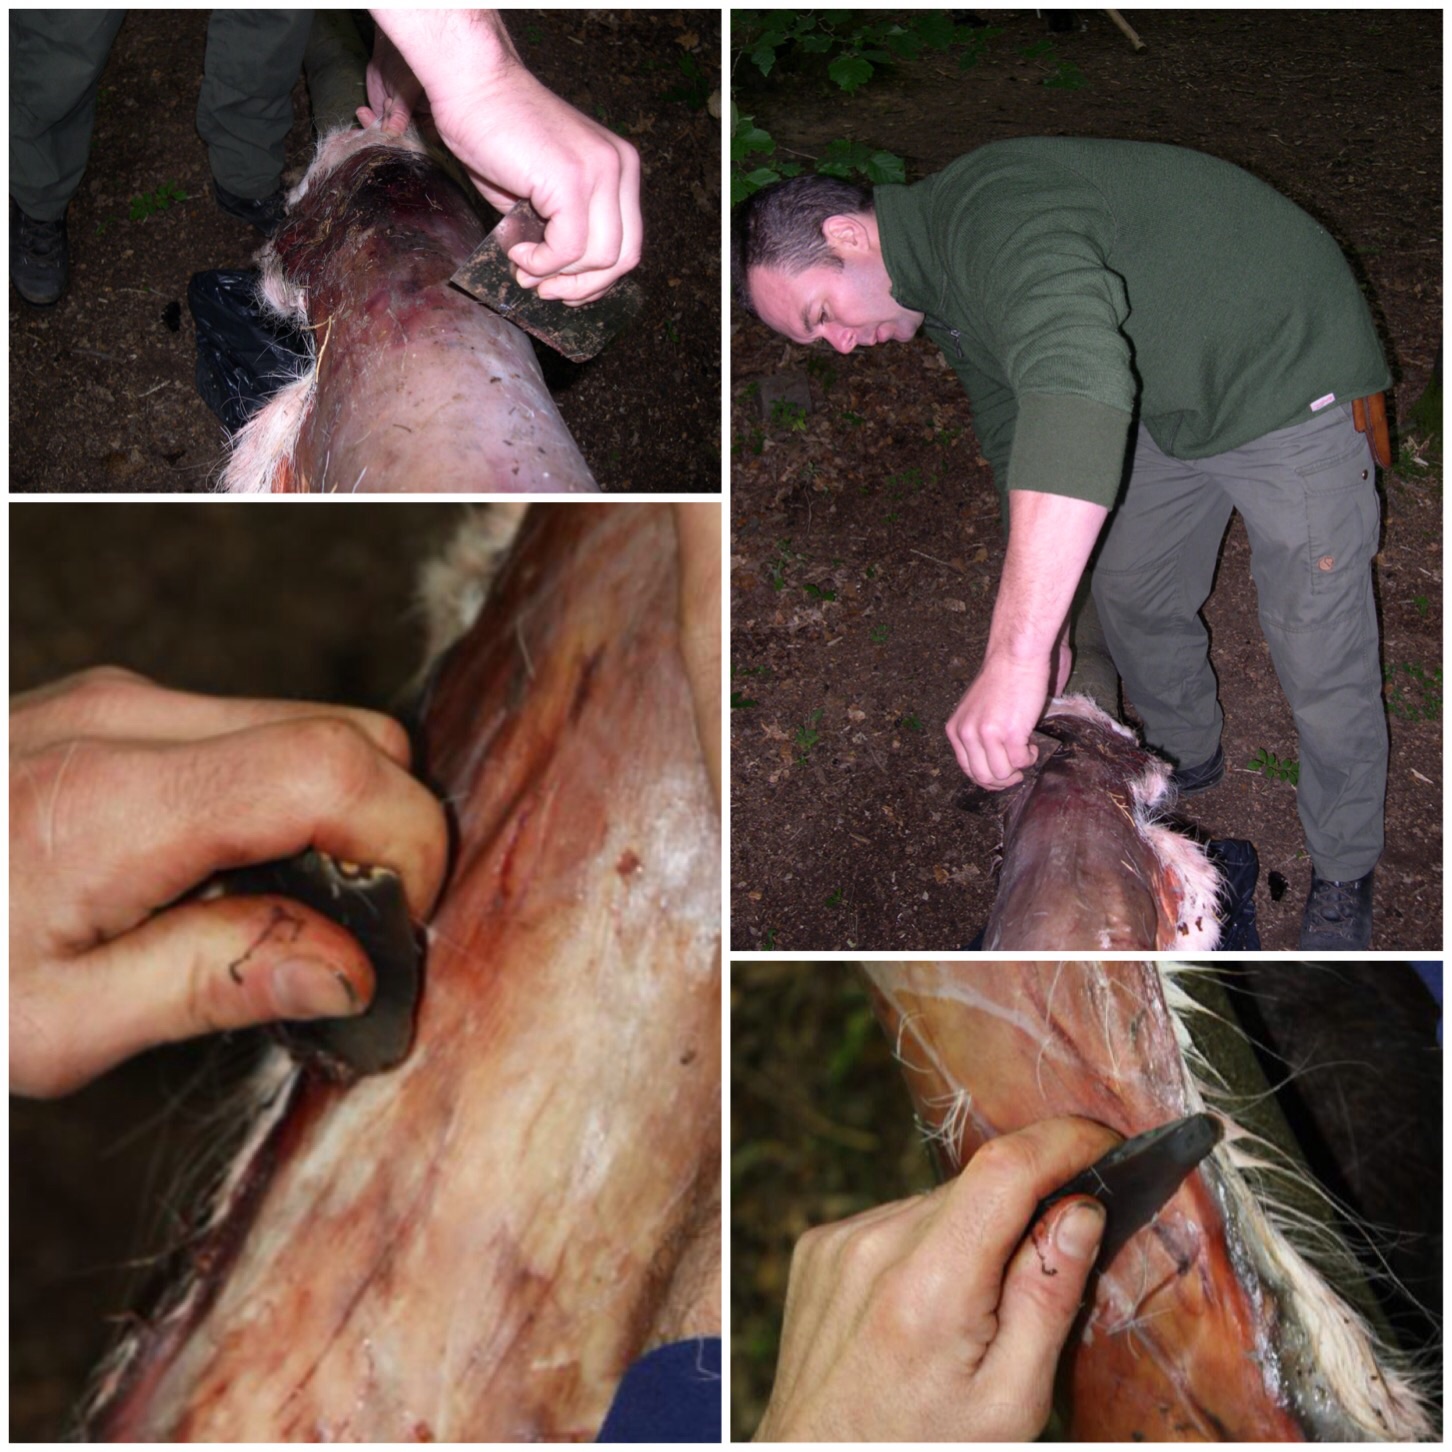
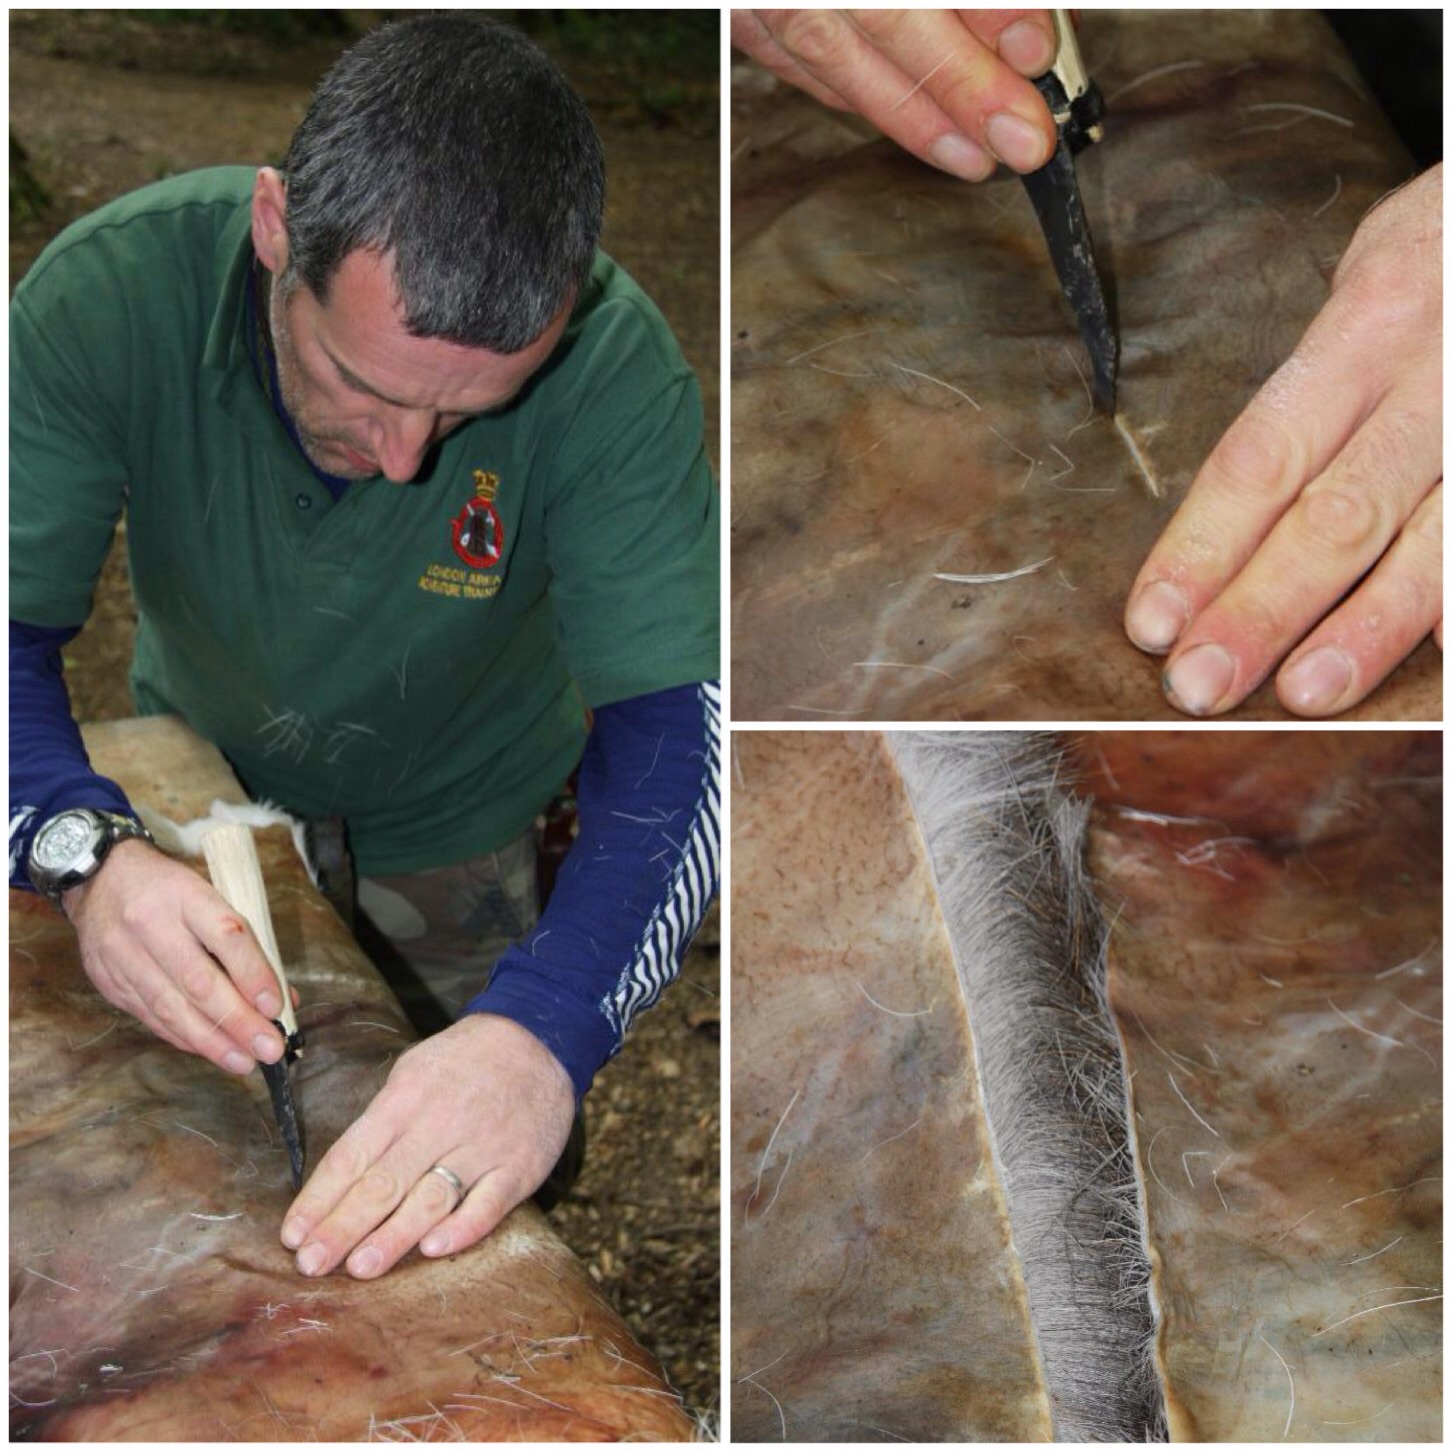
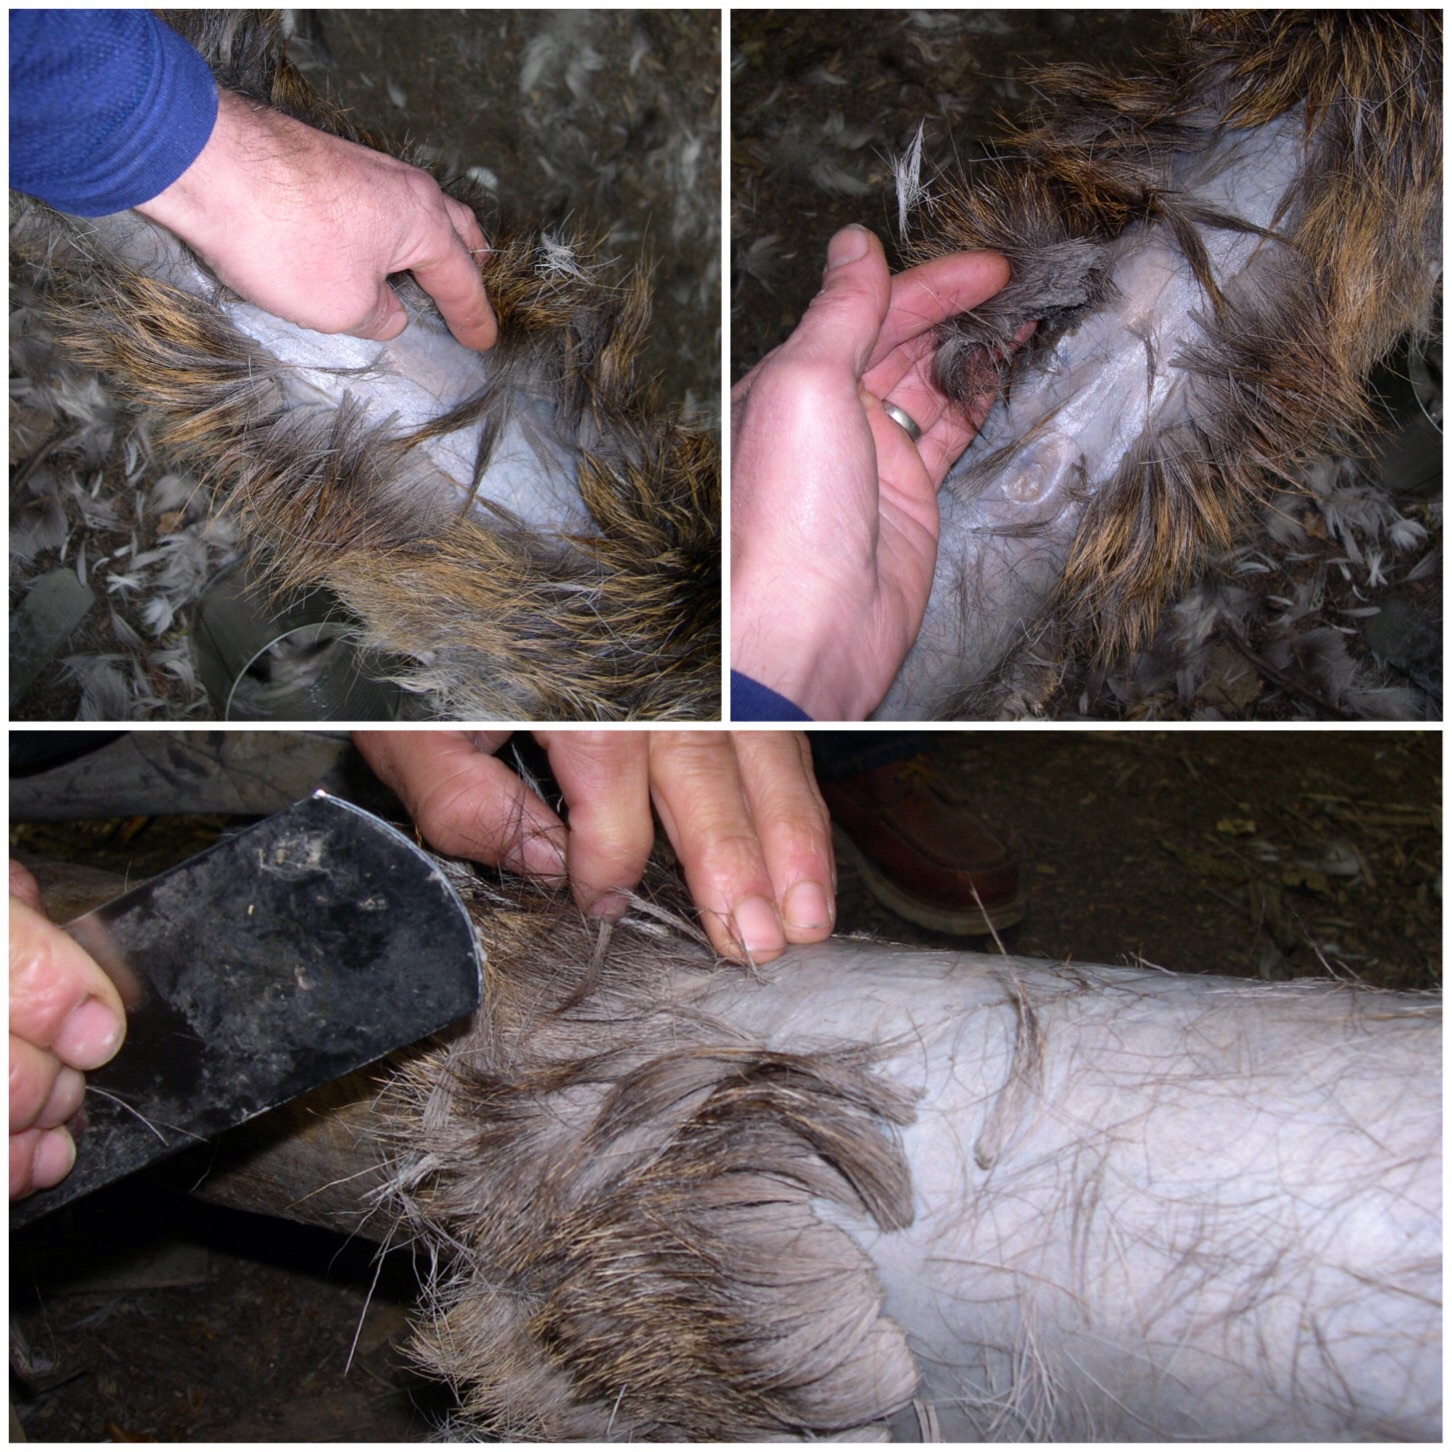
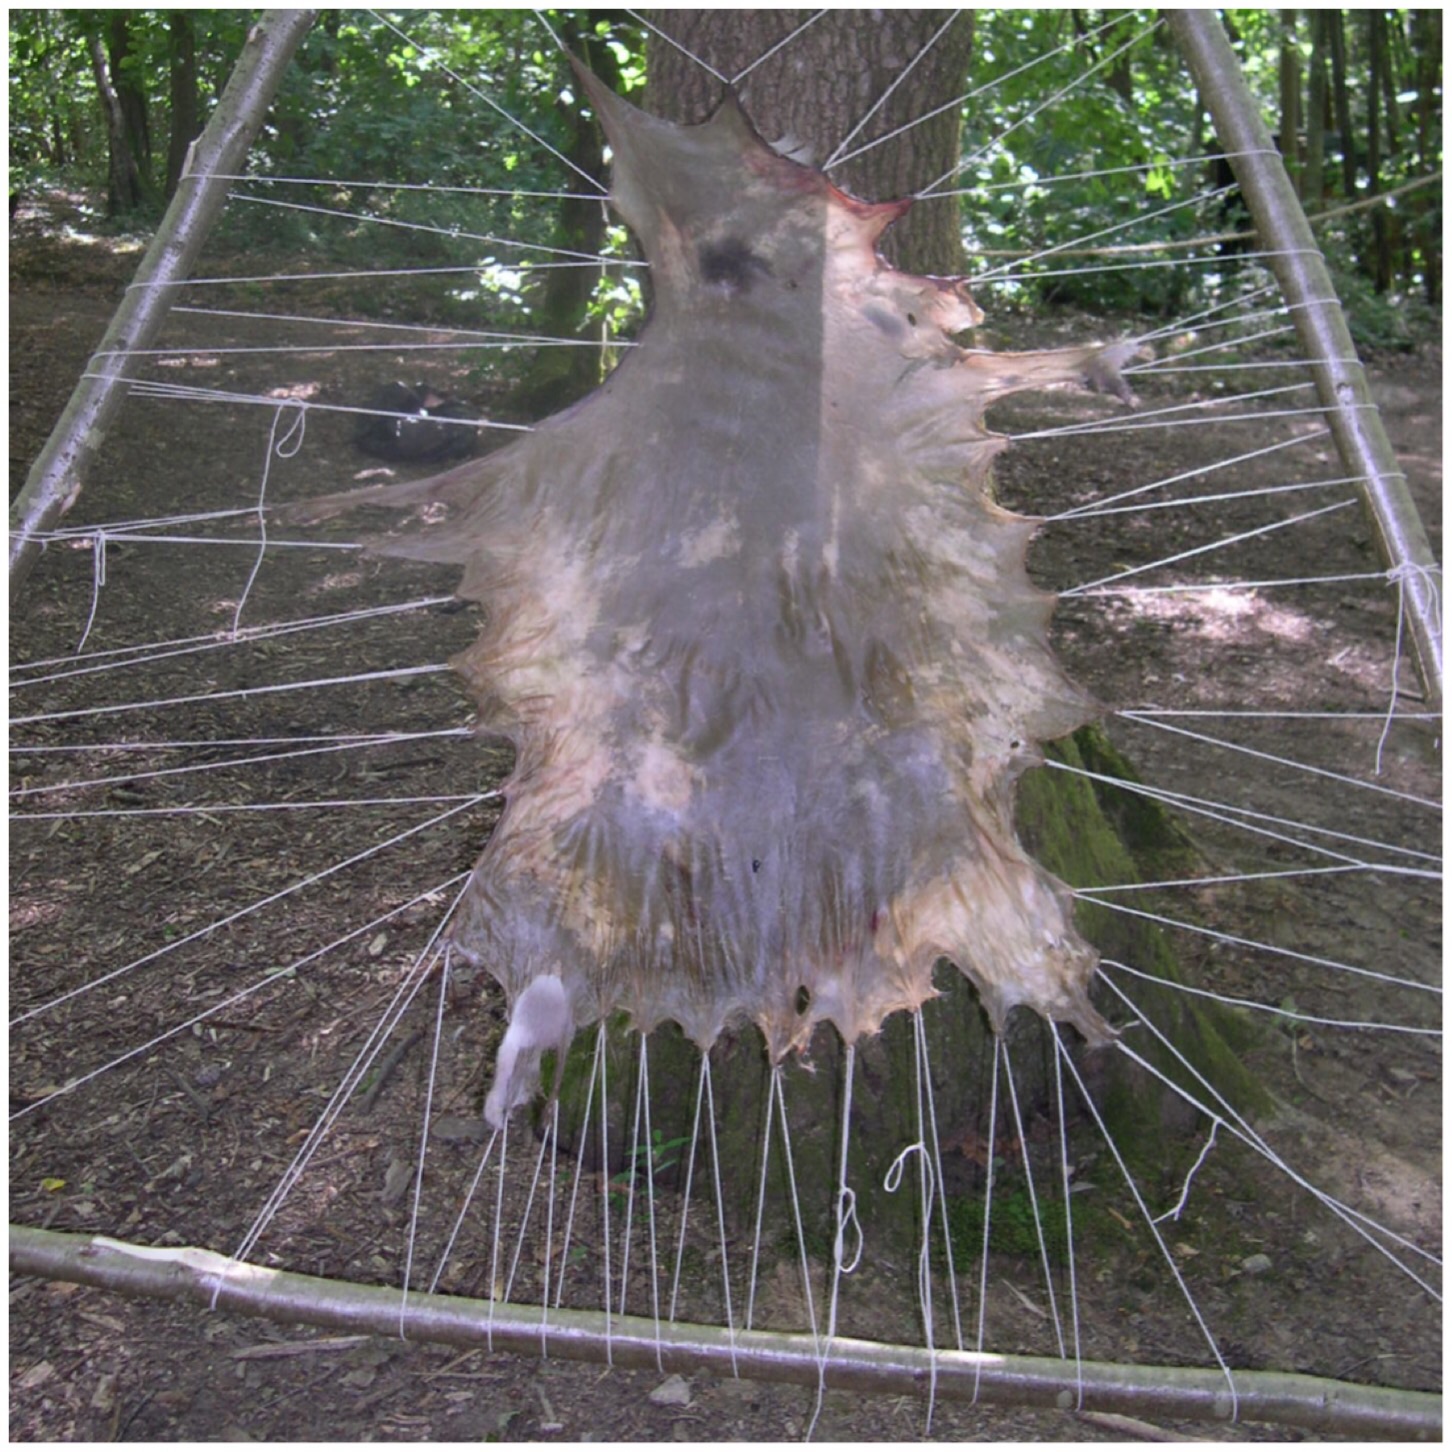
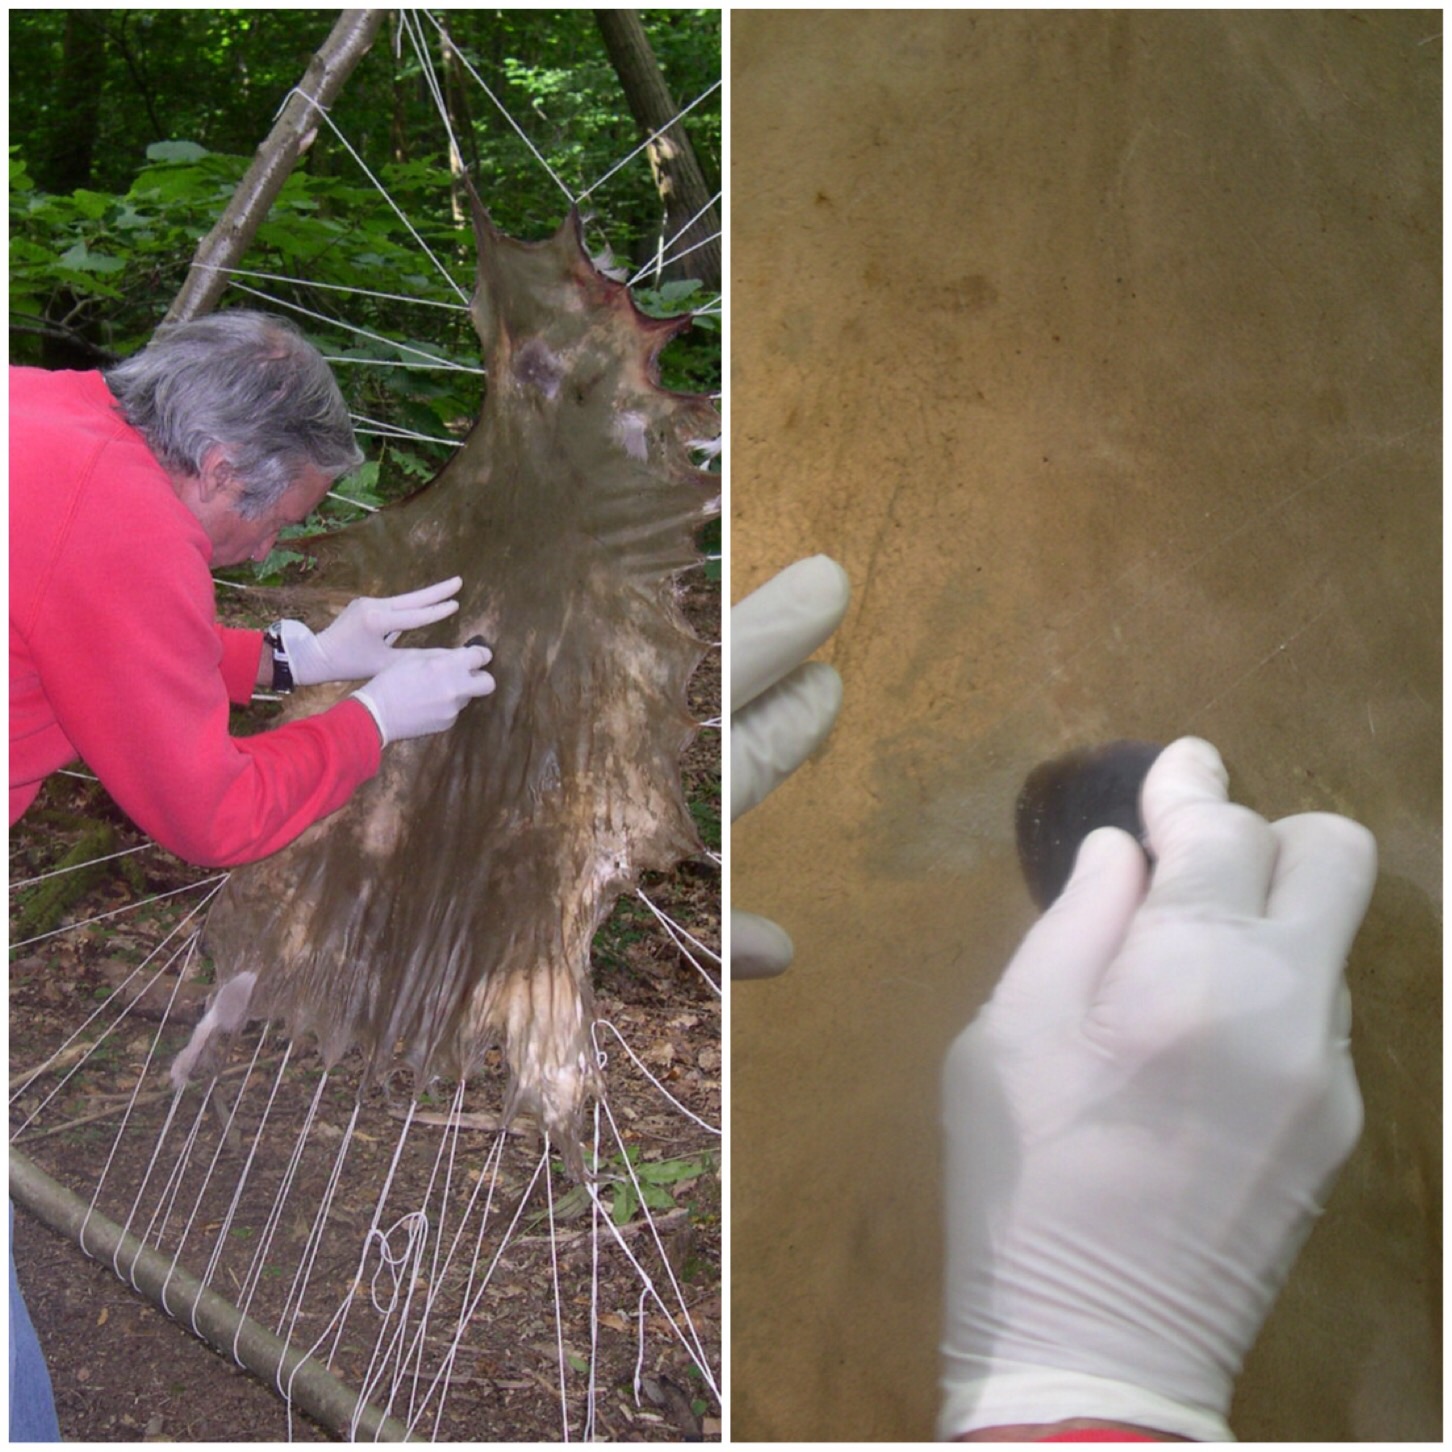
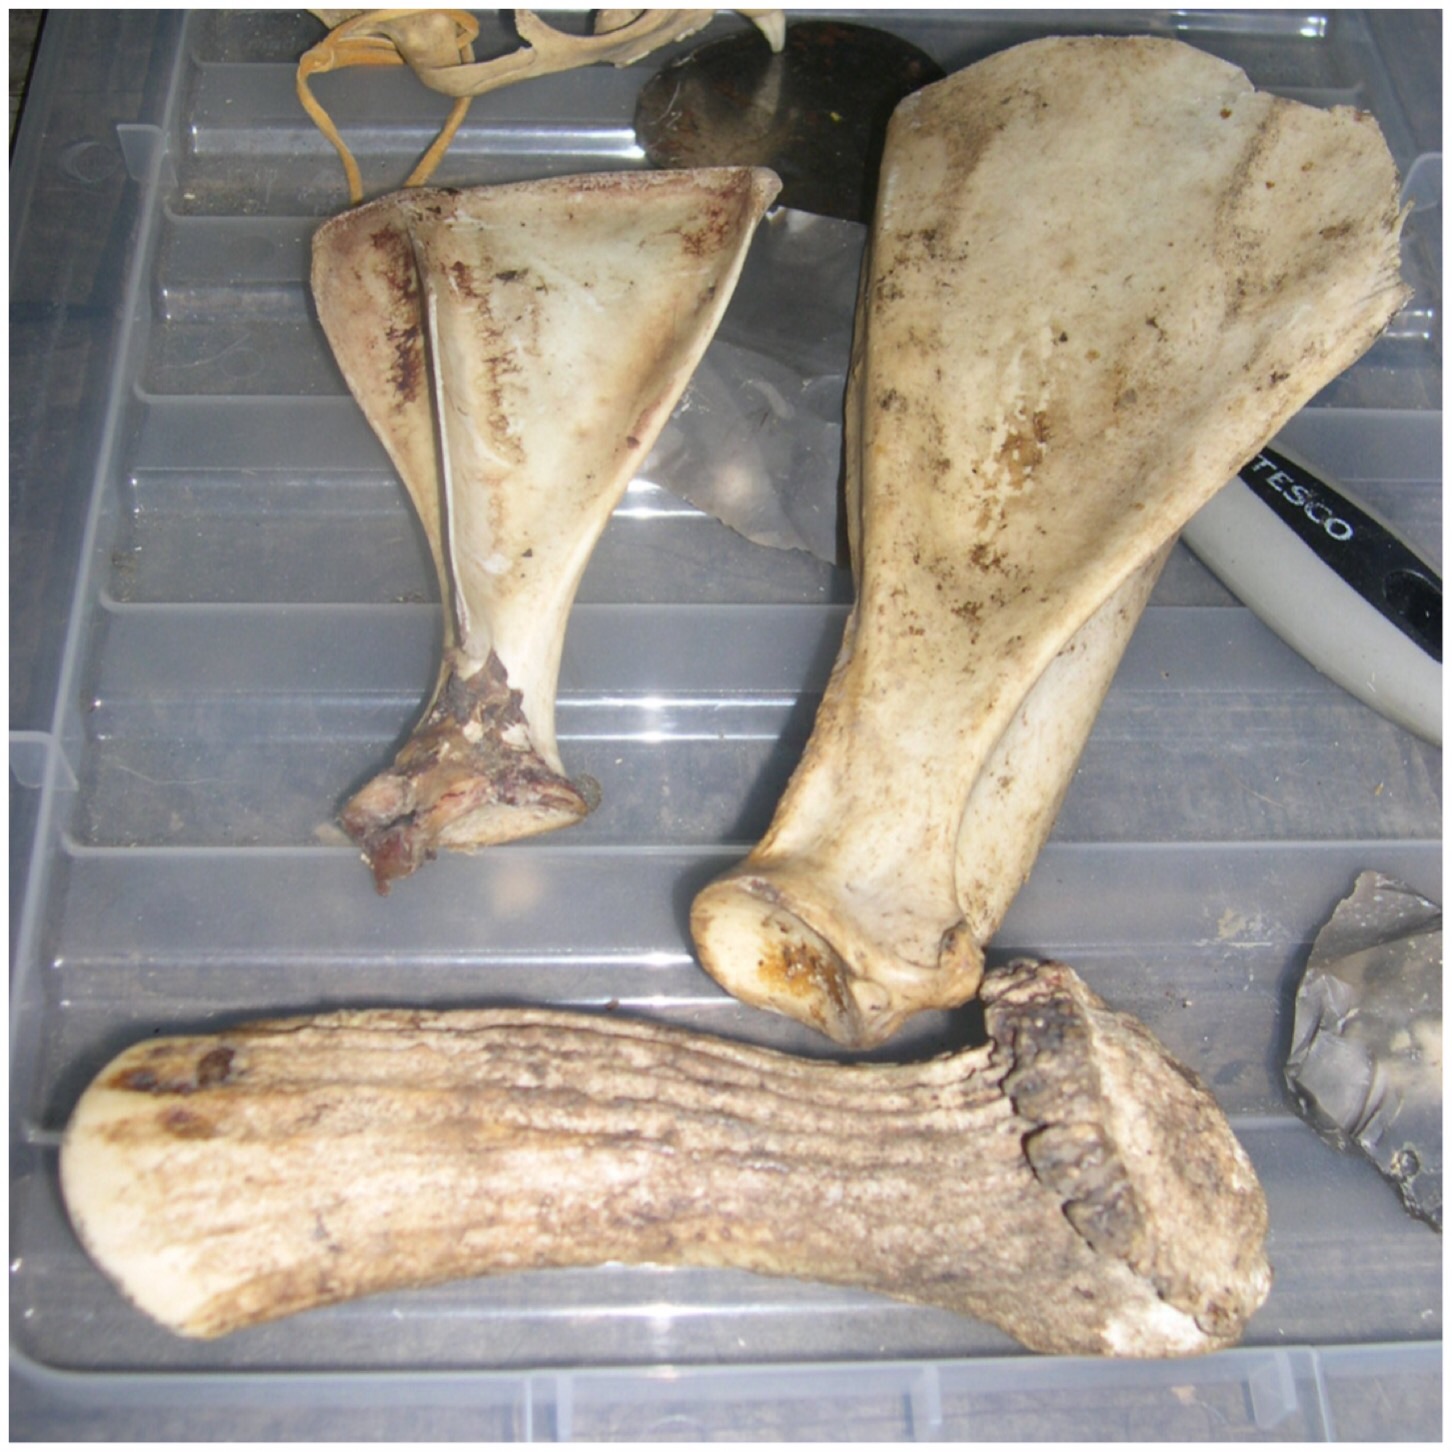
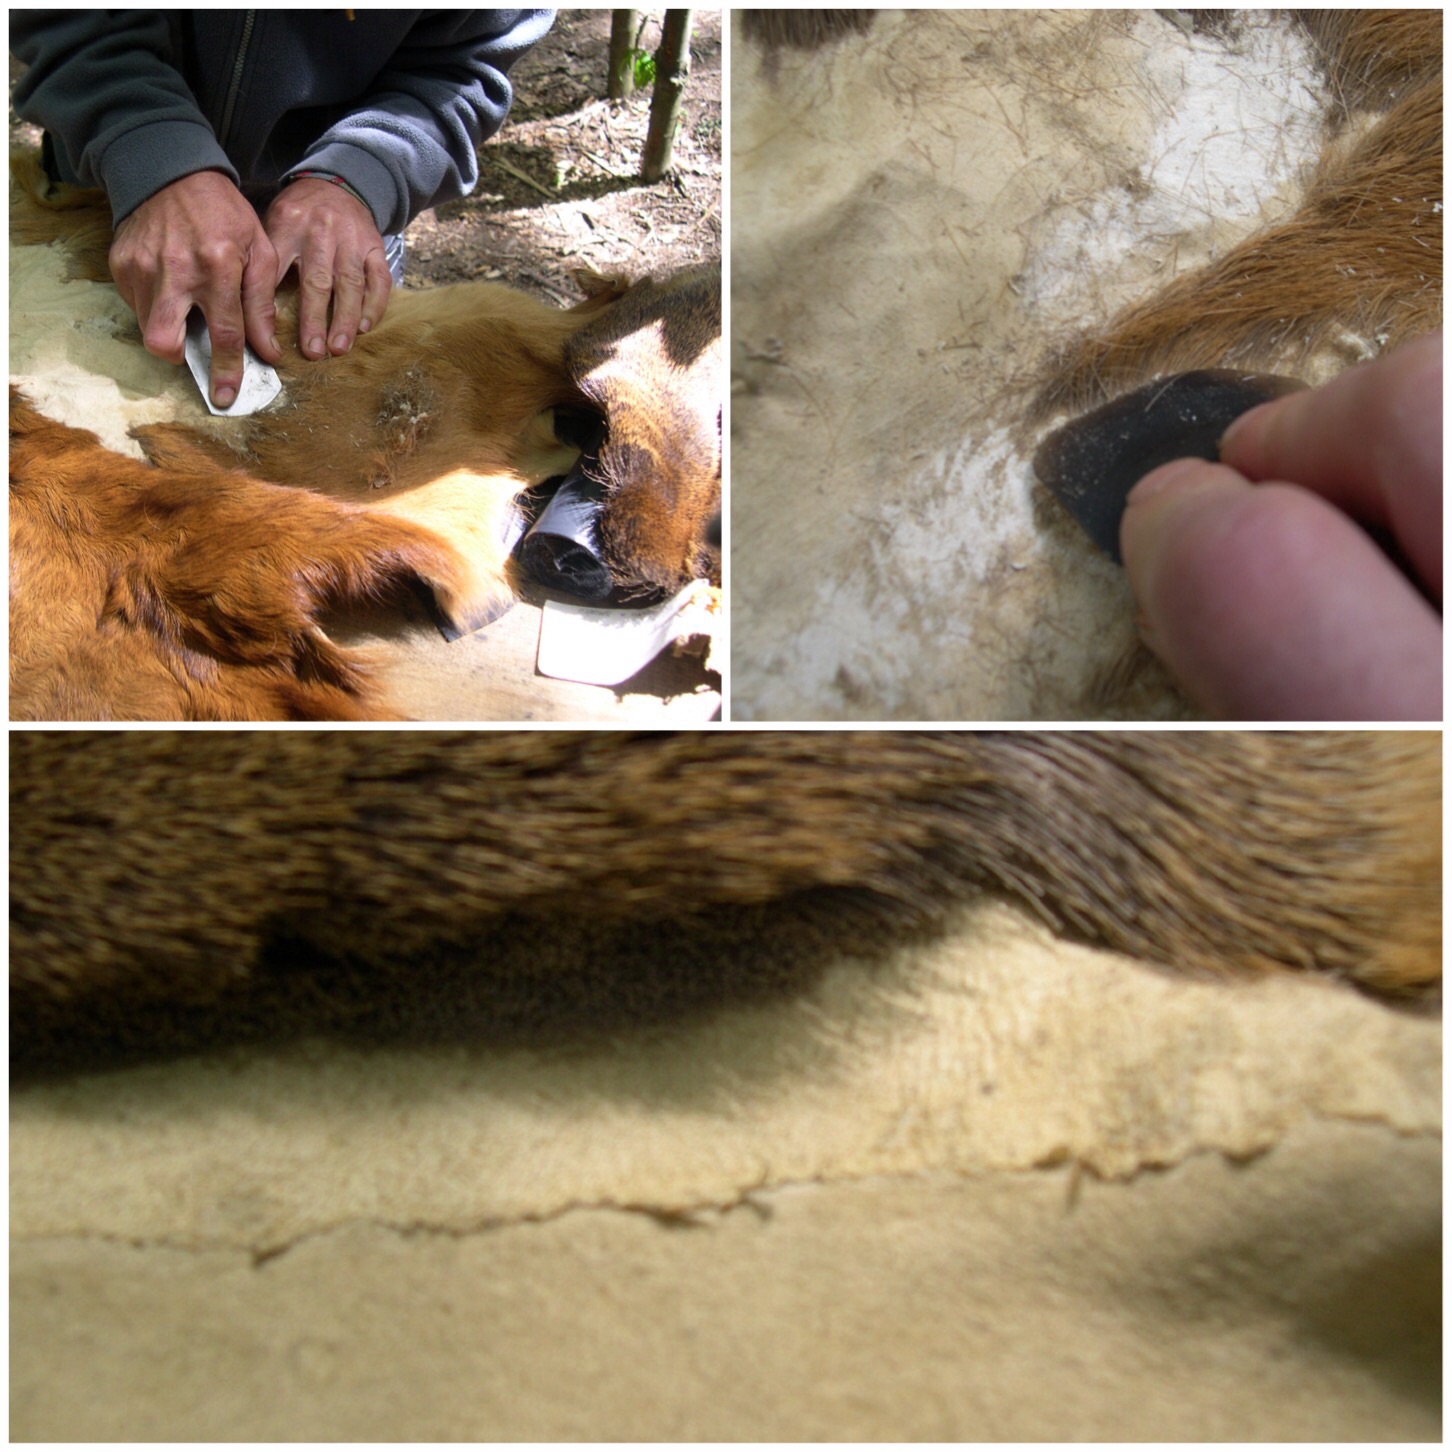
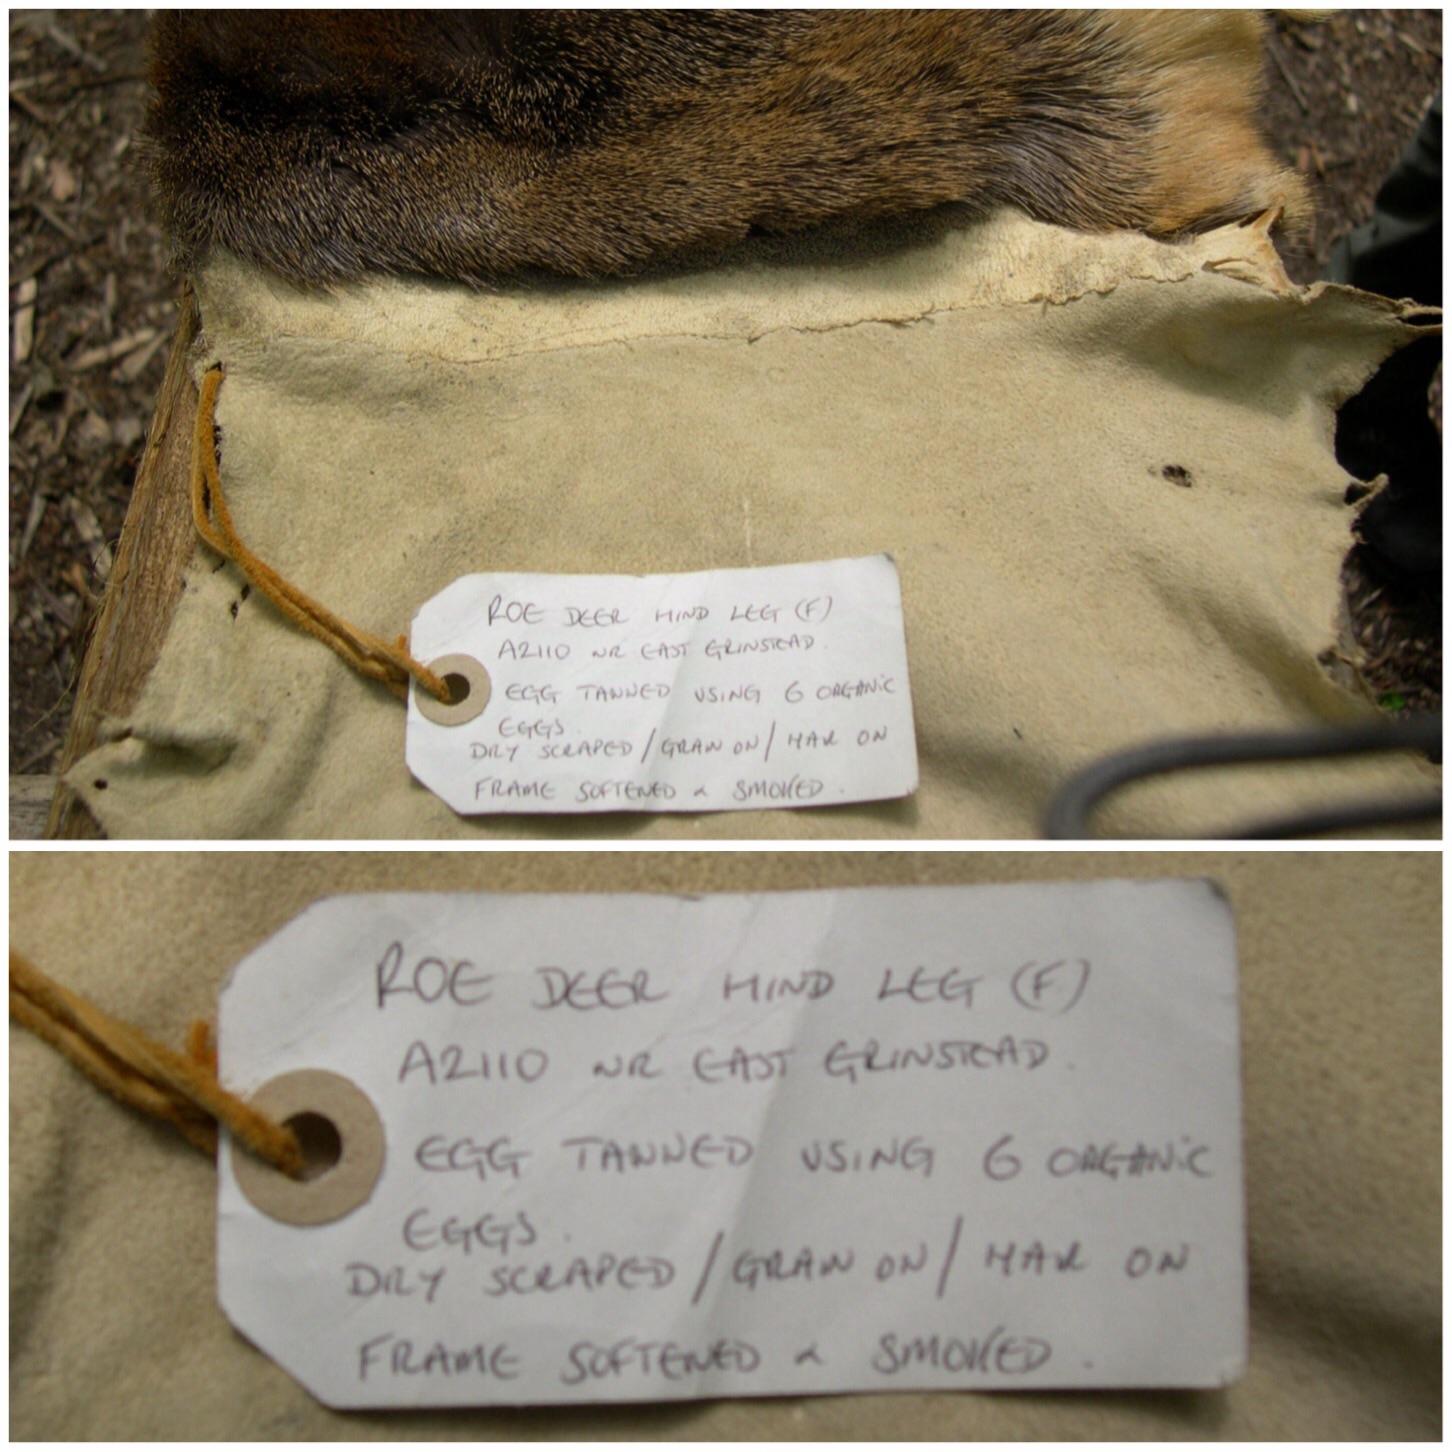
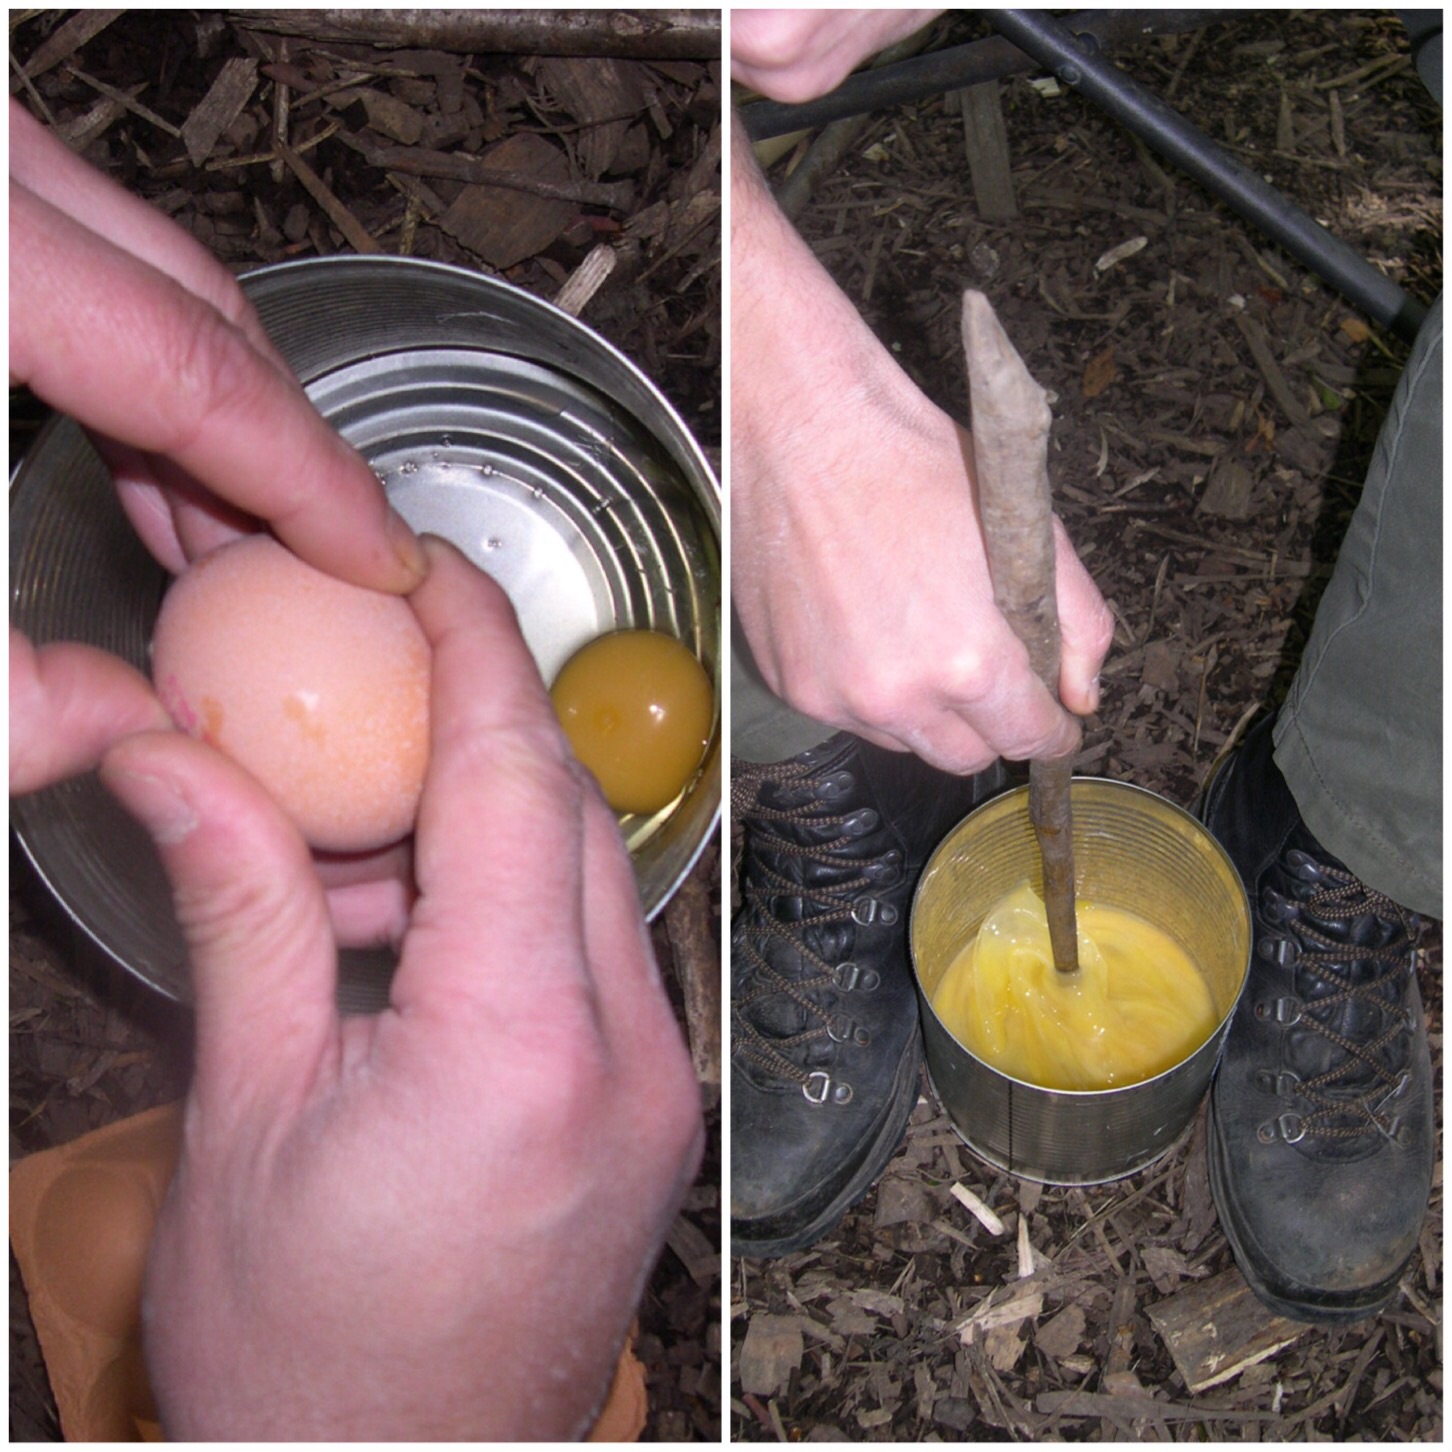
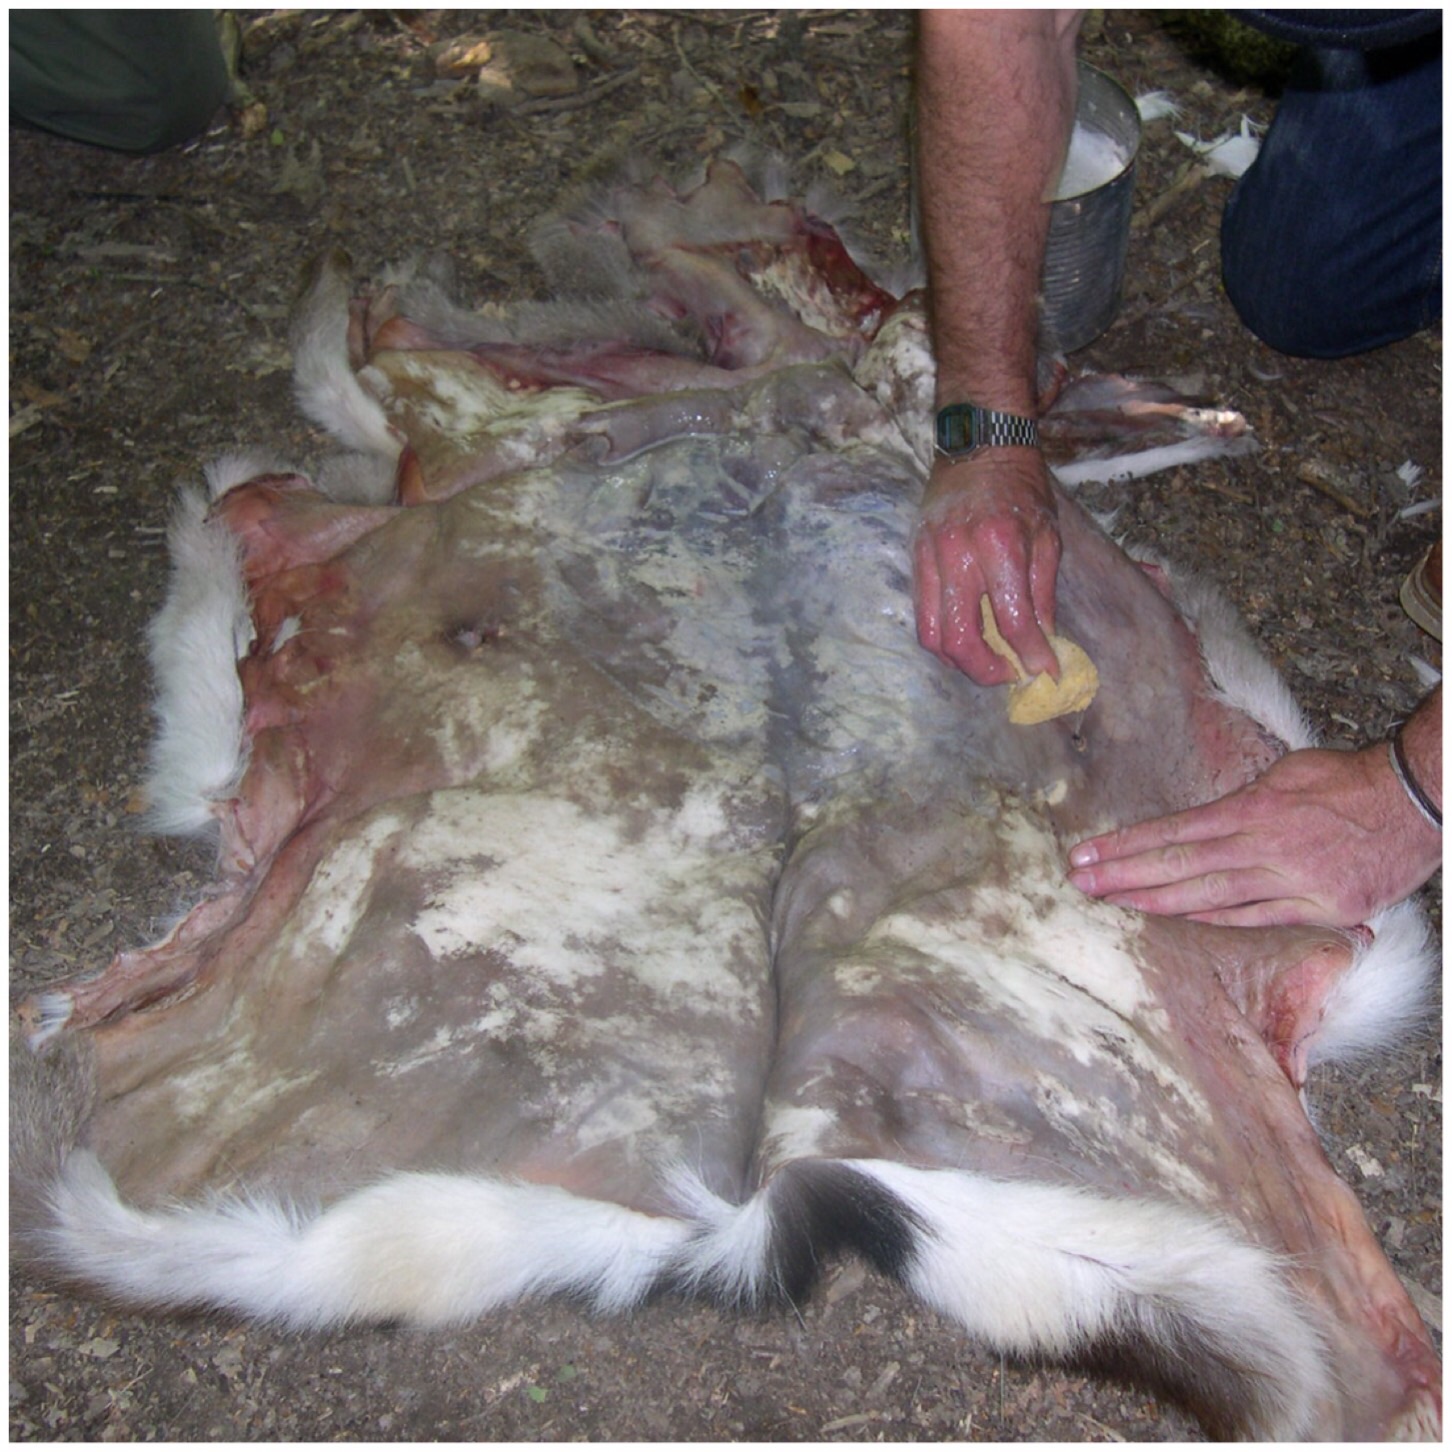
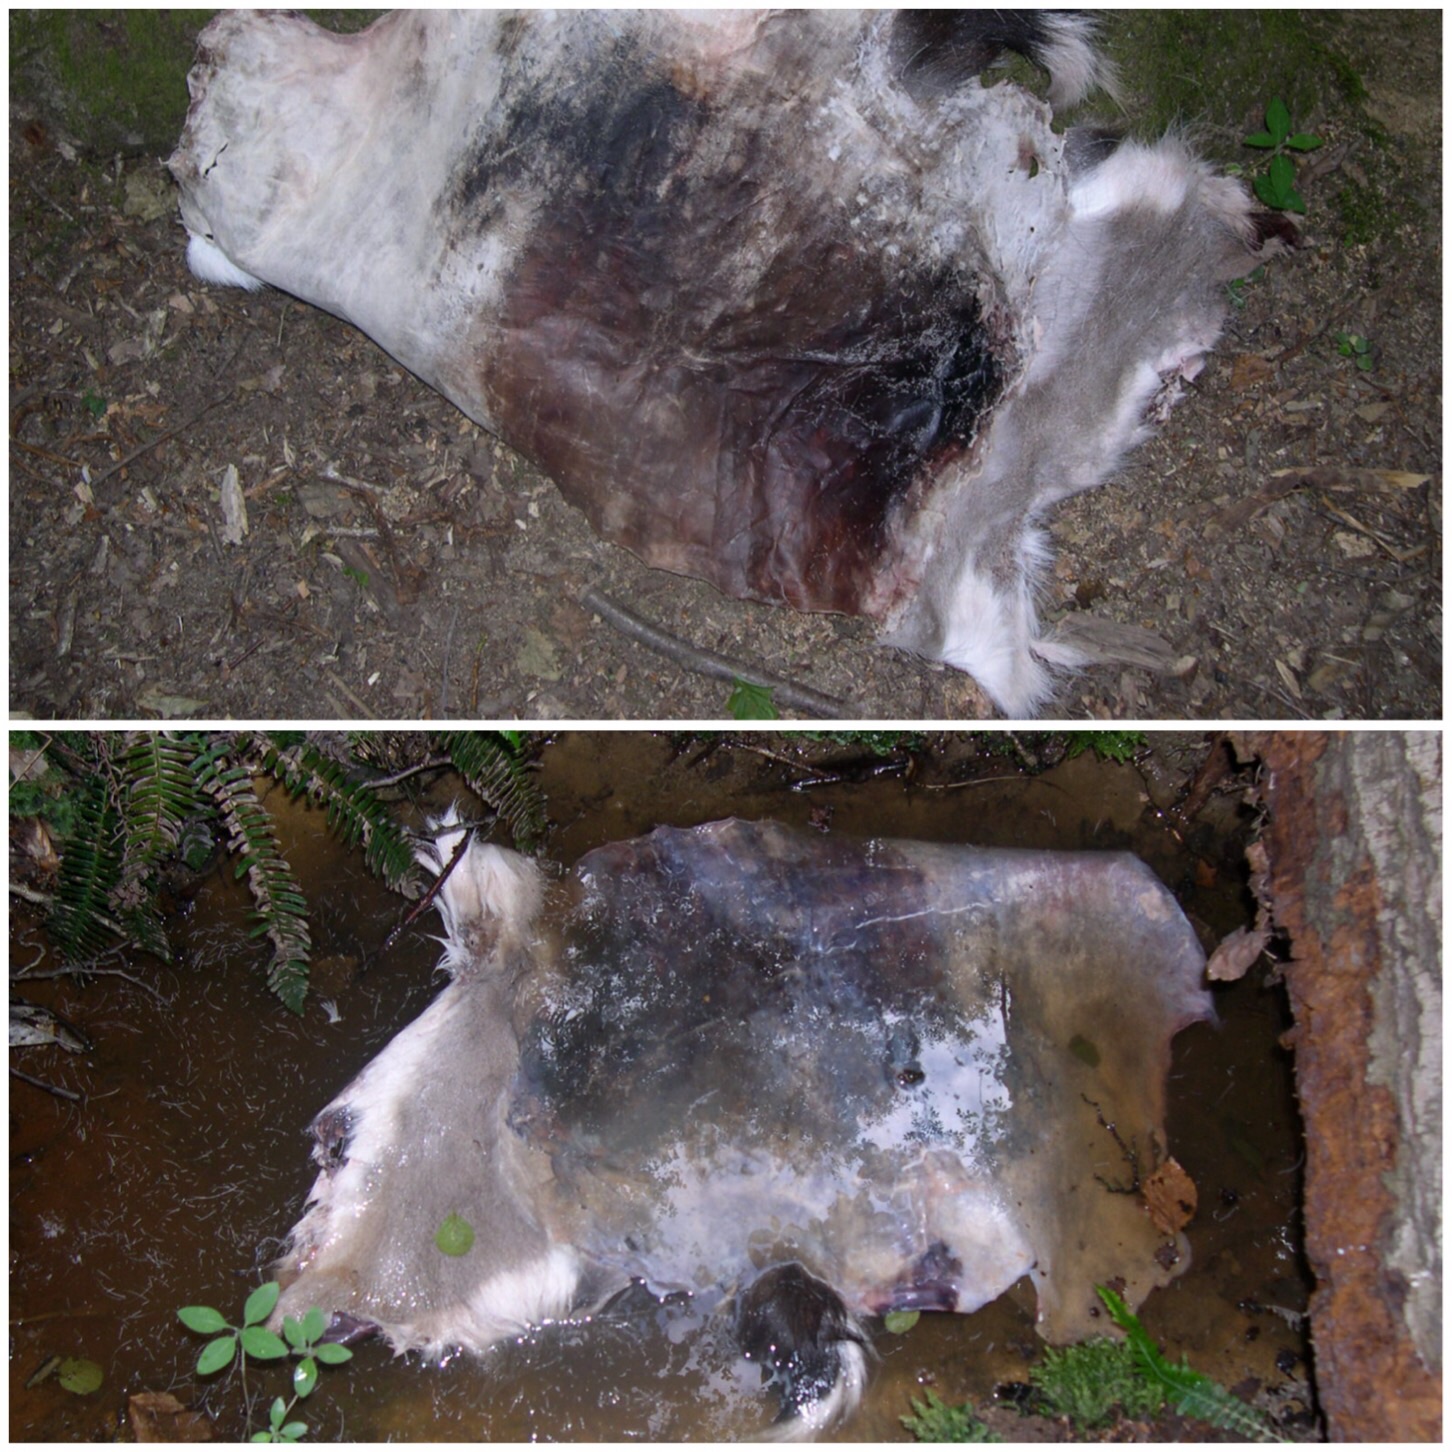
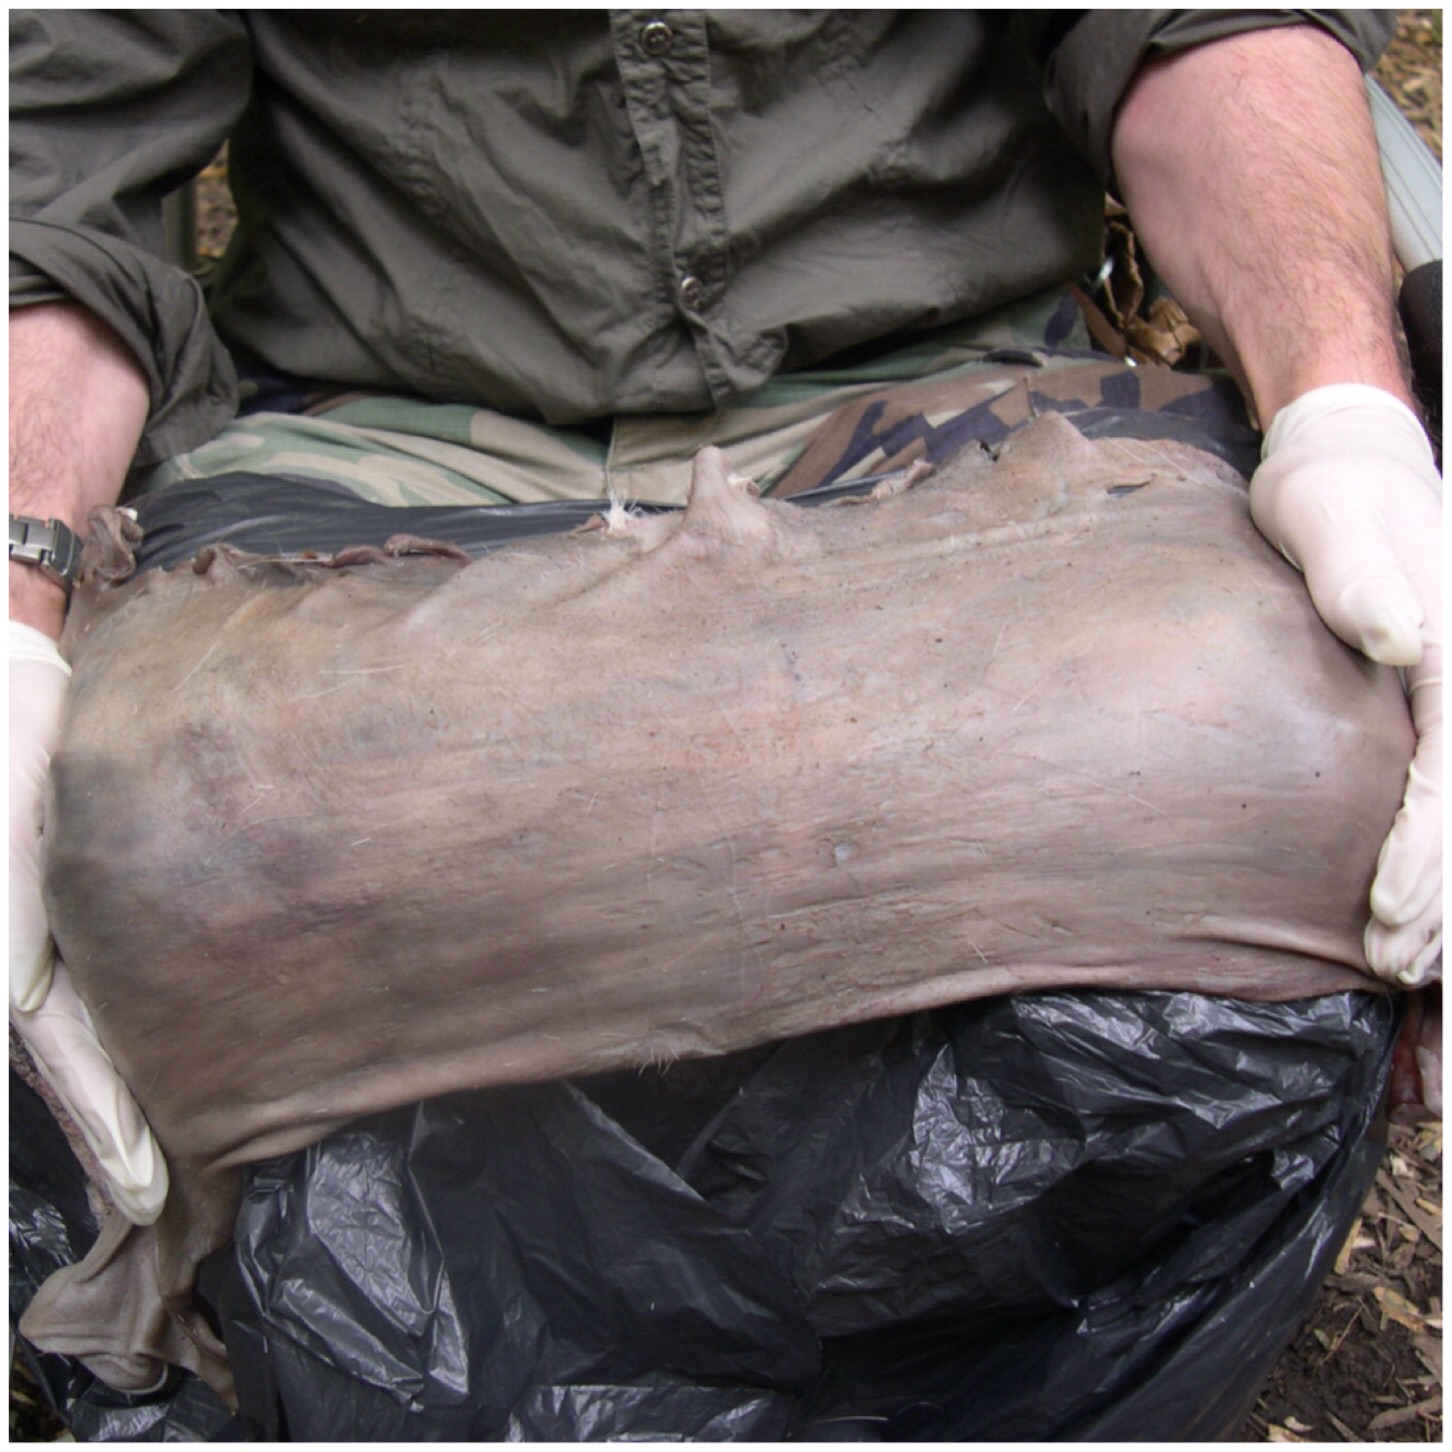
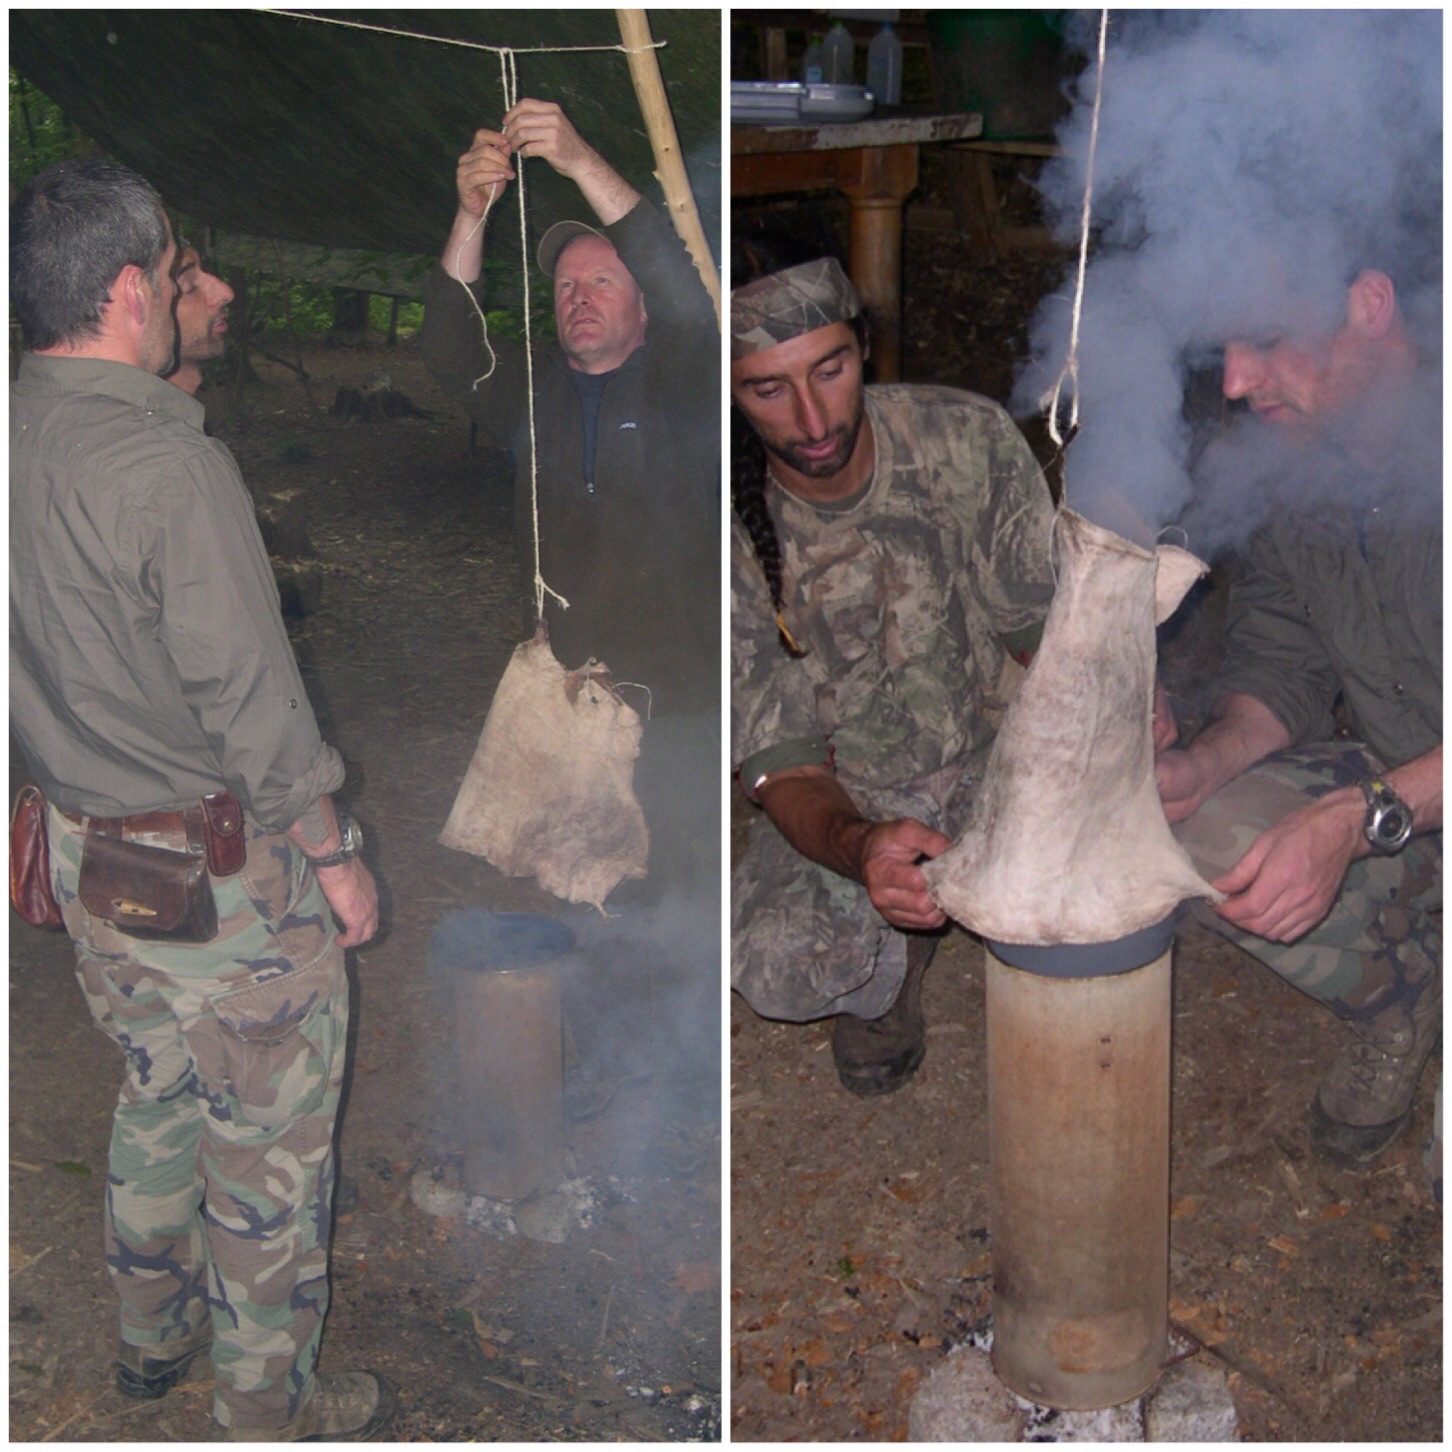
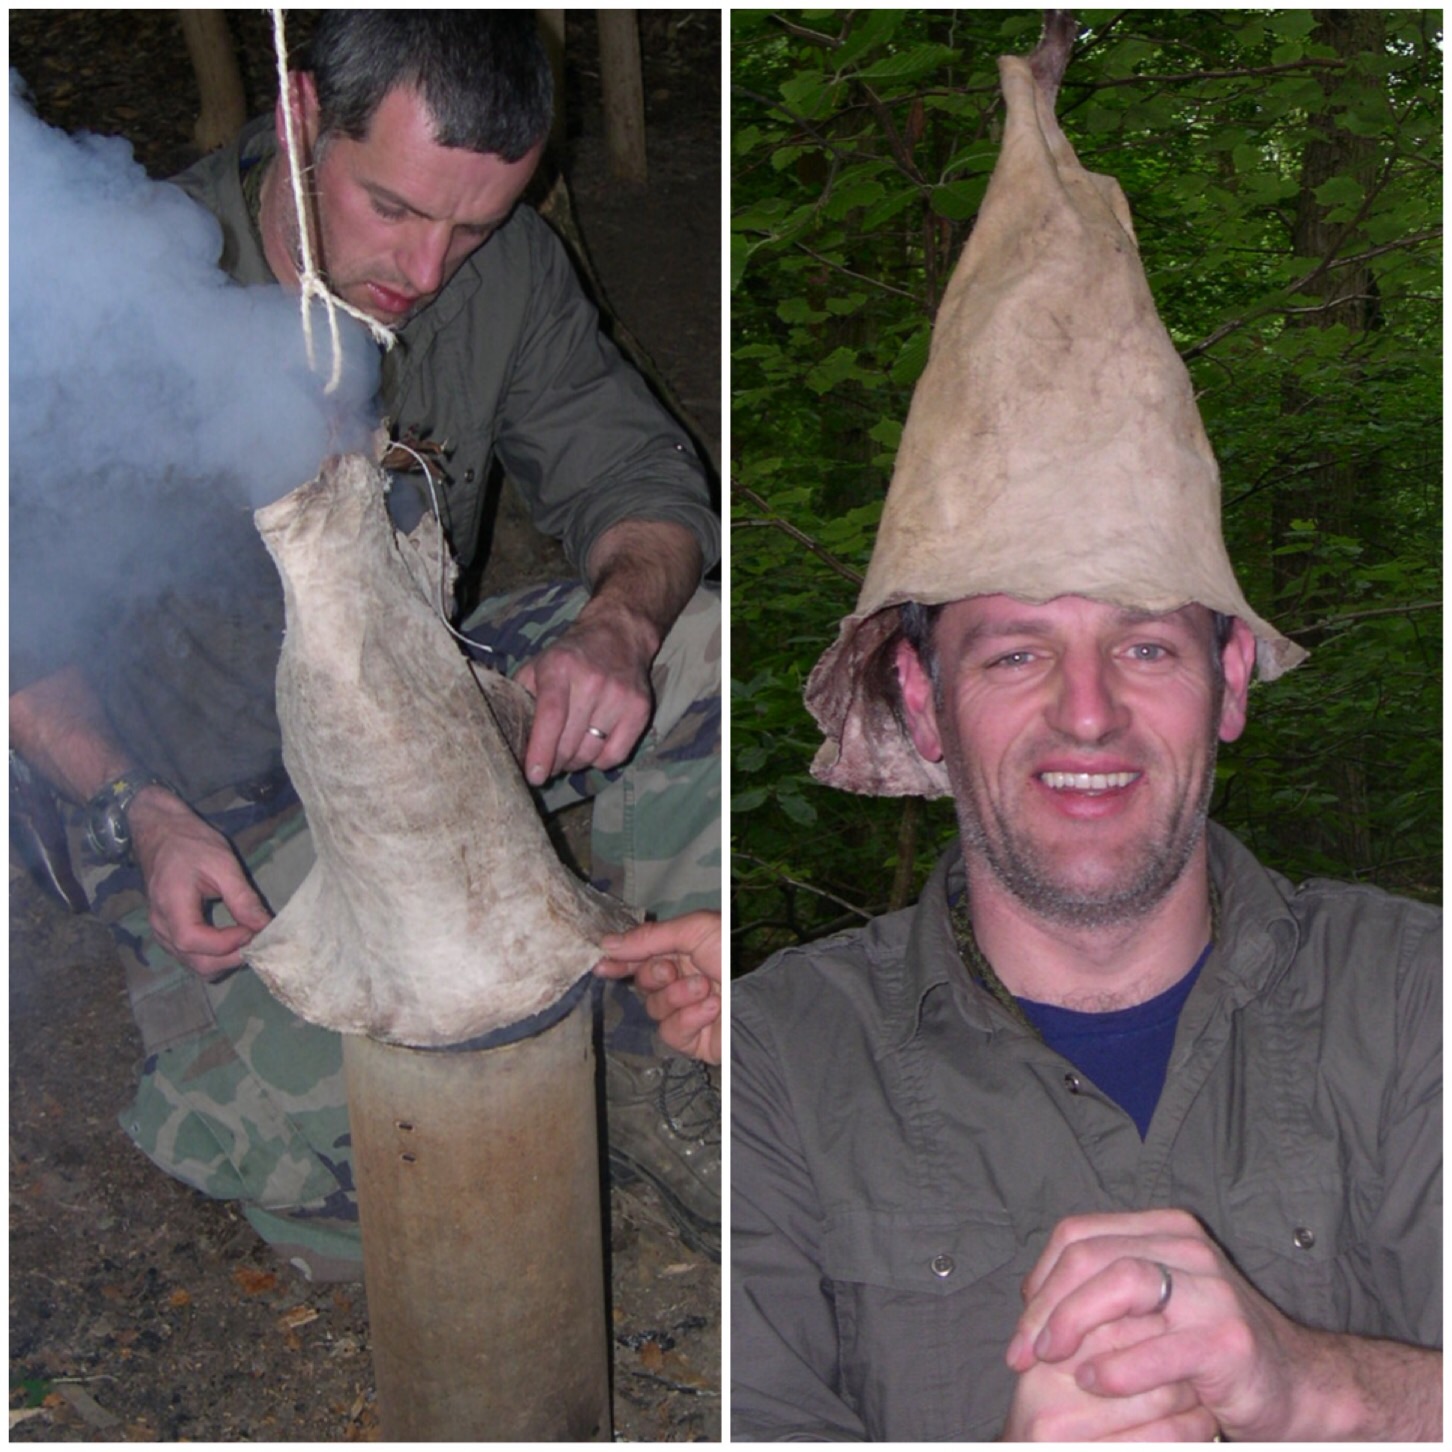
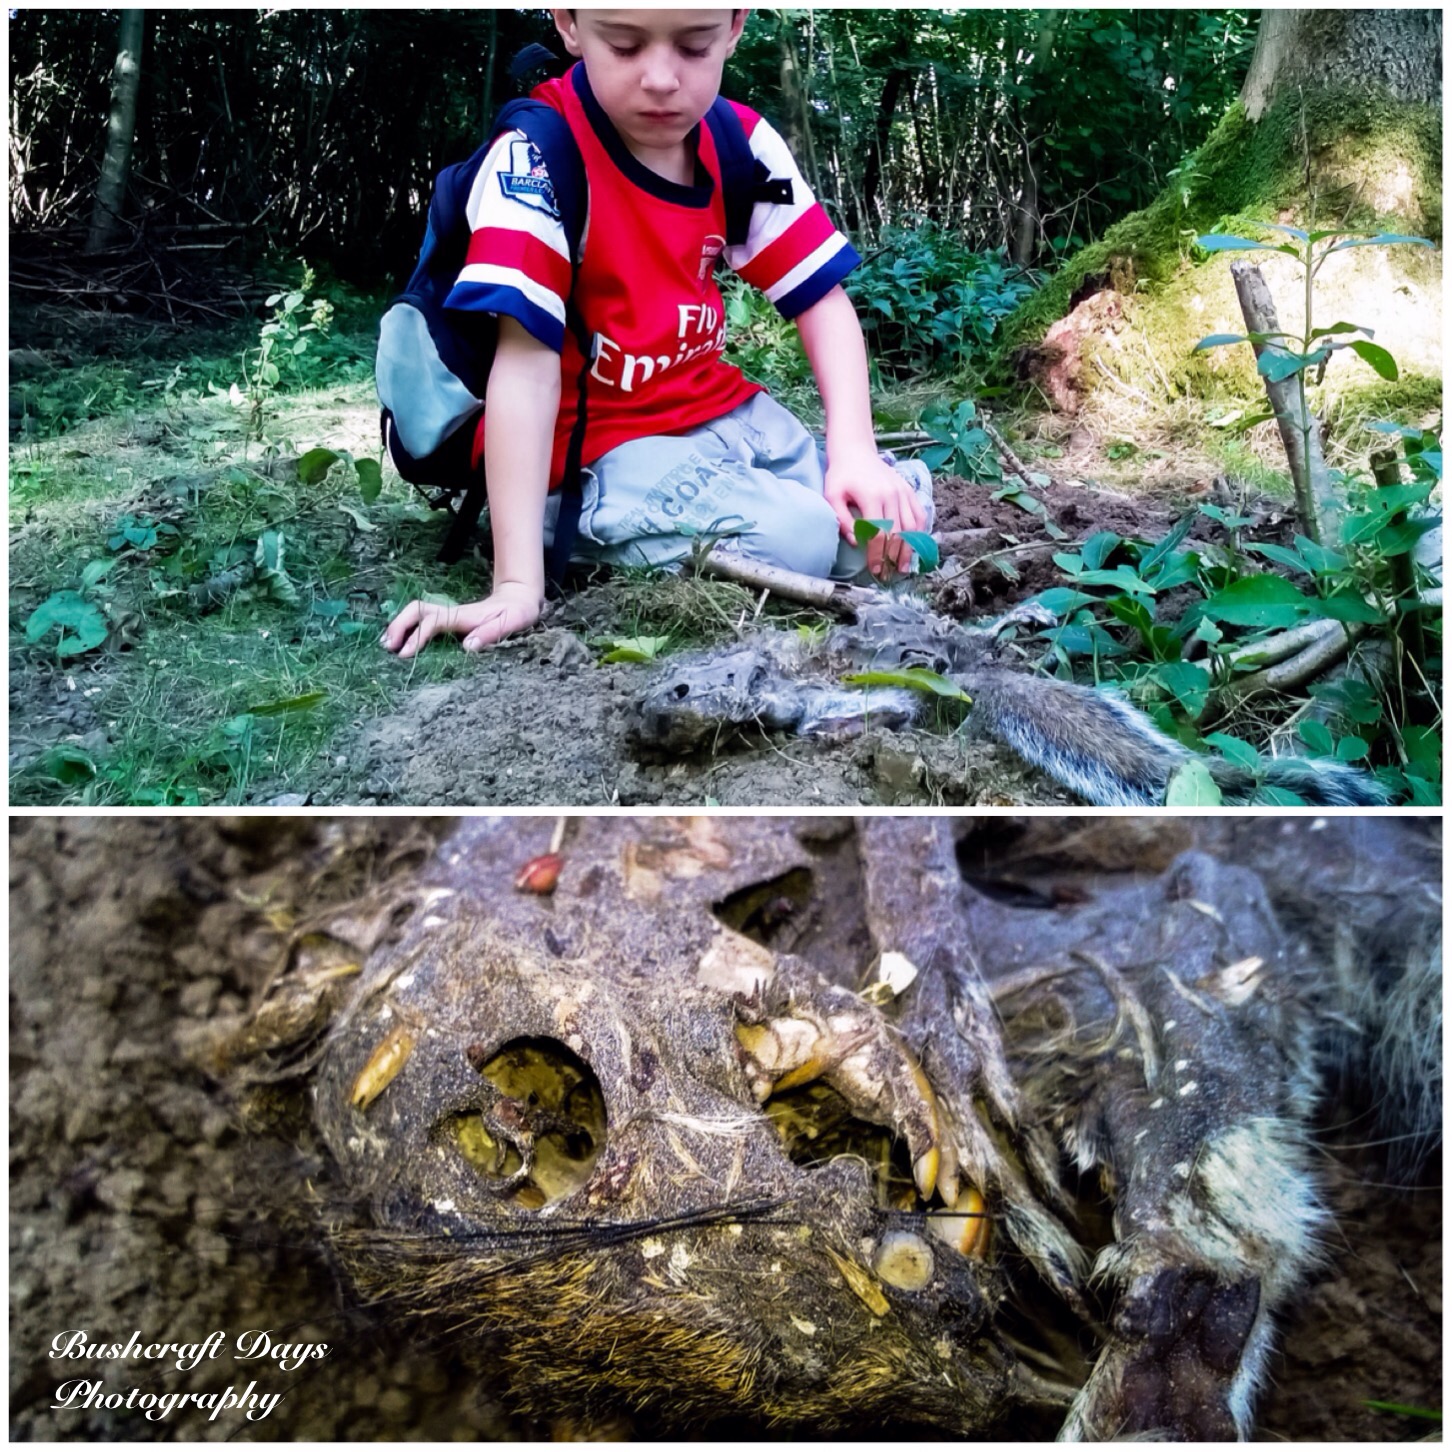
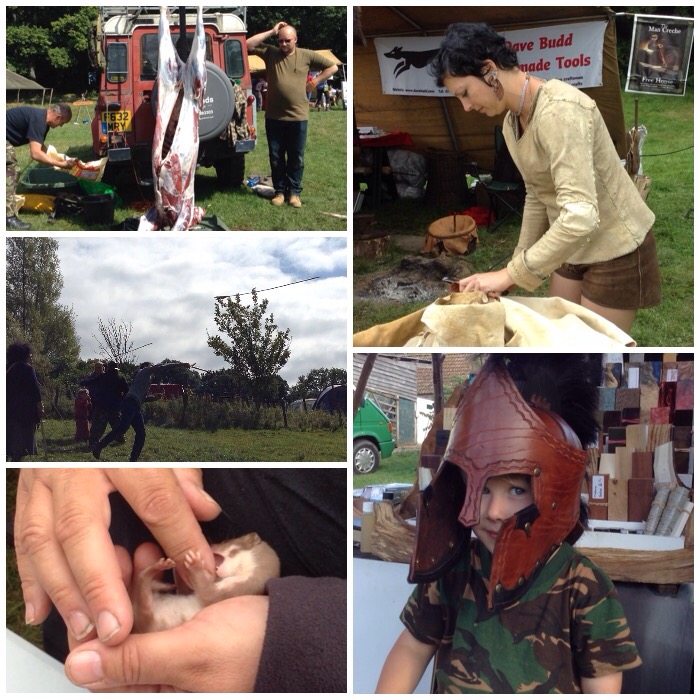
Fraser had recently found a deer that had been killed by a car and he had the hide loosely stretched as he de-fleshed it
Being Busy
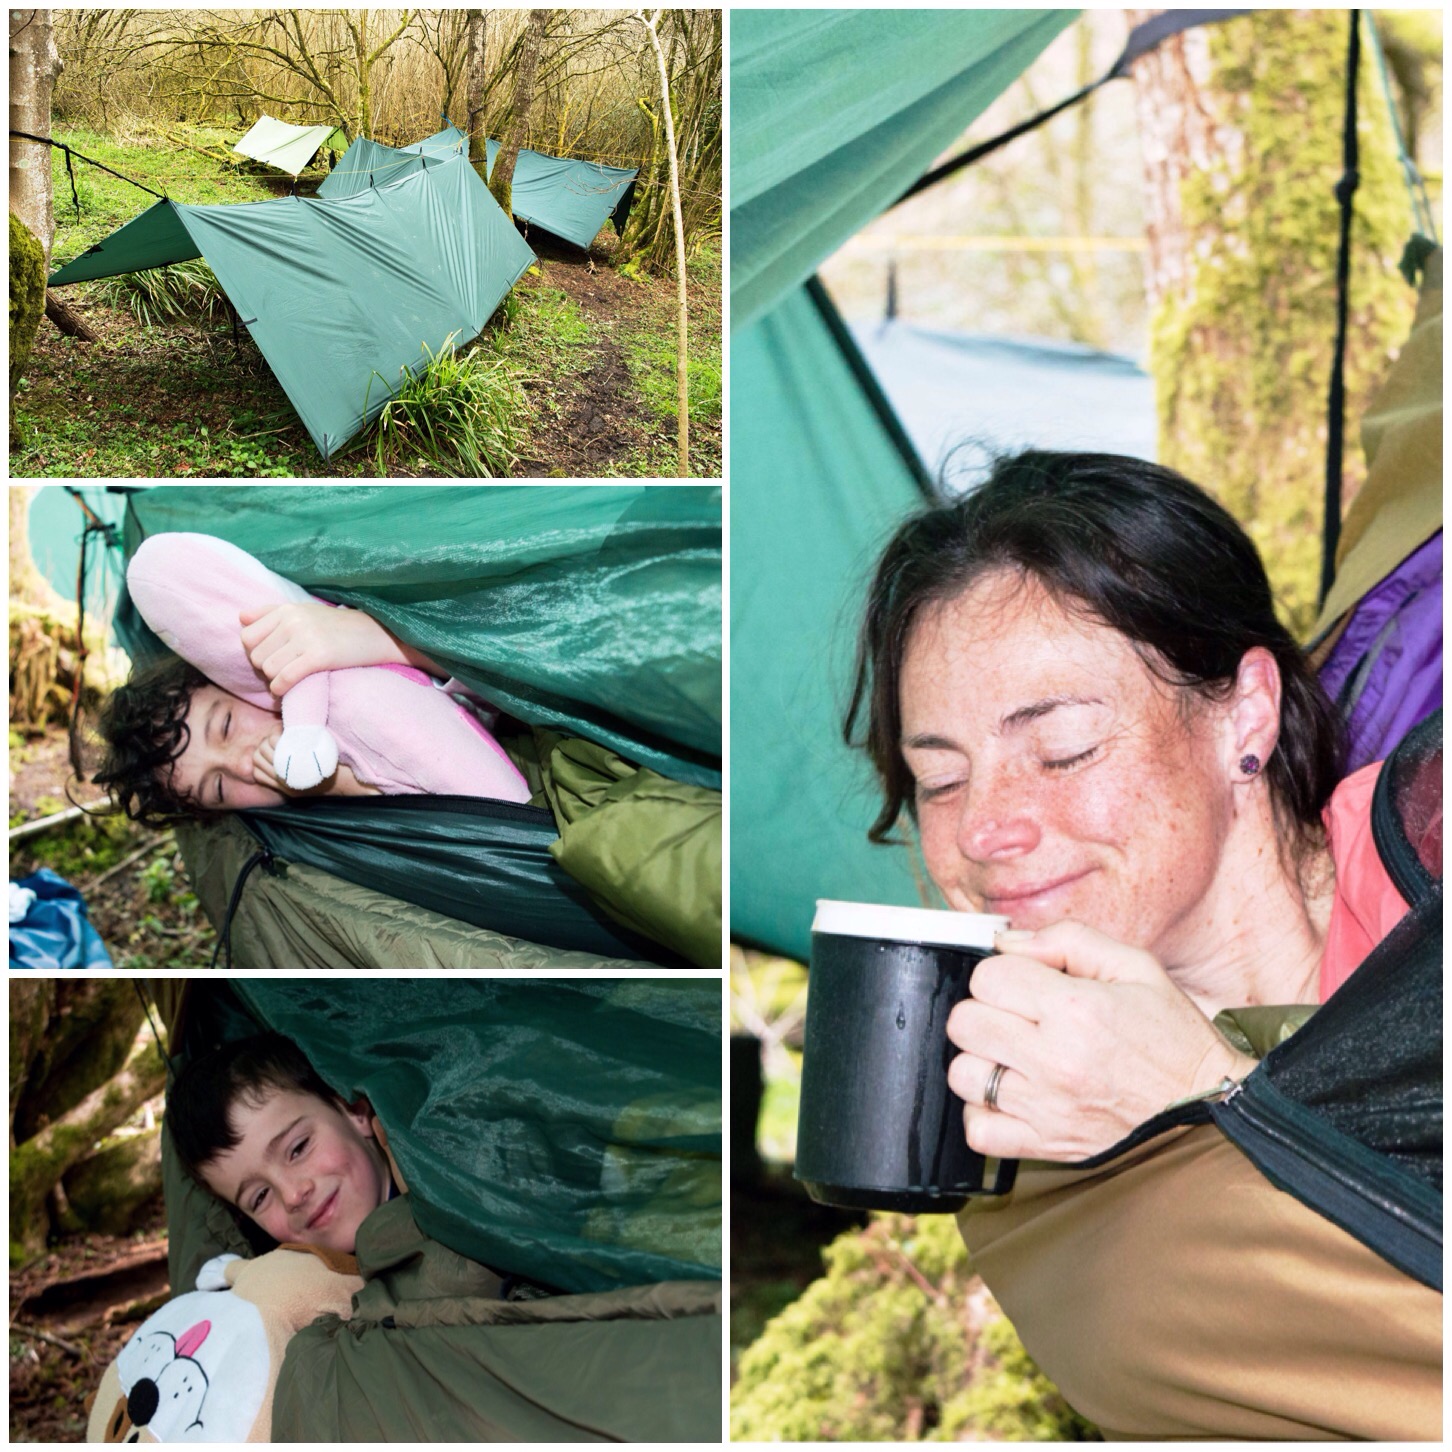
Our accommodation for the weekend was in hammocks. My kids are very happy now to sleep in them. I set up four under individual tarps. Each hammock had an under blanket attached to keep out the cold air, a roll mat, sleeping bag and top quilt.
Everyone was as snug as a bug in a rug you could say.
A tradition we have these days is for Alison to get a cup of coffee in the morning while still in her hammock – I failed with this on the first morning I am afraid but tried to make up for it on the other mornings.
Hammock Heaven
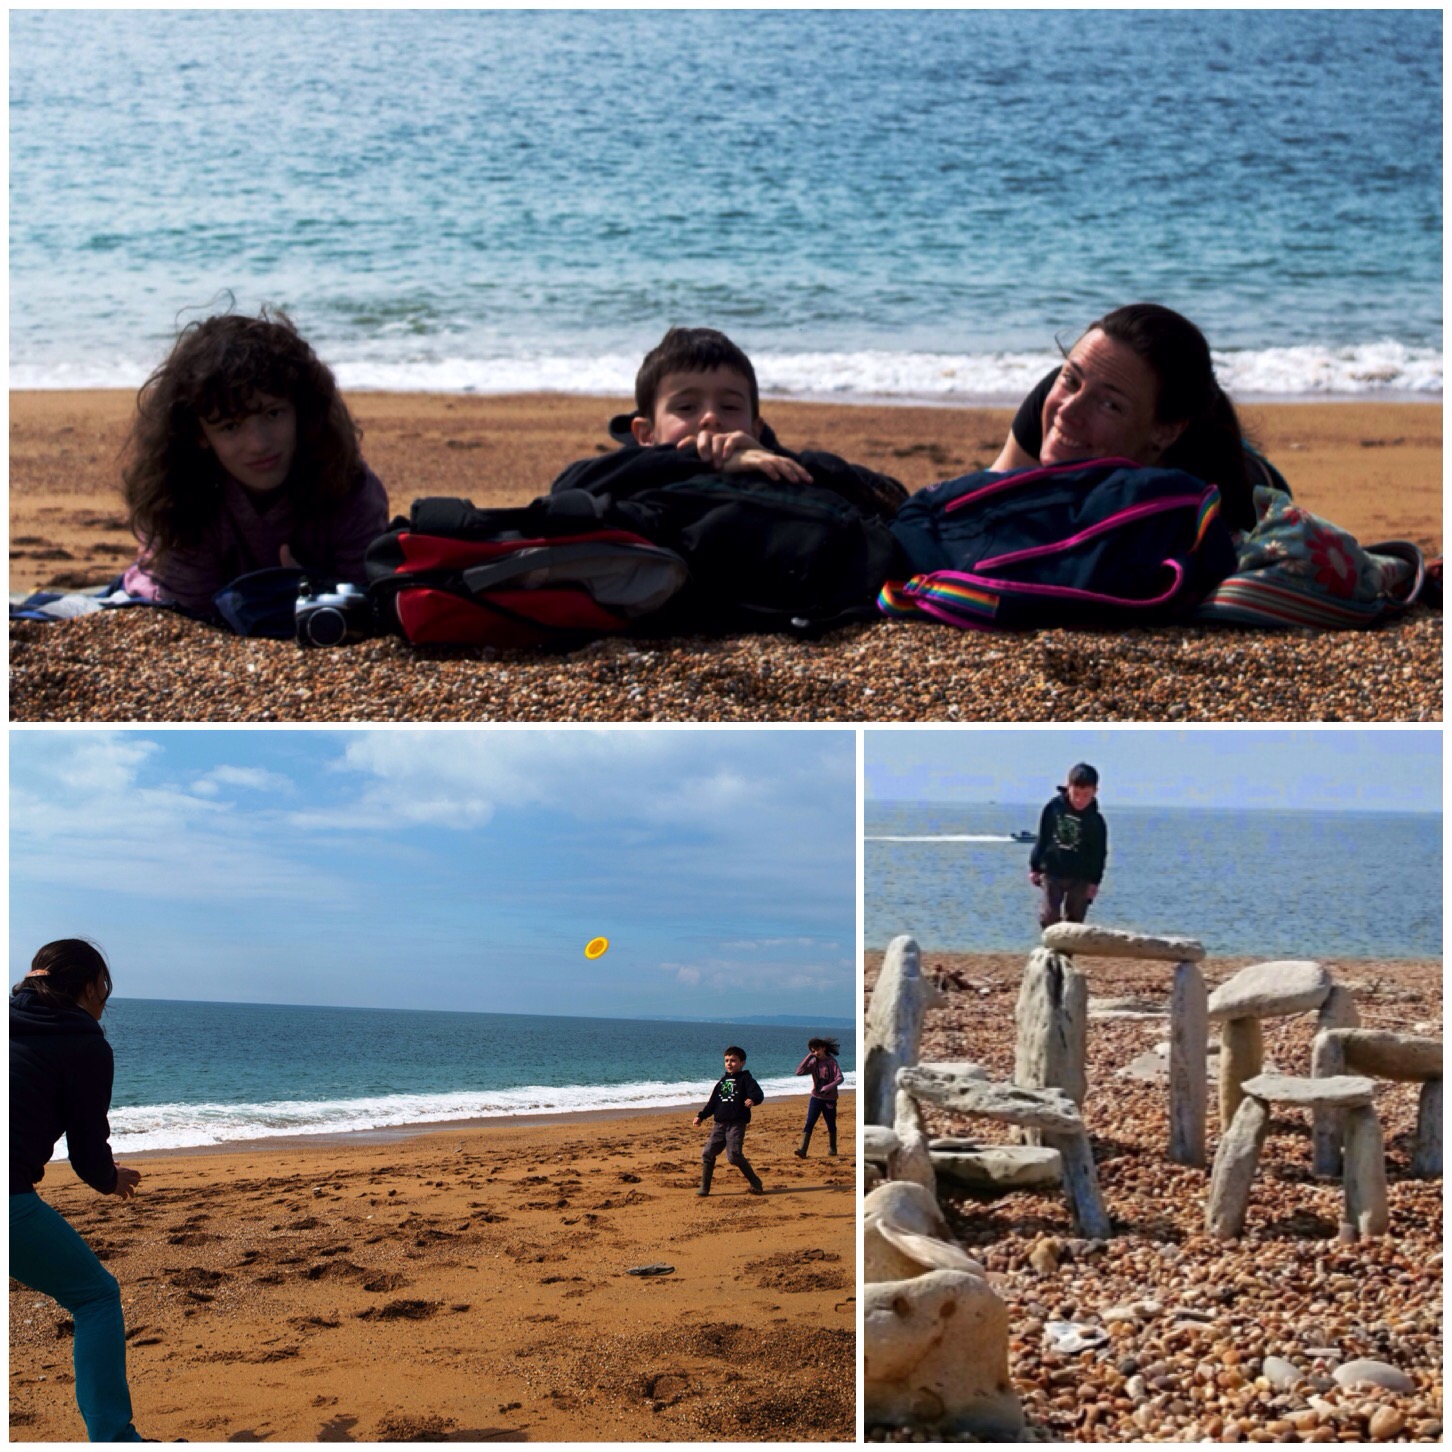
Our second day on the beach was spent playing with a frisbee, watching the fishermen cast and discovering and building little beach henges.
Sun, Sand and Sea
We had a lovely stroll along the coast foraging for sea kale and some scurvy grass. I found plenty of sea kale but no scurvy grass (as expected, comments were made about my poor foraging skills).
We found a nice beachside café to rest up in and a lovely grassy slope for the kids to roll down – perfect.
Together Time
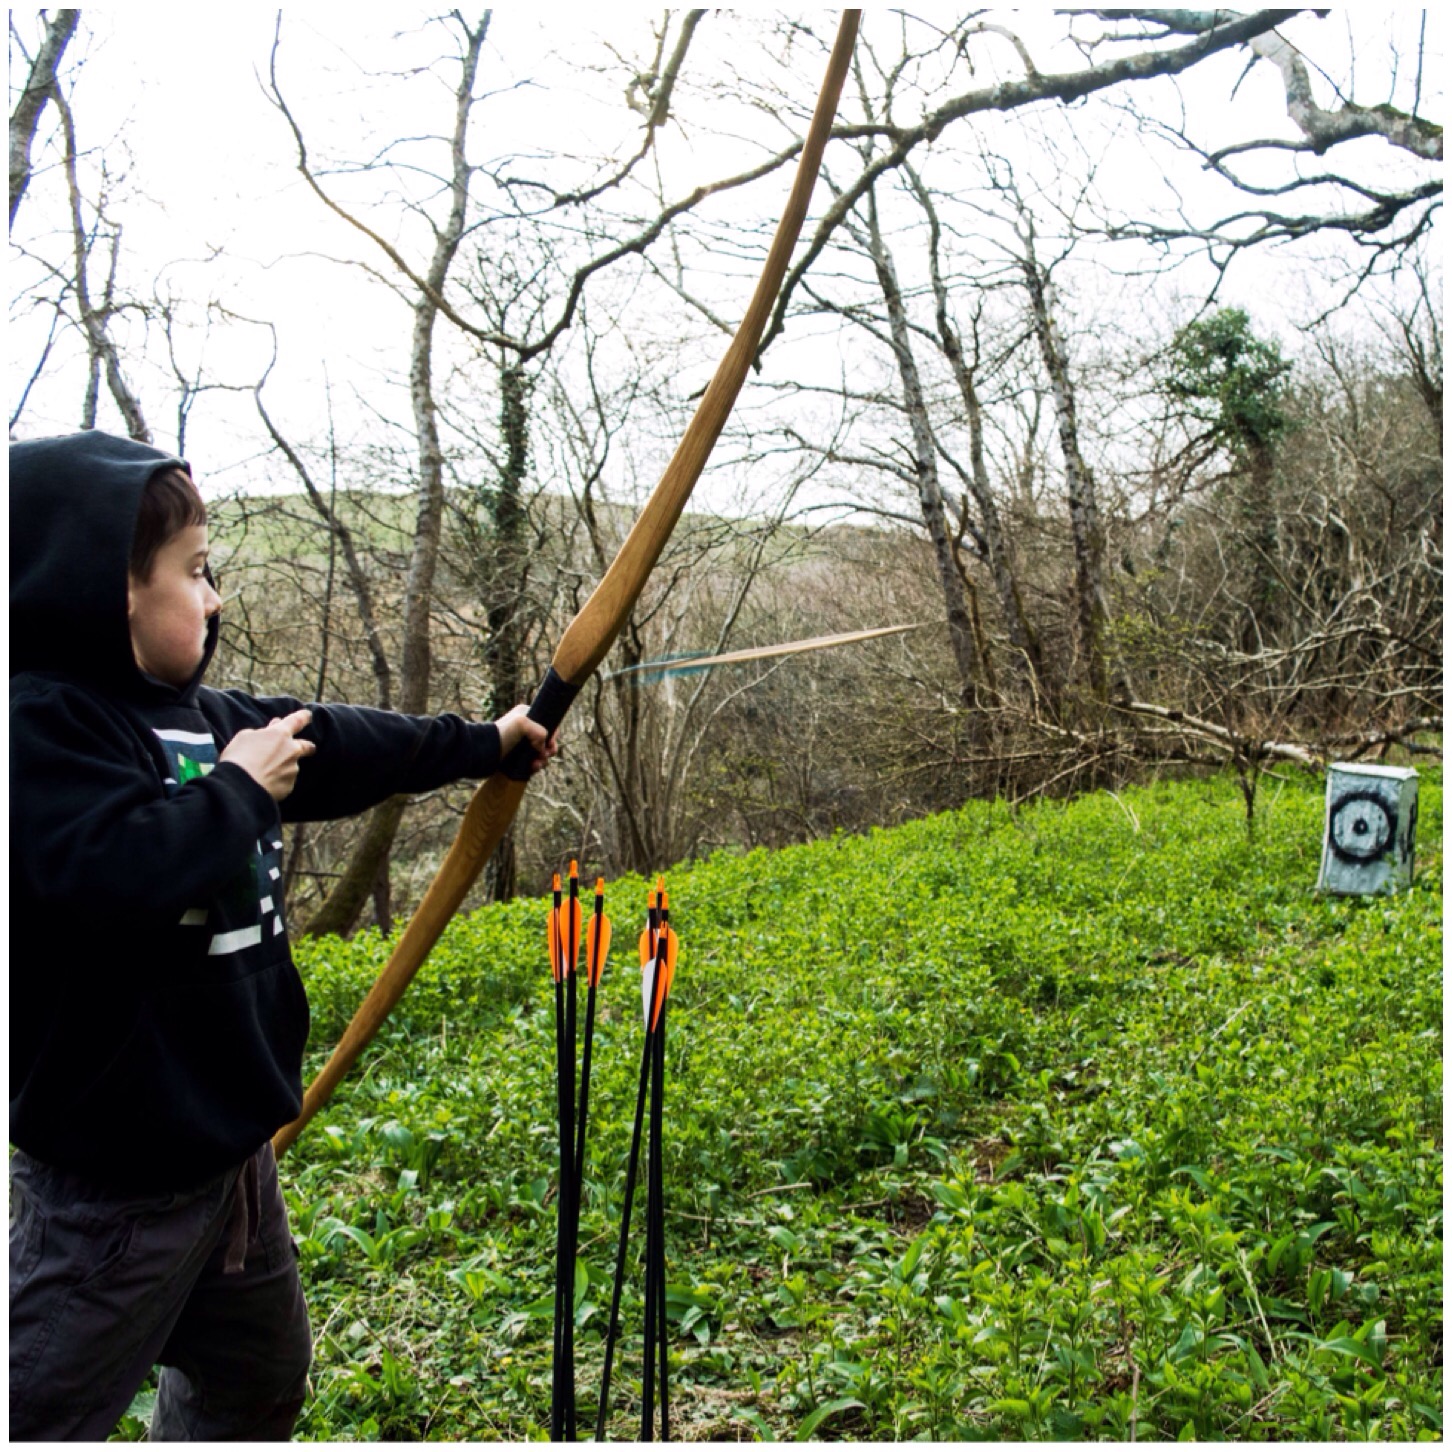
On the last evening before we left I asked the kids if they wanted to shoot some arrows. Only Finlay took me up on my offer and off we went. Finlay is seven and has shot before with his own smaller bow or with me on the larger holmegaard you can see here. This was the first time he had shot the holmegaard on his own. It is a full-sized bow but not heavy in terms of draw poundage.
I was impressed with his stance and his ability to shoot with so large a bow and equally chuffed to capture this great shot of the arrow in flight.
Airborne Arrows
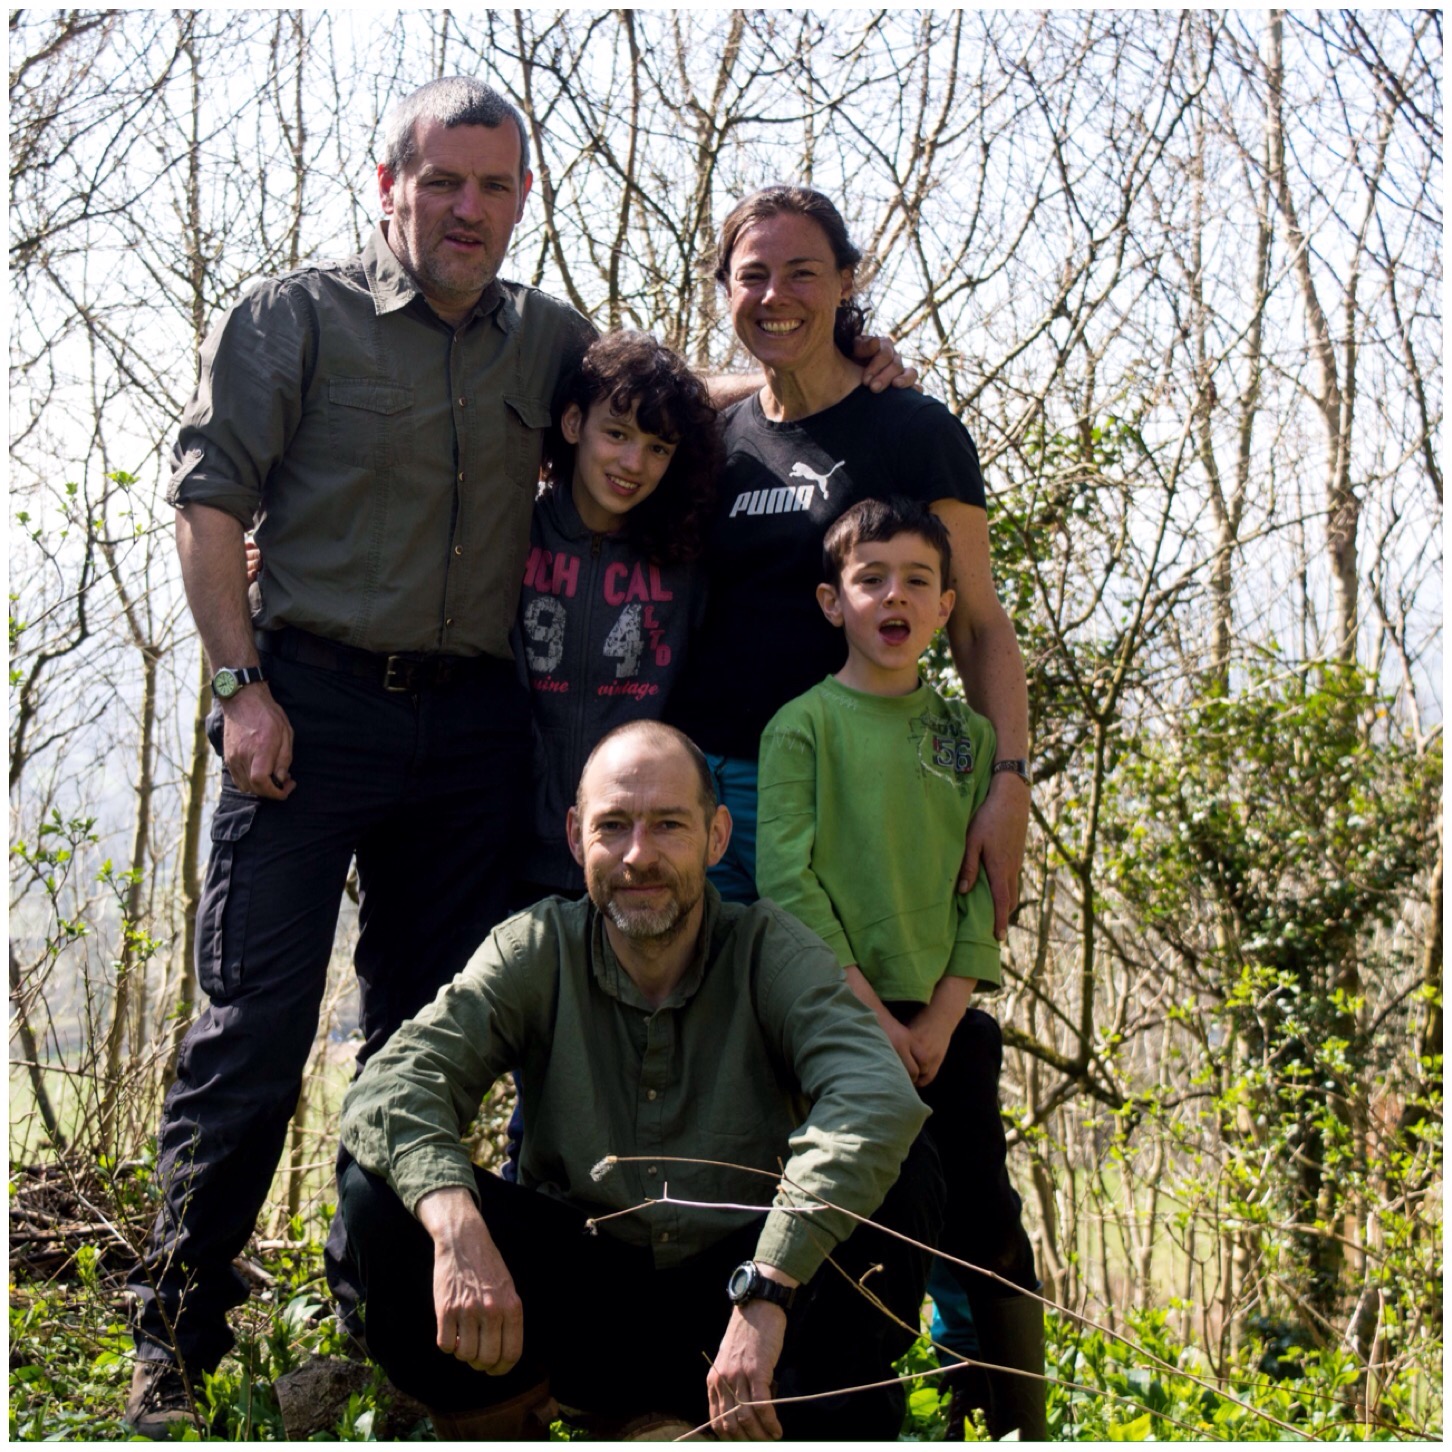
So all the boxes were ticked and we took a group picture of the happy campers before heading off.
Fraser was a great host and we were all sad to leave, however we will be back again if Fraser will have us.
Farewells
As well as taking my usual mass of pictures I put together this short video of the weekend.
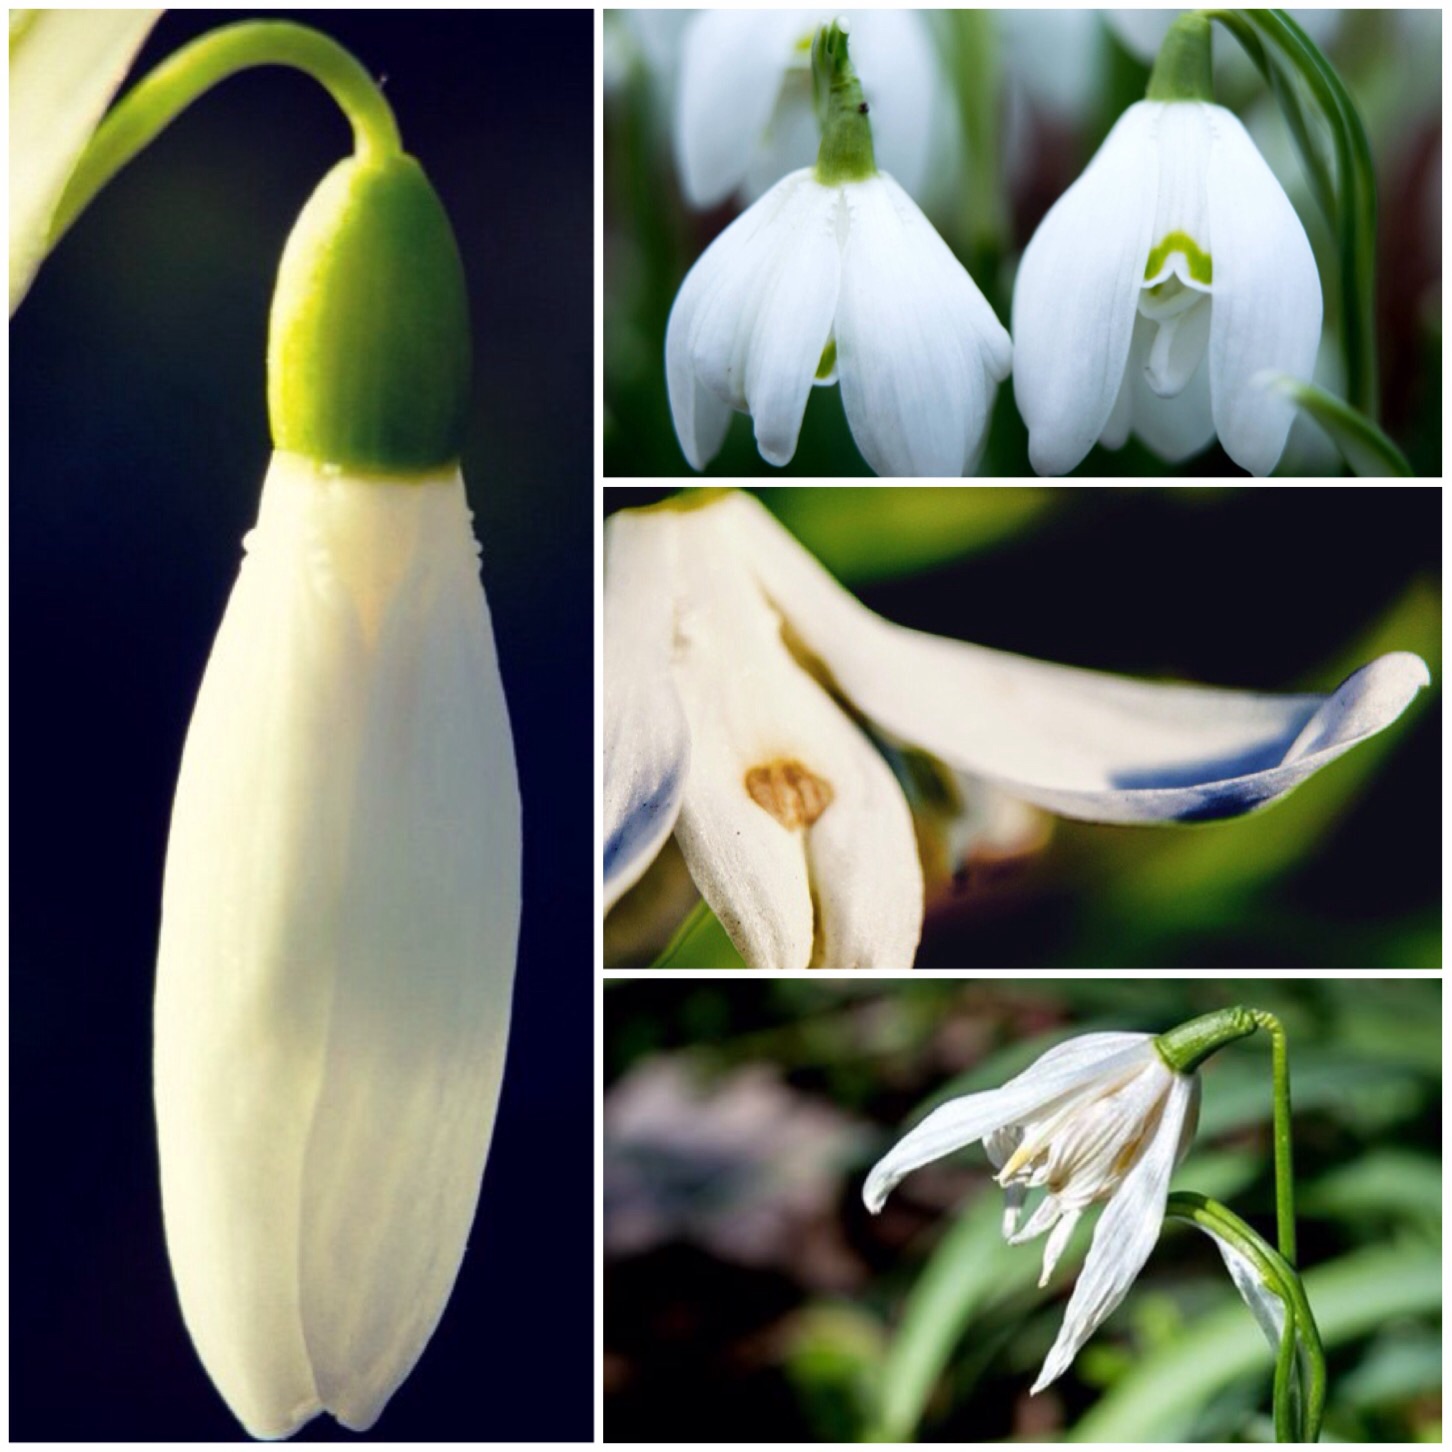
Carrying on in the winter wonders theme I took a close look at the snowdrops this year. All the way through their life cycle they are a beautiful little plant . From the simple beauty of the drooped heads as they emerge, to the majesty of them as they open, through the dramatic flaring as they mature and finally to their dignified withering as they die.
The snowdrop in its glory
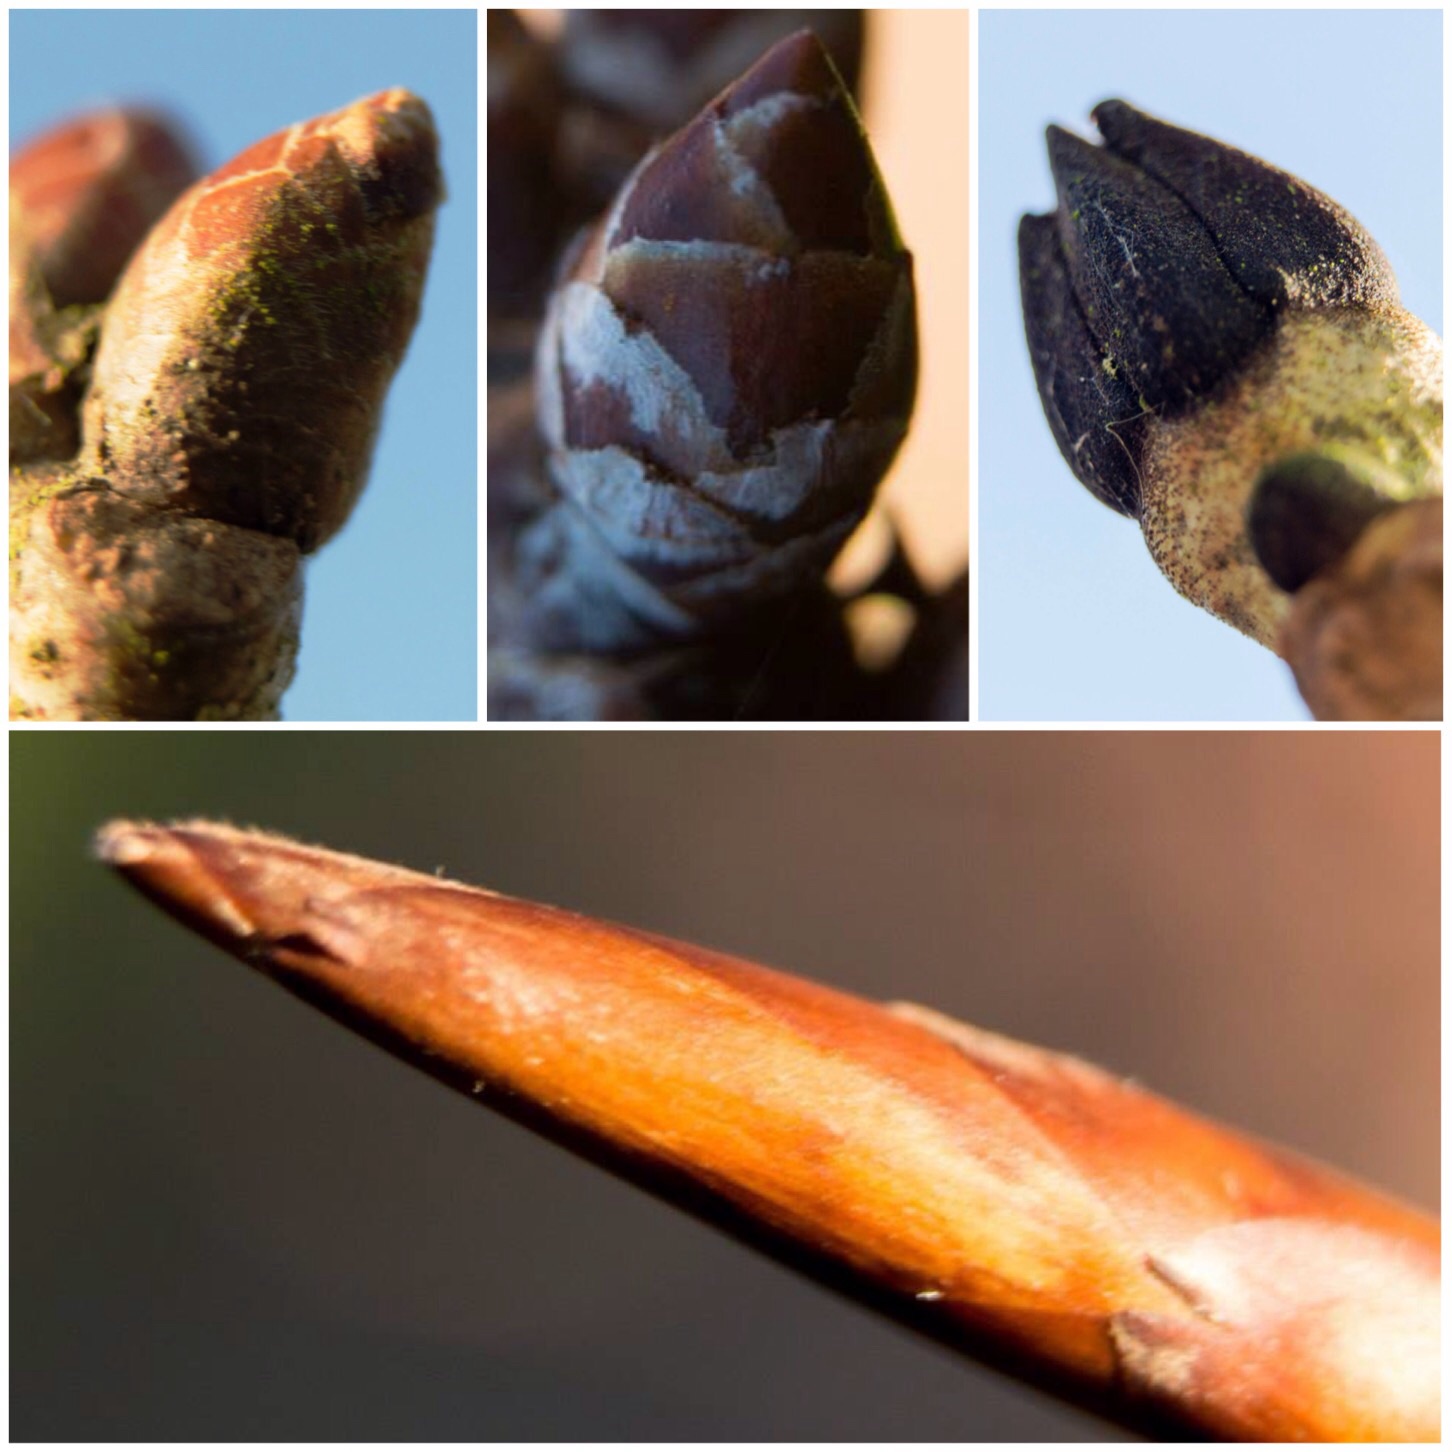
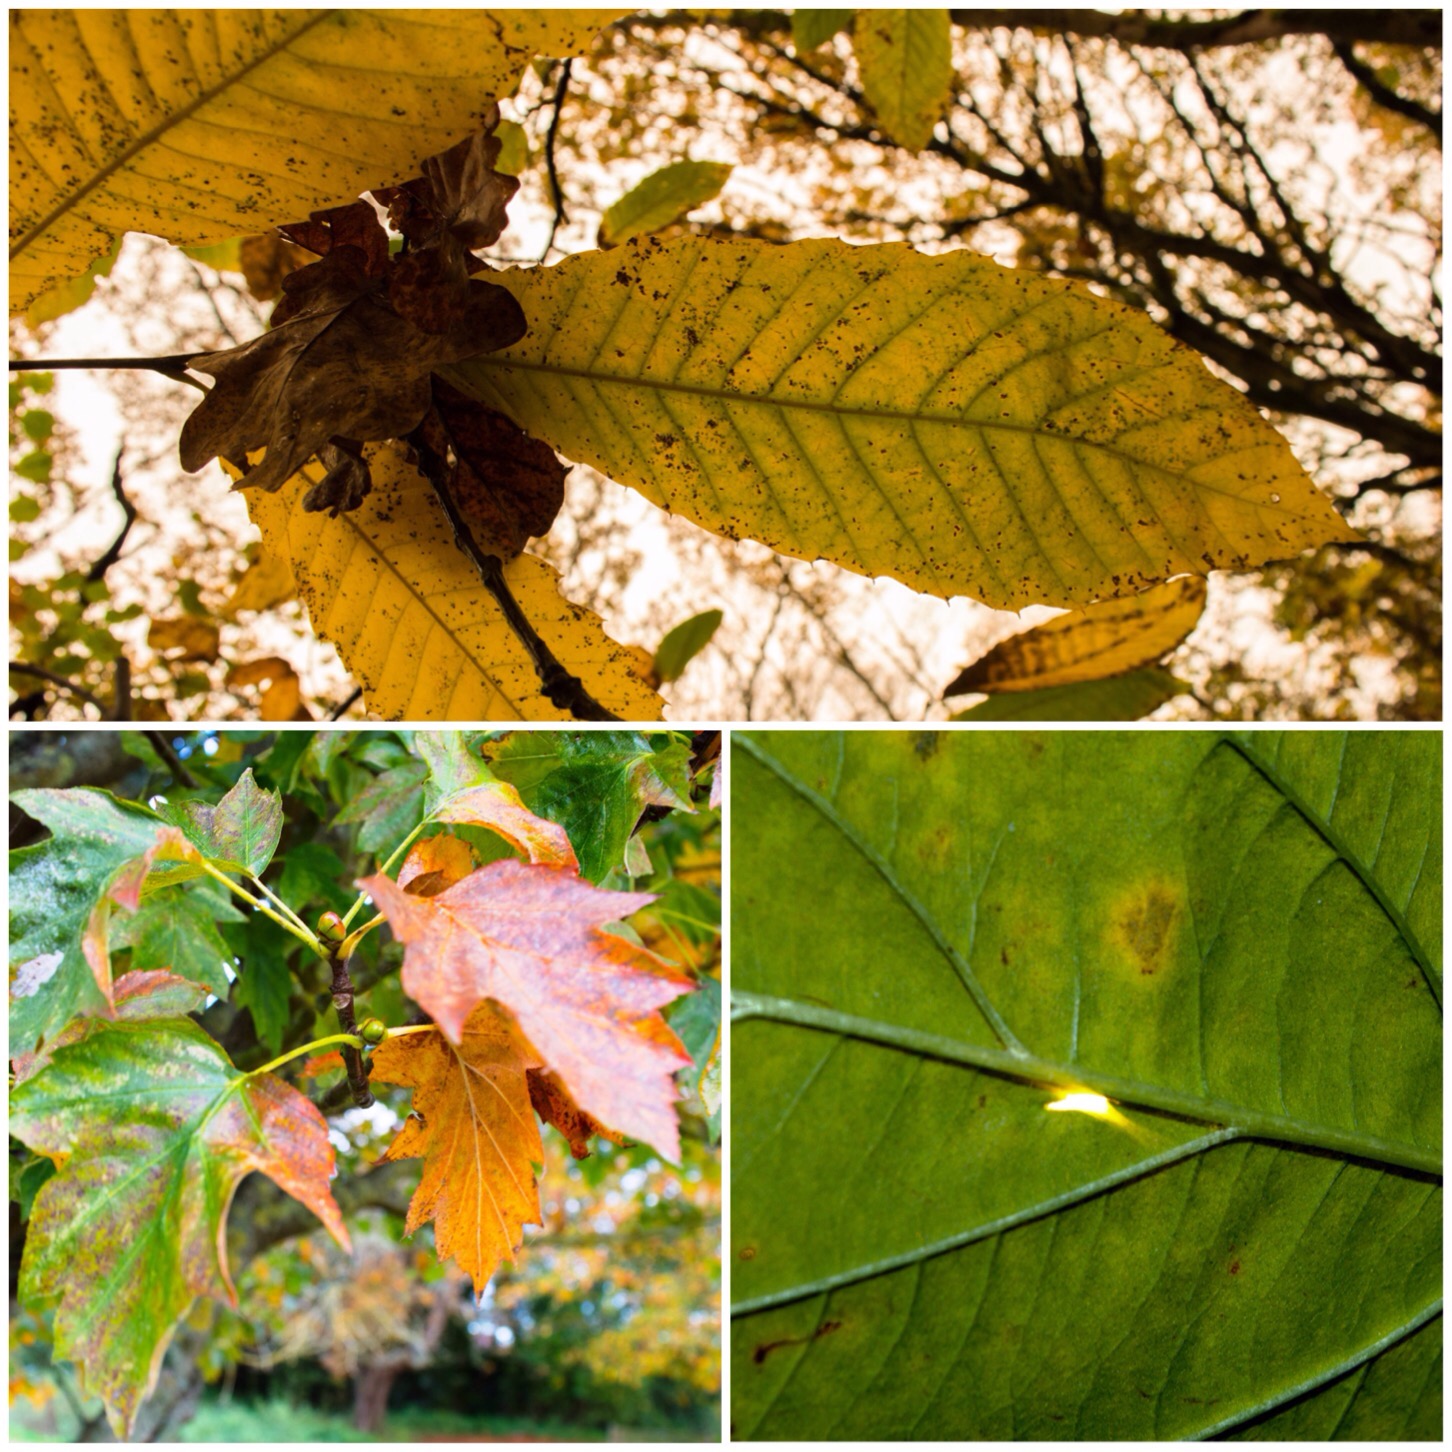
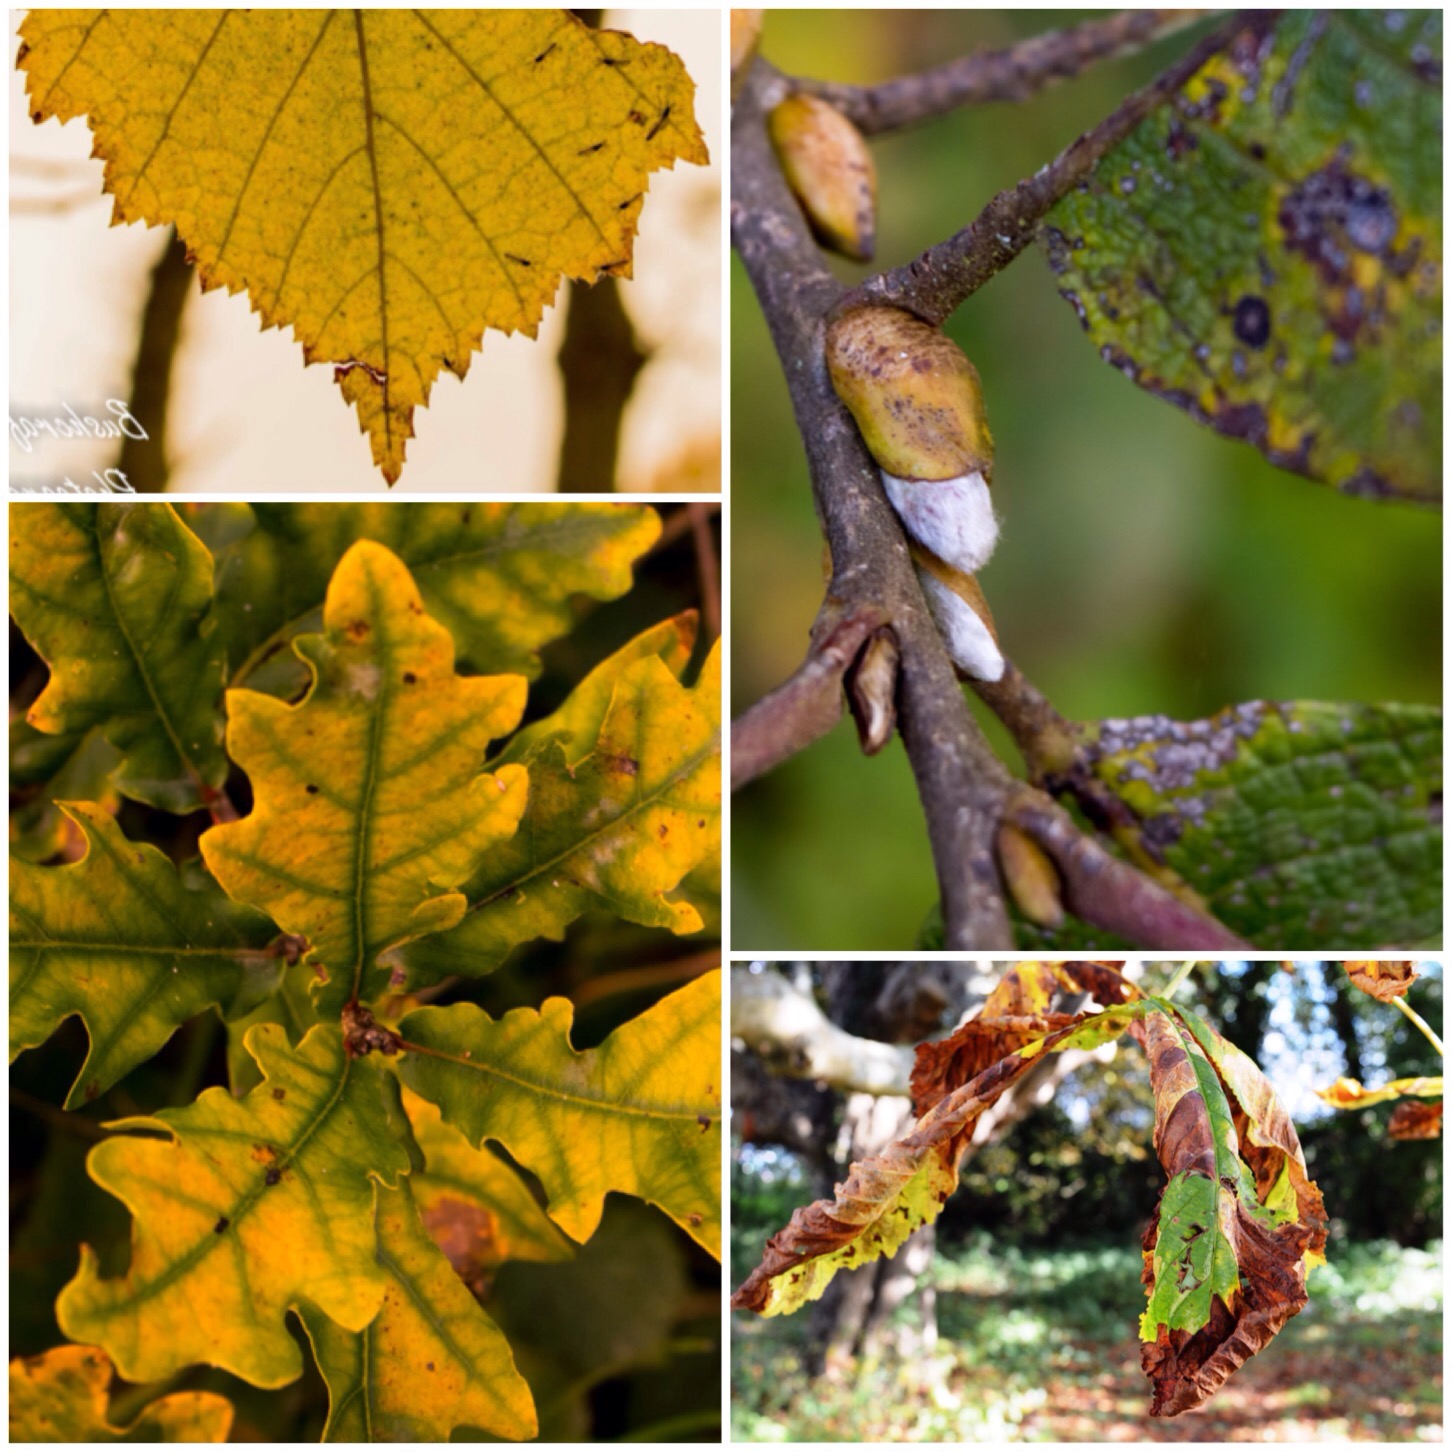
The buds on the trees at this time of year at first glance seem very simple and not worth a second glance but when you get up real close you start to really appreciate the complexity of these little compact power houses. Some like the long pointed beech bud look very smooth, others like the oak and cherry are covered in scales and the dark mitre of the ash looks rough to the touch. All though are biding their time to start that cycle of life again.
Buds biding their time
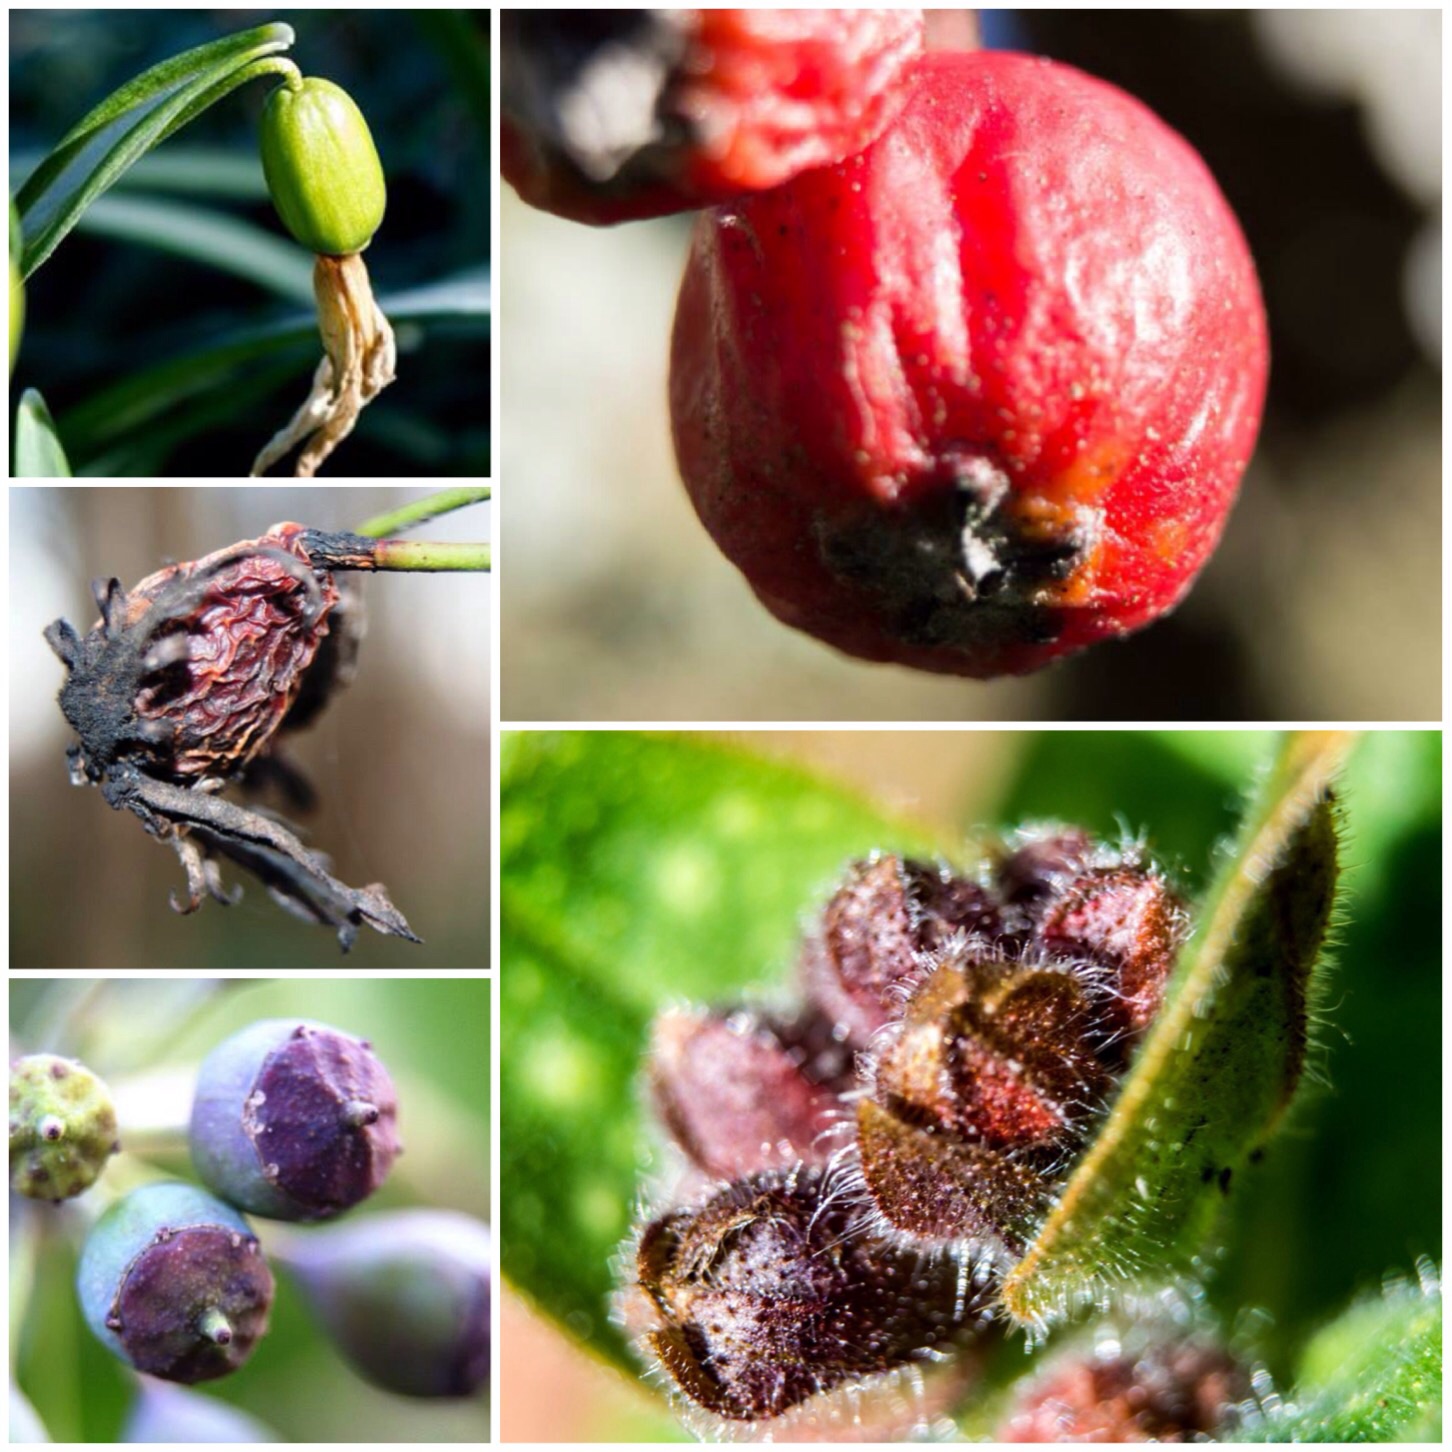
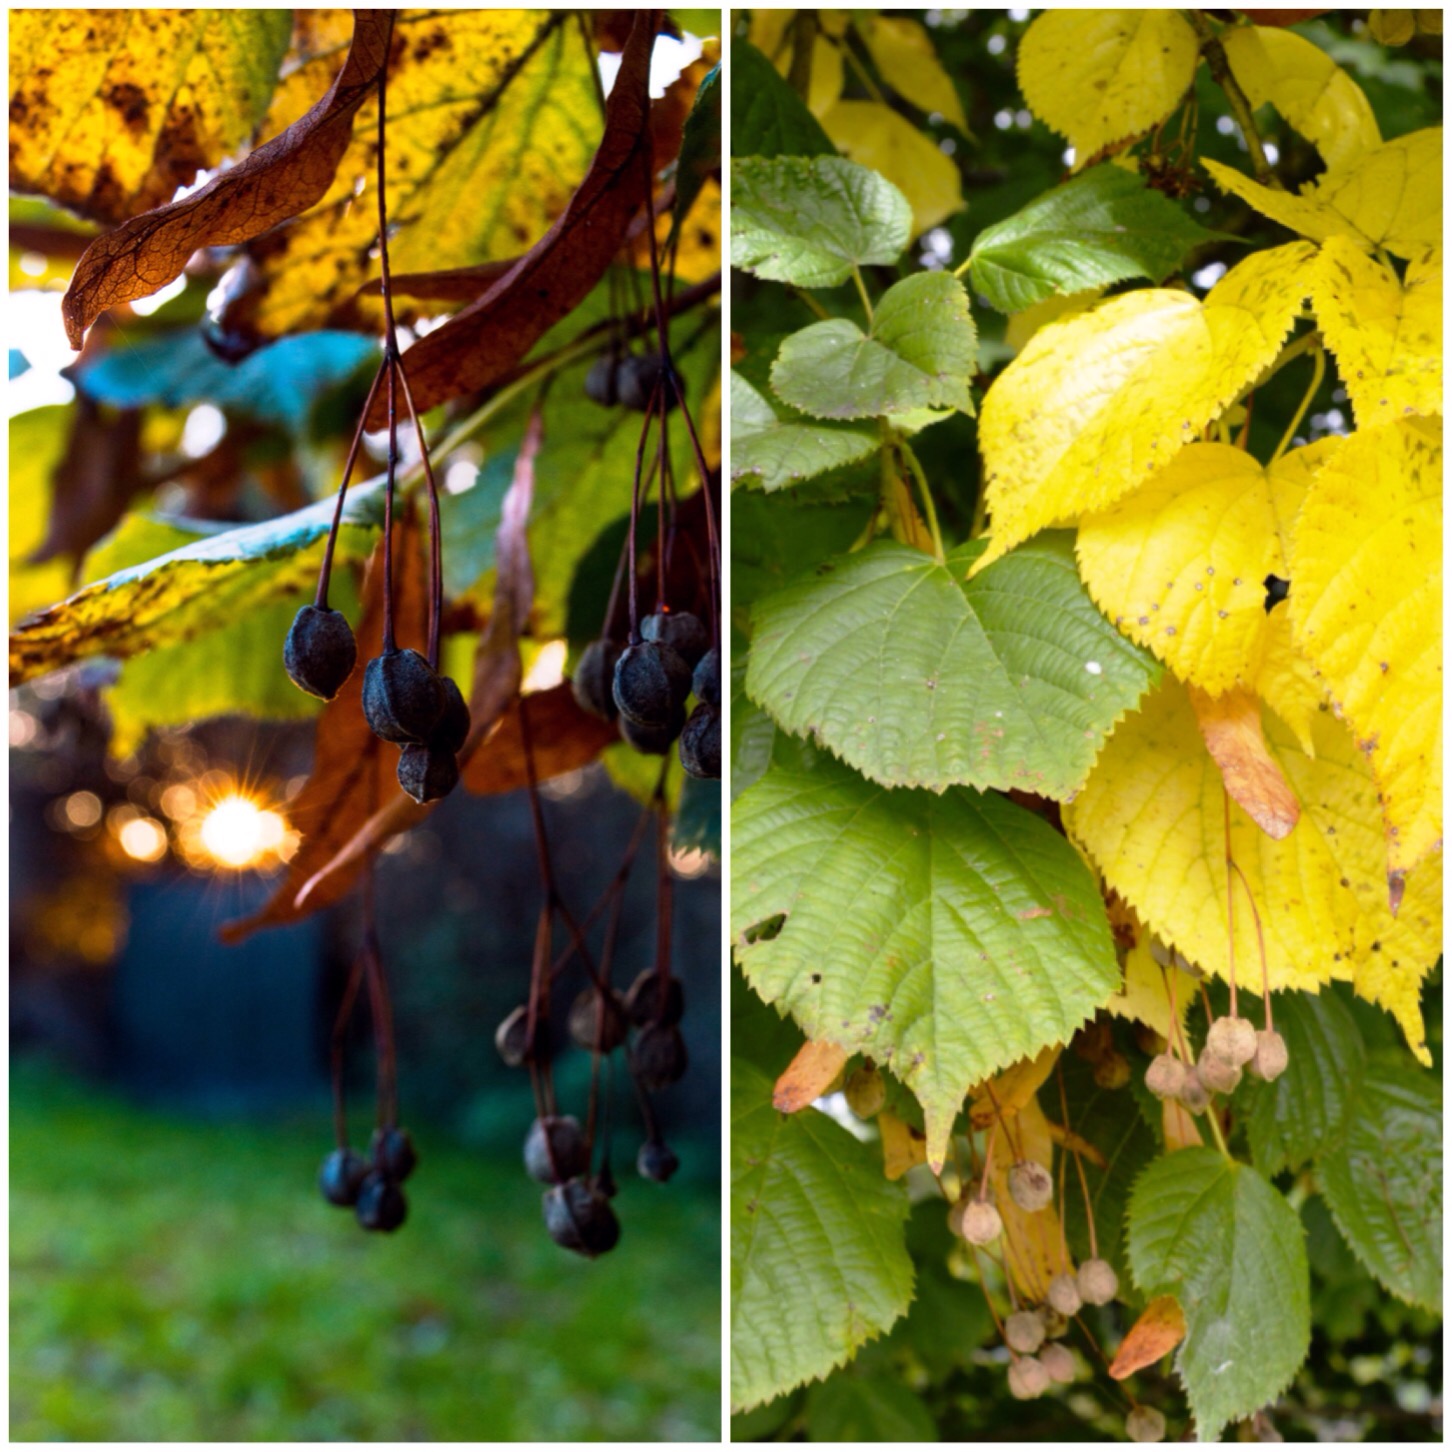
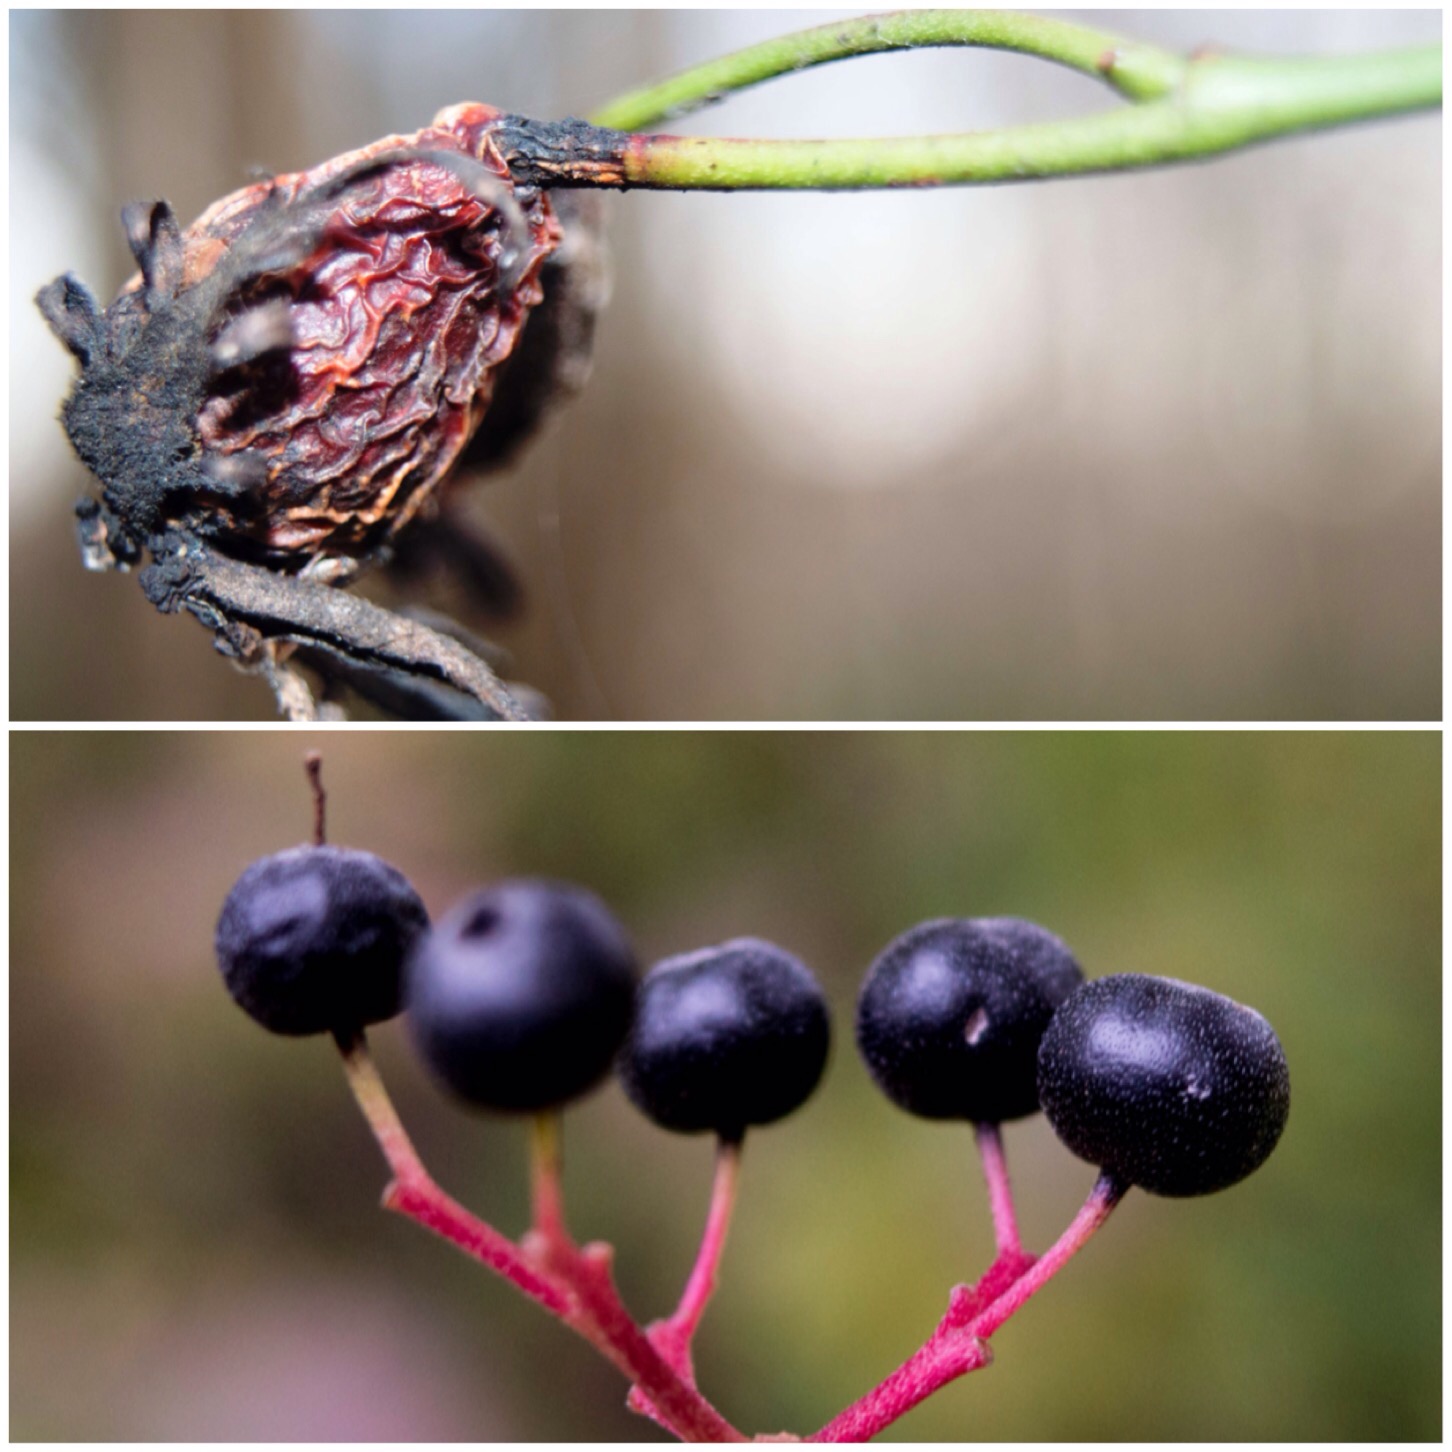
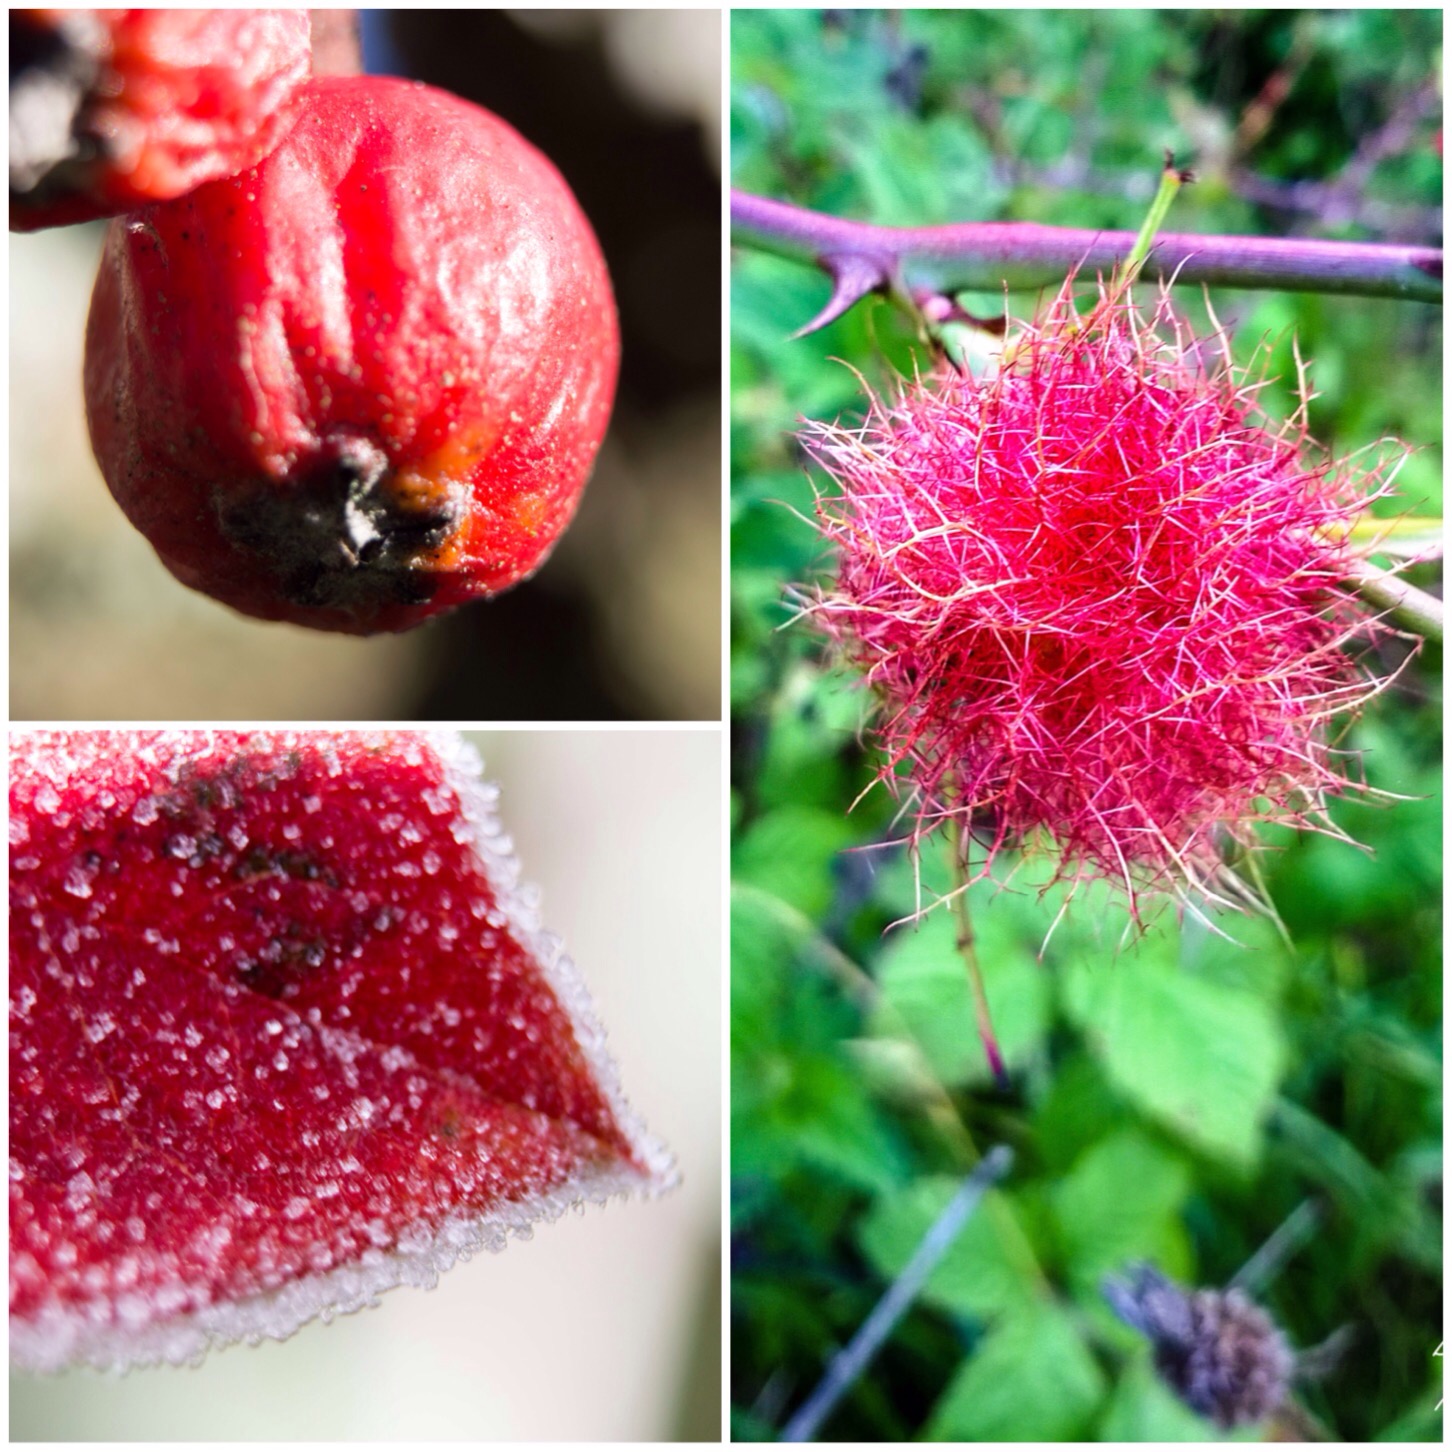
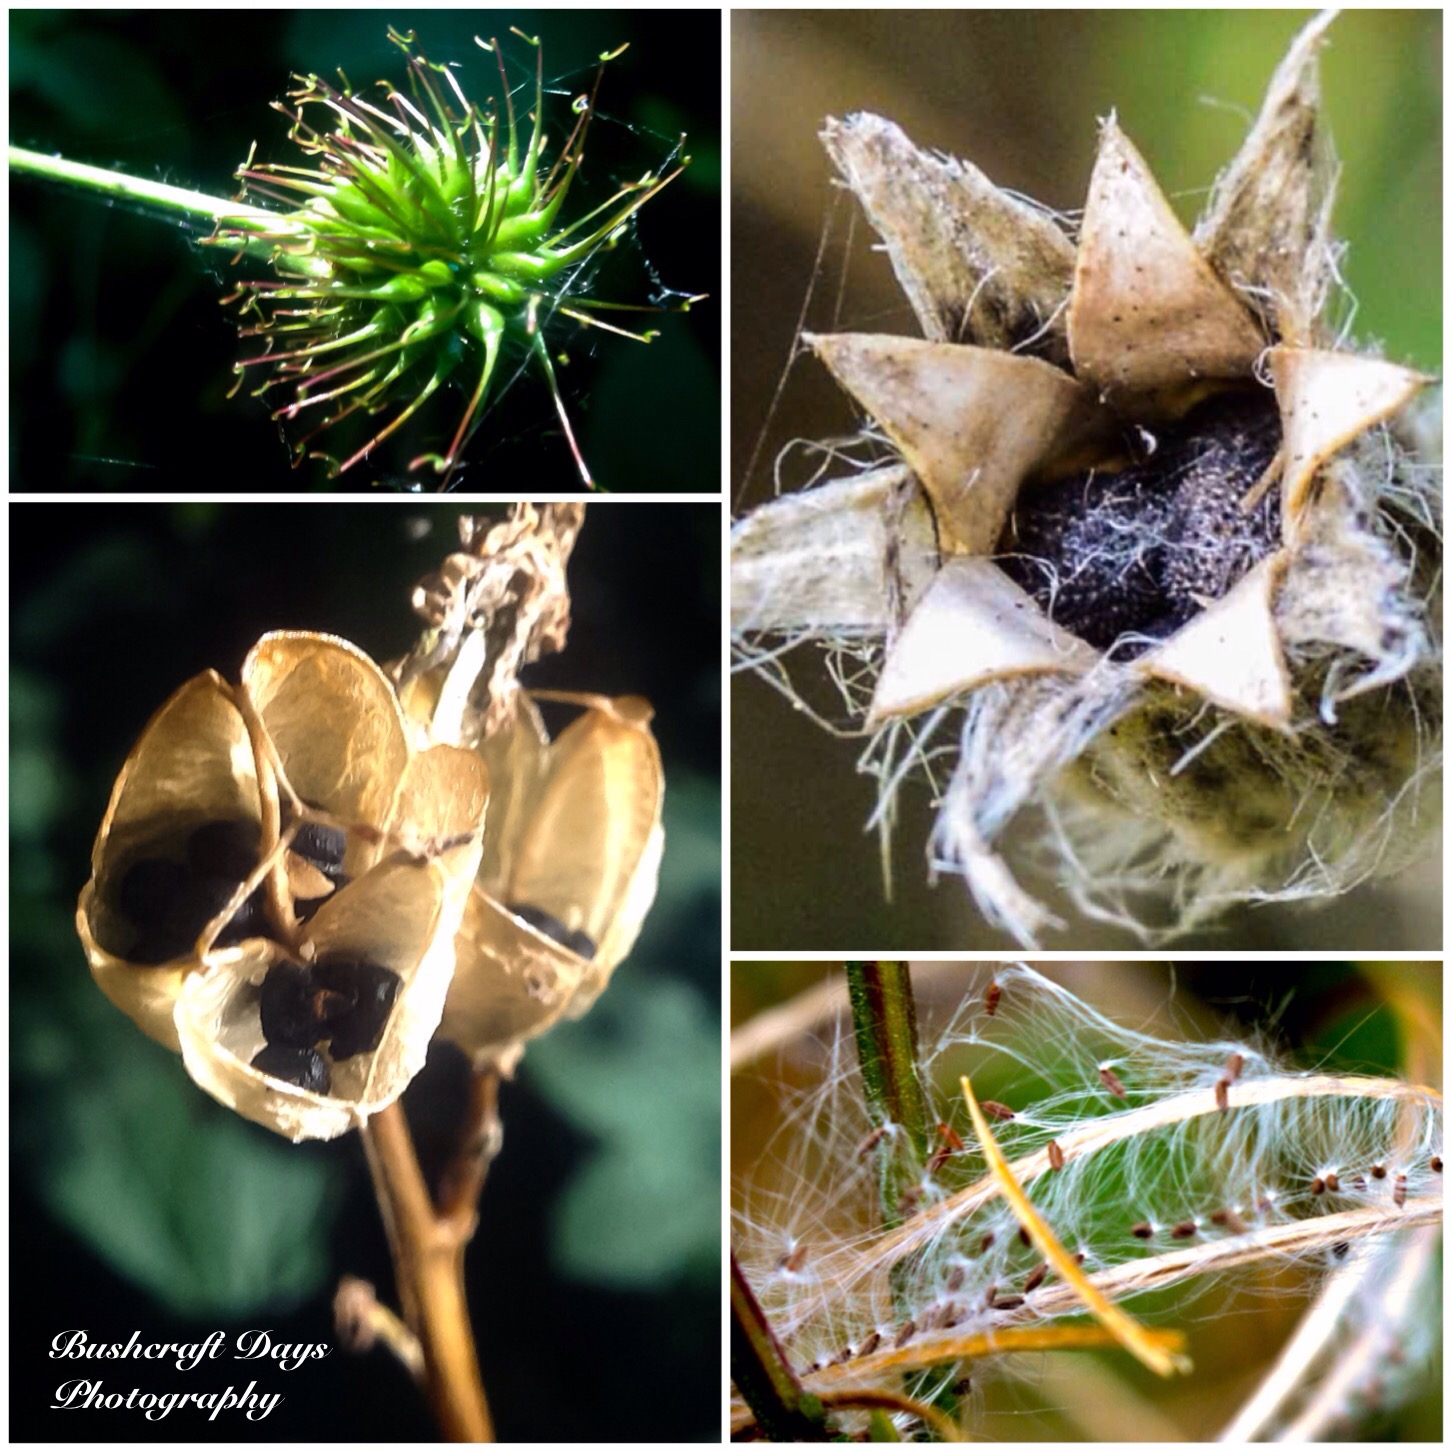
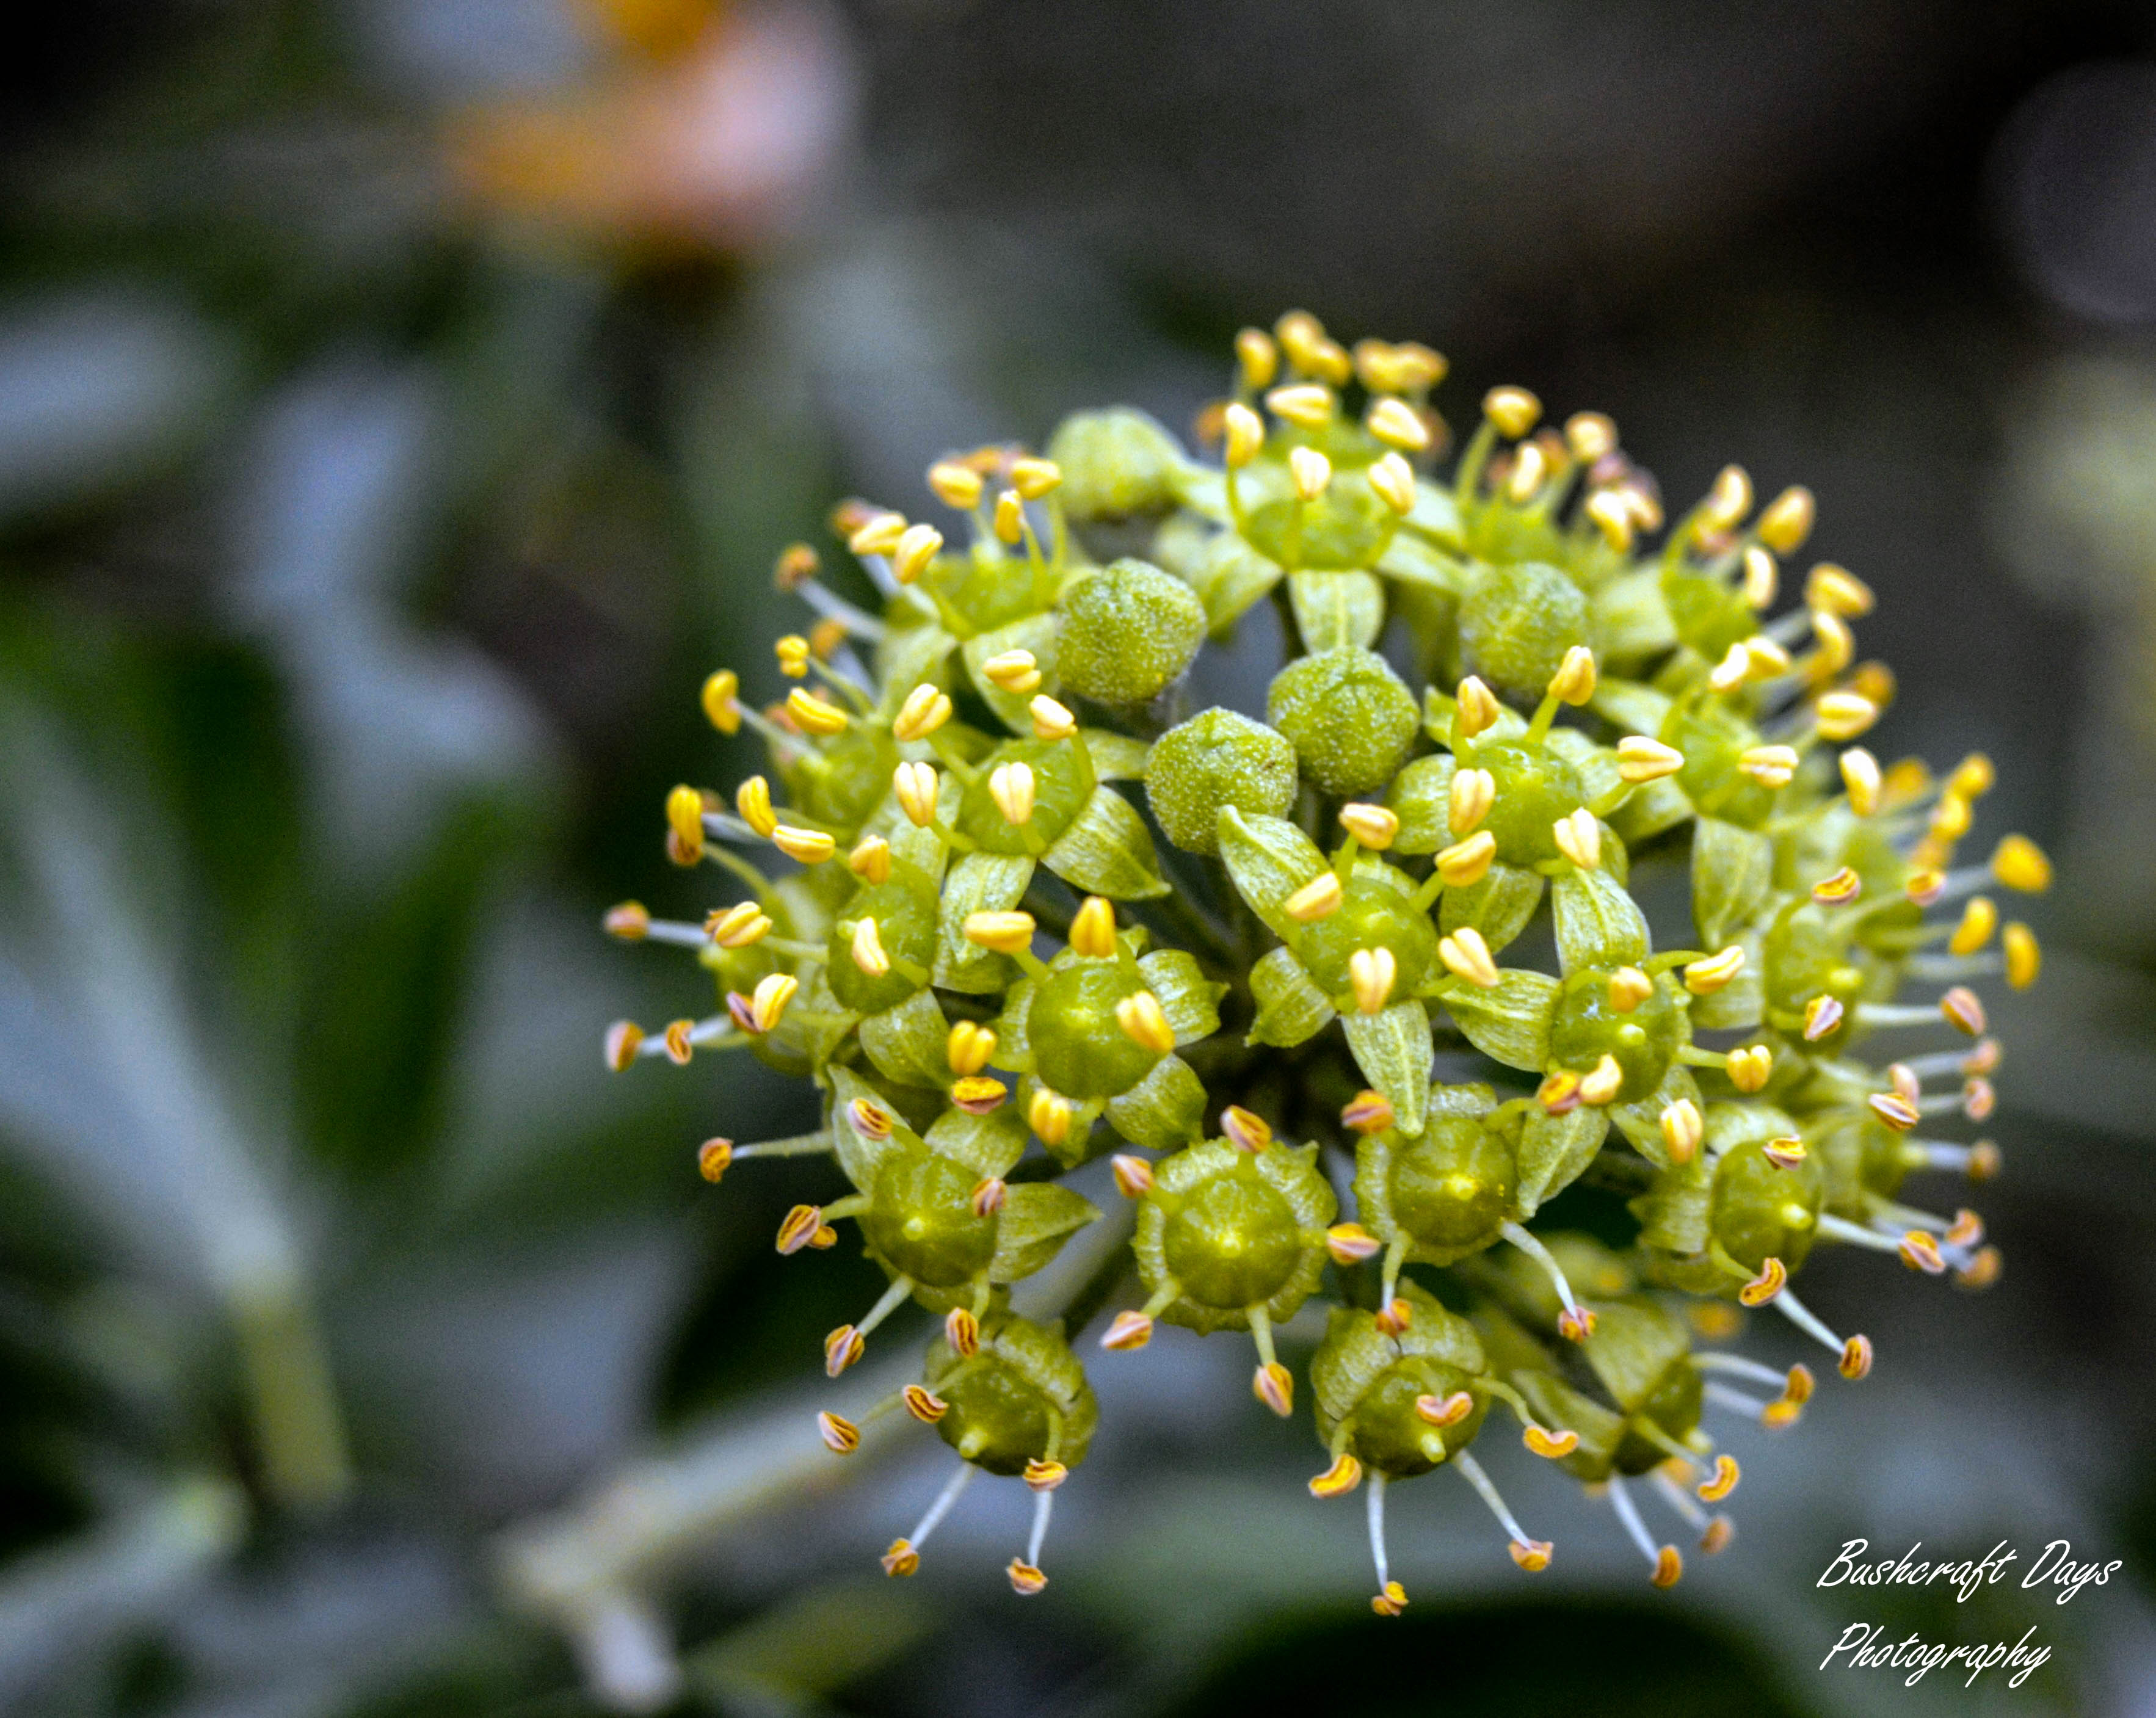
A lot of the colour over the winter is to be found with the seeds and nuts hanging everywhere. The red of the hawthorn (haw) berry can still be very striking but the deep red of the rosehip has gone as it has shrivelled up. The ivy seeds are all still hanging in there in their regimented clusters but emerging through are the tiny snowdrop seeds and the furry little pods of the lungwort nutlets.
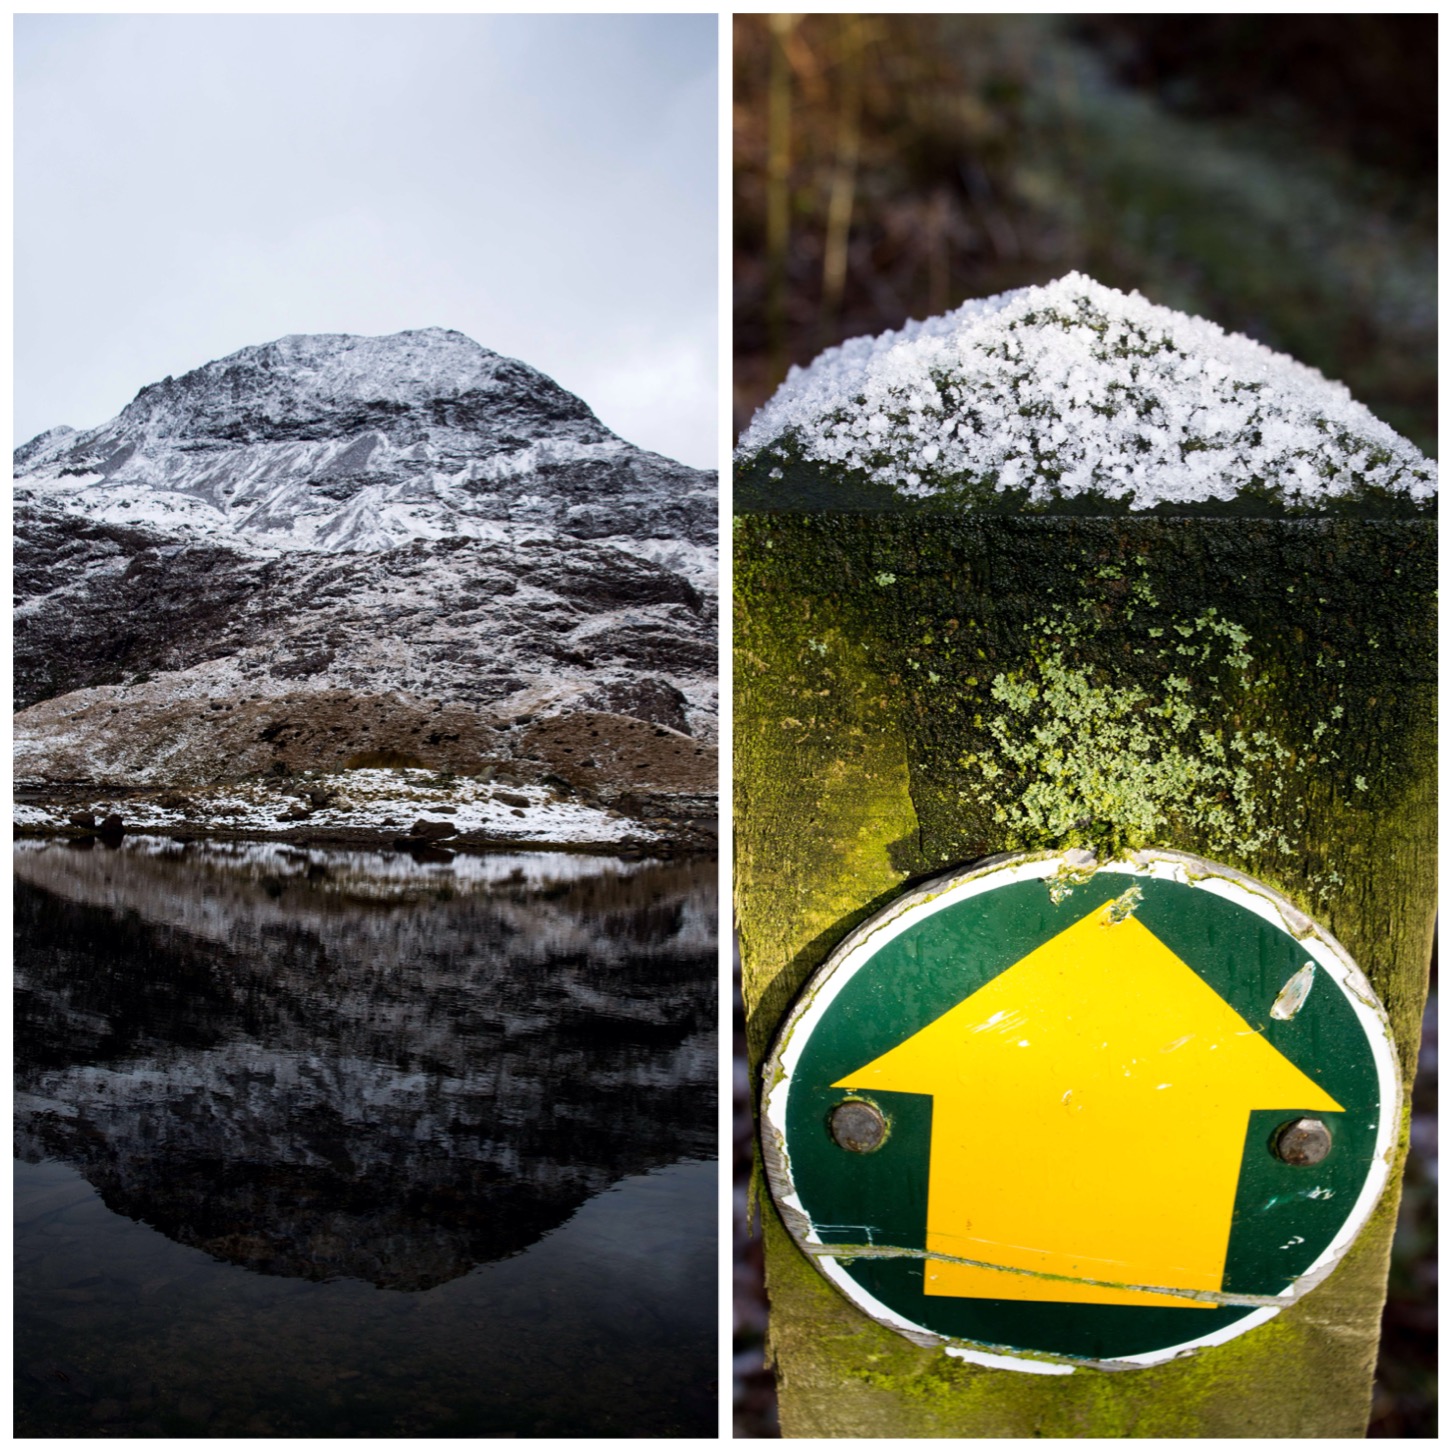
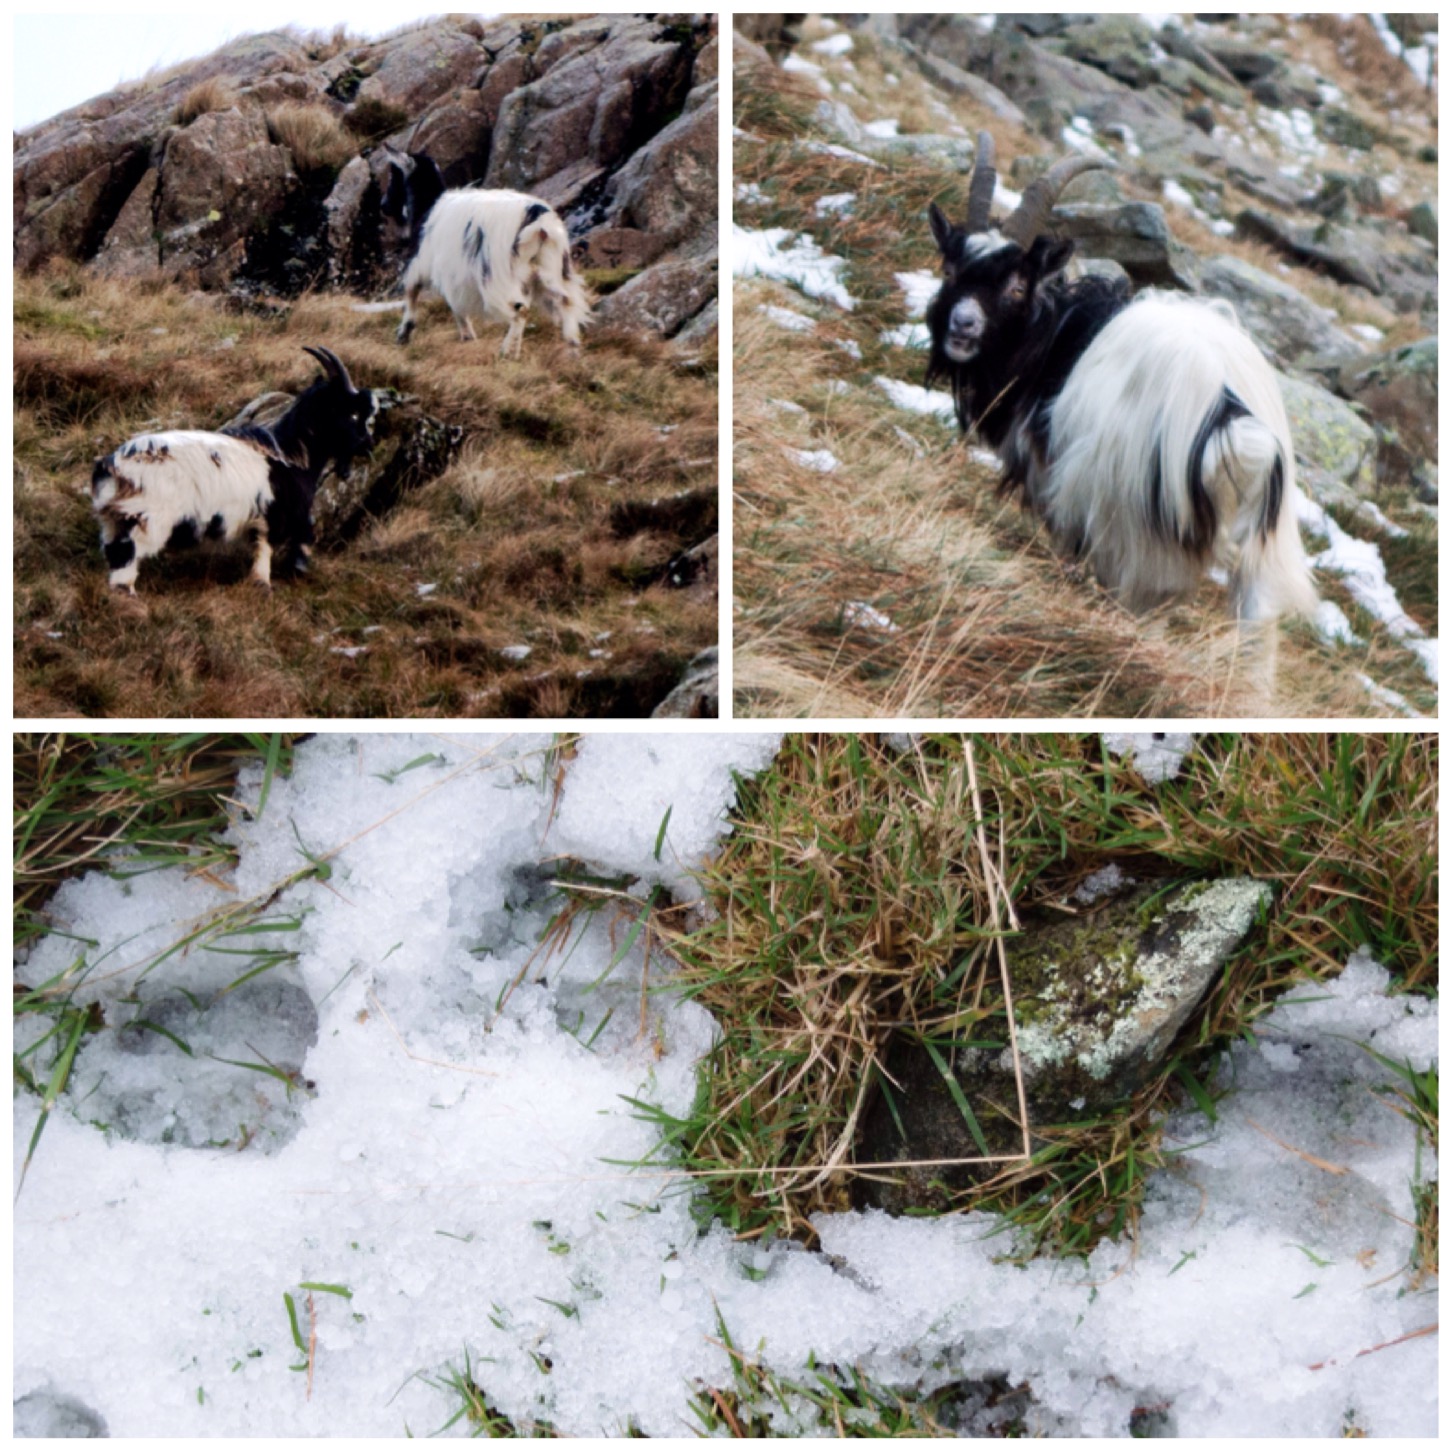
This winter I have seen no snow at all where I live in the southern part of the UK (plenty up north but none down here). Normally we get at least a few days’ worth of snow giving me the chance to try and take some decent winter photos.
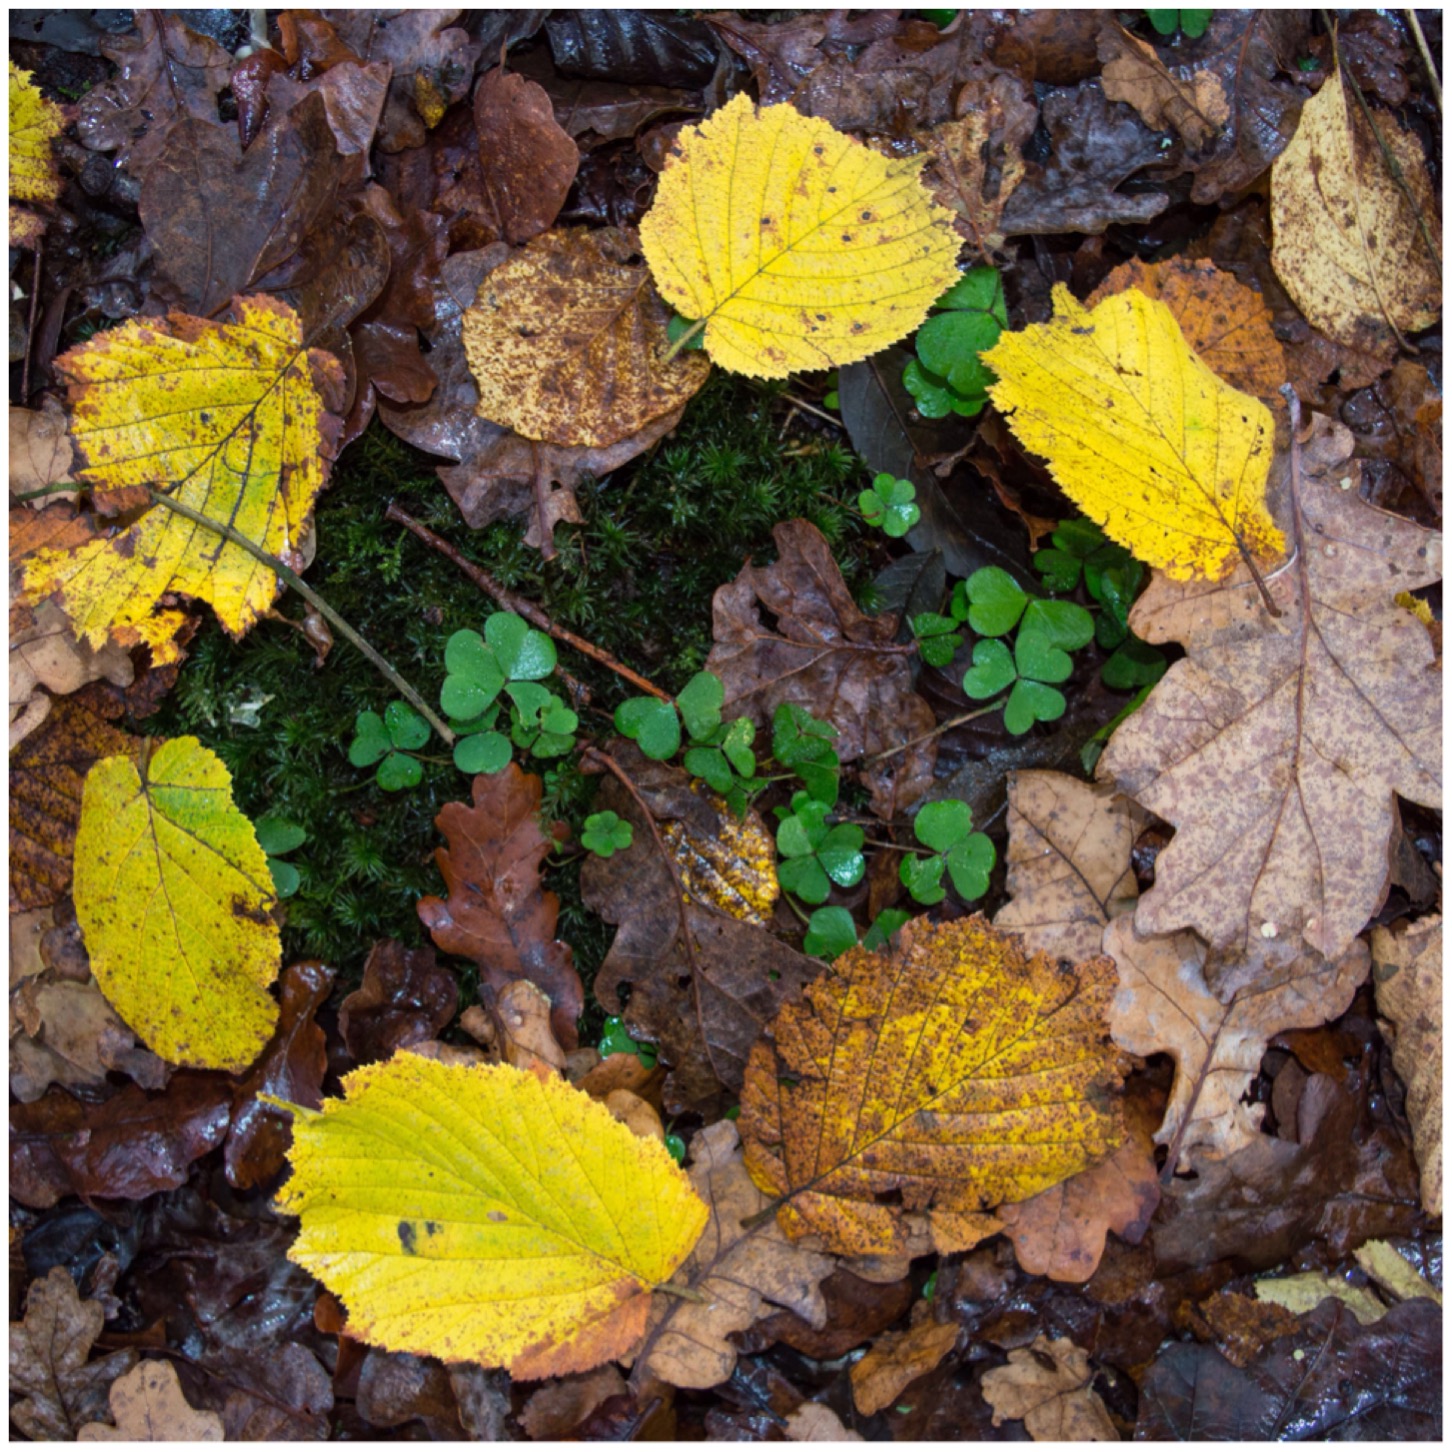
Not this year it would appear (so far, he said with crossed fingers) so I have been looking elsewhere for inspiration. The next three or four posts will be about these snowless winter days and the beauty I could find in what first appears to be a rather drab time of year.
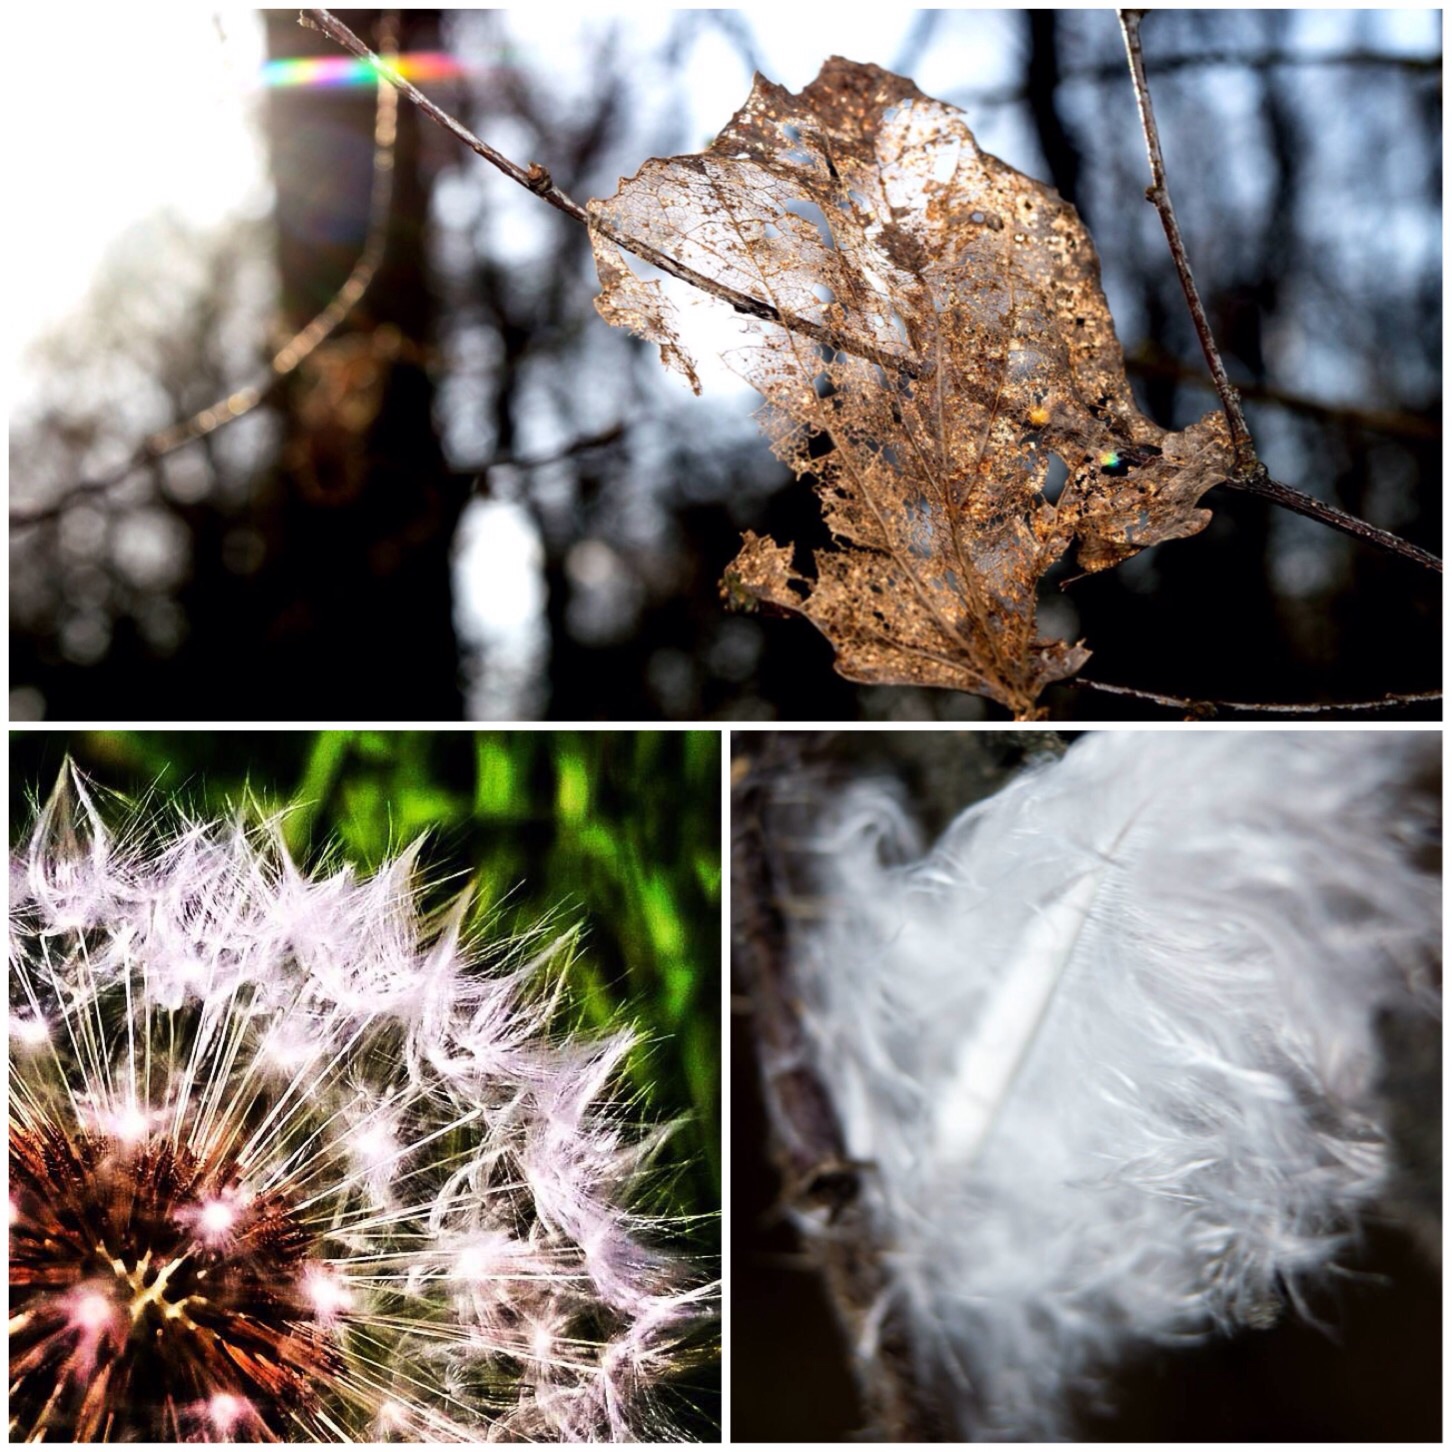
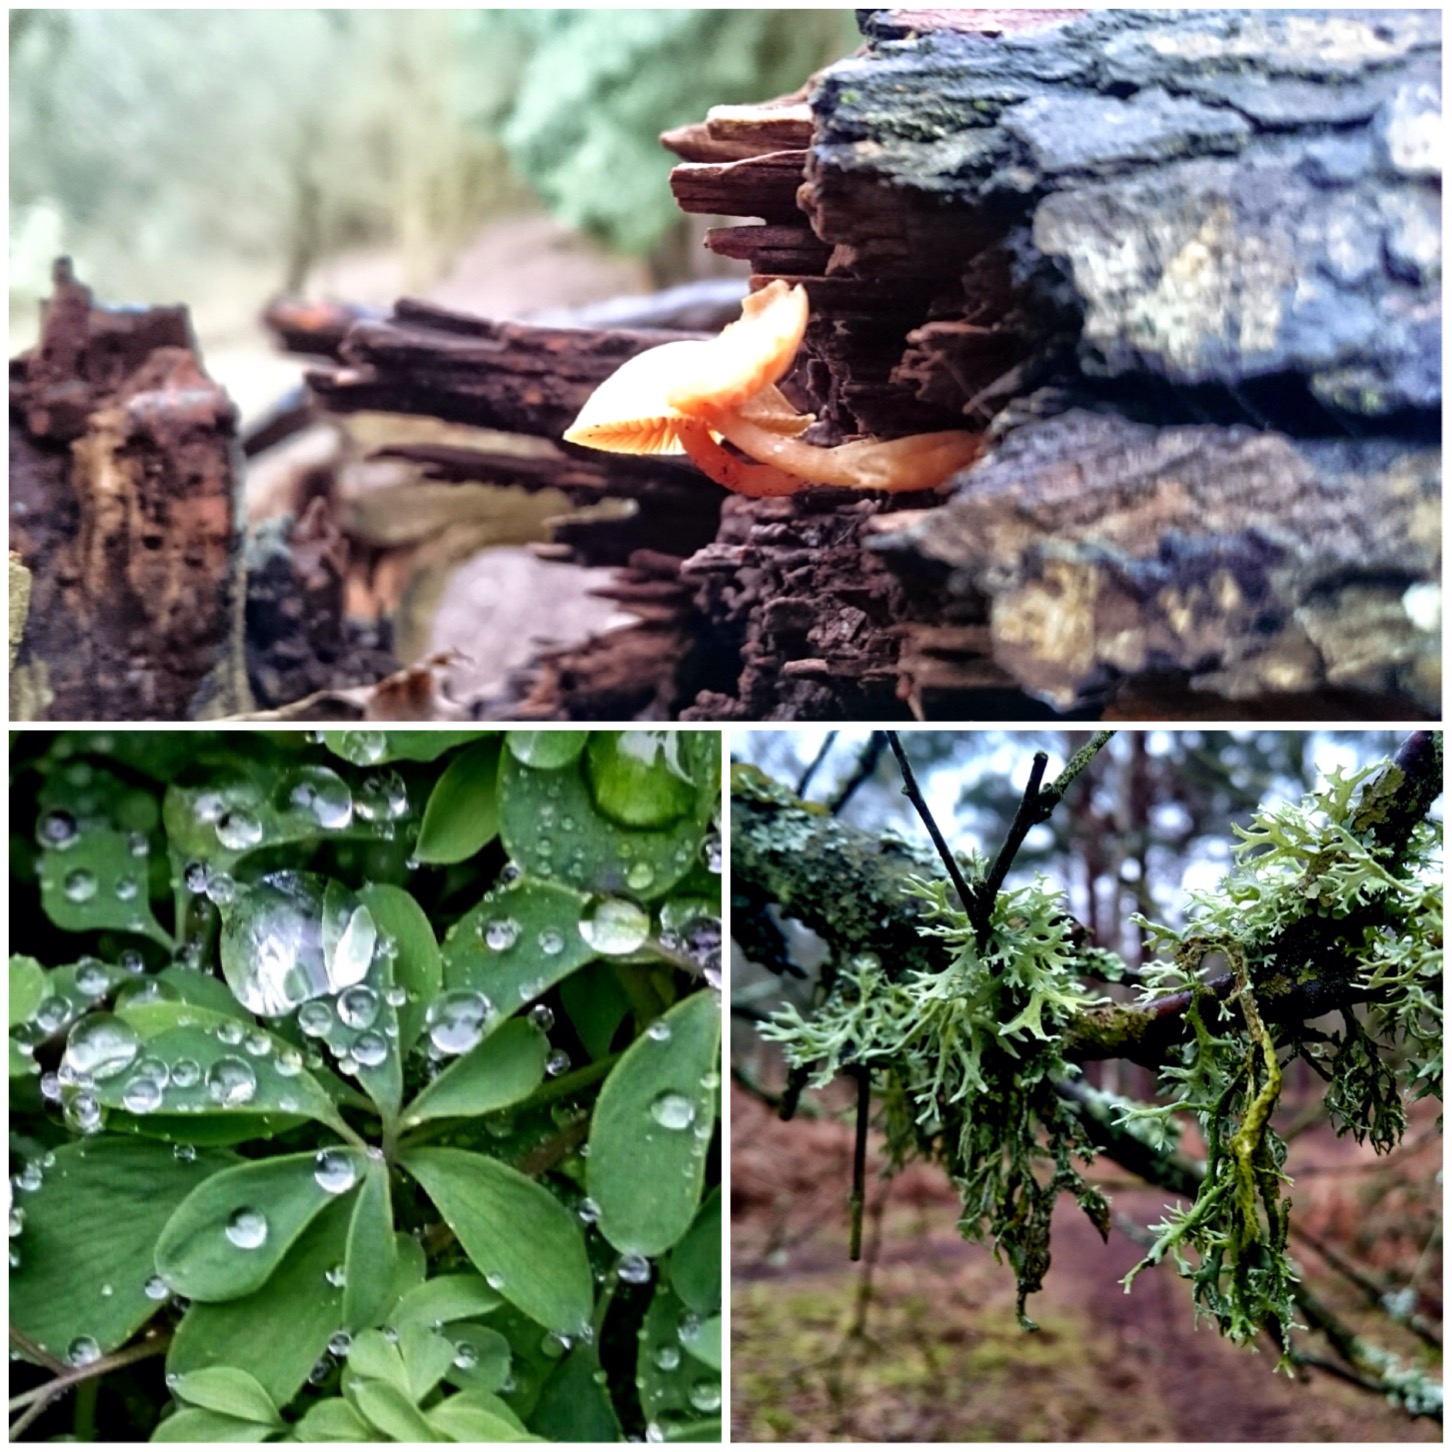
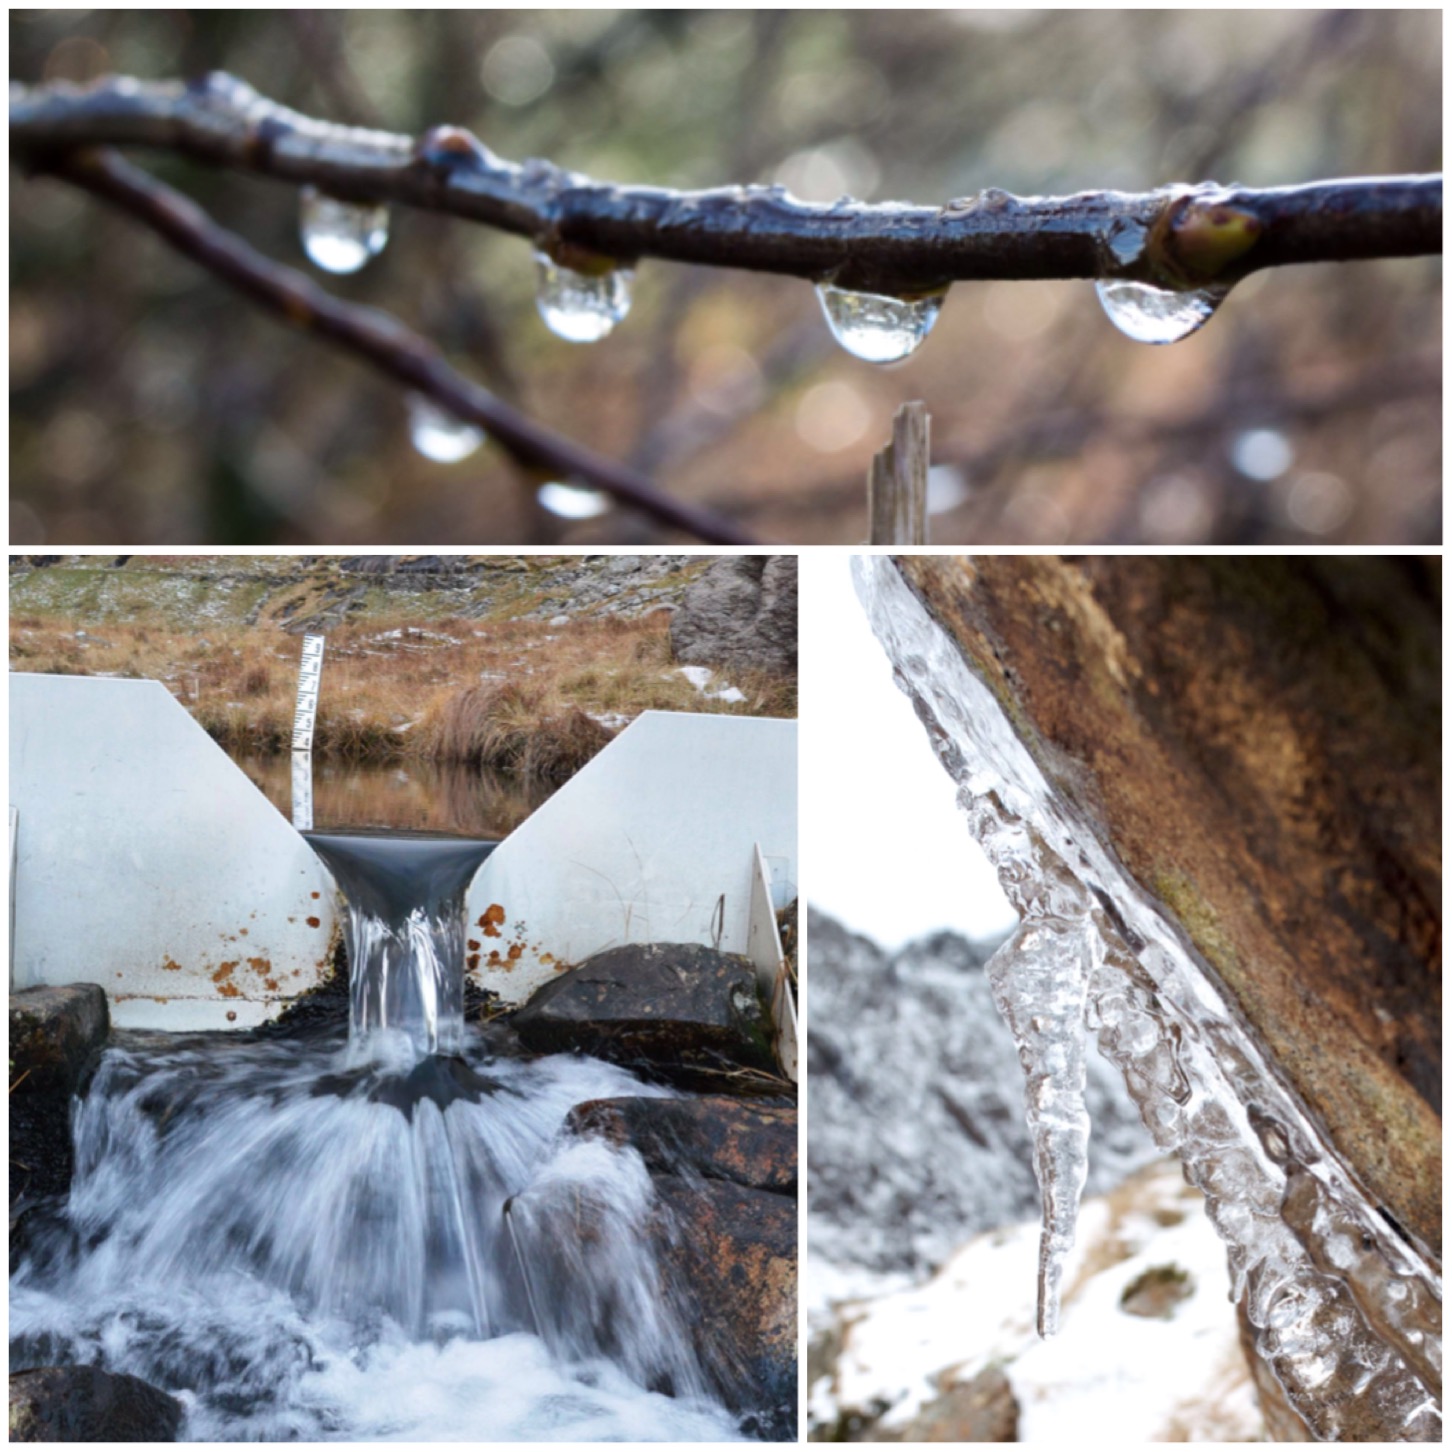
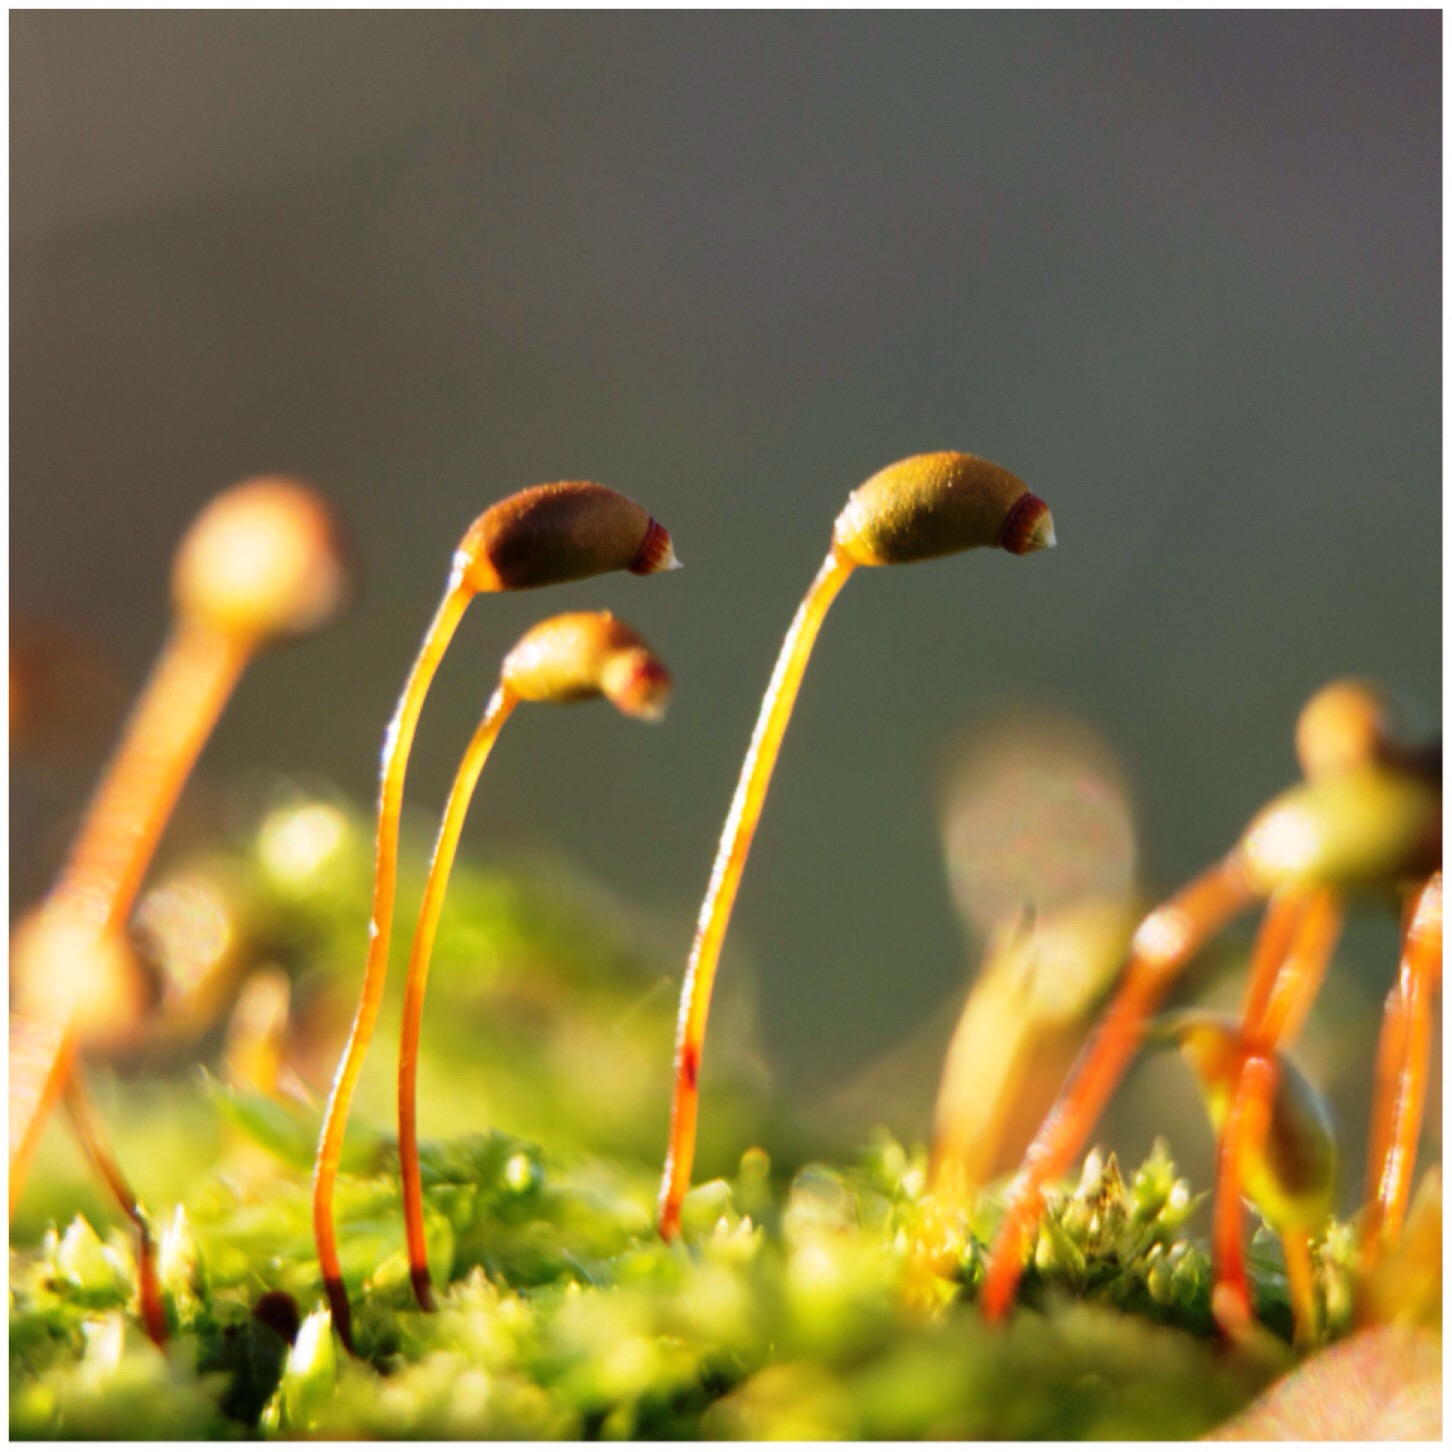
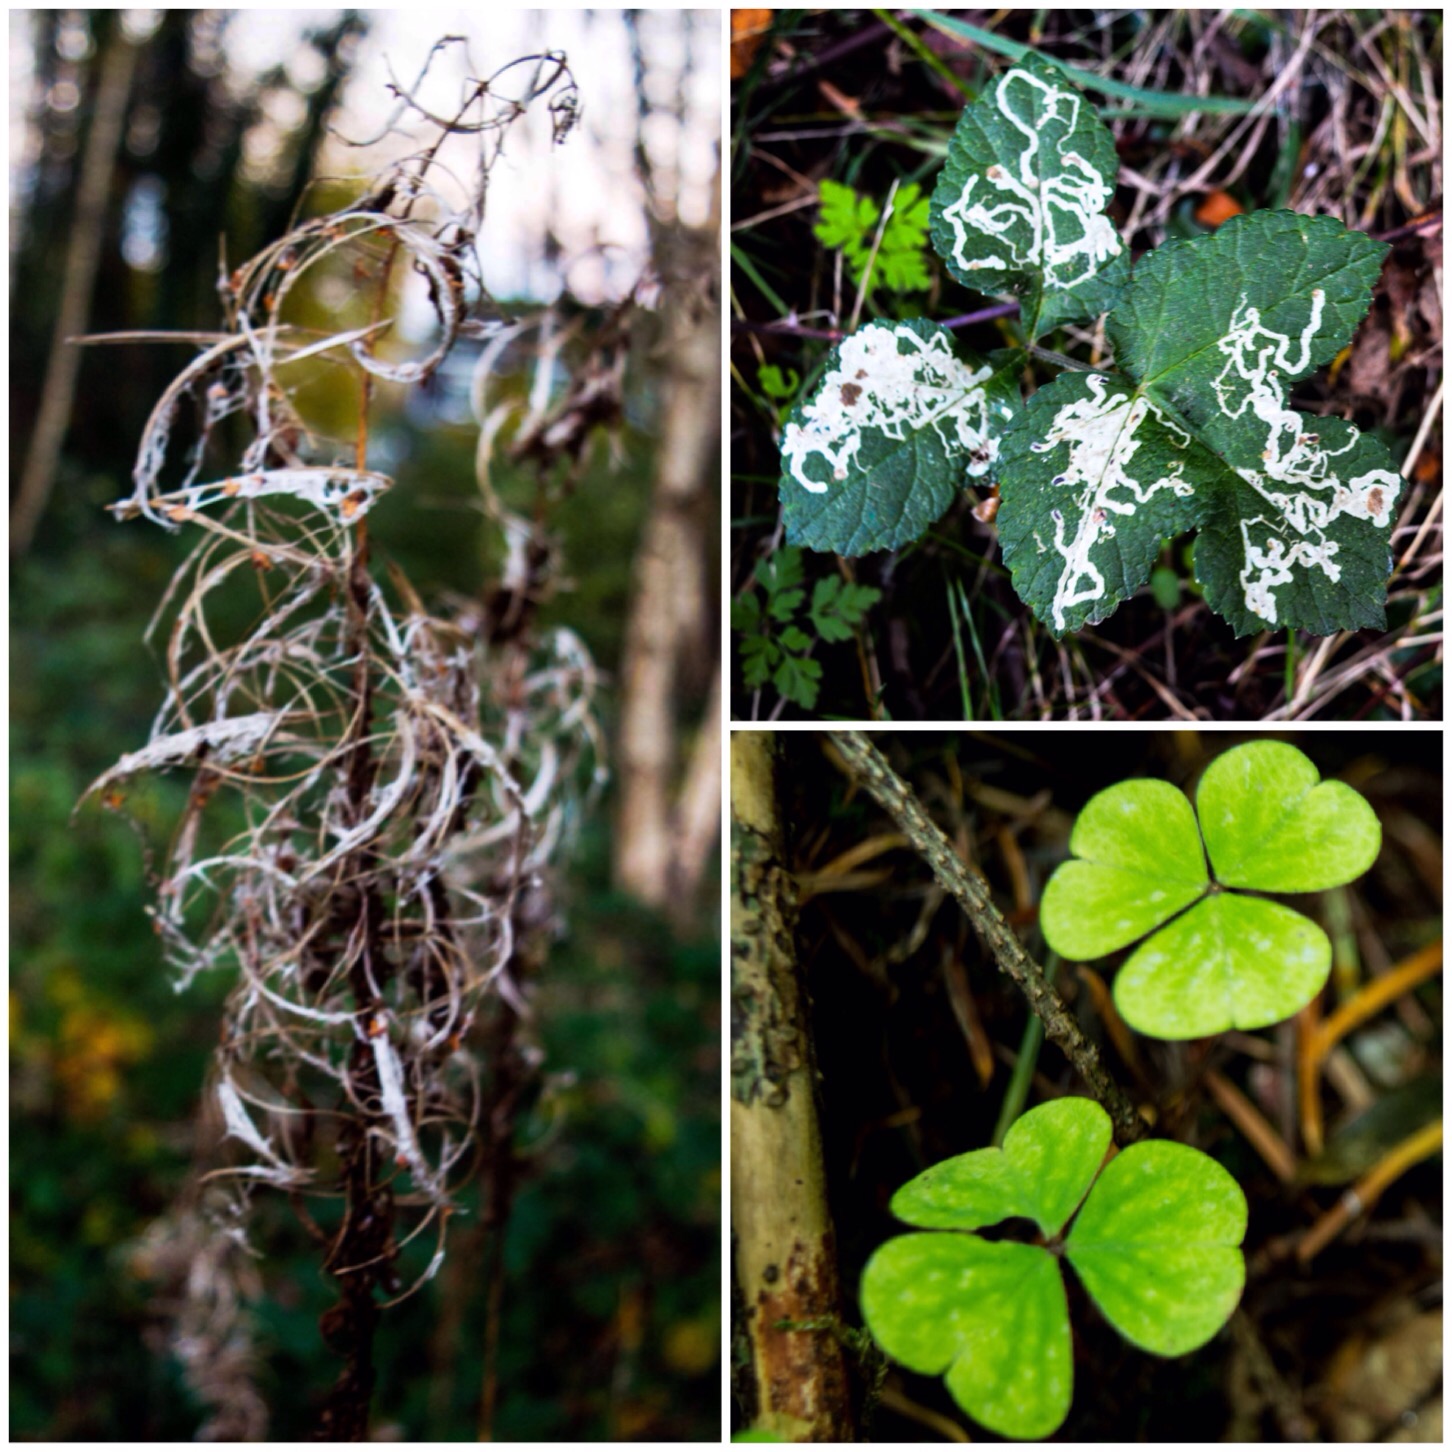
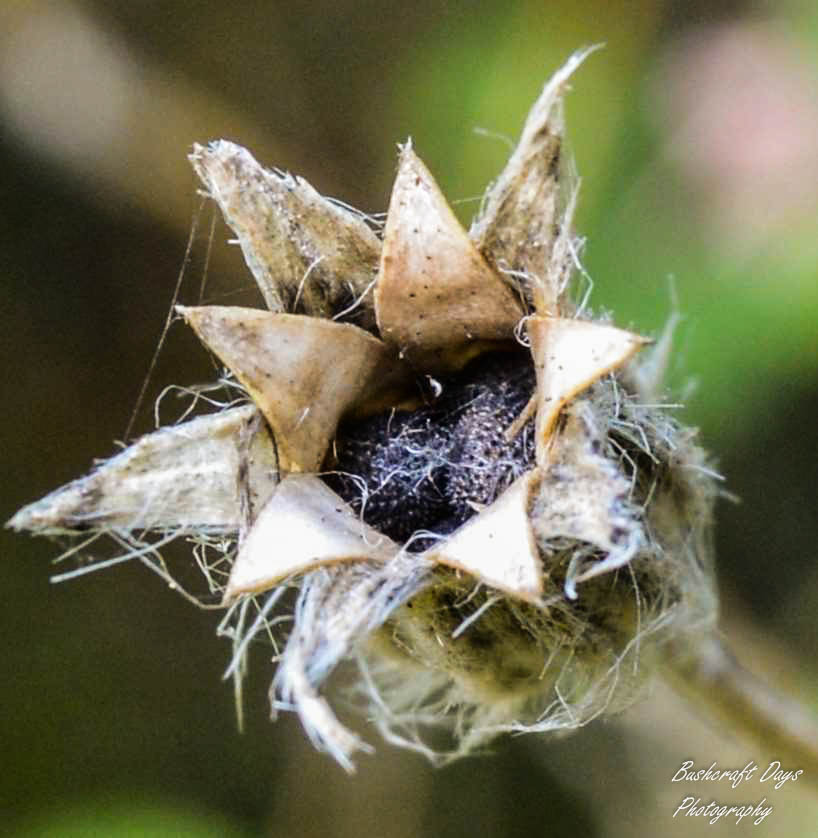
At the end of last year I started dabbling in macro photography and playing around with light, and found a whole new world opened up to me. I also started noticing the different textures that were all around me – a skeletal leaf, a dandelion seed head, a trapped downy feather – all have beauty in their own way if you look closely enough.
Different textures
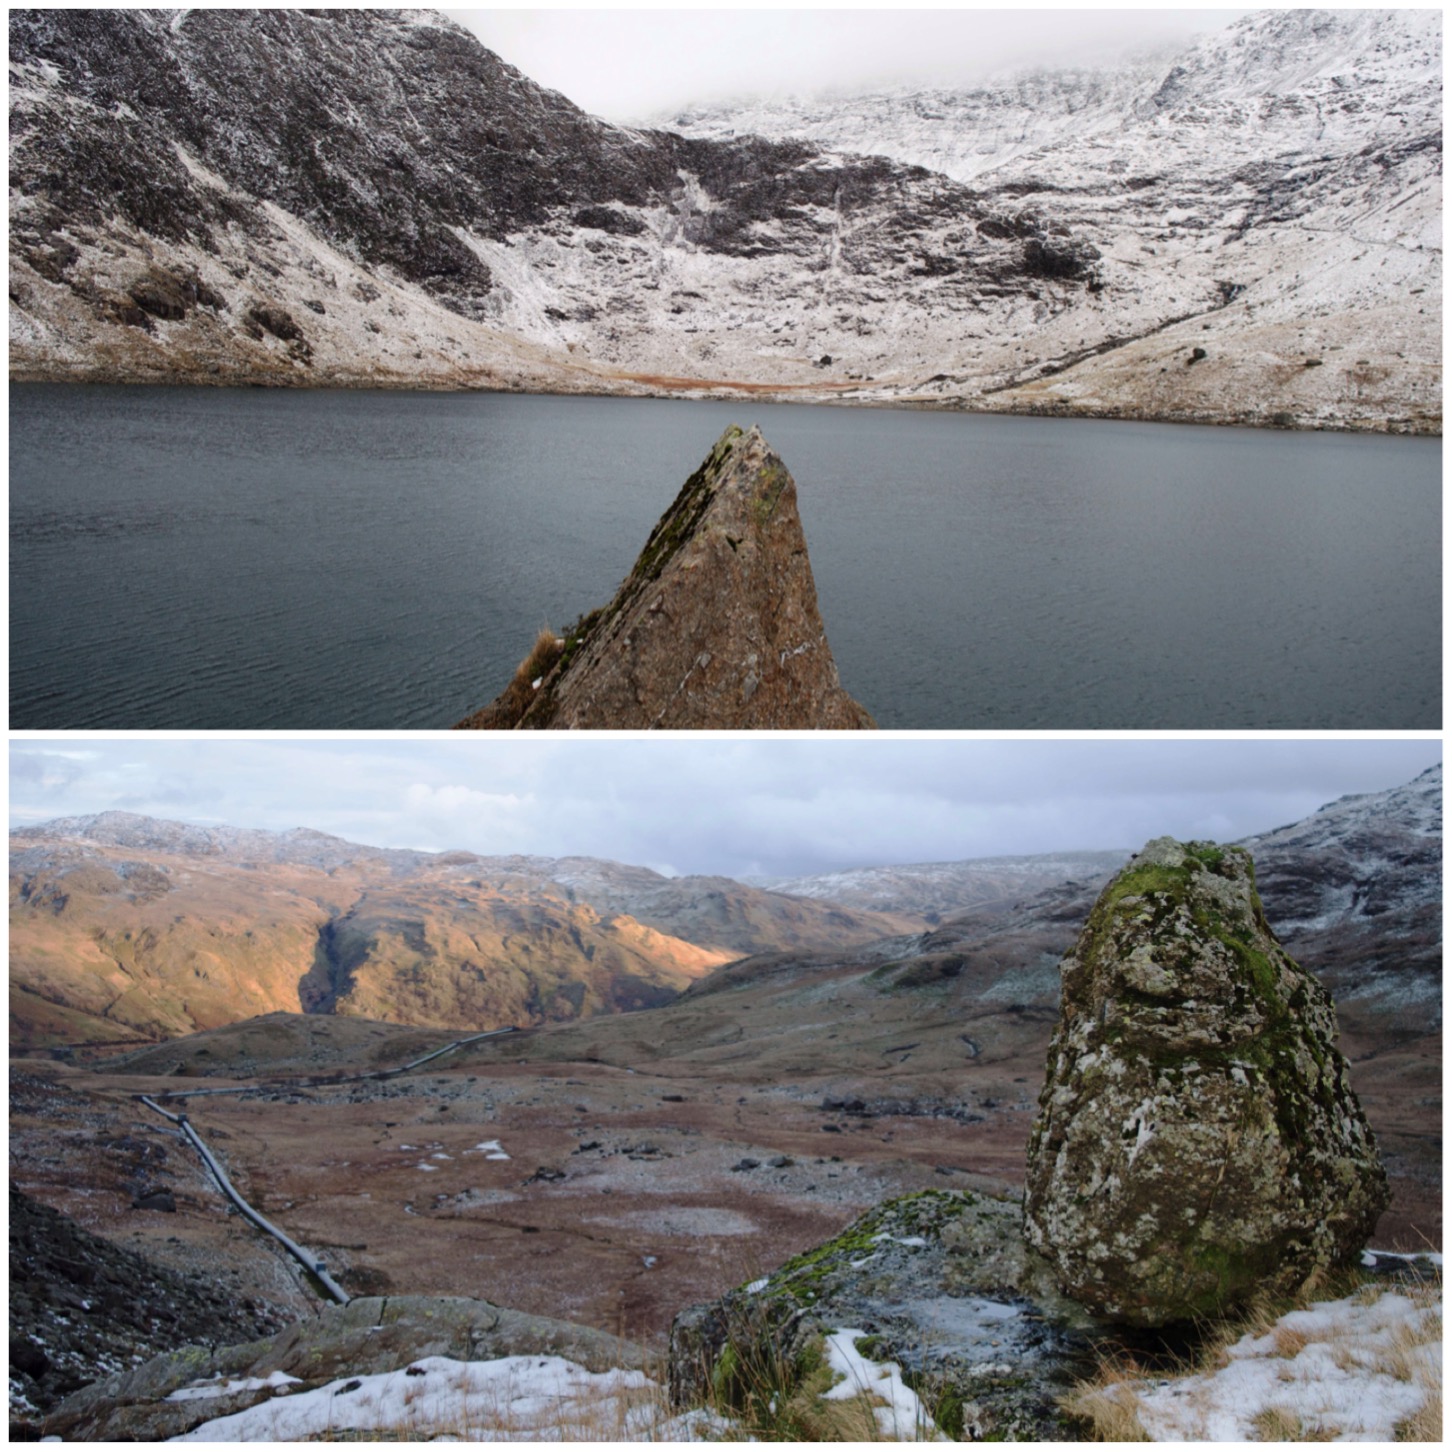
Since I started using my Nikon D3200 DSLR I have been dabbling with the manual settings more and more to try and capture pictures where the beauty of them is enhanced by the thoughtful use of light levels. Many of my past pictures, taken on my camera phone, were either way over-exposed or look washed out.
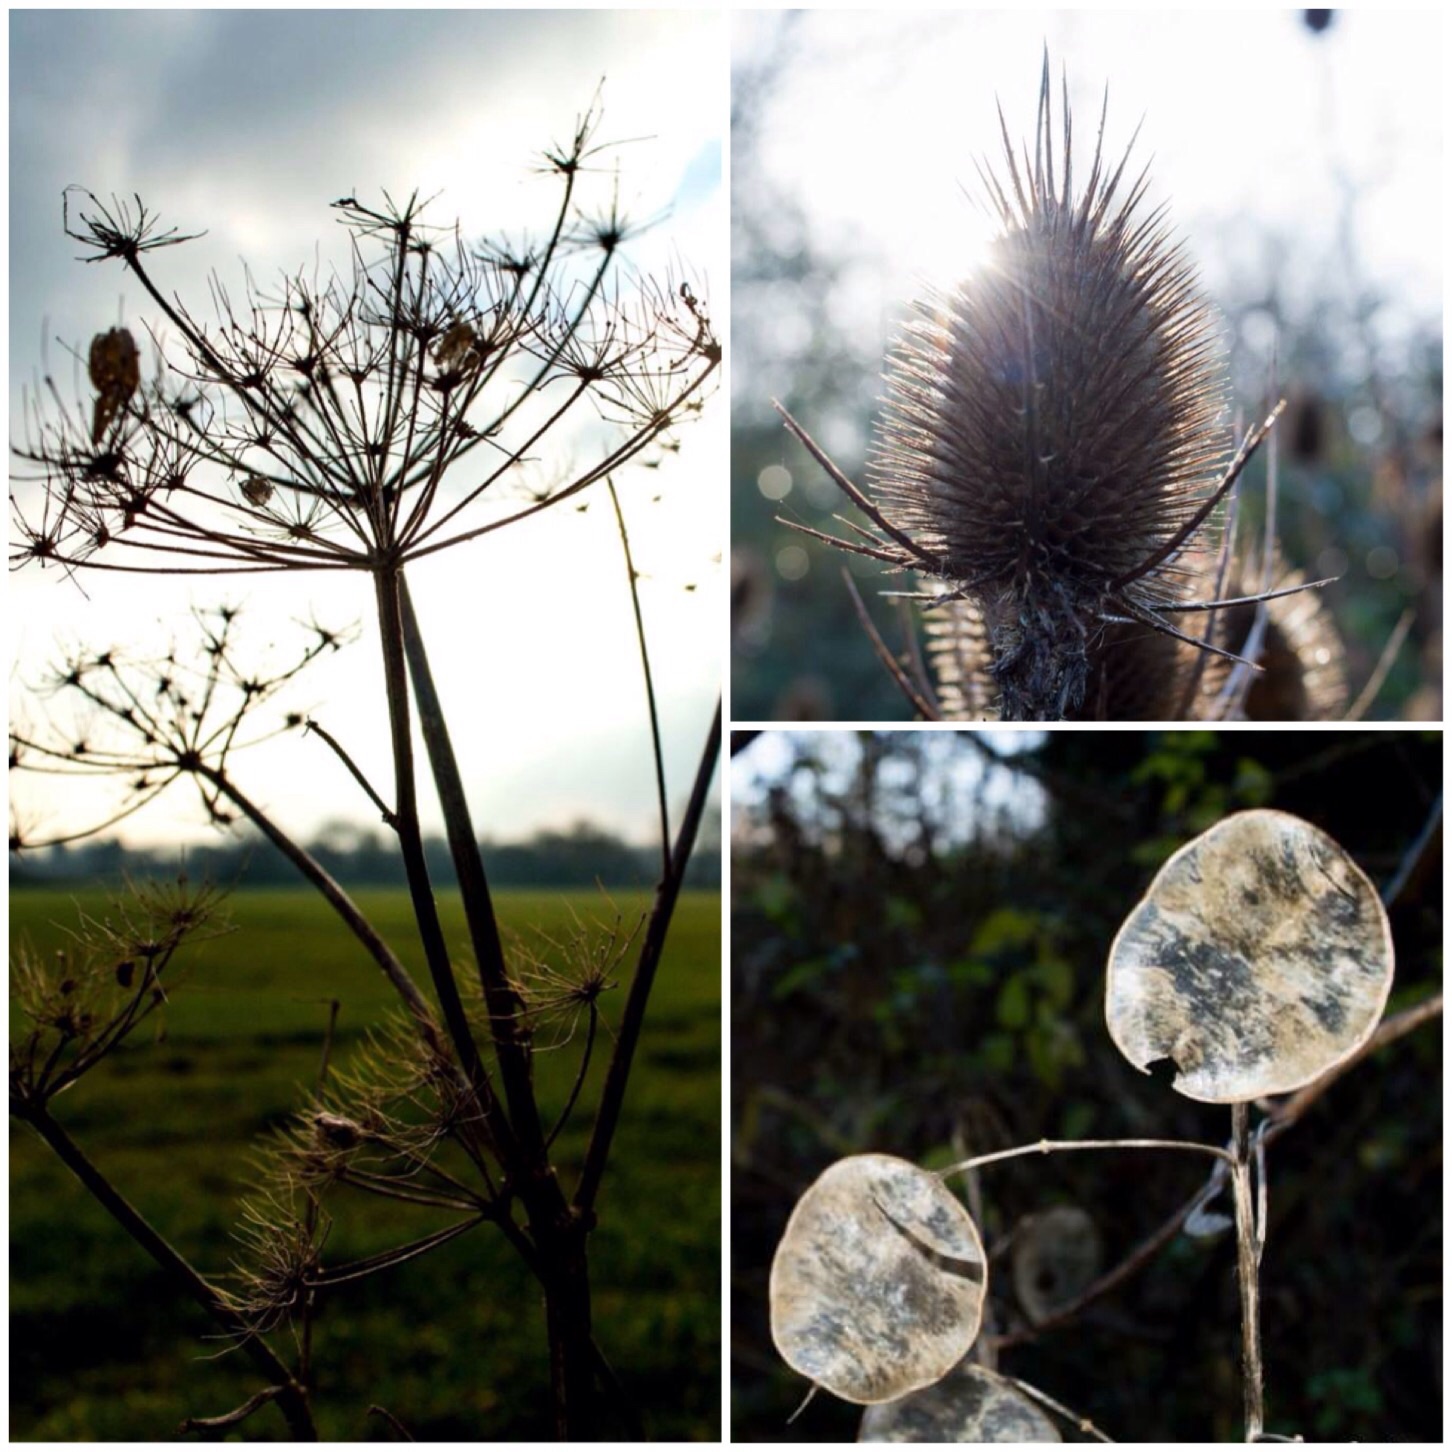
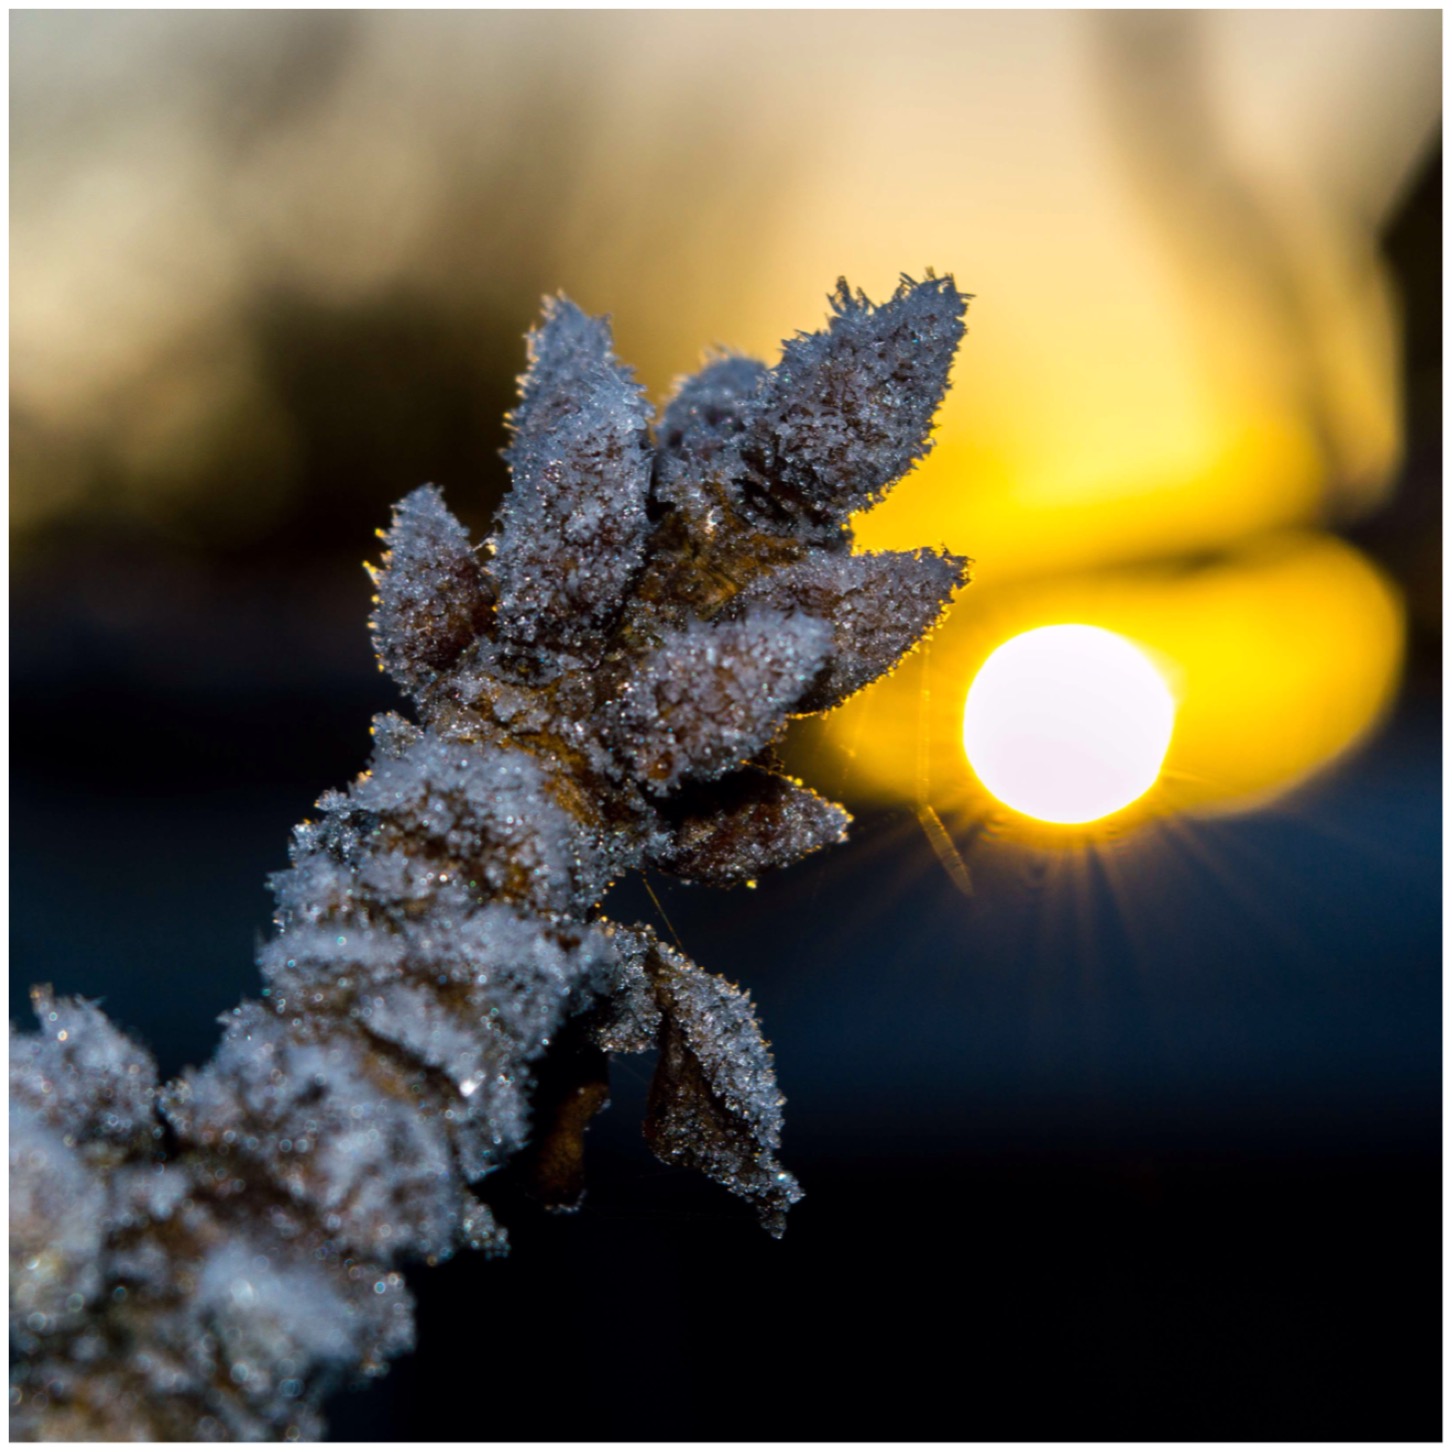
I like the effect of silhouetting a plant against the skyline or directly into the sun or even reflecting light off a plant as in the bottom right picture.
Playing with light
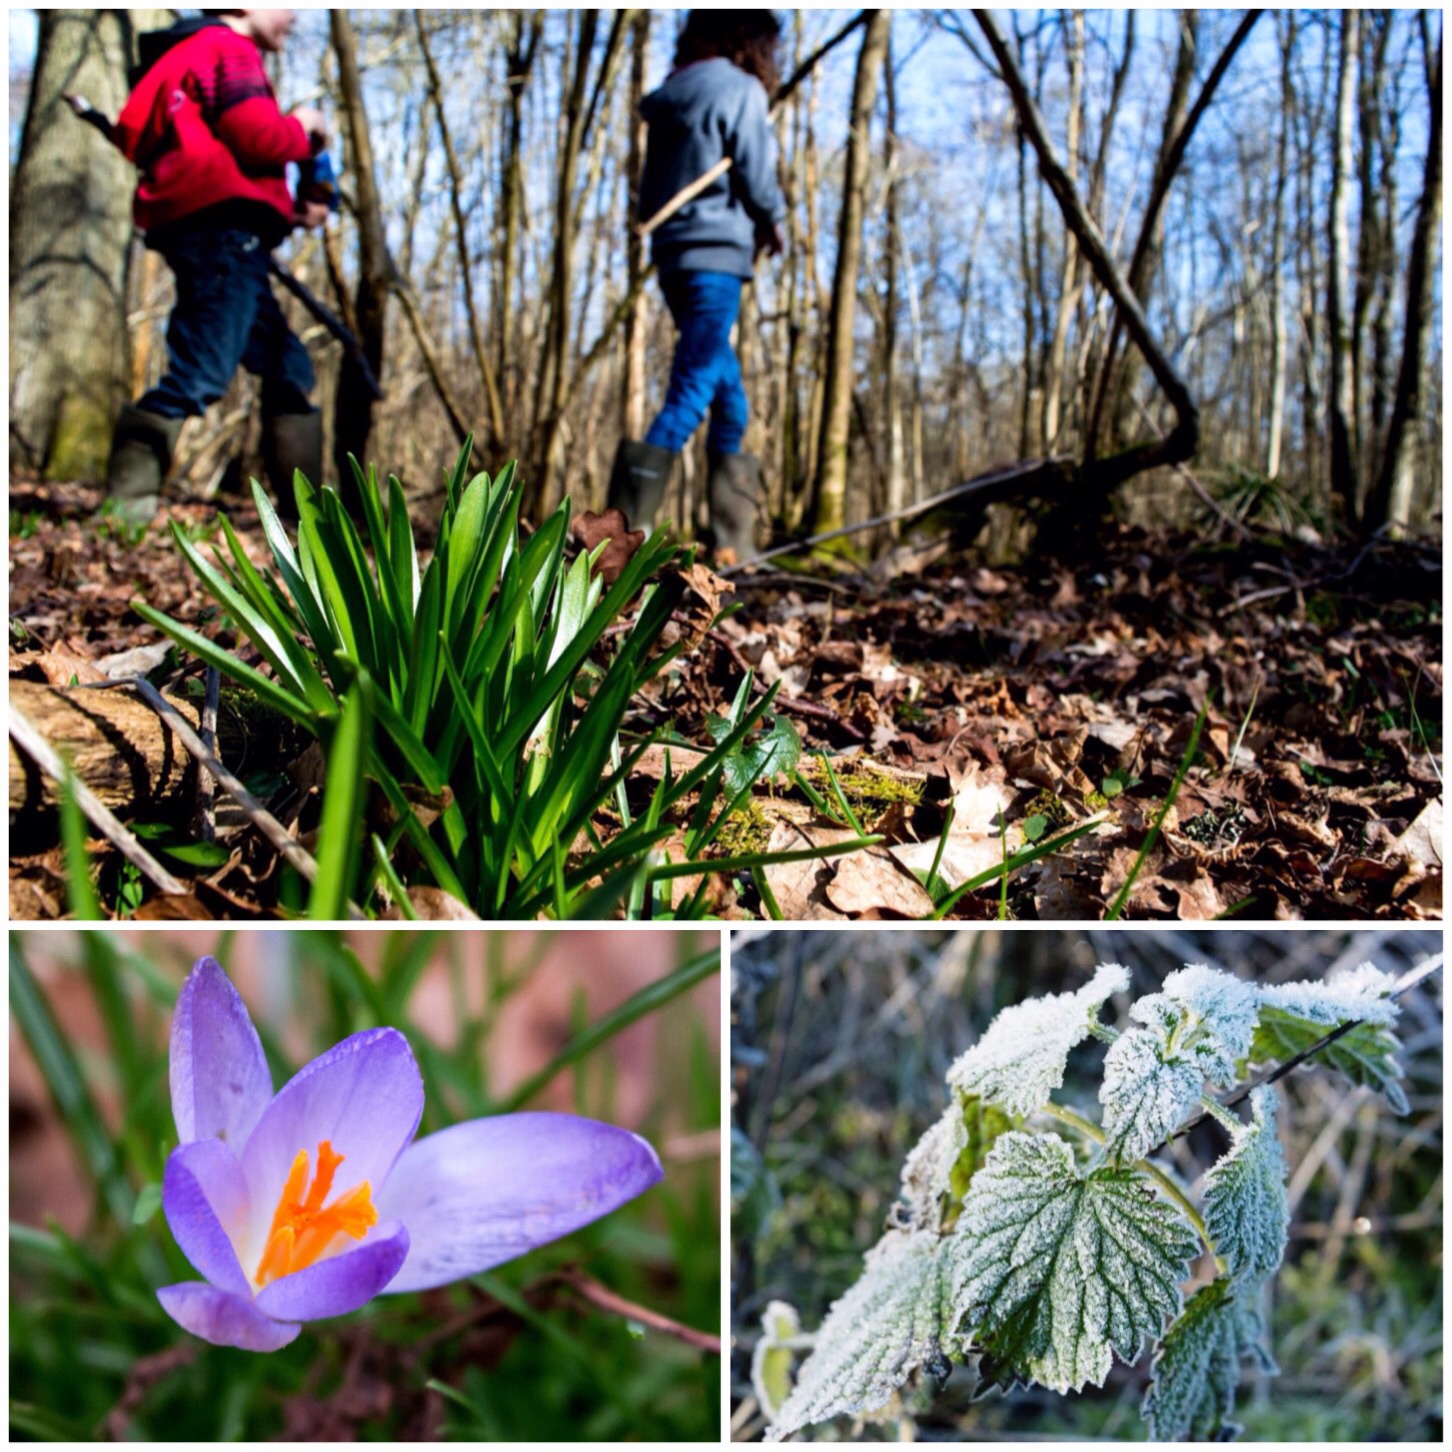
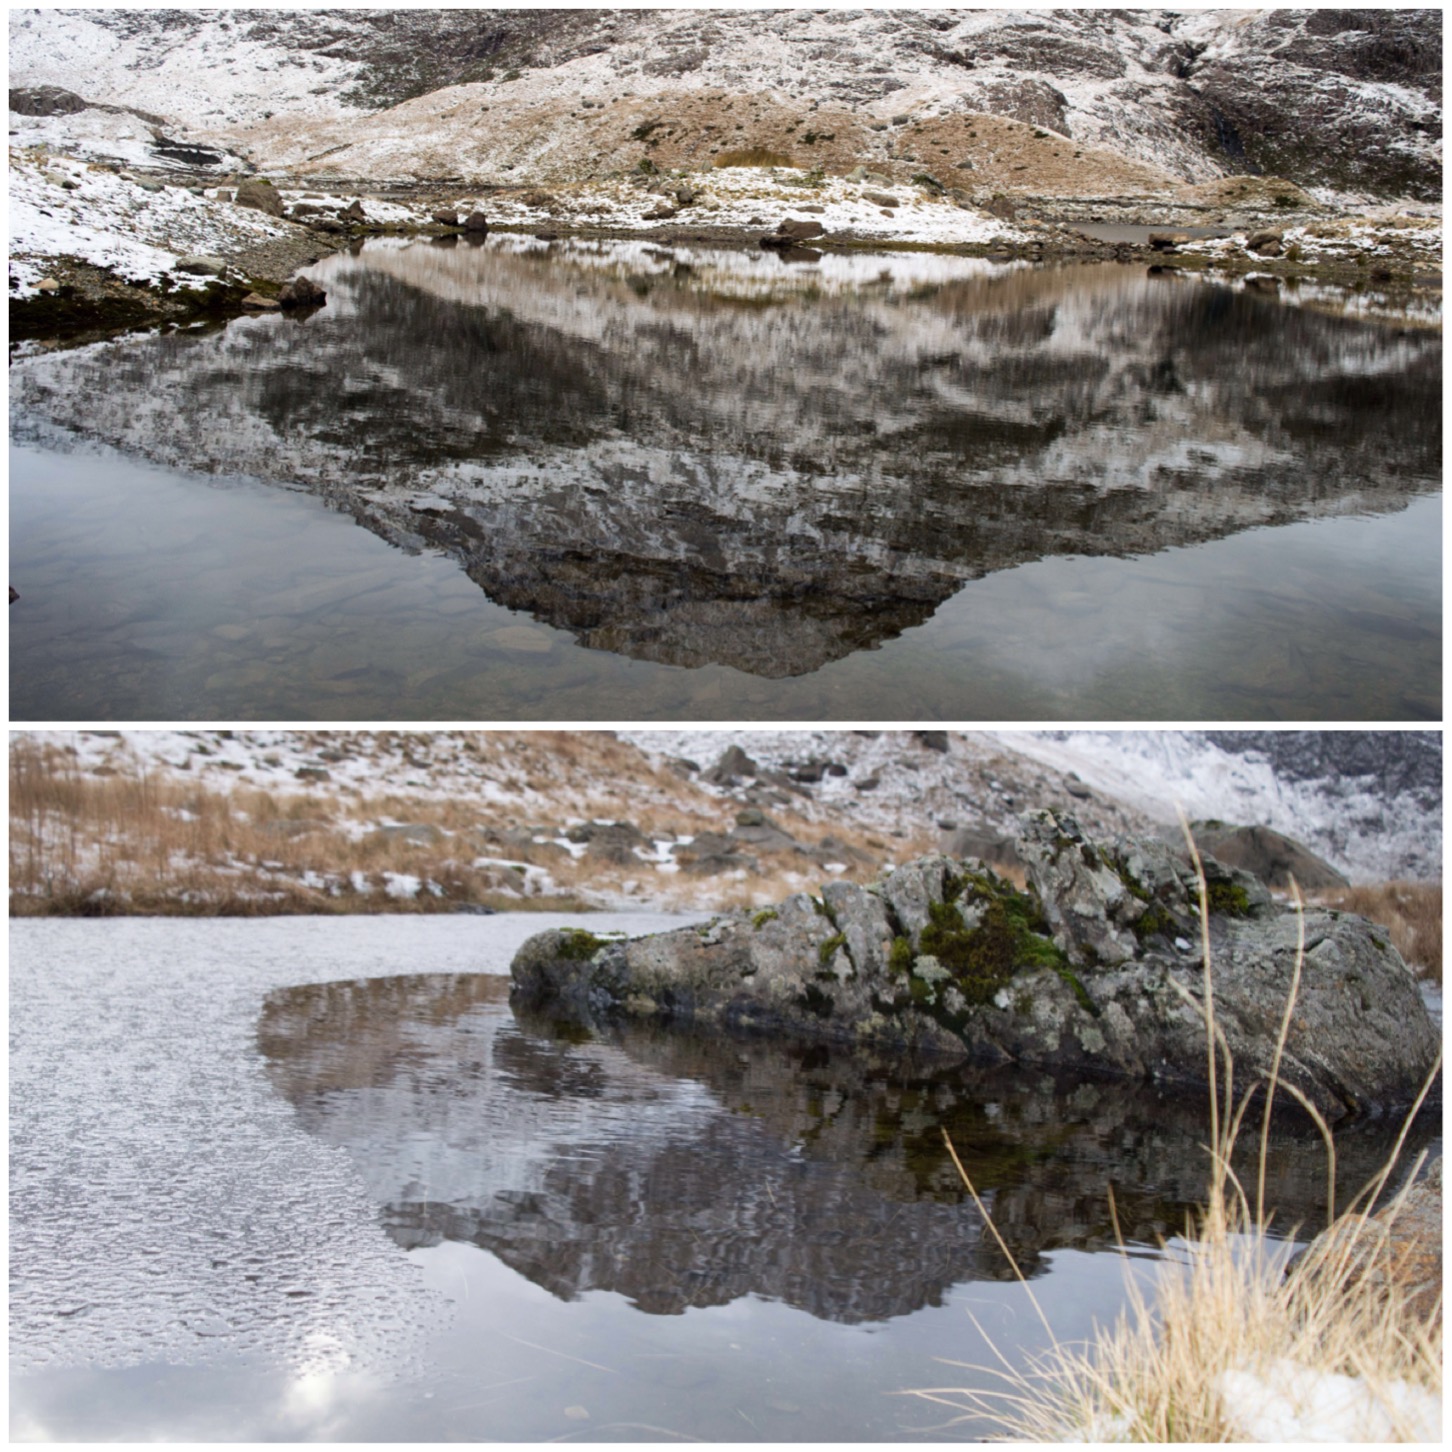
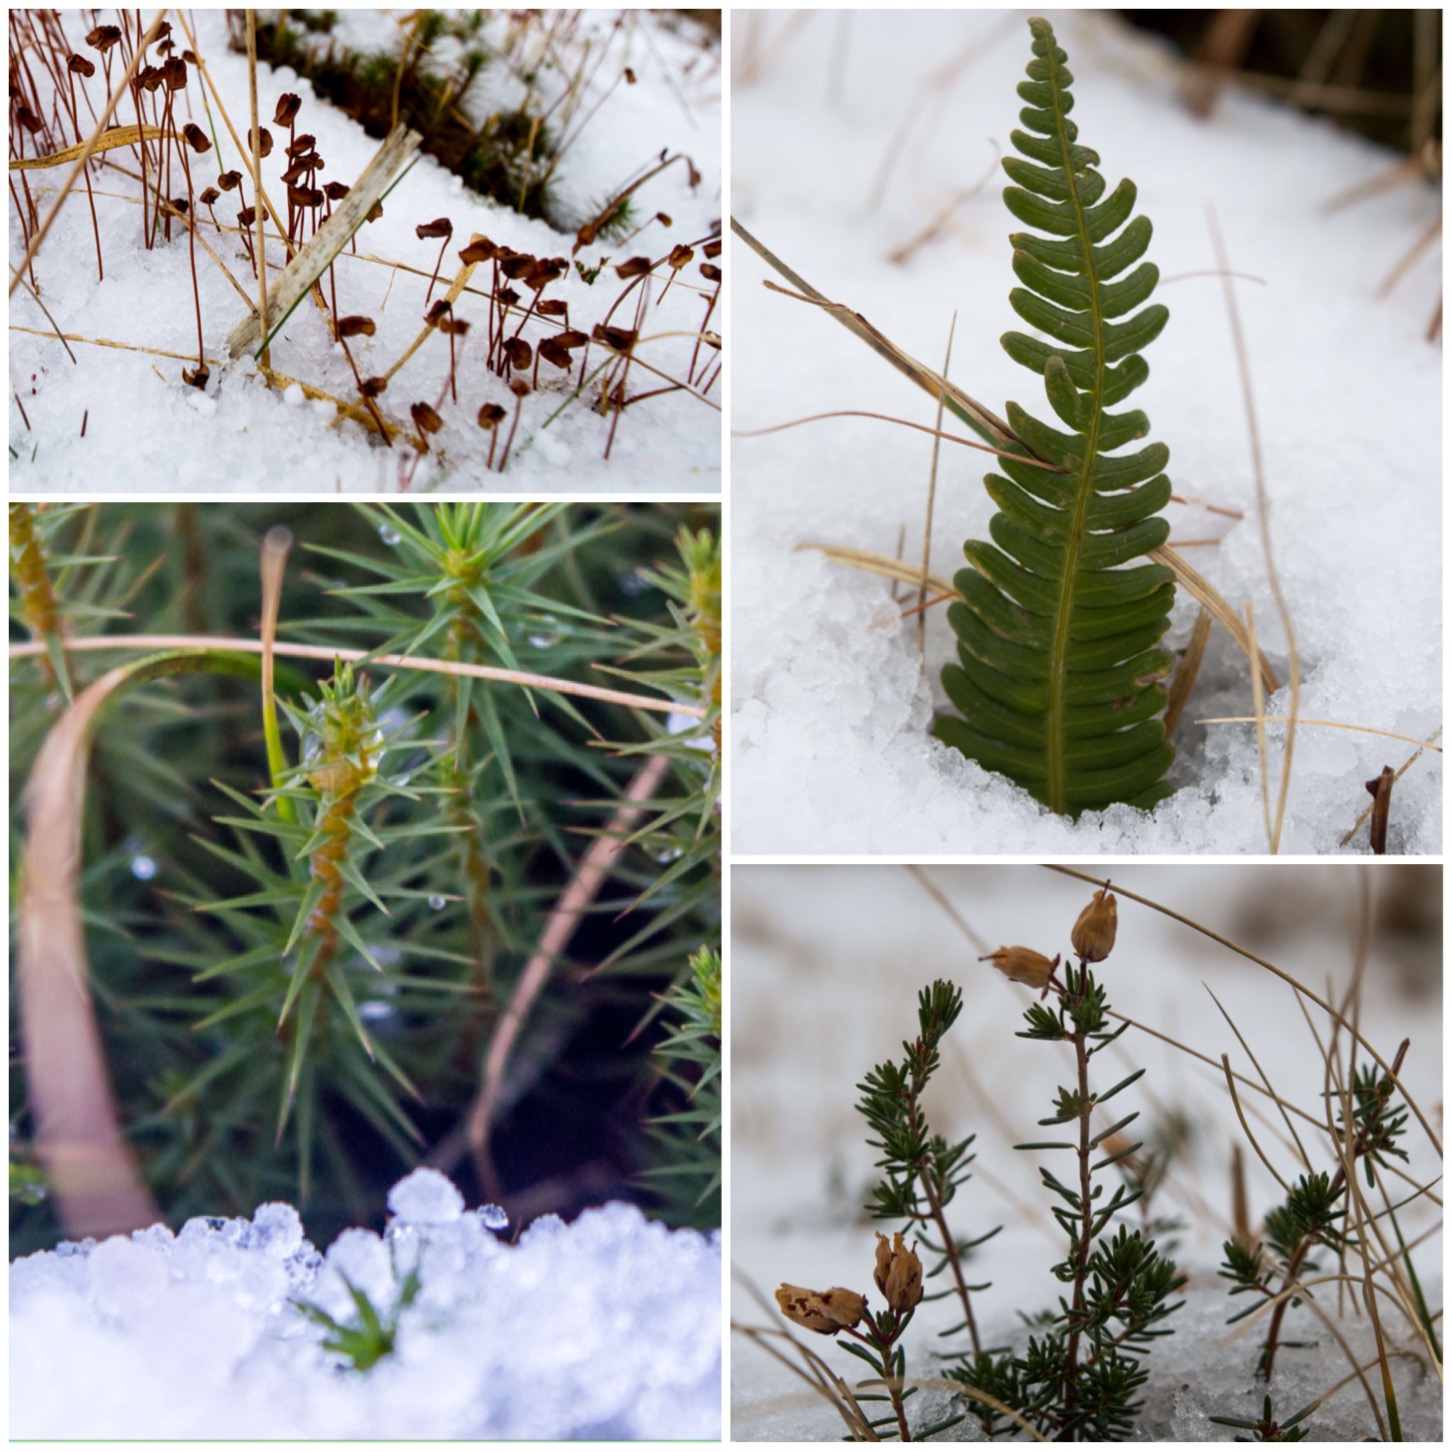
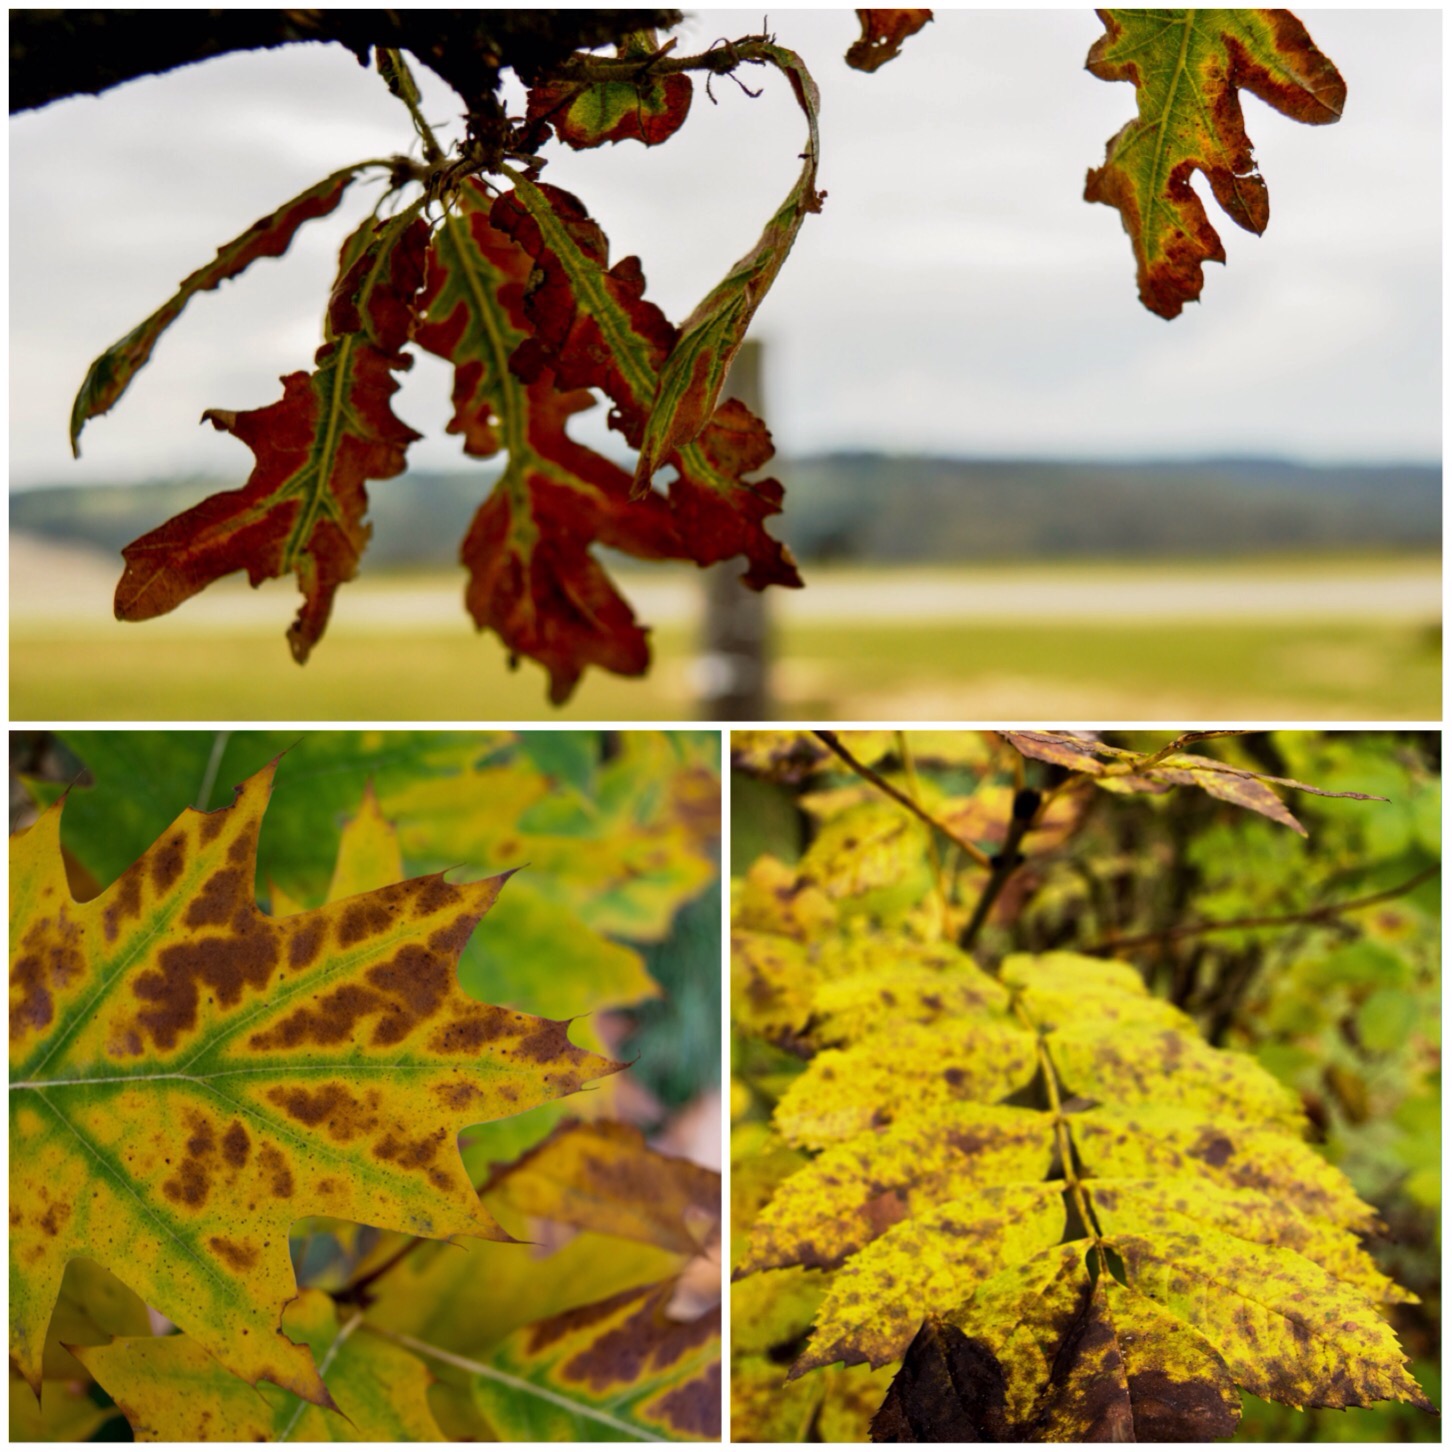
The other area I have been trying to capture is just how much colour is still out there during winter. Just because flowers aren’t popping up everywhere doesn’t mean there is no beauty to be seen.
The picture of the emerging bluebell leaves I felt was enhanced by seeing my kids walk past in the background just as I took the picture, the crocus is just beautiful and there is something lovely about the crispy white frost you find on leaves during a morning stroll.
Finding colour
A few more posts to follow in this theme so keep your eyes open for them, and for all the beauty around you out there as winter changes into spring.
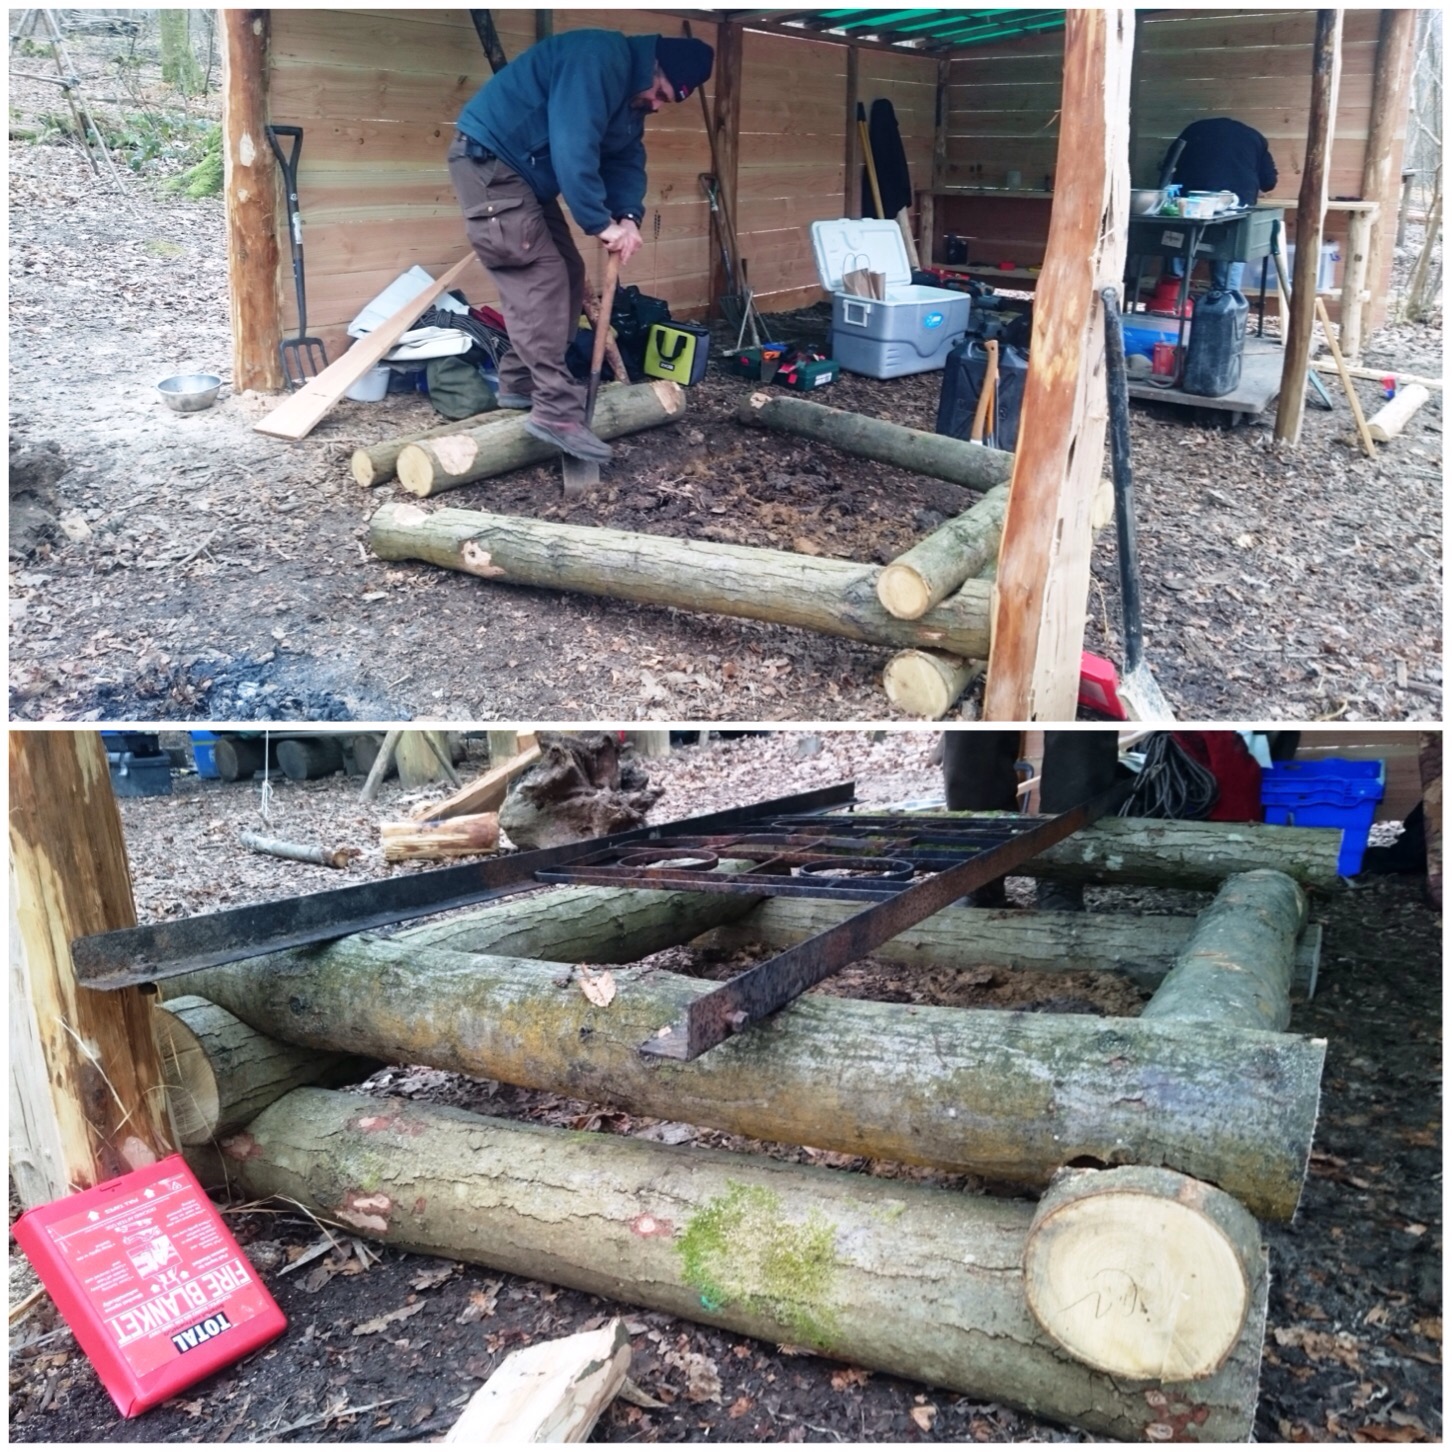
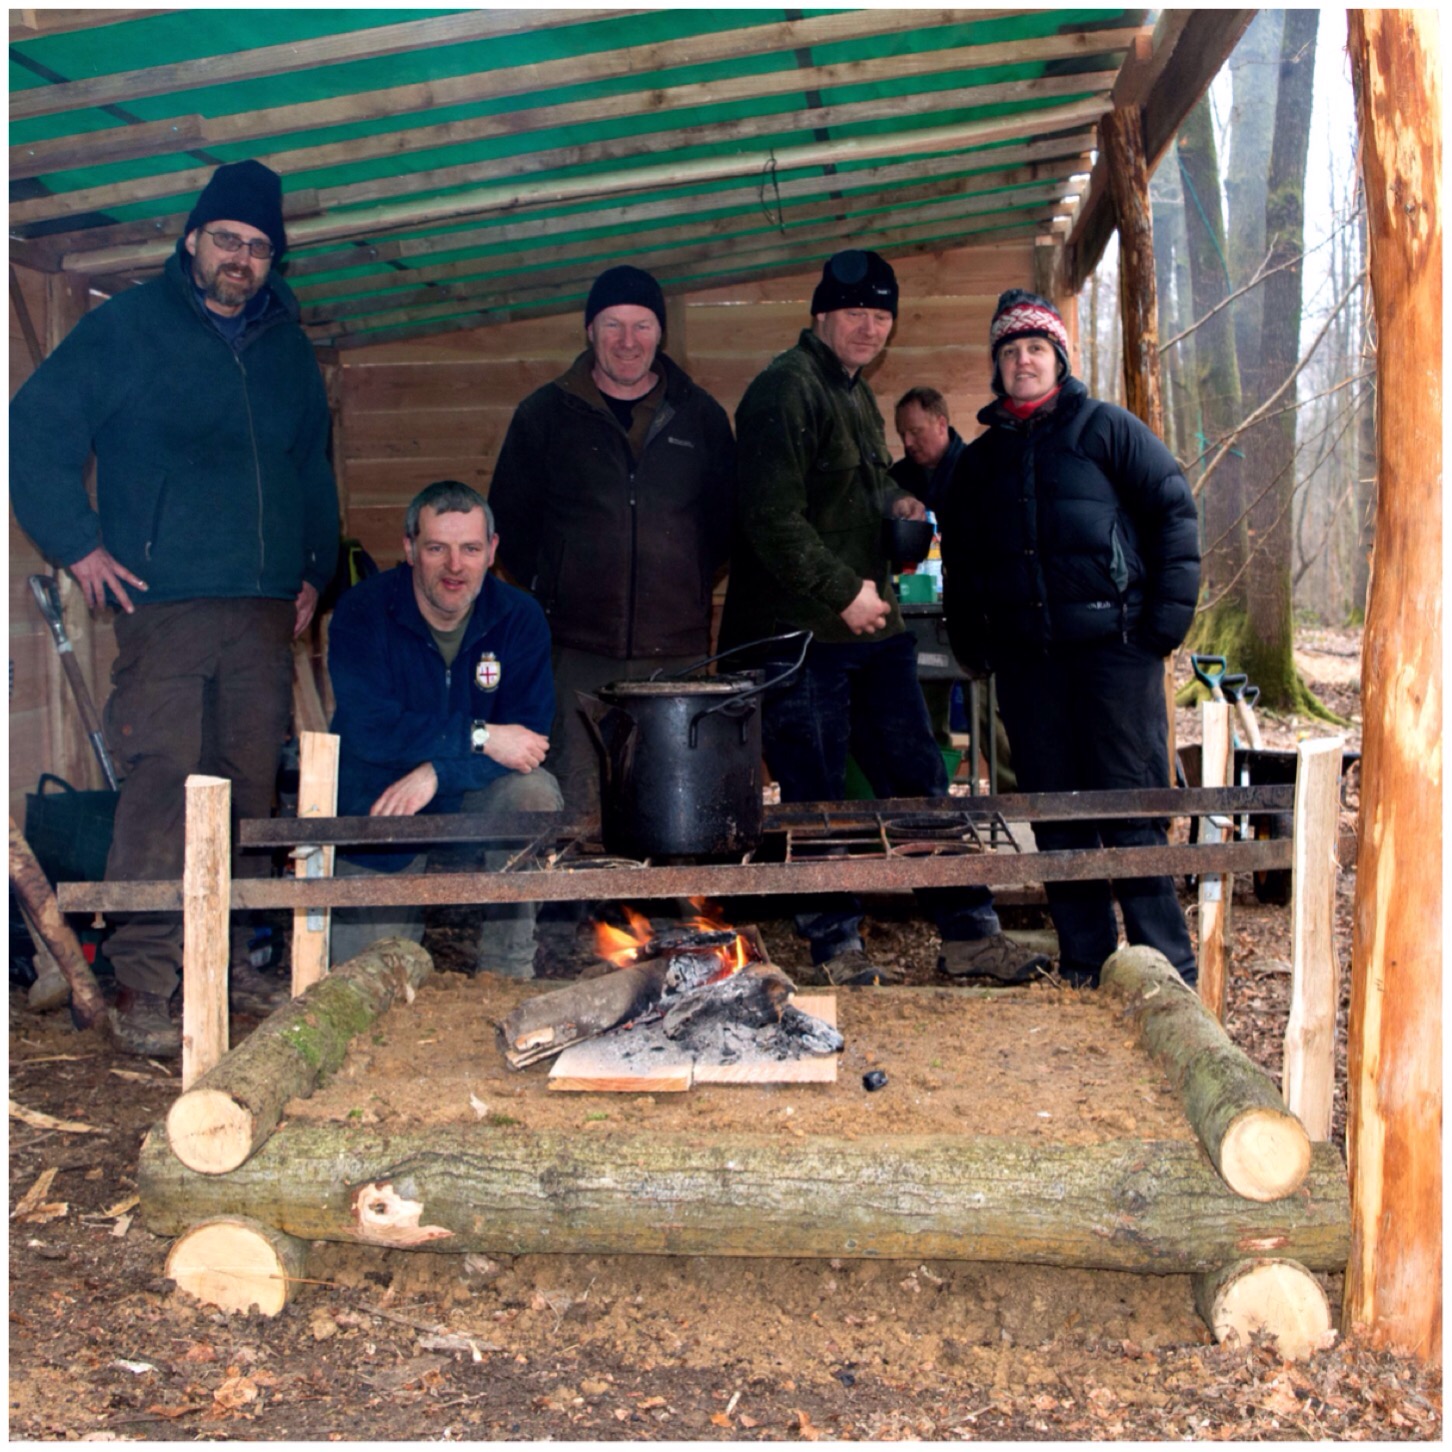
The final project I was involved in during the working weekend at John Rhyder’s Woodcraft School Hampshire HQ was to build a raised firepit for the students to use. John wanted this placed inside the new cookhouse to protect it from the elements.
The raised firepit
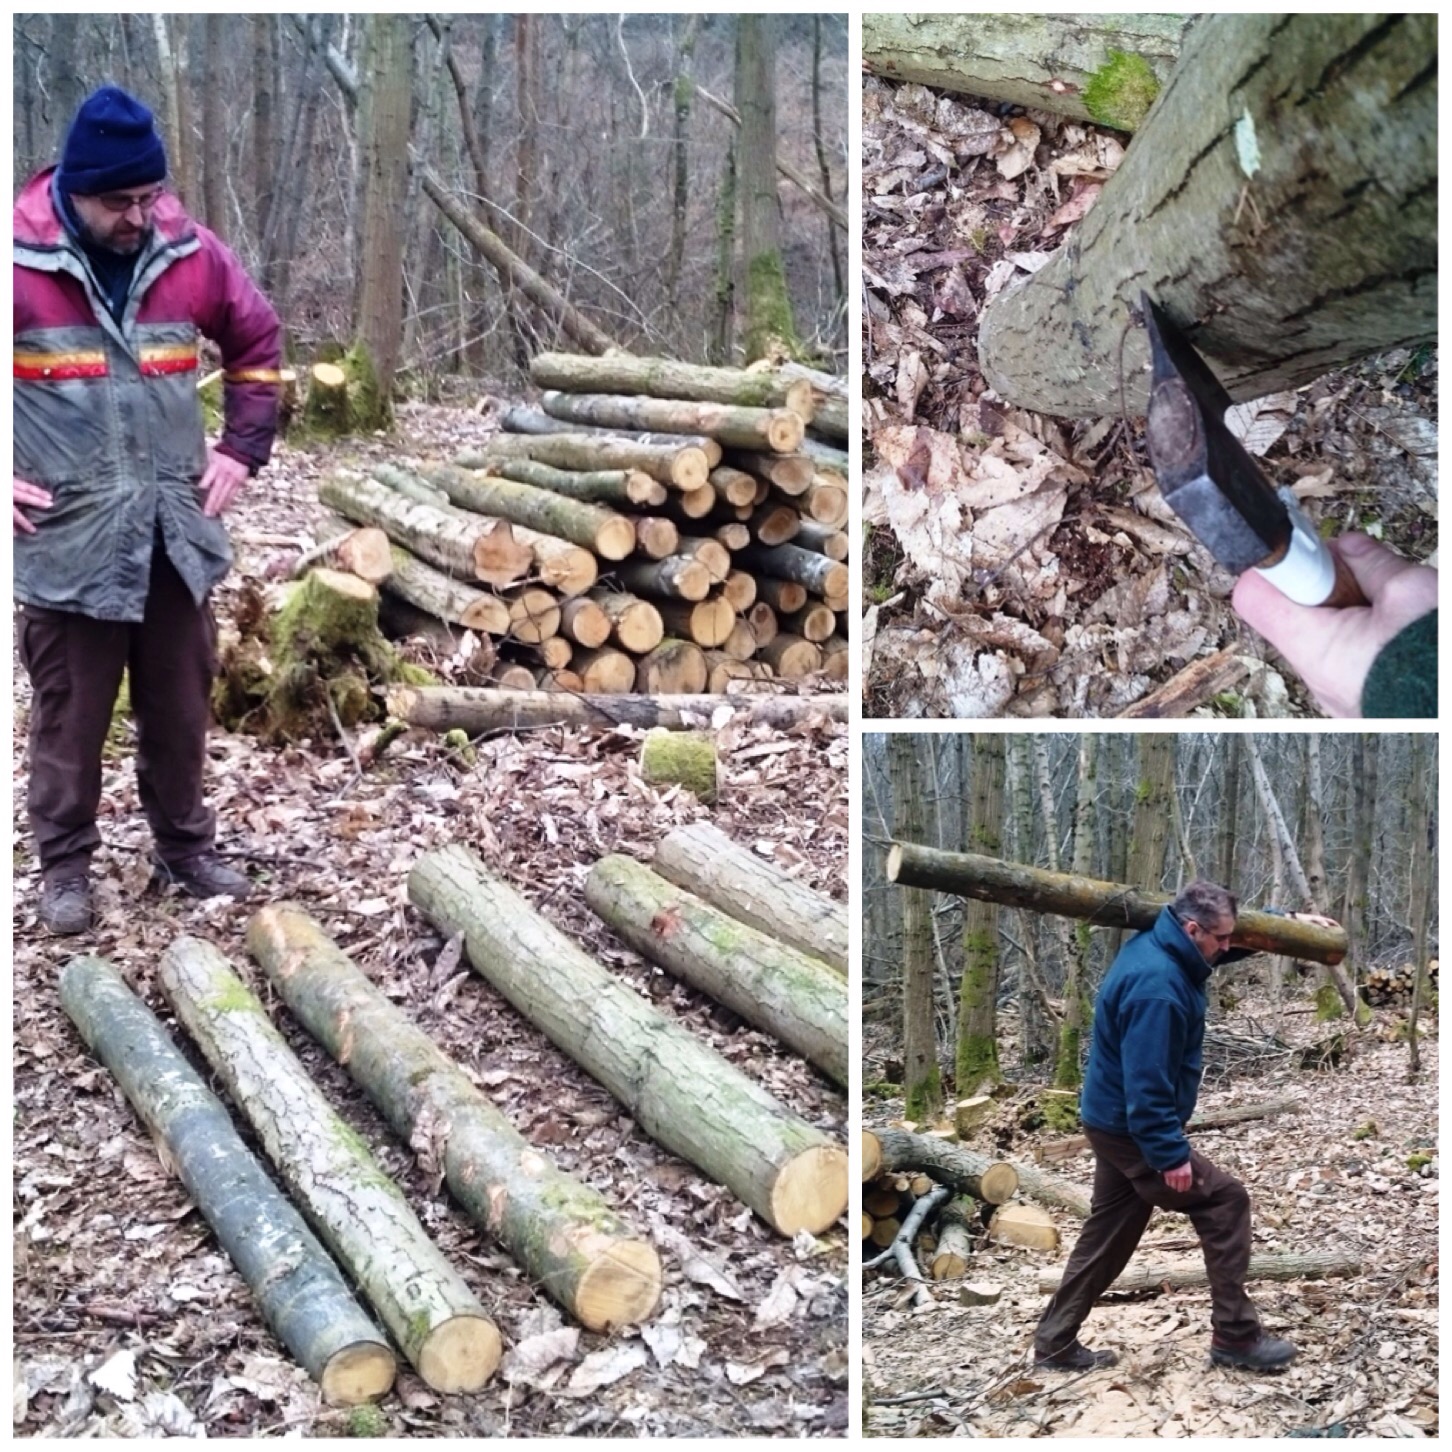
I volunteered to do this with Jumbo Jim (he flies planes) and after a bit of a chat we decided to make it out of sweet chestnut logs that had been cut down to about 5ft lengths. There were plenty to choose from so after a bit of a trimming we lugged them back to the main camp.
Selecting the logs
We found a flat area to work on (to make the build easier) as its final placement was to be on a slope. After we finished the build we moved everything to its final location in the cookhouse.
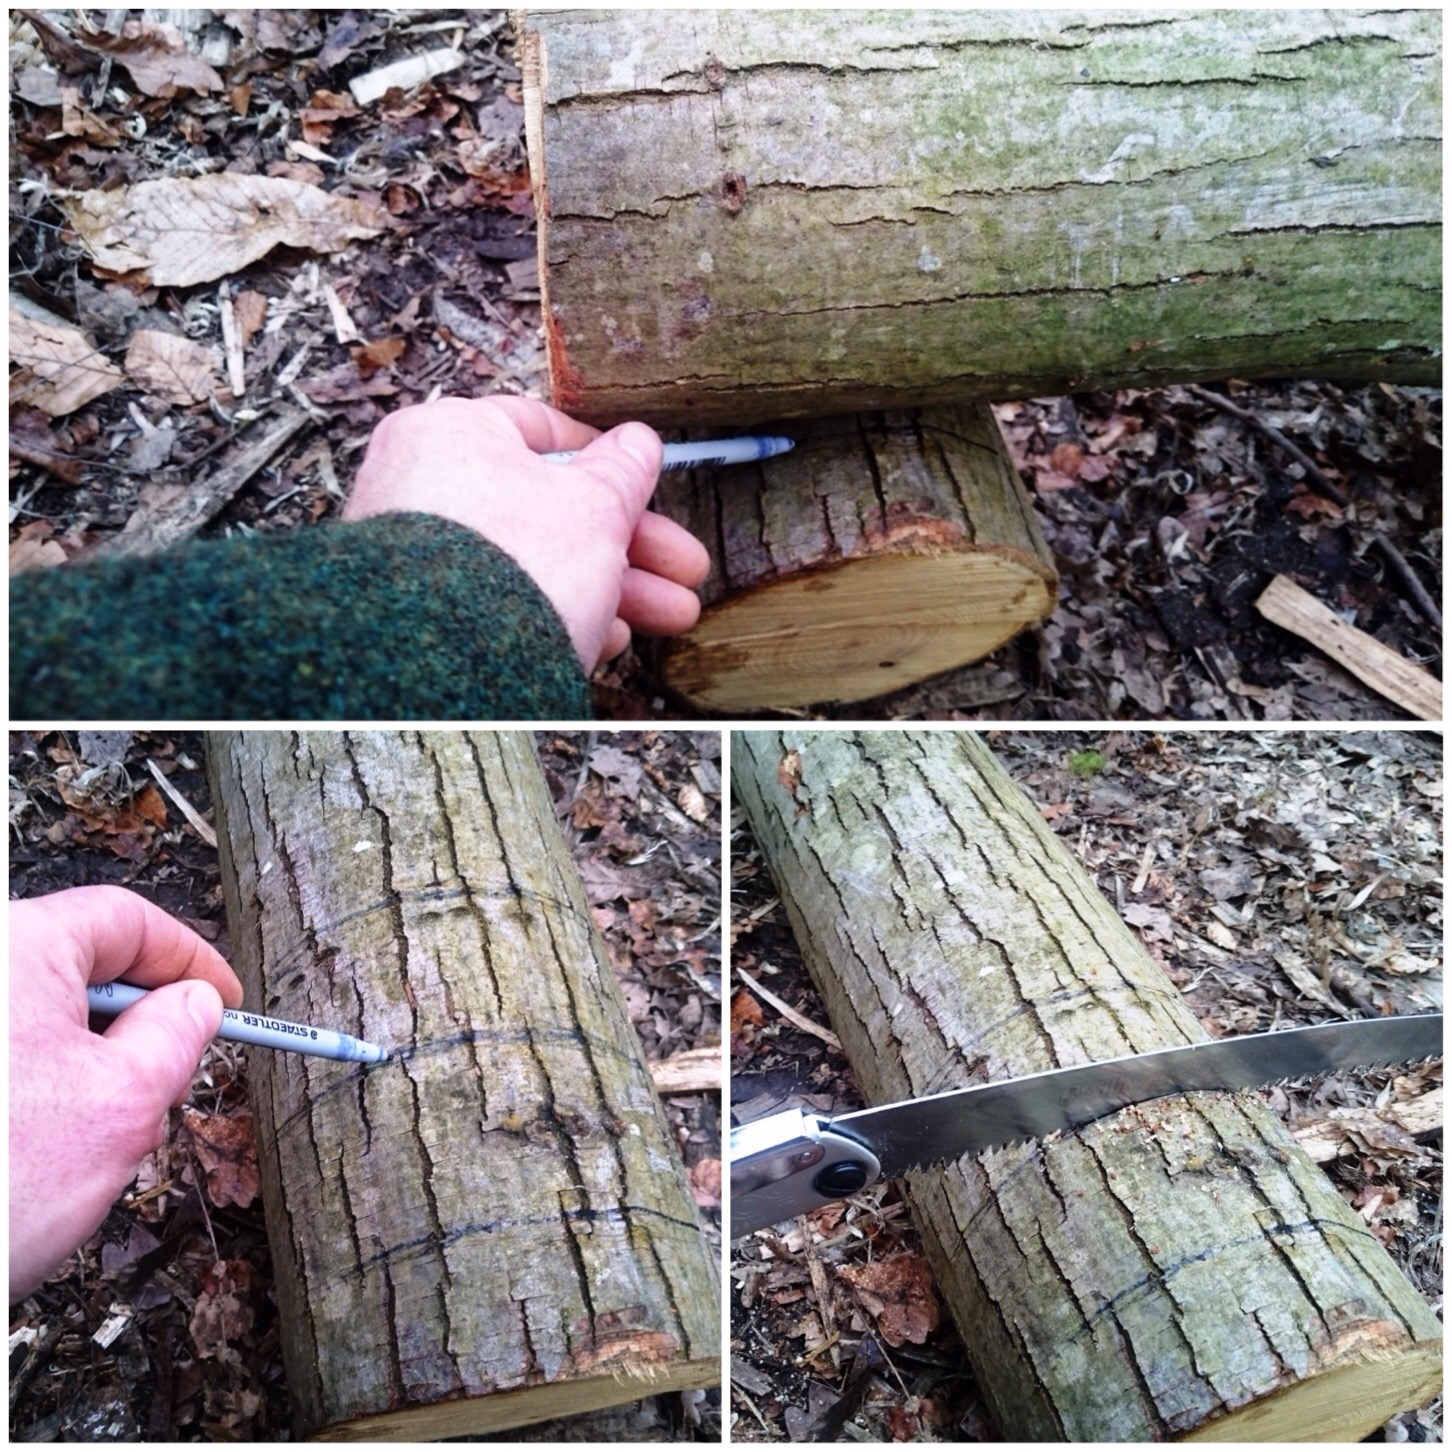
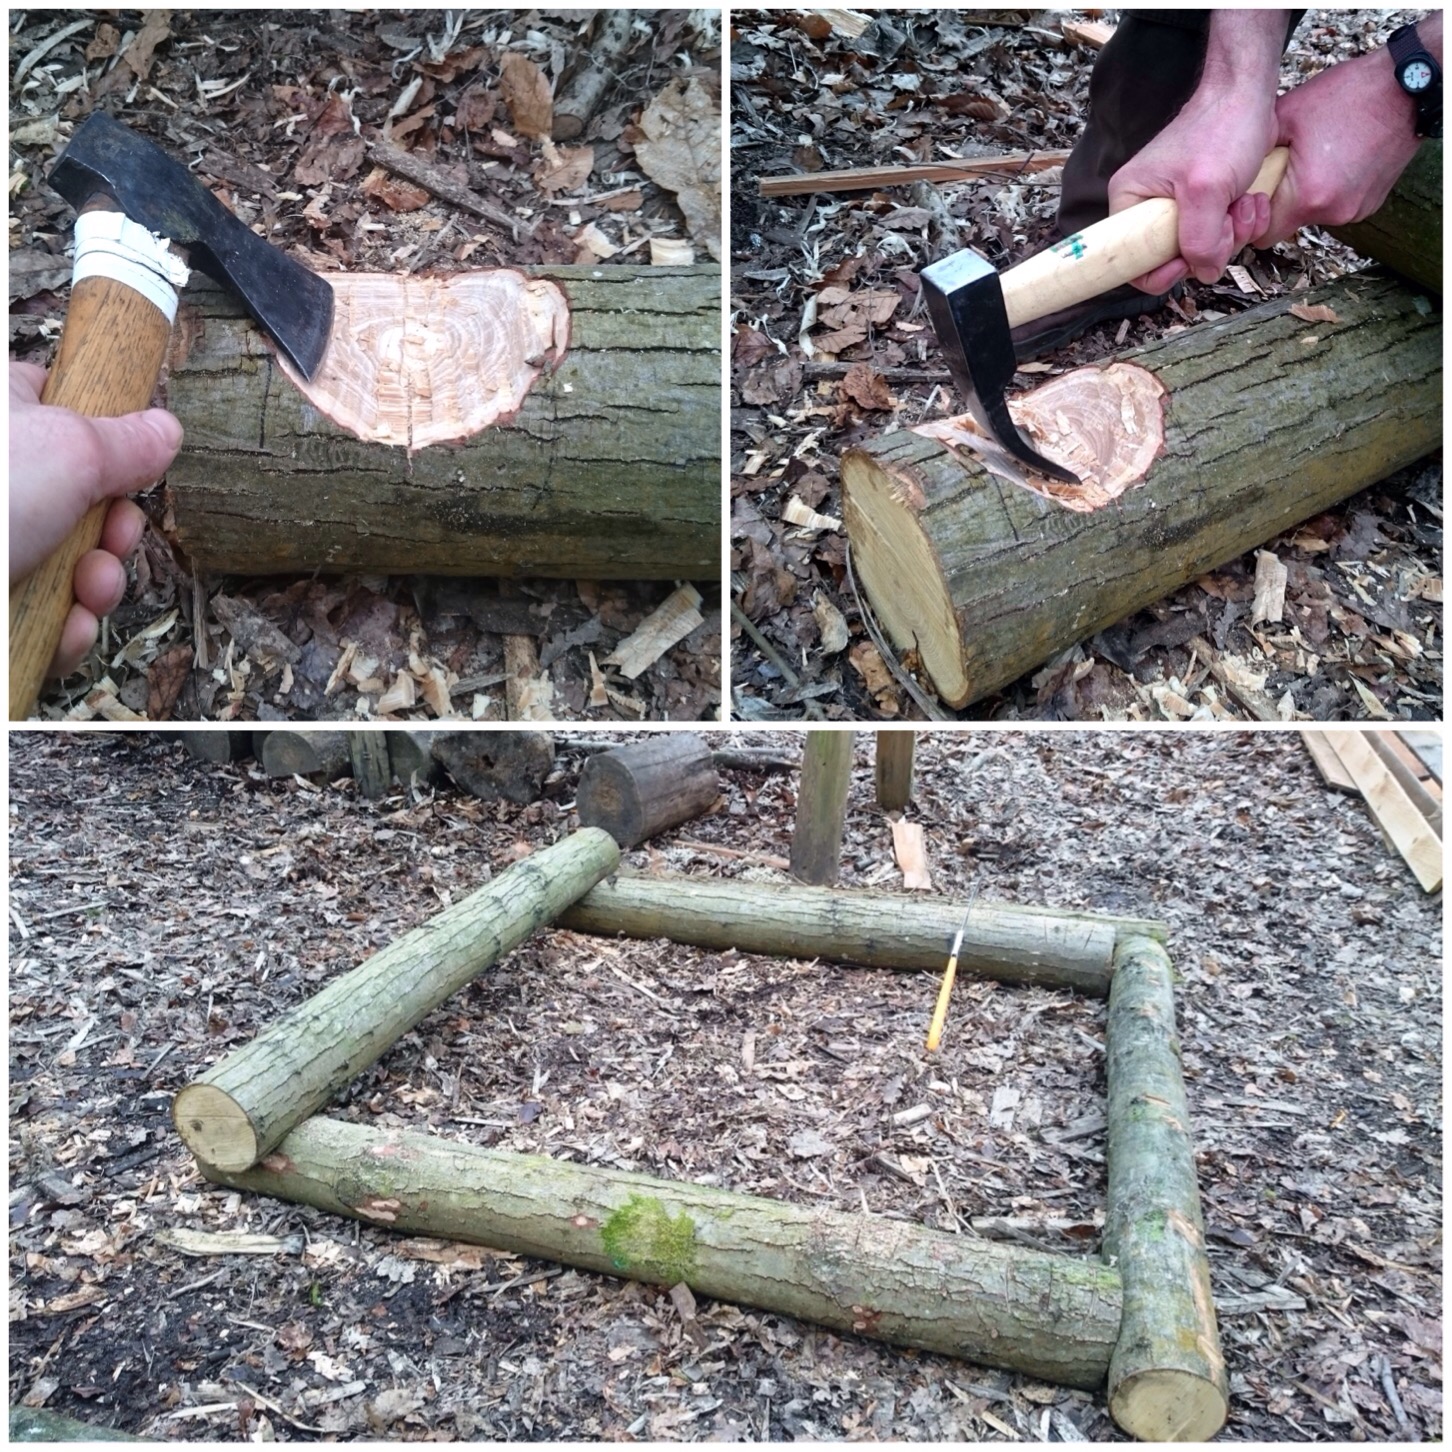
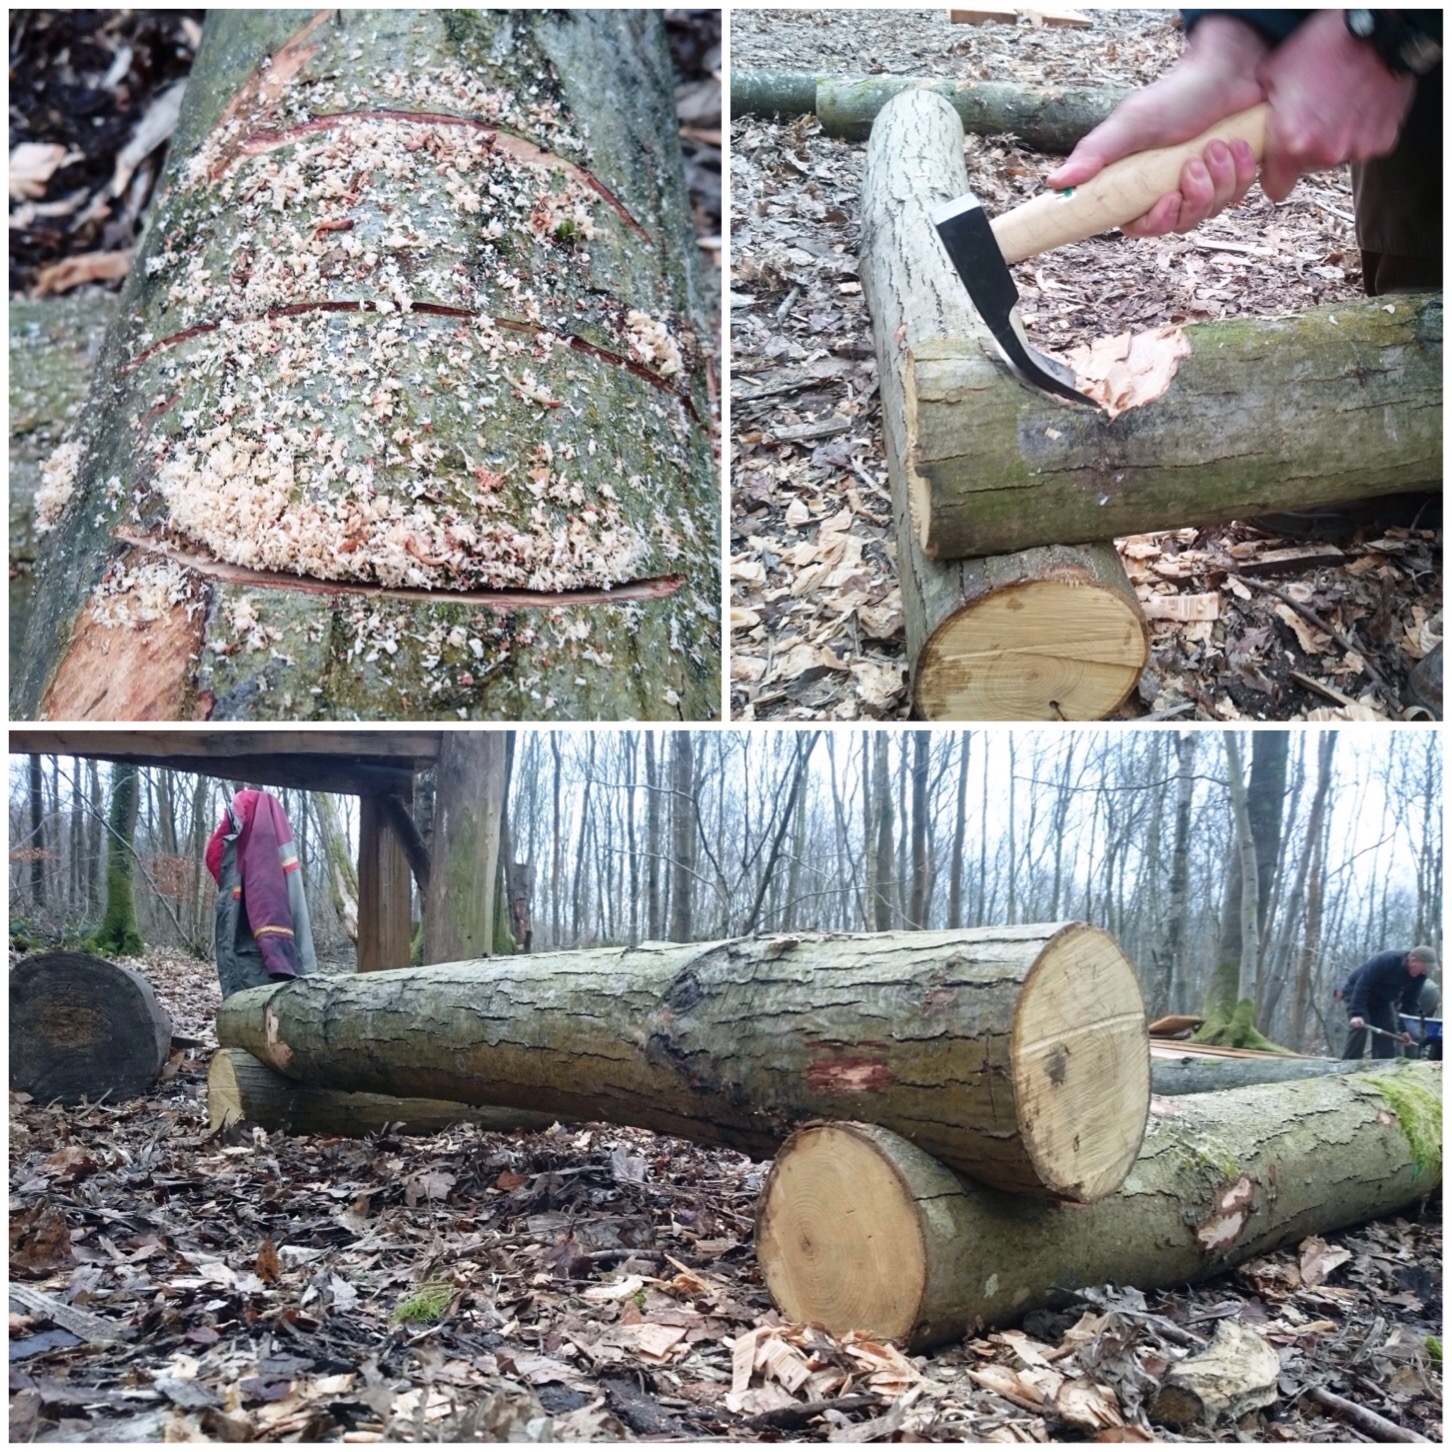
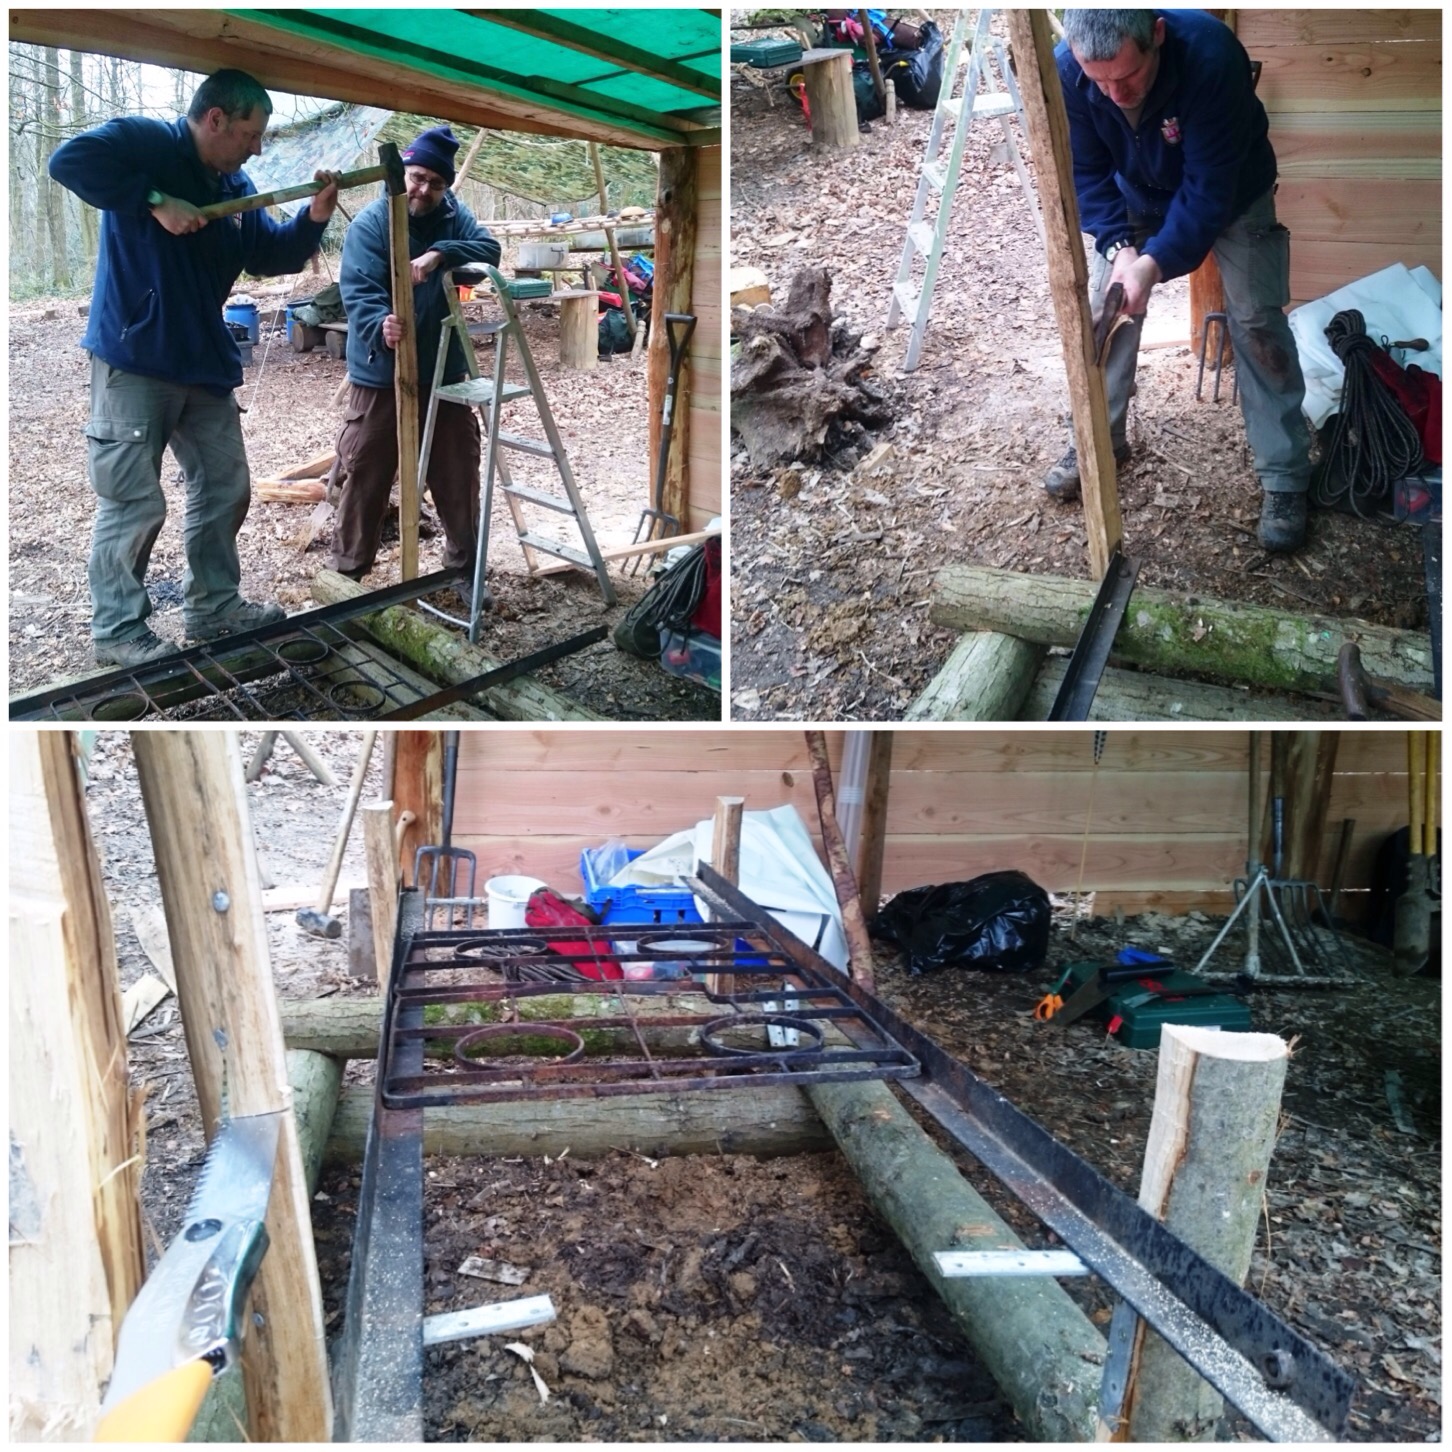
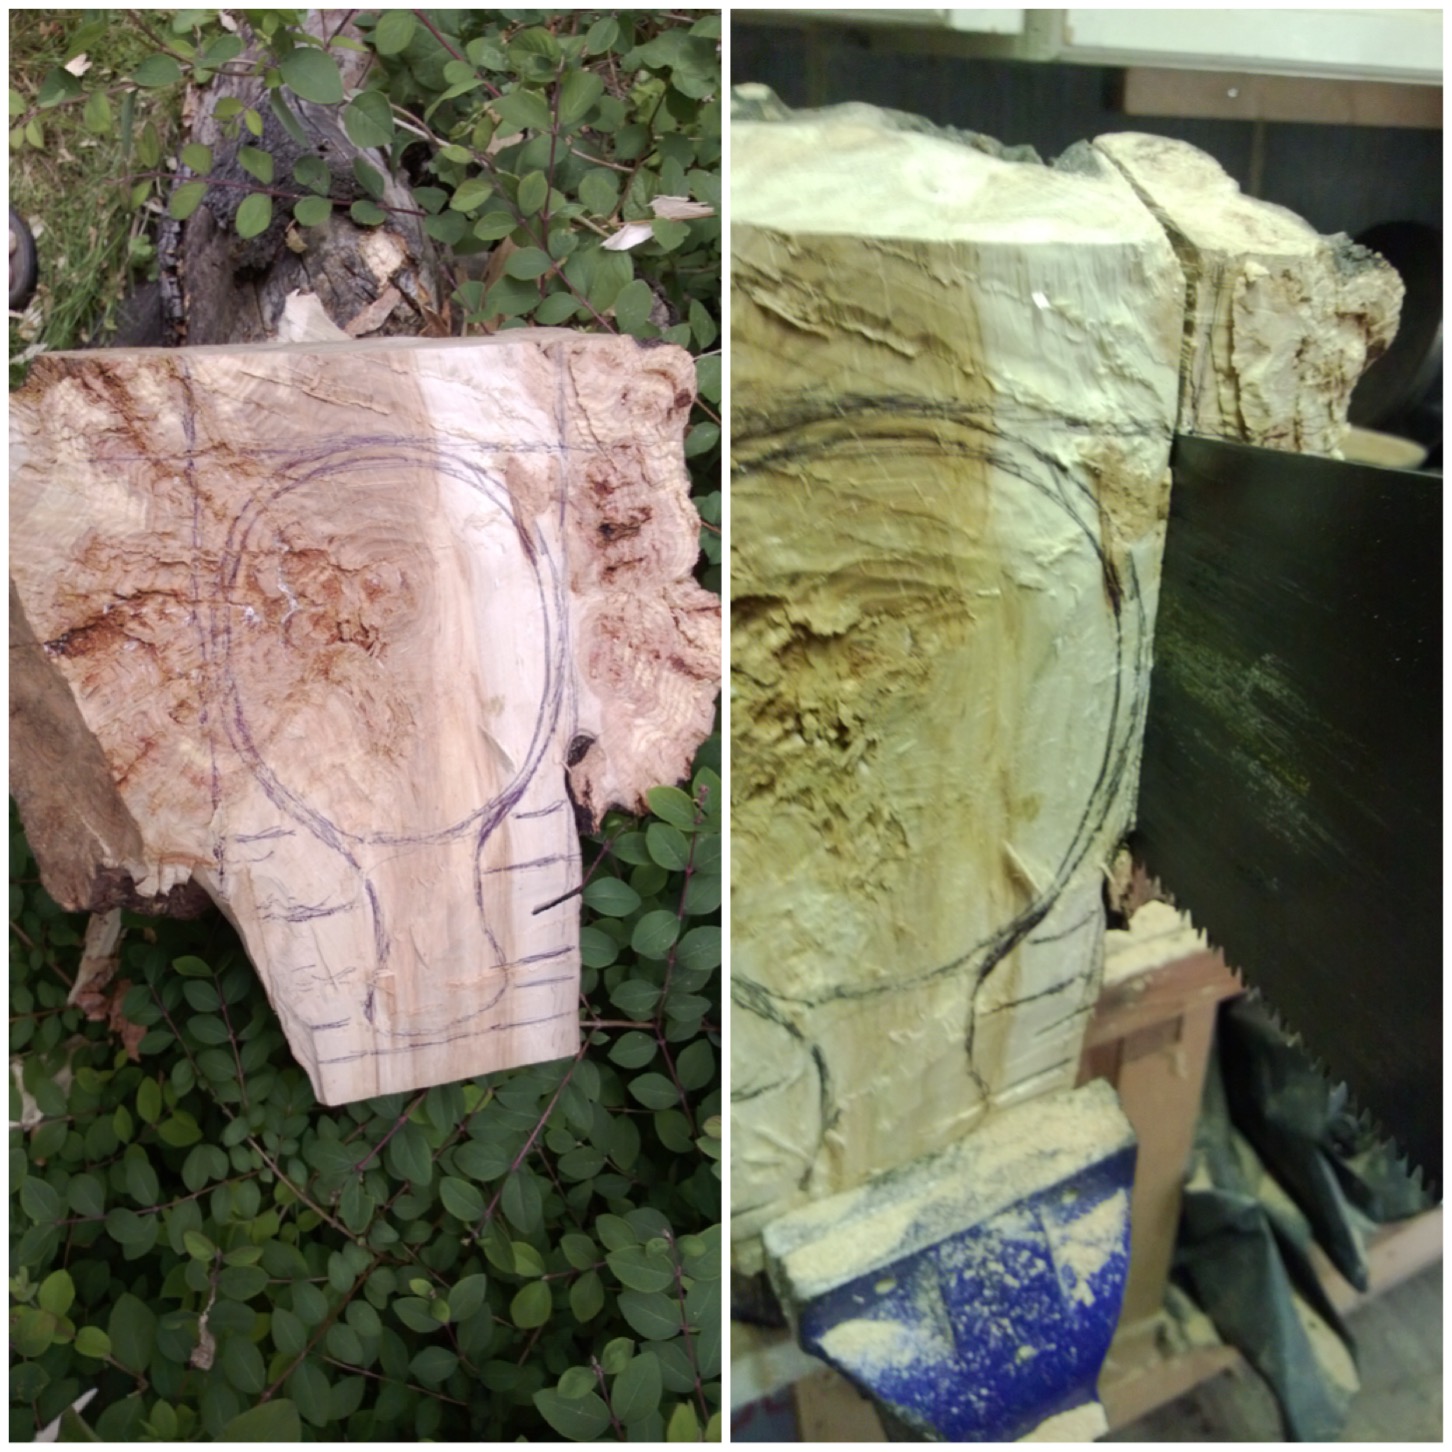
We decided to lock the logs together by carving notches out near the end of each log to form a square. We used each log as a template for marking another one out before sawing in some stop cuts.
Marking up and putting in stop cuts
The axing and adzing out (these were the tools we had available) did not take long. I thought we might need to go for a square cut for each notch but we decided to try a curved notch at first as they are quicker to carve. Even though the curve would not lock the logs perfectly the curved notches worked surprisingly well, with no movement on the logs when they were locked together.
Axing and adding the connection points
Once we were happy with the style of the notch it was then just a case of repeating this on each end of the logs so that everything locked together well.
Repeating the process
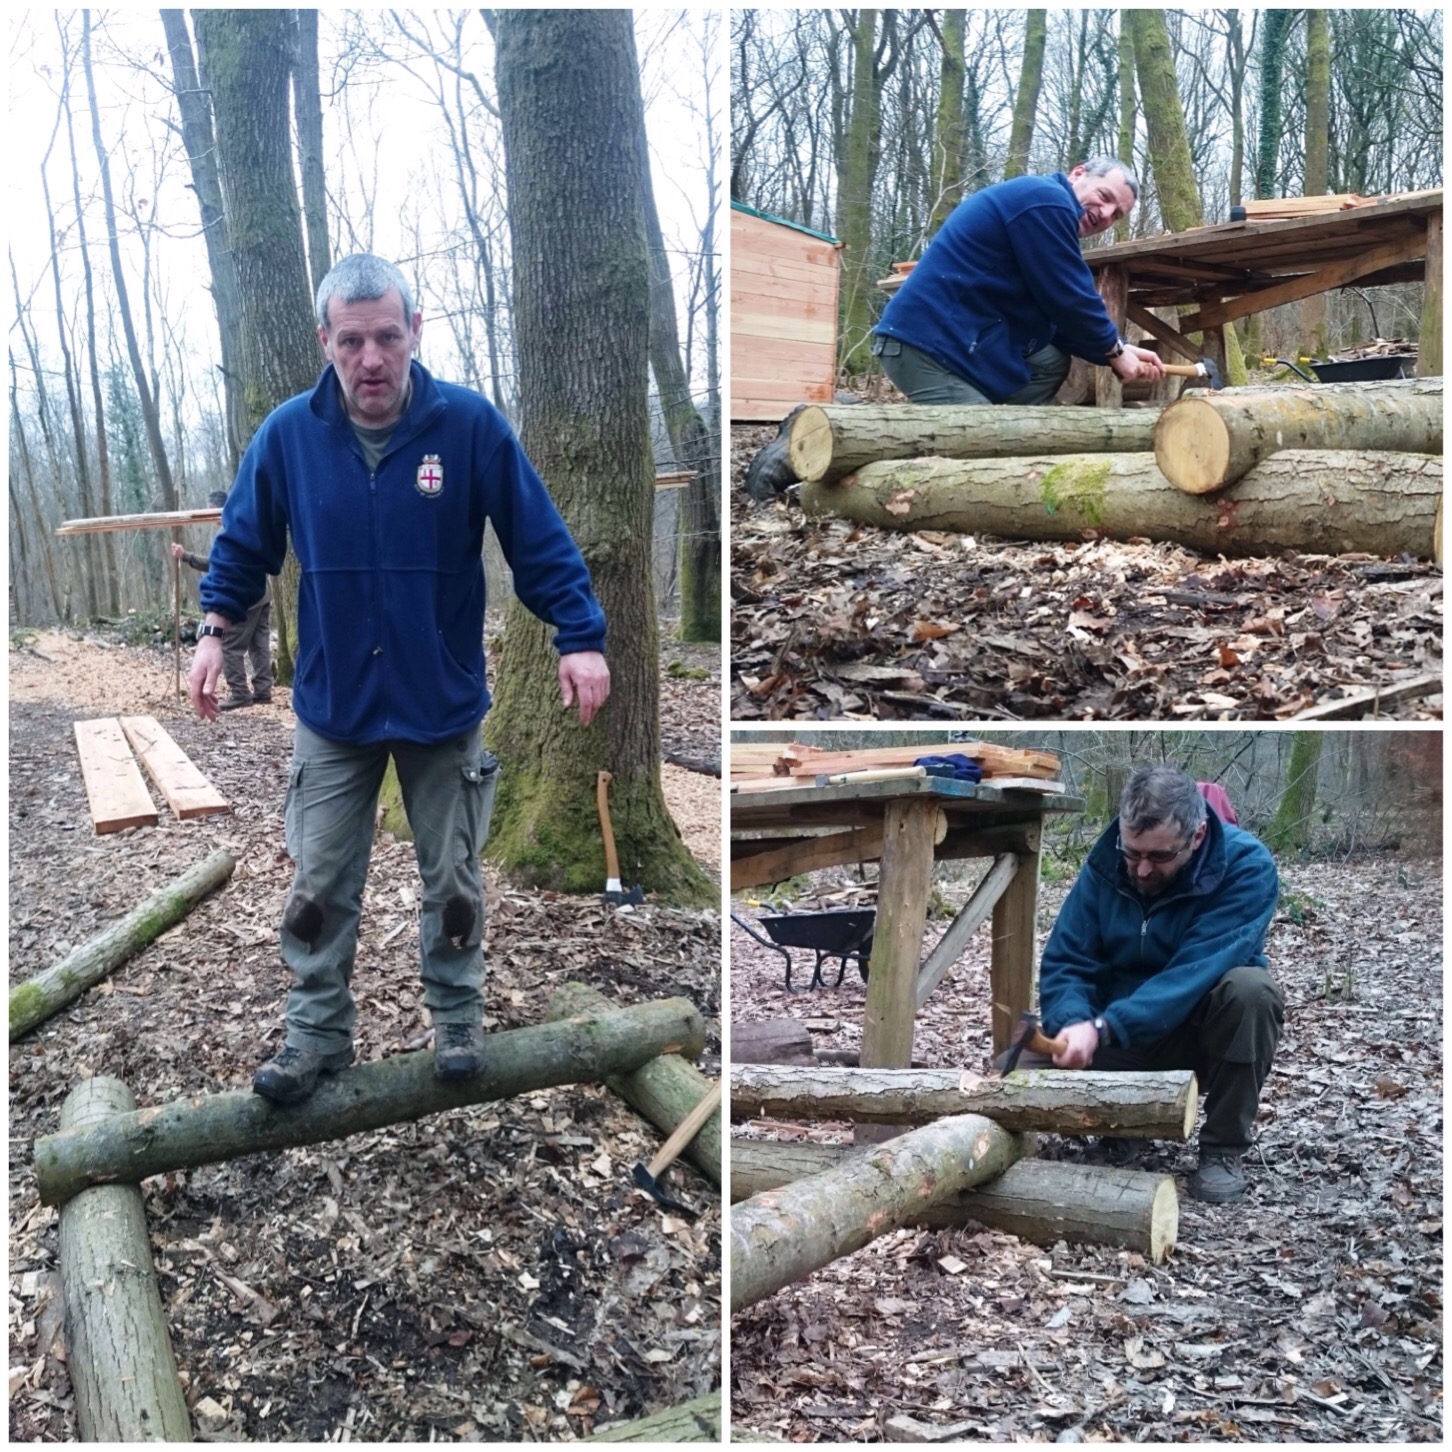
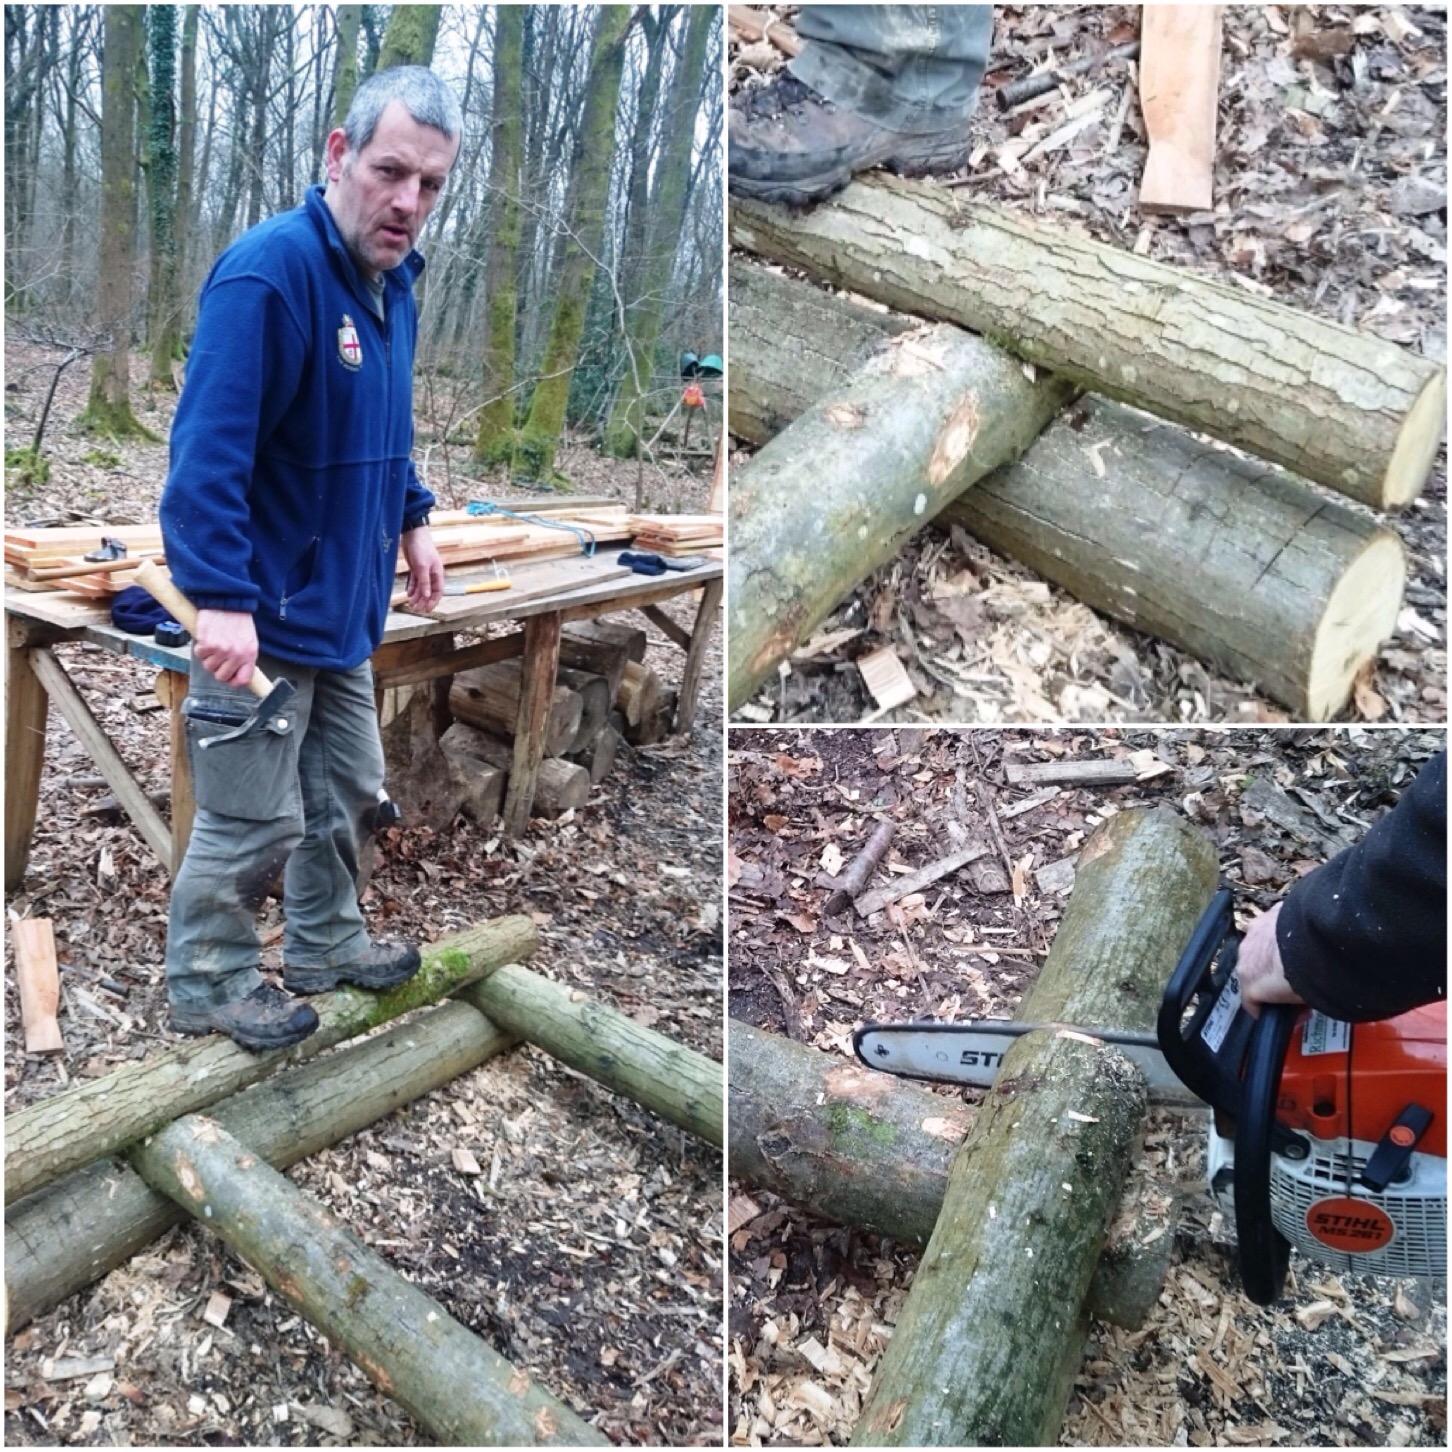
I tested the strength of the locks between the logs by walking and jumping (with the odd jig) on each level as we built it up.
Initially we’d planned a 5ft square but after discussing this with Caron and John we went for a 5ft by 4ft rectangular shape. This was to allow the students easy access to most of the firepit without having to lean too far to reach the centre. You can see the excess wood at the ends in the bottom right picture that needed to be trimmed off.
Testing and re-adjusting the size
After some more notch cutting, locking together and jumping around we got John to trim the excess wood off with his chainsaw.
More testing and trimming
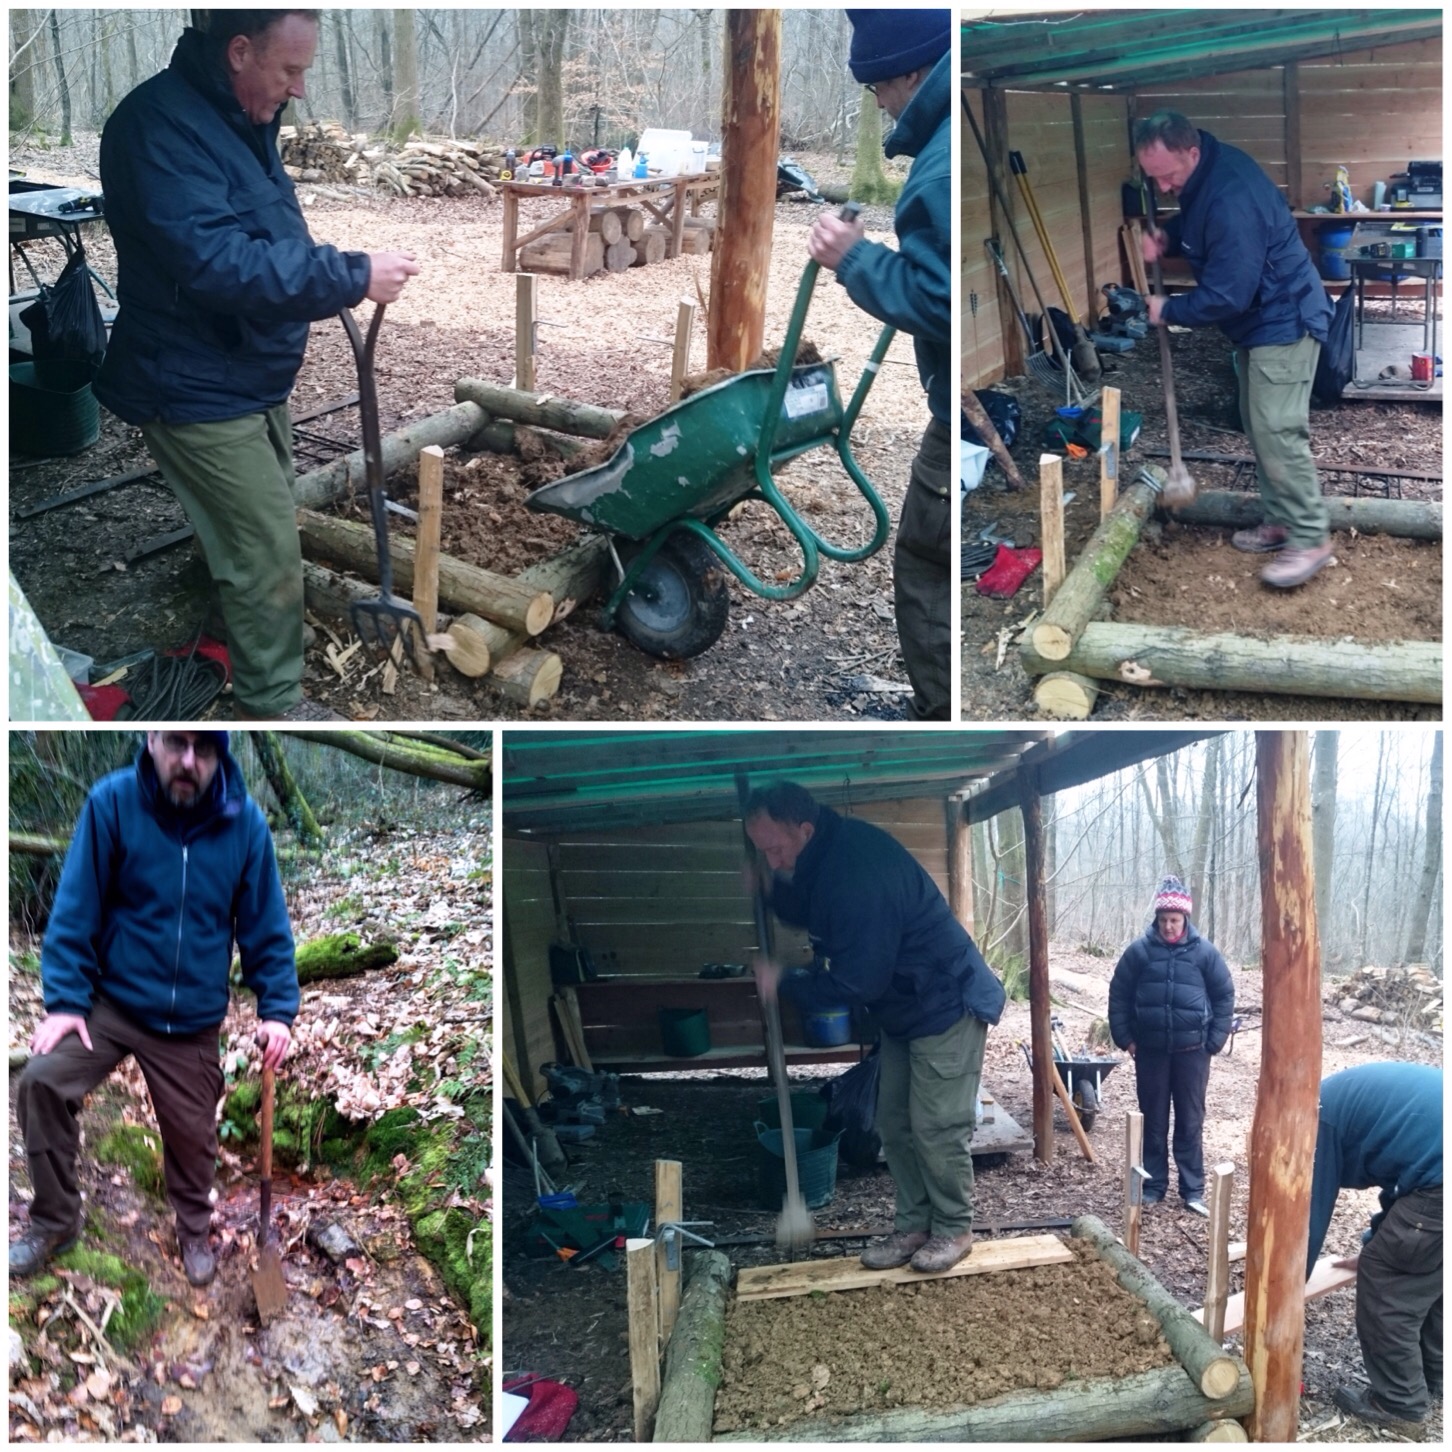
We positioned the firepit where it was to sit in the cookhouse and dug out a small trench on the upslope section to flatten the firepit out a bit and lock it in place. On reflection I think we could have dug the trench a bit deeper but the depth we dug held that top log well enough even though the firepit was not perfectly flat..
Digging in the firepit
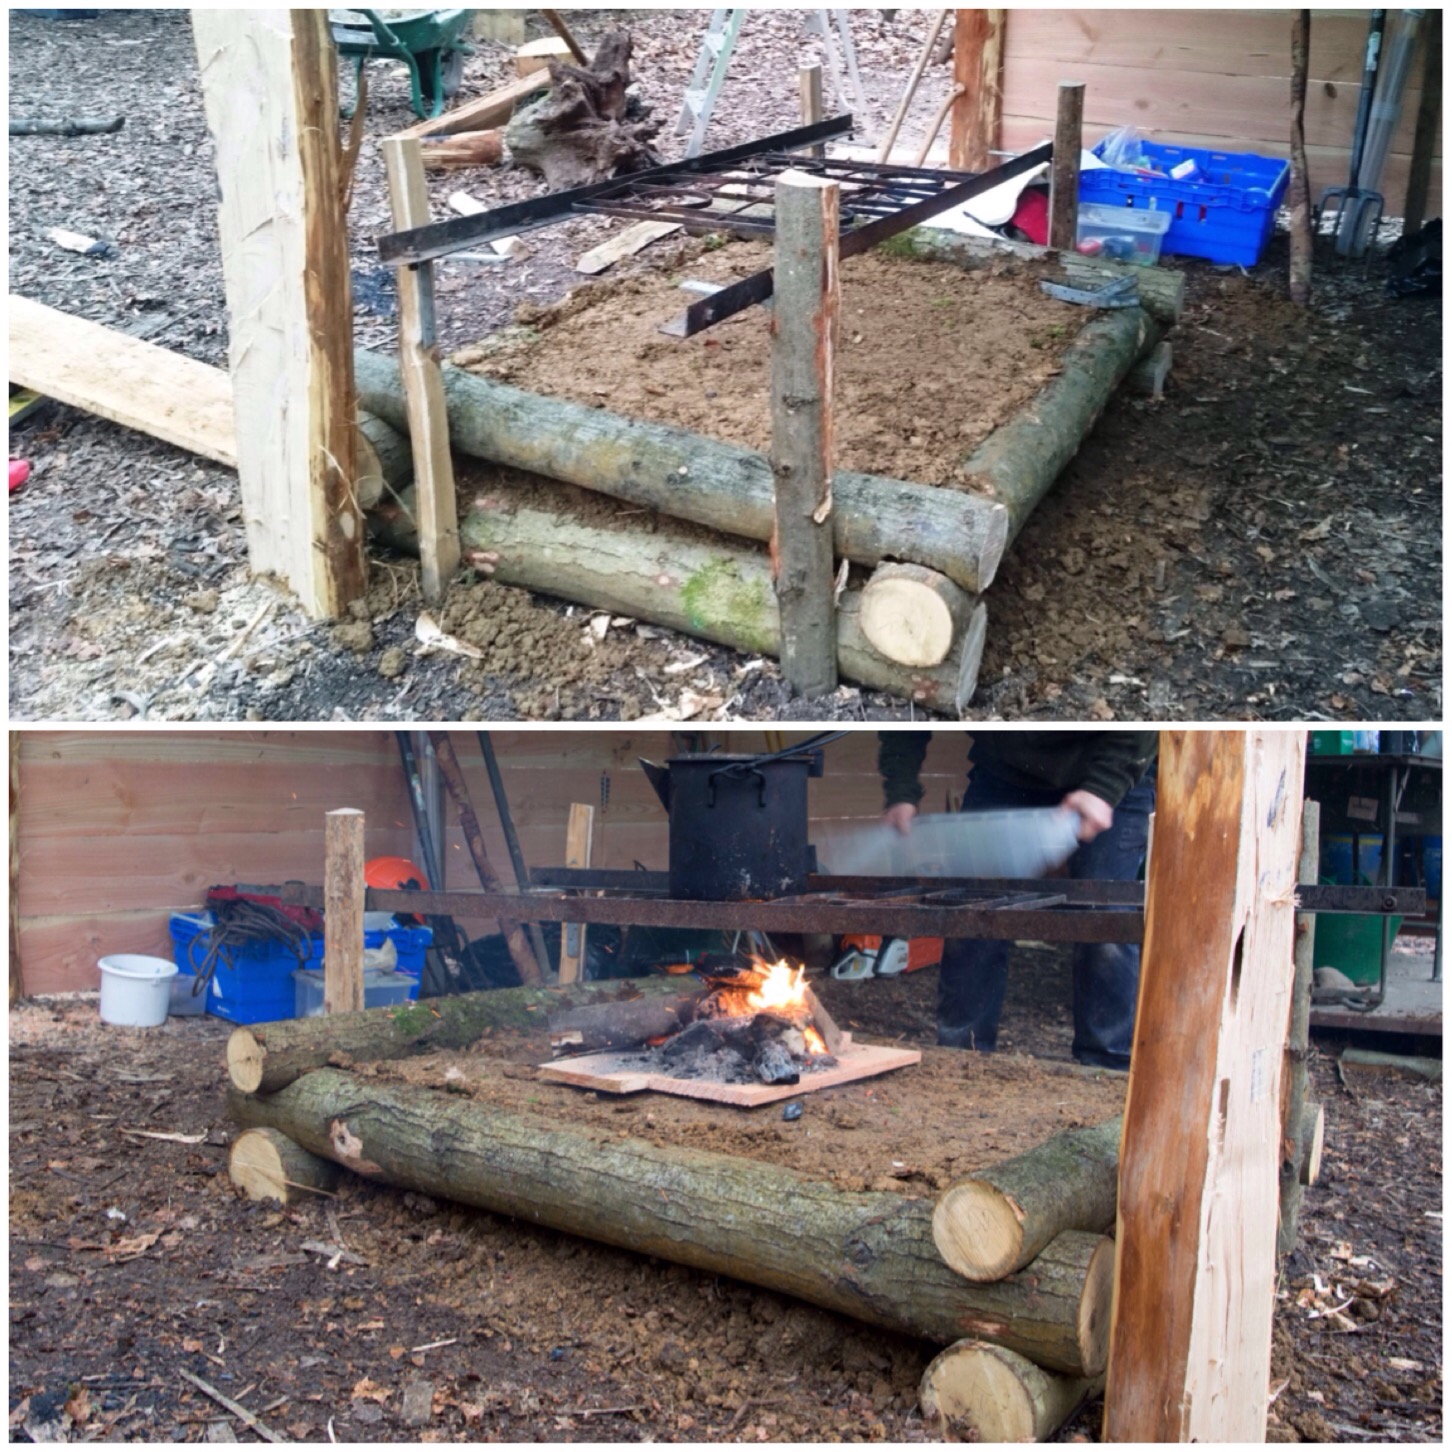
When we had locked all the logs into place we had a chat with John and agreed that we would drive in four stakes to act as supports for the grill. We found four brackets to attach to the stakes to hold the bars of the grill in place and left enough room on the stakes to add another four brackets so the grill could be raised (we left John to attach these later when he got some more brackets).
Constructing the grill stand
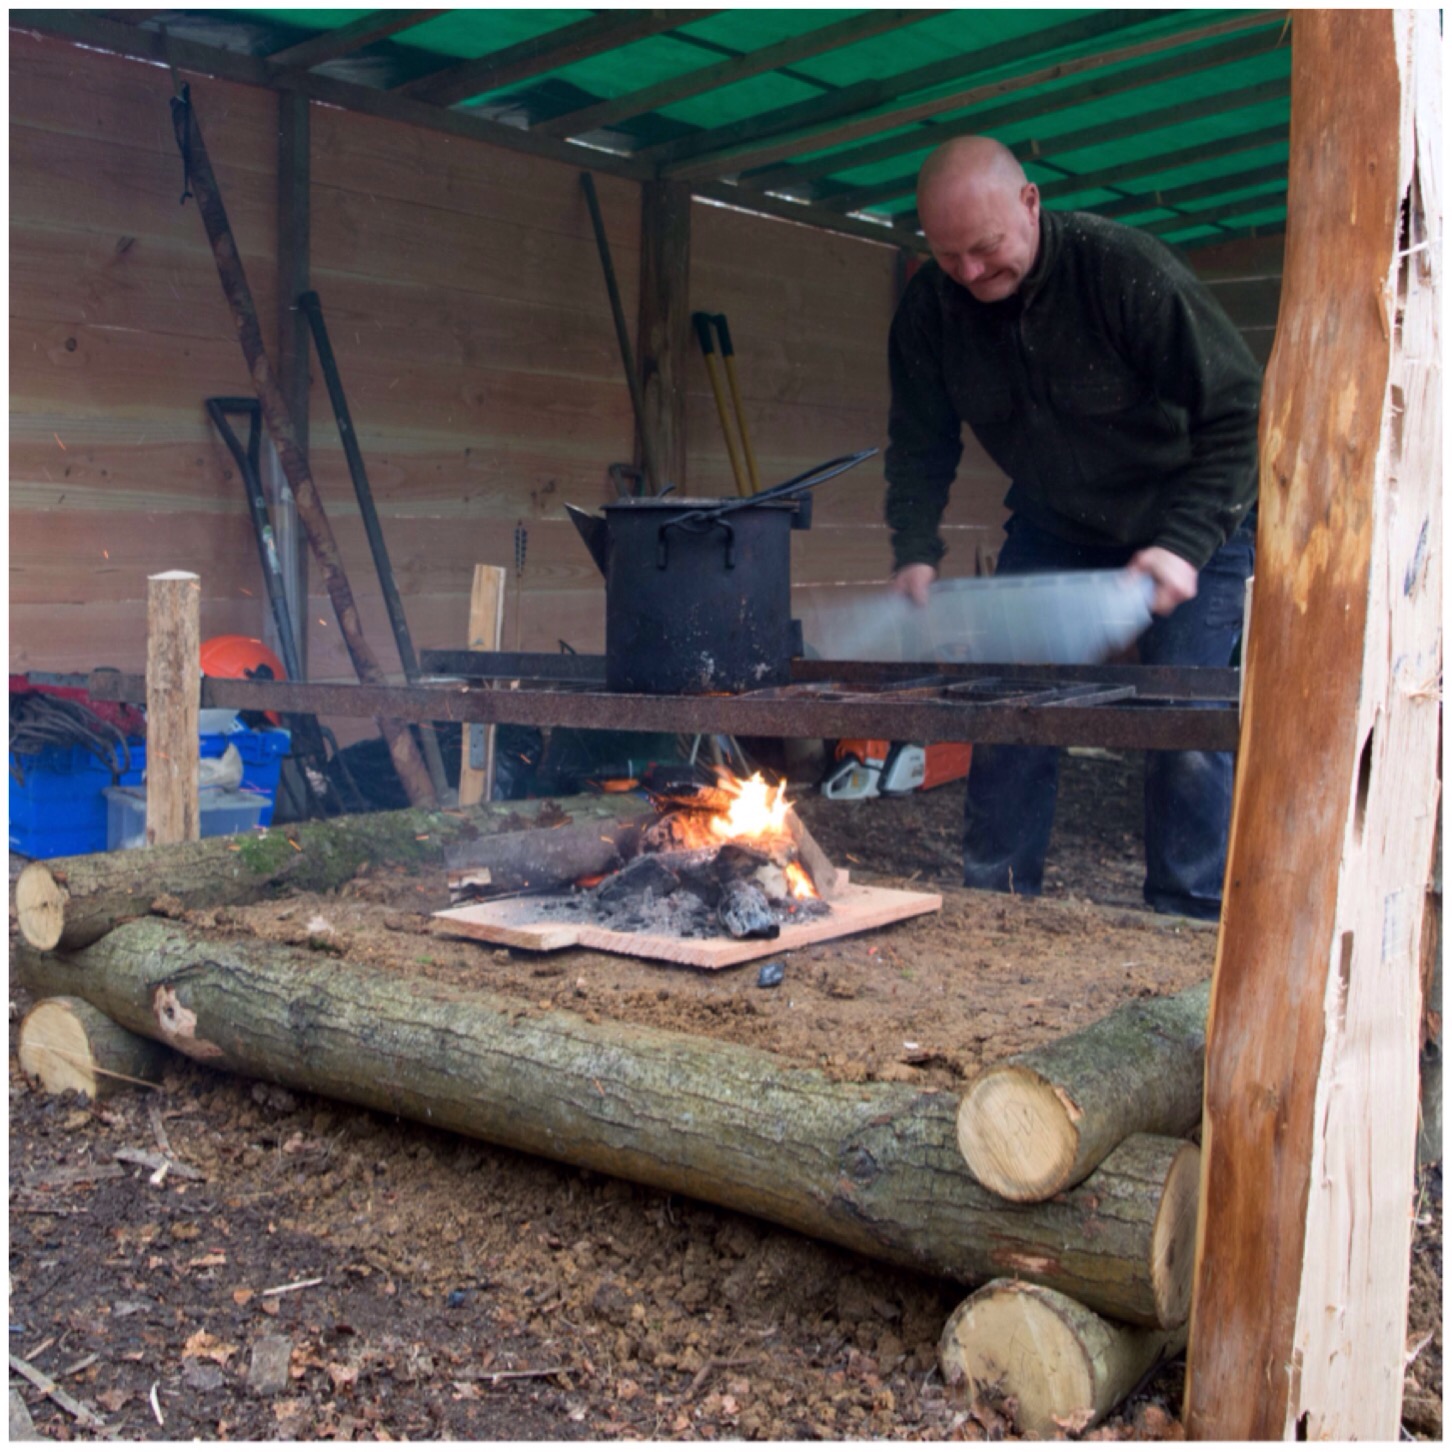
The filling in of the firepit was the easy bit as we simply dropped about 5 wheelbarrow loads of earth into it. Nigel was on hand while we dug the earth to tamp it all down.
The top layer of fill was taken from the edge of a small stream where there was a high concentration of clay. I hope that over time this layer of clay will harden and make for a good surface to light a fire. I suggested to John that as the top layer dries out he could add a few more layers of clay to build the surface up a little more to be in line with the top of the logs.
Filling in the firepit
When we had finished tamping the soil down it was just a case of putting the grill back on and lighting a fire. I placed some dry off-cuts over the damp soil to give the fire a good chance to get going. With a little bit of waftage from Kev it was soon going nicely.
As soon as John adds a layer or two more the surface will get a bit closer to the grill for a fast cooking time and when the other brackets are added higher up they’ll allow for slower cooking too.
Topping off and first firing
The grill is as flat as we could make it although it appears to slope, because the ground isn’t level.
I had a great time building this firepit with Jim, figuring out how it would all link together and finally putting it all in place with the grill on top.
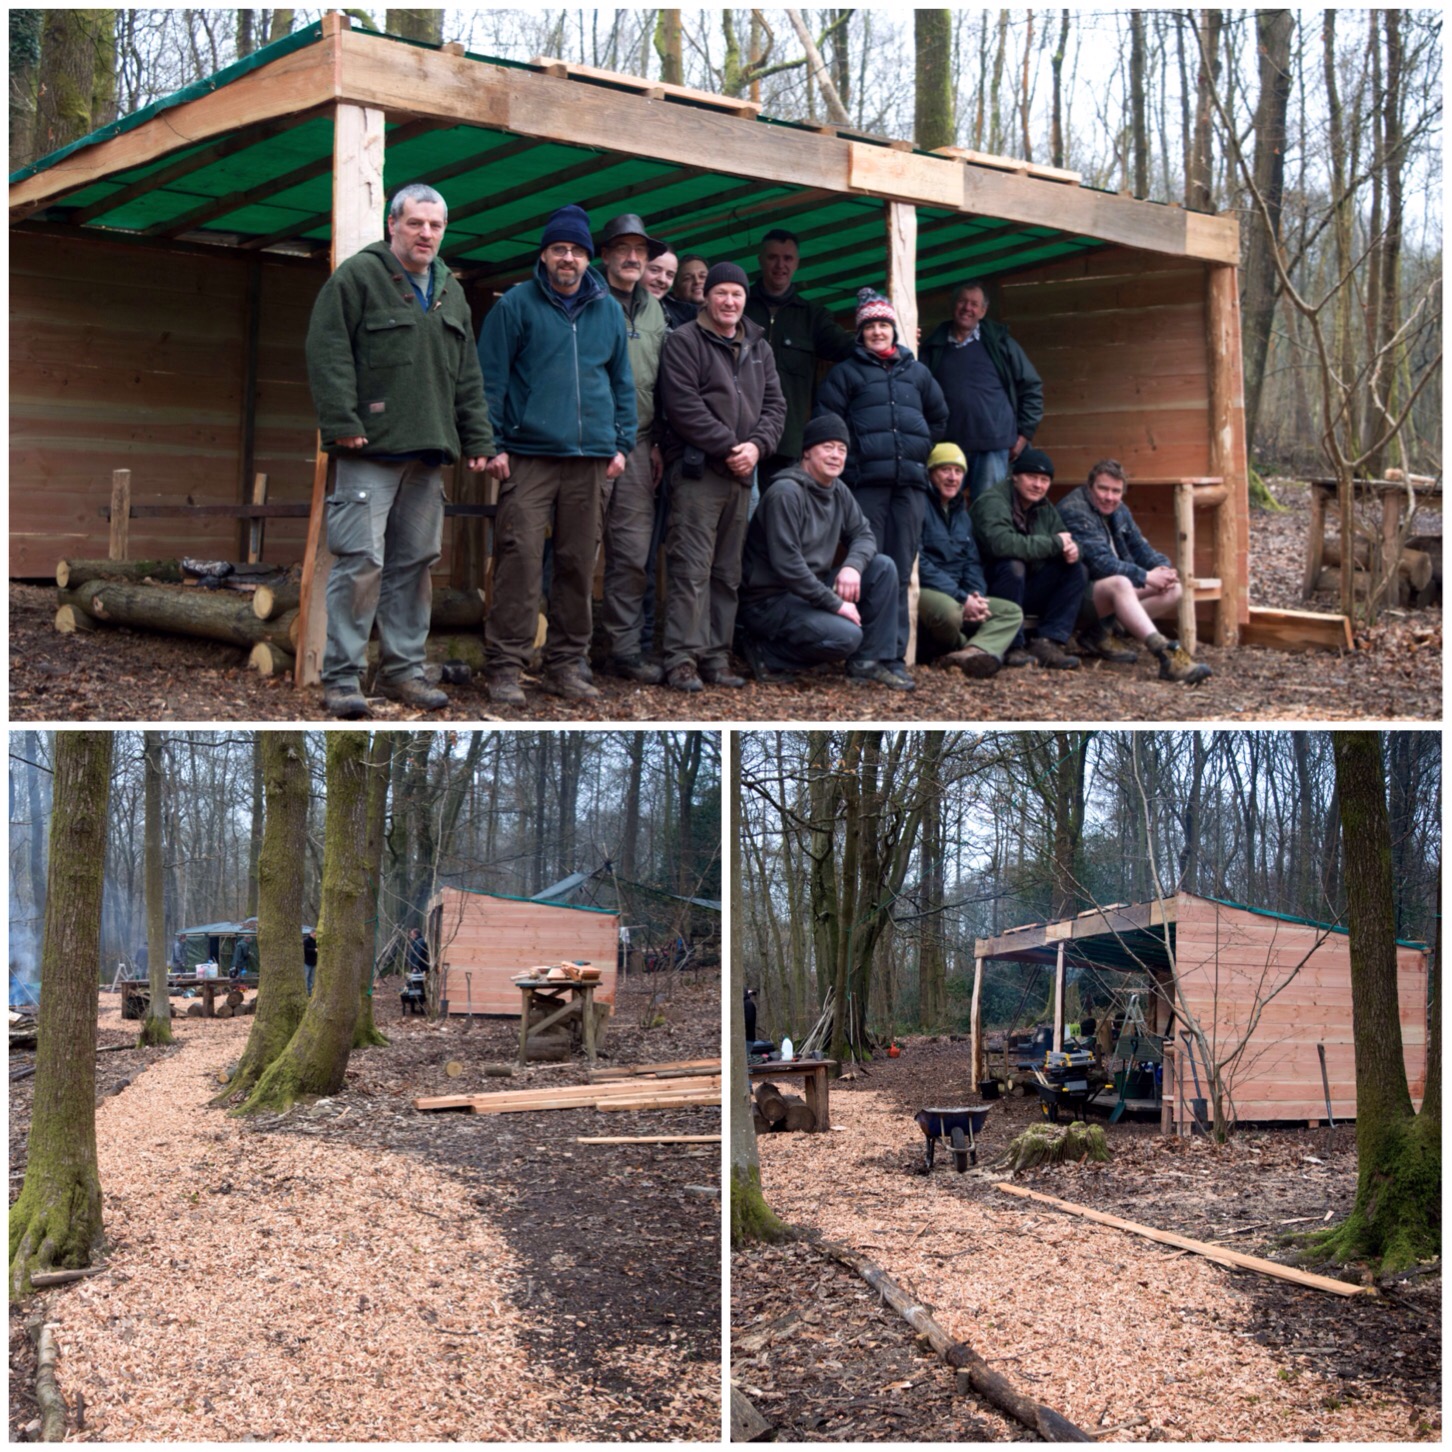
A happy team
There are two more posts on projects we did that weekend. They are:
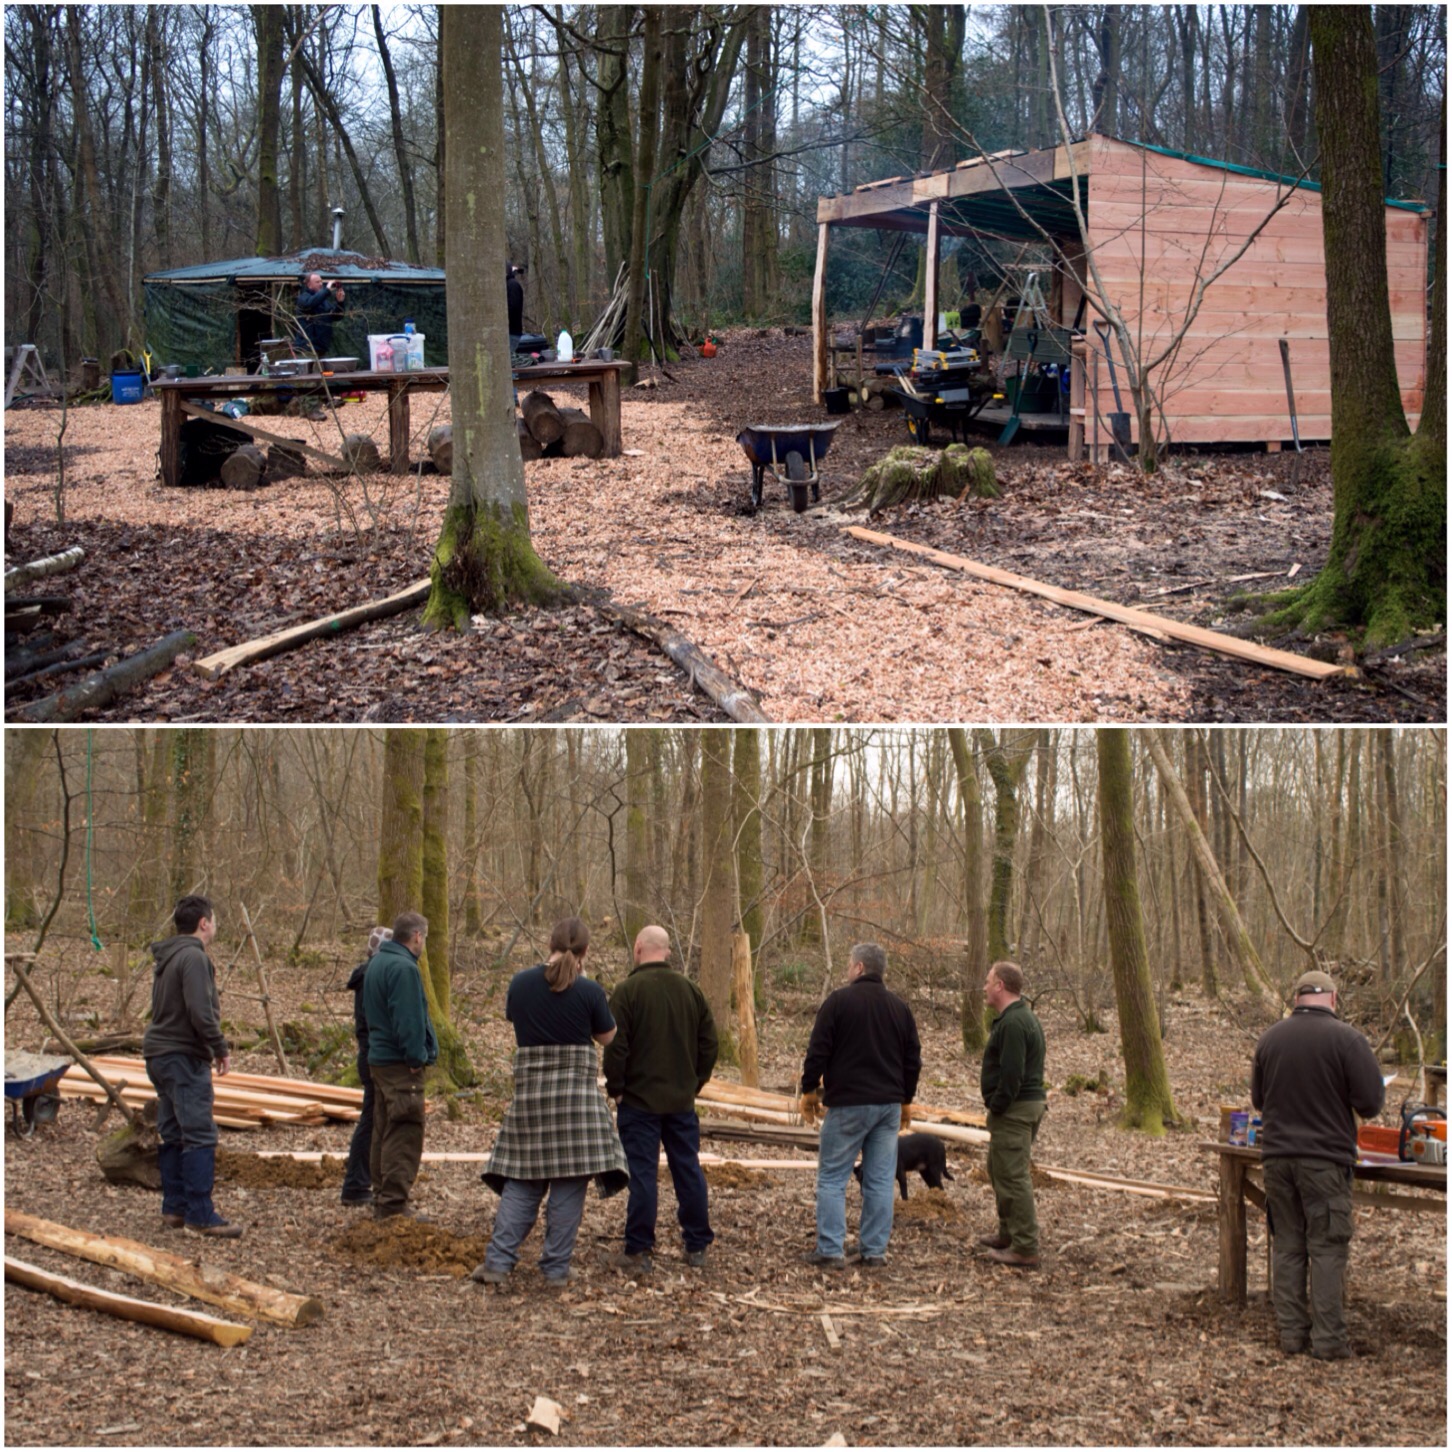
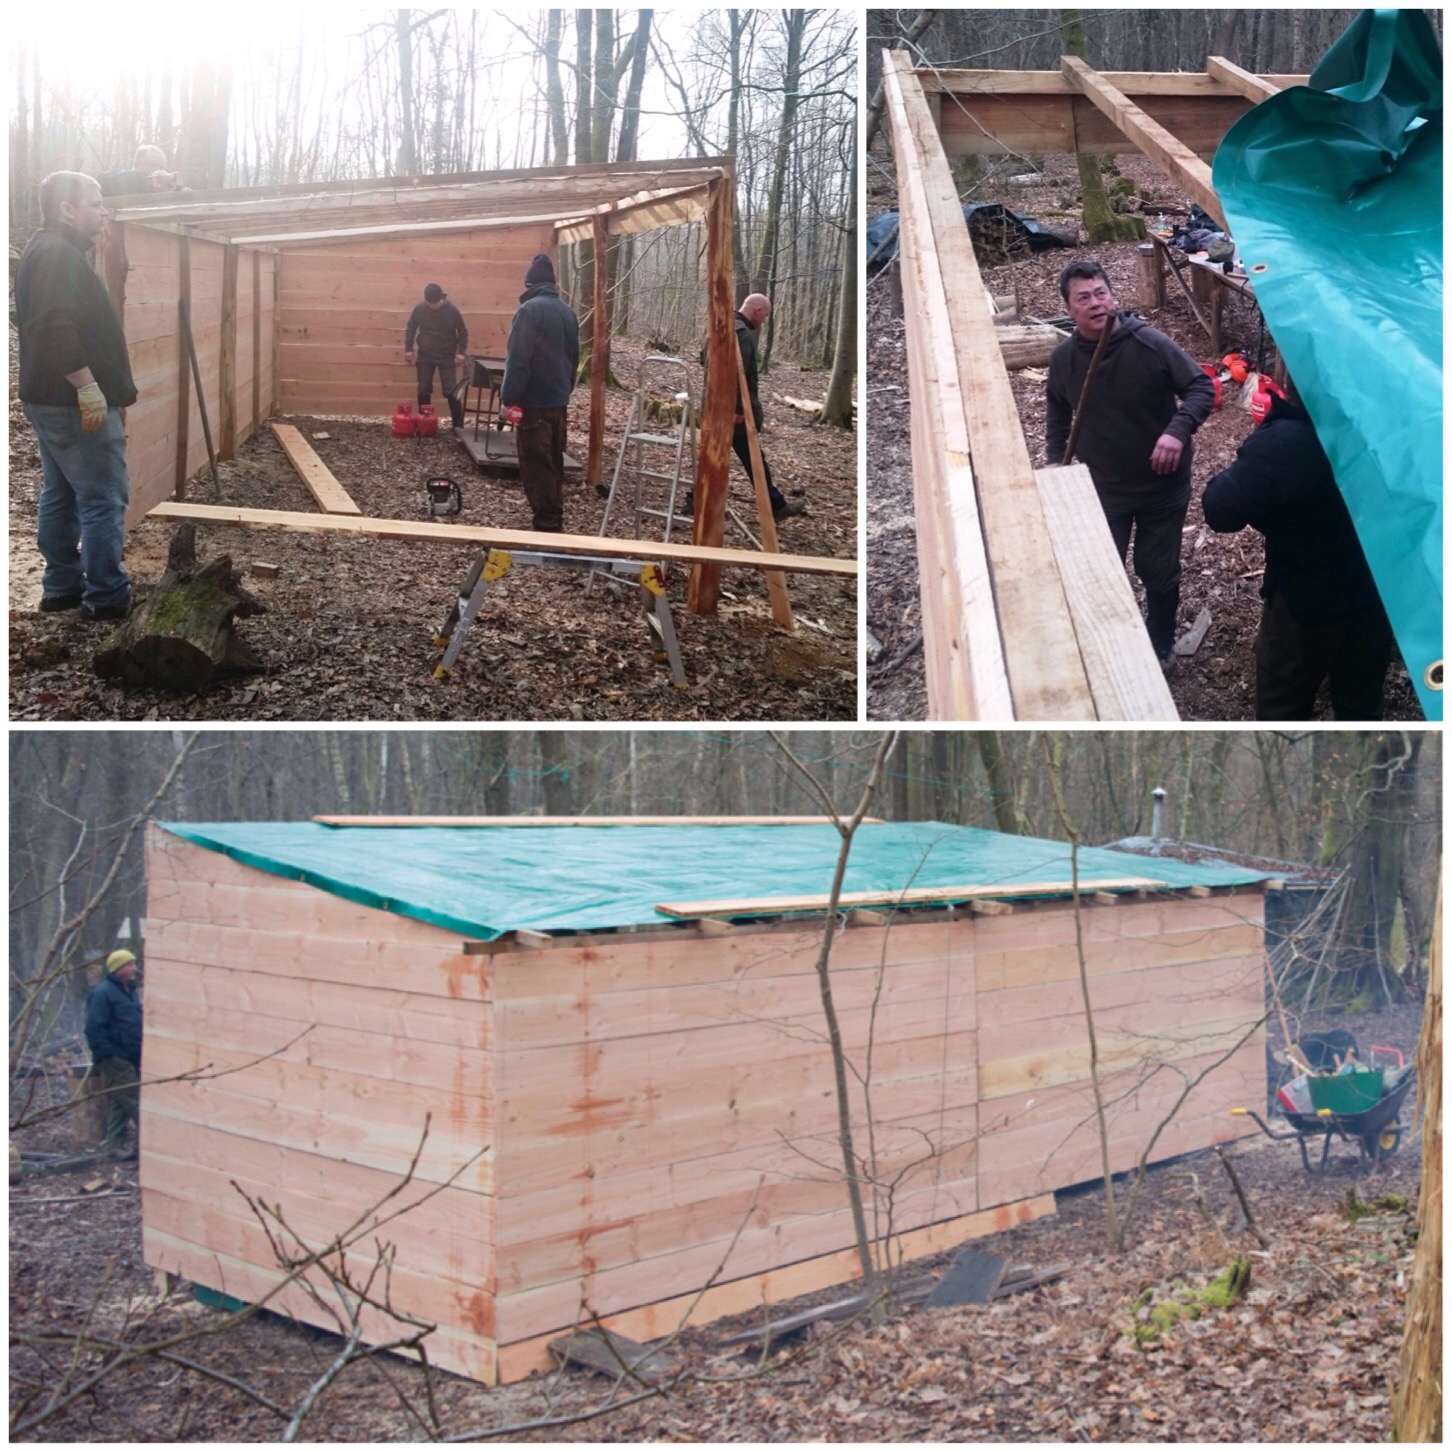
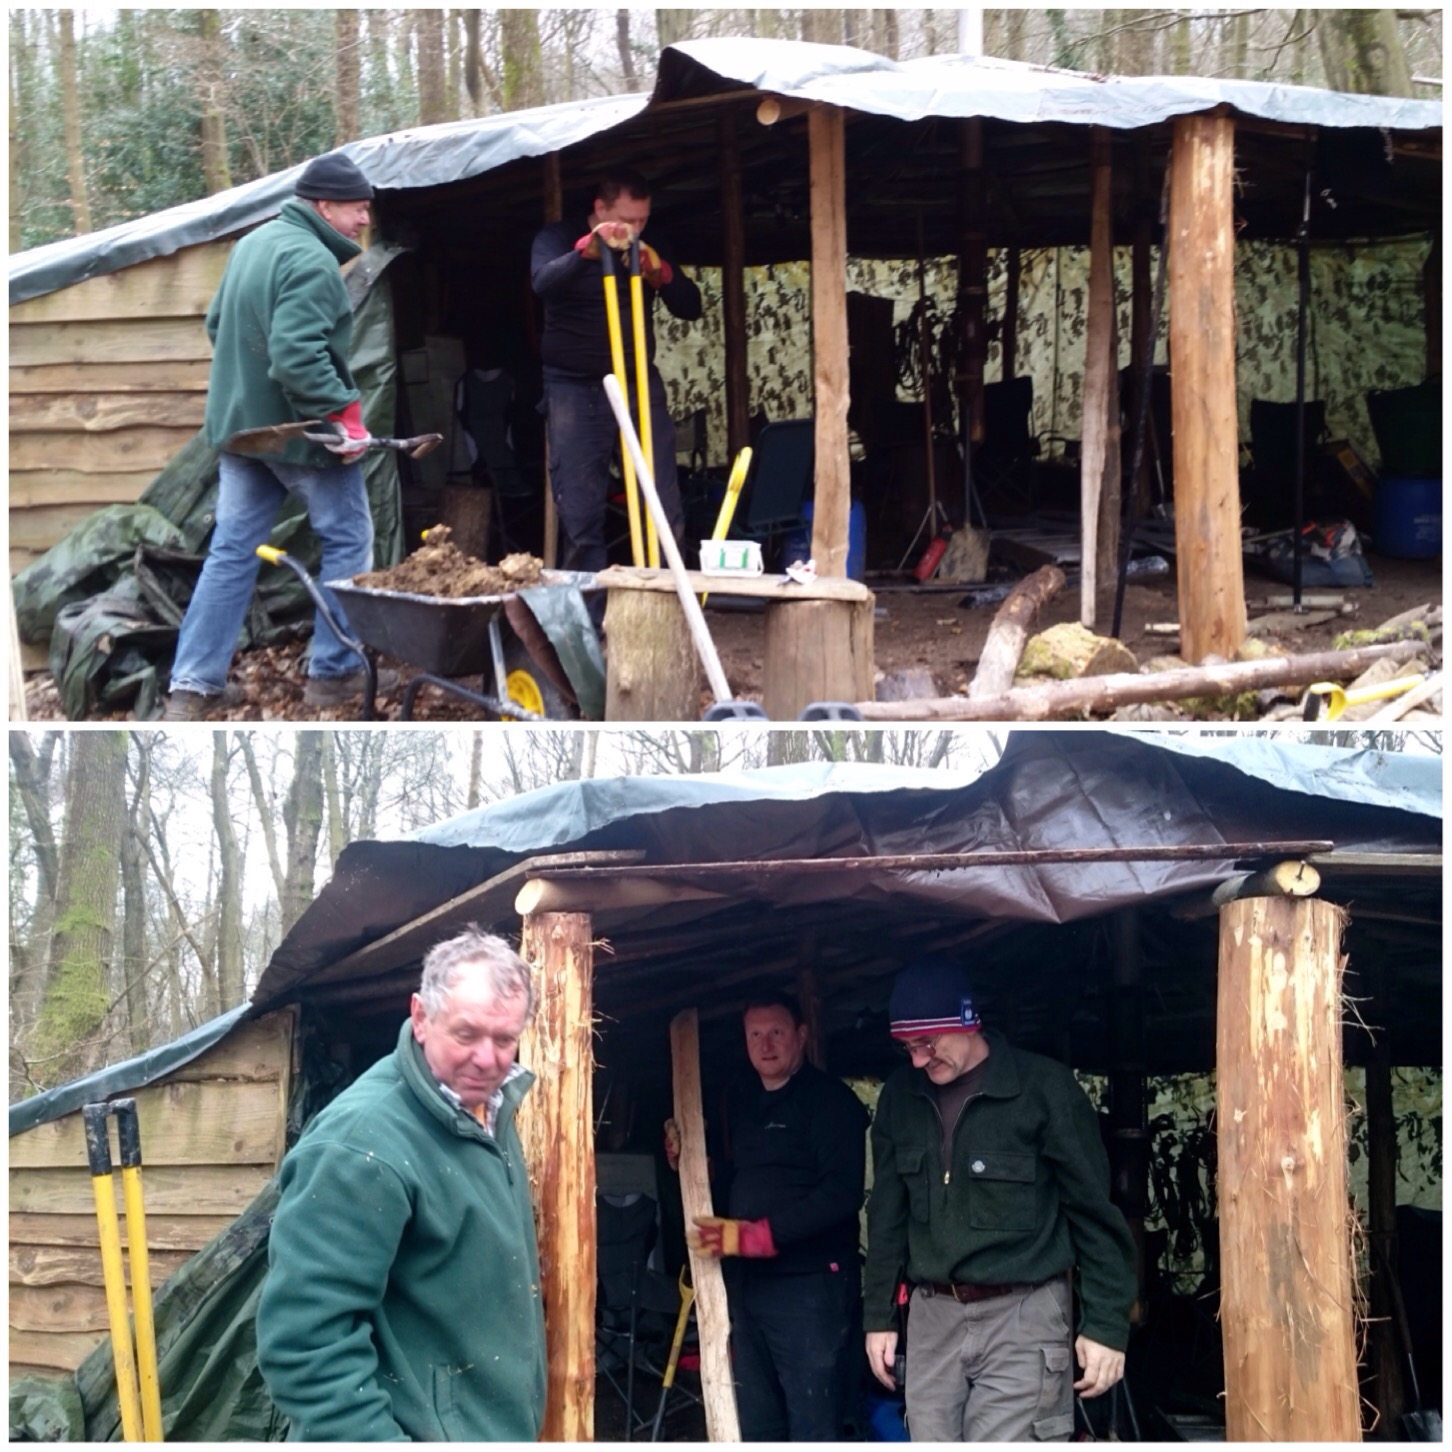
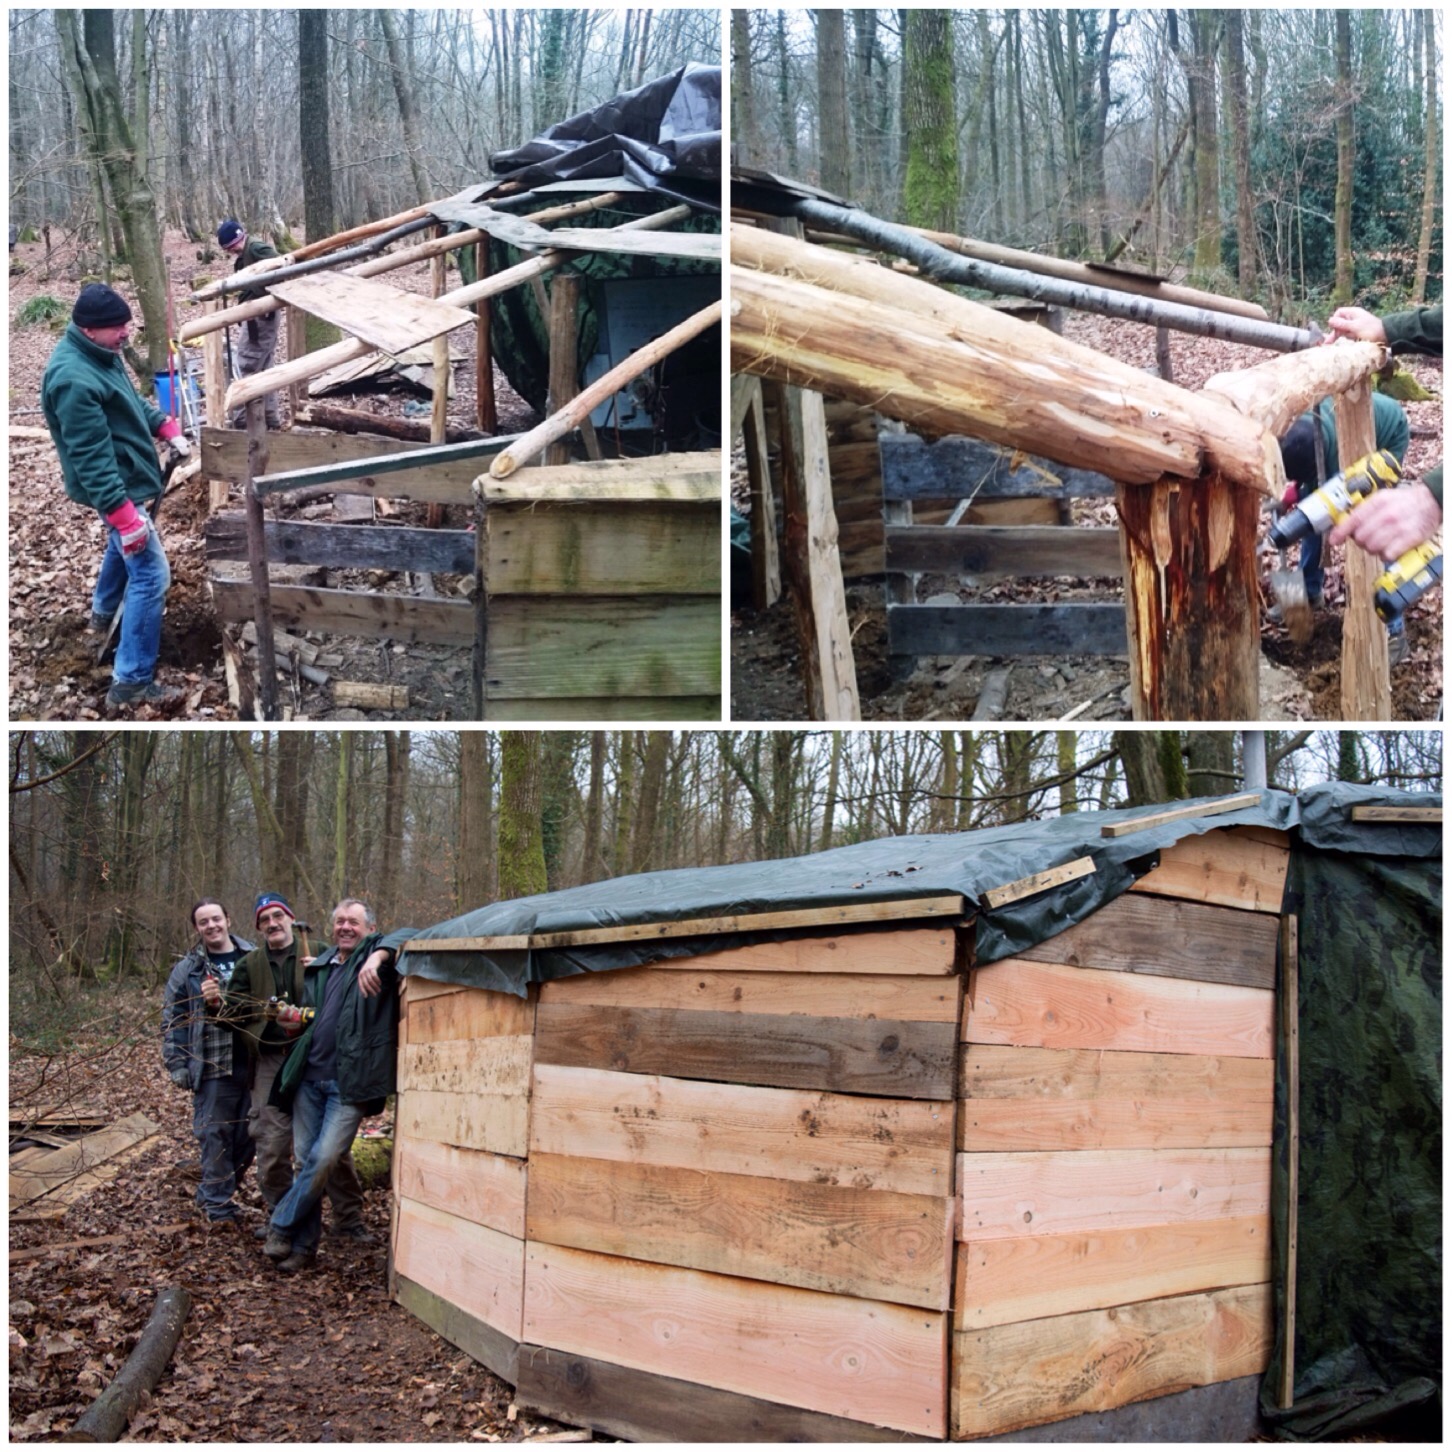
Earlier I wrote up a post on re-building the roundhouse at John Rhyder’s Woodcraft School HQ in Hampshire. This post is all about the new cookhouse we built that weekend as well.
In the top picture below is the open-fronted cookhouse we built and in the bottom picture how it all looked on the Saturday morning when we first arrived – a few post holes in the ground.
After and before
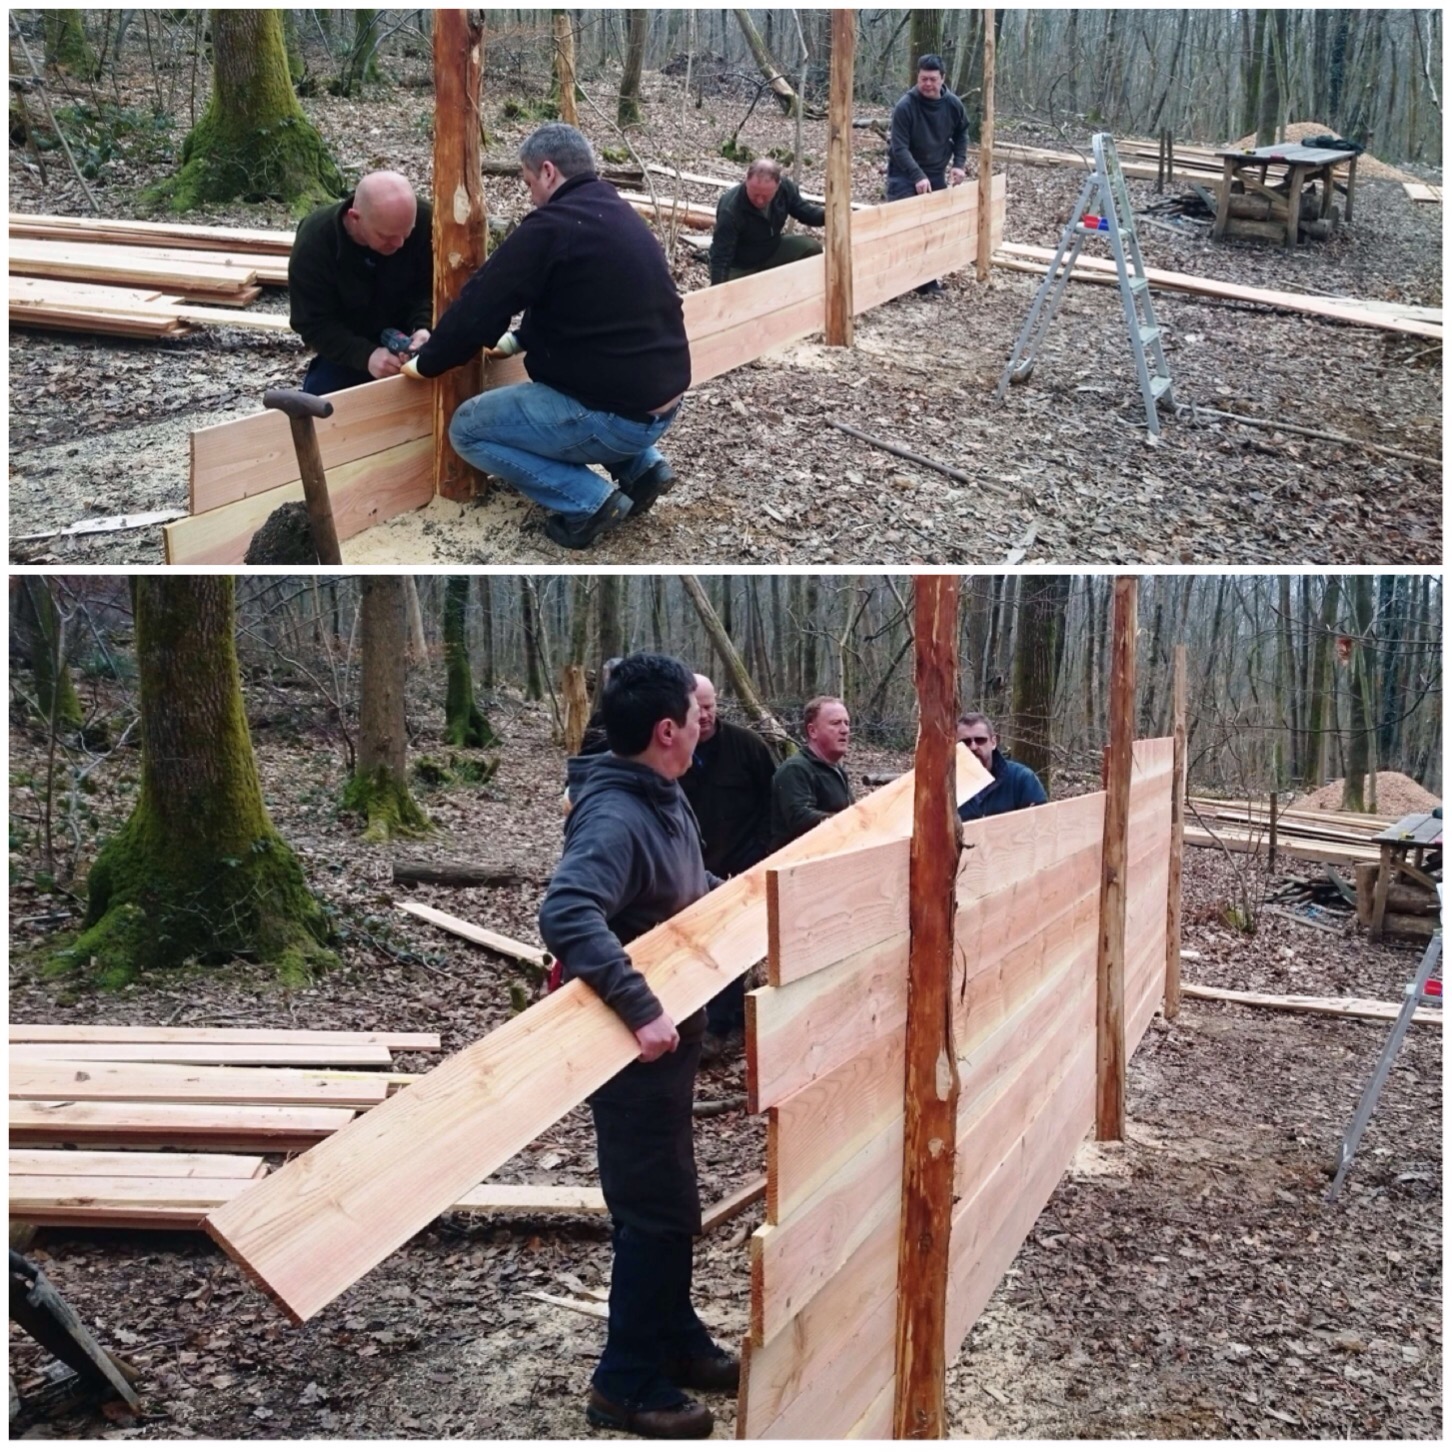
In the group building this were Scott Batty, Kev Howlett, Jumbo Jim, Nigel Painter, Paul Workman, Chen, David Willis, John Rhyder and myself. John had split a load of sweet chestnut to use as the uprights and brought into the site a load of timber to build up the walls and for battoning and rafting.
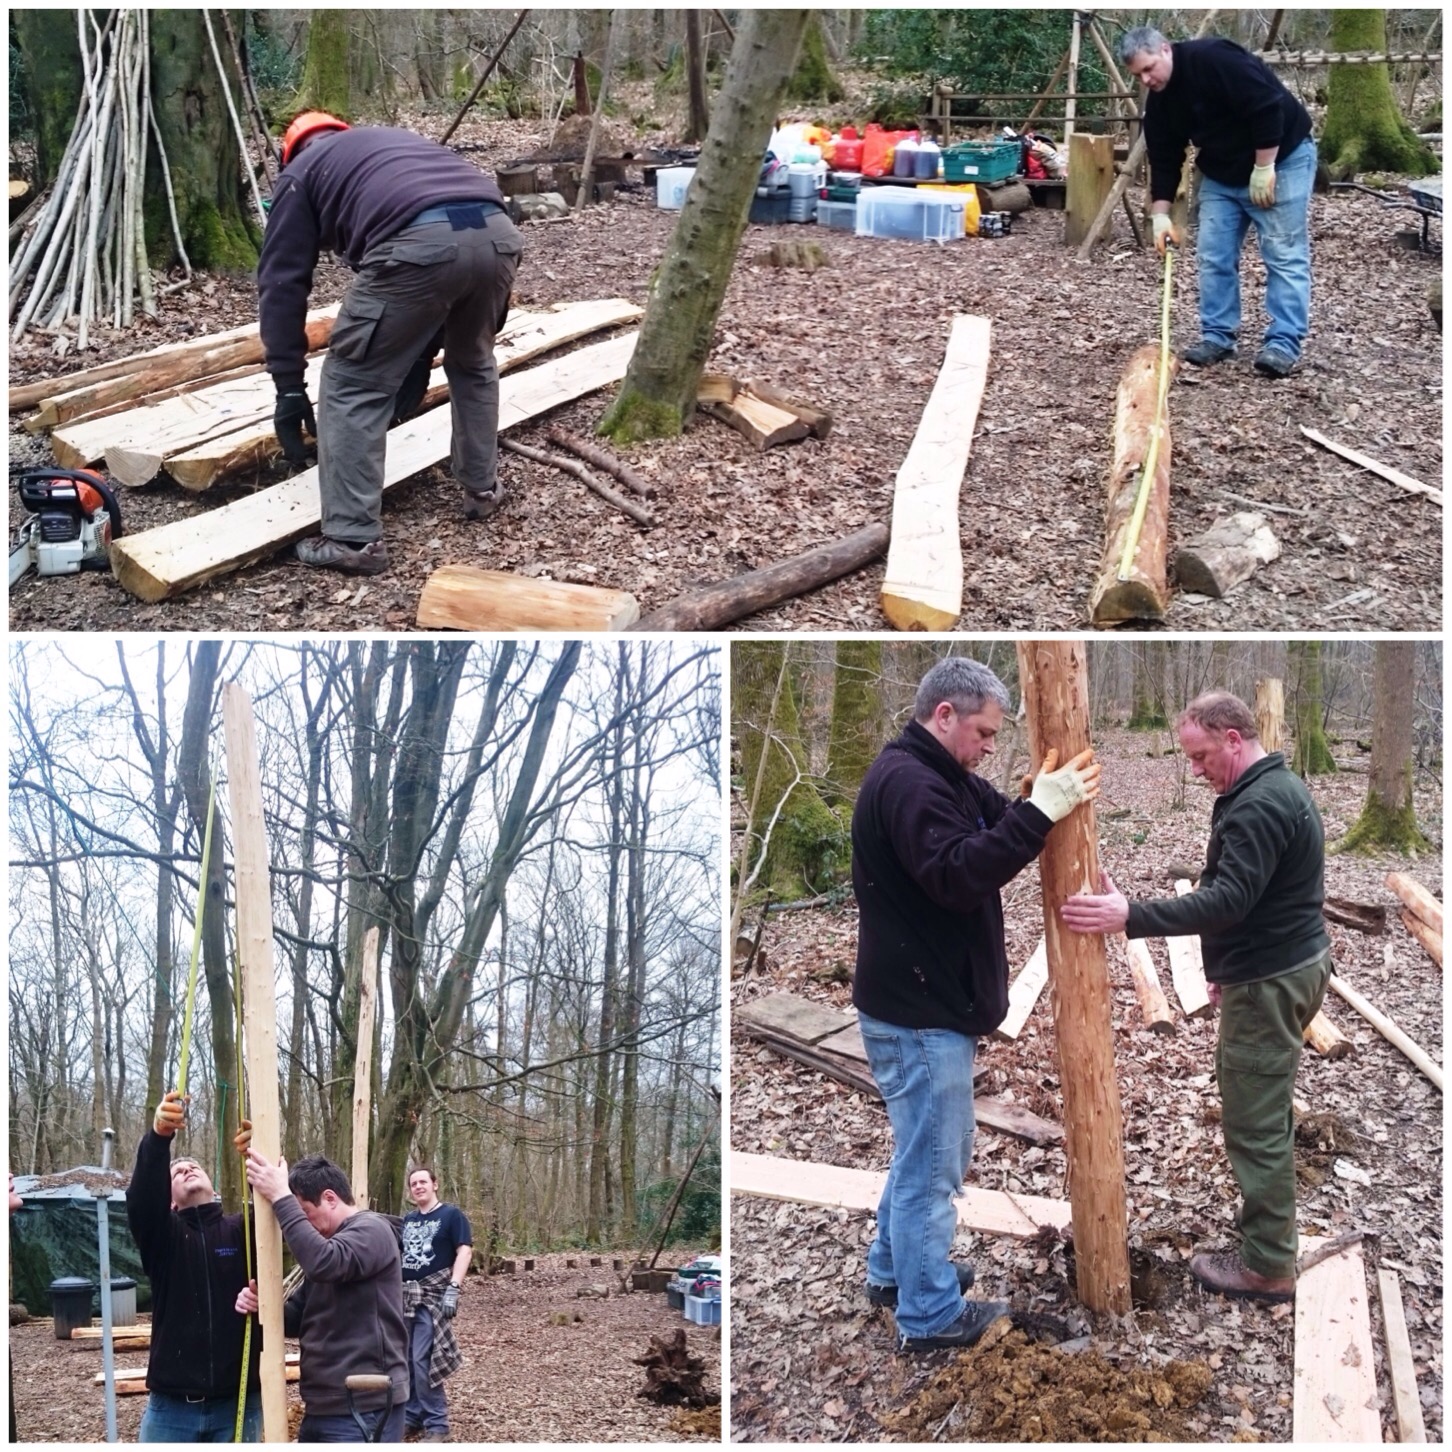
We selected six pieces for the uprights and started on the back wall first. The plan was to have the kitchen closed off on two sides (to protect from the prevailing wind) and to have it open on two sides.
The first post went in easy enough and we compacted earth and stones around it to keep it secure.
Measuring up and digging in
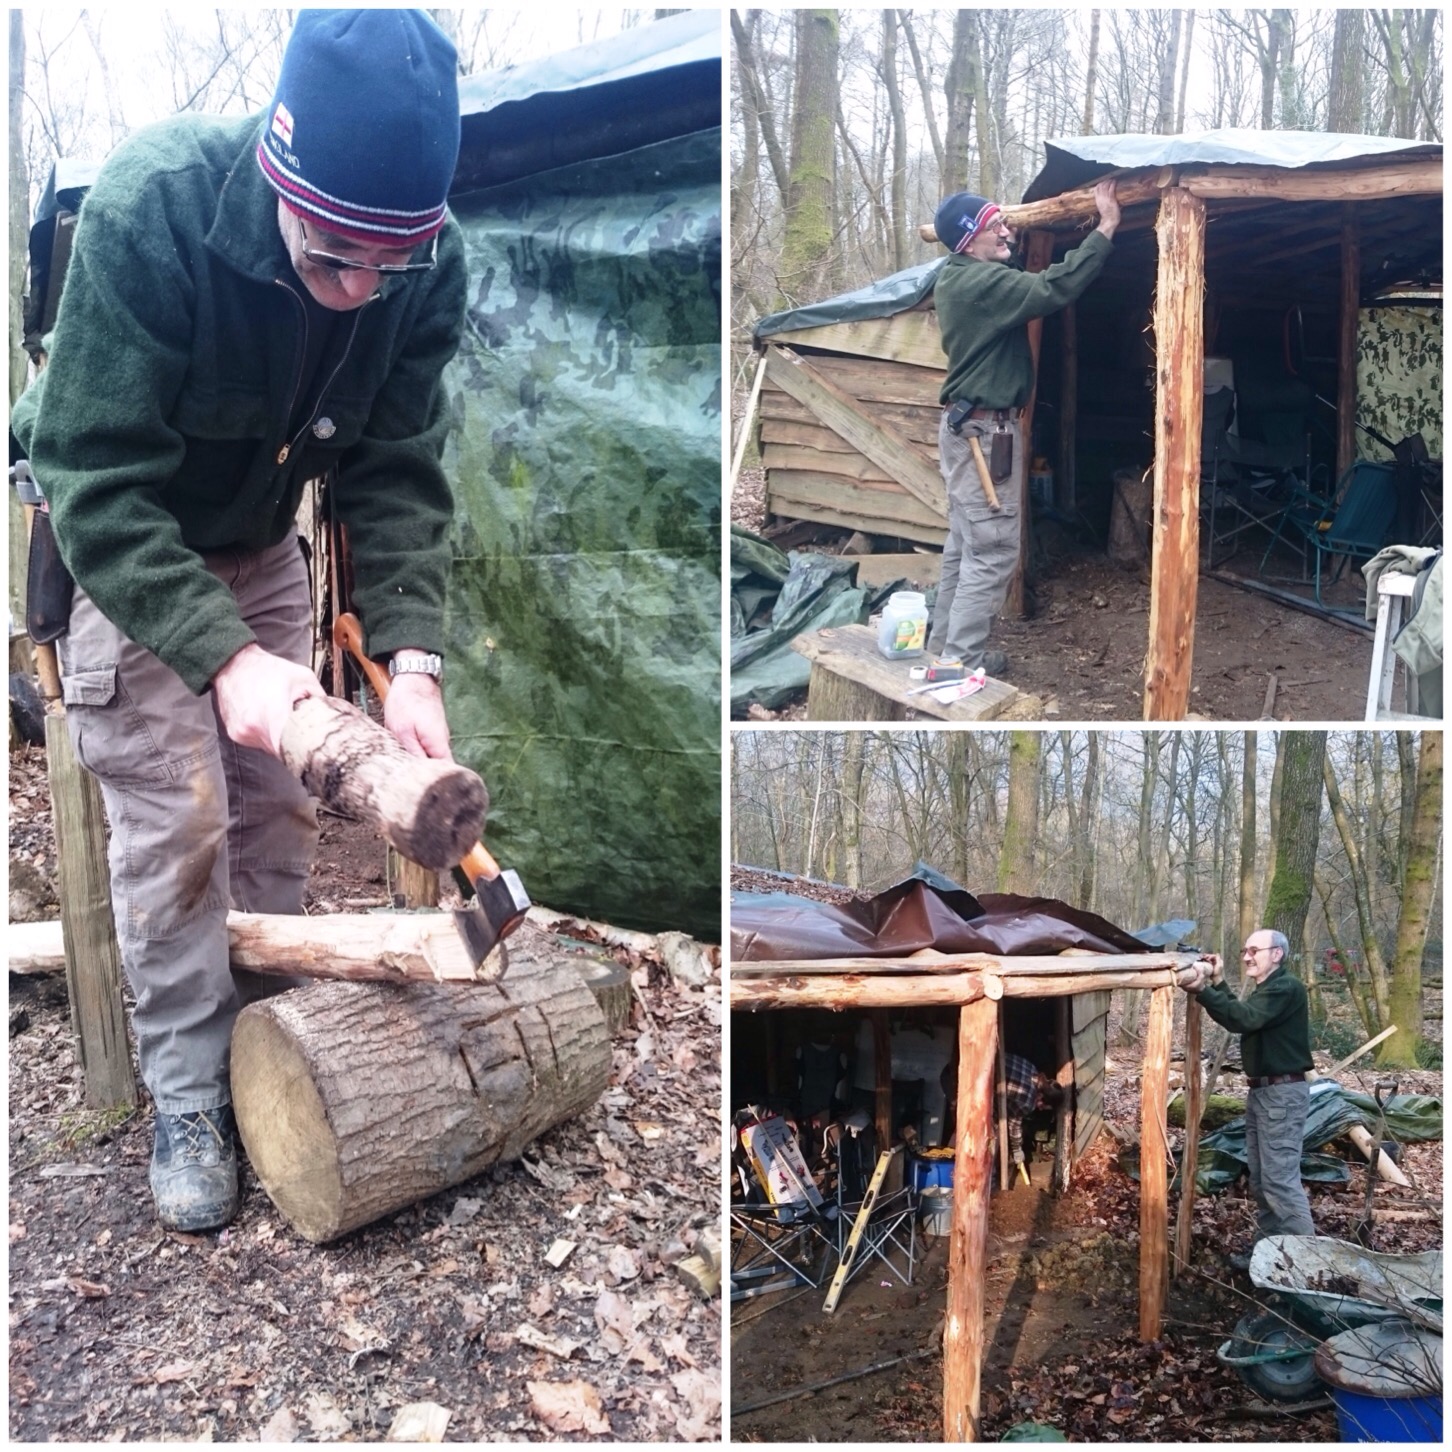
The other posts were put in and we used large pieces of straight timber to make sure the these posts lined up properly (mark one eyeball – carpenters measures).
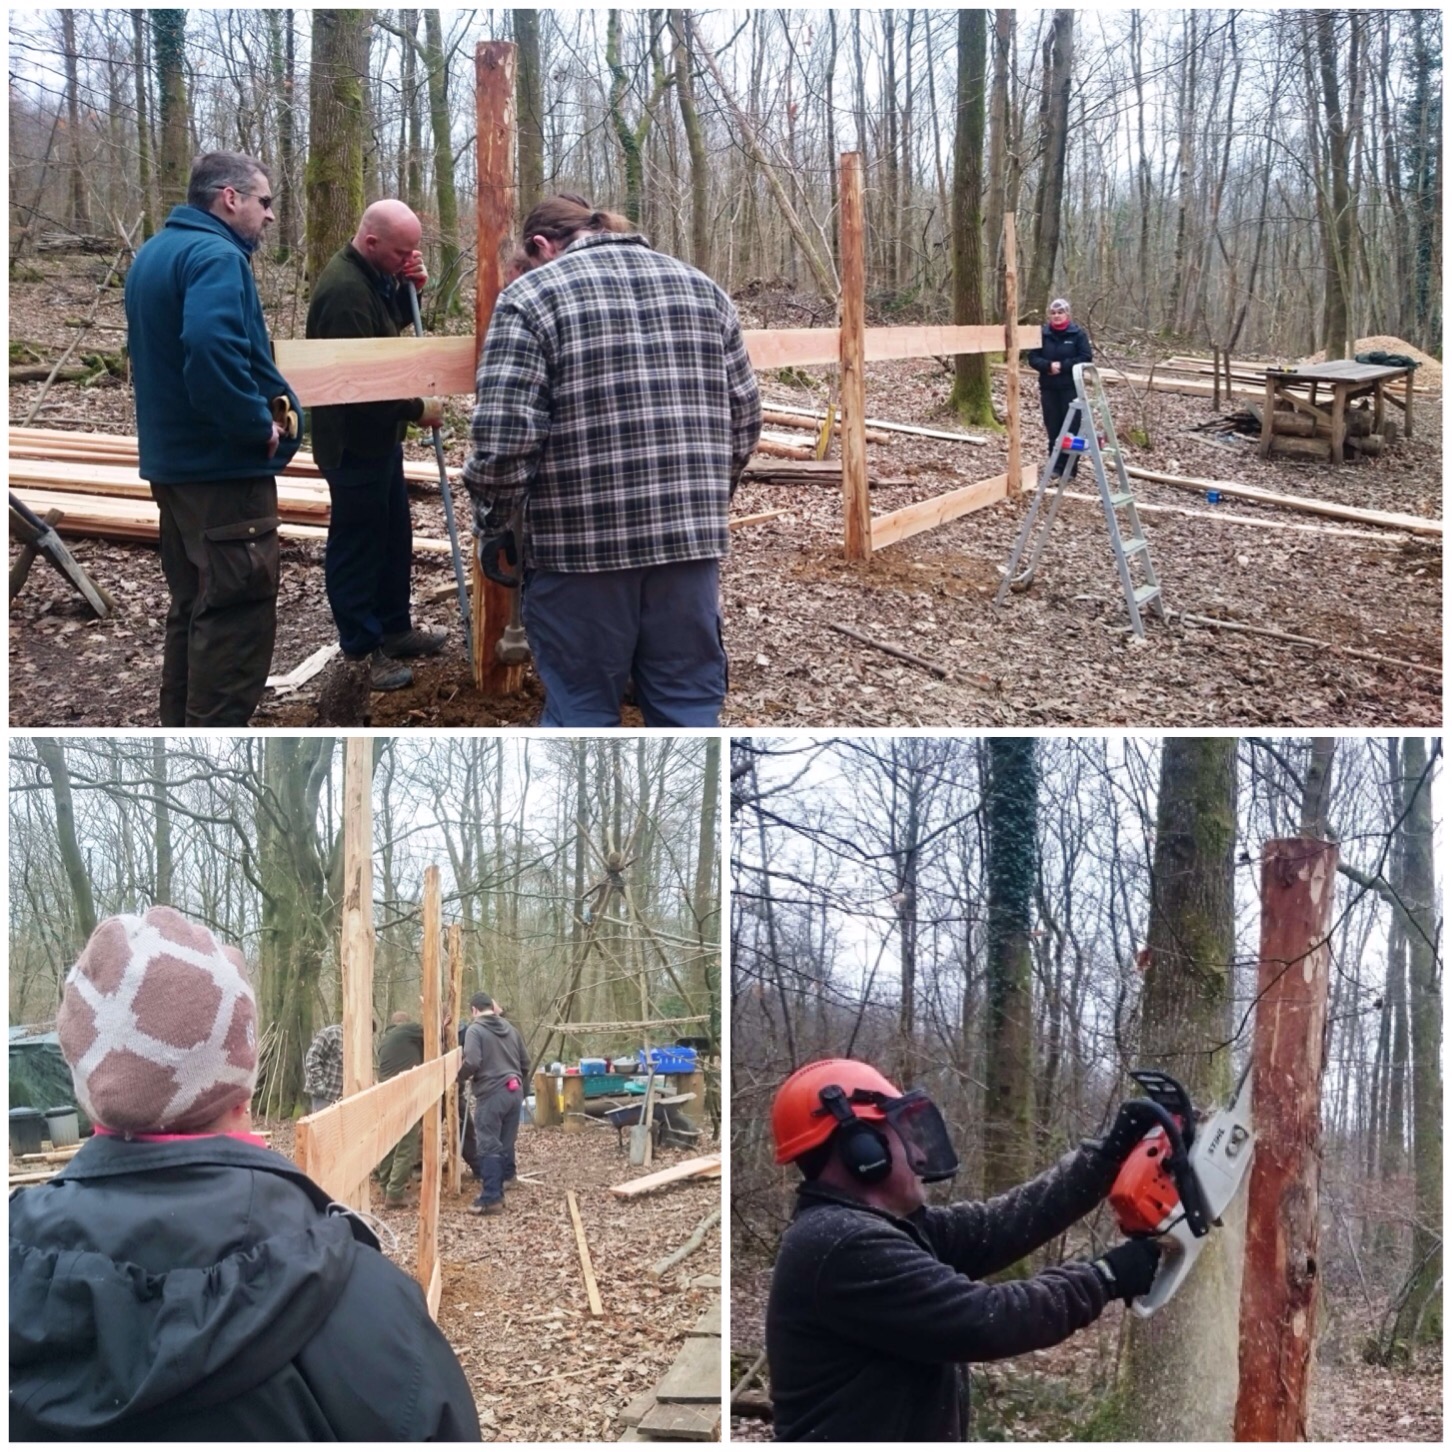
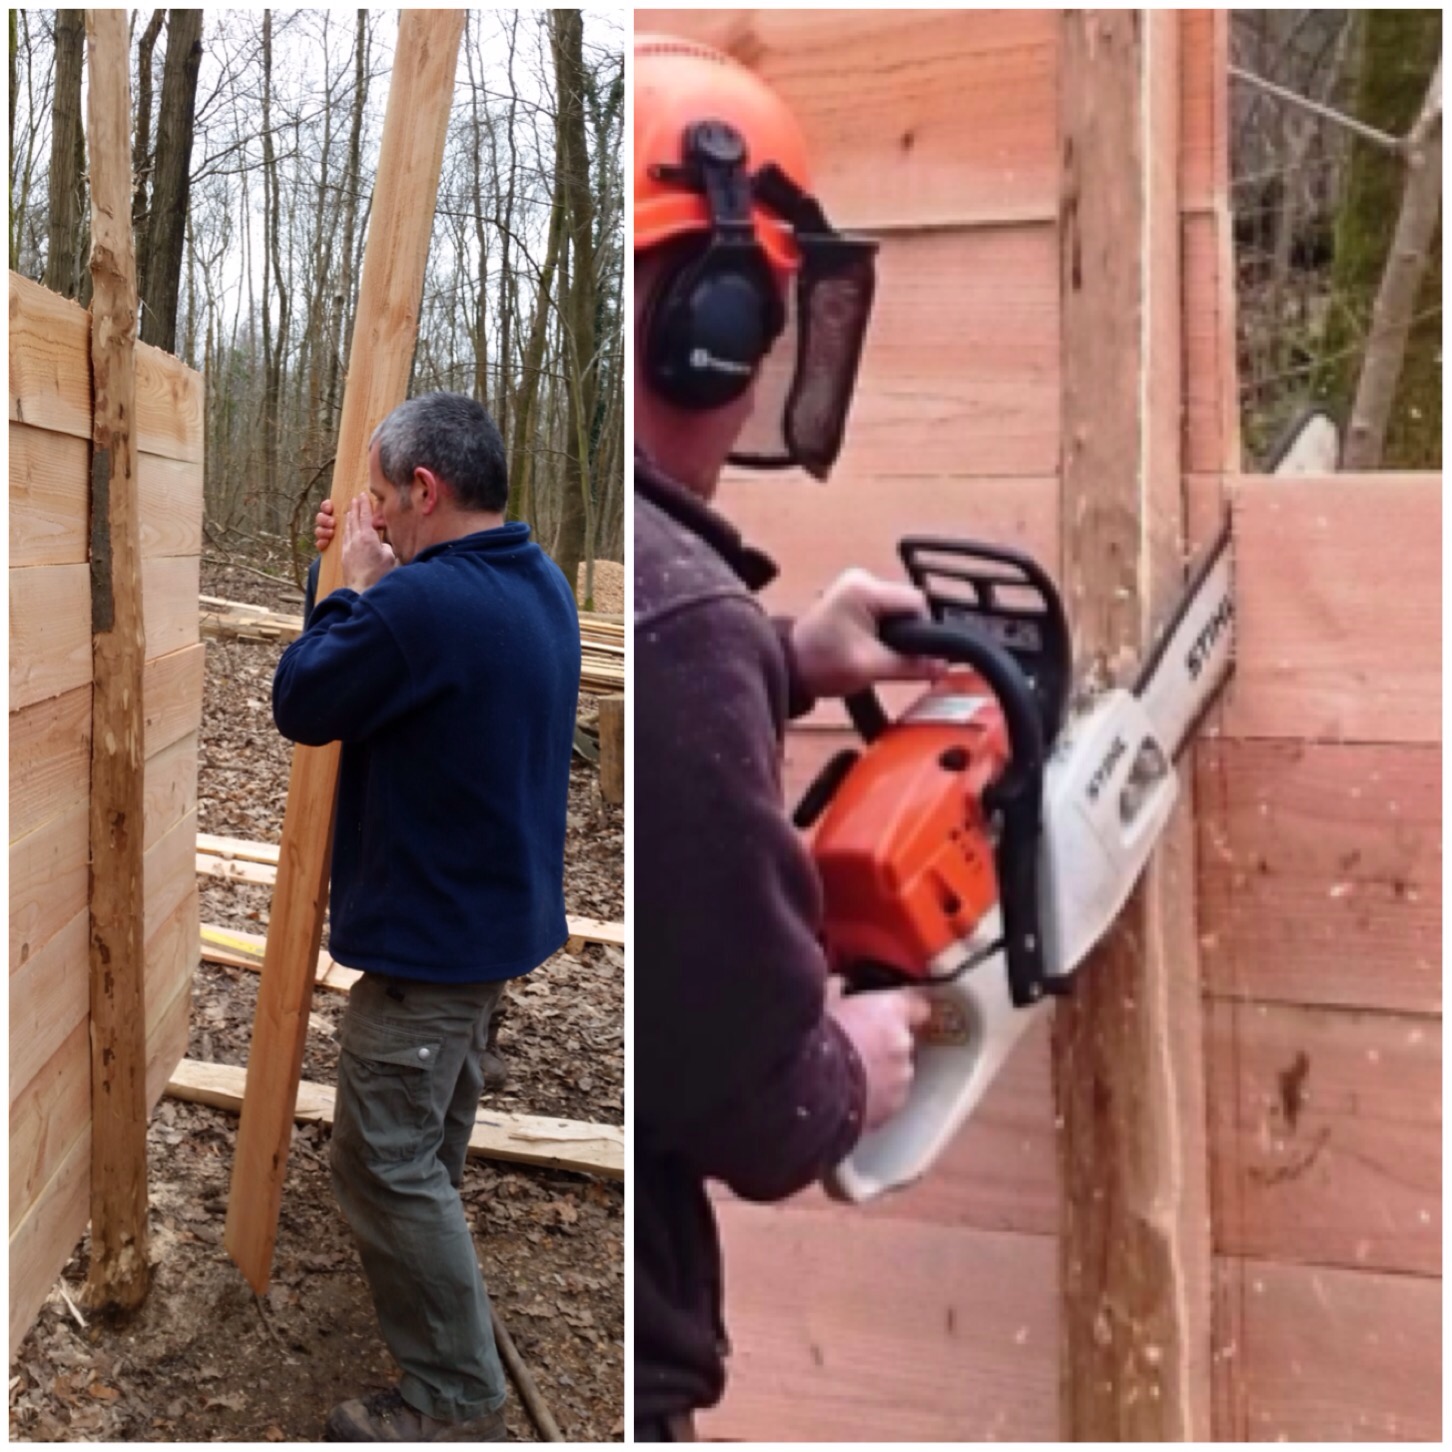
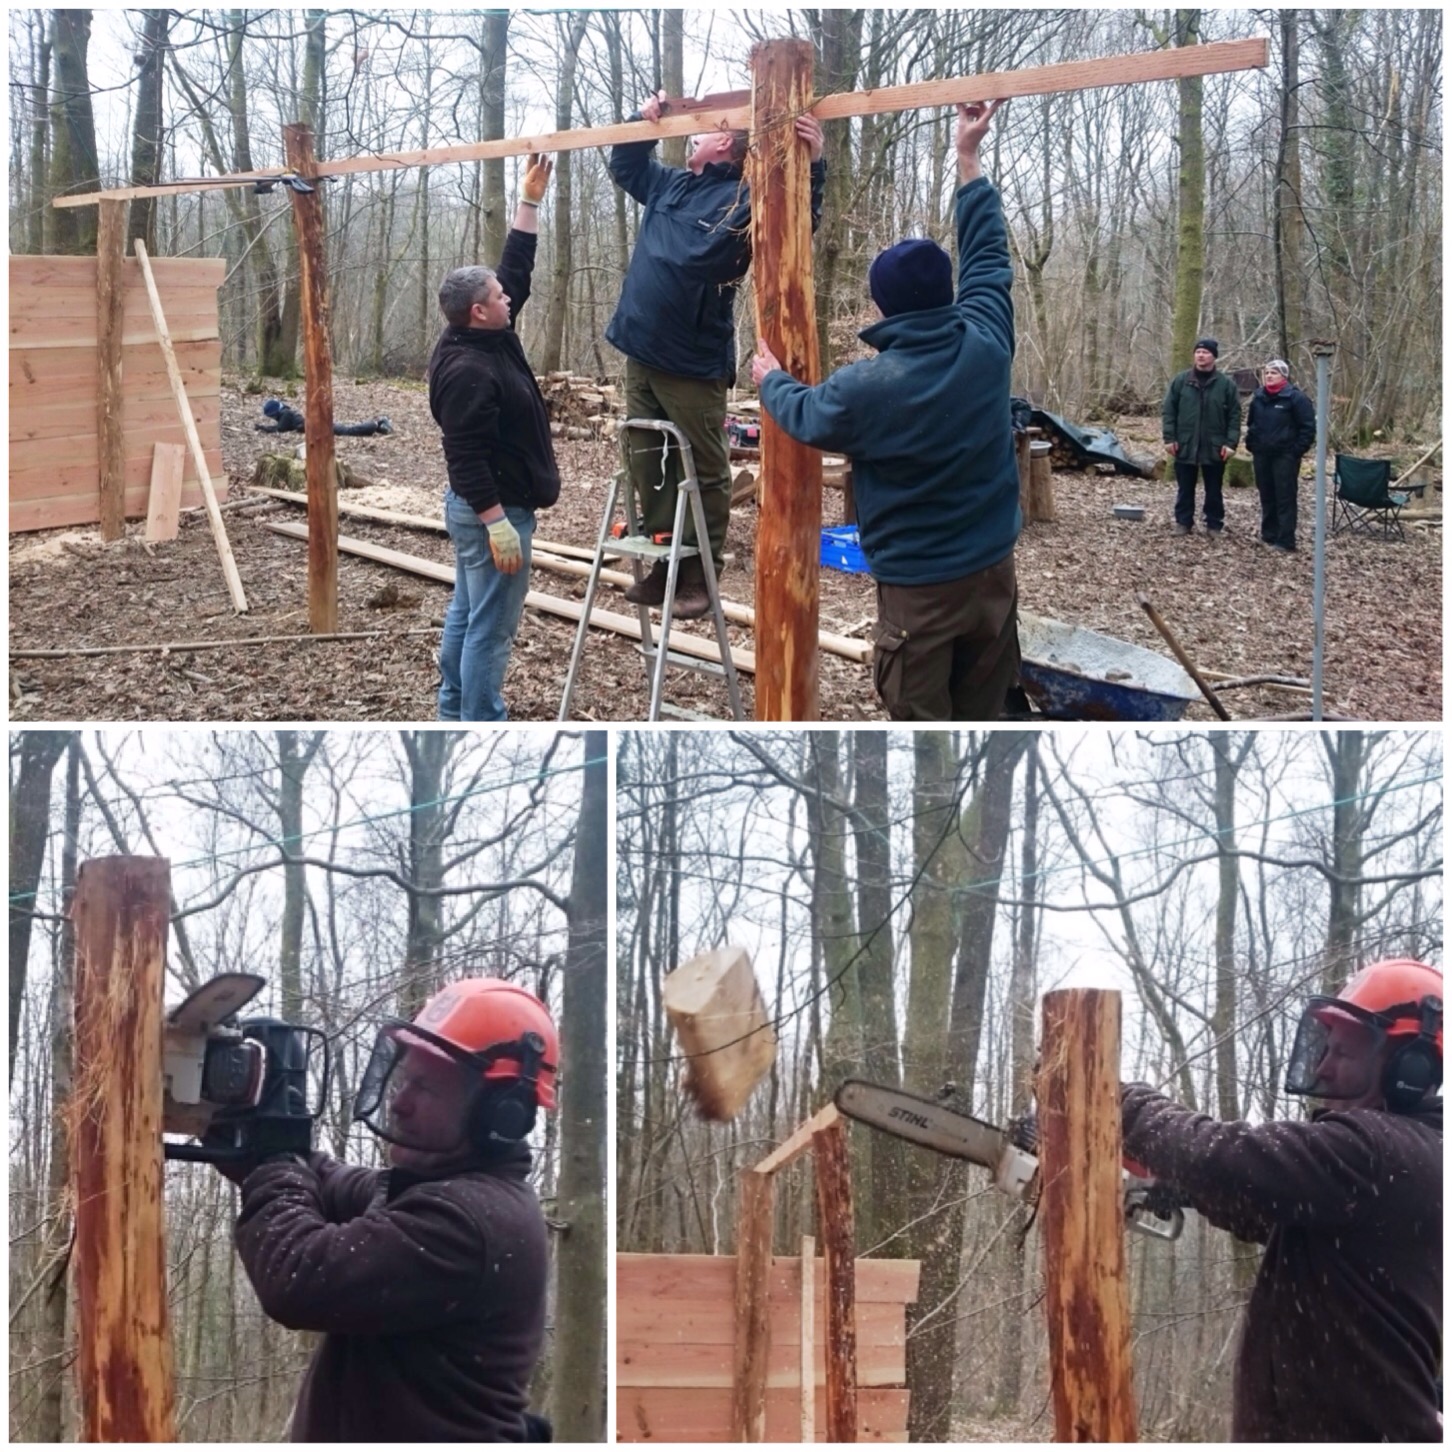
John then used his chainsaw to make the facings of the uprights smooth so we could attach the timber for the walls.
Aligning and smoothing
We actually built the back wall rather quickly. One person would select the timber, another held it in place, then pilot holes were drilled in by someone and finally someone else screwed the planks in. We all took turn about and soon had the back wall up.
The plan initially was to overlap the planks of wood so as to let the water drain off but we estimated at the start there were not enough to do that so we had to place them directly on top of each other.
Racking up
There was excess wood on one side so after using a plank as a measuring device John trimmed the excess off with his chainsaw. We left just a lip of wood at the edge to overlap with the side wall that was to go up next.
Trimming off
Once the back was completed we built the side wall in the same way as the back wall (no pictures I’m afraid) and then started on the front.
The cookhouse is on a slope and John and Caron wanted a decent slope to the roof to help with runoff of rain (but not so tall as to be a problem in high winds). The first thing we did was decide on the height, then we marked it off on the uprights and got John to trim each pole to the right height.
Preparing the open front
We built a strong lintel at the front and I trimmed a couple of sweet chestnut poles to act as main rafters. We also had a selection of smaller machined battons to act as rafters.
I secured one of the sweet chestnut rafters in the middle and the other one at the open end of the cookhouse. The other machined rafters were all spread evenly along the roof and screwed down.
Rafting up
We did not have the shingles for the roof so we just nailed down a large tarp as a temporary cover.
In the bottom picture you get a feel for the angle of the slope the cookhouse sits on.
The temporary roofing
You can just make out the sign above Caron naming her kitchen (I have no idea who wrote it). In the pictures on the right you can see the shelving unit that Paul and Nigel built. Seemed pretty secure as it offered a perfect seat for John to survey it all.
You can also see the internal battoning (to the left of the jacket in the bottom tight picture and also to the right of John). This really strengthened the walls as we dug the battons deep into the ground.
Signs, shelves and snagging
Kev and Chen moved the kitchen platform from its old spot to inside the cookhouse. They did spend a good bit of time getting it secured properly on poles and perfectly flat.
We had some great food over the weekend with our dinner on the Saturday evening and breakfast on Sunday morning cooked inside it.
First cooking
There were some other projects going on involving re-building the shower house, laying new chippings on the paths and building the raised firepit you can see in the picture below (that will be my next post in this series).
The Sunday was a very frantic day as we strived to get everything done. When we took the group photo some of the lads had already left (about three or four I think) so apologies if i have not mentioned everyone involved in this project.
I went for a woodland walk with my kids last weekend to try and spot some signs of spring. We came across an area of the woods that had been recently thinned out and all the trimmed logs were lying around in piles.
My kids started to build themselves a little den from this wood but wanted me to show them how to make something both of them could get under.
A little shelter for two
We only had an hour to build something so I decided to show them how to construct a quick lean to shelter. We spotted a large piece of wood and after a quick chat they inserted one end in between two trunks of Goat willow and snapped it to the size the wanted for a main roof beam.
Snapping the main beam
Then we found a flat area of ground and laid one end of the beam into a crux in the coppice stool and laid the other end on the ground.
Picking a site
They cleared the floor of all the sticks and stones lying there and used the sawn off cuts of wood from the log pile to construct the wall of the shelter. I helped them out with this but as it was already pre cut it was just a matter of finding the right lengths.
Rafting
While we were building the shelter my daughter Catherine came across this rather lovely little squirrel skull. I am glad she spotted it quickly as it could so easily have been trampled under foot.
Squirrel find
As we only had an hour we did not have time to lay thatch on the roof or make a raised bed but the kids got the idea and thoroughly enjoyed making their den. When we go camping in the summer I think this will be a good project for them to do so that it is fully weather tight.
Half finished shelter
Lastly I got them to return the site to the way they found it by stripping all the logs of and putting them back on the pile.
Leave no trace
I appreciate that we did not finish the shelter but it did give my kids a little bit more insight into shelter building so that the next time we build one they understand the basics of what they are doing.
If anyone reading this has been on one of the Woodcraft School courses run by John Rhyder at his woodland site in Hampshire you will certainly remember the roundhouse. This little building has been a refuge on many a cold night for many people including myself.
Every now and thenthe roundhouse needs a bit of TLC. John had recently replaced the roof beams, so now it was the turn of the walls.
A group of us who are all ex students of John’s agreed to spend the weekend with him working on improving the camp facilities at his woodland HQ. I was not involved in working on the roundhouse (I was helping to build the new kitchen and raised fire pit) but I did get a number of pictures of the guys working on it.
Stripping out the old poles
Working on the roundhouse were Charlie Brookes, Keith Bosely, Scott Batty, Jack (aka Warren Frost) and Pete Bastable, helped from time to time by Fin Rhyder.
The guys stripped the tarps away from the sides to expose the outer ring of poles. They were well worn but some were showing signs of damp at the base. The guys started in one section by putting braces in to keep the roof in place and then dug out the outer pole for that area. They would then slot in a new piece of split sweet chestnut and trim it to size. You can see all that happening in the pictures above.
Preparing the lintels
The new uprights had already been split and de-barked so Pete and Fin got to work de-barking the poles that would be uses as lintels between the uprights to support the roof.
Soon the guys had a few of the uprights in place and they put some temporary lintels in place until the permanent ones had been finished.
Putting in the new uprights
After the lintels had been debarked, the lintels ends were carved so that they could be attached securely to each upright. This involved a bit of axing out to produce a flat platform at the end of each lintel.
Inserting the lintels
The door of the roundhouse also got a makeover and was rebuilt to fit in with the lintel above it. Also as each section was finished the tarp walls were put back securely in place with some battons.
John uses these tarp walls as they can be easily rolled up in the summer to give good airflow through the roundhouse.
The re-built door and snagging
The roundhouse has a small extension at the back covered in wood instead of tarps on the walls. This area is used for storing wood for the stove . The uprights and lintels were replaced here but the wood panels had deteriorated so they were stripped off as well and replaced.
I think the guys did a good job of this area making it secure and water tight in a very short period of time.
The back extension – the storage area
The job took the guys a day and a half to do and by the Sunday afternoon the outside of the roundhouse was looking good and strong again. At some stage John will be adding new shingles to the roof as tiles instead of just the tarp they have at the moment.
Looking good
This is just a brief summary and no doubt misses out many of the issues they faced as I did not work on this project, but I do know they did a cracking job.
This year I became the course director in London Area Sea Cadets for the nationally recognised qualification in Basic Expedition Leadership (BEL). This is the third time we as a Sea Cadet area have run the course and yet again it has proved very popular, with 13 instructors applying. I had set the limit at 12 but with one extra applying I thought that 13 had to be lucky for some 🙂
The course is spread over 4 weekends throughout the year (the final weekend is an assessment) and is aimed at training our instructors to a nationally recognised level where they are qualified to lead day and overnight expeditions in lowland environments. We were supposed to run the first course out of Crowborough Army Camp but due to overbookings there the Sea Cadet unit TS Black Swan (Sunbury & Walton) offered us the use of their building as a base for the weekend. This was ideal as the North Downs were a short 30-minute drive away.
BEAL and BEL 2015 – Weekend 1 at TS Black Swan
The weekend ran at the end of February and the Friday night was the usual madness of arrival and paperwork that needed to be attended to. Running alongside the BEL course that weekend was also the Basic Expedition Assistant Leadership (BEAL) course run by my good friend John Kelly. This is also a nationally recognised qualification and we run it to allow our older cadets (16 and 17 year olds) the chance to gain valuable outdoor experience as well as the qualification. The BEAL allows you to assist in an expedition, leading your own walks but not in overall control of the expedition.
Saturday morning, after a fantastic breakfast from the unit staff, was spent going over how the BEL certificate works in terms of the legal stuff and how it fits with Sea Cadets more generally.
We have candidates this year with a wide variety of experience, from very little to many years, so it was all new to some and for others the start of a period of Continuous Professional Development, but all will face an equally exacting assessment at the end of the year.
As soon as we got outside Graham Brockwell led the class on tents.
Different types of tents
This class was designed to show the students the wide variety of tents they will come across in the future and give them hints and tips on setting them up and, crucially, hints and tips on explaining all that to the cadets they will be training in future.
Pros and cons of different tents
One of the reasons I was very happy to take up the kind offer of Sunbury & Walton unit to use their building was that this first weekend involves a large amount of classroom time. As the weekends progress most of the classes need to be undertaken outdoors, giving the students time to practise everything they have learned.
Classes we gave included basic map work, legal definitions, risk assessing, meteorology, and also on clothing and equipment.
Lots of classroom work on the first weekend
As the course goes on all the students will have to cook for themselves on their own camp stoves but for this weekend we had Paul Kelly and staff from the unit cooking for us. All I had to sort out for myself was some lunch on Saturday. A great job guys – it was really appreciated.
Hard work in the Galley
Saturday night’s meal was really worth a mention. We all chipped in ten pounds and Paul and the gang produced a wonderful curry with some wine to wash it all down.
Great food all weekend
After lunch on Saturday we headed out to the North Downs for some map work. To begin with the instructors took the lead in delivering this training. Everyone went back to basics with using a map (no compass at this stage) as we had such a wide variety of experience within the group. I found this helpful later when the very experienced students were able to assist their colleagues.
It was a damp and windy day but I find I am most comfortable in this kind of environment.
Lots of trainer led mapwork
Needless to say, in between sessions when we were out and about we needed to take the occasional break. I like about 10 minutes’ break for every hour of travel so I found ample time to deploy my small EDC hammock chair (UKHammocks). Both Dave and myself are of the school of thought ‘if you can sit – sit, if you can lie down – lie down, if you can sleep – sleep’.
Chillax time
While we were strolling on the slopes of the North Downs there was little in the way of flowering plants on display but I found plenty of other beauty around – I just had to look a little bit harder.
Some winter flora
Once everyone had gotten the basics of scale, symbols and setting their maps to the ground we gave everyone individual legs of the journey to lead. Later we brought in the use of the compass, pacing, and talking about tick-off points, cut-off points and hand-railing.
Lots of individual work
The rest of the weekend was spent getting to grips with all the BEL paperwork, more classes on maps and routecards, planning for the next weekend in Dartmoor and a bit of relaxation on the Saturday evening.
Mapwork, paperwork and muddy lectures
We finished the weekend on a high when Perry presented Tara Kelly with her BEAL certificate. Tara undertook the BEAL last year while she was a cadet and the weekend was a good opportunity to present her with her pass certificate.
The BEAL certificate for Tara
The next weekend is in April and we will be heading down to Dartmoor to give everyone a chance to appreciate what type of countryside they will be allowed to work in and what type they will not, also to continue working on all the skills they learned on this weekend.
January is usually the time that as outdoor pursuits instructors in the Sea Cadets we venture up into the mountains and moors to do a bit of skills training. This is just not as a bit of extra training for ourselves but as a way of introducing some of the newer instructors to the world of hillwalking and mountaineering.
There was a smattering of snow on the mountains when we arrived but not a great deal. The winds had been very high in the few days leading up to our weekend and had blown most of it away. The weekend was organised in quite a relaxed manner. One group decided to walk over Moel Siabod and the surrounding area while the group I was with decided to do a bit of scrambling and winter skills around the base of Mt Snowdon.
We had arranged to meet up with some non-Sea Cadet friends that day who were also training in the area and set off early on Saturday. We were not aiming to summit that day but concentrated on working on our micro-navigation skills, leadership and group management. For me, it was also a good opportunity to practise my photography skills. I have a separate post on these pictures in this post on Special Snowdon Scenes.
While we were ascending up to The Horns and then onto the base of Crib Goch some of the lads took the opportunity to get a bit of bouldering in. The weather was cold but clear, making it ideal for keeping what little snow we had and perfect for photography as well.
Bit of Bouldering
We got some good views as we worked on taking bearings on near and far features so as to double check our positions. Also we spent some time working on rope skills, learning to ‘dog lead’ a nervous student over tricky terrain.
Route finding is always a good skill to practise, whether that is to avoid great big coils of barbed wire or picking your way across a stream.
Skills training
While we were wandering around having a good time a shepherd and his collie dog came by. As soon as the shepherd stopped the collie sat perfectly still. They both looked around, scanned the mountainside and then were away. In a couple of minutes both the shepherd and collie had disappeared. This moment reminded me that our playground is also someone else’s workplace.
Later in the day Graham and myself came across the Cym Deli pipeline that feeds water down to the oldest hydro electric station in the valley below. It is known locally as ‘the chapel in the valley‘ due to its design. I did not know this until I read the wiki page on the site but the pipelines appeared in the James Bond film ‘The World is Not Enough’
Working Snowdonia
We had hoped to scramble up Cribau but decided against it as there was a lot of ice at the top. Not everyone had crampons or ice axes so we decided to head down to Llyn Llydaw instead. We walked around the southern shore of Llyn Llydaw to get off the beaten track and concentrated on micro navigation.
The route is not obvious but well worth the effort. When we reached Cwn Dyli it was time for a snowball fight. Needless to say no prisoners were taken.
Enjoyment in different forms
We all decided to stay down low on the Sunday morning. Some of the guys went to the Pinnacles to do a bit of rock climbing and the rest of us walked from Capel Curig Training Camp up to the cafe in Capel Curig.
It was a stunning morning with low-lying mist and beautiful sunshine.
Sunny Sunday
We did a little bit of navigation but to tell you the truth we mainly just enjoyed the walk. It got a bit muddy in places but we just took our time.
Navigating and a bit of R & R
Just before we reached the cafe at Capel Curig I met up with Dan Keefe and his lovely family. They had all come up for the weekend and were staying at Llanrwst to celebrate Dan’s birthday. This was also the first time I had met Dan’s little lad Oscar.
Meeting the Keefe clan
The rain came in just after I took this picture so it was time to get a bit of lunch before heading off home in the minibus.
While we were walking and climbing in the park I set myself the challenge of photographing the beauty of the park in as many ways as possible.
I aimed to try and capture the big scenes, the little ones, the natural ones and the man made ones. This is my record of that attempt.
Stunning Snowdonia – big or small – natural or man made
Those who have ever been to Snowdonia will know that water is a very dominant force in this mountainous terrain. I found beauty in simple drips hanging off branches, the outflow from a stream monitoring station and the drip drip from an icicle.
Water – beauty in many forms
I have always been fascinated by reflections on water. I tried to capture the full reflection of Crib Goch in the picture below but could not quite get the angles right to get the top of the mountain in the picture as well.
The bottom picture I liked not just for the reflection from the mountains and the small rock but the texture of the water surface, with half of it semi frozen and half of it unfrozen.
Reflections – big and small
The geology of the park always catches my eye. I aimed in these two pictures below to capture the ruggedness of the scenery both in the sharpness of the rocks in the near distance and the rolling majesty of the land in the far distance.
Geology – sharp and rolling
While walking around Snowdon I came across these hardy little souls. The mountain goats were well at home on the steep slopes and hardly fazed by our presence.
I stood watching them for a good half hour as they jumped about in search of green shoots and even got some of their tracks in the snow.
Fauna – the beautiful mountain goat
The pictures below of a large bird of prey do not do the actual moment any justice at all. My lens is not the telephoto type so I could not get tight onto the bird to get a close up.
We were walking as a group in the woods near Capel Curig when I spotted the large brown bird land in a tree. We walked as close as we could to it and managed to snap these long range shots as it flew away. I am not sure if it was an owl, a hawk or buzzard but it was big and beautiful and majestic in its flight.
Fauna – the airborne sort
Lastly not to forget the beauty poking its head out of the snow. I spent a lot of time lying in the snow getting close up shots of whatever plant life I could see.
At this time of year the ferns, mosses, grasses and heathers are the dominant flora on the mountainside. To really appreciate this beauty you need to get down close and personal.
Flora – spikes in the snow
I find that photography is starting to awaken in me a greater awareness of all the beauty that surrounds me, even in environments where I think at first glance very little is going on.
I had pollarded a sycamore in my garden during the winter and had stacked up all the rods for use in bushcraft projects this year.
One pollarded sycamore
My kids though had other ideas and wanted a den built with the rods. As the rods were laid up against the tree I got the idea for a quick tipi style of den for them.
We stripped away all the rods that were either too big or too small.
A little help from the kids
We laid the remaining rods around the tree in a tipi style and then wrapped some old tarp around it all.
Wrap some old tarps
I cut up the middle of the tarp to form an opening and then with the kids tacked it all down with wooden pegs. I then added another tarp to reduce the size of the opening.
Cut and tuck
I added a few old sleeping bags to make it comfy and the job was done.
One den ready to go
My kids spent a lovely afternoon in the early spring sunshine playing out in their new den and it took about 45 minutes to make.
I came across a fallen hornbeam tree one day while teaching my Sea Cadets some map reading. Attached to it was a burl that produced this beautifully swirled kuksa cup.
My kuksa
Before I could drink out of my new kuksa I had to sort the small matter of carving it. As I explained in my previous How To… on Carving a Small Noggin cup the name kuksa (also known as kåsa in Sweden) is probably not the correct term for the cup as it was not carved in a Scandinavian country by the Sami peoples. Also it was not carved out of a birch burl but I like the word kuksa and it was carved out of a hornbeam burl at least.
After cutting the burl section from the fallen tree I left it to season for 3 years in a cold but dry area (my garage).
I wanted to create a kuksa that had the swirl of the burl wood and the clean lines of the heart wood. I started trying to saw down the length of the heartwood but that proved too difficult for my hand saw.
Hornbeam Burl
In the end I inserted two of my log splitting wedges into the saw cut and hammered down on them with a wooden mallet.
Splitting out
Thankfully they split cleanly leaving me a fairly smooth surface to start axing out the shape of the kuksa.
Dark wood of the burl
The heartwood was well seasoned and required quite a bit of axe work to get it down to the level I wanted.
Axing out the blank
I stopped axing out the top of the kuksa when I started to reach the burl wood but kept the heartwood for the handle. I was inspired by Jon Mac with his kuksa handle in the style of an otter’s tail and felt that the heartwood would prove a stronger option to the burl wood.
I drew out my general shape and used my saw again to cut off the excess on the sides. All the excess burl was carved later into either a quaich or a bowl.
Making most of the burl
The burl was of a very good depth and even though there were some deep fissures I knew for once I would get a decent sized cup out of it.
Ready to carve the bowl
I did not take any pictures of me carving the bowl or shaping the kuksa as I was too busy carving and there was no one around to photograph for me.
I looked in my archive though and came across these pictures of the master craftsman John Arthur from the Woodlife Makers Guild at the 2011 Wilderness Gathering demonstrating how to quickly blank out a kuksa.
John Arthur – Master Wood Worker
After chopping out the basic shape, John used a saw to put some stop cuts in. Stop cuts allow you to remove wood from specific areas without any split running off into wood you want to keep (in this case the area that will become the bowl).
Stop cuts and blanking out the cup
Once John had the basic shape he used his crook knife to carve out the bowl. He kept the knife in his right hand and continually turned the kuksa to carve out the bowl.
Carving the bowl
Finally he used a small knife to shape the outside of the kuksa. He used a number of cutting styles cutting towards himself and away from himself but he was always in full control of the knife and soon had the basic shape of the kuksa made.
As this was green wood he then explained he would let it dry slowly over a number of weeks before finishing it off.
Deft knife work
Here are some of John’s finished kuksas on display at the Gathering. With this level of detail you can see why he is a master craftsman.
John’s creations
Back to my kuksa – the burl wood of the bowl came out very easily with a chisel and my crook knife.
I put lots of stop cuts into the sides of the blank so as to help get rid of the excess here in a controlled way (you can see all the pencil marks where I was to put them). I really took my time here to get rid of the excess wood and not damage the bowl.
Stop cuts
The whole process of removing the burl wood took quite a while as the outer bark was very hard and the burl wood underneath the bark because of its curving nature was very soft in places and very hard in others.
When I had formed it into the shape you see in the top picture (below) I started using different grades of sandpaper, working up from very rough to very fine, until it reached the smoothness you see in the bottom picture.
Carving the Kuksa shape
The inside of the bowl was very stable, smooth and did not contain any holes.
The underside was a different matter with small holes in a number of places.
Smooth bowl but imperfect base
In the up close pictures below you can see that they were fairly deep. I felt I needed to fill these holes to prevent any leakages (never a good thing when you are desperate for a brew).
Holes – big and small
To fill the holes I used a mixture of wood glue and sawdust from the sanding as a kind of filler. I rubbed the mixture all over the underside of the bowl, allowed it to dry, sanded it and repeated the process again. This all took a couple of days to allow for the drying process.
Wood glue and shavings on the base
There was still some roughness left over even after the sanding but I felt that went with the character of the kuksa.
Drying and sanding
To seal the cup I melted beeswax and poured it over the cup. I then re-melted the beeswax with a hairdryer so that as much of it as possible would soak into the burl wood to fill all the pores. I repeated this a number of times, covering the whole cup until no more beeswax would soak into the wood.
Beeswax filler
The beeswax did what the sanding alone never could; it smoothed out the wood and gave it a lovely shine as well. The swirls of the burl wood really stood out after this process.
Beautiful swirls on the sides
I particularly liked the contrast of the burl wood of the bowl with the heartwood of the handle. This is what I was hoping for and was very pleased with the outcome.
Contrasts – heart wood and burl wood
Next up was to test out the waterproofness of the cup. To begin with I poured cold water into the cup and let it stand for an hour. Thankfully there were no leaks.
Waterproofing test – cold water
Then it was time to add hot water. I started with warm water and in stages moved up until I was pouring just-boiled water into the kuksa. I was fairly happy that there would be no leakages now.
Waterproof test – hot water
Next up was to see how a brew tasted with all that beeswax in the wood. I poured myself a coffee and could taste nothing of the beeswax. I think the boiling water helped with removing any excess beeswax.
Taste test 1 – Coffee
A final test was at my friend Fraser’s place (of Coastal Survival) when he made me a beautiful cup of mint and blackberry tea.
Taste test 2 – Herbal tea
I used more of the burl to make a bowl to go with the cup and it too turned out quite beautifully (in my opinion at least!).
Alison had always wanted a one carved for her so I thought it was time to get on with it. These cups were traditionally made out of burls (I will cover this in more detail in my next How To…) however I did not have one available at the time and used silver birch wood instead.
Noggin carving is a skill that has been practiced for millennia but due to modern industrial practices it is now something generally limited to green woodworkers, bowl turners and bushcrafters. These are a few of my carvings, all utilitarian and nothing fancy. The cup at the bottom is the one I made for this How To…
Carvings
Wood selection and splitting
For this noggin I selected a green piece of silver birch that had no crack lines starting on either end. The log had a few knots in it but looked quite easy to carve.
I split the log on a stump with my axe and drew out the basic shape of the noggin with a pencil. My intention was to carve a shallow flat-bottomed noggin with steep sides as the log was not that big.
Beginnings – splitting the log and drawing
Tools & the bowl
As the sides were to be steep I opted to use a curved wood chisel and a mawl. I carved out the bowl first for various reasons:
To locate any cracks deep in the bowl area quickly
Working with the whole piece makes it more stable
There is less chance of the side of the bowl cracking
Mawl and curved wood chisel for the bowl
Carving the bowl
To begin with I worked my way around the edge of the bowl taking out small chippings. I tapped the chisel with the mawl quite gently at this stage. The work piece was placed on my lap with 3 thick layers protecting my legs – two jackets and a small day sack.
I positioned the log so that the chisel was always pointing away from me. A work bench with a vice would have been safer but not available at the time (we were working in the winter in a small roundhouse).
Fine work to begin with on the bowl
Going Deeper
Once the initial edge area was carved out I was able to use more force with the chisel. By this time I did not need to use the mawl but cut into the wood by just pressing down with force on the chisel. This seemed to work quicker than using the mawl all the time.
Working my way around the bowl I was able to take out a lot of wood rapidly until I had the basic shape roughed out.
Chunking out the bowl
Axing out the basic shape
Once the bowl was created I axed out the basic shape of the noggin. I used the saw to make ‘stop cuts’ first though so that when I was using the axe I did not cut out areas of wood that formed part of the cup.
I did this work on a stump placed on the floor. The work piece was always well in front of me so that the follow through from any slippage (from the axe) went to the side of me.
Here you can see the two stop cuts created by the saw coming in at either side of the work piece. I then used the axe to cut out the areas of wood I did not require.
Stop cuts and axe work
Carving with the Sloyd knife
After using the axe to blank out the basic shape of the noggin I then switched to using my Mora Sloyd knife. This small knife is ideal for more detailed, controlled carving.
I was able to carve in a very controlled and safe fashion with my thumbs pressing on the back of the blade. Even though the cuts were always small it did not take long for me to fine tune the shape as the blade itself was very sharp and the wood was green.
Knife work
The crook knife
When I had the outside of the noggin ready for sanding I decided to use the crook knife on the inside of the bowl.
This was to take out as many of the small ridges produced by the chisel as possible and also to try and flatten out the bottom of the bowl some more. The crook knife enabled me to smooth out a lot of the ridges that the Sloyd could not reach.
After finishing with the bowl I left the noggin in a paper bag to dry slowly over a two-week period as it is easier to sand down dry wood.
Finishing the bowl with the crook knife
Sanding the Noggin
I used a variety of different sandpapers on the noggin including:
Top left – 80 grit
Top right – 150 grit
Bottom left – 320 grit
Bottom right – 1200 grit
The sandpapers used
I started with the coarsest, 80 grit, ensuring I covered the whole noggin and that all the edges were rounded off. The bottom of the noggin did take a considerable period of time to roughly sand (I should probably have done more knife work) but I wanted to create a small flat area so that it would be stable when set down with liquid in it.
I did not sand the whole of the noggin smooth as I wanted to leave some of the tool marks showing but I did give the rim of the cup an extra bit of sanding as I wanted that bit particularly smooth.
Sanding
I really focused on making the rim smooth as I wanted that smoothness to contrast with the tool marks on the lower area.
Once I had finished with the 80 grit I worked my way up through the other sandpaper slowly smoothing the noggin down until I reached the finest, 1200 grit.
Smoothing the rim
Boning the noggin
After sanding I oiled the noggin lightly (I used vegetable oil as that was all that was available) then used the back of a spoon to really smooth the surface. This is known as boning and as well as smoothing the surface it helps to seal the oil into the wood (a small rounded pebble works just as well).
Boning
This whole process took a couple of hours and I added more oil as I went along. I find boning quite therapuetic, and it leaves a beautifully smooth satiny finish.
Lastly I carved a hole in the handle, fixed a leather loop and oiled the noggin once again.
Before and after oiling
Lovely carvings for lovely ladies (although sadly Alison couldn’t christen hers with a dram of whisky on Christmas Day: she was pregnant with our son Finlay, who was born just a couple of weeks later!).
This How To… is put together from my records of a Primitive Technology course I did with John Rhyder of Woodcraft School back in 2009. In particular I will walk you through the steps I took to brain tan a fallow deer hide into a piece of buckskin to make a bag.
Buckskin bag
Background info on Buckskin
Any animal hide that is left untreated will harden into what is called rawhide. This has many useful applications, such as making bindings for tools and inserting and holding stone tools in sockets, and these days it’s often used as dog chews.
If a hide is stretched out on a rack its surface area increases and it can be useful in making drum skins. However if a hide is stretched, manipulated, properly cleaned and soaked in a solution made up from the animal’s own brains and smoked it becomes buckskin. This is very useful in making clothing and bags.
Buckskin making will be discussed in this How To… but it is made differently to normal shop-bought leather. Traditionally processed or shop-bought leather is tanned in vats of tannic acid solutions. This could be from the tannins found in oak, willow and chestnut. Skins can be soaked in these solutions for periods of 8 months to 2 years. This produces a heavy leather which is good for making shoes, jackets, ‘possibles pouches’ and sheaths.
Also with modern commercially made buckskin the process is very polluting with the chemicals used and the grain layer (see below) is also left on. This does not allow perspiration to escape through the fibre so leads to degradation of the buckskin.
With hand-worked buckskin the grain layer is removed and due to the longer periods of stretching the fibres are more open so allowing perspiration to disperse. The skins are also lighter because of the stretching.
Due to hunting restrictions in this country since medieval times, much of the knowledge regarding tanning in this country has been lost. Most of the knowledge that we use now in relation to traditional tanning and buckskin production comes from studies with Native Americans.
It is estimated that there are 6 million hunting licenses issued in the States each year but only about 500,000 skins are tanned each year. This means skins can now be obtained more easily and information about tanning or making buckskin is becoming increasingly available on the web as people experiment more.
In the UK animal skins can be obtained from many sources including roadkill, game dealers and stalkers. It must be remembered that the quality of a skin relates directly to how the animal is skinned. Damaged skins from road kill may prove a challenge to the person treating the skin. Also nick marks from knives in the skinning process can produce cuts in the skin that expand when stretching the skin. The ideal is to get an animal that has a near complete hide and has been skinned with the minimum use of a knife.
If a skin is not processed properly it will either stay dry, hard and stiff as rawhide or, if it gets wet, it will go soft and eventually rot. The ideal with buckskin is that it will be soft when dry, and when wet will not rot easily but be able to dry out and remain soft.
In all leather or buckskin making the flesh and hypodermis membrane are removed. Hairs can be left on or removed depending on the final product. Commercial leathers also remove the hair but much of the epidermis and grain layer is left on.
To make buckskin the epidermis, grain level, much of the small fibres, hypodermis and flesh are all removed. Only the mature fibres are left to process.
Brain-tanning a hide in general
Skin the animal carefully
De-flesh the hide with a scraper
Remove the hypodermis membrane by scraping
Remove loose hairs if required by hand
Remove the grain level and stubborn hairs by wet scraping
Remove small fibres by dry scraping
Stretch the (moistened) skin initially to start opening the fibres so as to make the skin more pliable
Dress the skin in a solution such as brains and water, or eggs and water
Continue to soften and stretch the skin so as to manipulate the fibres and coat them in the oils of the dressing. This helps to keep the fibres separate from each other as the skin dries
Apply more and more dressing with continual stretching and manipulating. About 3 or 4 dips in the dressing mixture.
When the skin has finally dried out (it needs to be continually stretched until it is dry) it needs to be smoked. Smoking changes the skin chemically to stop the fibres glueing back together when it gets wet, hence keeping the buckskin soft. Smoking also locks the oils from the dressing into the fibres.
De-fleshing
Steve Lawson, the instructor, brought in a range of fallow deer hides for us to work on. There were not enough to go around so my friend Phil Brown of Badger Bushcraft shared one with me. Our skin was the one on the right of the line. Steve set up a pole at about 35 degrees to hang the skins on for us to de-flesh all the remaining muscle and fat (initially we used metal scrapers before moving onto primitive scrapers), The pole had been well scraped to make it smooth so the hide would not be damaged
The skins and set up
The skin Phil and I were working on was particularly thick so we guessed this was an older animal. There was an area of deep red where all the blood had pooled in the skin after it had been shot. By this stage we had moved onto using flint scrapers and they worked particularly well. The edges of the hide needed extra work as this was where a lot of the muscle and fat had been left.
De-fleshing
Splitting and removing the hair
After de-fleshing we decided to split the hide. The flint knife cut through the hide as easily as cutting through butter. The hide was placed on the bench so that it could be cut accurately and safely.
Flint knife work
After cutting the hide in two we noticed that one half of the hide had started to lose its hairs. This was due to the blood from the gunshot wound pooling into the skin and loosening the hair follicles but this was only in patches and the hair came away easily. As I wanted to make a buckskin bag I elected to use this half and Phil decided to keep the hair on his half to make a small cover.
Removing the hair
Once the loose hair came off (very easily) I started to use a scraper on the other hair. This did not come off easily at all so I used metal and flint scrapers on it. It took me several hours to remove the rest of the hairs from the healthy part of the hide.
Problems
Dry Scraping
While we were working on our hides John Rhyder had set up a dry scraping rack for another student to use.
Dry scraping set up
Once the hide is stretched out fully it is then left to dry and it is then scraped of all the excess muscle, fat and the grain layer.
Dry scraping with flint
As well as the metal and flint scrapers, the shoulder blades of the deer also make excellent scraping tools.
Scraping tools
During a break Steve showed us how to dry scrape an old fox hide. The hair and grain layer came off for him very easily, unlike the hide I was working on.
Getting down through the layers
If you do not remove the grain layer the oils from the brain or egg solution will not fully soak in and the buckskin will not become truly soft.
In detail
Tanning – eggs
We made up one pot of egg solution. For a fallow deer about 12 eggs are required per hide, well mixed with water in a ratio of about 4 parts water to 1 part egg.
Tanning using eggs
With a hide where the hairs are kept on it is best to apply the solution with a sponge or cloth until it soaks in.
Applying the mixture
Tanning – brains
Steve showed us how to take the brains out of a deer. The first method started with a vertical slit down the hide over the forehead. With the skull exposed a heavy knife could pierce the skull, allowing the brains to be scooped out.
The other method is to go through the area of the skull where the spinal column attaches to the skull. Again, a heavy knife is needed to hack away at the bone to open a hole big enough to get a small spoon into it.
Brain tanning – opening up the skull – front and back
Steve used an old knickerbocker glory ice-cream spoon (it has a very long handle) for the job, with the sides of the bowl bent upwards. To get all the brains out you need to mash the brains up with a spoon and scoop out as much as you can. Then add water to the brain casing and scoop or pour the last bits out.
Using a slightly bent knickerbocker glory spoon works well – A long handle and easy to bend up the sides.
Brains are mixed with water in the same ratio as the eggs. It is generally agreed that an animal’s own brains will tan its own hide but in terms of weight, for the average hide you need about half a pound of brains.
The brains we were using were supplied by Steve and they had been double bagged and kept in a freezer until we used them. In the pot in the bottom right picture are two sets of brains. The darker one was thought to contain blood from a head wound. In total four sets of brains were used.
Preparing the brains solution
Warm water was added to the brains and mixed vigorously. It was topped up again and re-whisked.
Preparing the brain solution
Soaking & Stretching
My hide had gone rock solid so I soaked it in a stream to soften it.
Re-softening
After wringing it out I popped it into the brain mixture for 10 minutes. Then began the stretching. I rigged a line up to help with this and I had to use my whole body weight to stretch the hide (it was very thick).
Dip and stretch
This process went on for a number of hours. I also twisted the hide every now and then while it was attached to the line with a stick to further stretch it. I re-dipped the hide in the mixture every now and then went back to stretching. This repetition of stretching and re-dipping opens up the fibres and allows the oils in the mixture to attach themselves to the fibres to keep them supple.
I alternated the stretching from the line to over my knees. When we could, we even worked in pairs to stretch the hide out. This is quite a tiring process and really works your finger muscles.
Stretch, stretch and stretch
The skins were left hanging overnight and we resumed stretching in the morning without adding any more mixture.
The plastic bag was used to keep the skin as clean as possible so it did not pick up dirt from my trousers.
Knee stretching
Here Phil had decided to use a post. The post is rounded smooth at the top. This allowed him to exert great pressure and really stretch the hide without damaging it.
Stretching on a post
To speed up the drying process we carried on stretching the hides over the warmth of the fire. This is a crucial period as you need to keep stretching the skin until it is completely dry to keep the fibres separated and coated with the oils.
Stretching and drying
Smoking
When it is dry it is ready for smoking. My skin was very soft and buckskin-like on the outer areas (which covered the stomach of the deer) but still stiff on the inner areas (which covered the hind quarters). This caused the rippling effect you see in the photo directly below.
To ensure the skin stays soft it needs to be smoked. If it is not smoked then as soon as it gets wet and dries out it will go rock hard. A small fire was set up with a pipe placed over it. Into this was placed a lot of dry rotten wood, which creates a lot of smoke but little flame.
Preparing for the smoking
I attached a line to a corner of the hide so I could hang it over the smoker.
Then, using hide glue, I formed the hide into a conical shape. I left a small opening by the string to let the smoke trickle out.
Sealing the skin for smoking
It was then hung over the pipe. I kept it in place here for about 15 minutes. The pipe did get very hot at one stage and singed the soft part of the hide, but slowly the hide changed to a slightly yellow colour.
Smoking
While doing this I also held the bottom rim of the hide over the smoke to try and get as much of it smoked as possible.
Thought about a hat as the final product.
Possibly a Gandalf hat………………………….
Even added a bow but have decided on making a bag.
With matching kit…………………
The bag
The top picture shows the smoked hide flattened out. It was still stiff in the central areas but the outer areas were soft like buckskin.
I trimmed off the ragged edges of the buckskin with my flint knife and used that as thread to make the bag. I attached the bag to my bark belt to hold all my flint knapping and fire making tools.
Decided in the end to make a bag for my primitive kit
I used an offcut of antler as a toggle to keep it shut.
Very happy with the bag in the end
This process took a full weekend but taught me a lot that I had only ever read about before.
I really appreciate now how long it takes to make buckskin and thoroughly recommend anyone to try it.
In September I received a most excellent birthday present from my wife Alison – a Nikon D3200 DSLR camera. As soon as I started using it the colour differences I saw in comparison to just using the camera on my phone really amazed me.
For example I would never have gotten all these subtle shades in the lime leaves to show up so clearly on my phone camera. I am still learning to use the manual settings on my camera so rely on the automatic settings when I am in a rush. I shoot in RAW format so that I can adjust the light and colour levels in Adobe Lightroom easily. I like Lightroom as it helps make up for the wrong choices I make on the camera when shooting in Manual mode.
Luscious lime
I asked Santa to bring me some Kenko lens extensions for Christmas and they duly turned up (thanks Alison and Santa). Lens extensions are a cheaper alternative to a full on Macro lens for close up shooting. Below is one of my first pictures taken with the extensions and the greens and browns in the moss really stand out.
Delicate moss
A splash of white, green and eventually pink is guaranteed from the snowberry. I love going out for a walk and seeing these delicate little globes dotted along the hedgerows. Eventually they turn to a lovely shade of pink before dying.
Snowberry
White can also be spotted in the delicate threads of the willowherb tops, on the bramble leaf caused by the moth larvae Nepticula aurella and the tiny little white dots in the sorrel leaves
Swirls of white and green willowherb, bramble and sorrel
Purple was an unusual colour to find but when I did such as with the herb robert, fern and red dead nettle it made for quite a striking contrast. This was the colour of choice for royalty in the past due to the expense it took to produce a purple dye but also I think because it does look so good.
Pretty purples – herb robert, fern and red dead nettle
Why some leaves go yellow and some go brown I presume is to do with the pigments that are left in the leaves after the chlorophylls stop their production but whatever happens it always leads to some amazing effects.
Sweet chestnut, wild service tree and the sun peaking through a crack in a leaf
This little shot is well staged. I just picked up a few yellow leaves and spread them out in a ring to capture the range of colours found under my feet. I only thought to take this picture as I had been following a small frog hopping around trying to stay under cover of the fallen leaves.
A fairy ring of colour
As some of the leaves went mostly yellow I started to see others like the horse chestnut start to take on a mixture of yellows and browns. this led to a slightly military DPM effect but you could see the odd bit of white still showing as you can see in the goat willow catkin buds.
A bit of DPM – hazel, oak, goat willow and horse chestnut
I particularly liked the brown edging in the oak leaves in the top picture below. You can see how the leaves are shutting down from the edges to the centre as opposed to the bottom two where the process is happening from the inside out. Either way it is a beautiful and striking sight.
Browns into yellows – oaks and ash
I liked the contrast between the two pictures of the berries below. The top one is of a dessicated rosehip I think but am not sure on the bottom one at all. Even when the berry has lost it’s moisture content as in the top picture it can still look rather striking when you get up close to it.
Berries – wasted rosehip and an unknown black berry
Now this is a time of year for fungi and I see lots of Little Brown Jobbies (LBJ’s) dotted around the ground and I have no idea what they are. The picture in the top section below is an LBJ as I do not know its name (I am sure someone can identify it for me). I spotted it in some very long grass well hidden away and am glad I took my time to get the camera out as it is quite beautiful in its own way as it peels apart.
The bottom one is of a fungus called turkey tail I found attached to a log. It had very strong bright colours which I just enhanced slightly in Lightroom by adjusting the light levels on the different colours.
Fungi – LBJ at the top and a turkey tail down below
I was taking a picture of a pond I regularly monitor in my village when I spotted this iris seed pod just opening. The seeds were just waiting for a waft of wind to give them a little nudge and spill out into the water. I like the way how mother nature has packaged them really neatly in wedge shapes to keep them secure until they are ready to be released.
Beautiful brown – iris seed pod
A couple in the reds for you. The top picture below just had to be taken as the reds and greens of the rosehips and the apples contrasted really well. The fly agaric in the bottom picture was one of the very few I saw this year in my local woods but I was captivated more by the little slug that was happily munching away on it than the colours themselves.
Opposites – apples and rosehips versus fly agaric
Three lovely red pictures I took over the autumn. I used my lens extension on the pictures of the haw berry and the frozen leaf tip (left hand pictures) but not on the wasp gall on the right. You can gauge the size of the wasp gall by the thorn in the top left of the picture. I had never observed these tiny little red bundles until about two years ago and now regularly see them on brambles.
All the reds – haws, frozen leaf tip and a wasp gall
On a larger scale the light levels over the autumn have made me think about my photography. The setting sun in the top picture really lends to a dark feel to the woods as opposed to the overcast mid day light being slightly enhanced by the silver bark of the birches.
Contrasting woodlands
My final picture in this post really struck me as one to signify the end of autumn. It was a frosty morning and the sun was just rising when I took this picture of a bud on our cherry tree. I had to adjust the light levels in Lightroom to make the frost very clear and that slightly changed the colour of the sky to give an even yellower feel to what it was really like. It is a picture that I like though and a nice one to end on.
Start of Winter
I am now thinking on to the winter and looking forward to getting some more frosty plant pictures, snowy landscapes and shots of winter plants poking their buds up over the next month.
Back in October last year I heard that my good friend Mollie Butters would be demonstrating some of her many bushcraft skills at our local National Trust (NT) property – The Vyne. The whole family were keen to go and this is a little report on our wonderful day.
I met Mollie while studying bushcraft with John Rhyder at Woodcraft School back in 2008 and have been firm friends since.
Mollie has set up an outdoor education school called the Field Farm Project with her partner Nick McMillen and to quote their Facebook page it is ‘an exclusive mix of woodland crafts, field studies, farm life, horticulture, ancient crafts and technologies – combining to provide a rich and inspirational learning experience‘.
Mollie had already set up her stand when we arrived and had a lot of her beautiful creations on display. One of Mollie’s specialisations is basketry and she loves to pass that knowledge onto others. Mollie had planned to run classes that day but due to some last-minute changes by the local NT organisers she was only allowed to run some demonstrations.
Meet Mollie
The Vyne is a large estate so we spent the day going off on adventures and then popping back to Mollie’s stall to sneak in a bit of basketry.
My wife Alison and the kids got chatting to one of the NT volunteers who was using a rather strange device, an oval-shaped nest of wires, designed to pick up fallen apples. It was a simple but genius system allowing you to collect lots of apples without bending over, and without damaging them in any way. As the wires rolled over each apple they parted to let it in, then sprang back into shape again to hold it securely inside with all the others.
Once the apples were collected it was off to the device that shredded them ready for pressing.
Apples galore
As this was October the leaves were just turning. I loved the browns, yellows and greens that were all around. The yew was heavy with red fruit and the dew was still lingering in shaded areas of the grass – all quite beautiful.
Autumn colours
My kids wandered off to the woods to play and I bimbled back to chat with Mollie. The Field Farm Project is really gaining strength nowadays with a wide range of courses being run. They have bushcraft courses for children, basketry courses and bow-making courses and they are experimenting with growing many different foodstuffs all year round. For schools, Mollie and Nick offer courses for Key Stages 1 through to 4 covering many different types of learning in the natural environment.
I spent a long time just looking at Mollie’s baskets trying to figure out how she had made them – I can do the basics but that is all 🙂
Field Farm Baskets
I found my family later at the falconry display. Catherine was lucky enough to get picked to fly one of the birds. I was very chuffed to capture the picture at the top left just as the bird landed – Catherine did not move in the slightest – brave girl 🙂
Fun Falconry
Finlay was a bit disappointed not to get in on the act but we had some great adventures in the woods together that day.
I teach outdoor education to city children and I am fully aware that the majority of kids do not truly get to explore outdoors these days – I try wherever possible to let my kids run free and discover nature for themselves. We had a great time climbing, finding kill sites, spotting birds and just generally larking about.
Finlay Fun
I love to find fungi and photograph them. I can identify ones that I know are edible or have some sort of bushcraft use but in the set of pictures below the only one I could hazard a guess at would be the small puffball in the bottom right.
Finding Fungi
As well as the basketry and the carvings on Mollie’s stall, I spotted what I know as a Blobster, a character made out of clay (shown on the left). Mollie works with youngsters making these beautiful woodland creations and it is amazing to see what children can make from just the resources they find lying around them.
I love this activity myself – the trick is to mould the clay around a small twig to provide support. You can create whole communities from mud, twigs and leaves.
Field Farm fun
To finish my day I spent a little while trying out coiled basketry. This is such a simple art but has the potential to create very beautiful baskets in the right hands. Mollie can do that but I think I need a bit more practice.
A great way to relax
It was great to catch up with Mollie again and I know that Alison, Catherine and Finlay had a great day as well.
The Field Farm Project is going from strength to strength and I am looking forward to seeing all the adventures they get up to in the coming year.
Alongside us our friend John Kelly (bottom left) was running a DofE training course. This proved very useful to us as we could assess our BEAL students as they taught the DofE students the basics of living under canvas.
The other staff members – Perry, Jenny and John
The first class, taken by Tara and Jess, was on the different types of food you would want to take on expedition. In terms of assessment, as well as expecting them to talk about different food types we were looking to see how well they managed to hold the attention of the class. They had plenty of different foods to pass around and engaged the students well by asking them plenty of questions to keep them thinking.
Delivery from Tara and Jess on food
Next up was Jack with his class on the different types of kit they would be expected to use. Jack had brought a lot of kit to illustrate the discussion and explained well why he used particular pieces.
The DofE students were all fairly new to camping so found this invaluable.
Kit presentation from Jack
Thankfully Jen and Perry were happy to take all the notes as that left me free to take the pictures 🙂
Jen and Perry busily recording their observations
While the guys were running their classes indoors, Mehmet and James had been busy outdoors setting up a range of tents and tarps. They discussed the pros and cons of each tent type with the DofE students to give them some information to think about when either buying a tent or setting one up.
Mehmet and James delivering their tent class
We were grateful to John Kelly for letting us use his DofE students for our assessments as we could really see how the BEAL candidates interacted with these younger cadets, which made the assessments very realistic.
From the looks on these students’ faces I would say that they had a good time.
The DofE crew trying out their tents
While all these assessments were going on it was good to see so much happening on the river. We’d decided to run the final assessment here as we had finished with all the navigation parts of the assessments on previous courses. I had never been at this unit before and really enjoyed watching all the river activity.
The view from the classroom
While we were happy that they all could navigate for themselves, we watched each BEAL student run a one-to-one session with a DofE student to explain how maps worked and how to use a compass.
Being a good navigator is important, but if you cannot pass that skill over to someone else then you will never make a very good expedition leader. All the candidates fared well here thankfully.
Being assessed on how they teach map reading
The classes carried on well into the Saturday evening, when we observed the BEAL candidates supervising the DofE students as they cooked their evening meals.
All went well and everyone got fed quickly and safely. I have seen a few accidents happen at this time as everyone is tired and it was good to see our young trainee instructors still keeping an eye on what was going on.
Some late night assessment on teaching cadets safe stove use
Sunday morning was spent getting all the paperwork for the students in order and giving them feedback on their progress. I was happy to see that as a group of instructors we agreed that four of the students had passed after this weekend (the other was deferred, and I’m confident will pass very soon).
This was the first BEAL course the Sea Cadets had ever run (I do not think that even the Army or the Air Cadets have run one) and I was very proud to have been a member of the team. These new instructors (and they are instructors in every sense) are the ones who may well one day take over our jobs in the Sea Cadets.
Well done to all those cadets that undertook and passed this pilot course and I am looking forward to helping out at the BEAL course we will be running this year.
‘no need to be uncomfortable in the great outdoors’
Have you ever wondered what your kids get up to when they go off camping with one of the many different youth organisations we have in this country?
Well with the Sea Cadets we always try to make it a special trip as many of our younger cadets have never camped in their lives, or even wandered freely outdoors. There is a lot to learn if you want to live comfortably outdoors but even if the weather is not being nice to you all the time there is no need to be uncomfortable.
Campcraft in style
I spent a lovely weekend at the beginning of October this year with my friends Dave Lewis and Charlie Brookes teaching campcraft to Sea Cadets from North London in the beautiful military training area that is Pippingford Park located in the Ashdown Forest. The public do not have access to this area and if the military are not running exercises then it can be a most beautiful and tranquil place to visit.
The beautiful Pippingford Park
We had a small group of lads for this weekend and we started off by teaching them the basics of navigation. When I say ‘we’ I must truthfully say Dave taught the cadets: I spent most of the time trying to get to grips with the manual settings of my new D3200 Nikon camera.
The picture directly below was taken beside one of the many different weirs with a very slow shutter speed to try and capture that feeling of motion.
Playing with my new camera and navigating
In between learning the art of navigation and talking about the various properties of kit I snapped these two pictures with the leaf hanging off a spider’s thread. I like the totally different effect when the focus changes from the leaf to Dave.
Looking and learning
As usual with our weekends we spend a lot of time with the cadets discussing the different signs that can help us with navigation.
Below you can see Dave explaining to the cadets how the shape of lone trees on exposed slopes can reveal the prevailing wind direction. I taught the cadets about how to distinguish different tree types by looking at the leaves, bark and (in the example below, with the beech nuts) the fruit. Knowing your trees, for example whether they are coniferous or deciduous, is key to successful map reading.
We also got the cadets to identify animal tracks when they spotted them. The picture at the bottom left shows a steep slope where the hoof marks of a herd of deer could be clearly seen as they had tried to scramble up or down the slope.
Not all the signs are natural and the cadets soon learned to identify man-made objects such as this stepped weir (bottom right) so that they could identify where they were on the map easily.
Outdoor signs
The weather was a bit damp that weekend and as soon as we returned to Crowborough Army Camp we set up our tents, hammocks and tarps.
For our classes we set up a large tarp to keep the worst of the weather off us. The cadets put up the large tarp with a bit of instruction from us.
In the picture below the cadets are being introduced to the safe use of camp stoves.
Tarps up
After getting the stoves going the cadets got some food cooked and while they were doing this I had a look around and managed to get the lovely shot below of the spiders web covered in water droplets.
After tea we had a evening wander in the nearby woodland but did not stray too far as the military were conducting exercises there. Thankfully there is a lot of dead wood in that area so it did not take long to get together enough for a fire for the evening.
Preparing for nightime
The evening fire turned out to be quite a nice show in the end. As many of you will know I collect ‘Fire Faces‘ and will happily sit for hours in front of a fire taking pictures. Of every 100 or so I photographs I take I probably keep only one. I call the picture directly below ‘The Three Amigos’ as I can see a cat on the left, a rooster in the middle and a dog on the right. Take your time and see what you can see.
The usual marshmallows and biscuits came out for a relaxed evening by the fireside.
Fireside fun
Sunday morning was spent discussing all the different kit they will be expected to use outdoors. The classes cover kit such as rollmats, sleeping bags, bothy bags, rucksacks, food, packing, tents, first aid and footwear.
The amount of information they need to take in is enormous so at this basic level they are not tested on it. As they get older and move on to more advanced courses like the Level 2 Award in Assisting in Basic Expedition Leadership they will then be tested on the subjects.
Campcraft classes
On the Sunday morning we were joined by our friend and fellow Sea Cadet instructor Charlie Brookes. Charlie and myself took the cadets out of the camp into the woods to do some micro navigation. Up to this point the cadets had just been learning how to use maps for navigating so this short walk was just to introduce them to the use of the compass.
After we had finished with the compasses Charlie and myself got our EDC hammocks out for the cadets to try out and needless to say that they were a great hit – no need to be uncomfortable in the great outdoors.
Chilling out on a Sunday morning
Just before lunchtime we packed away all the tarps, tents and kit. While we were doing this a cadet called me over to one of the tents. The inner tent was covered in scores of baby spiders – it seems the heat of his body had caused a nest of spiders to hatch in the grass under the tent. They were really minute – the one I photographed was right at the edge of what my camera could handle.
After lunch it was time to parade, pass out the certificates and load up onto the buses to head home.
Wrap up time
This was a great weekend – the weather was not the best but as we took our time and prepared well everyone had a great time and came away with some lovely memories and new skills.
I have served with the forces for a short period and the cadet forces for quite a number of years so Remembrance Sunday is always a time for me to reflect on the sacrifice others have given to ensure our continued safety.
I took my children Catherine and Finlay to the Poppies in the Moat display at the Tower of London recently; even though there were thousands of people there it was well worth the effort.
When we arrived the first building that took our breath away was the Shard. I had never been up close to this ‘blade of glass’ and it sure is stunning. While we walked around to the Tower we stopped to look over HMS Belfast, the ship I worked on for many years as a Sea Cadet instructor. Nowadays I do not attend the ship evening sessions as I live too far away but I still teach cadets on weekend courses doing adventure training.
Visit to the Poppy display
It took us a long time to get over Tower Bridge due to the sheer number of people and the small alleyways. The slow shuffling was well worth the wait as the sight of all the poppies were amazing. I would have loved to have been able to just sit there and reflect but the sheer number of people moving around me (and the kids wanting to see more) made that impossible.
Each of these 888,246 poppies in this display represents one person from the British and Colonial forces who died during the First World War and is truly an awe-inspiring sight.
Reflecting
I took a couple of shots and then I made them black and white in Photoshop but kept the red in each picture. This is the part of the display that is called ‘The Wave’. The picture I took of it does not do this piece of artistic brilliance any justice and if you can get down to see it then do so.
The Wave
The other picture that I played with is the one with the waterfall of poppies. We waited a long time to get to the corner where the trees and bushes were. I placed Catherine and Finlay on the wall and slowly stepped back before taking the shot but I could not move far because of the throng of people around us.
Catherine and Finlay
While I am writing this I am listening to a song on television from the Royal British Legion Festival of Remembrance called the Shores of Normandy by Jim Radford. Jim was a 15 year old galley boy working on a tug maneuvering the blocks of the Mulberry harbour into place on D-Day. His song is beautiful and recounts what he saw that day as he watched the storming of the Normandy beaches. I know this display represents those British and Colonial deaths in the First World War but truly this display represents far more to me.
The Waterfall
Once we had finished we came across some members of the Parachute Regiment selling poppies. I introduced myself as an ex-Para and asked this sergeant if he was happy to have his picture taken with the kids and he was happy to oblige.
Then we were off sightseeing at all the strange buildings in the city centre. We ended up at the Monument and Catherine asked if we could go up. I had never been up before – the kids climbed all 311 steps without stopping for a break once.
Sightseeing
The views from the top were brilliant looking over St Paul’s Cathedral, HMS Belfast and Tower Bridge.
The Monument View
The display of poppies is to be dismantled on the 12th of November but the section known as The Wave will be around until the end of the month before going on a national tour.
July, August and September were very busy months for me this year so I did not post up much about the bimbles around my local village of Bramley.
Part of this was due to receiving a rather lovely birthday present in September from my wife Alison of a new Nikon D3200 DSLR camera. I have never owned a camera that requires anything more than point and shoot before so I have spent many an evening reading up on it and practising.
Some of the pictures in this post have been taken with my Nokia phone and some with my new DSLR.
I have put up just a few of the many pictures I have taken over the last two months and separated them into categories.
Butterflies
I am not that knowledgable about these lovely creatures so had to rely on a guide book to ID them. The three below from top left clockwise are a Comma Butterfly, a Marble White and a Silverwashed Fritillary. All were photographed in woodland glades enjoying the sunlight.
Comma Butterfly, a Marble White and a Silverwashed Fritillary
Flowers
As usual flowers are my passion with the range of smells, colours and textures they offer. I am still confused by some flowers I find in and around the woods by our village – there must be lots of garden escapes. The yellow flower my daughter is looking at was a late bloomer; I could not identify it from my books but she liked it.
The cornflower is always a nice find but the most unusual I spotted was at The Vyne National Trust property on the outskirts of Bramley. The little flower on the bottom right was sitting on top of a perfectly manicured hedge and was too good a shot to miss.
Cornflower (bottom left) and two unknowns
Two beautiful plants for late summer are Woundwort and Borage. Both plants have been used medicinally in the past, for treating cuts and kidney problems respectively.
Woundwort and Borage
Ok not a flower but the flowering heads of the hogweed when caught at the right angle and light turn into a thing of beauty.
The majestic hogweed
Fruits and nuts
I luckily have a local woodland next to me that has a carpet of wild strawberries. In the summer it was great to see these little red berries appearing and getting to nibble the odd one before the birds or slugs got to them. I managed to photograph far more hazlenuts this year (bottom left) before the squirrels snaffled them all. I don’t know if that was because I was really looking for them, there were more than usual, there were fewer squirrels about, or a combination of all of the above. As usual though there were plenty of horse chestnuts for my kids to collect. My rucksack always ended up being full of them every time I took the kids out.
Wild Strawberries, Hazelnuts and Horse Chestnuts
Finlay spotted the apple tree in full bloom and was soon scrumping for apples in its branches. I took the bottom shot as I really liked the contrast of red and green with the rosehips and apples, both beautiful and full of vitamin C.
Scrumping for apples through the rosehips
Leaves
I have been watching the leaves grow all year and now into the autumn I am watching them start to die off. They can be quite striking though at times with the higgeldy piggeldy white trail of the larvae from the moth larvae Nepticula aurella. A hazel leaf (bottom picture) may seem quite boring to look at first but if you put it to the light and peer closely then you see a whole new world.
Leaves up close
Seeds
The wood aven flower is a lovely yellow colour and the plant has many uses but the flower only lasts a few months. To know it all year round you need to recognise the shape of its leaves and also the spiky seed head it produces (top left). Once you have identified one you will see them all over the place.
I like to peer inside the little capsules containing the bluebell seeds just before they fall apart and drop their seeds (bottom left). This is a second period of beauty to me with this plant, often overlooked by most people. I have no idea what the seed pod in the top right is from (taken in my garden) but it is striking.
The last one at the bottom right shows the seeds from the willowherb starting to unfurl.
Seeds – Woodaven, Bluebells, Willowherb and one unknown (top right)
I could not resist putting this picture of the willowherb up on its own as it captures the moment the little hairs with their attached seeds are just starting to float off.
The beauty of a Willowherb seed pod unfurling
I came across this little chap (not my son) Mr Squirrel (though it could have been Mrs Squirrel) lying in the leaf litter on one walk with Finlay. Over a number of weeks we would see this little chap slowly decomposing and both Finlay and myself found it totally fascinating.
Mr Squirrel returning to the earth
Insects
Over the summer I have been trying to get some good macro shots of insects and I was particularly impressed with the spider in the top left picture. I took this one with my new camera as well as the honeybee (I think that is what it is) at the bottom right. The other two were captured using my Nokia phone camera.
Up close and personal with the insects
This little packet of pink madness is the red gall of the gall wasp. I found it hanging off a bramble branch and was very confused to what it was at first until I had looked it up. I will be looking out for more of them next year when I will hopefully have some extension tubes for my camera lens so as to take far better macro pictures.
The red gall of the gall wasp
A last little look at the beauty of the small fly and the daddy long legs.
The fly and daddy long legs
My last picture is of one of the few ground-dwelling fungi I spotted over the summer. As far as I am concerned it is an LBJ (Little Brown Jobbie): I do not study these little critters enough to identify the different types of LBJs. I liked this one for the forlorn look it had sitting on its own on the woodland floor after something or someone had snapped it.
Thankfully as autumn has progressed more and more fungi have started to pop up all over the woods which I can identify.
An early dejected looking LBJ
I had a great summer photographing around my village and look forward to getting some great pictures as the autumn comes to a close and winter sets in.
I was out on a Bramley Bimble a couple of days ago and came across a sad little find. Just by the public footpath in the Frith woods is a bridge under which the kids love to play trolls, but as they were playing I spotted some feathers and called them over – not much stops my kids from playing trolls but the mention of a dead bird got them moving.
Our find out on a Bimble
I was unsure at first what it was (I thought it was a bird of prey) so just took a couple of pictures and left it there. I put a picture (the one above) up on Facebook and Pablo from Woodlife Trails identified it as a Tawny Owl.
I went back to the site tonight and carefully collected up as many of the bones and feathers as I could find. The owl had pretty much decomposed but I did find the majority of the bones. They were in two piles so something had been along and had a nibble but had not totally destroyed the skeleton.
Everything I collected
There were not many feathers left but I did manage to salvage some good ones. These ones will end up on an atlatl shaft one day.
Feathers, talons and skull
The pads and talons were still attached to the leg bones so were easy to find but when I looked at the skull more closely I noticed damage. The beak was twisted to one side so whatever animal tried to eat it must have chewed the head a bit before giving up.
Up close on a leg and the skull
Below are some close ups of the talons, still looking razor sharp, and the small picture at the top right is all that was left of the spine and the hips.
Talons and spine
I have no idea how the bird died but it was great to find it and in such good condition.
I have been experimenting with my Nikon D3200 DSLR for a month now and I am very impressed with the results so far.
Also I have got Adobe Lightroom which really helps me get the best out of the pictures I take while in my learning state. I am shooting more and more in the RAW format as if I take a bad shot I have a chance of making something out of it in Lightroom.
Also I took the plunge and got the Nikon D3200 for Dummies ebook and am plowing my way through it in the hope of it all making sense one day.
Here are a selection of some of my close up work over the last month. I am enjoying this type of photography and so have been looking into lens tubes to help in this macro photography.
I hope you enjoy these pictures as much as I enjoyed shooting them and playing with them in Lightroom.
The Comma ButterflyPopping out of the hedgeCatherine investigatingGarden seed headHoverfly (I think) on an Ivy seed headCommon fly sunbathingDaddy Long Legs in some rushesHoverfly 2SpideyWillowherb seedDandelion and flyHazlenutHazel stem and next year’s budCornflowerUnknownThe red gall created by the Gall Wasp larvaeWillowherb seedsMr SquirrelIvy Seed HeadBeautiful BorageUnknownSeen better daysAn apple and rosehip harvest
A year ago I first advertised my Bushcraft Days blog on Facebook with a view to recording my adventurous activities and sharing them online. I did this primarily to let everyone know what we get up to in the London Area Sea Cadet Adventure Training Team.
We are a small team of instructors dedicated to getting cadets and staff outdoors and exploring as many different environments as possible. When I joined the Corps back in 1998 I came across this slightly eccentric but vastly knowledgable and experienced Adventure Training (AT) instructor Lt (SCC) Graham Brockwell. Graham has been in the Corps since he was a lad and I would say is the Corps’s most experienced AT instructor.
The Boss
For quite a few years now he has run the London Area Chosin Cup competition but he decided this year’s would be the last with him in charge.
This post is therefore dedicated to my friend Graham – our slightly eccentric, vastly knowledgeable but very friendly Boss.
As usual the AT team turned up early on the Friday (26th of September) to set everything up and the rest of the staff and cadets turned up over the course of the Friday evening. The cadets had to do a night nav into the campsite after being dropped off by their minibuses. Most teams found the camp but four teams took a wrong turning and headed off into the Forest. Dave Lewis and myself found them all huddled together conflabbing about where to go but they were in high spirits and were soon back at camp.
It was an early start the next morning where the teams were given separate routes and headed off to their stances. After finishing each stance they would head off on a new bearing to find the next one, repeating this throughout the day. My job was to keep moving around the course to make sure everyone was OK and not getting lost, which allowed me to take lots of pictures.
First I found the raft building stance where Enfield made a valiant effort to float their raft but sadly things were a bit loose and they soon ran into trouble (they managed to keep smiling throughout though). Next I came upon the plank race. This was a tough little race in the woods but the cadets were continually egged on by Tommo and his microphone and speakers.
Breakfast and away
One of my favourites has always been the archery stance. Charlie ran that one again this year with Robin up on Hill 170. It seems that one of my bows may need to be retired as it is now developing latteral cracks but it managed to last the day thankfully.
Archery stance
One of the stances I visited was the flag raising one with Paul and Eli but as no teams turned up while I was there could not take any pictures. Paul did film some of the stance though and I put this short video together from his footage.
Next I found Dave and Paul in the woods where they were running the river crossing stance. As it is training there was not a river in sight but the cadets had a great time setting up their rigs and ferrying their kit and themselves across.
River crossing stance
There were quite a few other stances I did not photograph including an AT quiz and identifying knots.
After all the stances were completed the cadets went back to the campsite to cook dinner, but as soon as it got dark they were given a new route to a different campsite. They had to navigate in the dark and cross one of the lakes in canoes. A bit of a logistical nightmare but great fun. Thanks to Jo, John and Kev for organising all this.
Night Nav
After all the cadets were set up in their new camp the instructors all relaxed for an hour or so around the campfire. It was great to get the night nav finished so early and for once I got a decent sleep on a Saturday night over Chosin Cup.
Rest back at camp
I made this video of the Saturday showing as many of the stances I could and it is set to my favourite classical track – The Ride of the Valkyries.
Sunday morning was one of these special ones. I got up at 6am and grabbed my camera straight away and got some beautiful shots.
Stunning morning
While I was prepping for the day I had a chuckle as I watched the Deputy Area Officer (London) Lt Cdr (SCC) Cliff Lewis giving the London Area Staff Officer Adventure Training CPO (SCC) Perry Symes a field shower. Not often you get to see that or even say all that 🙂
Prep for the day
The Sunday stances were all concentrated in and around a small woodland so the cadets could get around as many as possible. My first set of pictures were of the stalking stance run by Cliff. The cadets competed against each other to remain undetected, retrieve as much water as possible without spilling it, and identify the various man-made objects strewn about the course.
Stalking stance
Dean and Tommo ran the tree climbing stance. They had rigged some ropes up to an Oak tree and the cadets used a prusik system to ascend to the top.
Tree climbing
The cadets had to test out their seamanship skills by trying to get a heaving line into a container and Paul had them rigging a pulley system to move a very heavy water carrier.
Heaving line and pulley
Another of my favourites is the Atlatl. Dave ran this stance and had it set up against a massive pile of hay in the meadow to catch any stray darts. I was relieved to hear that my unit (City of London) came top in this stance 🙂
Atlatl
As Graham had wanted quite a bushcraft feel to the Sunday there was also a shelter stance and a fire making one. Paul had them setting up tarps to help treat an injured casualty and Charlie was doing timed firelighting – both fundamental bushcraft skills and great fun.
Shelter and Fire
Ian was running Kim’s game where the cadets have a minute to study a range of items and then when they are covered up have to describe each one in great detail – not as easy as you may think. Alan was running the Gyn stance – the cadets had to use all there seamanship and team working skills to build the Gyn so as to raise a log up to a set height.
Kim’s game and the Gyn
As I had taken a lot of video I made a separate video of the day.
Also running throughout the morning was the Endurance Race. The race was right down in the valley so the cadets would have to cross the river.
The start of the Endurance race
There was a great Postman’s Walk (rope brige), muddy slopes, ditches and netting to get through in a fast a time as possible.
In full swing
The teams had to help each other as much as possible as the clock did not stop until the last cadet had finished. I had a great time running around the course trying to get the best position to film and taking pictures.
The finish
My last video of the weekend was of the Endurance Race.
I had to leave before the placings were announced so I have used Joanna Russell’s pictures here. The visiting team trophy went to Poole unit and third place went to City of London unit.
Poole – Winning visitors City of London – Third place
Second place went to Finchley unit and First place (for the second year in a row) went to Enfield unit.
Second place – Finchley unit First place – Enfield unit
Also for the second year in a row the Team Leader trophy went to LCdt Jess Edwards of Enfield unit.
L Cdt Jess Edwards – Winner of the Team Leader trophy
I thoroughly enjoyed the Chosin Cup this year as the weather was kind to us and the bushcraft stances worked well but most importantly it’s great to see so many teams entered in what I think is the hardest competition the Sea Cadet Corps runs.
Well done to all the teams who took part.
A great weekend
There are a lot of people that make Chosin Cup happen (including staff and cadets) but without the drive and dedication of Graham Brockwell it would not be the success it is today.
So thank you Graham for organising another great Chosin Cup.
Meet our Junior Sea Cadets from London Area – Cadets who love to learn by having fun.
A year or so ago my friend Lt Cdr (SCC) Mark Weston invited me along to help out on one of the weekends he organises for our Junior Sea Cadets. Mark believes that it is sometimes good to bring these youngsters (10 and 11 year olds) away on training weekends where they can learn in a fun manner but not have the prospect of an assessment hanging over them at the end of the weekend.
I was hooked on these weekends from the start as the Juniors undertake a number of different activities to learn new skills and I get the chance to play at bushcraft with them.
Meet London Area Juniors
I was joined on the weekend by my friend Dave Lewis to deliver the bushcraft class in the woods. The training was conducted at Crowborough Army Camp but thankfully this time we got access to the ajoining woodland where we are allowed to light fires.
Many of the Juniors had never shot an arrow before but after some tuition they were pinging them down range as quick as they could. One little lad was so chuffed as he got the tiny bull’s eye on one of the targets.
Bulls-eye archery
Dave and I took it in turns to deliver different classes as we got a group of about 6 Juniors at a time for about an hour and a half each time. So while I was doing archery Dave was teaching half of the group how to use a firesteel properly and then how to build a proper fire.
Firesteel fun
I collect Fire Faces from images I see in the flames but the best faces are always found on the owners of the flame. Even Mark helped out with the fire lighting and I think his face says it all.
Happy Fire Faces
While we were having fun in the woods, other instructors were running courses back in the main camp. Here you can see Kay modelling some of the signalling flags the Juniors had designed in her class.
Also Sam and Lorraine ran a very busy and successful cookery class where the Juniors made some rather delicious biscuits (I know – I tried a few out).
Comms and Cooking
Every Junior took part in the First Aid class with Keith and learnt about CPR and got themselves a signed certificate to confirm this.
A Sea Cadet course would not be complete without a seamanship class so Alan and Nigel were kept busy teaching all the Juniors about bends and hitches.
Up in the gym Darren our PTI kept the Juniors running around all day with fun classes to use up all their excess energy.
First Aid and Fitness
On the Sunday all the classes were up in the camp and included the ever popular Atlatl class. This skill has become a popular one to learn as the older cadets are now marked on this in the Chosin Cup competition held annually by London Area Sea Cadets.
Steady – Aim – Shoot
Dave ran this class leaving me free for some time to concentrate on getting these pictures and capturing some video of the weekend.
As some Juniors were doing the Atlatl others were in the gym with Darren competing against each other doing lots of games.
On target
I got some of the Juniors and staff together that morning to do some relay bowdrill. I didn’t have time to run this with all the cadets but those that did had a great time.
Group Bowdrill
I put together two videos of the weekend. The first one shows all of the activities the Juniors undertook and was partly filmed by Deputy Area Officer (London) Lt Cdr (SCC) Cliff Lewis while I was teaching.
The other video shows the relay bowdrill I did with the Juniors. This was an experiment and as it was successful I will be using this technique with them again. Thanks to Chrissie Weston for filming much of this.
This was a great weekend and Mark has gotten a winning formula with the variety of classes the Juniors get to try out – I am looking forward to the next one in late spring next year.
I am told that if you keep doing the same thing each year, such as going to the same holiday destination, that time will seem to speed up as you get older. I agree with that to a point but as far as I’m concerned it’s what you get up to at your favourite destination that’s important.
I missed the very first Wilderness Gathering but have been to all the rest since and to combat that sense of time passing quickly I make sure I do something new each time. This year my focus was on the art of filming (there are five short videos in this blog post).
The Wilderness Gathering and the Coastal Survival Crew
For the third year I helped out Fraser from Coastal Survival, mostly in the role of cameraman for him (filming has been my ‘learn’ for this year) but occasionally doing some one-to-one instruction on making fishing spears and nets. Also in the team was fellow Scot, Steve, and new to the team Leo and Max.
The Gathering is also a time for me to catch up with old friends, such as the selection pictured here: Phil from Badger Bushcraft, JP and Pablo from Woodlife Trails, Pete, Martin (in the Billy the Bushcrafter mask) and Mark from G-Outdoors (there are quite a few more friends pictured later). Also it is a great time to meet new friends such as Phil’s partner Charlie.
Meeting old friends and new friends
Over all the days there were plenty of workshops going on but due to helping Fraser out I did not spend any great time at one workshop. In a way it was great to flit from class to class and grab a snapshot from as many as I could. Below you can see Will Lord expertly knapping, Steve and Paul from the Bushcraft Magazine giving some great demonstrations on the stage and I even managed to catch one axe in flight.
Workshops and demonstrations aplenty
One of the things I like about the Wilderness Gathering is all the art you can see in all its different forms, from the grass mat made in a day to the beautifully crafted kayak made by Patrick from Backwoods Bushcraft.
Wonderful art and craft
Once each day’s crowds had gone home it was time to tidy up, cook tea and relax. The stage was well attended this year with different acts and it was good to hear the music from most of the site.
I slept up in the main car park in my hammock suspended from my own home-made freestanding hammock stand. I packed it this year as I turned up a bit late and knew there would be no space left in the woods.
As usual I brought one of my Scandinavian candles along and managed to get one picture showing a couple of great fire faces.
Evening Time
On my wanderings I found that if you were patient enough you could get some great shots of some of the best bushcrafters and woodland workers practising their different arts. In these pictures you can see Peter Whiteman carving a yew bow, Ben Orford effortlessly creating a spatula, Jason Sears perfectly demonstrating the art of making cordage by rolling it on his thigh (I have never mastered this) and Jon Mac showing the art of chip carving.
Masters at Work
Fast becoming a regular feature at the Wilderness Gathering is the Bowdrill World Championship challenge and this year it was run by Phil Brown of Badger Bushcraft. The challenge is to light a fire using a bowdrill set as quickly as possible. I have entered this on a number of occasions. My quickest time ever from start to flame is 1 minute 13 seconds, but sadly not this year. The best I could do after four attemps was 2 minutes and 6 seconds. JP won this year with a time of 1 minute 20 seconds.
Running alongside all this competitive spirit was Jason teaching people all weekend how to use the bowdrill.
Bowdrill fun
So the main job for me on the weekend was to take pictures of all the activities Coastal Survival got up to. I was very happy to do this as Fraser is a good friend of mine and I am continually learning from him.
Fishing Spear with Coastal Survival
The video goes into more detail on how you make one of these very simple but effective spears for fishing.
Fraser has spent time over the winter and summer developing his own knife for use in the coastal environment. It is still in its development stage but I was very impressed with its versatility and particularly liked the rubber handled model.
Coastal Survival Coast Hunter Knife
I put together a short video showing it in use over the weekend.
As usual the net-making classes proved very popular and Fraser and the rest of the crew ran a number of classes on making a pocket gill net and a full-sized gill net. The kids particularly liked making the pocket version.
Net making with Coastal Survival
The video is not a step by step guide to making nets but it will give you a feel for their construction.
A very popular class that Fraser ran was his cold smoker class. The device was set up in front of the stand all weekend and we smoked some wood pigeon in it.
Cold Smoker with Coastal Survival
Have a look at the video and see how easy it would be to make one for yourself.
A few other snippets from the weekend: Theresa Kamper in the top right picture (below) is an expert in a lot of primitive crafts but particularly in different types of leather that primitive cultures would have used and is currently finalising her PhD in the subject.
Moments in Time
All in all I had a great weekend working hard and catching up with old friends like Sonni and Angela from Beneath the Stars Leatherworking and Dave Budd our resident expert blacksmith, and trying out new skills like dowsing with Hans.
More Moments in Time
At some stage Fraser said he had been given a canoe to take away as a gift. I initially thought he was pulling my leg but it turned out to be true. I had to turn around his front passenger seat so that we could get the thing into his van but after a bit of huffing and puffing we managed it.
The Coastal Survival Tardis
I had a fantastic weekend at the Wilderness Gathering and I was particularly happy that the filming worked out so well.
Here is my last video, with shots from as much of the weekend as I could cram in.