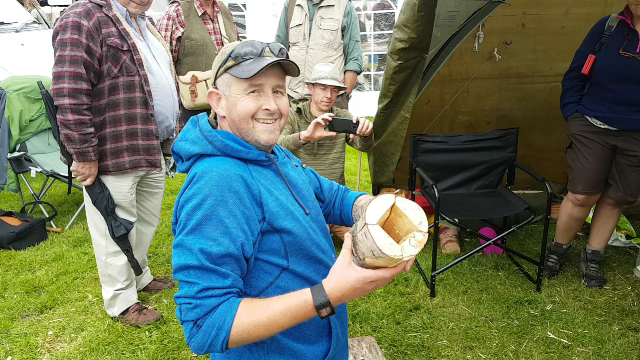
This year at the Wilderness Gathering my friend Des Cattys was showing his love of Log Rocket stoves to visitors. I decided to drop in on one of his sessions to watch how he constructs one. Like Des I am intrigued by these stoves and I am always looking to improve on their construction so watching someone else at work building one is a chance not to be missed.
If you want more detail on making one of these stoves have a look at my How To…. on building a Log Rocket stove. There are many variations on them and I have included some of them on my Bushcraftdays blog in my How To section.
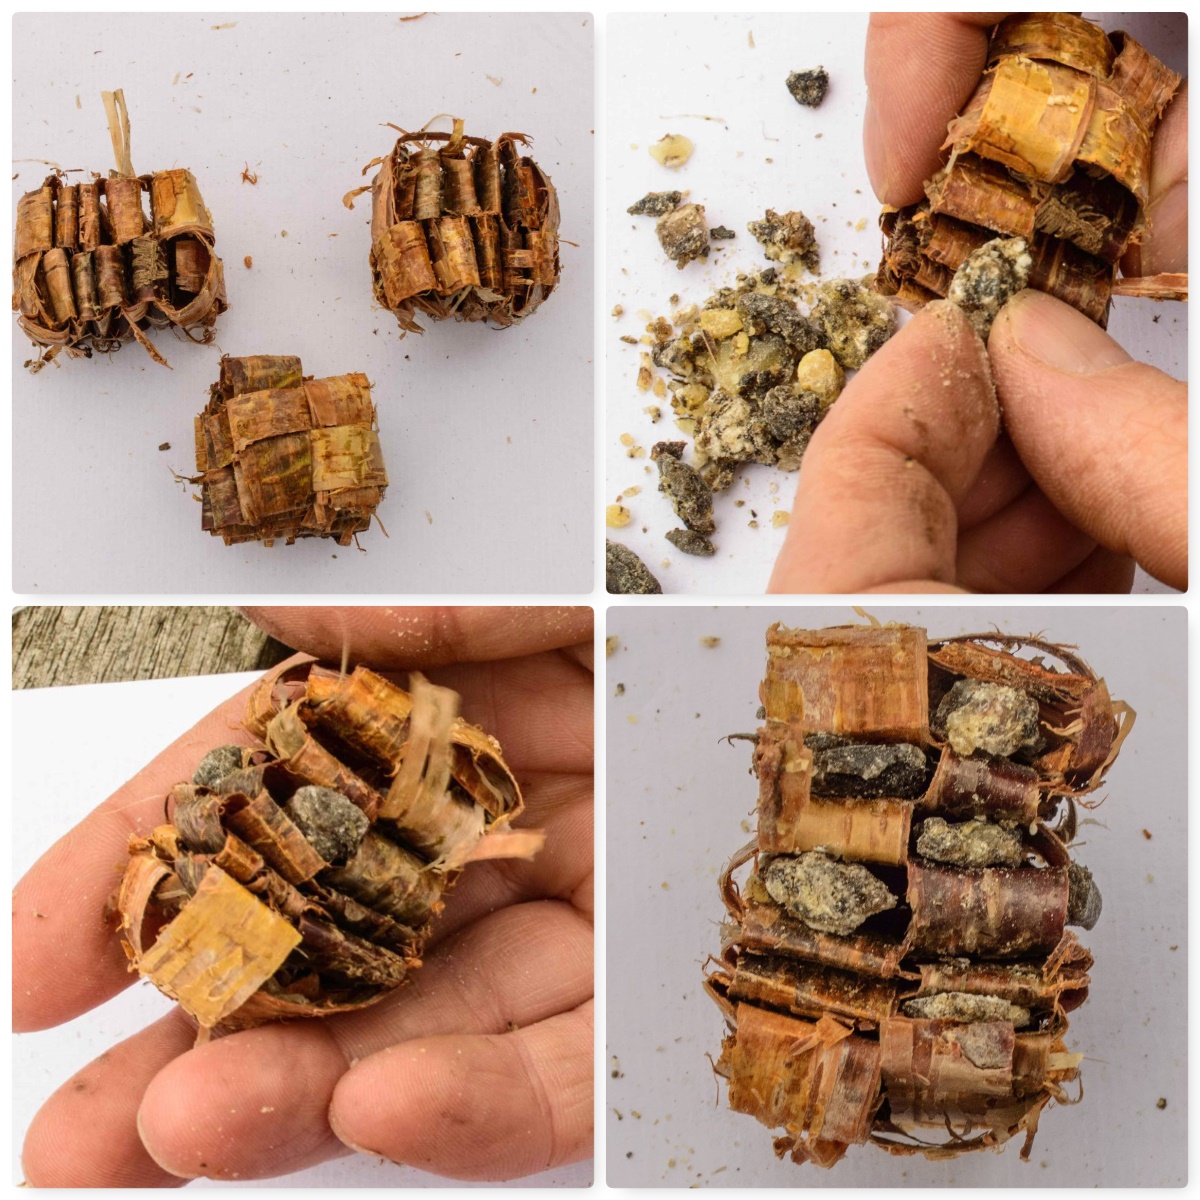
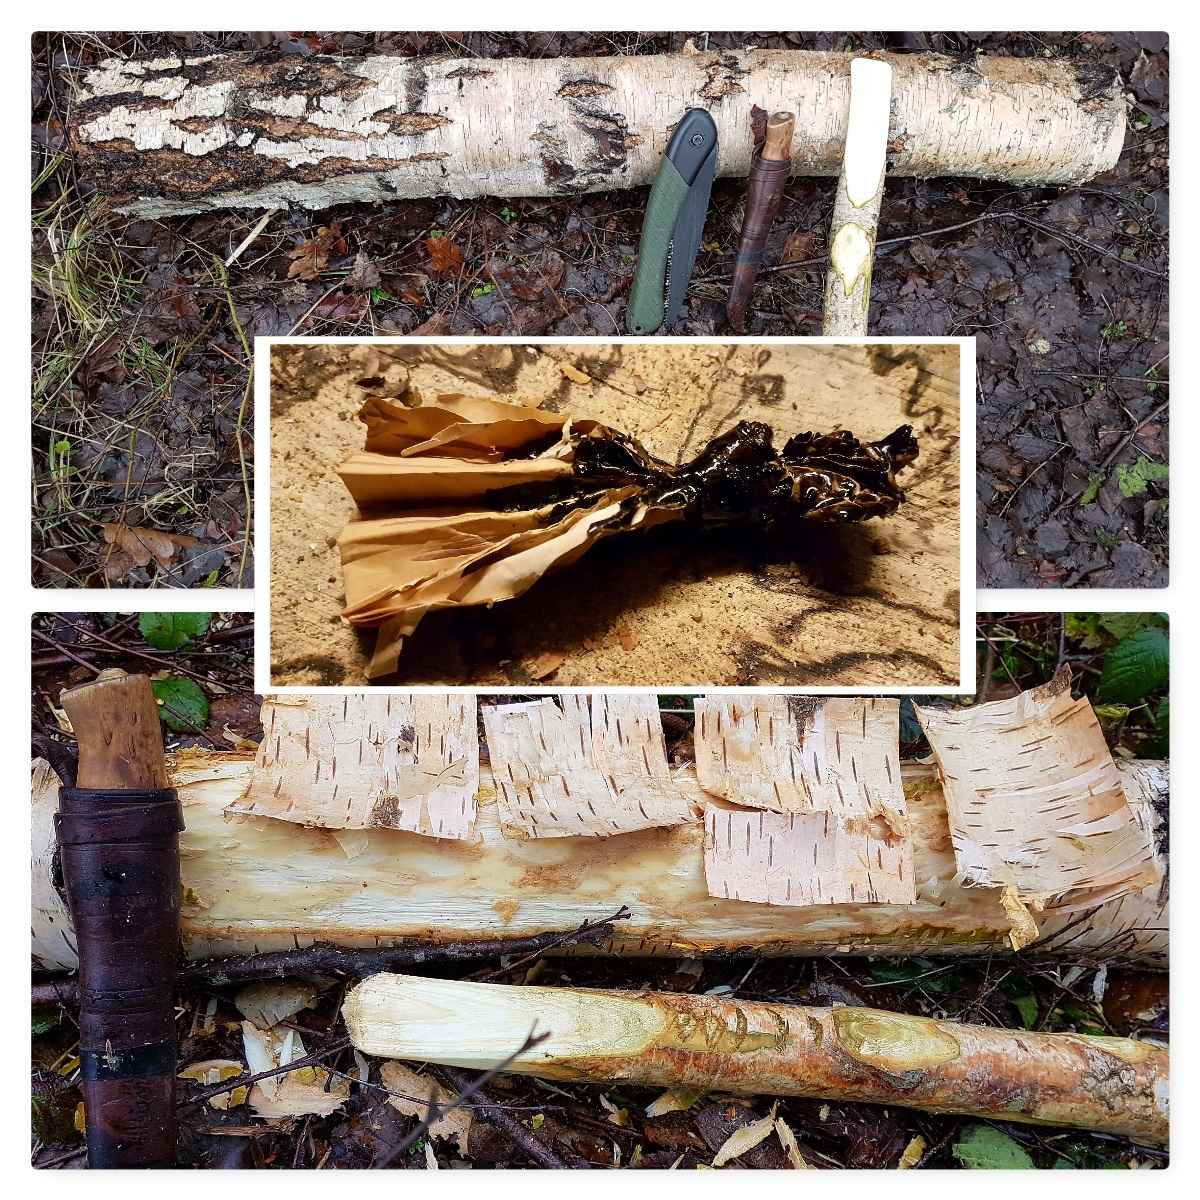
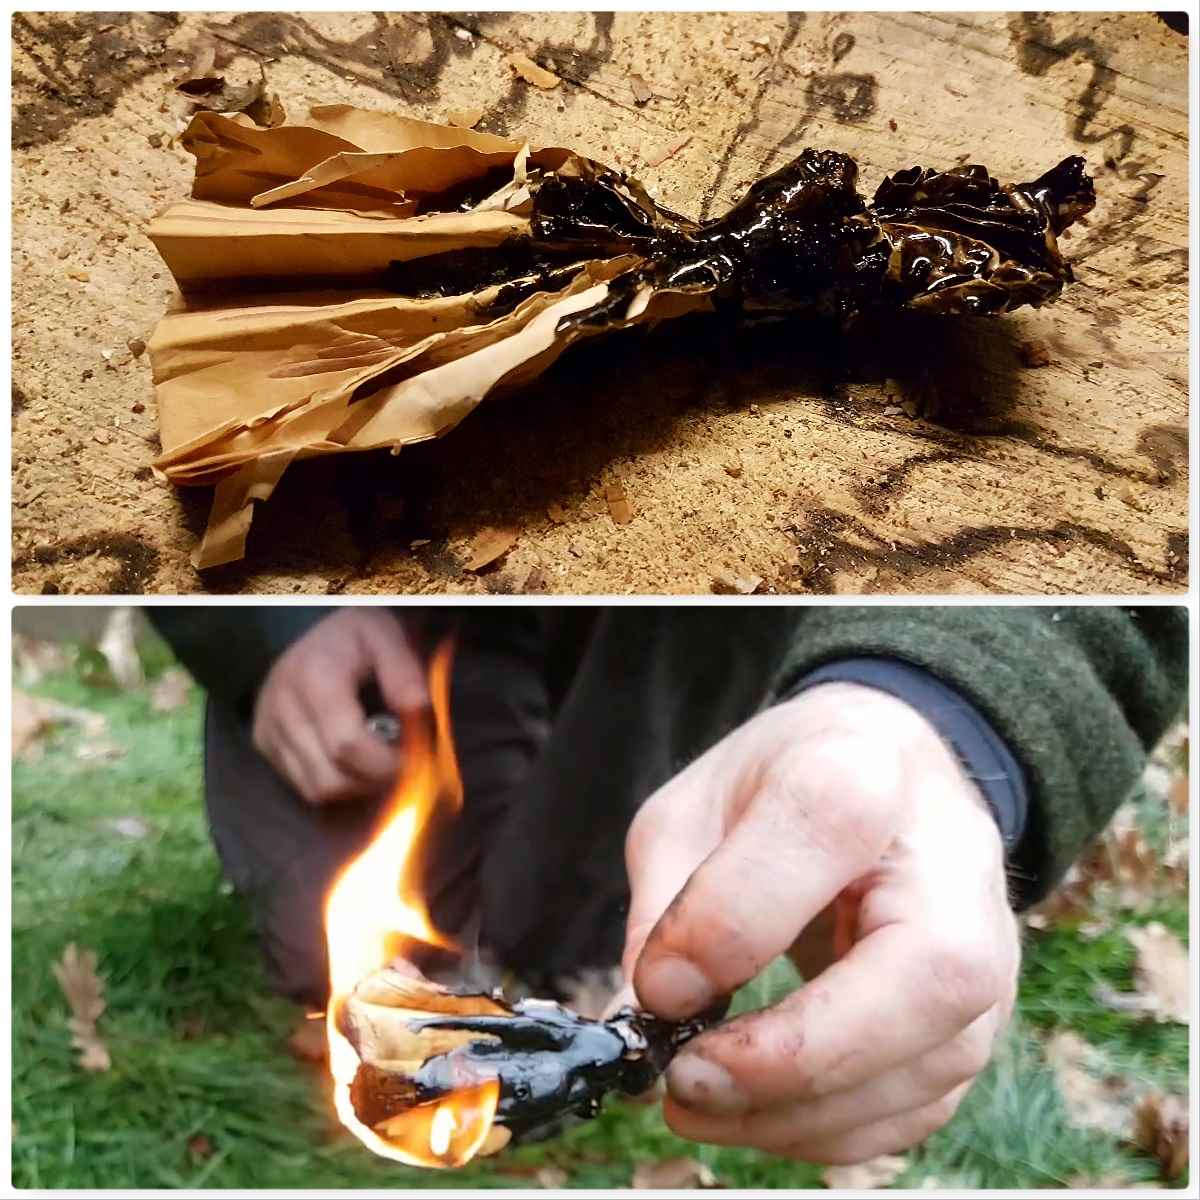
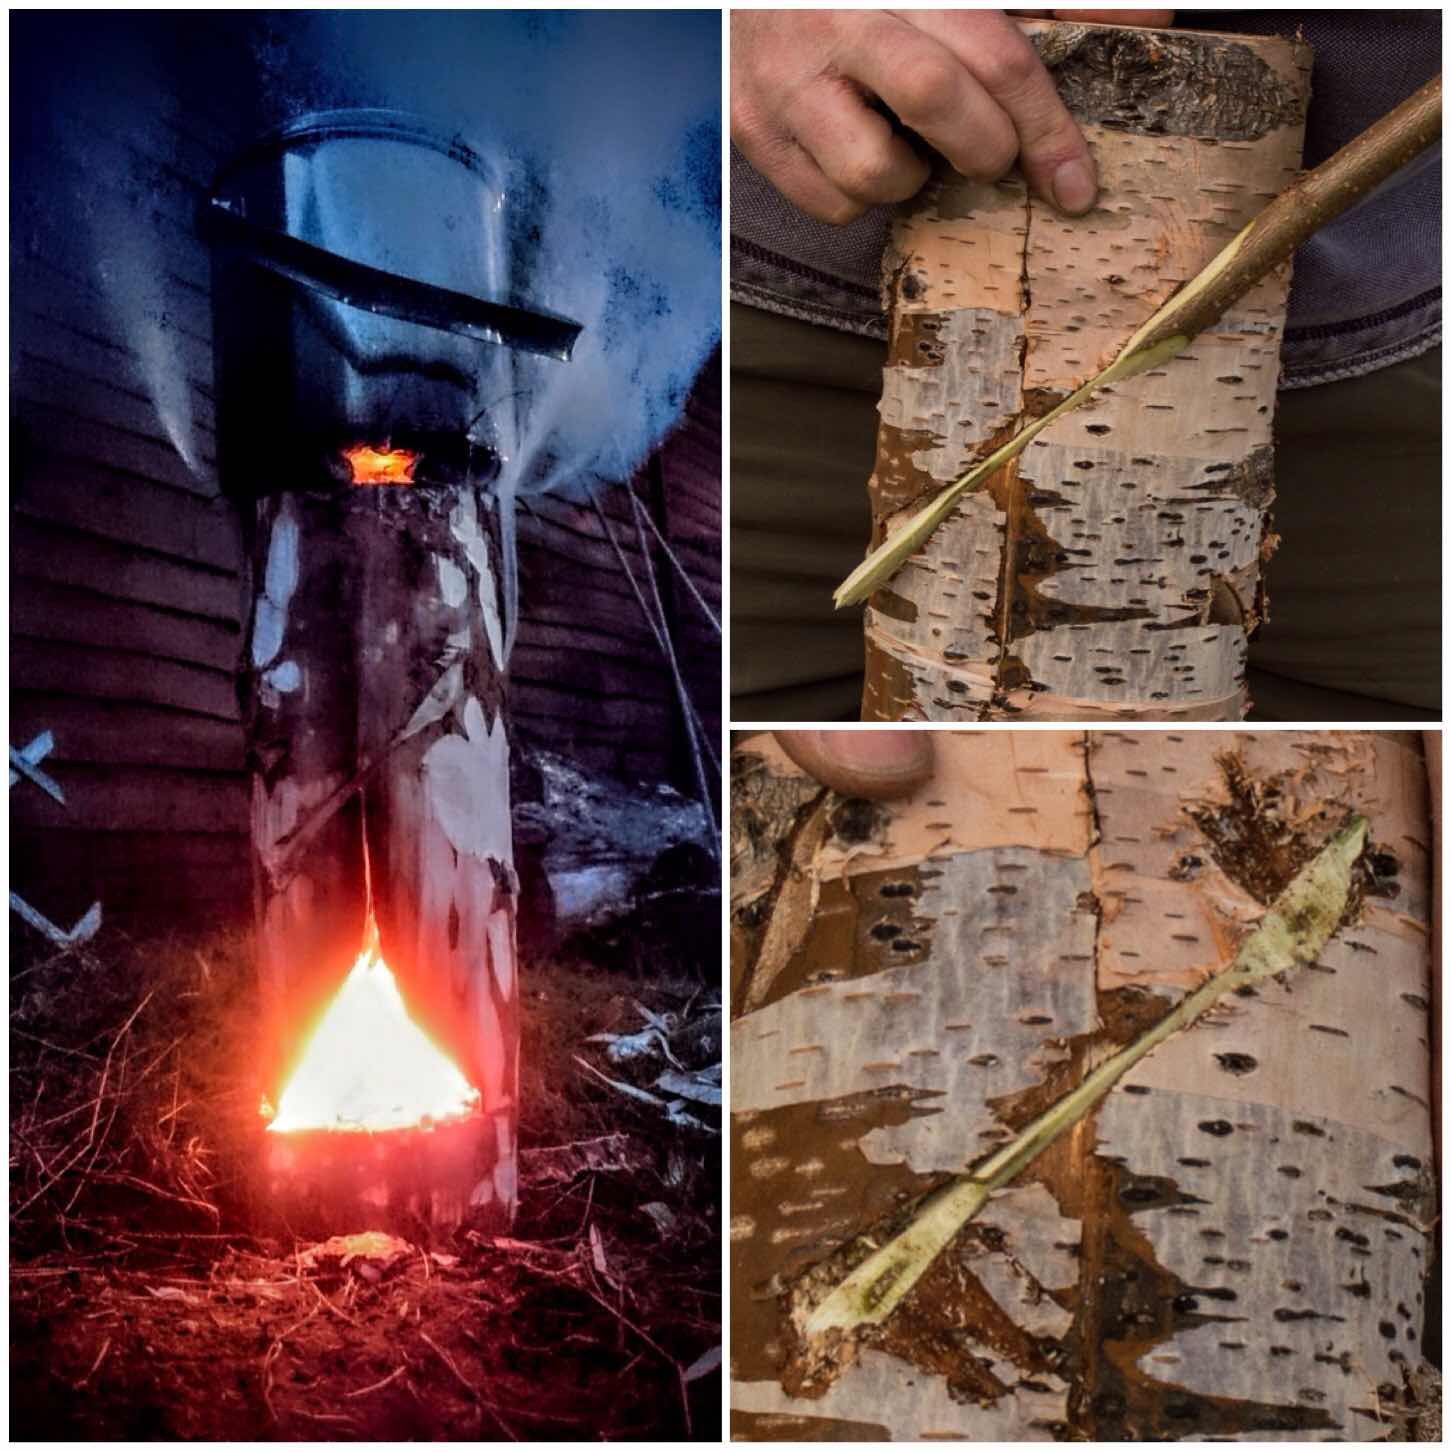
Apart from making baskets and sheaths out of bark I have been experimenting these last few years with weaving bark into natural firelighters. I came across a post on Bushcraft UK by a member called Woodwalker on these firelighters from 2010 – he called them Woven Kindling.
I have since added spruce resin to mine and liken them more to Natural Frelighters as they burn long and fierce. This is the second part in my two part series on natural firelighters – the first being my post on Birch Bark Fire Fans.
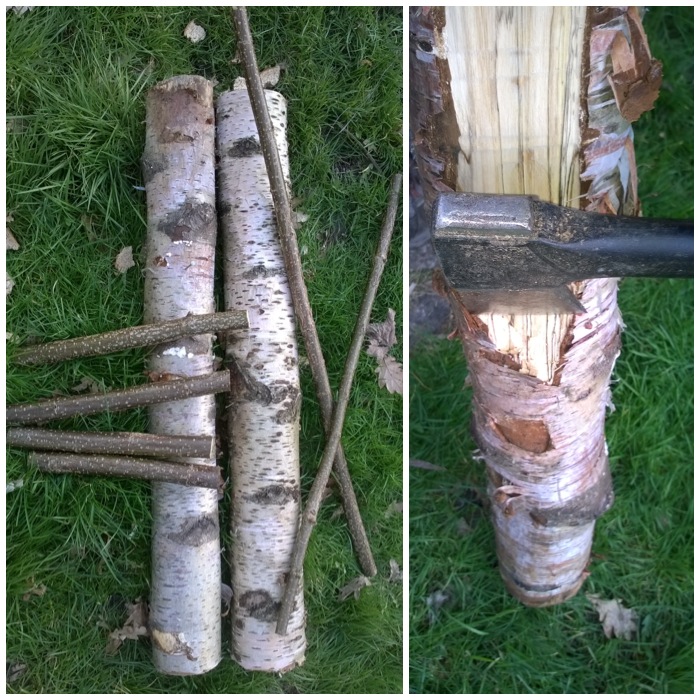
The Birch Bark Firelighter
Removing the bark
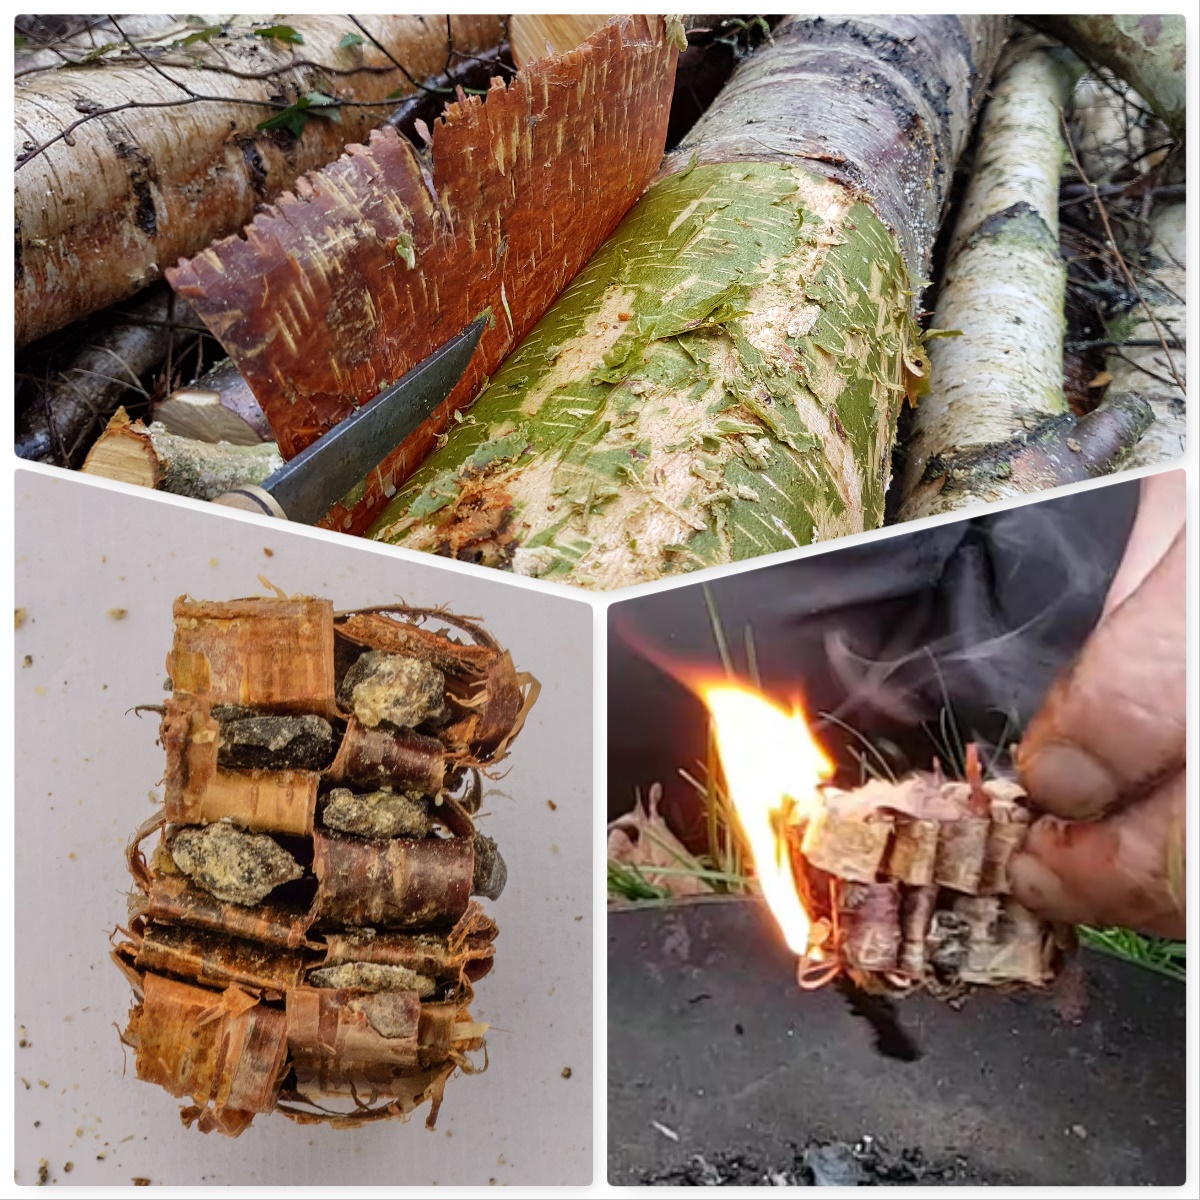
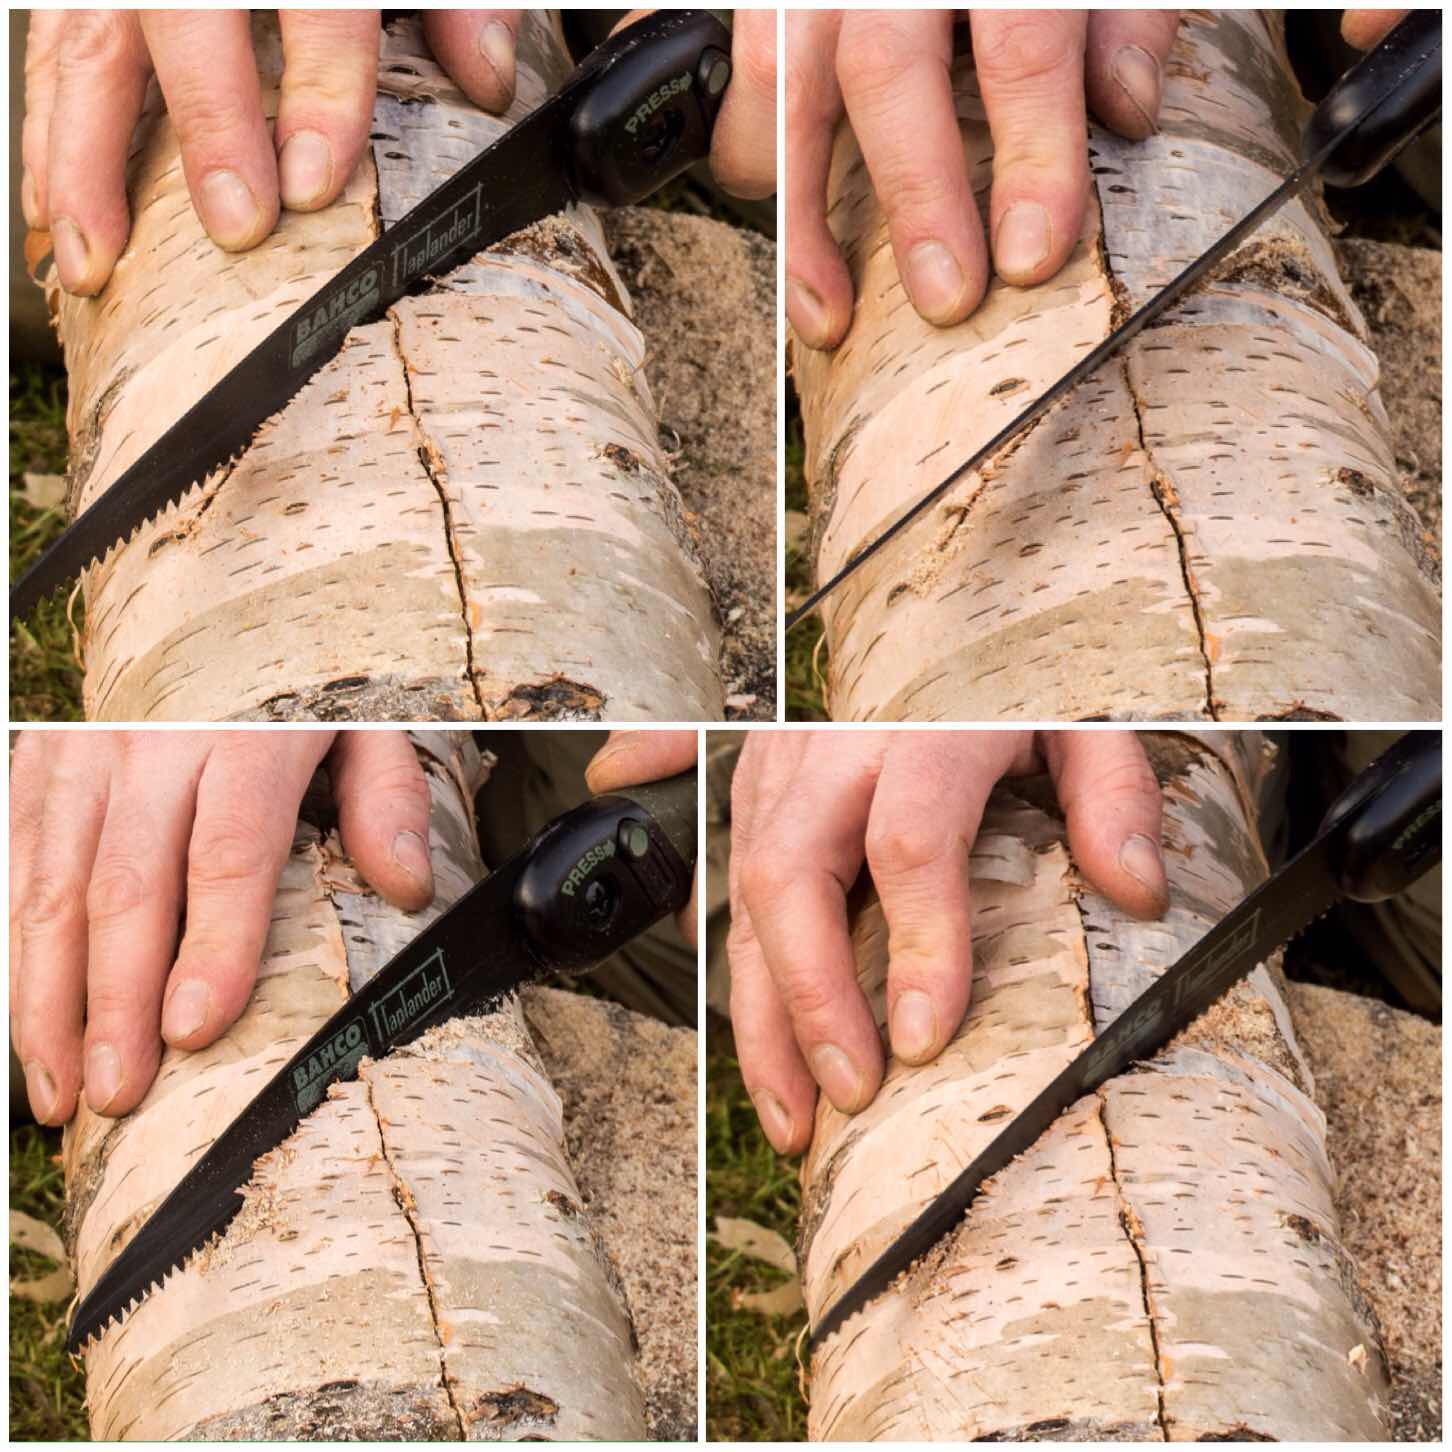
If you can find a semi rotten fallen birch log the bark tends to come of easily so just pull of the what you need. If you use semi rotted logs just take a little piece from as many different logs as you can as these logs are home to many different invertebrates.
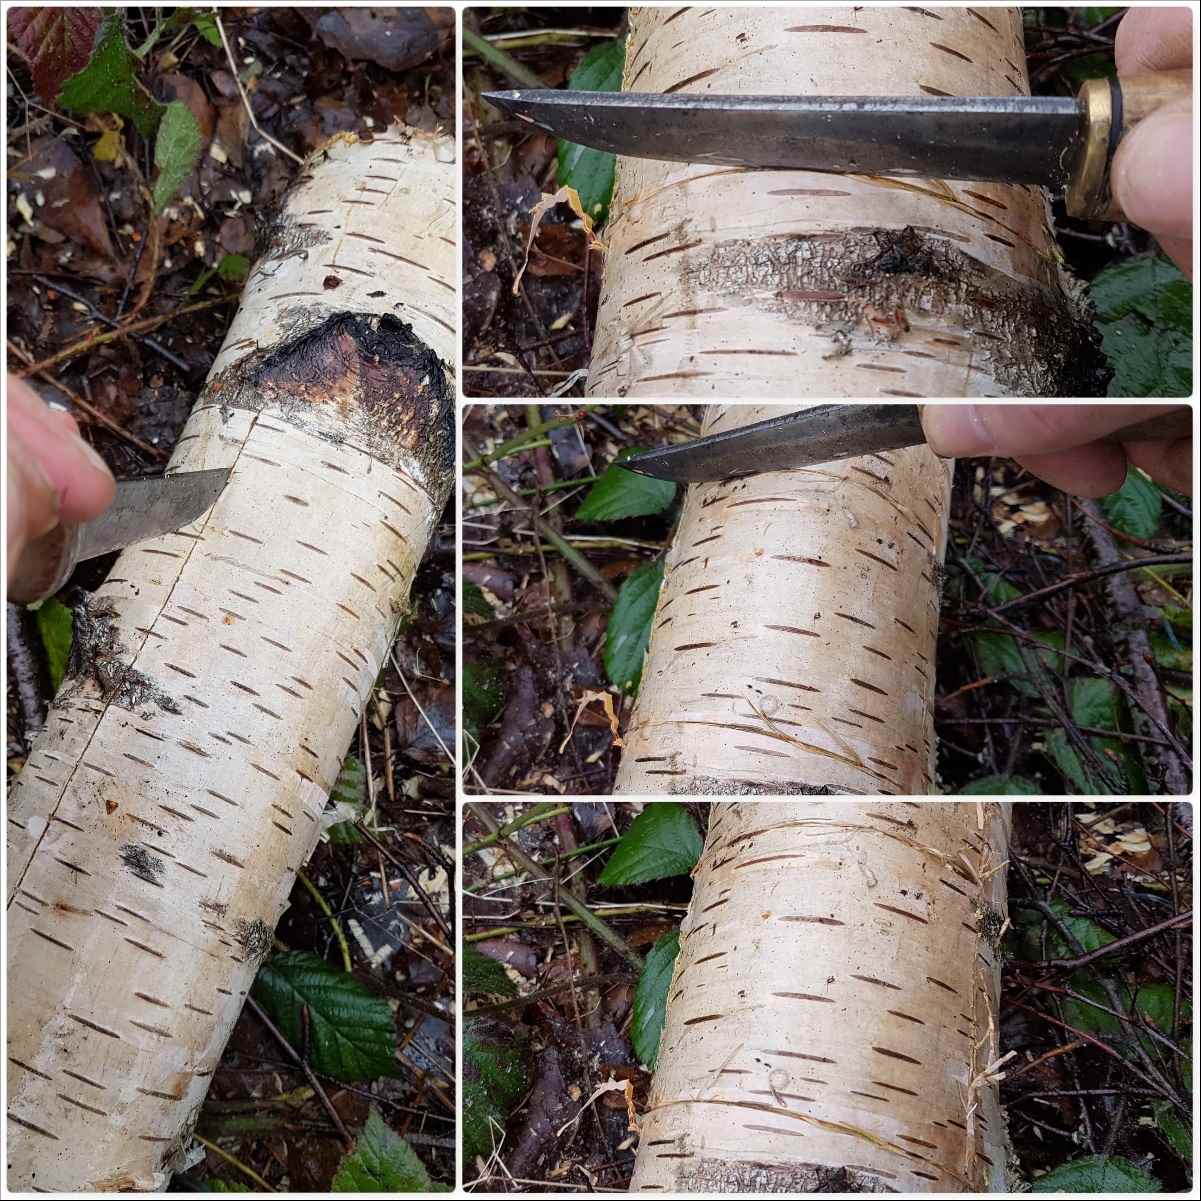
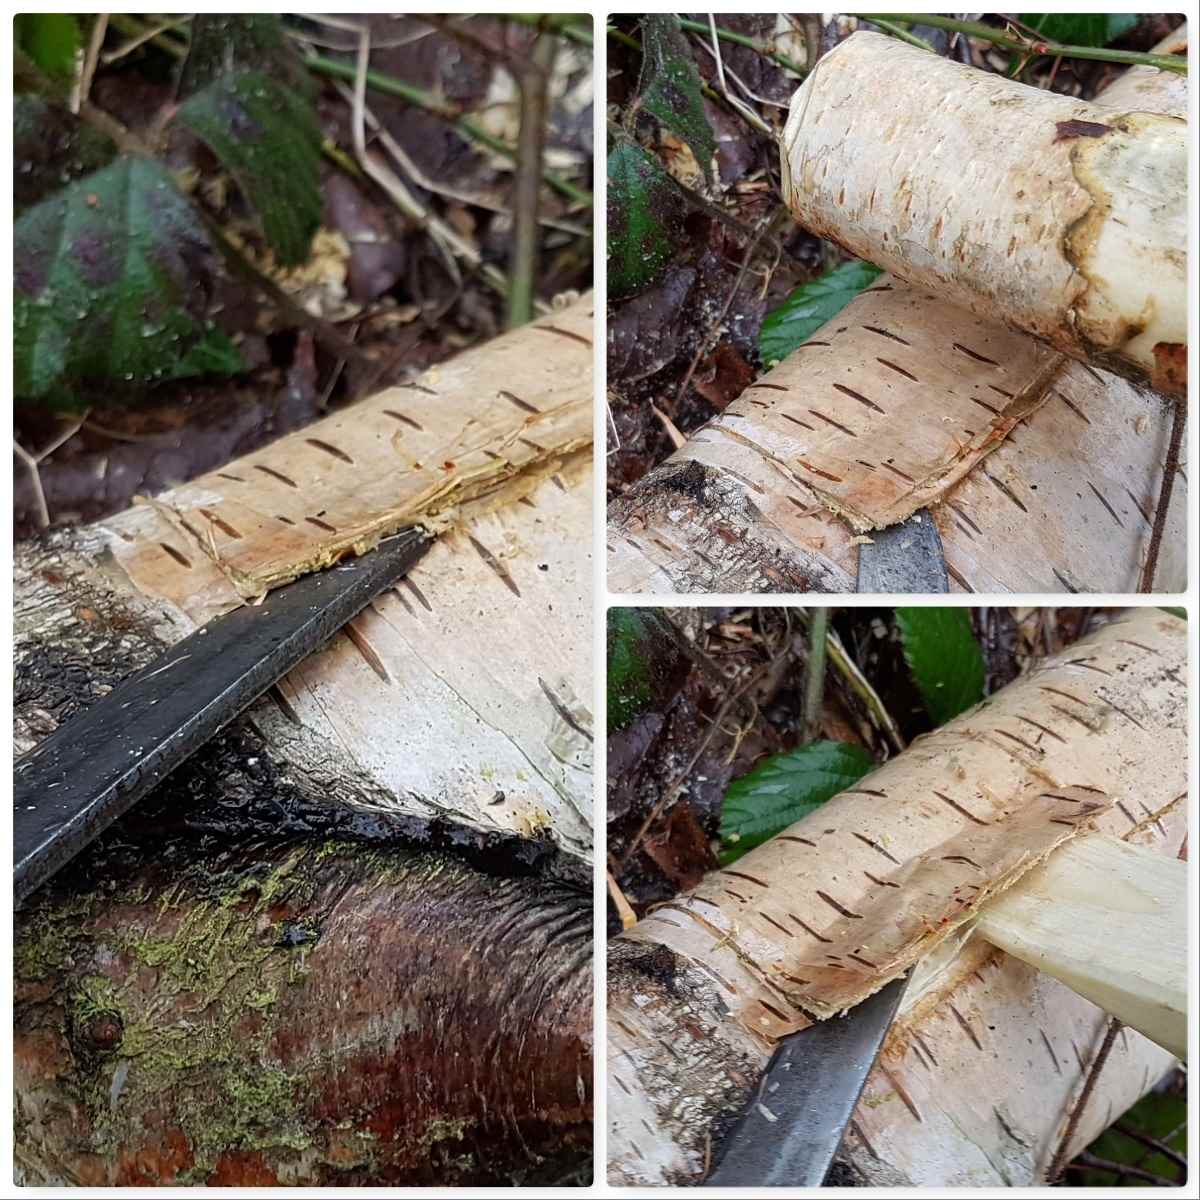
If the logs are freshly fallen then I use my knife to score out the area I want to cut out (ensure it is a smooth an area as possible). If the bark does not peel off easily I batton it with a small log to loosen everything up before prising it off with my knife. I go into the specifics of removing the bark in more detail in my post on the Birch Bark Fire Fan. The main thing is to take your time when the bark does not come off easily.
Stripping the bark
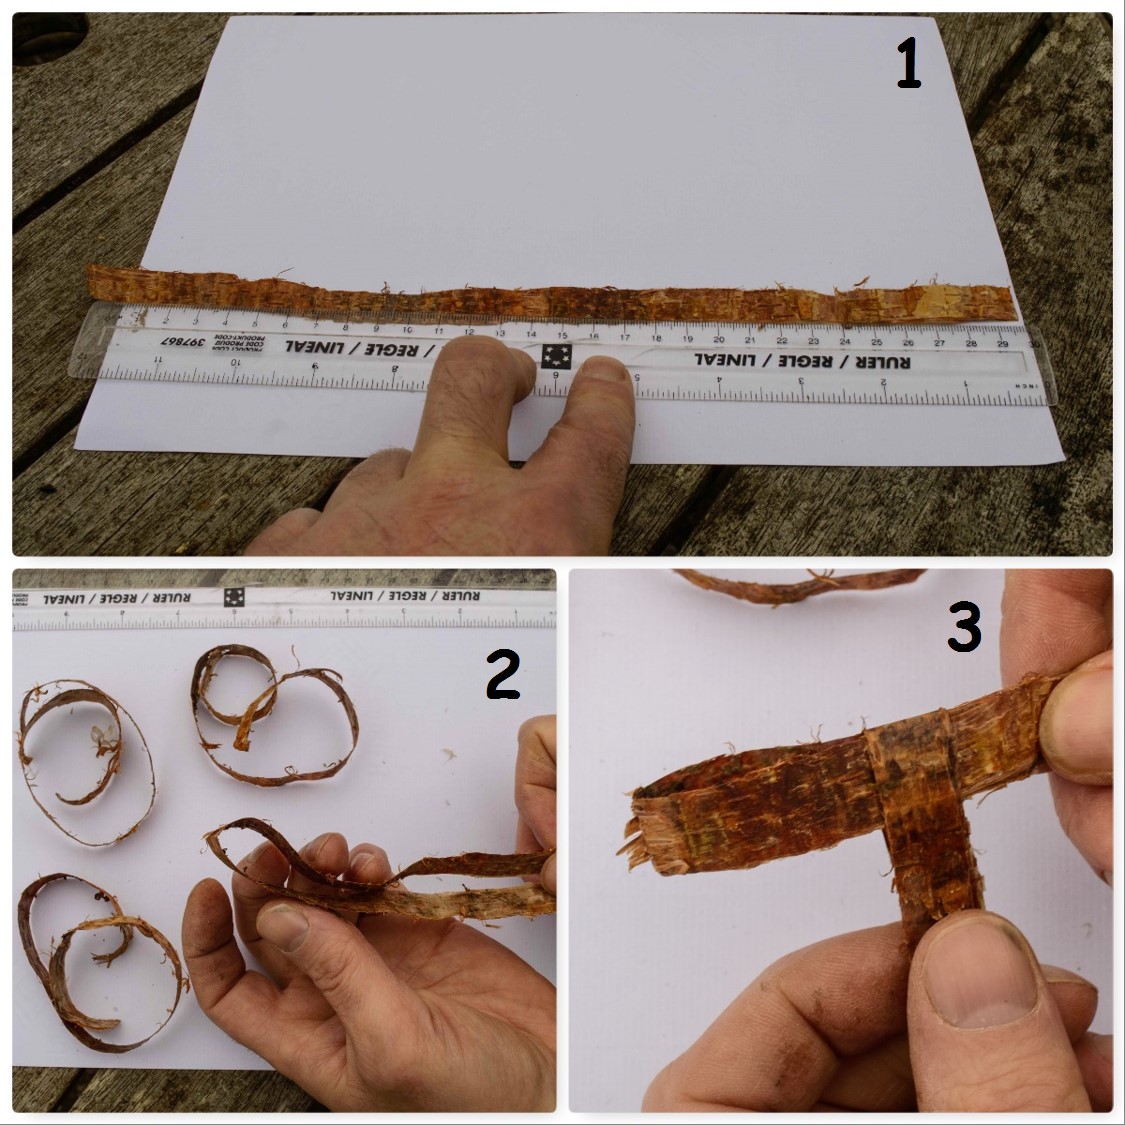
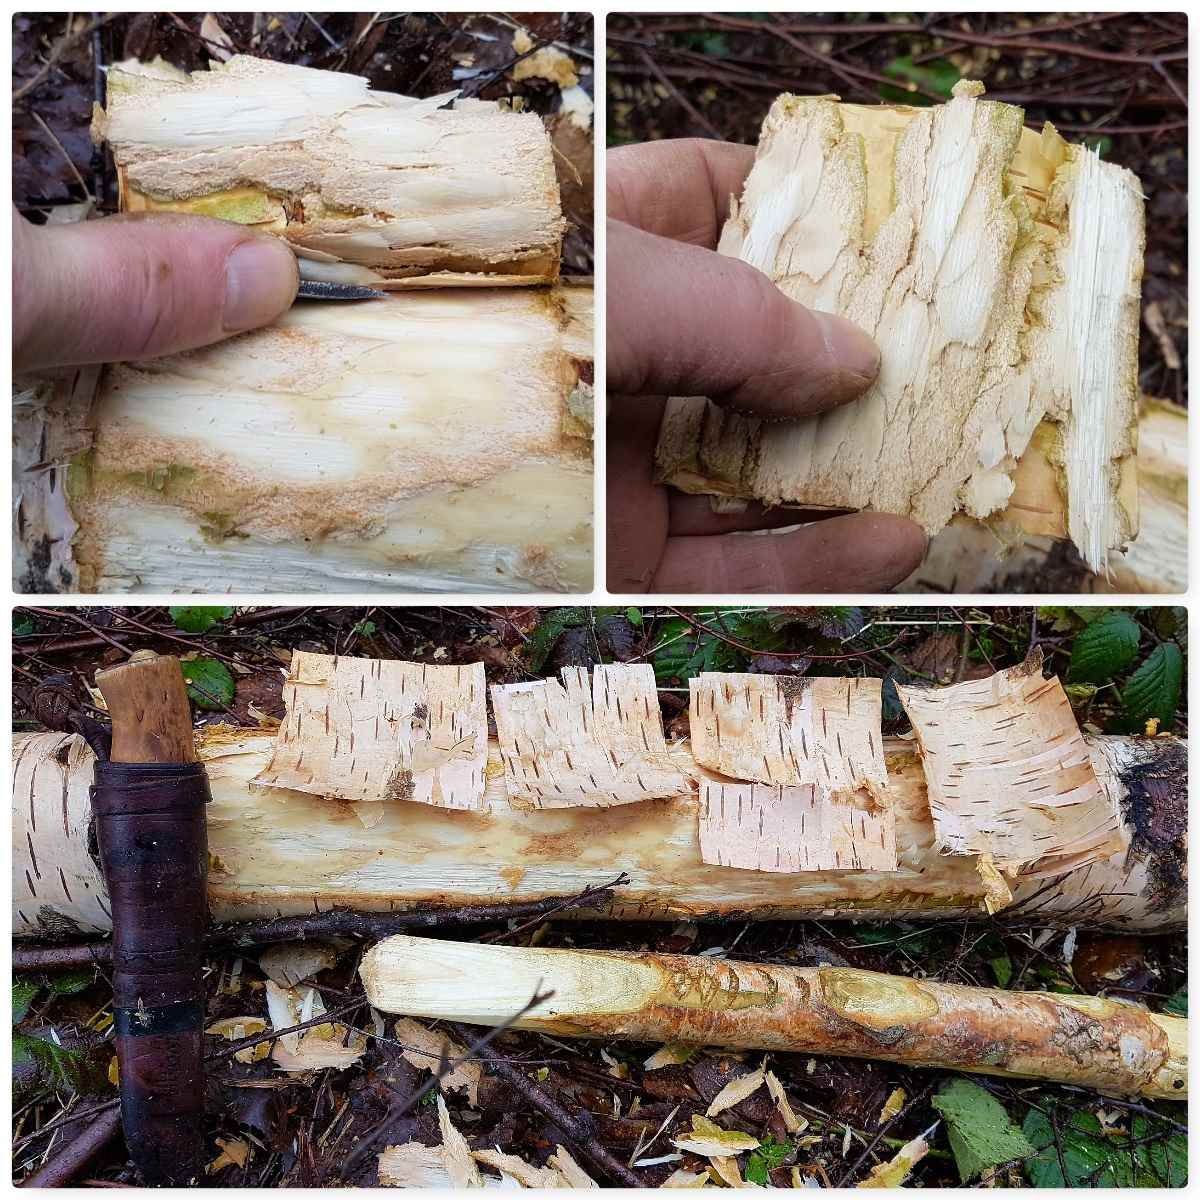
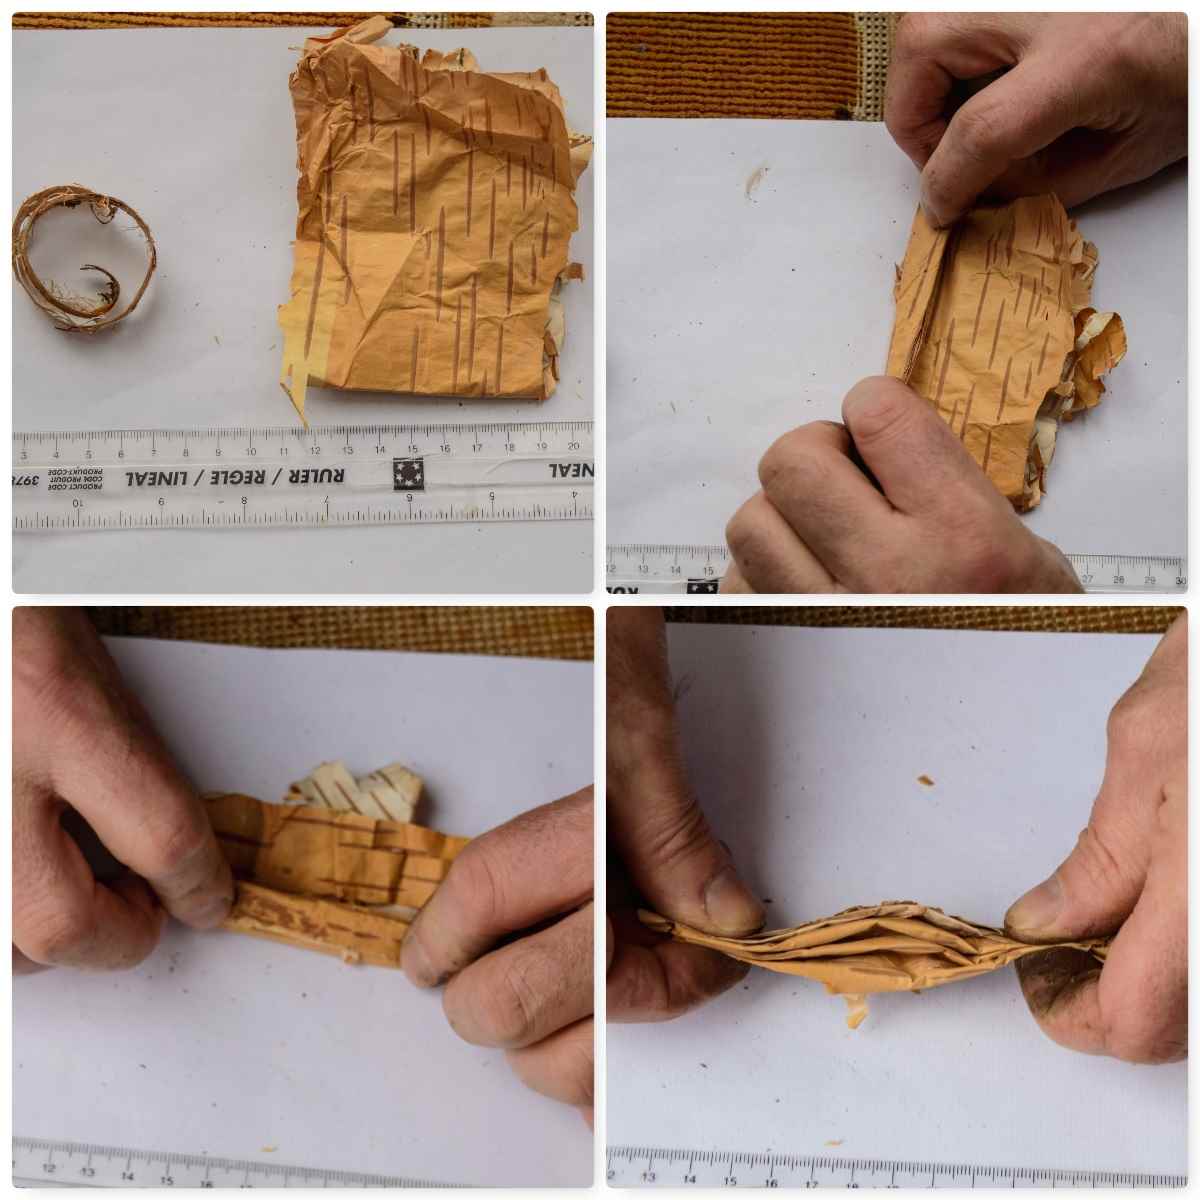
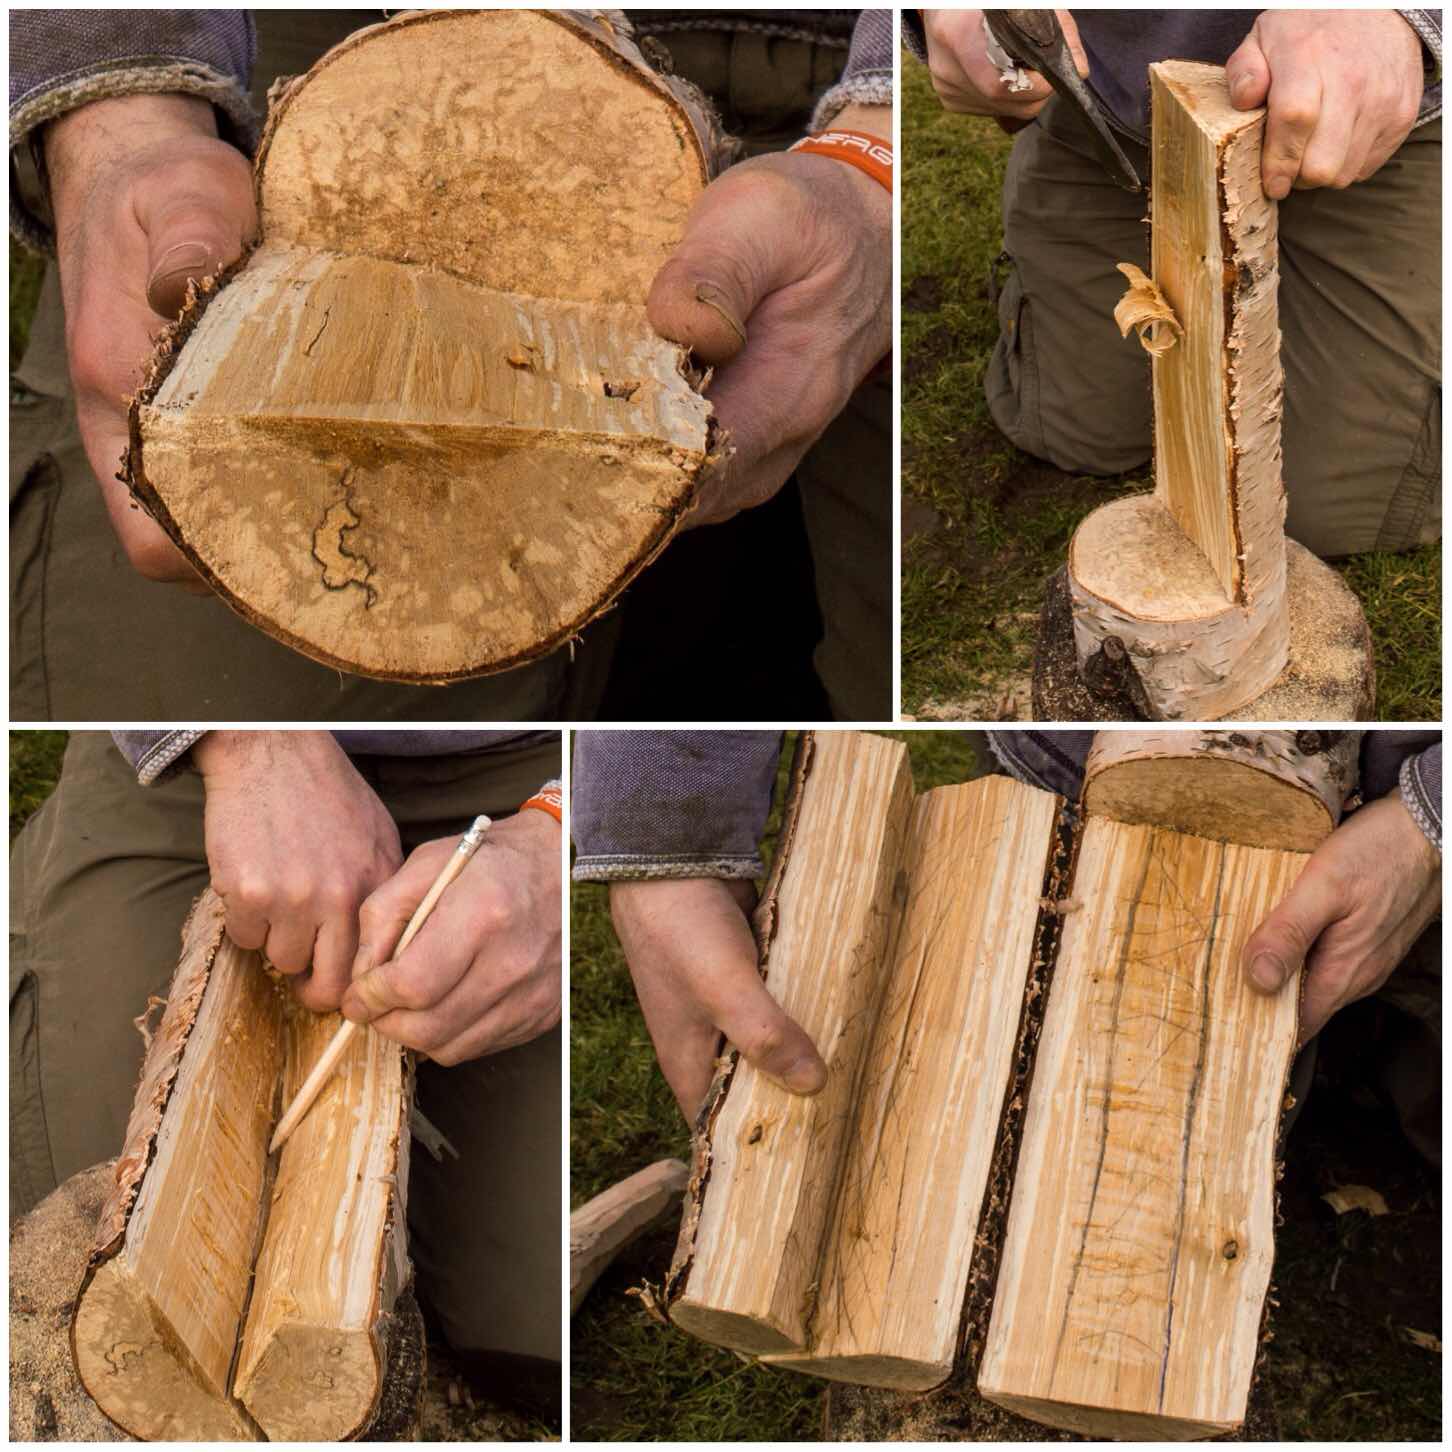
Once I have my section of bark I will either peel it by hand into strips of about 1 cm in length or if I am feeling the need to be very accurate I will tap my knife into a log and use that as a tool to cut the bark into even strips.
Locking the strands together
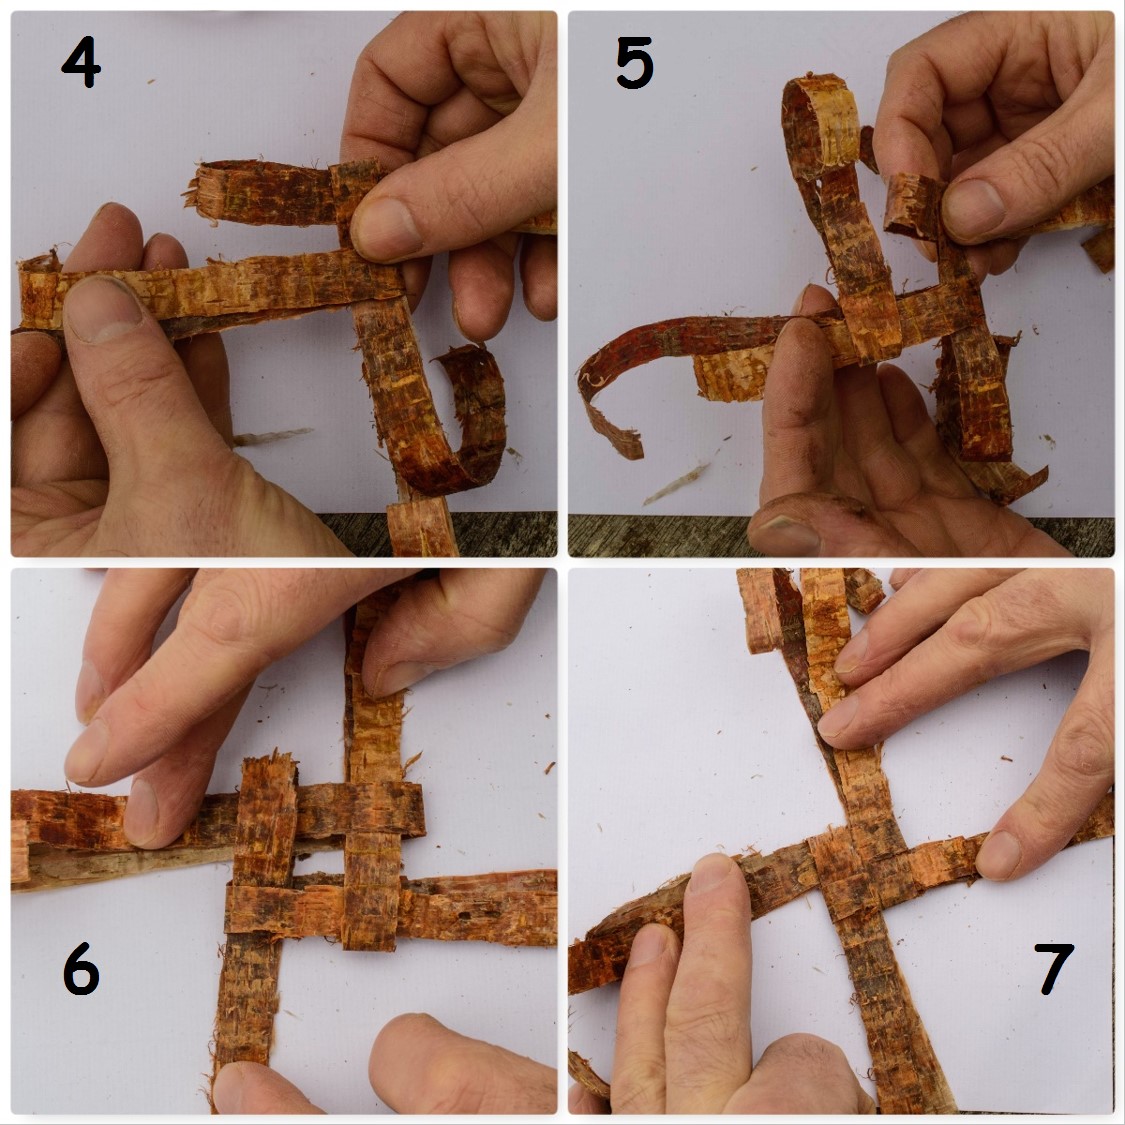
1. To make one firelighter you need four strips of birch bark. I use strips about 30 cm’s in length and 1 or 2 cm’s width.
2. Fold each strip in half – the folded end is called the closed end and the end with the two tails is called the open end.
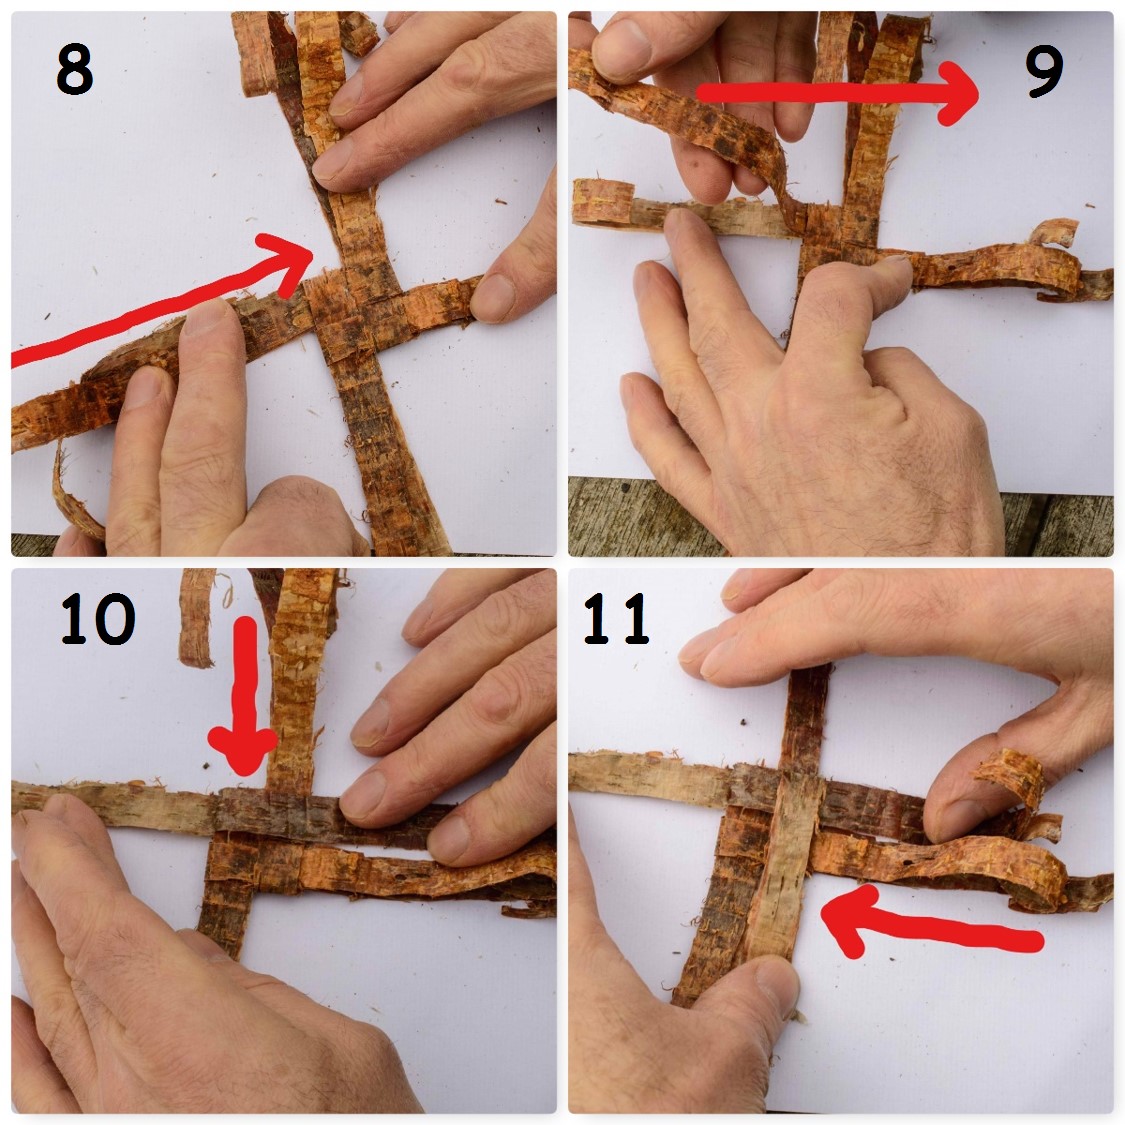
3. Slide one closed end between the open end of another strip so it sticks out by 2 or 3 cm’s. In the picture below in section 3 you can see a T shape is formed.
Folding – Open – Closed
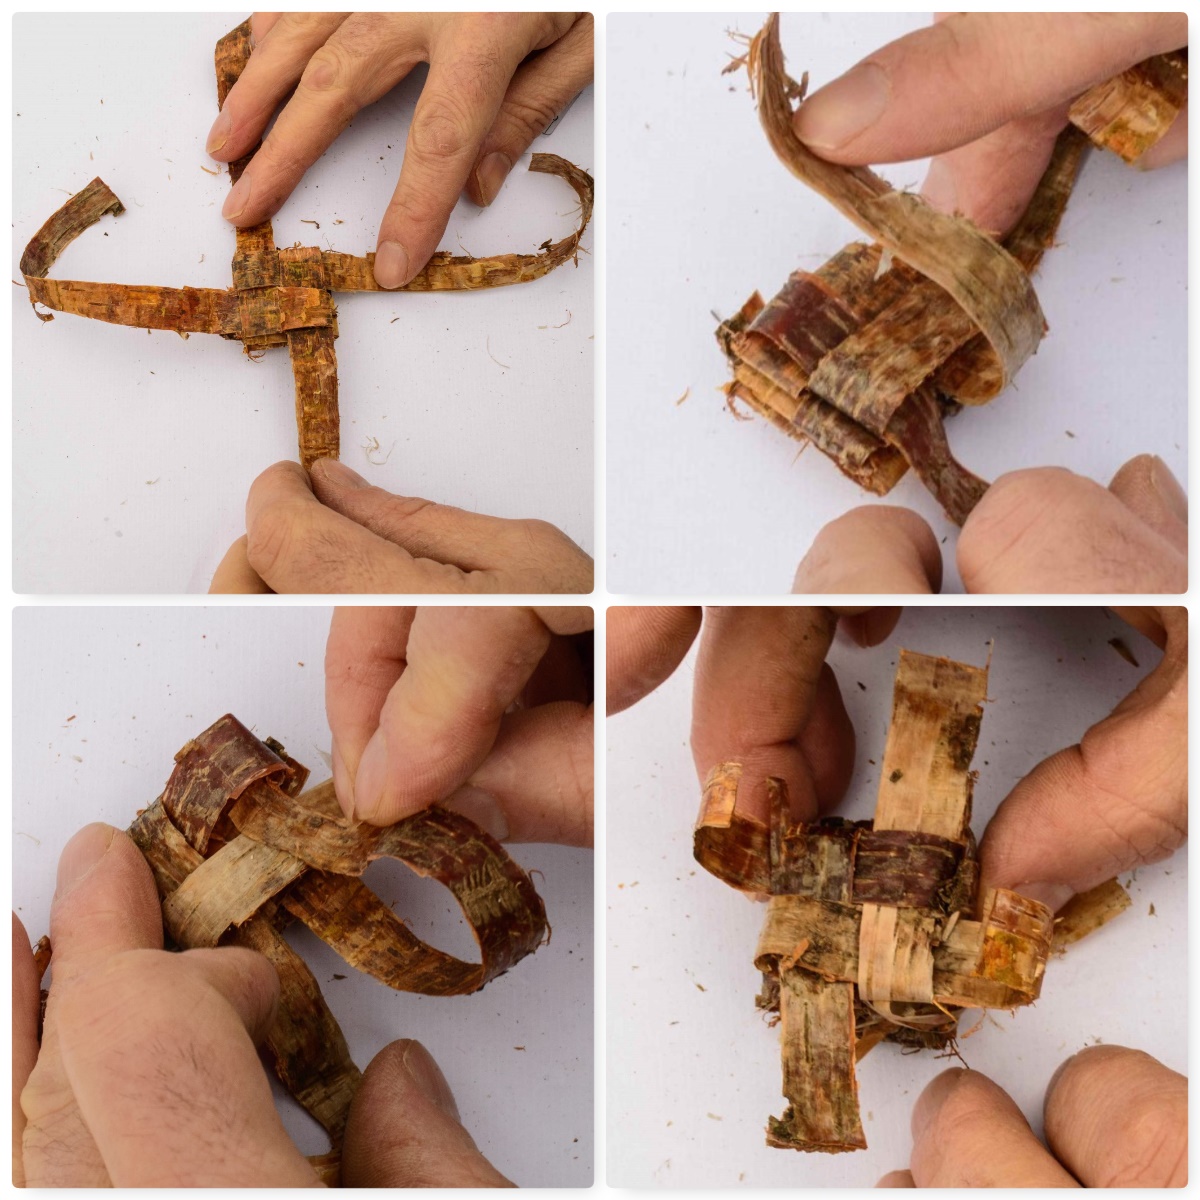
4. The closed end of a third folded strip is added to the upright part of the initial T shape to lock it off.
5. A fourth folded strip is added to the third strip to lock it off and the tails are threaded through the protruding loop of the first strip.
6.All the strips should now be locked off.
7. Pull everything in tight.
Locking in
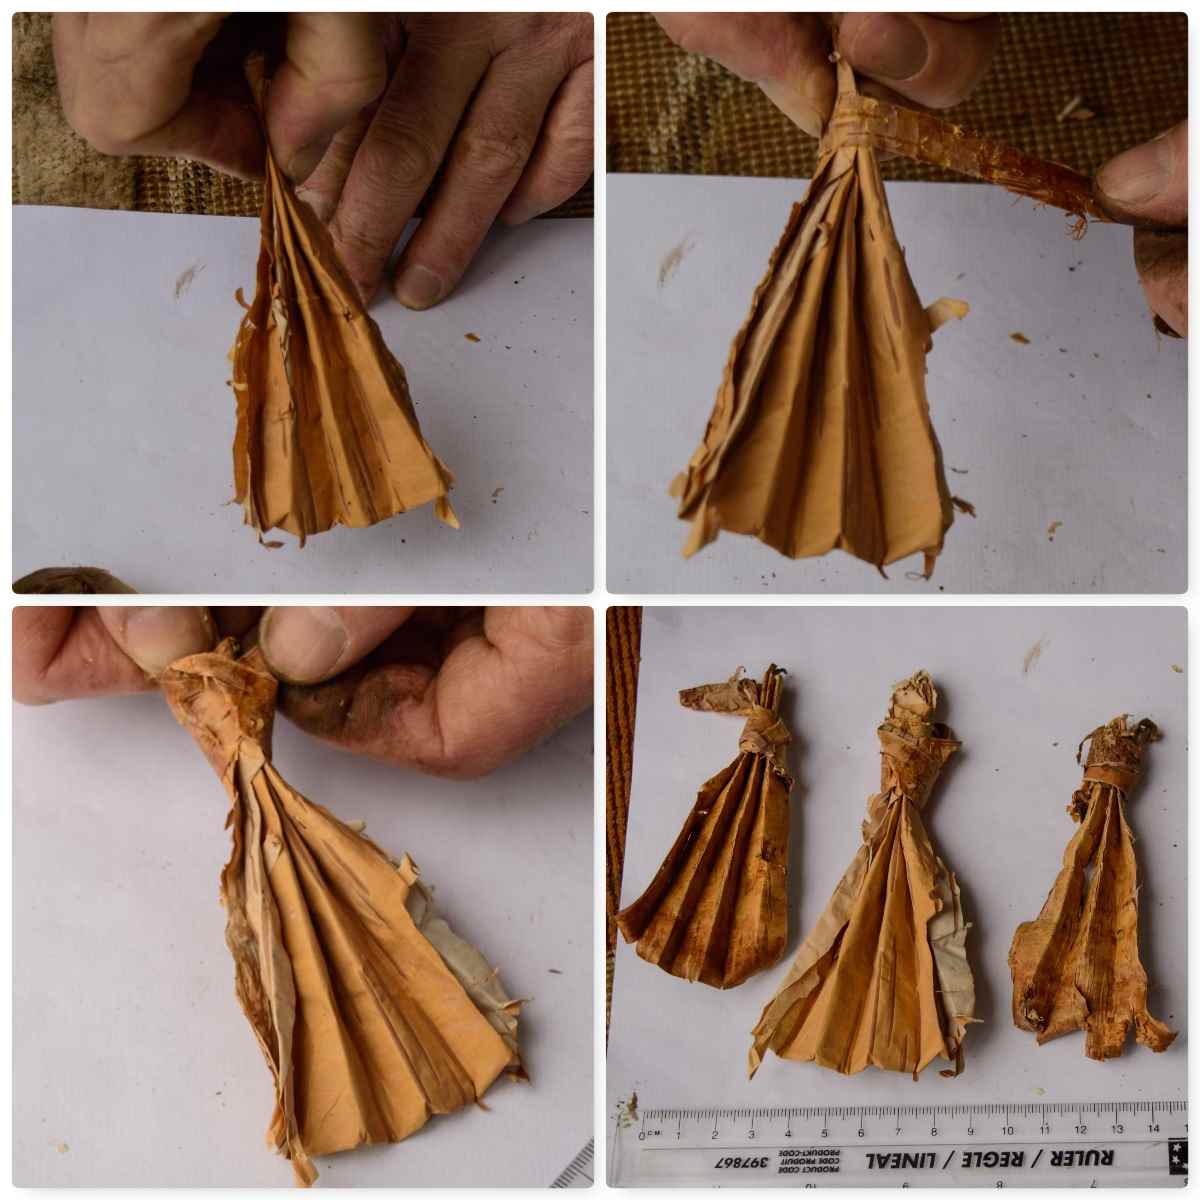
The Four Strand Crown
The firelighter is formed by weaving a Four Strand Crown knot. I have added the arrows to help you visualise what I am doing. Important – There will be two strips of bark at each open end. Only use the top strip of each open end when you begin the weave
8. To begin the knot fold one of the strips over. In section 8 I chose to fold the top strip on the left over first.
9. The strip is folded over to the opposite side.
10. To secure that strip in place I folded the strip at the top over this first strip to secure it in place.
11. This top strip (now at the bottom) was secured in place by folding the right hand strip over it.
Four Strand Crown Knot
12. To secure the fourth strip loosen the first strip slightly so that it forms a small loop by its fold – known as an eye.
13.Feed the tail of the fourth strip into this eye.
14. Pull the tail of the fourth strip in tight.
15. Repeat from step 8 to 14 again to form another layer of weave.
Building the layers
Flip the whole piece over and begin the weave on what were the bottom strips. Once you run out of bark to fold over tuck in the ends into a suitable slot or trim them off with your knife.
Repeating on the other side
The Resin
These little firelighters take only a minute or two to make but they can burn for far longer if you add some resin to them. I use spruce resin as it is plentiful here in the UK (again I discuss harvesting resin in my post on the Birch Bark Fire Fan in more detail).
I break of little blobs (it can get messy if the resin is runny) of resin and insert them into the little slots formed by the weave and that is basically it (use as much resin as you can).
Add the magic ingredient
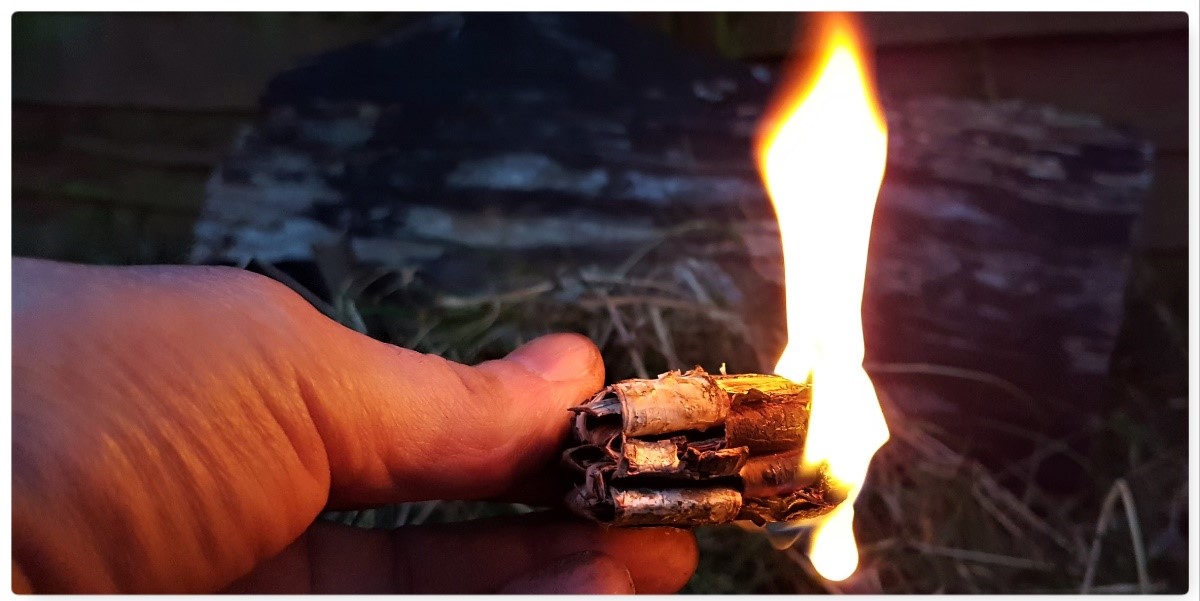
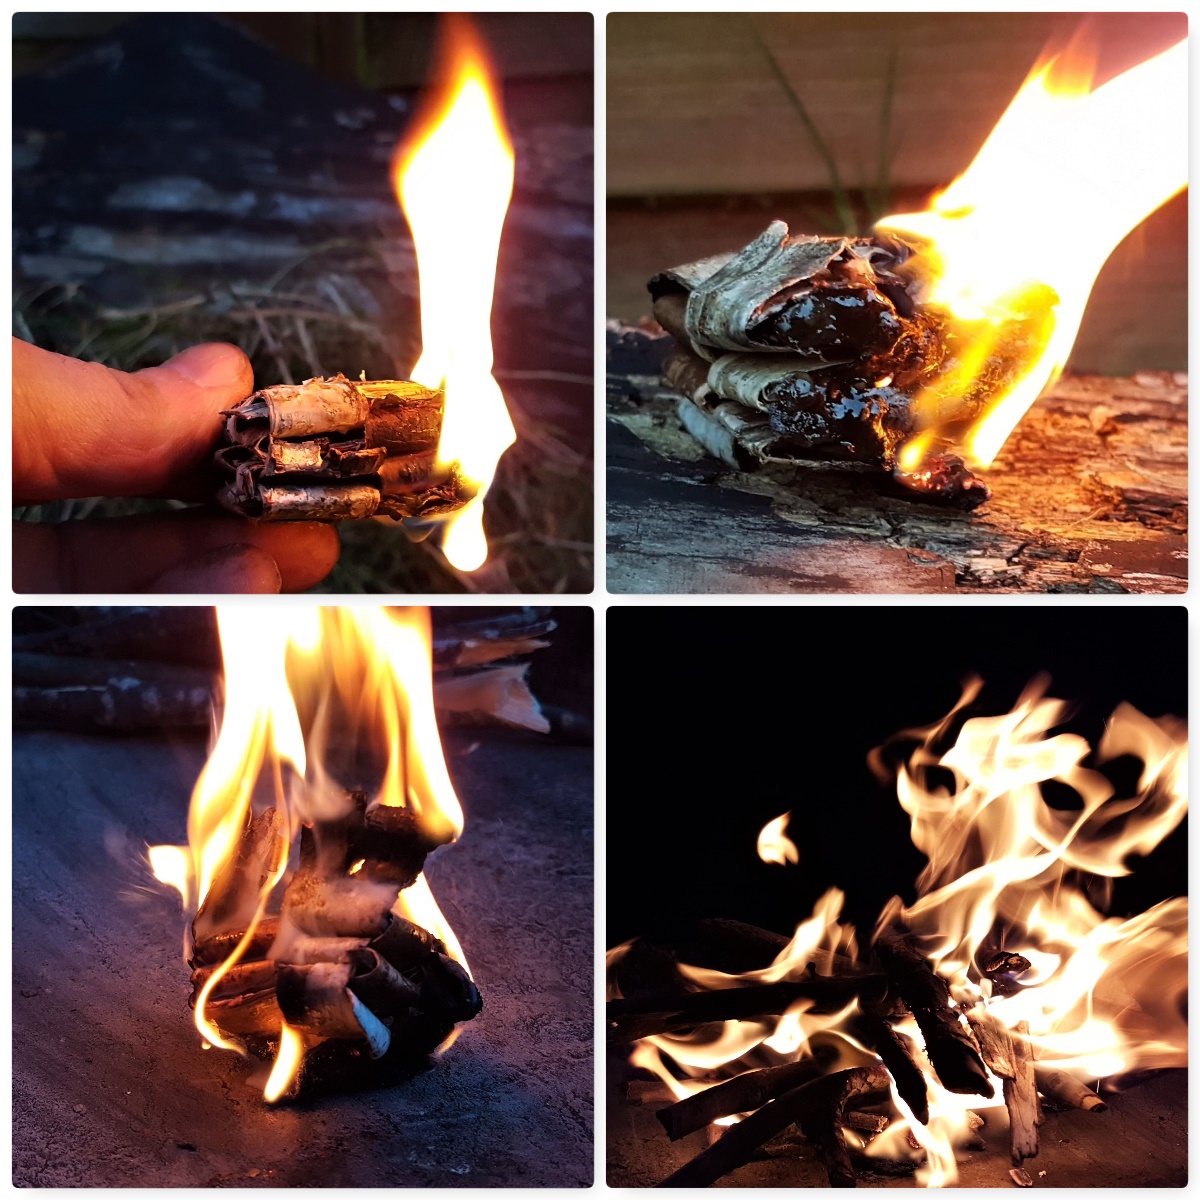
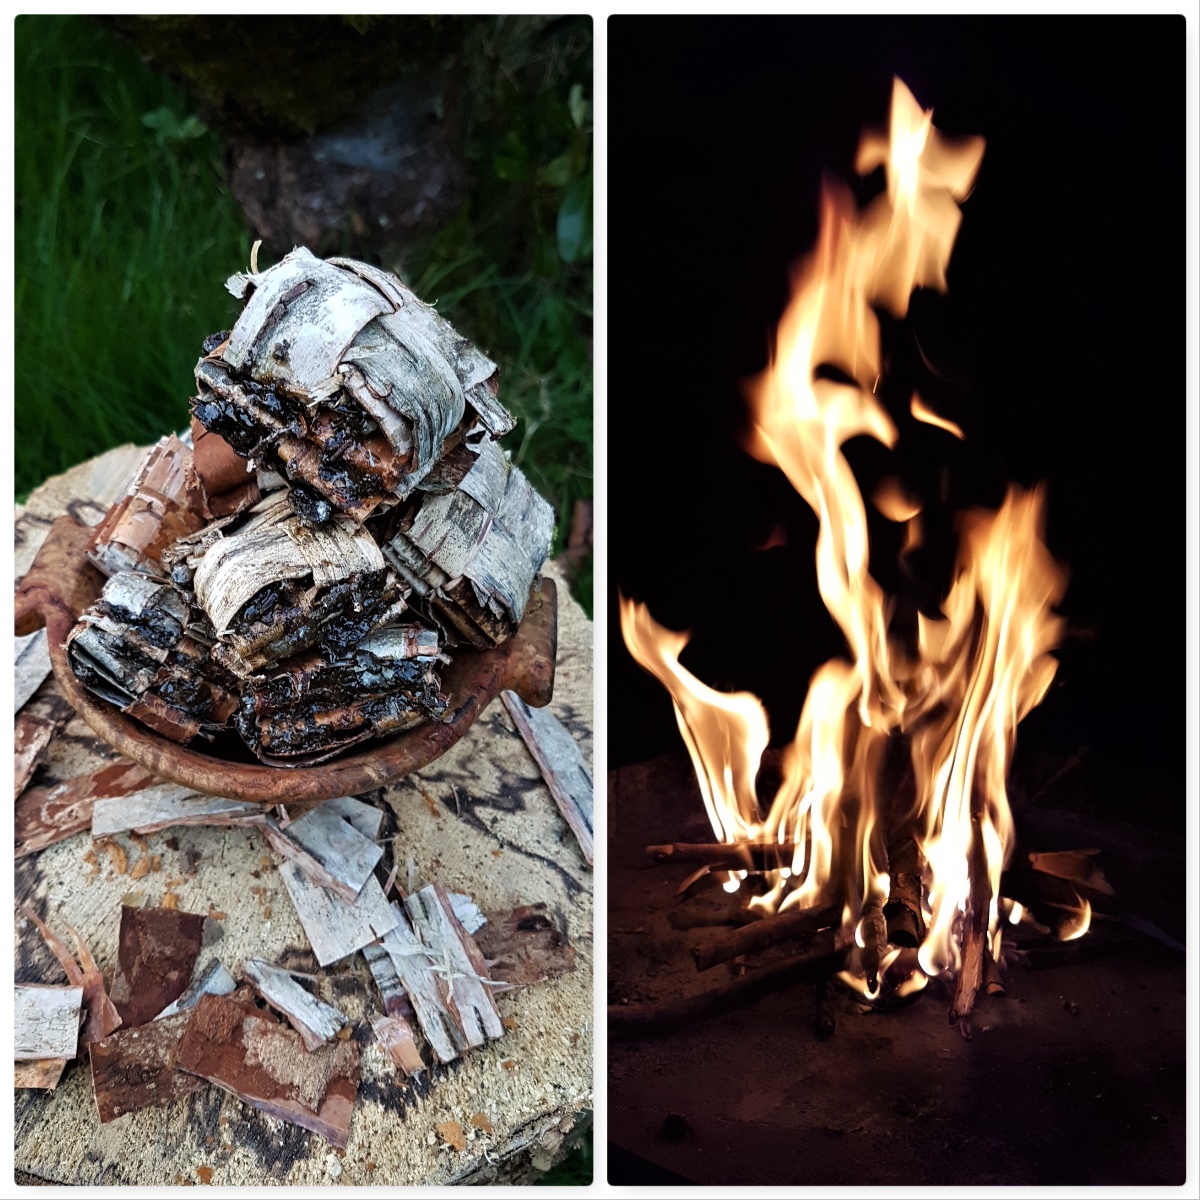
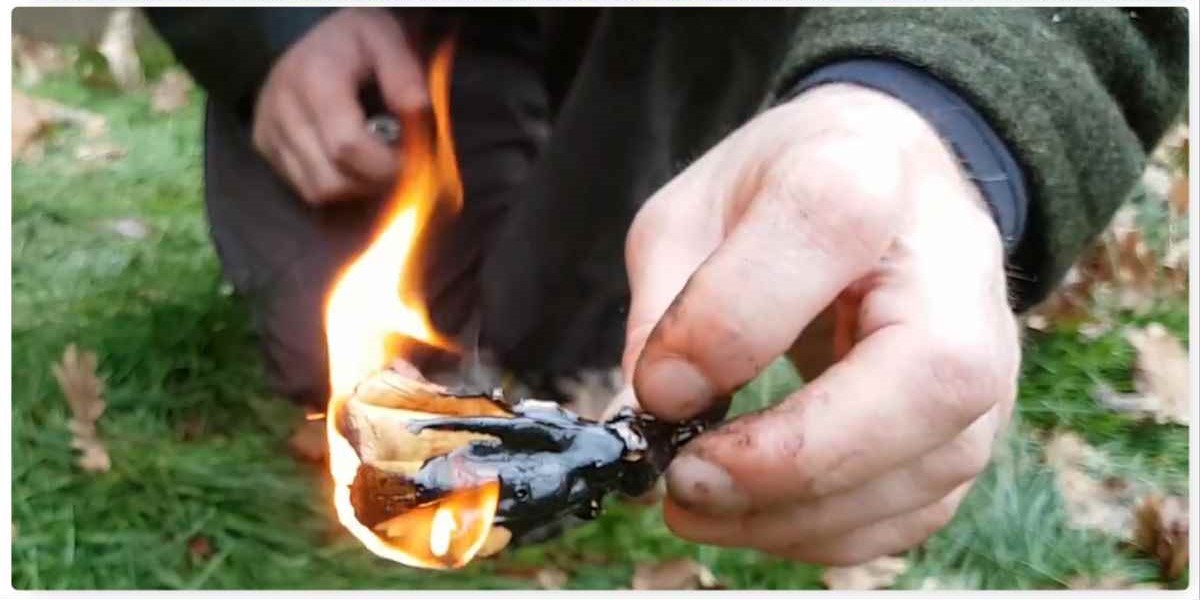
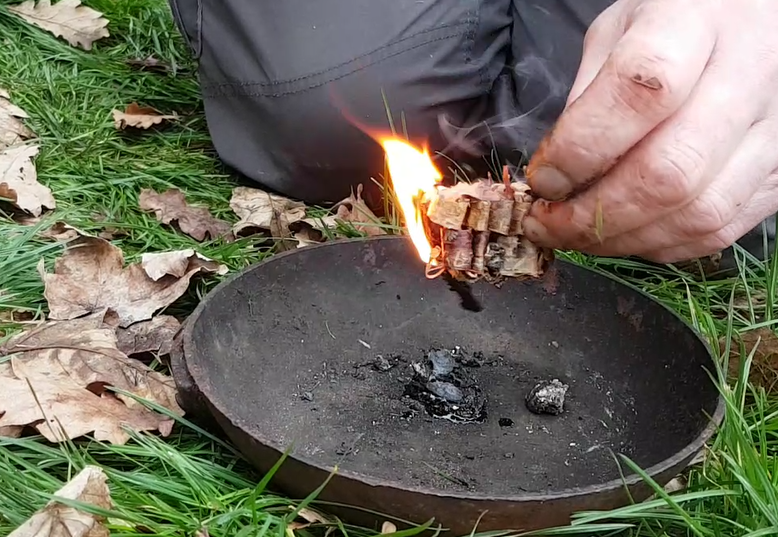
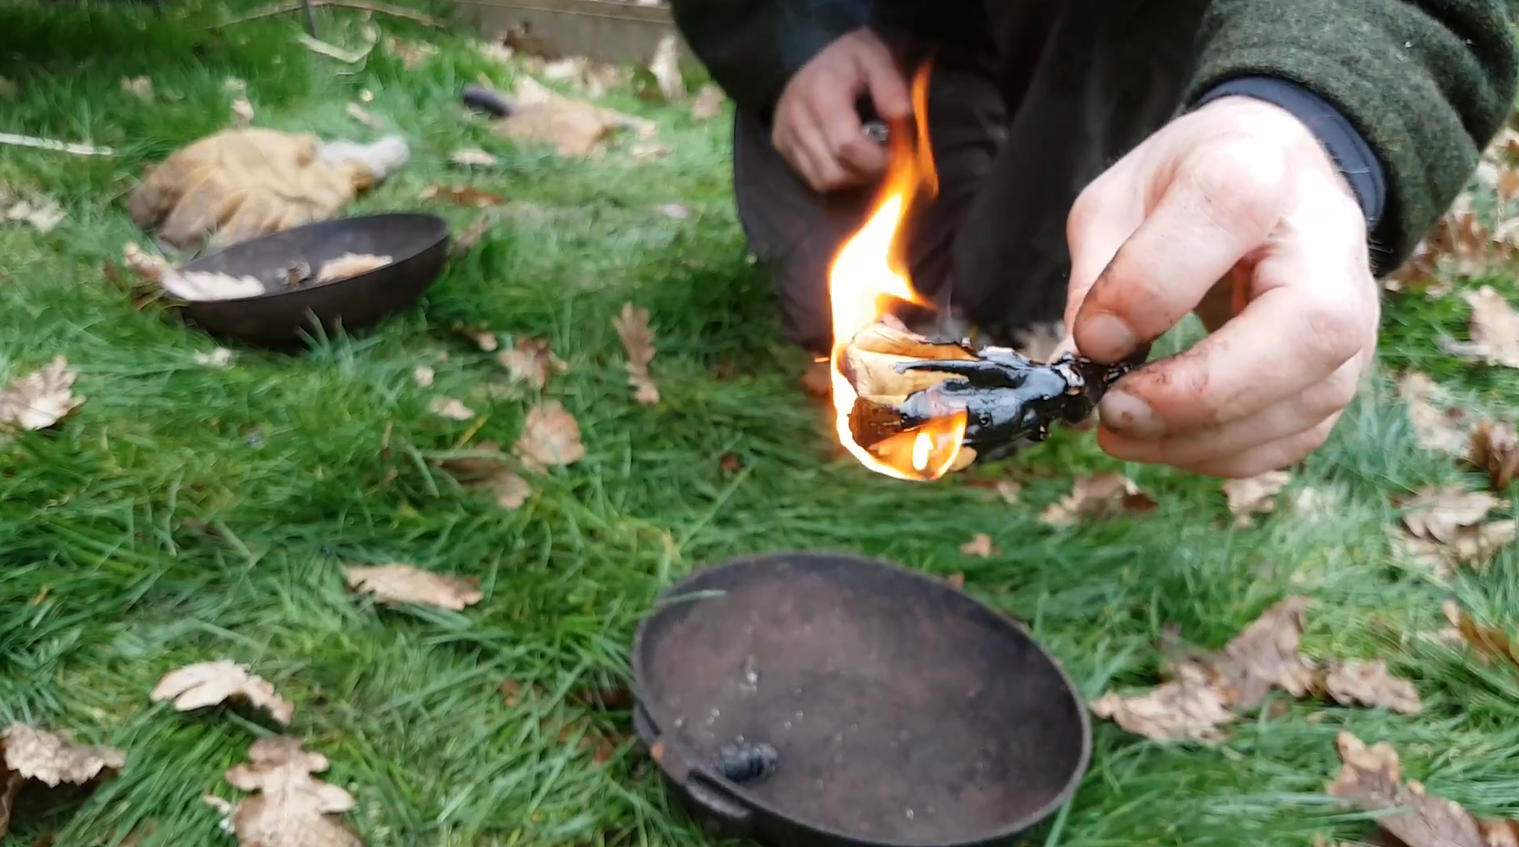
When lit these firelighters burn easily for over 5 minutes so giving you time to build your fire without resorting to using fine tinder and just small twigs. I can easily hold the firelighter for the first minute before it becomes to fierce to hold.
Once it gets going and the resin is well lit then it I go no where near it with my fingers. I like to use them first thing in the morning when I do not want to faff about with collecting tinders and just get a brew on.
Ready to go
I prep mine in the evening while sitting around the fire and pack them away for when I need them. If you are looking for a viable alternative to modern firelighters then these are ideal – if you are always a purist and insist on foraging for your tinders every time you light a fire then maybe they are not for you.
Quick to make and lasts for ages
For those that like a video intead of the step by step I put this short video together to explain the process.
Ever find yourself relying on using non-natural firelighters a lot due to their convenience? I do as I normally have a lot to organise before courses and using natural methods every time when I have a class can be time consuming when things are damp.
This is the first of two blogs on natural firelighters I like to use and how to make them. I like to prepare them well in advance of trips, pack them away in my bergen and use them instead of the likes of cotton wool and Vaseline (my usual non-natural method).
The Birch Bark Fire Fan
I came across a number of years ago a small section in Ray Mears book Essential Bushcraft on using a Birch bark fan. Ray recommended folding pieces of bark into a fan shape to stop the bark curling up quickly and becoming impossible to handle when it was lit.
I teach this method to my cadets however if I have time I like to add some melted spruce resin to these fans. This really extends the life of the fan giving me a better chance to get my fire going (great for these damp days) and because the resin soon hardens the fans they do not fall apart or deform so much when carried in a bag.
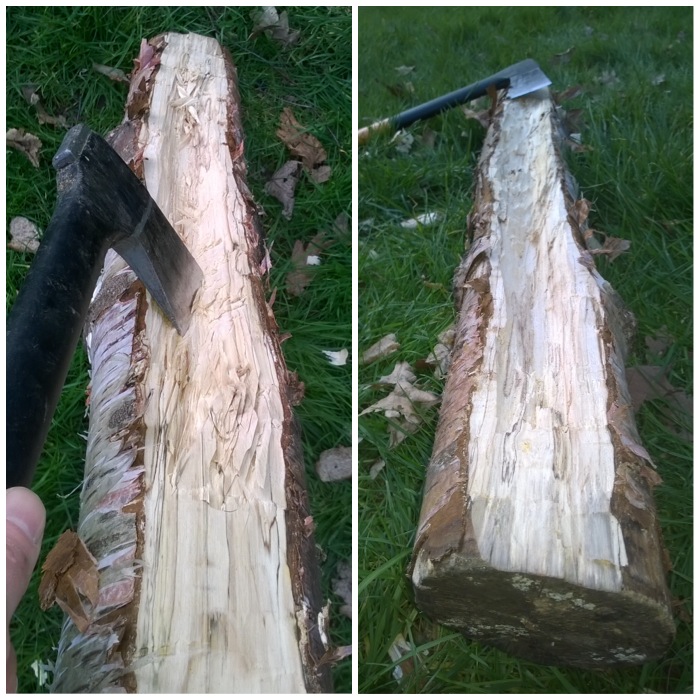
Removing the Bark
If you have a semi rotted birch log then the bark should come off easily however if it is a freshly felled log things may get a little more difficult for you. Here in the UK the birch bark can be quite thin and more difficult to remove than the thicker bark of birch trees you would find in more northern climes.
Mark out the squares
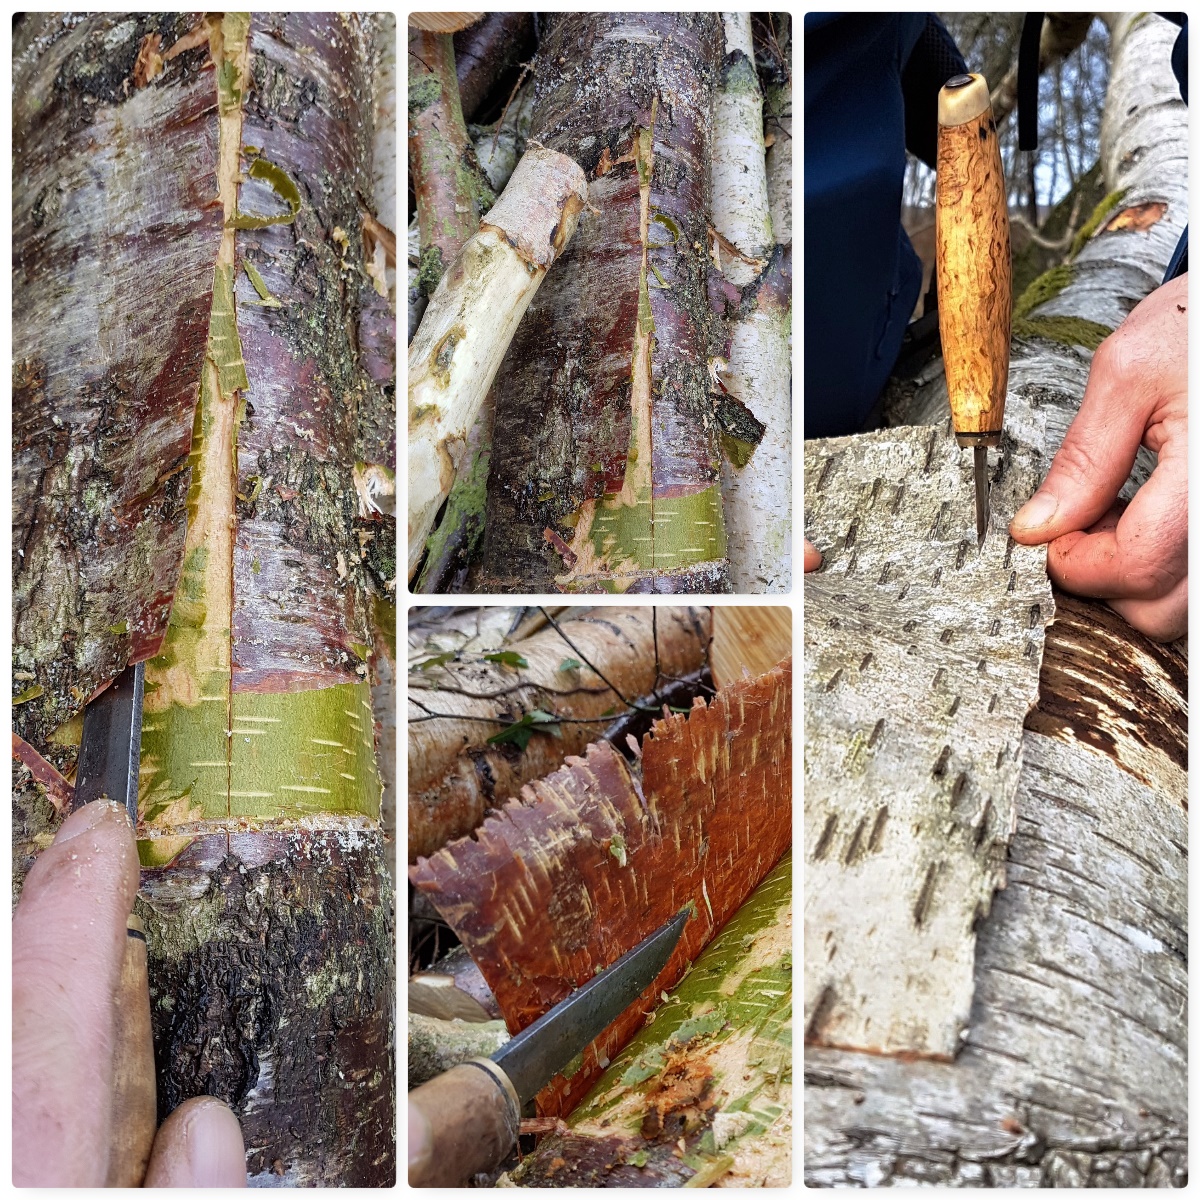
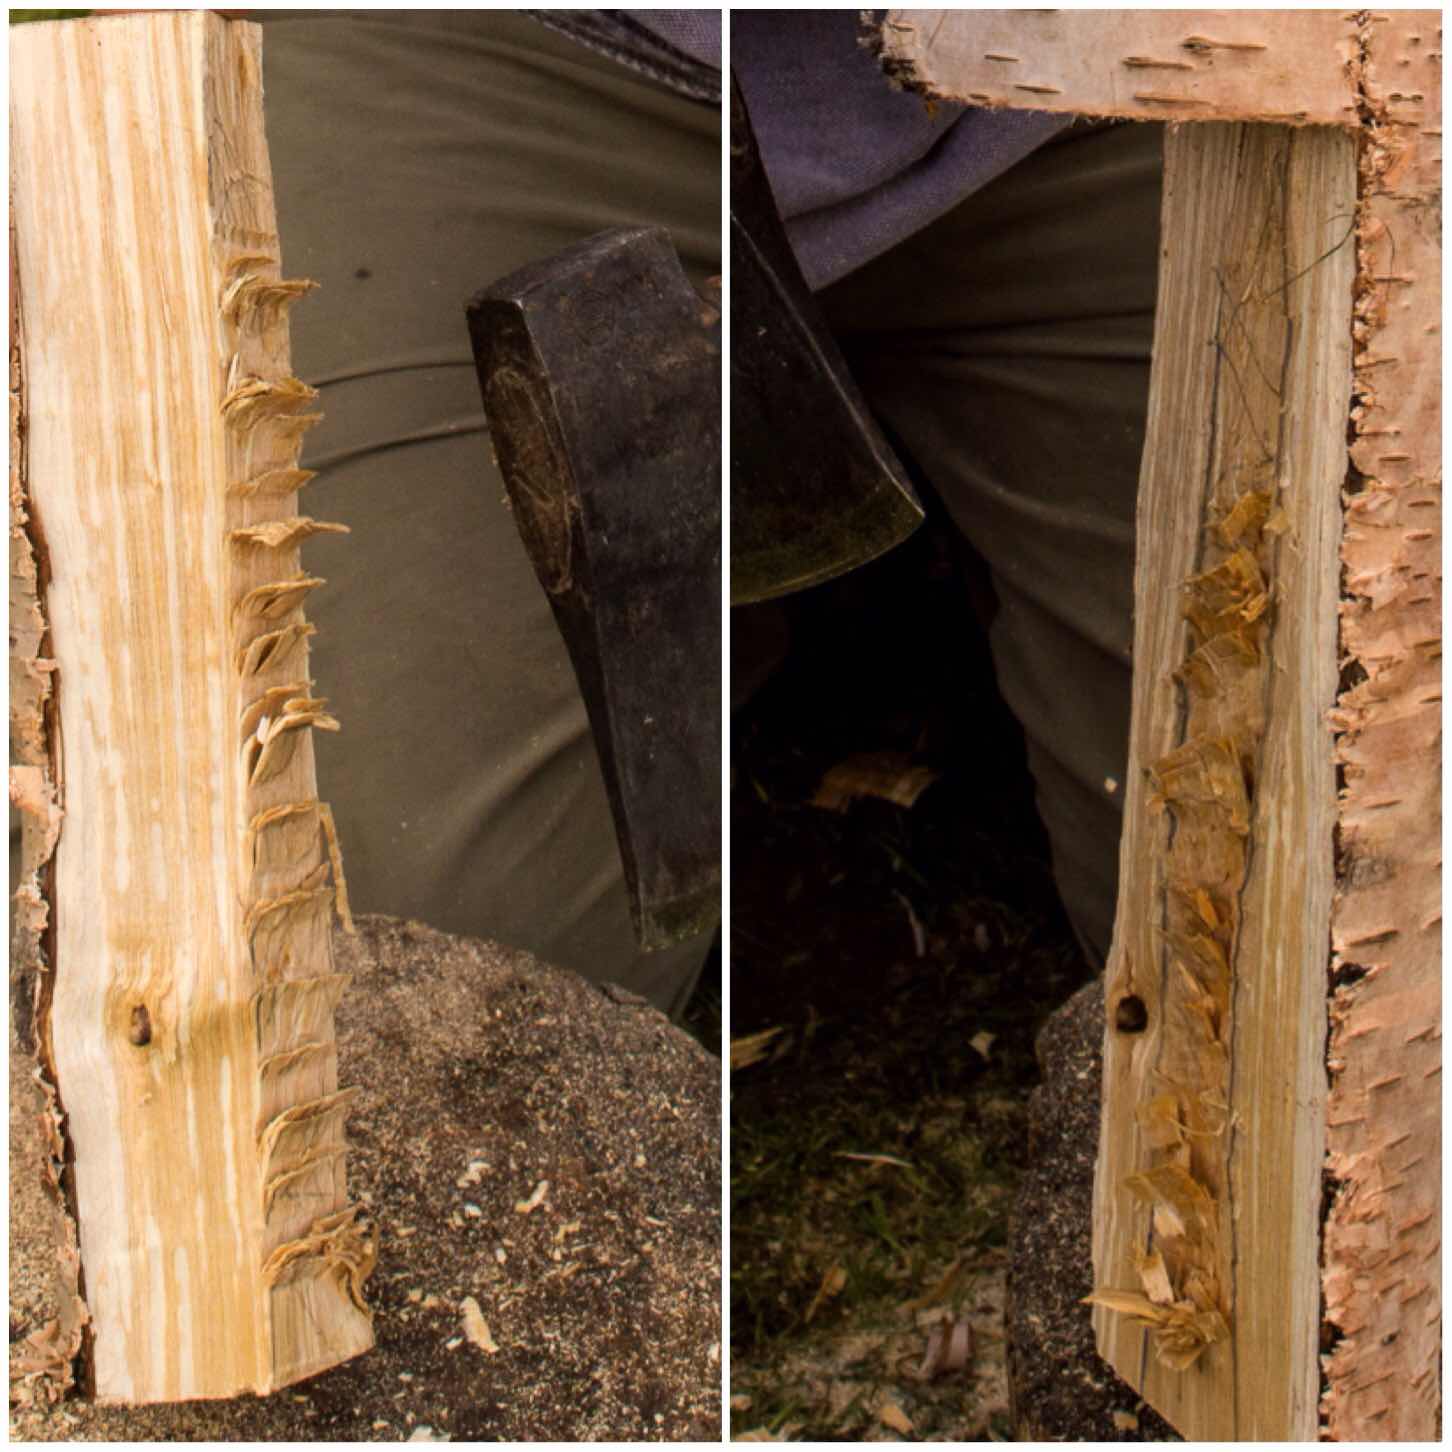
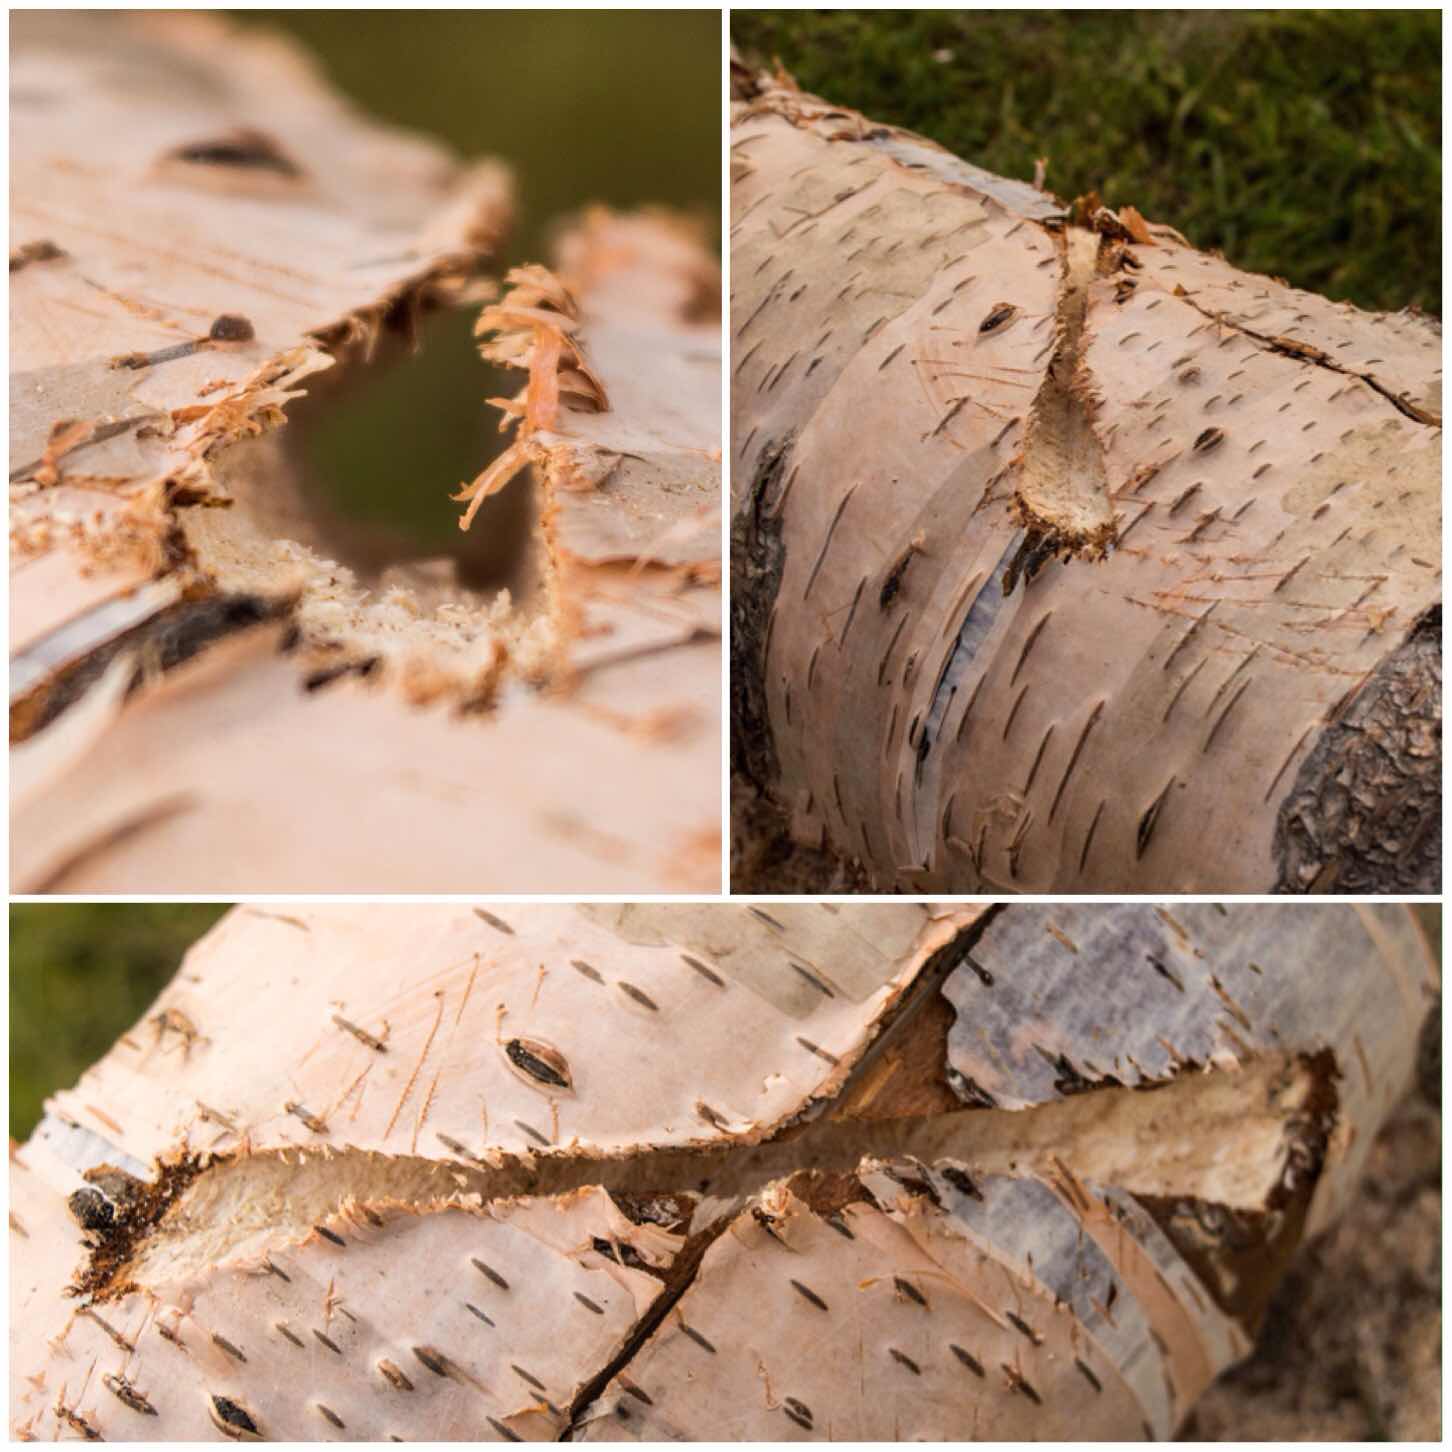
I mark out small squares with my knife and if the bark does not peel off easily I use a small batten to gently hammer the bark. This gentle hammering helps to loosen the inner bark from the sapwood.
Also having a wooden wedge helps to peel the bark of but mostly I tend to just use the curved part of my knife. Some folk say it is better to use the back of the tip of your knife but I find the curved part works well for me. The main thing is to take your time and remove the inner and outer bark from the sap wood.
Tap and Peel
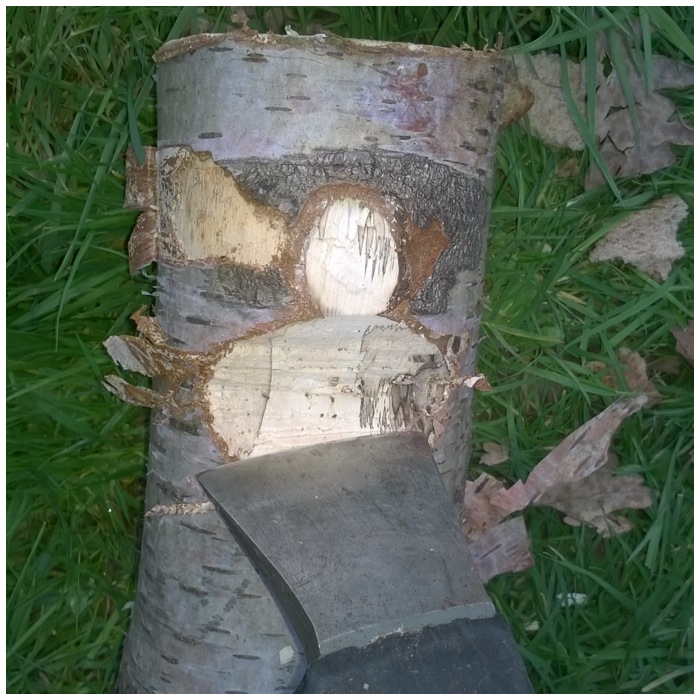
Remove the Inner Bark
When I have removed a small square I gently remove the inner bark. Again do this job slowly removing the inner bark in small pieces. It is very easy when using thin bark to rip the outer bark.
Carefully strip off the inner bark
Folding the Fan
To make your fan start folding your square as if you were making a very small fan – not much more you can say about that 🙂
Fold like a paper fan
Keep a hold on one end and with a strip of bark tie off the other end. They do not take long to make and are soon ready for the resin.
Tie a tail
Spruce resin
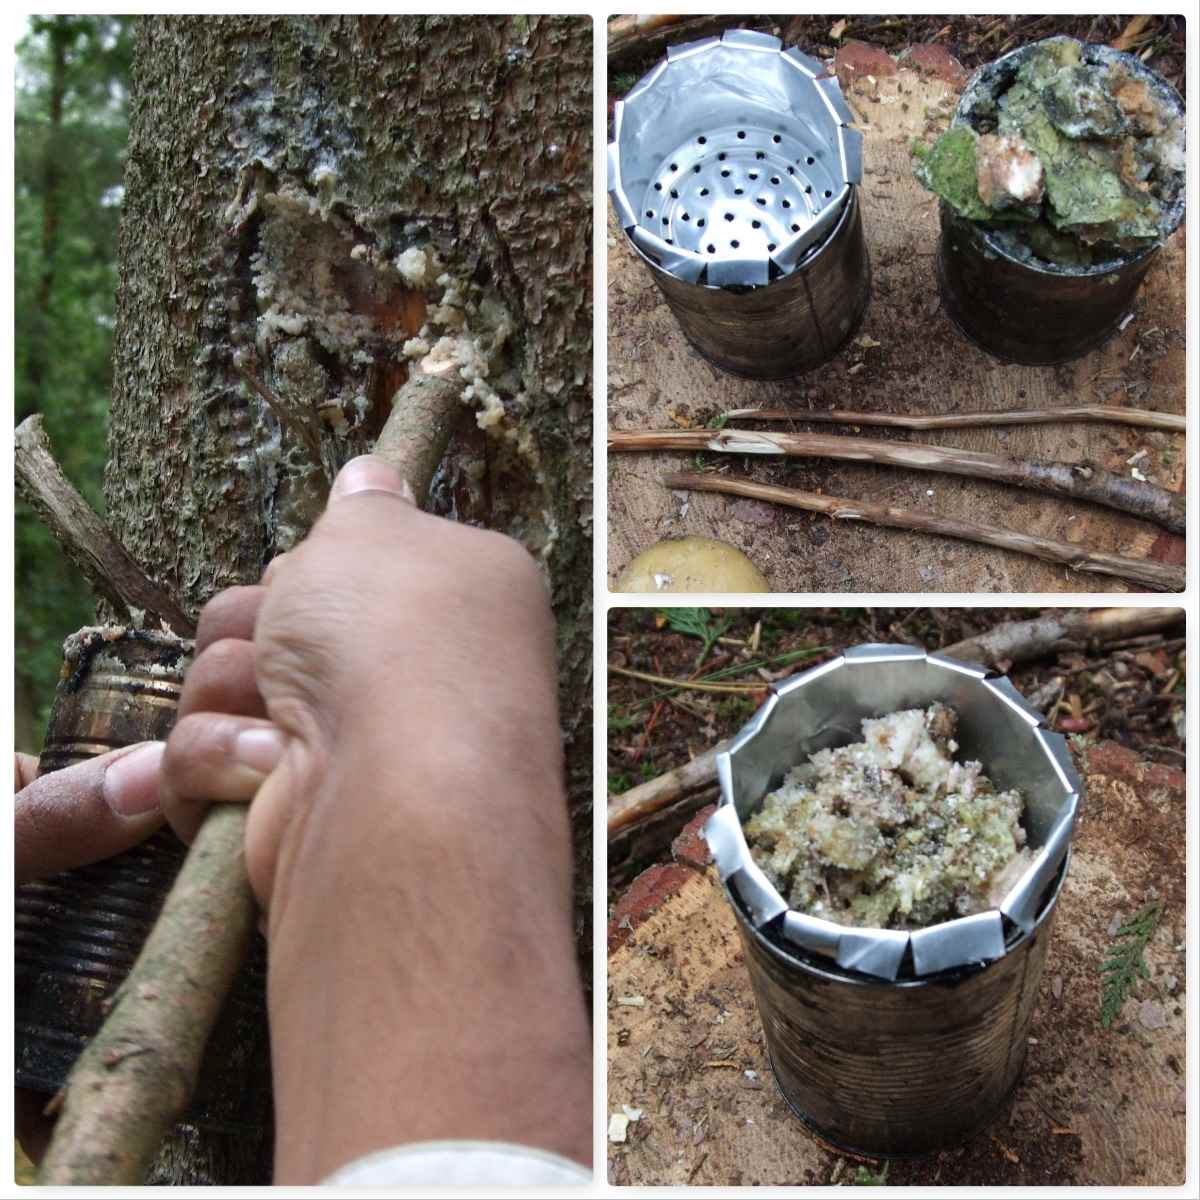
Here in the UK a handy and plentiful resource is Spruce resin. There are lots of conifer plantations where I live and a common tree in them is the Spruce. I keep an eye out for areas where the foresters have been using tractors to thin out the spruce as they tend to damage lower branches on trees they pass by.
To help heal itself the trees produce copious amounts of resin and this is full of oils that are flammable. By taking a little from different sites (I use a stick to scrape the resin) I can soon have plenty to melt and coat the Birch bark fans and leave plenty for the trees.
Harvest some resin
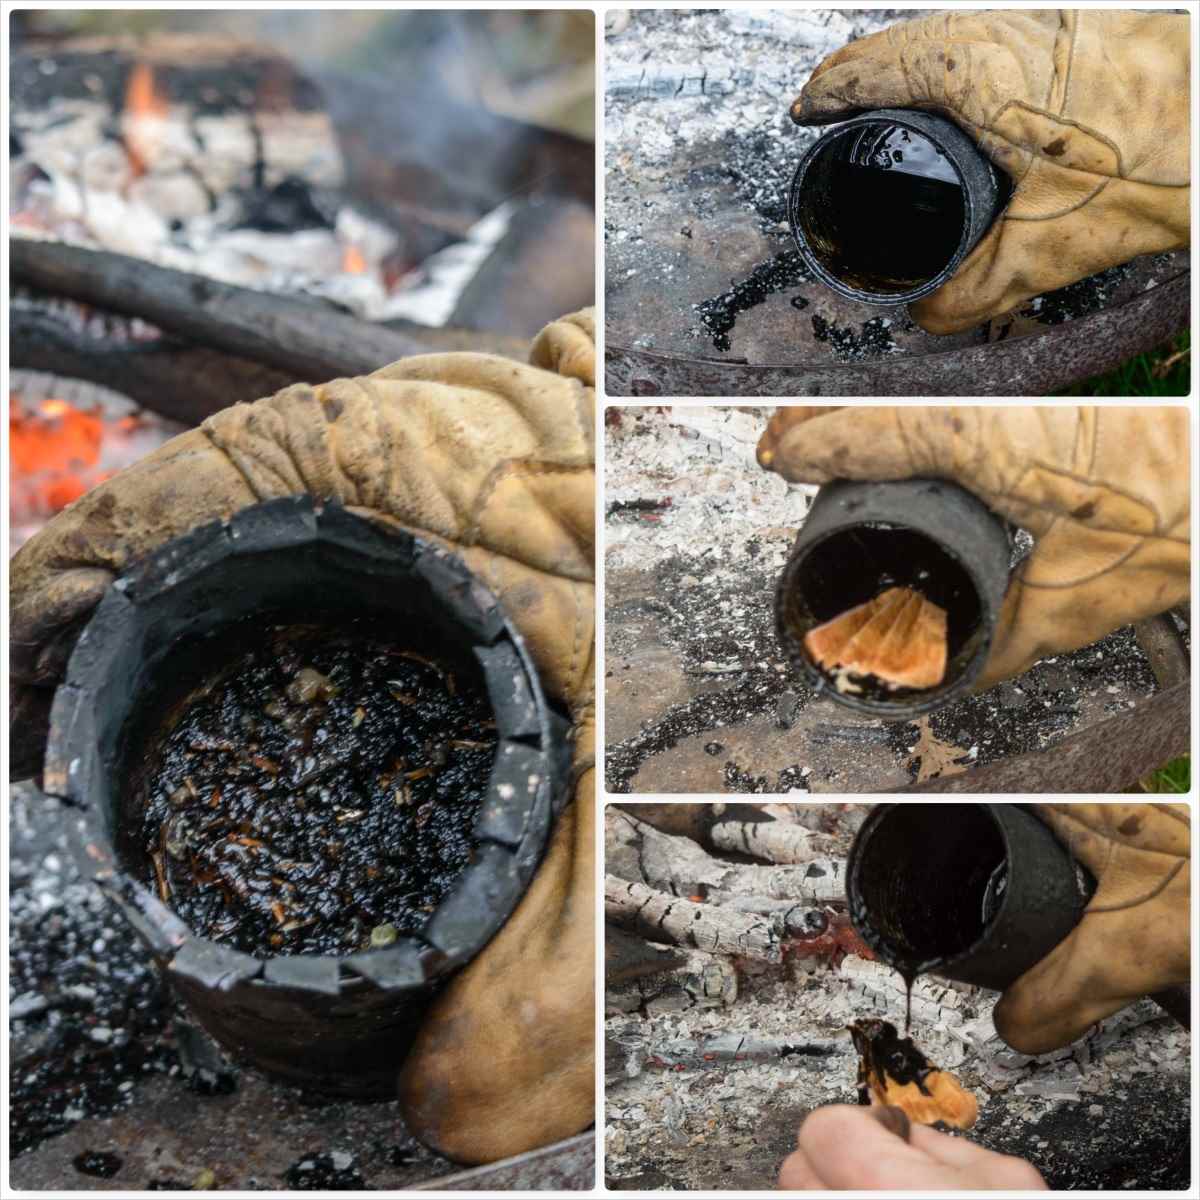
I just use a couple of tins (the inner tin has lots of little holes) to melt the resin by my campfire (I have documented this process in How To…. Spruce Pitch in a Tin Can) and dunk the tail of the fan into this hot liquid (good gloves or tongs are required here).
Once the tail is covered I pour some of the resin onto the area of the fan by the tail leaving the top of the fan clear of resin.
Melt, dip and pour
I find this combination works for me as the folds stop the bark from curling straight away and when the flame reaches the resin it burns for far longer.
One excellent fire lighter
I put a little video together on this to show you the process from start to finish.
The next post in this short series will be on making a woven Birch bark firelighter (again with Spruce resin).
I will post a full How To…. on harvesting the Birch Bark and making the fans but for now here is a short video post on an excellent bit of homemade bushcraft kit.
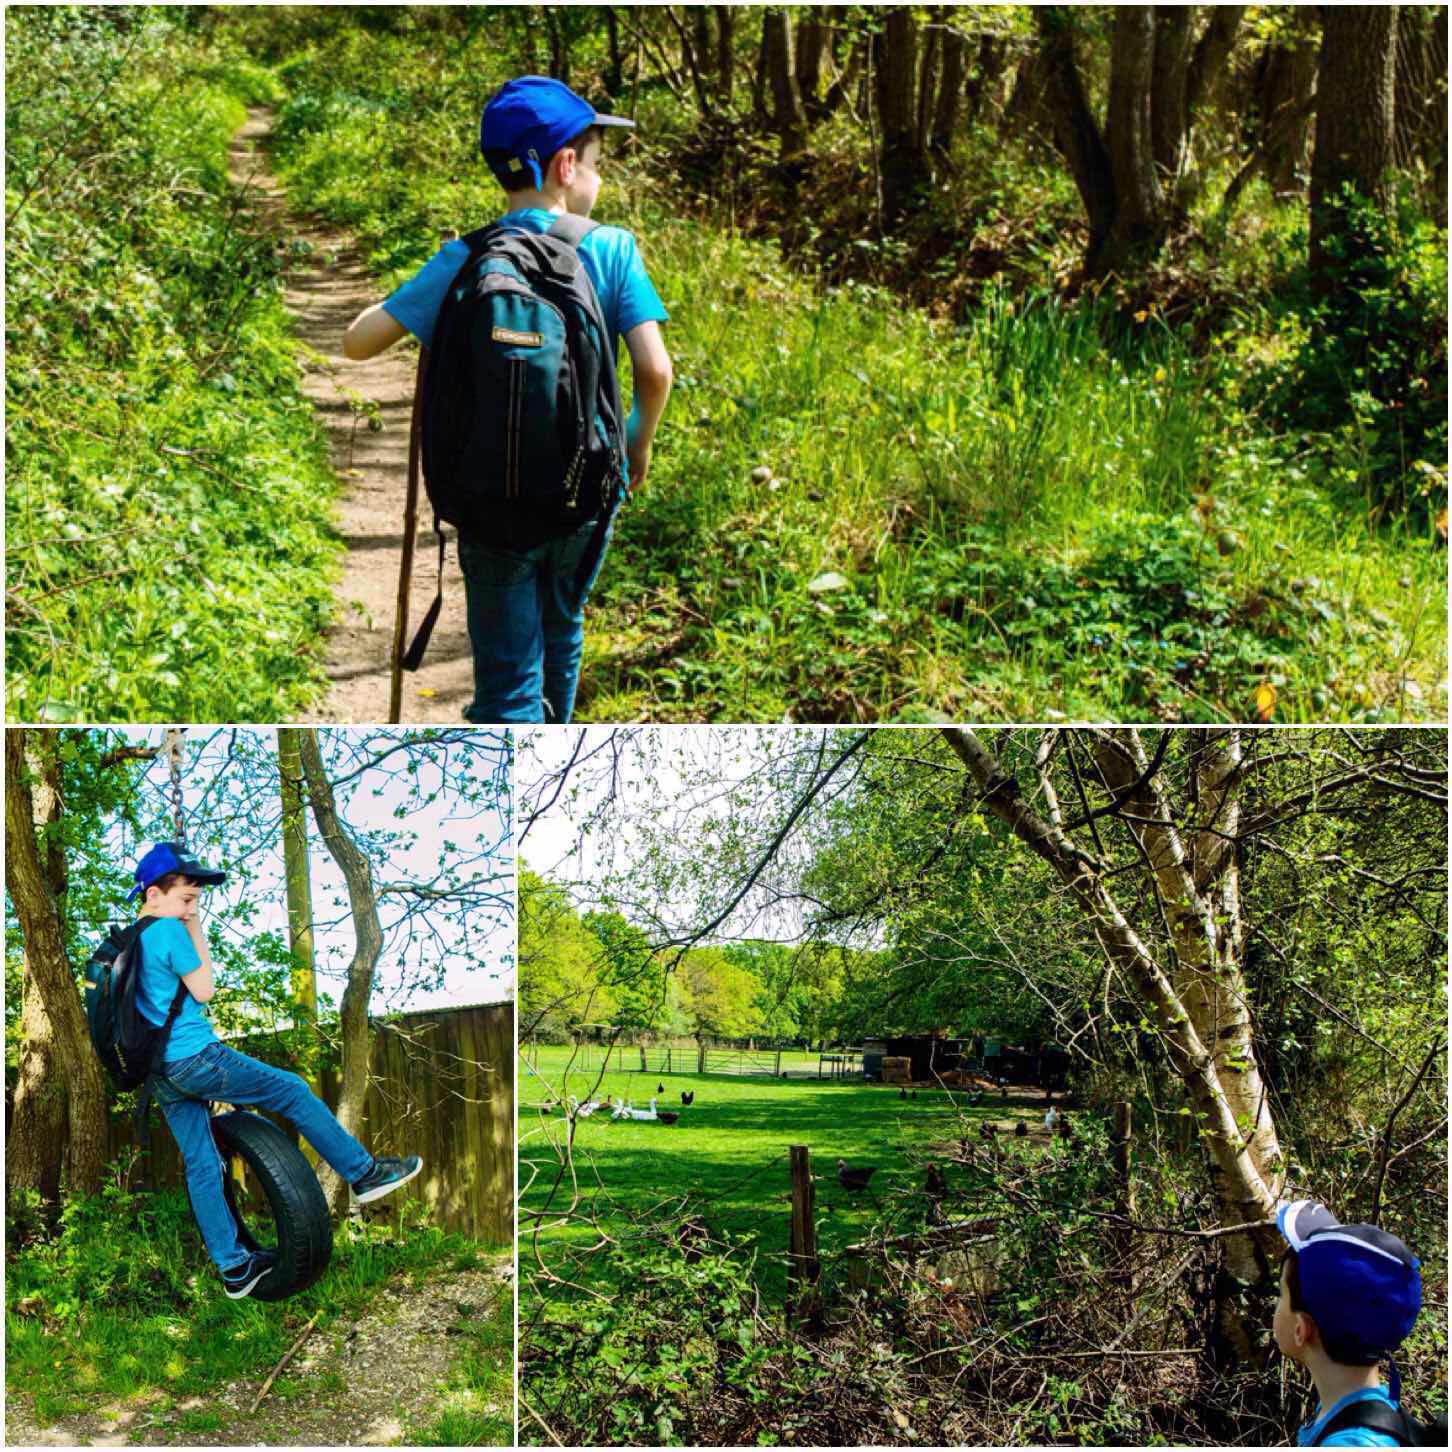
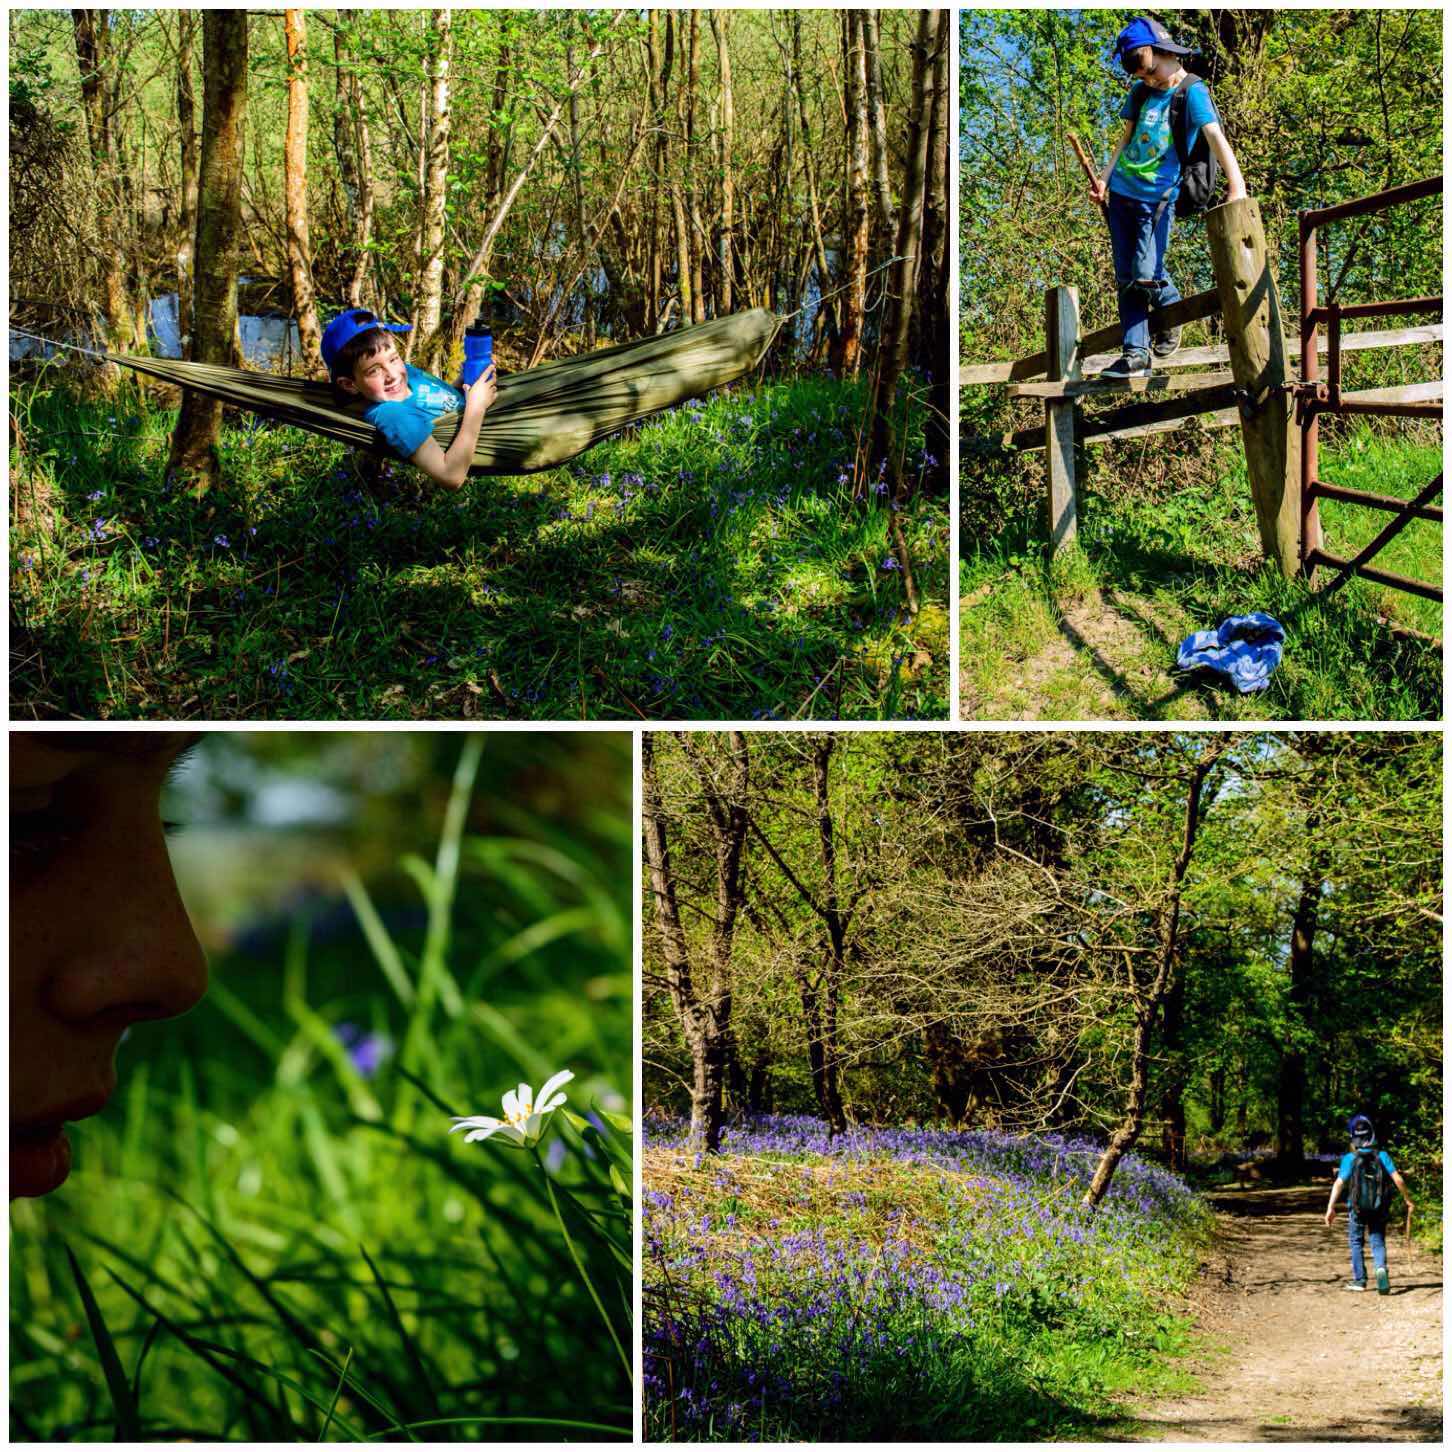
My little lad Finlay is a member of the Bramley Cub pack and when he was invested recently we received a little book on all the badges they can work towards.
There are badges for hiking, navigation and nature observation (amongst many others) so we decided to get out last Sunday and start earning some.
Not the usual bimble
Now this was not a usual bimble around the village but a proper hike. Finlay packed his rucksack with water, food, suncream, waterproofs, map, compass and a first aid kit. The manual stipulated that the hike needed to last for at least three hours and have a purpose.
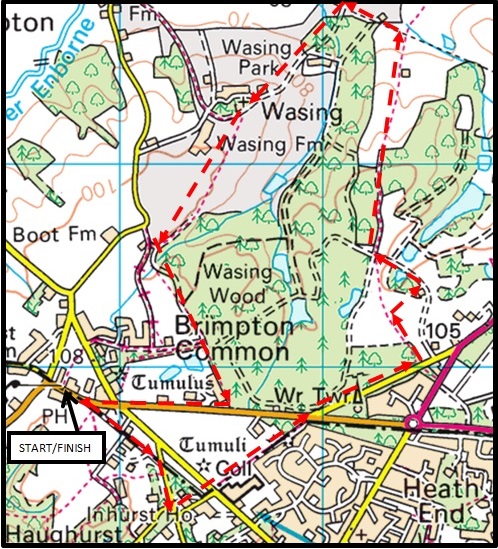
Our hike was to be around Wasing Wood near Tadley in Hampshire and our purpose was to learn to navigate and to forage (and throw in lots of fun in the middle).
Our hike around Wasing Woods
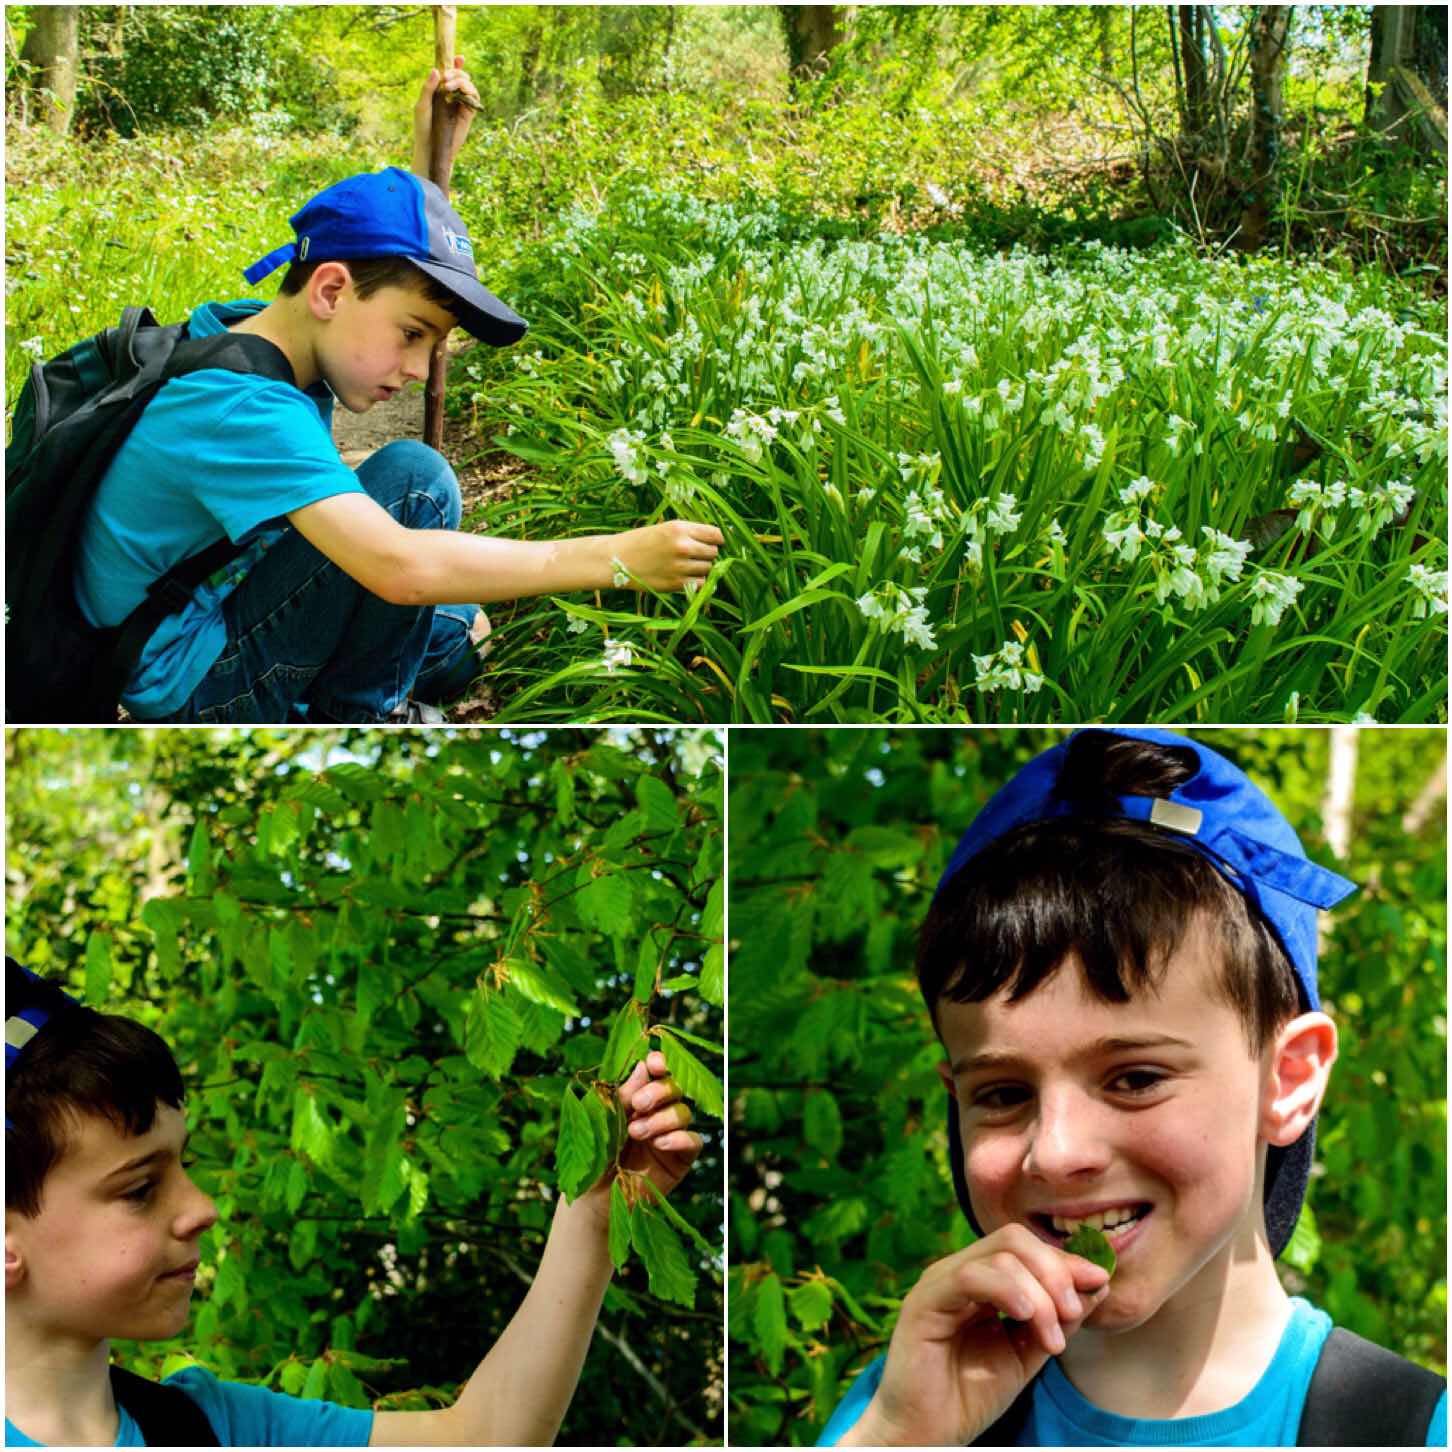
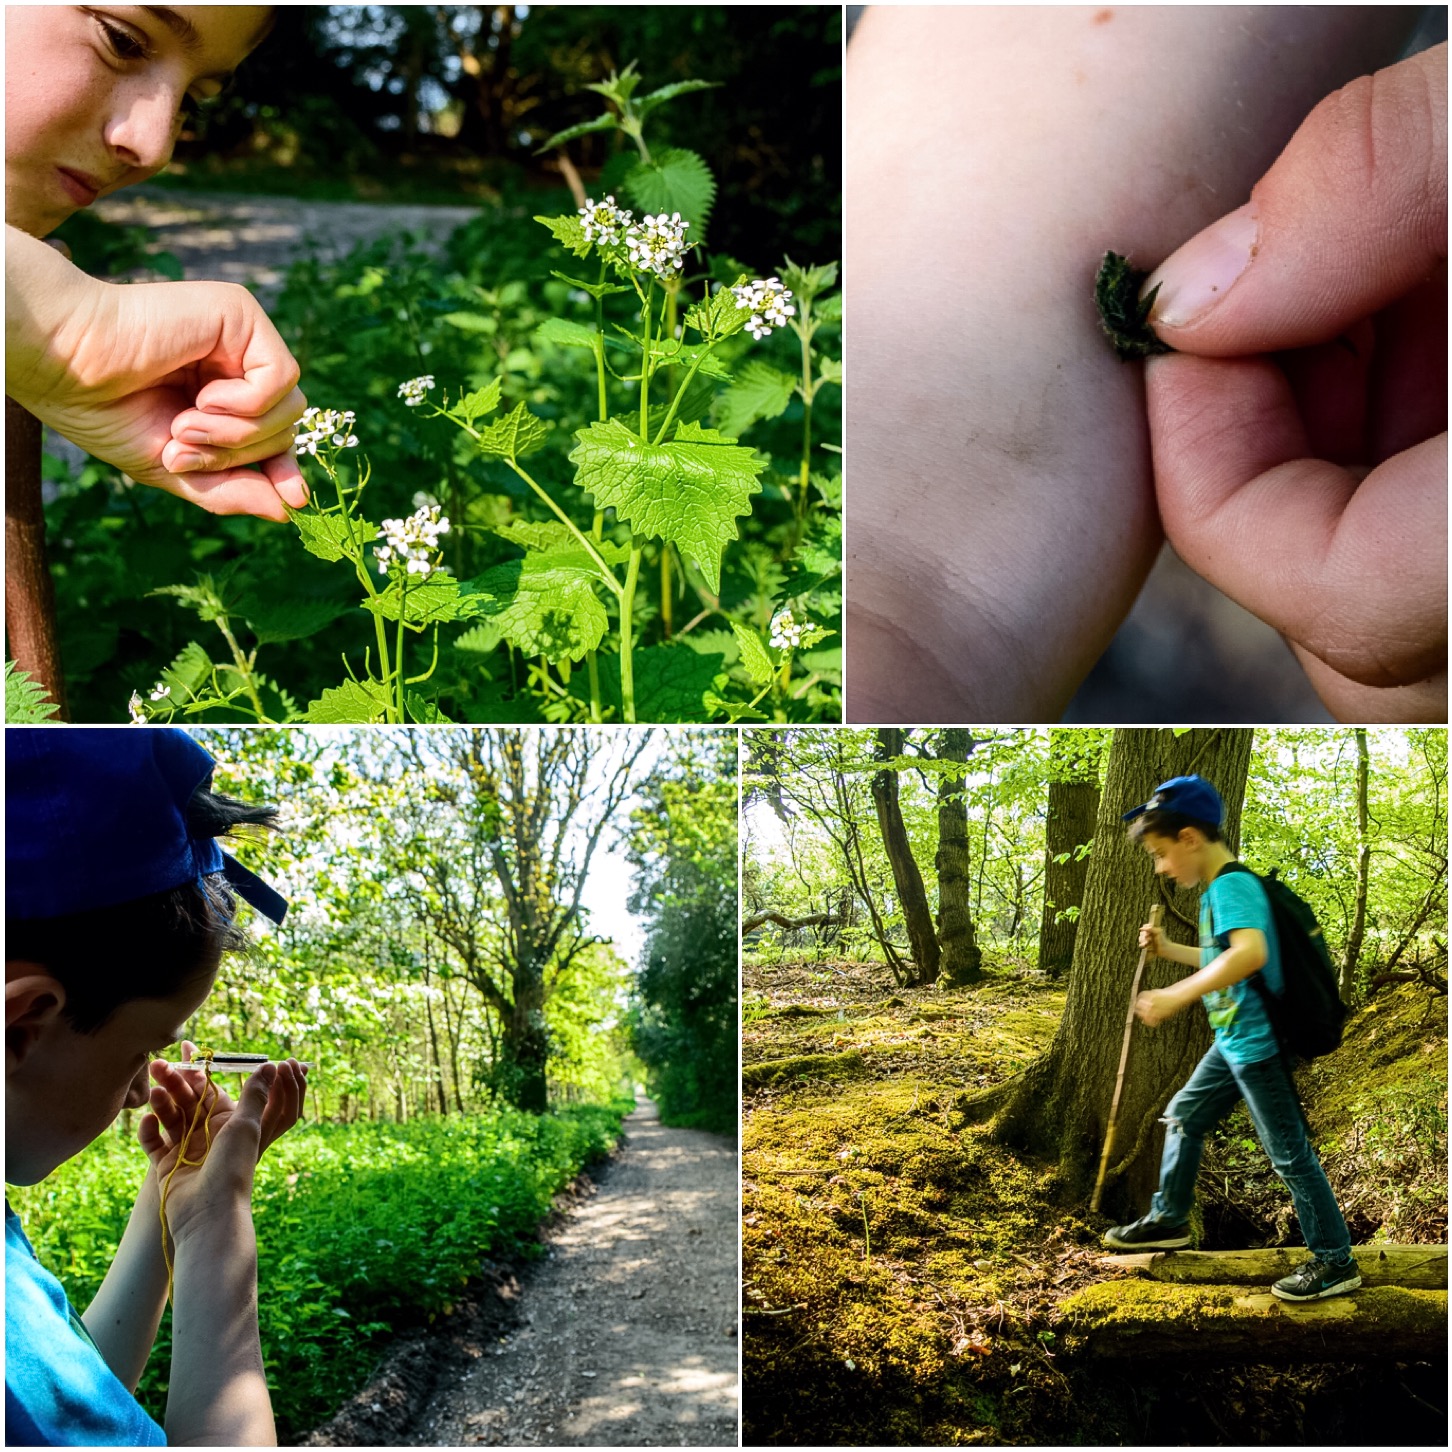
Very soon we spotted a clump of white flowers which turned out to be three-cornered leeks ( the leaves have three distinct corners) and some very fresh-looking beech leaves.
At this time of year the leaves of certain trees are quite edible, beech being one of them. Over the years Finlay has often foraged with me so I was not worried about him having any sort of reaction to anything he would be nibbling on. The walk was more about him learning the key features of certain plants for future safe identification. We left the leeks alone but had a munch on some of the really fresh beech leaves.
Leeks and Beech – Spring greens
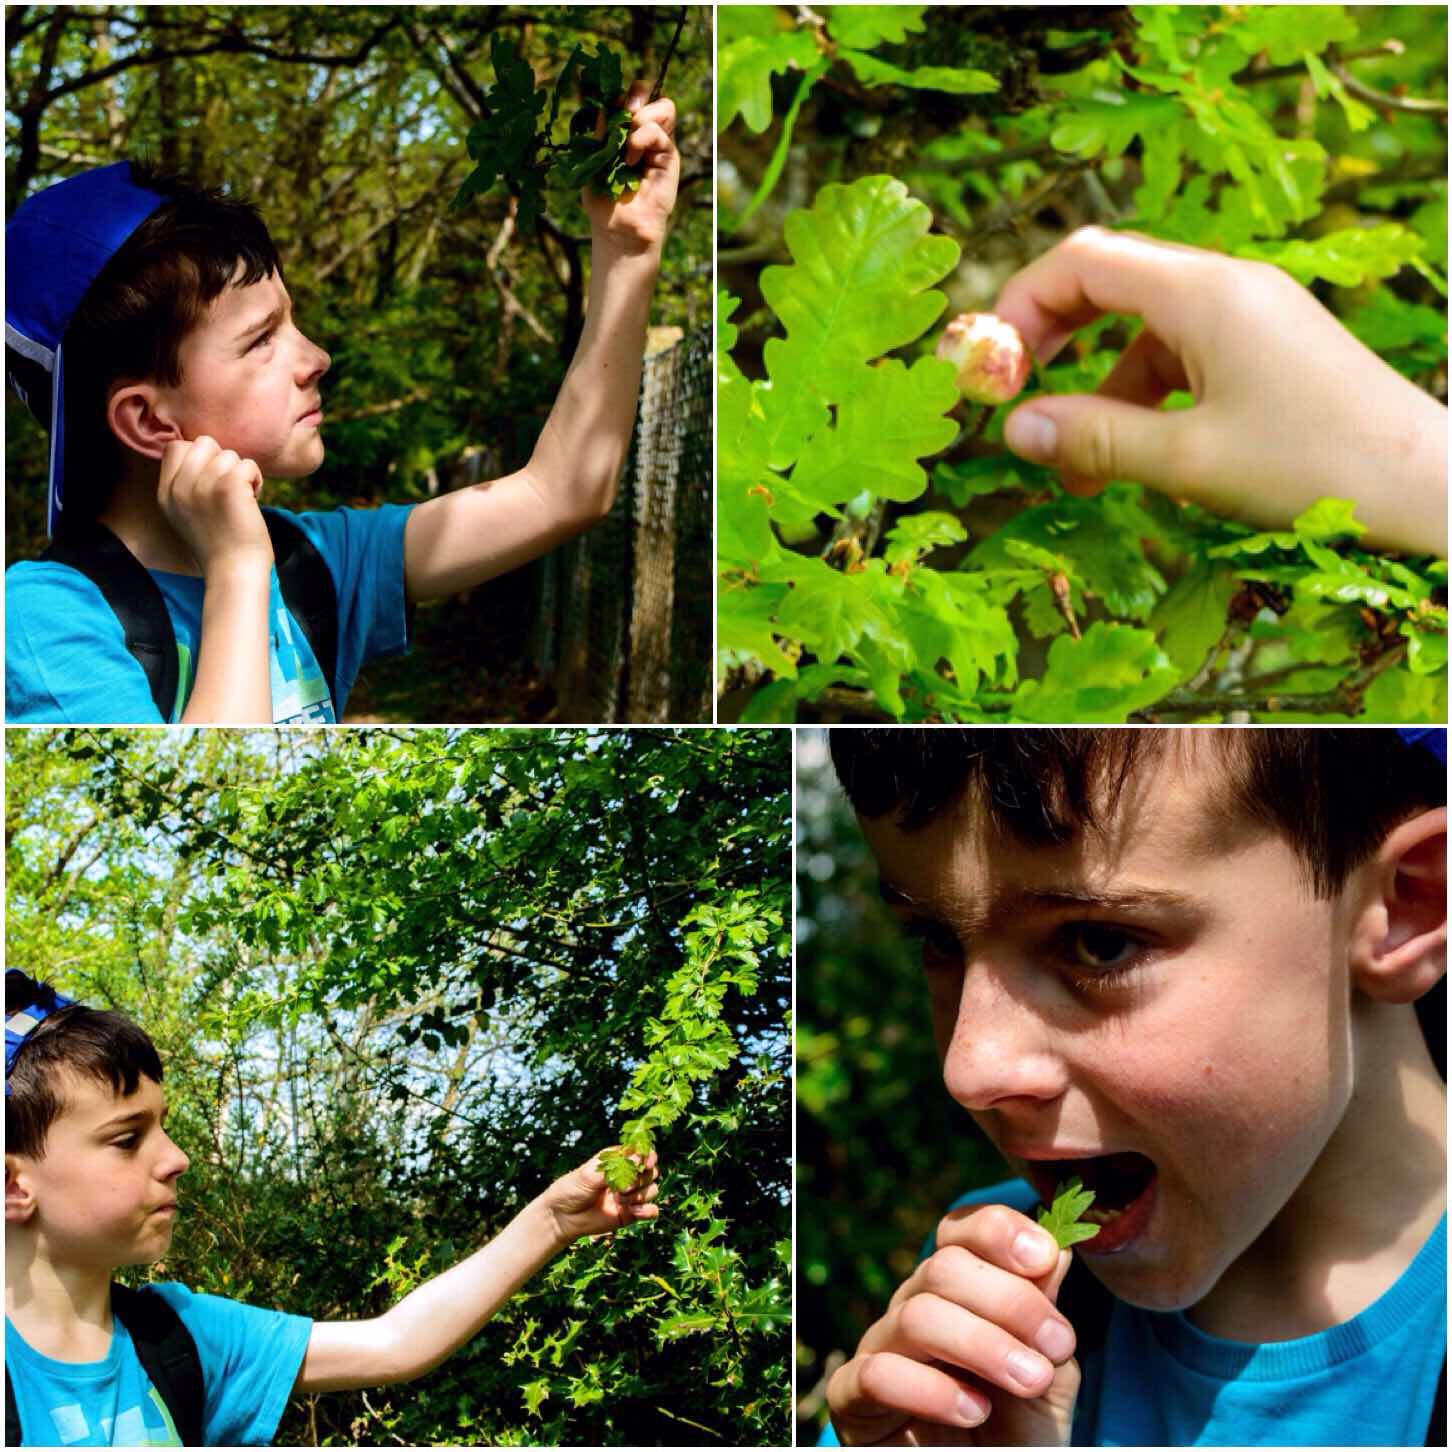
One tree that Finlay knew well was the oak, but to help him remember its leaf shape we likened its lobed leaf structure to that of his ear lobe. Also we investigated the very fresh-looking gall we found on one of the oaks. There was no hole in it so we concluded that the gall wasp had not hatched yet.
The next tree we came across was the hawthorn and Finlay’s first observation about it was that the leaves were much smaller than the oak leaves and had smaller and sharper lobes. As this is an edible leaf we were soon munching again.
Edible and non edible
I introduced Finlay to the Ordnance Survey map for our area and soon he was busy identifying different features on it and tracking our route. We looked at setting the map using features on the ground and using the compass. Also we discussed the scale of the map and features we would expect to find along our route.
We devised a route that was on public footpaths around Wasing Wood (and which had been well documented in a local guide book) however it soon became apparent that the footpaths we were using had been used little recently. The path was overgrown with hawthorn trees and it had also been cut in half by a local business as a testing area for diggers. Soon we were well off our intended route but by looking at the features around us we were able to keep track of where we were.
Map reading and adventuring – The path that disappeared
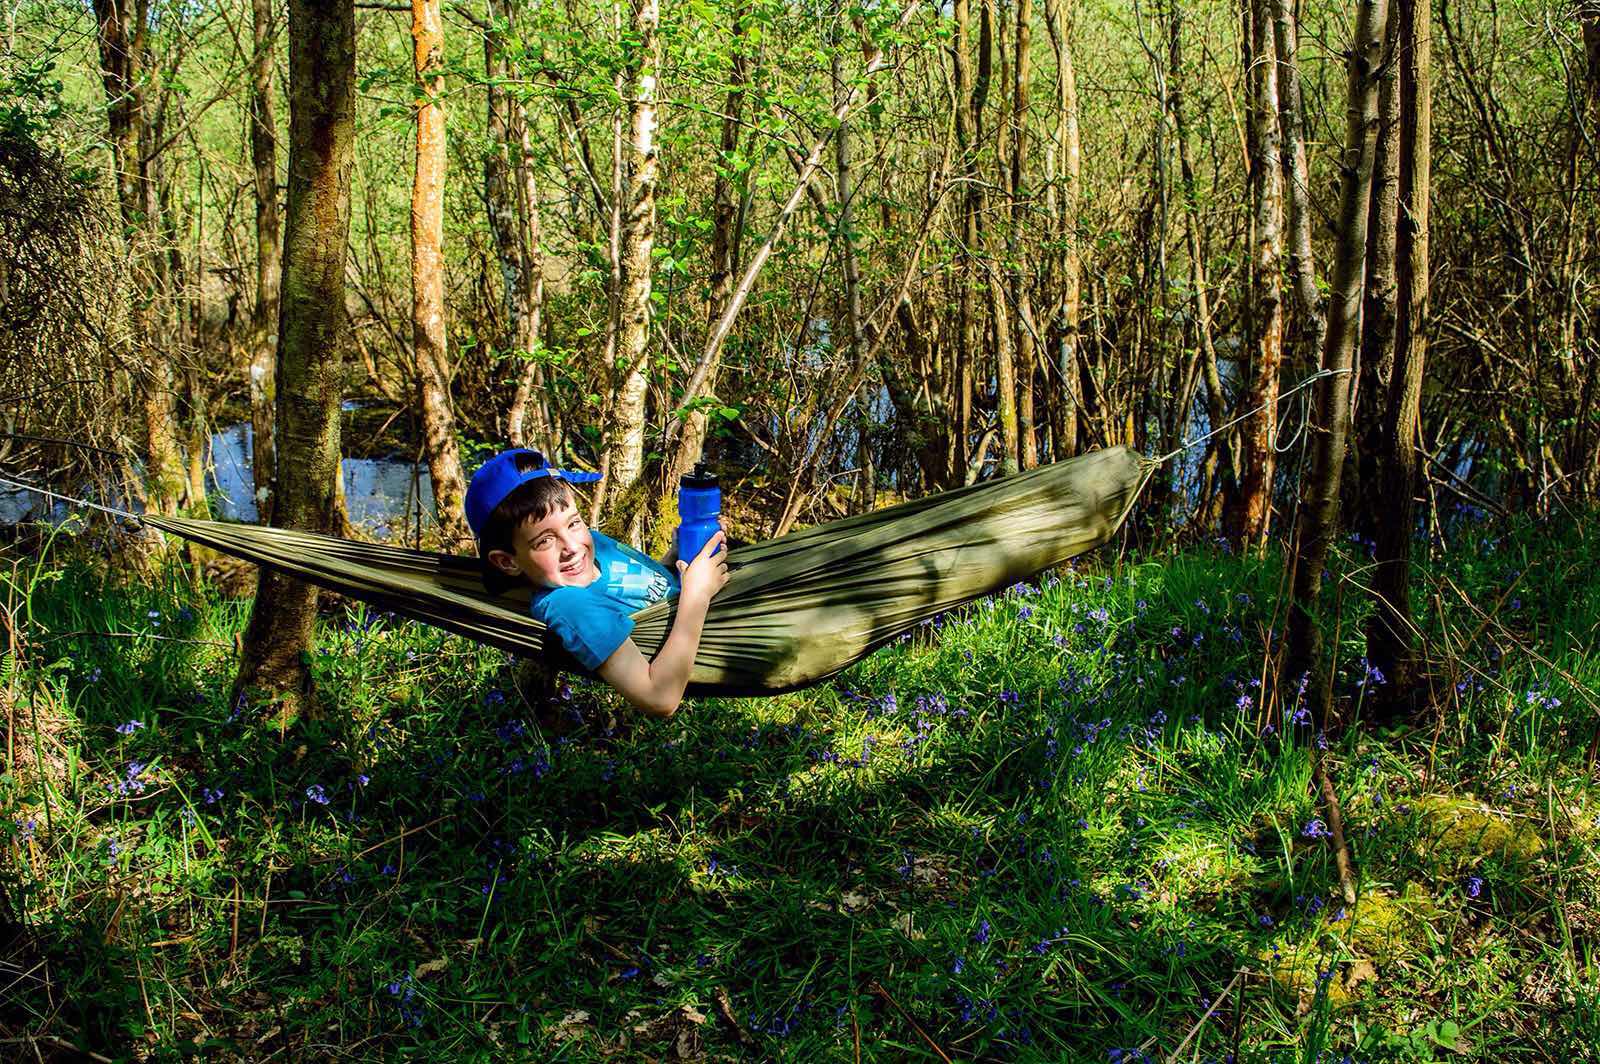
It was not all hard work as the hammock seat came out when we stopped for a snack (Finlay got it, not me). As well as trees we spent time identifying flowers.
There were plenty of bluebells, a few wild strawberry flowers but we did get down close to look at some Greater Stitchwort – a beautiful little white flower that has medicinally been used to help with the treatment of broken bones.
Strangely, when we were crossing a stile we came across a pair of boxer shorts lying on the ground. Not sure what to make of this, we hurried quickly along :-).
Strange and beautiful sites
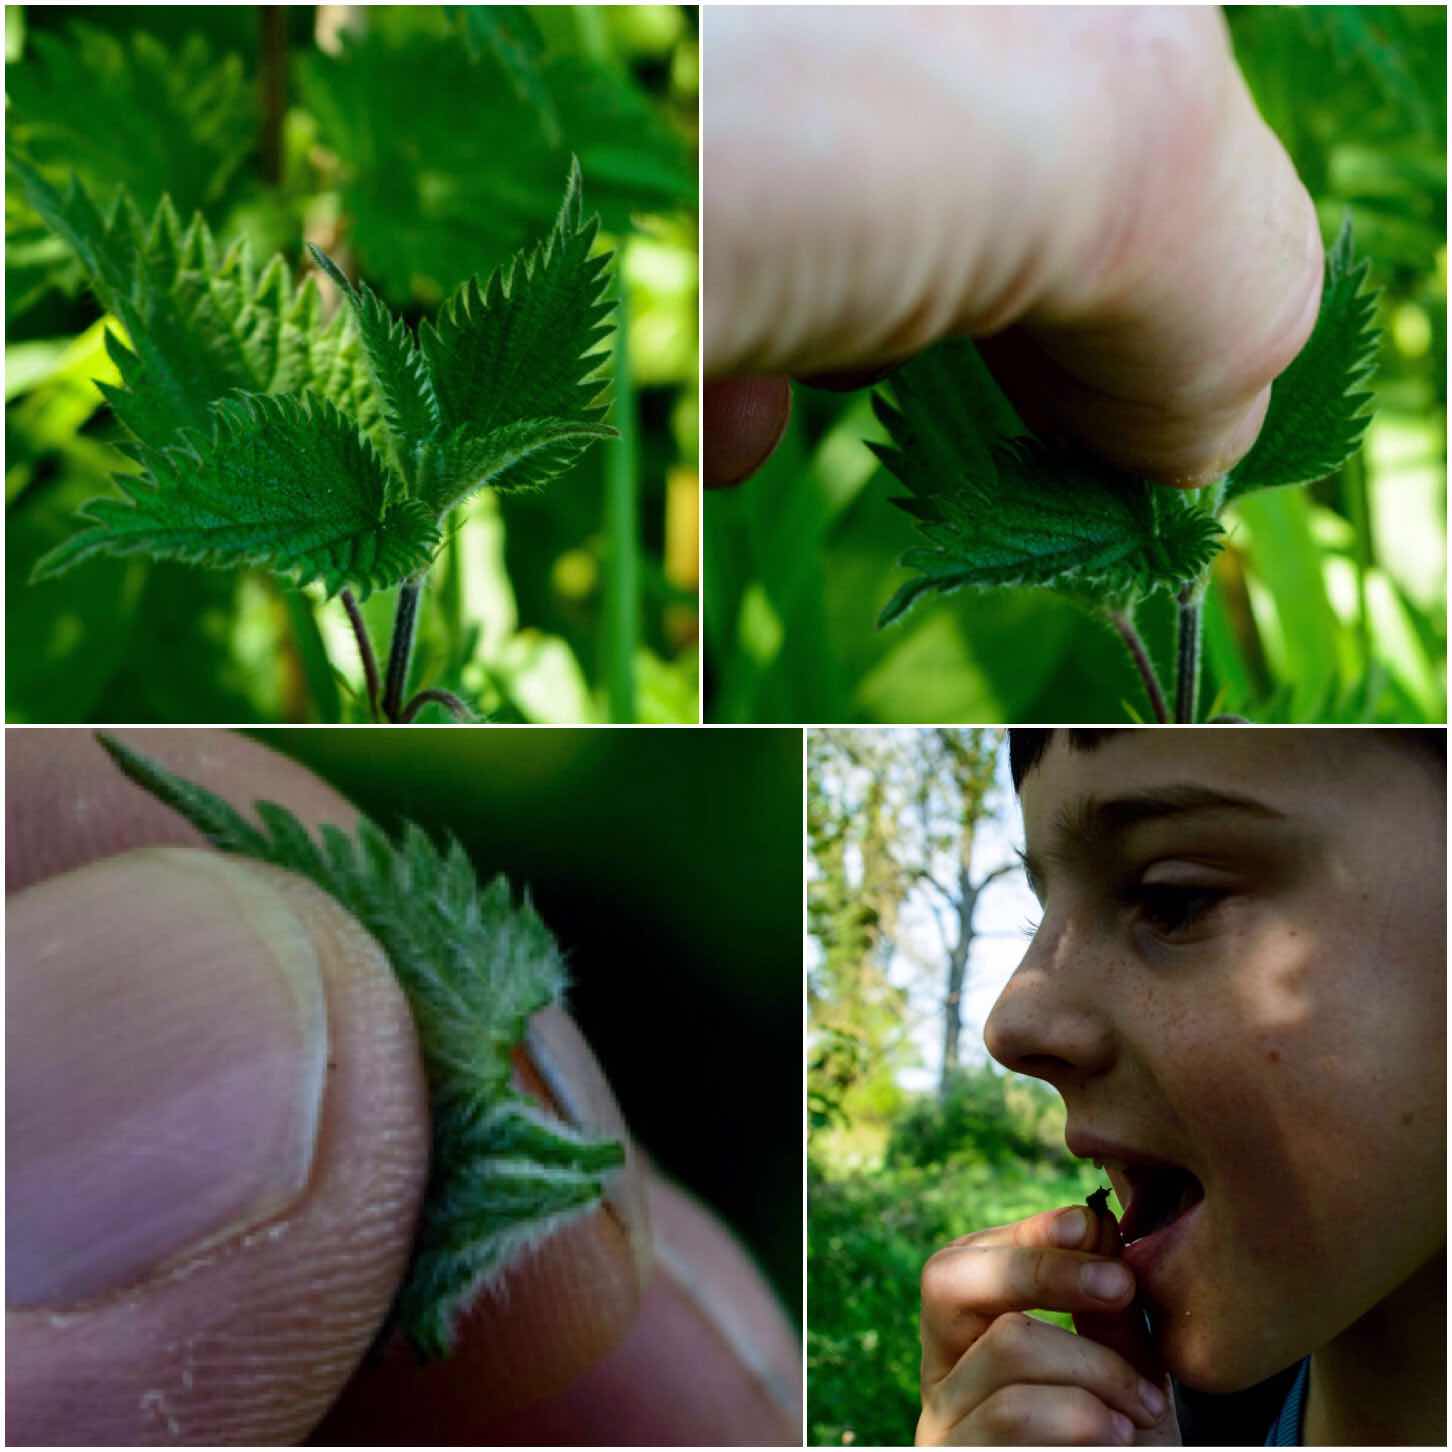
Now no trip out into the woods is complete without a little extra iron. There were plenty of new-growth nettles around and we picked a few ‘tops’ (the smallest leaves from the very top of the nettle), rolled them up to kill off the needles and munched away.
Finlay is happy to eat nettles now (he takes delight in doing this in front of other kids) though I am still working on him collecting them himself without gloves.
A little extra iron
Nettles though have a habit of biting you if you do not keep an eye on them 🙂 Finlay was picking a leaf from a ‘Jack by the Hedge’ plant for a little nibble when one of them sneaky nettles popped up and bit him on his arm.
Now a number of years ago he would have let out a loud wail and run about looking for a dock leaf. Now he knows to simply tell me he has been stung and I will grab a couple of the bigger nettle leaves and squish them up to a pulp. It is the juice of the nettle/plantain/dock (to name just a few) leaf that negates the sting – not just rubbing a dry dock leaf on a sting, which I have seen countless people do.
First Aid and final leg
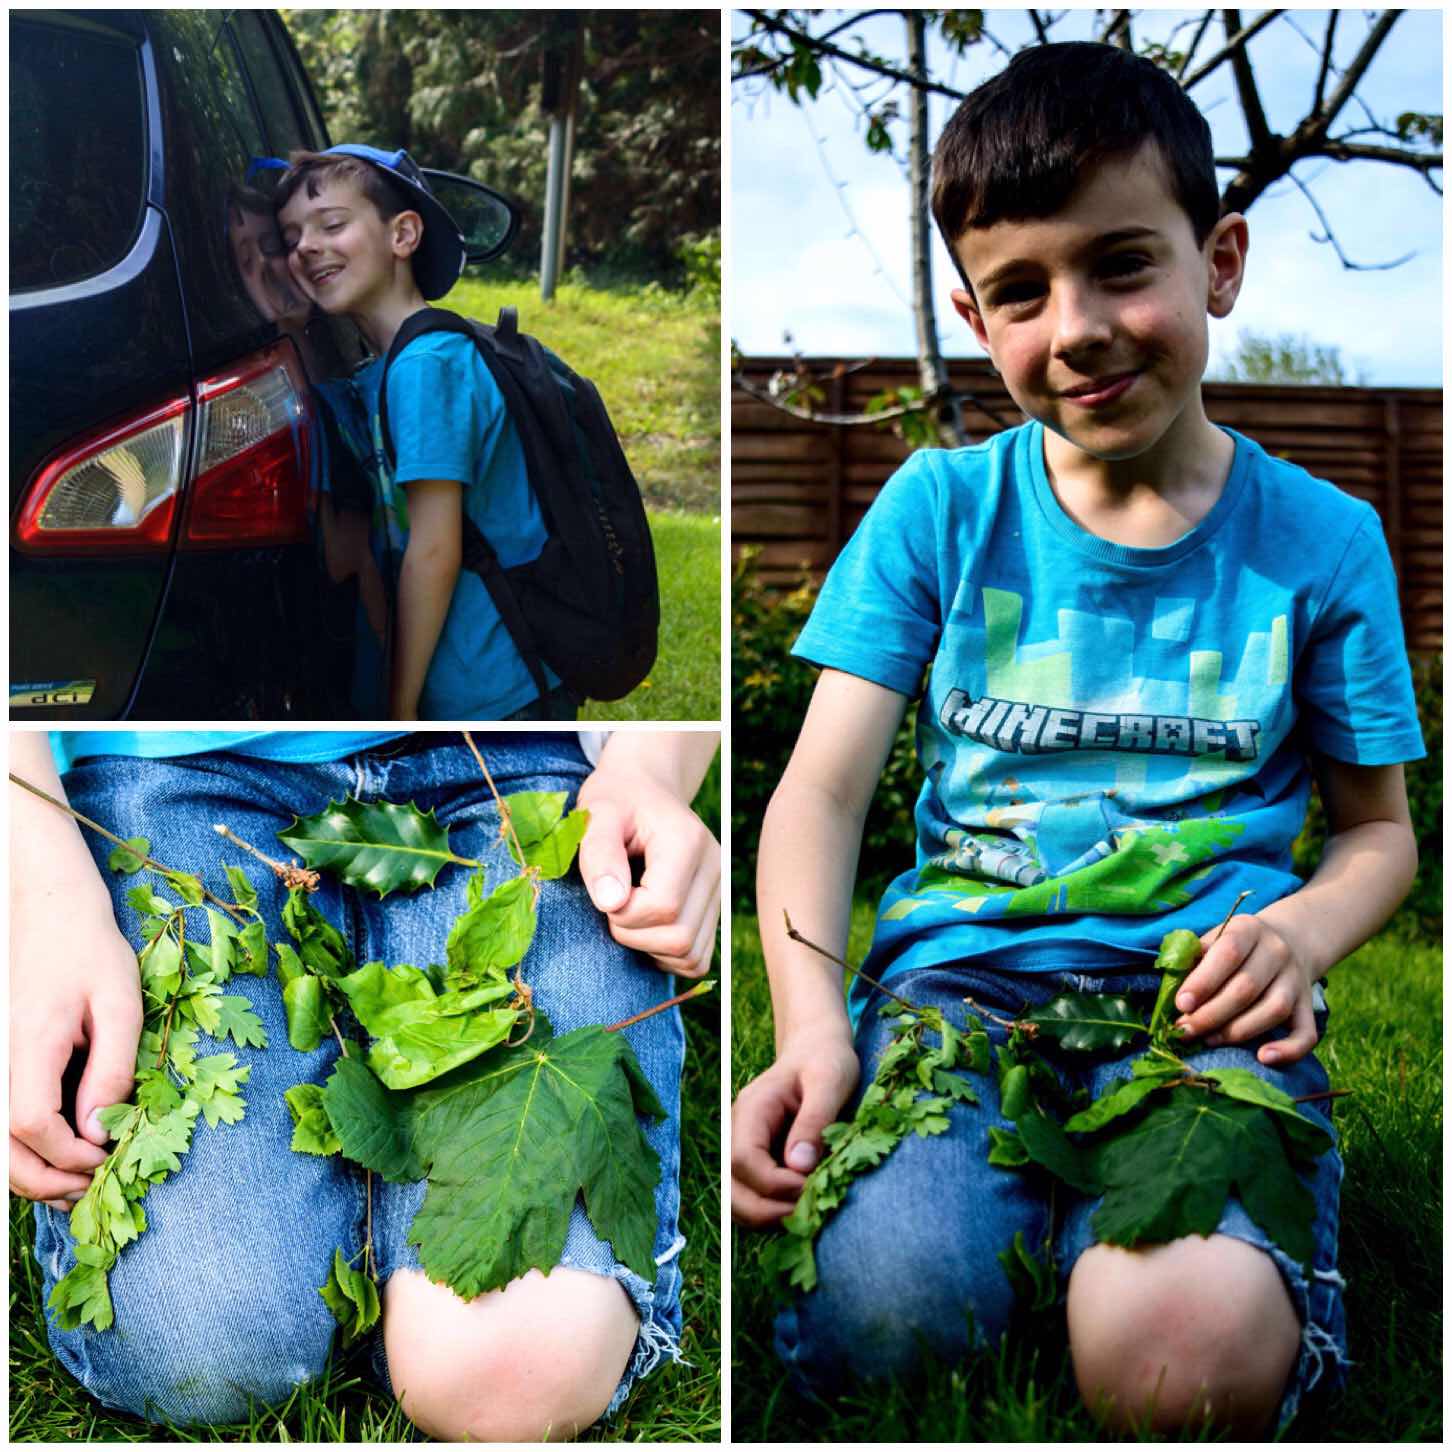
Before we knew it we had been out for over three and a half hours and diner was calling (Alison had insisted we be back in time for tea as we were expecting visitors). Out came the compass and after another quick lesson we were off through the woods and back to the car.
Tired but happy
Finlay had collected a few of the leaves from the trees we had studied but they soon wilted with the sun because they were so fresh. He collected holly, oak, hawthorn, birch, beech and sycamore leaves and spotted bluebells, stitchwort, leeks, wild strawberries, Jack-by-the-hedge and nettles.
The purpose of our hike was to study some trees, flowers and learn about the map and compass. I think you could say we managed that.
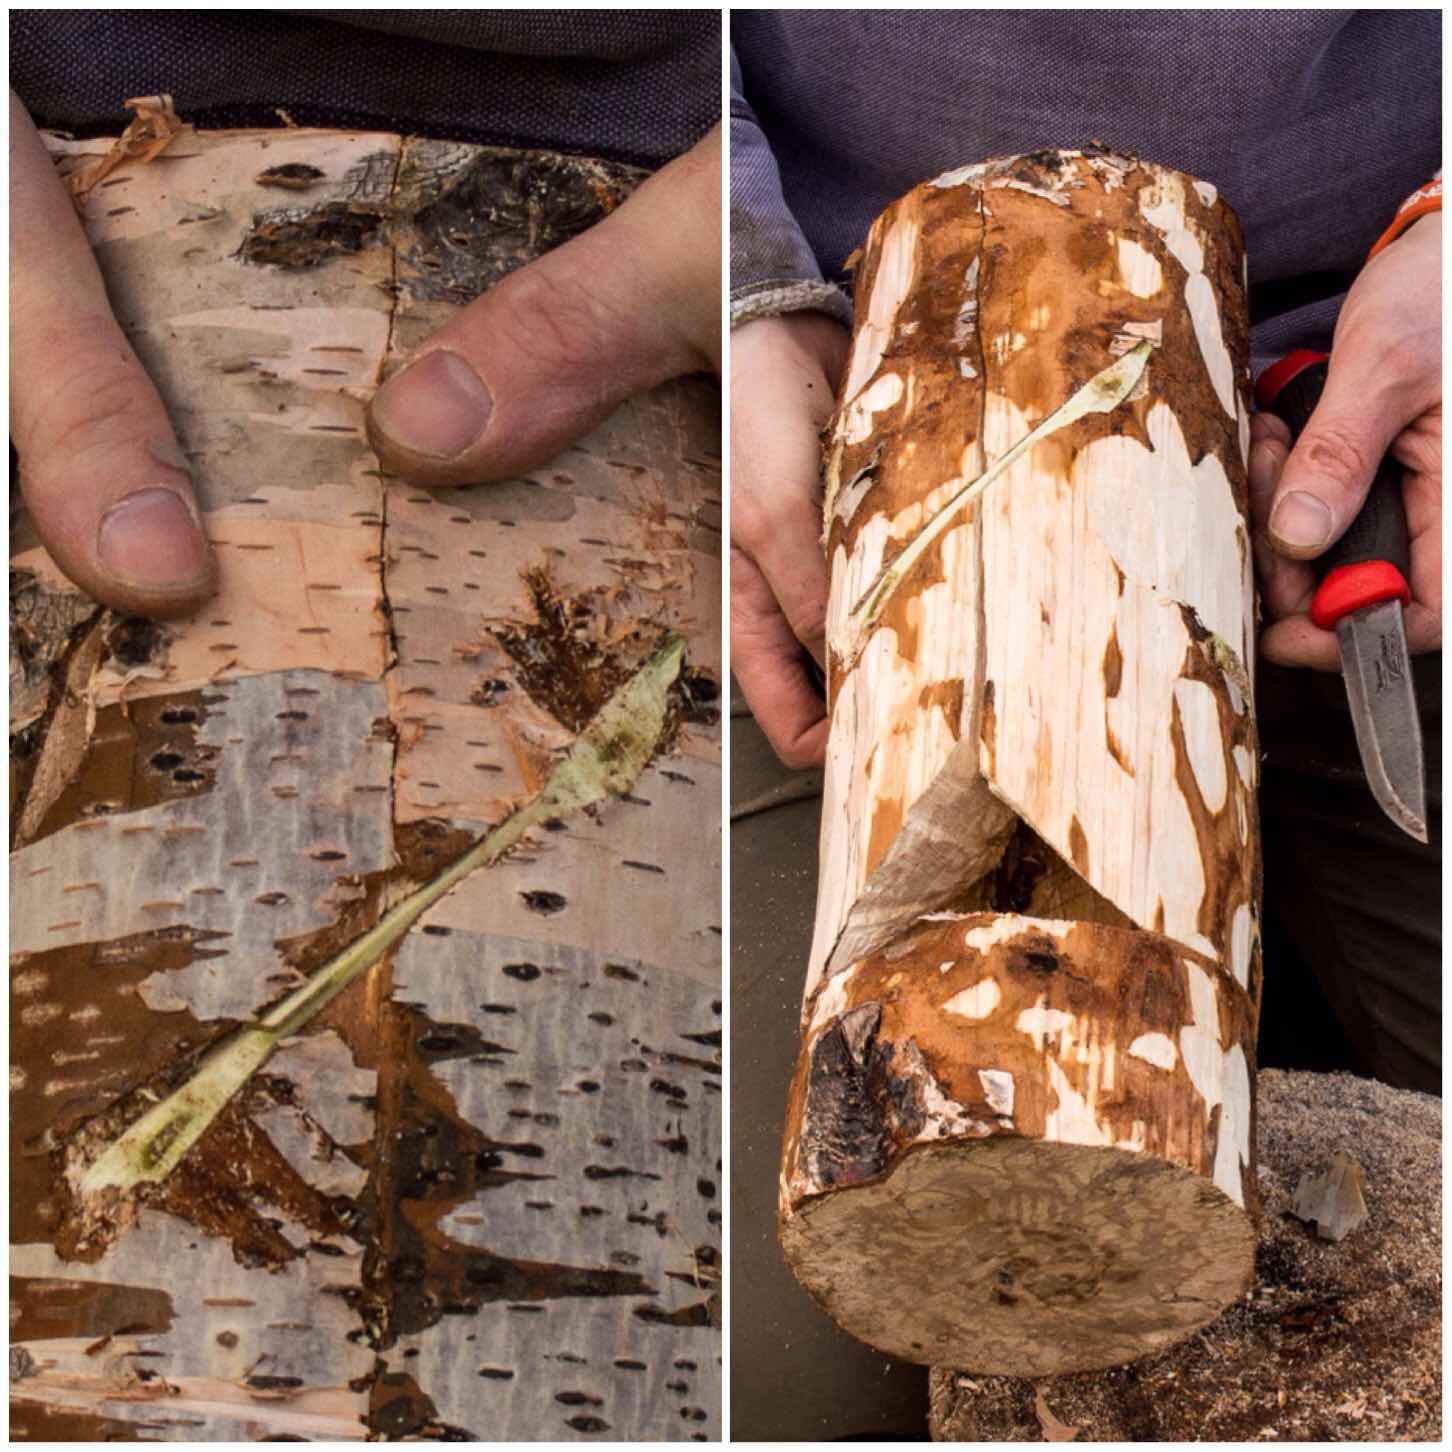
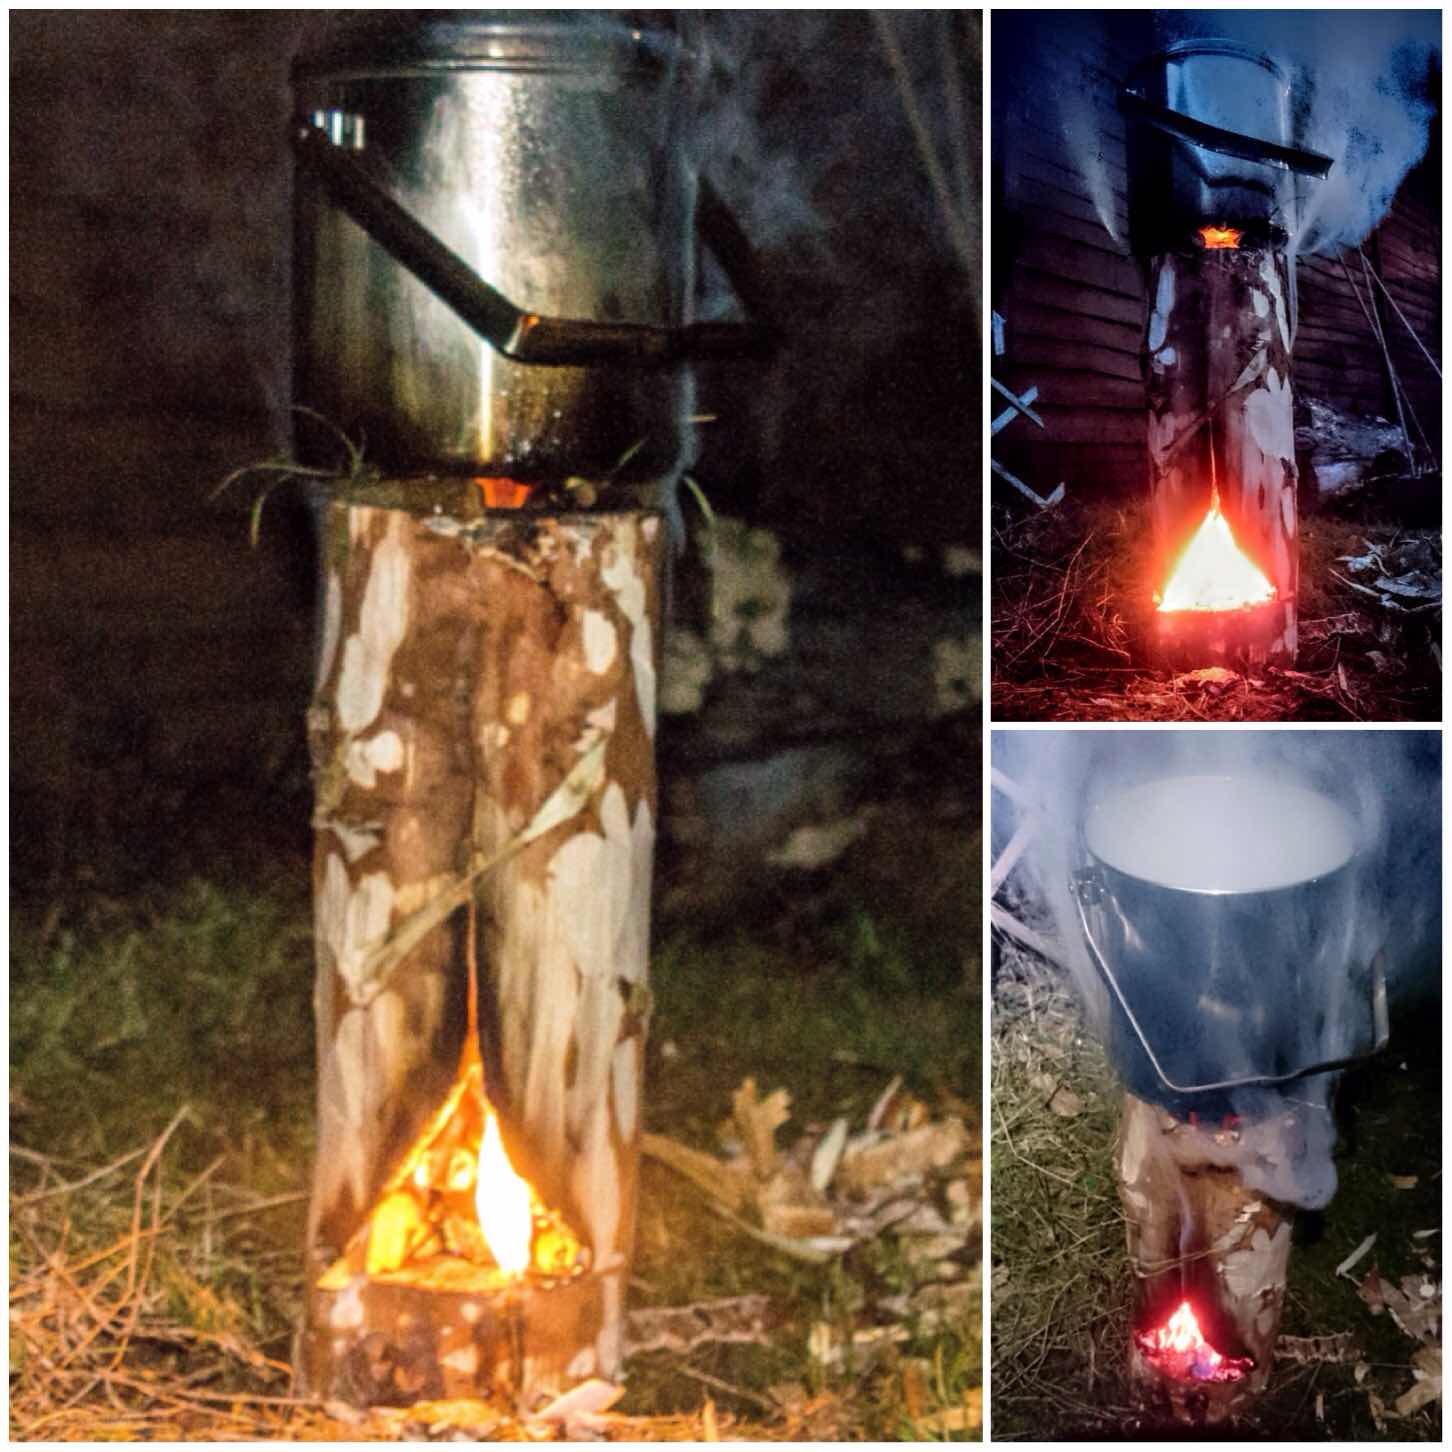
In my continuing research into Log Rocket Stoves I came across a Wikipedia page called the Schwedenfeuer and in it details of a type of log rocket stove I had not come across before, with a built-in fire tray and a chimney formed by simply cutting away the inner corner of one section.
Clever though it was, though, this stove still relied on string or wire to tie the sections together. As these stoves have been around for a long time I figured there must be other ways of holding them all together. I thought perhaps that green wood dovetail wedges might do the job, so I set out to test this.
The Dovetail Log Rocket Stove
Tools and Material
As usual I limited myself to the tools I would usually carry in my backpack, including a knife, saw and axe. A pen or pencil is handy for this project as well.
I’ve had a piece of birch stored in my garage for over a year however it had absorbed moisture over the winter and was fairly damp in its core.
Tools
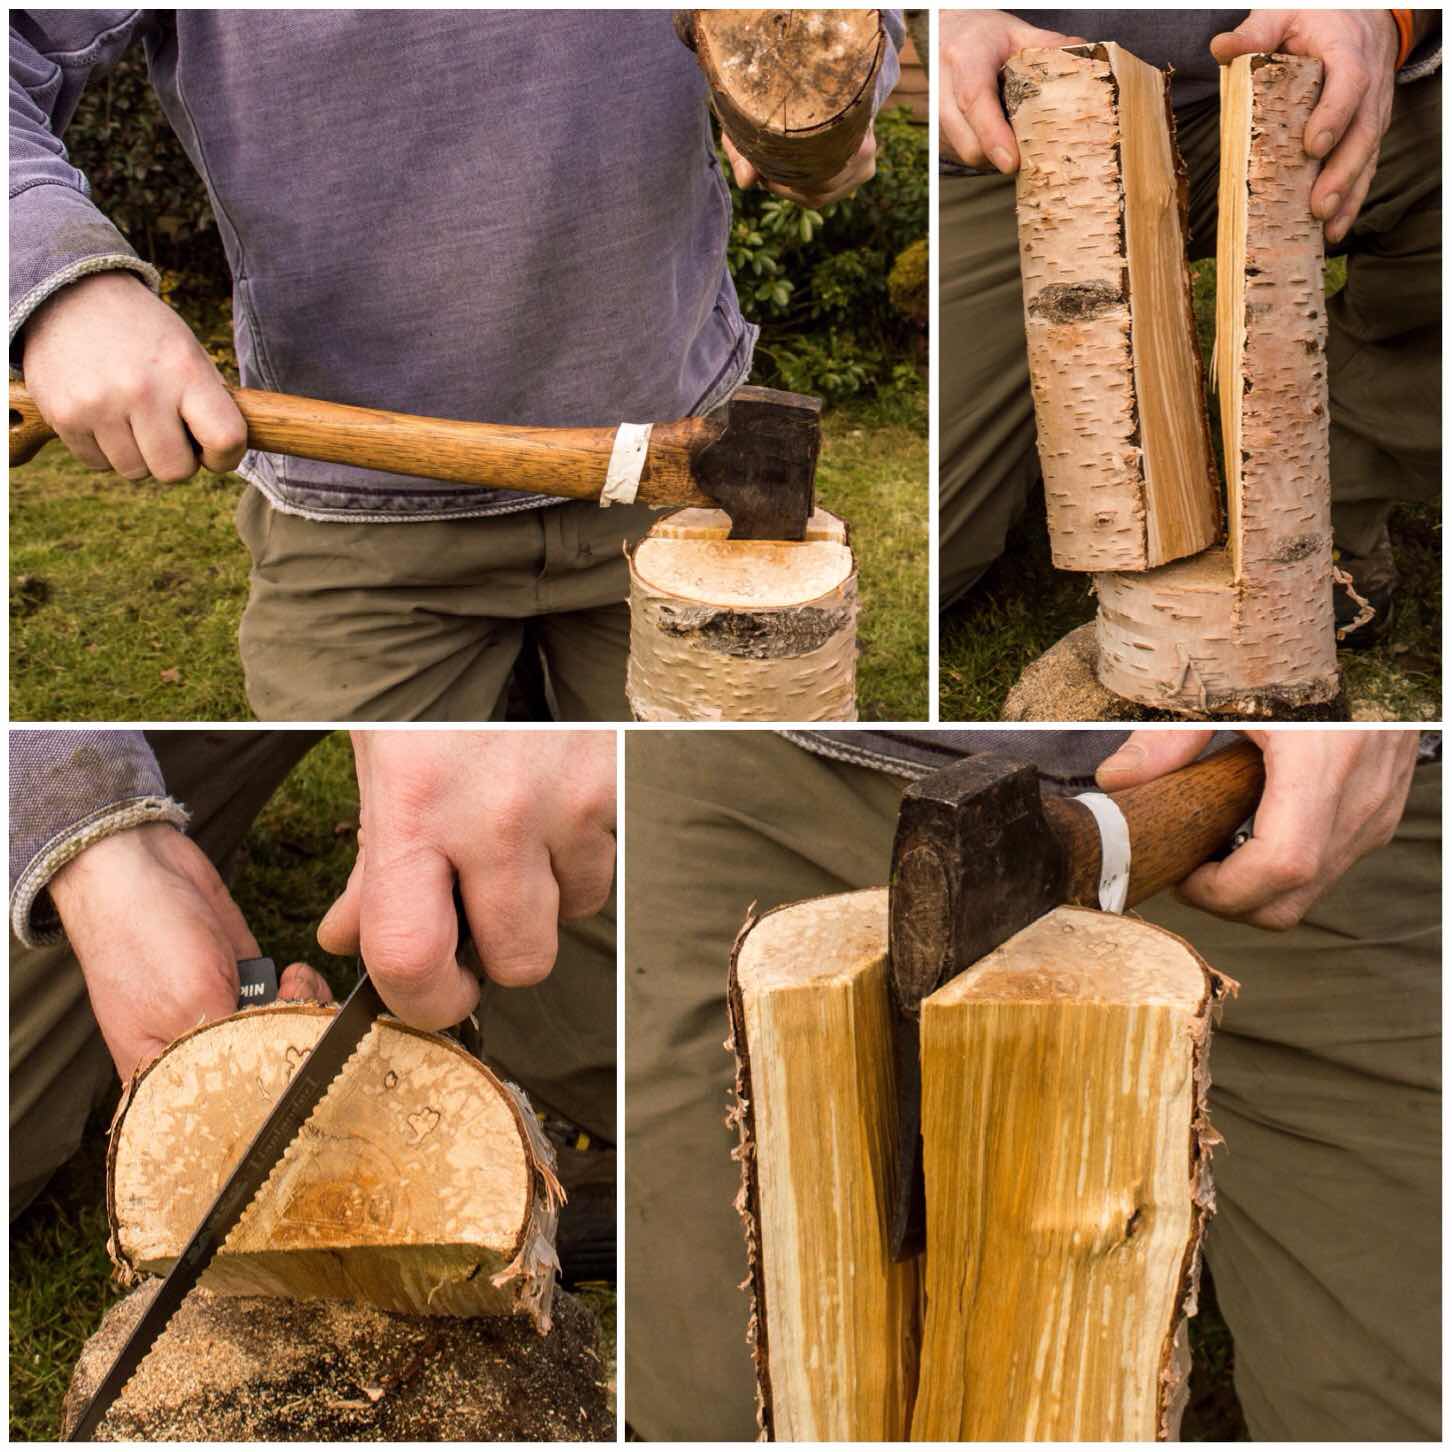
Splitting Out
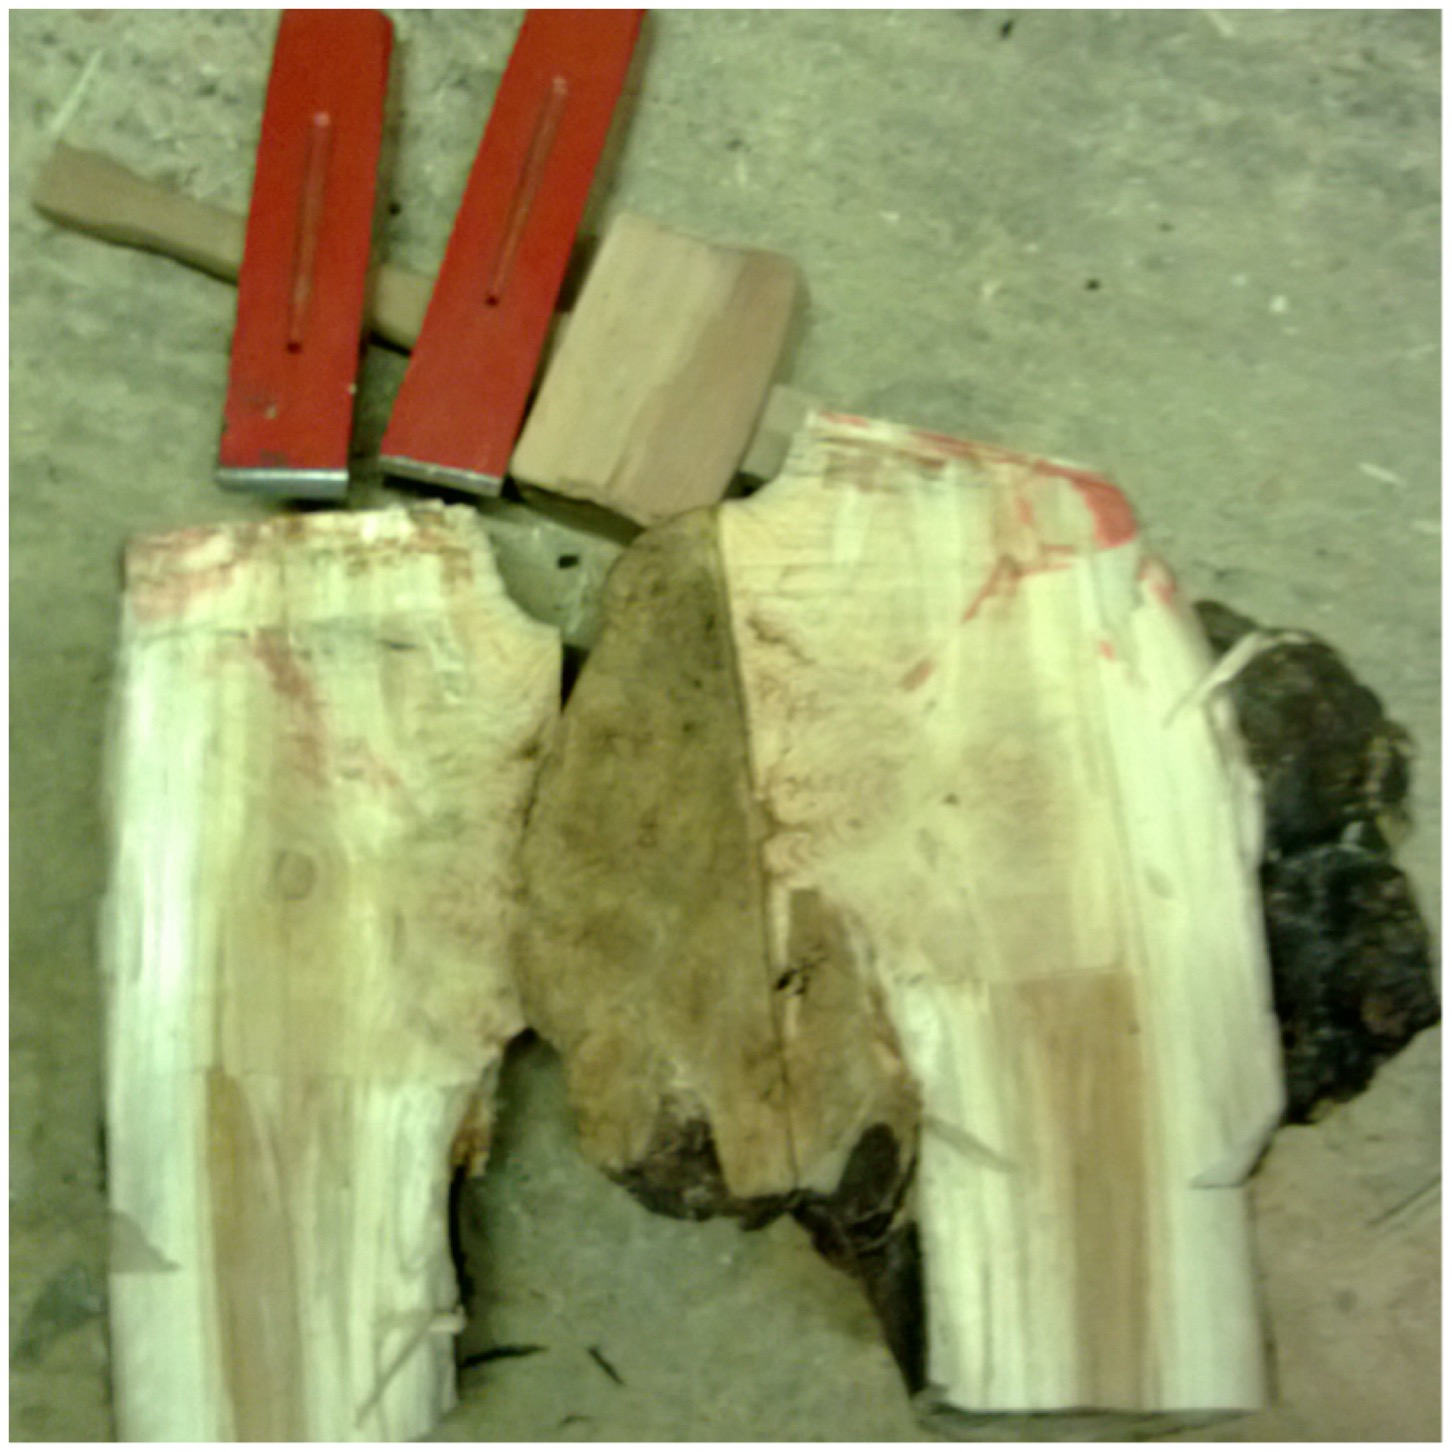
This style of log rocket requires you to put a stop cut into the bottom of the log to about two thirds of its width. You can see in the top left picture below the cut is about 10 to 15 cms from what will be the bottom of the stove.
The top right picture below shoes you how far I put my stop cut into the log. The bottom two pictures show me marking out with my saw the approximate area I would be battoning out.
Bottom cut and marking out
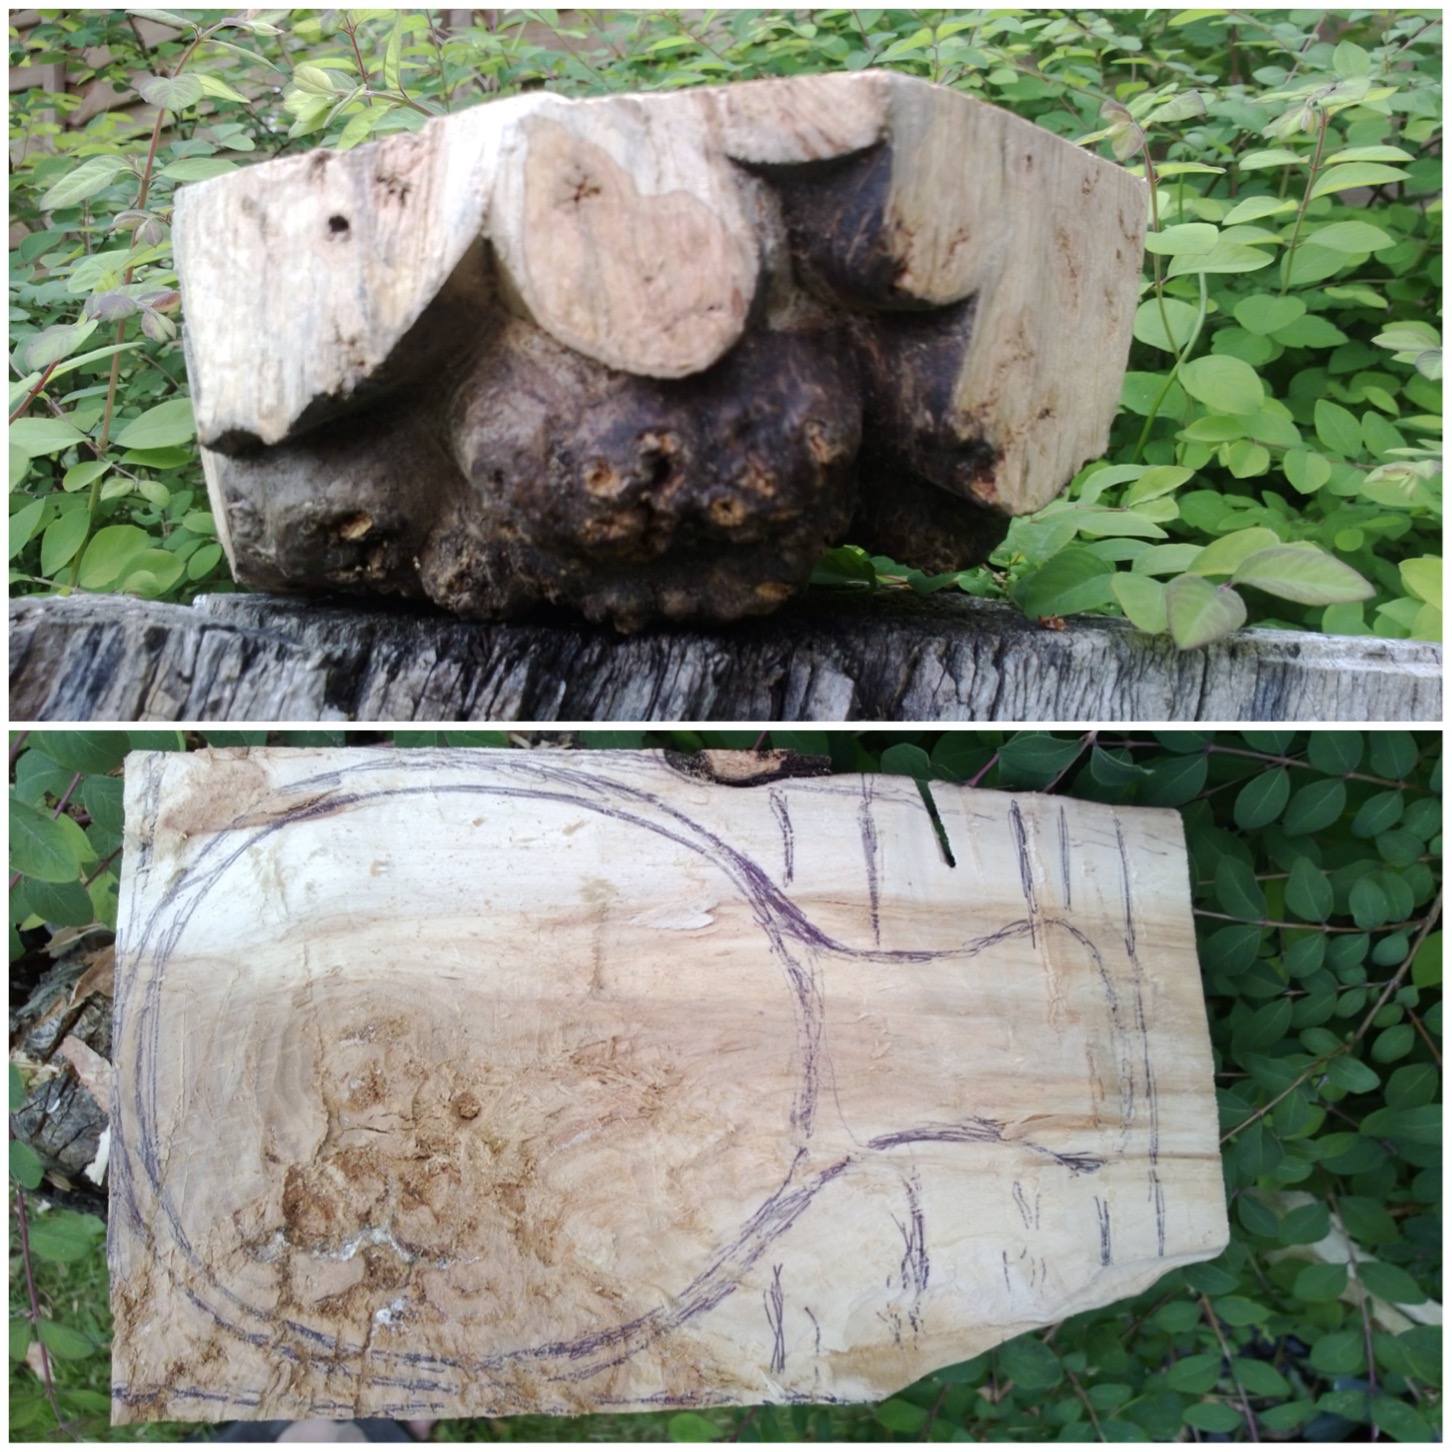
I used my axe and a large piece of wood to batton out the the wood. You can see the shape of the stove at this stage with one segment in an inverted ‘L’ shape (Segment 1) and a smaller piece (Segment 2).
The bottom two photos show me marking out the smaller piece for further splitting. This piece is not split exactly in two as this configuration allows you to form the chimney very quickly.
Splitting
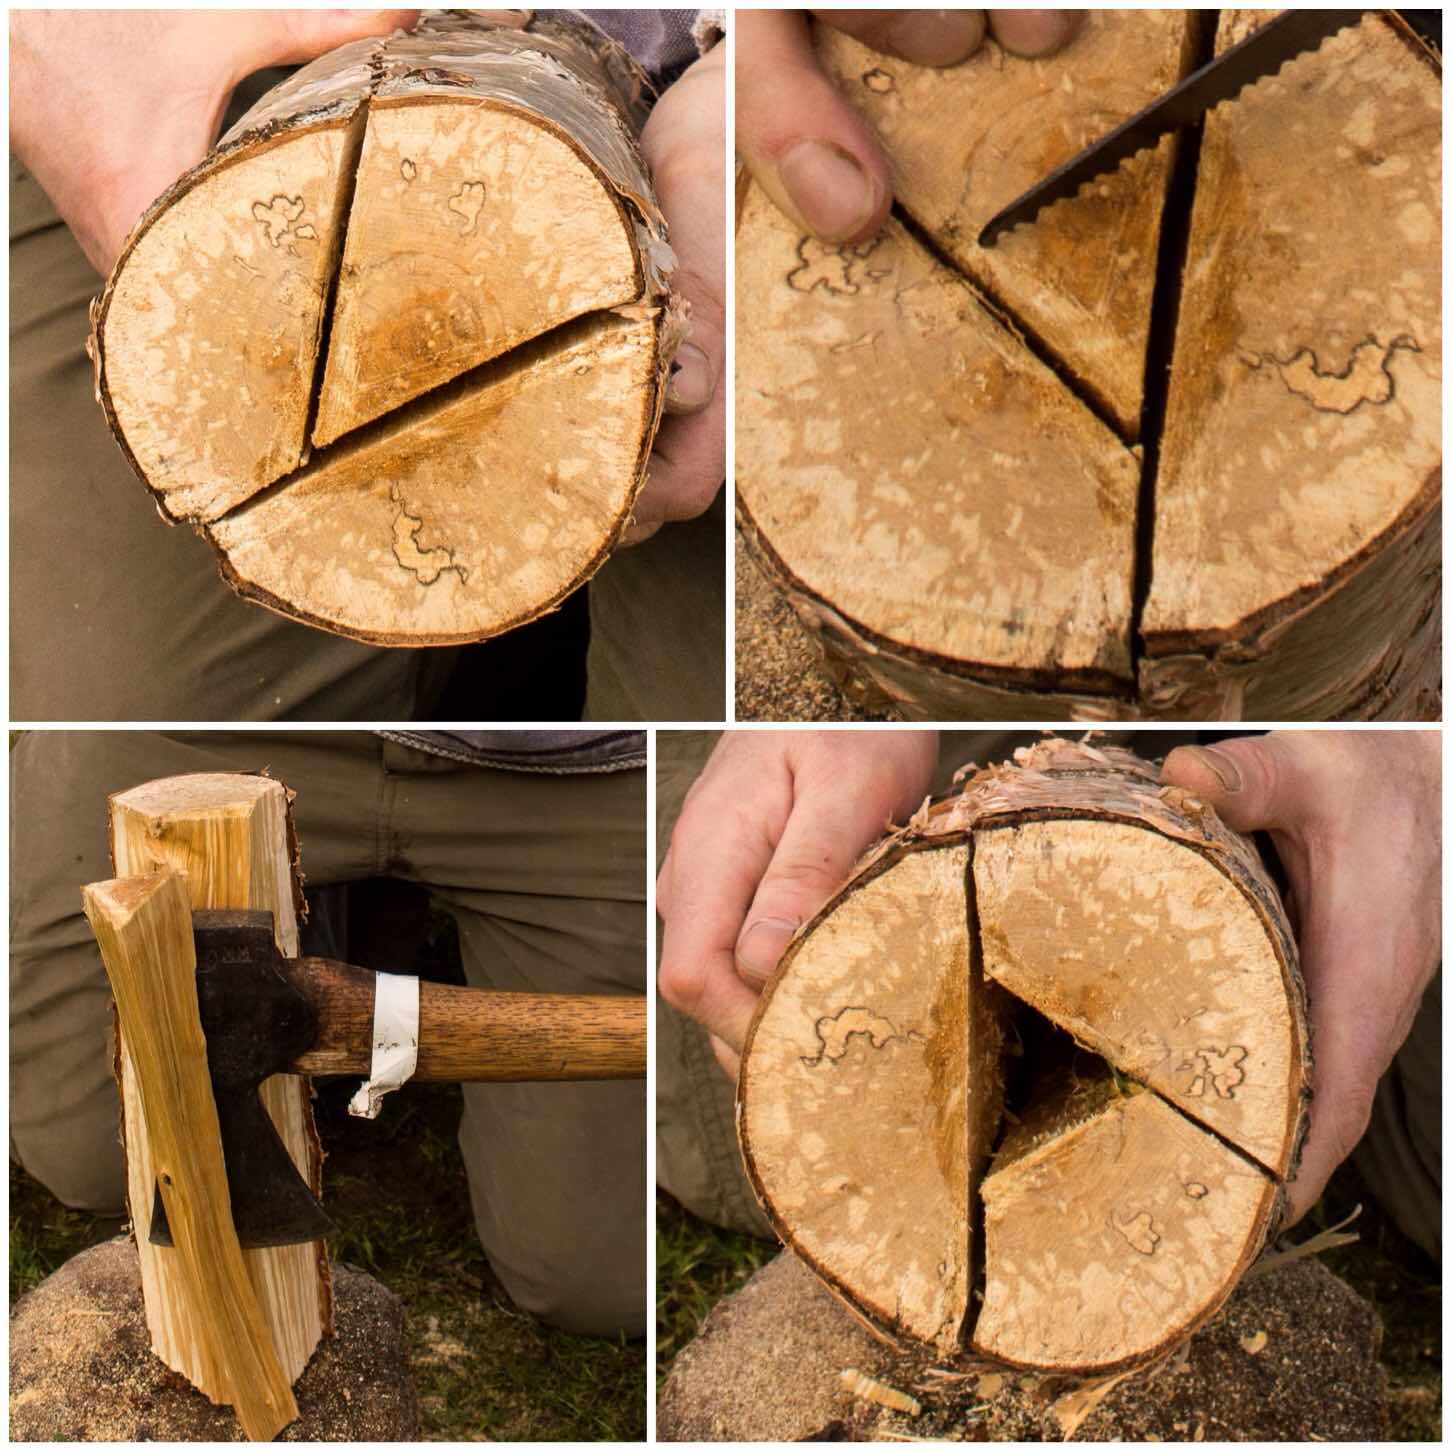
The Chimney
Below you can see the shape of all the pieces when they are put back together . I then battoned off the tip of the larger piece from Segment 2 so that a chimney would be formed. This piece of battoned-out wood I further split into fine pieces to act as kindling for the stove.
The One Cut Chimney
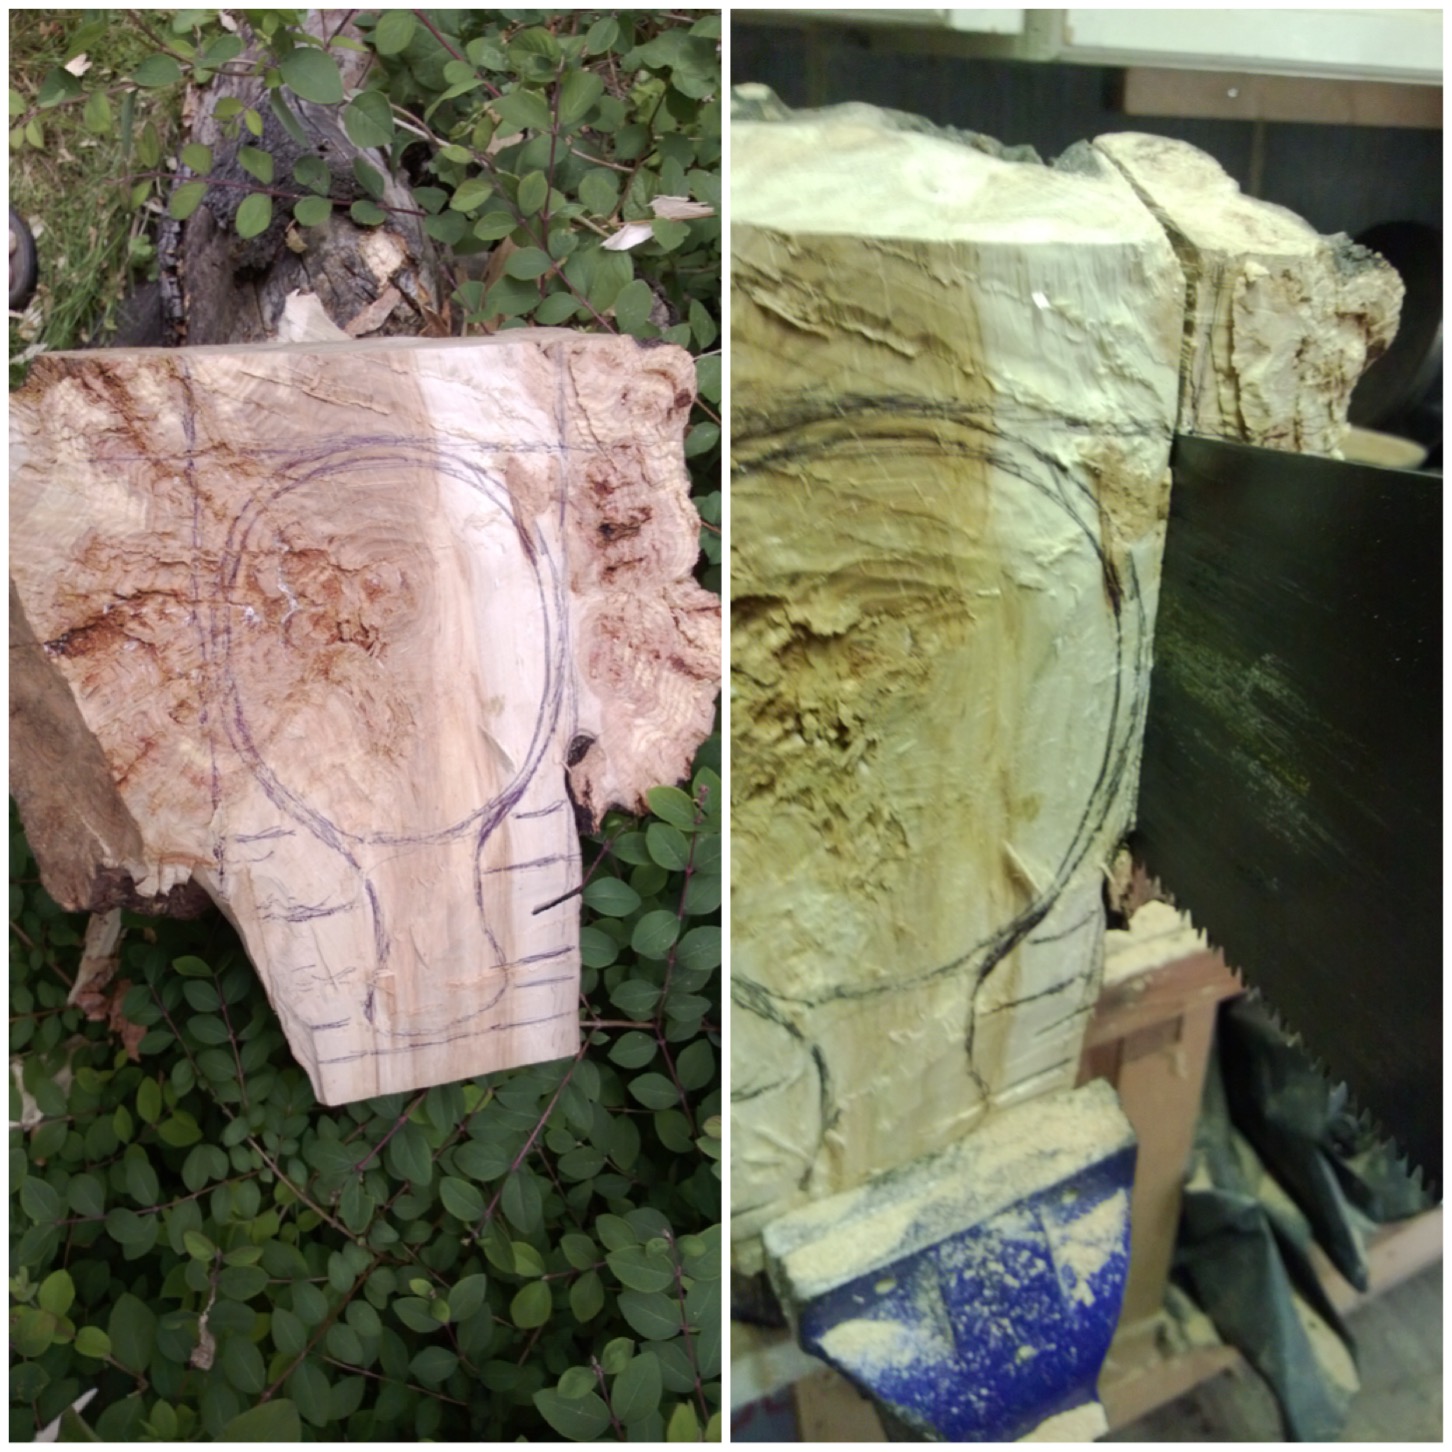
Once I had the chimney battoned out I trimmed off some excess wood from Segment 1 and then used a pencil to mark out the chimney area.
I did this so I could put some Raappanan tuli cuts into the chimney area. It is important to keep the sections of the log rocket that join together as smooth as possible for a good fit so marking out the chimney area ensures I do not cut into the wrong area.
Trimming & Marking out the chimney
The Raappanan tuli cuts are fairly simple to make with my axe. I just ensured I cut only into the wood in the chimney area and that the cuts were made upwards, towards the top of the chimney.
These cuts are particularly helpful when using damp wood as it offers far more surface area to the initial flame, allowing it to catch more quickly, and also it helps to dry the damp wood out.
Raappanan tuli cuts
The Firebox
The next stage I worked on was the firebox opening. This can be done in a number of different way however I elected to go for a triangular opening.
I formed the opening by cutting a small triangle at the base of both pieces from Segment 2. I also tapered the inside of the cuts to open the firebox up a bit. I made this firebox slightly larger than normal as the wood was very damp. My thought was that the extra air intake would help to keep the fire going at the start before the insides of the stove became fully lit.
The firebox opening
The Dovetail Joints
These joints were a total experiment. I put all the pieces together again and, holding them tightly, sawed a line to the depth of a centimetre across two of the joints. (I recommend you use some string or maybe a belt to hold everything together as you make the cuts – I didn’t and I wished I had.)
I then did the same cut but flared my saw out slightly (about 45 degrees) to the same depth. I then repeated the cut with the saw flared out 45 degrees in the opposite direction to the original cut to the same depth (there will be a picture of the cut further down the post).
Once that was done I used my saw like a rasp to carve out all the excess wood to form what is called the dovetail ‘Tail’.
Cutting out the ‘Tails’
Below you can see this ‘Tail’ part of the dovetail joint. It forms what I think of as a bow tie shape when done properly. The important point is to start each cut from the same place, saw to the same depth each time and ensure that the middle of the tail is centred over the split in the segments.
I found that as I had not strapped the segments together I had to really hold them firmly together – this is where you will appreciate your belt or piece of string. Also while sawing these ‘Tails’ in be aware at all times where the saw is in relation to your thumb and forefinger on the hand holding the stove.
I made three of these tails (one over each split) to hold all the segments together.
The Tails
To hold the segments together you need to carve some ‘Pins’ to insert into the ‘Tails’. I used green hazel wood to make the pins and made sure that they were carved into a triangular shape but initially too big for the tail.
Carving in this manner allowed me to insert the pin into the tail and then progressively carve off smaller pieces from the pin until it started to slide in. I also used my large piece of wood to hammer the pins in to ensure a very tight fit.
If you find that your pin is too small just get a fresh piece of green wood and try again. They only take seconds to make. To finish the pins off I trimmed the ends with my saw.
Cutting and inserting the ‘Pins’
As the bark of the birch tree is very flammable I stripped it all off and kept it to the side to use later as kindling to get the fire started. The dovetail joints if fitted snugly will keep all the segments locked together tightly.
Trimming
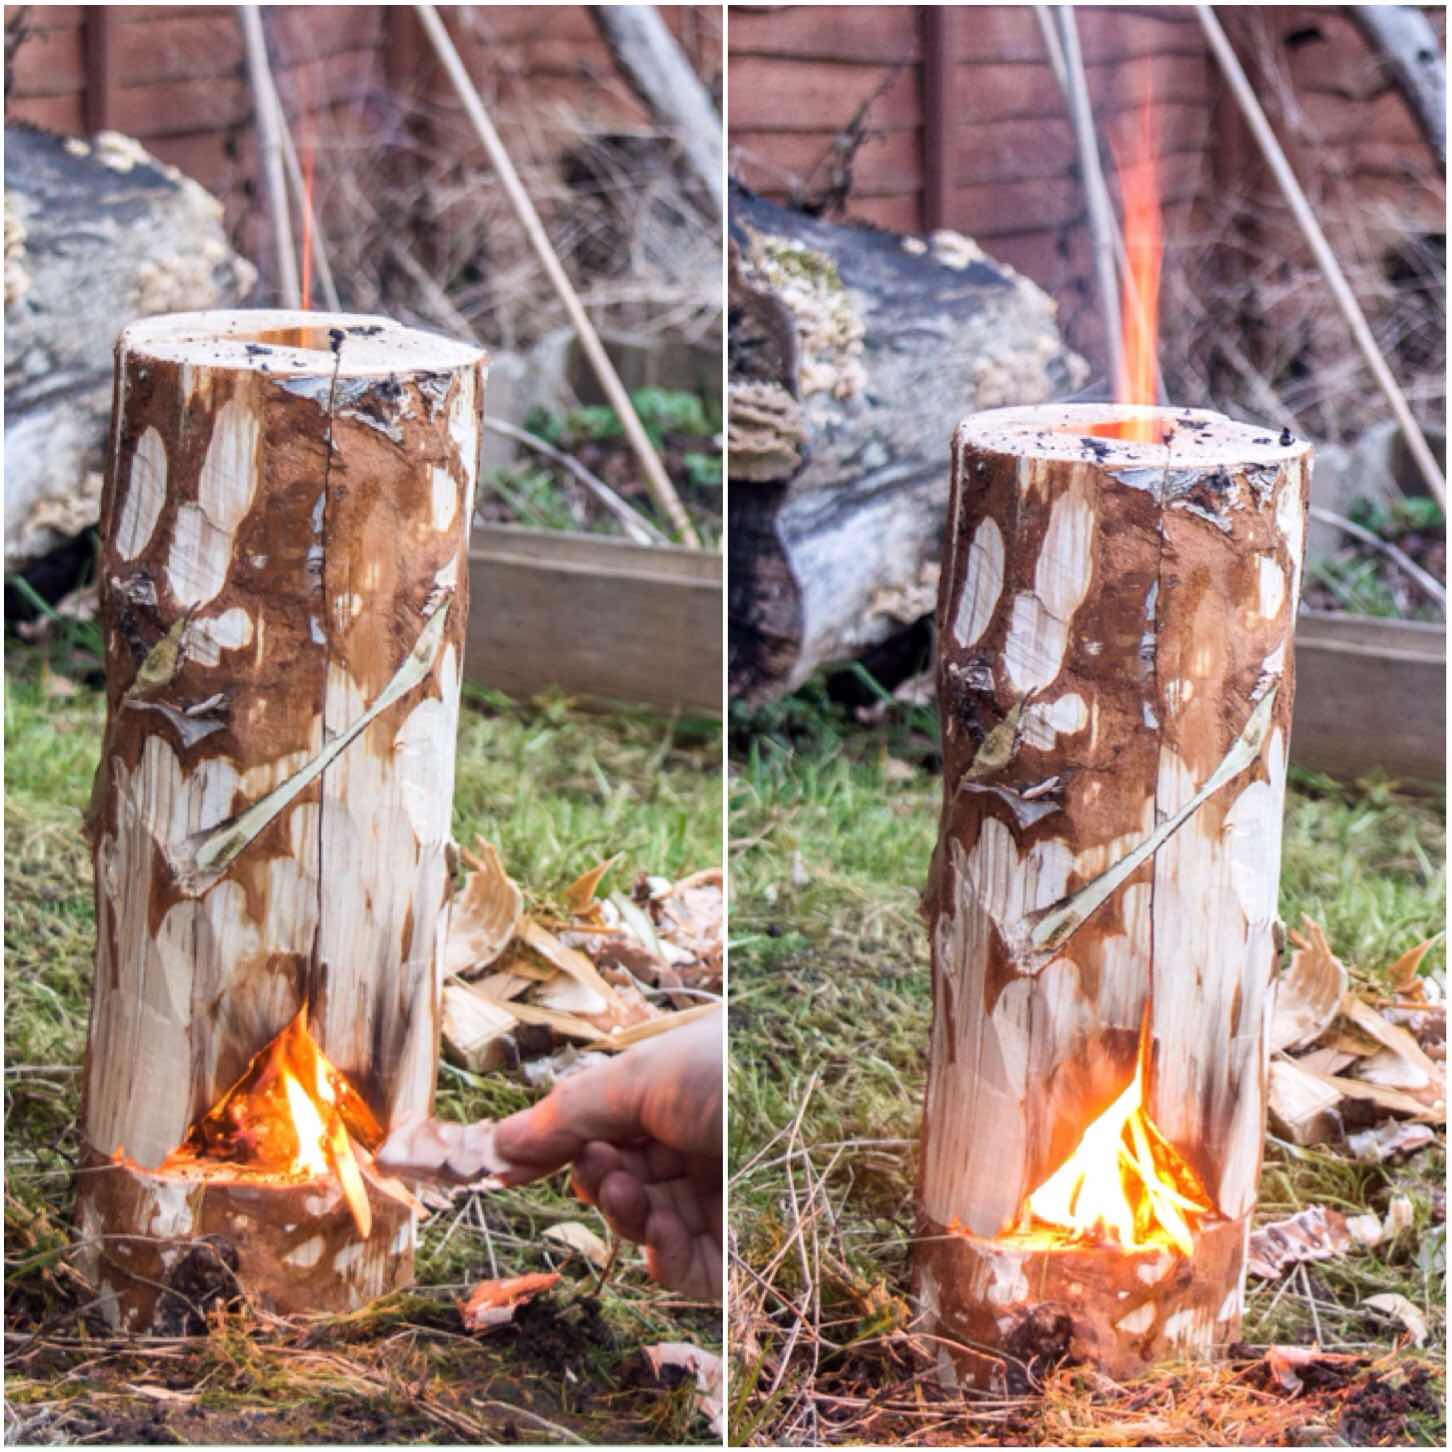
Firing Up
I lit the stove with some Vaseline-soaked cotton wool balls (which I always carry with me) because everything was so damp. The wind was non existent that day so it took me a while to get the stove going well.
Normally these stoves fire up really easily when there’s a little bit of wind to create the rocket effect up through the chimney
Firing up and drying out
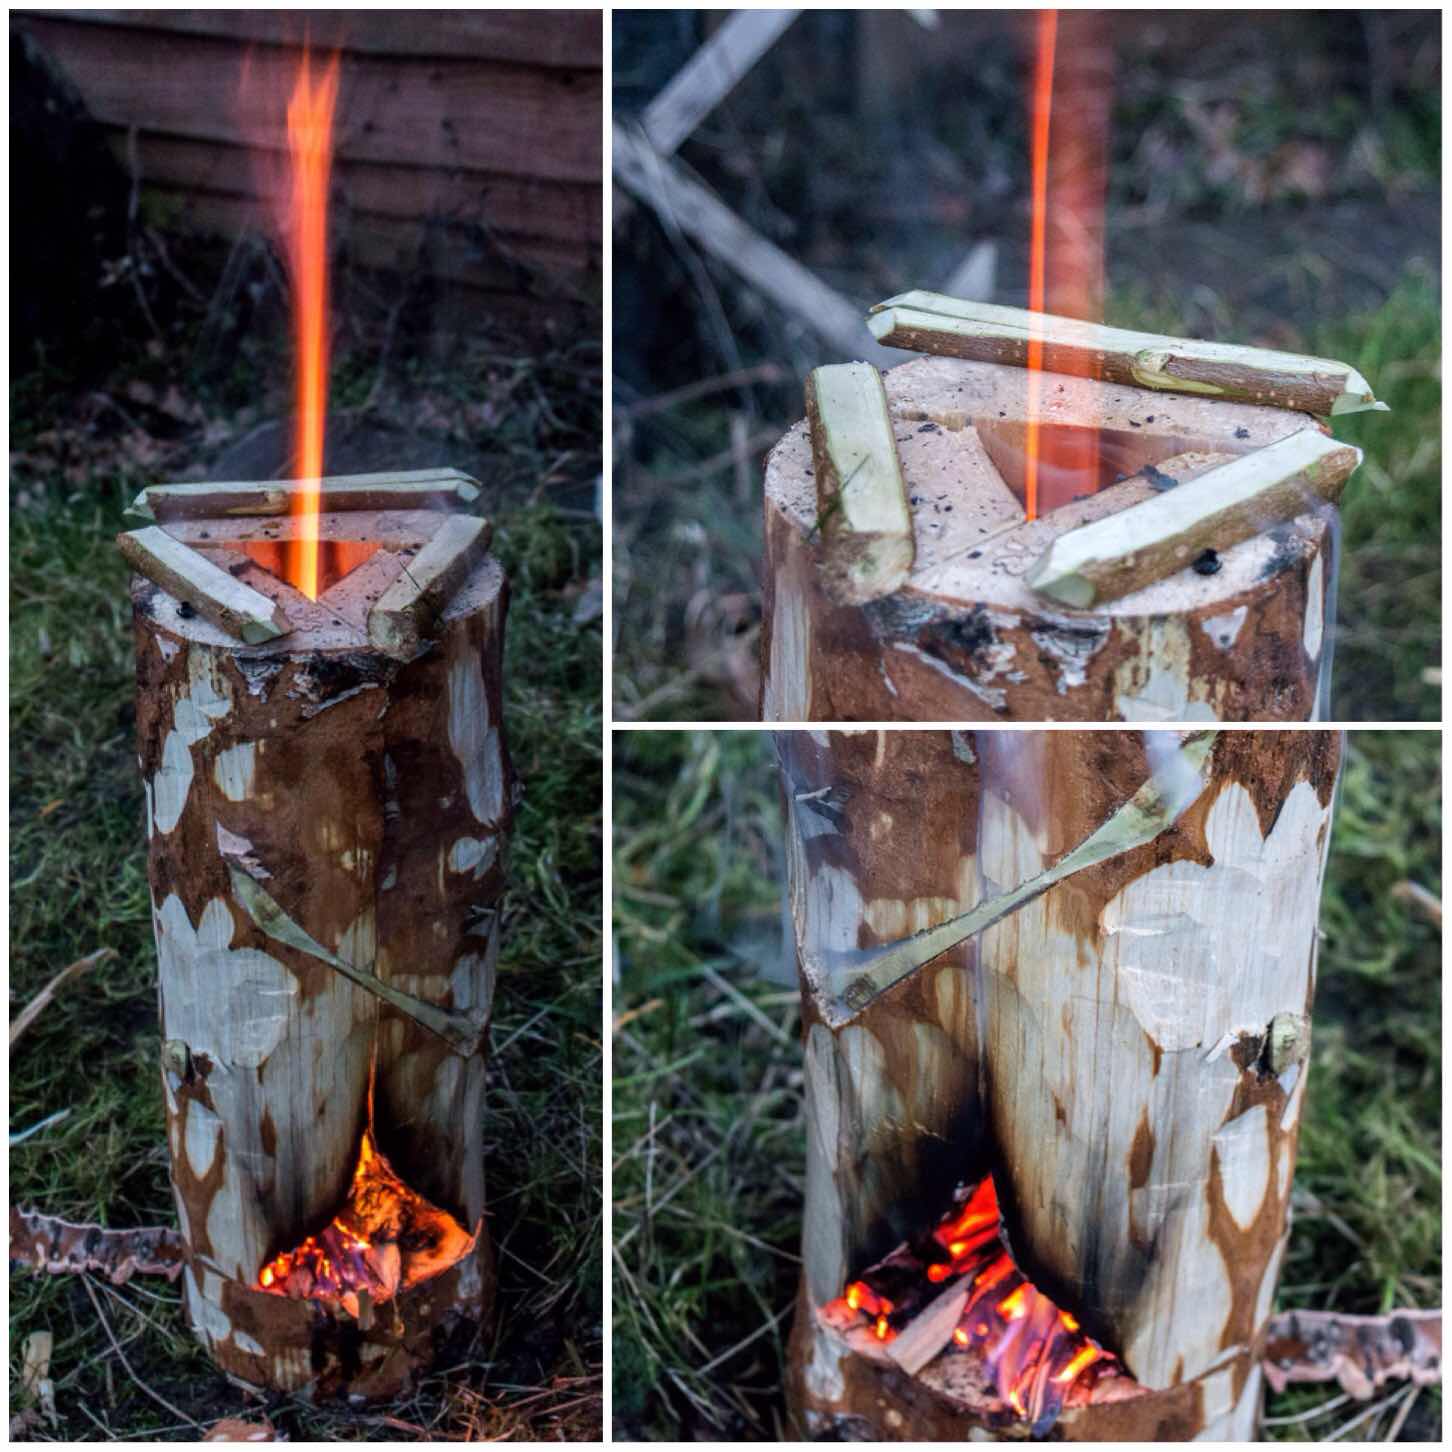
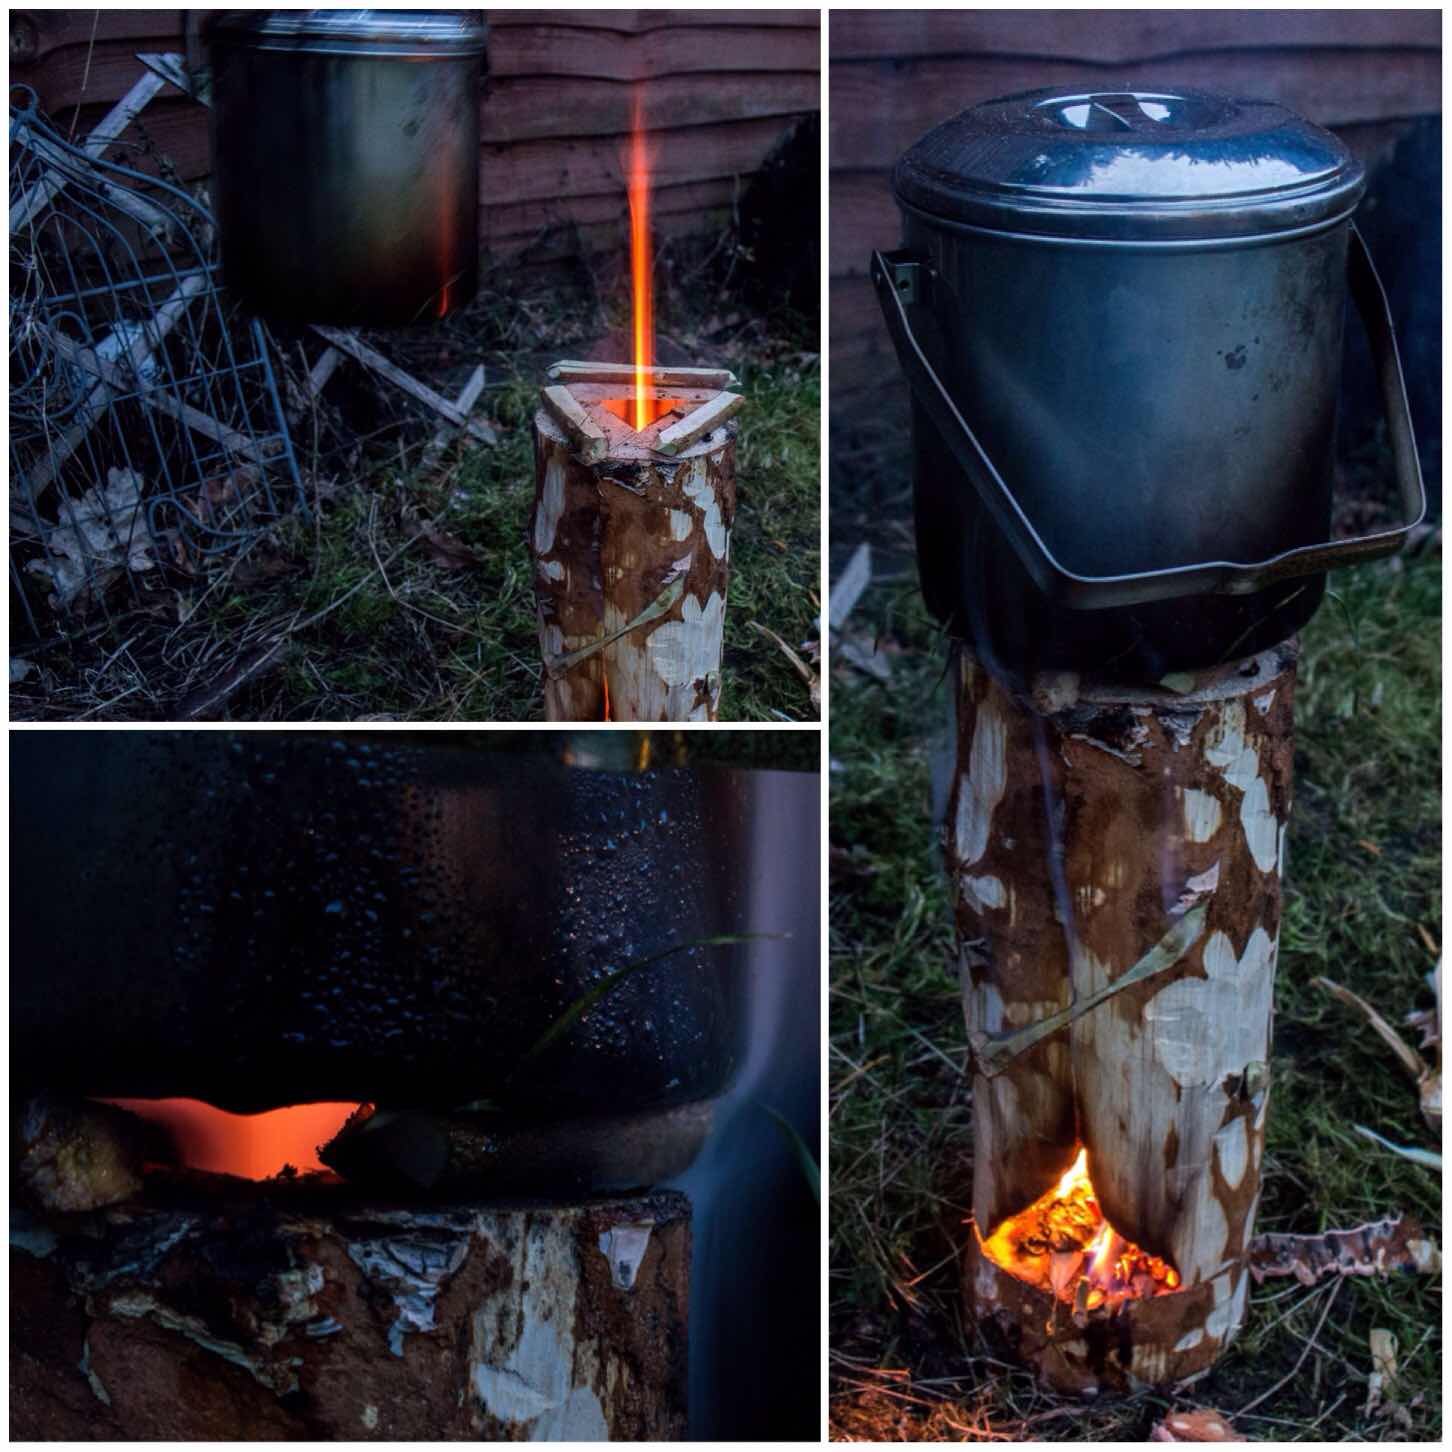
Eventually the rocket effect started and I placed three pieces of green wood onto the top for my pot to sit on. These were fairly thin pieces but would last long enough to boil some water. Have a few pieces spare on standby though if needed.
Green wood pot stand
Once the pot was on (about 10 minutes after initial burn) I needed to keep popping small pieces of wood into the fire box to keep the fire going. If your wood is really dry or resinous (like spruce or pine) you may not need to keep tending the fire as the internal walls of the chimney will probably be well lit.
Now it is a stove
It took me just under 15 minutes to boil this pot of water (enough for approx 3 cups of coffee) and the dovetail joints remained strong throughout.
Roaring
After 45 minutes the first of the joints burnt through however the stove remained standing until it burnt out. Due to the lack of wind the majority of the wood did not burn through.
I made this short video of another Dovetail Log Rocket Stove to show it in action.
I like to experiment with log rocket stoves and this reliance on using string or wire to hold them together (although you can dig the segments of some types directly into soft ground) has always bugged me.
This Schwedenfeuer type of stove lends itself well to the dovetail joints I think, and once you have practised making a couple you will be able to knock together a stove very quickly with just natural materials.
As usual I am open to ideas and suggestions on creating more log rocket stoves and Scandinavian candles. If you have not seen my other posts on this subject have a look at my summary post on this subject titled – Candles, Rockets and Long Fires.
For a while now I have been making Log Rocket Stoves in different ways.
The ones I make in the workshop are easy as all you require is a drill however if you make one in the woods things become more complex. A common theme about these woodland Log Rocket Stoves is that you need something like string or wire to hold everything together.
I thought about this a lot recently and came up with this adaptation of the Log Rocket Stove using green wood dovetail joints.
I will post a full step by step tutorial in the near future in my How To…. section.
Ok, I know it is supposed to be one picture every week however I thought I needed to zoom in on this one a bit more so I added another for detail.
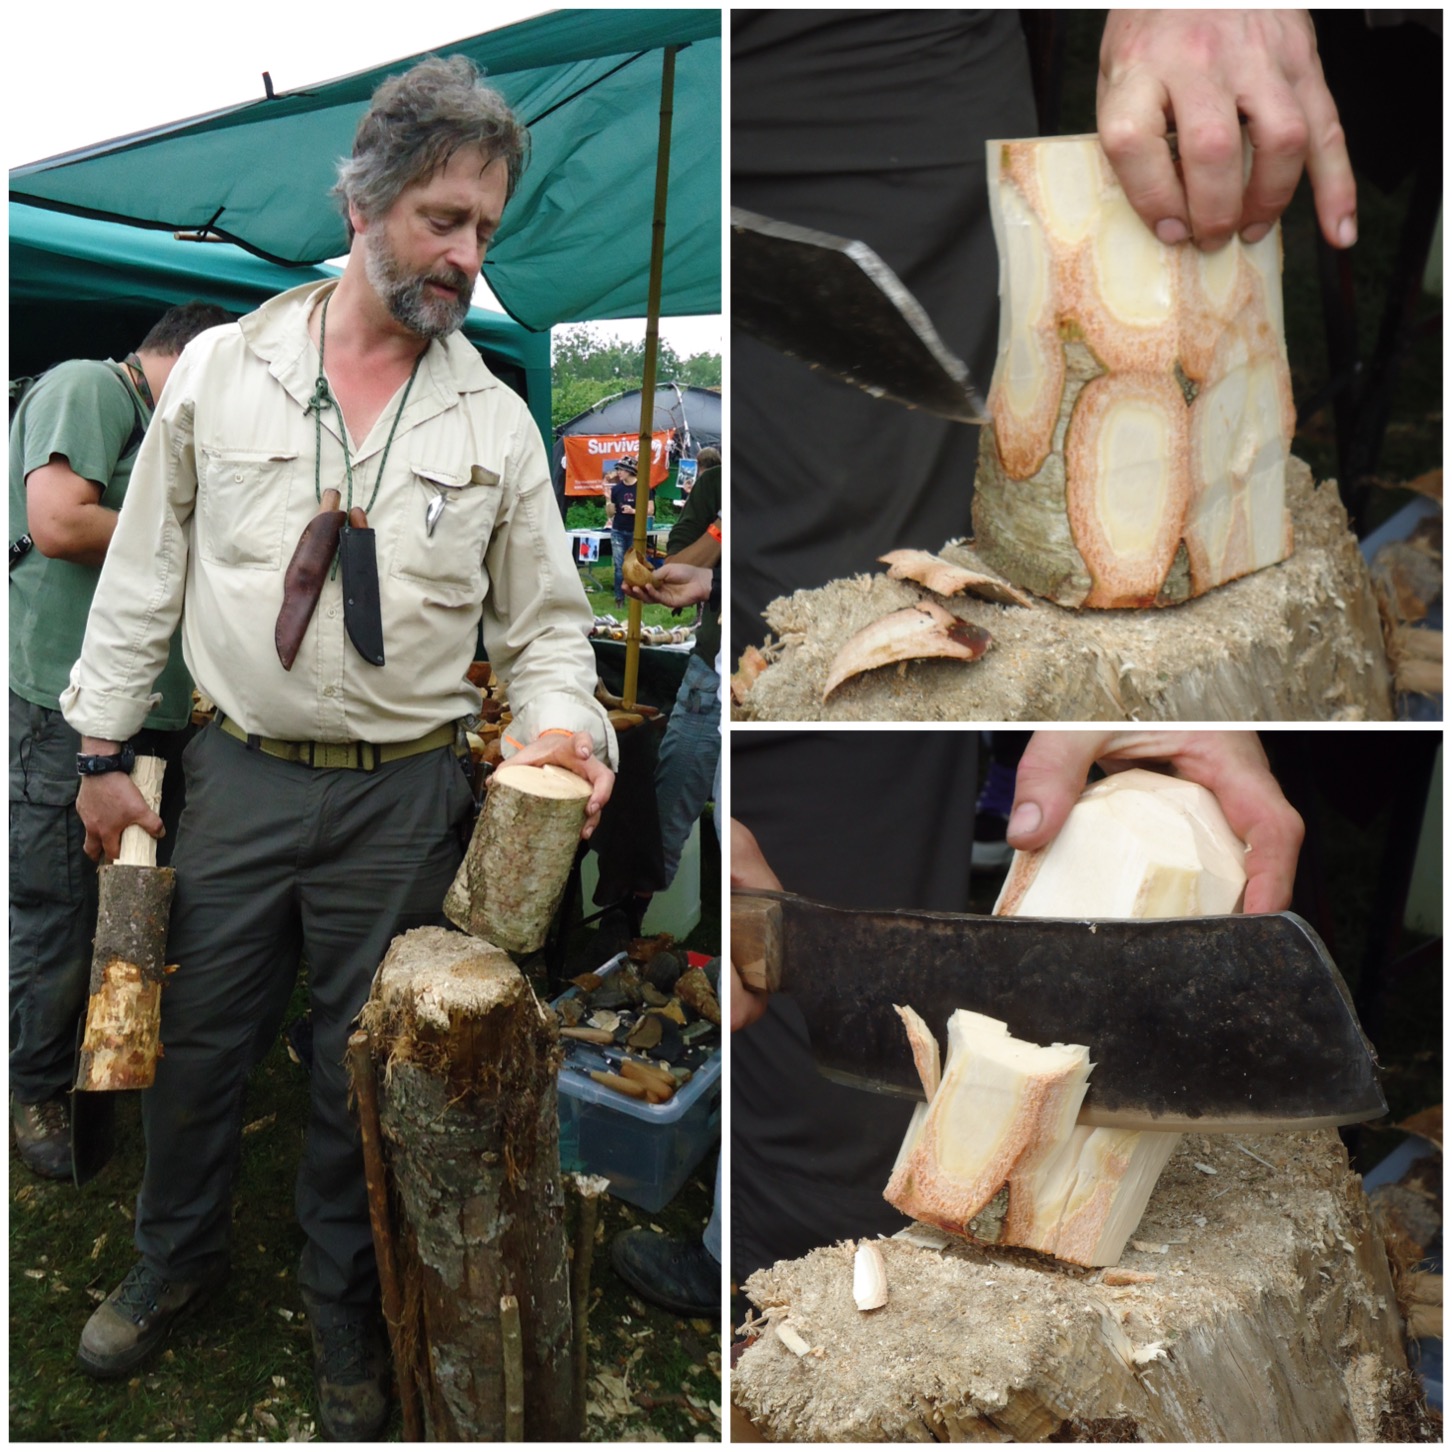
Many of you know I love to tinker with log rocket stoves so today found me once again working on another design.
Dovetail Log Rocket Stove
I came across an old Swedish design for a log rocket called the Schwedenfeuer (Swedish fire) however like many other log rockets all the parts were held together with wire. As these stoves are supposed to date back to at least the middle ages they had to be held together with something else then.
I came up with the idea to use green wood wedges carved into the stove in a dovetail fashion. They worked perfectly, I got my coffee made and also a video (to follow). I will also be popping a How To…. blog post soon to show how to make one.
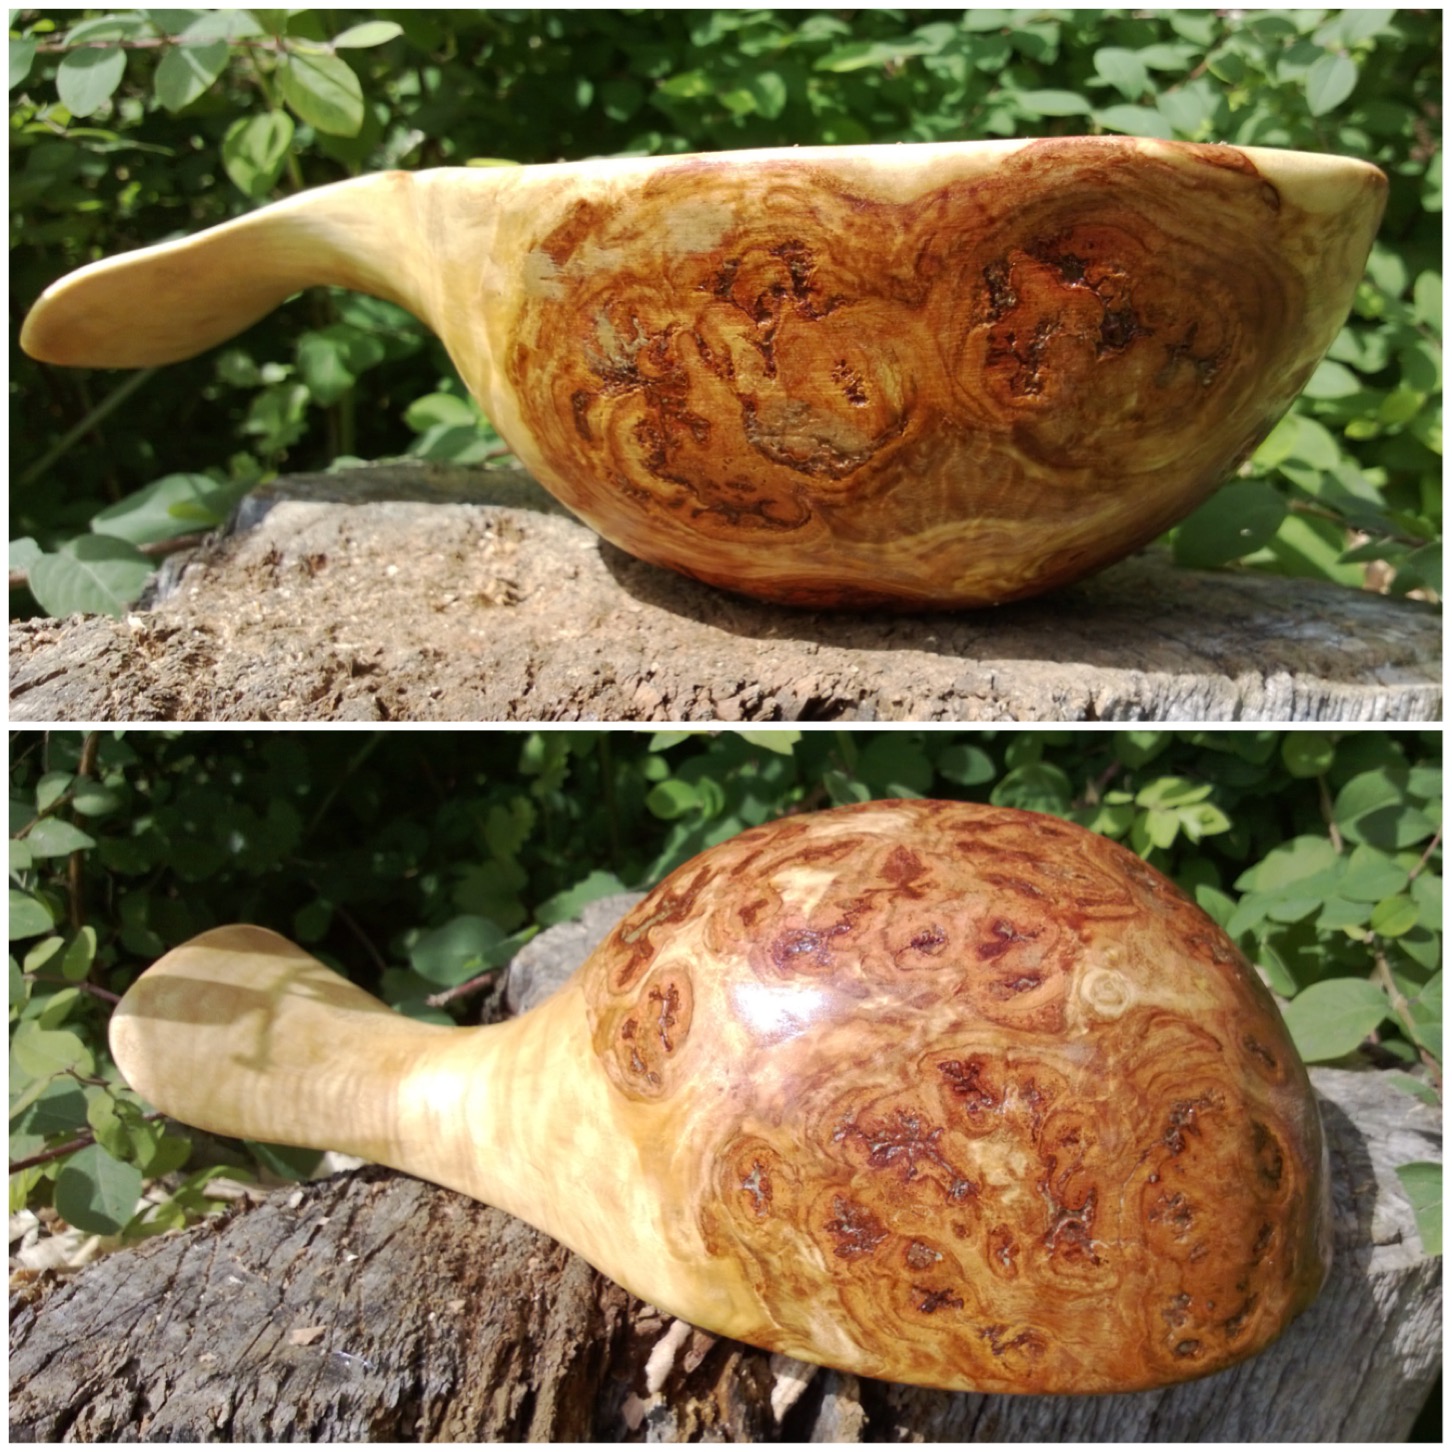
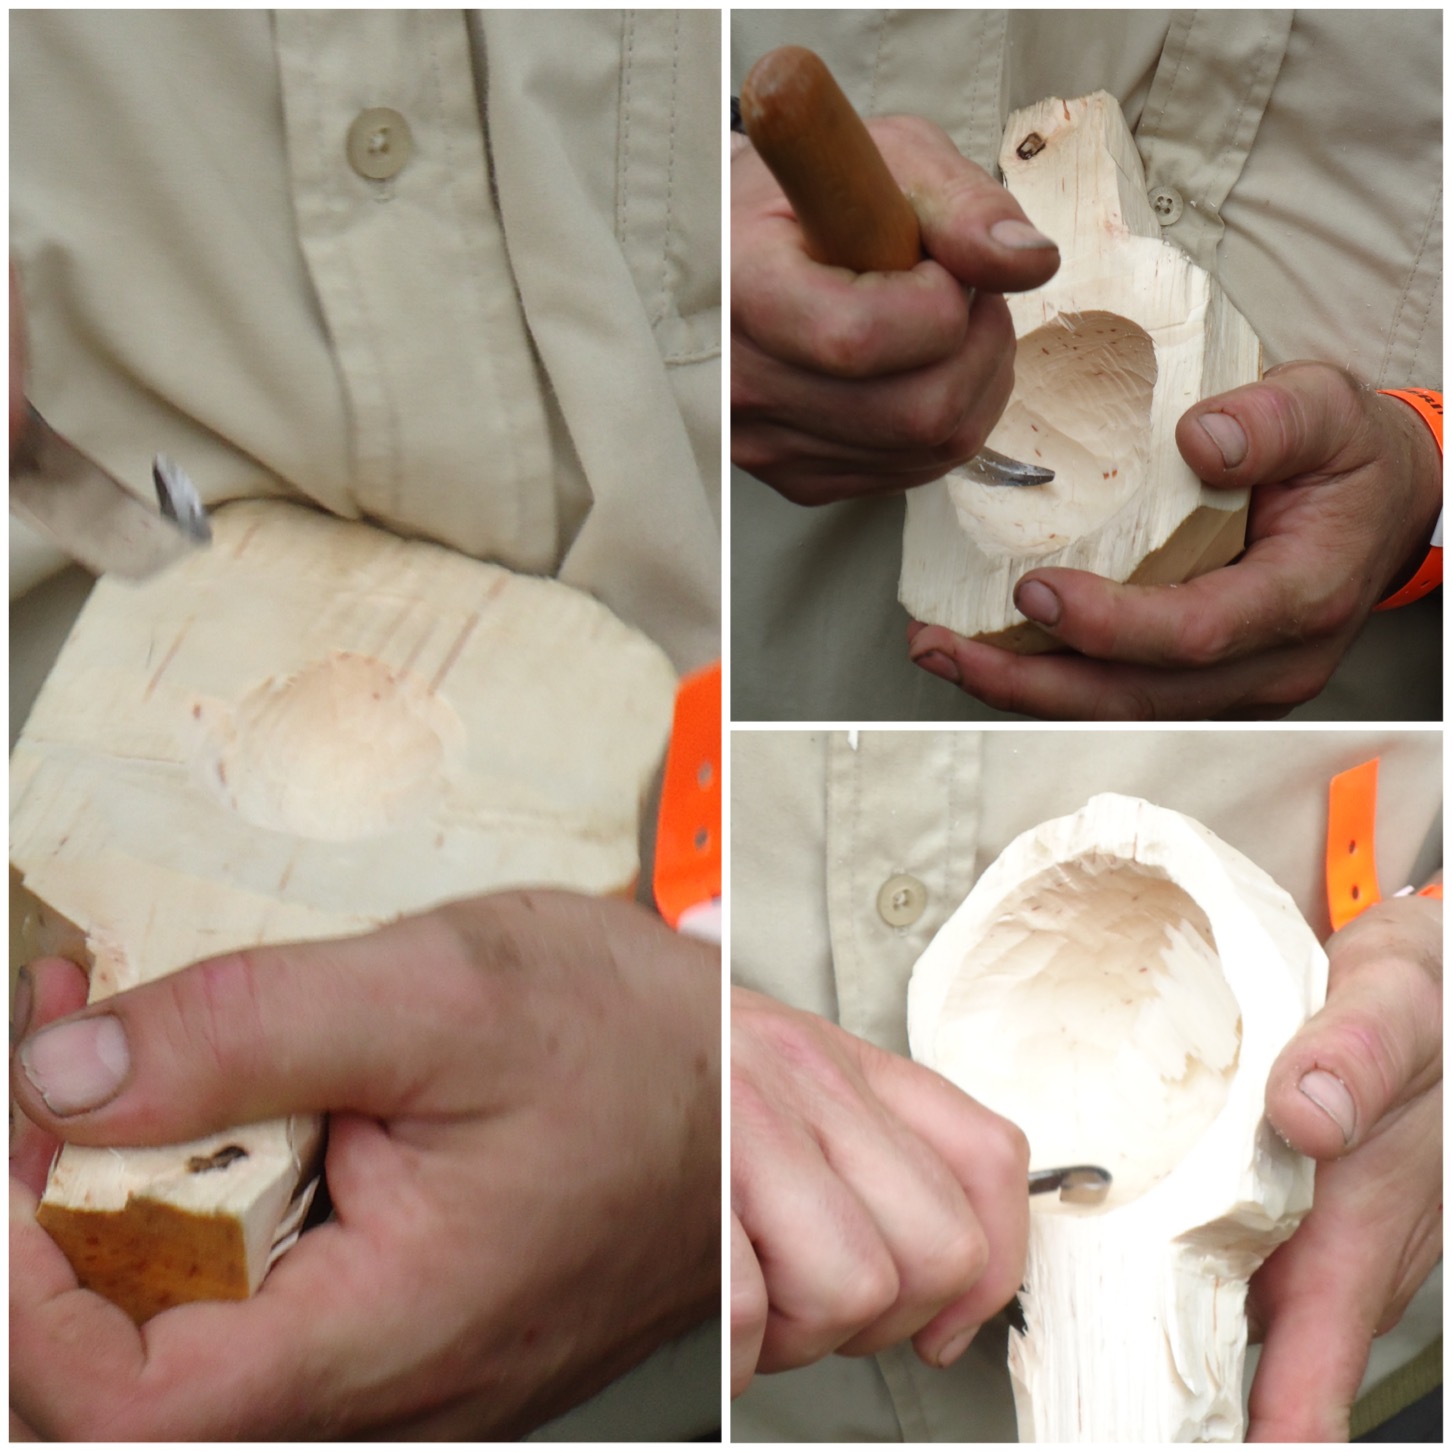
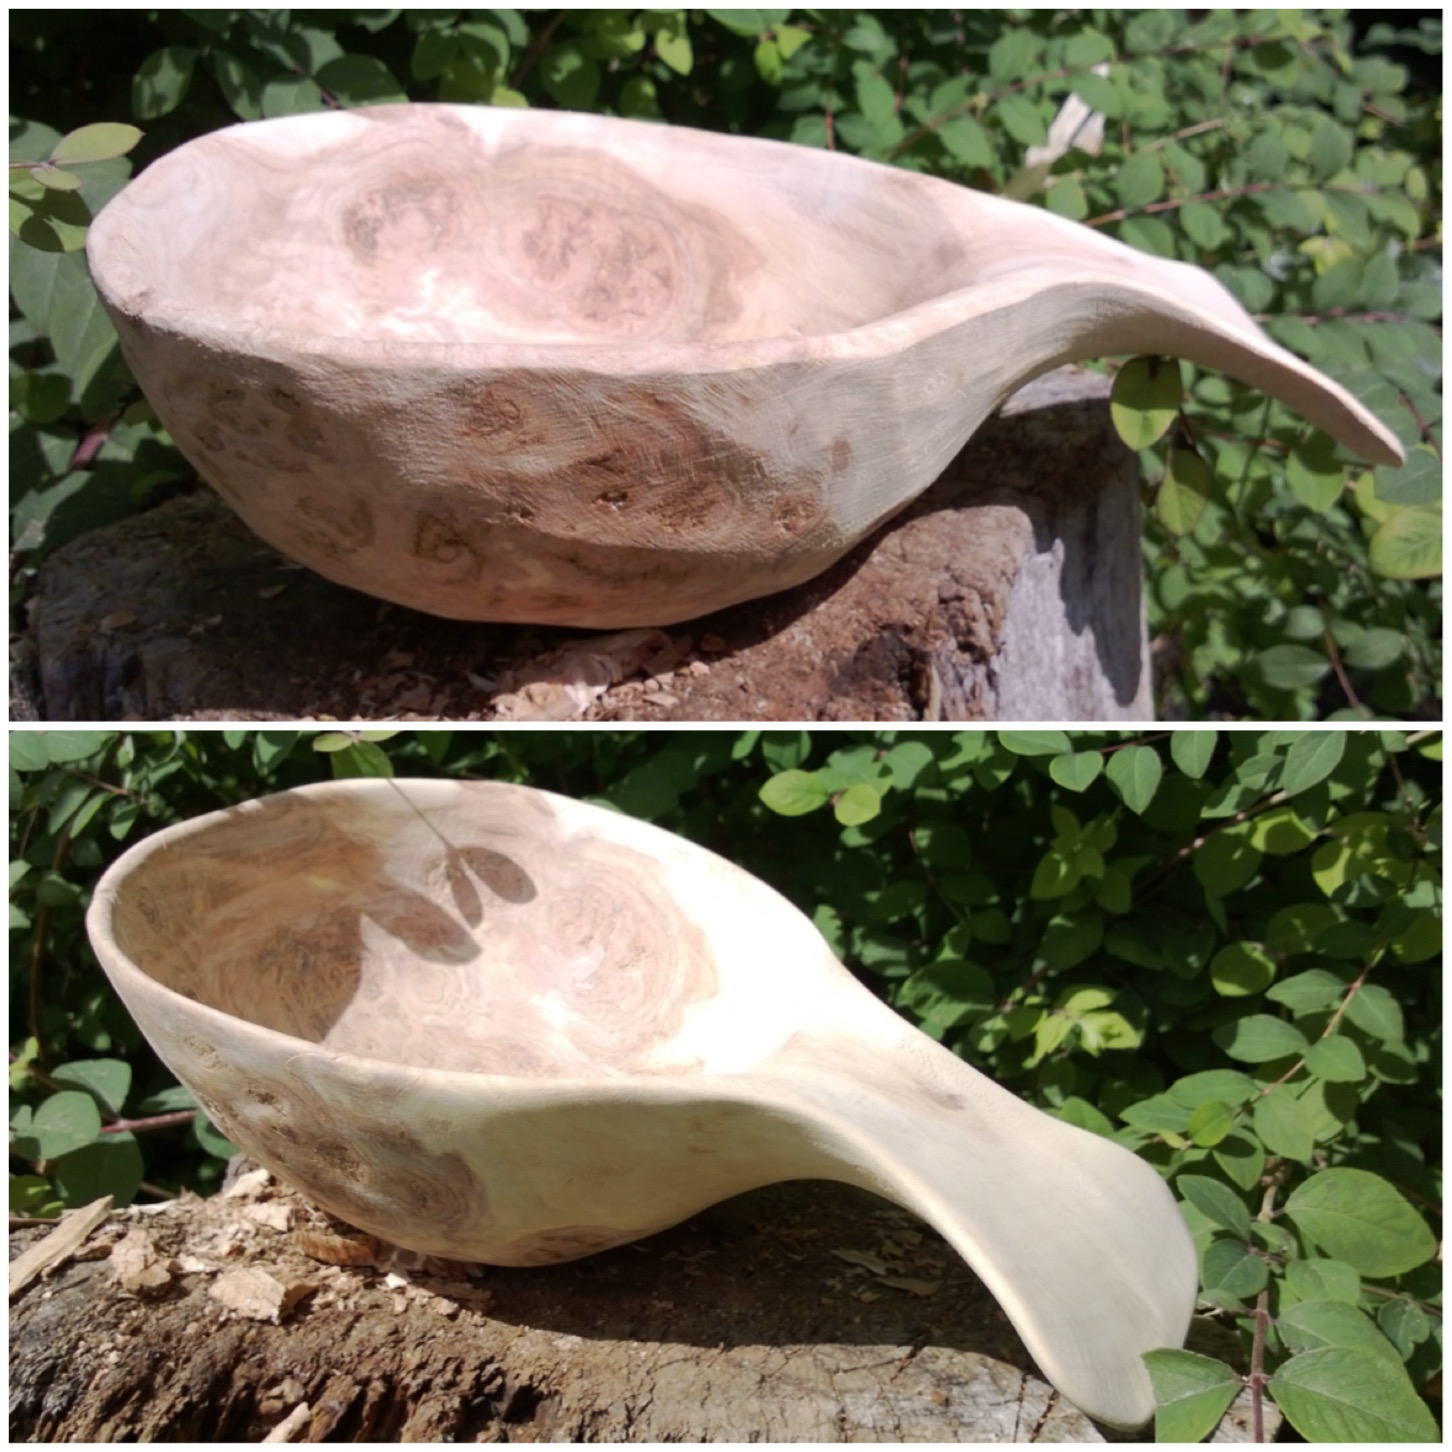
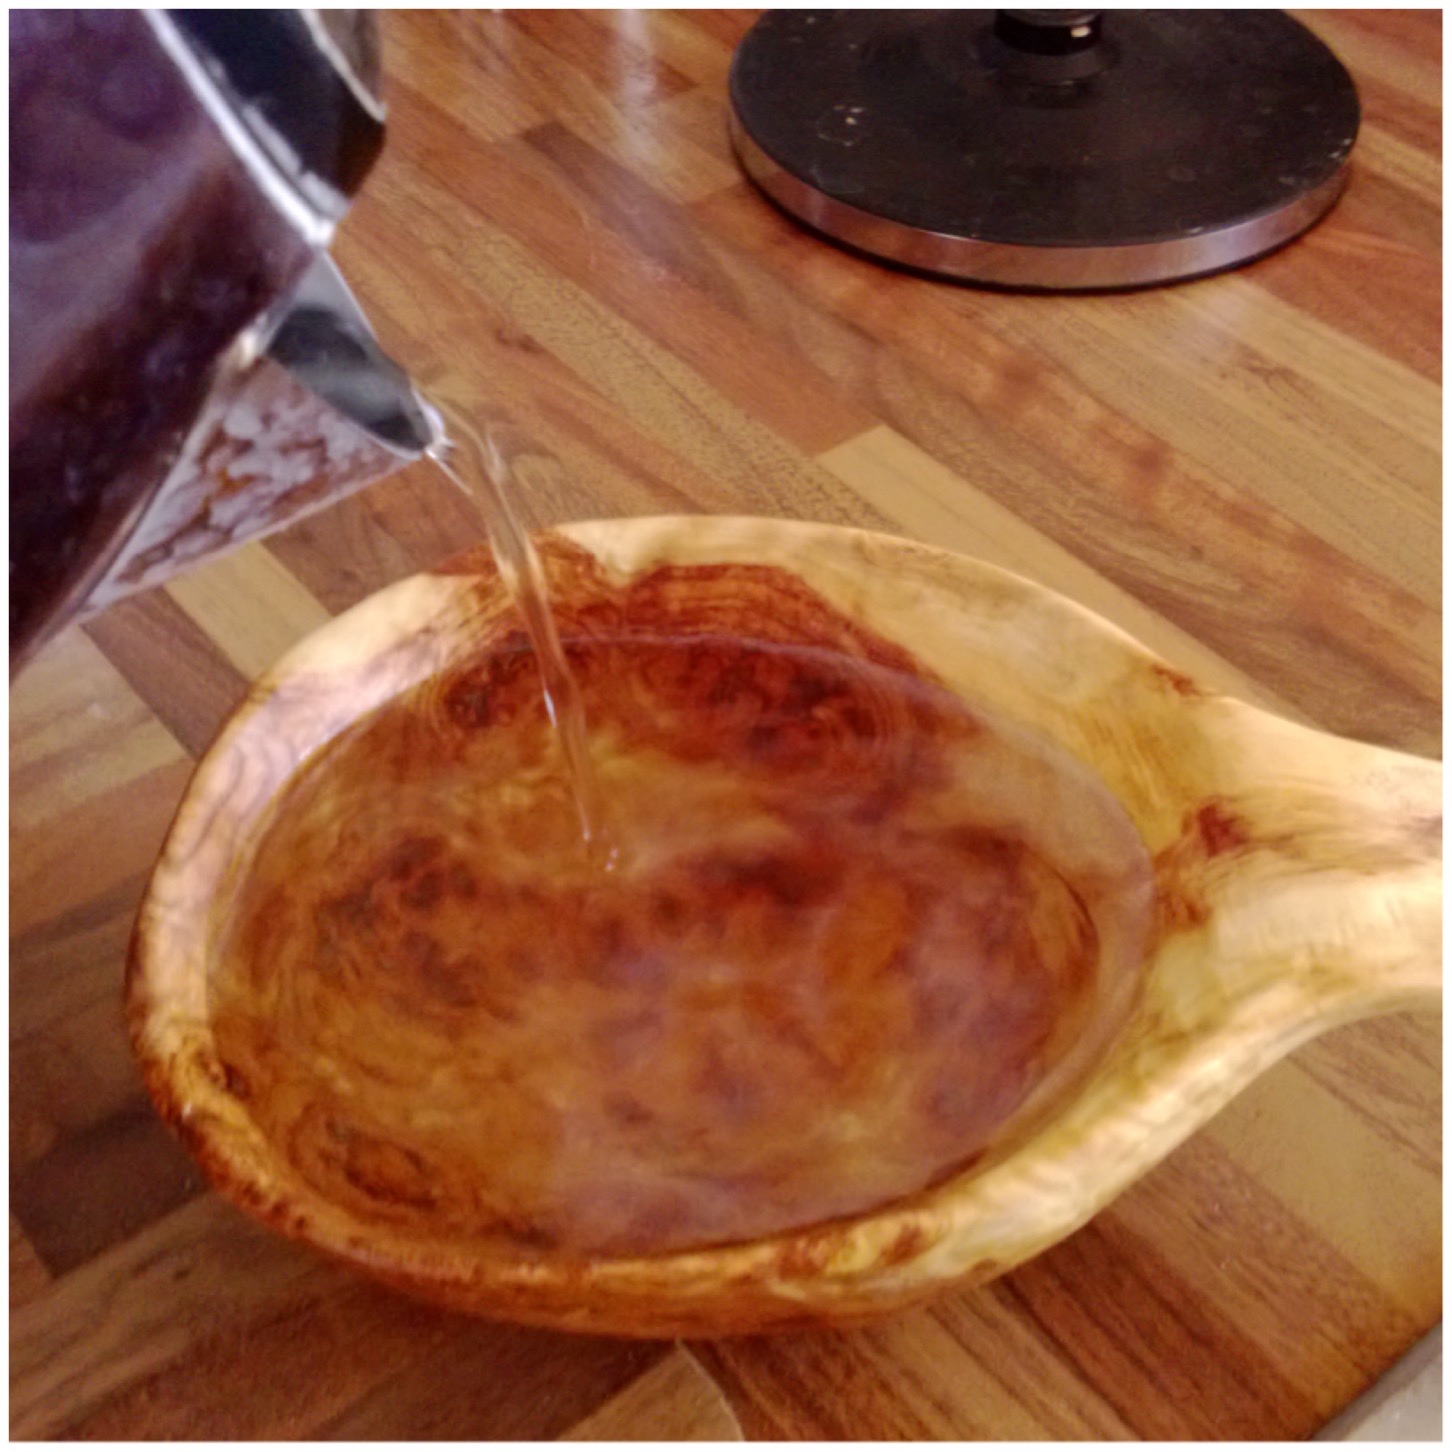
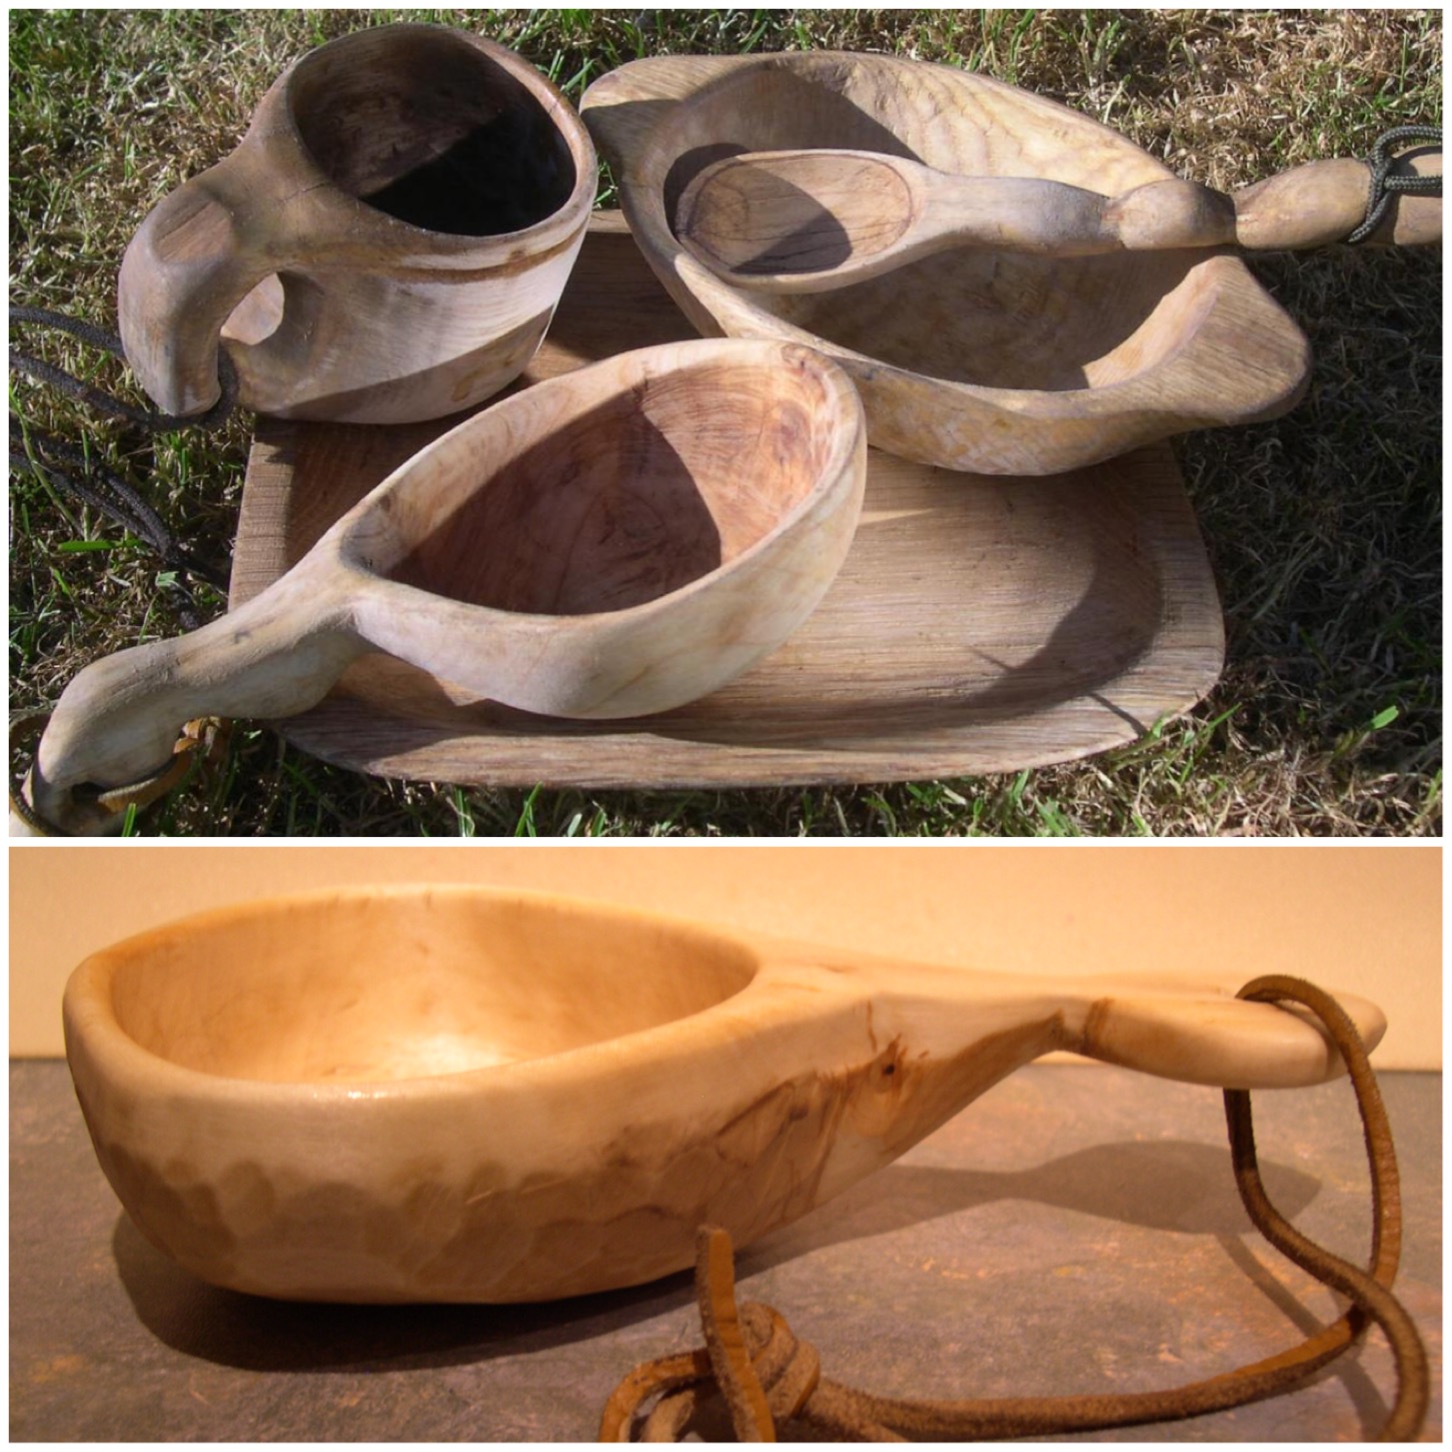
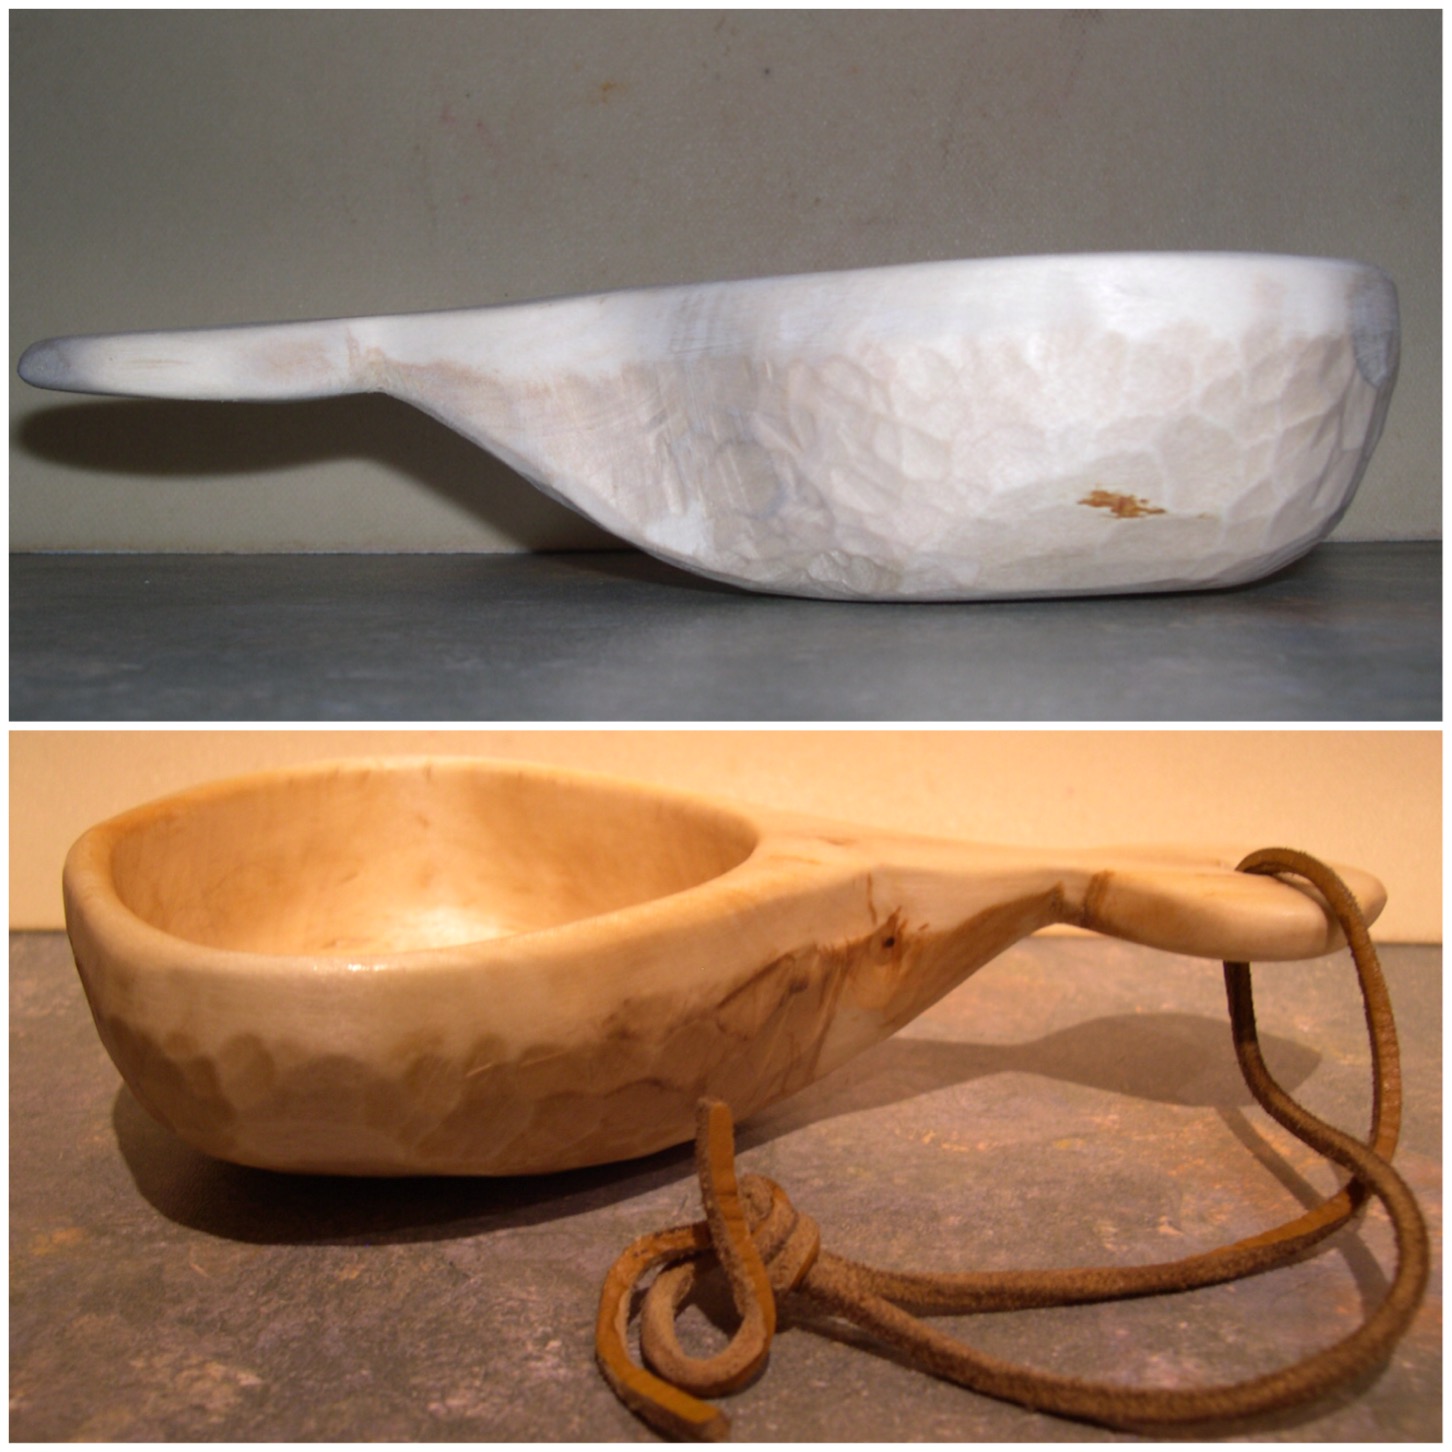
I came across a fallen hornbeam tree one day while teaching my Sea Cadets some map reading. Attached to it was a burl that produced this beautifully swirled kuksa cup.
My kuksa
Before I could drink out of my new kuksa I had to sort the small matter of carving it. As I explained in my previous How To… on Carving a Small Noggin cup the name kuksa (also known as kåsa in Sweden) is probably not the correct term for the cup as it was not carved in a Scandinavian country by the Sami peoples. Also it was not carved out of a birch burl but I like the word kuksa and it was carved out of a hornbeam burl at least.
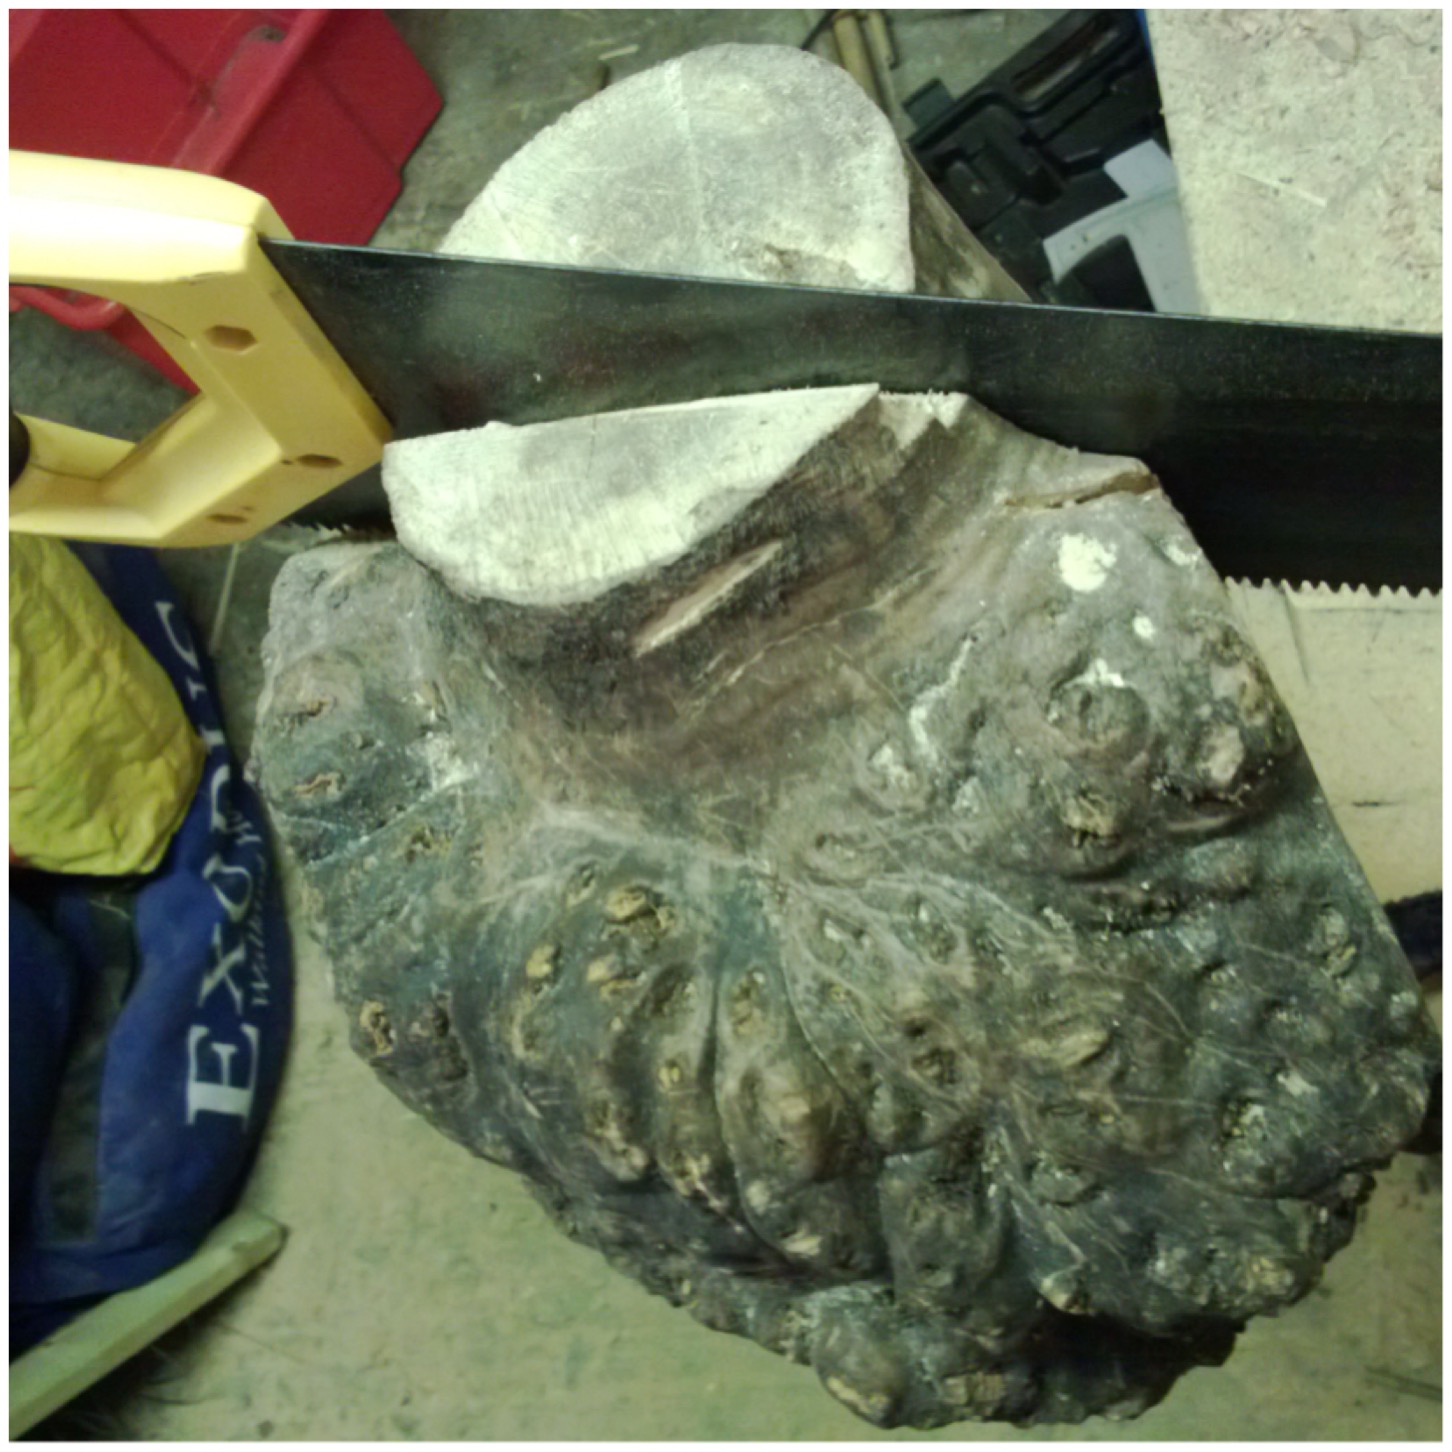
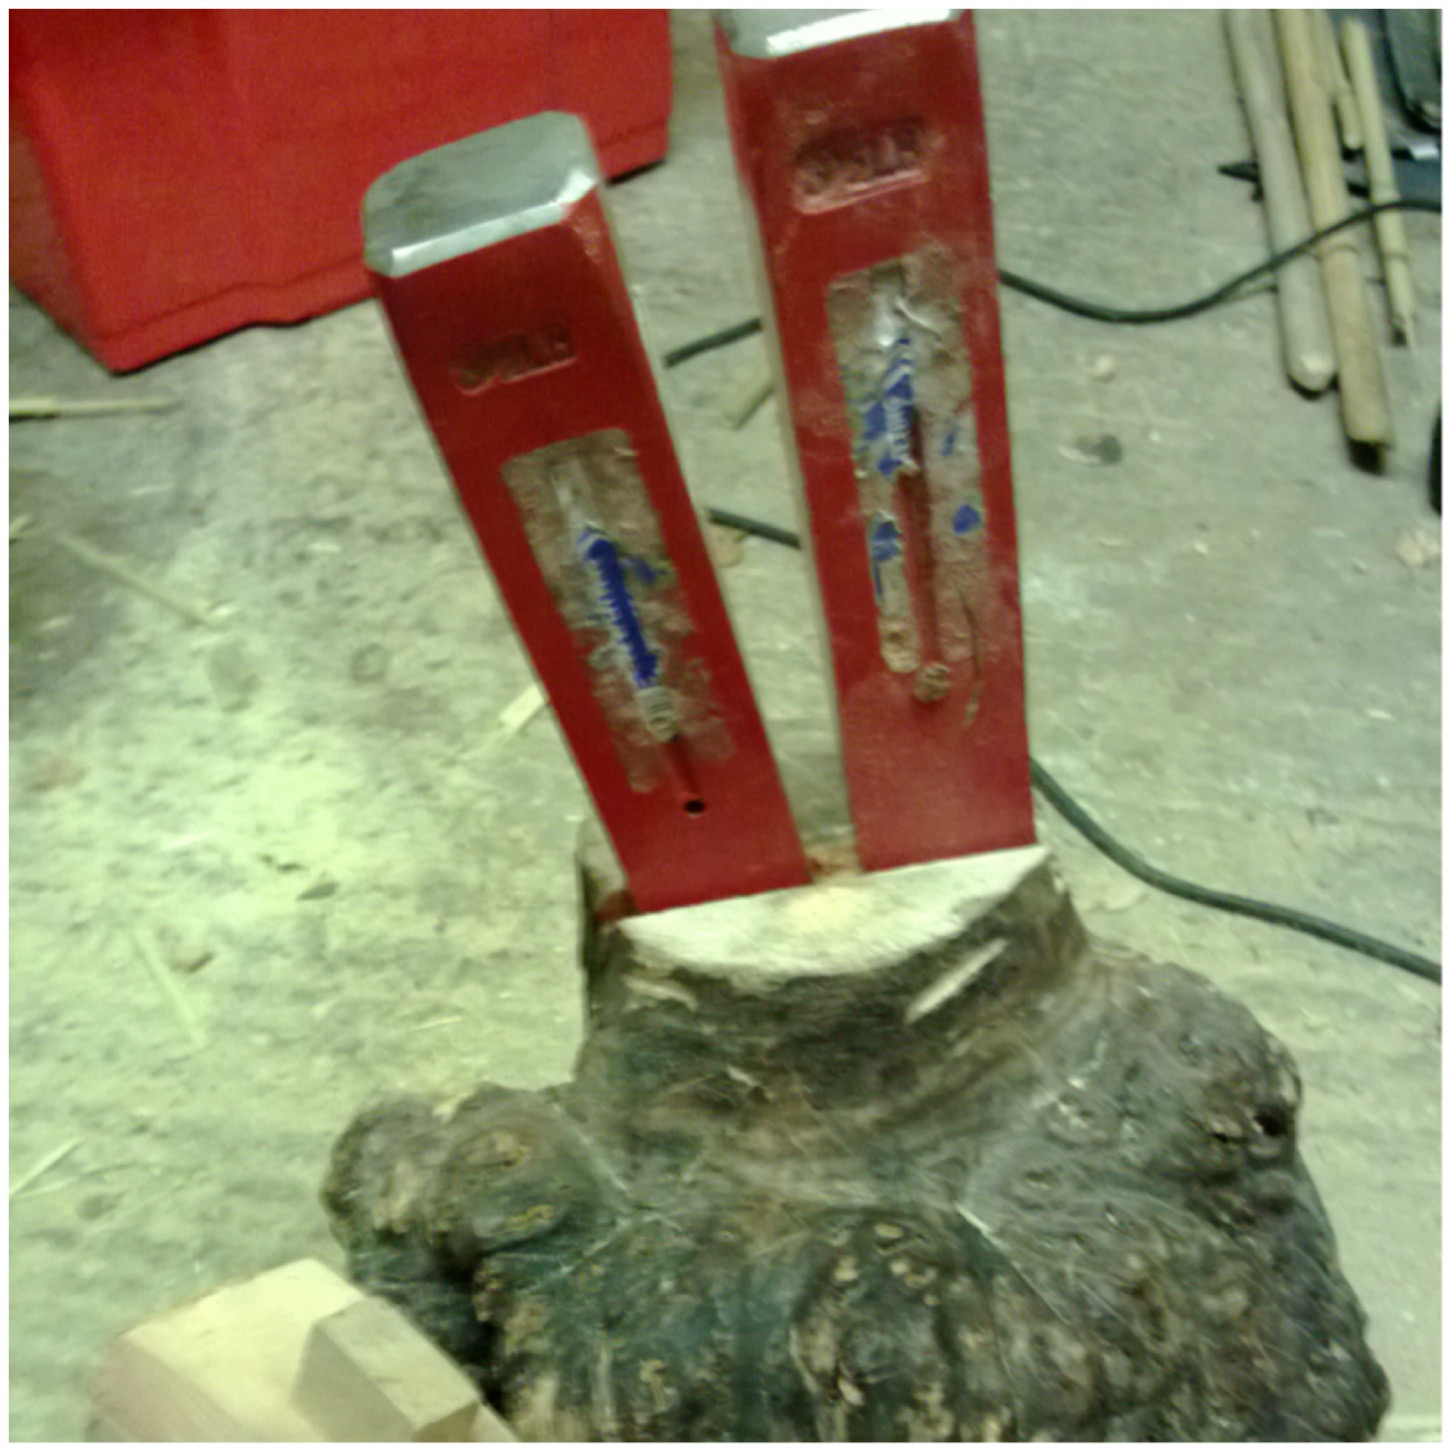
After cutting the burl section from the fallen tree I left it to season for 3 years in a cold but dry area (my garage).
I wanted to create a kuksa that had the swirl of the burl wood and the clean lines of the heart wood. I started trying to saw down the length of the heartwood but that proved too difficult for my hand saw.
Hornbeam Burl
In the end I inserted two of my log splitting wedges into the saw cut and hammered down on them with a wooden mallet.
Splitting out
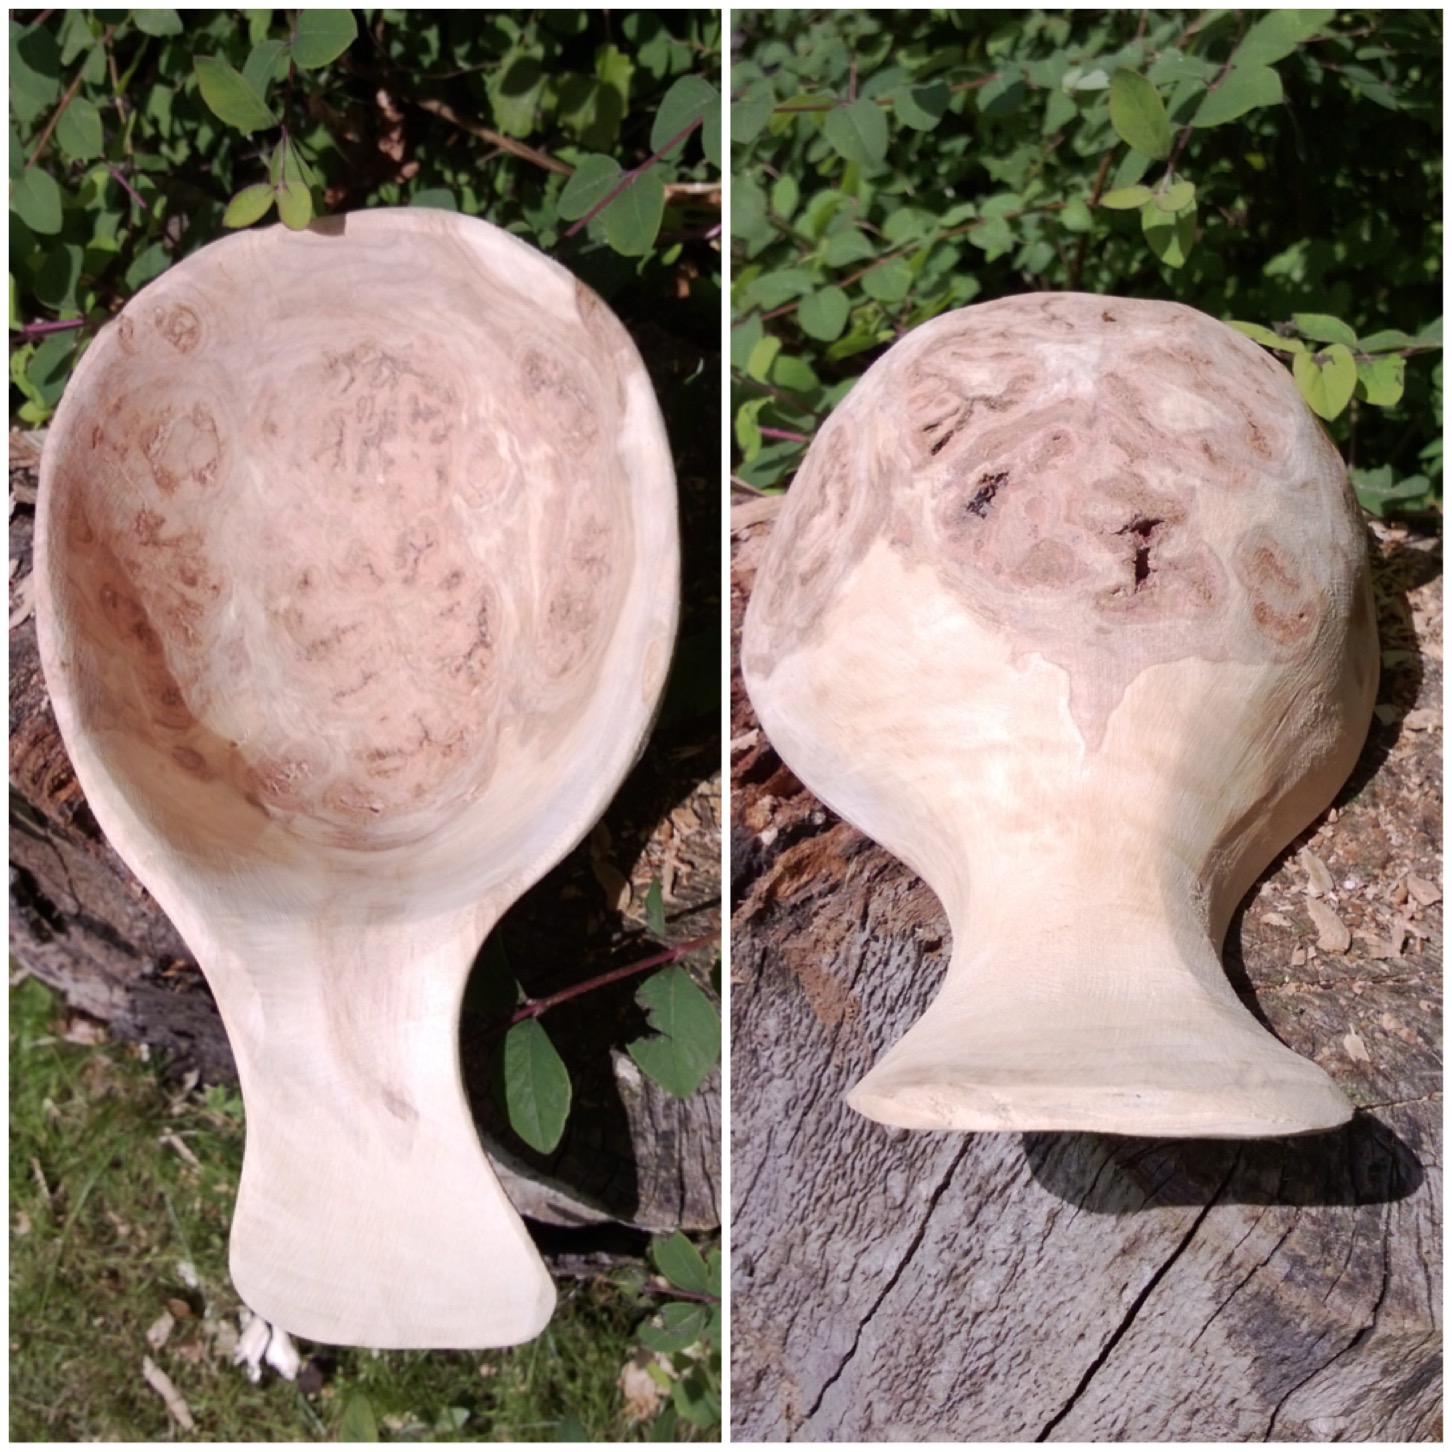
Thankfully they split cleanly leaving me a fairly smooth surface to start axing out the shape of the kuksa.
Dark wood of the burl
The heartwood was well seasoned and required quite a bit of axe work to get it down to the level I wanted.
Axing out the blank
I stopped axing out the top of the kuksa when I started to reach the burl wood but kept the heartwood for the handle. I was inspired by Jon Mac with his kuksa handle in the style of an otter’s tail and felt that the heartwood would prove a stronger option to the burl wood.
I drew out my general shape and used my saw again to cut off the excess on the sides. All the excess burl was carved later into either a quaich or a bowl.
Making most of the burl
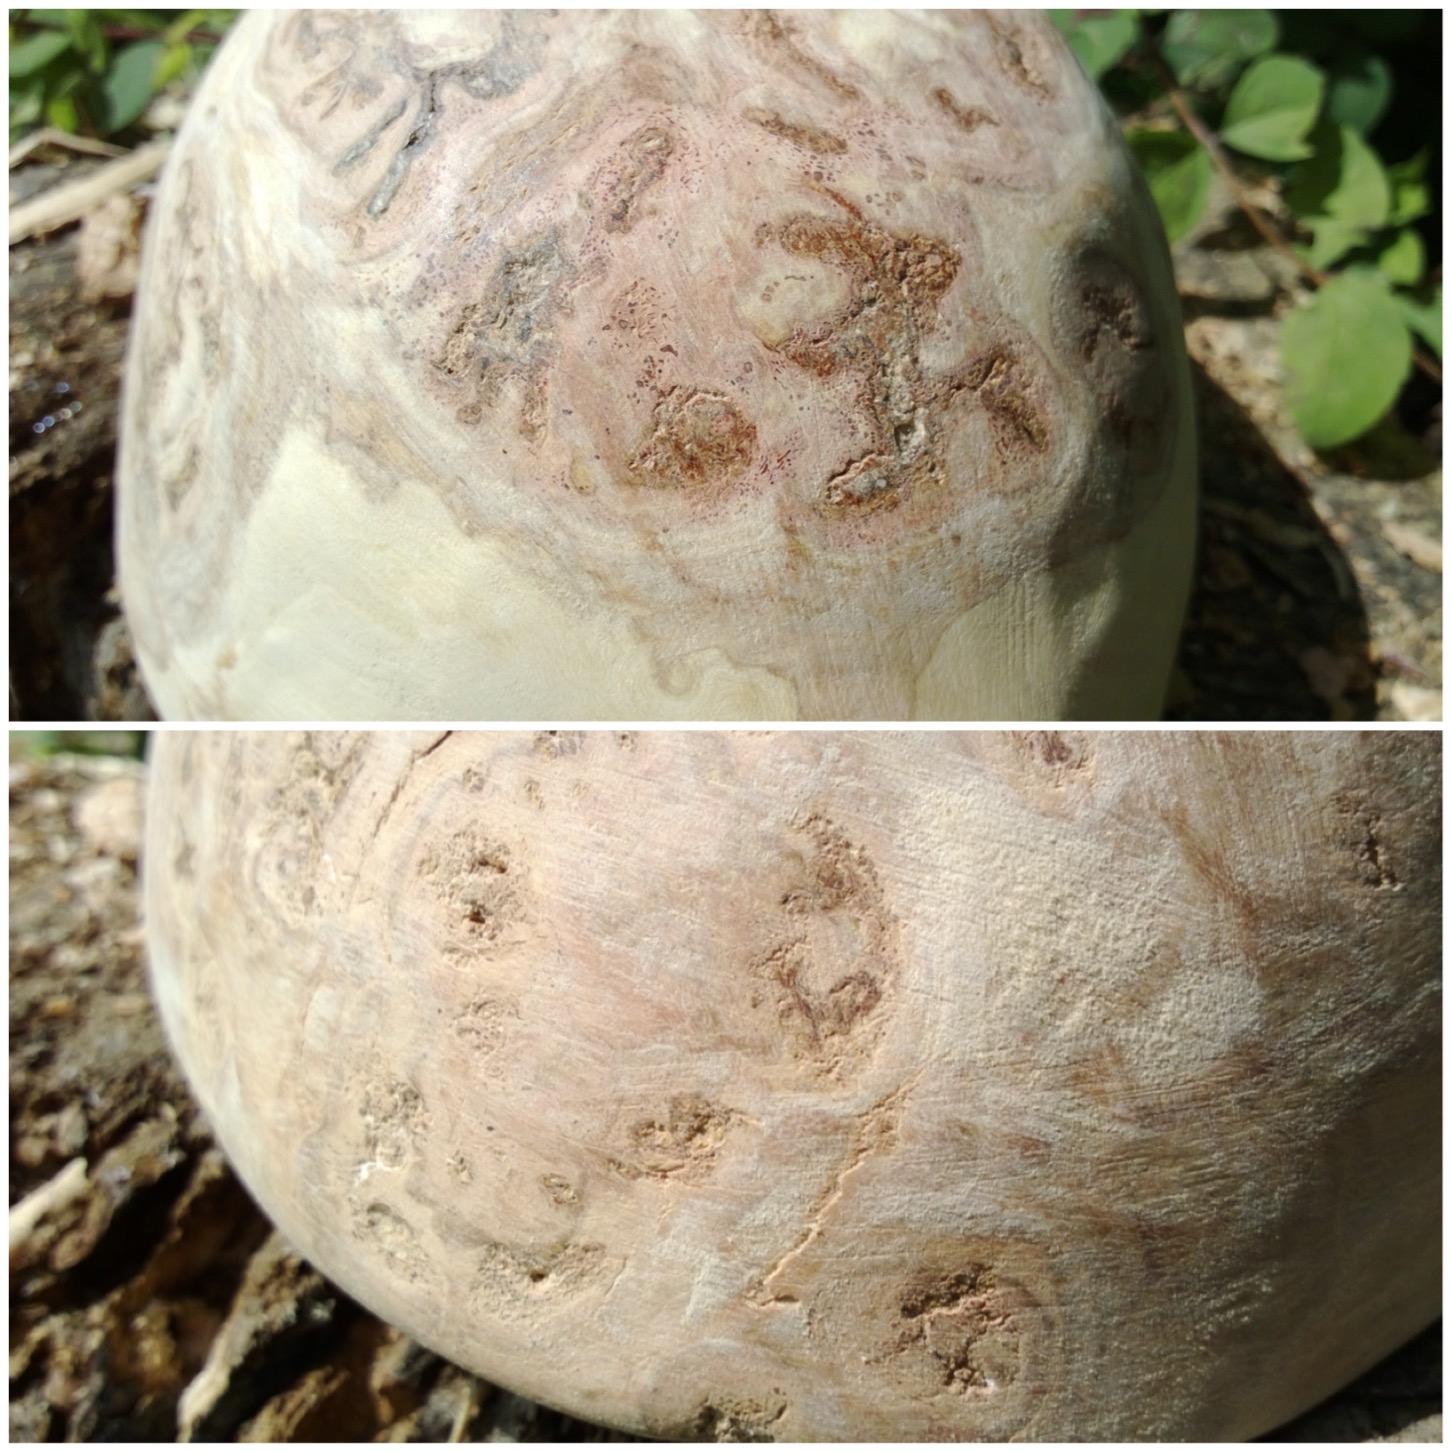
The burl was of a very good depth and even though there were some deep fissures I knew for once I would get a decent sized cup out of it.
Ready to carve the bowl
I did not take any pictures of me carving the bowl or shaping the kuksa as I was too busy carving and there was no one around to photograph for me.
I looked in my archive though and came across these pictures of the master craftsman John Arthur from the Woodlife Makers Guild at the 2011 Wilderness Gathering demonstrating how to quickly blank out a kuksa.
John Arthur – Master Wood Worker
After chopping out the basic shape, John used a saw to put some stop cuts in. Stop cuts allow you to remove wood from specific areas without any split running off into wood you want to keep (in this case the area that will become the bowl).
Stop cuts and blanking out the cup
Once John had the basic shape he used his crook knife to carve out the bowl. He kept the knife in his right hand and continually turned the kuksa to carve out the bowl.
Carving the bowl
Finally he used a small knife to shape the outside of the kuksa. He used a number of cutting styles cutting towards himself and away from himself but he was always in full control of the knife and soon had the basic shape of the kuksa made.
As this was green wood he then explained he would let it dry slowly over a number of weeks before finishing it off.
Deft knife work
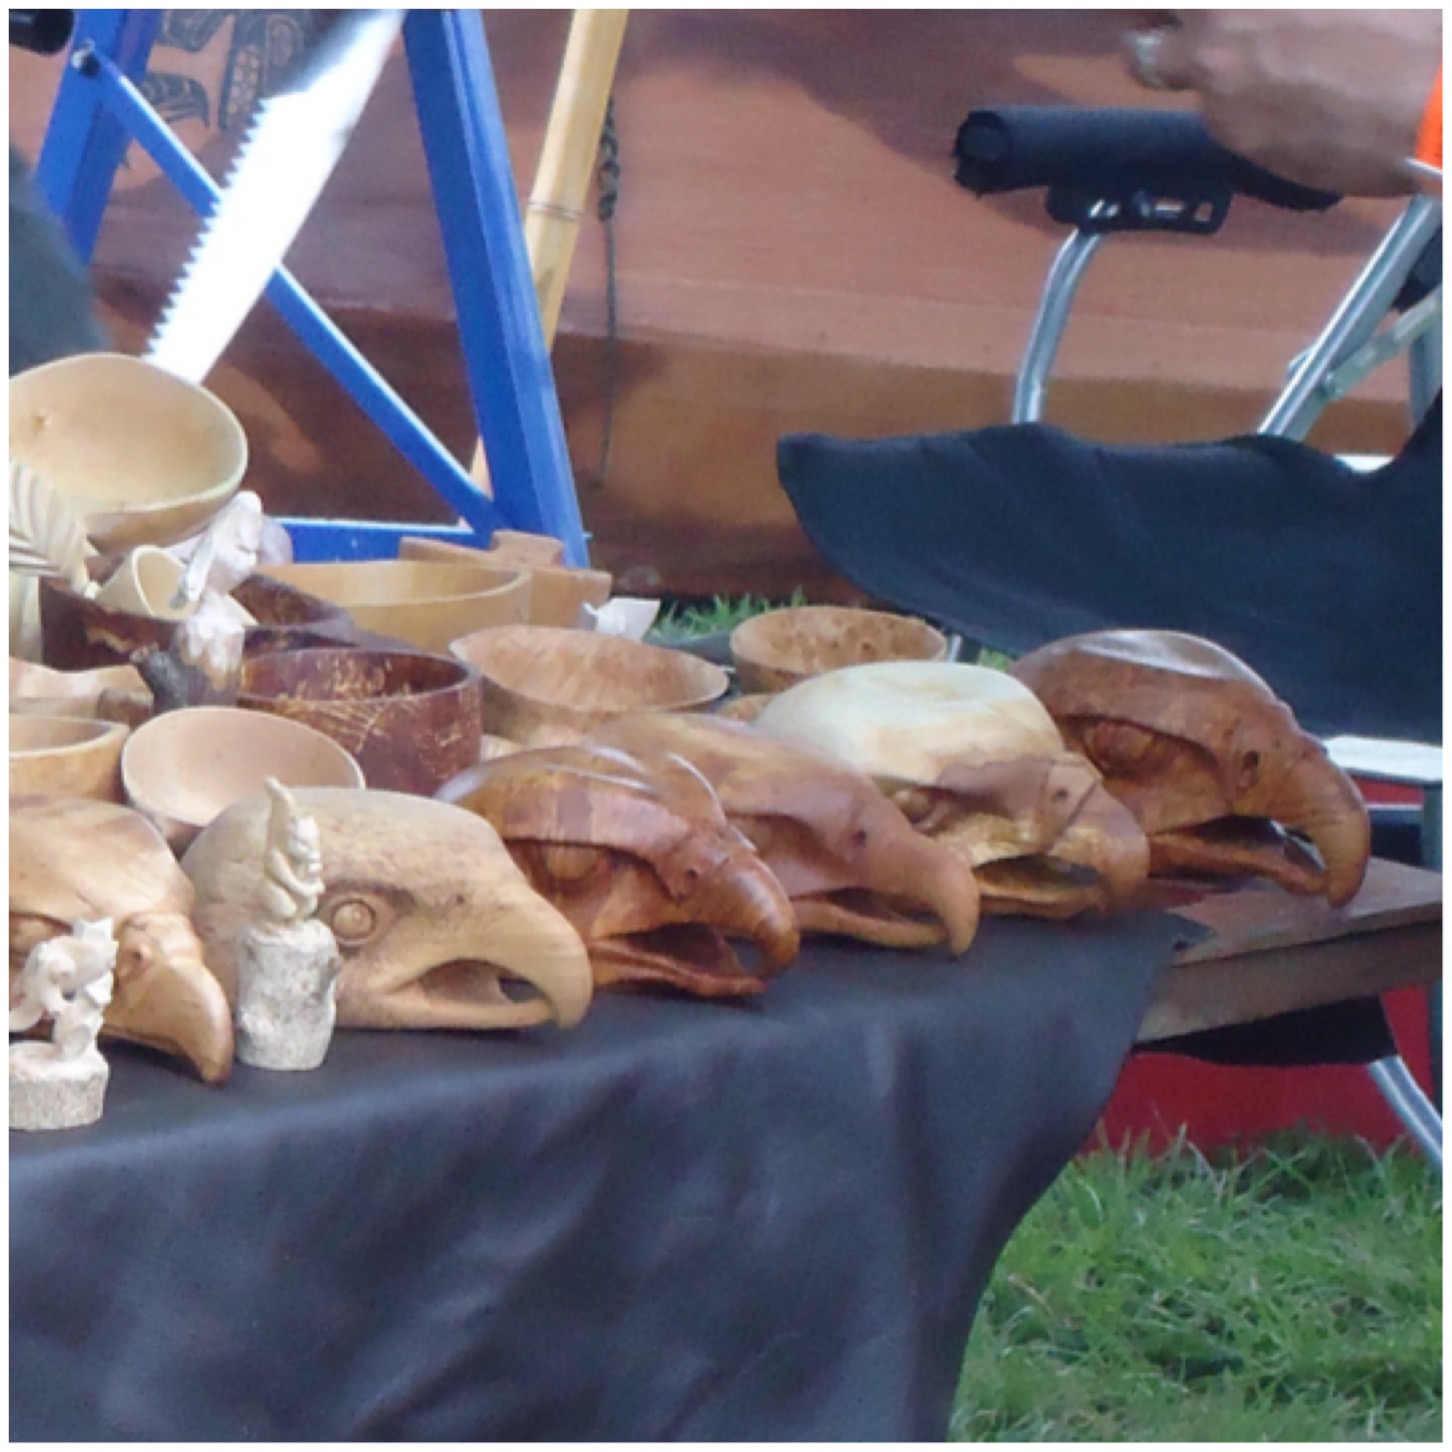
Here are some of John’s finished kuksas on display at the Gathering. With this level of detail you can see why he is a master craftsman.
John’s creations
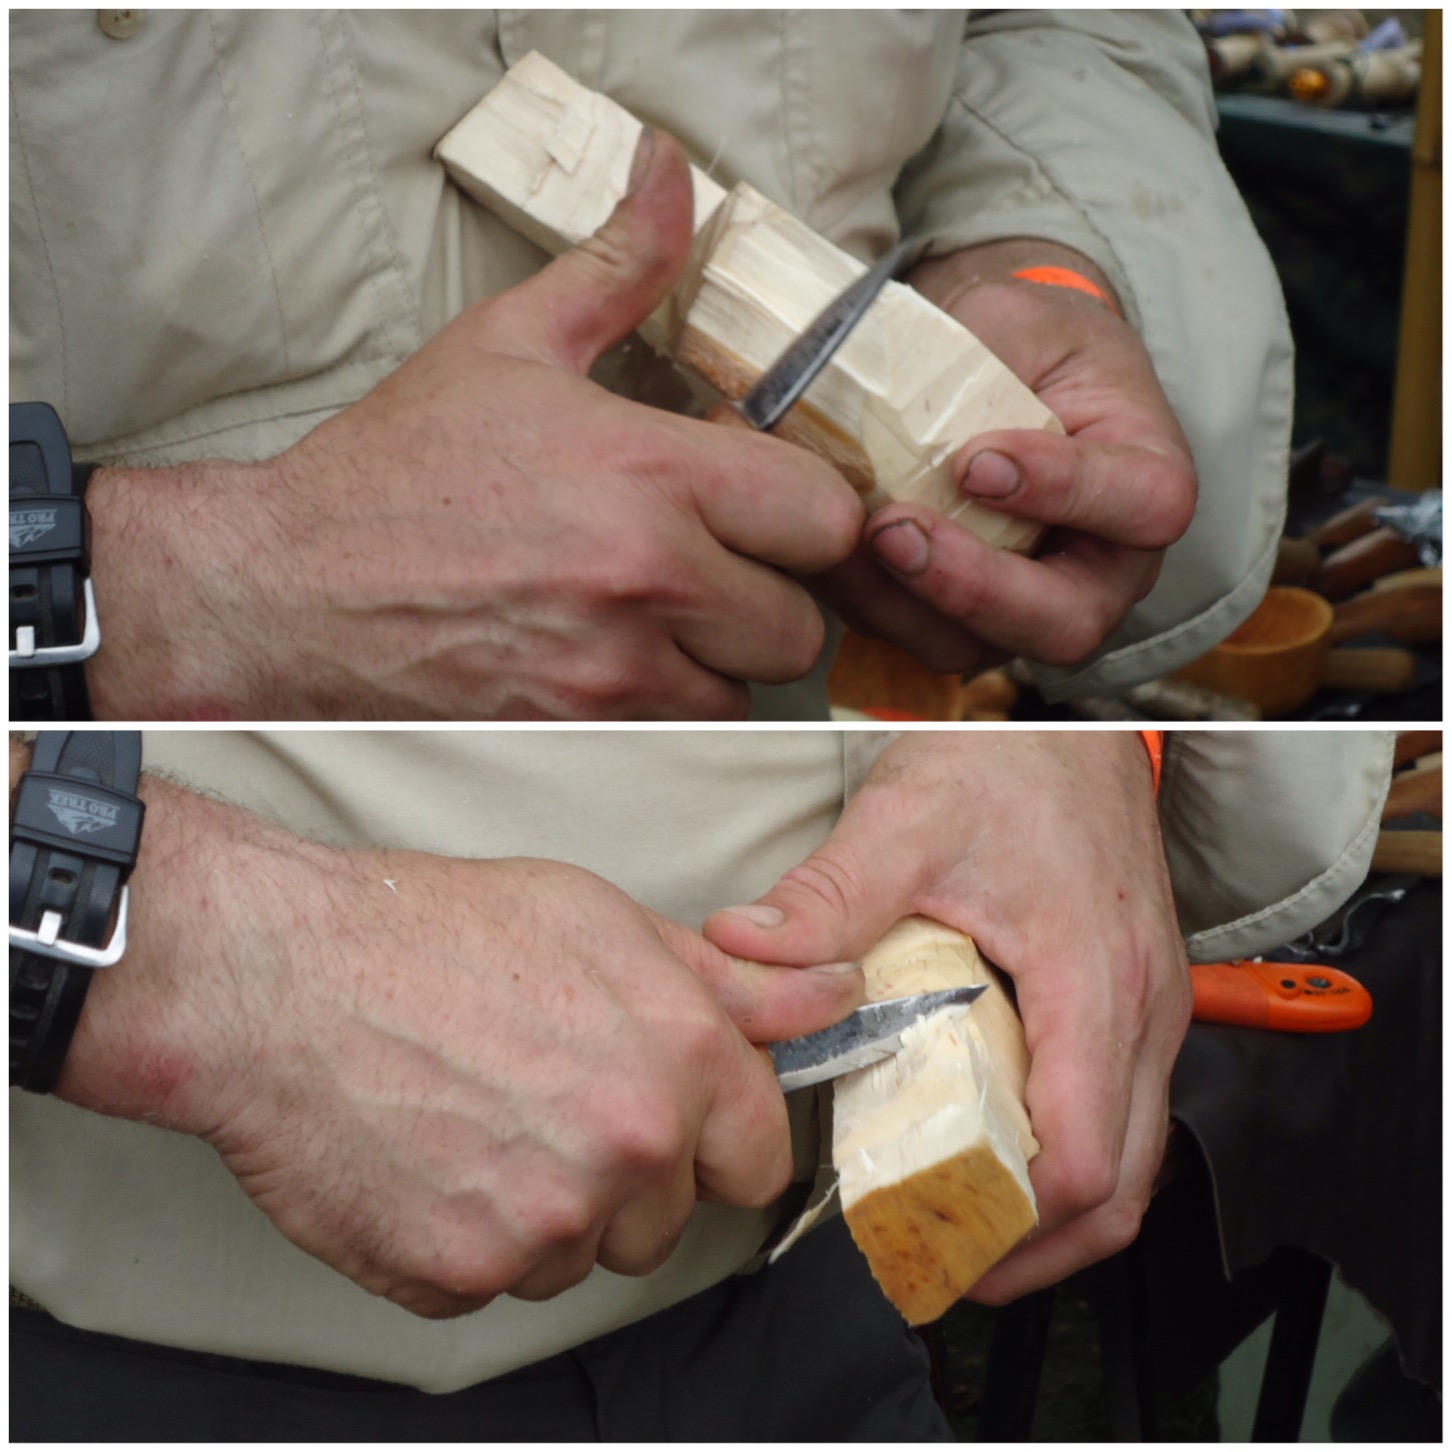
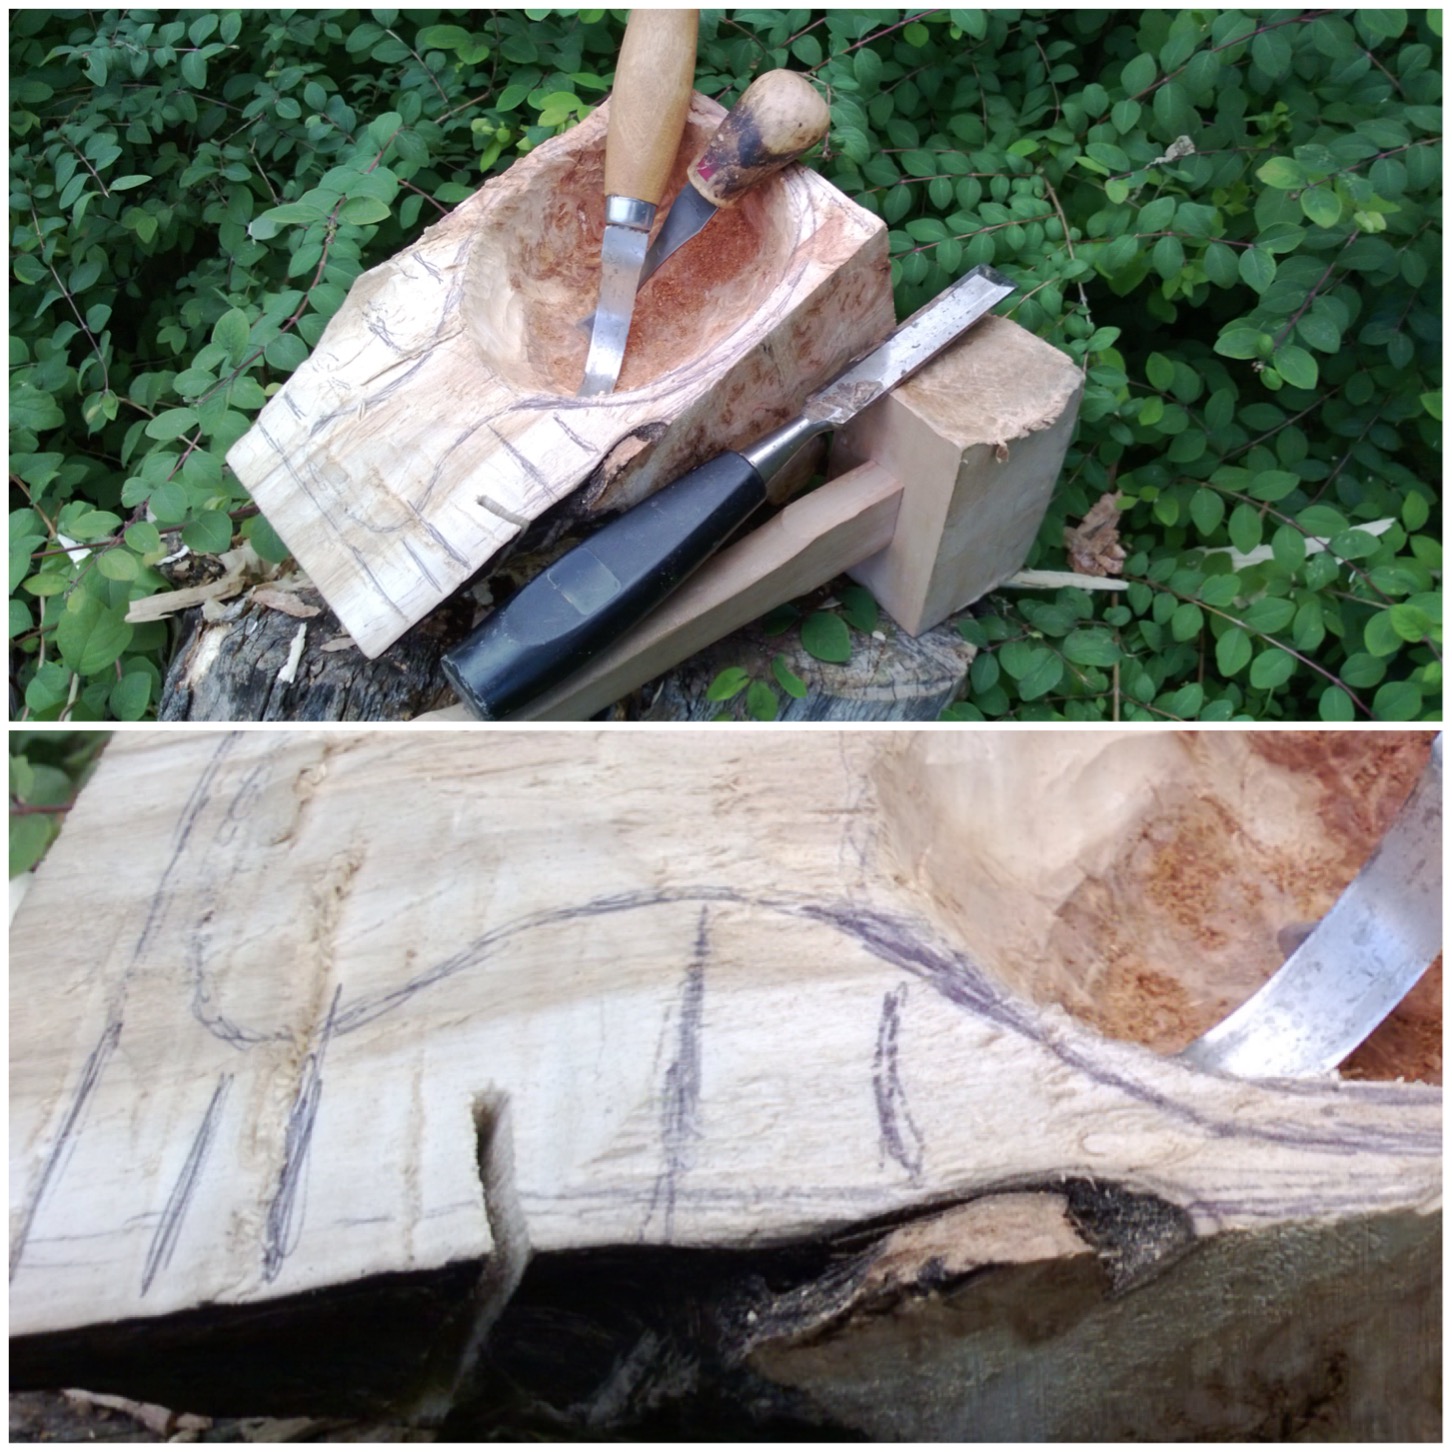
Back to my kuksa – the burl wood of the bowl came out very easily with a chisel and my crook knife.
I put lots of stop cuts into the sides of the blank so as to help get rid of the excess here in a controlled way (you can see all the pencil marks where I was to put them). I really took my time here to get rid of the excess wood and not damage the bowl.
Stop cuts
The whole process of removing the burl wood took quite a while as the outer bark was very hard and the burl wood underneath the bark because of its curving nature was very soft in places and very hard in others.
When I had formed it into the shape you see in the top picture (below) I started using different grades of sandpaper, working up from very rough to very fine, until it reached the smoothness you see in the bottom picture.
Carving the Kuksa shape
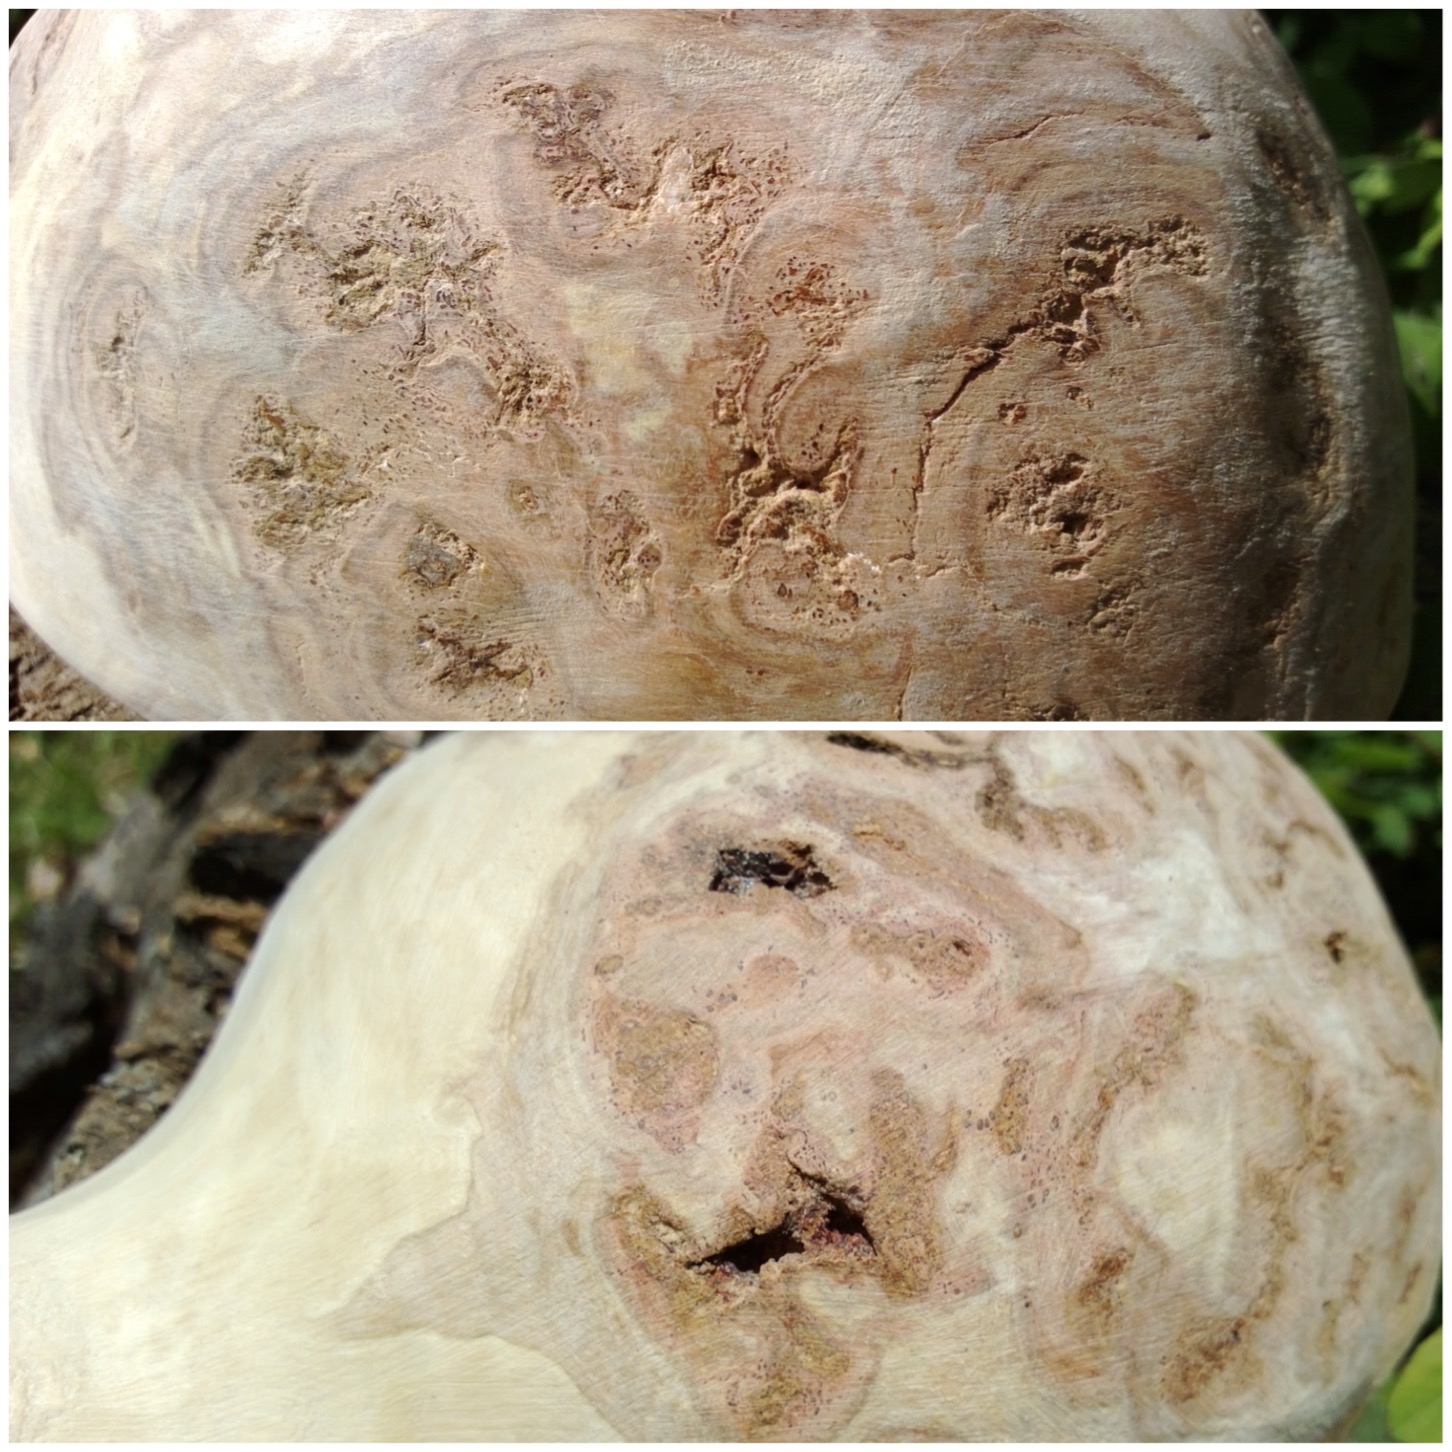
The inside of the bowl was very stable, smooth and did not contain any holes.
The underside was a different matter with small holes in a number of places.
Smooth bowl but imperfect base
In the up close pictures below you can see that they were fairly deep. I felt I needed to fill these holes to prevent any leakages (never a good thing when you are desperate for a brew).
Holes – big and small
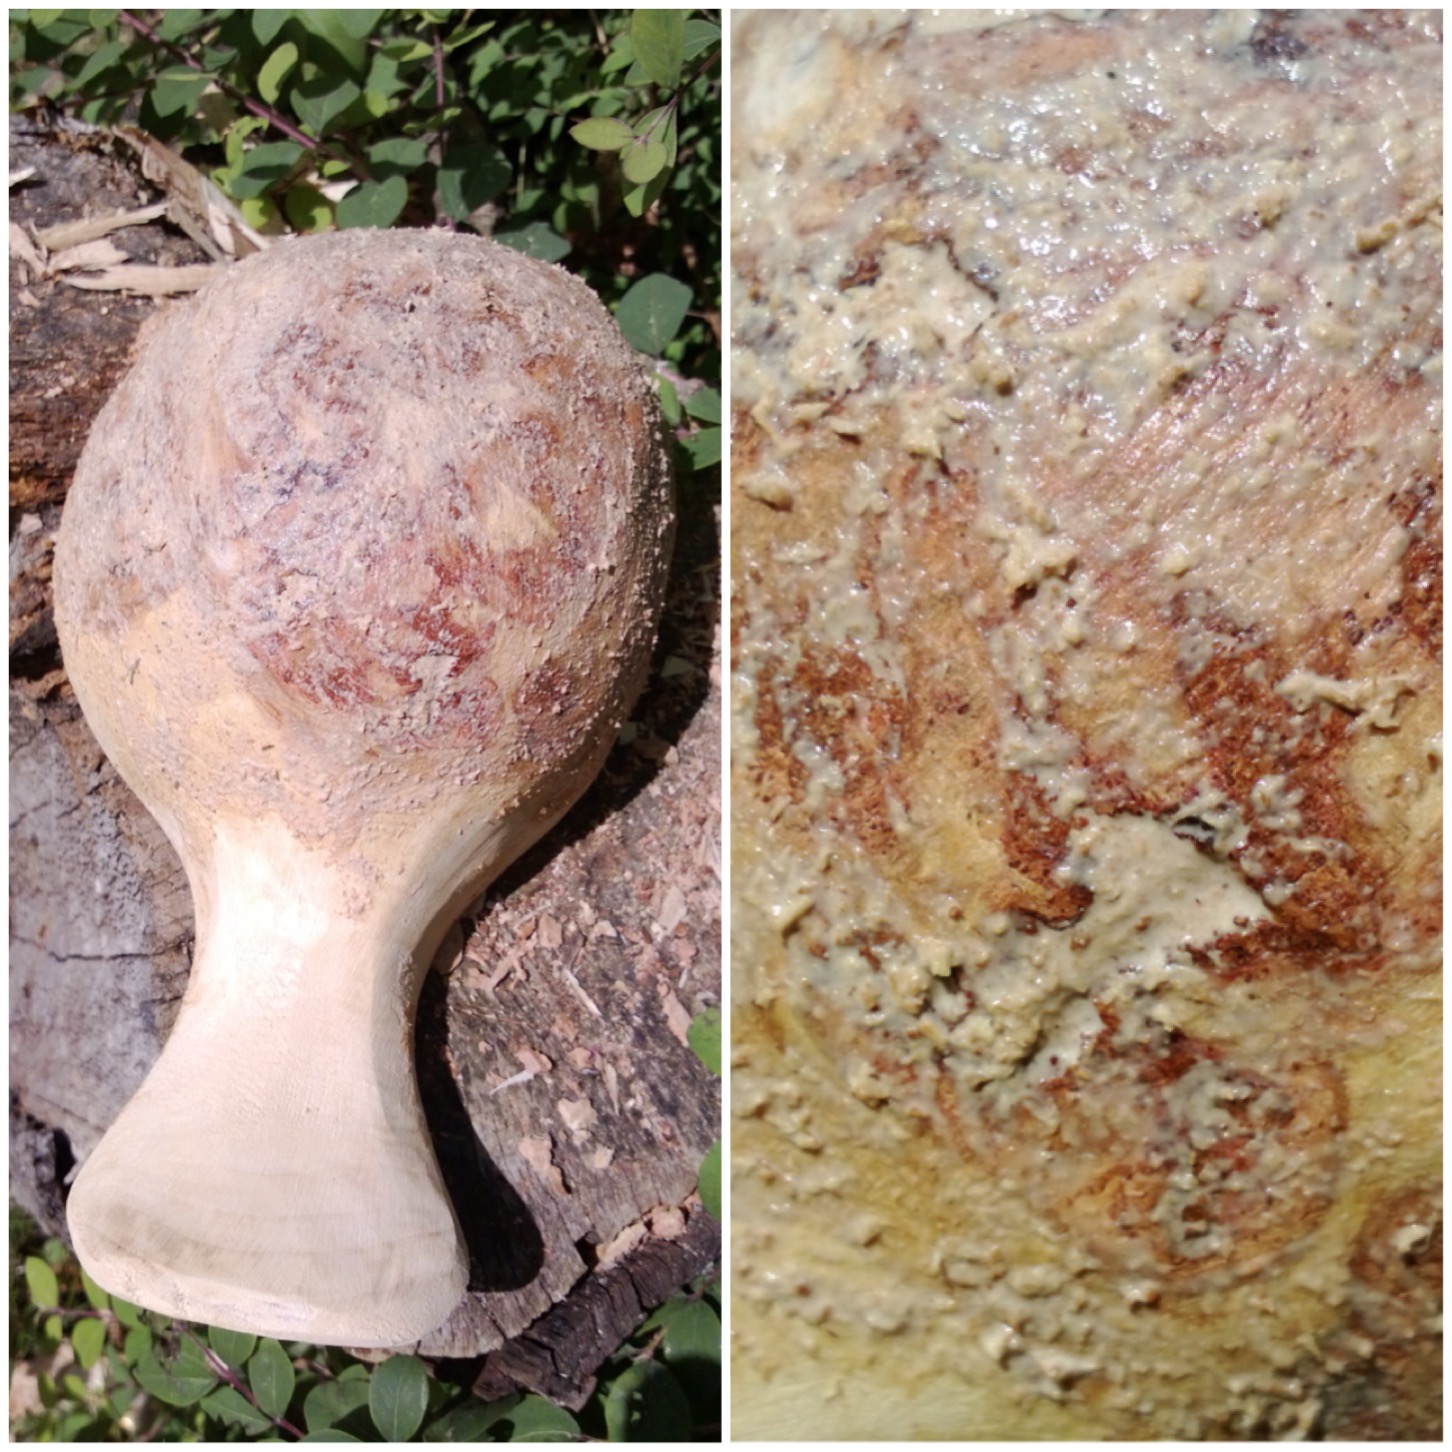
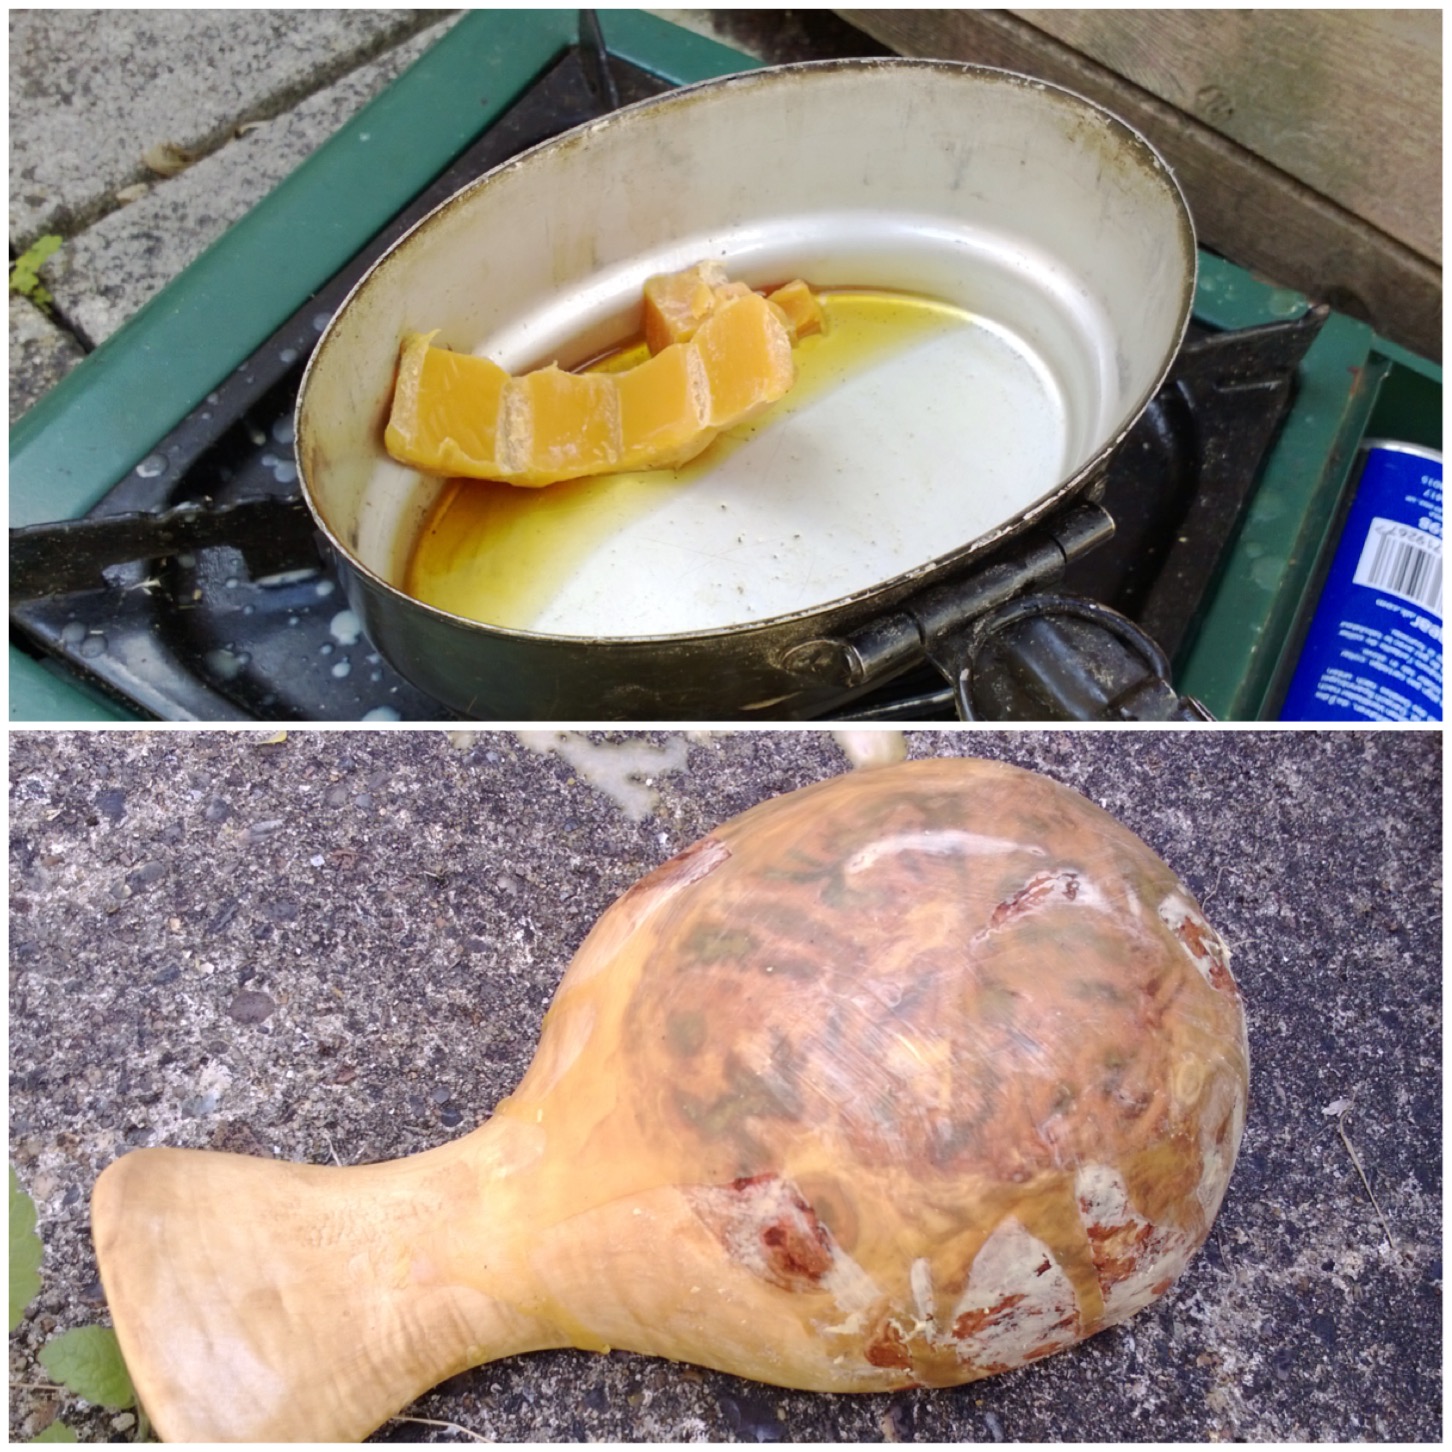
To fill the holes I used a mixture of wood glue and sawdust from the sanding as a kind of filler. I rubbed the mixture all over the underside of the bowl, allowed it to dry, sanded it and repeated the process again. This all took a couple of days to allow for the drying process.
Wood glue and shavings on the base
There was still some roughness left over even after the sanding but I felt that went with the character of the kuksa.
Drying and sanding
To seal the cup I melted beeswax and poured it over the cup. I then re-melted the beeswax with a hairdryer so that as much of it as possible would soak into the burl wood to fill all the pores. I repeated this a number of times, covering the whole cup until no more beeswax would soak into the wood.
Beeswax filler
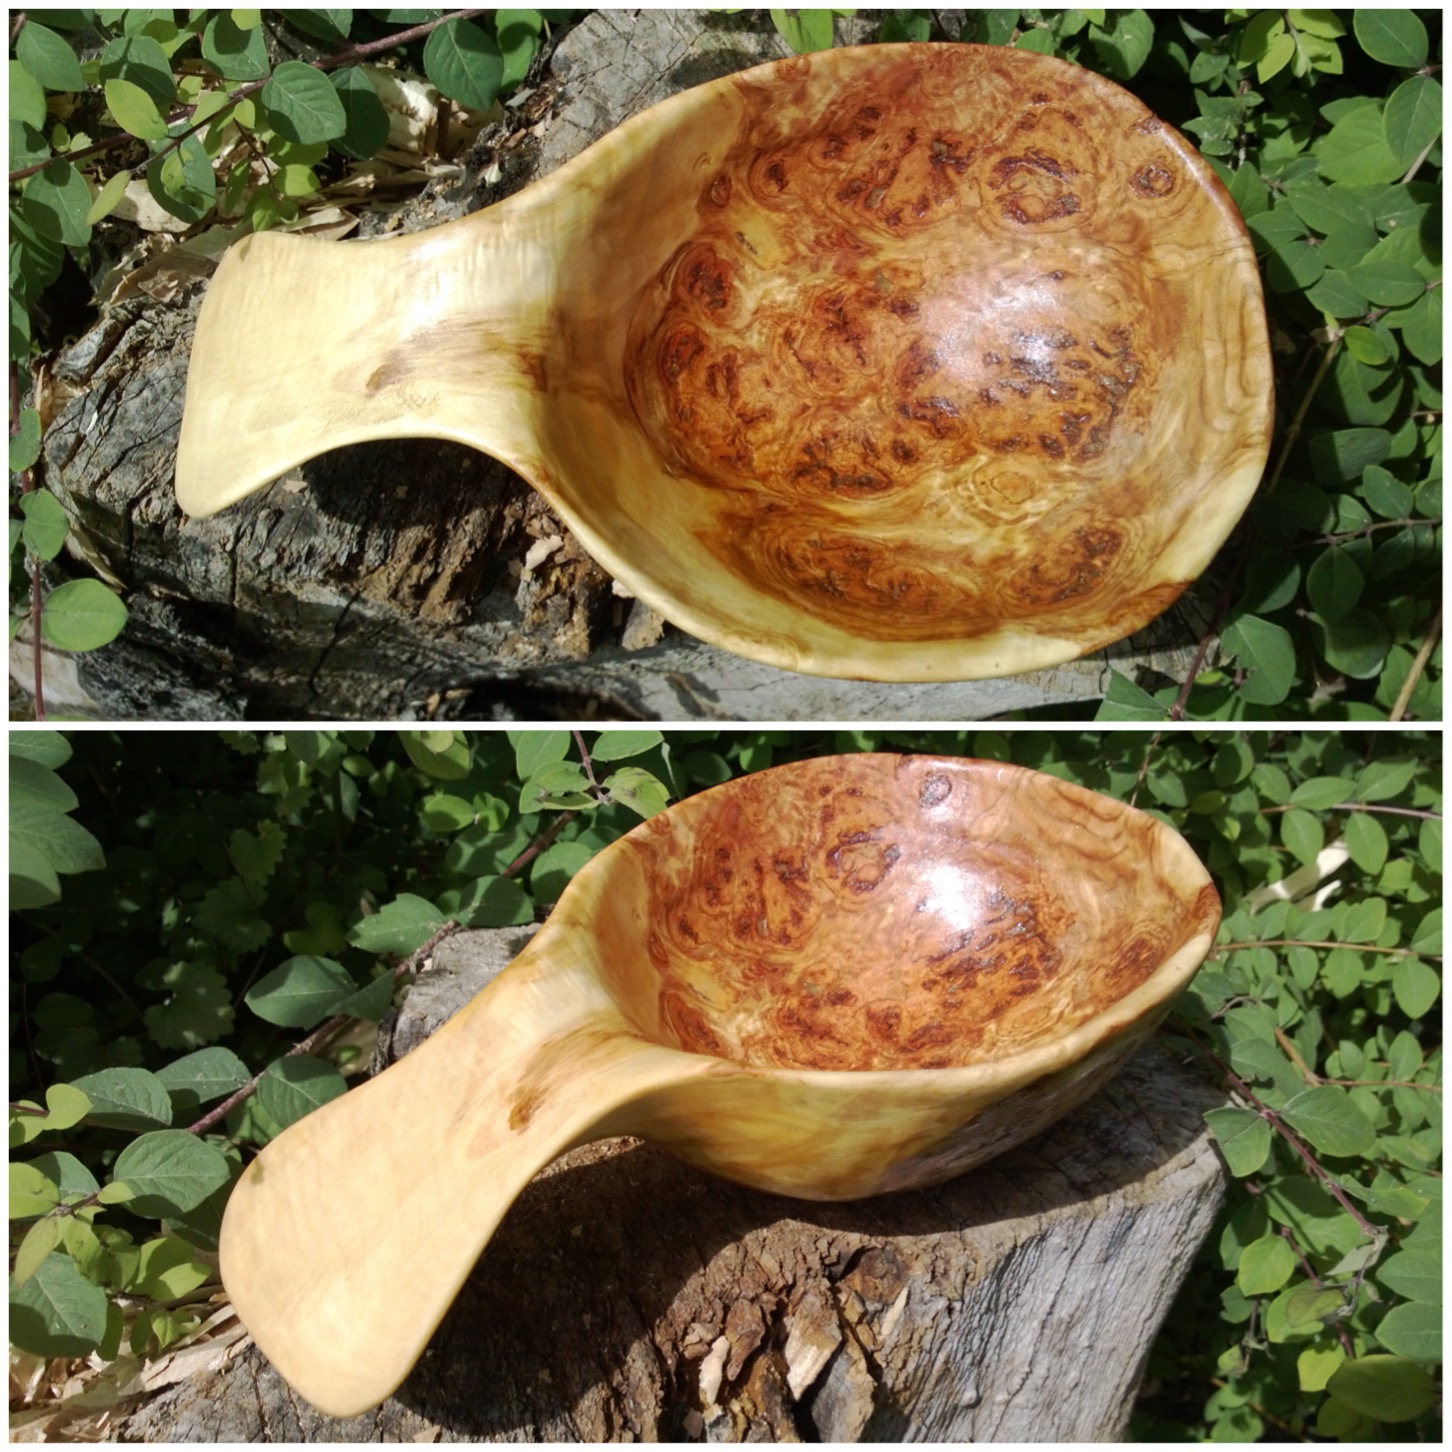
The beeswax did what the sanding alone never could; it smoothed out the wood and gave it a lovely shine as well. The swirls of the burl wood really stood out after this process.
Beautiful swirls on the sides
I particularly liked the contrast of the burl wood of the bowl with the heartwood of the handle. This is what I was hoping for and was very pleased with the outcome.
Contrasts – heart wood and burl wood
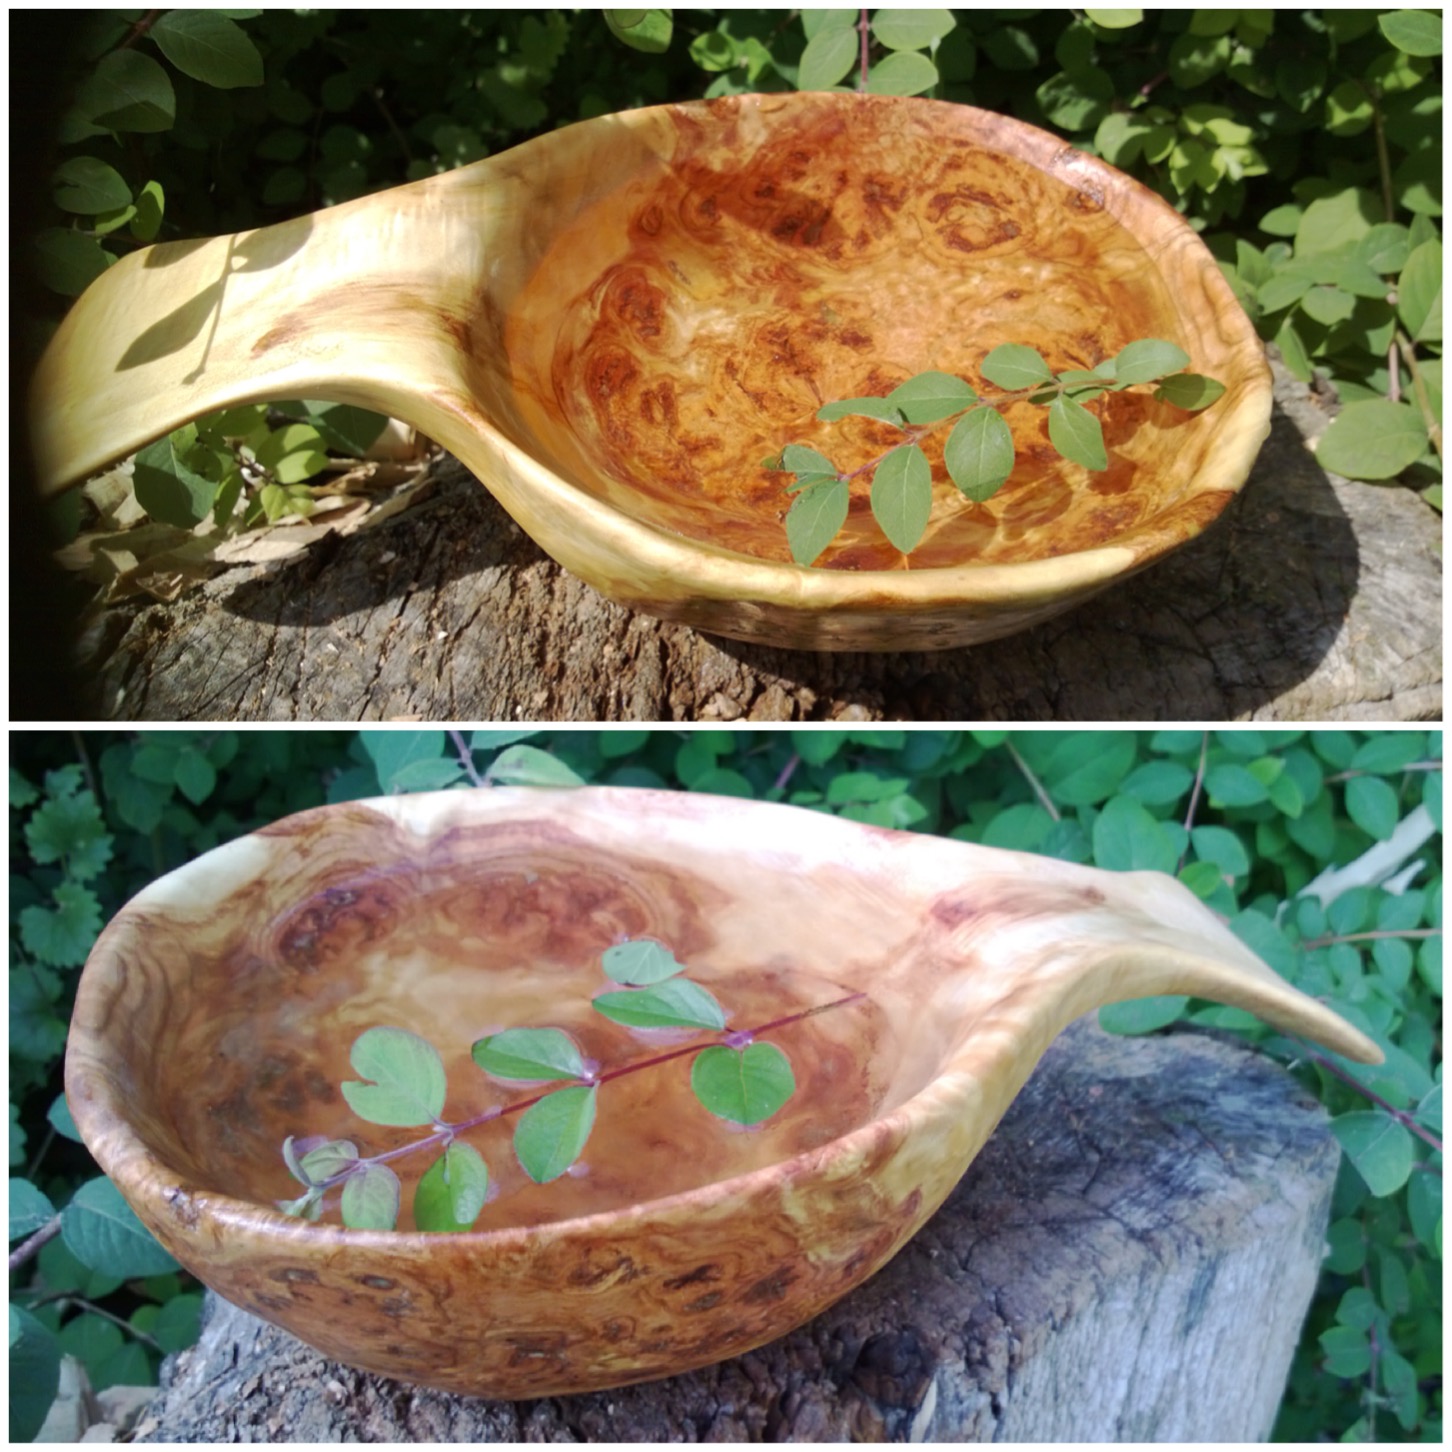
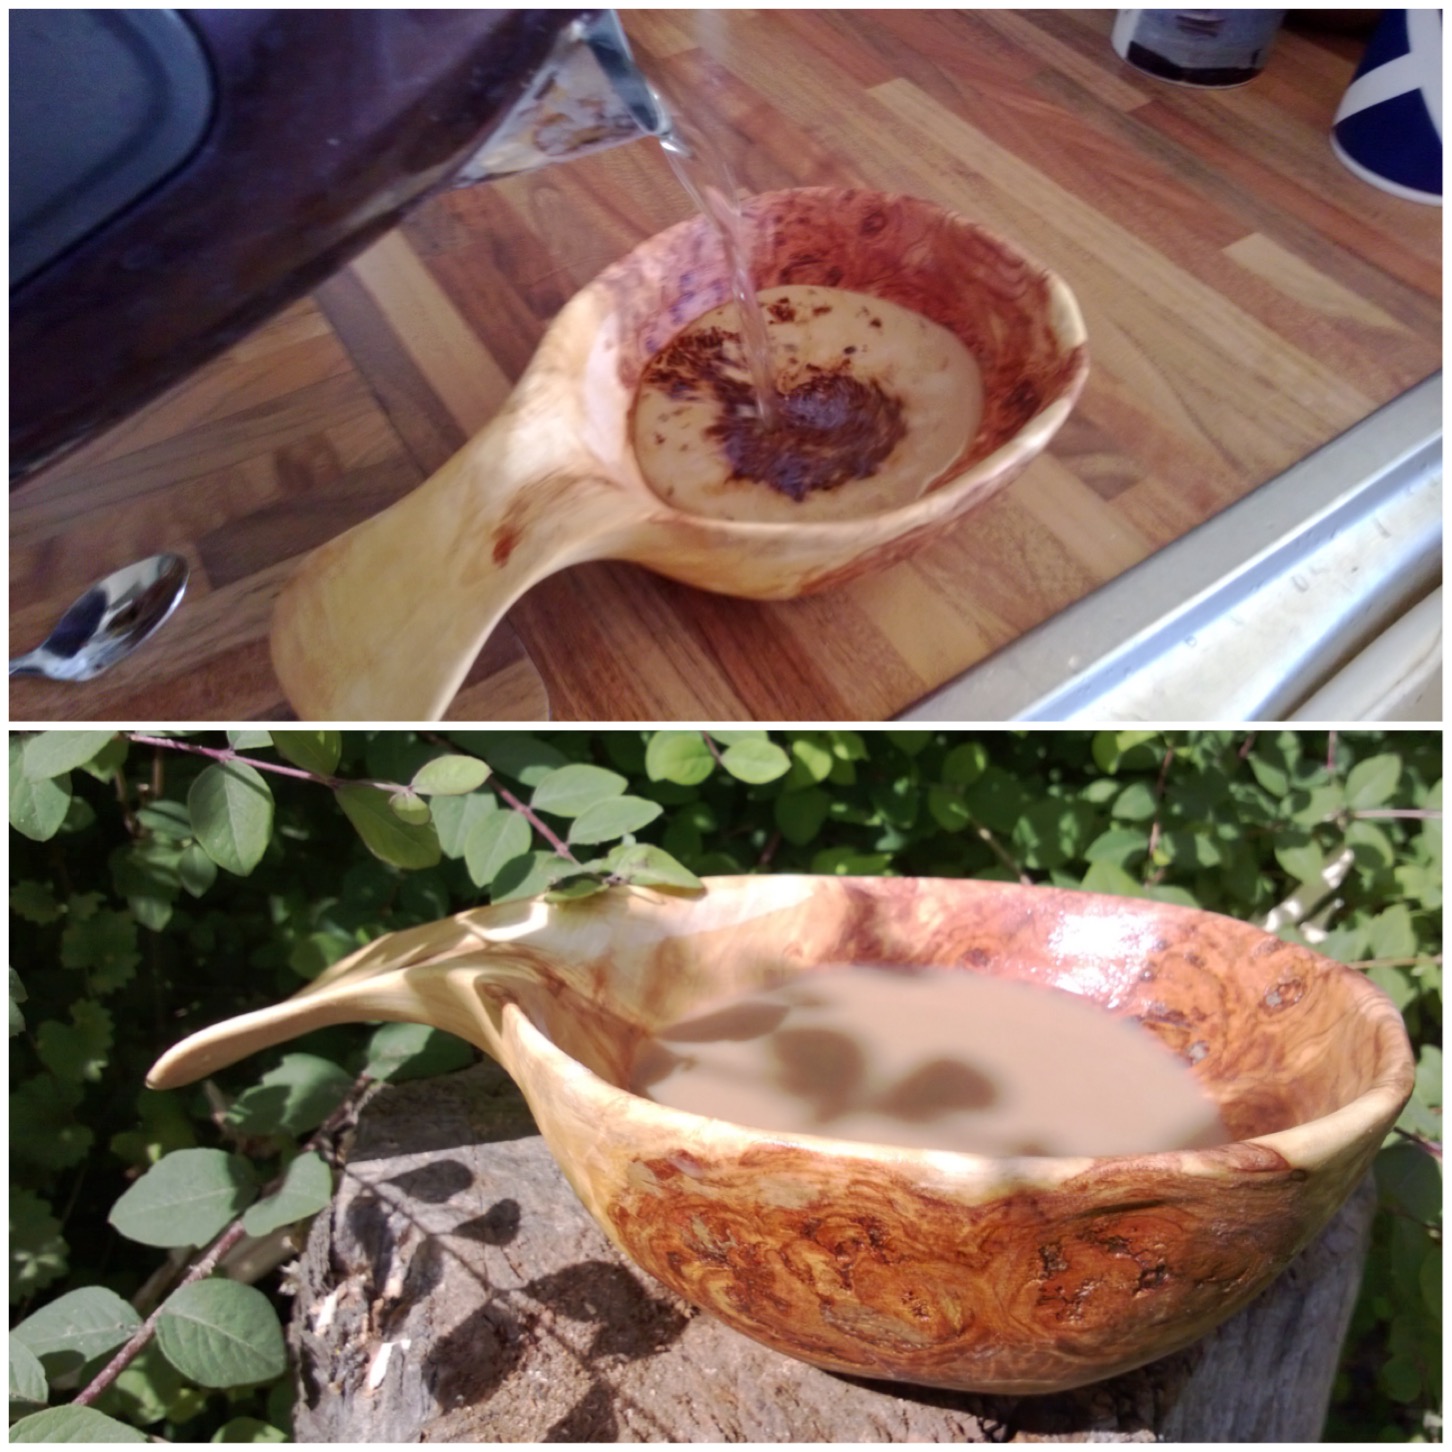
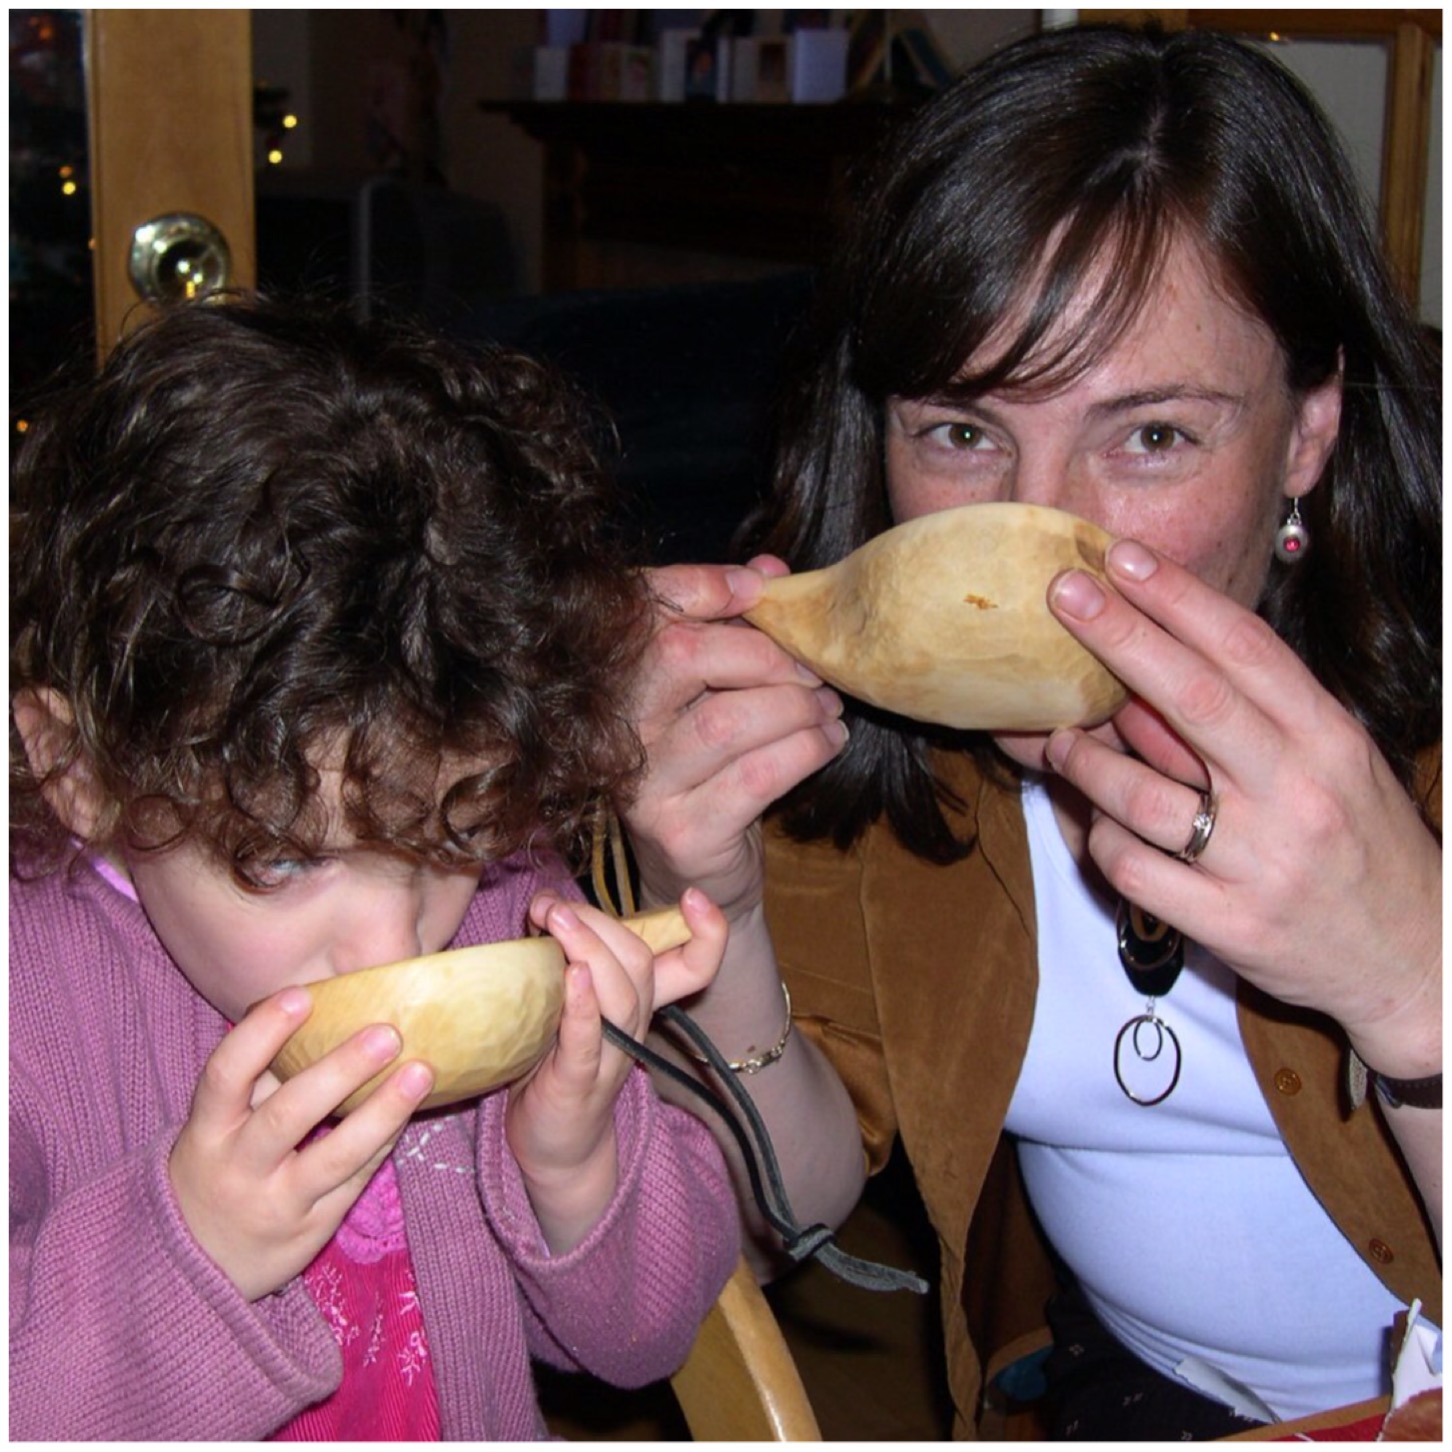
Next up was to test out the waterproofness of the cup. To begin with I poured cold water into the cup and let it stand for an hour. Thankfully there were no leaks.
Waterproofing test – cold water
Then it was time to add hot water. I started with warm water and in stages moved up until I was pouring just-boiled water into the kuksa. I was fairly happy that there would be no leakages now.
Waterproof test – hot water
Next up was to see how a brew tasted with all that beeswax in the wood. I poured myself a coffee and could taste nothing of the beeswax. I think the boiling water helped with removing any excess beeswax.
Taste test 1 – Coffee
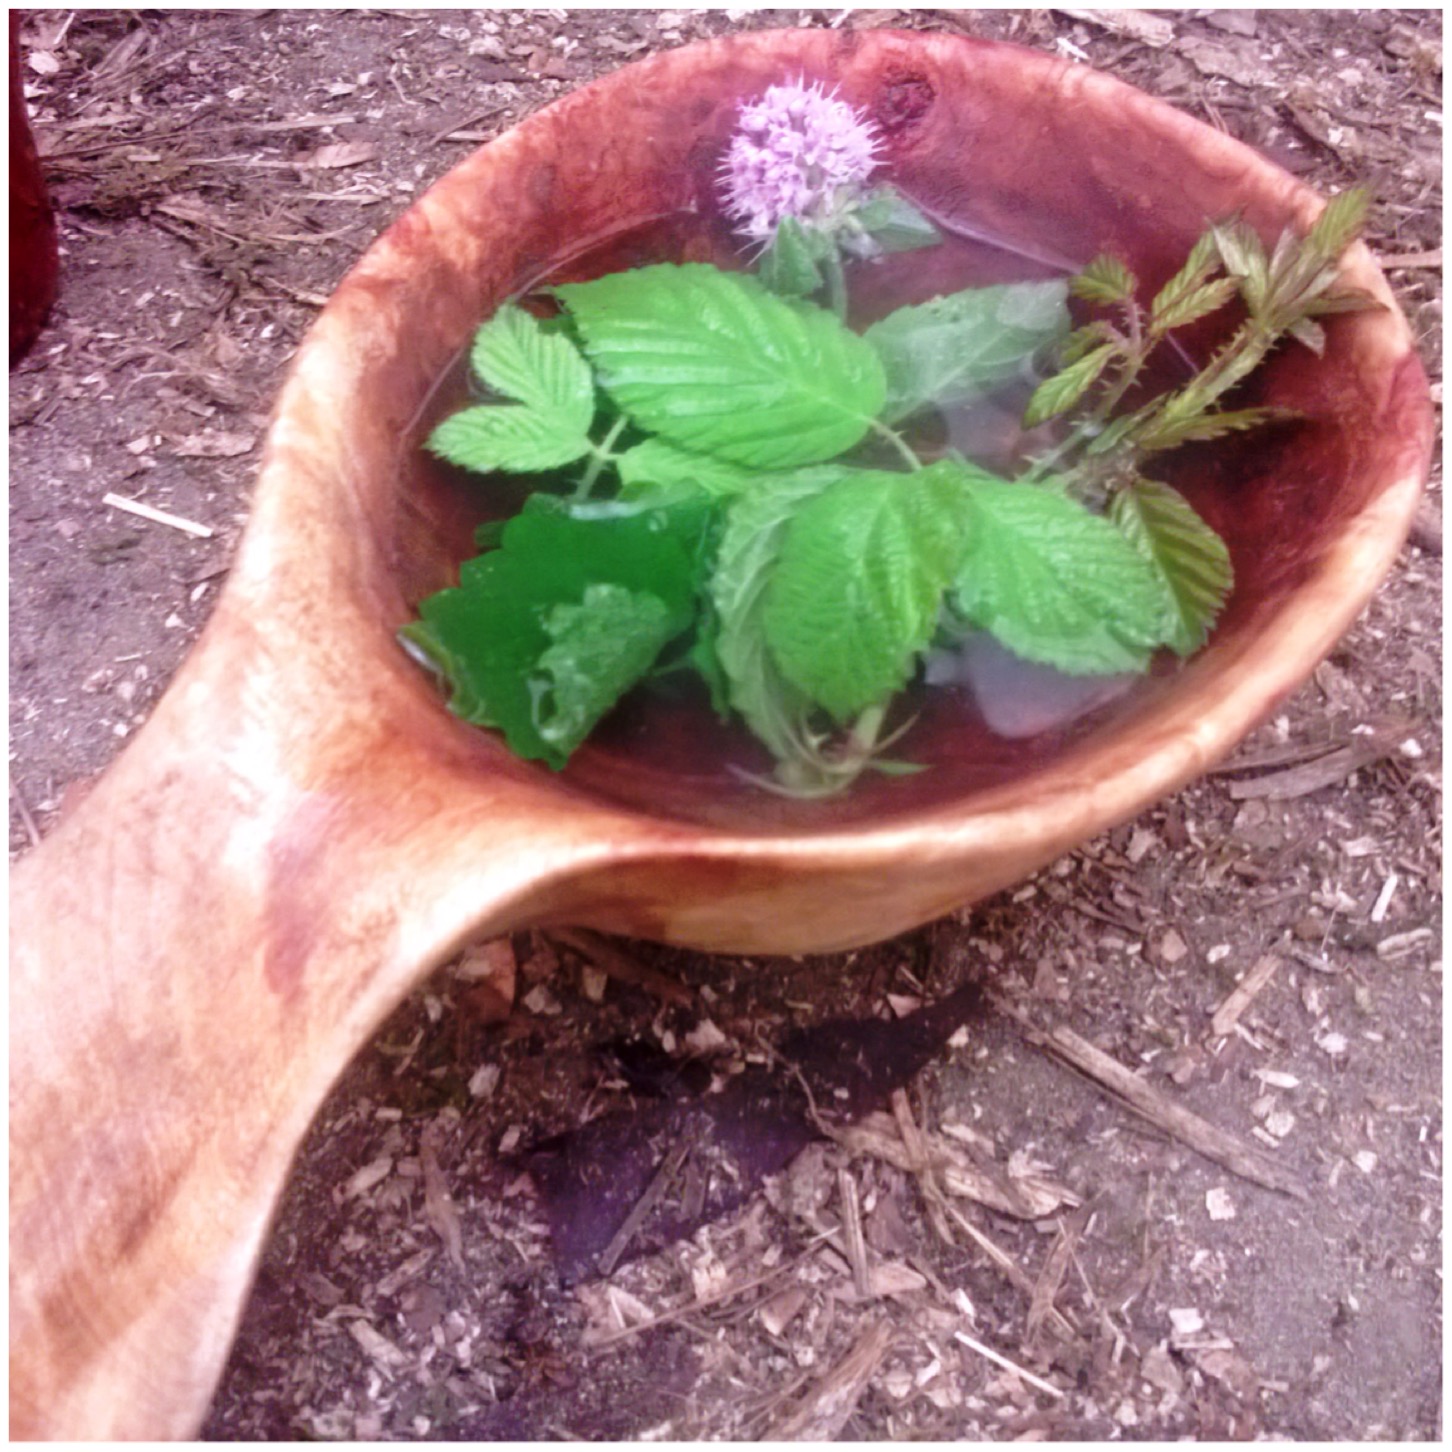
A final test was at my friend Fraser’s place (of Coastal Survival) when he made me a beautiful cup of mint and blackberry tea.
Taste test 2 – Herbal tea
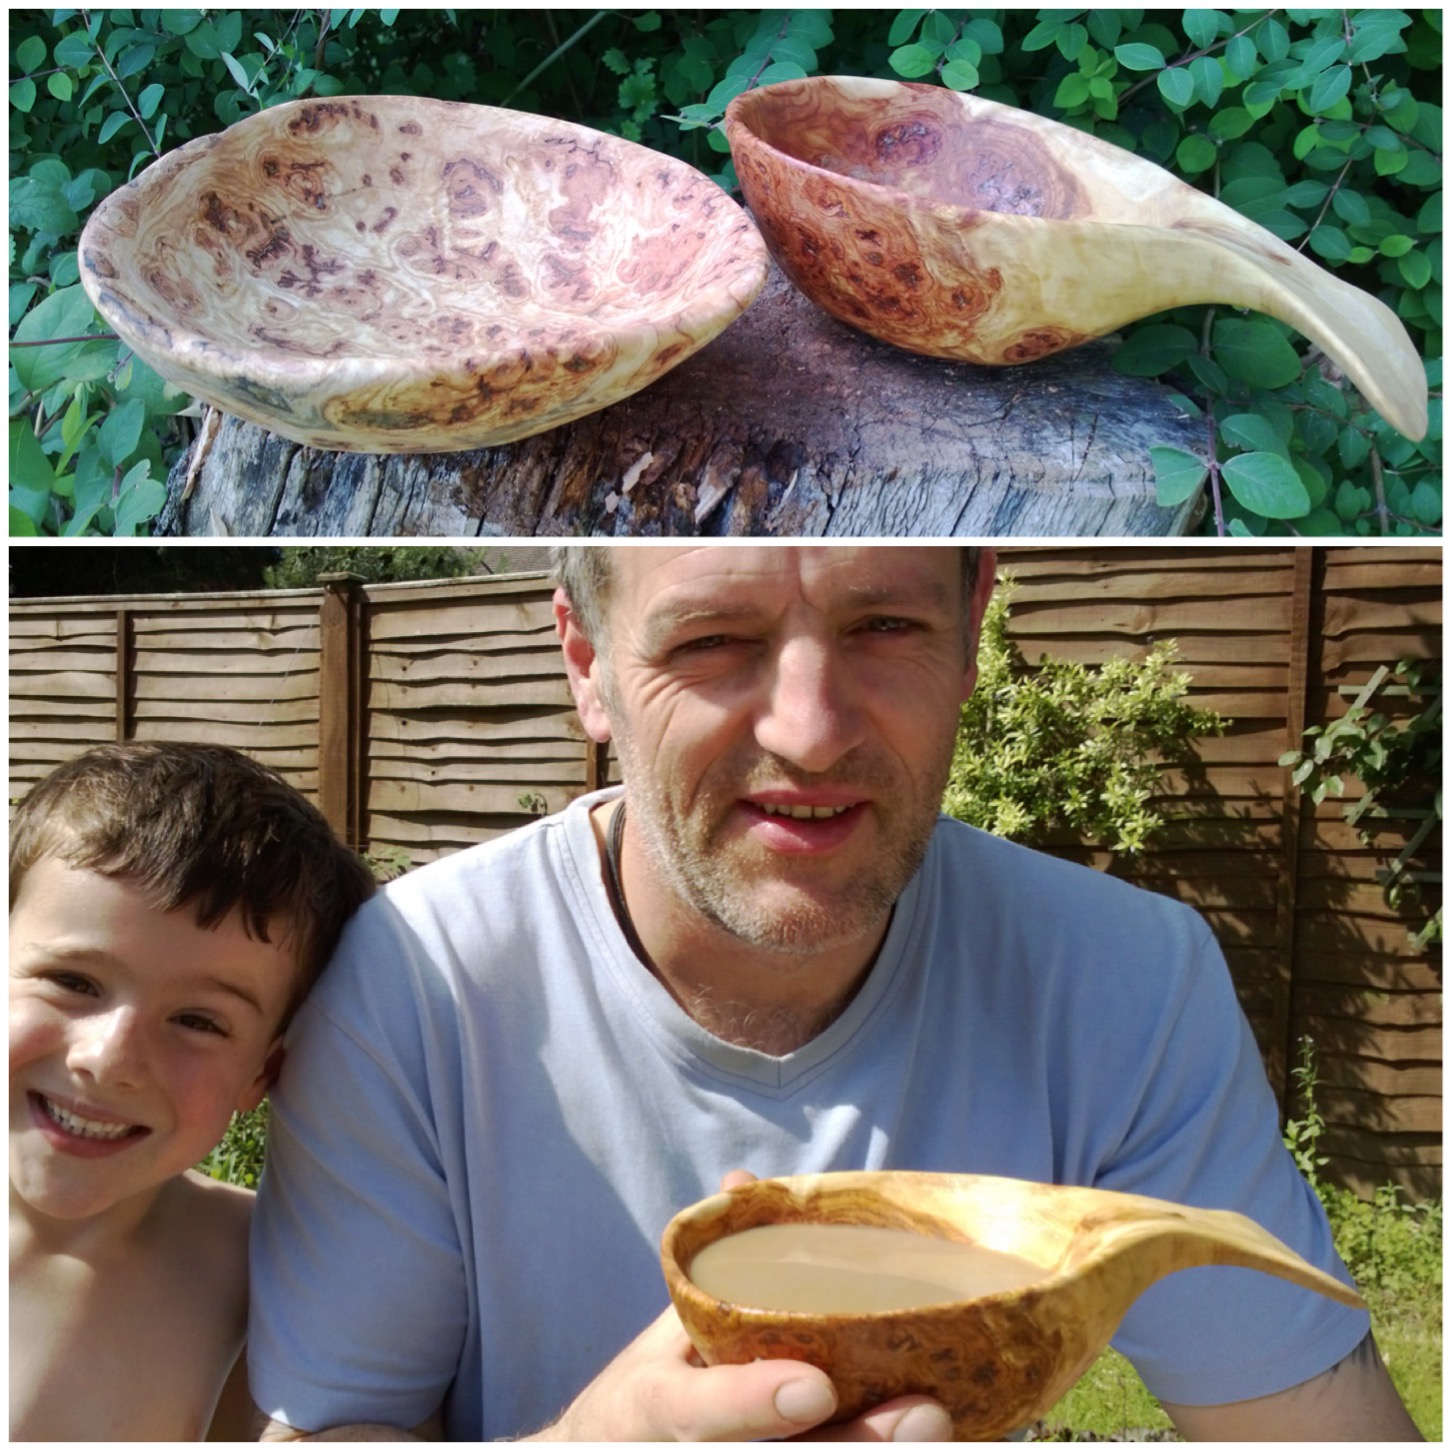
I used more of the burl to make a bowl to go with the cup and it too turned out quite beautifully (in my opinion at least!).
Alison had always wanted a one carved for her so I thought it was time to get on with it. These cups were traditionally made out of burls (I will cover this in more detail in my next How To…) however I did not have one available at the time and used silver birch wood instead.
Noggin carving is a skill that has been practiced for millennia but due to modern industrial practices it is now something generally limited to green woodworkers, bowl turners and bushcrafters. These are a few of my carvings, all utilitarian and nothing fancy. The cup at the bottom is the one I made for this How To…
Carvings
Wood selection and splitting
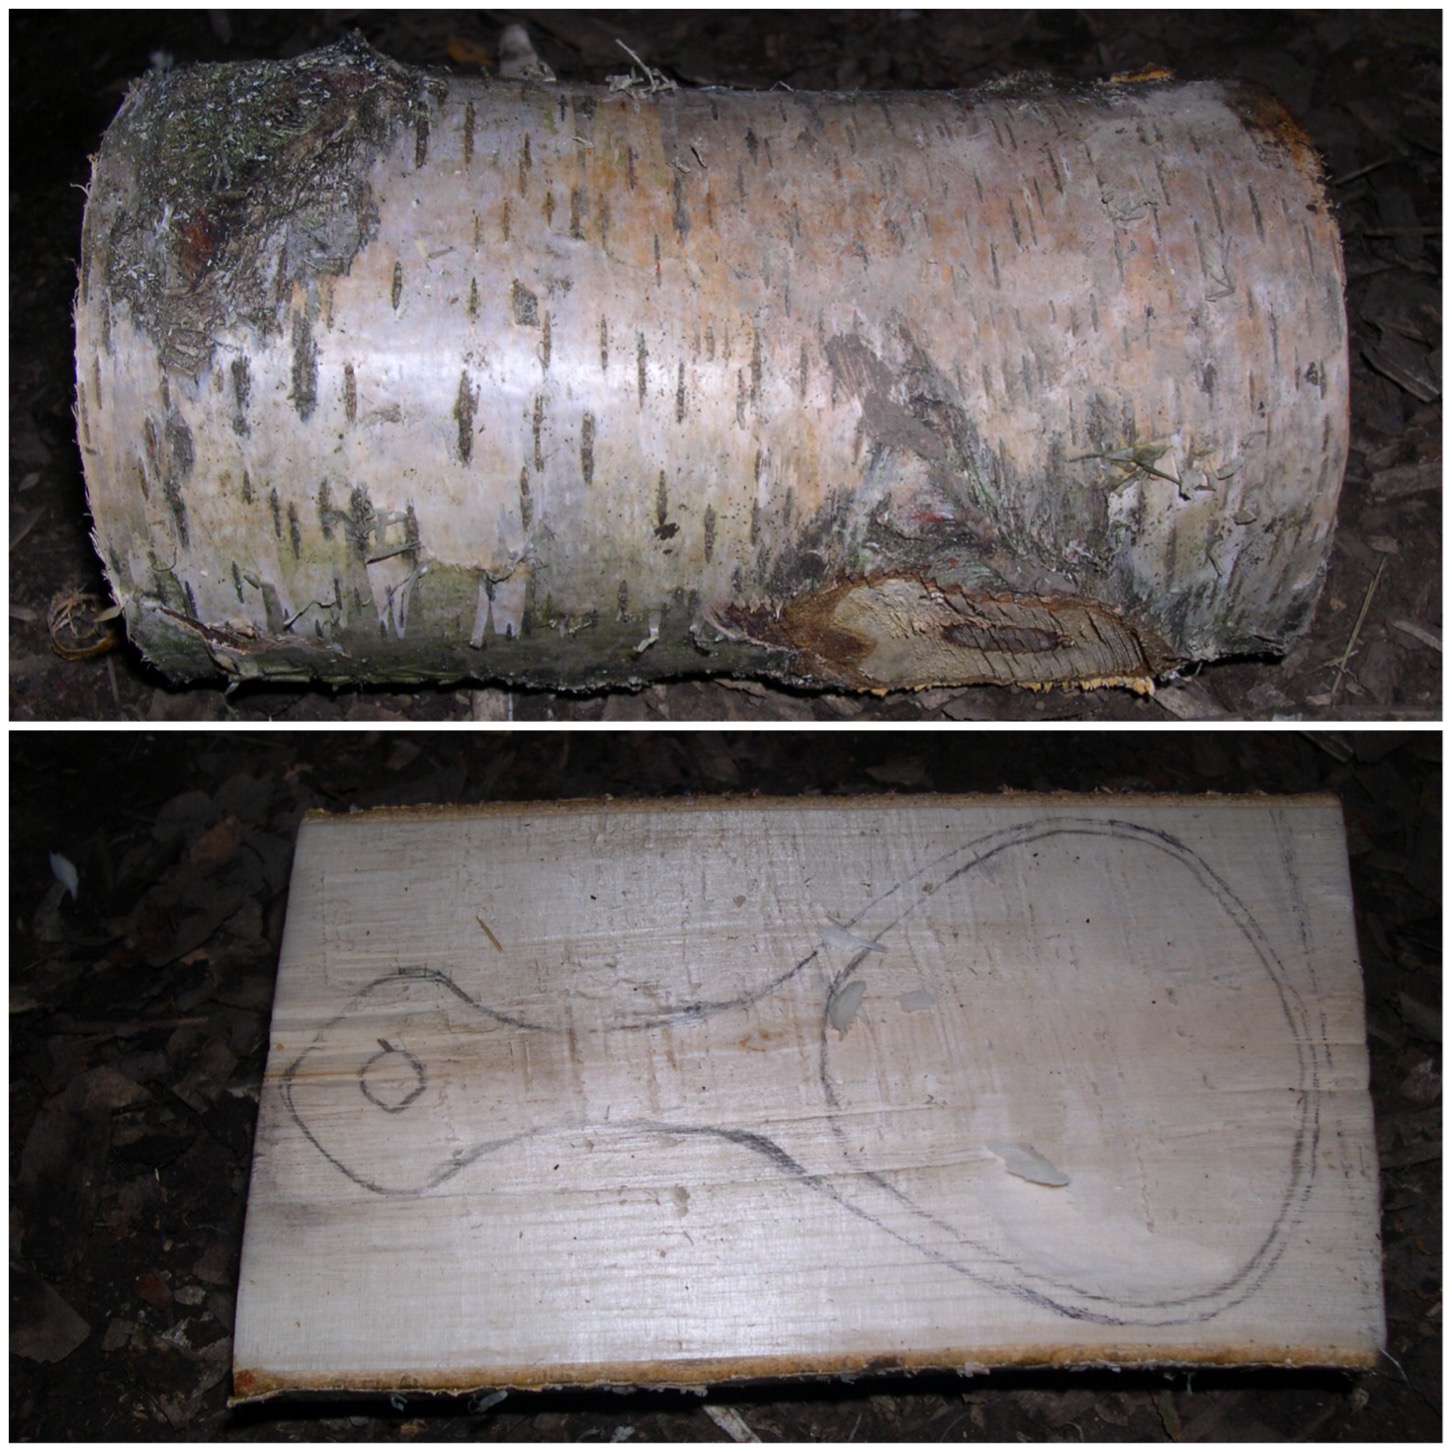
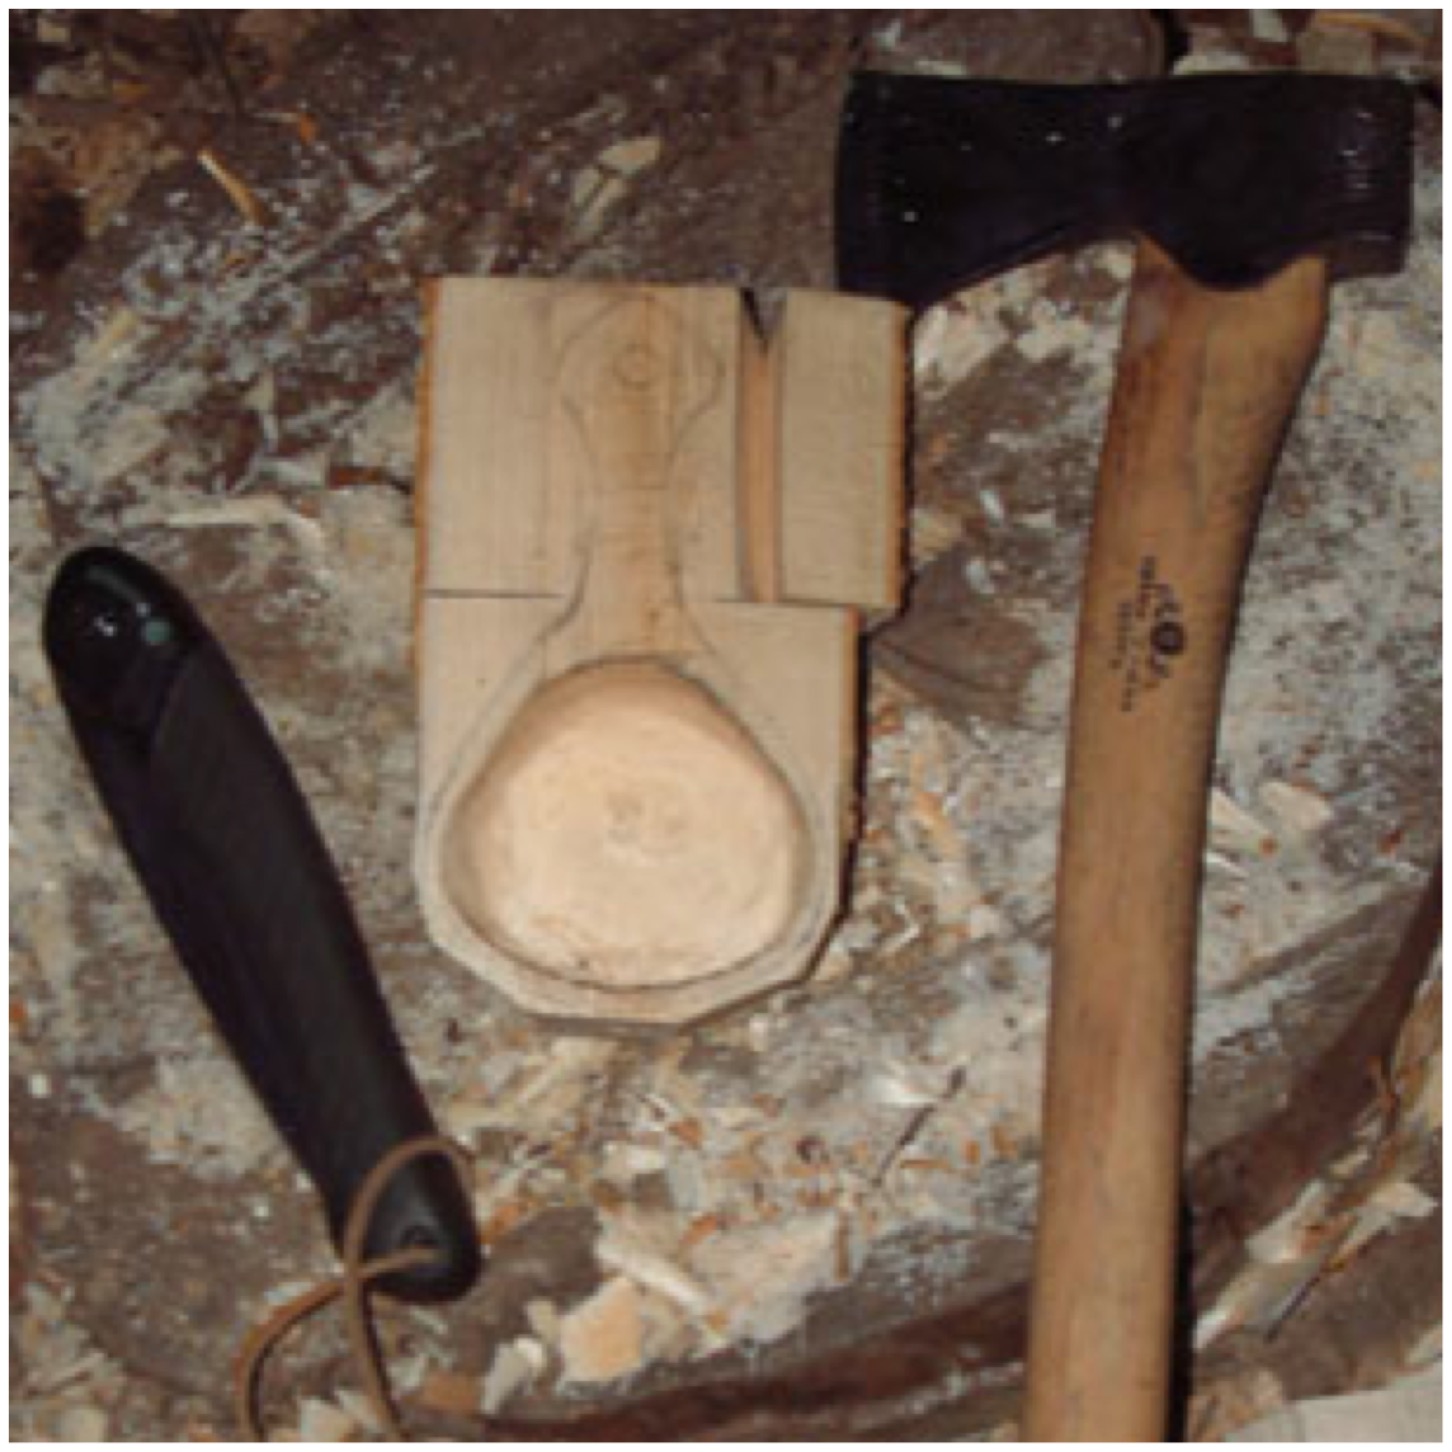
For this noggin I selected a green piece of silver birch that had no crack lines starting on either end. The log had a few knots in it but looked quite easy to carve.
I split the log on a stump with my axe and drew out the basic shape of the noggin with a pencil. My intention was to carve a shallow flat-bottomed noggin with steep sides as the log was not that big.
Beginnings – splitting the log and drawing
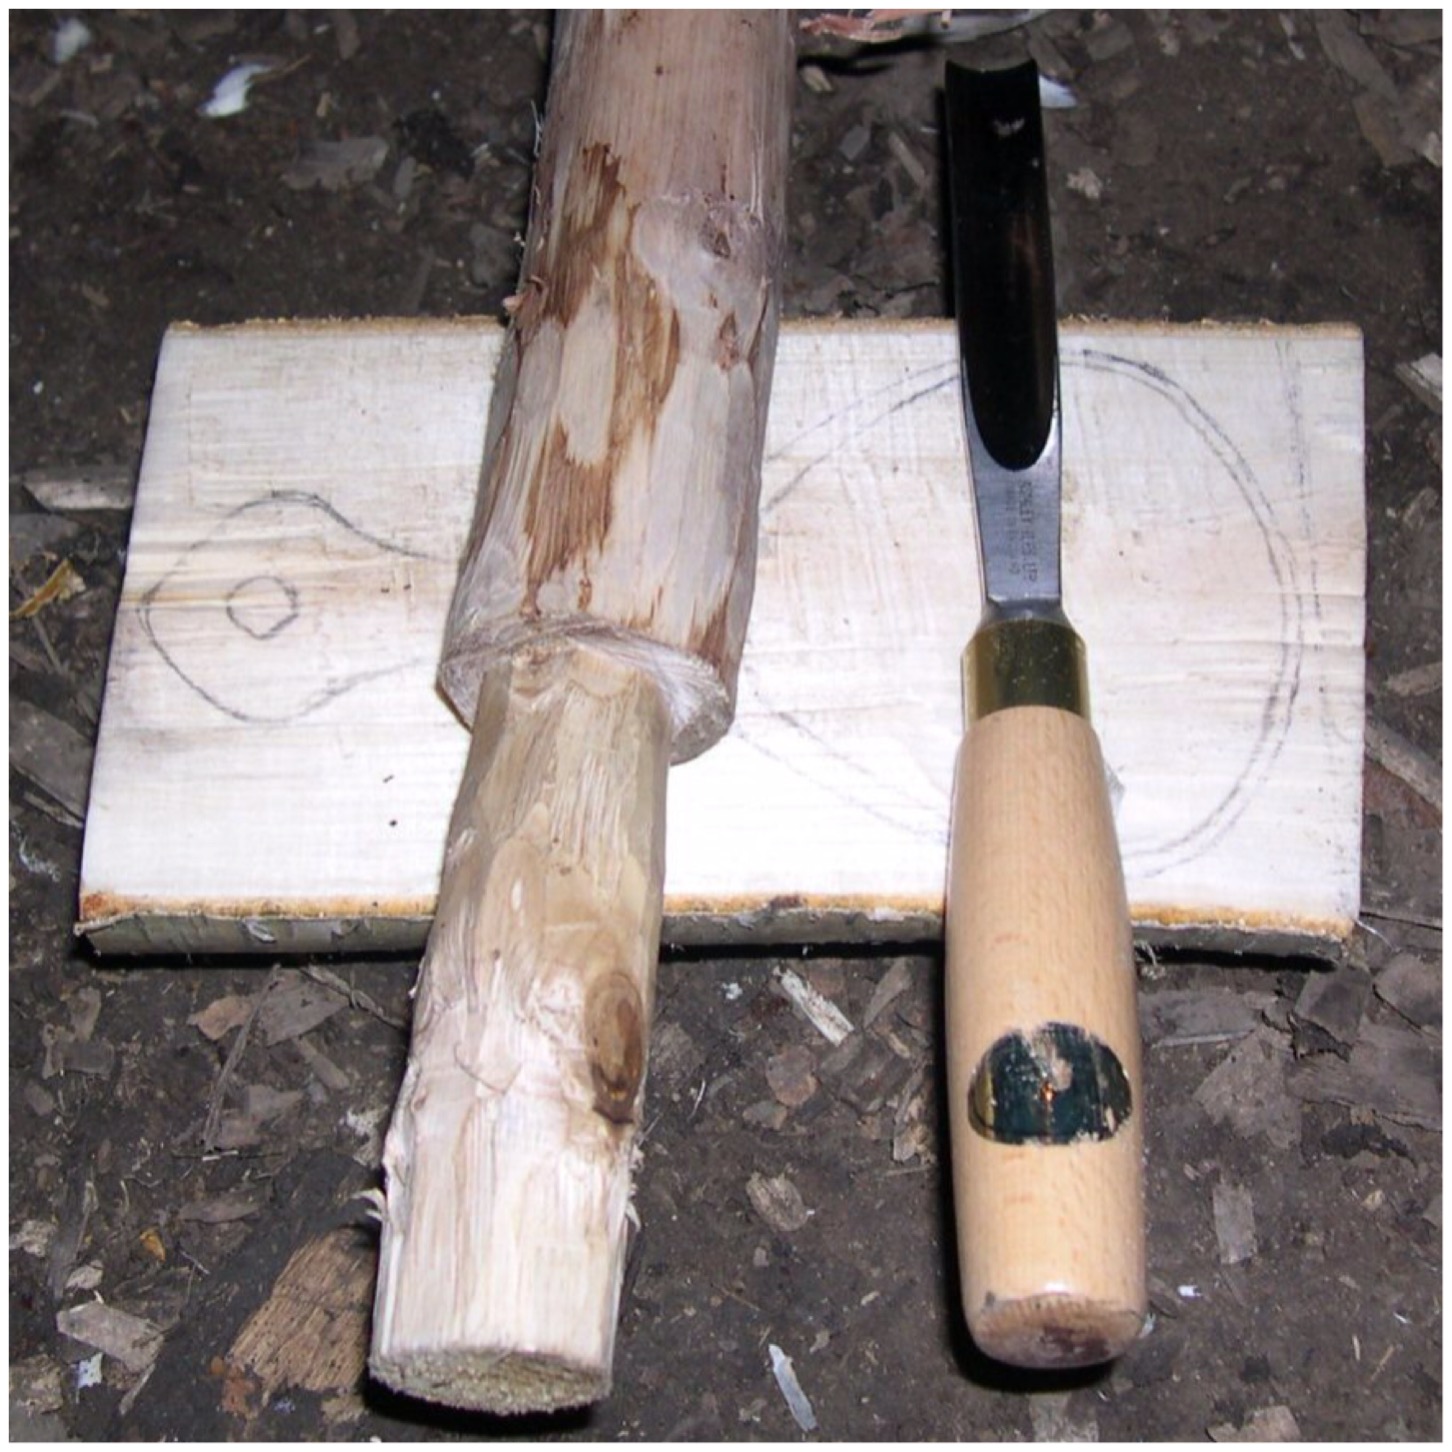
Tools & the bowl
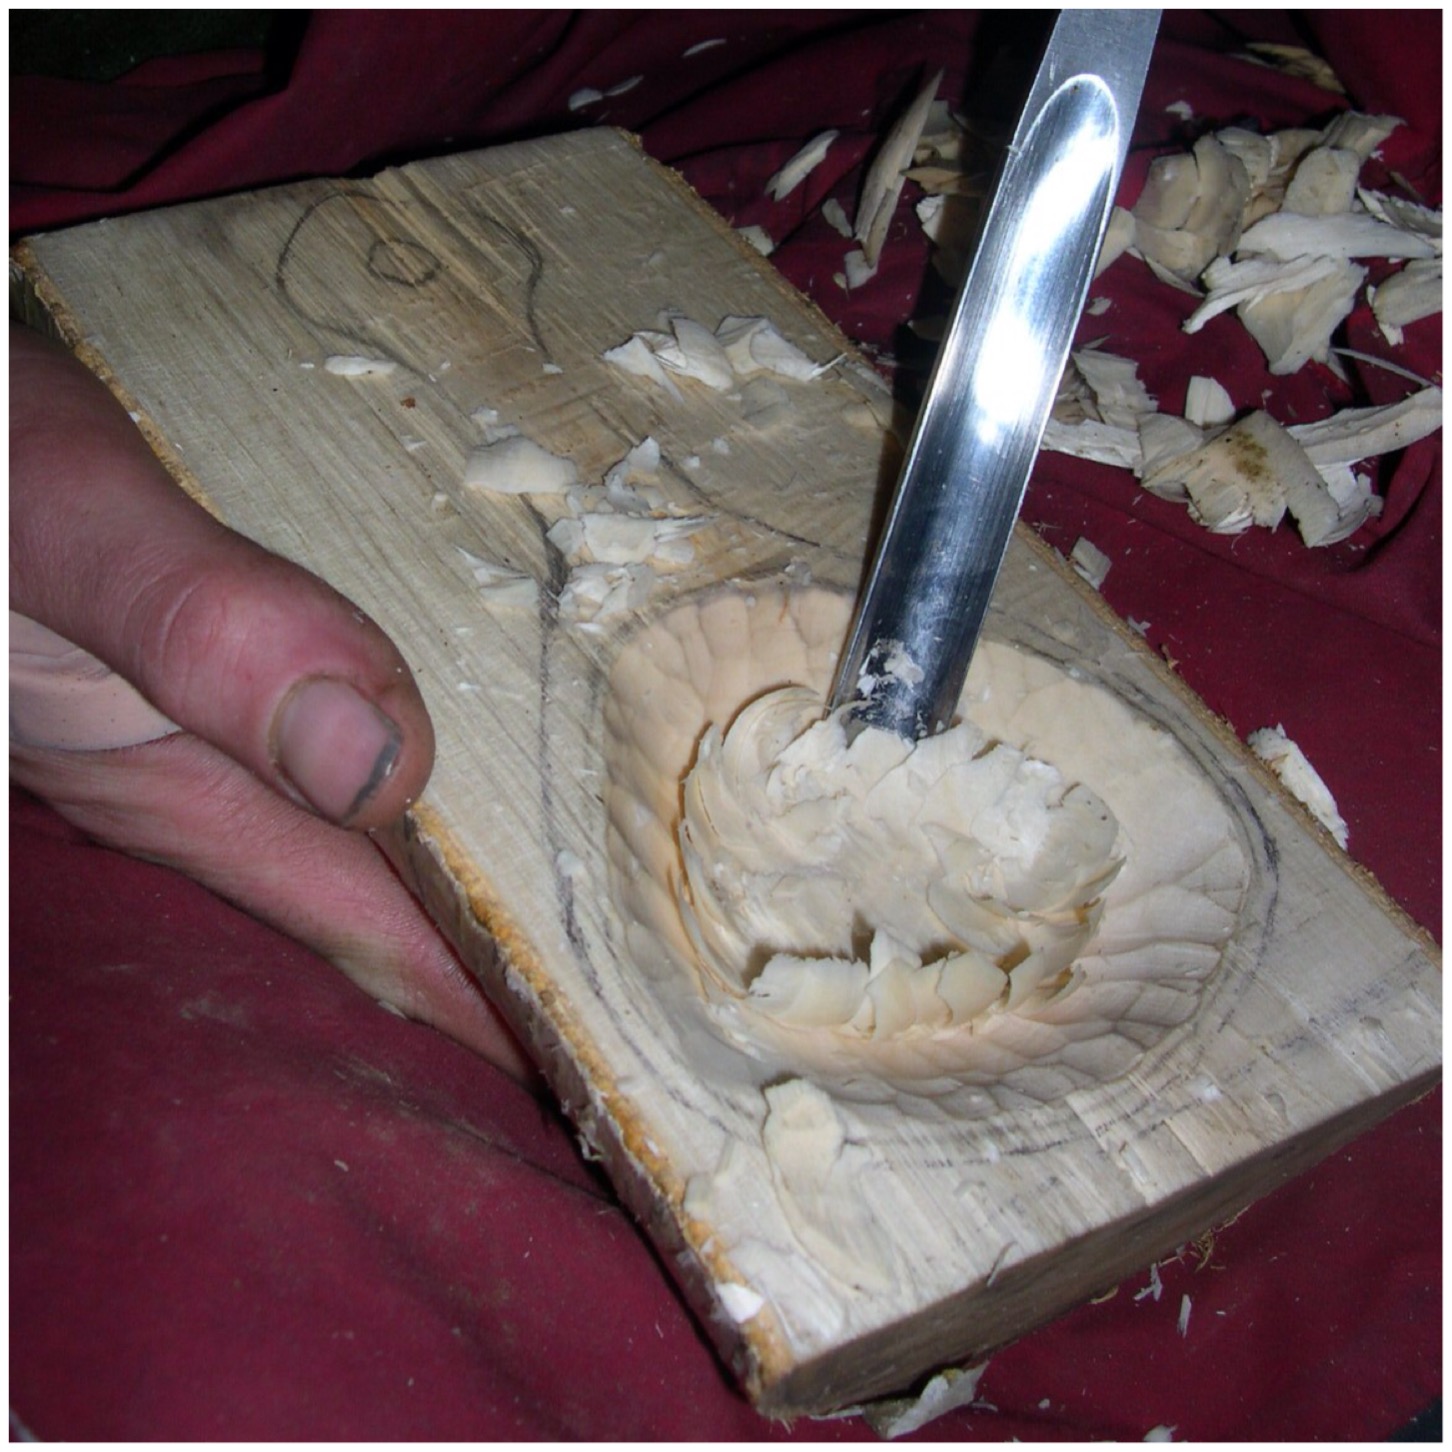
As the sides were to be steep I opted to use a curved wood chisel and a mawl. I carved out the bowl first for various reasons:
To locate any cracks deep in the bowl area quickly
Working with the whole piece makes it more stable
There is less chance of the side of the bowl cracking
Mawl and curved wood chisel for the bowl
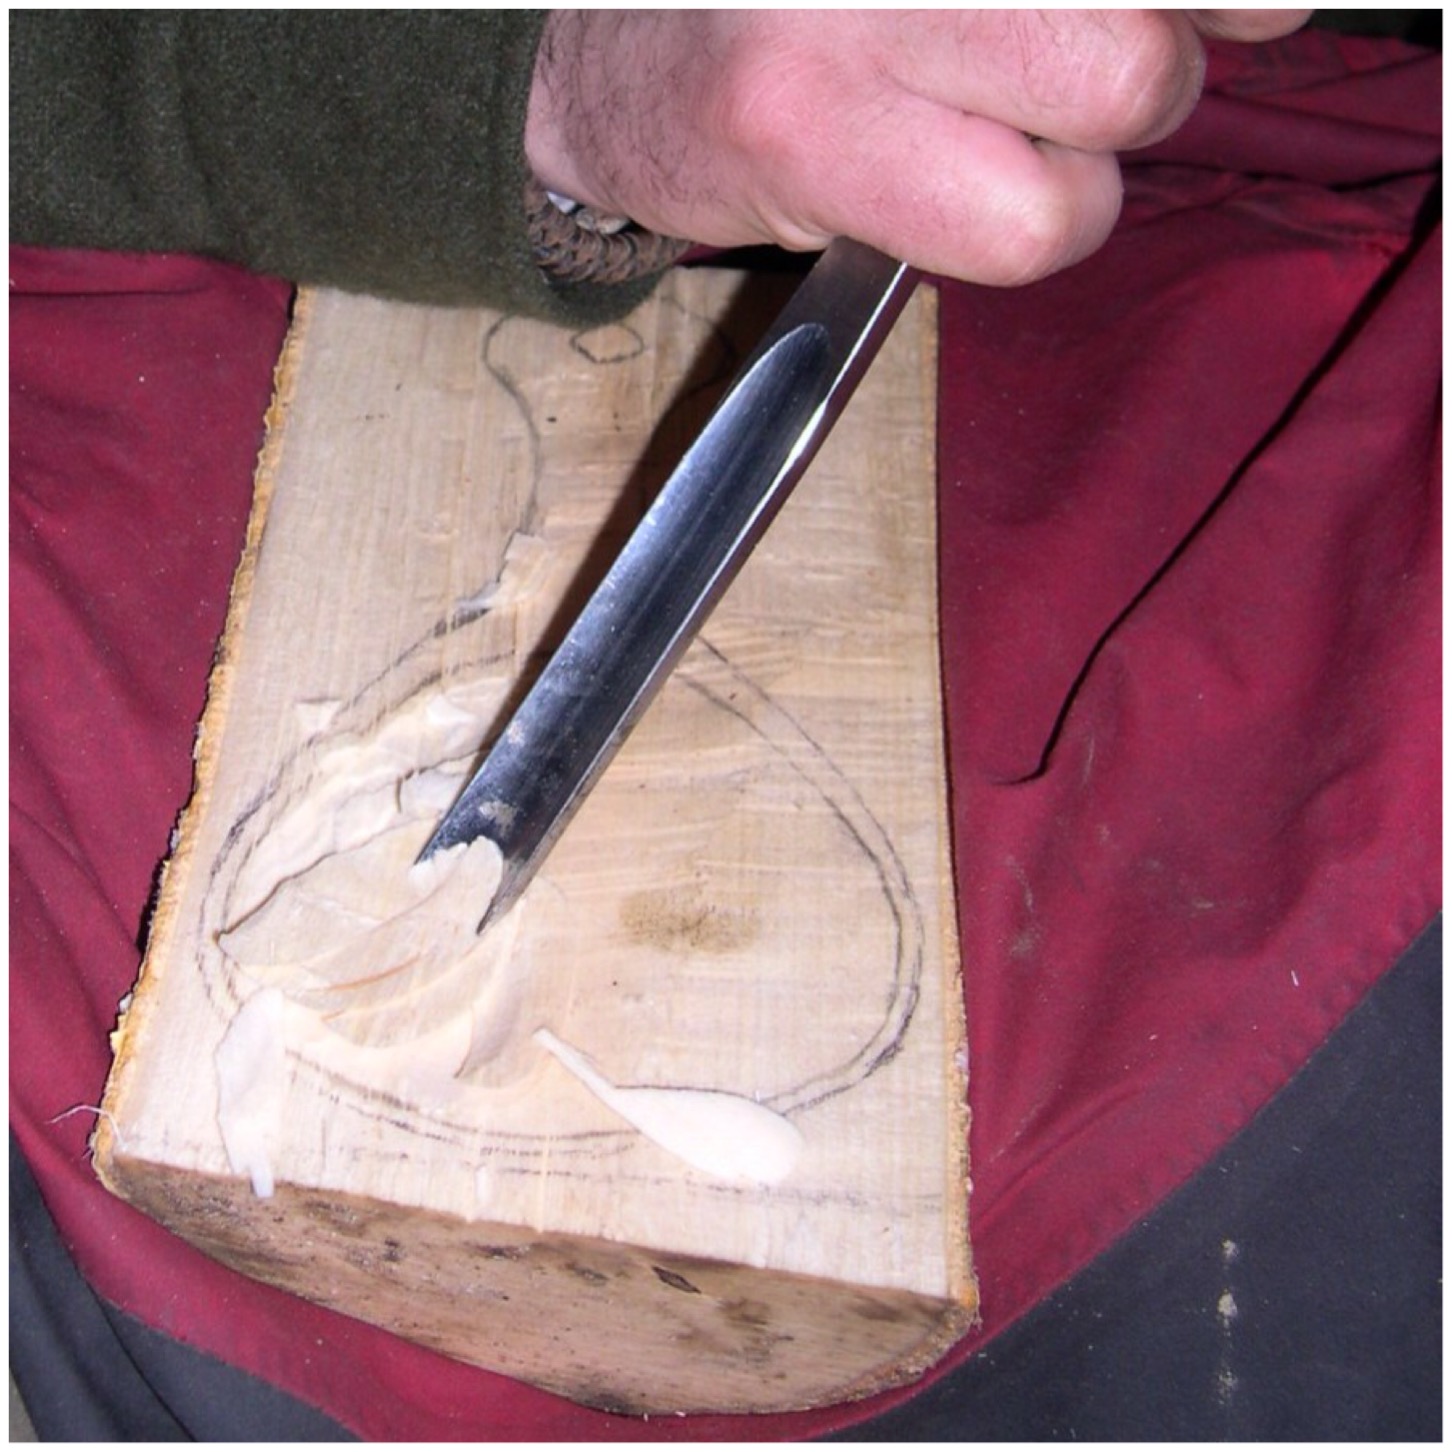
Carving the bowl
To begin with I worked my way around the edge of the bowl taking out small chippings. I tapped the chisel with the mawl quite gently at this stage. The work piece was placed on my lap with 3 thick layers protecting my legs – two jackets and a small day sack.
I positioned the log so that the chisel was always pointing away from me. A work bench with a vice would have been safer but not available at the time (we were working in the winter in a small roundhouse).
Fine work to begin with on the bowl
Going Deeper
Once the initial edge area was carved out I was able to use more force with the chisel. By this time I did not need to use the mawl but cut into the wood by just pressing down with force on the chisel. This seemed to work quicker than using the mawl all the time.
Working my way around the bowl I was able to take out a lot of wood rapidly until I had the basic shape roughed out.
Chunking out the bowl
Axing out the basic shape
Once the bowl was created I axed out the basic shape of the noggin. I used the saw to make ‘stop cuts’ first though so that when I was using the axe I did not cut out areas of wood that formed part of the cup.
I did this work on a stump placed on the floor. The work piece was always well in front of me so that the follow through from any slippage (from the axe) went to the side of me.
Here you can see the two stop cuts created by the saw coming in at either side of the work piece. I then used the axe to cut out the areas of wood I did not require.
Stop cuts and axe work
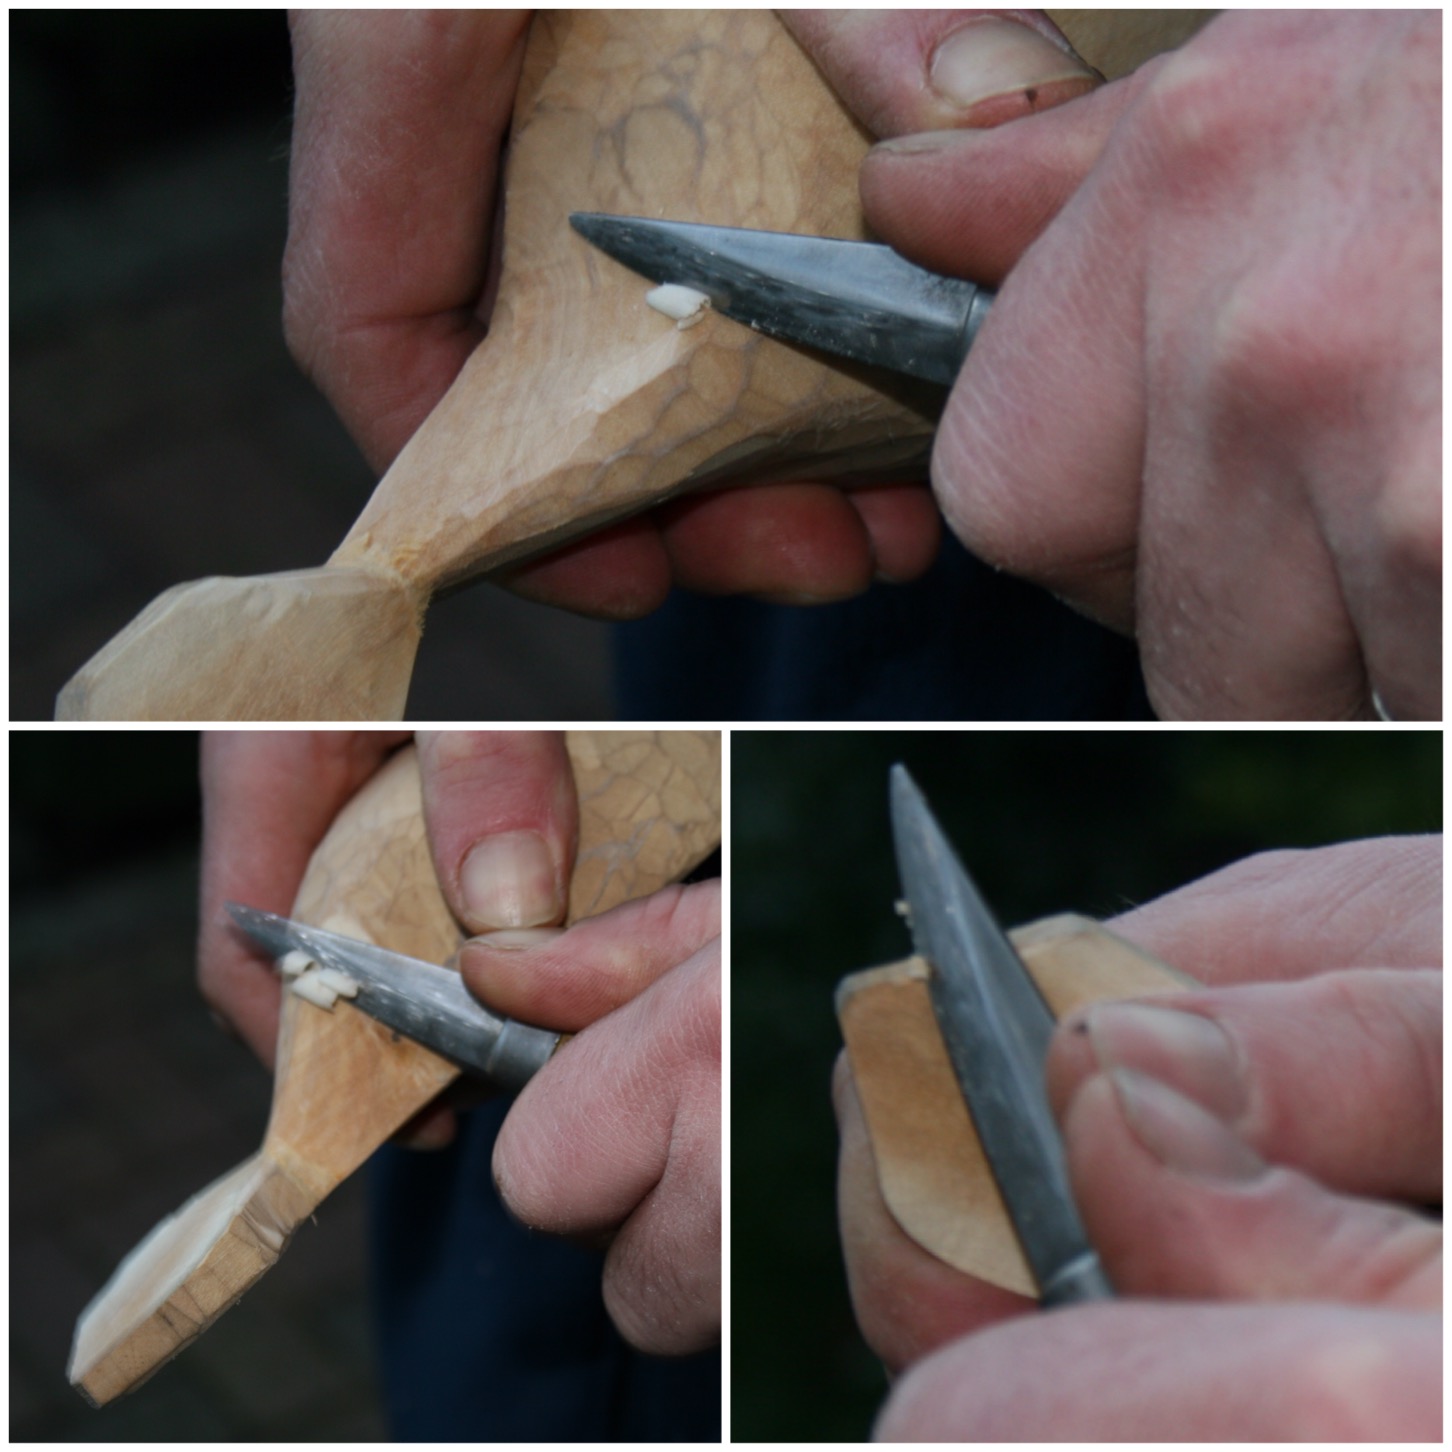
Carving with the Sloyd knife
After using the axe to blank out the basic shape of the noggin I then switched to using my Mora Sloyd knife. This small knife is ideal for more detailed, controlled carving.
I was able to carve in a very controlled and safe fashion with my thumbs pressing on the back of the blade. Even though the cuts were always small it did not take long for me to fine tune the shape as the blade itself was very sharp and the wood was green.
Knife work
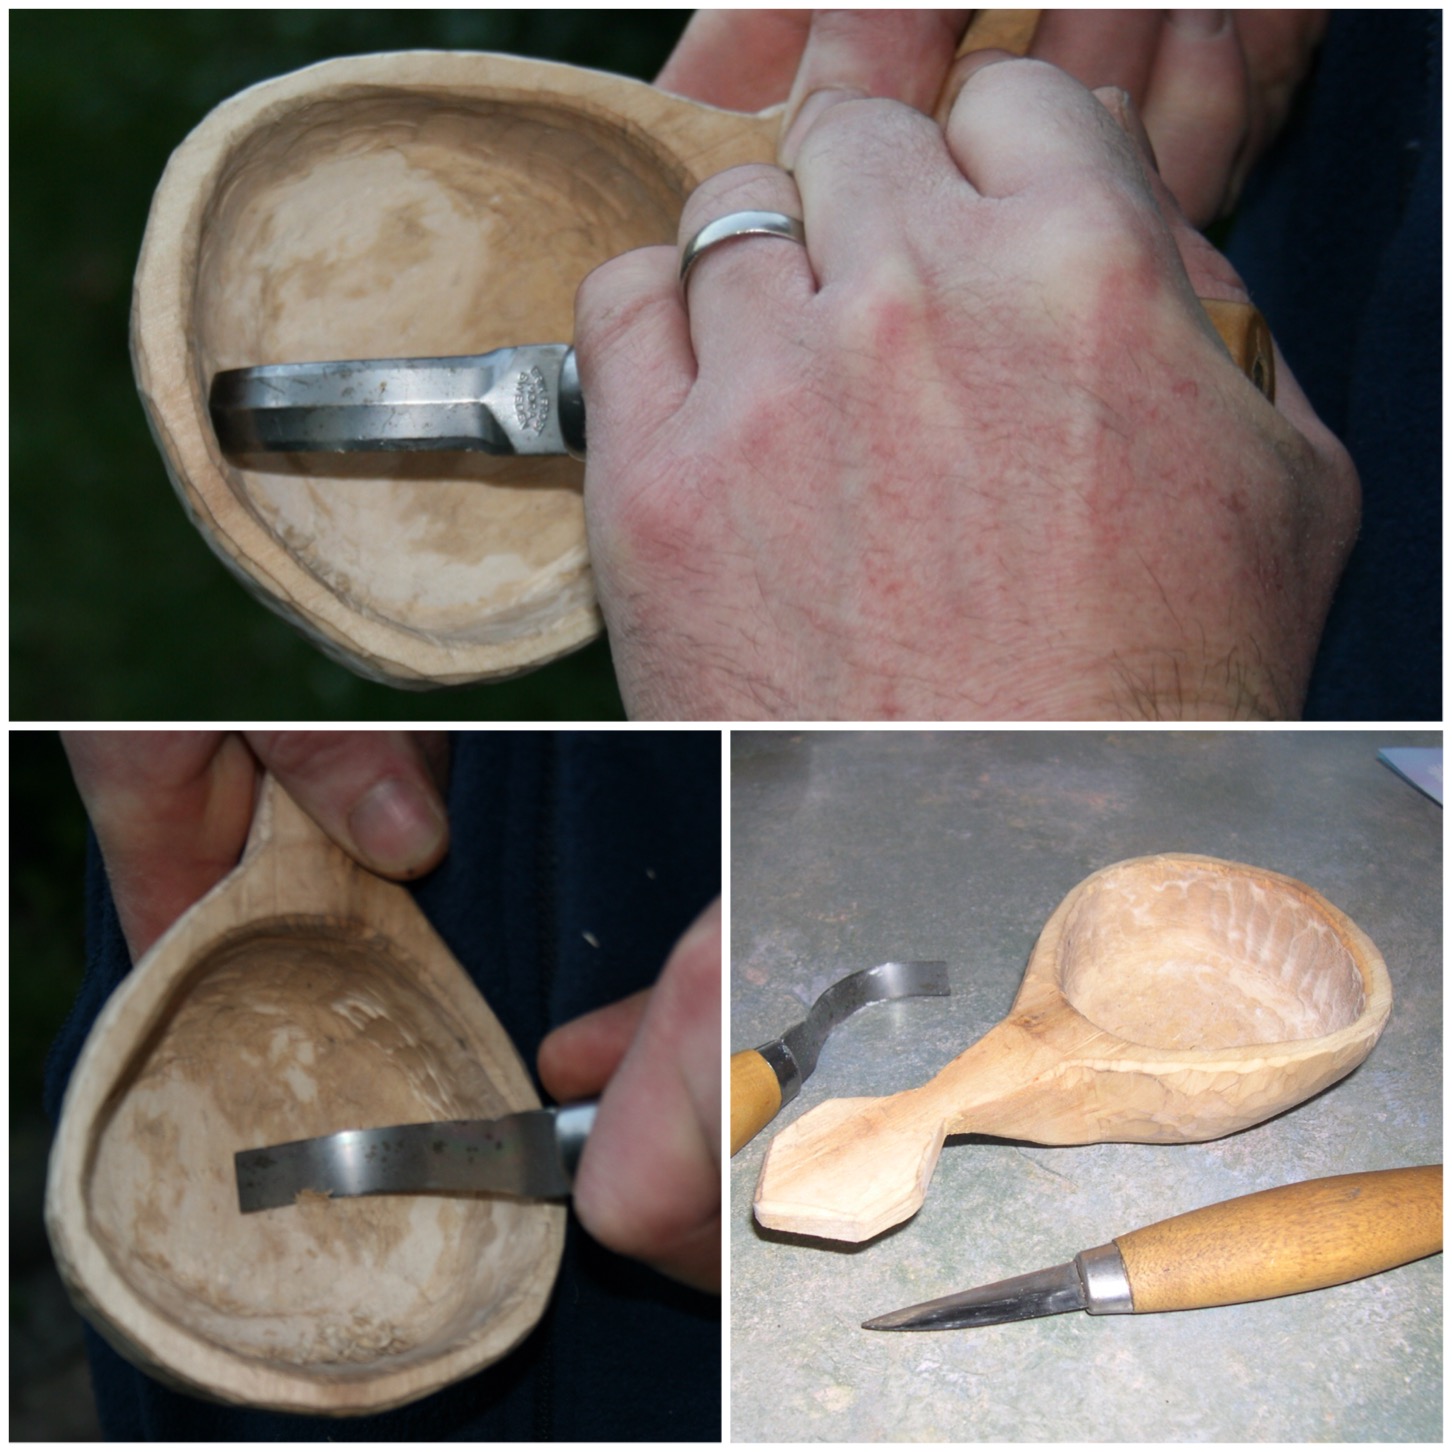
The crook knife
When I had the outside of the noggin ready for sanding I decided to use the crook knife on the inside of the bowl.
This was to take out as many of the small ridges produced by the chisel as possible and also to try and flatten out the bottom of the bowl some more. The crook knife enabled me to smooth out a lot of the ridges that the Sloyd could not reach.
After finishing with the bowl I left the noggin in a paper bag to dry slowly over a two-week period as it is easier to sand down dry wood.
Finishing the bowl with the crook knife
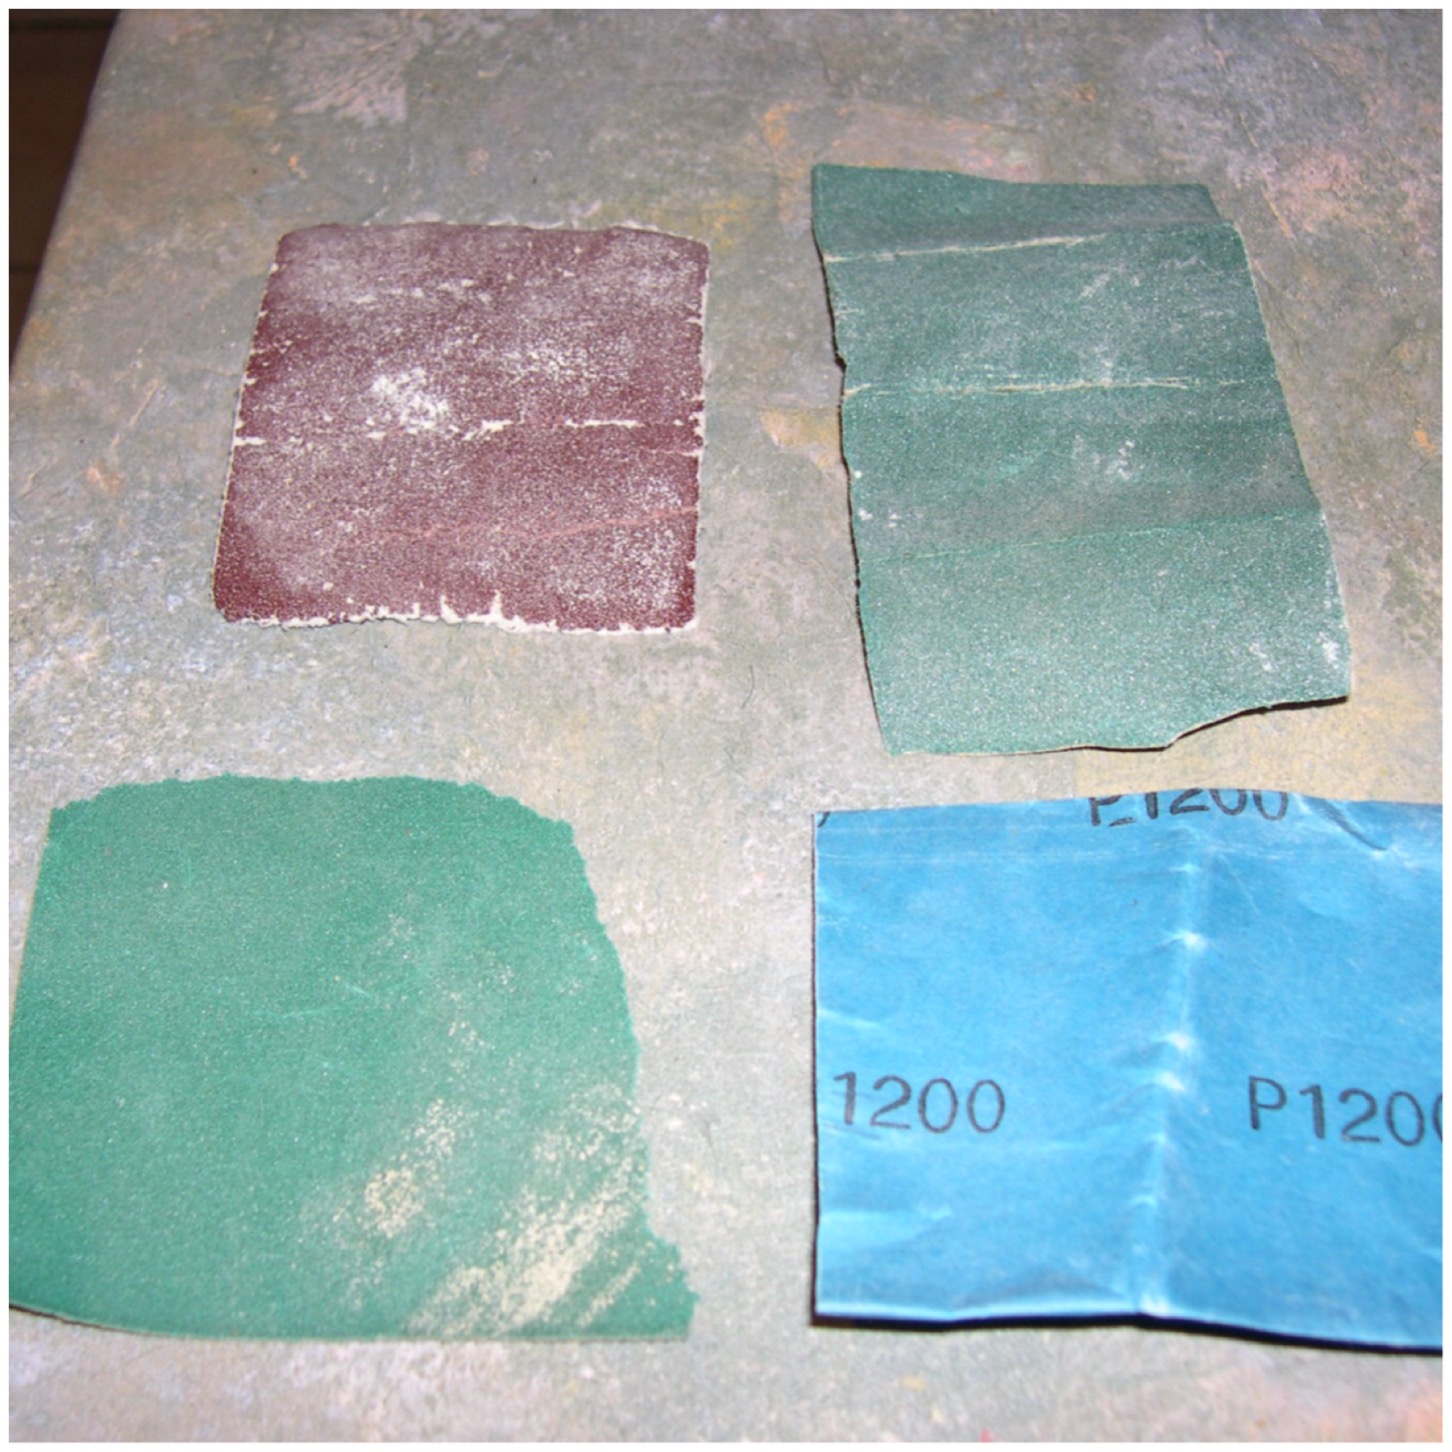
Sanding the Noggin
I used a variety of different sandpapers on the noggin including:
Top left – 80 grit
Top right – 150 grit
Bottom left – 320 grit
Bottom right – 1200 grit
The sandpapers used
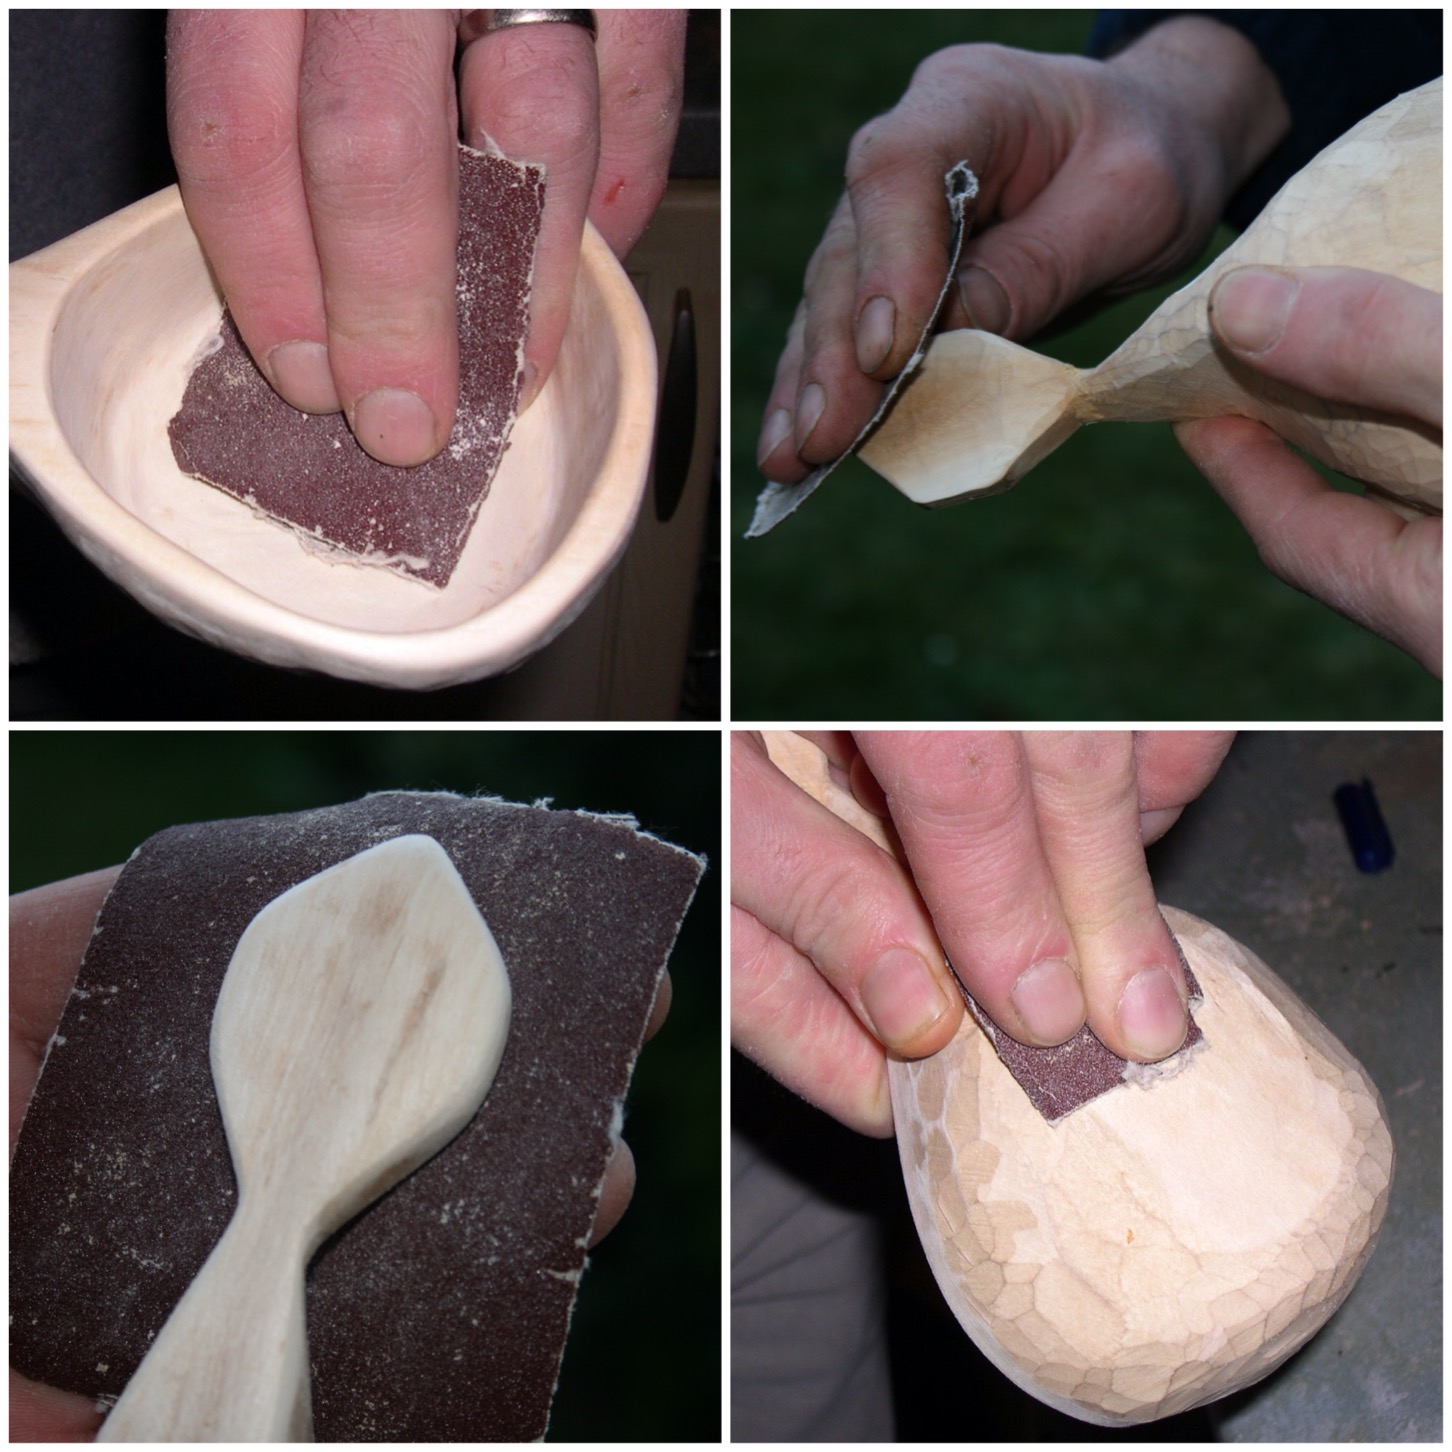
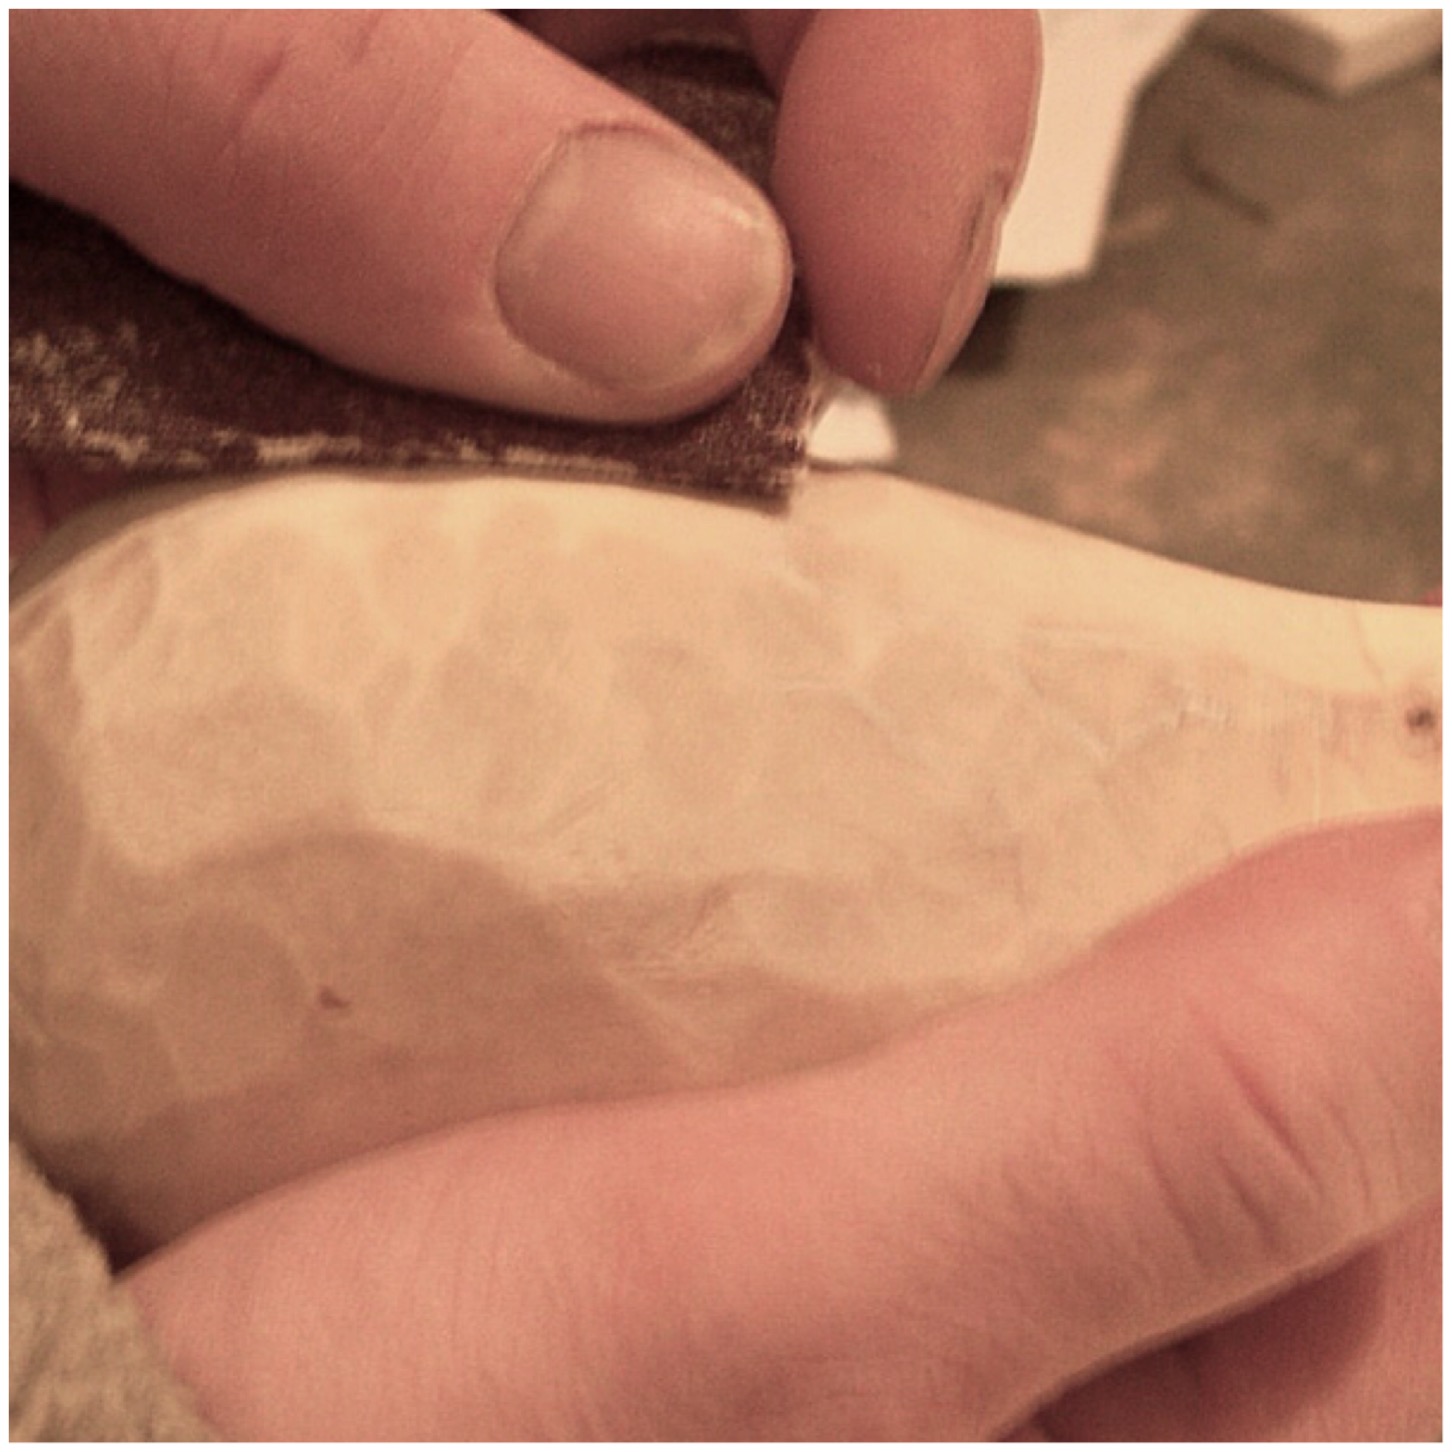
I started with the coarsest, 80 grit, ensuring I covered the whole noggin and that all the edges were rounded off. The bottom of the noggin did take a considerable period of time to roughly sand (I should probably have done more knife work) but I wanted to create a small flat area so that it would be stable when set down with liquid in it.
I did not sand the whole of the noggin smooth as I wanted to leave some of the tool marks showing but I did give the rim of the cup an extra bit of sanding as I wanted that bit particularly smooth.
Sanding
I really focused on making the rim smooth as I wanted that smoothness to contrast with the tool marks on the lower area.
Once I had finished with the 80 grit I worked my way up through the other sandpaper slowly smoothing the noggin down until I reached the finest, 1200 grit.
Smoothing the rim
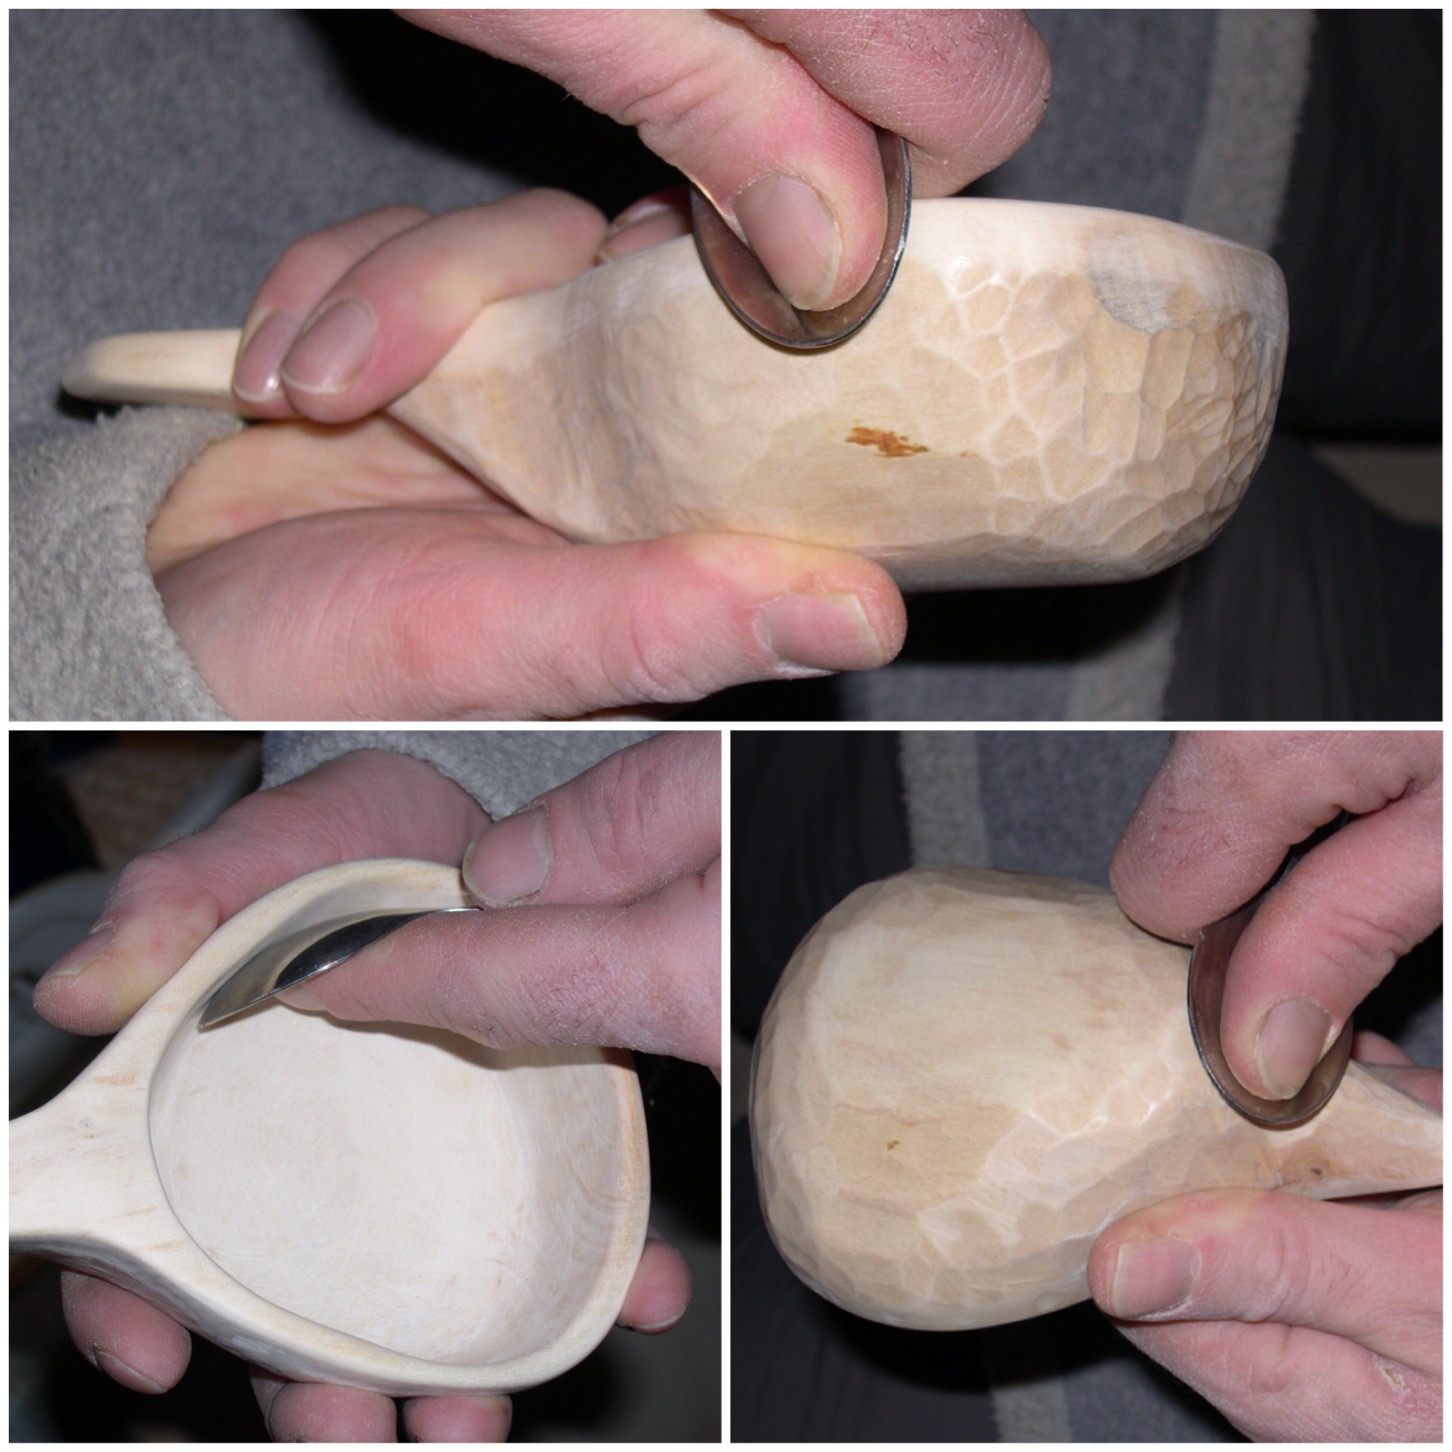
Boning the noggin
After sanding I oiled the noggin lightly (I used vegetable oil as that was all that was available) then used the back of a spoon to really smooth the surface. This is known as boning and as well as smoothing the surface it helps to seal the oil into the wood (a small rounded pebble works just as well).
Boning
This whole process took a couple of hours and I added more oil as I went along. I find boning quite therapuetic, and it leaves a beautifully smooth satiny finish.
Lastly I carved a hole in the handle, fixed a leather loop and oiled the noggin once again.
Before and after oiling
Lovely carvings for lovely ladies (although sadly Alison couldn’t christen hers with a dram of whisky on Christmas Day: she was pregnant with our son Finlay, who was born just a couple of weeks later!).
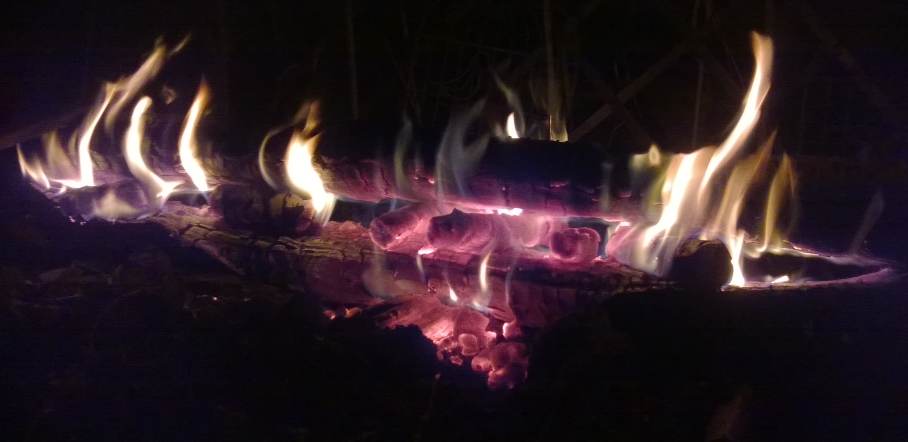
While writing my posts on my Scandinavian Candle series I recollected a long log fire I was taught how to set up by my good friend Kevin Warrington of Natural Lore. I like to think of it as a candle, but horizontal instead of vertical. The set up is basically two logs (usually pine) laid horizontally with one on top of the other.
This post is a step-by-step recording of how I set up what I have discovered is called the Rakovalkea Gap Fire.
Finnish Rakovalkea Gap Fire
Back in 2007 I was on a bushcraft course with Kevin Warrington and he showed me how to set up a long log fire. This isn’t quite the Finnish Rakovalkea but the idea is basically the same. These fires are great when you’re sleeping outdoors in a lean-to shelter or under the tree canopy in very cold or arctic conditions. Last weekend I came across an excellent post on making a large full length Rakovalkea Gap Fire by SKW Bushcraft(I used Google Chrome to translate the page).
Where it all began
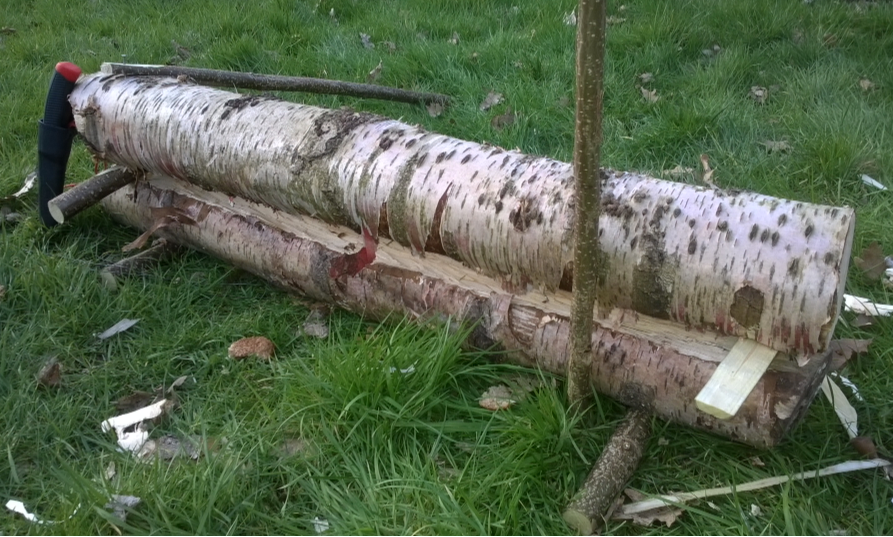
While out last weekend in the woods I came across some dead standing birch logs that looked ideal for the fire (normally pine is used but I do not have access to any at the moment), and luckily there were some handy, biddable children around to help transport it home.
Foraging
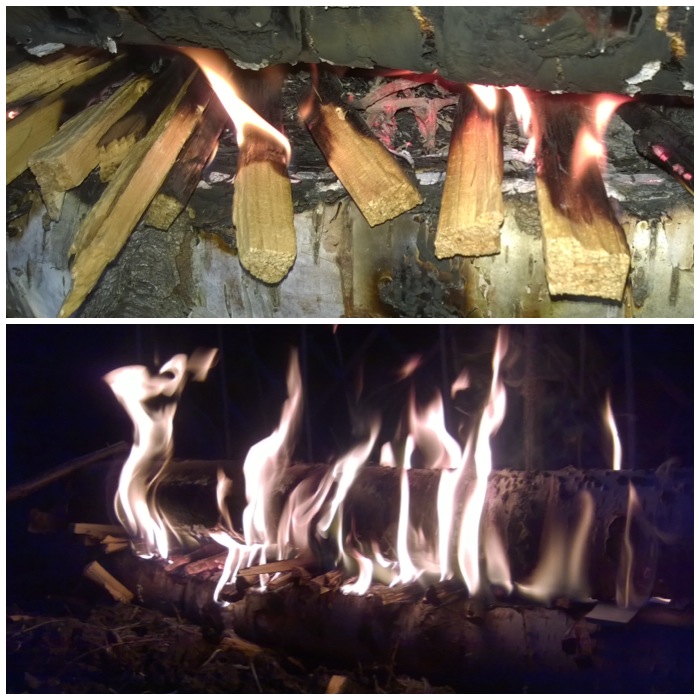
The component parts are two logs and various green sticks for supports and wedges. I flattened one of the logs in preparation for cutting out a groove in which to start the fire, keeping all the chippings for getting the fire going later. The log was not wet, exactly, but it was slightly damp owing to the heavy rain we have had recently. I could have left this experiment for the summer but thought that if I could get a damp log going then that would be a more realistic test for the UK environment. This type of fire is normally used in dry arctic environments where dead standing pines are abundant.
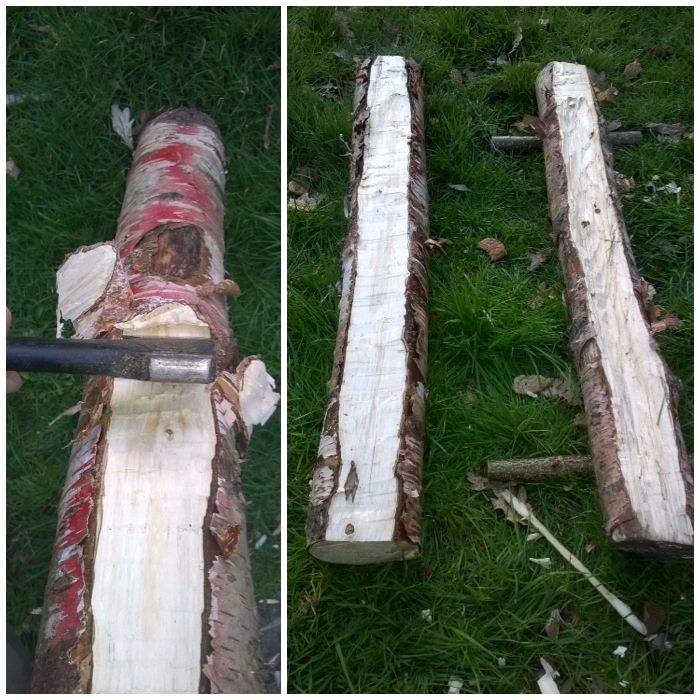
Component parts – Create a flat surface on one log
Once the log was flattened I carved out the channel. This is the dangerous bit, so cut the channel out with small cuts and with the log on the ground or well off to your side. I left flattened areas off to the sides but on reflection I think I should have made the channel the full length to maximize airflow.
Axe out a channel
On the underside of the log with the channel I axed out two grooves for the support poles.
Under the log with the channel axe out a groove at each end
The support poles help to stop the log from rolling off to one side. I think if they were big enough they must help when the log is resting on snow to keep it secure.
Bottom log set up
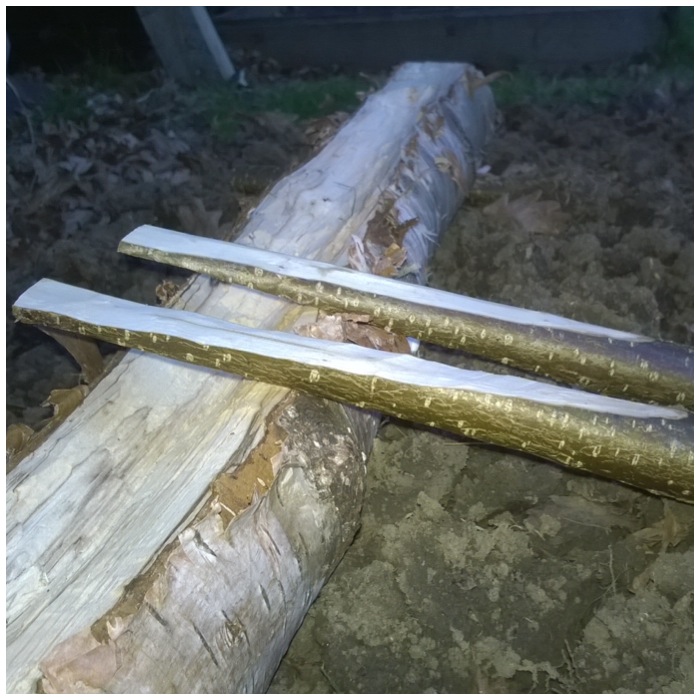
On the log that I was going to place on top I just flattened one side of it so it would rest securely on top of the bottom log. Again, on reflection, as the log was damp I should have made multiple cuts in this area with my axe to increase the surface area of the log and let the flames catch hold better. I came across this method when researching the Raappanan tuli candle.
Flatten out along a section of the top log
I carved two wedges that were to be used to vary the gap height between the two logs. These also proved useful as tongs later.
Green wood wedges for adjusting height
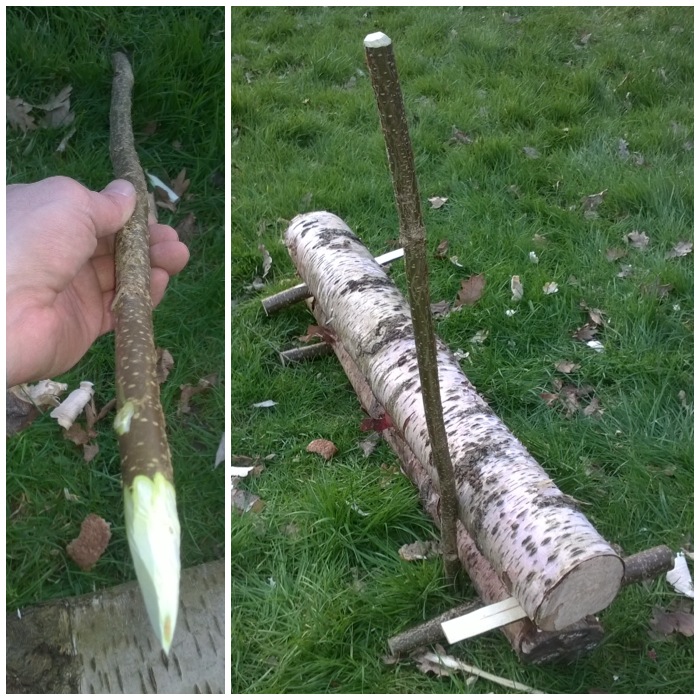
On one of the poles of green wood I carved a point and dug it into the ground beside the set up as support. I made this extra long as I was setting this up on soft earth (on the potato bed my wife had just dug over, in fact, but as it’s not been planted yet no potatoes were harmed in the making of this fire, and as I keep telling her ash is good for the soil).
One sharpened pole for support
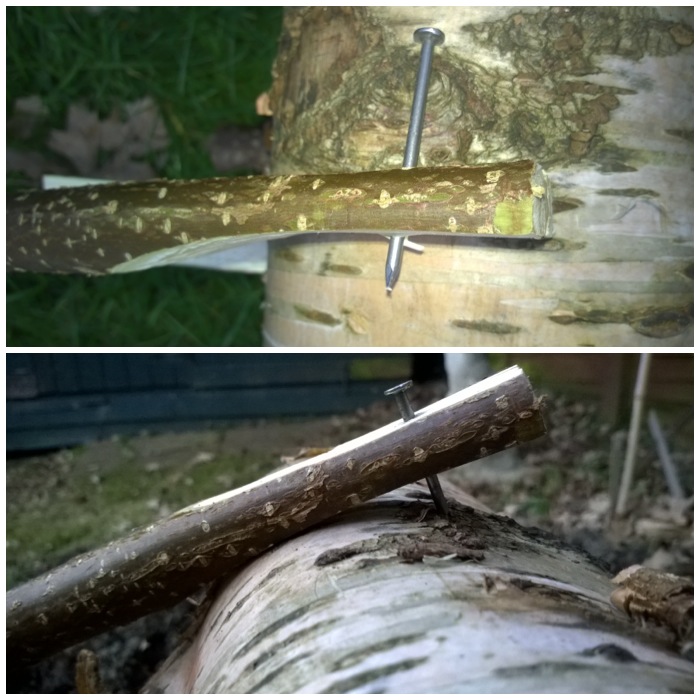
I slimmed down the end of another green stick and hammered a nail into it. One end of the stick is dug into the ground and nailed into the top log (diagonally opposite to the vertically upright green pole)
Nail pole support
This is the basic set up without any tinders in the middle. All in all (not including foraging the wood) this set up took me about 15 minutes to do. I have read that with the much larger set ups (full body length) someone with good axe skills can set one up in an hour or so.
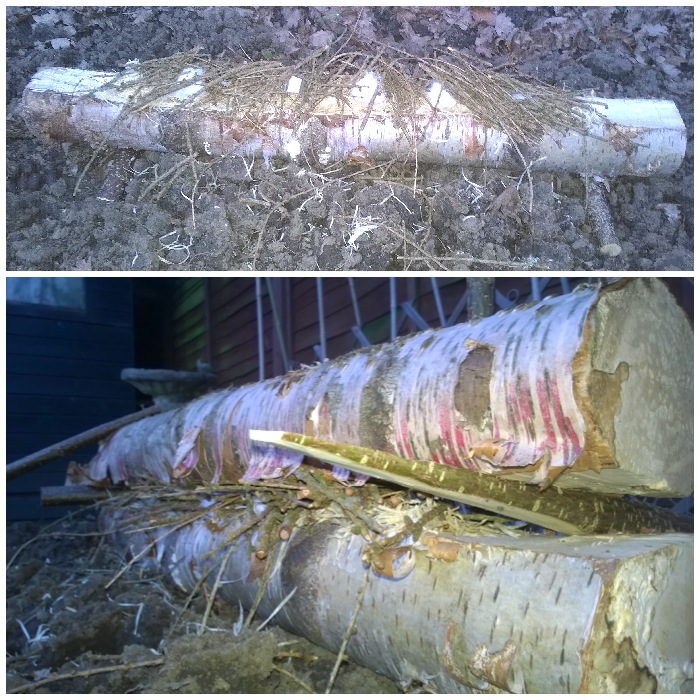
Basic set up without tinder
To get the fire going I used a mixture of waxed wood shavings, cotton wool balls smeared in Vaseline, and a lot of dry larch twigs. I did try and find some pine or spruce resin but to no avail. Resin is traditionally used along with pine fat wood.
Filled with tinders
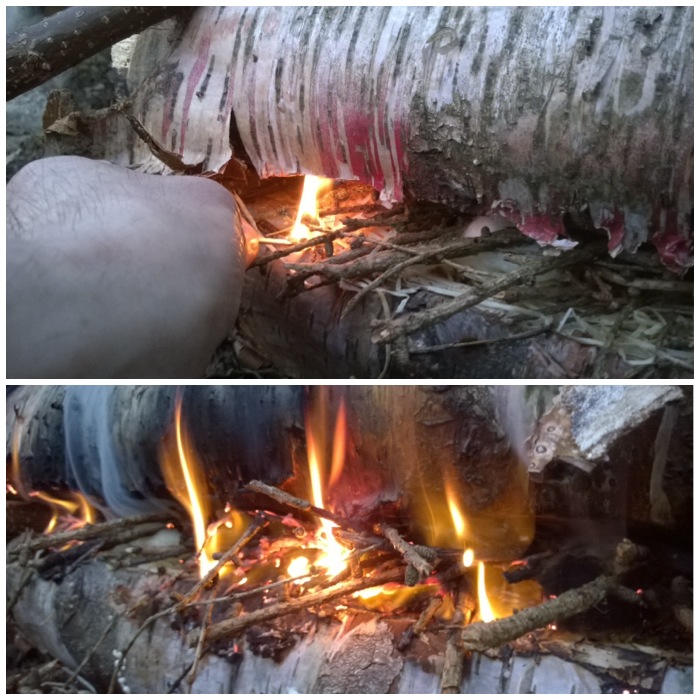
I lit the whole thing with just a couple of matches and in a few seconds the whole set up was alight.
Firing up
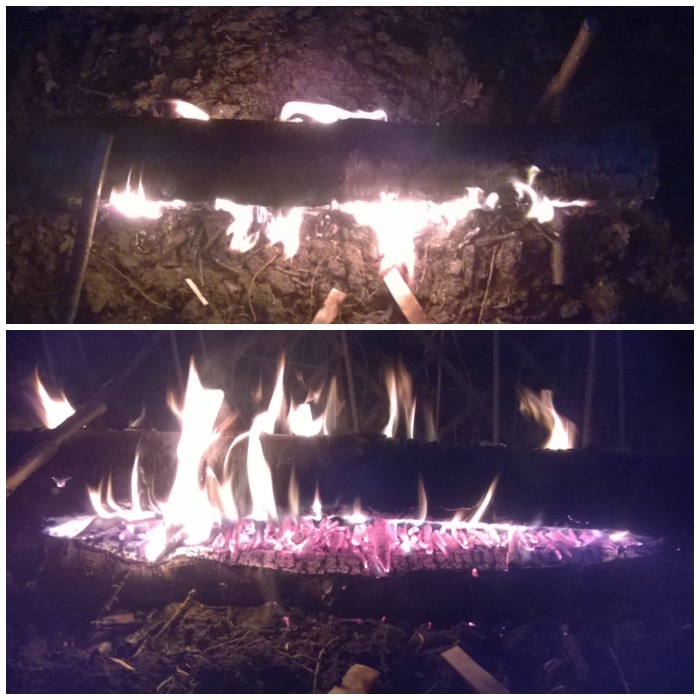
It was lovely to see the flames spread so quickly and on both sides.
Initial burn
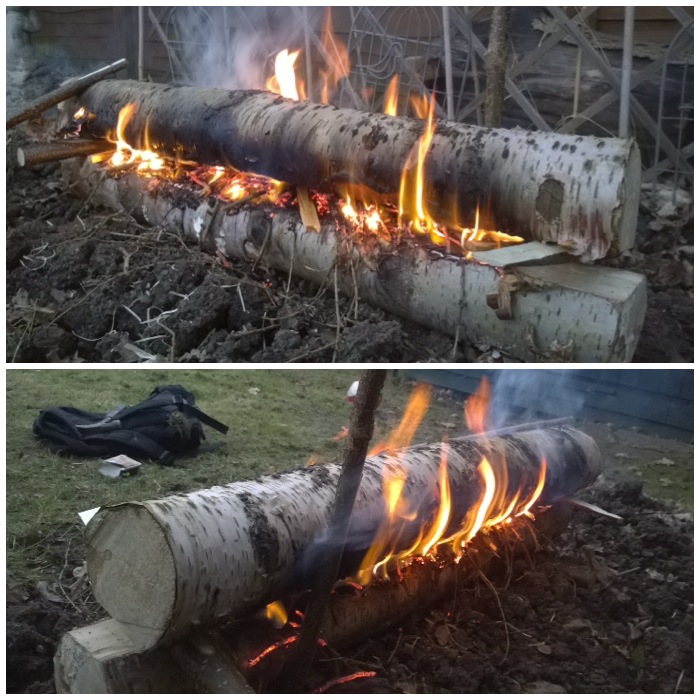
After about 5 minutes I started to add lots of pine kindling along the whole length. There was no wind so I had a small plastic plate to use as a wafter. The wooden wedges really came into their own as they allowed me to adjust the height of the gap so as to insert the kindling.
I tested the heat (with the back of my fingers) along the full length of the set up and it felt very uniform along its full length.
Adding small kindling
For the next hour I just kept giving the fire the occasional waft and added more and more kindling. I made a short video (the sound is quite poor I am afraid) of the fire at this stage.
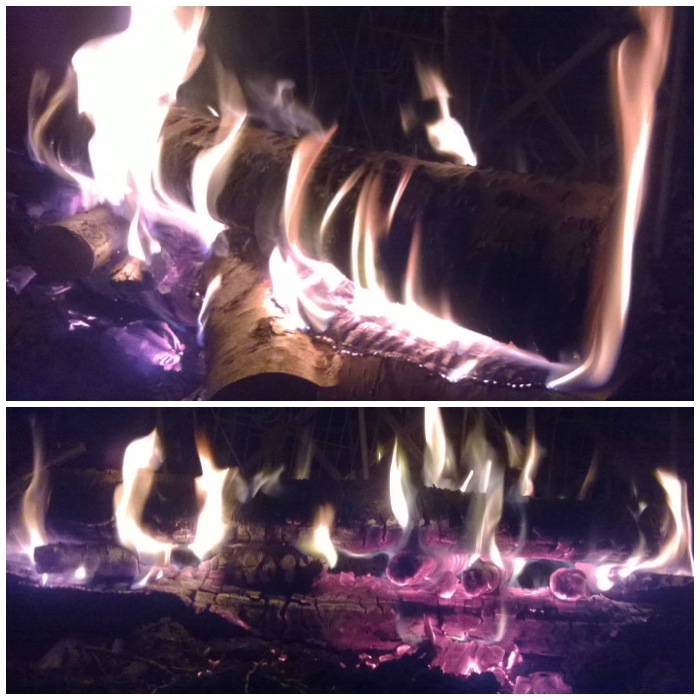
Main logs starting to go
After I had used up the kindling the gap had widened a fair bit between the logs so I did not need to use the green wood wedges anymore. I used the wedges after this to insert larger pieces of wood into the gap along the length of the fire. This greatly helped combating the dampness in the main logs. I had to use the wedges as tongs at this stage as the heat was quite fierce.
Adding larger pieces of wood
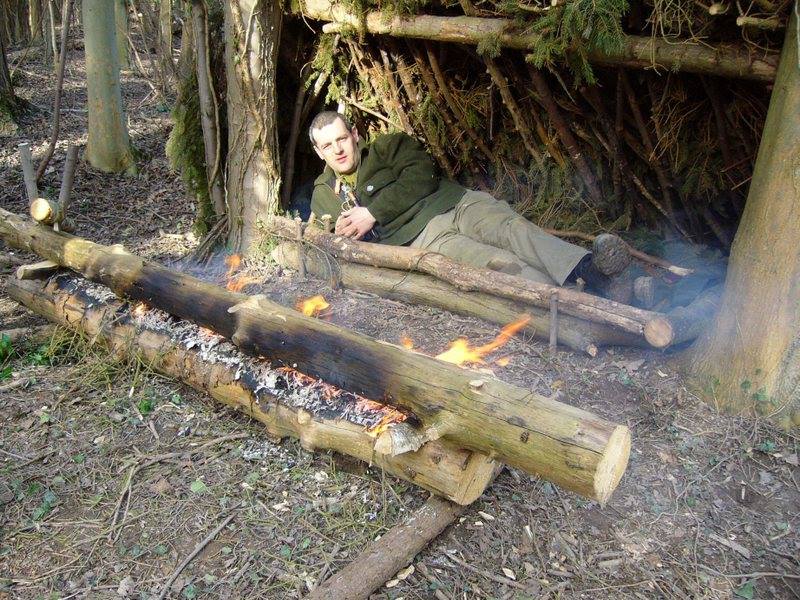
After two hours the bottom log was alight quite nicely and if I was sitting in front of this in the woods I would have been toasty warm. In comparison to a traditional set up I would normally use (criss cross lay for example) I needed to use very little wood to feed the gap.
Final flames
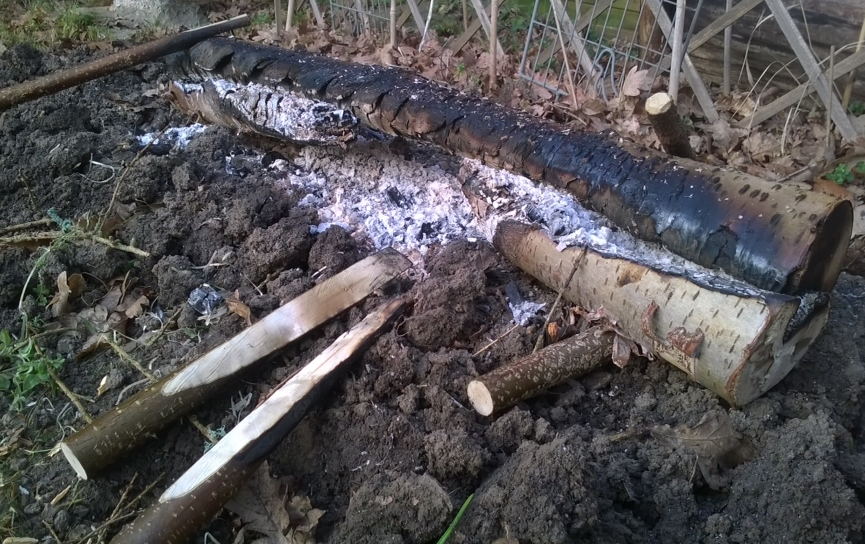
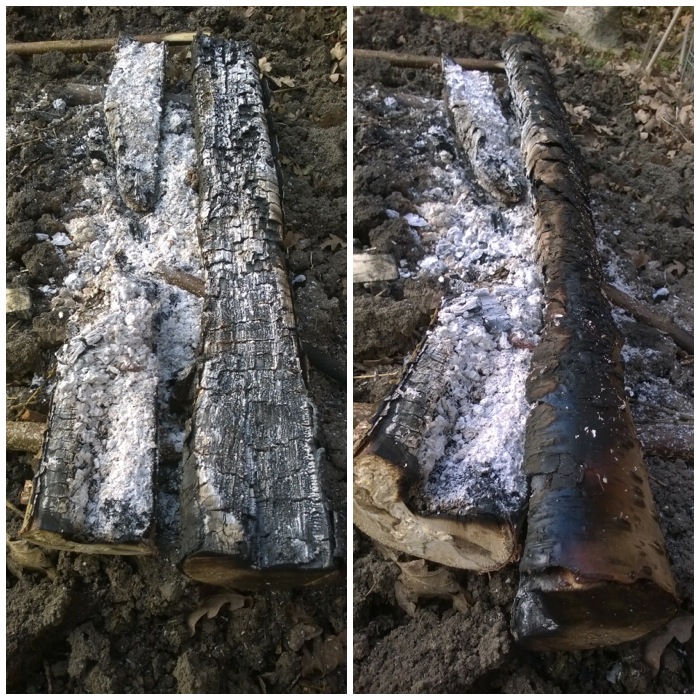
In the morning I found that the bottom log had burned through where I had placed the last of my small logs (I concentrated them on the centre section).
The next day
The top log due to its dampness had still not burnt through after all that heat but I was very impressed with this set up.
Top log too damp to burn through
I am looking forward to later in the year when I can try this again but with larger pine logs and one day soon sleeping out in a lean-to shelter in an arctic environment with one of these fires to keep me warm.
There are some excellent long log fire pictures here on the Bushcraft UK forum to view and the Winter Trekking forum shows some good pictures of the Finnish army using the method.