I started an online plant masterclass this year with Paul Kirtley of Frontier Bushcraft. The aim of the course is to learn more about the plants around us in a very structured way. As the course is spread out over a year, one of the benefits of this type of learning is to observe plants as they change throughout the seasons.
So far I have been compiling pictures on a variety of plants and sites around my village (Bramley in Hampshire, UK) by taking pictures of them every two weeks or so.
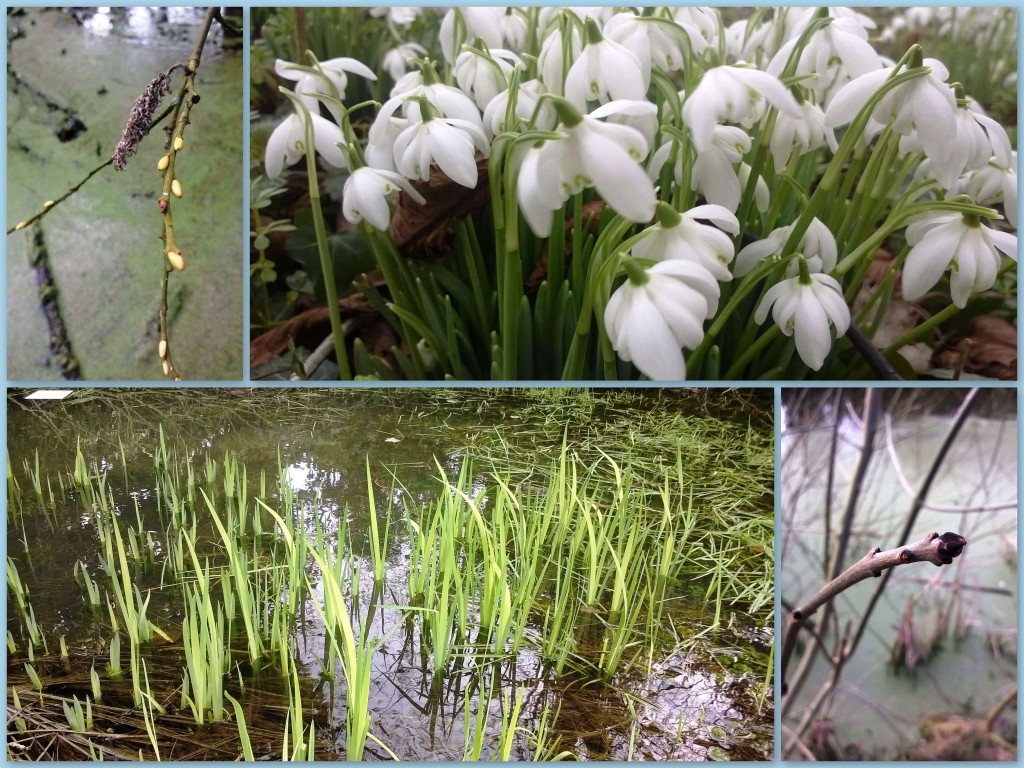
The first pictures I took in early February showed a very quiet time with most of the tree buds lying waiting for these longer spring days but there were a few gems around like the snowdrops.
Everything is quiet apart from the snowdrops early in February
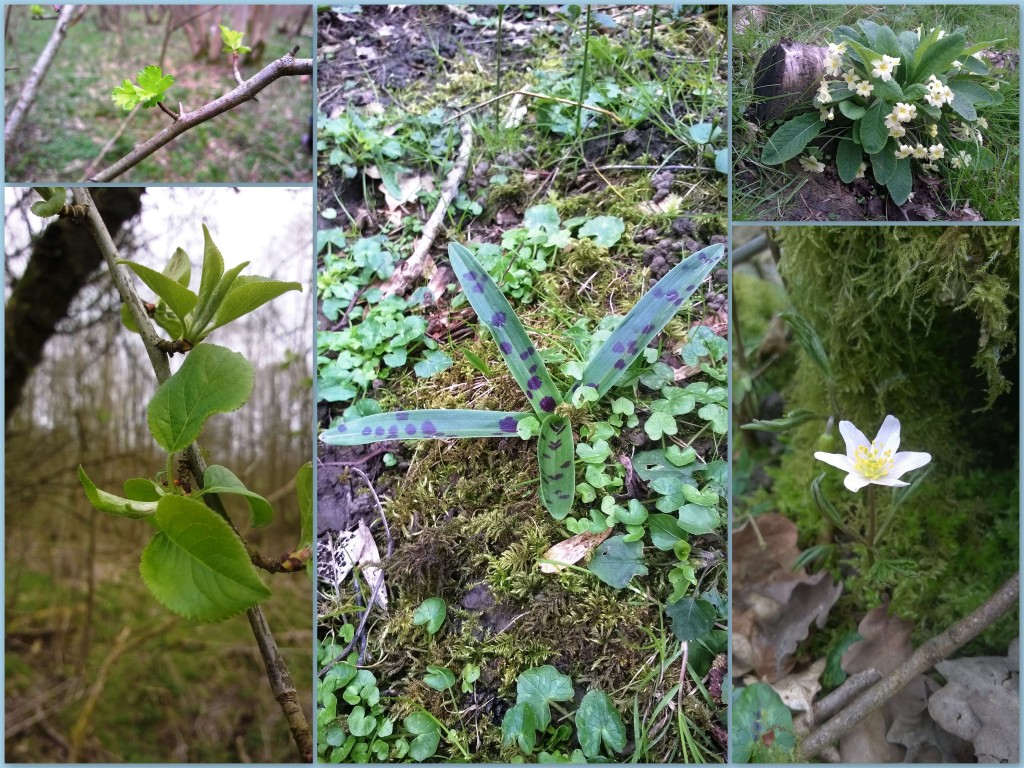
My last trip out was on 30th March: I came across quite a few plants like primrose that have been around for a while now but also spotted some new orchid growth and a wood anemone. The hawthorn and apple that I had been photographing had also just burst into life.
Bursting with life in late March -hawthorn, apple, orchid, primrose and wood anemone
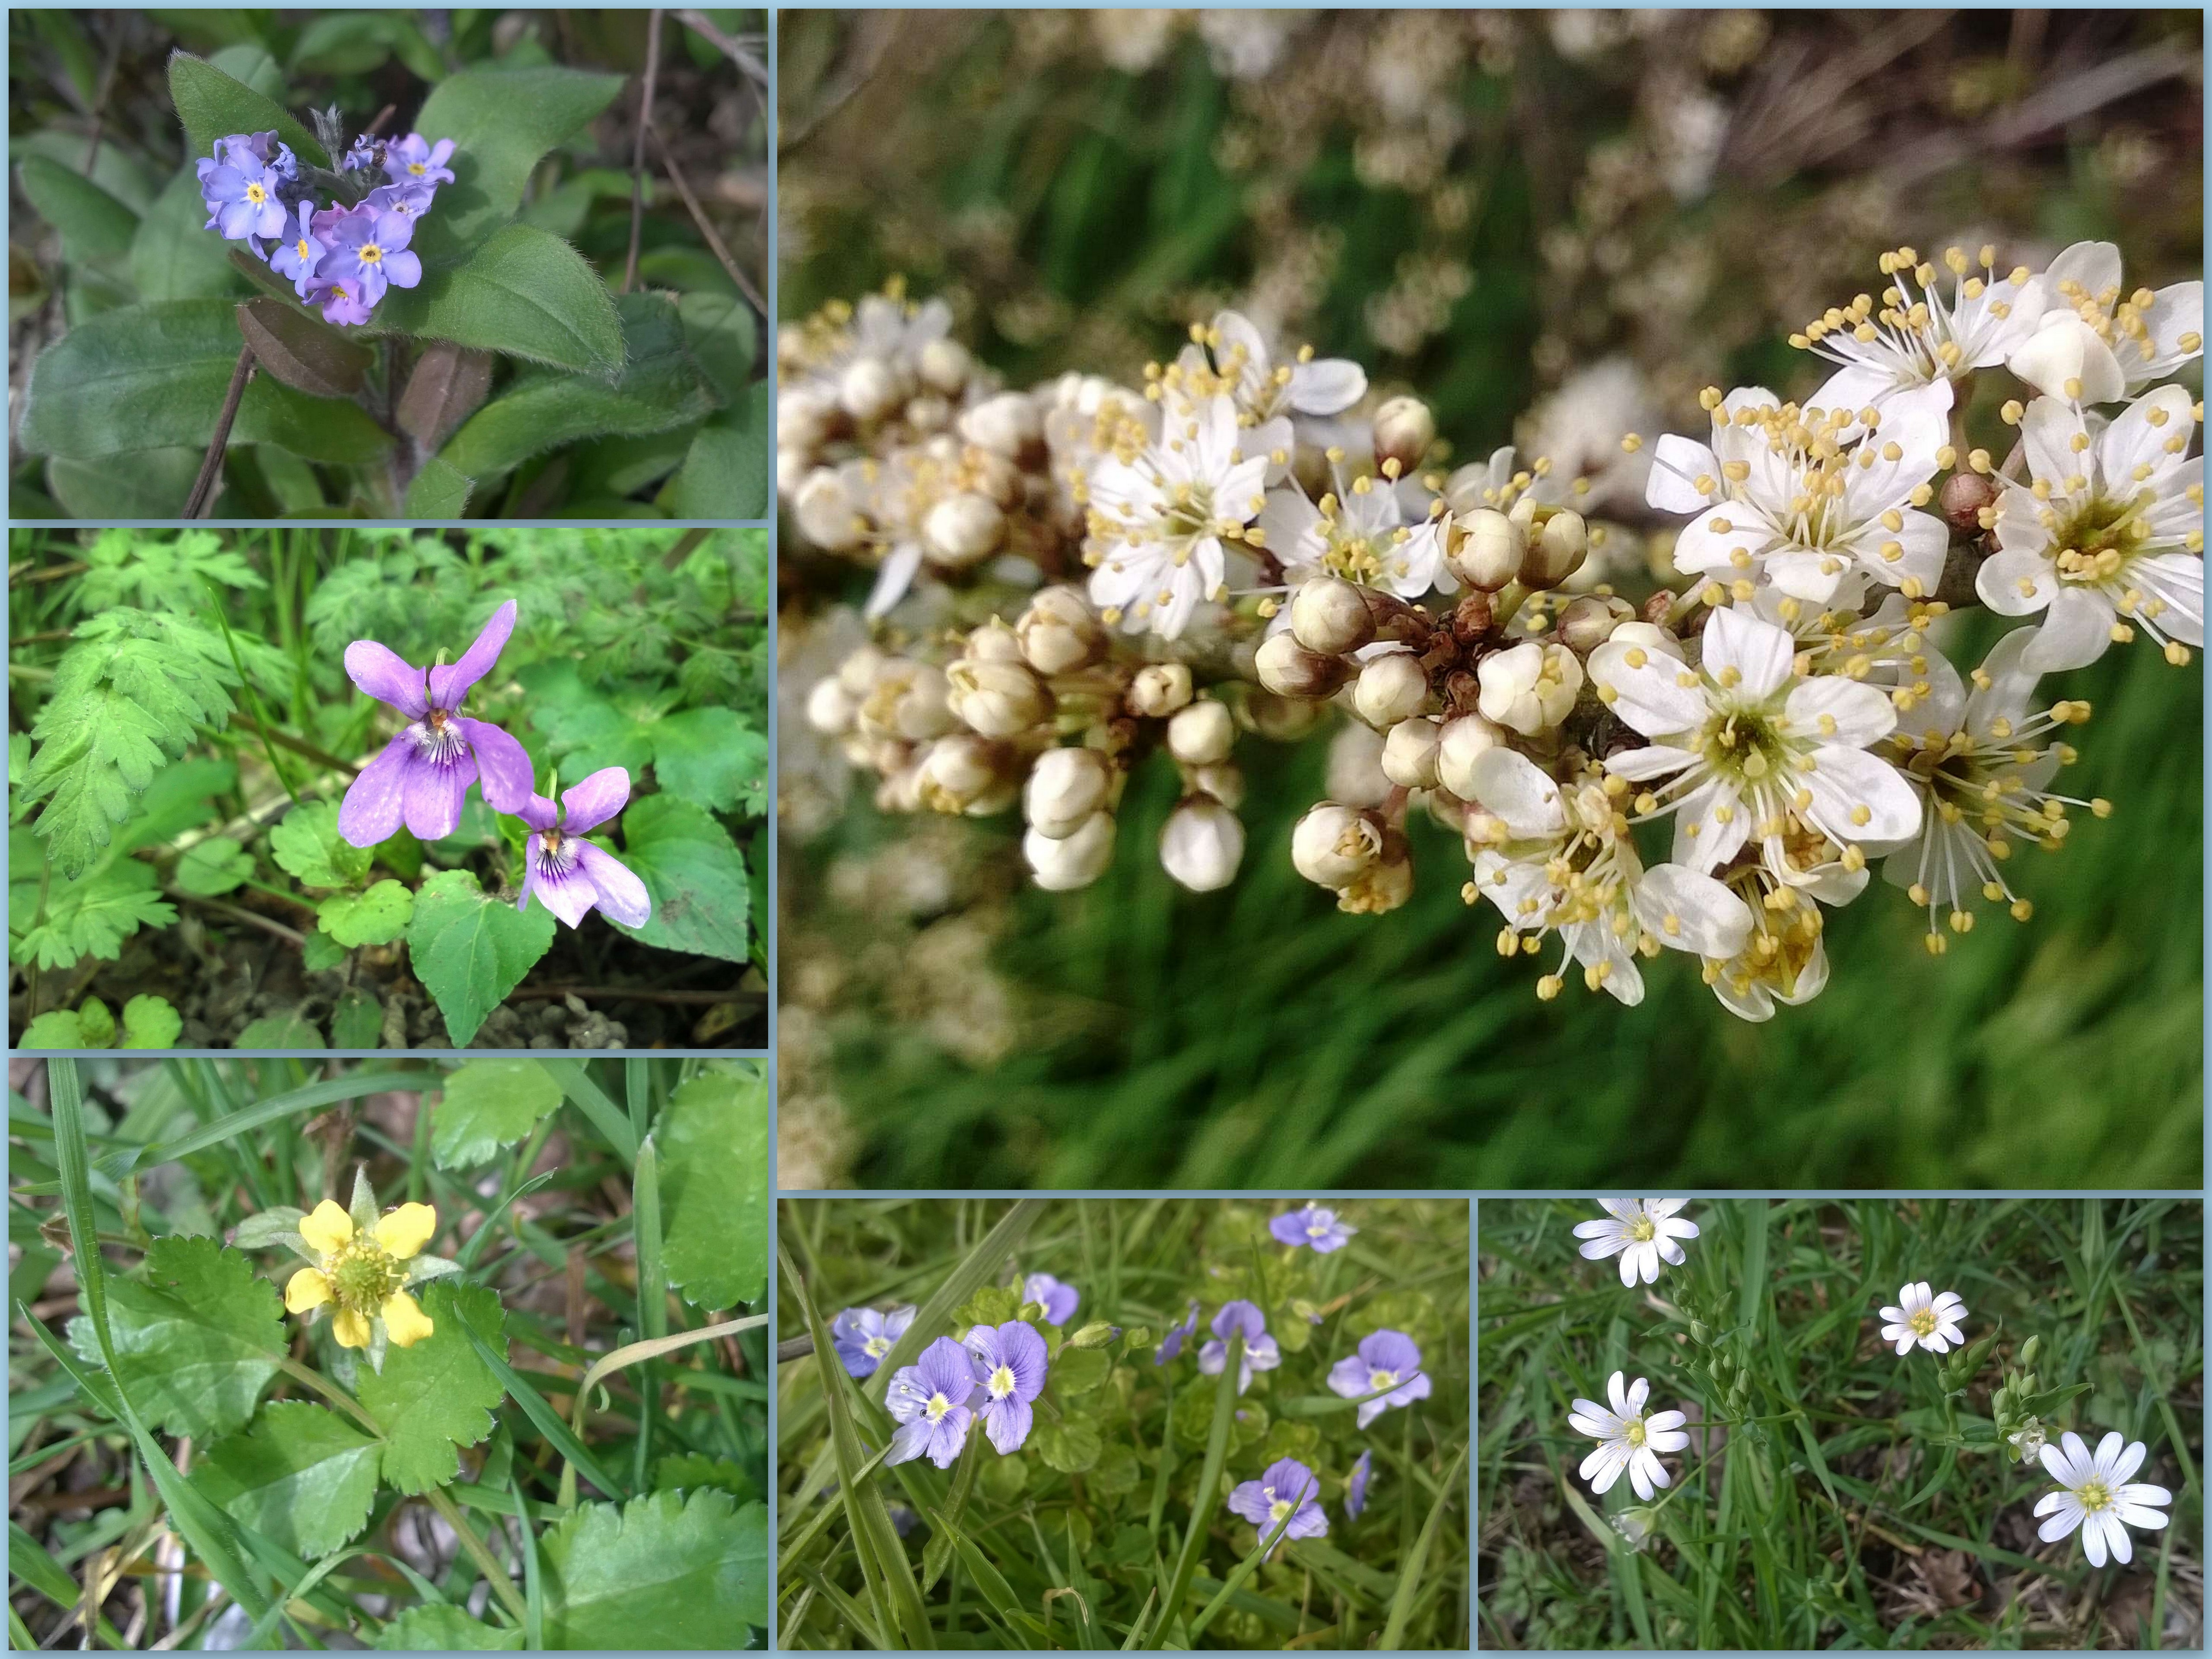
I was taken aback by the sheer number of flowers that had popped up and the leaves that were starting to show themselves on the tree branches. I am still waiting for the oak and ash to start appearing but will be keeping a close eye for these buds opening.
Also forget-me-not, dog violet, wood aven, damson, speedwell and stichwort
I am really enjoying this course as it is making me look at plants in detail again. Over the last few years I have concentrated on the craft side of bushcraft and failed to maintain all that knowledge of plants I had worked so hard to learn when studying at Woodcraft Schoolback in 2008. Looking at all these plants a second time round and throughout the whole year can’t help but increase my level of knowledge.
I have compiled a short You Tube compilation of pictures (set to music) I have taken over the last couple of months showing this transformation from winter dormancy to the rush of spring growth so far.
When I want a bowl fast a modern adze is what I use, but if I have the time and I want to create something in a more leisurely fashion then I love to use a flint adze
Any self-respecting Stone Age woodworker would always have had a decent flint adze to hand. So to become that self=respecting Stone Age woodworker I had to go out and make myself one as they do not turn up in the shops that often.
I needed one to undertake my final project on my Woodcraft School Primitive Technology course: to create a bone bodkin and a bark sheath. The aim was to make them without the use of modern tools and I would need an adze to help me craft the sheath.
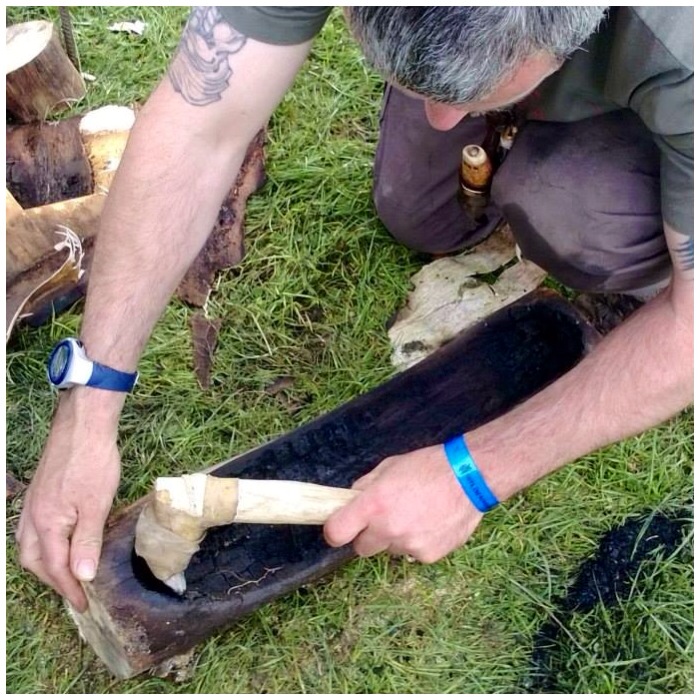
The adze I created for this has been extremely useful since then on other projects such as hollowing out this long bowl.
Chunking out a bowl
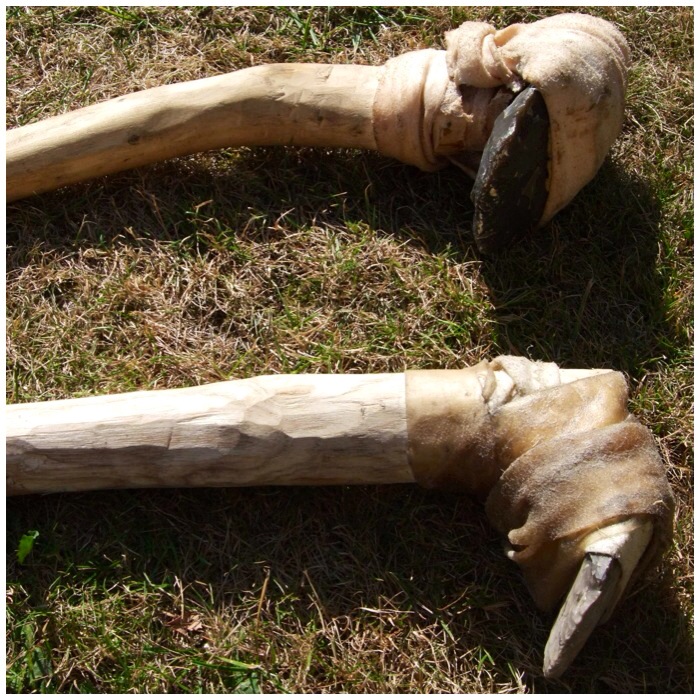
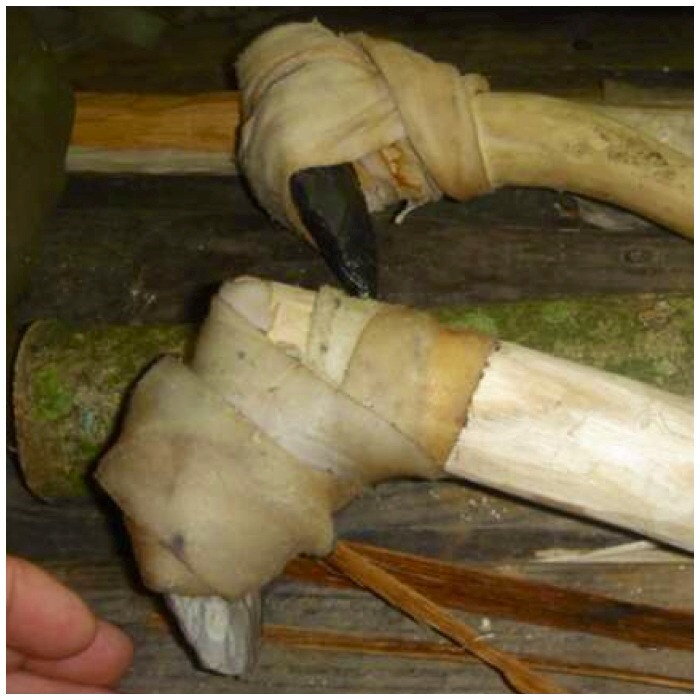
I ended up making two adzes out of flint, rawhide and curved branches.
Two well used adze’s
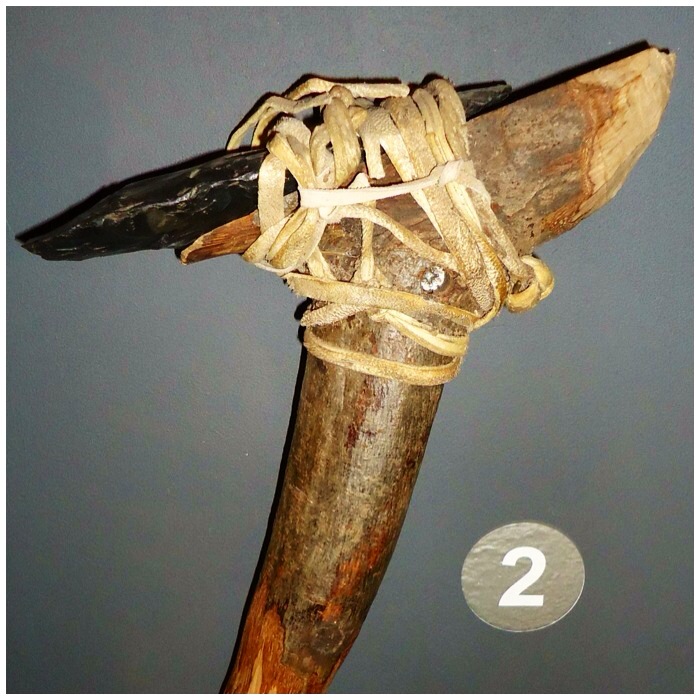
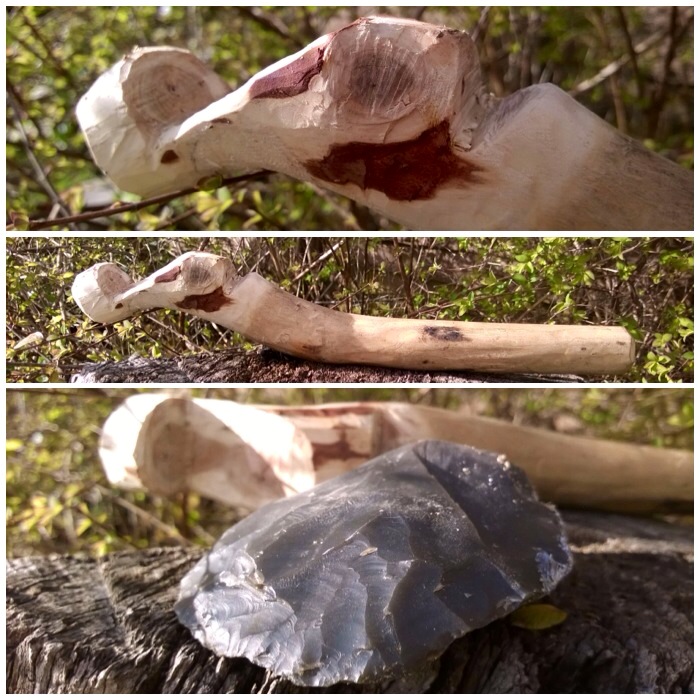
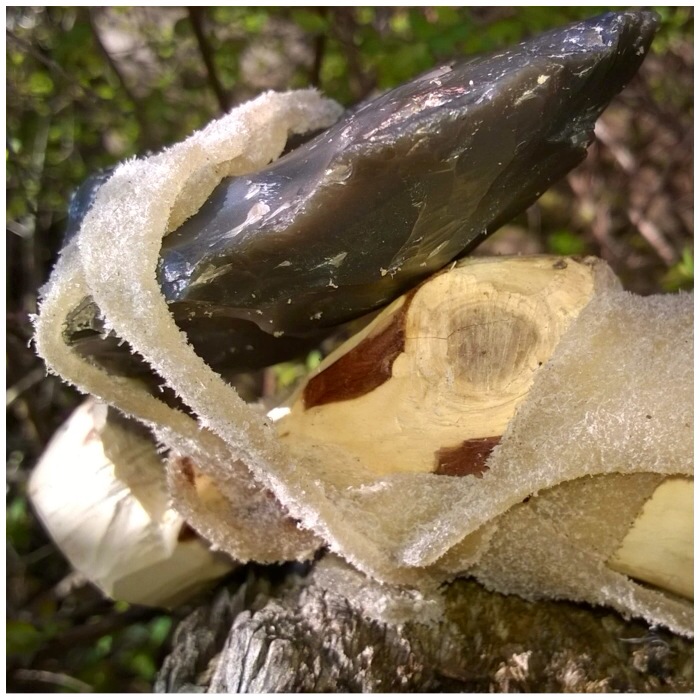
I took my inspiration from the Cheddar Gorge Museum where I came across this very basic but beautiful flint adze.
Cheddar Gorge Museum replica
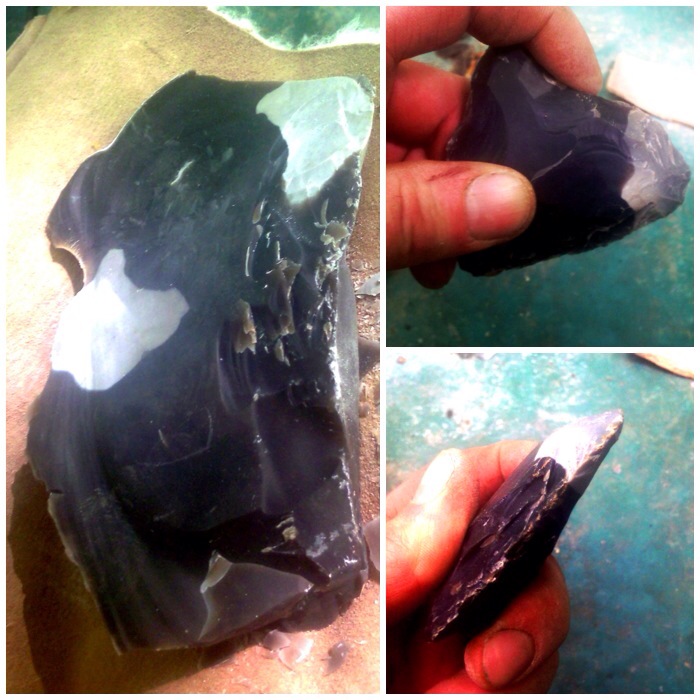
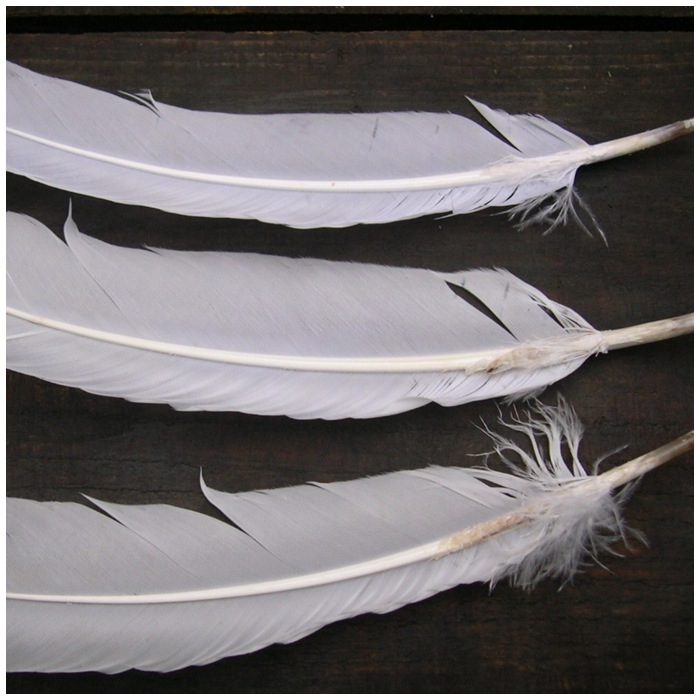
I had kept some flint from the course I had done with John Lordand I got a couple of good strong blades from this chunk of flint. The flint axe blade shouldn’t be overly sharp as that will make it fragile. It needs to have a well-defined edge that has good strong shoulders.
Knapped adze blade
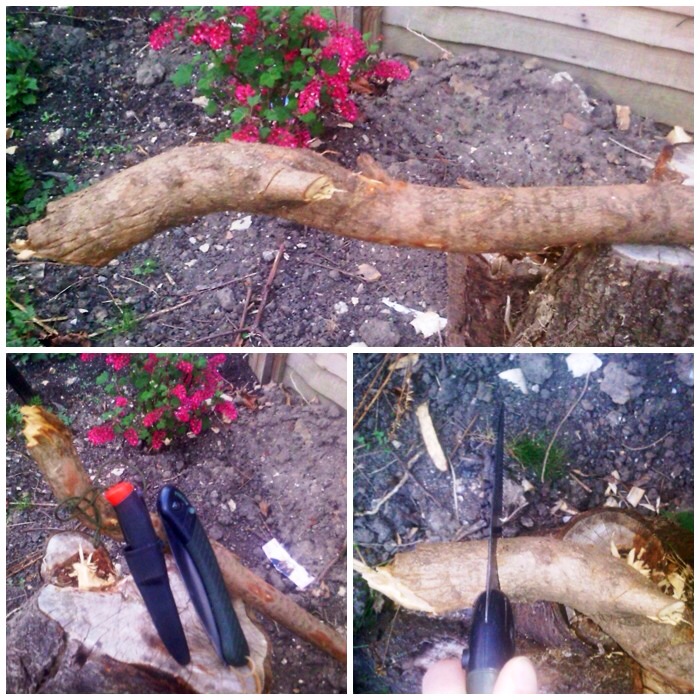
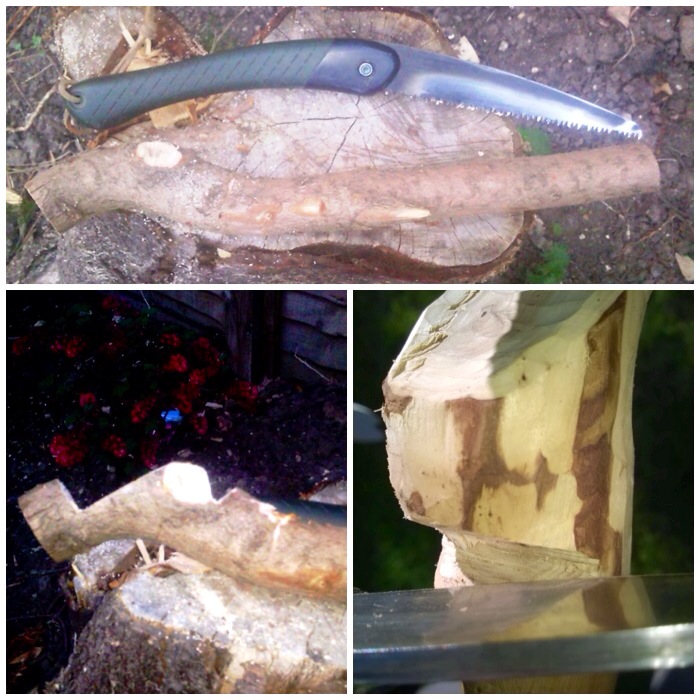
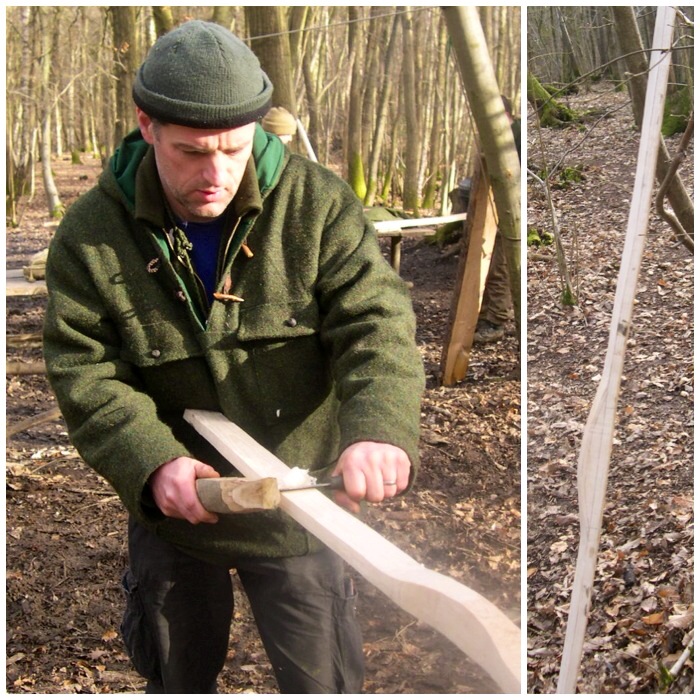
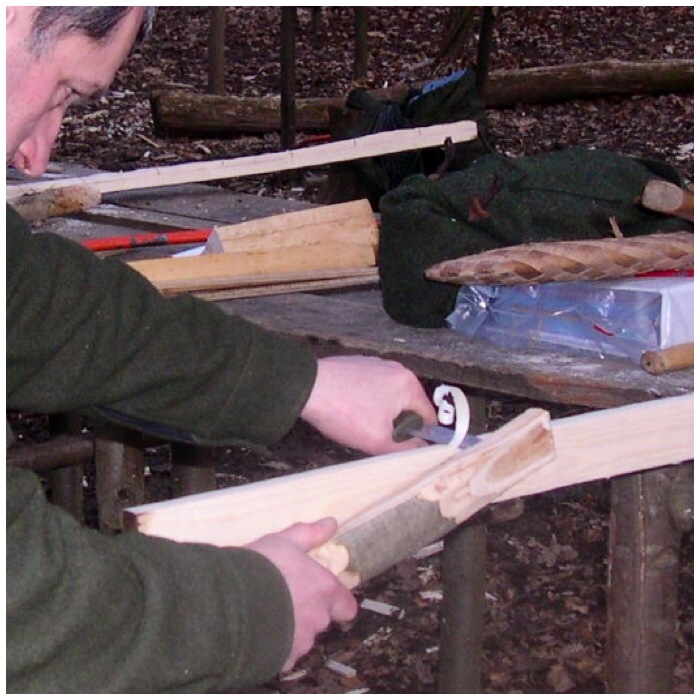
This piece of yew was cut down in my garden and then sawn to its basic shape with a modern saw.
The handle-to-be
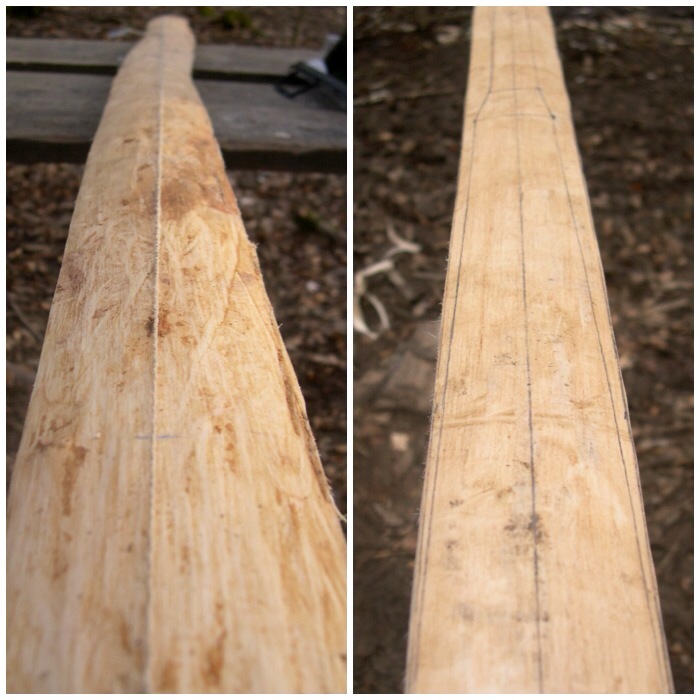
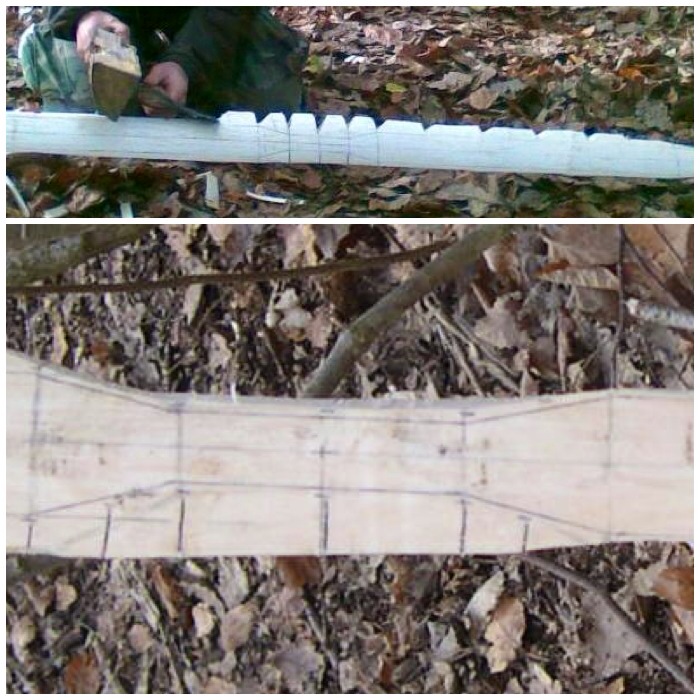
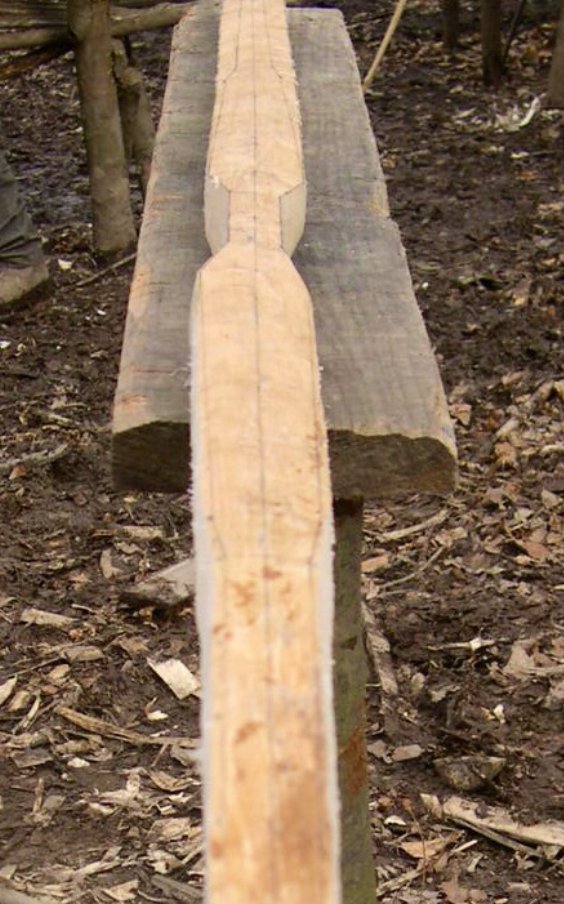
I used the curve to give the flint blade a flat surface to sit on and carved out the notch to give the rawhide some additional surface area to hold on to. I did not cut so deep so as to weaken the handle as this tool was destined for some hard use.
Carving the shape
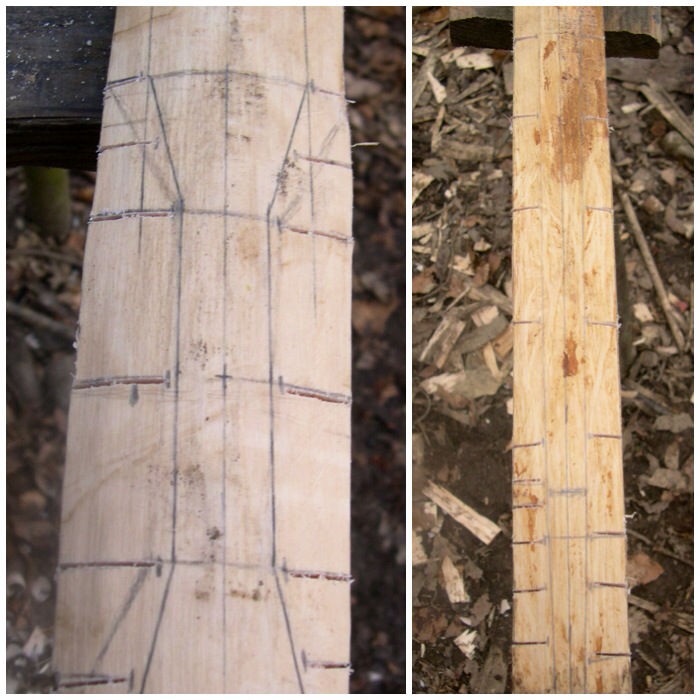
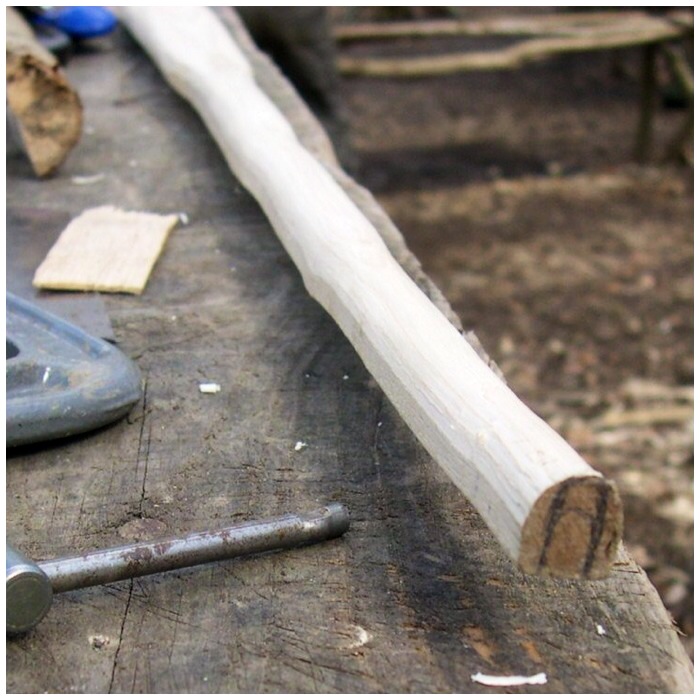
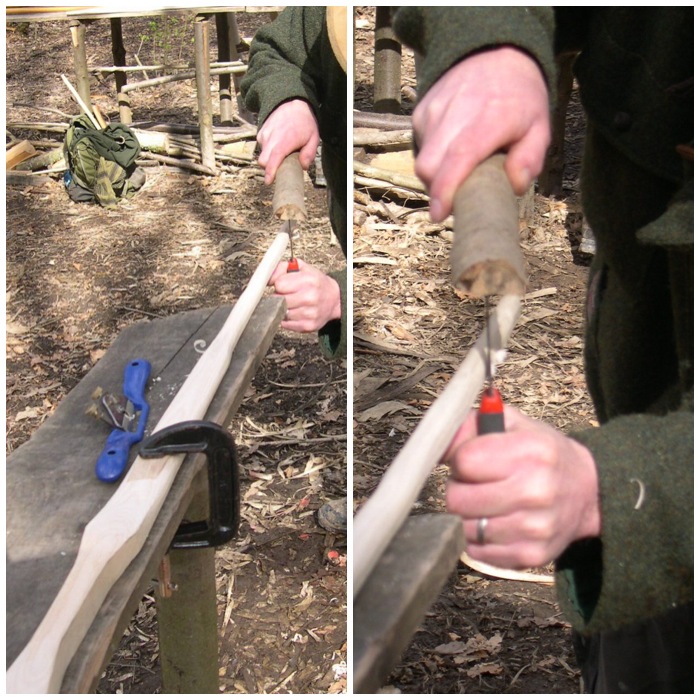
After shaping I stripped the bark off and roughly smoothed it with sandpaper. I did not smooth the handle down too much, as I wanted to retain some natural grip.
The platform for the blade
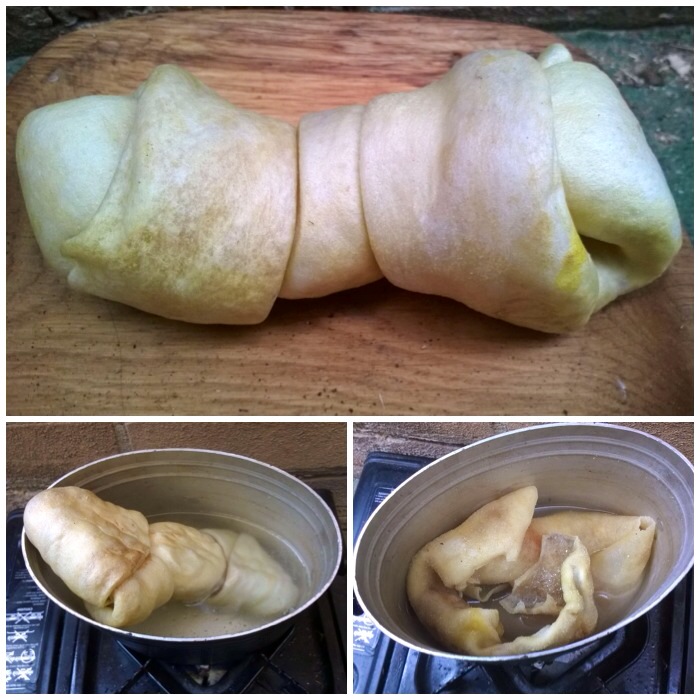
Traditionally rawhide was used to bind the flint to the handle alongside sinew, buckskin or other natural cordage. I like to use rawhide as it was commonly used and is easily obtained these days from dog chews (I buy the biggest I can find).
I boiled the dog chew in water for about twenty five minutes in order to soften it enough to be able to cut it into strips.
Rawhide from a dog chew
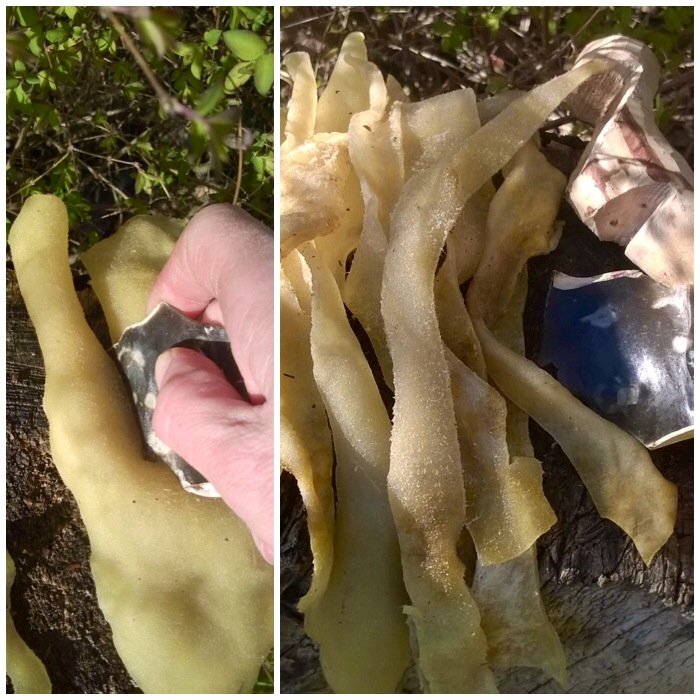
After laying the rawhide out flat I just used a sharp piece of flint to cut it into strips I could use to bind the adze together.
Cutting out strips
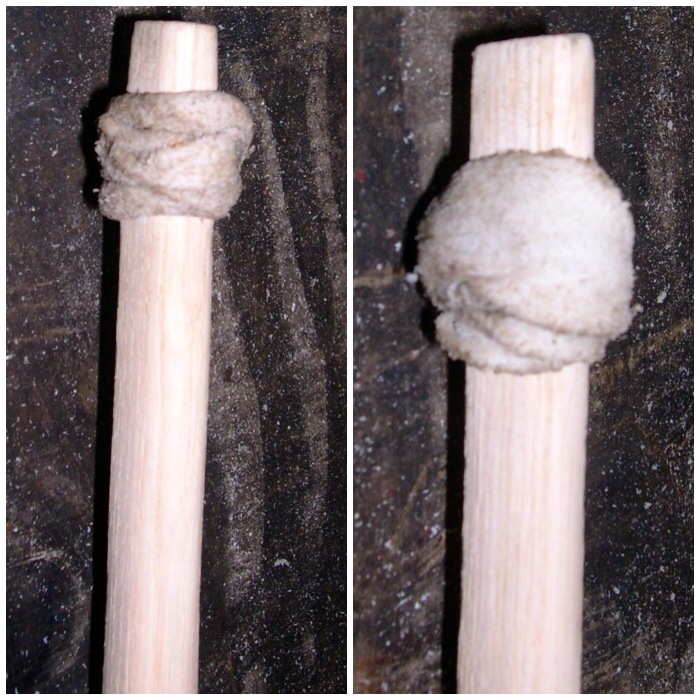
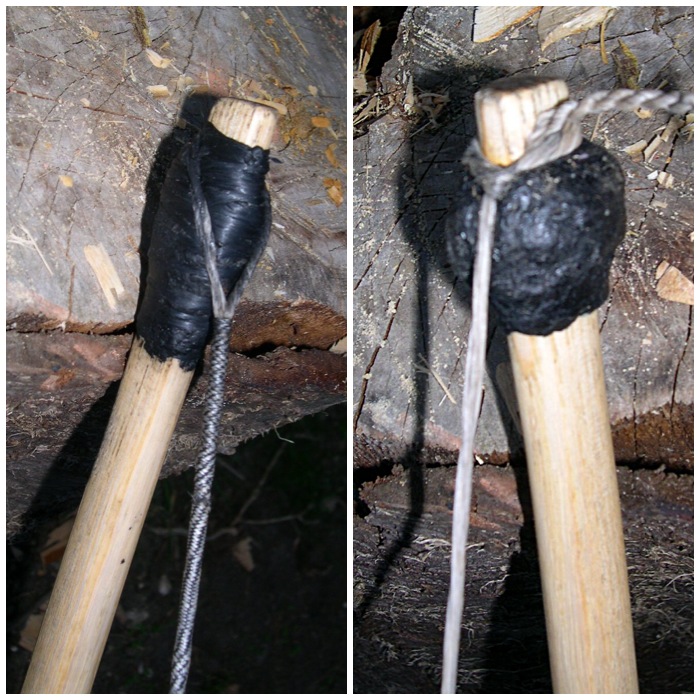
I wrapped thin pieces around the blade and the handle initially. Don’t pull too tight as this will snap the rawhide. Just tighten slightly, and tie off the ends when you are finished. I left this one to harden in a warm area for a couple of days. As rawhide dries out it shrinks and goes very hard (almost rock hard).
Initial rawhide wrap
For the next layer of rawhide I used wider strips, which allowed me to really pull them tight without worrying too much about it splitting. They were quite difficult to tie off but I settled for simple overhand knots to finish.
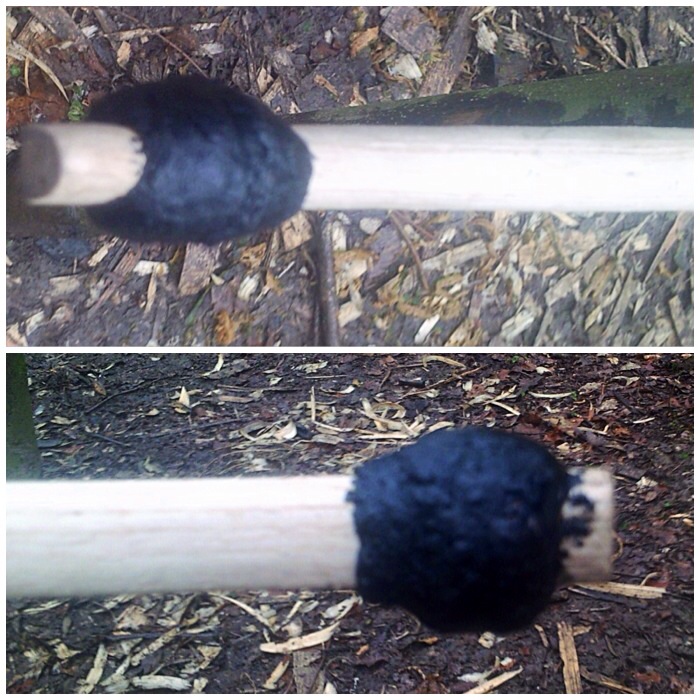
I left these adzes to dry out and tighten for a month until they were needed on the final part of the course.
Drying out
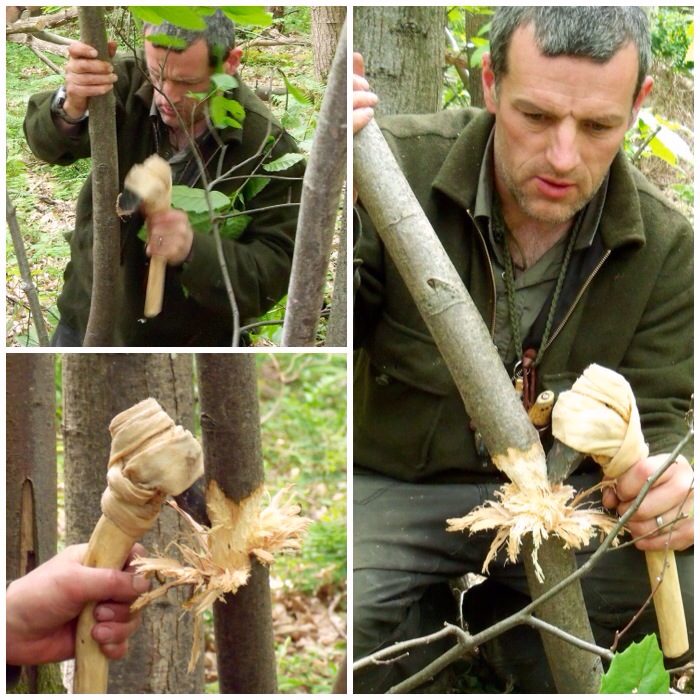
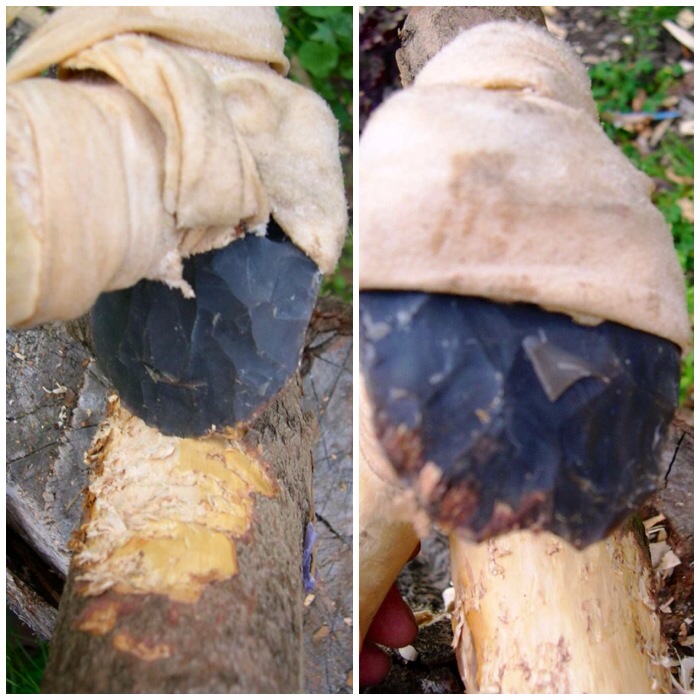
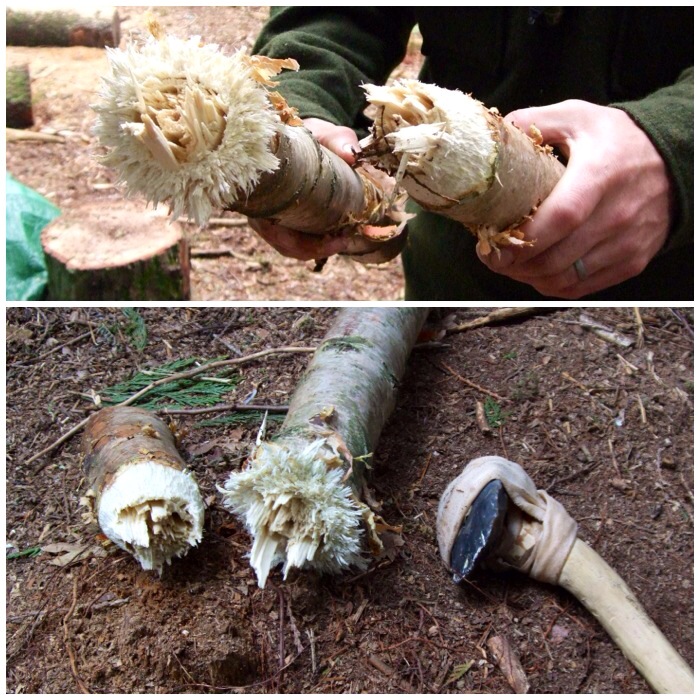
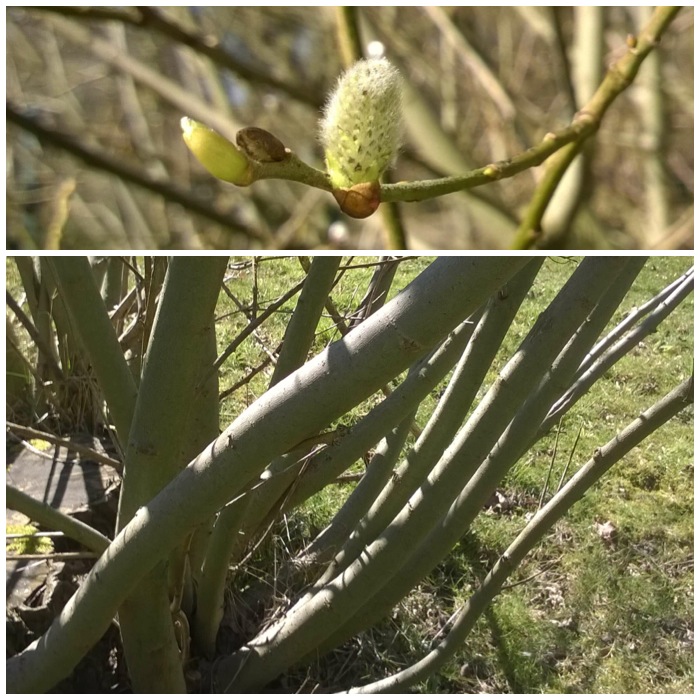
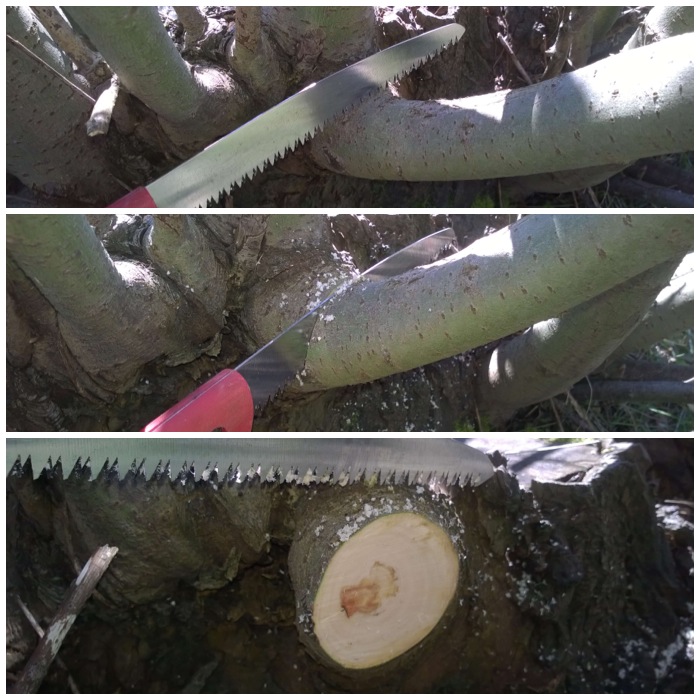
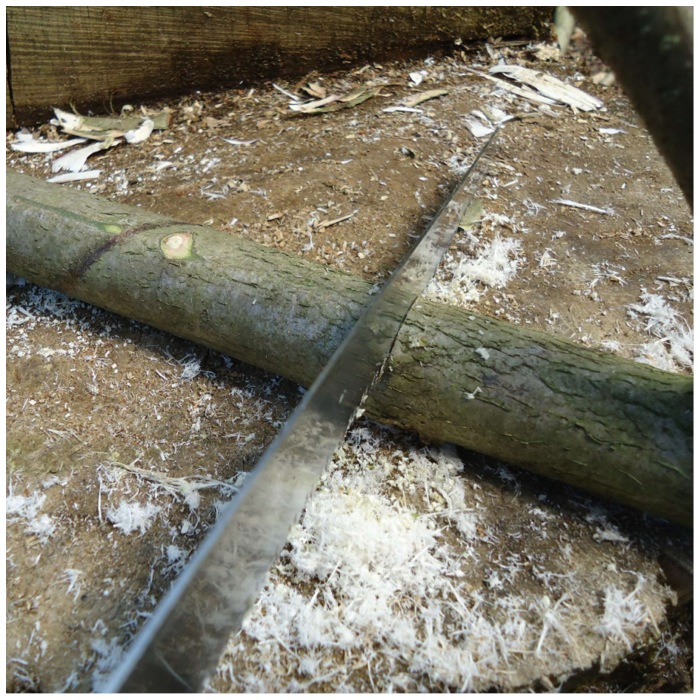
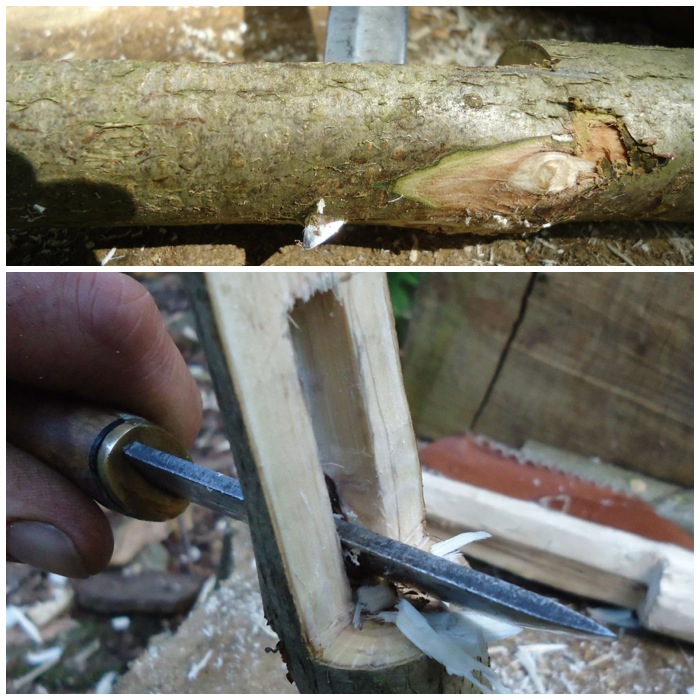
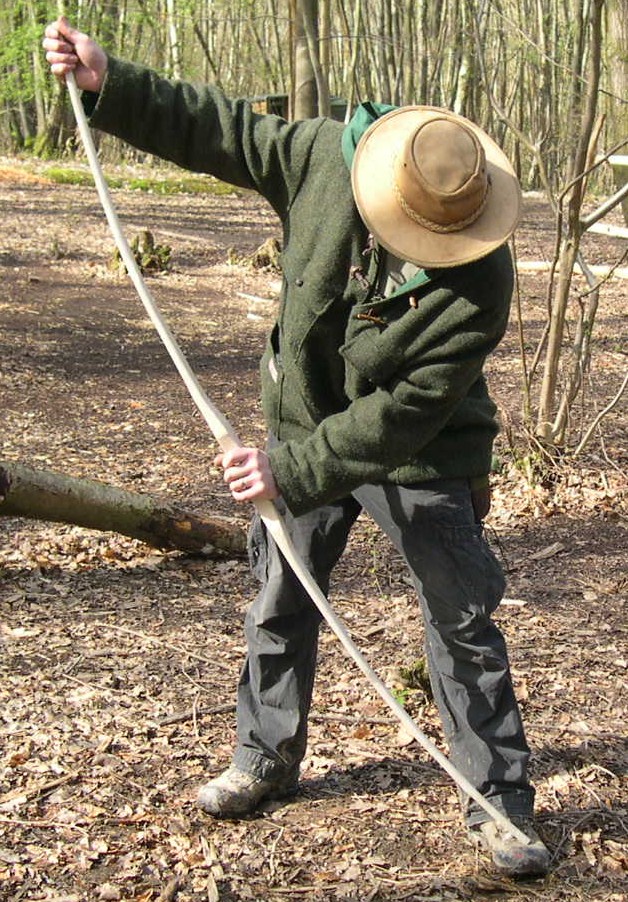
The first job I had to do with the adze was to take down a small sweet chestnut limb. I needed this to make bark strips for weaving a sheath out of the bark and the wood for carving spoons. I took the limb down using a rosette cut, chipping away at the wood all the way around the limb until it fell over. I did not use any large swings or try and gouge the wood out with it, just a steady chipping rhythm, and eventually worked my way through the limb.
First job – taking down a sweet chestnut limb
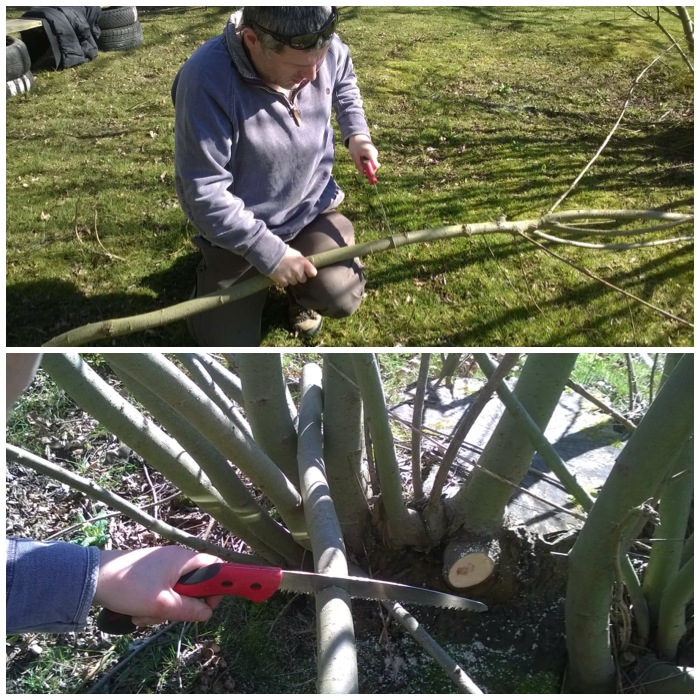
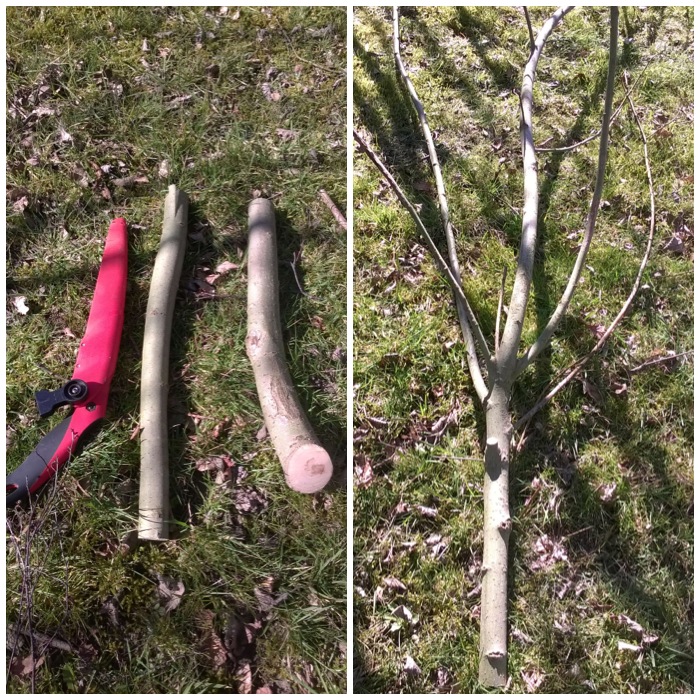
It took me about 20 minutes to fell the tree. (I used a modern saw to trim the stump, leaving a clean cut to help stop infection setting in and to help the stump re-grow a new limb.)
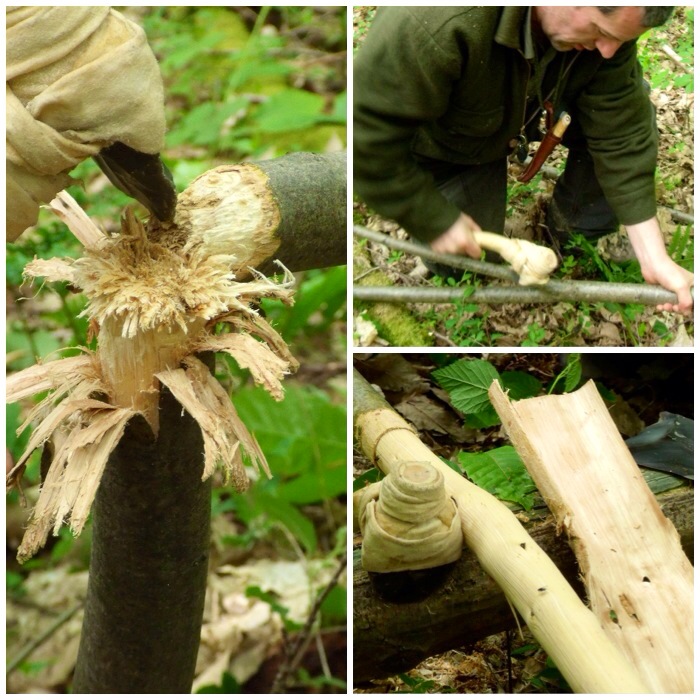
The Rosette cut
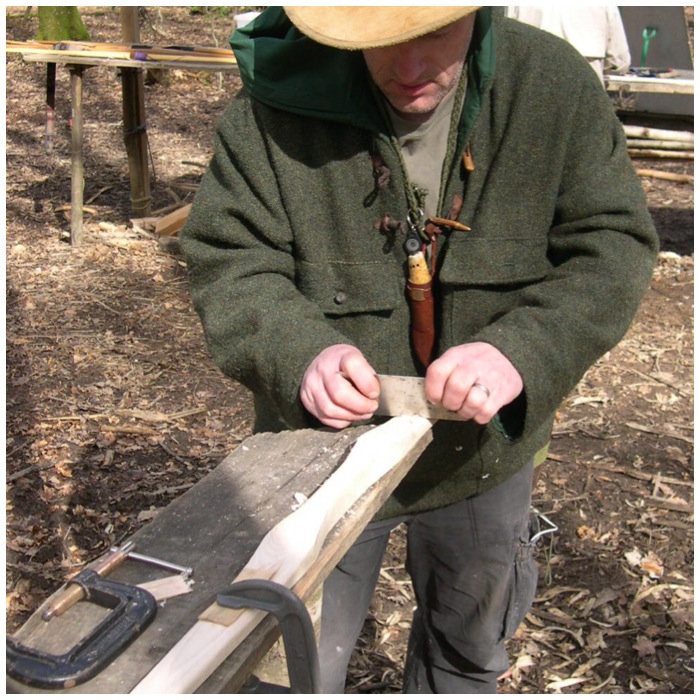
The next project I put the adze to was the shaping of a yew handle for a large flint axe. The yew piece I was using was well seasoned and proved too much for the flint adze. After about half an hour of chipping away at the bark and outer layer of wood I chipped the blade of the adze quite badly.
It was quite easy to re-profile the edge with a bit of pressure flaking but I resorted to using a modern axe for carving the flint axe handle.
Too tough for this adze
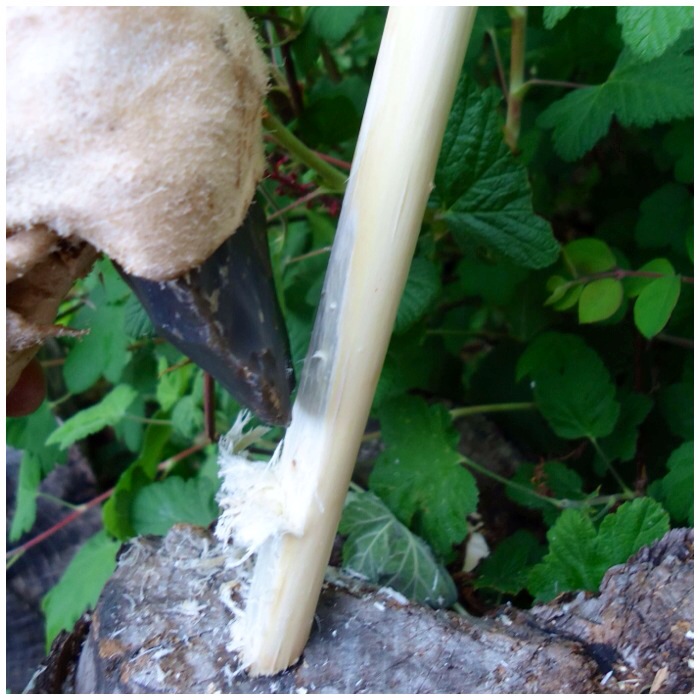
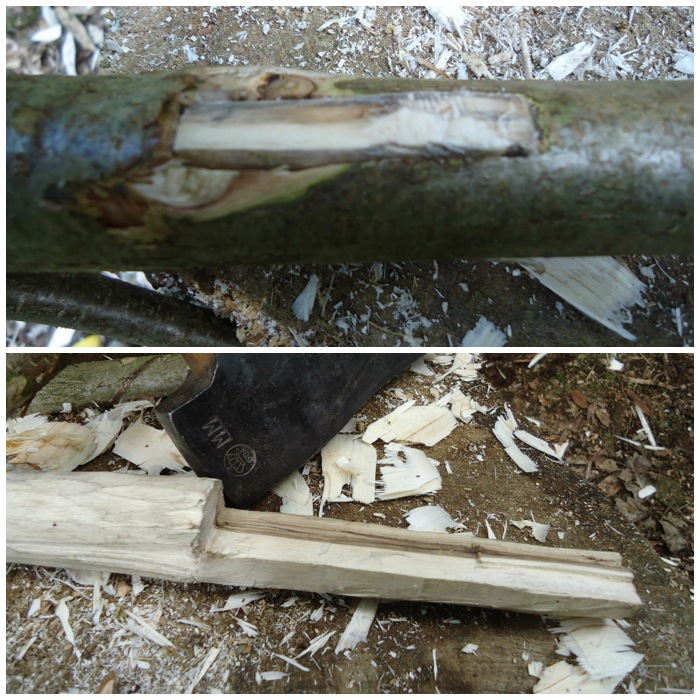
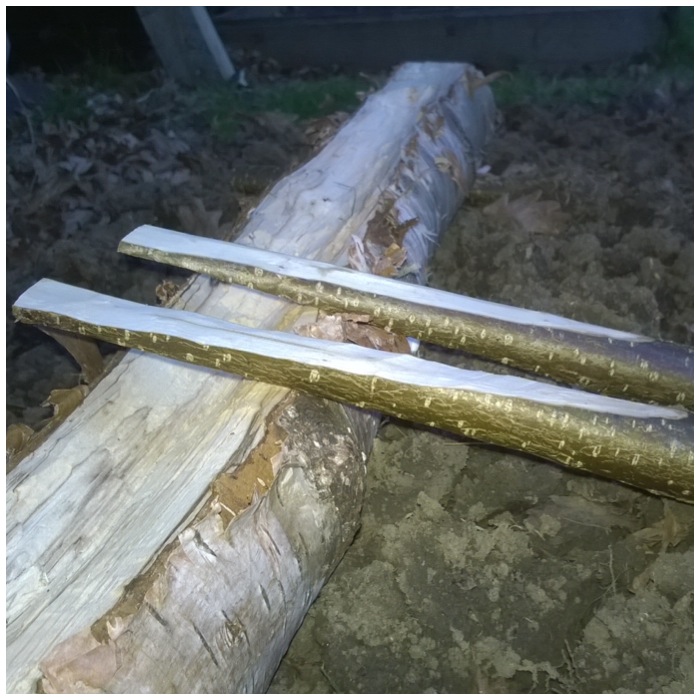
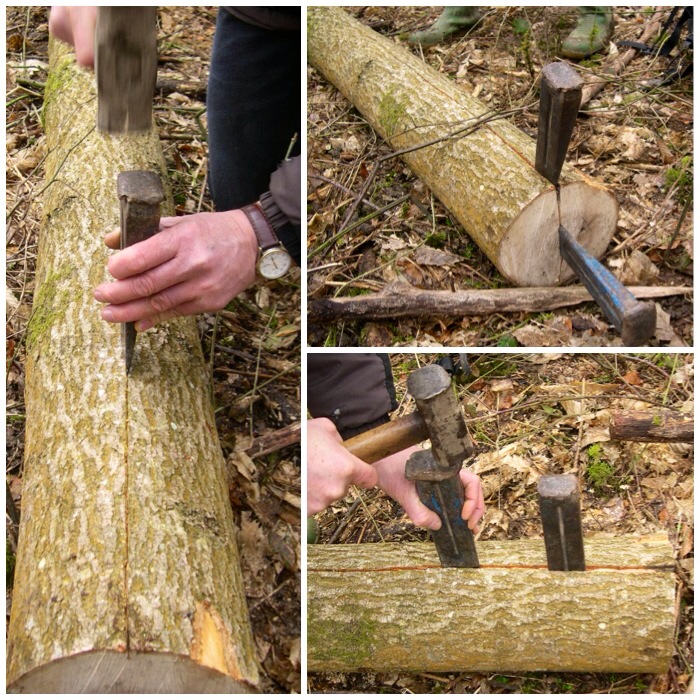
When working with green wood woods like this goat willow the adze worked very well. I used the adze here to create a wedge for my Split Stick Atlatl.
Chipping out a wedge for an atlatl
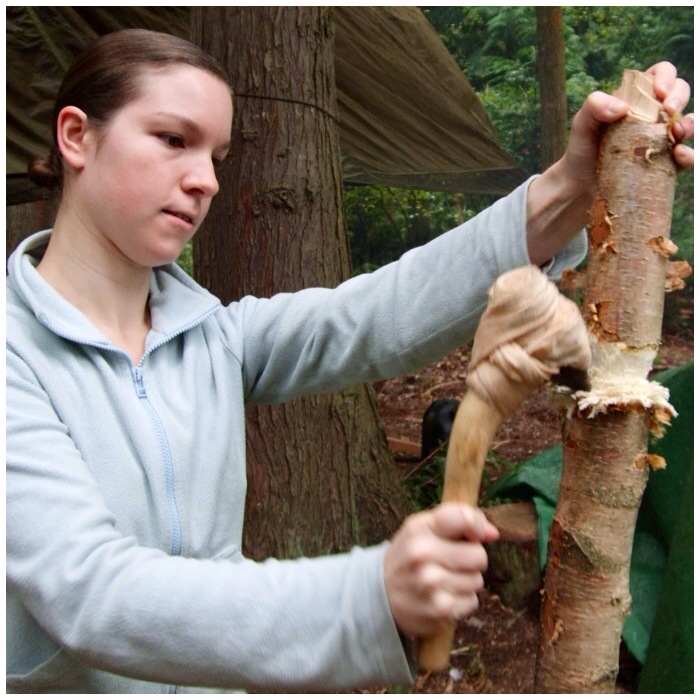
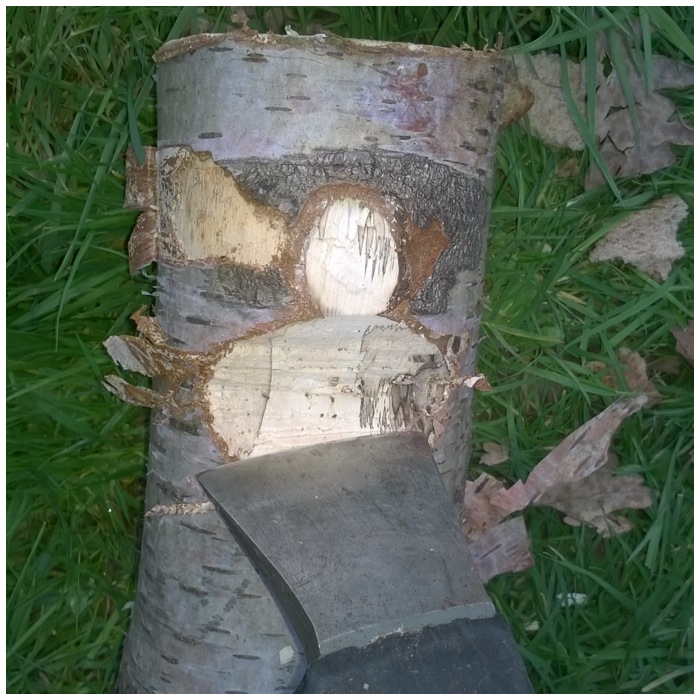
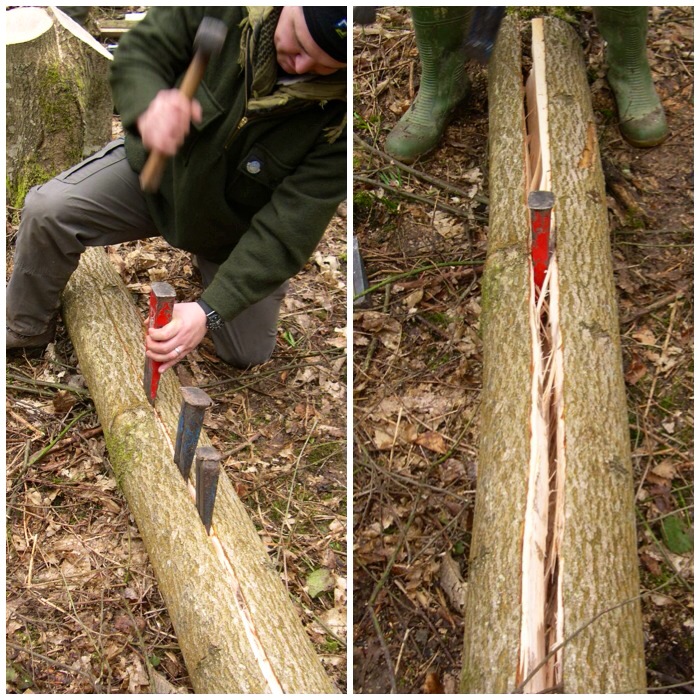
My friends have all been keen to try these adzes out. The silver birch that Angela is splitting was fairly well seasoned but still quite easy to cut with the adze.
Cutting into more seasoned wood as a test
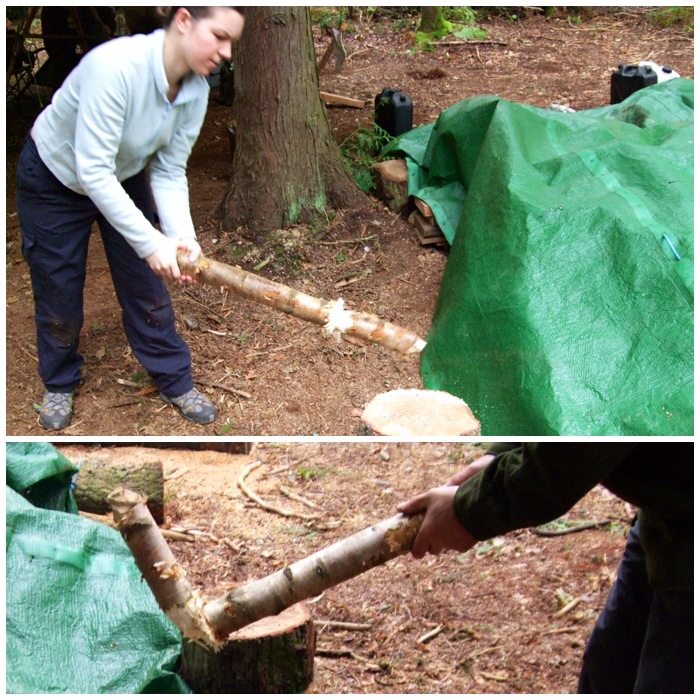
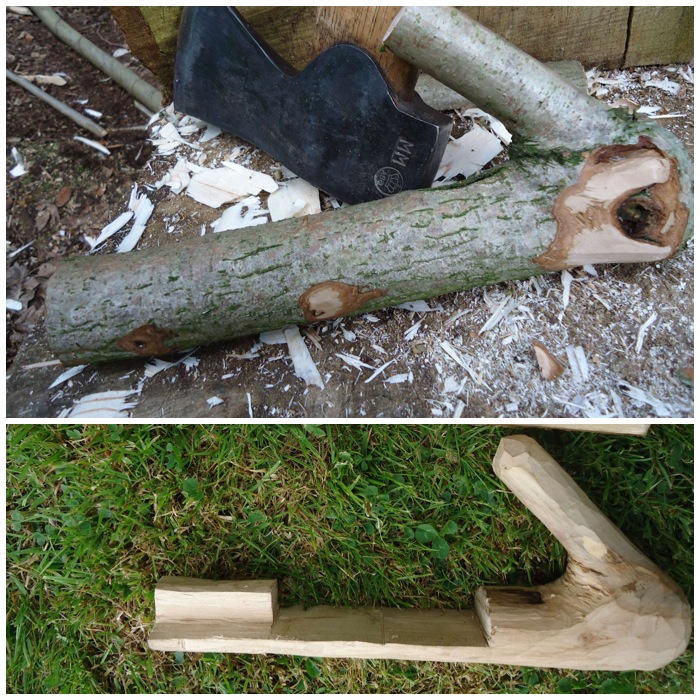
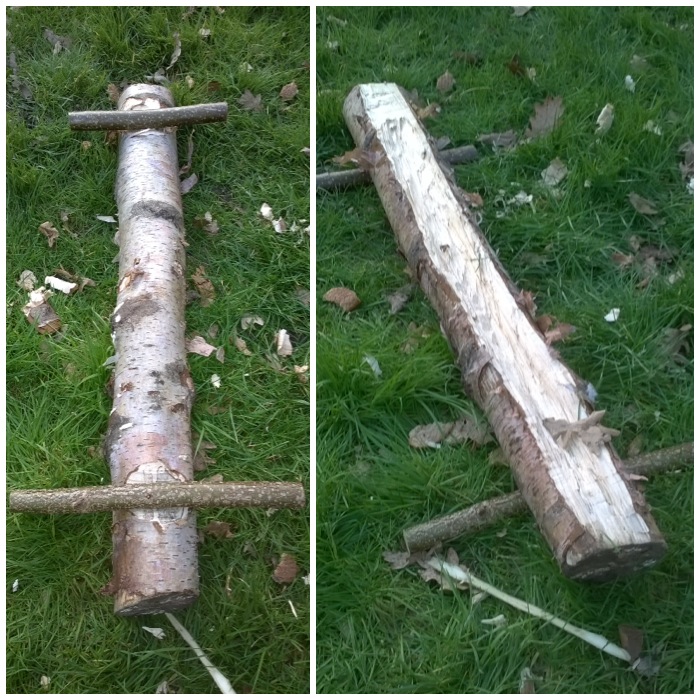
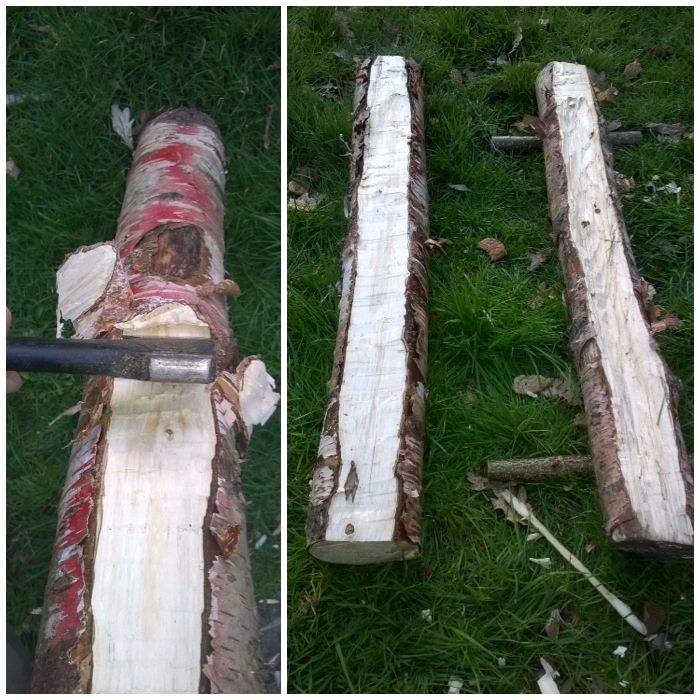
When Angela had the branch weakened enough it was just a case of tap tap and…………………………………..
Final tap
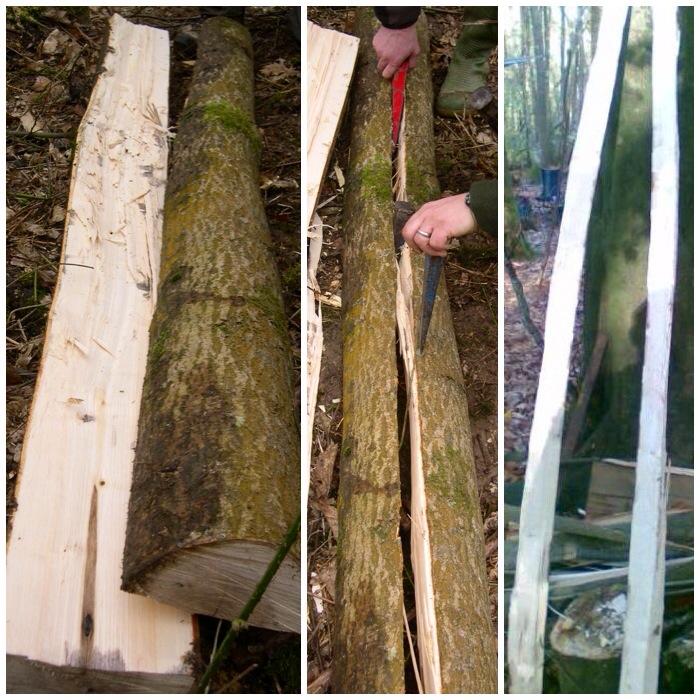
…………we had two more logs for the fire.
Quite a beautiful finish
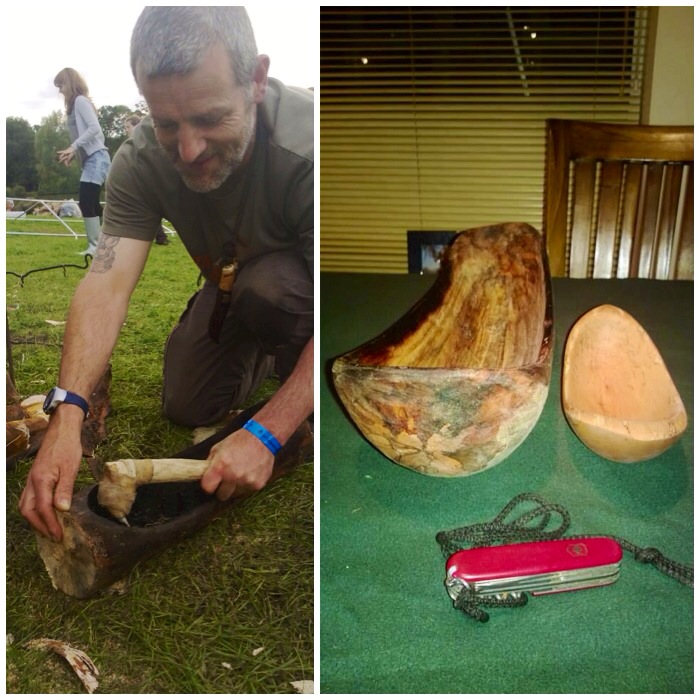
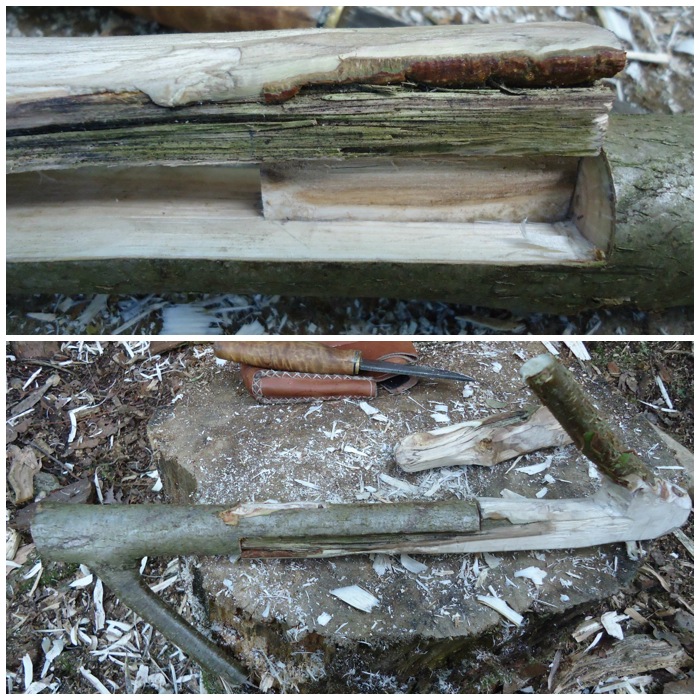
The adze really did come into its own when my friend Stephen Herries found this burnt-out log lying in a ditch. The adze was perfect for chipping out all that charcoal so that in the end I had a rather lovely long bowl to add to my collection.
Great for bowl work
In comparison to a modern steel/iron adze you have to invest more time in whatever you are creating when using a flint adze. Unlike a modern adze, which will slice wood off cleanly, a flint adze rips the wood off and leaves totally different tool marks.
When I want a bowl fast a modern adze is what I use, but if I have the time and I want to create something in a more leisurely fashion then I love to use a flint adze. It kind of takes me back in time I suppose.
It was at this point Spikey had his Eureka moment: ‘Why not try and find a piece of sycamore that’s oval shaped instead of round?’
This post is for my friend Spikey who had one of those Eureka moments that pop up out of the blue. It happened when we were experimenting with the building of a green-wood, free-standing hammock stand at the 2012 BCUK Bushmoot. If it hadn’t been for his inspired idea this hammock stand would never have worked. More on that later but to begin with I need to explain how I got into building these free-standing hammock stands and explain a bit more about what they are.
A free-standing hammock stand comprises a couple of tripods with a ridgepole hanging down between them. The ridgepole is not directly attached to the tripods but slung on some Amsteel cordage. I like to use Amsteel cordage as it is fantastically strong, does not stretch easily and is very rot resistant. The hammock is tied off to the ridgepole so that the compression forces from someone lying in the hammock are solely on the ridgepole. The tripods only take the vertical forces caused by the person’s weight. As the forces are separated there are no compression forces on the tripods that could cause them to topple over, which means you do not need ground anchors.
The two pictures below show two free-standing hammocks I made, one with green wood and one from machined wood.
Woodland-made and workshop-made free-standing hammock stands
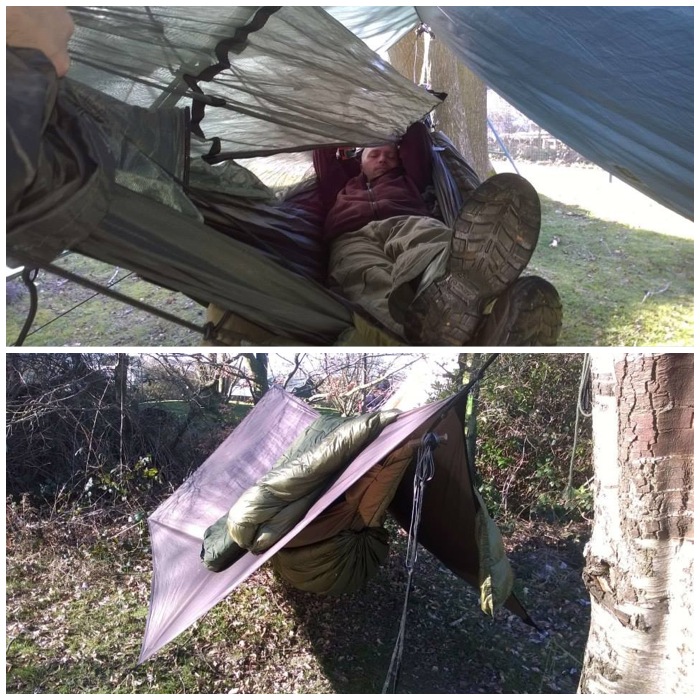
To me there is nothing better than finding a nice spot with two perfectly placed trees where you can set up a hammock, have a great sleep and waken up in the morning to a great view. Sadly this is not always possible: the trees may not be placed perfectly, or may not be strong enough to support a hammock, or there may simply be no trees about.
At times like this you have to start thinking out of the box if you want to still sleep in your hammock.
Relaxing hammocking when the trees are perfectly placed
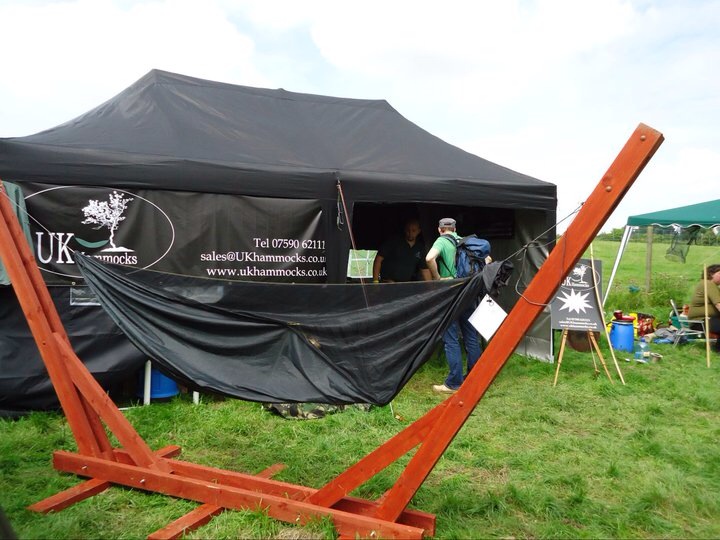
If you have the tools and the ability to transport your own hammock stand you can make something as good as my friend Mat made for displaying his UK Hammocks.
The deluxe version
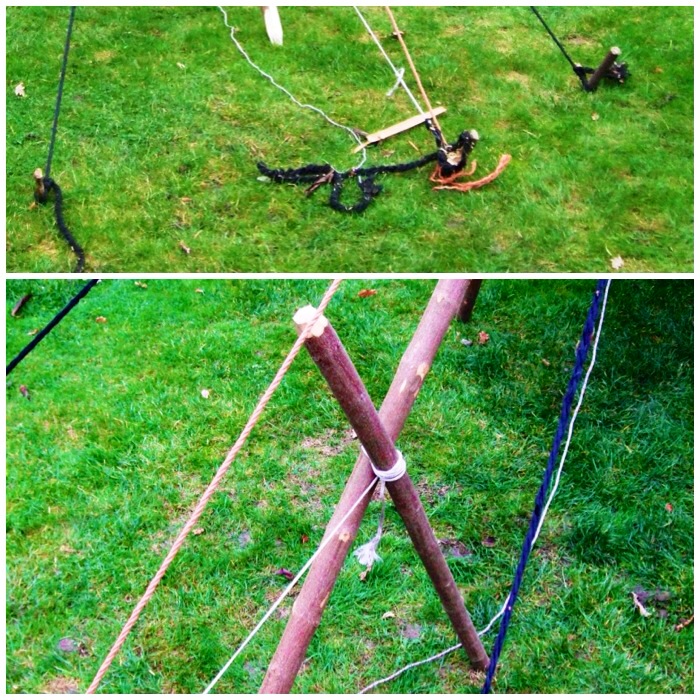
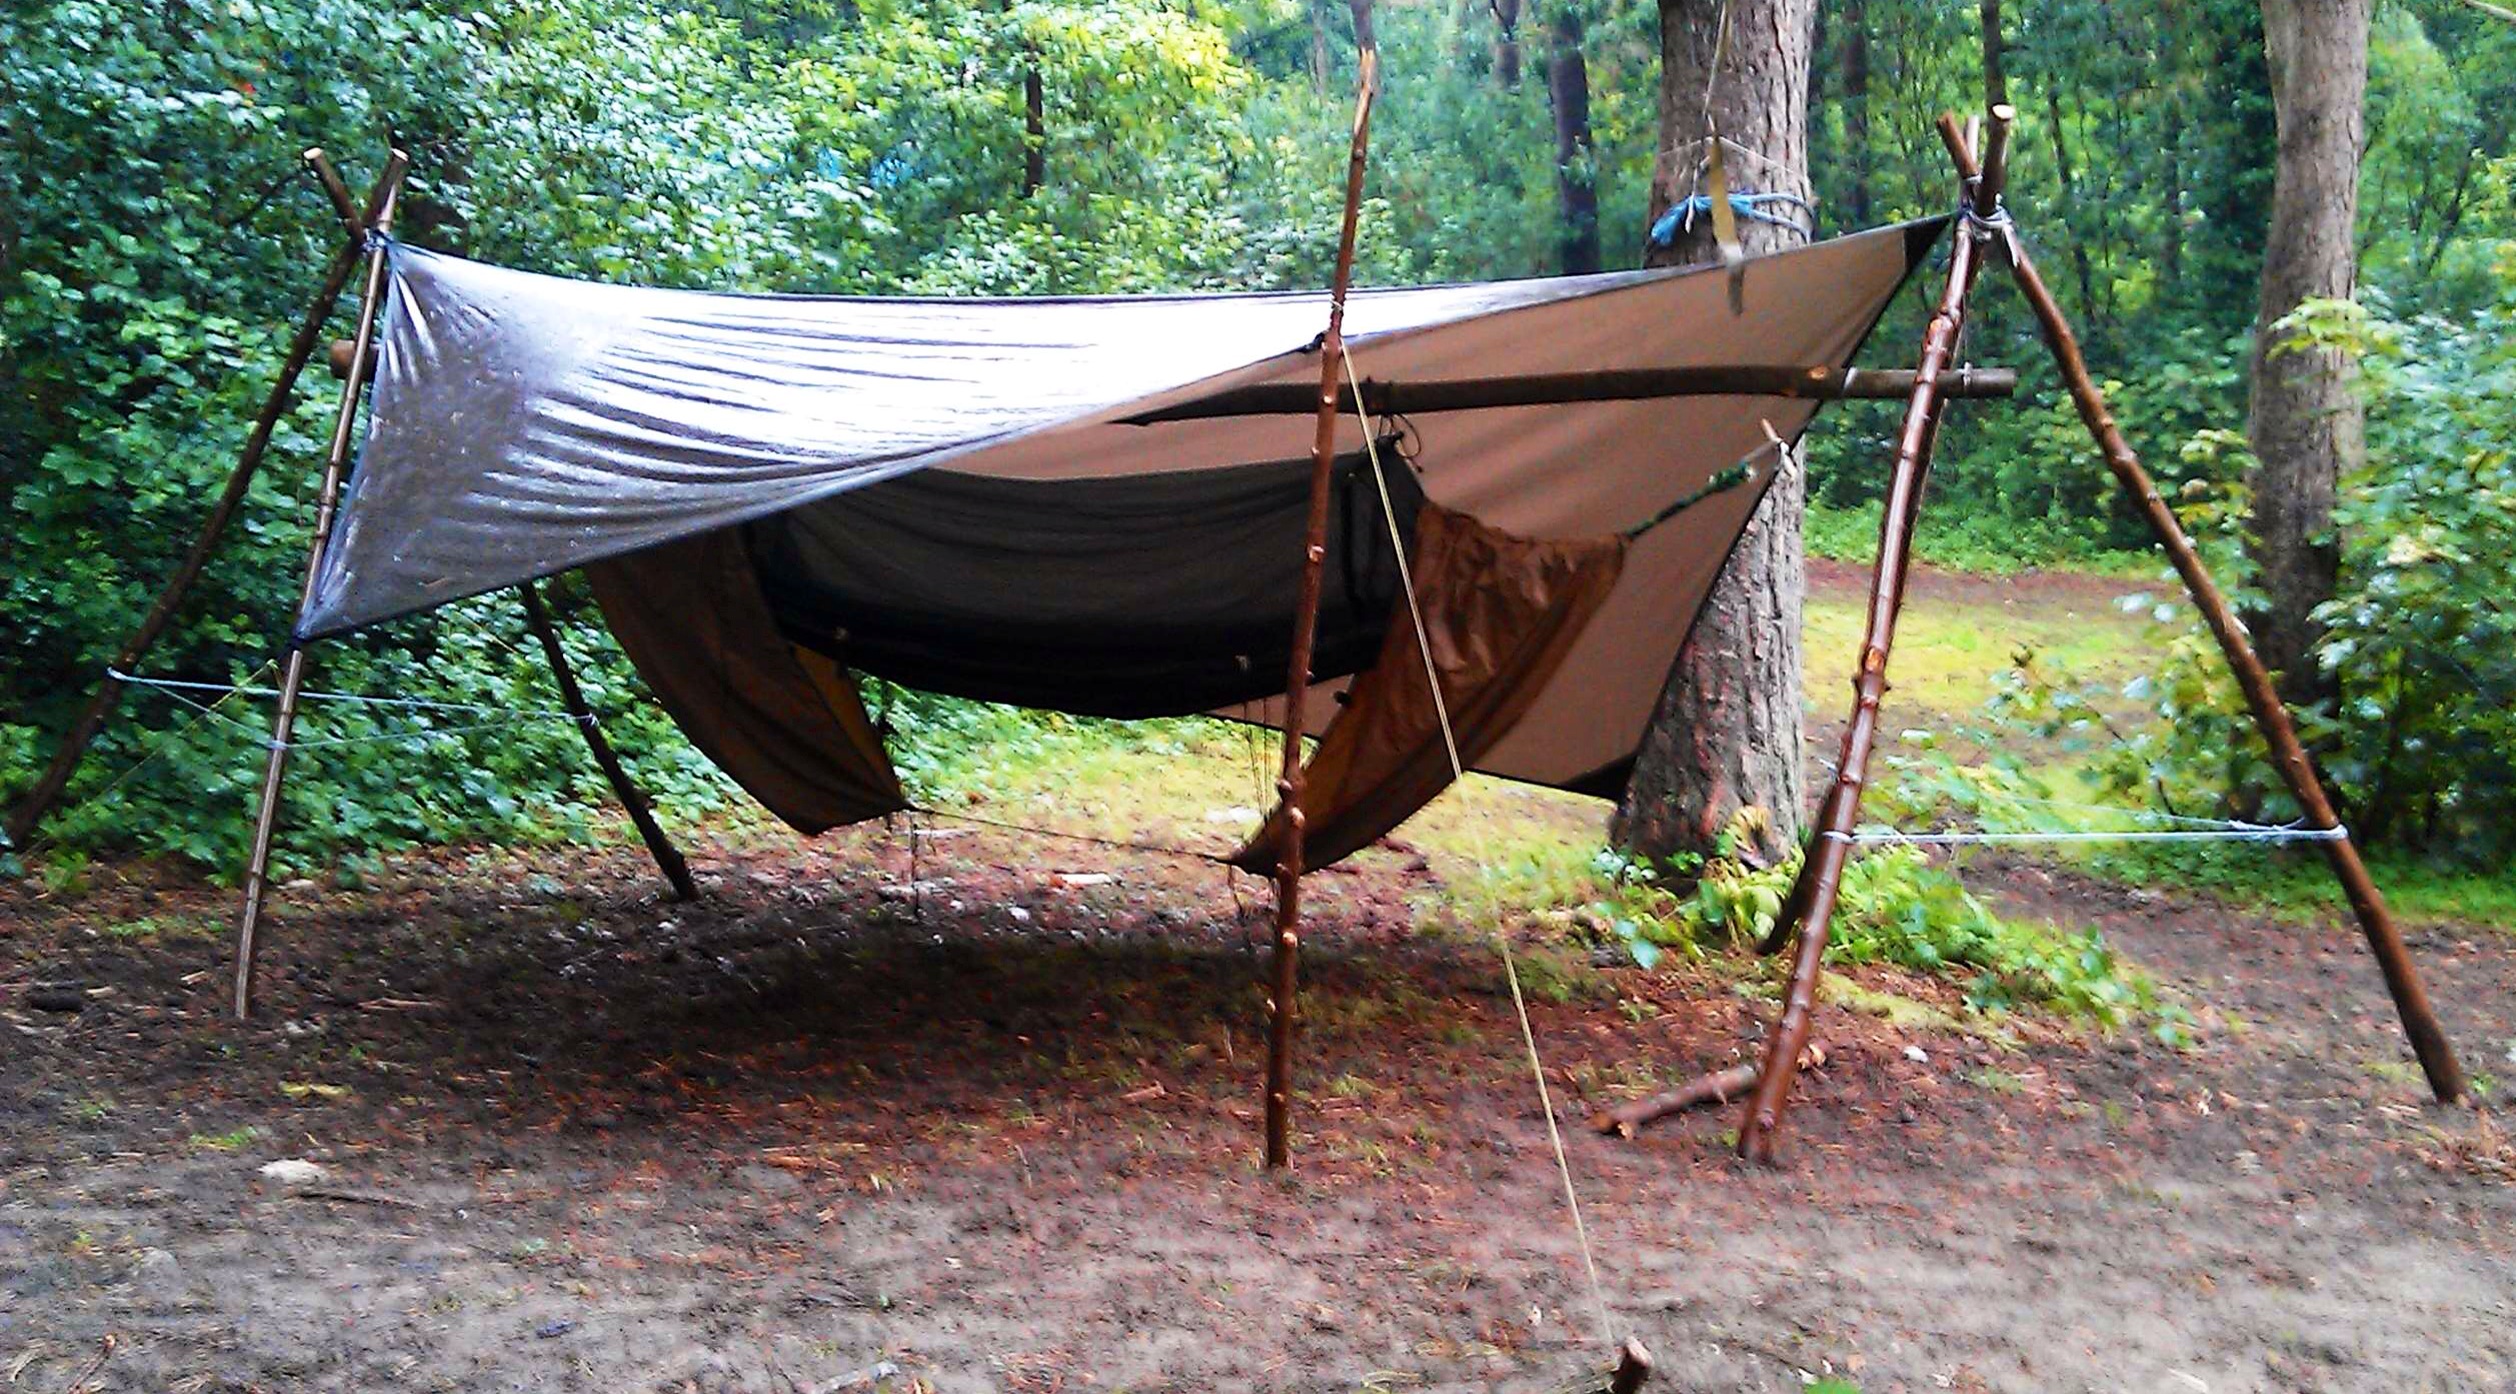
I can’t transport or store a hammock stand like Mat’s so I started experimenting with what I called the one-tree hammock stand. I set up a tripod made of sycamore rods that had lots of wooden anchors to hold the tripod in place. I then tied one end of my hammock to the only big tree in our garden and the other end to the tripod.
The tripod was held in place by lots of anchor points and worked well until my wife Alison pointed out all the holes I was making in the garden, and muttering about ‘trip hazards’.
One-tree hammock stand with multiple ground anchors
Not only did I need anchors to stop the tripod from toppling over, I needed to set up further spikes on the tripod to give it extra strength and keep it in place. I suppose this was due to the fact I was using wooden pegs and ropes of different strengths which tended to stretch a bit.
A lot of rope is required for this set up, and backwards facing pegs
My friend Paul Bradley (Bardster) cracked all this with a hammock stand he made that had 10″ screw anchors and used top-quality non-stretch rope. Paul plans to experiment with delta anchors in the future. I however did not have screw anchors and had never heard of delta anchors.
I wanted something I could just put up in my garden for the kids to use, as and when required, something that did not take up much space, was not dependent on land anchors and could be easily transported in my van.
Paul Bradley’s single ground anchor hammock stand (Photo courtesy of Paul Bradley)
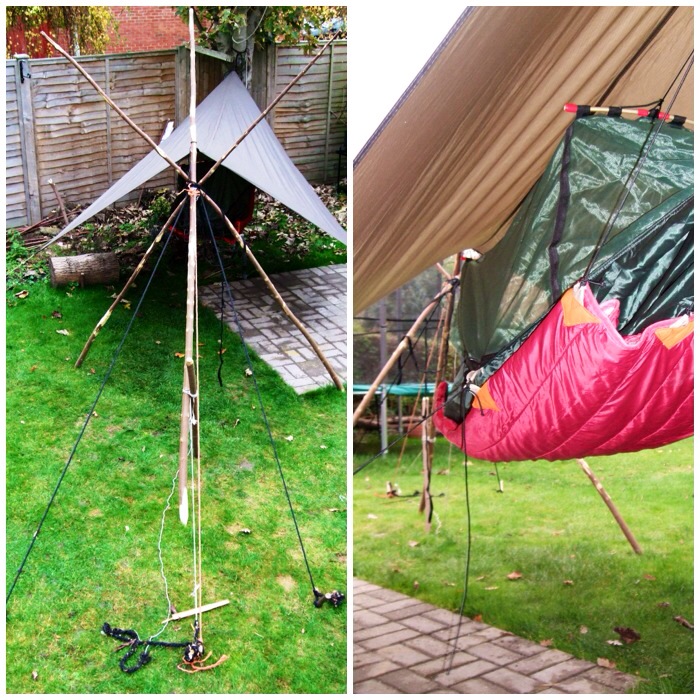
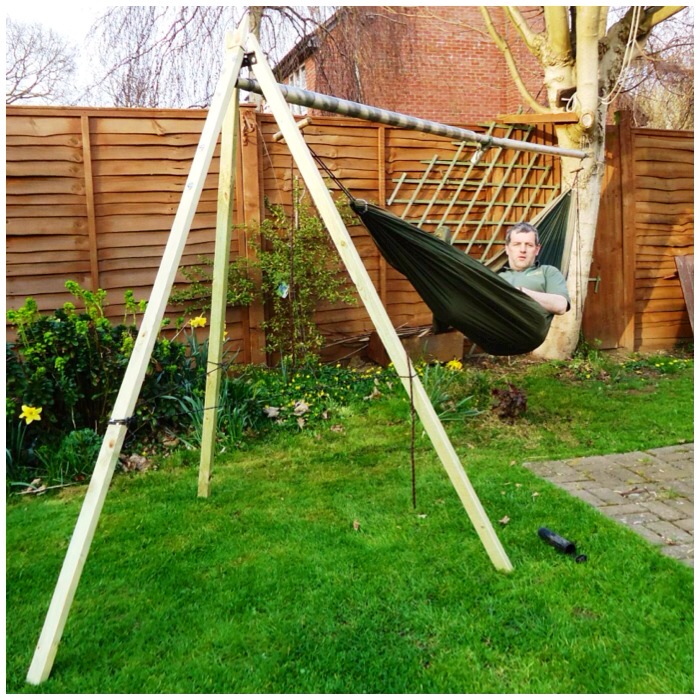
Turtlelady’s post gave me ideas for experimenting with just one tripod and a single tree. I suspended the ridgepole (two old army tent poles) between the tree and the tripod using Amsteelrope and then slung the hammock directly to the ridgepole. As the hammock was not tied directly to the tree or the tripod the ridgepole absorbed all the compression forces, meaning no ground anchors were required.
One-tree free-standing hammock
The tripod I made was from ‘Sawn Treated Softwood’. I bought a pack of 8 x 1.8m length pieces (47mm x 22mm) which cost just under £10. I cut the legs of the tripod to approx. 1m 70cm lengths so as to fit easily in my van.
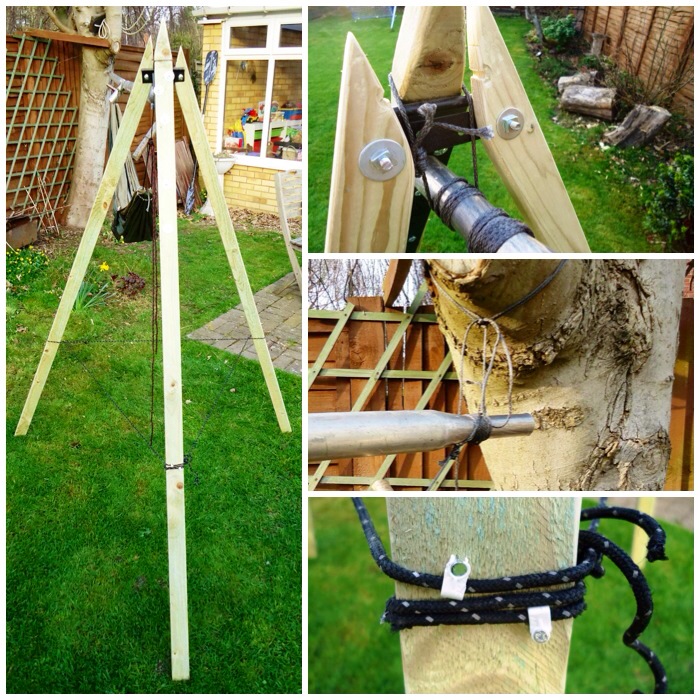
To connect the tripods I used a ‘T’ Hinge (about 45cm in length) at a cost of about £2.50. I attached the hinge to one of the legs using bolts of about 4cms (cost about £3). As you can see in the top right picture below I shaped the wood as best I could so that when the tripod was open the tops did not touch each other.
I used Amsteel rope to connect the ridgepole to the tripod. As you can see the ridgepole is hanging off the centre tripod leg on a length of Amsteel. I bought 5 metres of Amsteel rope for this job costing me about £5.
The other end of the ridge pole I hung directly from the tree (I now use a hammock strap to go round the tree and tie the Amsteel rope directly onto the strap). This tree has a handy branch coming off the side to tie directly onto, allowing the rope to hang down directly. Where you have only the trunk of the tree, a strap grips the bark better than just cordage.
Finally I tied off some old guyline rope around the tripod legs to stop them splaying out when they were under load.
Make up of the one tree free standing hammock
After testing out the one-tree set up I made another tripod and changed the ridgepole.
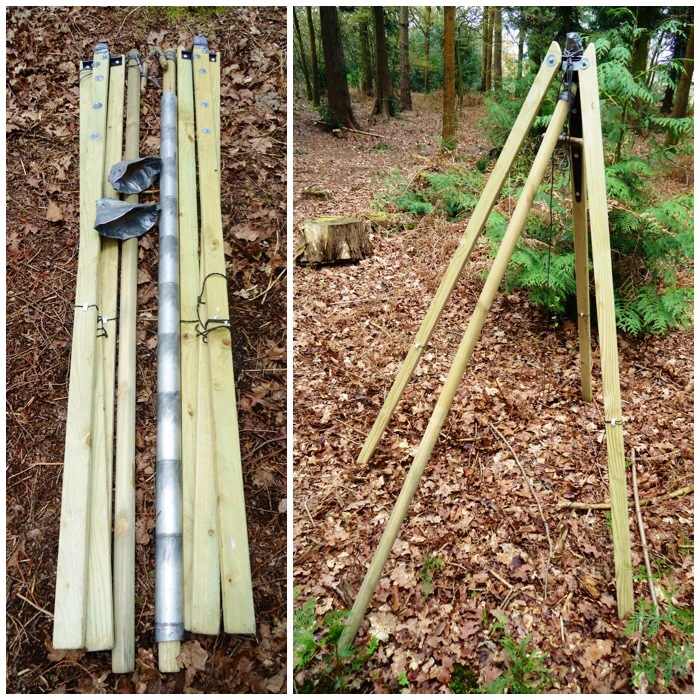
I made the second ridgepole from two large tree stakes from from a local garden centre (cost about £3.50 each). Each stake was 1.8m x 40mm but I cut each one down to 1m 74cm to get rid of the points.
I connected the rods with an old army aluminium tent pole. I cut the ends off the tent pole to allow it to slip easily over the tree stakes. I saw these old army aluminium tent poles for sale on eBay for about £6 (a single ridgepole would never have fitted it in my van).
Below you can see both tripods collapsed and ready for transport and one of them set up. The little caps you can see in the left-hand picture are protectors for a tarp.
Freestanding – tripod set up
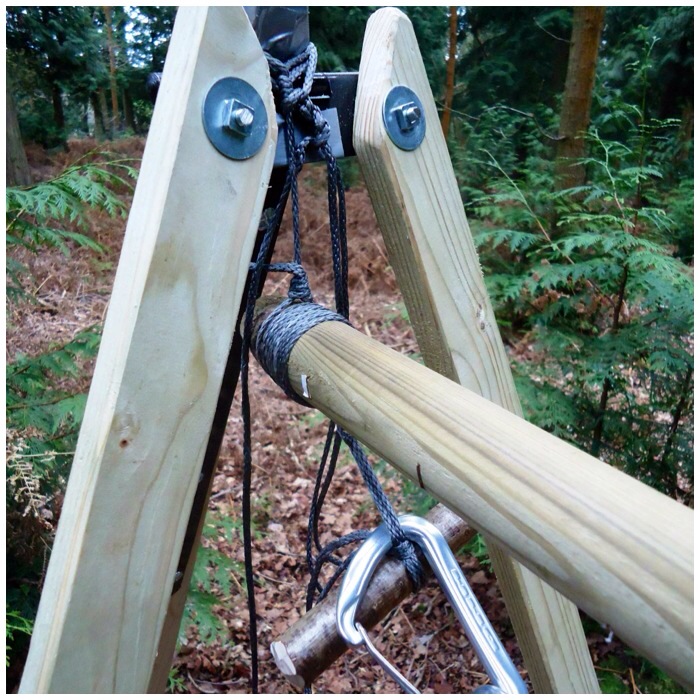
Below you can see a close up of the ‘T’ bar hinge set up and how the ridgepole is connected to the tripod.
I carved 3 grooves all the way round the the ends of the ridge poles to give the Amsteel rope something to grip onto. The ridgepole is attached by means of an adjustable loop that is hung from the tripod and around the first groove on the ridgepole.
The wrapping of Amsteel you can see on the ridgepole is a common whipping that is wrapped around the area where I had carved the other two grooves. This whipping has a tail on it that can be used to create a marlinspike hitch to allow the hammock to be hung off.
Free standing – tripod back
Below you can see the marlinspike hitch and the hammock clipped to it with a carabiner. This set up makes attaching the hammock very easy and the common whipping ensures that the Amsteel does not slip when I get into my hammock.
Free standing – tripod front
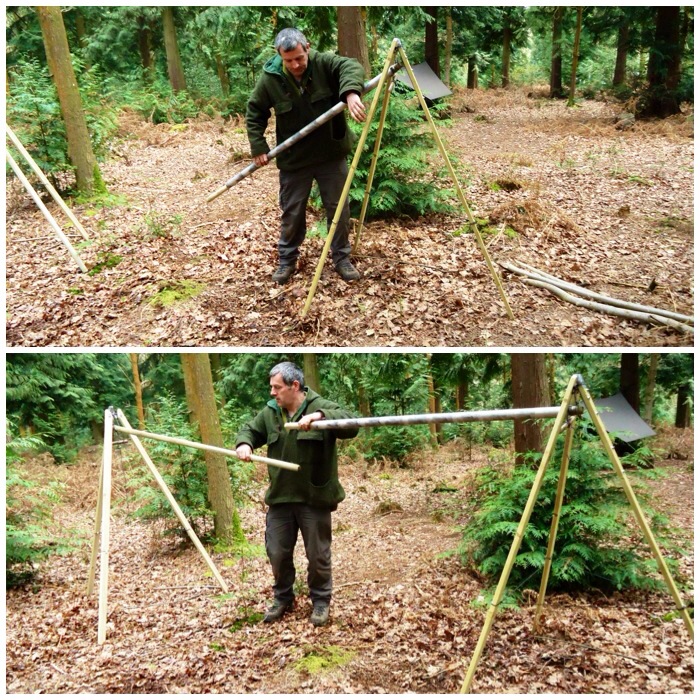
To put it all together I simply open up the tripods and place them roughly the correct distance apart from each other (the length of the two ridgepoles).
Free standing – set up part 1
I then connect the two ridgepoles with the tent pole sleeve. I usually re-position the tripods so that the two ridge poles are touching inside the sleeve and that the Amsteel rope attaching the ridgepole to the tripod is hanging vertically.
Free standing – set up part 2
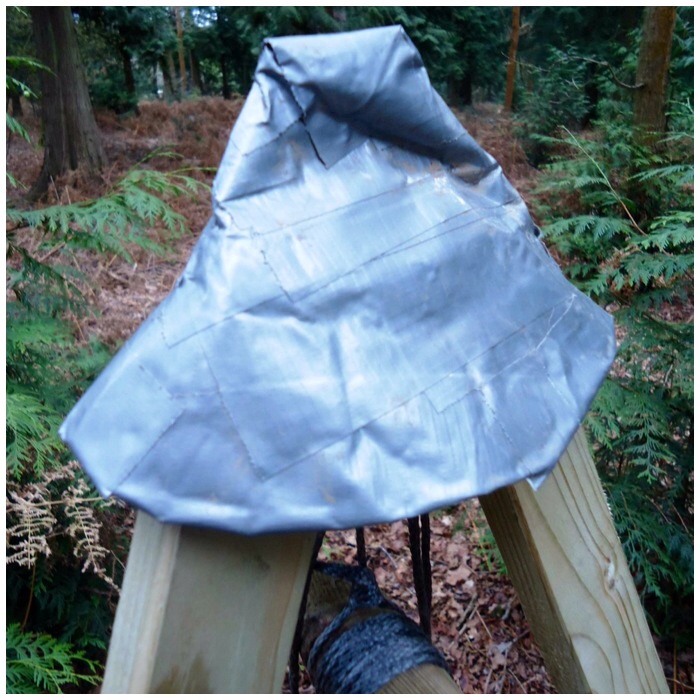
As the tripods are not that far apart the tarp will actually lie on top of them, so I made a cap for each so that the wood would not damage the material. I took an old hessian sack and cut off two of the corners, then covered these corner pieces with duct tape to make them more durable.
Tri pod cap
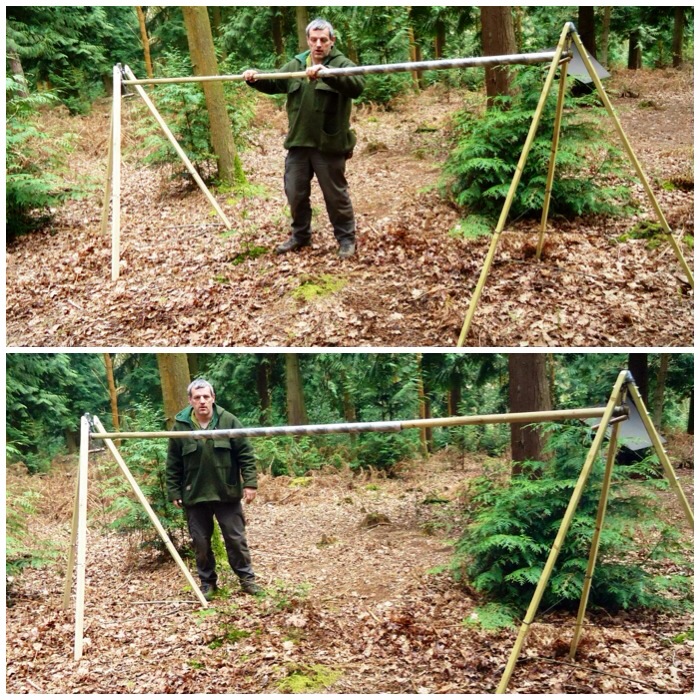
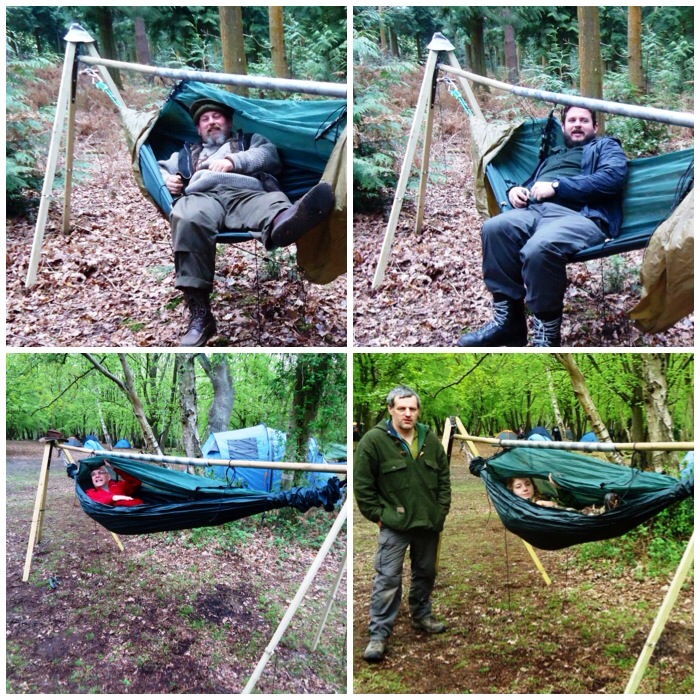
Whenever I use a hammock, whether slung between trees or tripods, I always test it by pushing down on the material of the hammock first, then I sit in it gently before finally lying back into it. This tests all your knots, tightens them up and gives you confidence that everything is ok.
With the free-standing set up what you need to watch for is the ridge pole over-bending with the compression forces you are placing on it from lying in the hammock. In this set up the old tent pole sleeve is so strong that there is very little bend in the ridgepole. I weigh about 14 stone (including all the kit I generally wear while bushcrafting) so if it takes my weight easily I am happy for my kids to use this set up.
Testing and relaxing
Over a few months I used this hammock at various meets and got different people to test it out. After some initial trepidation most people got on well with it. You just have to remember not to bang your head on the ridgepole when you get up.
Further testing
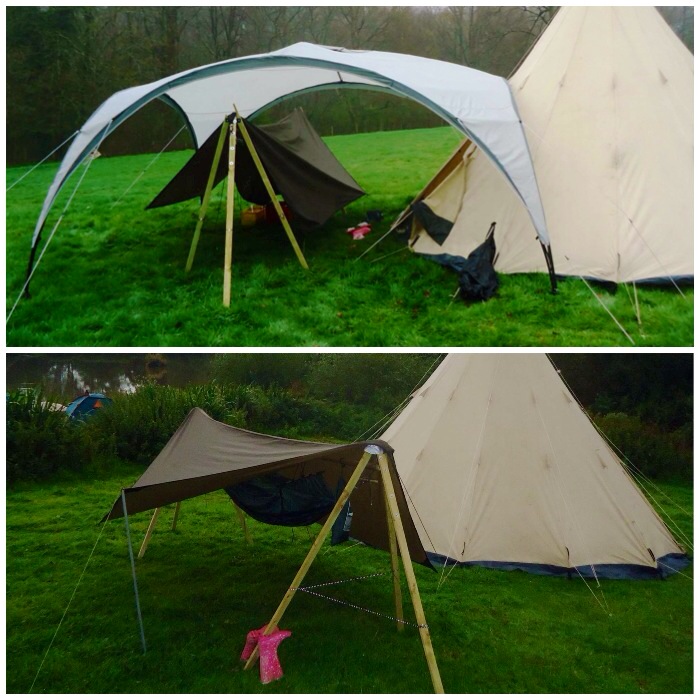
Setting the tarp up on this is quite simple as I just lay it on top of the tripod caps and peg it out. The first night I slept in the set up I put it under our group shelter as it was very windy and wet. I figured if the tarp came off in the night the big shelter would offer me some protection from the rain.
I slept well that night apart from wakening a couple of times to the creaking of the ridge pole as I changed position in my sleep. I have got used to these noises now and trust the ridge pole to take my weight. Now I am happy to set this up with just the tarp for cover. In the bottom picture I had the hammock stand set up at the Wilderness Gathering last year for my daughter to use as a nest to go and relax in during the day and for visitors to come and see the design.
Tarp testing
Back in 2012 I had promised some of the guys at the BCUK Bushmoot I’d bring the stand along for them to look at. In all the usual confusion of preparing and setting off for the Moot I forgot to put the stand into my van. Undeterred, I decided to try and make a similar stand using sycamore poles, of which there are plenty on the site at Merthyr Mawr, so I set off to gather the wood I would need: this is when my friend Spikey spotted that I was up to something and asked if he could help.
After I explained the concept Spikey helped me cut the poles to make up two tripods. We lashed the tripods with Amsteel rope and made little adjustable loop danglers to hang from each tripod for a ridgepole. Also each tripod had rope tied around each leg to stop them from splaying out when put under load. We tested each tripod by both doing pull ups together on each one. Our combined weight is about 28 stone so we were quite happy each tripod would be up to the job.
Green wood tripod set up
I did not have a handy old army tent pole to act as a sleeve for the ridgepole this time so I had to find a length of sycamore that was long enough (about 3.5 metres) and strong enough not to bend with the compression forces. I wanted a piece that was fairly uniform in girth along its length and as straight as possible. Spikey and I spent quite a few hours trying to find this perfect pole but when we found a couple that seemed to be ideal they both bent horribly when a load was applied. I did not want to put a massively thick ridgepole above my head and was getting quite frustrated at this point.
It was at this point Spikey had his Eureka moment: ‘Why not try and find a piece of sycamore that’s oval shaped instead of round?’ I could see what he meant – an oval pole would have two sides with fairly flat surfaces and two sides with sharply curved surfaces. These sharp curves would take far more load without bending than the flat surfaces, so off we went to find this magical ridgepole.
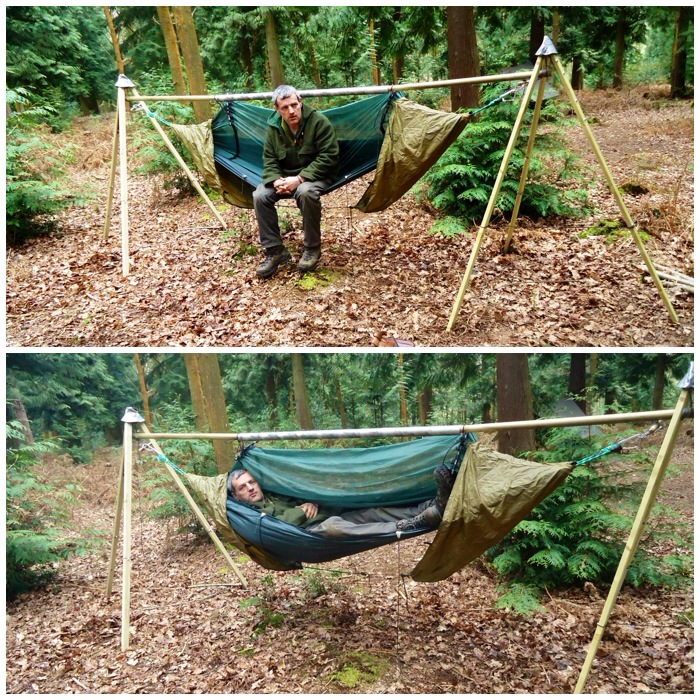
As you can see below we found it, and set it up so that the ridgepole hung beneath each tripod. I attached more Amsteel with some simple whipping to each end of the ridgepole for the hammock to hang off and slung my tarp over it all. The ridgepole hardly bent as the sharply curved sides of the pole were very rigid. I got lots of different people to try this set up out and it took the weight of everyone who tried it out easily.
Green-wood free-standing hammock stand
I slept for 5 nights in this set up and had a great sleep every time. I like the fact now that if I am stuck for somewhere to sleep in my hammocks (if for example there are no lovely big trees around) I can now set up a system that will still keep me well clear of the ground.
As part of a primitive technology course I was taking with Woodcraft School back in 2009 I had to make various craft pieces. The aim of the course was to slowly take away our modern tools so that by the end of the course we would only be using primitive tools to make our craft items.
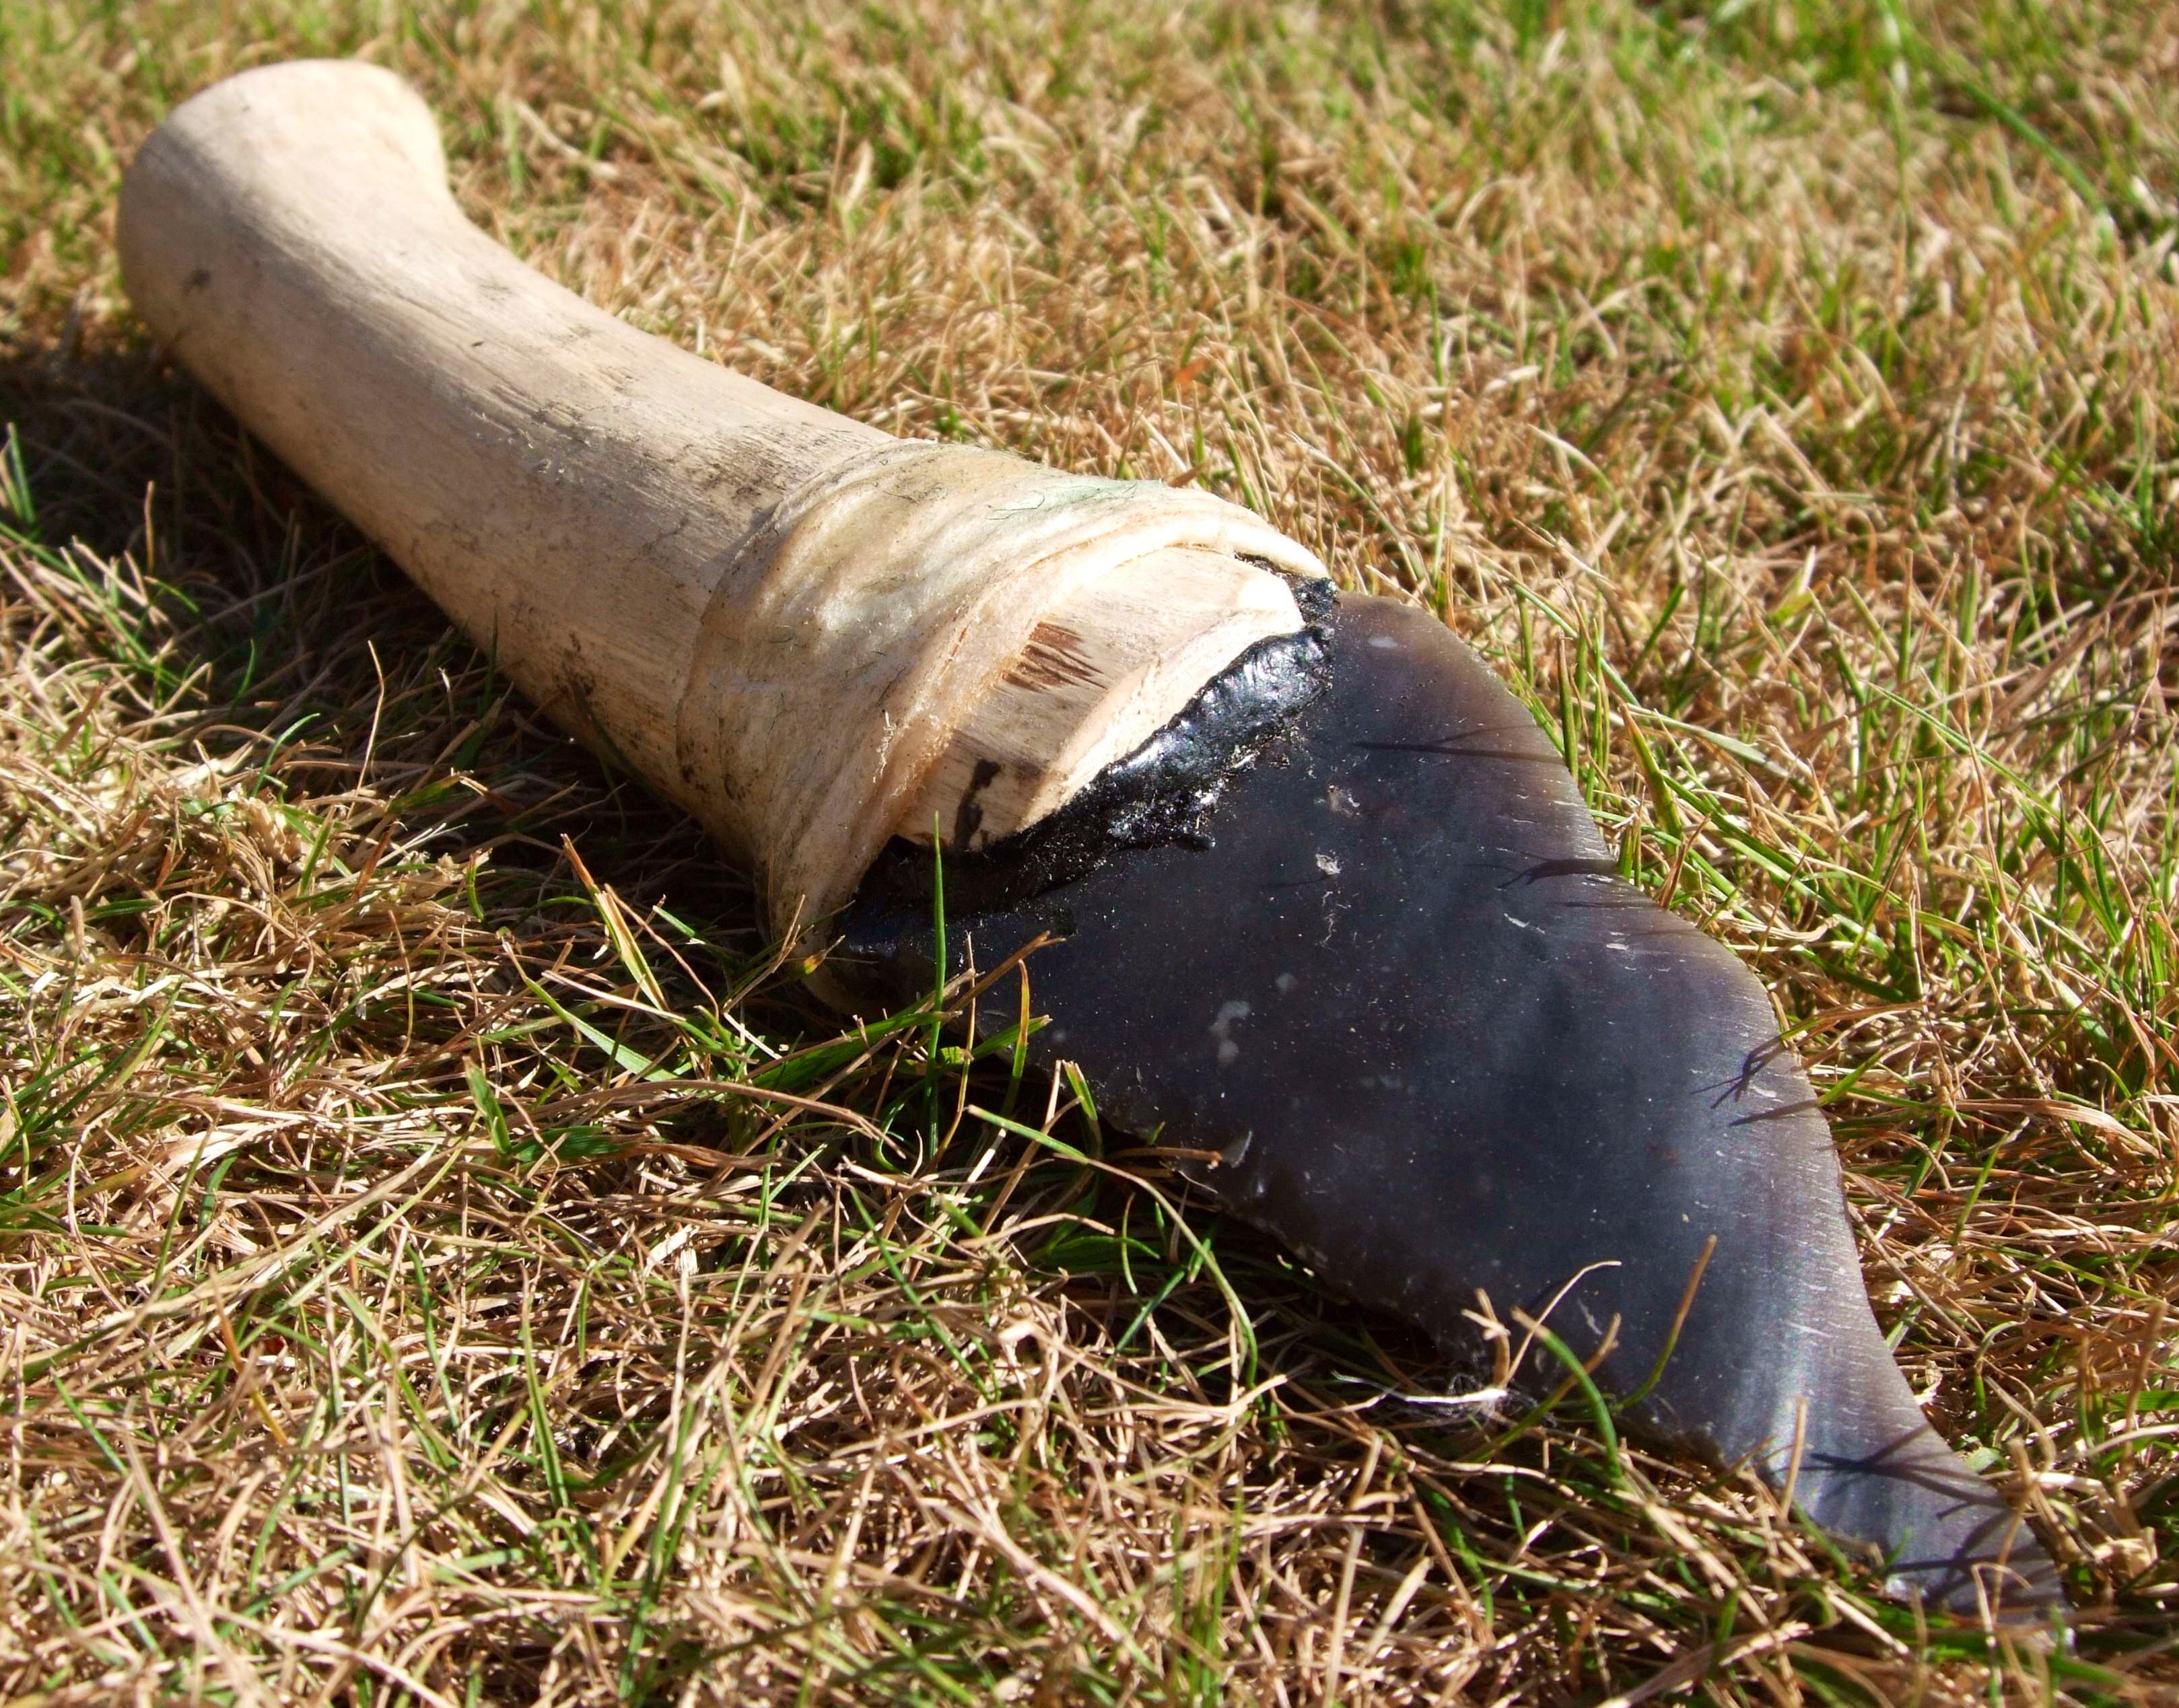
I was using hand-held flint tools such as discoidal knives in the beginning but about halfway through the course I decided something a bit better was required. This How To…. is designed to show you the simple steps I took to make my flint knife and show you some of the uses I have put it to since.
A simple flint knife
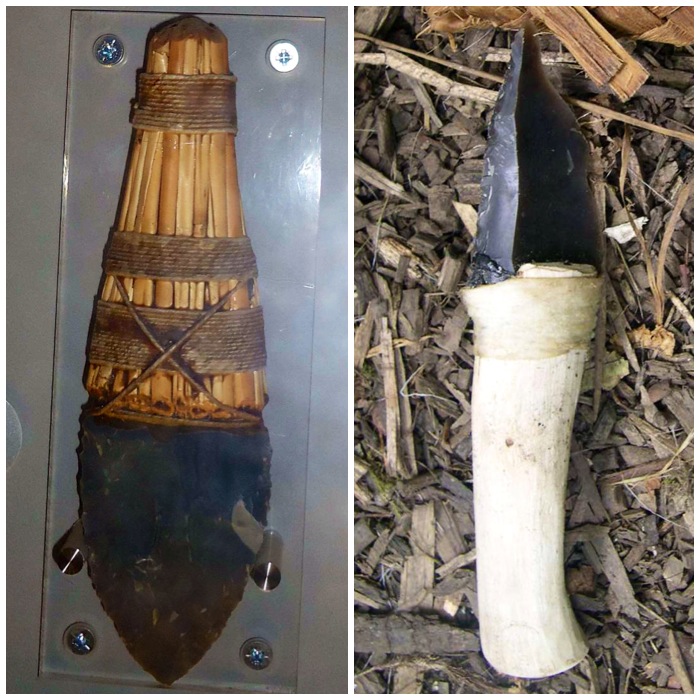
During the course (spread out over 5 months) I came across the knife you can see below left in the Museum of Prehistory at Cheddar Gorge. Not only was the knife beautifully constructed it also looked strong and practical. I knew I was to be taught on the next part of the course by top flint knapper John Lord so was keen to keep my eye out for a suitable piece while I was knapping flint with him. The knife I made on the course is on the right, not as strong or anywhere near as beautiful but for my needs very practical.
My inspiration
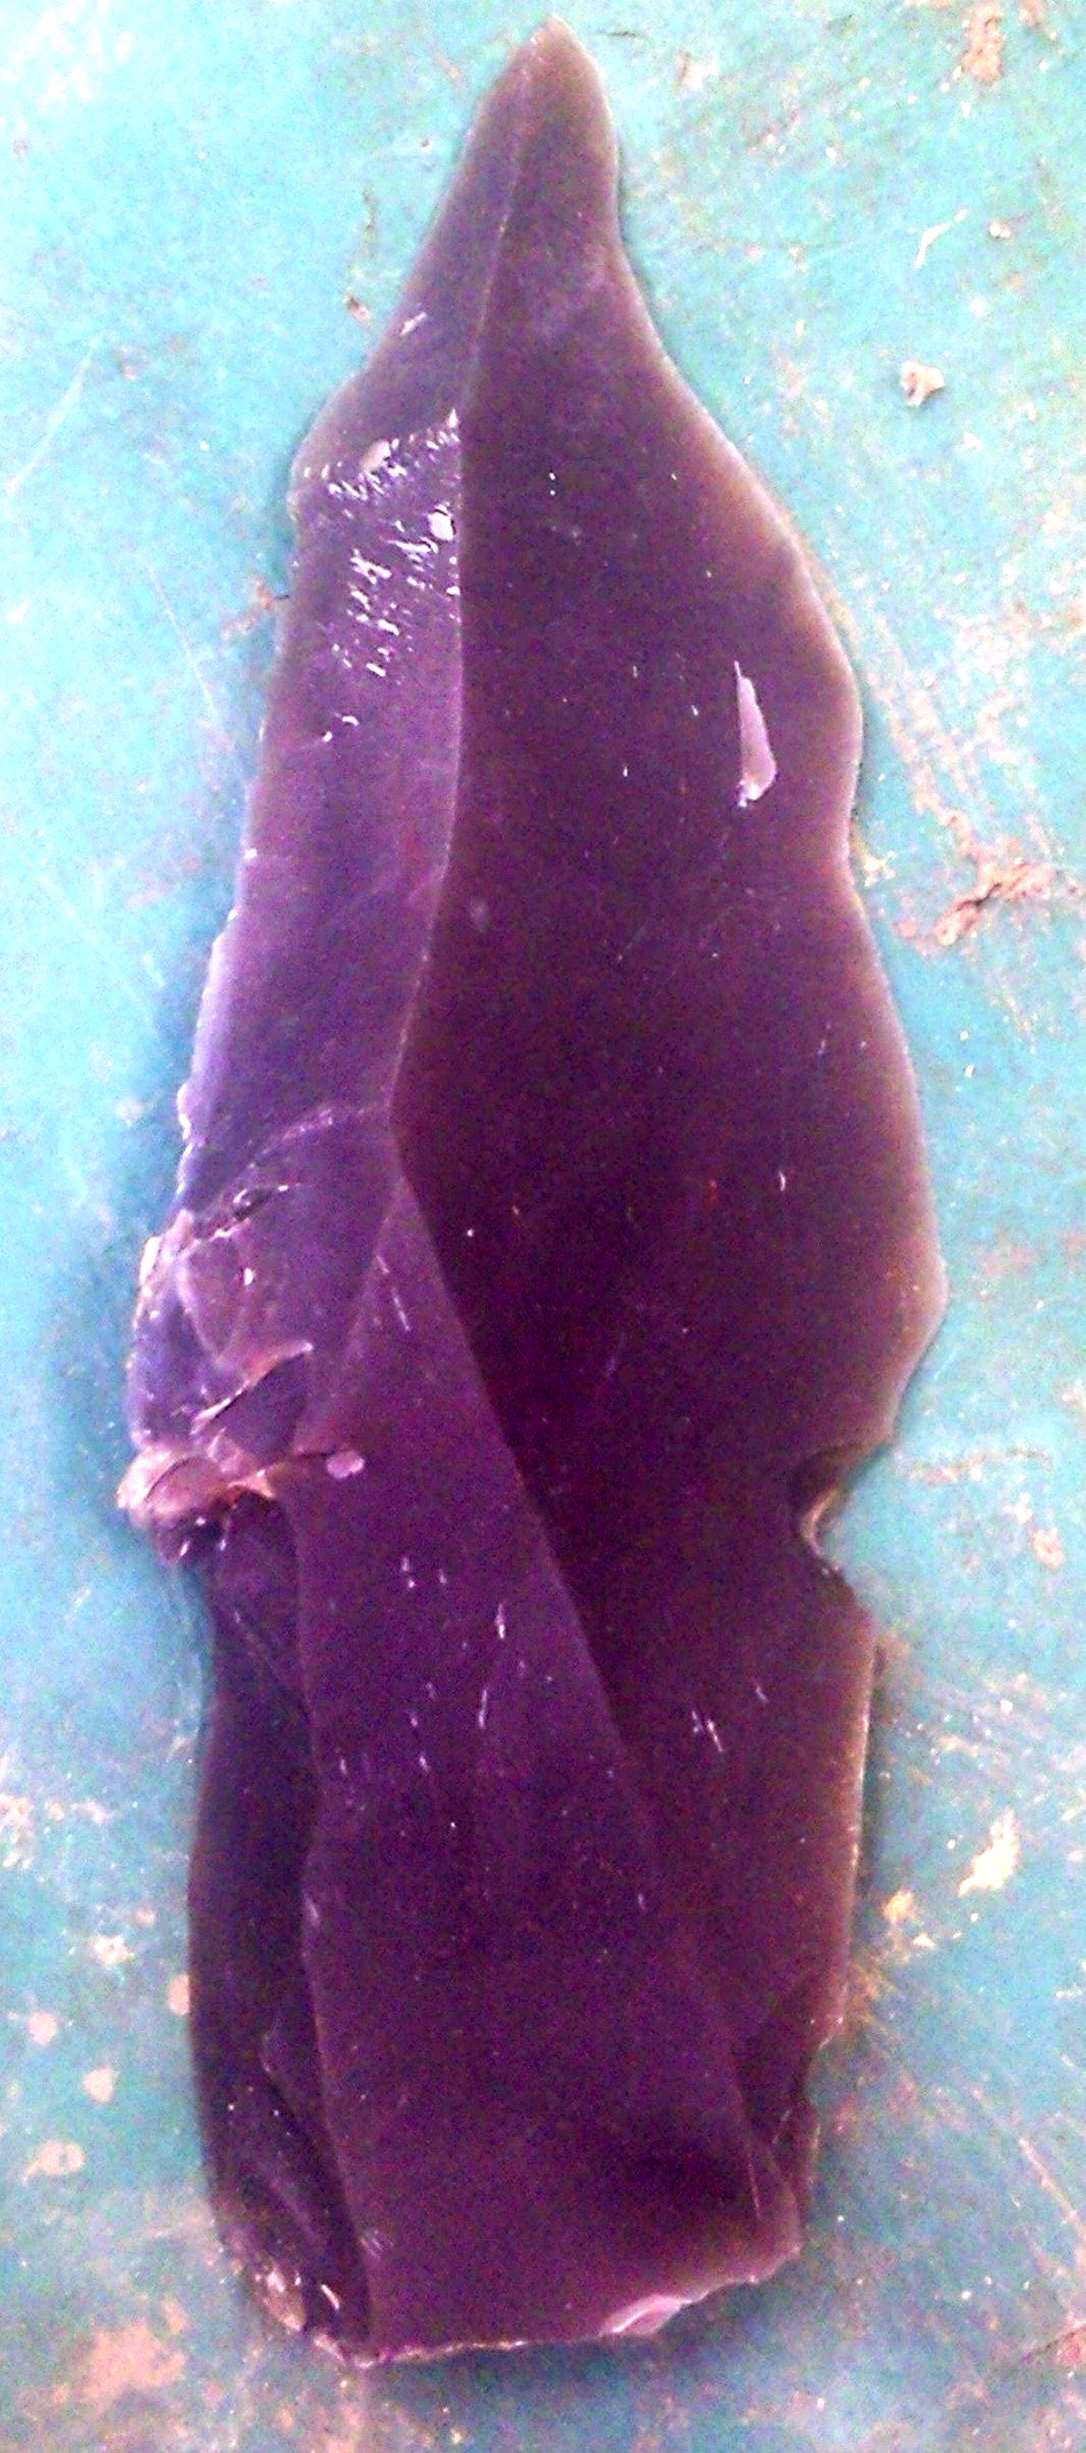
It was while I was knapping my flint axe head that I saw this piece pop off. The piece had a strong back, a sharp edge with good curves and a perfect point. I re-touched the back to smooth it down a bit and pressure flaked a groove where the sinew wrap to the handle would be.
The blank blade
I’m afraid I didn’t take many pictures of the handle preparation as it wasn’t going into my portfolio: I used a modern saw and knife for this part to save time. (As I said at the beginning of the post the course was designed to introduce me to primitive crafts by gradually reducing my reliance on modern tools.)
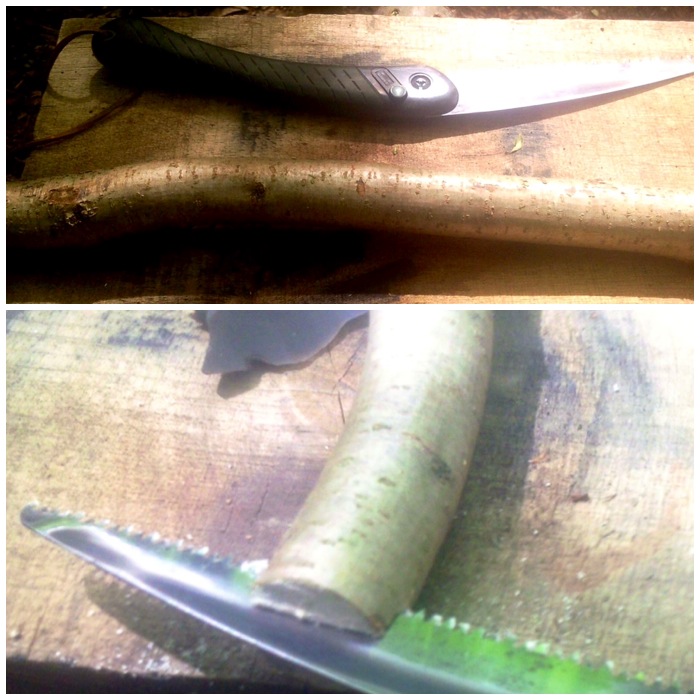
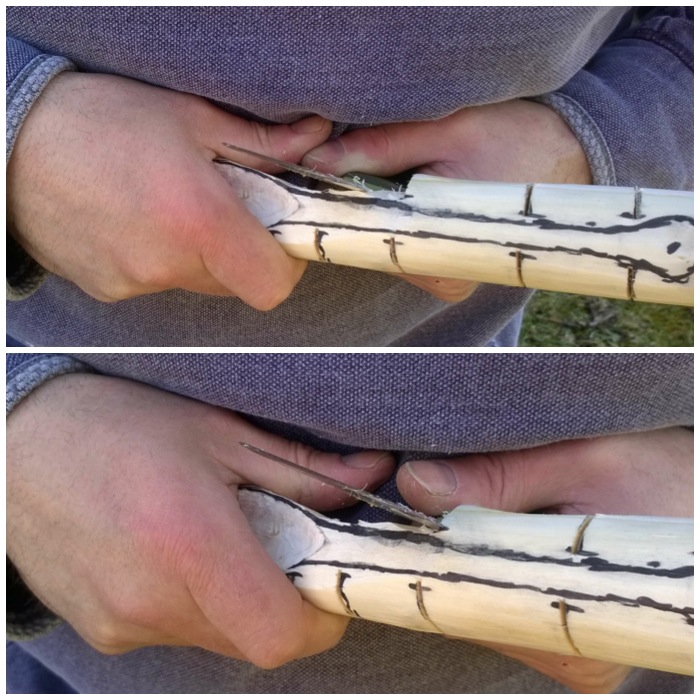
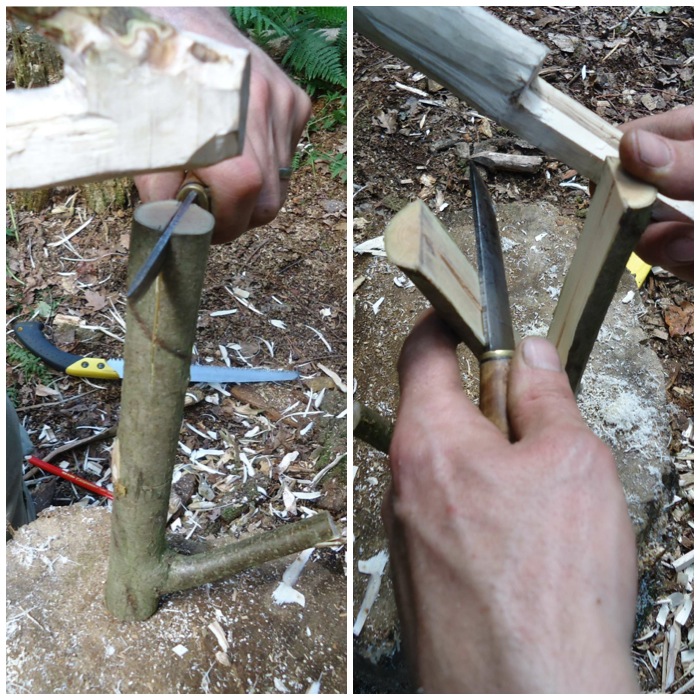
I selected a piece of dead standing wood that was well seasoned and had a slight curve in it, to make for a more comfortable grip and also to reduce the amount of carving necessary. I then used my saw to cut two stop cuts in a ‘V’ shape into the end of the wood. Since finishing the course I now know that a piece of serrated flint would have done this job just as well, if a bit slower.
The handle-to-be: starting the slot
Once I had the stop cuts in place I used the tip of my steel knife to cut out the centre of the ‘V’ for the tang part of the flint blade to fit into. Then using my steel knife I carved the wood down into the final handle shape.
Stop cuts in place
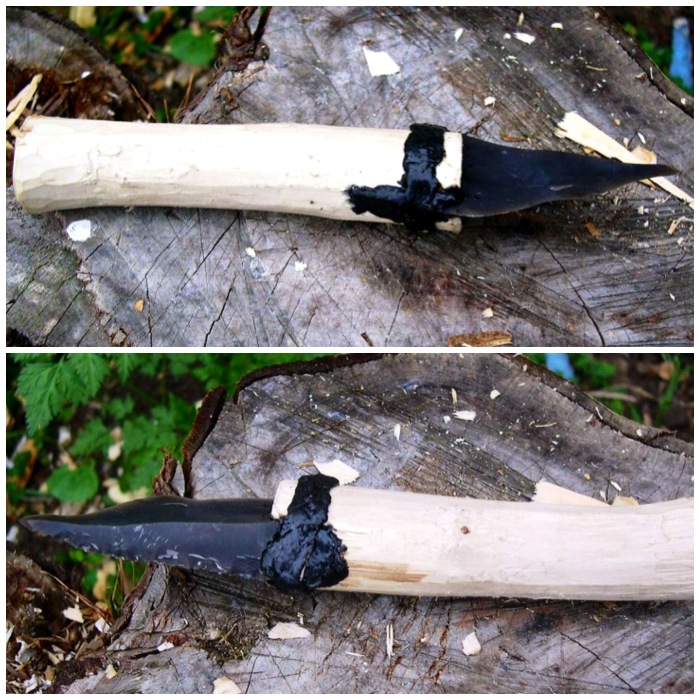
I filled the ‘V’ notch with some spruce pitch (see my article on arrow making for making spruce pitch) and slid the tang of the flint blade into the notch. I then bound the hilt of the handle with sinew to secure it and covered the sinew with more pitch to protect it. Within 24 hours this knife was ready to use.
Rawhide and pitch wrap
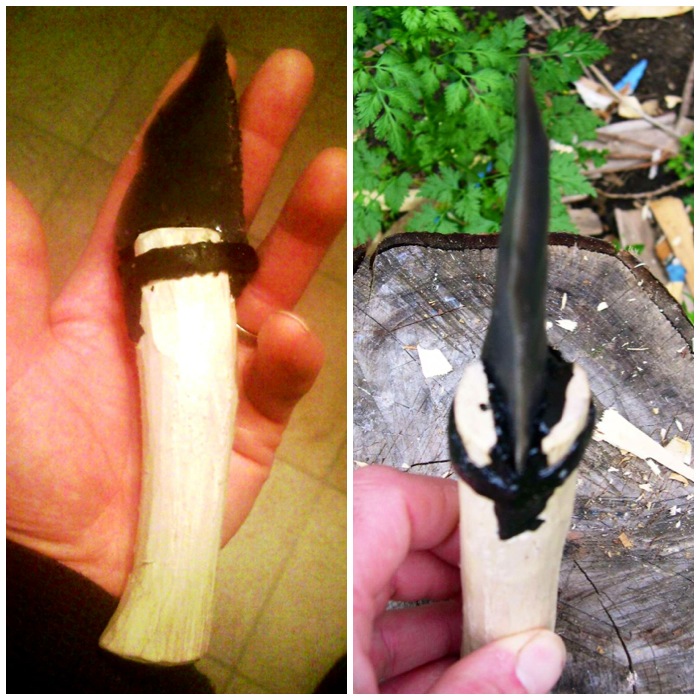
Not the best pictures I am afraid but as you can see this knife was the perfect size and shape to use on many of the jobs I would normally use a steel knife for.
A perfect size and very sharp
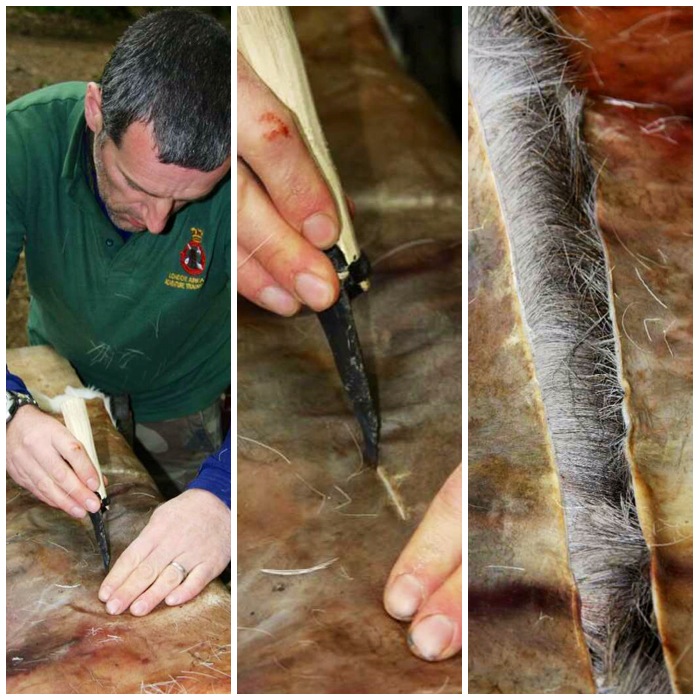
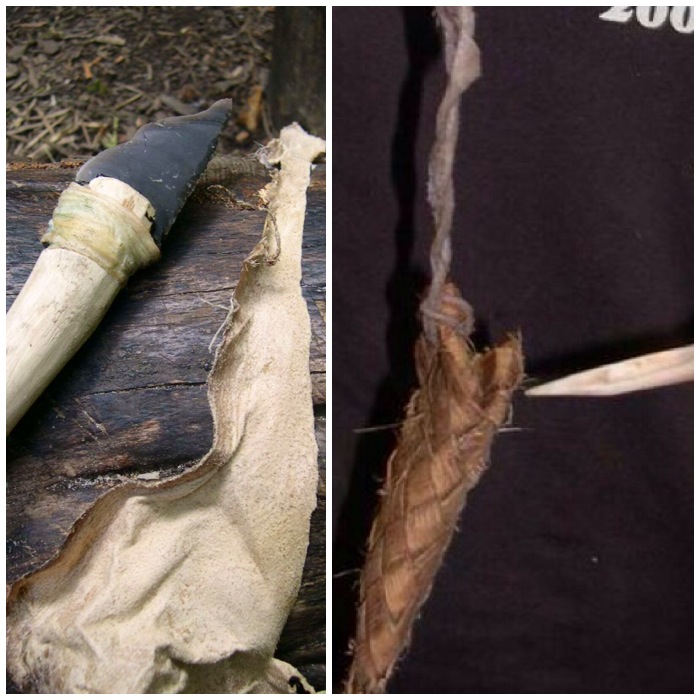
The purpose for which I created the knife was tanning some deer skin on the course. When splitting the hide of the deer the knife was comfortable to use and the top curve near the tip cut through the hide like a knife through butter.
First job – cutting a deer hide
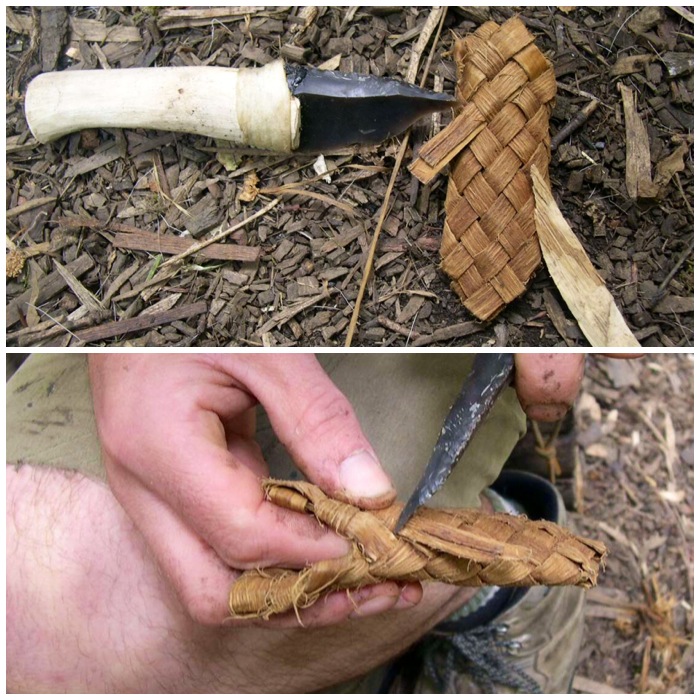
My final craft item was to make a bark sheath for the small bone bodkin you can see on the right. The knife allowed me to easily cut out many strips of bark in a very controlled manner so that the strips were all of the same width. I added a wrap of rawhide at this stage to protect the pitch and sinew from general wear and tear.
Creating bark strips and a new rawhide wrap
When I was finishing the sheath I found the knife edge was brilliant for trimming off all the excess bark.
Perfect for trimming
Finally, to hang the sheath on my bark belt I cut up lots of buckskin with the knife to make some rough cordage.
Good for cutting up buckskin
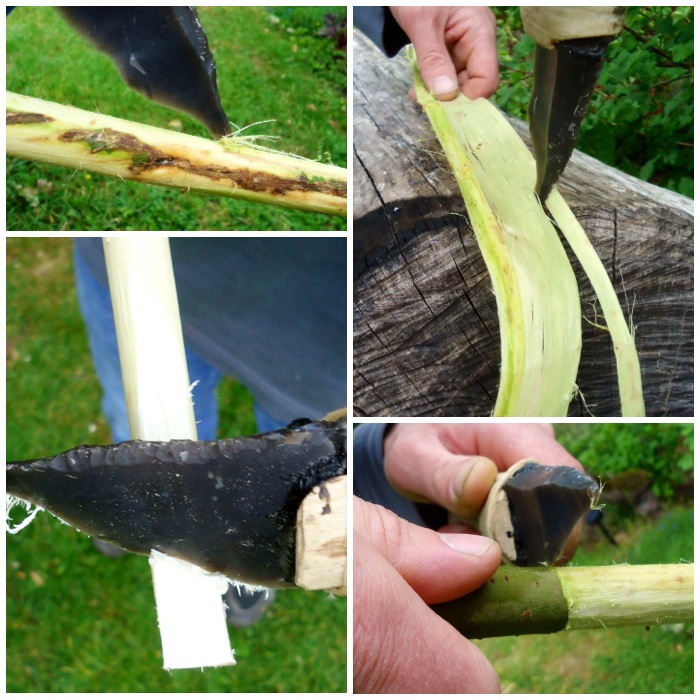
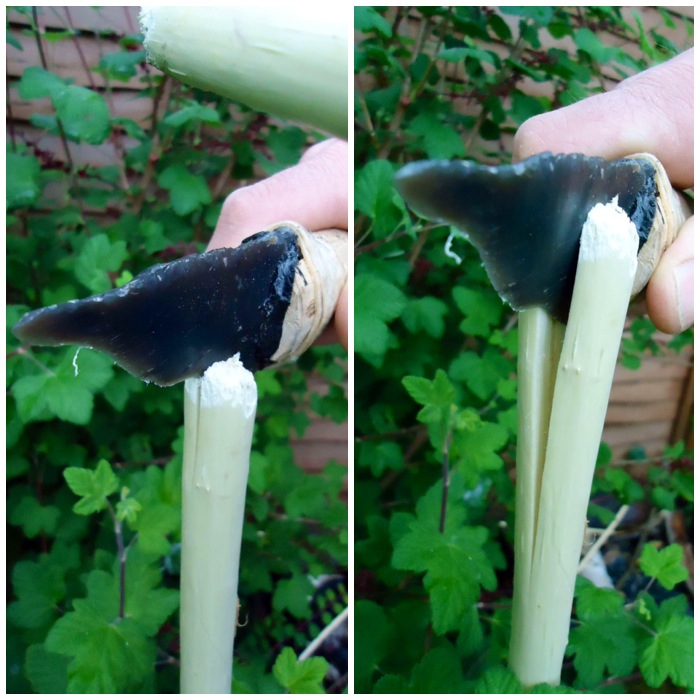
Since the course I have used the knife on a few other projects. So long as I am respectful of the fragility of the flint edge, the knife has produced some wonderful results. It’s great for scoring lines in bark, shaving pieces of green wood down to points and for making rosette cuts in small branches to snap them.
Scraping, point work and splitting
When I was making my Split Stick Atlatl and had to batton open a piece of green wood I found that the thick back of the blade was able to withstand a lot of force from my wooden hammer, which was a pleasant surprise, although I was very nervous throughout the process.
Robust enough for battoning
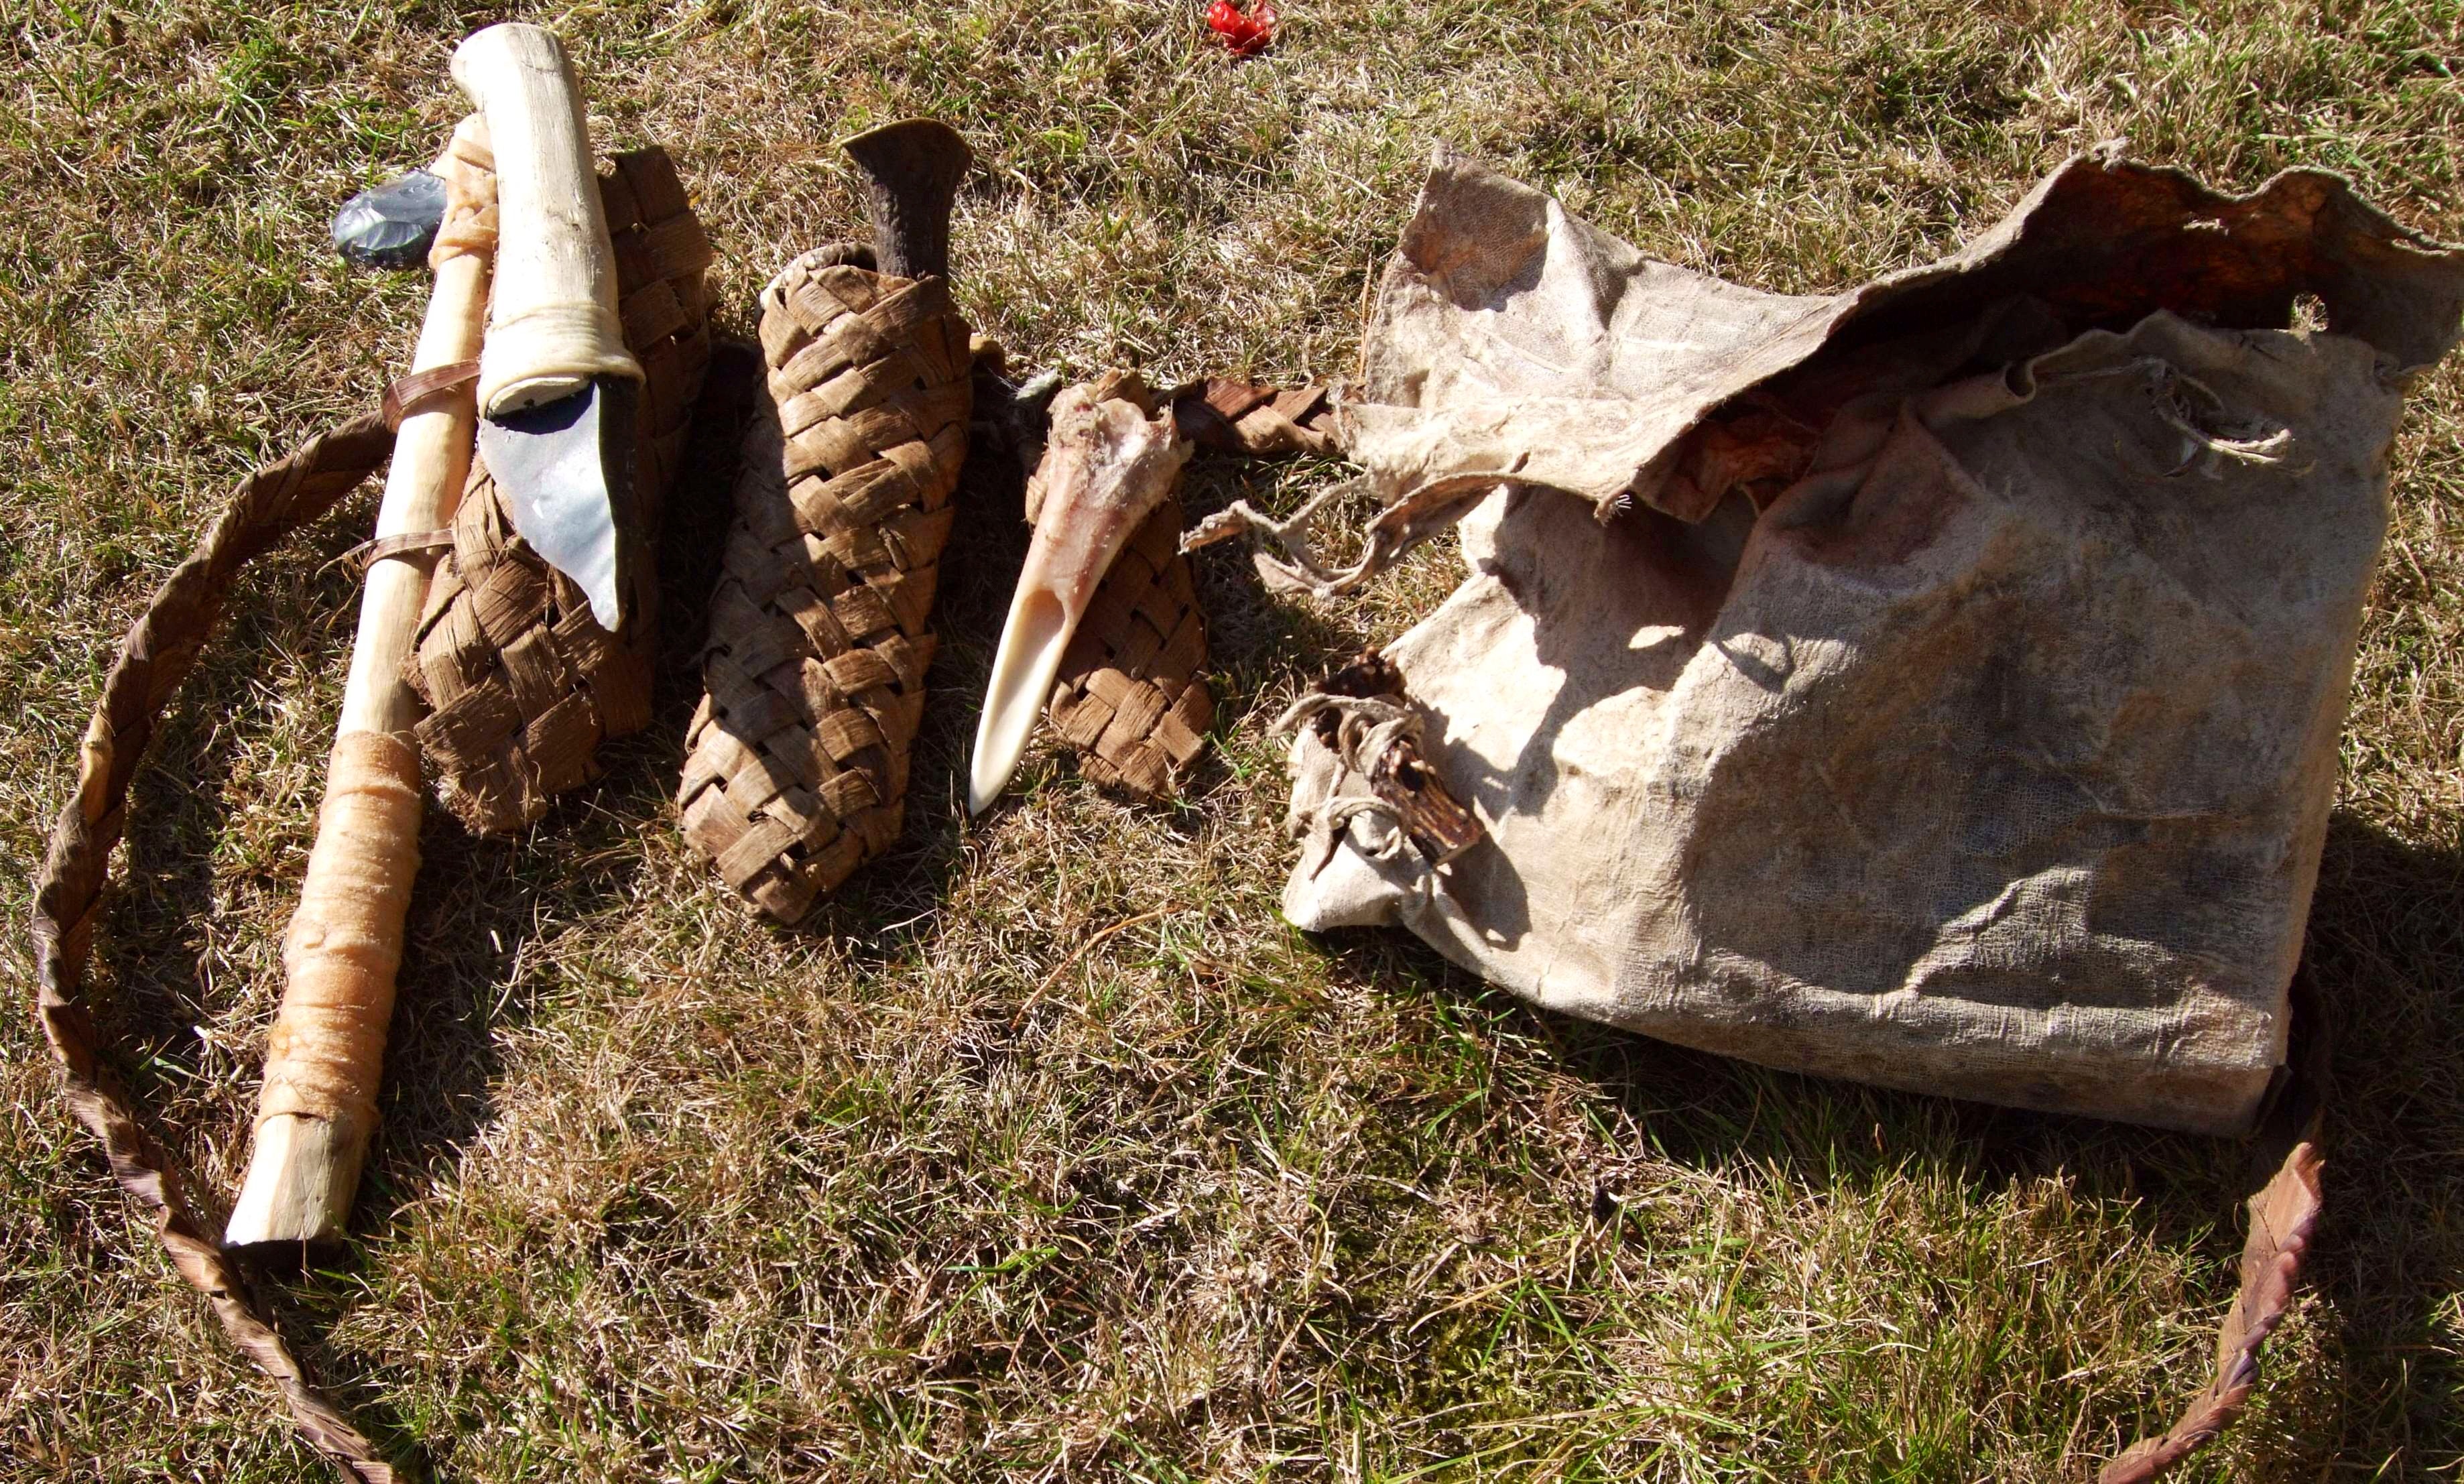
Eventually I made the knife its own bark sheath and it now sits proudly as a well-used tool on my primitive belt order.
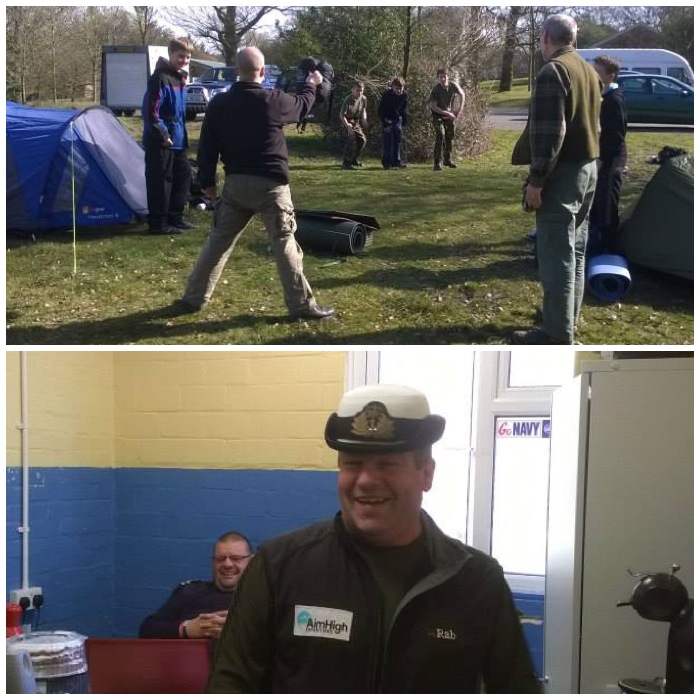
I got a lovely sunny weekend in Crowborough – not often I can say that in March
The London Area Sea Cadet Adventure Training has run over the last few years a couple of Level 3 Certificate in Basic Expedition Leadership (BEL) courses for our instructors. This is a nationally recognised qualification and we as a team have worked very hard with the trainees to get them trained up and assessed. Our training team in the London area has grown quite a lot now with more and more camps taking place.
The downside to this was that as more and more cadets were being trained up there was a point when they hit 16 years old there was little in the way of camping qualifications we could offer them. My boss Perry Symes has worked hard to bring in a brand new qualification for these 16 and 17 year old cadets – the Level 2 Award in Assisting in Basic Expedition Leadership (BEAL).
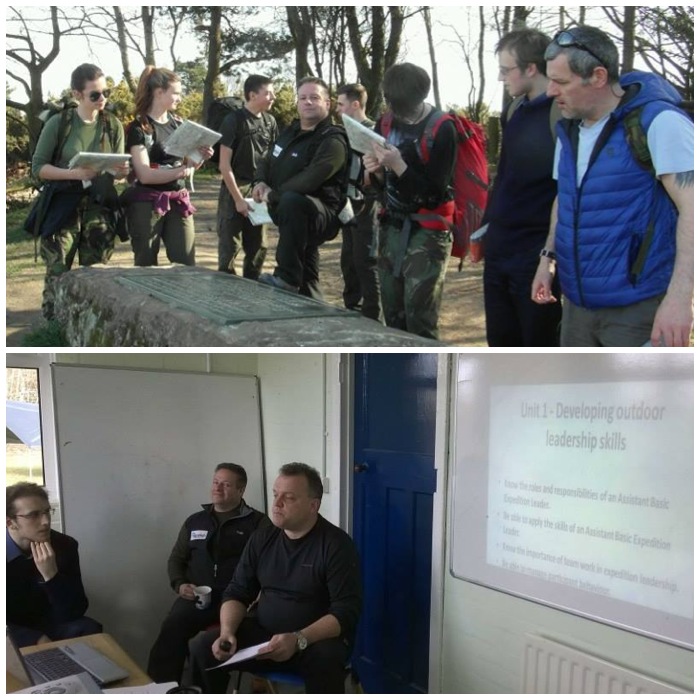
The course comprises at least two training weekends, a couple of weekends where the cadets assist on other camping courses, and an assessment weekend. The first training weekend this year took place in (for once) a rather sunny Ashdown Forest. Most of the training takes place outside but as we were also using Crowborough Army Camp we did have the use of a classroom as well.
Lots of outdoor work and a little indoor work
We had six cadets over the age of 16 on the course but could have had another six if they had not applied too late. The course instructors were Perry Symes, John Kelly, Liz Rowan and myself. John and Liz passed the BEL a couple of years ago so they came on the course to gain valuable experience. John in particular is working towards his Walking Group Leaders award so running this course will give him valuable experience.
We also had another course running alongside this one for the younger cadets covering all the subjects for their Basic Campcraft badge. This course was run by Dave Lewis, Charlie Brookes, Lloyd Martin and Dean Barnett. Lloyd has passed his BEL course recently as well so it was good to see him in action and Dean is just starting out in his training to becoming an Adventure Leader.
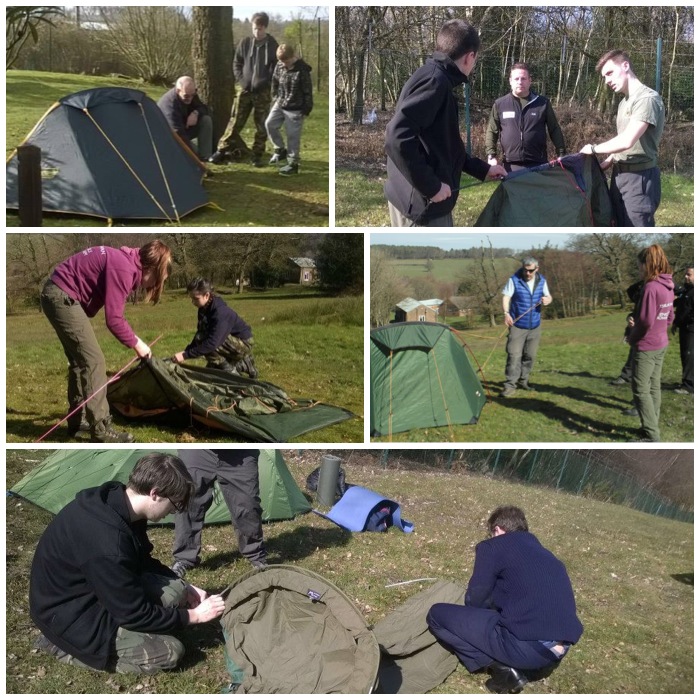
Learning to erect tents so they can teach the art in the future
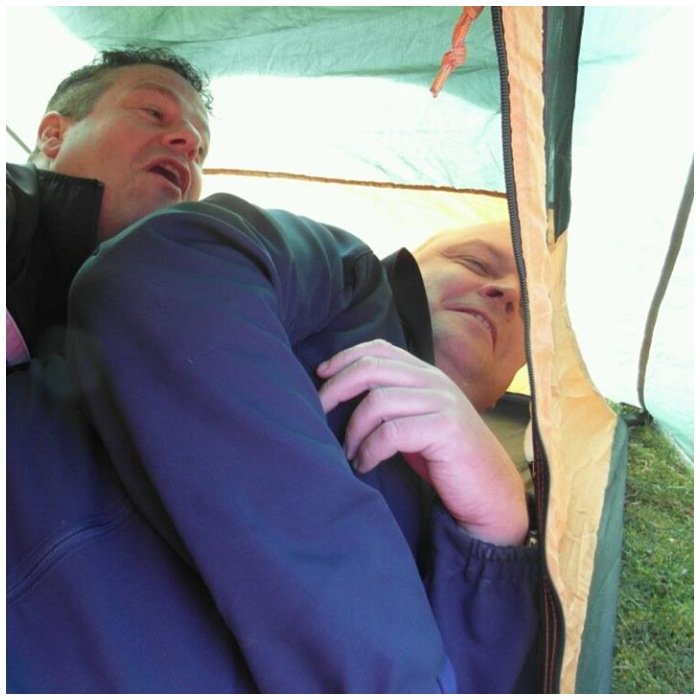
I think Perry and John were trying to prove to the cadets that if they could both fit into one of the smaller tents then they would have no problems at all 🙂
A squash and a squeeze
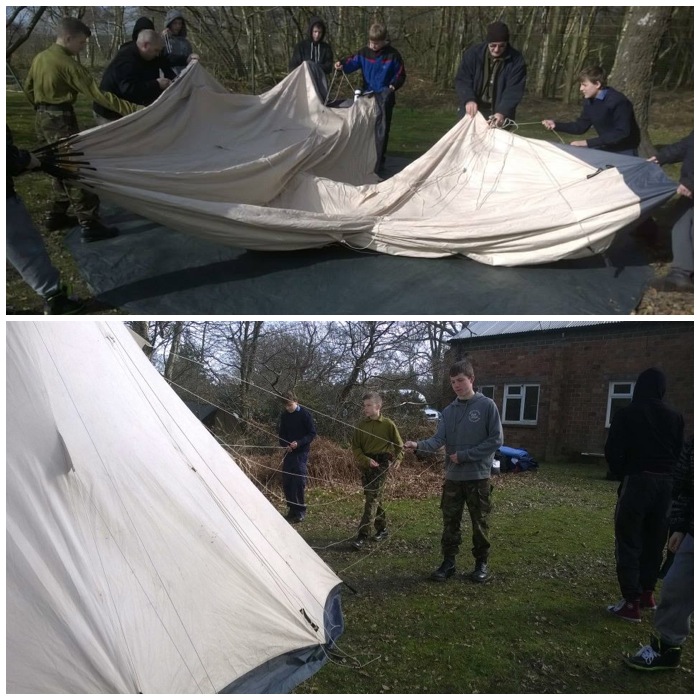
While the BEAL students were doing some class work, Dave and Charlie had the younger cadets put up my tipi. They used this over the weekend as a group shelter and temporary classroom, and some of the cadets slept overnight in it.
Teamwork for the team tent
In between all the classes we do try and have a bit of fun wherever possible.
Fun and games
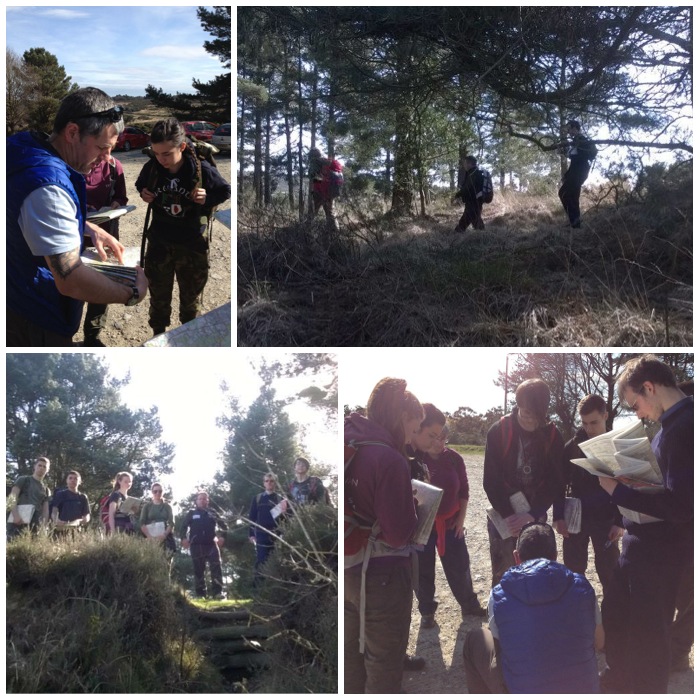
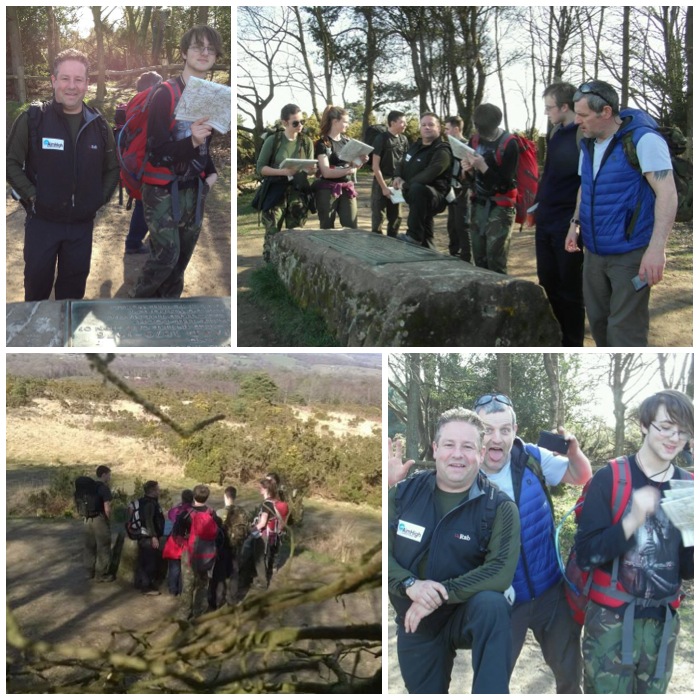
Both teams set out in the afternoon on the Saturday to focus on navigation. The young ones at this stage get an introduction to using a map and working as a team in the outdoors. The BEAL students had already shown us they could use a map and compass in the morning so we set them to work in pairs with some challenging places to find.
Serious time
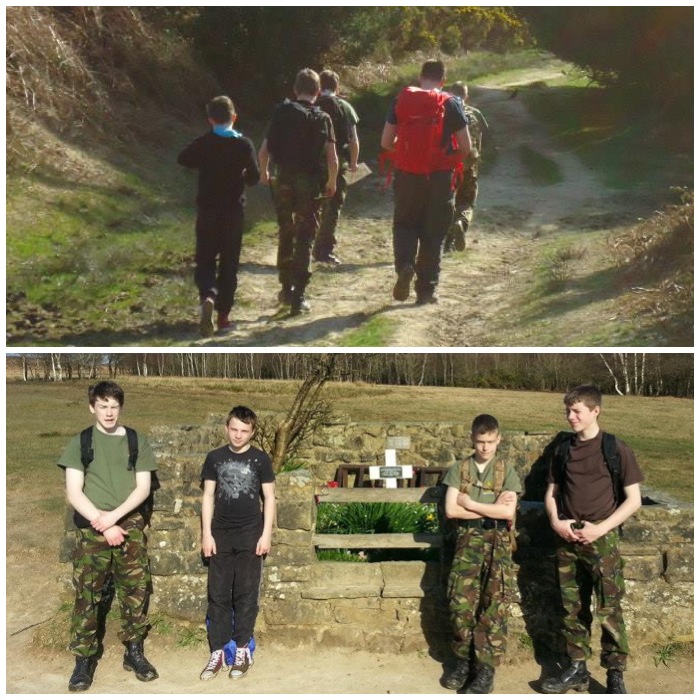
On our travels we came across the memorial plaque to A.A. Milne. There are fantastic view from this spot so it is great for more macro work with the compass. We got the cadets to take ‘back bearings’ on known locations they could see to identify exactly where they were and also to use their compasses and maps to try and identify far-off unknown features they could see.
Perry wanted a proper picture taken of him but I seemed to get in the way:-)
100 Acre Wood
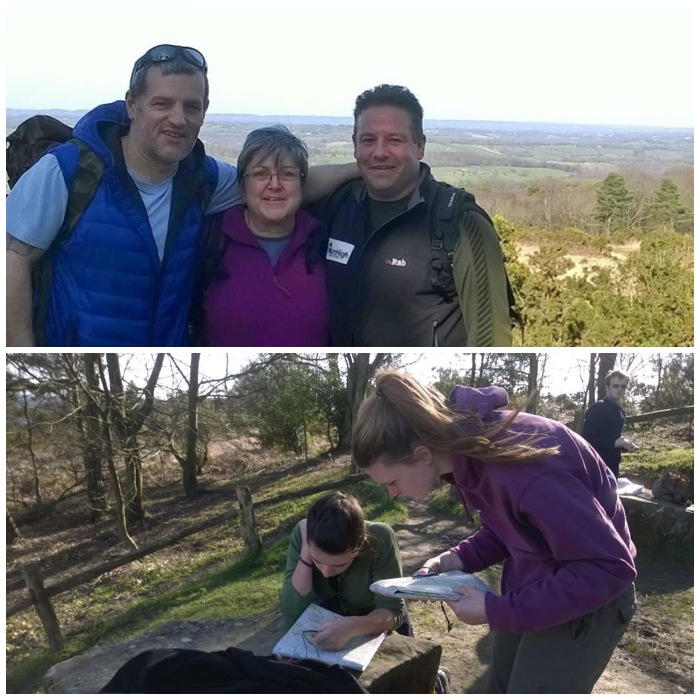
What we aim to do with this course is to train the BEAL students up to a standard that can be assessed for a nationally recognised qualification so that one day they can take over from us. In the meantime I am very happy to continue teaching outdoors skills but recognise that one day others will need to take our places.
Current instructors and future instructors
While we were doing compass work the younger cadets had found the Airman’s grave. This is not an actual grave but a memorial site to the crew of a Wellington bomber that crashed here on the 31st of July 1941 returning from a mission over Germany.
Basic Campcraft group
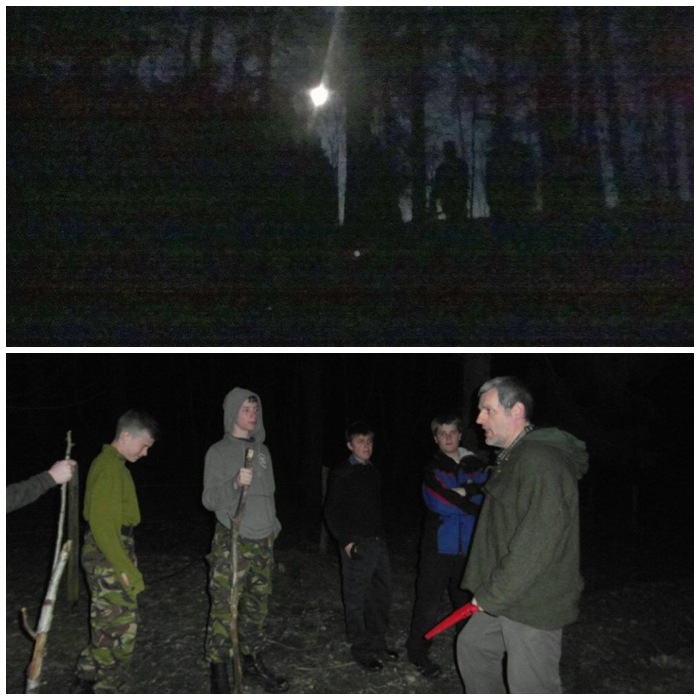
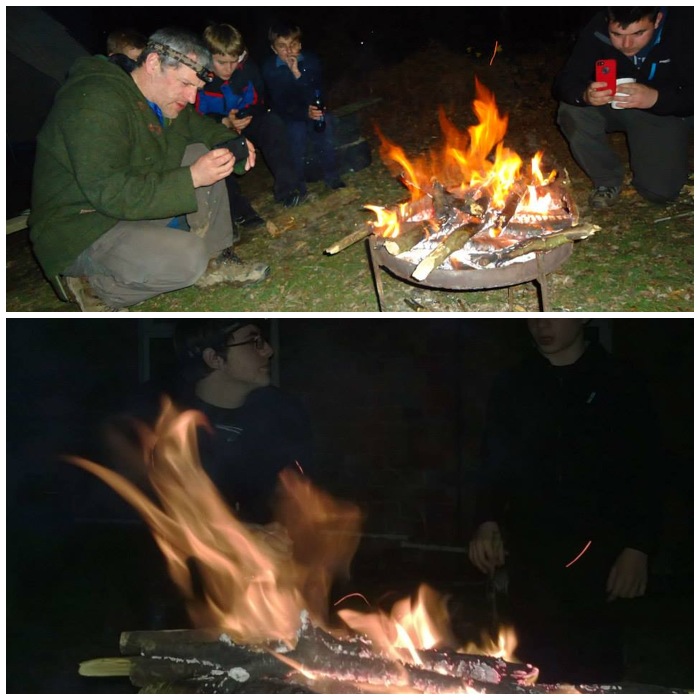
Later that evening after all the classes were finished, Charlie, Liz and myself took the younger cadets off for an evening’s walk. I insist that the cadets do not use torches to show them how quickly their eyes adjust to the dark. Most of these cadets had never walked in the woods at night, let alone without torches. Thankfully we had a good moon that night with a clear view of the skies.
I took them down to an area of the military camp that is heavily wooded but is the site of some old World War 1 training trenches. In no time the cadets were running all over the place having a great time and had totally forgotten that they were nervous about being in the dark. We took them through various types of woodland and heathland and also met the Royal Marine Cadet instructors out training.
Night time wanderings
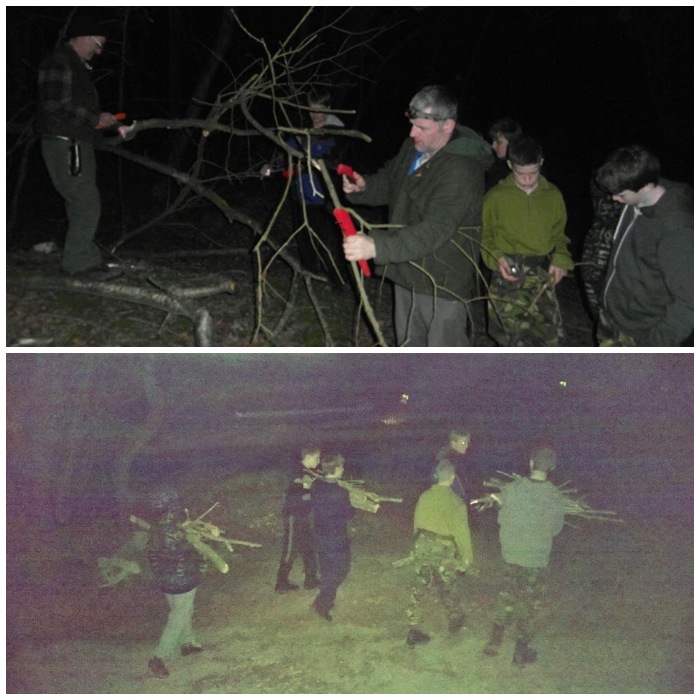
Just before we got back to camp we got the torches out and cut up some dead standing wood for a fire to toast some marshmallows. On the way back after this we managed to get a bit of star gazing in as well.
Wood Party
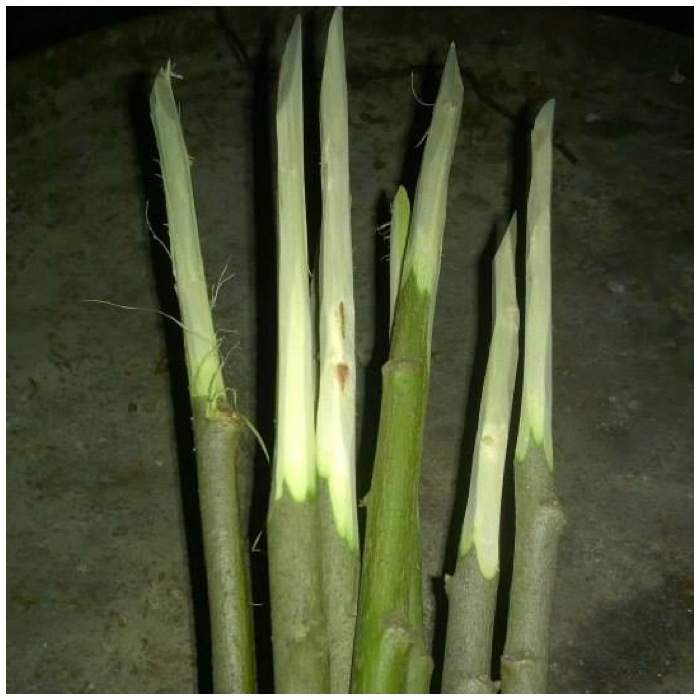
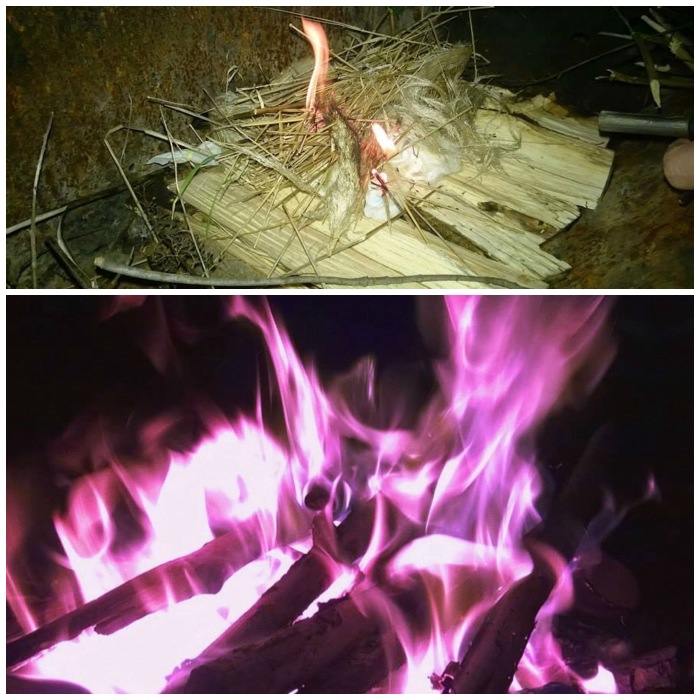
One of my usual nightly chores is to carve some marshmallow sticks for the cadets to use. Thankfully though we have some good willow shoots nearby. While I was doing this Charlie was teaching Dean how to light a fire properly and maintain it. I got this little video of it all in between carving the sticks.
Marshmallow sticks
After the fire got going it was time for a photography shoot to get some fire faces. You can see a small one on the left in the bottom picture.
Fire Faces
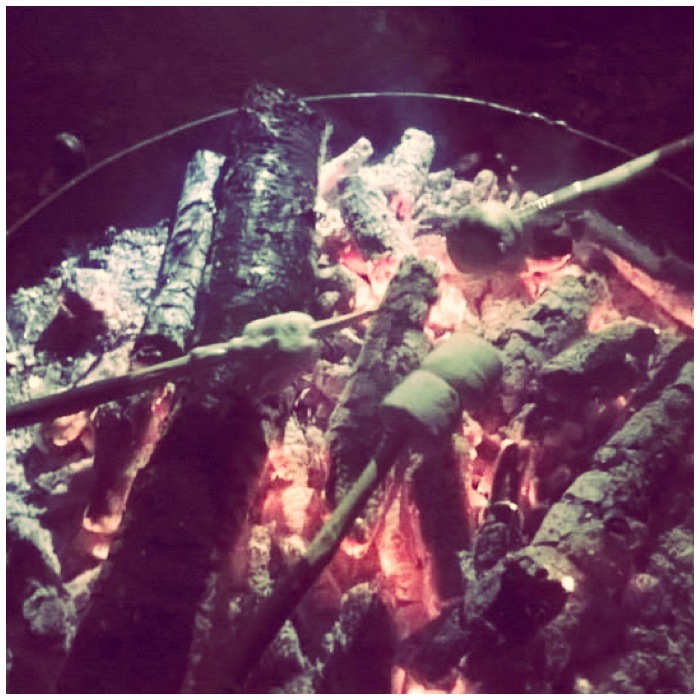
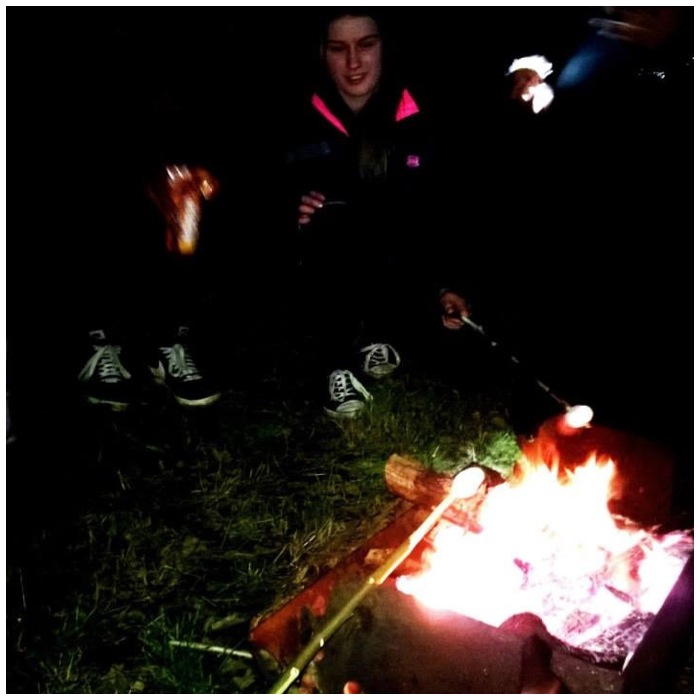
Then it was onto the serious job of teaching the art of toasting a marshmallow. It still amazes me to find so many children in their teens who come on these courses and have never had the simple pleasure of toasting a marshmallow over an open fire.
Marshmallow time
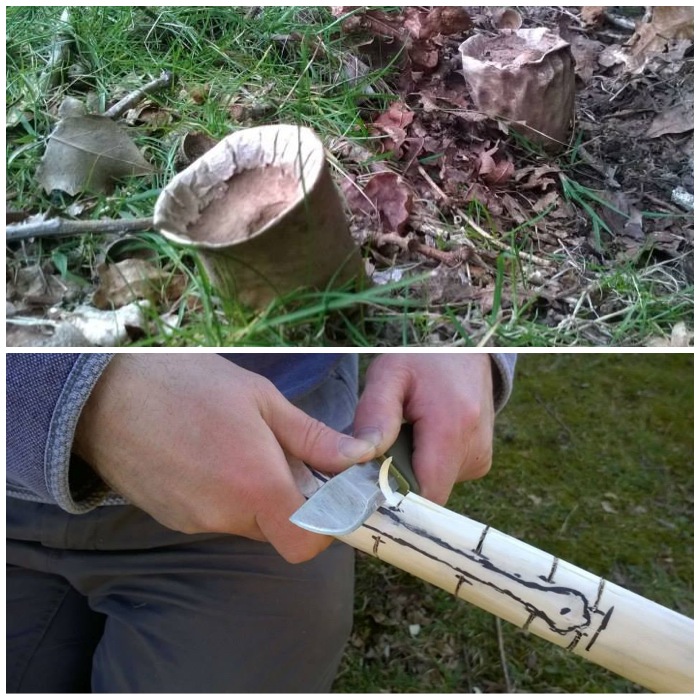
Next morning in between classes I managed to get some time in spotting some unusual fungi (cheers Liz for finding these) and a bit of spoon carving. I have a tutorial on carving this spoon here – How To…. Carve a Simple Spoon: the double-handle technique.
A touch of bushcraft
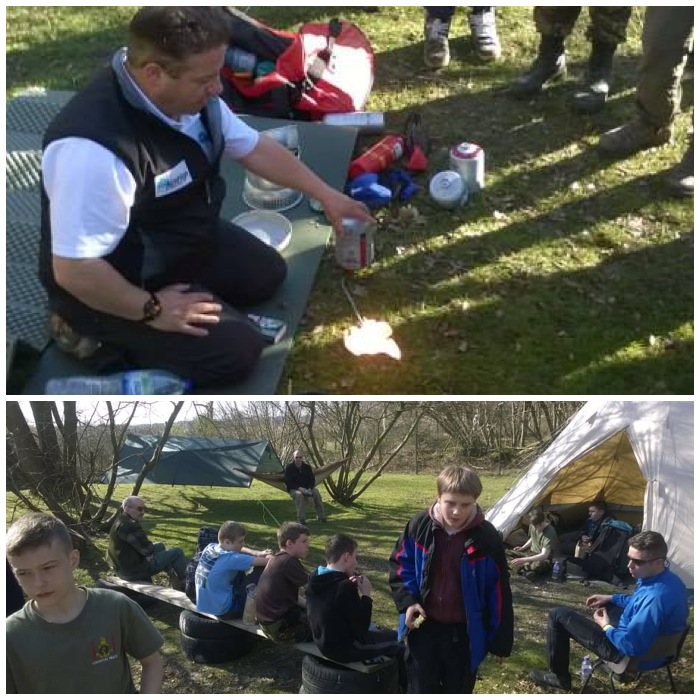
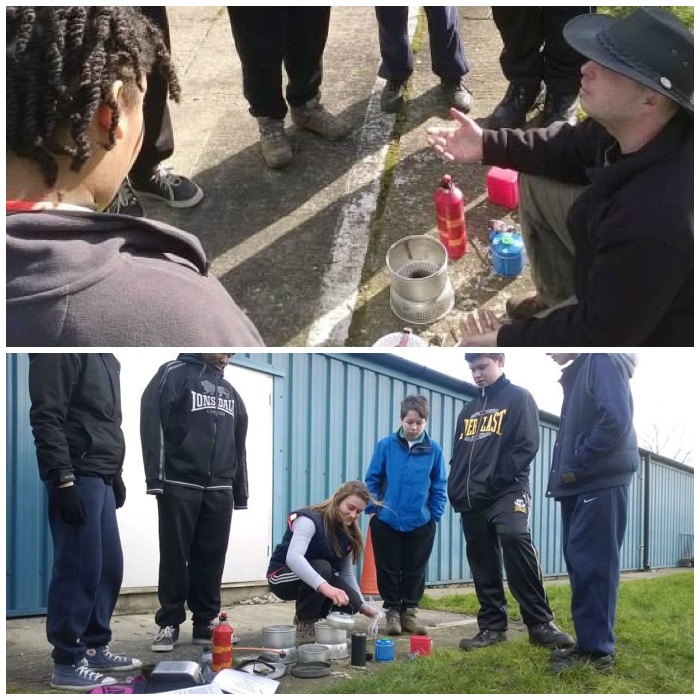
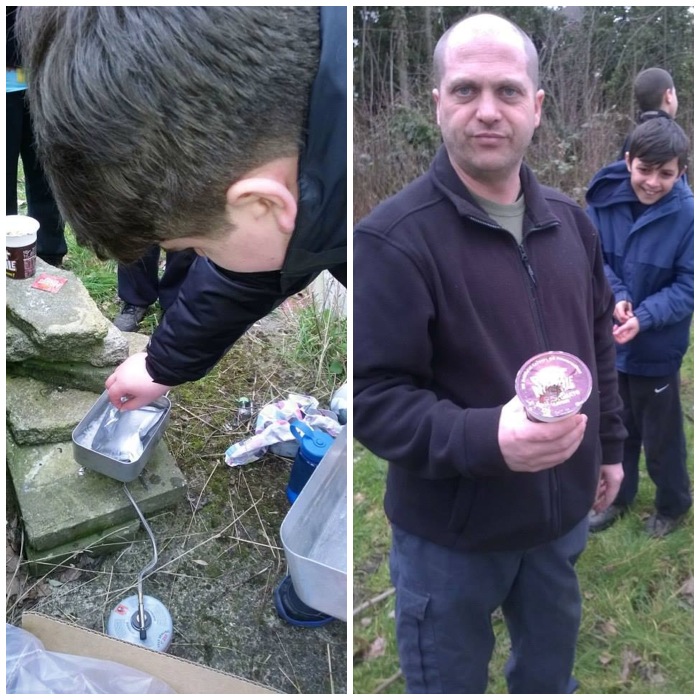
It turned out that running these two classes at the same time worked quite well. The younger cadets had to learn all about camping like using stoves and the BEAL students had to re-learn the same subjects so that they could prepare themselves for teaching the cadets themselves in the near future. In the top picture Perry is showing the cadets how that if a gas bottle is shaken too much it may flare up and become dangerous.
Classes
While Perry got on with the class with all the cadets and other instructors Dave took a well earned break and I got my sleeping bags out for an airing.
Hammock time
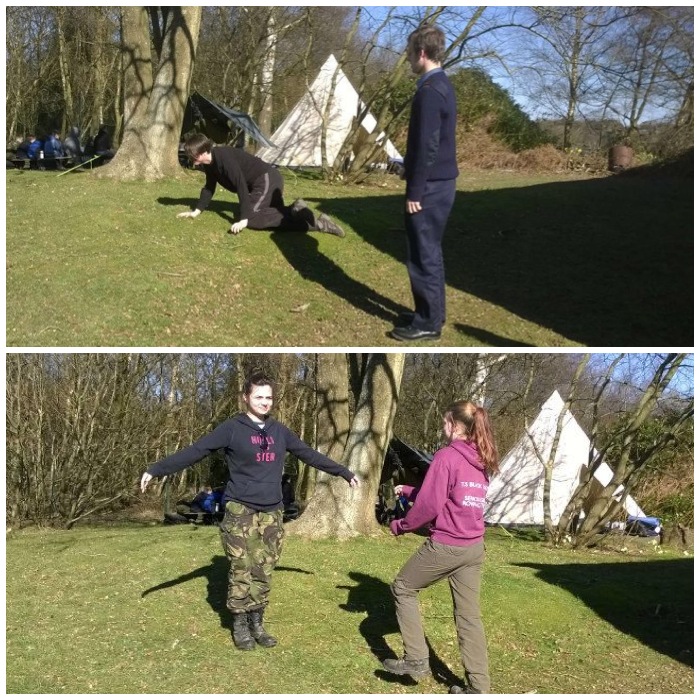
Part of the course is designed to get the BEAL students to come up with different ways to get the learning across. Here they are using Charades to explain the Country Code. They felt a bit embarrassed at first but soon got into it.
Trying to make teaching the Country Code interesting
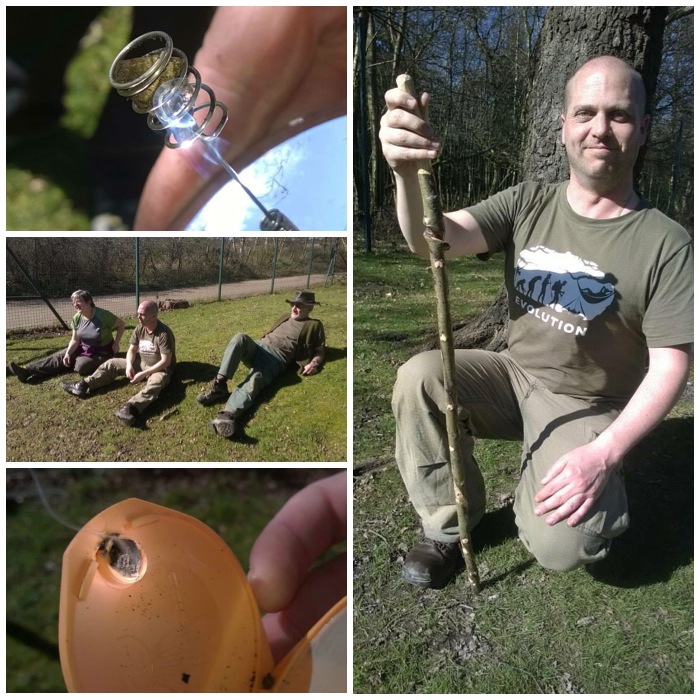
It is not often you come down to a weekend at Crowborough in March and manage to make fire using parabolic mirrors. I even found a nice honeysuckle-wrapped shoot that could be turned into a nice walking stick. I gave it to Dave as I’d broken one of his walking poles a few years ago – it was after he had tripped in a ditch and bent it and I had tried to straighten the thing 🙂
That was the end of a very successful weekend. All the BEAL students went off with areas of navigation to work on and a date for another course which they would help to run. Some of the new instructors gained some valuable experience and I got a lovely sunny weekend in Crowborough – not often I can say that in March.
I am looking forward to the second training weekend later in the year for this course.
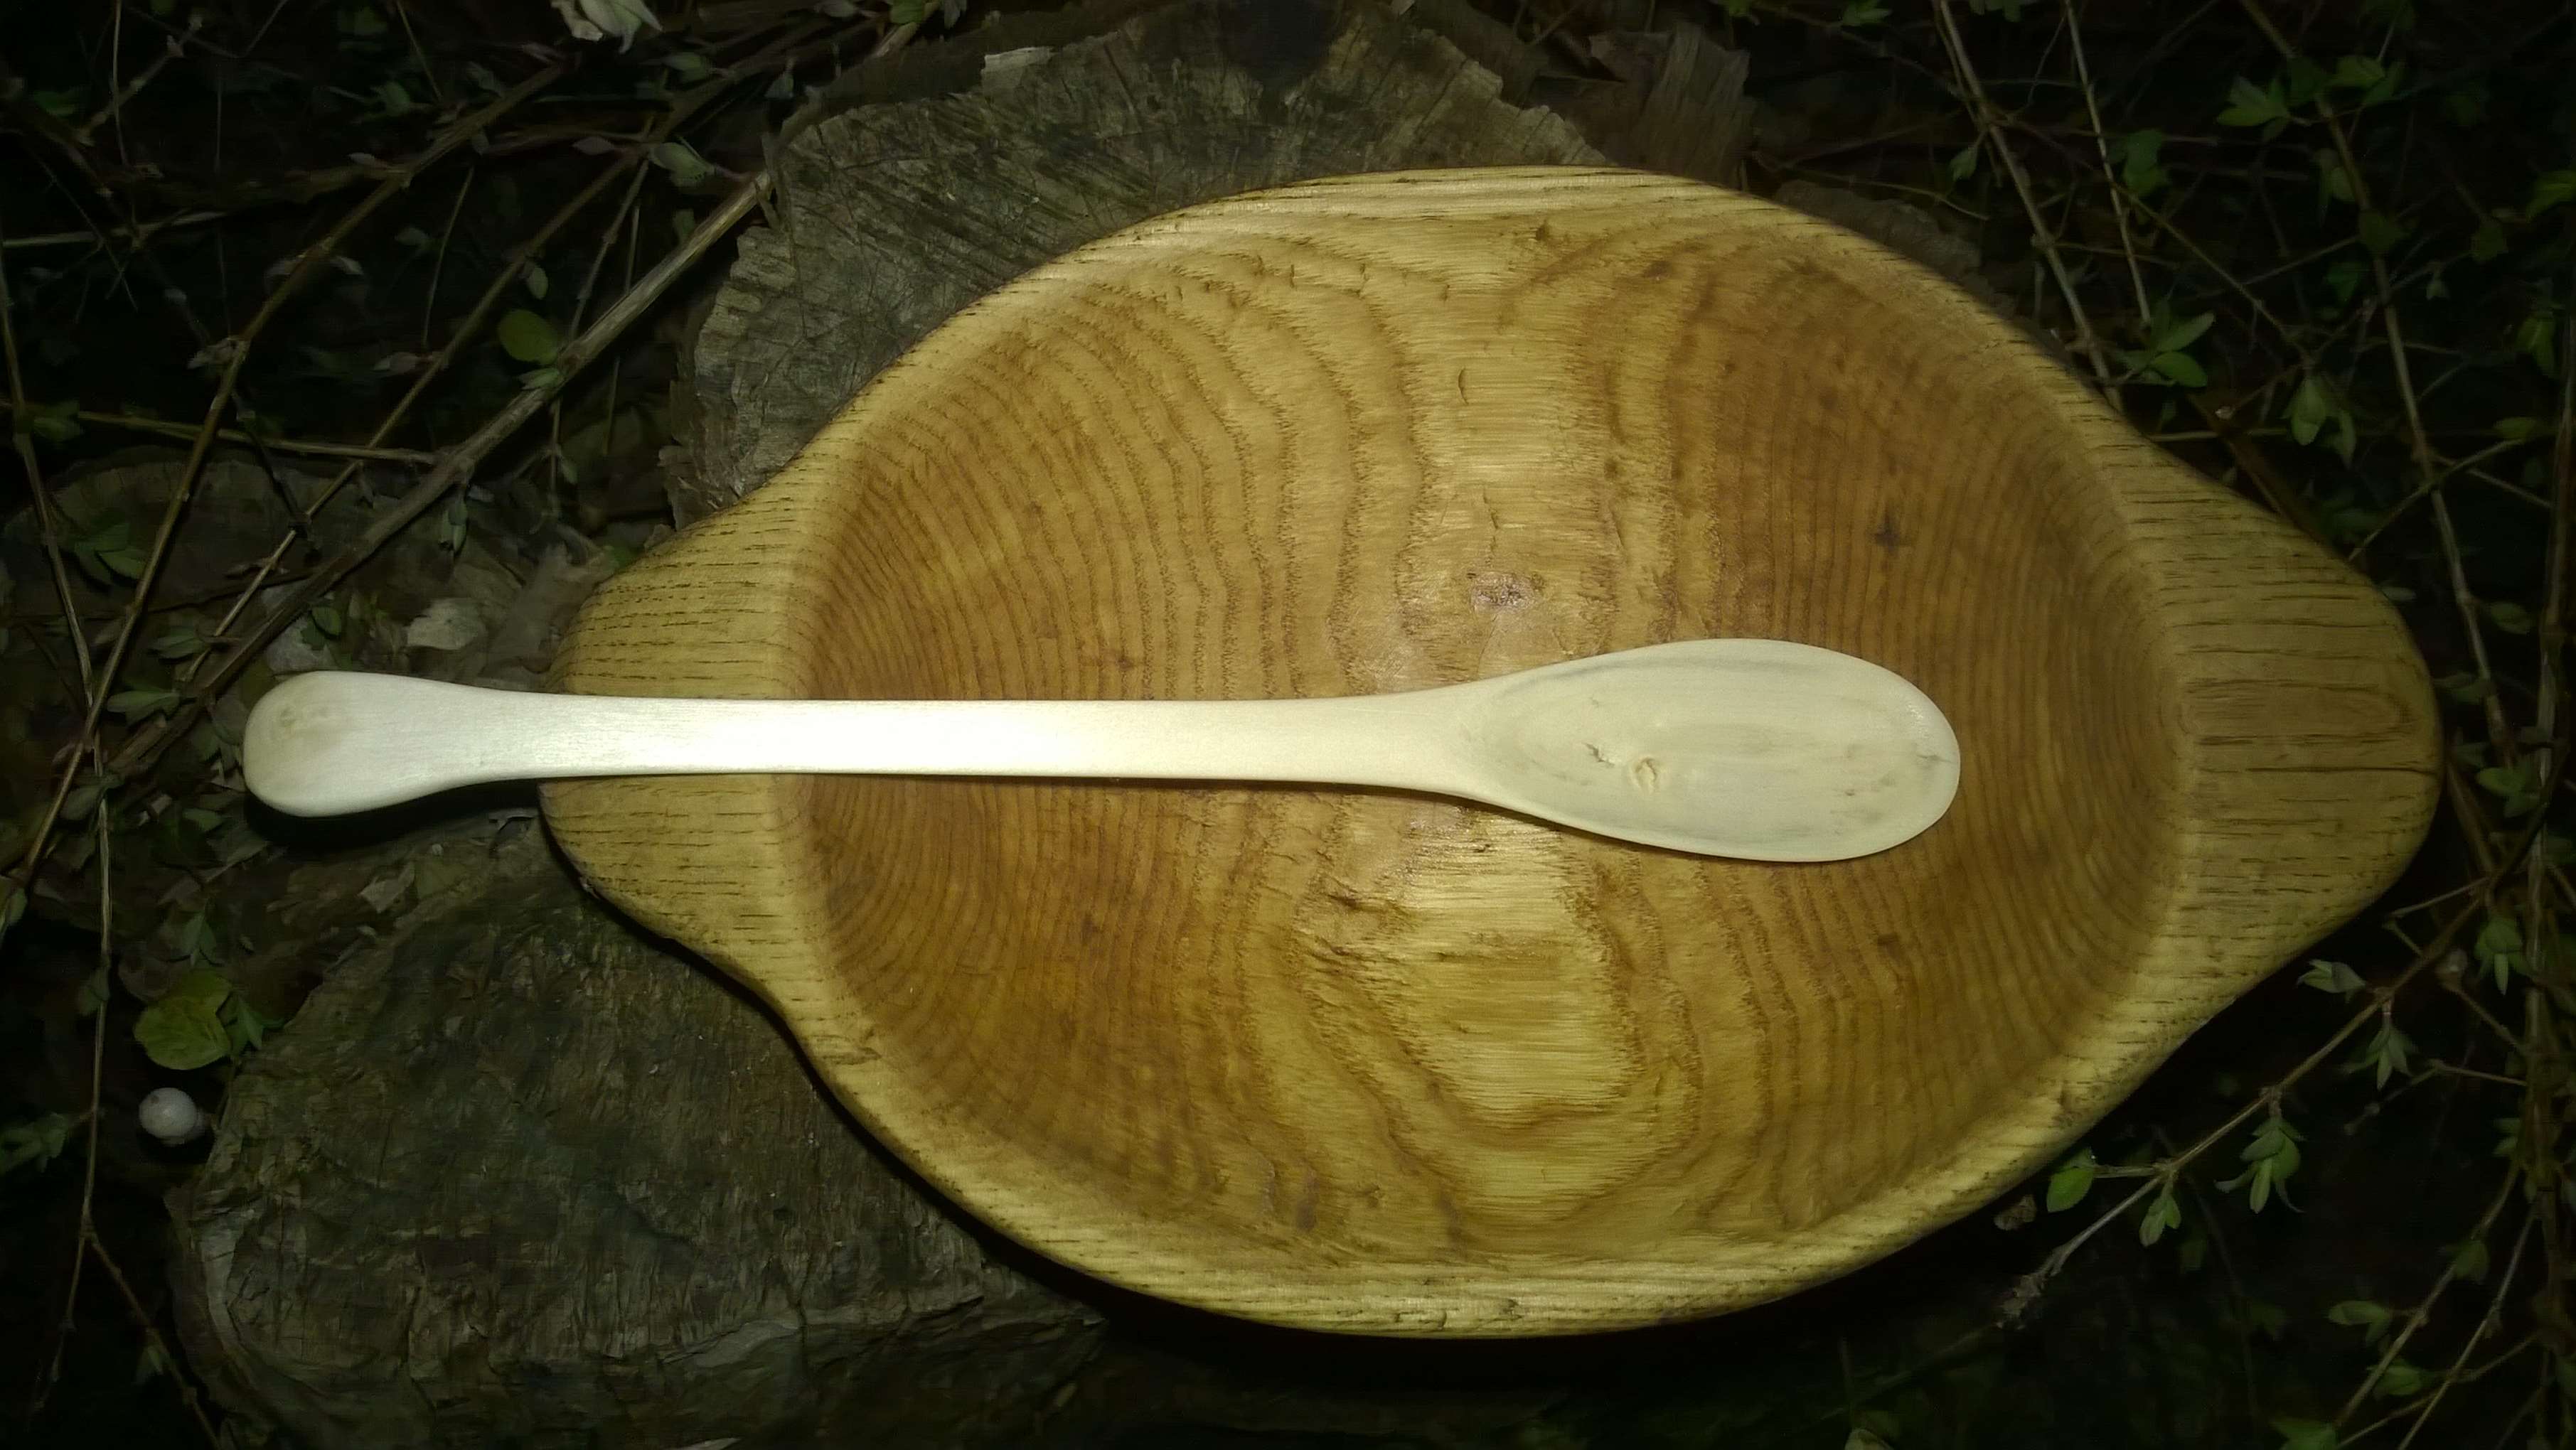
This How To…. illustrates some simple steps to carve a small spoon you can easily make when you are out and about.
A simple spoon
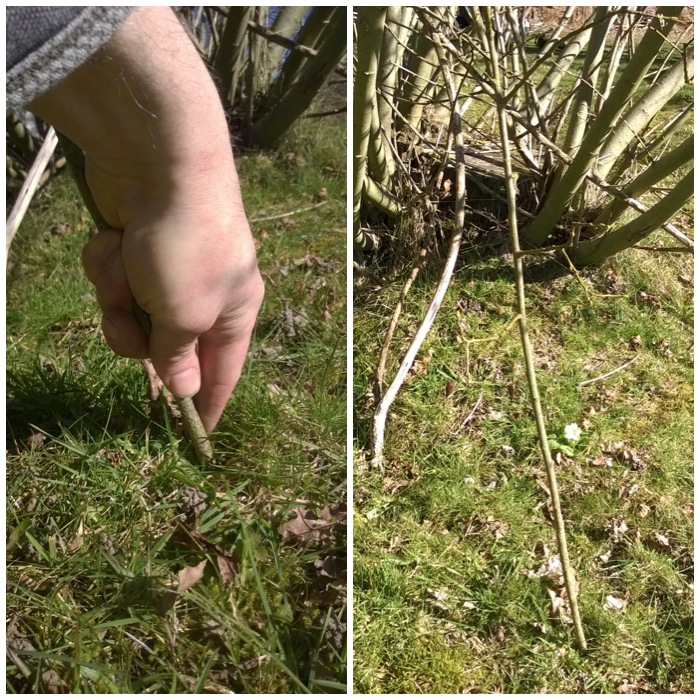
I was training on campcraft in Crowborough (Ashdown Forest in the UK) recently and in between classes decided to carve this simple spoon. A nearby willow tree had been felled a few years ago and lots of shoots had re-grown from the stump.
Local Willow
I selected a shoot and sawed it off near its base. Cutting the limb cleanly at the base will allow the tree to heal itself quickly and send out a replacement shoot the following year.
Cut right back
I selected the limb because of its curves, which help in making a strong spoon. I trimmed the limb in a safe position and used the live limbs as a vice to do the final sawing.
Trimmed safely
I took two pieces to make a couple of spoons and then trimmed off a couple of the smaller shoots from the top.
The spoons-to-be
These smaller pieces I re-planted around the base of the tree by pushing them into the ground, as willow has the ability to re-grow from these shoots.
Re-planting
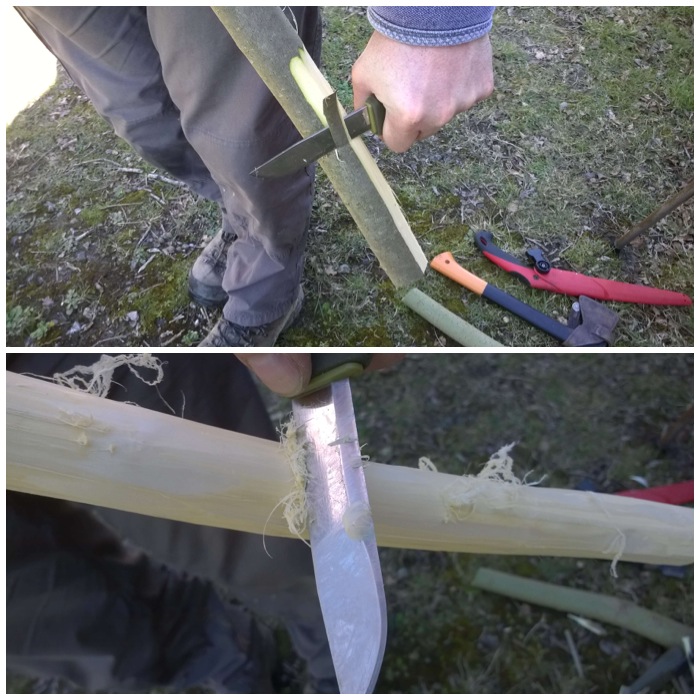
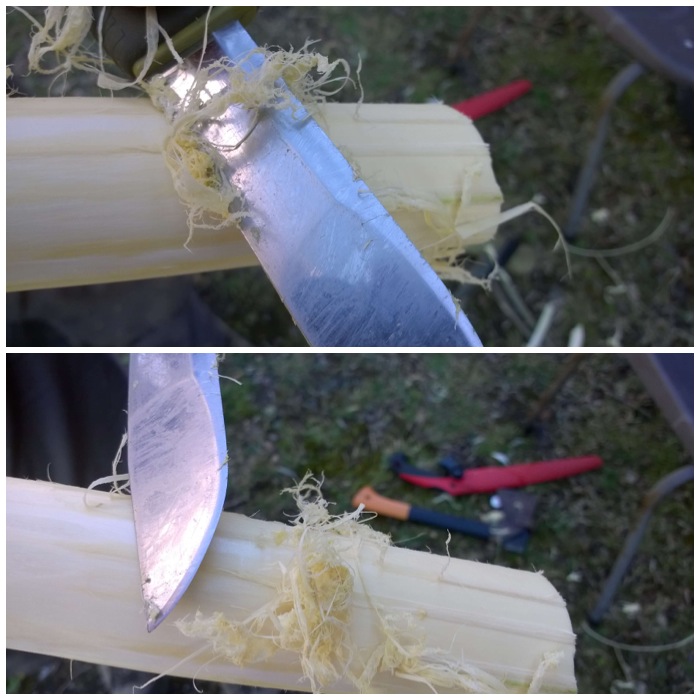
The next job was to strip off the outer and inner barks. I tried to strip the bark off in one piece but as the sap had not yet risen it was very difficult to do. If the bark had peeled off easily I could have made some nice cordage from it.
I used the back of my knife to scrape off the remnants of the inner bark to get right down to the wood.
Taking off the outer bark
This inner bark does clog up on the back of the blade so you have to continually scrape it off. The whole process of stripping the bark took about 5 minutes.
Removing the inner bark
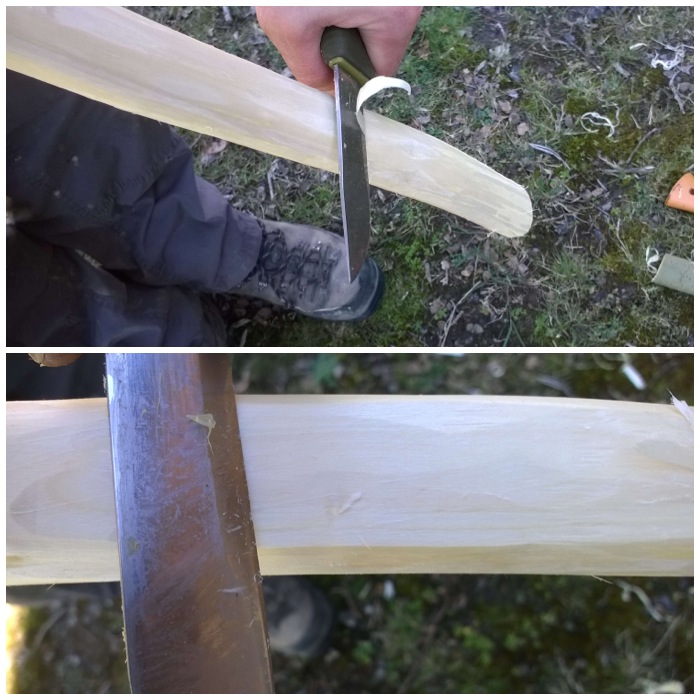
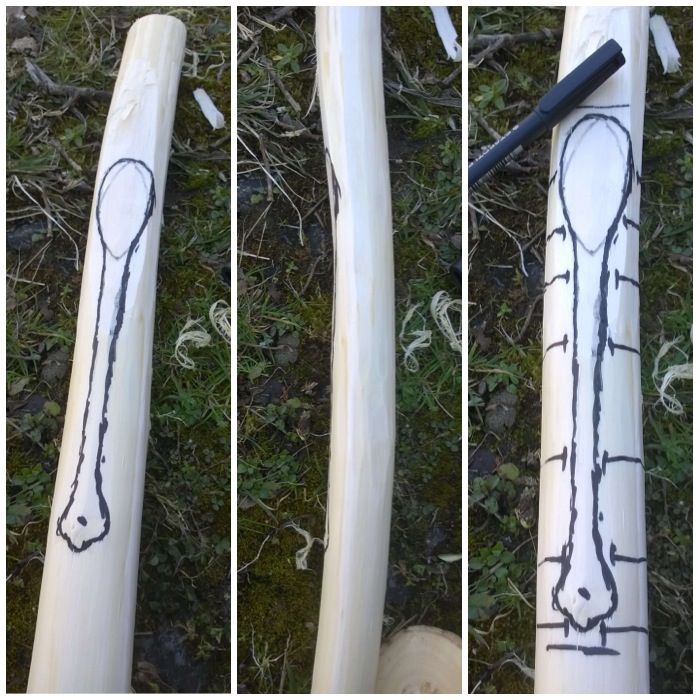
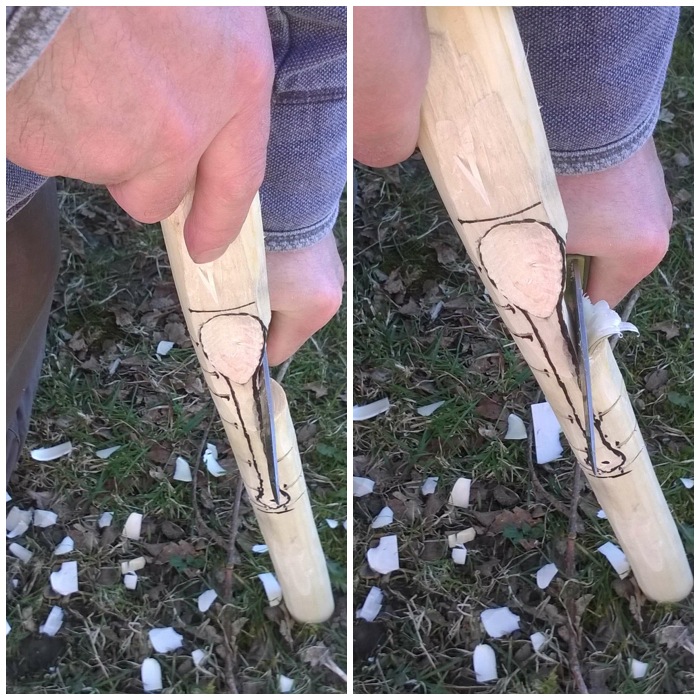
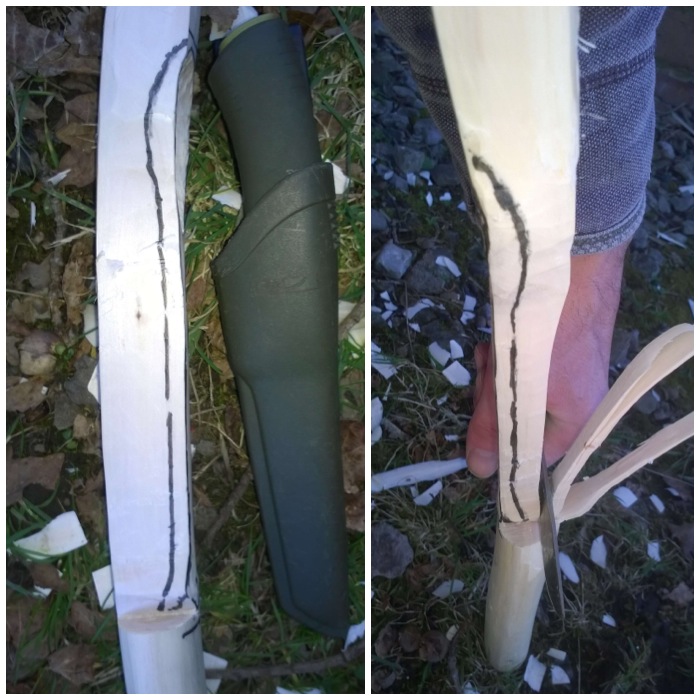
I flattened out the area of wood that would make the bowl of the spoon to give myself a little bit more area to work with.
Creating a working surface
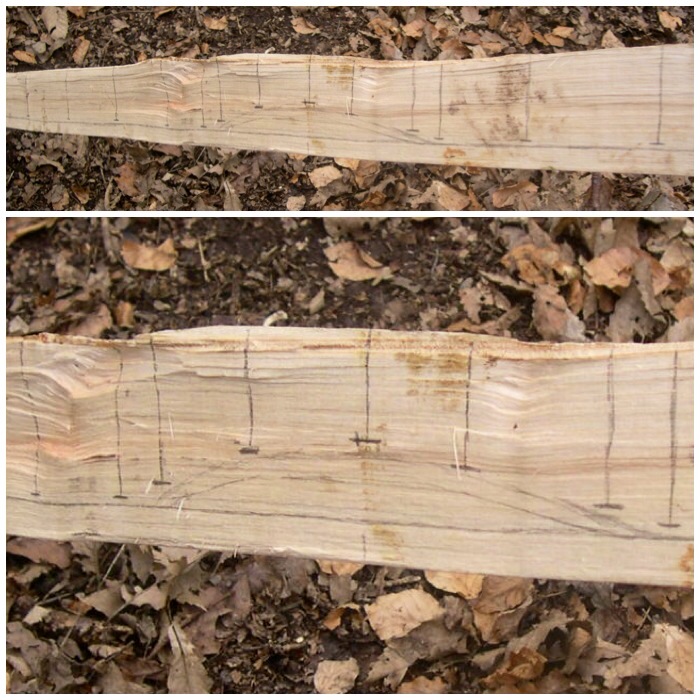
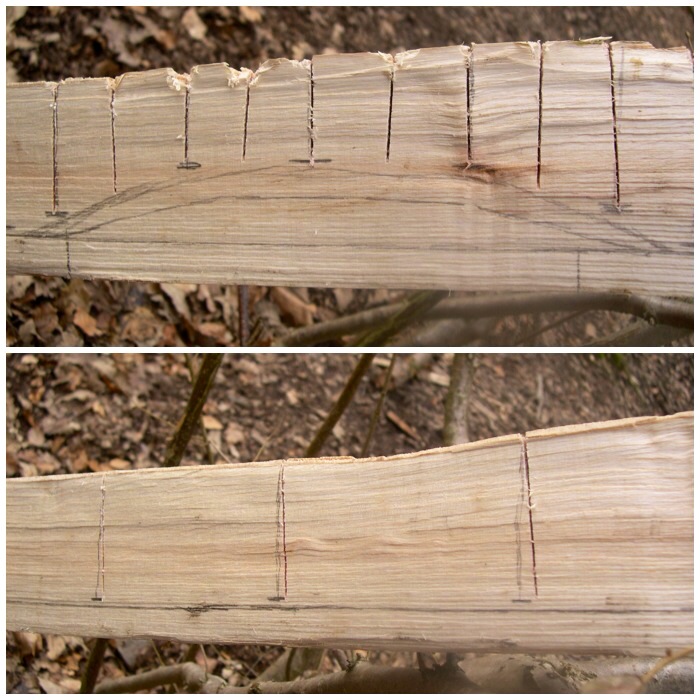
I like to draw out my spoon leaving areas of waste wood at each end as these act as handles when carving. Also, I prefer to carve the spoon from the top down as this cuts through many different rings thereby making the spoon stronger. I also mark out at this stage all the stop cuts I will need. (The technique of leaving handles to work with was taught to me by my good friend Mark Beer a few years ago and I find they are particularly useful when you are teaching novices.)
Drawing out the spoon
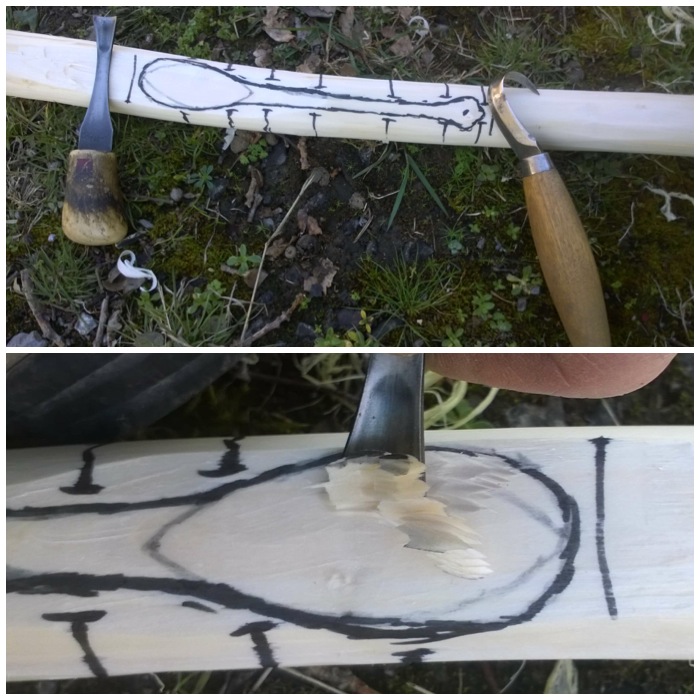
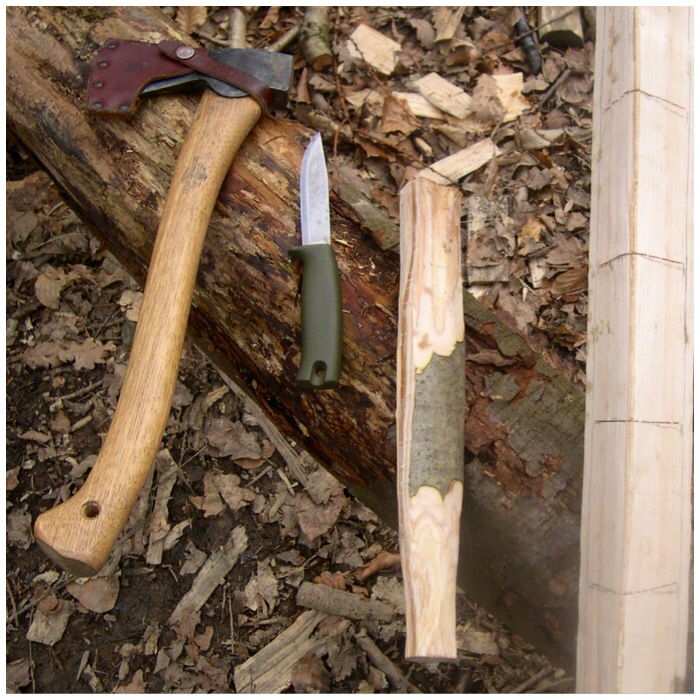
I like to carve the bowl of the spoon first. To do this job I usually use a palm gouge (on the left) and a crook knife (on the right).
The bowl tools
I use the palm gouge first, tracking around the edge of the bowl to cut out the waste. Having the two handles in the wood means I can use the same hand to do this (I am left-handed). They also allow me to keep my other hand well away from the sharp edge of the gouge.
The palm gouge
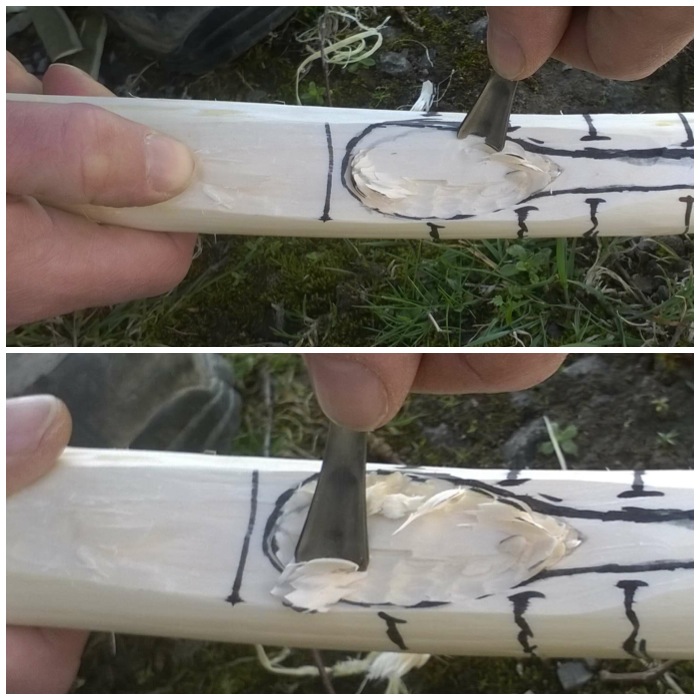
The gouge makes short work of the waste wood but it does not leave a smooth surface.
Rough bowl
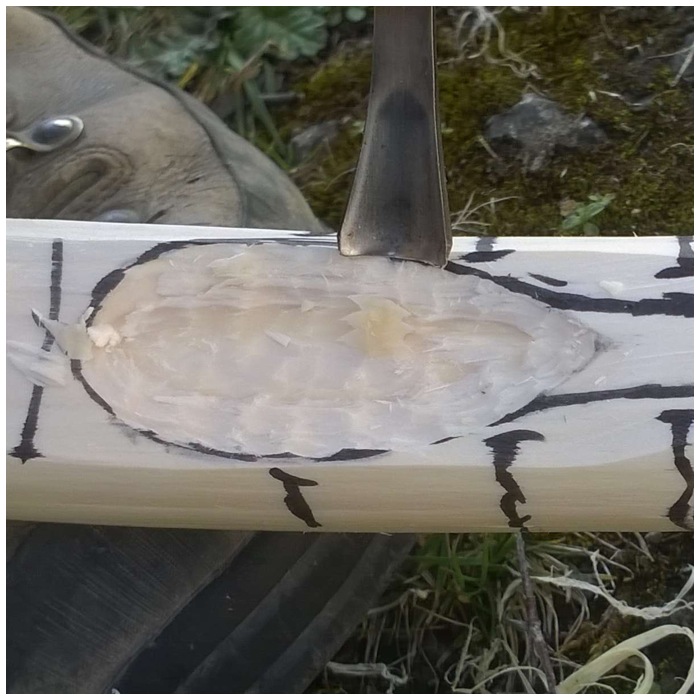
To smooth the bowl out a bit more I usually switch to the crook knife. I find that the crook knife helps to accentuate the curve of the bowl more than the gouge does. With both tools I always try and cut across the grain of the wood but this is not always possible near the ends so I need to be extra careful there not to lose wood on the edges.
Smoothing out the bowl with the crook knife
After the bowl is roughed out I saw all the stop cuts. These stop cuts help to stop splits occurring in the wood as I carve the rest of the waste wood away.
Creating the stop cuts
Stop cuts are particularly important when carving around the bowl; they act like small breaking points for the knife edge, stopping splits occurring.
Removing the waste
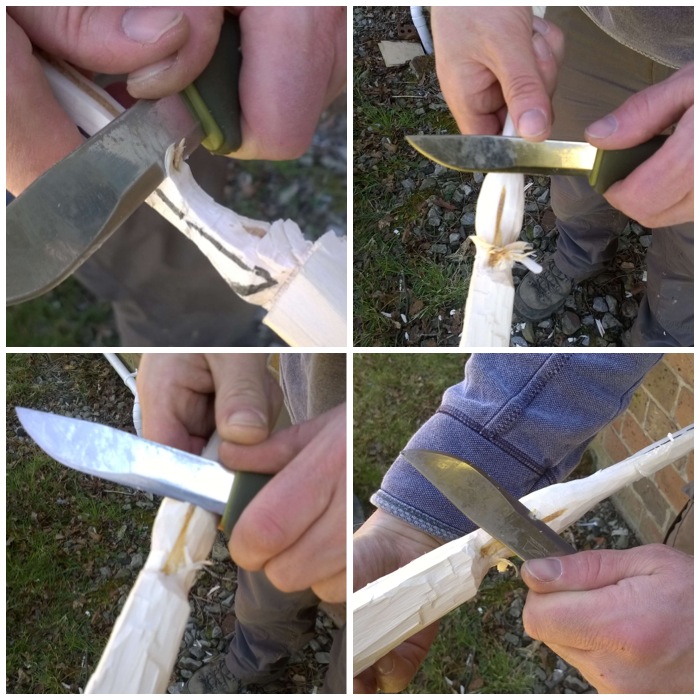
I take my time at this stage and make small cuts to remove each piece of waste wood between the stop cuts. In these two pictures I am using my thumbs on the back of the blade to apply pressure. You can push either with both thumbs on the back of the blade or with one thumb on top of the other.
Thumb pressure
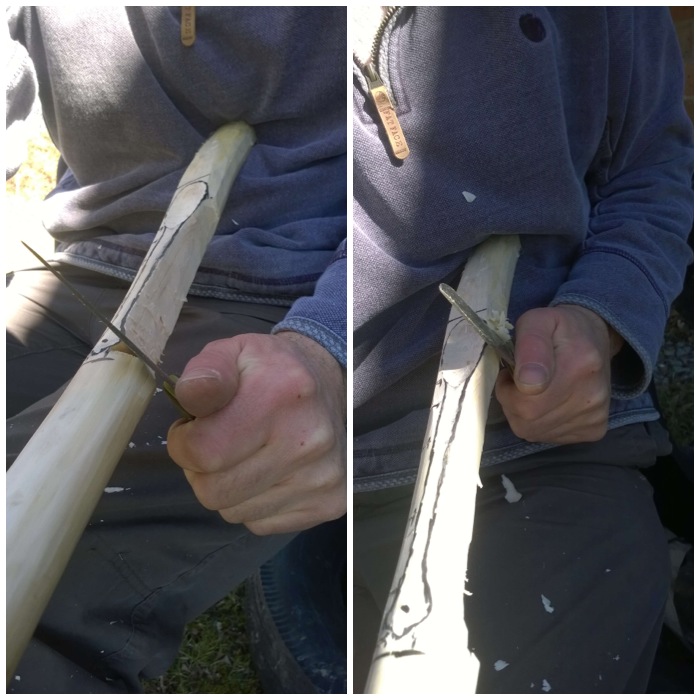
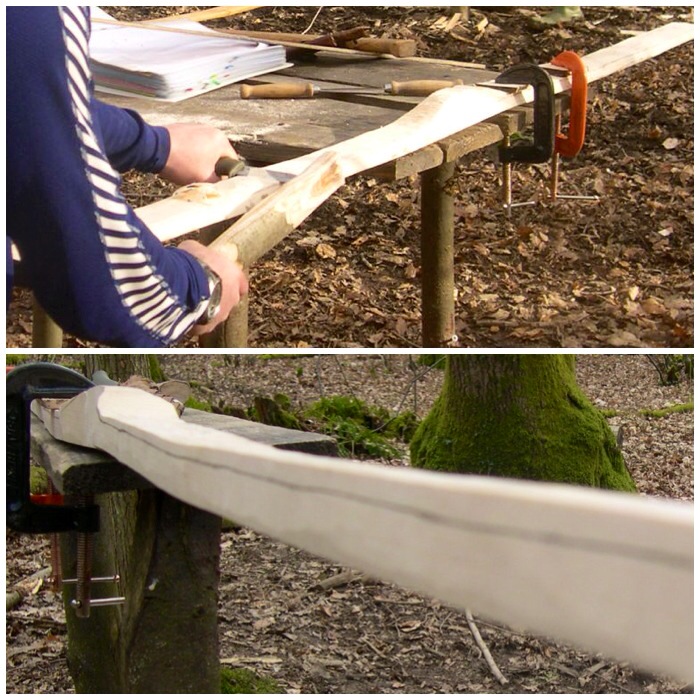
When I am on a straight section like the handle I tend to use the chest lever grip. This is a very controlled and powerful cut. I have my hands tight against me and use my chest muscles to push my hands apart. This pushes the knife edge into the wood in small, controlled but powerful cuts.
Chest lever grip
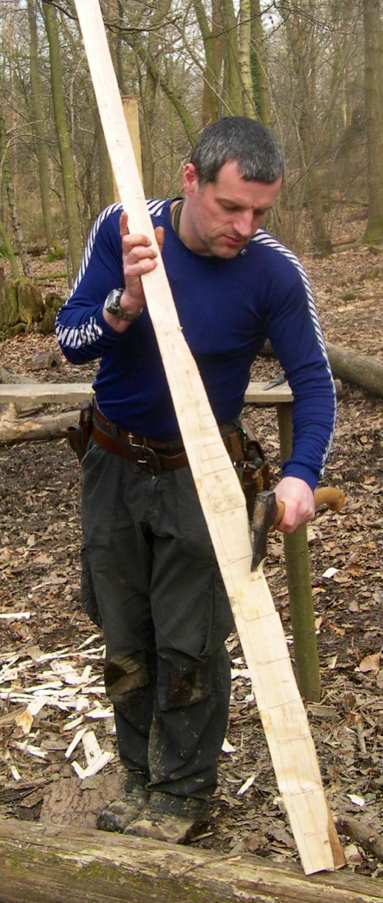
Another cut that can be used here is the shoulder cut. With the work piece off to your side and the bottom of it on a log or on the ground (if the handle at the bottom is long enough), keep your arm locked straight and push down with your shoulder muscles to cut into the excess wood. You can cut big or very fine pieces with this technique.
Shoulder power cut
I learnt this technique from Mors Kochanski when he was over in the UK at the BCUK Bushmoot a few years ago. I pushed one end of the work piece (perfect when you have these handles on each end) and then, using the knife like a draw knife, cut slivers of wood towards me. This is one of the few cuts where the blade comes towards you. The key to this technique is to keep the arm that is holding the work piece bent and well away from the knife tip. Also the arm that is holding the knife is clamped against my side which stops any big movements. If my knife were to slip with this technique the blade would actually only move a few centimeters.
Mors Kochanski style
Using these techniques I quickly removed the waste wood around the spoon.
Top plane cut out
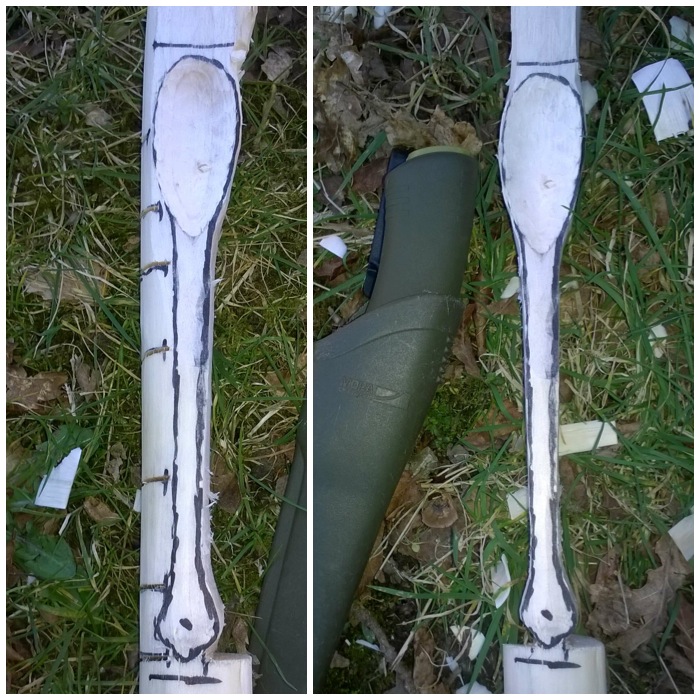
I then marked out the side of the spoon and started to remove the waste wood using the shoulder cut. I could have put stop cuts in at this stage but decided not to as there was not much curve to the spoon on this plane.
Side plane
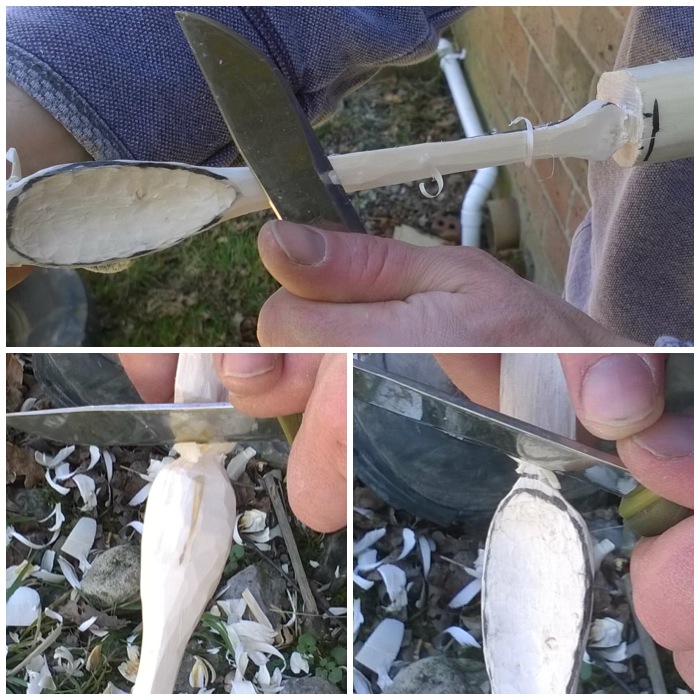
Finishing the tail and the bowl requires a lot of fine work. You have to find how the grain of the wood is flowing and just chip away at it with small cuts to form your final shape.
Fine work
After some final work on the handle of the spoon I slowly carved around the tip of the bowl to remove one of the working handles. Take your time with this so that you get down to the last few fibres of wood before twisting the handle off. Any big cuts here can damage the bowl.
Trimming the handle and removing one handle
I then repeated the whole process at the other end to remove the other working handle.
Removing the other handle
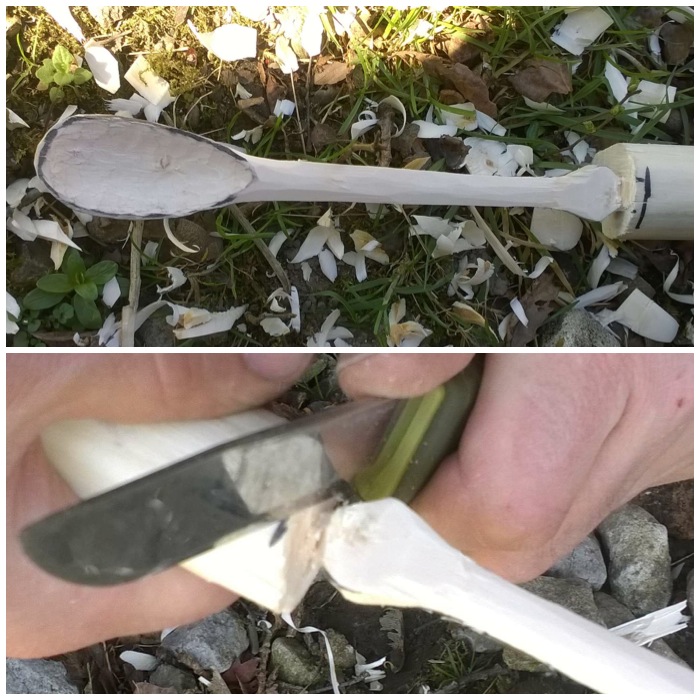
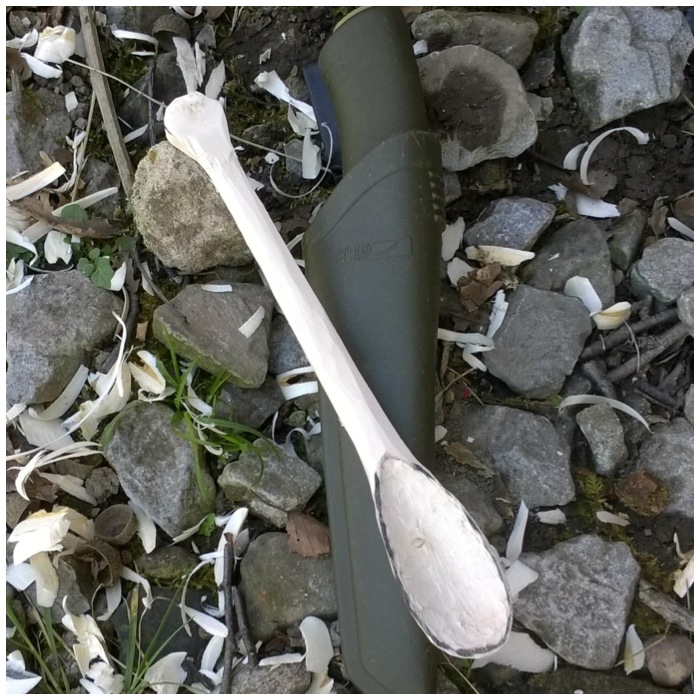
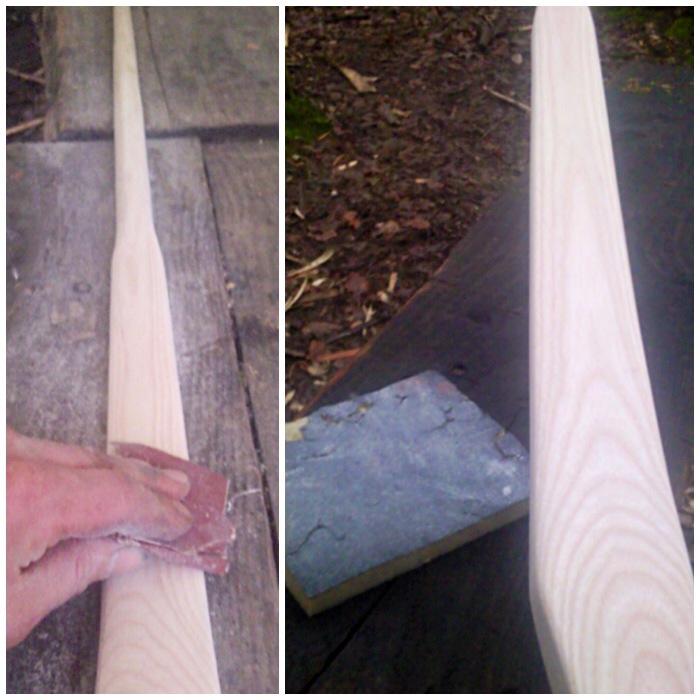
The wood was green so full of moisture. Normally I would dry the wood slowly for a few weeks before sanding it down. Sanding green wood can be hard work and no matter how smooth you get it you will need to repeat the process in a few days as small fibres of wood will start to rise up again, giving the spoon a furry texture.
I accept that when making these spoons as I normally want to use it straight away. Ideally I should have used a piece of seasoned wood so that this would not happen but you sometimes have to use what is available. I left the spoon to dry out for a couple of days before sanding it down.
A blanked out spoon
I used sandpaper of different grades and luckily have some cloth sandpaper that works well when sanding the bowl out.
Sandpapers
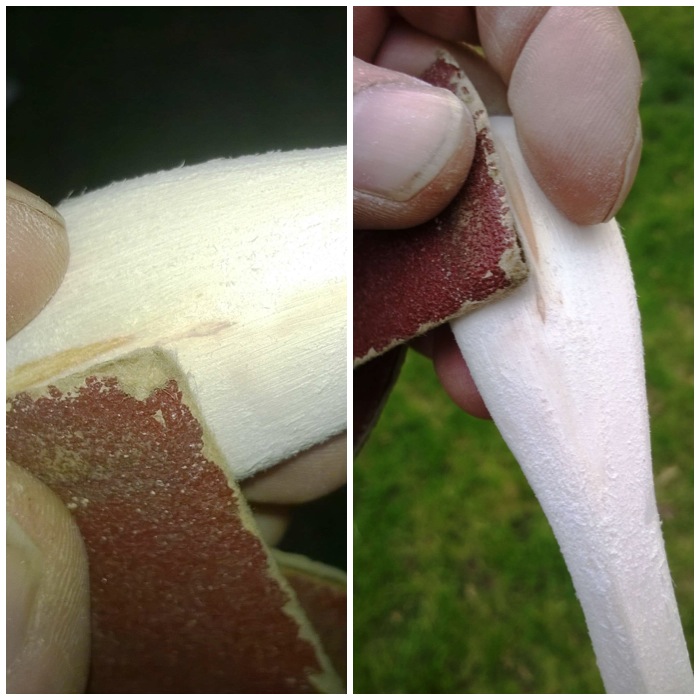
I used the rough sandpaper first and you can see in these pictures how the fibres of the wood are being ripped out here rather than being sanded smooth. All the sandpaper is doing at this stage is flattening out the tool marks.
Rough first
Eventually the spoon started to take on a more smooth appearance. The bottom picture shows the bowl untouched but the handle is now smoother.
Taking shape
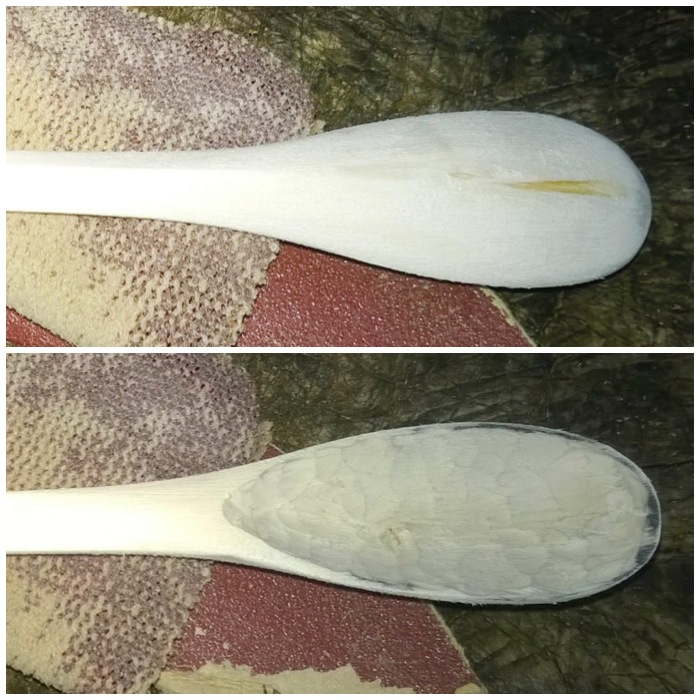
The cloth sandpaper is ideal for getting into the bowl and smoothing it out. I like this sandpaper as it does not break apart in the bowl as traditional paper-backed sandpaper tends to.
Smoothing the bowl
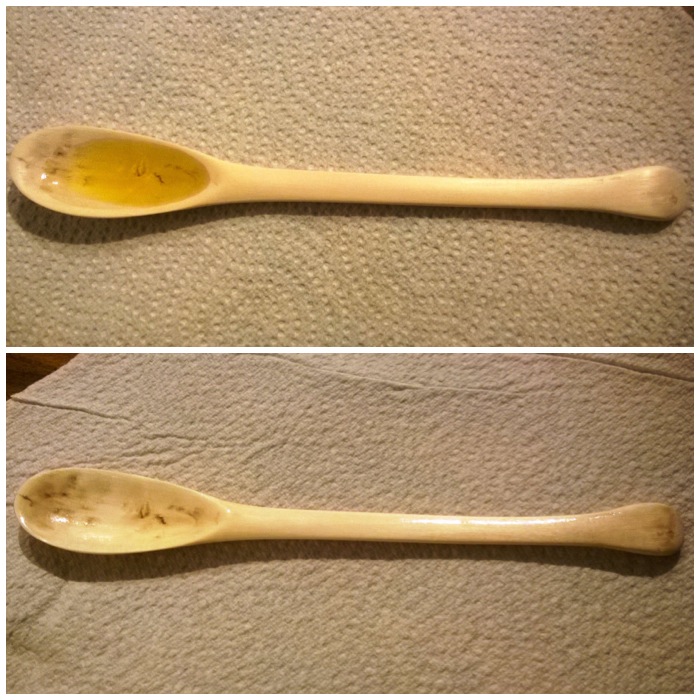
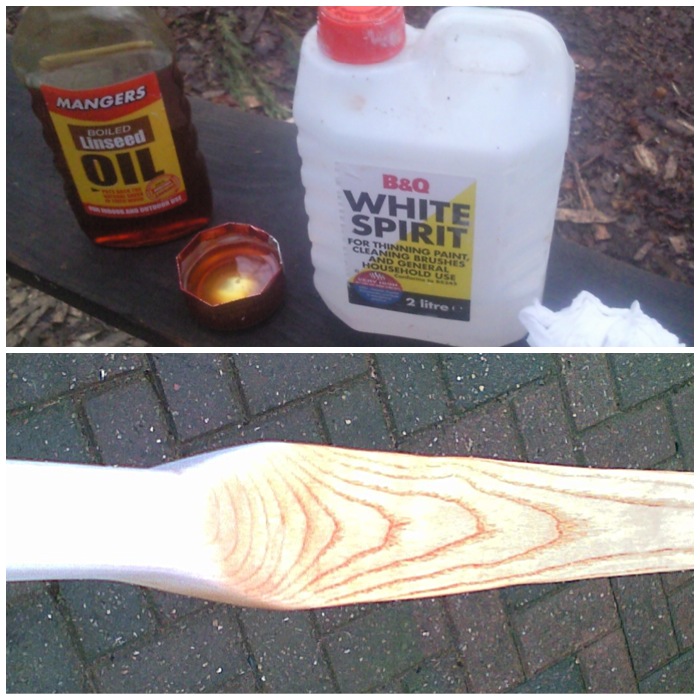
After sanding the spoon down using a mixture of grades from rough to very fine (about a half hour’s work) I added some oil to the spoon. I generally use vegetable oil as that is what I usually have in my cooking kit when out in the woods.
After the first coating had soaked in I applied a second coating and left the spoon to dry out.
First oiling
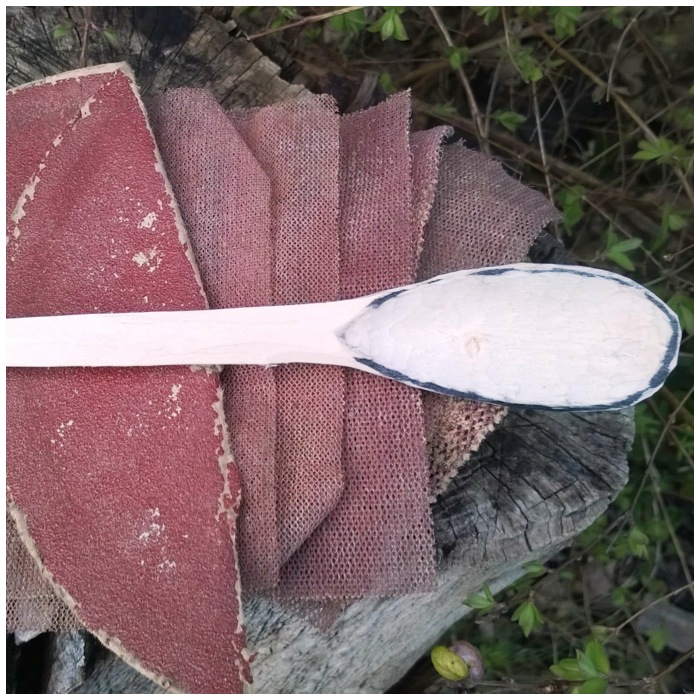
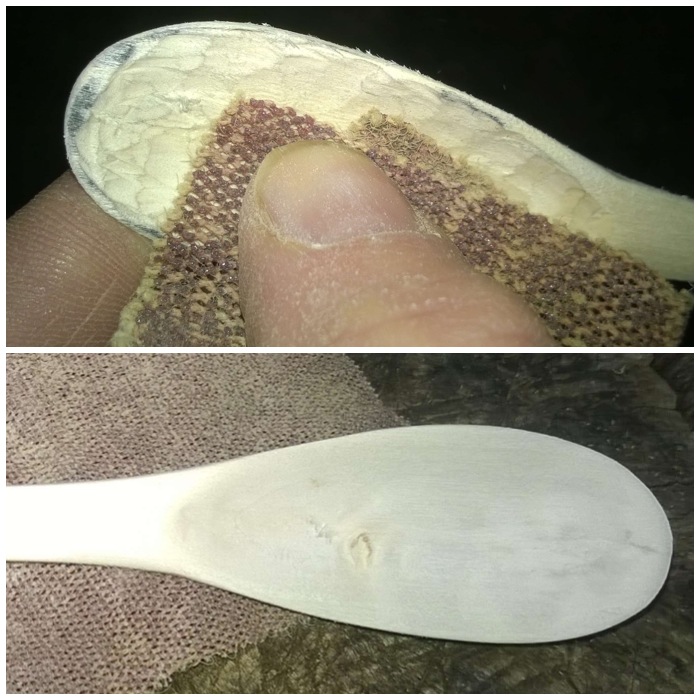
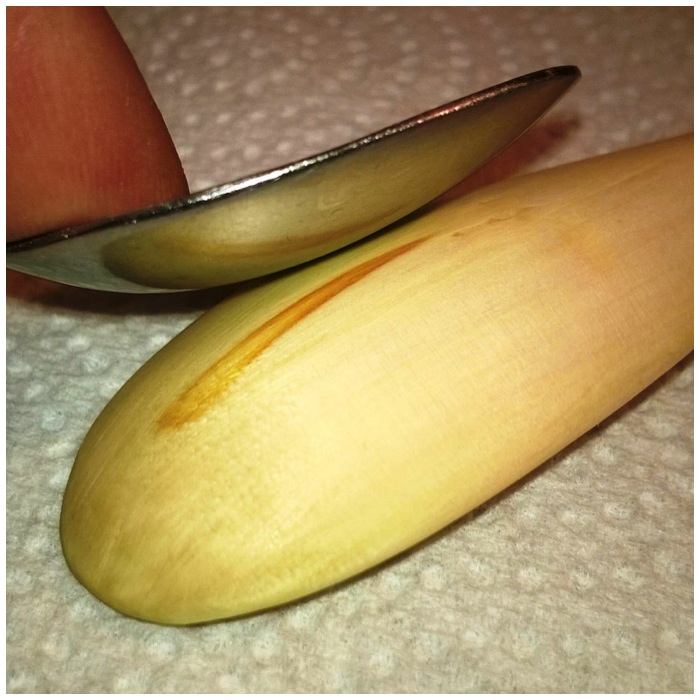
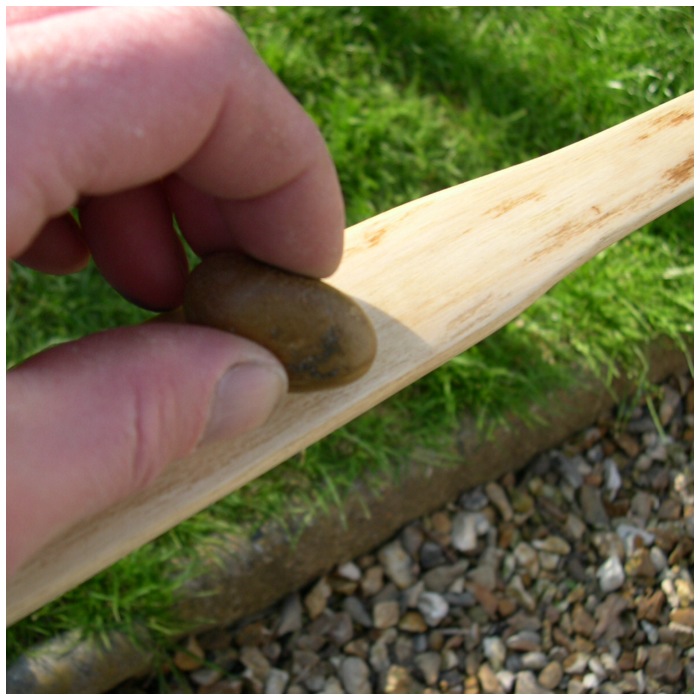
I like to add a finishing touch by boning the spoon. You can do this with the back of a spoon, a rounded pebble or with a rounded piece of bone. I rub the spoon with the rounded surface in a circular motion covering the whole of the surface area of the spoon. I normally do this for an hour or so as this seals the fibres of the wood down and adds a beautiful shine to the spoon.
Boning
This spoon will need to be re-sanded, oiled and boned again in a few weeks as the fibres rise up as it dries out. You can see that the bowl is not perfectly smooth and there are slight imperfections in it. Hopefully these will disappear with that second sanding but for now it is a spoon I can use.
Imperfections but a working spoon
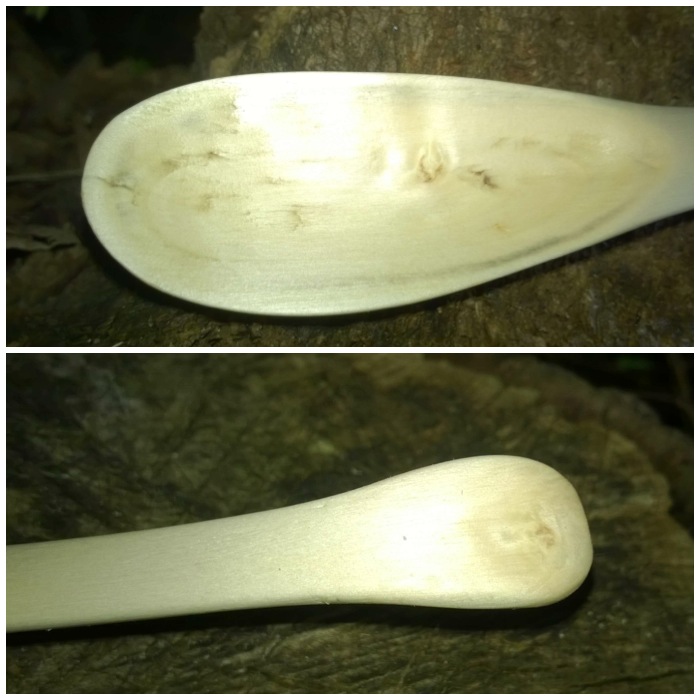
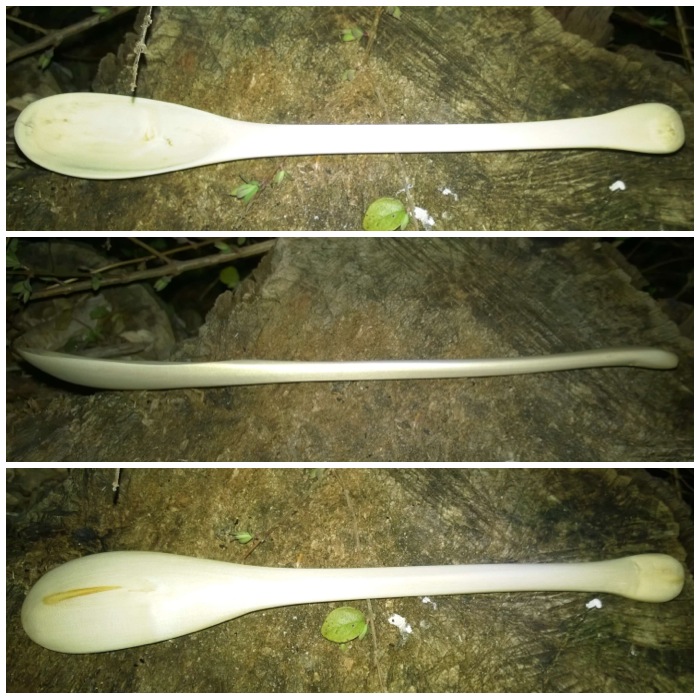
The different profiles of the spoon.
Profiles
Ready to go.
Ready to do its job
Have a go and try out some of these different cutting techniques.
When I first started venturing into the world of bushcraft I got into carving spoons and bowdrill sets. It’s like a rite of passage with most bushcrafters to crack these skills. As time went on I began to explore the world of pot hangers and eventually these little devilish collapsible pot hangers.
This post will take you through the steps I went through to make a mortise-and-tenon collapsible pot hanger. I have included a couple of other types and links to show you how they are made or used. As you can see in the picture on the left, one of the hooks is pointing down and one is pointing upwards. This set up makes for a great pot hanger but sadly you don’t find many trees with this configuration of branches.
Mortise and Tenon Pot Hanger
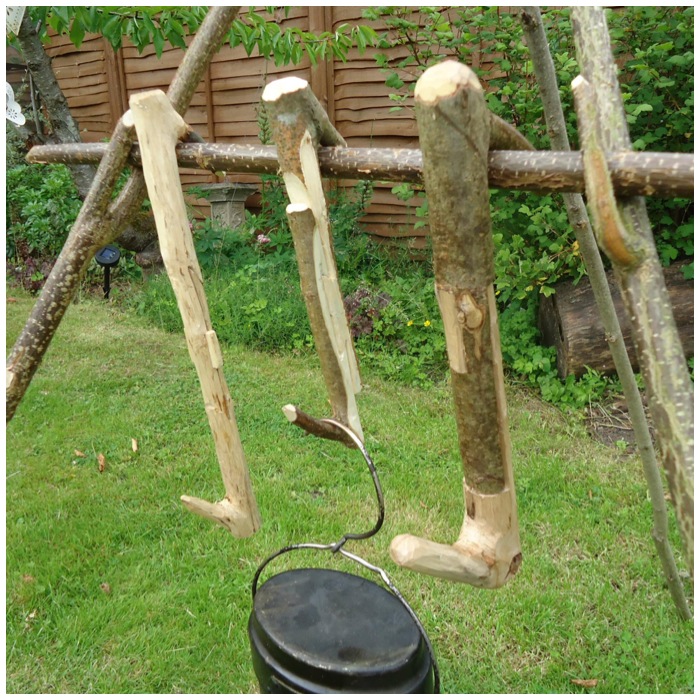
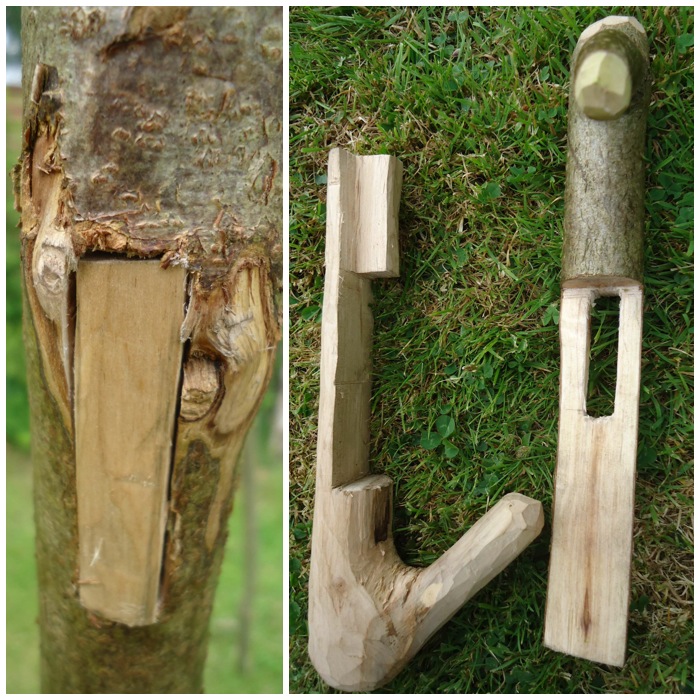
Here are the three different types of pot hangers I will discuss here, from left to right: the wedge hanger, the dovetail hanger and the mortise-and-tenon hanger.
The trio
The wedge hanger
I call this the wedge hanger as the two pieces are kept in place by a single wedge of wood in the middle. There are a lot of angles to take into account with this hanger and as with all of the hangers in this post I would advise you to make it out of dead standing wood. If you were to use green wood you might find that the pieces do not fit together any more as it dries out. I found a good tutorial on making this hanger on the Bearclaw Bushcraftsite.
Wedge Pot Hanger
The dovetail hanger
This hanger replaces the wedge with a dovetail joint in the middle. I found it surprisingly easy to carve. The trick is to make the joint snug but not too tight. You want just enough friction between the two pieces to hold it all together but still be easy enough to pop apart when you are finished with it. A good video by GJohnridge11 on You Tube shows this hanger but I am afraid not how it is carved.
Dovetail Pot Hanger
All the hangers so far have hooks pointing in opposite directions and on opposite sides. I have had discussions with fellow bushcrafters on this and some argue that a pot may slip off if the hooks are on opposite sides. I have made a few hangers now with hooks on opposite sides and on the same side as in the picture below. As of yet I personally have not had problems with either method.
Wedge Pot hanger with both hooks on the same side
The reason I like these hangers is that they are easy to store and carry with you. Once broken apart they fit inside your pot or kettle snugly.
Neatly stowed away
Mortise-and-tenon hanger
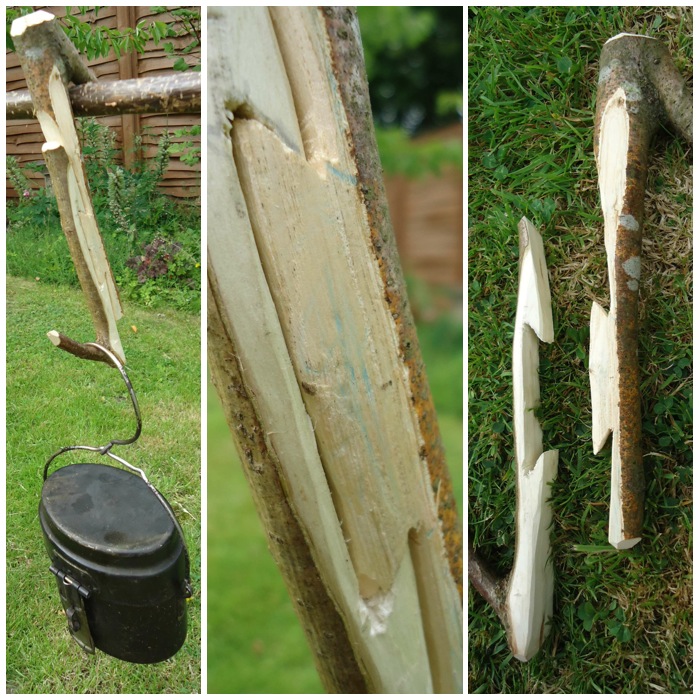
I found two dead pieces of wood of similar widths with good strong branches leading off them. After stripping the bark off one I noticed there was a fungal infection inside it. I decided to try using it anyway as the wood still felt strong. I left the bark on the other piece of wood as it had attractive honeysuckle markings going around it.
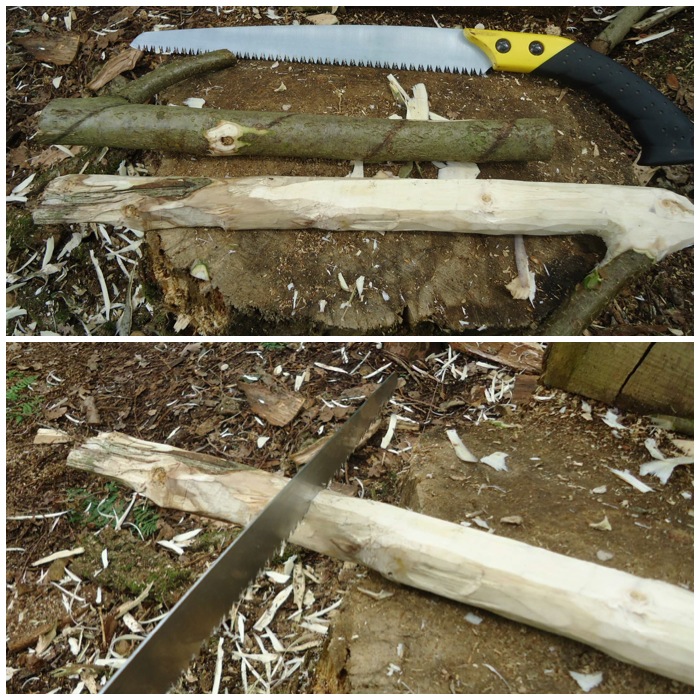
I trimmed the bottom piece so it was the same length as the top piece.
Trimming to size
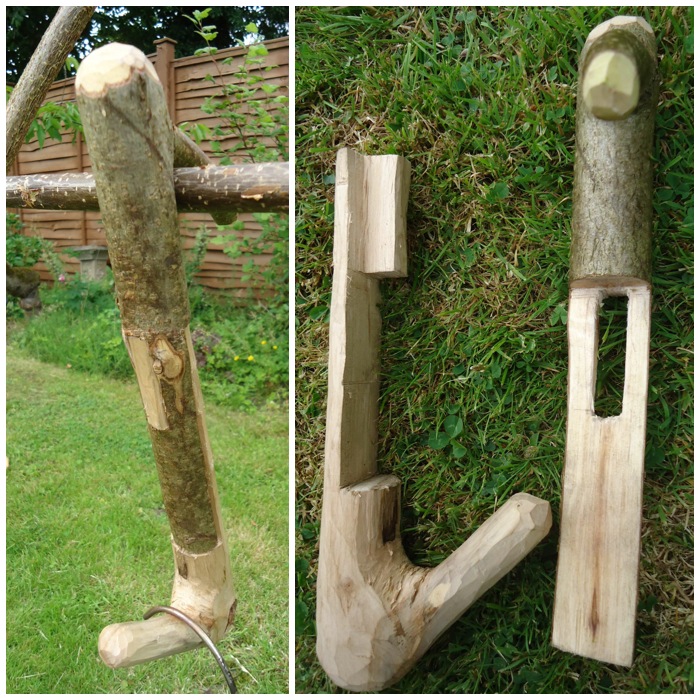
The tenon limb
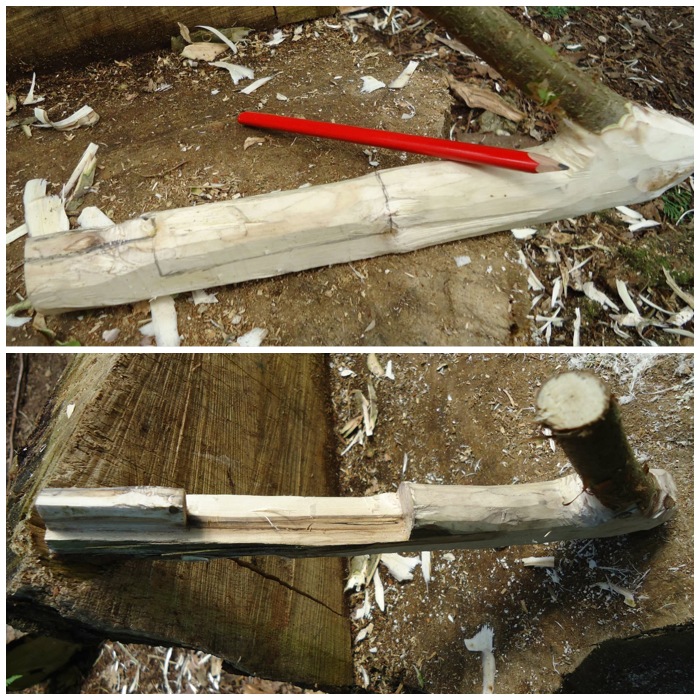
Using a pencil I marked out all the areas of wood I was going to cut out. (I should have shaded the areas of wood I would be cutting out with my pencil for the camera, see the bottom picture for how this limb will finally look.) This limb is called the tenon limb.
Mark out the shape of the tenon
I used a small hand saw to make some stop cuts on the pencil marks. These stop cuts are particularly useful when you start carving with your knife to stop any splits running off into areas of wood you want to keep.
Stop Cuts – Part 1
The stop cuts done, I used my knife to start carving the excess wood away. I used small cuts all the time, my thumbs on the back of the knife for fine control. This is a great activity to do while sitting around the campfire where you can relax and take your time.
Stop Cuts – Part 2
Once you get one block out it is time to take out the next block of excess wood. I am keeping the wood that is under the blade and removing the wood directly to the right of it.
Forming the tenon – Part 1
Finally I used my saw to cut out the tenon at the end of the piece of wood. This is a small rectangular piece of wood at the end of the limb as you can see in the bottom picture.
The finished tenon
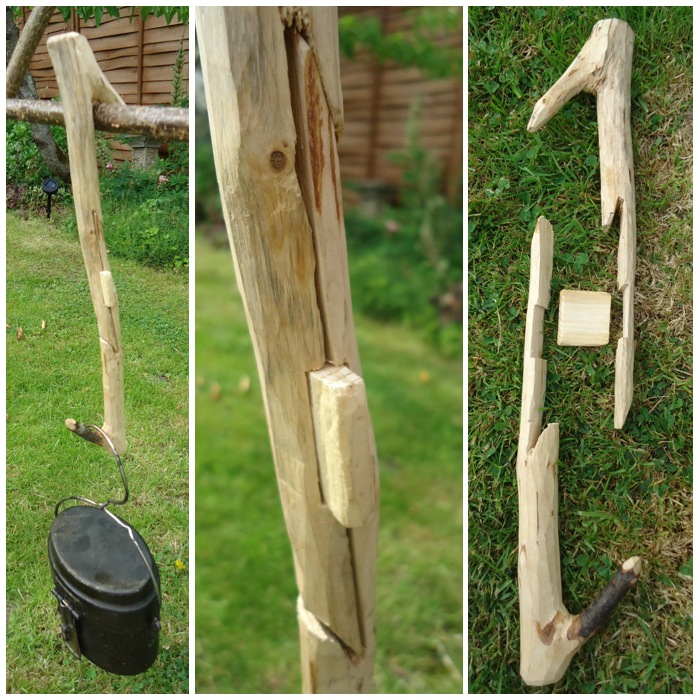
The mortise limb
I cut a stop cut into the mortise limb where I had measured that the tenon limb would fit snugly against it. You have to judge this by using the tenon limb as a measuring stick and saw to a depth that will make the limbs fit together well.
Mark a stop cut
Once the stop cut is in place you can easily batton the excess wood out with your knife. I am using the tenon limb as a hammer at this stage.
Batton out the waste wood
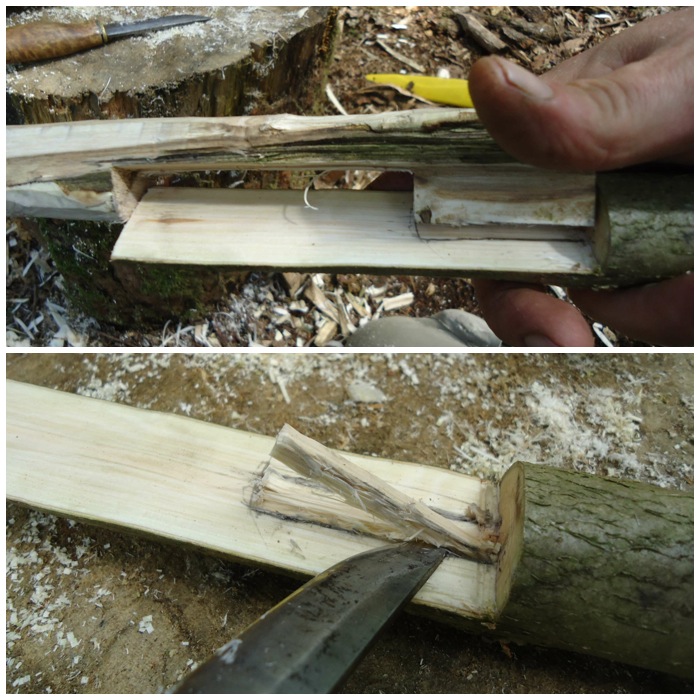
You can see in the top picture that the two pieces fit well together now so I marked out the area of the joint I needed to cut out on the mortise limb. I used the protruding rectangle of wood on the tenon limb to mark out the corresponding section of wood I needed to carve out of the mortise limb.
Once marked out I used the tip of my knife to start carving out the rectangular hole I needed to make in the mortise limb.
Draw out the mortise
Again this was a piece of carving I took my time with. I placed the mortise limb on a work surface rather than holding it in my hand, where any slip of the blade could have meant a nasty cut.
Carve out the mortise
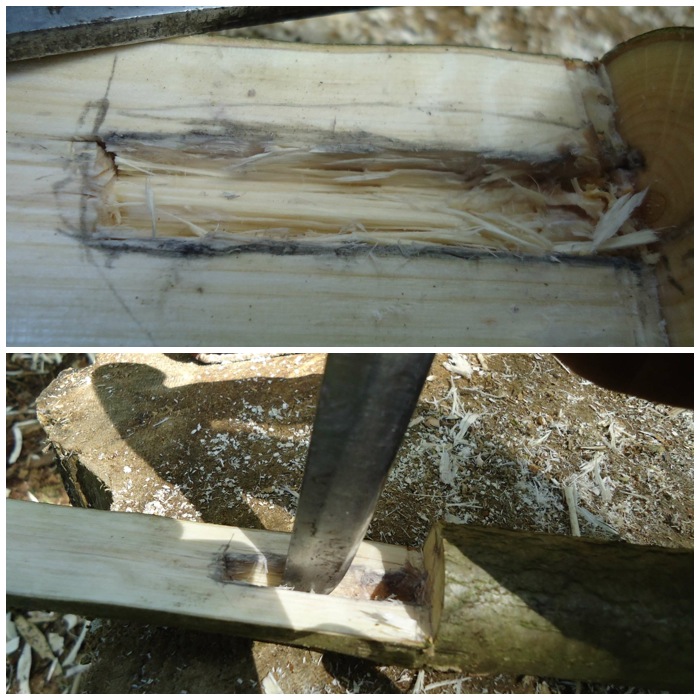
Eventually I worked my way through the limb and carved out a rough rectangular shape.
Form a neat rectangle
If you have taken your time and not cut outside of the pencil markings the fit of the Tenon and the Mortise should be snug. If it is too tight make some cuts where you feel there is resistance and keep trying to see if both pieces will fit together.
The fit should be snug but not overly tight
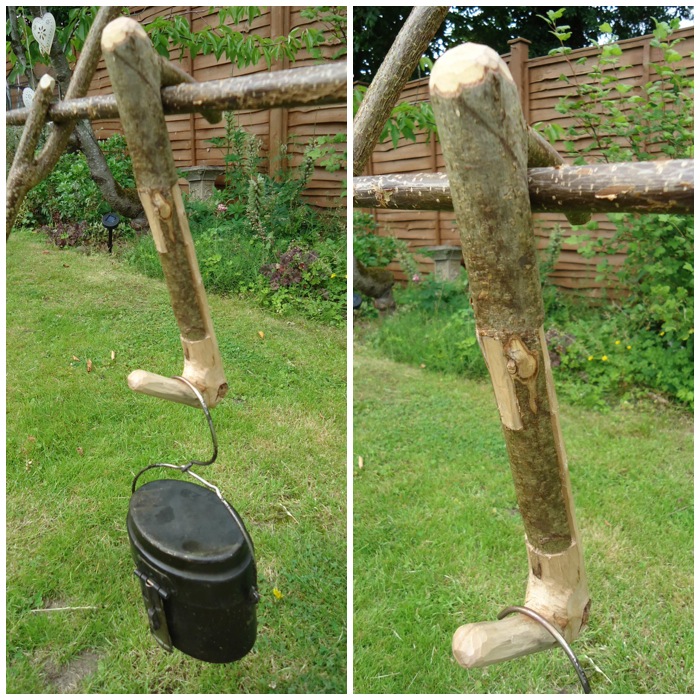
Eventually both pieces fitted well together but disaster struck for me here. I was showing the hanger to a friend and was explaining it is very strong on the vertical plane, ie when holding a pot, but very weak on any other plane, ie if you twist this hanger it will break.
Just as I was explaining this my friend did indeed twist the hanger as he tried to pull it apart and the tenon joint simply snapped. The fact that the tenon had some rot in it did not help but I had tried it out earlier and it did take the weight of a heavy Dutch Oven. To separate the limbs you need to push on the rectangular tenon so it pops out of the mortise slot: do NOT twist!
A trimmed but flawed tenon
Still, it didn’t take long to make up another tenon limb to fit the original mortise limb.
Tenon Mark 2
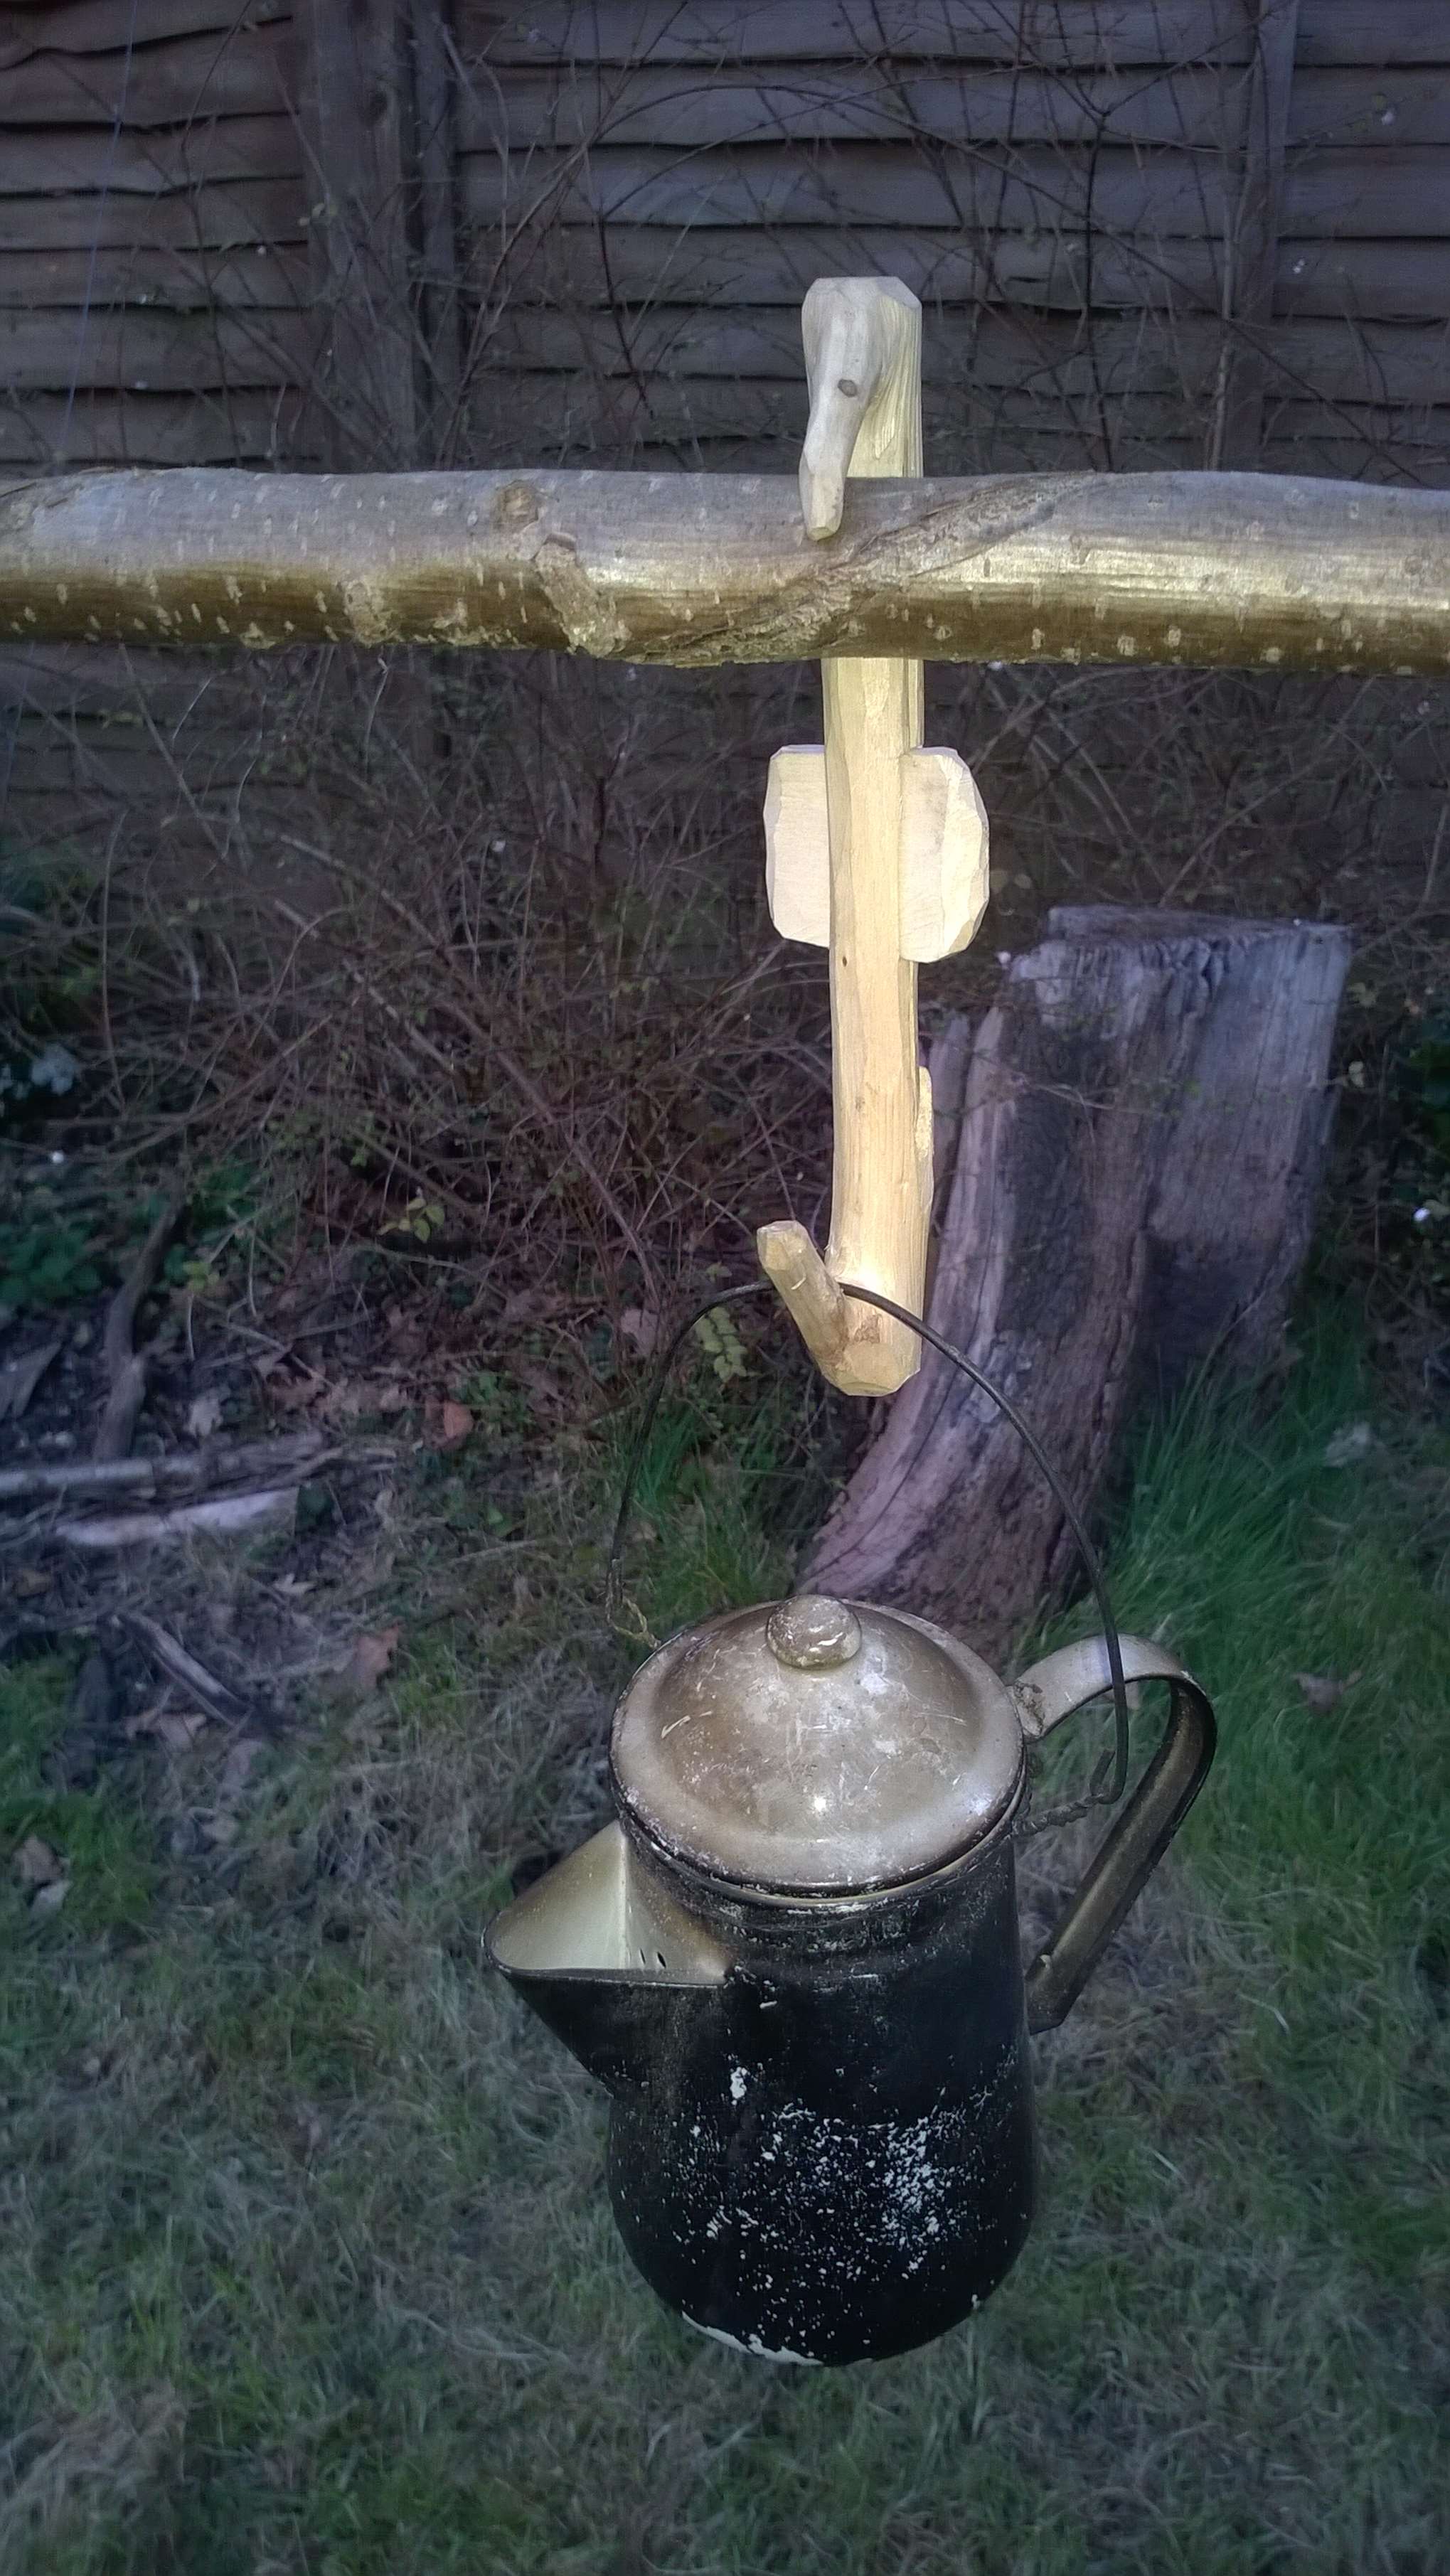
All that was left to do was tidy up the hooks, put the limbs together and hang a pot.
Mortise-and-tenon hanger in use
I can’t remember where I came across this hanger (somewhere on the internet) so if anyone knows where this hanger originated please drop me a message. Even though it looks complex to begin with, once you get working on it it is easy enough to do and a joy to craft as long as you take your time with the fiddlier saw and knife tip bits.
Closed and open
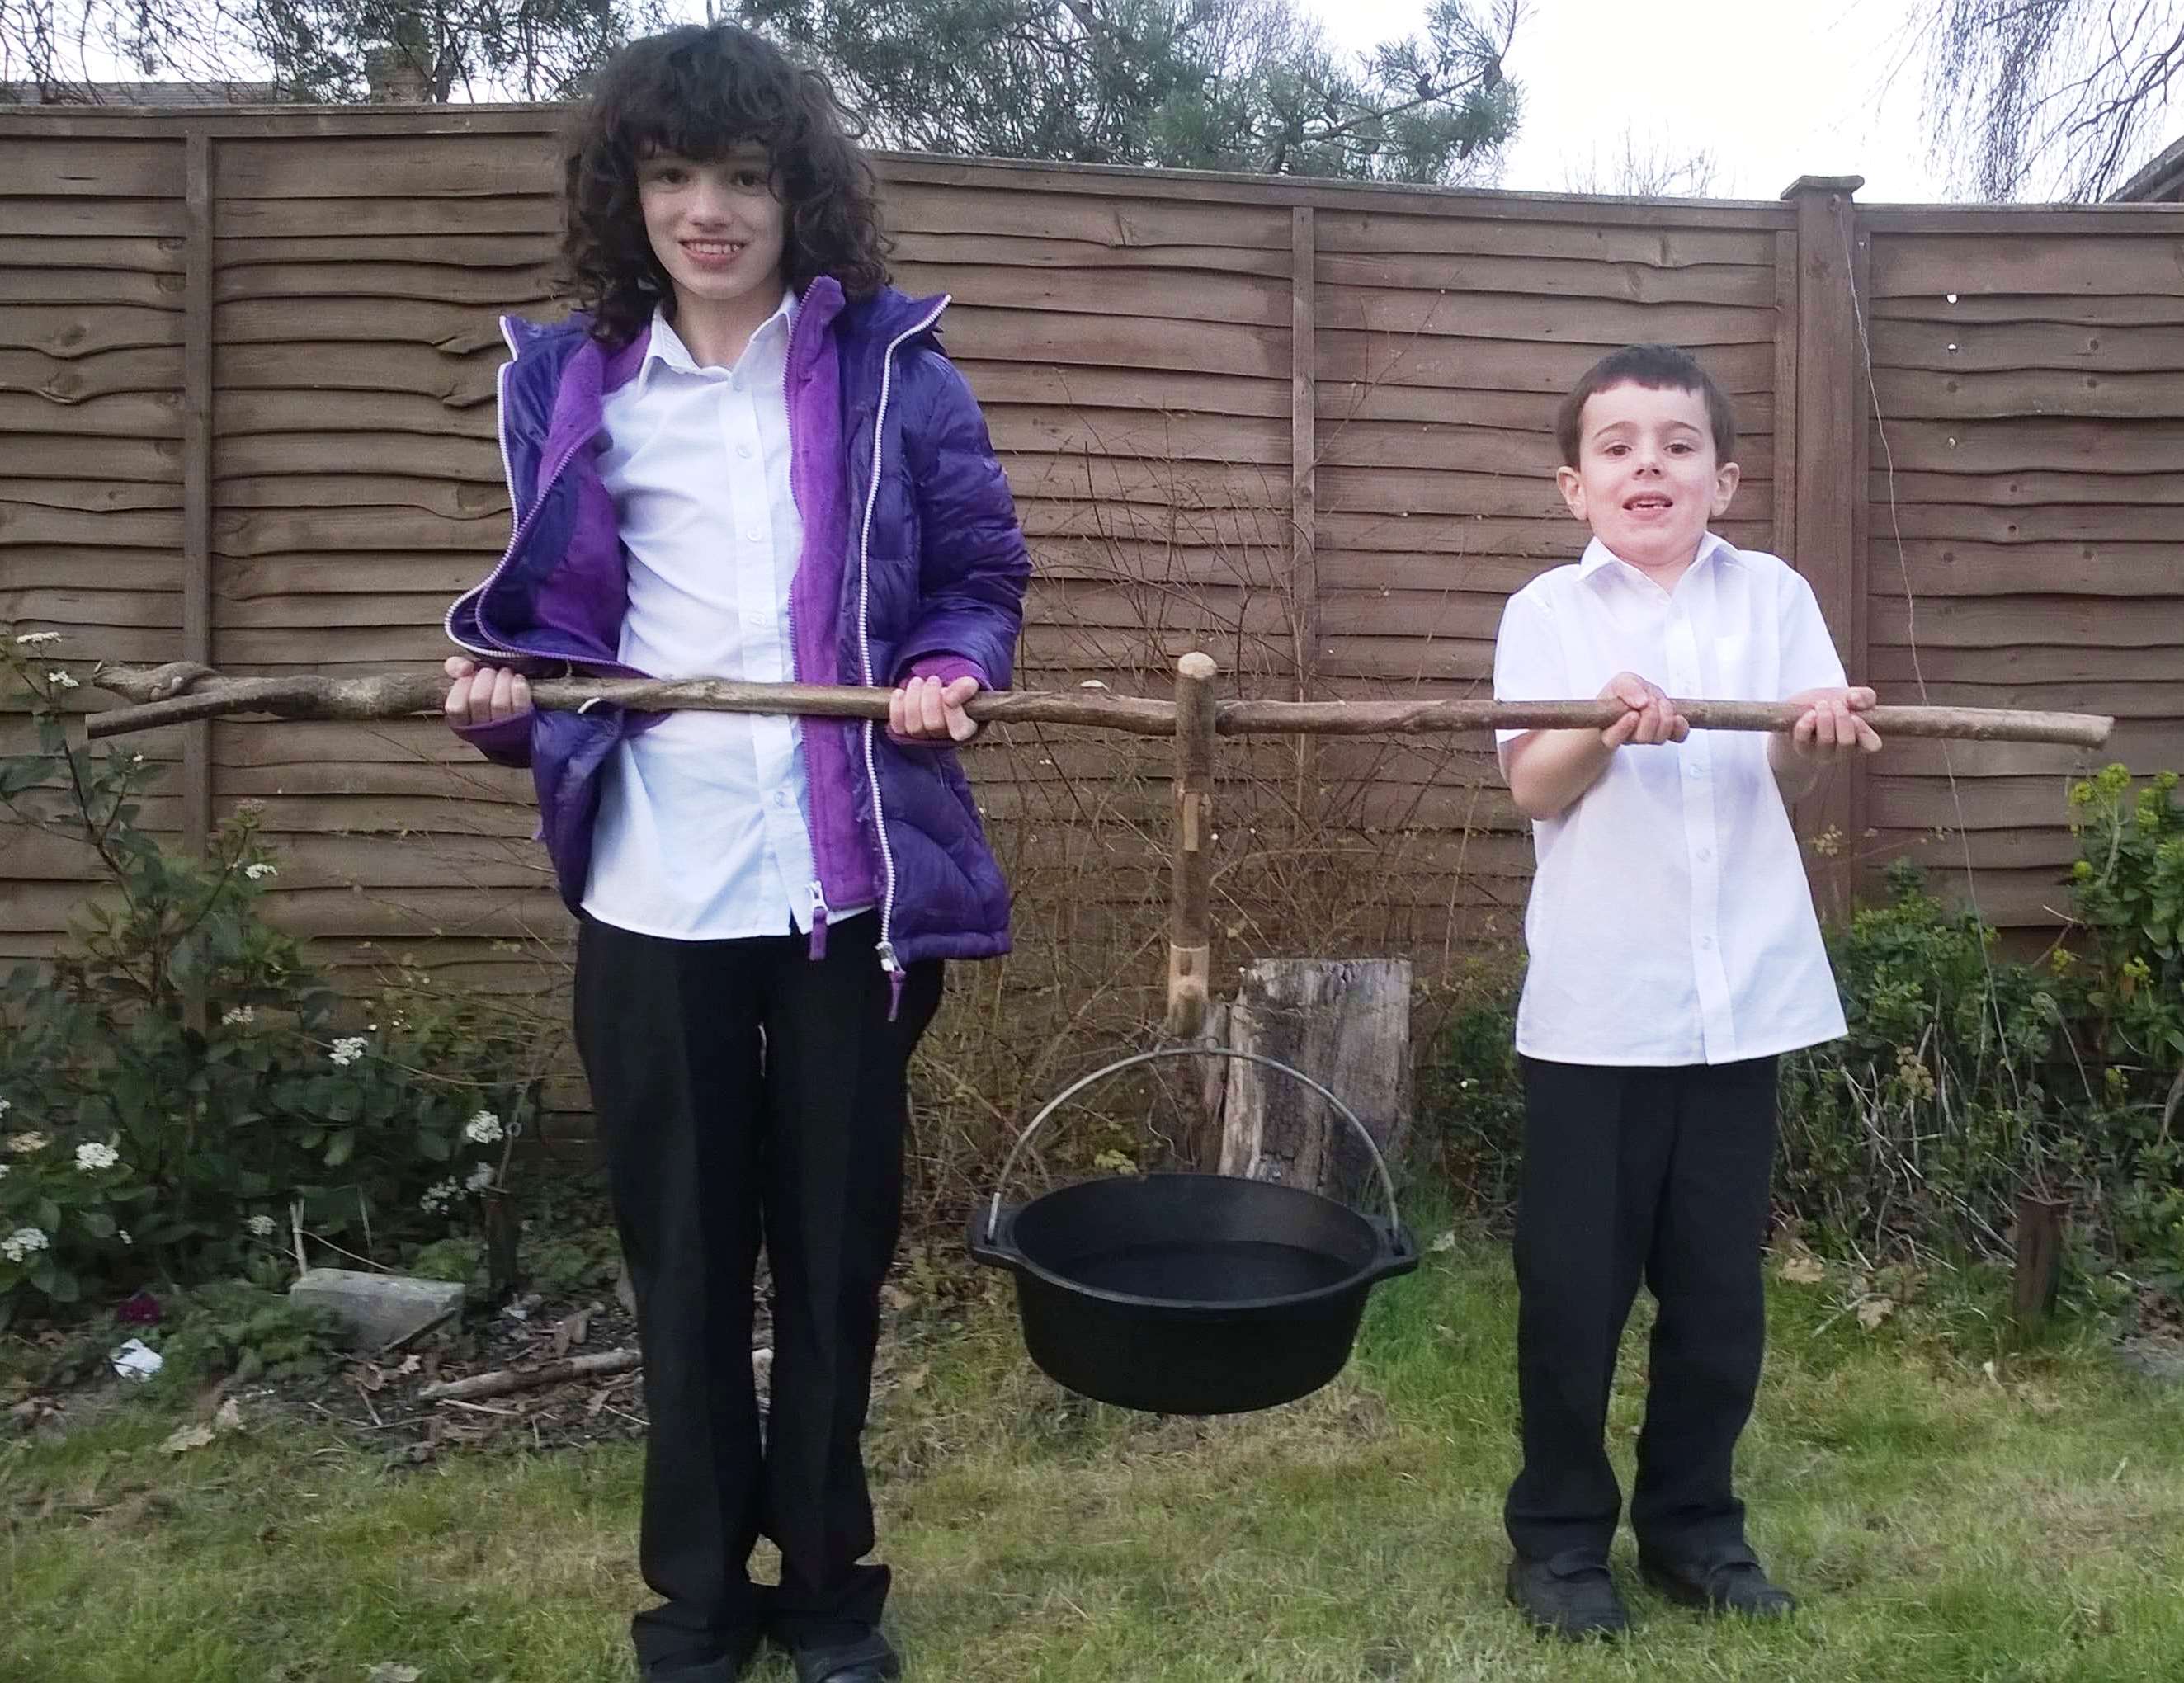
I filled this Dutch Oven with water and got my two little helpers to show you how strong this hanger can be.
One very strong pot hanger
Some other sites on the wedge hanger you might find interesting:
I put this How To…. together to show how to construct a couple of primitive arrows. I used mainly primitive tools with the exception of a few modern touches: the occasional use of a steel knife, adding false sinew when I ran out of real sinew, some sandpaper, a copper-tipped flaker and bleached feathers.
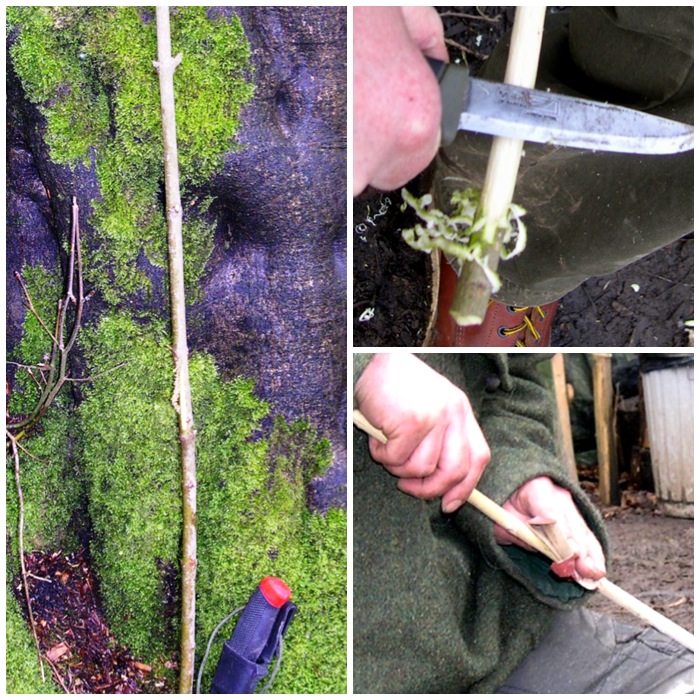
Preparing the arrow shafts
I made these arrows while on the Woodcraft School Primitive Technology course in 2009. John Rhyder the course instructor supplied us with pre-cut branches from a spindle(Euonynus europaeus) tree, which has traditionally been used for the manufacture of arrows as it is a hard wood and takes a point well. Another option that was available to us was hazel(Corylus avillana) as there was some on site. I chose to use spindle as I had never used it before to make arrows.
Flint-tipped arrows
I used the back of my knife to scrape the bark off the wood but this would traditionally have been done with a piece of sharp flint or other such stone. For safety I kept the knife still and pulled the green stick backwards, scraping bark off with the back of the blade. I like this method as the blade stays still making it very safe. I then roughly sanded each of the branches with sandpaper. This could have been completed traditionally with either a handful of sand or a soft rock such as sandstone.
De-barking
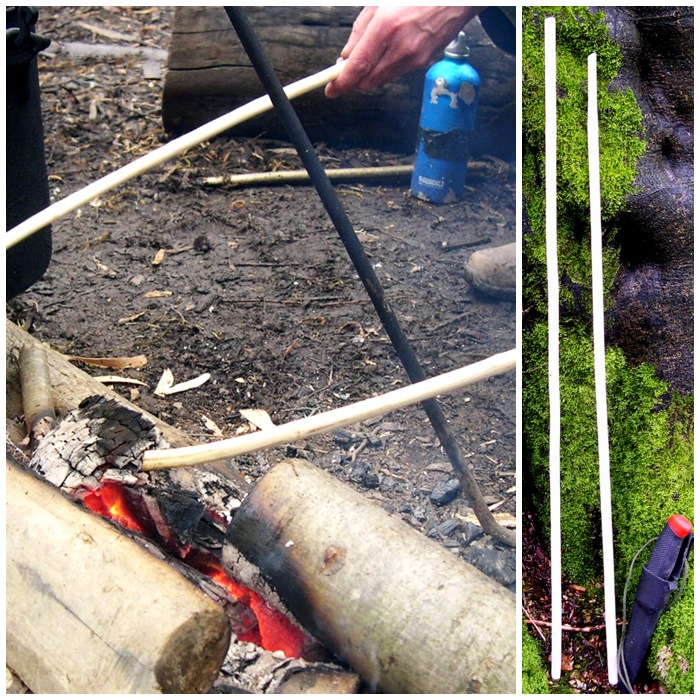
I then heated the branches over an open fire. I was careful not to scorch the wood as this changes its properties and makes it brittle. The trick is to slowly turn the branch in a circular fashion, heating evenly all around the section of wood that needs straightened. This in effect creates steam in the wood as the sap heats up and so allows you to slowly straighten the arrow (this method works best on green wood). To straighten the bumps in the wood you need to hold it in position (as straight as possible) until it cools and sets into its new shape.
Heating and straightening
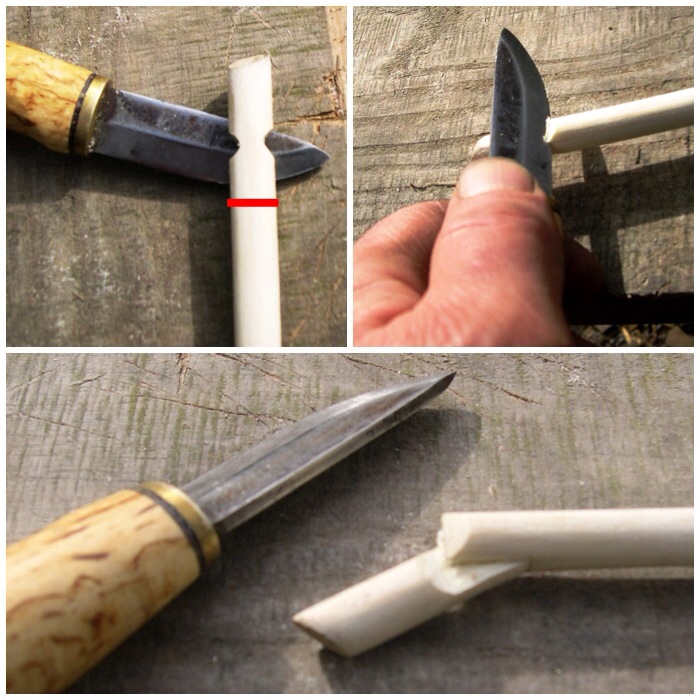
Making a Self Nock
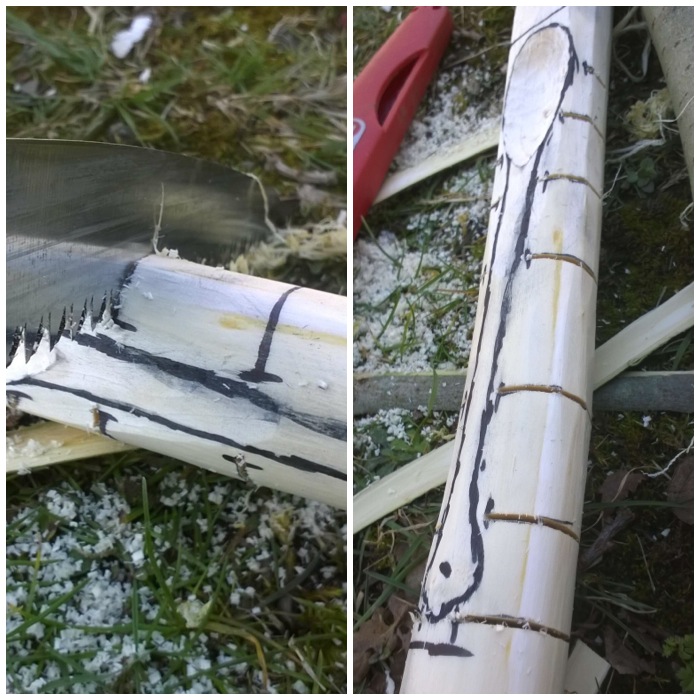
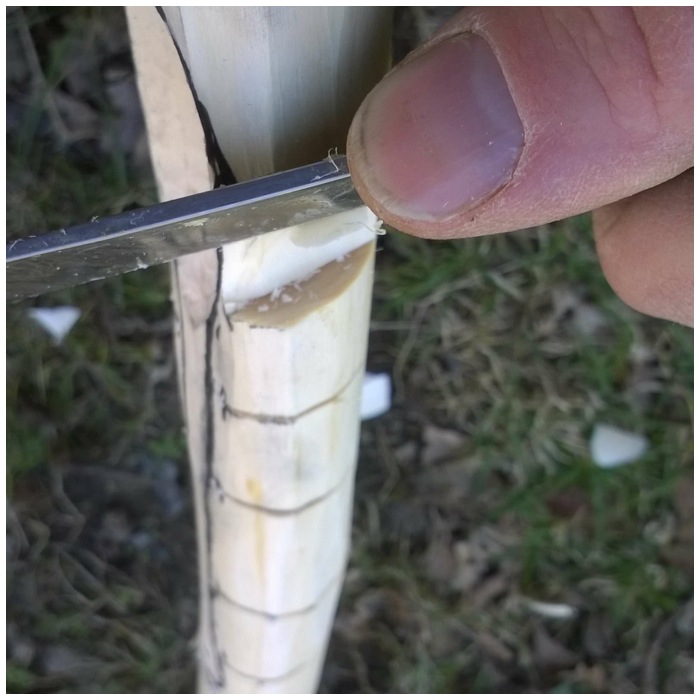
Next I needed to make the nock for the string. I cut two small grooves (opposite each other) at the thin end of each shaft. Then about a centimeter down the shaft (showed here in red) I rolled the knife edge to mark a thin line at 90 degrees to the first grooves (too fine to see in the picture).
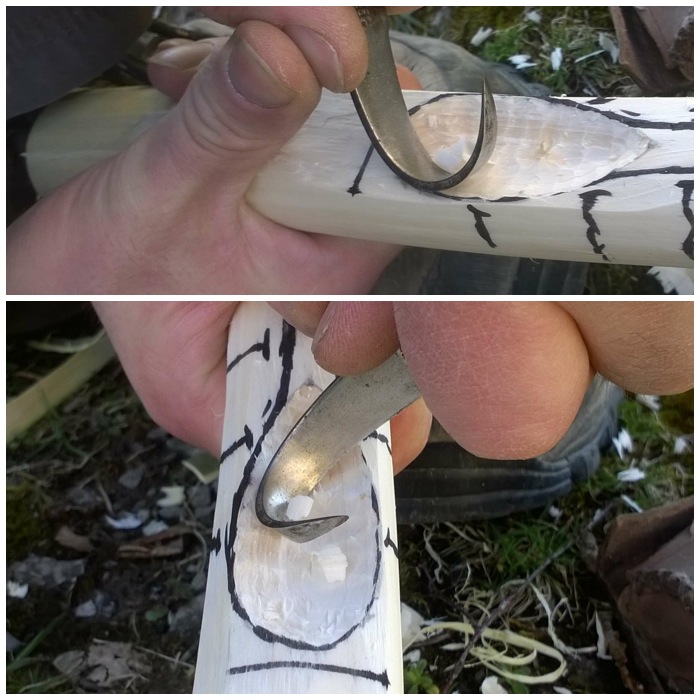
I then placed the edge of the knife into one of the larger grooves to split the wood down to the lower line. The small cut in the wood at the lower line helps stop the split running off too far. I then repeated the procedure on the opposite groove.
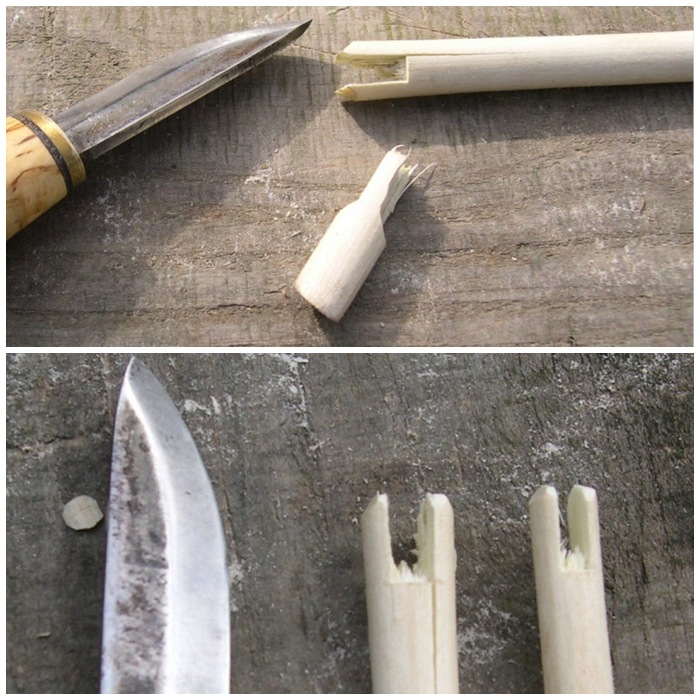
I wiggled the centre section back and forth until it started to break away from the main arrow shaft. In the bottom picture you can see the nock starting to appear.
Self Nocks
The resulting peg finally pops out after a lot of wiggling about. Freejutube has an excellent video on making a primitive nock using a slightly different method – Arrow snap self-nock – with flint and bone tools
The knocks
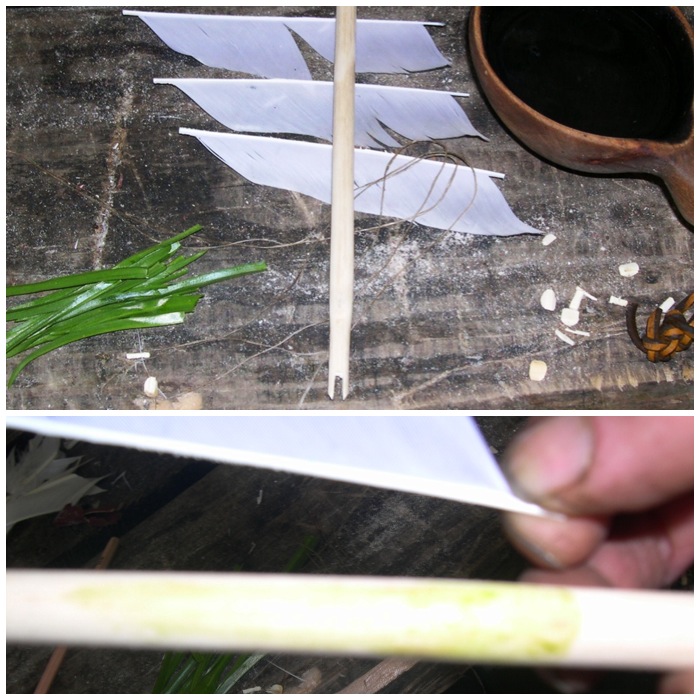
Preparing the Flights
John Ryder provided feathers for us to use. Due to health and safety requirements John had to supply his students with feathers that had been washed: traditionally of course the remnants of bird kills would have been kept and the feathers used for this job. If the feathers are from the same wing they make excellent flights, making your arrows more accurate.
The Flights to be
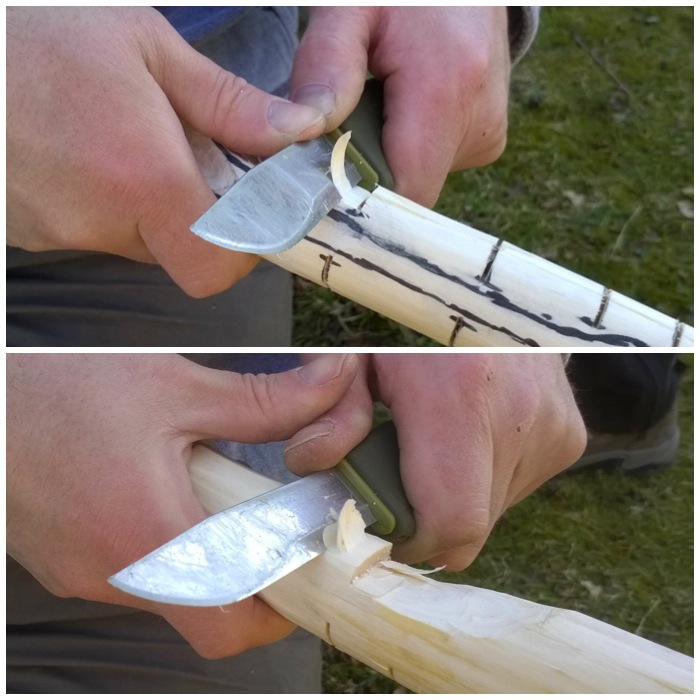
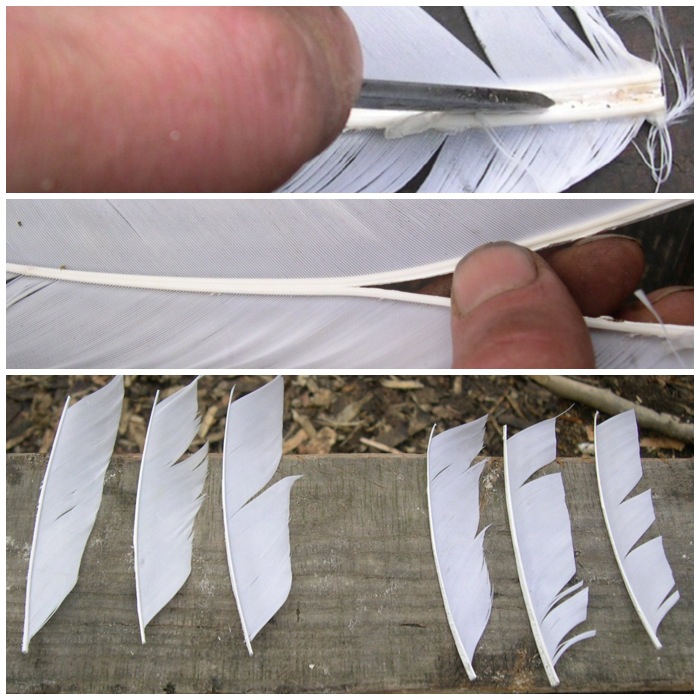
I used my knife tip to start the split of the feathers to create the flights – a sharp piece of flint would have worked just as well. After the initial split had been made I used my fingers to split the rest of the feather. I tried to be very careful here to keep the split in the centre of the spine of the feather all the way to the end. It gets a bit tricky as it tapers out near the end.
I split and trimmed the feathers leaving enough of the spine at each end for wrapping purposes.
Splitting out the flights
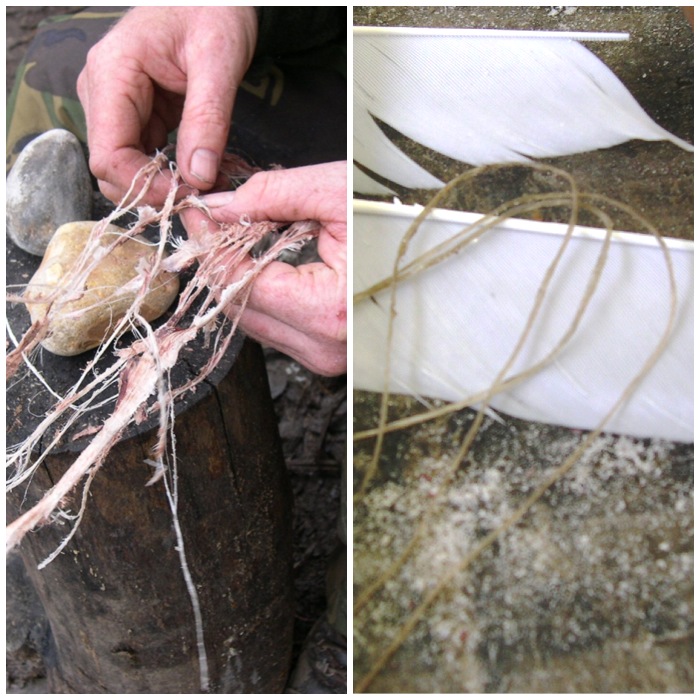
Making Sinew Cordage
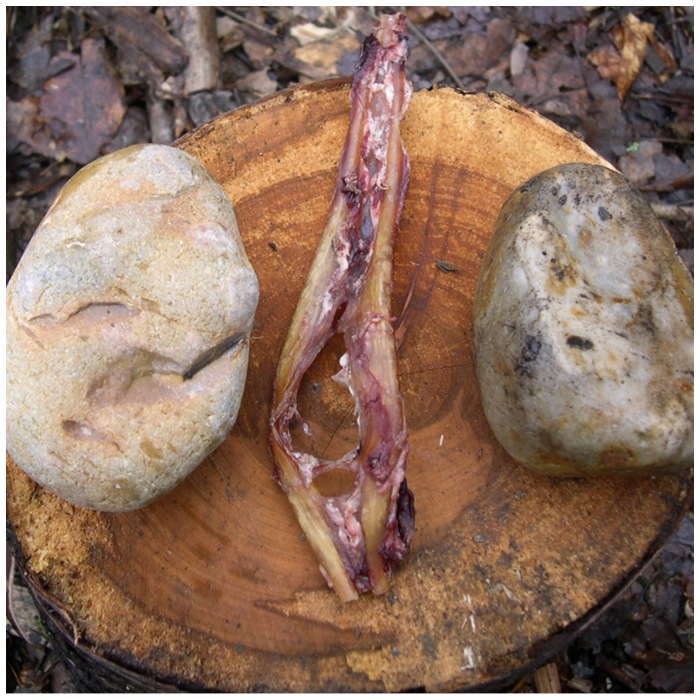
To wrap the feathers onto the shaft I used deer sinew. This needs to be pounded gently between two stones until all the sinew fibres separate.
Sinew
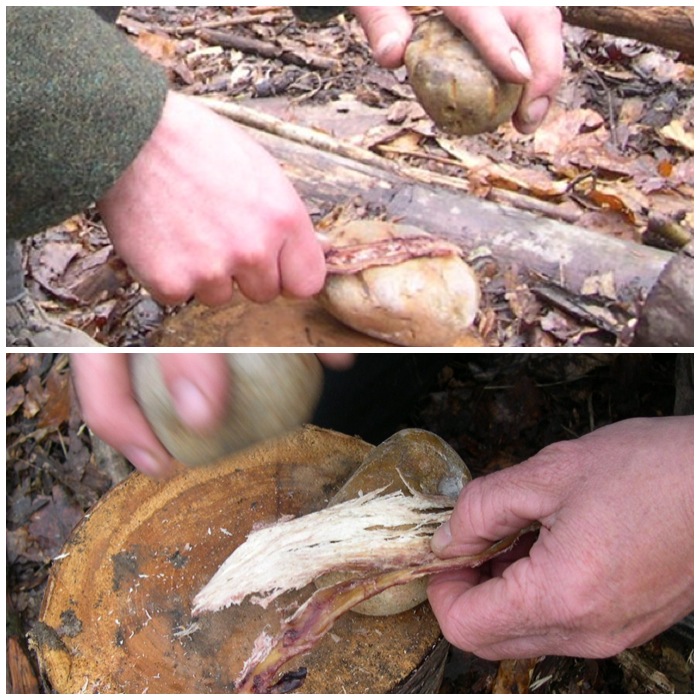
This takes time but it is worth it to see all the strands of sinew start to appear.
Breaking down the sinew
Here you can see the fibres starting to really fall apart. There wasn’t enough real sinew for everyone so I had to supplement it with some false sinew: dental floss is another possible alternative.
I rolled the sinew strands to make them stronger and wet each strand with saliva. This allows the sinew to bind to the shaft as the fats in it act like a glue when wet. On the right you can see some sinew that is ready to use as wrapping.
Finished sinew
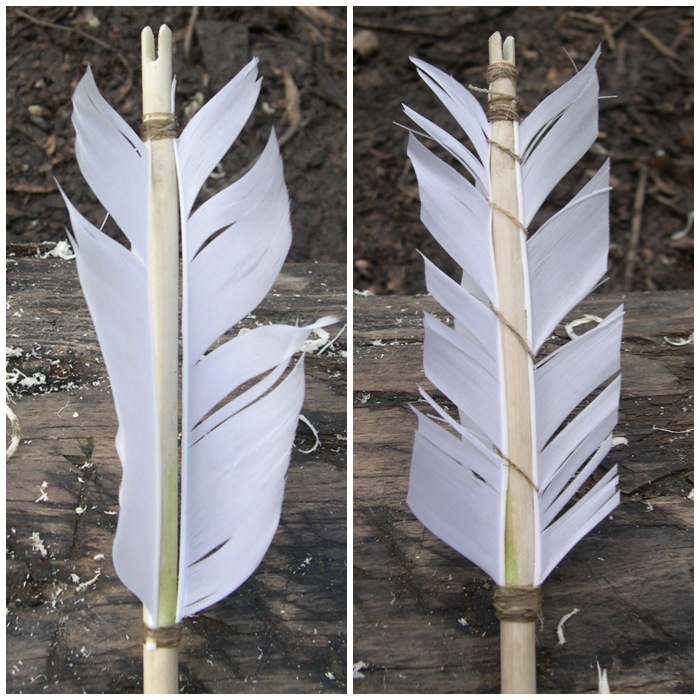
Attaching the Flights
To aid in the process of attaching the flights to the shaft I tried out another type of glue made by crushing bluebell leaves to a pulp between my fingers. The resulting gloop was supposed to act as a first fixing to help keep the flights in place before wrapping; it turned out to be a little bit tacky but nowhere near strong enough to act as a glue. In the bottom picture you can just make out the shaded area on the shaft where the bluebell ‘glue’ was placed.
Bluebell glue
In the end I just used sinew to hold the flights in place. You can see the bluebell stain on the shaft in this picture.
First tie off
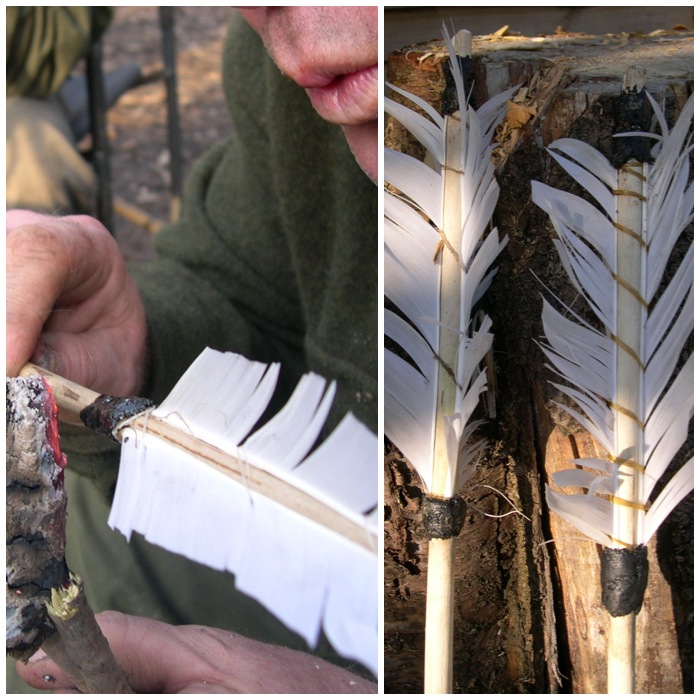
I then wrapped the flights at the top with sinew (bottom left) and then to finish this stage I wrapped the body of the flights with more sinew (bottom right).
I also wrapped sinew just below the nocks on each arrow to strengthen them. You can see this clearly in the arrow on the right. If I hadn’t reinforced the nocks with sinew they could easily have split with the forces of the bow string as soon as I shot them.
Tied off with sinew
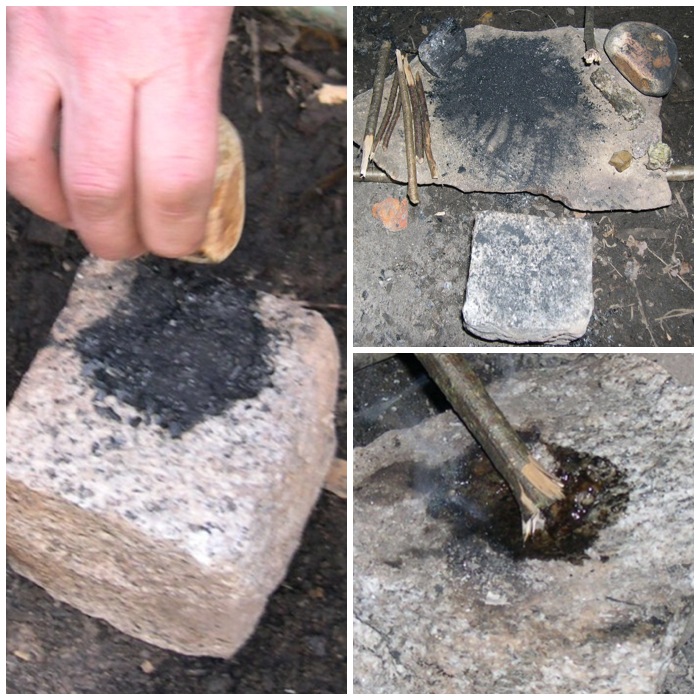
Creating and Using Pitch
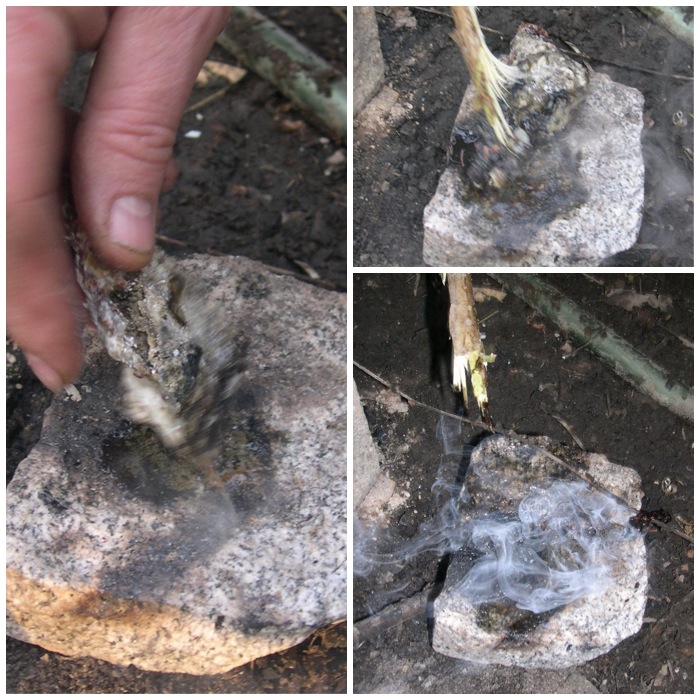
Once the sinew was attached to each arrow I decided to put together some pine pitch. This was to cover the sinew to protect it from fraying and also to waterproof it. The name pine pitch is a bit misleading as I used spruce resin, since that was what was readily available in the area. After collecting the resin that had oozed from spruce trees (the tree uses the resin to seal any damaged areas on its bark) I mixed it with fine charcoal (to give it strength) and beeswax (to give it flexibility).
I used the small rock (left hand picture) to grind the charcoal and a large flat rock (top right) as a preparation table. I heated the square rock in the fire to help with melting and mixing everything together. The sticks were used as mixers and to store the resin (see below). The hot rock I used had been heated before many times so there was no risk of it exploding (which can happen if they contain trapped air).
On the heated rock (bottom right) I heated the first lump of resin, and as it melted I scraped off any debris such as bark.
Pine Pitch Prep
I kept adding more and more resin, charcoal and beeswax (I just added charcoal until the mixture thickened slightly and added beeswax in little lumps) until it had all melted. The rock was super-heated so I had to take great care not to burn myself.
Mixing
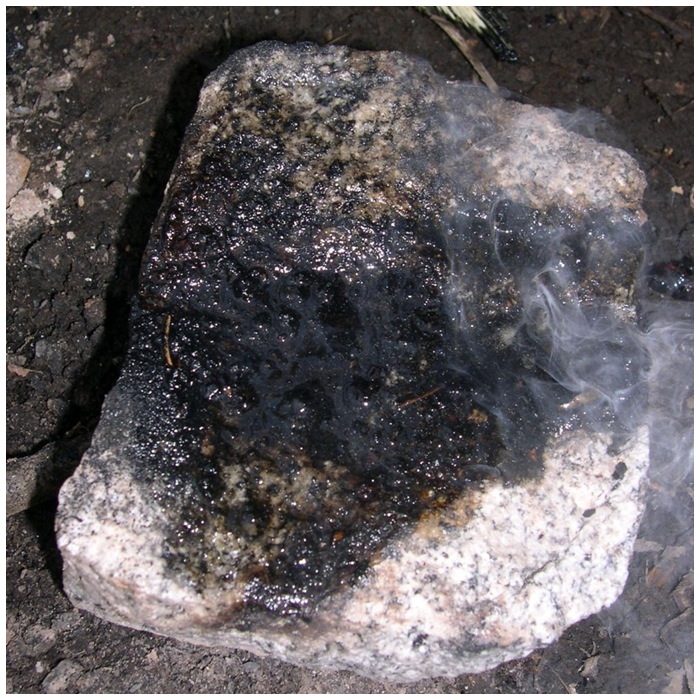
The rock had a slight indentation to collect the melted resin. It doesn’t look like there is much resin here but it was enough for what I had to do.
Hot Pine Pitch
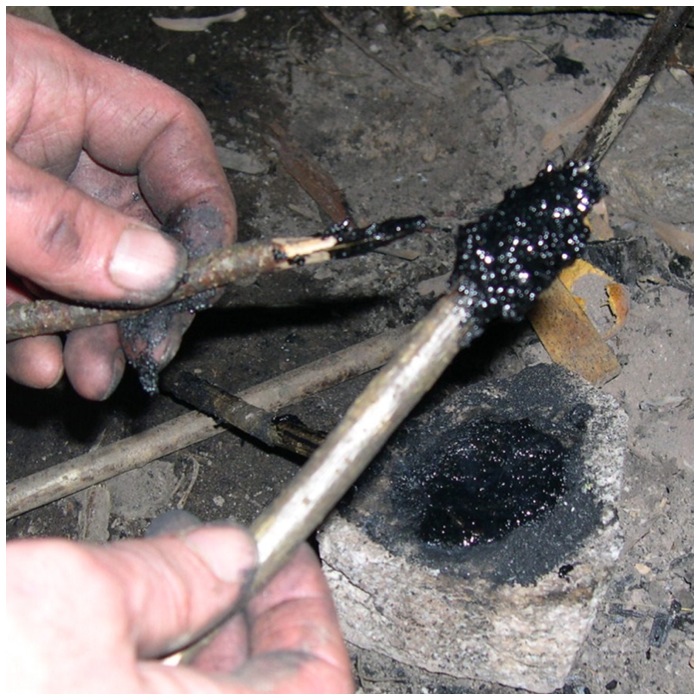
Using two sticks, one to scrape the pine pitch up and one to hold the cooling pitch, I coated the holding stick with the pitch mixture then submerged it in a pot of cold water to harden it. I would then repeat the process adding more and more layers. Using cold water speeded up the whole process.
Here you can see the pine pitch building up on the stick. This primitive method does not give you very fine pitch as you would get using a modern method but it does work surprisingly well
Creating a Pine Pitch Stick
I made up two pine pitch sticks in the end. The stick on the far left has been charred and can be re-ignited quickly by dipping it into a fire to create heat to melt the pine pitch again to coat the sinew on the arrows. This protects the sinew and gives the arrow a nice finish
Prepping to coat the sinew
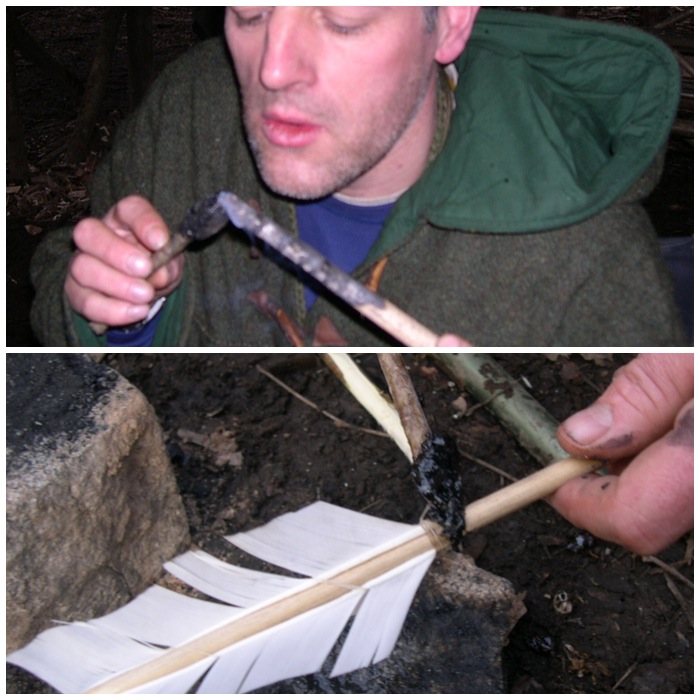
After re-lighting the charred stick I used it to to re-melt the tip of a pitch stick (top picture). I found it fairly easy to drip the melting pitch onto the area of sinew on the arrow I wanted to cover (bottom picture).
Heat and coat
As I dripped the pine pitch onto the sinew I wet my fingers so that I could smooth the resin out and spread around evenly (John the course instructor is in the left hand picture demonstrating this). If you do not wet your fingers the hot pitch could burn you and also it will stick to your fingers (out in the woods without hot running water this is a pain to clean up).
Re-heat and smooth out
Knapping the Arrow Tips
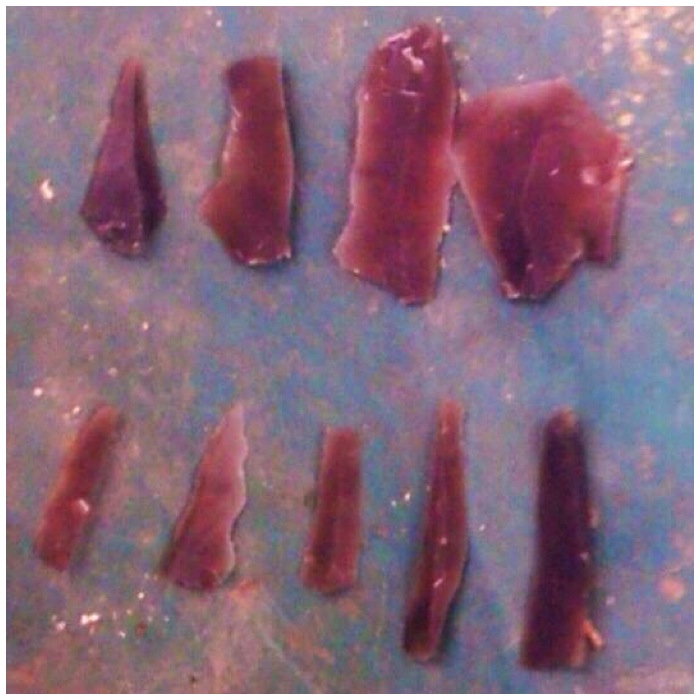
The next stage in the process was to make some arrow tips. I had collected up some shards of flint left over from the course we had with John Lord. Thankfully there was a mass of leftover flint for me to look through and choose from. All of the pieces shown below I thought could be made into decent arrow tips or barbs with the minimum of effort.
Possible points
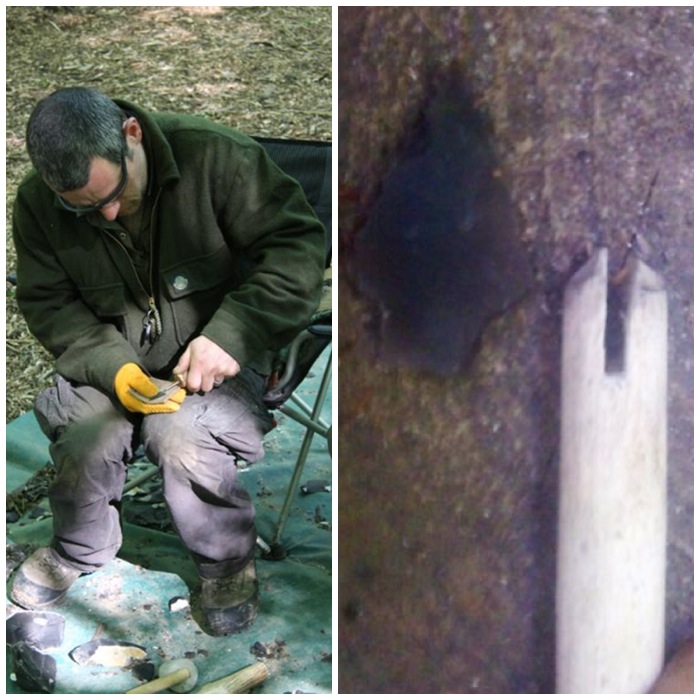
The next stage was to pressure flake the pieces with a copper tipped pressure flaker and an antler tine (I wanted to try both tools) into usable arrow heads. The glasses were worn to protect my eyes from flying pieces of flint and the glove protected me against cuts. I placed under the flint a strip of leather to give support and further protect my hand.
The picture on the right did not turn out very clear (a smear on the lens of my camera) but I soon had an arrowhead ready to insert into my arrow shaft. Using the same method as I used to make the knock, I created a groove at the arrow tip.
A bit of knapping
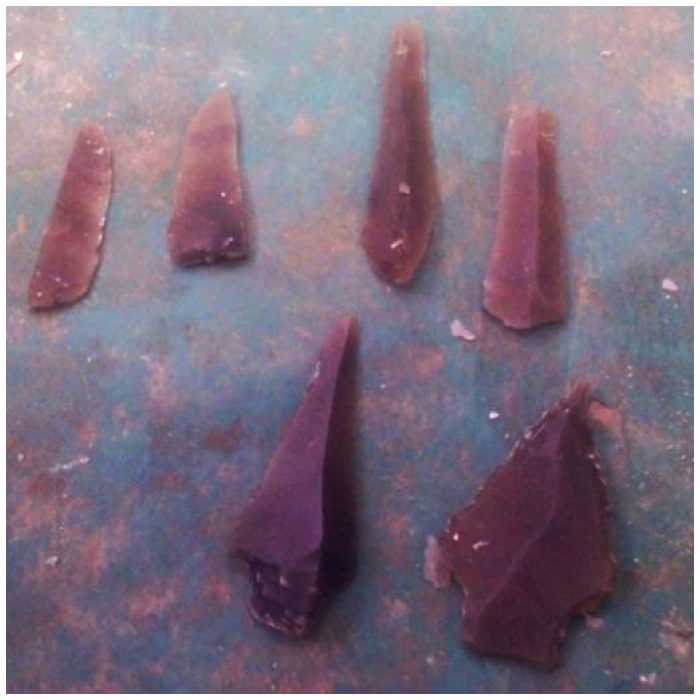
I re-worked the other pieces and after a little touching up these other flint points were ready to be used.
The rest of the finished points
Attaching the Tips
I then coated the arrowhead with some pine pitch and placed it into the groove on the shaft. I then coated the tip of the shaft in more pitch and wrapped sinew round it to keep the arrowhead secure.
Update 13/03/2014 – I have been advised by one of the Primitive Arts Society members David Colter that it is very important to securely bind the shaft immediately below the point for a length of about a centimetre to prevent it from splitting on impact and failing to drive the point into the target. There is a very good experiment showing this in the Traditional Bowyers Bible Vol 3. I did not bind it for a full centimeter in my example (thanks for the update David).
Attaching points
I finally added more pitch to cover the sinew to waterproof it all.
Well attached
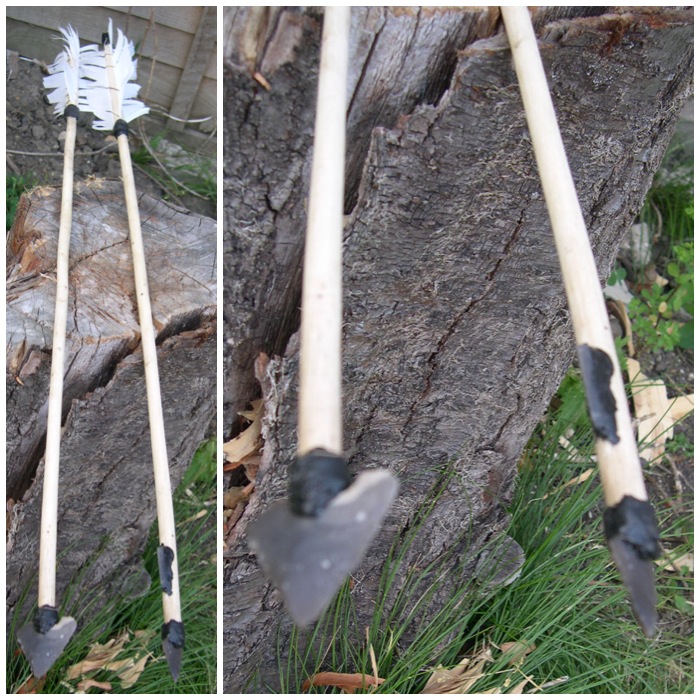
Based on archaeological evidence I decided to add a barb to the arrow. I firstly scraped a groove along the arrow shaft then put some pine pitch into it.
I then placed a long thin piece of sharp flint onto this pitch and coated more around the base of it (bottom picture) The barb is designed to cause maximum damage to the prey animal as the arrow enters its body.
Attaching a barb
I finished two arrows in this project. The one I completed for this tutorial is the one on the right.
Finished arrows
Using similar techniques I was able to produce an Atl atl set as well.
Atlatl extras
I have never shot these arrows at a modern target as I don’t want to break off the tips but I did shoot them into some bales of loose hay and was very impressed with their accuracy.
This was a great project as it introduced me to some primitive but very effective techniques in arrow making.
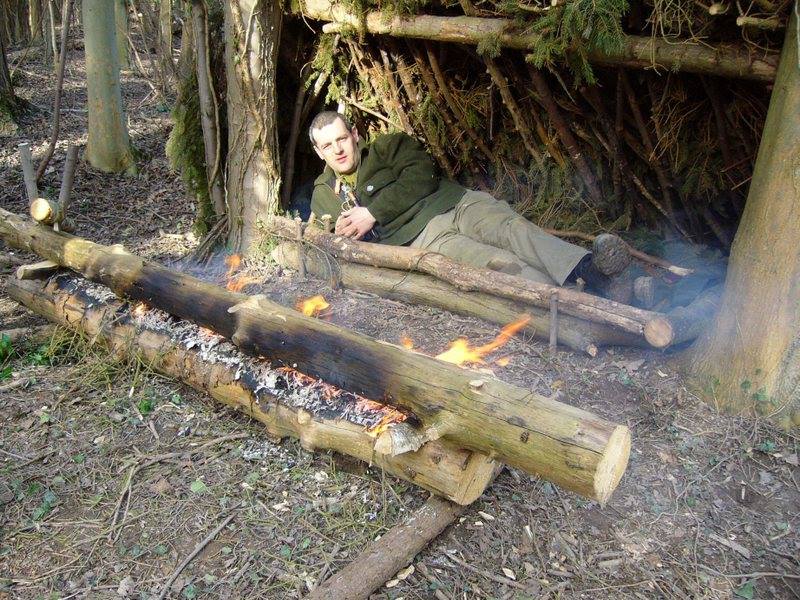
While writing my posts on my Scandinavian Candle series I recollected a long log fire I was taught how to set up by my good friend Kevin Warrington of Natural Lore. I like to think of it as a candle, but horizontal instead of vertical. The set up is basically two logs (usually pine) laid horizontally with one on top of the other.
This post is a step-by-step recording of how I set up what I have discovered is called the Rakovalkea Gap Fire.
Finnish Rakovalkea Gap Fire
Back in 2007 I was on a bushcraft course with Kevin Warrington and he showed me how to set up a long log fire. This isn’t quite the Finnish Rakovalkea but the idea is basically the same. These fires are great when you’re sleeping outdoors in a lean-to shelter or under the tree canopy in very cold or arctic conditions. Last weekend I came across an excellent post on making a large full length Rakovalkea Gap Fire by SKW Bushcraft(I used Google Chrome to translate the page).
Where it all began
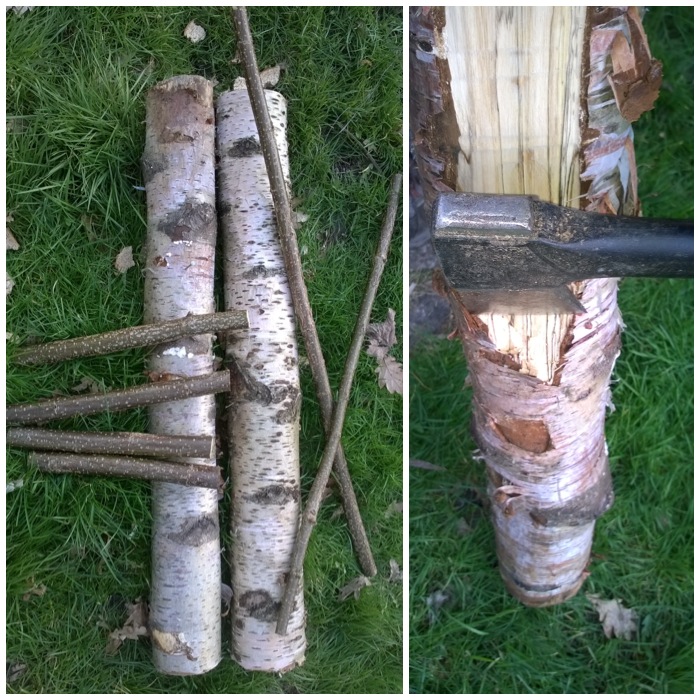
While out last weekend in the woods I came across some dead standing birch logs that looked ideal for the fire (normally pine is used but I do not have access to any at the moment), and luckily there were some handy, biddable children around to help transport it home.
Foraging
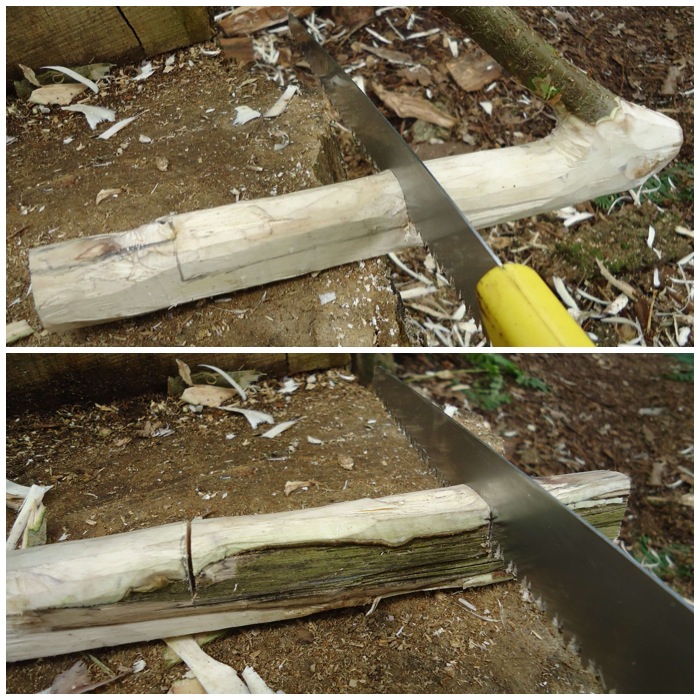
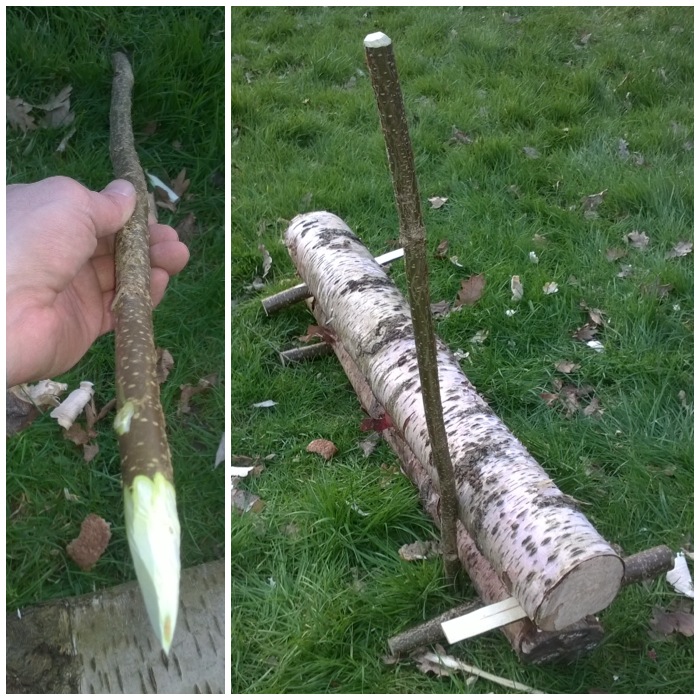
The component parts are two logs and various green sticks for supports and wedges. I flattened one of the logs in preparation for cutting out a groove in which to start the fire, keeping all the chippings for getting the fire going later. The log was not wet, exactly, but it was slightly damp owing to the heavy rain we have had recently. I could have left this experiment for the summer but thought that if I could get a damp log going then that would be a more realistic test for the UK environment. This type of fire is normally used in dry arctic environments where dead standing pines are abundant.
Component parts – Create a flat surface on one log
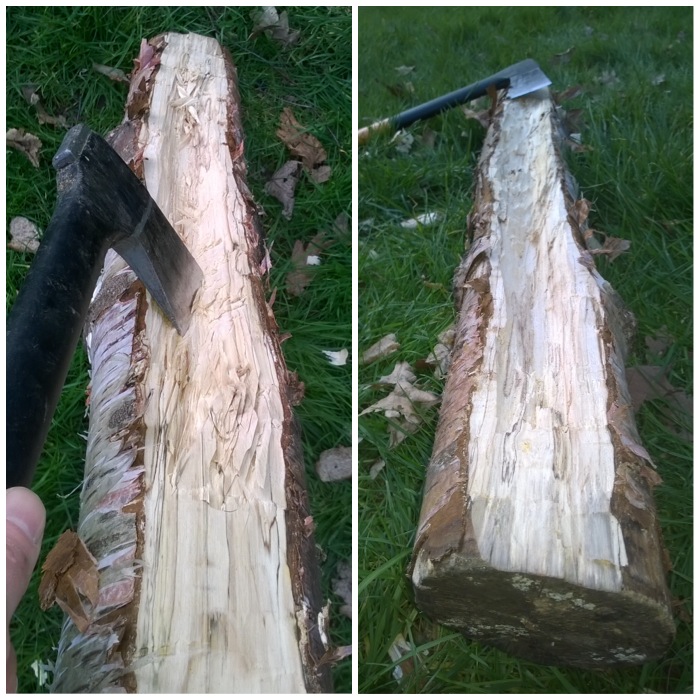
Once the log was flattened I carved out the channel. This is the dangerous bit, so cut the channel out with small cuts and with the log on the ground or well off to your side. I left flattened areas off to the sides but on reflection I think I should have made the channel the full length to maximize airflow.
Axe out a channel
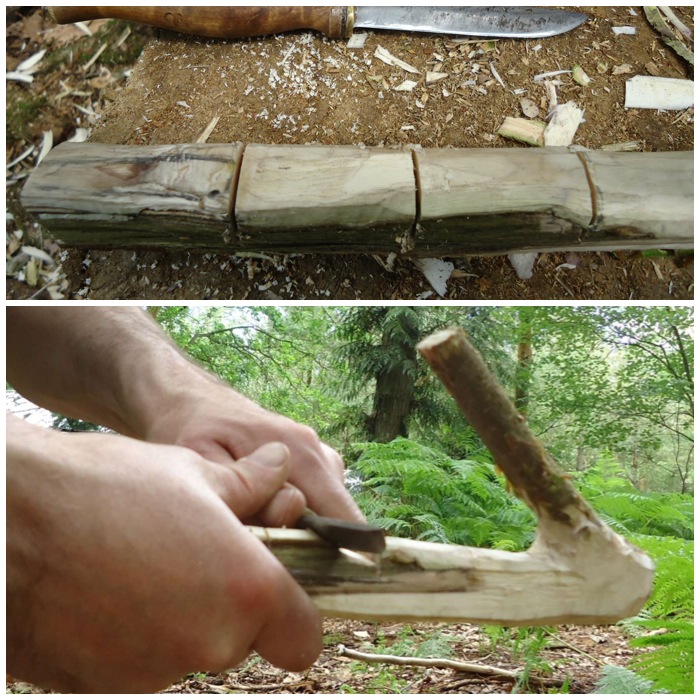
On the underside of the log with the channel I axed out two grooves for the support poles.
Under the log with the channel axe out a groove at each end
The support poles help to stop the log from rolling off to one side. I think if they were big enough they must help when the log is resting on snow to keep it secure.
Bottom log set up
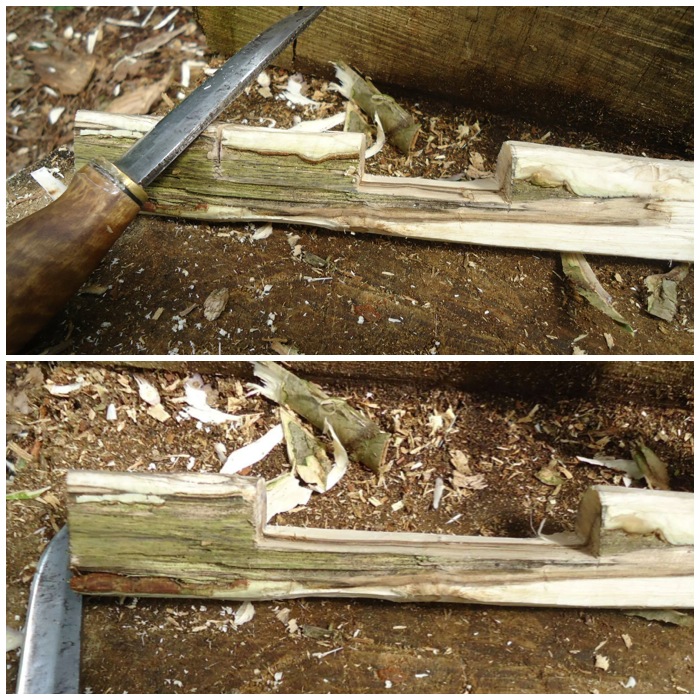
On the log that I was going to place on top I just flattened one side of it so it would rest securely on top of the bottom log. Again, on reflection, as the log was damp I should have made multiple cuts in this area with my axe to increase the surface area of the log and let the flames catch hold better. I came across this method when researching the Raappanan tuli candle.
Flatten out along a section of the top log
I carved two wedges that were to be used to vary the gap height between the two logs. These also proved useful as tongs later.
Green wood wedges for adjusting height
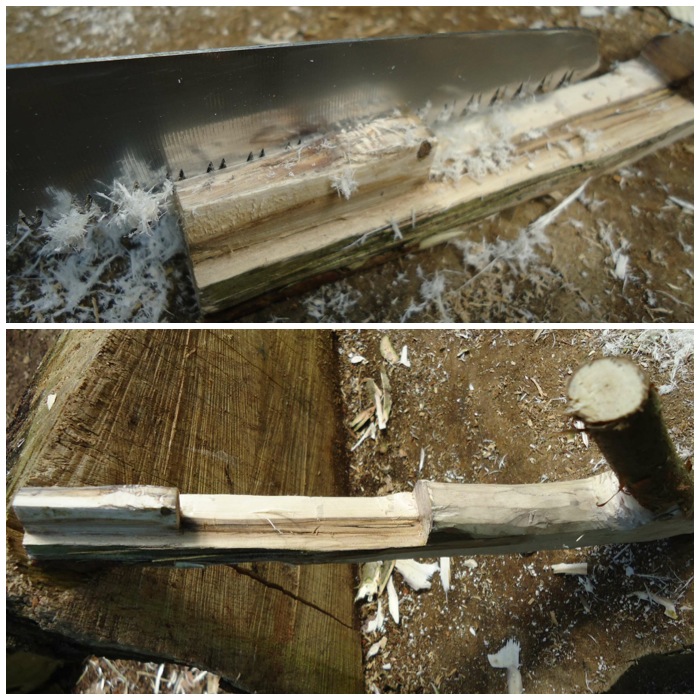
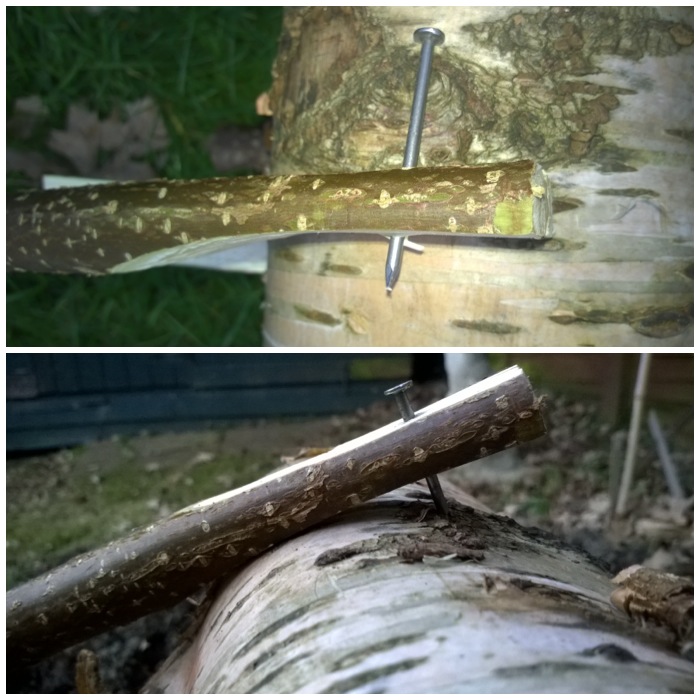
On one of the poles of green wood I carved a point and dug it into the ground beside the set up as support. I made this extra long as I was setting this up on soft earth (on the potato bed my wife had just dug over, in fact, but as it’s not been planted yet no potatoes were harmed in the making of this fire, and as I keep telling her ash is good for the soil).
One sharpened pole for support
I slimmed down the end of another green stick and hammered a nail into it. One end of the stick is dug into the ground and nailed into the top log (diagonally opposite to the vertically upright green pole)
Nail pole support
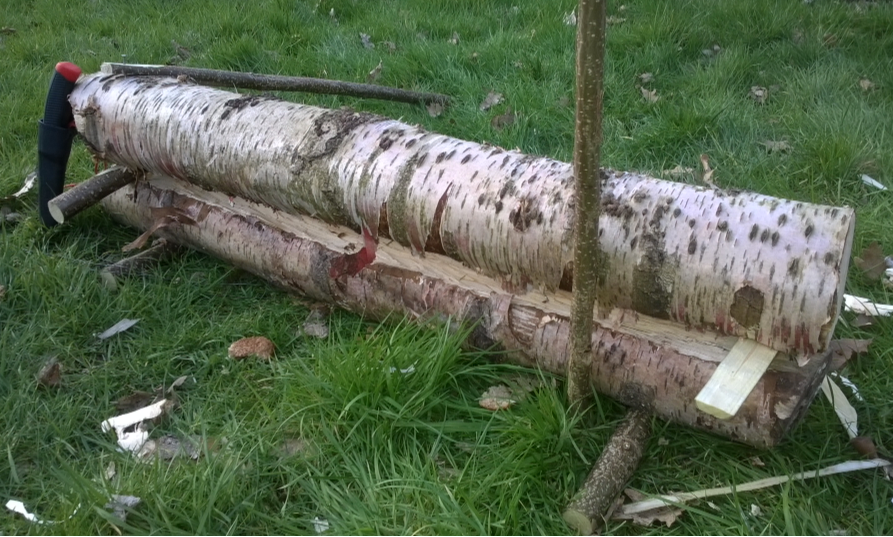
This is the basic set up without any tinders in the middle. All in all (not including foraging the wood) this set up took me about 15 minutes to do. I have read that with the much larger set ups (full body length) someone with good axe skills can set one up in an hour or so.
Basic set up without tinder
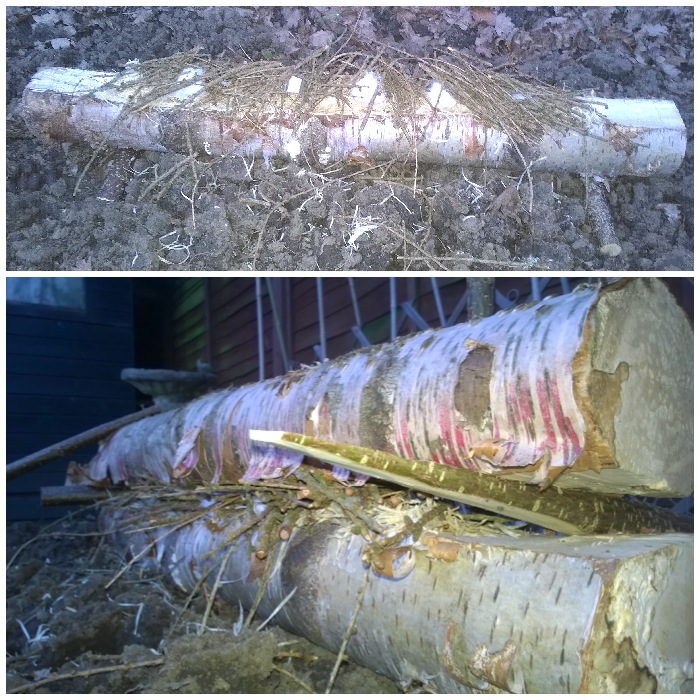
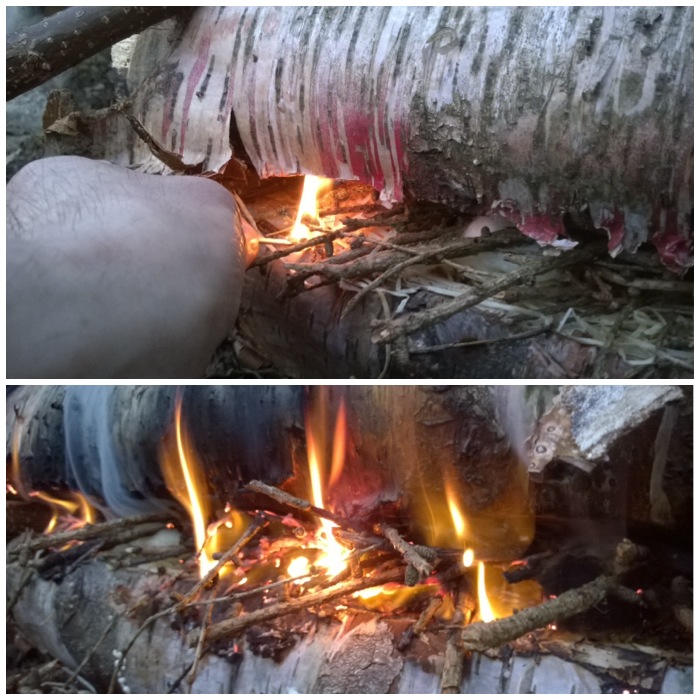
To get the fire going I used a mixture of waxed wood shavings, cotton wool balls smeared in Vaseline, and a lot of dry larch twigs. I did try and find some pine or spruce resin but to no avail. Resin is traditionally used along with pine fat wood.
Filled with tinders
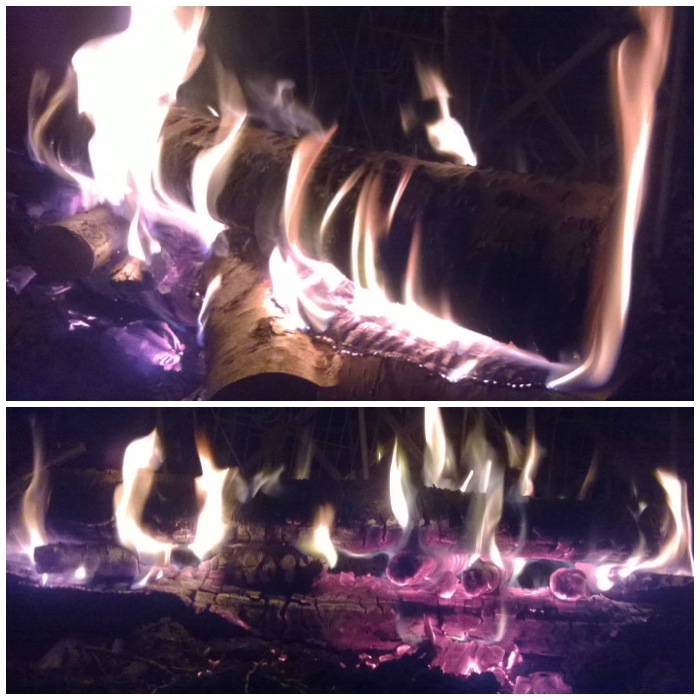
I lit the whole thing with just a couple of matches and in a few seconds the whole set up was alight.
Firing up
It was lovely to see the flames spread so quickly and on both sides.
Initial burn
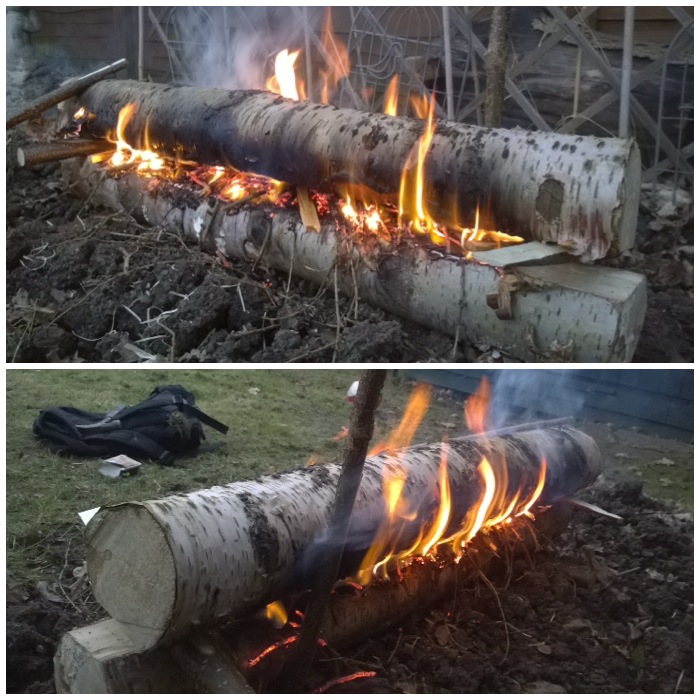
After about 5 minutes I started to add lots of pine kindling along the whole length. There was no wind so I had a small plastic plate to use as a wafter. The wooden wedges really came into their own as they allowed me to adjust the height of the gap so as to insert the kindling.
I tested the heat (with the back of my fingers) along the full length of the set up and it felt very uniform along its full length.
Adding small kindling
For the next hour I just kept giving the fire the occasional waft and added more and more kindling. I made a short video (the sound is quite poor I am afraid) of the fire at this stage.
Main logs starting to go
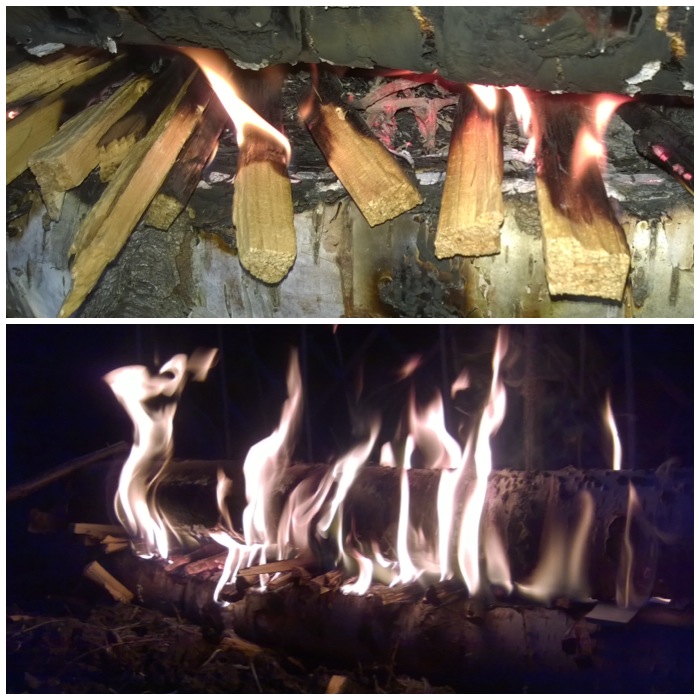
After I had used up the kindling the gap had widened a fair bit between the logs so I did not need to use the green wood wedges anymore. I used the wedges after this to insert larger pieces of wood into the gap along the length of the fire. This greatly helped combating the dampness in the main logs. I had to use the wedges as tongs at this stage as the heat was quite fierce.
Adding larger pieces of wood
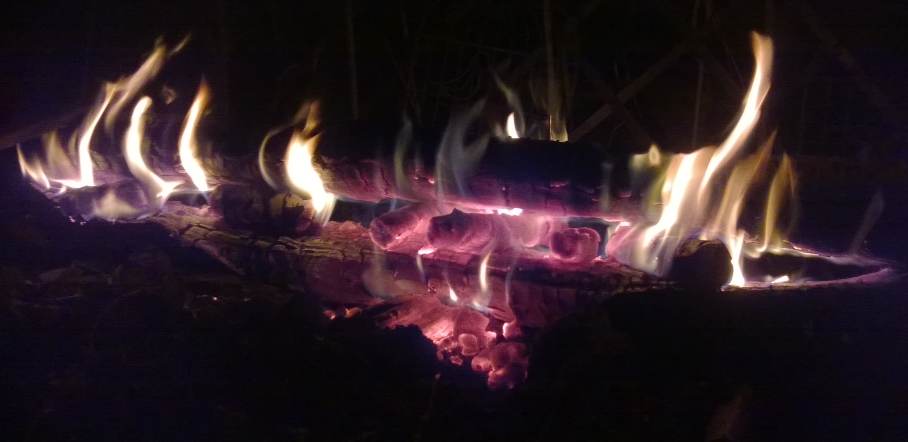
After two hours the bottom log was alight quite nicely and if I was sitting in front of this in the woods I would have been toasty warm. In comparison to a traditional set up I would normally use (criss cross lay for example) I needed to use very little wood to feed the gap.
Final flames
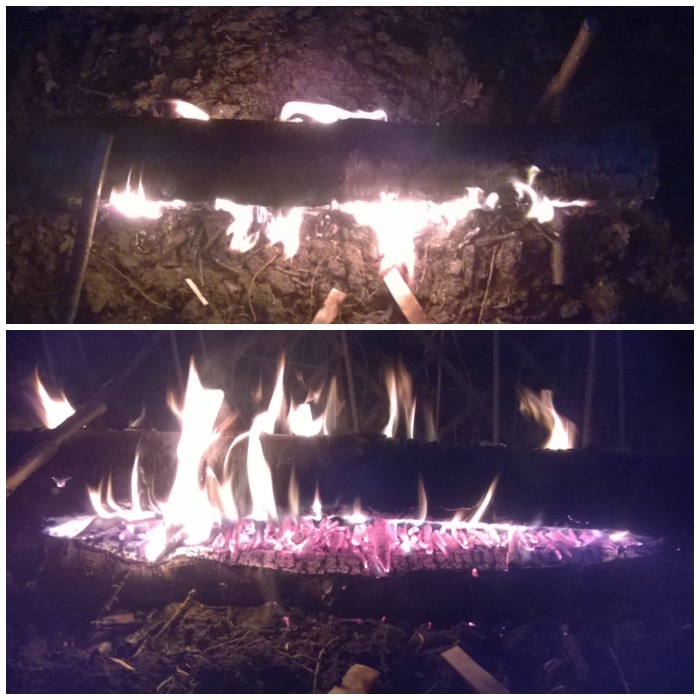
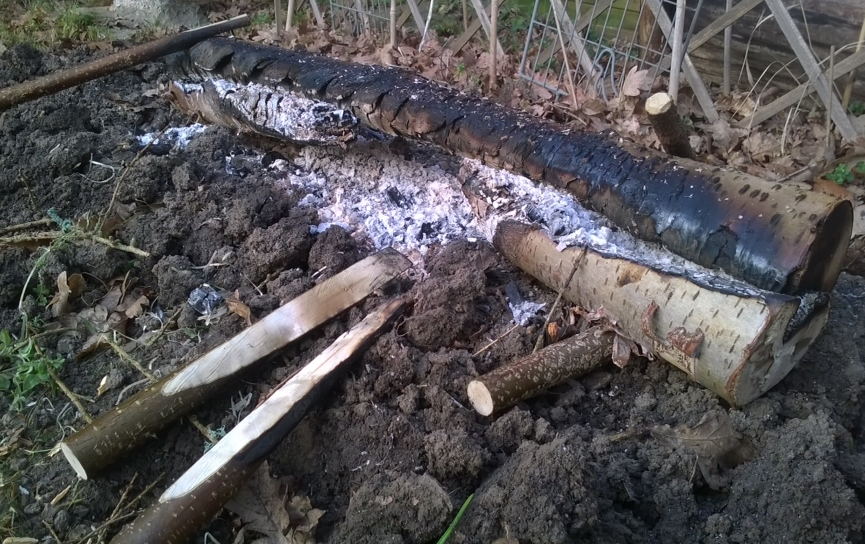
In the morning I found that the bottom log had burned through where I had placed the last of my small logs (I concentrated them on the centre section).
The next day
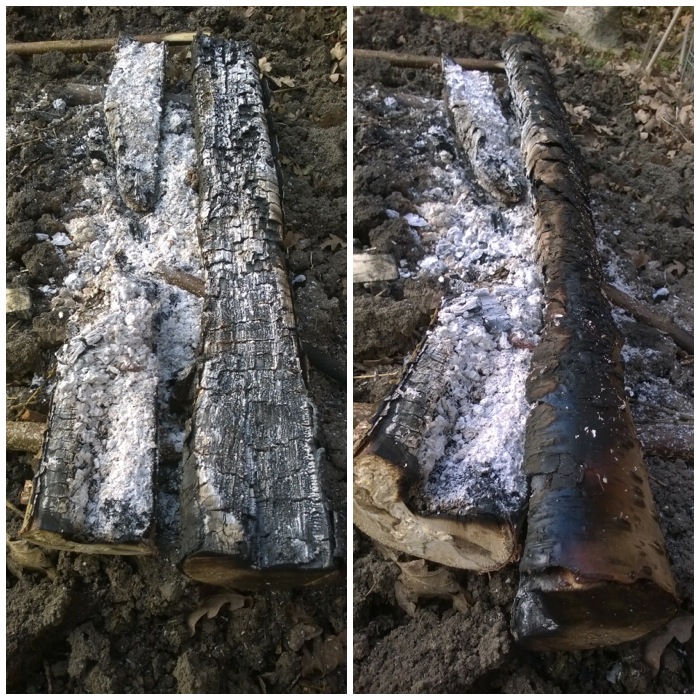
The top log due to its dampness had still not burnt through after all that heat but I was very impressed with this set up.
Top log too damp to burn through
I am looking forward to later in the year when I can try this again but with larger pine logs and one day soon sleeping out in a lean-to shelter in an arctic environment with one of these fires to keep me warm.
There are some excellent long log fire pictures here on the Bushcraft UK forum to view and the Winter Trekking forum shows some good pictures of the Finnish army using the method.
Best to learn the tricks of campcraft here so that when you are sorting your life out on that wet and windy morning in Brecon – life is a breeze.
This post documents the last of my courses with the Sea Cadets for 2013 and one of the first of 2014. It was a very good year (2013) for expeditioning in the Corps as far as I was concerned. Some of our cadets will eventually find themselves climbing mountains in the Alps and great fun they will have too, but they have to start somewhere before this high-level work can happen
In November last year and in February of this year I helped run two Northern District (London Area Sea Cadets) Basic Campcraft weekends. These weekends are designed to introduce the cadets in a constructive but fun way to the skills they will need to develop to reach their higher goals – be that completing a Gold Duke of Edinburgh’s expedition or climbing in the Alps.
Basic Campcraft with the Sea Cadets
The areas we cover in the course are:
Providing shelter
Food and Cooking
Packing and carrying equipment
Safeguarding health and well-being
Recognising suitable clothing and equipment
Navigation skills
Safeguarding the environment and countryside
Planning and preparation
The pictures in this post come from both courses to show all the activities the cadets undertake. Some of the cadets who come on this introductory course have never camped in their lives. Most are city kids who have had little chance to get out and about into the woods and hills so the pace is taken gently as we slowly expand their comfort zones.
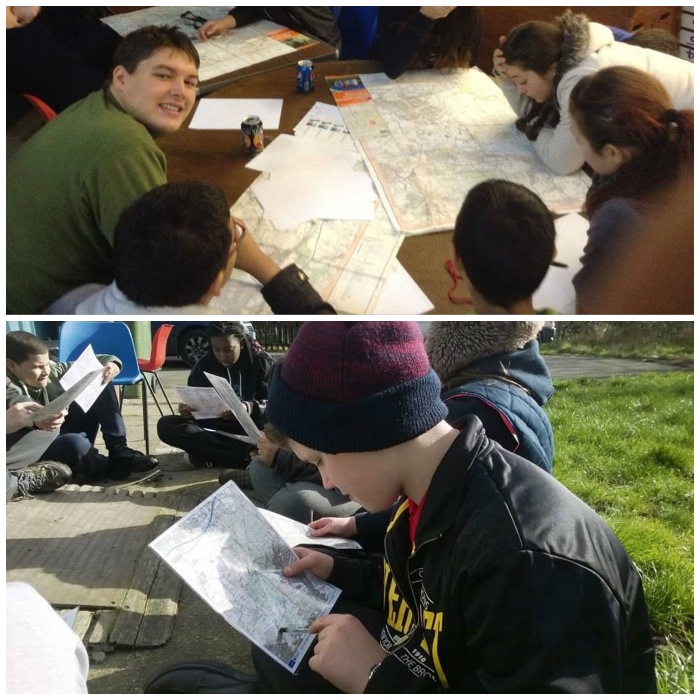
After introductions, discussions on safety and a kit check it is time to start learning how to read a map properly. I find it best if the cadets start to read maps like a book, and the only way to do that is to understand the symbols. Everything else such as scale, slope aspect and compass use comes later.
Learning how to use a map
We get out and about as soon as possible but will vary the timings depending on the weather. On the left below is Chief Petty Officer Dave Lewis, who is as keen as I am in getting the cadets adventuring. On the February course Dave and I took a step back to let one of the younger instructors, Emma Deasy, run the course. We were there for safety, to add extra detail when required and to assess Emma for her Adventure Leader qualification. This is an in-house Sea Cadet qualification but is a first step towards gaining the nationally recognised Basic Expedition Leader Award.
While Emma briefed the cadets (picture on the right) Dave and myself watched from on high.
Getting out there
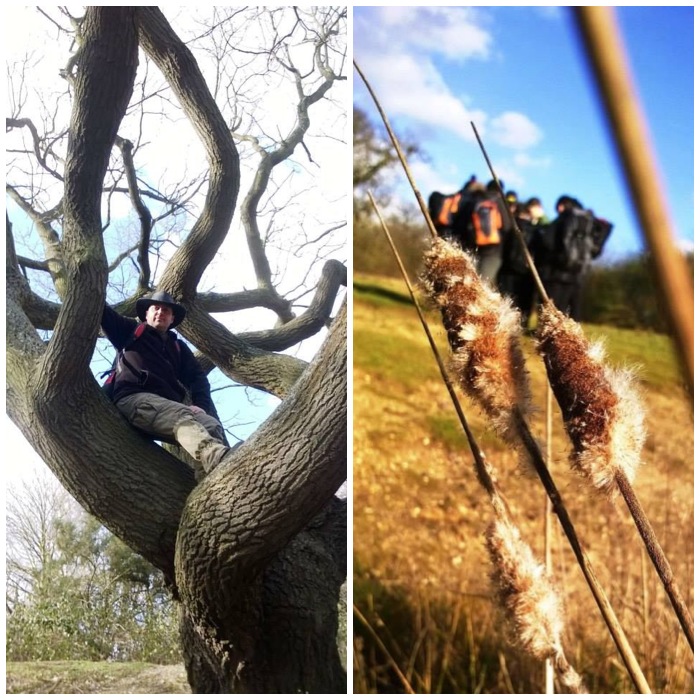
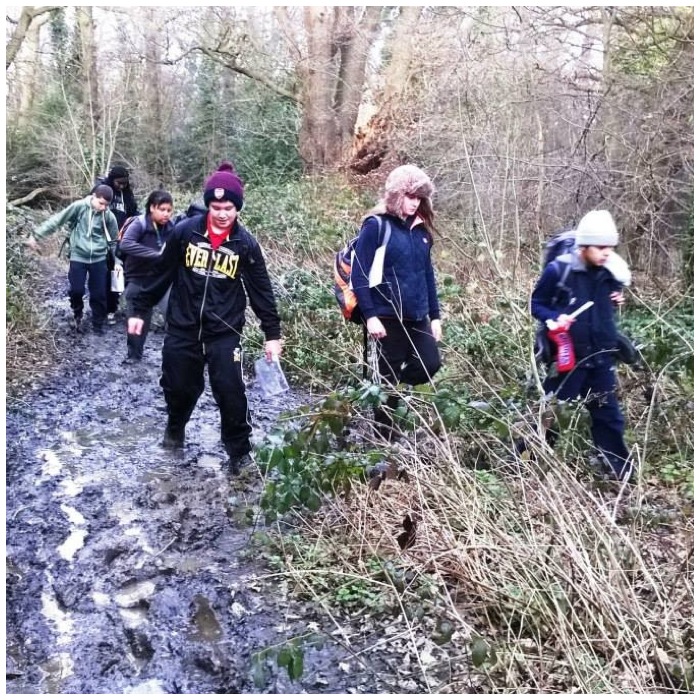
The cadets are not expected to lead the navigation at this level but just get used to using a map and to start to get an understanding of how it relates to the real world. In between all this learning it is always good to find some mud.
Finding muddy trails
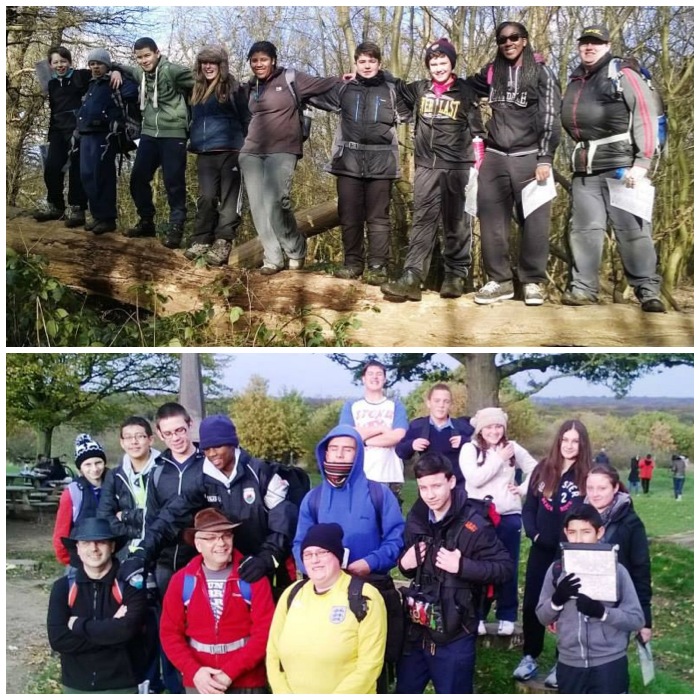
These are the two groups we had, the top picture from February this year and the bottom picture from November last year. Pictured in the bottom picture in the red jacket is Lt (SCC) Keith Coleman RNR. Keith like Dave is a great friend of mine; I didn’t know at that time that this was to be the last Sea Cadet course I would work with Keith.
The cadets and staff
I had to get this picture in as I always like to take my EDC hammock chair with me on trips. Sometimes I get a rest, more often the cadets nick it. The trip in February was hard for me as I forgot to take it with me – poor skills on my part.
Time for a brew
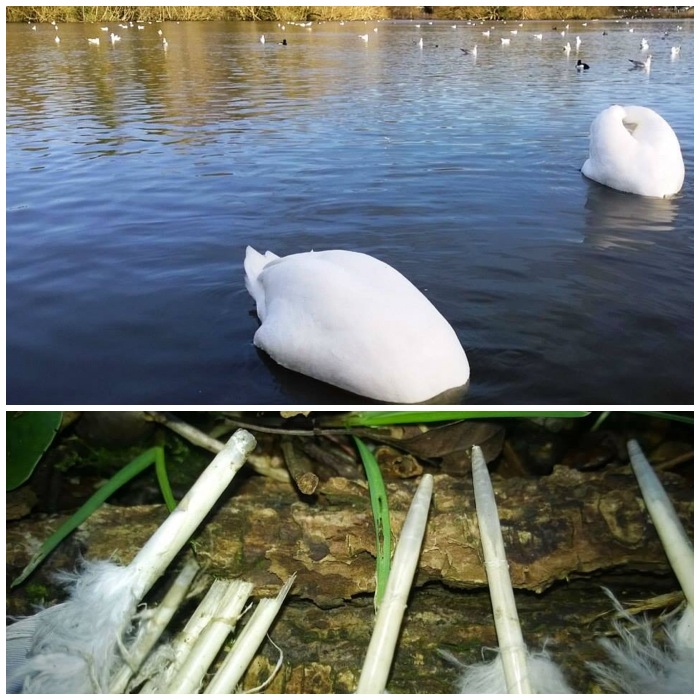
It is not all navigation: it’s good to get close to nature too – be that alive or dead. The bottom picture shows some wood pigeon feathers found by one of the cadets. After some initial hesitation the cadets got up close to investigate them. On close viewing you can see the blunt bite marks typical of a fox but some of the quills have the single score line on them typical of a bird of prey. I am no expert in tracking or hunting but it’s clear there is a story to tell here and it is great for the cadets to see this and start to open their own eyes and mind to what is happening all around them.
Watching nature
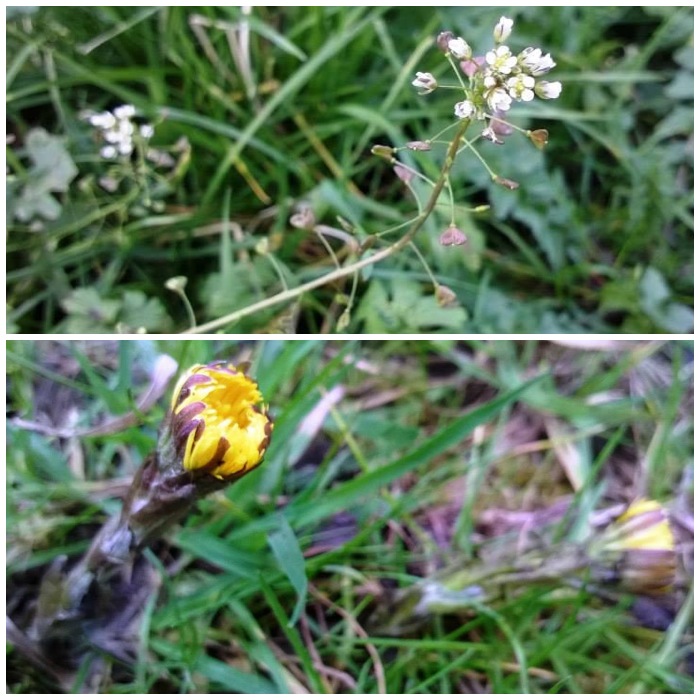
Along the way we teach the cadets about the plants that are in season at that time and they are then expected to start to look for more of them along the way. I don’t expect the cadets to remember all the names, just to start noticing them more.
Plant ID – Shepherds Purse and Coltsfoot (taken in February)
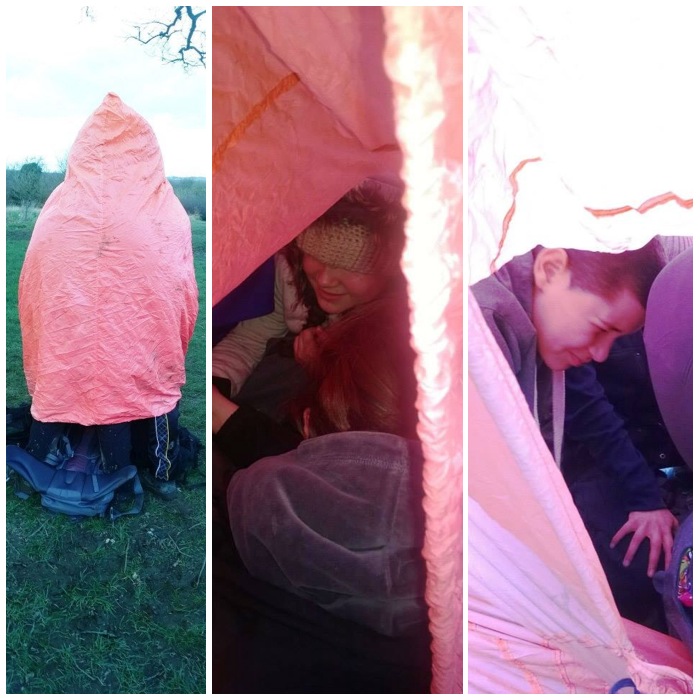
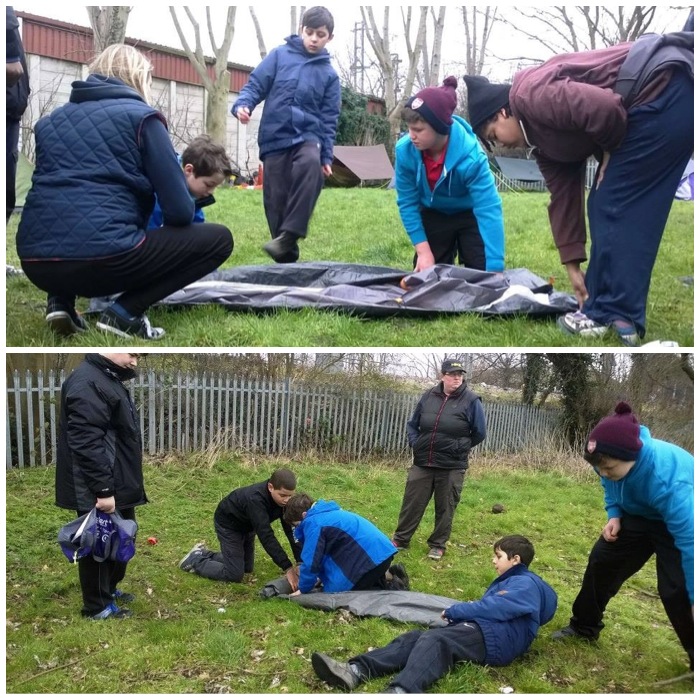
No introduction to campcraft would be complete without trying out an emergency bothy. Most instructors will carry one of these whether they are on the hills or just wandering around the woods. I have used these for real on a couple of occasions in high winds and rain on mountains. When you get inside as a group the bothy traps warm air so that the temperature rises quickly. They are not waterproof but do cut out the wind and can make all the difference.
For the cadets it is a fun if squashed couple of minutes.
An intro to the emergency bothy
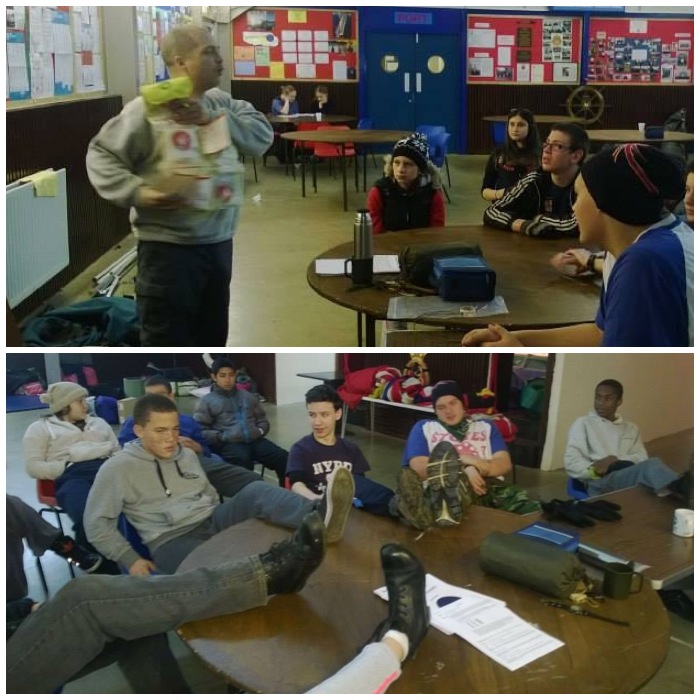
These two courses were run at the Waltham Forset Sea Cadet Unit in North London. As we had access to the main building we ran some of the classes indoors (some other courses are based solely outdoors). As I said at the beginning, this course is about an introduction to campcraft where we slowly expand the cadets’ comfort zones.
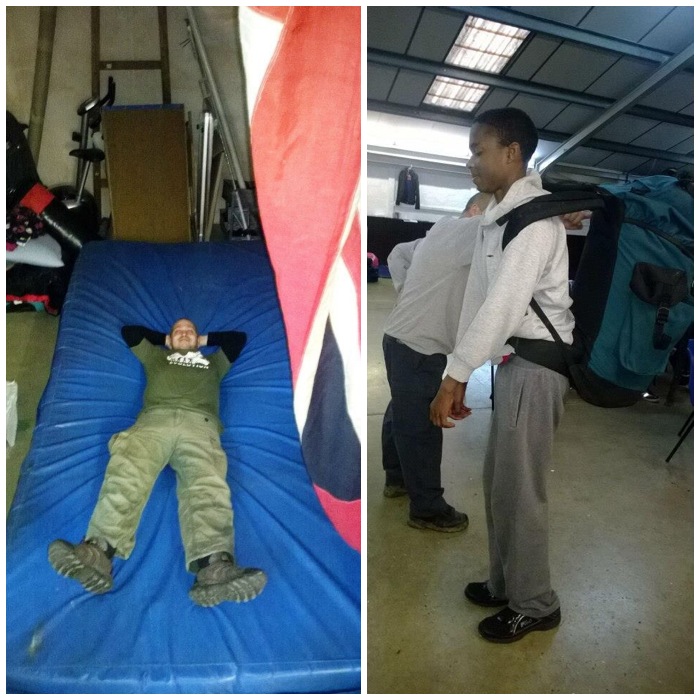
Speaking of comfort zones, as you can see (below left) Dave has mastered the art of getting comfortable no matter where he finds himself. In the picture on the right the cadets are being taught what to look out for when buying or using a rucksack.
Indoor breaks and classes on kit
Next up were classes on First Aid kits and footwear. You can see that not all the cadets fully appreciate the need to wear walking boots at this stage and some do turn up in trainers thinking they will be OK. On both weekends there were a few cadets with wet feet.
First Aid and footwear
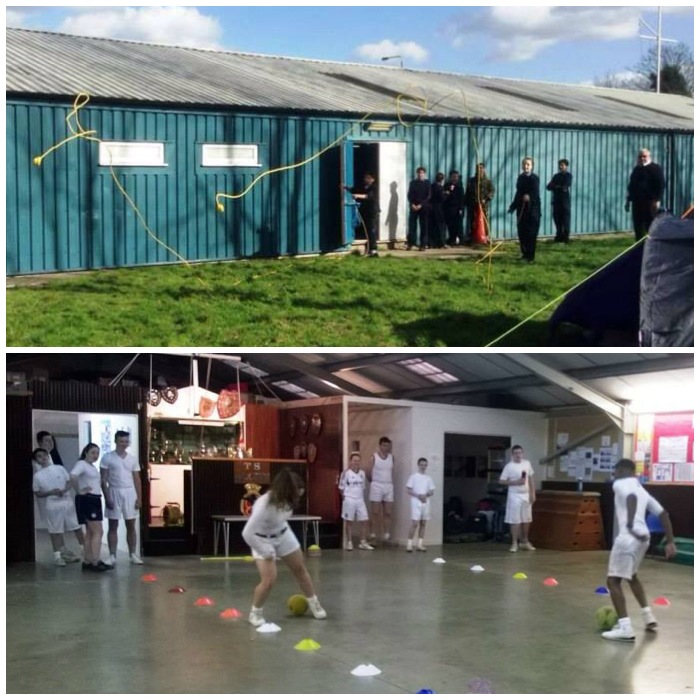
While we were running about doing this adventure training stuff there were other courses being run out of the unit, including Seamanship, Communications and Physical Training (PT).
In the pictures below you can see cadets learning how to throw a heaving line properly and taking part in games on the PT course.
Other courses – Seamanship and PT
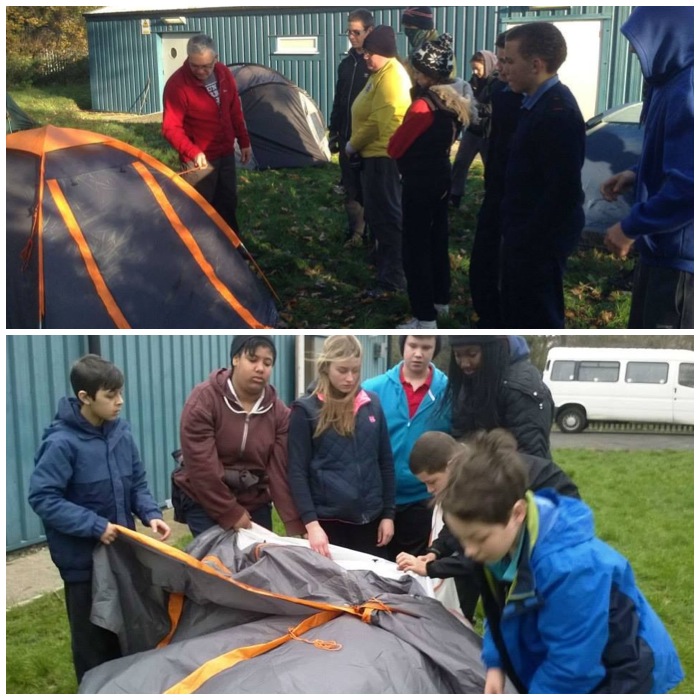
Usually when the cadets turn up on the Friday evening the staff have to help them set their tents up. A few bring their own but most cadets are given a tent to use by their own Sea Cadet unit. Most of them won’t have set a tent up before and some will never have slept outdoors in their lives.
On the Saturday we normally have a class on the different types of tents you can buy and how to erect them. Here Keith is leading the class and once he had shown them the basics it was over to the cadets to have a go.
Setting up tents
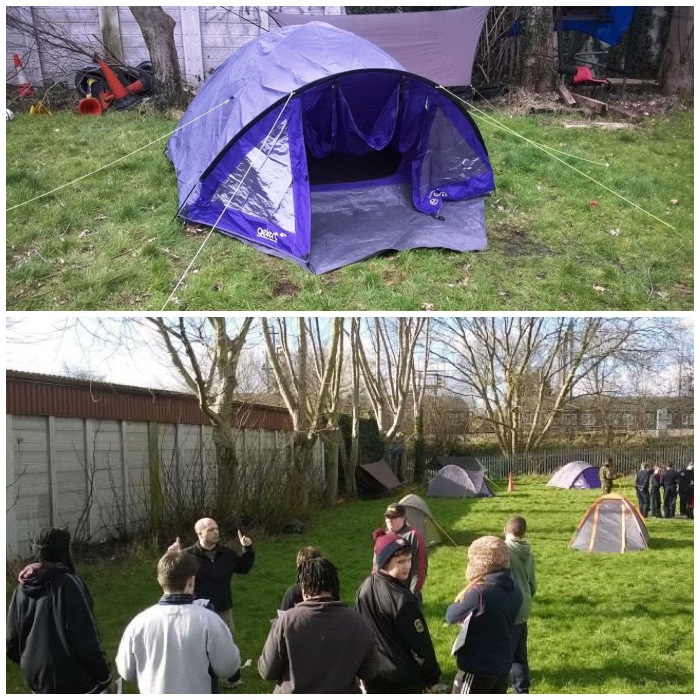
Sometimes things go pop in more ways than one. In the top picture the cadets have failed to secure the pole over the entrance; in the bottom picture the pole had actually snapped. In the former case the pole is easy to re-position but with a snapped pole a little bit of imagination, a tent peg and some duct tape are essential. Everyone got a good night’s sleep in the end.
Dealing with problems
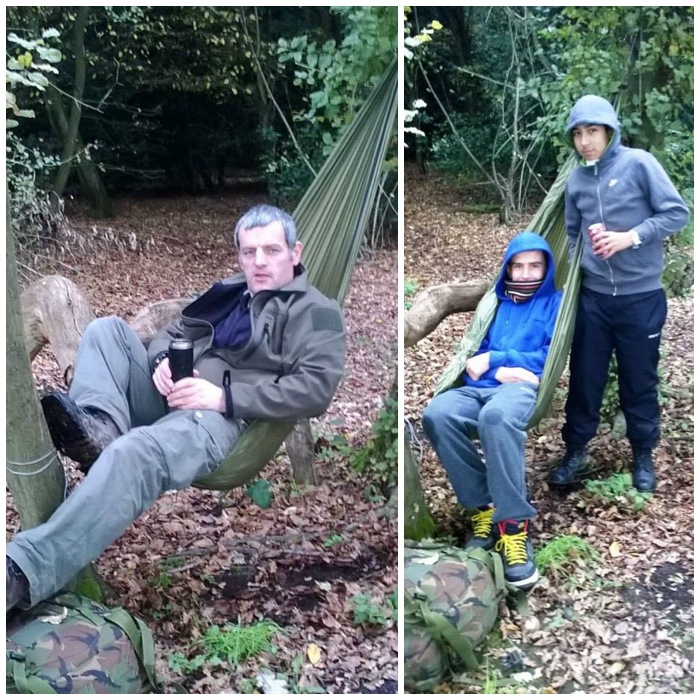
Eventually the tents were all up properly. The staff hammocks and tarps are right at the back. I do not usually let cadets on this course sleep in hammocks, but when they advance to other courses they will be offered the chance to do this. Here the cadets get to see what hammocks are all about and to try one out if they wish. I like to see the cadets using hammocks as they do have a real historical association with the sea.
Getting it right
In the evening wherever we are running this course I do try and have a camp fire lit. I remember as a young lad what camping meant to me – sitting around the fire in the evening eating toasted marshmallows (yes they were around then).
Evening fire
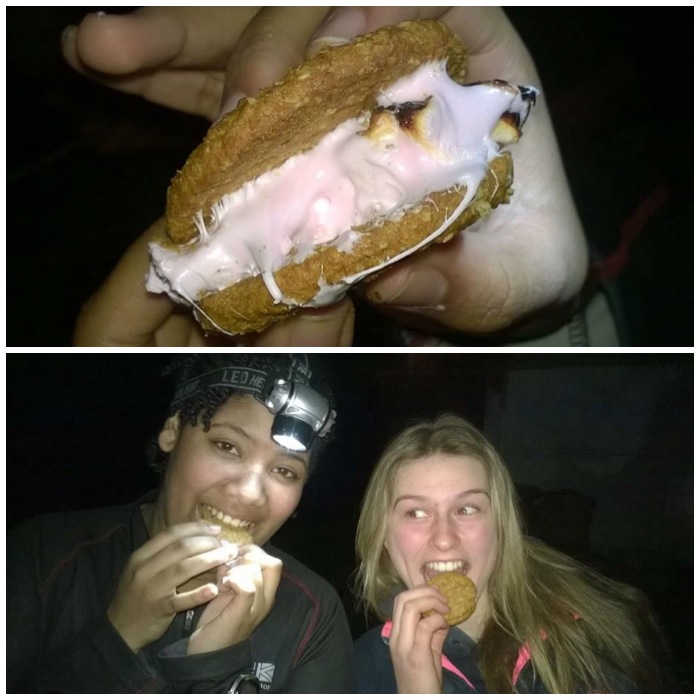
We do not cook food over the open fire on this course as it is not on the syllabus but it is our tradition now to have Shmores whenever possible.
Time for marshmallows
A Shmore is a toasted marshmallow or two inside a couple of biscuits. Why some people find this unappealing (Dave) I will never know.
Who could resist a Shmore
The cadets do have to cook a meal for themselves on the course so need to be introduced to some different types of stoves. After some safety tips and basic tuition it is over to them to have a go under close observation.
Learning how to use stoves
We try to keep the cooking simple with foodstuffs such as pasta, beans or even just boil-in-the-bag ration pack food. Dave though takes a strong dislike to seeing the inevitable pot noodle rear its head out of some cadet’s rucksack. Have a guess who the culprit is on the right? Although pot noodles are quick to heat up with boiling water they generally have only about 300 calories in them, not enough to keep a cadet going on these weekends.
Trying it out for themselves and some less-than-desirable food
Put the tents up – then learn to put them away properly as a team. It is easy to do in this controlled environment when the weather is dry and there is little wind; it is a bit more challenging on the side of a hill in Brecon on a wet and windy morning.
Best to learn the tricks of campcraft here so that when you are sorting your life out on that wet and windy morning in Brecon – life is a breeze.
Packing away properly
There were many more classes including different types of clothing to wear, first aid scenarios, planning, the countryside code and packing kit that the cadets have to cover.
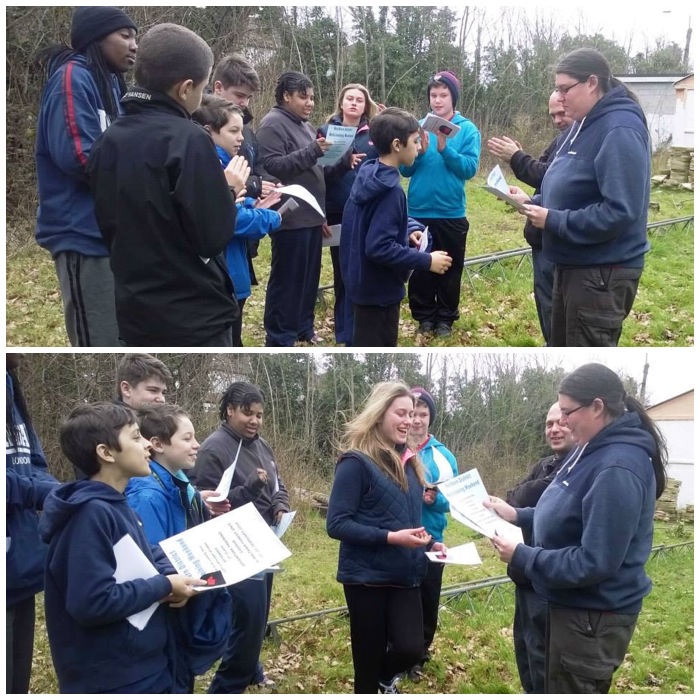
At the end of the course all the cadets receive their certificate and basic campcraft badge. For some this is as far as they will go with camping but for most I will see them again on more advanced courses leading them into the mountains and the world of bushcraft.
The Awards
These two courses were an end of an era for Keith and the beginning of a new era for Emma.
Emma managed to pass her Adventure Leader assessment after working hard towards it over the last few years. This qualification is not easy to attain due to the complexities of all the different situations you can find yourself facing – so welcome to the team Emma and well done.
Keith has now left the Sea Cadets but it was always a pleasure working with him. Keith is a good friend and we will work again on other courses, in particular bushcraft courses, as that is where his heart truly lies. As well as being an excellent Adventure Leader Keith is a great organiser – Dave, that leaves you and me to do the paperwork now 🙂
The second bow I ever carved was a Holmegaard-style bow made out of ash. The bow on which I based my replica was found in a peat bog in the Holmegaard area of Denmark in the 1940s and is thought to be over 9000 years old. I made this bow while studying at John Rhyder’s Woodcraft School doing a Primitive Technology course. The wood that was available to us at the time for bowmaking was ash but the original bow found in Holmegaard was made of elm. The bow is a mixture of styles with the limbs that have a flatbow shape for half their length and ‘D’ sectioned like a longbow on the limb tips.
The Holmegaard
I really like this bow as it is very light in terms of draw weight but fast and whippy when it shoots owing to its ‘D’ sectioned tips. I have included in my previous post on Carving an Ash Flatbow explanations on different bow terminology and the differences between flatbows and longbows. Below are the rough dimensions I made my bow to – I tried to replicate the dimensions of the original bow as much as possible.
Holmegaard dimensions
An ash tree had recently been felled and a section of the trunk cut down to just over 6 foot. I scored a line in the bark with a wedge down to the wood to help with guiding the split of the log. Note that the wedge is positioned to one side of the person scoring the line. This maintains a safe position for the worker. I then drove a wedge into the scored line to start the split at one end of the log (upper wedge in the top right picture). A second wedge was driven in at the base of the log to further split the log (lower wedge). Putting in the second wedge loosened the first wedge so I pulled it out and drove it in further down the line to widen the split.
Start of split
I just kept repeating this process of ‘leap frogging’ the wedges, and the scored line helped greatly with controlling the direction of the split.
First complete split
Once the log had been split I kept repeating the process again and again until all the staves were split out.
Finished staves
Using a wooden wedge I shaved off the bark of the stave. I was very careful to remove only the outer and inner bark and not to touch any of the wood. The wood found just under the bark is the most flexible part of the bow and will form the back of the bow. Apart from light sanding this area of the bow will not be touched.
De-barking with a wedge
This is the side profile of the stave (top picture). The side profile has been roughly drawn out leaving plenty of room for error. A close up of the handle area can be seen in the bottom picture and the vertical lines are for the stop cuts.
Side profile
These stop cuts help greatly when getting rid of the excess wood. As the excess wood is cut out, the stop cuts prevent splits from travelling down the length of the bow. The top picture shows the area around the handle ready to be cut out and the bottom picture shows one of the limbs ready for work.
Stop cuts
Some of the tools that are used to take off the excess wood: the axe for the start of the process and a knife and batton to finish it off.
Tools for initial shaping
Keeping the stave off to one side of me and resting on a log, I trimmed the excess wood off. As the stave was off to one side I was in a safe position to work with the axe. If the axe had slipped its follow-through path would have been to my side.
Axing out
The tool on the left is a draw knife and can be used to finely trim the bow shape. If you do not have a draw knife you can embed the tip of a knife into a piece of wood to act as a second handle and use it as a draw knife. If you choose this method make sure that the piece of wood is on a secure flat surface before pushing the tip into it – never hold the piece of wood in your hand while you do this.
Professional and impromptu draw knives
I clamped the bow securely to a workbench and then could easily start to use the draw knife. Here you can see the impromptu method in action; it works surprisingly well if your knife is sharp enough. It does not take long to work your way down to the line.
Using the draw knife
A lot of the time I braced the tip of the bow against my stomach as I removed the excess wood. As I worked towards the tip I repositioned the bow on the workbench so that it was held securely without needing to brace it. You can see the side profile of the bow emerging on the picture of the stave propped up against the tree on the right.
Side profile blanked out
The next stage was to mark out the top profile of the bow. I used a string to mark out a centre line down the length of the stave (picture on left). Then using my measurements (shown at the beginning) I marked out the shape of the bow (picture on right).
Marking out the top profile
The picture on the left is the handle area I drew out and the one on the right is of one of the limbs. Both now have stop cuts sawn in to help with chopping out the bow shape.
Stop cuts in place
I enlarged some of the stop cuts to make sure that no split would travel very far. I find that jamming one end of the bow against a tree helps with the axing-out process and that it can be done in a much more controlled, safe manner so that the axe blade can never swing into me. It’s important too to use the axe in a safe and controlled manner. In the bottom picture you can start to see the handle shape appearing.
Axing out the top profile
As well as taking off a lot of wood quickly, the draw knife method is useful for taking off fine shavings as you get down close to the line.
Draw knife on the top profile
The top profile slowly started to appear as I finely carved the excess wood down to the line.
Top profile getting there
The draw knife was very easy to use as the angle of the limb changed from a Flatbow (near the handle) to a more ‘D’ shaped Longbow limb near the tips.
The Holmegaard shape is appearing
The ‘D’ sectioned shape of the tips soon started to appear. It was at this stage I decided to let the wood season for a month before doing any more work.
Limb tip needing trimming
I seasoned the wood for one week in my garage and for three weeks in a cool spot in my house. This allowed the wood to season enough to start the fine work. During this seasoning process I tied the bow into a frame to induce some reflex into it.
Tied back to keep the shape while drying
One month later it was time to finish the bow. I started work on the tips of the bow so that they would have more of a ‘D’ section shape to them. Making the tips smaller meant there would be less weight in them, allowing them to move forward faster when shooting an arrow. Using my knife as a draw knife I was able to finely carve the shape of the ‘D’ section on each limb. As the tip of the knife is firmly embedded into a piece of wood it is very safe to use and highly manoeuverable.
Fine draw knife work
On each tip I came right down to the line but not past it with the draw knife.
Limb tip finished
Up to this point I had tested the bow’s flexibility by floor-tillering it. This involves pushing down on the limb and checking to see if I was getting a nice curve or if there were areas of stiffness.
Lots of hand tillering
To take off excess wood from areas of stiffness I used a metal cabinet scraper. The scraper only takes off minute pieces of wood and is ideal for this part of the process. I carried on this process of scraping and floor tillering until I got a fairly good curve on both limbs.
Time for the cabinet scraper
Before using the tillering pole to finely check the curvature, I had to add knocks to the bow. Some Holmegaard bows have been found without knocks carved into them and it is thought that they may have had bone-tipped knocks added, or some sort of wrap on each limb as a knock. I decided as an experiment to make a knock from some material wrapped around the tips of the limbs. I first tried cordage made from western red cedar bark, but I found that this did not grip the wood firmly enough and kept slipping.
Failed cordage knocks
Next I tried rawhide, soaking it in hot water and then wrapping strips onto each end. This took about one and a half days to harden but allowed me to string the bow.
Successful sinew knocks
I coated the rawhide in pine pitch to waterproof it so it would not soften and slip if it got wet.
Rawhide knocks covered in pine pitch
I just used some strong nylon string at first as a bowstring before starting the tillering process, tying on one end of the string with an overhand loop and the other end with a timber hitch. The string was just tied loosely, with no brace height. This picture is from when making my ash flatbow but the principle was exactly the same. Dick Baugh wrote a good article on tillering on the Primitive Ways website that is worth a read.
Tillering string
I then placed the bow on the tiller and in increments slowly bent it to view the curve on each limb. The pictures are of the bow during the tillering process. After viewing it each time I would return to the workbench to scrape wood from areas of stiffness using the cabinet scraper or spoke shave. Also I would raise the brace height a little by shortening the bow string to see how the bow reacted under pressure when braced. This whole process ensures you get a good even curve on each limb and also trains the bow to bend properly.
Tillering followed by scraping
This picture was taken at the end of the tillering process with a 4 inch brace height: I was happy to take my first shot now.
Ready to shoot
Having seen a few bows in my time still fail (split) at this point, I only drew back on the string about two thirds of my normal draw length for this first shot.
First shot
I then set about making my proper bowstring, which consisted of a Flemish twist on one end, a timber hitch on the other and serving the bowstring. Two good sites on this are Sam Harper’s site Poor Folk Bows for the string making and the Archery Talk forum for serving the string.
Flemish twist and timber hitch
I used various grades of sandpaper to sand the bow down to get rid of any marks and sharp edges.
Hours of sanding
To protect the bow I stained the wood slightly. Then I applied a mixture of boiled linseed oil and white spirits (50/50 at first). After this had dried I reapplied more oil, but with less white spirits each time until by the end I was applying just oil.
Coats of linseed oil and white spirits
The next stage was to bone the wood by rubbing the whole bow with a small smooth pebble. This helps to close the fibres, making the bow very smooth, and also helps to lock in the oil. The whole process of boning can take a few hours but leaves a very smooth and shiny finish.
Boning with a pebble
Lastly I wrapped on a small leather handle secured with a little glue. I thought about stitching one on but felt the seams might be too uncomfortable when holding it.
Leather handle
The completed bow showing the belly, side profile and the back..
One bow I am very proud of
I am so glad that the rawhide knocks worked so well on this bow as they were something of an experiment. I don’t know if the size of the knocks slows the limbs down when shooting, but she does shoot fast.
This bow is particularly liked by youngsters as it is so easy to draw but still shoots fast. I managed to capture this arrow just after it had been released by the Holmegaard bow.