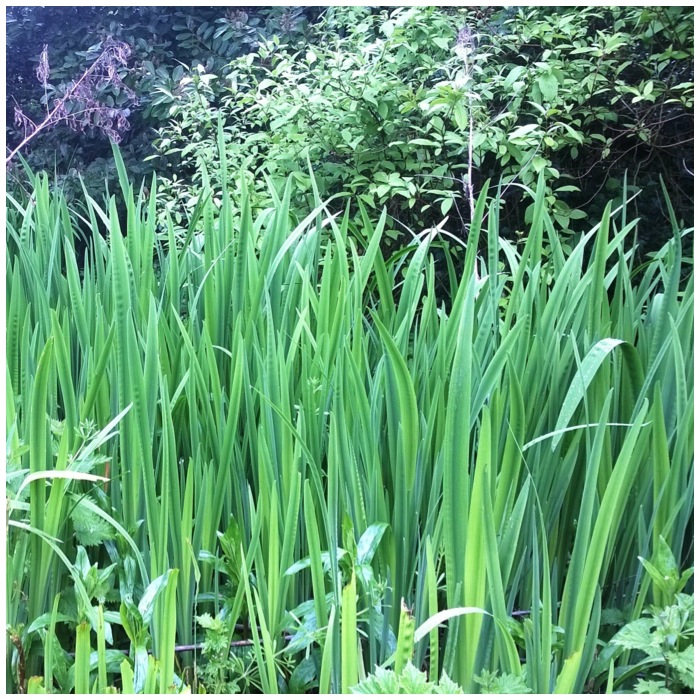
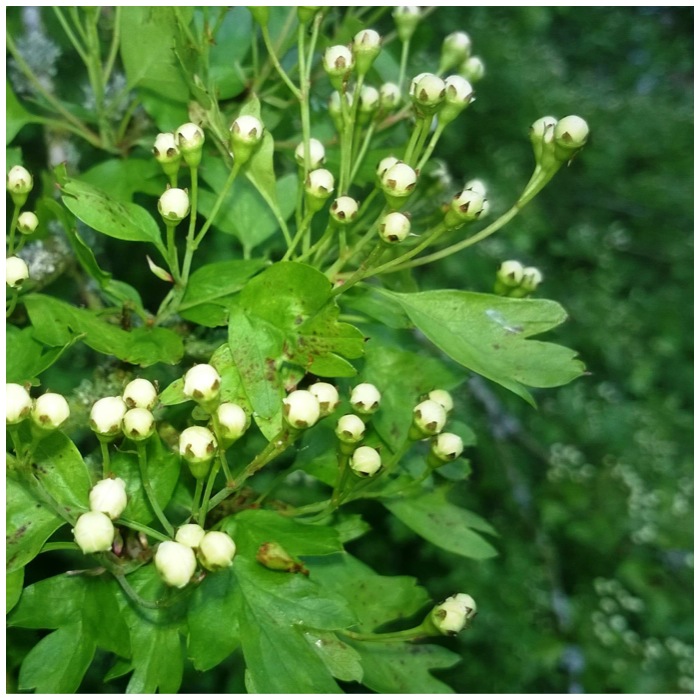
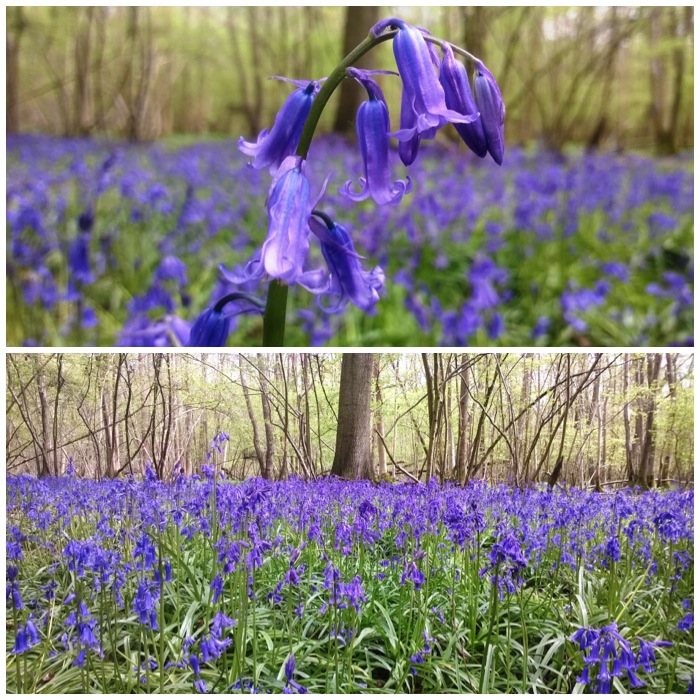
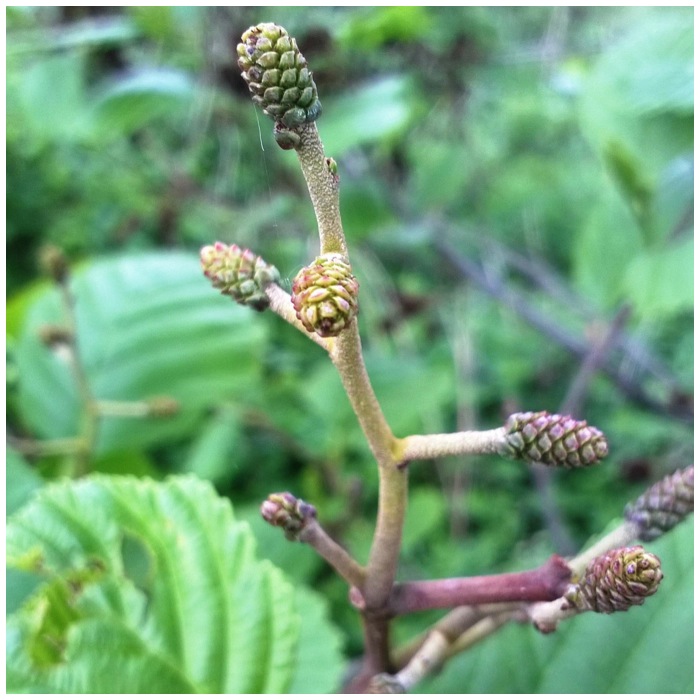
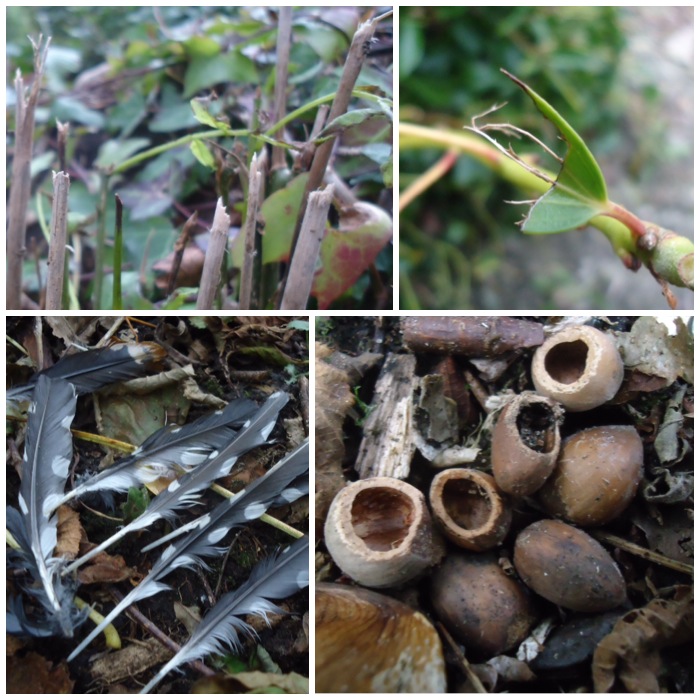
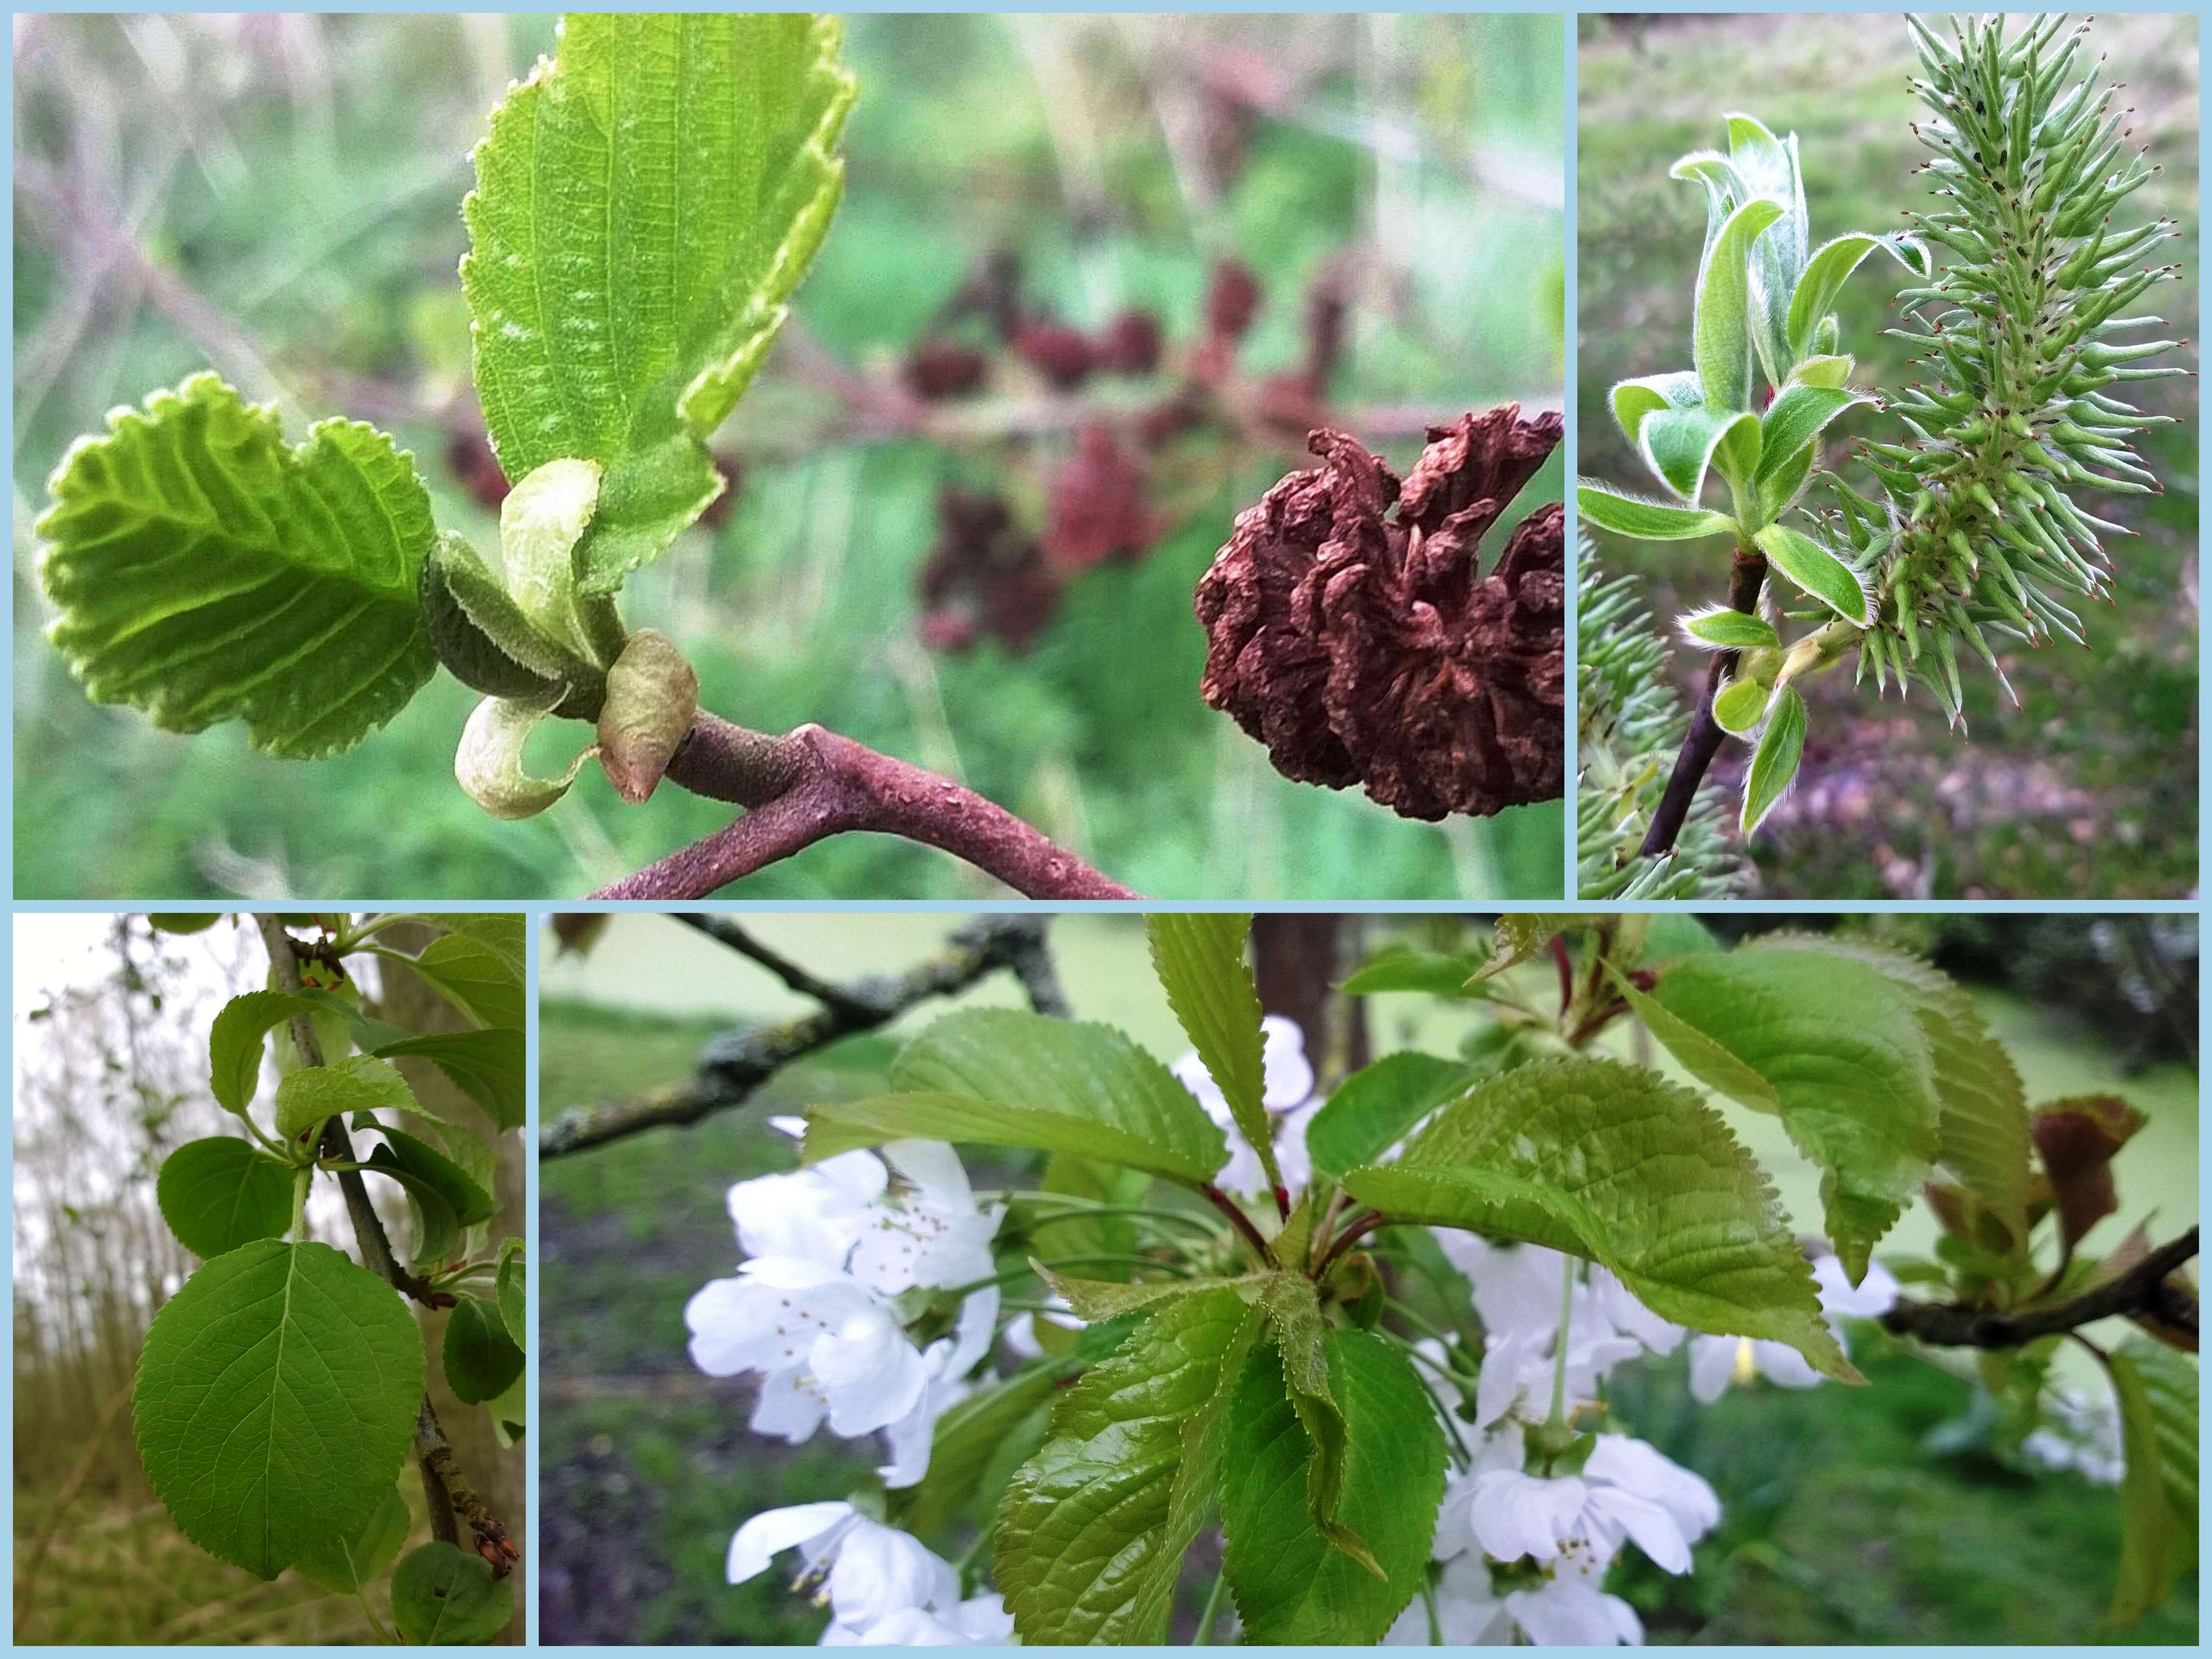
I managed to get out around Bramley this morning before all the rain came in and it was well worth the effort.
The bluebells are looking particularly impressive at the moment but if you look closely you will find so much more.
Here is a little taste of what I found this morning.
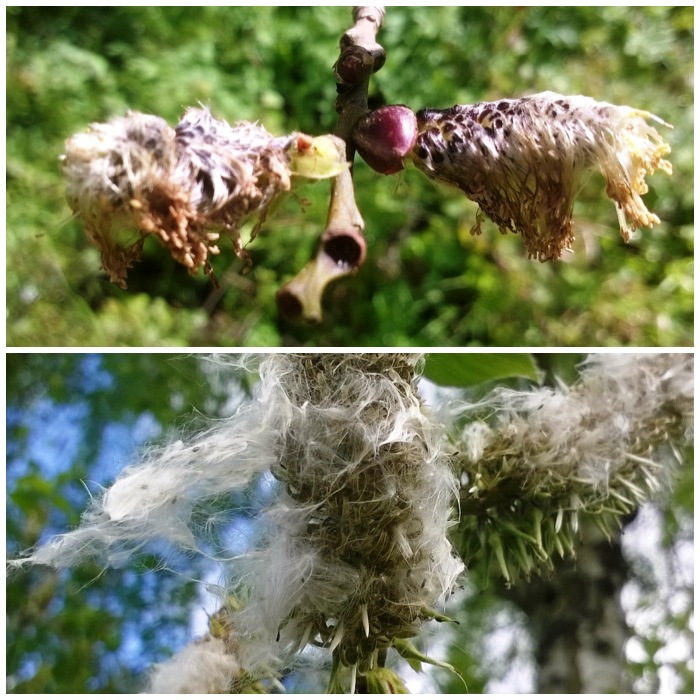
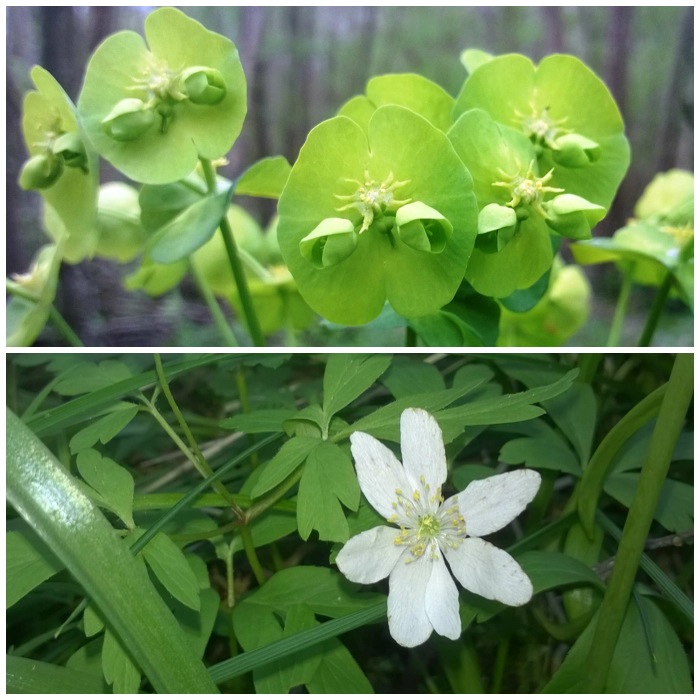
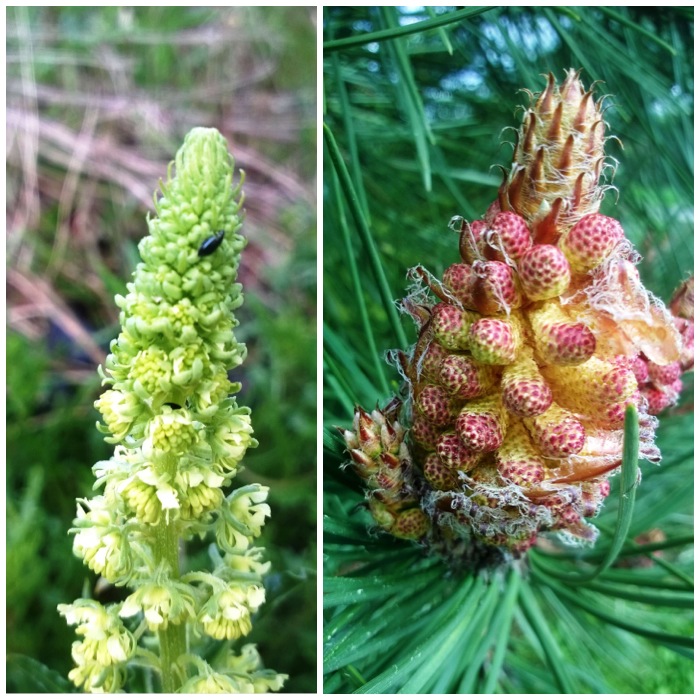
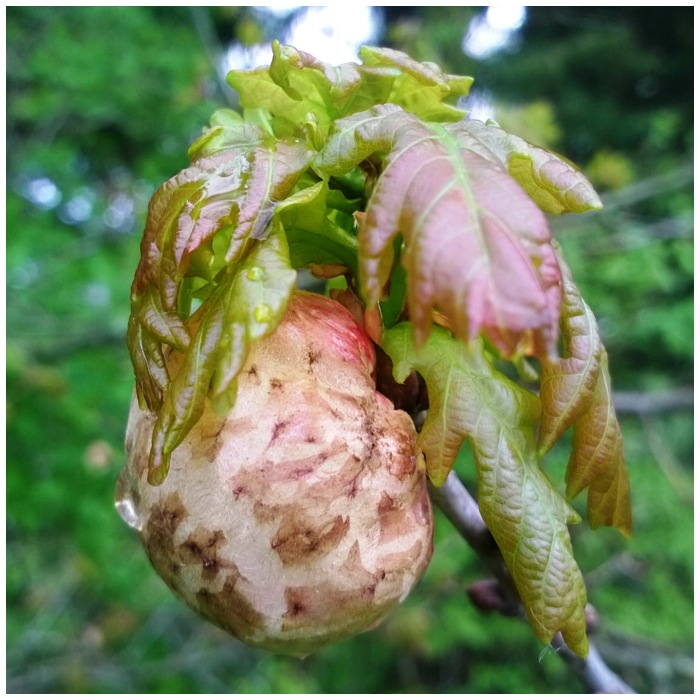
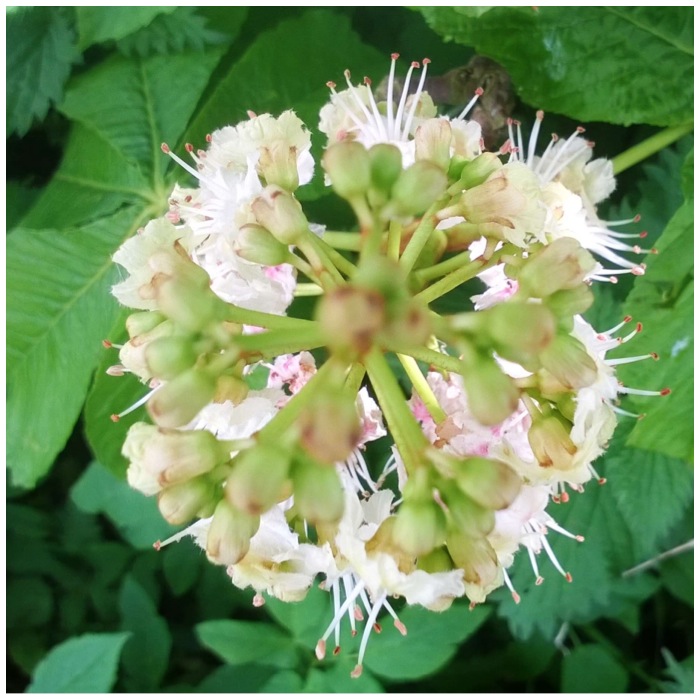
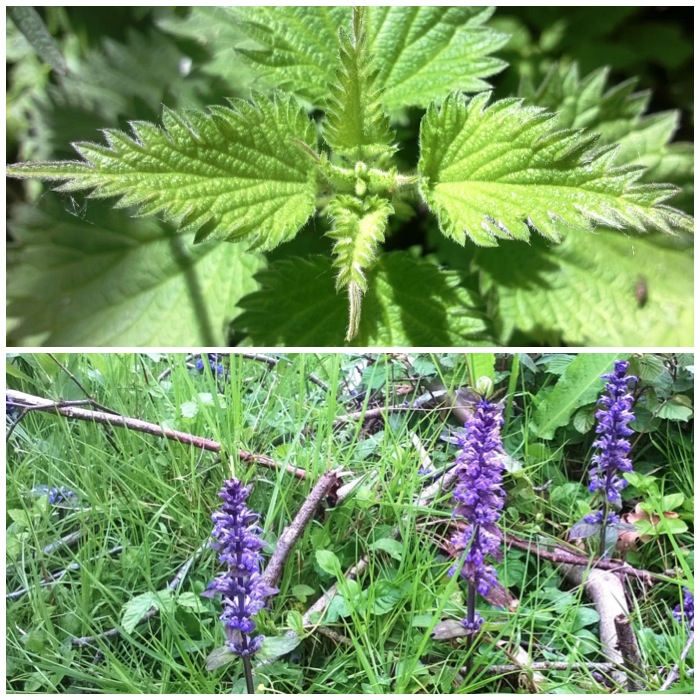
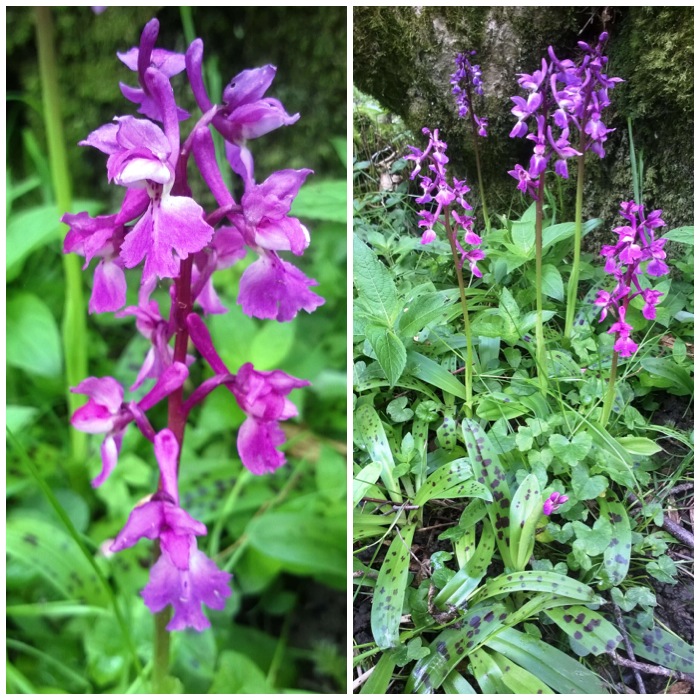
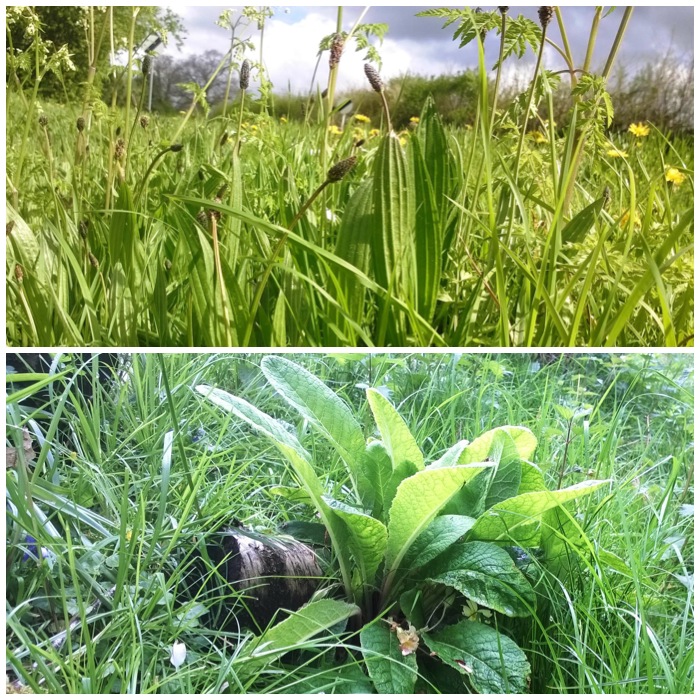
Iris – yellow flag leavesHawthorn blossom budsBluebellsYoung alder catkinsWillow catkins gone to seedWood spurge and wood anemoneWild mignonette and a bursting pine conePossible large oak gallHorse chestnut blossomFresh nettle leaves and bugleEarly purple orchidRibwort plantain and elderly primroseCow parsley
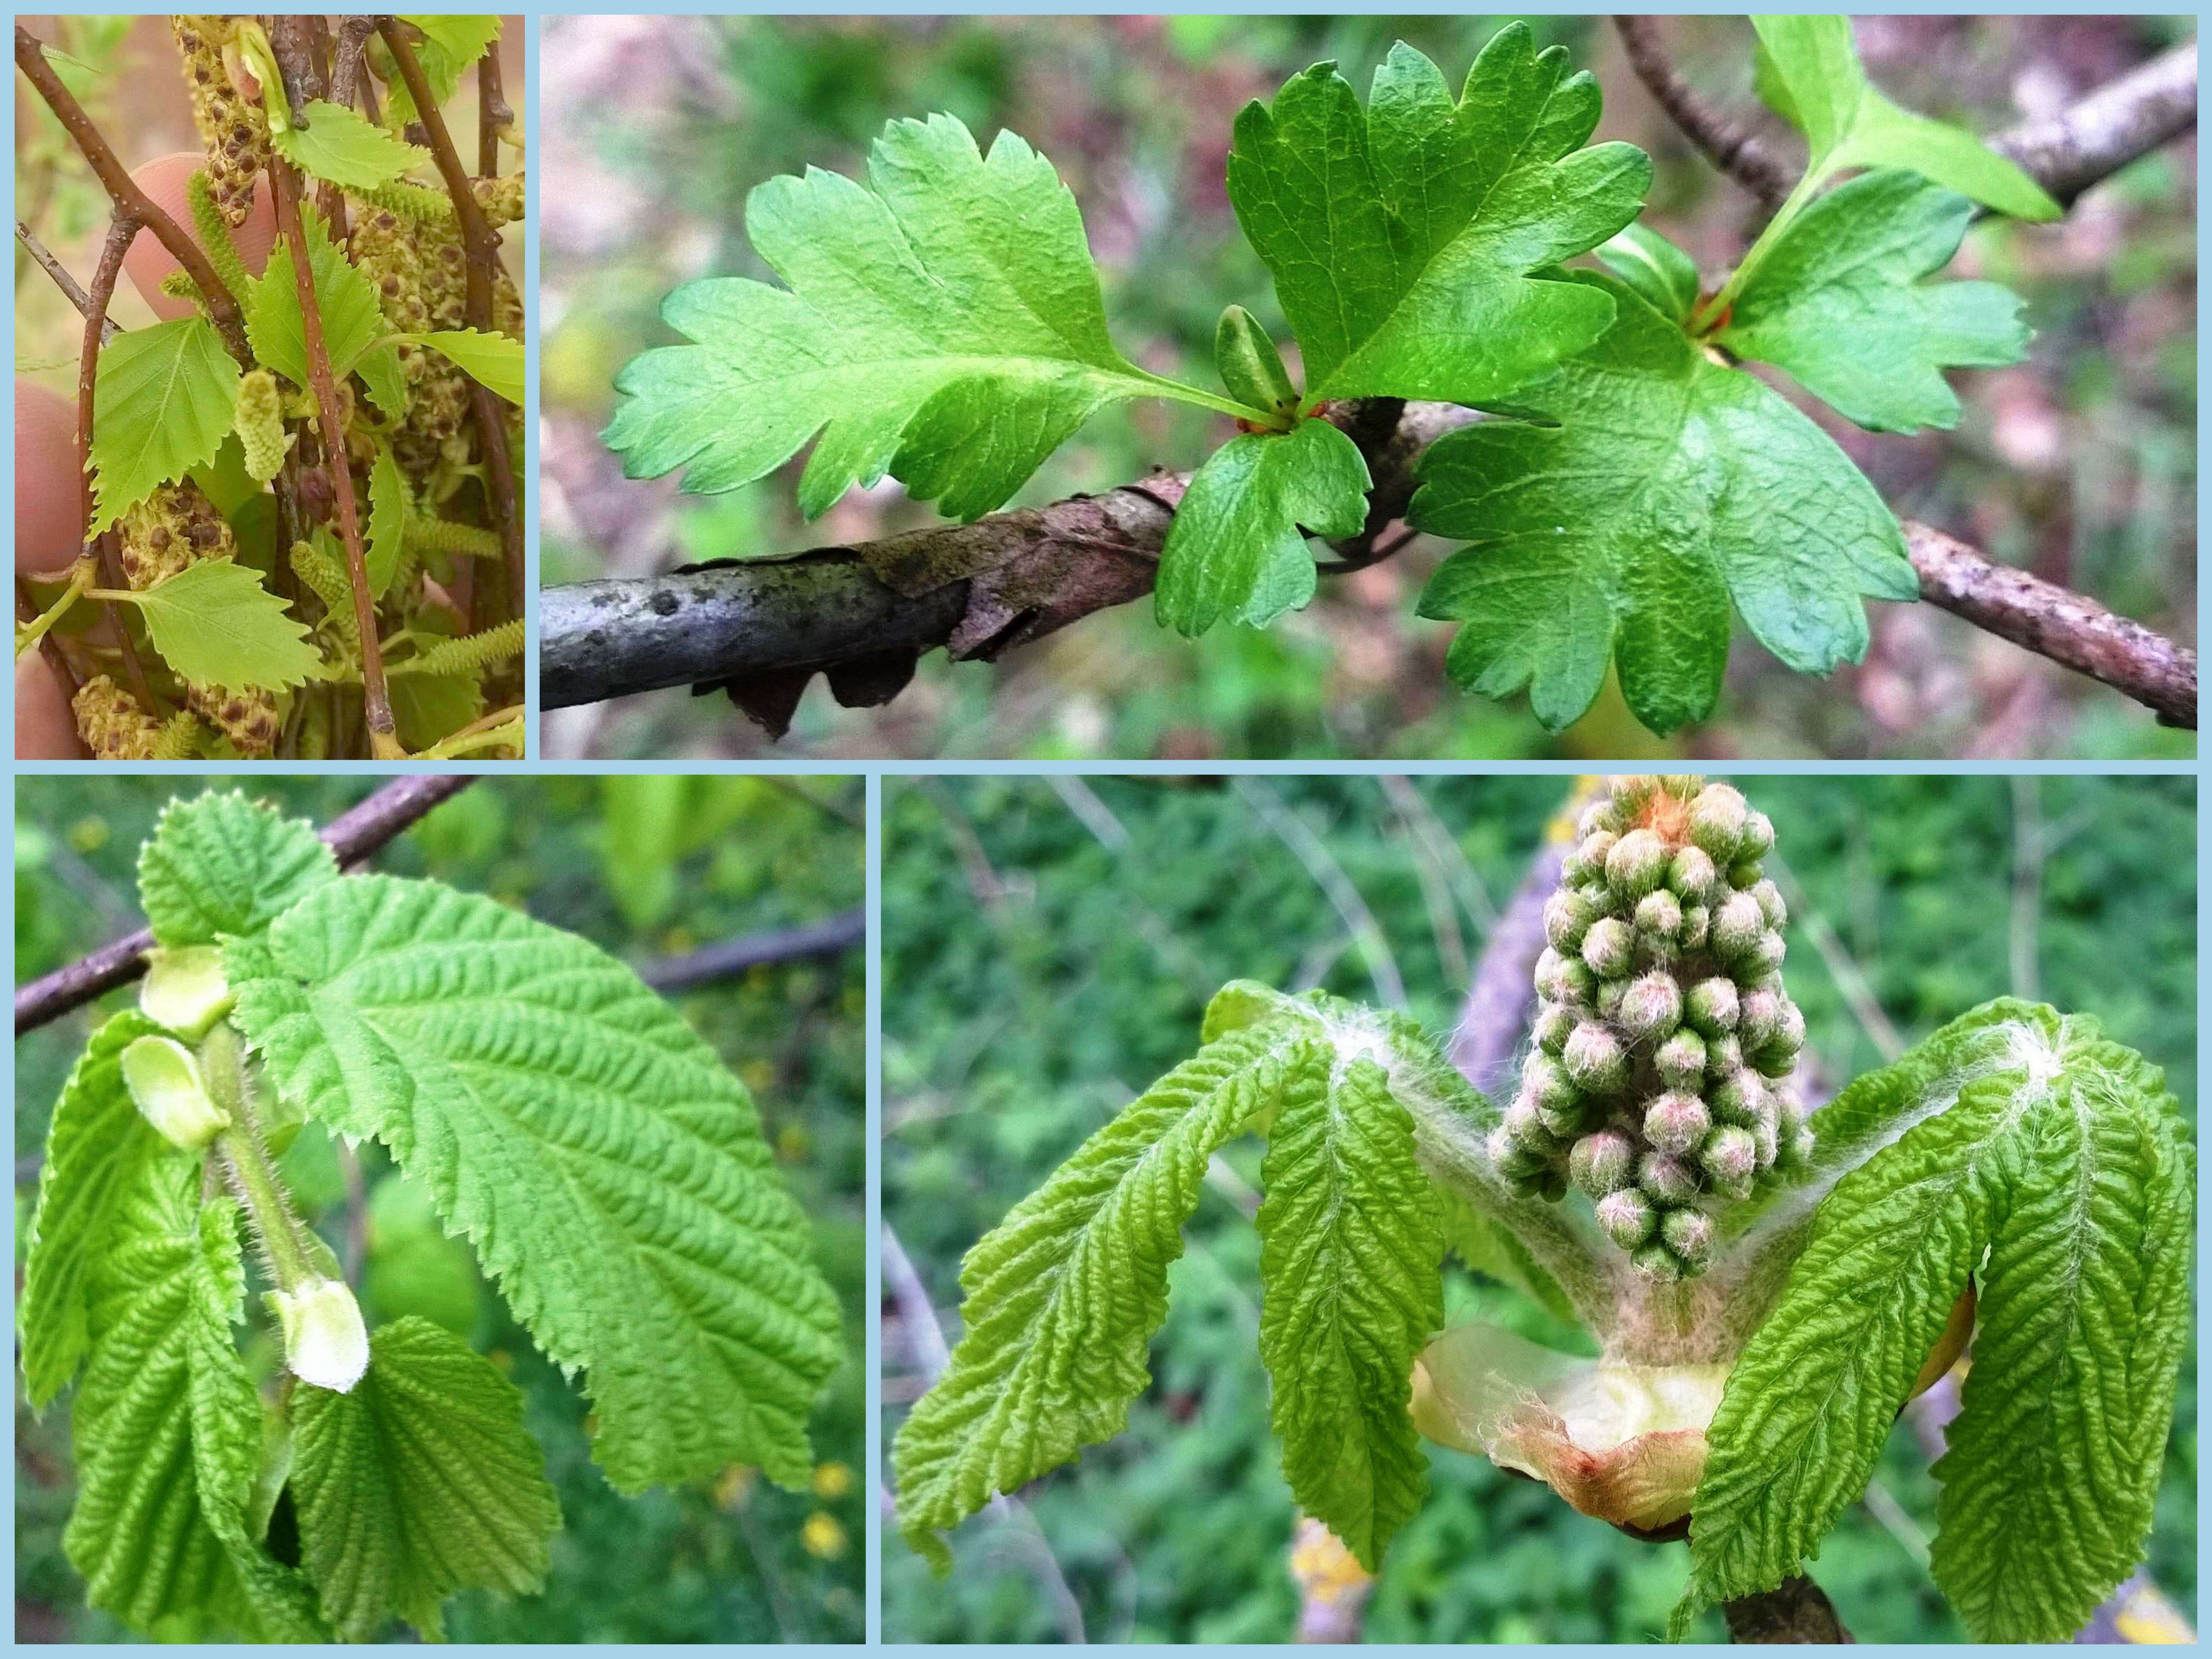
I take a wander around my village (Bramley, Hants, UK) every week or two and photograph certain sites to see all the changes that are happening here with the flaura and fauna.
I will post what I think are the best pictures of these bimbles here. Currently I am using a Nokia Lumia 820 phone camera to take these pictures.
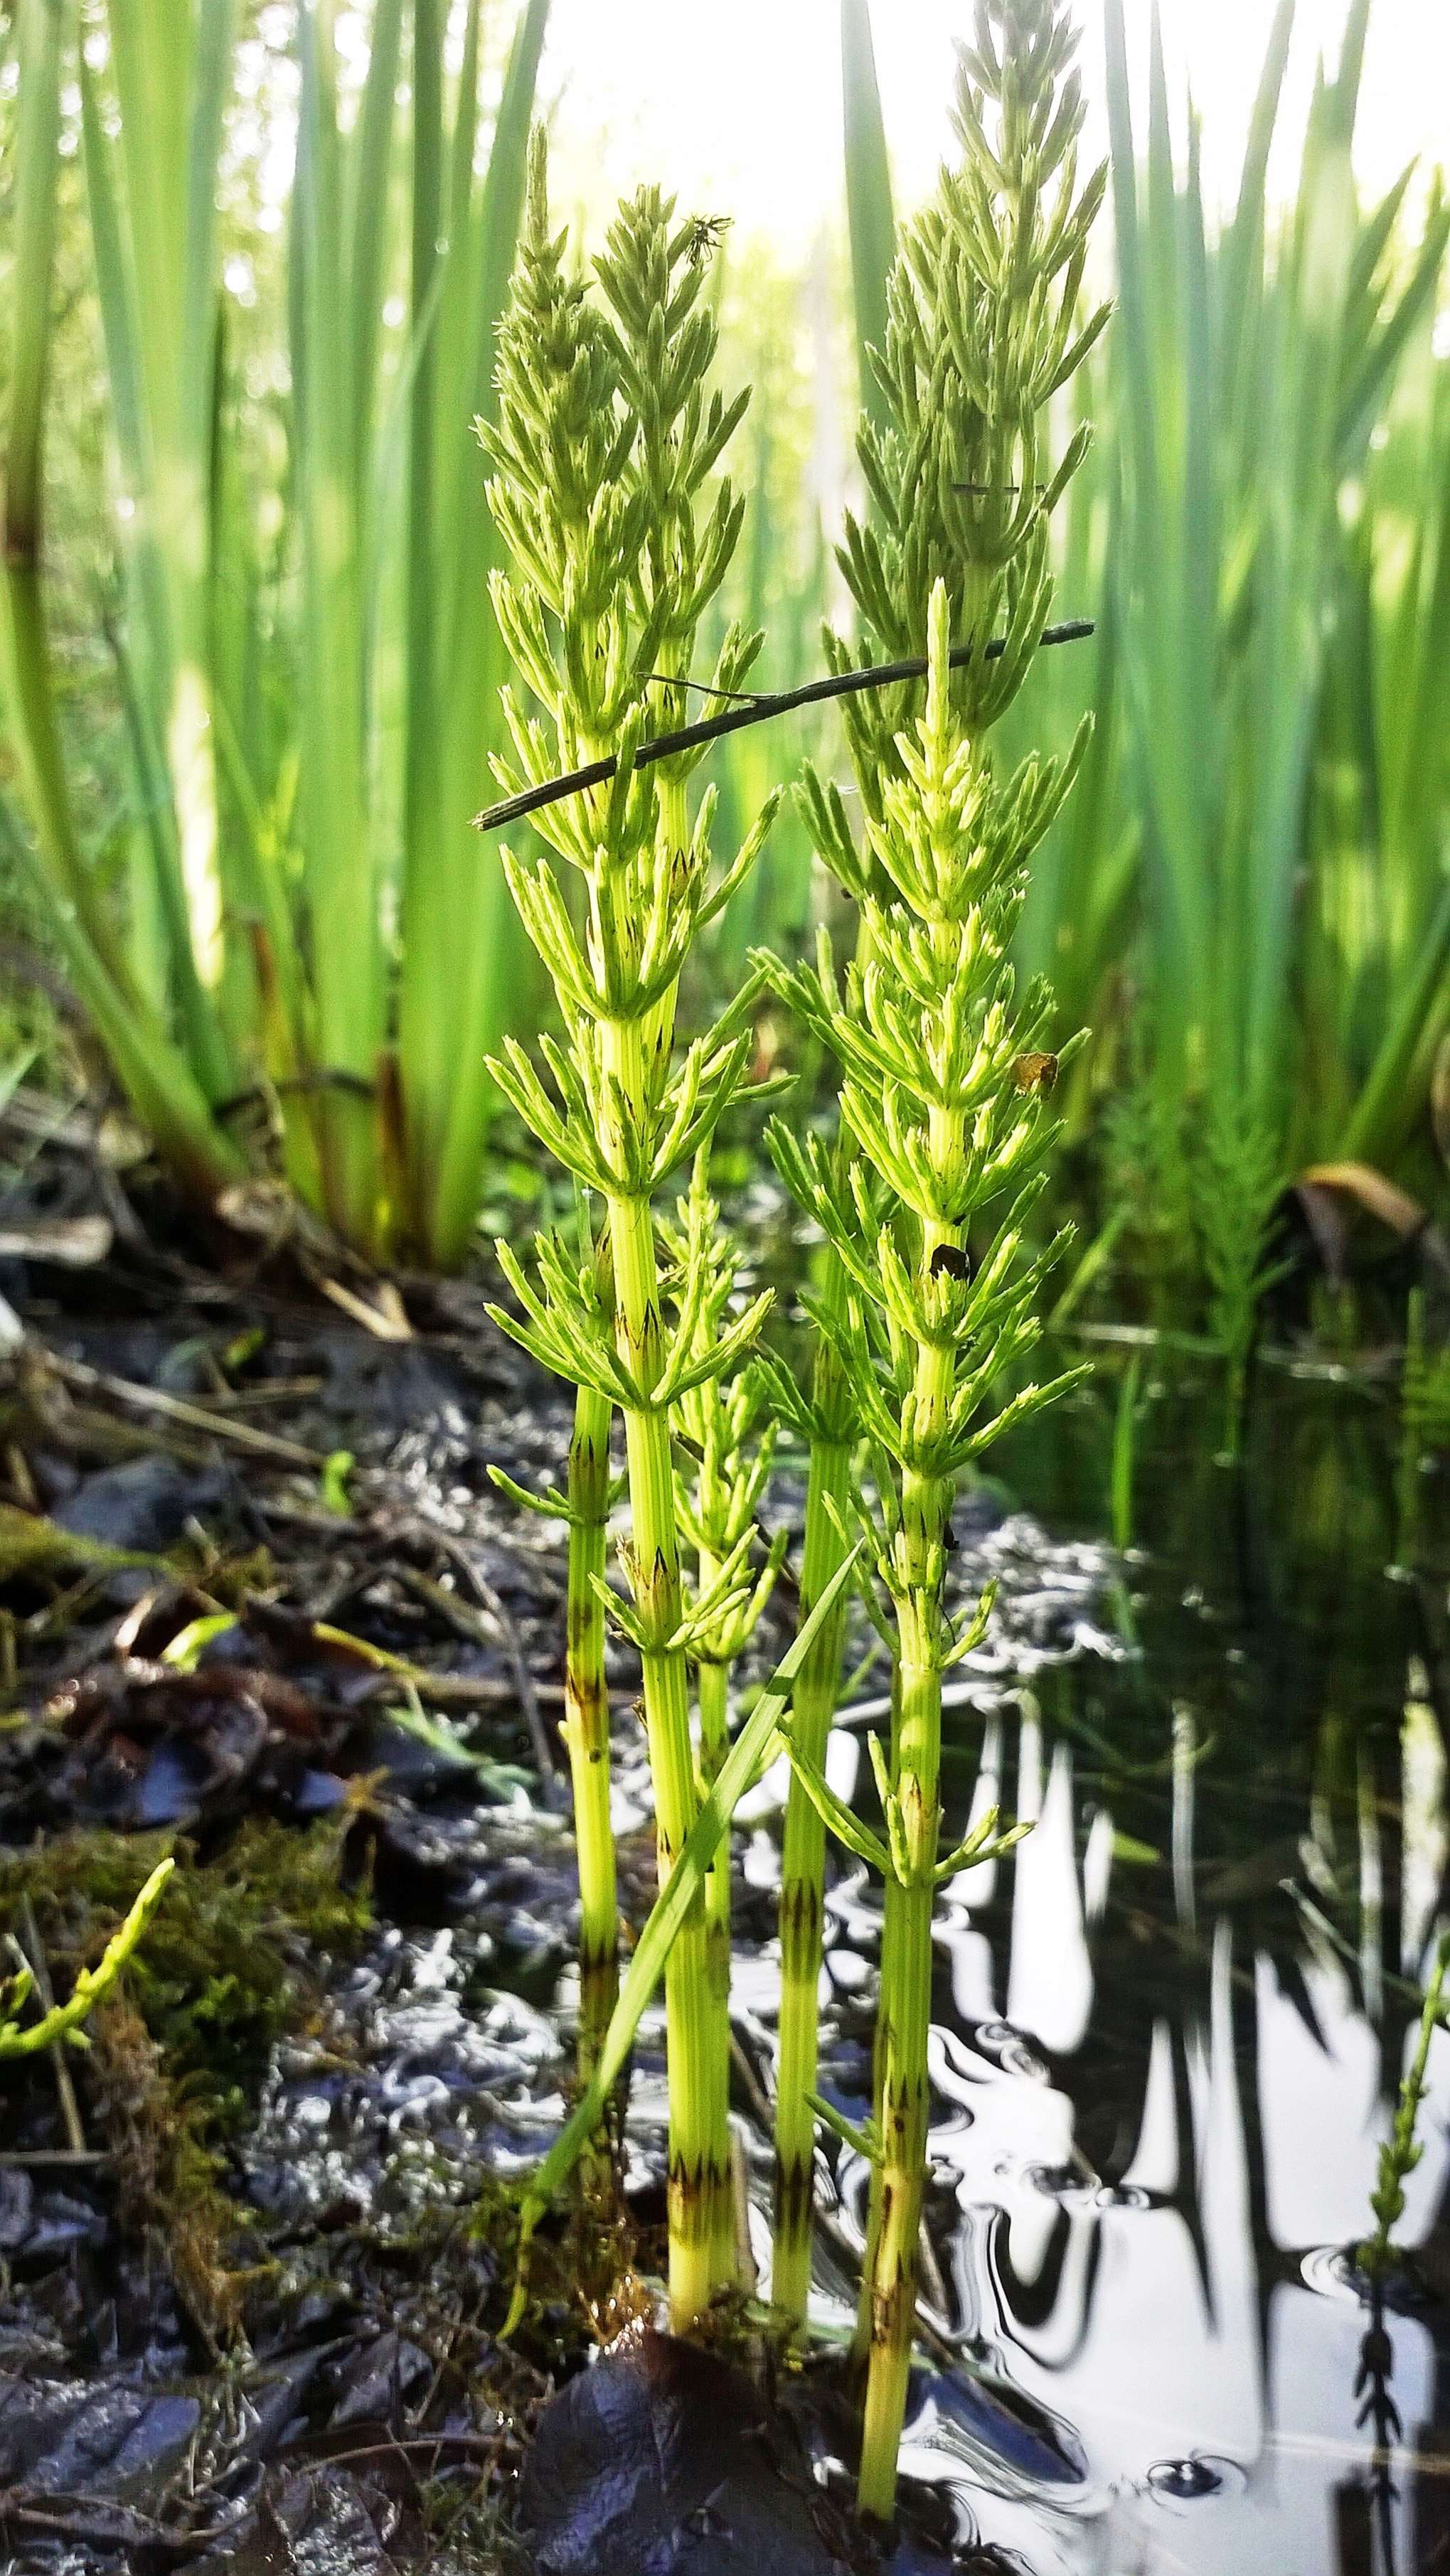
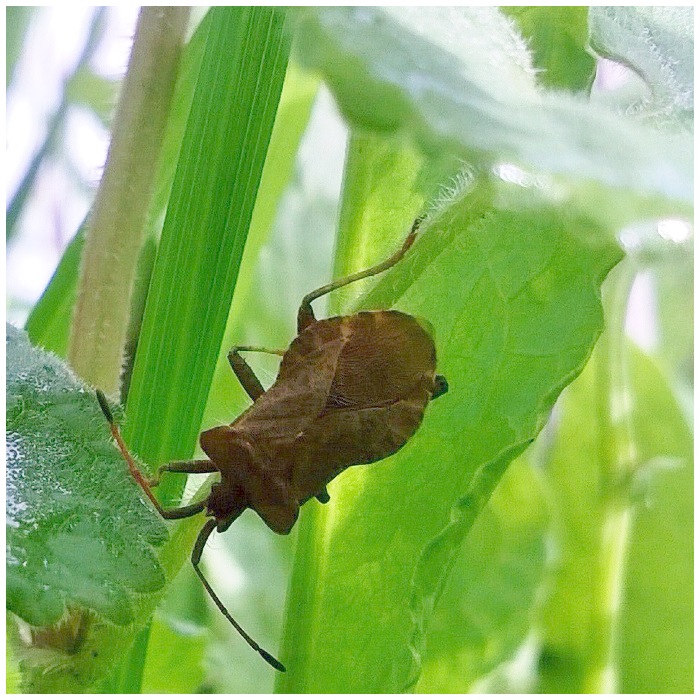
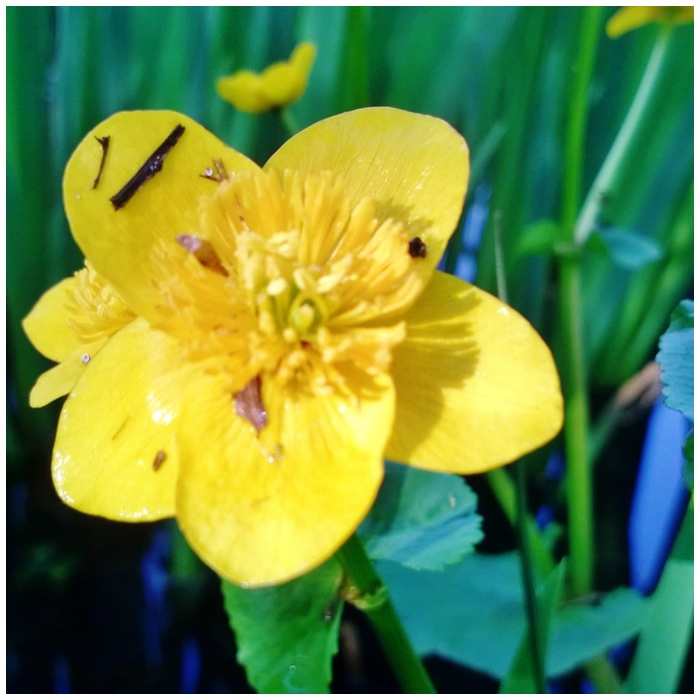
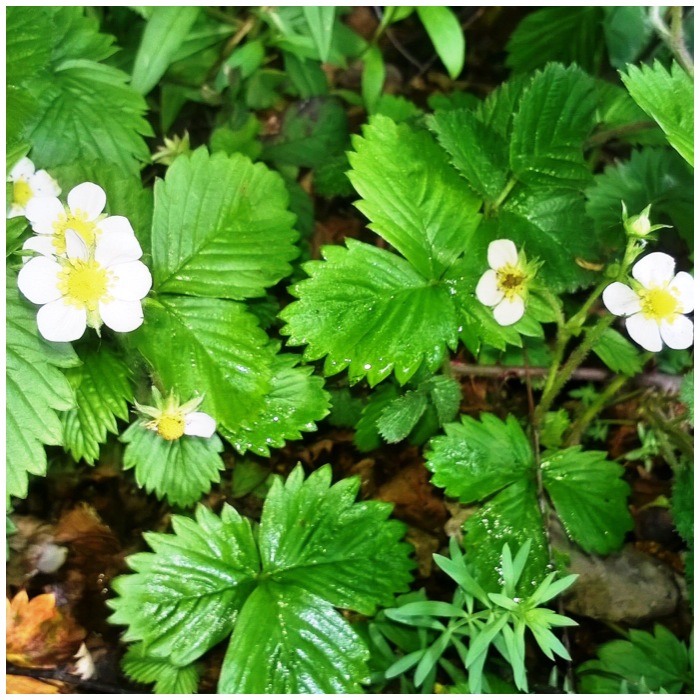
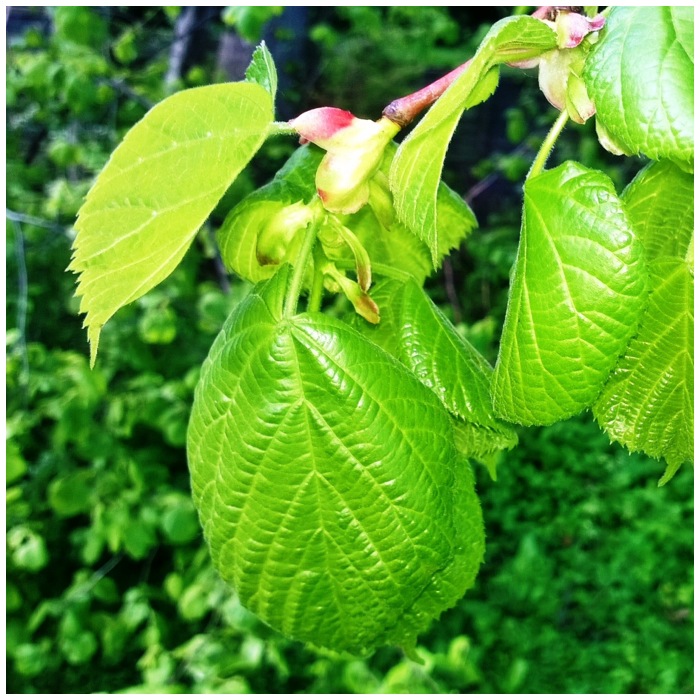
HorsetailA little Shield Bug possiblyMarsh MarigoldEmerging AshCherryWillowVisiting the VetchHerb RobertYoung OakWild StrawberryFresh Young Lime
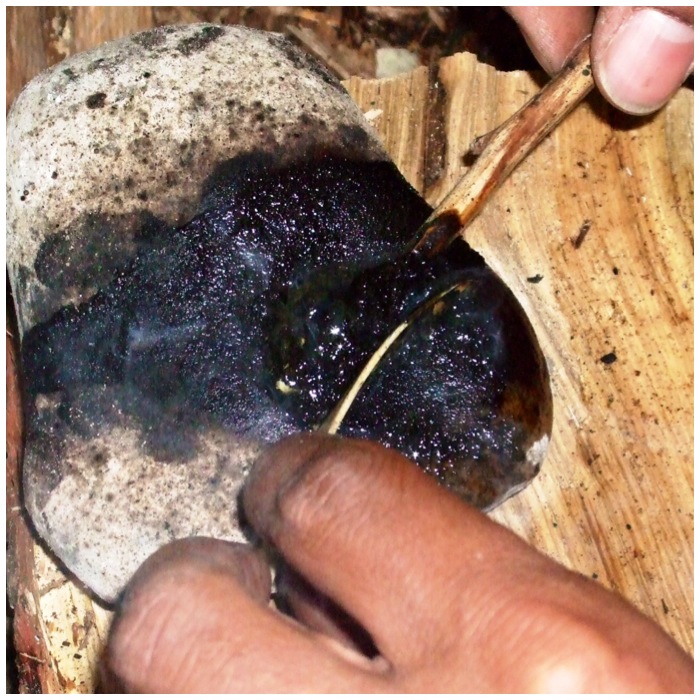
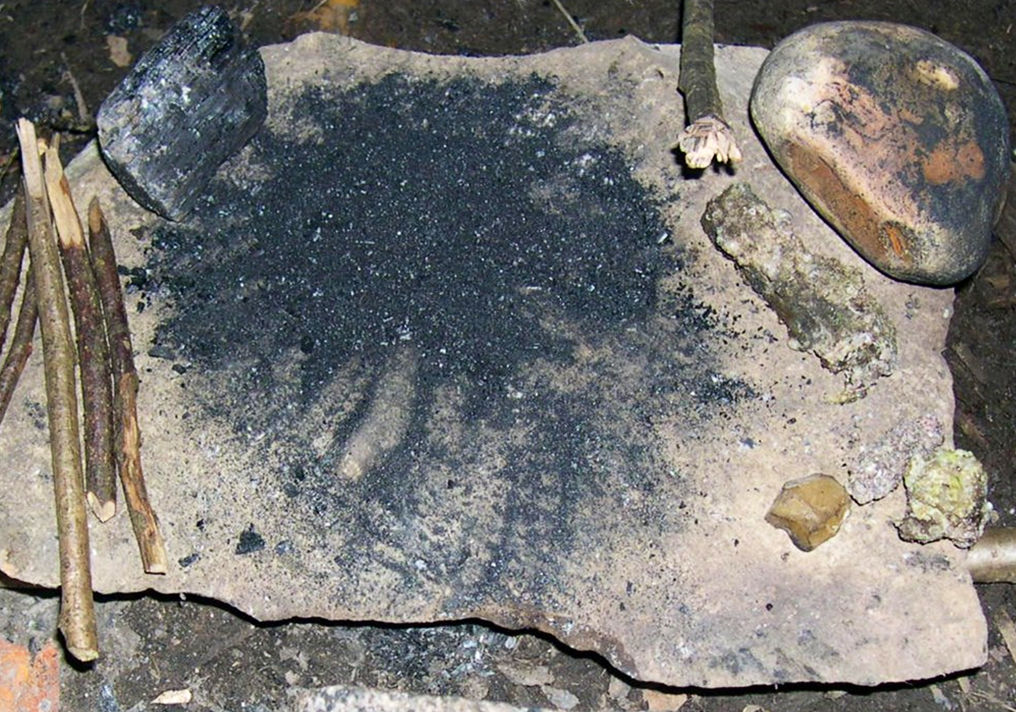
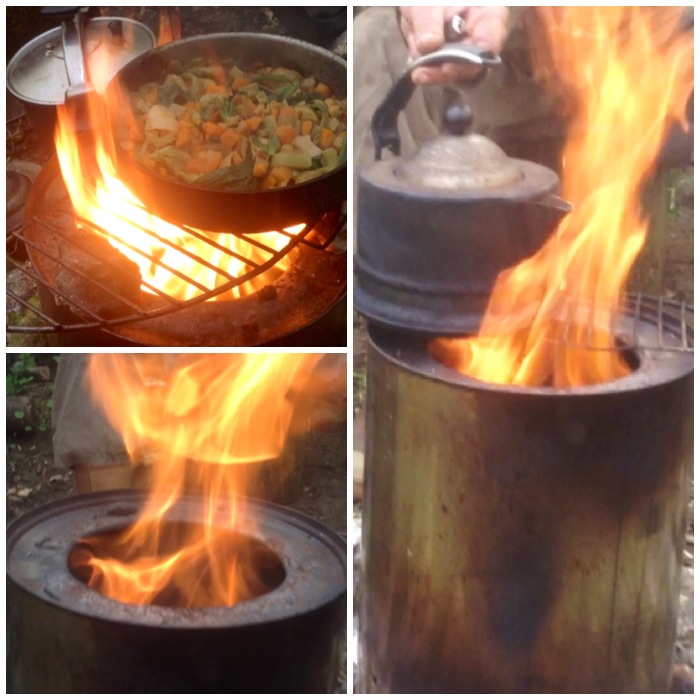
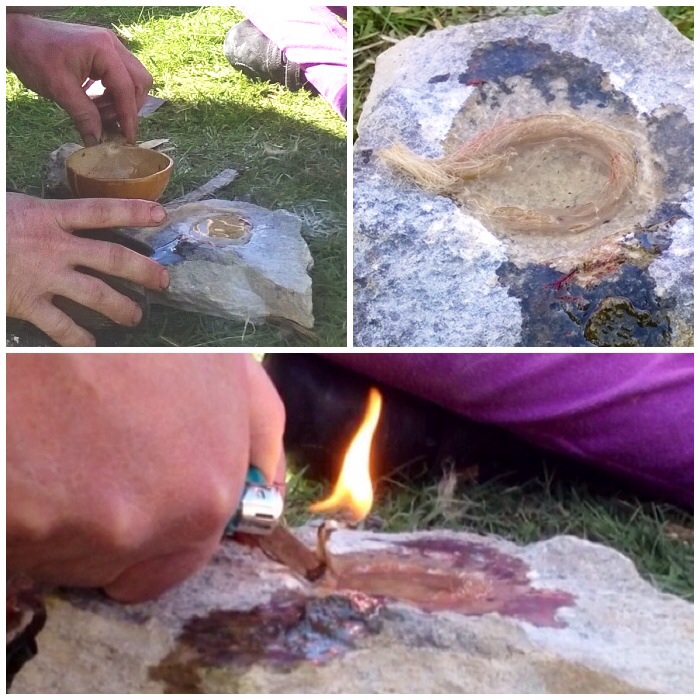
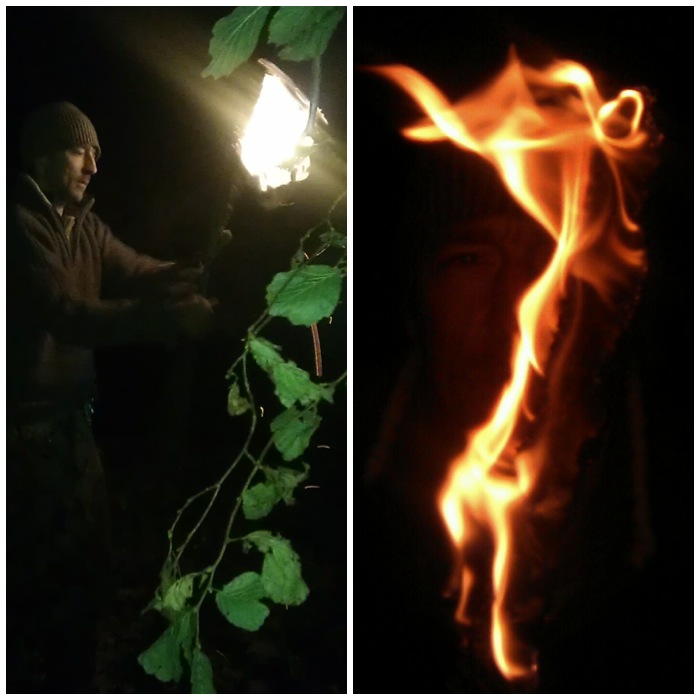
Pitch can be made with many different materials and I have covered some of these in that previous post. On this occasion I used spruce resin, beeswax and charcoal dust. Instead of a nice handy tin to prepare it all though I opted to try this out using more primitive materials: hot rocks. I touched on this method previously in the post How To…. Make a Flint-Tipped Arrow but feel it needs its own stand-alone post.
Hot Rock Pitch
I collected a lot of resin from some spruce trees in my local area with the use of a stick as I find that this does not damage the trees as a knife would do. Also I look for areas where the resin has pooled at the base of the tree as you can collect all of this without affecting the tree.
Spruce Resin
My other ingredients are charcoal dust to give the pitch body (I used the small rock to crush the charcoal) and beeswax to make it flexible. I used the sticks to make the finished pitch stick.
Preparation
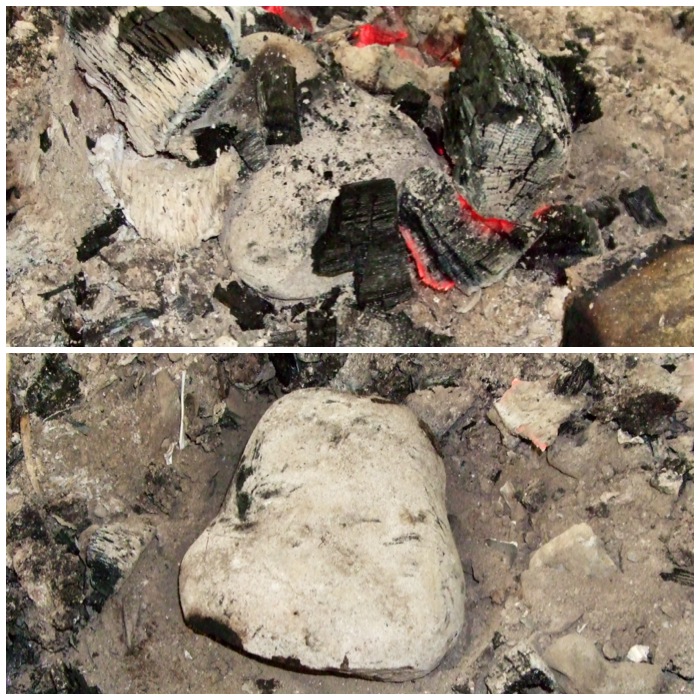
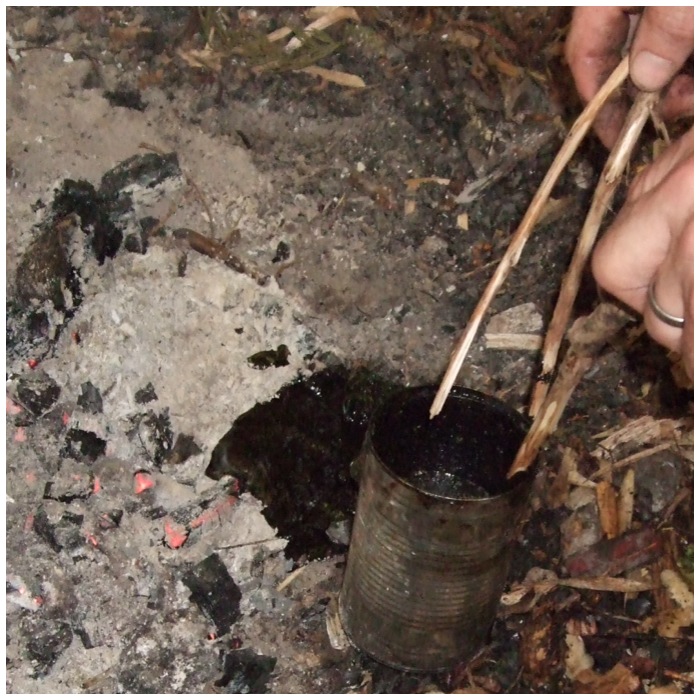
While I was out collecting resin and preparing everything else I had a rock heating up in the fire. I used a rock that had been heated before so I could be sure it would not crack. (If there is any trapped air or moisture in a rock there is a chance it will crack or, in the worst case scenario, explode.)
To handle the rock I used some wooden tongs I had made up (sorry, no photo).
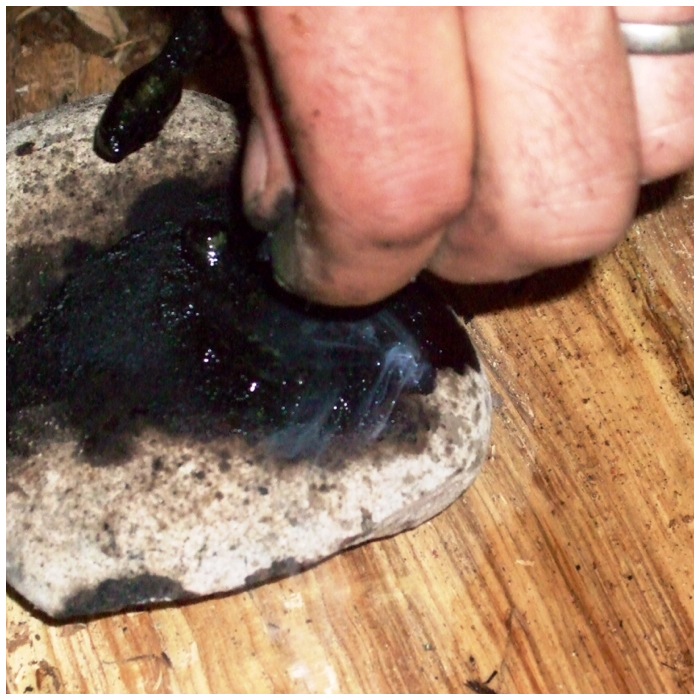
Hot Rock
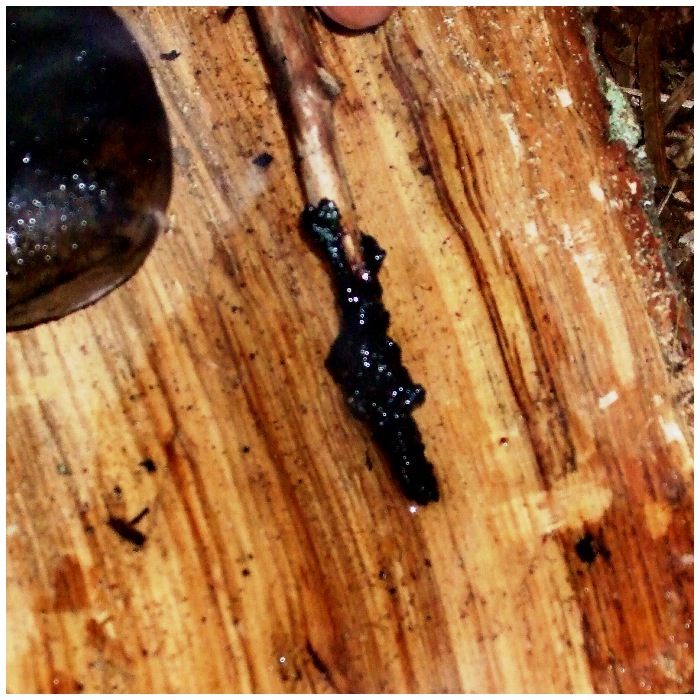
The rock I had chosen had a slight hollow in the top surface which I thought would help stop the resin from flowing away instantly as it melted. I dragged the rock to the side of the fire, popped a piece of resin onto it and with a small twig moved it around until it had all melted. Some resin did run off but enough was kept in the hollow for me to use.
Melting the resin
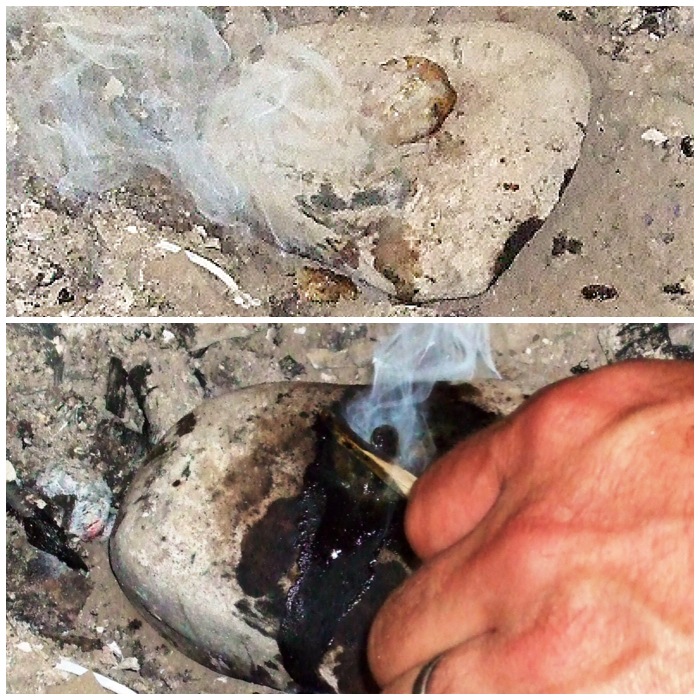
I then moved the rock onto a piece of curved bark which held some water to act as a coolant as I built up my pitch stick.
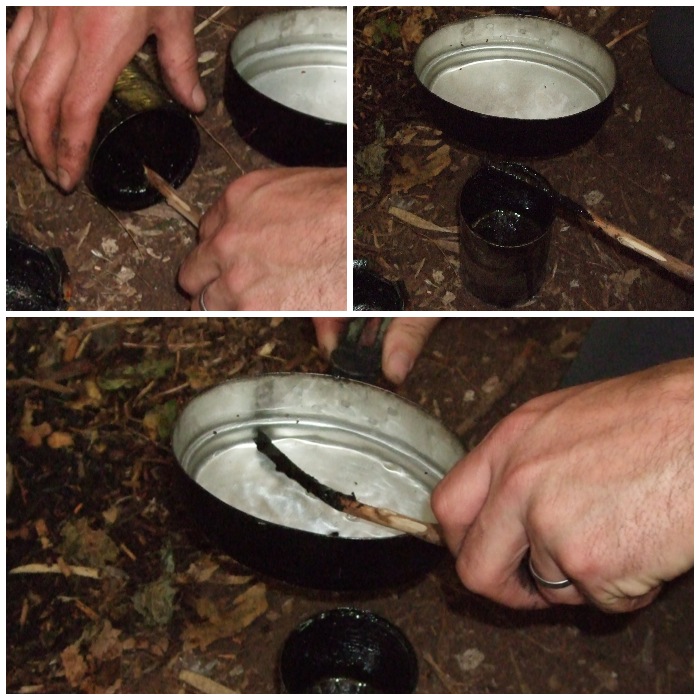
Once this was all set up I popped a piece of beeswax into the melted resin and allowed it to mix in (experiment for yourself with ratios).
Melting the beeswax
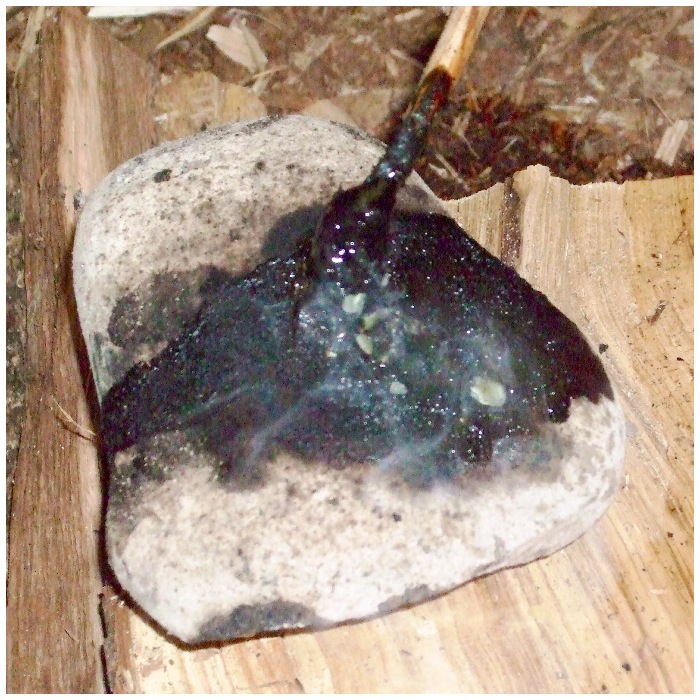
Then I sprinkled a good-sized pinch of charcoal dust into the mixture and carried on mixing it up.
Adding the charcoal dust
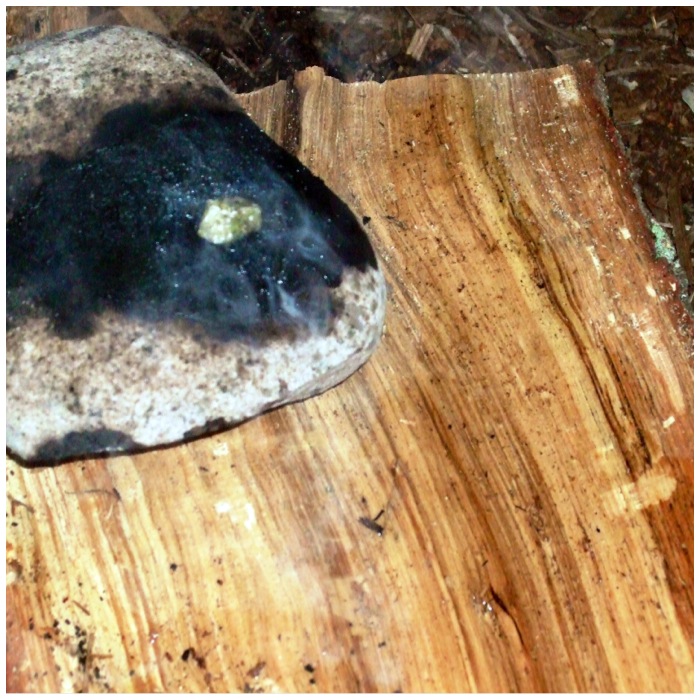
As the rock was quite small I could only make a little batch of pitch at a time so it did not take long to all melt and mix together.
Mix it all up
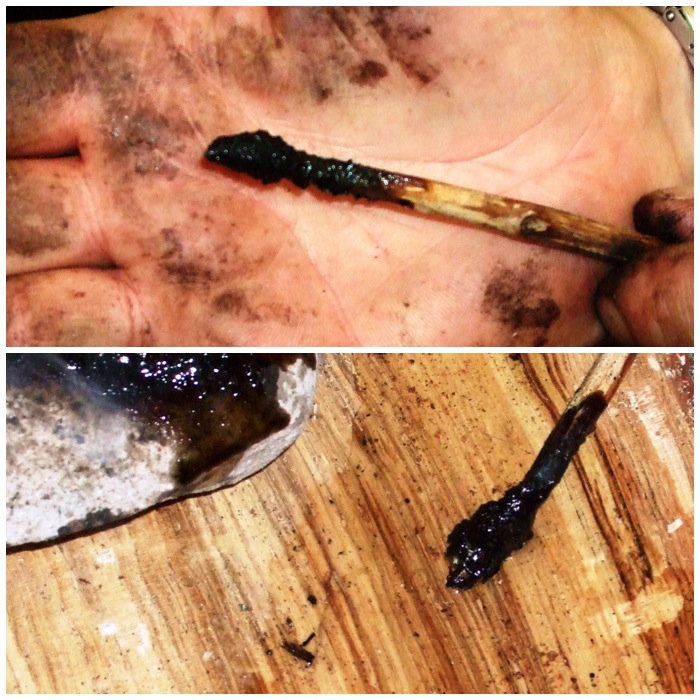
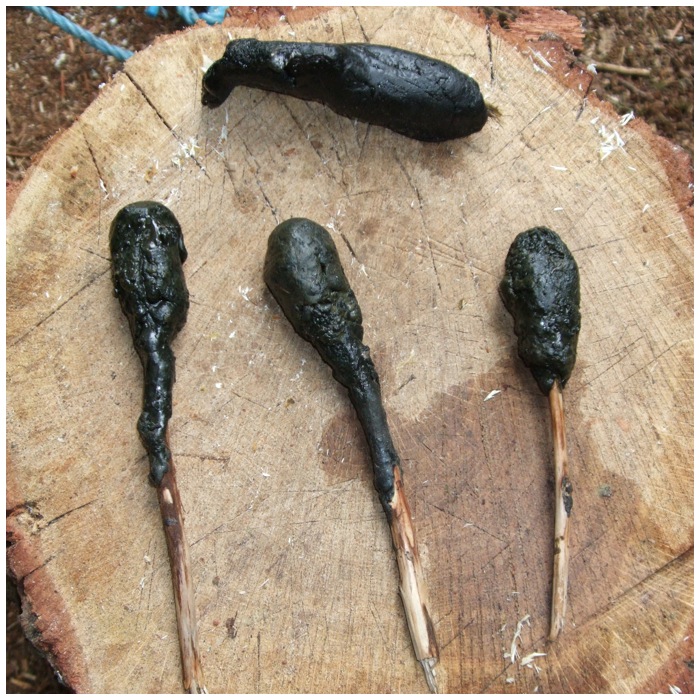
I used a sliver of wood to scrape the hot, sticky pitch onto a squared-off stick.
Scrape onto a twig
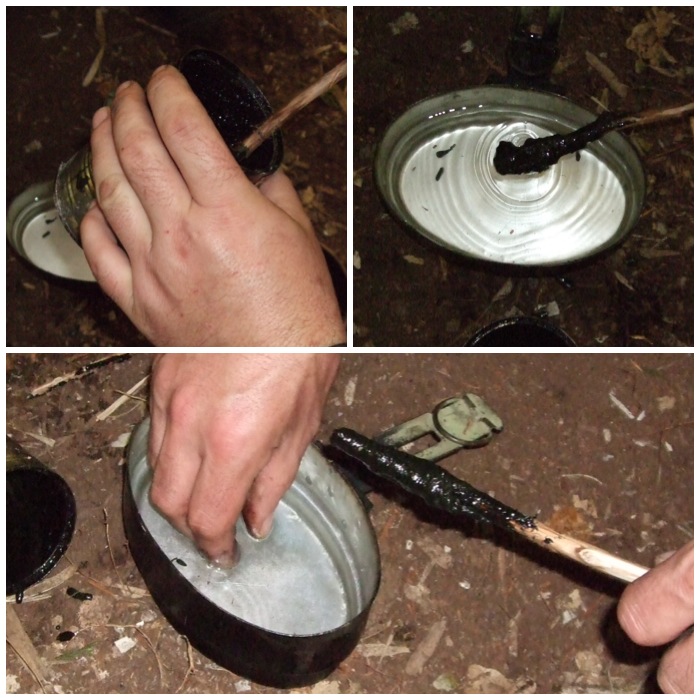
The pitch you create using this method is a bit lumpy but still perfectly useable. As soon as I had some pitch on the stick I dipped it into the water to cool it down rapidly. This cooling-down process allowed me to use wet fingers to mould the pitch and smooth it out.
I kept repeating this process until all the melted pitch was on the stick and then mixed up another batch.
Cool rapidly in water
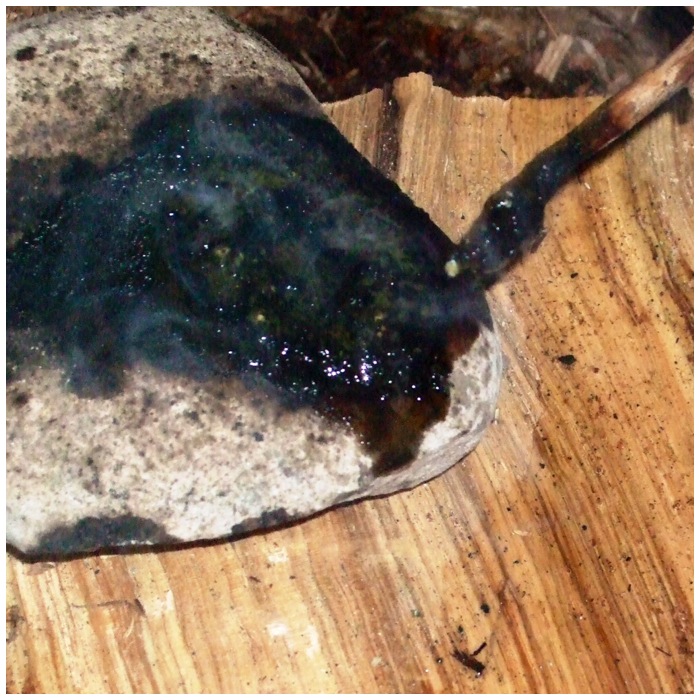
The rock was so hot that I was able to keep melting and mixing the ingredients several times to build up the pitch on the stick.
Mix more resin, beeswax and charcoal
I found that the curved piece of bark was very effective for storing water to cool the pitch.
Scrape onto the twig and cool again
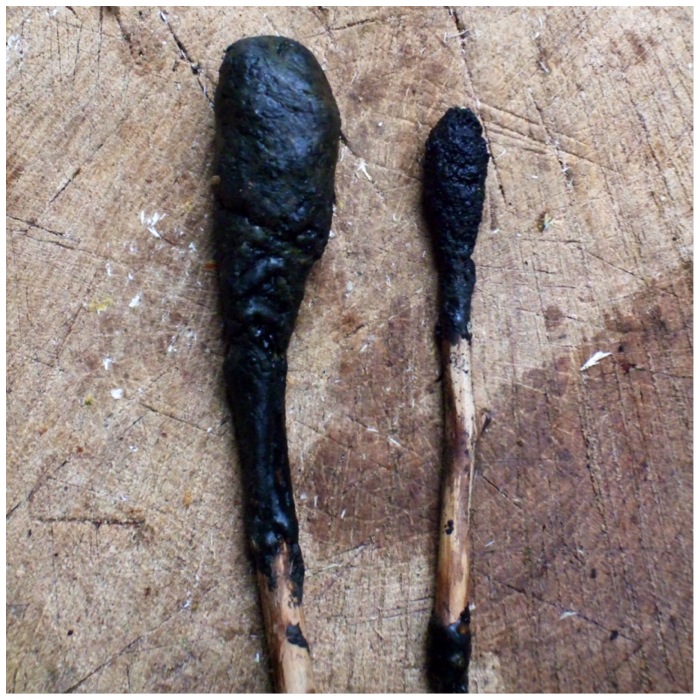
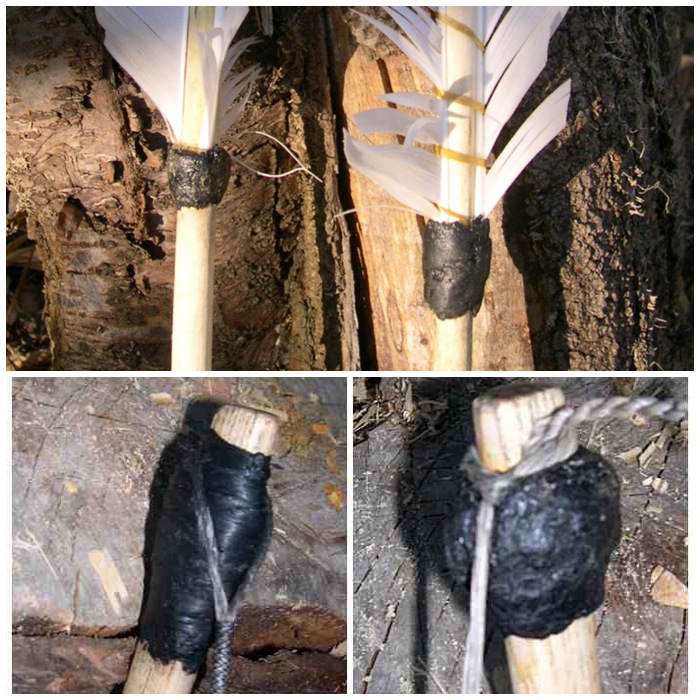
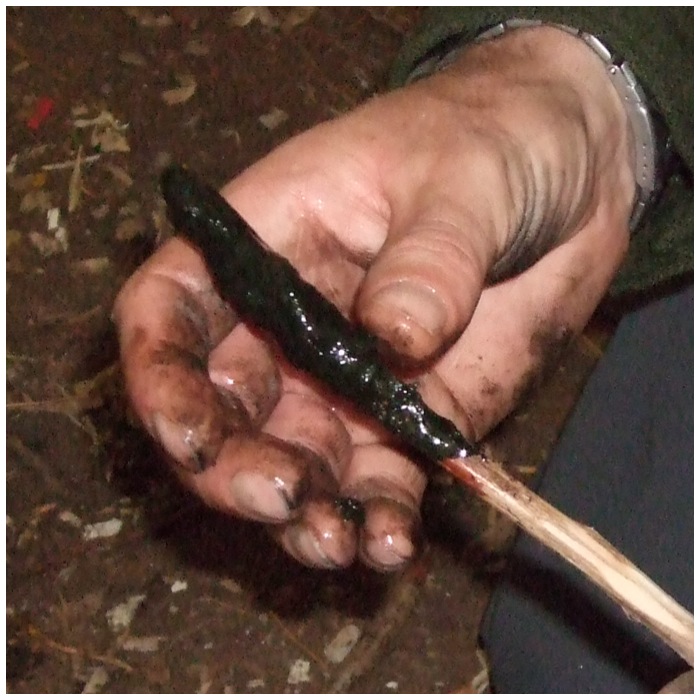
The pitch stick on the right was made using hot rocks and the one on the left using a tin can. The primitive hot rocks method takes longer and produces a coarser pitch but in my opinion was far more satisfying to make.
Keep repeating until you build your own pitch lollipop
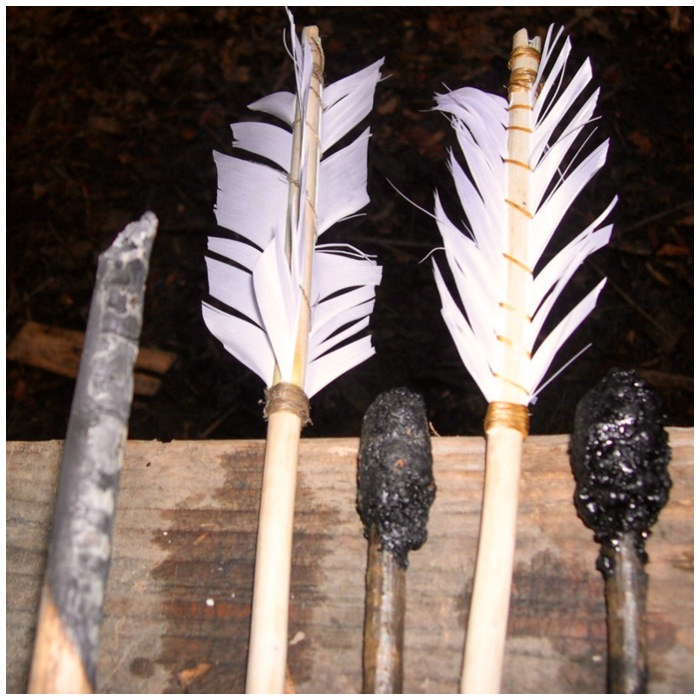
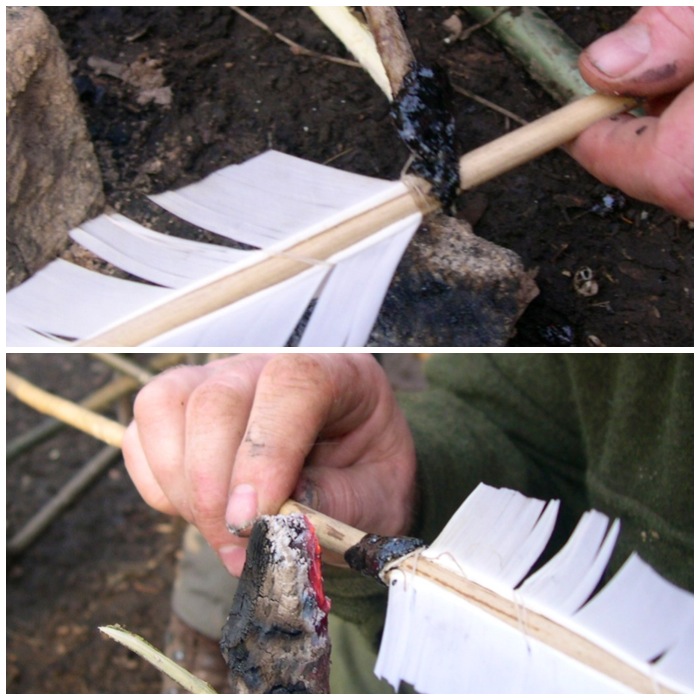
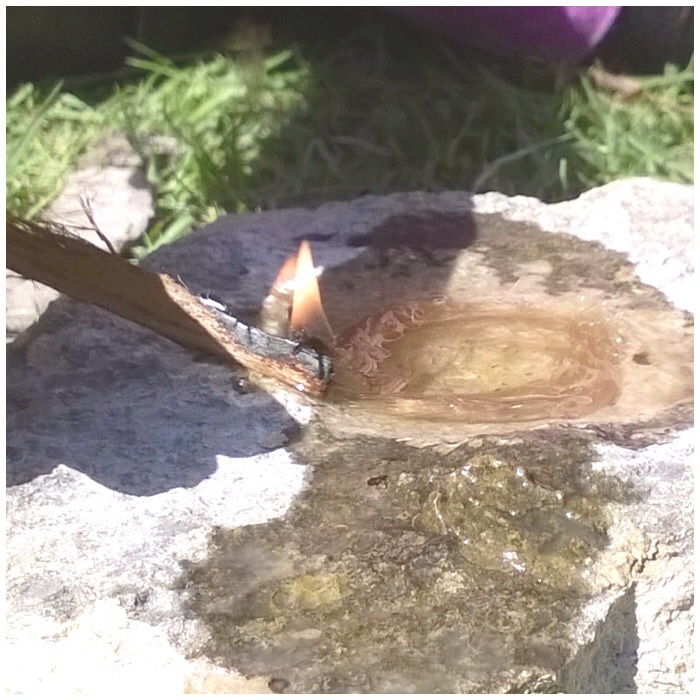
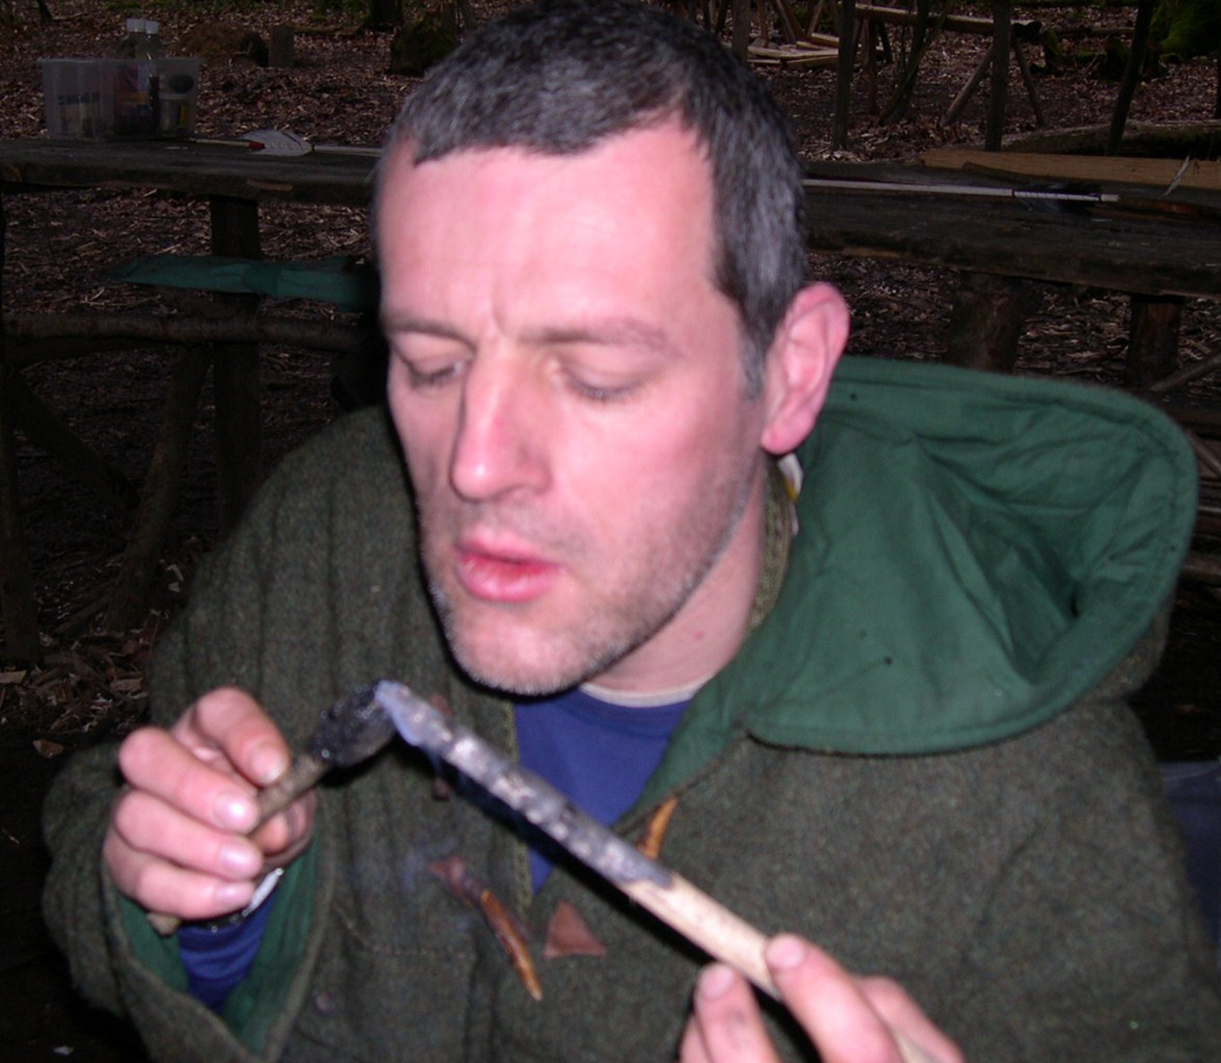
The pitch is great for waterproofing things like sinew on arrows. I prepared a ember stick to help melt the pitch so I could cover the sinew you can see in the picture below.
Ready to be used
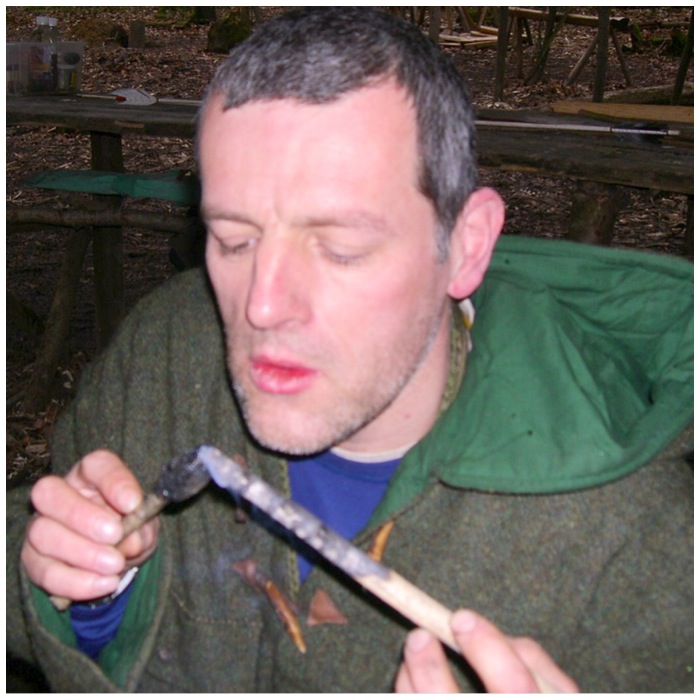
To melt the pitch, simply blow on the ember stick while holding the pitch stick close to it.
Heat the resin with an ember stick to melt it
Drip the melted pitch onto what you want to cover and with wet fingers spread it around. Keep re-applying more pitch until you are happy everything that needs to be covered is covered. I sometimes re-heat the area I have covered with the ember stick to further smooth it out.
Drip it onto whatever you want to cover, fill or attach
With a little patience this primitive method can produce some very good pitch. I have seen some master primitive technology craftsmen makes some wonderful pieces with the use of pitch.
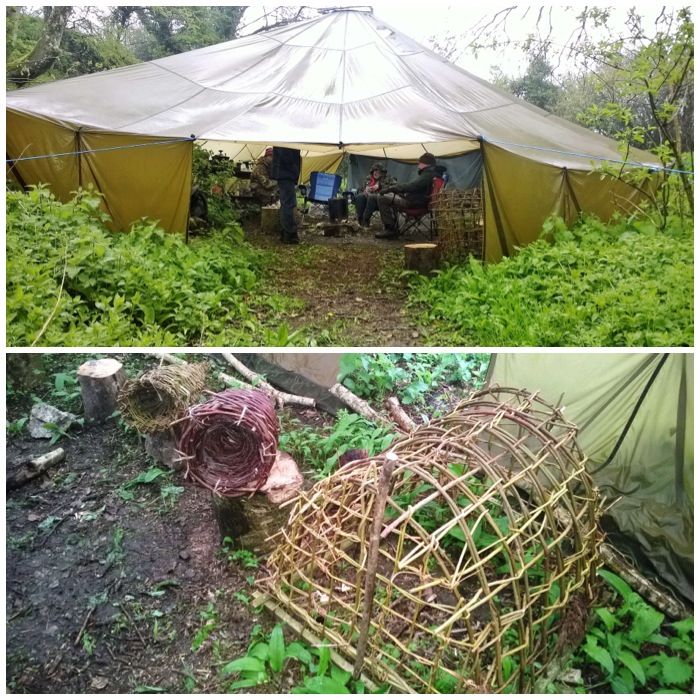
It was great to be back down at Fraser’s place once again, it is a proper playground
Every now and then I head off into the hills with some friends. This time it was to be Gordon and Rick, whom I have worked with for a number of years at the Crisis Open Christmas shelters, and I had arranged with my friend Fraser from Coastal Survival that we would come down and spend time at his place in the woods in Dorset.
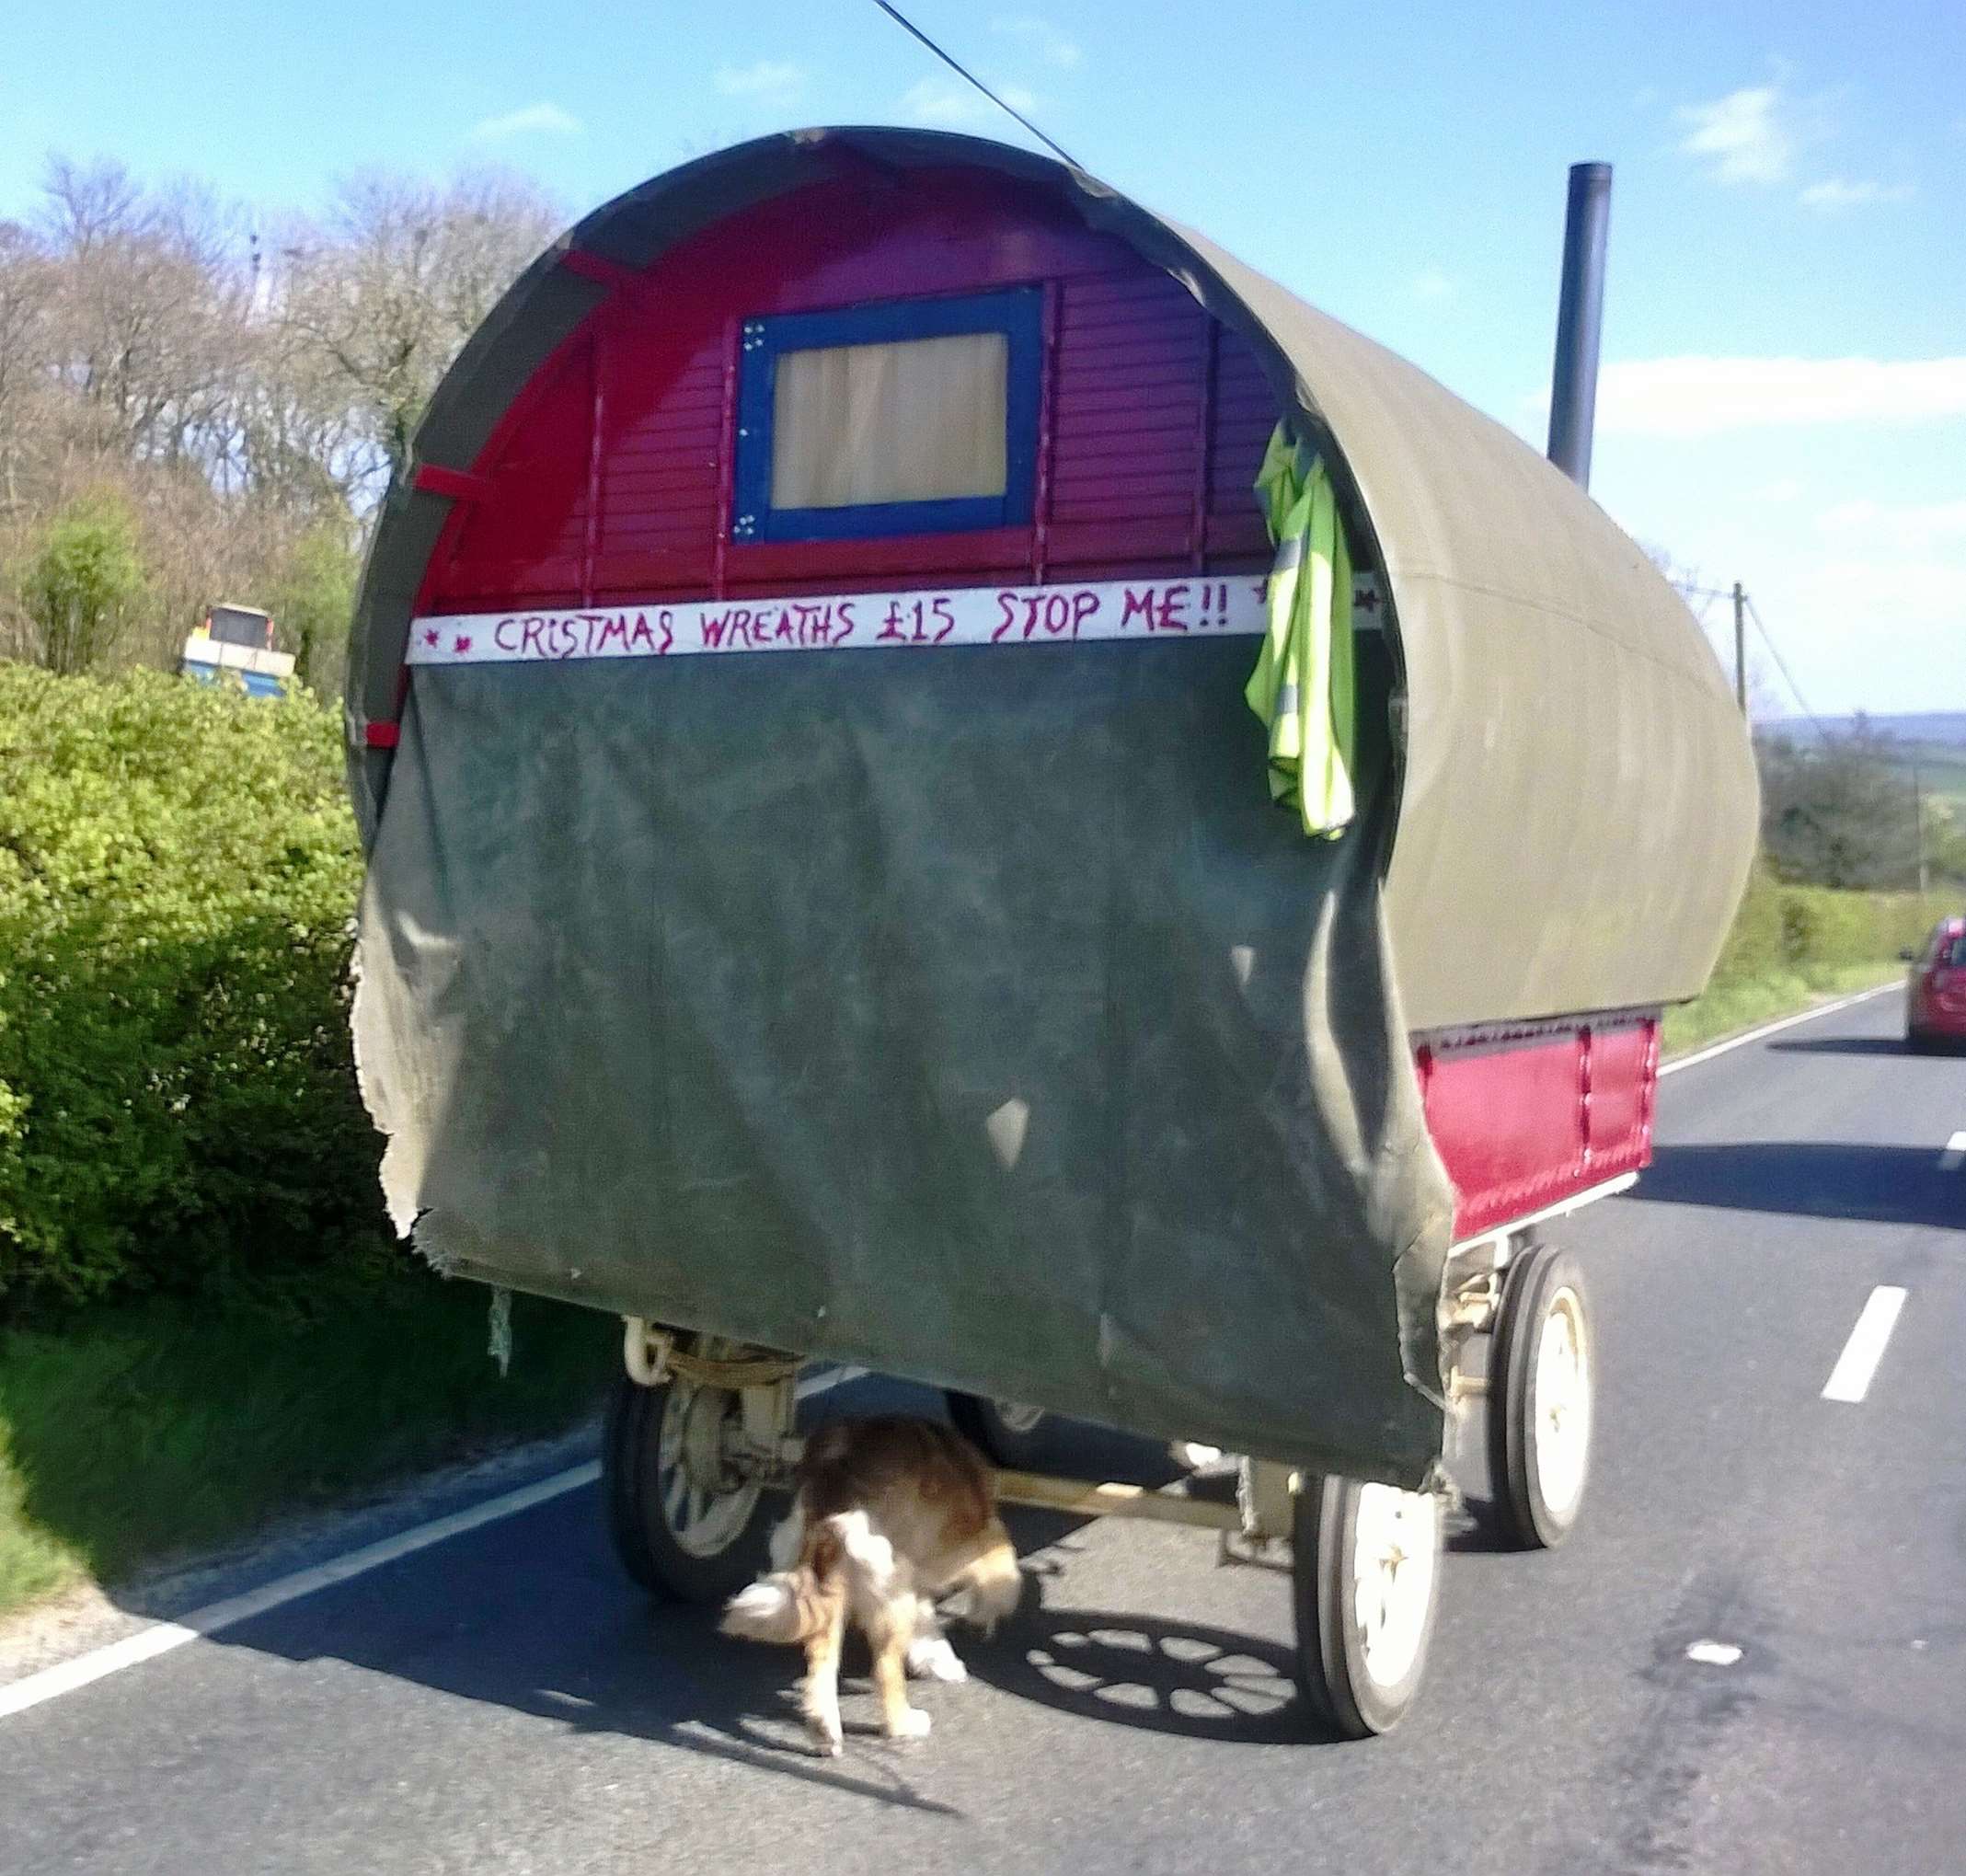
Rick drove us down there in his campervan so it did feel as though we were off on a holiday from the start. I took this picture as we neared Fraser’s place. The angle is such that you can’t see the horse and it looks like the little dog at the back is pushing the Barrel Top along.
Arrival in Bearminster
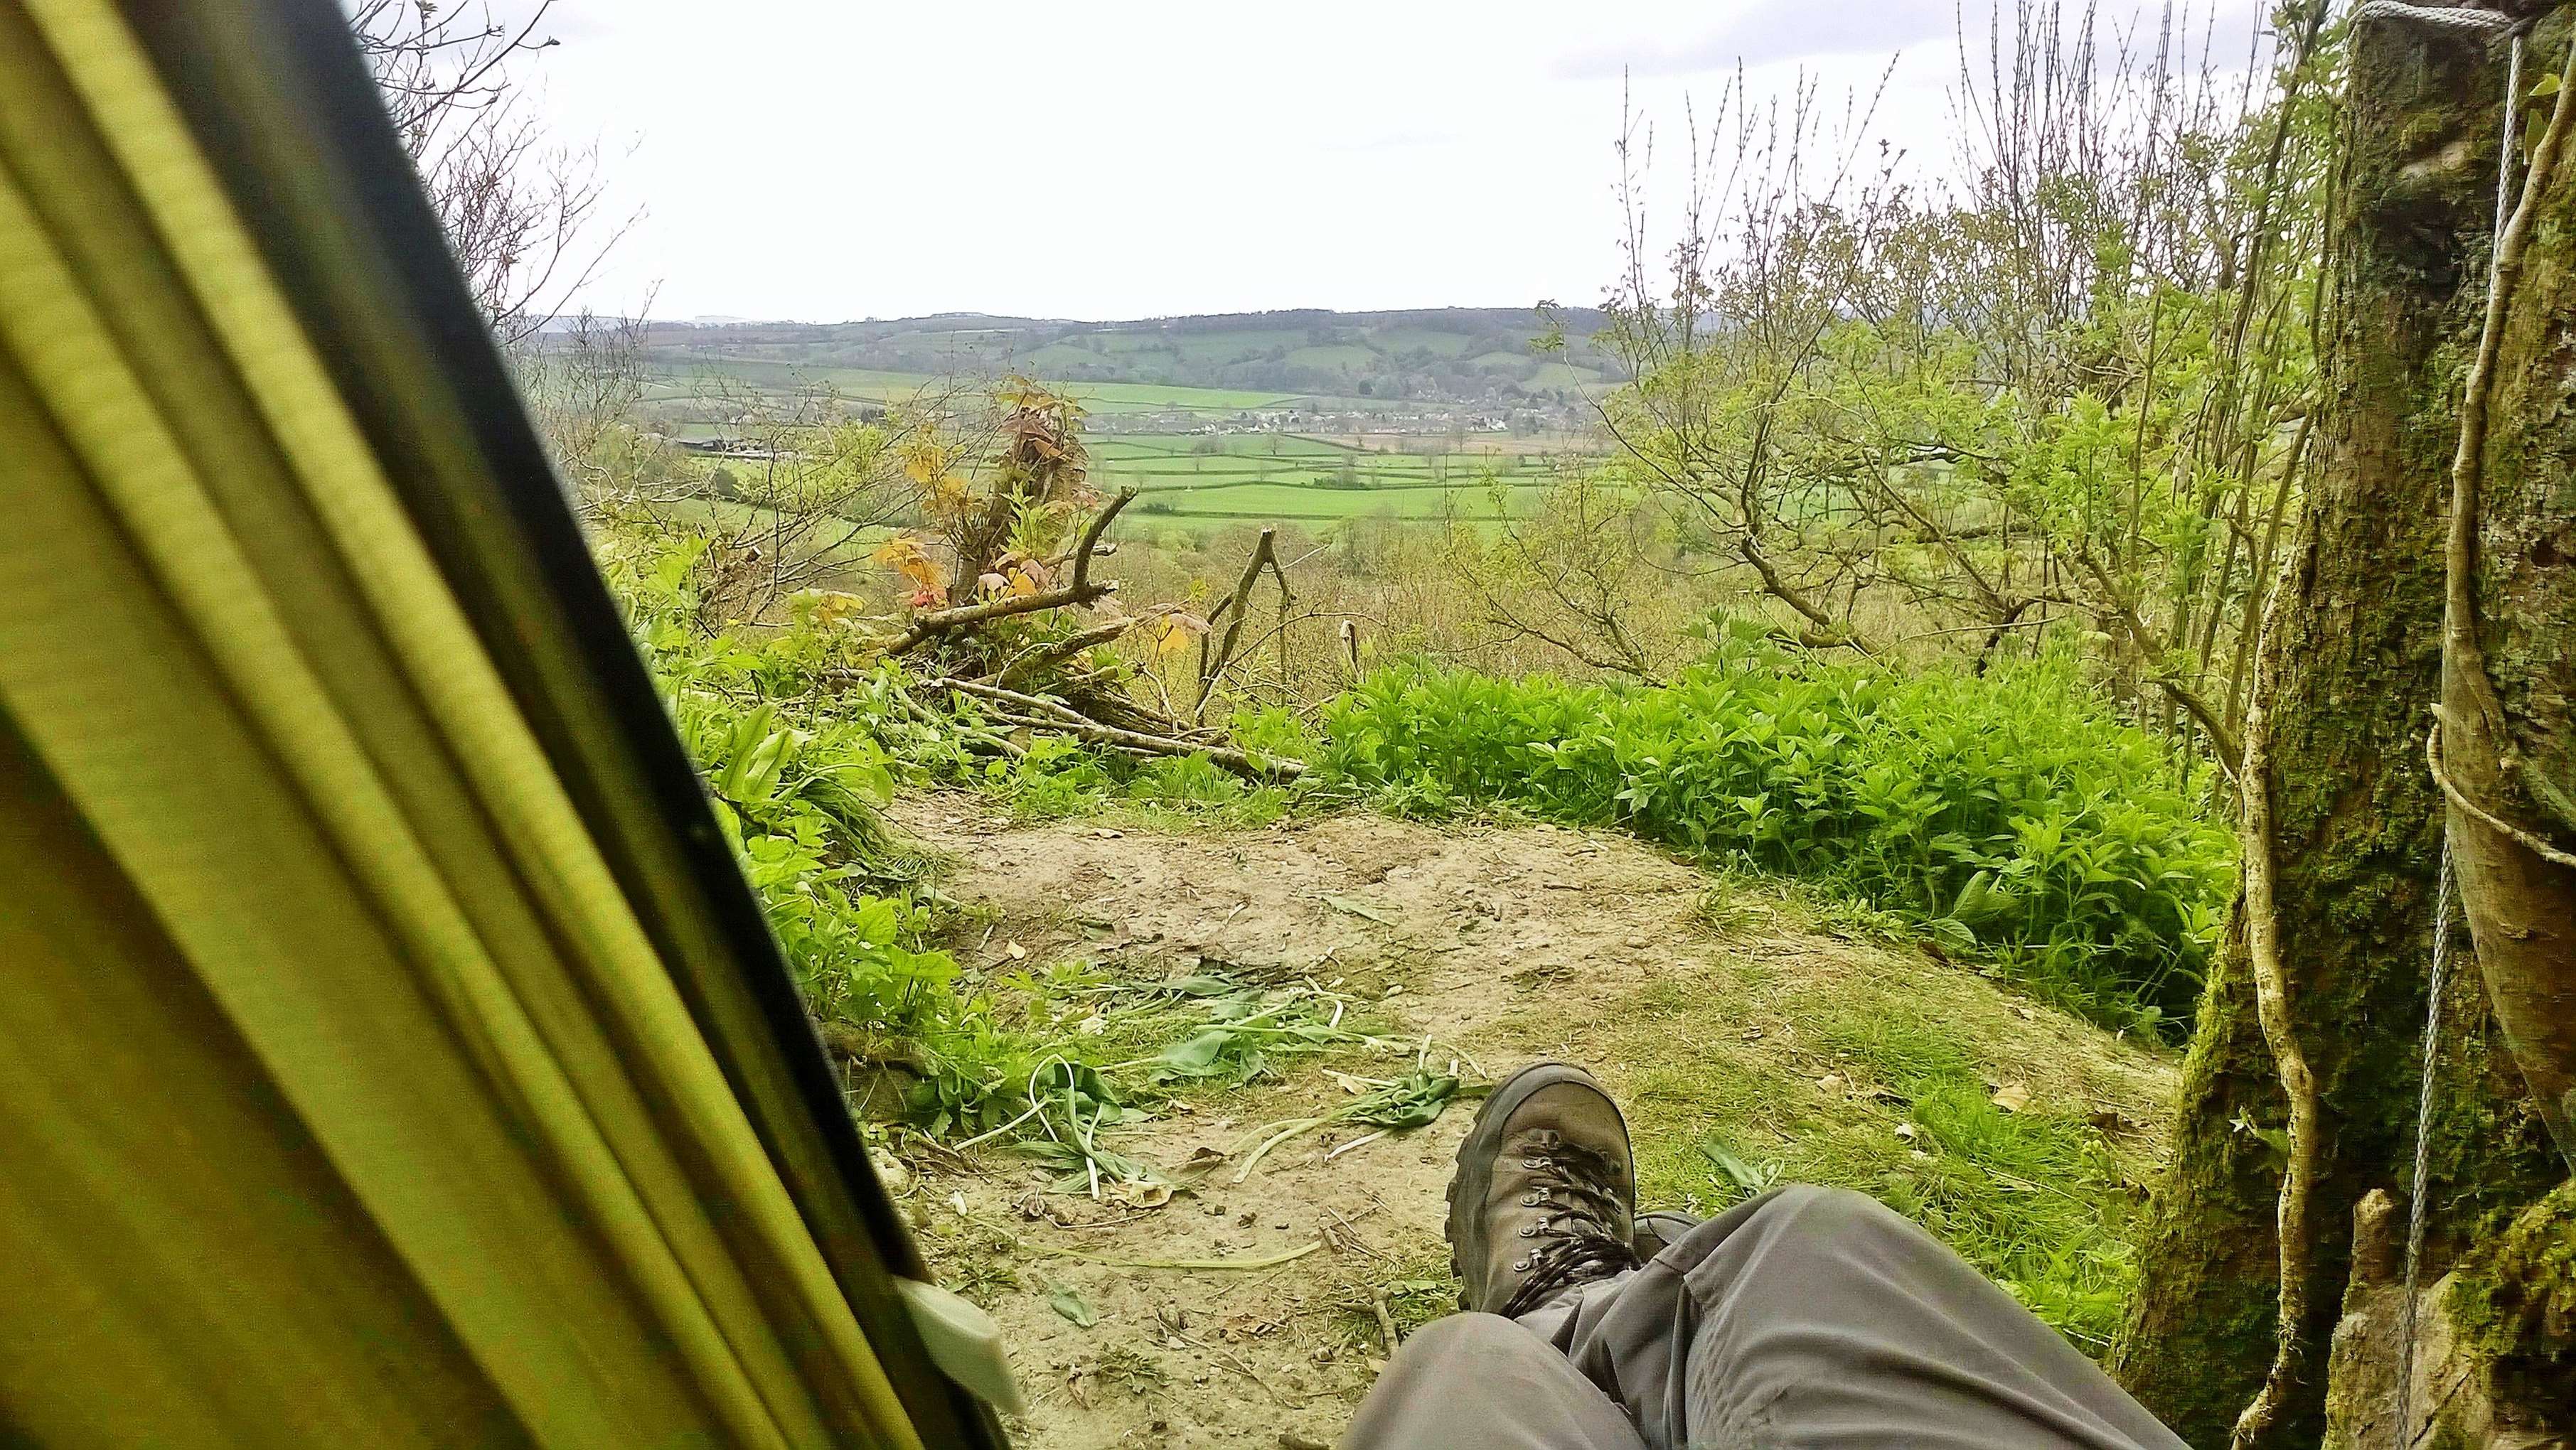
I found myself a nice spot for my hammock, on a bit of a slope so slightly slippy but the view was worth it. I had also brought along a couple of other hammocks for Gordon and Rick to use.
The rest of the Friday was spent teaching the guys how to put their hammocks and tarps up, carrying all the kit up to the site and chilling around the fire eating excellent food cooked by Fraser.
My home for the weekend
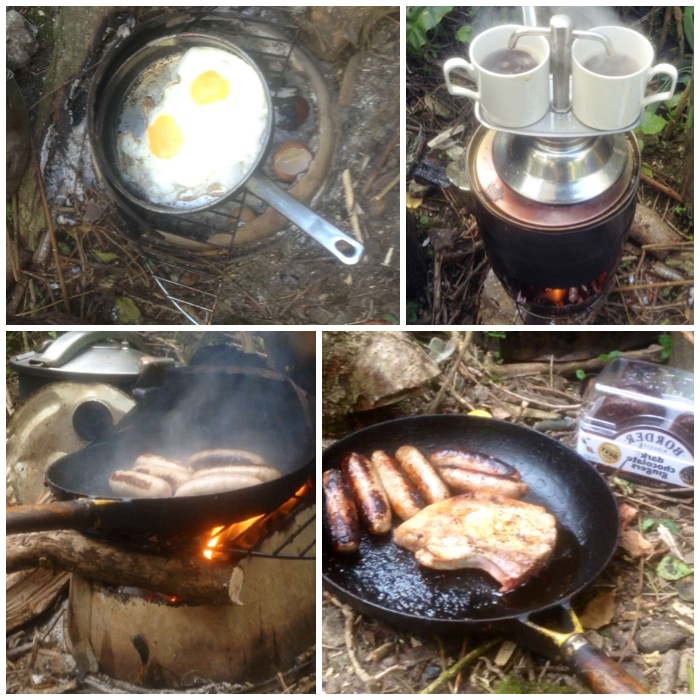
Food is always a dominant part of any visit to Fraser’s place. Breakfasts were a slow relaxed affair with plenty to eat and the coffee was excellent as well.
Breakfasts were good
As usual whenever I spotted some beautiful plants out came my trusty phone camera. I am very impressed with the results I get from the camera on my Nokia Lumia 820 phone (not being sponsored to say that!).
Figwort, Horsetail and Scarlet Pimpernel
That first morning was spent collecting ramsons, or wild garlic (Allium ursinum), to pickle for later use. I’ll do a separate post on this later.
Ramson forage
Lunch was a tortilla cooked on the open fire with the ransom adding that lovely garlicky flavour.
Ramson tortilla lunch
One of my main aims of the weekend was to find some chill-out time. I did that with my trusty EDC hammock chair from UKHammocks. The views were wonderful.
Post-lunch relaxing in my EDC hammock chair
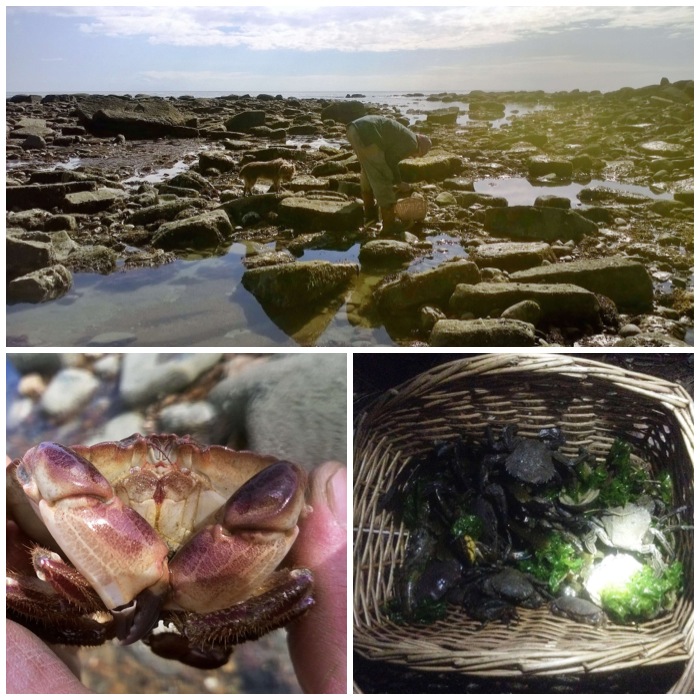
Saturday afternoon was spent down on the coast near Bridport foraging for crabs, small fish, limpets and seaweed. We met some other friends on the coast – Paul Burkhardt and Paul Newman – while we were there. Both Pauls were also looking for fossils. This part of the coast is full of fossilised sea creatures and it doesn’t take long to find them once you get your eye in.
Coastal Forage
The walk along the coast was a very pleasant affair but I was ever mindful of the risk of the clay cliff faces collapsing. With all the recent rain they did look rather unstable, with lots of collapsed areas.
Man’s best friends
I made a couple of videos on the Saturday:
Easter with Coastal Survival – Foraging
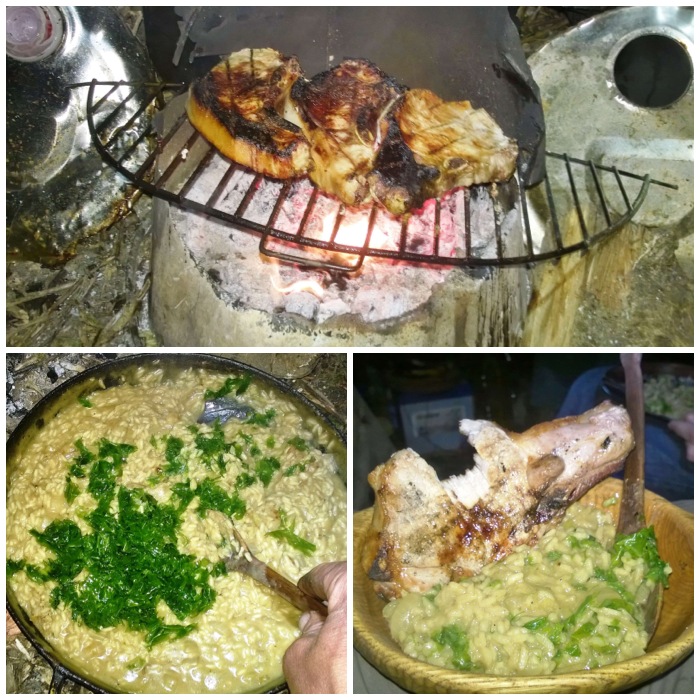
Dinner that night was a lovely risotto made with shellfish stock and a garnish of seaweed, topped with a chop for the non-vegetarians. It all went down a treat.
Seafood risotto and pork chops
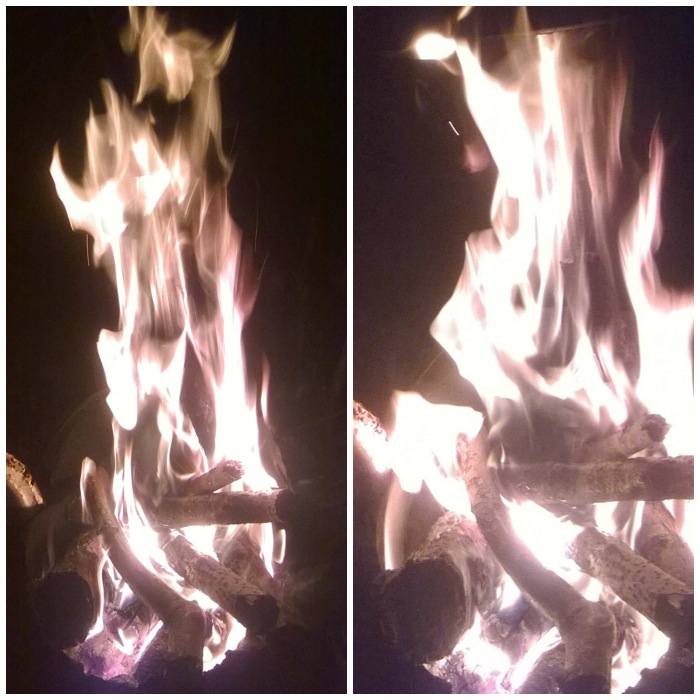
The Saturday evening was a quiet affair chilling out around the fire and testing out Fraser’s large gas wood burners (or more properly re-burners, as the gases produced are recirculated and reburned). I got a few fire faces and particularly like the Ent’s face (Lord of the Rings tree giant) in the one on the left.
Fire faces
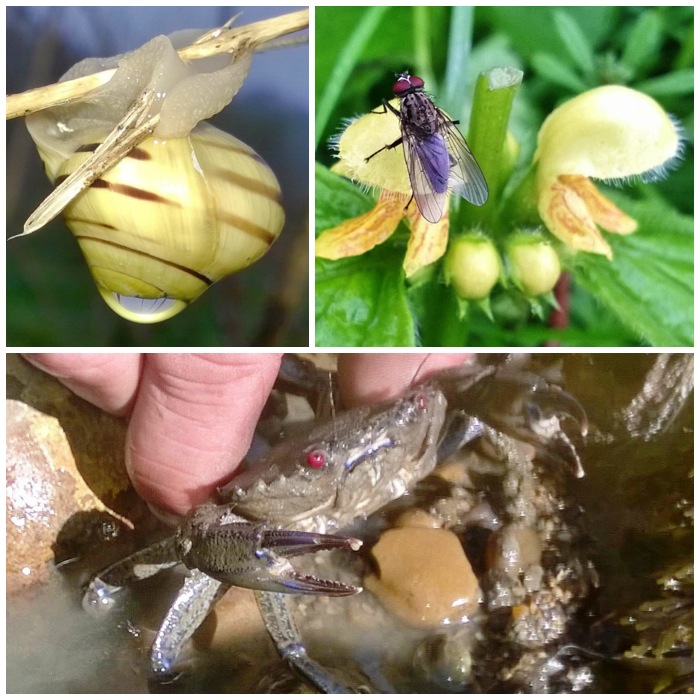
On the Sunday morning we had a beautiful walk through the woods looking at the new growth, the animal tracks and the views. I took the top two pictures that morning just to see what kind of detail my phone camera could give me. The crab picture was from the day before.
I took a video that morning but encountered a few problems making it. The problem with the second video was that I managed to delete the original files before saving the clip in iMovie. I could then only view the clip in iMovie and couldn’t upload it to YouTube. To get round this I ran the clip on the iMovie app and re-videoed it with my phone camera (I hope that all makes sense). Not as high quality as the first one but I still want to post it here.
Easter with Coastal Survival – Day two walk
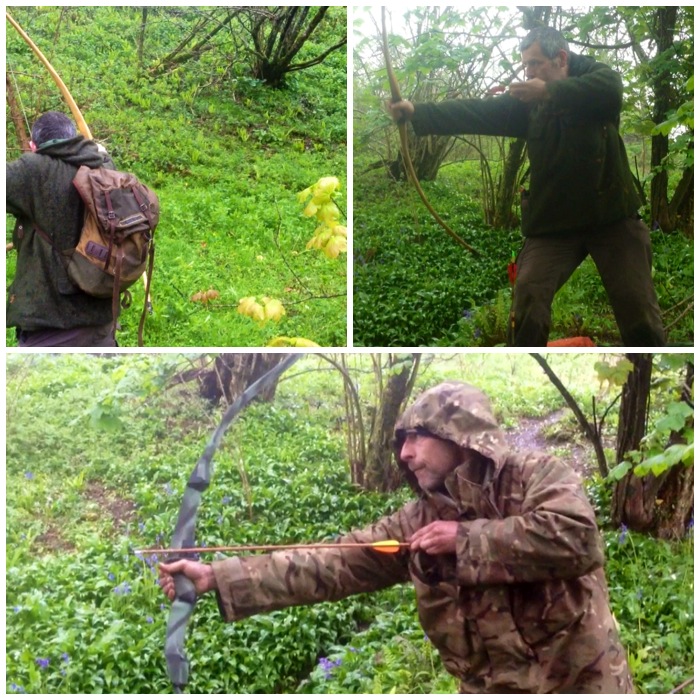
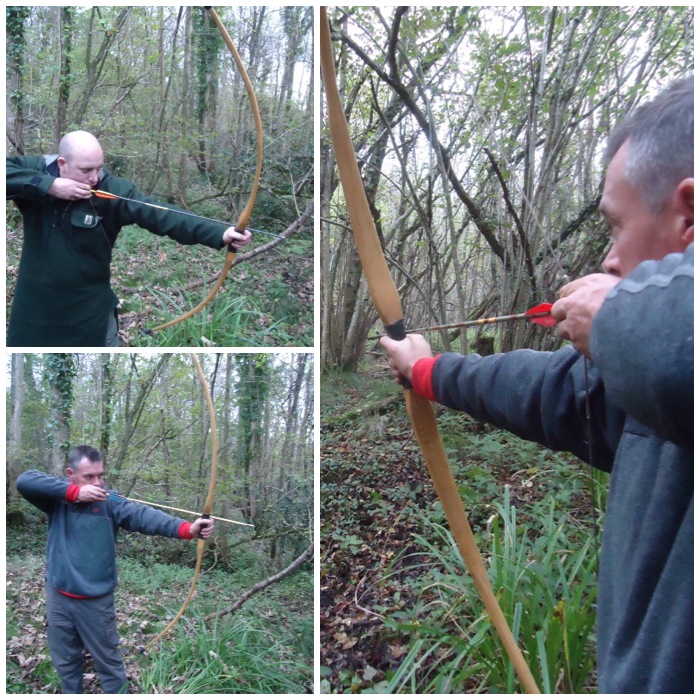
After the woodland walk I brought my bows up for a bit of stump and target shooting.
Bringing up the bows
I do like wandering around just shooting at stumps or the bases of trees. While I was out with Gordon that morning we stumbled across two large fallow deer. It was quite a sight, but they were too quick for me to get my camera out.
Archery time
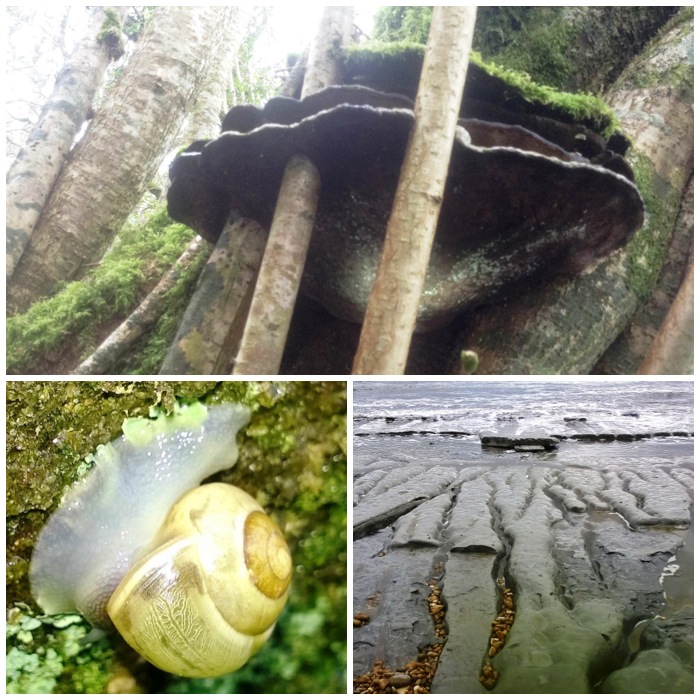
Three of the more unusual things I spotted over the weekend: some hazel coppice growing through an artist’s fungus, scores of these beautiful snails, and fresh-water tracks in the blue clay of the beach.
Wonderful finds
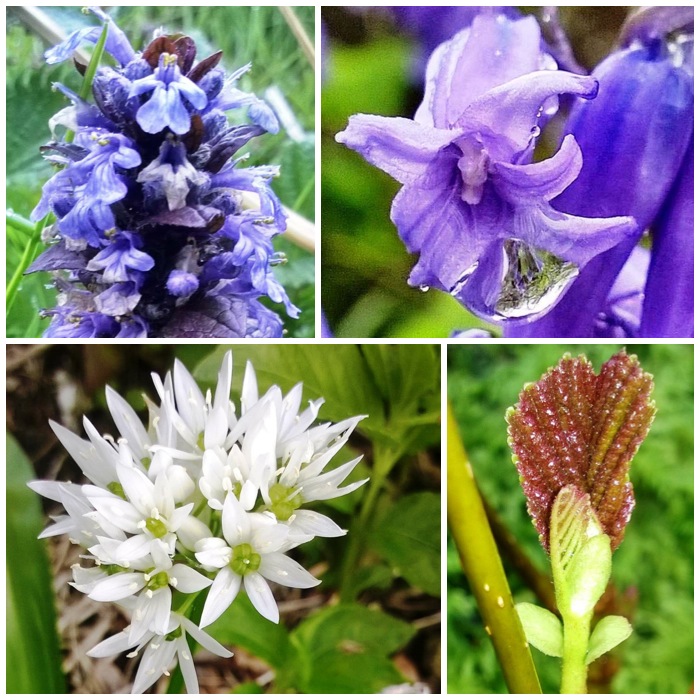
Some lovely close-ups of bugle, bluebells (top row), ramsons and alder (bottom row).
Spring bloom
A lot of Sunday, though, was spent under the parachute staying warm by the fire and listening to the rain hammering down. In the bottom picture you can see the different traps Fraser has made for fishing and catching small animals on the ground.
The classroom
After all that rain we decided it was time to head off down to the local pub for a few beers and a game or two of pool.
Wood gas re-burner
I now have one of Fraser’s gas wood (re-)burning stoves that you can see in the above picture and intend to really test it out over the summer.
On that final evening in the pub I edited the last of my clips to make this short video:
Easter with Coastal Survival – Bimbling and Bows
Monday morning was a pack-up-and-away day to try and miss the Bank Holiday traffic. It was great to be back down at Fraser’s place once again, it is a proper playground.
Last weekend I stopped for a break at one of the roadside services you find on most main roads these days. I decided to have a wander while the rest of the lads got what they wanted from the shop.
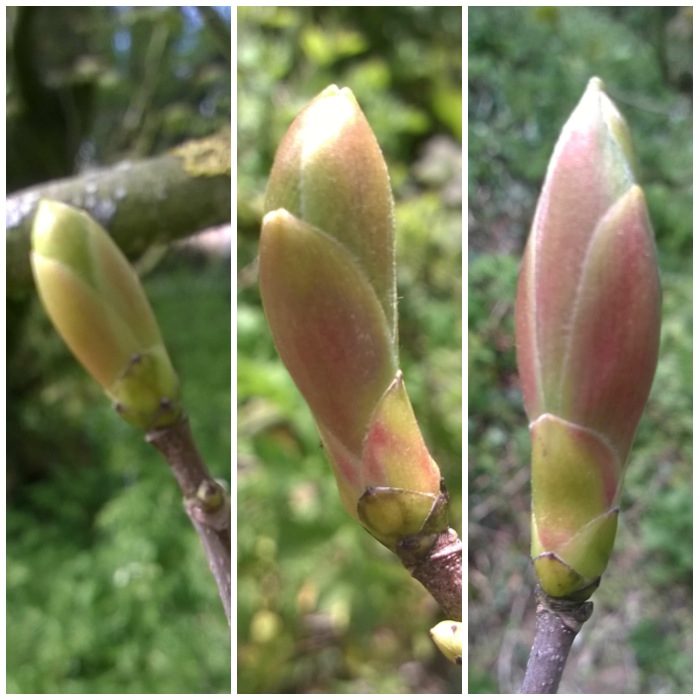
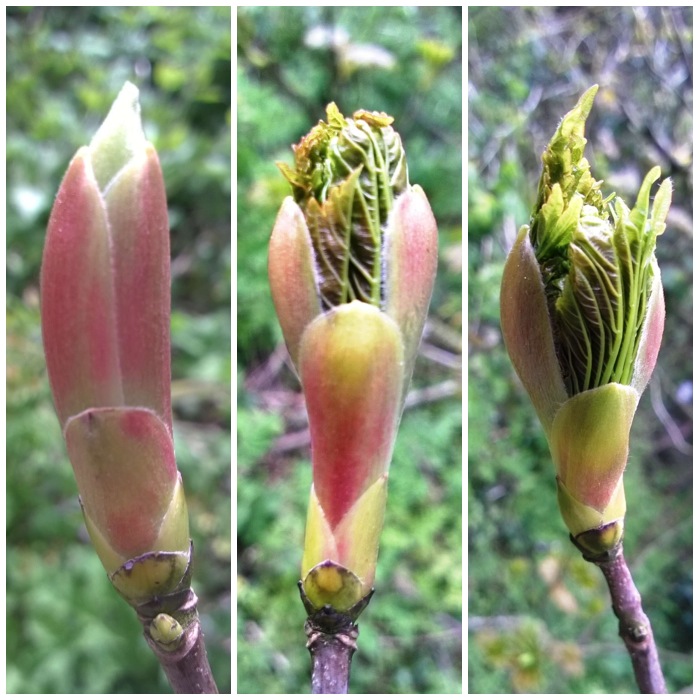
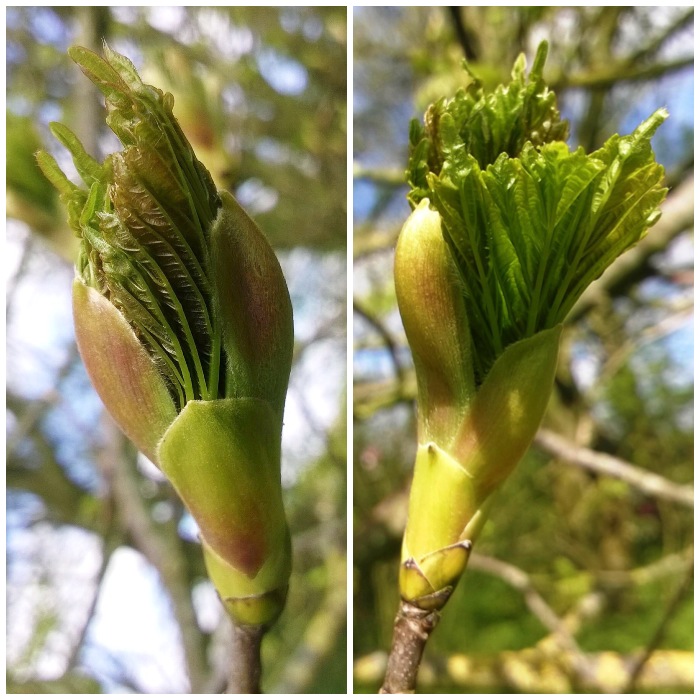
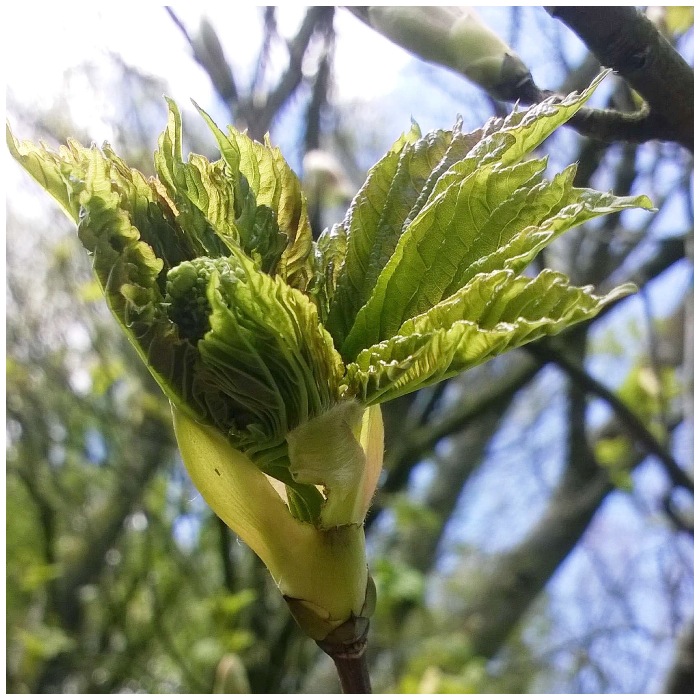
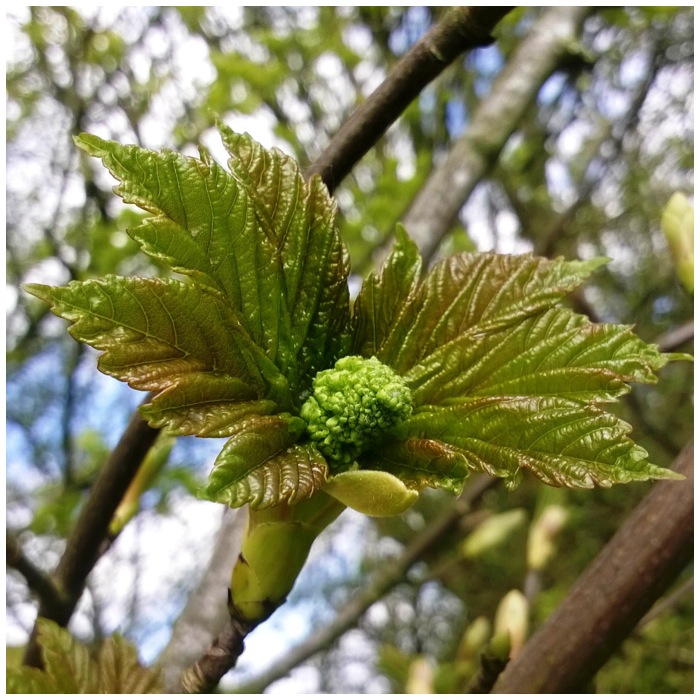
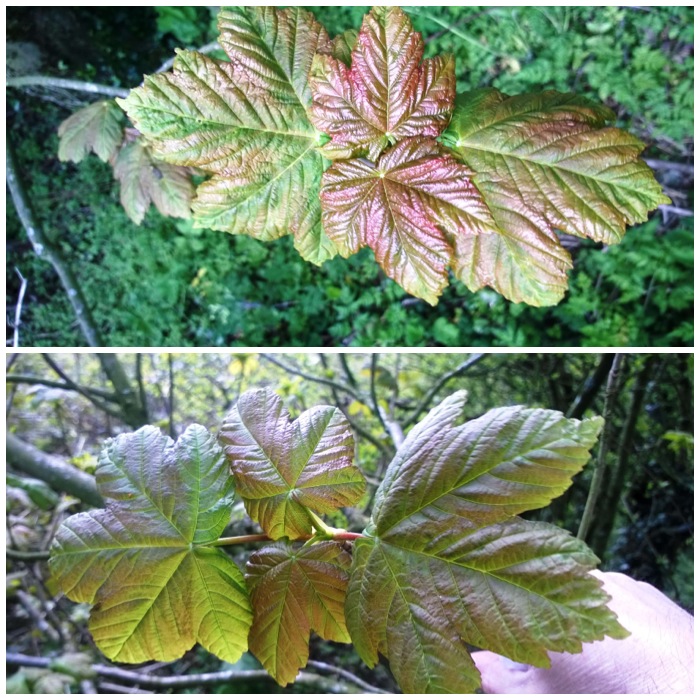
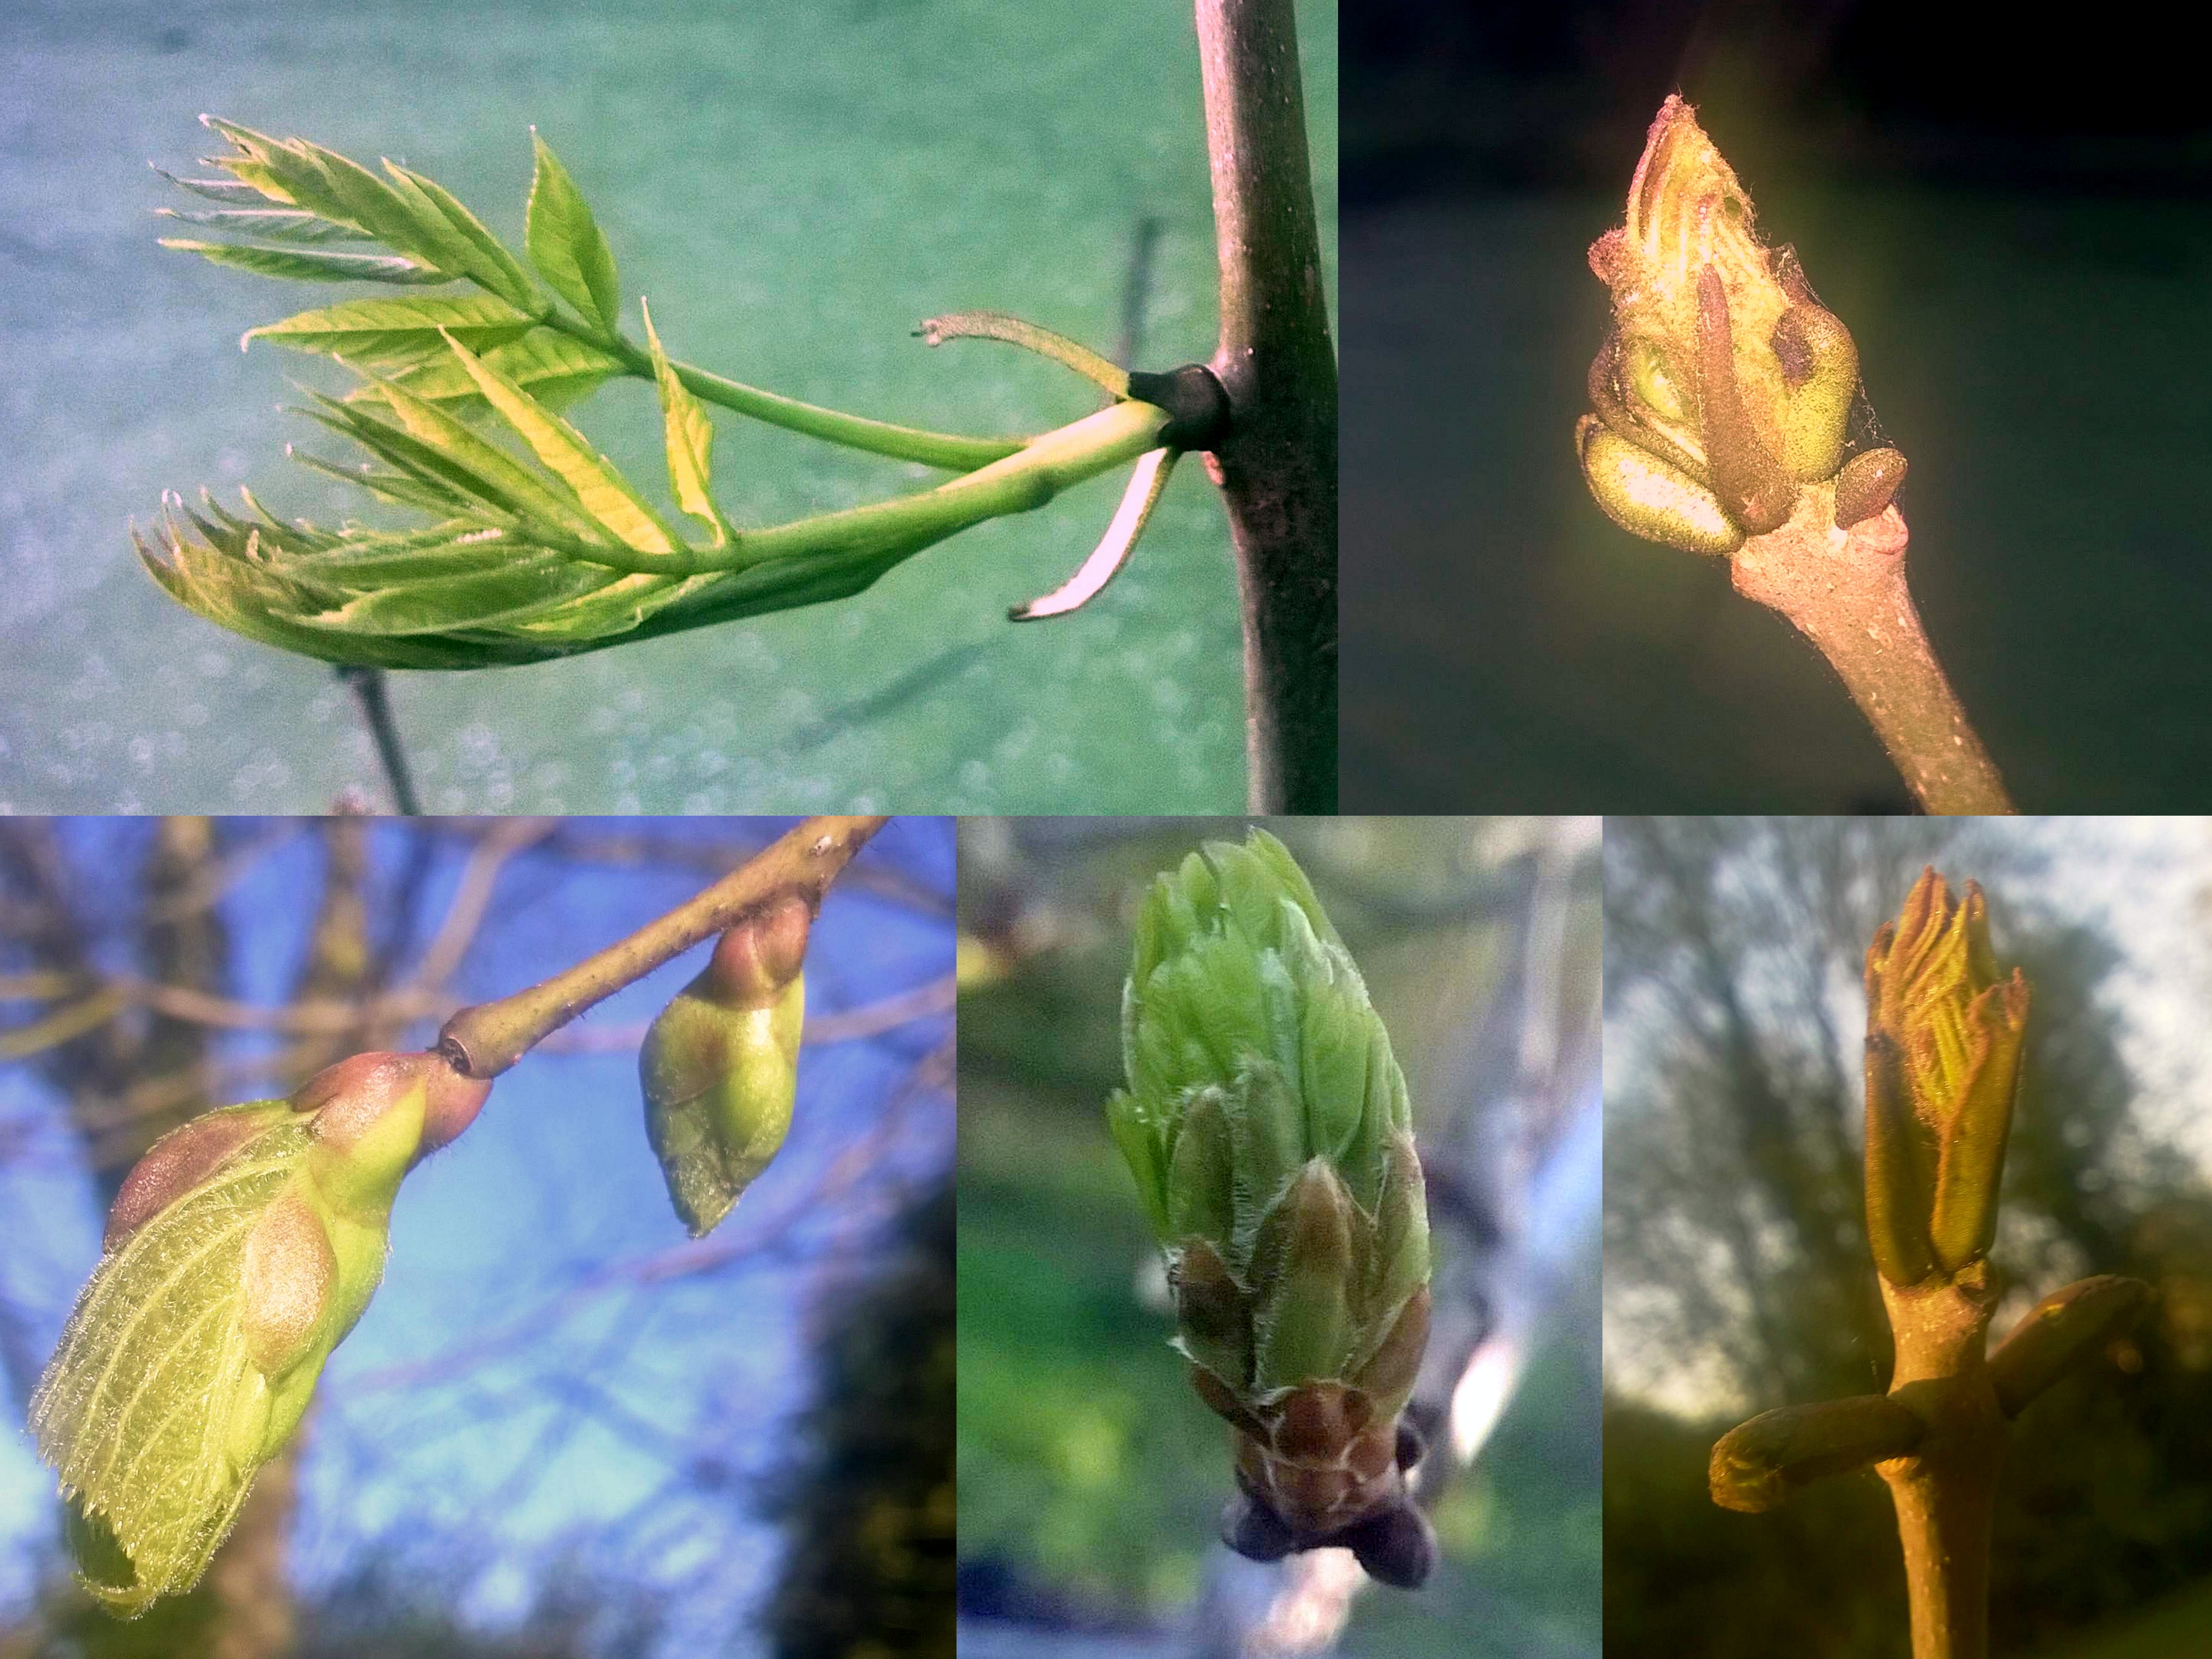
I was lazily staring at the trees and noticed something about one tree in particular, a sycamore (Acer pseudoplatanus). The tree had buds on it at every stage of growth. I could track in a zig zag pattern across just one small part of the tree all these stages.
When the lads arrived they asked what I was doing and shook their heads pityingly as I took out my phone to capture the pictures.
Here are all the stages I saw. No need for me to try and describe them as the pictures say it all.
A stretching budPeeking outUnfurlingThe small leaf bundle then appearsGathering in that first sunlight – like a young butterfly drying its wings outPreparing to unfurl the central leavesUnfurled, growing and working
I have been trying to capture this process of growth on different trees this spring but was struck by the sight of all these stages on just a few branches of the same tree.
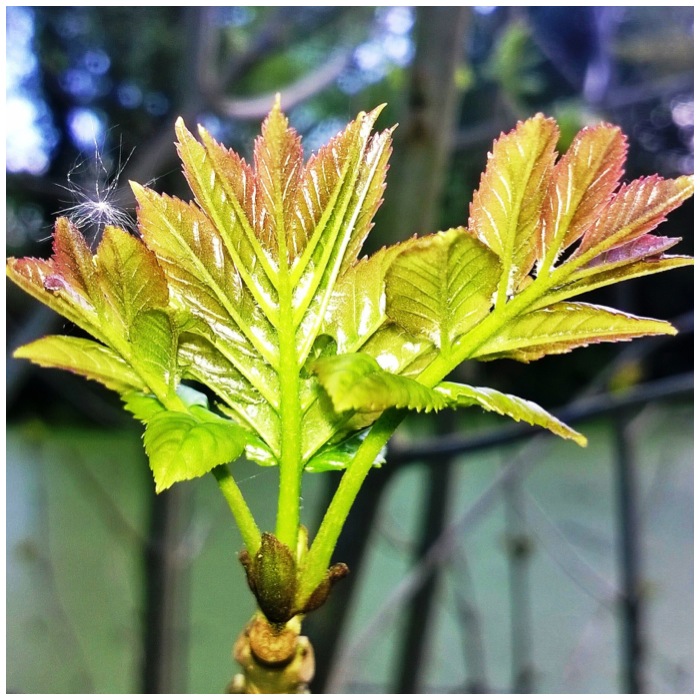
As the spring growth is coming thick and fast I popped back out on Monday to see what was coming through around Bramley.
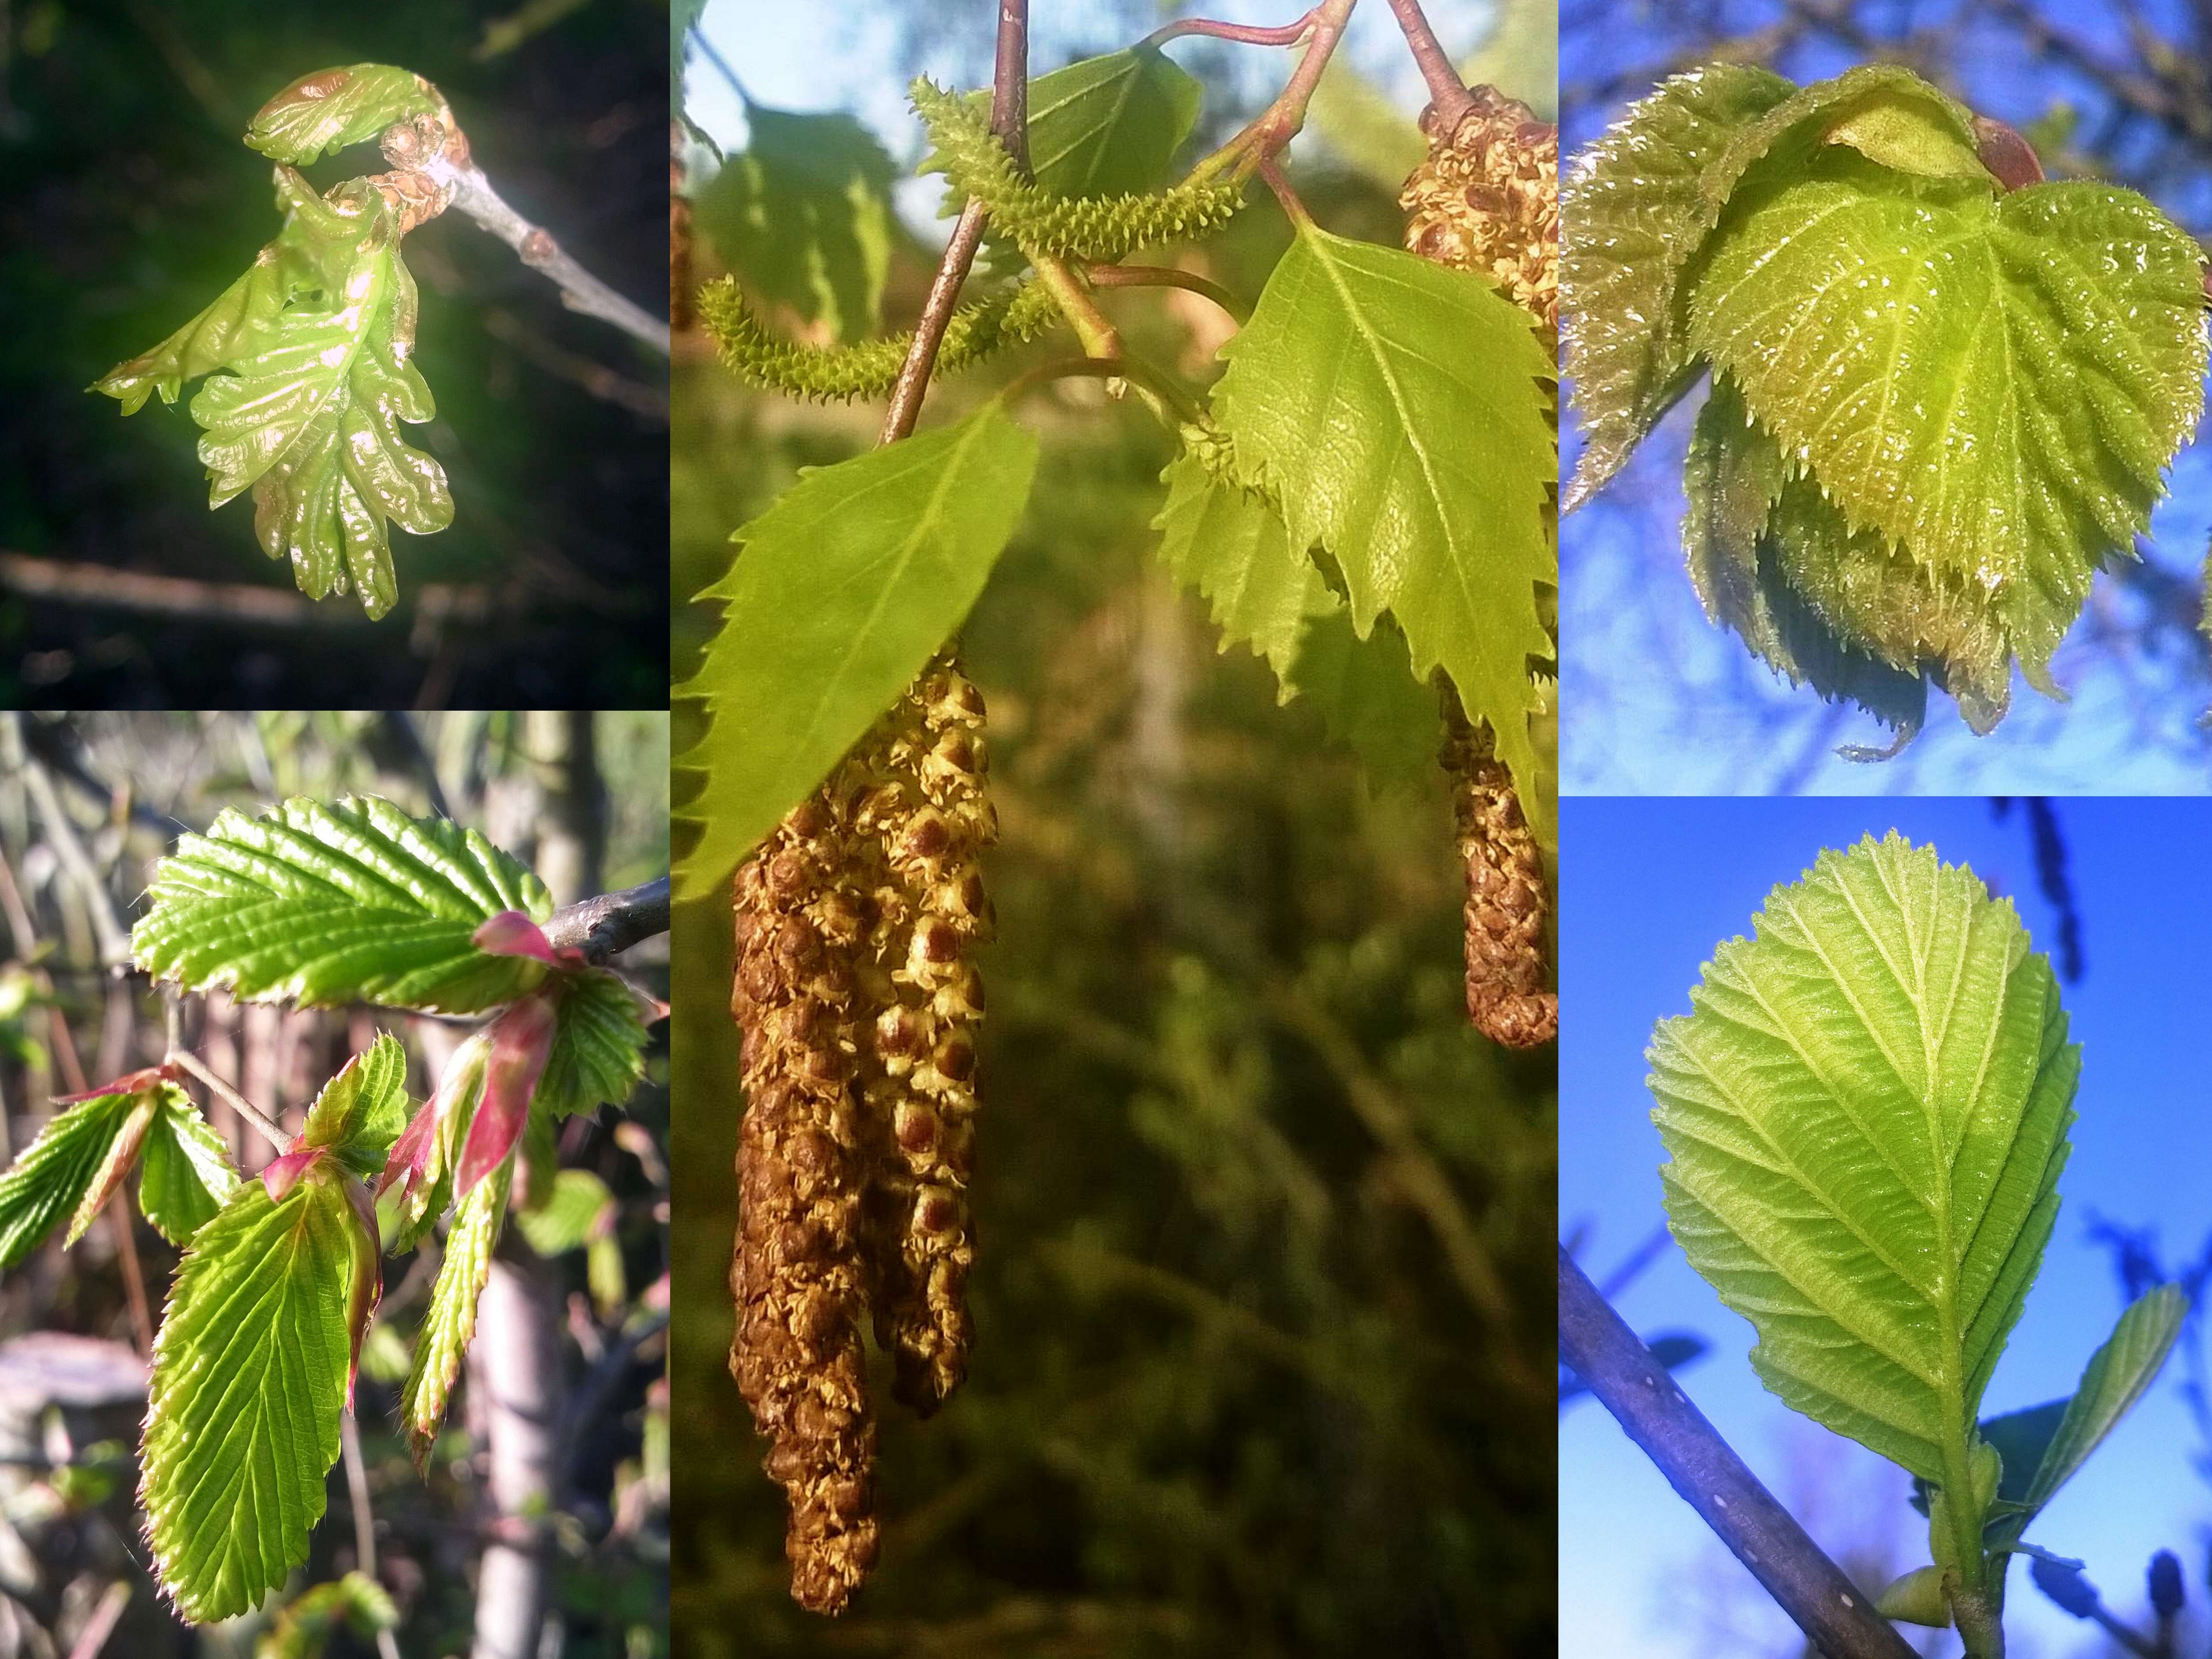
I found that the ash had started to burst through but only on some trees. The top two pictures are of ash as well as the bottom right picture.
Bottom left is lime and in the centre (bottom) I found one English oak tree that was starting to push its leaves out.
Bursting buds
That English oak had just one solitary leaf showing when I photographed it so as I write this three days later I expect it will be well covered now. The beech tree (bottom left) that I have been monitoring had been chopped in two as they had been doing some mechanical hedgecutting in the area. Thankfully as you can see the bottom half of the beech is managing to push some leaves out.
The silver birch in the middle picture has produced masses of leaves and they taste exceptionally good at the moment. On the right looking very shiny the lime tree I have been watching has just a few leaves showing now. Finally on the bottom right the alder is well established with leaves as it had started two weeks ago.
Young leaves
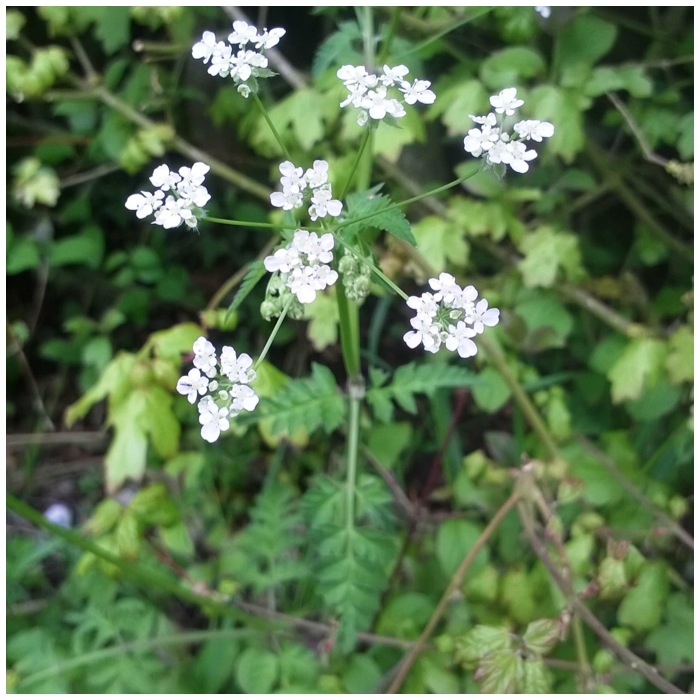
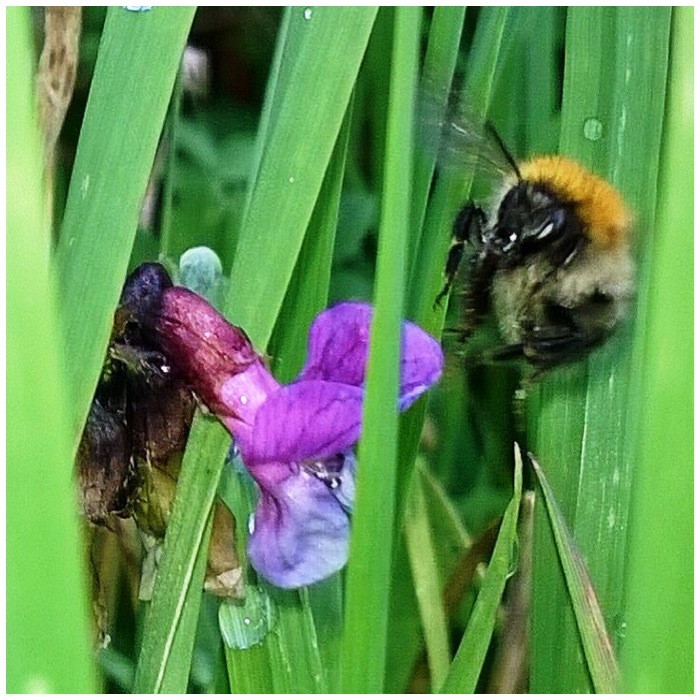
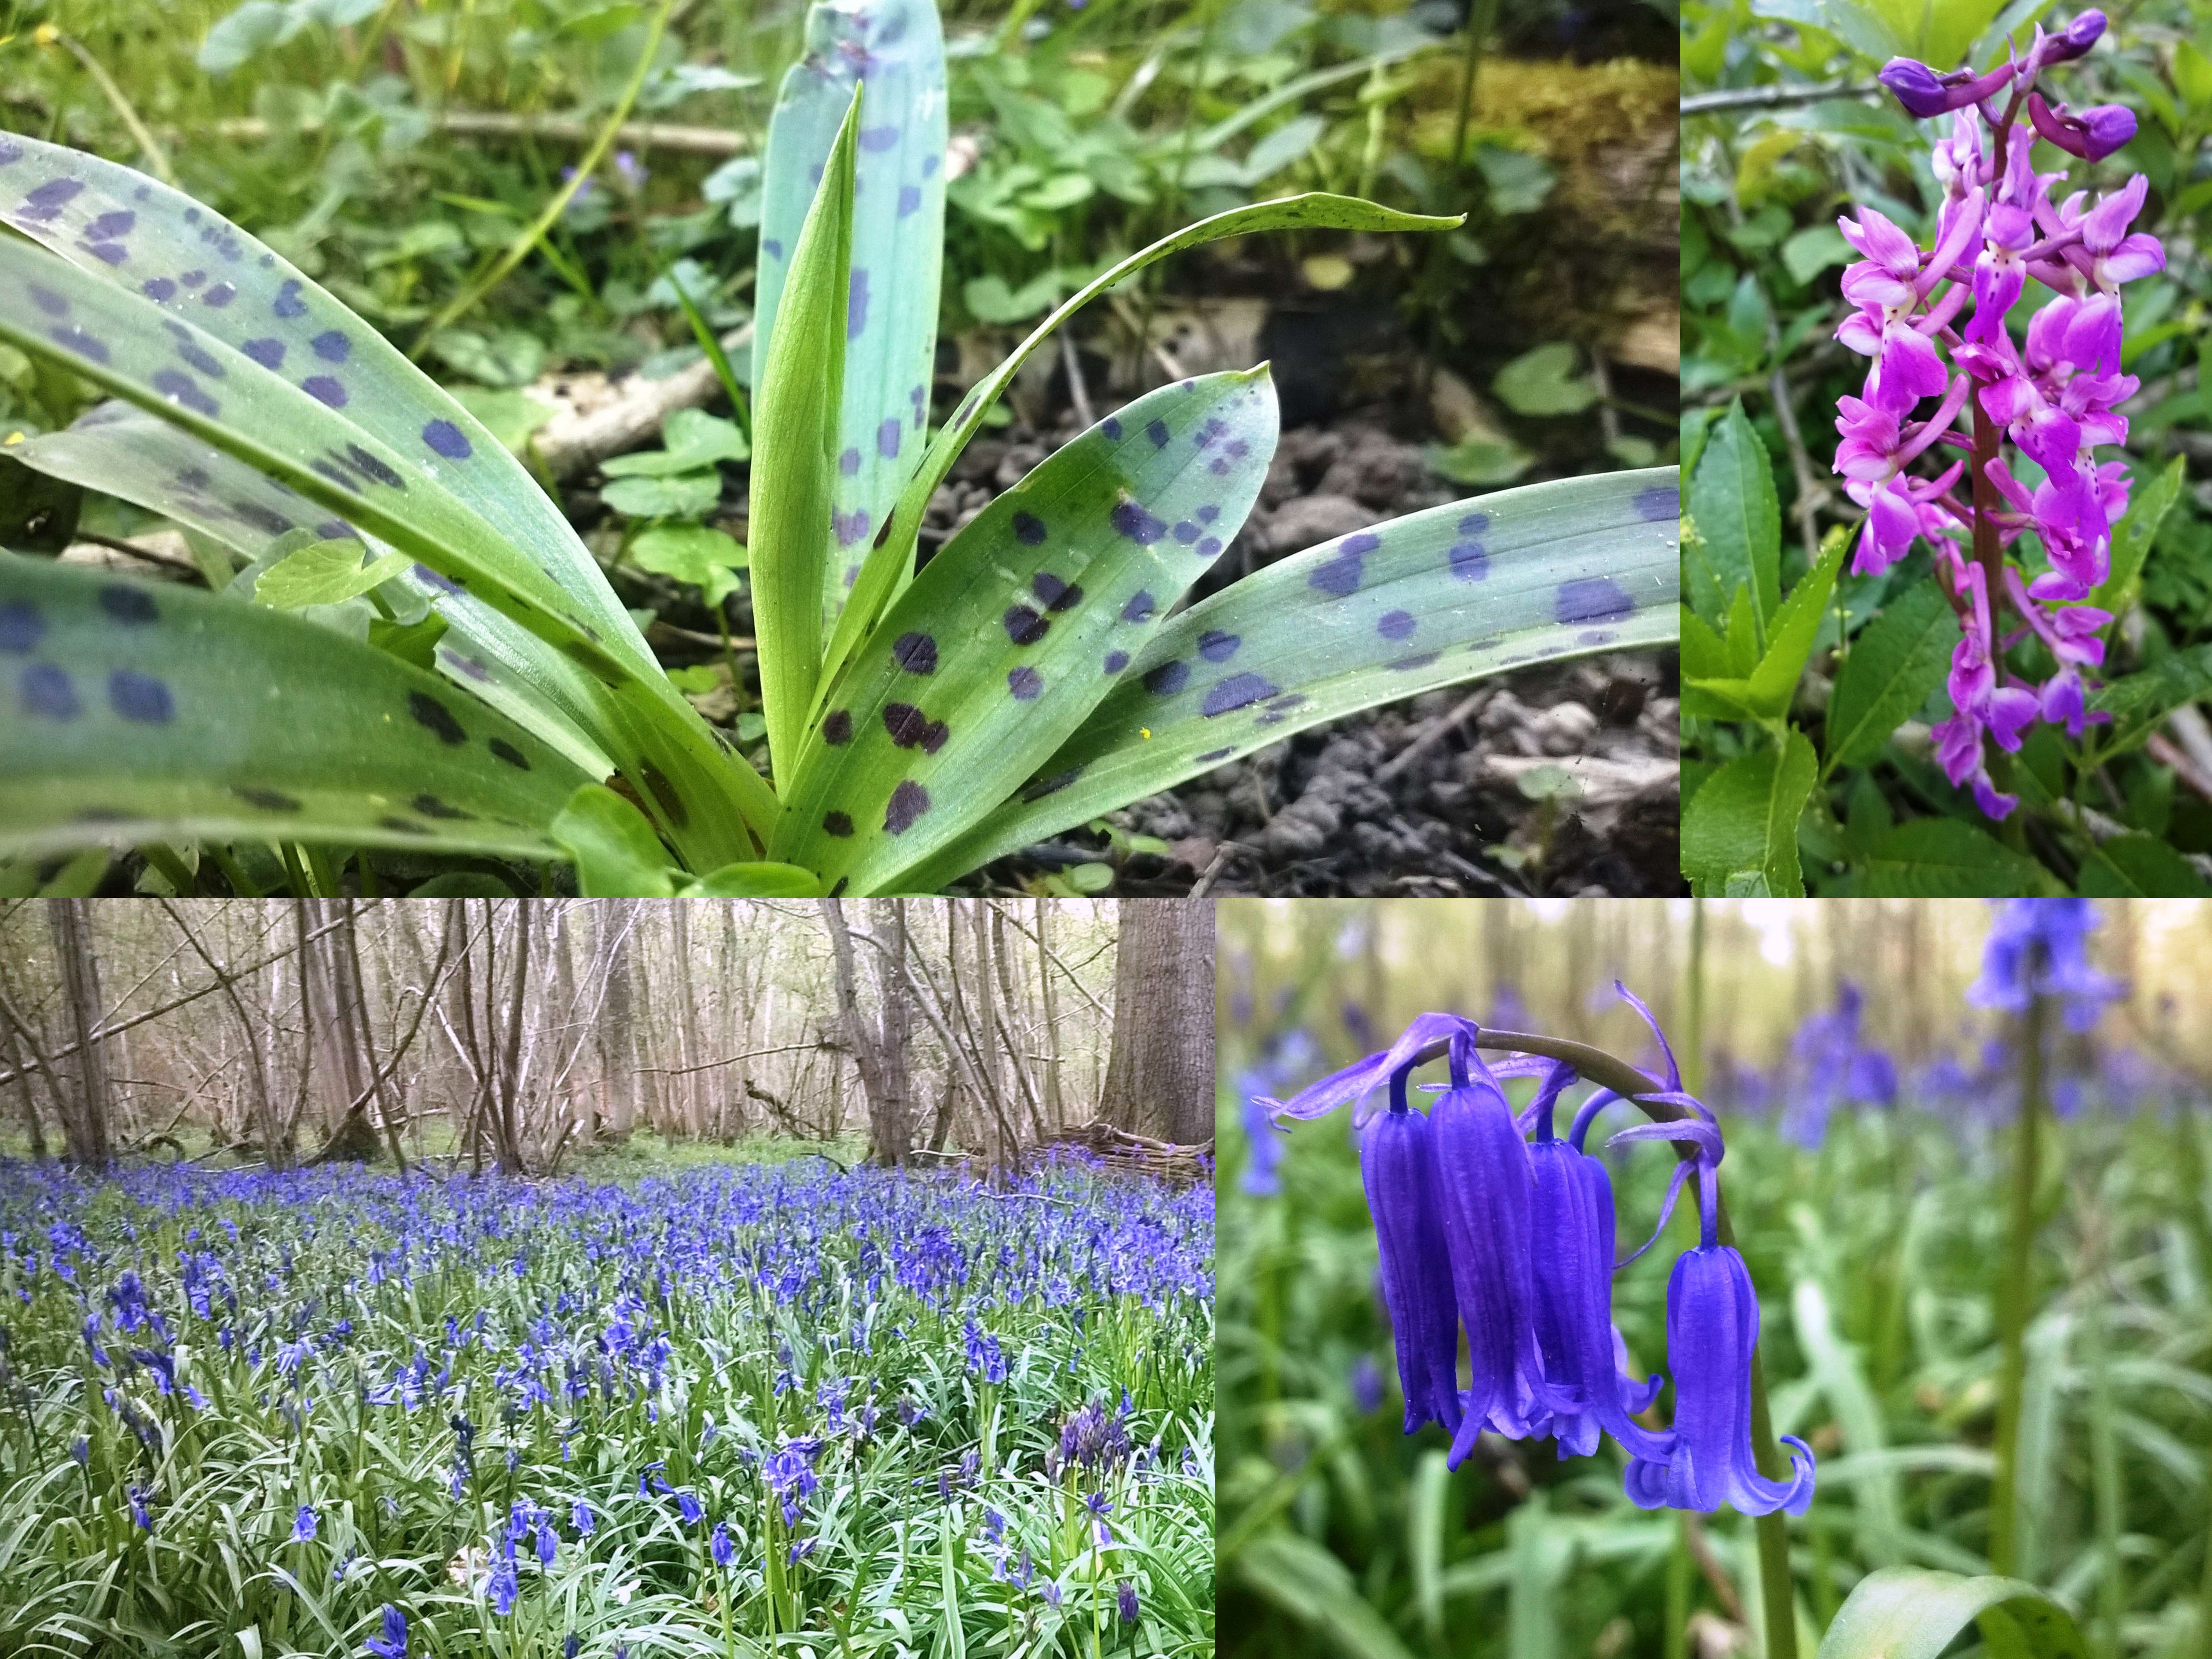
There are plenty of flowers out there still, including primroses, stichworts, wood anemones and wild strawberries to name a few, but two caught my attention this trip. The top two show the early purple orchid and the bottom two the masses of bluebells that have appeared over the last week.
New Flowers
My kids had a great time looking for these orchids so we decided to make a little video of it.
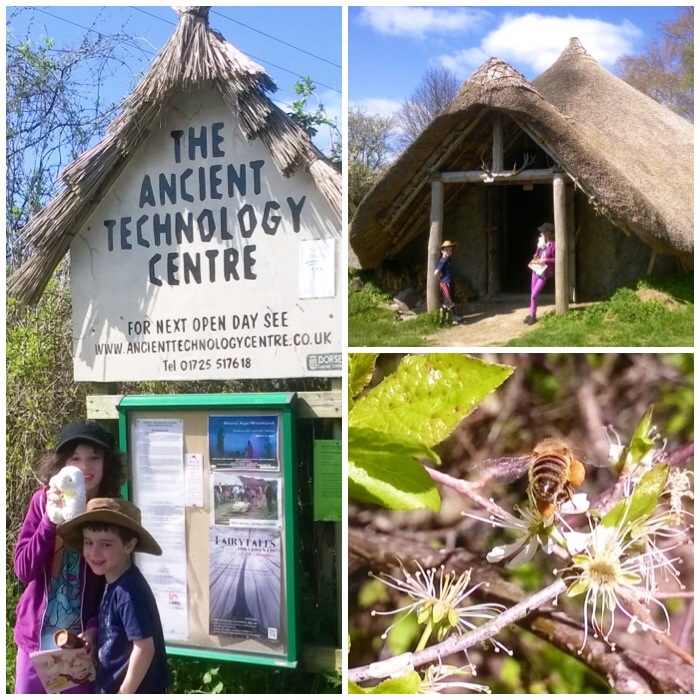
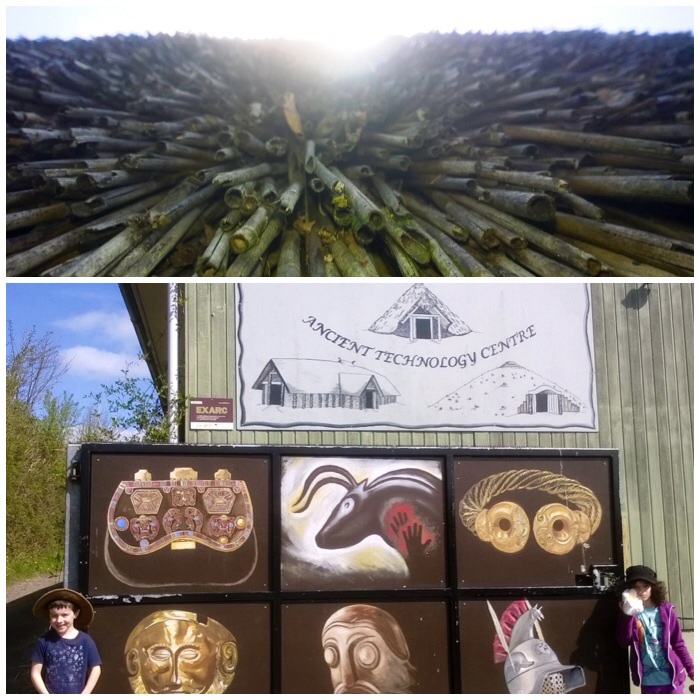
I was catching up on what was happening on Facebook last week and spotted that the Ancient Technology Centre (ATC) was holding a Stone Age Weekend the following week. Thankfully for me my calendar was free and as my kids love this sort of interactive show it was not hard to sell it to them. The centre is in Dorset, just over an hour’s drive from our house, and on this weekend the weather was perfect for my Scottish skin (warm but not too hot).
The Ancient Technology Centre
My main aims for the visit were to let my kids have lots of hands-on fun and pick up some ideas for myself for future projects. The ATC caters well for parents and kids and as it is a place where lots of experimental archaeology is undertaken it ticked all the boxes for me.
The top picture below is taken from the bottom of the roof of one of the roundhouses.
Great for kids (of all ages)
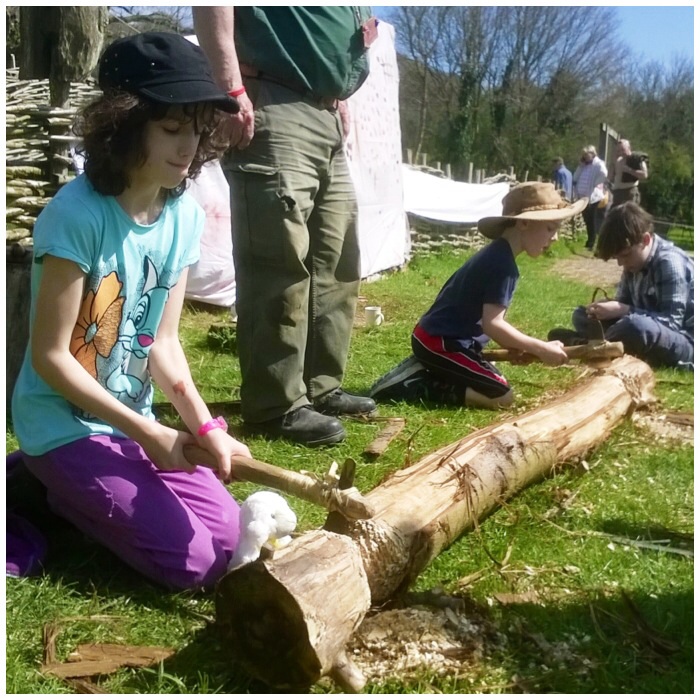
We took a walk around the whole site at first just to show Catherine and Finlay what they could do. In the end the kids had to drag me away from one of the roundhouses as I wanted to explore every item in it and how it was built.
After a five-minute wait Catherine and Finlay were using Bronze Age axes and happily chopping away. They did come back for a second go later and I managed to have a chop as well. This was the first time for me using a Bronze Age axe and it is different to using modern or flint axes. I liked the fact that the queues here were in single-figure minutes (currently writing this in a queue – 35 minutes at Legoland and counting) and everybody was really relaxed.
Bronze Age axes
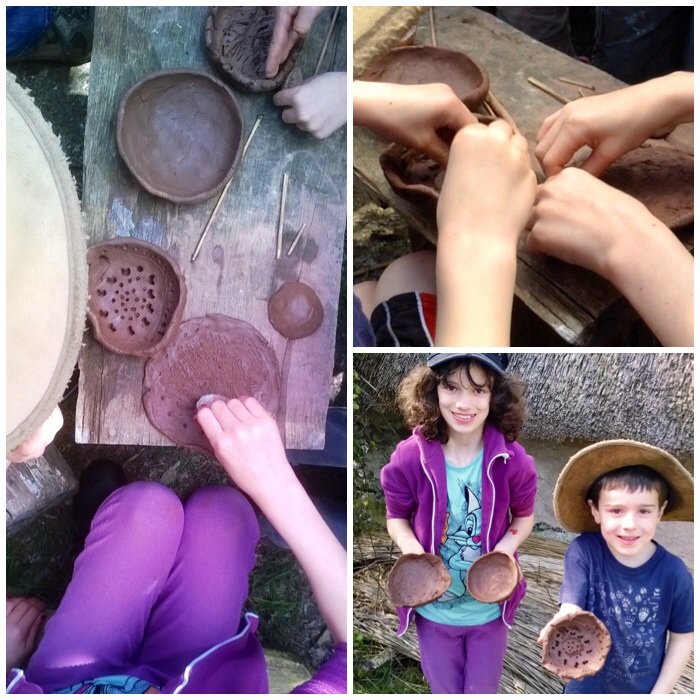
The centre also experiments with primitive pottery and had set up a work area where we could all make a pot and decorate it using old bones shells and feathers. We left our pots to dry in the sun before taking them home. We will have to let them dry for at least another two weeks before firing them over an open fire. I don’t know if we’ll do this final stage as they may crack.
Primitive pottery
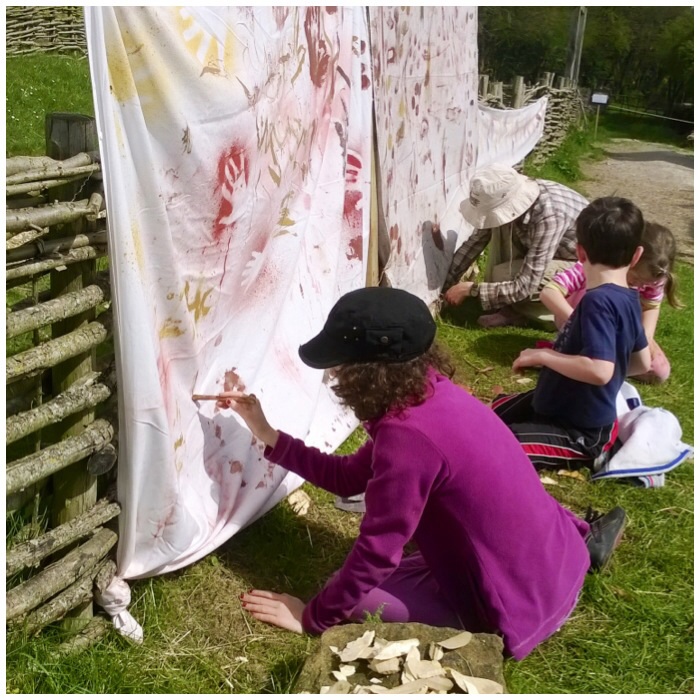
While Catherine and Finlay were happily engrossed in cave painting techniques I managed to slip off and see what else was going on.
Cave painting
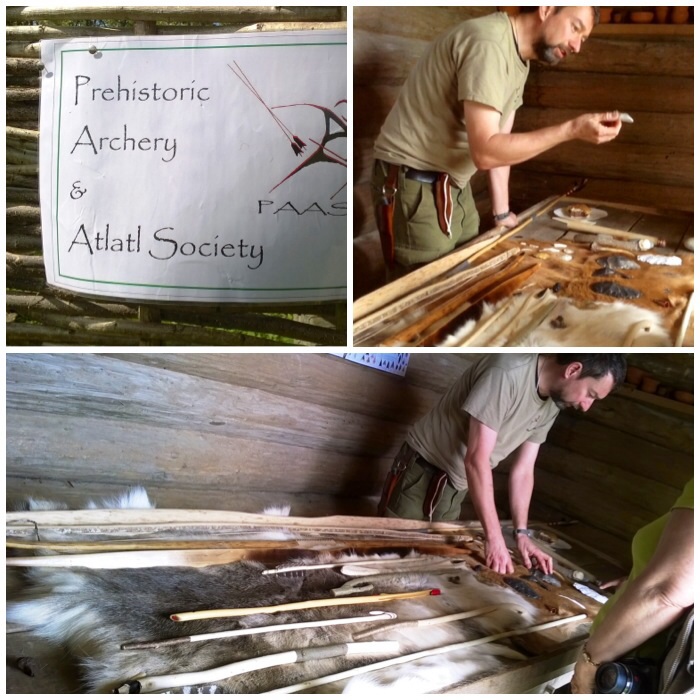
I popped over to see what was on display on the Prehistoric Archery and Atlatl Society (PAAS) stand. PAAS make some beautiful craft items based as close as possible to archaeological finds and are also keen experimental archaeologists. Last year PAAS visited us at the Bushcraft UK Bushmoot and gave some great classes on archery, atlatls and slings. They plan to be at the Bushmoot this year as well.
PAAS
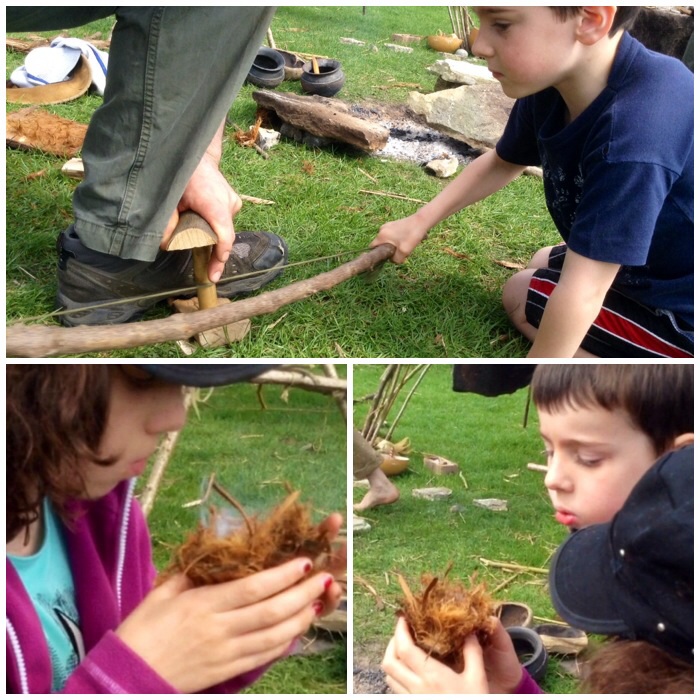
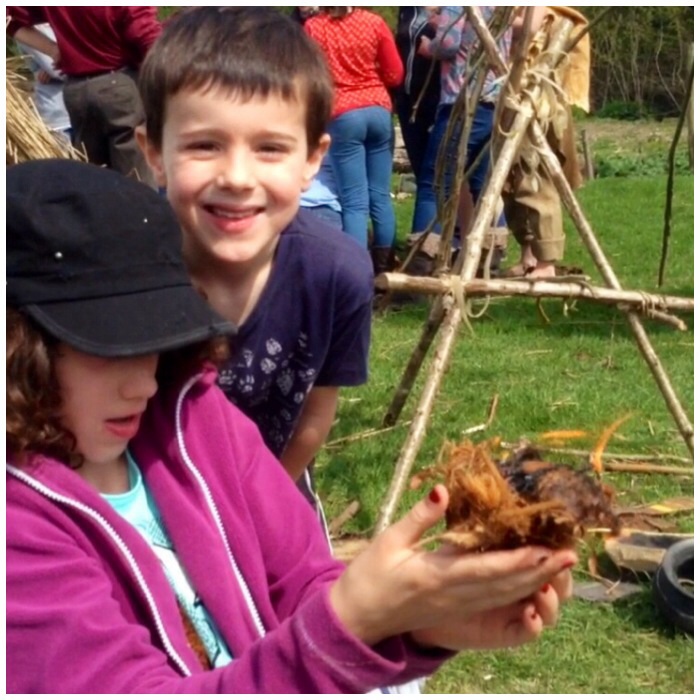
We watched a demonstration next of Bowdrill using just a primitive set. The couple doing the demonstration were from Outback2Basics and put on a great show. We missed the first class on making campfire bread and cooking salmon but managed to get some time bowdrilling.
Bowdrill with primitive kit
Finlay and myself took a twirl on the bow and then Catherine took over on blowing the ember into flame.
Family bowdrill
With a little help from Finlay we soon had a flame. The tinder was the inner bark from a Leylandi tree.
Flamage
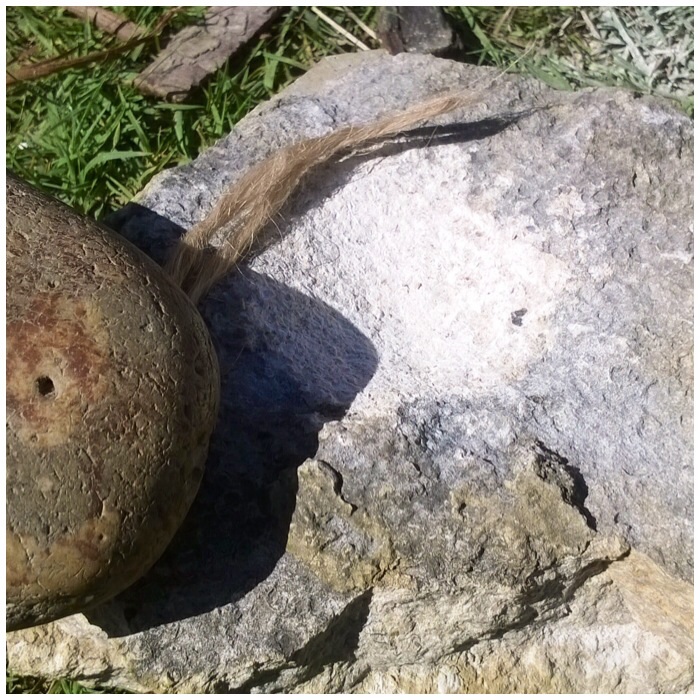
The next class with them was making a fat candle using a rock as a holder. We chipped away on a soft rock with a hard rock to create a small scoop to hold the fat.
The wick we made out of some jute string by untwisting it and then loosely putting it all back together.
Fat candle – prepping the stone
The scoop took us about 20 minutes to chip out.
Fat candle – fat well and jute wick
I cannot remember what type of fat was used but once it was poured in the wick was added, leaving about a centimeter protruding from the fat so that it could be lit.
Fat candle – set up
The winds were quite light but would gust a little so we had to protect the flame.
Fat candle – alight
I managed to capture a lot of the day on this short video.
Afterwards we had a look at the wood carving section and Catherine learned all about how beds were constructed in the past.
Woodcarving
I picked up some ideas on making a circular stack for my kindling and the kids had fun on the Roman turntable.
Kindling wheel and Roman turntable
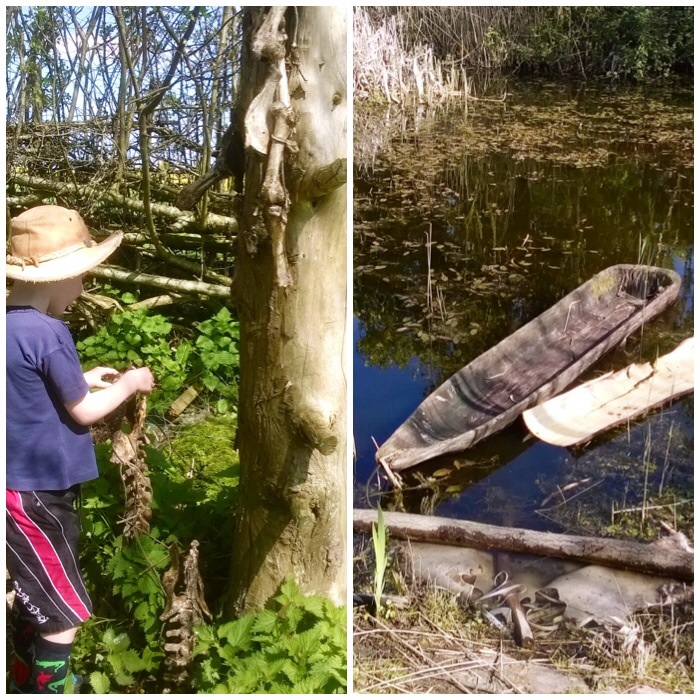
Two good finds of the day for me were the drying post for bones and the wooden dugout in the pond.
Bones and dugout canoes
I would thoroughly recommend you visit the ATC if you ever find yourself down near the New Forest as the work they undertake is quite amazing.
It was magical to lie there and watch the snow falling in the perfectly quiet woodland.
A winter weekend with Coastal Survival
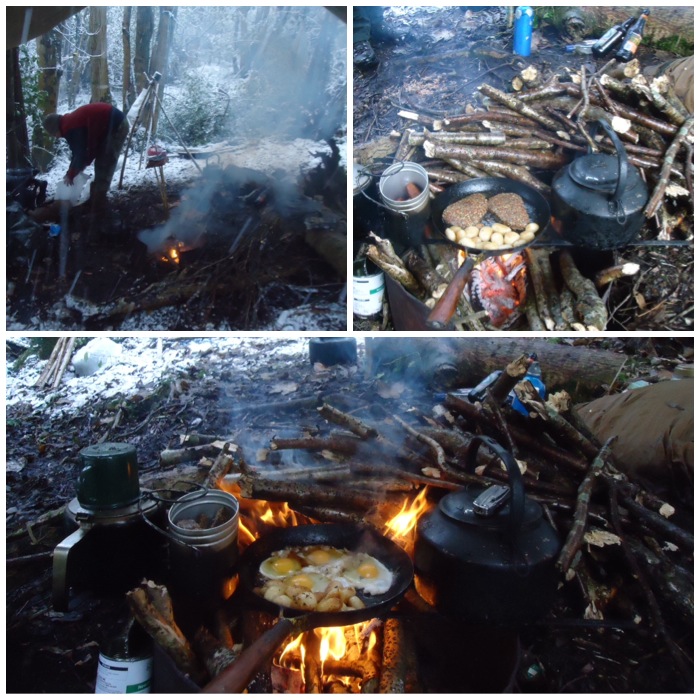
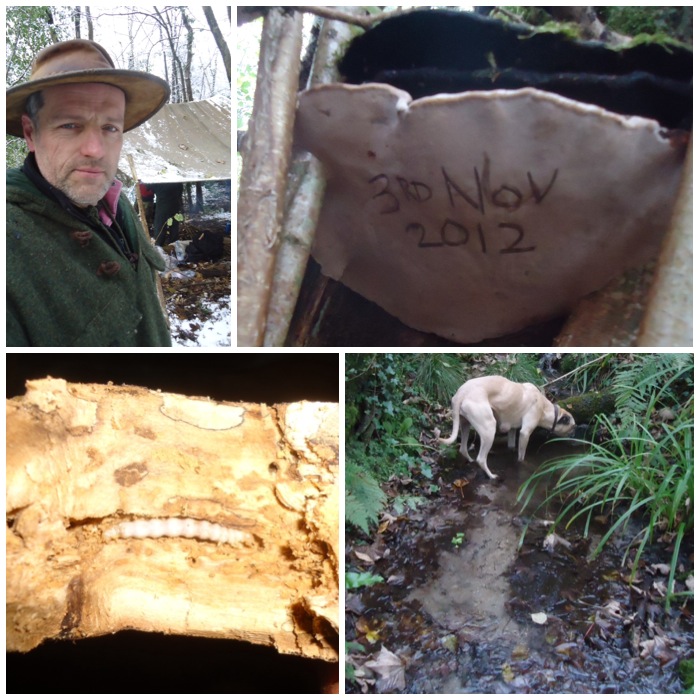
It was on a wet weekend back in November 2012 I first went to visit my friend Fraser from Coastal Survival at his woodland in Dorset. I was reviewing my photos as I will be visiting him again soon and thought that the ones I had taken on this weekend warranted their own post even though the trip was over a year and a half ago.
The snow you see in the picture above did not arrive until the Sunday but I did have a great time even with all the rain and mud before the snow arrived. The weekend was a relaxed affair with no formal teaching planned, just a get together to relax and explore the beautiful Dorset hills.
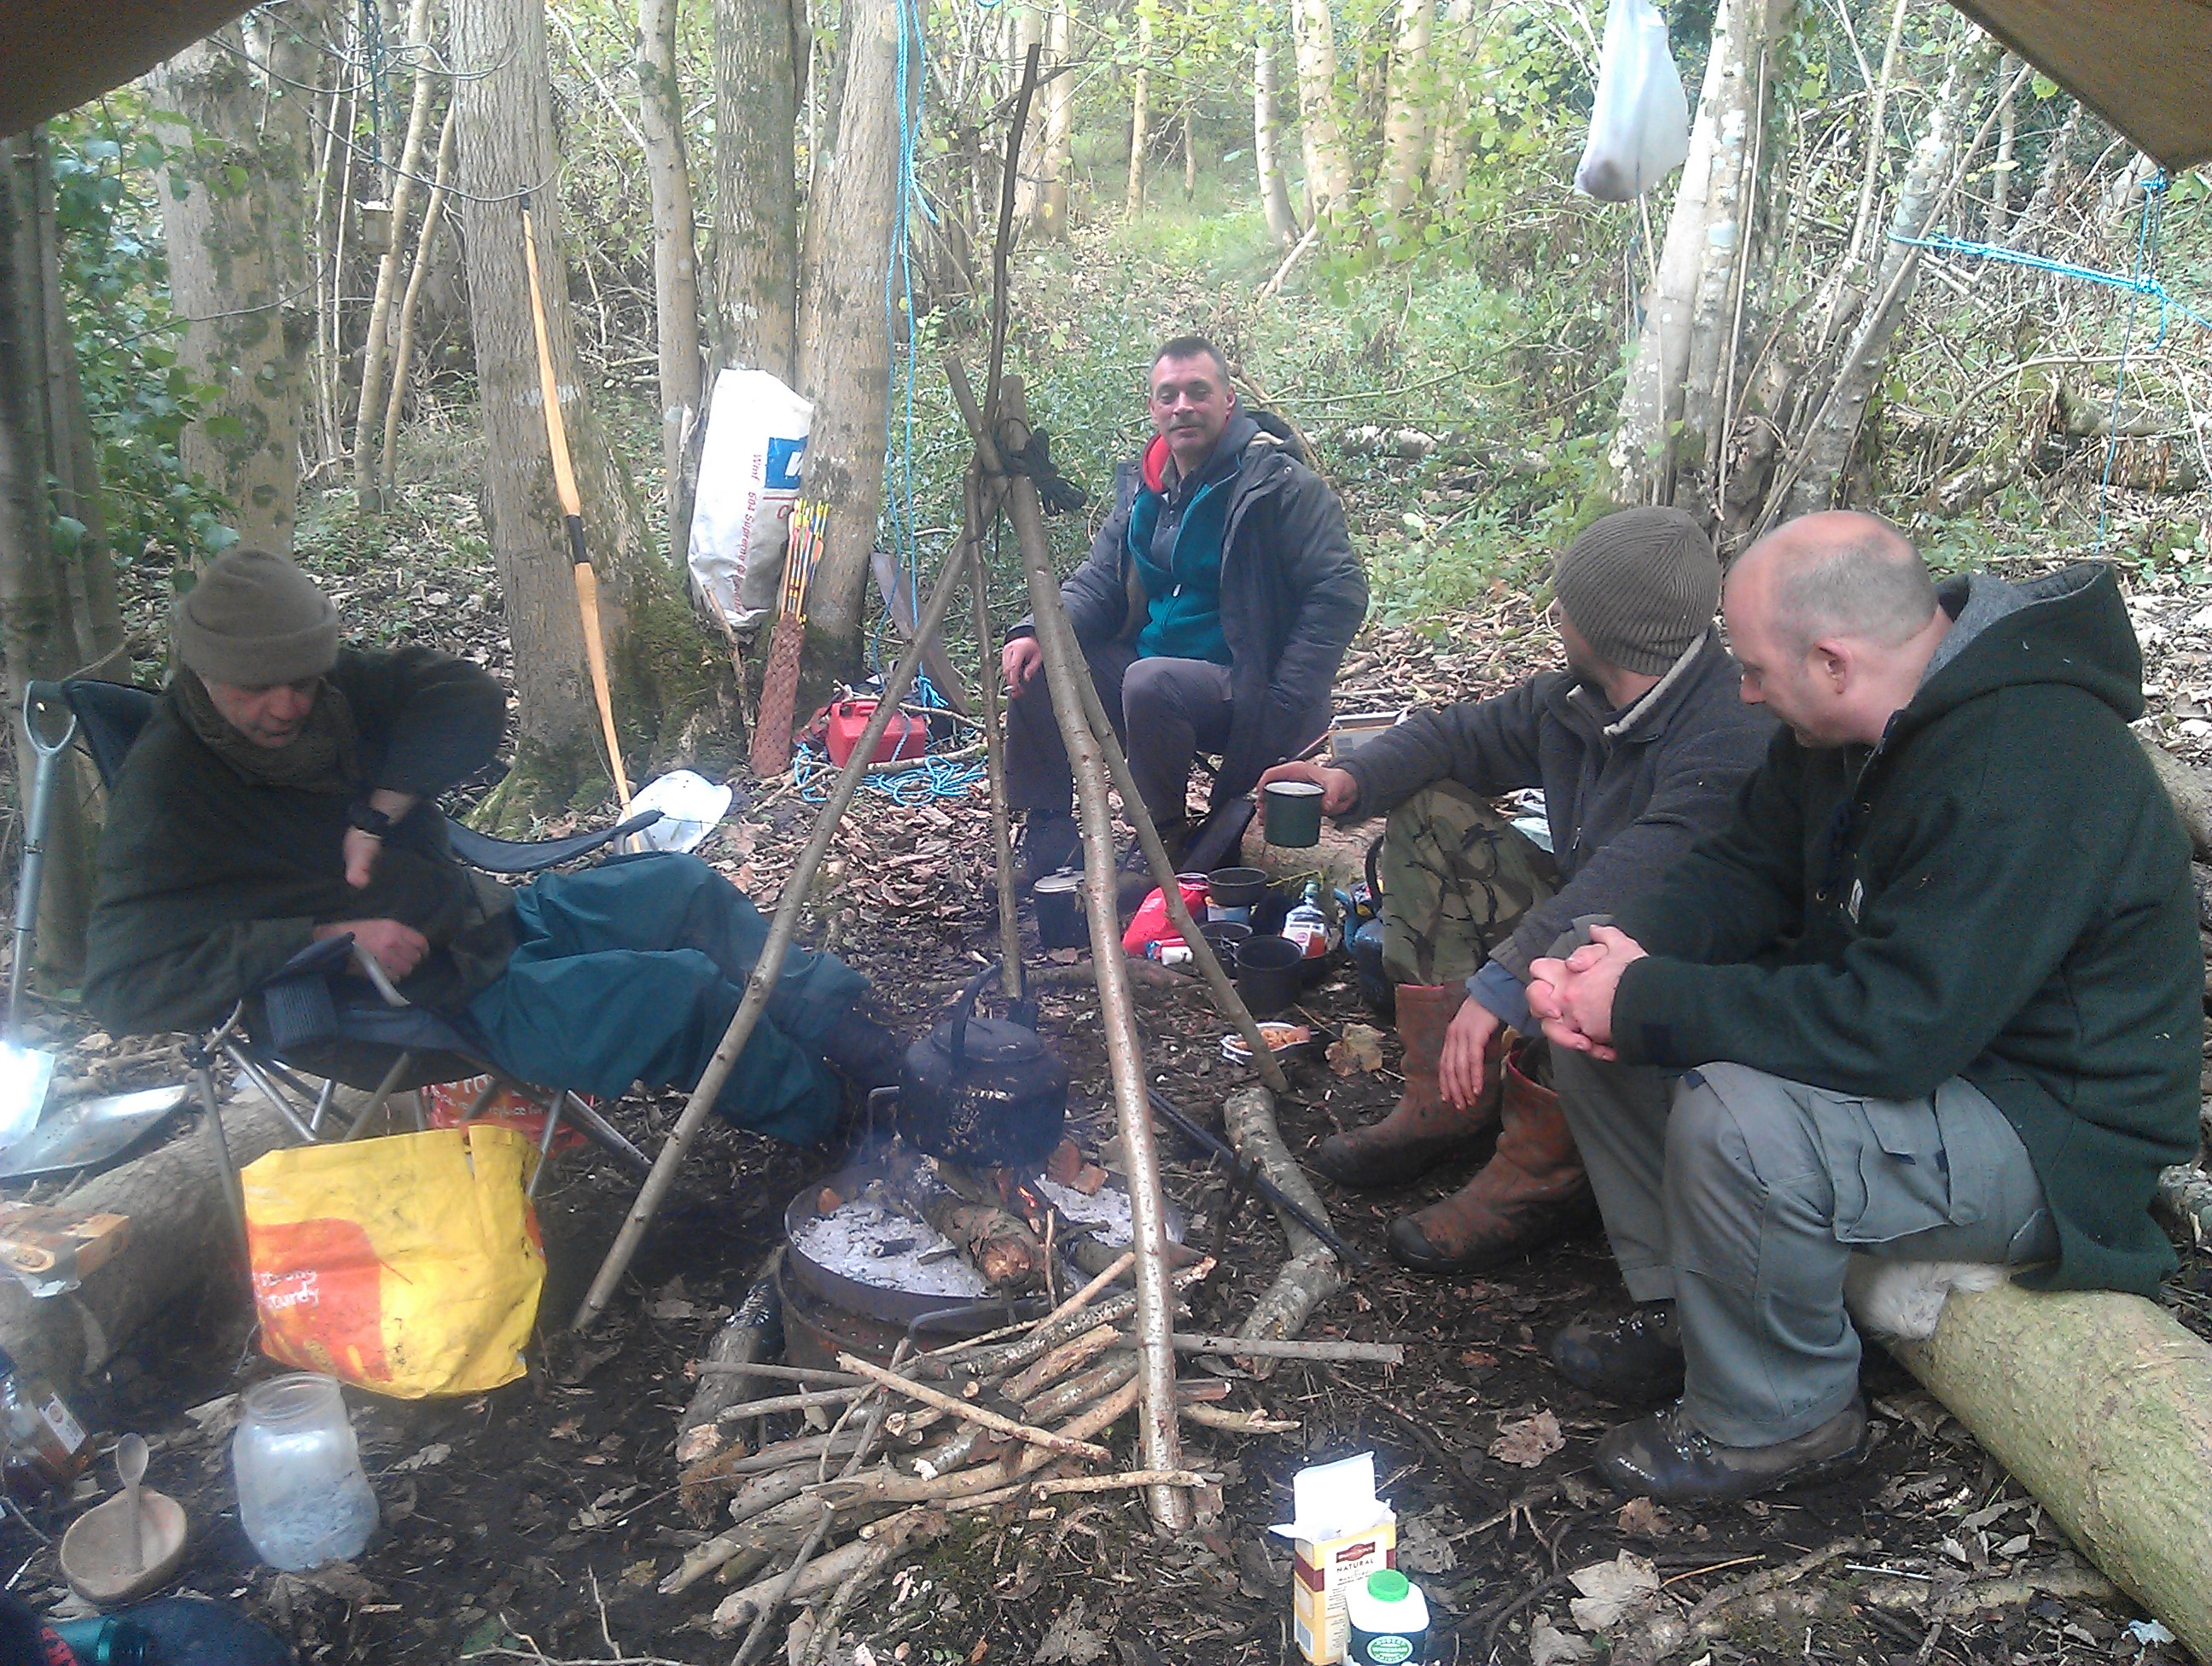
The gang below included (from the left) Steve, Rich, Fraser, Si and myself.
The gang for the weekend
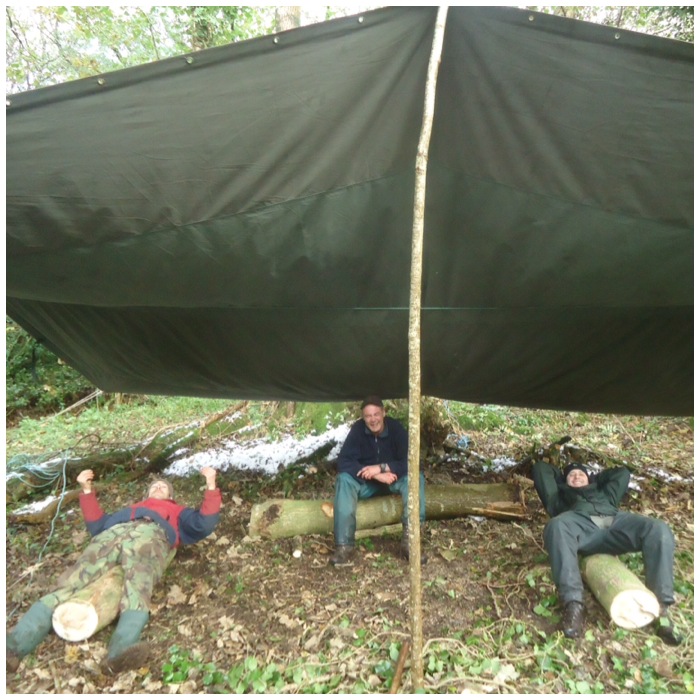
We did a little bit of work on the weekend but only a little. That work included sawing up these logs for classroom seats and pitching properly what was one massive tarp.
Now that’s what you call a tarp
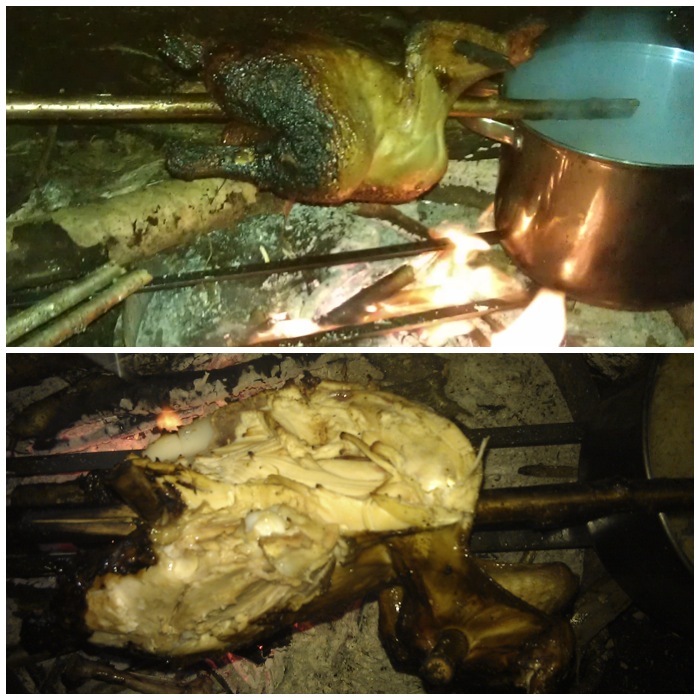
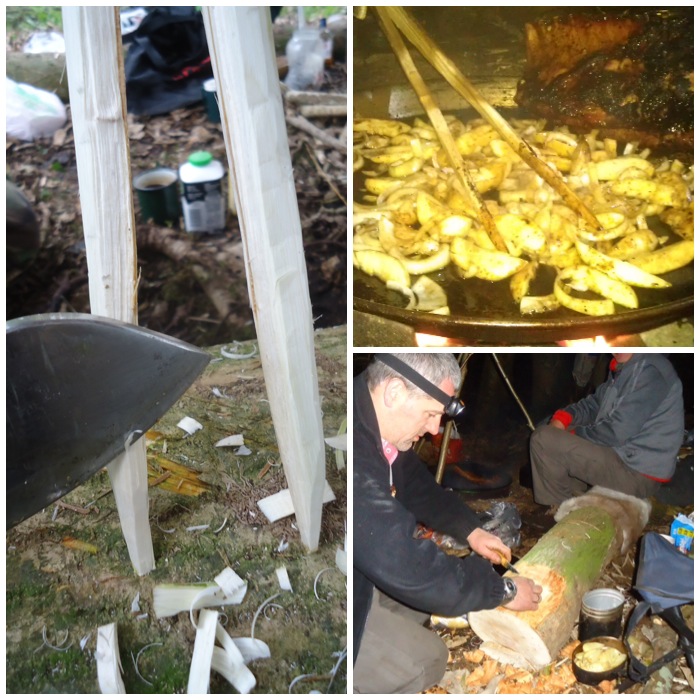
After sorting my hammock out, Friday night was spent sitting around the fire chatting and watching our dinner slowly roasting over the fire. You may have noticed with previous posts about Fraser that food seems to play a central role in everything we do 🙂
Friday night dinner
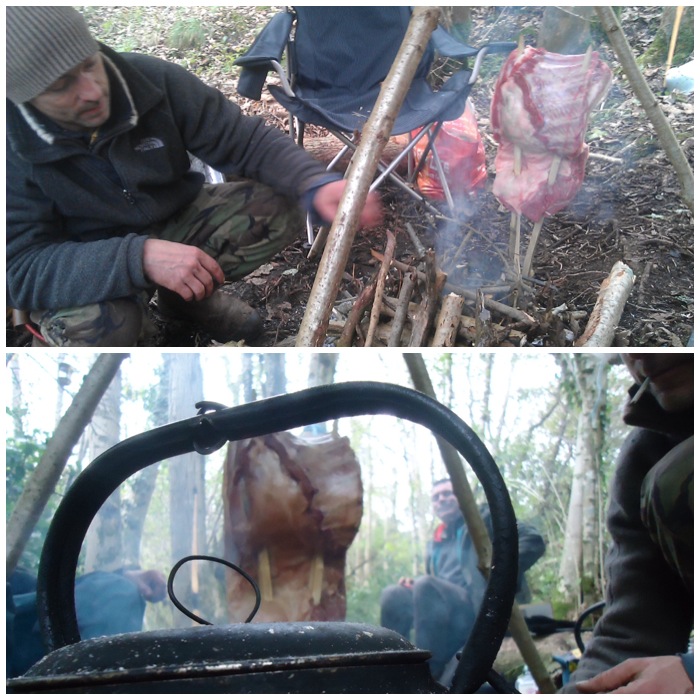
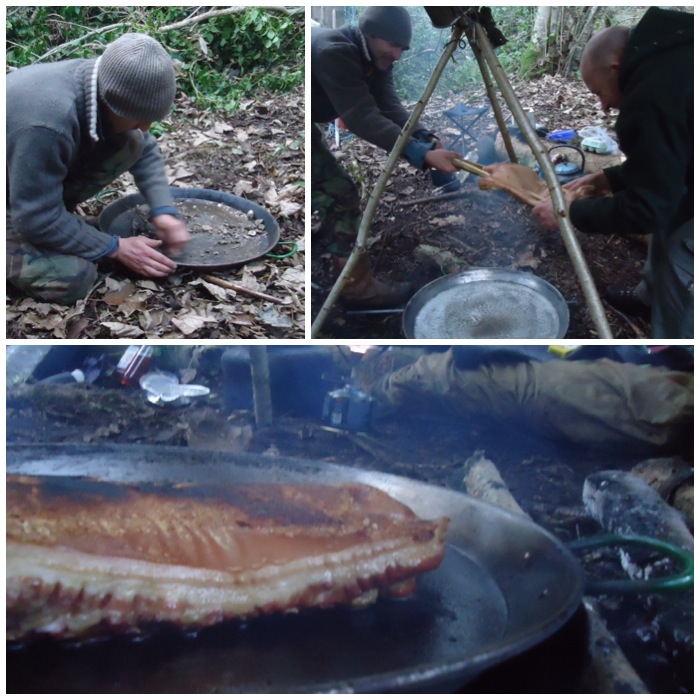
After breakfast Fraser prepared a side of pork and set it up on a stake to slowly be smoked by the side of the fire. The pork remained there most of the day, gradually absorbing the woodsmoke.
Smoking Saturday night’s dinner
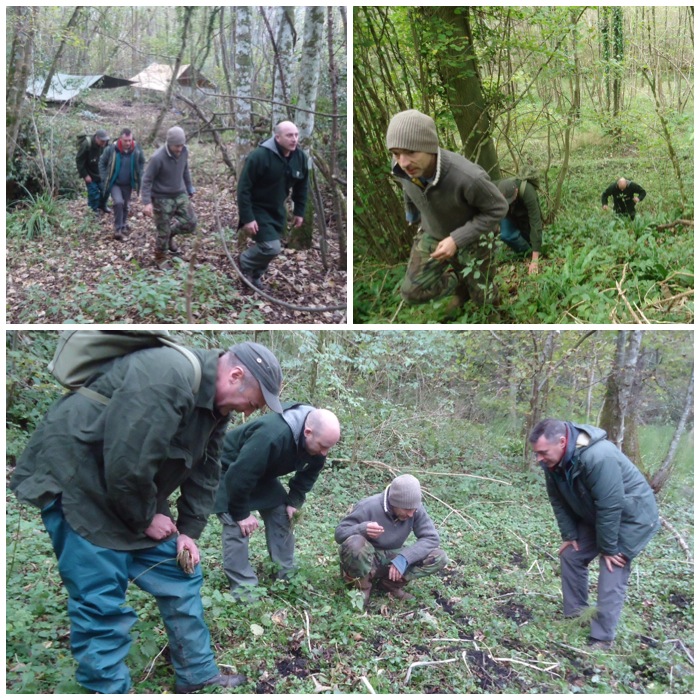
After a few brews we struck out to do a bit of foraging and tracking. I think I am a better forager than tracker and may one day have to find the time to study tracking under the likes of JP and Pablo from Woodlifetrails. In the bottom picture we found what looked like badger tracks in some soft ground.
Striking out for the day
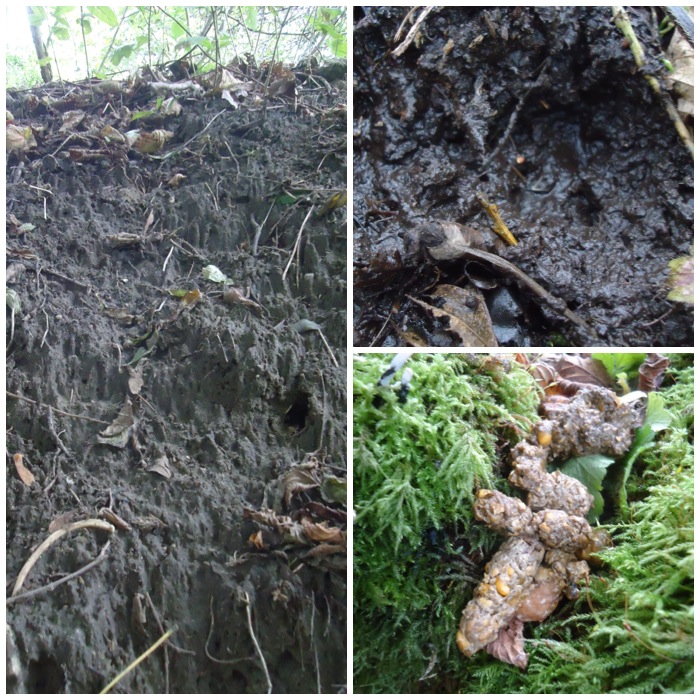
On the left you can see the claw marks made as the animals scrambled up the bank and on the right a possible badger paw print. The picture at the bottom right was scat from a fox, I think. It was full of yellow maize/corn so the animal may have visited a farm recently.
Plenty of signs
Another sign we came across was grazing by deer. The top two pictures show the tell-tale deer nibble, where the bite is not clean. Fraser found these woodpecker feathers in a pile and they still had all the points on the quills suggesting a kill by a bird of prey. I found all the nutshells in the bottom right picture and it looks like a dormouse or something similar has been nibbling away.
Nibbling
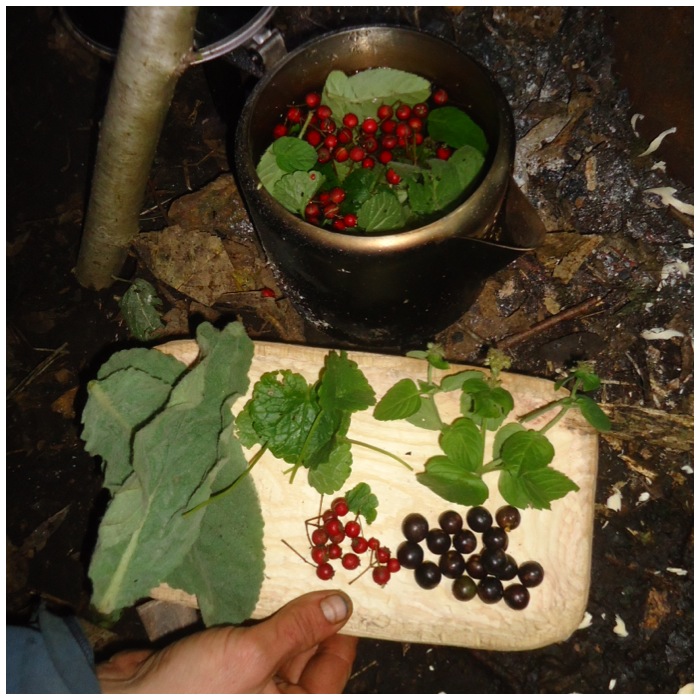
We foraged quite a bit over the weekend and even though this was November there was still a lot to be found. The water mint was destined for the teapot and the large burdock root was chopped up and added in with the other vegetables for the evening meal. The bottom left picture shows hogweed seeds which Fraser collected for using later.
Foraging
After all this hard work of spotting signs and foraging we relaxed by wandering around the woods doing some stump shooting.
Stump shooting
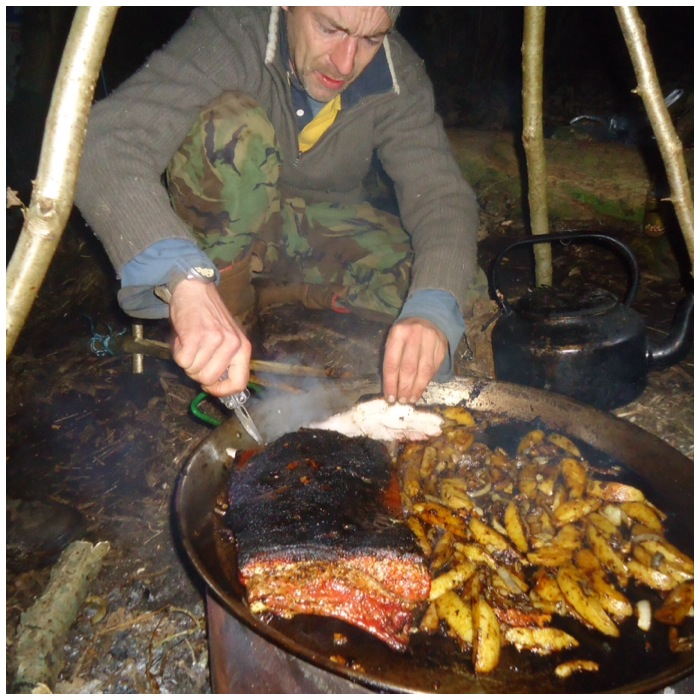
Fraser has a large paella pan that he wanted to use for cooking that night. It was a tad blackened from previous use so he used mud and small pices of gravel as a scouring agent to get it clean. It worked a treat as you can see in the other pictures. After the cleaned pan was rinsed with fresh water he heated it up and put the side of pork on it to start cooking.
Scrubbing, Stripping and Searing
The fork you can see being made on the left was actually for using as a stand for the pork to be smoked during the day. Once the pork was cooking they made excellent tongs for mixing all the vegetables. Si had flattened a piece of one of the logs for me to use as a chopping block for cutting all the vegetables up on. As he had just stripped the bark and the wood was still green it was a very clean surface to work on.
Prepping tools and veg
While all the food was cooking we made a fresh herb tea. The ingredients included sloes, haws, ground ivy, water mint and mullein. Very tasty it was too.
Time for a brew
Fraser as usual managed to make a banquet (well, what I call a banquet) in very cramped conditions with minimal tools and taught us all along the way.
Final touches
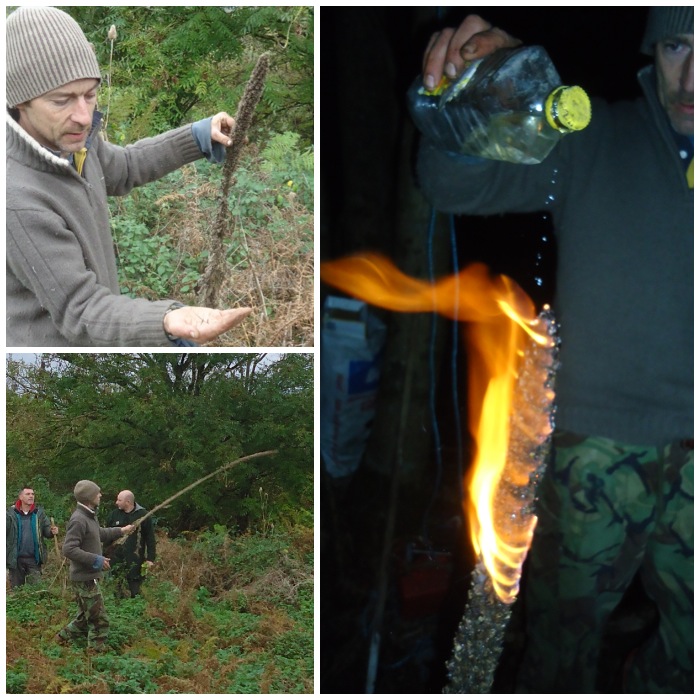
During the day we came across some live mullein (also known as Aaron’s Rod) that had not produced a stalk as yet but we also found one mullein that had grown a stalk and had died. The stalk was dry so Fraser took the time to release the seeds and spread them around to promote future growth. I like to use this stalk as a hand drill for making fire by friction but another use for this plant in the past was making torches. The seed head would be dipped in fat, grease or tallow and then set alight. For speed we stuck with some vegetable oil and soon had a good flame going.
Aaron’s Rod
The picture on the left shows how much light the candle actually throws out. I took the picture on the right with the focus of the camera directly on the flames. When you do this you can get some interesting shapes. I see a climbing fox in this one. It has a long tail, distinctive legs and you can just make out its snout – and I am not talking about Fraser’s face in the background 😉
Mullein candle
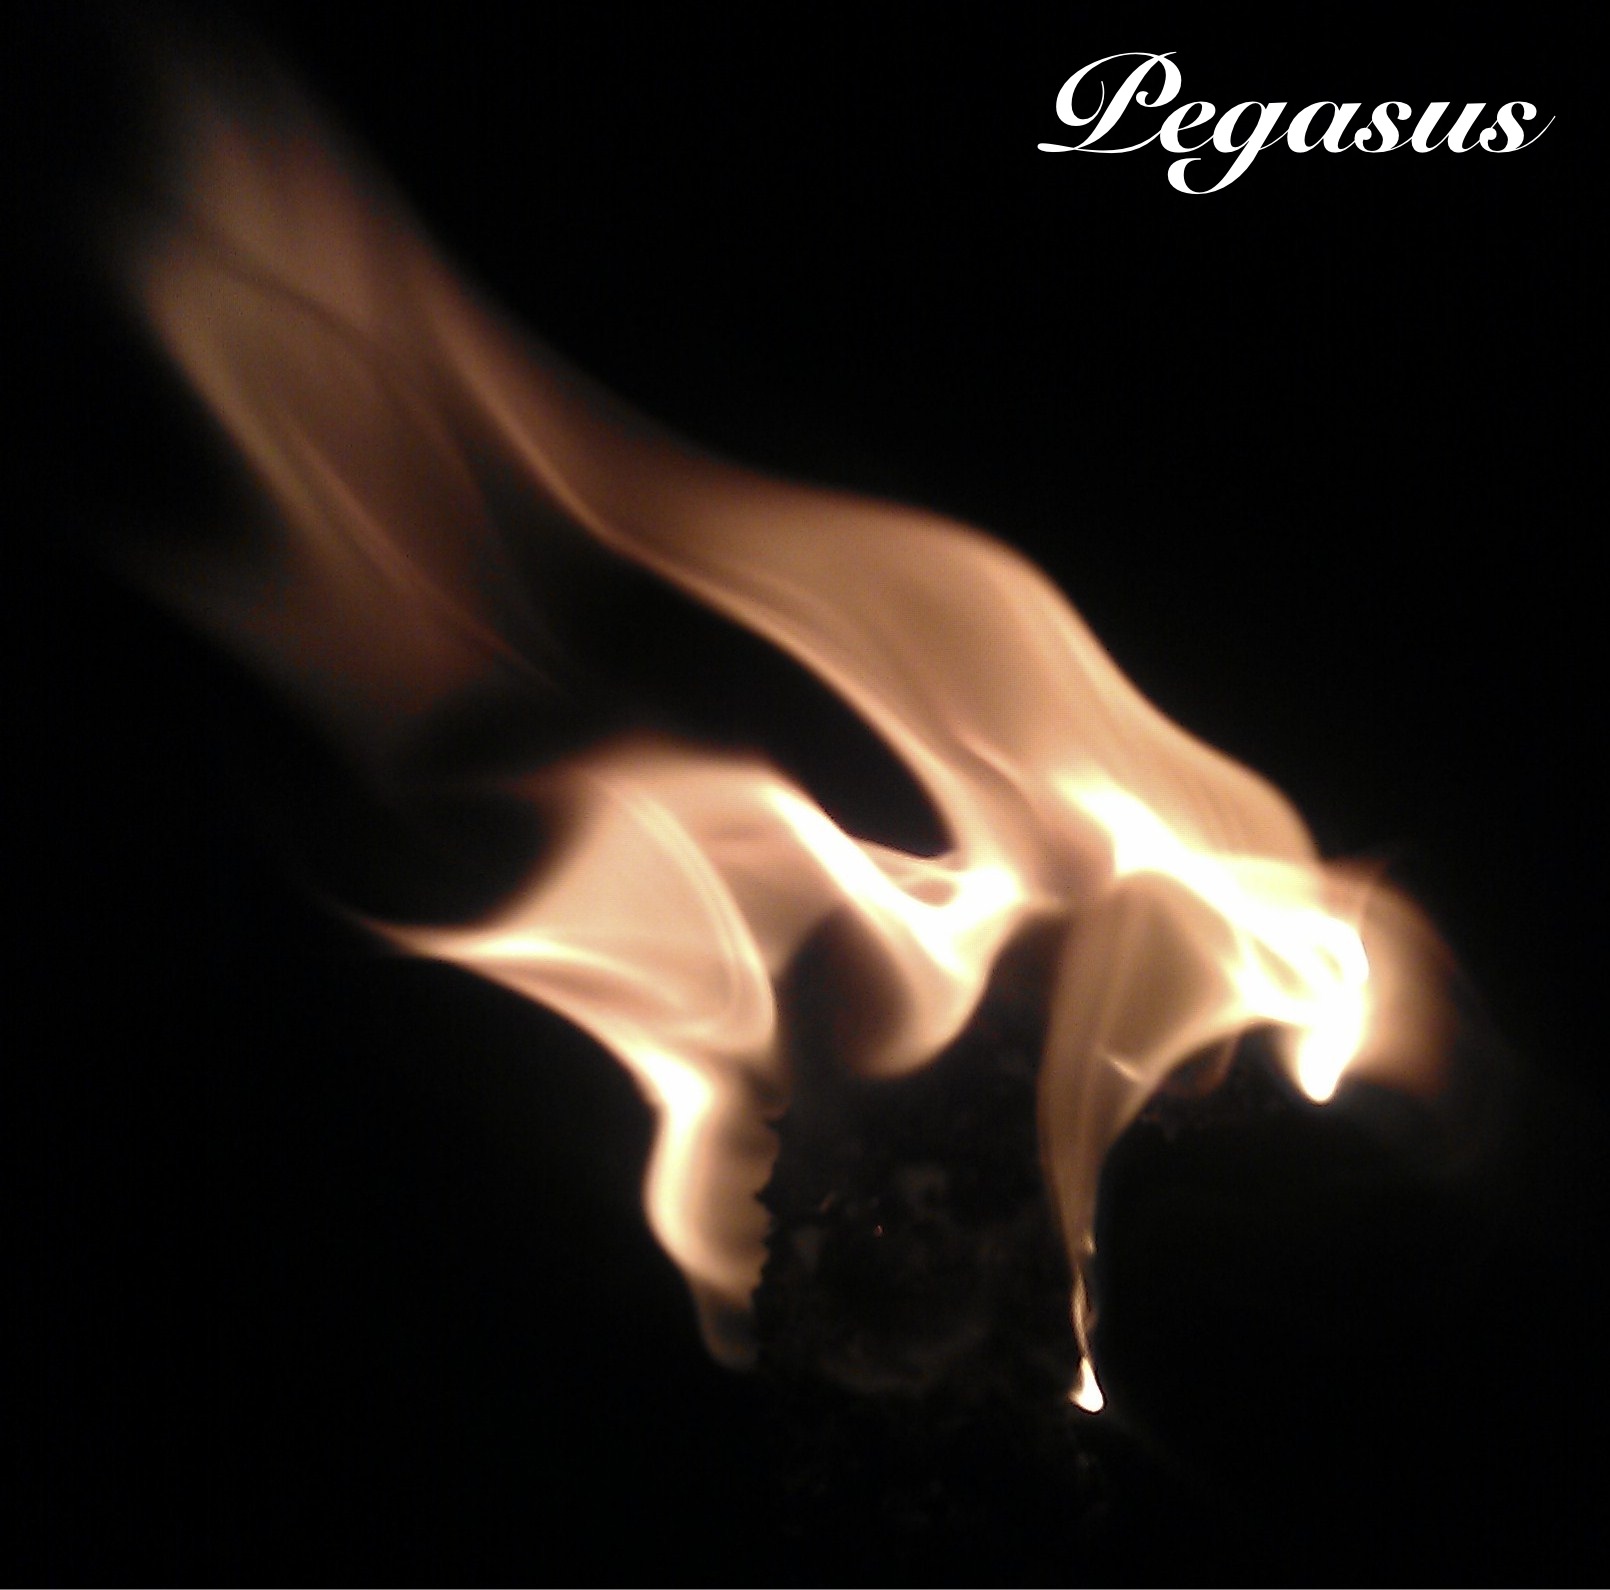
One of my favourite pictures of this candle is the one that produced Pegasus the winged horse.
The flaming horse
While I was compiling the pictures for this post I was struck by these two pictures. I have inverted the right hand one and call it the Crimson Climber. The pictures were taken one after each other. You can clearly see the figure on the left about to start climbing but look closely and you will see on the right with two small arms and a hunched back a figure at the top of the flame.
The Crimson Climber
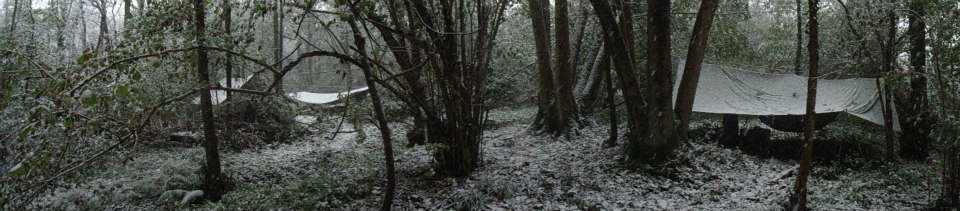
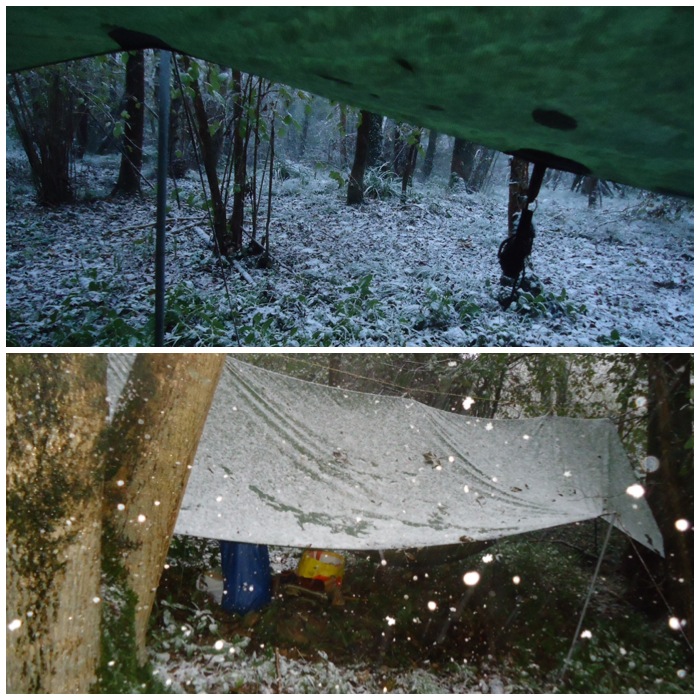
Sunday morning was a relaxed affair at first. I could hear the pitter patter of rain on my tarp as I lay there but it all went quiet soon after. As I turned in my hammock I glanced out and saw the view you see in the top picture. It was magical to lie there and watch the snow falling in the perfectly quiet woodland. This magic did not last long as the snow started to accumulate my tarp started to droop. I had set it up on a shallow angle more suited for the good view rather than to shed lots of snow.
Wintry Wake Up
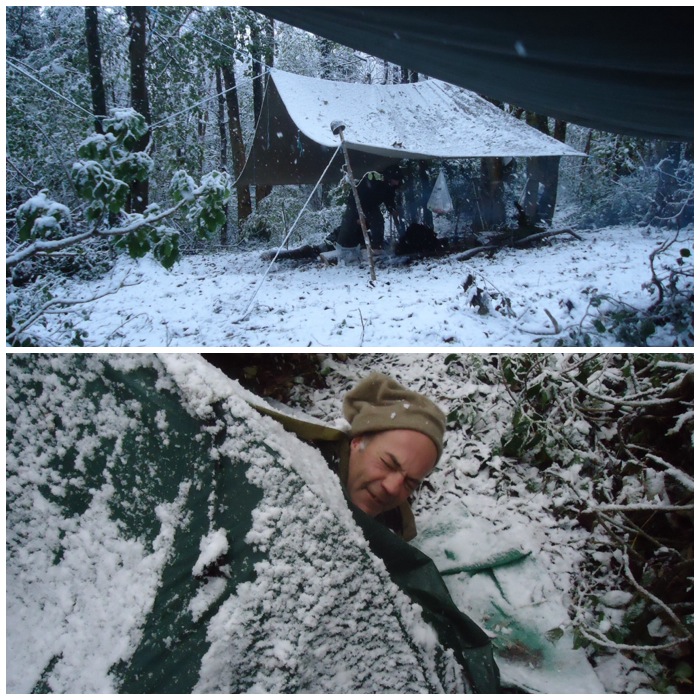
So it was time to get up and over the next half hour I had to keep clearing snow from all the tarps to stop them collapsing. Steve eventually got up wandering what all the racket was about.
Morning Steve
Breakfast was soon on the go and it was time to pack up to head home.
Heartening breakfast
A few pictures to finish on. It was a great weekend chilling out in the company of some great guys.
Extras
I am hoping to pop down and visit Fraser in the next couple of weeks and see what changes he has done with his site.
I have written various posts now on creating primitive tools and in my article on making arrows I showed you how to make some spruce pitch using hot rocks. This How To…. will lay out all the steps I take to make spruce pitch using tin cans. I find that when I want to make a lot of pitch quickly that this method works well for me however I do appreciate that there are many other methods for making pitch.
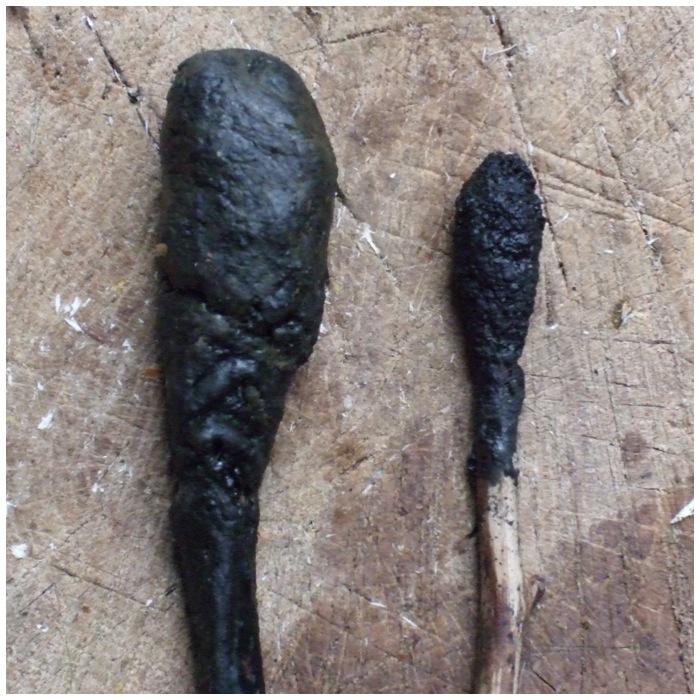
The resin produced using this method gives you a much finer pitch than the hot rocks method as you can see in the picture below. The pitch stick on the left was made using the tin method and the smaller rougher pitch stick on the right was made using hot rocks.
I took these pictures while out bushcrafting with my friend Mark Beer in the woods around Silchester in Hampshire (UK)
Pitch – Using a tin (left) – Using hot rocks (right)
I tend to use spruce resin when making pitch as this is more readily available where I am and do not tend to use pine resin as this is not so readily available to me. I normally use pitch as a filler material, for example, when fitting a flint axe head into its socket or use it as a covering to waterproof rawhide wraps.
The knife below has had the rawhide wrap covered in the fine pitch from the tin method and is very easy to produce. I am sure that with time I would be able to produce fine pitch using hot rocks but as yet I do not have that skill level.
Spruce Pitch – a wonderful material
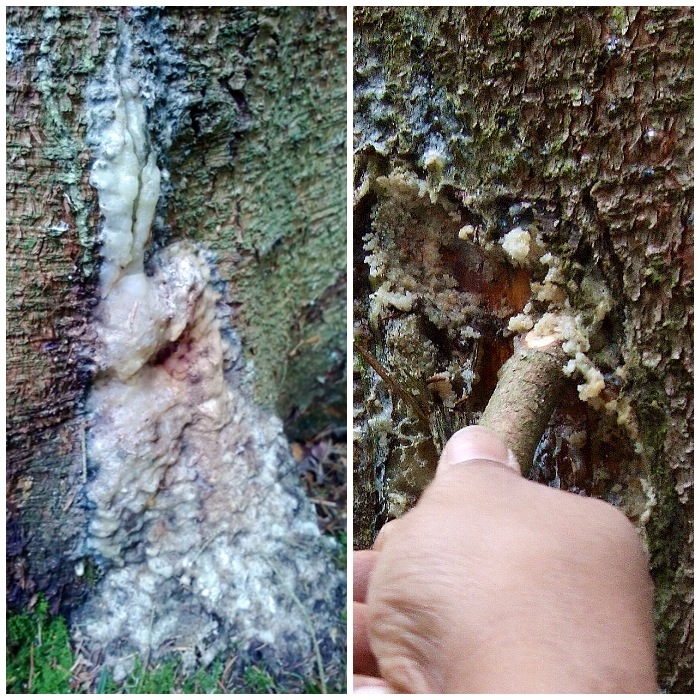
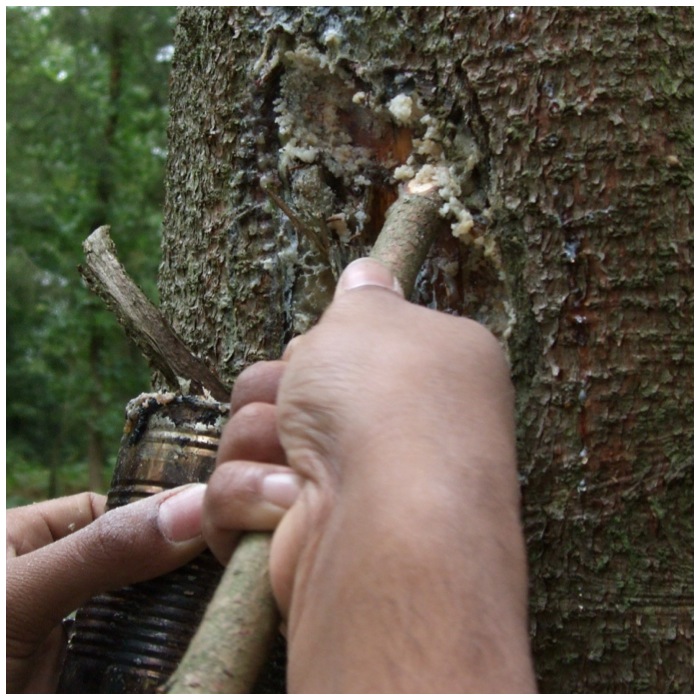
I collect spruce resin using a flattened stick and a tin (or plastic bag). I use the stick as it does not damage the tree as a knife tip would do. Also it is a messy job to clean the resin of a knife blade and the stick also saves my fingers becoming covered in resin which can be hard to clean off when you do not have access to hot running water.
I collect the resin wherever possible where branches have been broken off and the tree has excreted the resin to protect the damaged area. I do not clean out all the resin but just take a little from many different sites. If you are lucky enough to find a spot where the resin has flowed away from the damaged area and pooled into a big clump then it is fine to collect it all. A good spruce tree will keep excreting the resin so if you are careful you can return at a later date to harvest more.
Collecting stick
It did not take long to collect this large tinful of resin as Mark and I managed to find spots where the resin had pooled into large clumps.
A good haul
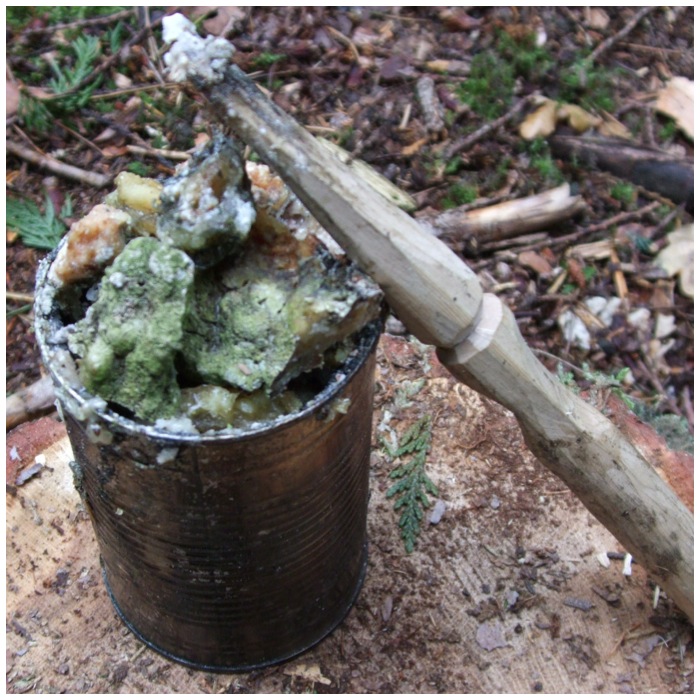
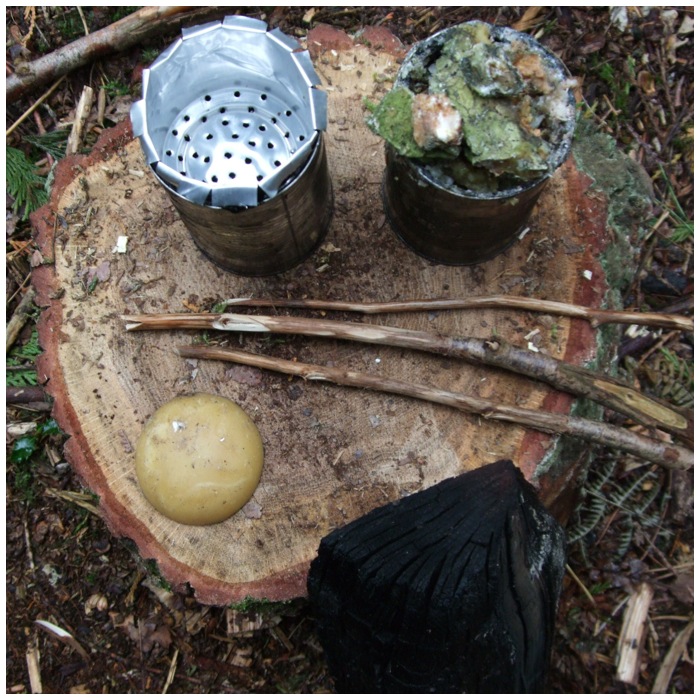
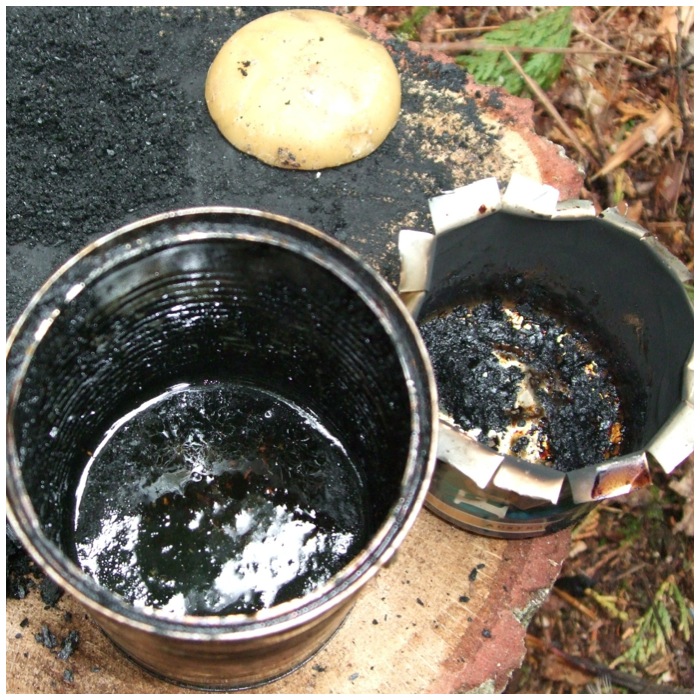
To make pitch I use two baked bean style tins with a small improvised colander in one made out of half a beer can with holes punched through the bottom.
The sticks in the picture below are ready for rolling the pitch on to when it is ready. An alternative is to use a stick like elder with the pith taken out and the pitch poured into the cavity, which makes a kind of pencil.
The charcoal and the beeswax are for binding and tempering the pitch to make it strong but flexible.
Equipment
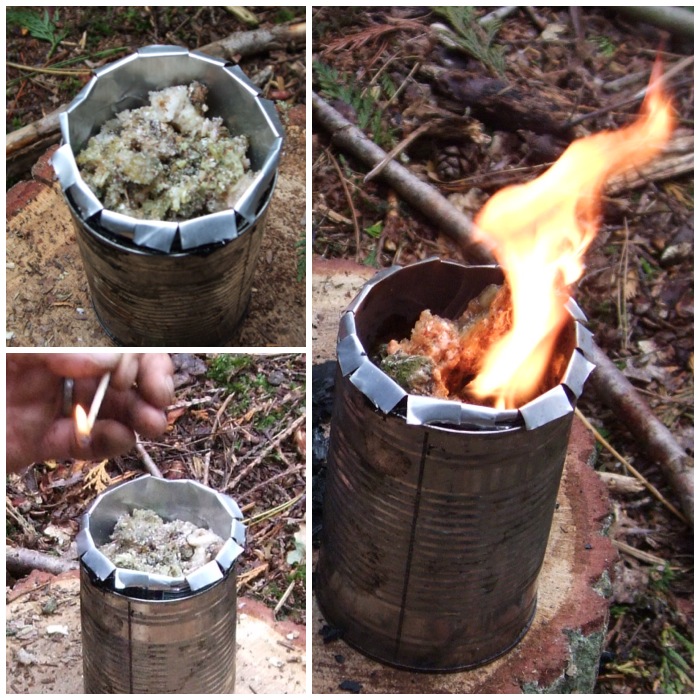
I packed the colander with resin then set light to it. The disadvantage of this method is that you lose a little of the resin but the big plus is that it melts quickly, collects quite cleanly in the bottom of the tin and leaves the detritus in the colander. Two good friends of mine Mark Oriel and Keith Coleman introduced me to this method: previously I’d just put the resin into a tin, placed it into some embers and scooped out the detritus when it had melted.
Packing and firing
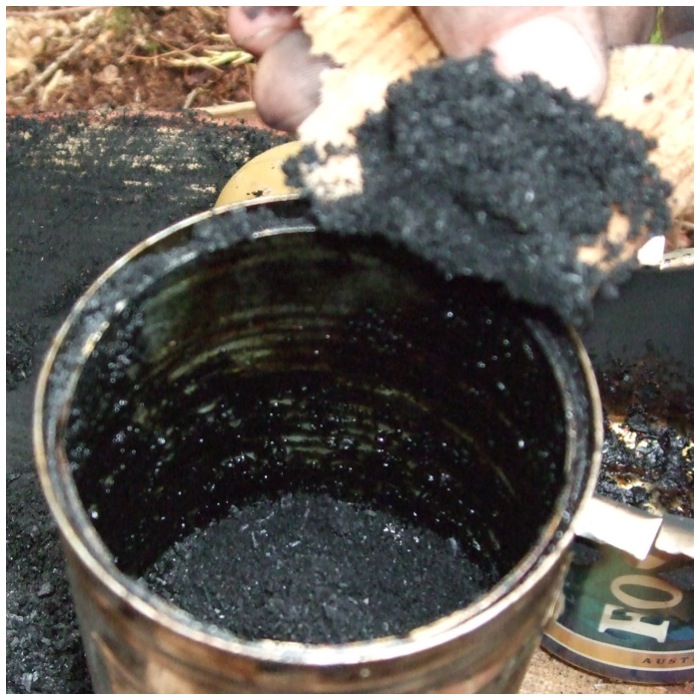
As the resin burns and melts in the tin I then take the time to crush the charcoal down to fine dust with a small stone. This fine dust acts as a binding agent that the resin can cling to and make the pitch you produce stronger. There are many other materials that you can experiment with as binding material such as ash and rabbit droppings. The Primitive Ways website has an excellent article on making pine pitch using a tin but in a different way and discusses other binding agents.
Making charcoal powder
Soon all the resin had melted and dripped down into the tin (it looks black from previous pitch making). As the detritus is left in the colander the resin in the tin is very fine, which makes for very smooth pitch.
Liquid resin and remnants
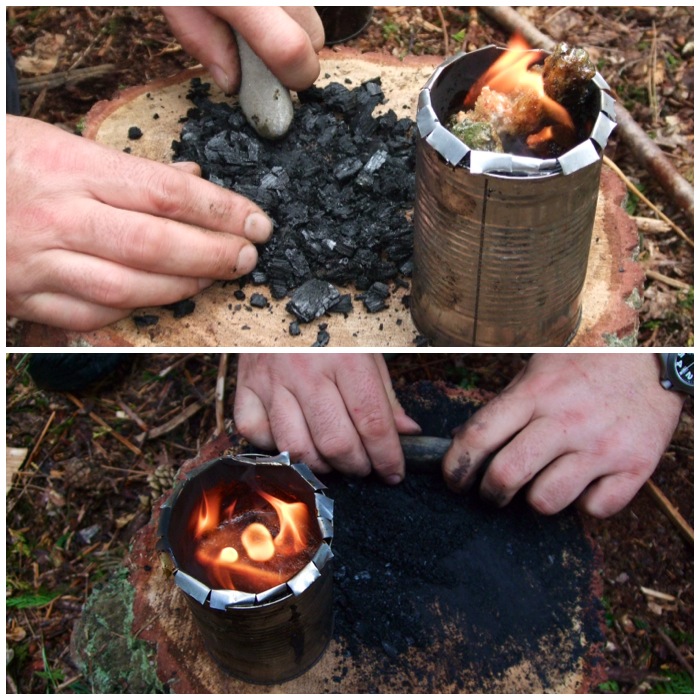
I tend to put in as much charcoal dust as there is spruce resin and mix it all together while the resin is still hot.
Add some charcoal
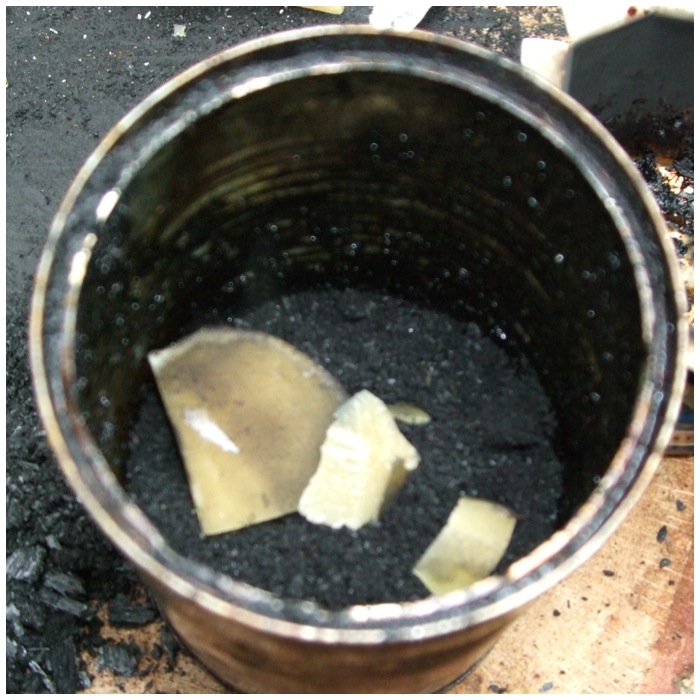
I then added some lumps of beeswax. I have heard some folk say that they put in the same quantities for everything but I usually just put in a small block or two of beeswax. I also use beeswax balsam as this is easy to buy in shops and it seems to work just as well as pure beeswax. Experiment for yourself with quantities to see what works for you.
Then some beeswax
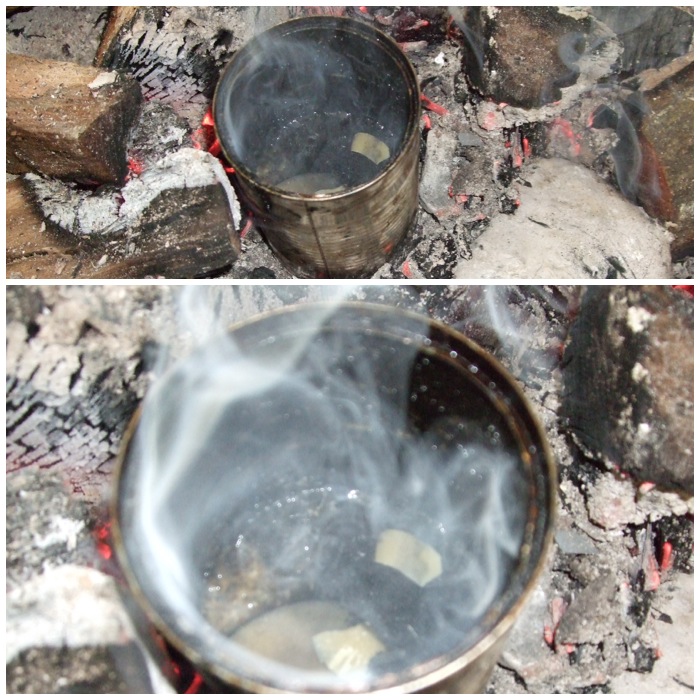
I then put the tin into the embers of my fire and mix it all up. Watch out that you don’t overheat it as it will froth up and spill over. I normally have some tongs nearby so that I can move the tin around the embers so as to better control the heat.
Melt and mix
I use the tongs to move the tin out of the embers when all the beeswax has melted and been thoroughly mixed in. The tin will be scorching hot and the liquid pitch will scald you badly if it comes into contact with your skin.
Remove from heat carefully
I let the pitch cool slightly and so it becomes a little bit tacky. While it is cooling down I make sure I have a little pot of water ready.
I then put one of the sticks into the mixture and roll it a few times (I try to square off the stick as this helps catching the tacky pitch) until I have some pitch on the stick. I then dunk the stick into the water to rapidly cool the pitch down. The pitch will not dissolve in the water due to the oils, charcoal and beeswax in it and but will bind to the stick.
Roll and dip
I then repeat the process again and again to build up more layers of pitch on the stick. You will find loose bits of pitch will float in the water so just fish them out and pop them back into the tin and they will melt back into the mixture.
Roll, dip and wet your fingers
After two or three times doing this you will need to use your fingers to mold the pitch into a tight blob on the end of the stick and also to smooth it out. As the pitch can still be quite warm and sticky you need to keep your fingers wet during this process. If your fingers are dry then the pitch will just stick to them.
Smooth the hot pitch down
In no time at all you will have a good amount of spruce pitch to help you with making primitive craft items.
Pitch Sticks
To use a pitch stick I just heat the end of it with a glowing ember until it starts to melt and then drip the liquid pitch onto whatever I am making.
To use just heat
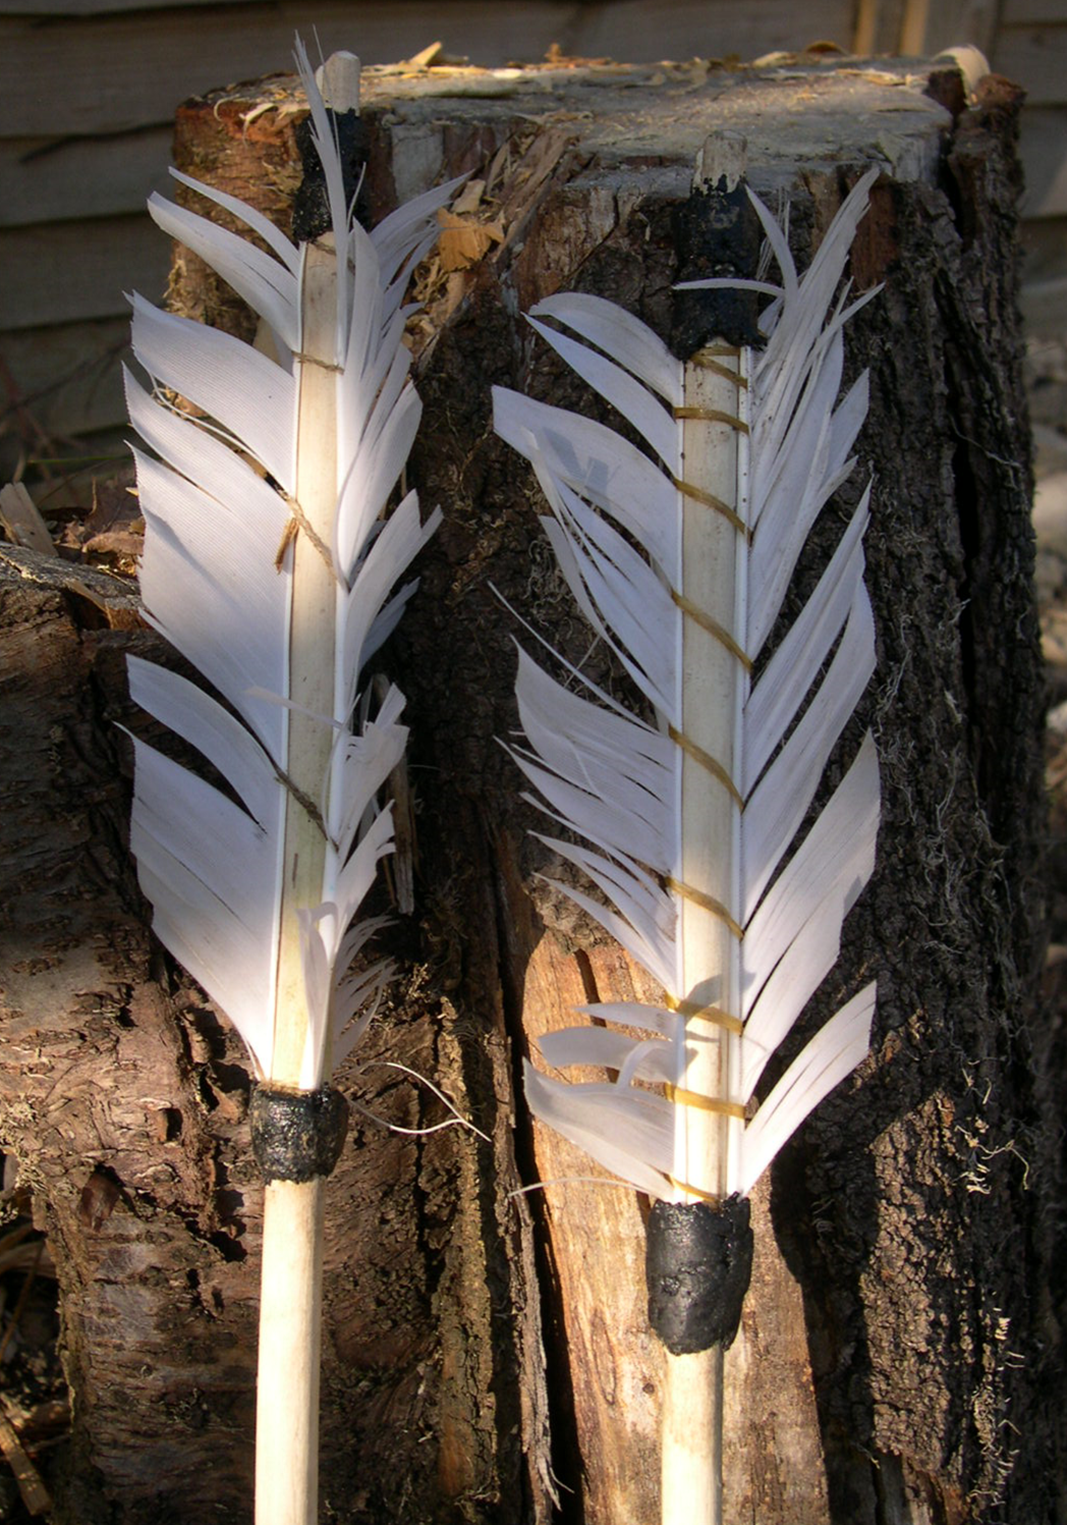
I have used pitch for waterproofing bindings on arrows.
Great for arrows
It is also great as a filler as in this small hatchet. I filled the socket with pitch, inserted the flint axe head and then bound it all up with rawhide.
And great for axes
I have also published an article on making pitch in a primitive fashion using hot rocks instead of a tin – How To…. Make Hot Rock Spruce Pitch.
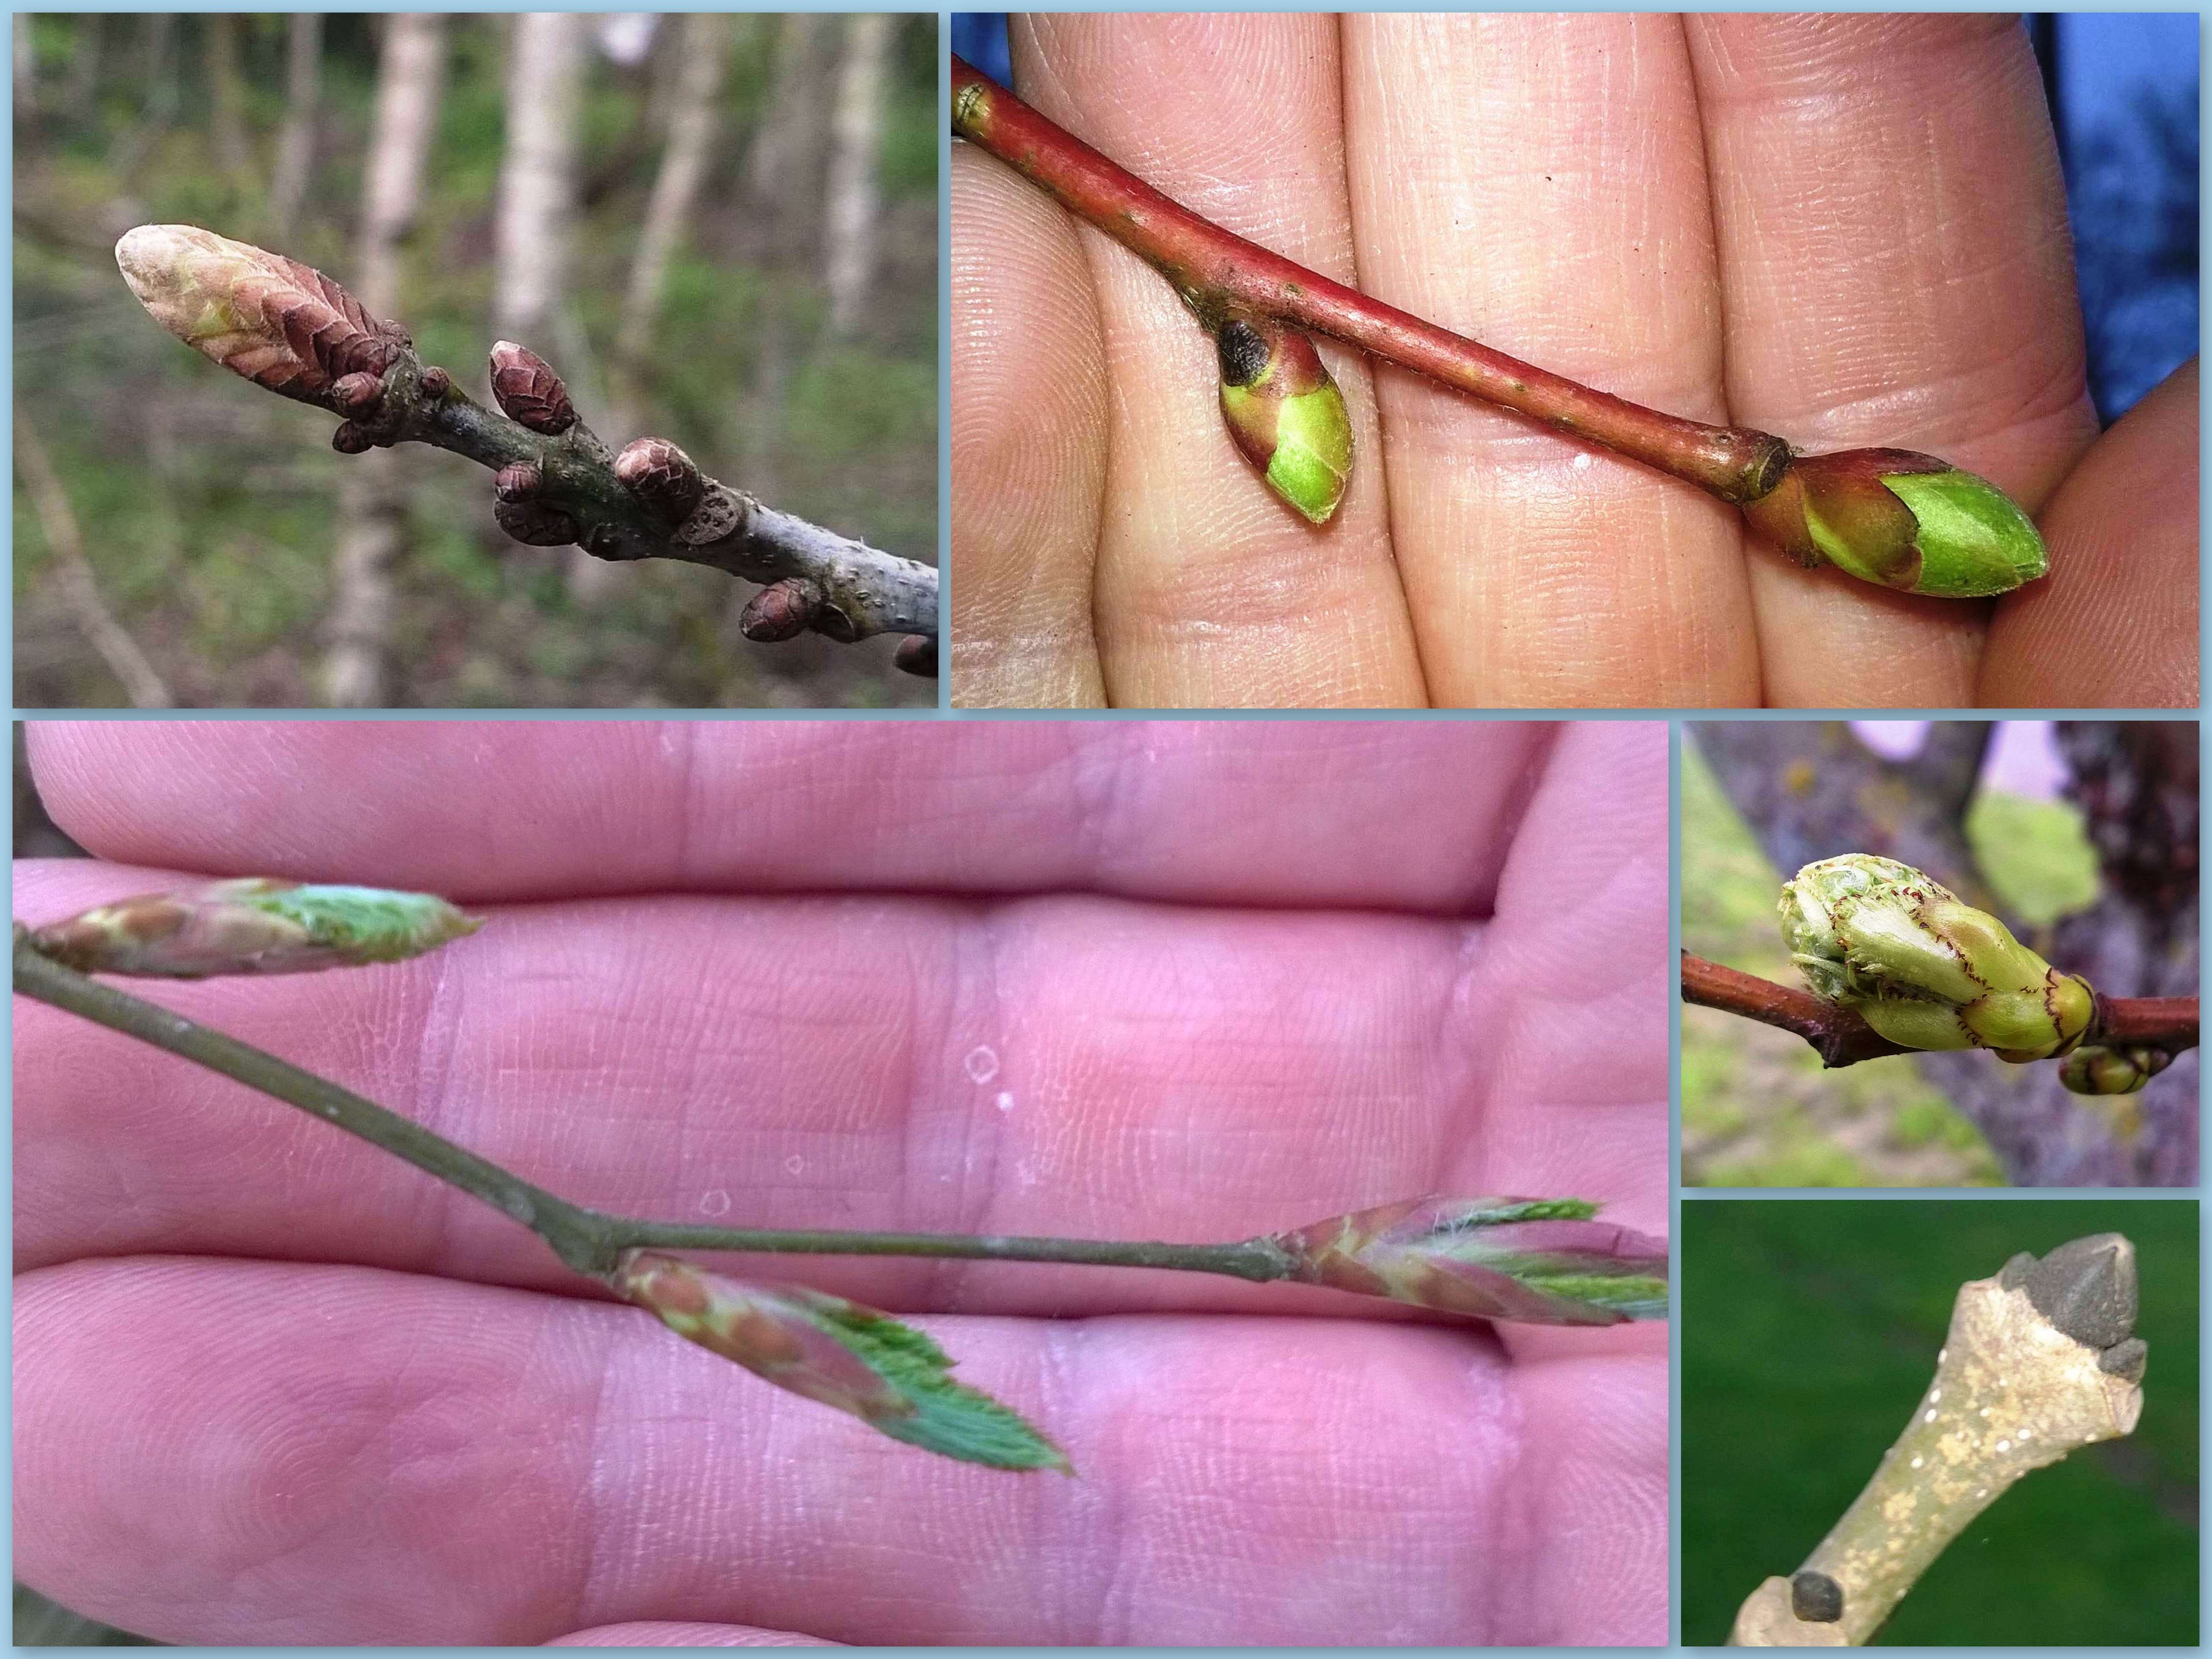
I have been out and about again seeing what has been appearing in the woods around my village.
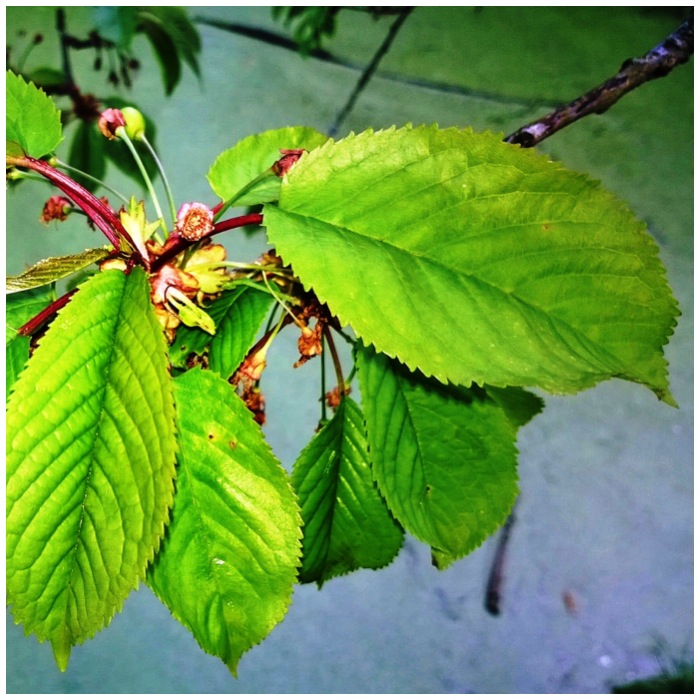
I took my son out this time and we used our bikes to get around. Normally I would walk so I would not miss anything but this time I wanted to try something new, that is to video my ’round’. My round consists of 12 sites I visit every week or two to see what is appearing at each site and in between each site photographing the growth appearing on certain trees.
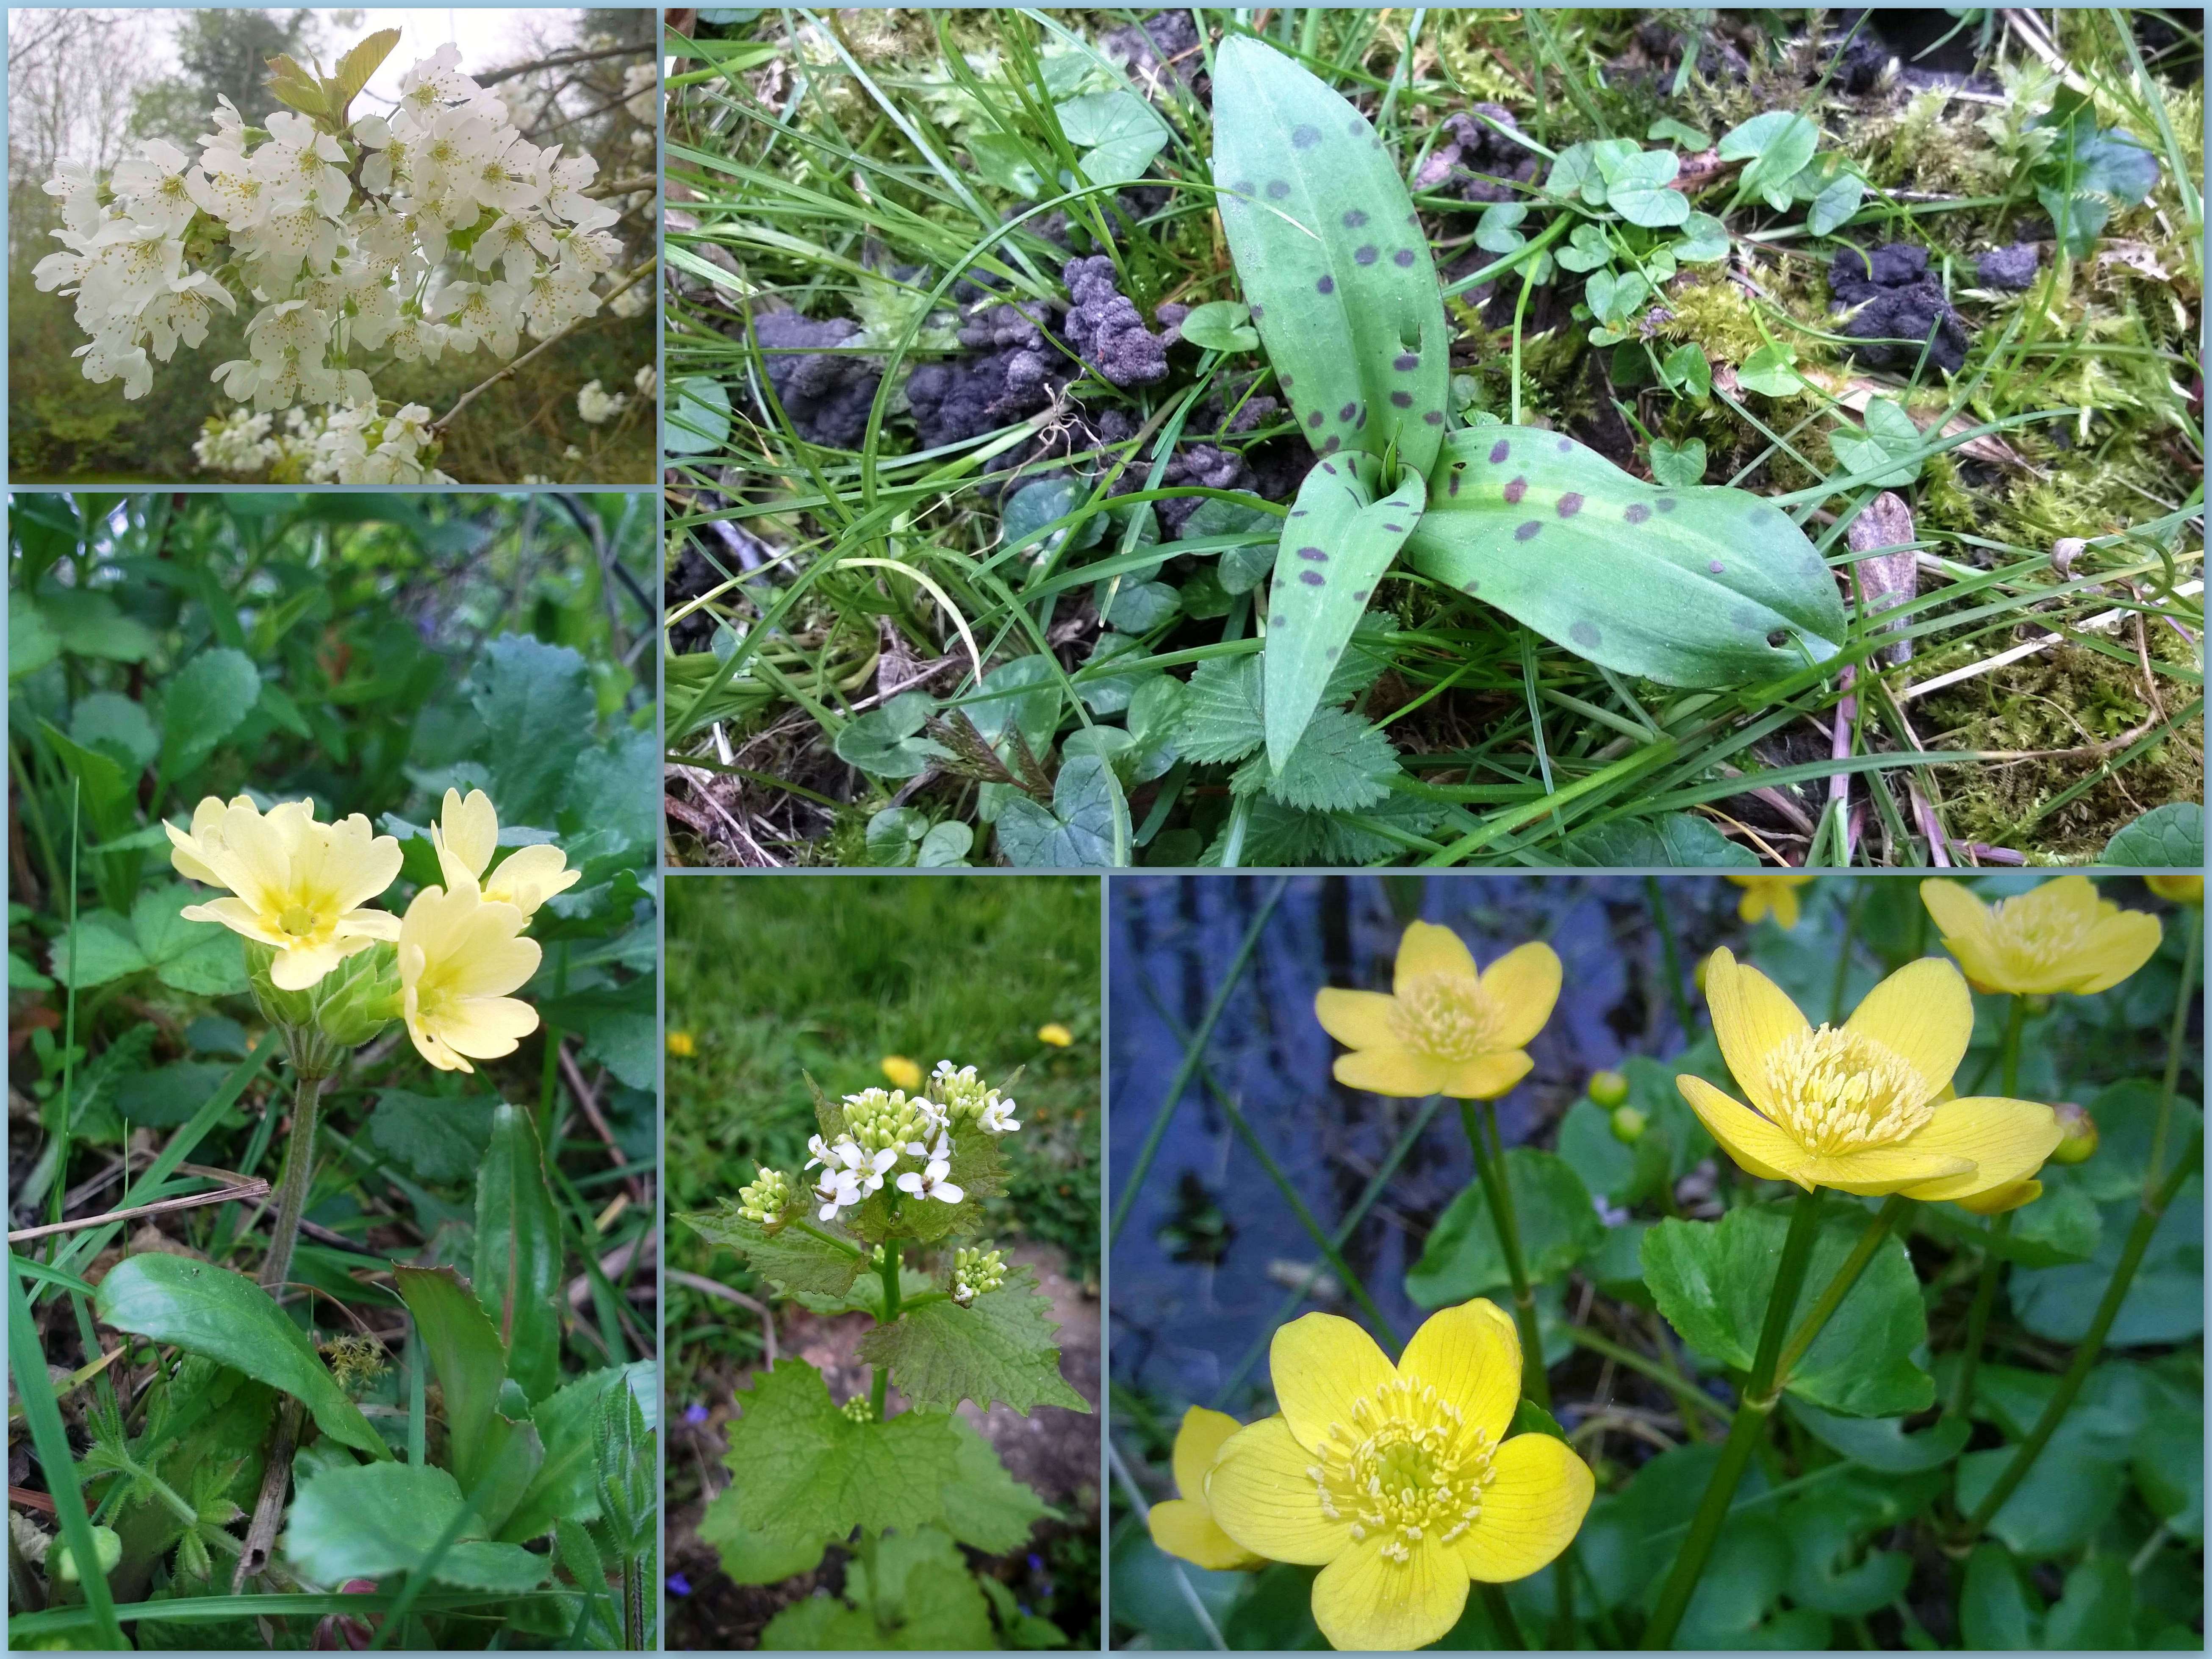
Here are some of the pictures I took as I filmed. From left to right they are (top row) cherry blossom, orchid leaves, (bottom row) oxlip, hedge garlic and marsh marigold. All of the flowering parts of these plants – apart from the orchid, which hasn’t flowered yet – have been appearing in just the last week.
Spring flowers, leaves and blossom appearing
Lots of trees have finally been bursting their buds. Below from left to right are (top) alder, goat willow, (bottom) apple and cherry.
Leaf burst 1
Also appearing have been the silverbirch, hawthorn, hazel and horse chestnut:
Leaf burst 2
Some trees are still waiting to leaf and they include the English oak, lime, beech and (bottom right) the ash. I haven’t yet identified the bud shown in the middle right picture: any ideas?
Still in bud
While I was doing all this photography I tried a little experiment using my mini iPad camera filming my route. Sorry about the quick change between scenes and all the movement, I will try and work on making this easier on the eye in future.
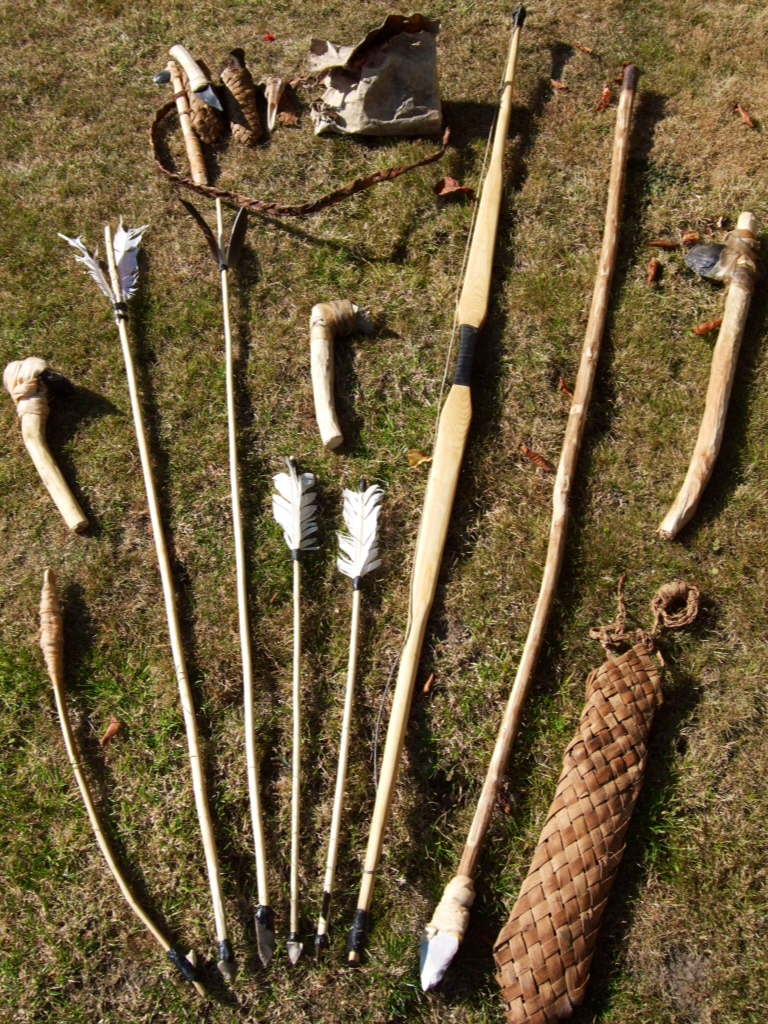
Sometimes a flint knife or adze is just not enough and you need something with a bit more clout. At times like these, what you need is a flint axe.
Here’s how I constructed the large flint axe you can see below, with a few pictures at the end about its little brother, the hatchet.
Two good tools
I made these tools on the Woodcraft School Primitive Technology course and had some excellent tuition from John Rhyder and John Lord.
John Lord gave an excellent demonstration on knapping a flint axe head. It was a joy to watch this master take a lump of flint and transform it into a work of art.
When it came to the turn of us students to knap out our axe heads John gave everyone lots of one-to-one tuition. If it hadn’t been for this (and John knapping the tricky bits) I would have been lucky to have ended up with an arrow head, never mind a large axe head.
Some tuition from the master Mr Lord
I like to think that this axe head has some of me in it but truth be told it’s more John Lord than me. I did however have a great time seeing this axe head appear out of the flint knowing at least part of it is me.
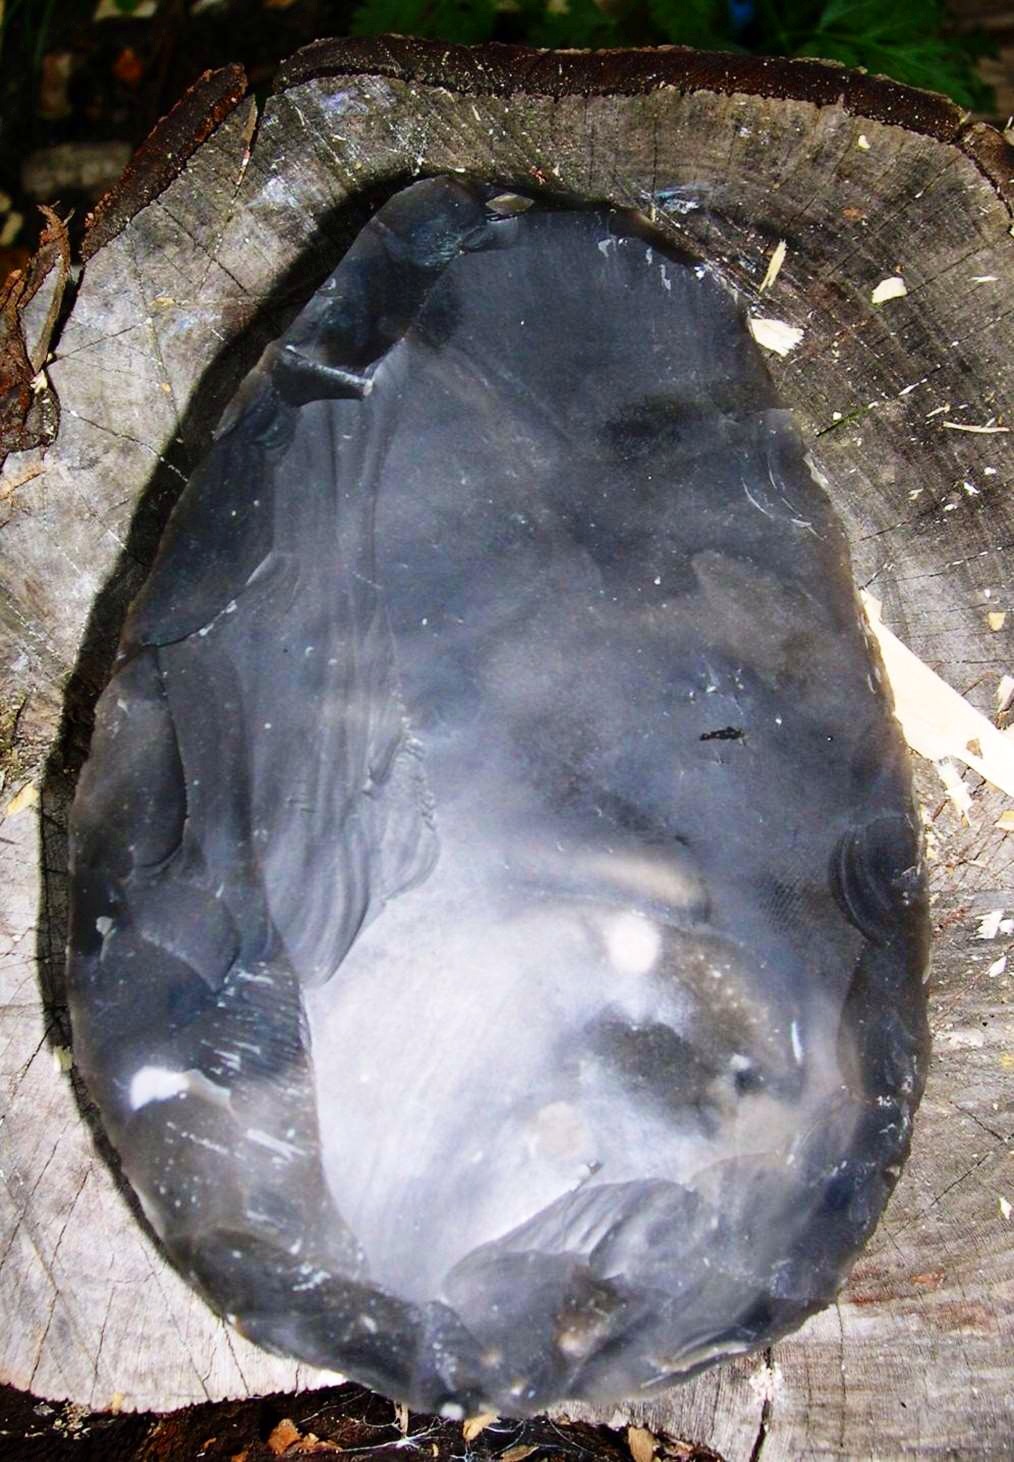
One knapped flint axe blade
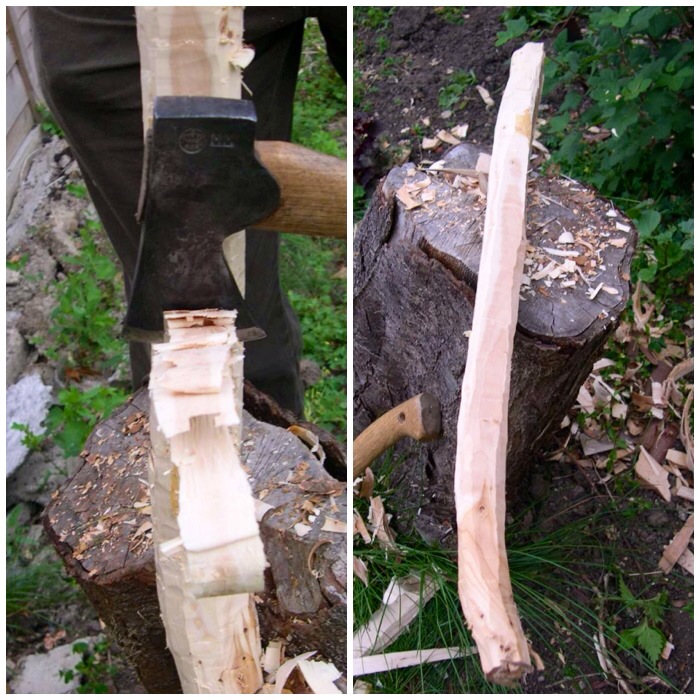
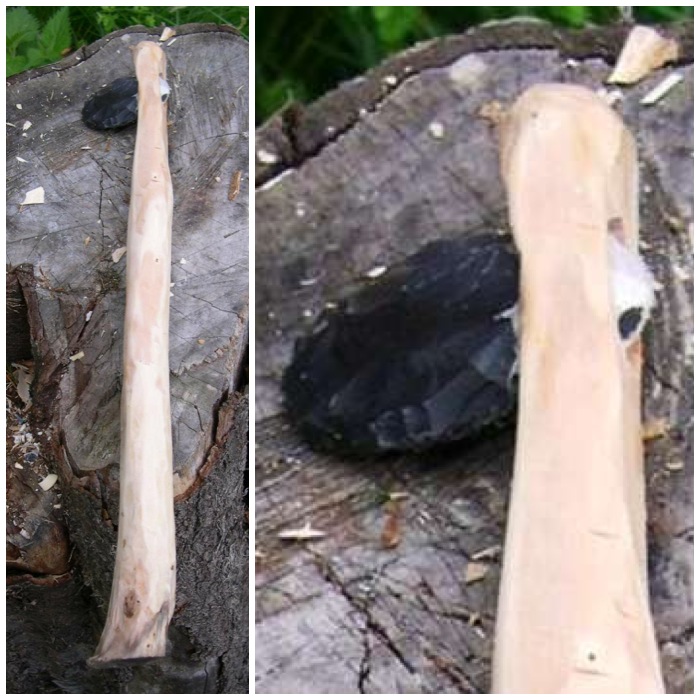
I used a well-seasoned piece of yew for the handle as that was what I had available at the time.
Initially I used my flint adze to try and shape the yew, but although the bark came off easily enough it didn’t make much of an impression on the hard wood beneath.
You can see the tool marks left on the wood by the adze in the right-hand picture below. As a Time Team enthusiast I have watched the archaeologists discuss such marks on many ancient pieces of worked wood they have found so it was good to see it in action for myself.
Stripping the handle
At first I used short chopping motions to tear away at the bark and wood with the adze. Ever experimenting, I tried a few strikes with a bit more force and eventually took a chip out of the adze blade. I was able to re-sharpen the edge of the adze by pressure flaking it but decided that the yew was just too tough for the adze (notwithstanding my lack of patience and skill).
Too tough for the flint adze
I reverted to my modern axe which took the excess wood off easily. In the picture on the right below you can see the very different tool marks left by the iron axe in comparison to the flint adze marks.
Time for an iron axe
This piece of yew had a slight curve to it which I thought would give added strength to the handle. I left the handle fairly rough, just ensuring I would have a comfortable grip and not get any splinters.
One rough handle
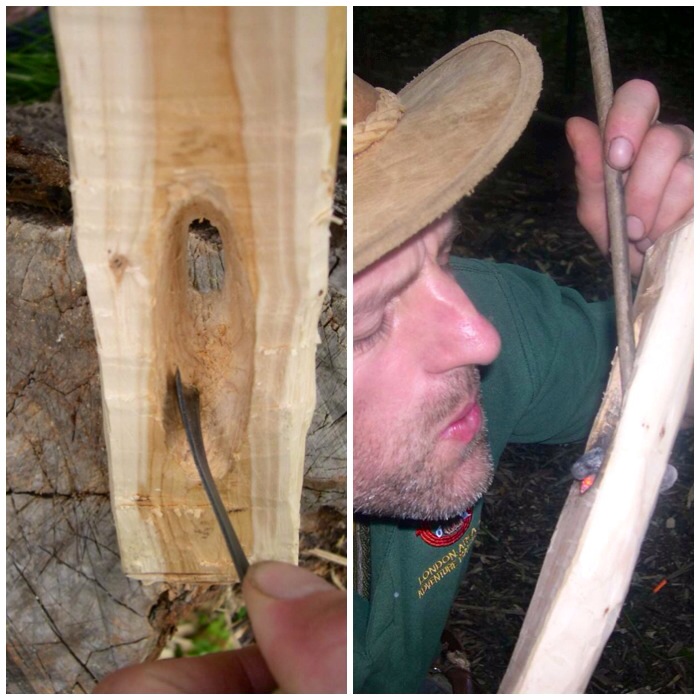
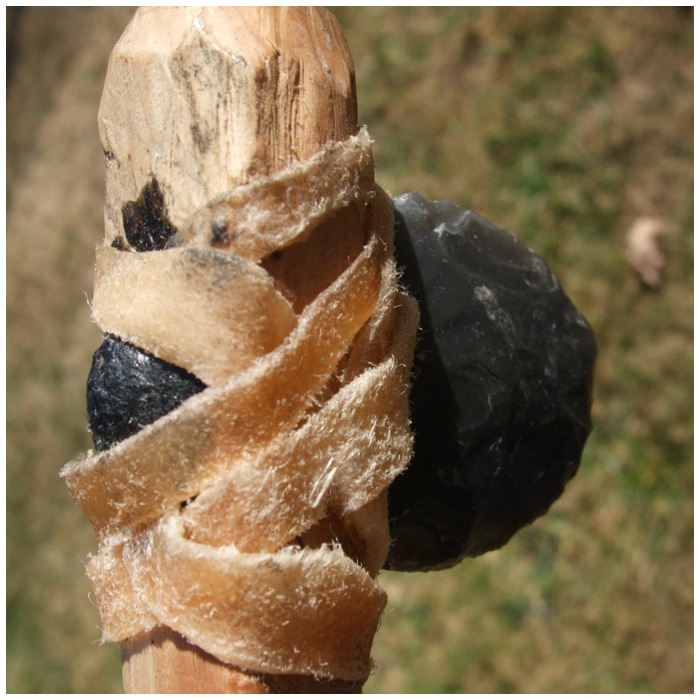
I initially started using a discoid all-flint knife to cut out the socket for the axe head but I did not take any pictures of this part. I did not do this for long as the yew was just too hard and the flint blade kept slipping. A few of the other students did just use flint for this stage but since the woods they were using were slightly softer they had more success. I ended up using my little palm gauge for the job and it worked very well.
I did try and burn out the wood with embers but soon got put off this with the fumes (yew wood being highly toxic).
Carving and burning
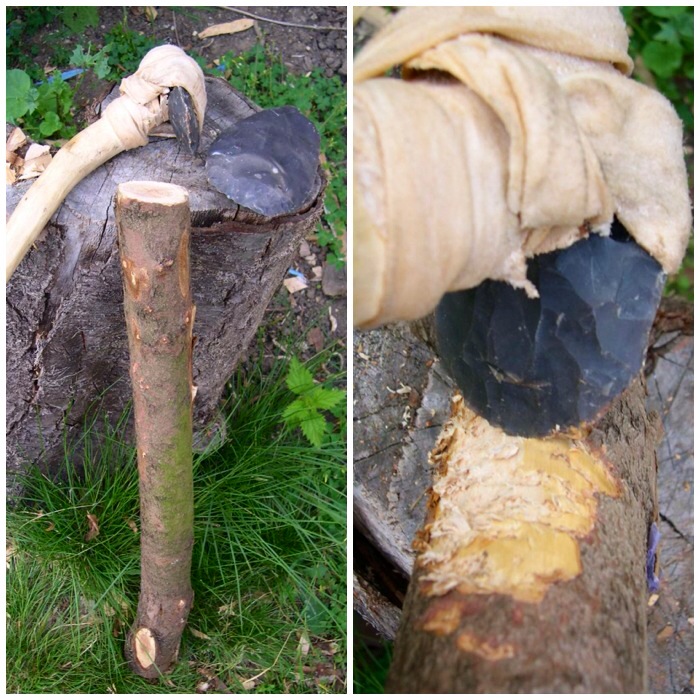
The socket finished – front and back.
The finished socket
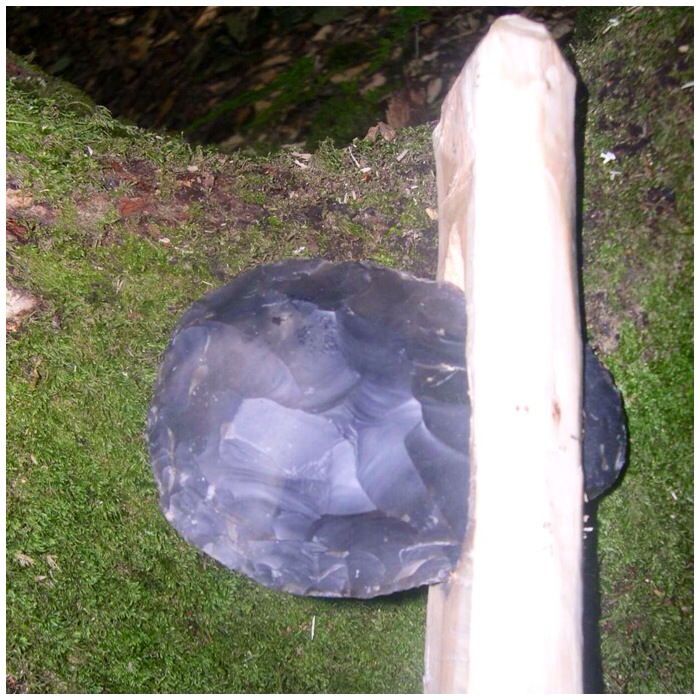
A good fit but too loose for use.
Test fit
I wrapped the flint axe head in a piece of rawhide to see if that would secure the axe head in the socket (apologies for the poor quality of the pictures), but with one piece wrapped around it the axe head would not fit into the socket.
Prepping rawhide
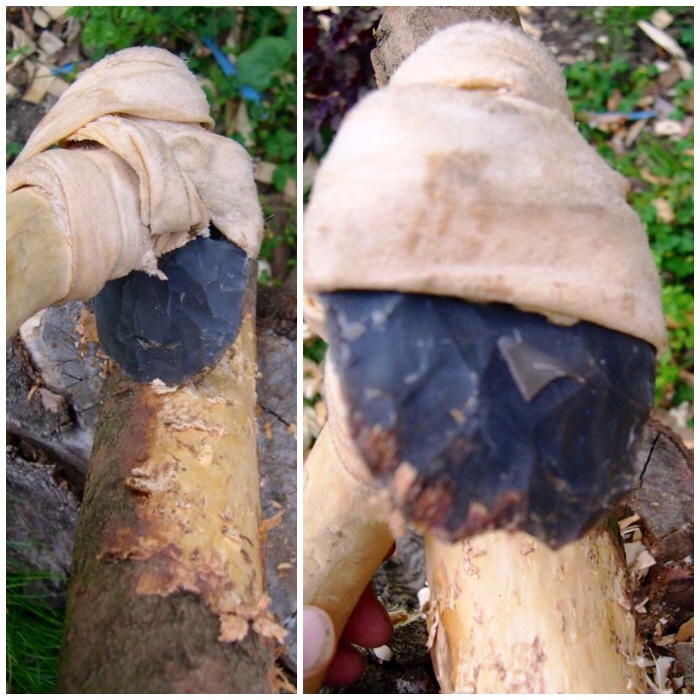
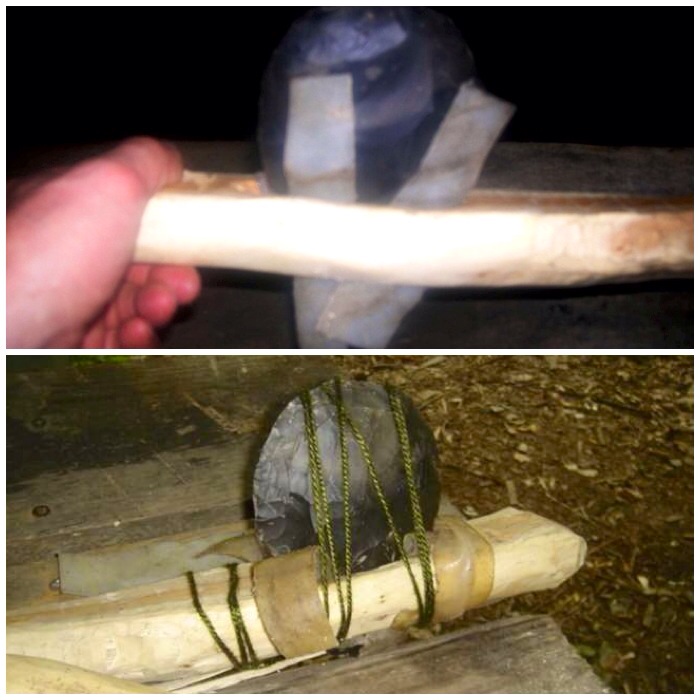
Instead I cut up some strips of rawhide and held it all in place with some string. As the rawhide dried out it really gripped the axe head and the wood of the socket.
Securing with rawhide
After that it was a case of wrapping a load more rawhide around the axe head and leaving it to dry for a couple of days.
Drying and adding more rawhide
After the rawhide had dried out it became almost translucent but it was a very strong hold.
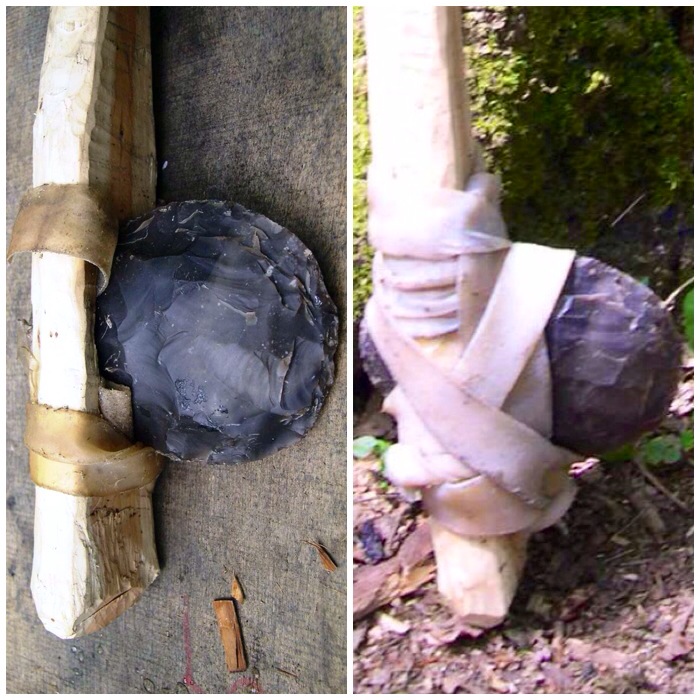
Side profiles
Top and bottom profiles of the axe head.
Top and bottom profiles
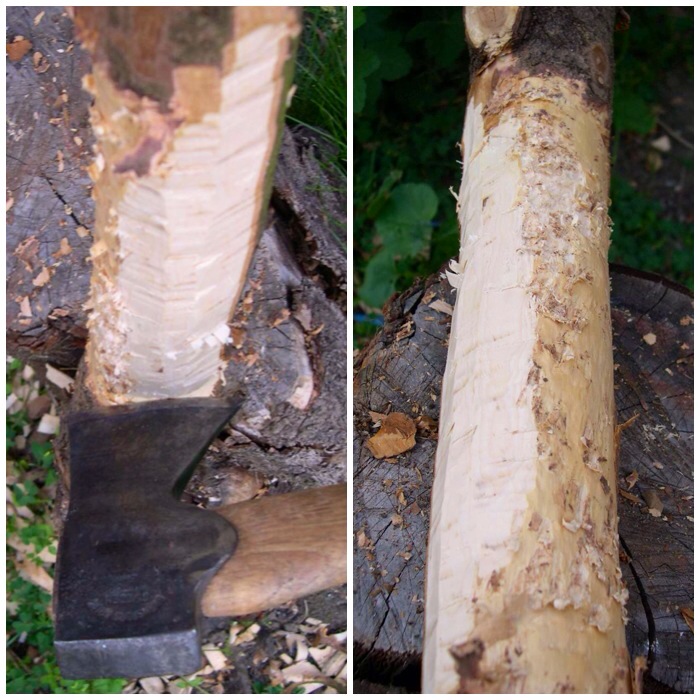
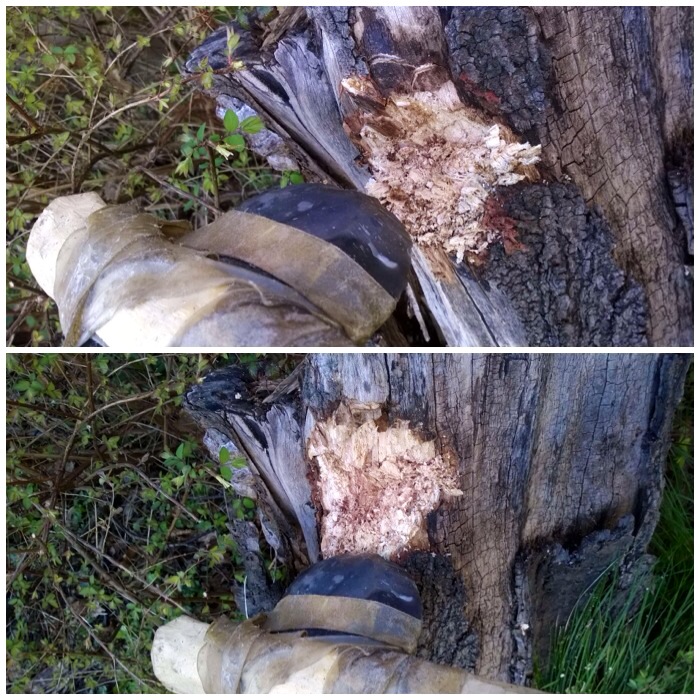
I tested the axe out on an old stump in my garden. Like the adze, the axe tears into the wood as opposed to slicing into it as a modern iron axe would do. It was still very effective in its own way.
Leaves the wood torn
The blade edge is not particularly sharp and has a good shoulder area behind it. This shoulder area really supports the edge so that it does not break off when the axe is used.
Up close
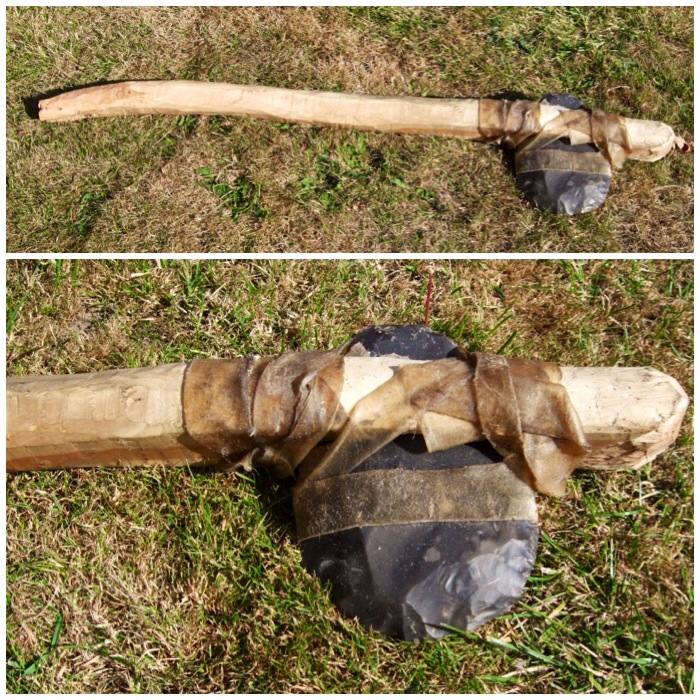
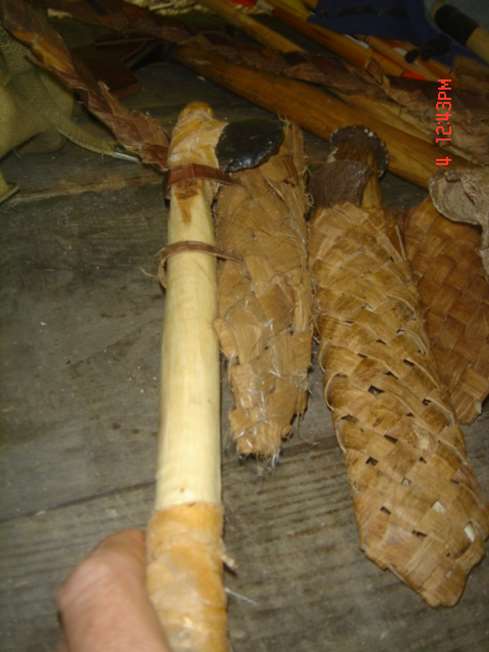
I had a small flint axe blade I had made at the same time as the larger one, so I just scaled everything down to make a hatchet.
Hatchet blade jammed in with rawhide
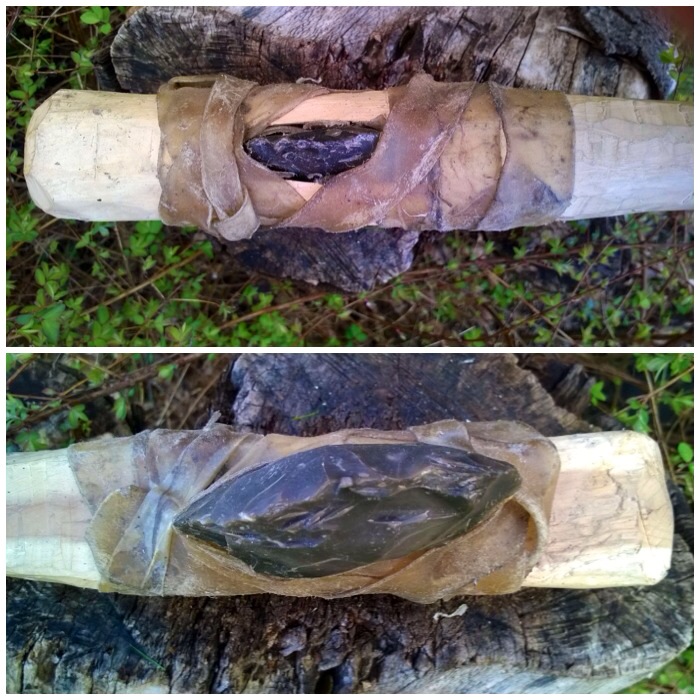
As well as using rawhide I filled the socket with some spruce pitch to fill up any gaps and to help secure the head more.
Gaps filled with resin
I have never used this tool on anything – it would have been used mostly to dispatch small game that had been caught in traps. I do like it a lot though, in some ways more than the larger axe.
Rawhide wrap
This hatchet sits nicely on my primitive belt order.