Over the last few years I have written a fair bit about carving Finnish Candles or Log Rockets using just the tools I would carry in my bergen (saws, knives, axes etc) so I thought it was time to see what could be done with a chainsaw.
I decided to opt for the Log Rocket as I thought there has been plenty written about using Finnish Candles (referred to sometimes as Swedish Candles/Torches). At the Bushcraft UK Bushmoot last year I asked my friend Rob Nash if he was willing to carve a large log rocket for me using his chainsaw.
For those of you who just like to watch a short video on its construction here it is – for those of you who prefer detailed instructions there are loads of pictorial steps after the video below.
The Log Rocket
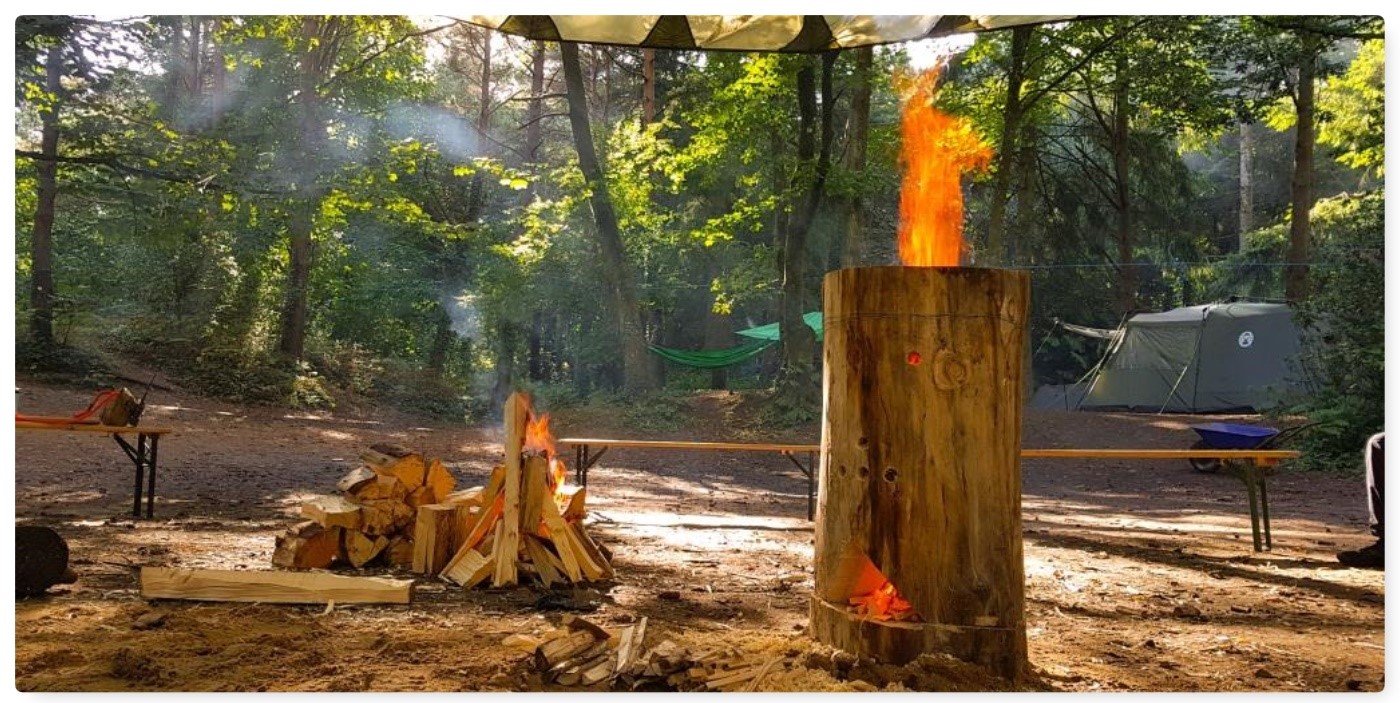
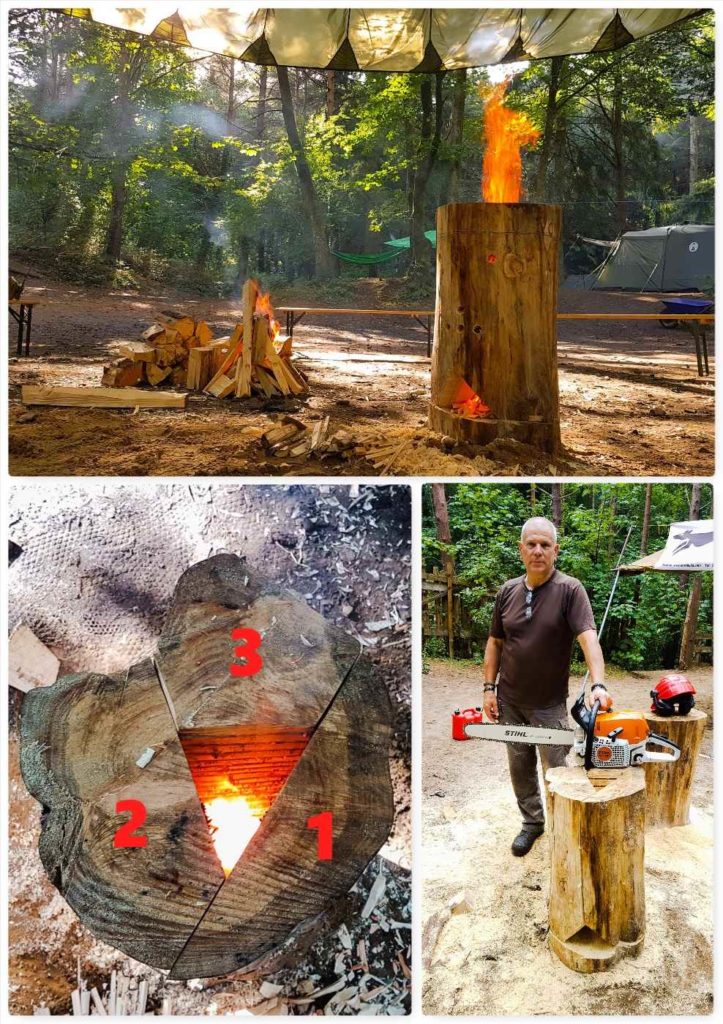
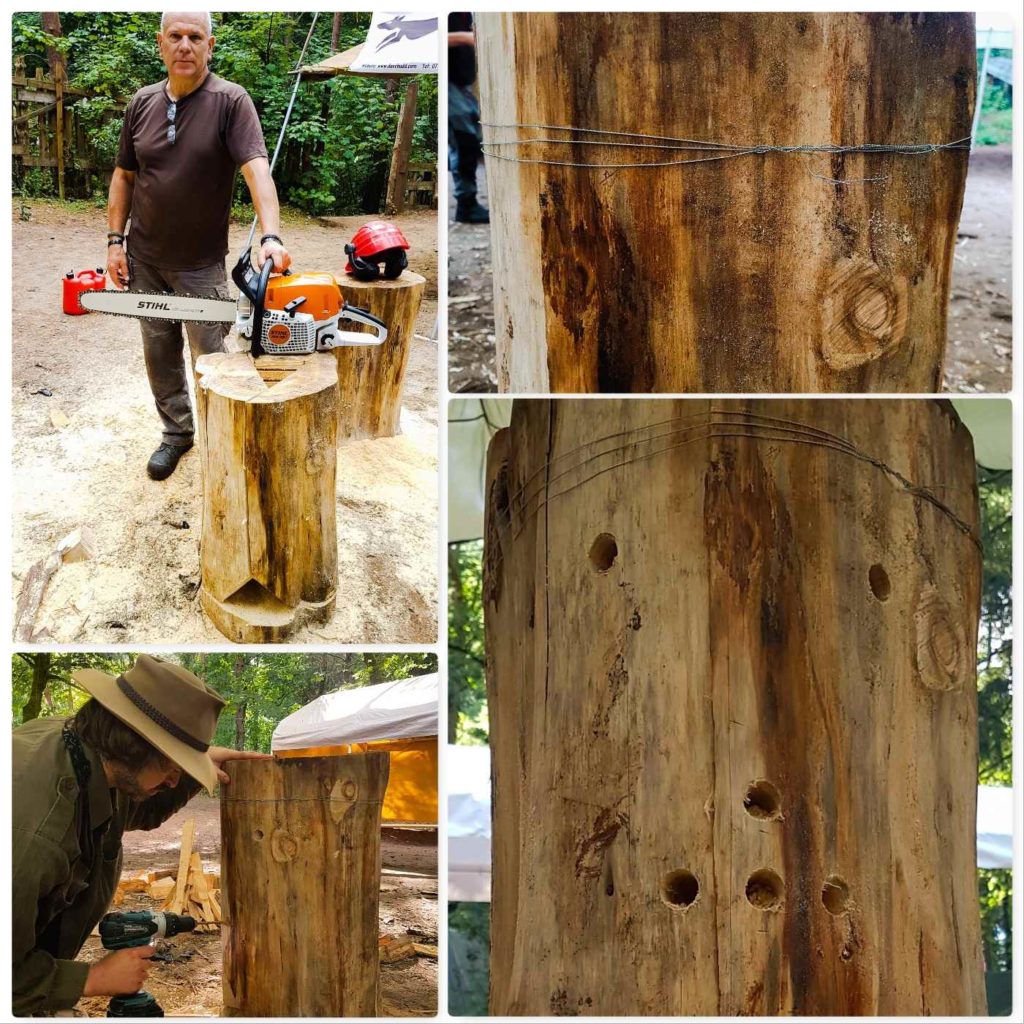
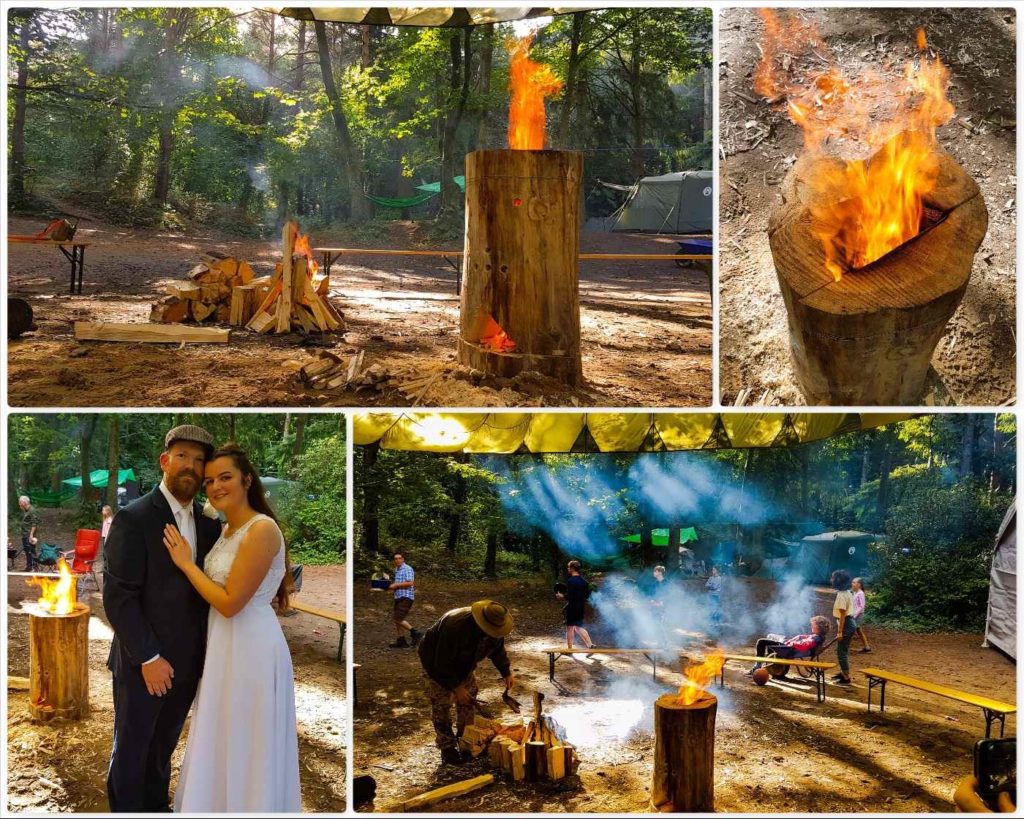
The log rocket worked spectacularly and you can get a sense of scale (forgot to measure it) from the picture of Rob standing next to it.
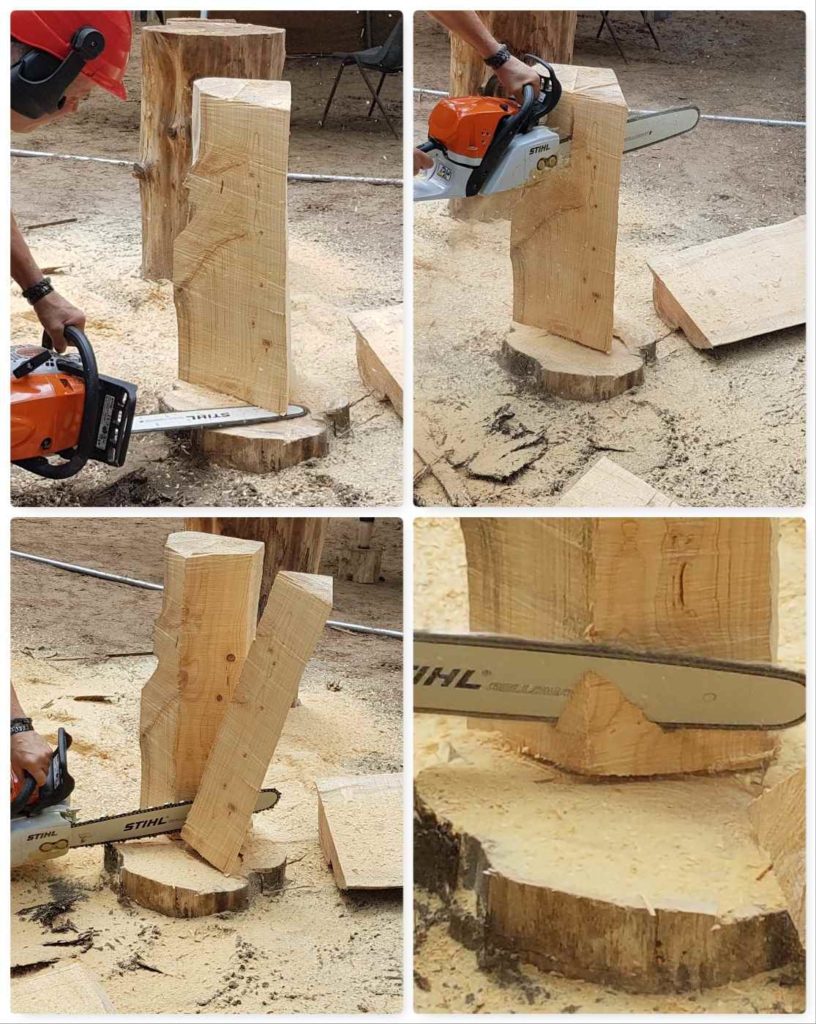
I chose a large piece of piece of what I think was Spruce (hard to tell when there is no bark and it is seasoned). I will be referring to the 3 parts of the log rocket as you can see in the bottom left picture below.
The Giant Log Rocket
Section 1
Rob took out a slice of the log (approx 1/3 of the log) and stopped the cut about 15 cms from the bottom. Then he cut in from the side at the bottom of the log to remove Section 1.
Cut 1
Section 2
To describe this cut is quite difficult so refer to the picture above in which the pieces are numbered. The aim was to leave Section 3 with a point that could be removed to form the chimney. Again it was a case of cutting down to about 15 cms from the bottom and removing section 2 by cutting in from the side.
Cut 2
Section 3
You can clearly see the point left on Section 3. Rob made an undercut at the bottom first this time and then removed the ‘Point’. This is the area that would form the chimney. The triangular-shaped piece of wood from the centre point was split down further with an axe to form the kindling to get the log rocket going.
The final step here in the bottom right picture shows Rob cutting out a piece of wood at the bottom of Section 3 to slightly enlarge the ‘firebox’ area.
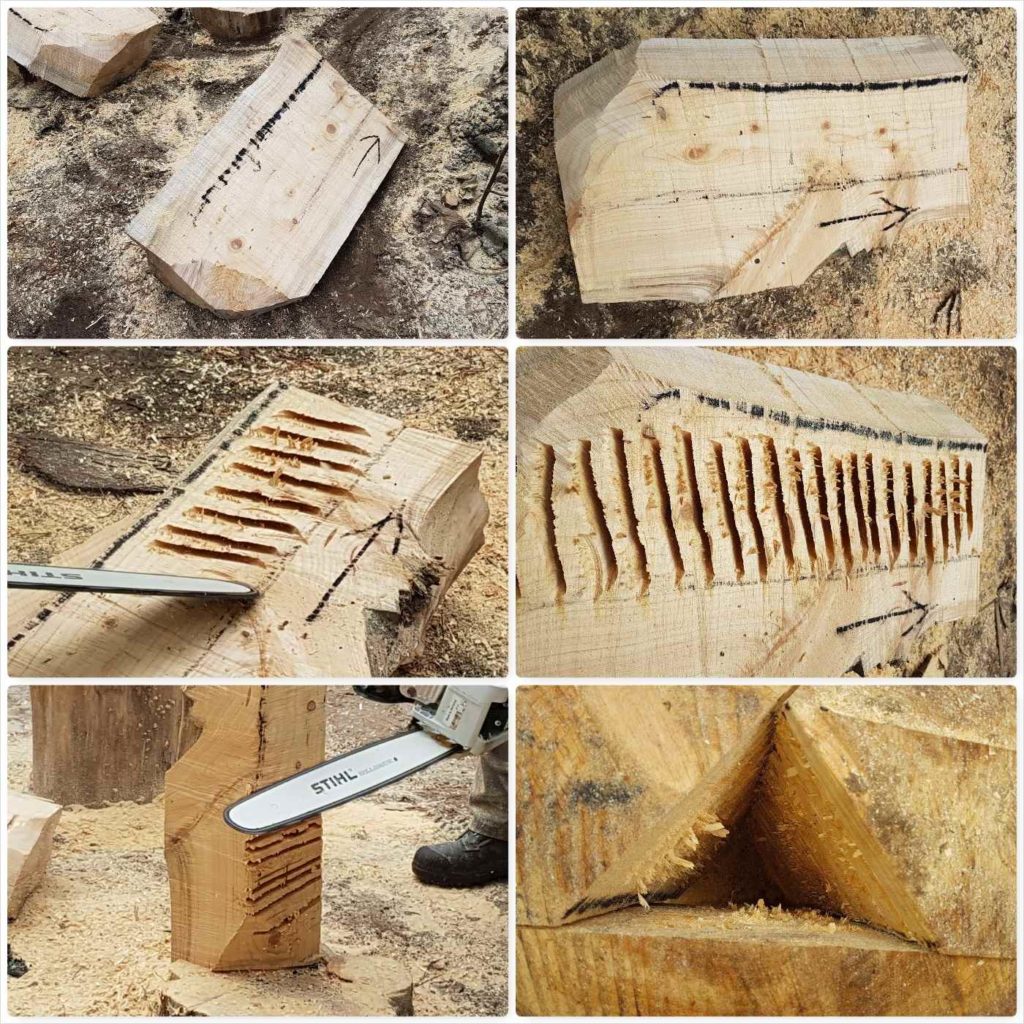
The chimney
Firebox opening
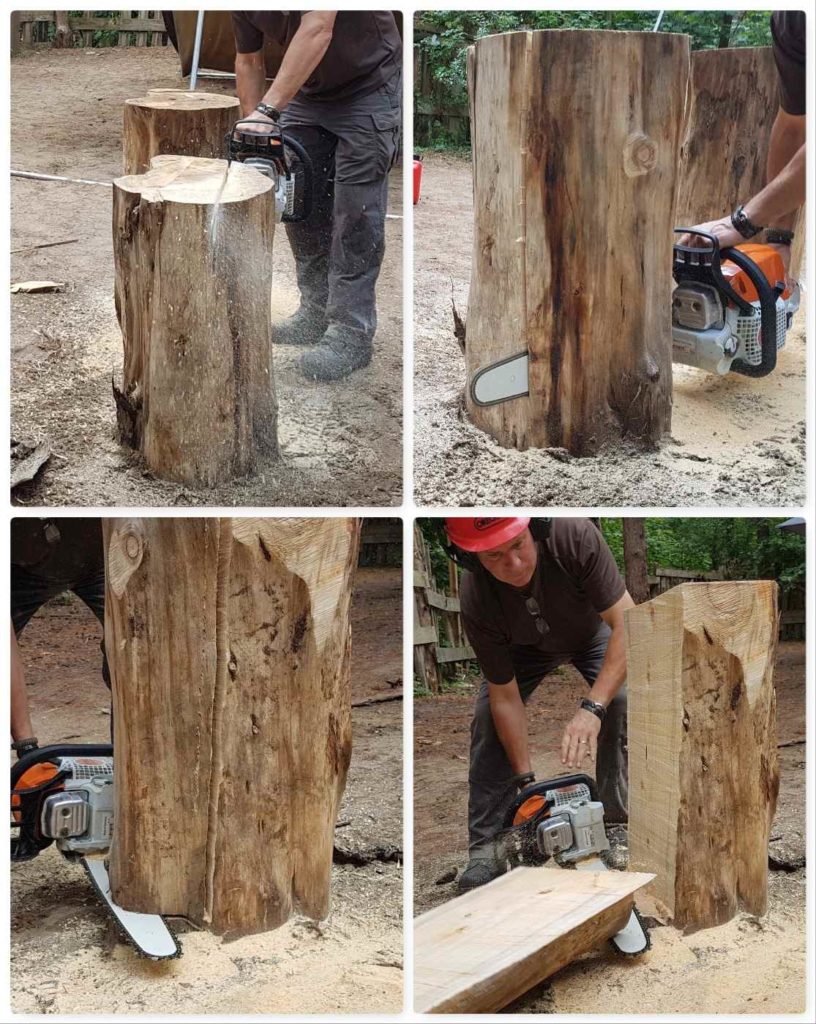
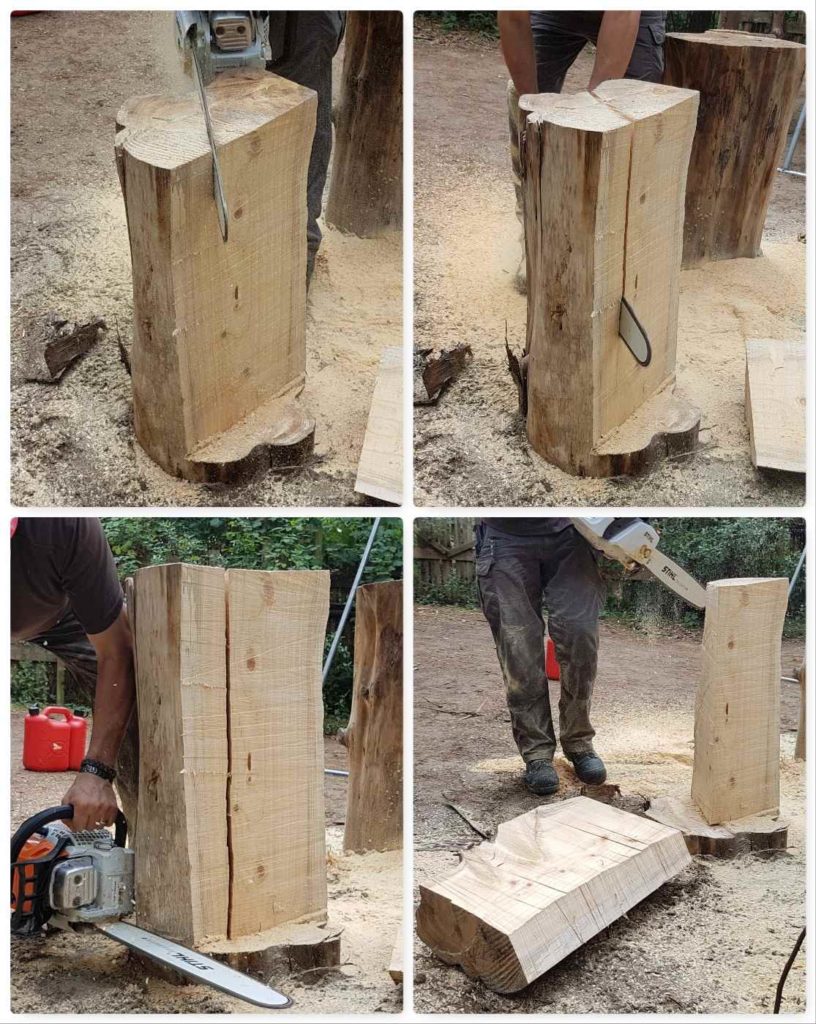
I have shown the final look of the firebox opening in the top left picture below. Rob created this firstly by re-assembling Sections 1 & 2 with Section 3. The he marked the corners of Sections 1 & 2 that needed cutting to form the firebox opening (that might sound overly complicated, but it’s important if you’re not to cut the wrong corners).
Once he’d cut off the corners he shaved off more wood from the ‘Shoulder’ of the opening so as to enlarge the firebox area.
The Firebox
The Raappanan Tuli cuts
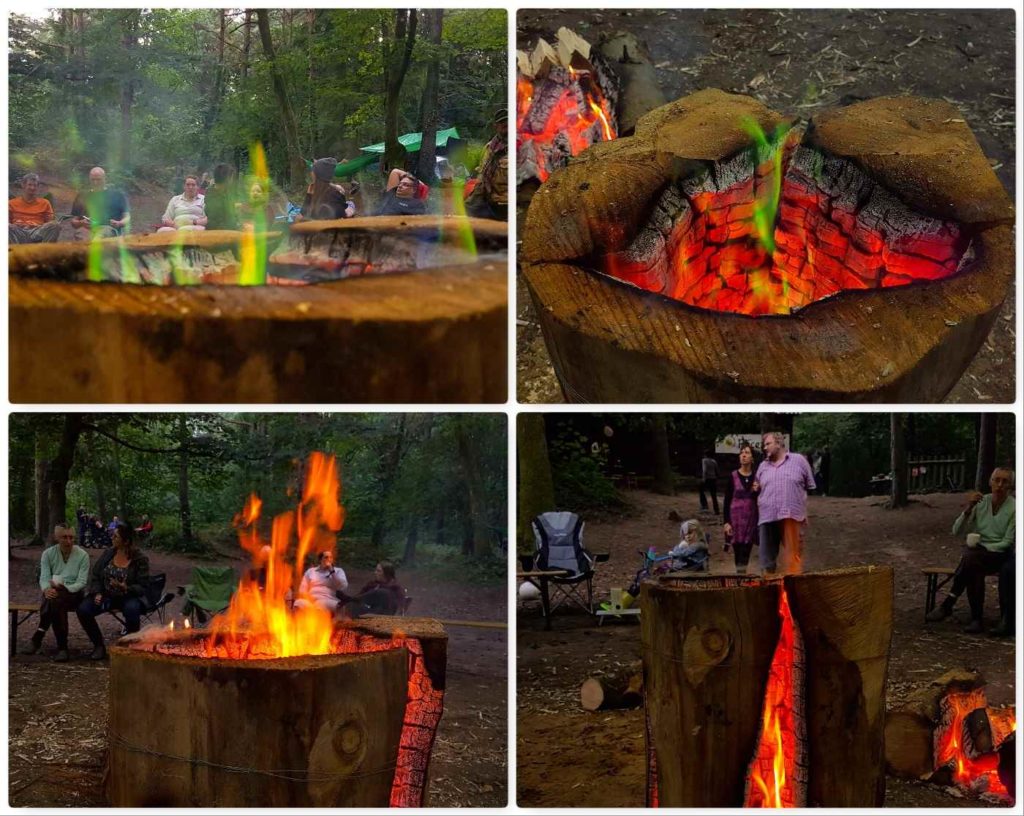
To increase the surface area of the chimney and help the log catch light more quickly I asked Rob to makes some cuts in the flue area. I got this idea from researching different types of log fires – this style of cut comes from the Raappanan Tuli log fire.
These cuts are particularly useful when you have a damp log as the increased surface area greatly increases the chances of the fire taking properly.
Ribbing the chimney
Final touches
I used strong wire to hold all the pieces of the reassembled log together – an alternative would have been to make some dovetail joints and join them together with green wood pegs – see here for more details – How To…. Build a Dovetail Log Rocket Stove.
Finally my friend Mark used his drill to give the log rocket a face (which also helped provide a bit more ventilation).
Final touches
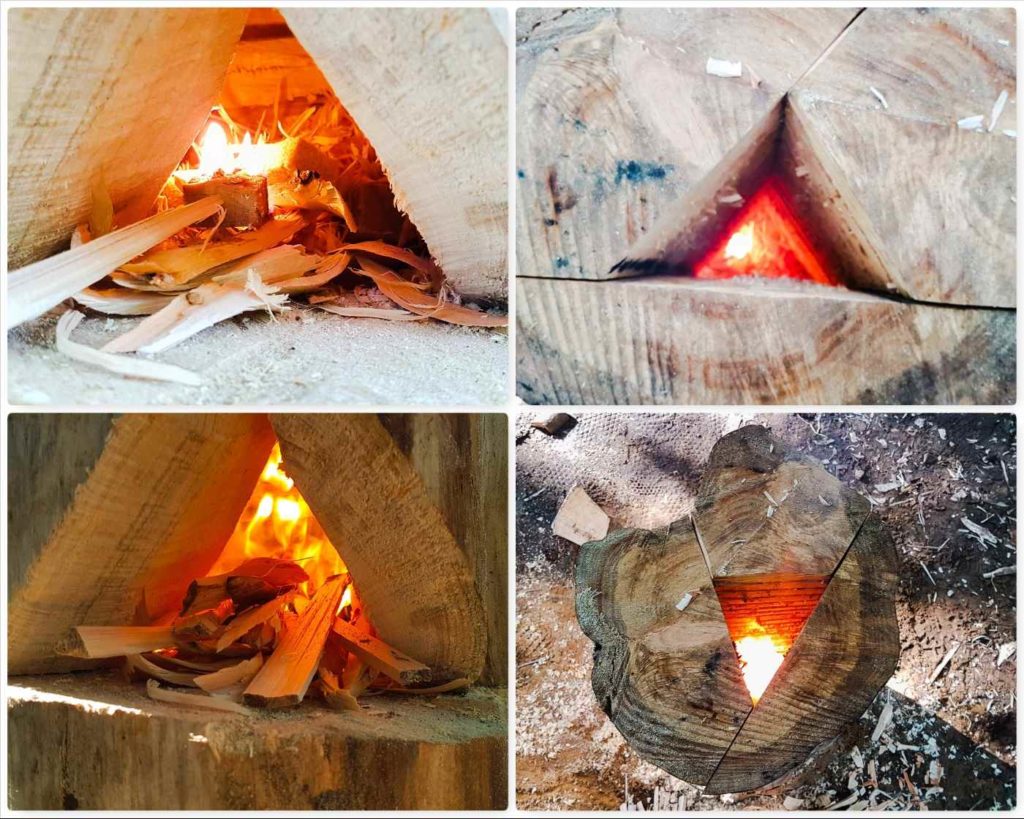
Firing up
I used slivers of the central section Rob had cut out of the log as kindling and lit it all with a lollistick lighter (a firelighter pierced on a sharp stick – have a look here – Lolli Stick Fire).
Firing up
Party time
The log rocket was a stunning central feature for everyone to sit around in the evening and we even used it as a backdrop in a wedding photo (Magdalena and Phil renewed their vows at the Bushmoot).
Why it is called a Log Rocket
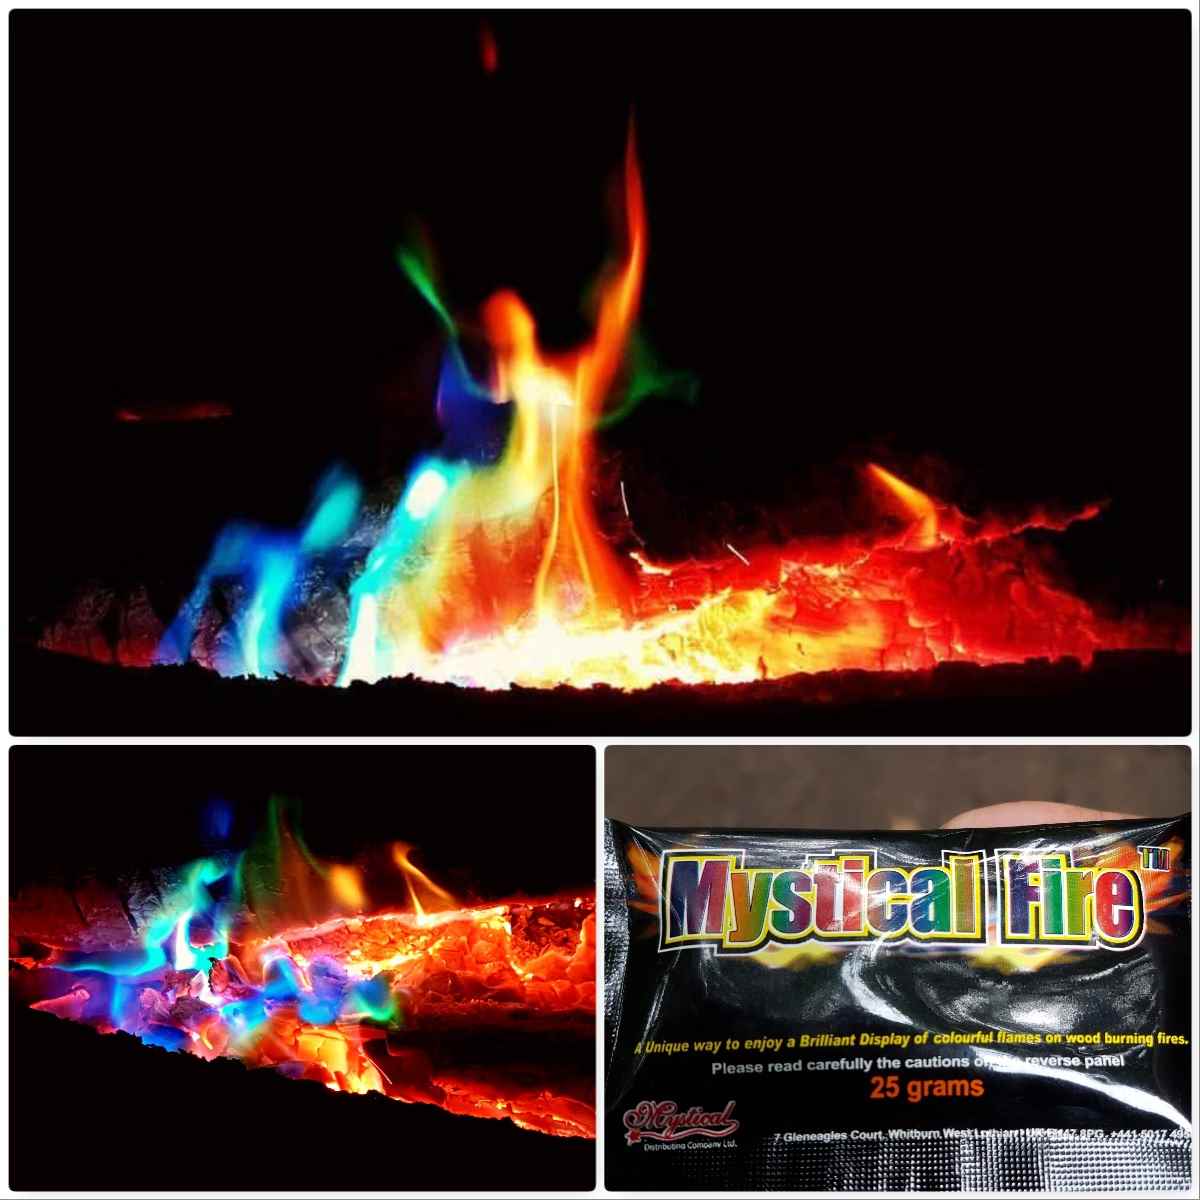
We even added a little bit of Cap’n Badger’s magic Rainbow dust to ‘mix the colours up’ a bit.
Some Magic Dust
When I looked at the log rocket the next day (over 14 hours after it was lit) the base was just a mass of burning embers – quite a log rocket, I would say.
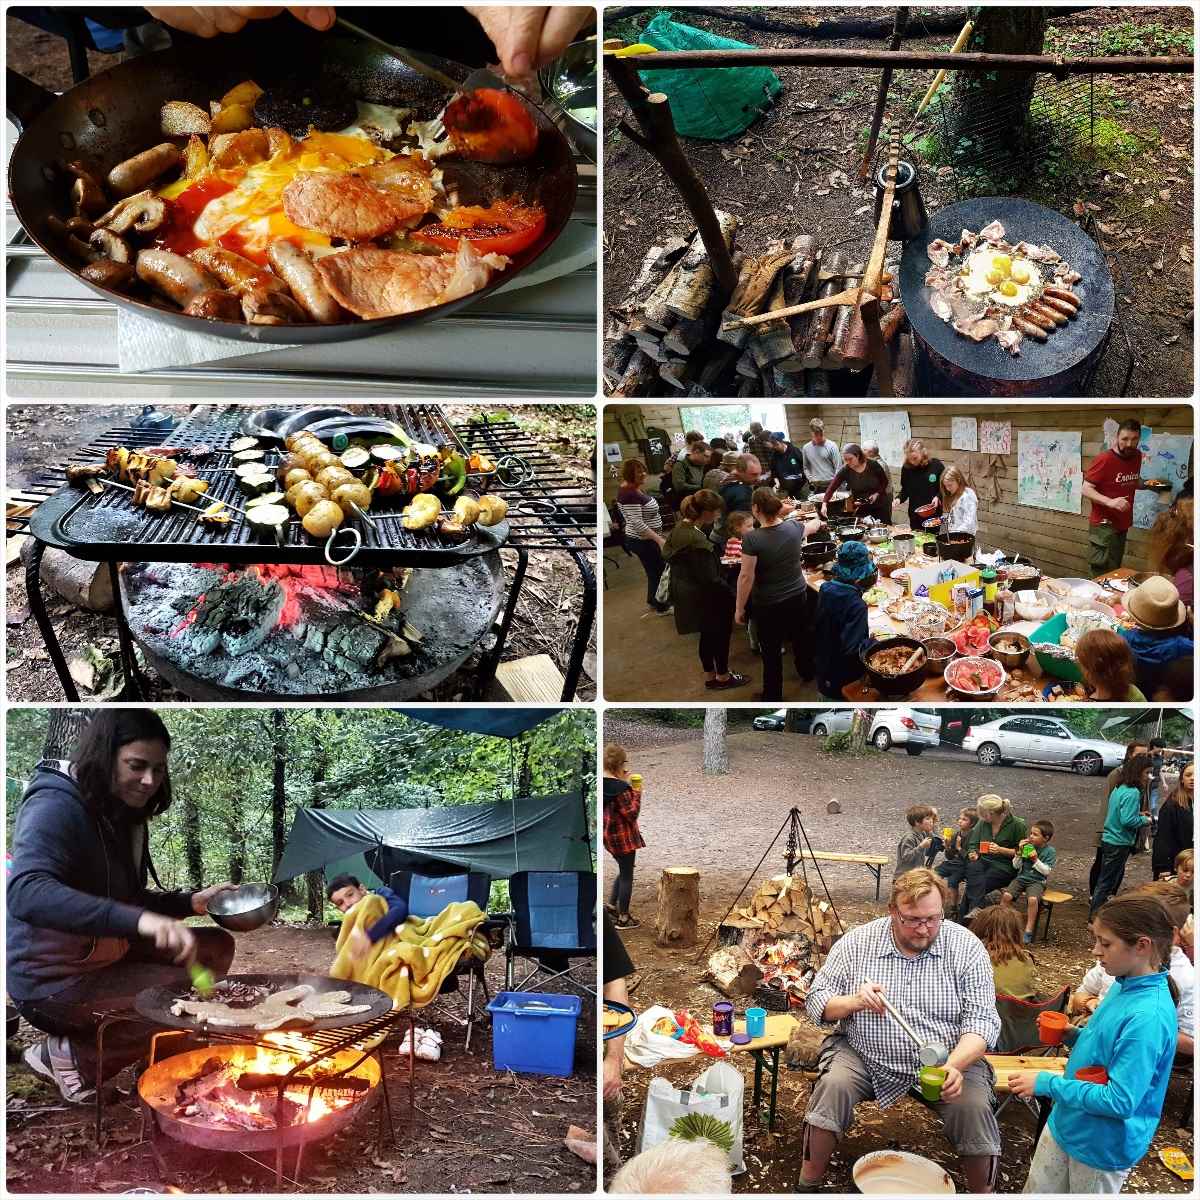
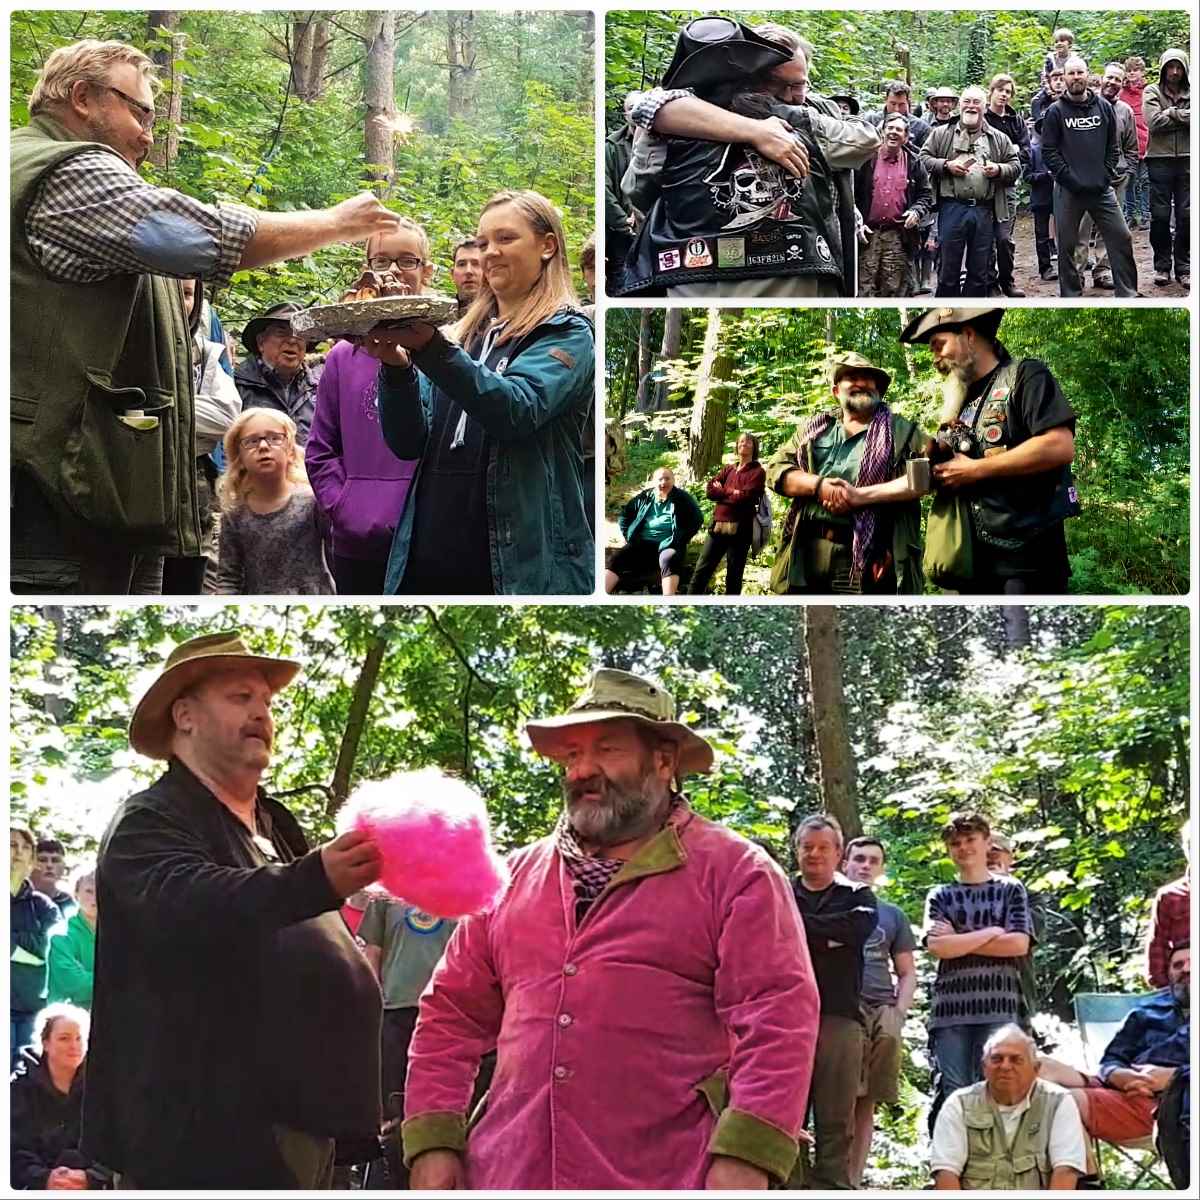
A ‘Brilliant Moot’ is how I would summarise this year’s Bushcraft UK Bushmoot. It was action packed from start to finish for me as I juggled my time between looking after my kids, running workshops and doing a lot of filming.
I will let the pictures and video do most of the talking so will keep the text to a minimum.
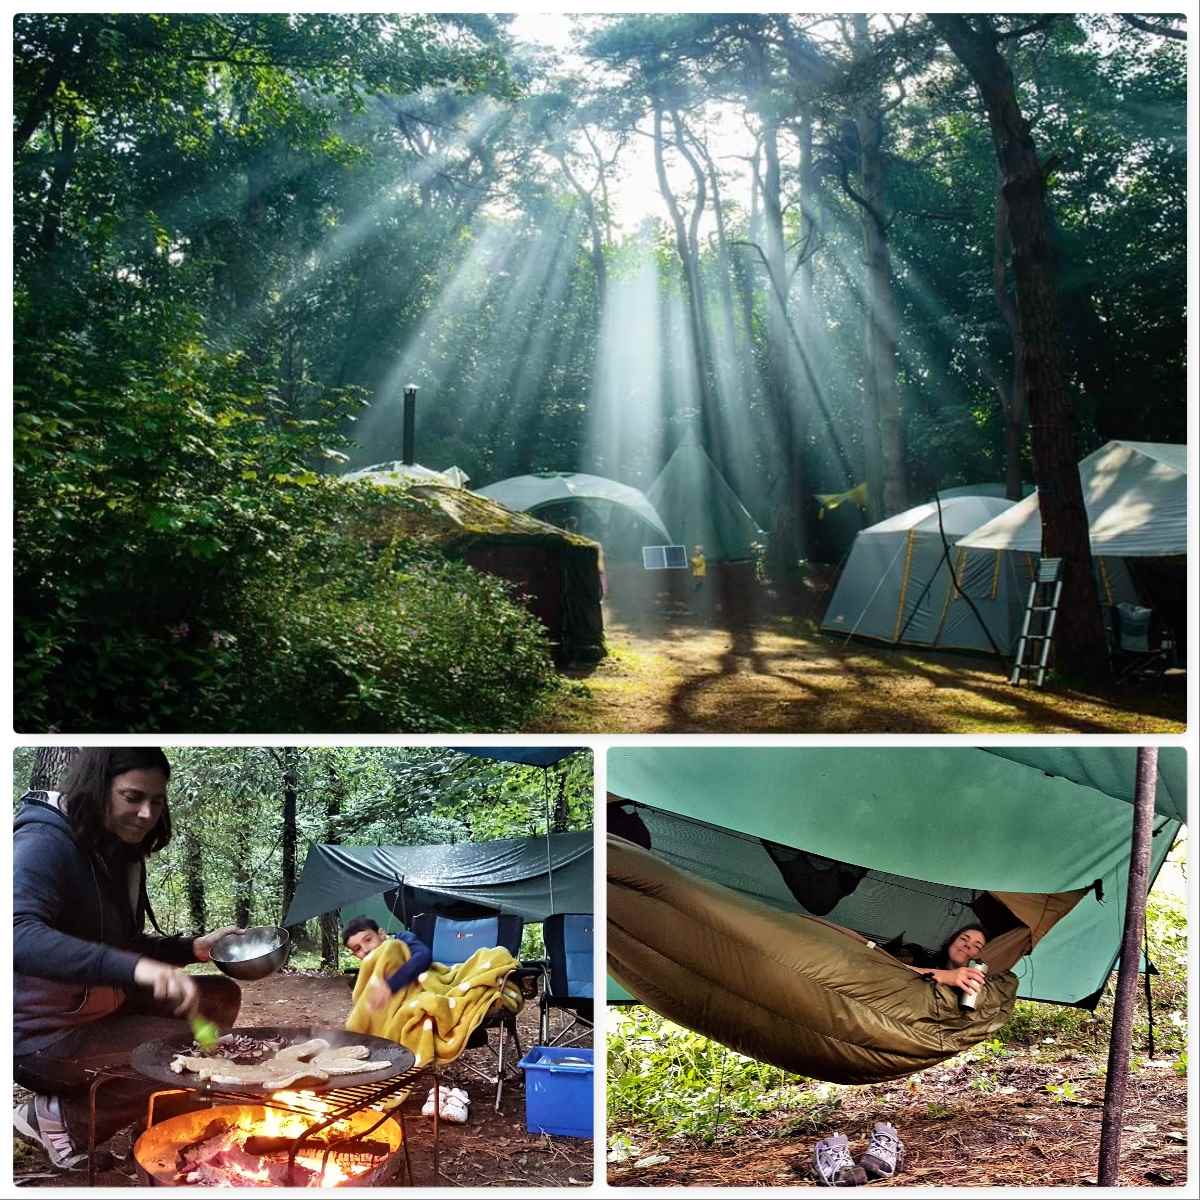
Bushmoot 2017
The first few days for us ‘Mods’ (forum moderators) were all about setting up the Bushmoot so that everything was in place for everyone arriving later in the week. We did not rush things as it was a holiday for us as well but over a few days the Bushmoot was soon set up.
Set up
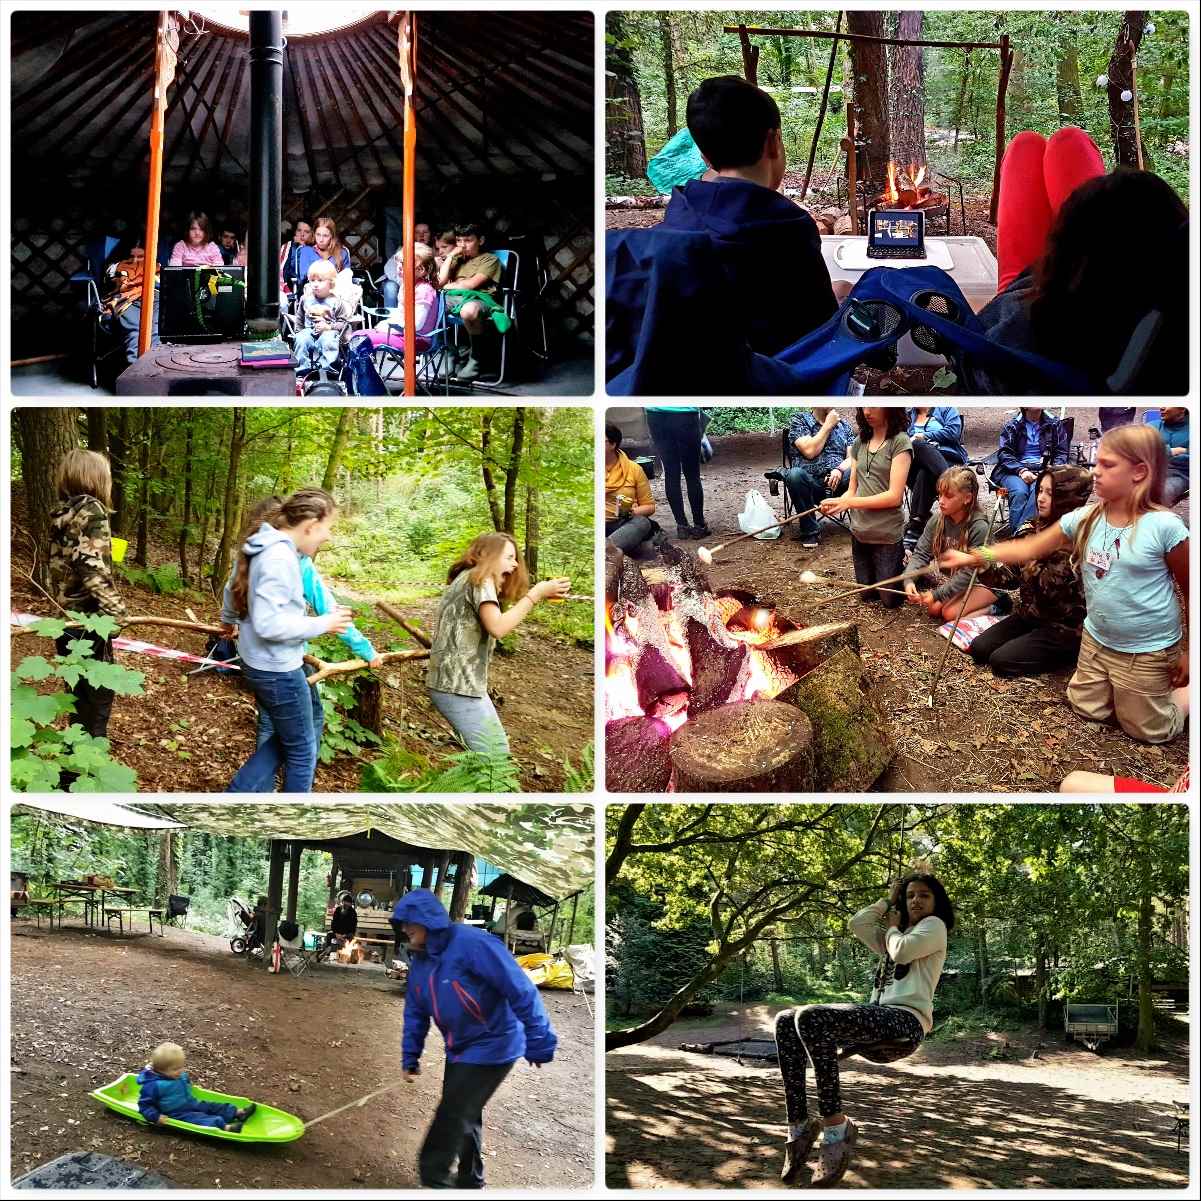
There are some great places to camp at the Bushmoot which makes for stunning photography. The Mods’ corner is great to photograph on a sunny morning.
I have used the same camping spot for a number of years now and even though a year passes between each visit it feels as if I have never been away when I return.
Camp life
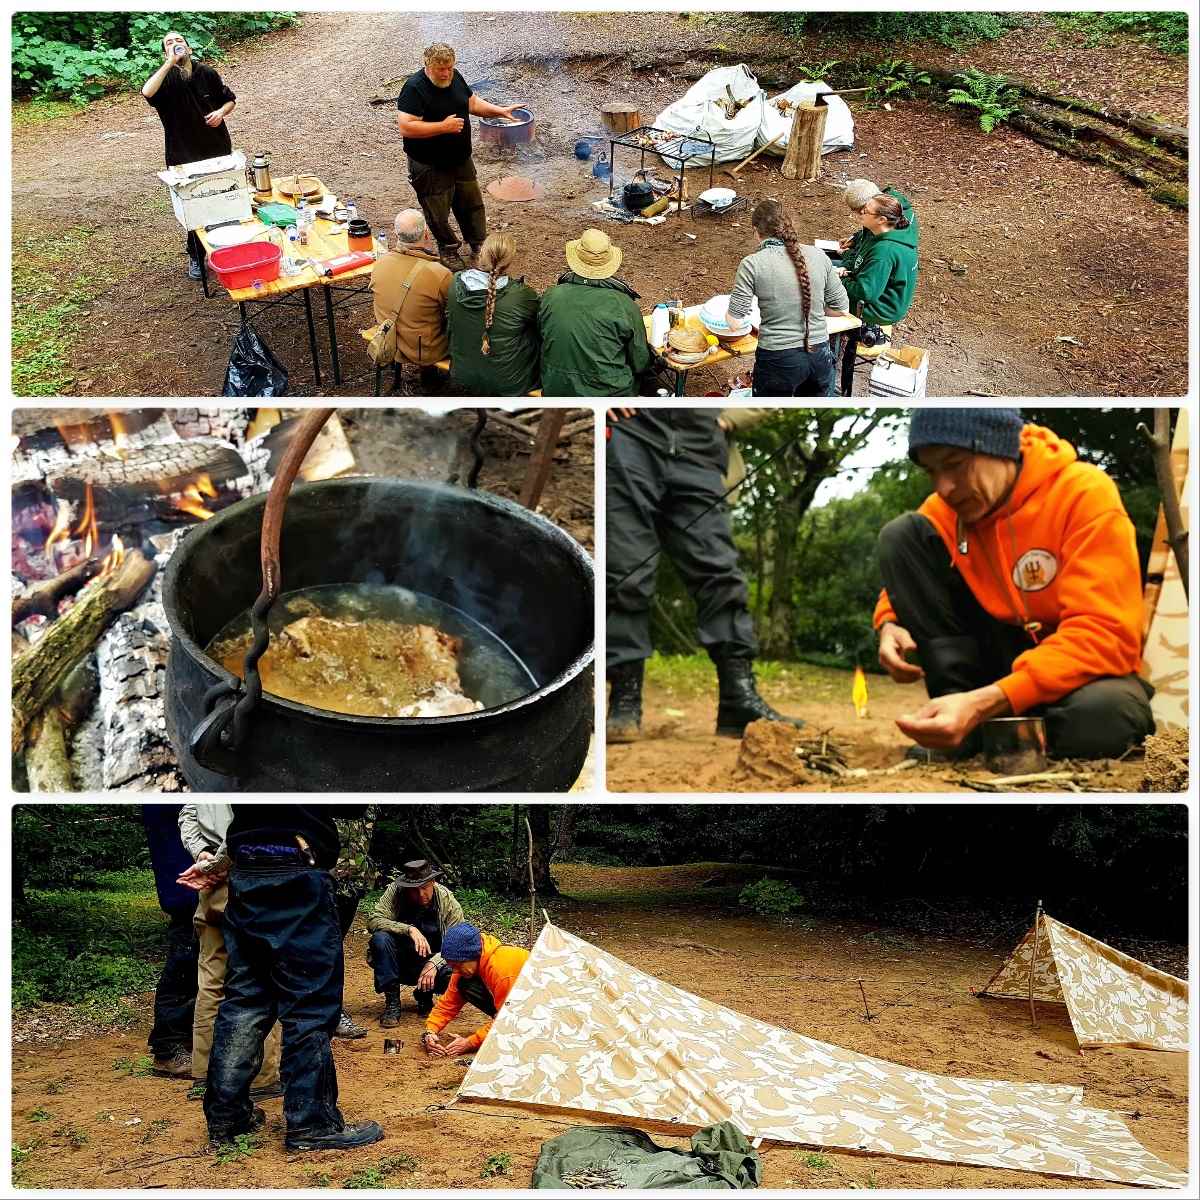
Early Workshops
There were a couple of early workshops this year – Open Fire Cooking with Neil and a 48hr Survival Course with Fraser from Coastal Survival. Both courses covered a lot of different areas so my photos are just a snapshot of their content – needless to say on both courses all the students eat well.
Early workshops
Videos
I put a short video together of this early part of the Bushmoot – including a scenario where my son pretends to chop my head off with an Ivy sword 🙂
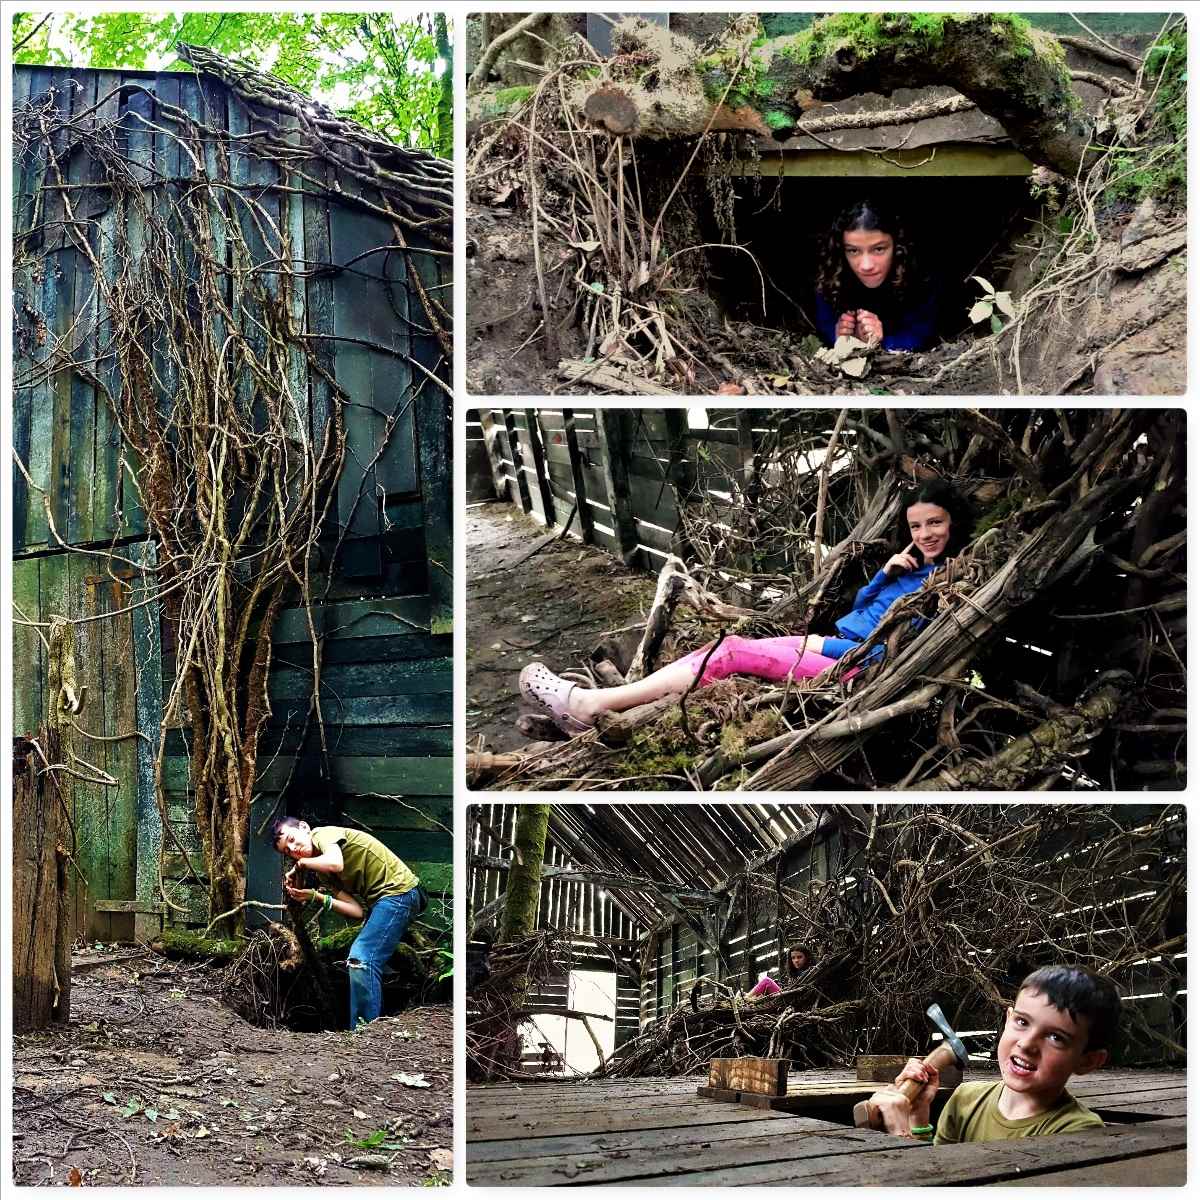
In amongst all these workshops and general setting up my kids took themselves off exploring. I went with them on one jaunt and they took me to the ‘House of Doom’ (as they referred to it). I think film companies use the site and they had left this massive Gothic barn – quite beautiful but eerie at the same time (the axe was for posing with only by the way).
Exploring
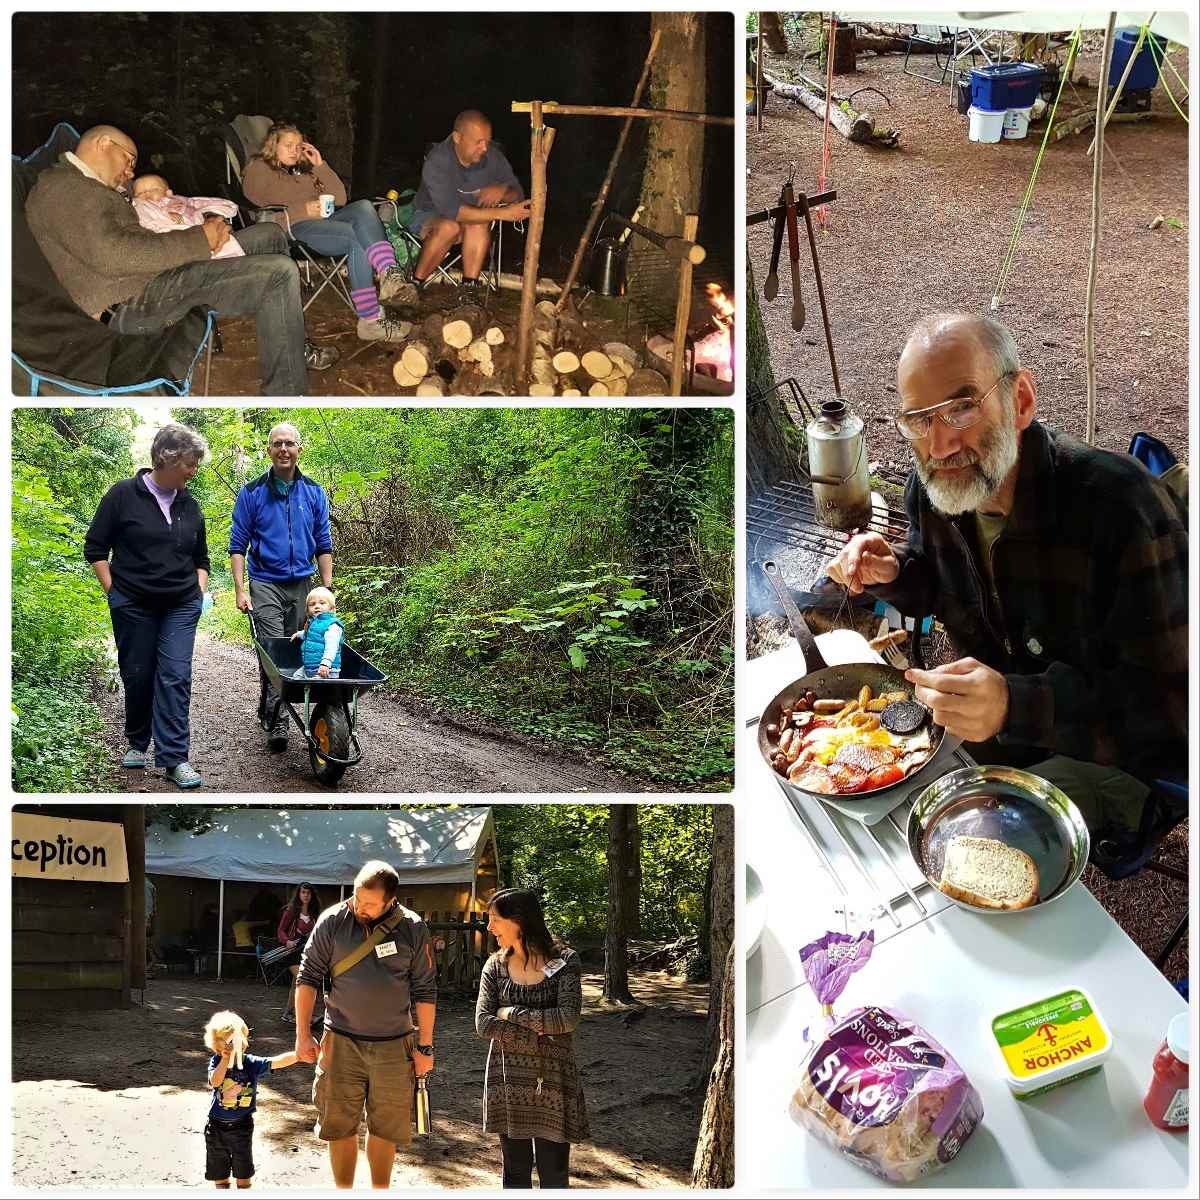
The Bushmoot is all about ‘Family’ as far as I am concerned – this family extends out to all my Bushmoot friends I see time and time again as I return each year.
Friends
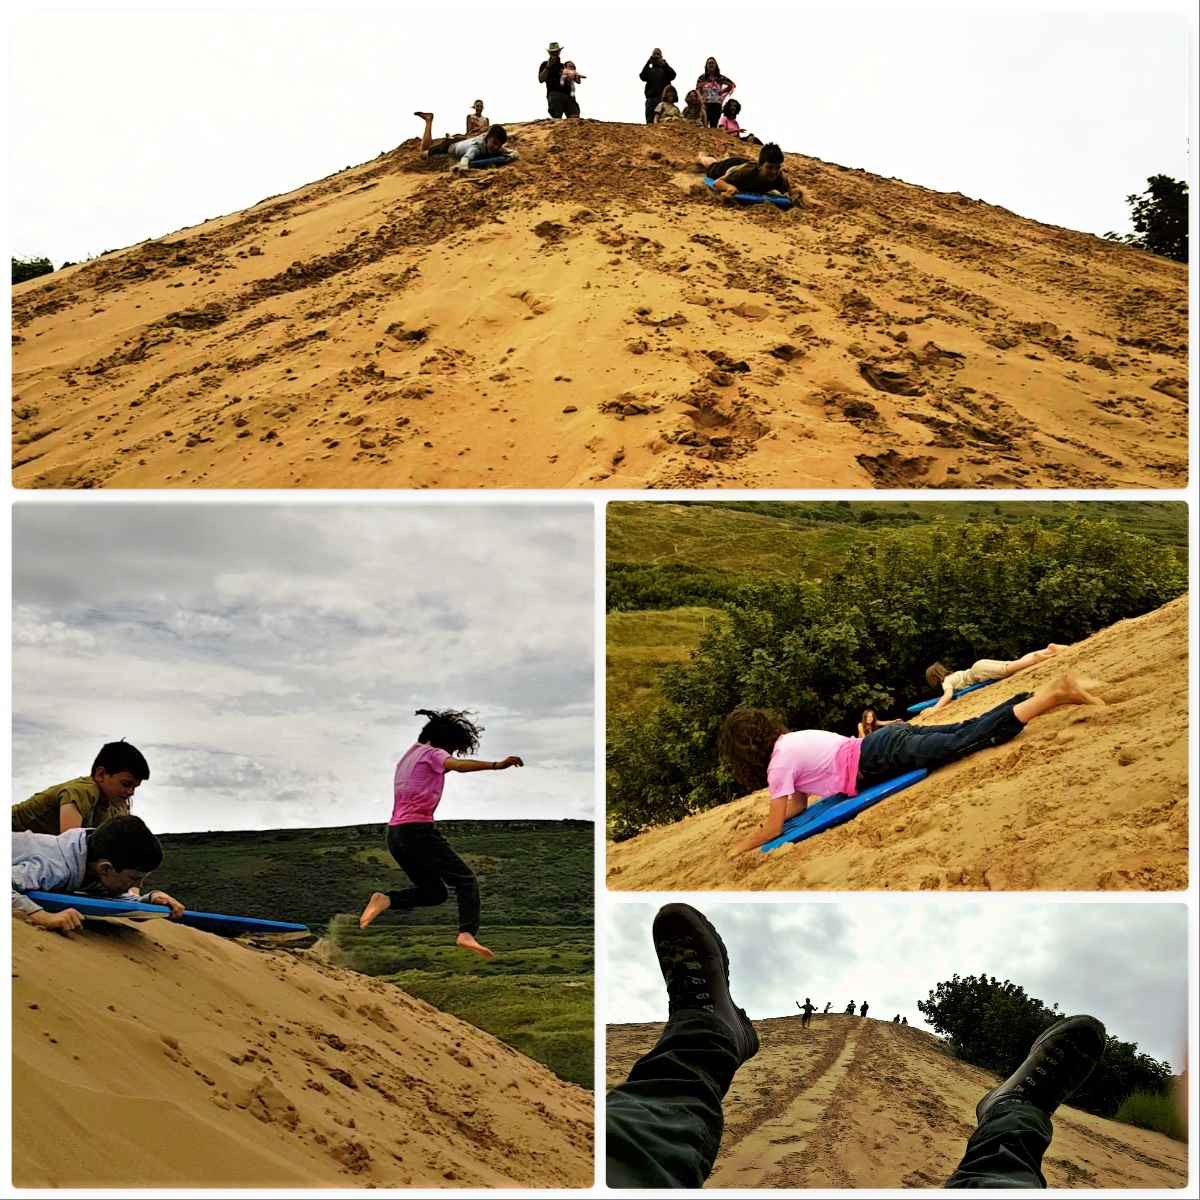
Getting out of the woods one day with my friends Ian, Catherine and Liz (and assorted kids) we went Dune Diving. Merthyr Mawr sand dunes are the second highest dunes in Europe, apparently, and there is one dune in particular that the kids love.
Needless to say I joined the kids as they threw themselves down the dune – great fun even for a 50-year-old kid like me.
Dune riding
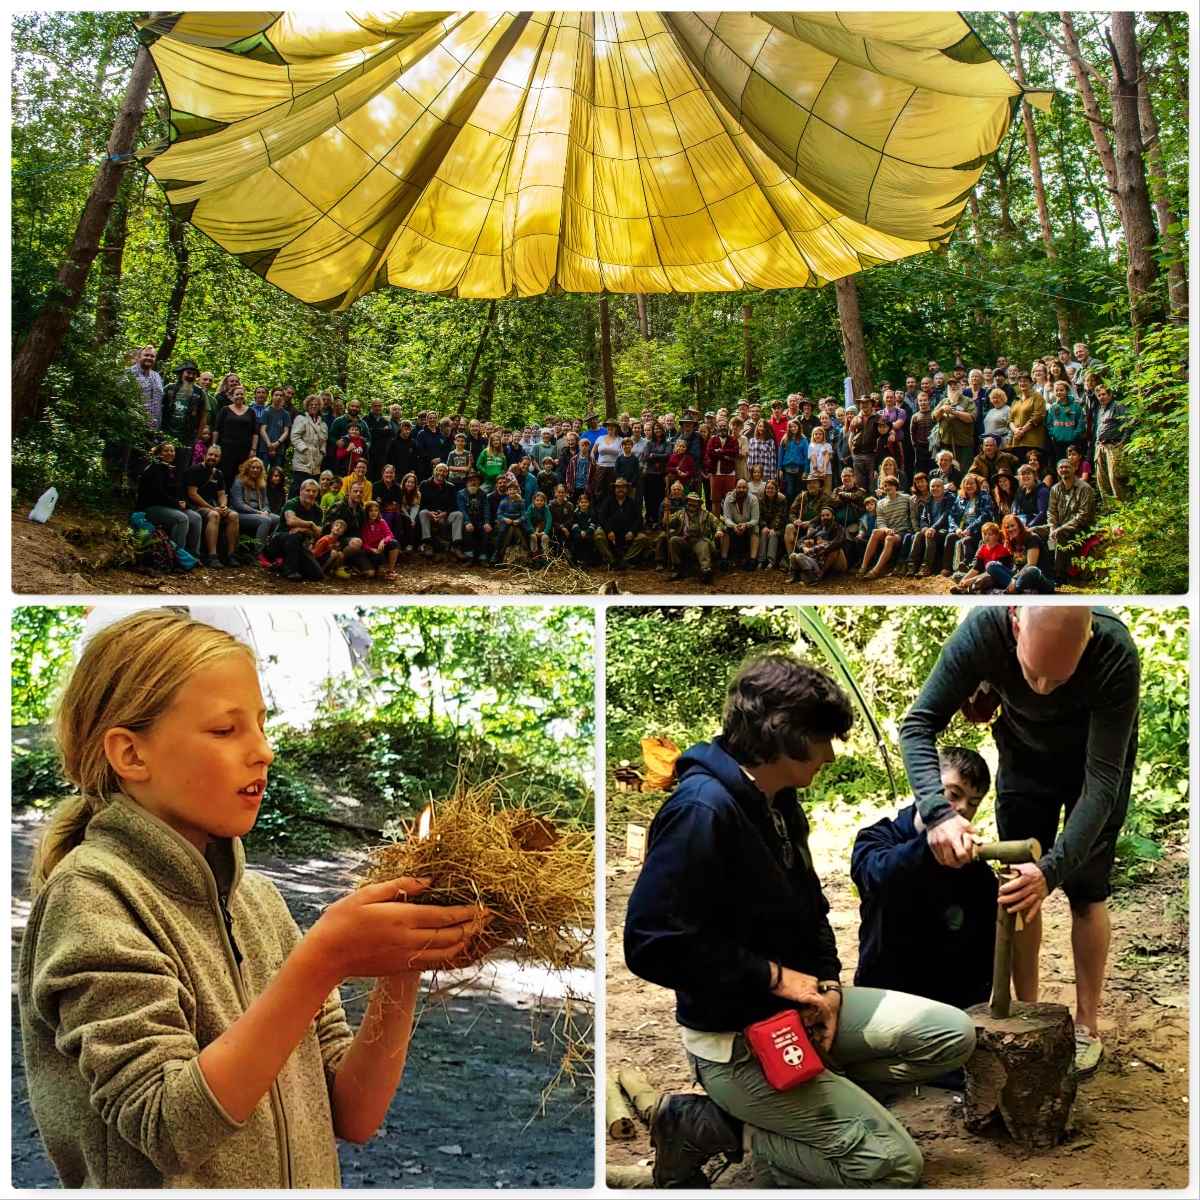
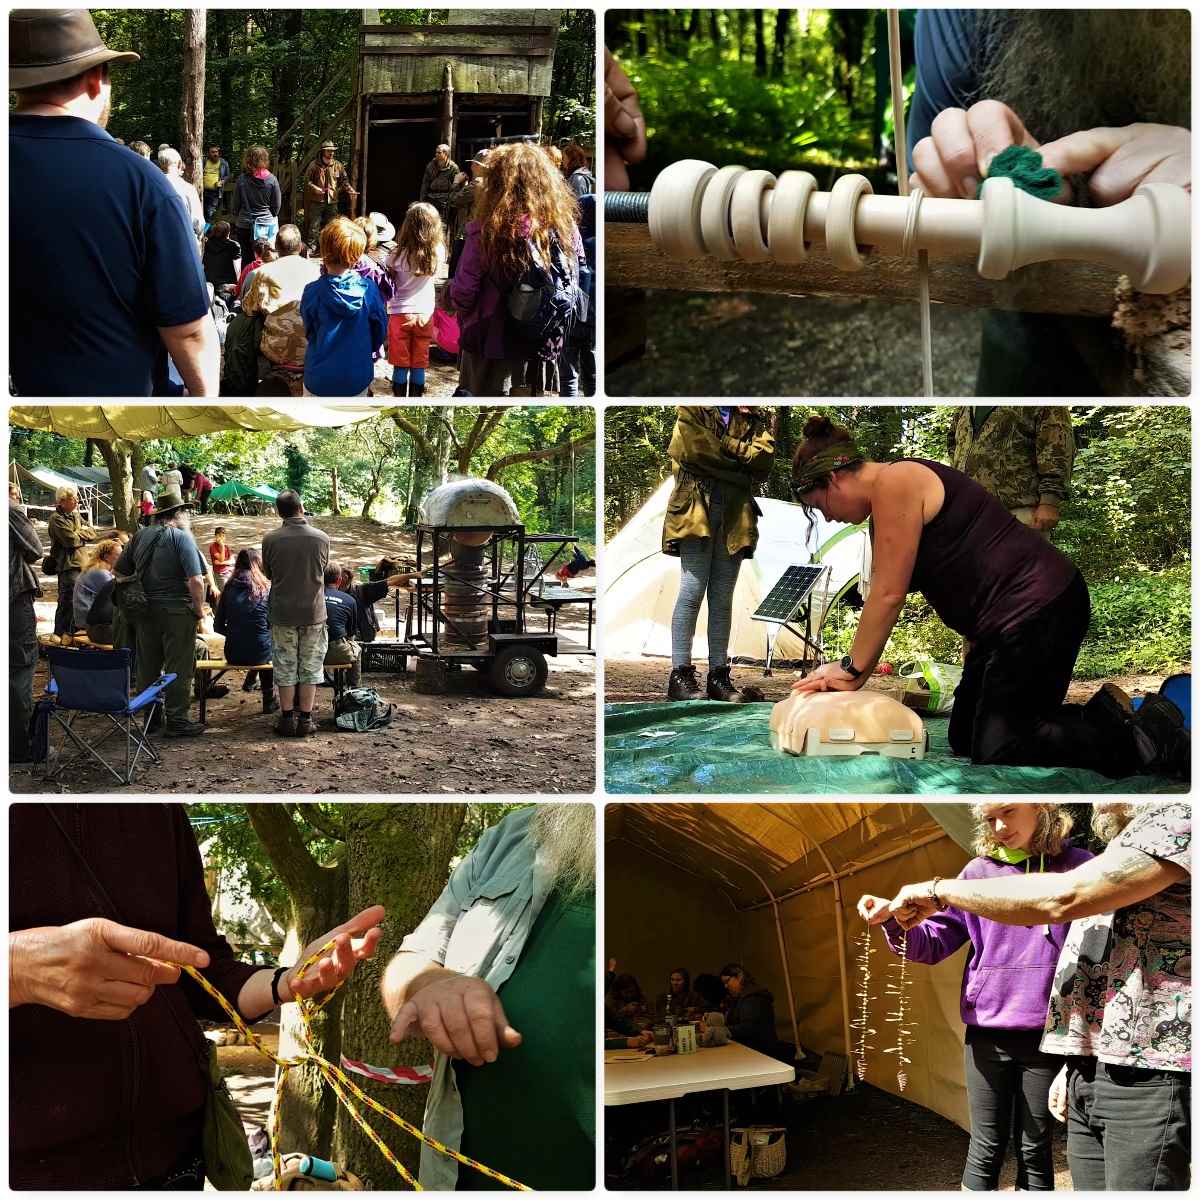
Core Day Workshops
I have no idea how many different workshops we ran this year and I only photographed or filmed a small number of them. We always start with a tool safety presentation (normally three different groups) before starting the main workshops.
Core days – part 1
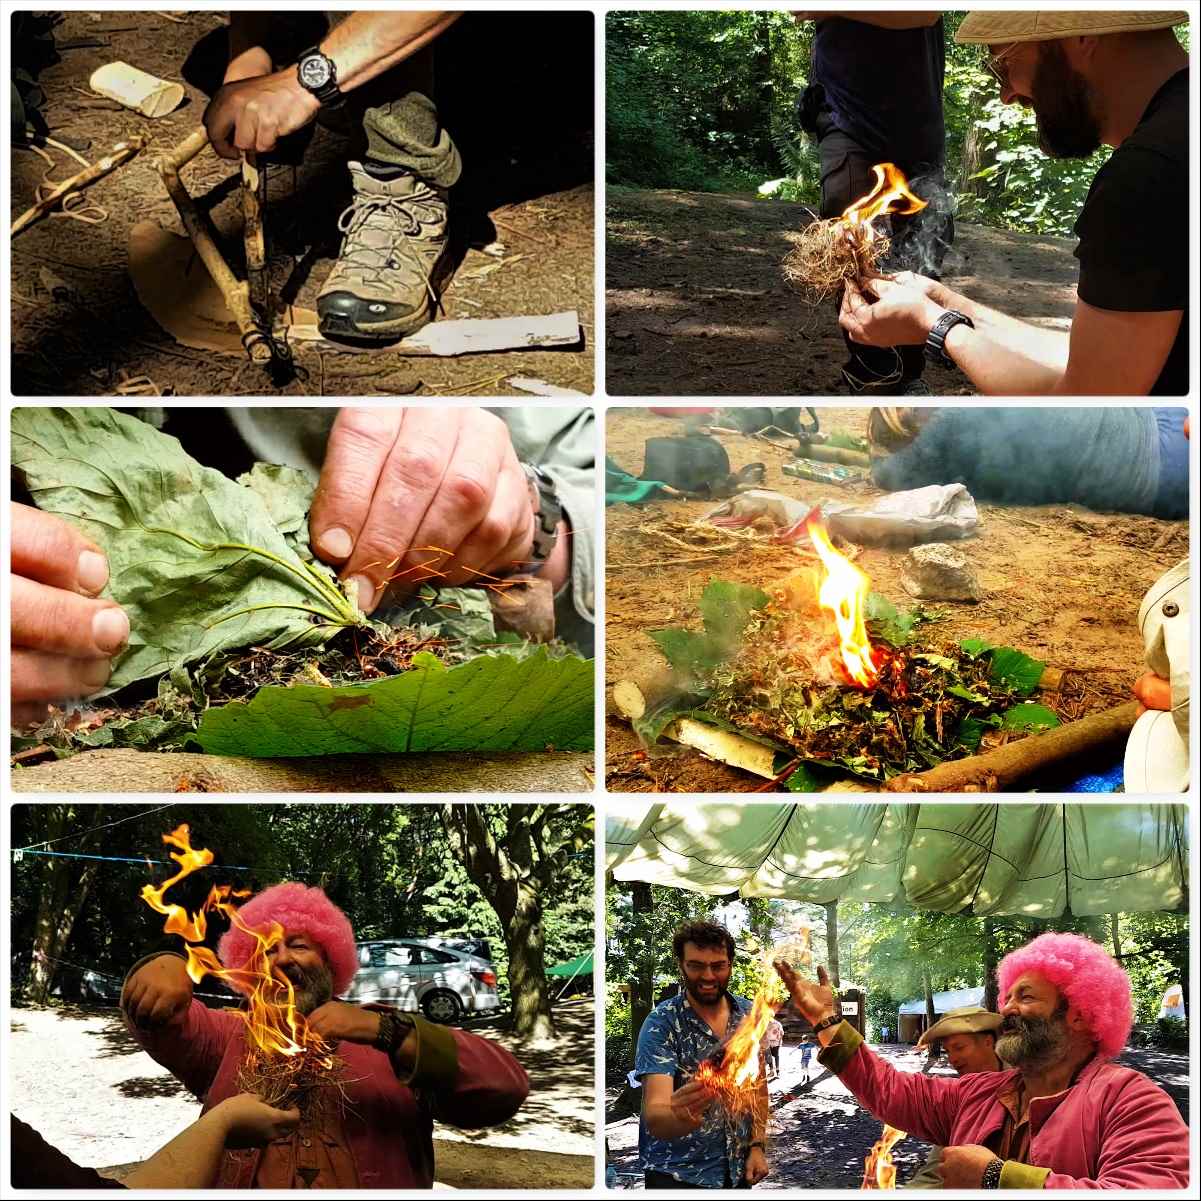
Fire lighting in its many different forms is a staple of the Bushmoot and this year was no different – below are pictures from the bowdrill, the damp tinder and the flint and steel workshops.
Core days – part 2
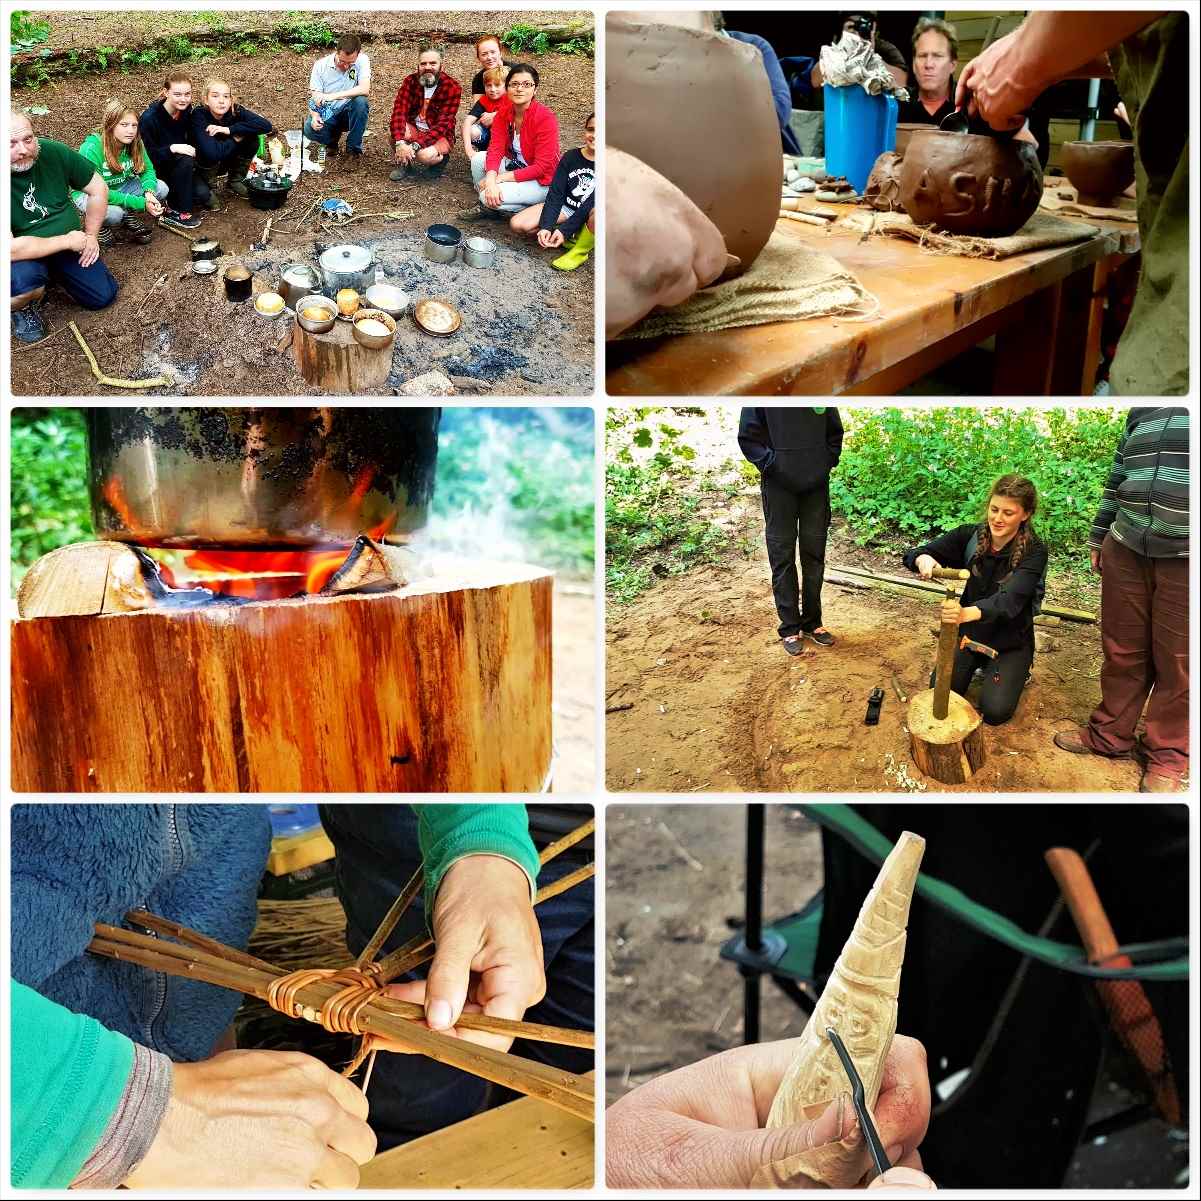
Other workshops included Baking, Pottery, Rocket Stoves, the Starter Course, Basketry and Wood Spirits (to name just a few).
Core days – part 3
Watch the video to get a feel of the subjects we cover at the Bushmoot.
Bushmoot Life
Outside of all these workshops and background work life goes on at the Bushmoot – food I can tell you forms a big part of that life 🙂
I am no great chef (tend to prefer building Campfire Cooking Constructions) but can when needed put something together – thankfully though there are plenty of people around like my wife Alison willing to put together a good spread for the kids and myself. Highlights of the Bushmoot are the Group Meal and the Hot Chocolate evening.
All things food
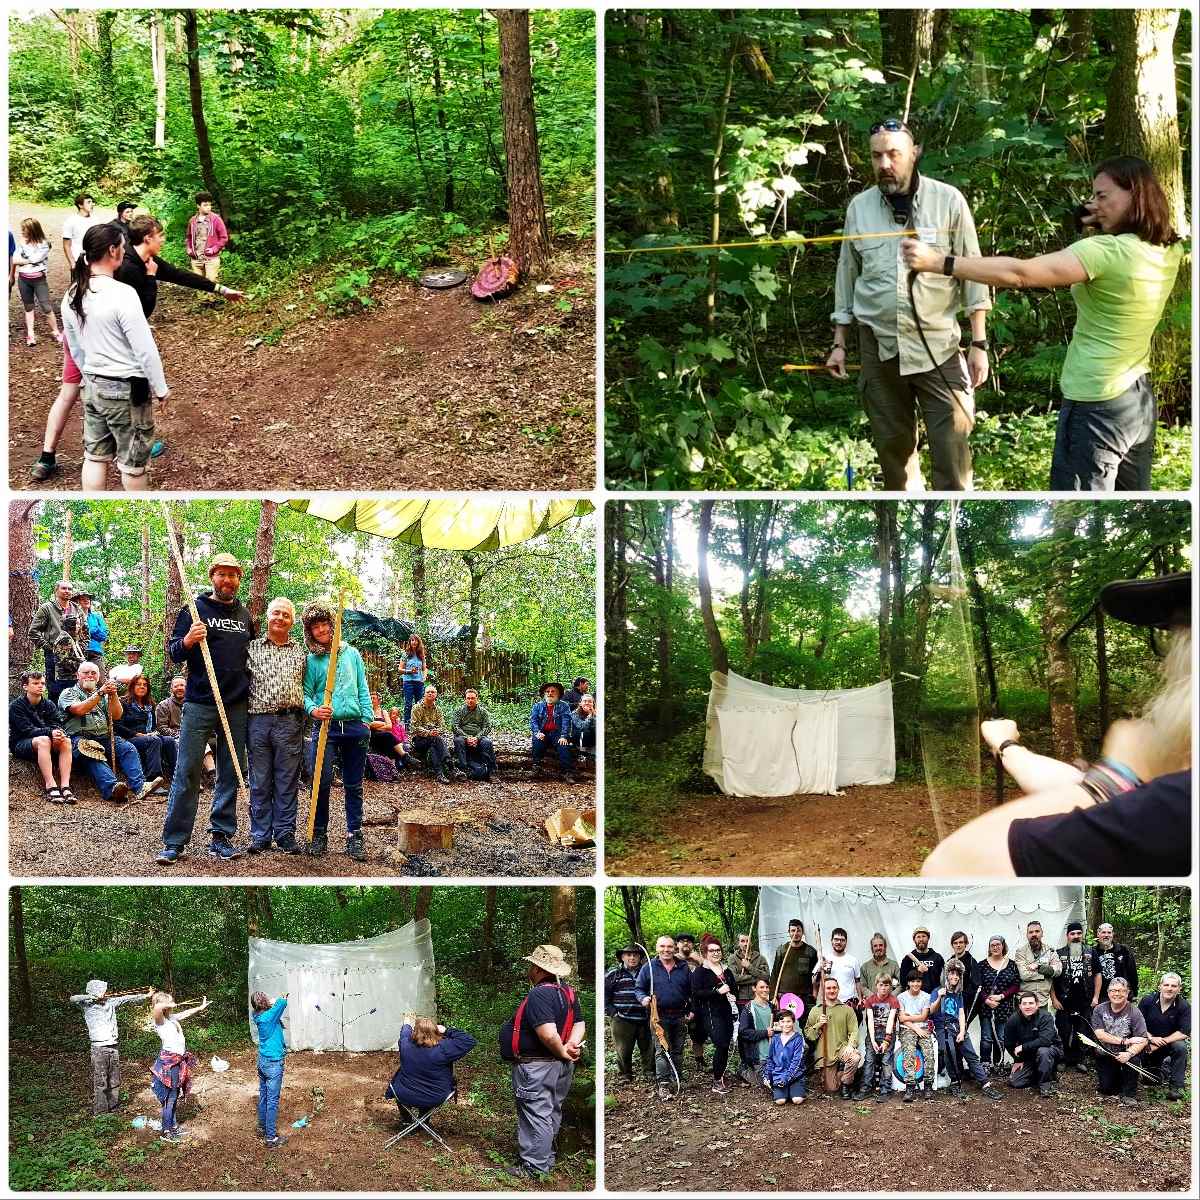
A favourite of mine has always been the archery range. We had another great competition this year. The winners from last year (Marek and Louey) were also presented their made-to-measure bows from Wayne Jones of Forest Knights.
This year we also had a catapult competition run by Steve (Mesquite) Harral and a workshop from David Colter on the Pellet Bow. Around the site we had various smaller ranges for axe, spade and pin throwing.
Down on the range
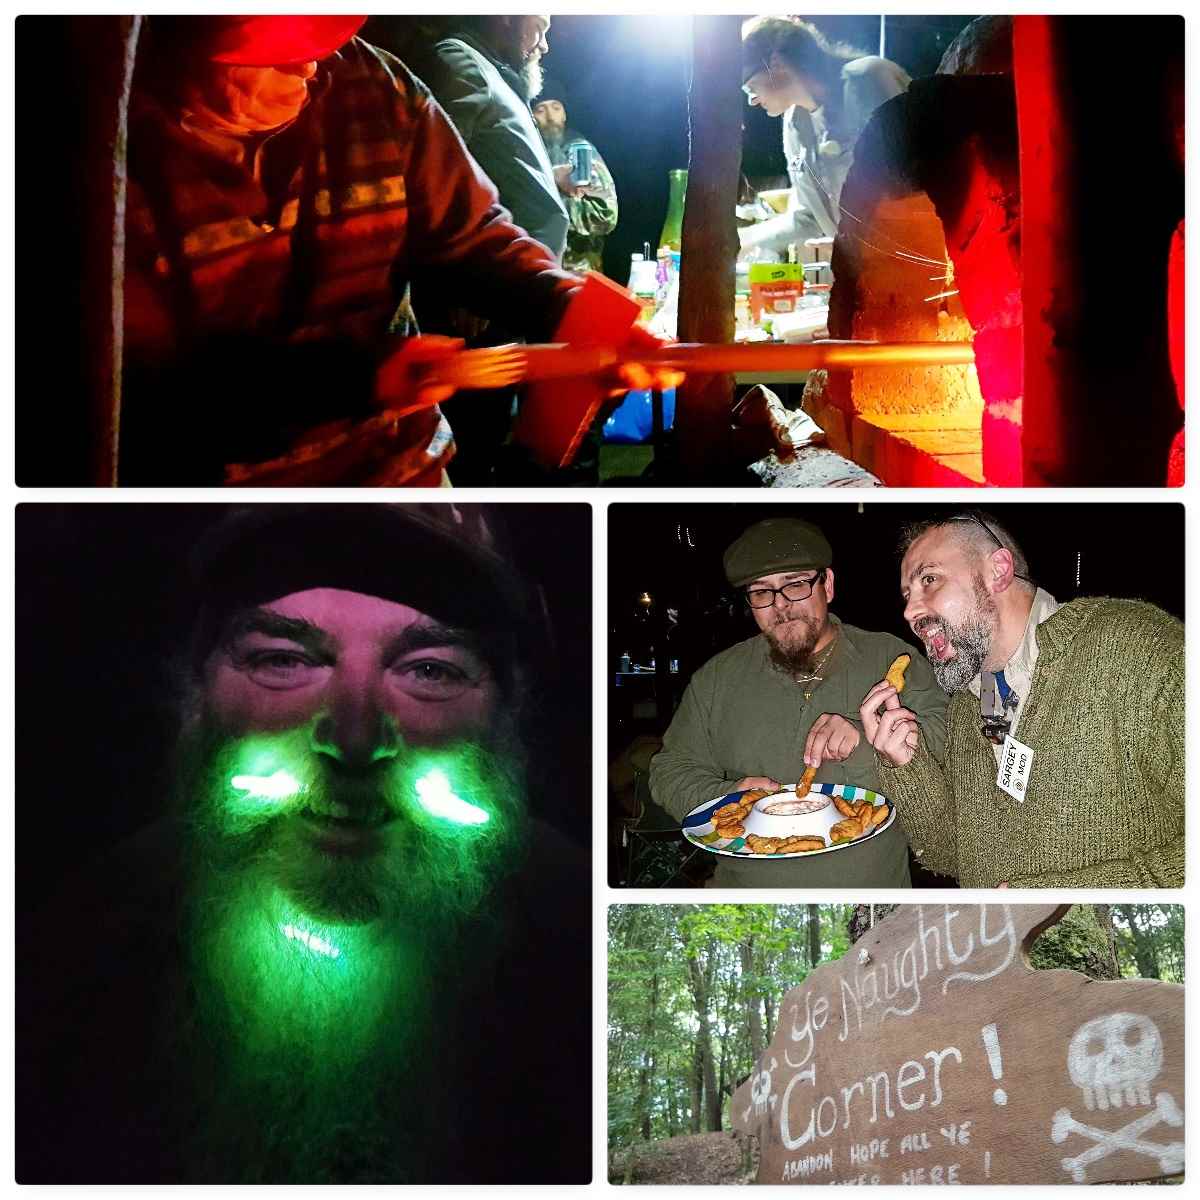
The Naughty Corner
No Bushmoot would be complete without the Naughty Corner and I try to get up to it for an hour or two each evening. This year my friend from the Sea Cadets Alan Lewis joined me at the Bushmoot for the first time and as he is a chef found himself drawn to the pizza oven.
Phil and Magda as usual kept us well fed each evening and Cap’n Badger made sure we were all not too naughty 😉
The Naughty Corner
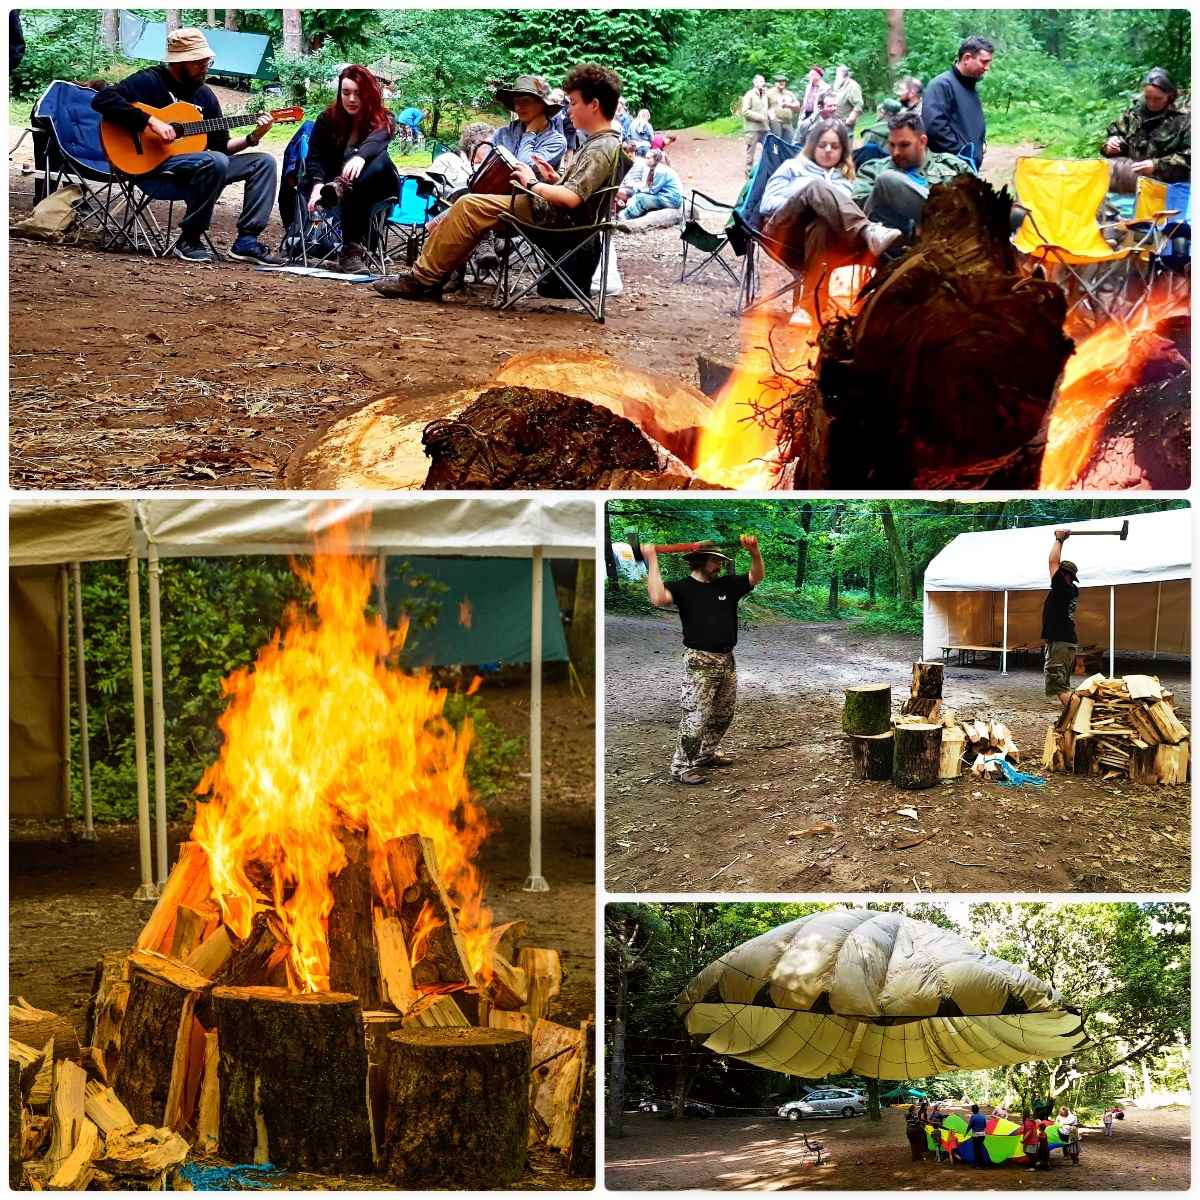
The Sand Pit
The evening socialising is not restricted to the Naughty Corner – usually for a couple of evenings lots of folk congregate under the big chute by the kids sandpit for a bit of a shindig.
We were supposed to have a band along one evening but for some reason they failed to show up – thankfully Marek and Gemma with some others started their own musical session that lasted well into the evening.
Sandpit evenings
The Main Chute
This is where we meet each day, talk about what will be happening, answer questions and celebrate people.
The Bushmoot is run by Tony and Shelly Bristow (along with us volunteer Mods) and as often happens the Bushmoot coincided with Tony’s birthday. We also remembered our dear friend Drew who passed away so tragically at a young age in 2013. We do this by giving each year an engraved Swiss Army Knife to the person we feel has contributed most to the Moot.
Our good friends John Fenna and Steve Harral raise money each year for Cancer charities. Steve gets John to dress up in a different pink outfit each year and we make lots of donations in various ways. Also John has an award he gives out called the John Fenna Award (a Teddy Bear with lots of bushcraft kit) and this year it went to Cap’n Badger for dedicated service to running the Naughty Corner – or undetected crime as I hear 😉
Life under the main chute
Kids’ Fun
All this talk of fun would not be complete without mention to what we organise for the kids (I mean the young ones here). We are not against technology and I am happy to let my kids watch a movie in the evening by the fire (gives me a breathing space to get on with camp chores).
The Bushmoot is a family friendly place and there are always workshops and games planned in for the kids. When there are no planned activities the whole estate is their playground and it’s great to see my kids roam free as I once did as a kid growing up in the Western Isles.
Kids – old fun and modern fun
My last video on the Bushmoot looks at this ‘Bushmoot Life’.
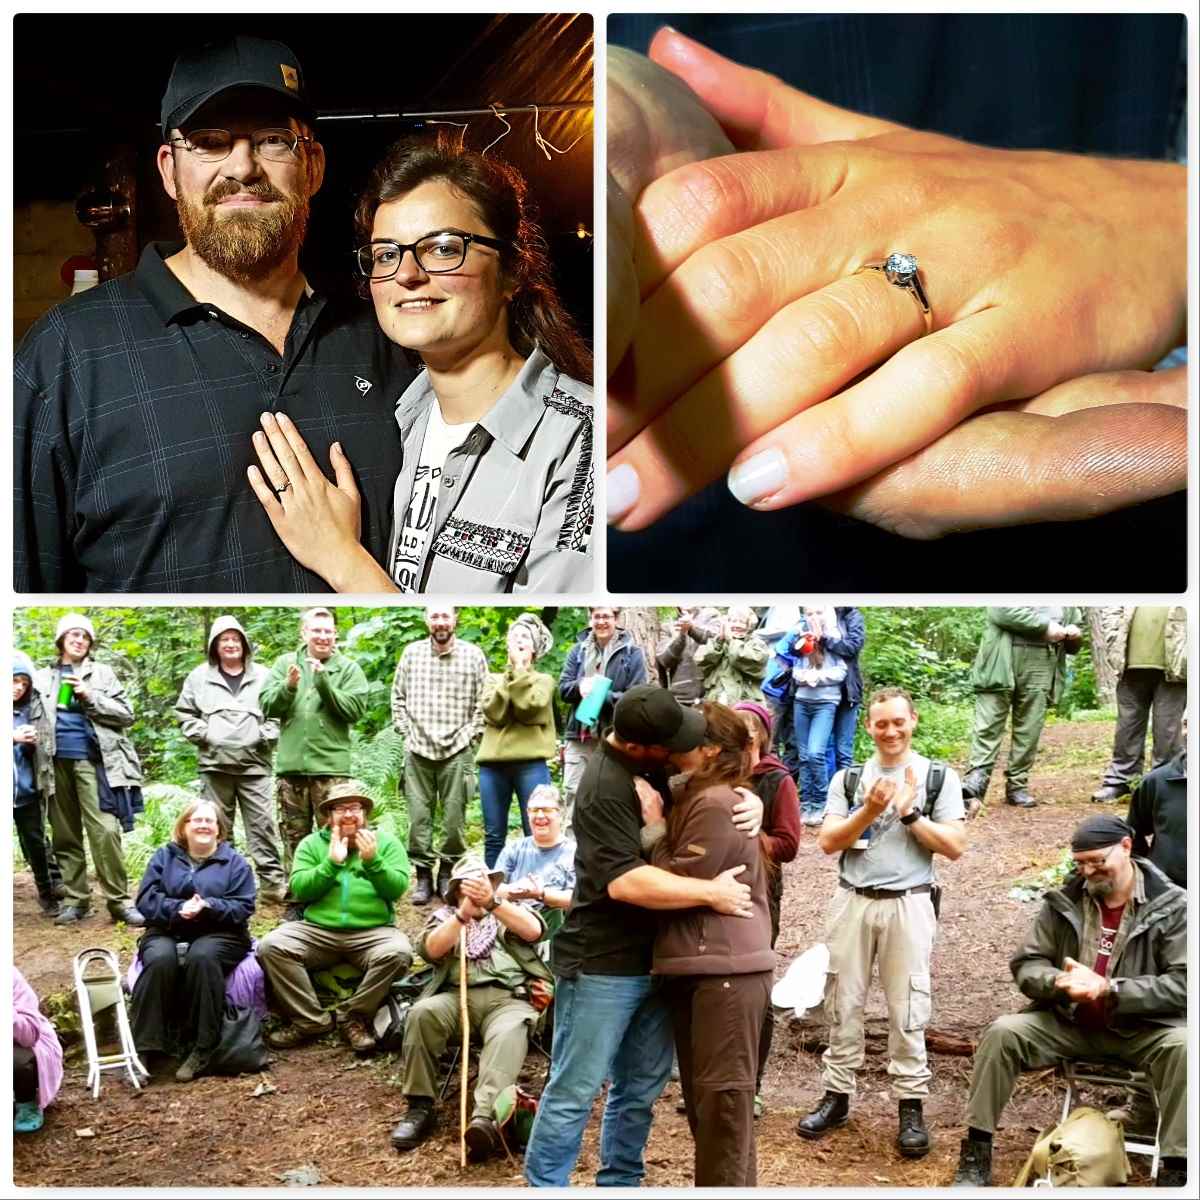
A Celebration
When I popped up to the Naughty Corner one night I got chatting to our chefs Phil and Magda and found out that they had just got engaged – Phil had popped the question to Magda that day down on the beach and she had said yes.
The next day we got Phil and Magda to announce the engagement to everyone under the Main Chute – congratulations guys.
Congratulations
Me
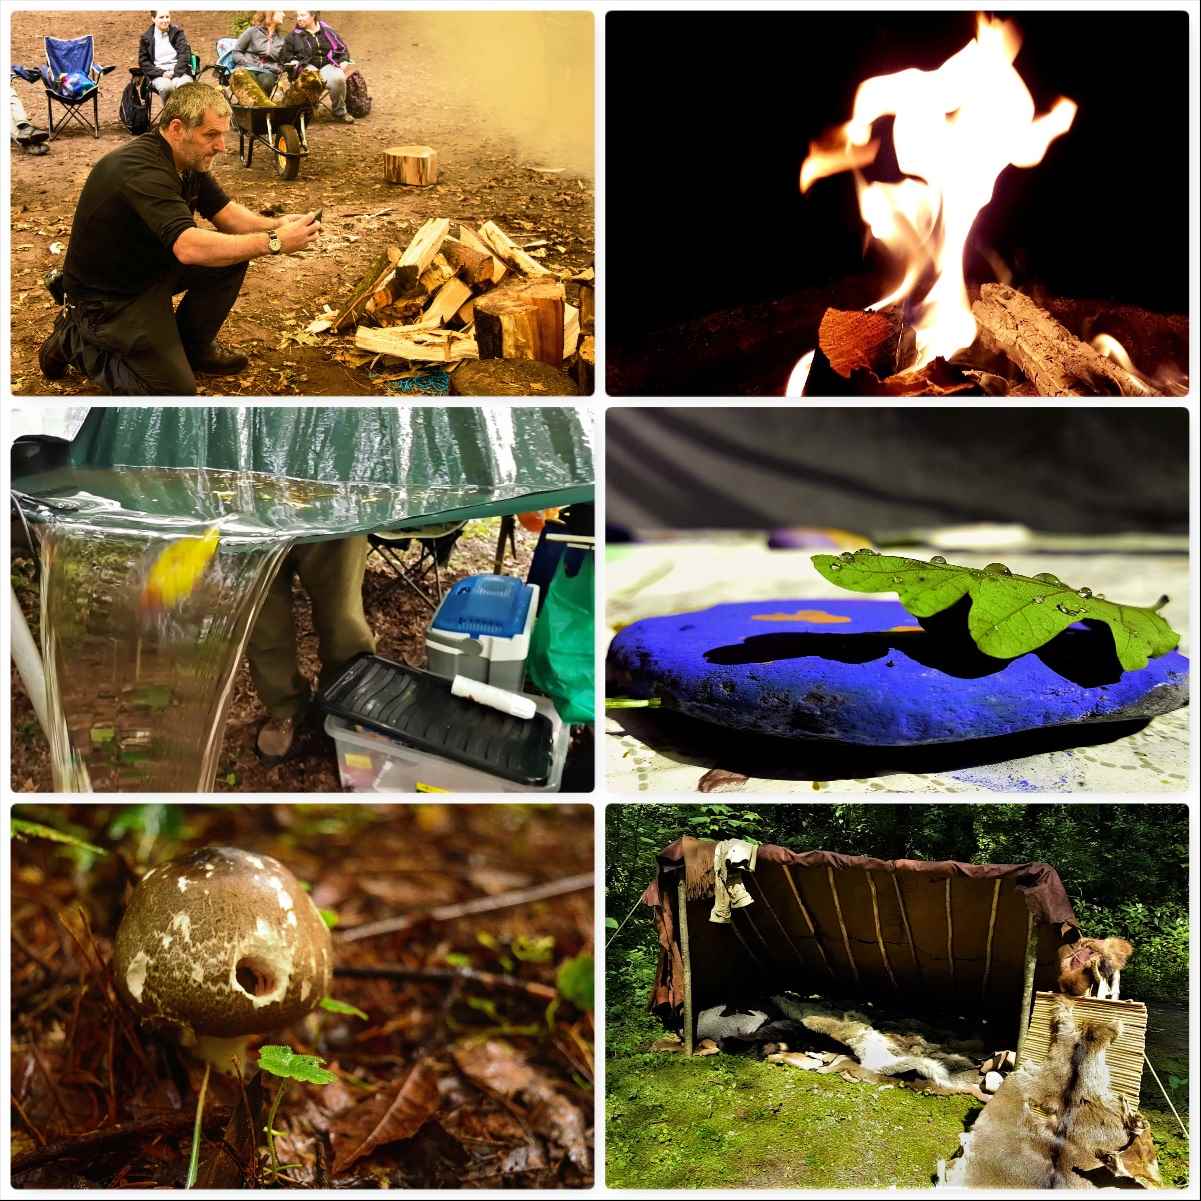
I am mostly to be found behind the camera lens so you do not see many pictures of my silver mop at the Bushmoot. Over the last 10 years I have really embraced photography and am always on the look out for something unusual to snap.
Fire Faces are a favourite of mine – spotted the BFG in one snap I took this year – but there is always something interesting to photograph at the Bushmoot.
Just me
A bit of Magic
This year at the Naughty Corner it was hard to miss the fact that the fire was making a good impression of a Rainbow. It turns out that Cap’n Badger had acquired some Mystical Fire and popped it into the fire. I took a few snaps of the flames and caught a lovely shot that I call ‘The Dancer’.
My kids loved the stuff and so we popped a couple of sachets on our campfire one evening while they watched a movie.
Rainbow flames
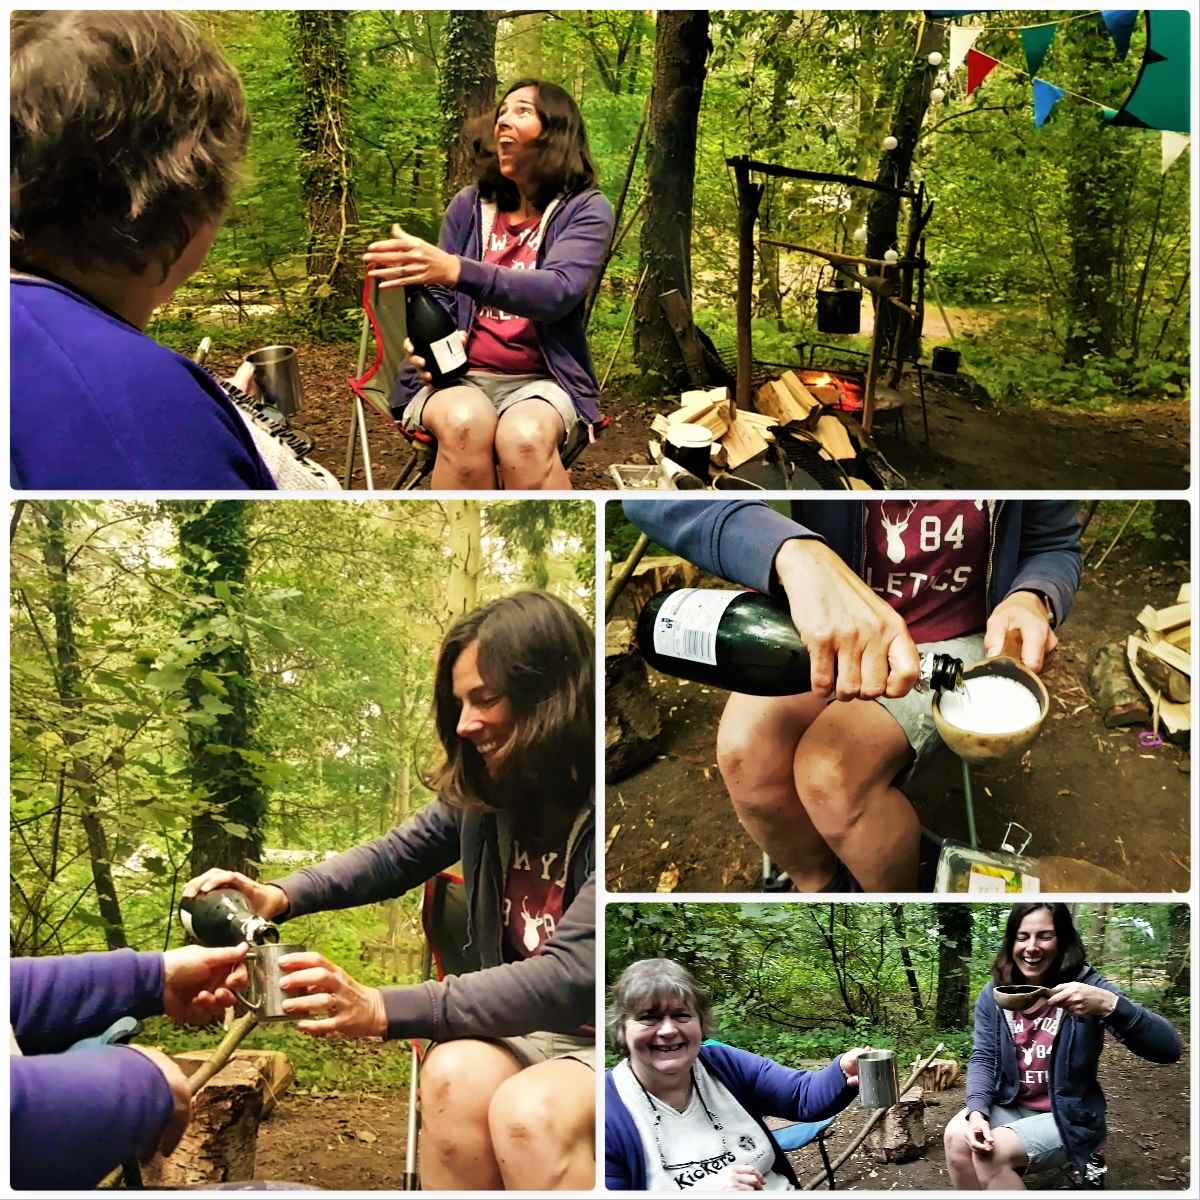
Alison
My wife Alison did not attend the whole of the Bushmoot (she pops back and forth from home over the fortnight) as she runs her own publishing company and this year was focused on finishing the first draft of her own book while we were at the Bushmoot.
Needless to say when Alison returned at the end of the Bushmoot she did so with a bottle of bubbly to celebrate the fact that she had finished her first draft – well done darling 🙂
Congratulations Alison
That is it from me on the subject of the 2017 Bushmoot. Thank you to Tony, Shelly, all the Mods and all the other helpers who organised everything and helped make it such a magical two weeks.
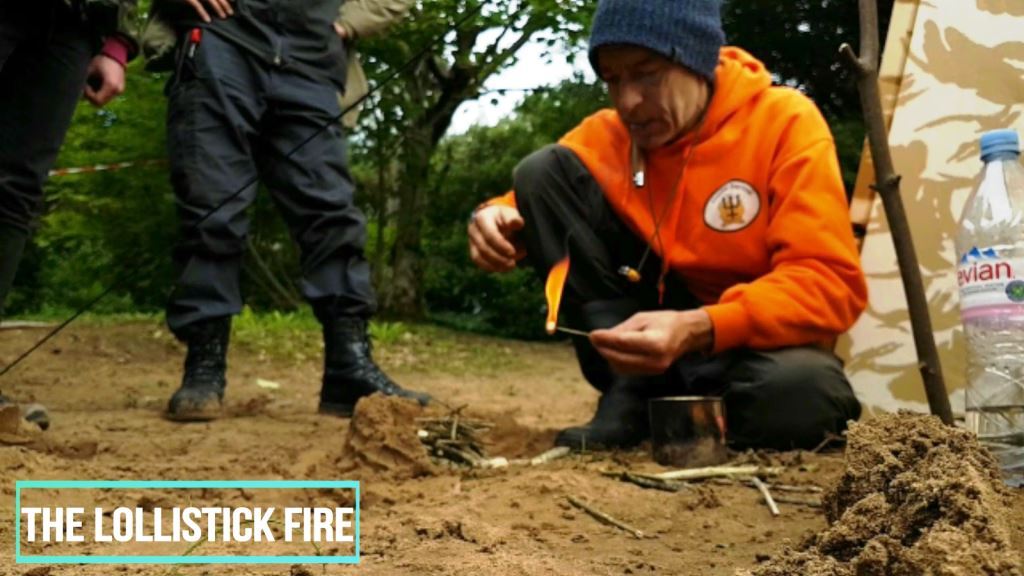
There is no rocket science here or fancy skill to learn – just down right common sense.
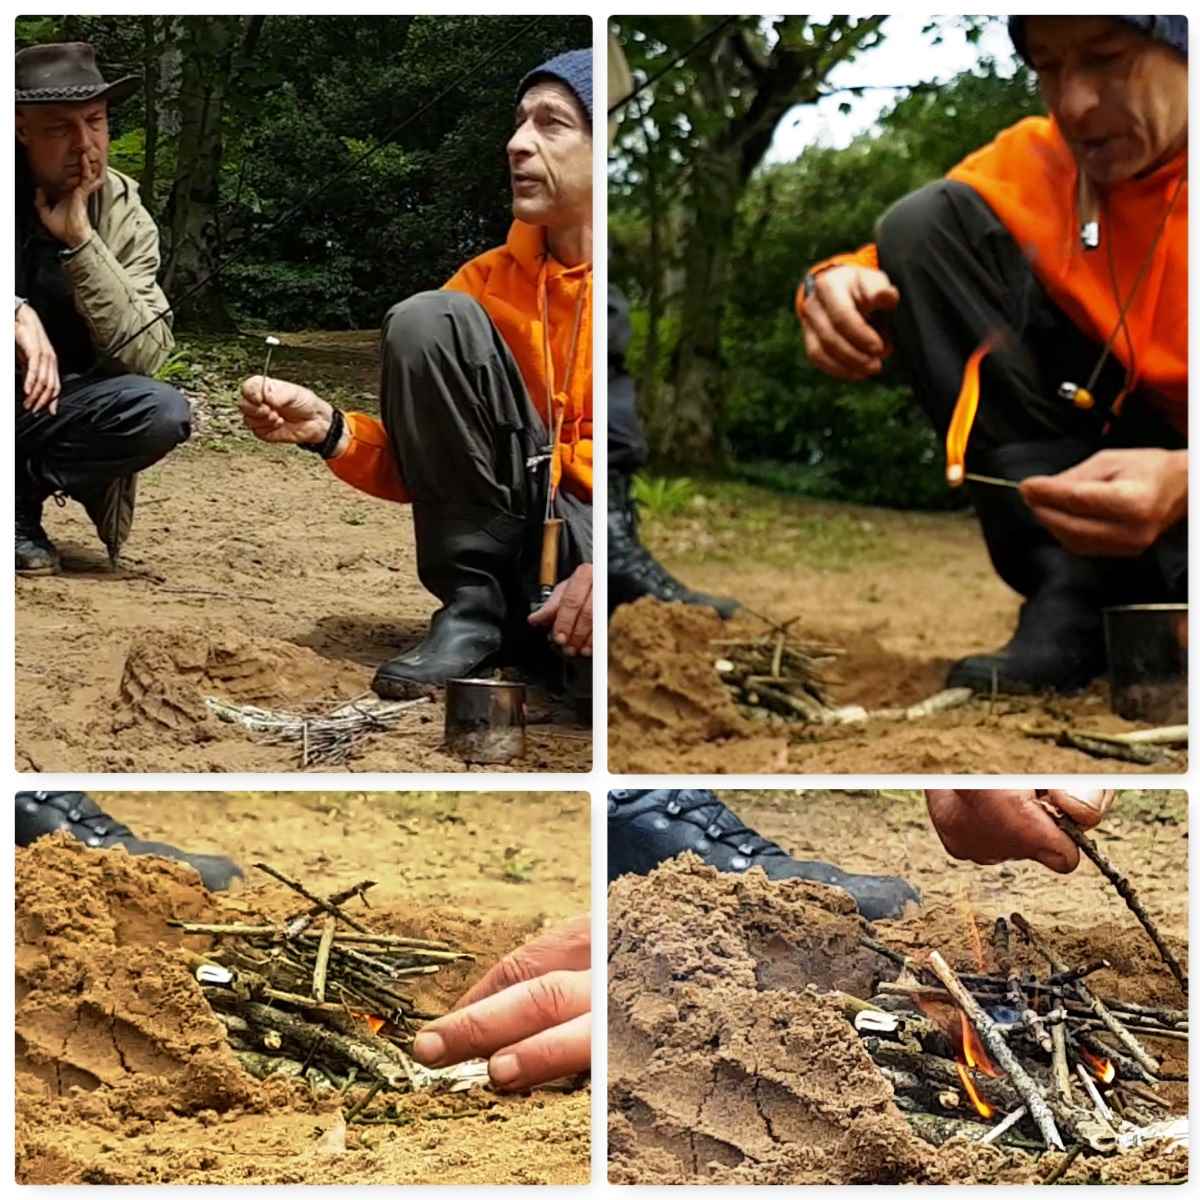
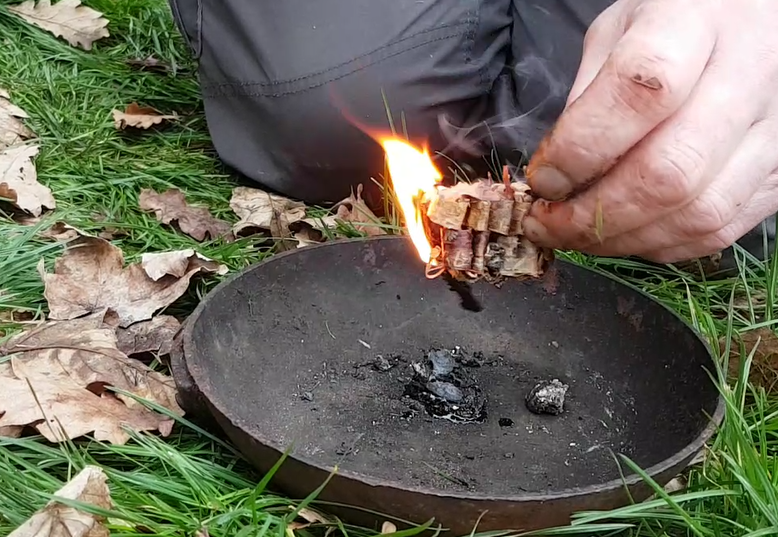
When you have limited resources and the elements may be against you, then you may wish to consider the ‘Lolli Stick Fire’.
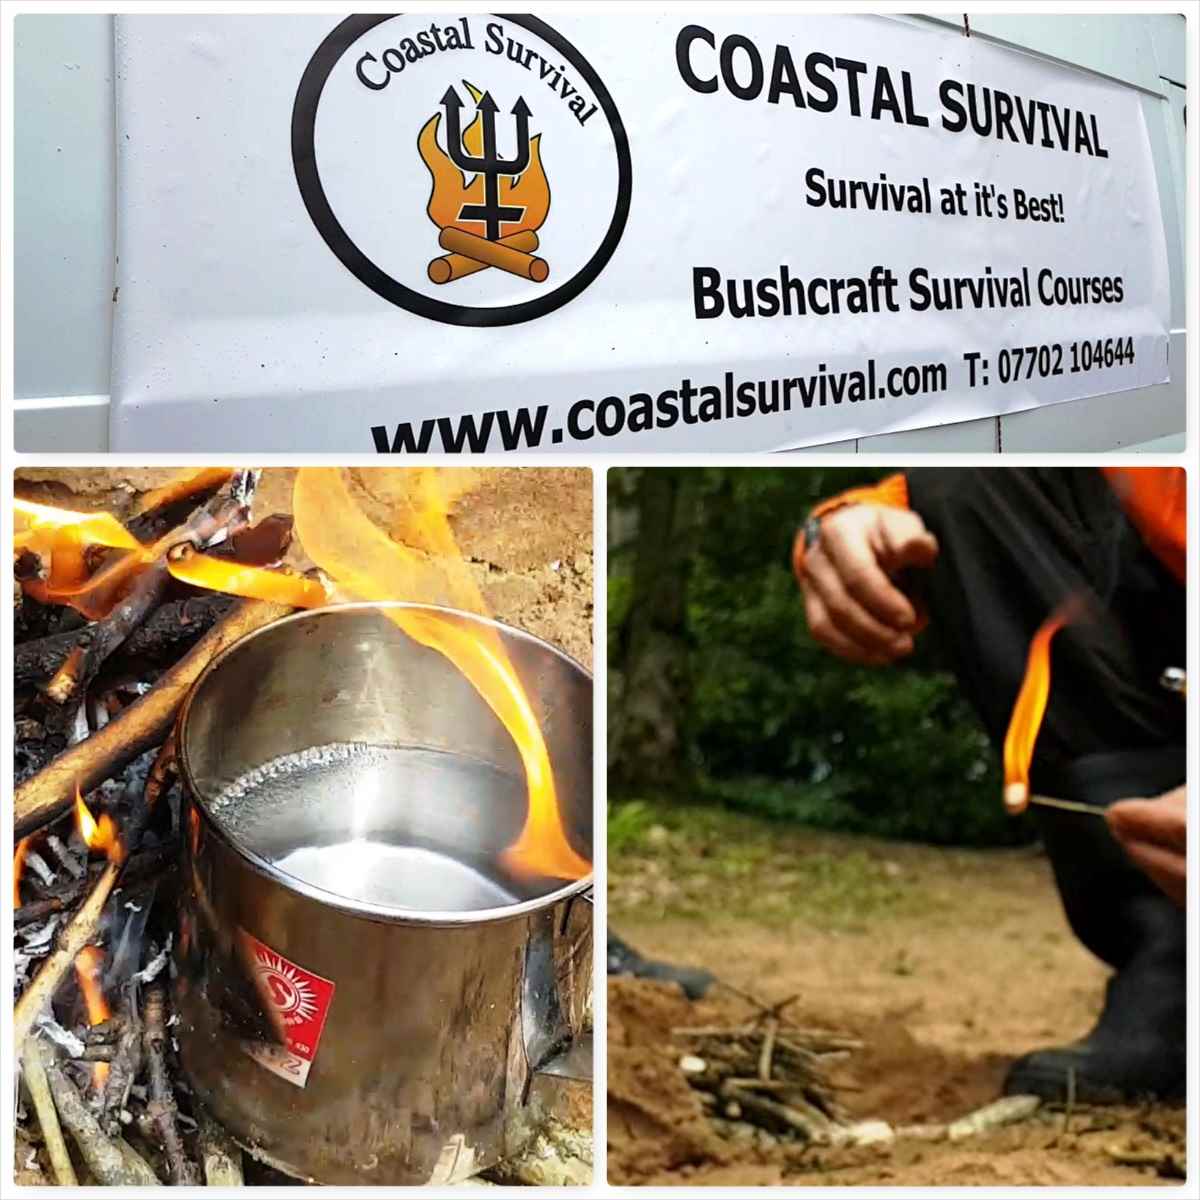
At the 2017 BCUK Bushmoot my good friend Fraser Christian from Coastal Survival was running a 48hr workshop on Coastal Survival. One of the classes was on lighting a fire on the beach in windy conditions with very limited resources – he called this the ‘Lolli Stick Fire’.
The ‘Lolli Stick’ Fire
There is no rocket science here or fancy skill to learn – just down right common sense.
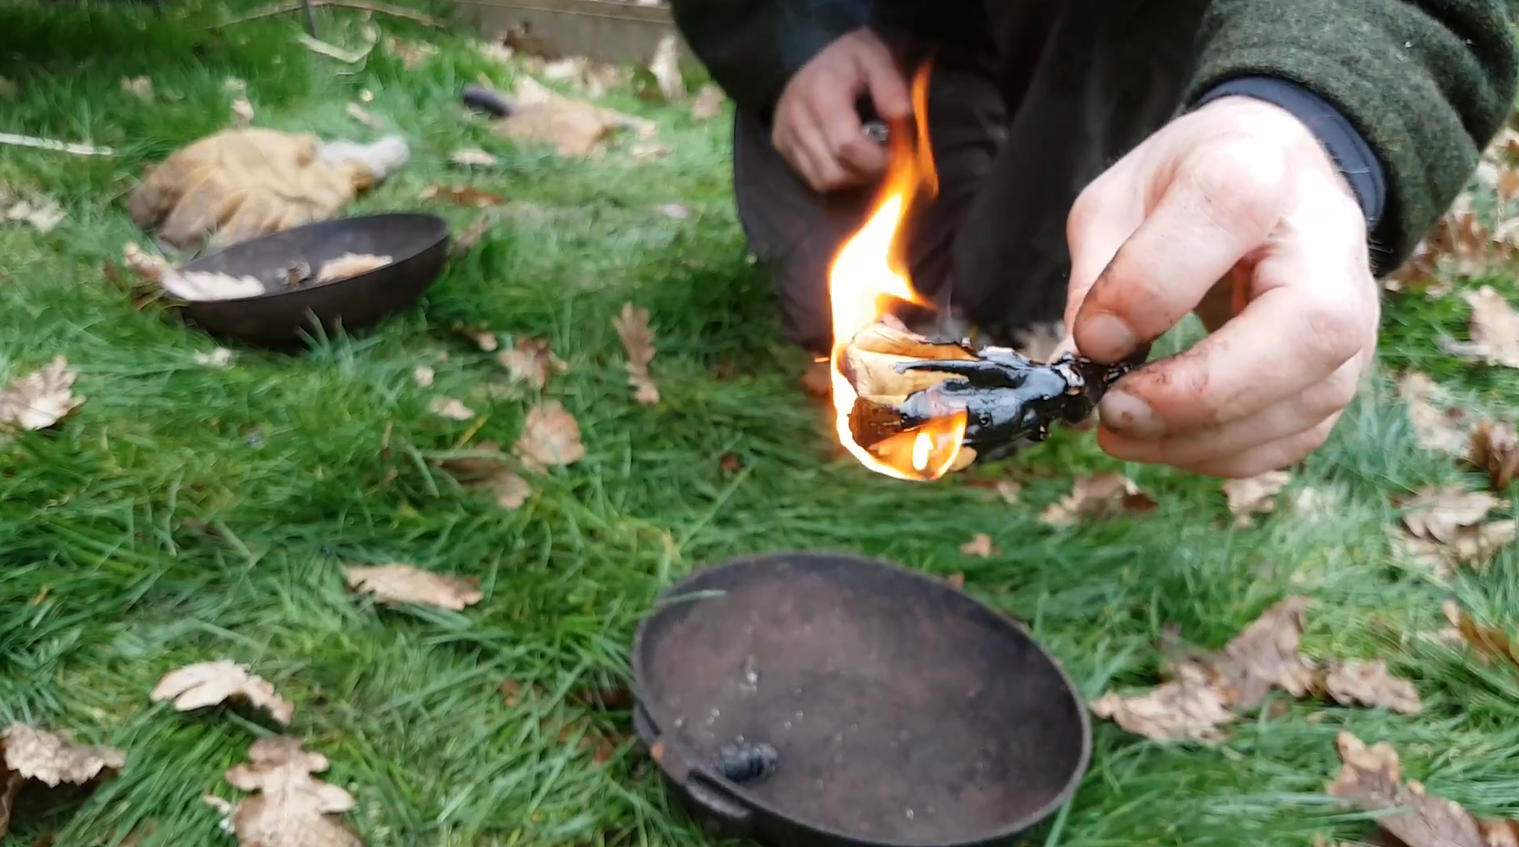
Fraser built using sand a little reflector wall in a horse shoe shape and within it he laid a platform of dry dead twigs. On the surface of this platform he laid three loose piles of twigs in a ‘U’ shape. On top of this ‘U’ shape he laid a further pile of loose twigs making a roof. This shape left a hole in the side to add a firelighter.
Rather than using a whole firelighter Fraser cut a firelighter into 8 pieces and stuck one of these small pieces onto a thin sharp twig (and here likened it to a ‘Lolli Stick’). He lit this in the shelter of his tarp and easily popped it into the middle of his twigs.
Minimal resources
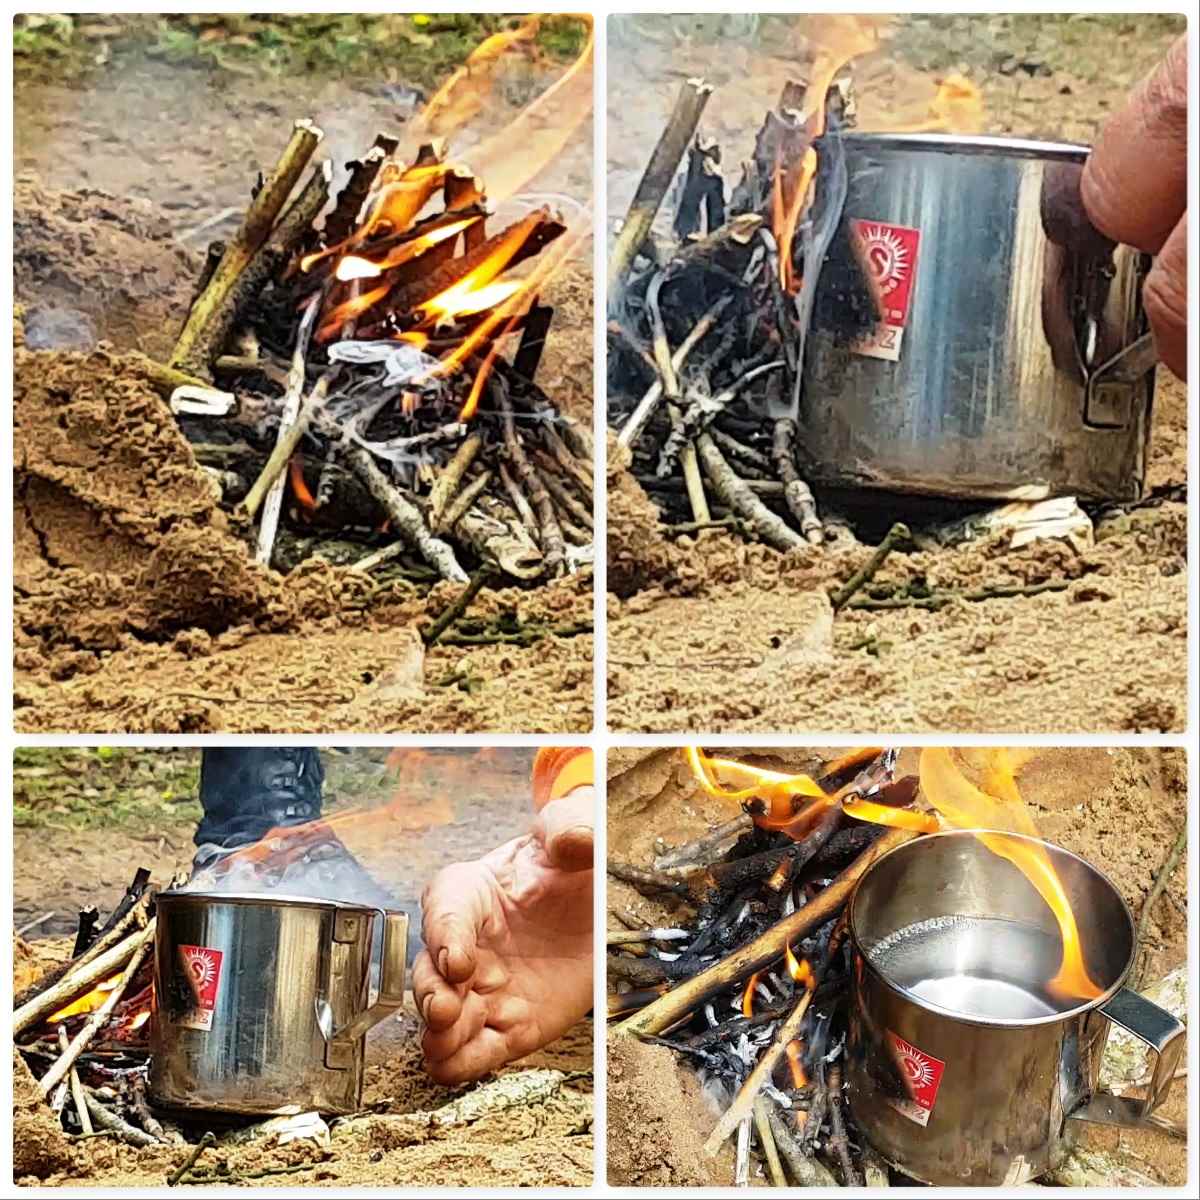
The flames spread through the twigs very easily as they were loosely laid and Fraser topped them off with further twigs to get the fire going really well. This process only took around a minute and he soon had a cup of water pushed up against the side of the fire.
Enough for a brew
The small reflector wall helped bounce the heat back onto the cup and so boil the water quite quickly.
You can see it in action in the short video below.
Fraser uses this technique on the coast as the reflector wall protects the fire from the fierce winds and because of the minimal resources needed to light and maintain it. I incorporated this technique into our Starter Course at the Bushmoot and everyone easily got there fires going with it with very limited resources.
The ‘Lolli Stick’ is safe to handle, requires only an eighth of a firelighter and is easy to light – as I said before ‘down right common sense’.
This year at the Wilderness Gathering my friend Des Cattys was showing his love of Log Rocket stoves to visitors. I decided to drop in on one of his sessions to watch how he constructs one. Like Des I am intrigued by these stoves and I am always looking to improve on their construction so watching someone else at work building one is a chance not to be missed.
If you want more detail on making one of these stoves have a look at my How To…. on building a Log Rocket stove. There are many variations on them and I have included some of them on my Bushcraftdays blog in my How To section.
A number of years ago my friend Rich59 from BCUK taught me how to get a fire going using damp tinder found on the forest floor. This short video goes through the process – I will post a detailed How To…. on this shortly.
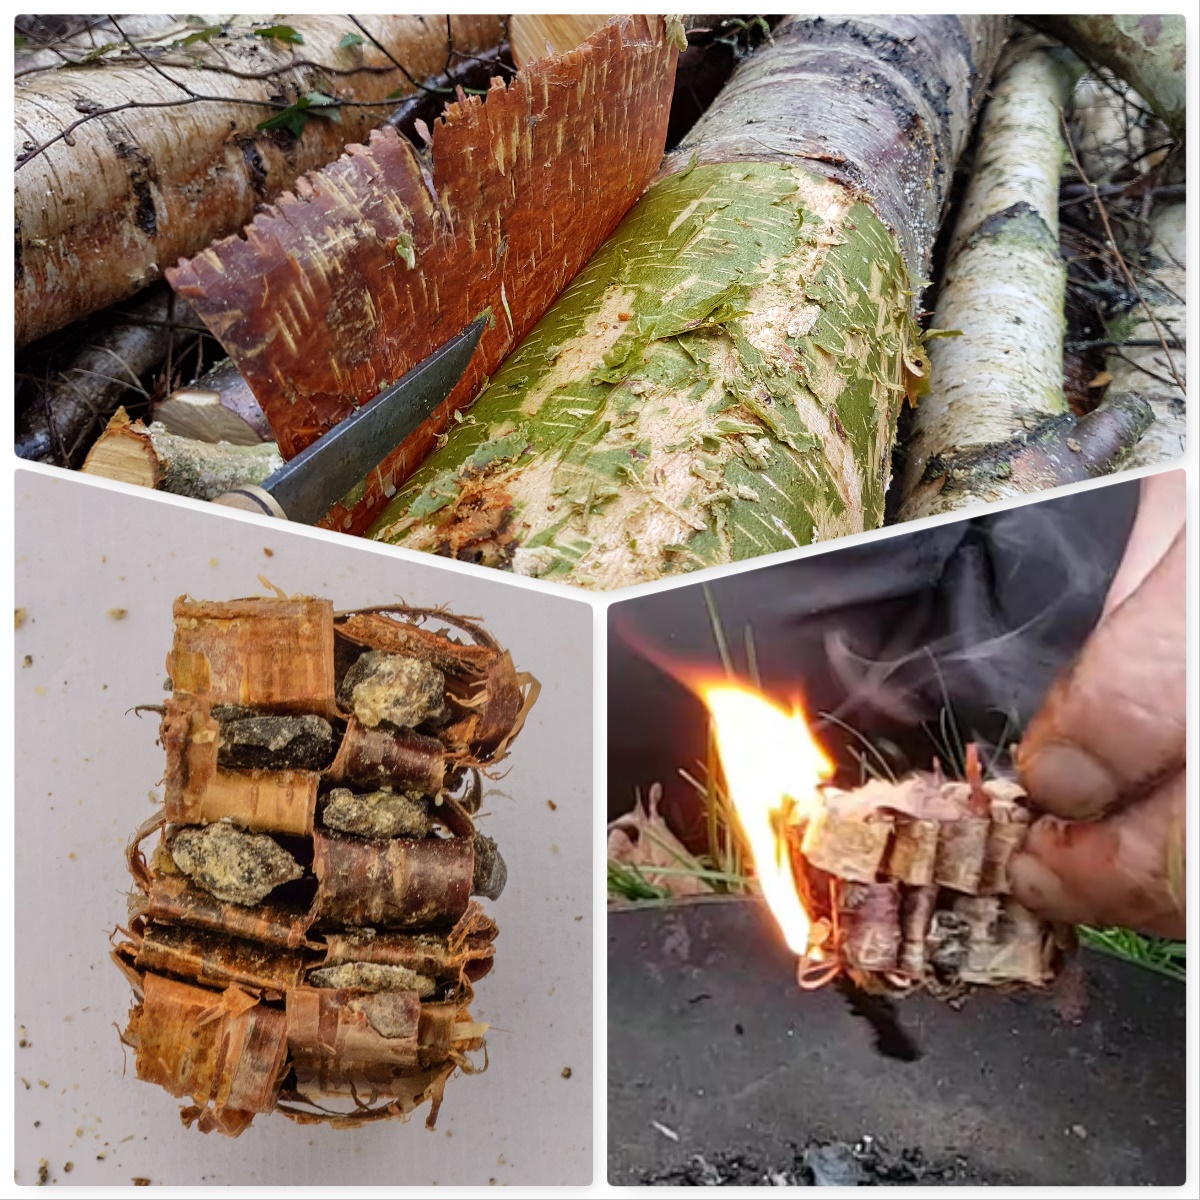
Apart from making baskets and sheaths out of bark I have been experimenting these last few years with weaving bark into natural firelighters. I came across a post on Bushcraft UK by a member called Woodwalker on these firelighters from 2010 – he called them Woven Kindling.
I have since added spruce resin to mine and liken them more to Natural Frelighters as they burn long and fierce. This is the second part in my two part series on natural firelighters – the first being my post on Birch Bark Fire Fans.
The Birch Bark Firelighter
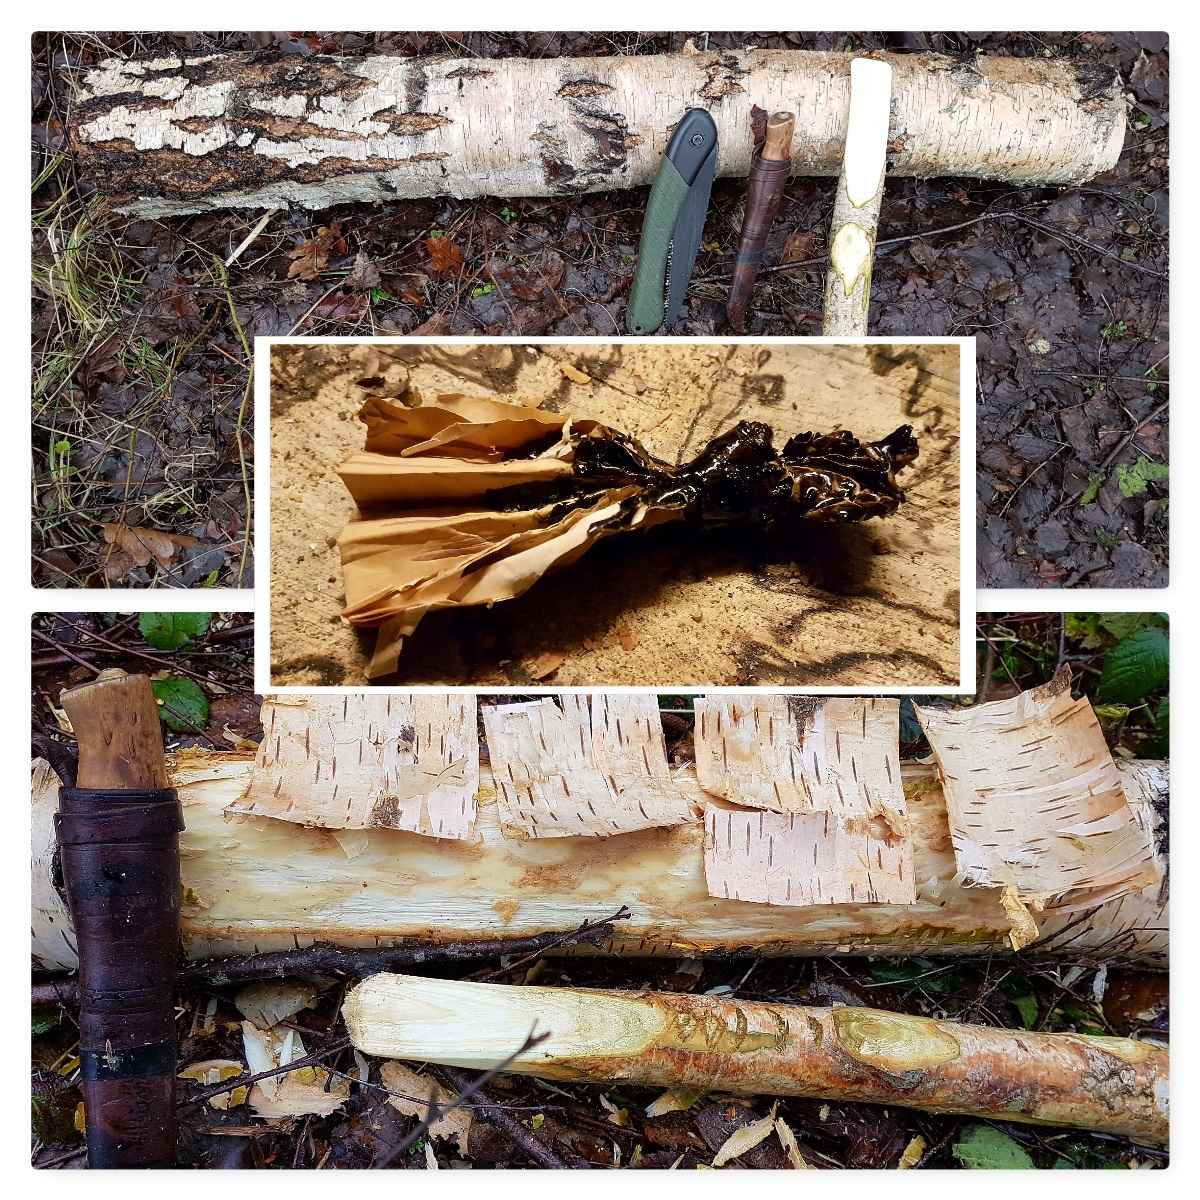
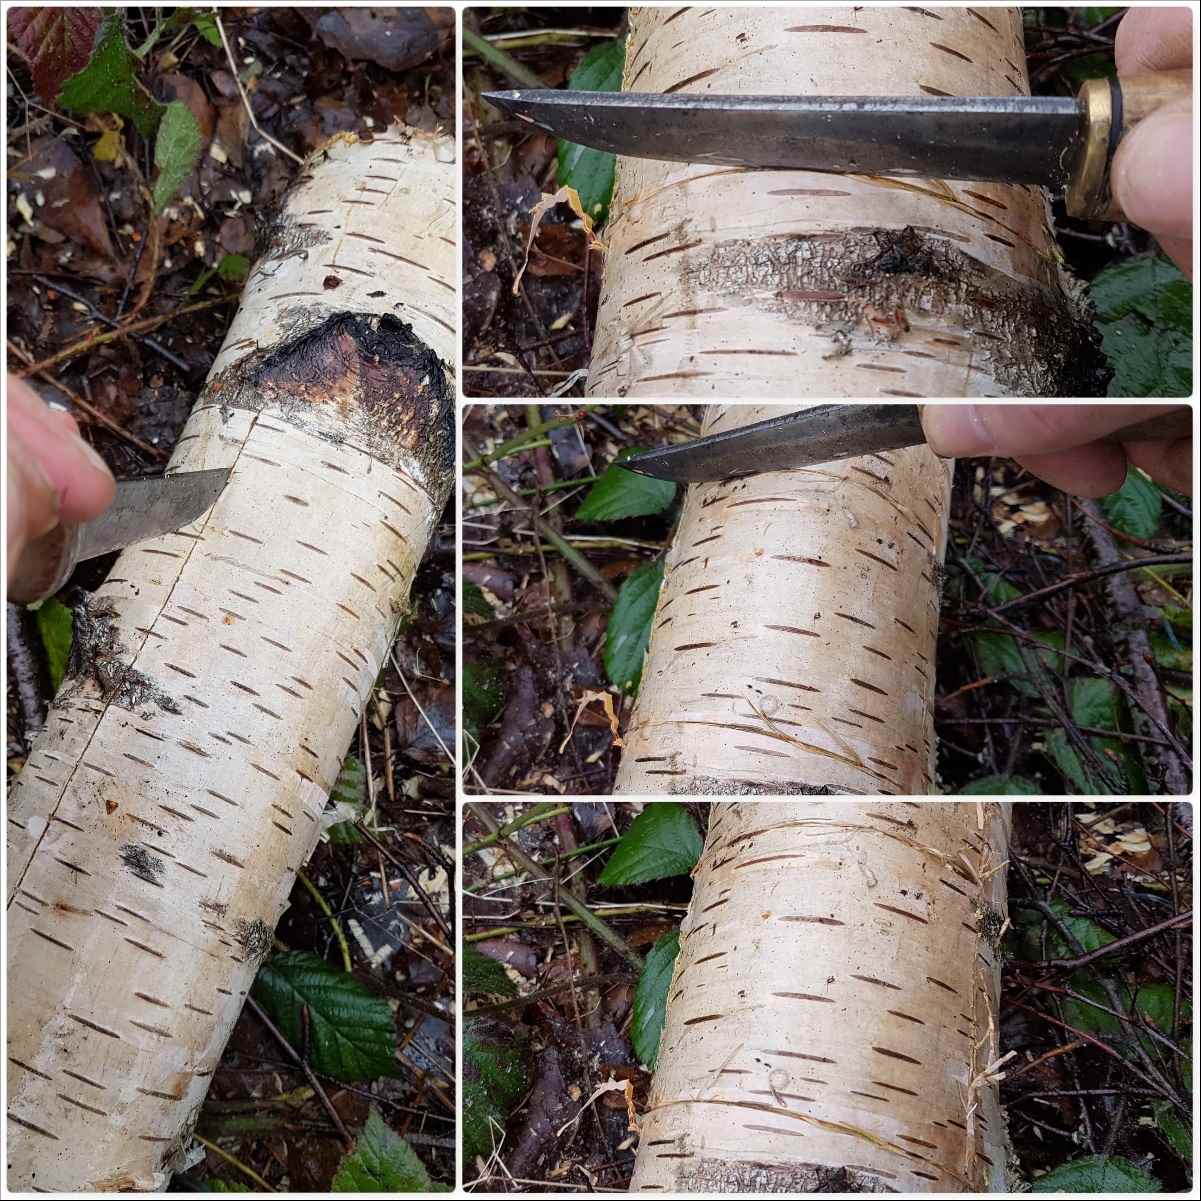
Removing the bark
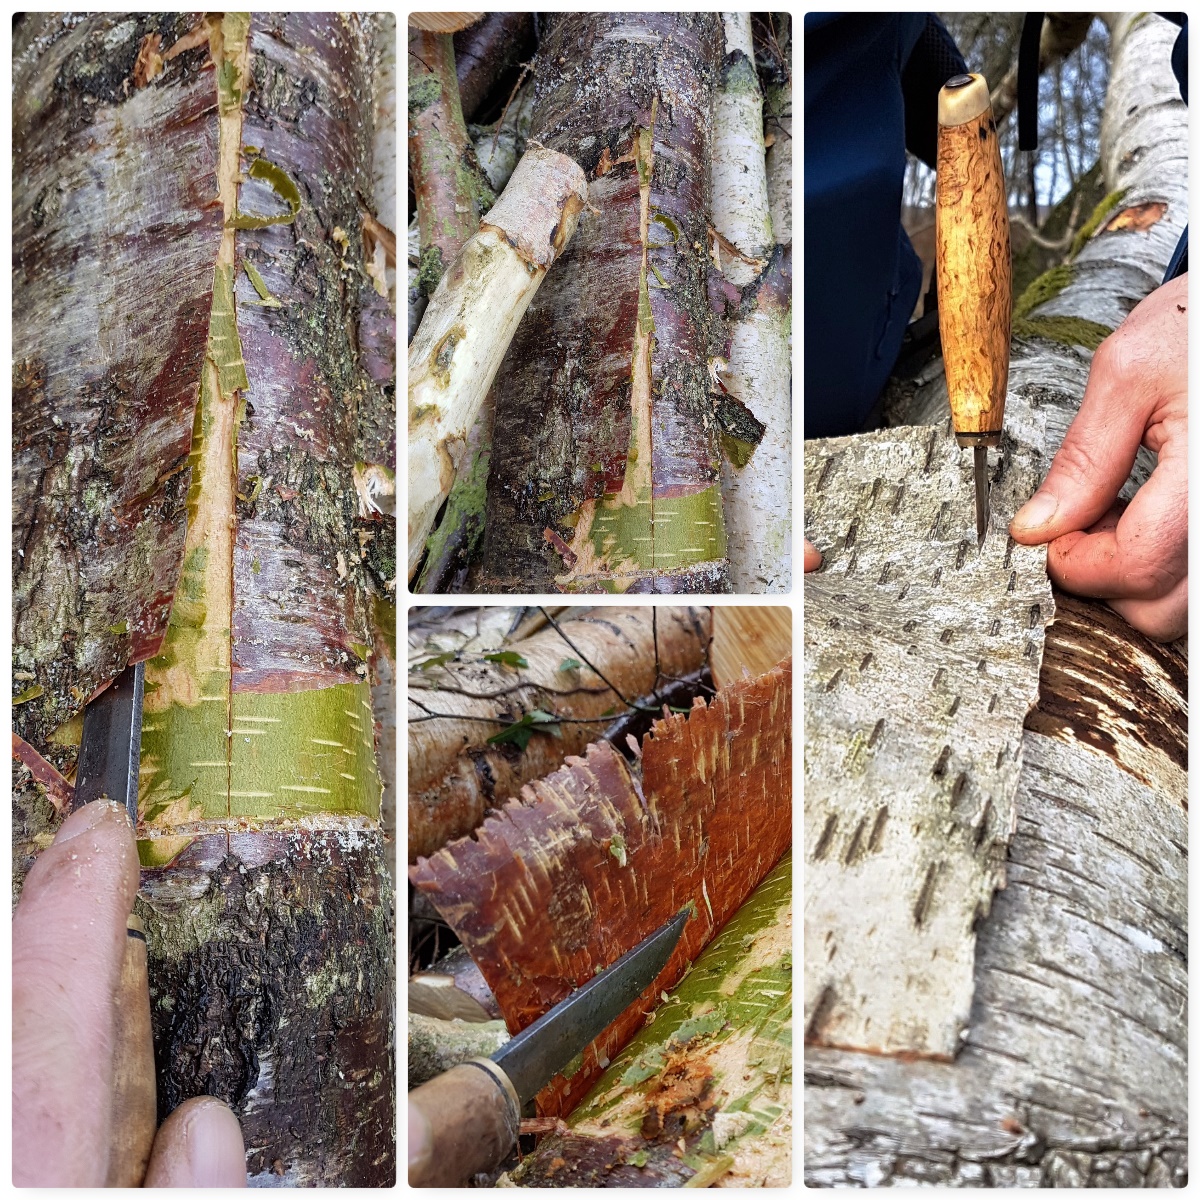
If you can find a semi rotten fallen birch log the bark tends to come of easily so just pull of the what you need. If you use semi rotted logs just take a little piece from as many different logs as you can as these logs are home to many different invertebrates.
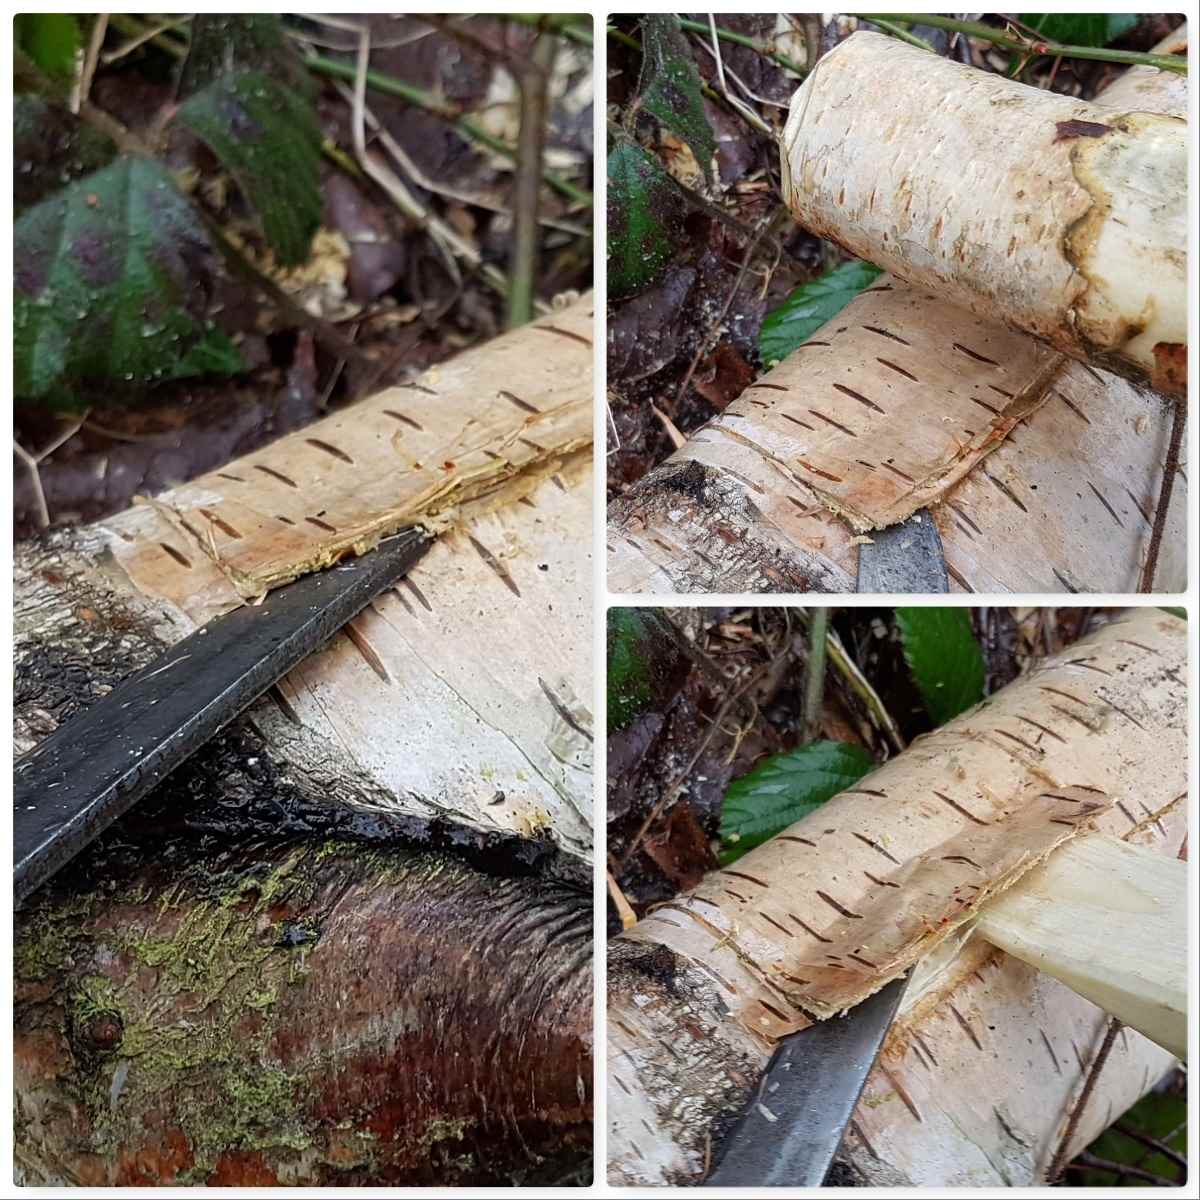
If the logs are freshly fallen then I use my knife to score out the area I want to cut out (ensure it is a smooth an area as possible). If the bark does not peel off easily I batton it with a small log to loosen everything up before prising it off with my knife. I go into the specifics of removing the bark in more detail in my post on the Birch Bark Fire Fan. The main thing is to take your time when the bark does not come off easily.
Stripping the bark
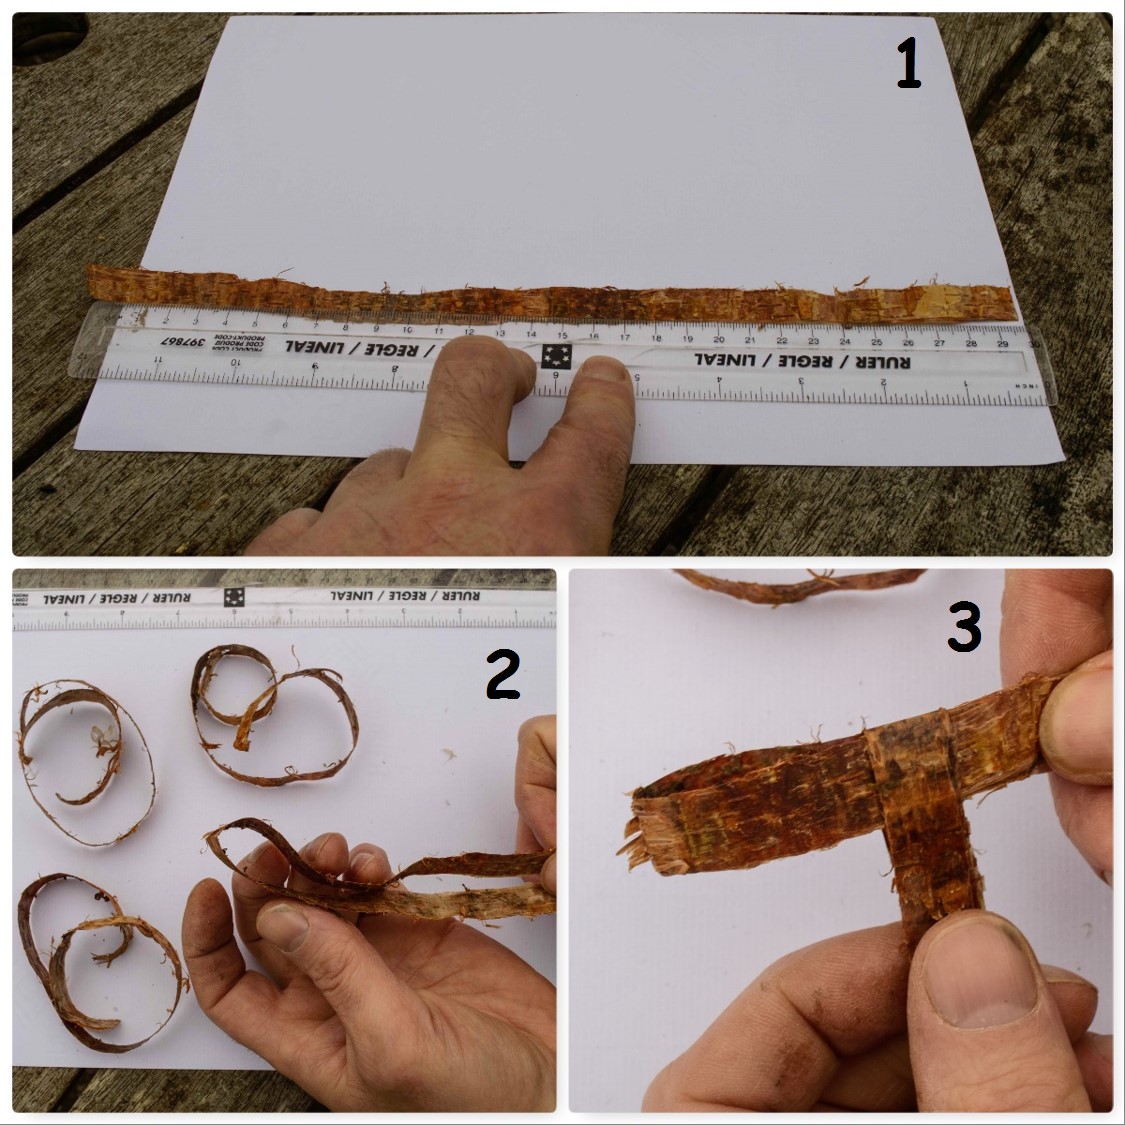
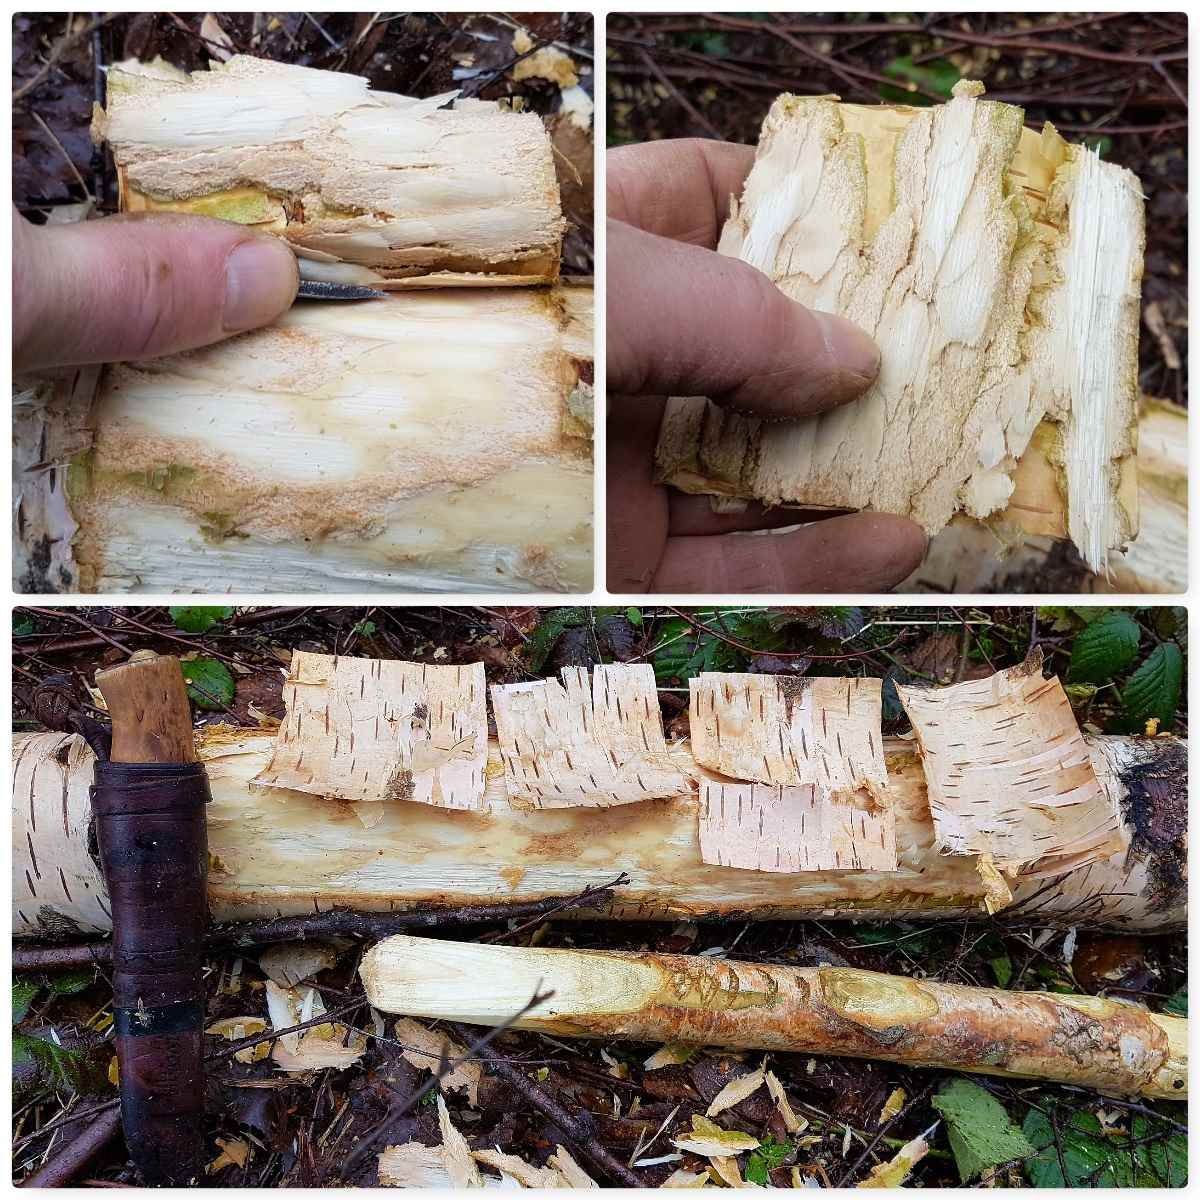
Once I have my section of bark I will either peel it by hand into strips of about 1 cm in length or if I am feeling the need to be very accurate I will tap my knife into a log and use that as a tool to cut the bark into even strips.
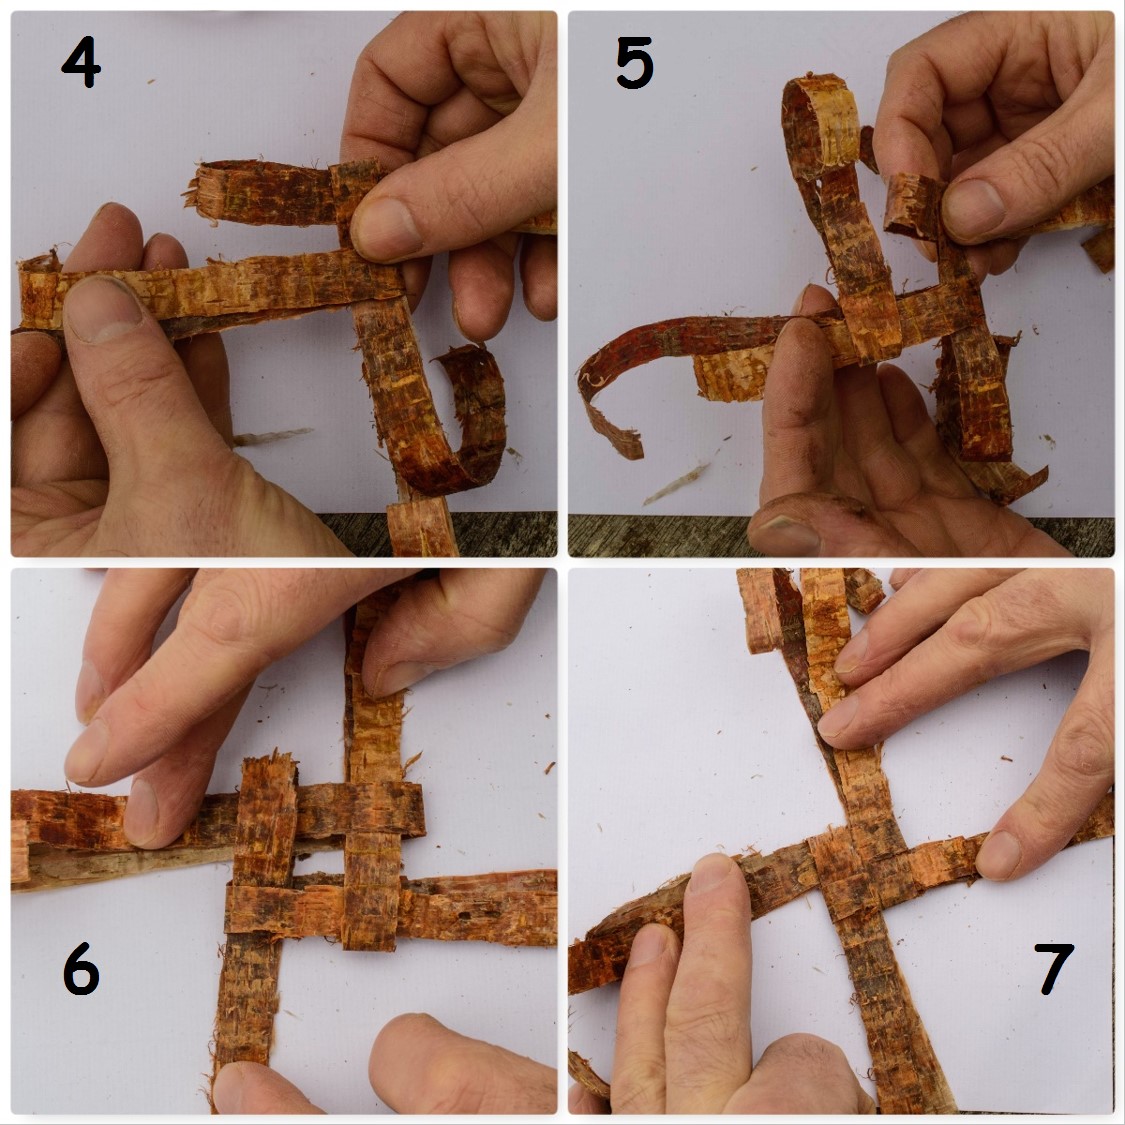
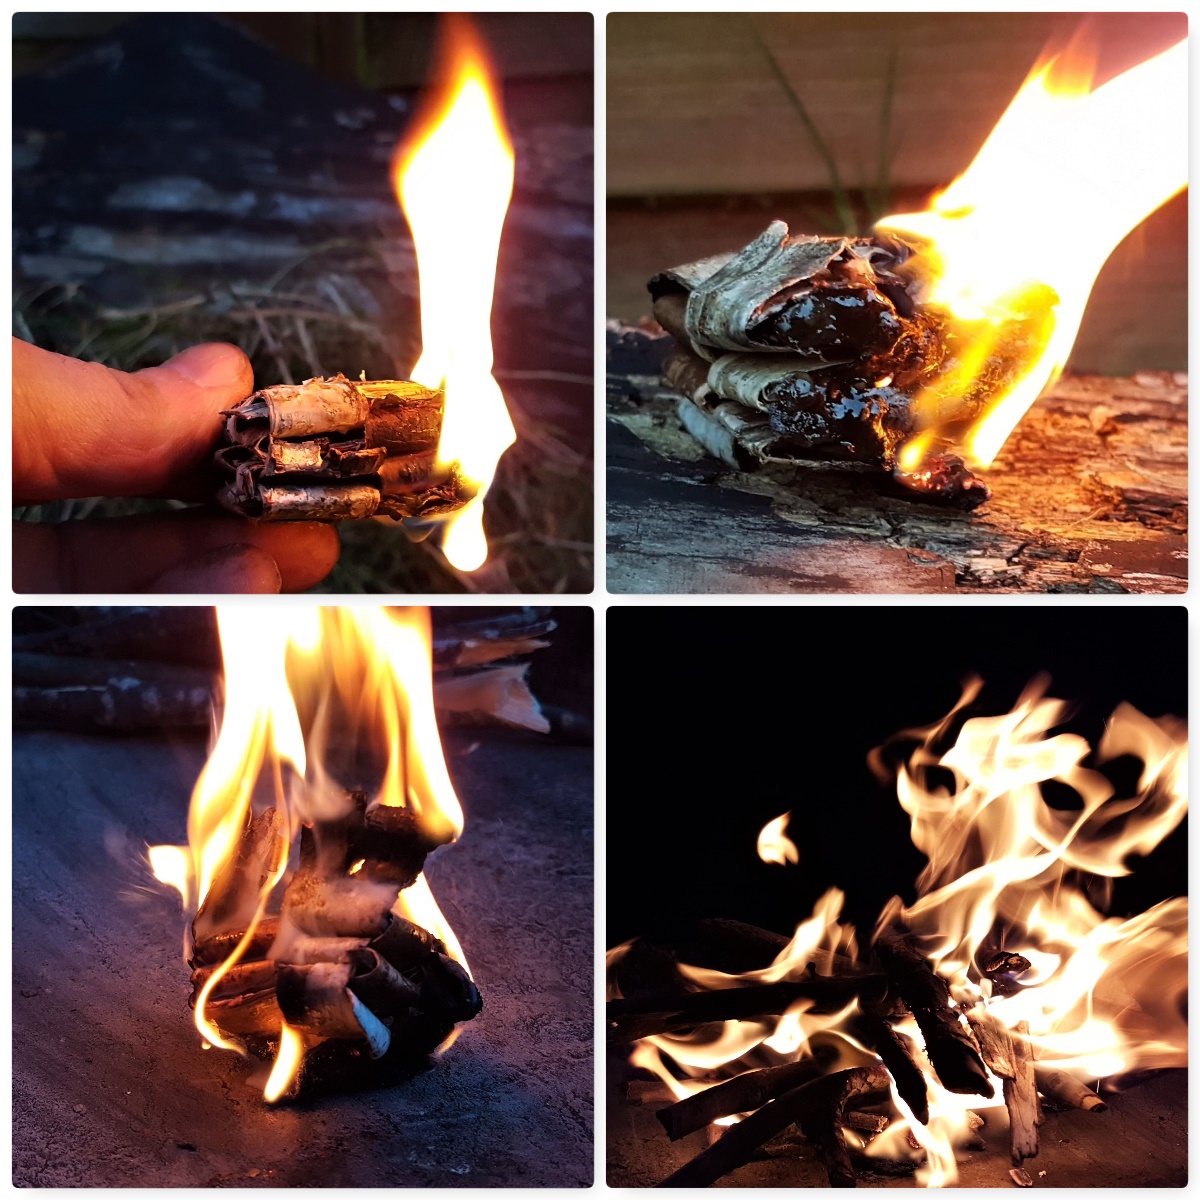
Locking the strands together
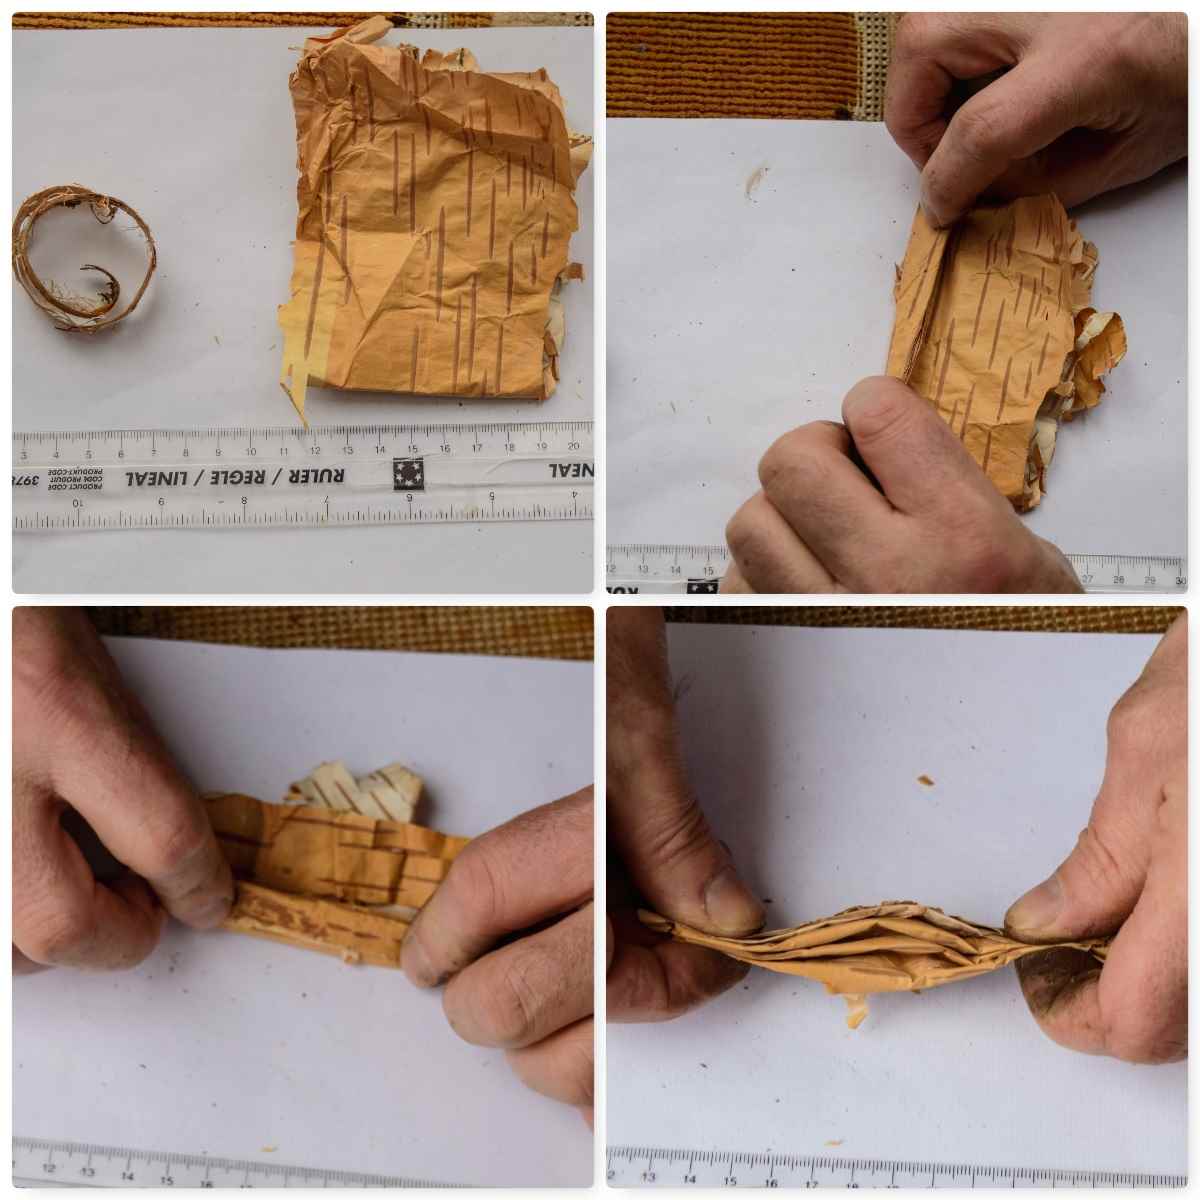
1. To make one firelighter you need four strips of birch bark. I use strips about 30 cm’s in length and 1 or 2 cm’s width.
2. Fold each strip in half – the folded end is called the closed end and the end with the two tails is called the open end.
3. Slide one closed end between the open end of another strip so it sticks out by 2 or 3 cm’s. In the picture below in section 3 you can see a T shape is formed.
Folding – Open – Closed
4. The closed end of a third folded strip is added to the upright part of the initial T shape to lock it off.
5. A fourth folded strip is added to the third strip to lock it off and the tails are threaded through the protruding loop of the first strip.
6.All the strips should now be locked off.
7. Pull everything in tight.
Locking in
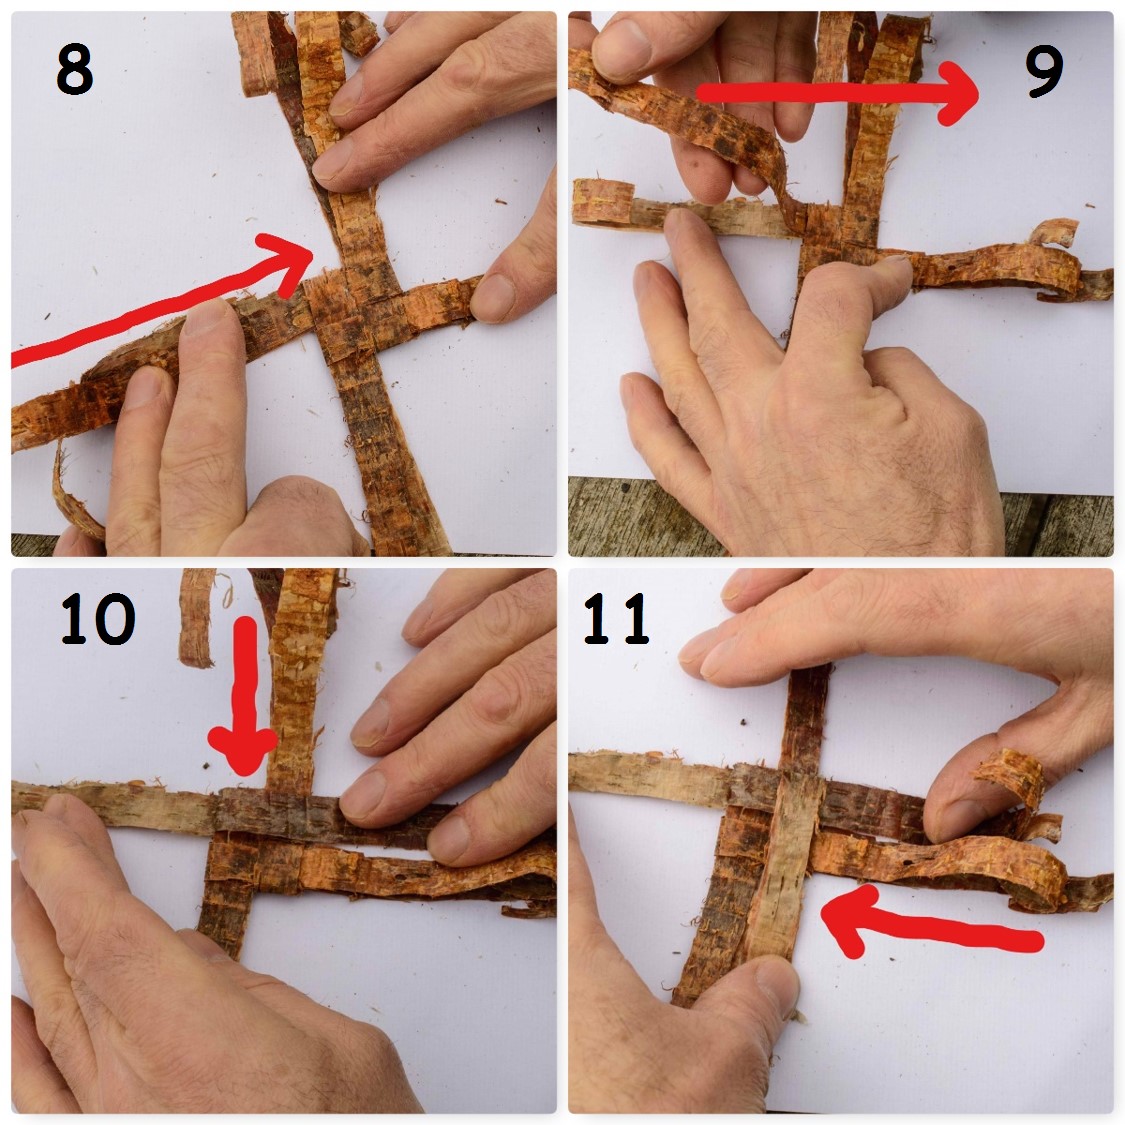
The Four Strand Crown
The firelighter is formed by weaving a Four Strand Crown knot. I have added the arrows to help you visualise what I am doing. Important – There will be two strips of bark at each open end. Only use the top strip of each open end when you begin the weave
8. To begin the knot fold one of the strips over. In section 8 I chose to fold the top strip on the left over first.
9. The strip is folded over to the opposite side.
10. To secure that strip in place I folded the strip at the top over this first strip to secure it in place.
11. This top strip (now at the bottom) was secured in place by folding the right hand strip over it.
Four Strand Crown Knot
12. To secure the fourth strip loosen the first strip slightly so that it forms a small loop by its fold – known as an eye.
13.Feed the tail of the fourth strip into this eye.
14. Pull the tail of the fourth strip in tight.
15. Repeat from step 8 to 14 again to form another layer of weave.
Building the layers
Flip the whole piece over and begin the weave on what were the bottom strips. Once you run out of bark to fold over tuck in the ends into a suitable slot or trim them off with your knife.
Repeating on the other side
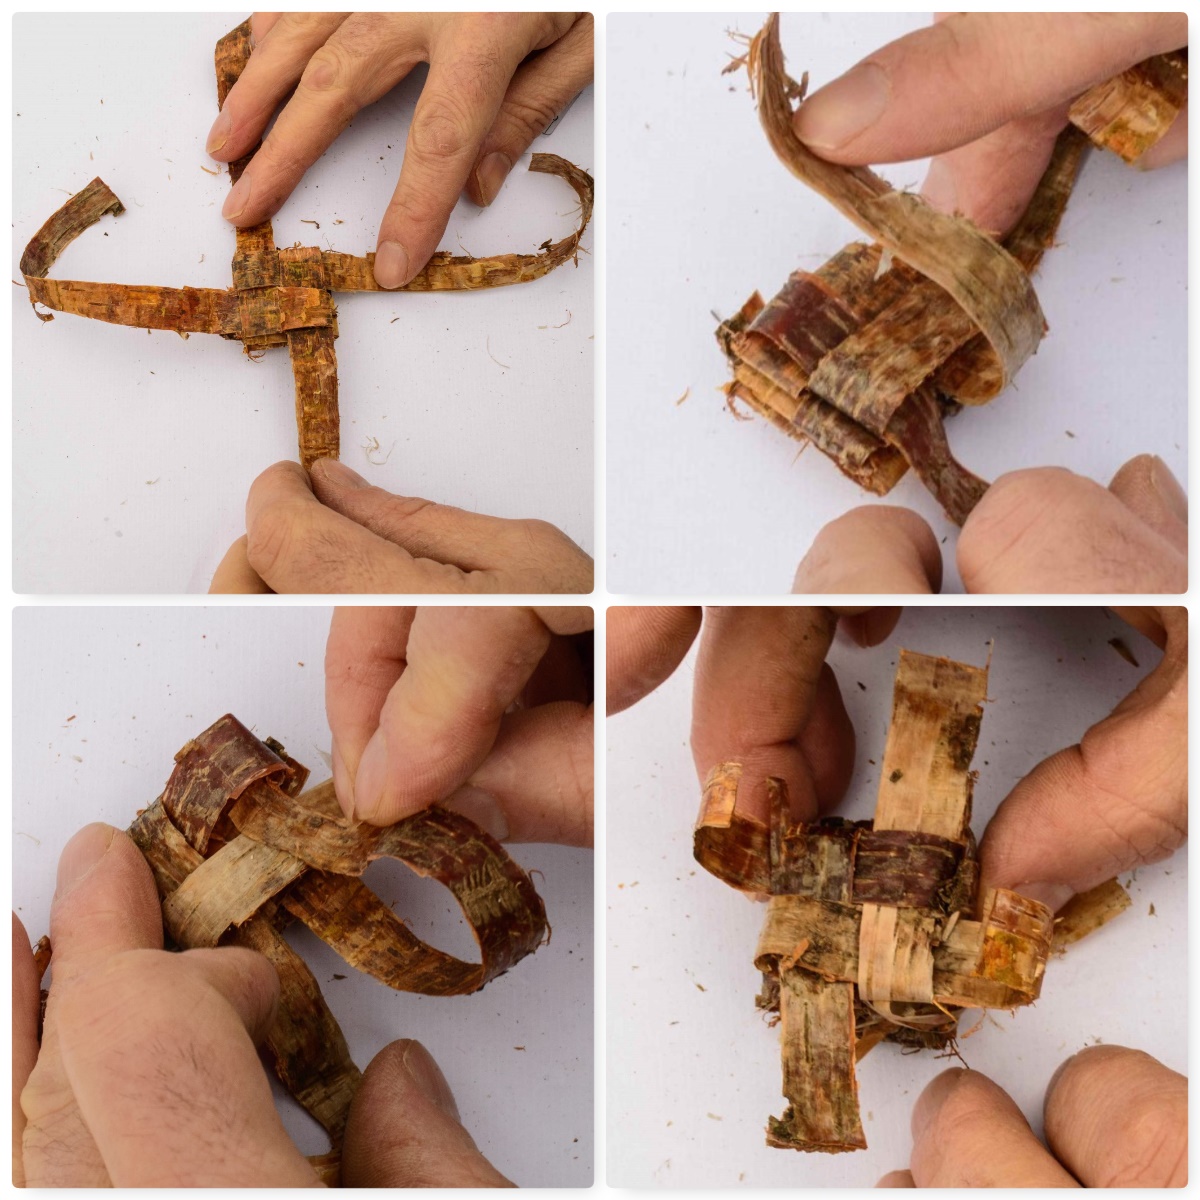
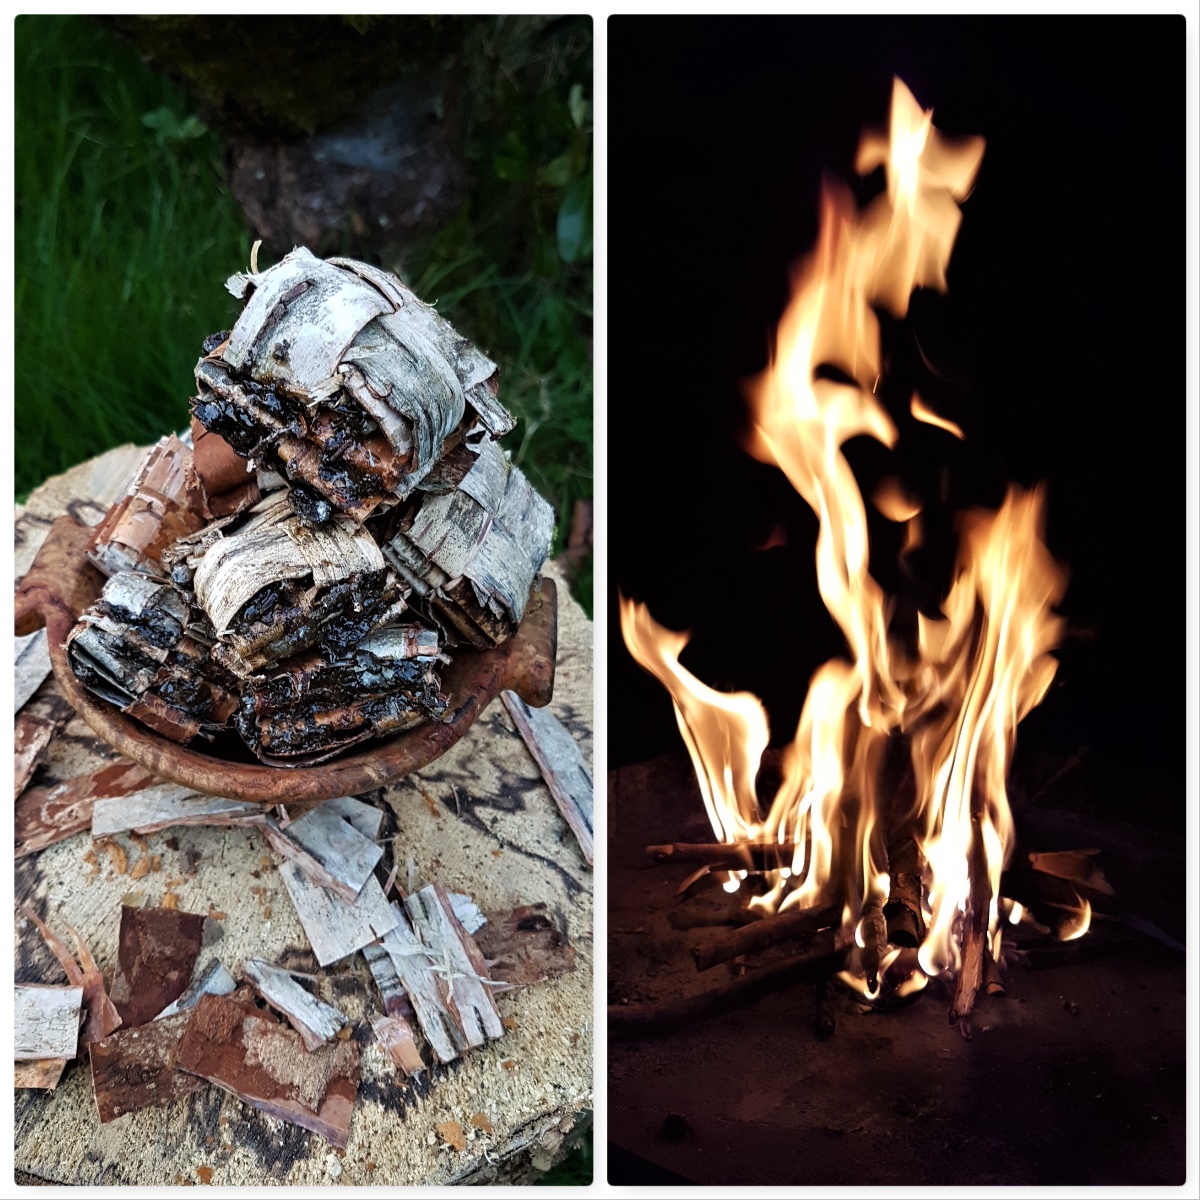
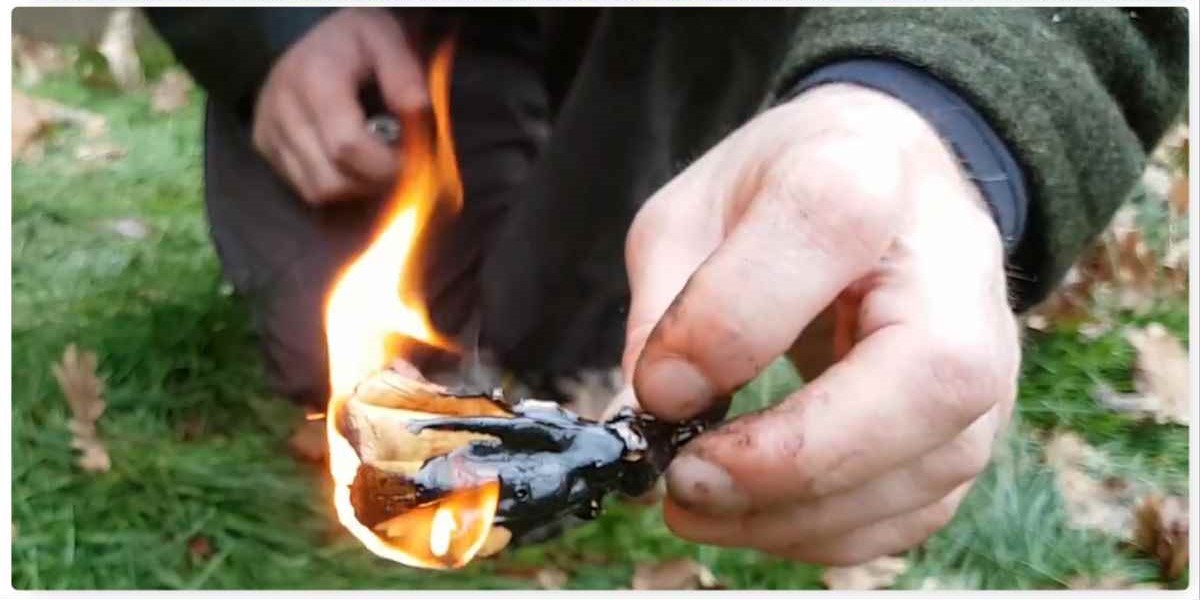
The Resin
These little firelighters take only a minute or two to make but they can burn for far longer if you add some resin to them. I use spruce resin as it is plentiful here in the UK (again I discuss harvesting resin in my post on the Birch Bark Fire Fan in more detail).
I break of little blobs (it can get messy if the resin is runny) of resin and insert them into the little slots formed by the weave and that is basically it (use as much resin as you can).
Add the magic ingredient
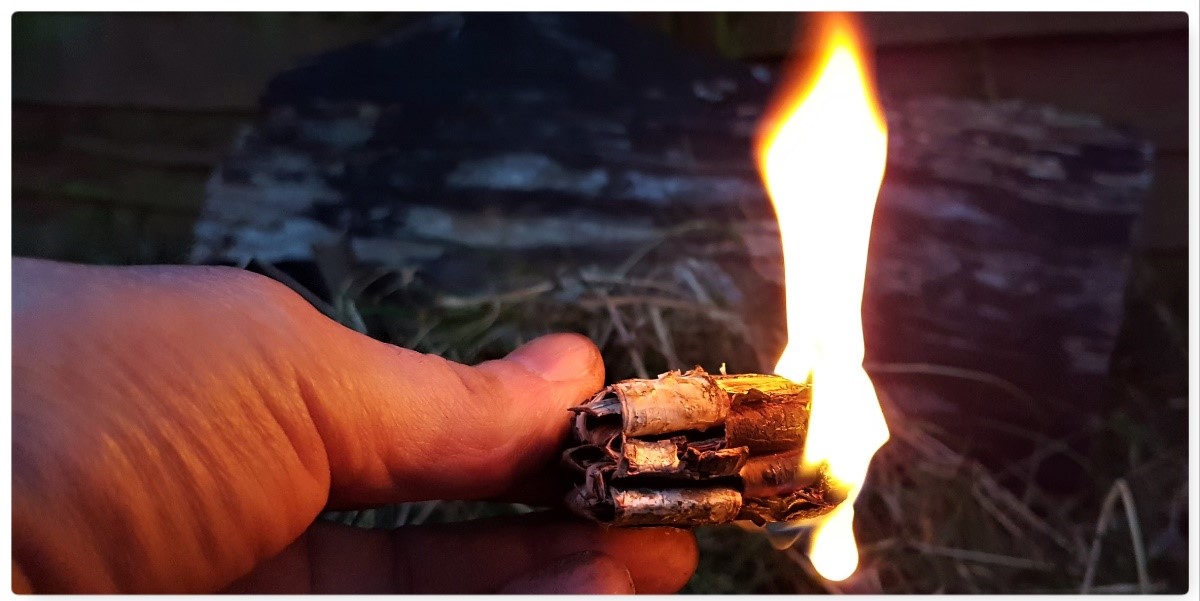
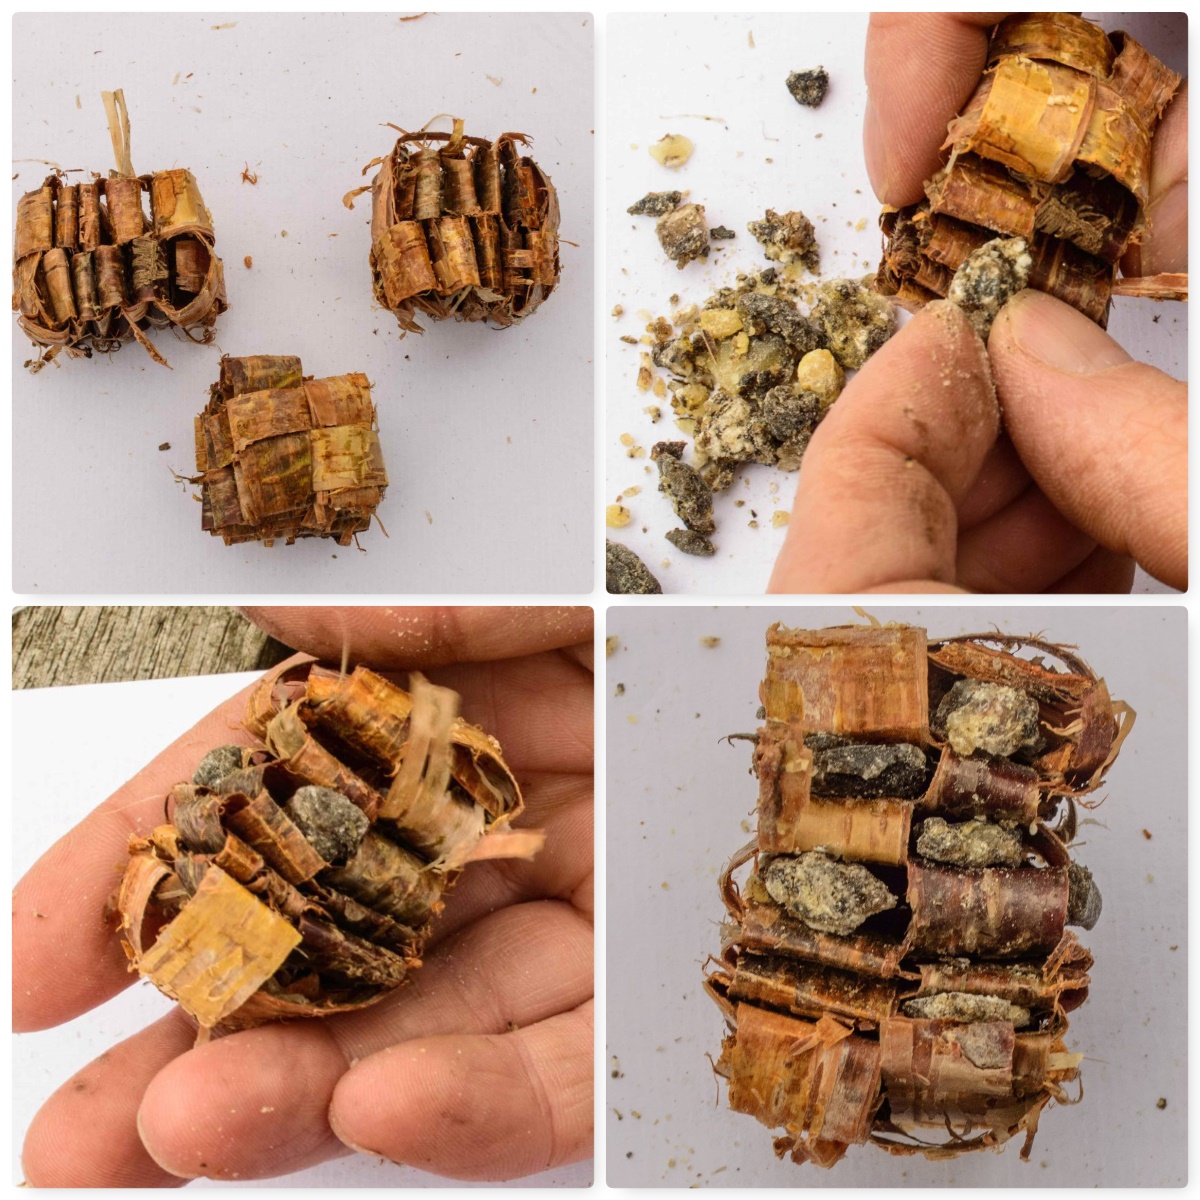
When lit these firelighters burn easily for over 5 minutes so giving you time to build your fire without resorting to using fine tinder and just small twigs. I can easily hold the firelighter for the first minute before it becomes to fierce to hold.
Once it gets going and the resin is well lit then it I go no where near it with my fingers. I like to use them first thing in the morning when I do not want to faff about with collecting tinders and just get a brew on.
Ready to go
I prep mine in the evening while sitting around the fire and pack them away for when I need them. If you are looking for a viable alternative to modern firelighters then these are ideal – if you are always a purist and insist on foraging for your tinders every time you light a fire then maybe they are not for you.
Quick to make and lasts for ages
For those that like a video intead of the step by step I put this short video together to explain the process.
Ever find yourself relying on using non-natural firelighters a lot due to their convenience? I do as I normally have a lot to organise before courses and using natural methods every time when I have a class can be time consuming when things are damp.
This is the first of two blogs on natural firelighters I like to use and how to make them. I like to prepare them well in advance of trips, pack them away in my bergen and use them instead of the likes of cotton wool and Vaseline (my usual non-natural method).
The Birch Bark Fire Fan
I came across a number of years ago a small section in Ray Mears book Essential Bushcraft on using a Birch bark fan. Ray recommended folding pieces of bark into a fan shape to stop the bark curling up quickly and becoming impossible to handle when it was lit.
I teach this method to my cadets however if I have time I like to add some melted spruce resin to these fans. This really extends the life of the fan giving me a better chance to get my fire going (great for these damp days) and because the resin soon hardens the fans they do not fall apart or deform so much when carried in a bag.
Removing the Bark
If you have a semi rotted birch log then the bark should come off easily however if it is a freshly felled log things may get a little more difficult for you. Here in the UK the birch bark can be quite thin and more difficult to remove than the thicker bark of birch trees you would find in more northern climes.
Mark out the squares
I mark out small squares with my knife and if the bark does not peel off easily I use a small batten to gently hammer the bark. This gentle hammering helps to loosen the inner bark from the sapwood.
Also having a wooden wedge helps to peel the bark of but mostly I tend to just use the curved part of my knife. Some folk say it is better to use the back of the tip of your knife but I find the curved part works well for me. The main thing is to take your time and remove the inner and outer bark from the sap wood.
Tap and Peel
Remove the Inner Bark
When I have removed a small square I gently remove the inner bark. Again do this job slowly removing the inner bark in small pieces. It is very easy when using thin bark to rip the outer bark.
Carefully strip off the inner bark
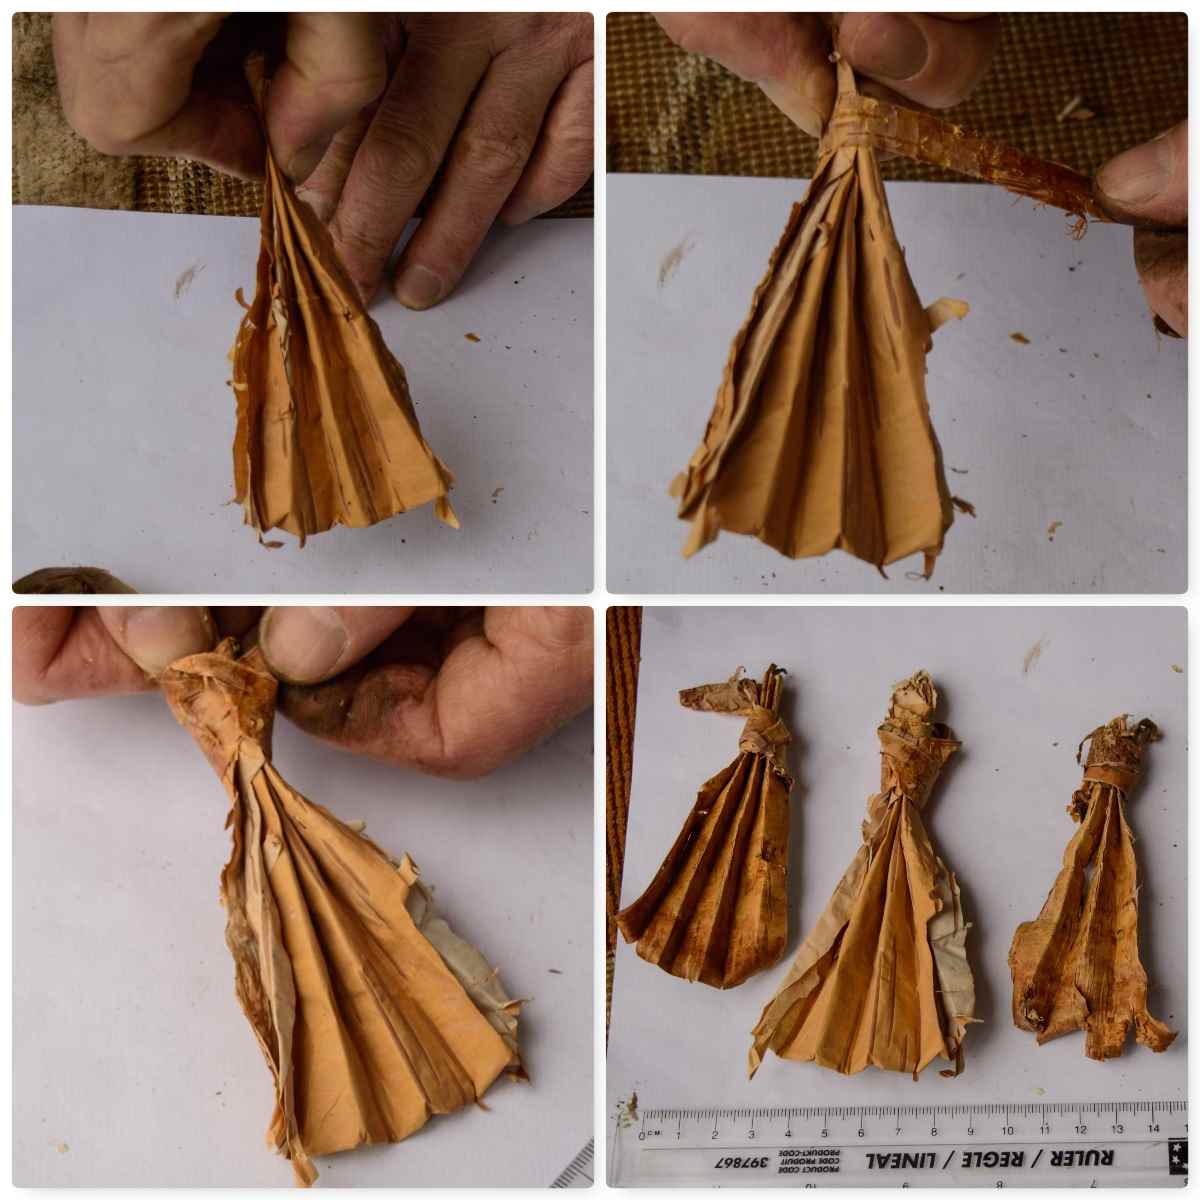
Folding the Fan
To make your fan start folding your square as if you were making a very small fan – not much more you can say about that 🙂
Fold like a paper fan
Keep a hold on one end and with a strip of bark tie off the other end. They do not take long to make and are soon ready for the resin.
Tie a tail
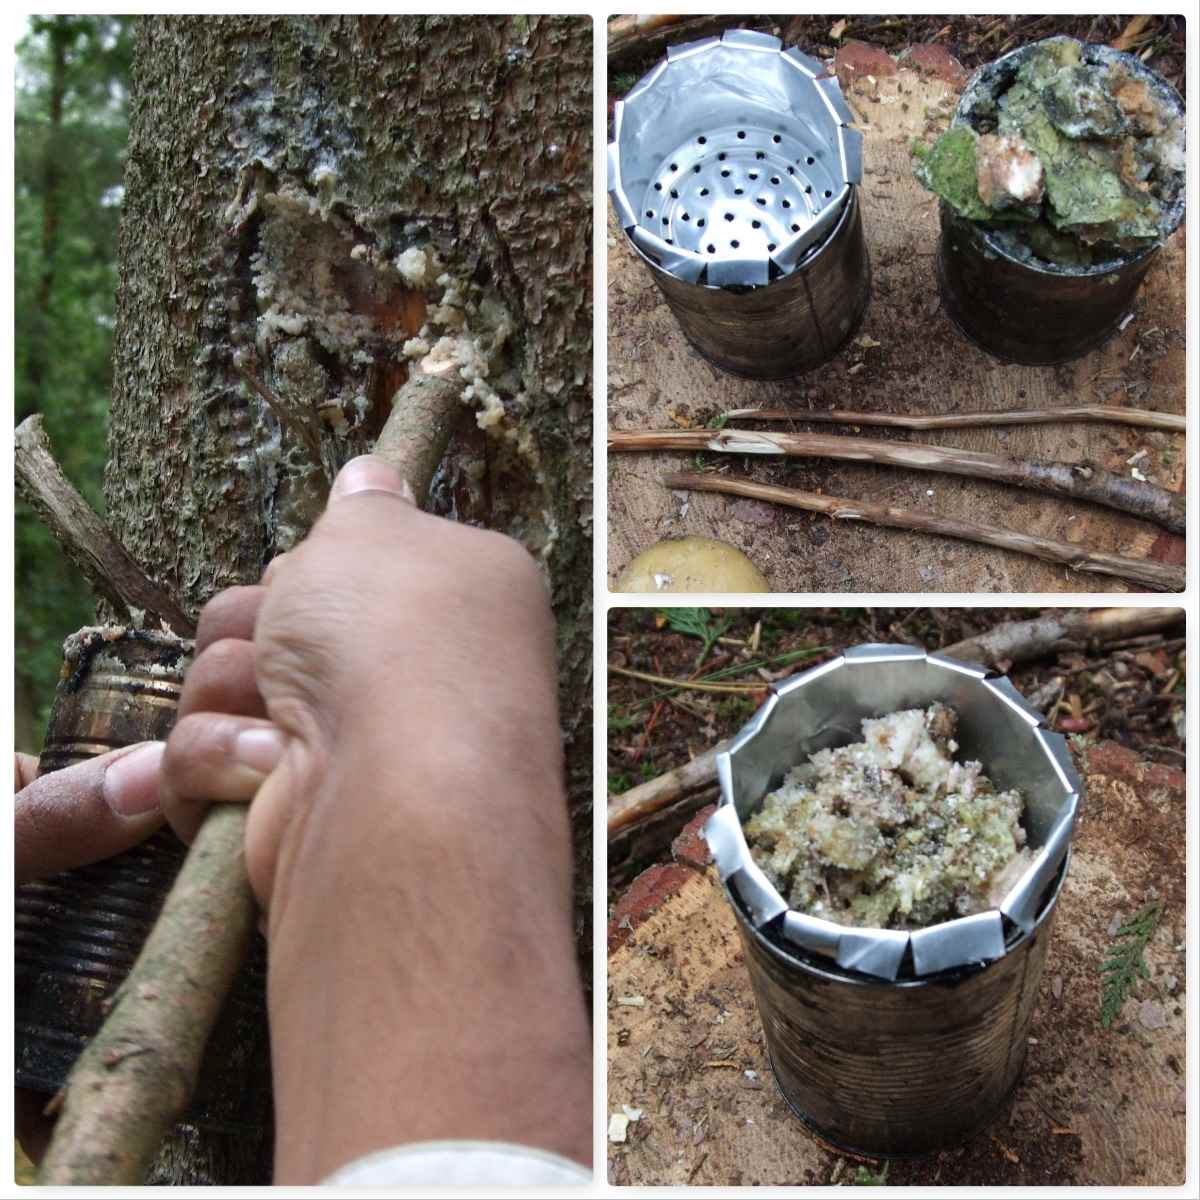
Spruce resin
Here in the UK a handy and plentiful resource is Spruce resin. There are lots of conifer plantations where I live and a common tree in them is the Spruce. I keep an eye out for areas where the foresters have been using tractors to thin out the spruce as they tend to damage lower branches on trees they pass by.
To help heal itself the trees produce copious amounts of resin and this is full of oils that are flammable. By taking a little from different sites (I use a stick to scrape the resin) I can soon have plenty to melt and coat the Birch bark fans and leave plenty for the trees.
Harvest some resin
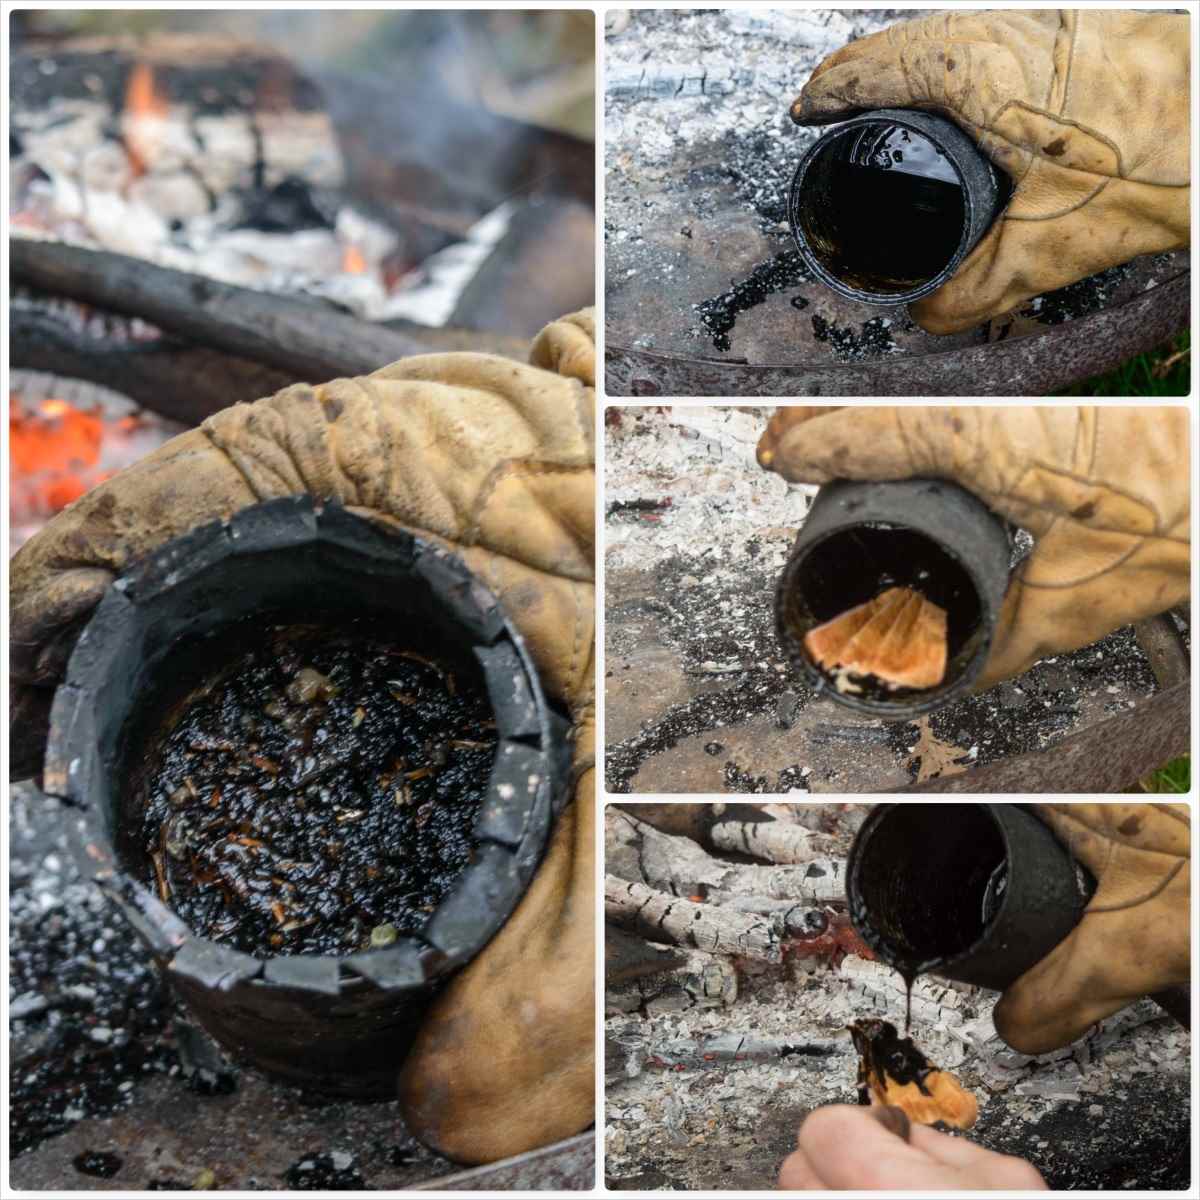
I just use a couple of tins (the inner tin has lots of little holes) to melt the resin by my campfire (I have documented this process in How To…. Spruce Pitch in a Tin Can) and dunk the tail of the fan into this hot liquid (good gloves or tongs are required here).
Once the tail is covered I pour some of the resin onto the area of the fan by the tail leaving the top of the fan clear of resin.
Melt, dip and pour
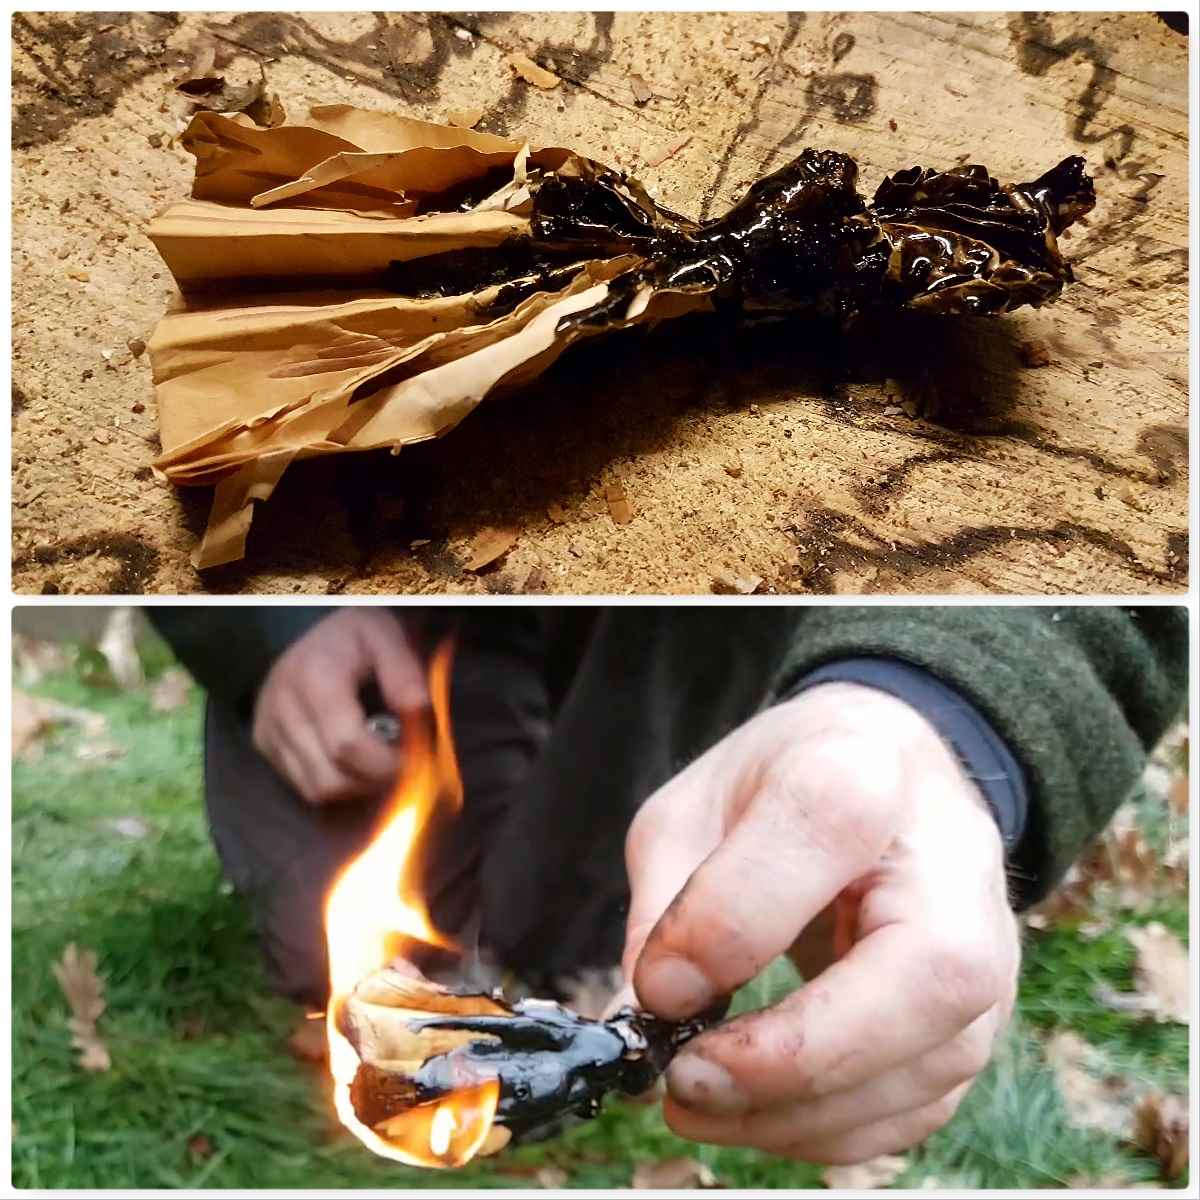
I find this combination works for me as the folds stop the bark from curling straight away and when the flame reaches the resin it burns for far longer.
One excellent fire lighter
I put a little video together on this to show you the process from start to finish.
The next post in this short series will be on making a woven Birch bark firelighter (again with Spruce resin).
I will post a full How To…. on harvesting the Birch Bark and making the fans but for now here is a short video post on an excellent bit of homemade bushcraft kit.