
This How To… is put together from my records of a Primitive Technology course I did with John Rhyder of Woodcraft School back in 2009. In particular I will walk you through the steps I took to brain tan a fallow deer hide into a piece of buckskin to make a bag.
Background info on Buckskin
Any animal hide that is left untreated will harden into what is called rawhide. This has many useful applications, such as making bindings for tools and inserting and holding stone tools in sockets, and these days it’s often used as dog chews.
If a hide is stretched out on a rack its surface area increases and it can be useful in making drum skins. However if a hide is stretched, manipulated, properly cleaned and soaked in a solution made up from the animal’s own brains and smoked it becomes buckskin. This is very useful in making clothing and bags.
Buckskin making will be discussed in this How To… but it is made differently to normal shop-bought leather. Traditionally processed or shop-bought leather is tanned in vats of tannic acid solutions. This could be from the tannins found in oak, willow and chestnut. Skins can be soaked in these solutions for periods of 8 months to 2 years. This produces a heavy leather which is good for making shoes, jackets, ‘possibles pouches’ and sheaths.
Also with modern commercially made buckskin the process is very polluting with the chemicals used and the grain layer (see below) is also left on. This does not allow perspiration to escape through the fibre so leads to degradation of the buckskin.
With hand-worked buckskin the grain layer is removed and due to the longer periods of stretching the fibres are more open so allowing perspiration to disperse. The skins are also lighter because of the stretching.
Due to hunting restrictions in this country since medieval times, much of the knowledge regarding tanning in this country has been lost. Most of the knowledge that we use now in relation to traditional tanning and buckskin production comes from studies with Native Americans.
It is estimated that there are 6 million hunting licenses issued in the States each year but only about 500,000 skins are tanned each year. This means skins can now be obtained more easily and information about tanning or making buckskin is becoming increasingly available on the web as people experiment more.
In the UK animal skins can be obtained from many sources including roadkill, game dealers and stalkers. It must be remembered that the quality of a skin relates directly to how the animal is skinned. Damaged skins from road kill may prove a challenge to the person treating the skin. Also nick marks from knives in the skinning process can produce cuts in the skin that expand when stretching the skin. The ideal is to get an animal that has a near complete hide and has been skinned with the minimum use of a knife.
If a skin is not processed properly it will either stay dry, hard and stiff as rawhide or, if it gets wet, it will go soft and eventually rot. The ideal with buckskin is that it will be soft when dry, and when wet will not rot easily but be able to dry out and remain soft.
In all leather or buckskin making the flesh and hypodermis membrane are removed. Hairs can be left on or removed depending on the final product. Commercial leathers also remove the hair but much of the epidermis and grain layer is left on.
To make buckskin the epidermis, grain level, much of the small fibres, hypodermis and flesh are all removed. Only the mature fibres are left to process.
Brain-tanning a hide in general
- Skin the animal carefully
- De-flesh the hide with a scraper
- Remove the hypodermis membrane by scraping
- Remove loose hairs if required by hand
- Remove the grain level and stubborn hairs by wet scraping
- Remove small fibres by dry scraping
- Stretch the (moistened) skin initially to start opening the fibres so as to make the skin more pliable
- Dress the skin in a solution such as brains and water, or eggs and water
- Continue to soften and stretch the skin so as to manipulate the fibres and coat them in the oils of the dressing. This helps to keep the fibres separate from each other as the skin dries
- Apply more and more dressing with continual stretching and manipulating. About 3 or 4 dips in the dressing mixture.
- When the skin has finally dried out (it needs to be continually stretched until it is dry) it needs to be smoked. Smoking changes the skin chemically to stop the fibres glueing back together when it gets wet, hence keeping the buckskin soft. Smoking also locks the oils from the dressing into the fibres.
De-fleshing
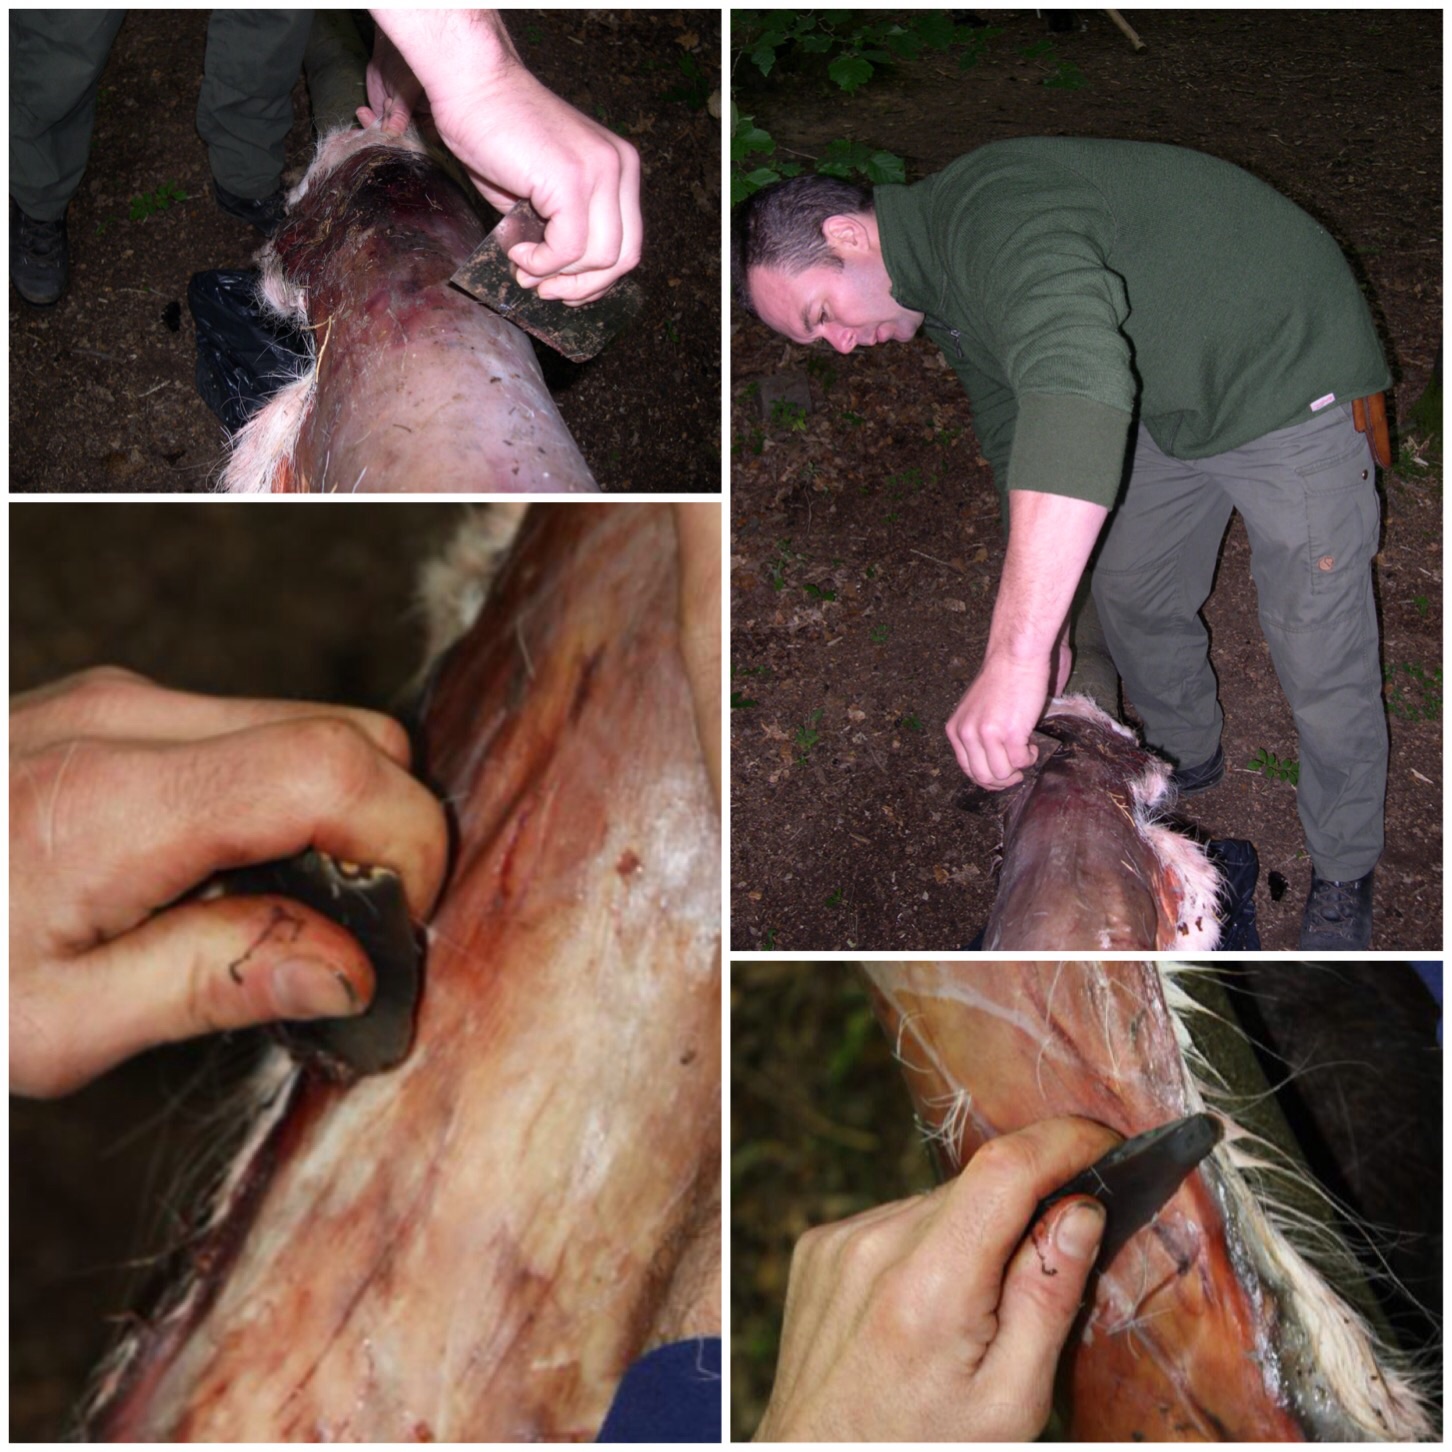
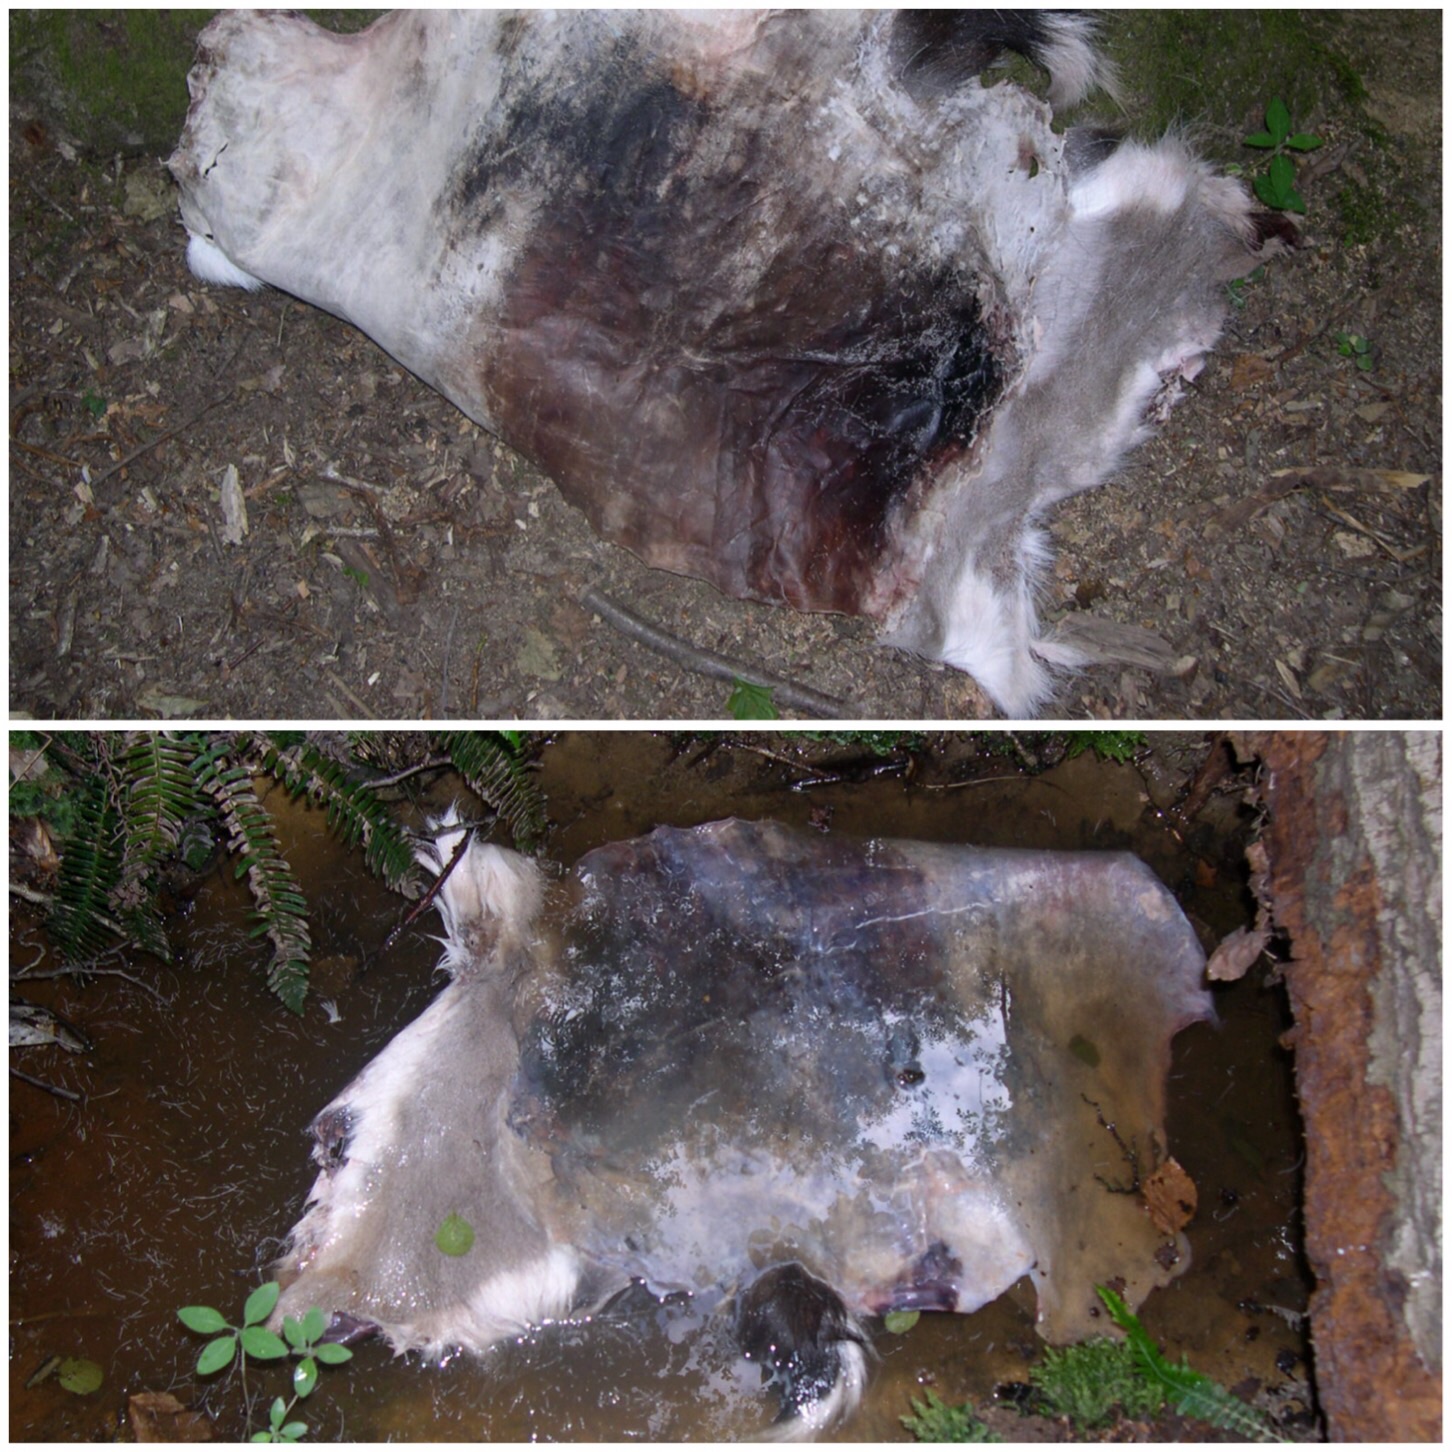
Steve Lawson, the instructor, brought in a range of fallow deer hides for us to work on. There were not enough to go around so my friend Phil Brown of Badger Bushcraft shared one with me. Our skin was the one on the right of the line. Steve set up a pole at about 35 degrees to hang the skins on for us to de-flesh all the remaining muscle and fat (initially we used metal scrapers before moving onto primitive scrapers), The pole had been well scraped to make it smooth so the hide would not be damaged
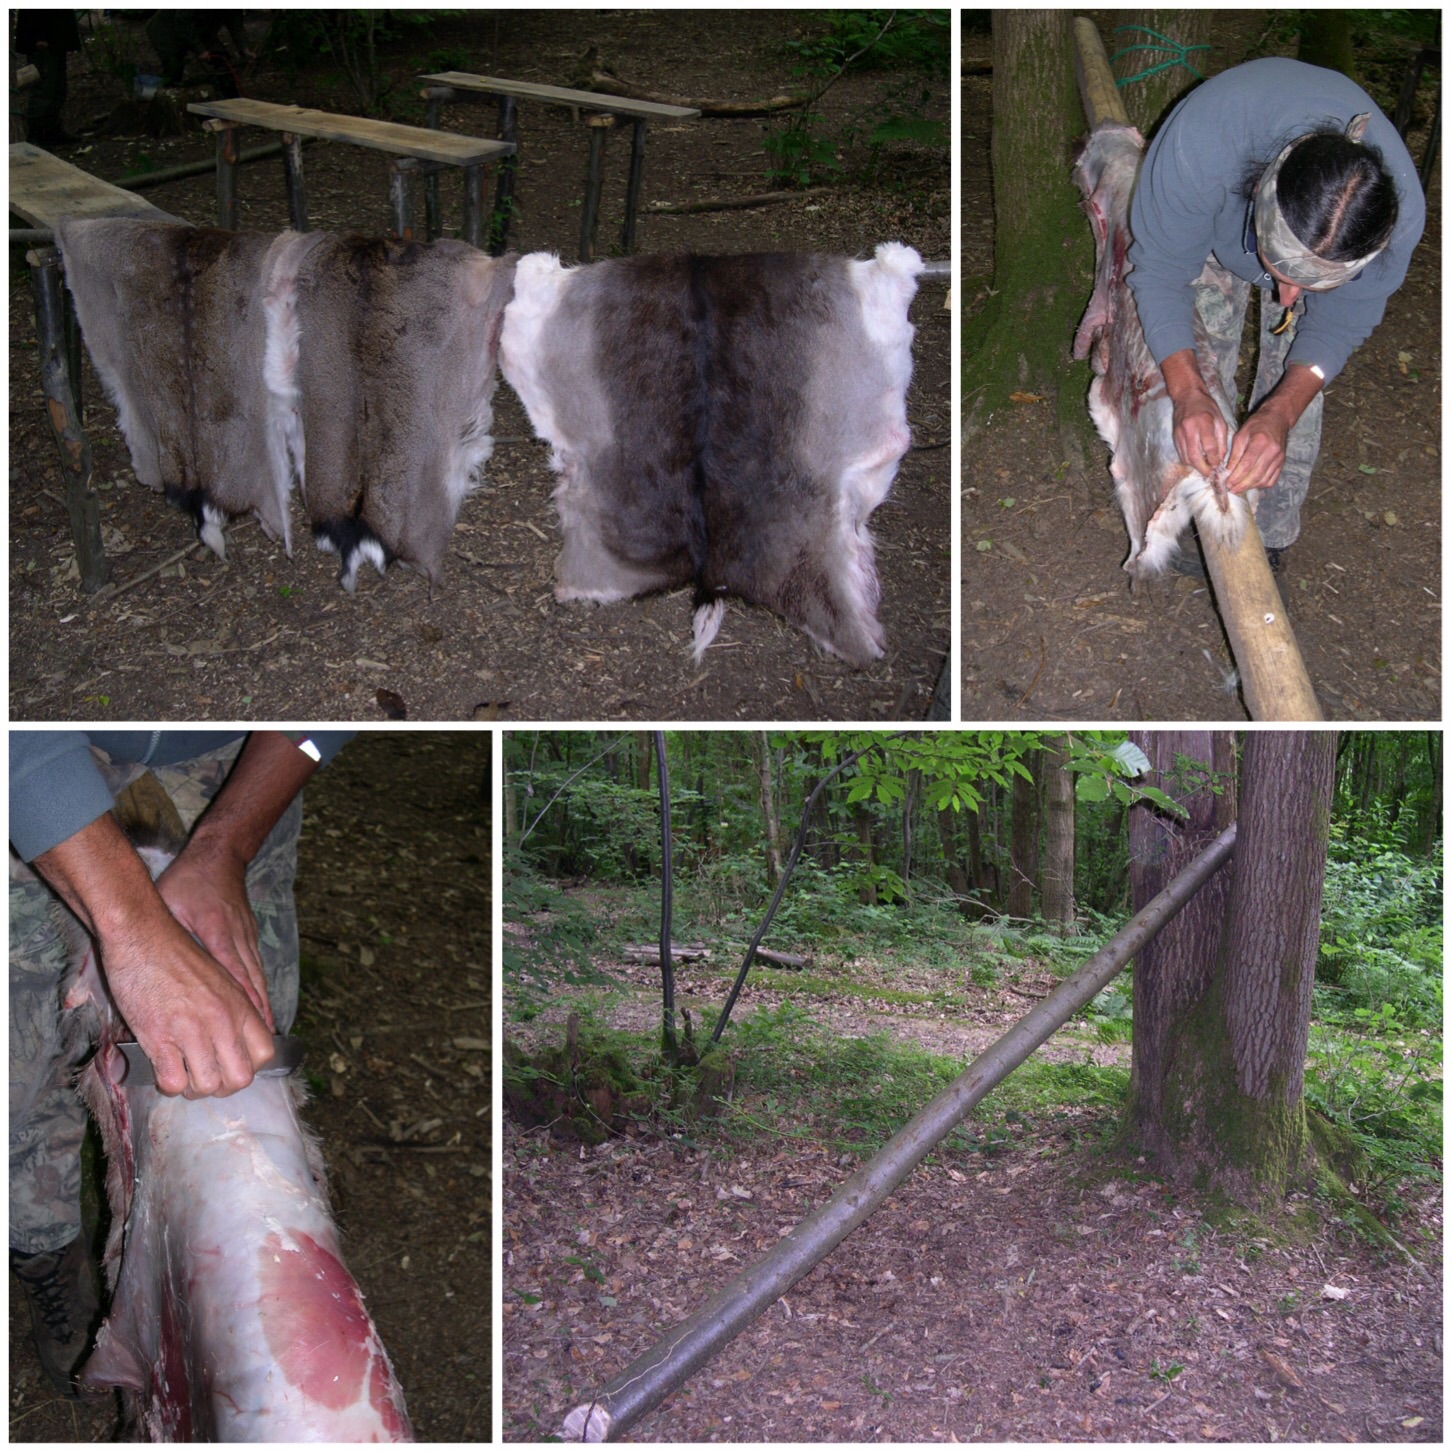
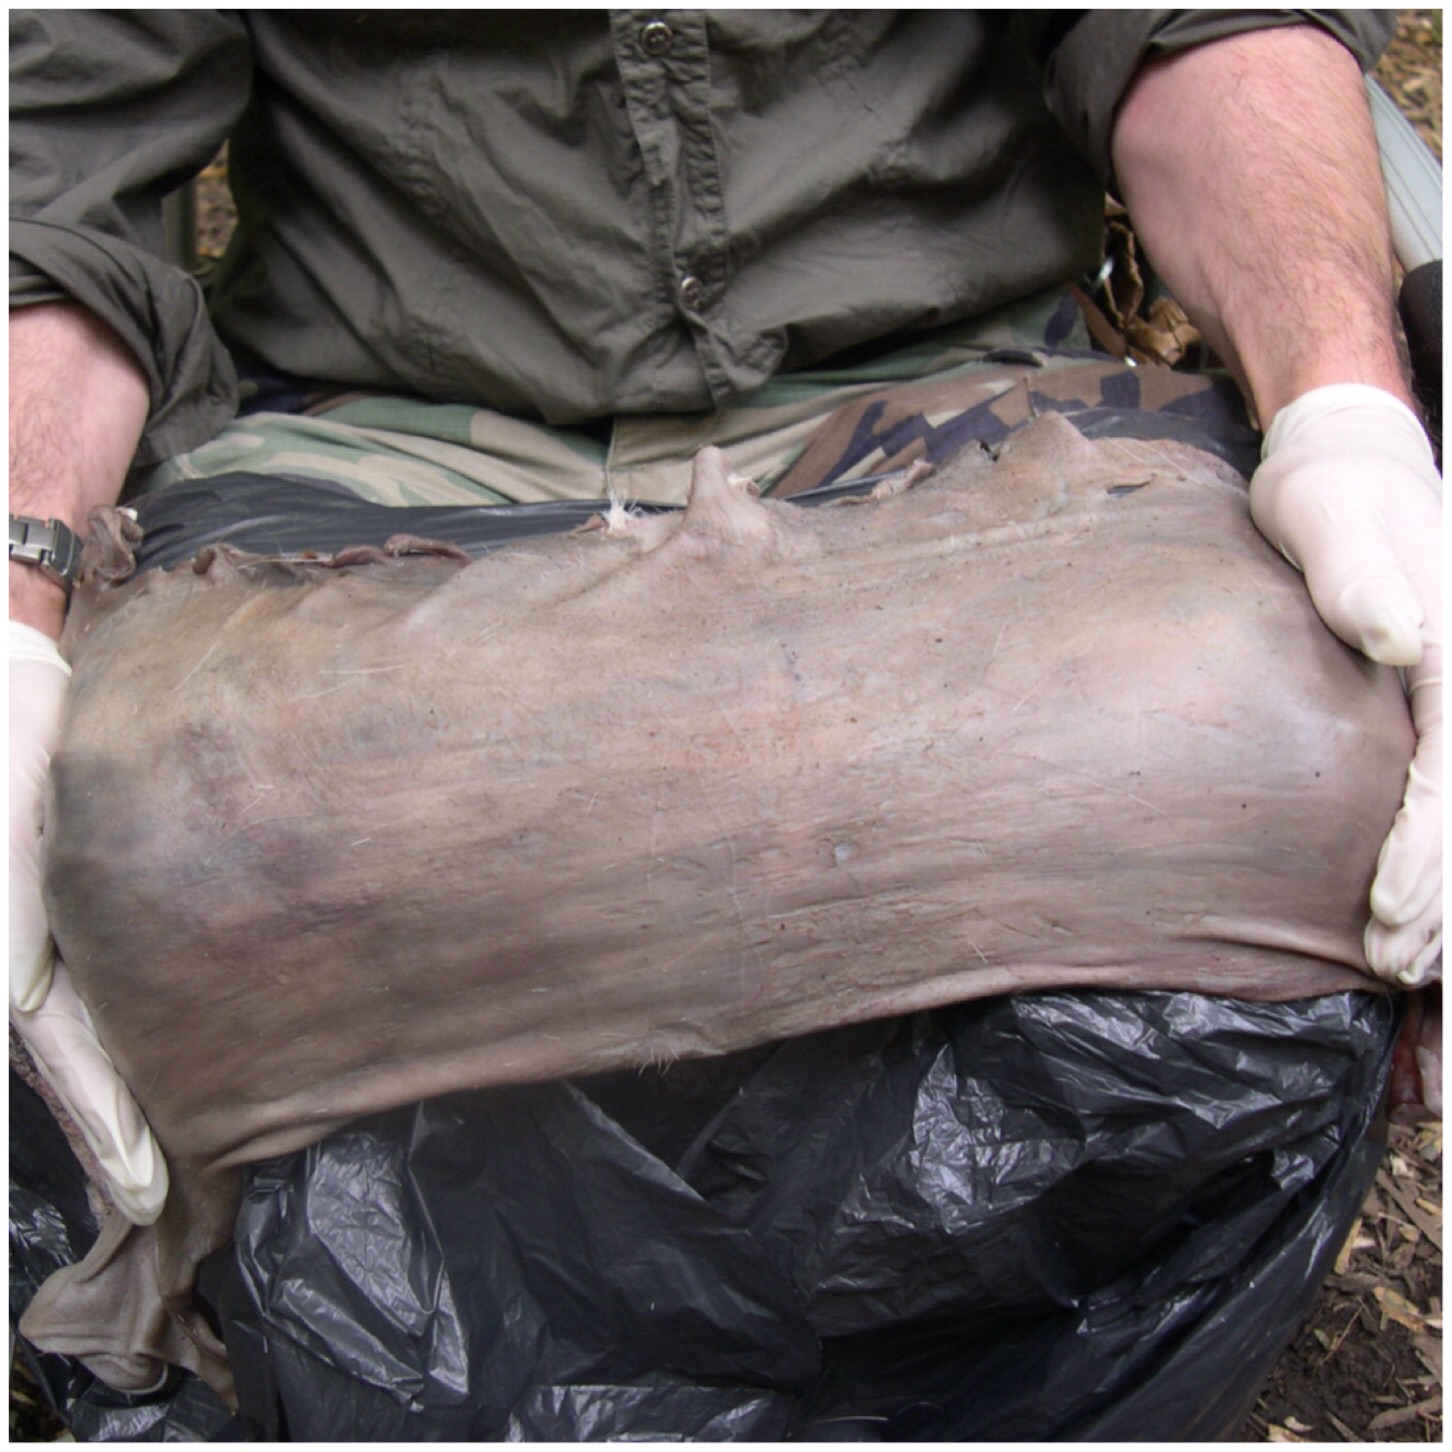
The skin Phil and I were working on was particularly thick so we guessed this was an older animal. There was an area of deep red where all the blood had pooled in the skin after it had been shot. By this stage we had moved onto using flint scrapers and they worked particularly well. The edges of the hide needed extra work as this was where a lot of the muscle and fat had been left.
Splitting and removing the hair
After de-fleshing we decided to split the hide. The flint knife cut through the hide as easily as cutting through butter. The hide was placed on the bench so that it could be cut accurately and safely.
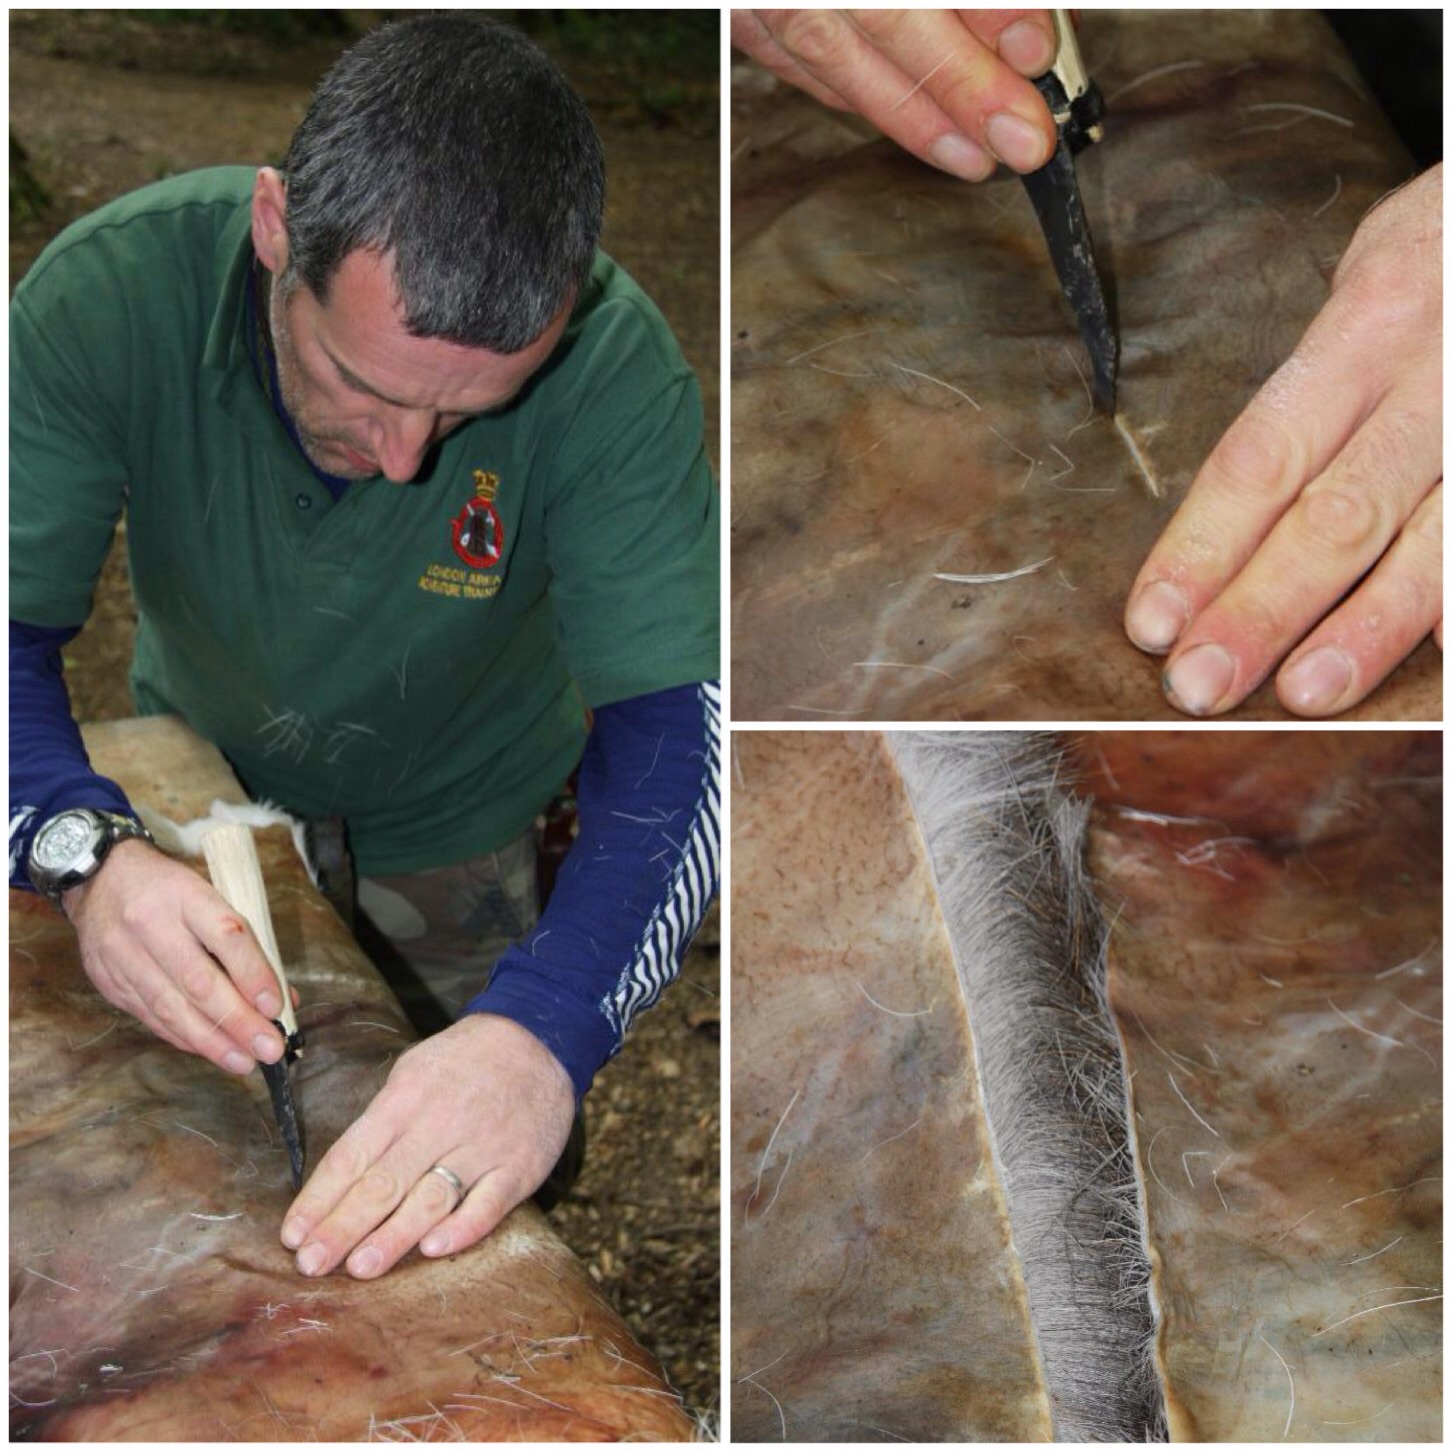
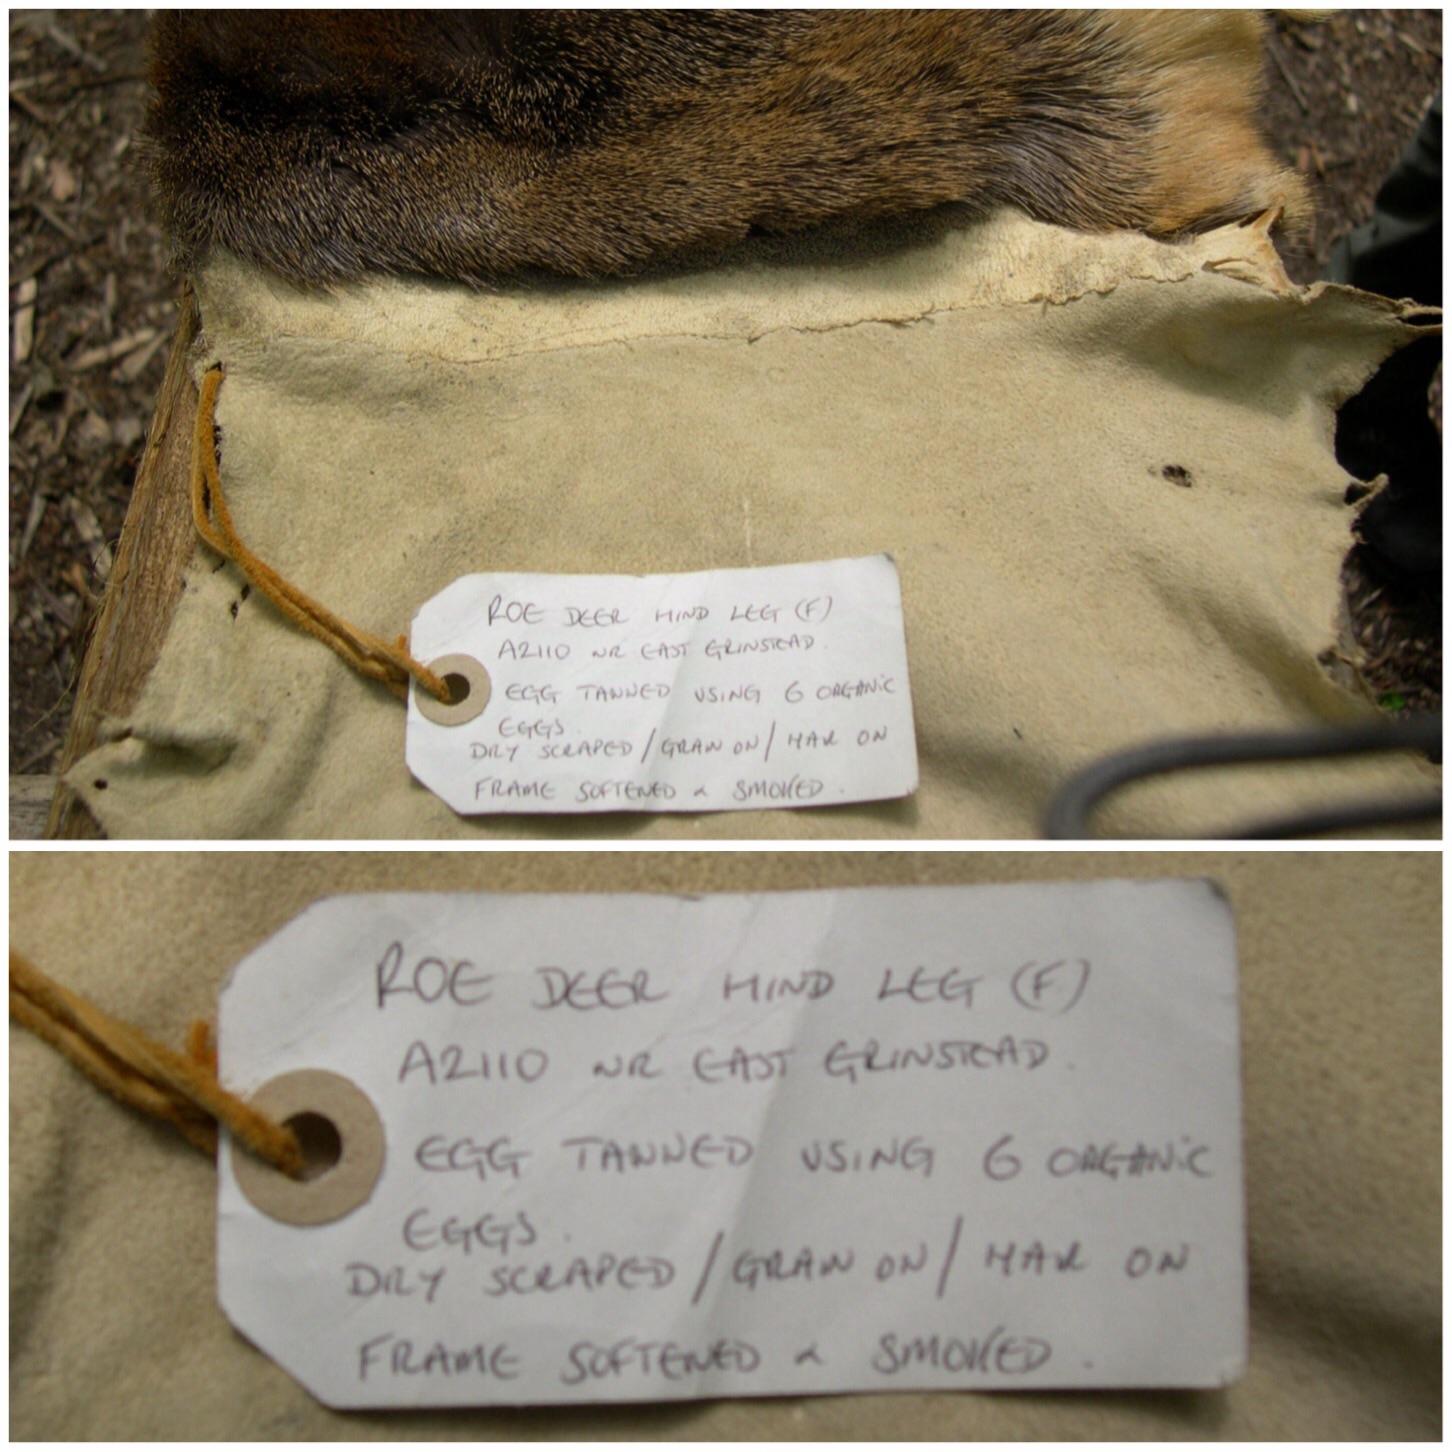
After cutting the hide in two we noticed that one half of the hide had started to lose its hairs. This was due to the blood from the gunshot wound pooling into the skin and loosening the hair follicles but this was only in patches and the hair came away easily. As I wanted to make a buckskin bag I elected to use this half and Phil decided to keep the hair on his half to make a small cover.
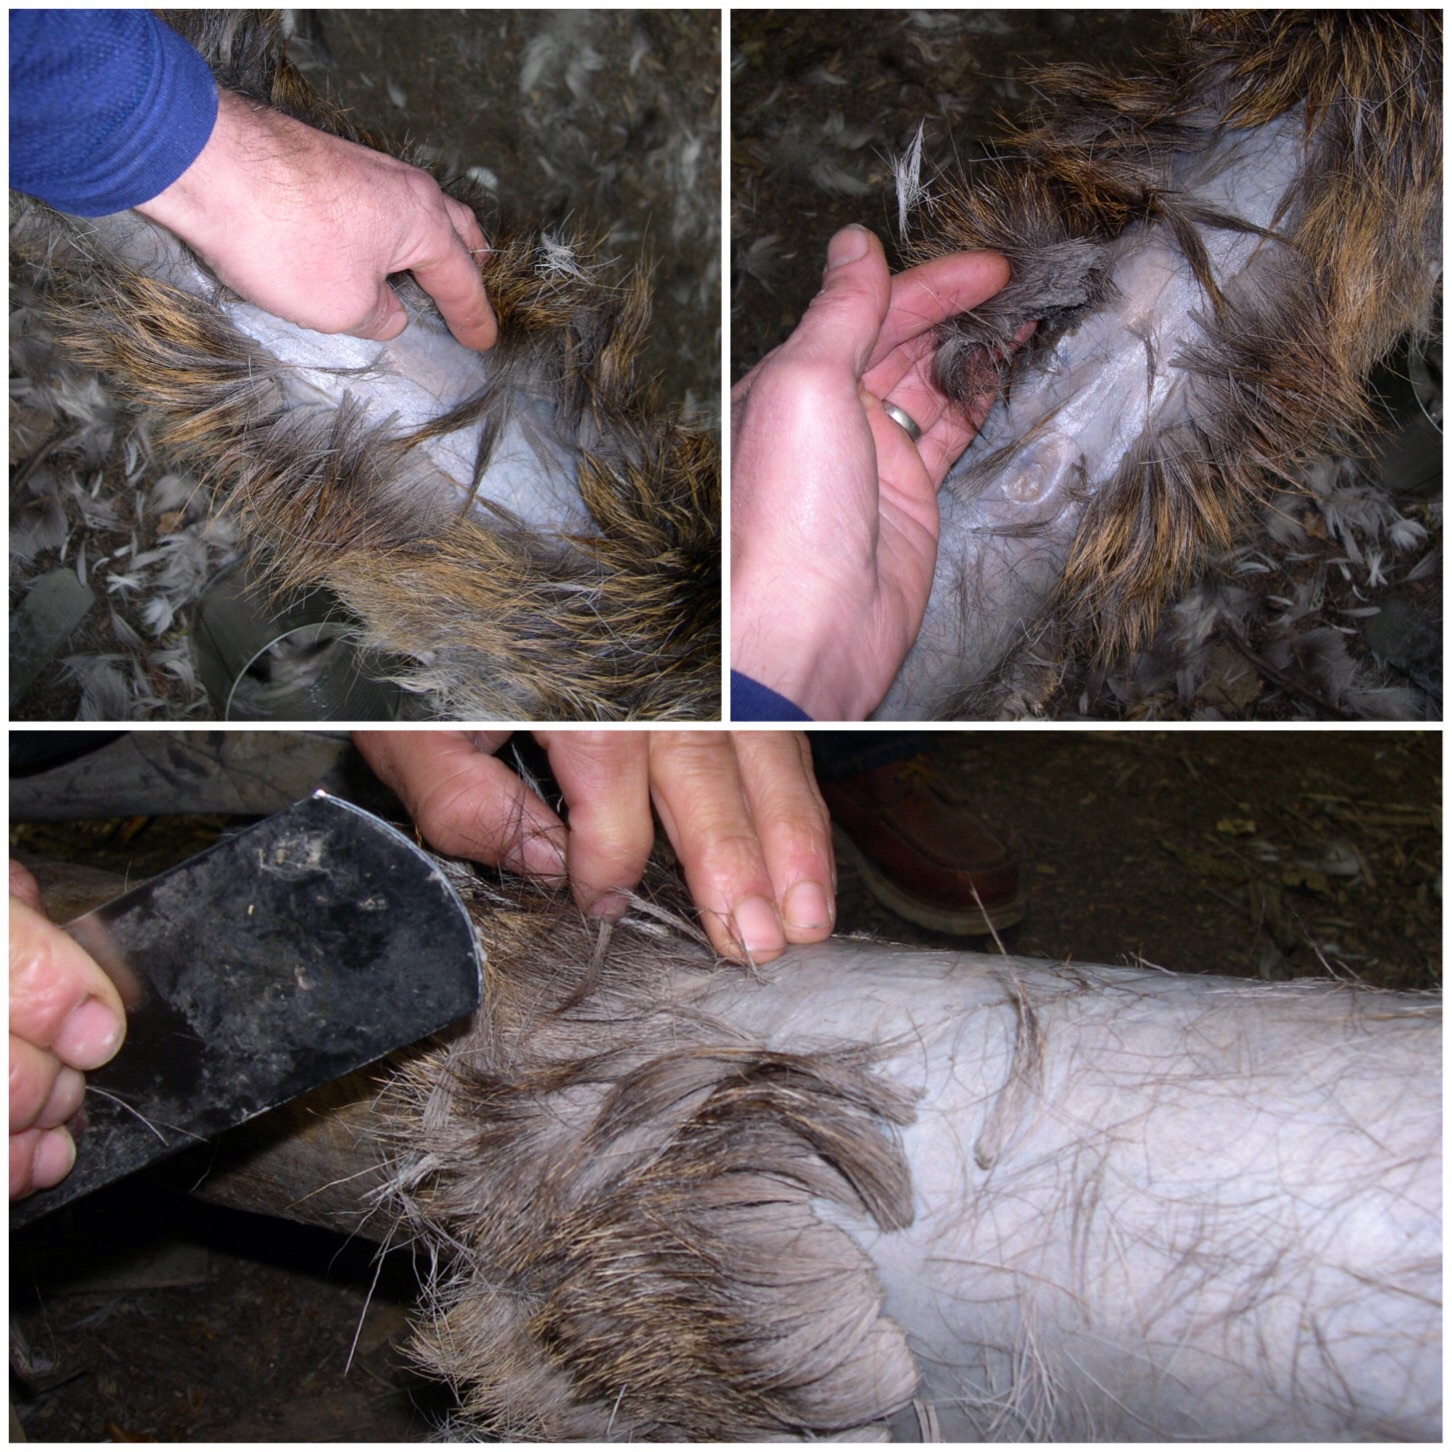
Once the loose hair came off (very easily) I started to use a scraper on the other hair. This did not come off easily at all so I used metal and flint scrapers on it. It took me several hours to remove the rest of the hairs from the healthy part of the hide.

Dry Scraping
While we were working on our hides John Rhyder had set up a dry scraping rack for another student to use.
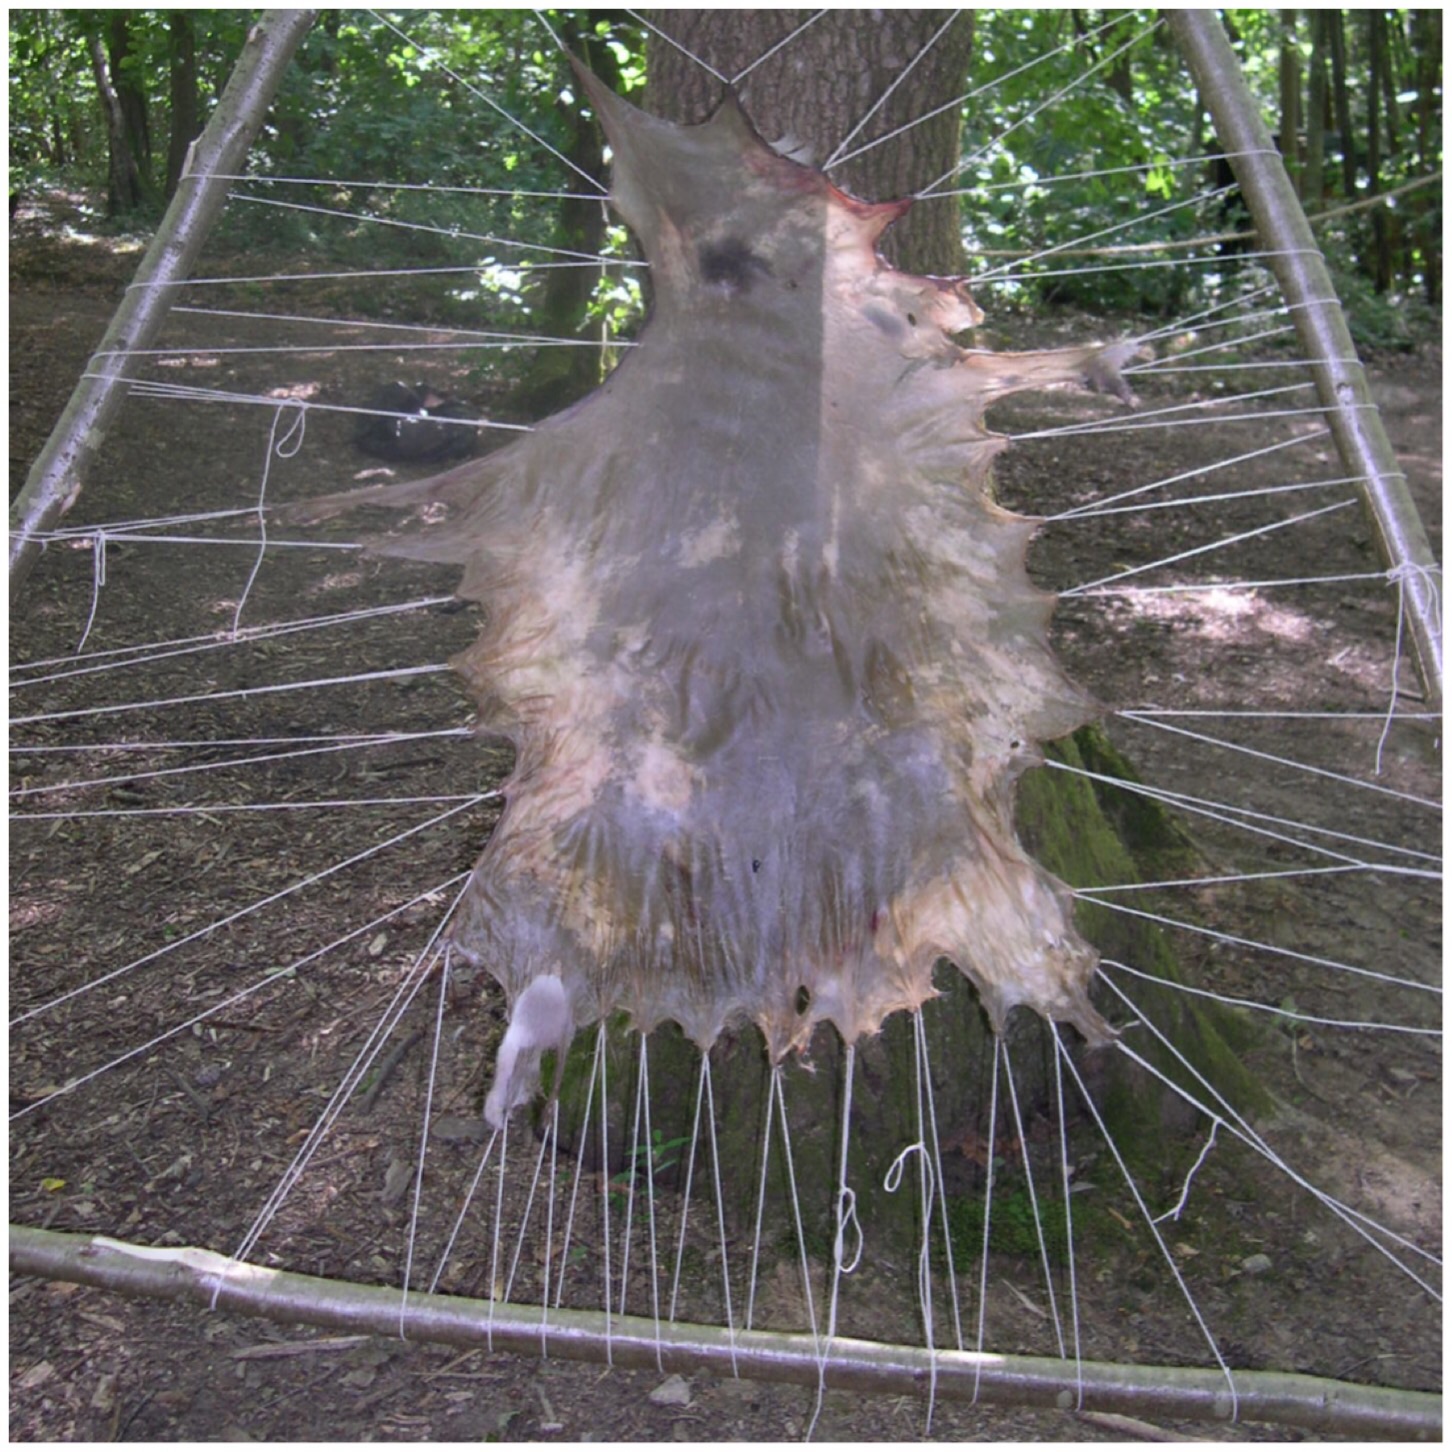
Once the hide is stretched out fully it is then left to dry and it is then scraped of all the excess muscle, fat and the grain layer.
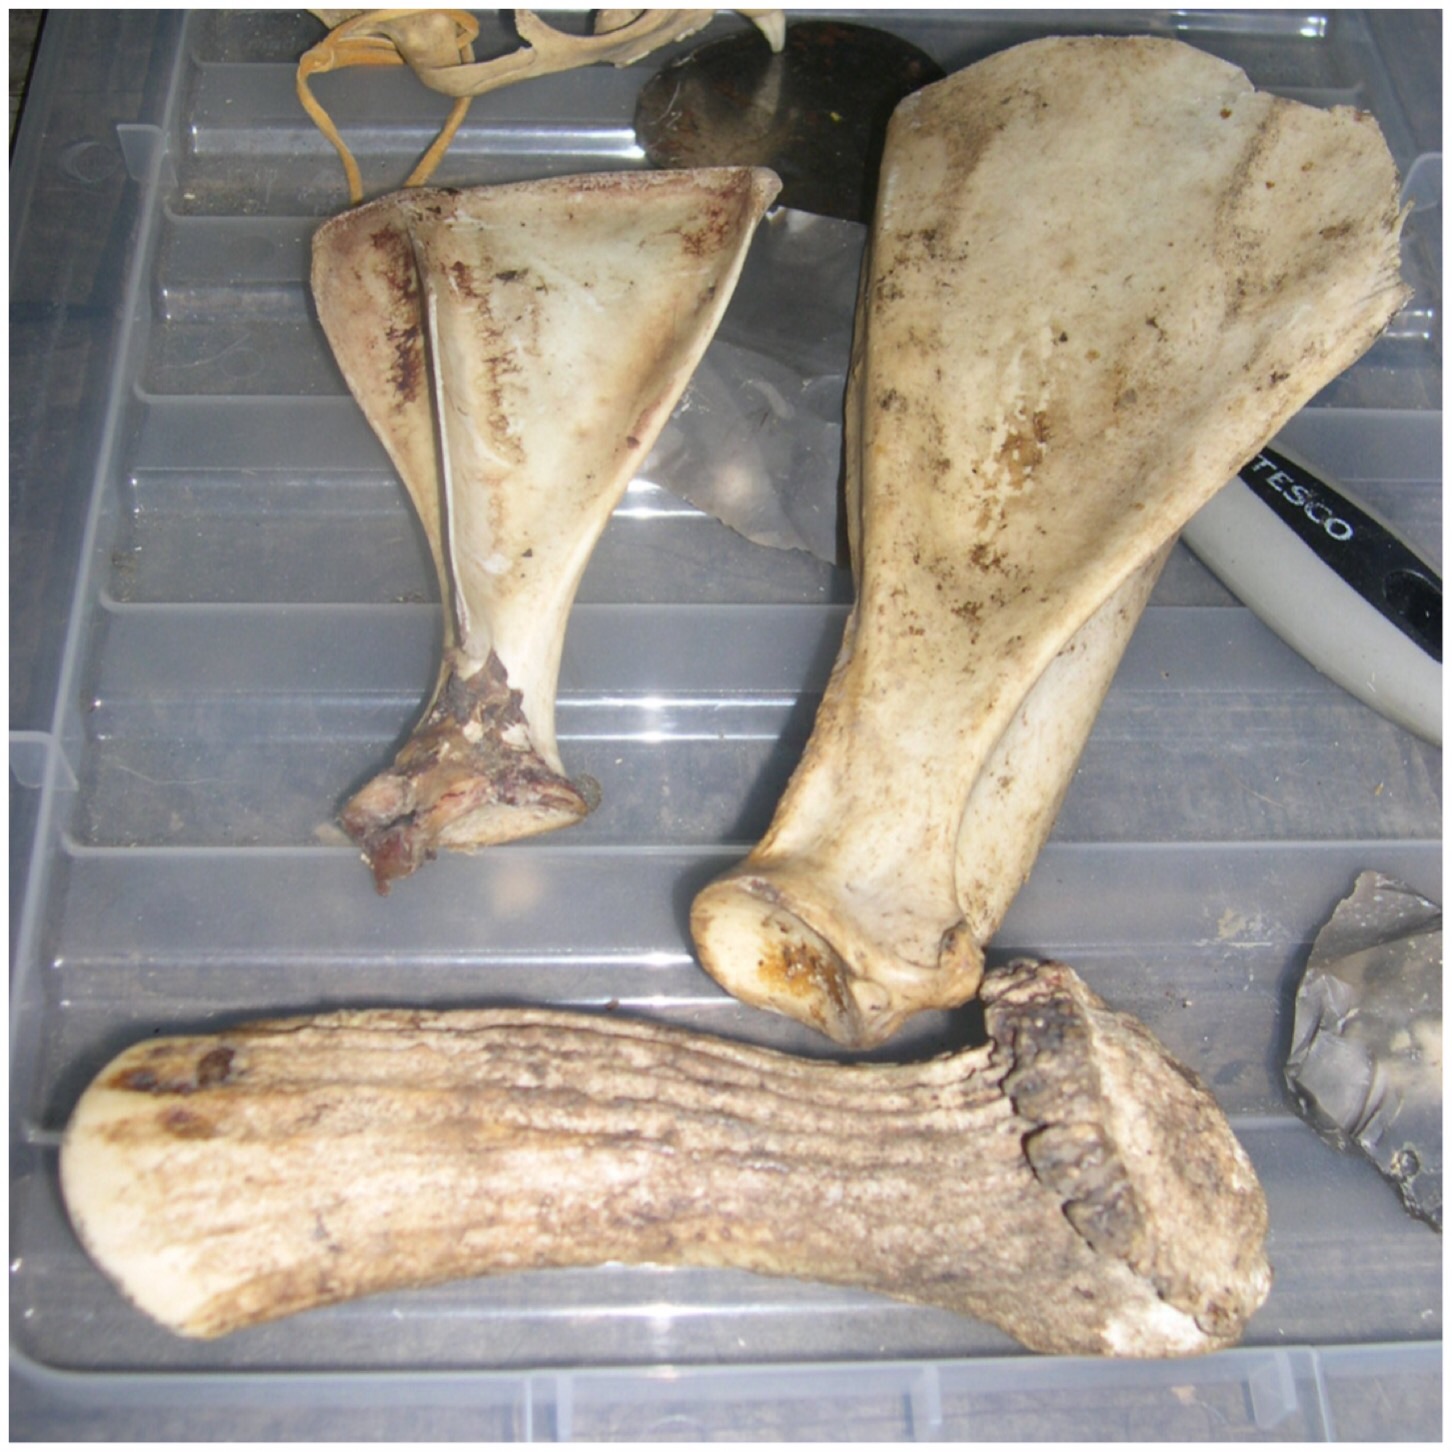
As well as the metal and flint scrapers, the shoulder blades of the deer also make excellent scraping tools.
During a break Steve showed us how to dry scrape an old fox hide. The hair and grain layer came off for him very easily, unlike the hide I was working on.
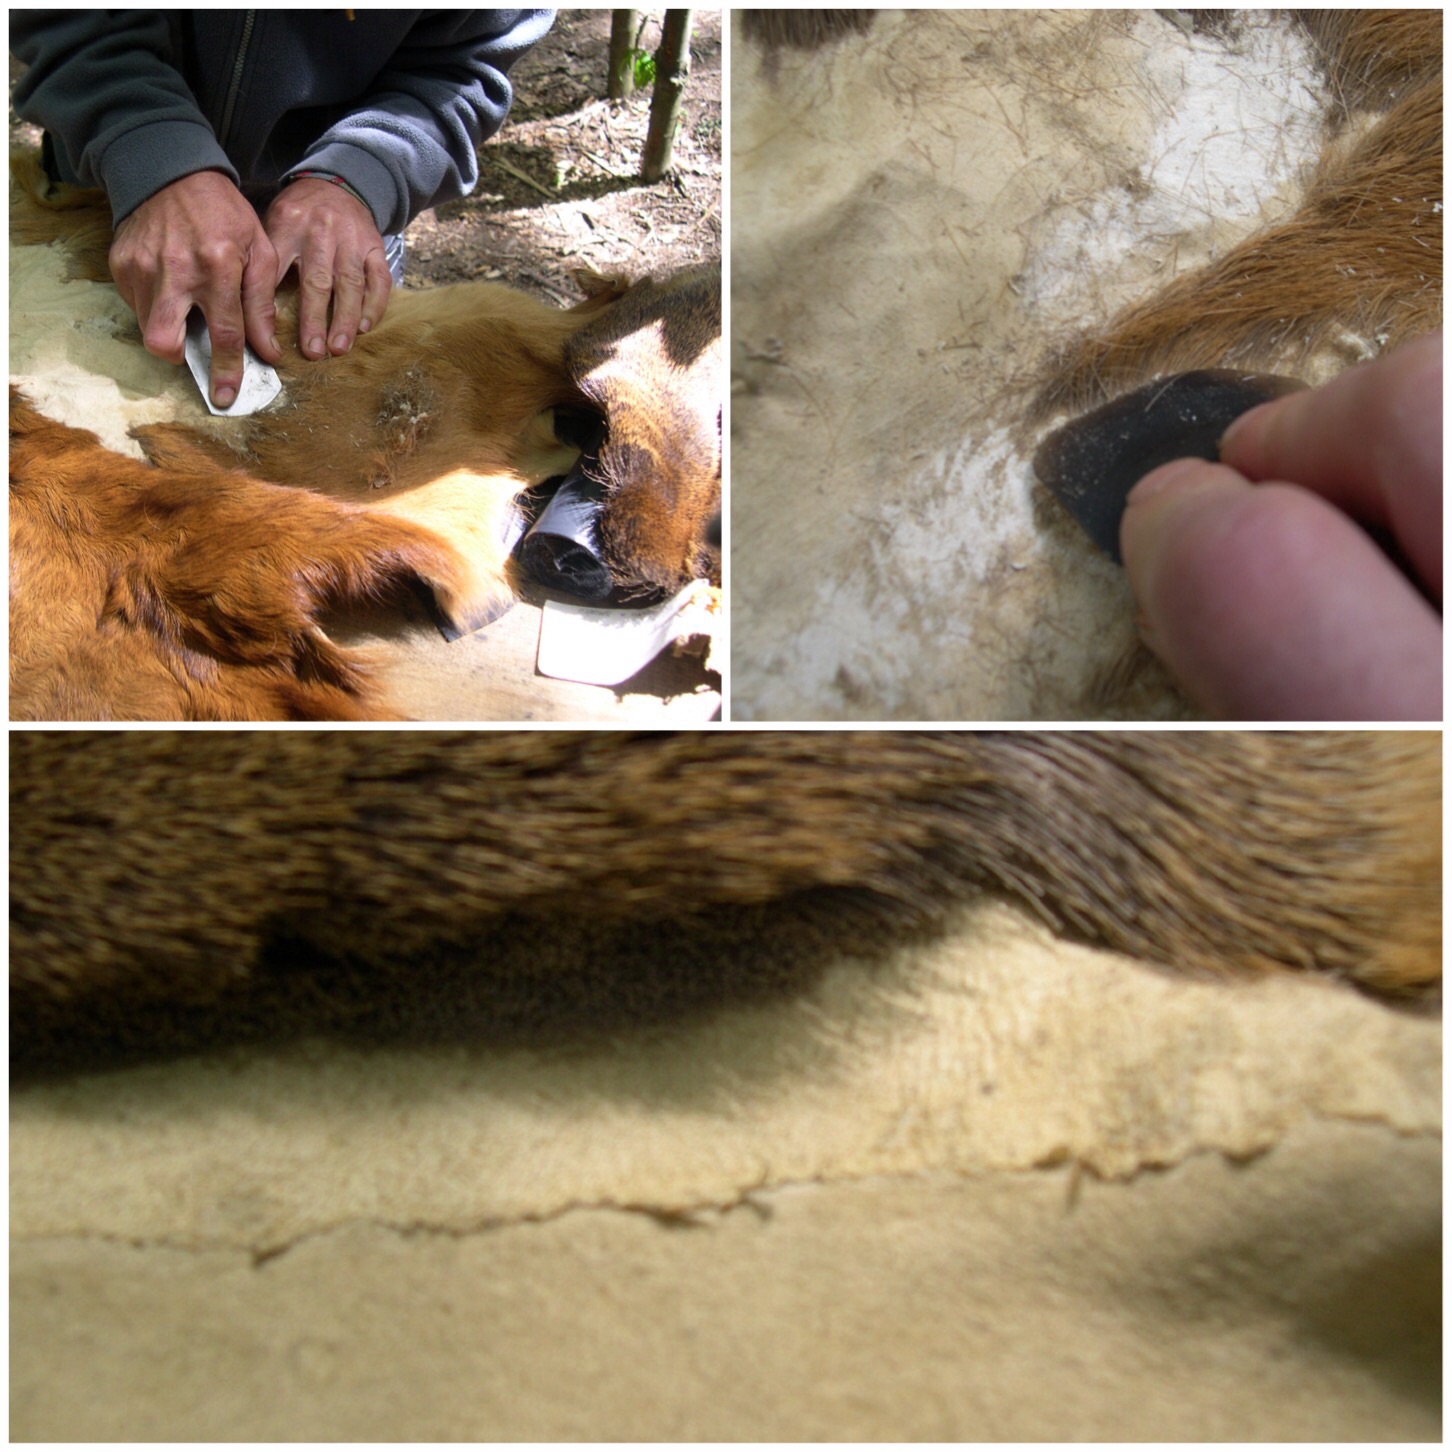
If you do not remove the grain layer the oils from the brain or egg solution will not fully soak in and the buckskin will not become truly soft.
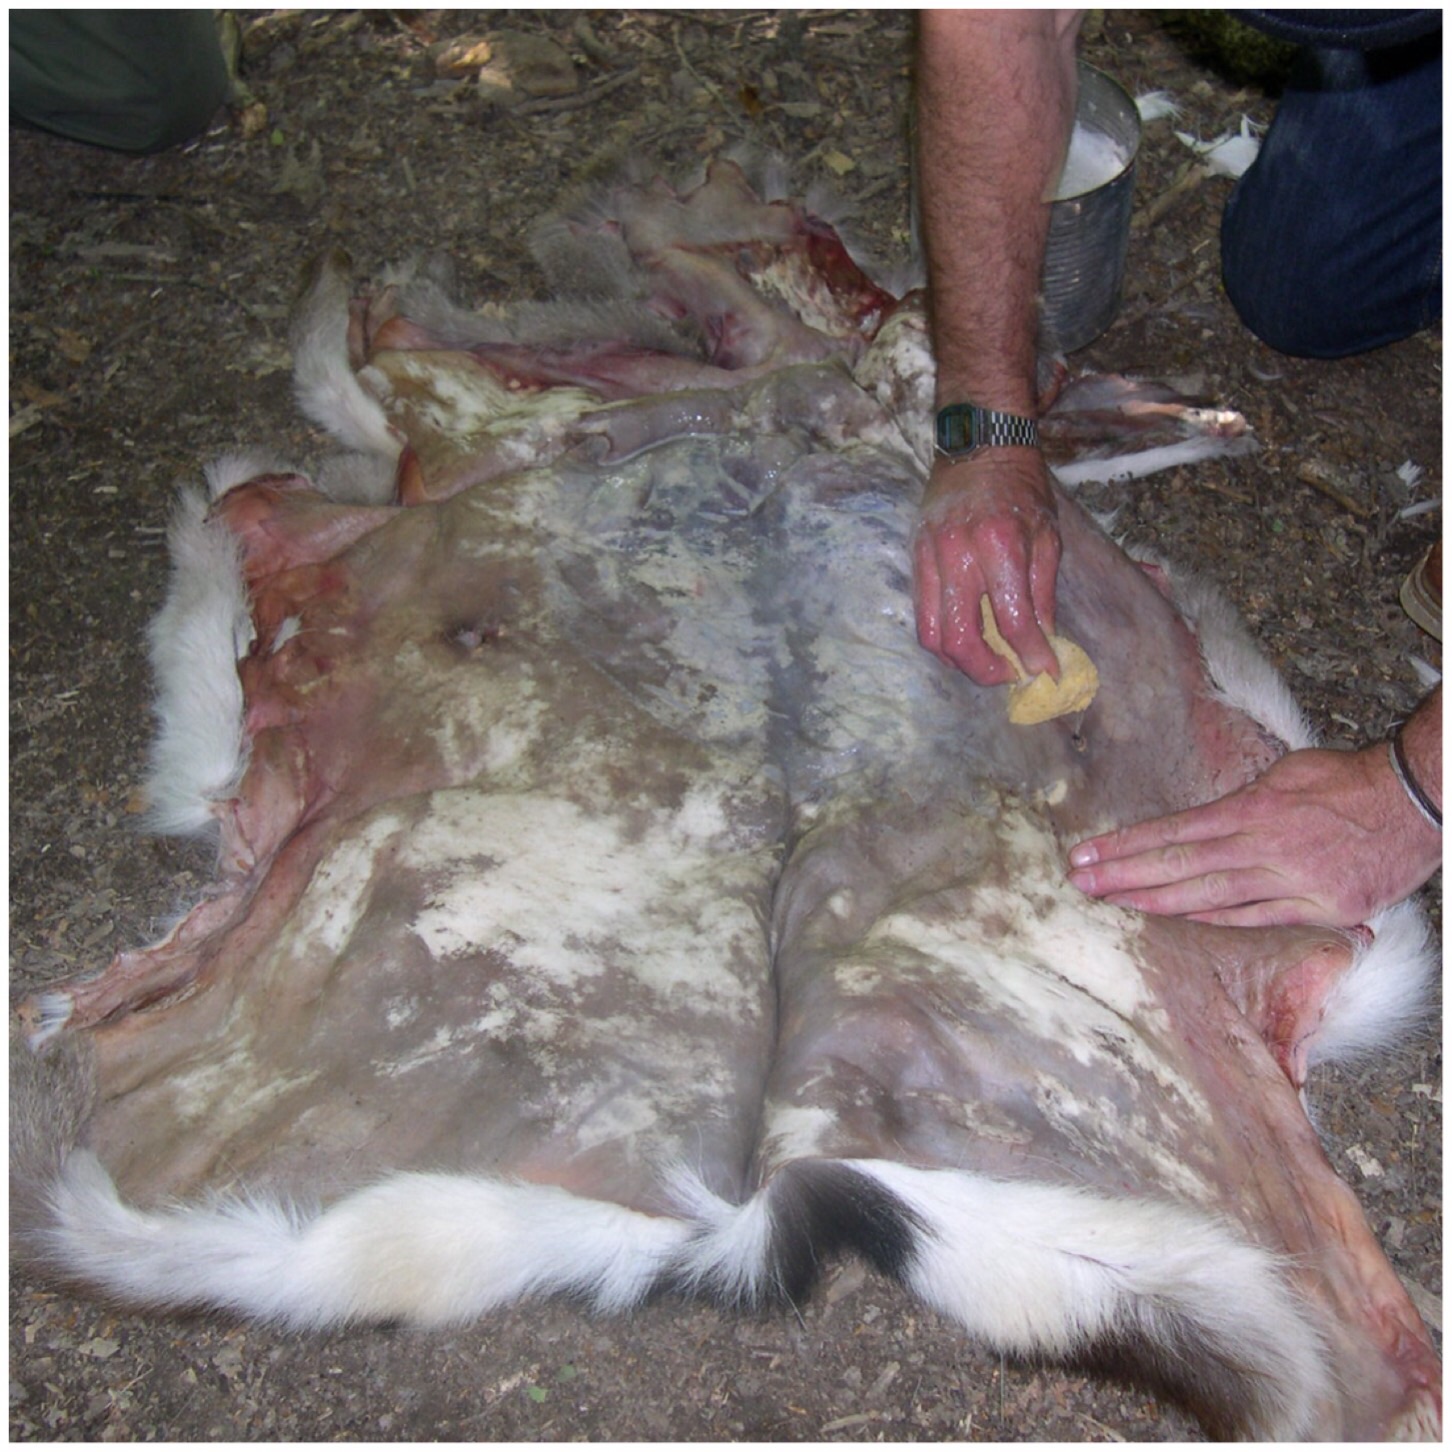
Tanning – eggs
We made up one pot of egg solution. For a fallow deer about 12 eggs are required per hide, well mixed with water in a ratio of about 4 parts water to 1 part egg.
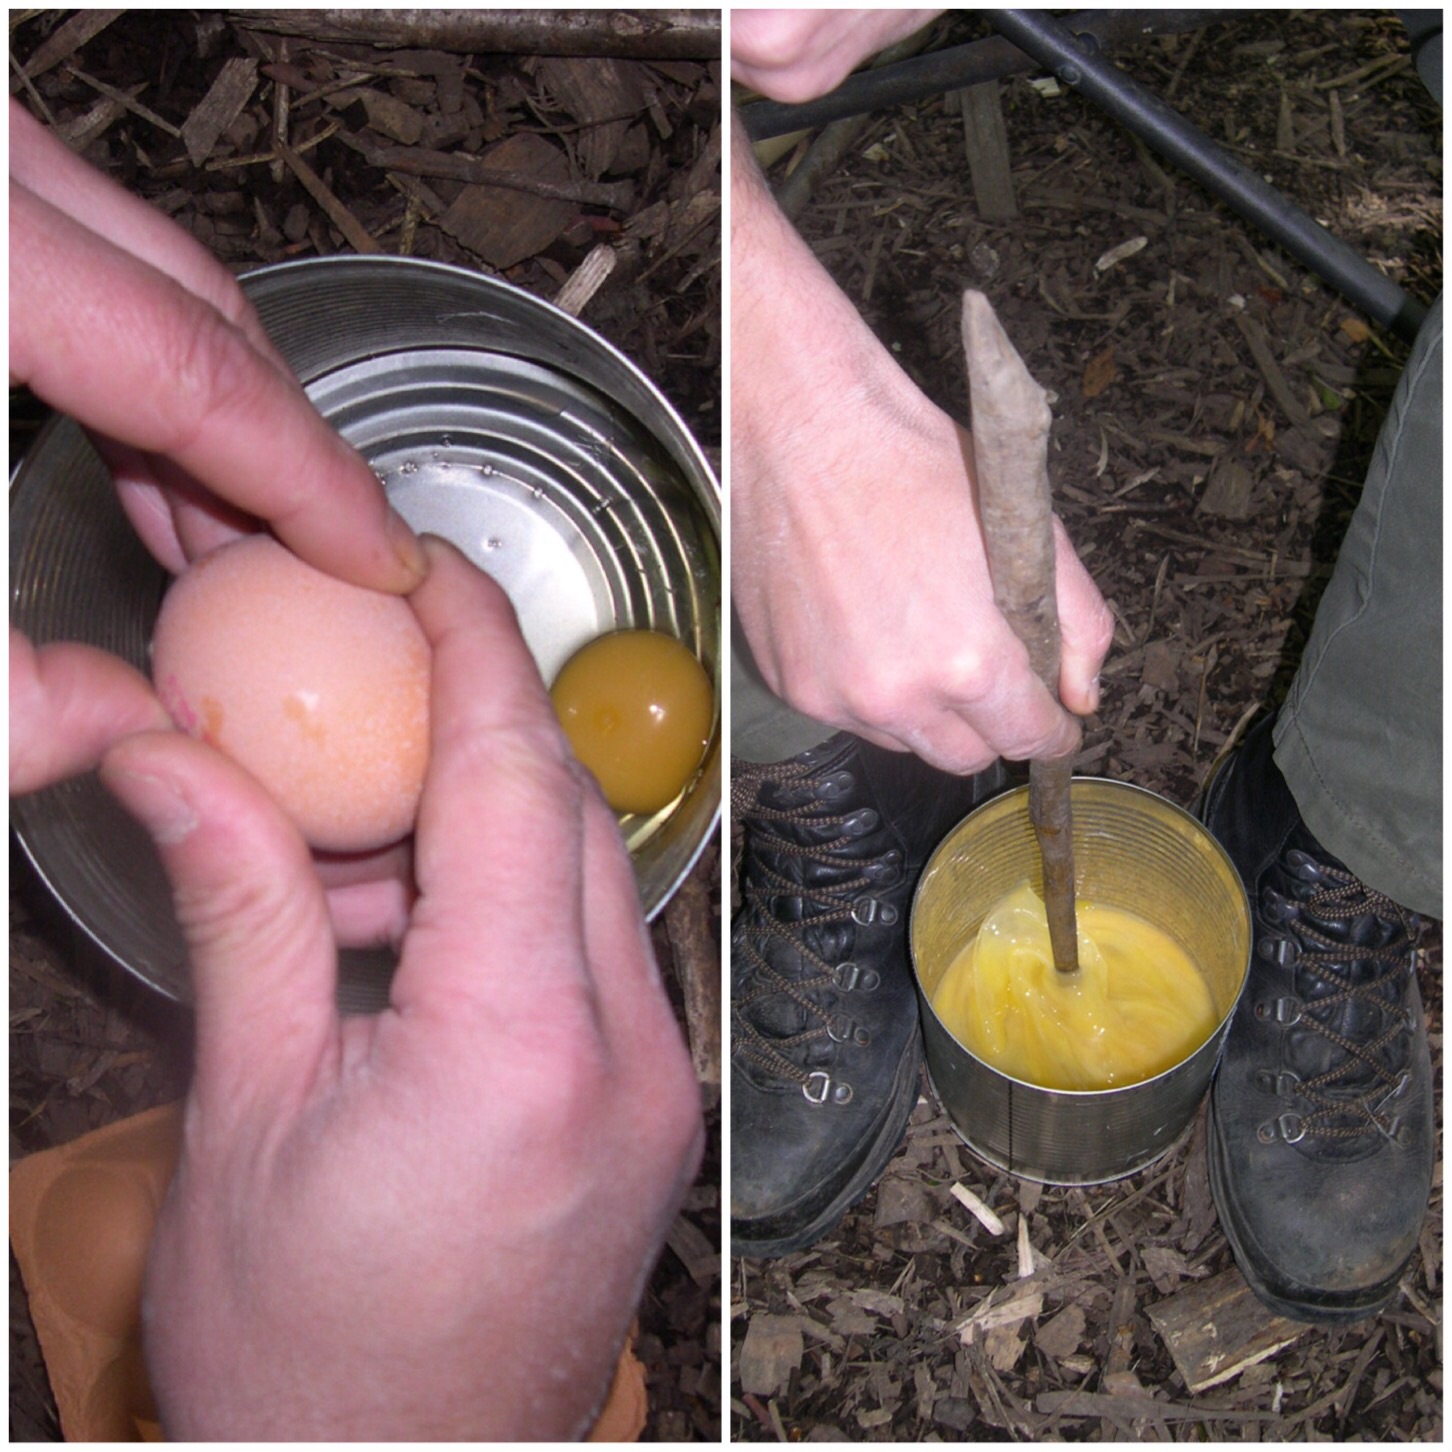
With a hide where the hairs are kept on it is best to apply the solution with a sponge or cloth until it soaks in.
Tanning – brains
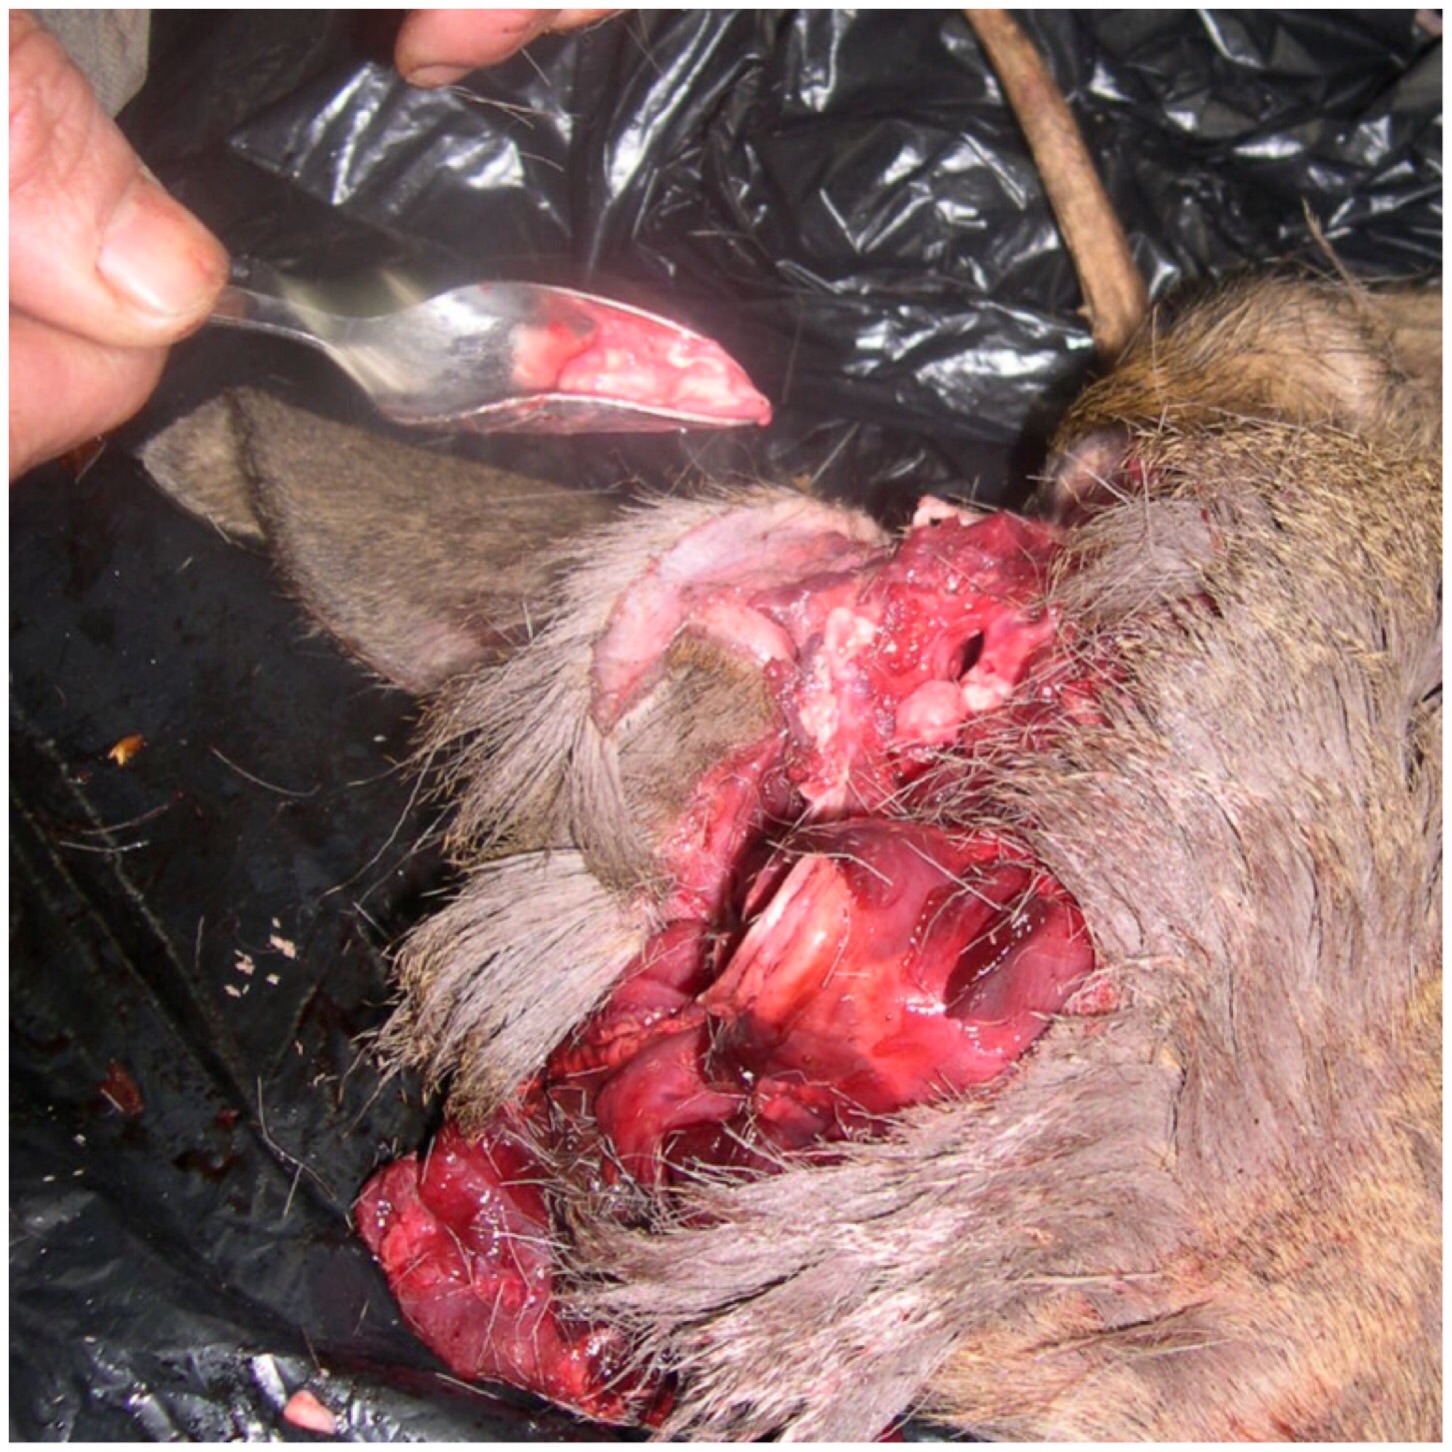
Steve showed us how to take the brains out of a deer. The first method started with a vertical slit down the hide over the forehead. With the skull exposed a heavy knife could pierce the skull, allowing the brains to be scooped out.
The other method is to go through the area of the skull where the spinal column attaches to the skull. Again, a heavy knife is needed to hack away at the bone to open a hole big enough to get a small spoon into it.
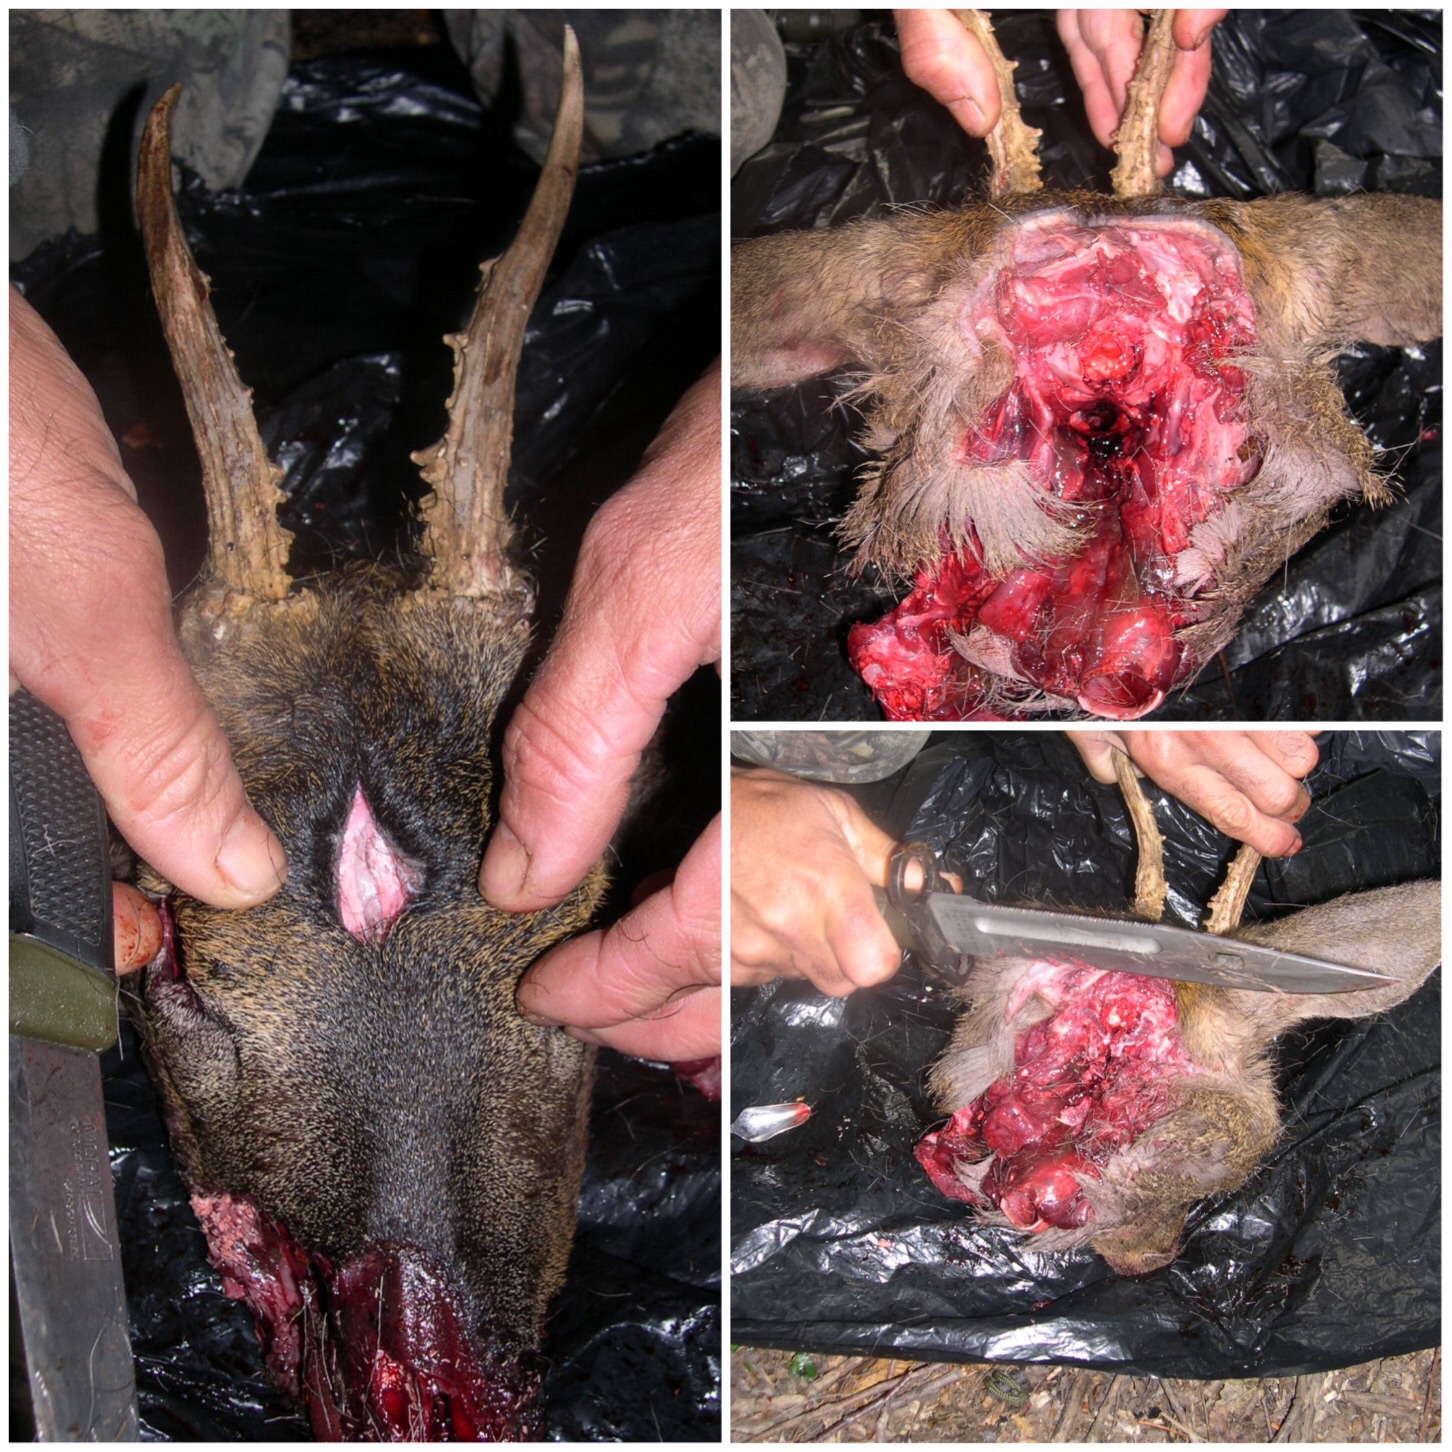
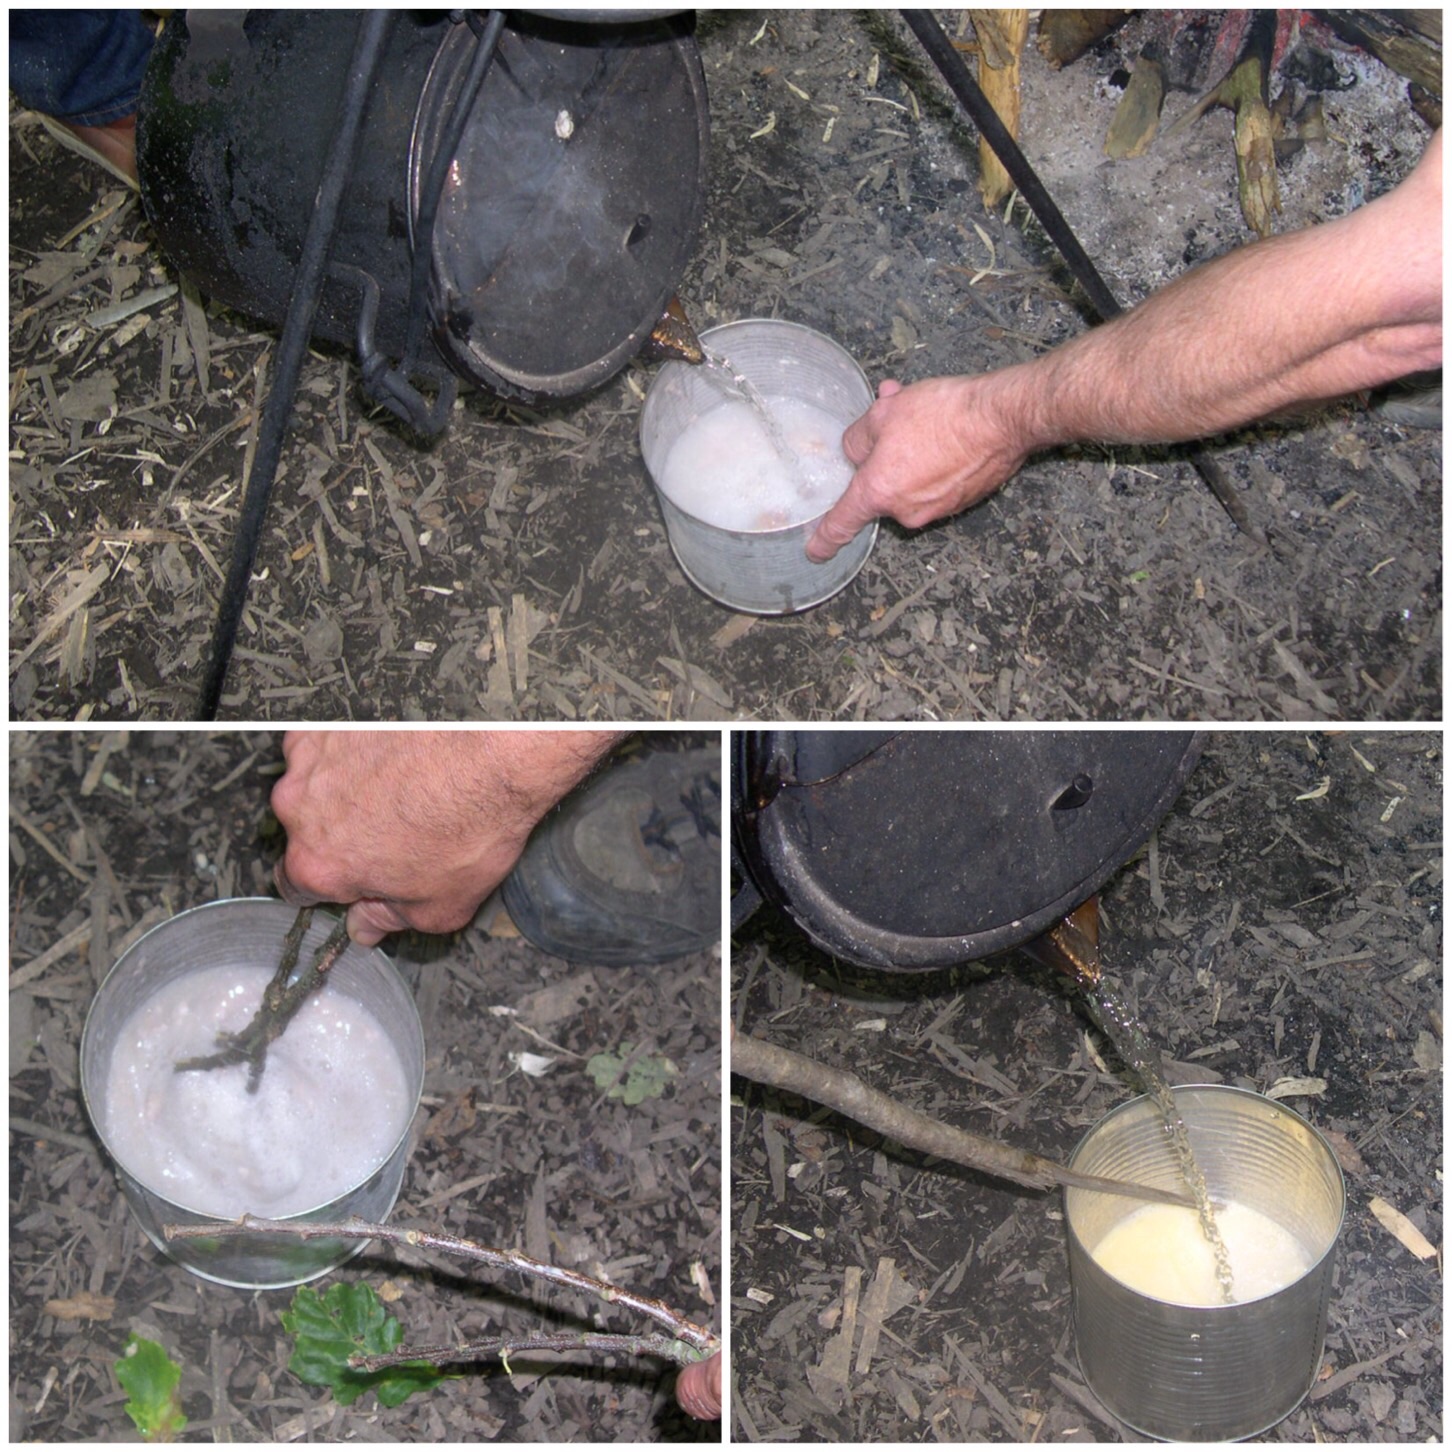
Steve used an old knickerbocker glory ice-cream spoon (it has a very long handle) for the job, with the sides of the bowl bent upwards. To get all the brains out you need to mash the brains up with a spoon and scoop out as much as you can. Then add water to the brain casing and scoop or pour the last bits out.
Brains are mixed with water in the same ratio as the eggs. It is generally agreed that an animal’s own brains will tan its own hide but in terms of weight, for the average hide you need about half a pound of brains.
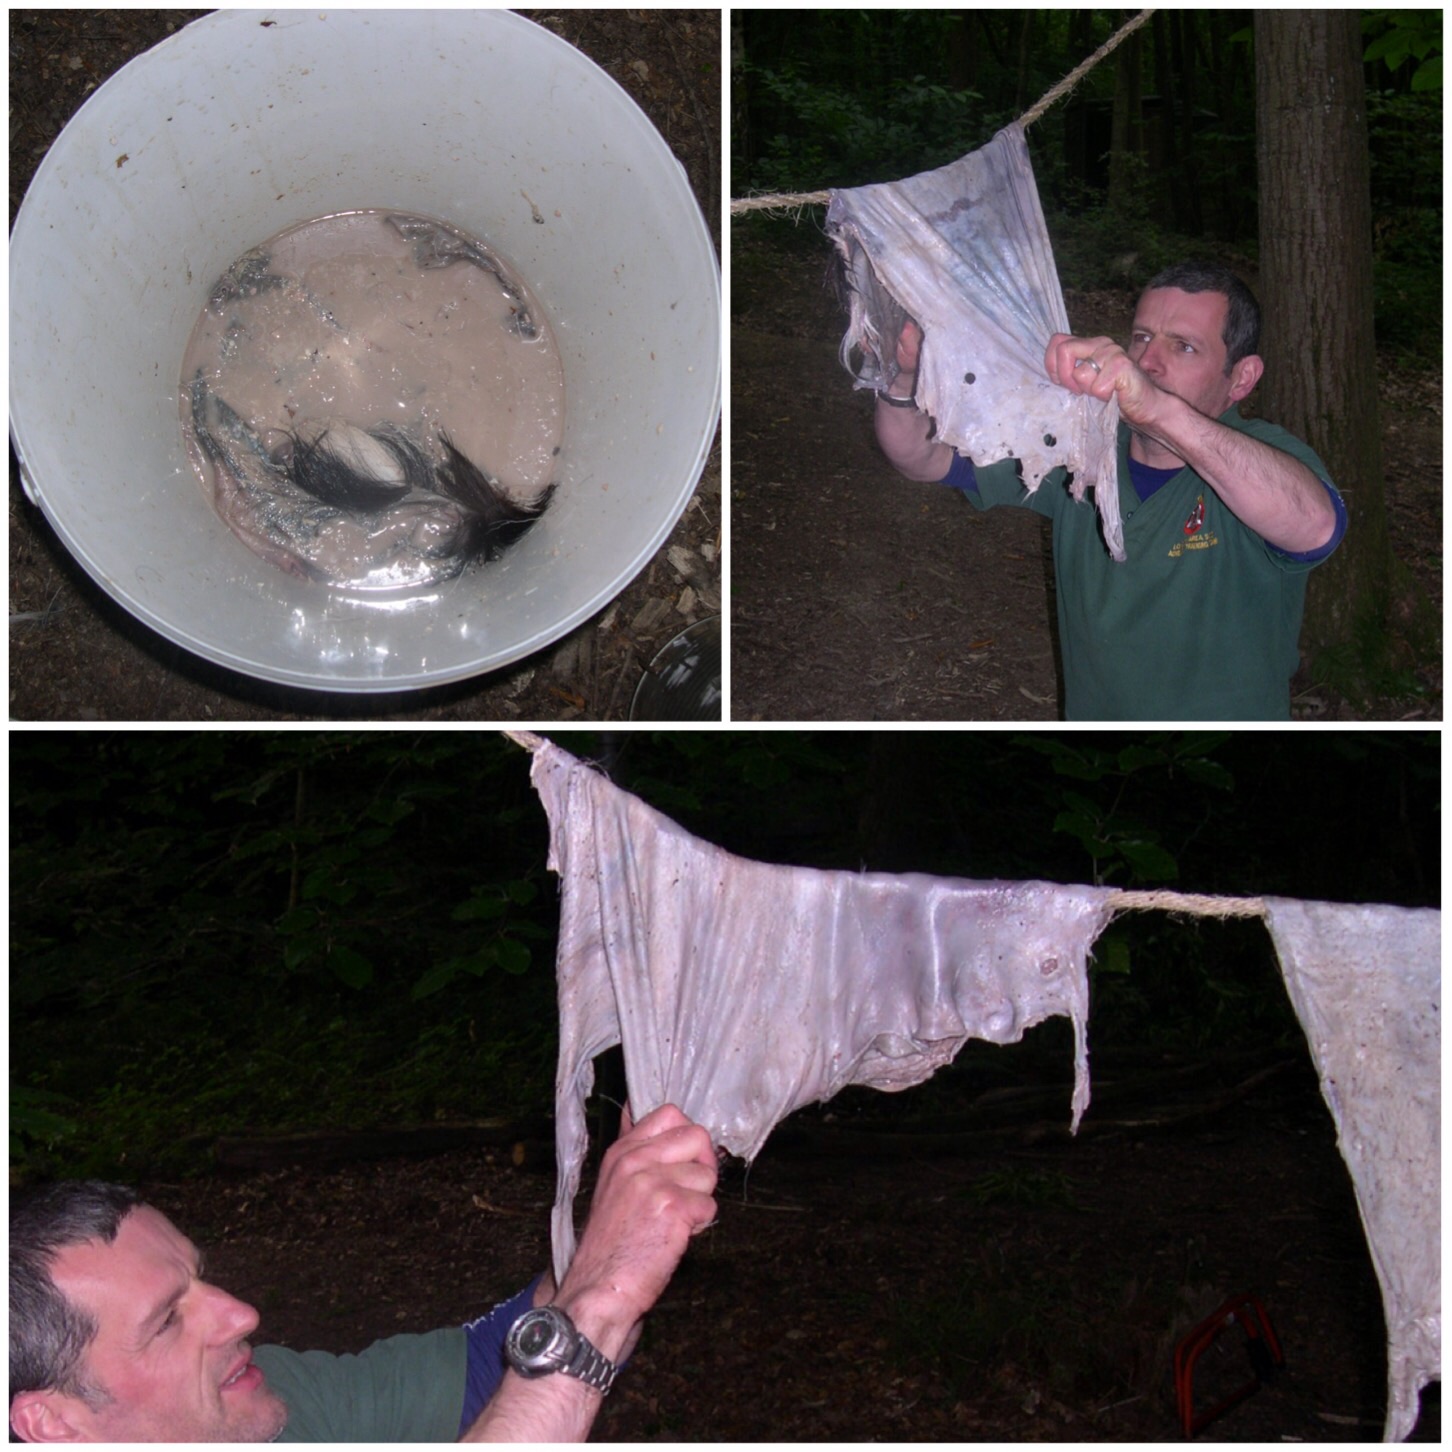
The brains we were using were supplied by Steve and they had been double bagged and kept in a freezer until we used them. In the pot in the bottom right picture are two sets of brains. The darker one was thought to contain blood from a head wound. In total four sets of brains were used.
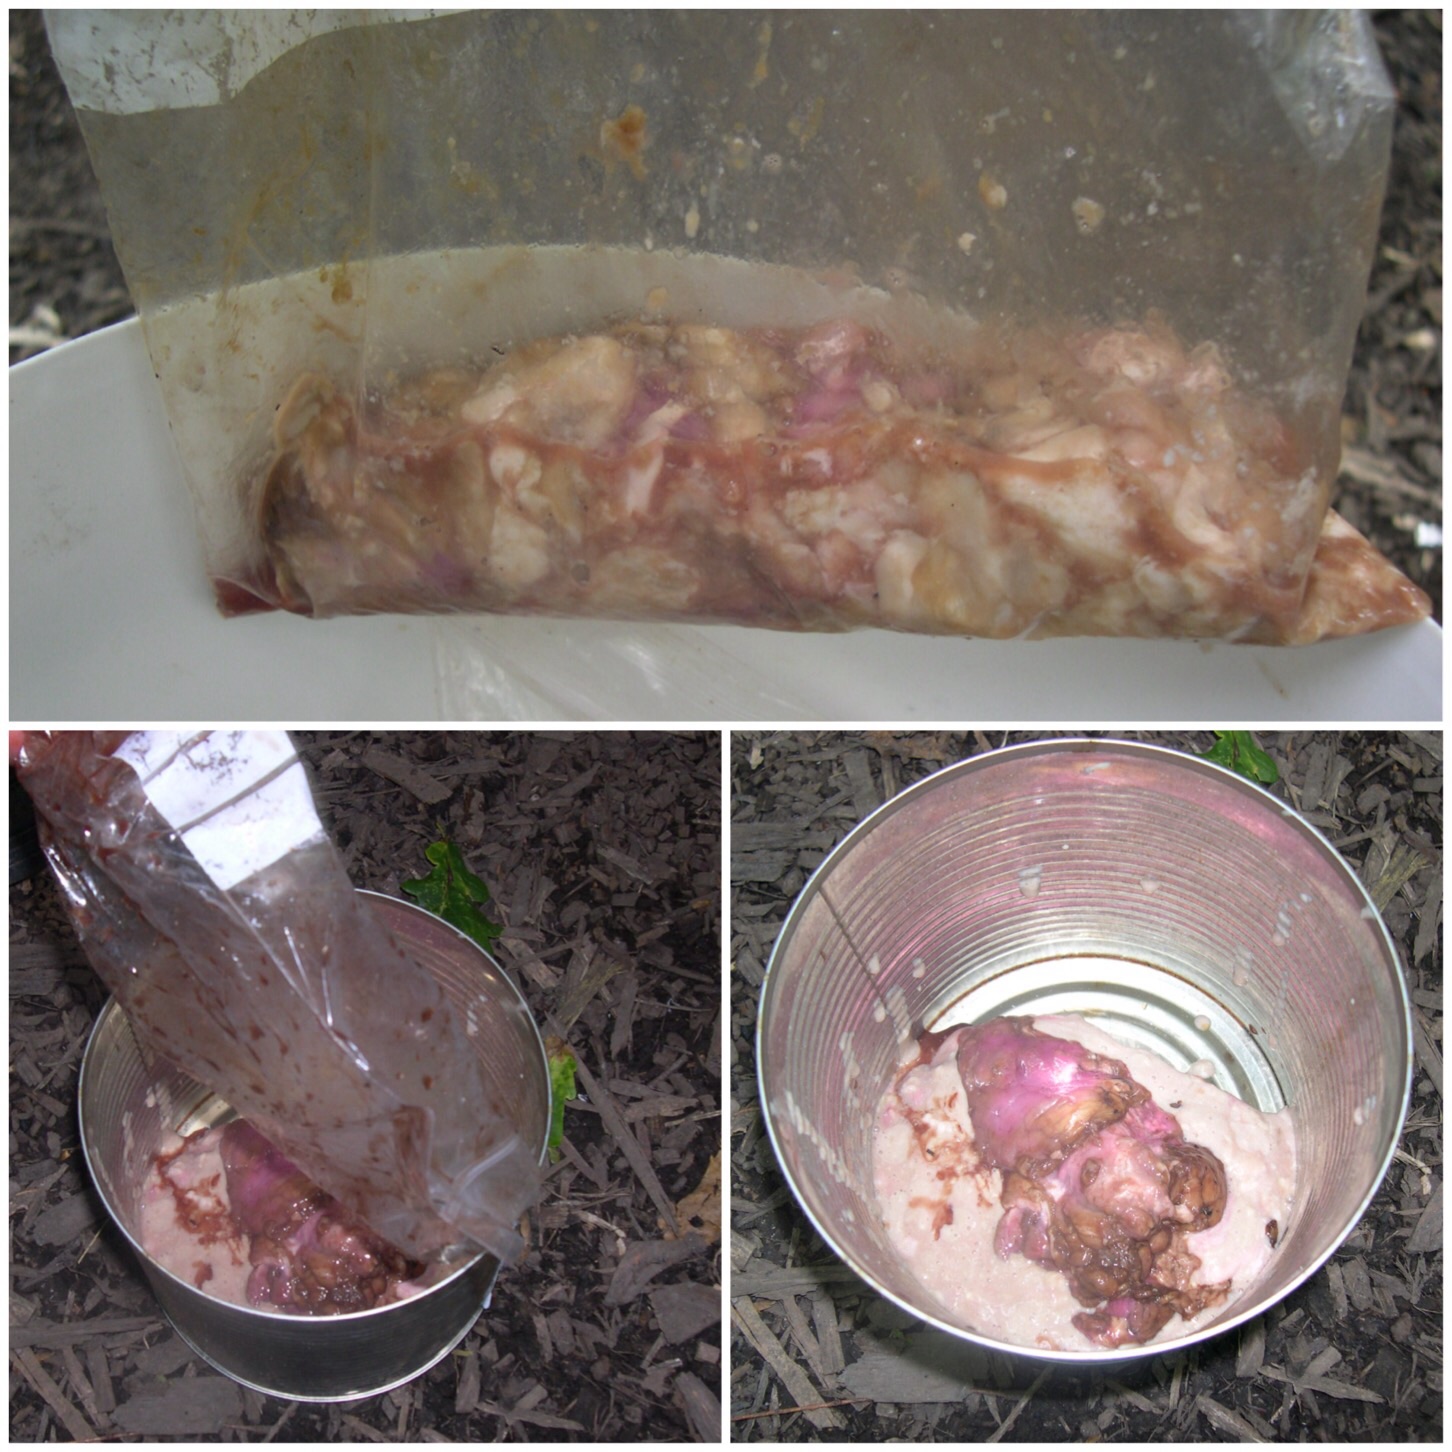
Warm water was added to the brains and mixed vigorously. It was topped up again and re-whisked.
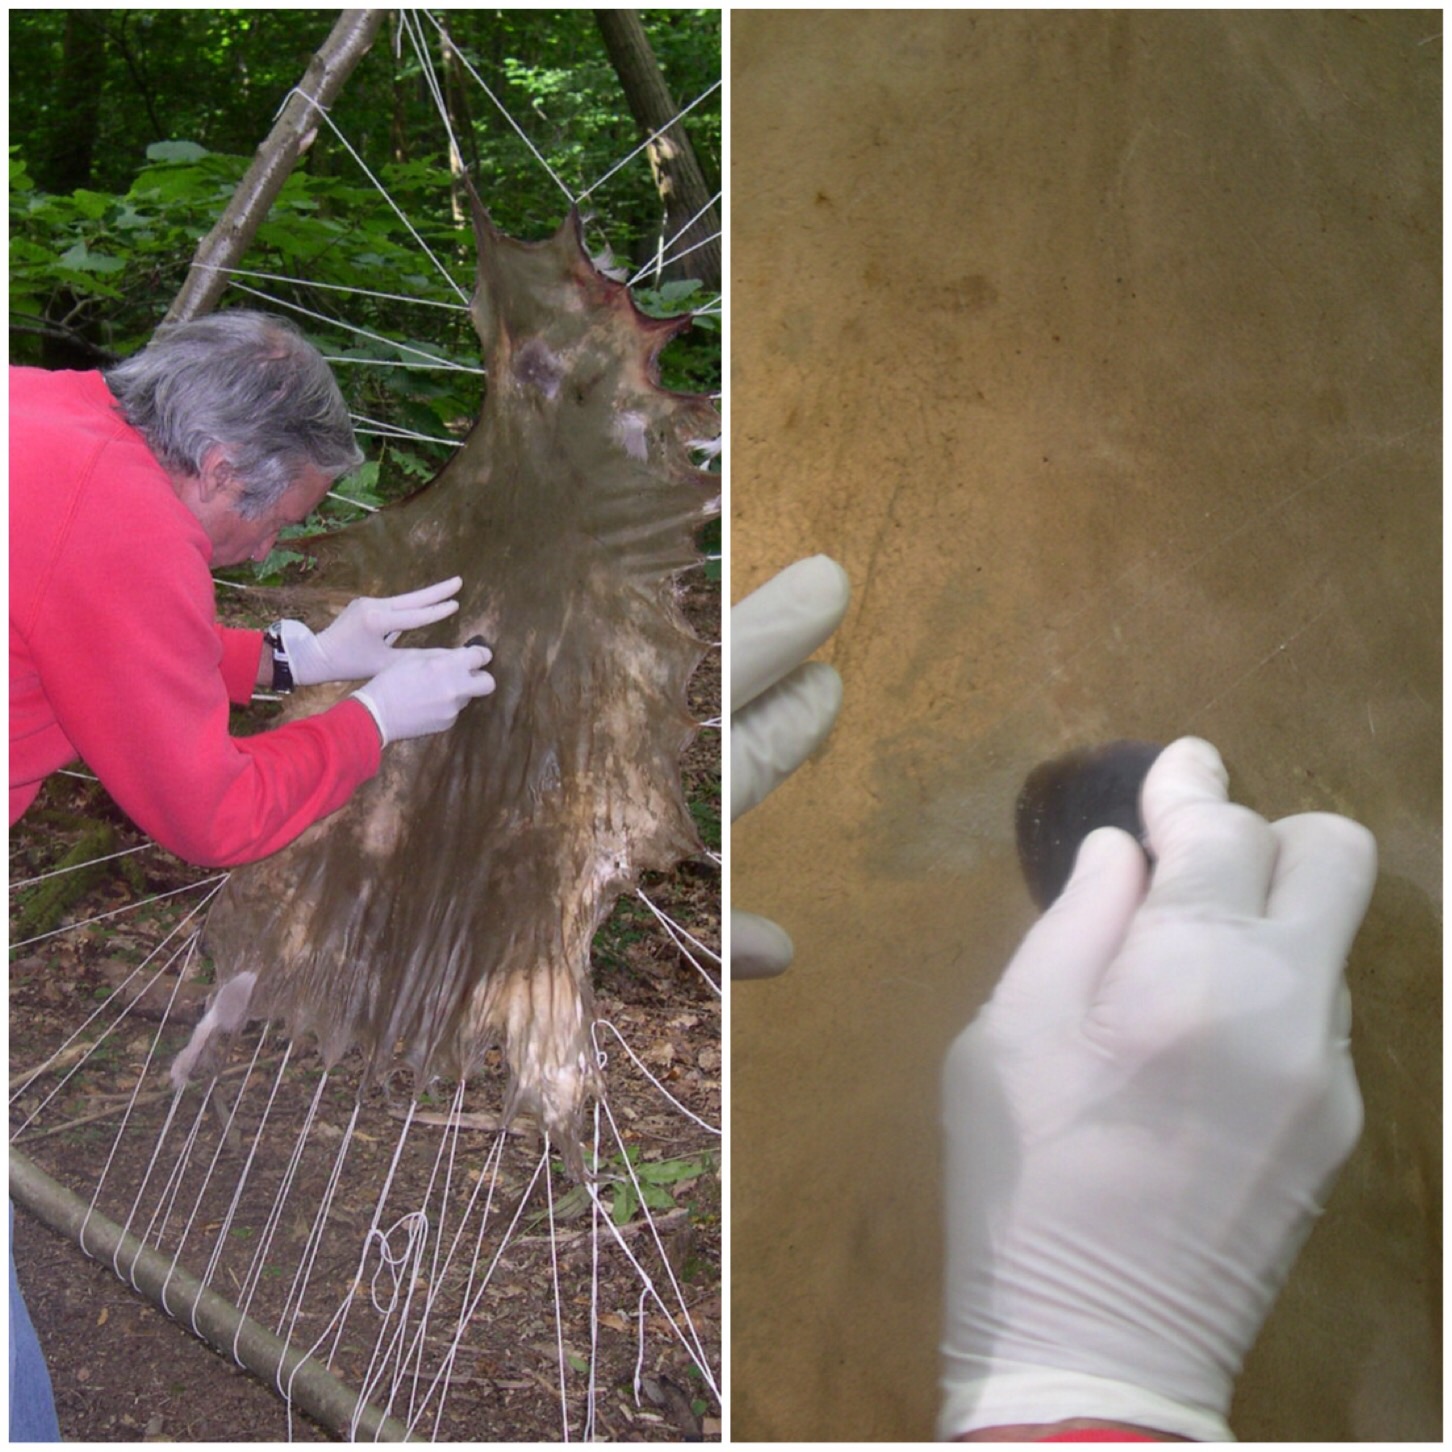
Soaking & Stretching
My hide had gone rock solid so I soaked it in a stream to soften it.
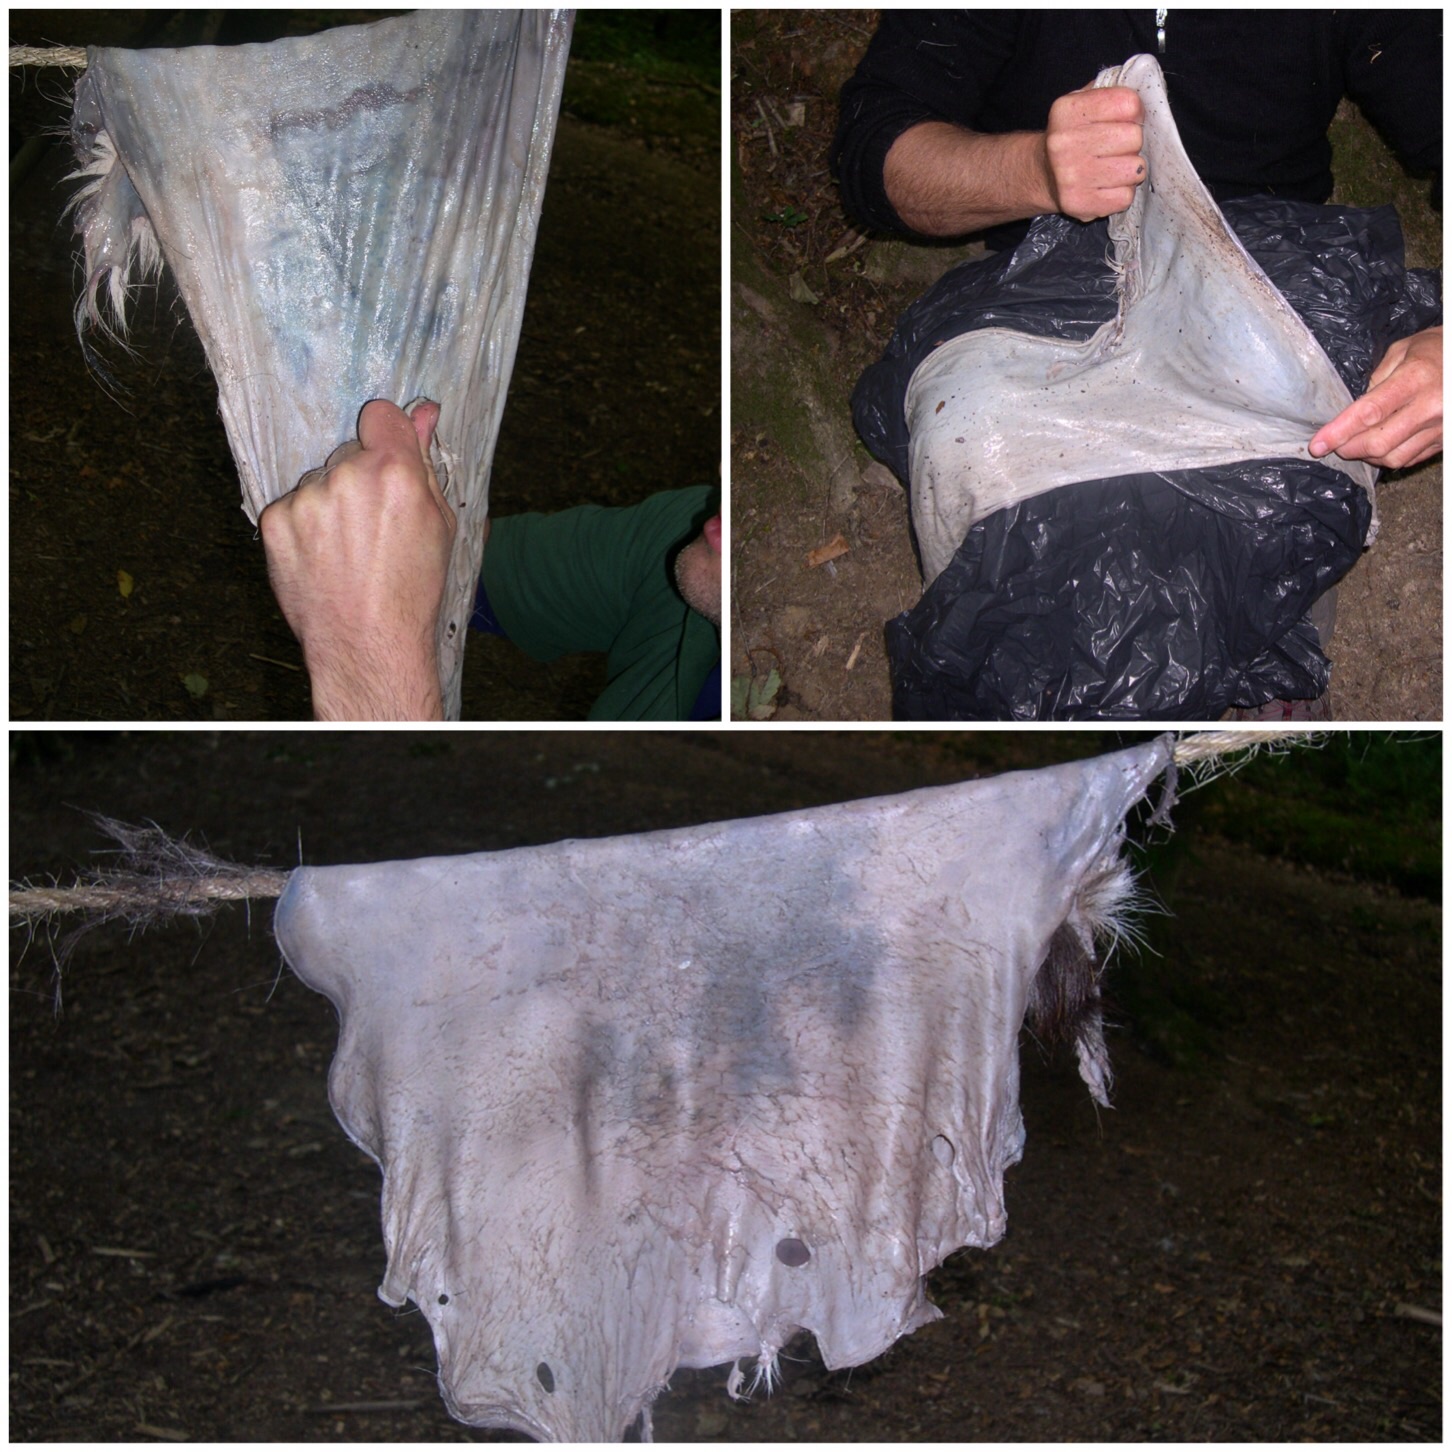
After wringing it out I popped it into the brain mixture for 10 minutes. Then began the stretching. I rigged a line up to help with this and I had to use my whole body weight to stretch the hide (it was very thick).
This process went on for a number of hours. I also twisted the hide every now and then while it was attached to the line with a stick to further stretch it. I re-dipped the hide in the mixture every now and then went back to stretching. This repetition of stretching and re-dipping opens up the fibres and allows the oils in the mixture to attach themselves to the fibres to keep them supple.
I alternated the stretching from the line to over my knees. When we could, we even worked in pairs to stretch the hide out. This is quite a tiring process and really works your finger muscles.
The skins were left hanging overnight and we resumed stretching in the morning without adding any more mixture.
The plastic bag was used to keep the skin as clean as possible so it did not pick up dirt from my trousers.
Here Phil had decided to use a post. The post is rounded smooth at the top. This allowed him to exert great pressure and really stretch the hide without damaging it.

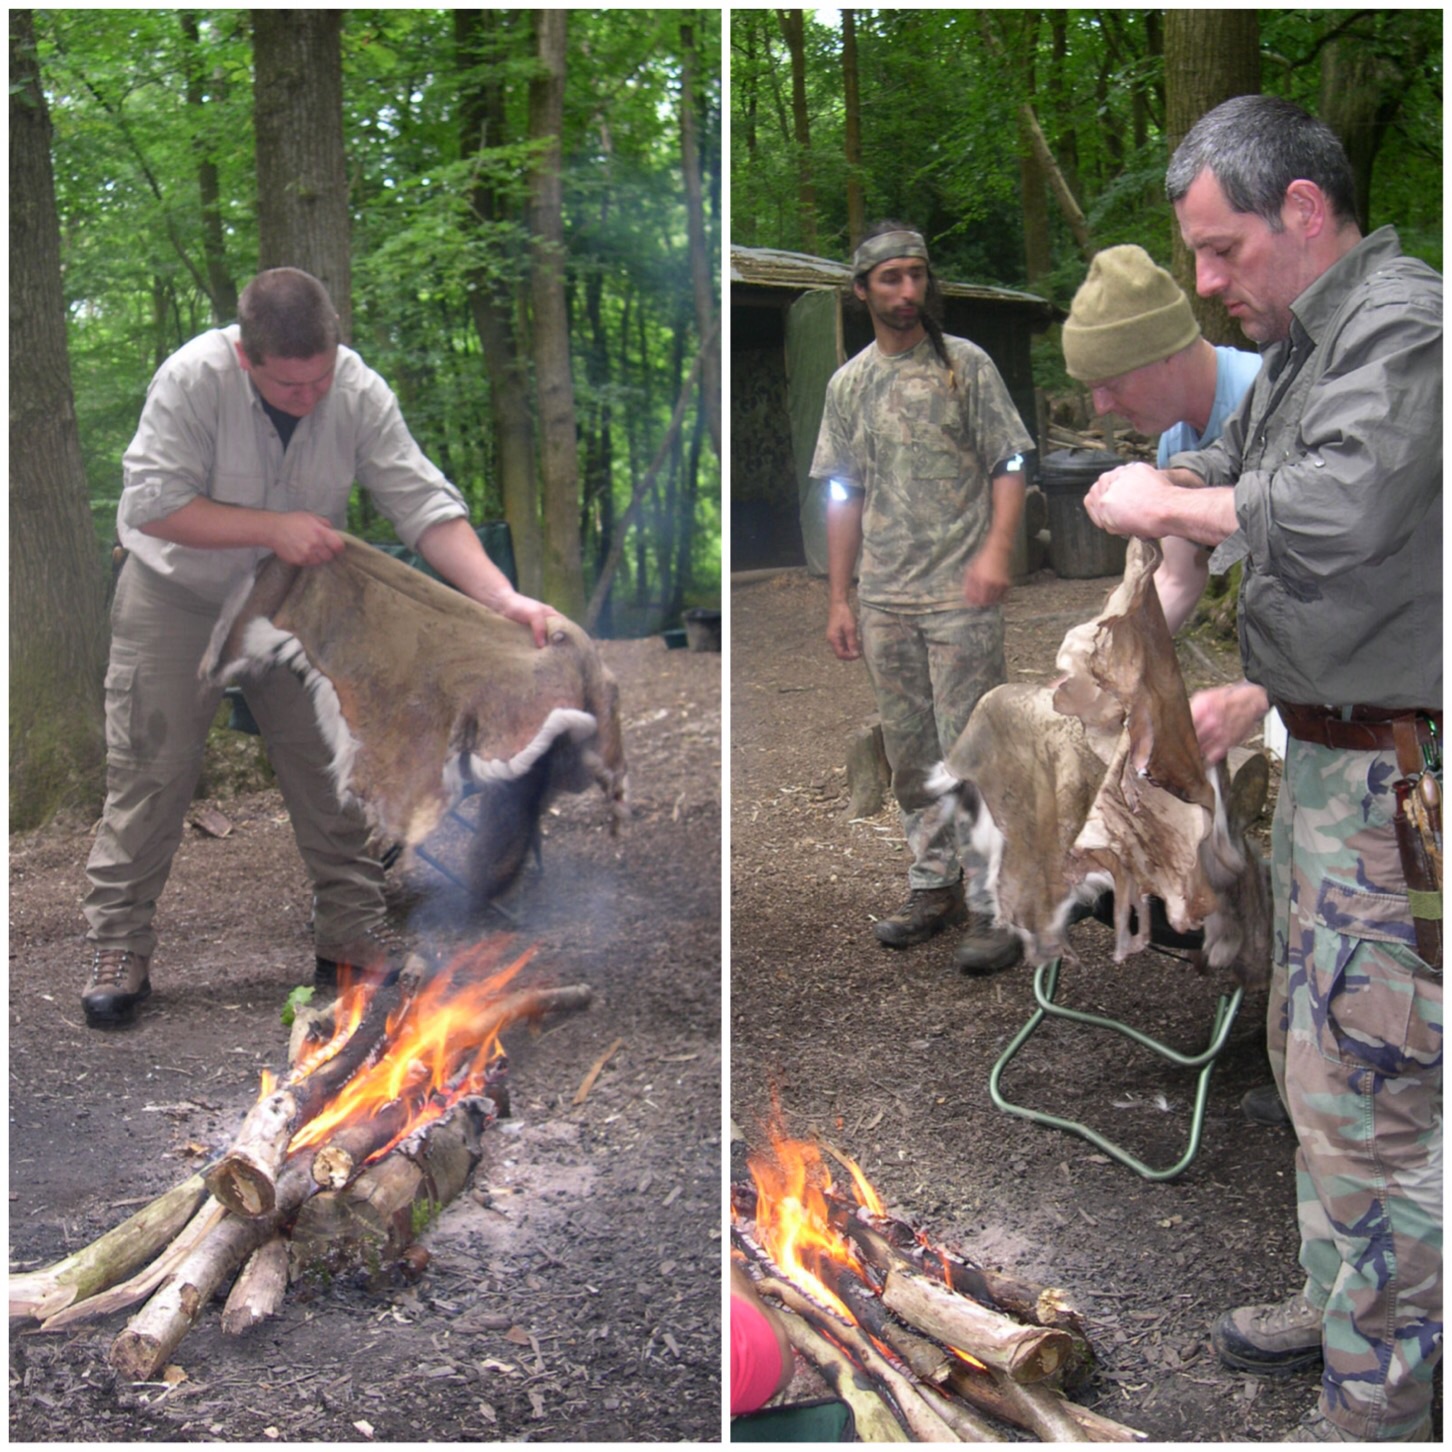
To speed up the drying process we carried on stretching the hides over the warmth of the fire. This is a crucial period as you need to keep stretching the skin until it is completely dry to keep the fibres separated and coated with the oils.
Smoking
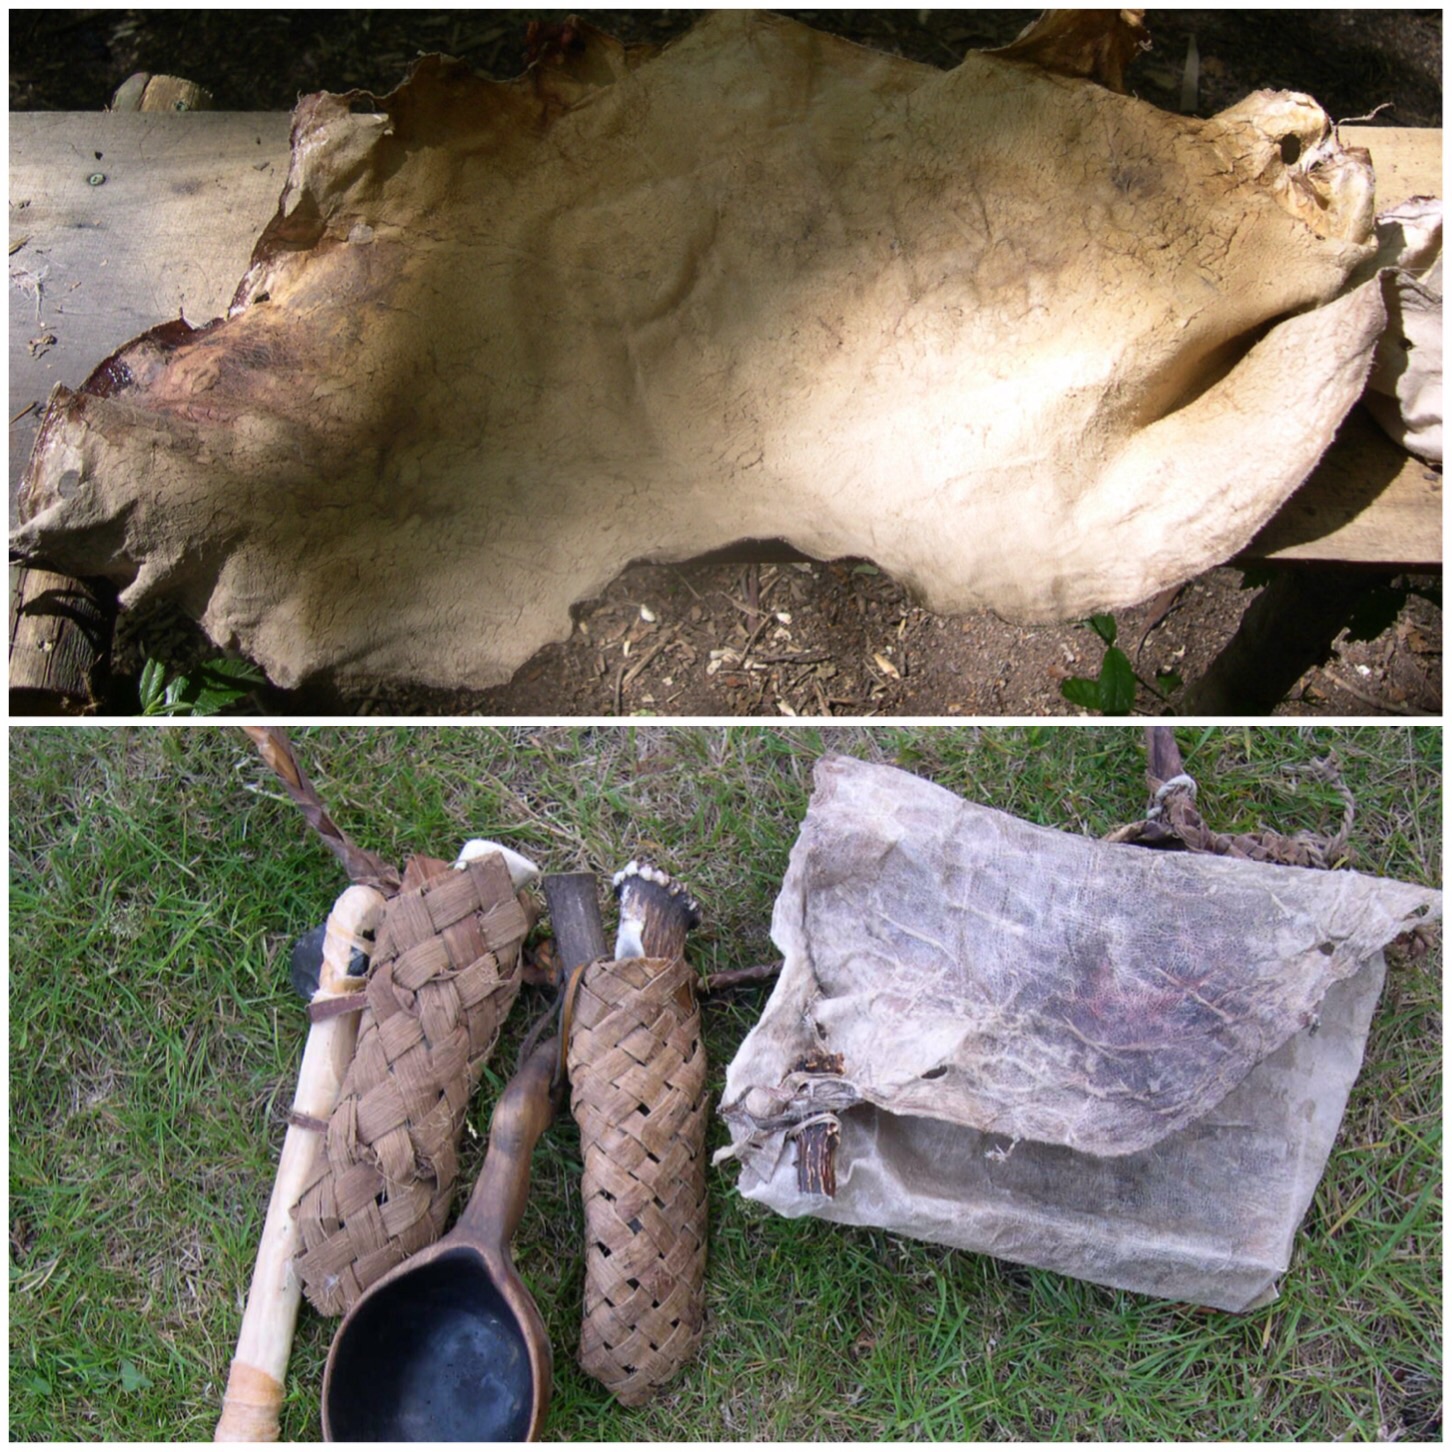
When it is dry it is ready for smoking. My skin was very soft and buckskin-like on the outer areas (which covered the stomach of the deer) but still stiff on the inner areas (which covered the hind quarters). This caused the rippling effect you see in the photo directly below.
To ensure the skin stays soft it needs to be smoked. If it is not smoked then as soon as it gets wet and dries out it will go rock hard. A small fire was set up with a pipe placed over it. Into this was placed a lot of dry rotten wood, which creates a lot of smoke but little flame.
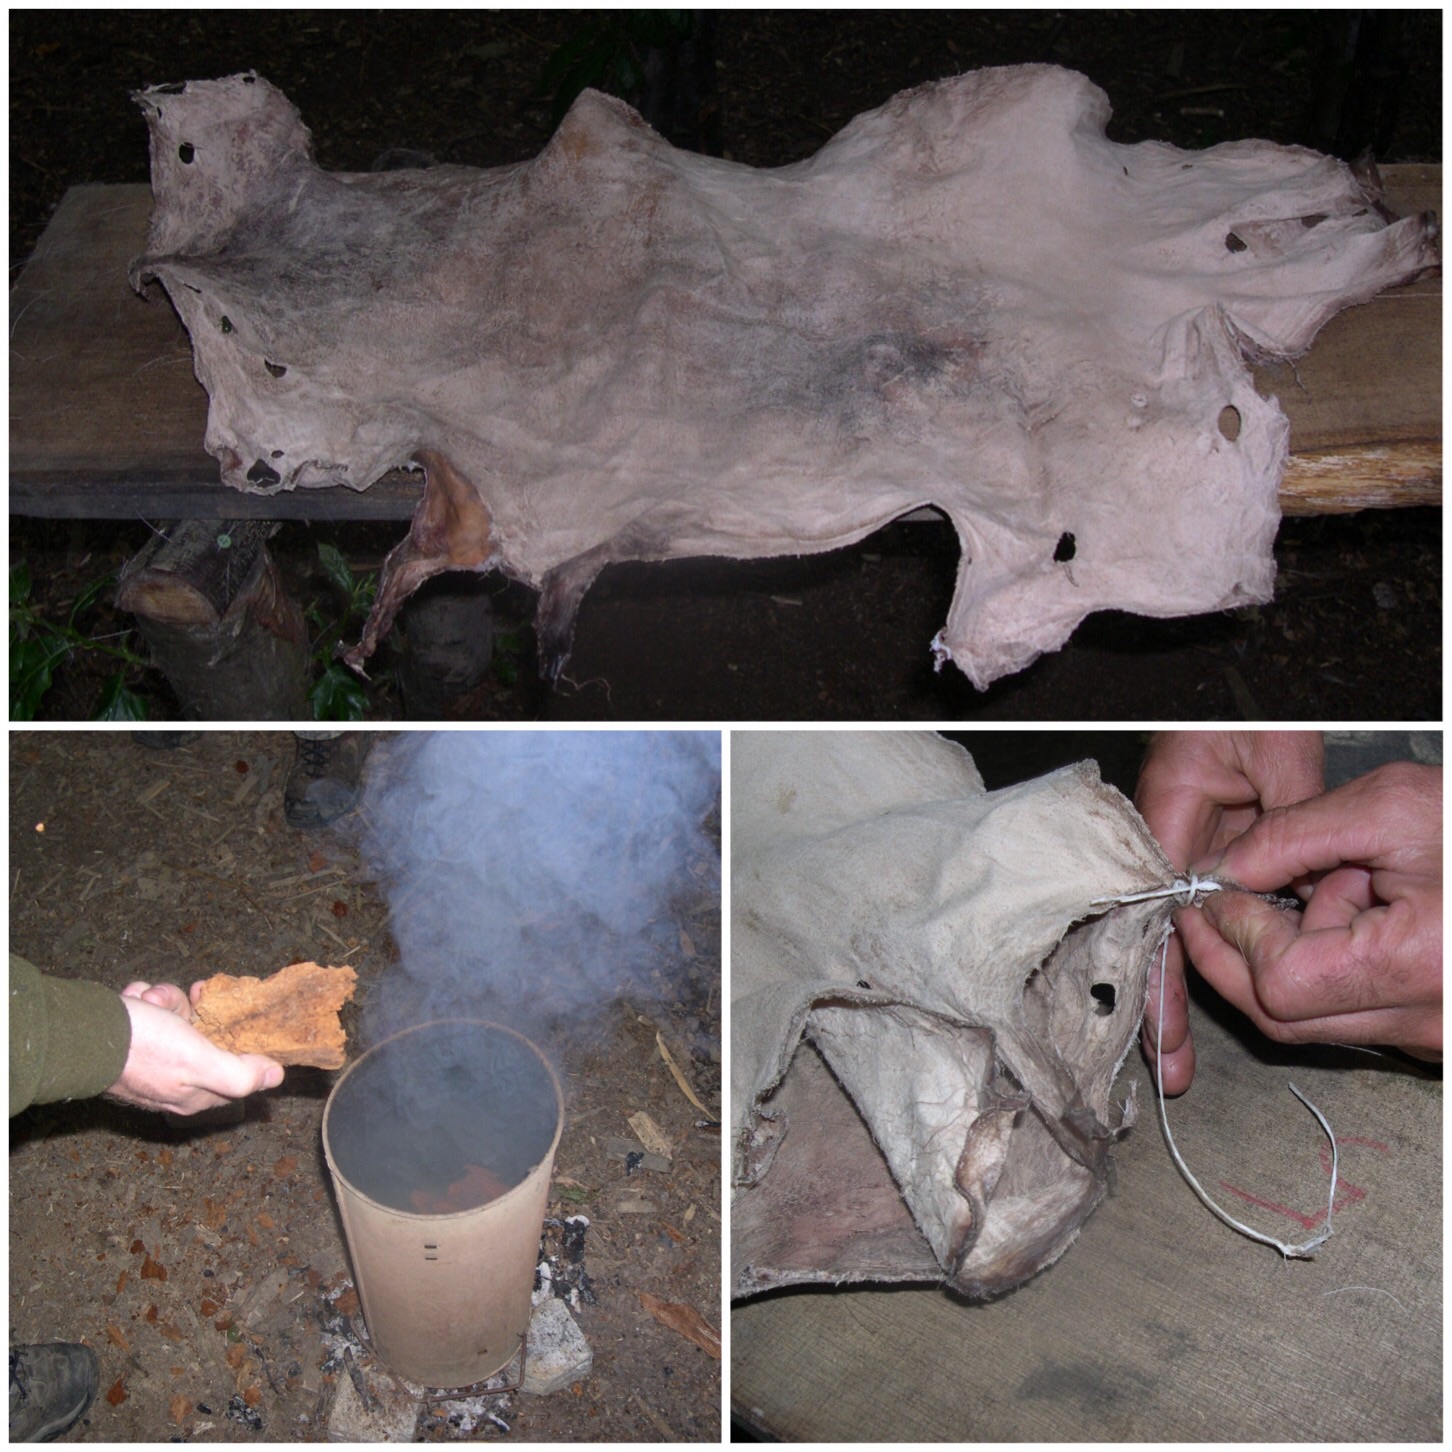
I attached a line to a corner of the hide so I could hang it over the smoker.
Then, using hide glue, I formed the hide into a conical shape. I left a small opening by the string to let the smoke trickle out.
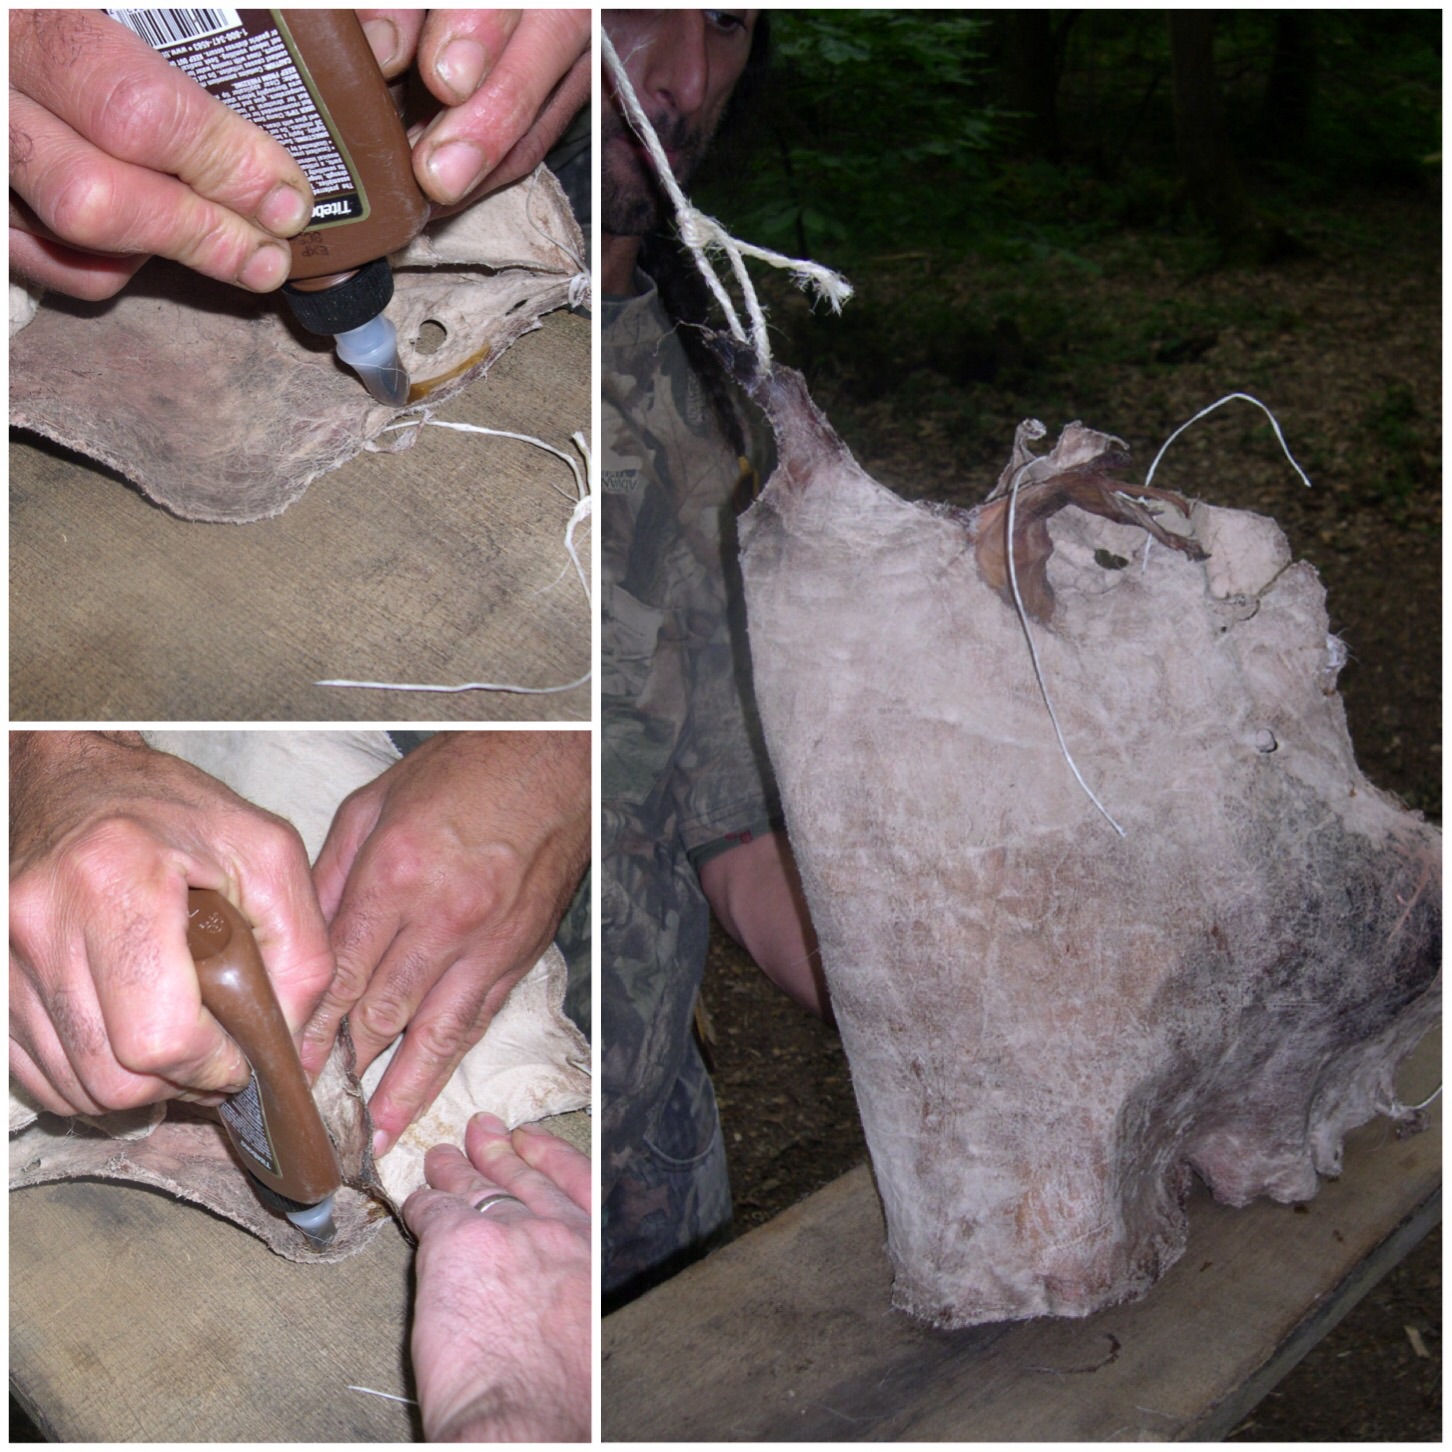
It was then hung over the pipe. I kept it in place here for about 15 minutes. The pipe did get very hot at one stage and singed the soft part of the hide, but slowly the hide changed to a slightly yellow colour.
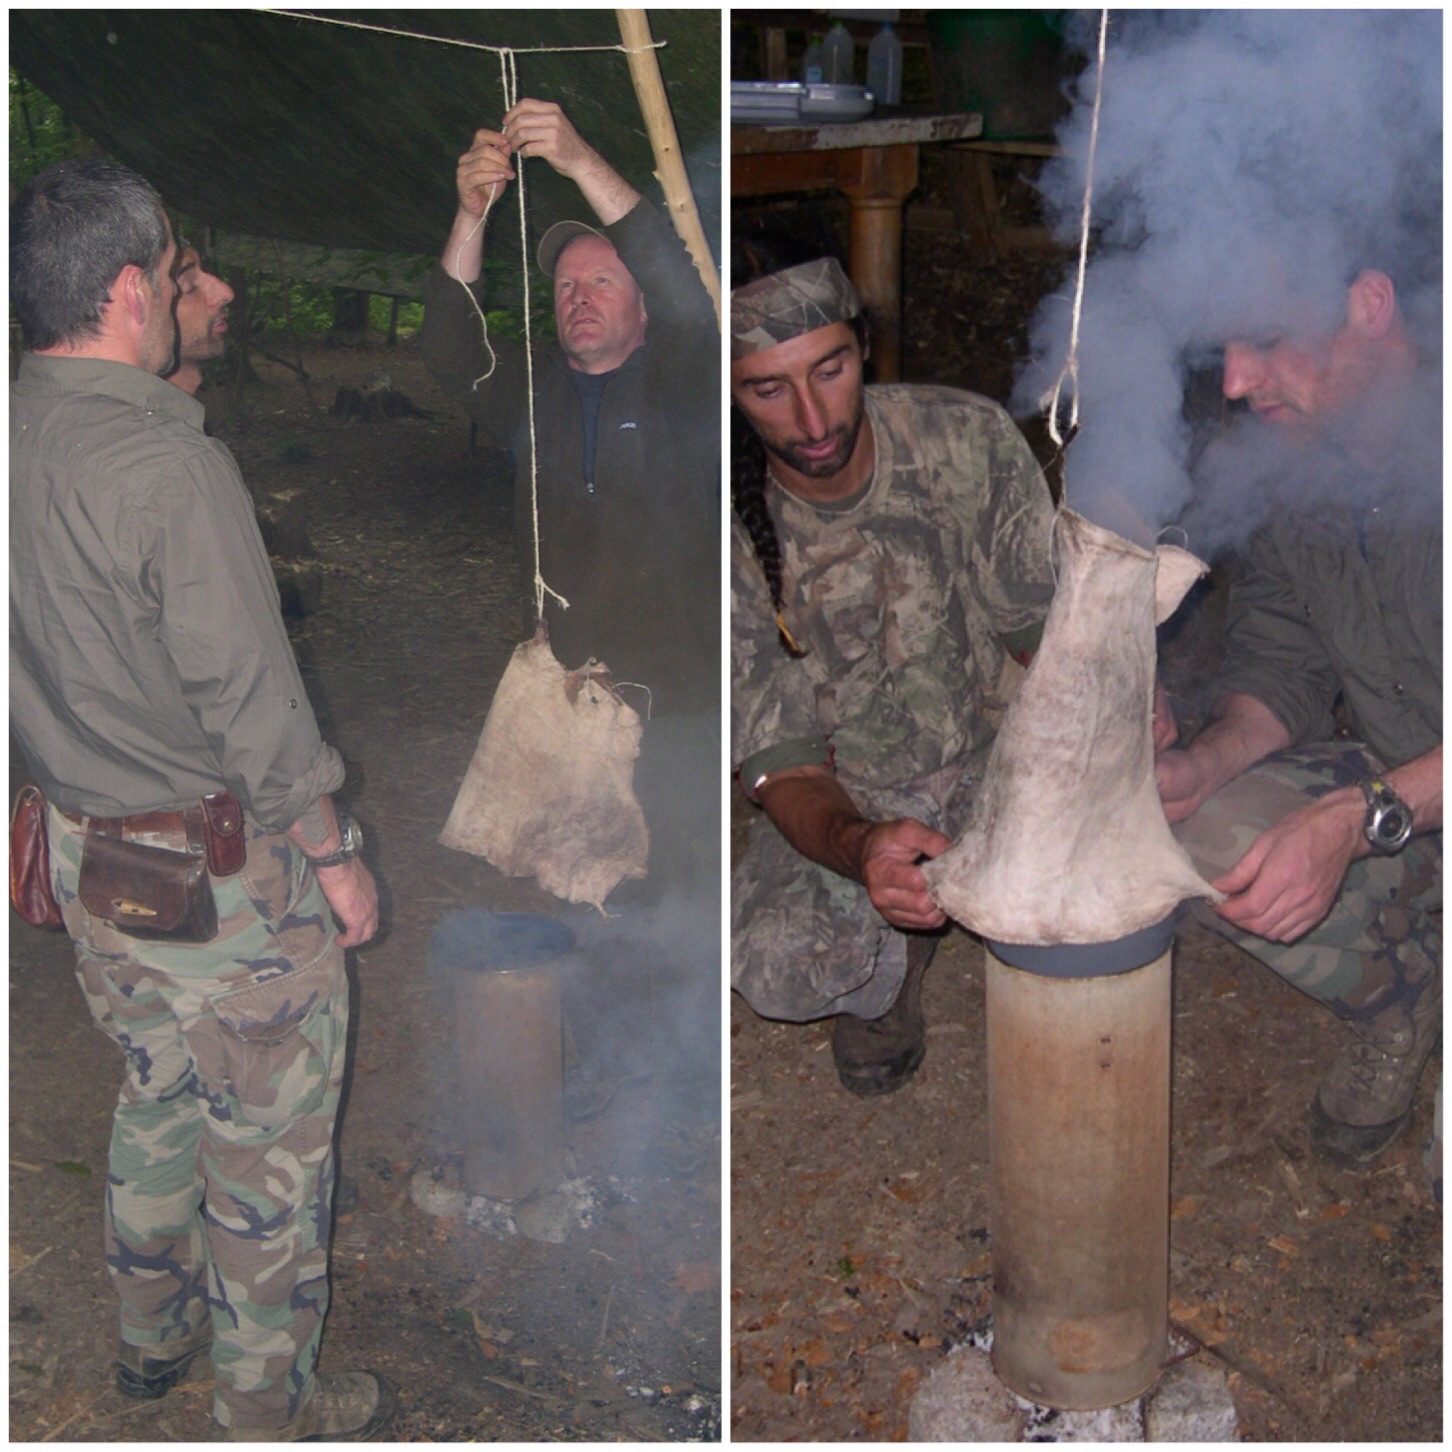
While doing this I also held the bottom rim of the hide over the smoke to try and get as much of it smoked as possible.
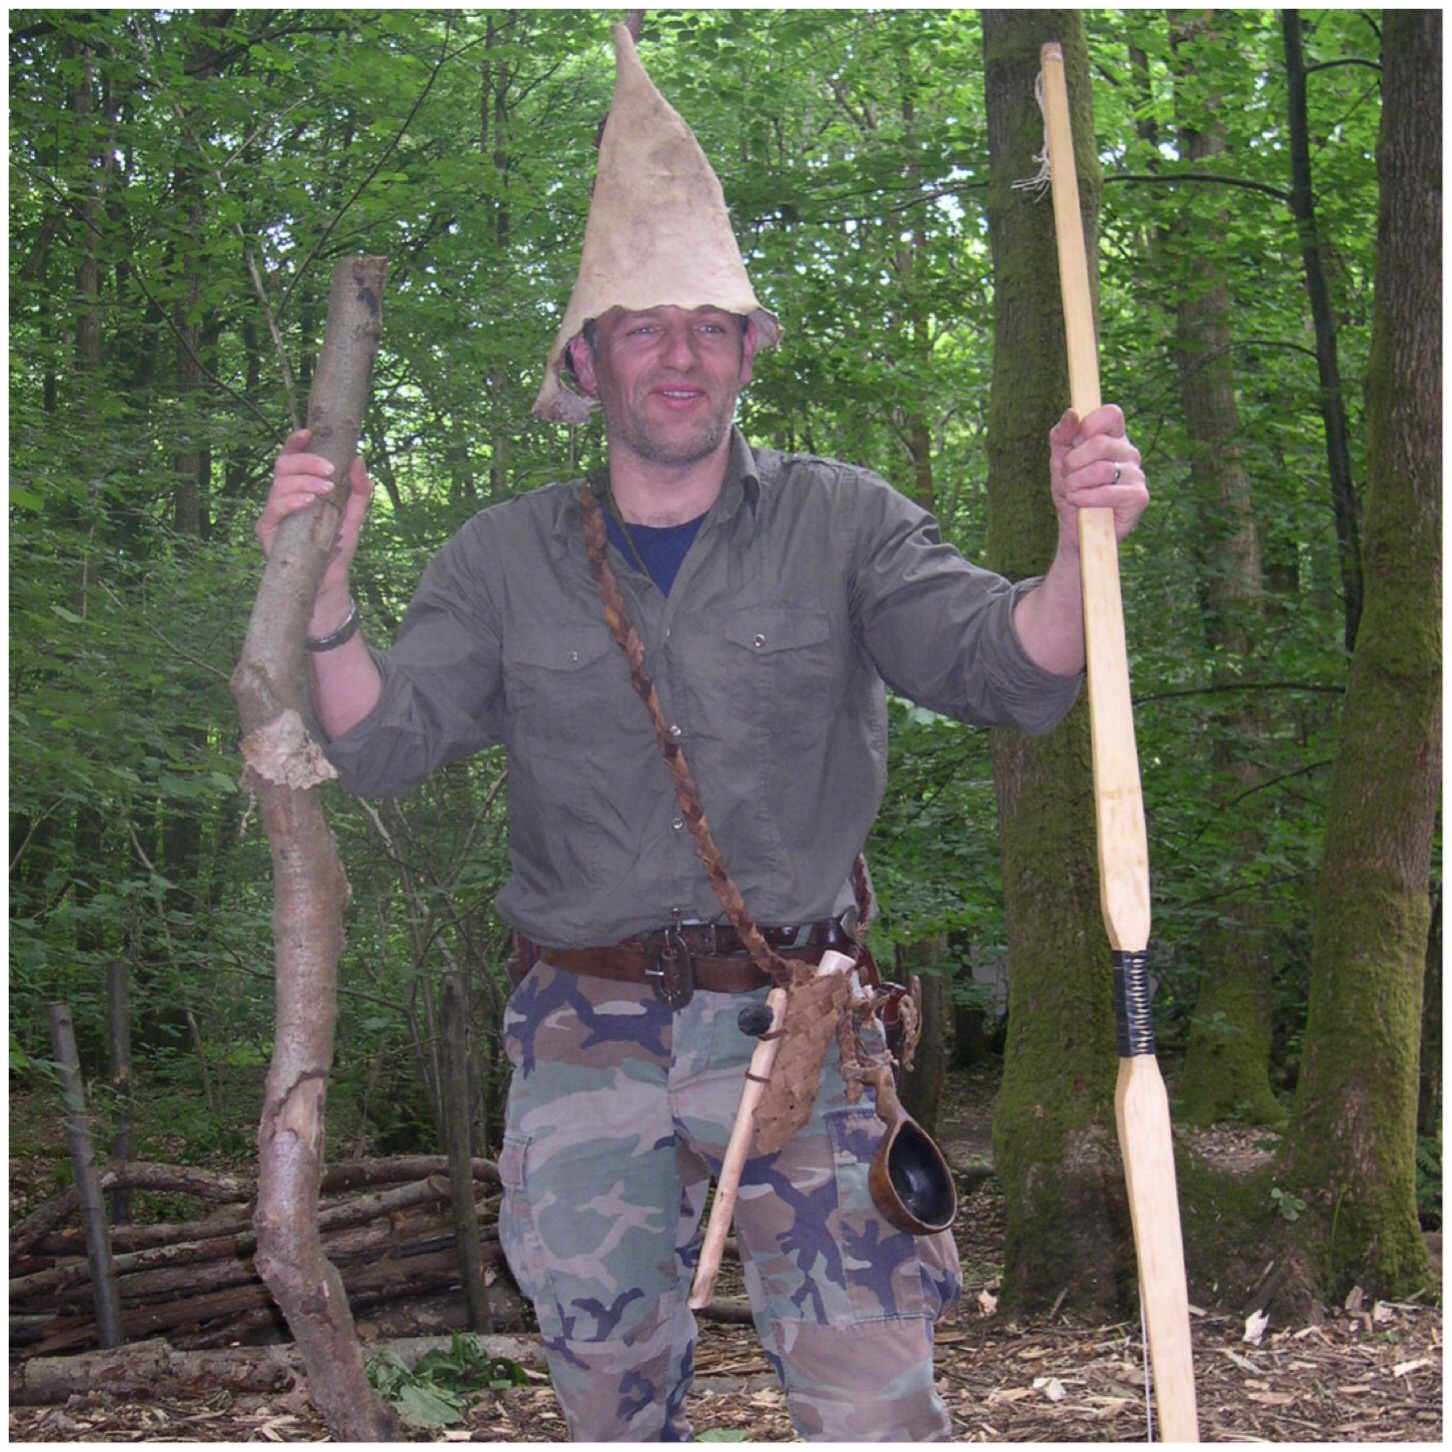
Thought about a hat as the final product.
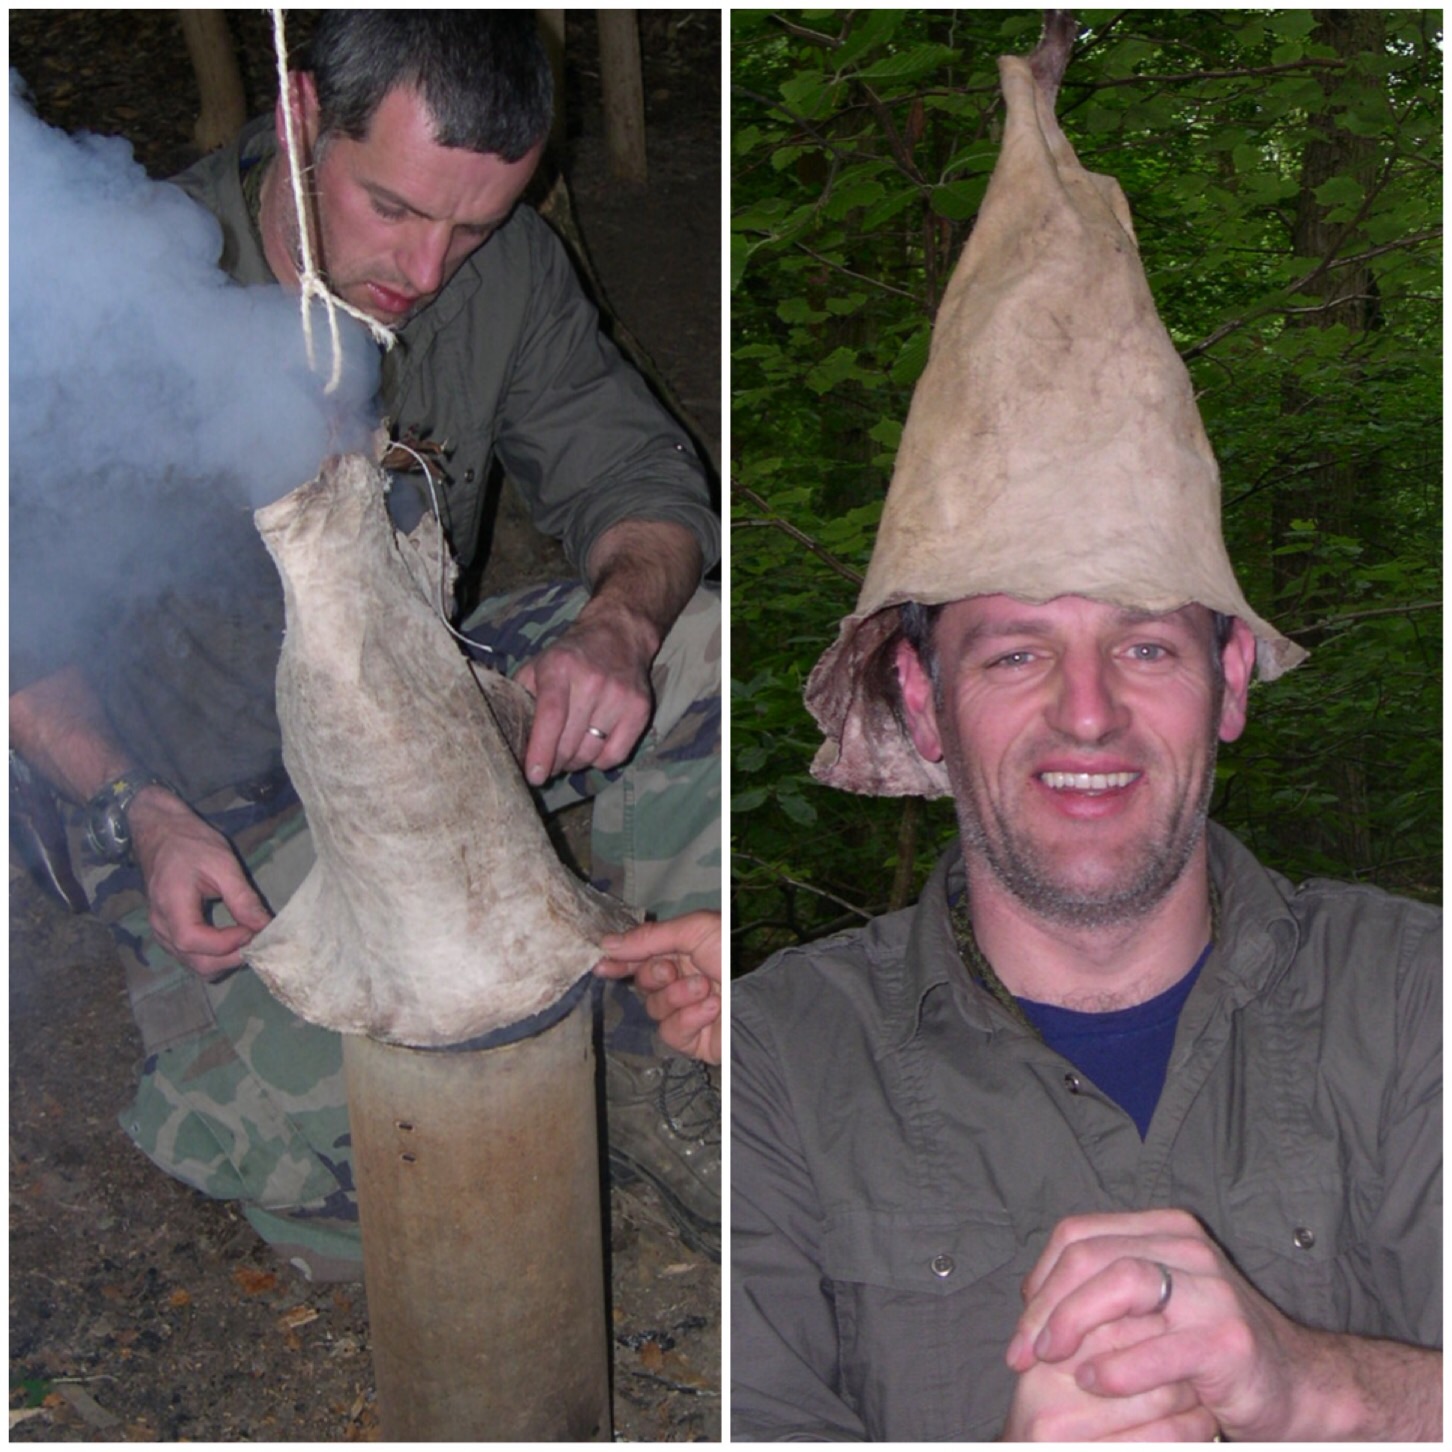
Even added a bow but have decided on making a bag.
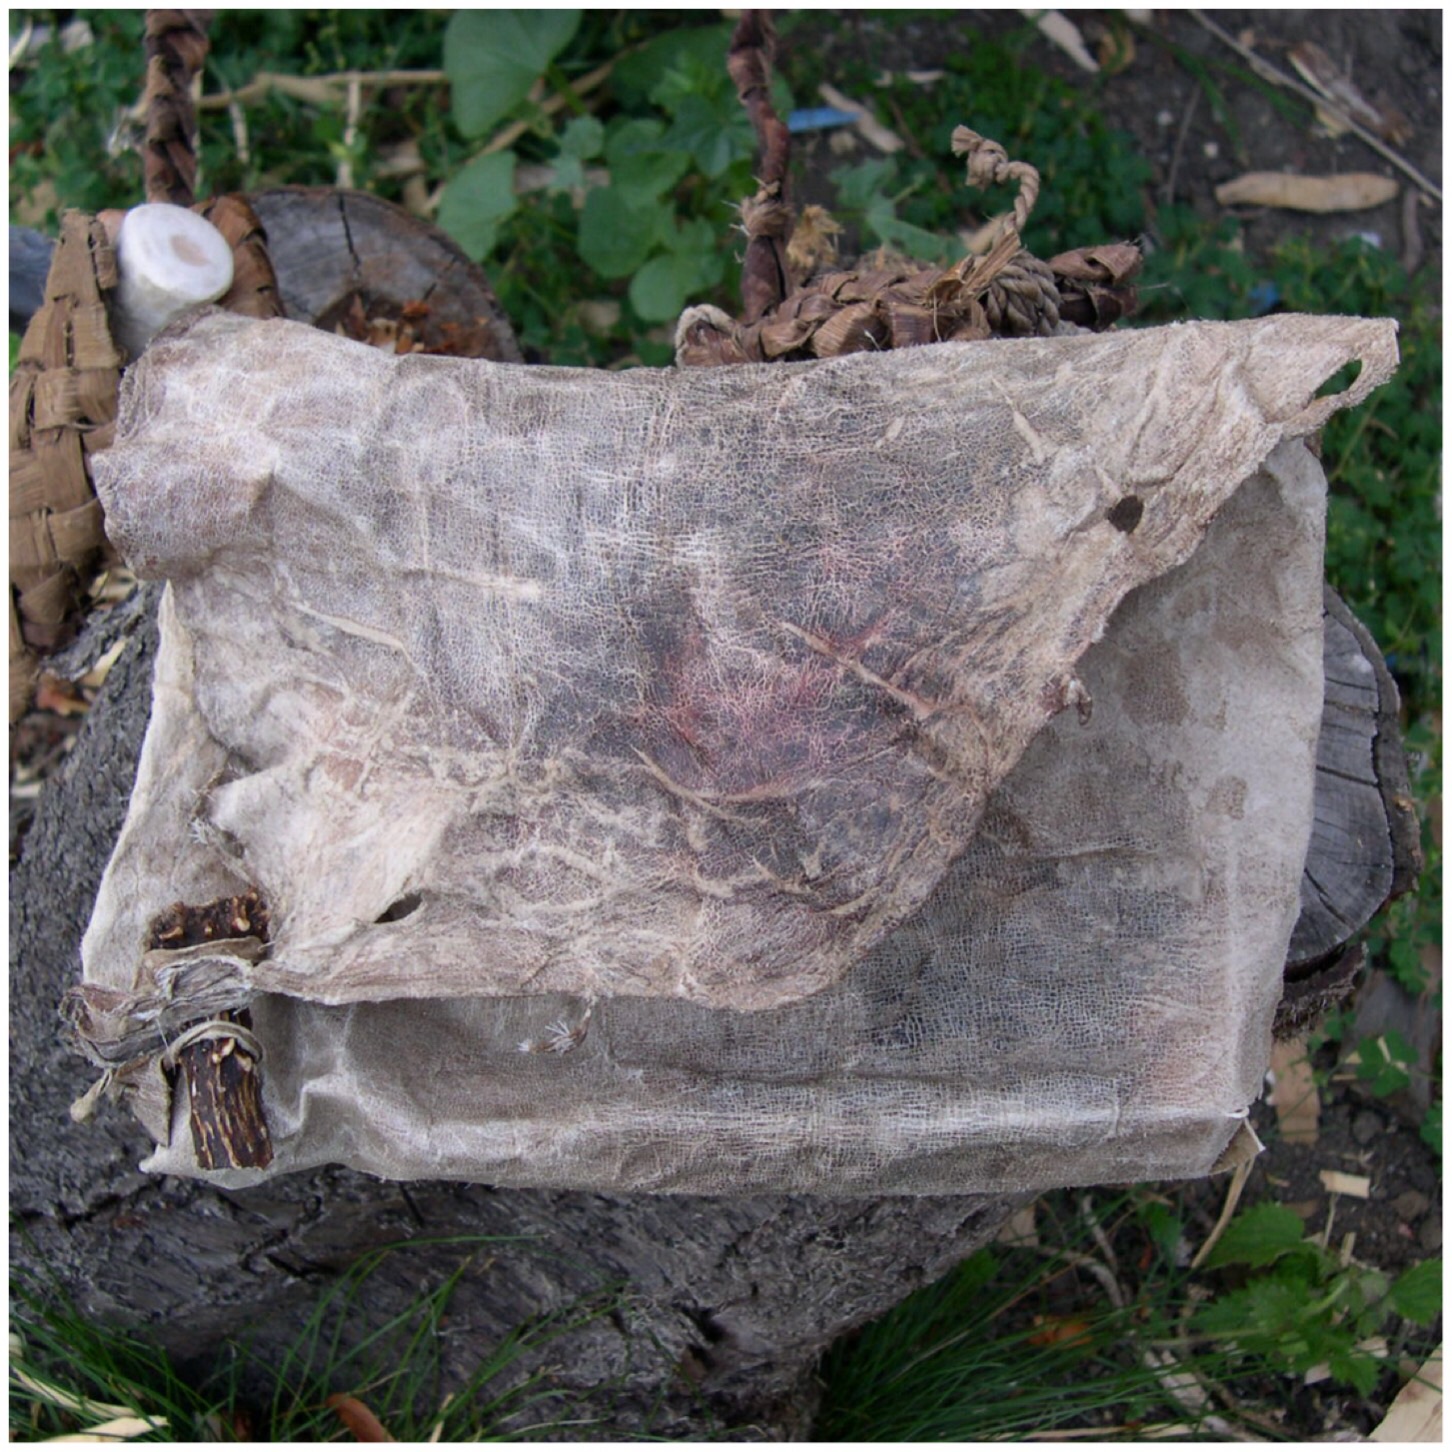
The bag
The top picture shows the smoked hide flattened out. It was still stiff in the central areas but the outer areas were soft like buckskin.
I trimmed off the ragged edges of the buckskin with my flint knife and used that as thread to make the bag. I attached the bag to my bark belt to hold all my flint knapping and fire making tools.
I used an offcut of antler as a toggle to keep it shut.
This process took a full weekend but taught me a lot that I had only ever read about before.
I really appreciate now how long it takes to make buckskin and thoroughly recommend anyone to try it.
Cheers
George
I an tanning hides using Lutan-F and Protol oil and I want to buckskin using these products. After the hides are soft, will smoking be okay?
I appreciate your help.
Charles Felkins
Hi Charles. Not sure about your oils. When I have a question I contact Theresa Kamper at the Forest Seal Society. They are on Facebook and this is their website – http://www.forestseal.com/
They are absolute experts and always willing to offer advice. Cheers, George