How To…. Build a Shear Leg Hammock Stand

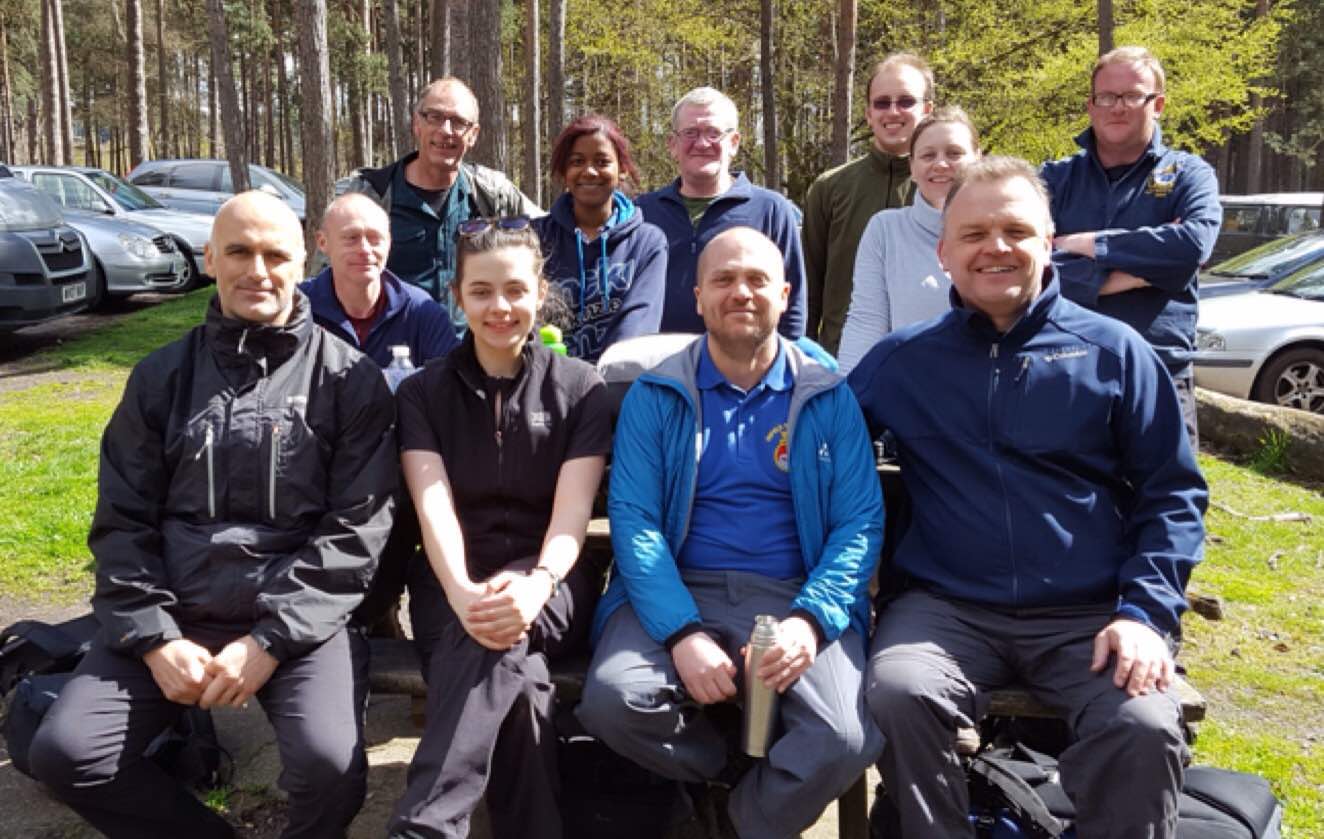
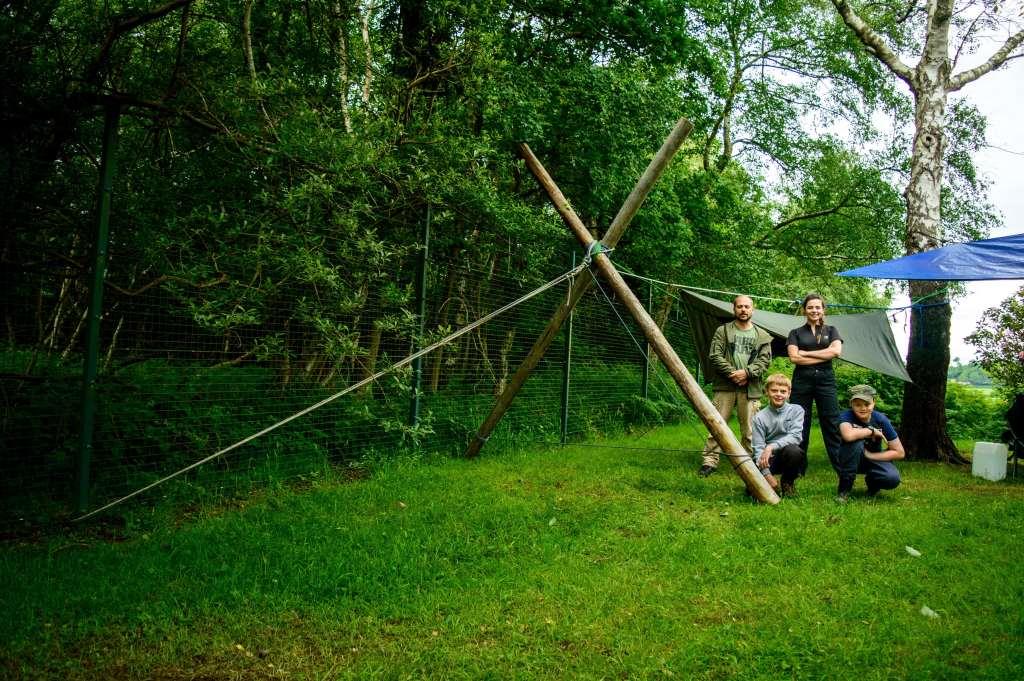
This is a post that came about because someone decided to chop down a tree. On a recent Sea Cadet training weekend we ended up with one instructor (Jess), one hammock and one tree – my friend Dave and myself had bagged the other trees for our hammocks :-). Not an ideal situation for Jess you could say.

We could not camp elsewhere and there was nothing in the way of available natural material to help us (we were on a military camp). Thankfully my friends Alan and Dave spotted some old poles (used for team building exercises) at the back of of a building. So Dave with Jess as his assistant in true Seacadet style, set out to apply their seamanship talents to our problem.
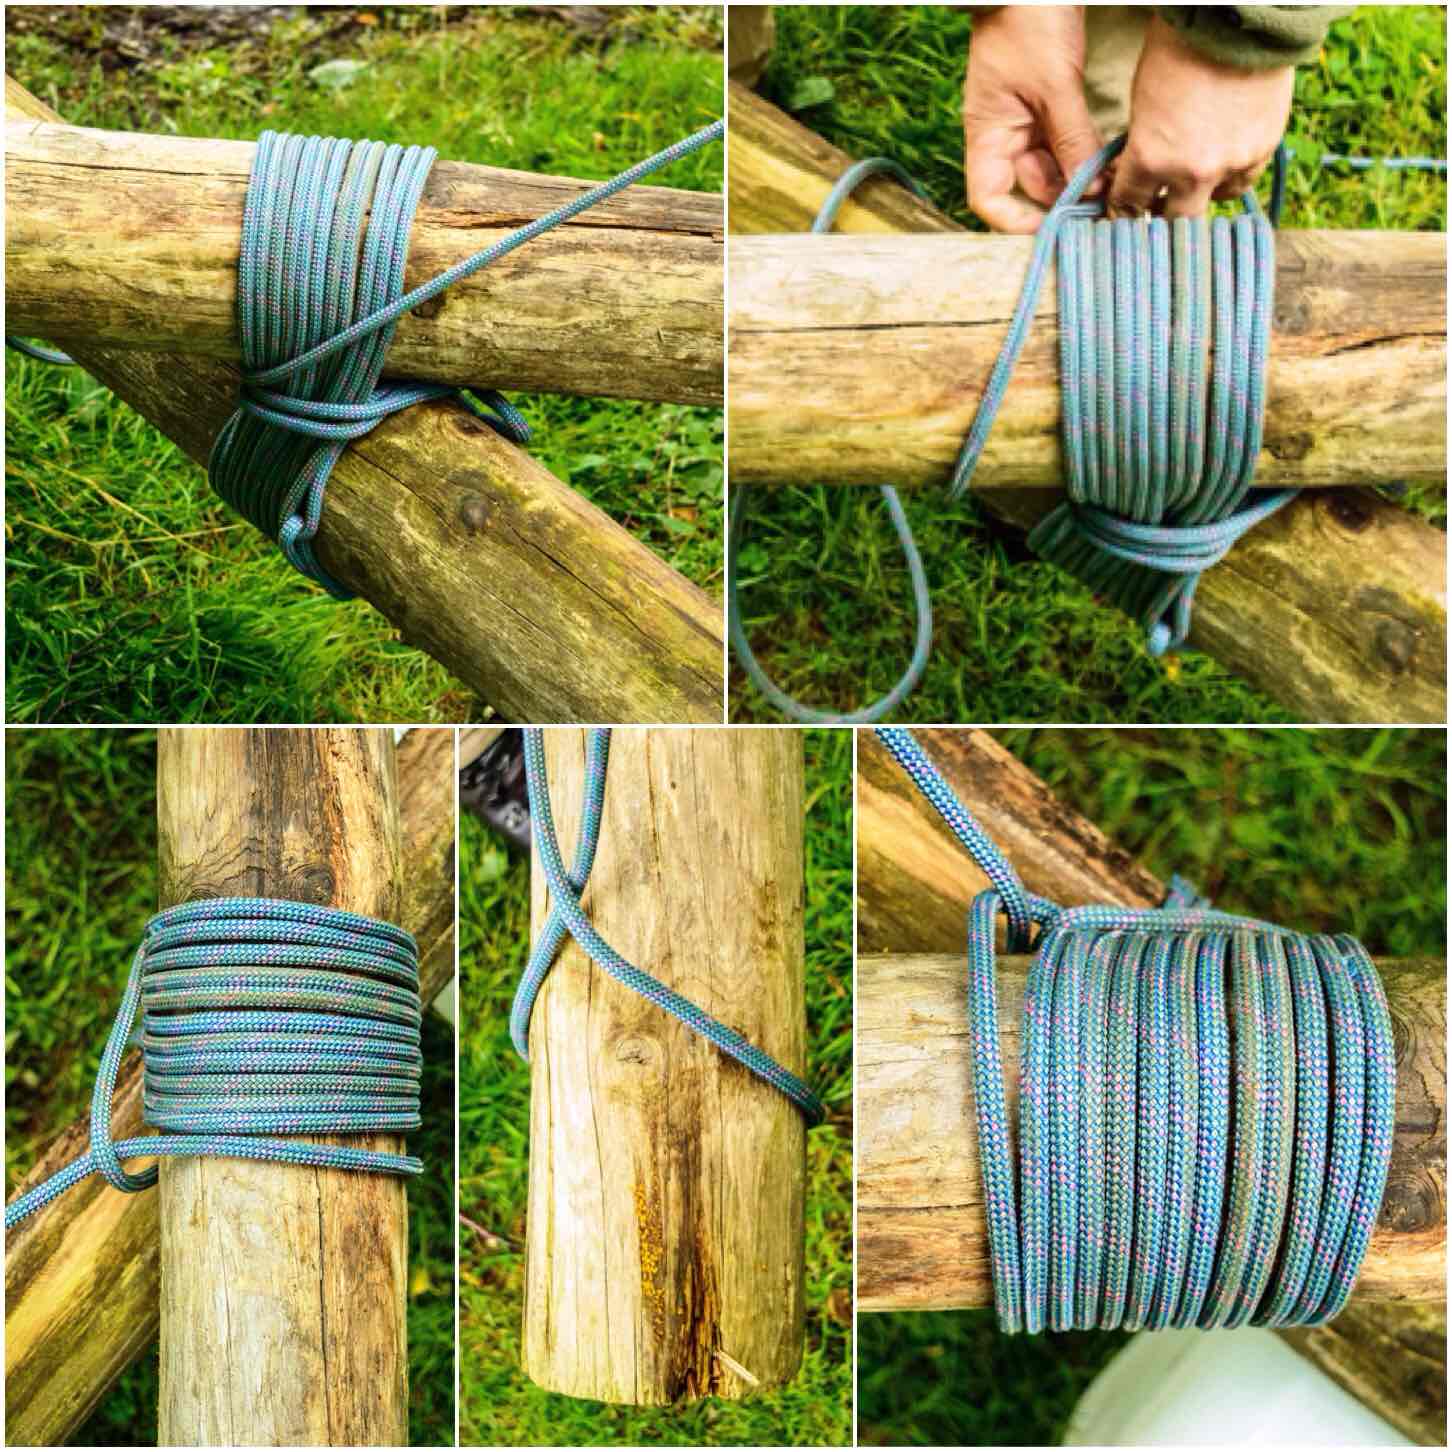
a
Shear Leg Stand

The Shear Lashing

They collected some assorted pieces of rope and a couple of cadets to help out. The poles were quite long and thick so they decided to tie the poles together about two thirds of the way along their length. The poles were tied together using a shear lashing (I will be using Grog’s Knots to help describe how they did this).

To start the shear lashing they attached the rope to one pole using a timber hitch and then wrapped the rope a number of times around both poles (this is known as wrapping). To make this easier the poles were raised slightly of the ground and the cadets helped to pass the masses of ropes around the poles.

b
Wrapping

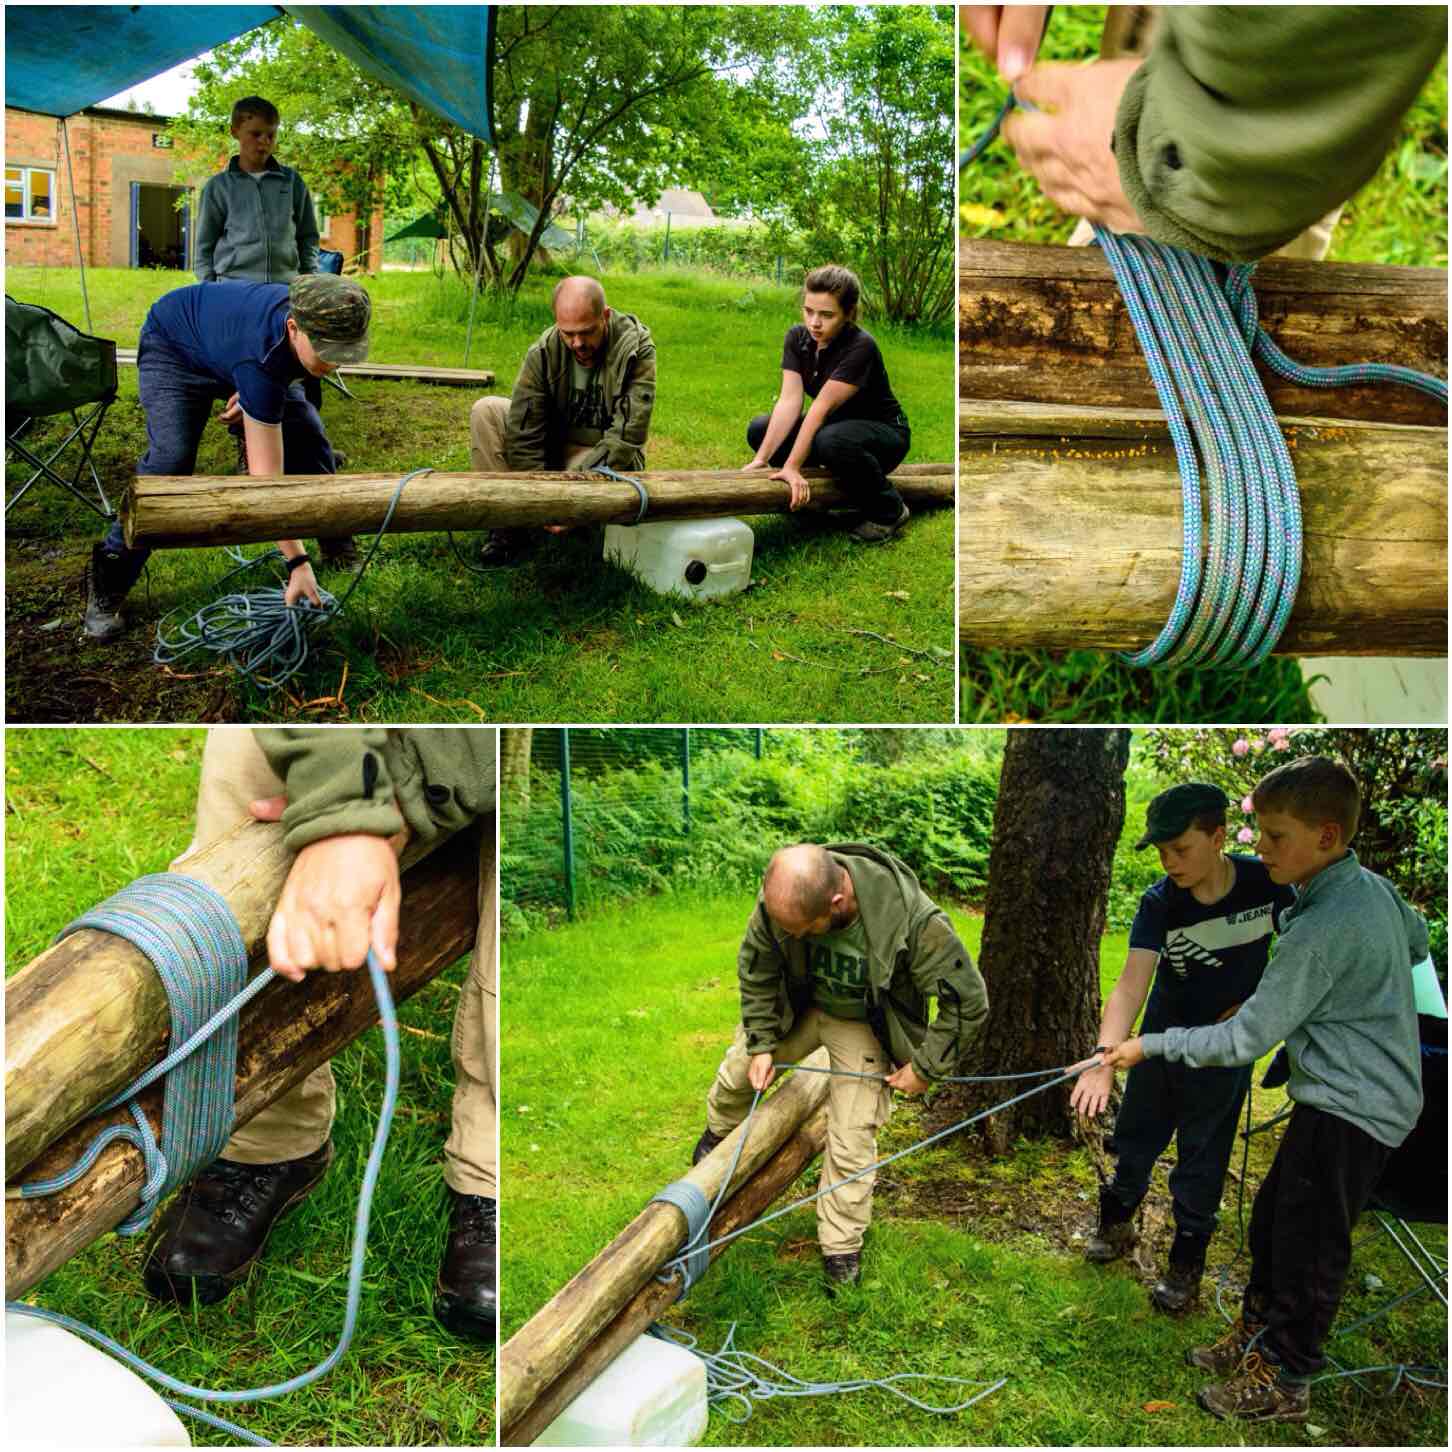
Once the wrappings were completed the lashing was tightened by being frapped (nothing to do with Facebook). Frapping is the nautical term to describe the tightening of a rope or cable. Dave did this by completing a number of turns around the centre of the lashing and pulling it all in tight.

To finish the lashing off he secured it with a clove hitch to the pole without the timber hitch. There was plenty of rope left over as well to help with anchoring the shear legs down.
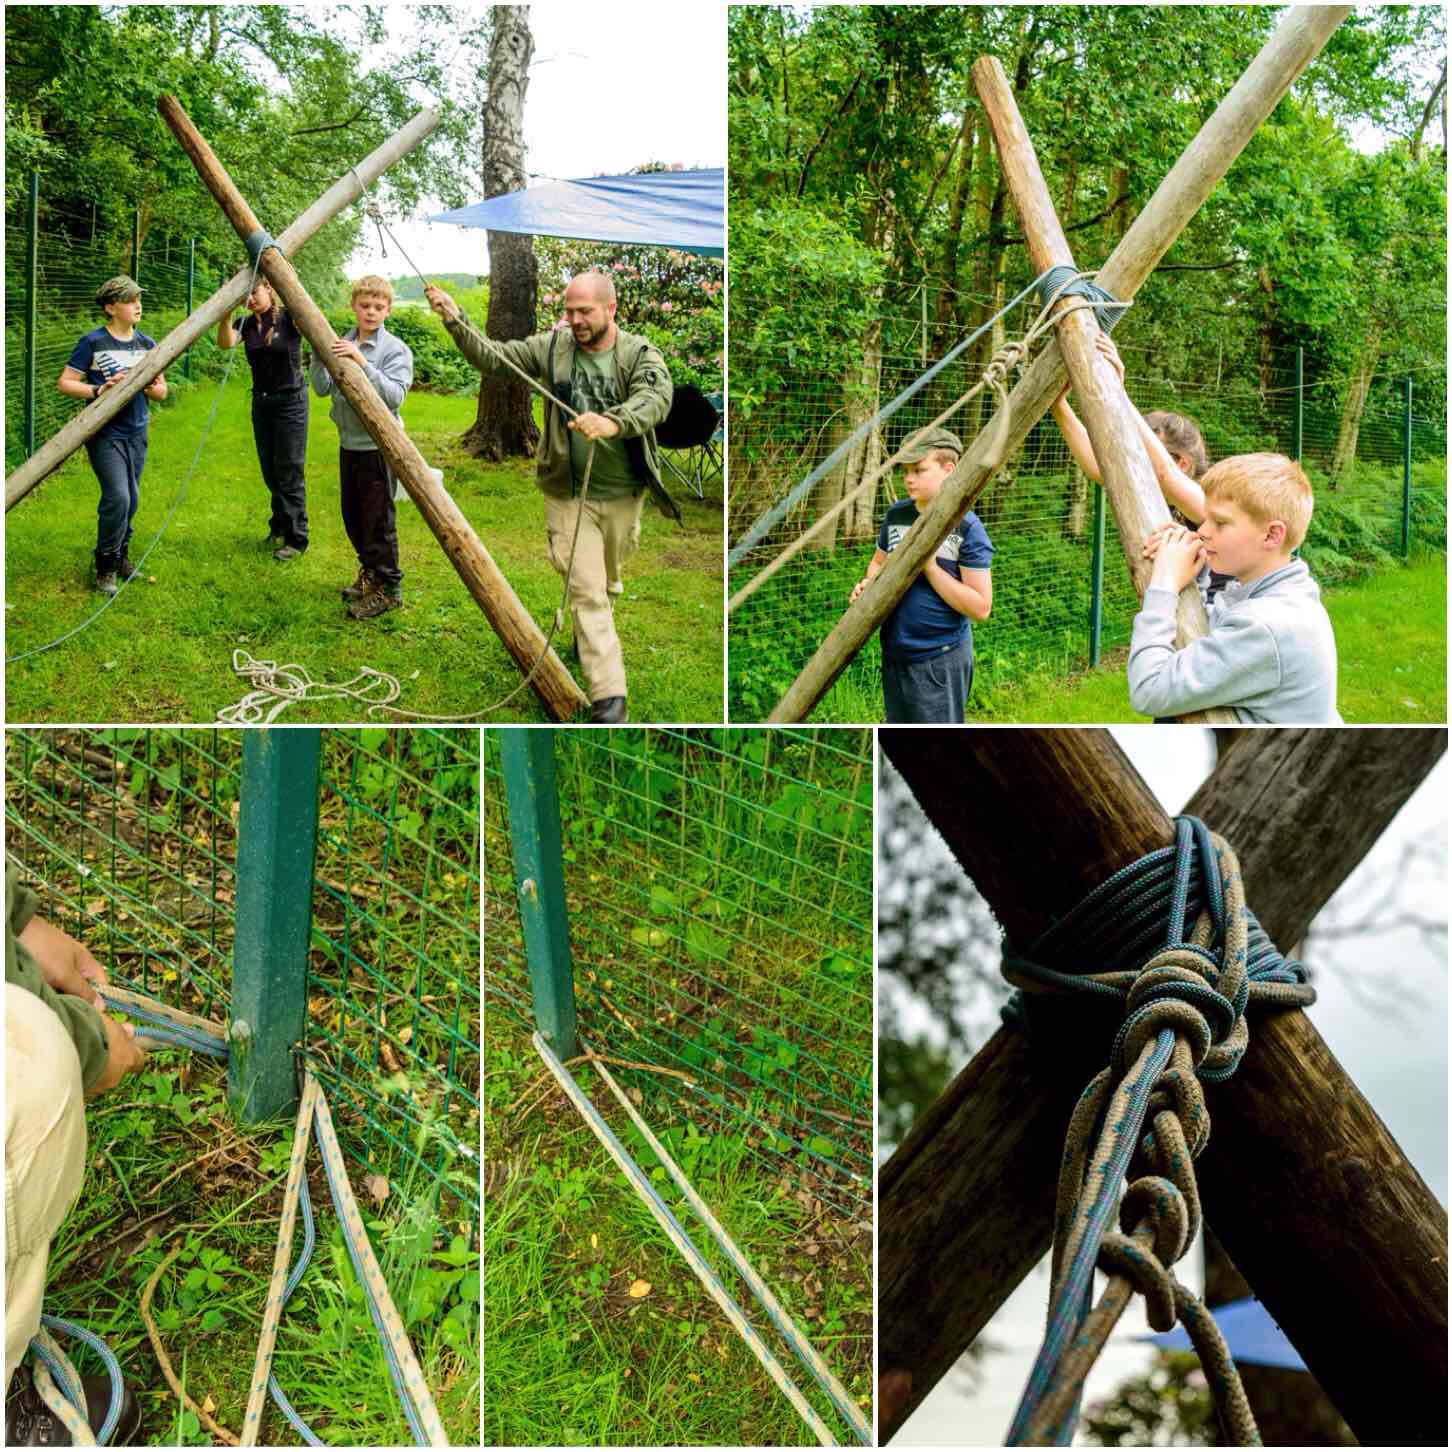
c
Frapping

Anchoring

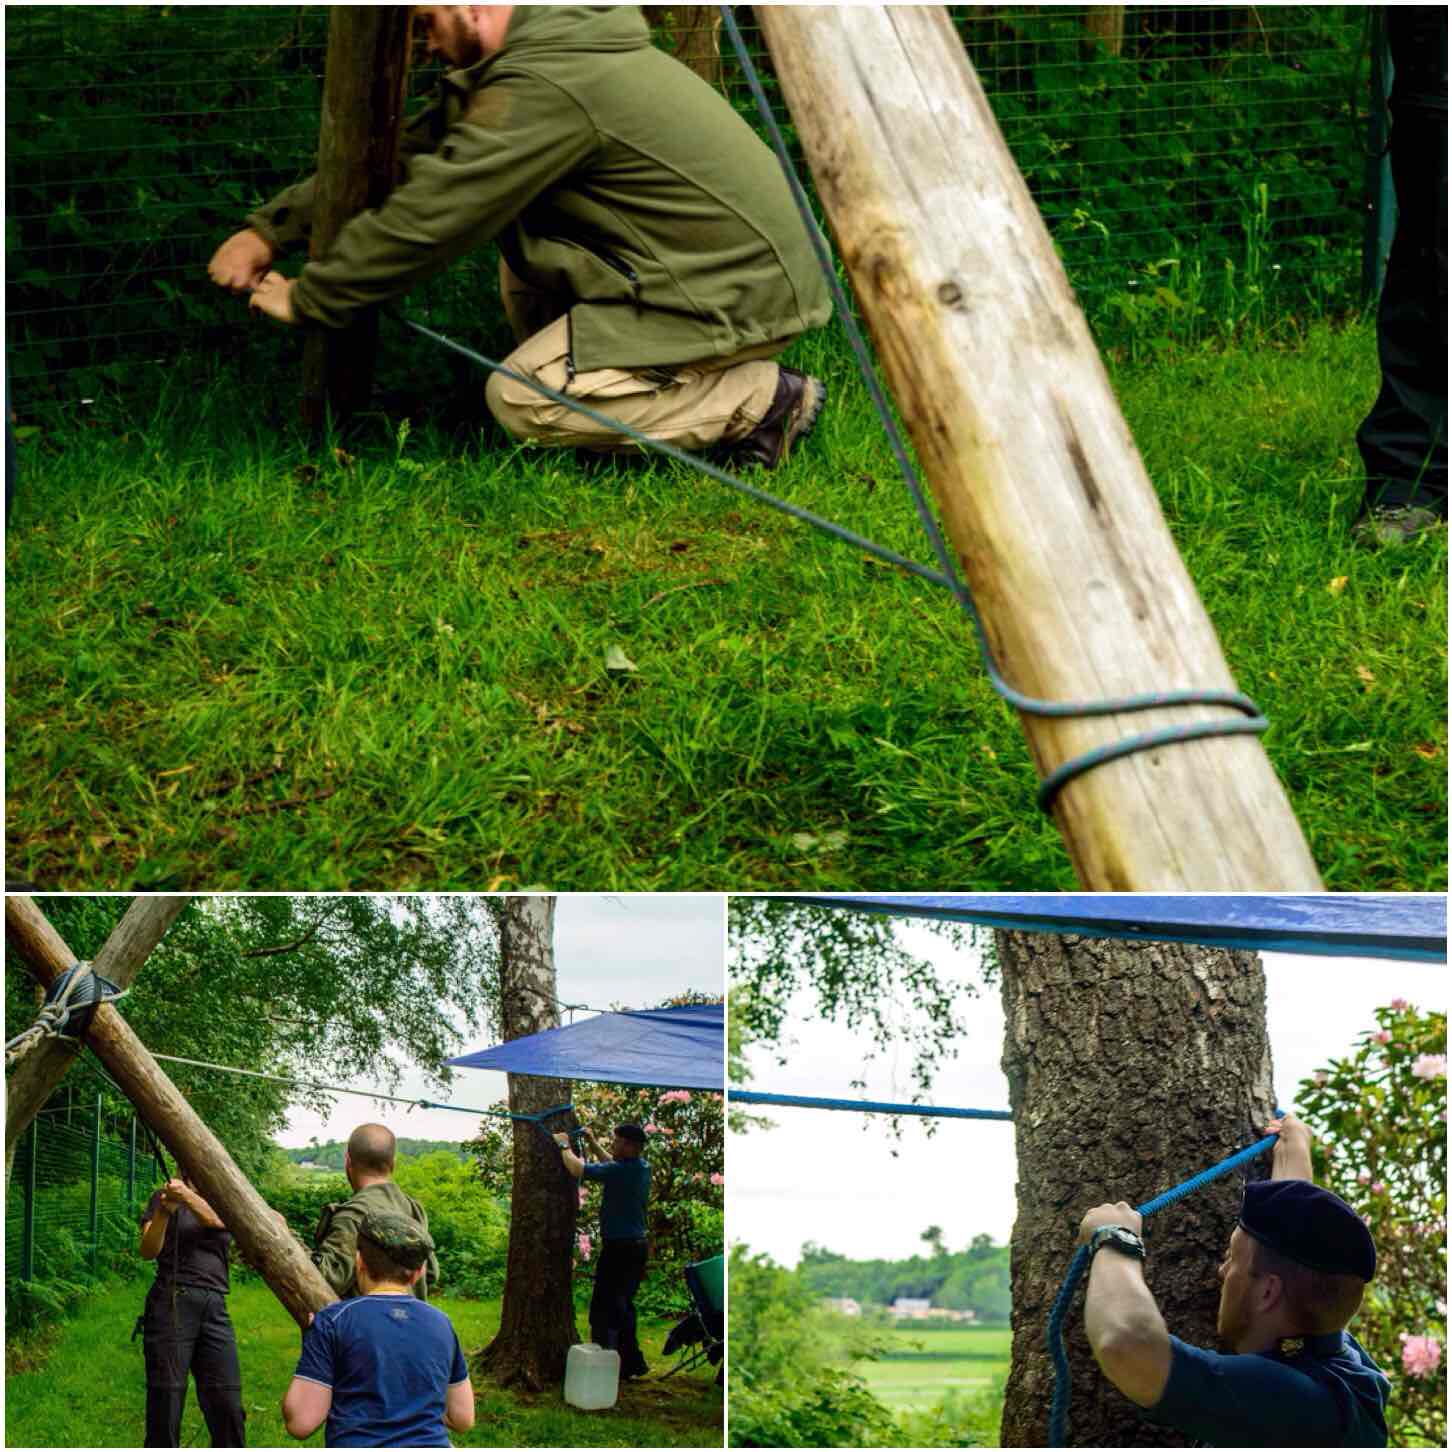
Though the poles were large they were surprisingly light so they were soon standing vertical. A spare piece of rigging line was looped over the pole with the timber hitch on it and with the spare rope from the shear lashing the legs were securely anchored by wrapping both ropes around base of a solid fence post.

Both ropes were then tied off around the shear lashing on the poles to make it all secure.

d
Anchoring

Alternative Anchors

If you do not have a handy anchor like our fence post you can make your own. In the past I have had shear legs and tripods for hammocks anchored safely with three large wooden stakes.

f
Alternative Anchors

Securing

If you cannot drive your shear legs into the ground I would advise you to tie them together near the bottom so that they do not inadvertently splay out. Dave used the last of the lashing rope (it was a rather long piece of old climbing rope) to do this.

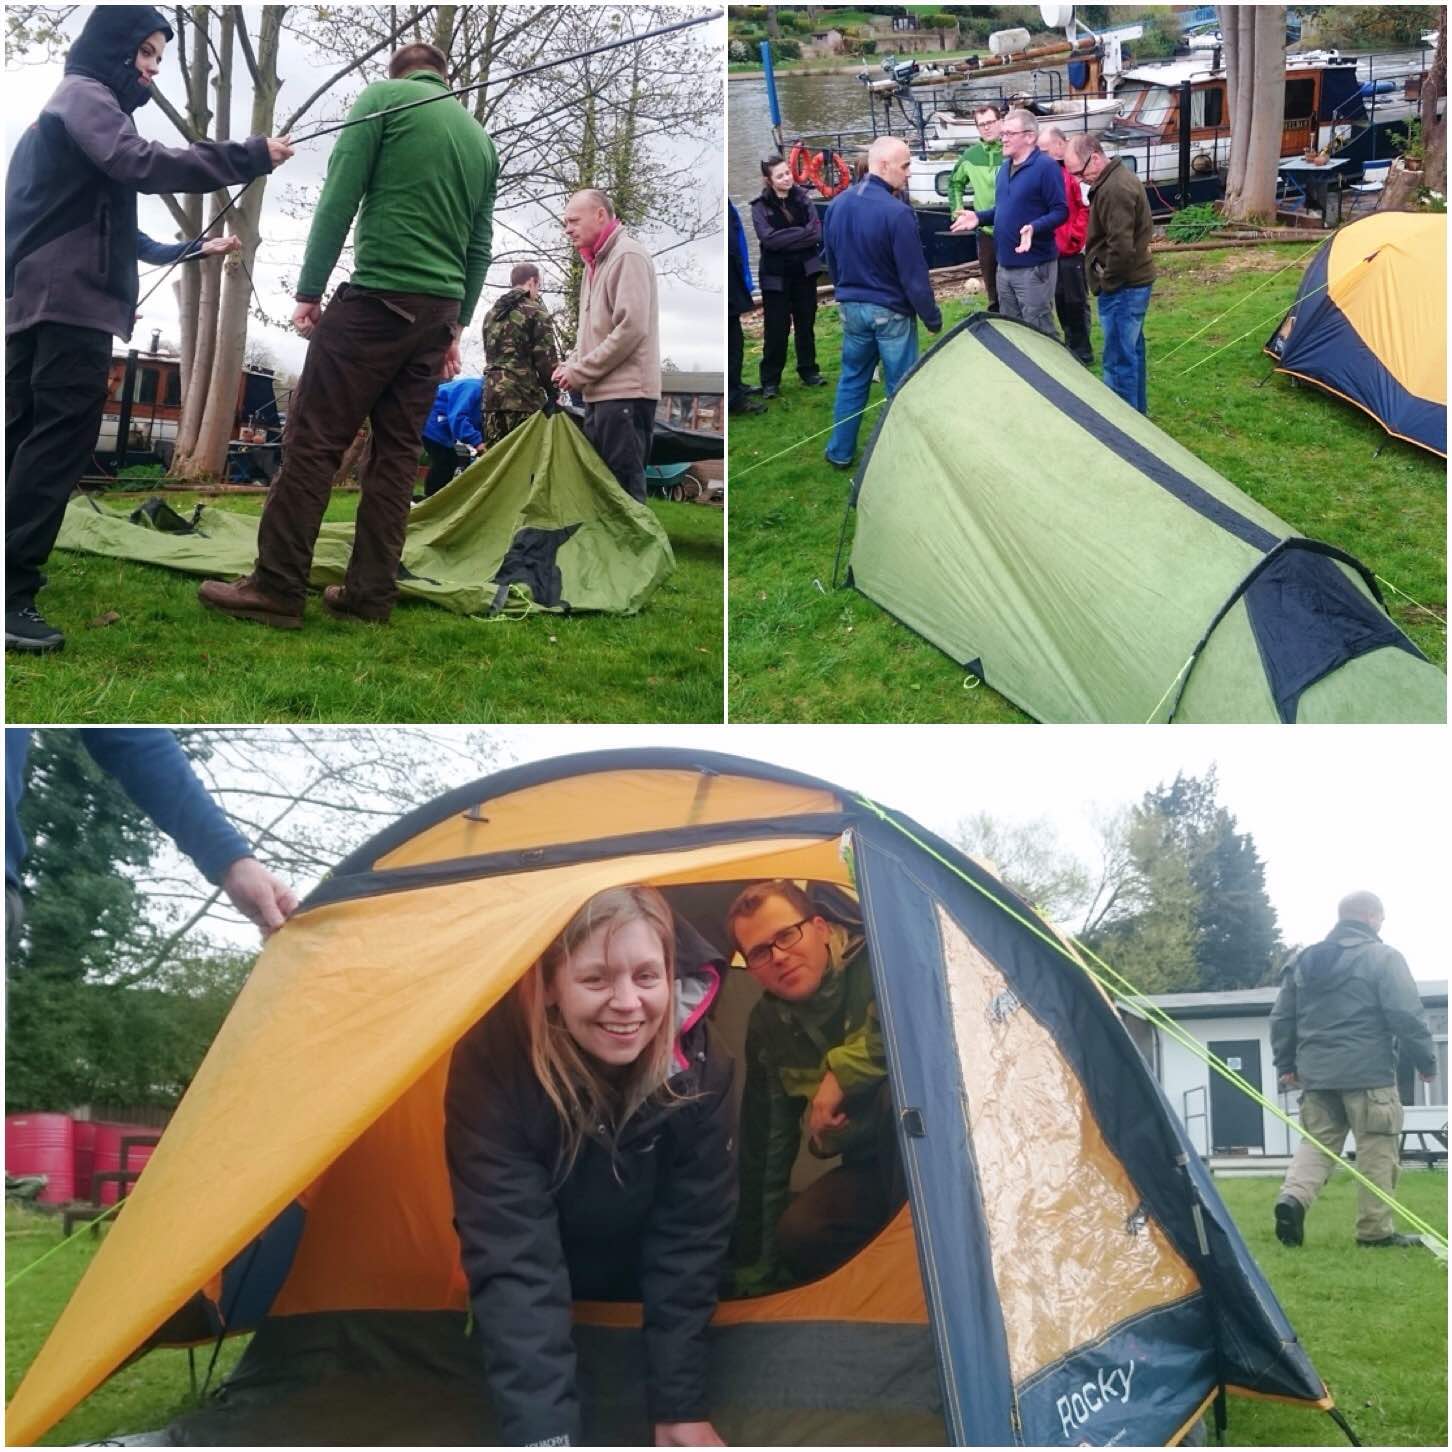
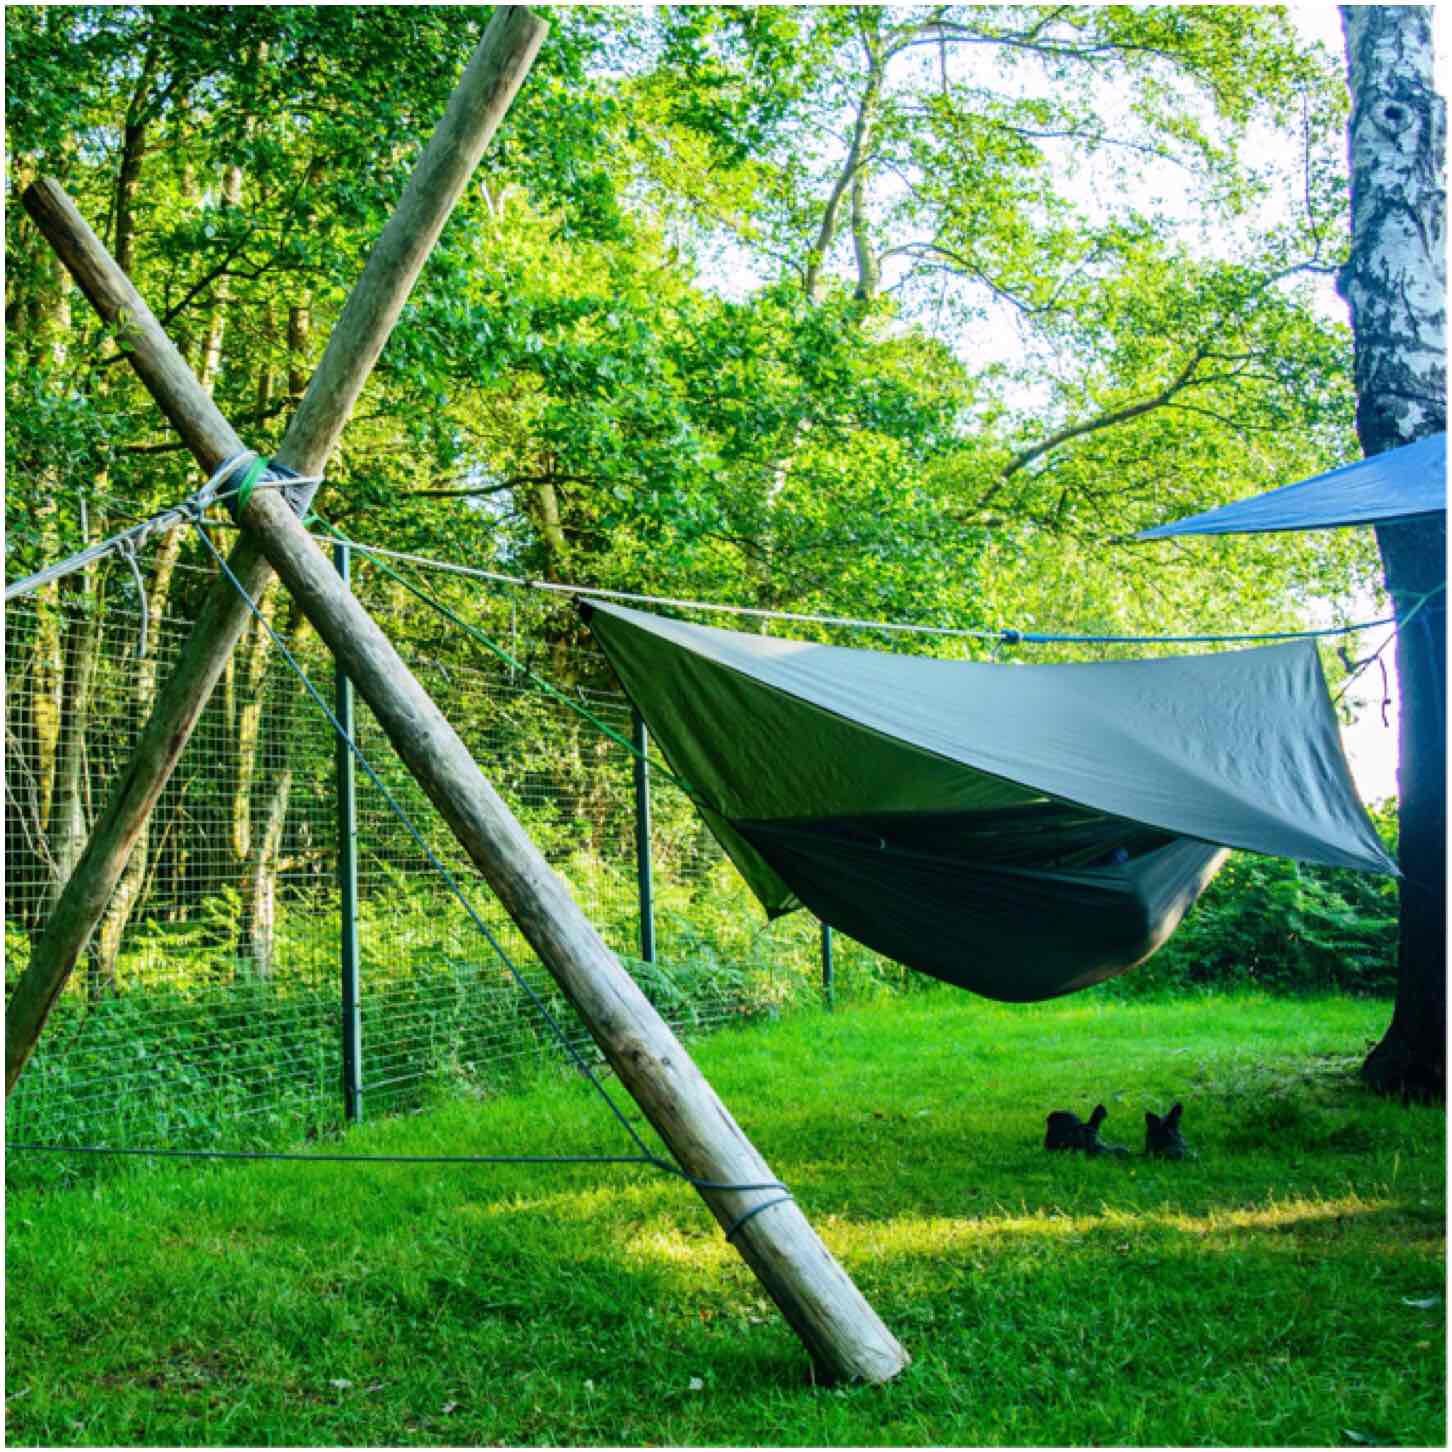
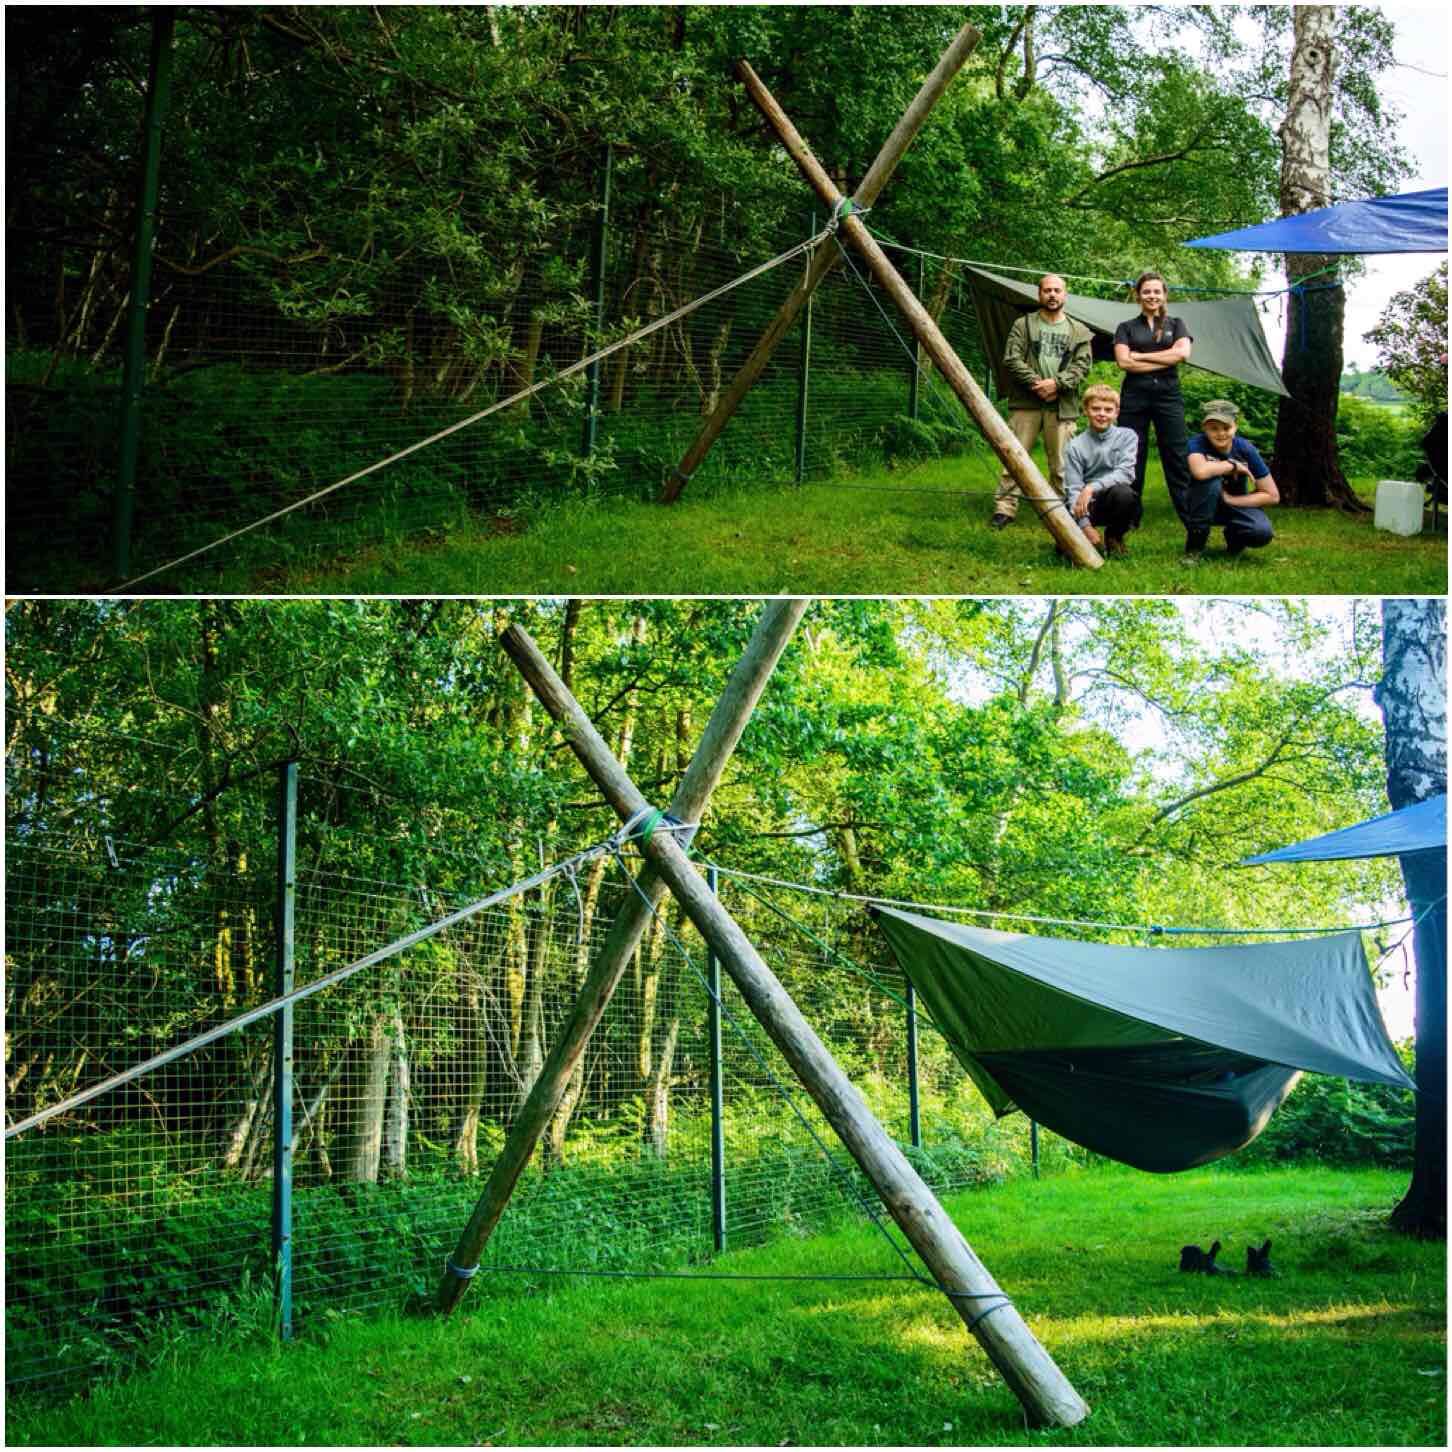
Finally, to finish the set up the shear legs were tied securely to our single tree using a top line. This top line as well as securing the shear legs was to act as a line to hang Jess’s tarp off.

g
Securing

Testing & Set Up

I did a bit of testing after we had hung the hammock. I figured if it took my weight then Jess would have no problems. The top line went slightly slack when the system took my weight so that was re-tightened while I was in the hammock.

h
Testing

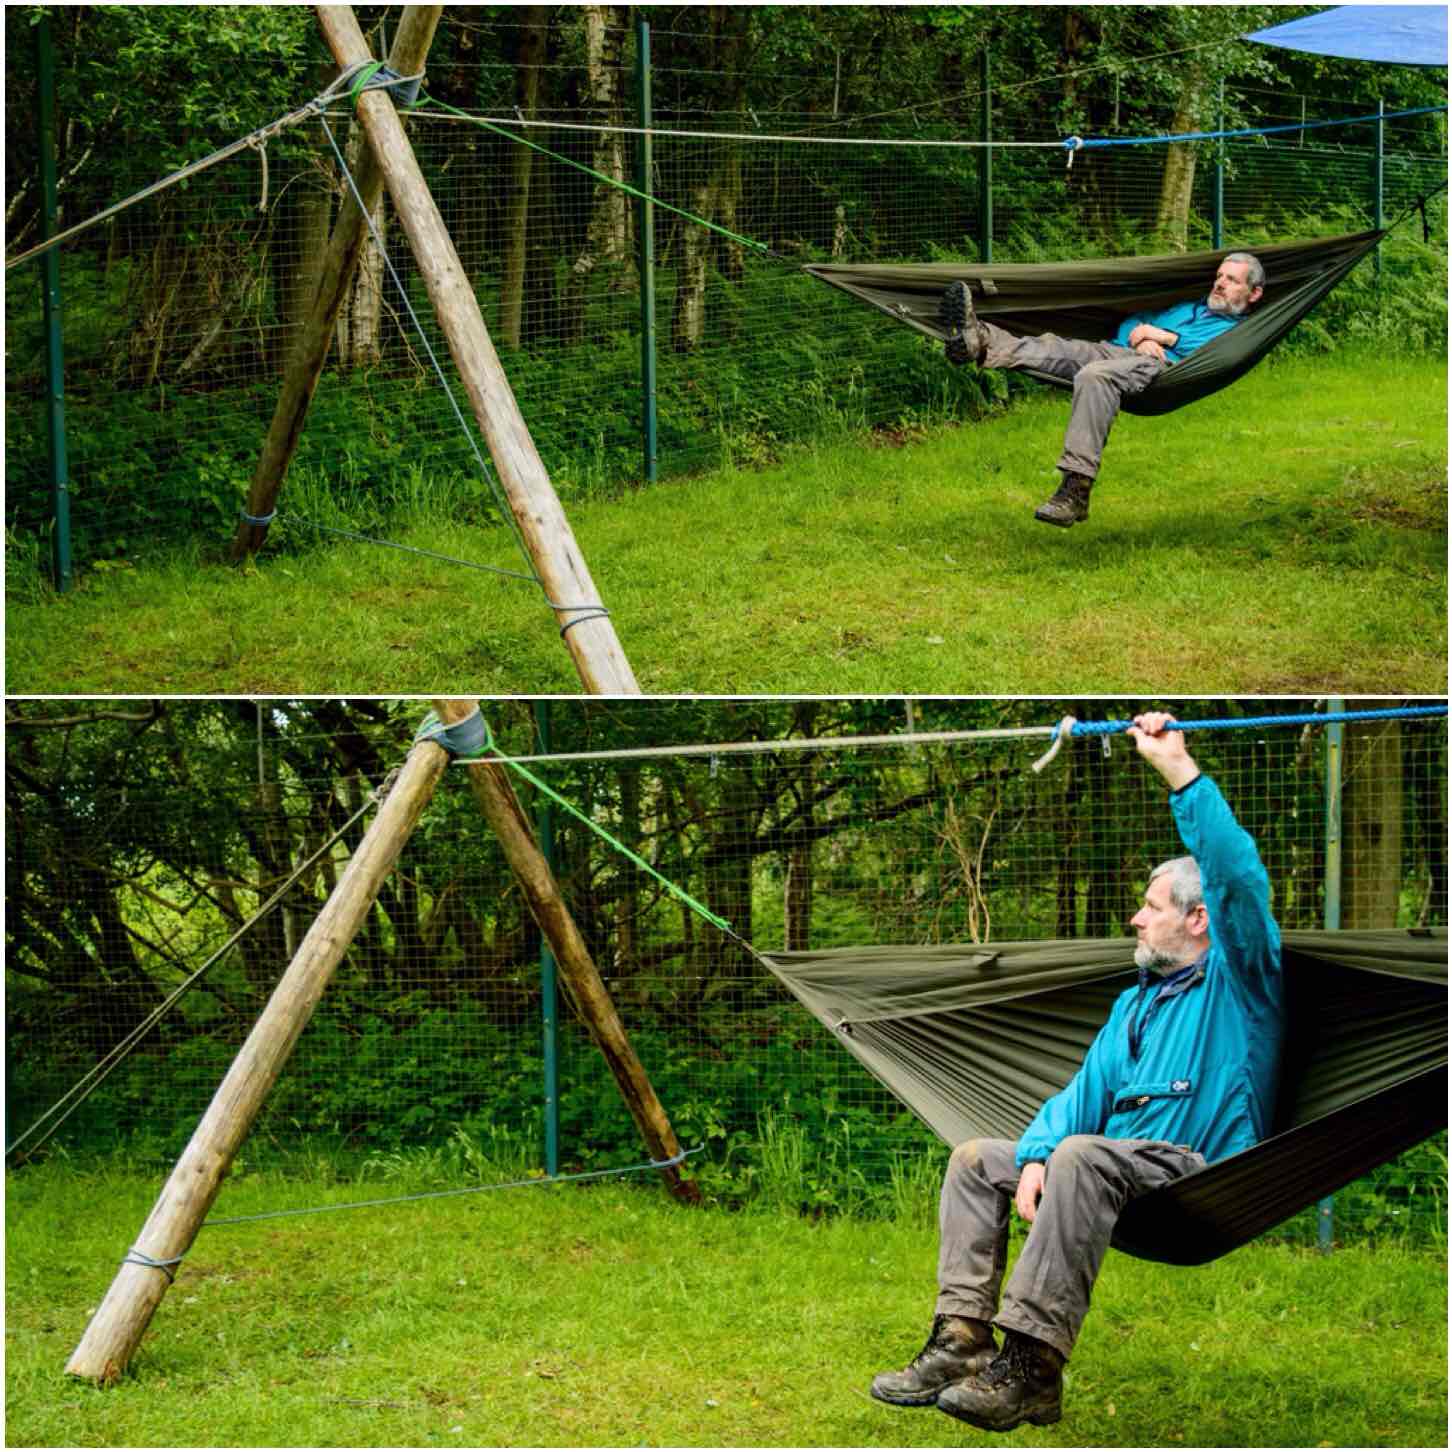
After that it was a simple case of rigging the tarp and Jess setting up home for the night.

i
Setting up home

This was a great solution from Dave to our missing tree problem and took less than an hour to complete. Jess slept the whole night soundly in her impromptu sleep system and I was chuffed that I managed to capture most of the stages in its construction.

j
A Good Nights Sleep

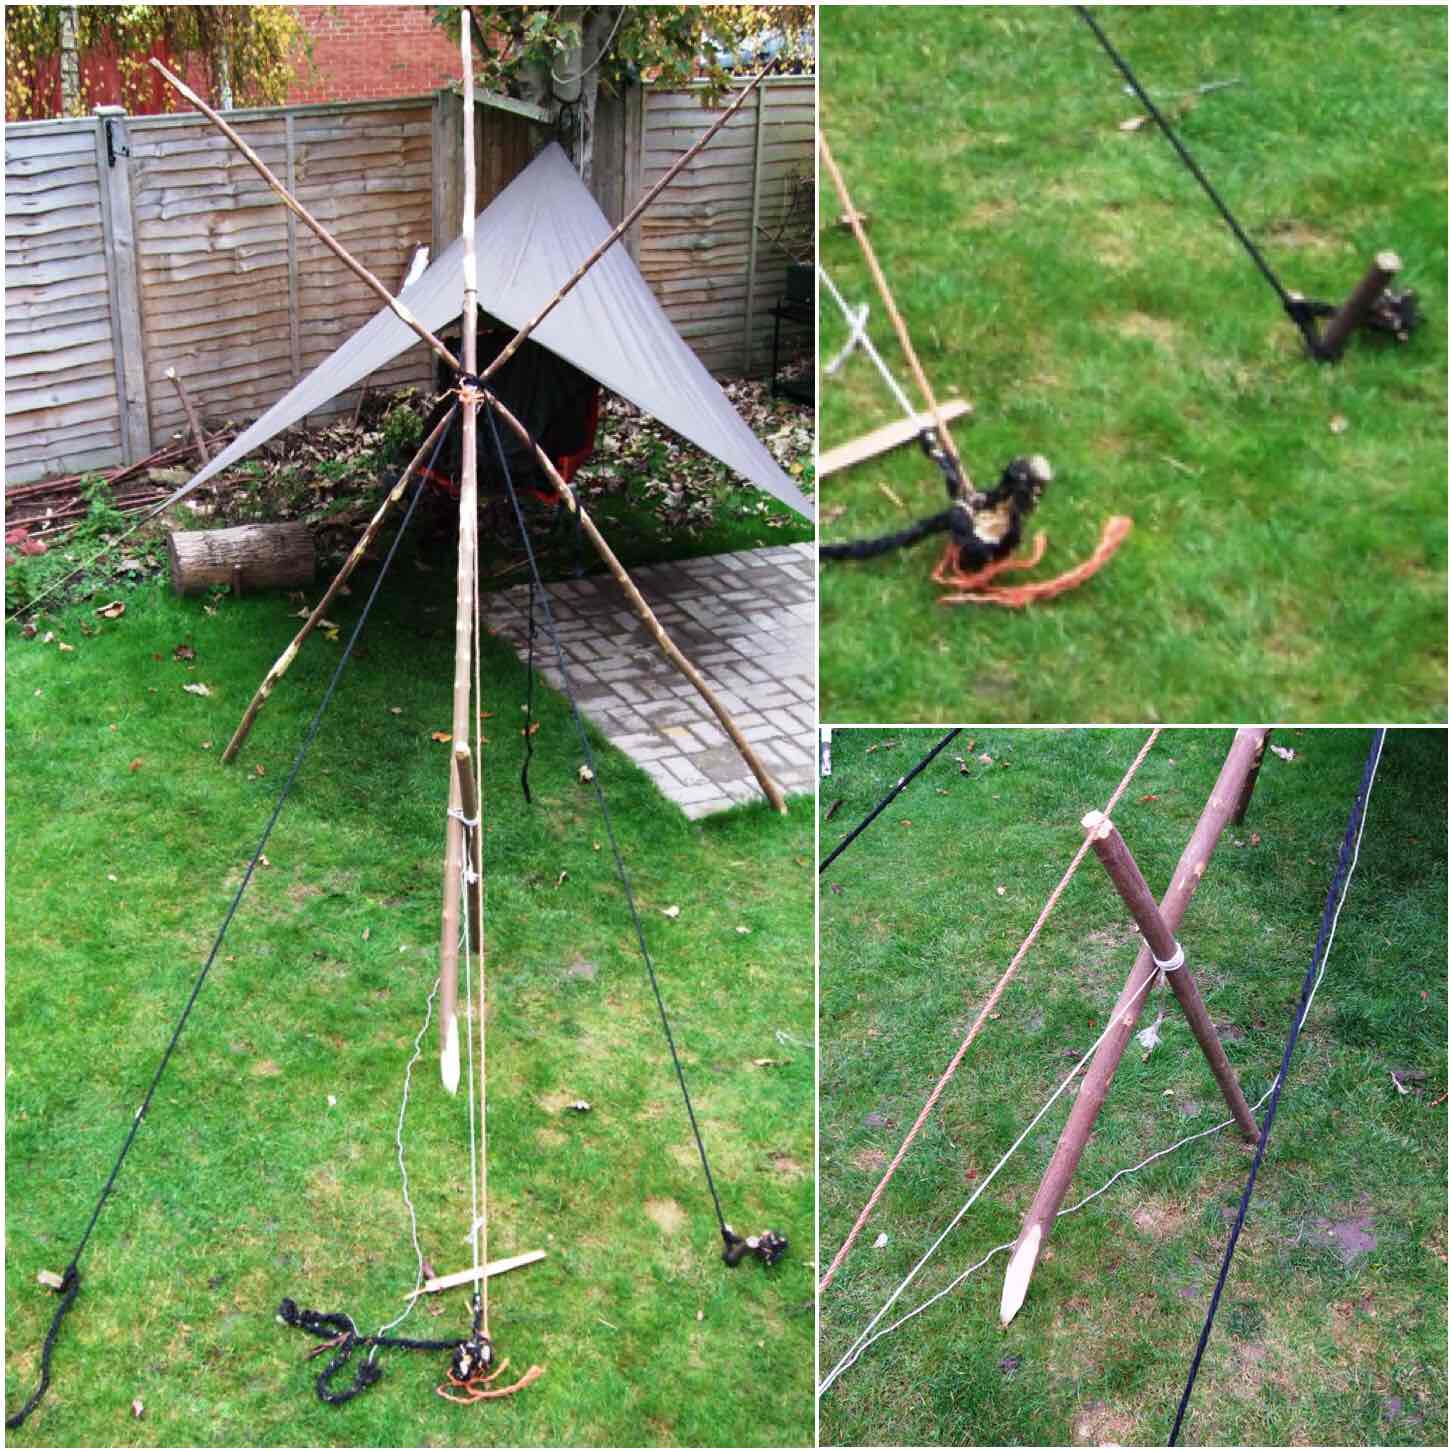
If you are interested in making a slightly smaller and more mobile hammock stand yourself have a look at my two other posts on this subject,

How To…. Make a Freestanding Hammock Stand

How To…. Mk2 – Make a Freestanding Hammock Stand

Cheers

George

Picture of the Week – Week 23 – A Simple Moment in Time

A picture from a week ago in the depths of Pippingford Park in the Ashdown Forest. I chose this picture due to the perfect framing the canopy gave the cadets and the reedmace you can see on the left.

Adventuring On
Adventuring On

I had stopped to photograph something else and as I turned around I spotted the cadets moving off, so quick as a flash I snapped this simple moment in time before it disappeared forever.

As a photographer I am continually looking for these moments in time, they are rare but they are out there.

Cheers

George

Skilling up in the New Forest

Recently I have been reading a lot on social media about how kids and adults seemingly do not interact enough with nature. This is now the fourth year I have written about our annual trip to the New Forest so I would like to say that whoever writes these general stories has never been out with the Sea Cadets. We immerse both our cadets and staff in nature, so much so that they keep coming back for more. This is the story of just one of the many expeditions we run throughout the year.

This particular expedition is arranged each year so that we can skill up our cadets and staff in Adventurous Training (AT) activities and also to support the annual HMS Hood Remembrance Service at Boldre church in the New Forest.

Photo 24-06-2016, 17 12 58
The Crew

The weekend is organised by Chief Petty Officer Paul Townsend (City of London Sea Cadets) and we have cadets and staff attending both from London and Southern areas.

Our aim is to immerse everyone fully in nature as well as teaching them the traditional AT activities such as map reading, compass work and camping. This weekend saw the cadets finding the skeleton of a fox, observing pond life and scrambling all over the woods.

Photo 24-06-2016, 17 14 20
Relaxing and Exploring

We have various groups set up over the weekend focusing on different skills. There was a group for the Juniors, various groups for the older cadets and a Duke of Edinburgh’s (DofE) group out as well.

I took out a group with Paul, Jess and some of the older cadets, The cadets were looking to gain various camping tickets and Jess was under training for her Basic Expedition Leaders (BEL) award. This requires her to have a high level of navigation skill however it also requires he to have the skill to pass that knowledge onto others.

Photo 24-06-2016, 17 15 58
Map and Compass work

Now it is not all hard work and no play by any means. Soon the cadets were flying through the puddles and we took time to rest up on the Saturday afternoon at the hotel near Beauly Rd station. On the way back to the campsite at Ferny Crofts the way got pretty boggy so it was fun watching the cadets trying to keep there feet dry. They soon learnt how to select a good route along the way.

Photo 24-06-2016, 17 17 49
Fun for all ages

Evening activities involved the usual football, netball and run out games before it was marshmallow time.

We had enough wood this year for the cadets to have their own fire and soon it was sparking away merrily.

Photo 24-06-2016, 17 19 49
Woodland TV

On the Sunday morning a group of cadets go off to the remembrance service at Boldre church while the rest of us get on with the mornings activities.

Simon was thankfully with us again this year and ran the galley in the roundhouse. He certainly can make some great meals with very little in the way of ingredients. The Juniors meanwhile cracked on with firelighting with Charlie and cooking with Chrissie. I enjoyed some giant toasted chocolate marshmallows however the orange cakes were left in the embers for a little too long I think 🙂

Photo 24-06-2016, 17 22 02
Sunday Morning Feast

The rest of the staff and the older cadets cracked on with lots of classes. This allowed the trainee instructors like Sarah, Jess and James to gain some valuable time teaching AT skills while training up for their BEL award.

Classes included tent pitching, first aid, bag packing, cooking and compass work. I did not see much of the DofE team as they were out on their expedition on both days however reports back were that they all successfully completed the weekend.

Photo 24-06-2016, 17 26 01
Adventure Training classes

While all this was going on on the Sunday morning the group at Boldre church put on a fine parade and learnt a bit more about HMS Hood. In all my years going to the New Forest for this trip I have never managed once to get to the parade – mind you that would involve me putting a uniform on 😉

Photo 24-06-2016, 17 31 08
2016 HMS Hood Remembrance Service

As I get older the years seem to pass quicker however each year has been packed full of fun. I am looking forward to many more years of visiting the New Forest and passing on my knowledge of nature to others so that they can continue this skilling up cycle.

Cheers

George

Previous years in the New Forest

2013 – Adventures in the New Forest – To play and learn

2014 – New Forest – Our annual pilgrimage to remember HMS Hood

2015 – New Forest Adventures

Forest Flammage

Flammage – A phrase I heard for the first time at Woodcraft School when I was studying for my Bushcraft instructors certificate. I love the word as teaching firelighting has always been a passion of mine. Over the last couple of months I noticed I had gotten some excellent flammage shots.

I teach firelighting using many different methods however when you have lots of kids to teach and not much in the way of time then firesteels do the trick. They do make for some cracking pictures as demonstrated below by my friend Dave Lewis at a recent Sea Cadet camp. When teaching firesteels to very young children I liken them to fairy lights and you can see why below.

Photo 23-06-2016, 10 24 18
Fairy Lights

Now it is not all just one big firelighting fest as we do teach everyone to respect fire and how to be responsible in using it. Charlie got the kids in the picture below to use firesteels to strike onto char cloth and then blow it all into a flame using some dried grass. The resulting fire was kept contained in a fire tray and soon produced plenty of tea and chocolate cakes.

Photo 23-06-2016, 10 22 30
Flammage

Some flammage fun here – we were given some offcuts of soft wood to burn by one of the other Sea Cadet instructors and I had brought along a pre-drilled fire face log rocket stove. With a criss cross fire lay and a well lit log rocket with the parachute in the background taking a picture seemed like a good idea.

Photo 23-06-2016, 10 25 12
Log rocket fire face

I can spend hours watching a fire and when I think the flames are right out comes my camera and I start snapping away. I may take a hundred pictures in the hope that something will appear in the flames.

I call these pictures Fire Faces and in the two below I spotted two old men of the woods – see if you can spot them?

Photo 23-06-2016, 10 20 14
Old men of the woods

I have plenty of pictures of the cadets and my own kids sitting around a fire toasting marshmallows and this simple act is something I never tire off. This evening though really stands out in my memory with the Fire Faces adding that bit of extra light and ambience.

Marshmallows by candelight

Taken in late spring down at my friend Fraser’s (Coastal Survival) during a rather stormy night was this picture of a bunch of hairy bushcrafters sitting snugly around the fire. Needless to say a dram or two helped pass the evening along nicely.

Stormy nights
Stormy nights

My favourite fire picture of the last couple of months though is this one. It is the fire the cadets were sitting around and I played around with the settings of my camera to try and capture the picture as best I could without a flash. I then just waited until a piece of wood split in the flames to capture all the sparks spiralling upwards.

Woodland TV

No doubt there will be a few more Flammage pictures coming up over the summer as the Bushmoot and the Wilderness Gathering approach so I will leave you with these for now.

Cheers

George

Life & Death with a Touch of Decay

Sometimes when I review photographs I have taken on trips a pattern or a theme starts to emerge. On my recent trip to the New Forest here in the UK with the Sea Cadets one of life and death with a touch of decay thrown in for good measure started to appear.

Take for example in the two pictures below. The cadets are sitting in the shade by a pond in the top picture with all the late spring growth going on around them. While in the bottom picture in amongst all the new iris shoots the bracket fungus on the alder trunk is slowly doing its bit for the cycle of life breaking down wood fibres into sugars. Two lovely pictures but ones I could too easily have overlooked.

Photo 22-06-2016, 17 40 03
Water life

While the cadets were getting to grips with the art of map reading in various huddles, around them nature was getting on with its business. A rather forlorn looking spiders web seemed to be full of leaf shoot casings and the roots of some trees seemed to be tying themselves into some weird knots. Quite beautiful to see however I only spotted them when I stepped back to photograph the cadets.

Photo 22-06-2016, 17 41 30
Stopping places

My friend Charlie spotted this little rabbit skull by the side of the pond you saw in the first picture. It was such a delicate little thing and we could so easily have trod on it. I have no idea how it died – maybe it was a fox……………………….

Photo 22-06-2016, 17 45 20
Death – the prey

Well we found the fox – well, we found a fox :-). One of my cadets spotted some bones in the undergrowth and after a little bit of exploration we put together pretty much all of the skeleton.

The skull still had some of the fur and whiskers still attached to it so I assumed that it had not long since died. The cadets I was with were mostly city kids so they were very excited to find the fox. They wanted to take the skeleton back with us but I did not feel that that was right to do so we left ‘Foxy’ to be discovered by some other woodland adventurers.

Photo 22-06-2016, 17 46 01
Death – the predator

The trees themselves were painting a beautiful picture in this cycle of life. We came across some pretty massive artists fungus (top left below) that really stood out against the skyline when you looked up from under it.

There is a certain spot I pass most times when I visit the New Forest where there are a number of holly trees (bottom left). For some reason the forest ponies like to gnaw at the bark. They leave some great markings on the trunk and I love to get the cadets guessing what causes this strange site.

Lastly we spotted this strange tree (bottom right) we dubbed it the Easter Island tree due to its likeness to the statues found there. These growths known as burls/burrs are caused by the tree trying to protect itself from some sort of infection (if I remember my university courses correctly). My bushcrafting friends know they can make for some quite exquisite bowls.

Photo 22-06-2016, 17 49 24
Tree life

Last but not least are these two little critters. The toad below was spotted by the cadets and he tried very hard to pretend he was invisible. The cadets and myself lay down to observe him when we realised he was not running away. After a few minutes we left him in peace to get on with his business (I say ‘he’ but have no idea if that is correct).

A last little visitor to our camp (you can see the camp chair legs) was this little Chaffinch (bottom picture). She was not bothered by us as she searched our fireside for some morsels. I was quite content to just sit and watch her potter about while I put my feet up.

Photo 22-06-2016, 17 50 41
Critters

I never set out to write this blog based on this them of life, death and decay but I was sure glad I spotted it.

Cheers

George

Picture of the Week – Week 22 – My Kind of Classroom

Classrooms are places I spend a lot of my time, some are well equipped, some are just glorified storage rooms however some are just perfect.

A perfect classroom
A perfect classroom

This spot known as Hill 170 made for a perfect classroom for Jess to teach some of our cadets the art of navigation.

Classroom Hill 170 on a day like this has it all as far as I am concerned – a view, shade and the promise of adventure.

Cheers

George

Building the Bug Hotel

One of the requirements for Finlay’s Naturalist badge at Cubs was to build a Bug Hotel. So off to the woods we went with his friend Finlay (yep, two best friends called Finlay) and his sister Catherine to get supplies.

We collected a range of material including twigs, spruce cones, elder shoots and bark. We only took a little from each area we visited but we did visit a lot of different areas and soon had a good haul.

Collage 2016-06-14 20_28_43
Collecting

I had prepared some extra material including bricks, timber, drilled logs, plastic plant pots and grass. I got some good ideas from the RSPB Giving Nature a Home project and also from the blogs shown on the 30 Days Wild site.

To begin with the kids dug up a load of dirt to help build up the base and then set to building the base of the hotel.

Collage 2016-06-14 20_58_20
Laying the foundations

They built two layers of material to attract different insects. I got them to hollow out the pith from lots of elder sticks and they also stuffed grass inside some plastic plant pots. The plant pots have holes in the bottom of them so the hope is they will make good bug nests.

Collage 2016-06-14 21_02_32
Building the Bedrooms

I had found some old roof tiles at the back of the shed and we used four of them to create an overlapping roof to keep the rain out. These heavy tiles also helped lock the rather wobbly bricks into place.

Each of the tiles though had some residents already in place on their undersides 🙂

Collage 2016-06-14 21_05_29
On goes the roof

To finish off they stuffed more material into the hotel and tidied it all up a little.

The longest part of this whole process was the collecting of the material however combining it with a good walk in the woods worked well. I did a little bit of work in the garage sawing the timber to length and drilling holes into the tops of two birch logs. Other than that the kids did most of the work.

Collage 2016-06-14 21_11_52
Finishing touches

I am looking forward to seeing if we get any residents over the next few months. I do hope the hotel provides a snug over-wintering spot for our local bugs and that it is teeming with life next year.

Cheers

George

Picture of the Week – Week 21 – Quality Time

Reviewing my pictures this week I kept on coming back to this one. I would not say it was in anyway a brilliant shot however it is a shot of ‘Quality Time’ – that is time well spent with my daughter Catherine teaching her to use her new camera. She was really taken with all the yellow iris flowers and last years reedmace stalks.

Quality Time
Quality Time

Catherine I feel has a good eye for a picture so it is not hard to work alongside her. This was the first time she had tried out the monopod stand with the camera. Here’s to lots more Quality Time out and about 🙂

Cheers

George

The Adjustable/Lockable Solar Panel Stand

This post is not a full How To…. on building a adjustable stand for a solar panel as the actual steps to make one are very simple. I will not even go into the detailed dimensions of the stand as they will vary depending on the type of panel you have, instead I’ll focus on all the different parts of the stand and how it works.

I wanted my stand to keep the solar panel clear of the ground, and it had to be able to rotate, lock in place (so the wind would not move it), pack away flat and have parts that could be sourced in the woods if needed.

Photo 13-06-2016, 18 46 12
My solar panel stand

Over the last few years my family has come out to join me at the BCUK Bushmoot, wanting to come and explore this magical place I disappear to in South Wales for two weeks every year.
Living without any power was not an issue when it was just me (I could charge my phone up in my car) however my family’s power requirements are slightly higher. After a long day’s playing in the woods the kids like to settle down with a video on my laptop before bed, and that requires power.
I have relied on my friends Fraser Christian (Coastal Survival) and Stephen Conway to recharge the laptop for me over the last couple of years and this year I decided it was high time to get my own set up. I had long discussions with my friend Si Parker on the different types of set ups I could go for. Si has a fantastic level of knowledge and I was soon clear about what I needed. I opted for a CLT400 solar powerpack (Si’s suggestion – with built in regulator and inverter) and a SUNDELY® 50W 12V Monocrystalline Solar Panel.

Photo 13-06-2016, 18 51 06
The arm

The Arm

I’d seen a stand that Stephen had built a few years ago at the Moot that could rotate so I set out to build something similar. I had some scrap wood lying about (from my old hammock stand) and made this T-shaped arm to hold the panel out so it was angled correctly.

The system works on similar principles to my campfire cranes using friction to hold things in place. I worked out the length of arm I would need and drilled these two holes out (just big enough for the uprights to slip in).

Photo 13-06-2016, 18 53 13
The mini lap joint

The other end of the arm I joined together with a small lap joint, some wood glue and a couple of nails.

The Attachments

Below you can see the attachments on the solar panel I added. I just used some wire to hang the panel off the upright however the bottom of the panel required something more flexible.

I opted for some tent bungees, fencing nails and food bag clips. I attached the bungee to the panel by a mounting hole and then wrapped it around the T bar back onto itself. The food bag clip ensures the bungee does not slip over the plastic ball, and the fencing nail stops the bungee slipping off the side of the T bar.

Photo 13-06-2016, 18 56 41
Panel attachments

Testing

I have had this out for a couple of days now and used the CLT400 to charge up my laptop and other small battery packs. Even in low light (it has been very wet over the last few days) the solar panel has kept the powerpack well charged.

I just went out every now and then and removed the back pole, rotated the panel slightly and then hammered the back pole back in. This back pole stops the panel from moving out of its set position. I had originally thought to use guy lines instead of this second pole but I prefer this method because it’s so much easier to adjust as the sun moves (the idea came to me as usual when I was trying to get to sleep).

Photo 13-06-2016, 19 02 09
Fully adjustable

As well as at the Bushmoot I will be using this set up at our Sea Cadet camps to charge the other instructors’ phones and radios.

Somehow though I think the family will be wanting to bring along a few more appliances to the Moot – I am hoping it will not be the hairdryer or the XBox 🙂

Cheers

George

Nature Based Bushcrafting

Over the last few months I have not done much in the way of bushcraft so there has been a slight lack of How To …. tutorials coming out. I plan to change that after the Moot (where I will be looking for inspiration) however I have been getting out on little trips recently to photograph nature.

This post is just to record some of the moments I have had over the last few months. Starting with an accidental shot of a very wet and bedraggled willow catkin. It was a damp day and I was trying to get a close up of a bug but after looking at the picture found the catkin to be of more interest.

Pussy Willow

Not long after ripping a muscle in my calf I hobbled out into my garden and applied the 20 metre rule. That is stand still, kneel down, sit down and lie down but continually look around you for approx 20 metres and you should see something worth shooting. When I eventually laid down I came up close and personal to these beautiful little Forget-me-nots

Forget-me-nots

There was a re-wilding theme on the BCUK website a couple of months ago and I was stuck for ideas. Not long after the closing date I remembered this place outside our village. Proper re-wilding you could say 🙂

DSC_6902
Re-wilding

Back in April I went out for a walk with my kids in Morgaston woods and the bluebells were just coming through. I spotted this slightly thicker patch and after getting the kids to lie down (it was a job with all the pricklies) I got this rather nice shot. The angle of the shot made the bluebell patch seem much thicker than it actually was.

Peek a boo

Another one from my garden during my hobbling period. I was particularly taken with the water droplets on the primroses.

Spring days

My son has been undertaking some nature observations for his naturalists badge at cubs. we have been getting out and about as much as we can identifying trees and flowers such as these lovely Ramsons.

Naturalist badge – IDing the Ramsons

Spring would not be the same without a picture or two of some fluffy creatures. I thought this Greylag geese family looked particularly impressive at The Vyne National Trust property.

The Greylag family

This was a ‘face off’. I spotted this deer in the shadow of the woods while out looking at the bluebells. I had to change the lens on my camera as she was a fair distance away. Normally they run off by the time I change lenses but this one kept me square in her sights the whole time.

Staring contest

We moved on from just identifying plants for Finlay’s naturalist badge to tasting them as well. We tried out a whole range of leaves including the likes of these Jack by the hedge plants.

Naturalist badge – IDing the other garlic – Jack by the hedge

Some of the best finds were literary stumbled on like this complete fox skeleton in the New Forest. It was found by some of my Junior Sea Cadets and we laid it all out onto this log to get a real good look at it. Many of these kids have never been out of the city before so this was quite a find for them.

A Foxy find

I spotted this little butterfly sitting on a Herb Robert flower while visiting my friend Fraser from Coastal Survival a couple of weeks ago. Normally these little devils are away before you can get near them but this one just seemed to be soaking up the sun.

Delicate beauty

One of my favourite pictures was taken last weekend at The Vyne National Trust property. I heard a splash by the side of the lake and turned to see this Coot with a large Signal Crayfish in its beak.

The joy was not to last for the Coot though as another Coot came along and stole the crayfish away – such is nature sometimes I suppose.

A top spot

So although I have not been out doing practical bushcrafting much I have been getting out and observing nature with a keen eye – so you could say it was the more nature based side of bushcrafting.

Cheers

George

Picture of the Week – Week 20 – The Secret Garden

I had to stop and ask myself – ‘Did I just see that?’

Have you ever had one of these moments when you were bimbling along a quiet country lane? Well I did last weekend while down in Dorset on holiday with my family.

The Secret Garden
The Secret Garden

After passing by this little portal in a wall I had to go back for a closer look. It did not feel as though there was anything wrong with peeking into someone’s garden as the portal framed it beautifully. The view went on down a meadow slope, through some trees and finally to a lake.

Now that is a garden I would appreciate 🙂

Cheers

George

Adventure Leaders – 2016

Last April it was time to start the Basic Expedition Leaders course for 2016 here at London Area Sea Cadets. The course is spread over four weekends and the students – if they pass – get accredited by Sports Leaders UK as Adventure Leaders.

I have passed the administration of the course to my friends John Kelly and Dave Lewis. I am happiest working as instructional staff on these weekends – all the paperwork that goes with them sends shivers down my spine 🙂

Photo 05-06-2016, 11 53 45
Classes, classes and loads of admin

The weekend was hosted by Sunbury and Walton Sea Cadet unit (TS Black Swan) where all of the classes took place on the Saturday. The classes were run by Dave Lewis, John Kelly and myself however all the students had to deliver their own class as part of the weekend.

In amongst all these classes we were well fed the whole weekend by the unit staff. This onsite catering allowed us to really concentrate on all the classes (one less chore to do) so thanks to everyone who helped.

I had ripped a muscle in my calf a few weeks earlier (never go trampolining with your kids!!) and thought it was healing well. Needless to say, within 5 minutes of arriving I managed to re-open the rip so spent the rest of the weekend hobbling around. I did enjoy the unit bonfire though as they burned some old boats.

Photo 05-06-2016, 11 53 42
Lots going on – Bottom left picture courtesy of Jacob Leverett

There were many classes from navigation to the law but quite a few hands-on ones such as learning about different tents. It is crucial that Adventure Leaders are proficient in putting up a wide a range of tents as they’ll be faced with all sorts of different types when they’re teaching cadets.

Photo 05-06-2016, 11 53 44
Tentage

I did not get out on the Sunday on the navigation exercise because of my gammie leg, however I did get a great picture of the Swans on the slipway by the unit.

Jess Edwards took the top picture below (taken on the North Downs) and its simple beauty lent itself well to black and white.

Photo 05-06-2016, 11 53 46
Beauty – Top picture courtesy of Jess Edwards

On the Sunday morning I headed home to rest up but the guys all struck out for the North Downs. They had a morning of intense instruction from John and Dave. They needed it, as they would soon be taking the cadets out and about.

Photo 05-06-2016, 11 53 47
The art of nav – pictures courtesy of Lee Diss

The next weekend on the course was last month in the New Forest and that report will be up soon.

Cheers

George