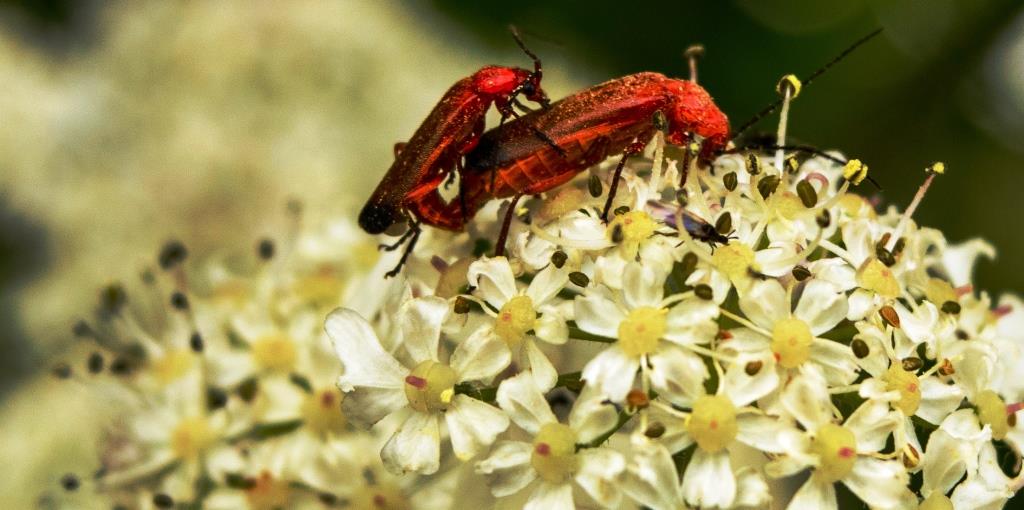
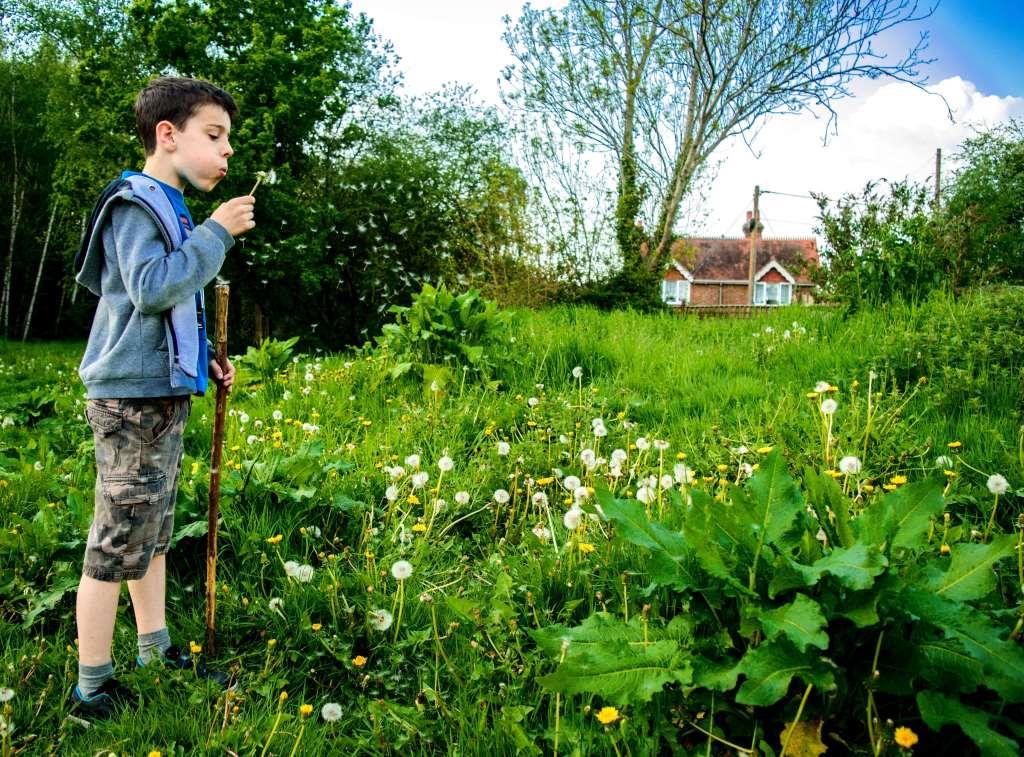
This last week has been a busy one so I have not been out and about with my camera much. I had a look back at my pictures from over a week ago and noticed on my Facebook page a comment on this intimate moment atop a Hogweed plant.
The insects are Red Soldier Beetles and they are having a ‘Special Cuddle’ as my wife mentioned to her friend Brian 🙂
A Special Cuddle
It is so easy to pass on by scenes like this – see how many ‘Special Cuddles’ you can spot in nature tomorrow 🙂
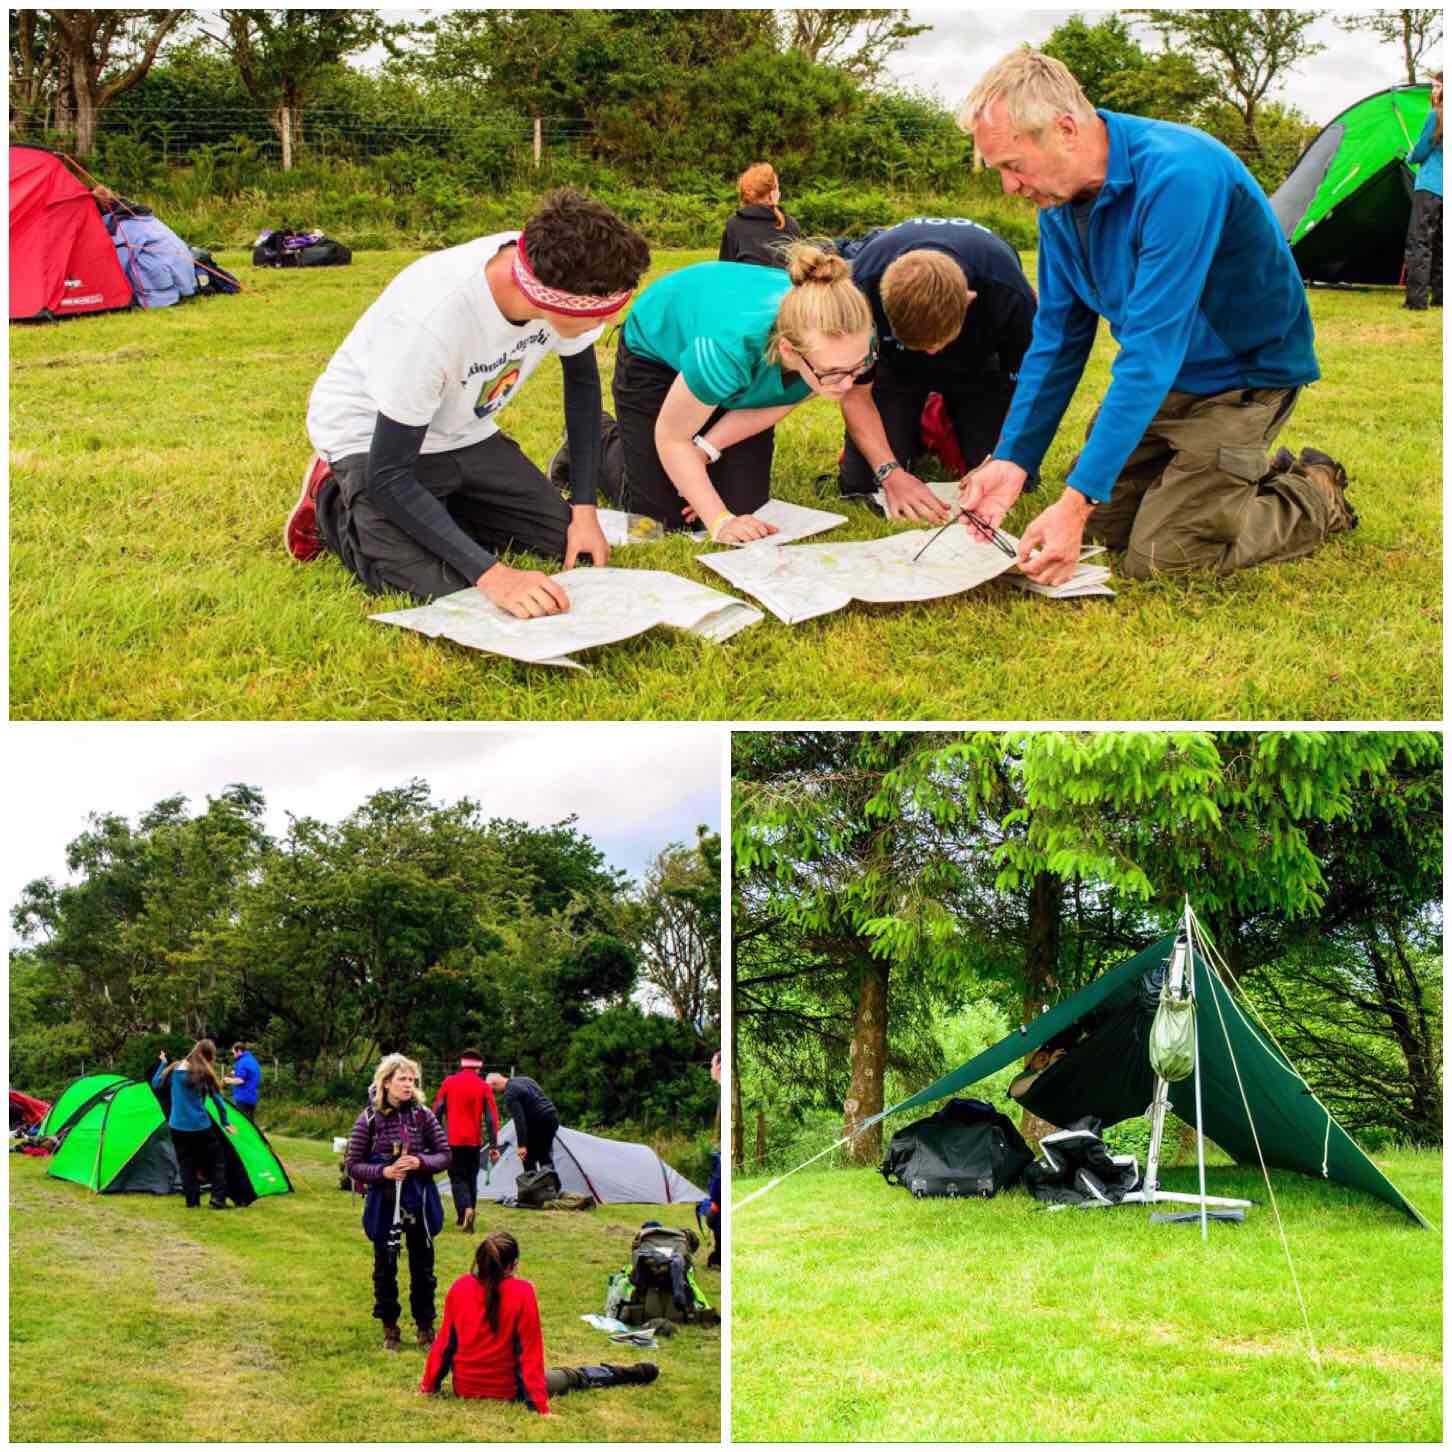
The cadets and staff were from a number of different units in the London and Southern areas. We set up camp initially at the Tavistock Camping and Caravanning site just outside of Tavistock. This is a well catered-for site located on the edges of the Dartmoor National Park – I even managed to set up my hammock here (always a bonus on Dartmoor, where the trees are few and far between).
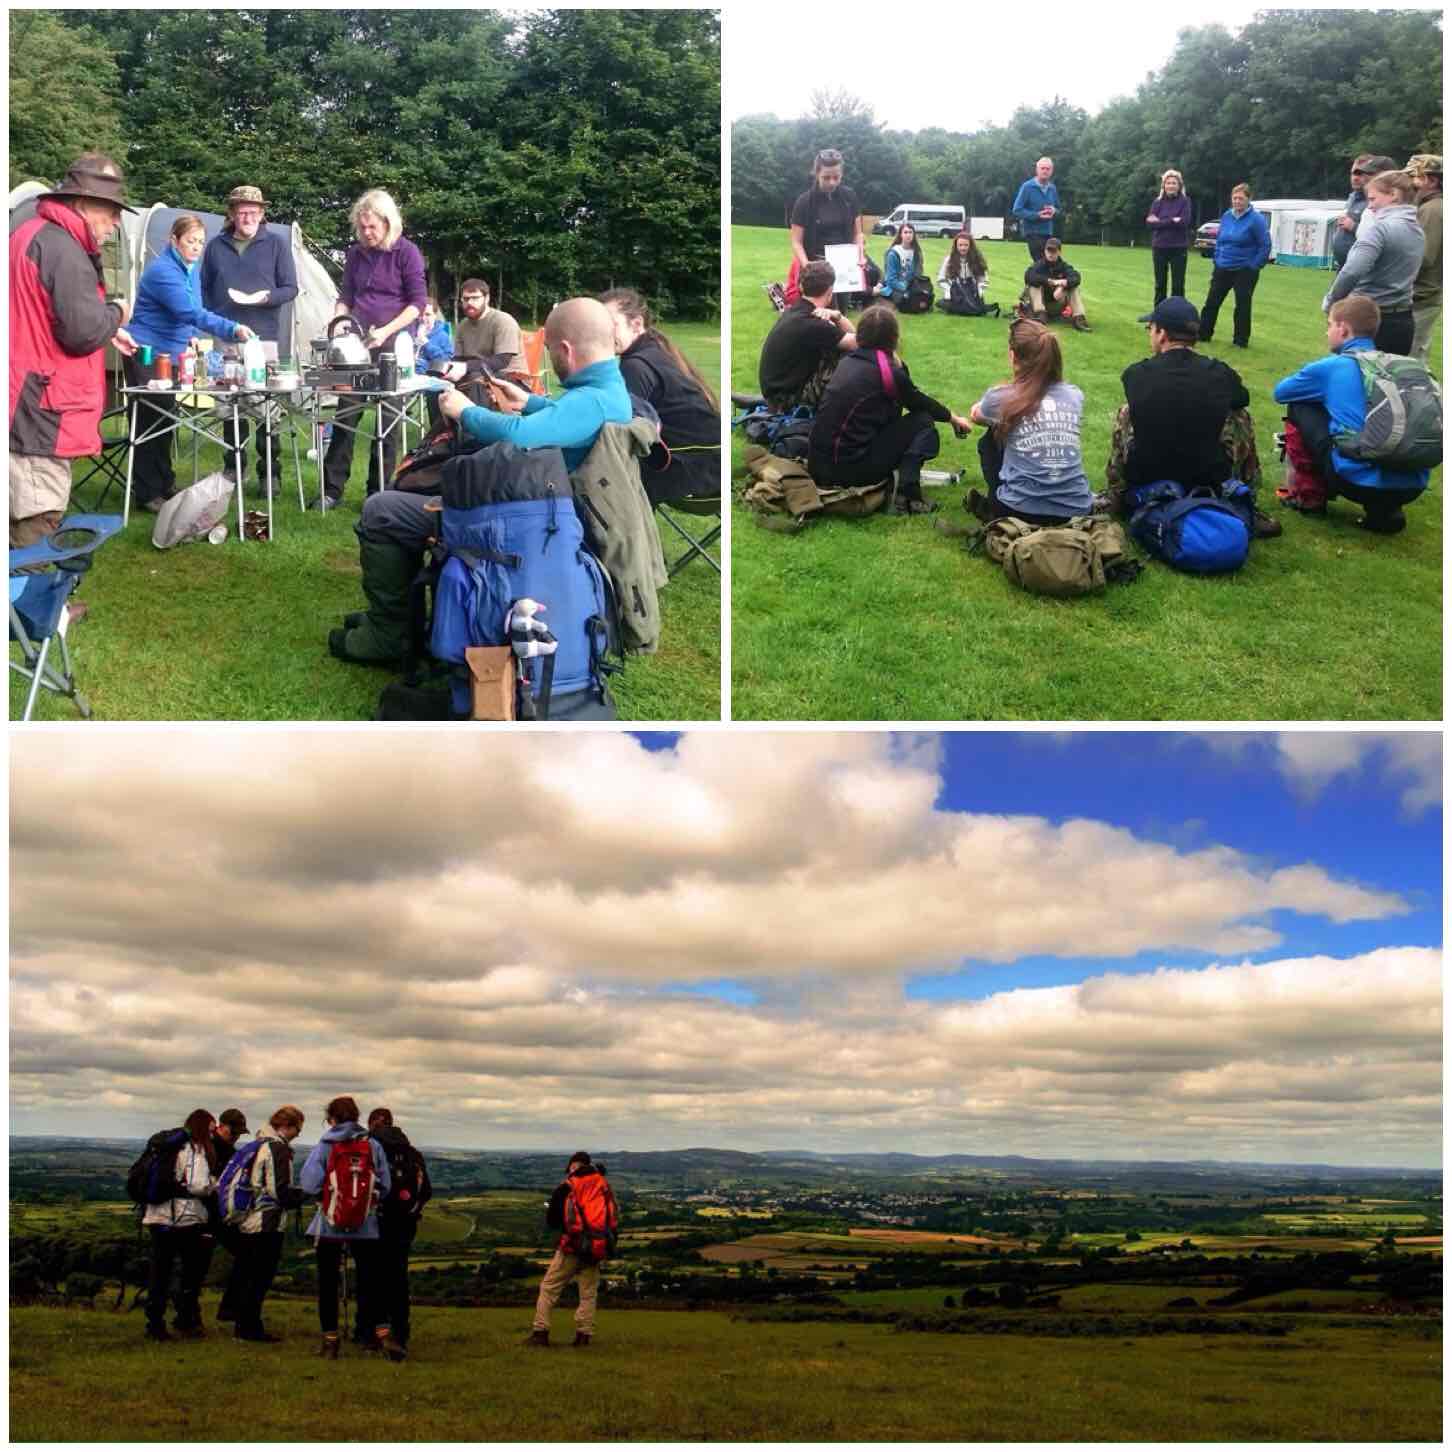
Training day
Time was spent planning and preparing for the first day out on the moor before setting off on an intensive training session the next day.
Prep and set off
Joining us were a number of trainee Basic Expedition Leaders (BEL) so there was plenty of adult cover. We had three teams on this expedition, two undertaking their Gold award and one their Silver.
At least one fully qualified and one trainee BEL instructor were assigned to each team on this first day. The teams spent the day learning the art of navigation and group management around the heights of Cox Tor, Barn Hill, Great Staple Tor and Great Mis Tor to the East of Tavistock.
I spent my time wandering the moor keeping an eye on the different teams and meeting up with them from time to time.
Tuition day
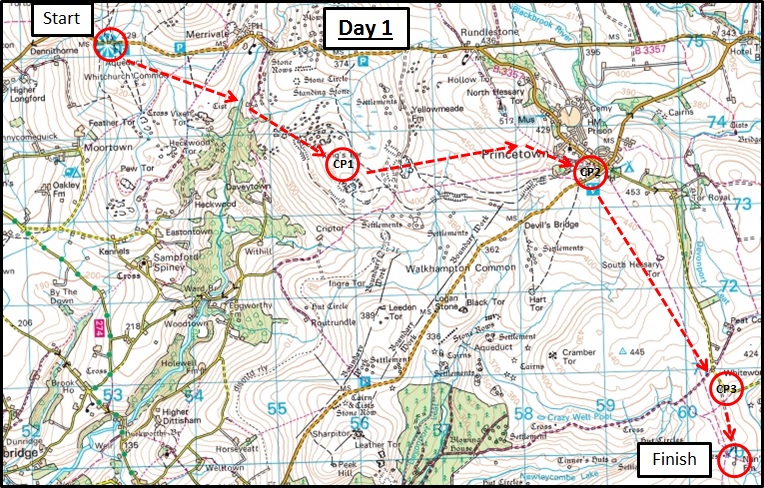
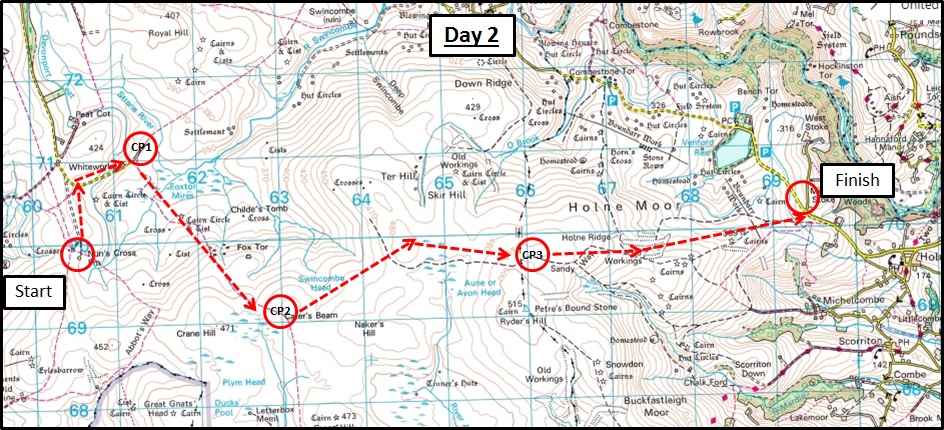
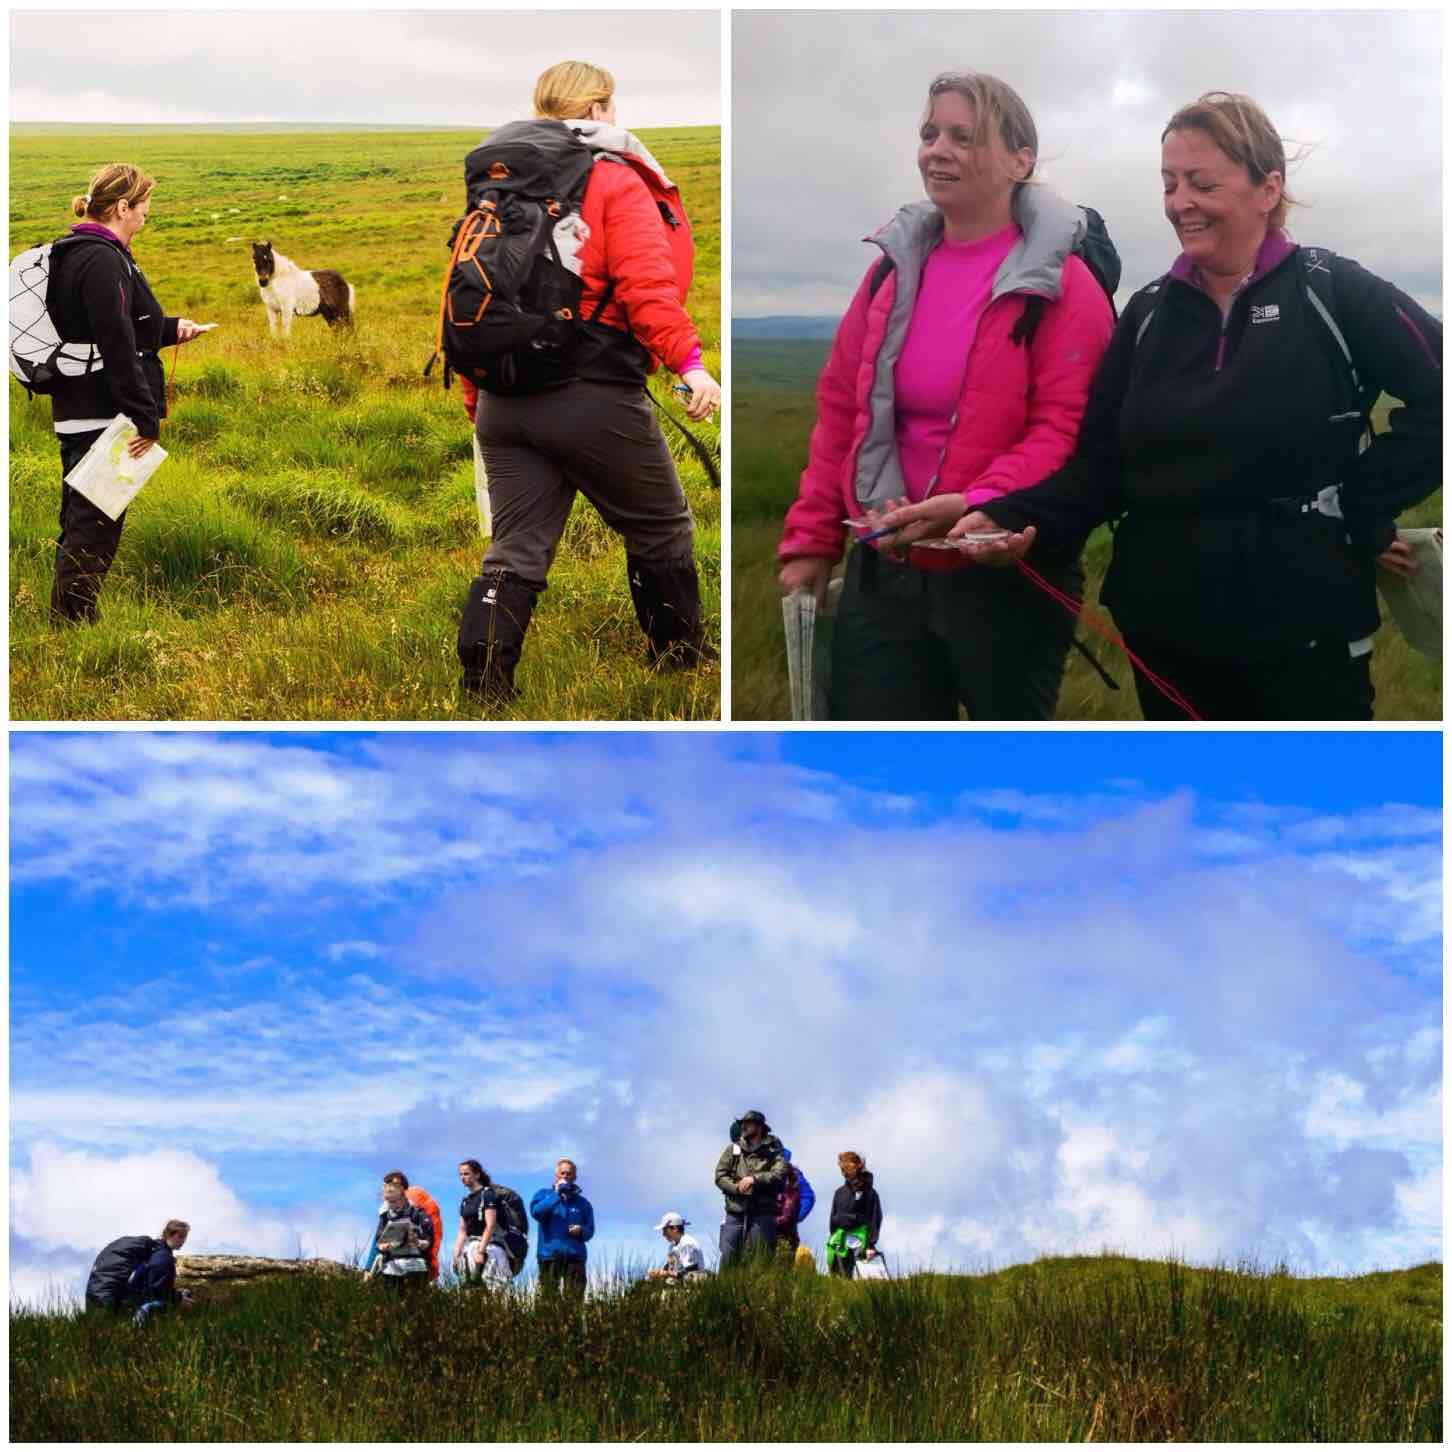
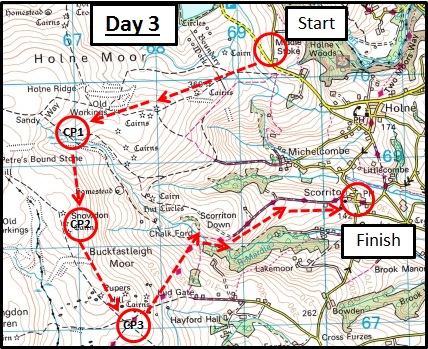
Day 1
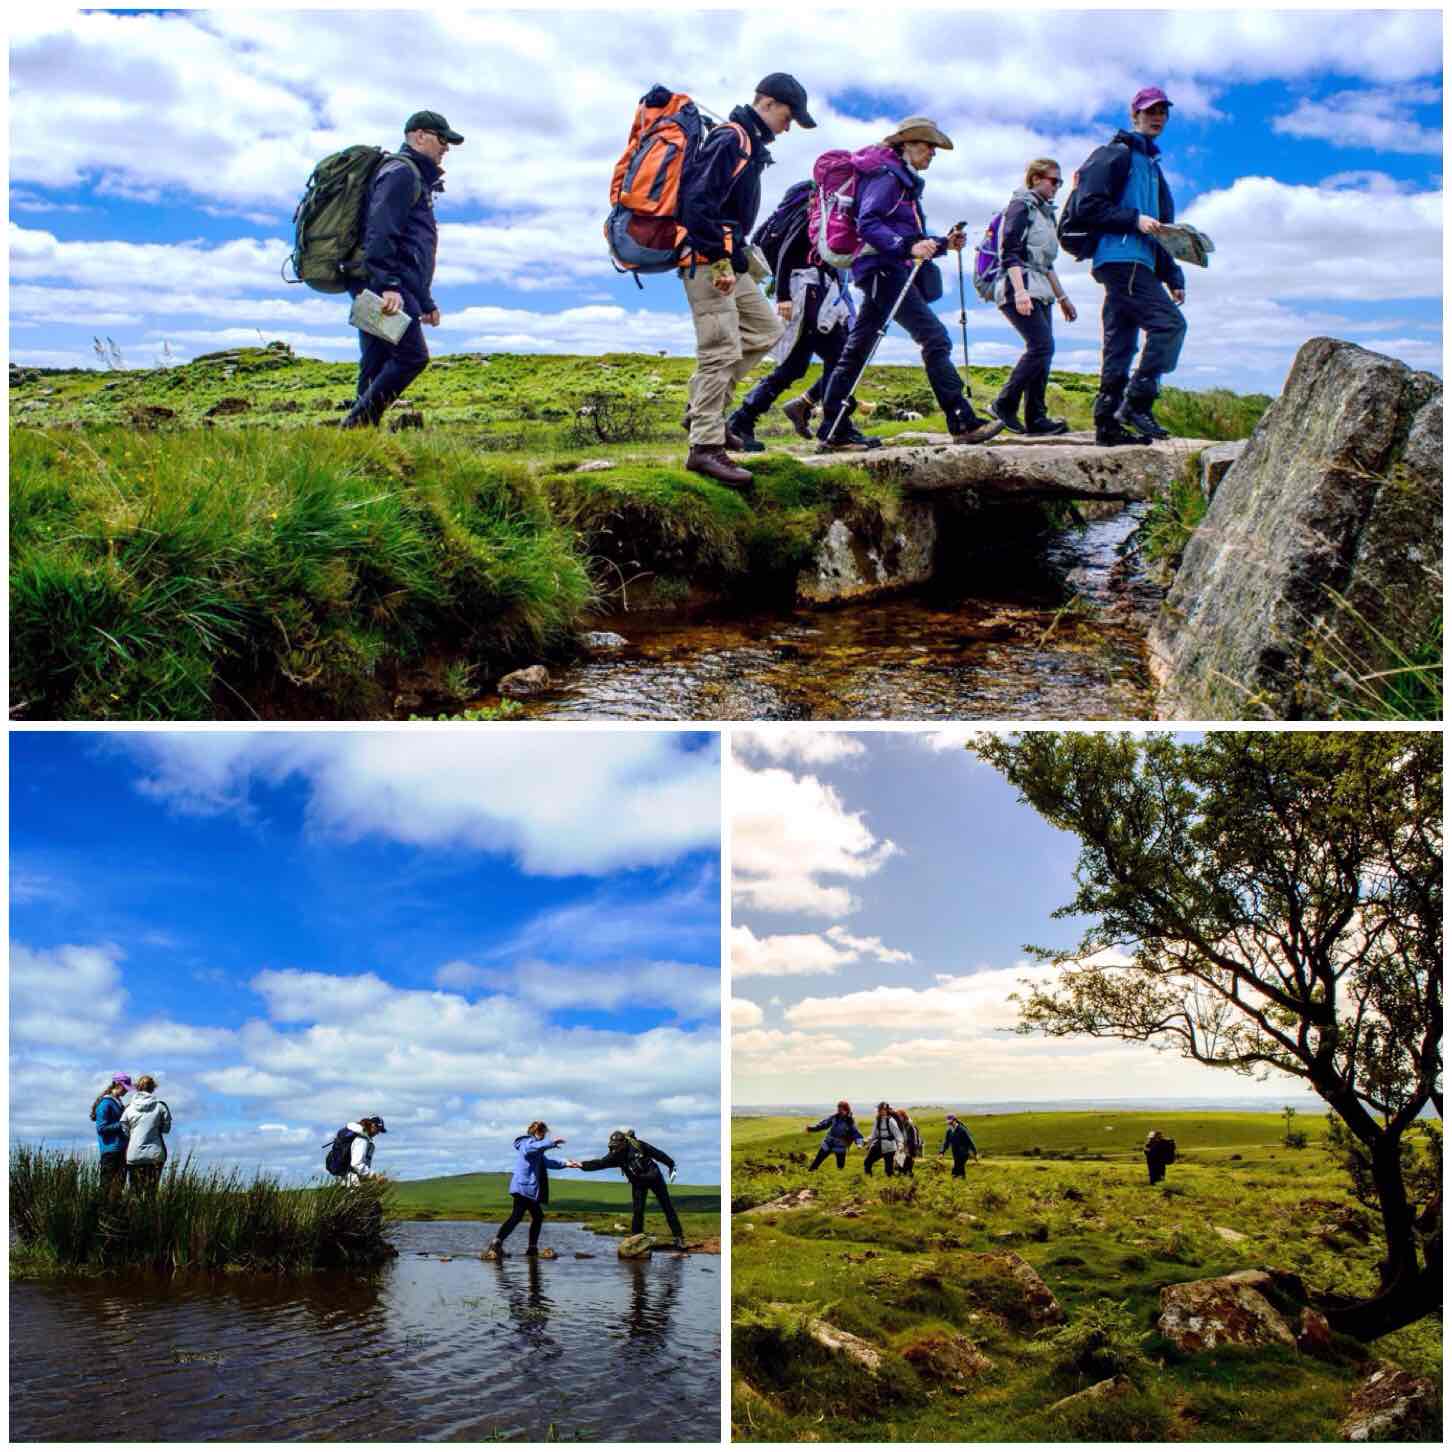
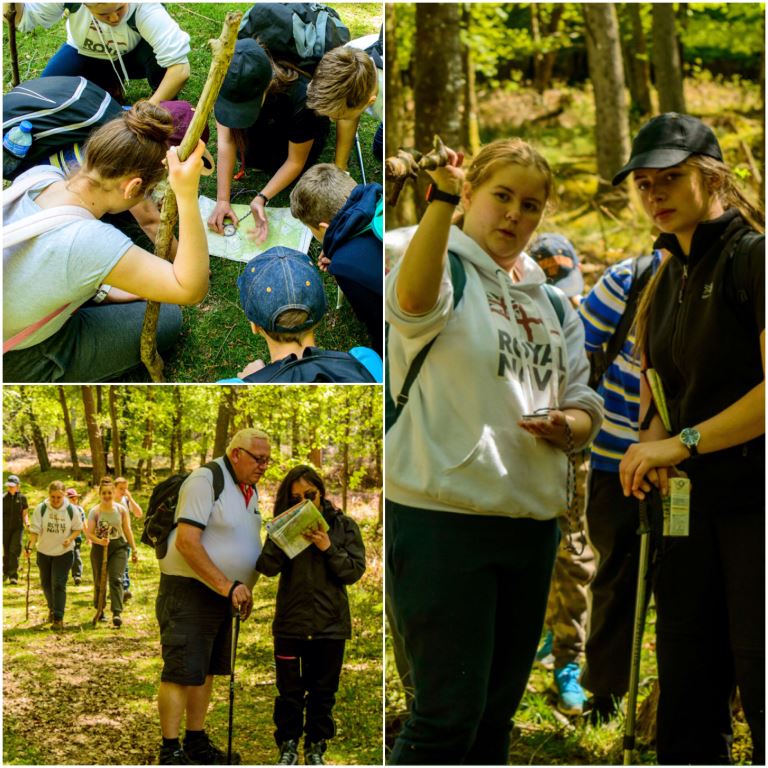
Even though the cadets and staff were only on their training expedition they were expected to navigate the moor without having a trained instructor present. At this stage in their development our job as DofE Leaders and trainers is to step back and keep a close eye on them through ‘Remote Supervision’ – which basically means to keep a good eye on them from afar and meet them from time to time at pre-arranged check points.
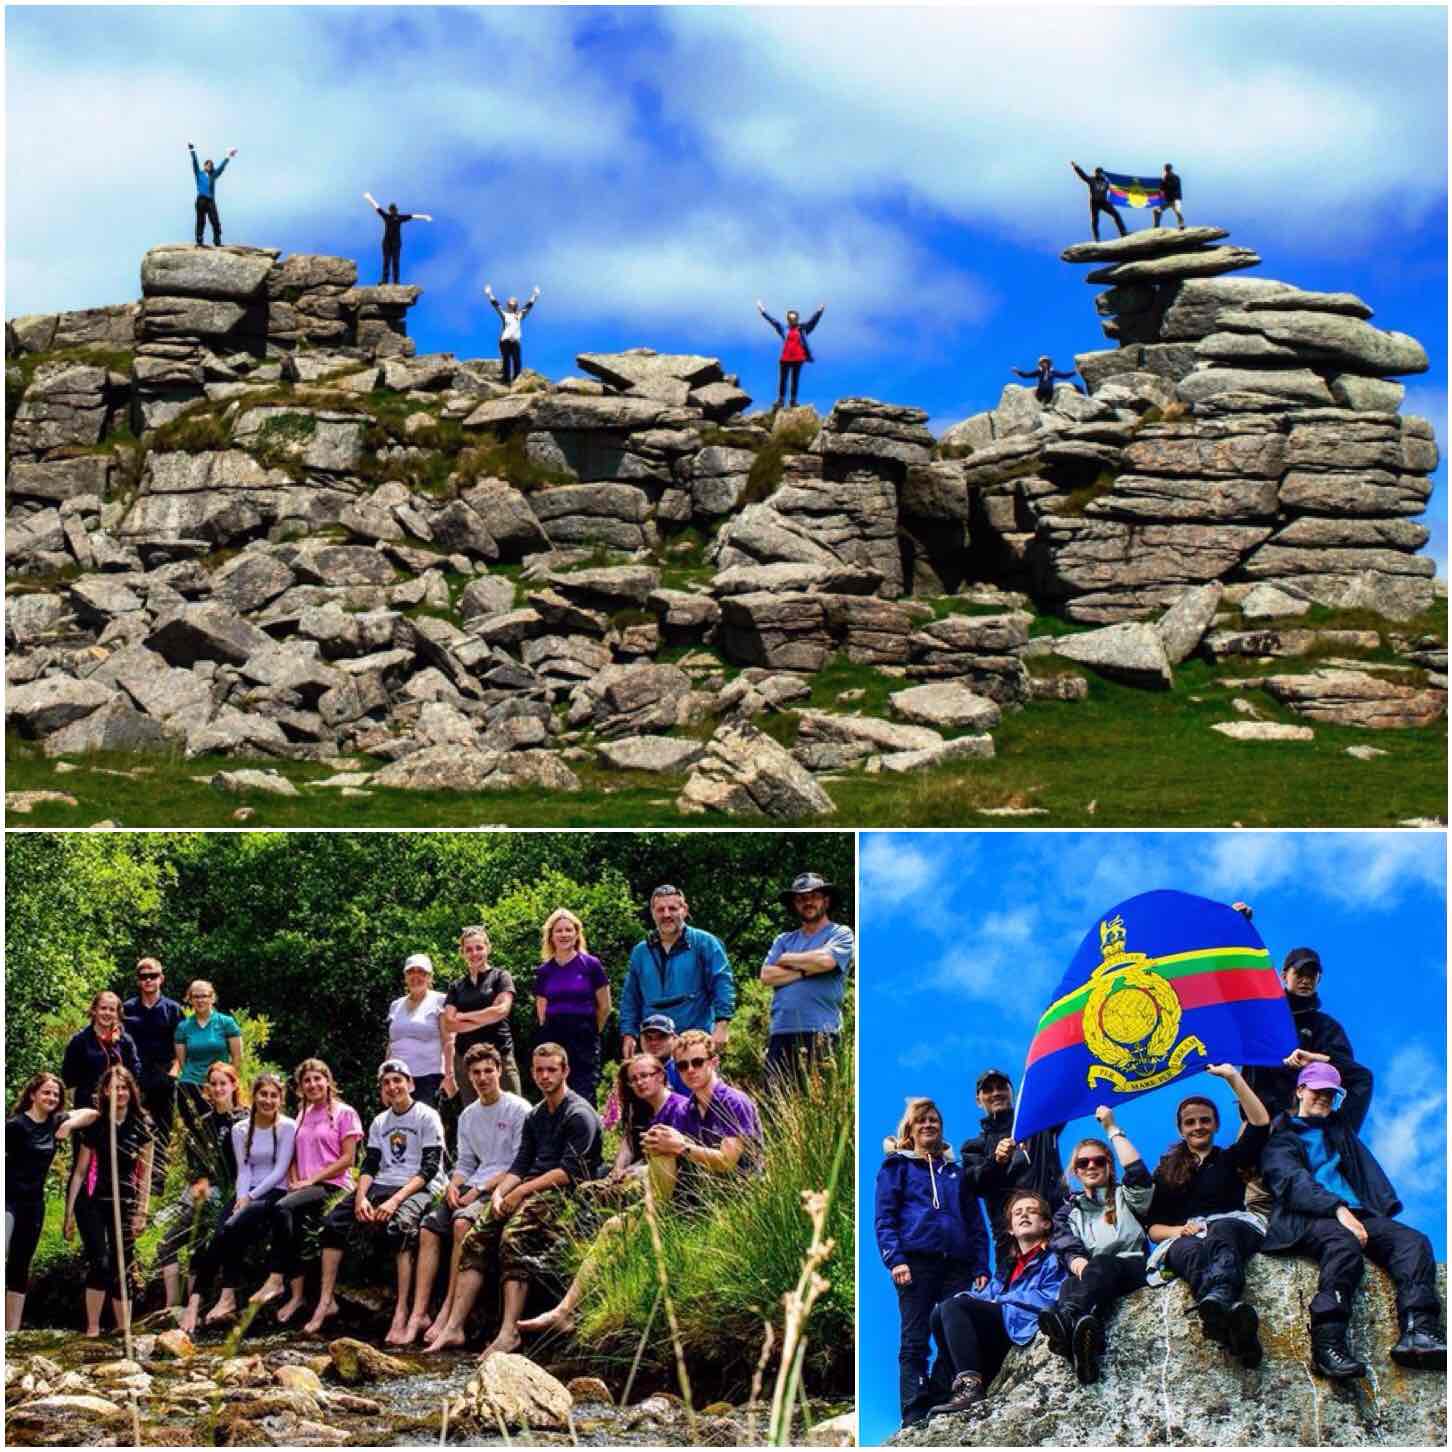
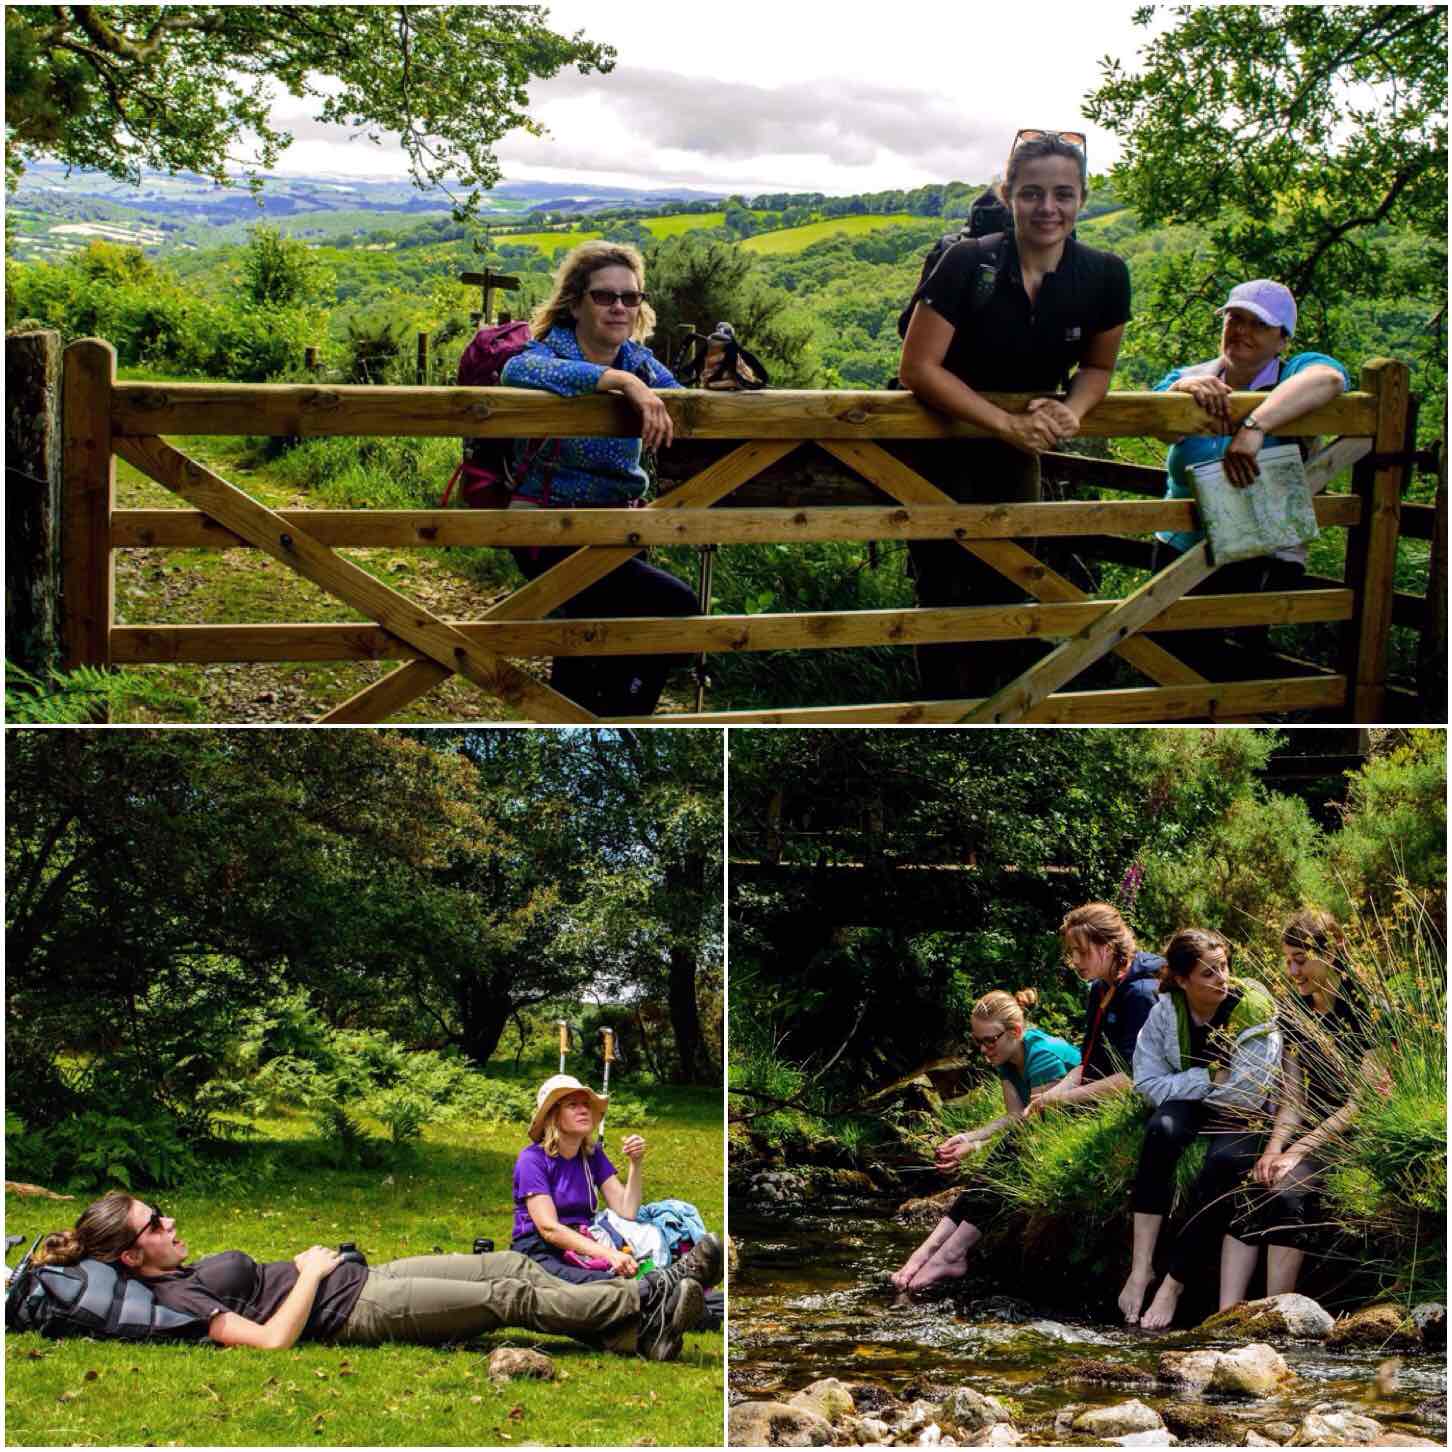
Below you can see the three teams with some of the instructors who were keeping a close eye on them. The bottom two teams were training for Gold and the top team for Silver.
They had full packs for the next few nights and were soon off and away. The observers keeping an eye on them were Lee, Dave, Jess, Carol and Donna.
The teams (pictures courtesy of John Kelly)
While the teams were on the Moor with their observing staff I helped de-camp and move the staff tents to a new campsite in Princetown.
We camped at the site behind the Plume of Feathers pub (thankfully again there was a spot to set up my hammock.
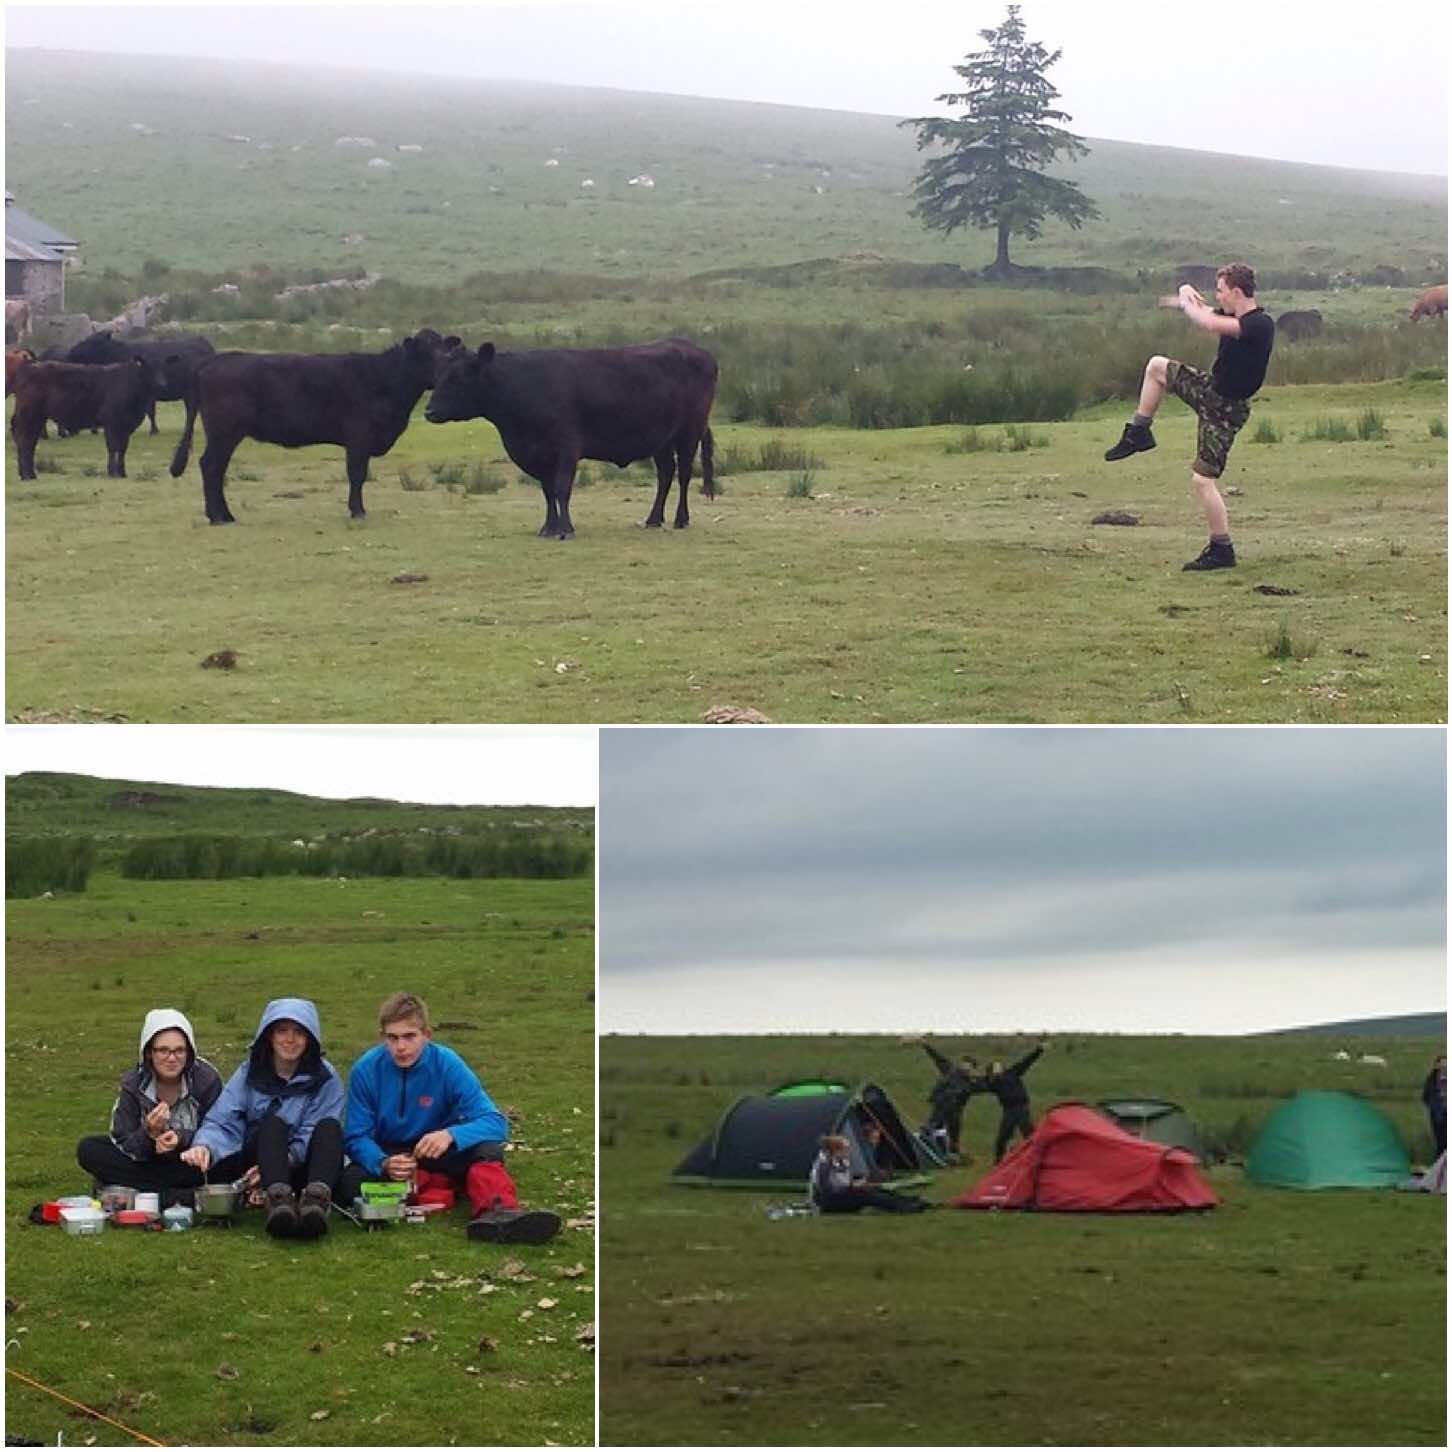
We met the teams as they came through Princetown and they all seemed in good spirits. It was a hot day and we made sure there was plenty of water available at checkpoints. Their final campsite was in amongst a herd of cows – I think it was quite a new experience for some of them.
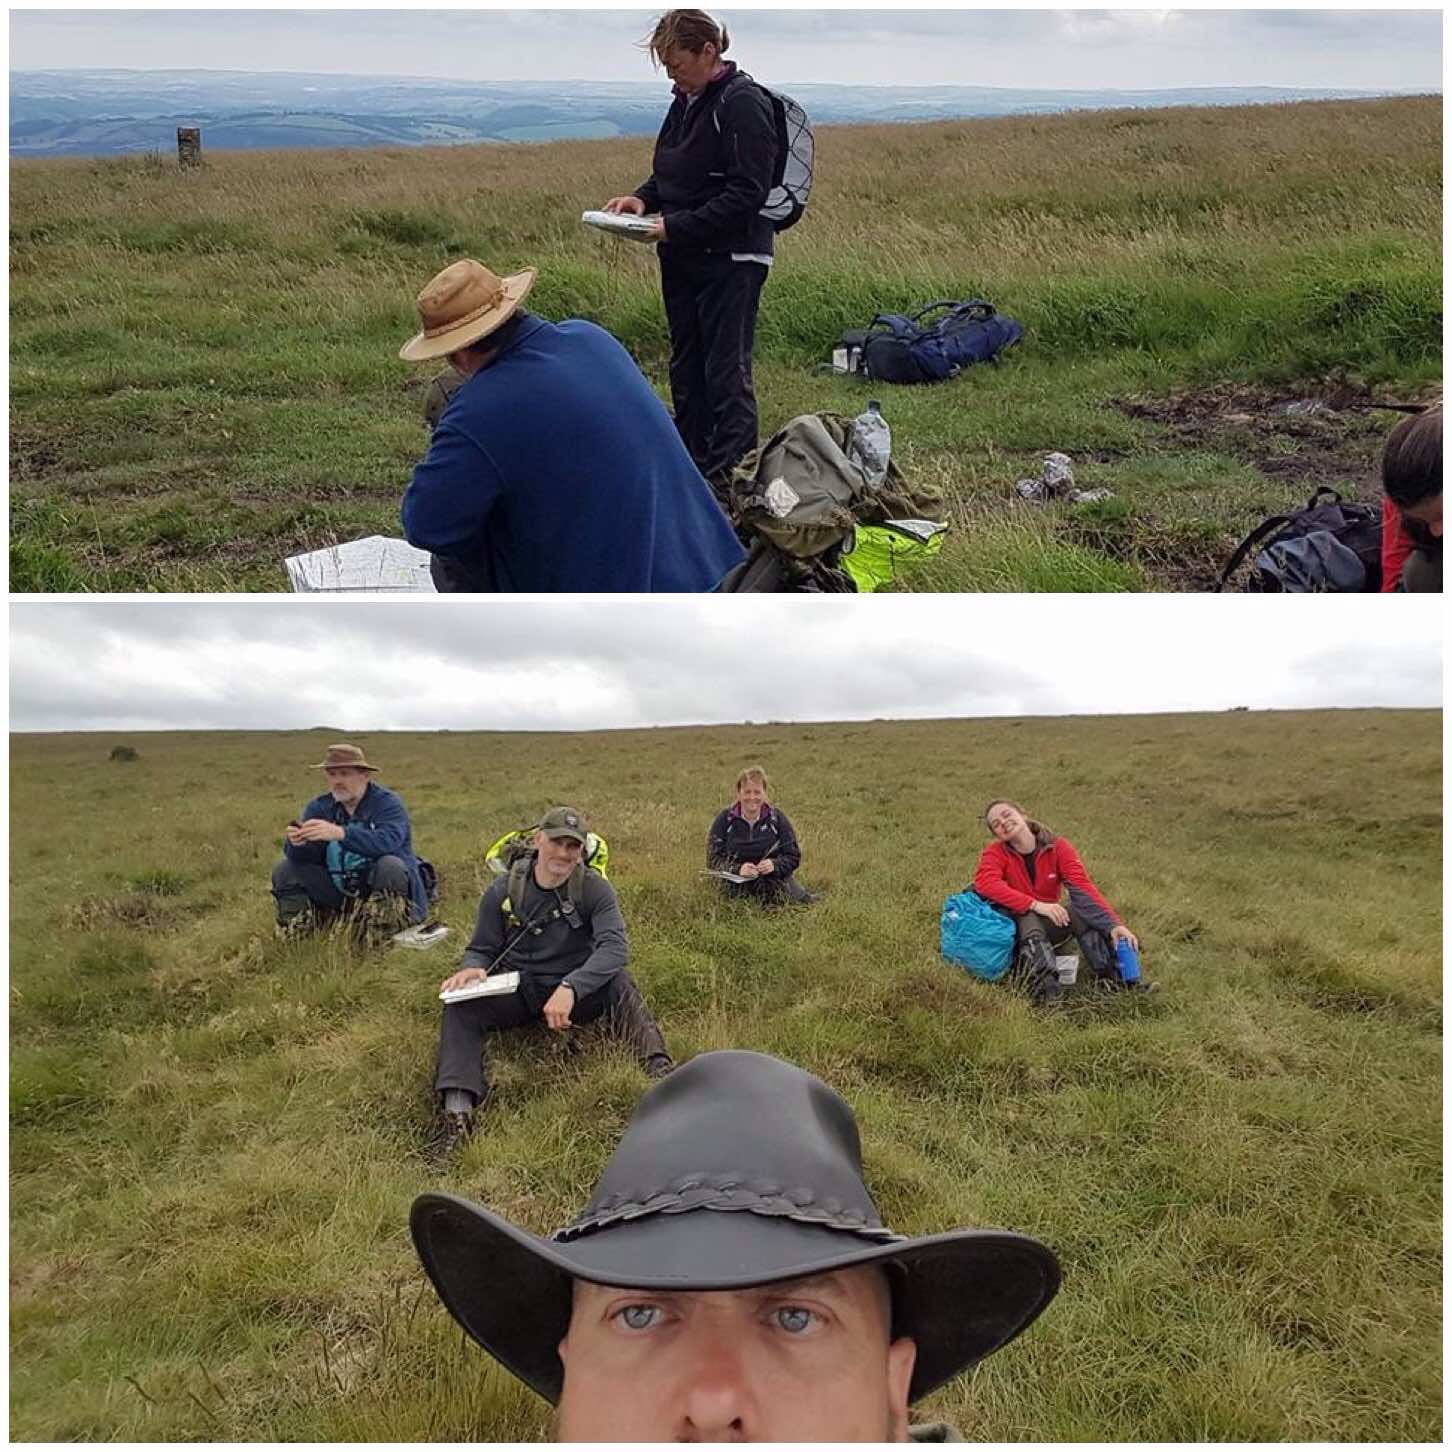
The teams and observational staff (Alan, Carol, Lee, Dave and Jess) were off early so I went for a wander up onto Holne Ridge with fellow instructors John, Sarah and Donna. Both Sarah and Donna are hoping to become qualified BEL instructors so we spent a lot of time doing map and compass work.
Along the way I introduced them to the delights of cleaning their hands in sphagnum moss and Donna even managed to find a whole bog full of the stuff to herself – she dried off soon enough :-).
Once onto the high moors we joined up with some of the other staff and kept an eye on the teams moving across the moors.
Training and waiting
As the day was clear the trainee BEL candidates could really get to grips with their mapwork and Dave got the cracking ‘selfie’ below of us all sitting and observing at our meet up point.
Remote supervision – pictures courtesy of Dave Lewis
Everyone was tired at the end of day 2 (cadets and staff alike) and after preparing their routes for the next day they got their food on the go and had a well earned rest that evening. Chris made sure that the team leaders had their route planned out well so they could brief their team members.
I went with a number of staff to the end point at Scorriton and headed off with Jess. Carol and Donna up onto the Moor to meet the observers. The observers, Dave and Chris, had good visibility so were able to keep me informed by radio of the teams’ locations all the time.
As there was no need for everyone to climb up onto the moors I left Jess, Carol and Donna by a stream crossing that the teams would have to pass and set off up Pupers Hill to meet the teams.
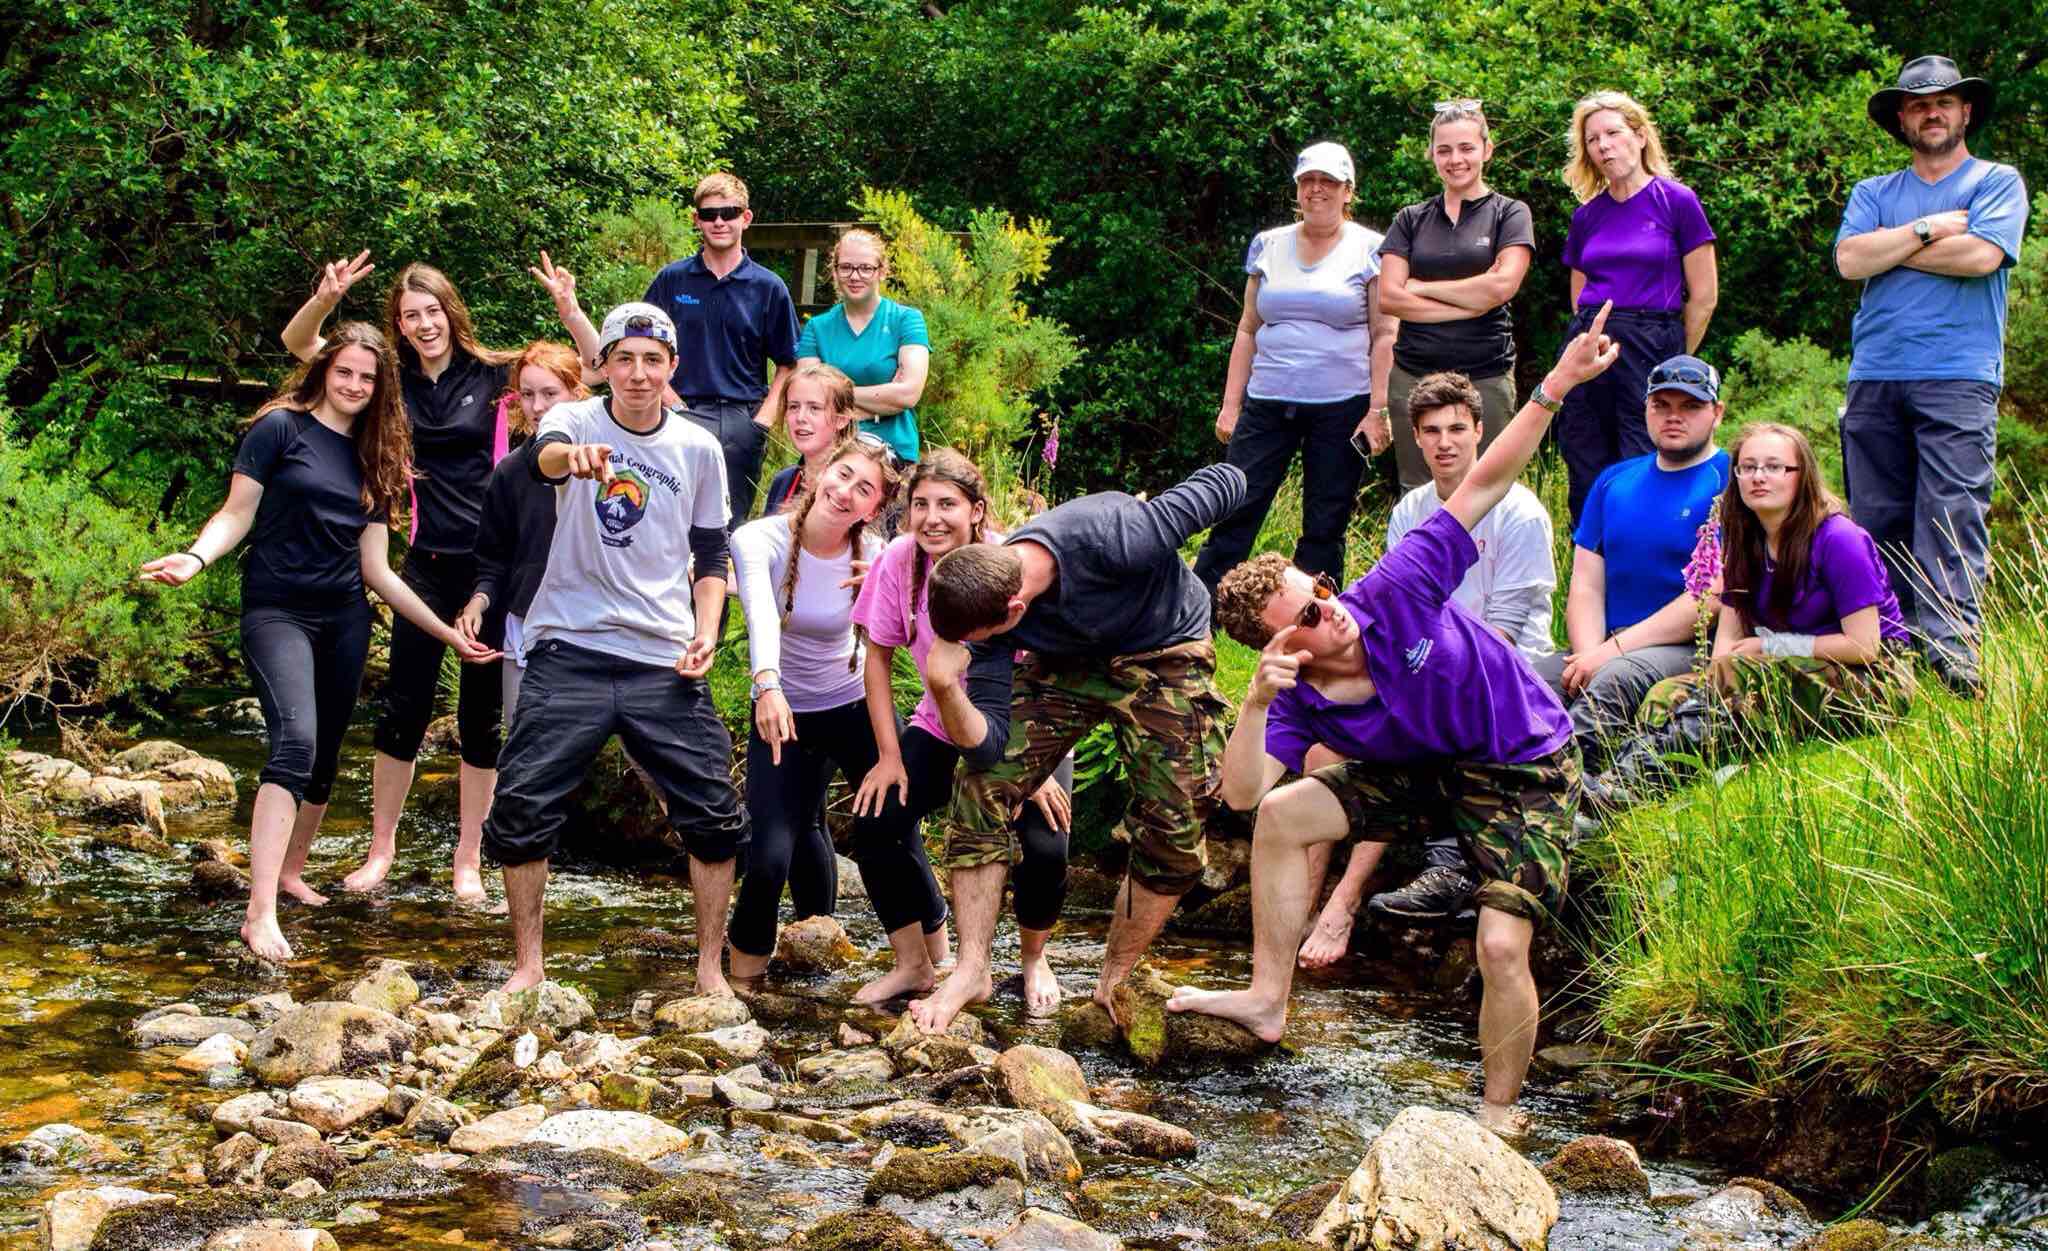
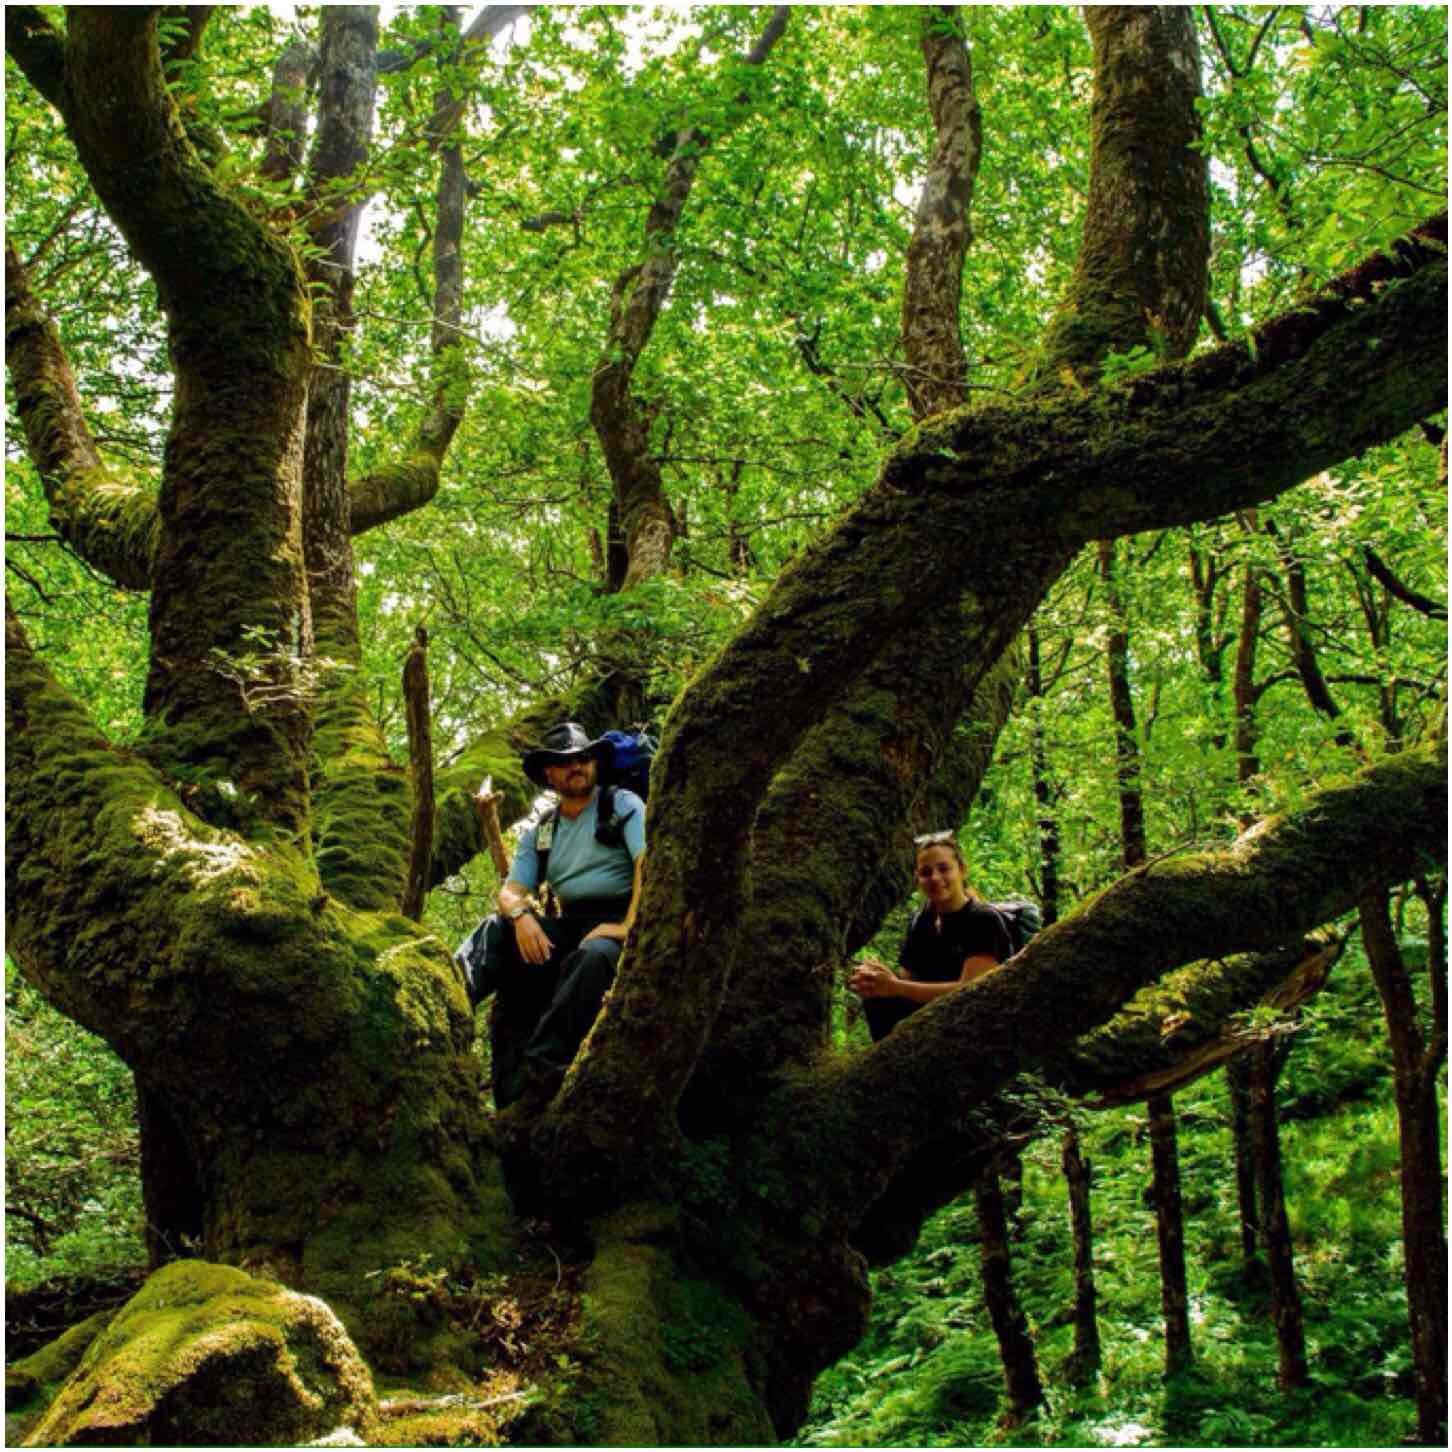
Taking time out
Soon everyone was down off the moor and relaxing by the stream where I got some great shots of everyone. After a good rest we headed off but could not resist a quick climb into this magnificent tree (well, Dave and Jess couldn’t resist it). Based on the amount of moss and lichens on the tree you can begin to appreciate just how wet this area can be.
Sit point
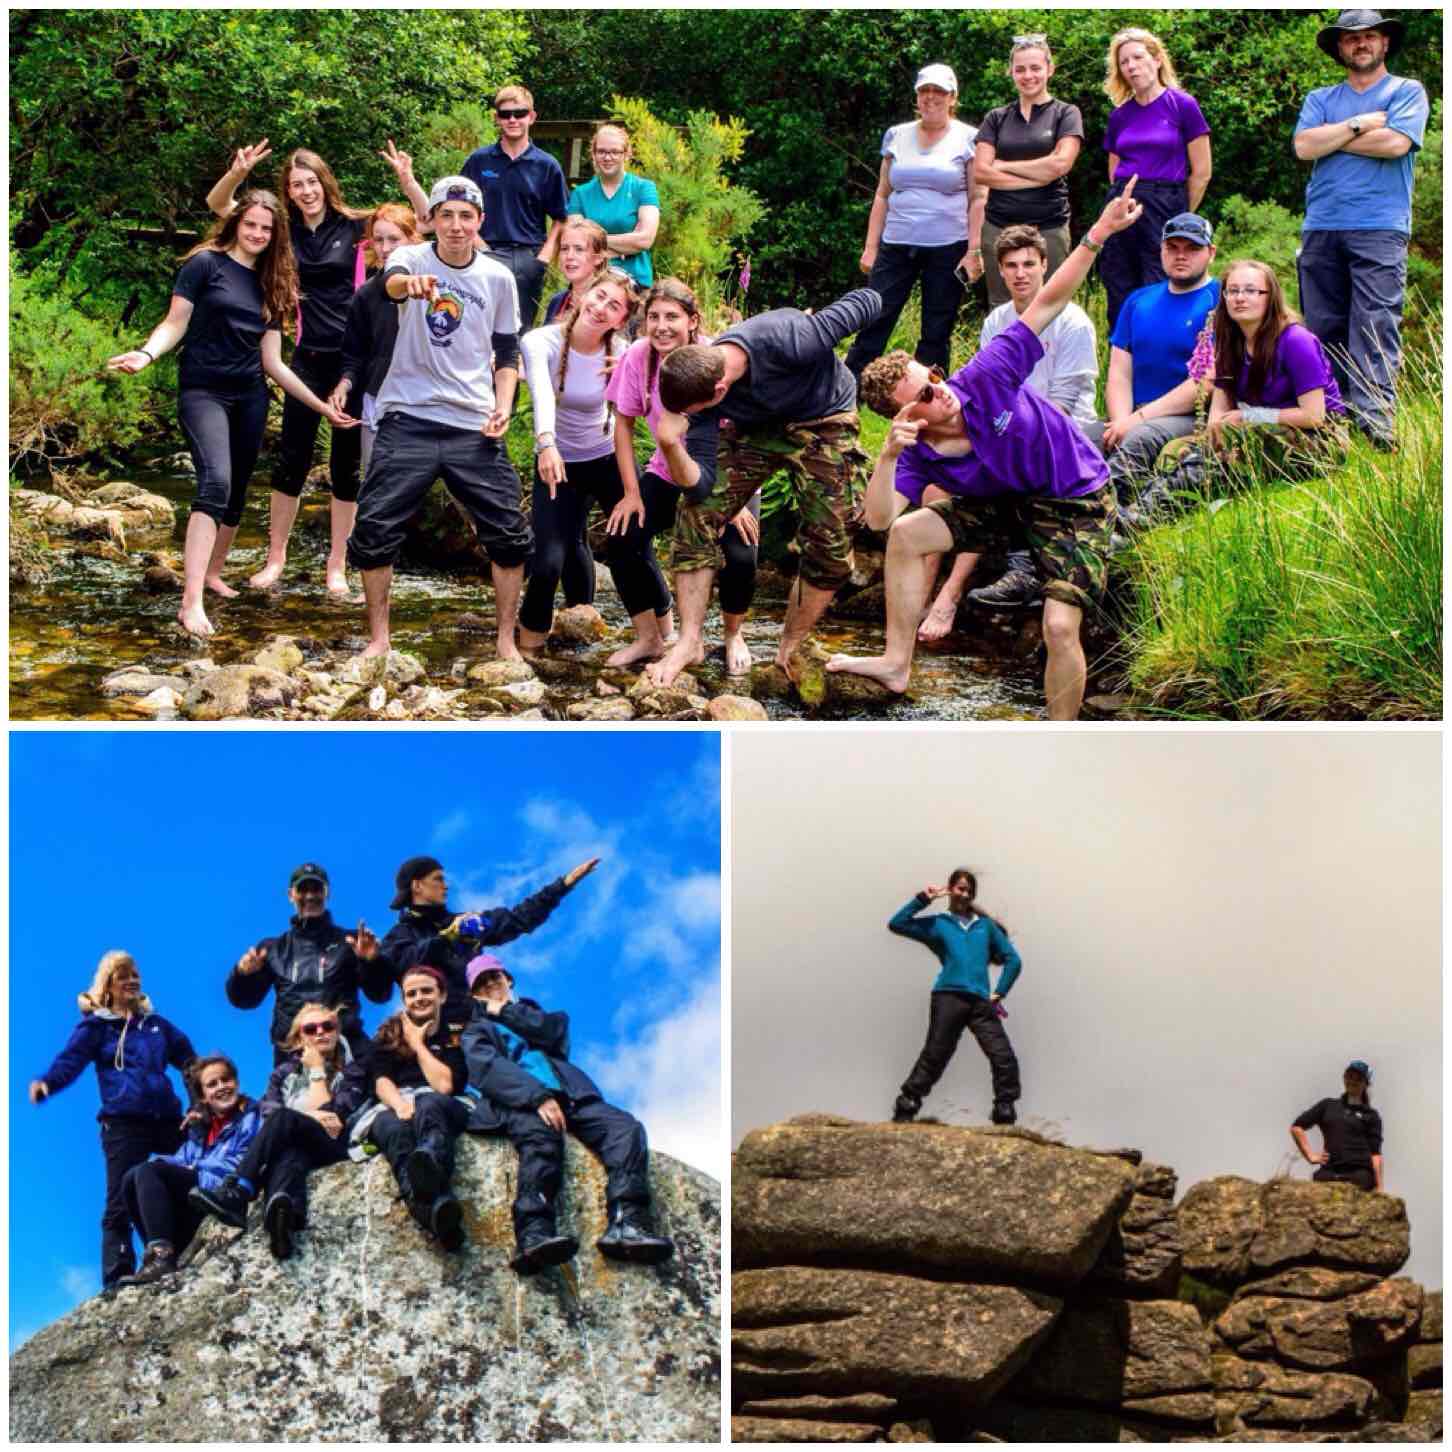
This was a hard week with misty mornings and hot afternoons. Everyone worked well and really developed themselves so that their assessment expedition in October will be a success.
We did though as you can see below have some laughs along the way. Adventuring is hard work – but it should also be fun.
Having fun
I am looking forward to working with everyone again in October when we will be running the assessed expedition on the Brecon Beacons.
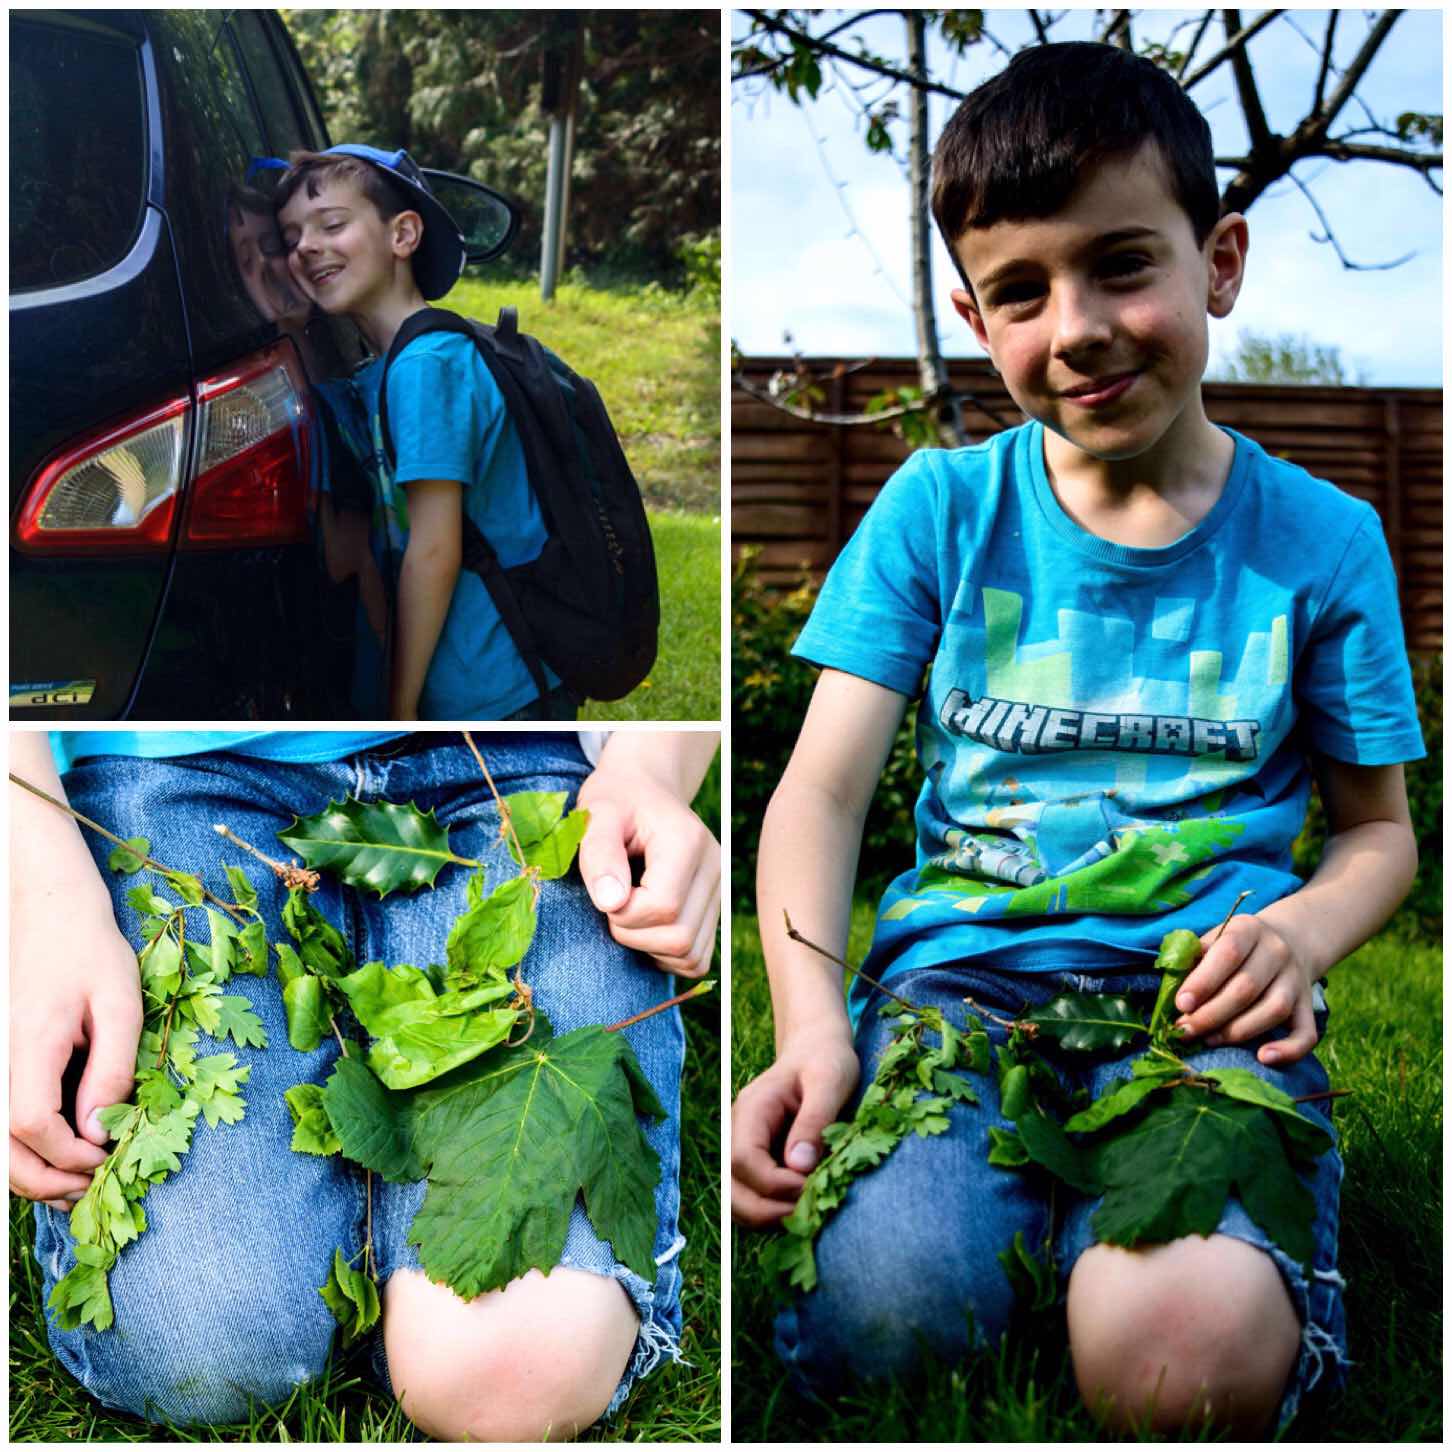
For the last three months I have been out on regular bimbles with my son Finlay to observe and learn about nature for his Naturalist badge at Cubs.
This is not an easy badge to obtain and takes three months to complete with a number of different standards to meet (some of the standards have different options to choose from).
The standards/options Finlay chose to do were:
Observe a natural area over a three month period a number of times to observe and record changes in nature
Learn to identify six trees and six wild flowers
Learn the Country Code
Build a Bug Hotel
Rather than just observe one natural area we spotted three good areas around the village to observe. We visited each area five times over three months to observe the changes occurring in nature.
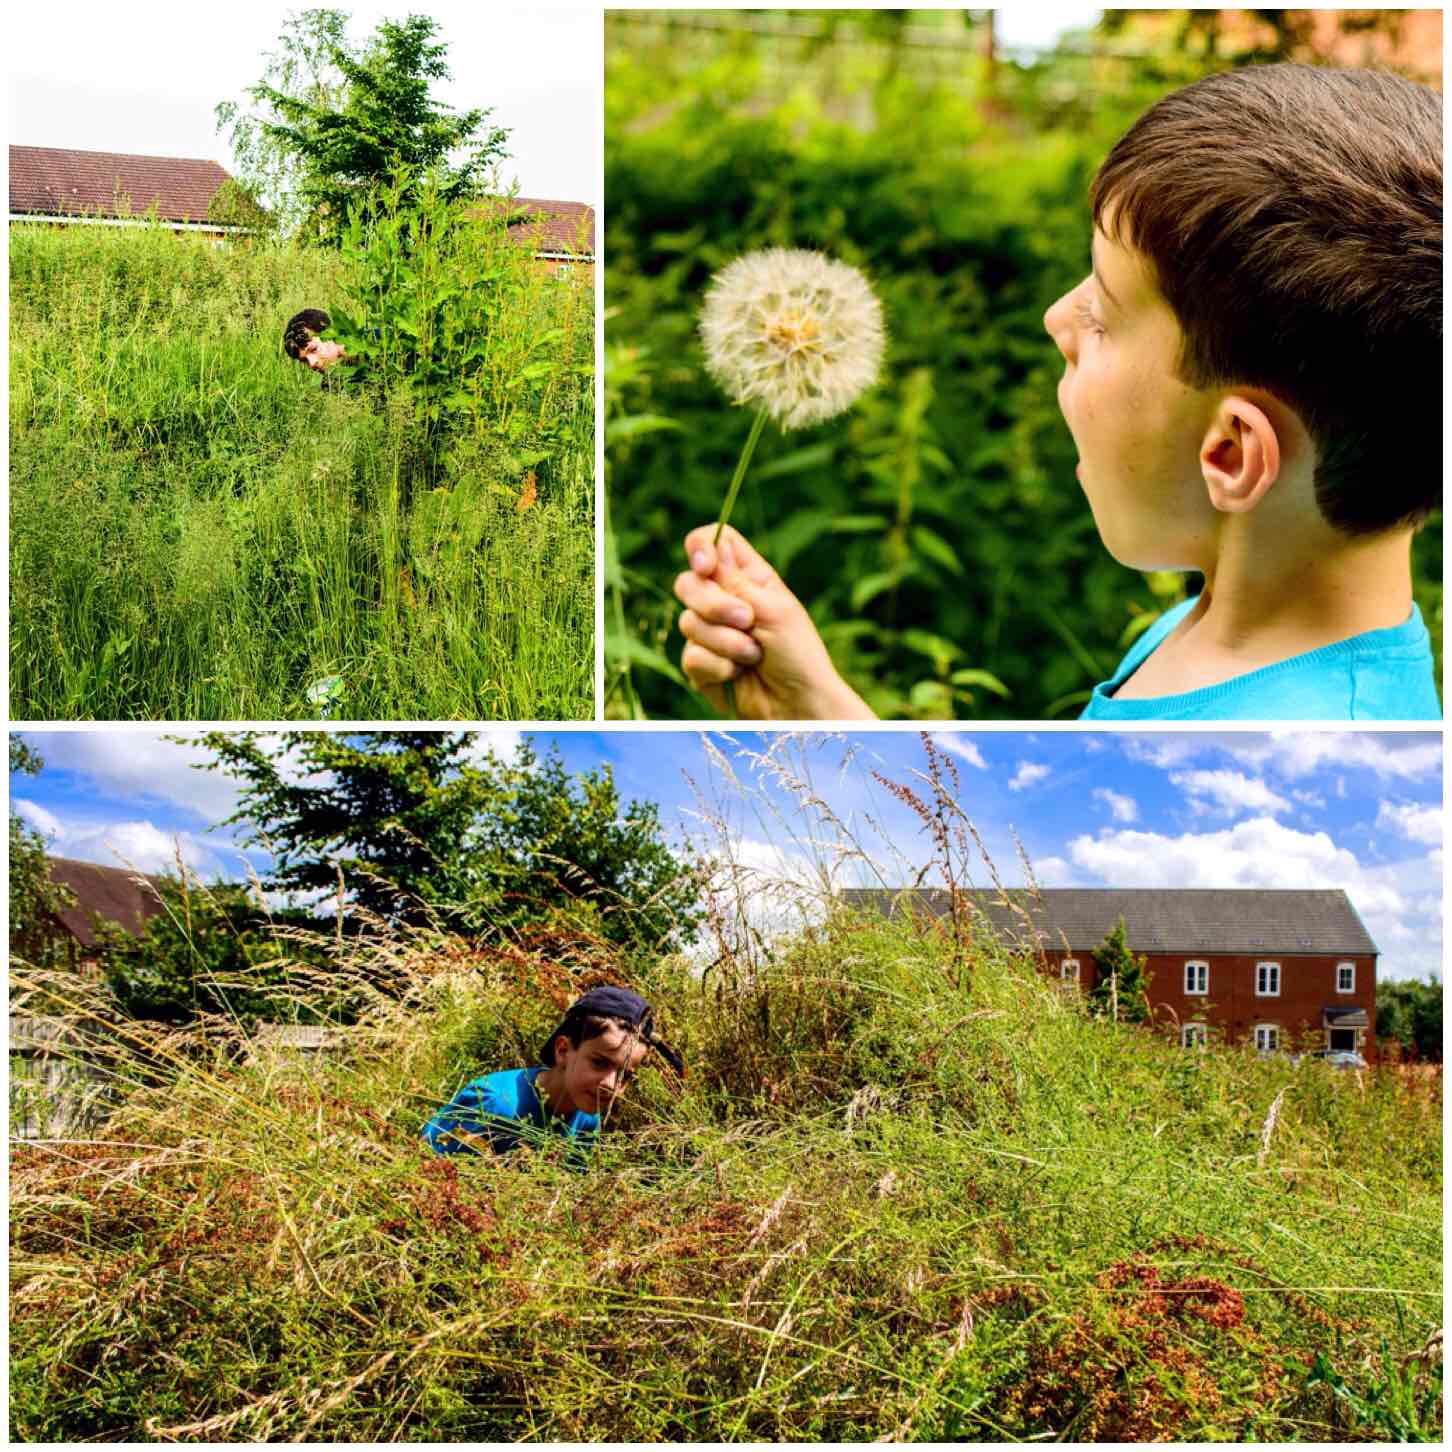
Area 1 – Scrubland
This site was next to one of his playgrounds and initially seemed very promising (in the hope we would see a variety of different spring flowers) with all the Dandelion seed heads. They were still there on our second visit however the thick grass seemed to be inhibiting the growth of many of the spring flowers we were hoping to see.
Area 1 – Scrubland – Visits 1 & 2
Over the following visits we spotted a few White Campion flowers and some Green Alkanet however it was the grasses, Docks and Cleavers (Sticky Willy) that seemed to dominate in the end. Finlay seemed happy with that as I usually found loads of Cleaver strands stuck to my back when we got home 🙂
Area 1 – Scrubland – Visits 3, 4 & 5
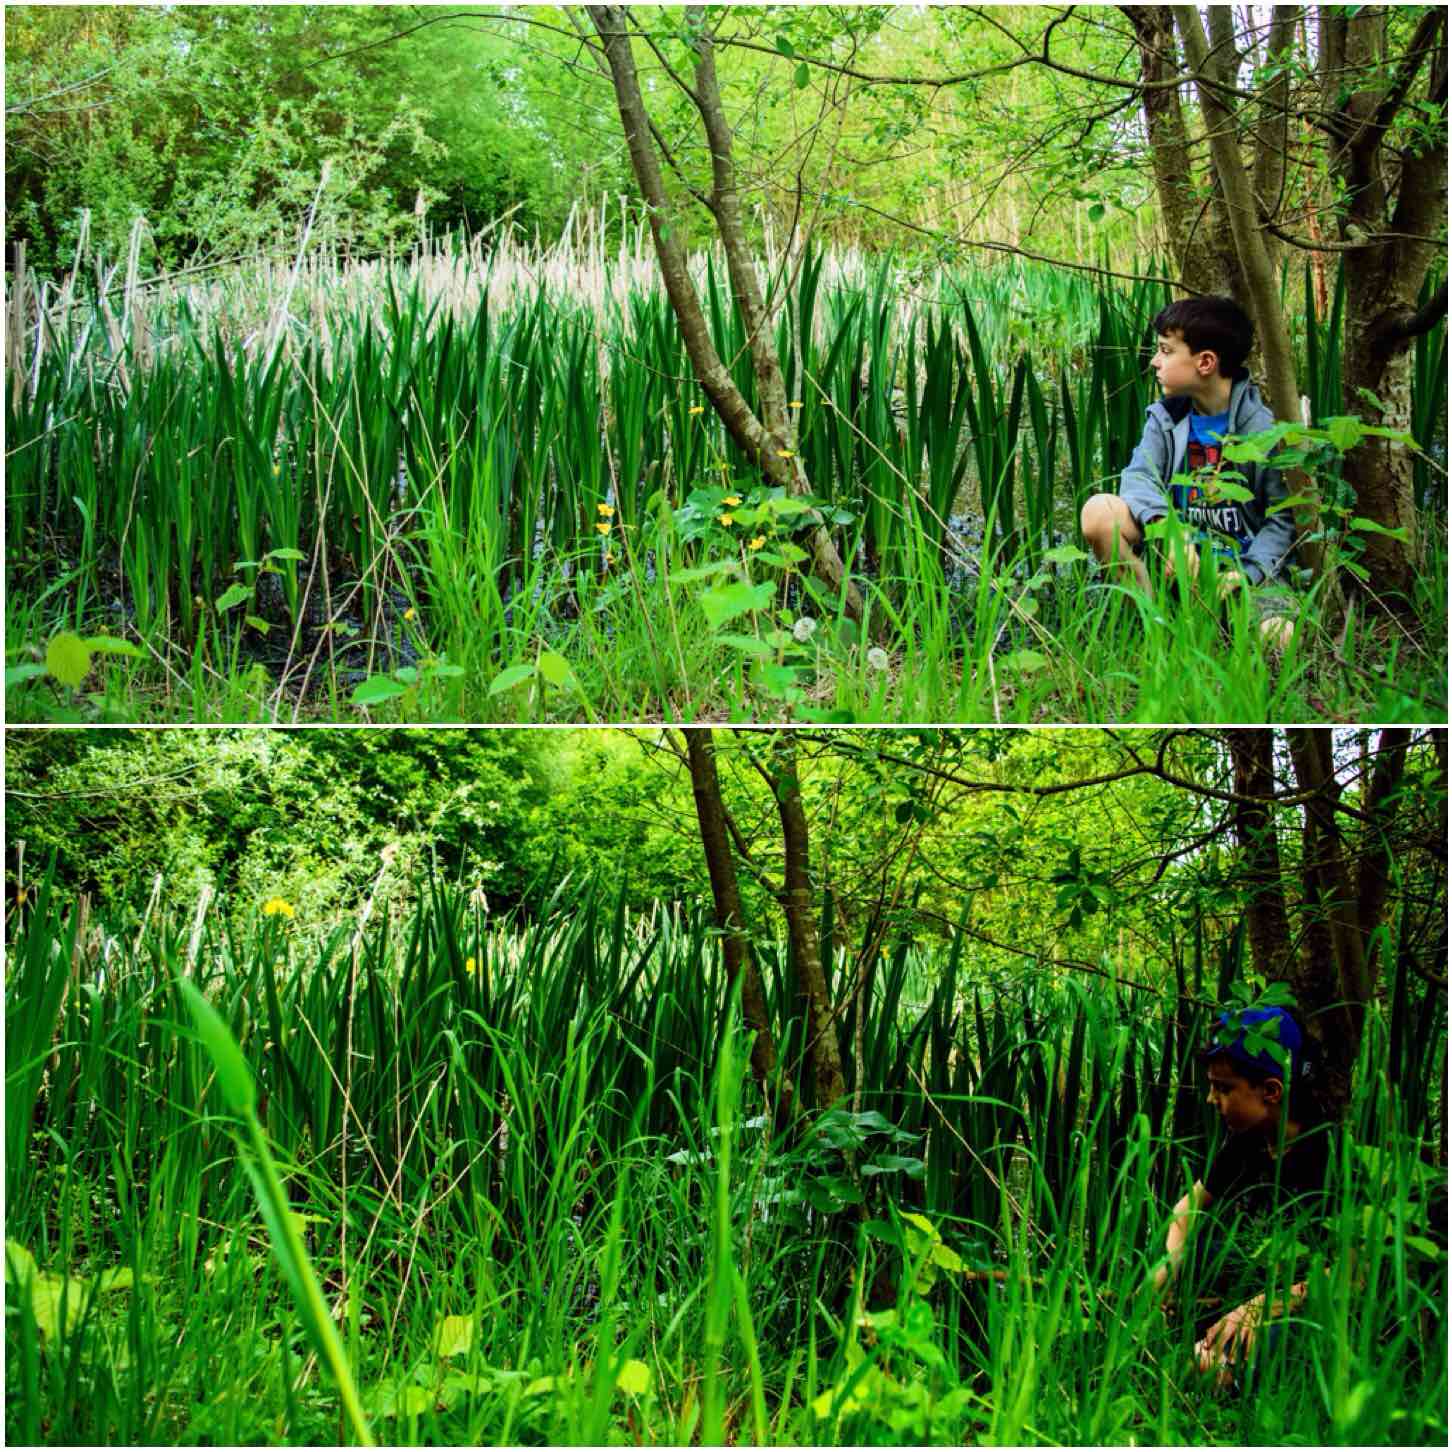
Area 2 – The Pond
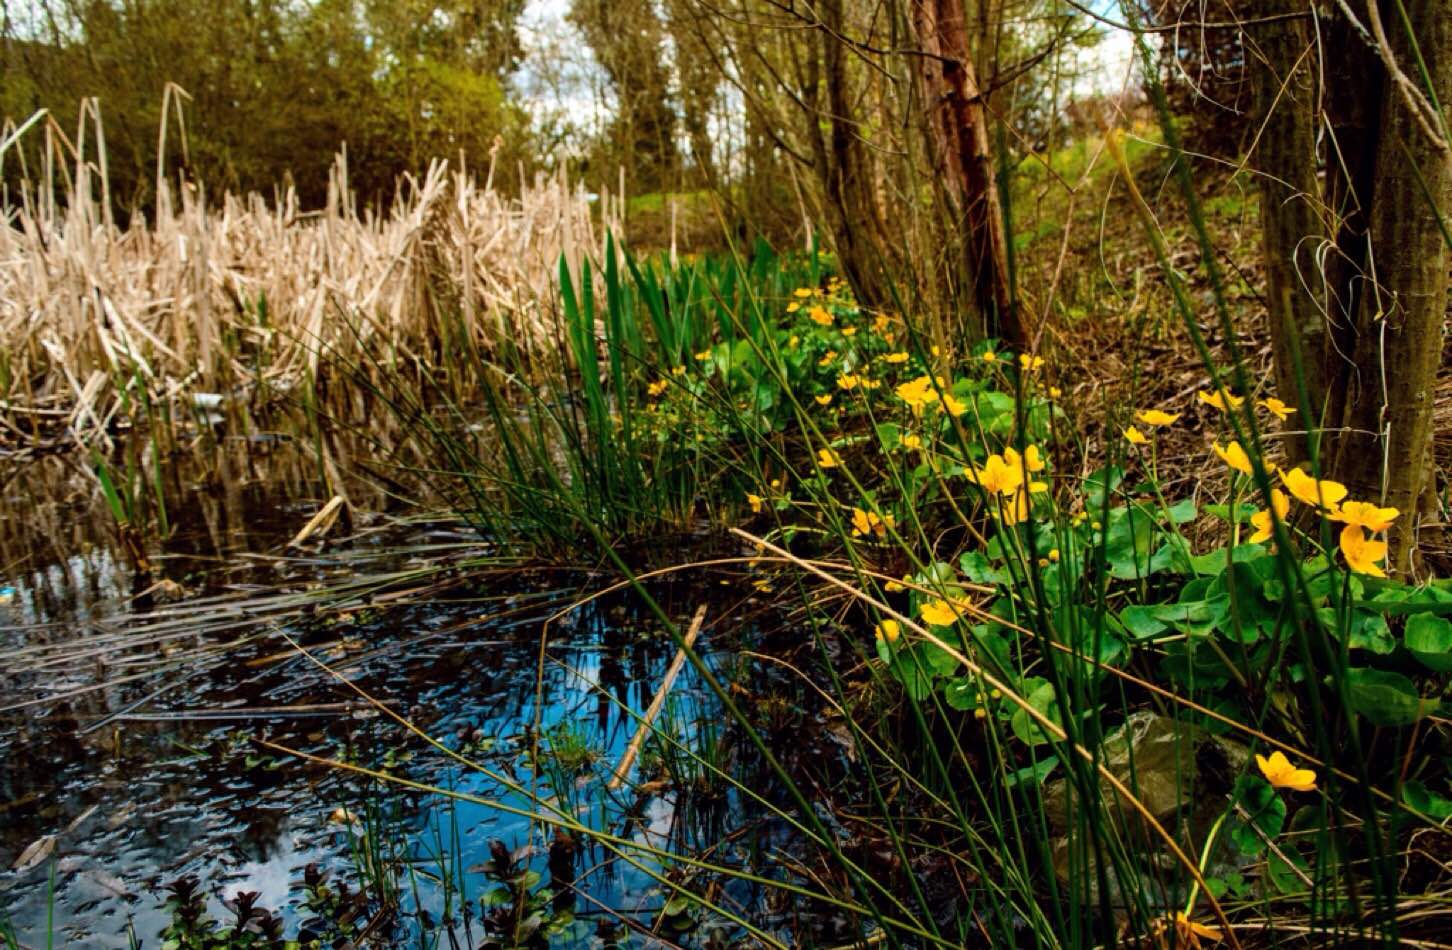
I have been observing a particular pond in our village over the years and knew it would be good for Finlay to observe changes in nature.
The pond is full Reedmace (aka Cattail), Iris, and ringed by Marsh Marigolds and Mare’s Tail. Initially all the growth was very subdued however you can see in the second picture below (2nd visit) that there was far more shade as the plants had started to grow. Finlay is in the same spot in each picture to observe and act as a measure to the growth.
Area 2 – The Pond – Visits 1 & 2
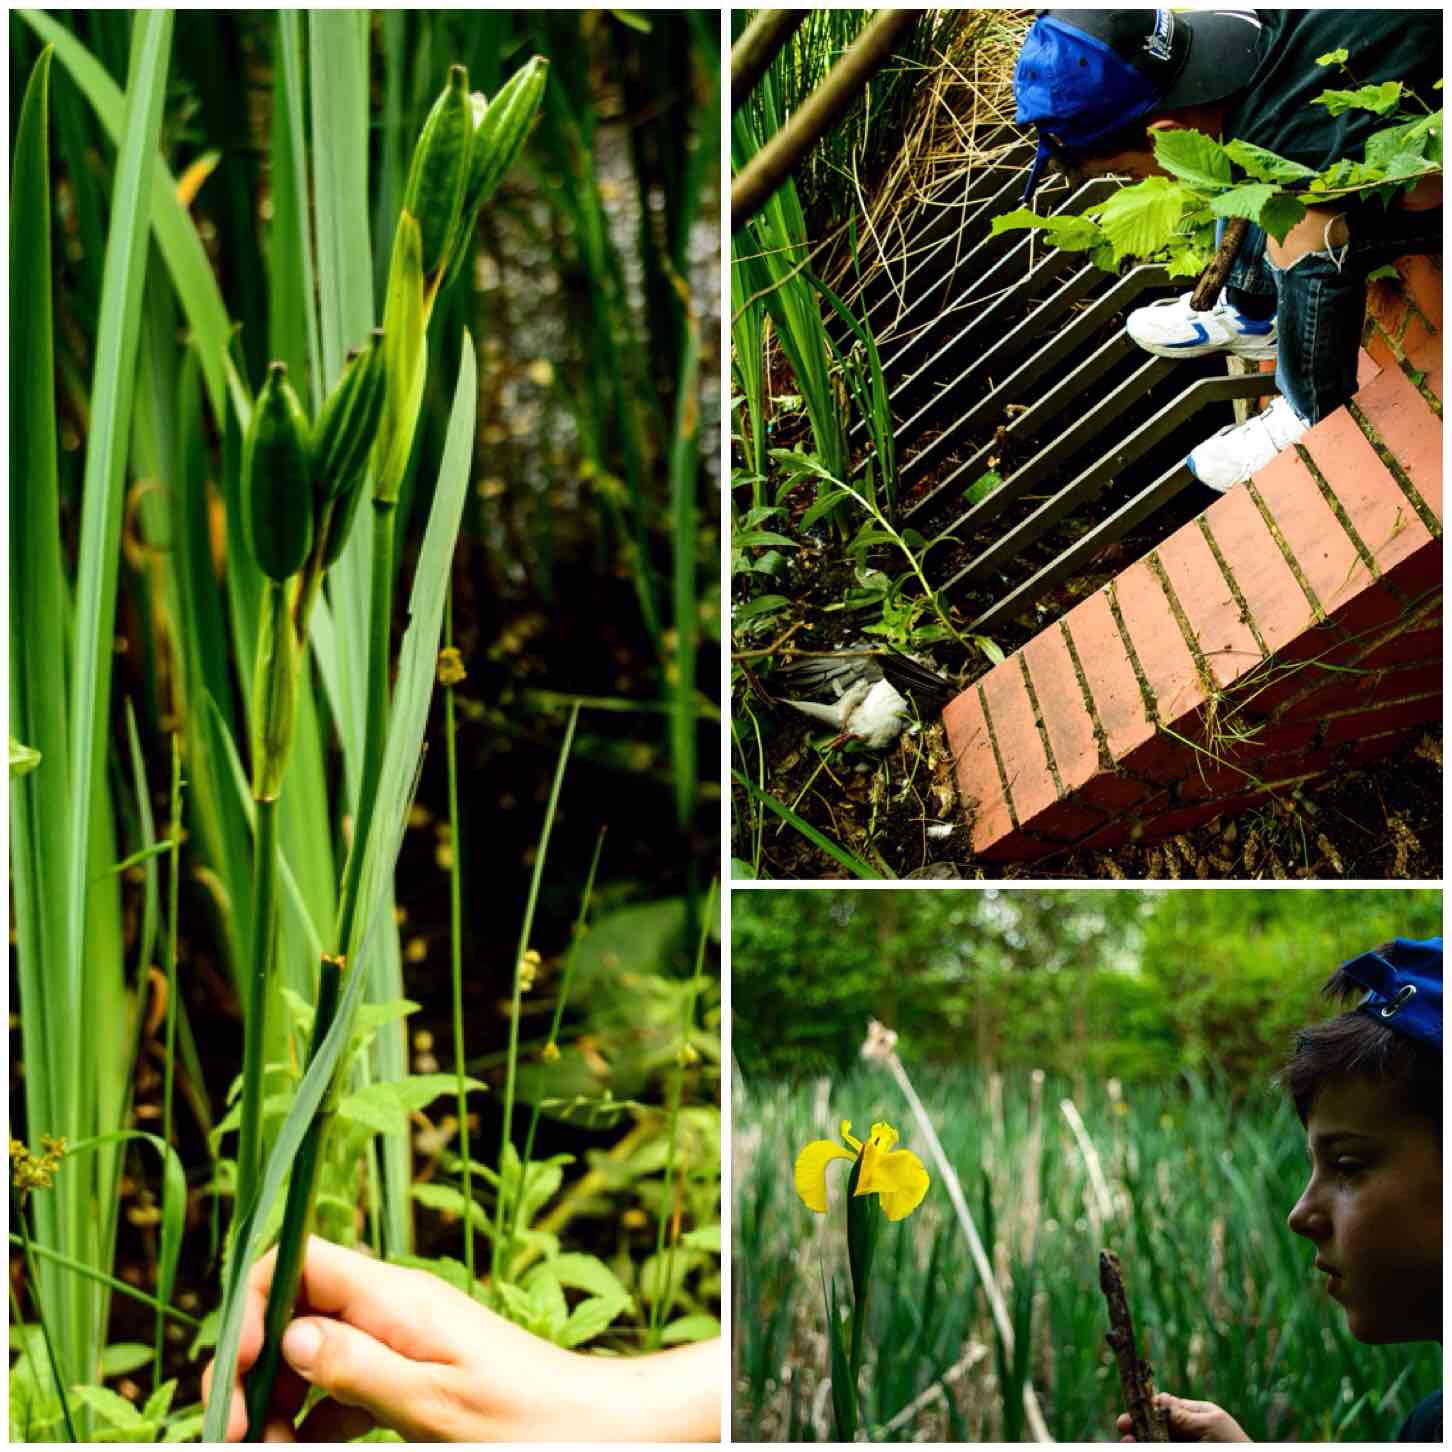
There is always something happening at the pond with wildlife. Usually we disturbed a duck or two but we did spot plenty of frogs and insects. One visit we found a dead pidgeon by the side of the pond and noticed that the Iris had started to produce its seed heads near the end of our visits.
Area 2 – The Pond – Spots
Over the last 3 visits the Iris and the Reedmace soon came to dominate the pond and the outer ring of Marsh Marigolds generally died back.
Area 2 – The Pond – Visits 3, 4 & 5
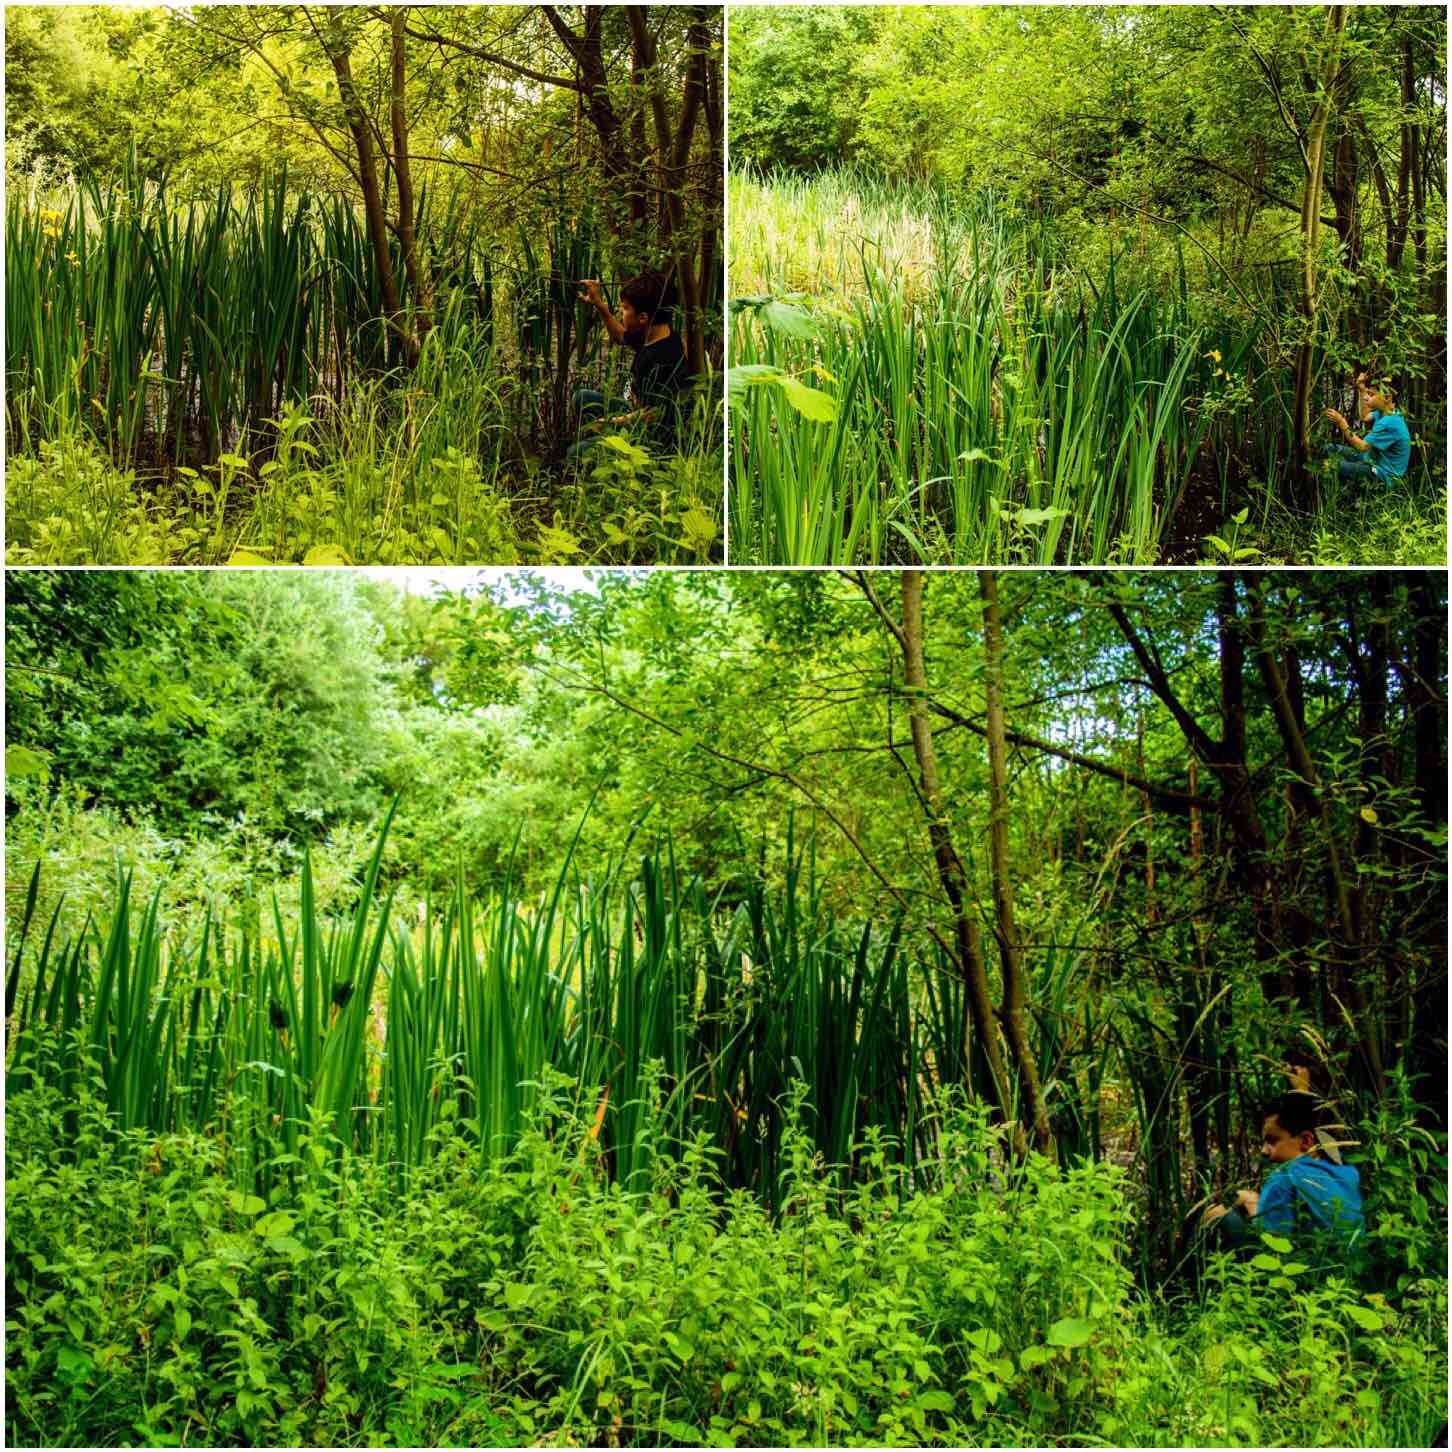
Area 3 – The Stream
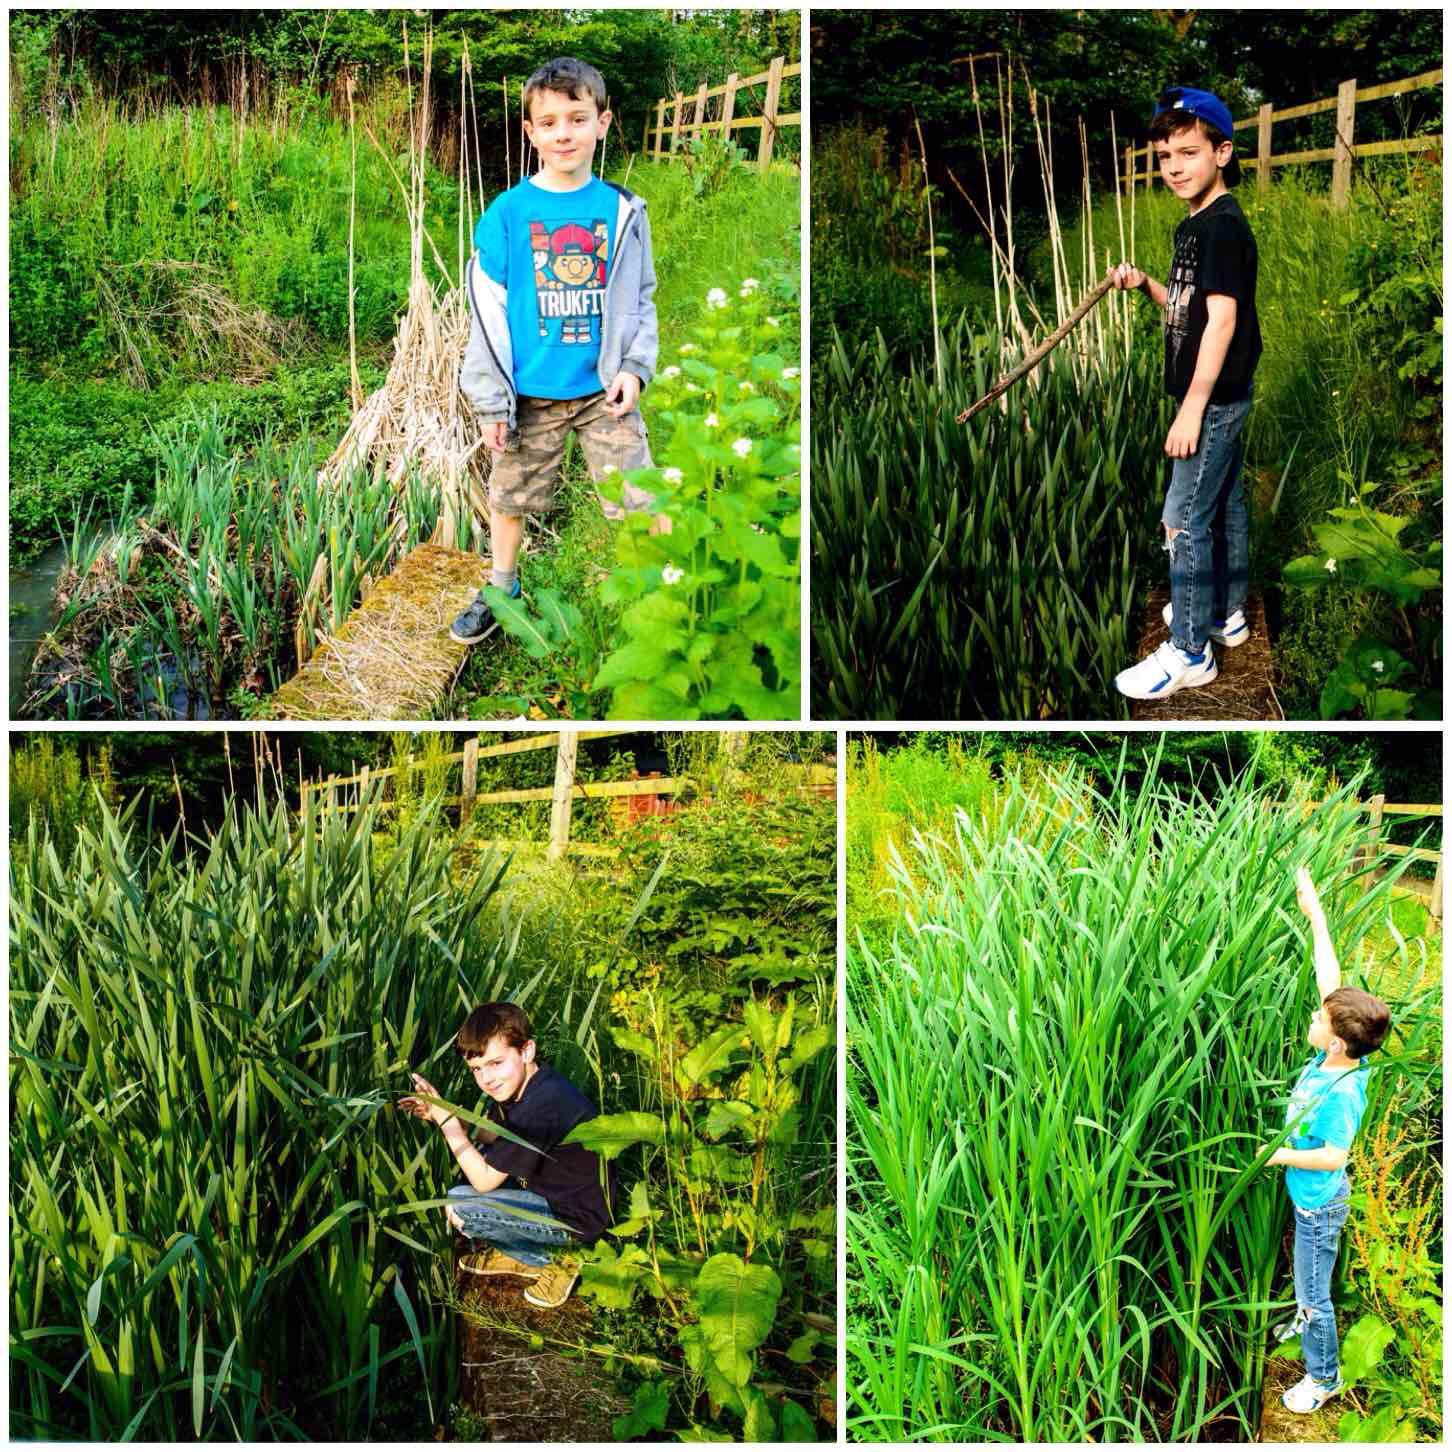
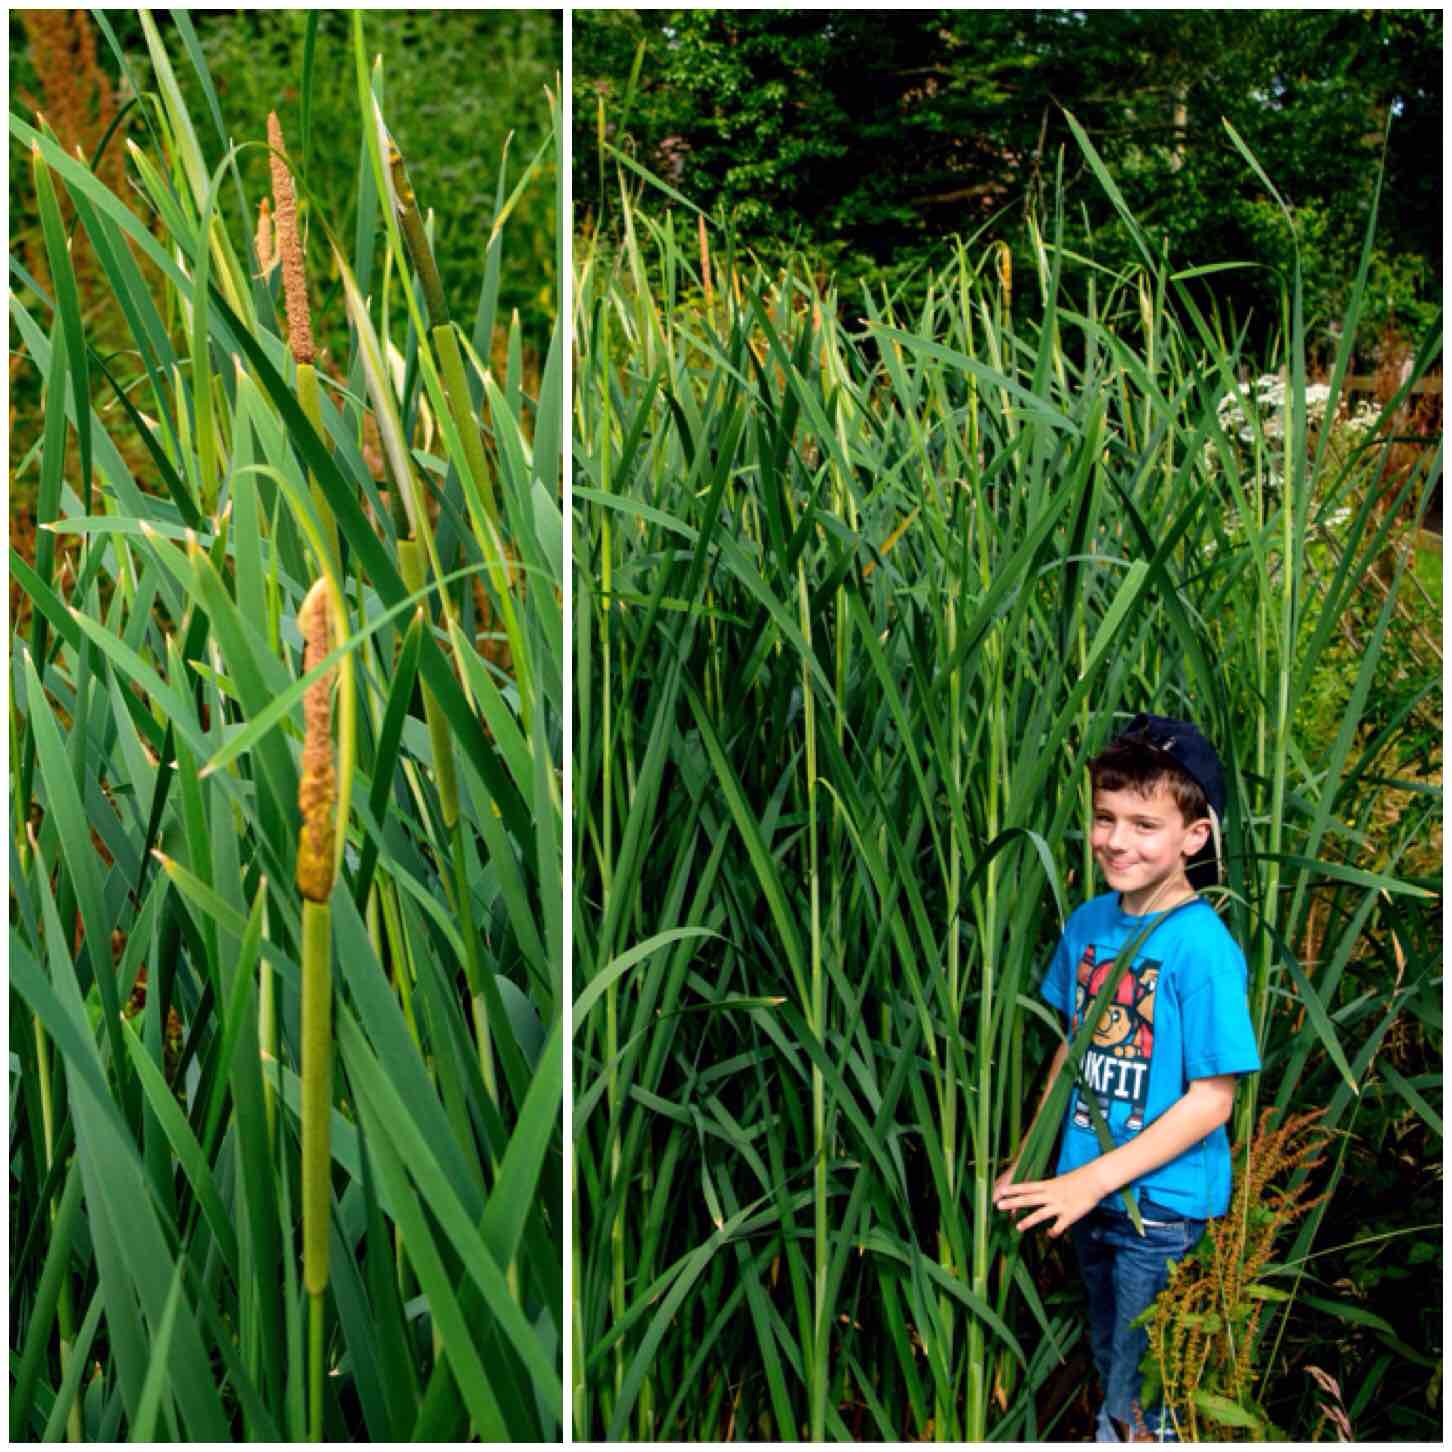
We have a culvert near our house and there is a good patch of Reedmace growing beside it. This spot I thought ideal to show Finlay how quickly this plant grows.
Initially it was the last years growth that dominated the stream with a lot of Hedge Garlic growing beside it. Over the subsequent visits the spring flowers all died off and the Reedmace shot up.
The growth you can see below happened over a two and a half month period.
Area 3 – The Stream – Visits 1 to 4
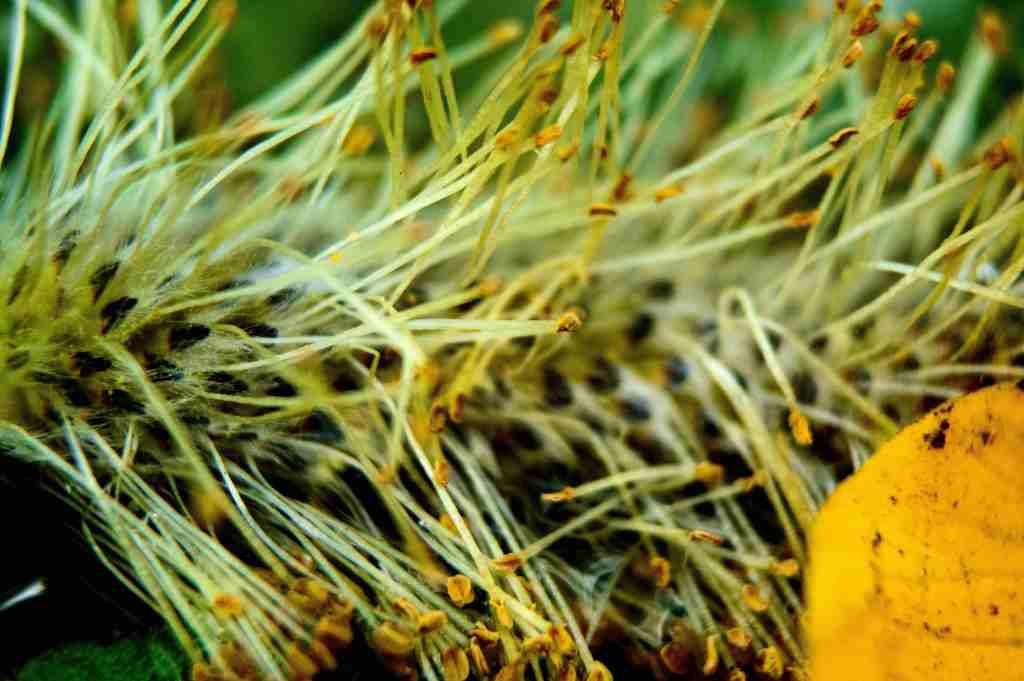
On our last visit we spotted that the pollen spikes of the Reedmace had appeared. These are a great plant for any bushcrafter as the young spikes can be boiled and eaten, the roots are edible as well as the young plant shoots.
As this plant grows frequently beside (as seen by the pond) its lookalike poisonous neighbour – Iris, learn to 100% identify both plants before attempting to forage Reedmace.
Area 3 – The Stream – Visit 5
Trees and Flowers
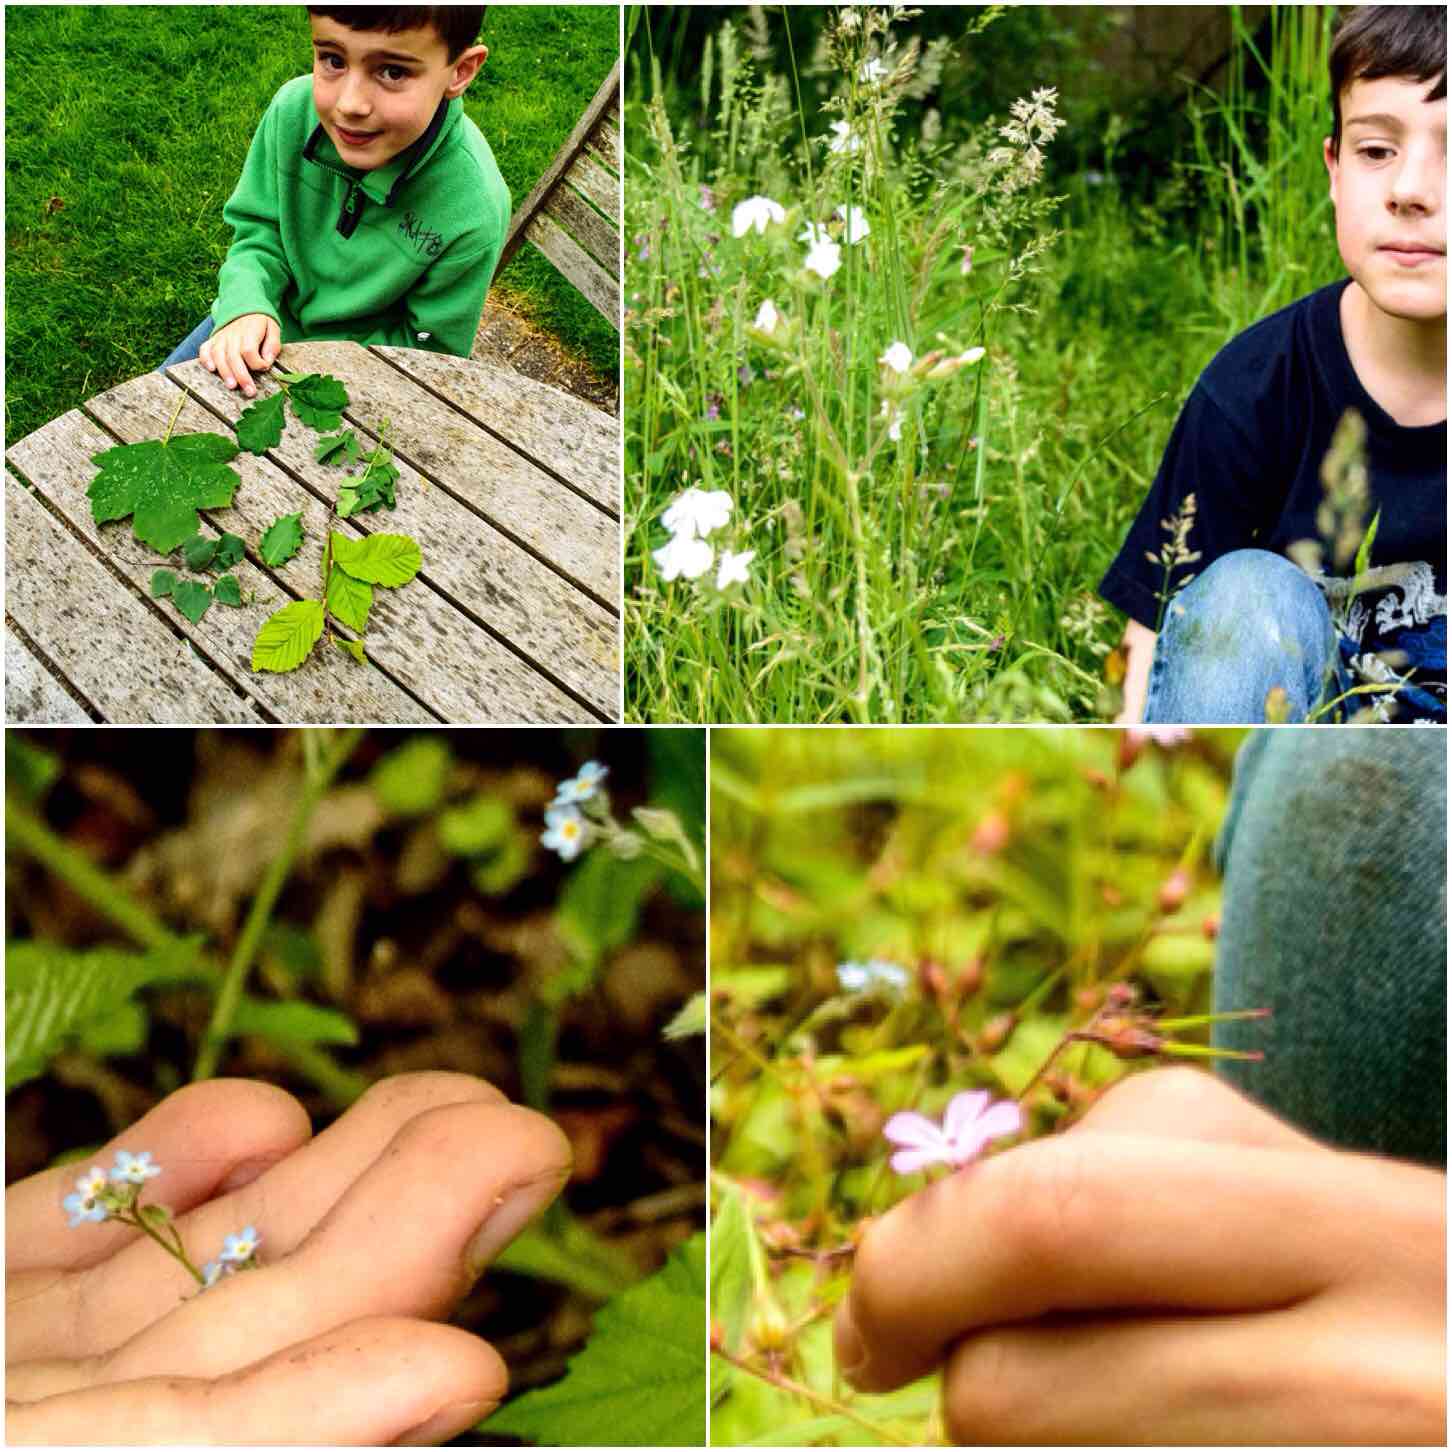
Over the last three months we studied our trees and wildflower as well as Finlay had to learn to identify six trees and six wildflowers.
For trees we focused on Oak, Hawthorn, Sycamore, Beech, Holly and Hazel. We started this on our first forage way back in in May when we went out on our first foraging hike together – Foraging with Finlay. He is pretty confident with most of the trees now however he still has to think about some of them. We remember them by shapes i.e. the star for Sycamore, ear lobes for Oak, spikes for Holly etc.
Some of the flowers we saw regularly included White Campion, Forget-me-nots and Herb Robert. I think he struggles with White Campion as that one disappeared early but then again not many people can easily identify it.
Trees and Flowers
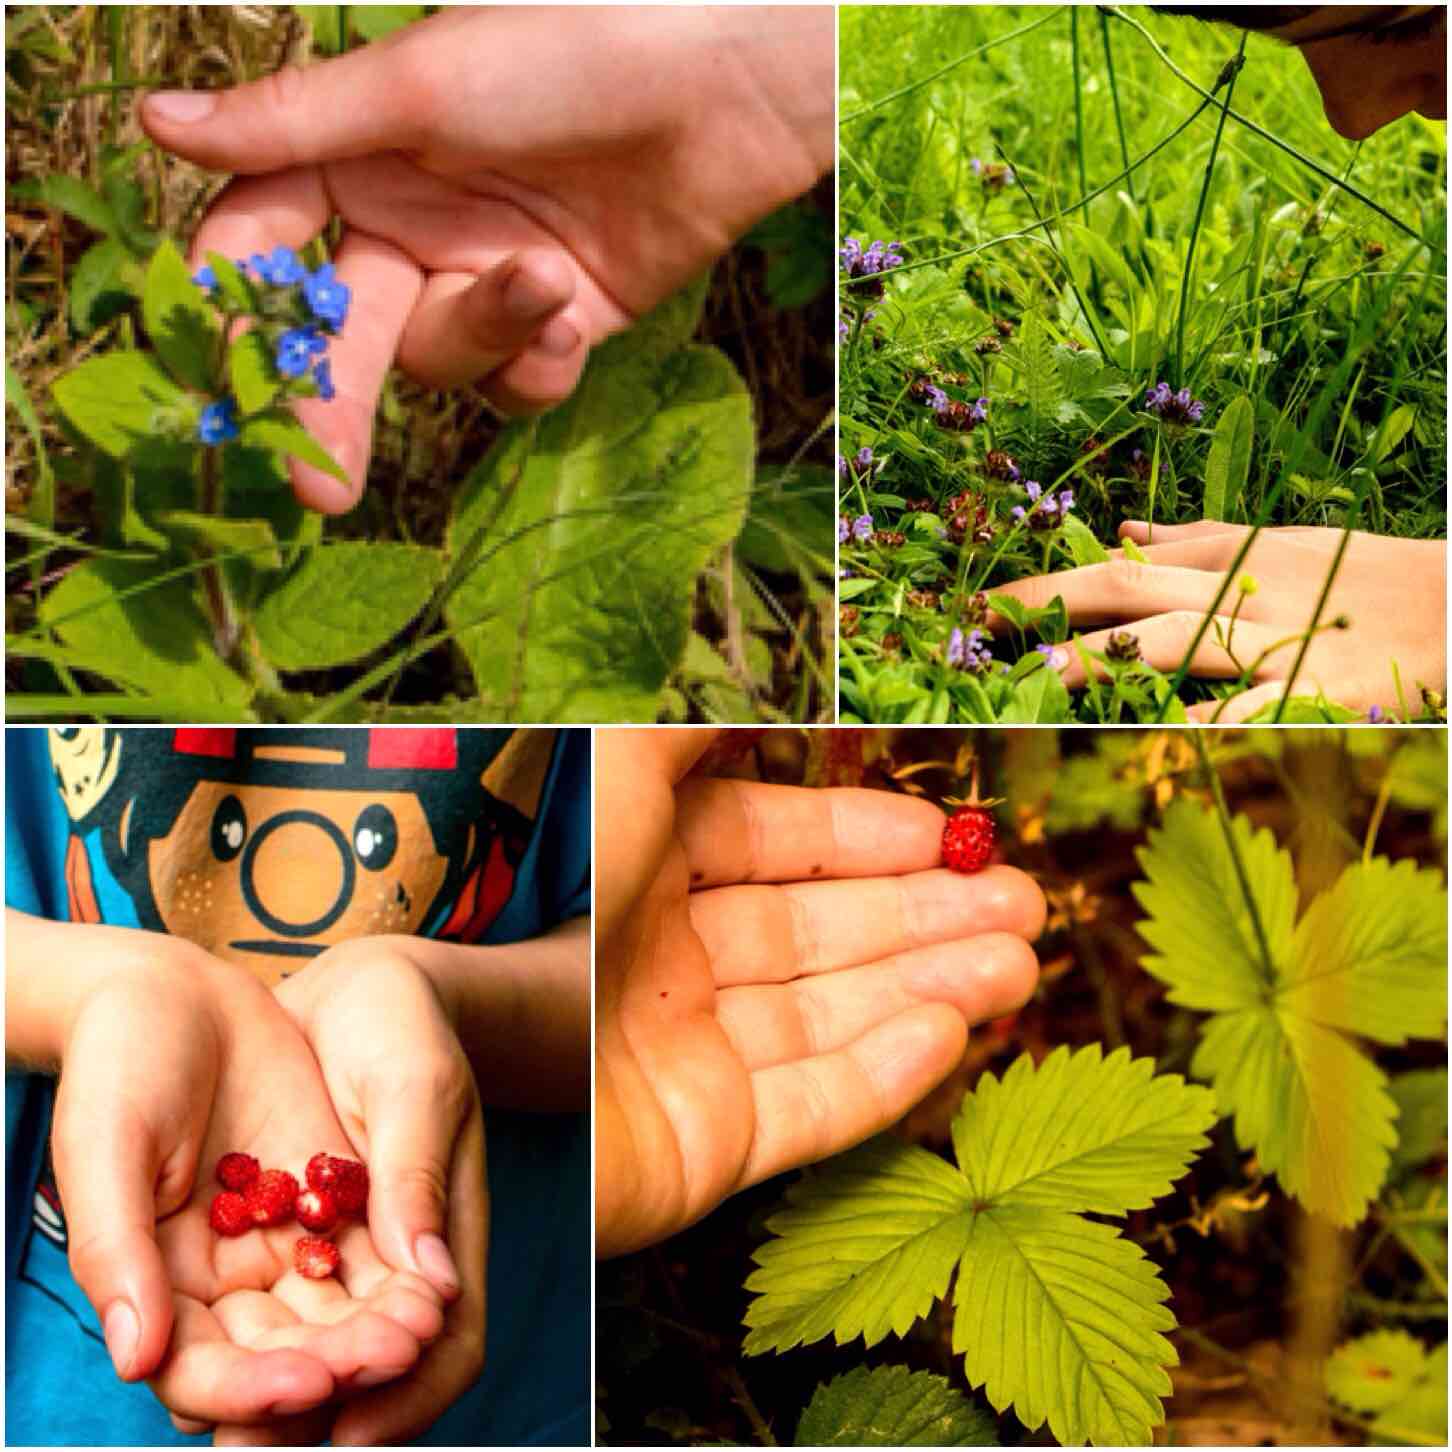
One he does remember easily is Green Alkannet (something to do with the blue flower and it having the word ‘Green’ in its title I think), Self Heal and Wild Strawberries. The white flowers of Strawberries he remembered well, in anticipation of the feast we had on the last visit.
Flowers and Foraging
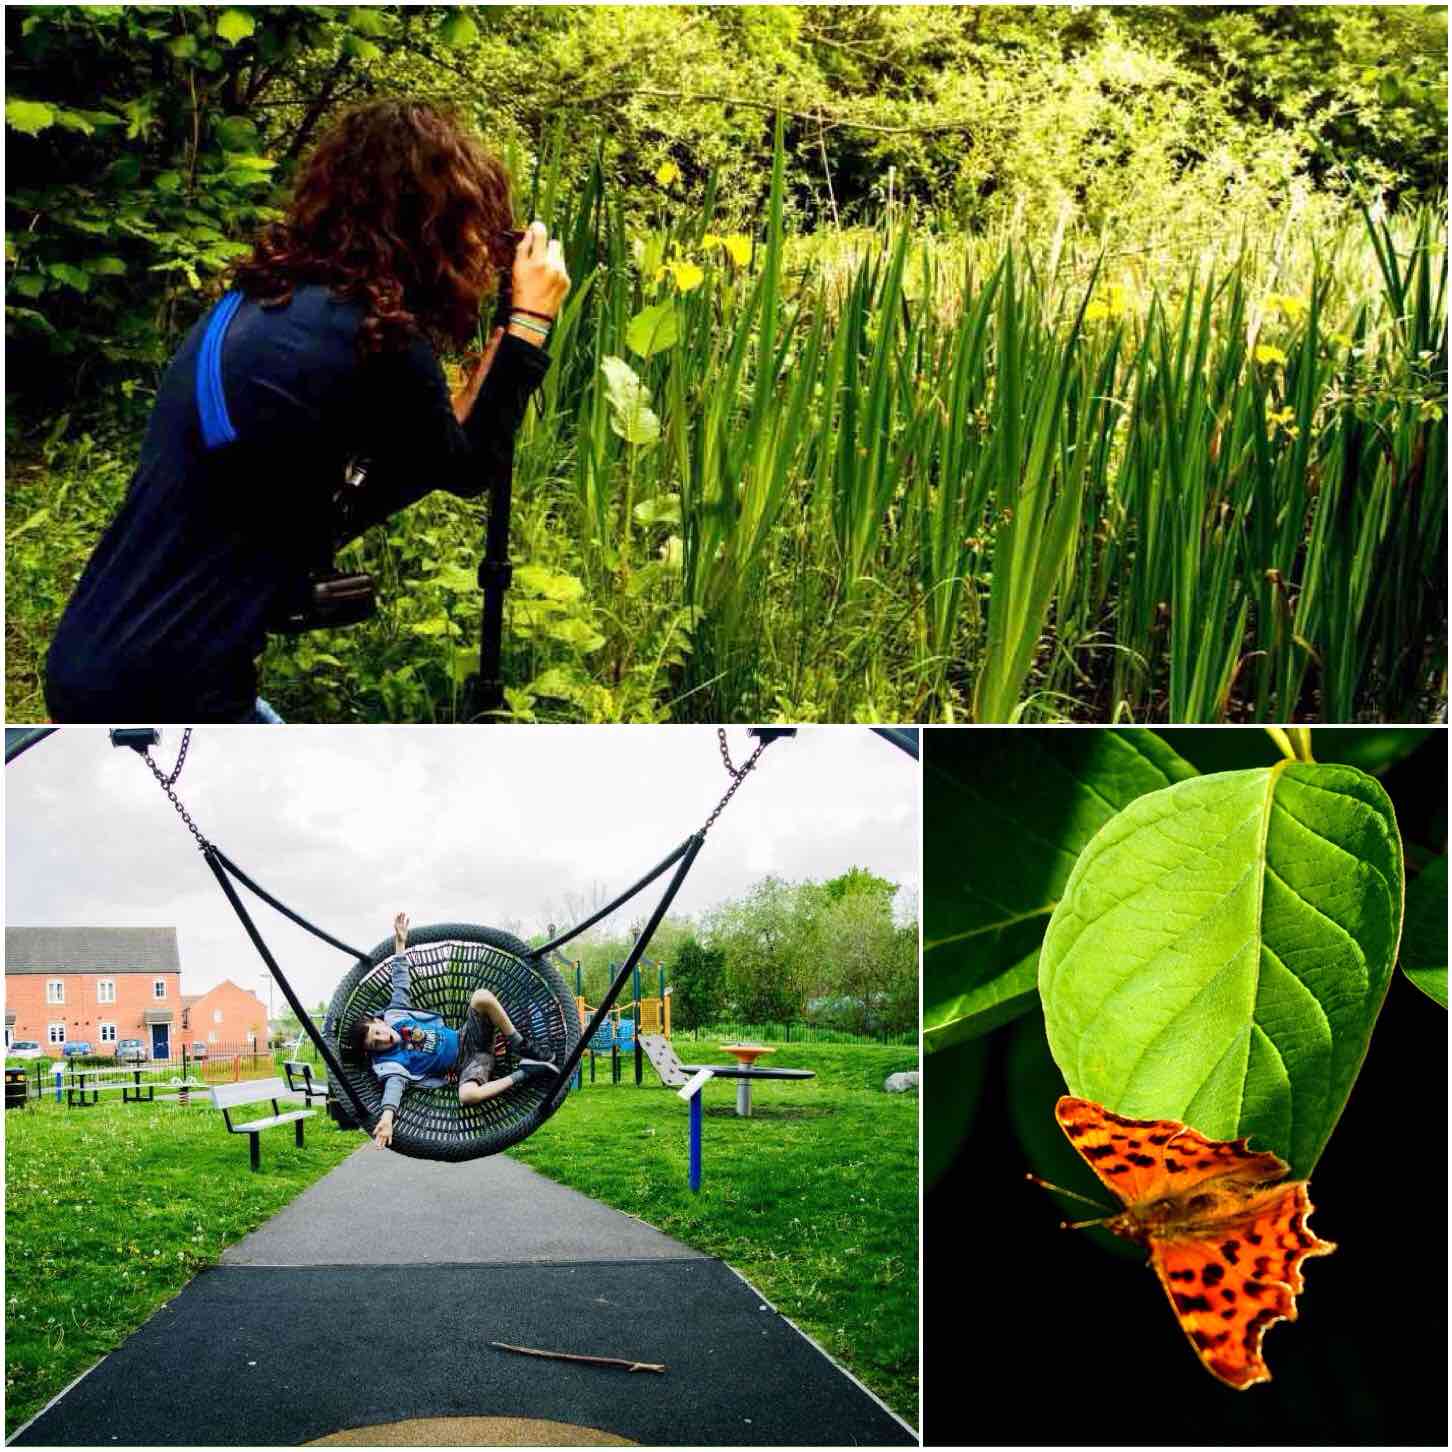
It was not all learn, learn, learn as we had lots of fun along the way. Sometimes his sister Catherine joined us, there was lots of time spent in the parks , some beautiful insects were spotted and best of all we got muddy and spent quality time together.
Extras
The Countryside Code
We spent time talking about how we treat the countryside while out and about. When I was a young lad we all had to be able to recite the country code however that list has now fallen out of favour now. The main aims now are to ‘Respect, Protect and Enjoy’ the countryside. Our trips would touch on these aims and a good pamphlet on the current code can be found here at the Peak District website.
The Bug Hotel
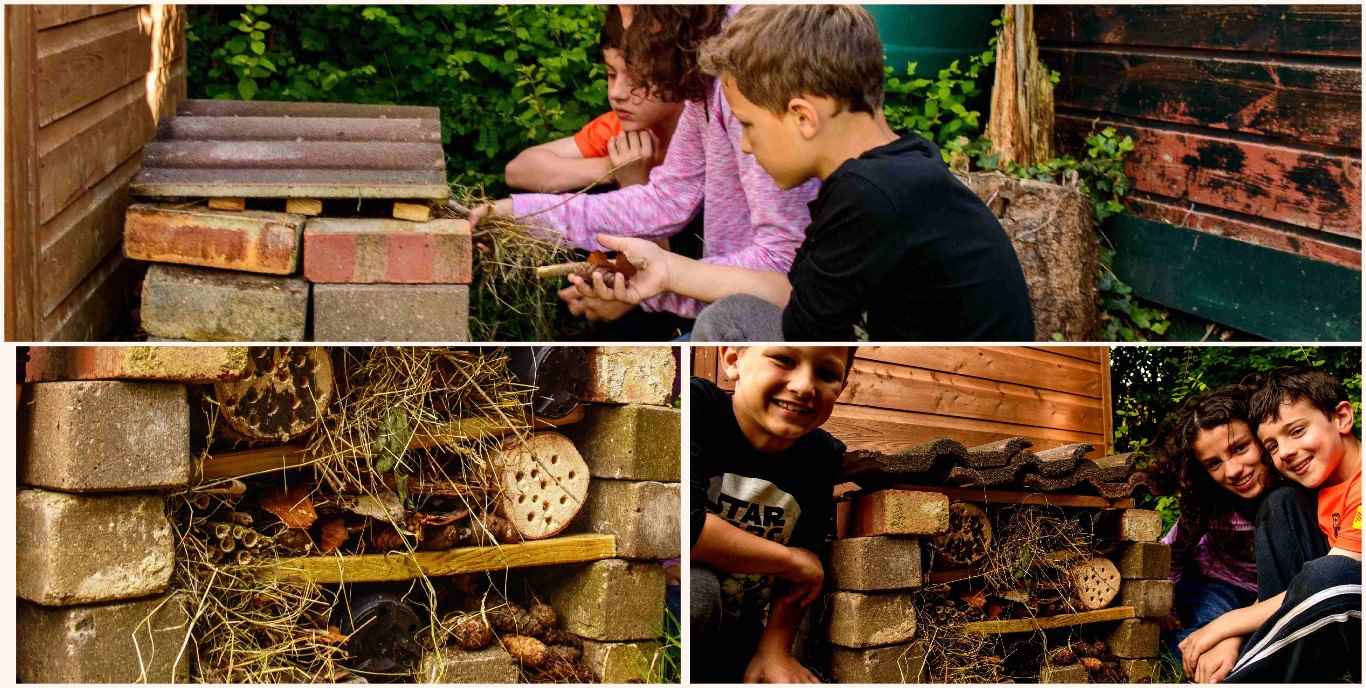
The last standard for the badge was to build something for nature. We opted for a Bug hotel in the garden. Finlay, Catherine and one of his friends (another Finlay) spent a long time collecting and building their Bug hotel. I wrote a separate post on this titled – Building the Bug Hotel.
The Bug Hotel
It has been great fun working on this project with Finlay. He really deserves his Naturalist badge now and I look forward to working on some of these more challenging badges with him in the future. One day he will no longer need me to help him but in the meantime I intend to get out and about with him as much as possible.
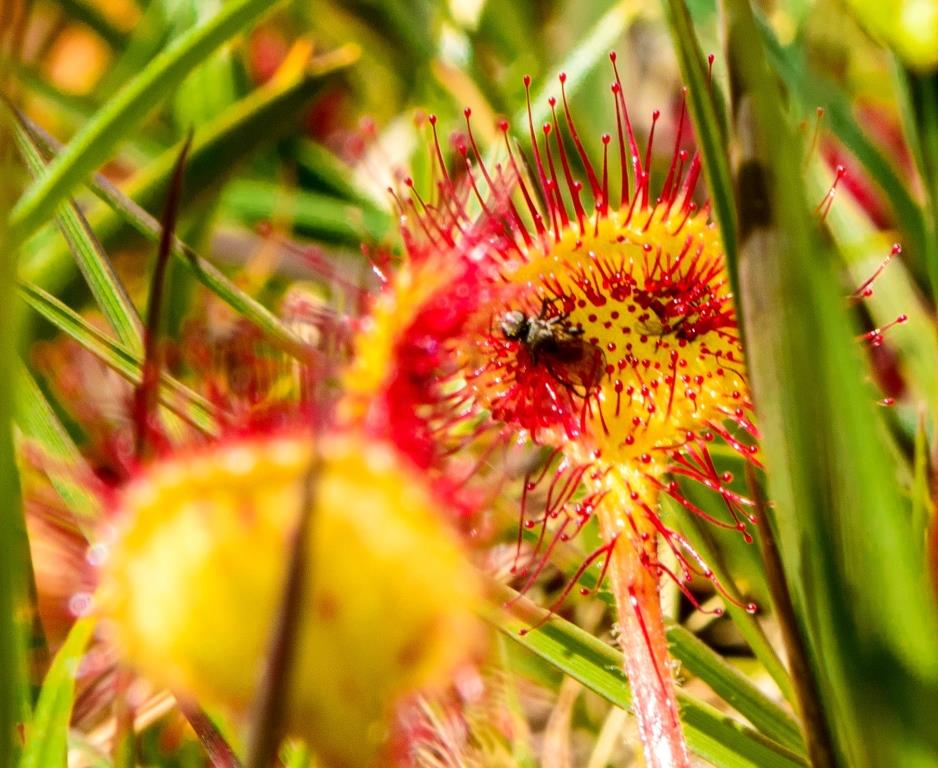
As I was observing the cadets from afar I had plenty of time to look for the little details that make up nature. I found that detail with this scene where a fly had been trapped in the sticky glandular tentacles of a Sundew plant.
Sundew Snack
The fly had not been caught long as it was still struggling. Within about 15 minutes of being trapped they normally expire with exhaustion and are slowly dissolved by the Sundews enzymes. You can find out a lot more about this beautiful little plant at carnivorous–plants.com
I come across hundreds of Sundews at this time of year alongside the upland streams however it is not often I spot one having a snack.
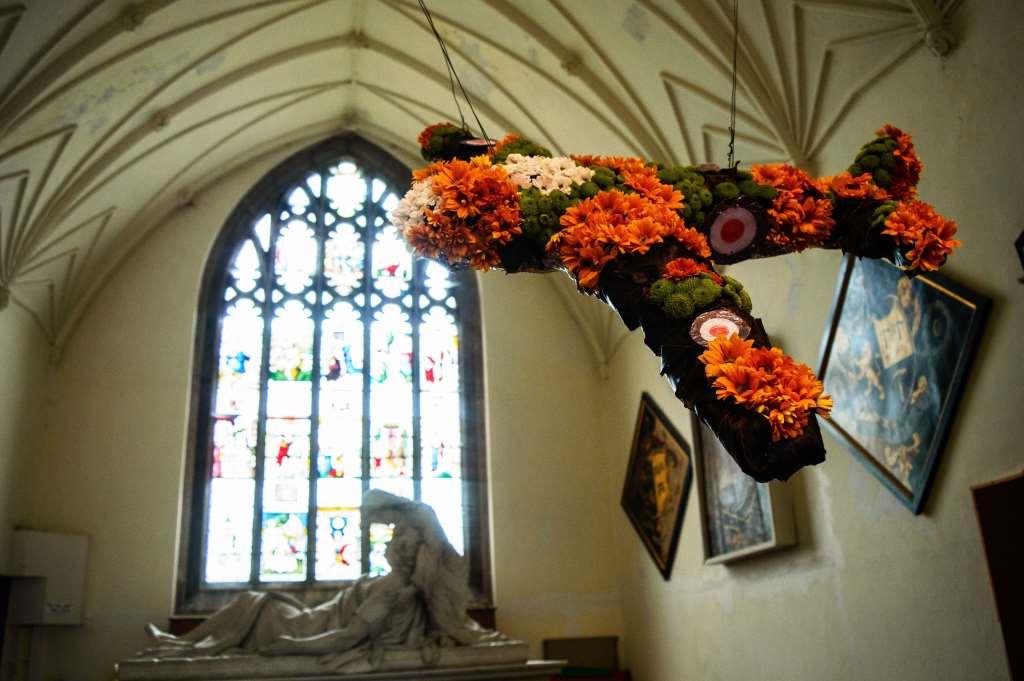
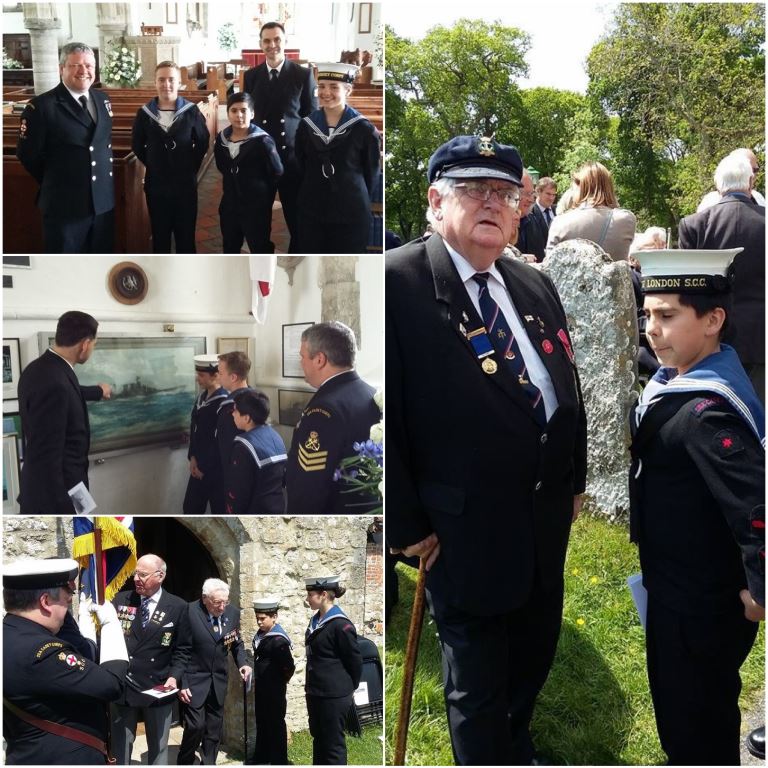
My local church St James here in Bramley held a wonderful flower festival last week. Each display linked to a particular hymn and the one that really caught my eye was the display for the armed forces.
Eternal Father
The armed forces display was split into three parts. There was a separate display for the Army, Navy and RAF and the hymn they all related to was Eternal Father however it was the RAF display set against the Brocas Aisle window that really caught my attention.
As an old soldier and a serving member of the cadet forces I was particularly pleased to see my church remembering Armed Forces week in this beautiful way.
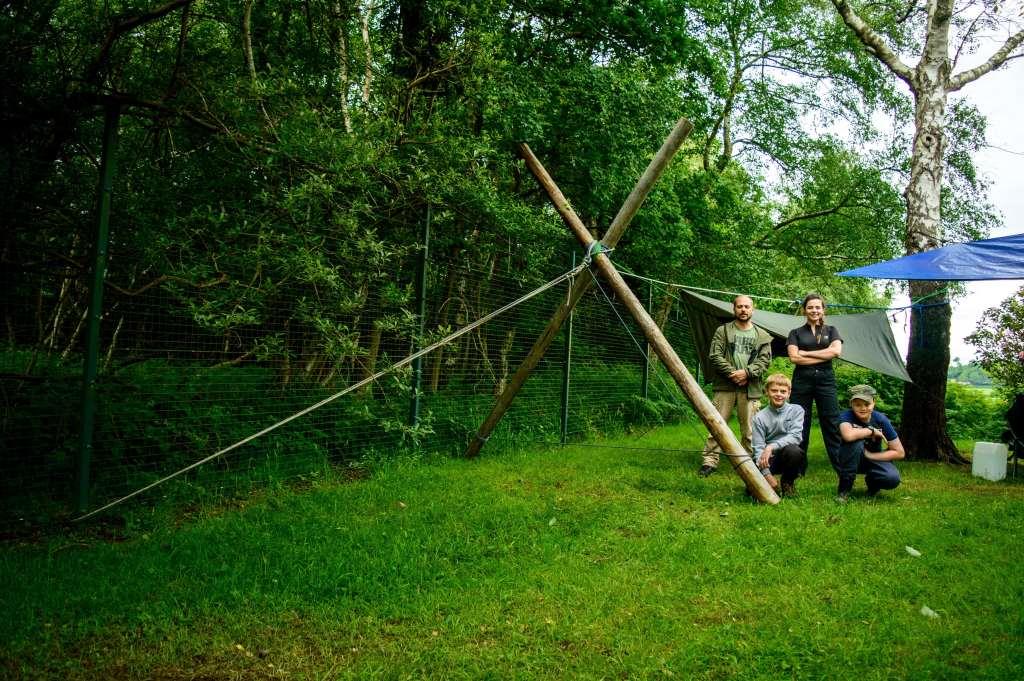
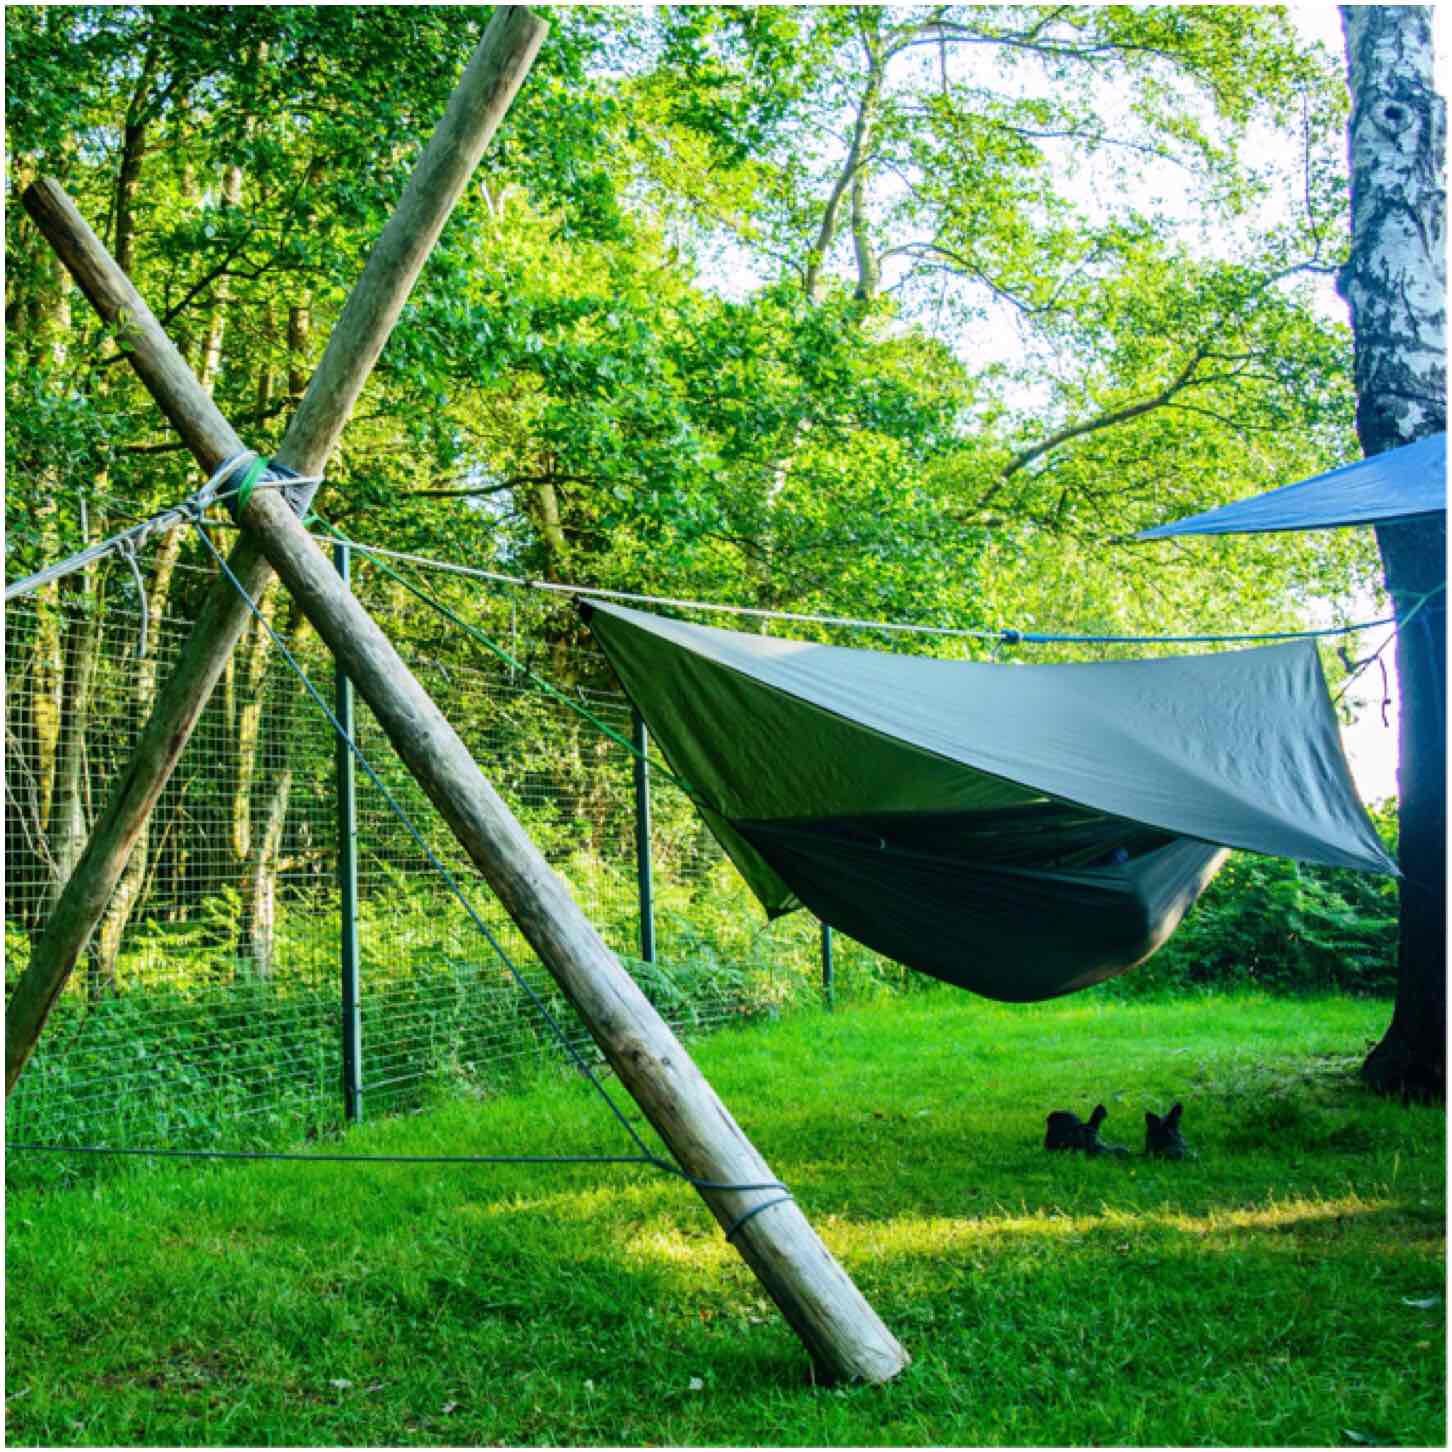
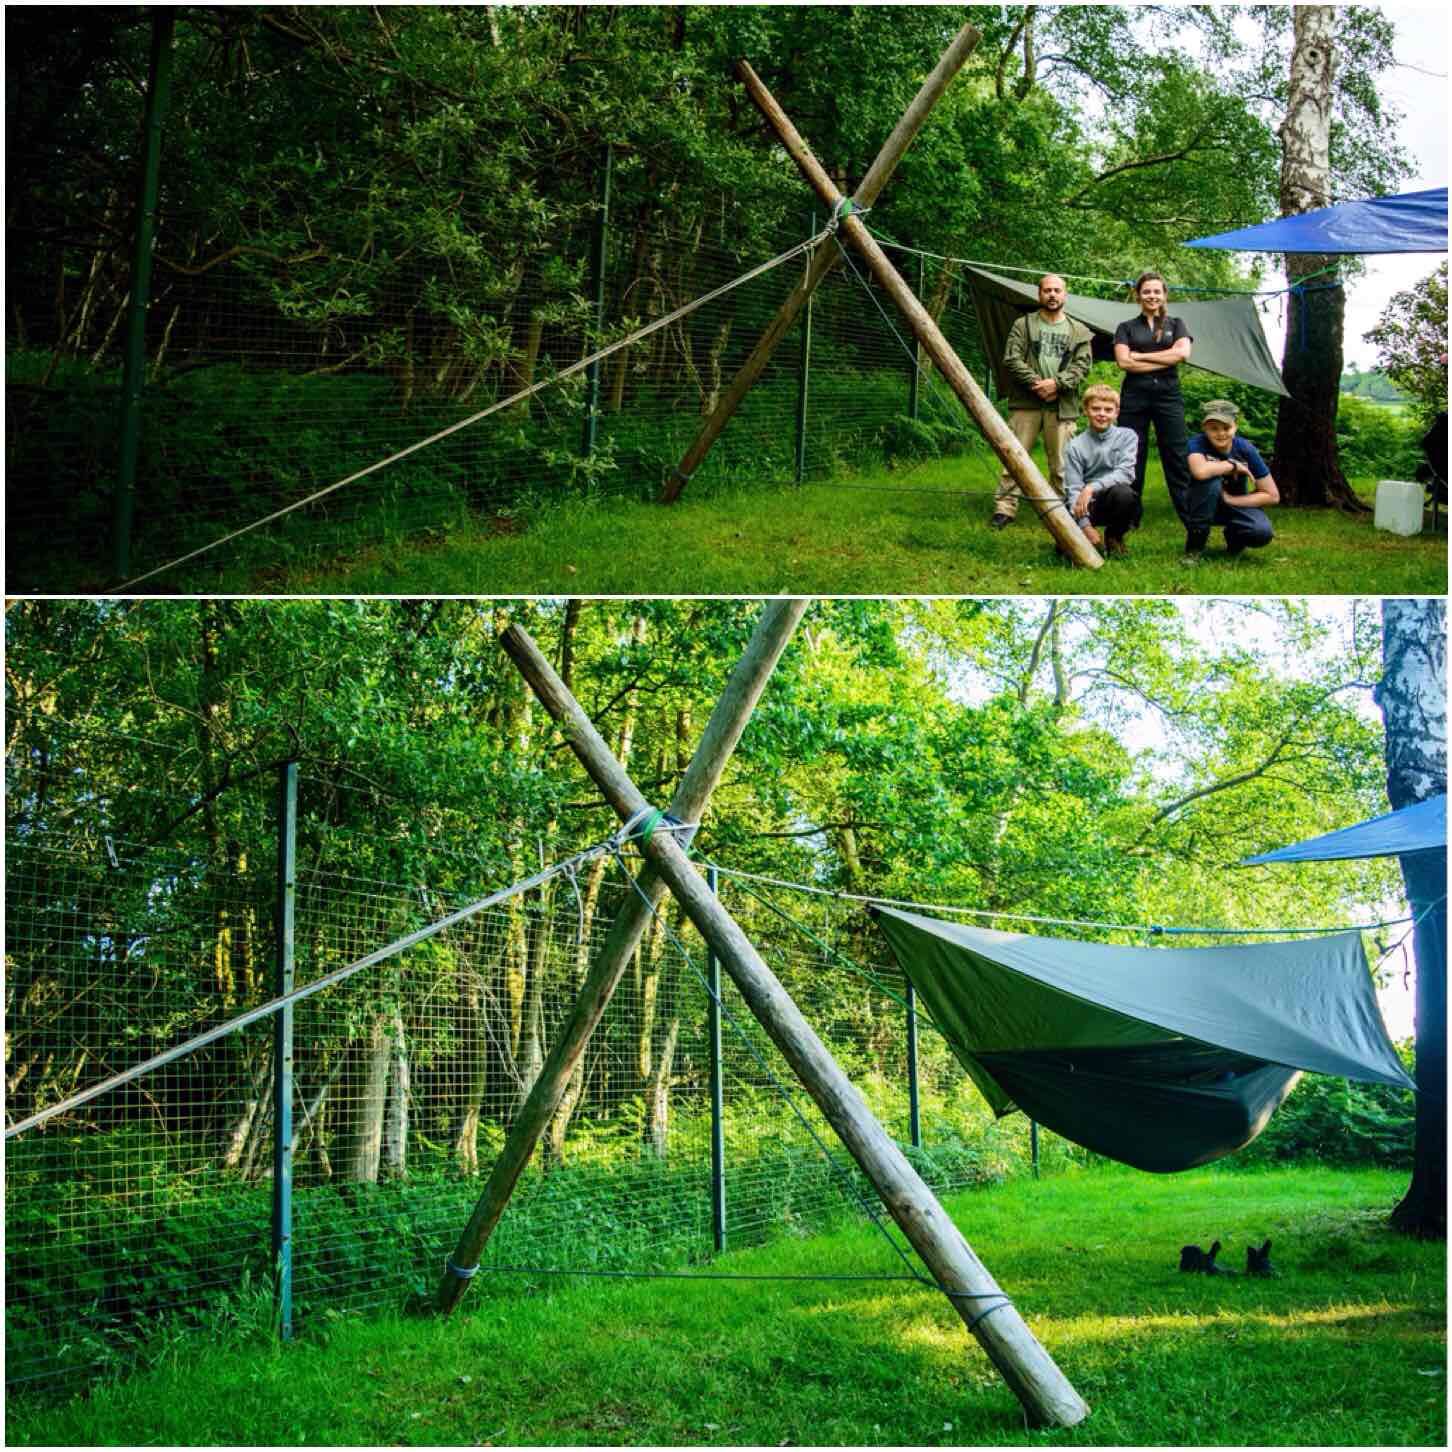
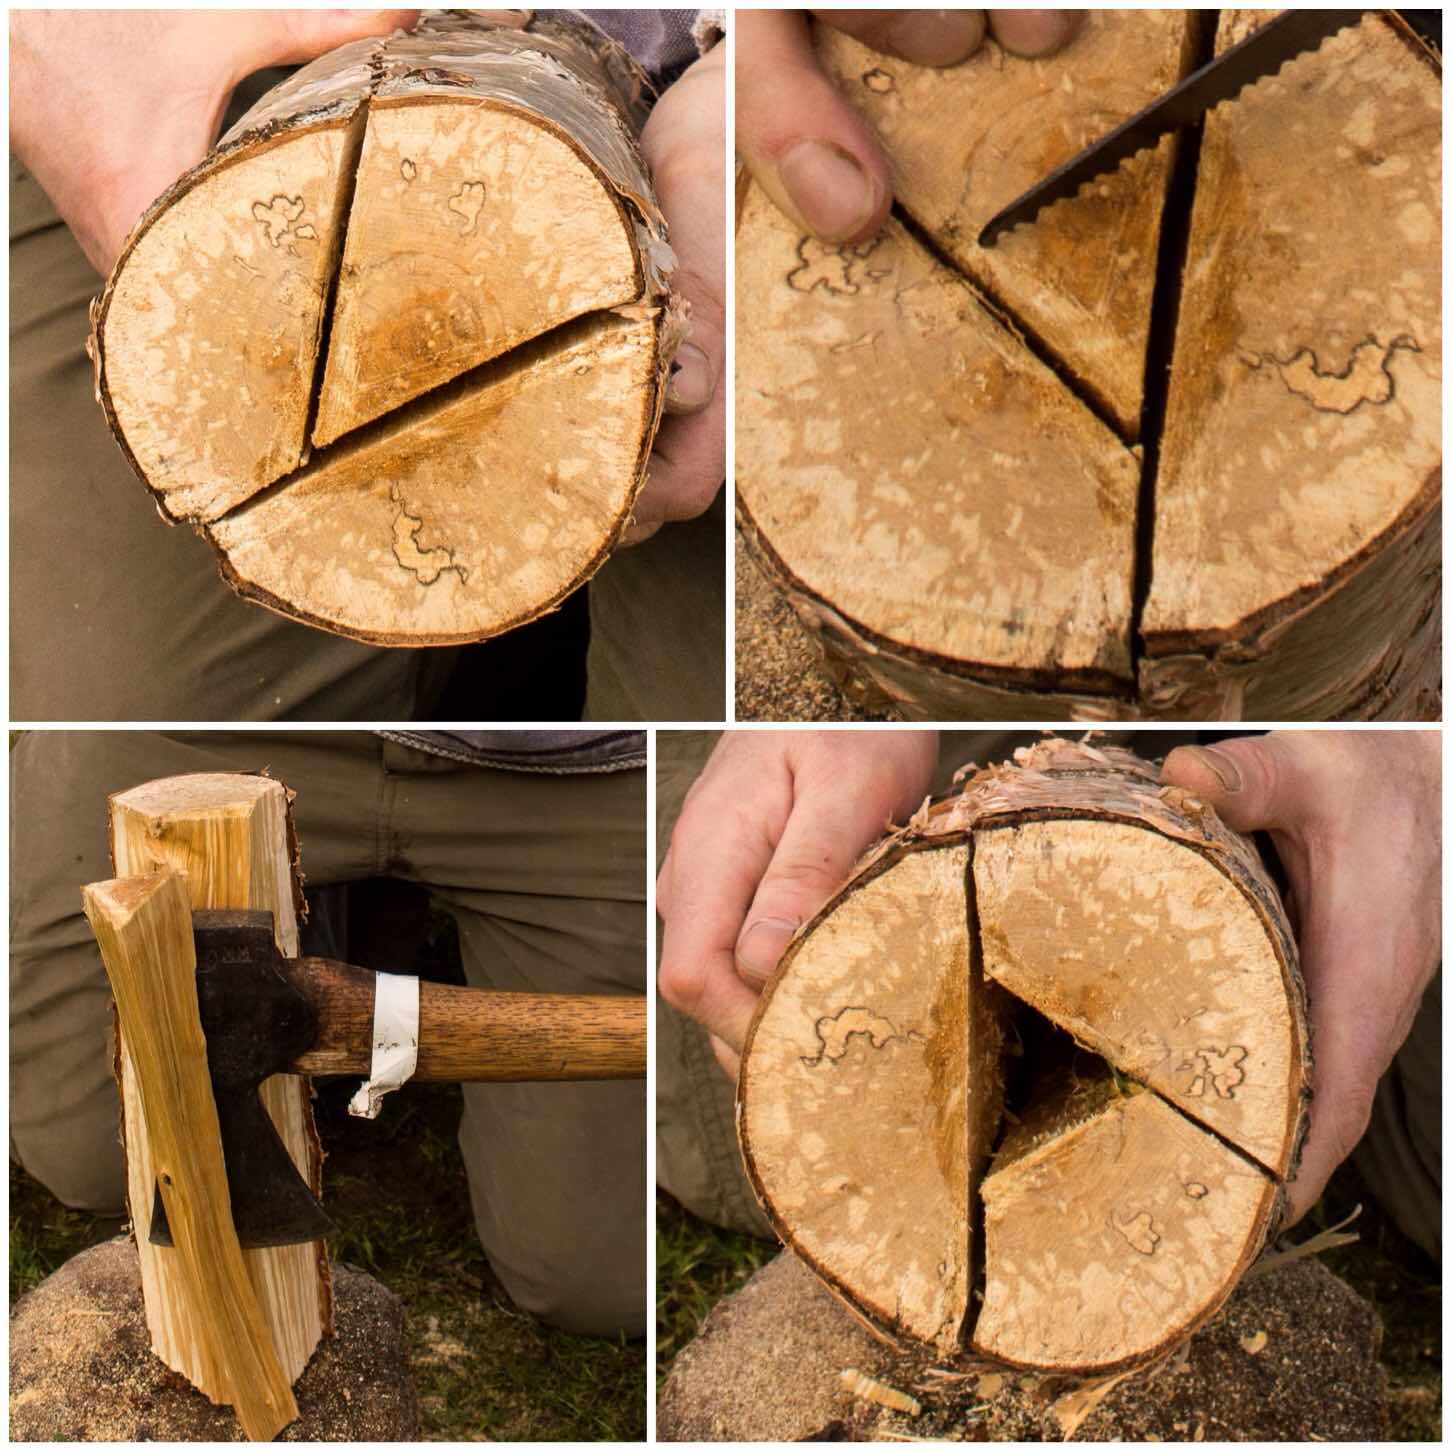
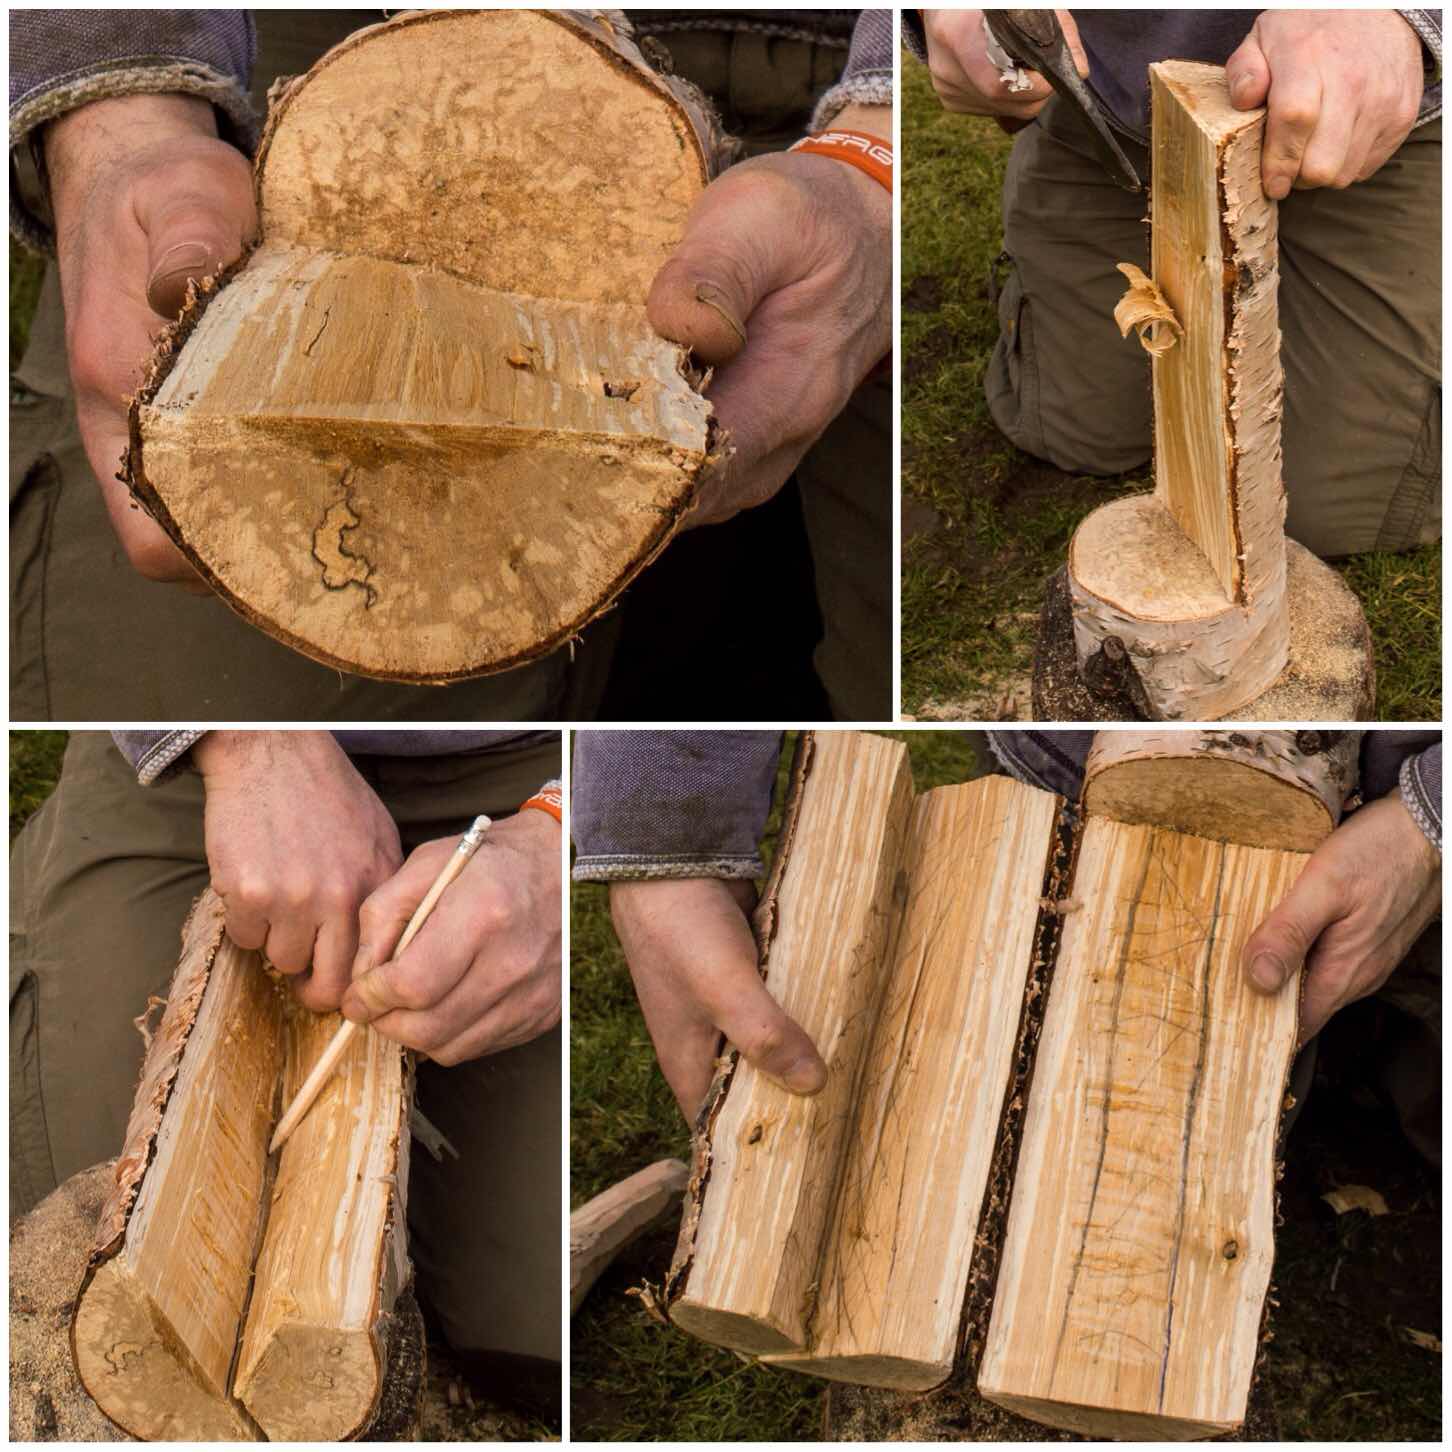
This is a post that came about because someone decided to chop down a tree. On a recent Sea Cadet training weekend we ended up with one instructor (Jess), one hammock and one tree – my friend Dave and myself had bagged the other trees for our hammocks :-). Not an ideal situation for Jess you could say.
We could not camp elsewhere and there was nothing in the way of available natural material to help us (we were on a military camp). Thankfully my friends Alan and Dave spotted some old poles (used for team building exercises) at the back of of a building. So Dave with Jess as his assistant in true Seacadet style, set out to apply their seamanship talents to our problem.
Shear Leg Stand
The Shear Lashing
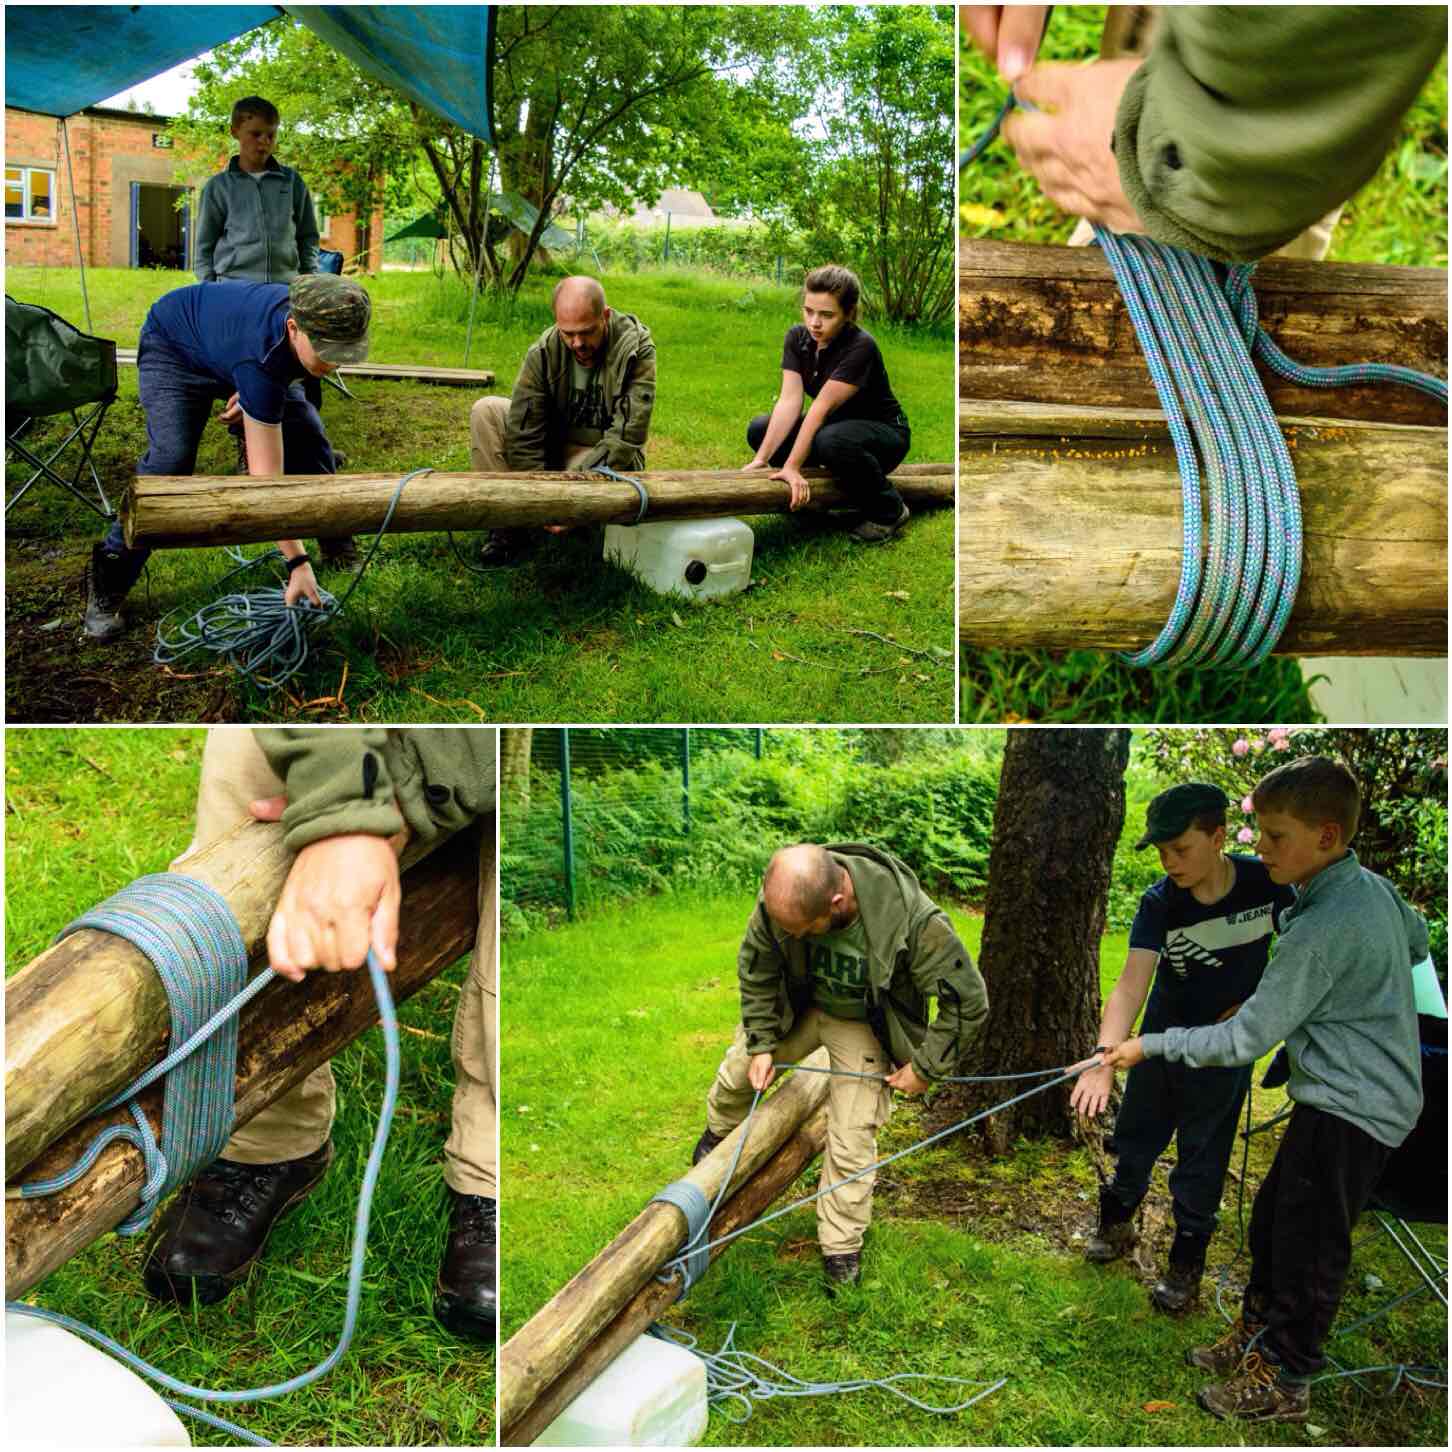
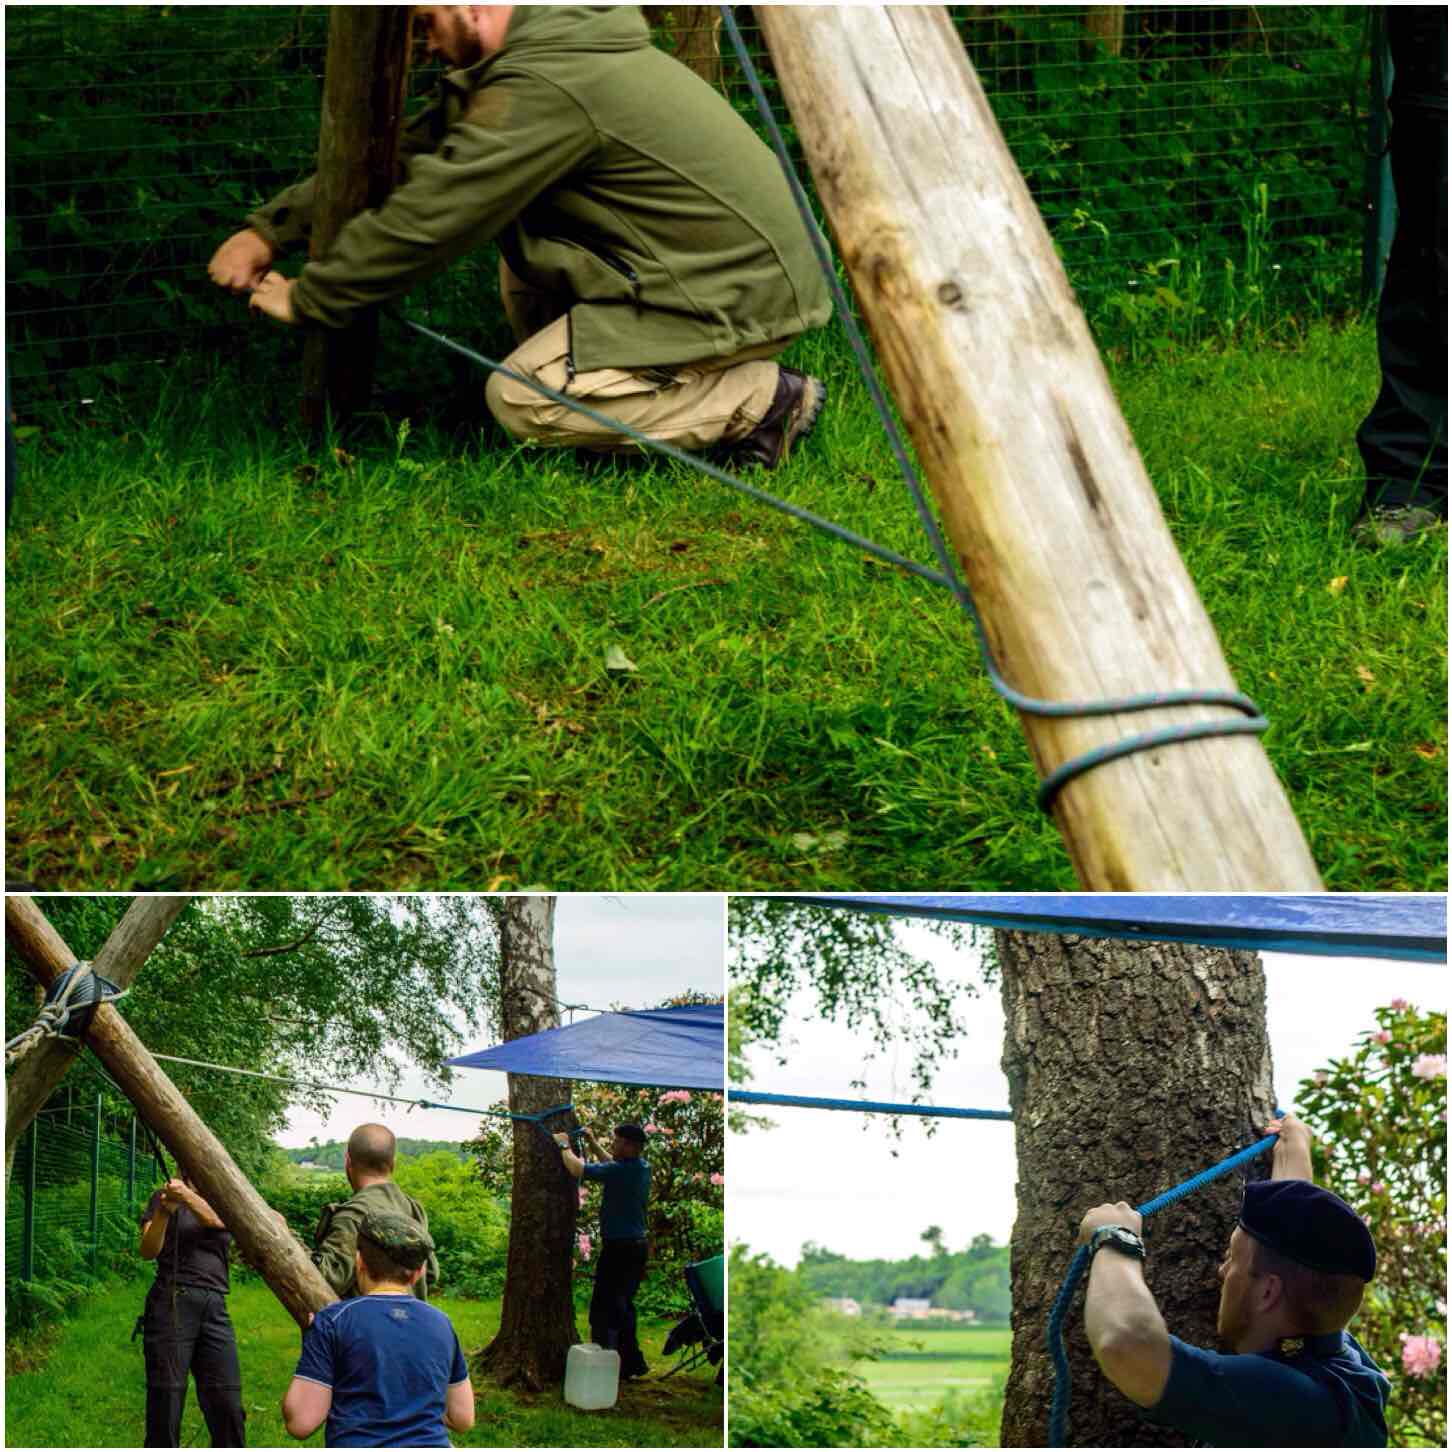
They collected some assorted pieces of rope and a couple of cadets to help out. The poles were quite long and thick so they decided to tie the poles together about two thirds of the way along their length. The poles were tied together using a shear lashing (I will be using Grog’s Knots to help describe how they did this).
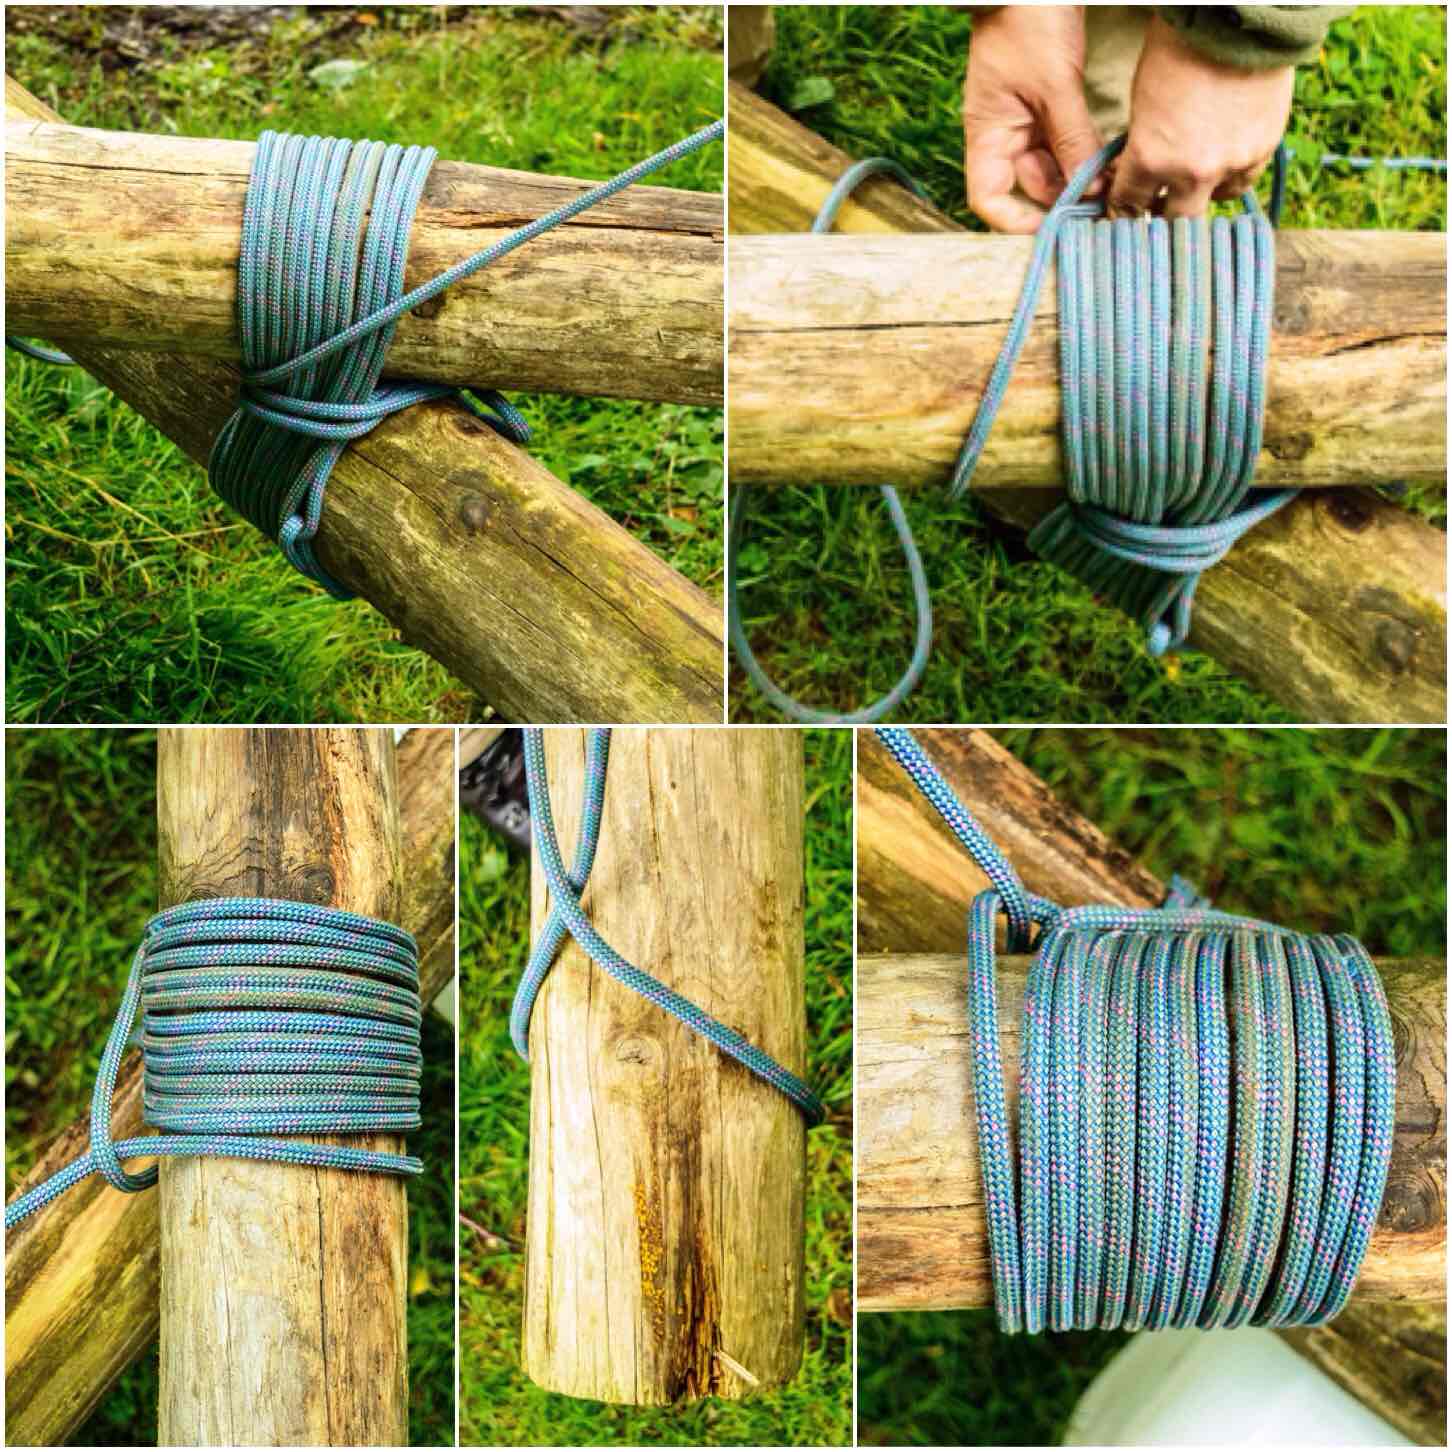
To start the shear lashing they attached the rope to one pole using a timber hitch and then wrapped the rope a number of times around both poles (this is known as wrapping). To make this easier the poles were raised slightly of the ground and the cadets helped to pass the masses of ropes around the poles.
Wrapping
Once the wrappings were completed the lashing was tightened by being frapped (nothing to do with Facebook). Frapping is the nautical term to describe the tightening of a rope or cable. Dave did this by completing a number of turns around the centre of the lashing and pulling it all in tight.
To finish the lashing off he secured it with a clove hitch to the pole without the timber hitch. There was plenty of rope left over as well to help with anchoring the shear legs down.
Frapping
Anchoring
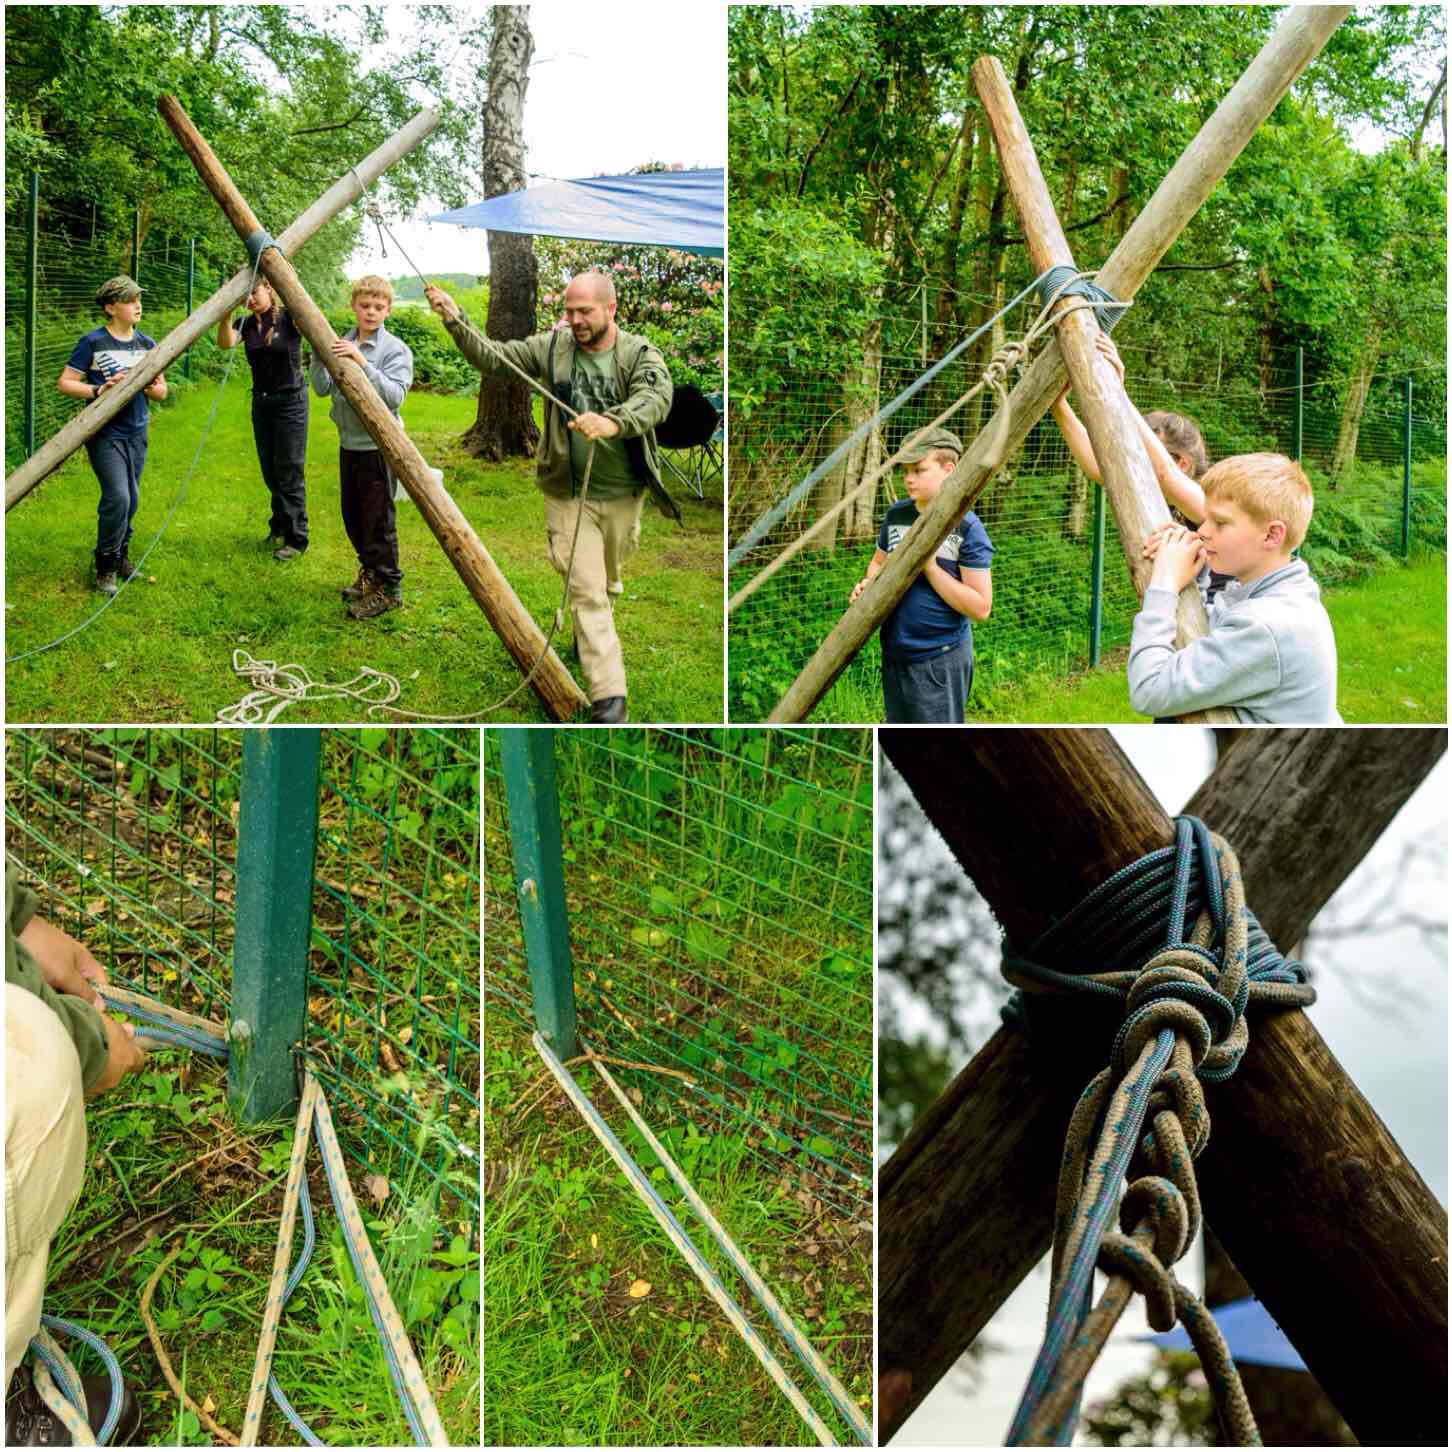
Though the poles were large they were surprisingly light so they were soon standing vertical. A spare piece of rigging line was looped over the pole with the timber hitch on it and with the spare rope from the shear lashing the legs were securely anchored by wrapping both ropes around base of a solid fence post.
Both ropes were then tied off around the shear lashing on the poles to make it all secure.
Anchoring
Alternative Anchors
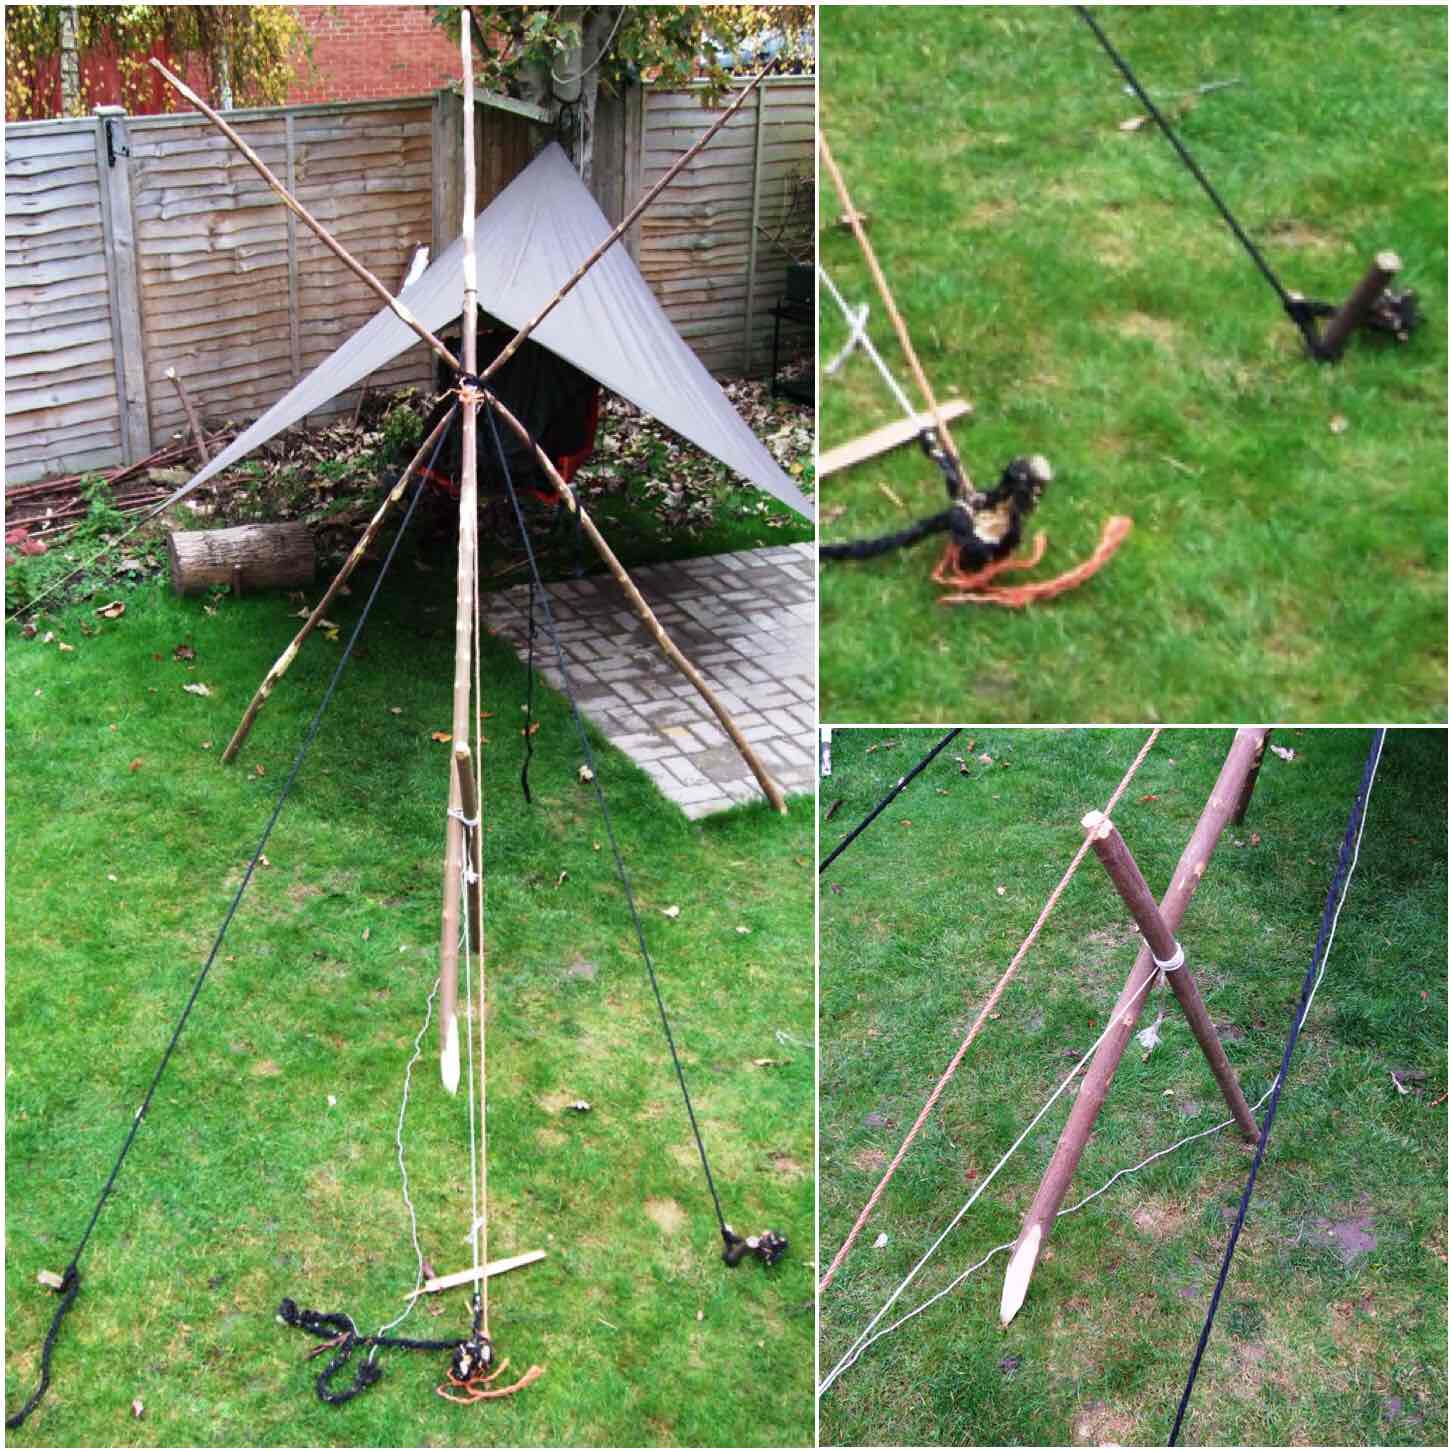
If you do not have a handy anchor like our fence post you can make your own. In the past I have had shear legs and tripods for hammocks anchored safely with three large wooden stakes.
Alternative Anchors
Securing
If you cannot drive your shear legs into the ground I would advise you to tie them together near the bottom so that they do not inadvertently splay out. Dave used the last of the lashing rope (it was a rather long piece of old climbing rope) to do this.
Finally, to finish the set up the shear legs were tied securely to our single tree using a top line. This top line as well as securing the shear legs was to act as a line to hang Jess’s tarp off.
Securing
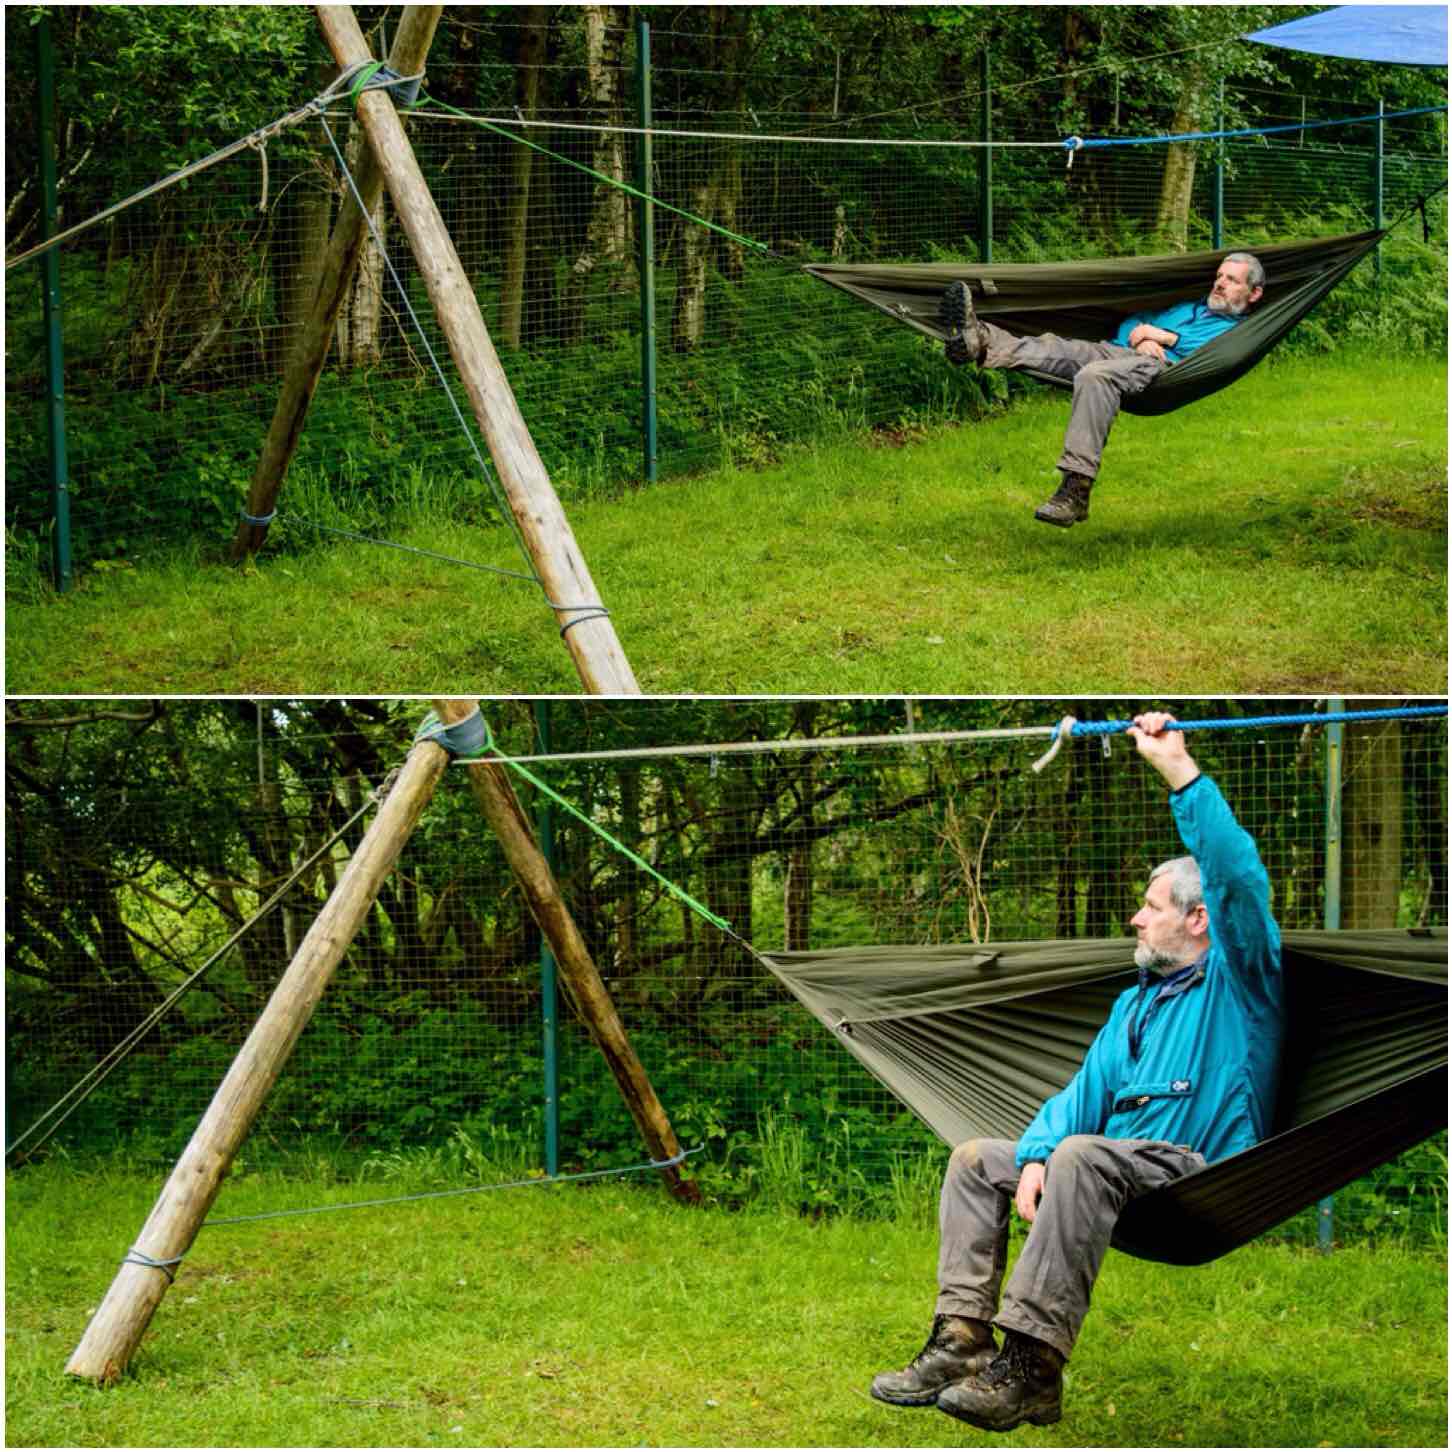
Testing & Set Up
I did a bit of testing after we had hung the hammock. I figured if it took my weight then Jess would have no problems. The top line went slightly slack when the system took my weight so that was re-tightened while I was in the hammock.
Testing
After that it was a simple case of rigging the tarp and Jess setting up home for the night.
Setting up home
This was a great solution from Dave to our missing tree problem and took less than an hour to complete. Jess slept the whole night soundly in her impromptu sleep system and I was chuffed that I managed to capture most of the stages in its construction.
A Good Nights Sleep
If you are interested in making a slightly smaller and more mobile hammock stand yourself have a look at my two other posts on this subject,
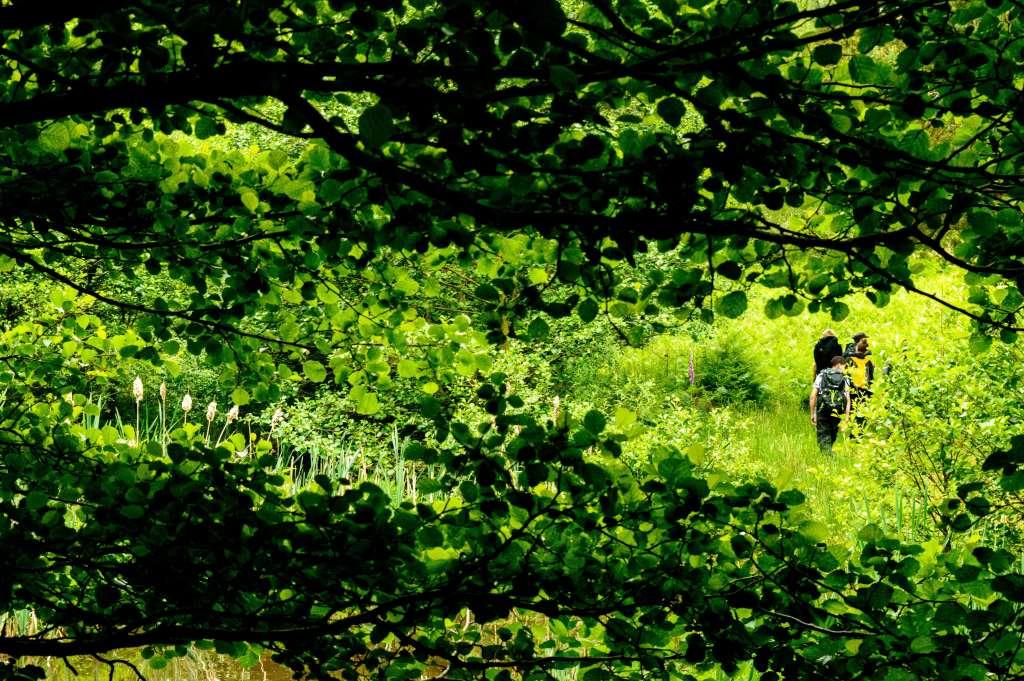
A picture from a week ago in the depths of Pippingford Park in the Ashdown Forest. I chose this picture due to the perfect framing the canopy gave the cadets and the reedmace you can see on the left.
Adventuring On
I had stopped to photograph something else and as I turned around I spotted the cadets moving off, so quick as a flash I snapped this simple moment in time before it disappeared forever.
As a photographer I am continually looking for these moments in time, they are rare but they are out there.
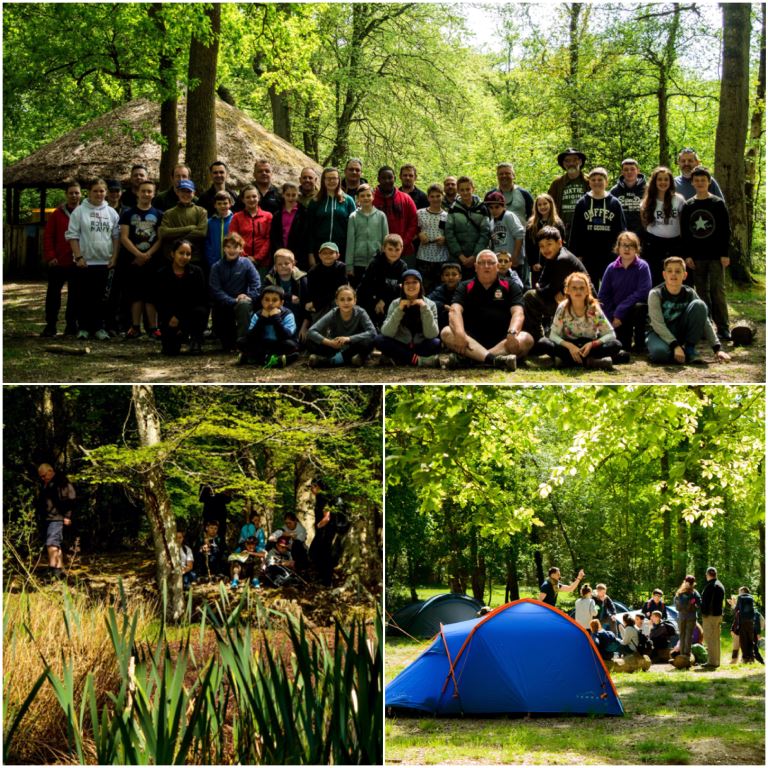
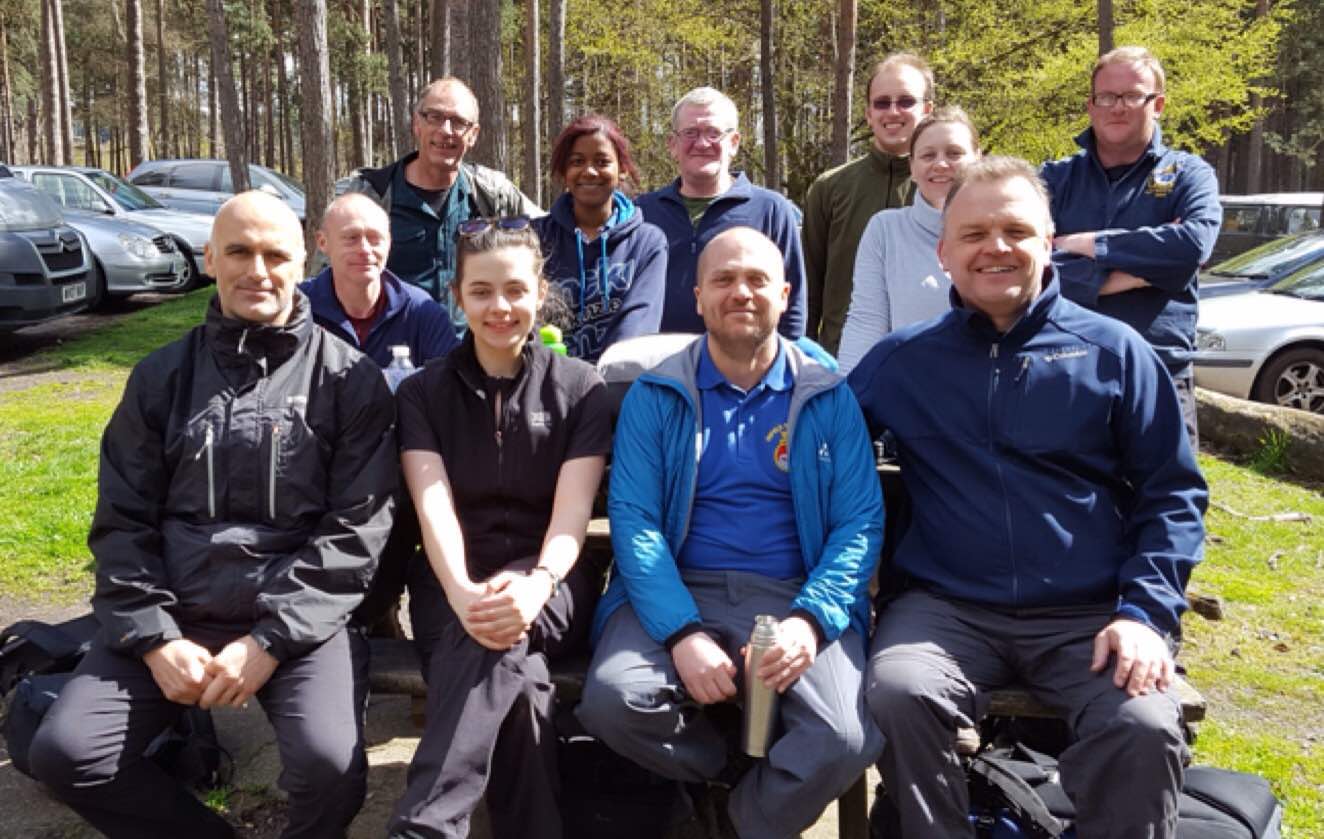
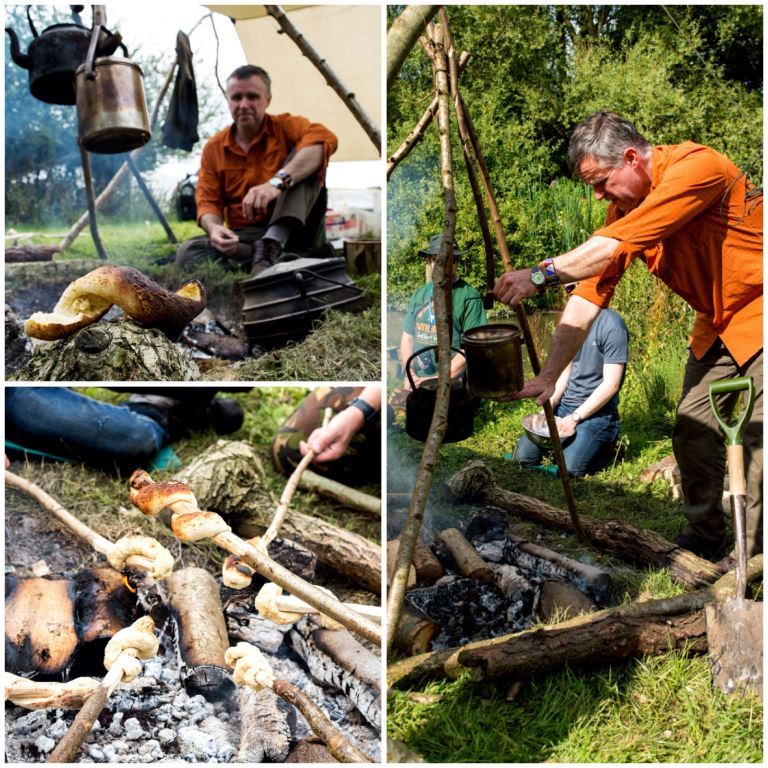
Recently I have been reading a lot on social media about how kids and adults seemingly do not interact enough with nature. This is now the fourth year I have written about our annual trip to the New Forest so I would like to say that whoever writes these general stories has never been out with the Sea Cadets. We immerse both our cadets and staff in nature, so much so that they keep coming back for more. This is the story of just one of the many expeditions we run throughout the year.
This particular expedition is arranged each year so that we can skill up our cadets and staff in Adventurous Training (AT) activities and also to support the annual HMS Hood Remembrance Service at Boldre church in the New Forest.
The Crew
The weekend is organised by Chief Petty Officer Paul Townsend (City of London Sea Cadets) and we have cadets and staff attending both from London and Southern areas.
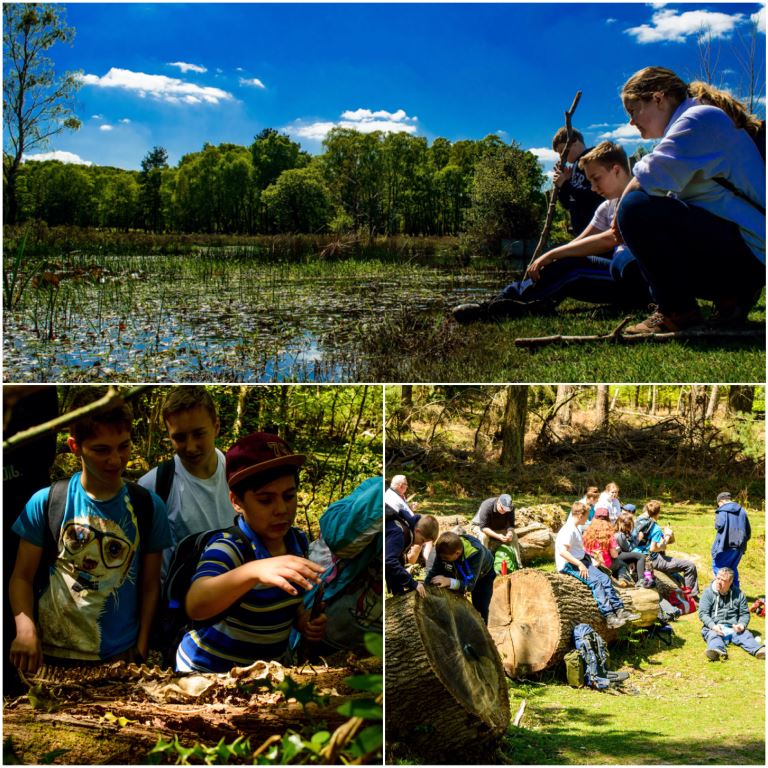
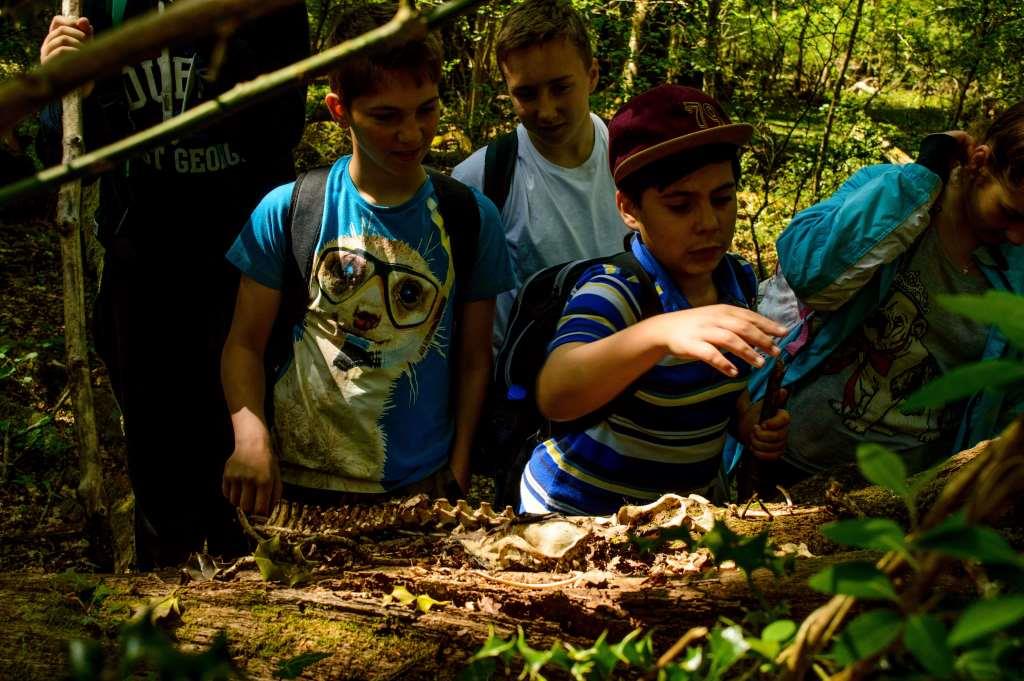
Our aim is to immerse everyone fully in nature as well as teaching them the traditional AT activities such as map reading, compass work and camping. This weekend saw the cadets finding the skeleton of a fox, observing pond life and scrambling all over the woods.
Relaxing and Exploring
We have various groups set up over the weekend focusing on different skills. There was a group for the Juniors, various groups for the older cadets and a Duke of Edinburgh’s (DofE) group out as well.
I took out a group with Paul, Jess and some of the older cadets, The cadets were looking to gain various camping tickets and Jess was under training for her Basic Expedition Leaders (BEL) award. This requires her to have a high level of navigation skill however it also requires he to have the skill to pass that knowledge onto others.
Map and Compass work
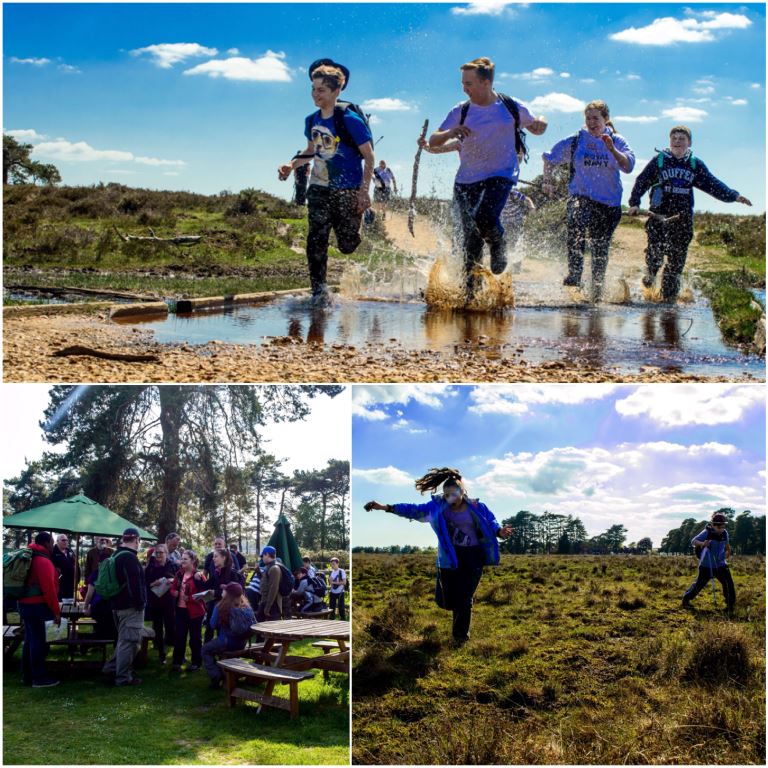
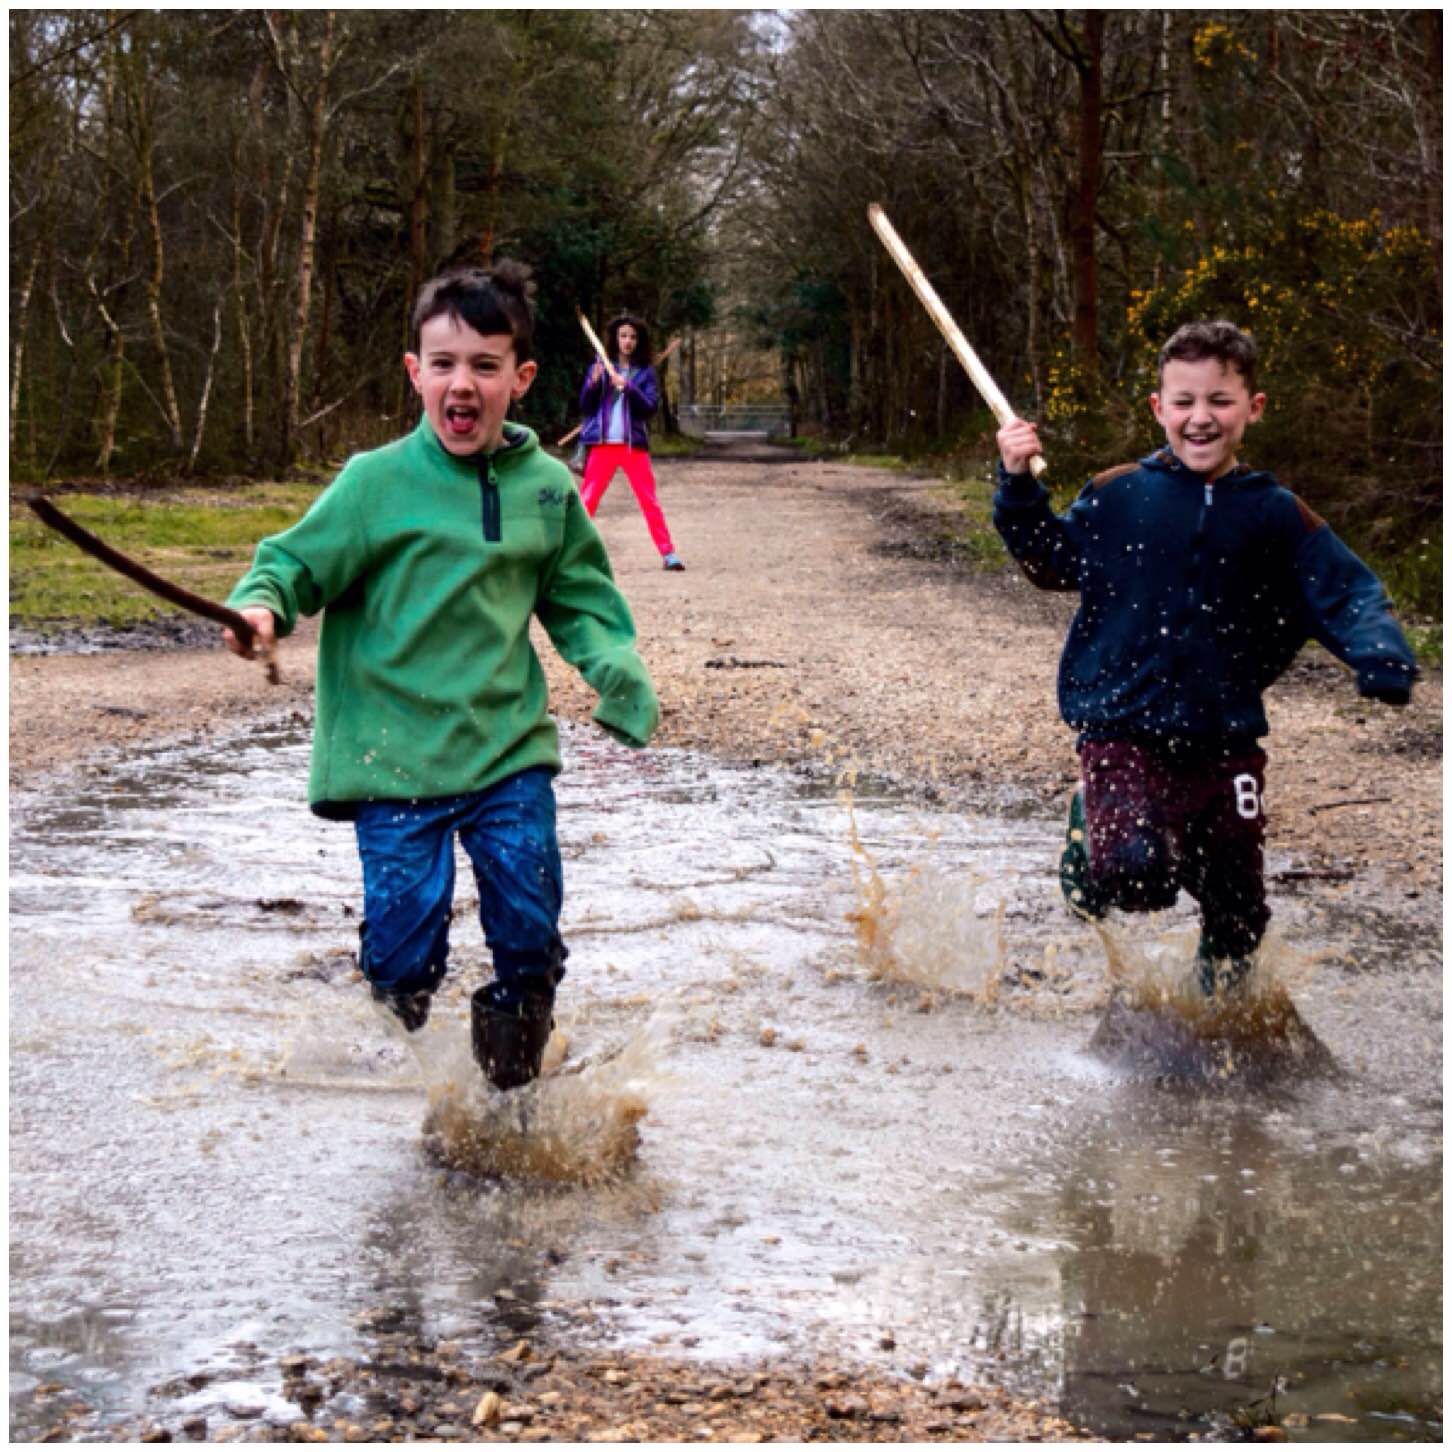
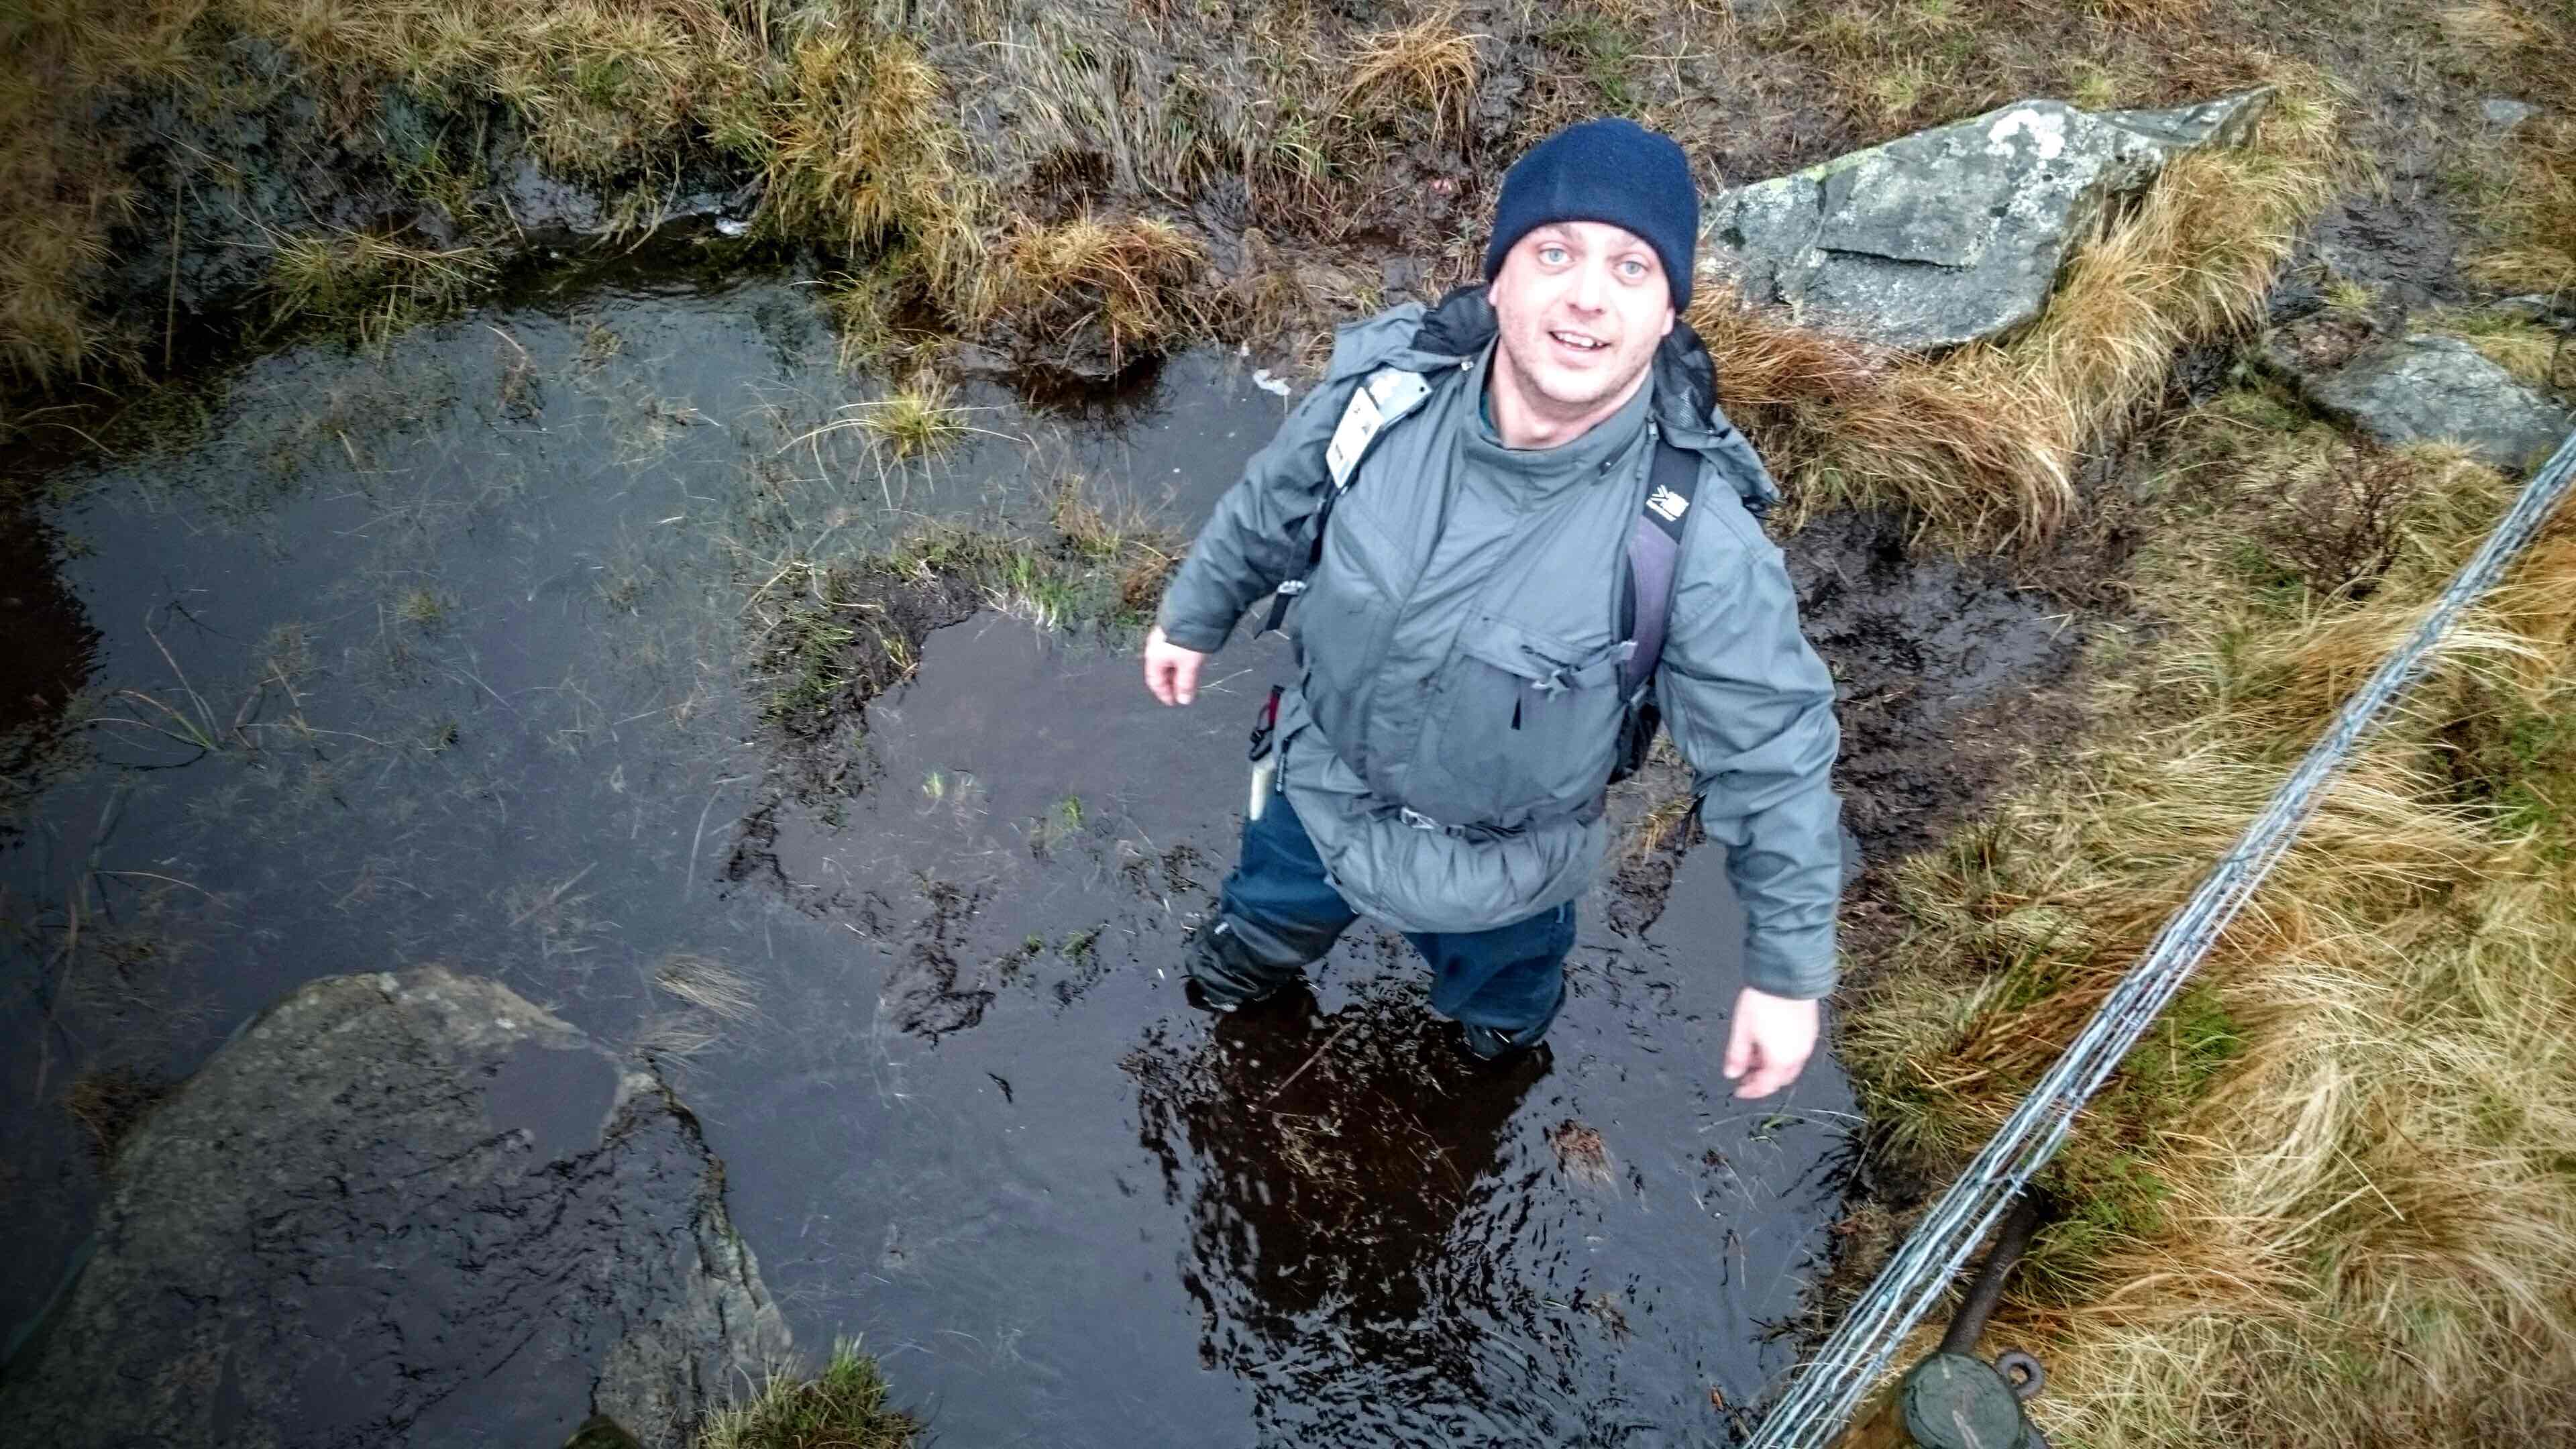
Now it is not all hard work and no play by any means. Soon the cadets were flying through the puddles and we took time to rest up on the Saturday afternoon at the hotel near Beauly Rd station. On the way back to the campsite at Ferny Crofts the way got pretty boggy so it was fun watching the cadets trying to keep there feet dry. They soon learnt how to select a good route along the way.
Fun for all ages
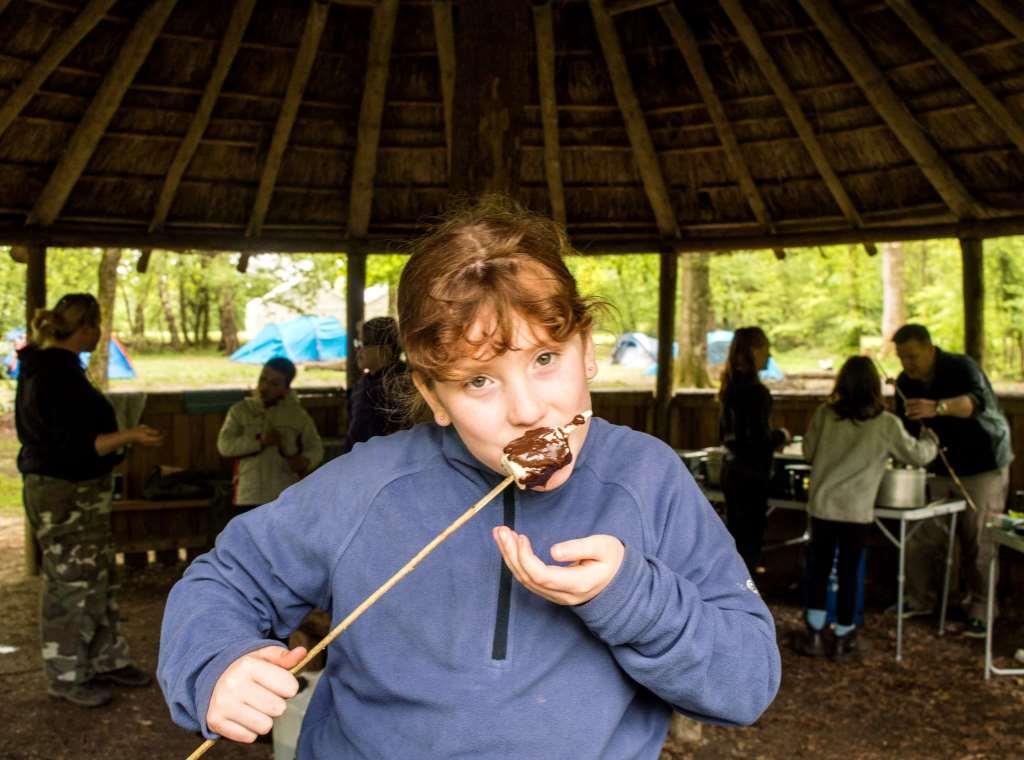
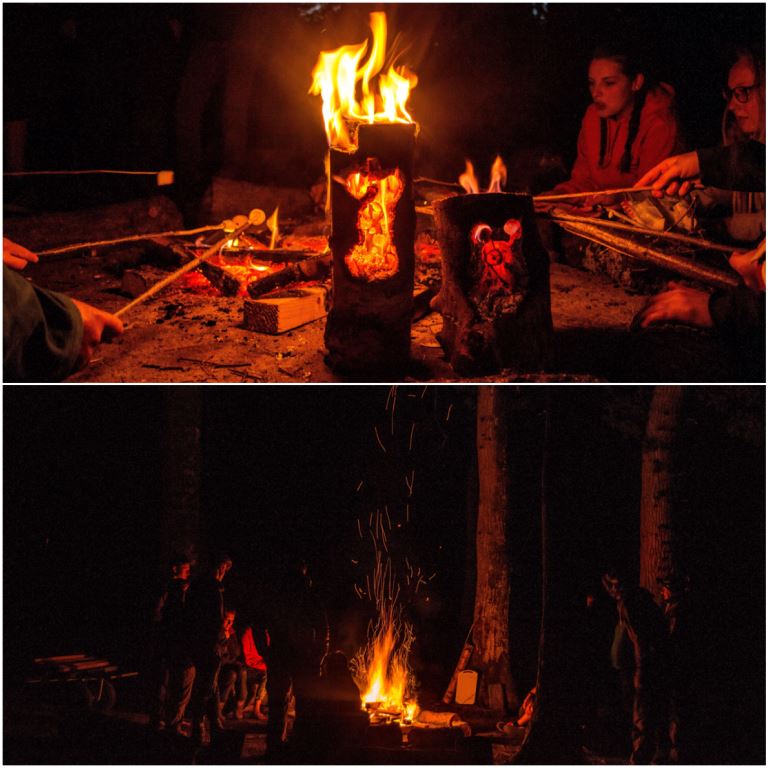
Evening activities involved the usual football, netball and run out games before it was marshmallow time.
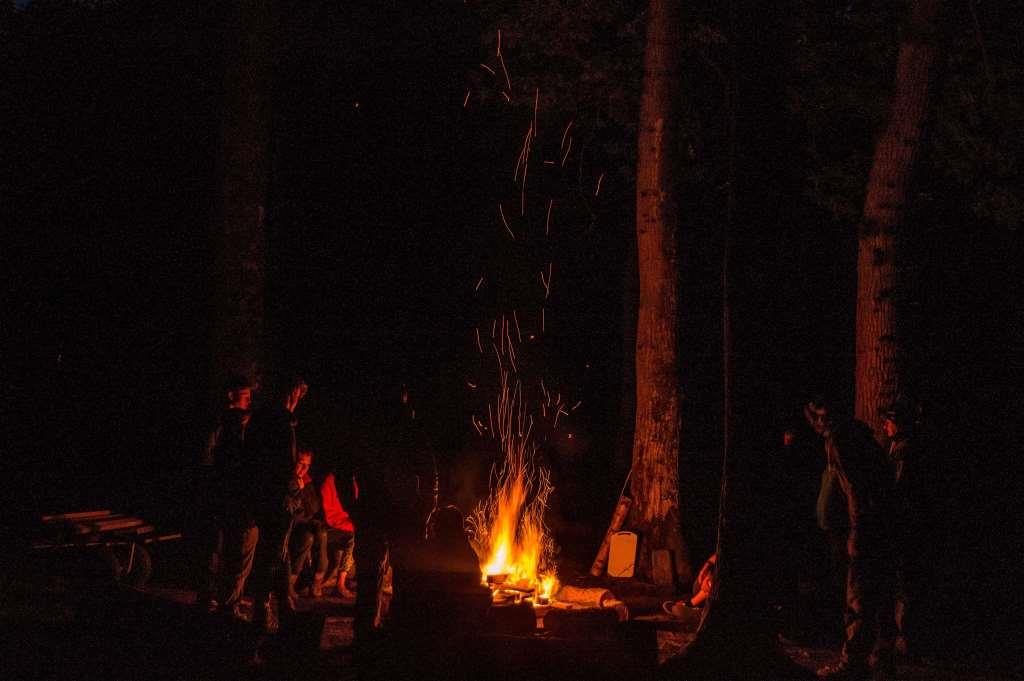
We had enough wood this year for the cadets to have their own fire and soon it was sparking away merrily.
Woodland TV
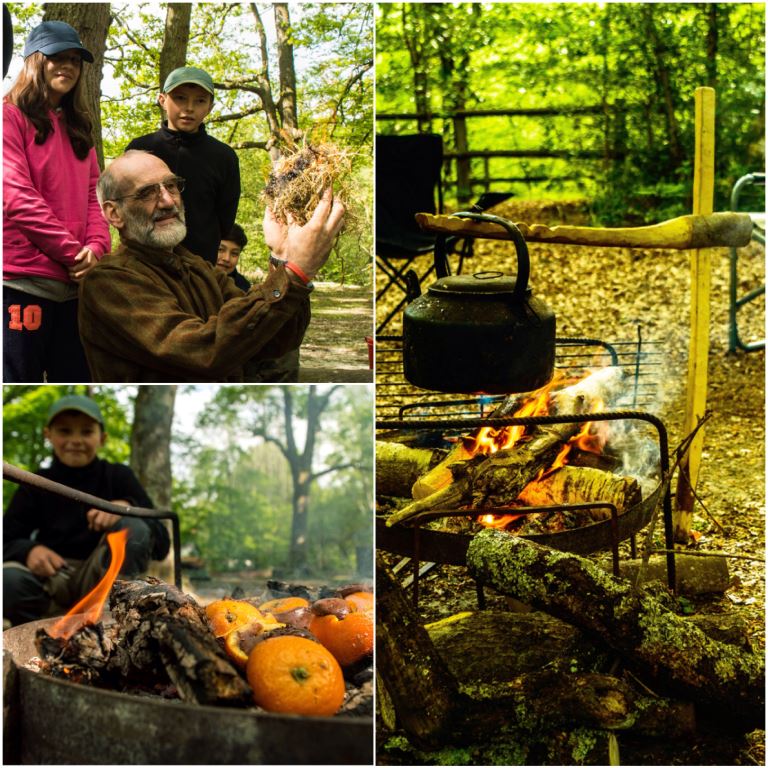
On the Sunday morning a group of cadets go off to the remembrance service at Boldre church while the rest of us get on with the mornings activities.
Simon was thankfully with us again this year and ran the galley in the roundhouse. He certainly can make some great meals with very little in the way of ingredients. The Juniors meanwhile cracked on with firelighting with Charlie and cooking with Chrissie. I enjoyed some giant toasted chocolate marshmallows however the orange cakes were left in the embers for a little too long I think 🙂
Sunday Morning Feast
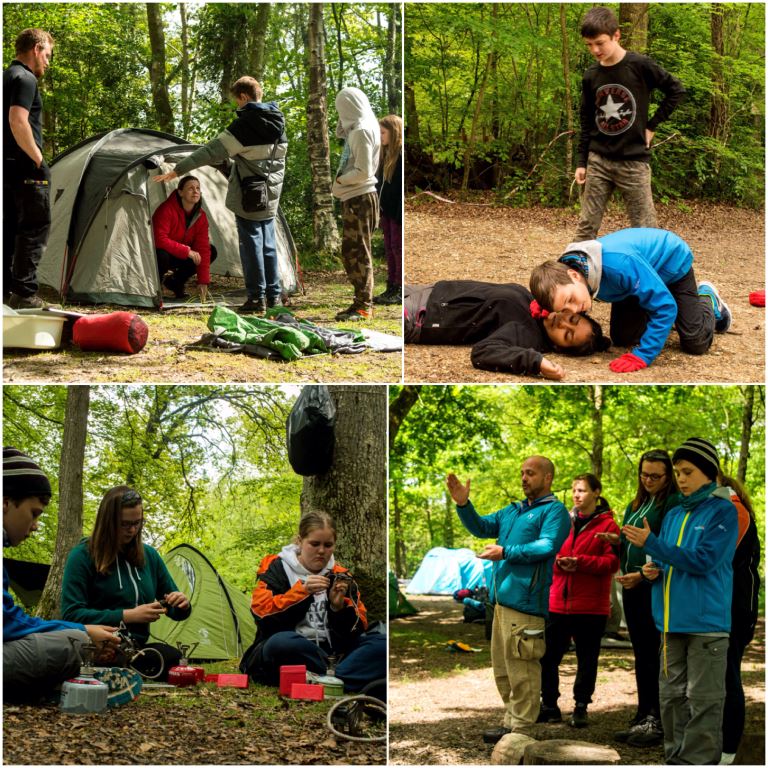
The rest of the staff and the older cadets cracked on with lots of classes. This allowed the trainee instructors like Sarah, Jess and James to gain some valuable time teaching AT skills while training up for their BEL award.
Classes included tent pitching, first aid, bag packing, cooking and compass work. I did not see much of the DofE team as they were out on their expedition on both days however reports back were that they all successfully completed the weekend.
Adventure Training classes
While all this was going on on the Sunday morning the group at Boldre church put on a fine parade and learnt a bit more about HMS Hood. In all my years going to the New Forest for this trip I have never managed once to get to the parade – mind you that would involve me putting a uniform on 😉
2016 HMS Hood Remembrance Service
As I get older the years seem to pass quicker however each year has been packed full of fun. I am looking forward to many more years of visiting the New Forest and passing on my knowledge of nature to others so that they can continue this skilling up cycle.
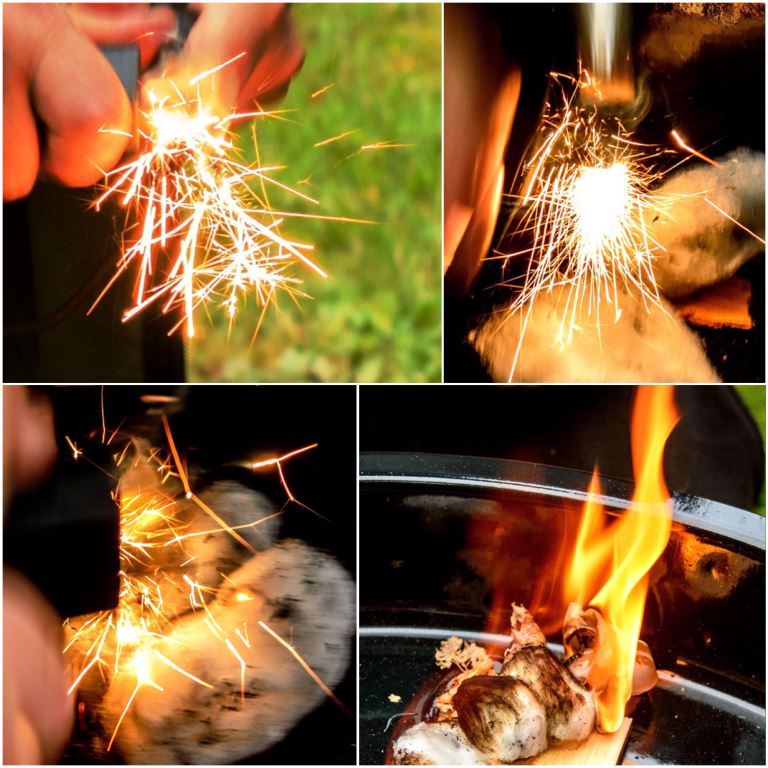
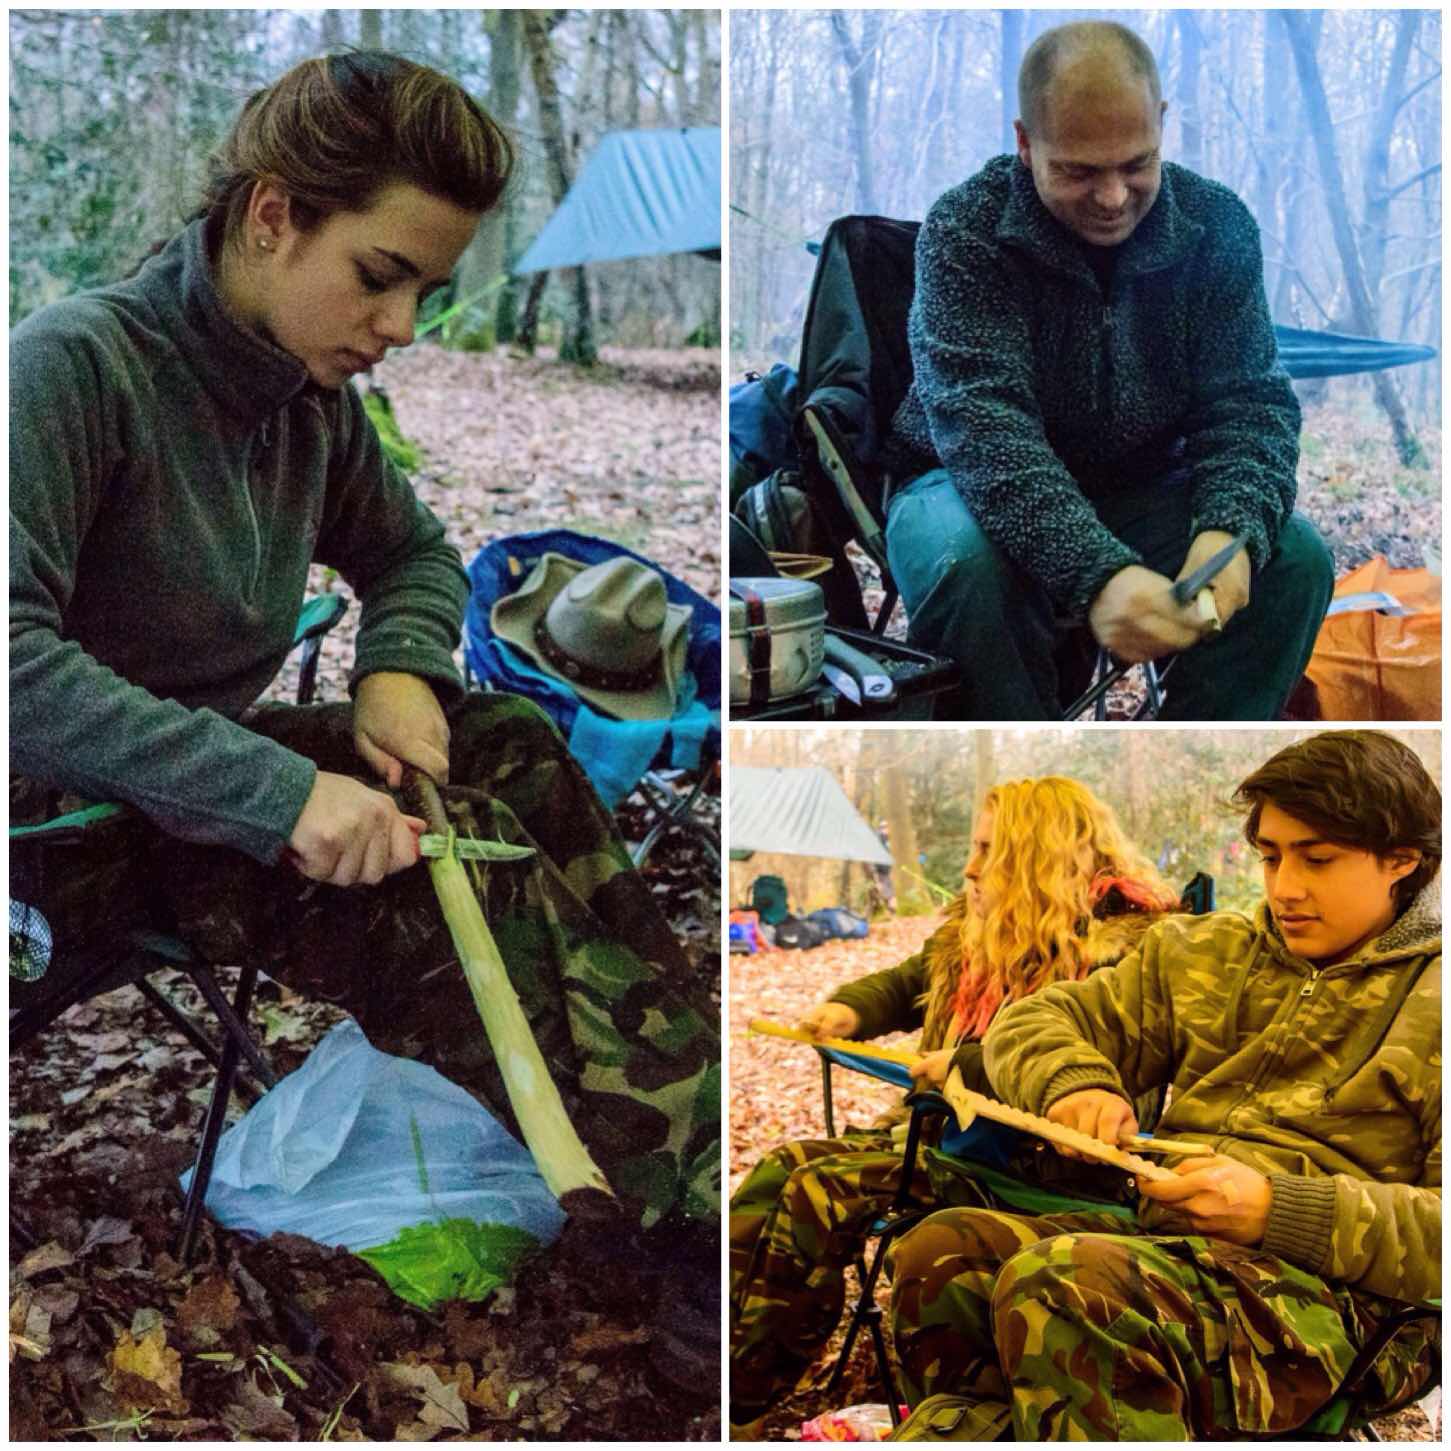
Flammage – A phrase I heard for the first time at Woodcraft School when I was studying for my Bushcraft instructors certificate. I love the word as teaching firelighting has always been a passion of mine. Over the last couple of months I noticed I had gotten some excellent flammage shots.
I teach firelighting using many different methods however when you have lots of kids to teach and not much in the way of time then firesteels do the trick. They do make for some cracking pictures as demonstrated below by my friend Dave Lewis at a recent Sea Cadet camp. When teaching firesteels to very young children I liken them to fairy lights and you can see why below.
Fairy Lights
Now it is not all just one big firelighting fest as we do teach everyone to respect fire and how to be responsible in using it. Charlie got the kids in the picture below to use firesteels to strike onto char cloth and then blow it all into a flame using some dried grass. The resulting fire was kept contained in a fire tray and soon produced plenty of tea and chocolate cakes.
Flammage
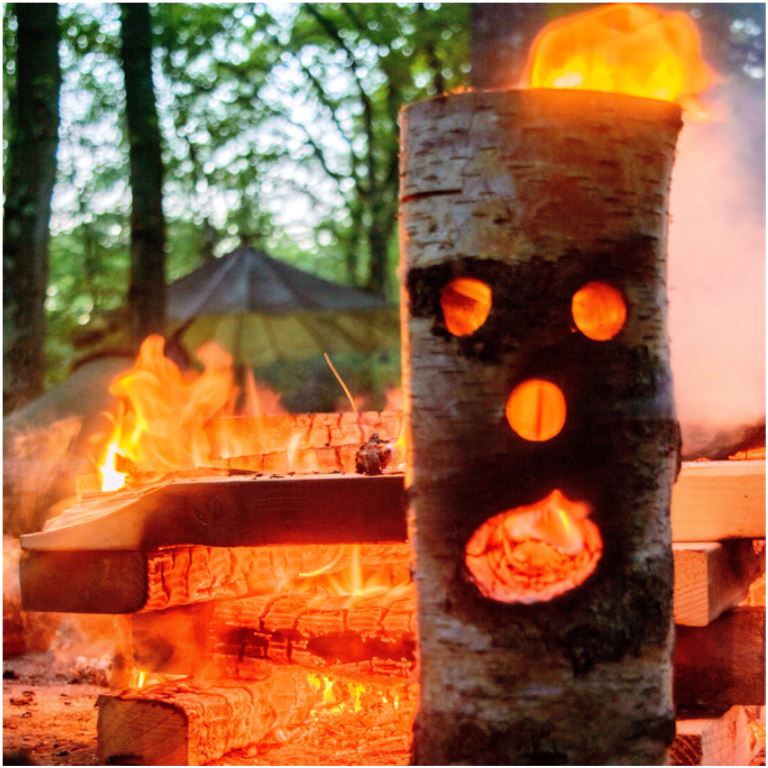
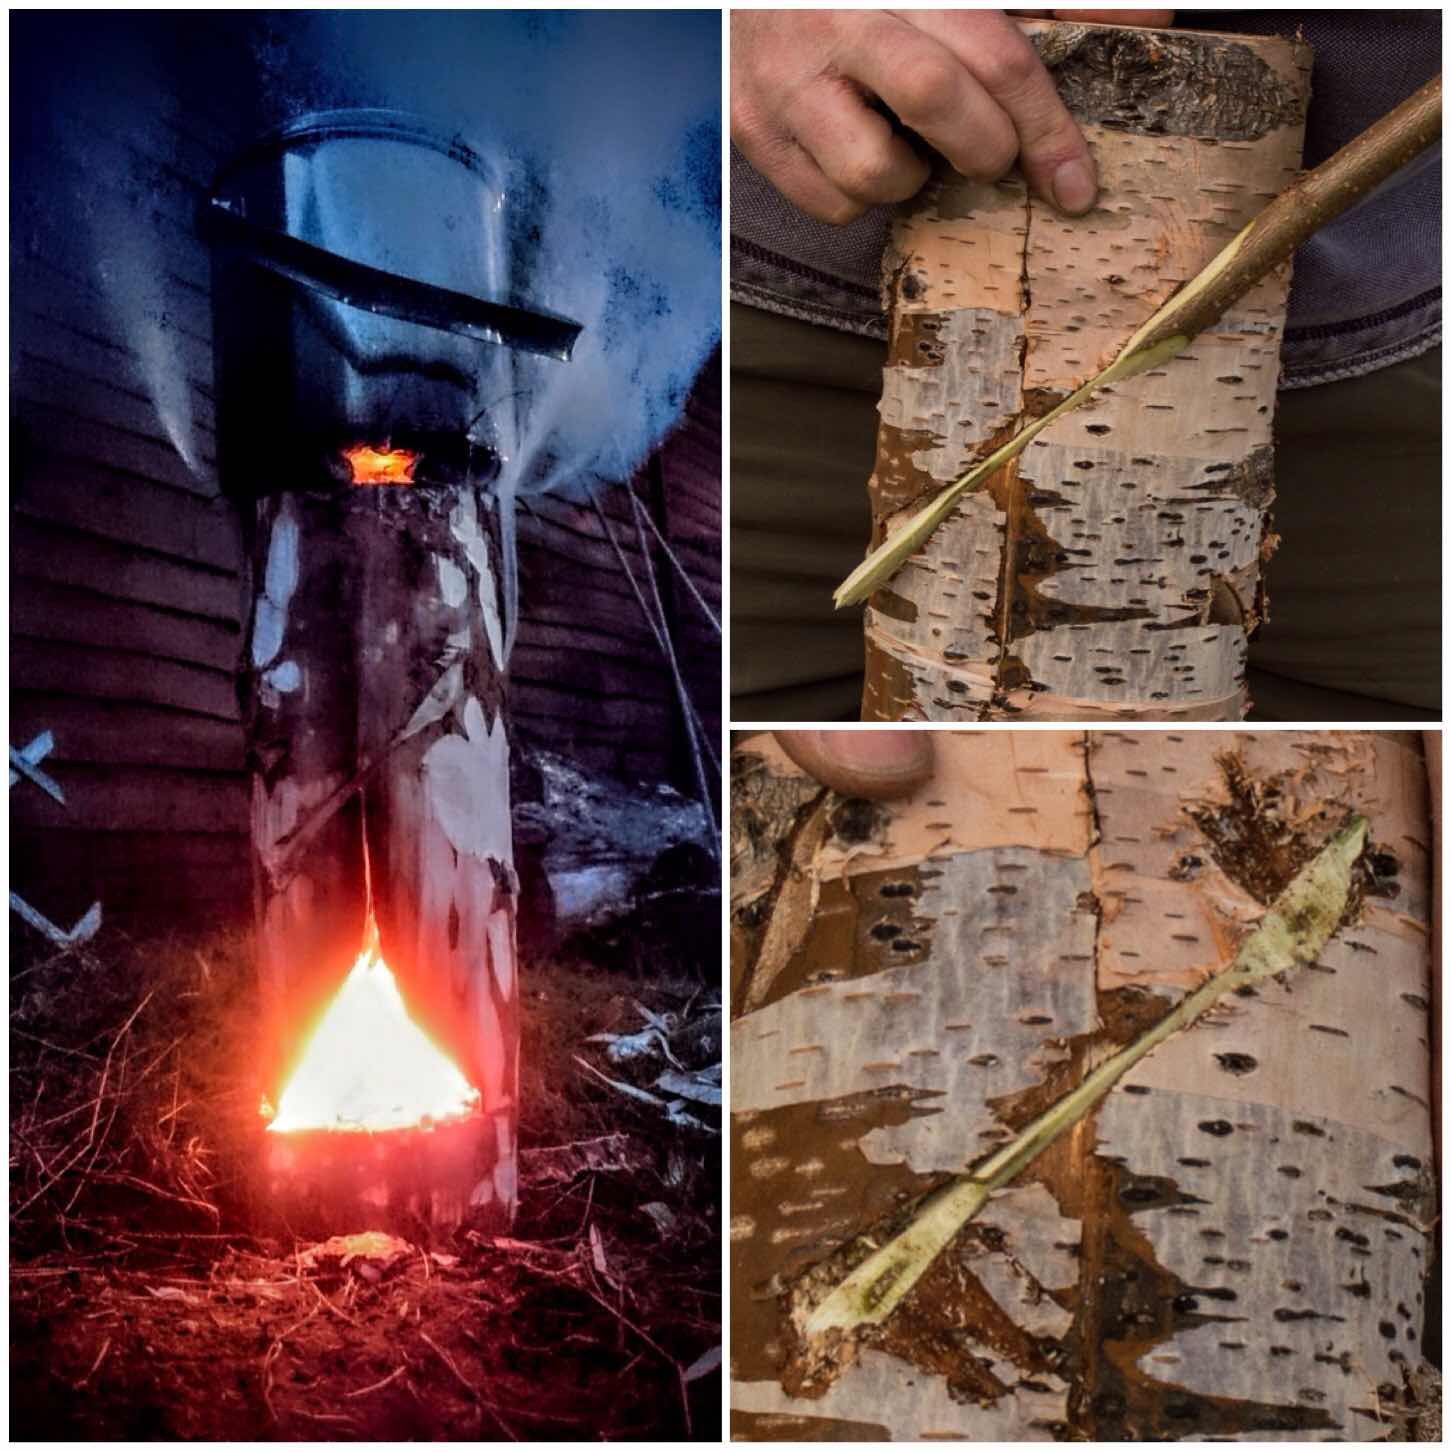
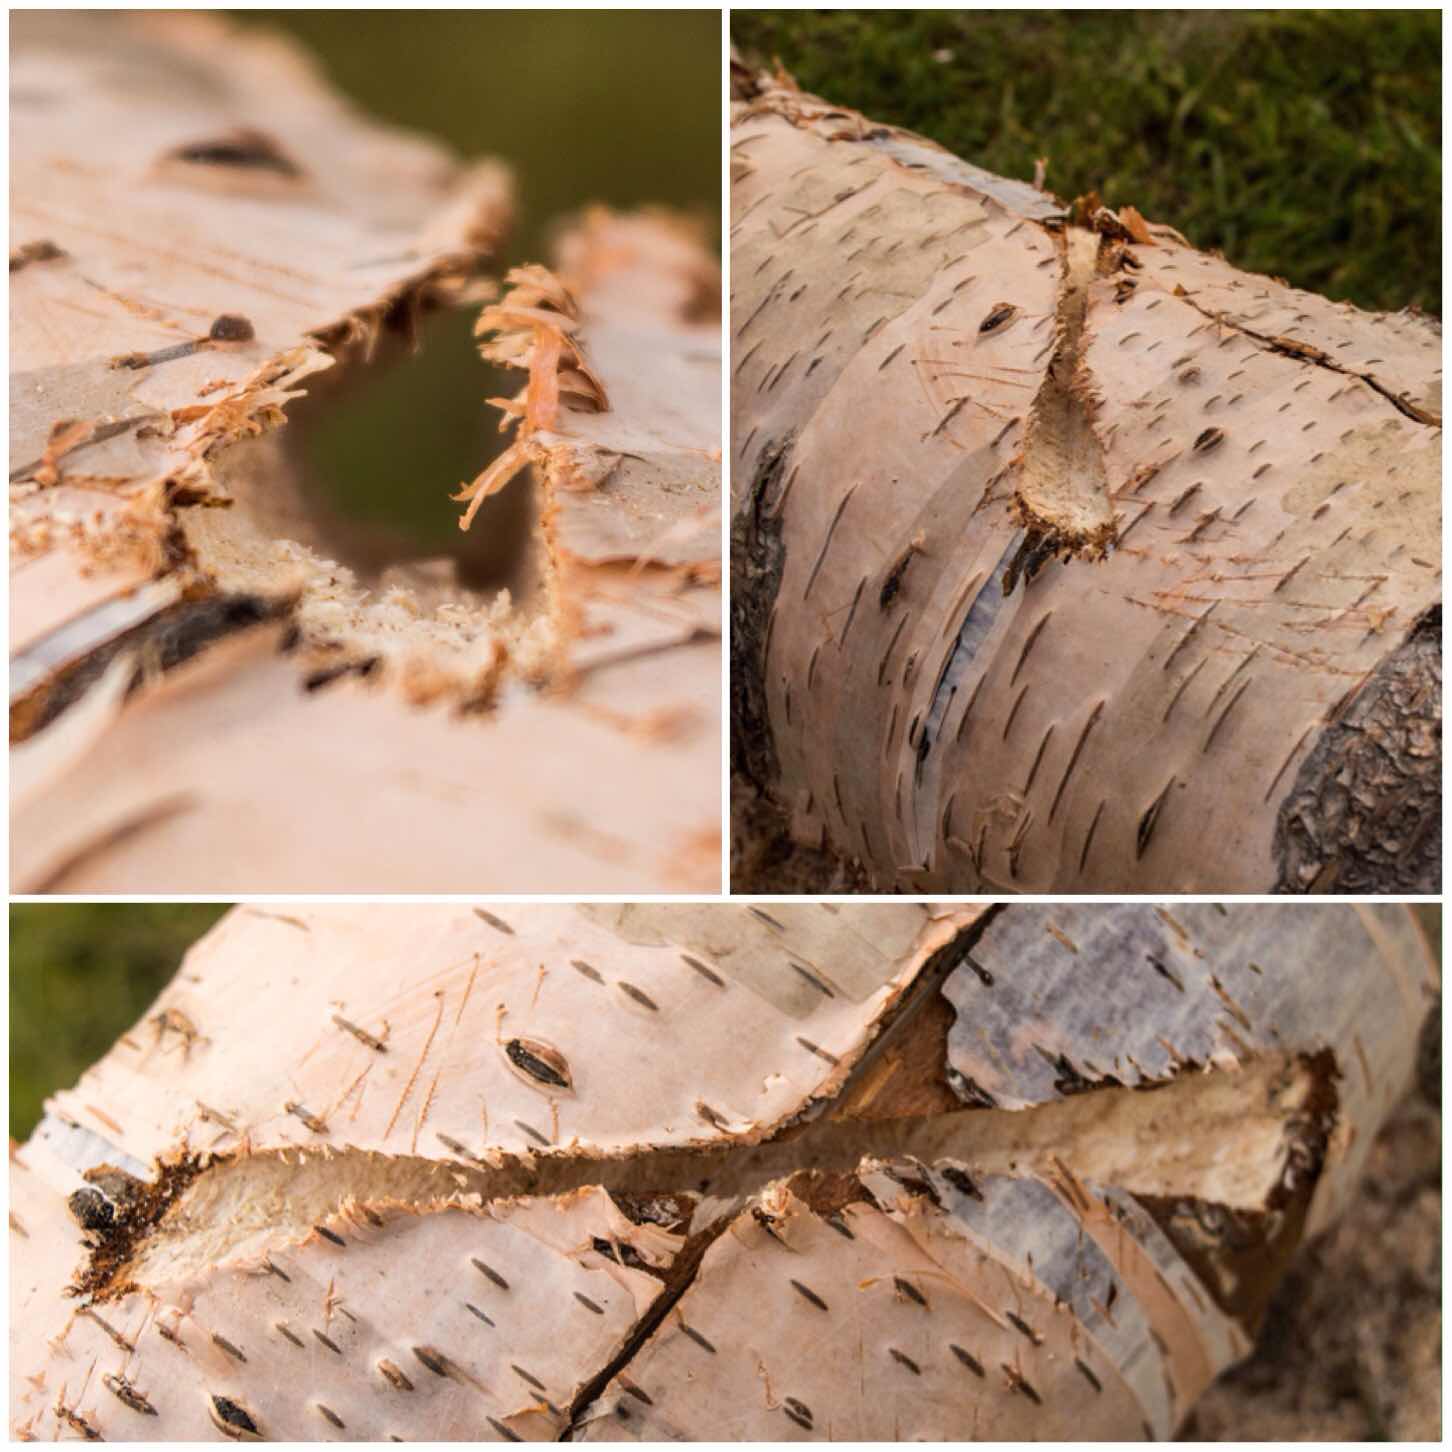
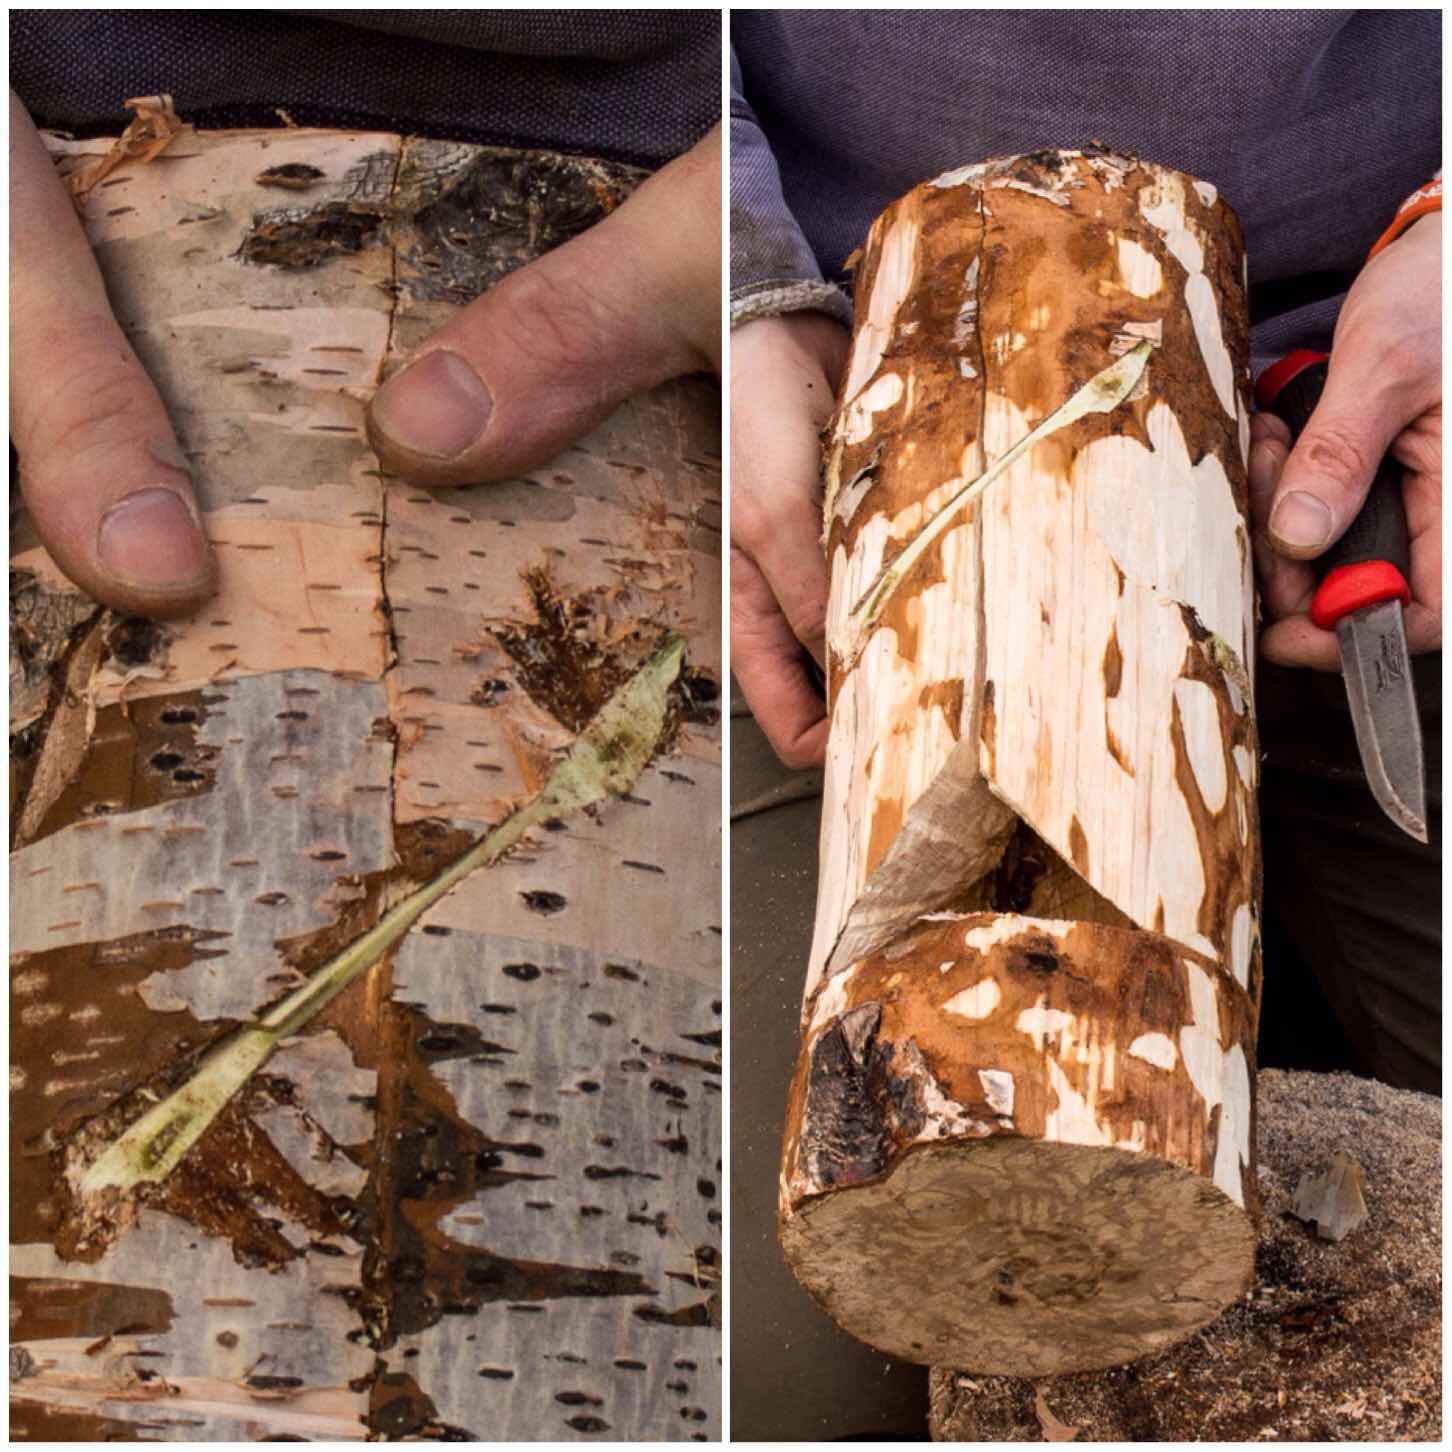
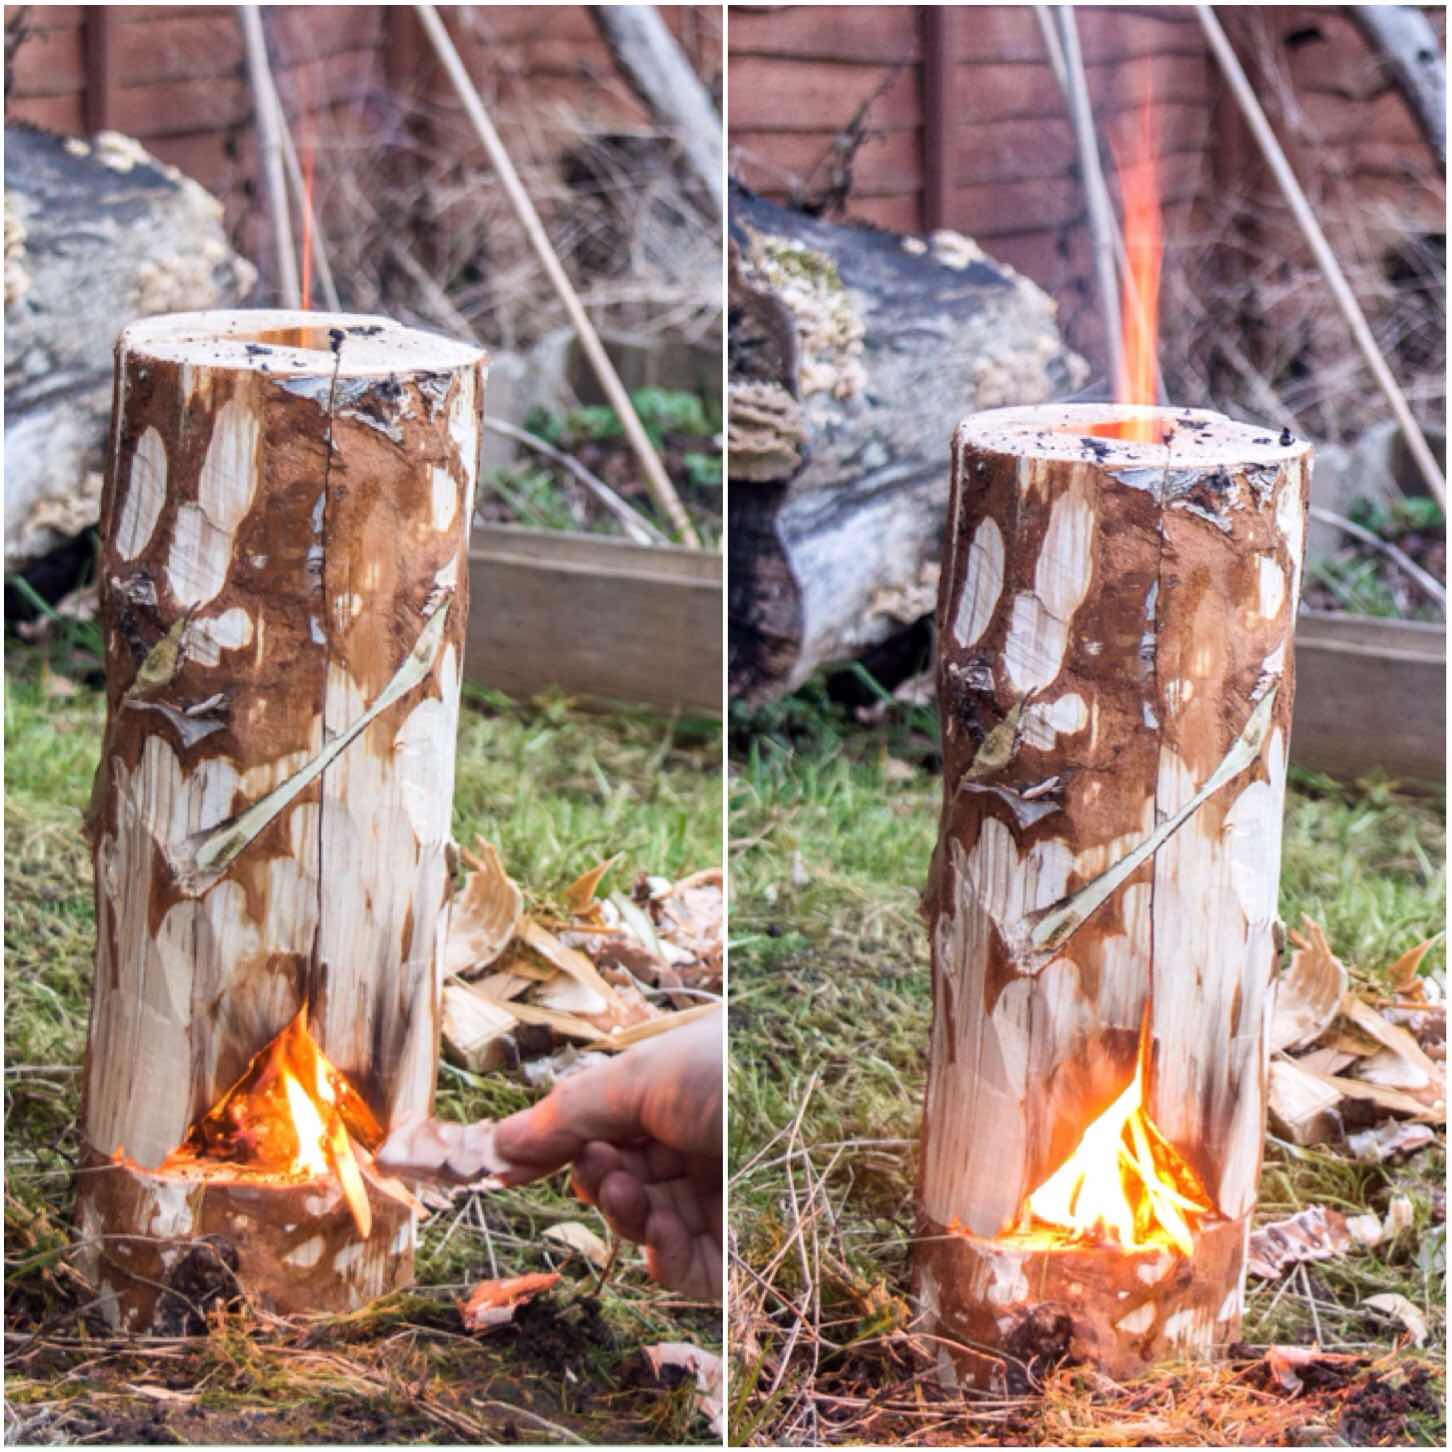
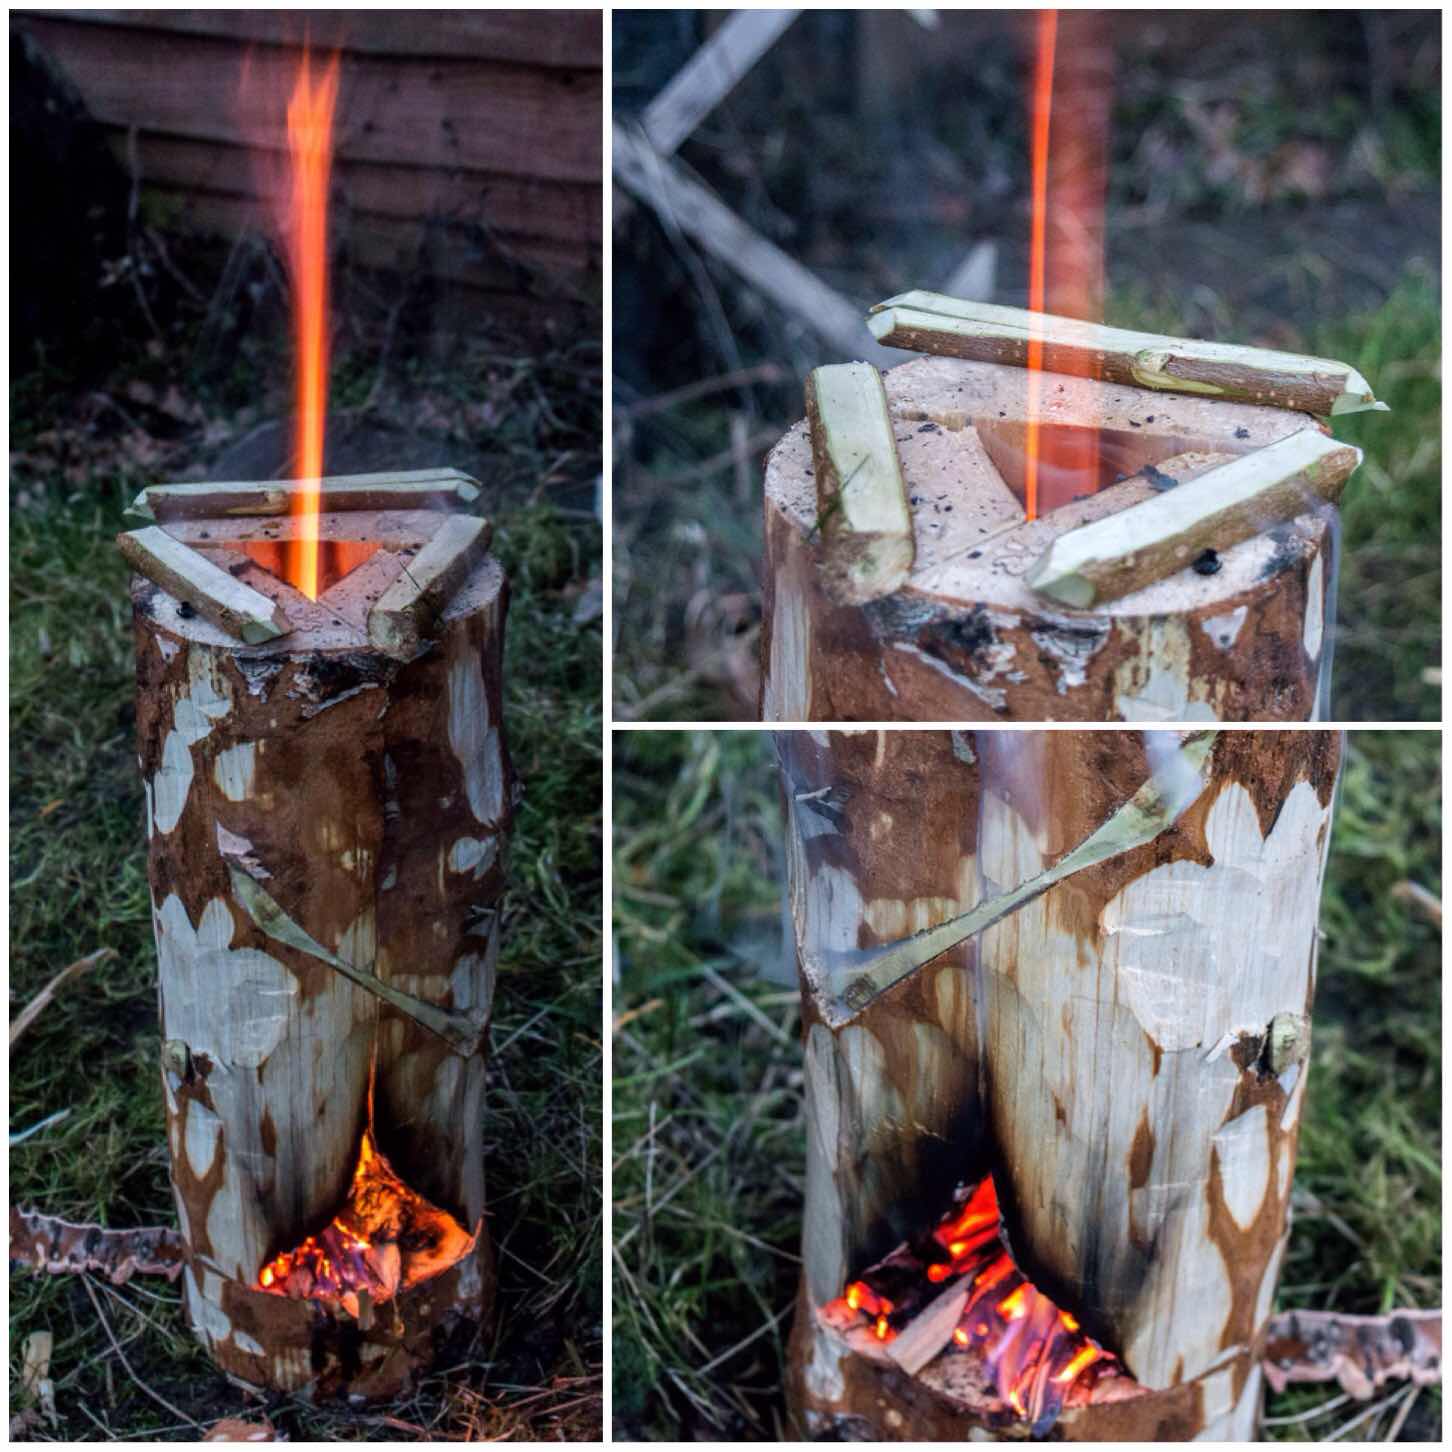
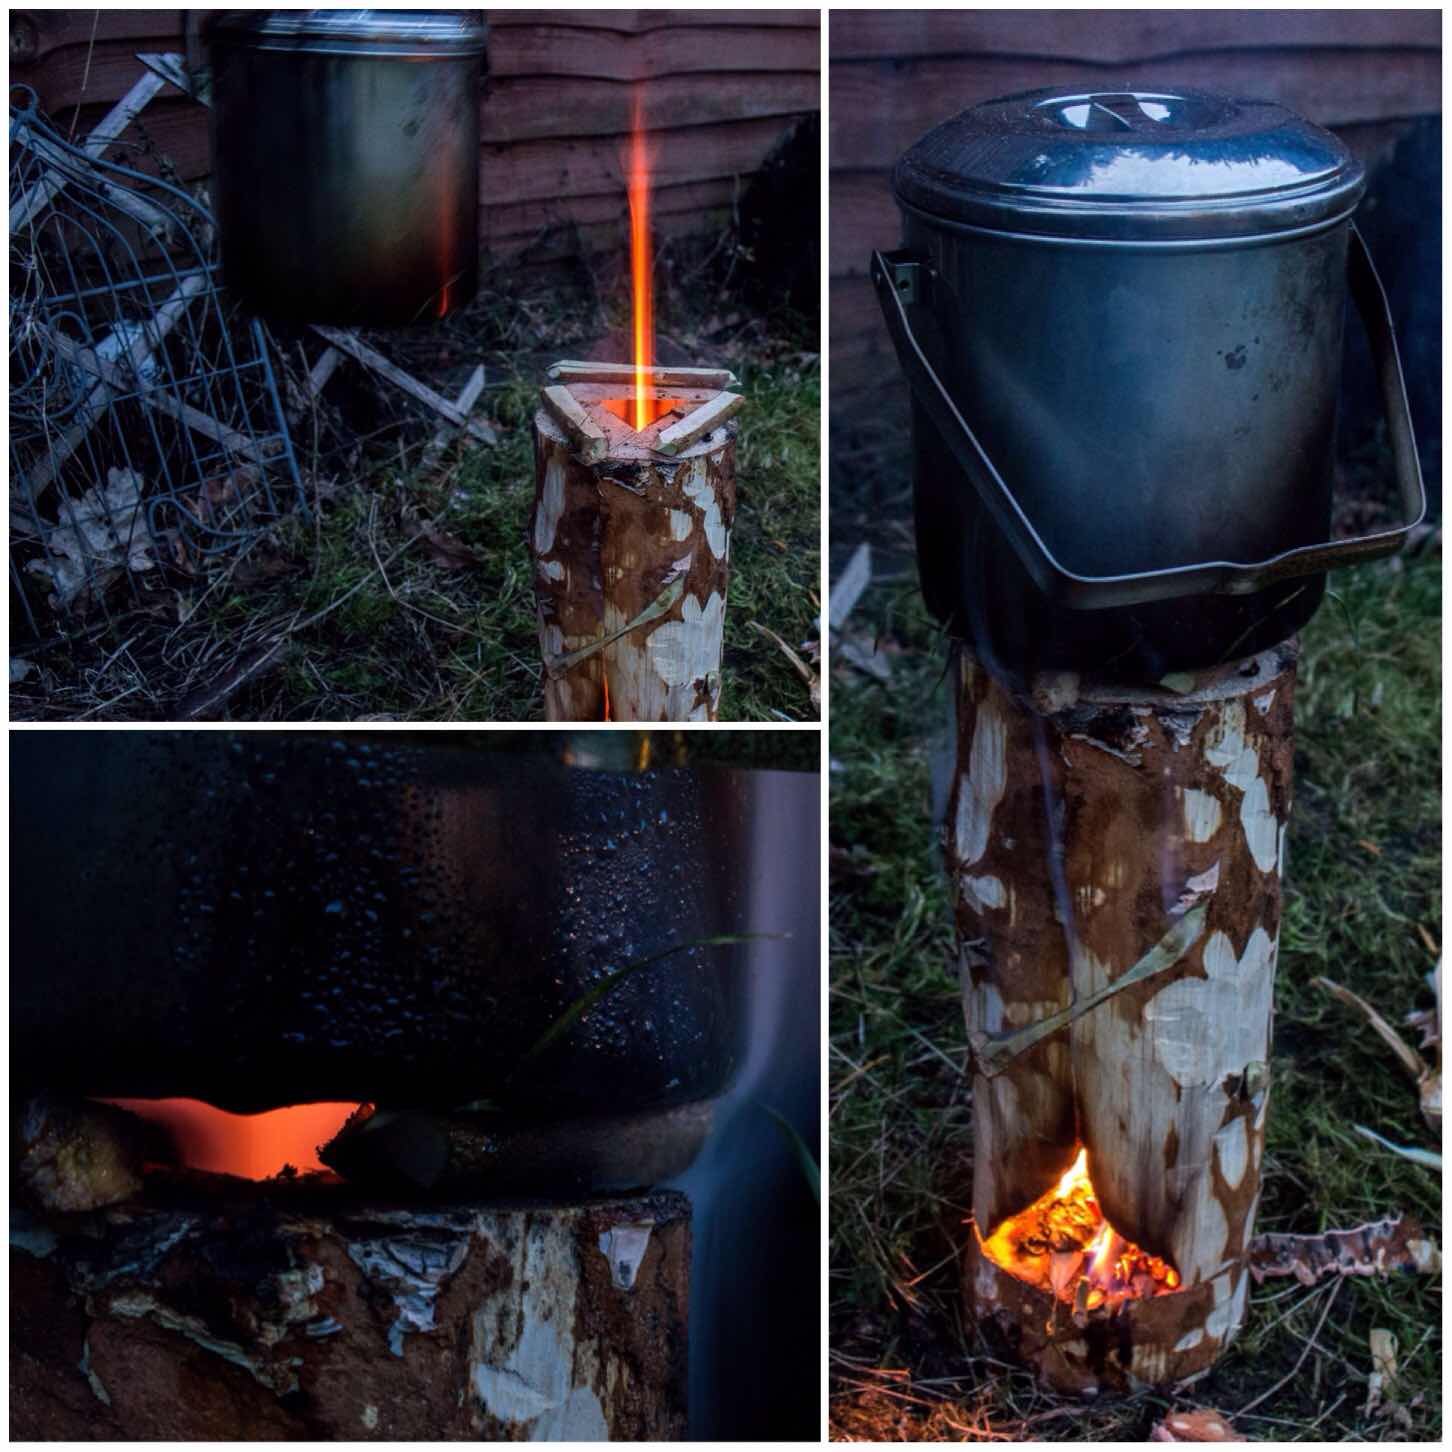
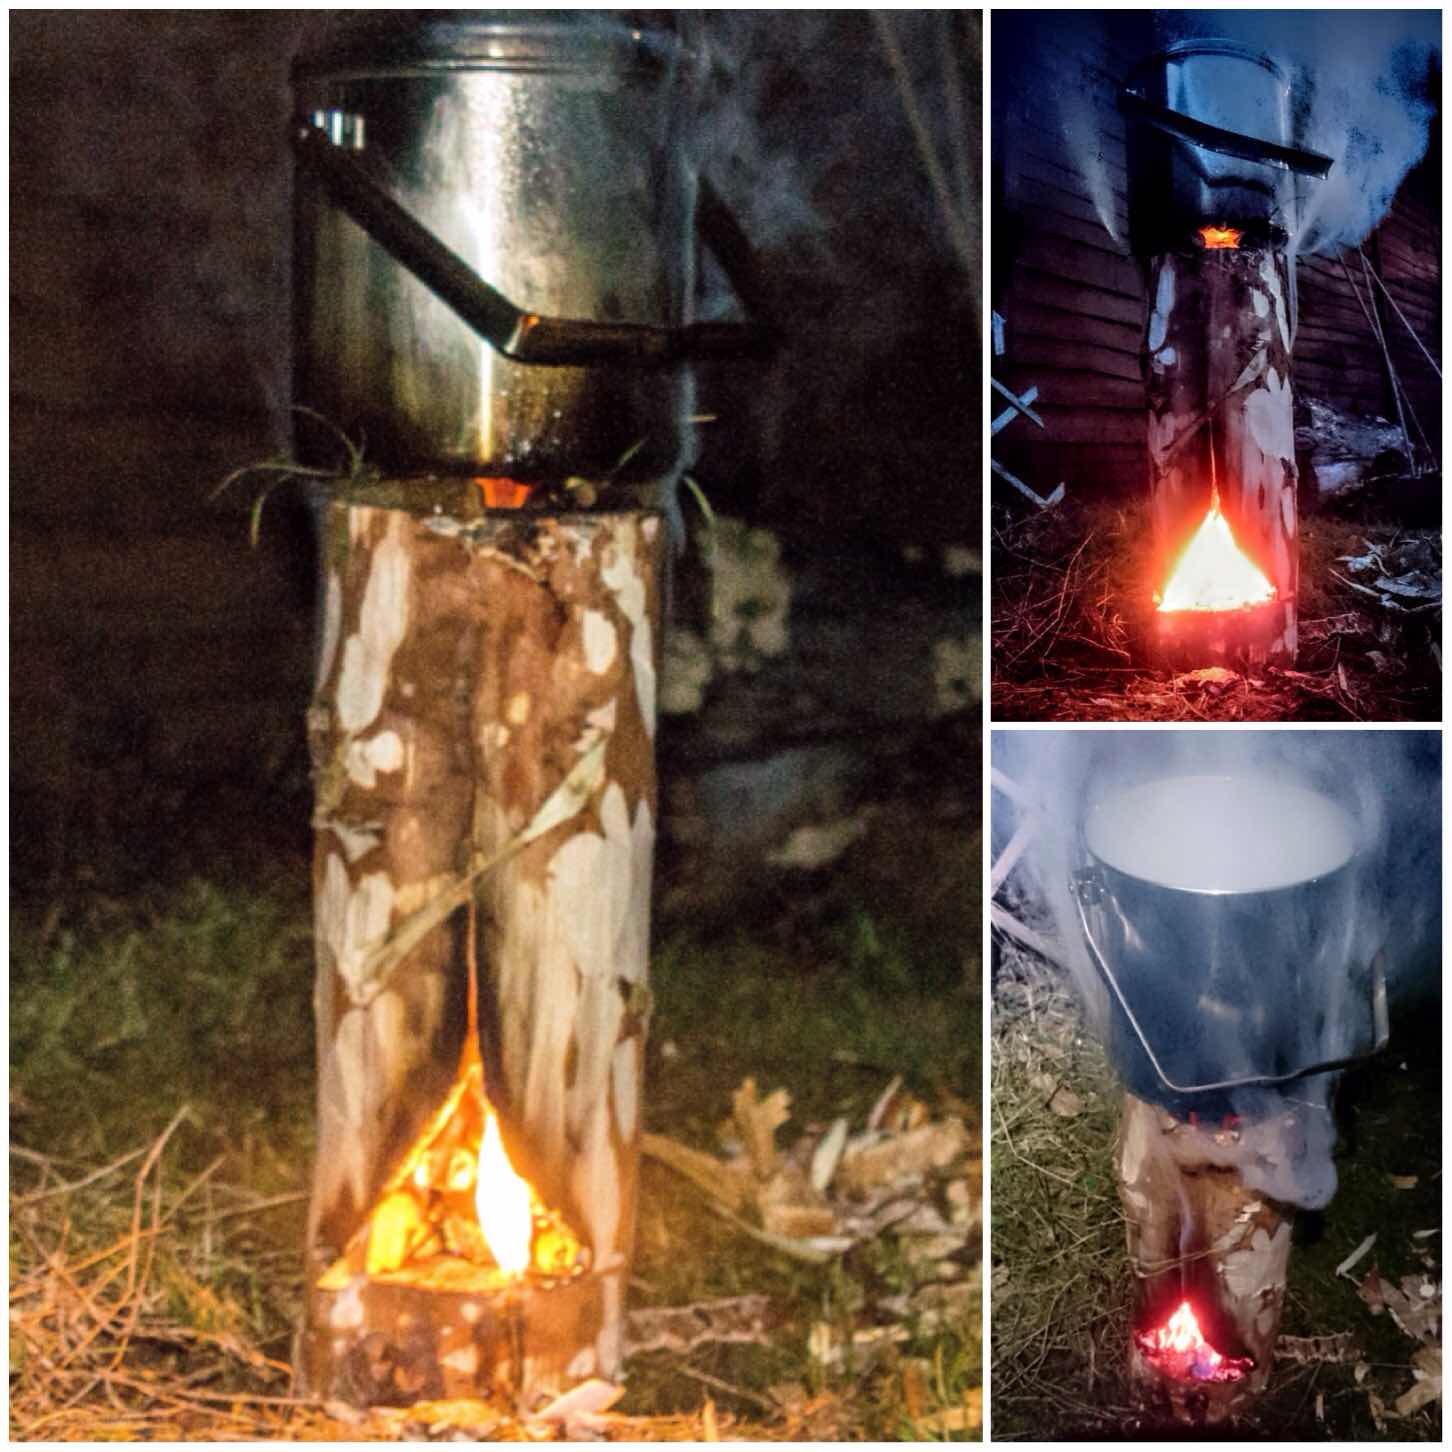
Some flammage fun here – we were given some offcuts of soft wood to burn by one of the other Sea Cadet instructors and I had brought along a pre-drilled fire face log rocket stove. With a criss cross fire lay and a well lit log rocket with the parachute in the background taking a picture seemed like a good idea.
Log rocket fire face
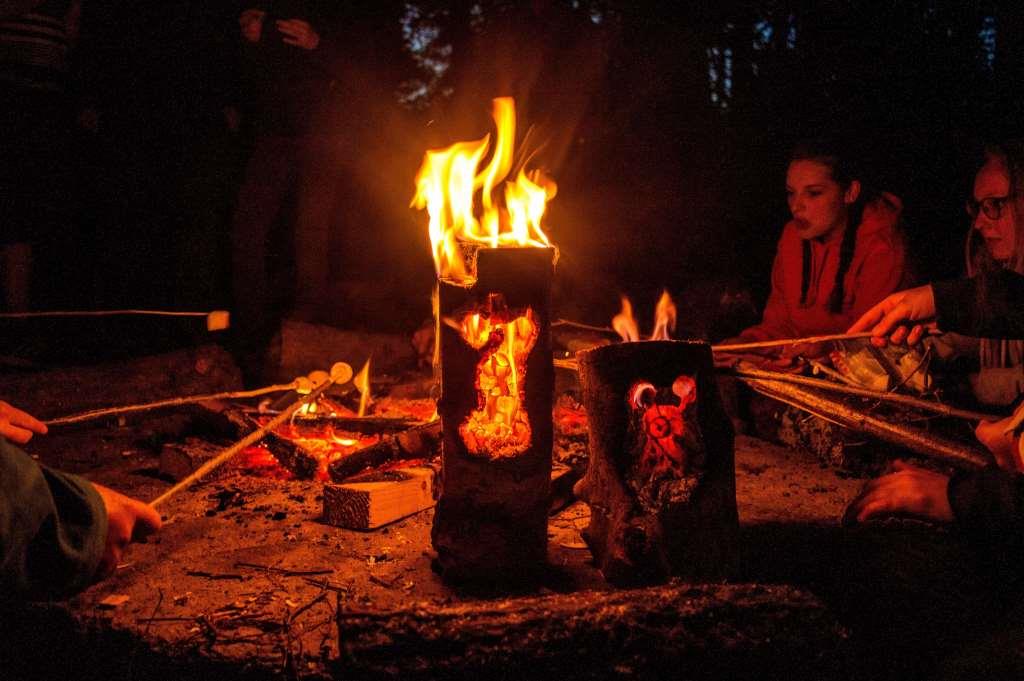
I can spend hours watching a fire and when I think the flames are right out comes my camera and I start snapping away. I may take a hundred pictures in the hope that something will appear in the flames.
I call these pictures Fire Faces and in the two below I spotted two old men of the woods – see if you can spot them?
Old men of the woods
I have plenty of pictures of the cadets and my own kids sitting around a fire toasting marshmallows and this simple act is something I never tire off. This evening though really stands out in my memory with the Fire Faces adding that bit of extra light and ambience.
Marshmallows by candelight
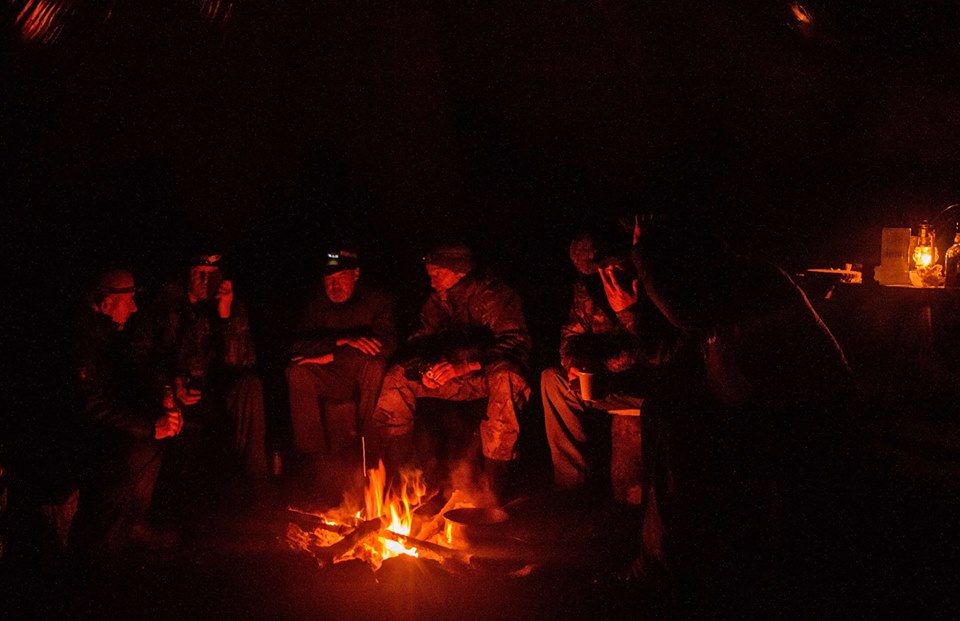
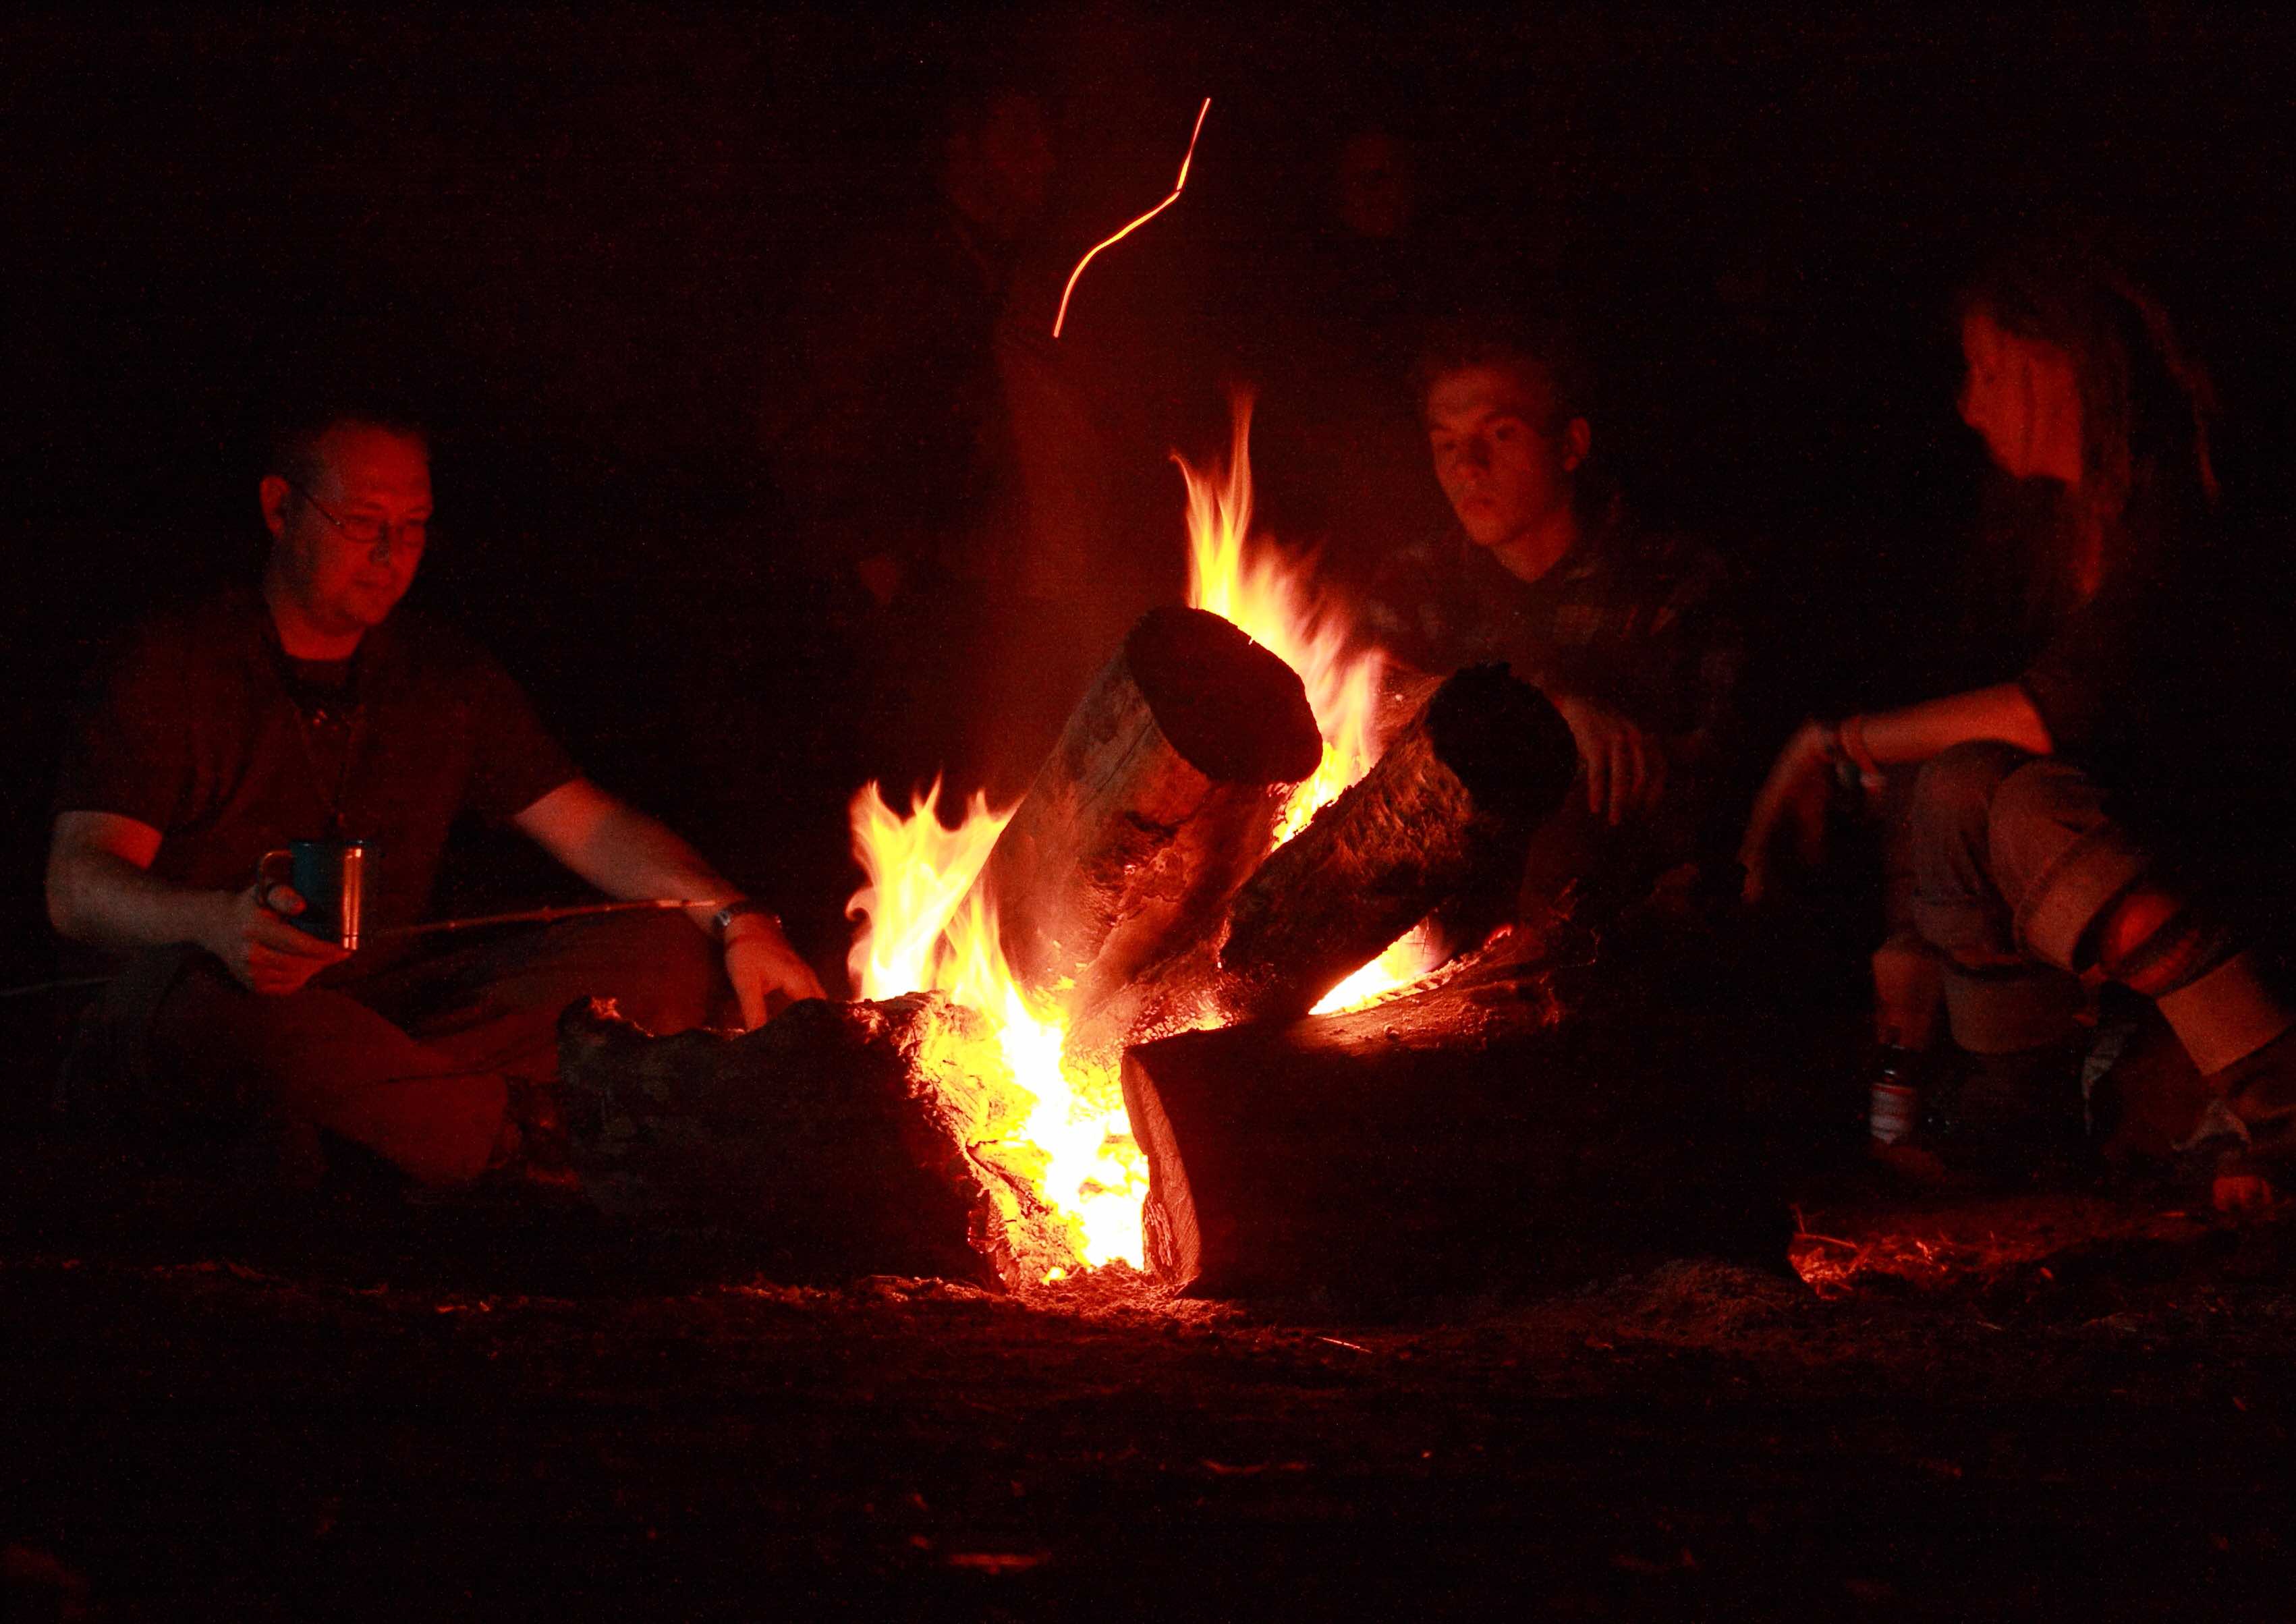
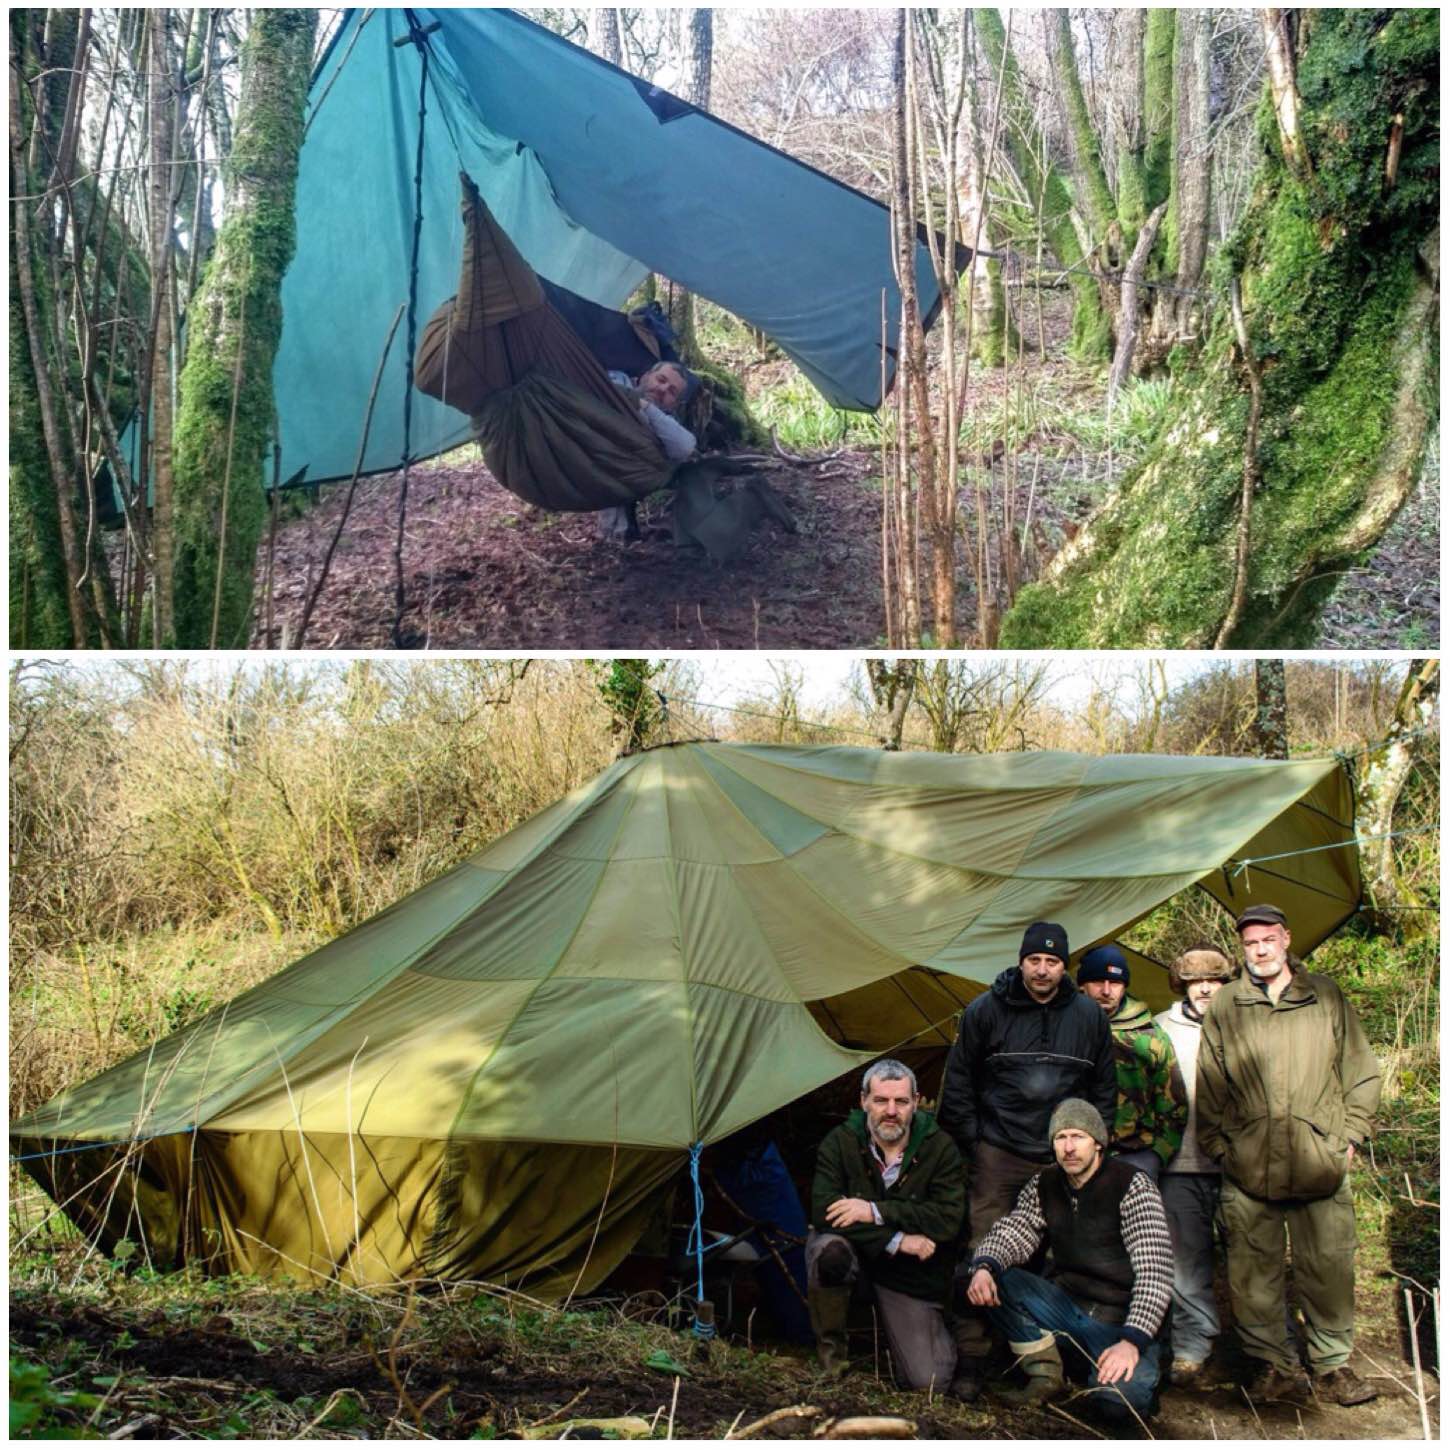
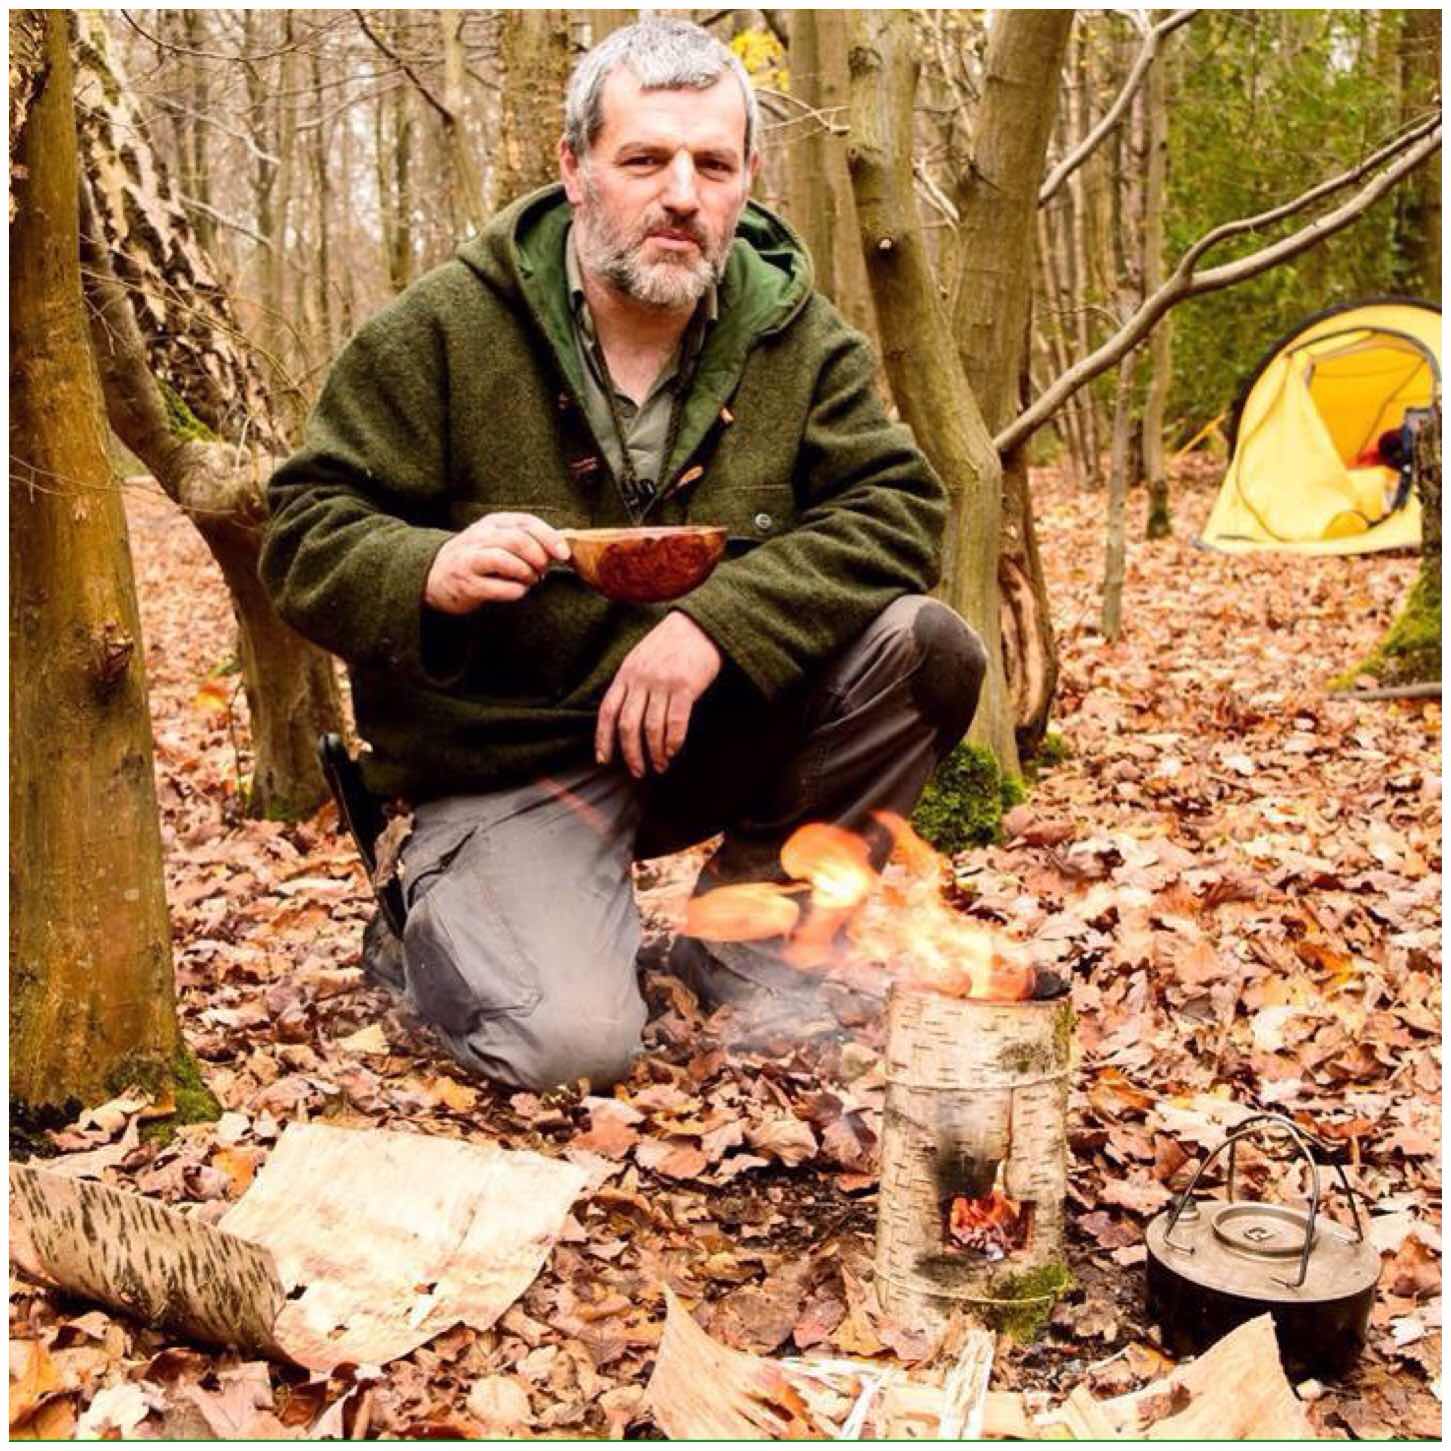
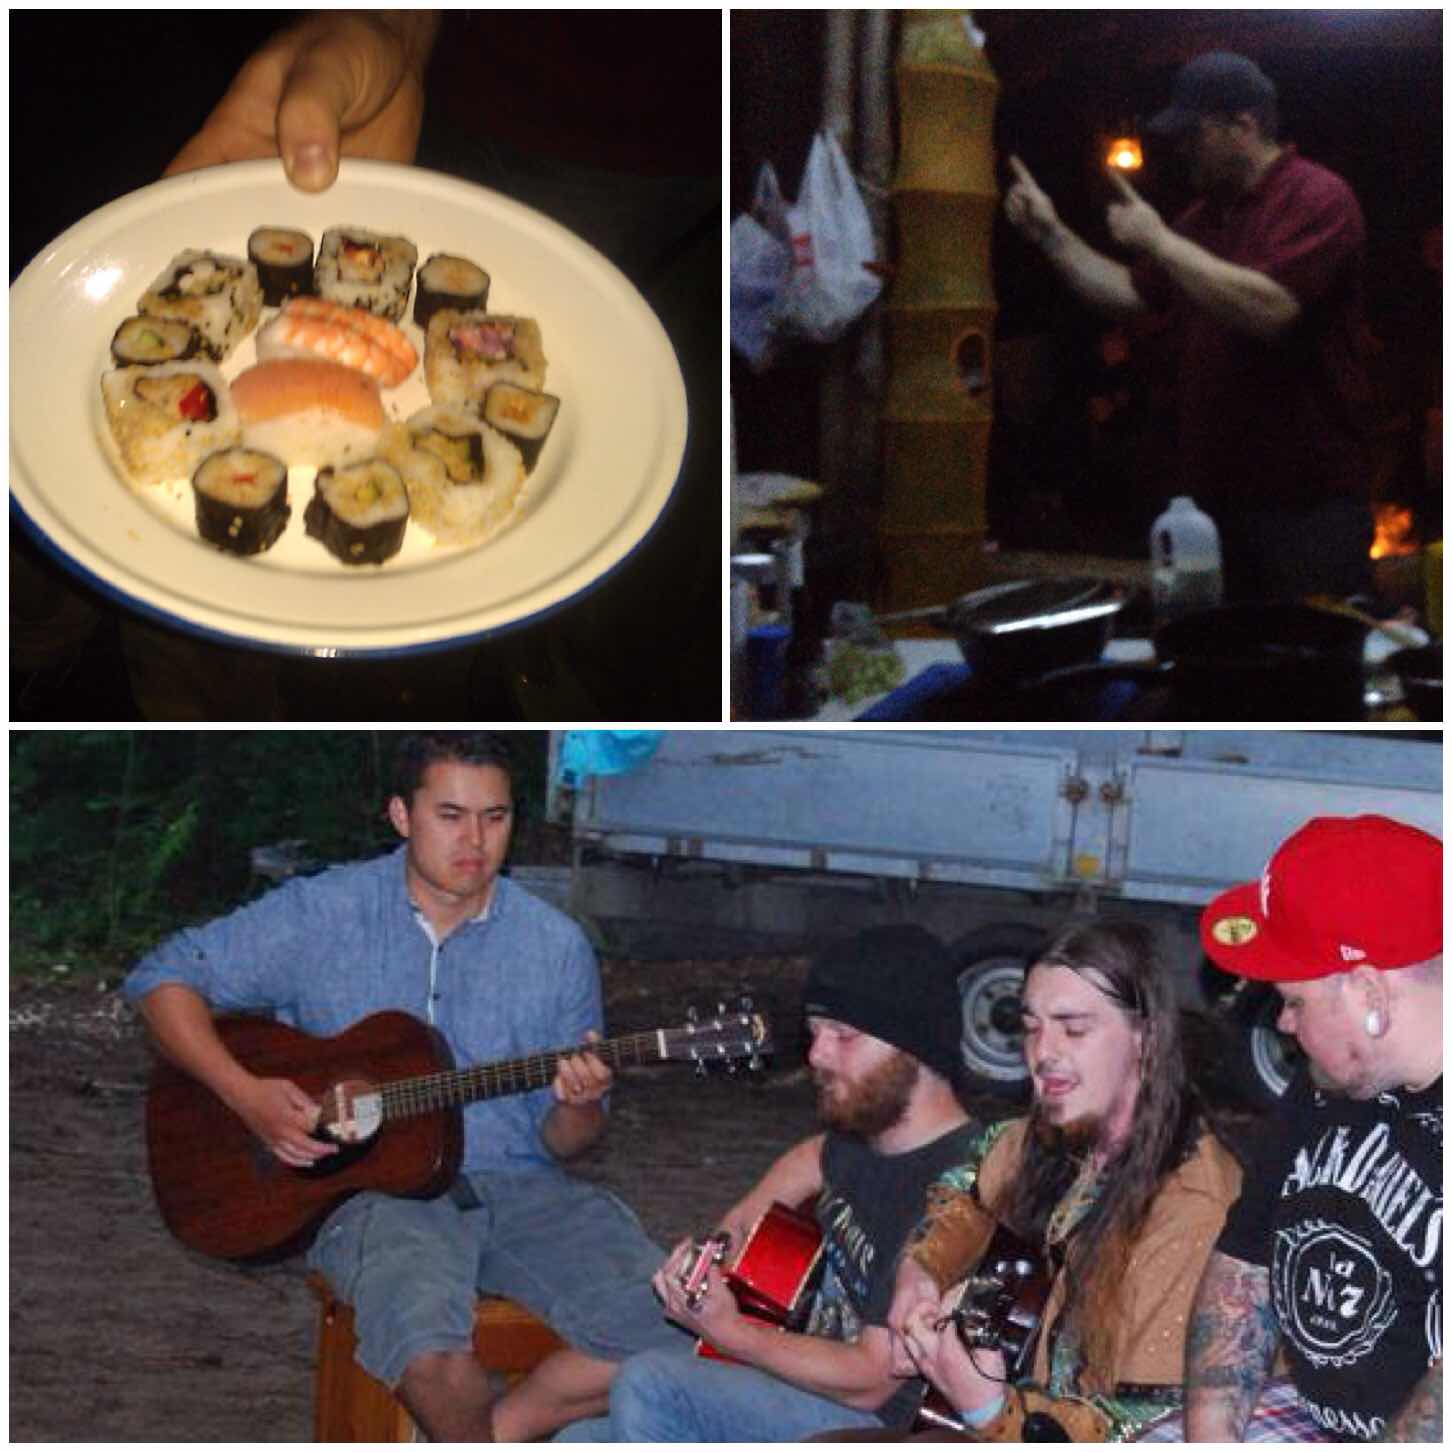
Taken in late spring down at my friend Fraser’s (Coastal Survival) during a rather stormy night was this picture of a bunch of hairy bushcrafters sitting snugly around the fire. Needless to say a dram or two helped pass the evening along nicely.
Stormy nights
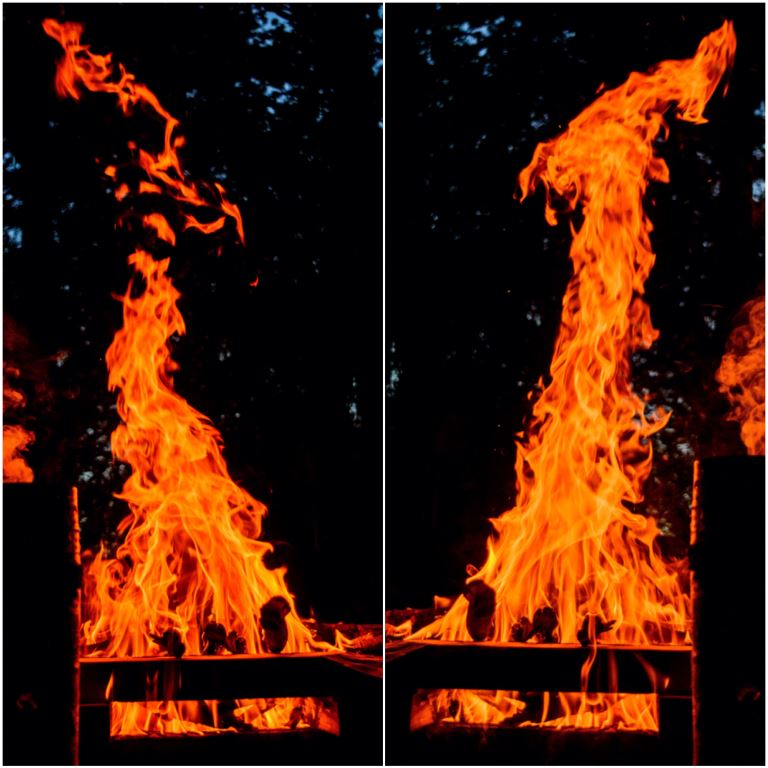
My favourite fire picture of the last couple of months though is this one. It is the fire the cadets were sitting around and I played around with the settings of my camera to try and capture the picture as best I could without a flash. I then just waited until a piece of wood split in the flames to capture all the sparks spiralling upwards.
Woodland TV
No doubt there will be a few more Flammage pictures coming up over the summer as the Bushmoot and the Wilderness Gathering approach so I will leave you with these for now.
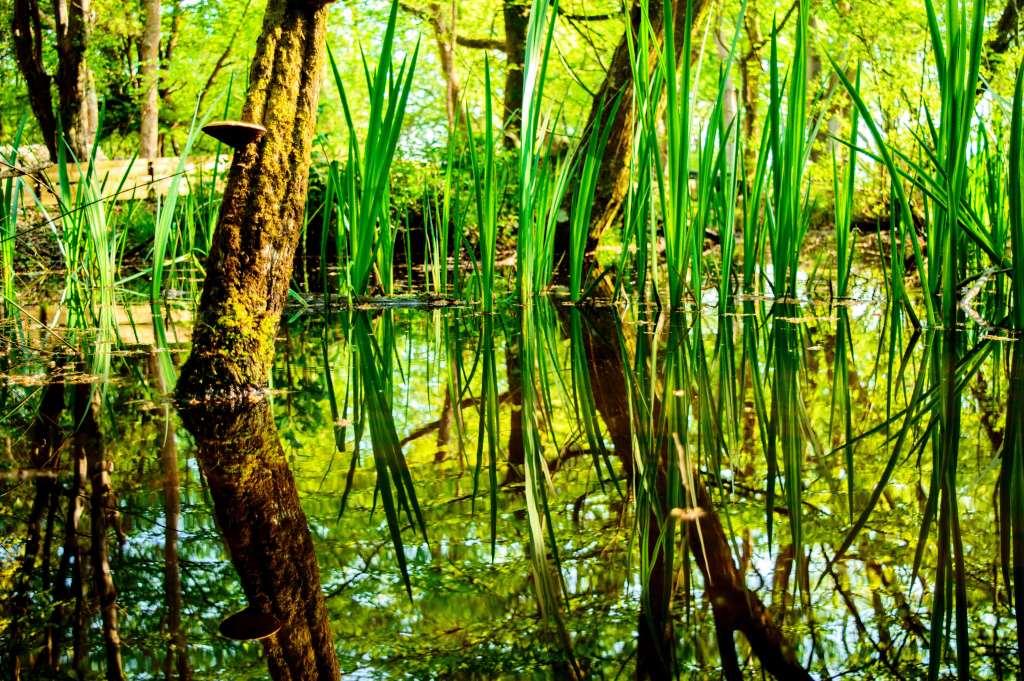
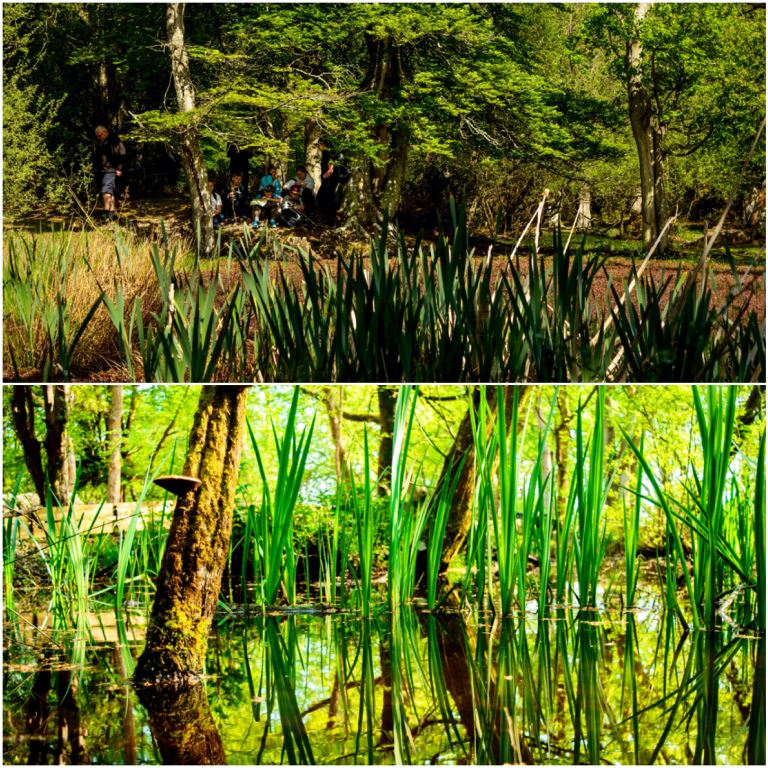
Sometimes when I review photographs I have taken on trips a pattern or a theme starts to emerge. On my recent trip to the New Forest here in the UK with the Sea Cadets one of life and death with a touch of decay thrown in for good measure started to appear.
Take for example in the two pictures below. The cadets are sitting in the shade by a pond in the top picture with all the late spring growth going on around them. While in the bottom picture in amongst all the new iris shoots the bracket fungus on the alder trunk is slowly doing its bit for the cycle of life breaking down wood fibres into sugars. Two lovely pictures but ones I could too easily have overlooked.
Water life
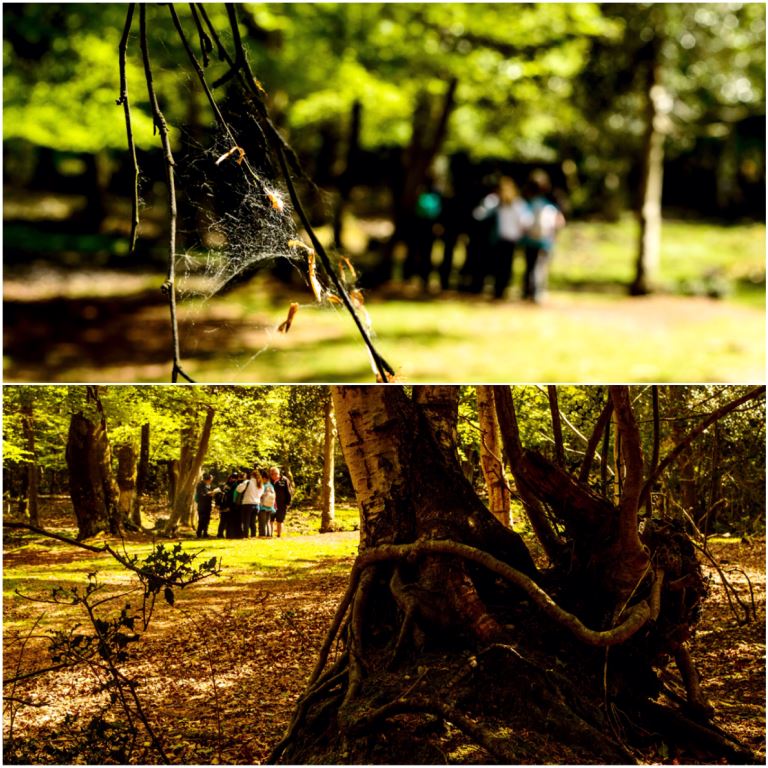
While the cadets were getting to grips with the art of map reading in various huddles, around them nature was getting on with its business. A rather forlorn looking spiders web seemed to be full of leaf shoot casings and the roots of some trees seemed to be tying themselves into some weird knots. Quite beautiful to see however I only spotted them when I stepped back to photograph the cadets.
Stopping places
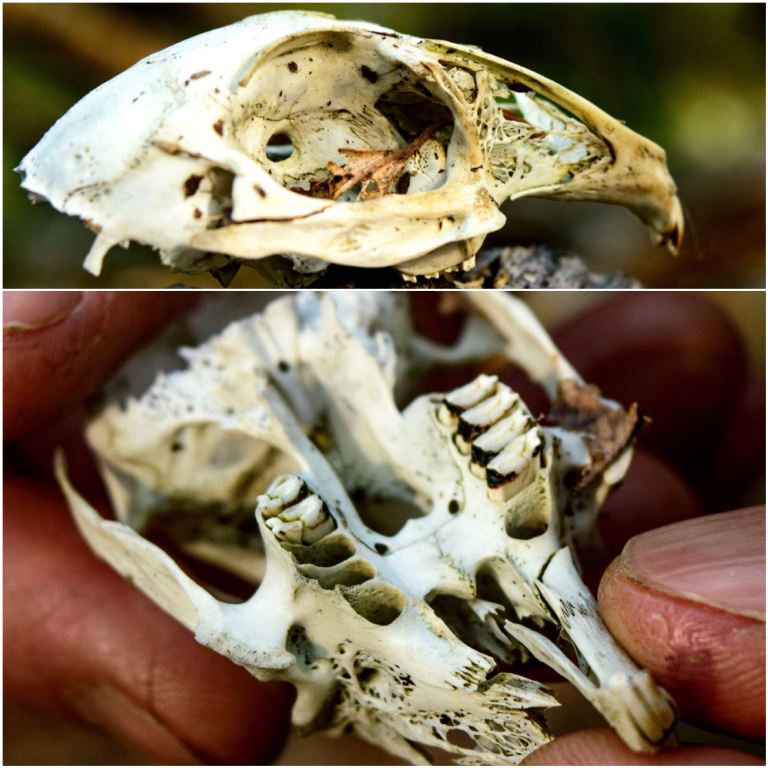
My friend Charlie spotted this little rabbit skull by the side of the pond you saw in the first picture. It was such a delicate little thing and we could so easily have trod on it. I have no idea how it died – maybe it was a fox……………………….
Death – the prey
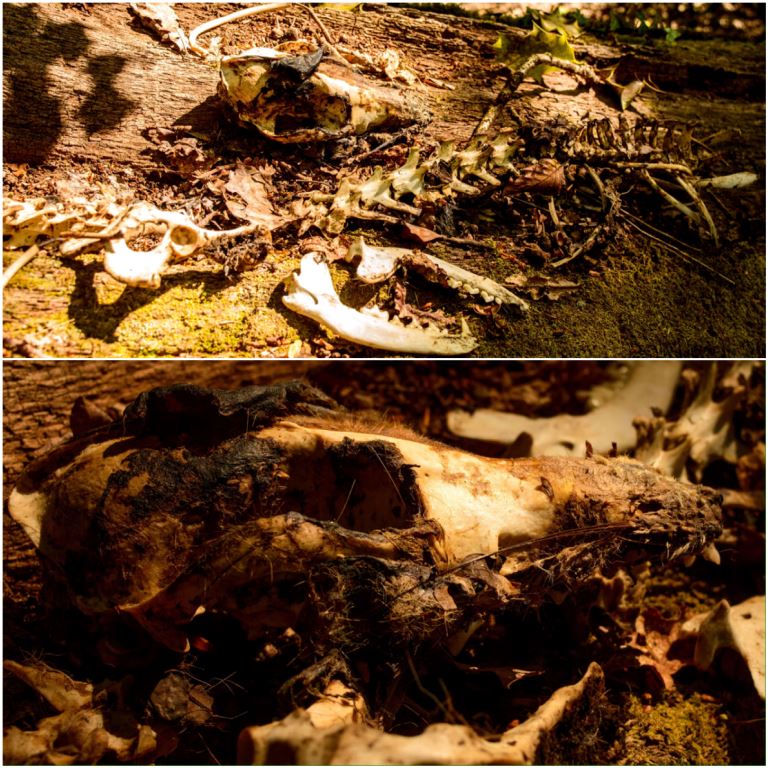
Well we found the fox – well, we found a fox :-). One of my cadets spotted some bones in the undergrowth and after a little bit of exploration we put together pretty much all of the skeleton.
The skull still had some of the fur and whiskers still attached to it so I assumed that it had not long since died. The cadets I was with were mostly city kids so they were very excited to find the fox. They wanted to take the skeleton back with us but I did not feel that that was right to do so we left ‘Foxy’ to be discovered by some other woodland adventurers.
Death – the predator
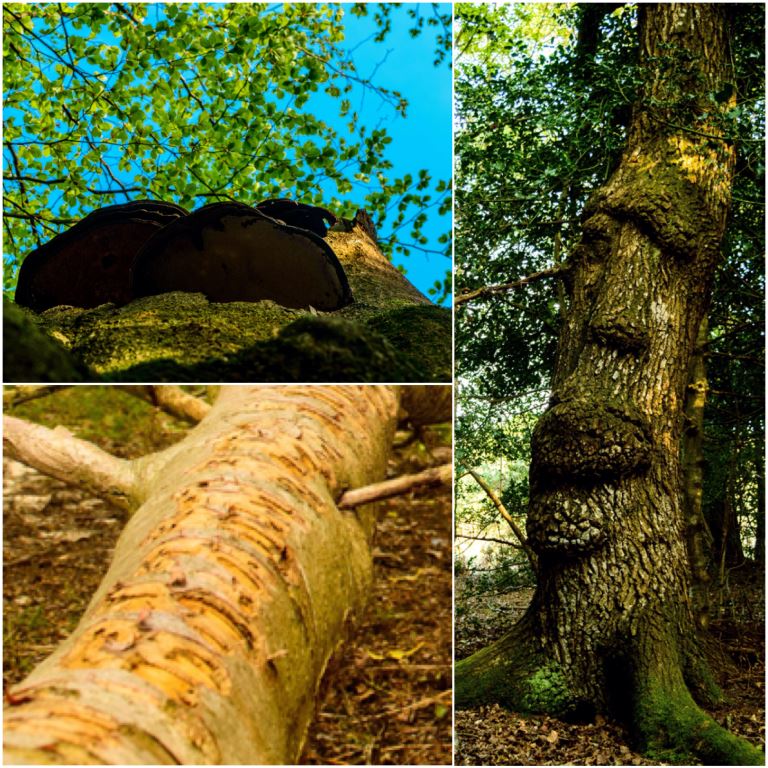
The trees themselves were painting a beautiful picture in this cycle of life. We came across some pretty massive artists fungus (top left below) that really stood out against the skyline when you looked up from under it.
There is a certain spot I pass most times when I visit the New Forest where there are a number of holly trees (bottom left). For some reason the forest ponies like to gnaw at the bark. They leave some great markings on the trunk and I love to get the cadets guessing what causes this strange site.
Lastly we spotted this strange tree (bottom right) we dubbed it the Easter Island tree due to its likeness to the statues found there. These growths known as burls/burrs are caused by the tree trying to protect itself from some sort of infection (if I remember my university courses correctly). My bushcrafting friends know they can make for some quite exquisite bowls.
Tree life
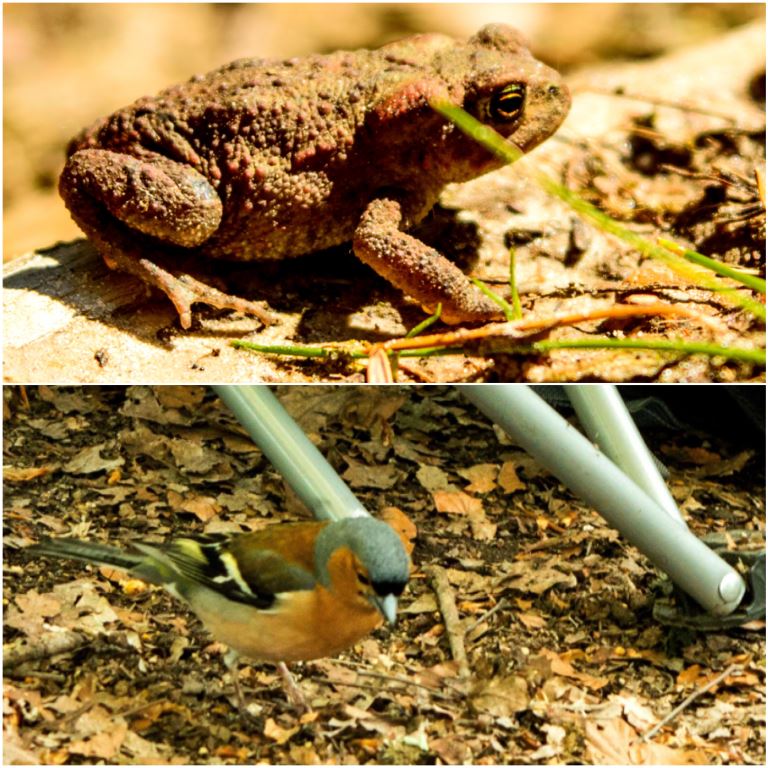
Last but not least are these two little critters. The toad below was spotted by the cadets and he tried very hard to pretend he was invisible. The cadets and myself lay down to observe him when we realised he was not running away. After a few minutes we left him in peace to get on with his business (I say ‘he’ but have no idea if that is correct).
A last little visitor to our camp (you can see the camp chair legs) was this little Chaffinch (bottom picture). She was not bothered by us as she searched our fireside for some morsels. I was quite content to just sit and watch her potter about while I put my feet up.
Critters
I never set out to write this blog based on this them of life, death and decay but I was sure glad I spotted it.
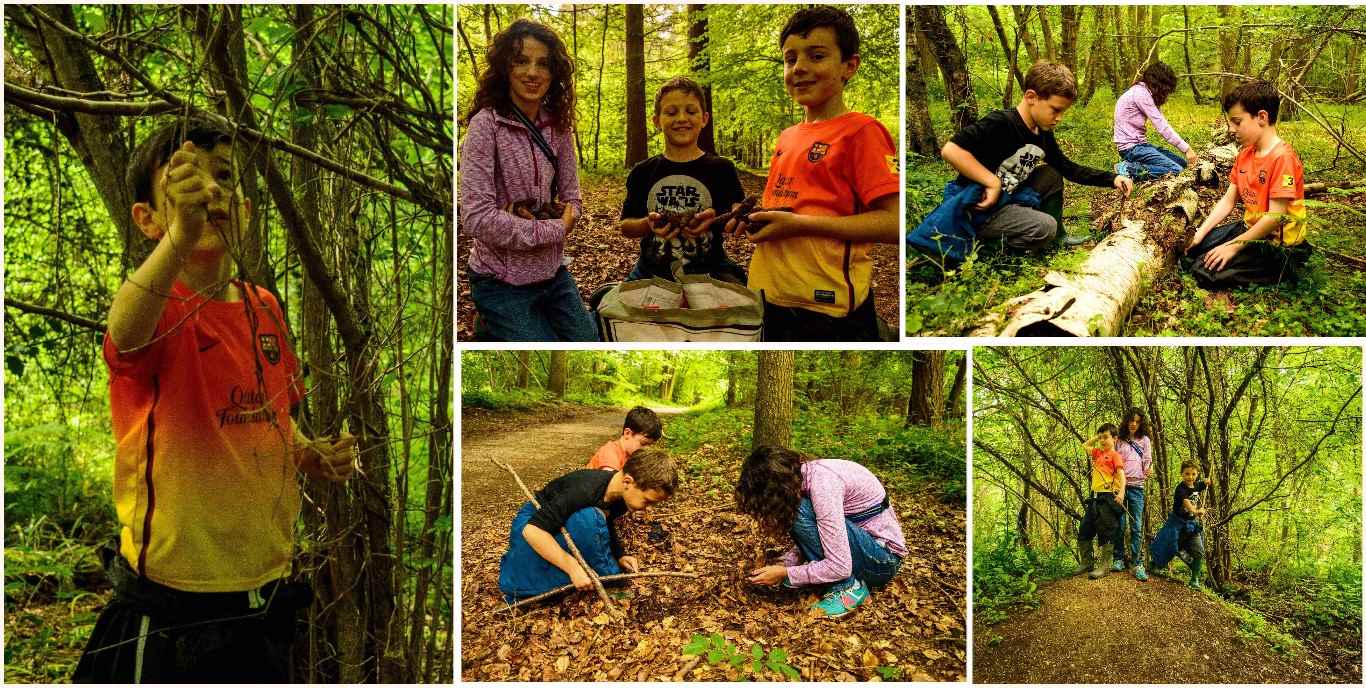
One of the requirements for Finlay’s Naturalist badge at Cubs was to build a Bug Hotel. So off to the woods we went with his friend Finlay (yep, two best friends called Finlay) and his sister Catherine to get supplies.
We collected a range of material including twigs, spruce cones, elder shoots and bark. We only took a little from each area we visited but we did visit a lot of different areas and soon had a good haul.
Collecting
I had prepared some extra material including bricks, timber, drilled logs, plastic plant pots and grass. I got some good ideas from the RSPB Giving Nature a Home project and also from the blogs shown on the 30 Days Wild site.
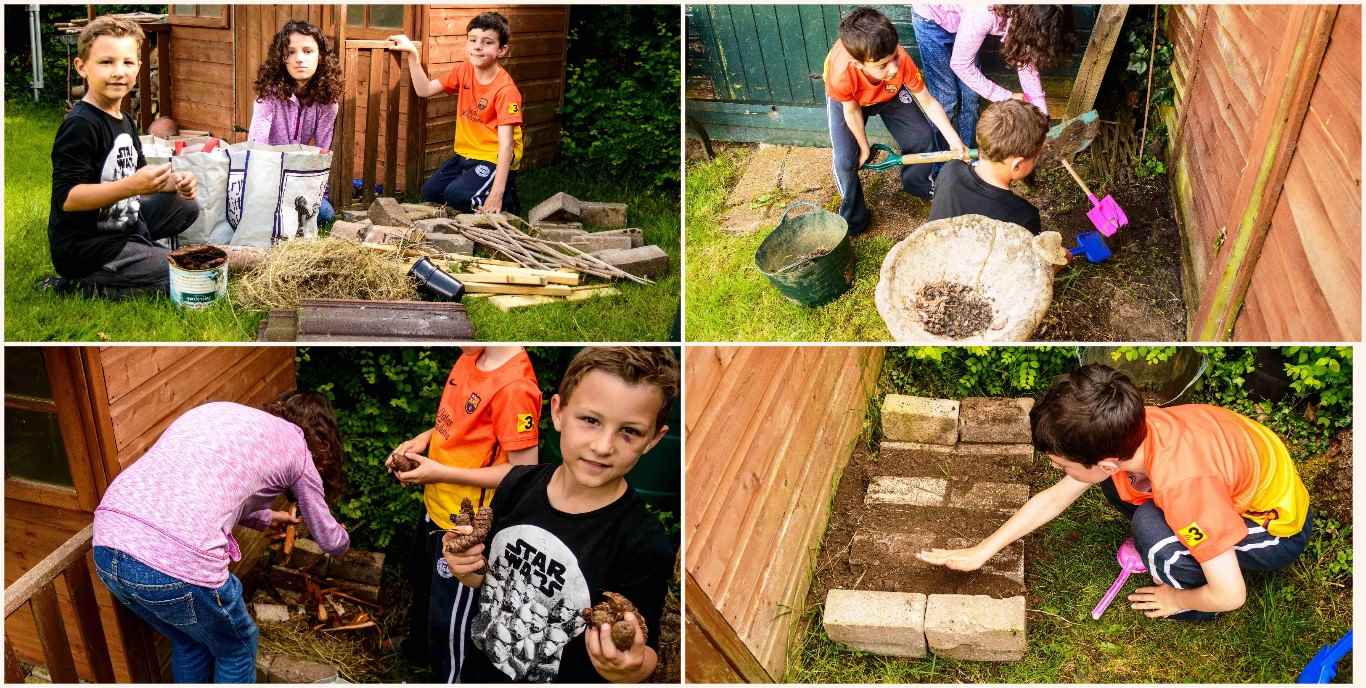
To begin with the kids dug up a load of dirt to help build up the base and then set to building the base of the hotel.
Laying the foundations
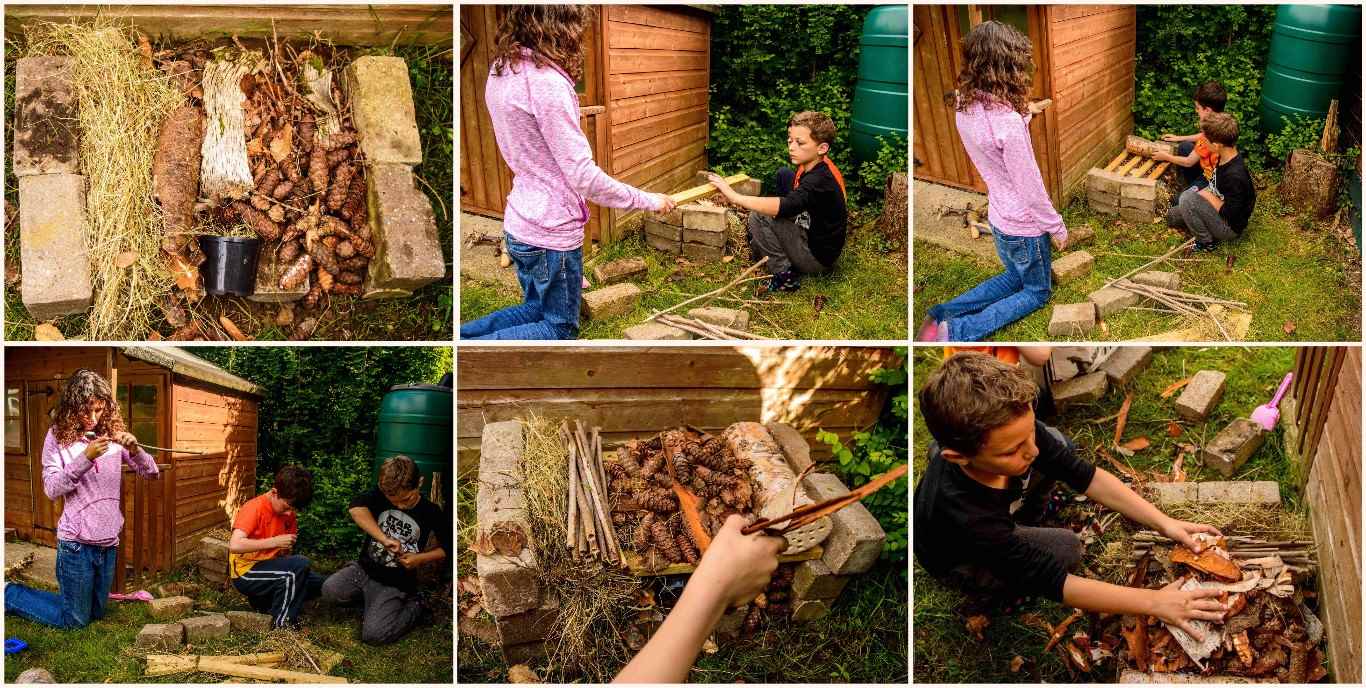
They built two layers of material to attract different insects. I got them to hollow out the pith from lots of elder sticks and they also stuffed grass inside some plastic plant pots. The plant pots have holes in the bottom of them so the hope is they will make good bug nests.
Building the Bedrooms
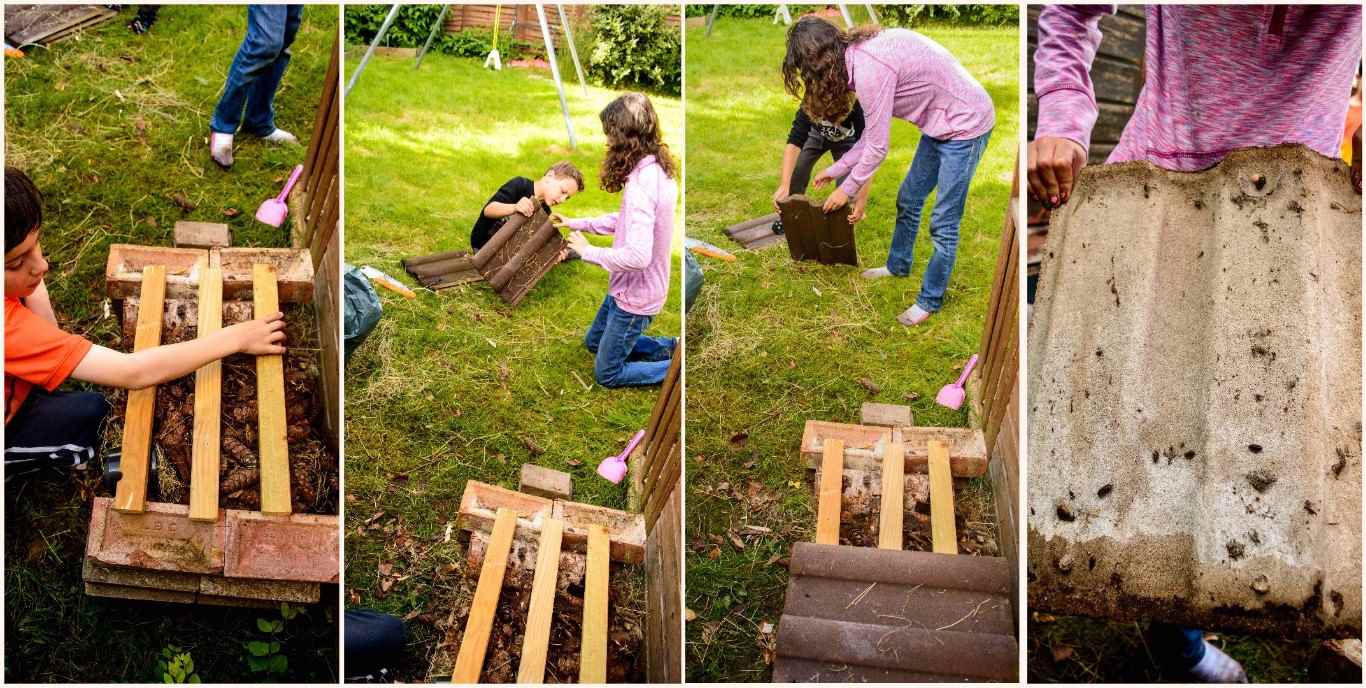
I had found some old roof tiles at the back of the shed and we used four of them to create an overlapping roof to keep the rain out. These heavy tiles also helped lock the rather wobbly bricks into place.
Each of the tiles though had some residents already in place on their undersides 🙂
On goes the roof
To finish off they stuffed more material into the hotel and tidied it all up a little.
The longest part of this whole process was the collecting of the material however combining it with a good walk in the woods worked well. I did a little bit of work in the garage sawing the timber to length and drilling holes into the tops of two birch logs. Other than that the kids did most of the work.
Finishing touches
I am looking forward to seeing if we get any residents over the next few months. I do hope the hotel provides a snug over-wintering spot for our local bugs and that it is teeming with life next year.
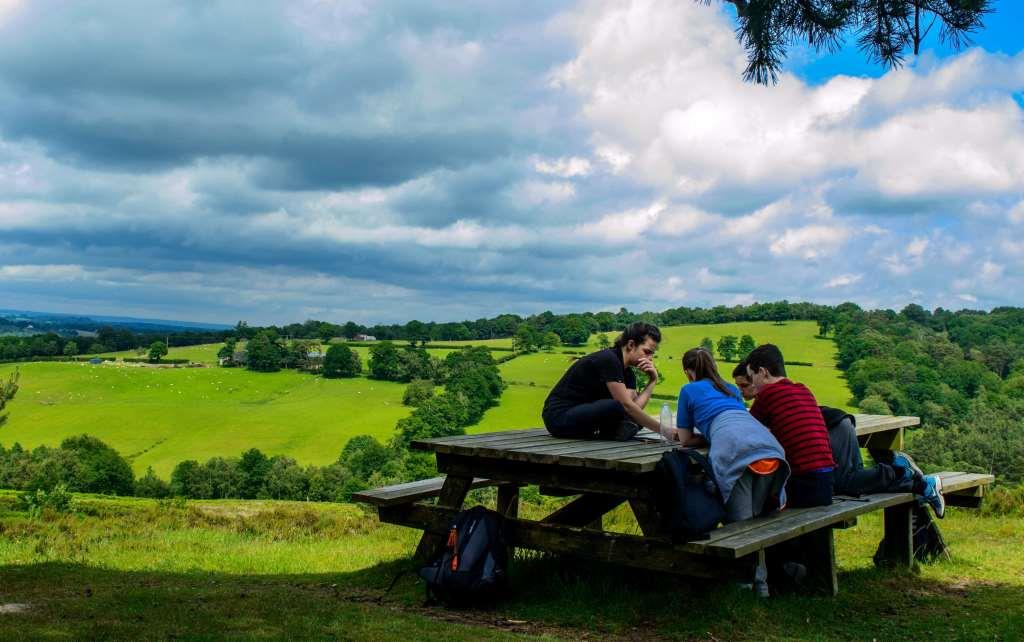
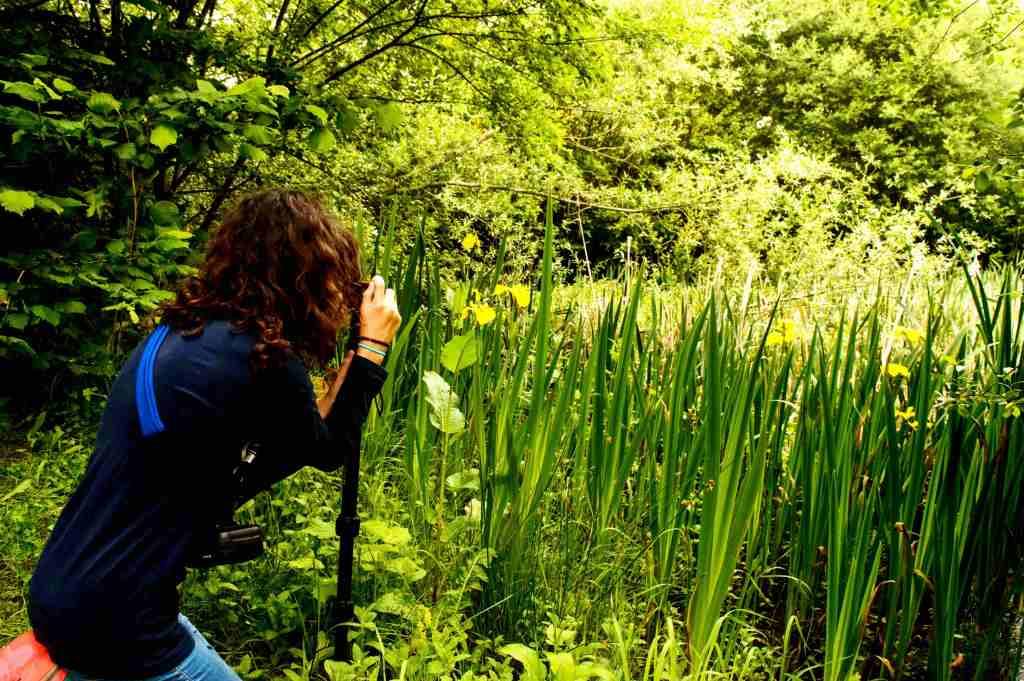
Reviewing my pictures this week I kept on coming back to this one. I would not say it was in anyway a brilliant shot however it is a shot of ‘Quality Time’ – that is time well spent with my daughter Catherine teaching her to use her new camera. She was really taken with all the yellow iris flowers and last years reedmace stalks.
Quality Time
Catherine I feel has a good eye for a picture so it is not hard to work alongside her. This was the first time she had tried out the monopod stand with the camera. Here’s to lots more Quality Time out and about 🙂
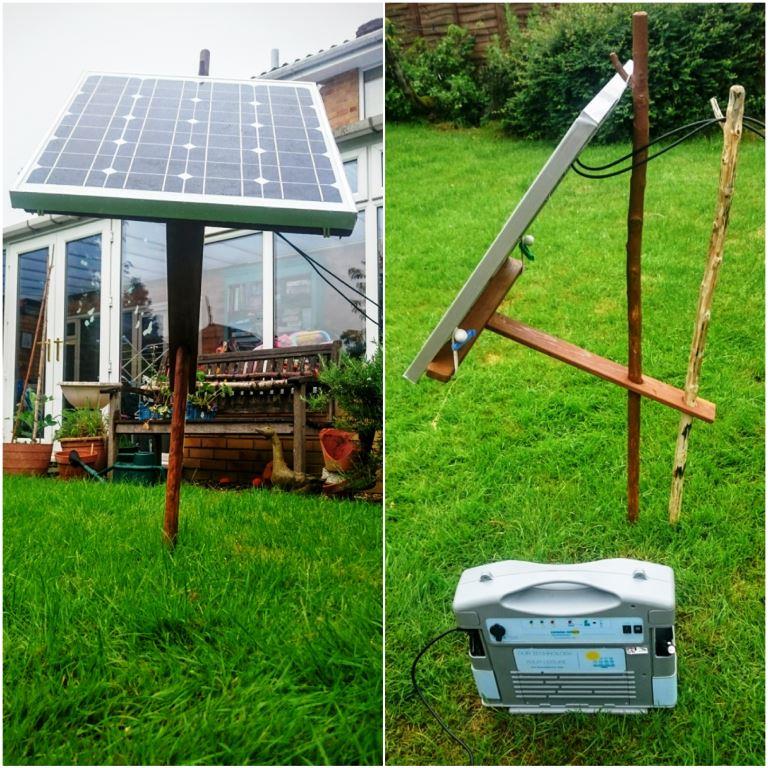
This post is not a full How To…. on building a adjustable stand for a solar panel as the actual steps to make one are very simple. I will not even go into the detailed dimensions of the stand as they will vary depending on the type of panel you have, instead I’ll focus on all the different parts of the stand and how it works.
I wanted my stand to keep the solar panel clear of the ground, and it had to be able to rotate, lock in place (so the wind would not move it), pack away flat and have parts that could be sourced in the woods if needed.
My solar panel stand
Over the last few years my family has come out to join me at the BCUK Bushmoot, wanting to come and explore this magical place I disappear to in South Wales for two weeks every year.
Living without any power was not an issue when it was just me (I could charge my phone up in my car) however my family’s power requirements are slightly higher. After a long day’s playing in the woods the kids like to settle down with a video on my laptop before bed, and that requires power.
I have relied on my friends Fraser Christian (Coastal Survival) and Stephen Conway to recharge the laptop for me over the last couple of years and this year I decided it was high time to get my own set up. I had long discussions with my friend Si Parker on the different types of set ups I could go for. Si has a fantastic level of knowledge and I was soon clear about what I needed. I opted for a CLT400 solar powerpack (Si’s suggestion – with built in regulator and inverter) and a SUNDELY® 50W 12V Monocrystalline Solar Panel.
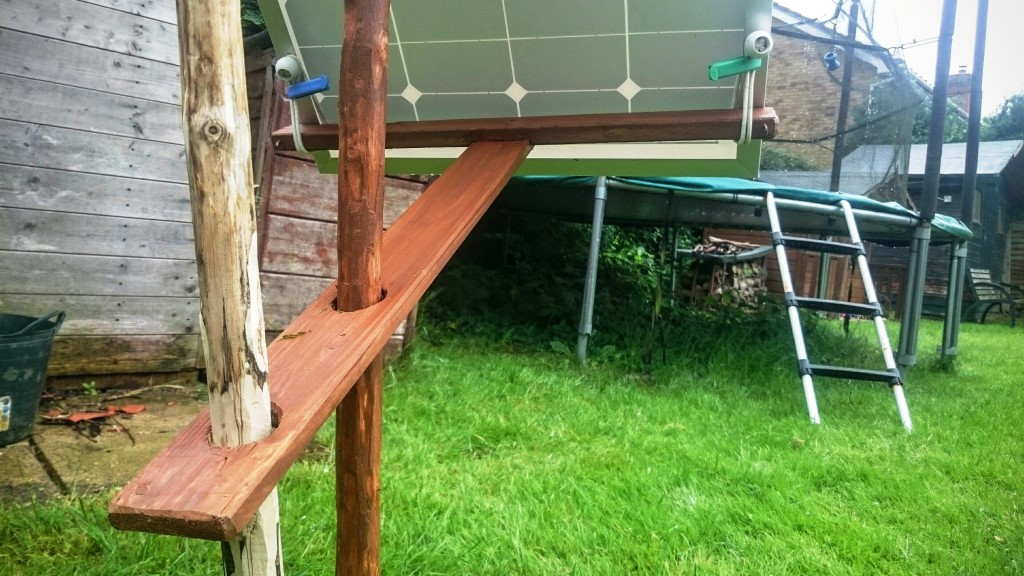
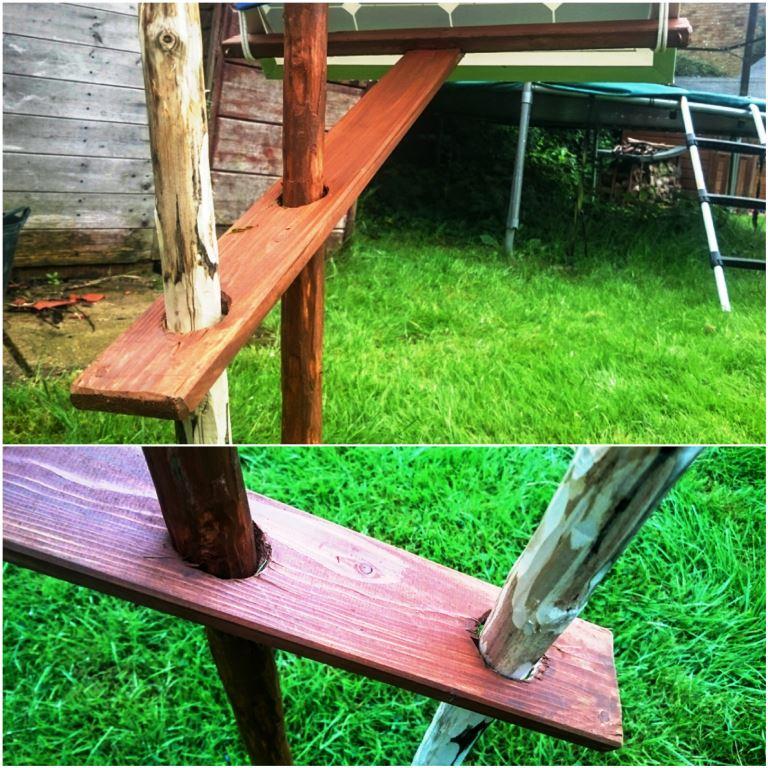
The arm
The Arm
I’d seen a stand that Stephen had built a few years ago at the Moot that could rotate so I set out to build something similar. I had some scrap wood lying about (from my old hammock stand) and made this T-shaped arm to hold the panel out so it was angled correctly.
The system works on similar principles to my campfire cranes using friction to hold things in place. I worked out the length of arm I would need and drilled these two holes out (just big enough for the uprights to slip in).
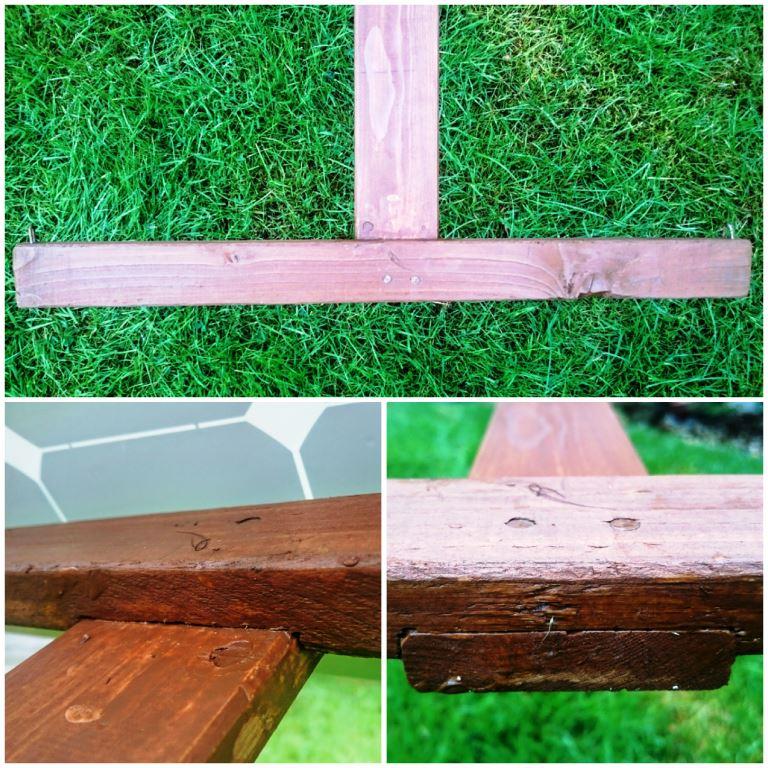
The mini lap joint
The other end of the arm I joined together with a small lap joint, some wood glue and a couple of nails.
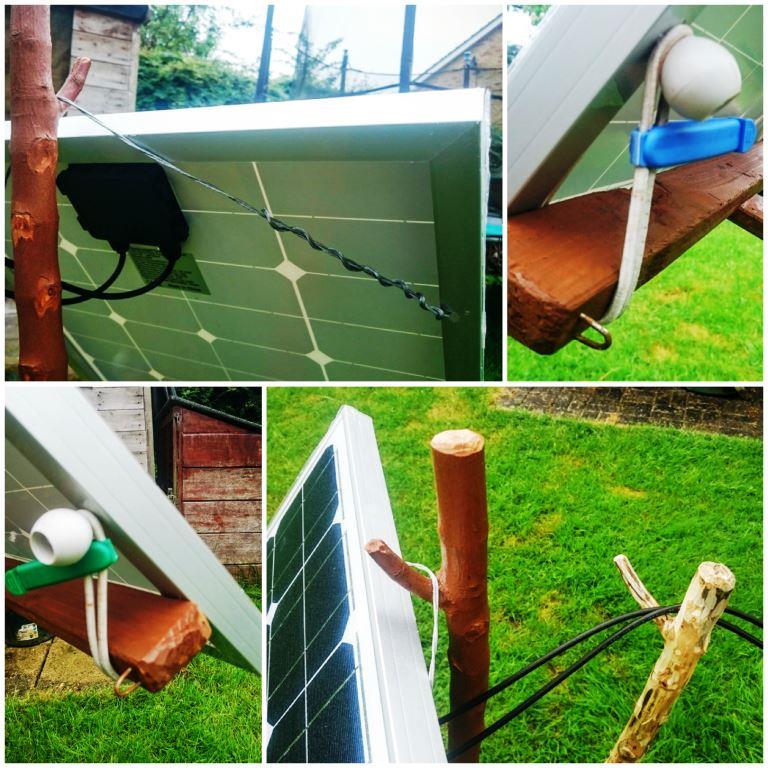
The Attachments
Below you can see the attachments on the solar panel I added. I just used some wire to hang the panel off the upright however the bottom of the panel required something more flexible.
I opted for some tent bungees, fencing nails and food bag clips. I attached the bungee to the panel by a mounting hole and then wrapped it around the T bar back onto itself. The food bag clip ensures the bungee does not slip over the plastic ball, and the fencing nail stops the bungee slipping off the side of the T bar.
Panel attachments
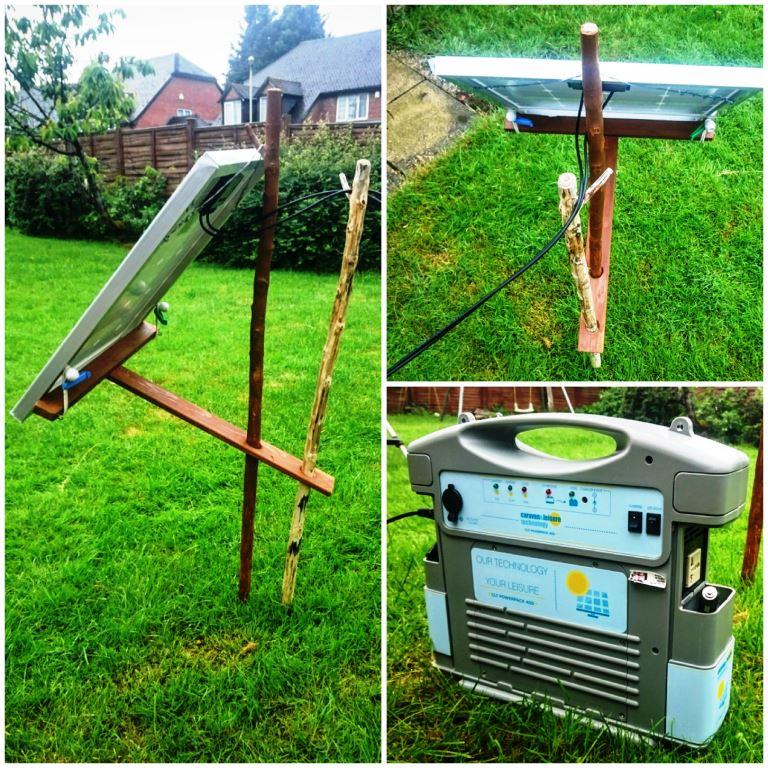
Testing
I have had this out for a couple of days now and used the CLT400 to charge up my laptop and other small battery packs. Even in low light (it has been very wet over the last few days) the solar panel has kept the powerpack well charged.
I just went out every now and then and removed the back pole, rotated the panel slightly and then hammered the back pole back in. This back pole stops the panel from moving out of its set position. I had originally thought to use guy lines instead of this second pole but I prefer this method because it’s so much easier to adjust as the sun moves (the idea came to me as usual when I was trying to get to sleep).
Fully adjustable
As well as at the Bushmoot I will be using this set up at our Sea Cadet camps to charge the other instructors’ phones and radios.
Somehow though I think the family will be wanting to bring along a few more appliances to the Moot – I am hoping it will not be the hairdryer or the XBox 🙂
Over the last few months I have not done much in the way of bushcraft so there has been a slight lack of How To …. tutorials coming out. I plan to change that after the Moot (where I will be looking for inspiration) however I have been getting out on little trips recently to photograph nature.
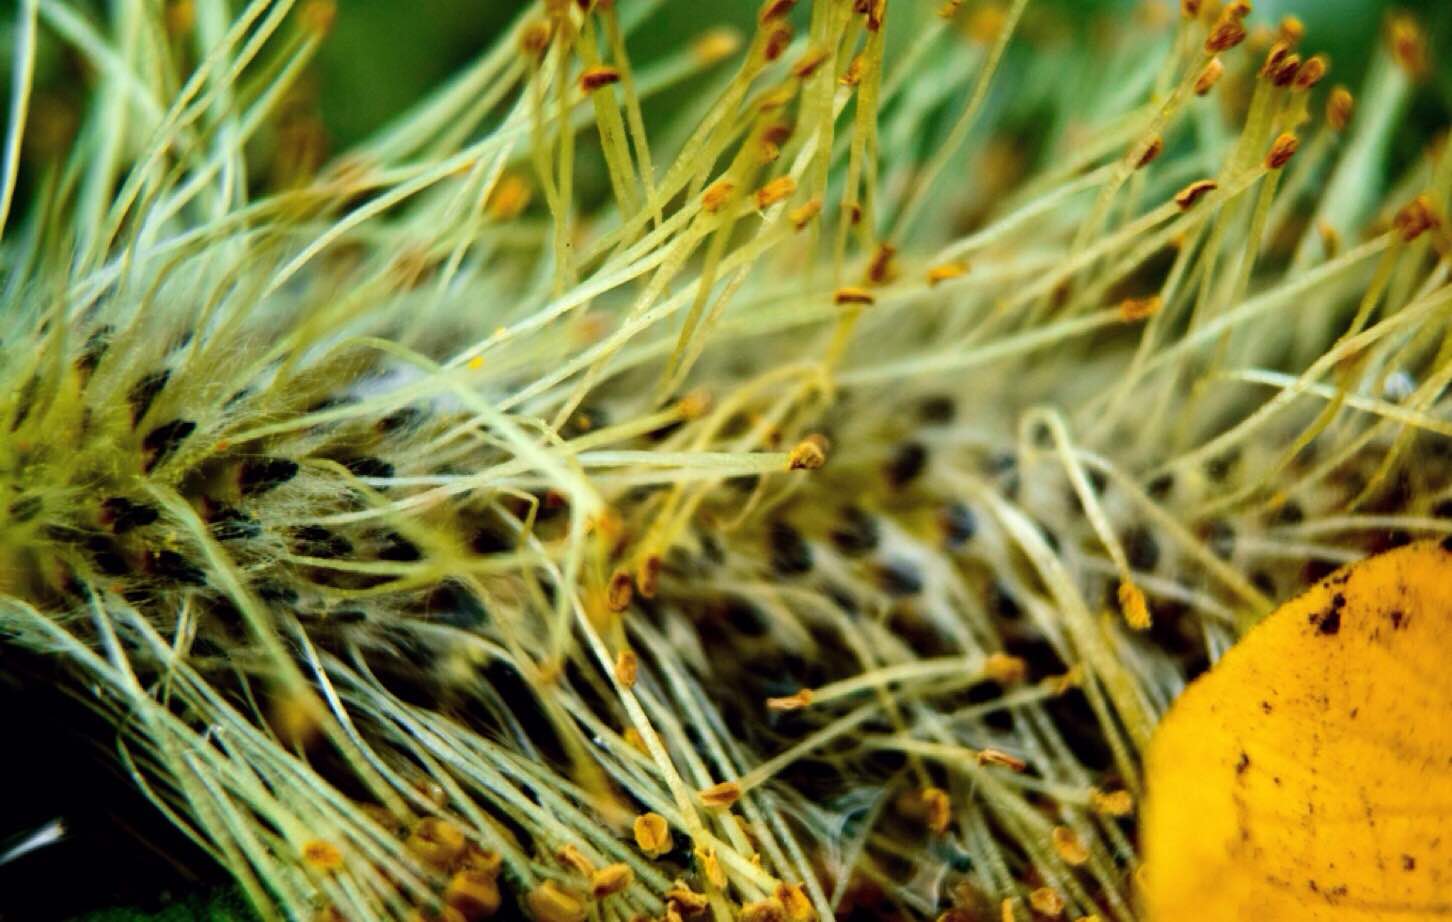
This post is just to record some of the moments I have had over the last few months. Starting with an accidental shot of a very wet and bedraggled willow catkin. It was a damp day and I was trying to get a close up of a bug but after looking at the picture found the catkin to be of more interest.
Pussy Willow
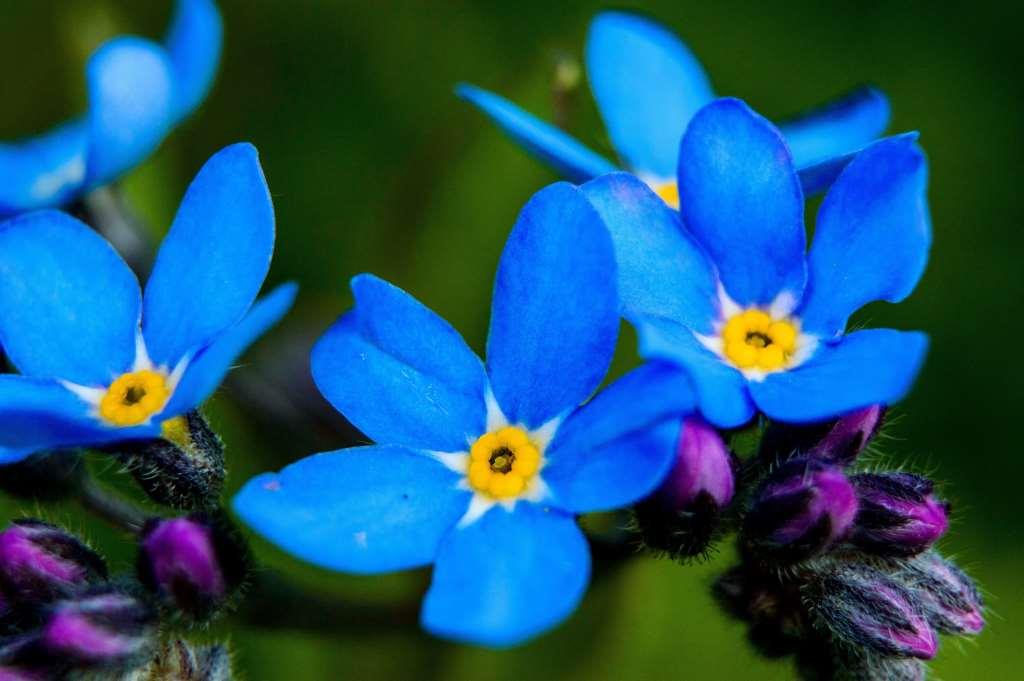
Not long after ripping a muscle in my calf I hobbled out into my garden and applied the 20 metre rule. That is stand still, kneel down, sit down and lie down but continually look around you for approx 20 metres and you should see something worth shooting. When I eventually laid down I came up close and personal to these beautiful little Forget-me-nots
Forget-me-nots
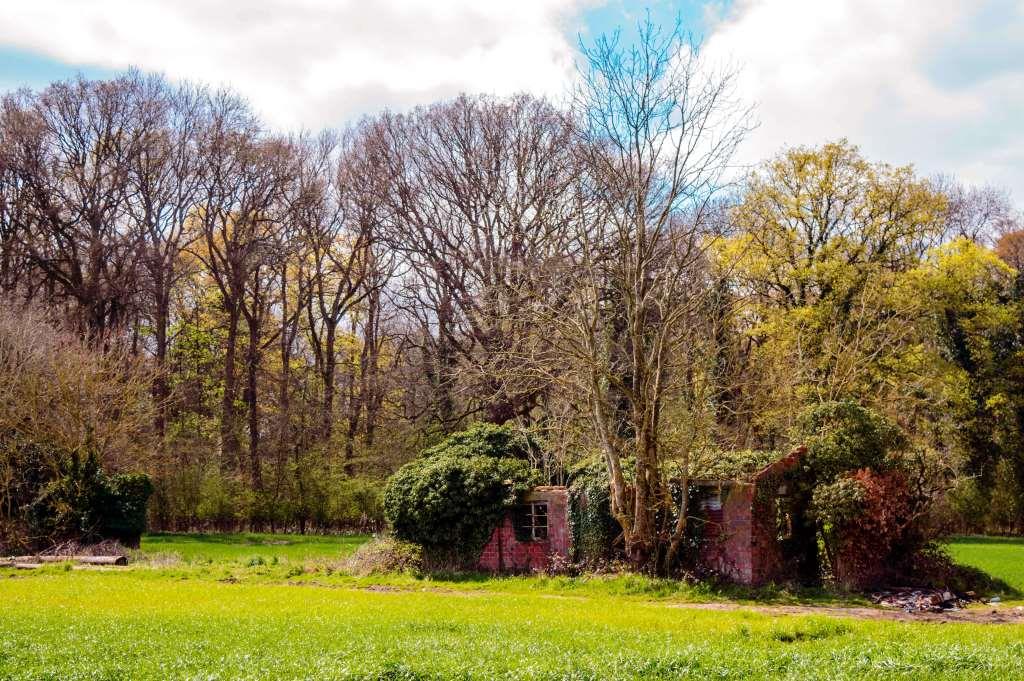
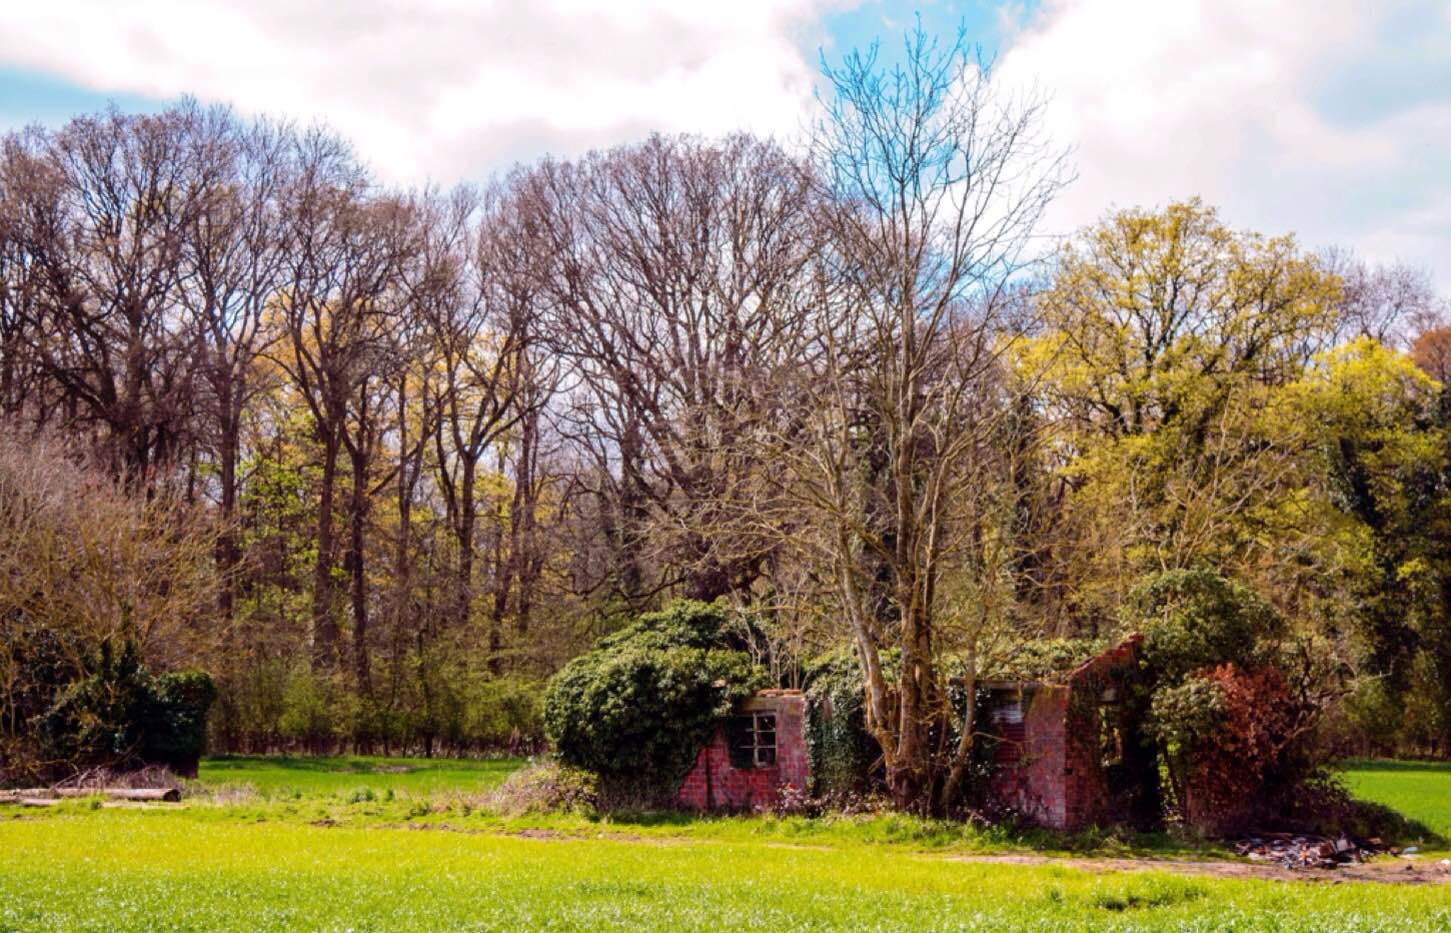
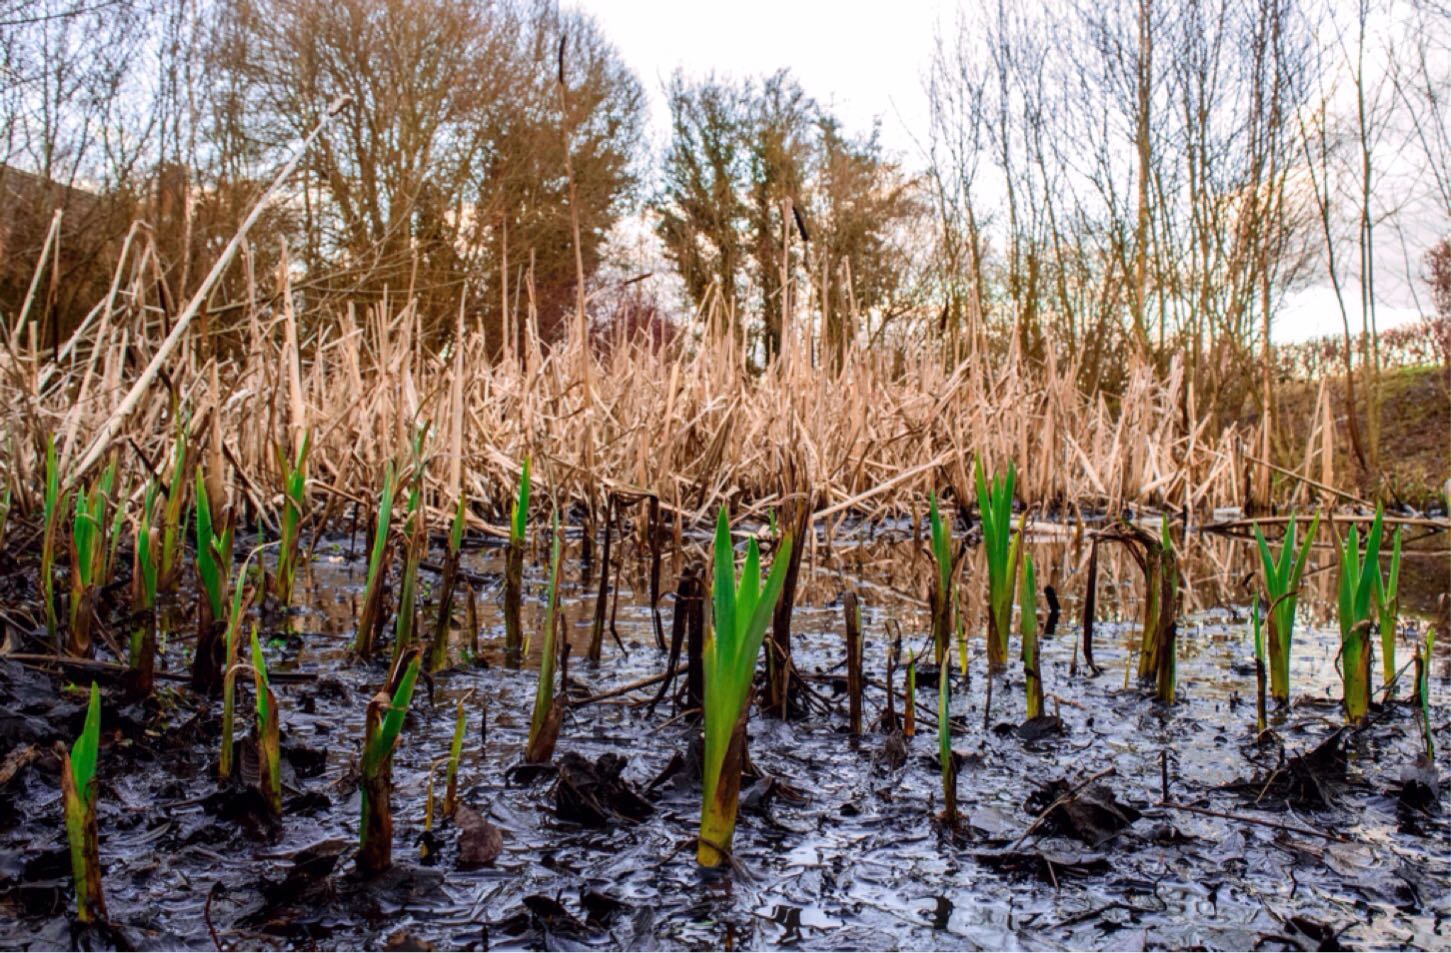
There was a re-wilding theme on the BCUK website a couple of months ago and I was stuck for ideas. Not long after the closing date I remembered this place outside our village. Proper re-wilding you could say 🙂
Re-wilding
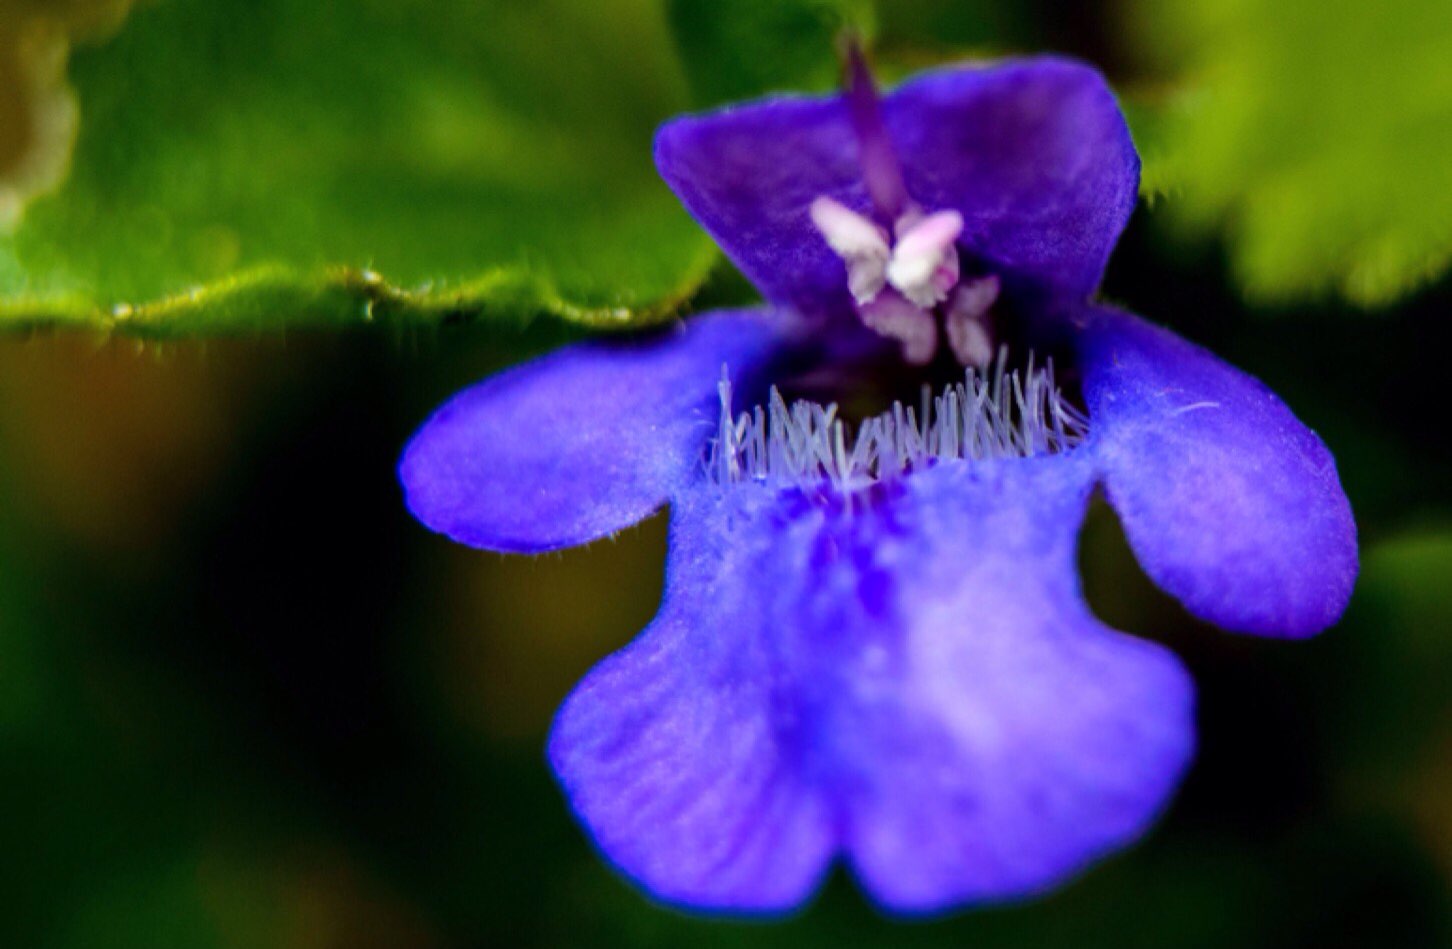
Back in April I went out for a walk with my kids in Morgaston woods and the bluebells were just coming through. I spotted this slightly thicker patch and after getting the kids to lie down (it was a job with all the pricklies) I got this rather nice shot. The angle of the shot made the bluebell patch seem much thicker than it actually was.
Peek a boo
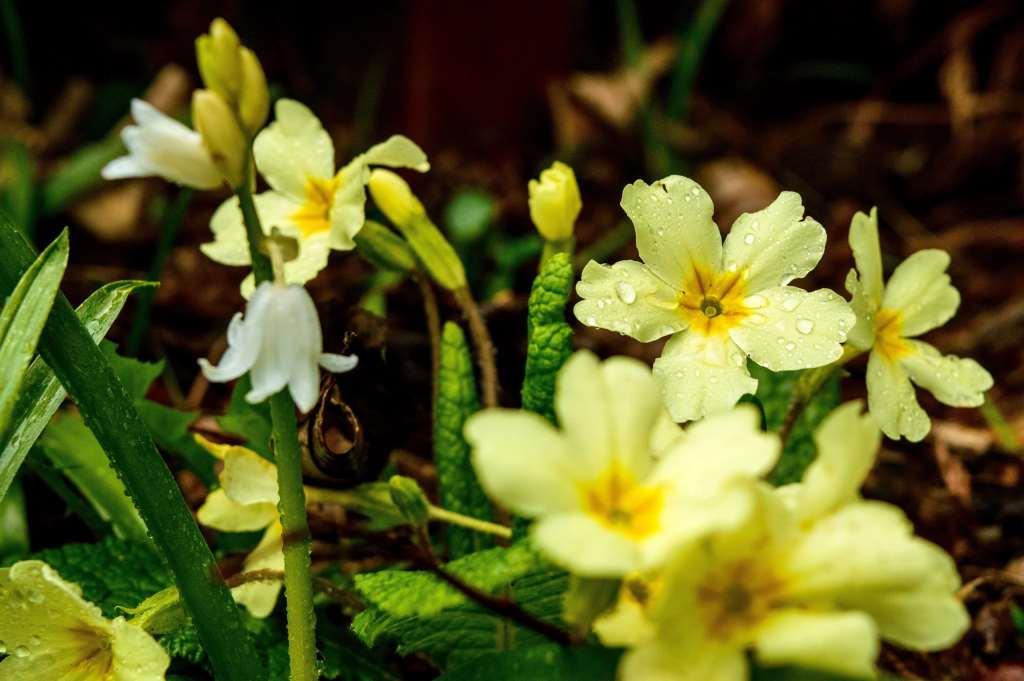
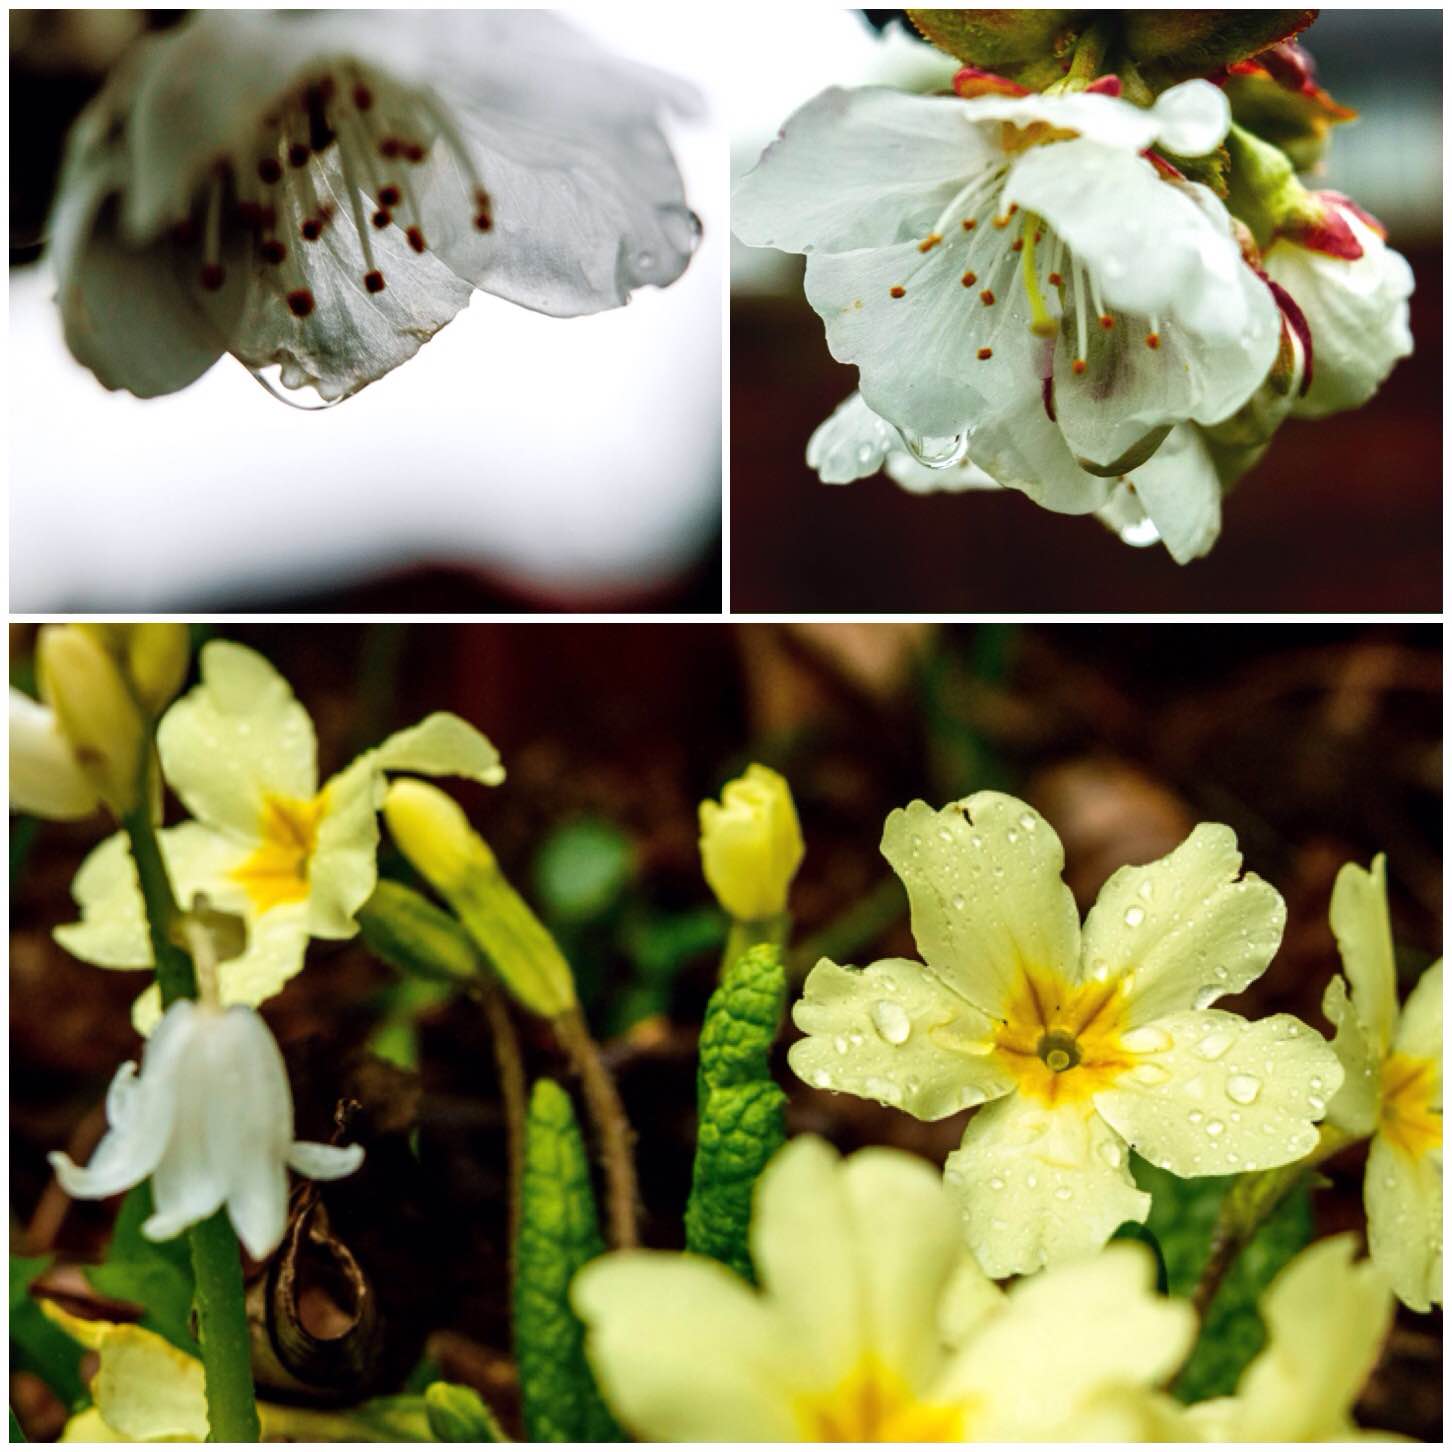
Another one from my garden during my hobbling period. I was particularly taken with the water droplets on the primroses.
Spring days
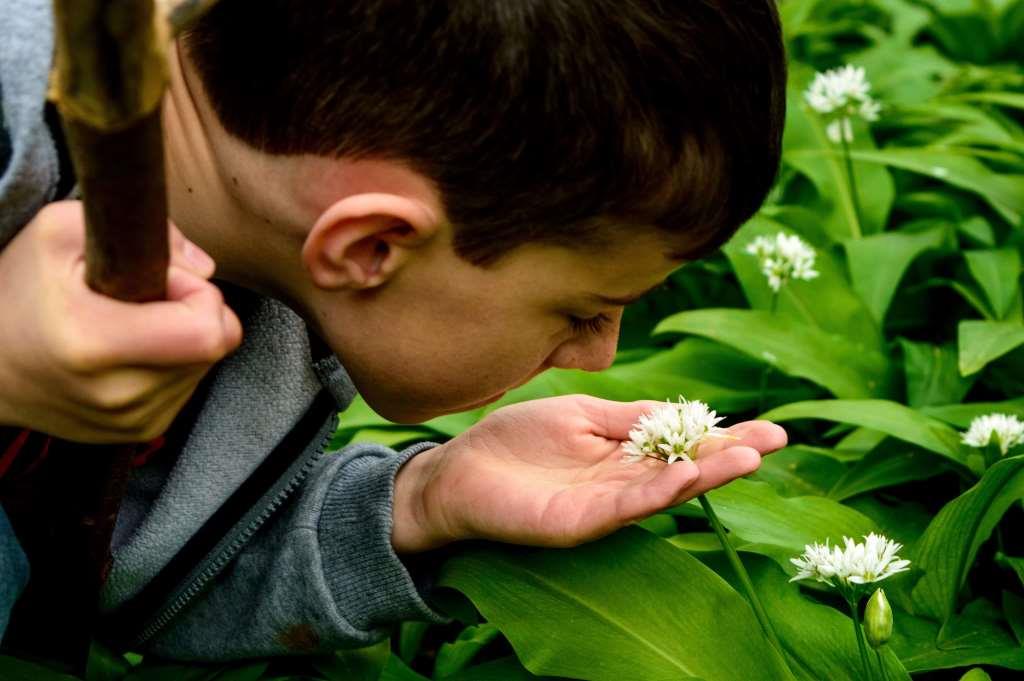
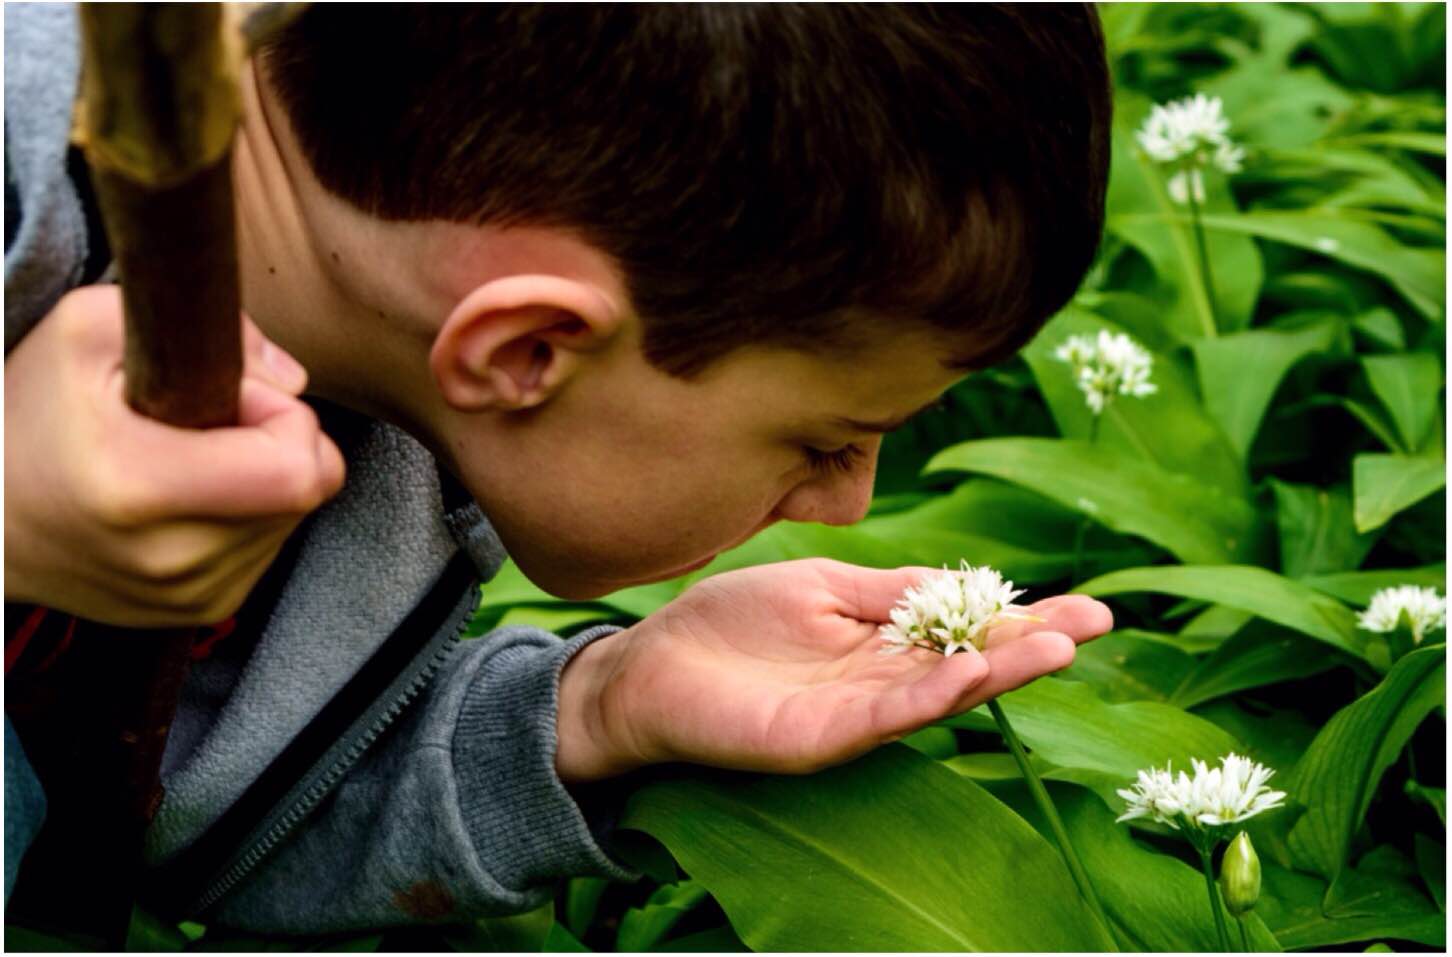
My son has been undertaking some nature observations for his naturalists badge at cubs. we have been getting out and about as much as we can identifying trees and flowers such as these lovely Ramsons.
Naturalist badge – IDing the Ramsons
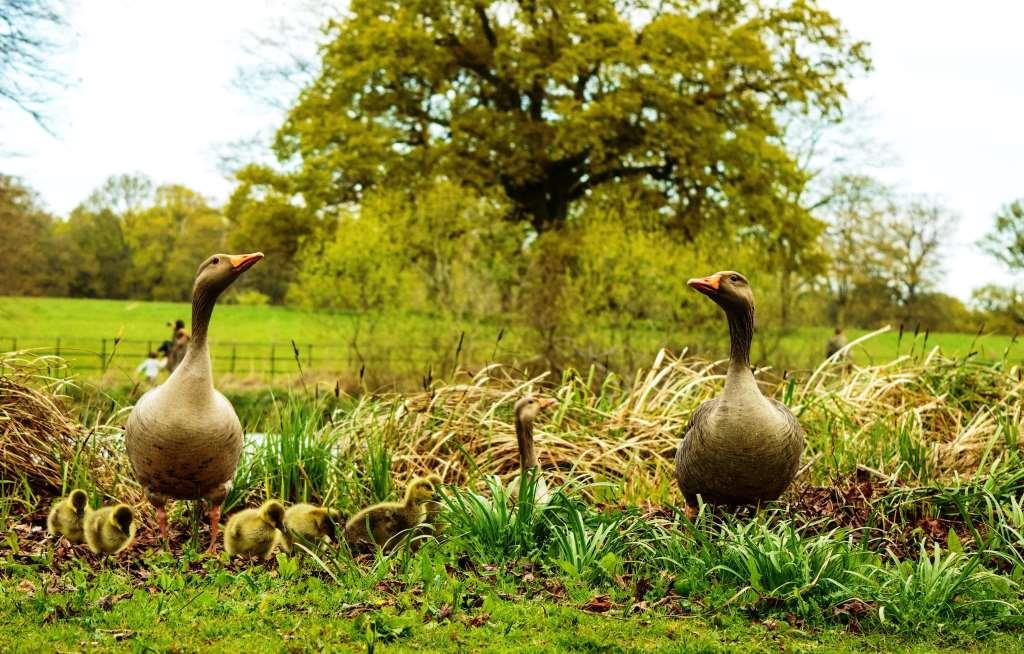
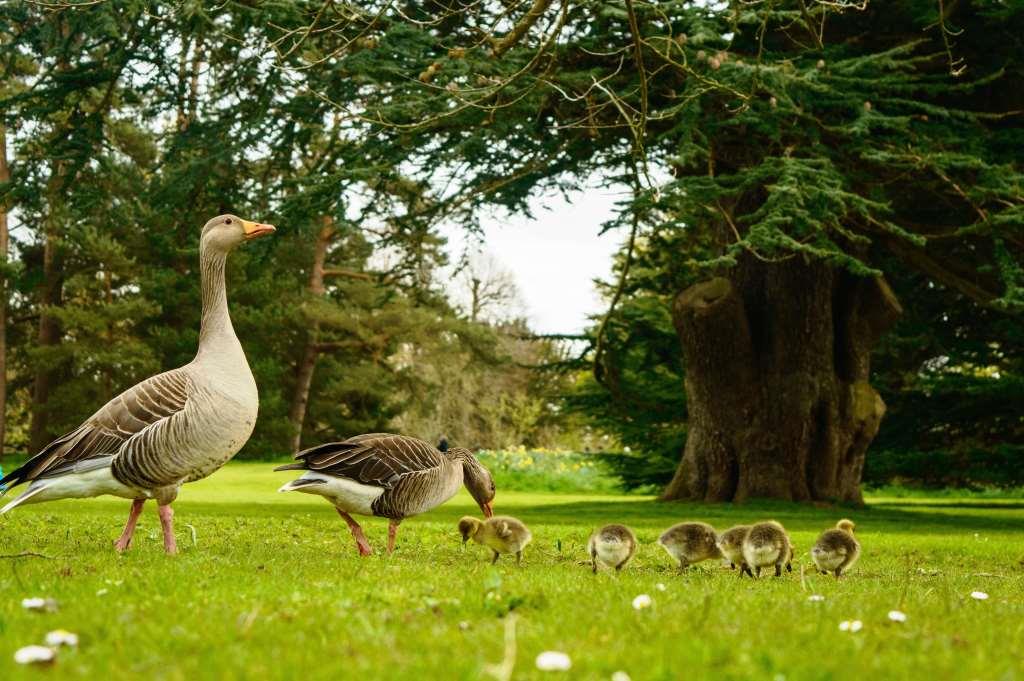
Spring would not be the same without a picture or two of some fluffy creatures. I thought this Greylag geese family looked particularly impressive at The Vyne National Trust property.
The Greylag family
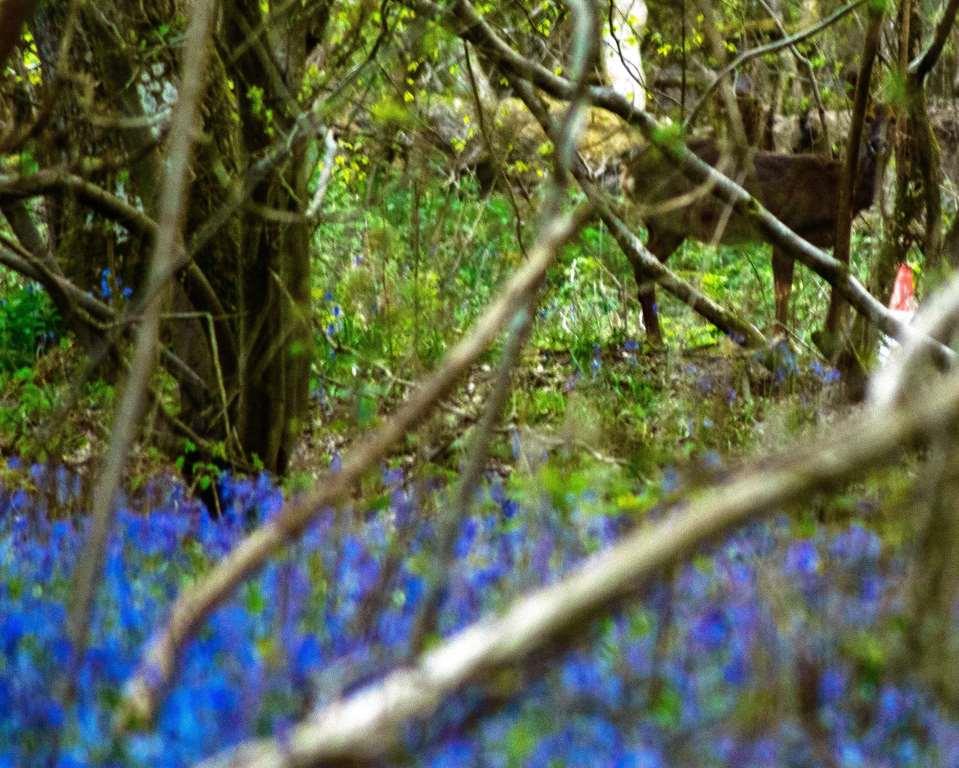
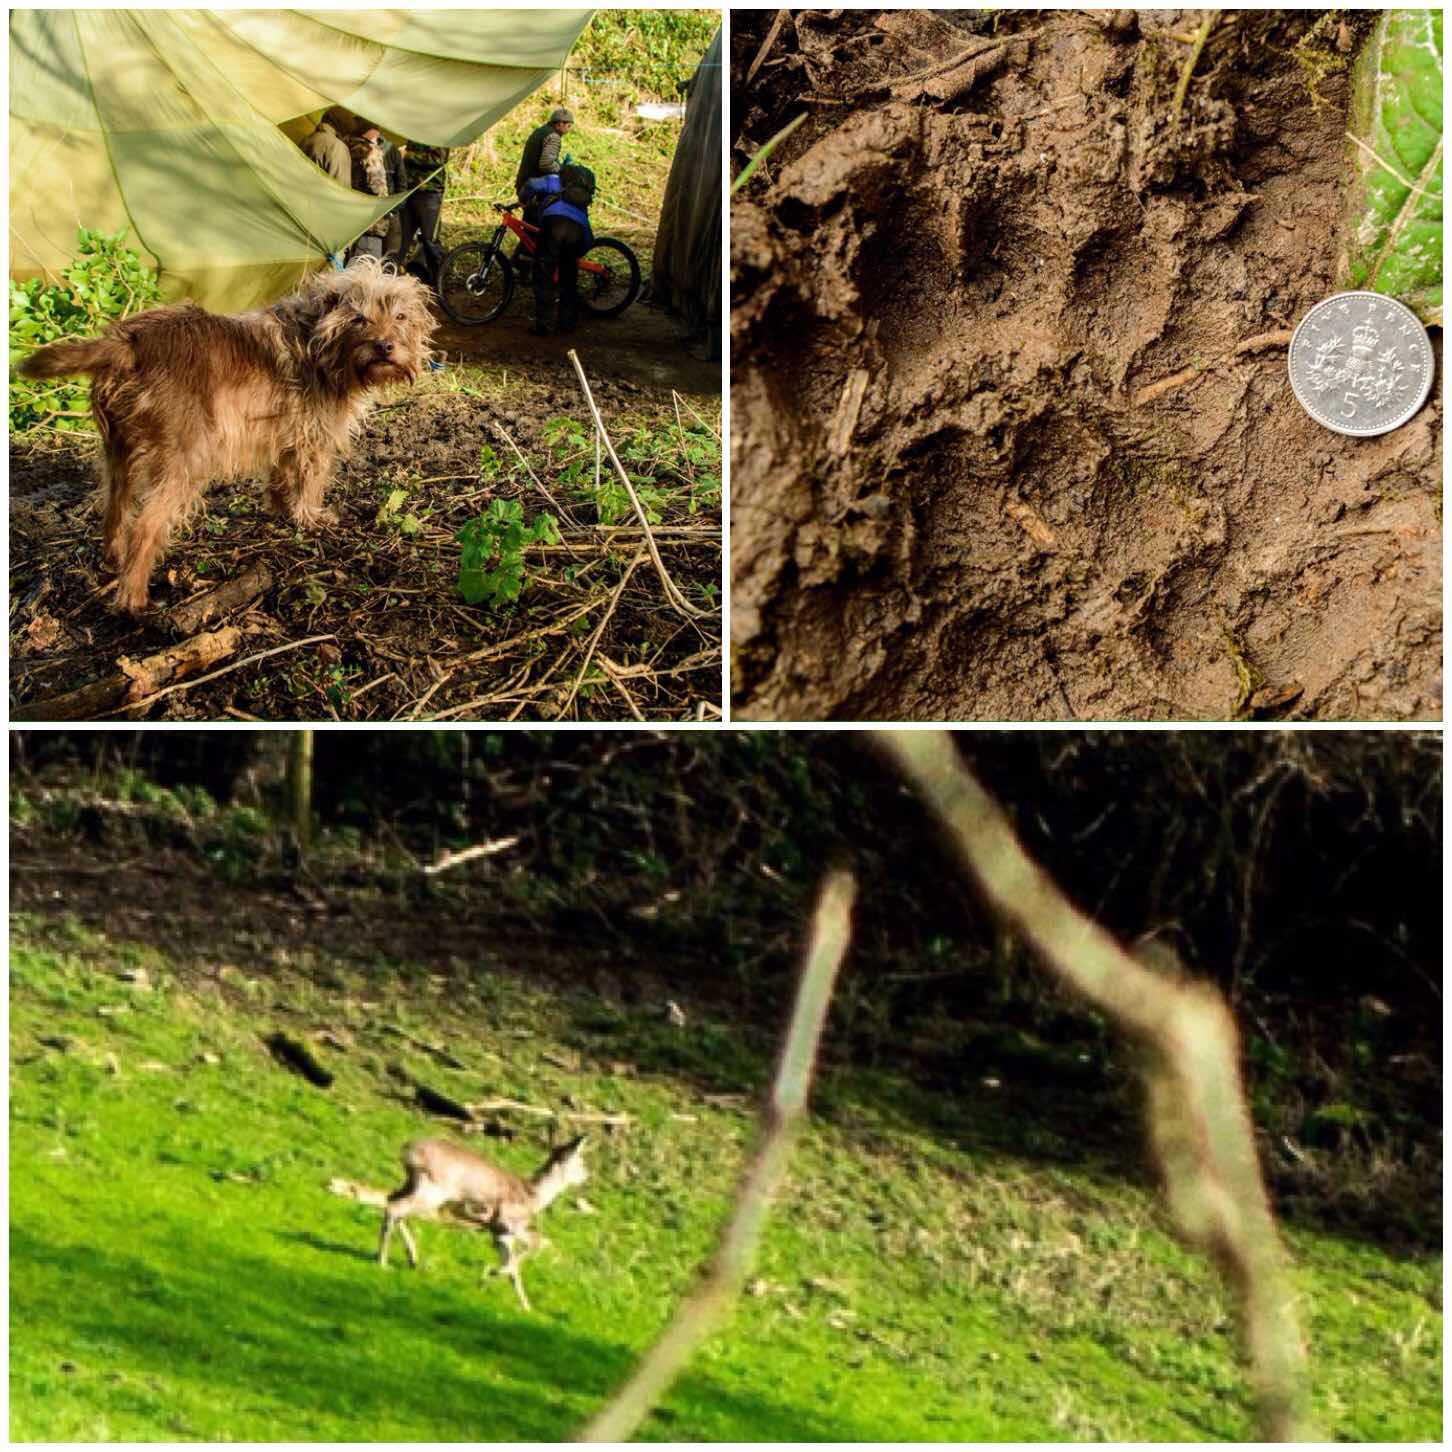
This was a ‘face off’. I spotted this deer in the shadow of the woods while out looking at the bluebells. I had to change the lens on my camera as she was a fair distance away. Normally they run off by the time I change lenses but this one kept me square in her sights the whole time.
Staring contest
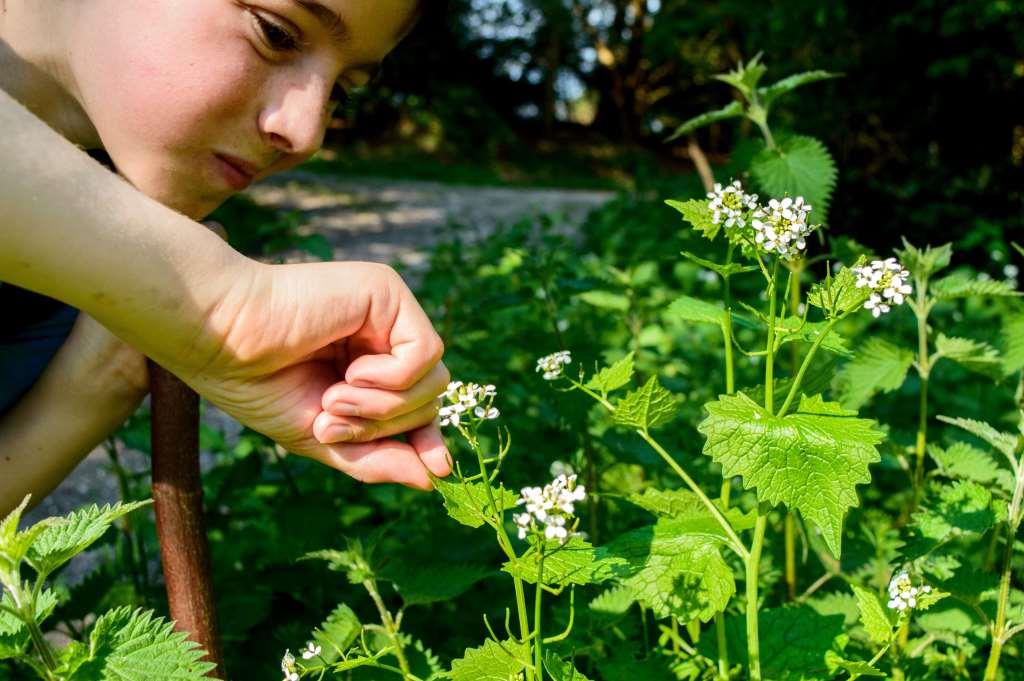
We moved on from just identifying plants for Finlay’s naturalist badge to tasting them as well. We tried out a whole range of leaves including the likes of these Jack by the hedge plants.
Naturalist badge – IDing the other garlic – Jack by the hedge
Some of the best finds were literary stumbled on like this complete fox skeleton in the New Forest. It was found by some of my Junior Sea Cadets and we laid it all out onto this log to get a real good look at it. Many of these kids have never been out of the city before so this was quite a find for them.
A Foxy find
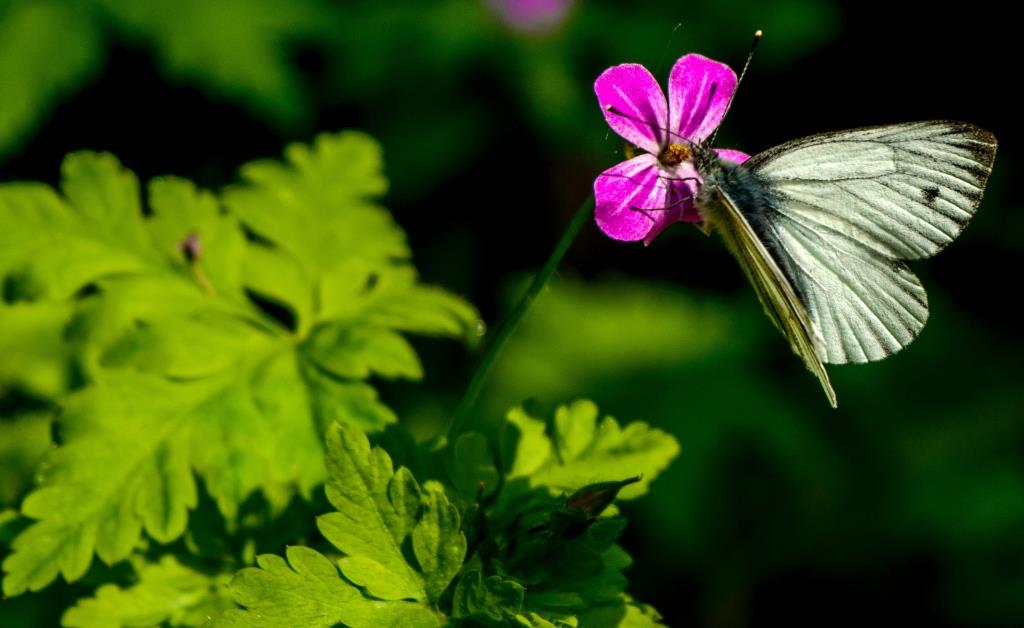
I spotted this little butterfly sitting on a Herb Robert flower while visiting my friend Fraser from Coastal Survival a couple of weeks ago. Normally these little devils are away before you can get near them but this one just seemed to be soaking up the sun.
Delicate beauty
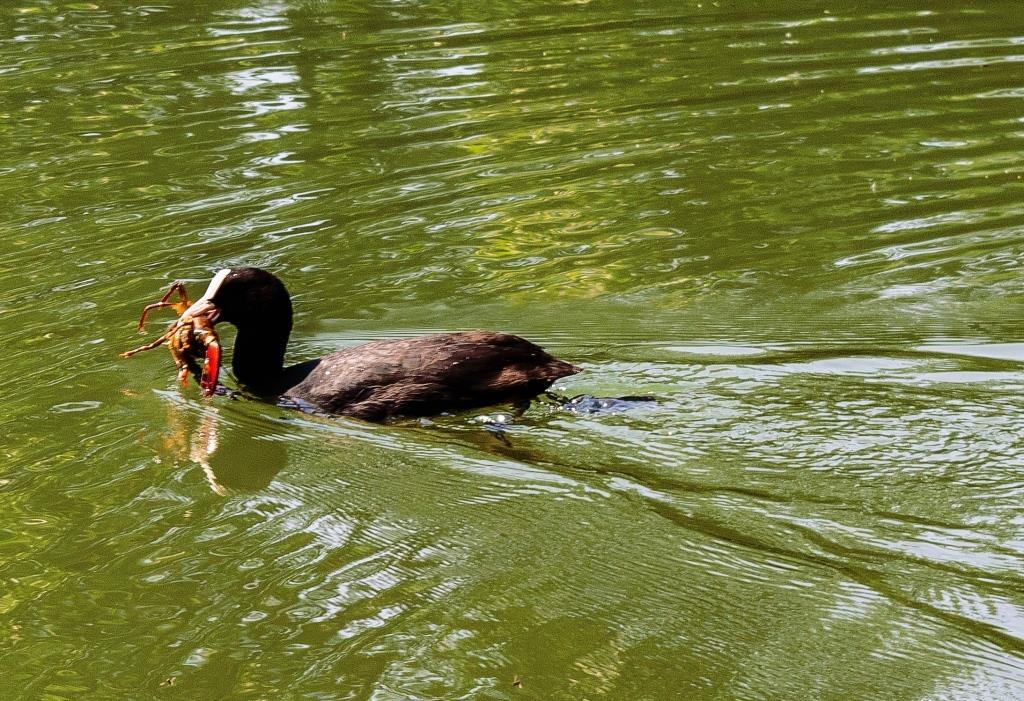
One of my favourite pictures was taken last weekend at The Vyne National Trust property. I heard a splash by the side of the lake and turned to see this Coot with a large Signal Crayfish in its beak.
The joy was not to last for the Coot though as another Coot came along and stole the crayfish away – such is nature sometimes I suppose.
A top spot
So although I have not been out doing practical bushcrafting much I have been getting out and observing nature with a keen eye – so you could say it was the more nature based side of bushcrafting.
I had to stop and ask myself – ‘Did I just see that?’
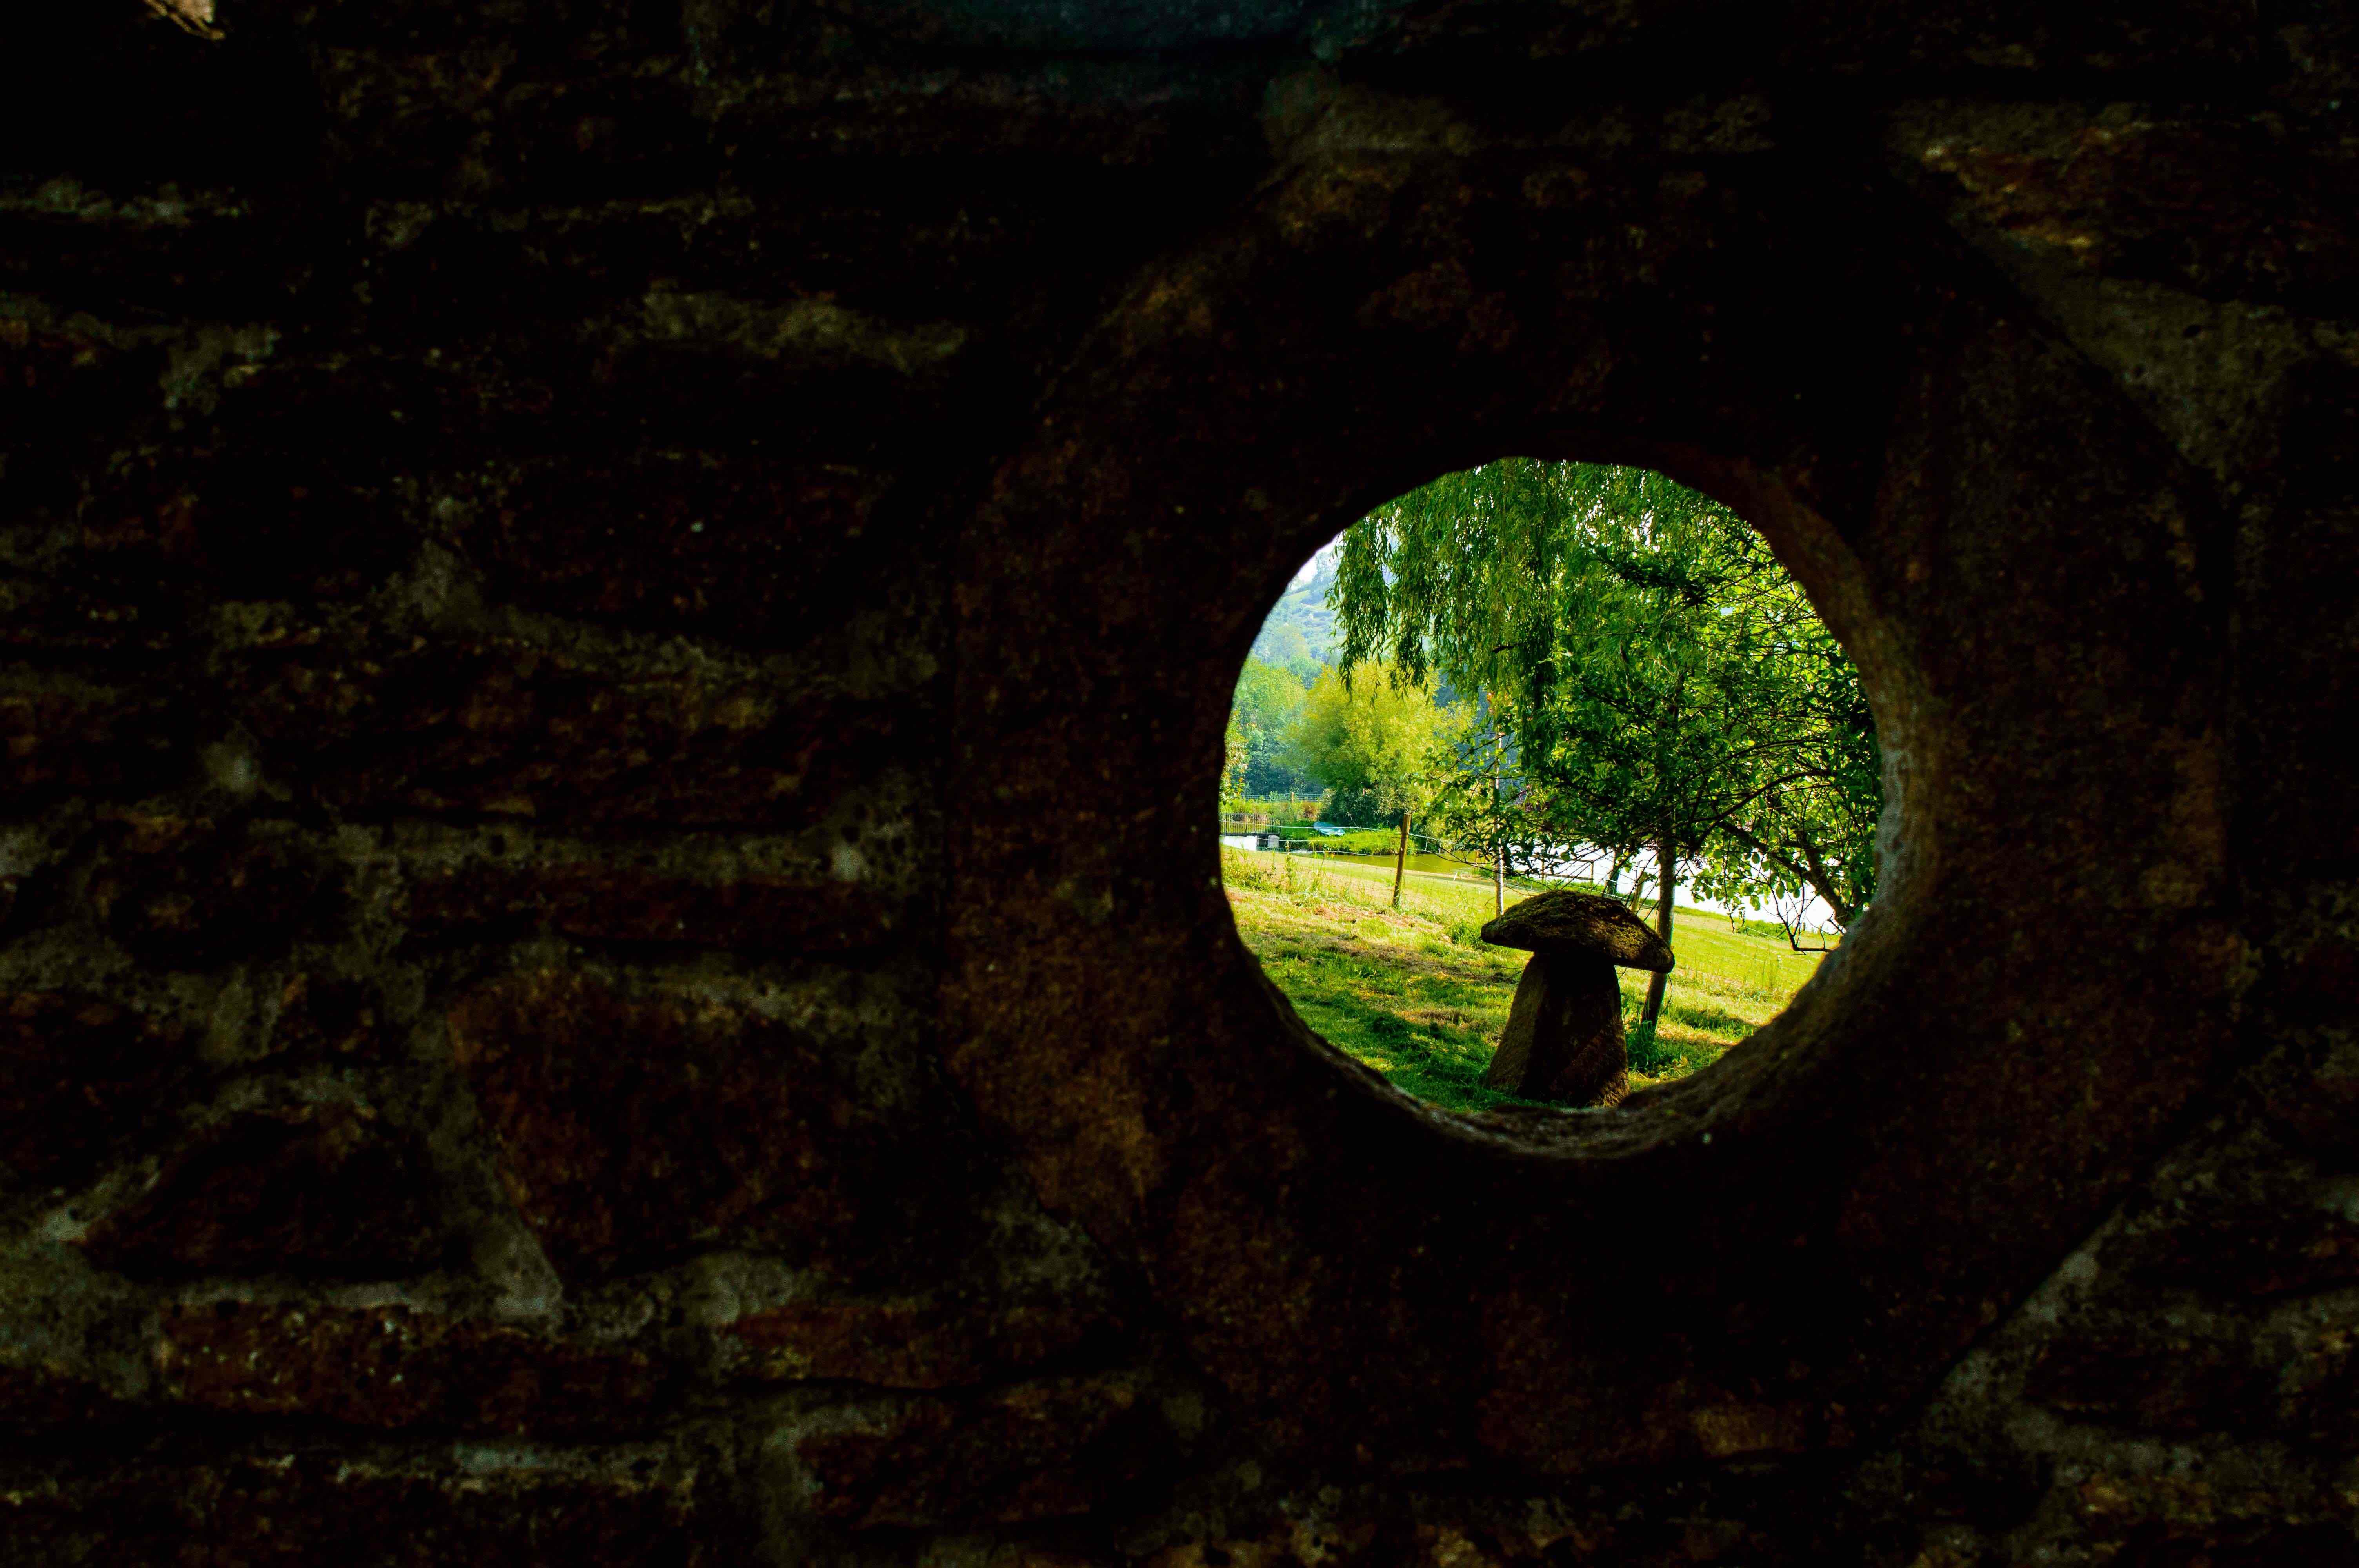
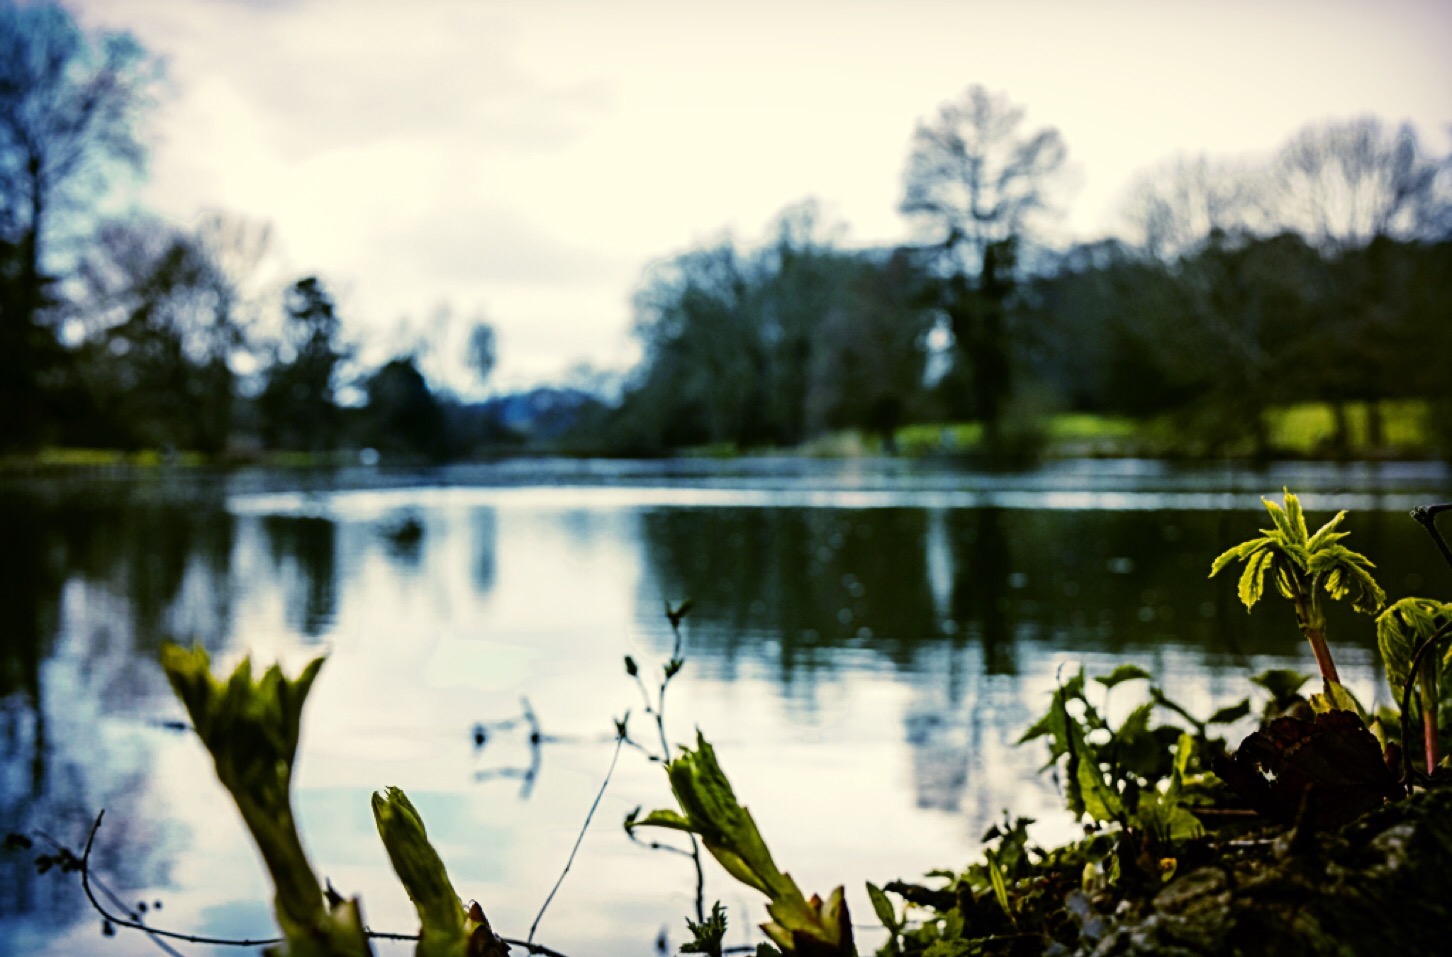
Have you ever had one of these moments when you were bimbling along a quiet country lane? Well I did last weekend while down in Dorset on holiday with my family.
The Secret Garden
After passing by this little portal in a wall I had to go back for a closer look. It did not feel as though there was anything wrong with peeking into someone’s garden as the portal framed it beautifully. The view went on down a meadow slope, through some trees and finally to a lake.
Last April it was time to start the Basic Expedition Leaders course for 2016 here at London Area Sea Cadets. The course is spread over four weekends and the students – if they pass – get accredited by Sports Leaders UK as Adventure Leaders.
I have passed the administration of the course to my friends John Kelly and Dave Lewis. I am happiest working as instructional staff on these weekends – all the paperwork that goes with them sends shivers down my spine 🙂
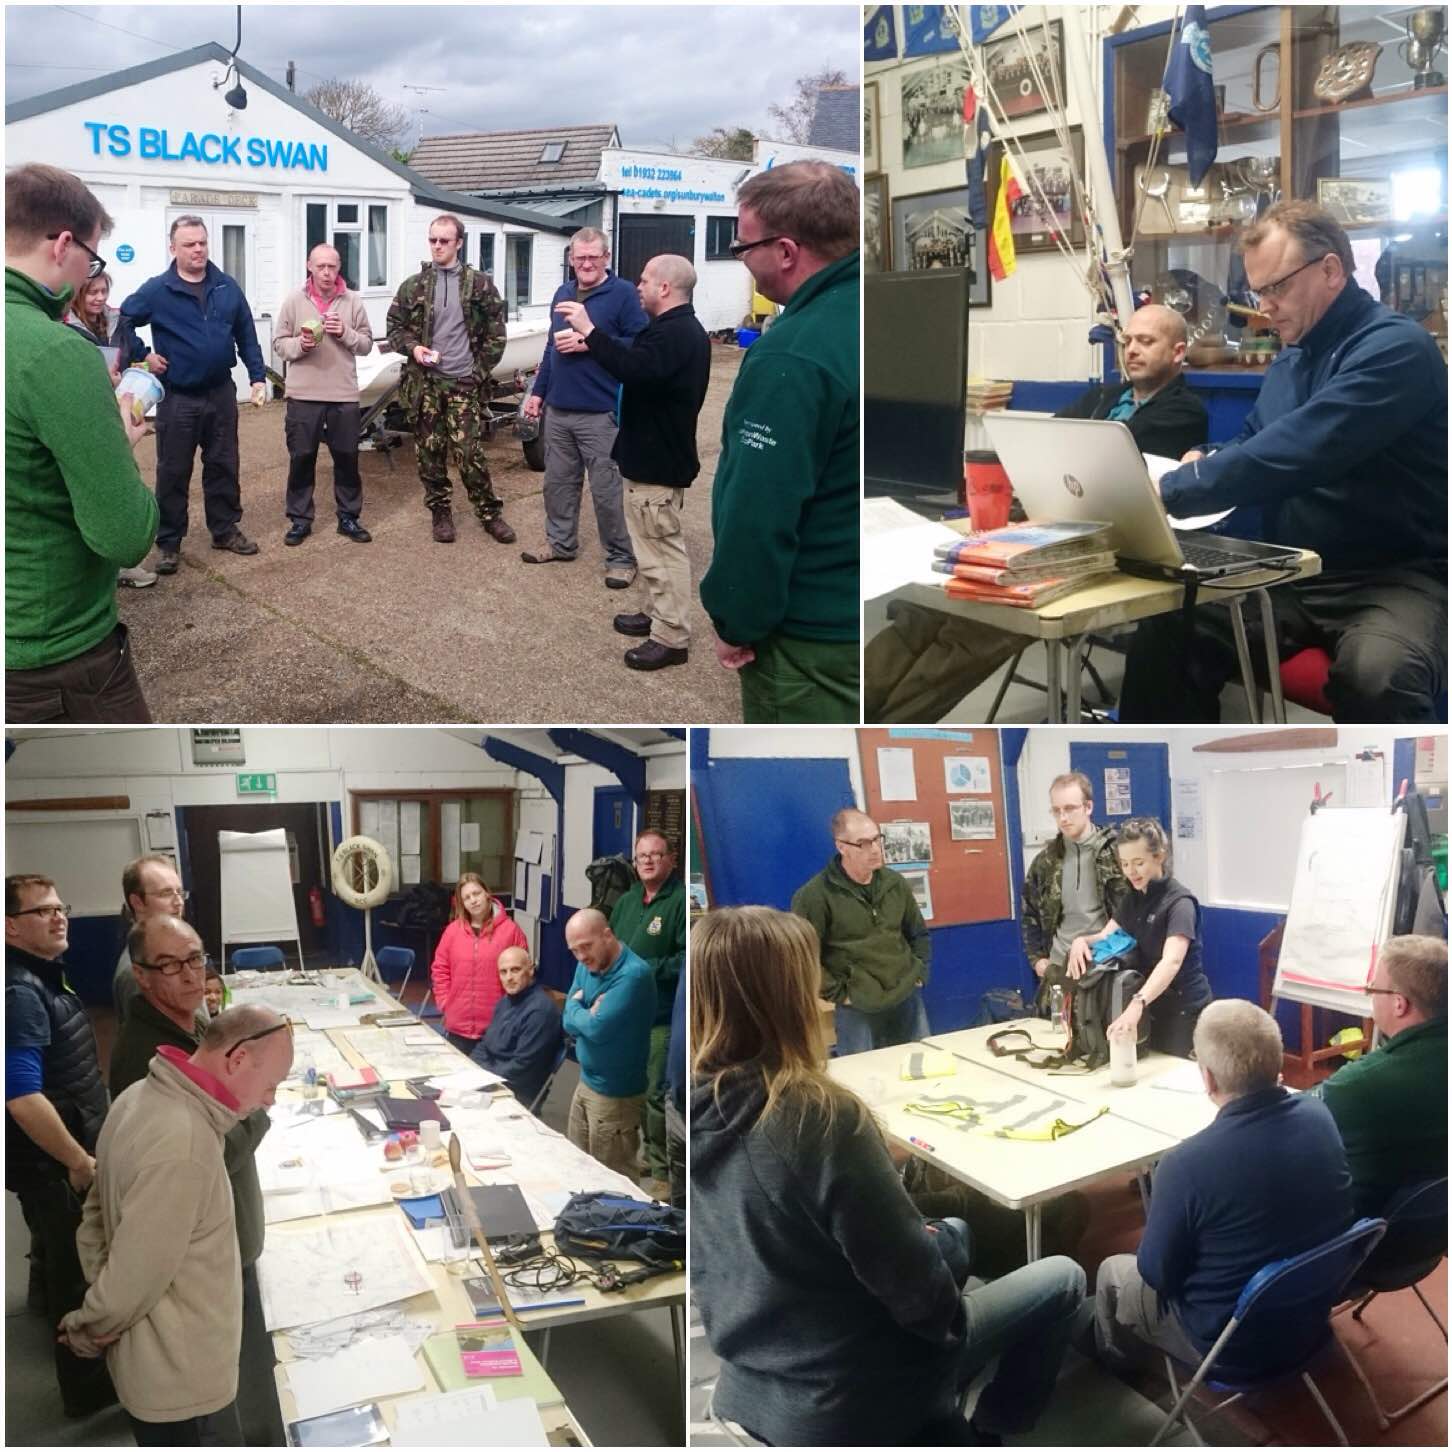
Classes, classes and loads of admin
The weekend was hosted by Sunbury and Walton Sea Cadet unit (TS Black Swan) where all of the classes took place on the Saturday. The classes were run by Dave Lewis, John Kelly and myself however all the students had to deliver their own class as part of the weekend.
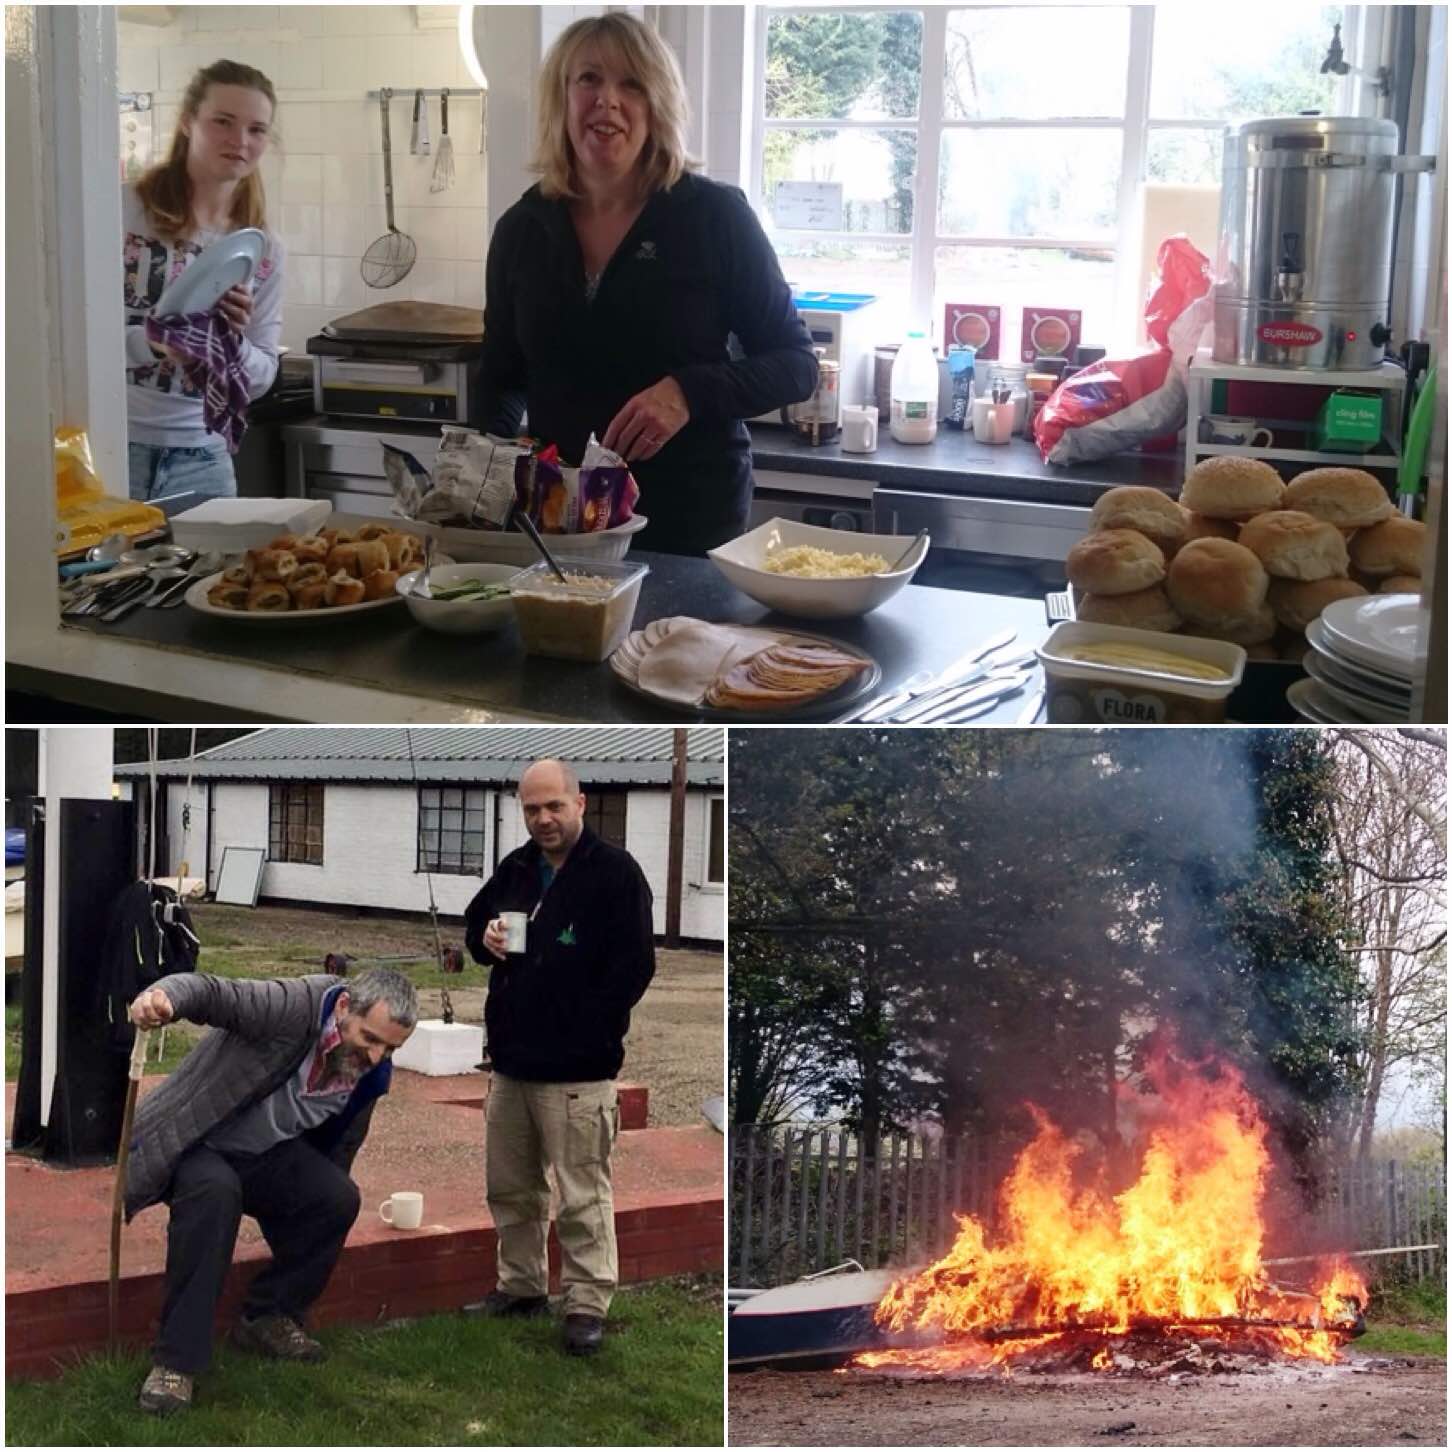
In amongst all these classes we were well fed the whole weekend by the unit staff. This onsite catering allowed us to really concentrate on all the classes (one less chore to do) so thanks to everyone who helped.
I had ripped a muscle in my calf a few weeks earlier (never go trampolining with your kids!!) and thought it was healing well. Needless to say, within 5 minutes of arriving I managed to re-open the rip so spent the rest of the weekend hobbling around. I did enjoy the unit bonfire though as they burned some old boats.
Lots going on – Bottom left picture courtesy of Jacob Leverett
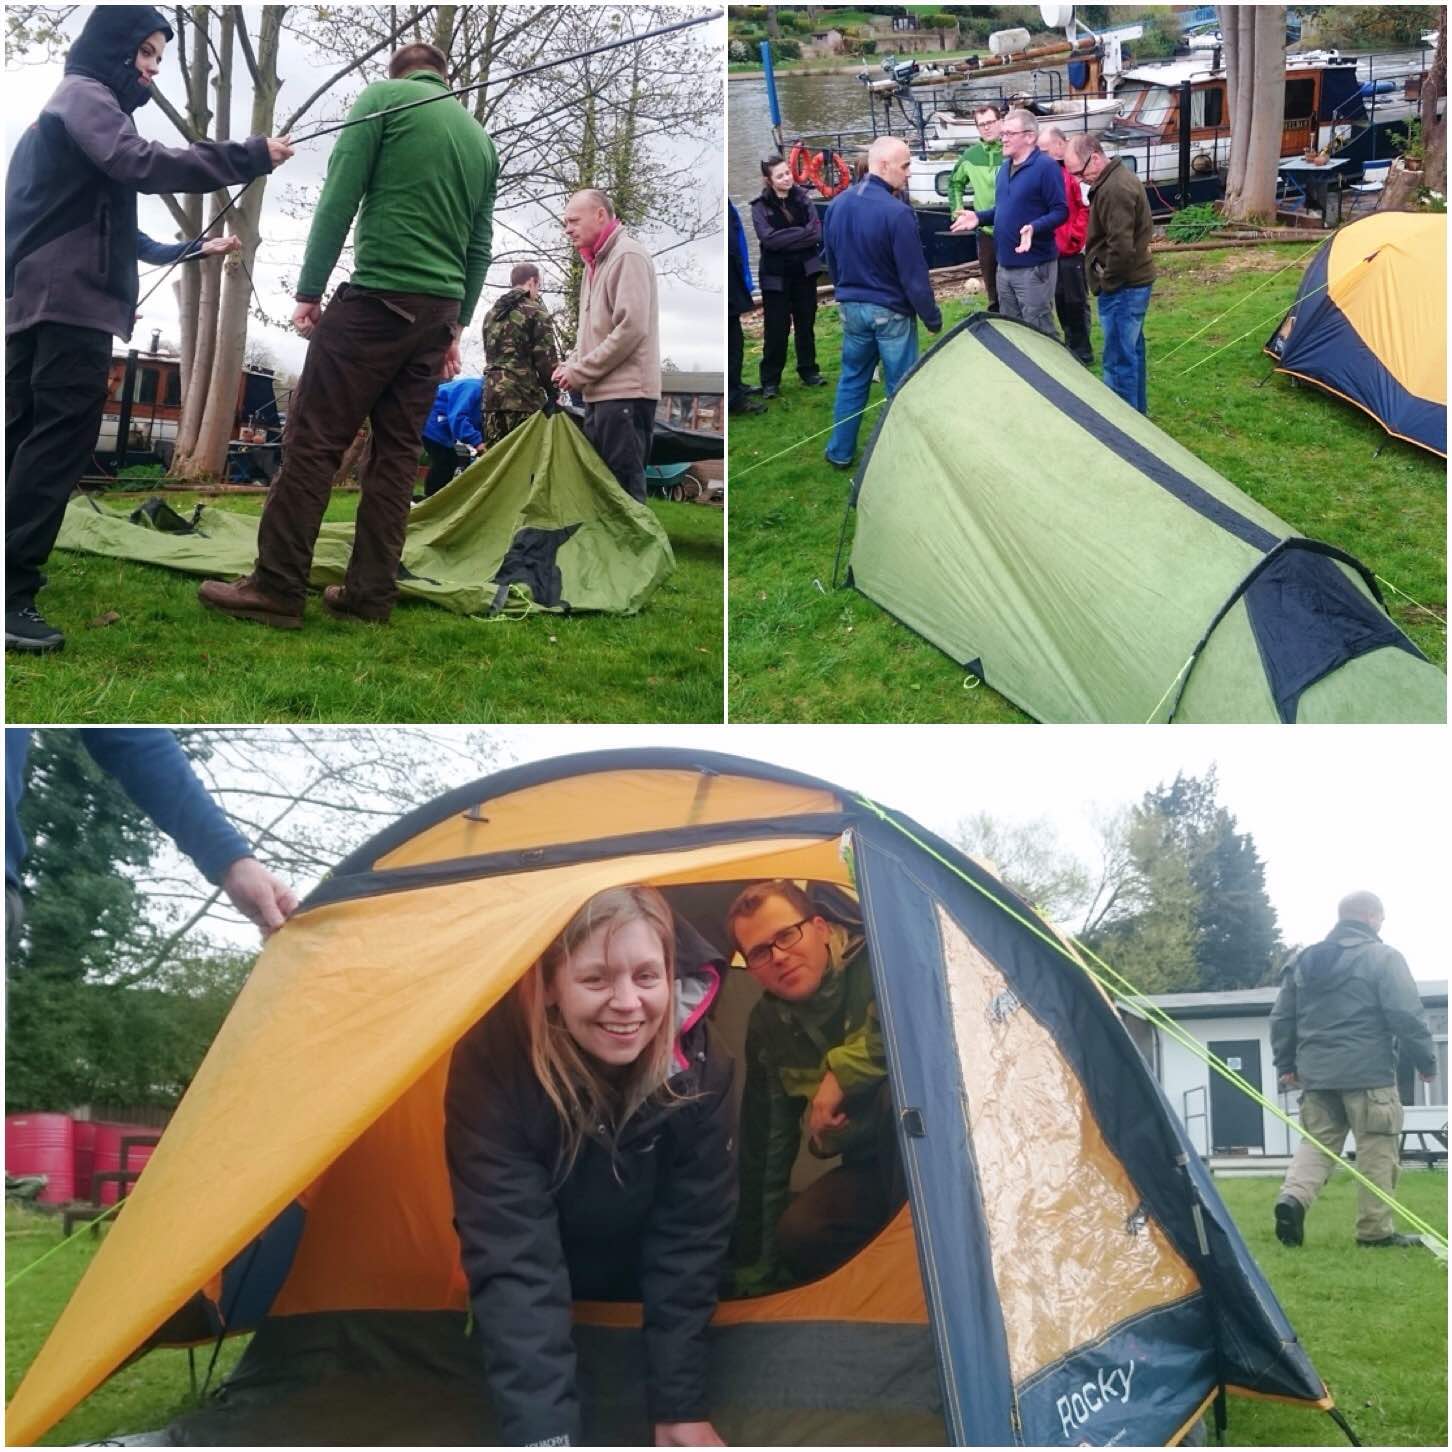
There were many classes from navigation to the law but quite a few hands-on ones such as learning about different tents. It is crucial that Adventure Leaders are proficient in putting up a wide a range of tents as they’ll be faced with all sorts of different types when they’re teaching cadets.
Tentage
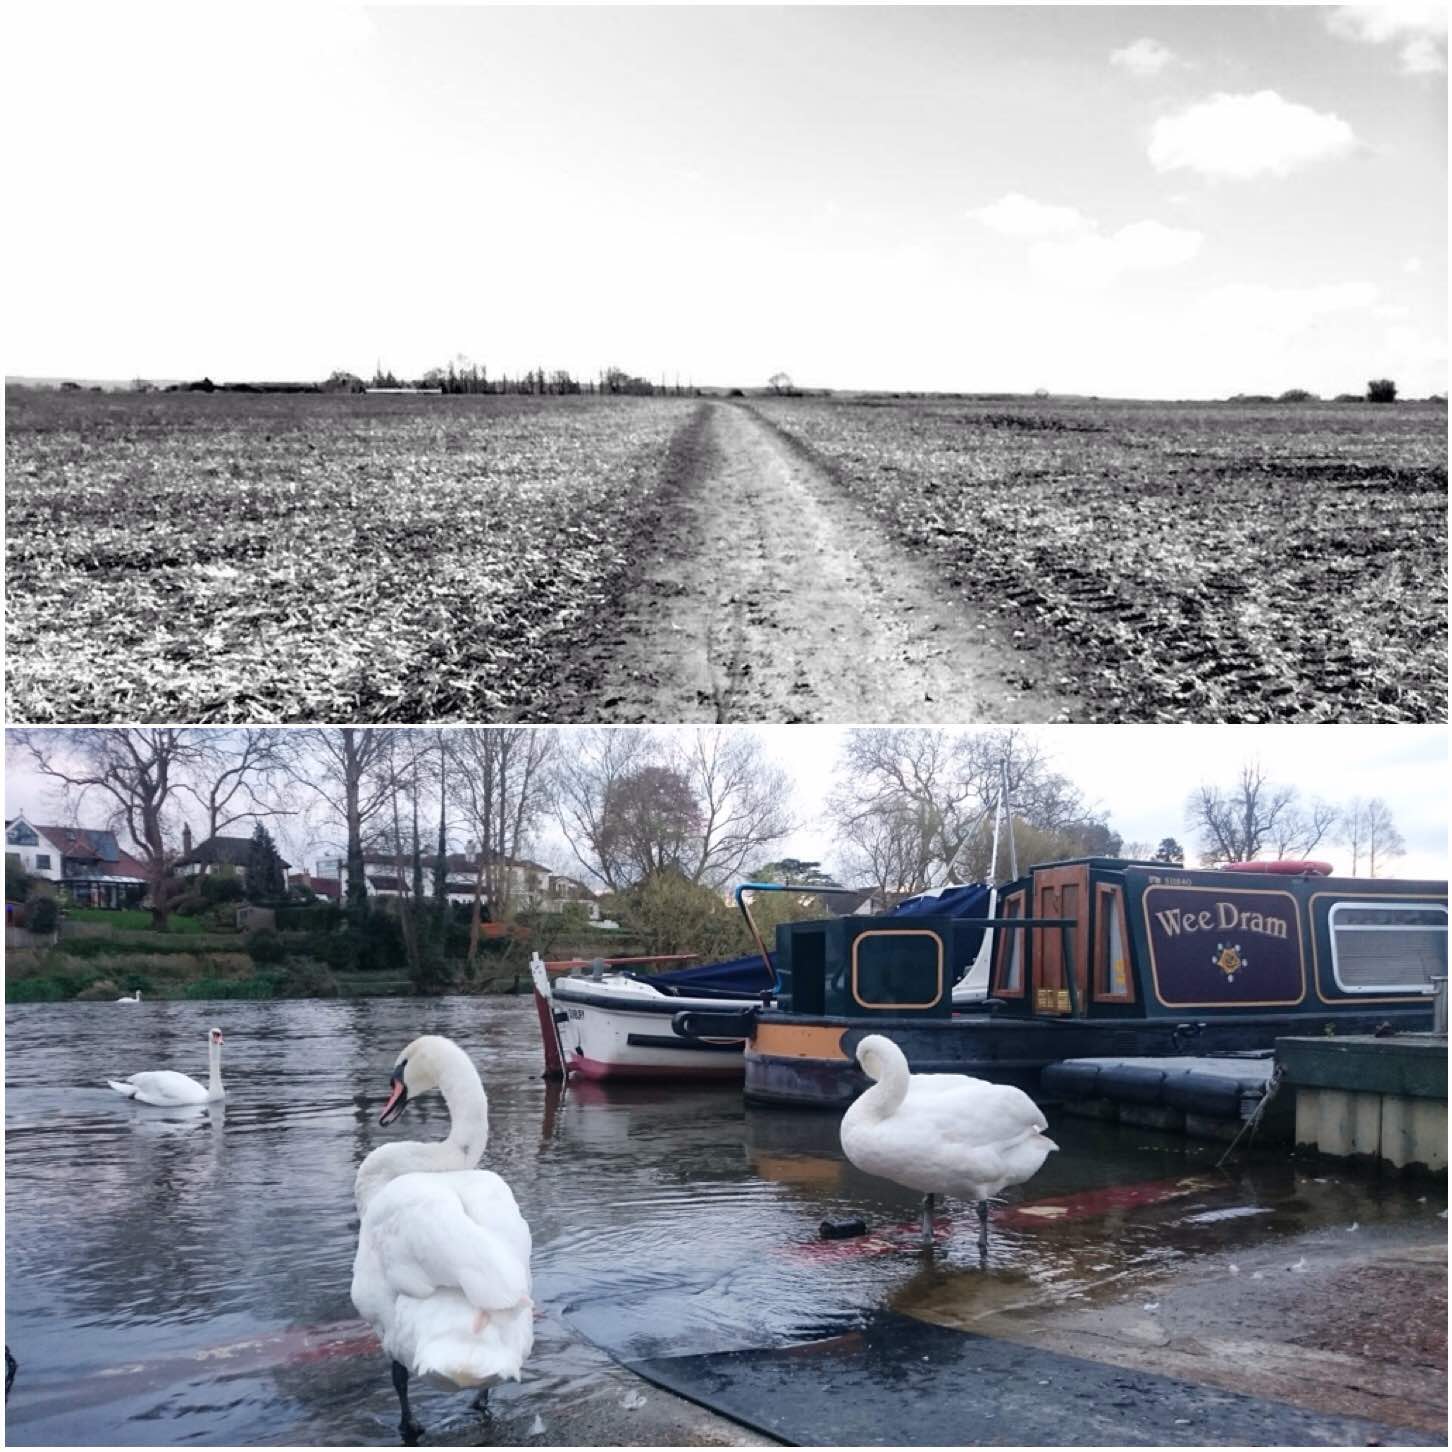
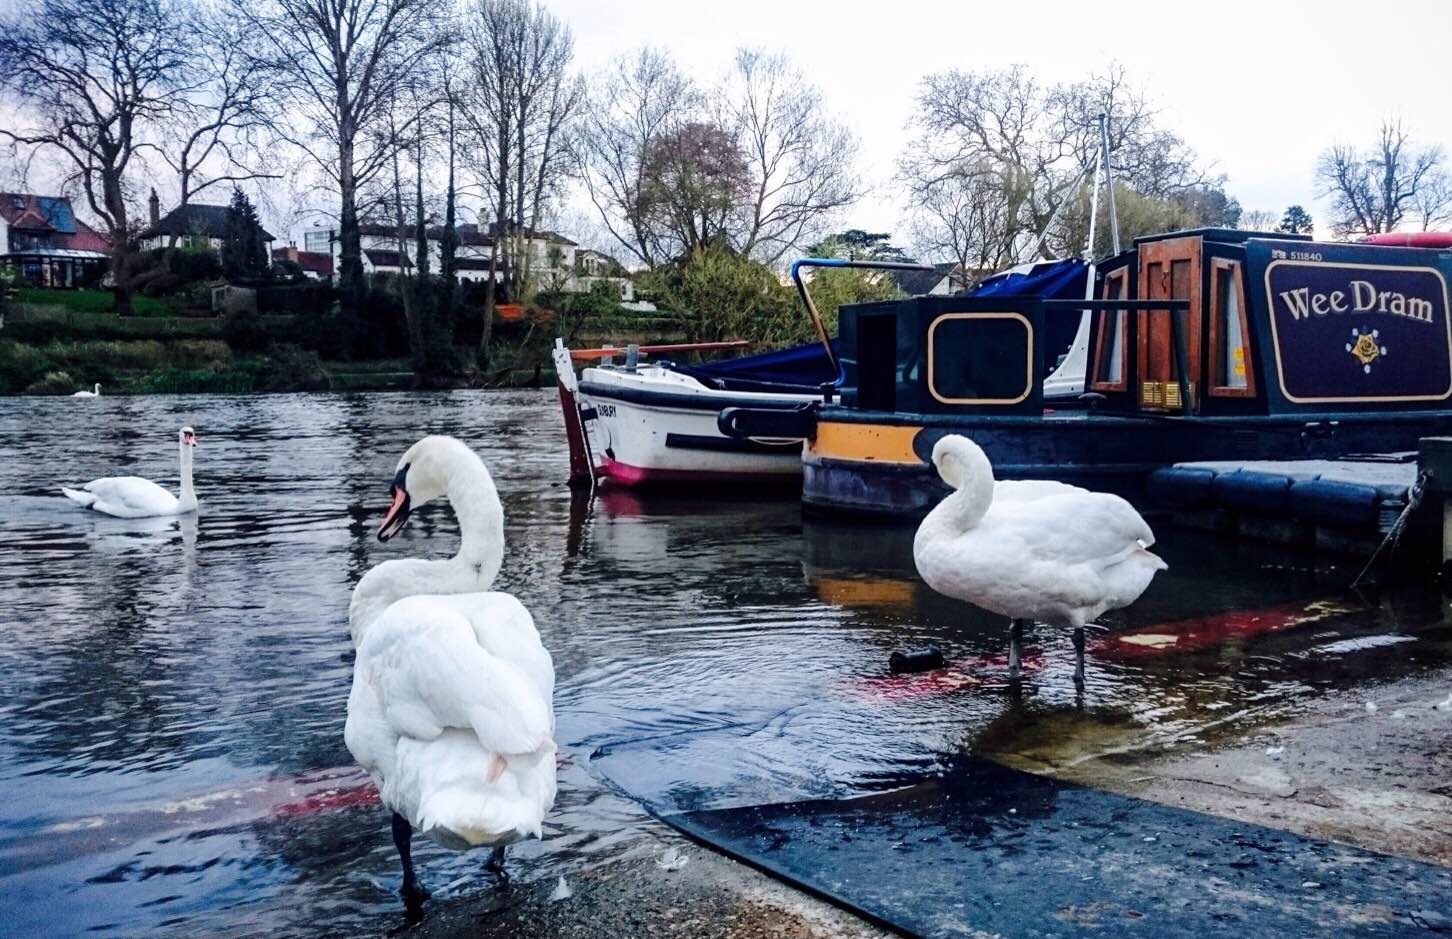
I did not get out on the Sunday on the navigation exercise because of my gammie leg, however I did get a great picture of the Swans on the slipway by the unit.
Jess Edwards took the top picture below (taken on the North Downs) and its simple beauty lent itself well to black and white.
Beauty – Top picture courtesy of Jess Edwards
On the Sunday morning I headed home to rest up but the guys all struck out for the North Downs. They had a morning of intense instruction from John and Dave. They needed it, as they would soon be taking the cadets out and about.
The art of nav – pictures courtesy of Lee Diss
The next weekend on the course was last month in the New Forest and that report will be up soon.
Here’s instalment number 10 in the ‘10 Reasons to Bushmoot‘ series. For those of you who have been following the series so far you will have gotten a feel of the wide range of activities on offer at the BCUK Bushmoot. Some of you have contacted me to say you will be attending for the first time this year, which is great, however if you still have not made up your mind then don’t just take my word for it.
I contacted a number of BCUK members and asked them to send me their favourite picture(s) of the Bushmoot (either one they took or from someone else) and to say why it was their favourite.
Charlie Brookes’s favourite – picture taken by George Aitchison
Charlie –This picture fully sums up the most important thing about the Bushmoot for me, which is the welcoming family. I first attended the Bushmoot in 2007 and that was only on a last-minute decision. Having been encouraged by the willingness of the BCUK members to welcome you to the forum and share knowledge, I decided to take the plunge and attend the Bushmoot. It was with a feeling of apprehension that I drove down the lane from Merthyr Mawr. This feeling soon disappeared on booking in, where I was made most welcome by Tony and Shelley. What followed was one of the most enjoyable few days I had spent in a long time, everyone you met made you welcome and they were willing to pass on skills. I can only hope I can continue to make newcomers to the Bushmoot feel as welcome as people made me feel.
Ian Woodham’s favourite picture
Ian –When I was asked by George to look through my photos and send him something that says why I enjoy Bushmoot, my first thought was to my boy. He and all the children play continually, coming back to camp only for food. There is always something going on, and in an age of computer games, you never hear a child say “I’m board” when spending two weeks away from electricity.
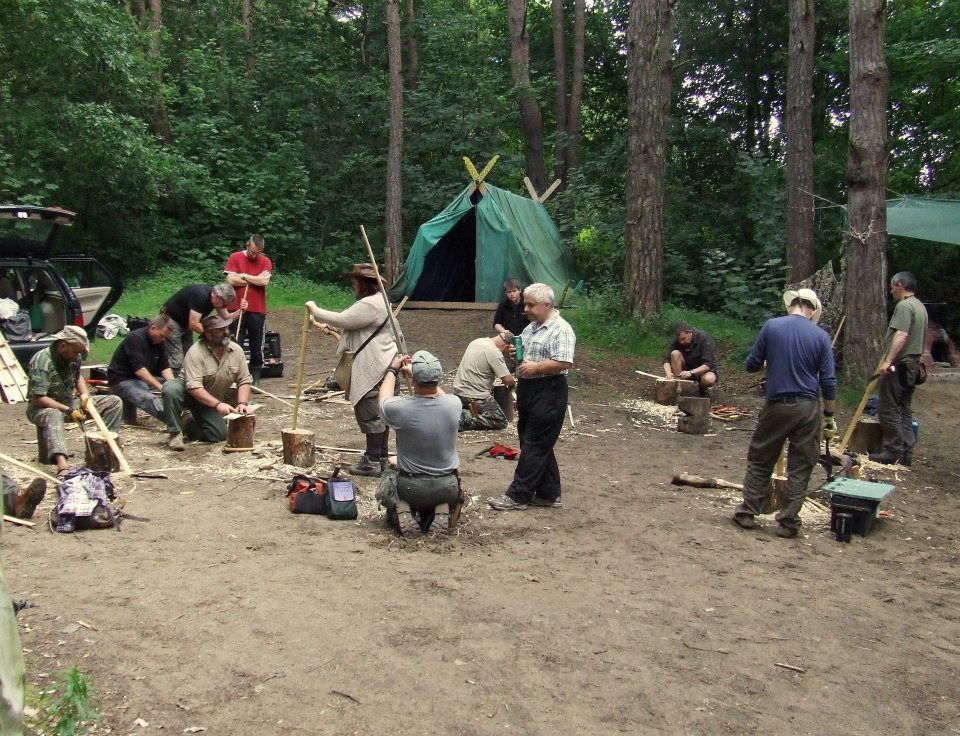
Wayne Jones’s favourite picture
Wayne (Forest Knights)-The photo shows the spirit of the Bushmoot. Sharing skills with other bushcrafters from the novice to seasoned instructors. All come with a willingness to share their skills and learn from each other. Teaching Bhutanese bow making in such a beautiful location is a privilege. It is a joy to be part of the team.
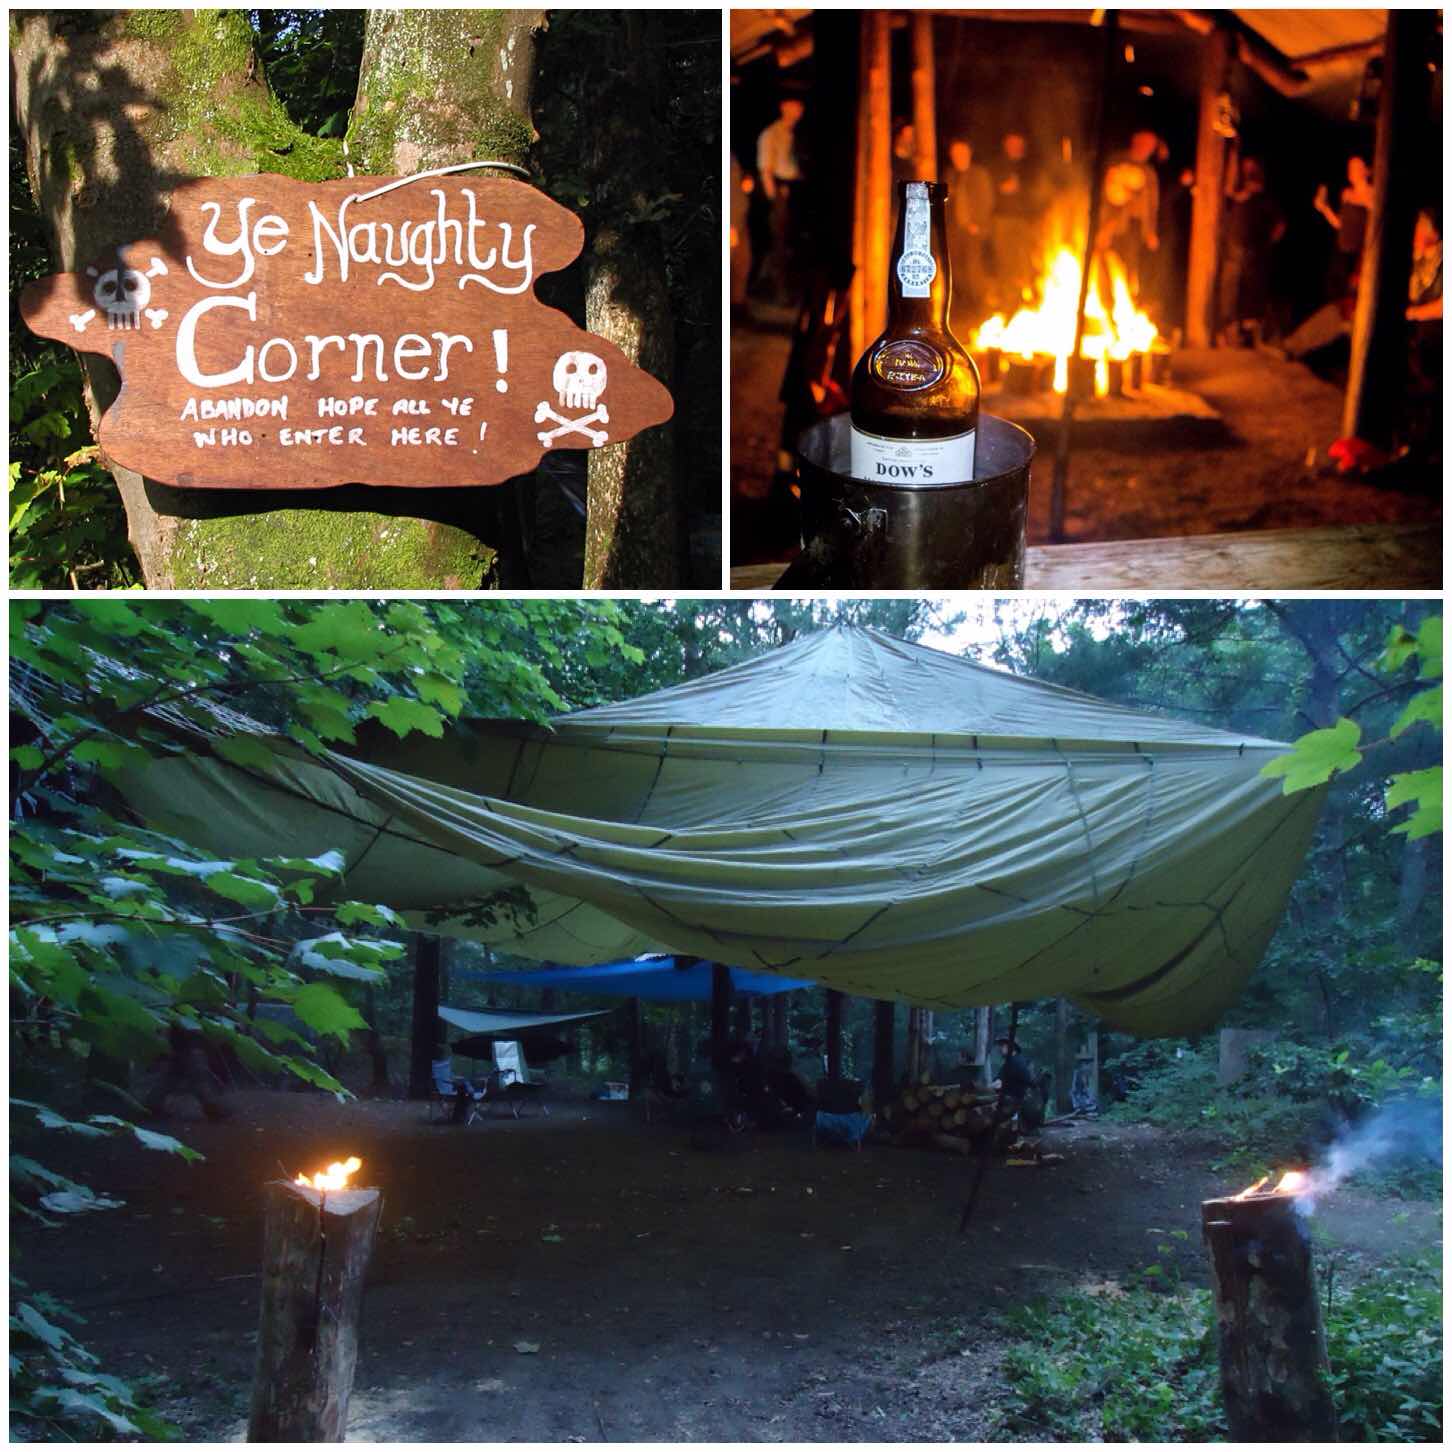
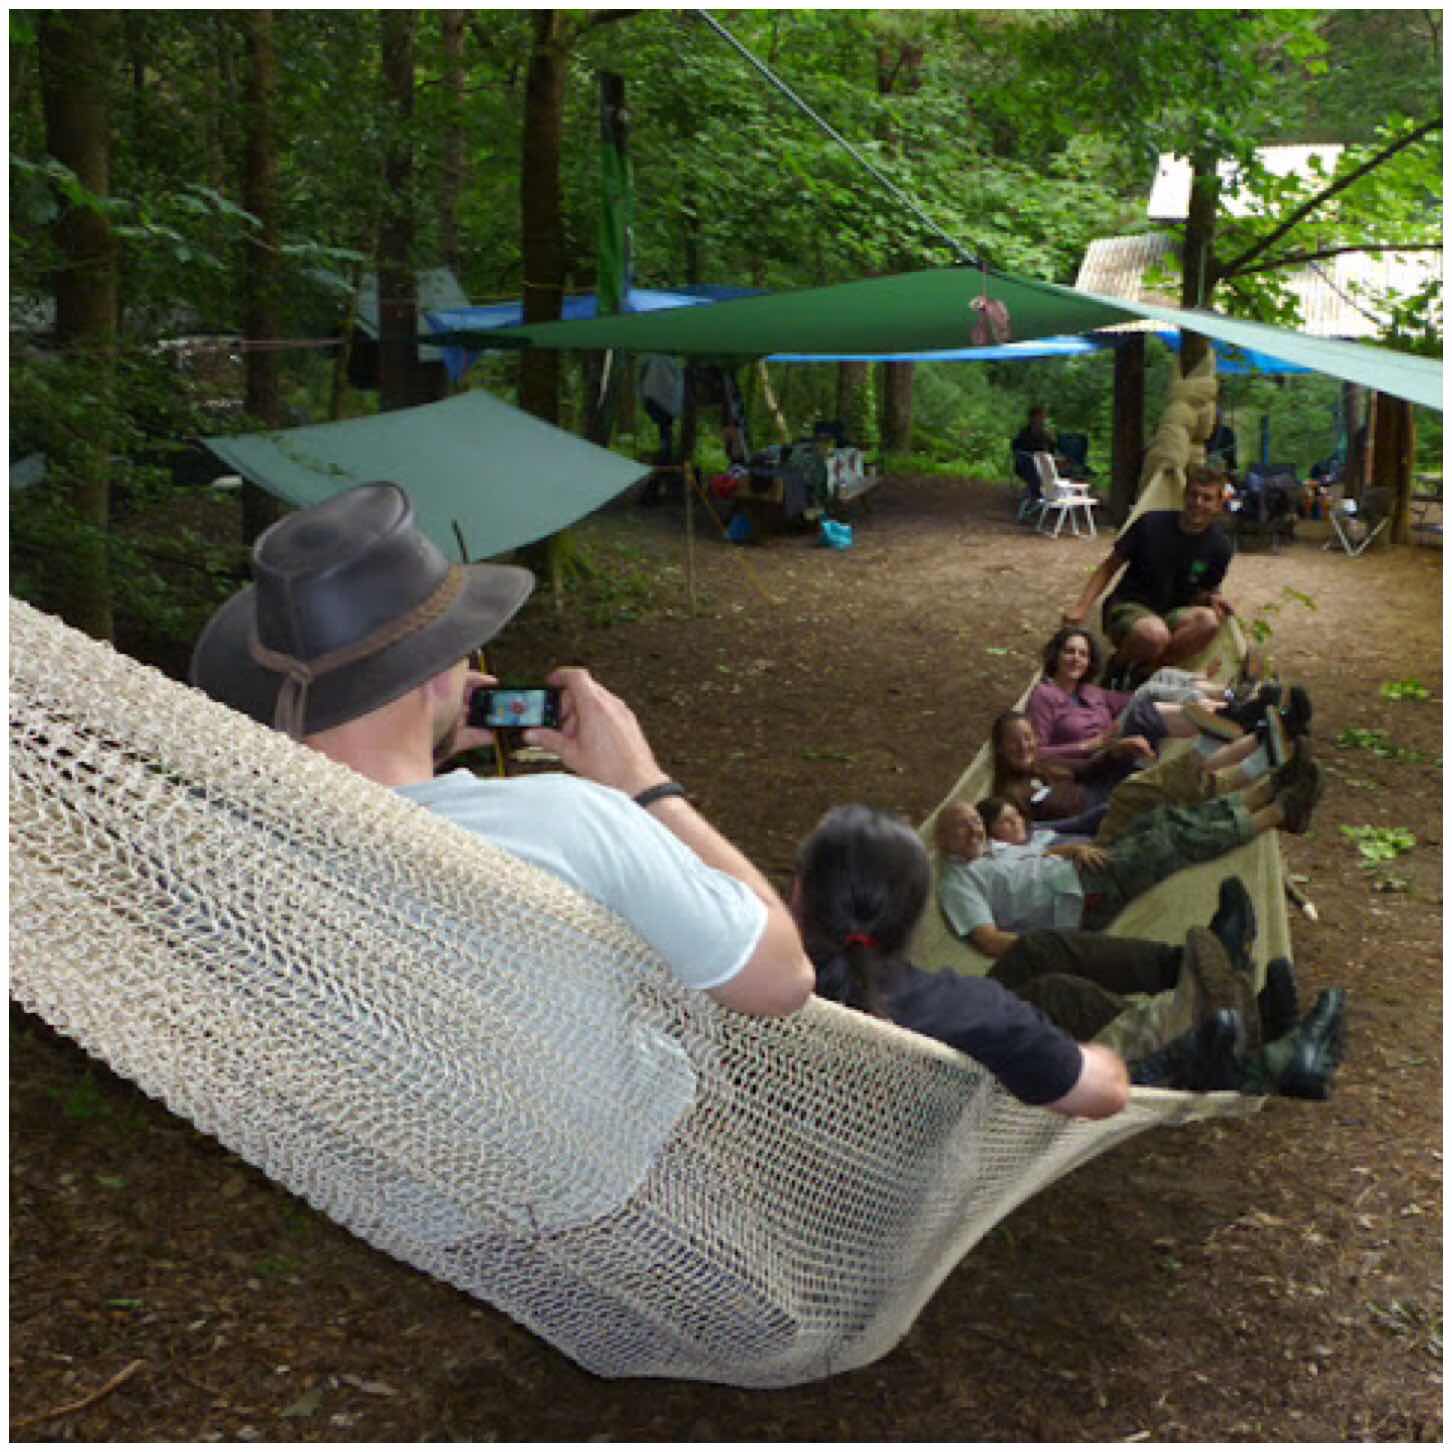
Cap’n Badger’s favourite picture up at the Naughty Corner – the ‘Mammock’
Cap’n Badger – He chose this picture but cannot remember who took it (I think it may have been Lindsey Dearnley) – I remember I was chilling in the sunshine with Darsha one afternoon when the life raft was stuck into the ‘Mammock’. Also I remember it being spun around with some of the girls inside..lol..and getting thirteen people in it! I’m surprised that little tree took the strain…
Susannah Parsons’s favourite picture
Susannah –The photo of a group of people toasting marshmallows reminds me of a couple of great things about the Bushmoot.
Firstly, woodland TV. There’s nothing like a fire for socialising, quiet contemplation and a general feeling of well-being. I do nearly all my cooking over a communal fire for the entire week, even my breakfast coffee, I love the smell of woodsmoke, sharing food around the fire and the flavour – everything seems to taste better!
Secondly, this picture was taken on a night-time photography course in 2009. What you can’t see, is that this group of people had kindly allowed around 15 paparazzi to surround them and their fire to practice taking night time shots – a great testament both to the range of courses you find yourself doing and to the friendliness and helpfulness of the people you meet.
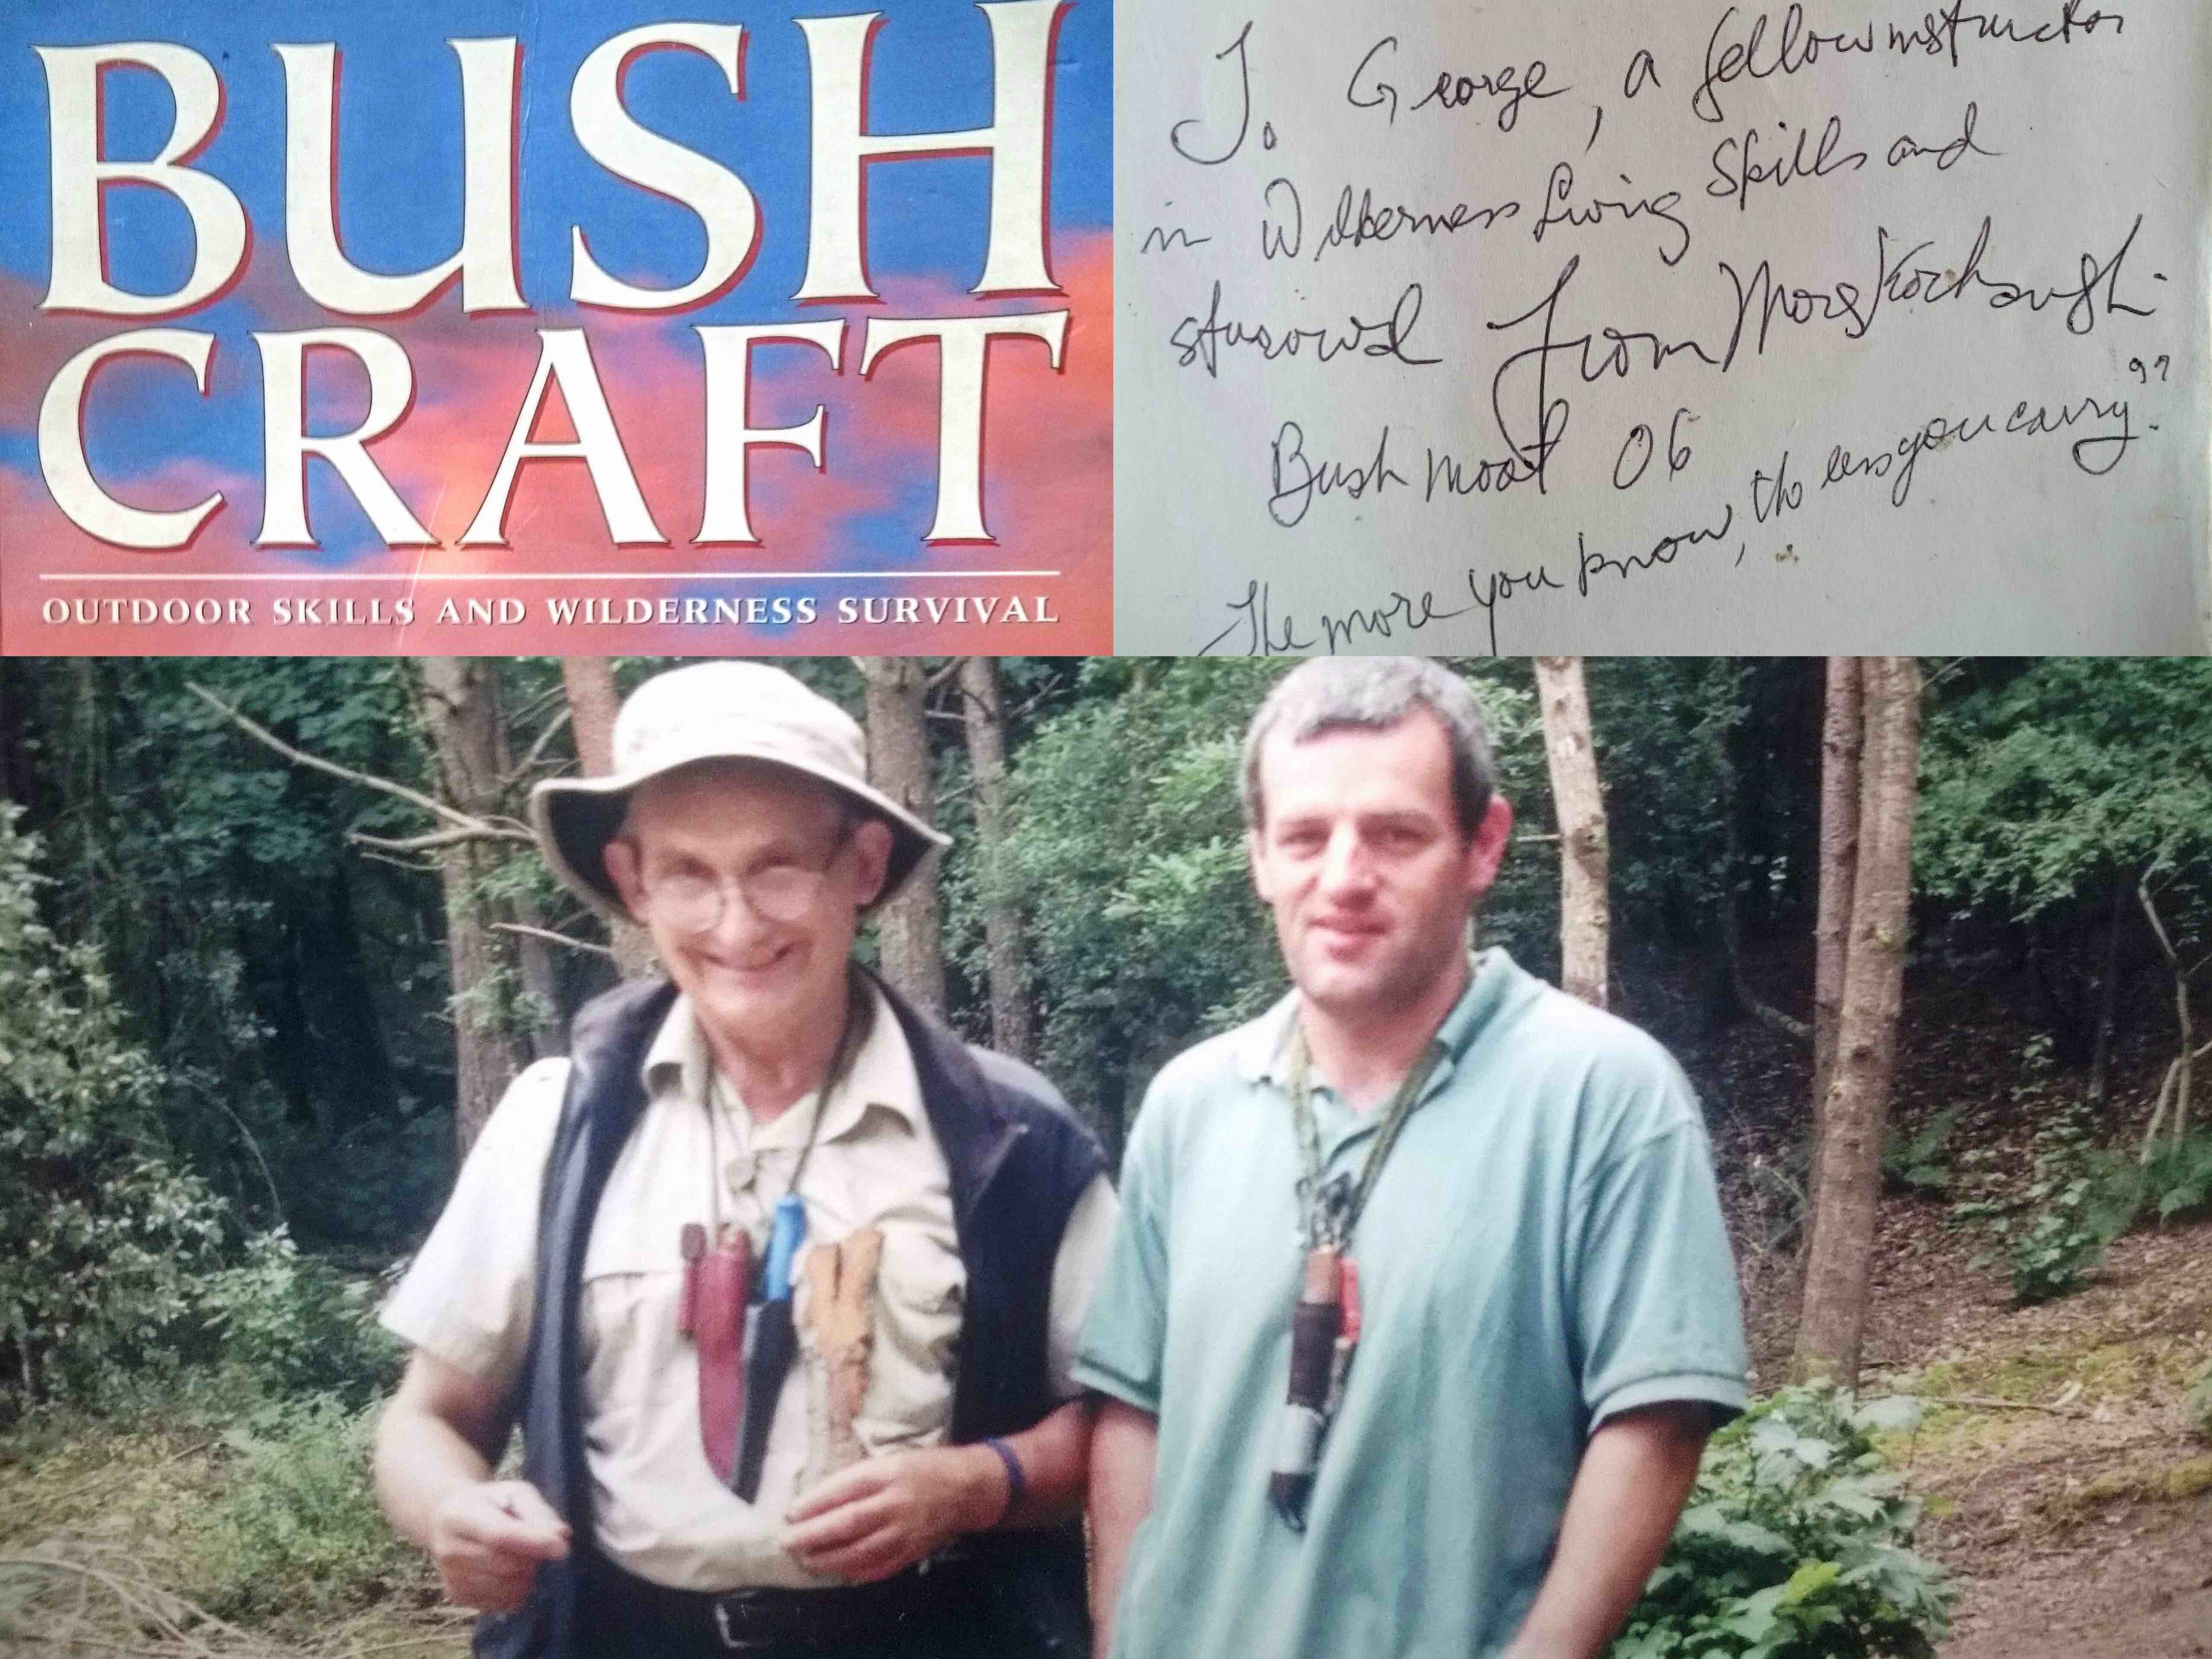
George Aitchison’s favourite picture
George –I put this little collage together after asking Mors Kochanski to sign my Bushcraft book at the Bushmoot. He asked me what I wanted written in it and I said whatever he felt like. Apart from his signature line of ‘The more you know the less you carry’ he signed it to ‘a fellow instructor’. That one line has stuck with me ever since.
I worked at both Bushmoots Mors attended and as well as me attending his classes he visited some of mine too. We spent many an evening sitting around the fire shooting the breeze and drinking beer.
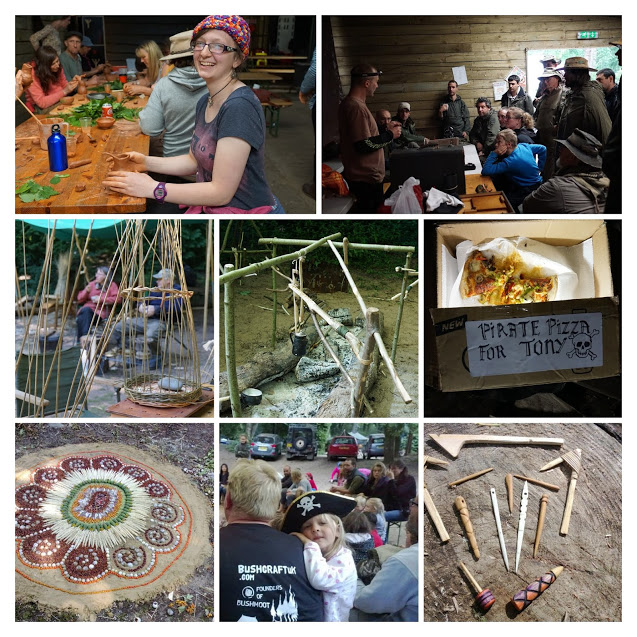
Tony Bristow – Collage from BCUK Members’ pictures
Tony – The Moot is a happy place, it’s also a relaxed place where we’re involved in sharing and creating, discovering and growing while making friendships and memories, where else would you get a group of guys excited about sewing machines, the loveliest pizza hand delivered and kids (actually it’s probably all of us) that go to bed tired, happy and looking forward to the next day of adventures.
Well that is it for me in this series. As Tony said the Moot is a ‘happy place’ so I am looking forward to once again attending this year with my family, seeing my ‘Bushmoot Family’ and having a few adventures along the way. Maybe I’ll see you there.
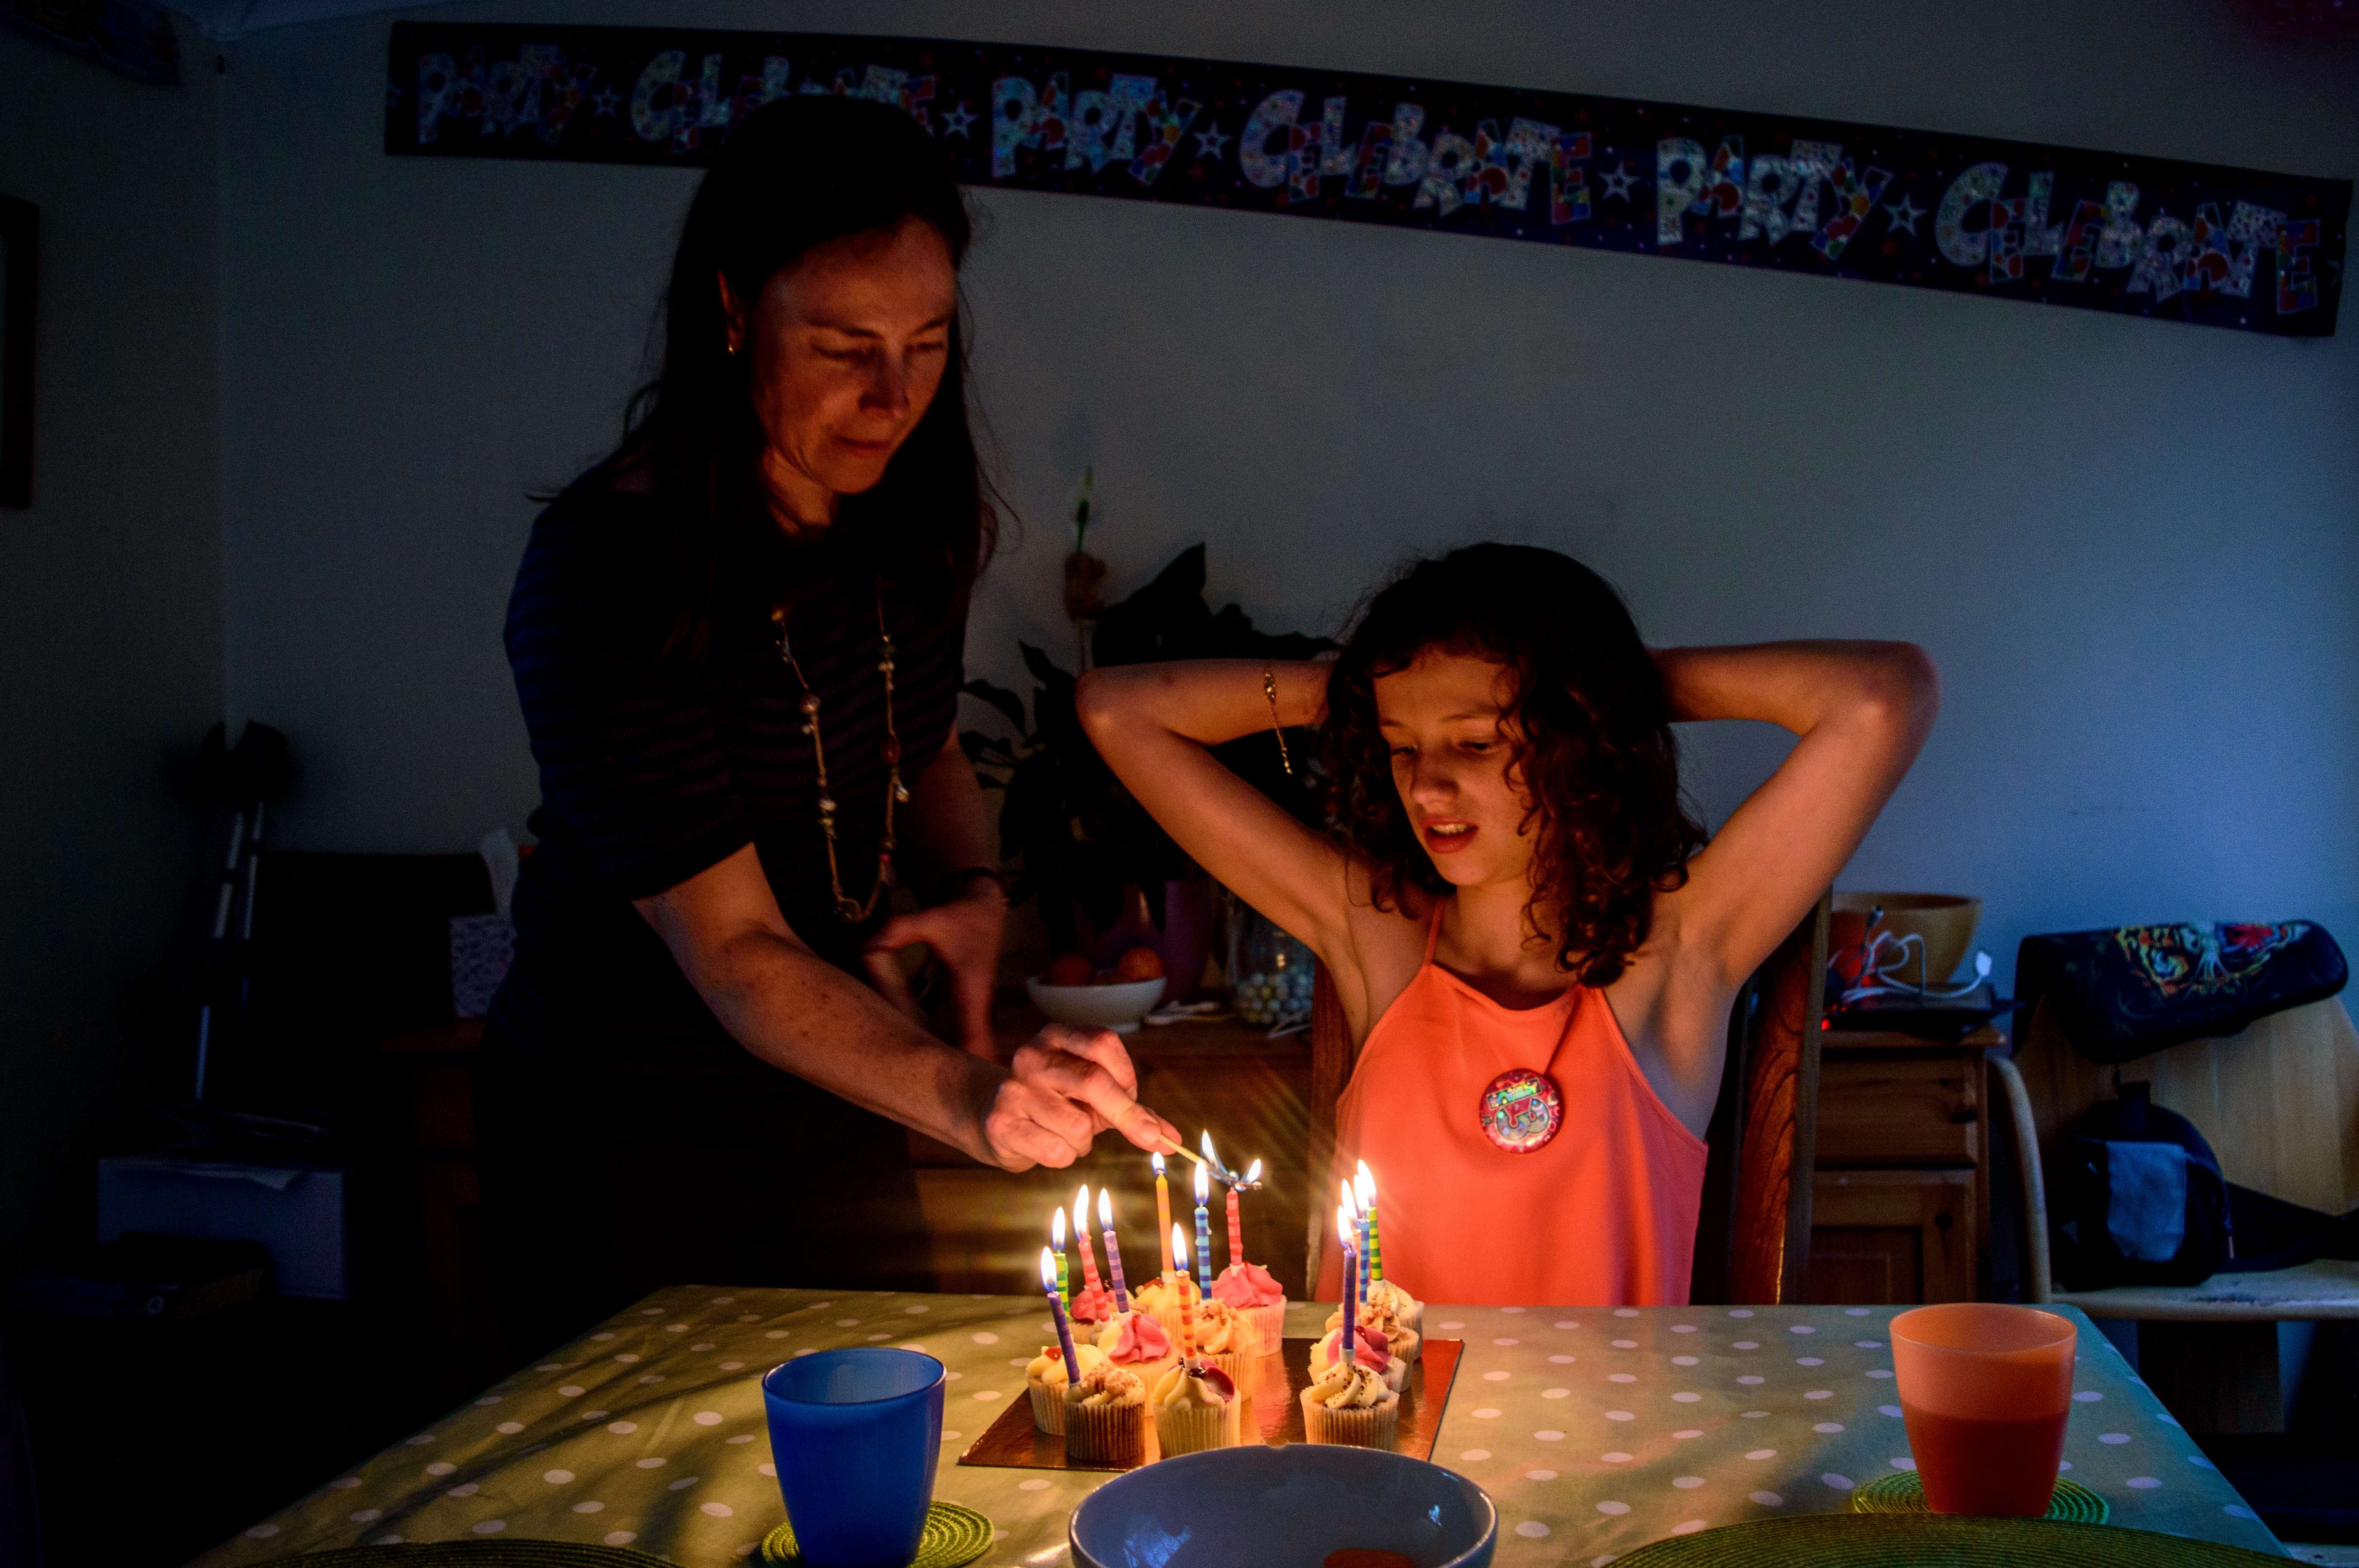
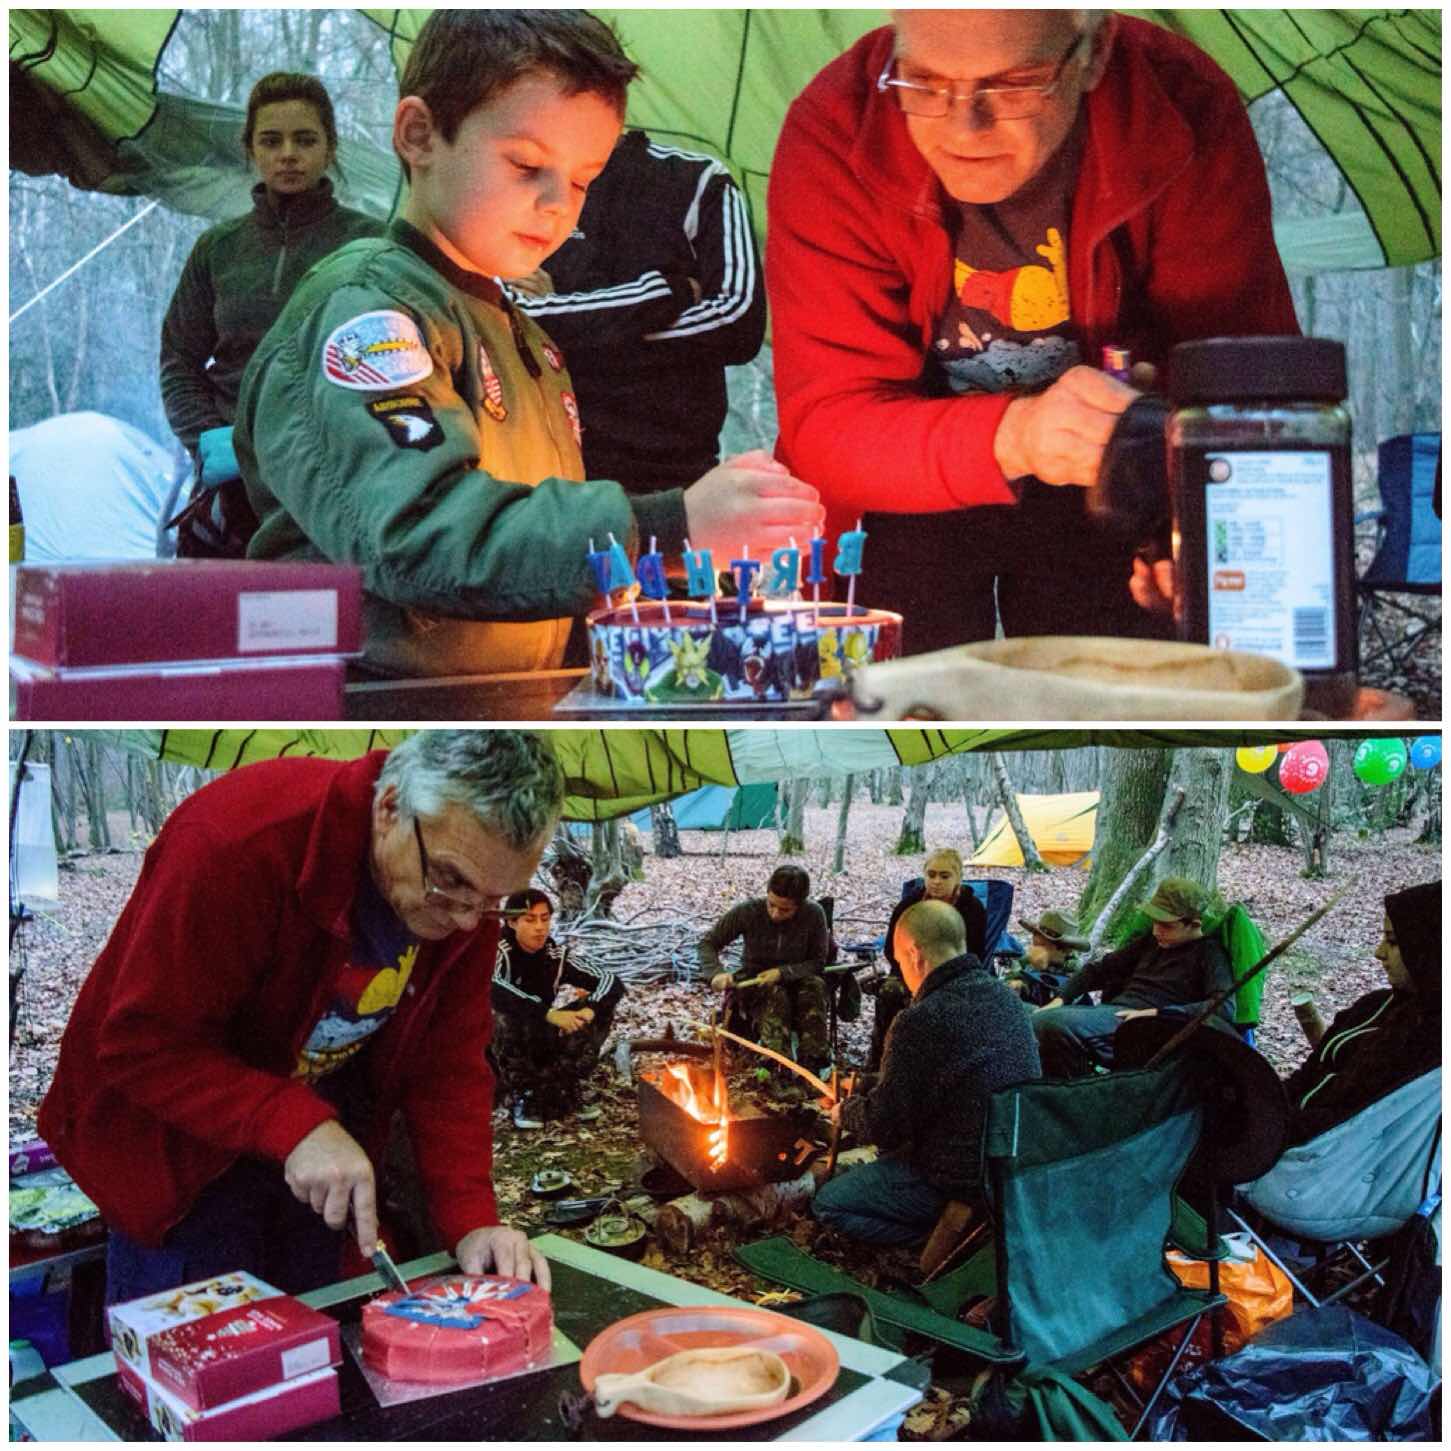
It has been a weekend of heavy rain and parties here in Hampshire. However it is my lovely daughter Catherine’s Birthday very soon and we had her party today.
Birthday Girl
It was a day of girlie spa treatments and cake. Alison also made a fantastic chocolate cake with an icing Hot Tub on top. I liked this picture of the cupcakes with the candles best and it definitely is my picture of the week.
Last weekend found me in the New Forest here in Hampshire in the UK. I was with the Sea Cadets and we were running a full on weekend of Adventure Training activities and we were based at Ferny Crofts Campsite.
My picture of the week though goes to a more relaxed moment as some of the cadets were sitting around the campfire toasting some marshmallows under the watchful eye of these fire faces.
Fire Faces
I will be writing a full report on the weekend sometime soon however I thought I would share just a little bit of what was a magical weekend with you.
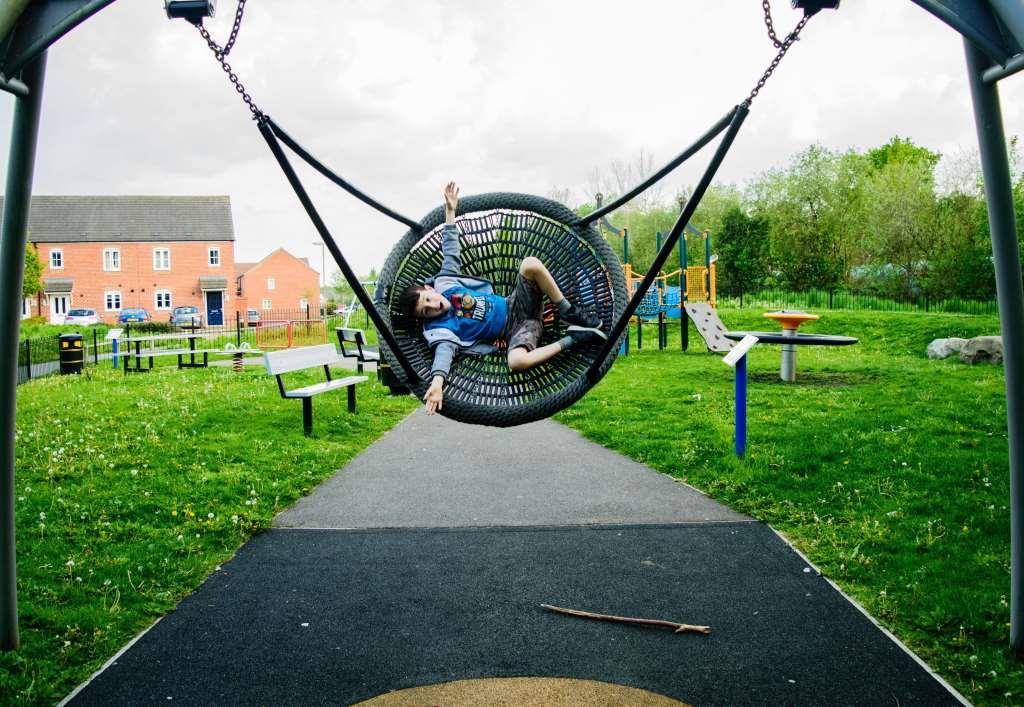
One that I was not expecting tonight. I was out with my lad Finlay to observe some plants as part of his naturalist badge at Cubs. He asked if we could have a quick play in the local swing park and so in we went.
Flying High
Now when I took this pic I thought he was sensibly holding on but after looking at it properly when I got home I could see he was testing out some centrifugal forces by the looks of it.
Fun was had though with a little bit of learning thrown in 🙂
My little lad Finlay is a member of the Bramley Cub pack and when he was invested recently we received a little book on all the badges they can work towards.
There are badges for hiking, navigation and nature observation (amongst many others) so we decided to get out last Sunday and start earning some.
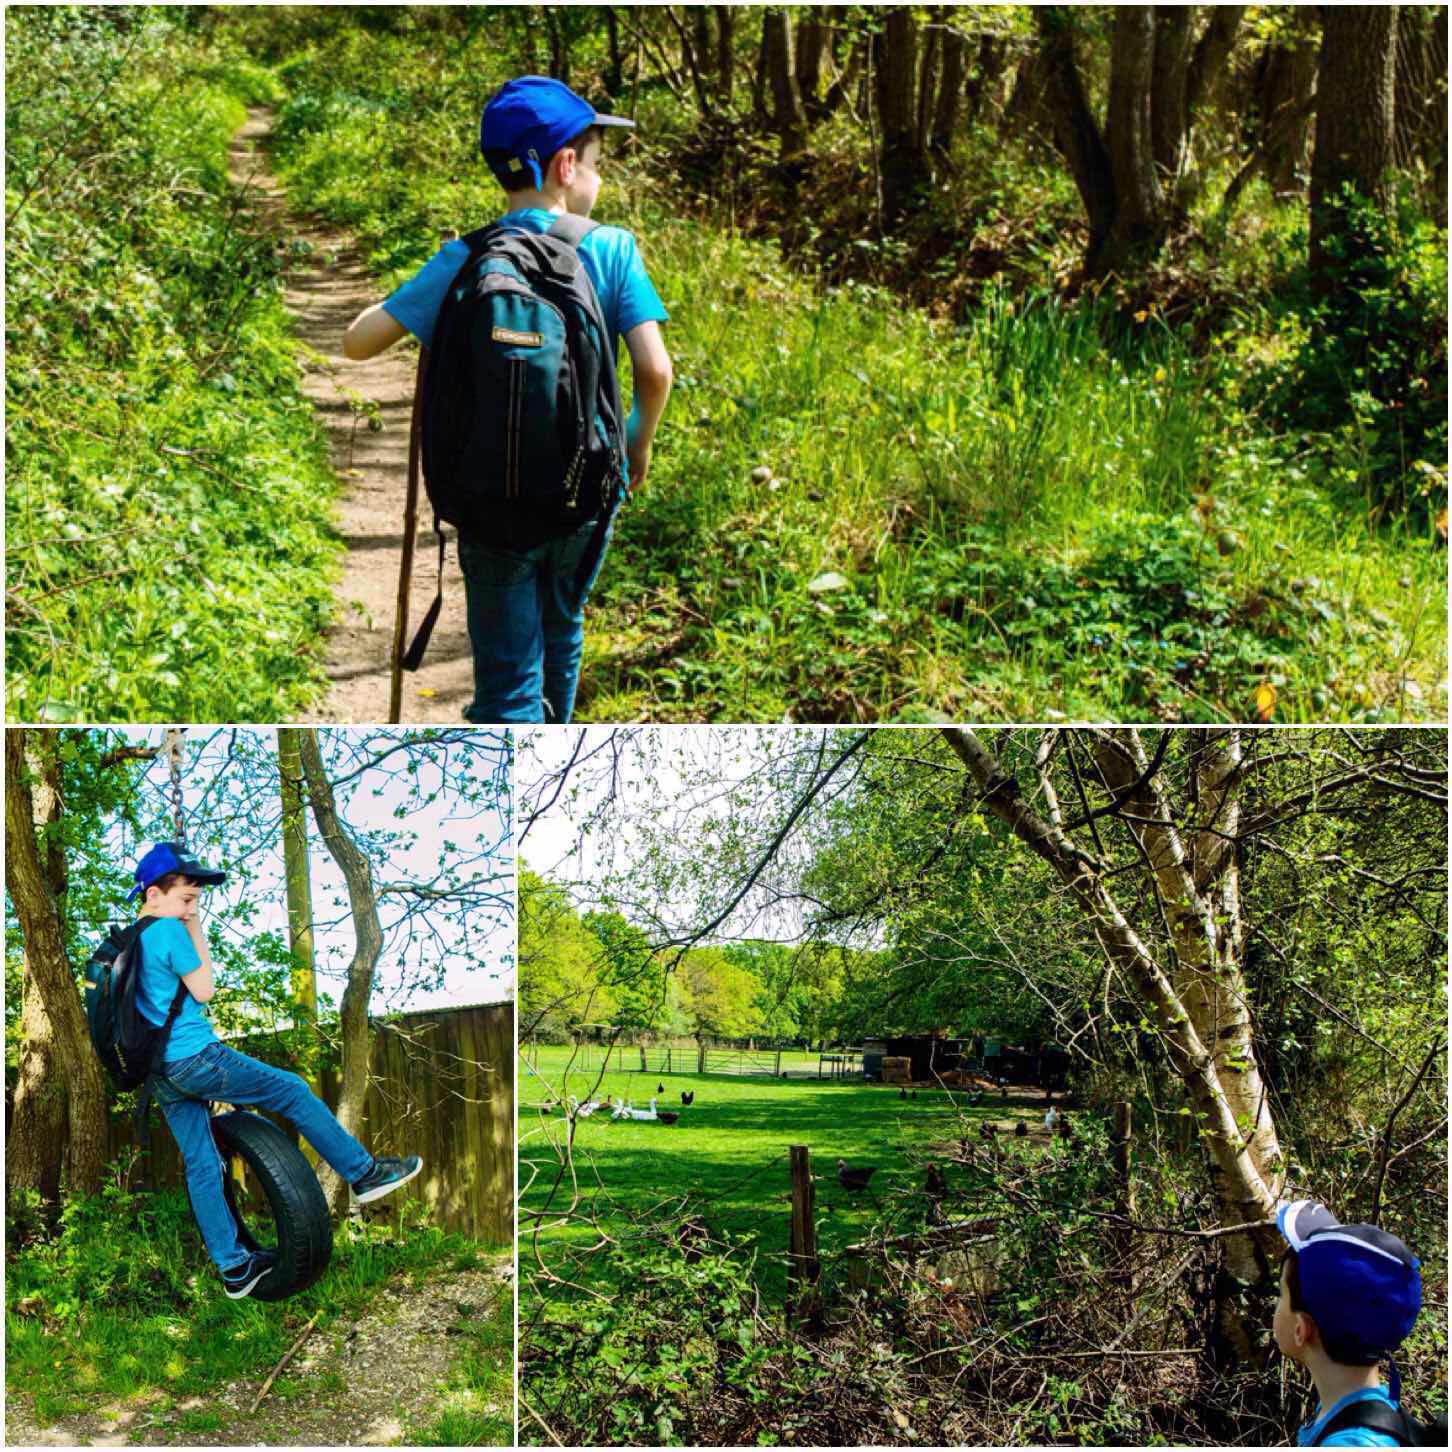
Not the usual bimble
Now this was not a usual bimble around the village but a proper hike. Finlay packed his rucksack with water, food, suncream, waterproofs, map, compass and a first aid kit. The manual stipulated that the hike needed to last for at least three hours and have a purpose.
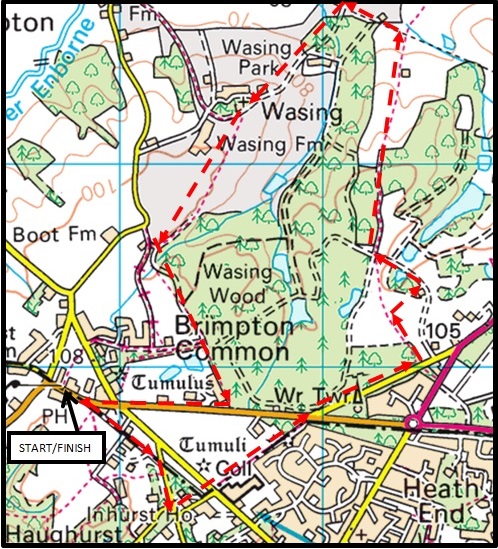
Our hike was to be around Wasing Wood near Tadley in Hampshire and our purpose was to learn to navigate and to forage (and throw in lots of fun in the middle).
Our hike around Wasing Woods
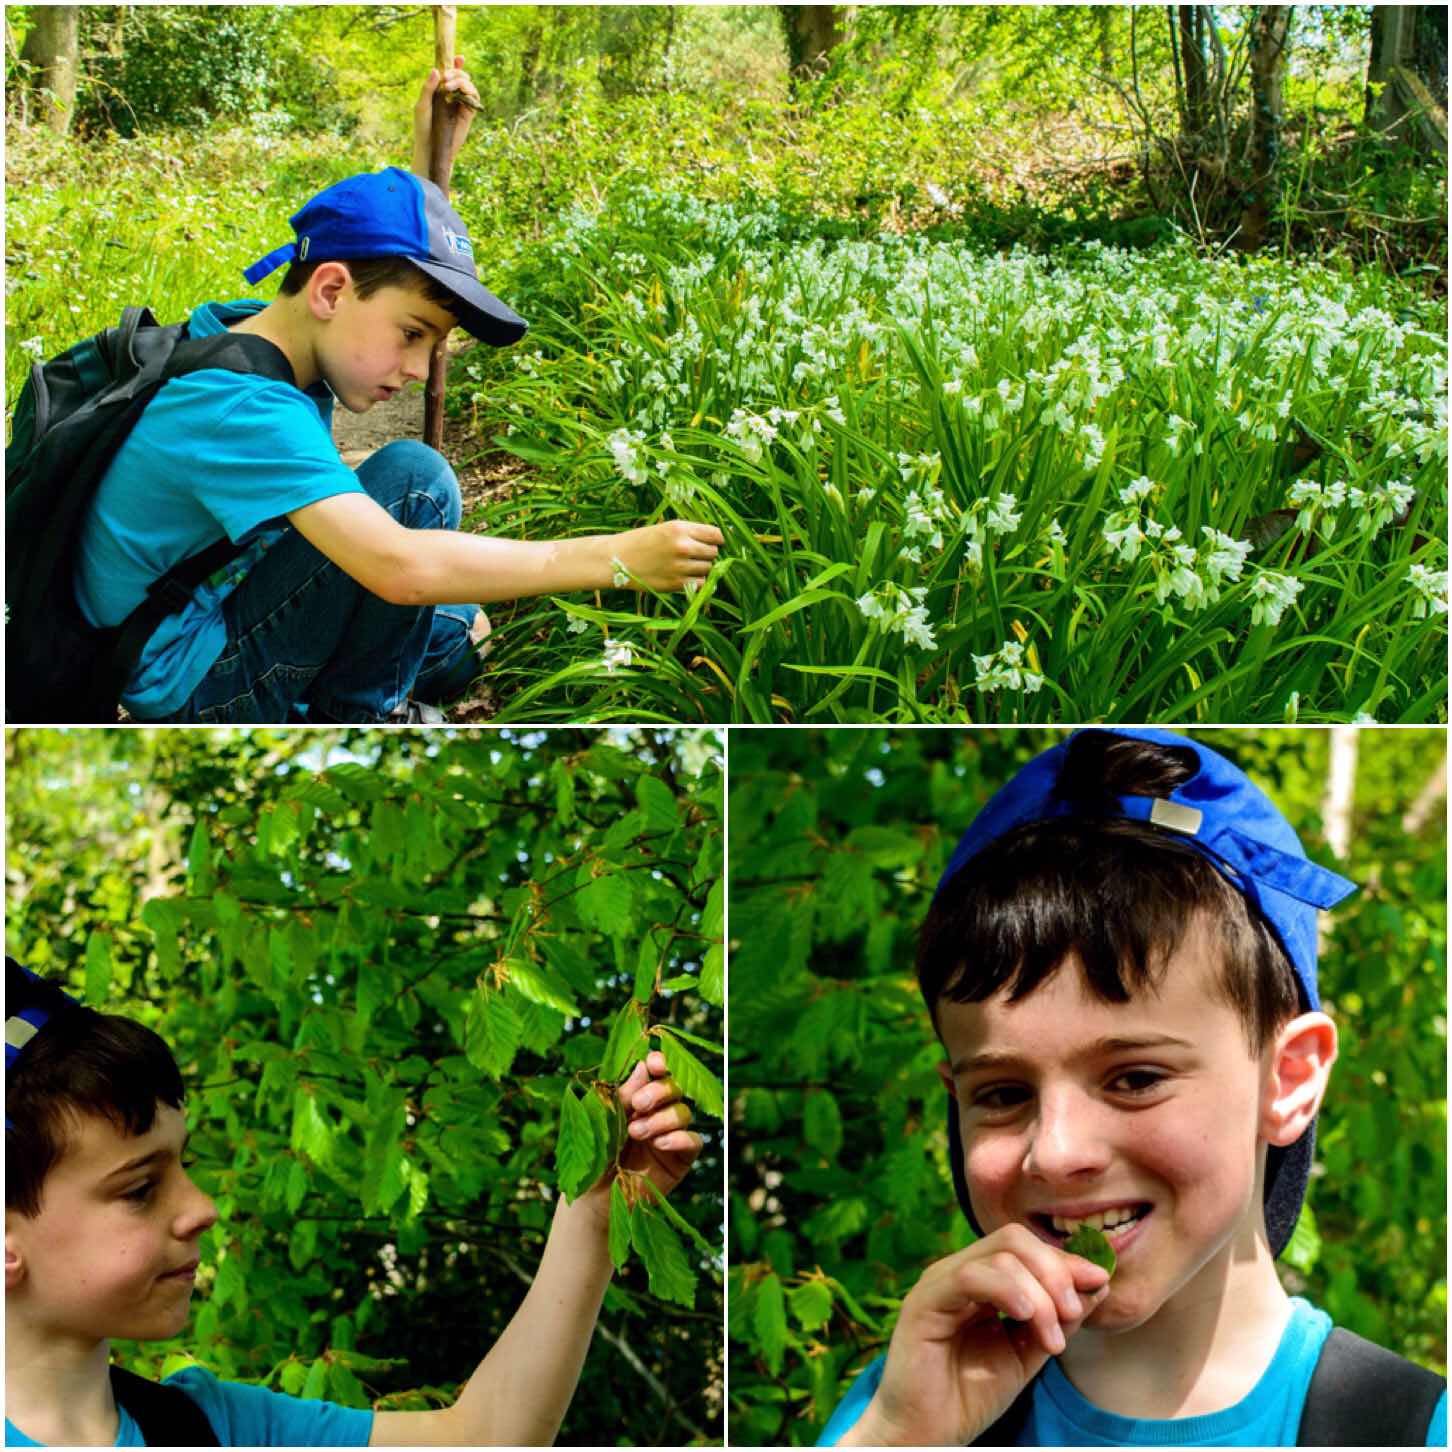
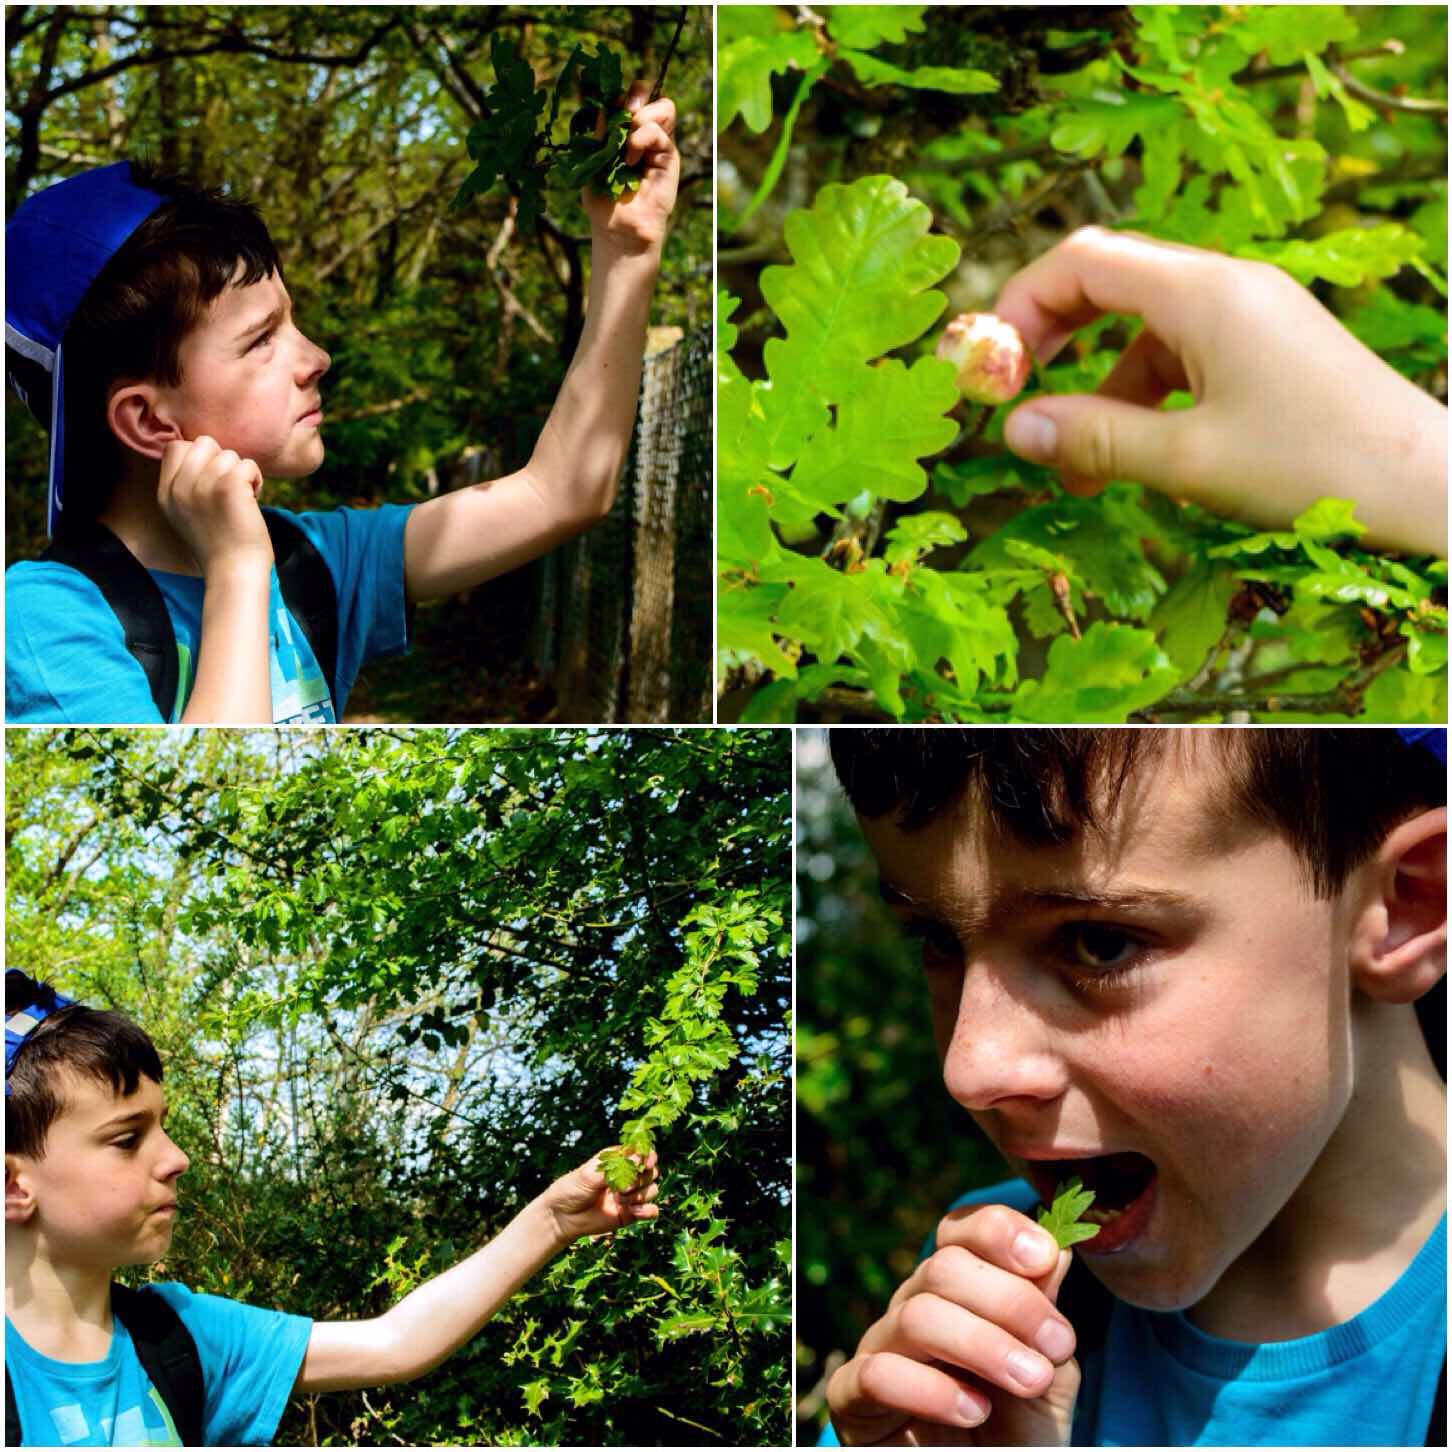
Very soon we spotted a clump of white flowers which turned out to be three-cornered leeks ( the leaves have three distinct corners) and some very fresh-looking beech leaves.
At this time of year the leaves of certain trees are quite edible, beech being one of them. Over the years Finlay has often foraged with me so I was not worried about him having any sort of reaction to anything he would be nibbling on. The walk was more about him learning the key features of certain plants for future safe identification. We left the leeks alone but had a munch on some of the really fresh beech leaves.
Leeks and Beech – Spring greens
One tree that Finlay knew well was the oak, but to help him remember its leaf shape we likened its lobed leaf structure to that of his ear lobe. Also we investigated the very fresh-looking gall we found on one of the oaks. There was no hole in it so we concluded that the gall wasp had not hatched yet.
The next tree we came across was the hawthorn and Finlay’s first observation about it was that the leaves were much smaller than the oak leaves and had smaller and sharper lobes. As this is an edible leaf we were soon munching again.
Edible and non edible
I introduced Finlay to the Ordnance Survey map for our area and soon he was busy identifying different features on it and tracking our route. We looked at setting the map using features on the ground and using the compass. Also we discussed the scale of the map and features we would expect to find along our route.
We devised a route that was on public footpaths around Wasing Wood (and which had been well documented in a local guide book) however it soon became apparent that the footpaths we were using had been used little recently. The path was overgrown with hawthorn trees and it had also been cut in half by a local business as a testing area for diggers. Soon we were well off our intended route but by looking at the features around us we were able to keep track of where we were.
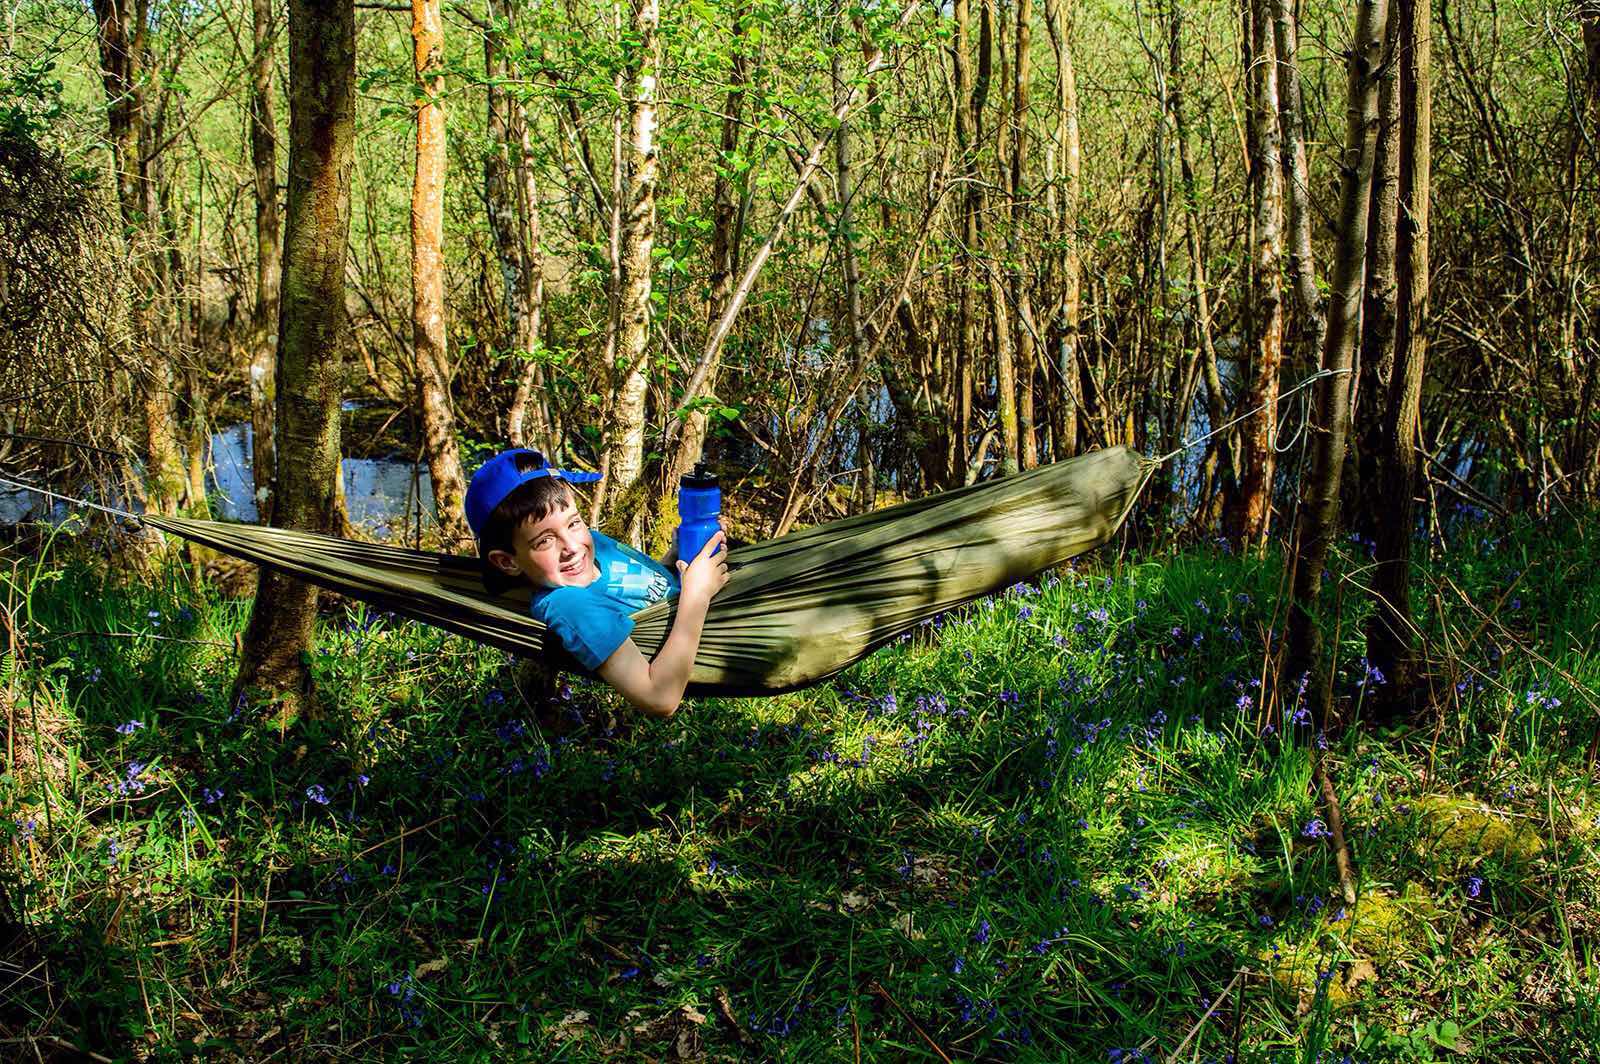
Map reading and adventuring – The path that disappeared
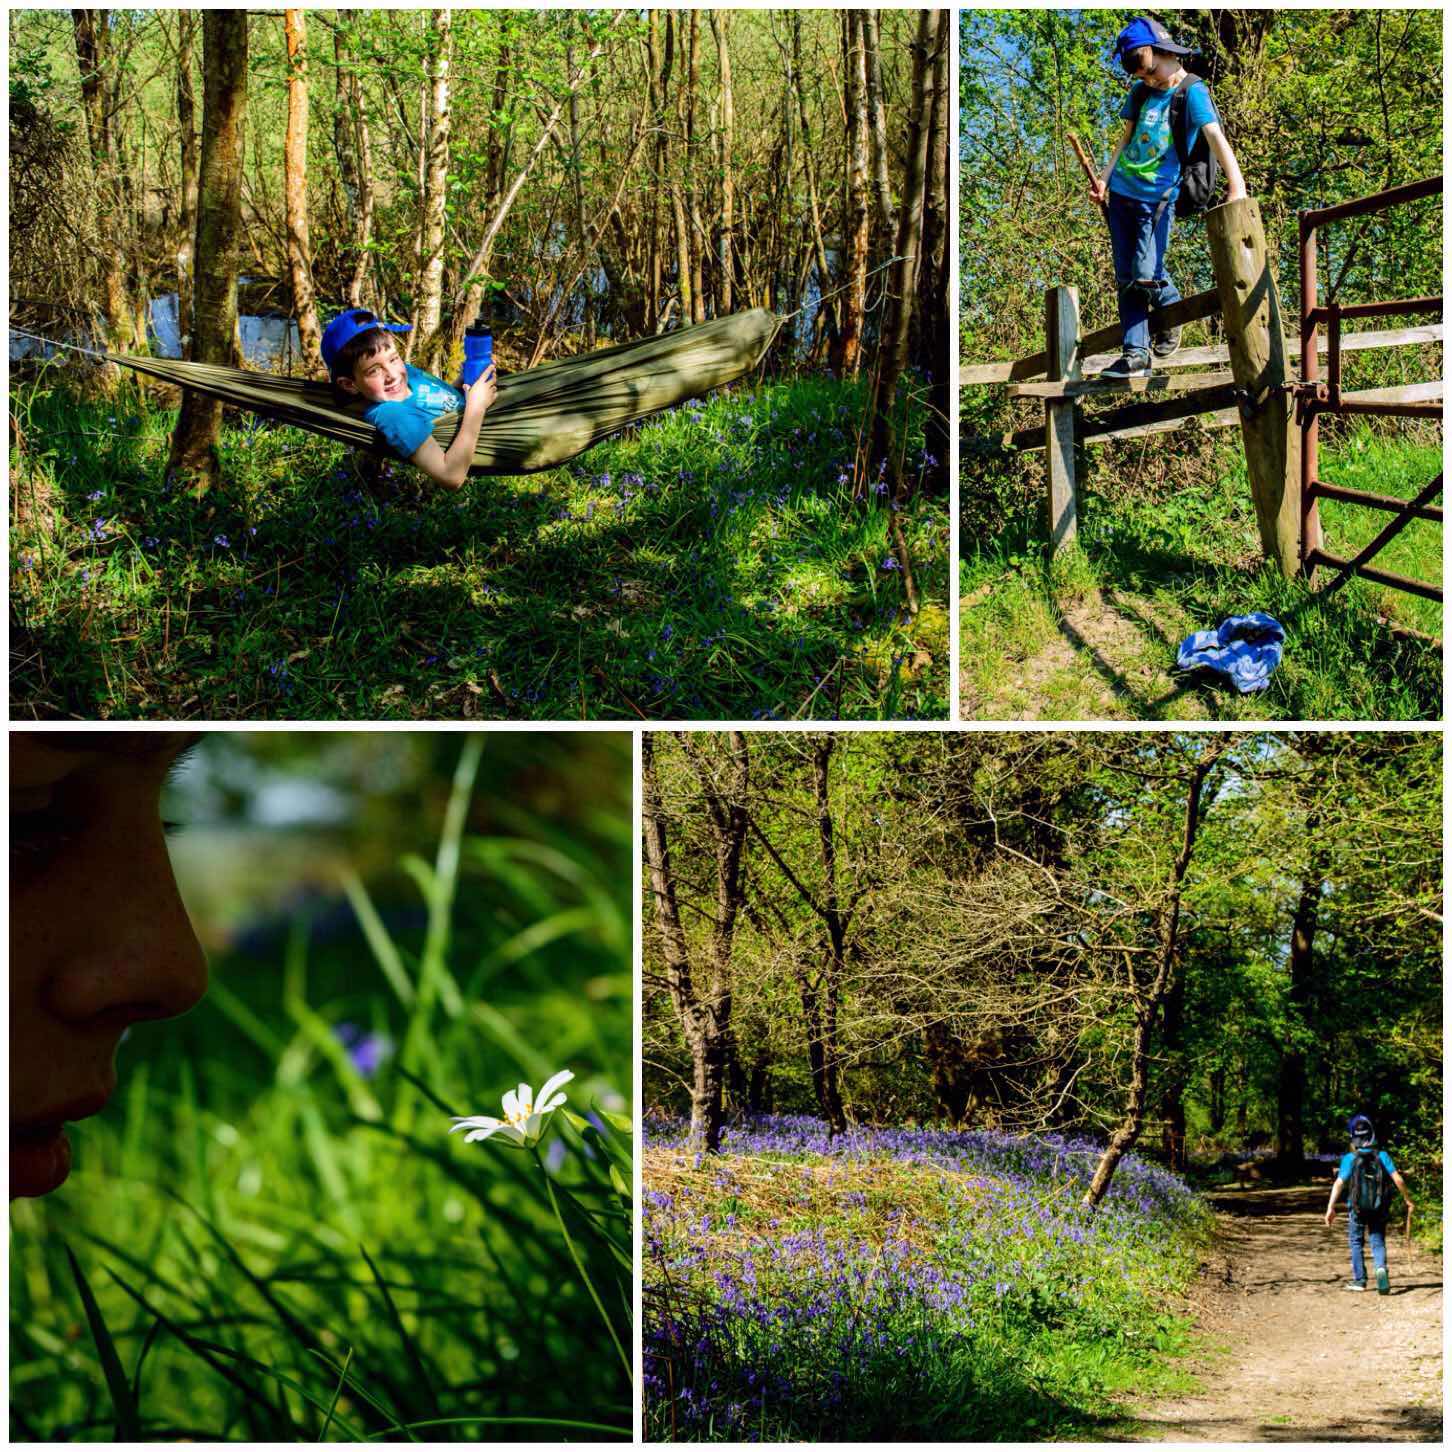
It was not all hard work as the hammock seat came out when we stopped for a snack (Finlay got it, not me). As well as trees we spent time identifying flowers.
There were plenty of bluebells, a few wild strawberry flowers but we did get down close to look at some Greater Stitchwort – a beautiful little white flower that has medicinally been used to help with the treatment of broken bones.
Strangely, when we were crossing a stile we came across a pair of boxer shorts lying on the ground. Not sure what to make of this, we hurried quickly along :-).
Strange and beautiful sites
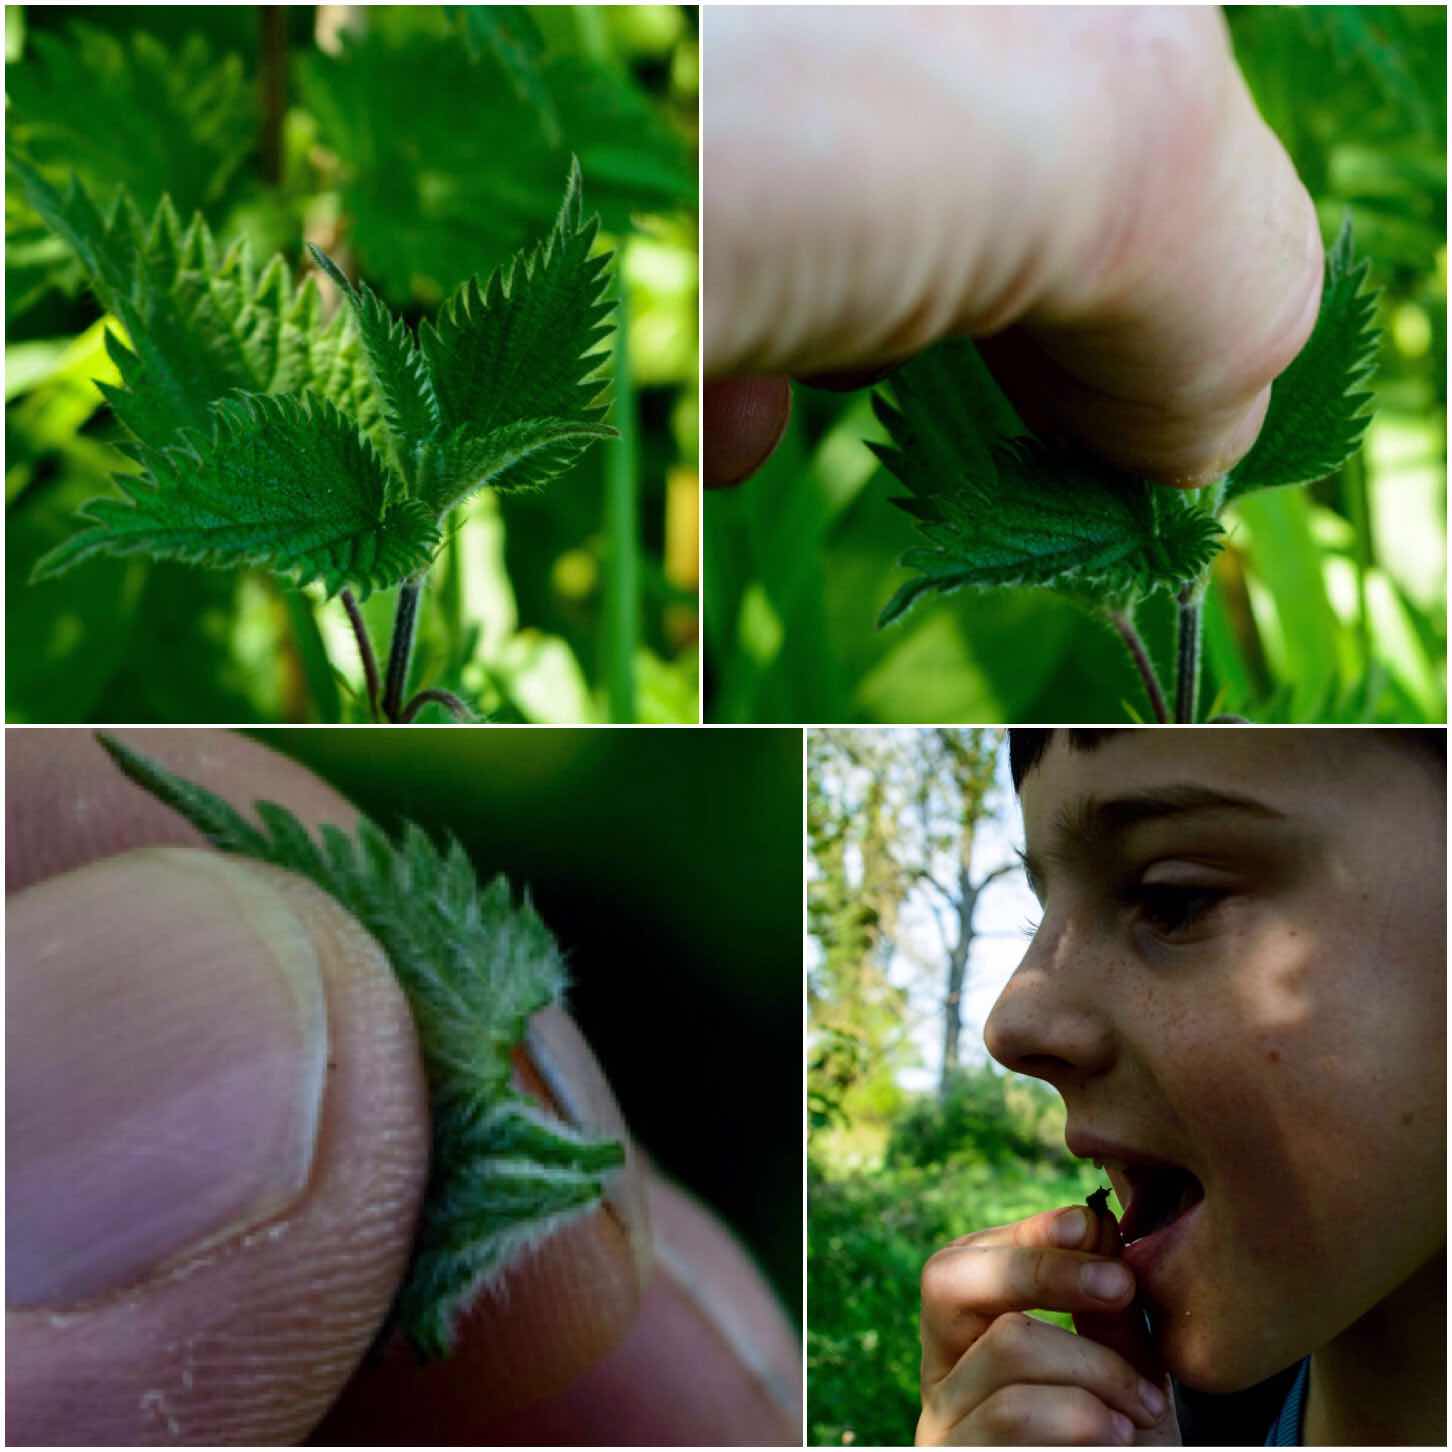
Now no trip out into the woods is complete without a little extra iron. There were plenty of new-growth nettles around and we picked a few ‘tops’ (the smallest leaves from the very top of the nettle), rolled them up to kill off the needles and munched away.
Finlay is happy to eat nettles now (he takes delight in doing this in front of other kids) though I am still working on him collecting them himself without gloves.
A little extra iron
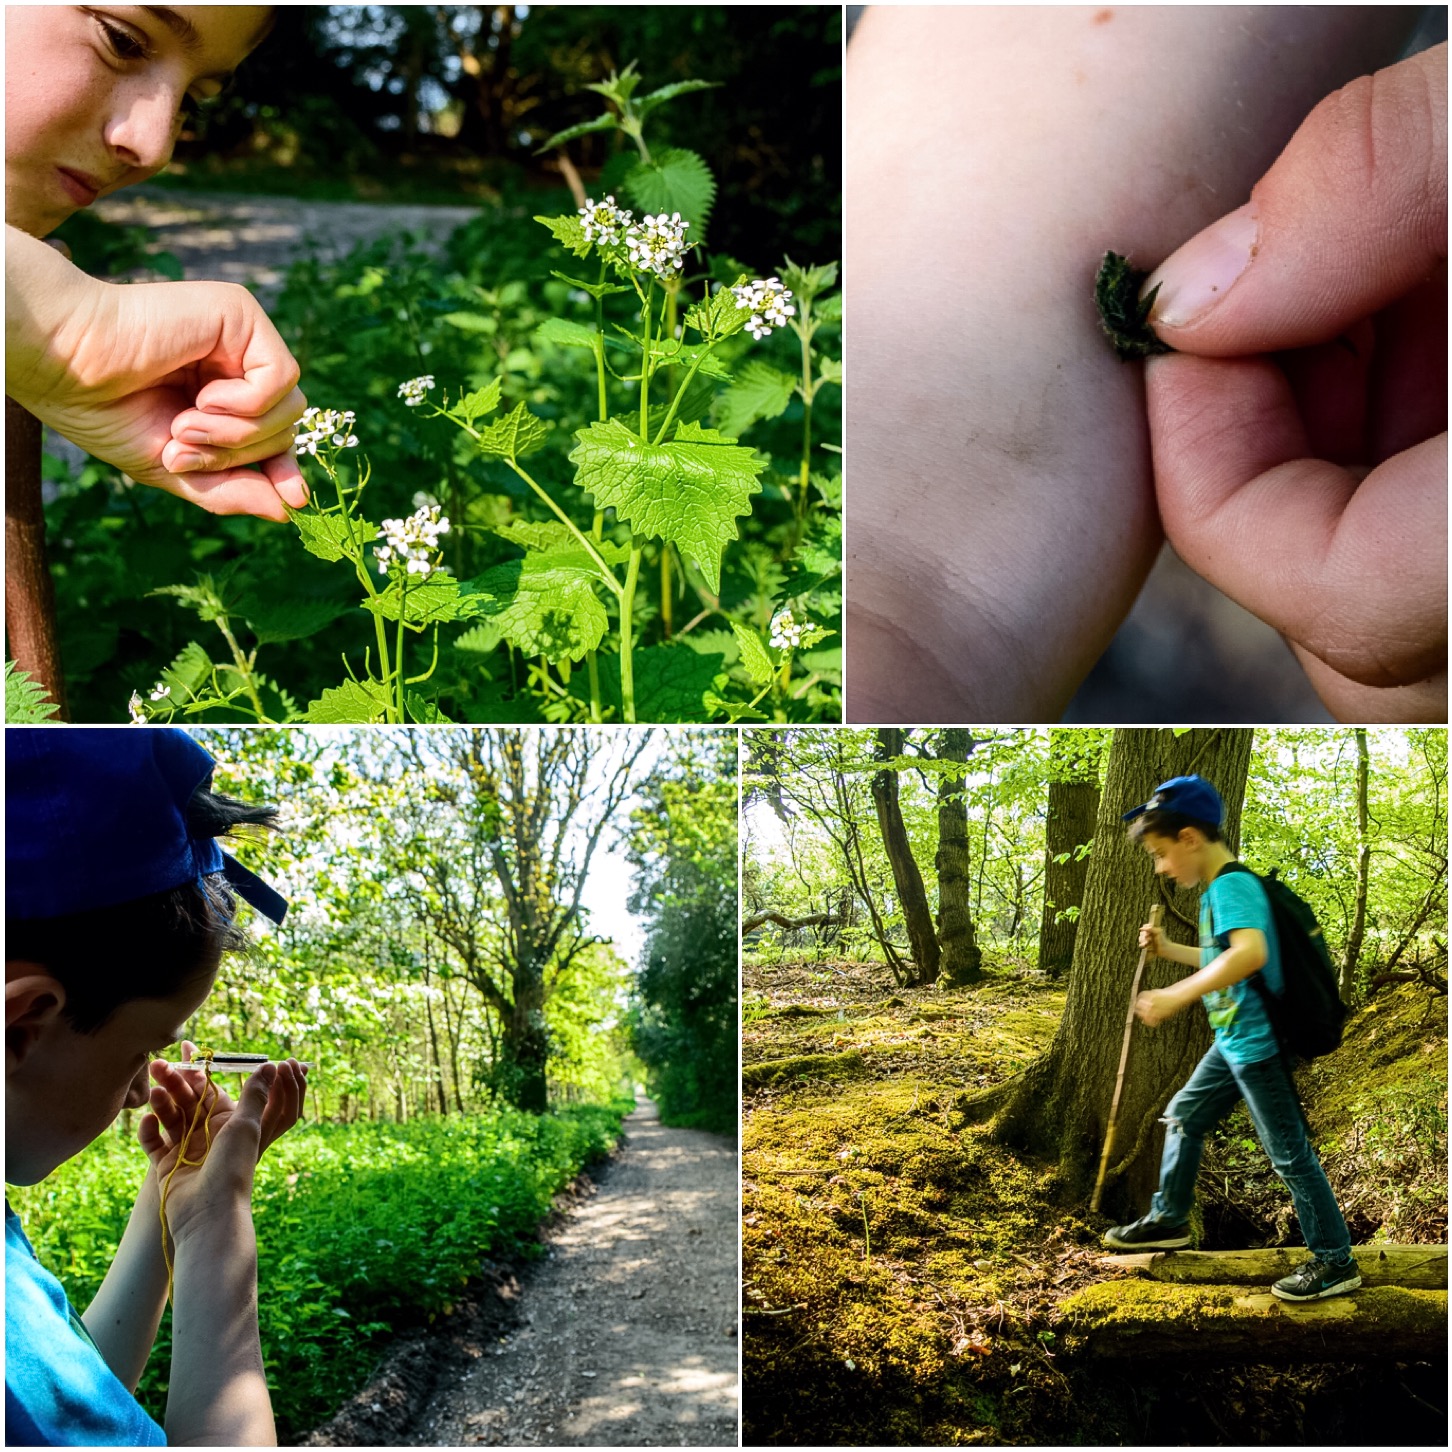
Nettles though have a habit of biting you if you do not keep an eye on them 🙂 Finlay was picking a leaf from a ‘Jack by the Hedge’ plant for a little nibble when one of them sneaky nettles popped up and bit him on his arm.
Now a number of years ago he would have let out a loud wail and run about looking for a dock leaf. Now he knows to simply tell me he has been stung and I will grab a couple of the bigger nettle leaves and squish them up to a pulp. It is the juice of the nettle/plantain/dock (to name just a few) leaf that negates the sting – not just rubbing a dry dock leaf on a sting, which I have seen countless people do.
First Aid and final leg
Before we knew it we had been out for over three and a half hours and diner was calling (Alison had insisted we be back in time for tea as we were expecting visitors). Out came the compass and after another quick lesson we were off through the woods and back to the car.
Tired but happy
Finlay had collected a few of the leaves from the trees we had studied but they soon wilted with the sun because they were so fresh. He collected holly, oak, hawthorn, birch, beech and sycamore leaves and spotted bluebells, stitchwort, leeks, wild strawberries, Jack-by-the-hedge and nettles.
The purpose of our hike was to study some trees, flowers and learn about the map and compass. I think you could say we managed that.
It has been a couple of weeks since I have posted a Picture of the Week – caused by a certain Kitty Brown 😉 nominating me to do the Nature Challenge over on Facebook.
Well it is back again and here is one I titled A Majestic Family.
The Majestic Family
They are a family of Greylag Geese I spotted at The Vyne National Trust property. I took loads of pictures of them on the water and on the meadow carpeted in Daisies. They were all lovely but this one I thought particularly majestic. One parent stands aloof and on guard while the other gently tends the Goslings. All this with the beautiful Cedar of Lebanon in the background.
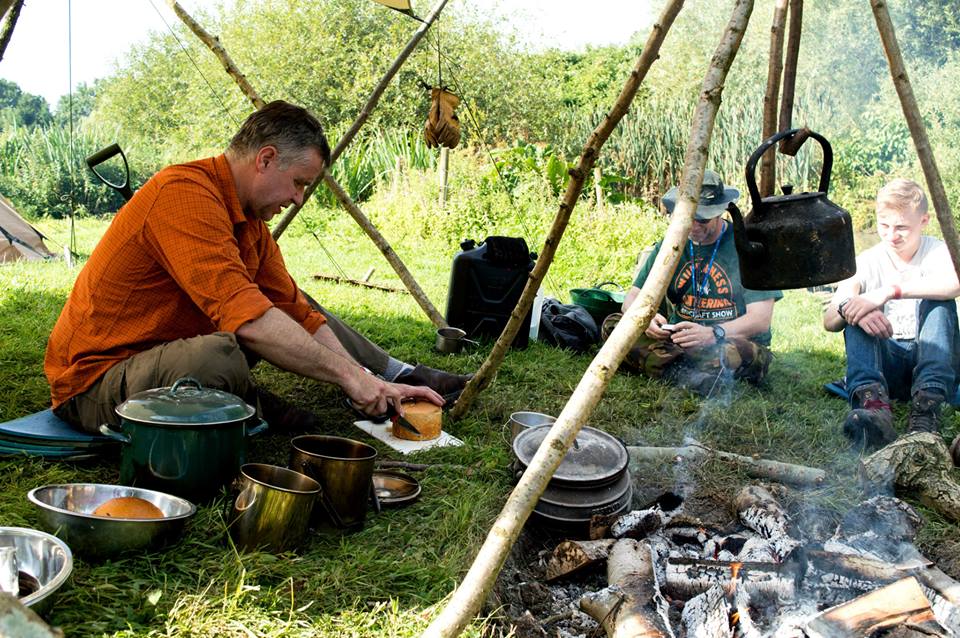
Recently I came across a video on You Tube from my friend David Willis who runs his own company called Bushcraft with David Willis. David teaches outdoor living skills, natural history and woodland crafts. I thoroughly enjoyed the video so decided to write this blog post, share the video and tell you a little about this excellent fellow bushcrafter.
David Willis
I have known David for a number of years now and met him at a re-union of student who studied under John Rhyder of Woodcraft School fame.
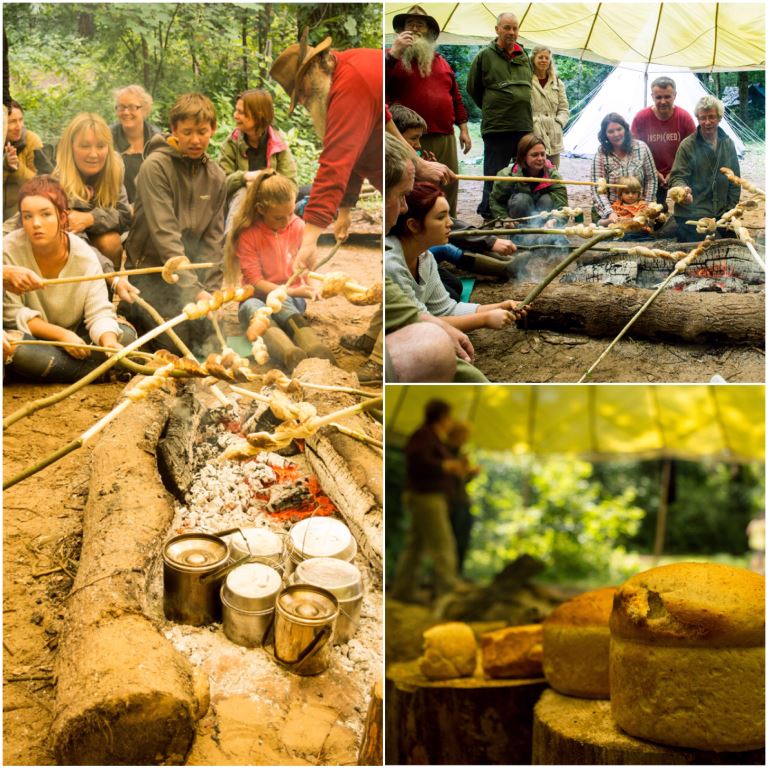
Last year at the BCUK Bushmoot David ran a number of classes for us and the Backwoods Baker class proved to be a hit. I was photographing lots of classes that morning but kept on coming back to David’s class just to take in the smell of the baking and get the odd morsel or two.
The BCUK Bushmoot
A week later at the Wilderness Gathering I met David once again and he asked if I could take a few pics of him running a class on Backwoods Baking – needless to say I readily agreed, got some great pictures and some lovely bread.
The Wilderness Gathering
Keep an eye out on David’s website for his free Family Friendly Guided Woodland Walks. They are becoming increasingly popular and David will guide you through the beauty of the Chiltern Hills.
I am hoping that I’ll see David back once again at the Bushmoot and the Wilderness Gathering but in the meantime here is the video on one of his Backwoods Baker courses to enjoy.
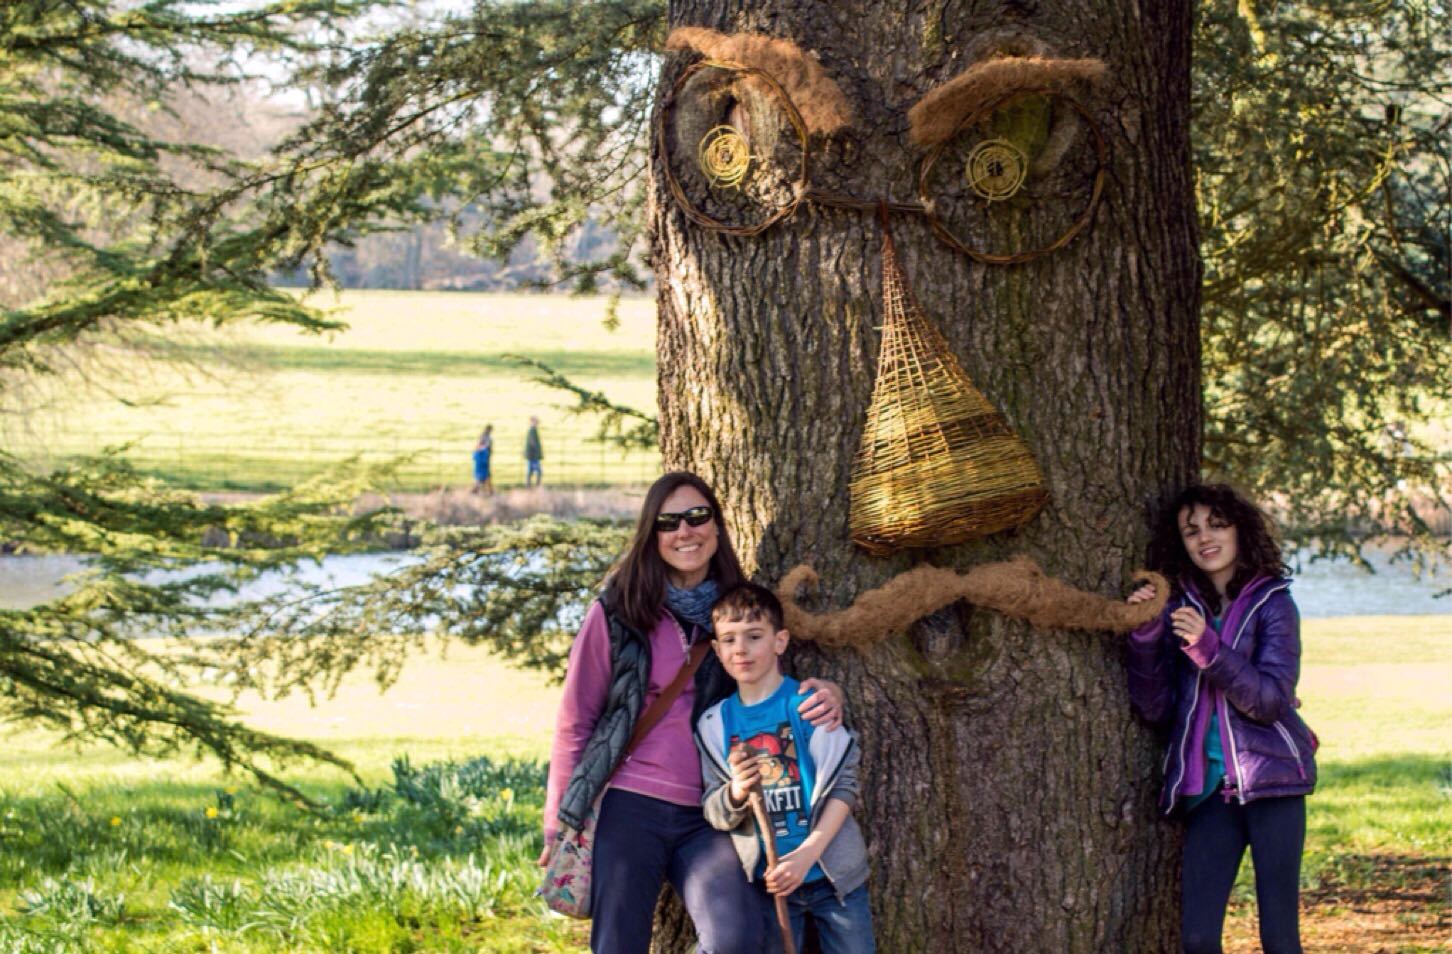
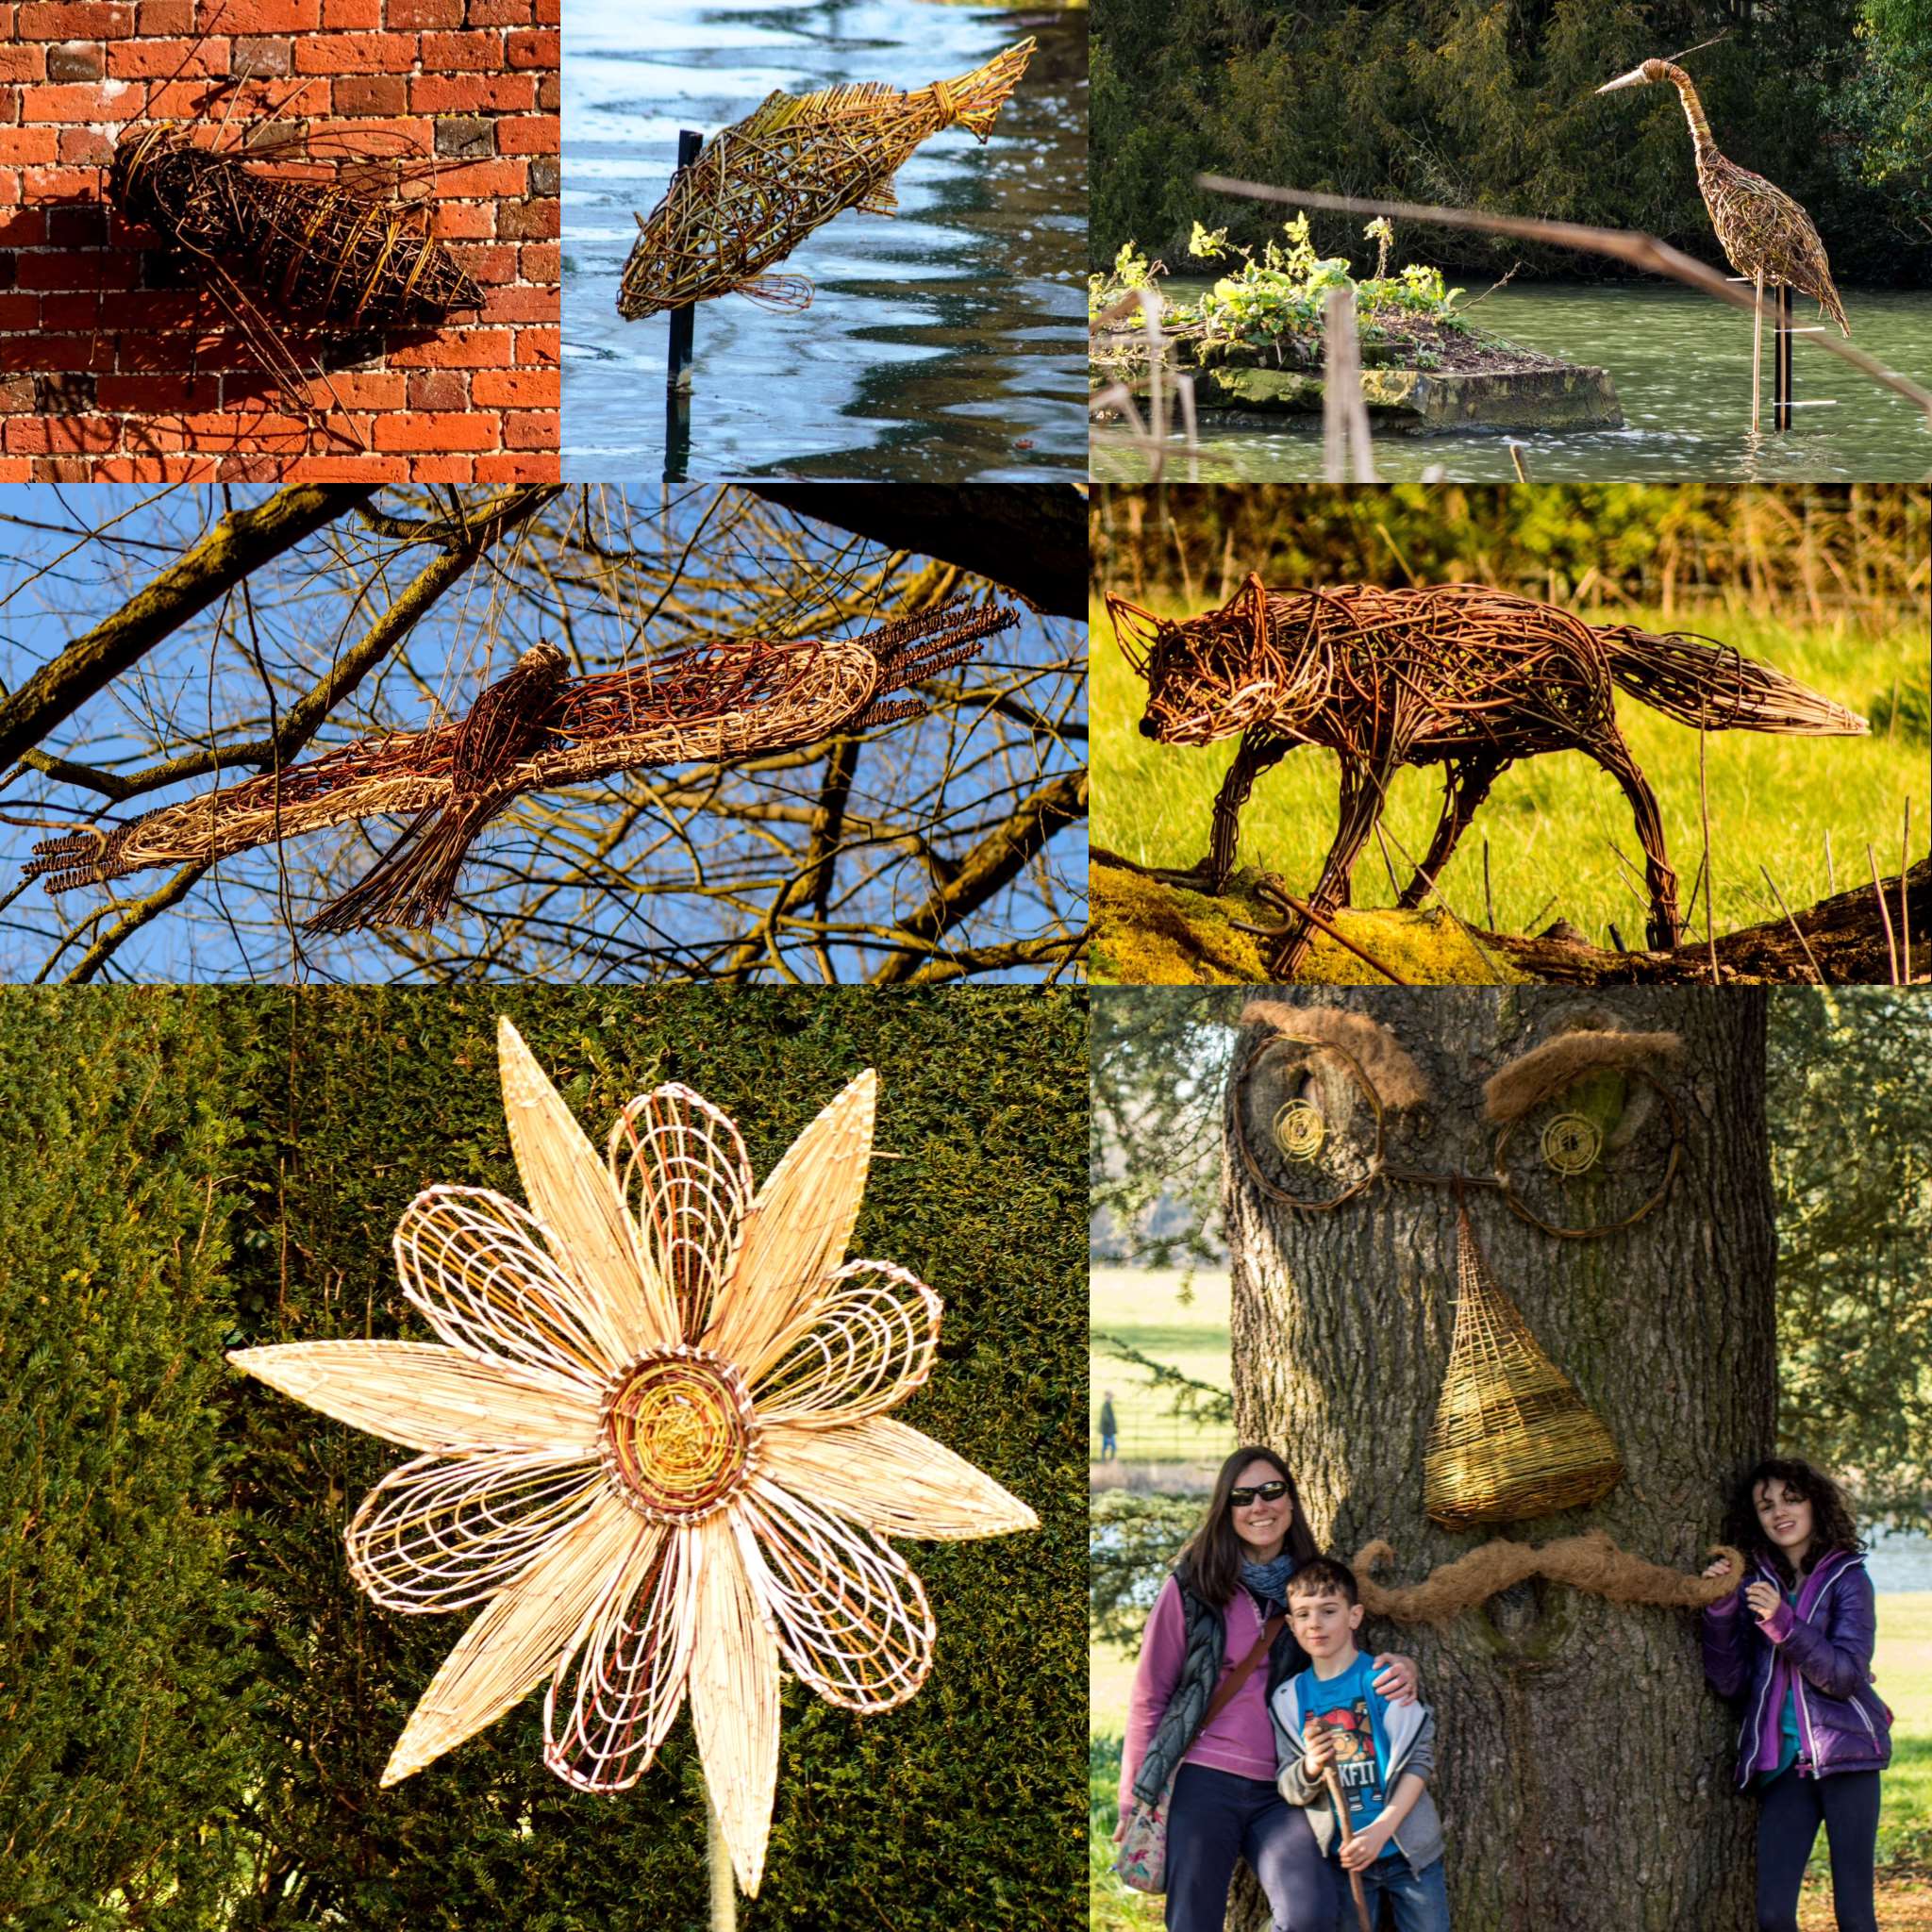
Today I came home to find our village paper – The Bramley Magazine – had been delivered. Inside was a nice surprise – a full page given over to my pictures from the Wild Wicker Walk at The Vyne National Trust property (thank you Rachel).
These are just some of the wicker sculptures you can find at the property and I heartily recommend a visit if you are in the area.
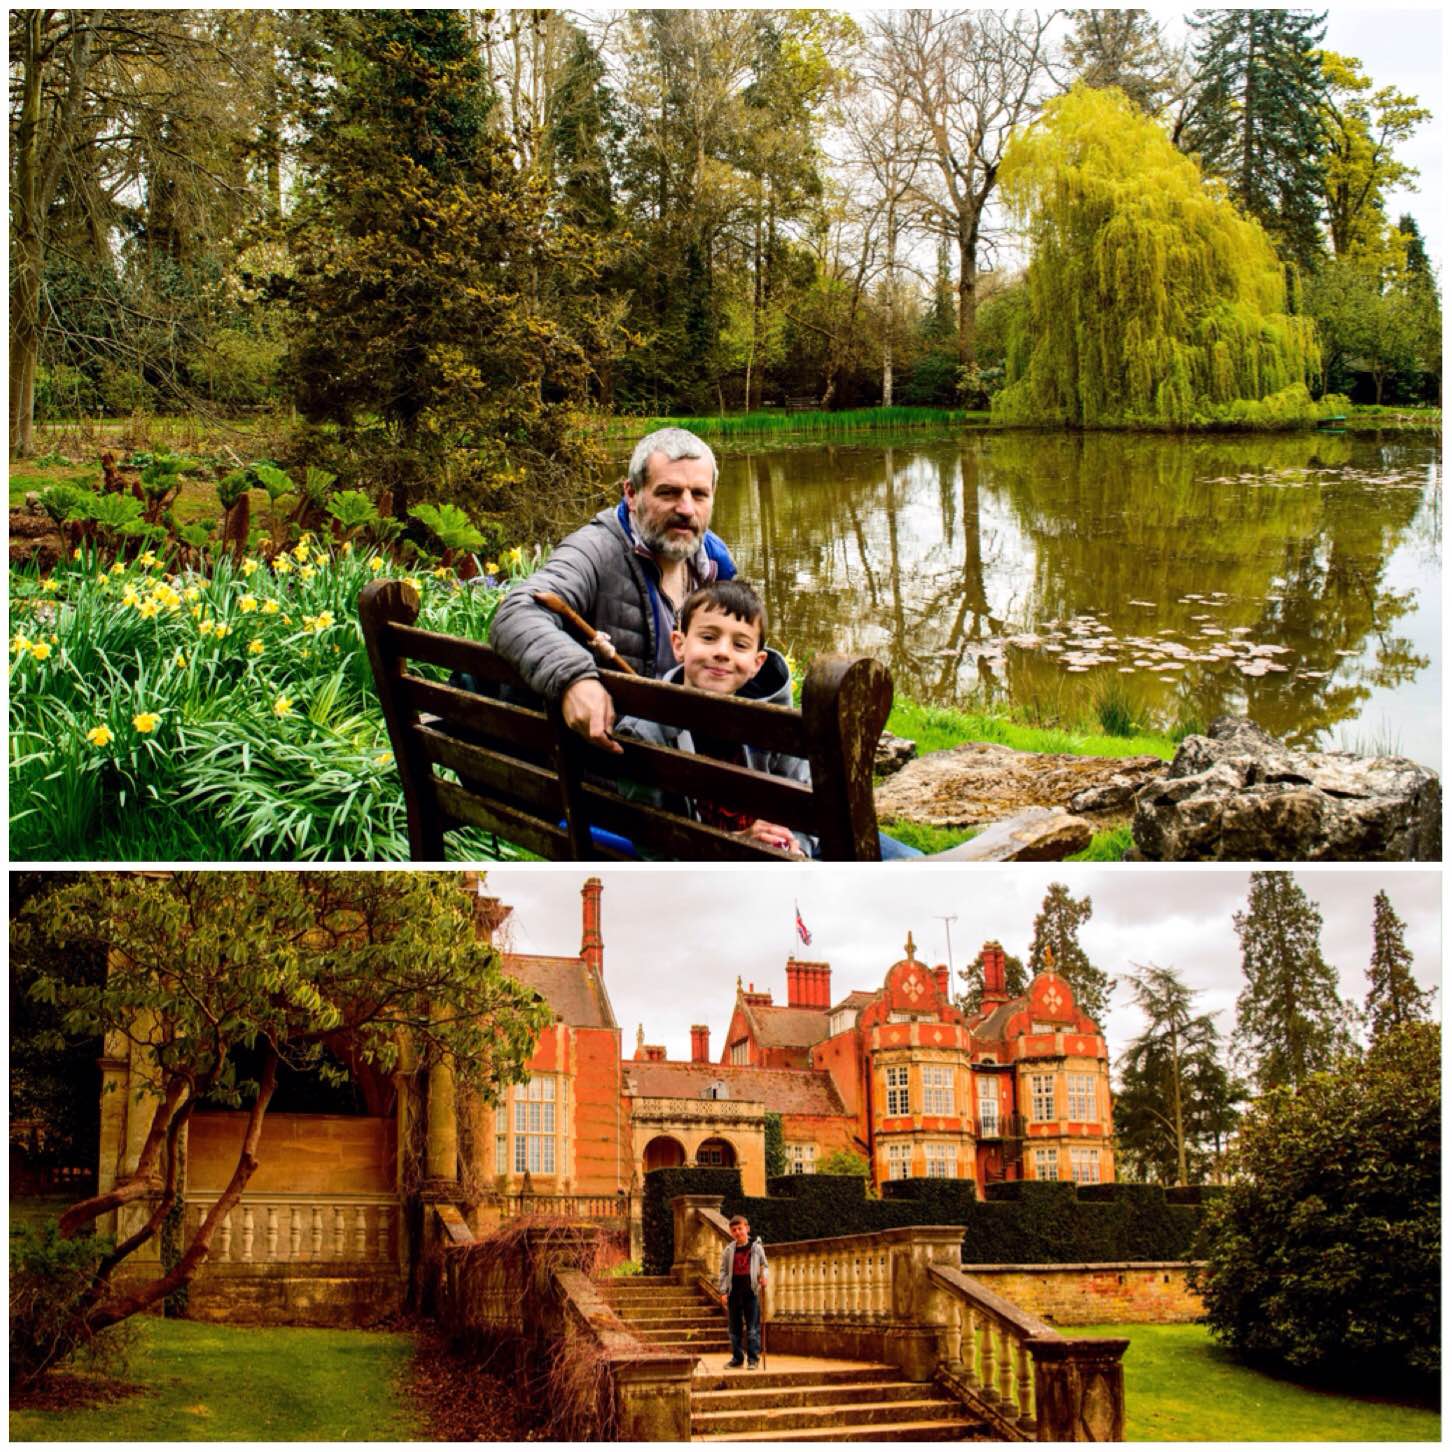
While watching my son Finlay play football this morning my friend Katie mentioned that Tylney Hall Hotel had an open day today as part of the National Gardens Scheme (who raise money for multiple charities).
My friend Paul is the head gardener there and I had said before to him that I wanted to come and explore the grounds of this beautiful hotel. Thankfully I had the afternoon free and Finlay was keen to go so I packed some snacks and my camera before heading out.
Tylney Hall Hotel and Gardens
After meeting Paul and getting a map of the grounds Finlay and myself set off to explore the gardens and surrounding woodland. The beautiful landscaped gardens surrounding Tylney Hall were designed by the 19th-century garden designer Gertrude Jekyll and maintained now by Paul and his team.
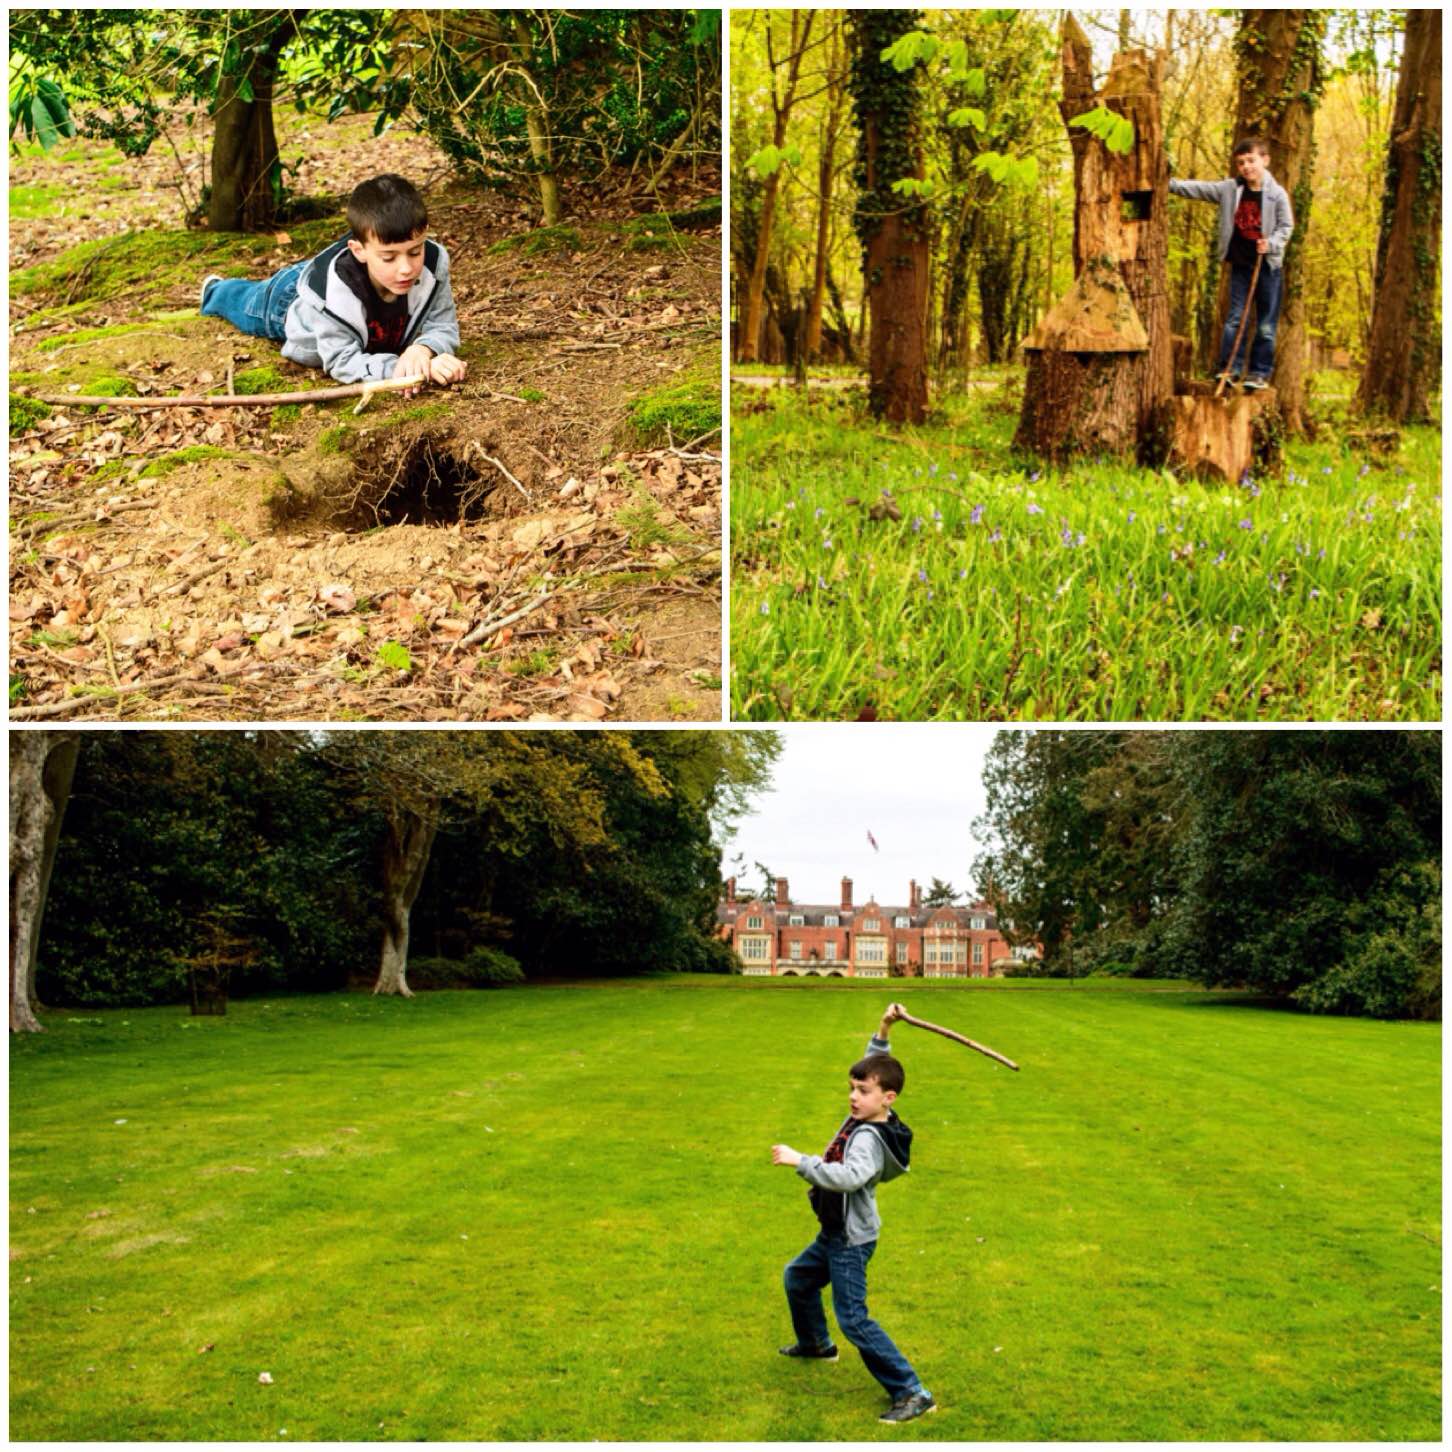
My aim was to find as many wild flowers as I could and to keep an eye out for beautiful and unusual spots to photograph. Finlay’s aim was to have a full on adventure by crawling, stalking and climbing his way around the gardens (and to learn about some trees and flowers for one of his Cubs badges).
We headed off first down to Boathouse Lake by rolling our way down the immaculate lawn. We found lovely brown carp in the lake and old buildings nearby to explore.
Views, slopes and nooks
Working our way around the Hall we explored the rabbit burrows, climbed on what Finlay called the Fairy Castle and enjoyed the lovely view from the Long Vista – well Finlay generally mucked about here 🙂
Play areas
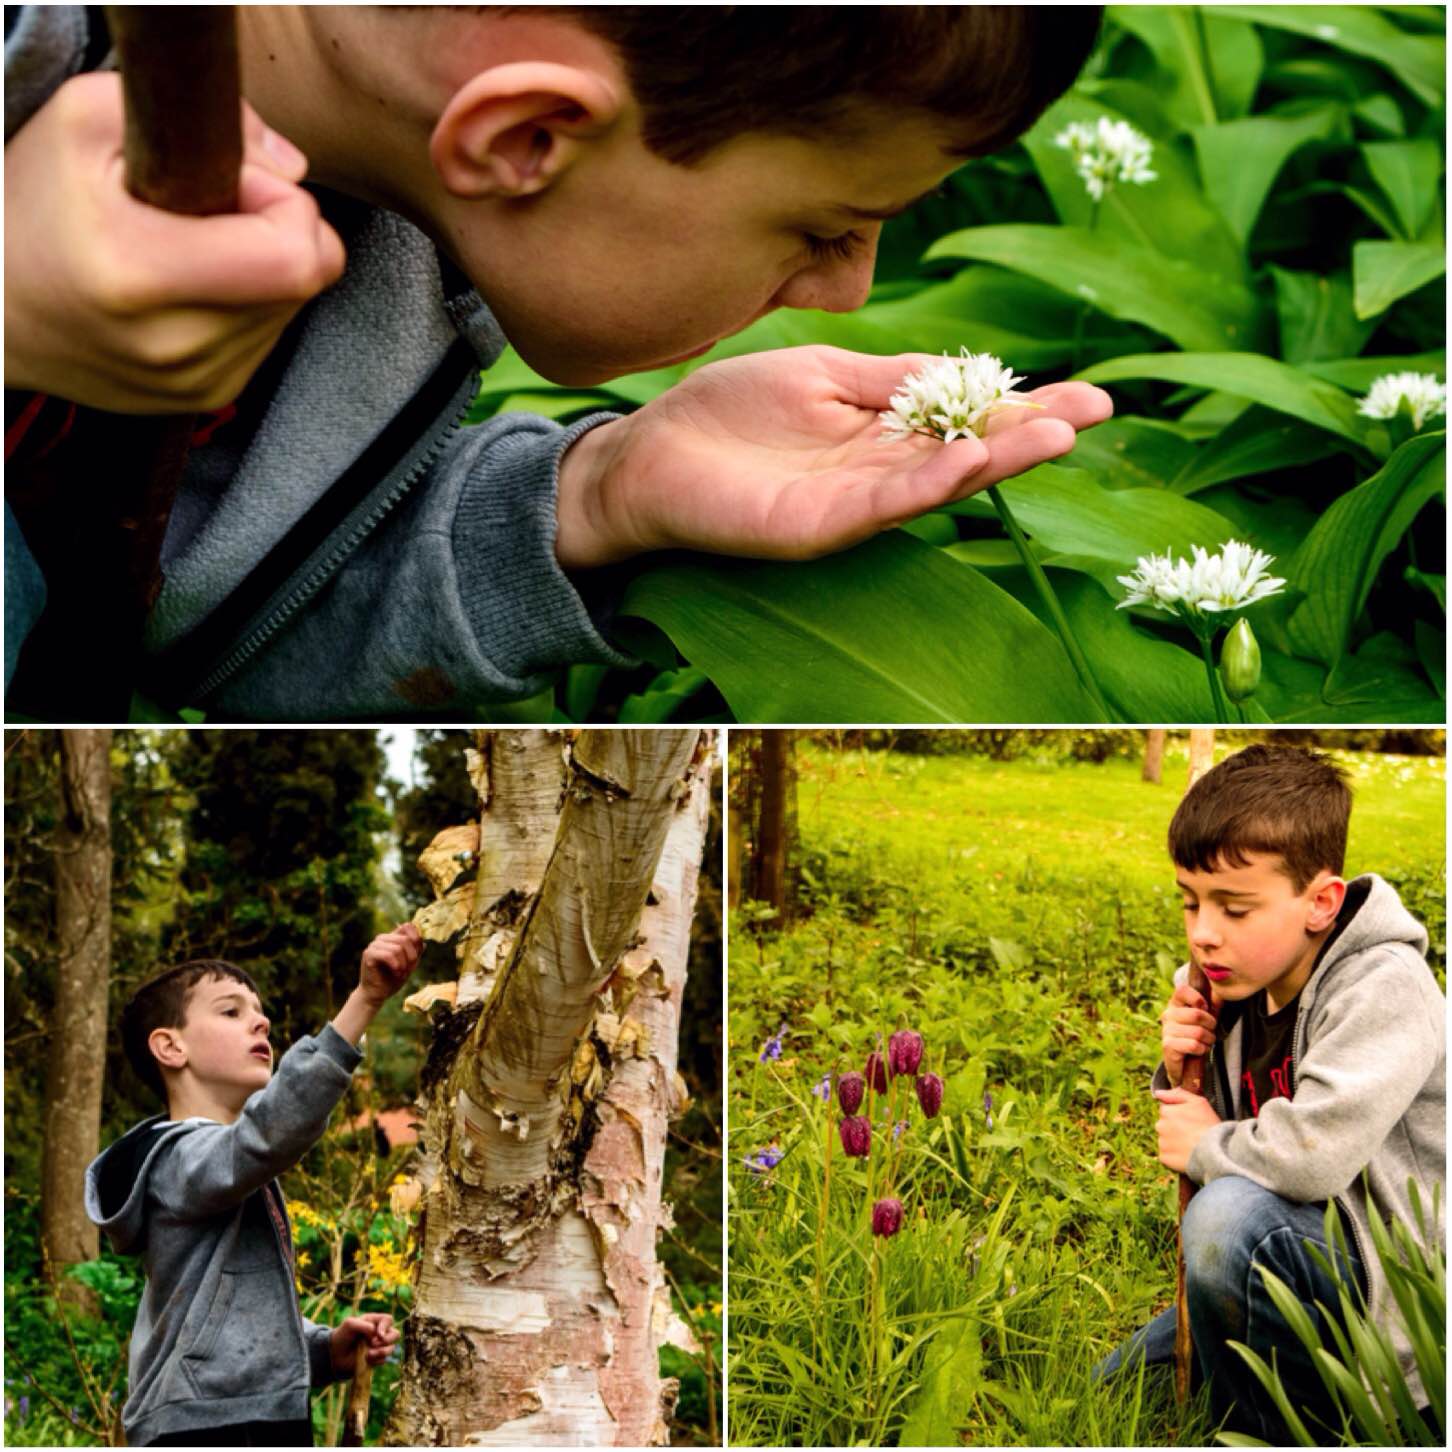
Soon we came across the Woodland garden and were confronted with a riot of colours and smells. This garden has such a wide variety of plants growing that I could have stayed there for hours. It was great to spot the Ramsons and the Snakes Head Fritillary.
There is a paper birch in the centre of the garden with strips of outer bark hanging off making it a very striking tree (we did not take any strips of bark from the tree but just explored its colours and textures).
Stunning nature
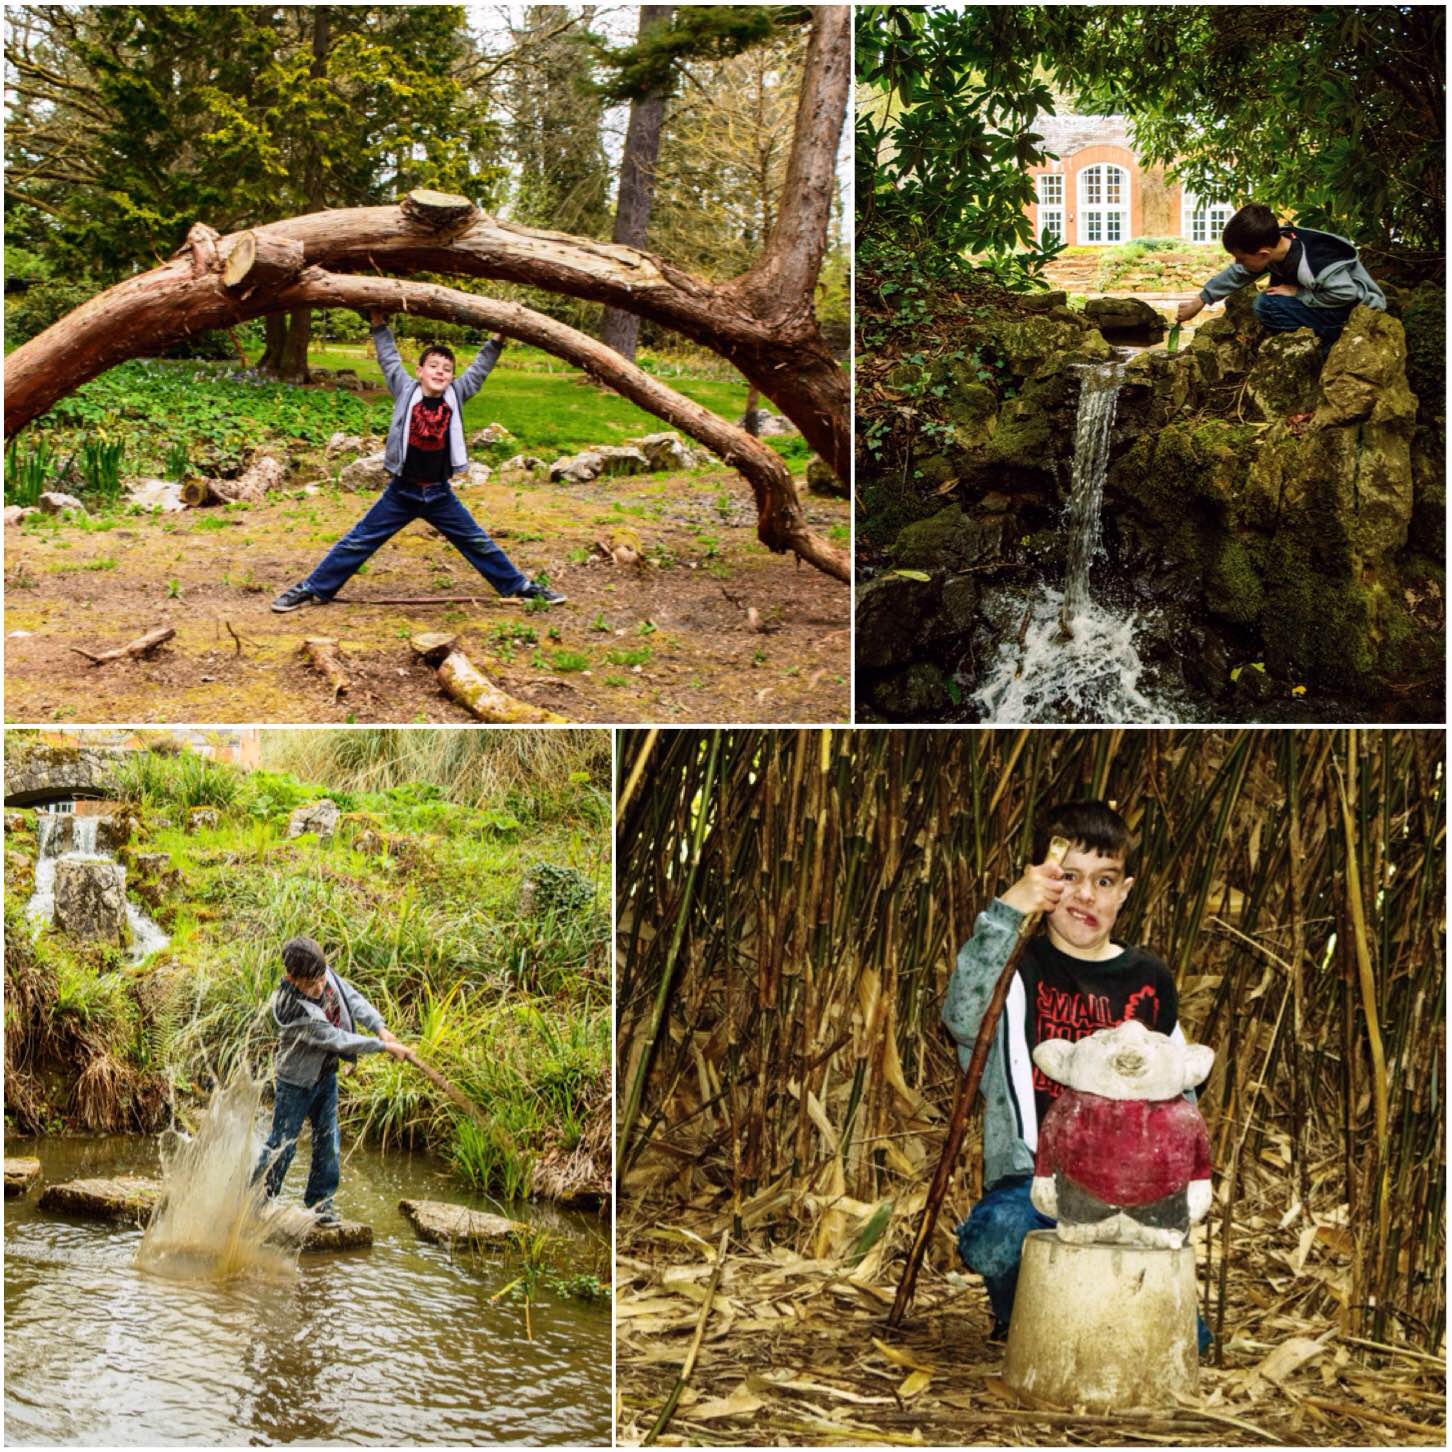
The woodland garden has a stream, ponds and waterfalls through the middle of it with paths following it and criss-crossing it with stepping stones and bridges – a perfect kids’ playground.
Running alongside the stream we spotted a most unusual tree trunk (possibly cedar) in the shape of an arch and a thicket of bamboo with a little stone creature hidden away in it.
Adventure
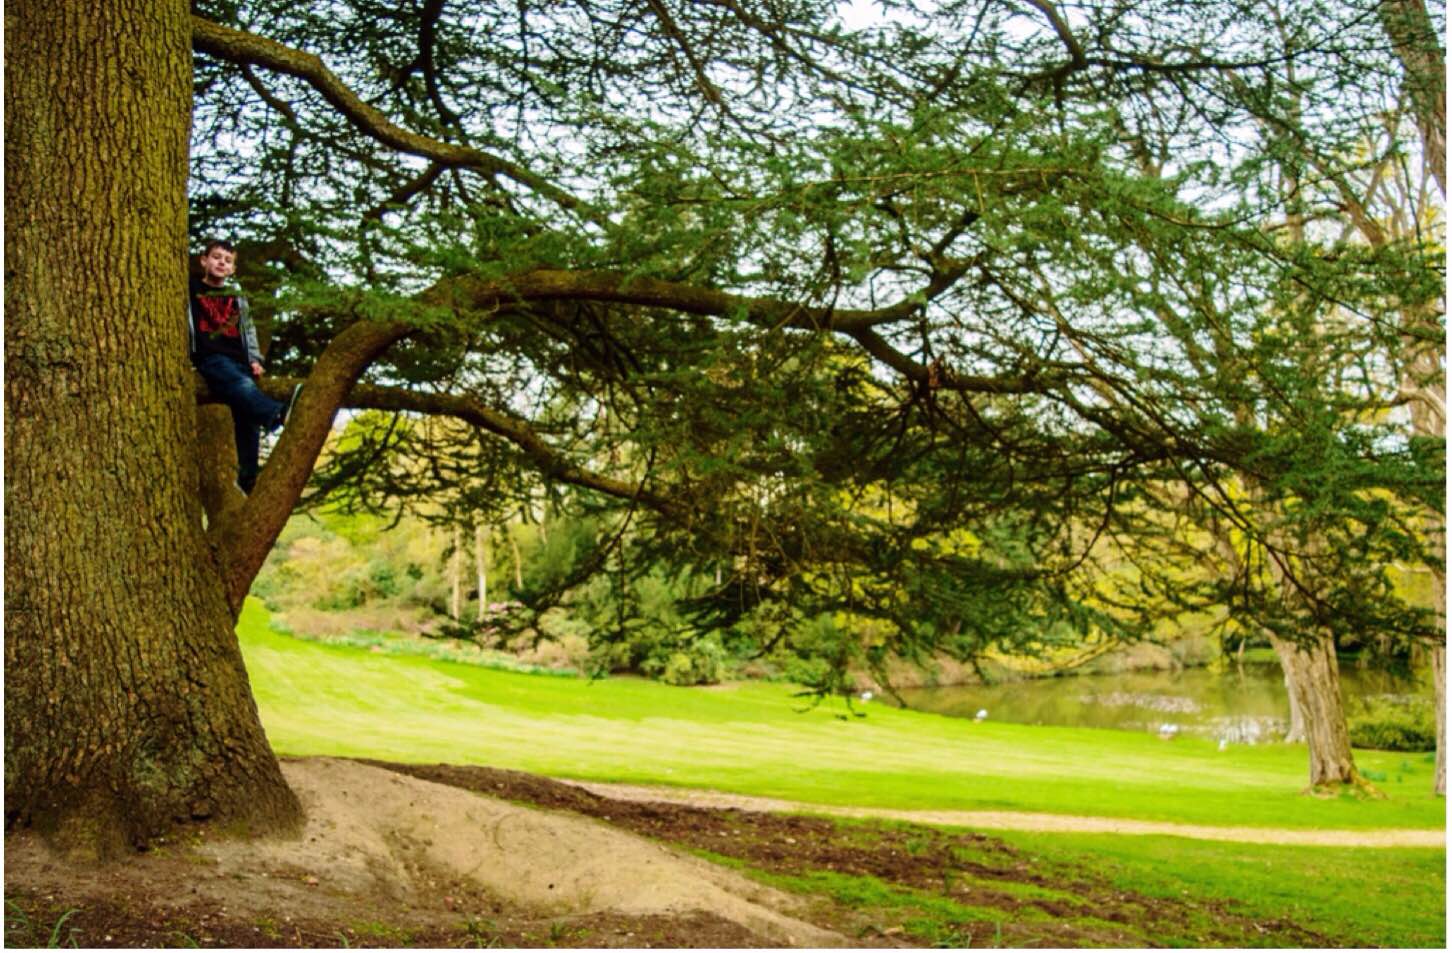
Before leaving Finlay asked to go back to a specific tree he had spotted on the way in so as to climb onto it. It was just situated above the Boathouse Lake and offered stunning views across it.
Stylish sit spot
We only had an hour and a half to explore the gardens today so when they are opened to the public once again I will be making more time to visit this beautiful place.
Paul and his team have created a beautiful setting for folk of all ages and abilities. Currently I am recovering from a torn calf muscle and the paths were perfectly maintained so I did not feel taxed at any time. Finlay did not want to leave and I want to come back again soon – thankfully Tylney run the open day for the National Gardens Scheme three times a year.
This nature challenge was set on Facebook and you were supposed to post up one nature picture each day and nominate some one else every time you posted.
I took more than one picture each day (except for day 1) and have not nominated anyone else to take part (do not really like that part of Facebook) so I have not really followed the rules however I have really enjoyed myself.
My last few pictures are a real sorry looking group to some but beautiful looking to me.
Damp Days
I was working all day and it was raining quite hard by the time I got home. Nobody was keen to be going out (I cannot blame them) so I fashioned a rain cover for my camera out of a freezer bag and got ‘down and wet’ amongst the wild flowers and blossom in my garden – Alison somehow found the spectacle of me lying in the wet grass quite funny for some reason 😉 The beauty of flowers are I feel enhanced with a few extra raindrops as decoration.
It was a wet finish to the challenge however the rain made sure it was a fitting challenge. I am not nominating anyone else to take up the challenge however if you feel the urge, feel free to take it on.
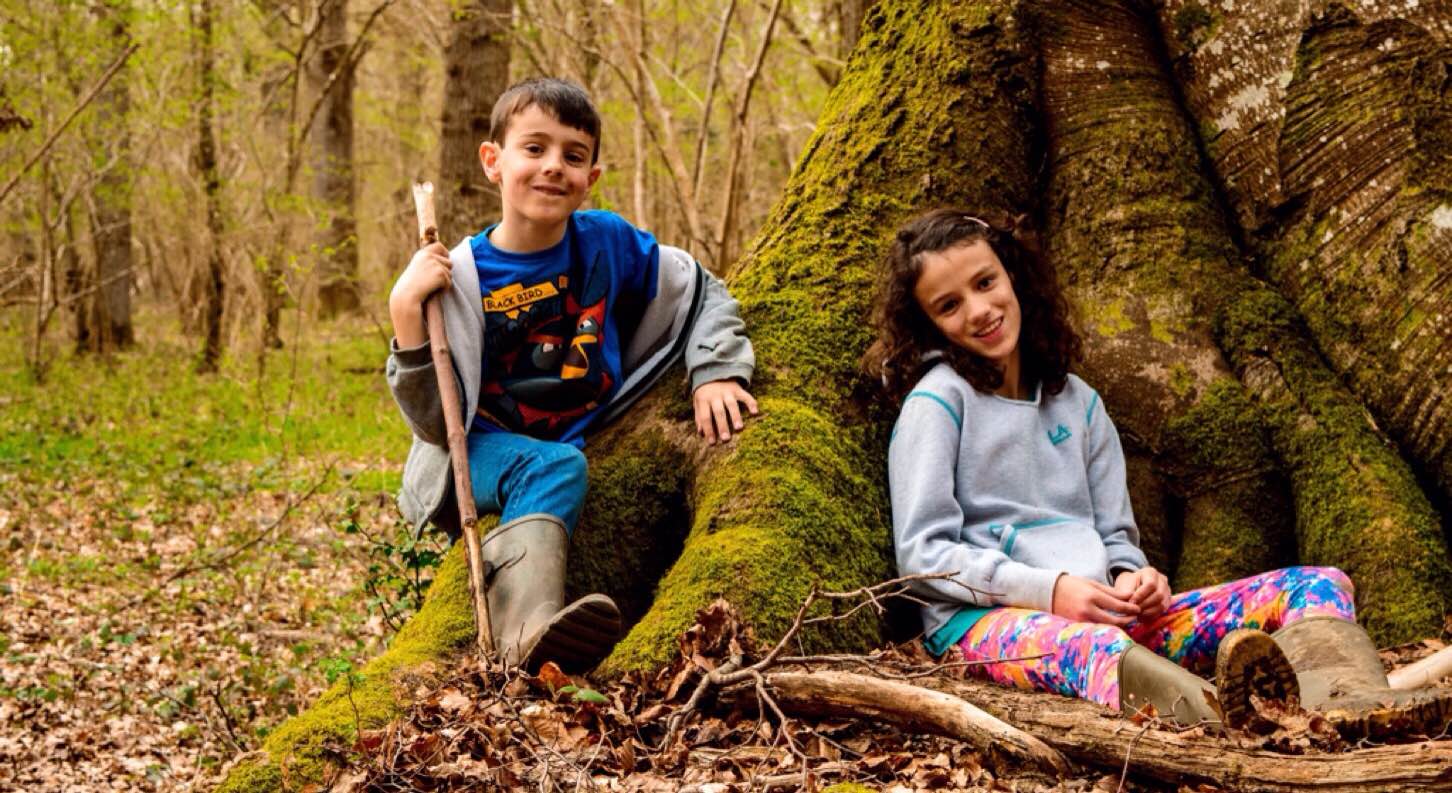
Yesterday I picked the kids up from school and instead of curling up in front of the Xbox or the iPads off we went to the woods.
I know we get out to the woods on a regular basis however not normally on a school night. I did not know what we would do with our limited time but as it turned out it was surprisingly a lot.
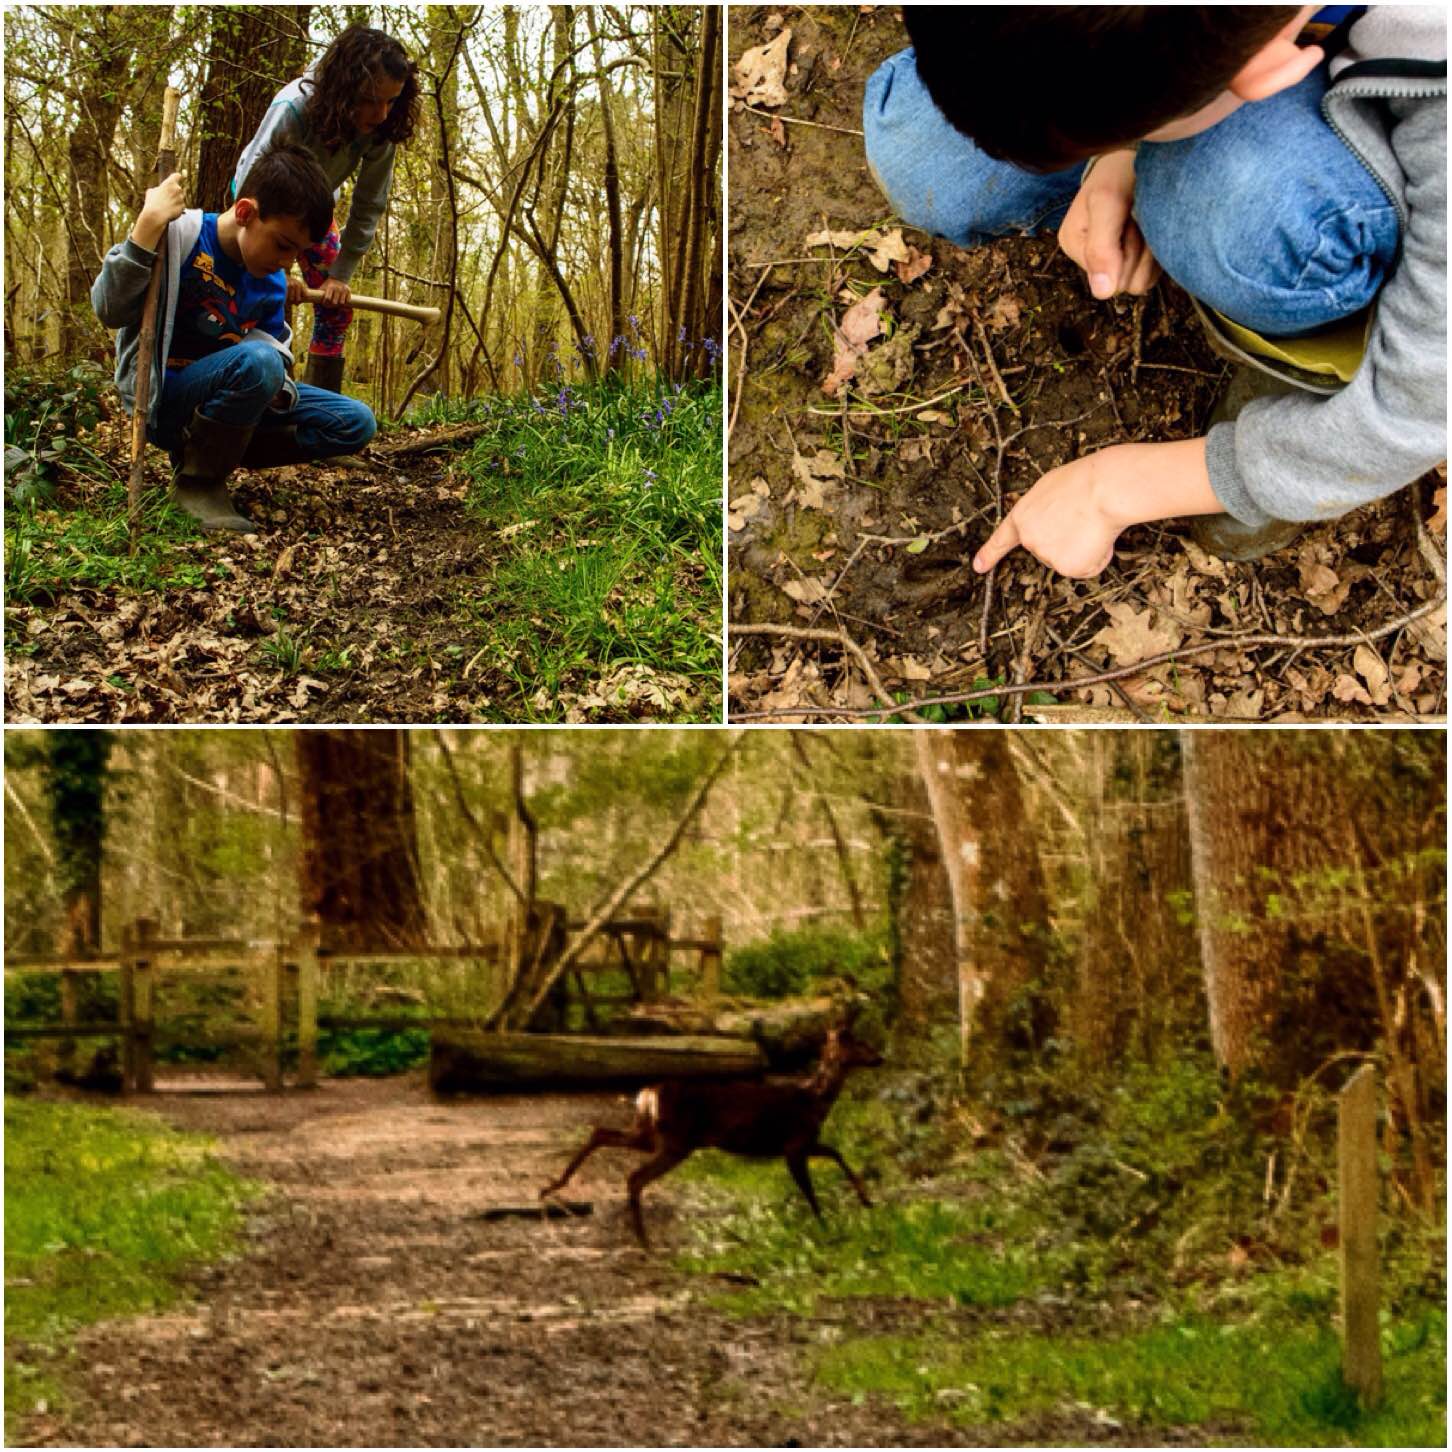
Tracking
As soon as we got into Morgaston wood the kids picked up some deer tracks and after sitting for five minutes we were rewarded by spotting a deer crossing one of the paths.
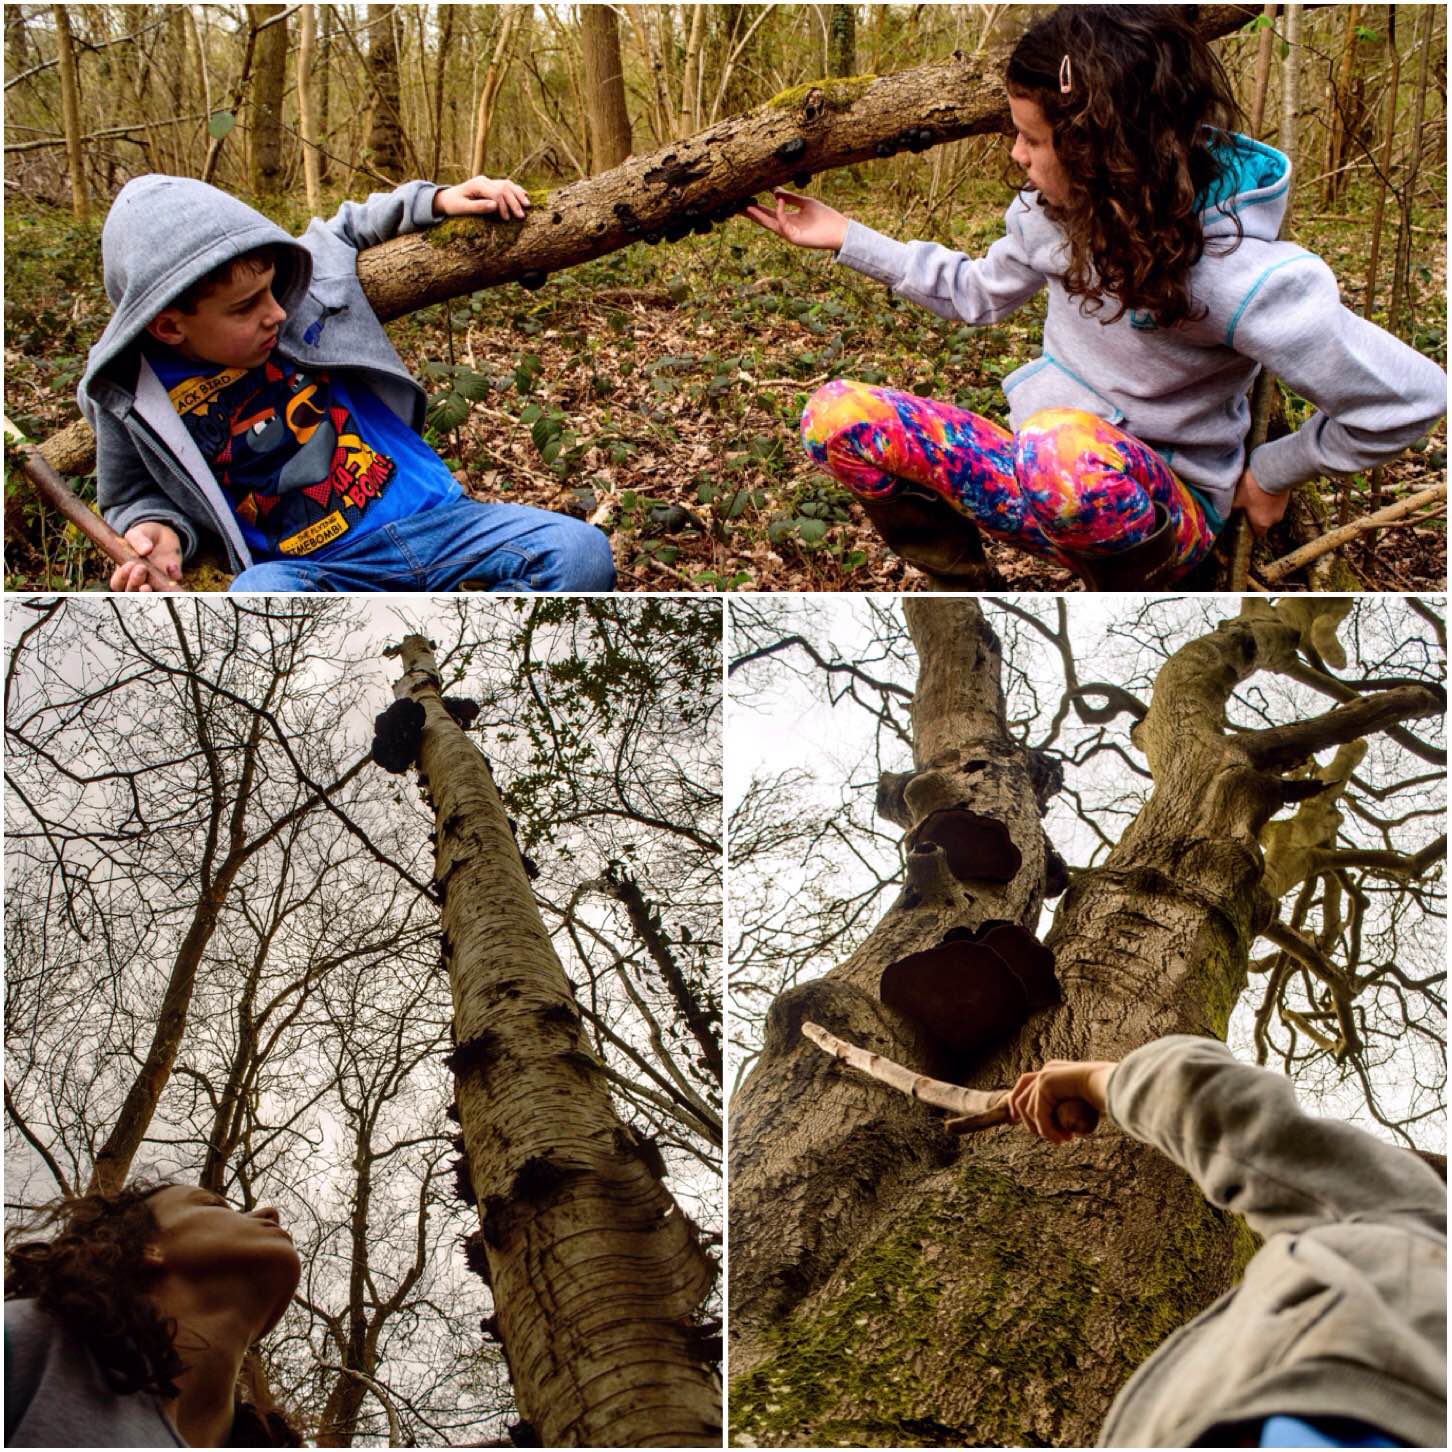
As we trundled along I got them to find some fungi. There was not much around but we did get some King Alfred’s Cakes, some Birch Polypore and some Artists fungi.
Finding Fungi
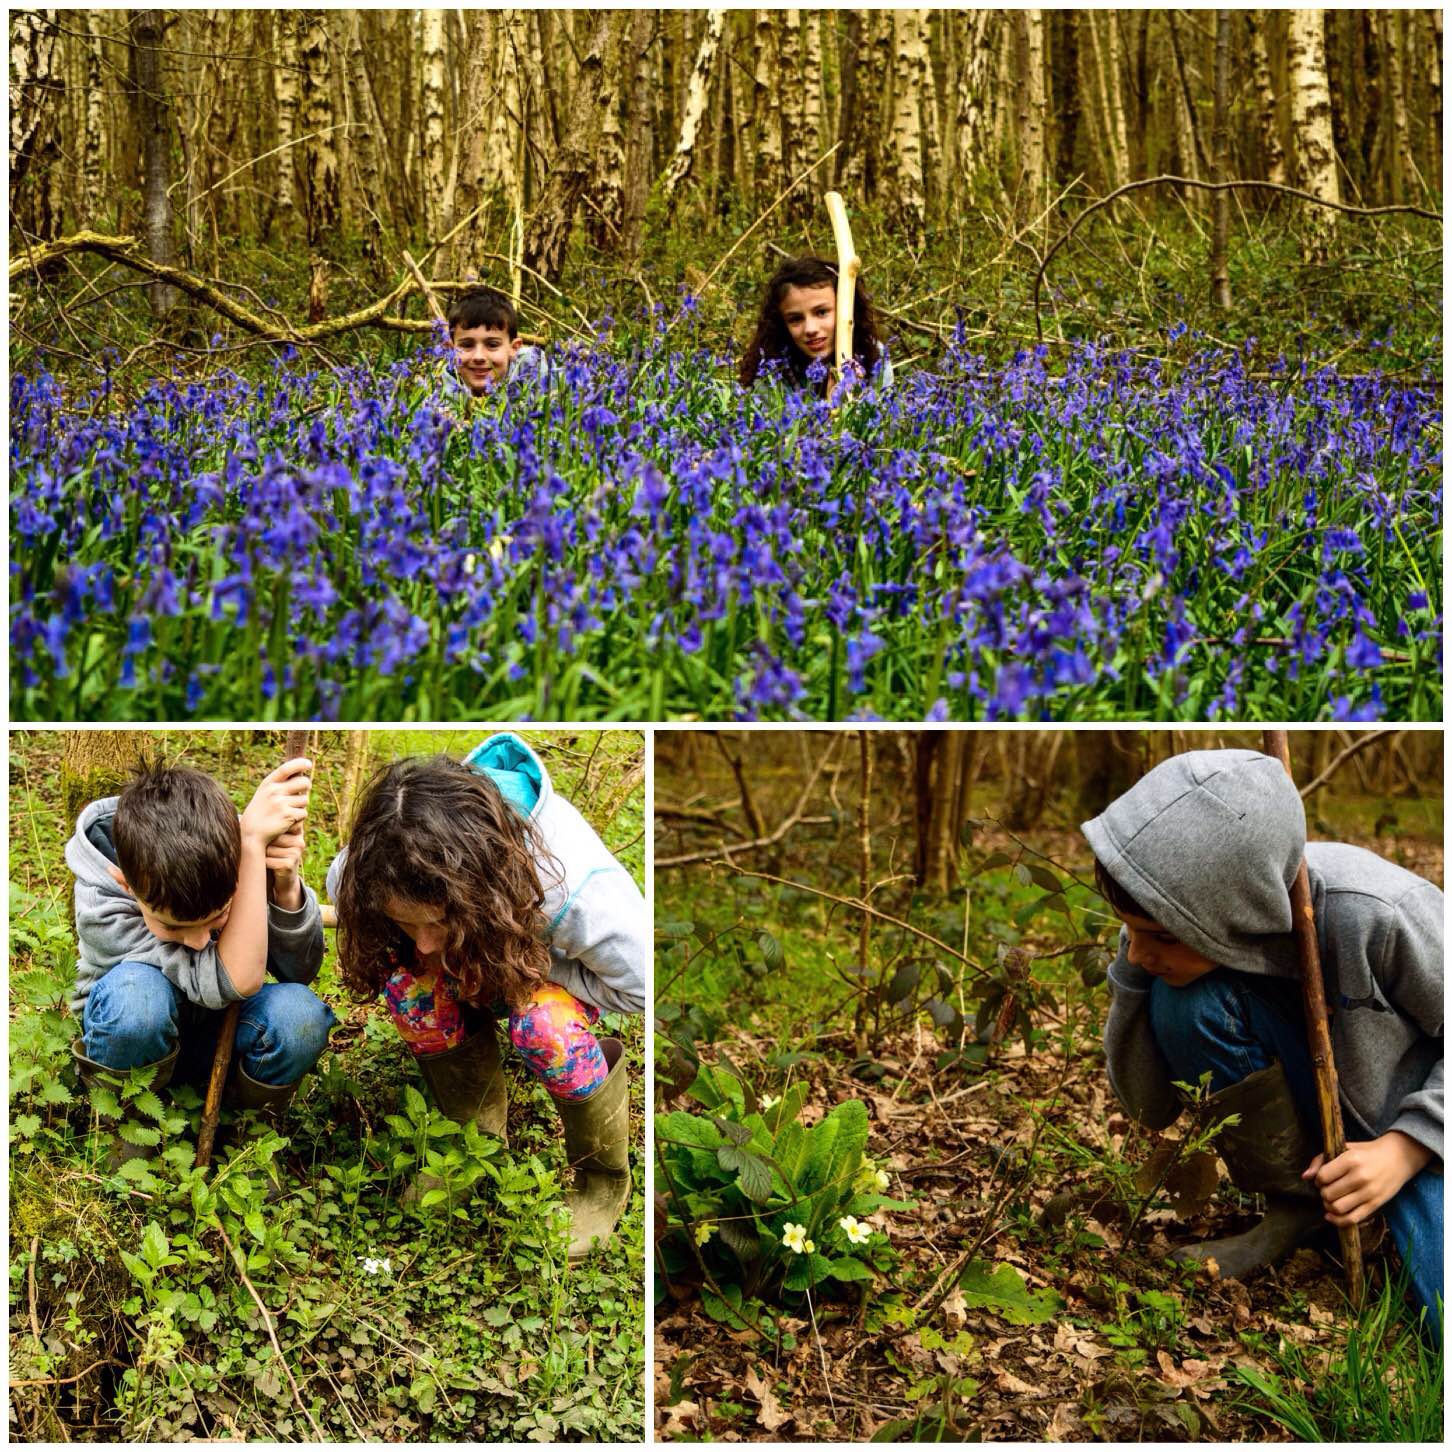
The Bluebells were really coming out and there were plenty of Primroses around. Just on the edge of the wood though we spotted our first Cuckoo flowers by a ditch. This is a sturdy little plant as it grows in some really exposed areas however it does have a very dainty look about it.
Wild Flower Spotting
It was not all learning – there was plenty of time to just explore and get muddy – as you do 🙂
Just Fun
This was a challenge to myself as I had to watch every step I took in case I re-opened my torn calf muscle – It was worth the effort though.
How photographers manage to get that perfect shot of insects flying about beats me but I did have fun trying tonight as part of day 5 of my nature challenge.
Fleeting
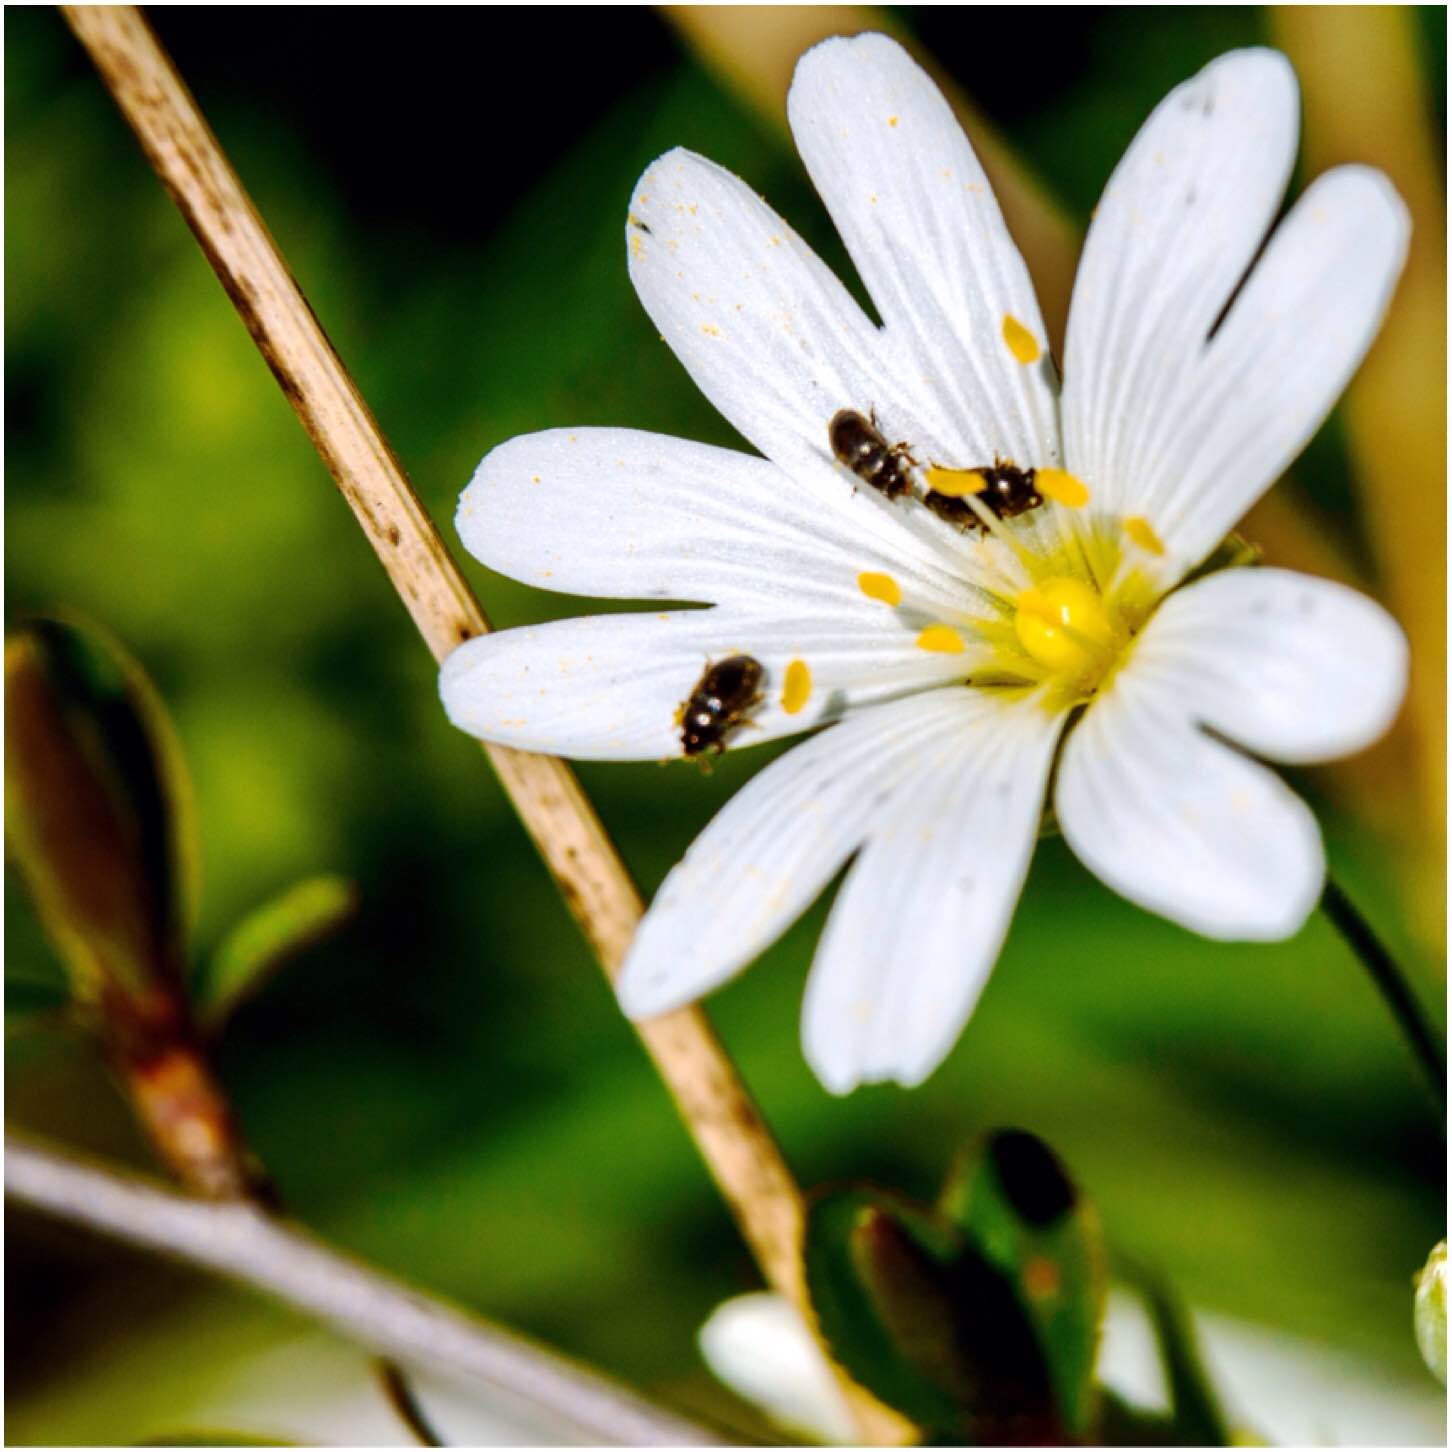
I gave up chasing (well hobbling really) and settled down amongst the flowers instead to see what was going on. There was plenty of life on this stitchwort. Not to sure what these little fellas were but they were pretty busy running around.
Tiny
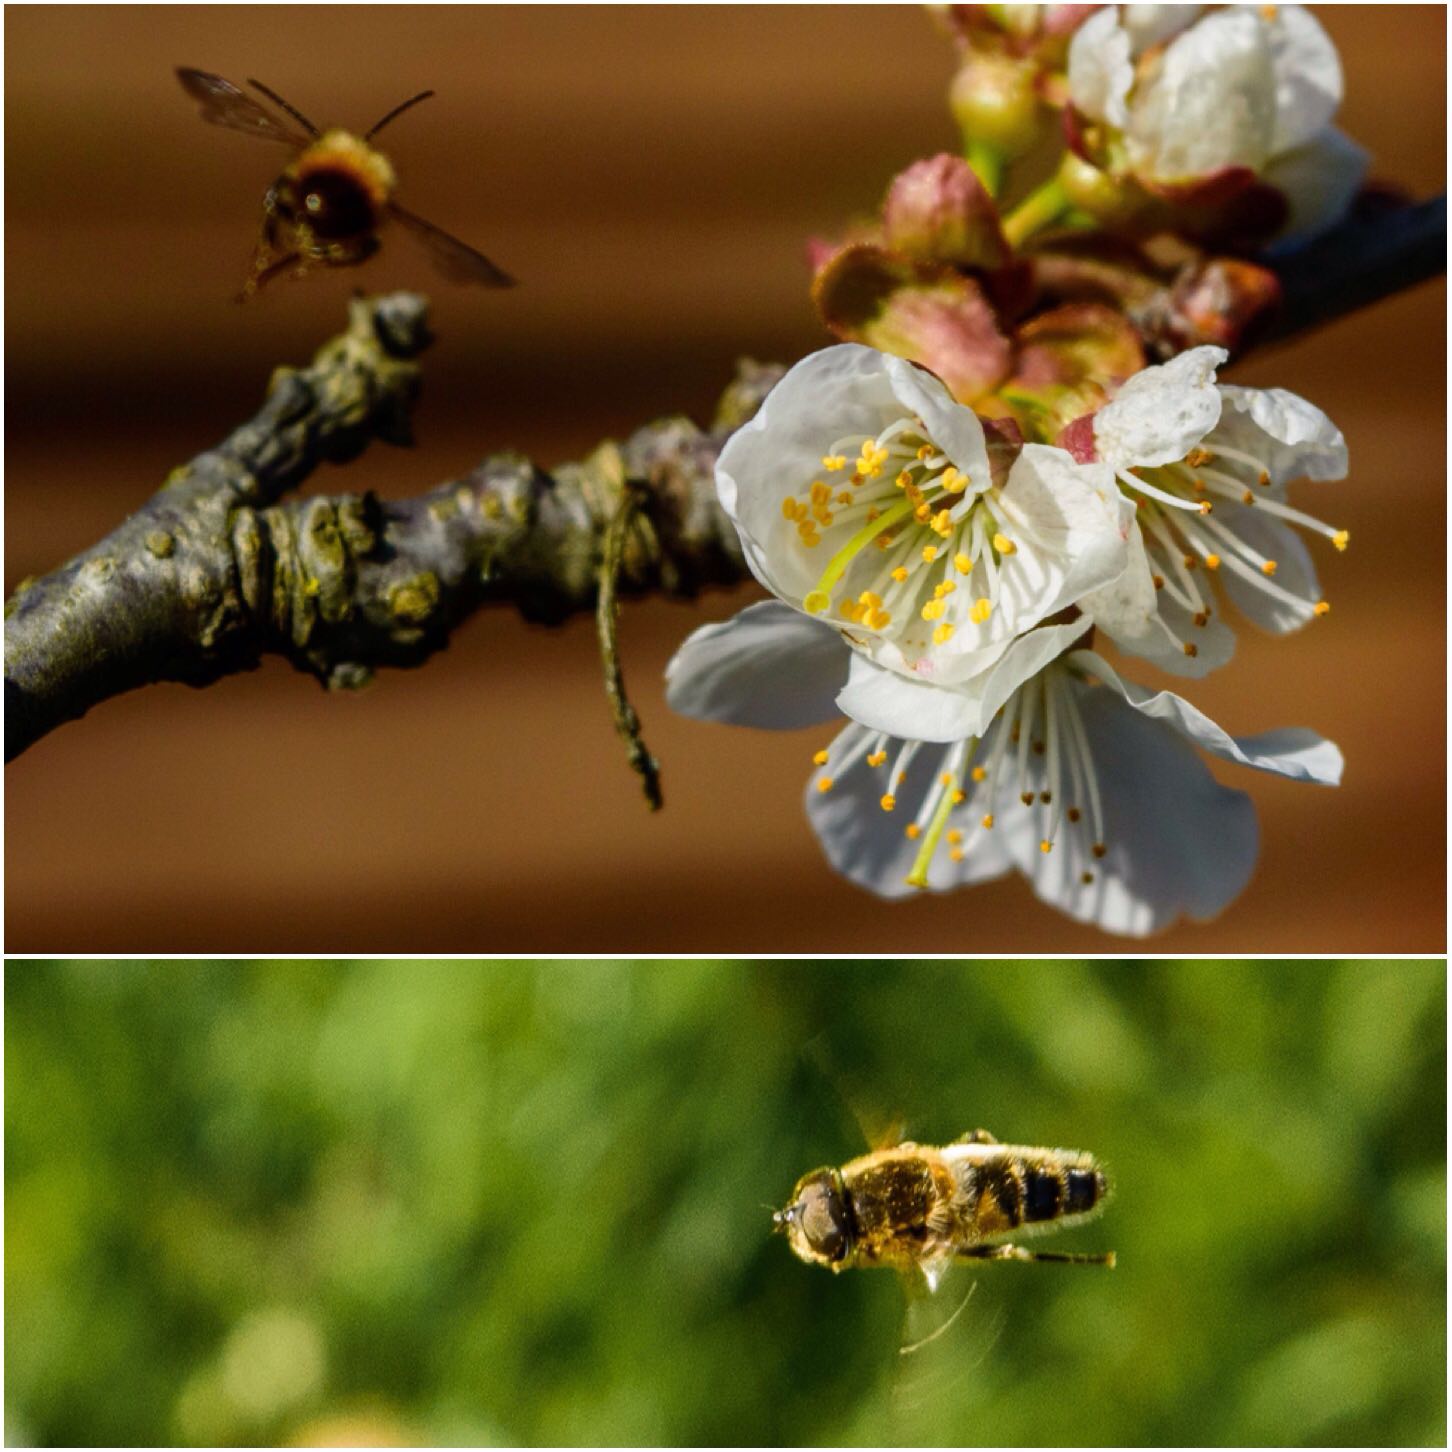
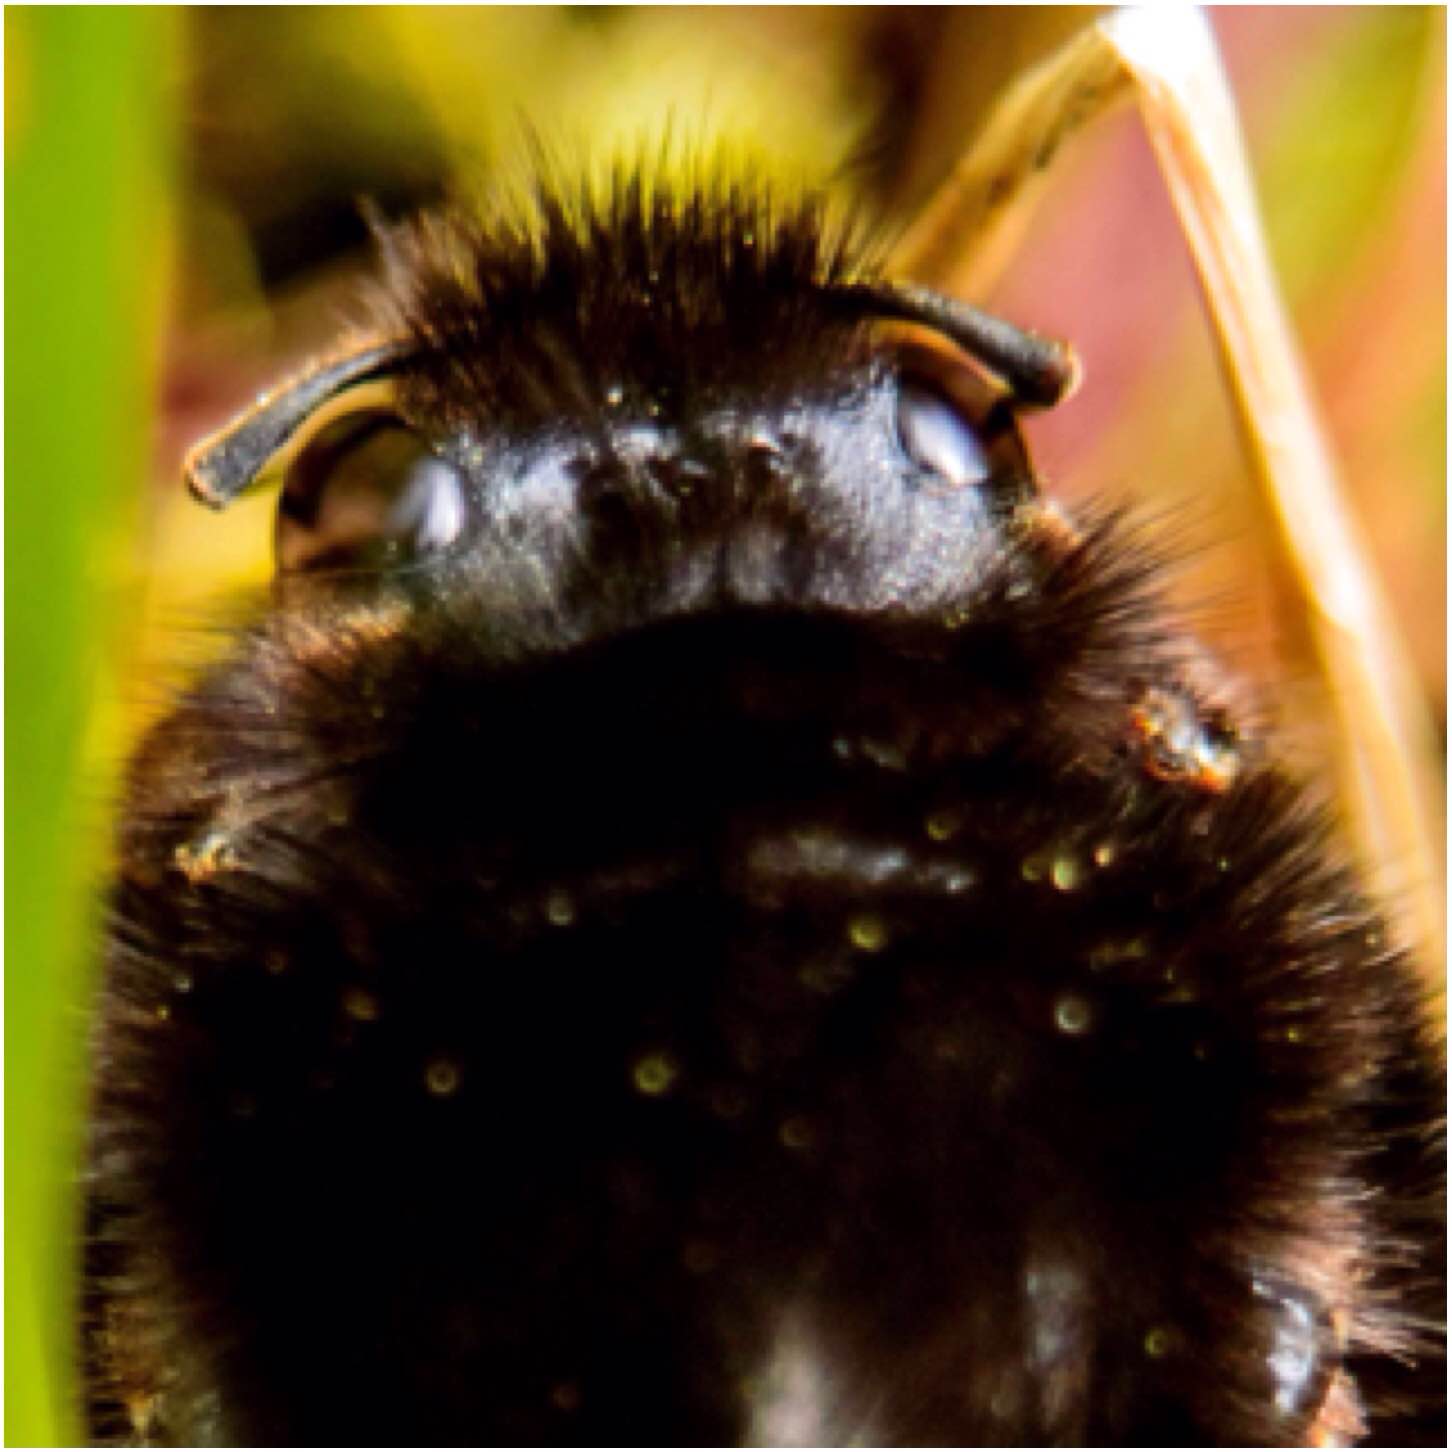
There are a lot of bees in our garden at the moment and I spotted this one resting in the grass. Not long after I took this picture she took off and was away in a flash.
Resting up
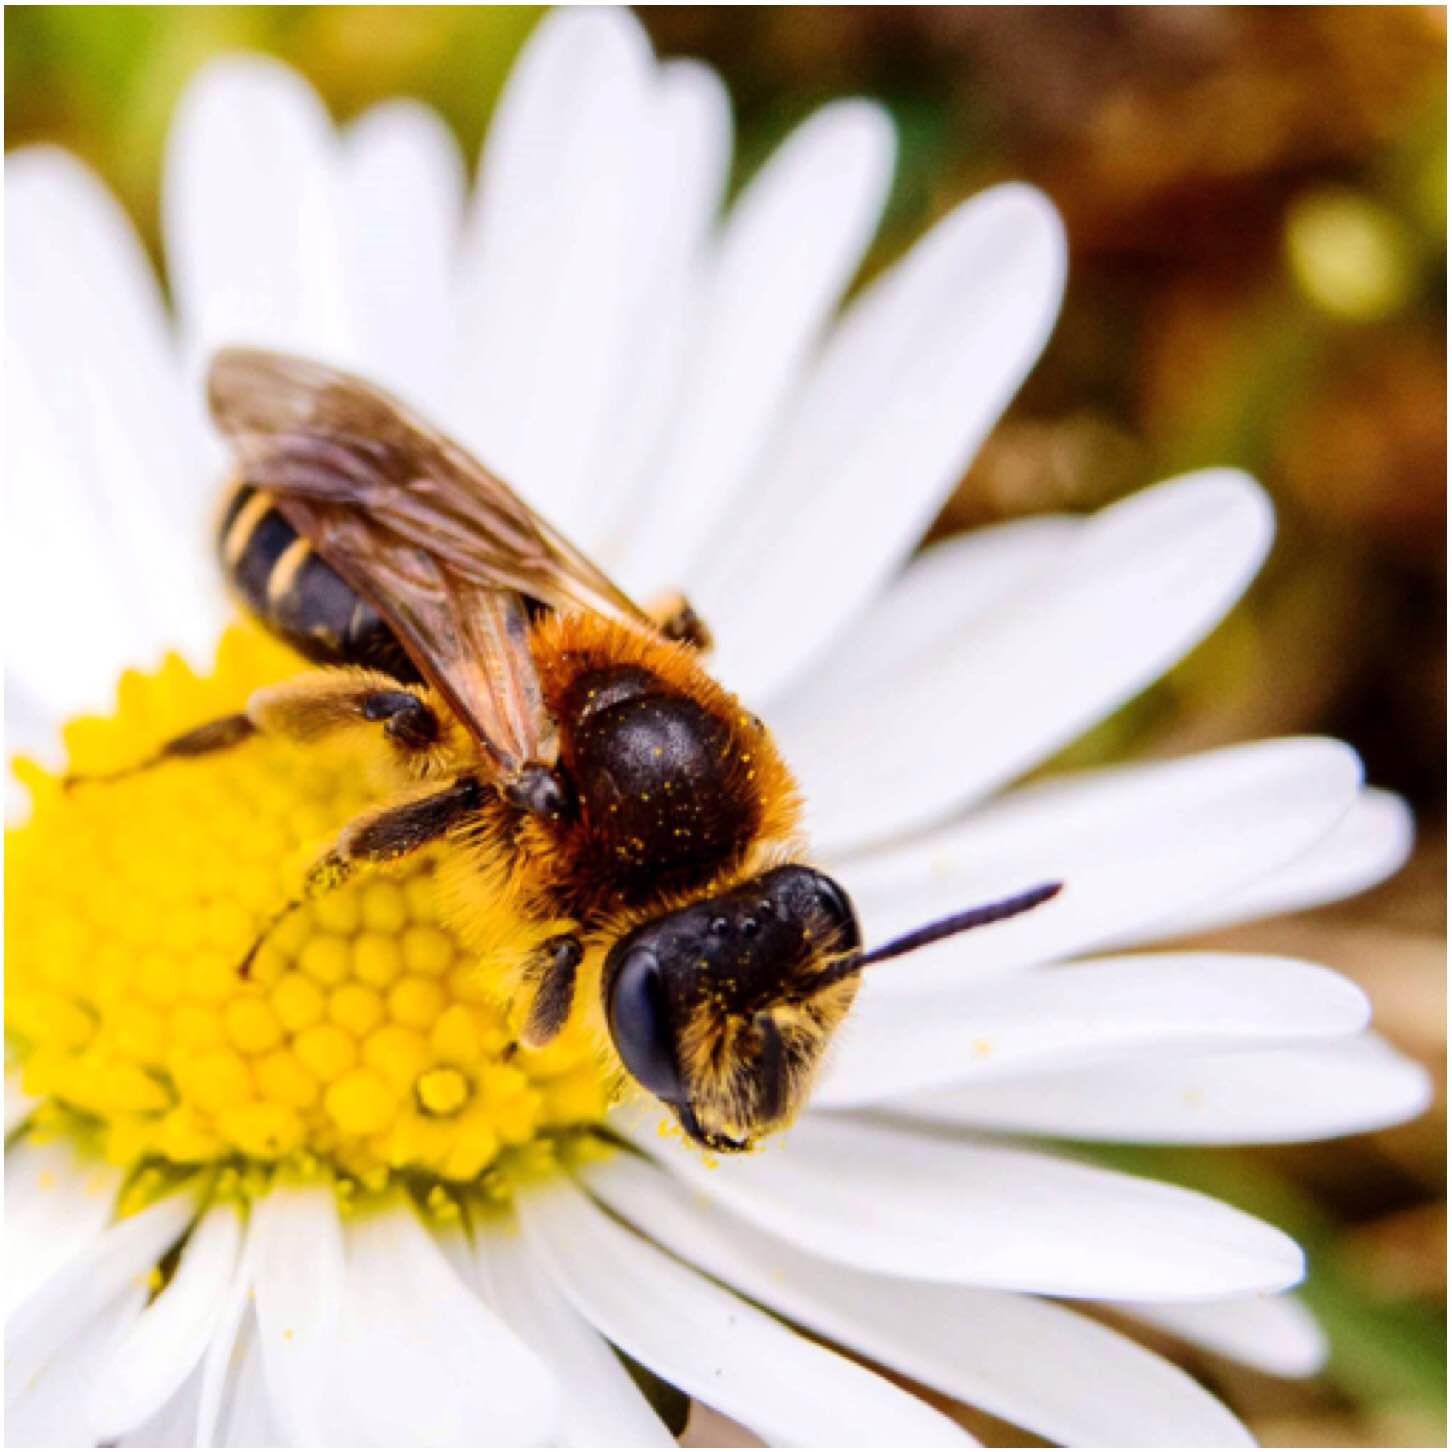
I am not sure if this was a hoverfly or a small wasp but the flower it was sitting on was a tiny daisy so that gives you the scale. I took the shot as I could see that is was really covered in pollen.
Pollen taxi
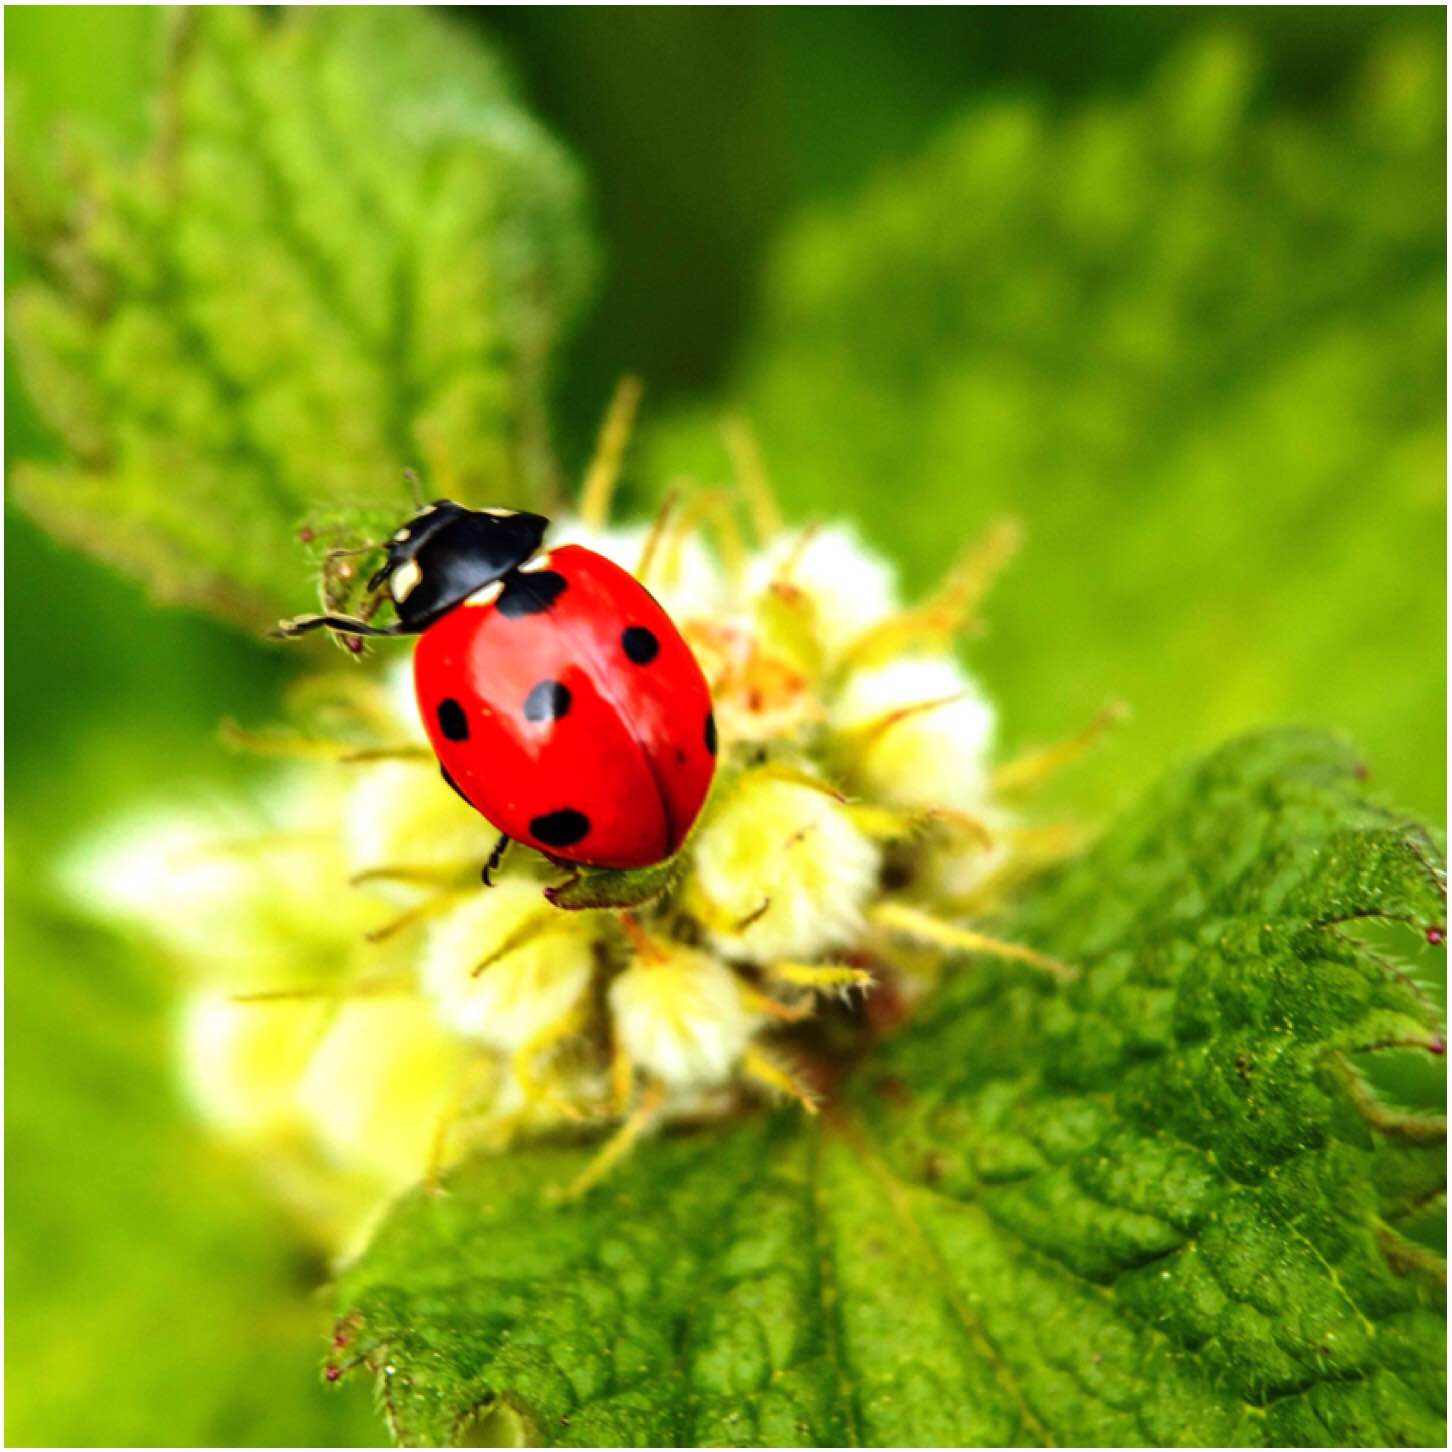
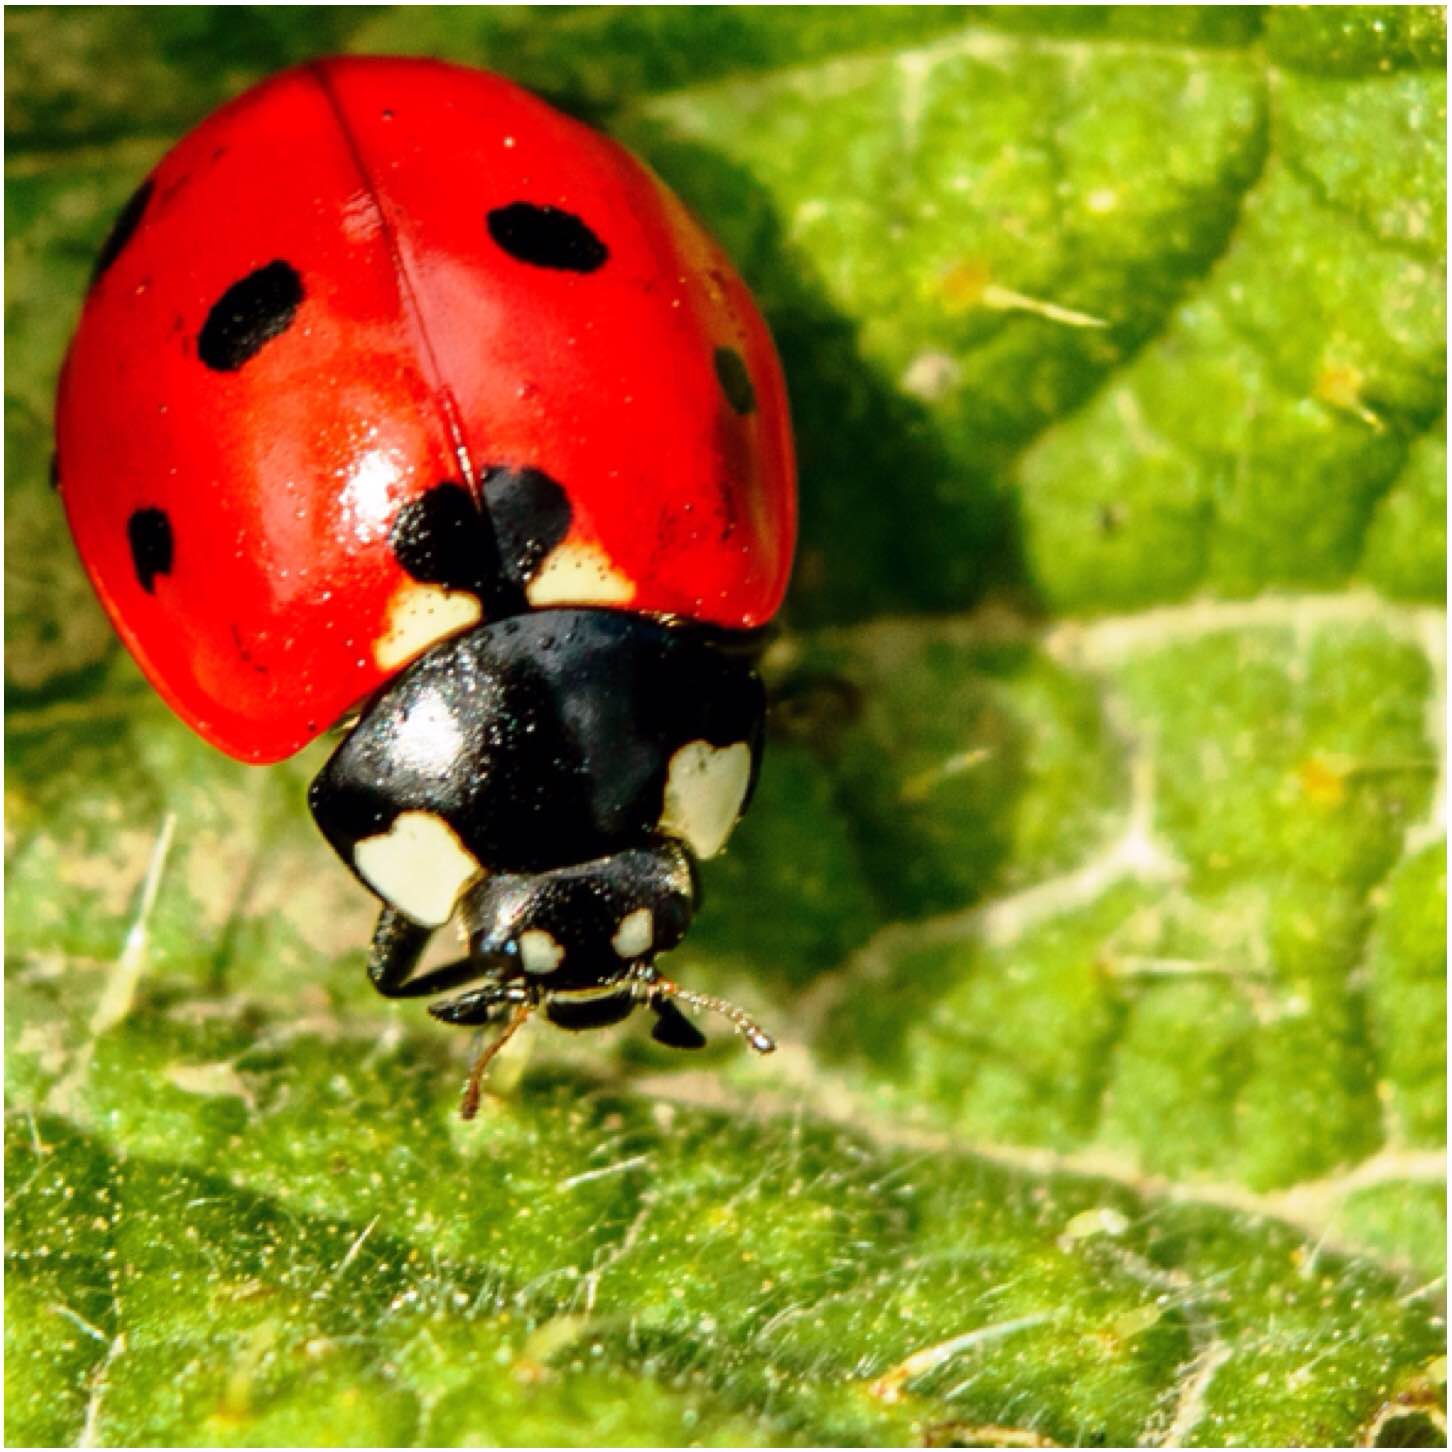
I spotted some ladybirds and this one seemed to be chasing some aphids about – I take it that it was dinner time 🙂 The picture was shot as the ladybird was standing on the tip of a white dead nettle.
On the hunt for aphids
My last shot of the evening was of this little ladybird settling down on a nettle leaf. An ideal location for a ladybird to curl up in so as not to become a meal for some other animal.
Last month the theme of the monthly photography competition over on Bushcraft UK was ‘Re-wilding’. I kept my eyes open for a decent shot but to no avail, then of course as soon as the month’s competition closed I spotted lots of locations.
I went out today to capture these scenes of nature starting to re-wild these human-made spots around my village.
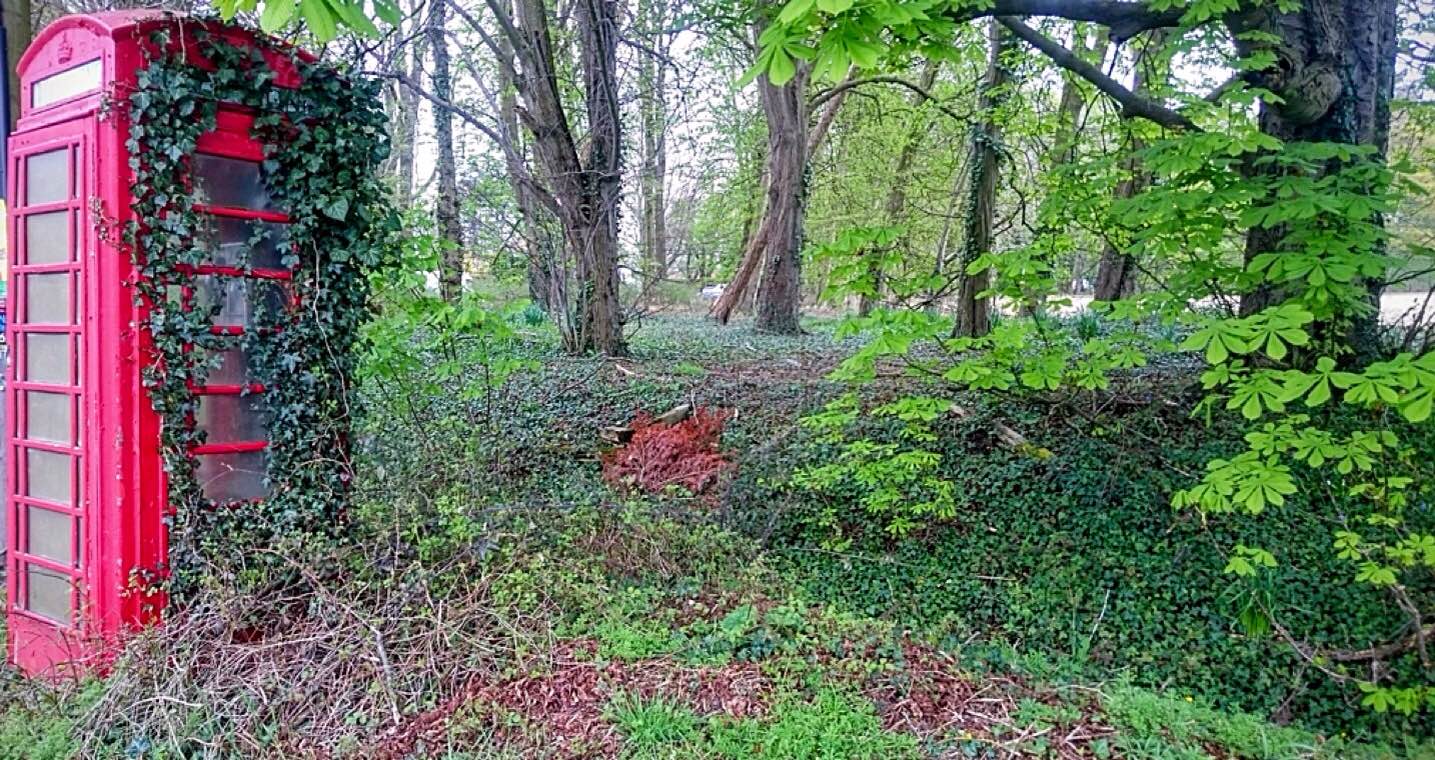
Disappearing phone box
I spotted the disused phone box first. From one angle it looks like it is still in use but from the other side nature is slowly starting to hide it as the ivy envelopes it.
The building below I likened to a vase as it seems to be holding a wide variety of plants from trees, bushes, ivy and (if you get close enough) flowers.
The building that became a vase
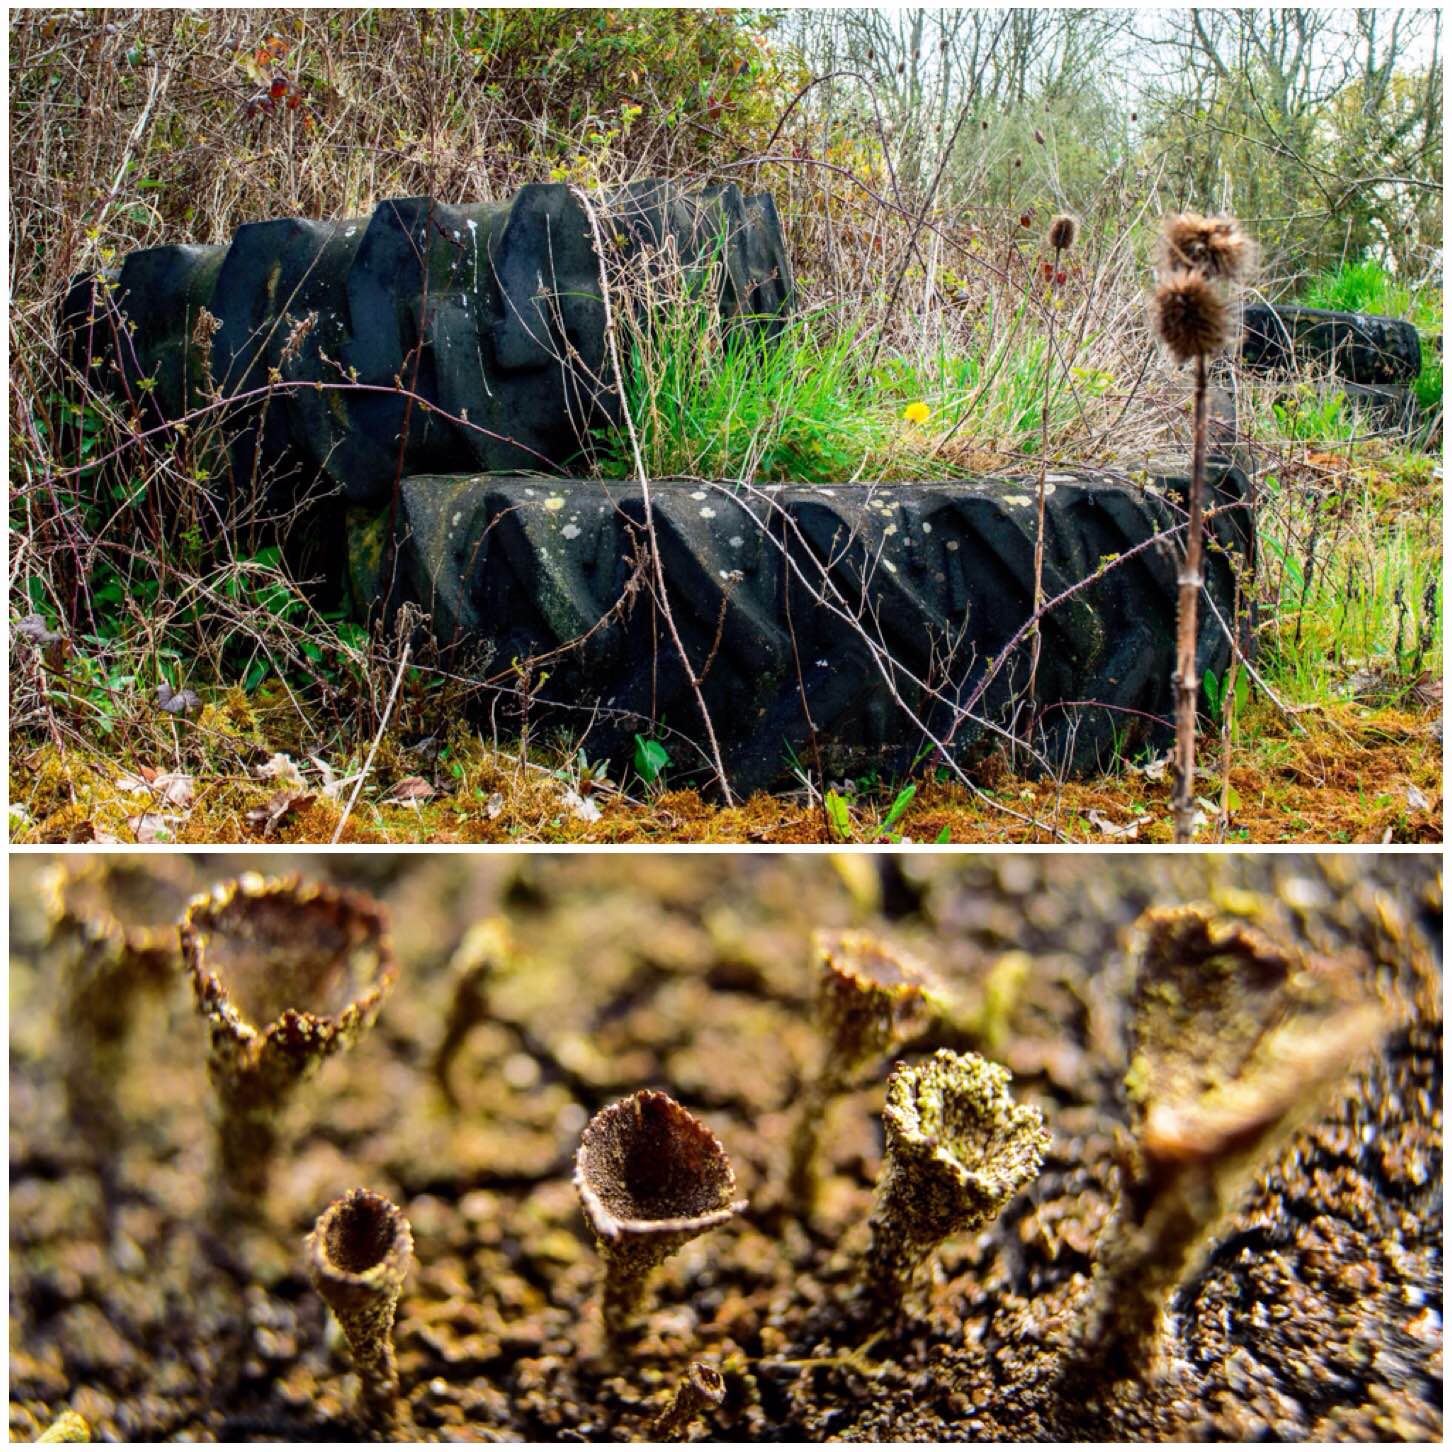
In another location there is an area of land that has had some commercial buildings pulled down. In amongst all the rubble are loads of tyres. They have been there so long now they are teeming with life. At the very bottom you can see the lichen that is colonising many of the tyres.
Rubber life
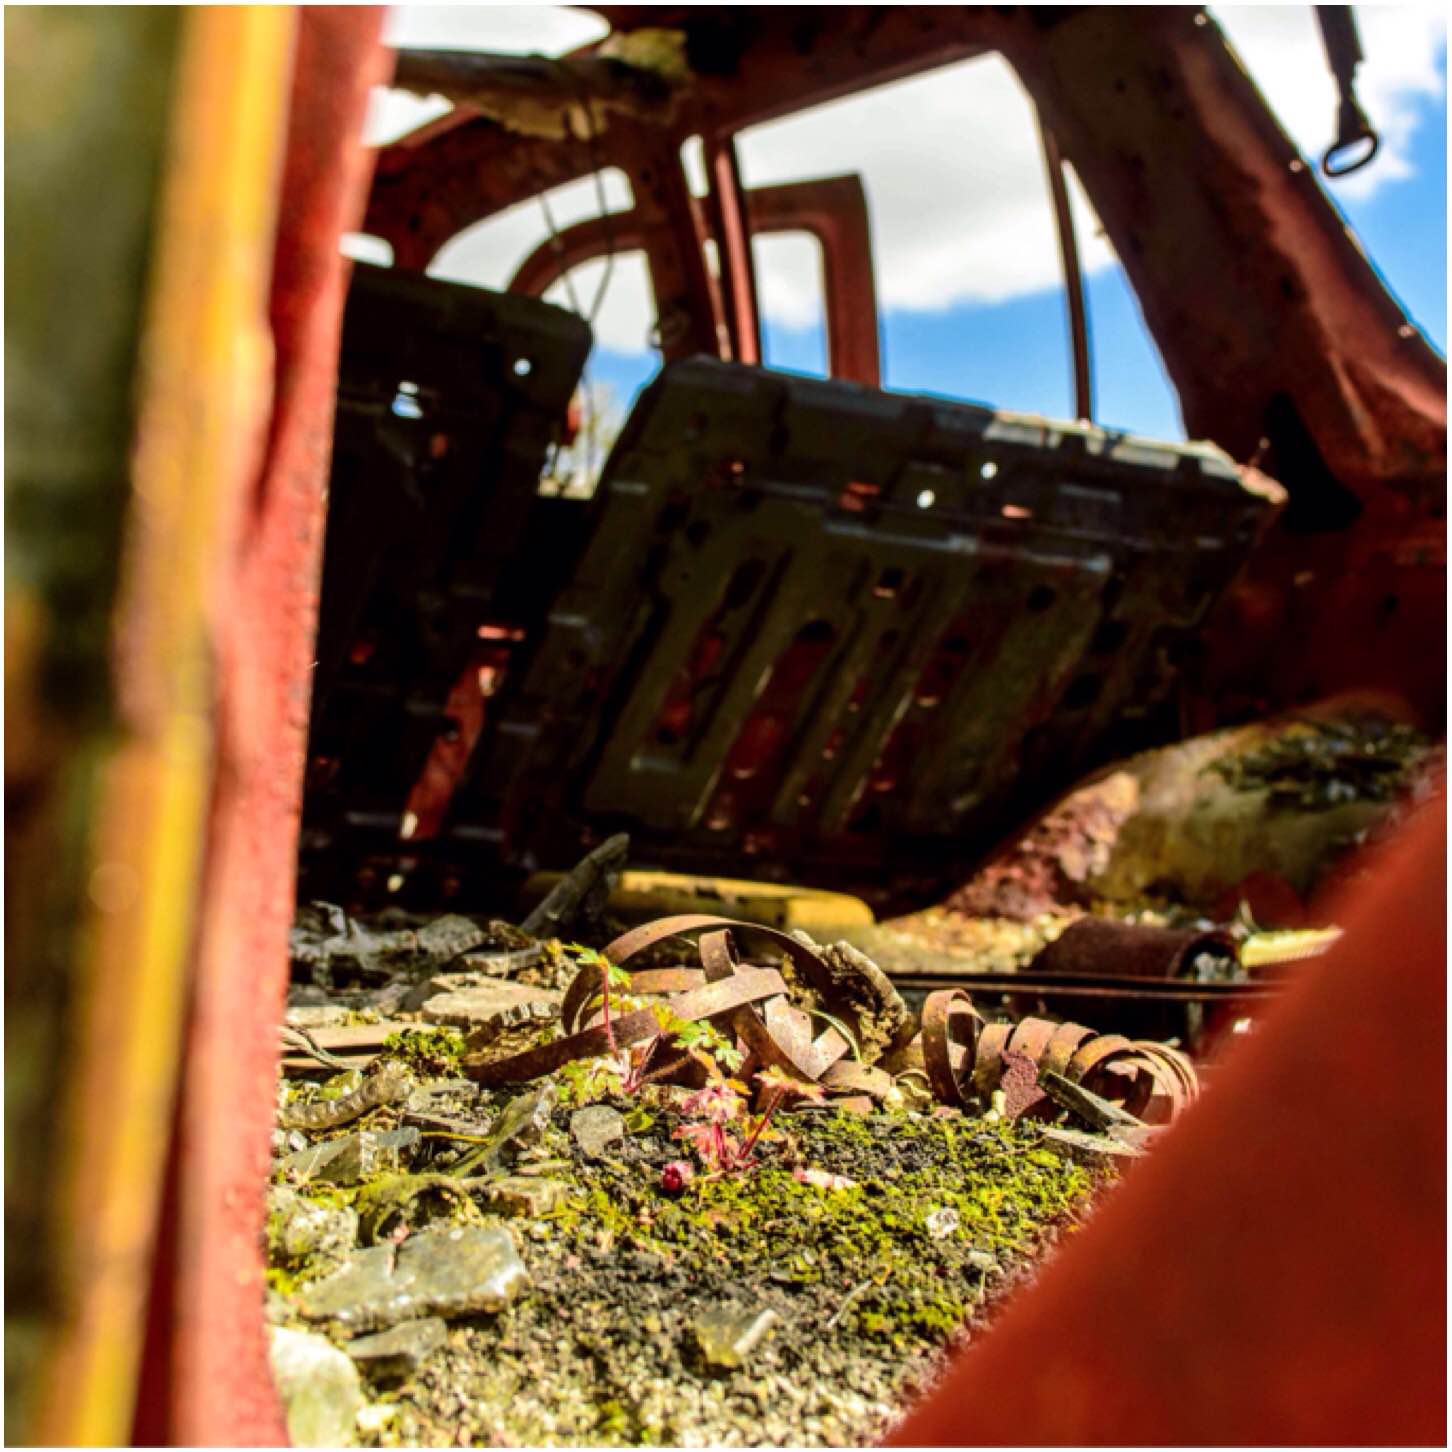
My favourite picture was of a burnt-out car that has been left abandoned in this area. Right in the middle of the boot area a small patch of Herb Robert has managed to gain a toehold in this otherwise sterile metal structure.
Herb robert colonising
Tomorrow’s instalment I think will be on insects as they seem to be becoming active now.
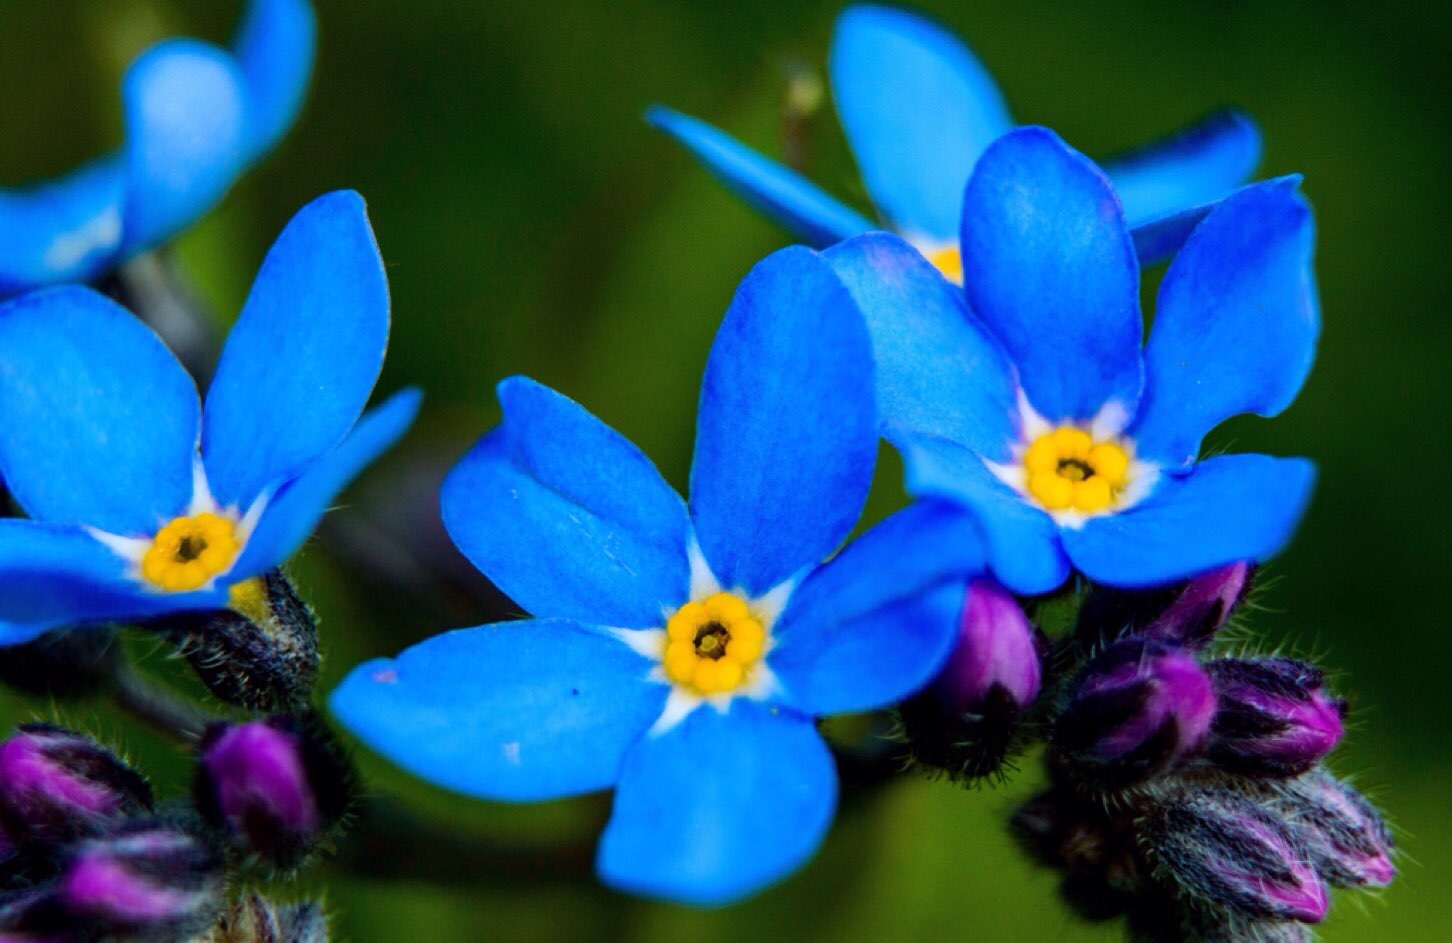
As I was contemplating heading out to do some photography for this nature challenge I spotted some beautiful blue wild flowers. The problem I had though was they were all really tiny so out came my macro lens extensions, mini tripod and remote control for my camera.
Forget-me-nots
There was a bit of wind and it was occasionally gusting so I had to be really patient to get a decent shot. The picture above of the forget-me-nots I took in the front garden in view of anyone passing by. The sight of me lying down on the grass taking close ups in front of everyone seemed to amuse my wife Alison and daughter Catherine for some reason 🙂
The next flower was really tiny – ground ivy (aka alehoof or creeping charlie). It was tucked away in a shady corner under a lot of leaf cover. I used all my lens extensions to get this shot right into the centre of the flower.
Ground ivy
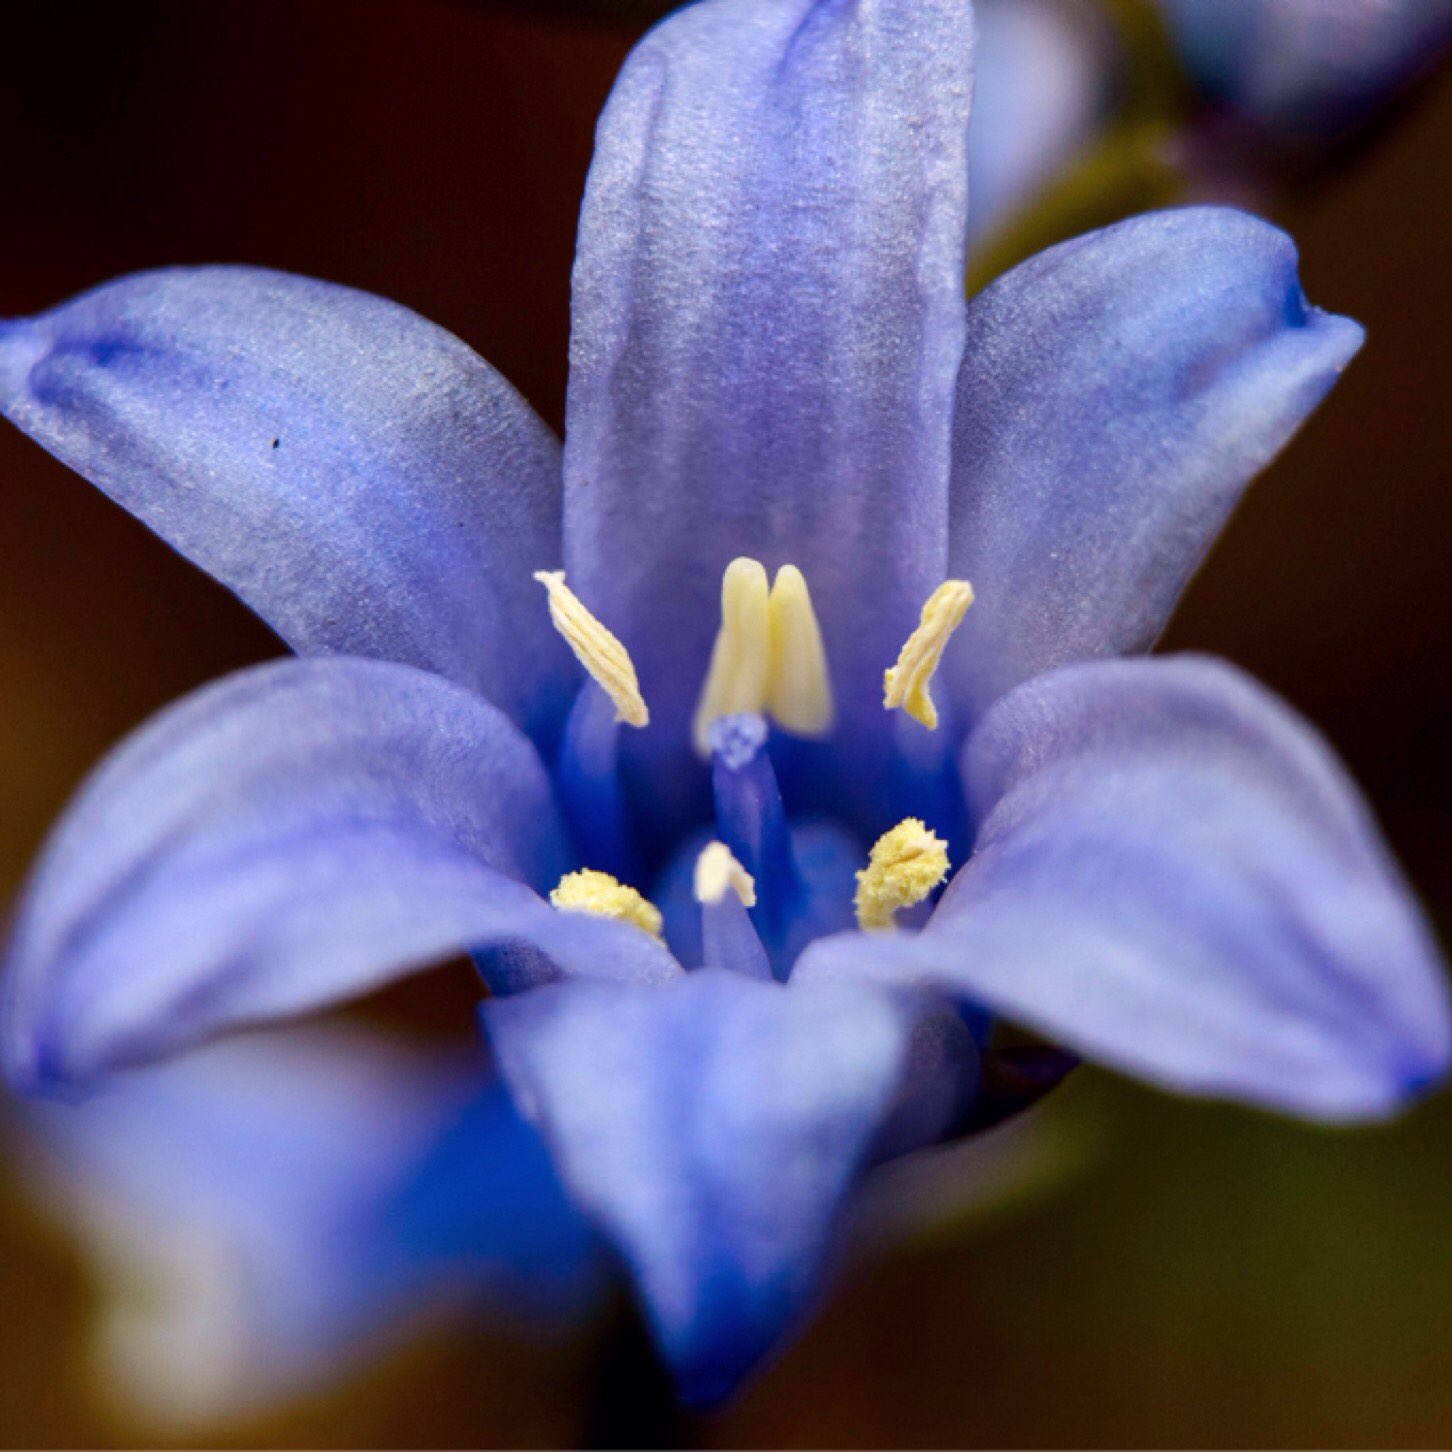
To finish off I spotted an upright bluebell flower. I took this one without the tripod and when the wind suddenly stopped. I think it was worth the perseverance though.
Bluebell (possibly Spanish)
I have no idea what tomorrow will bring in this 7 day challenge but I may venture further afield if I can.
Day 2 of this Nature Challenge found me back home in Bramley. I am really struggling to walk at the moment so I cheated today and jumped into my car and headed off down to one of the ponds in my village.
Spots along the way
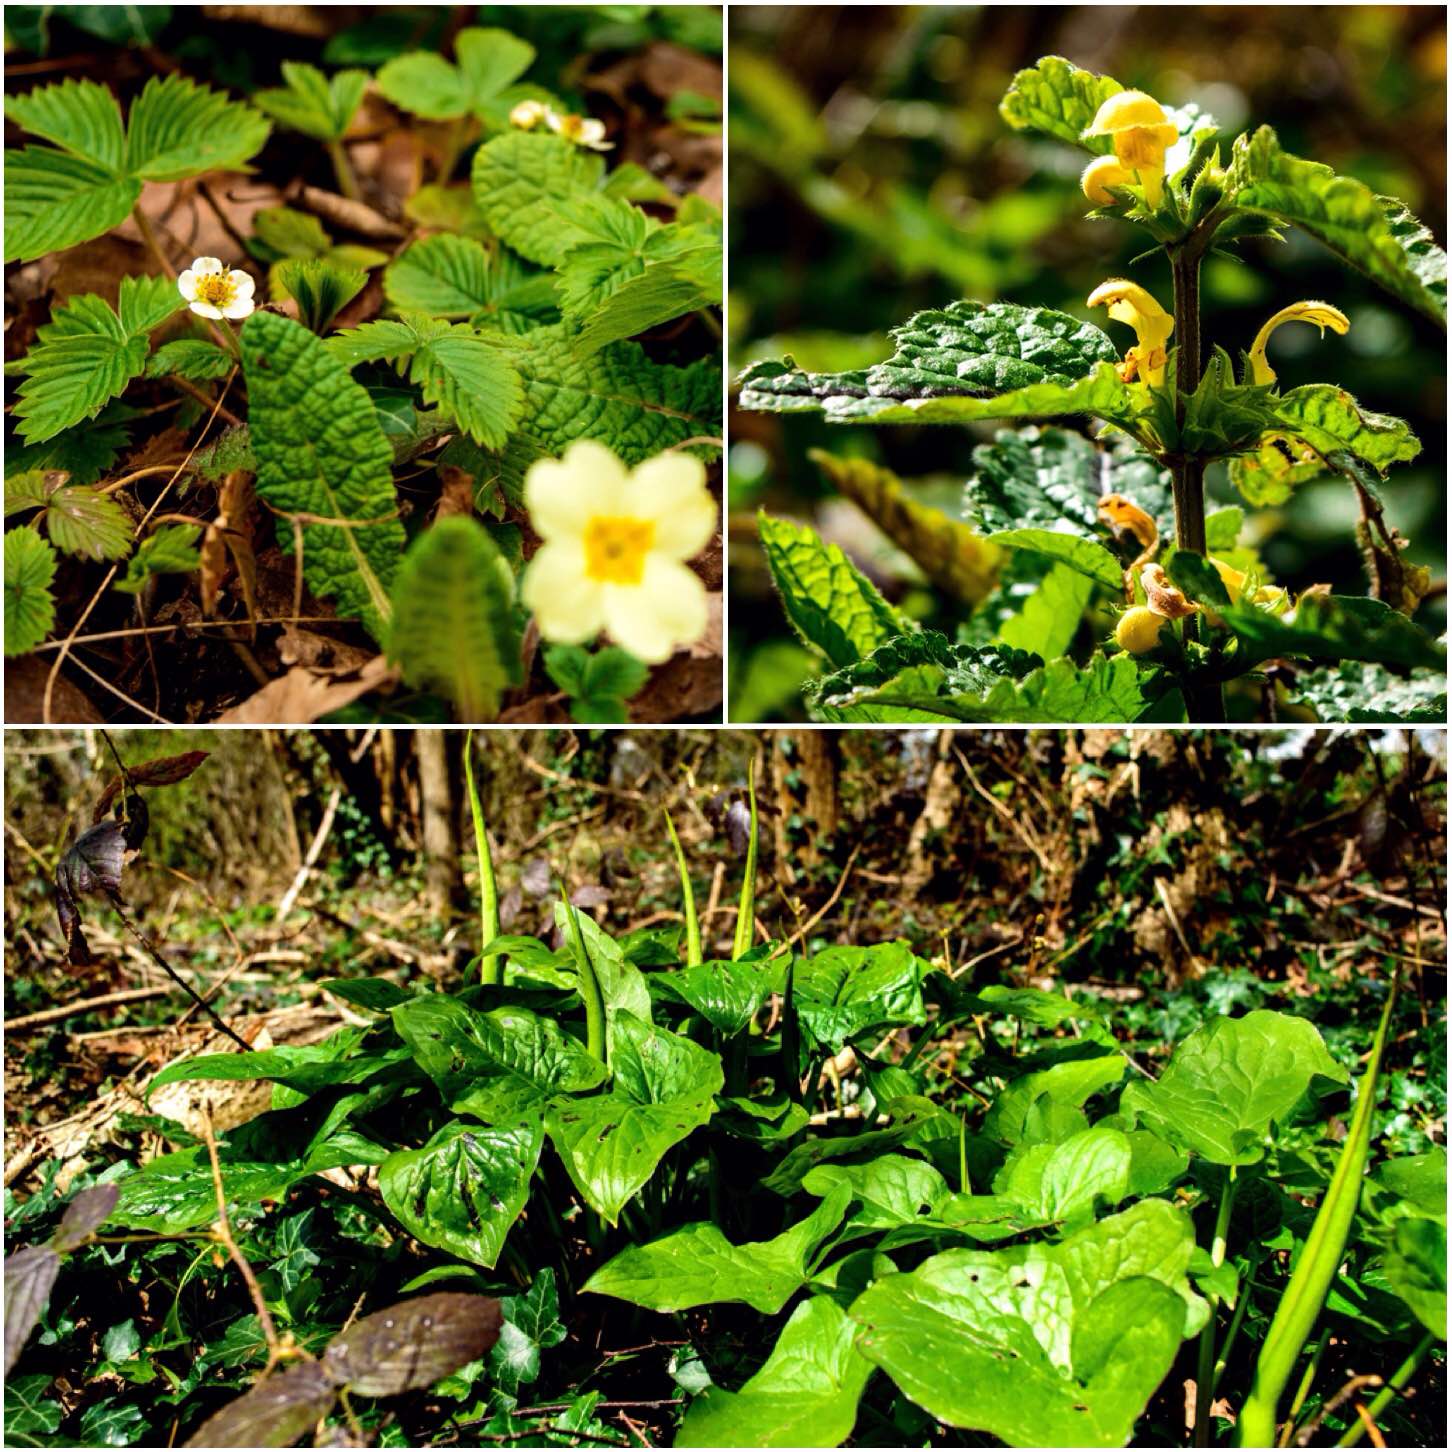
I thought it was time to see what life I could spot in the pond. Along the way I spotted some lovely wild strawberries in amongst the primroses as well as some yellow archangel. Beside it all the arum was starting to push up their spadix ready to transform themselves into things of beauty.
The pond I visited has had tv’s and other detritus dumped into it but it is still quite beautiful ringed with marsh marigolds and a centre of reedmace. There was a slight oil sheen on the surface but that did not seem to hinder the wildlife in any way.
The Pond
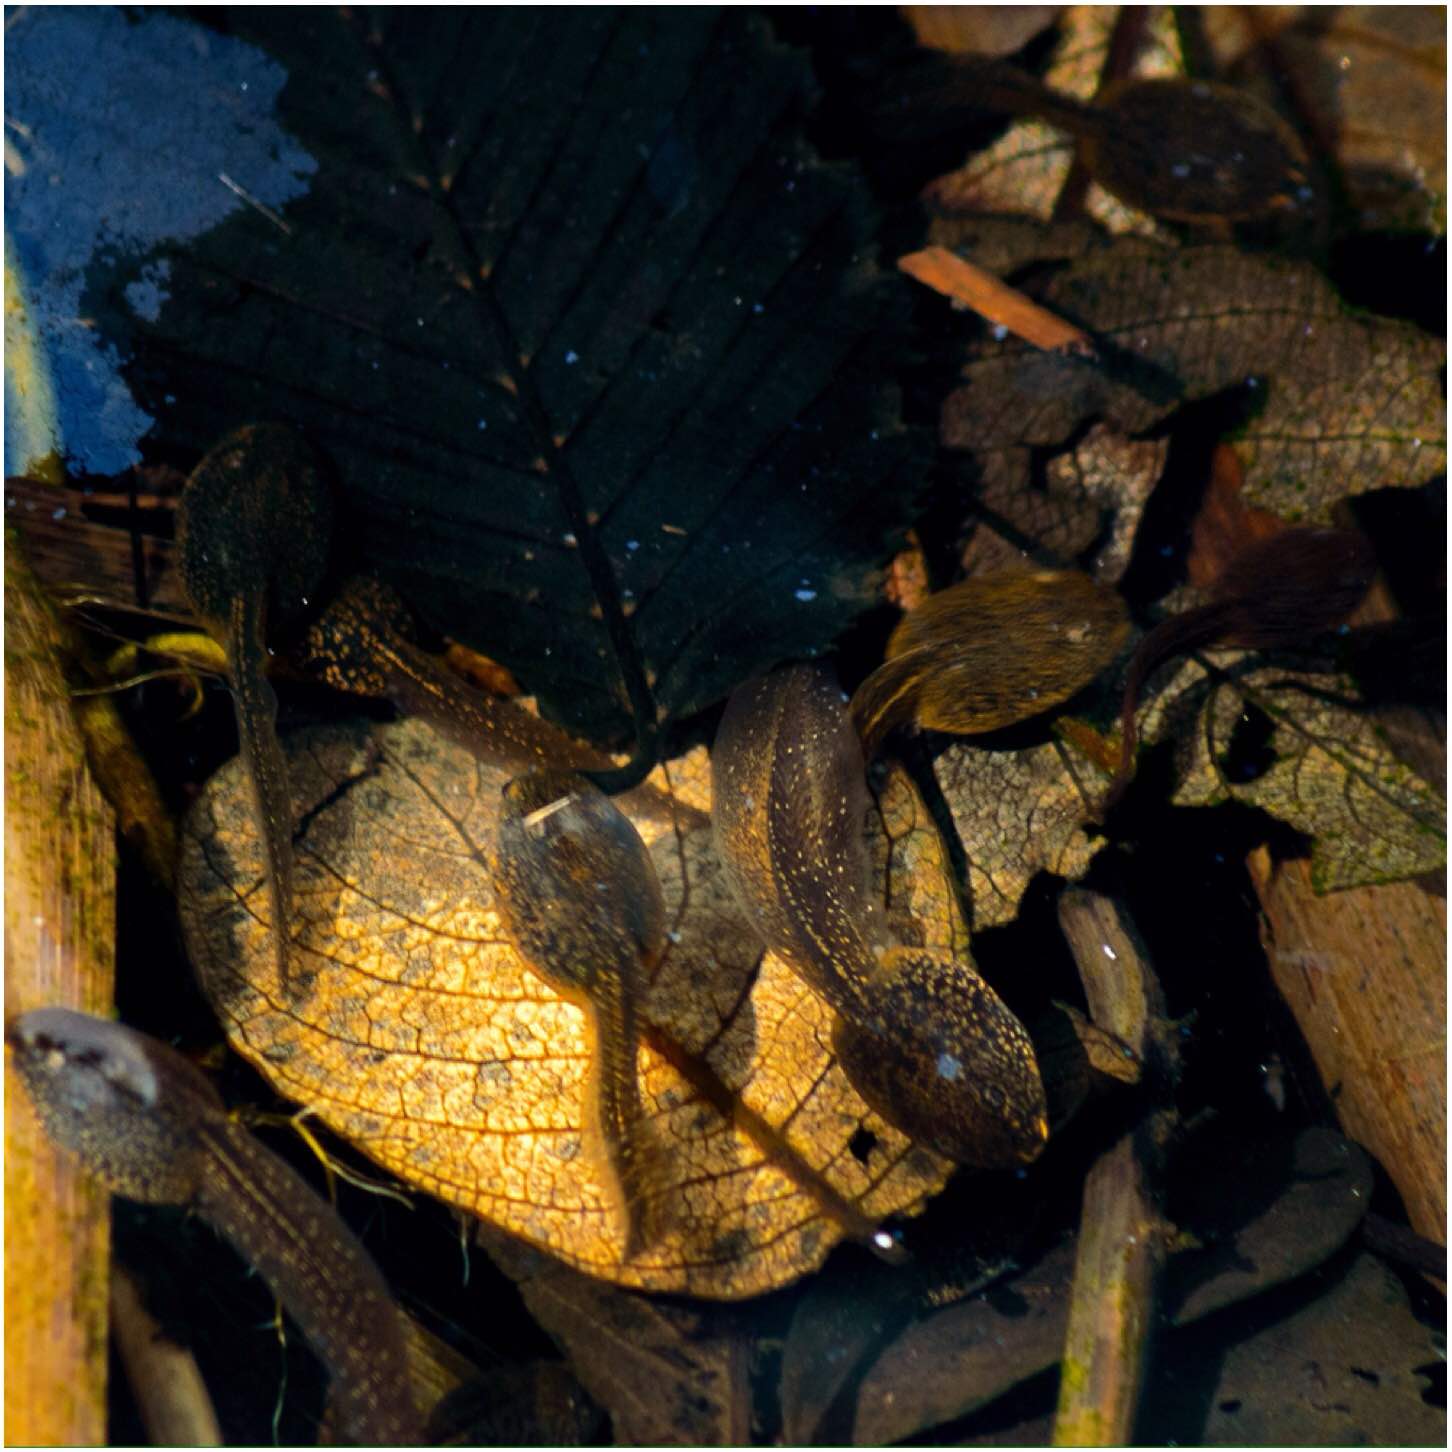
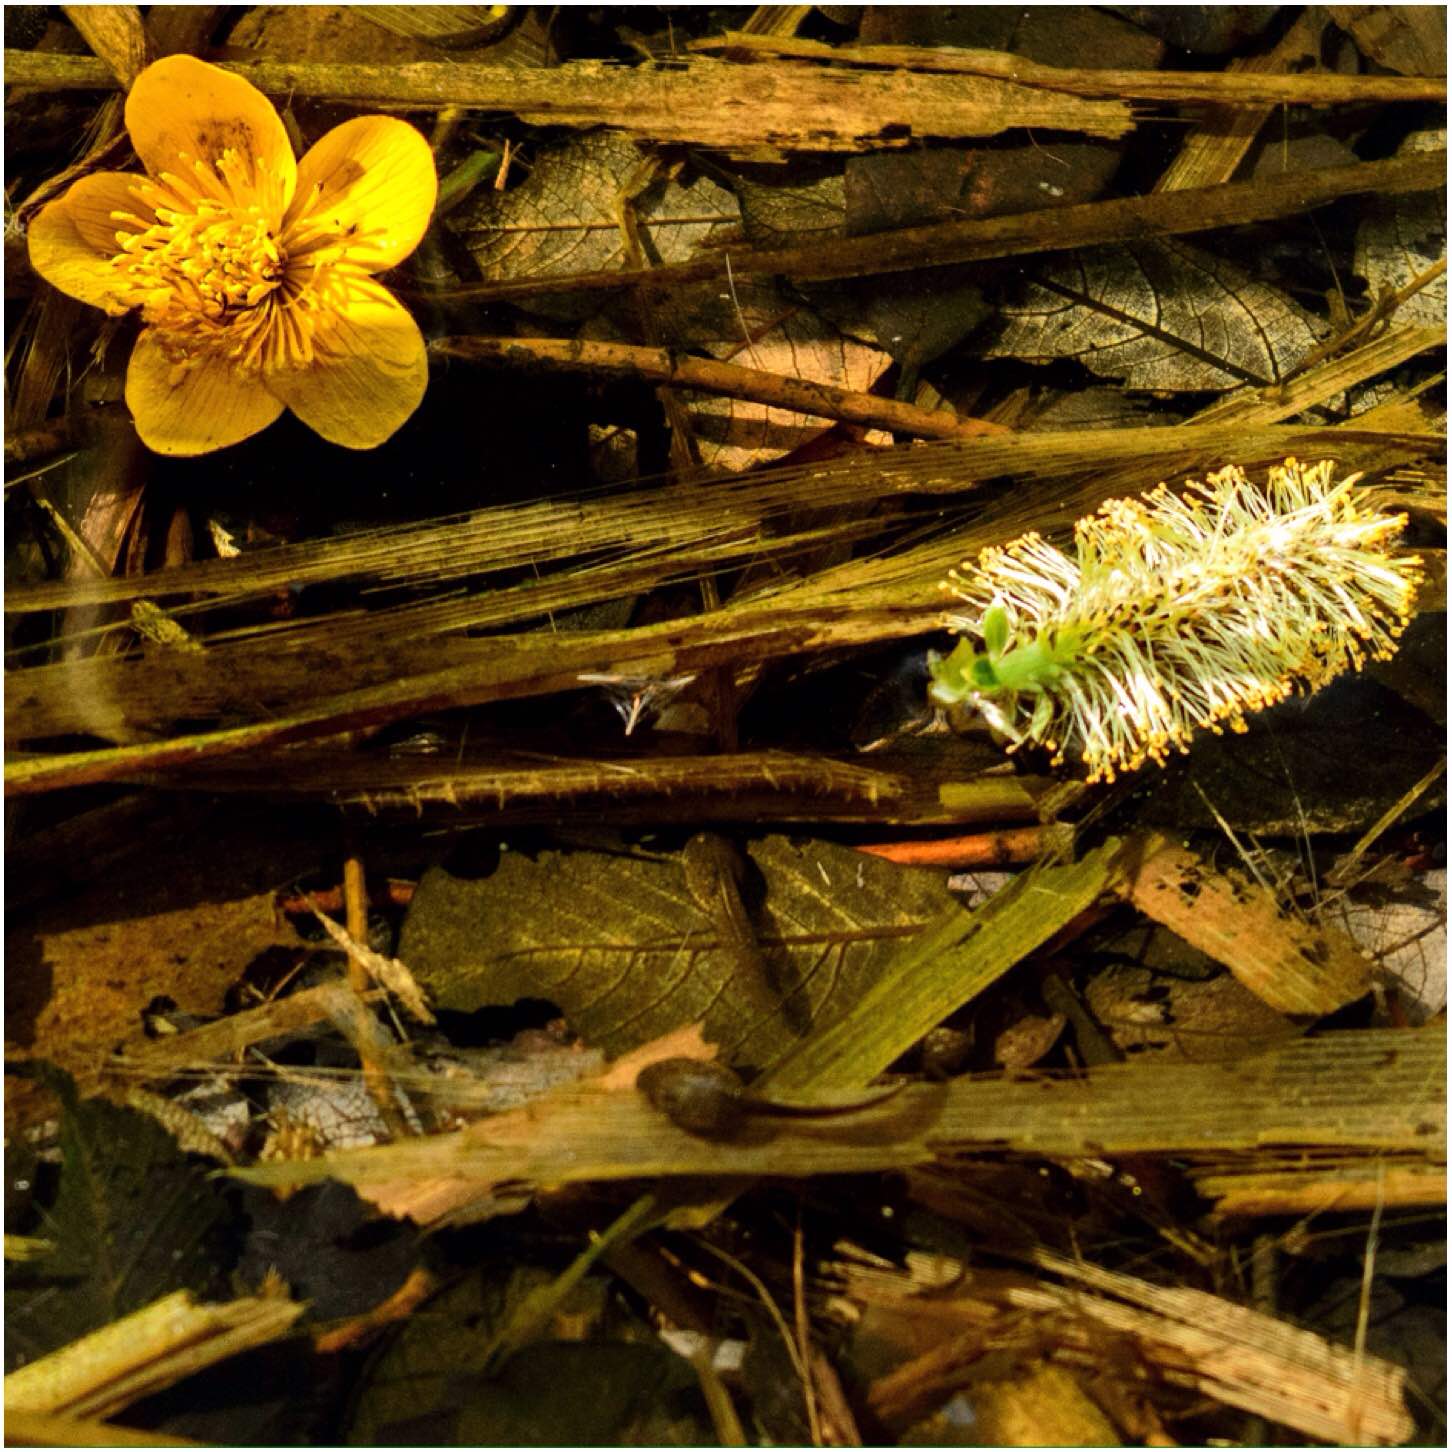
I soon spotted some tadpoles in amongst the decaying material in the pond however on the right you can see a catkin (the pond was strewn with them) from a pussy willow tree.
Spotted one of the little fellas
In my attempts to get a close shot of a tadpole (they do move fast) I inadvertently snapped a catkin. The complexity and beauty up close of the catkin really surprised me.
Fine detail – Pussy Willow
Finally I managed to get a half way decent shot of the little fellas. Not the most fearsome creature to track down but they sure are a difficult one to pin down and photograph 🙂
I got nominated by my friend Kitty Brown on Facebook for this Nature Challenge that is on the rounds. I am always up for a challenge if it helps me getting out and about.
I re-ripped my calf muscle again (not looking where I was going) so I cannot move very far but luckily I spotted these beauties preening themselves in front of the unit.
Preening Time
My home for the weekend is the lovely canal boat the Wee Dram (Thames Boat Training) that you can see just to the right of the picture.
Seemingly this lasts for 7 days so I may be doing a bit of macro photography in my garden as my mobility for the next few days looks like it will be severely curtailed – then again whoever said a challenge was supposed to be easy 🙂
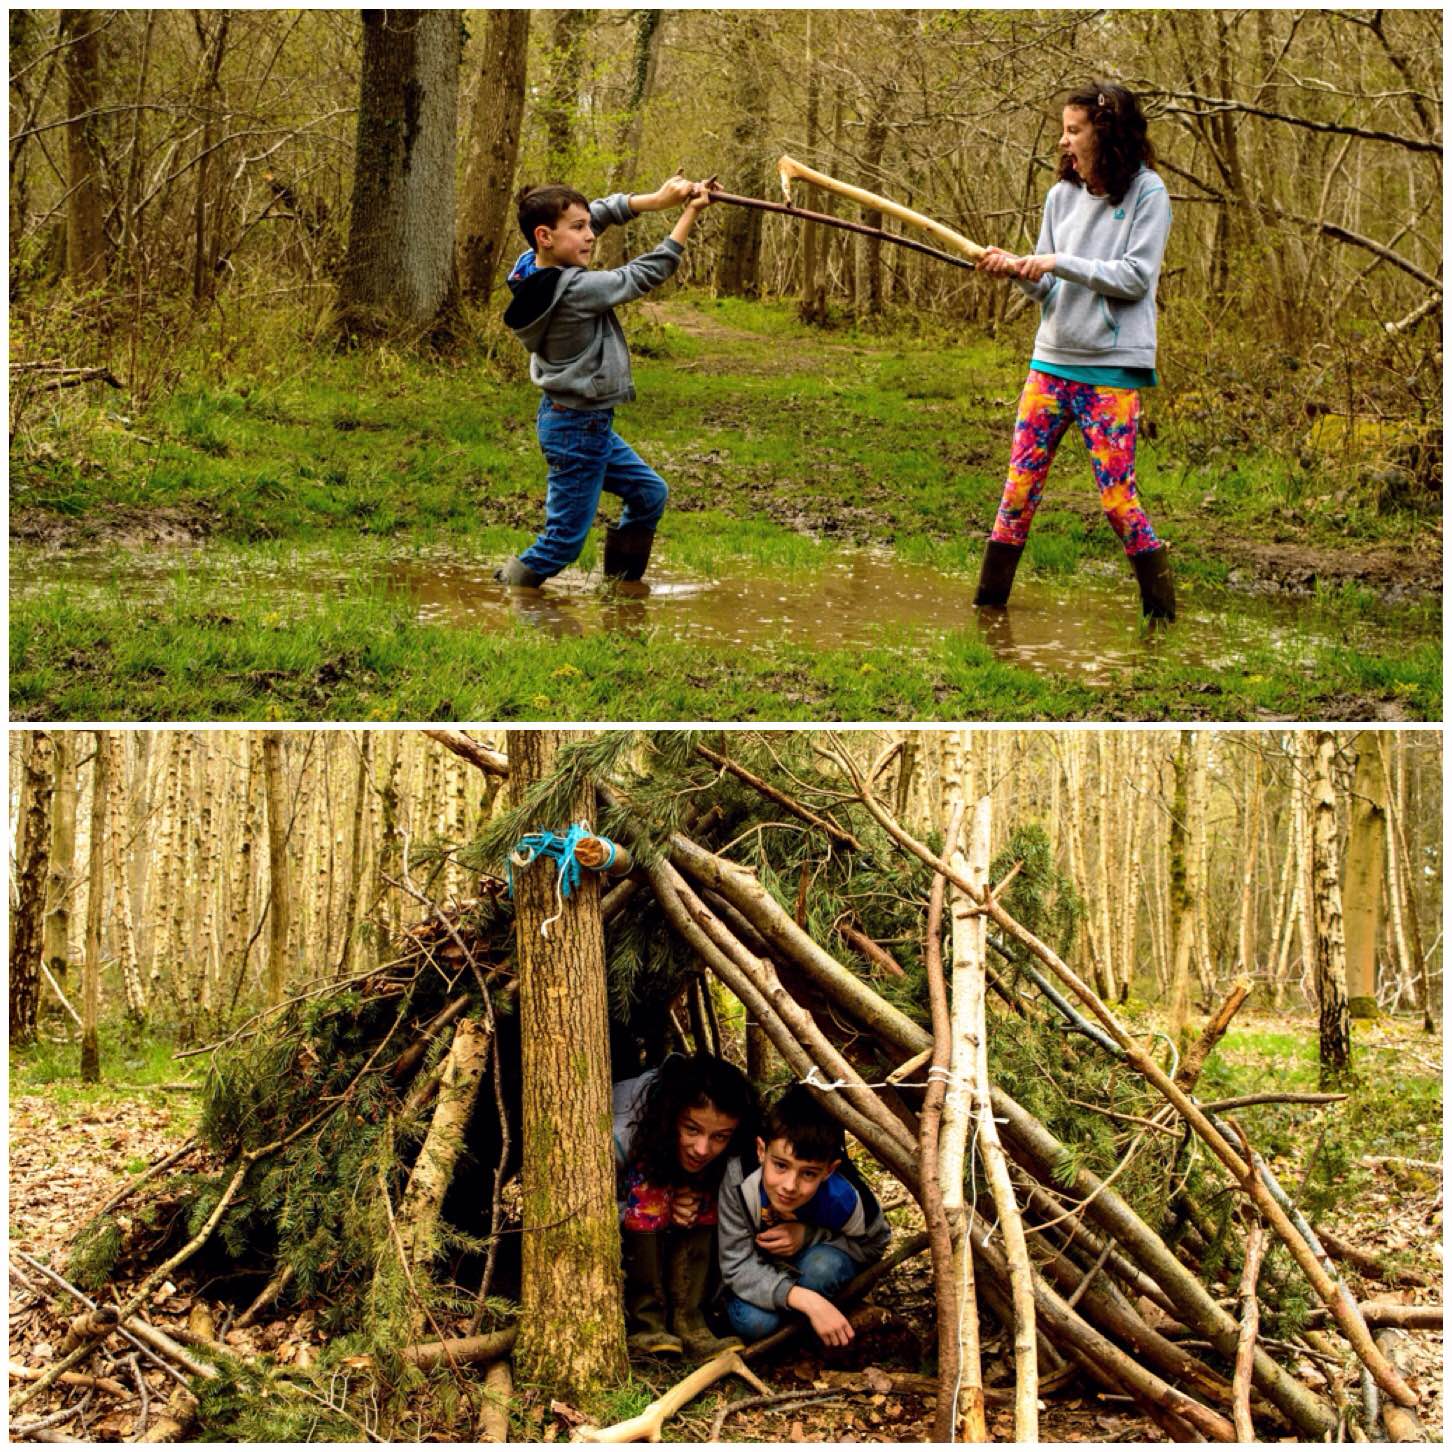
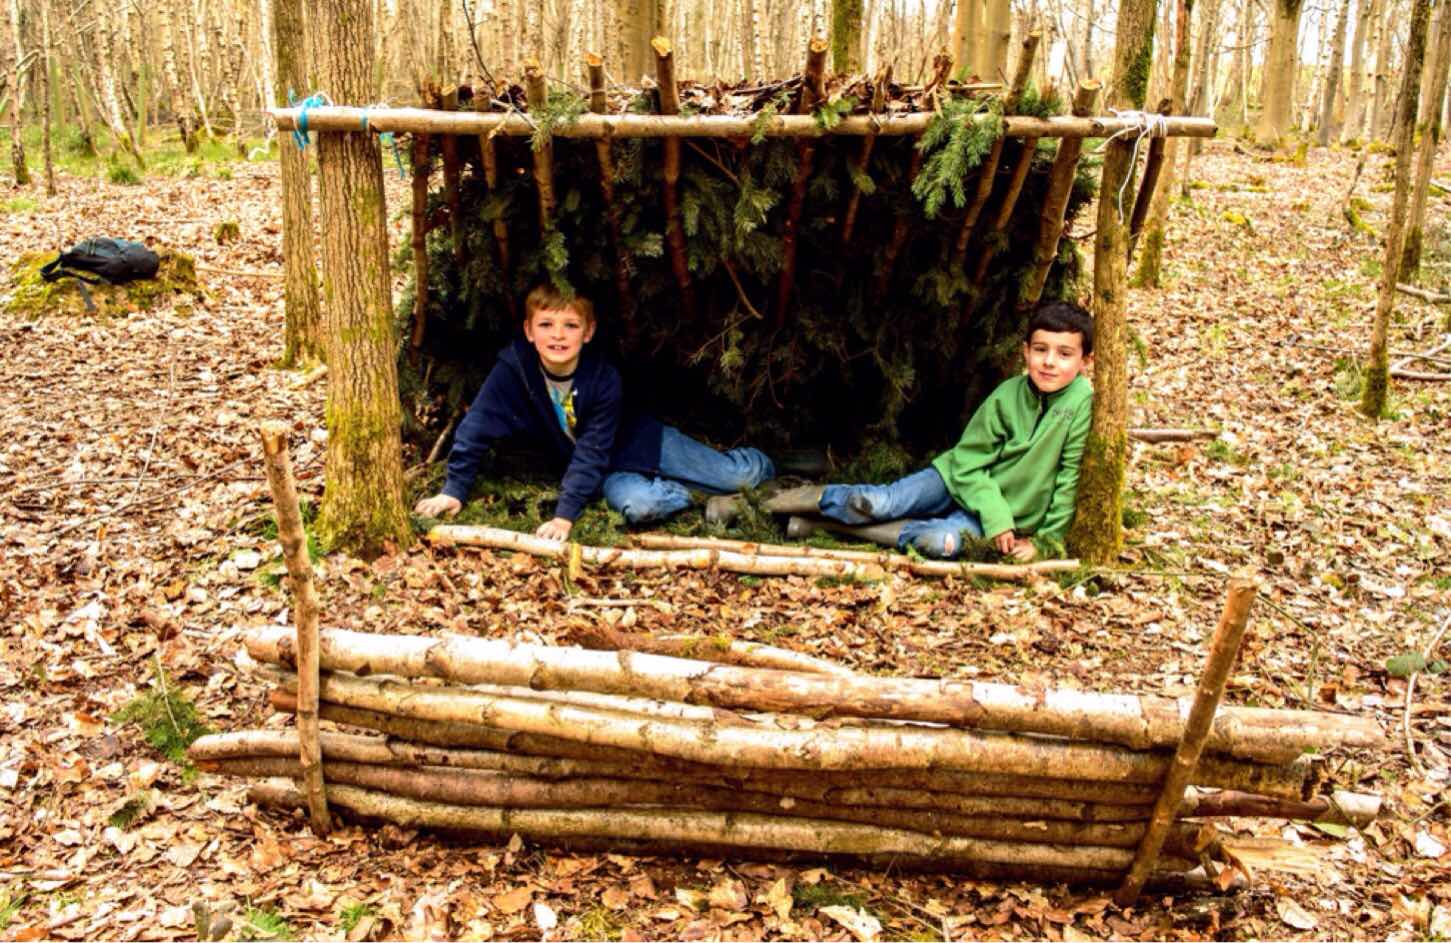
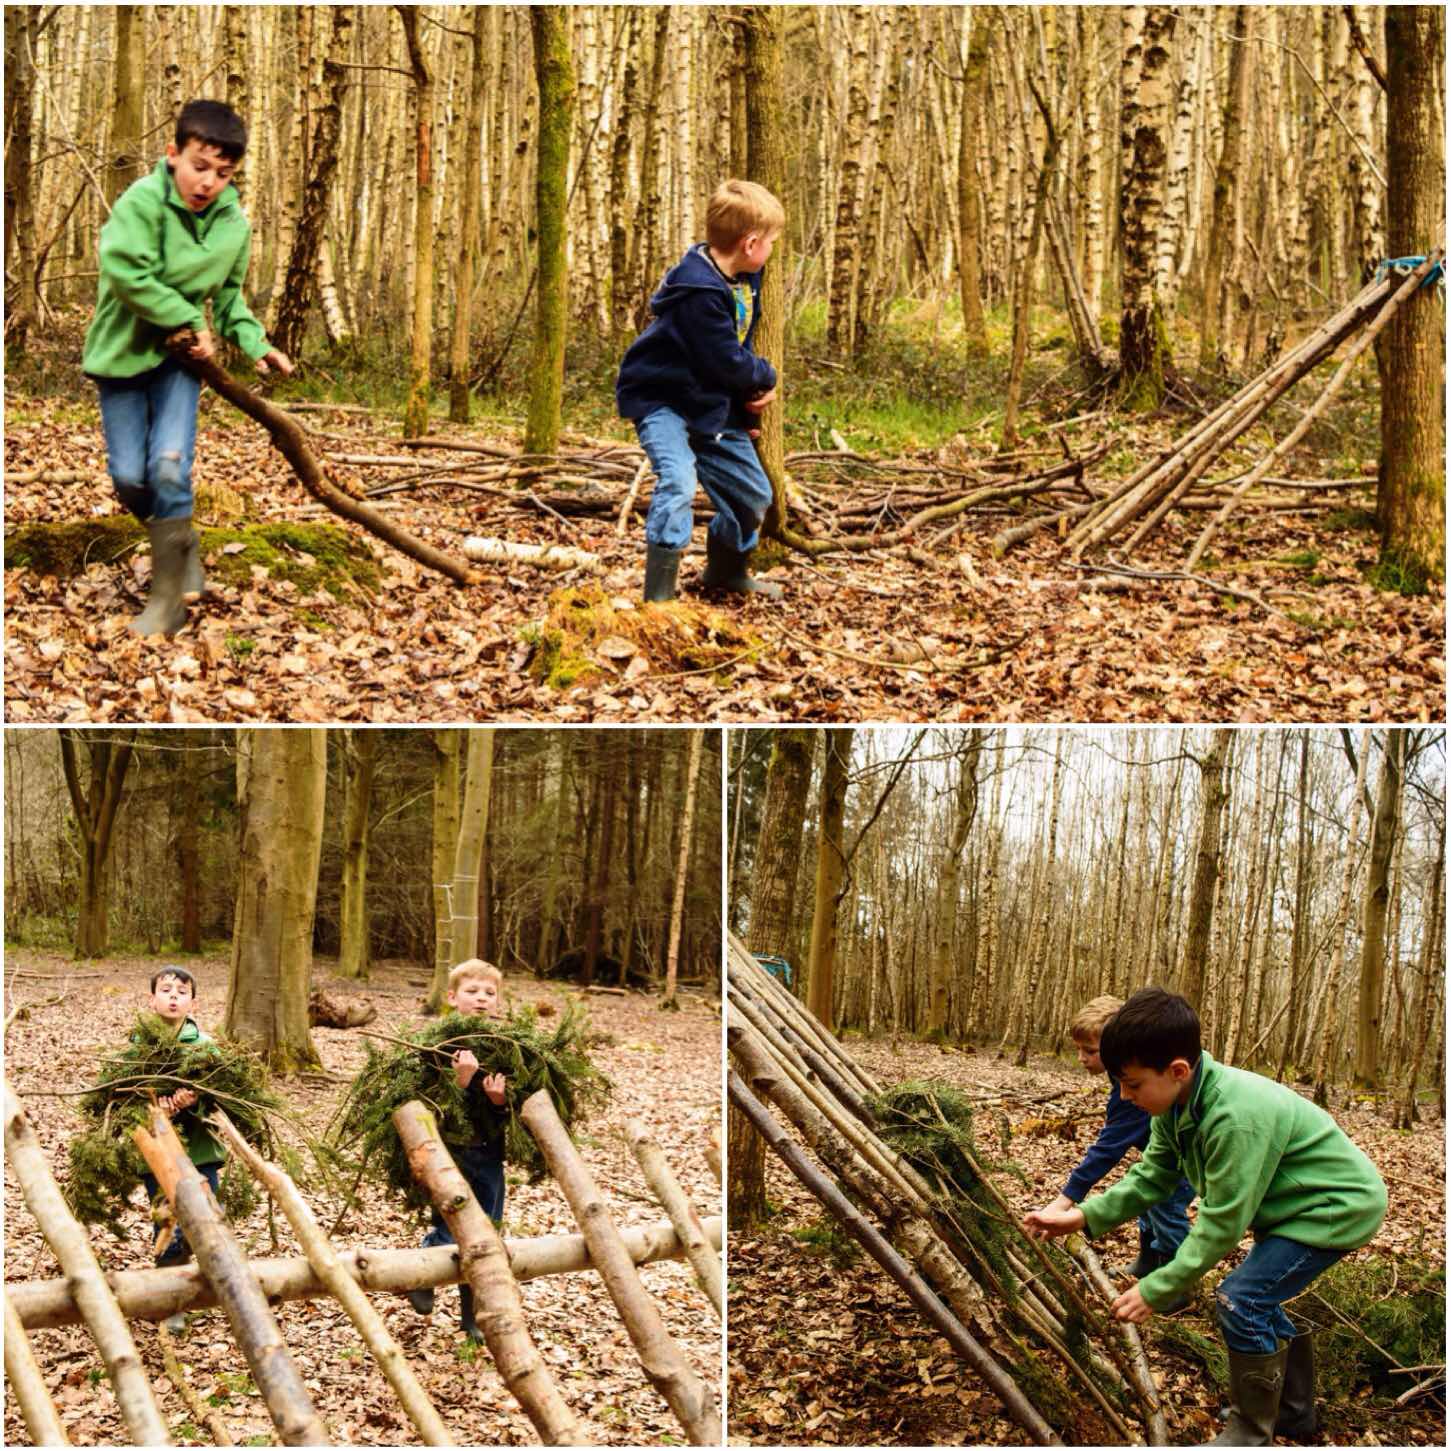
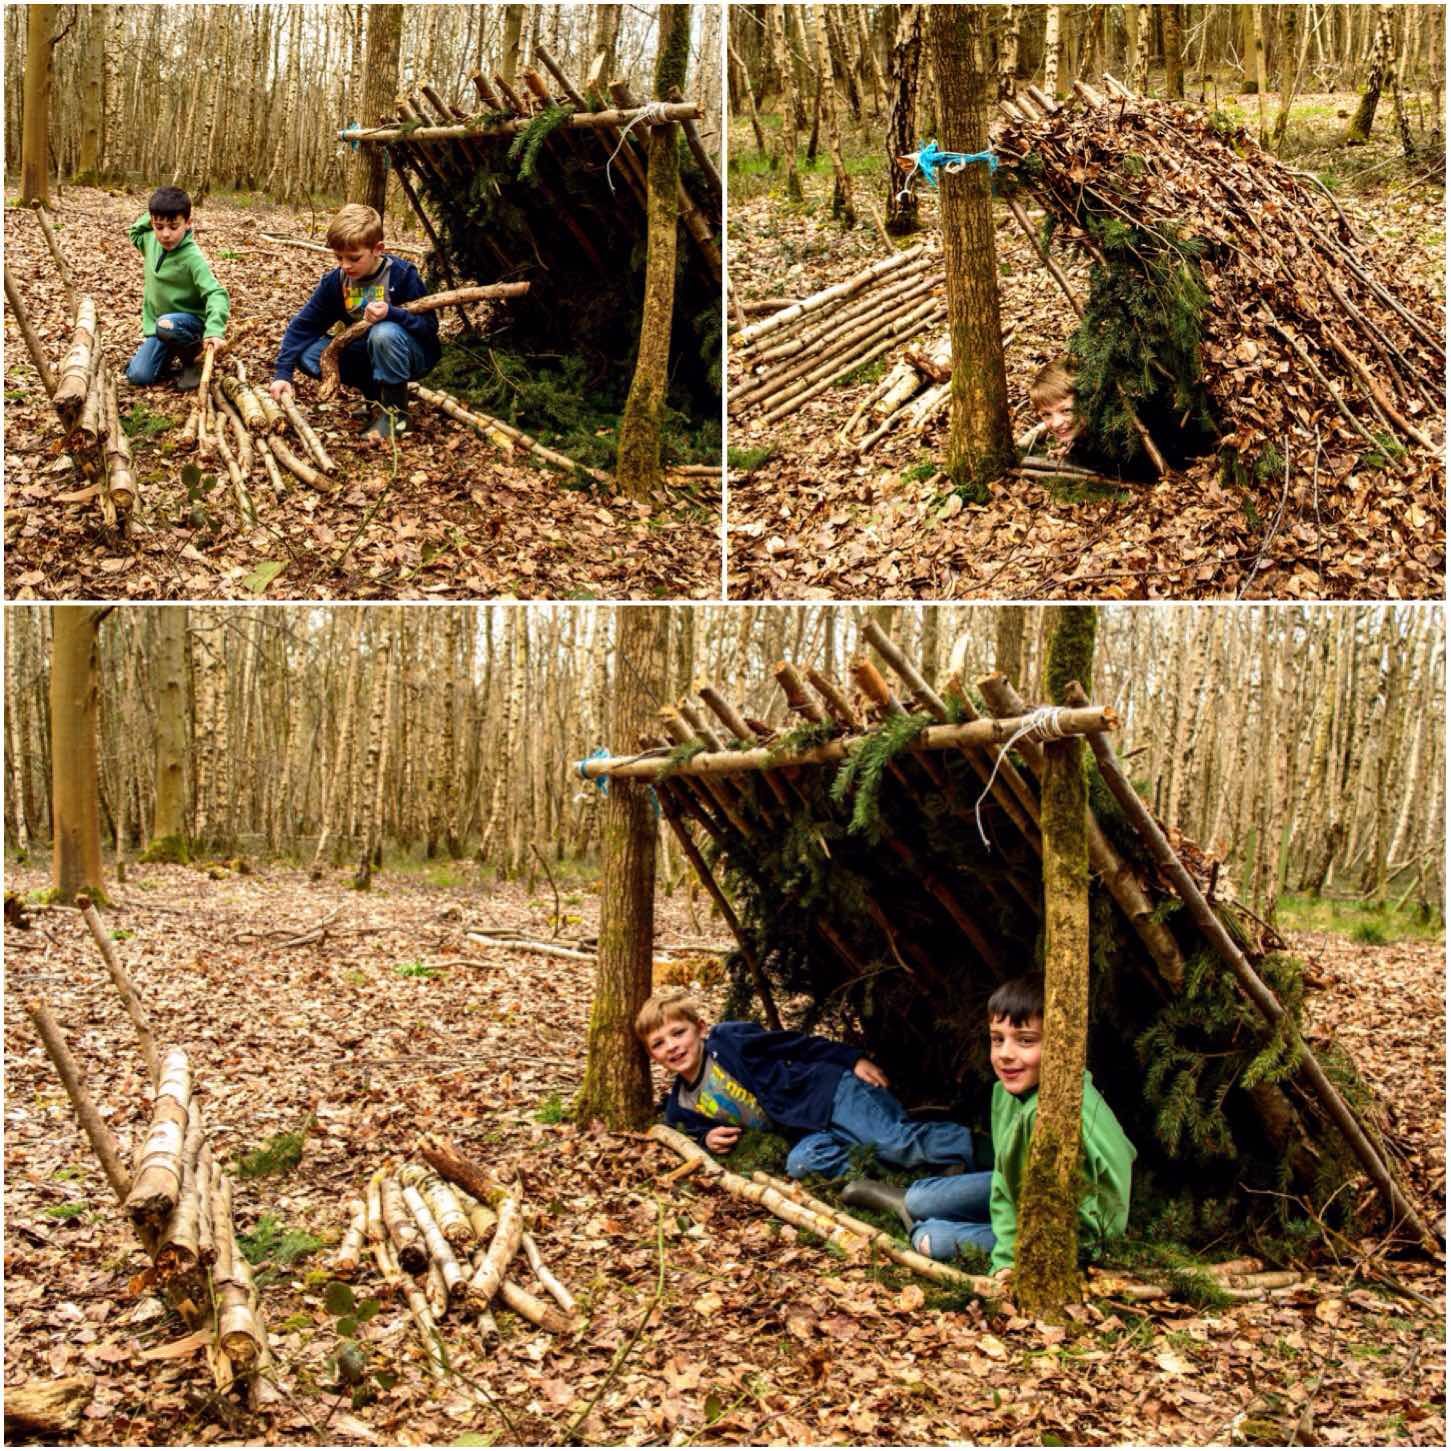
Last weekend I went for a walk in the woods with my lad Finlay and his friend William. I was planning a bit of a hike however I spotted a glade in our local woods where an area has been set aside for kids to build dens.
This post follows the steps I talked the lads through the principles of shelter building. This is not a full on How To…. guide to shelter building but more of an introduction to the principles of it all.
The principles of shelter building
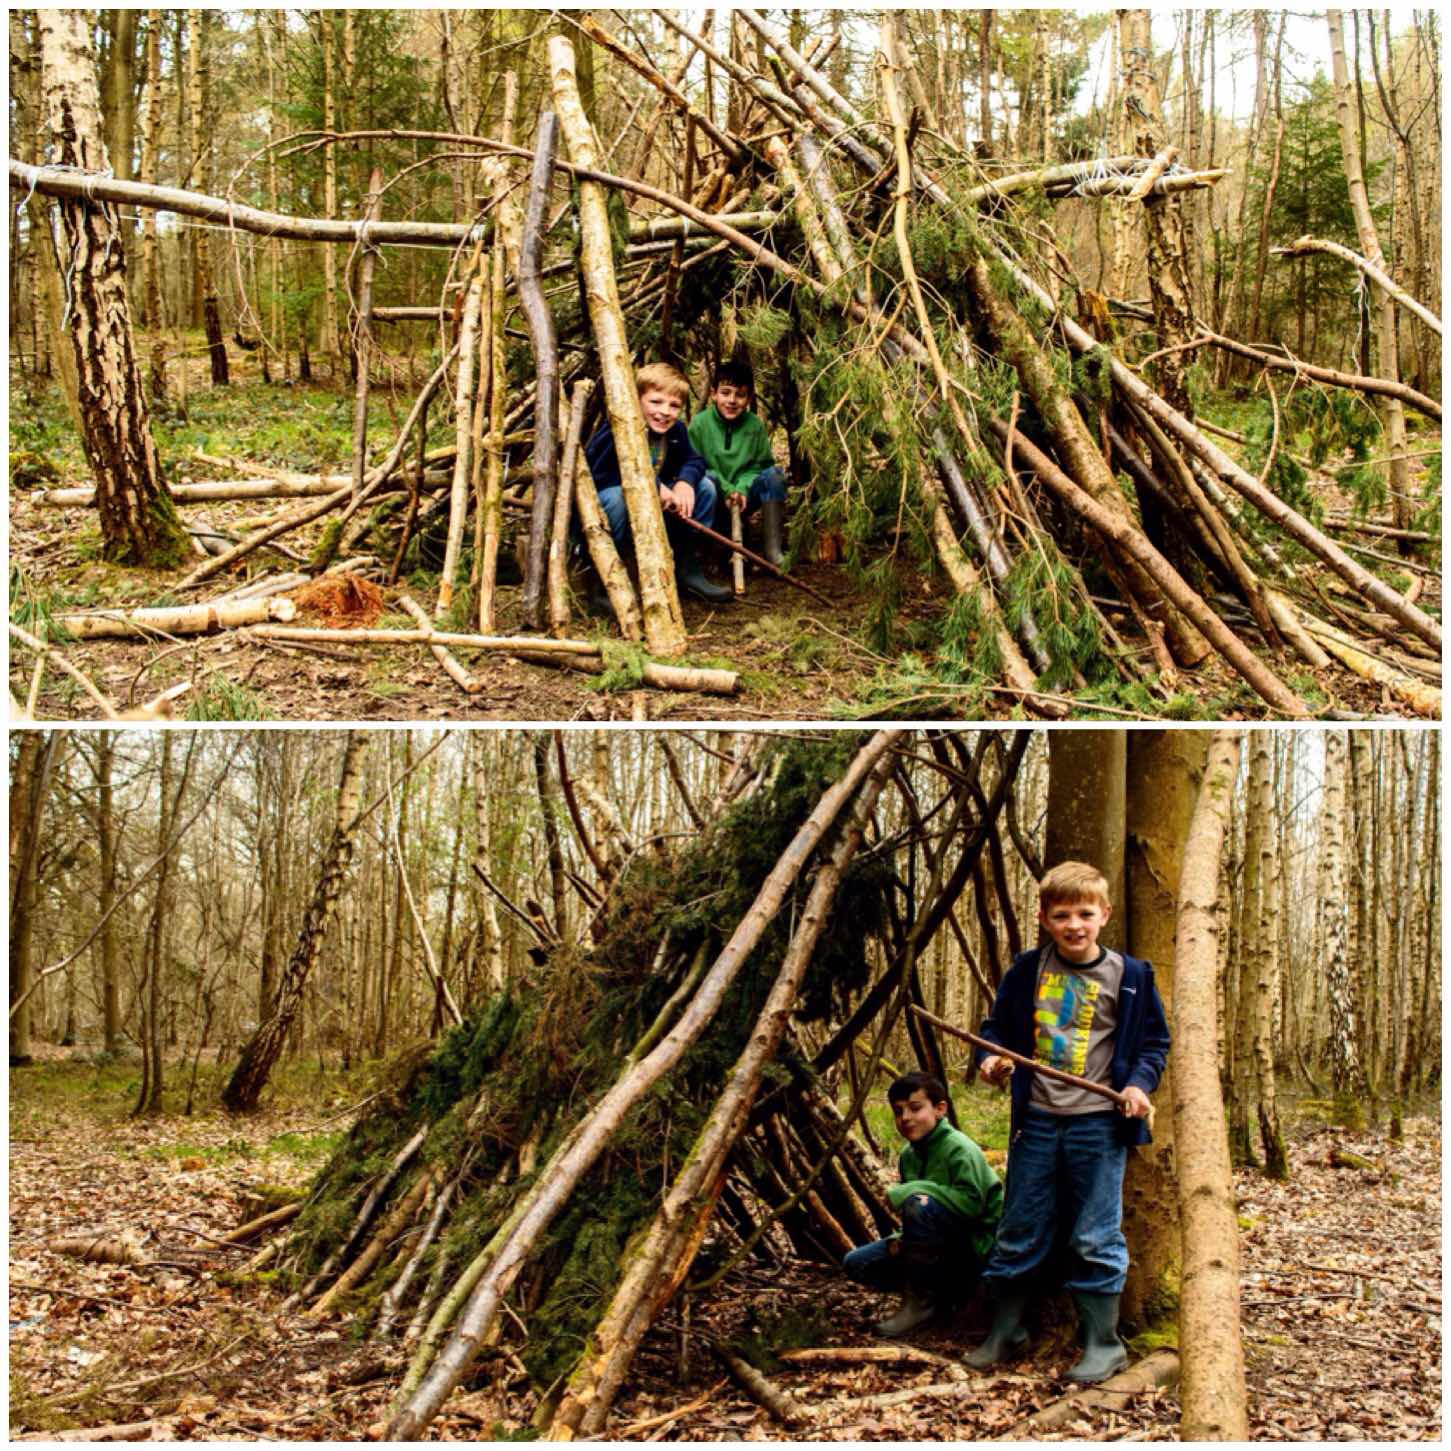
We had a wander around some of the shelters that had been left up by other groups and talked about the positive elements of each shelter. I find that this focuses the mind on what has worked well and how these elements can be incorporated into any other shelter.
We looked at how high a shelter needed to be, how many walls were really needed, how much thatch was needed and what was needed to keep them warm dependent on different weather conditions.
The positives
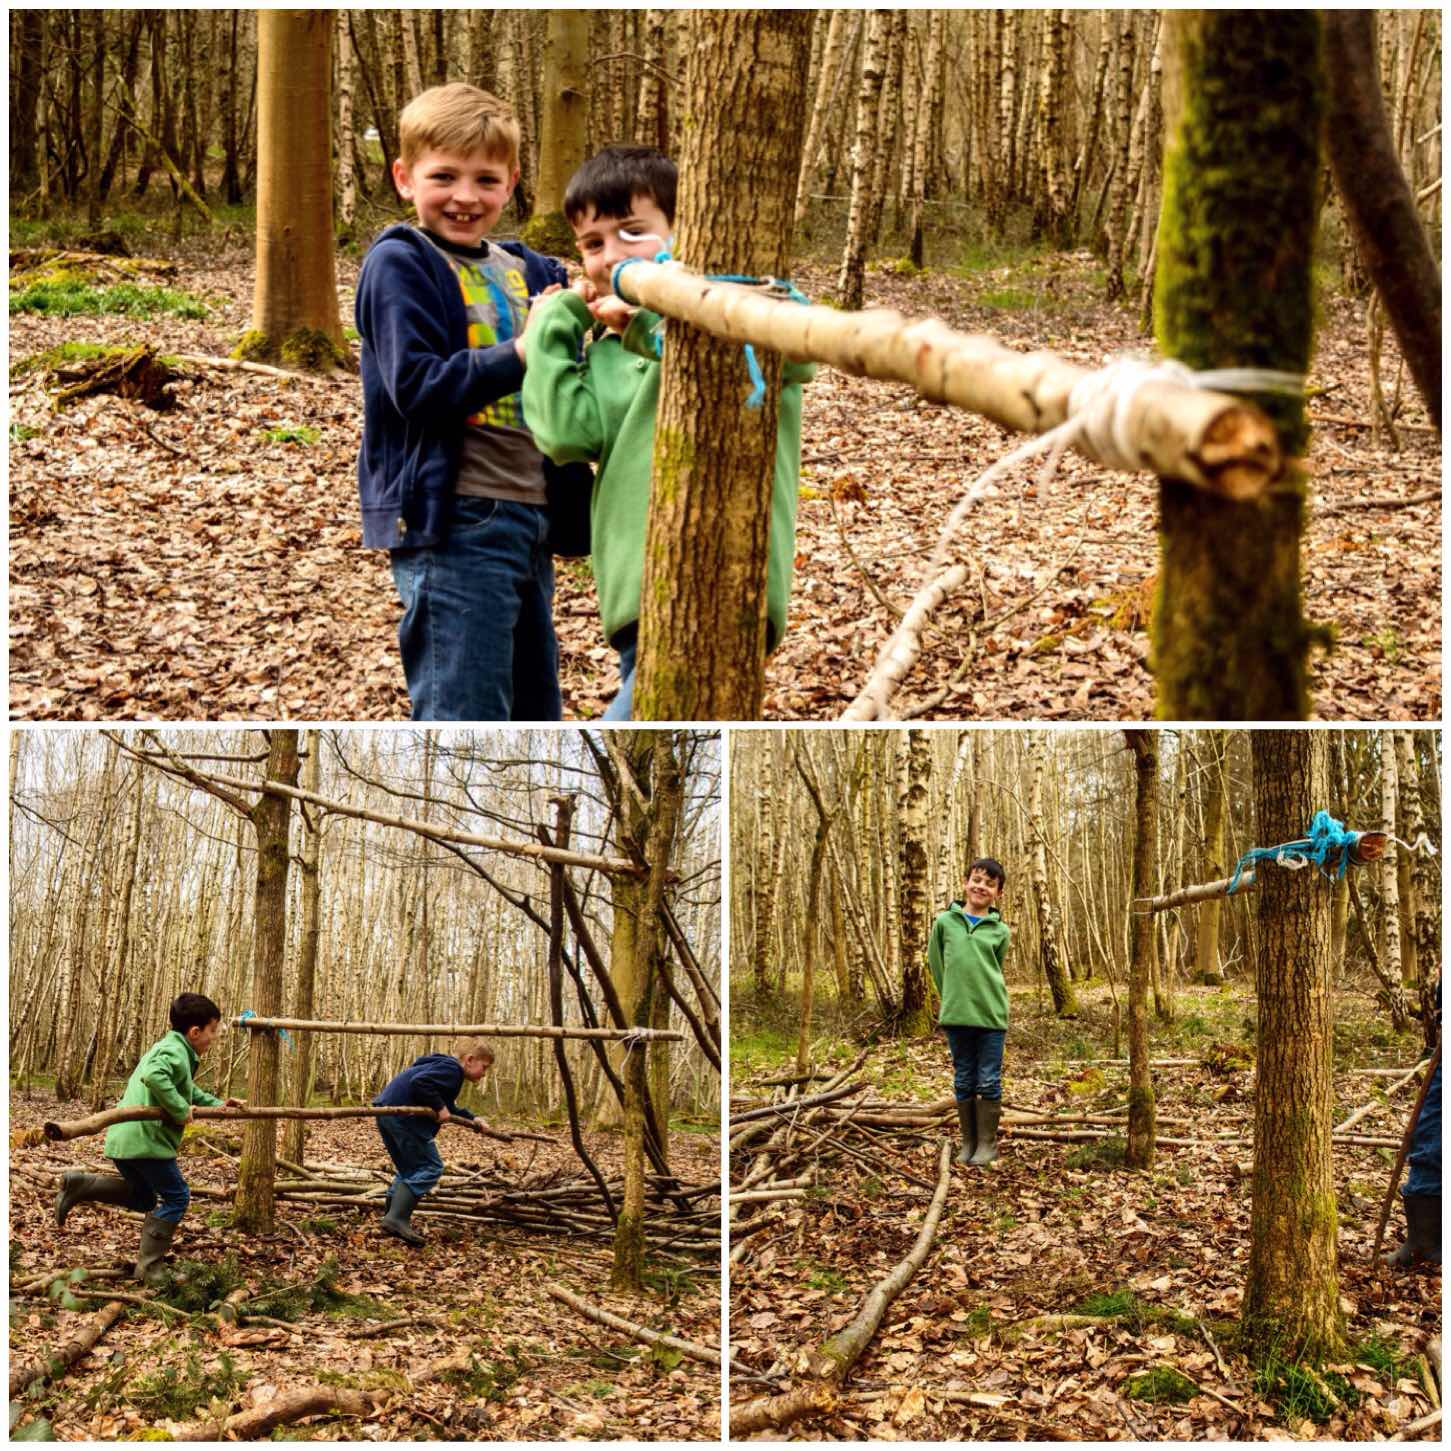
I told the lads that we only had time to build a small shelter (Sunday Dinner was calling) so they found some rope and wood and I showed them how to tie everything together to form a spar. We had no tools at all so had to work with what we had.
Setting out
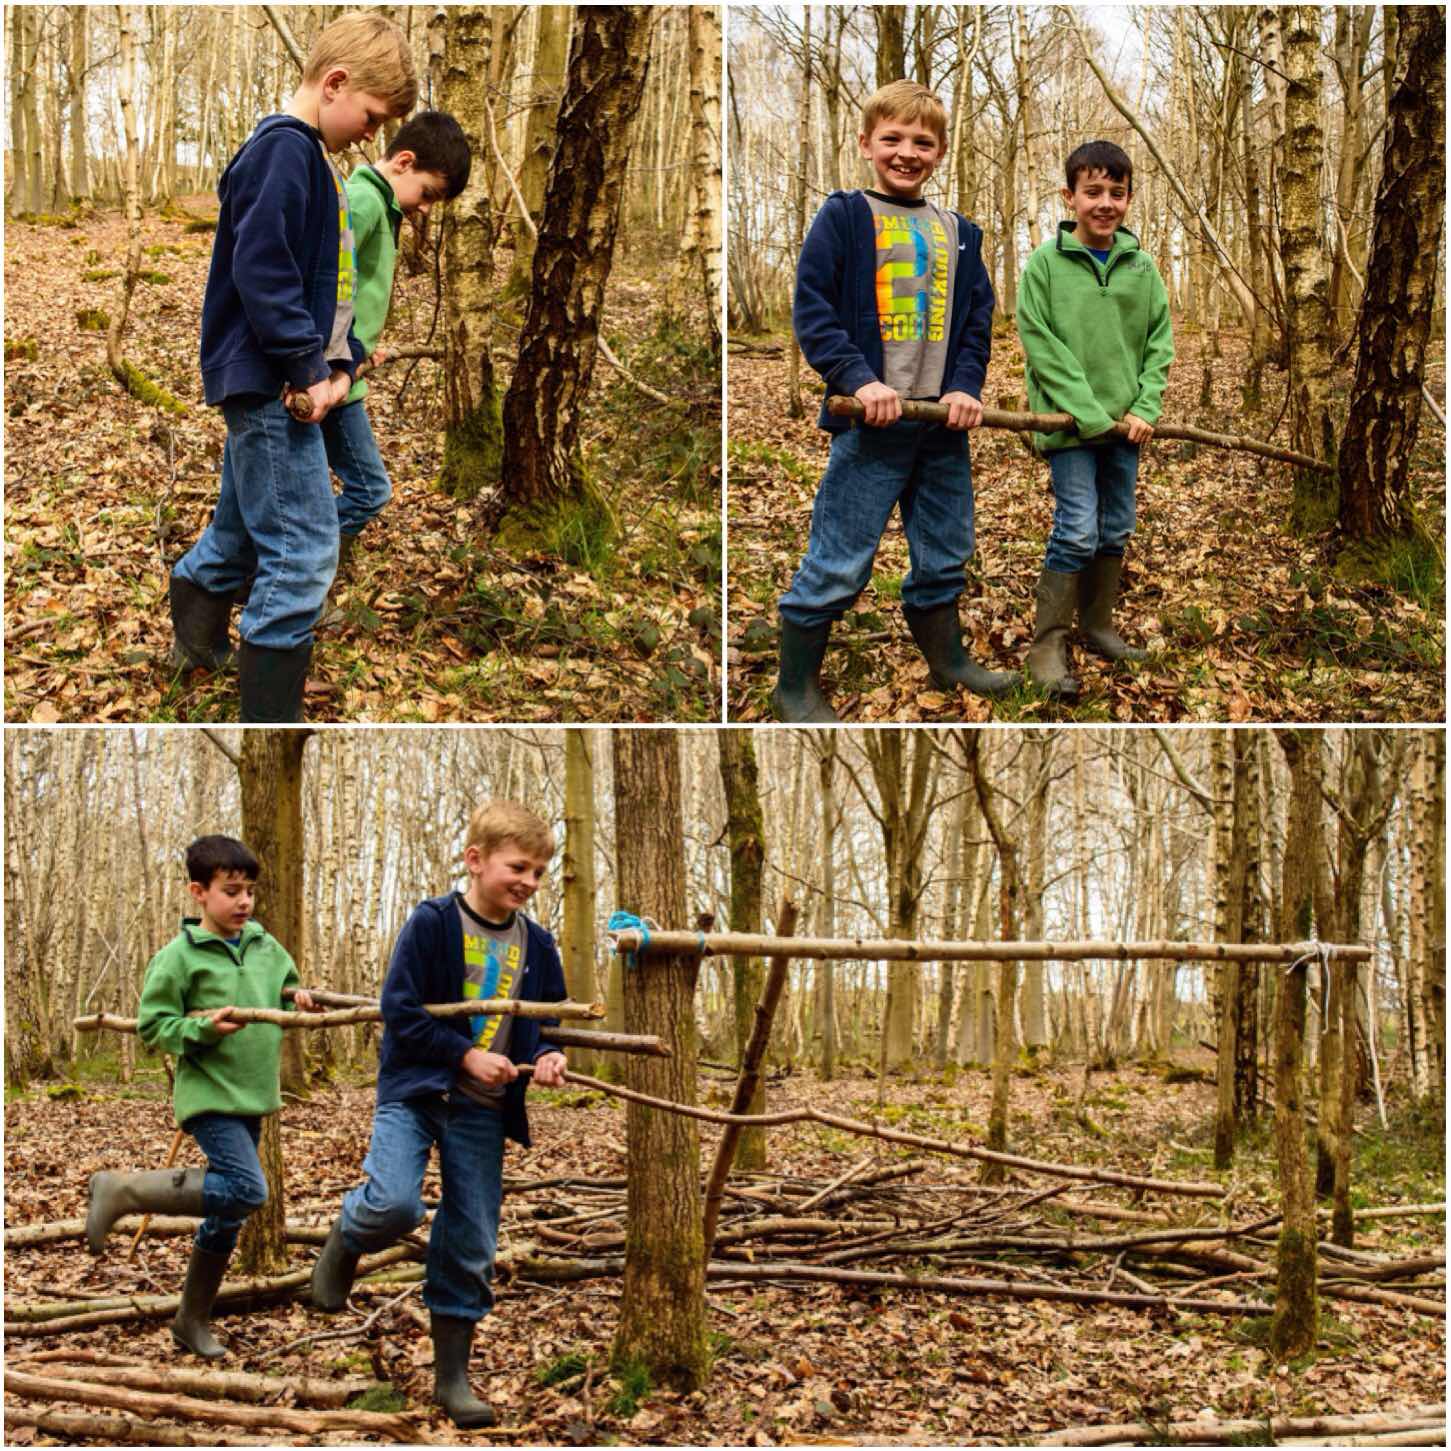
After a chat they opted to go for a simple lean to shelter as this they felt would take the least amount off time.
I told them they would need lots of sticks to lean up against the spar (more than they thought) and that they needed to be roughly the same size. After a quick demonstration on how to snap wood using the base of two tree trunks that were close together they were soon hard at work.
Sizing up
We put a pole on the ground to roughly mark out where each pole should be driven in and soon they had the basic skeleton of the shelter formed.
The Skeleton
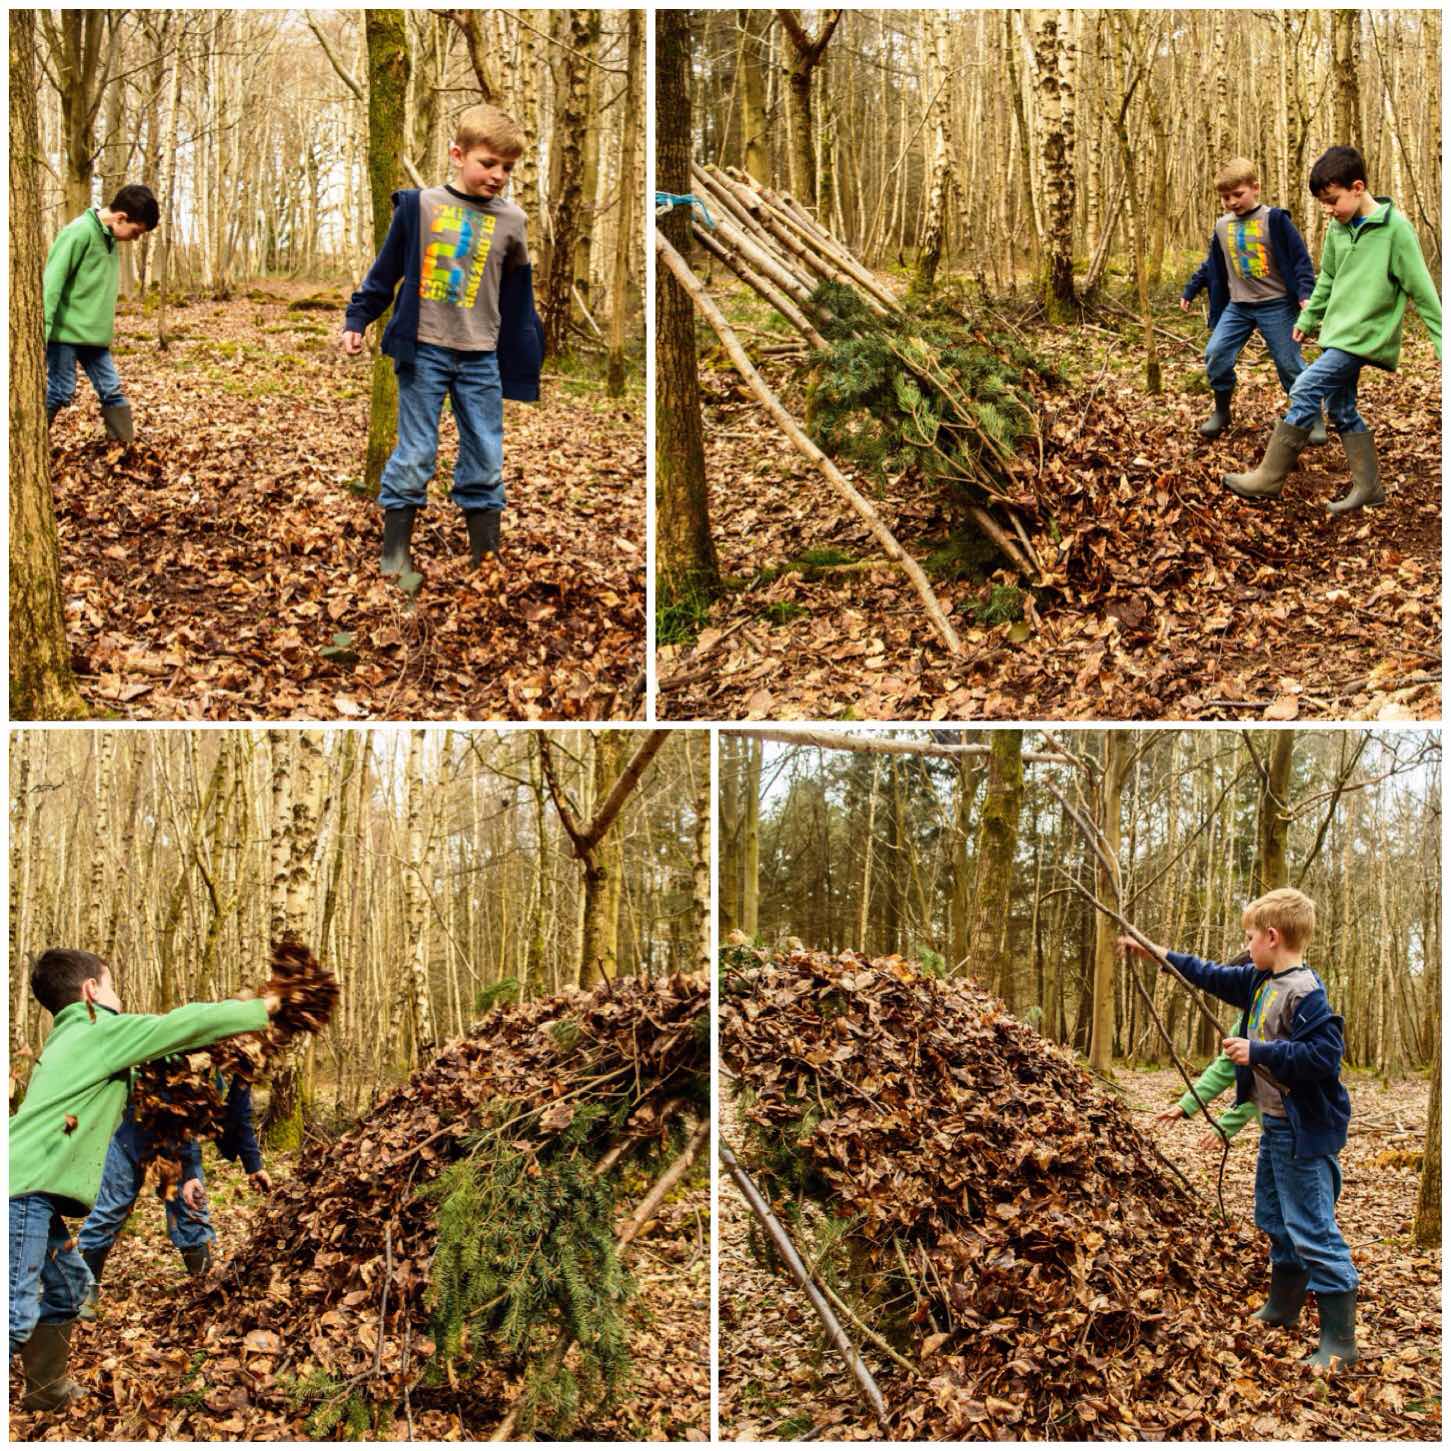
One of the hardest things to get across to them was the need to always have a tidy working area. we had lots of dead wood lying about so I made them clear it all away from the shelter so we had a safe area to work in.
Once that was all done we had a good forage around for some spruce boughs. There were plenty lying around that had been cut down by the foresters for the kids to use (I wish all woods had an area like this).
Tidying and foraging
After layering some of the spruce boughs onto the skeleton of the shelter I got the boys doing the penguin walk. This is the way I get the kids to gather up lots of leaves in a very short space of time. They would quickly make little piles of leaves and throw them over the spruce boughs.
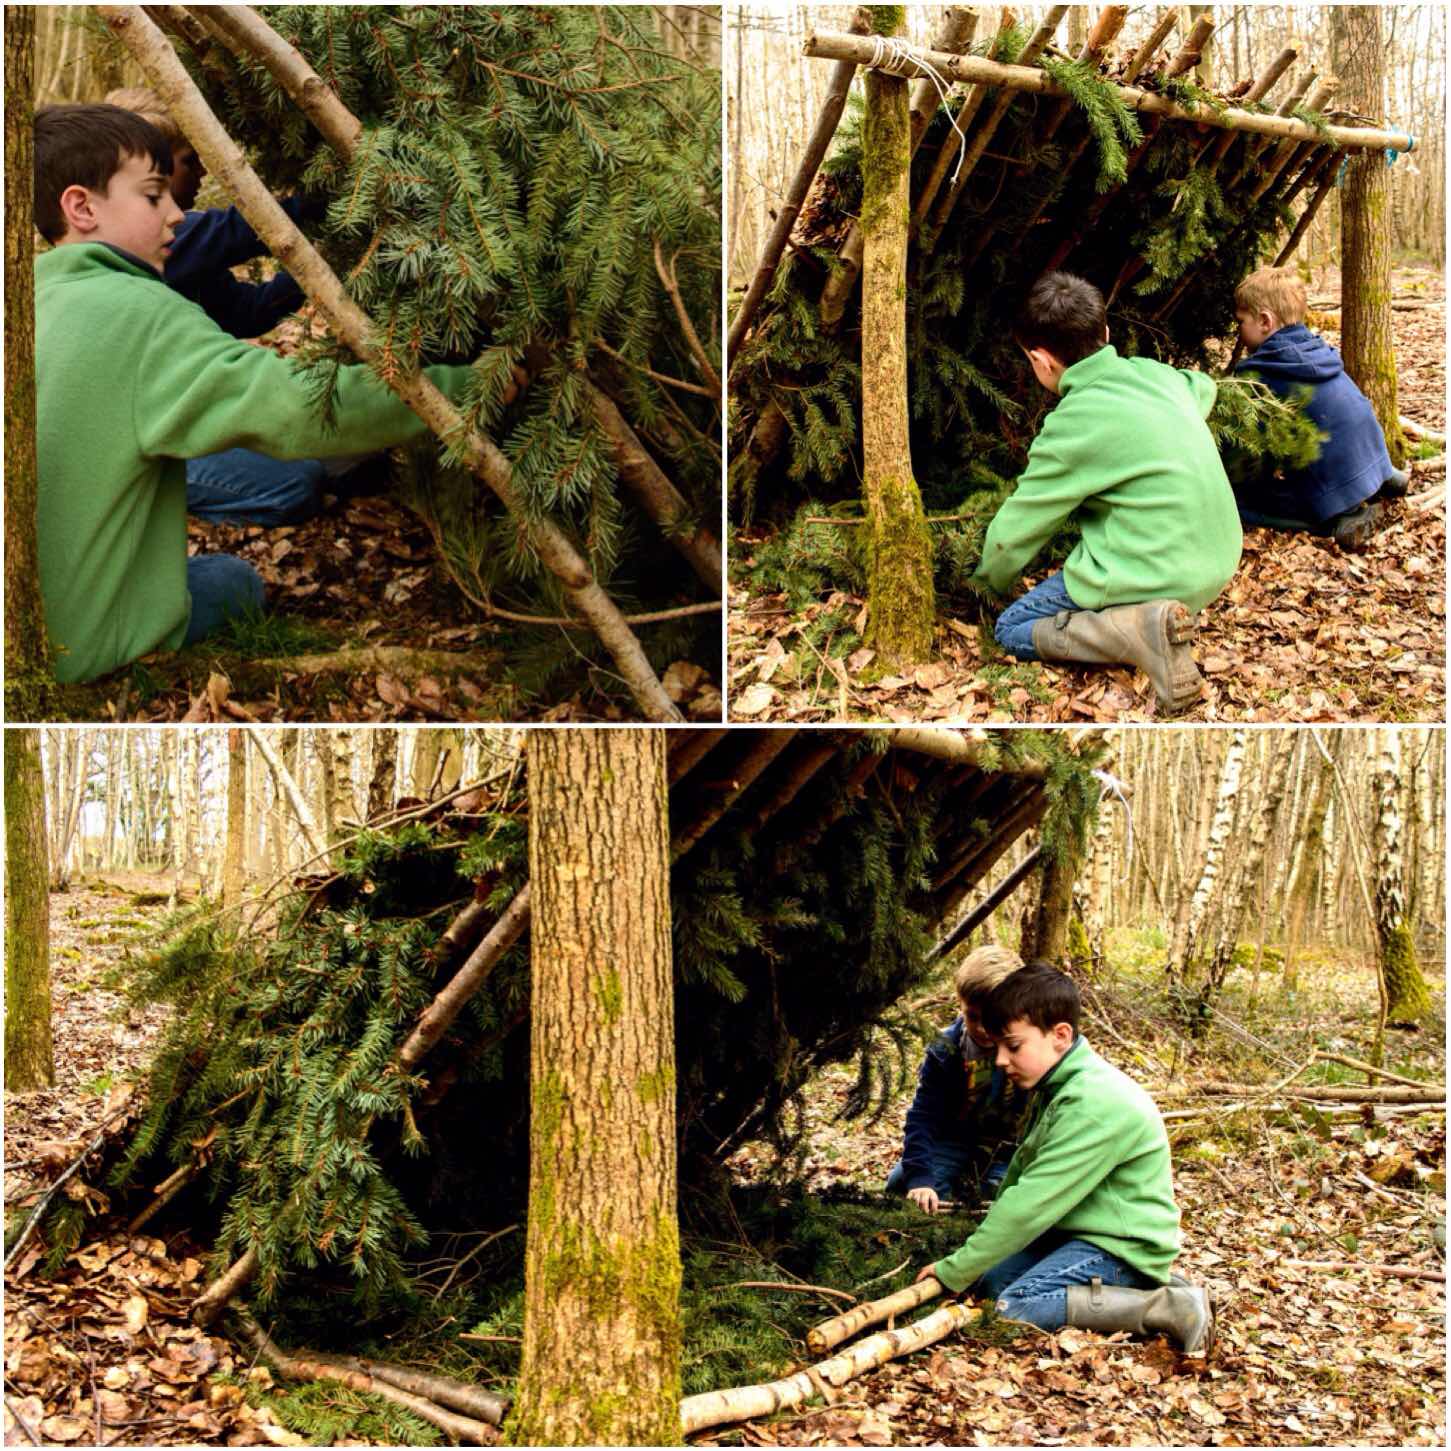
Once the bottom half was all done they got some more spruce boughs for the top and covered that in leaves as well. Finally to keep the leaves in place they laid a load of small sticks over the leaves (to try and help stop the wind from blowing it all away).
The layer system
Once they had finished the outside it was time to sort out the interior design. They spent a little while weaving back in all the loose (well some of them) spruce needles back into the thatch.
Once that was done they foraged for some more spruce and made themselves up a little bed to keep themselves off the cold earth.
Interior design
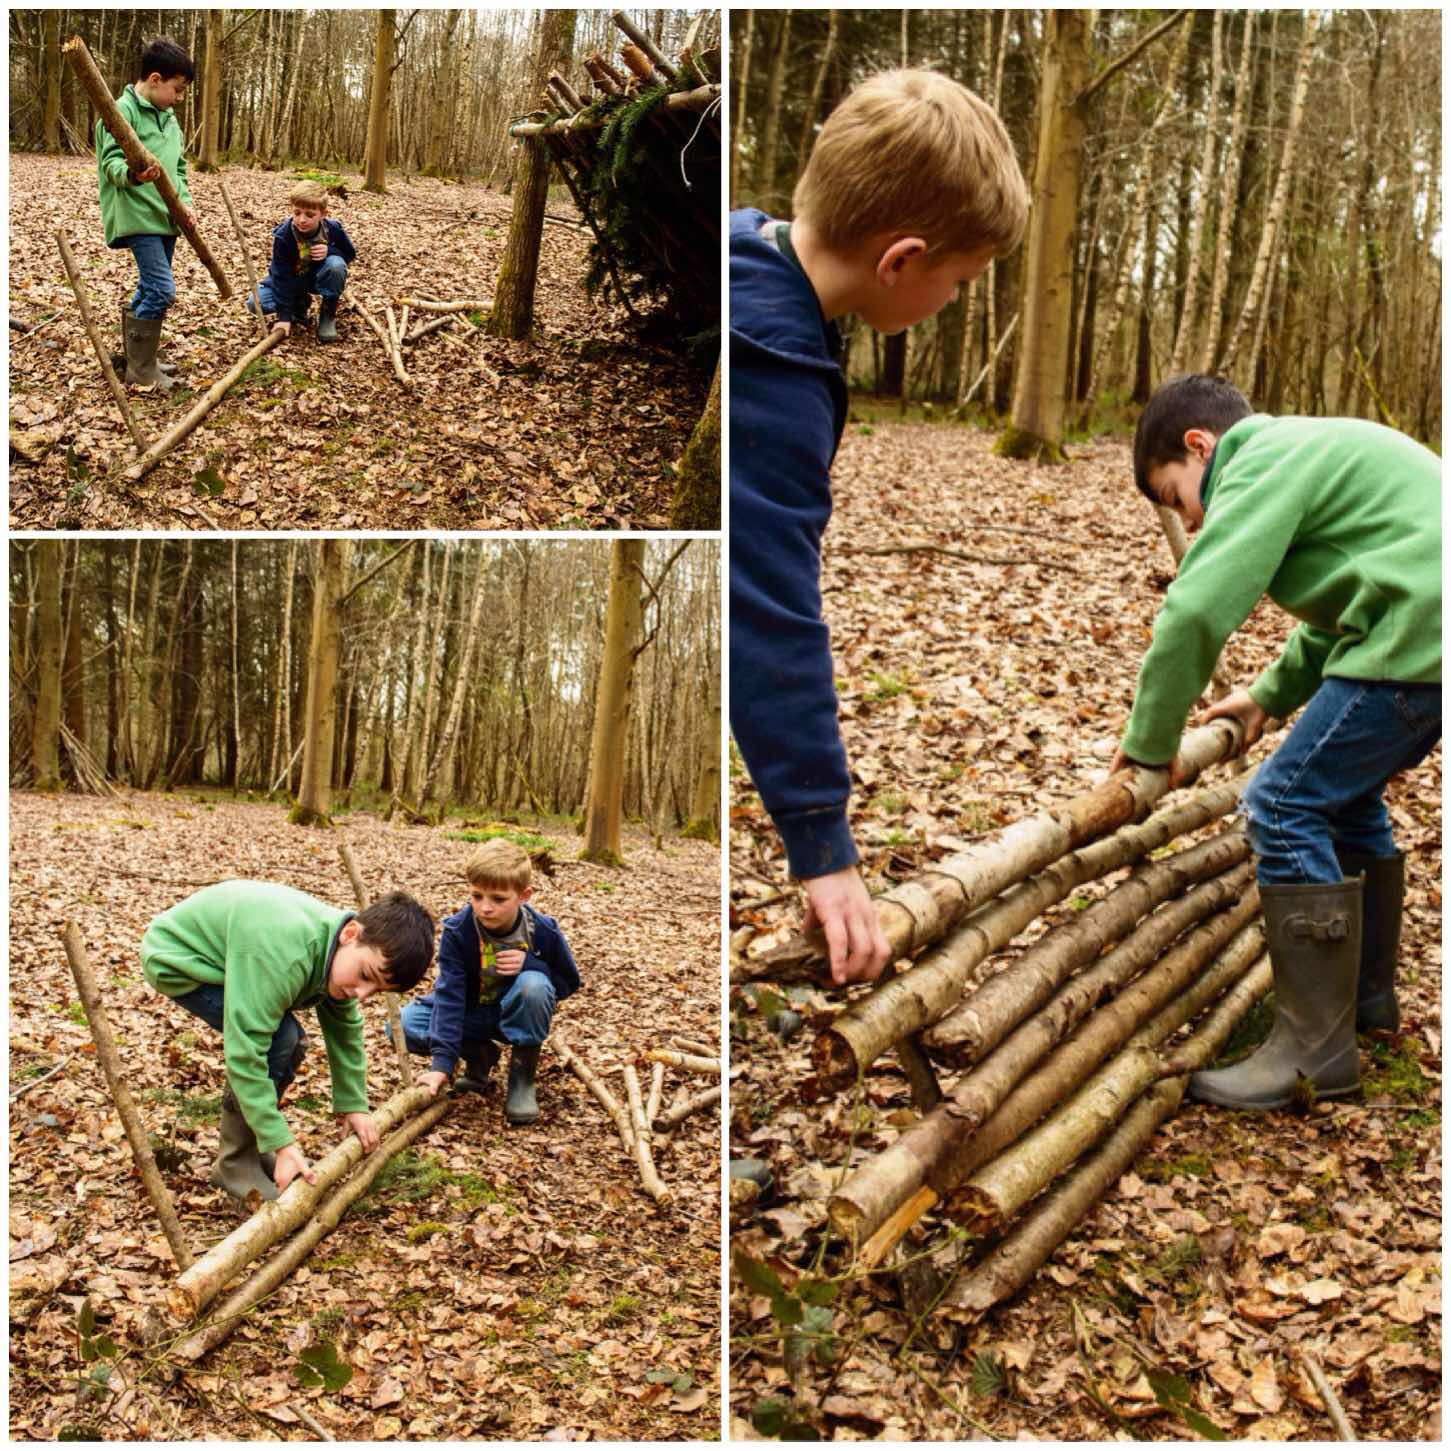
We did not have permission to have a fire in the woods but that did not stop us from pretending – after all that is what we kids do 🙂
I got them to build themselves a heat reflecting wall in front of the shelter (about two paces from the shelter). They just pushed two sticks into the ground and stacked some logs up against them.
Reflector wall
All that was left for them to do was construct their long log fire (one step away from the shelter) and relax.
Fire and finish
This took us about one and a half hours to complete and managed to have fun along the way as well.
As I said this was more about the principles of shelter building (done really to help towards one of their Cubs badges) and not a full on How To…. to building a shelter. If we had more time we would have put about 3 times as much debris over the top, the bed would have been raised up with a much thicker mattress of spruce and the sides would have been closed in.
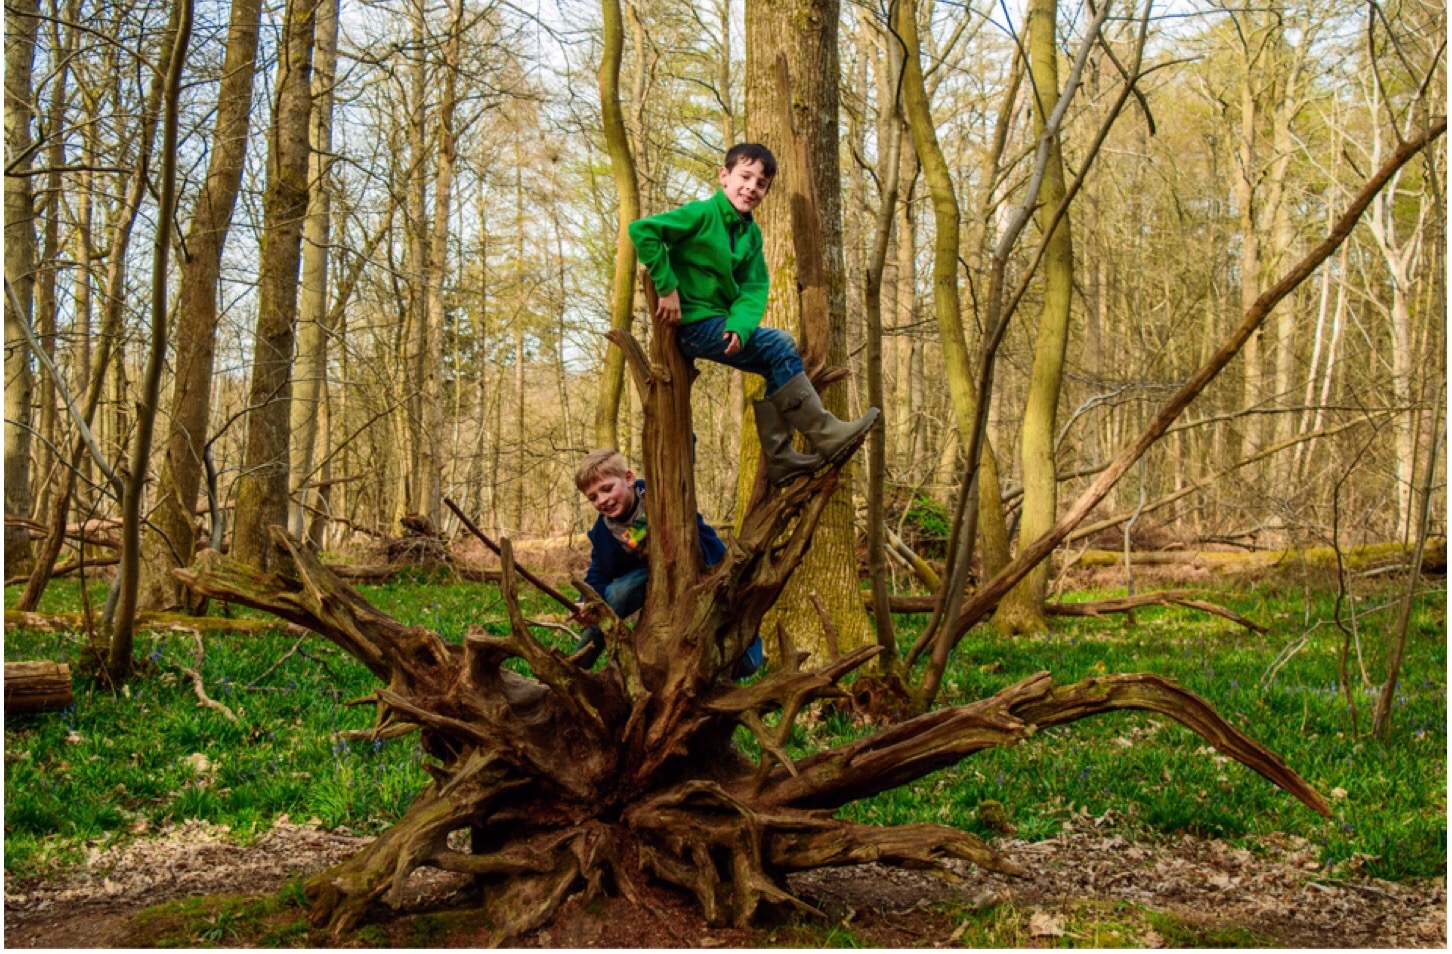
This afternoon I spent some time in the woods introducing my son Finlay and his friend William into the intricacies of shelter building (a post will follow on this).
We did have fun building the shelter however it was not free fun. I let the lads zoom off into the woods (I am still hobbling along) only to find them as usual at their favourite perch.
A favourite perch
This perch is all that remains of the root system of a fallen tree. It looks horrifying with all these spikes but they know only to climb up and down it from the back where it is smooth. I thought it looked rather lovely today in amongst all the bluebells.
This last week has found me cooped up in the house nursing a ripped muscle in my calf – the after effects of a nearly 50 year old going to a trampoline centre with his children (my advice is don’t do it – no matter what they say about how much fun it will be).
So today I got out (well hobbled out really) to The Vyne National Trust property here in Hampshire.
Spring Shoots – Sycamore
I was taught a while ago that any decent photographer can stand in any spot and after considering all the angles take a half way decent shot. This is what I did here at the side of the man made lake at The Vyne.
I spotted some newly burst sycamore shoots at the base of a tree at the edge of the lake and thought that the angles could work for me. It was a bit of a struggle to get low down for this shot without causing myself any further damage but the soft mud at the edge of the lake worked for me 🙂
I have worked on the picture to brighten the new sycamore shoot on the right but to to give the picture a slightly darker look all over – probably to reflect my current mood where I do feel slightly better now but am still really frustrated over my lack of mobility.
As winters past have gone this last one here in the southern part of the UK has proved to a bit quiet on the snow front. However even though much of nature has been lying dormant there was still plenty to see and do here over the last few months.
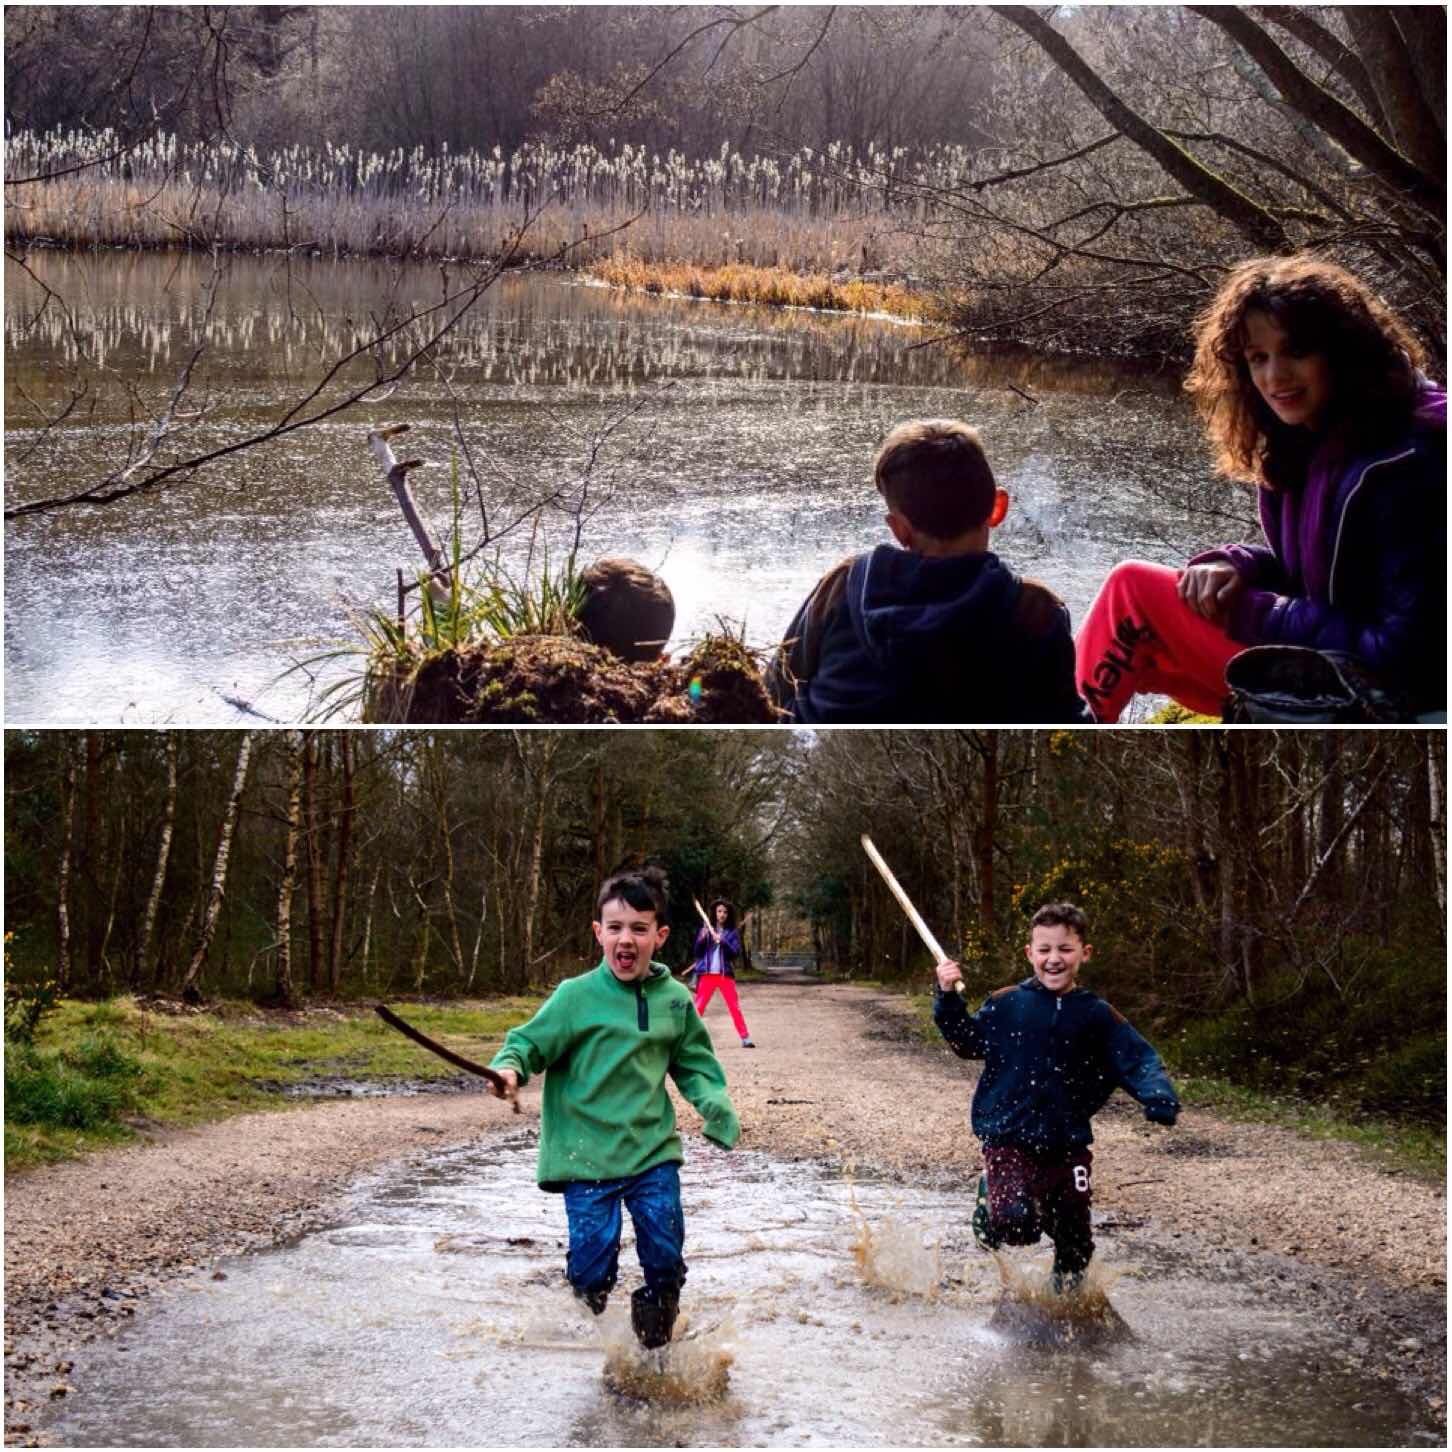
The following ‘grouped’ pictures are some of the favourites I have taken (apart from one taken by my wife Alison) since last December. I have spent as much time as I could outdoors with my family however I feel that it could have been more (work has kept me away from home a lot recently). We are definitely a digital family however we try and balance all that screen time out with some quality dirt time.
Family Fun
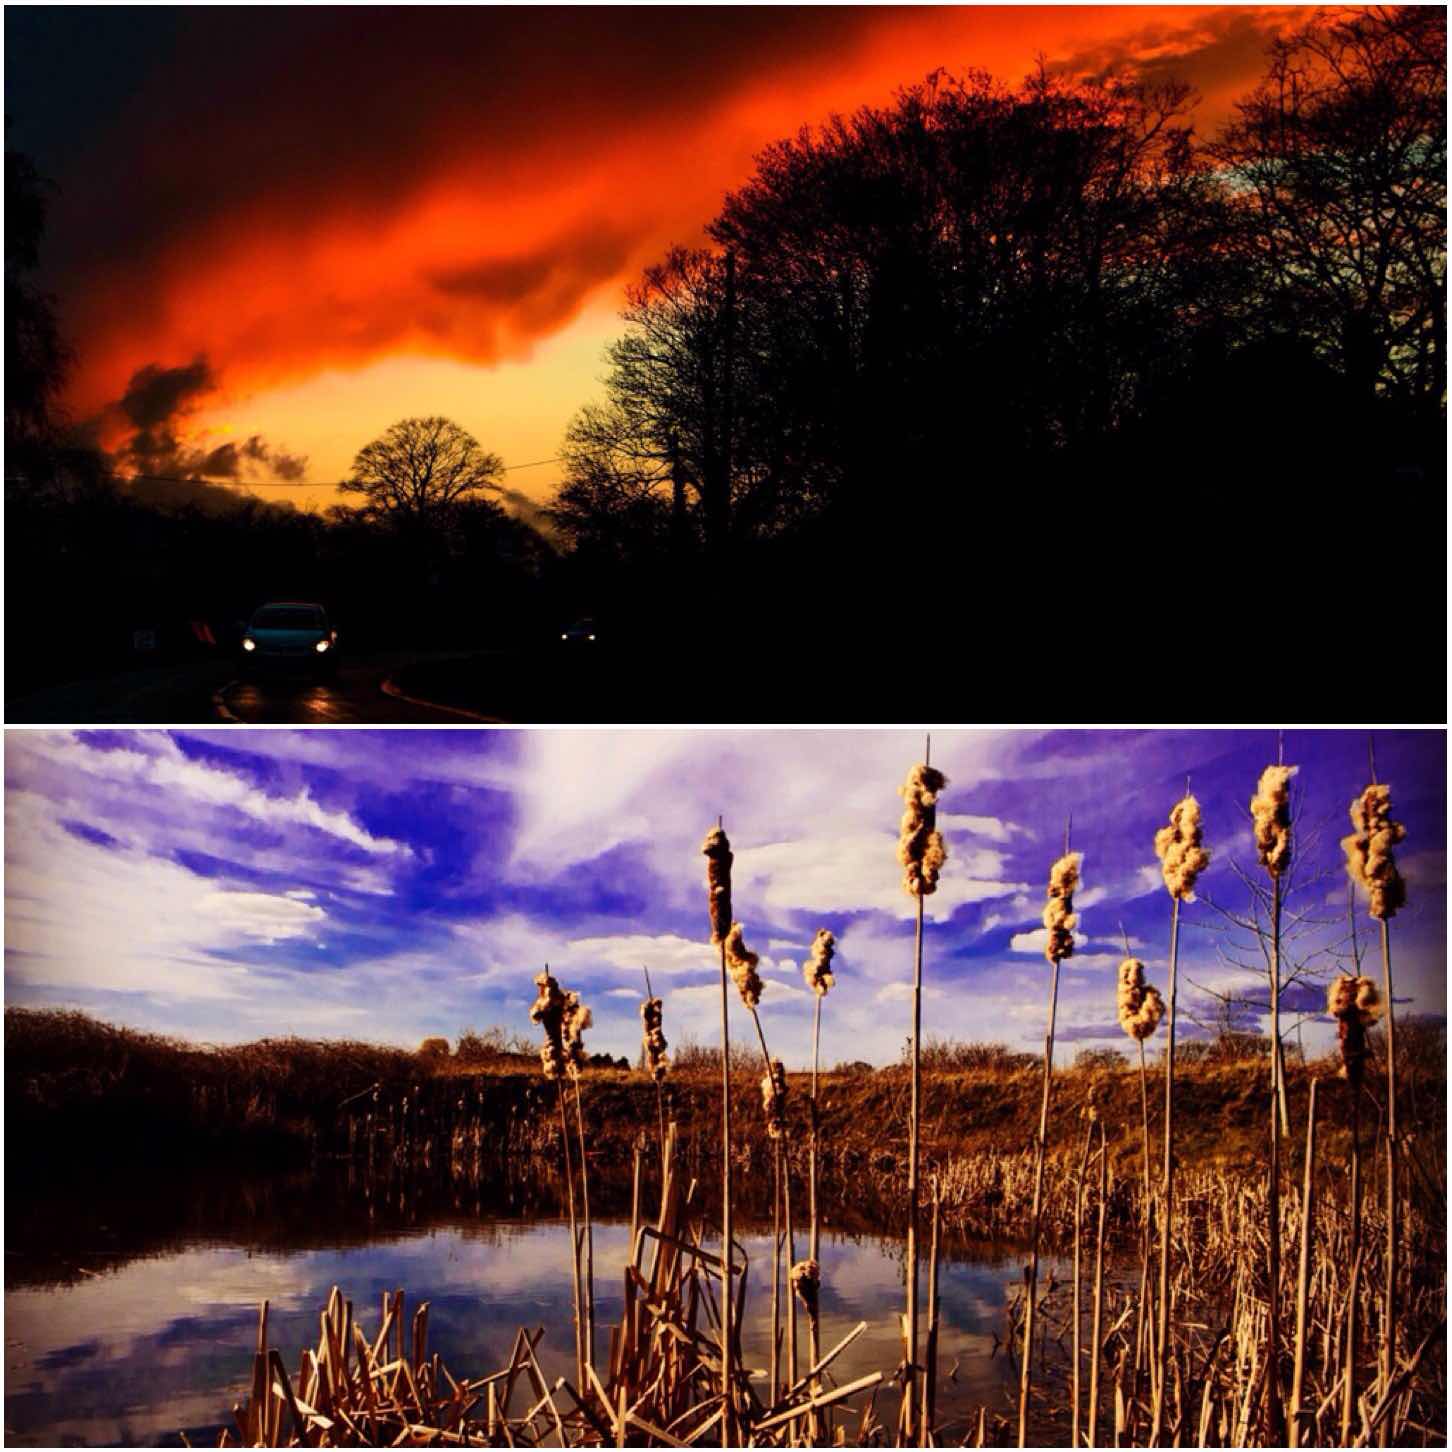
I use a Nikon D3200 Digital camera and shoot in RAW format so that I can use Adobe Lightroom to its fullest. I like Lightroom as it allows me to extract from the images (I am still learning about all the settings on my camera) I take something closer to what I saw originally or in some cases something slightly enhanced.
The sunset below was certainly not as dark as that originally however Lightroom allowed me to produce this moodier shot. The blue skies in the bottom picture were like this on the day however the shot I took the blues were all washed out. With a few tweaks though it was looking good again.
Dramatic skies
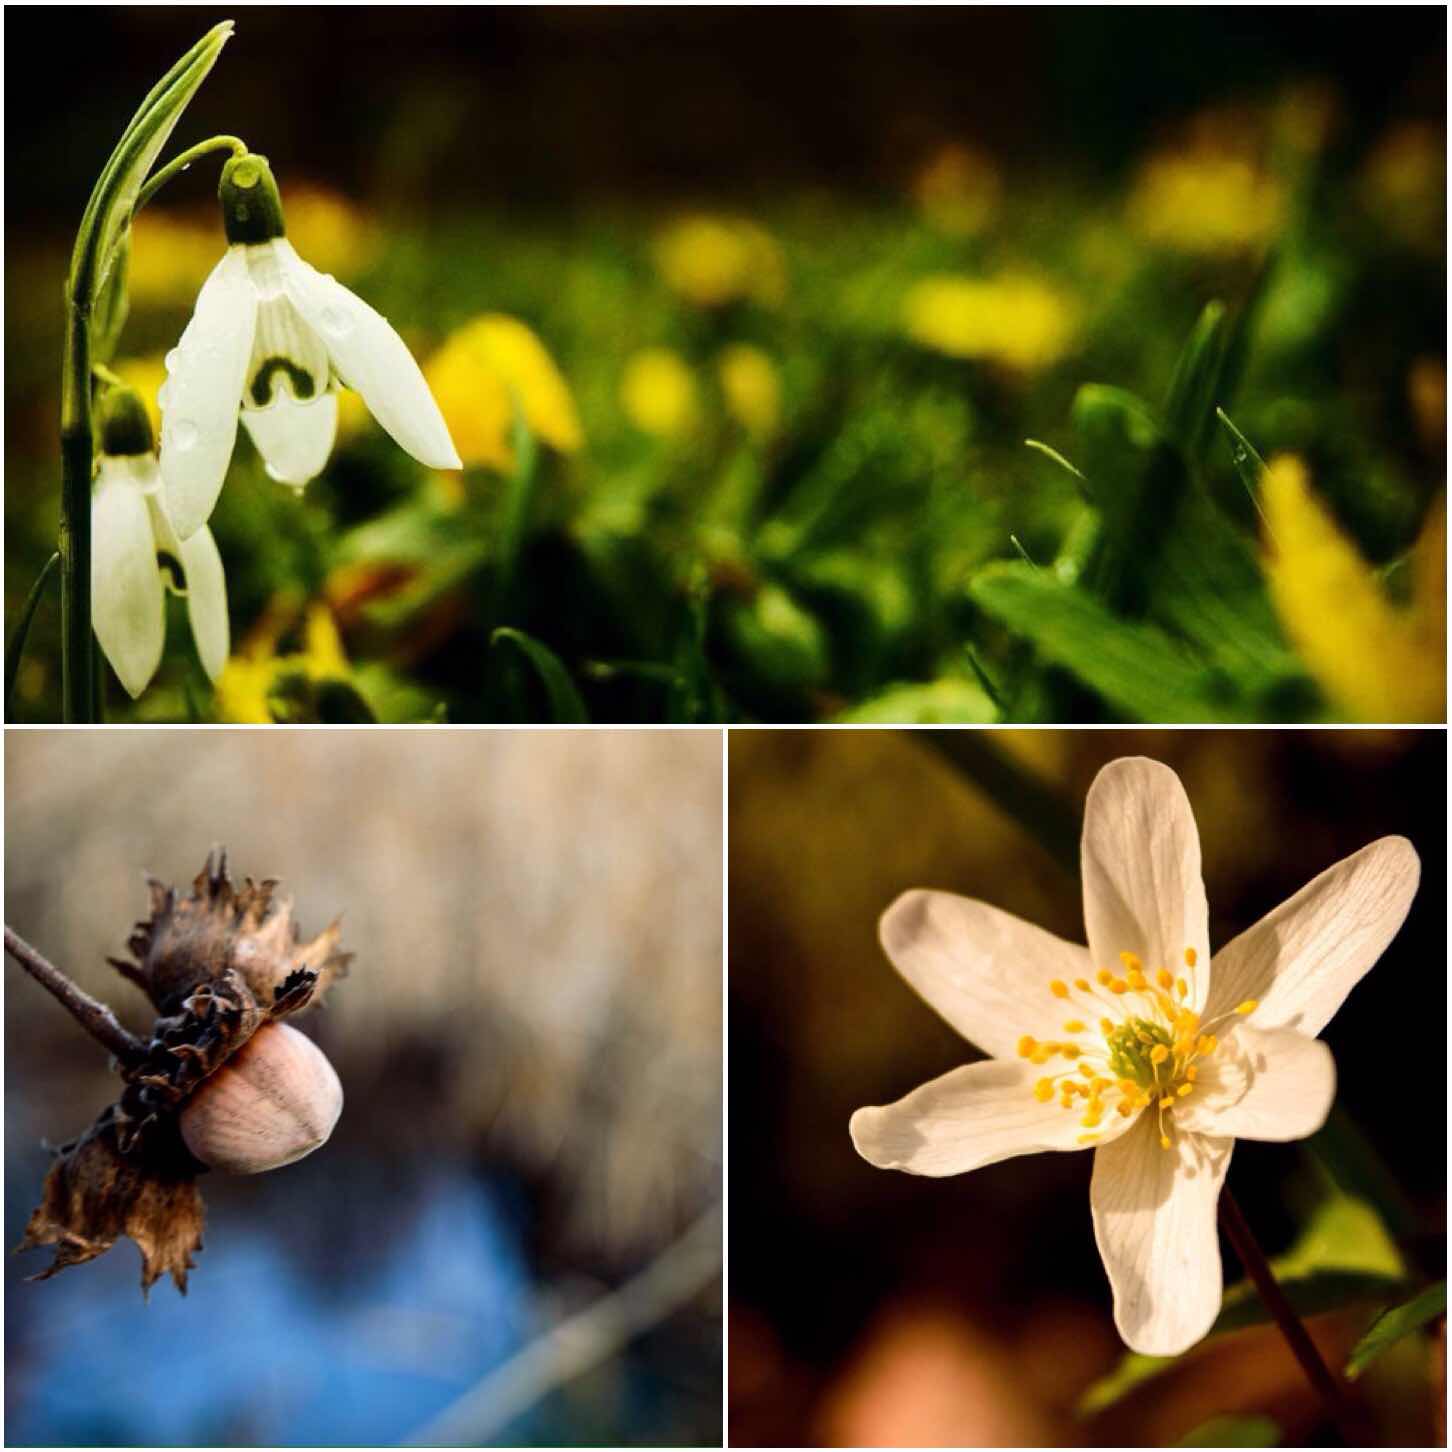
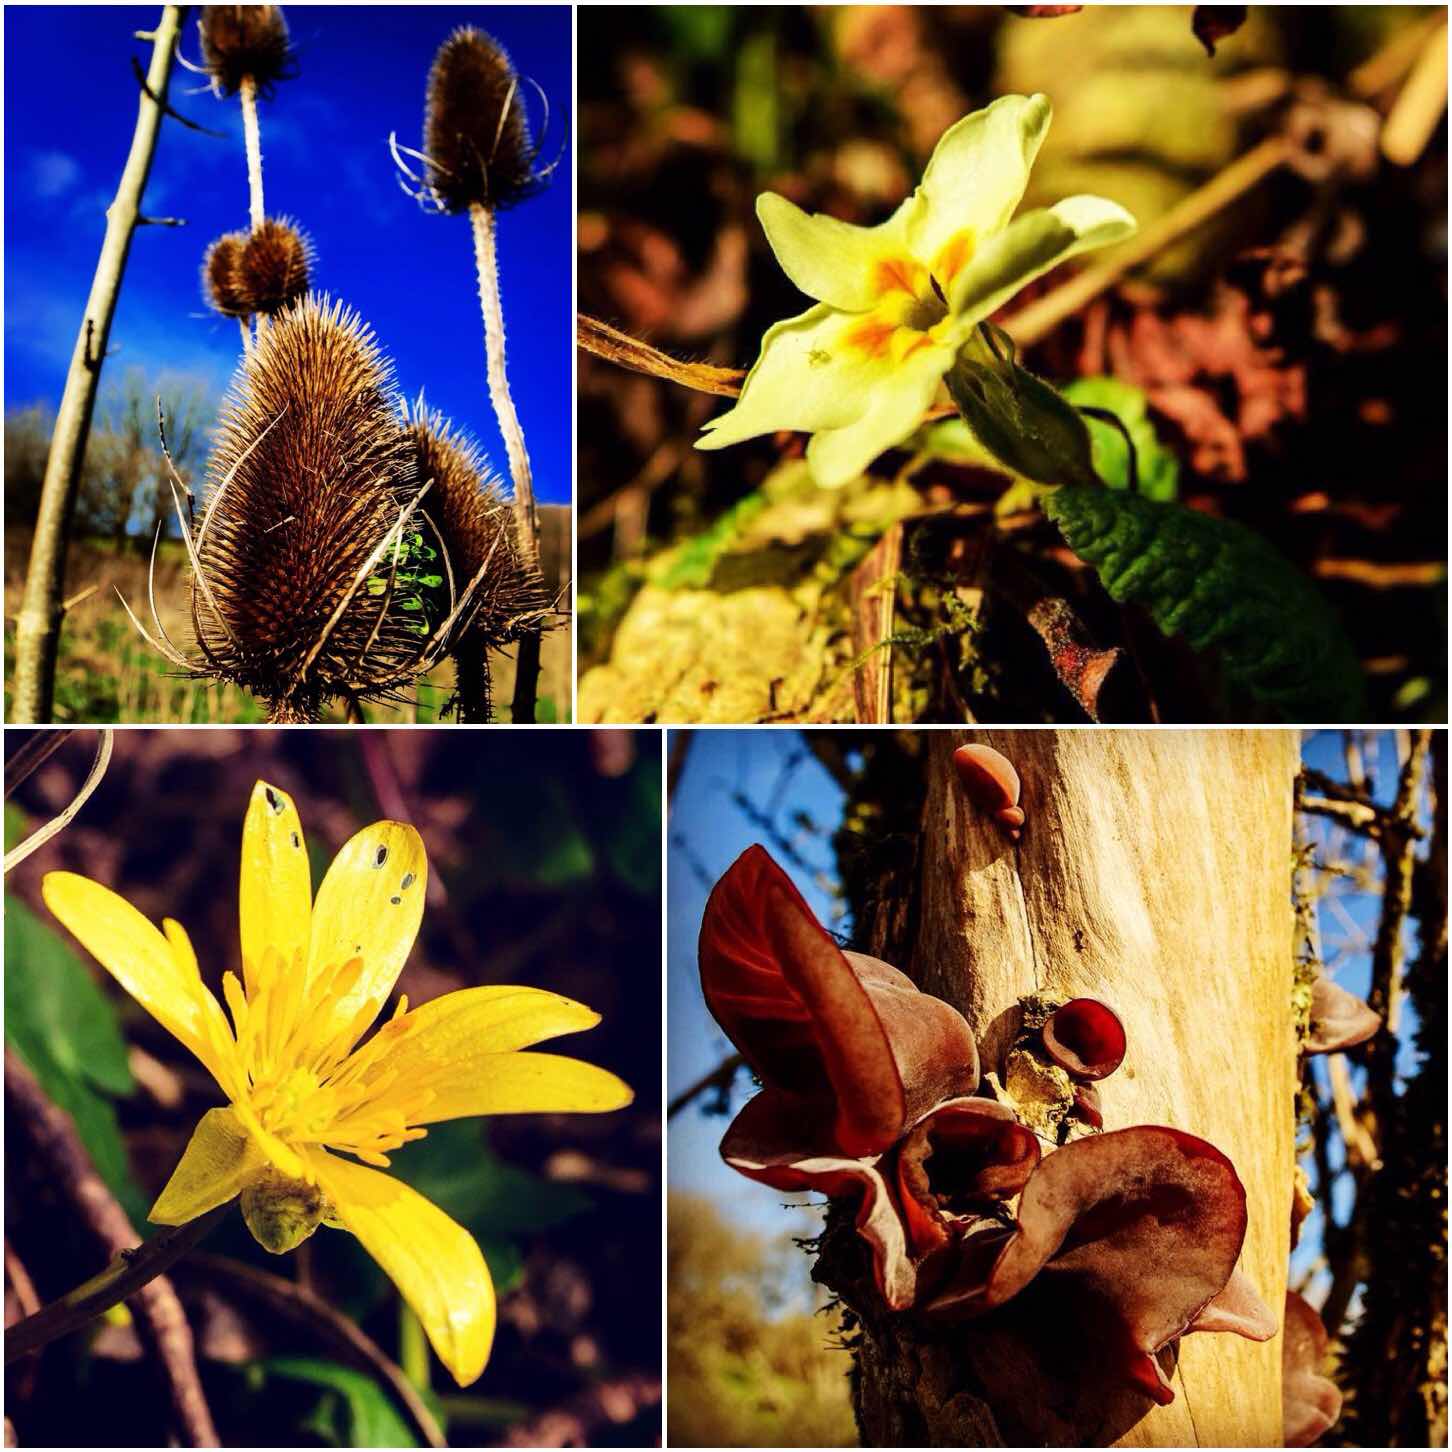
The snowdrop and the forlorn looking hazelnut were both taken in mid winter but the wood anemone was shot just a few days ago. I included the wood anemone as it is one of the first woodland spring flowers to pop up and to say that winter is now over.
All beautiful in their own ways and all photographed in different weather conditions.
Beauty in the detail
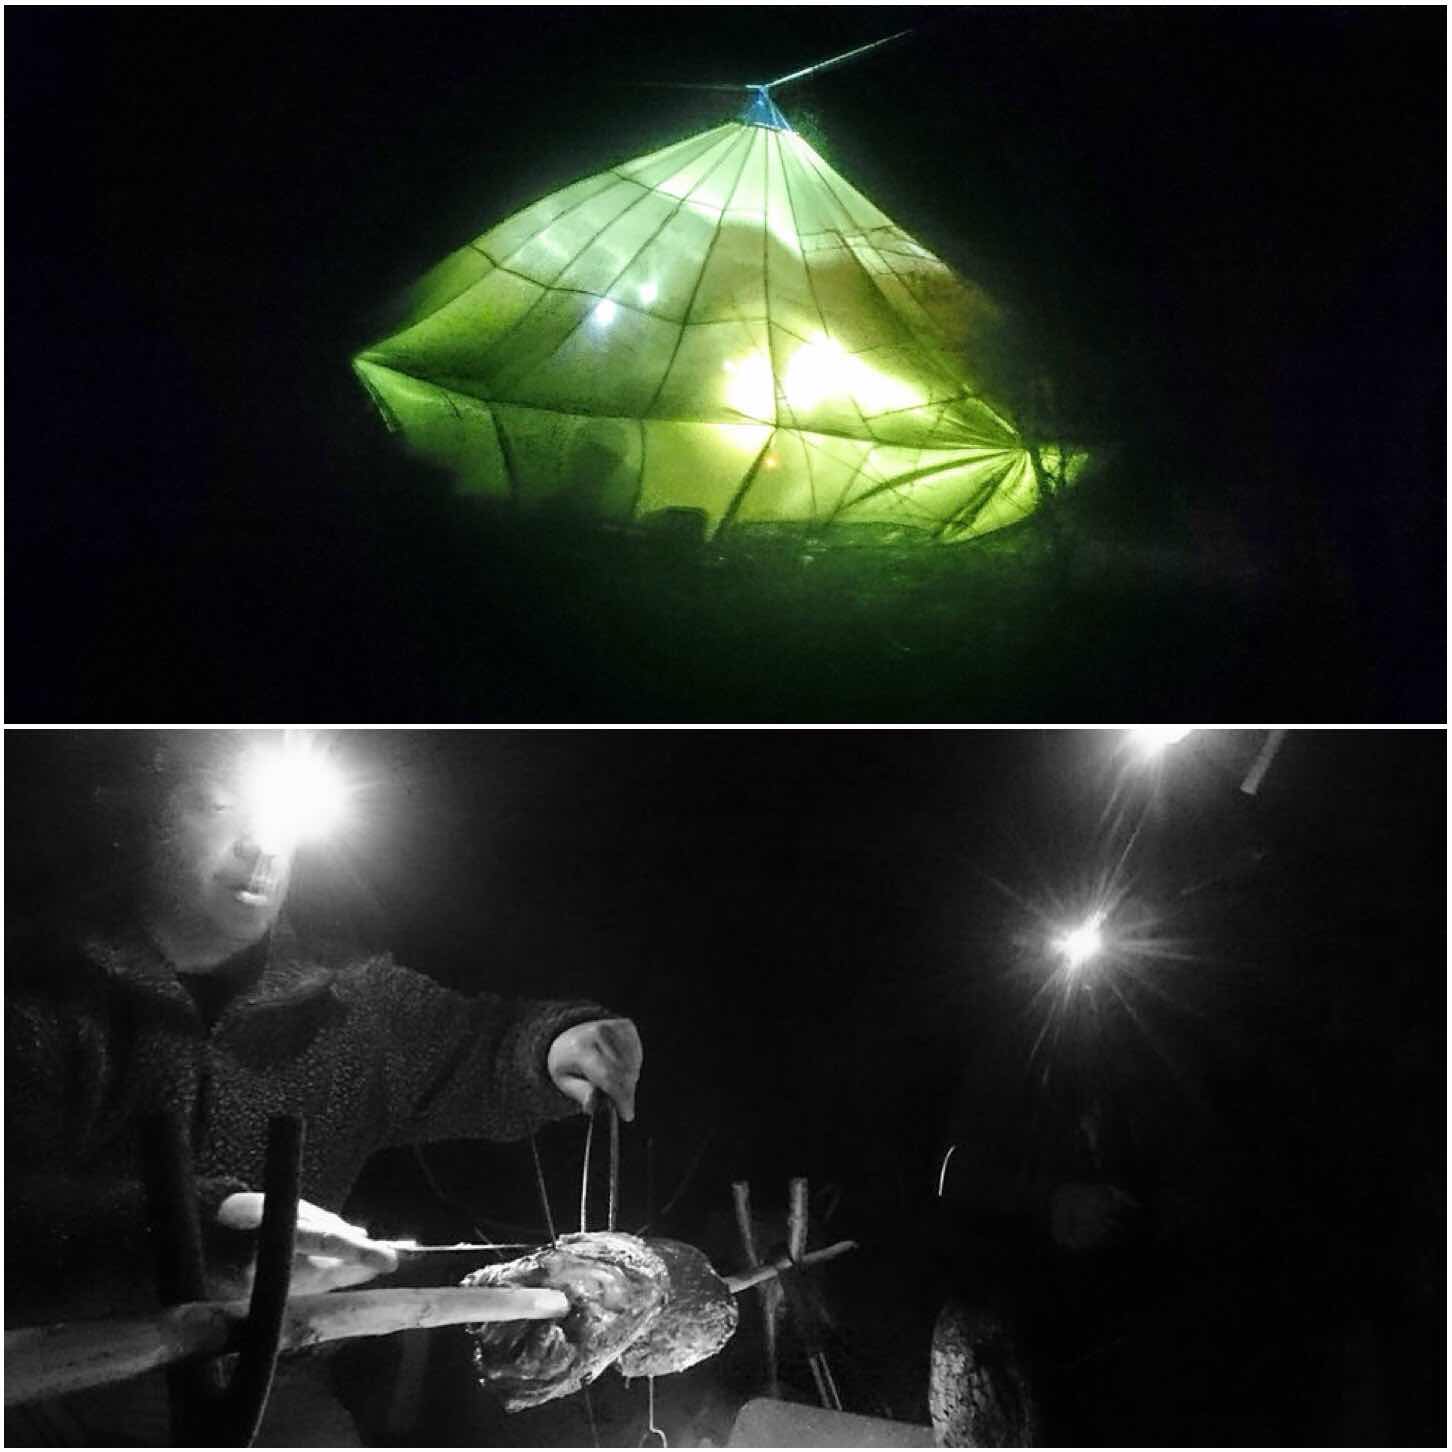
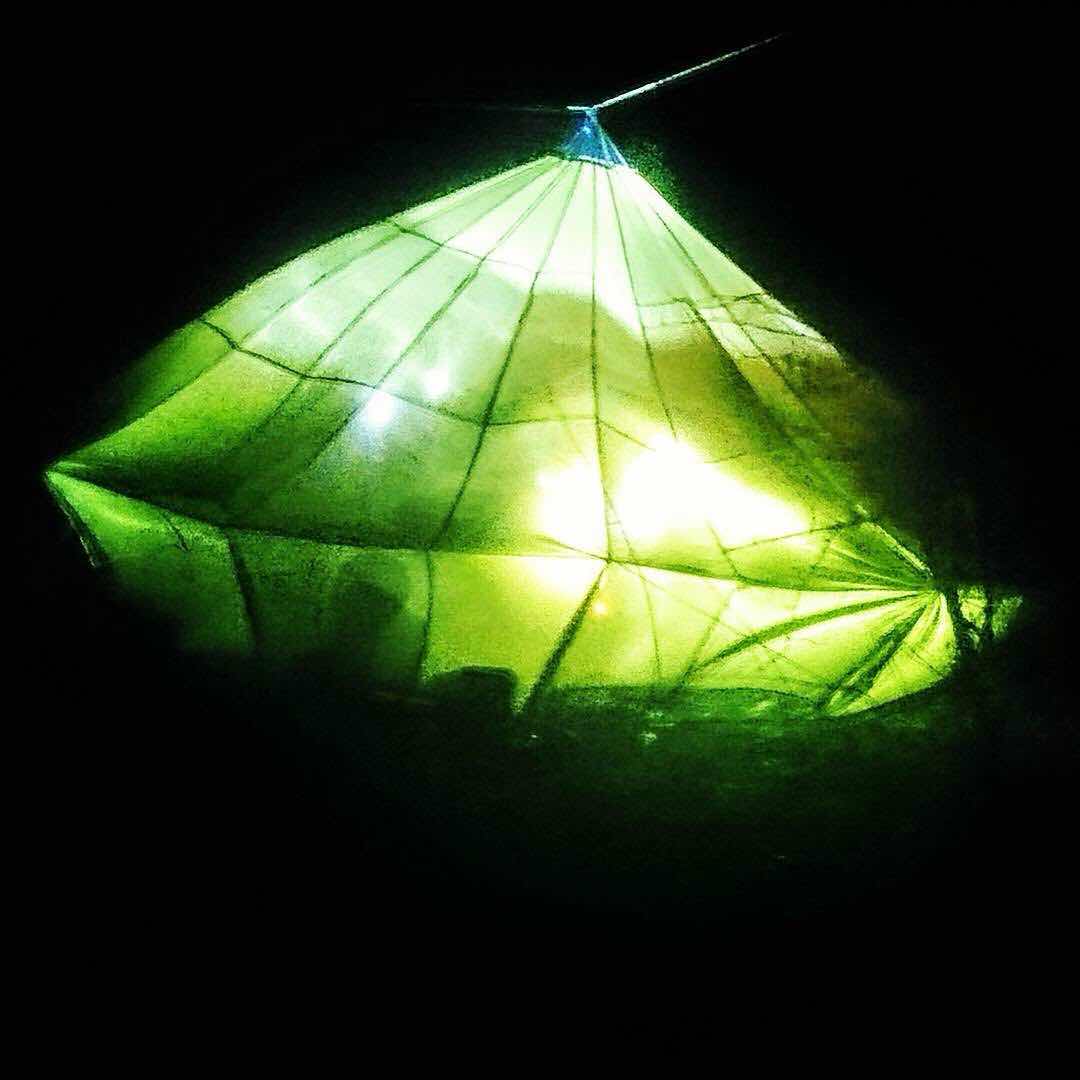
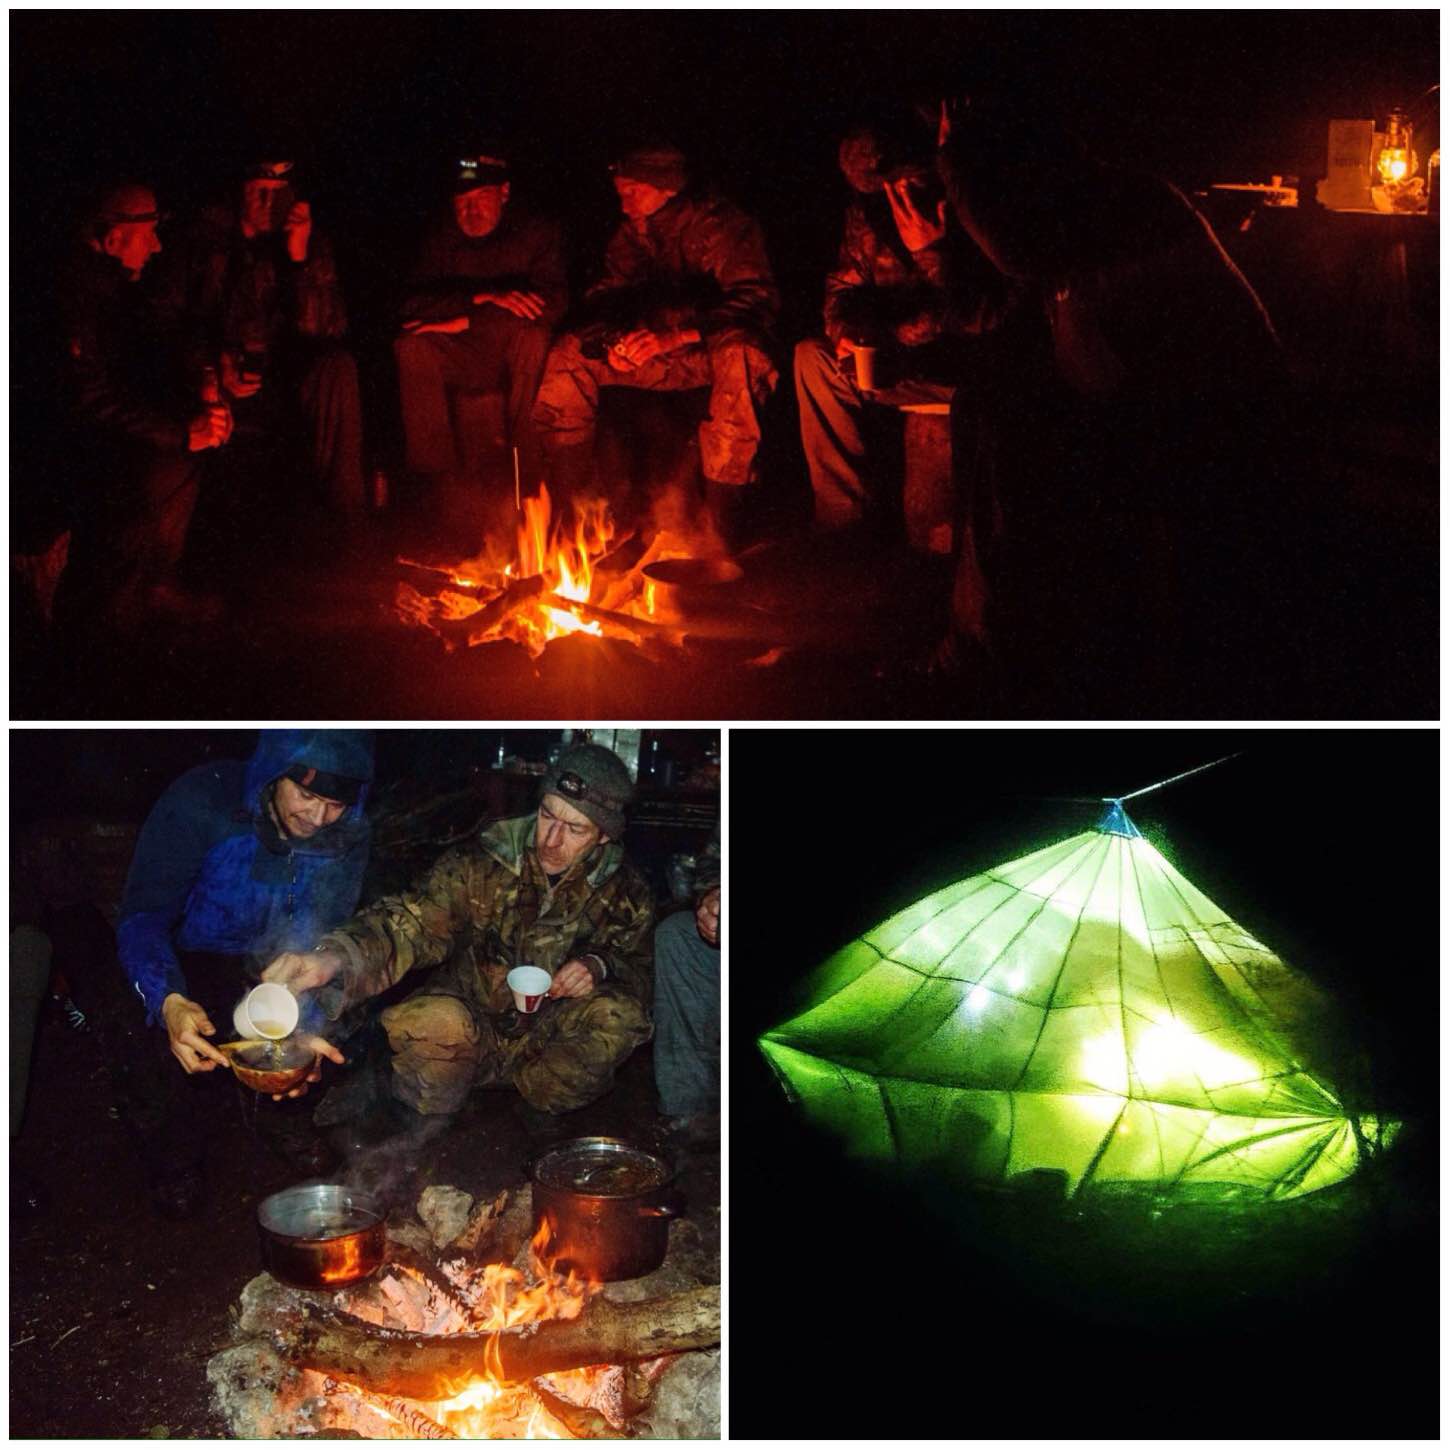
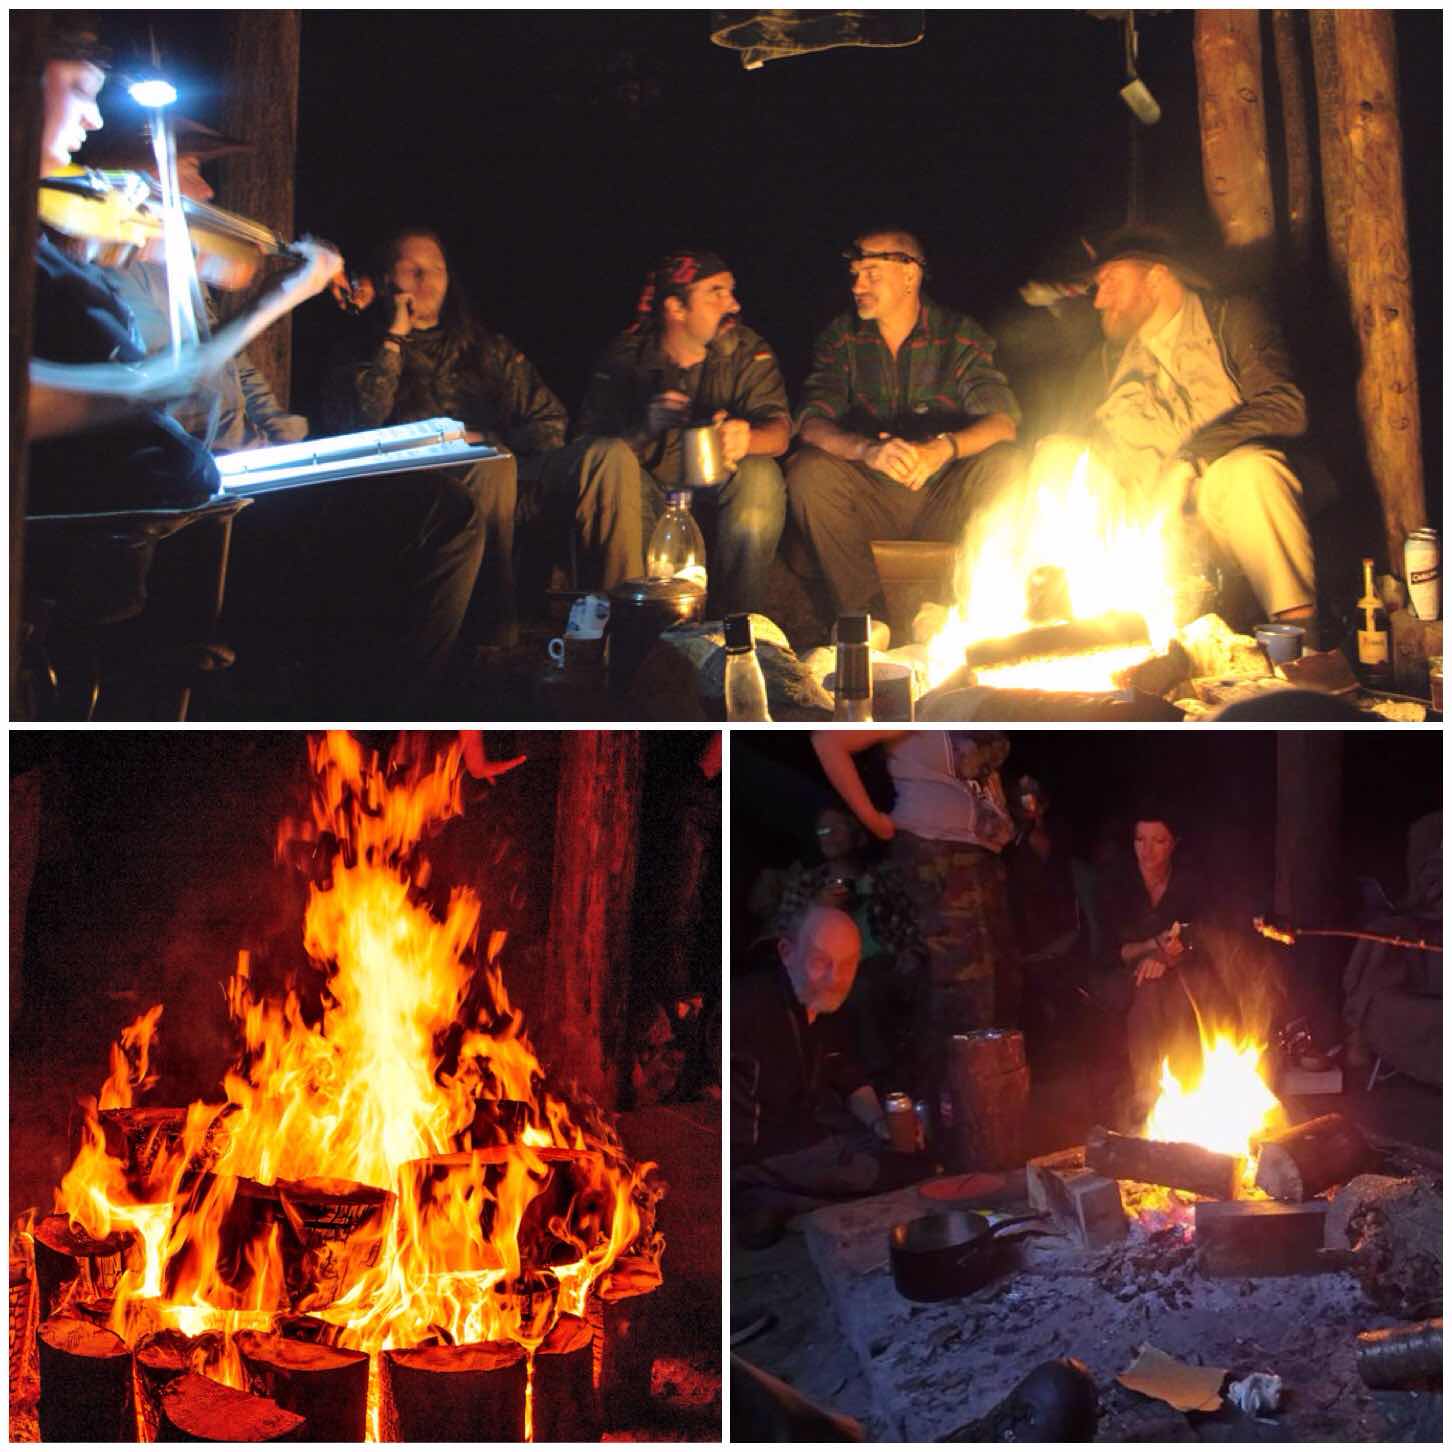
I took both these pictures with my Sony Z3 mobile phone as the weather conditions were to bad to bring out my Nikon. The top picture was a bit of an experiment with the guys lighting up the inside of our group parachute with their torches making it look like a downed UFO.
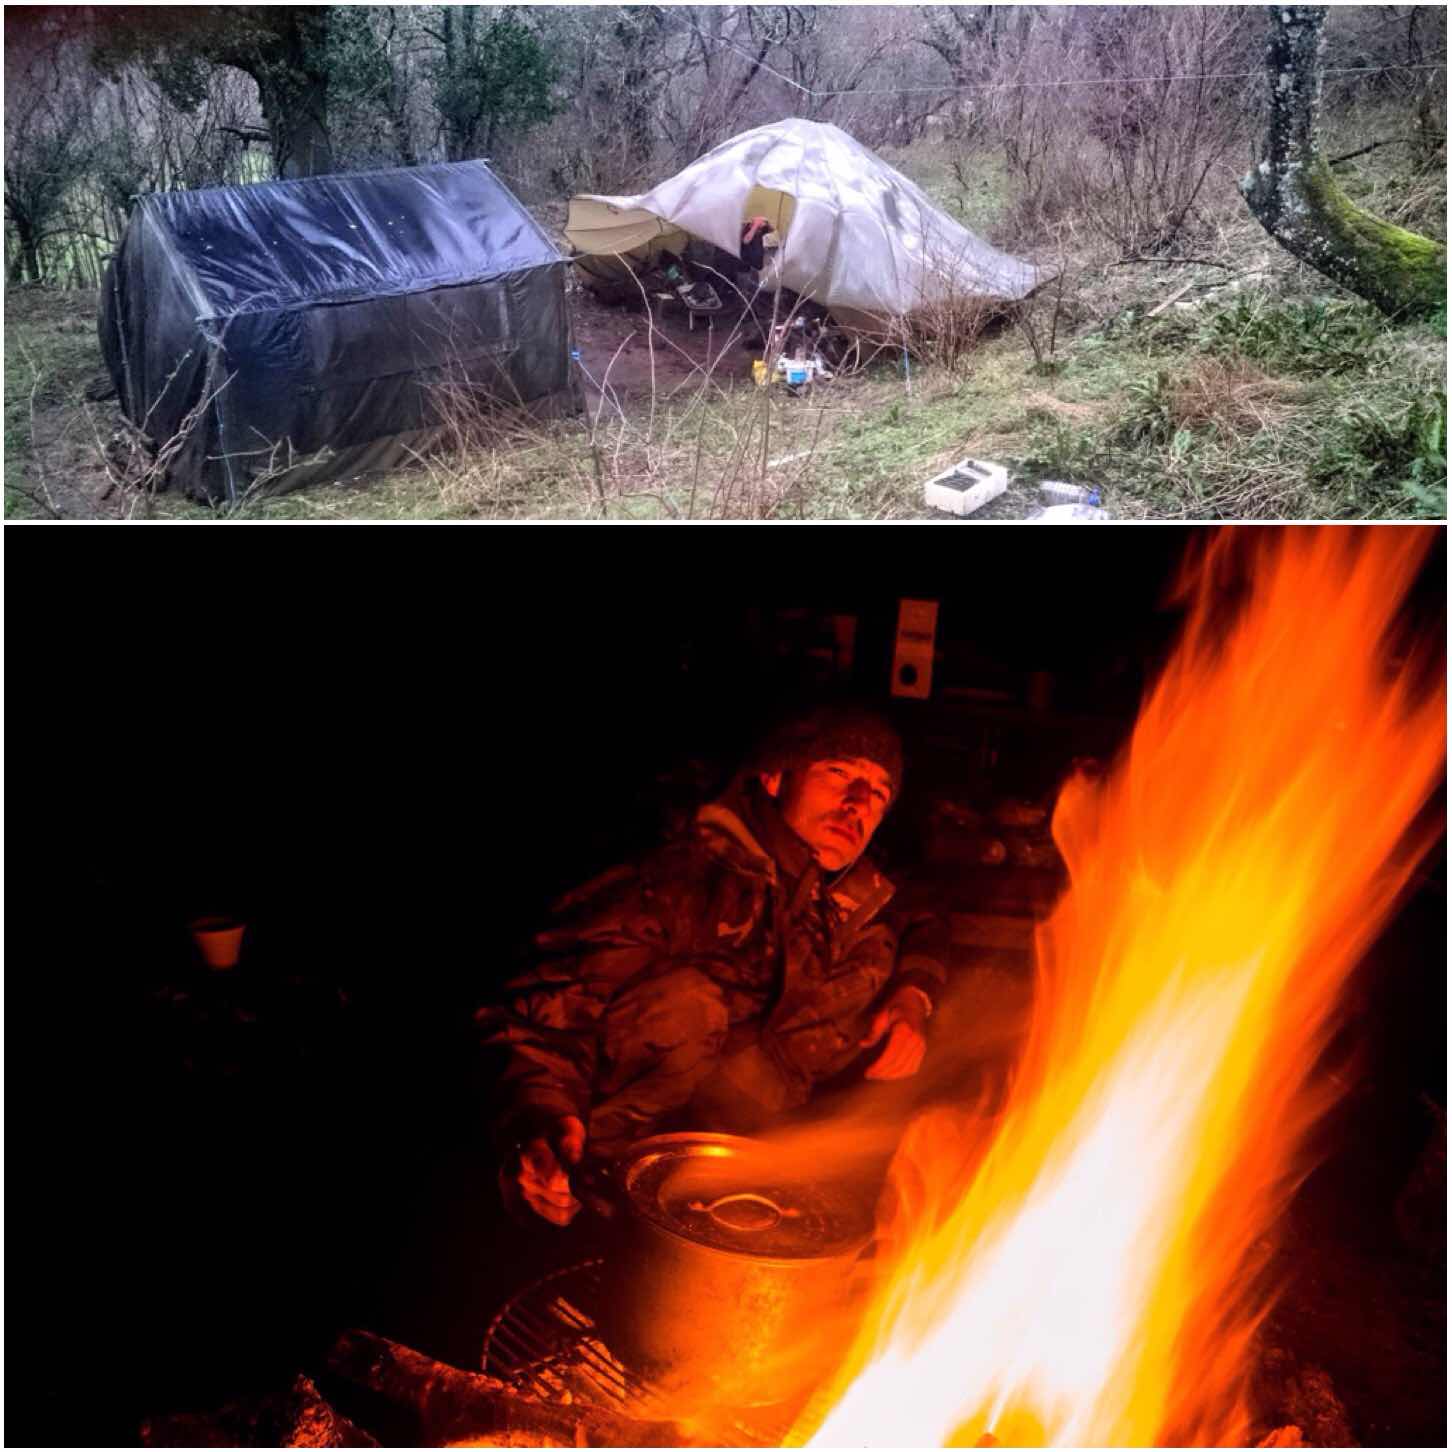
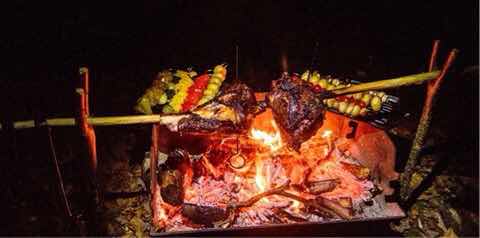
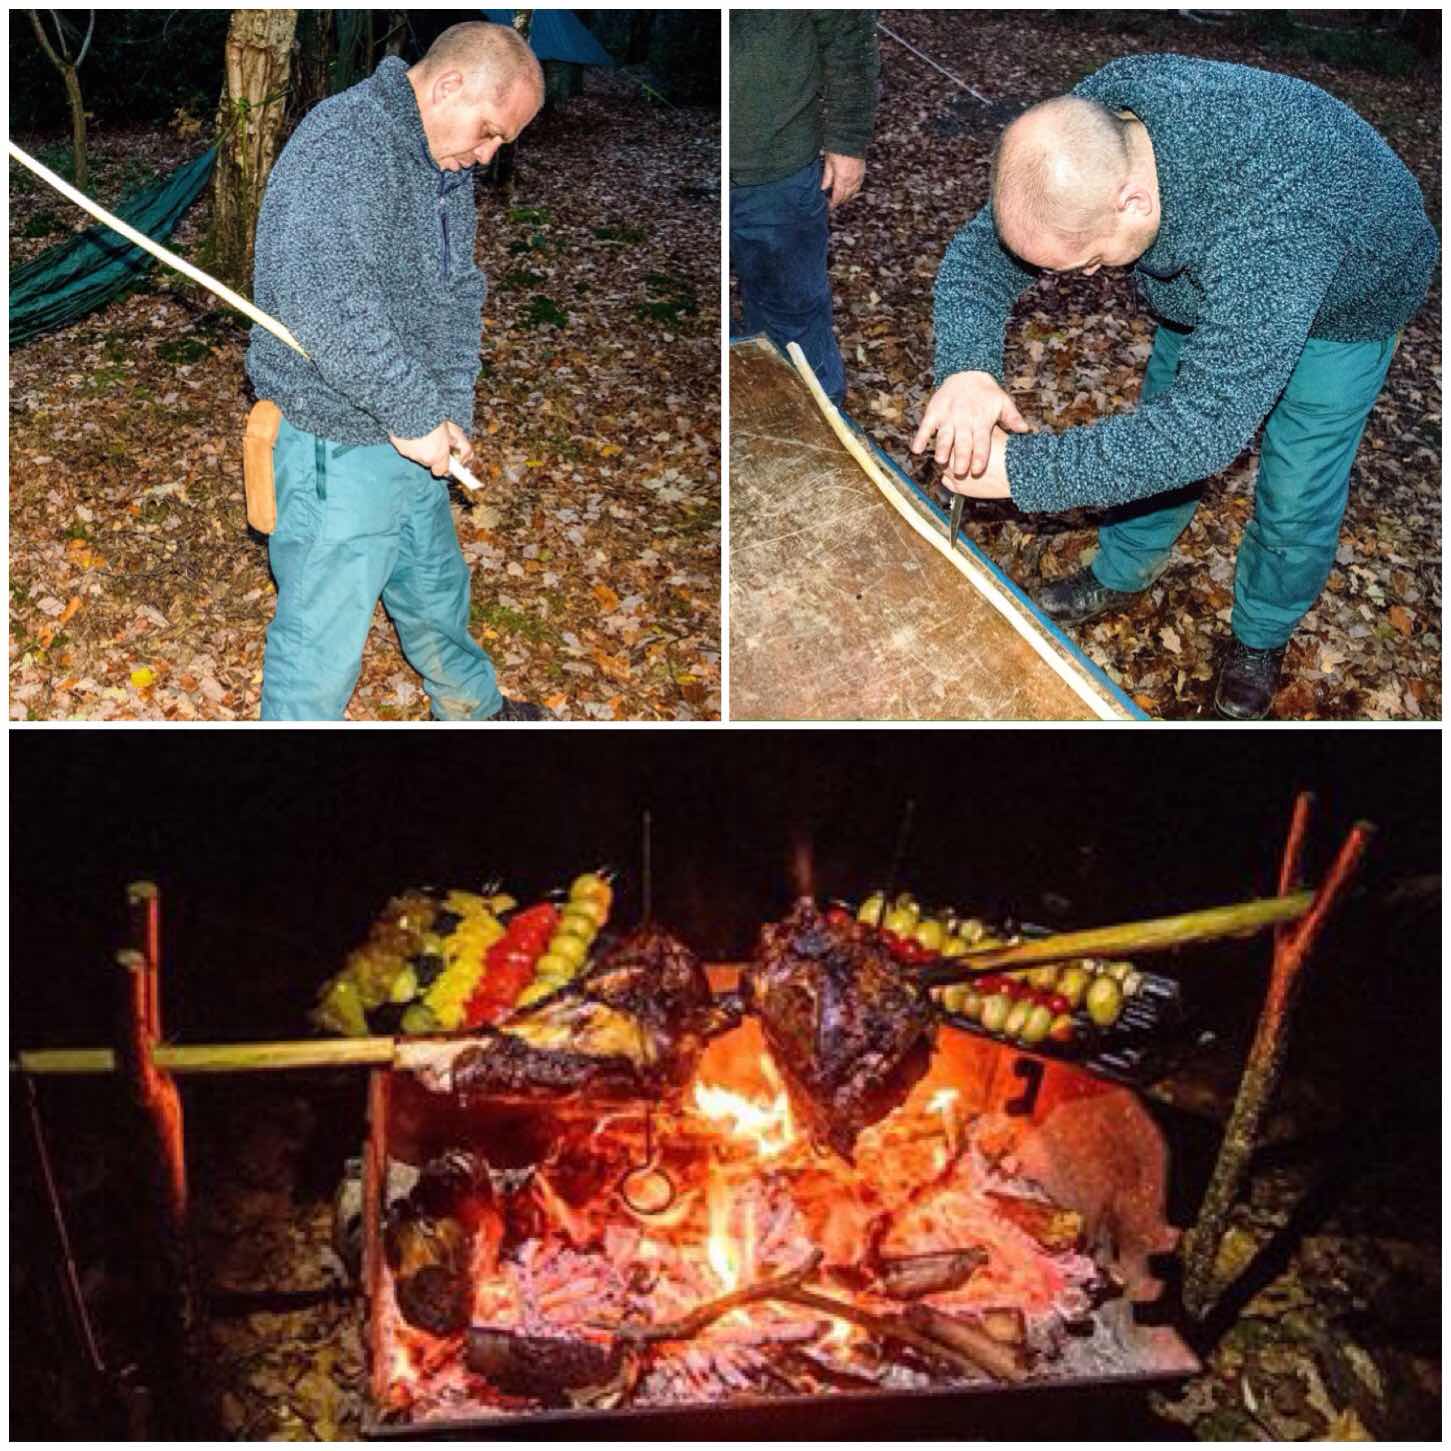
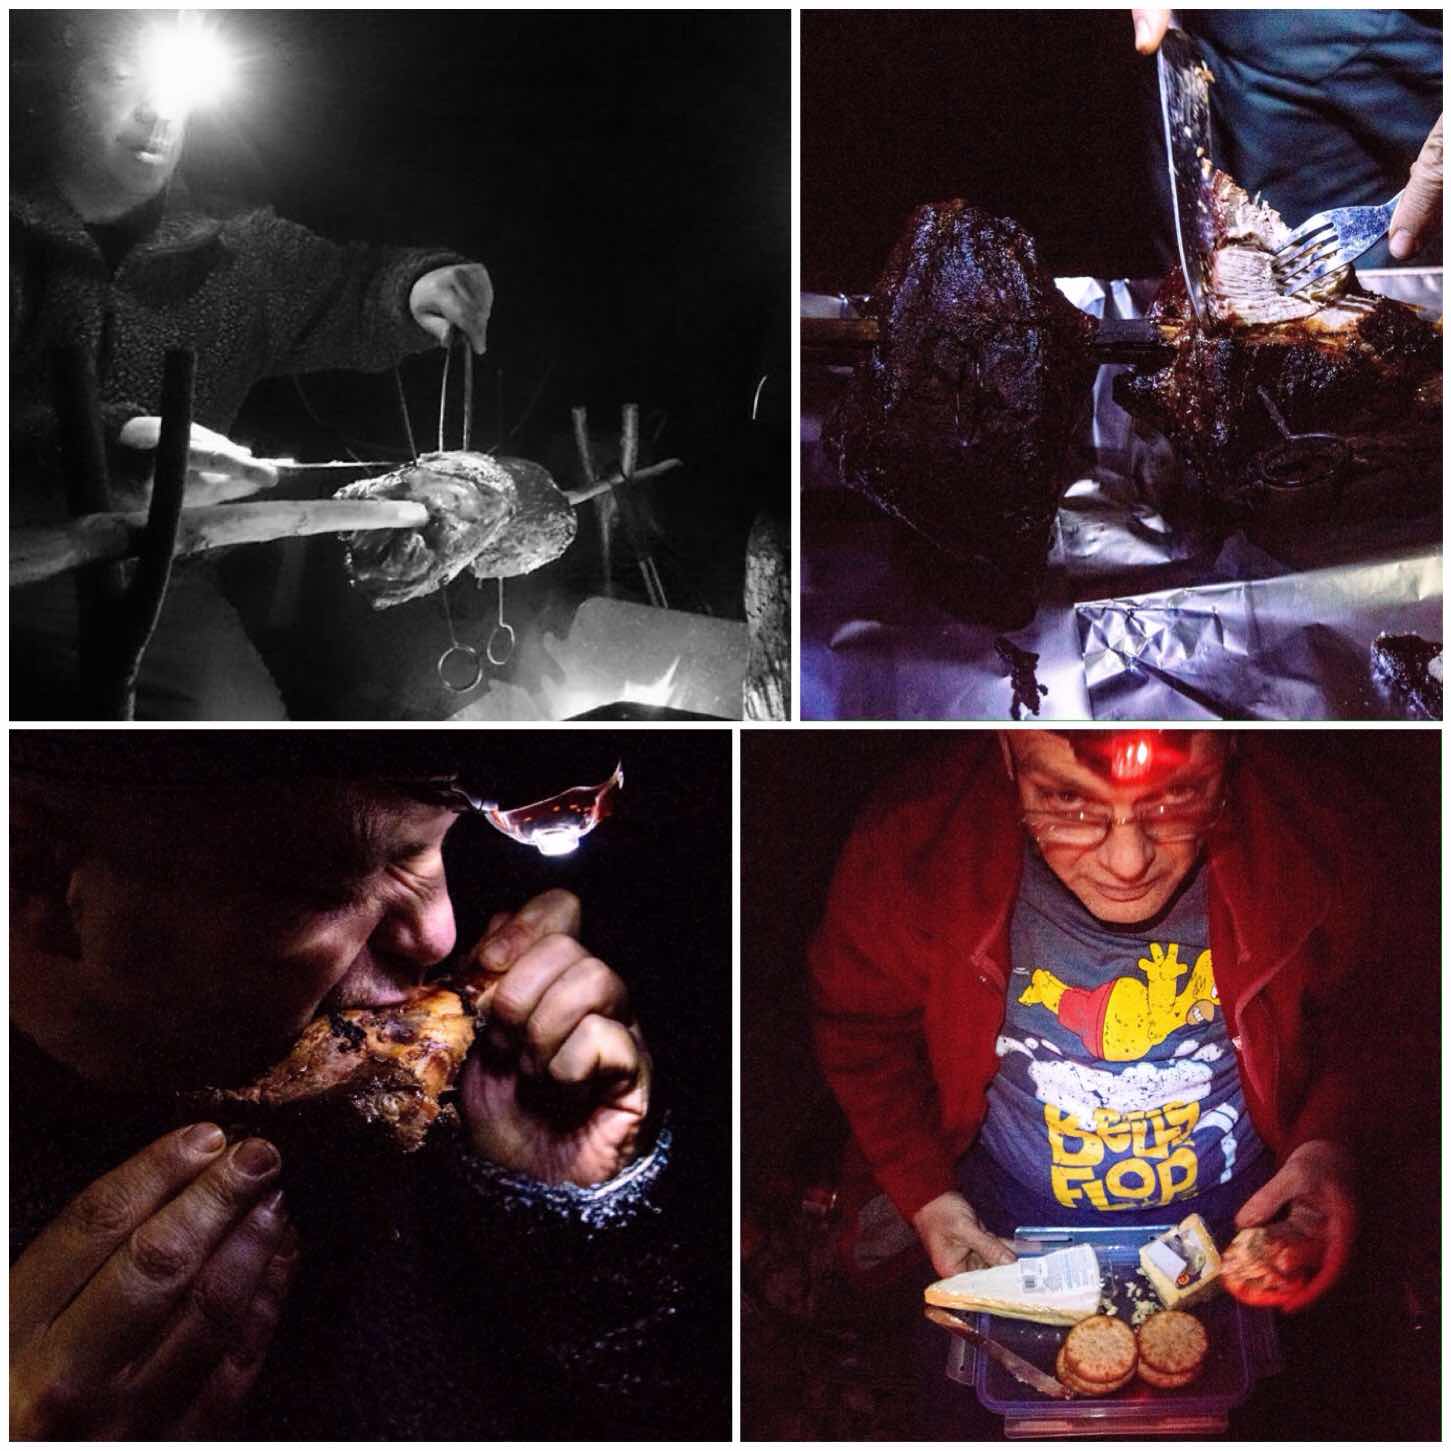
The bottom picture was taken inside a group parachute while we were huddled around the fire on a cold evening awaiting in anticipation for the feast to come being cooked by Dave.
Parachute time
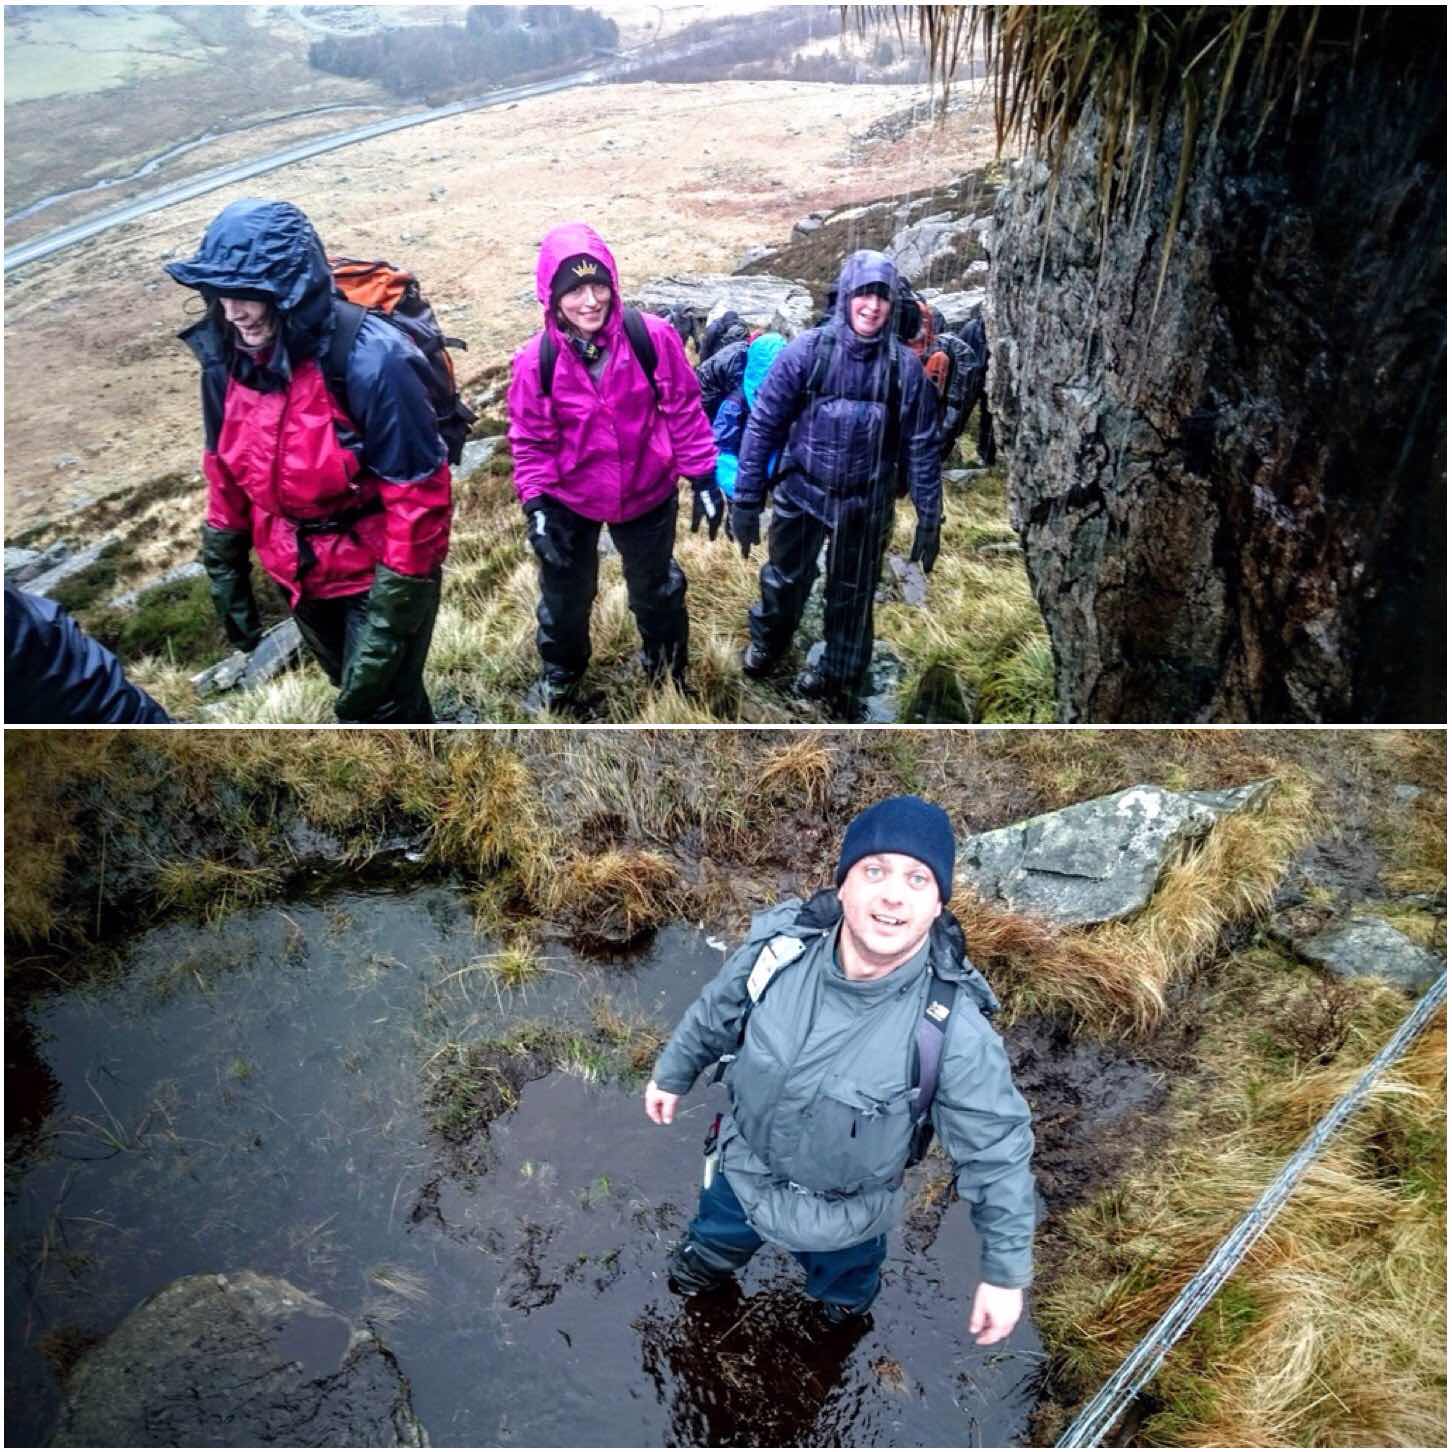
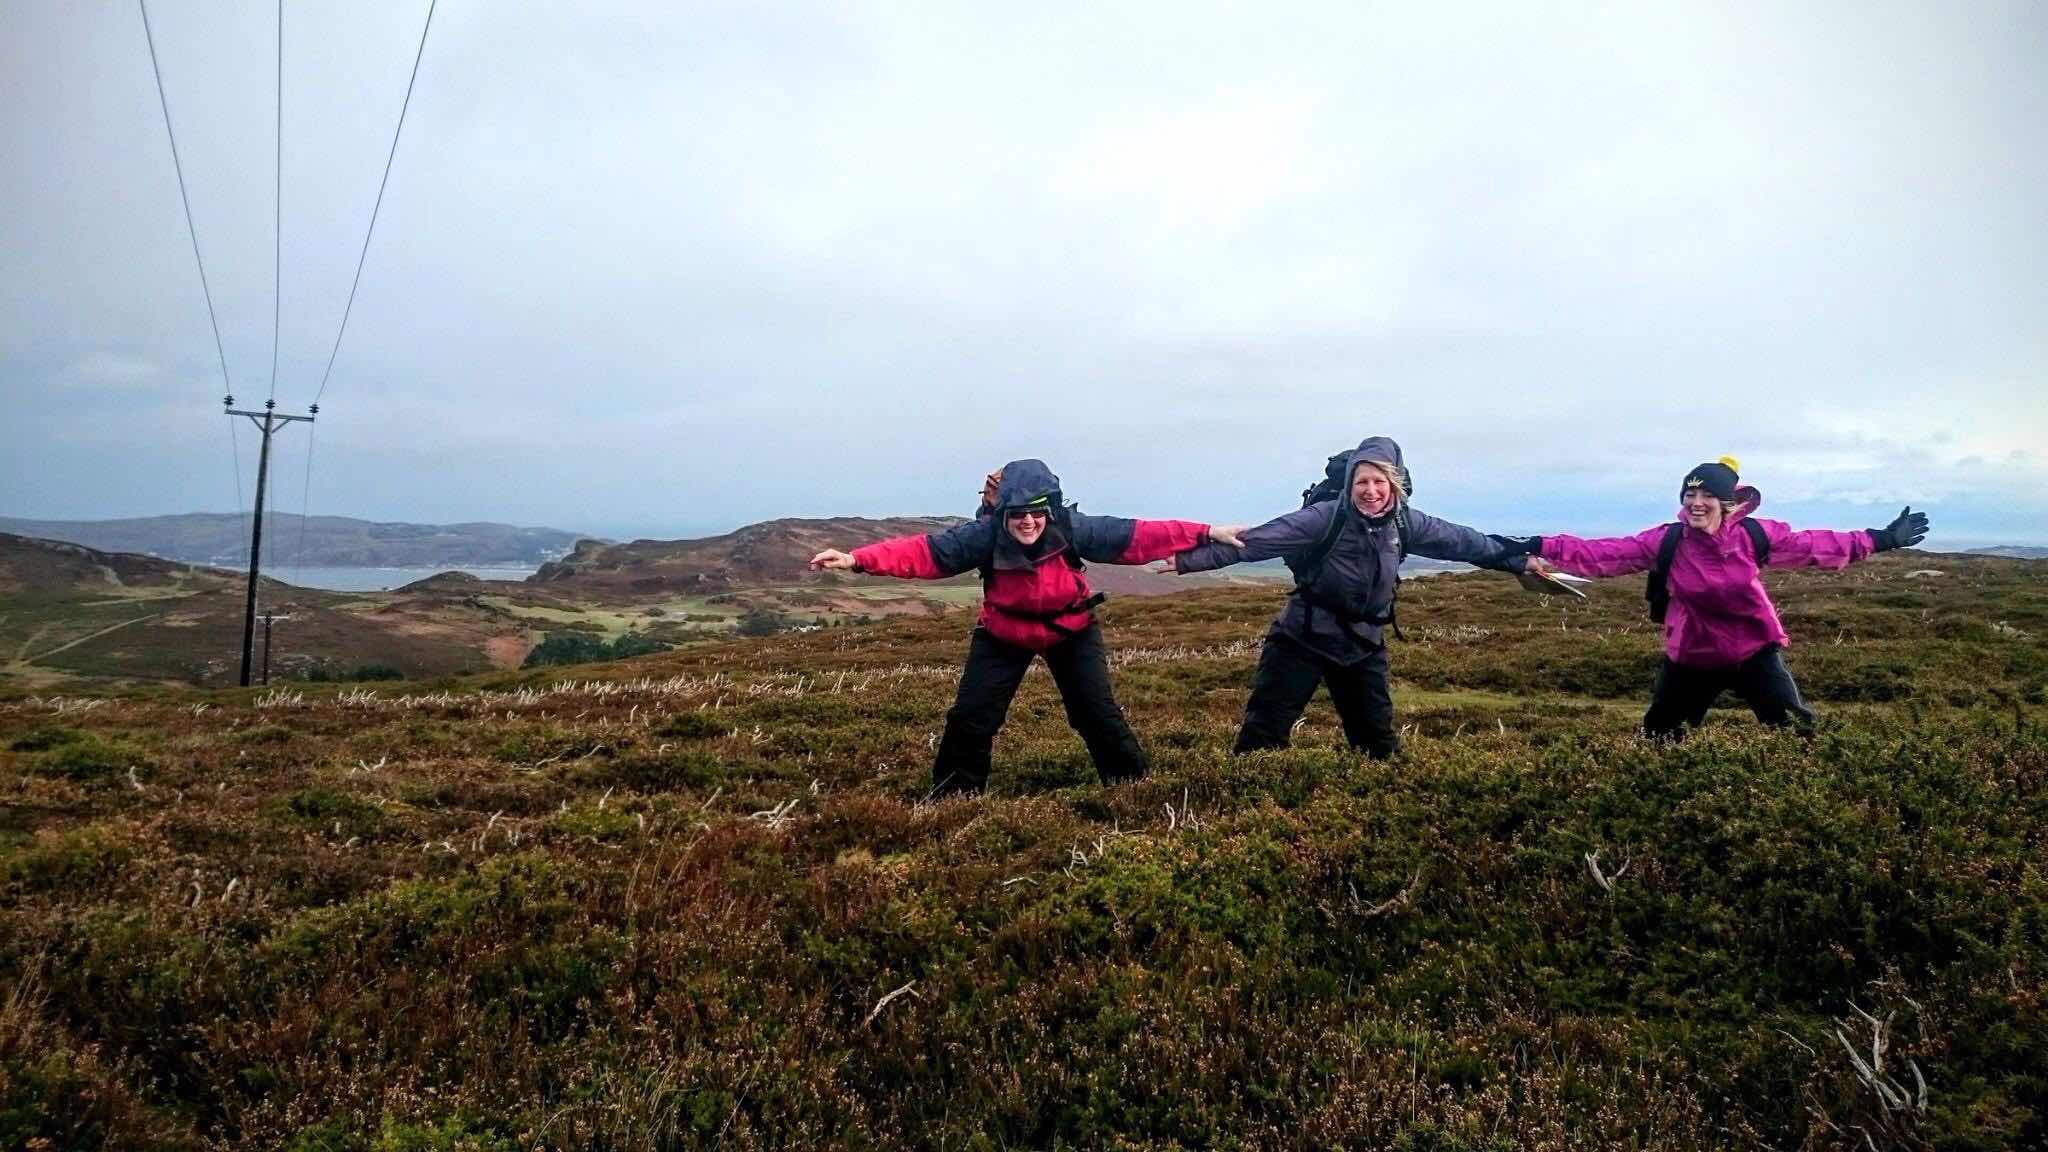
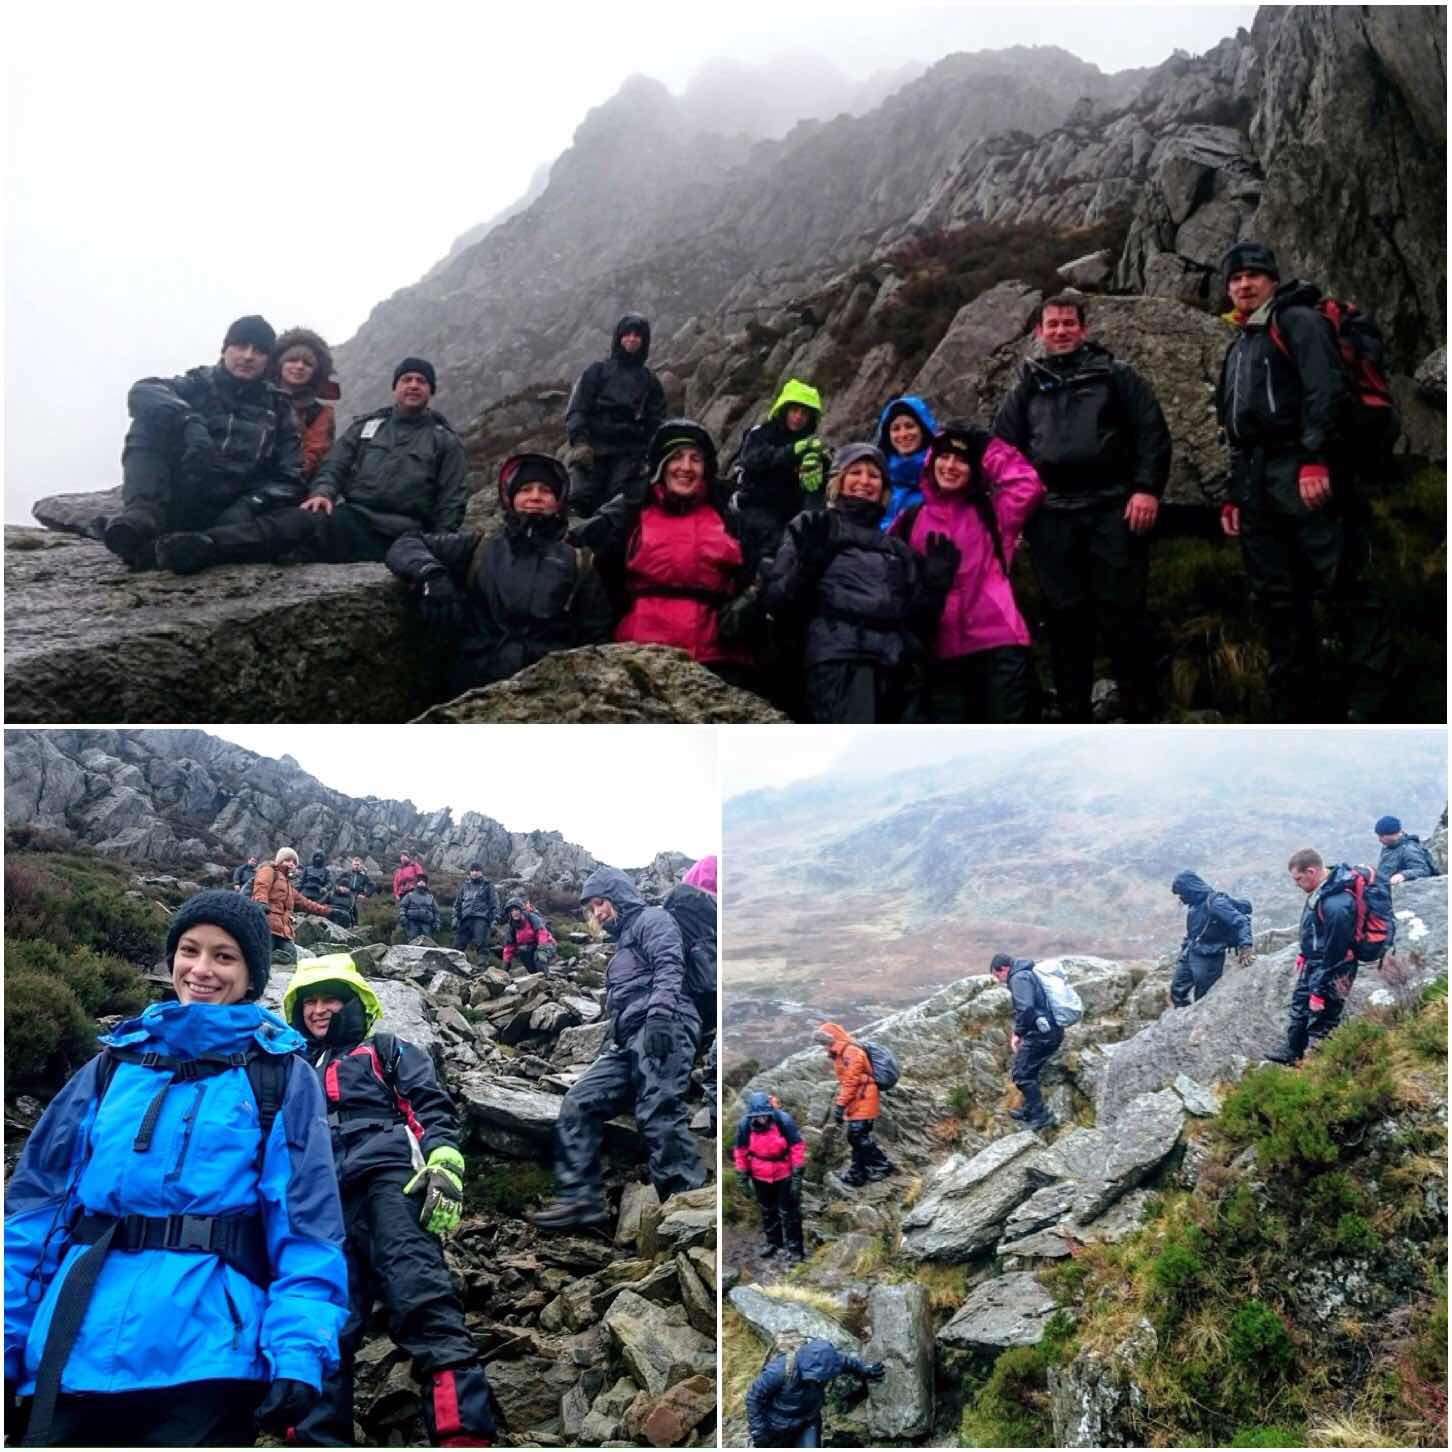
Mountain time this winter was limited to only one weekend however it was one to remember. The wind and the rain was incessant however this did not dampen the spirits of any of the guys I was walking with – in fact they seemed to revel in all that rain (might be due to the fact we are all either Sea or Royal Marines Cadets instructors).
Mountain madness
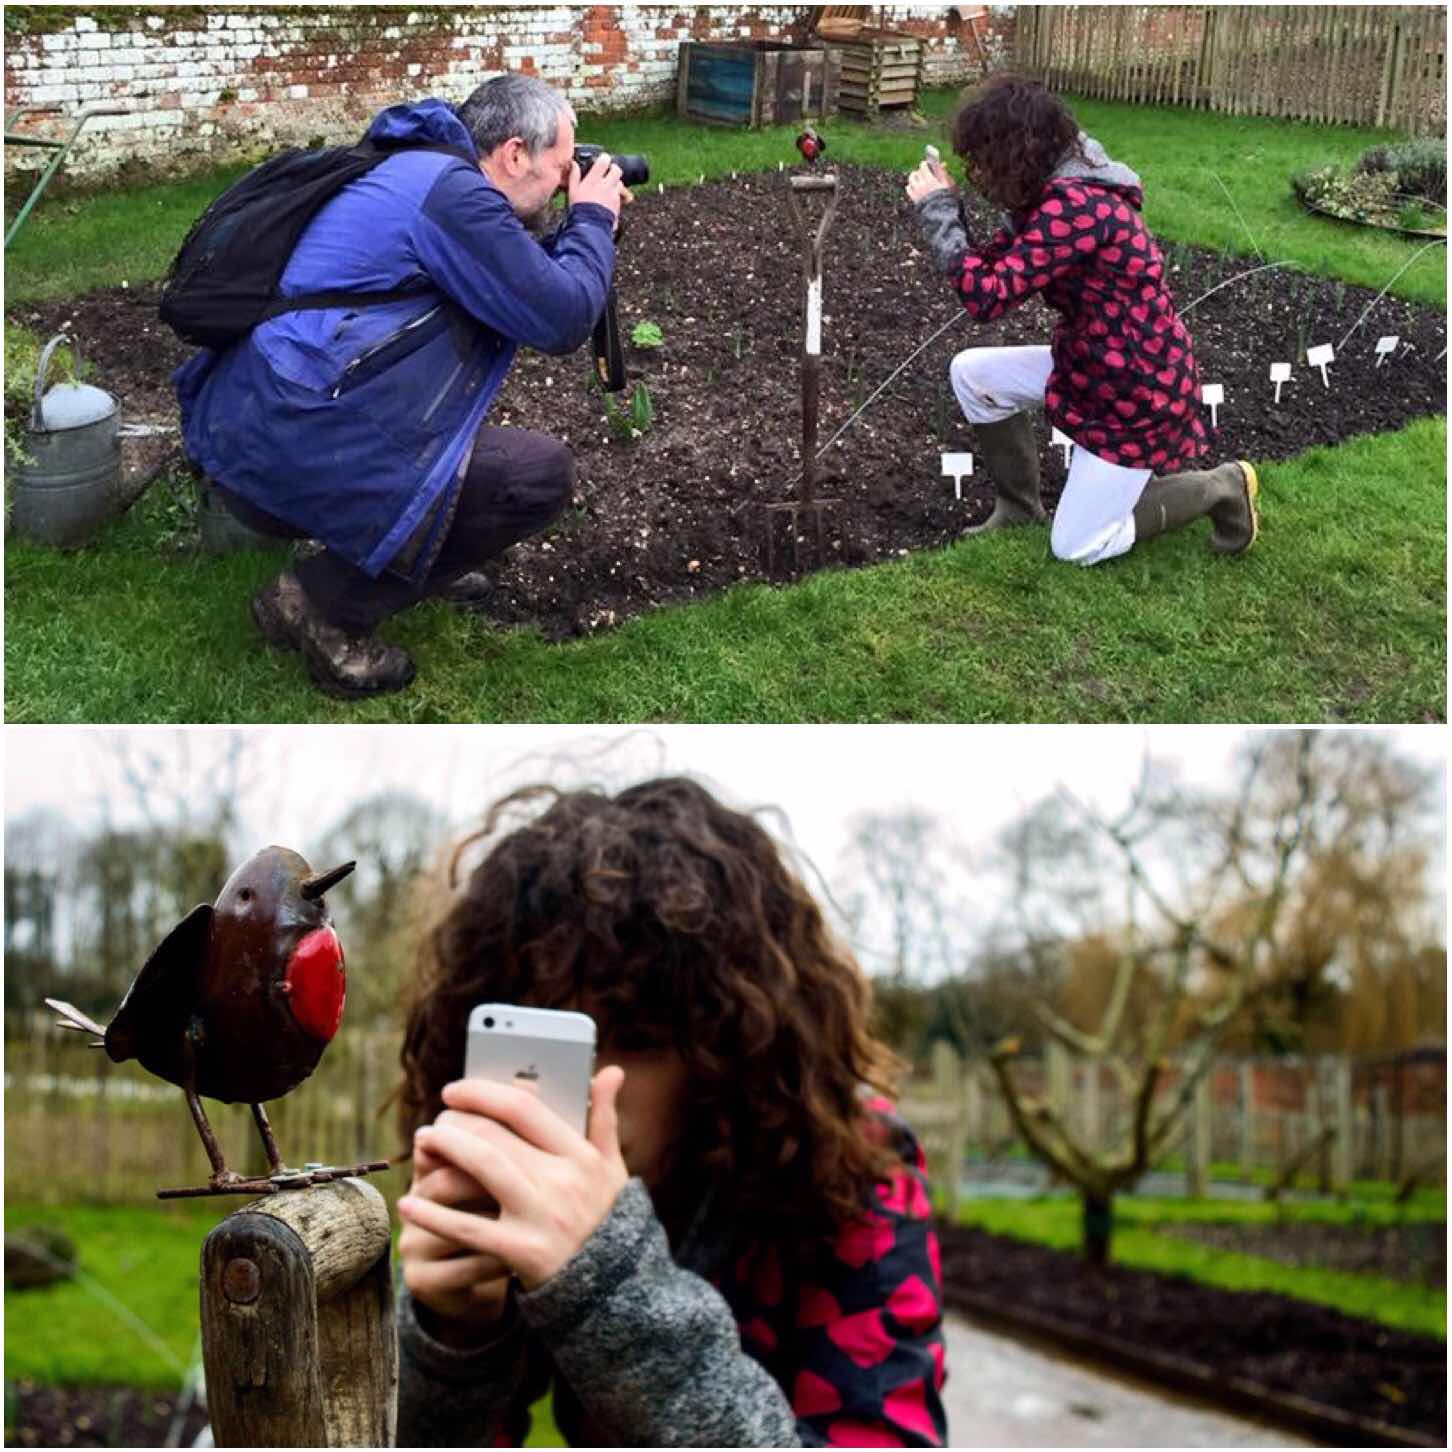
My daughter Catherine is a keen photographer and she really does think about what she wants to shoot and how to approach each shot.
The top picture was taken by my wife Alison and I like how it contrasts with the one I took of Catherine lining up for her shot.
Photographing the photographers
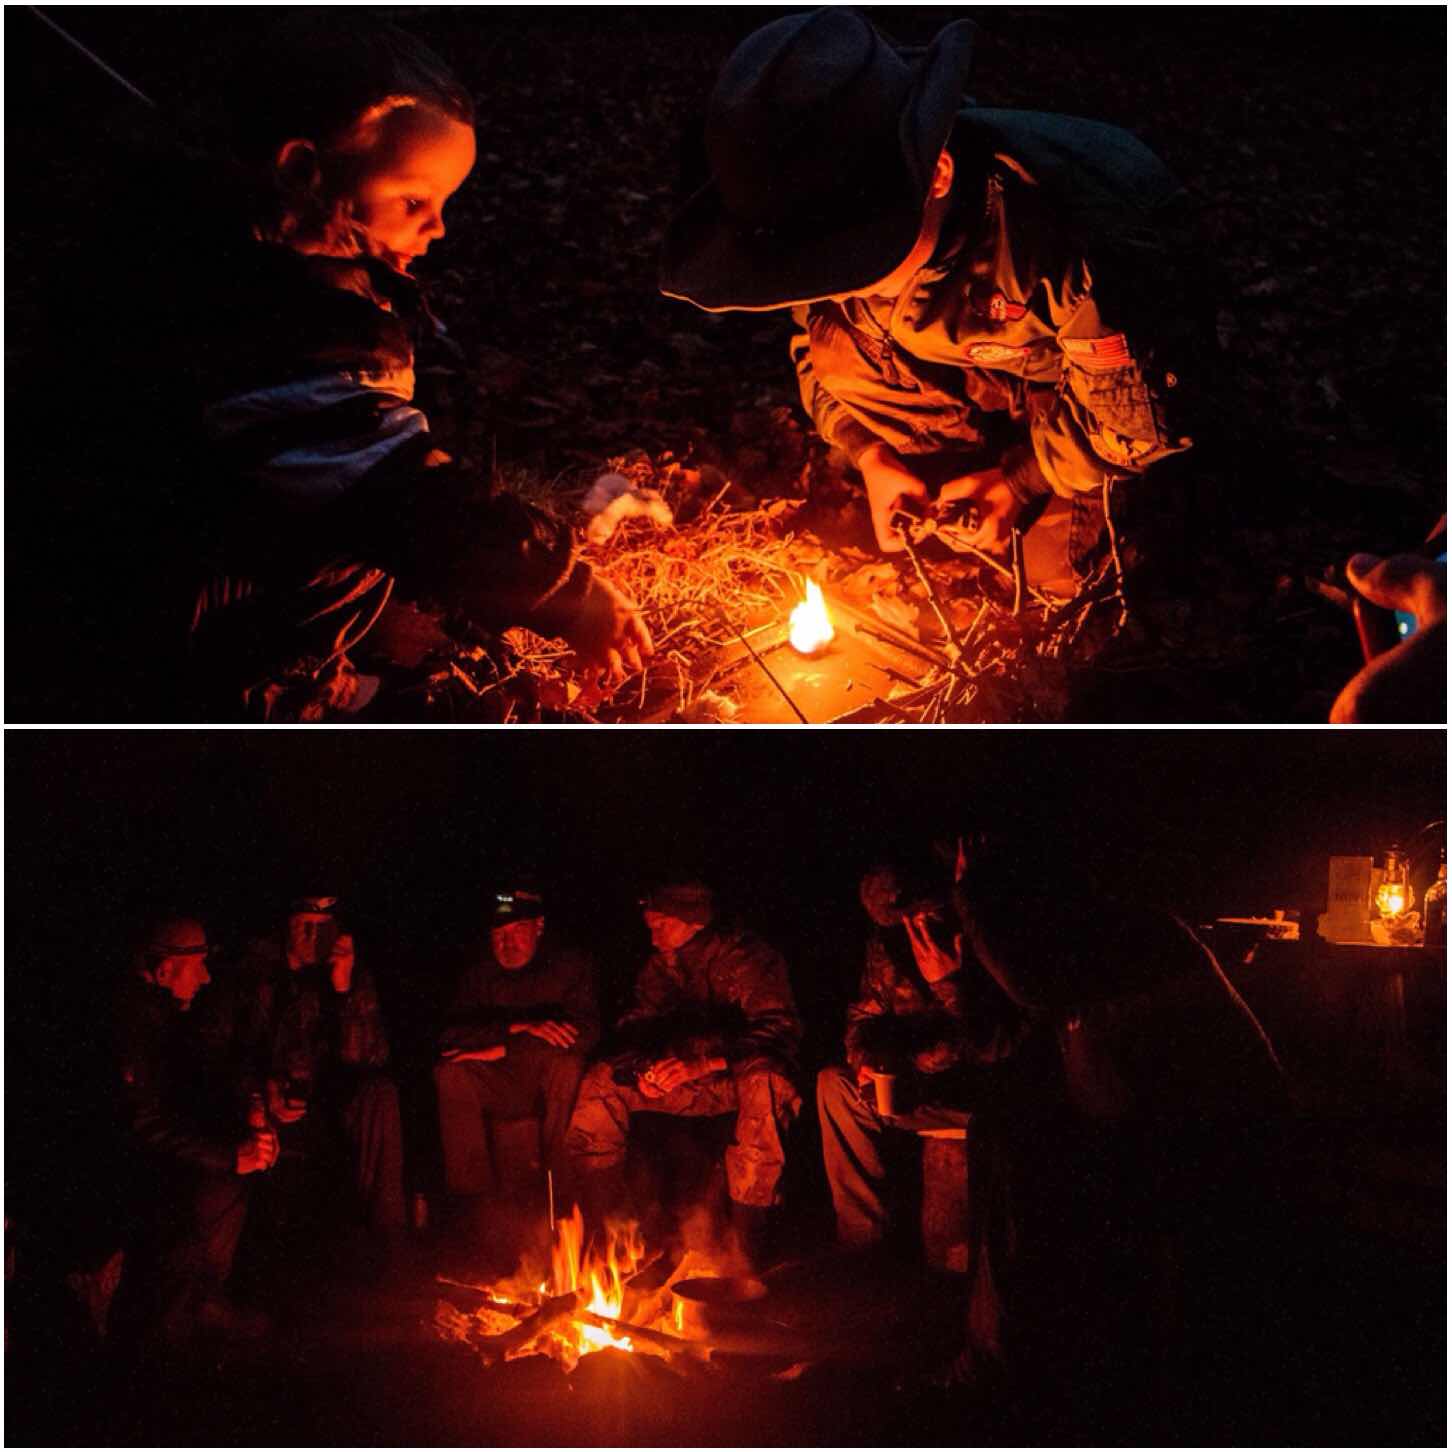
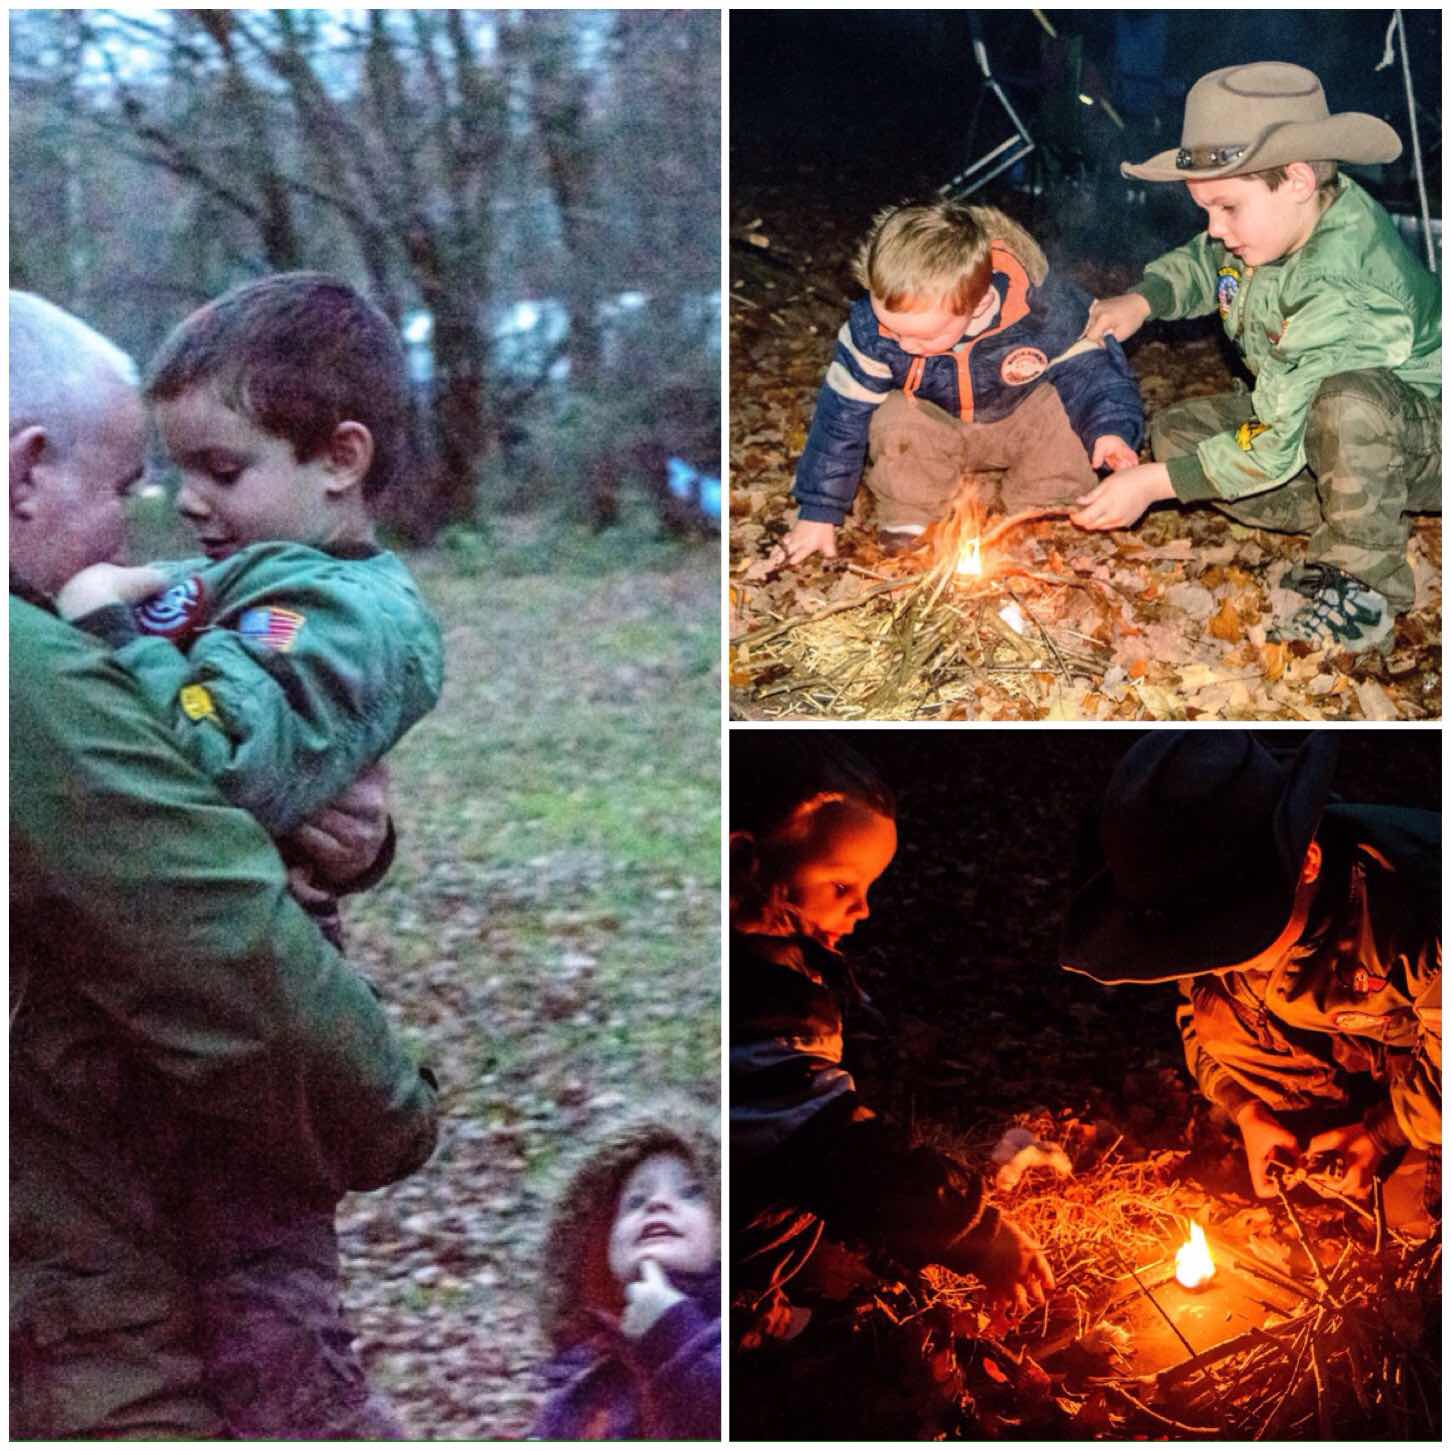
I have been experimenting with low light level photography so I do not have to rely on using the flash all the time.
I have found that a great time for that is when there is a fire going. These two photographs were taken on cold winter nights however I have fond memories of both evenings. The young boys had a great time learning to light a fire and the slightly older boys had fun putting the world to right around their fire.
Friends
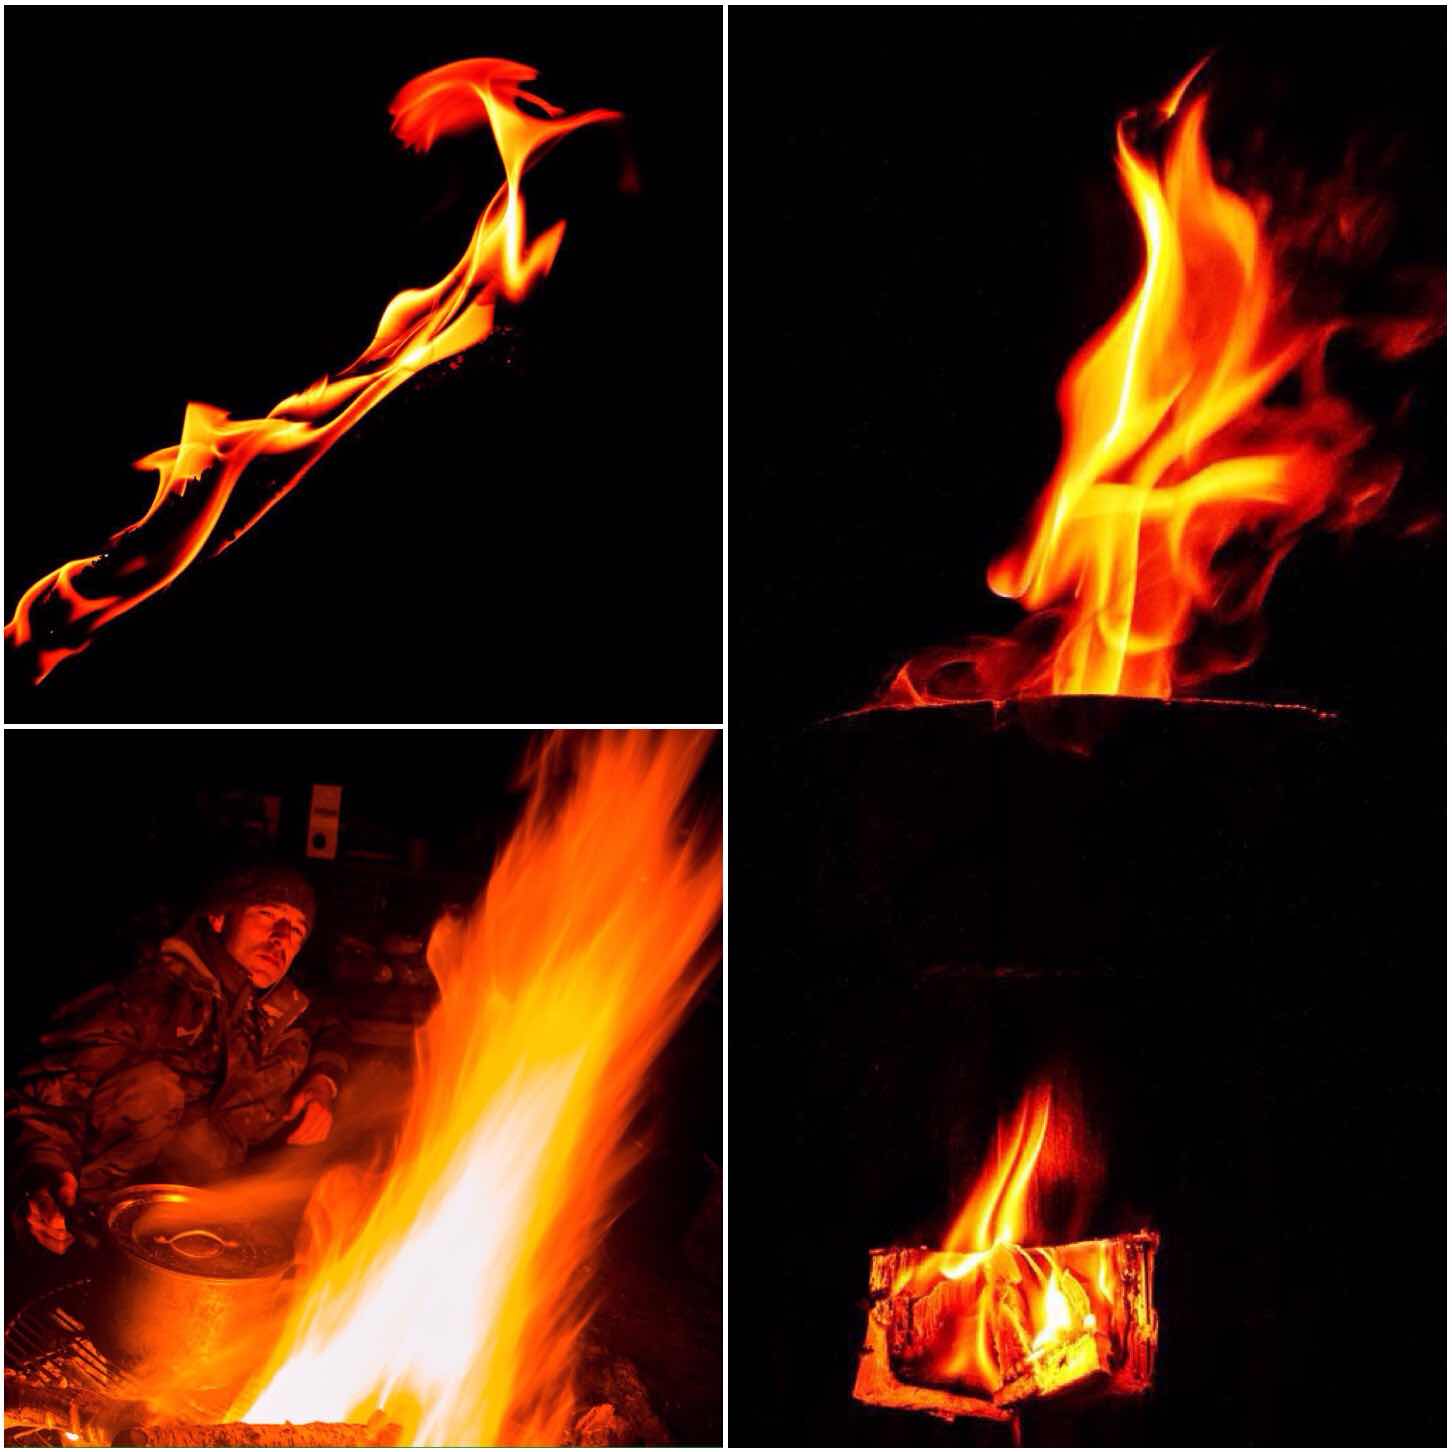
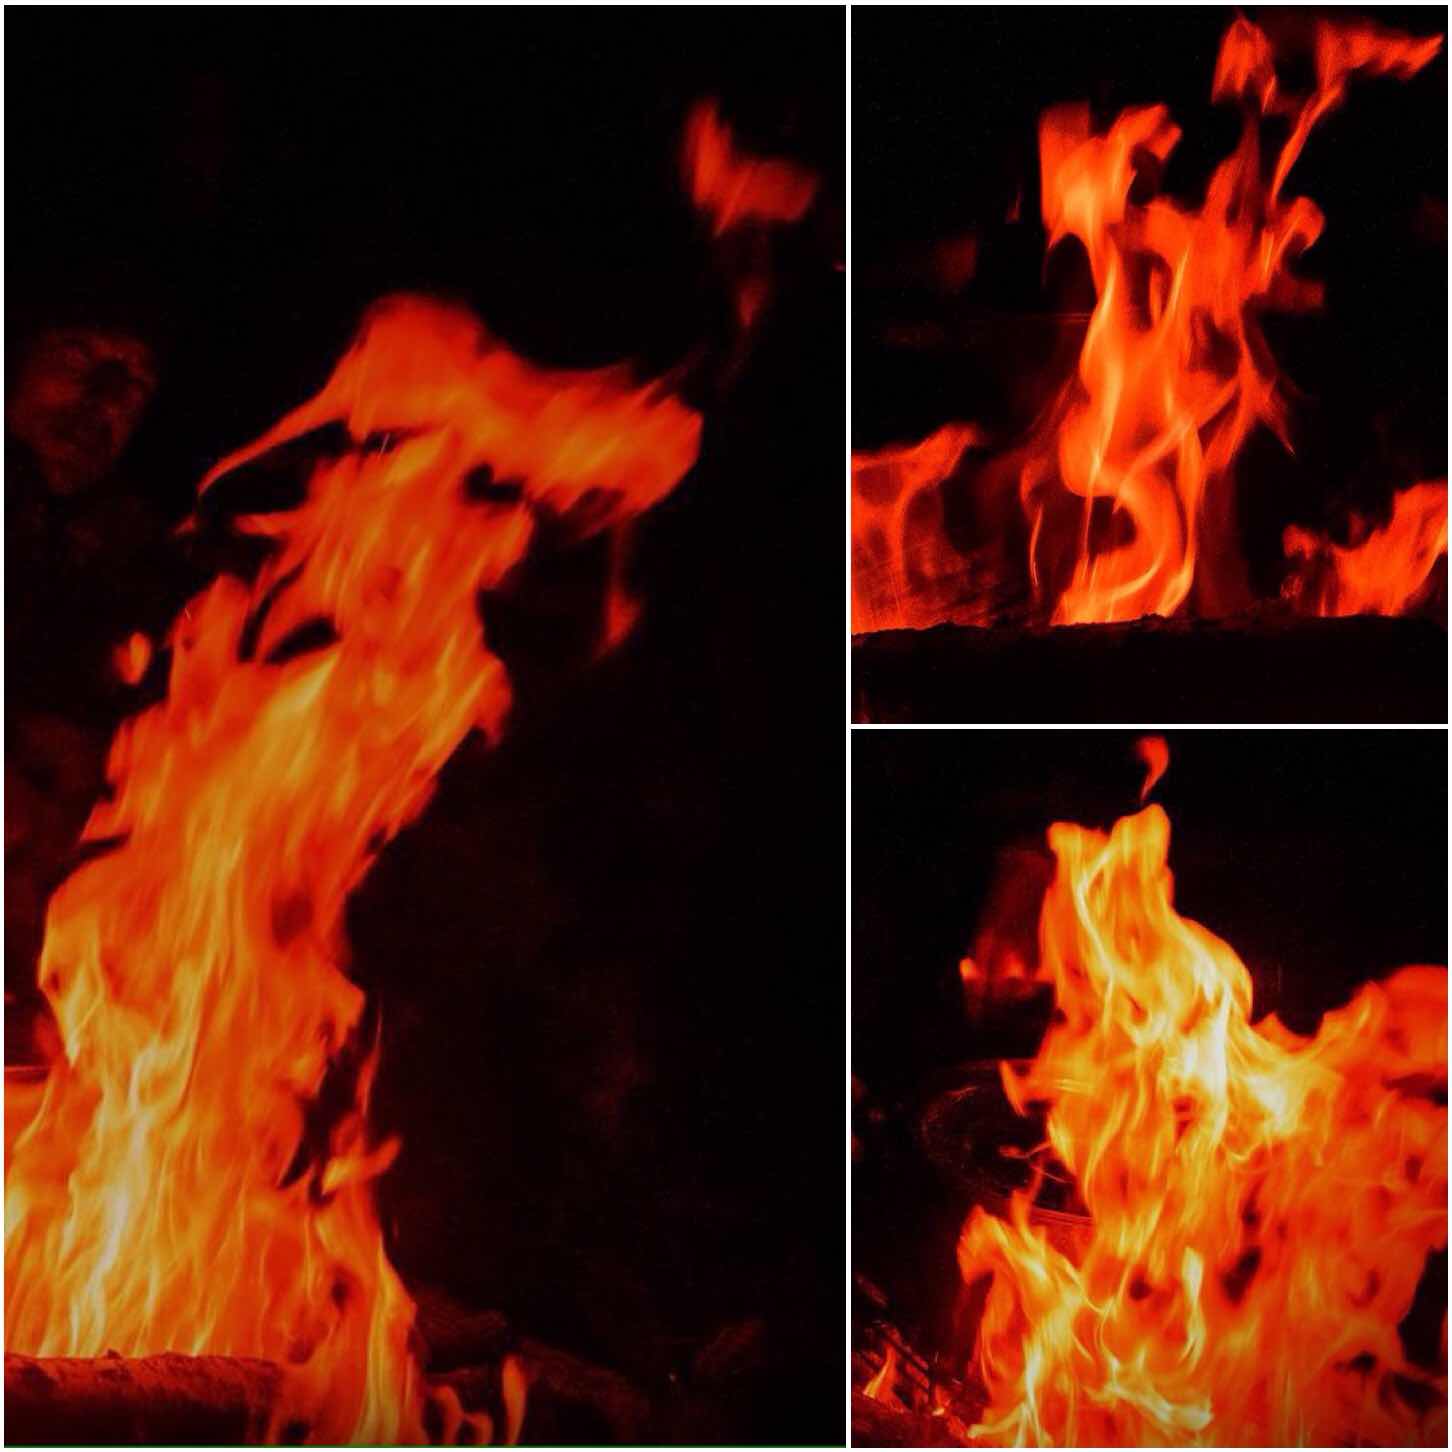
Still on the fire theme I have to mention ‘Fire Faces’. I have been photographing flames for years now looking for faces or figures in the flames. Two of my favourites this year were of the Roadrunner (top left) and a Dove (on the right).
My friend Fraser gets his face included as he always seems drawn to the fire when the camera comes out – kinda like a moth I suppose 😉
Fire, fire and more fire
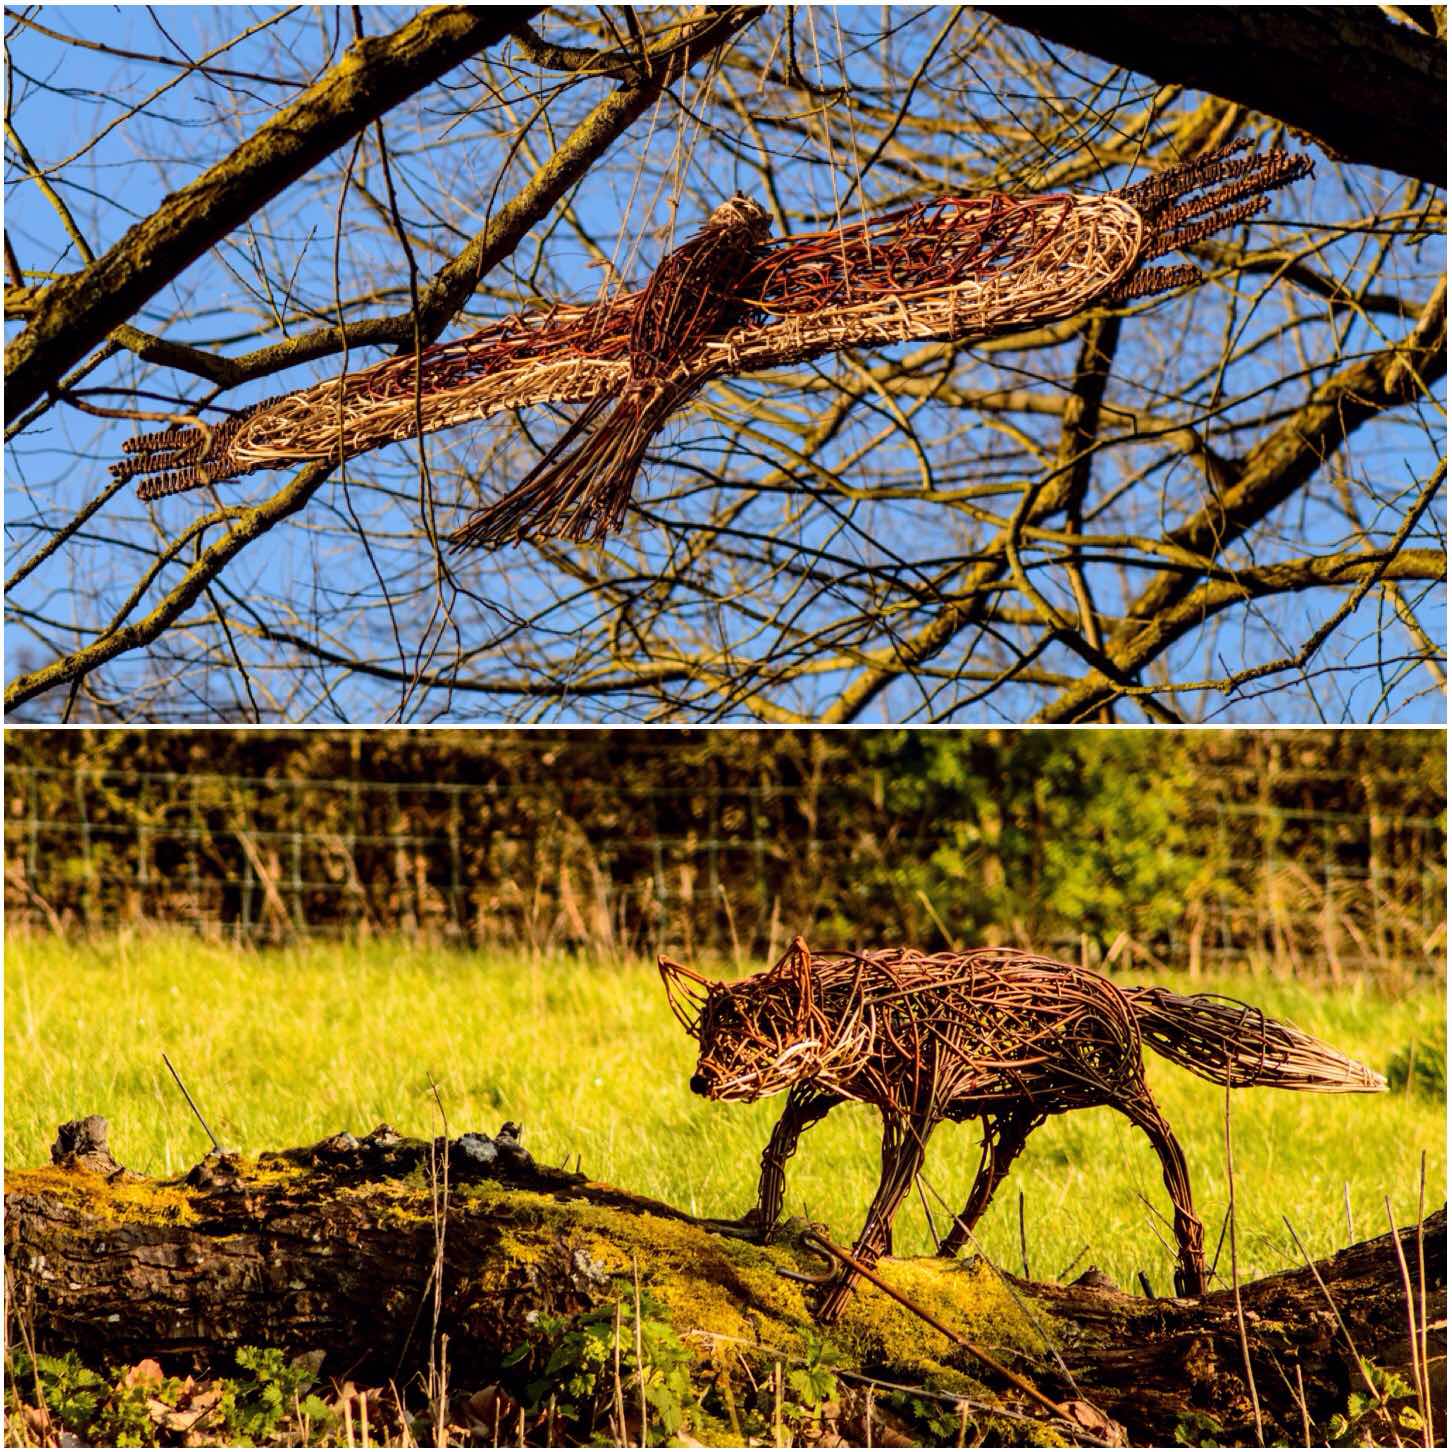
My last two pictures were taken just at the end of winter at the Vyne National Trust property in Hampshire. As many of the trees and flowers were dormant they set up a ‘Wild Wicker Trail’ in the grounds. There were plenty of wicker figures to spot including a heron, flowers and a fish however these two stood out for me – the Hawk and Mr Fox. Both beautifully crafted and positioned in the woodlands.
Woodland wonders
This last few days (been resting up with a torn calf muscle) I was thinking that I hadn’t gotten out as much as I would have liked this winter however after looking through my albums I must admit that when I did get out and about – they were good times.
Welcome to the view from my favourite ‘Sit Spot’ near where I live.
To those that are not familiar with the term Sit Spot it is a place to go and sit in a comfortable manner and observe the beauty of nature around you.
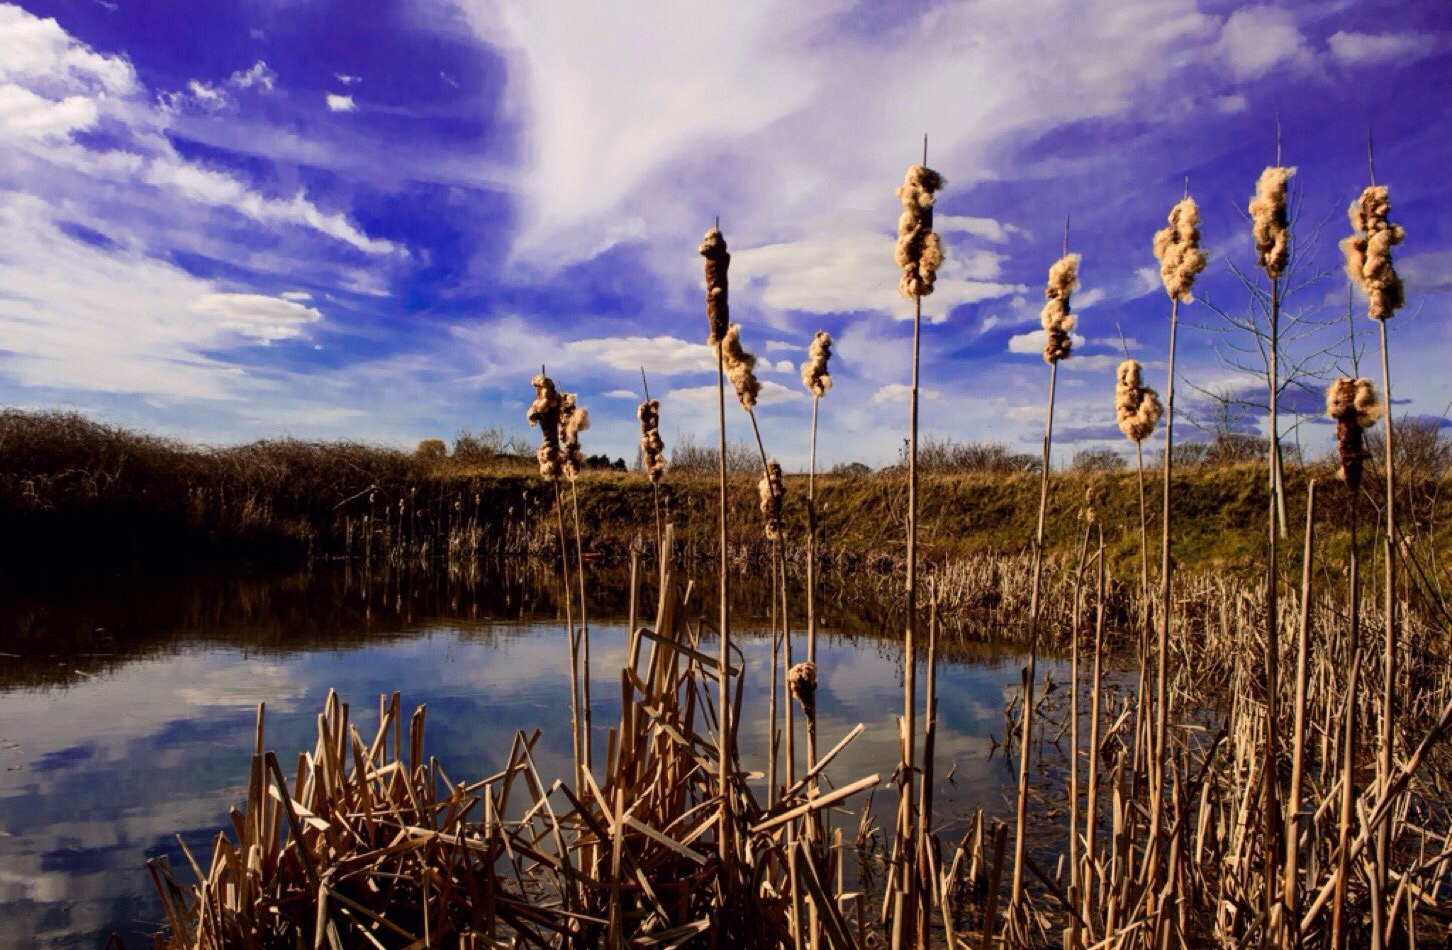
The Sit Spot
This reedmace fringed pond near my village in Hampshire has plenty of activity from fish, voles, waterfowl, dragonflies and nocturnal visits from deer and badger (plenty of tracks to testify to this).
I like to sit here for a half hour or so on some of my bimbles to quietly re-connect myself with the goings on with mother nature all around me.
Get out there and find your own Sit Spot and re-connect with nature – it is not hard.
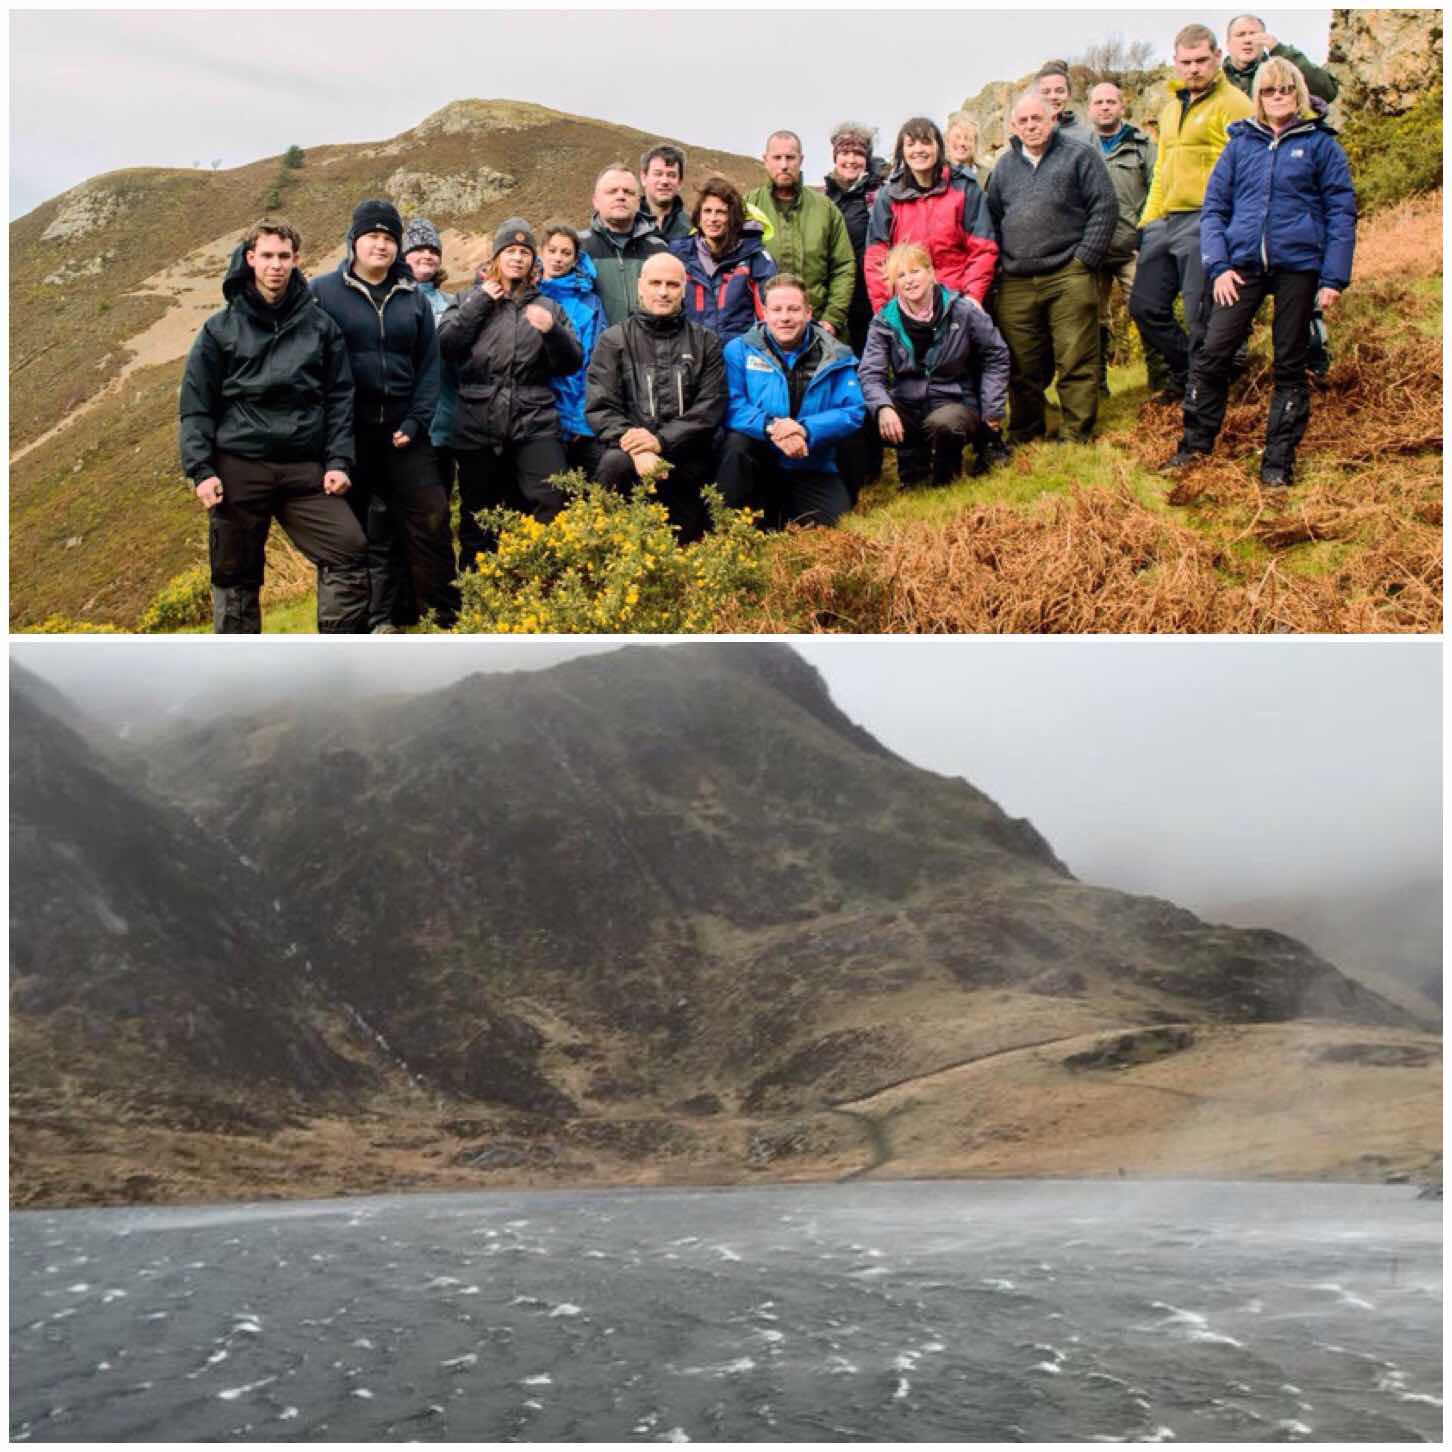
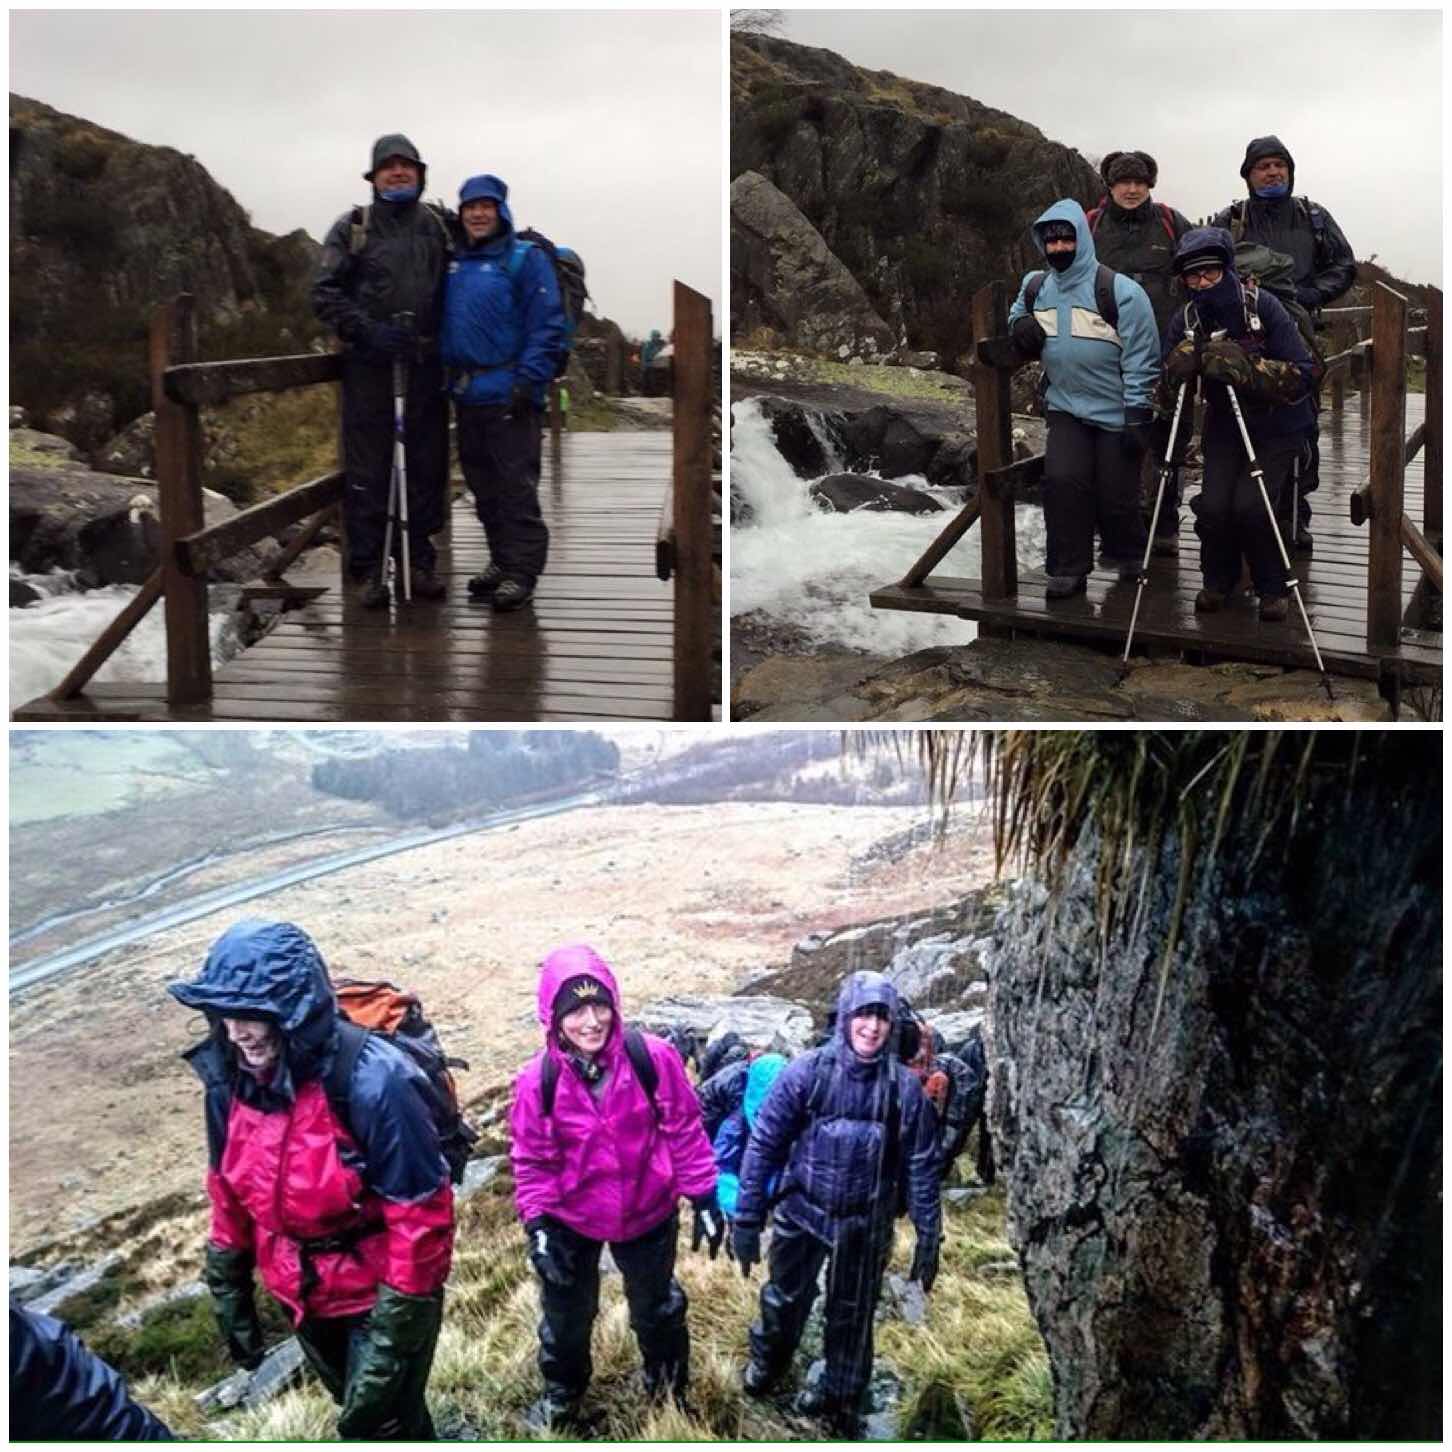
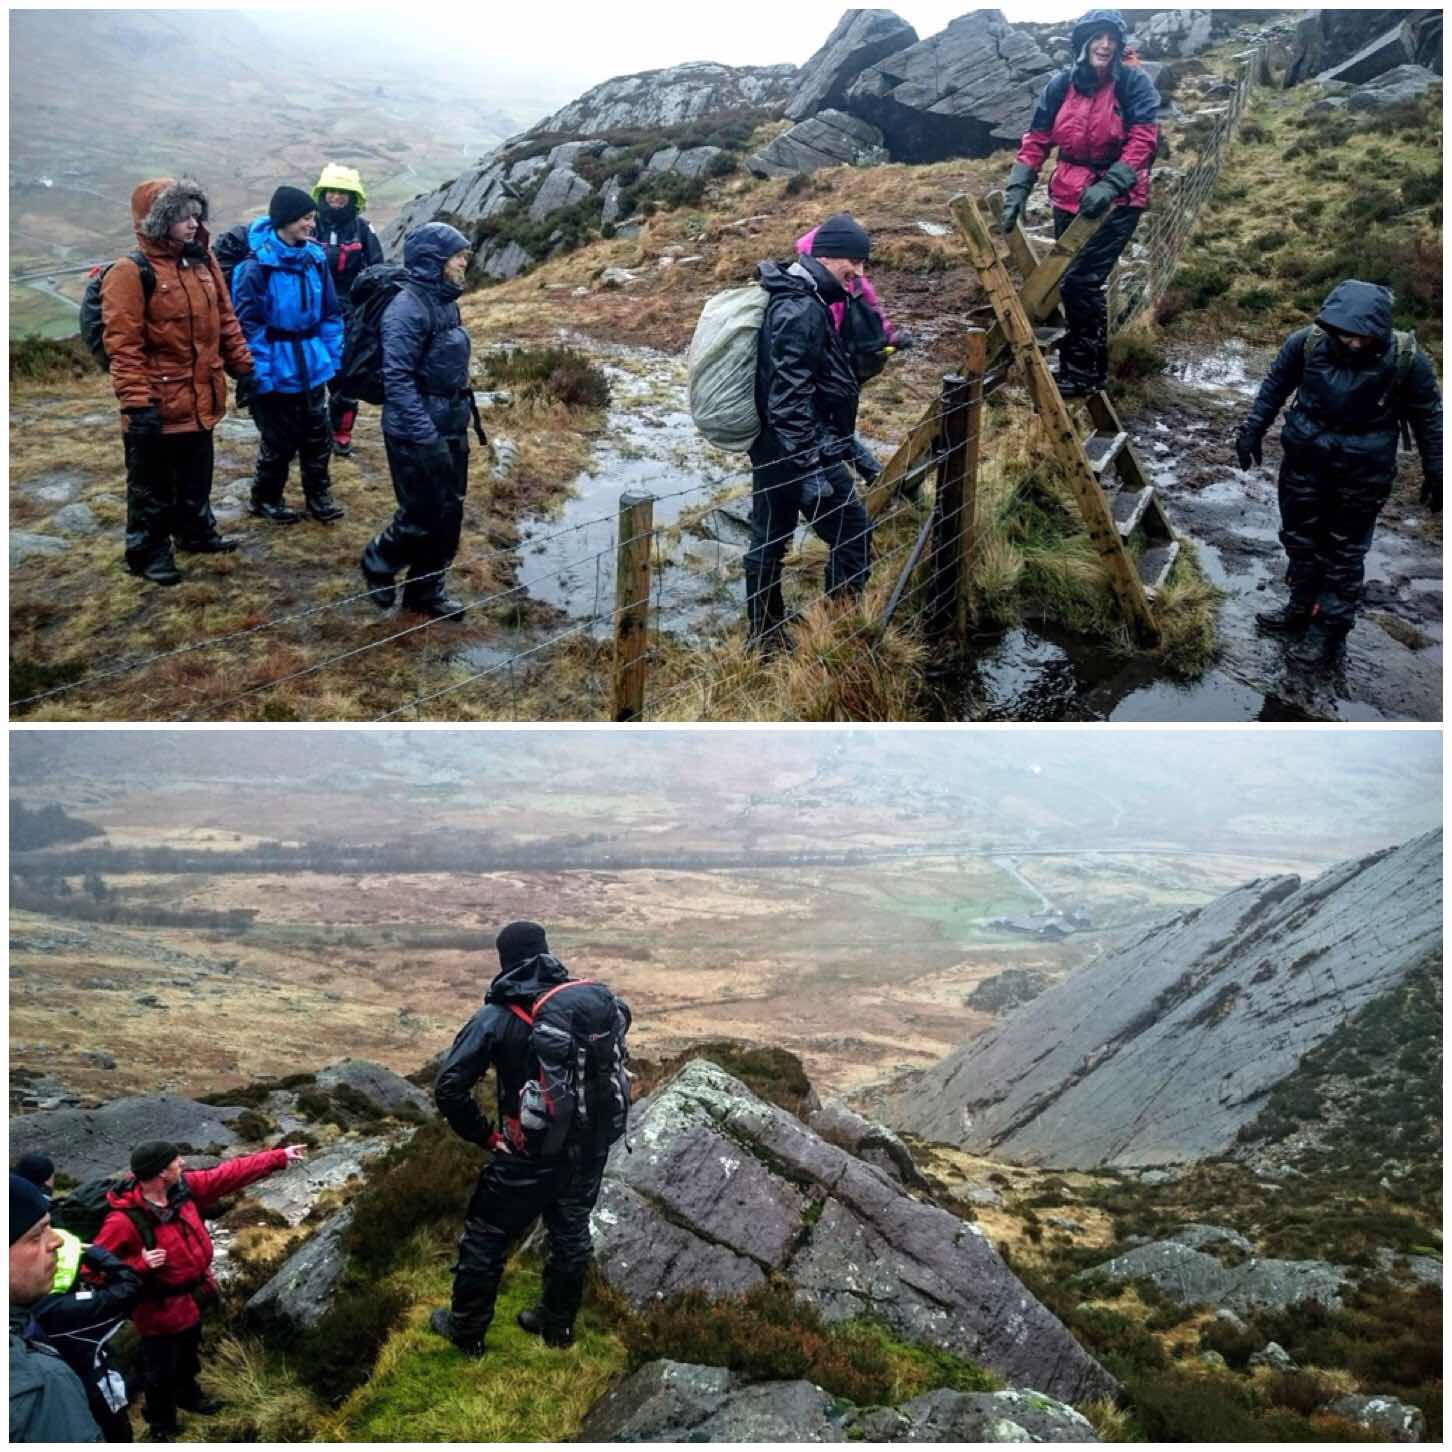
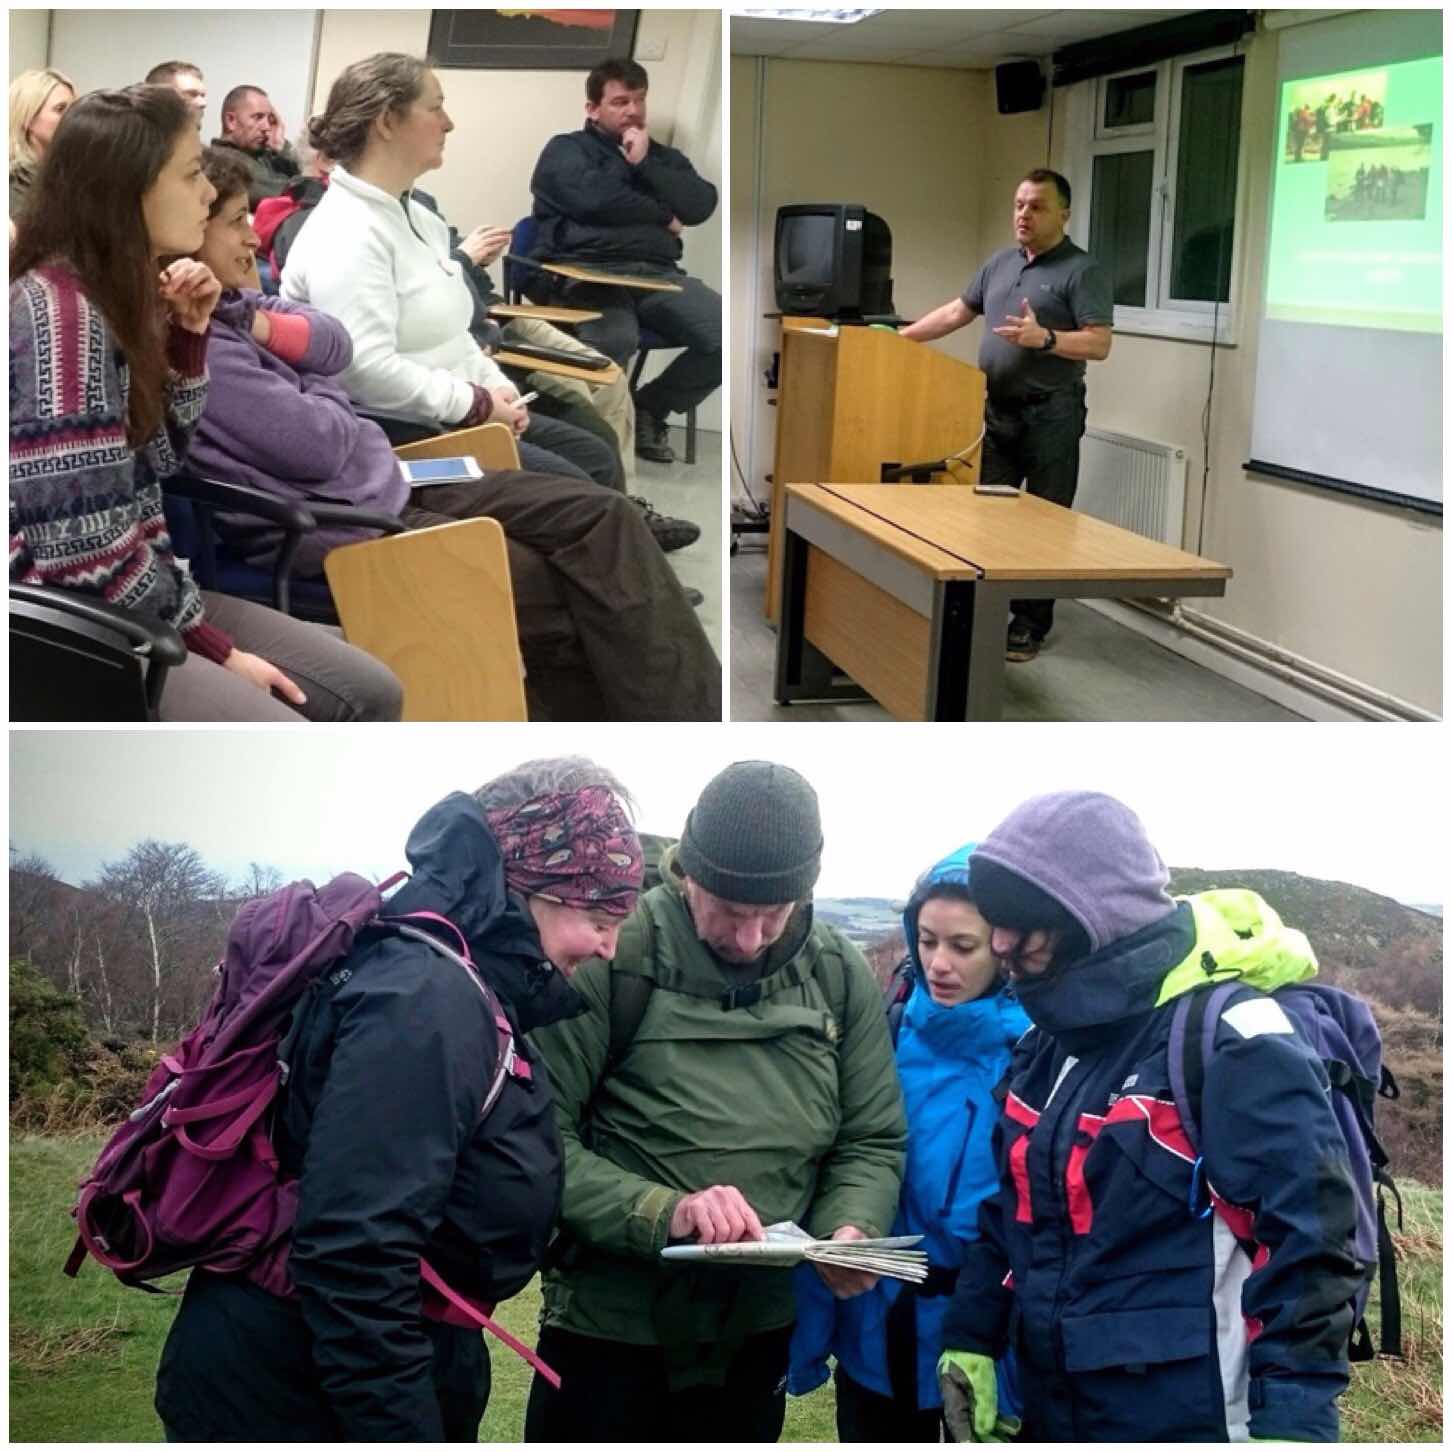
My last trip out into the mountains proved a bit draftier and damp than I was expecting. Last January I headed off with some other instructors from the Sea and Royal Marines Cadets into the mountains of Snowdonia in Wales.
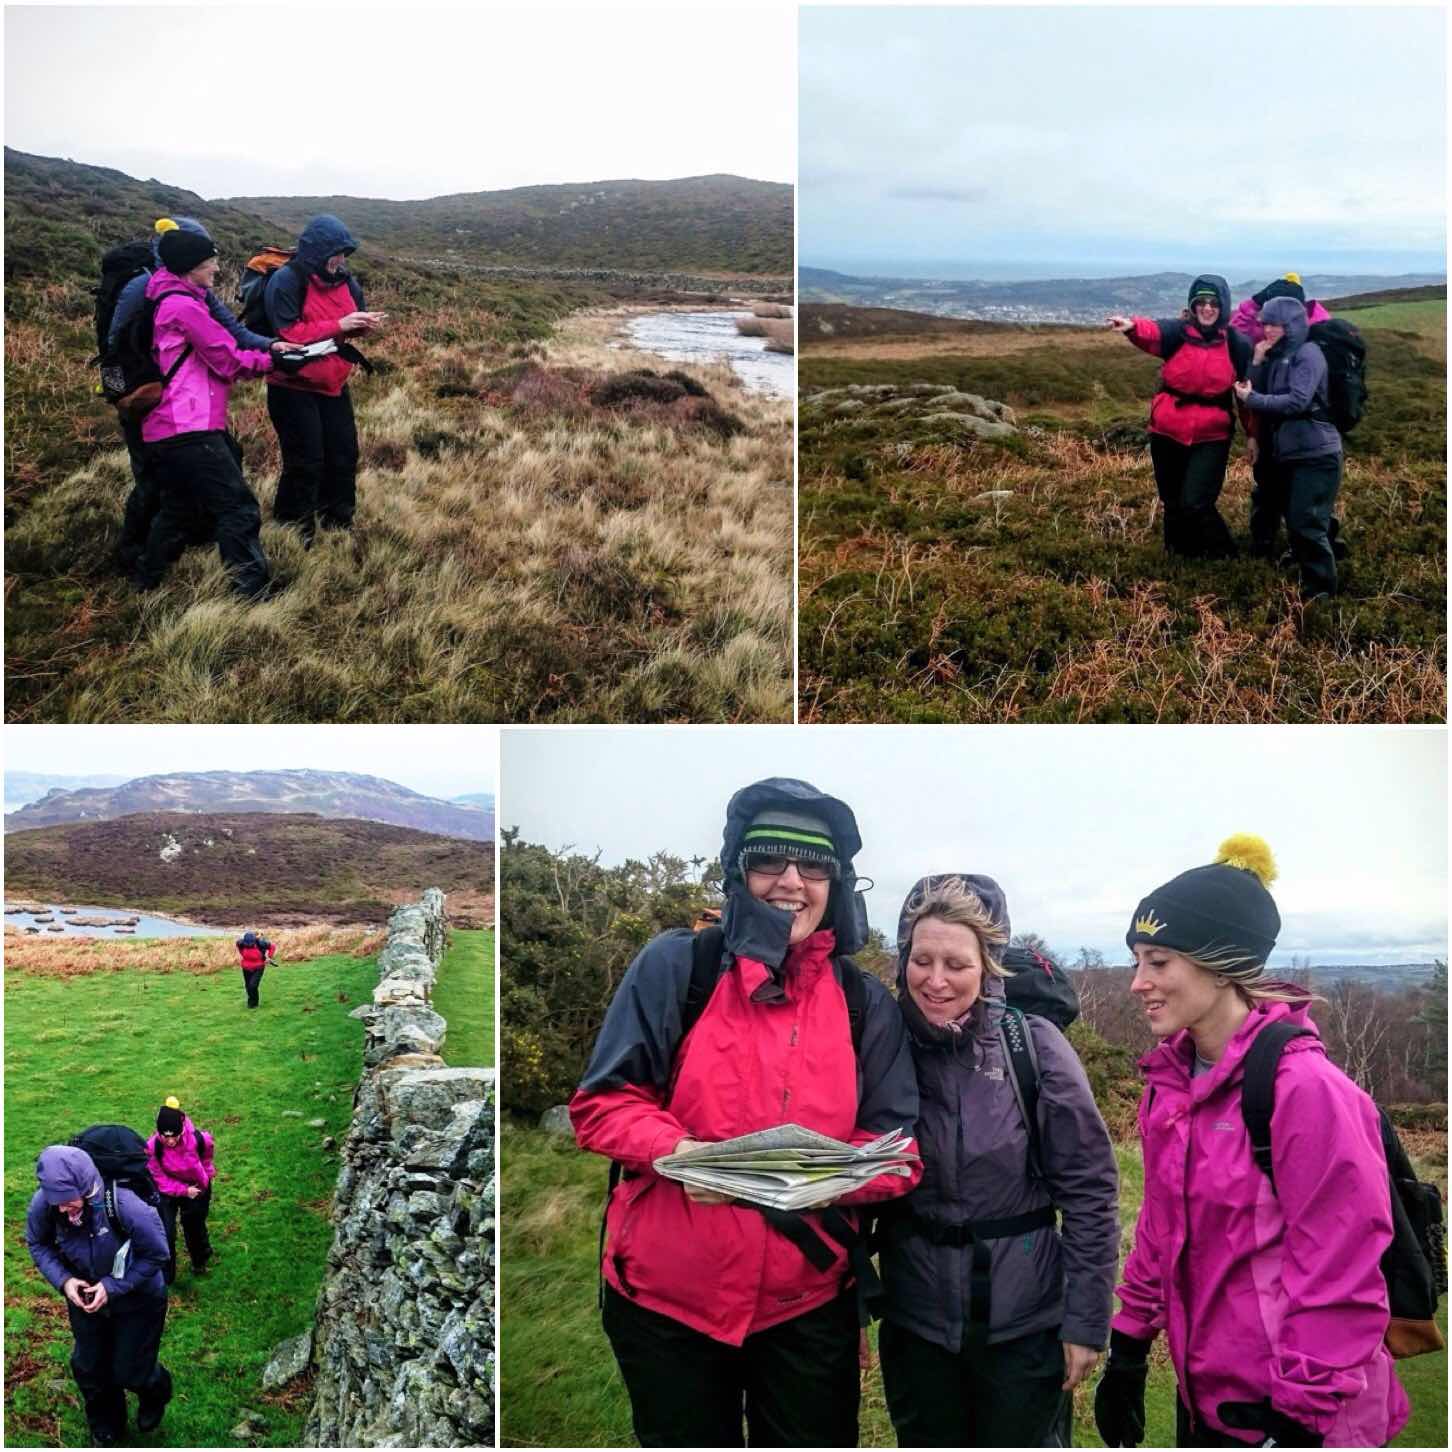
We run this every year as a weekend for experienced instructors to expand on their mountain navigation and as an introduction to mountain skills for the less experienced. Twenty two of us set off and thankfully the same returned – the weather though, was something to behold that weekend.
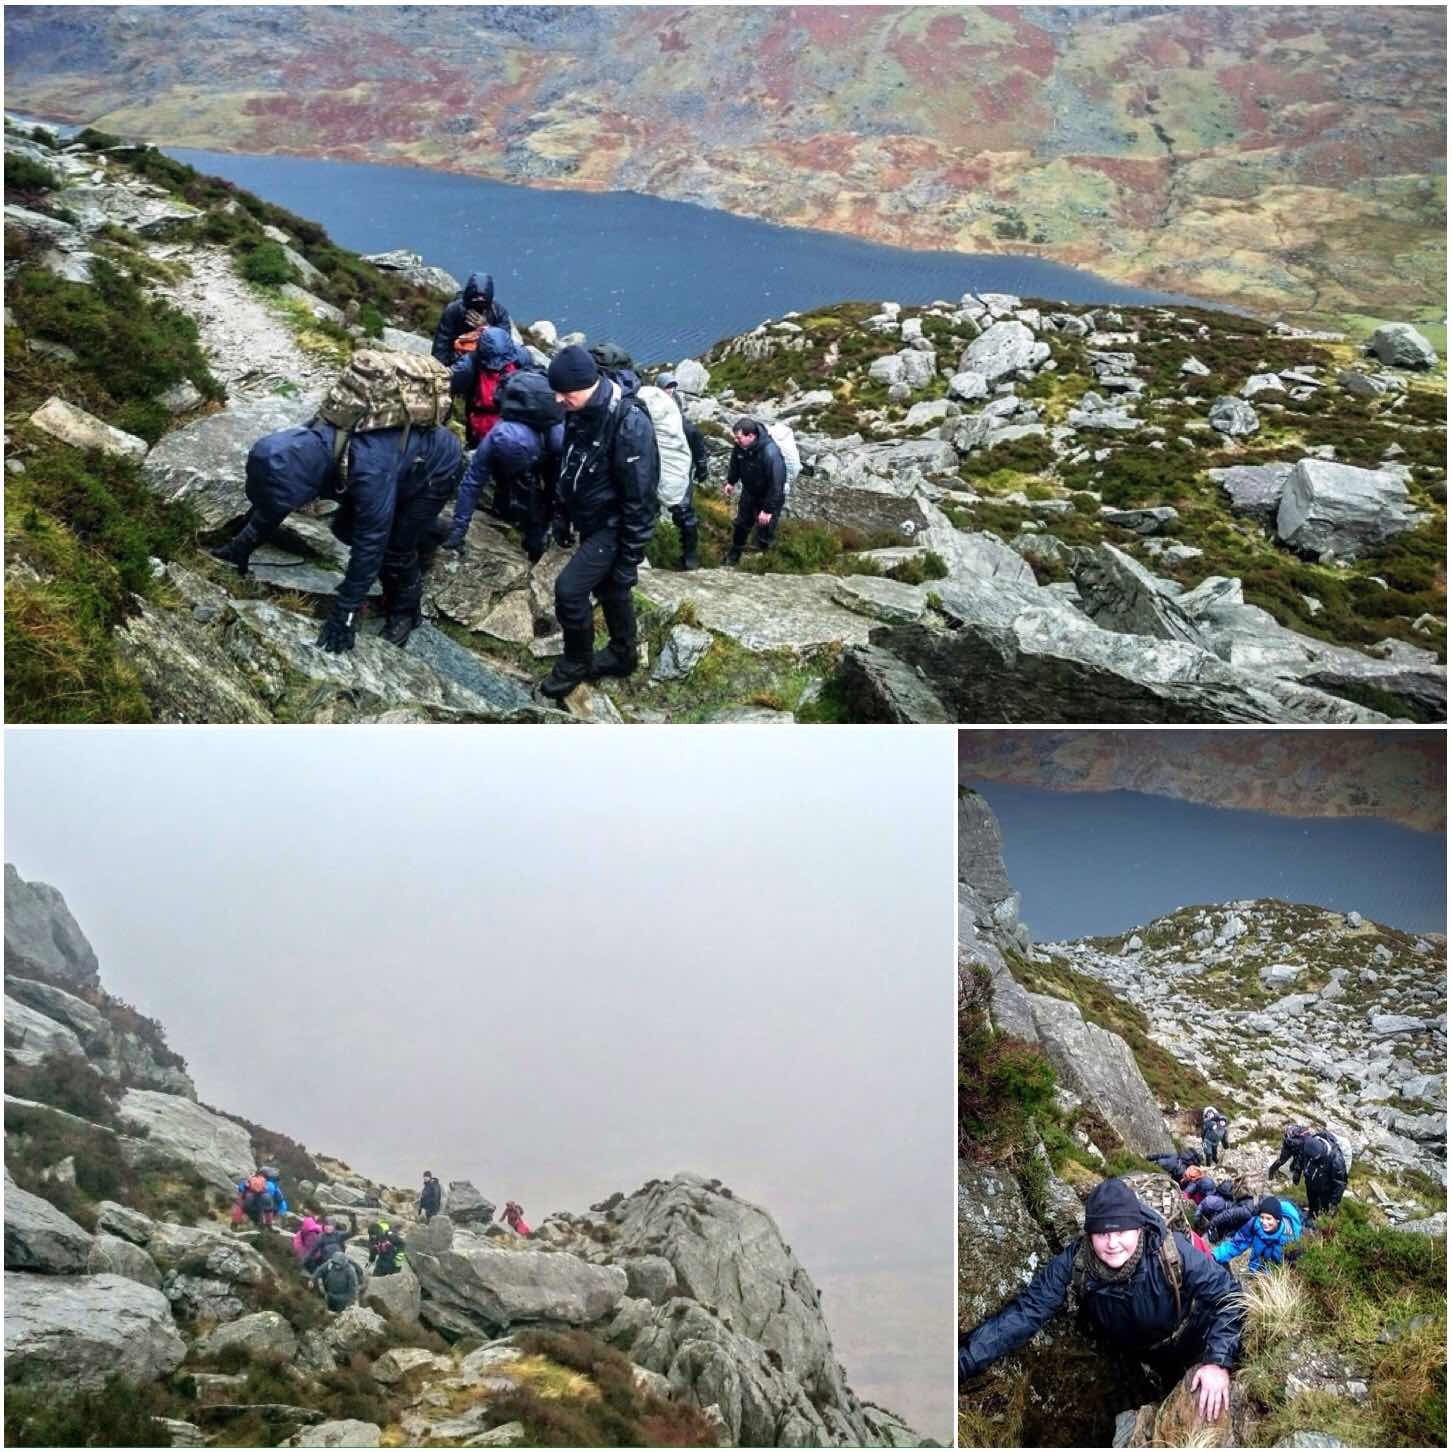
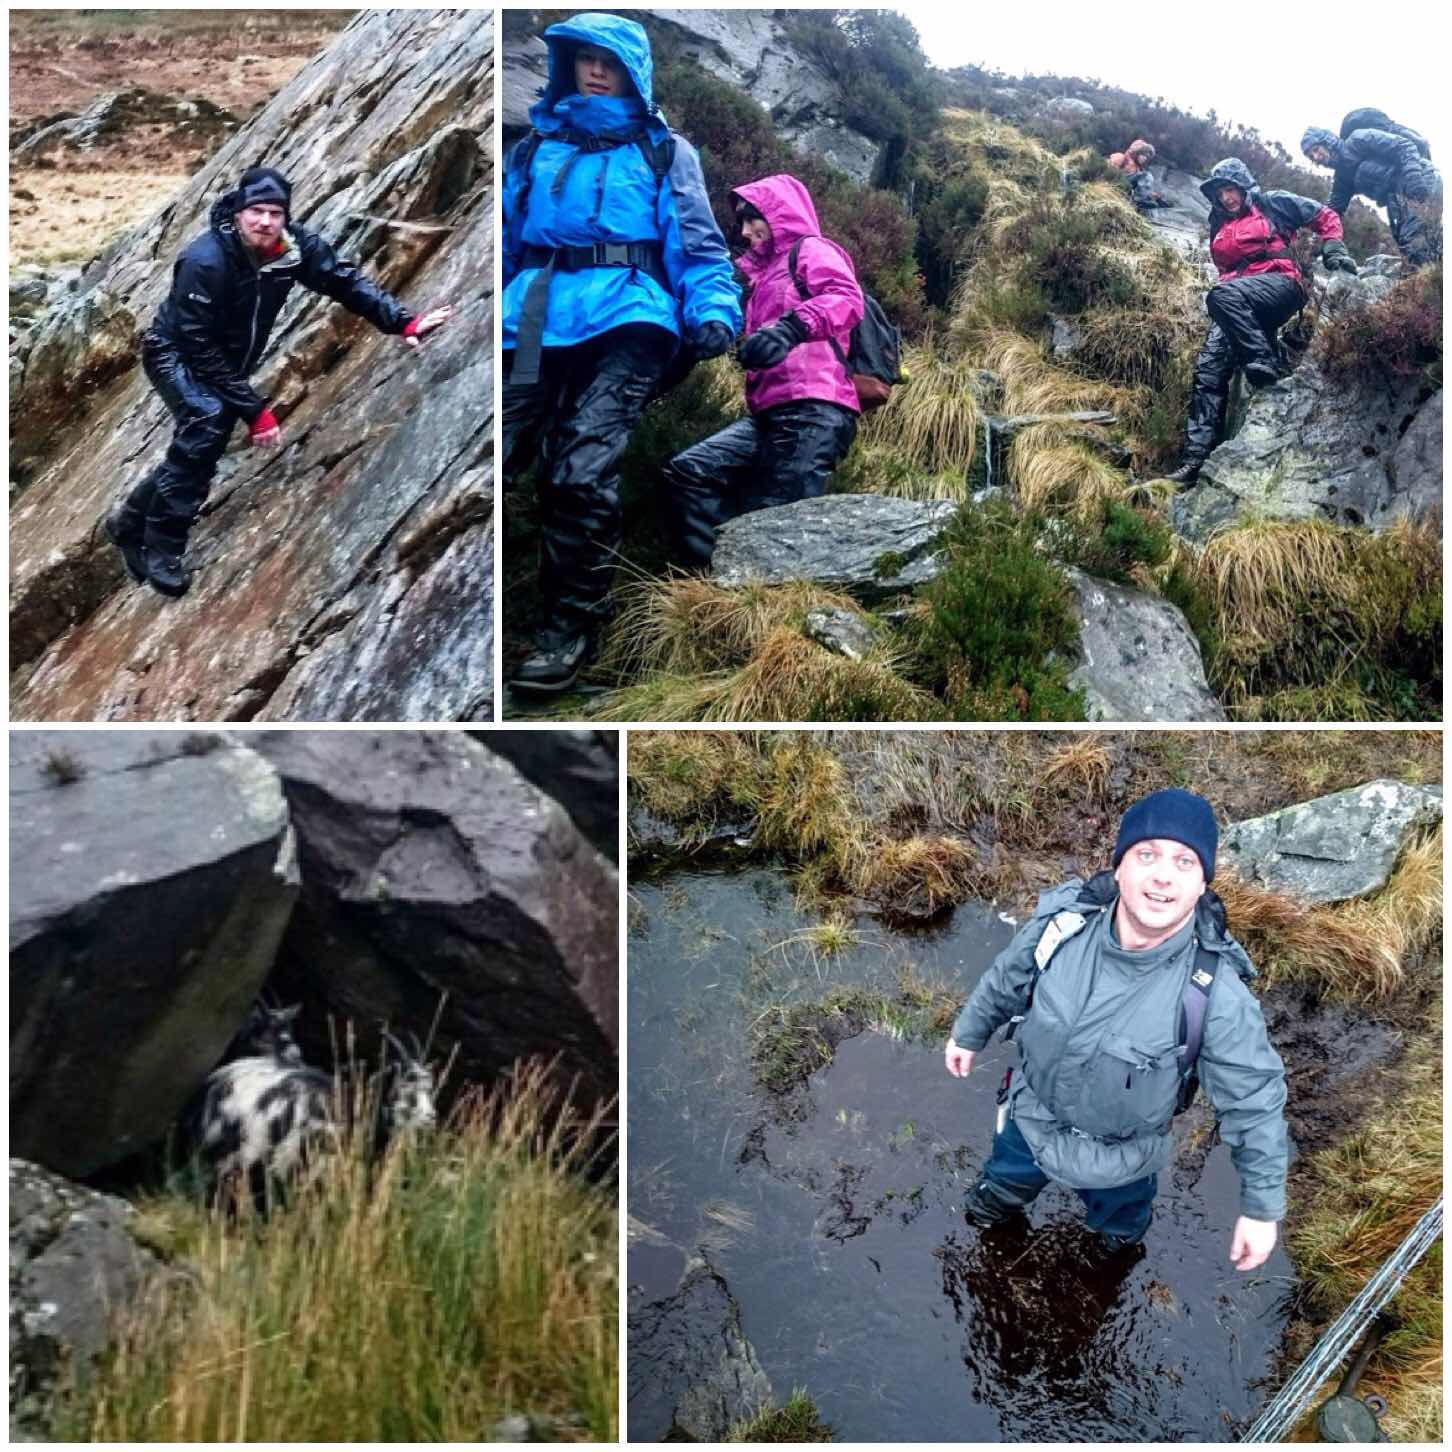
Stormy Snowdon (bottom picture courtesy of Perry Symes)
The winds were particularly strong that weekend and my friend Perry Symes (he is an International Mountain Leader) said that the winds were some of the strongest he had ever experienced. You can see the white tops on the surface of Llyn Idwal (picture above) and when you see the surface like that it is not advisable except for the most experienced to climb further.
Batten down the hatches (top two pictures courtesy of Perry Symes)
We decided to have one group stay low around Idwal and one to climb up on the rather more sheltered side of Tryfan up to an area called Heather Terrace. Perry and John took the lower route and Graham and myself took the higher route.
When I spoke with Perry and John later that day they said that at one stage they could not stay standing and had to hold onto the rocks to prevent them selves from being blown away.
We thankfully were not affected by the wind as we were in the lee of it on the other side of Tryfan. Our group was made up of instructors with different skill levels and fitness levels. We took the day at a slow pace introducing the newer members to scrambling. Even though the wind was not a problem eventually everyone was soaked through from the persistent rain.
Scrambling
The higher we got though the tougher the going got. We could hear the wind cracking like a whip in the crags above us once we got to about 650m’s. We took one last look at the towering crags of Tryfan and decided that the mountain could wait another day for us.
Tryfan – Wind ‘Cracking’ above
It was not all doom and gloom (though a few of us did want to top out) as we had fun slithering down again, doing a spot of bouldering, spotting some local mountain goats or like Dave did, partaking in some mountain paddling :-).
Fun for everyone
It was an extremley hard day on the mountains that day and I was particularly impressed with everyone’s patience and resilience. To some of the instructors this was nothing new but to some it was their first experience on the mountains. We had a couple of students develop some slight aches and pains however they persevered and completed the day safely.
Everyone was soon back in one of the Moel Siabod Cafe in Capel Curig drying off and drinking coffee.
As the wind was just as strong the next day we decided to stay low down in the hills and concentrate on micro navigation. We headed off from Snowdonia up into the hills just above Conway.
Re-cap and start of day 2
We split up into smaller groups and I was joined by Mandy, Tara and Sian. They all had different levels of map reading skills however they were all keen to get on and have some fun along the way.
I gave each of them different locations to find, sometimes with the map, sometimes with just a compass and sometimes by dead reckoning alone.
Micro nav with a smile
We had fun along the way and met some of the other groups on our travels. The wind got so strong at times we had to stay away from the cliff edges and were able to lean right into the wind without toppling over.
Taking it in there stride (top left picture courtesy of Sarah Diss)
Even though we did not top out mother nature tested us all out in her own way. For me it was to make sure everyone learnt, had fun along the way and came back safely.
Those that earned their mountain wings (you could say that after the winds we had) were Mandy Blackmore, Tara Green, Sian Avenell, Thomas Conway, Jasmine Turner, Sarah Diss, Lee Diss, Maria Griffiths, Amy Pizarro-Griffiths, Alan Lewis, Dave Lewis, Ben MacDonald, Rob Hina, Carol O’Brien, Jess Edwards, Jennifer Burdett, Rachel Selby, and Chris Cooke. The instructors were John Kelly, Perry Symes, Graham Brockwell and myself.
At the beginning of February this year I drove down the A303 towards Dorset here in the UK in ever worsening weather conditions.
My good friend Fraser Christian of Coastal Survival had organised a meet up of some of the guys who help him out at various events throughout the year. By the time I got to his village the weather had deteriorated to storm conditions.
The pictures below show his parachute getting a right battering and even later on in the shelter of the parachute the airflow really helped shoot the flames of the fire up.
A Stormy Night
Before going to up to Fraser’s woodland location I met some of the the guys – Fraser, Steve, Si, Danny and Nick in the local pub to have a few beers (and to dry off from the drenching I got from walking from the car park to the pub).
Even though the weather conditions were still extremely poor when we got to Fraser’s woodland site we soon made ourselves comfortable. The food and mulled cider were soon on and I even managed to get a picture of the parachute looking like some sort of downed UFO.
We were joined later in the evening by Tom who is one of the other Coastal Survival instructors. He had cycled his way through the storm to get to us but seemed happy to be out there in the wild conditions (I think that it is a pre-requisite of any outdoors pursuit instructor to show they can be comfortable outdoors whatever the weather throws at them).
Snugness
Due to the high winds the flames of the fire kept shooting up, so as usual I had my camera out grabbing some shots of fire faces and figures in the flames. If you look closely you will see a few faces. I can also see a deer and a water buffalo in the left hand picture below.
We spent the evening listening to the wind, catching up on the year gone by and planning trips for the coming months. Around about 10pm the wind dropped sufficiently I felt it safe enough to venture out and put my own hammock and tarp up.
Fire Faces
I slept for a full ten hours that night and woke the next morning feeling calm and refreshed. The guys already had the kettle on the go so all I needed to do was fill my cup and wait for my breakfast from Fraser.
One thing about working with Fraser is that you never go hungry and I will never get in the way of an expert chef wanting to cook me breakfast :-).
A calm morning
As part of our bed and board for the night we agreed to get out and collect some of the brash wood Fraser had stored around his woodland to replace the wood we had used the night before.
We said goodbye to Tom at this stage before stringing up the brash wood to take back to camp.
Morning re-supply
Once the chores were done I set off on my own to see what flora and fauna were about that morning. Little Tinker always makes for a great shot but I soon found an excellent badger print in the damp ground.
I spooked a deer on my travels through the wood but managed to get one decent long range shot of her as she ran across a field.
Local fauna
Even though this was early February there was a dash of colour about with the plants.
The teasel was looking particularly majestic with new seeds sprouting within the previous years seed head. I spotted a number of primroses for the first time this year at Fraser’s and the lesser celandines were sunning themselves nicely.
Finally I spotted an elder tree covered in some lovely looking jelly fungus.
Local flora
It was soon time to head home again however the drive back was a delight due to feeling refreshed and the sun was out 🙂
Thanks to Fraser for hosting us for the weekend and the rest of the guys for being such good company.
Ok, not so much a picture of the week but a collage of the week.
I had a delightful walk last Sunday with my family at The Vyne National Trust property in Hampshire. The gardeners have installed a number of wicker figures around the gardens and named the trail the Wild Wicker Walk.
The Wild Wicker Walk
Some are easy to spot but some are not (the Hawk in particular) however they kept our whole family happily busy as we hunted for them.
My favourite (they are all excellent) because of its location on a fallen log has to be the Fox.
Thanks to all the gardeners for taking the time to make these wicker characters and placing them in some beautiful spots for us to find.
In my continuing research into Log Rocket Stoves I came across a Wikipedia page called the Schwedenfeuer and in it details of a type of log rocket stove I had not come across before, with a built-in fire tray and a chimney formed by simply cutting away the inner corner of one section.
Clever though it was, though, this stove still relied on string or wire to tie the sections together. As these stoves have been around for a long time I figured there must be other ways of holding them all together. I thought perhaps that green wood dovetail wedges might do the job, so I set out to test this.
The Dovetail Log Rocket Stove
Tools and Material
As usual I limited myself to the tools I would usually carry in my backpack, including a knife, saw and axe. A pen or pencil is handy for this project as well.
I’ve had a piece of birch stored in my garage for over a year however it had absorbed moisture over the winter and was fairly damp in its core.
Tools
Splitting Out
This style of log rocket requires you to put a stop cut into the bottom of the log to about two thirds of its width. You can see in the top left picture below the cut is about 10 to 15 cms from what will be the bottom of the stove.
The top right picture below shoes you how far I put my stop cut into the log. The bottom two pictures show me marking out with my saw the approximate area I would be battoning out.
Bottom cut and marking out
I used my axe and a large piece of wood to batton out the the wood. You can see the shape of the stove at this stage with one segment in an inverted ‘L’ shape (Segment 1) and a smaller piece (Segment 2).
The bottom two photos show me marking out the smaller piece for further splitting. This piece is not split exactly in two as this configuration allows you to form the chimney very quickly.
Splitting
The Chimney
Below you can see the shape of all the pieces when they are put back together . I then battoned off the tip of the larger piece from Segment 2 so that a chimney would be formed. This piece of battoned-out wood I further split into fine pieces to act as kindling for the stove.
The One Cut Chimney
Once I had the chimney battoned out I trimmed off some excess wood from Segment 1 and then used a pencil to mark out the chimney area.
I did this so I could put some Raappanan tuli cuts into the chimney area. It is important to keep the sections of the log rocket that join together as smooth as possible for a good fit so marking out the chimney area ensures I do not cut into the wrong area.
Trimming & Marking out the chimney
The Raappanan tuli cuts are fairly simple to make with my axe. I just ensured I cut only into the wood in the chimney area and that the cuts were made upwards, towards the top of the chimney.
These cuts are particularly helpful when using damp wood as it offers far more surface area to the initial flame, allowing it to catch more quickly, and also it helps to dry the damp wood out.
Raappanan tuli cuts
The Firebox
The next stage I worked on was the firebox opening. This can be done in a number of different way however I elected to go for a triangular opening.
I formed the opening by cutting a small triangle at the base of both pieces from Segment 2. I also tapered the inside of the cuts to open the firebox up a bit. I made this firebox slightly larger than normal as the wood was very damp. My thought was that the extra air intake would help to keep the fire going at the start before the insides of the stove became fully lit.
The firebox opening
The Dovetail Joints
These joints were a total experiment. I put all the pieces together again and, holding them tightly, sawed a line to the depth of a centimetre across two of the joints. (I recommend you use some string or maybe a belt to hold everything together as you make the cuts – I didn’t and I wished I had.)
I then did the same cut but flared my saw out slightly (about 45 degrees) to the same depth. I then repeated the cut with the saw flared out 45 degrees in the opposite direction to the original cut to the same depth (there will be a picture of the cut further down the post).
Once that was done I used my saw like a rasp to carve out all the excess wood to form what is called the dovetail ‘Tail’.
Cutting out the ‘Tails’
Below you can see this ‘Tail’ part of the dovetail joint. It forms what I think of as a bow tie shape when done properly. The important point is to start each cut from the same place, saw to the same depth each time and ensure that the middle of the tail is centred over the split in the segments.
I found that as I had not strapped the segments together I had to really hold them firmly together – this is where you will appreciate your belt or piece of string. Also while sawing these ‘Tails’ in be aware at all times where the saw is in relation to your thumb and forefinger on the hand holding the stove.
I made three of these tails (one over each split) to hold all the segments together.
The Tails
To hold the segments together you need to carve some ‘Pins’ to insert into the ‘Tails’. I used green hazel wood to make the pins and made sure that they were carved into a triangular shape but initially too big for the tail.
Carving in this manner allowed me to insert the pin into the tail and then progressively carve off smaller pieces from the pin until it started to slide in. I also used my large piece of wood to hammer the pins in to ensure a very tight fit.
If you find that your pin is too small just get a fresh piece of green wood and try again. They only take seconds to make. To finish the pins off I trimmed the ends with my saw.
Cutting and inserting the ‘Pins’
As the bark of the birch tree is very flammable I stripped it all off and kept it to the side to use later as kindling to get the fire started. The dovetail joints if fitted snugly will keep all the segments locked together tightly.
Trimming
Firing Up
I lit the stove with some Vaseline-soaked cotton wool balls (which I always carry with me) because everything was so damp. The wind was non existent that day so it took me a while to get the stove going well.
Normally these stoves fire up really easily when there’s a little bit of wind to create the rocket effect up through the chimney
Firing up and drying out
Eventually the rocket effect started and I placed three pieces of green wood onto the top for my pot to sit on. These were fairly thin pieces but would last long enough to boil some water. Have a few pieces spare on standby though if needed.
Green wood pot stand
Once the pot was on (about 10 minutes after initial burn) I needed to keep popping small pieces of wood into the fire box to keep the fire going. If your wood is really dry or resinous (like spruce or pine) you may not need to keep tending the fire as the internal walls of the chimney will probably be well lit.
Now it is a stove
It took me just under 15 minutes to boil this pot of water (enough for approx 3 cups of coffee) and the dovetail joints remained strong throughout.
Roaring
After 45 minutes the first of the joints burnt through however the stove remained standing until it burnt out. Due to the lack of wind the majority of the wood did not burn through.
I made this short video of another Dovetail Log Rocket Stove to show it in action.
I like to experiment with log rocket stoves and this reliance on using string or wire to hold them together (although you can dig the segments of some types directly into soft ground) has always bugged me.
This Schwedenfeuer type of stove lends itself well to the dovetail joints I think, and once you have practised making a couple you will be able to knock together a stove very quickly with just natural materials.
As usual I am open to ideas and suggestions on creating more log rocket stoves and Scandinavian candles. If you have not seen my other posts on this subject have a look at my summary post on this subject titled – Candles, Rockets and Long Fires.
For a while now I have been making Log Rocket Stoves in different ways.
The ones I make in the workshop are easy as all you require is a drill however if you make one in the woods things become more complex. A common theme about these woodland Log Rocket Stoves is that you need something like string or wire to hold everything together.
I thought about this a lot recently and came up with this adaptation of the Log Rocket Stove using green wood dovetail joints.
I will post a full step by step tutorial in the near future in my How To…. section.
Ok, I know it is supposed to be one picture every week however I thought I needed to zoom in on this one a bit more so I added another for detail.
Many of you know I love to tinker with log rocket stoves so today found me once again working on another design.
Dovetail Log Rocket Stove
I came across an old Swedish design for a log rocket called the Schwedenfeuer (Swedish fire) however like many other log rockets all the parts were held together with wire. As these stoves are supposed to date back to at least the middle ages they had to be held together with something else then.
I came up with the idea to use green wood wedges carved into the stove in a dovetail fashion. They worked perfectly, I got my coffee made and also a video (to follow). I will also be popping a How To…. blog post soon to show how to make one.
My good friend Rick popped over to visit me today and we went for a Bimble around the village in the afternoon.
There were plenty of Daffodils and Lesser Celandine on show and even a few Snowdrops still hanging around but other than that all was pretty quiet on the flower front.
When we got to one of the village ponds I was saw that only the Yellow Iris was starting to show through so had a quick look and was about to head off.
Contrasts – Life and Death
Rick though mentioned that he liked the contrast of life and death between the Iris and the Reedmace. I could see his point but until I got right down and took this picture at a very low angle did I truly see what he meant.
As an aside to all this I managed to damage my ear drum when I lay down on my side to take the picture. I felt an intense pain in my right ear and realised a dead stalk of some plant or other had gone into my ear – here’s hoping the pain does not get worse.
I spent last weekend up in the beautiful mountains of Snowdonia in North Wales. The winds were particularly strong and the rain was pretty continual.
I was with fellow instructors from the Sea Cadets working on our navigation skills. Although the elements were against us from the start and we did not top out everyone kept up good spirits. This picture of my friend Dave captures for me the tough conditions however it also shows the high spirits of folk.
My last trip out for 2015 was a particularly nice one as we were celebrating the 6th birthday of a little bushcraft boy called David. He loves the outdoors and his Grandfather Keith Coleman had organised to celebrate the event out in the woods at Danemead Scout camp.
Keith was also out with a few of his cadets to practice some navigation skills and I was going to practice some bushcraft skills with my friends Dave, Alan and Jess.
Bushcraft Skills
David’s Mum Maria was who is a good friend of mine was also at the campsite so it was great to catch up with her as we had not met up for a long time.
Keith soon had the candles lit with David and we were soon tucking into a slice of Birthday cake.
Birthday Boy
Later on the boys Dad Jim turned up with David’s little brother James. Jim has been a good friend of mine for many years so It was good to catch up on goings on again with him. While we were chatting the boys asked if they could light their own fire.
We spent a little while collecting some dry birch bark and small twigs and then got the Firesteels out. I also gave them some cotton wool and Vaseline to help get the fire going as everything was very damp.
It was great to watch the two lads sparking away and then slowly building up their fire until it was well lit. Needless to say when it was time for them to go home they were very reluctant to leave their well nurtured fire.
Bushcraft with the Boys
While the lads were busy making their fire Dave was busily building a spit to cook a joint of beef on. He stripped a green hazel sapling and put a split through the the middle of it with one end squared off. Then he carved a couple of flat skewers to go through the beef and the split. This method keeps the joint fixed to the hazel rod as it is turned over the fire.
Once that was done he made two uprights to sit the hazel rod in over the fire. One of the uprights had a square notch carved into it for the squared end of the hazel rod to rest in. This ensured that as we turned the it it always remained fixed in the position we had set it.
Spit making
Dave’s father Alan is an excellent chef and he had been busily working away making up a whole range of different veggie kebabs. After a couple of hours turning the spit dinner was ready.
As we try to be civilised 😉 at these events the cheese board was produced by Keith and a relaxing evening was had around the fire.
Dinner time
After a very restful sleep in my hammock I was awoke by our chef Alan busily working away around the fire preparing some pancakes for breakfast.
Alan was using my griddle for this job (if you do not own one I would highly recommend that you invest in one) and it was hanging off my Dovetail Crane. This crane is made out of one piece of wood, is easy to make and offers you a wide range of cooking heights.
Pancakes using the Dovetail Crane
While Keith was off doing some navigation work with his cadets I spent my morning constructing a Damp Wood Log Rocket Stove. These are easy to make and great to get a fire going in damp conditions.
I must thank Jess for helping me at this stage to take a lot of my photographs as my hands were full with constructing the stove. Thankfully Jess is an excellent photographer so I did not need to worry if the right shot was being taken or not leaving me free to concentrate on the stove.
Log Rocket Stove
All that was left after this was to have a brew and pack up for the trip home. This was an excellent trip to round my year off amongst friends, eating well and celebrating the birthday of a budding bushcrafter.
No series on the Bushcraft UKBushmoot would be complete without a mention of ‘Ye Naughty Corner’ – I will refer to it as the NC in the rest of the post.
The NC is many things to many different people who visit the Bushmoot. There is usually a fire on the go at most hours however it is in the evening that the NC really livens up. Some folk love the place and spend a lot of time there, some folk just pop in for a visit every now and then, however some folk steer well clear as it can be busy and noisy. I personally like to visit the NC of an evening and catch up on the days goings on around the fire while enjoying a medicinal tot or two.
Ye Naughty Corner (top left picture courtesy of Susannah Parsons)
Cap’n Badger and Mad Dave (our resident Pirates) normally manage the NC though Dave had to miss the Bushmoot last year. The NC has been around for a number of years now and it has grown in size as each year has passed. Some say that is a good thing and others do not – you will need to decide for yourself.
It has always been a noisy place in the evenings (folks are warned about it if they camp near it for the first time) and as a regular over the years I am quite comfortable there however as the feel of the NC has changed from a small to a big community some folk have drifted off elsewhere on an evening.
Set up and the managers (Top and bottom right pictures courtesy of BCUK)
The central point of the NC is the fire and it makes for a great woodland TV. On some of the busy nights you will be lucky to get anywhere near it however if there is a decent stock of wood it is soon lit up well. I have snapped many a fire face picture in these flames over the years.
One thing you are guaranteed is the option to try out a number of different tipples while sitting around the fire. There is usually a bottle or two of Kraken rum, meade, port or whisky making the rounds to try. The nost memorable one for me was when I was passed a bottle of Dave Budd’s Chilli rum – never to be forgotten.
A place to relax in the evening (Top picture courtesy of Susannah Parsons)
I think one of the reasons the NC has become so popular is that there is usually some music and food on the go.
Initially folks would cook there own food and come along to the NC for a drink and a chat. Nowadays our resident Phil is on the go all night cooking and serving a wide range of excellent food (we do run a group kitty to cover the cost of the food).
Great food and great music (Bottom picture courtesy of BCUK)
A couple of years ago Tim Neobard ran a class at the NC to build a cob oven for baking pizzas. The pizzas proved to be very popular with the residents of the NC so everyone was looking forward to having some pizzas the following year.
When we returned last year we found that someone had decided to destroy the pizza oven. Un-dettered Neil re-built the oven this year out of brick instead of cob so hopefully it will be there this year.
Constructions (Top right picture courtesy of BCUK)
I like to pop by the NC during the day to see what is going on. Sometimes it is pretty quiet as folk are off at all the classes however sometimes you will find a class or two going on at the NC.
Classes (Top left picture courtesy of BCUK)
A few years ago one of our regular NC residents Drew Dunn passed away in a road traffic accident. This tragic loss really affected many of us at the Bushmoot as we had grown to love Drew. When I met Drew for the first time his first words to me were ‘Where can I find the Naughty Corner’.
Drew loved the NC so much that Cap’n Badger and Mad Dave organised the planting of a tree and plaque in his honour. The tree and plaque sit just behind the NC where Drew used to camp.
In memory (Bottom right picture courtesy of BCUK)
The NC does throw up some strange sights I must admit. A few years ago this massive net was strung up and it was termed the Mammock. I have no idea how many folk got crammed into the Mammock in the end but it proved a star attraction.
The memorable Mammock (Picture courtesy of Mad Dave Delaney)
Each year a fancy dress themed night is run. Last year it was Monty Python, the year before it was a Victorian explorer theme and I think next year it is a horror theme.
Not something I have gotten round to doing but there are plenty of folks who do and they do put in a lot of effort to look the part.
A different theme every year (Top right picture courtesy of Susannah Parsons)
As the evening gets on though the reason why the NC corner gets its name starts to become apparent. It might be that you find yourself getting covered in lots of little clothes pegs if you are not careful, you may inadvertently get passed the bottle of chilli vodka, or you may get buckarooed if you fall asleep.
There is an skill to buckarooing as you need a steady hand. The poor soul who is asleep has tins of beer (empty) and pegs (and other adornments) heaped on top of them before a picture is taken. Everything is then taken away so that when the poor soul wakens up they are none the wiser until they see the picture the next day.
It can get naughty (Bottom right picture courtesy of BCUK)
I appreciate that the NC is not for everyone as it can be a busy and noisy place however I personally like to spend an hour or two of an evening there.
To me it is one of the highlights of my year where I can relax and have a bit of fun while catching up with my friends.
Light in the night
There are plenty of campfires to visit at the Bushmoot where you can sit and relax and chat. The NC is just another one of them however it is one of the livelier ones.