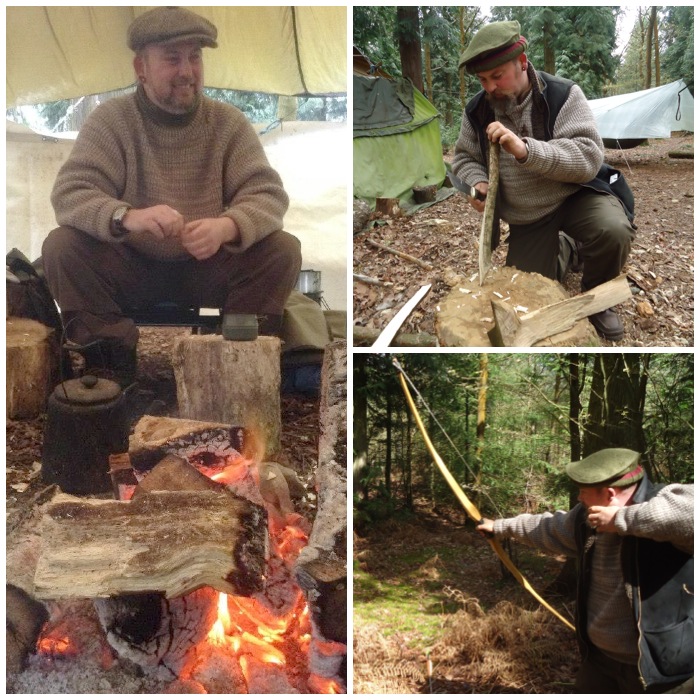
I like to think I can carve the odd decent spoon, bowl or cup from time to time but I know my skill level is only fair to middling as I do not spend enough time practising the art, but I do have a number of good friends who are absolute expert carvers and from whom I can get inspiration.
Mark Beer is one of them. He is an excellent all-round woodsman and carver and on a recent visit to his place I was quite taken aback by his latest creations. As usual I insisted on taking loads of pictures of his work and when he explained the fluorescent properties of Robinia (False Accacia) wood the photographer in me became quite excited.
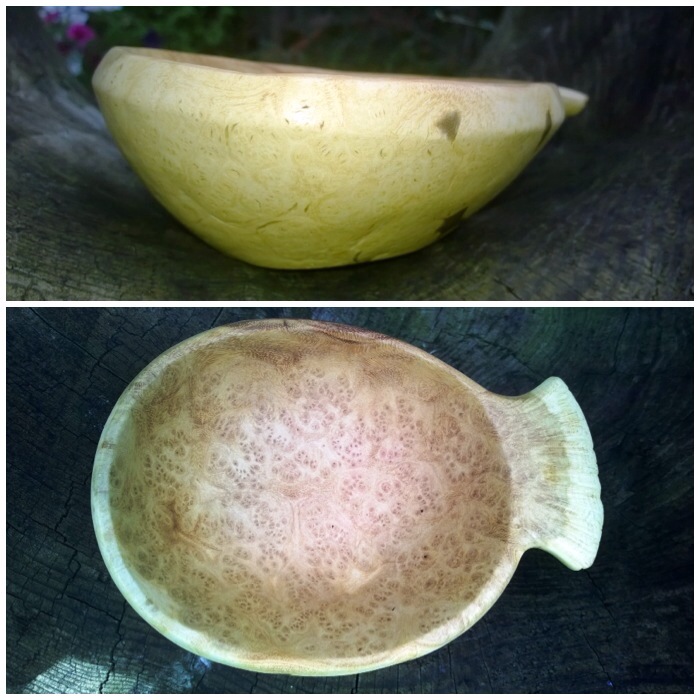
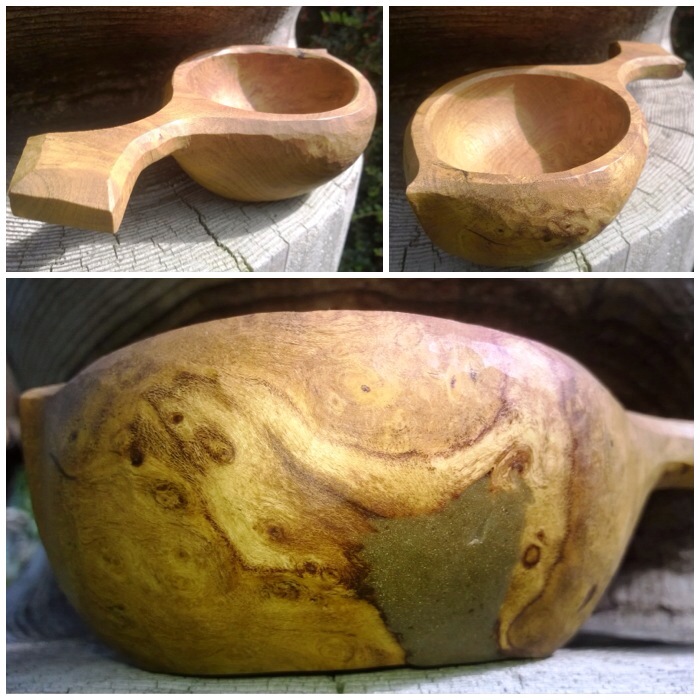
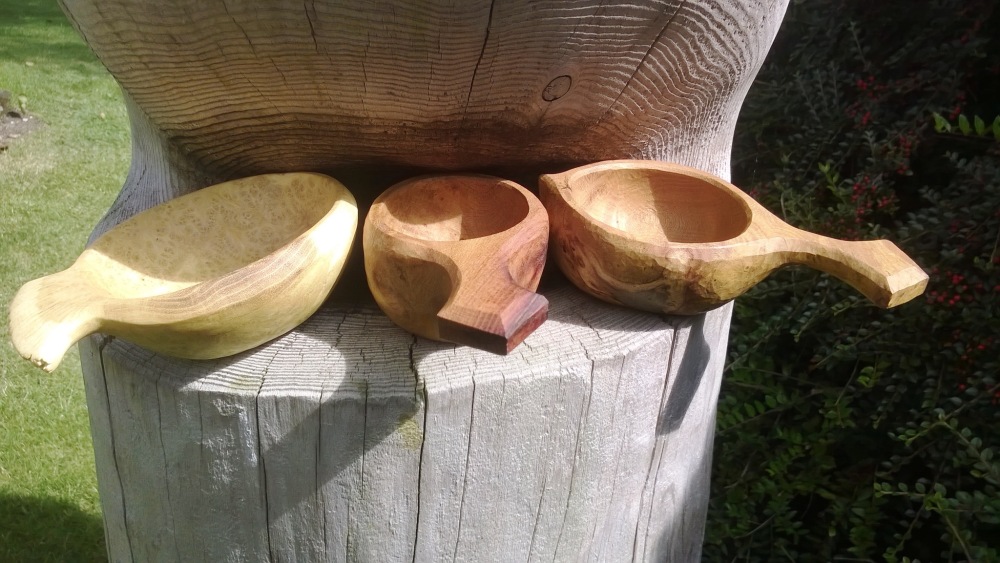
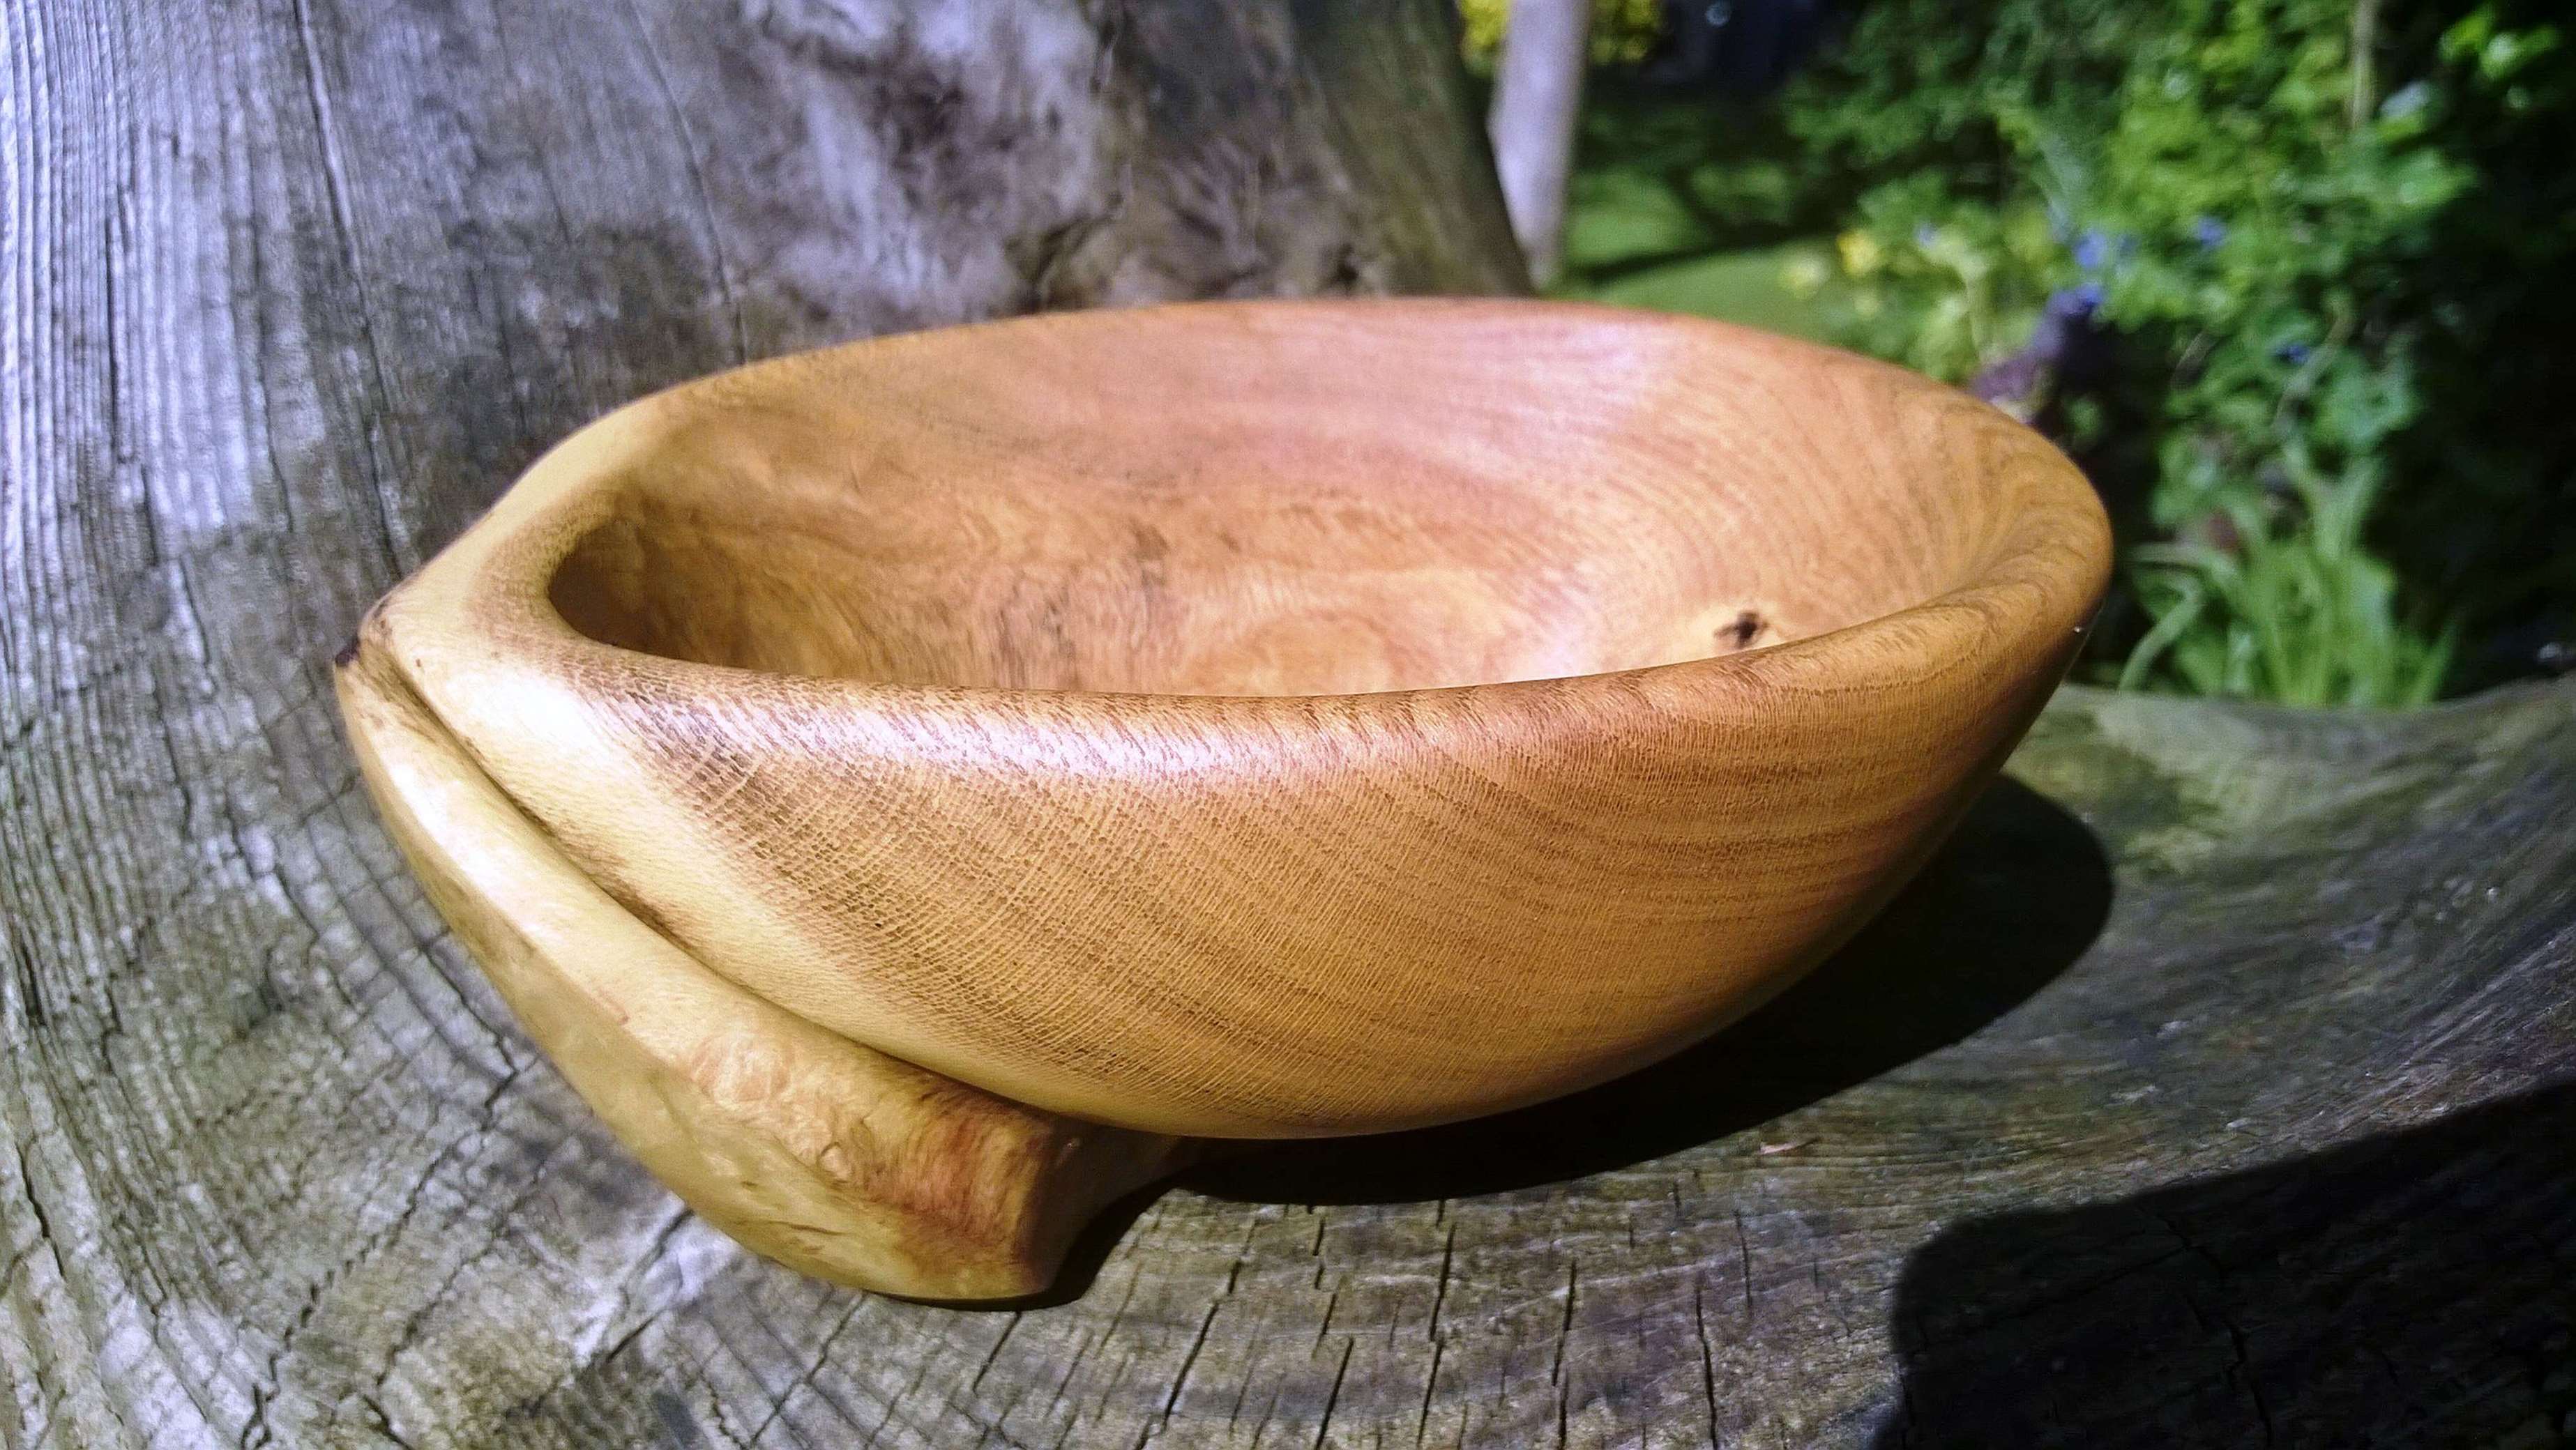
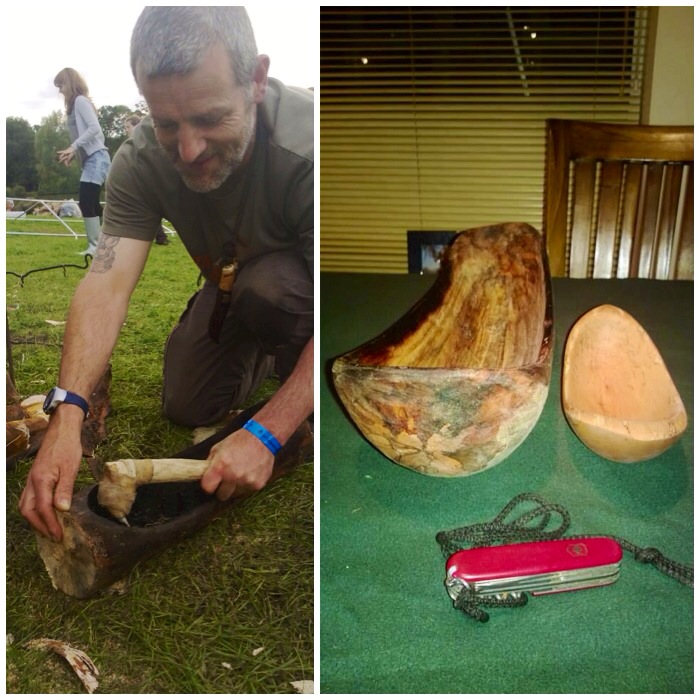
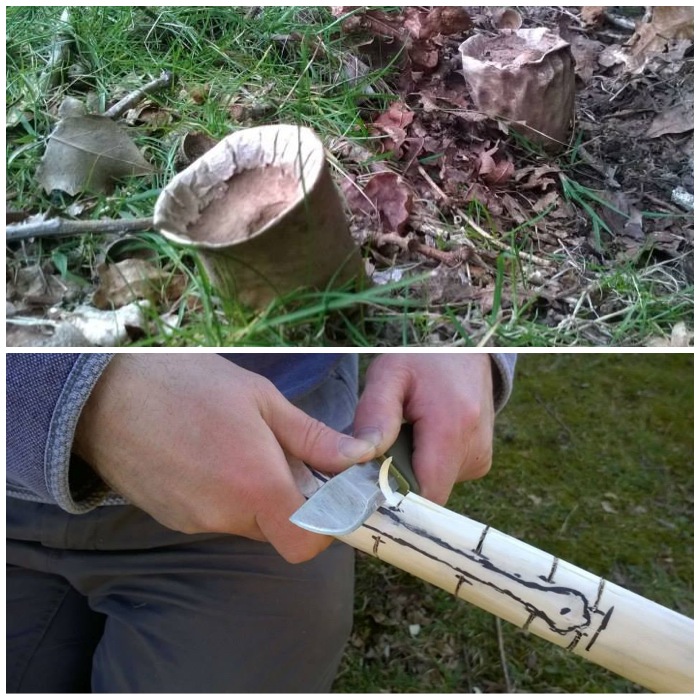
The cup on the left is carved from Robinia and the other two are from mulberry.
Robinia and mulberry make for beautiful carvings
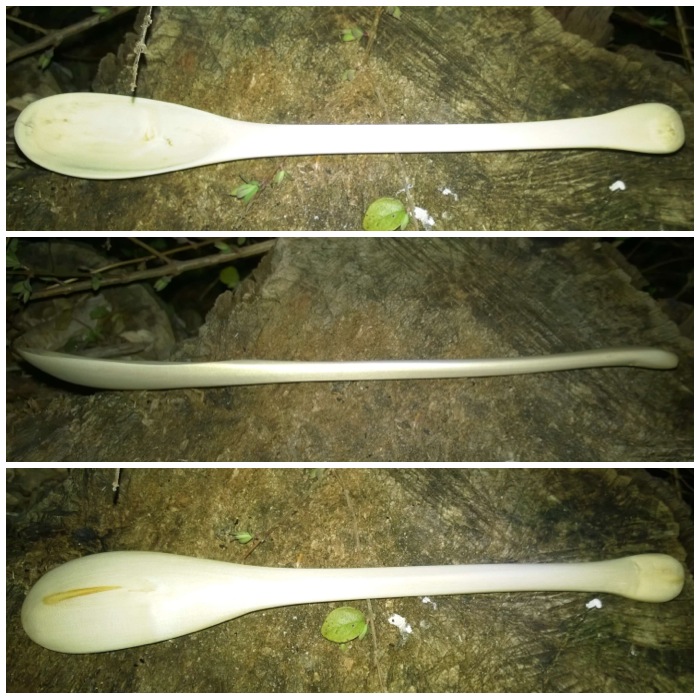
The cups were carved from burls found on the trees so you can see lots of swirls in the wood. The robinia under normal light is a light cream colour that contrasts well with the darker parts caused by the haphazard growth of the burl.
Robinia under natural light
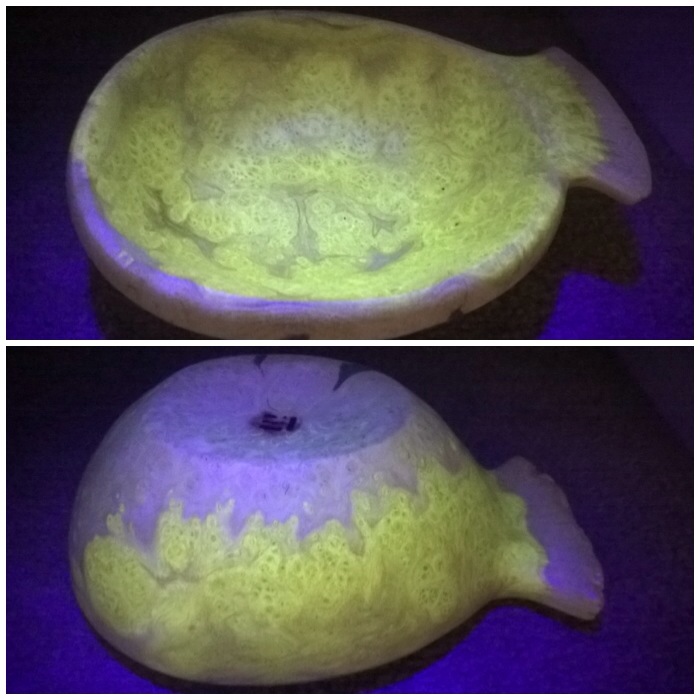
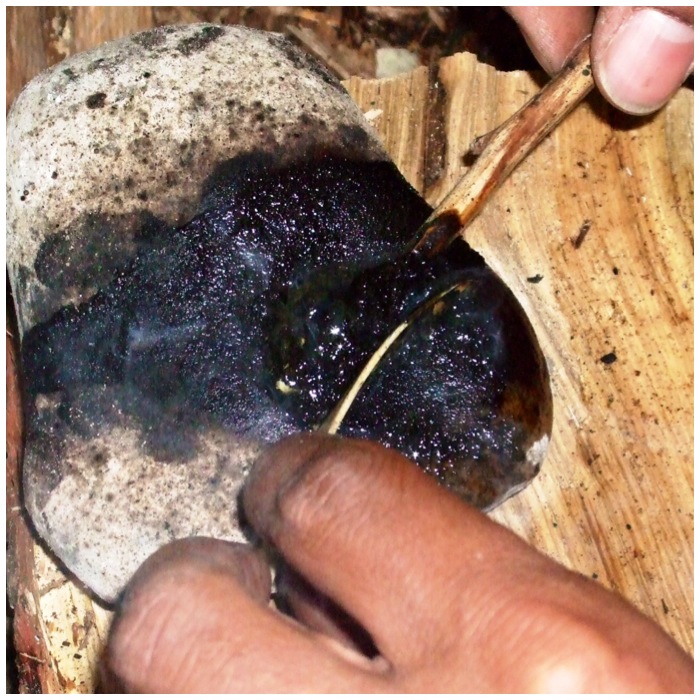
Under an ultraviolet light (I made an impromptu studio in his closet) the wood is transformed into a magical range of colours. I was as usual only taking pictures with my phone but I think you can really see the green, yellow and purple coming through.
Robinia under infrared light
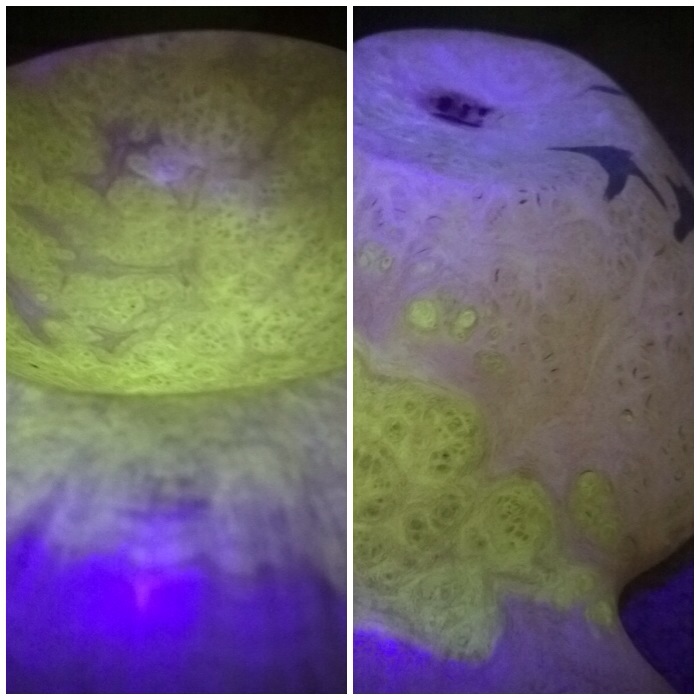
And up very close – quite psychedelic really.
Robinia up close
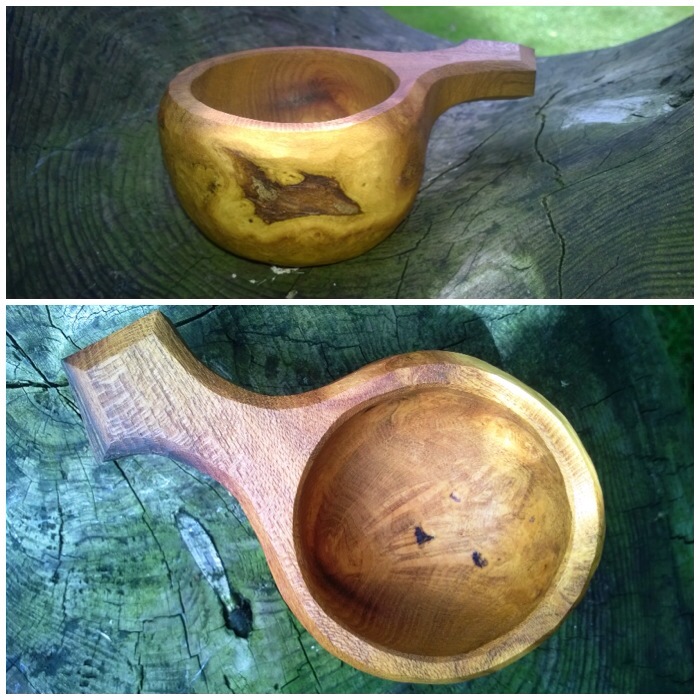
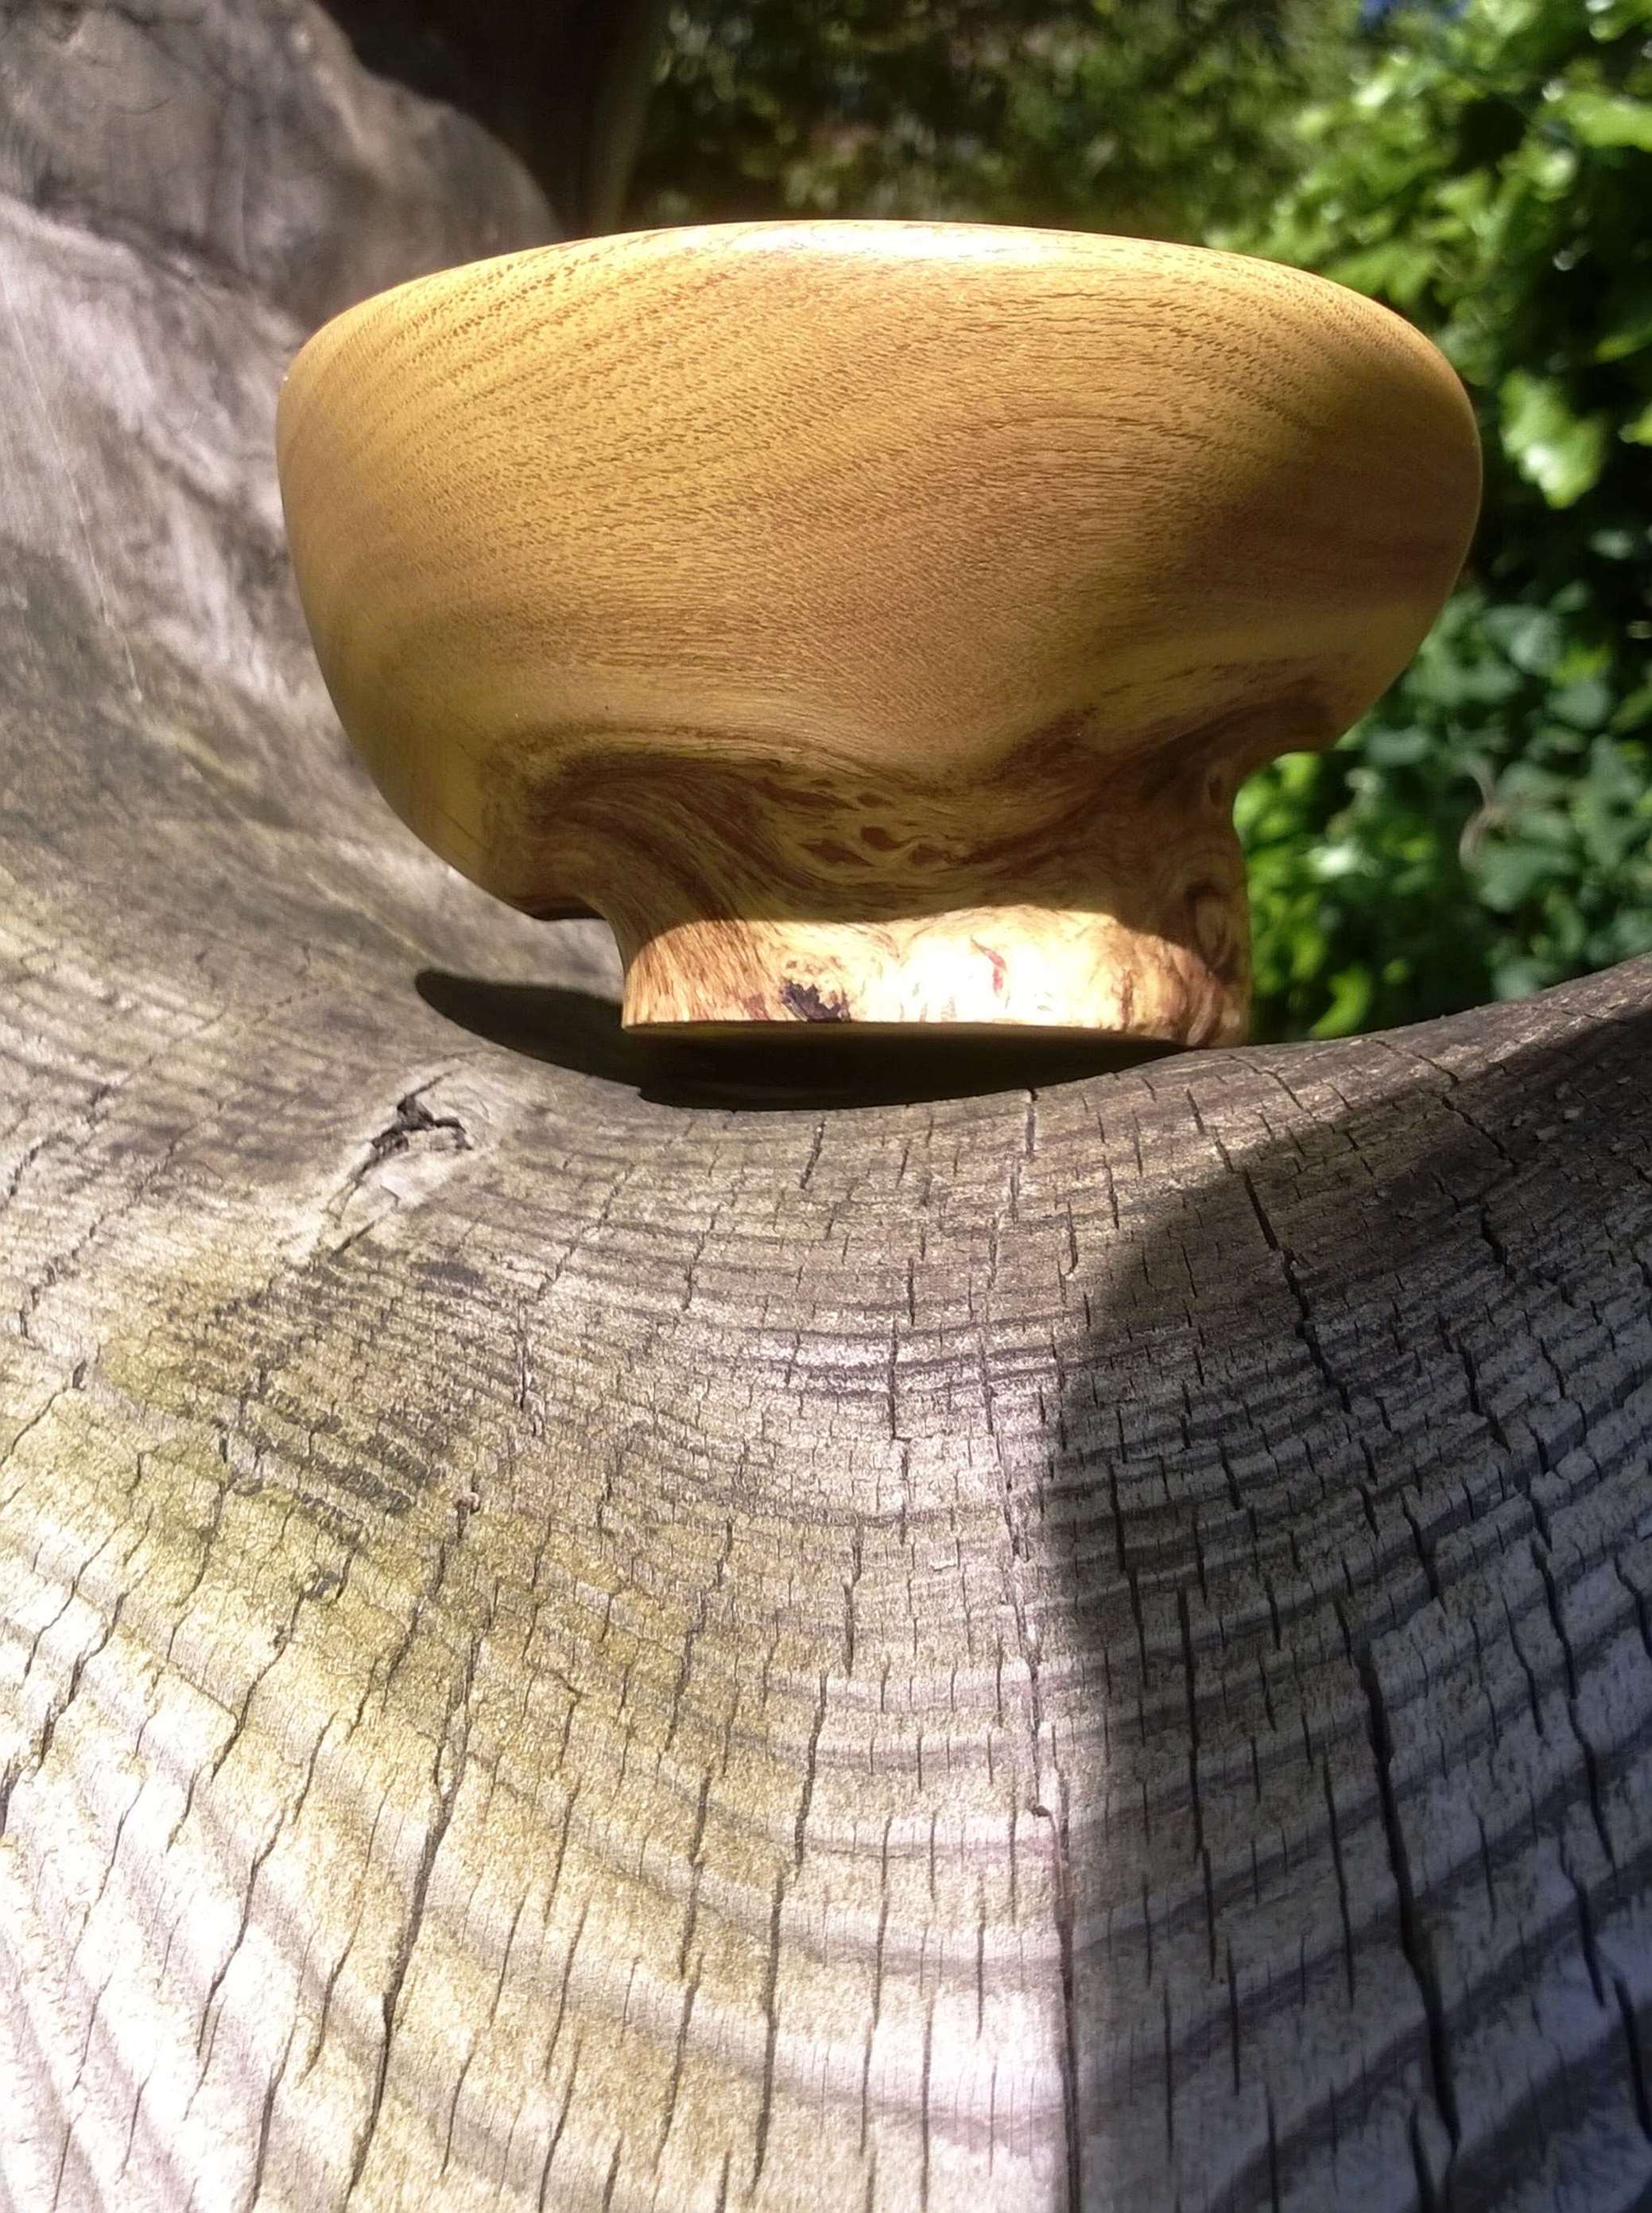
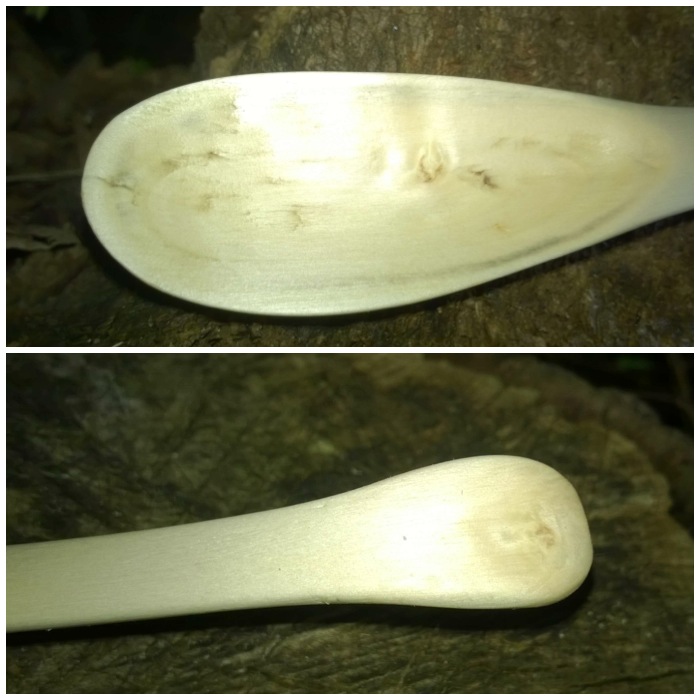
The smallest of the cups was made from Mulberry. I find carving small cups quite difficult as you need to carve deep but have so much less wood to hold while carving. This small cup is simple in its design but because of the growth of the burl is rather beautiful with shades of light and dark.
Mini Mulberry
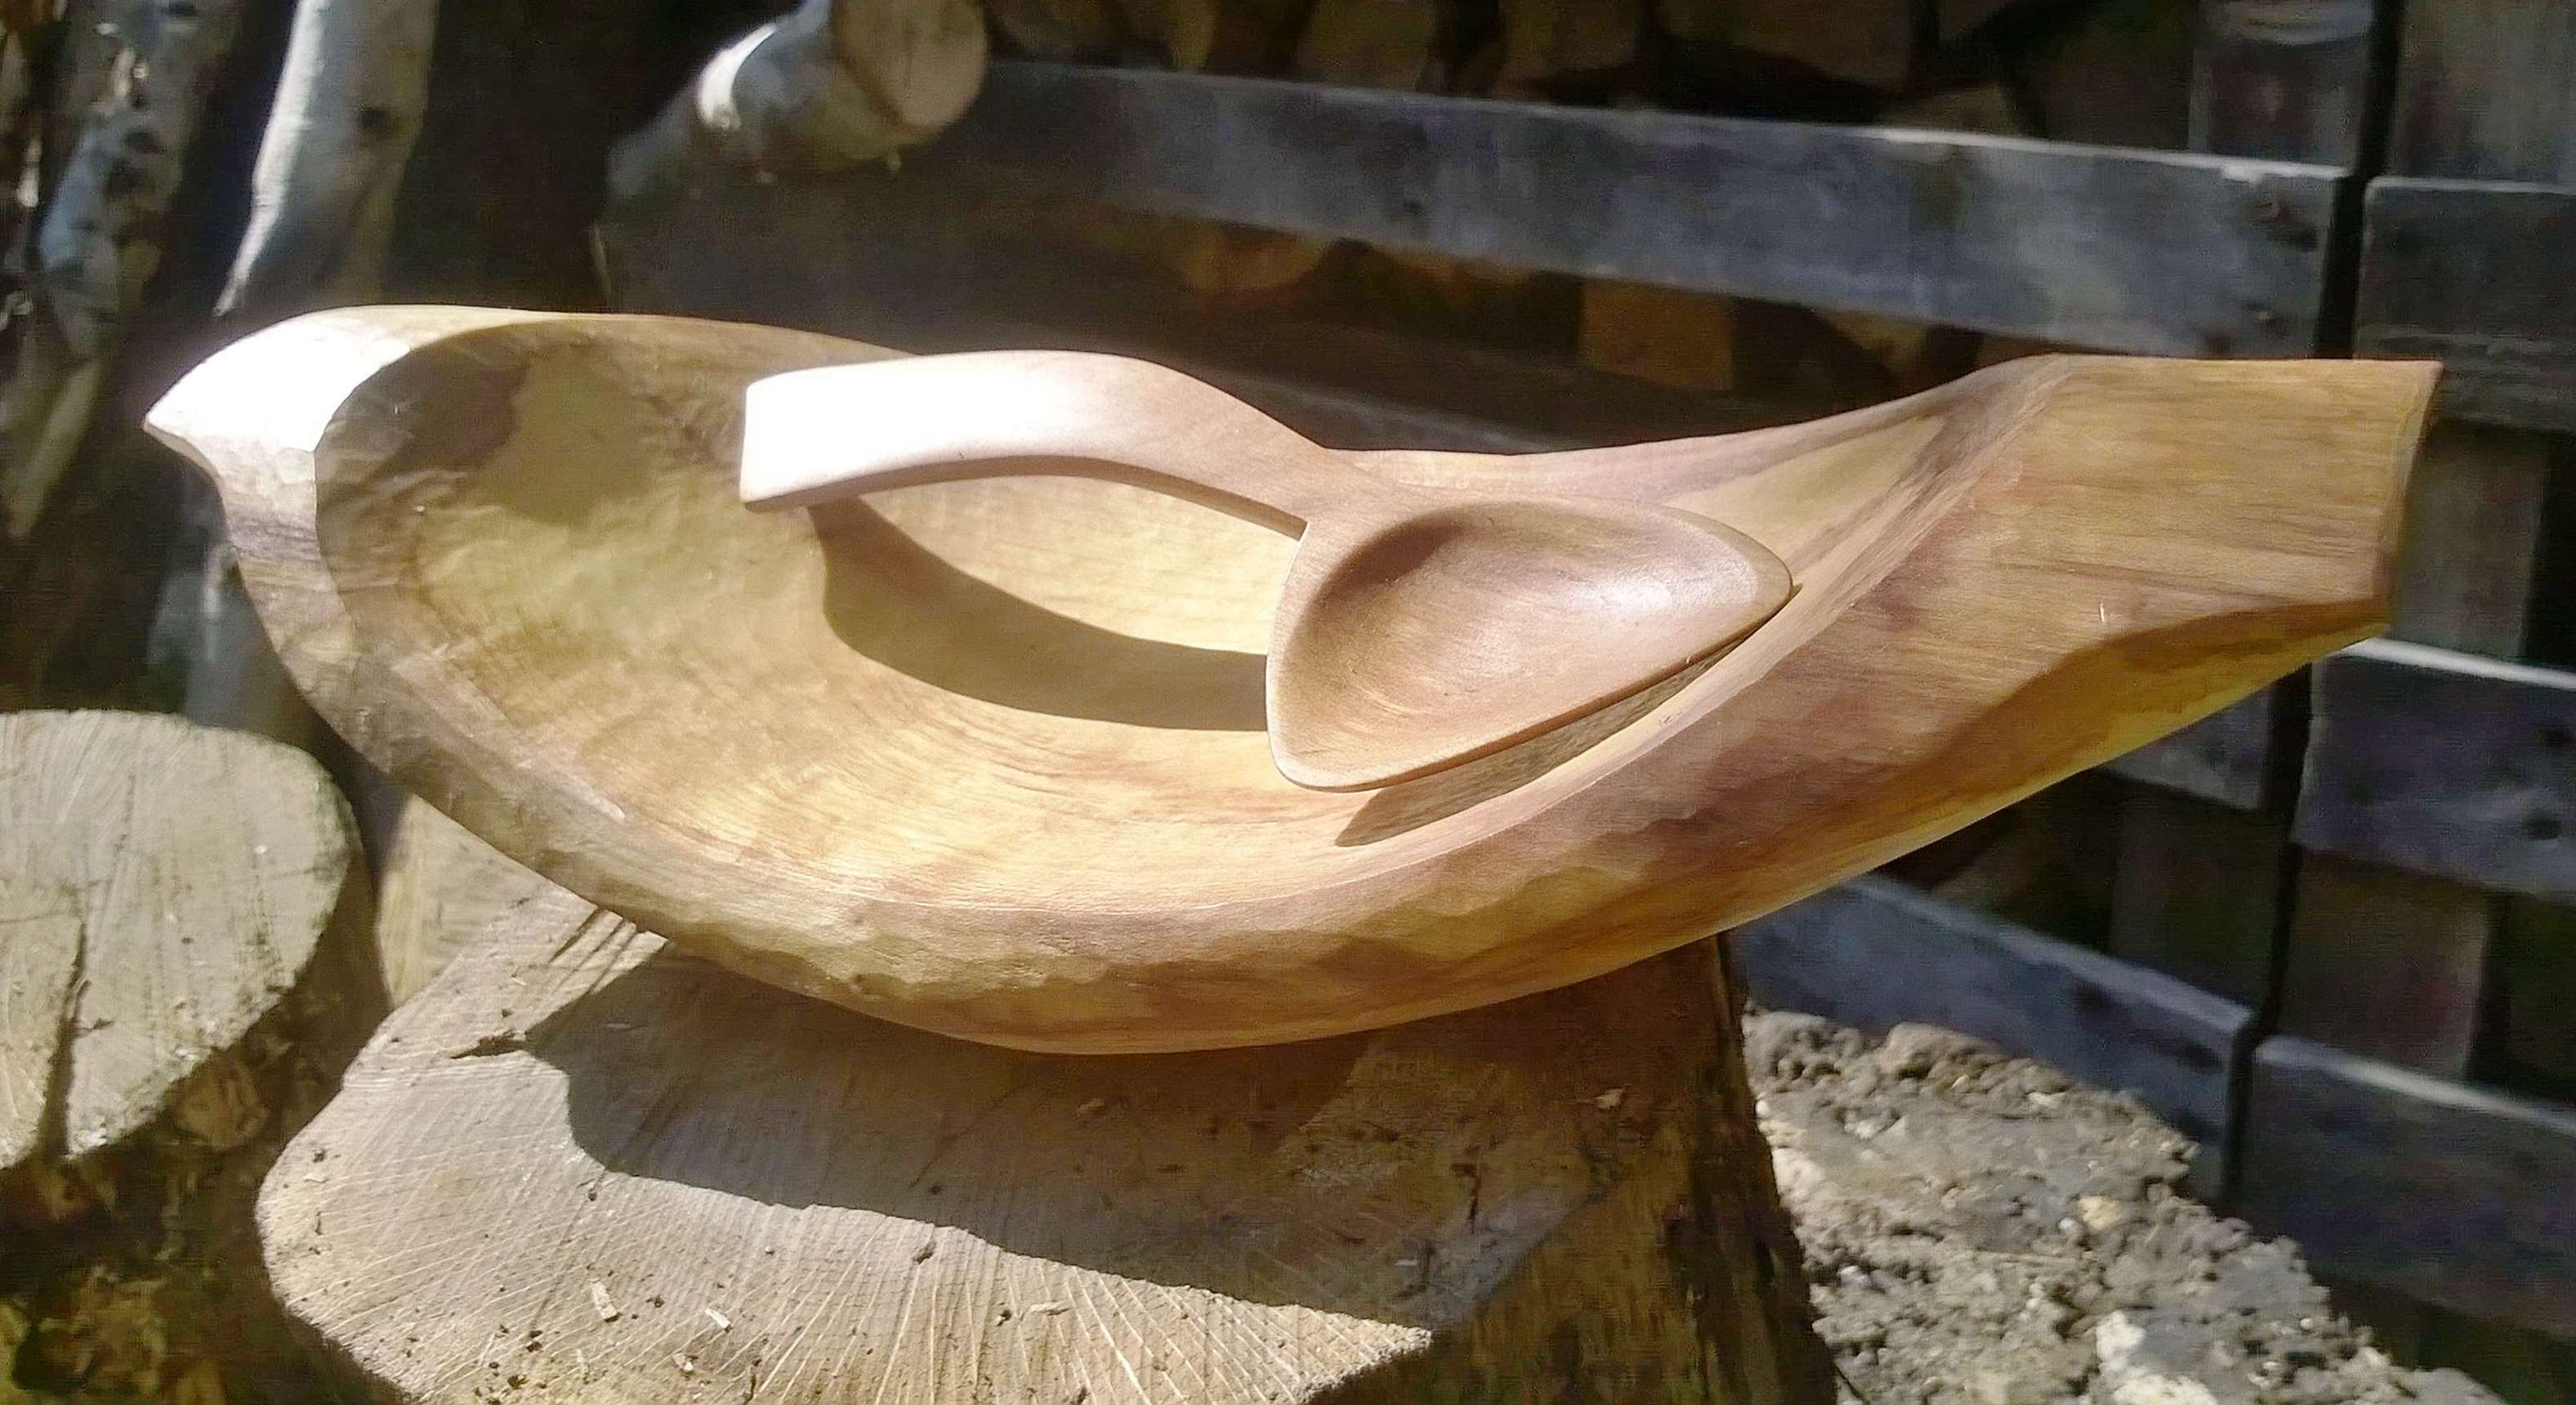
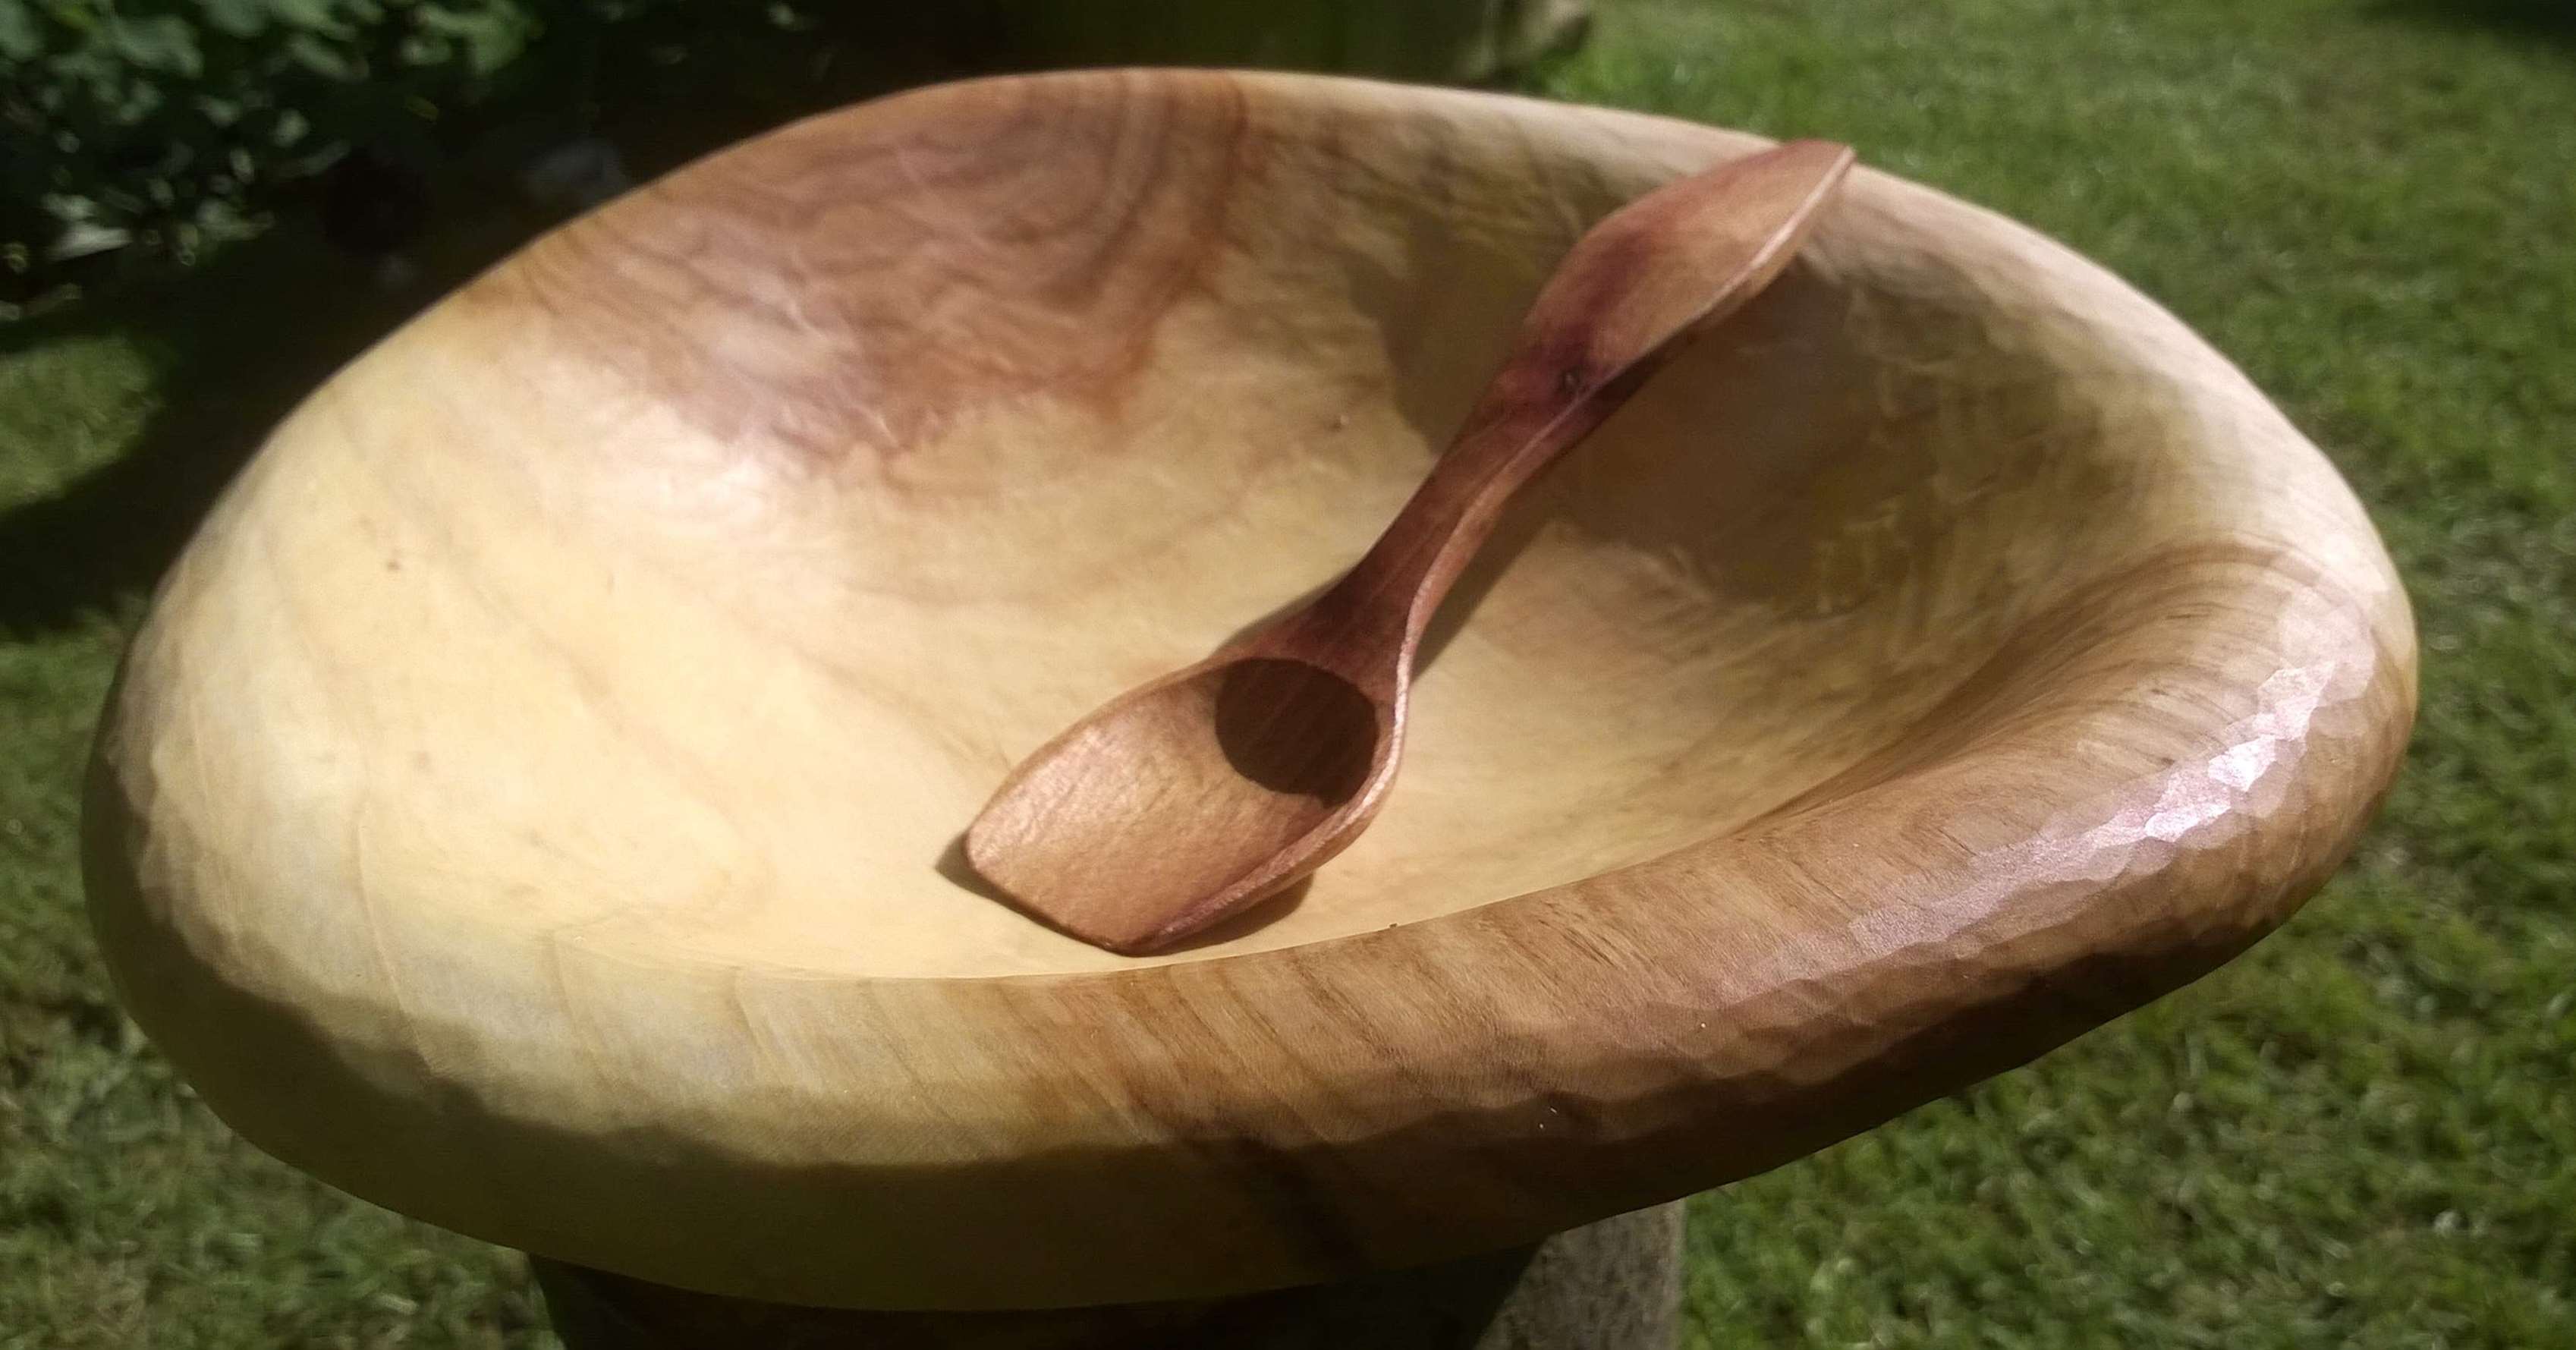
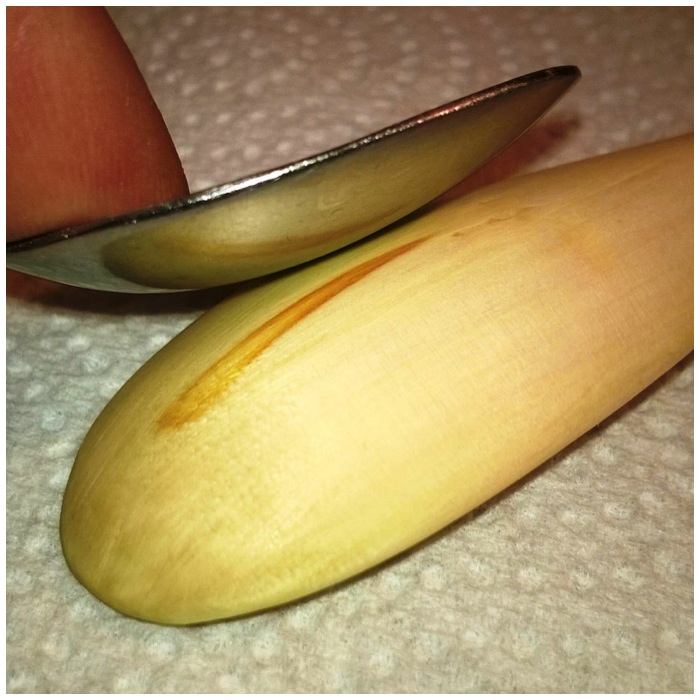
The third cup also made out of mulberry has a larger bowl with a pointed tip. The inside of the bowl was finished using his knife only with very fine cuts to make it smooth but the outside still had the tool marks clearly showing. These tool marks blended in well with the swirls of the burl.
All angles and curves
In terms of function these cups perform the exact same job but in terms of form each is a unique piece of beautiful art.
Contrasts
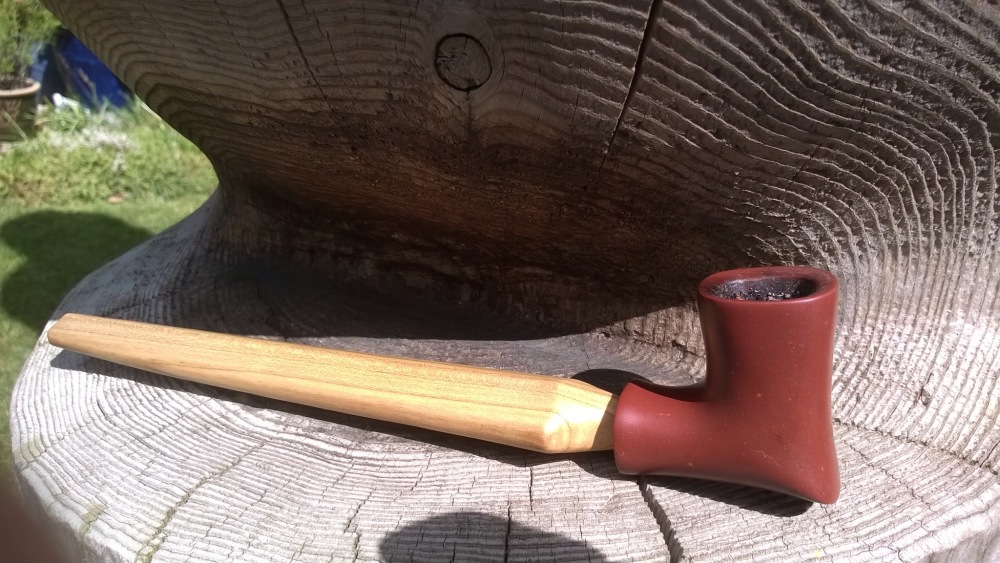
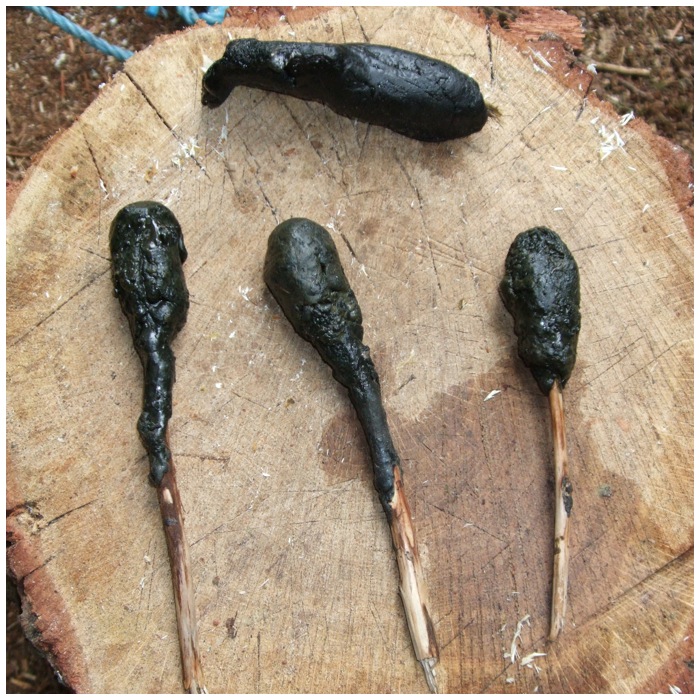
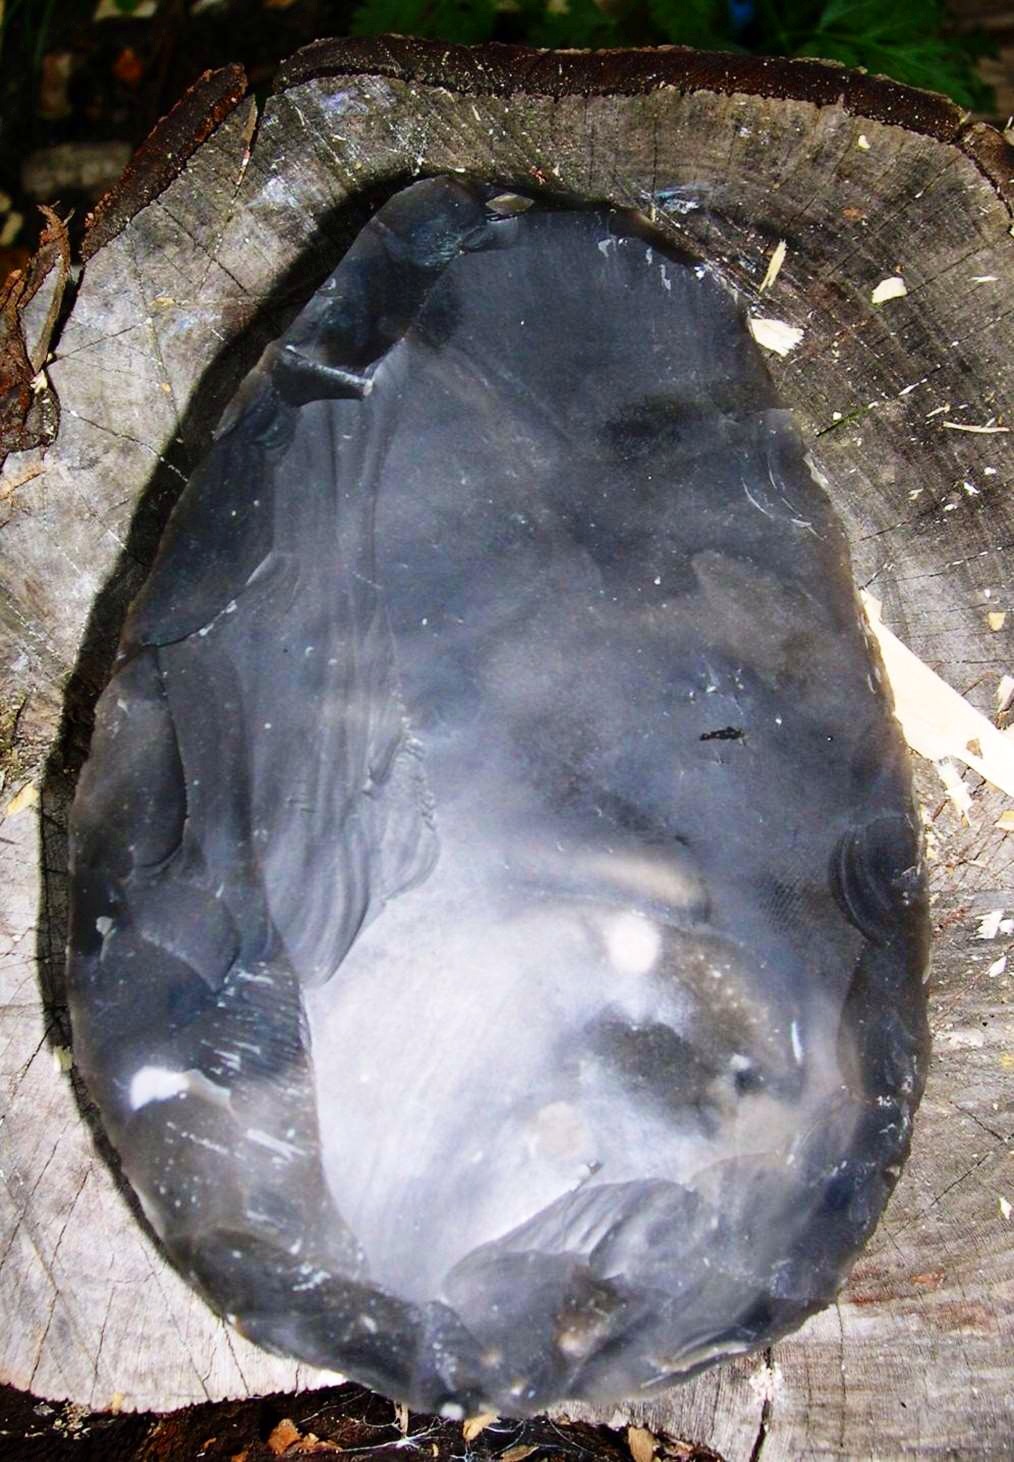
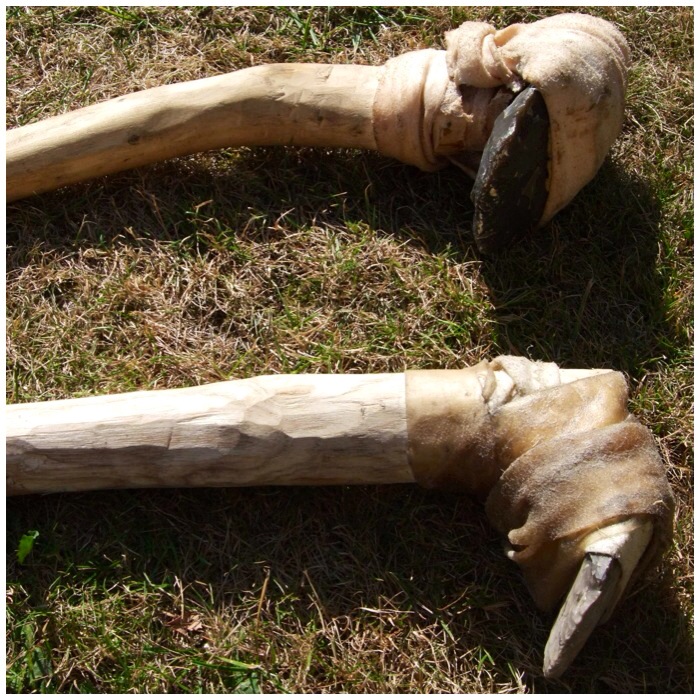
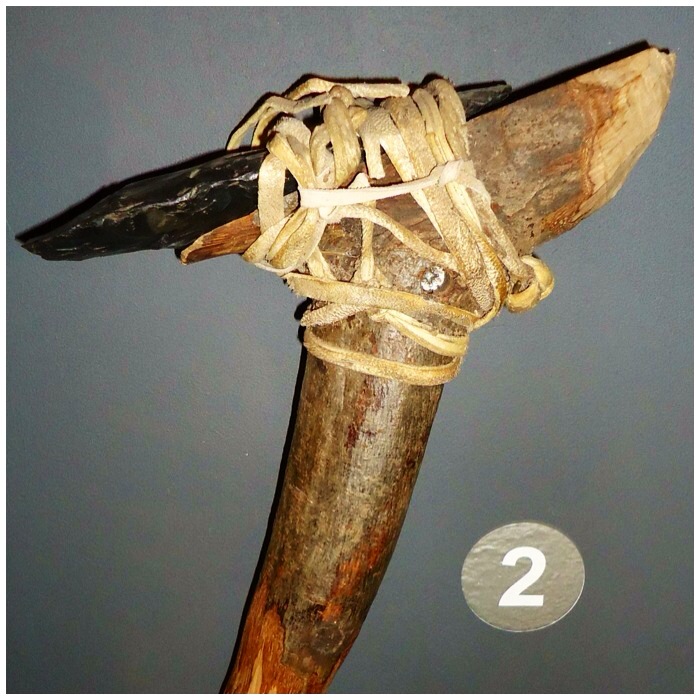
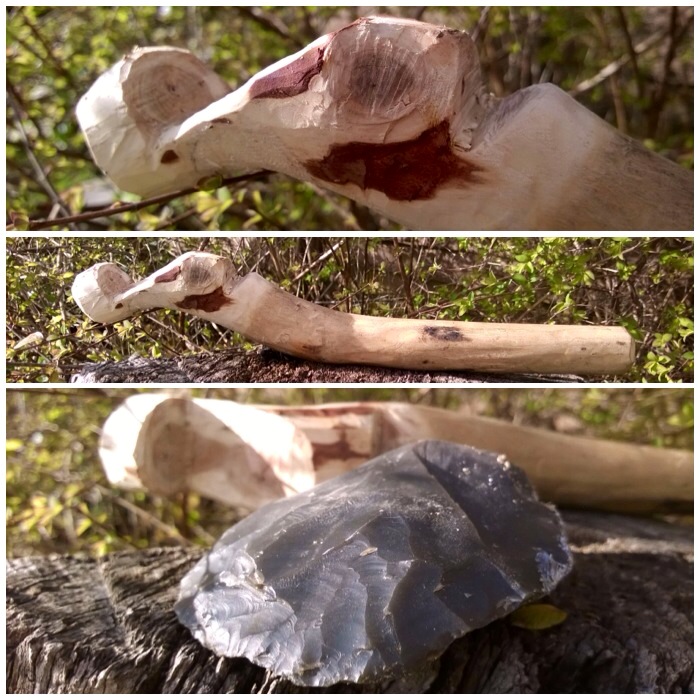
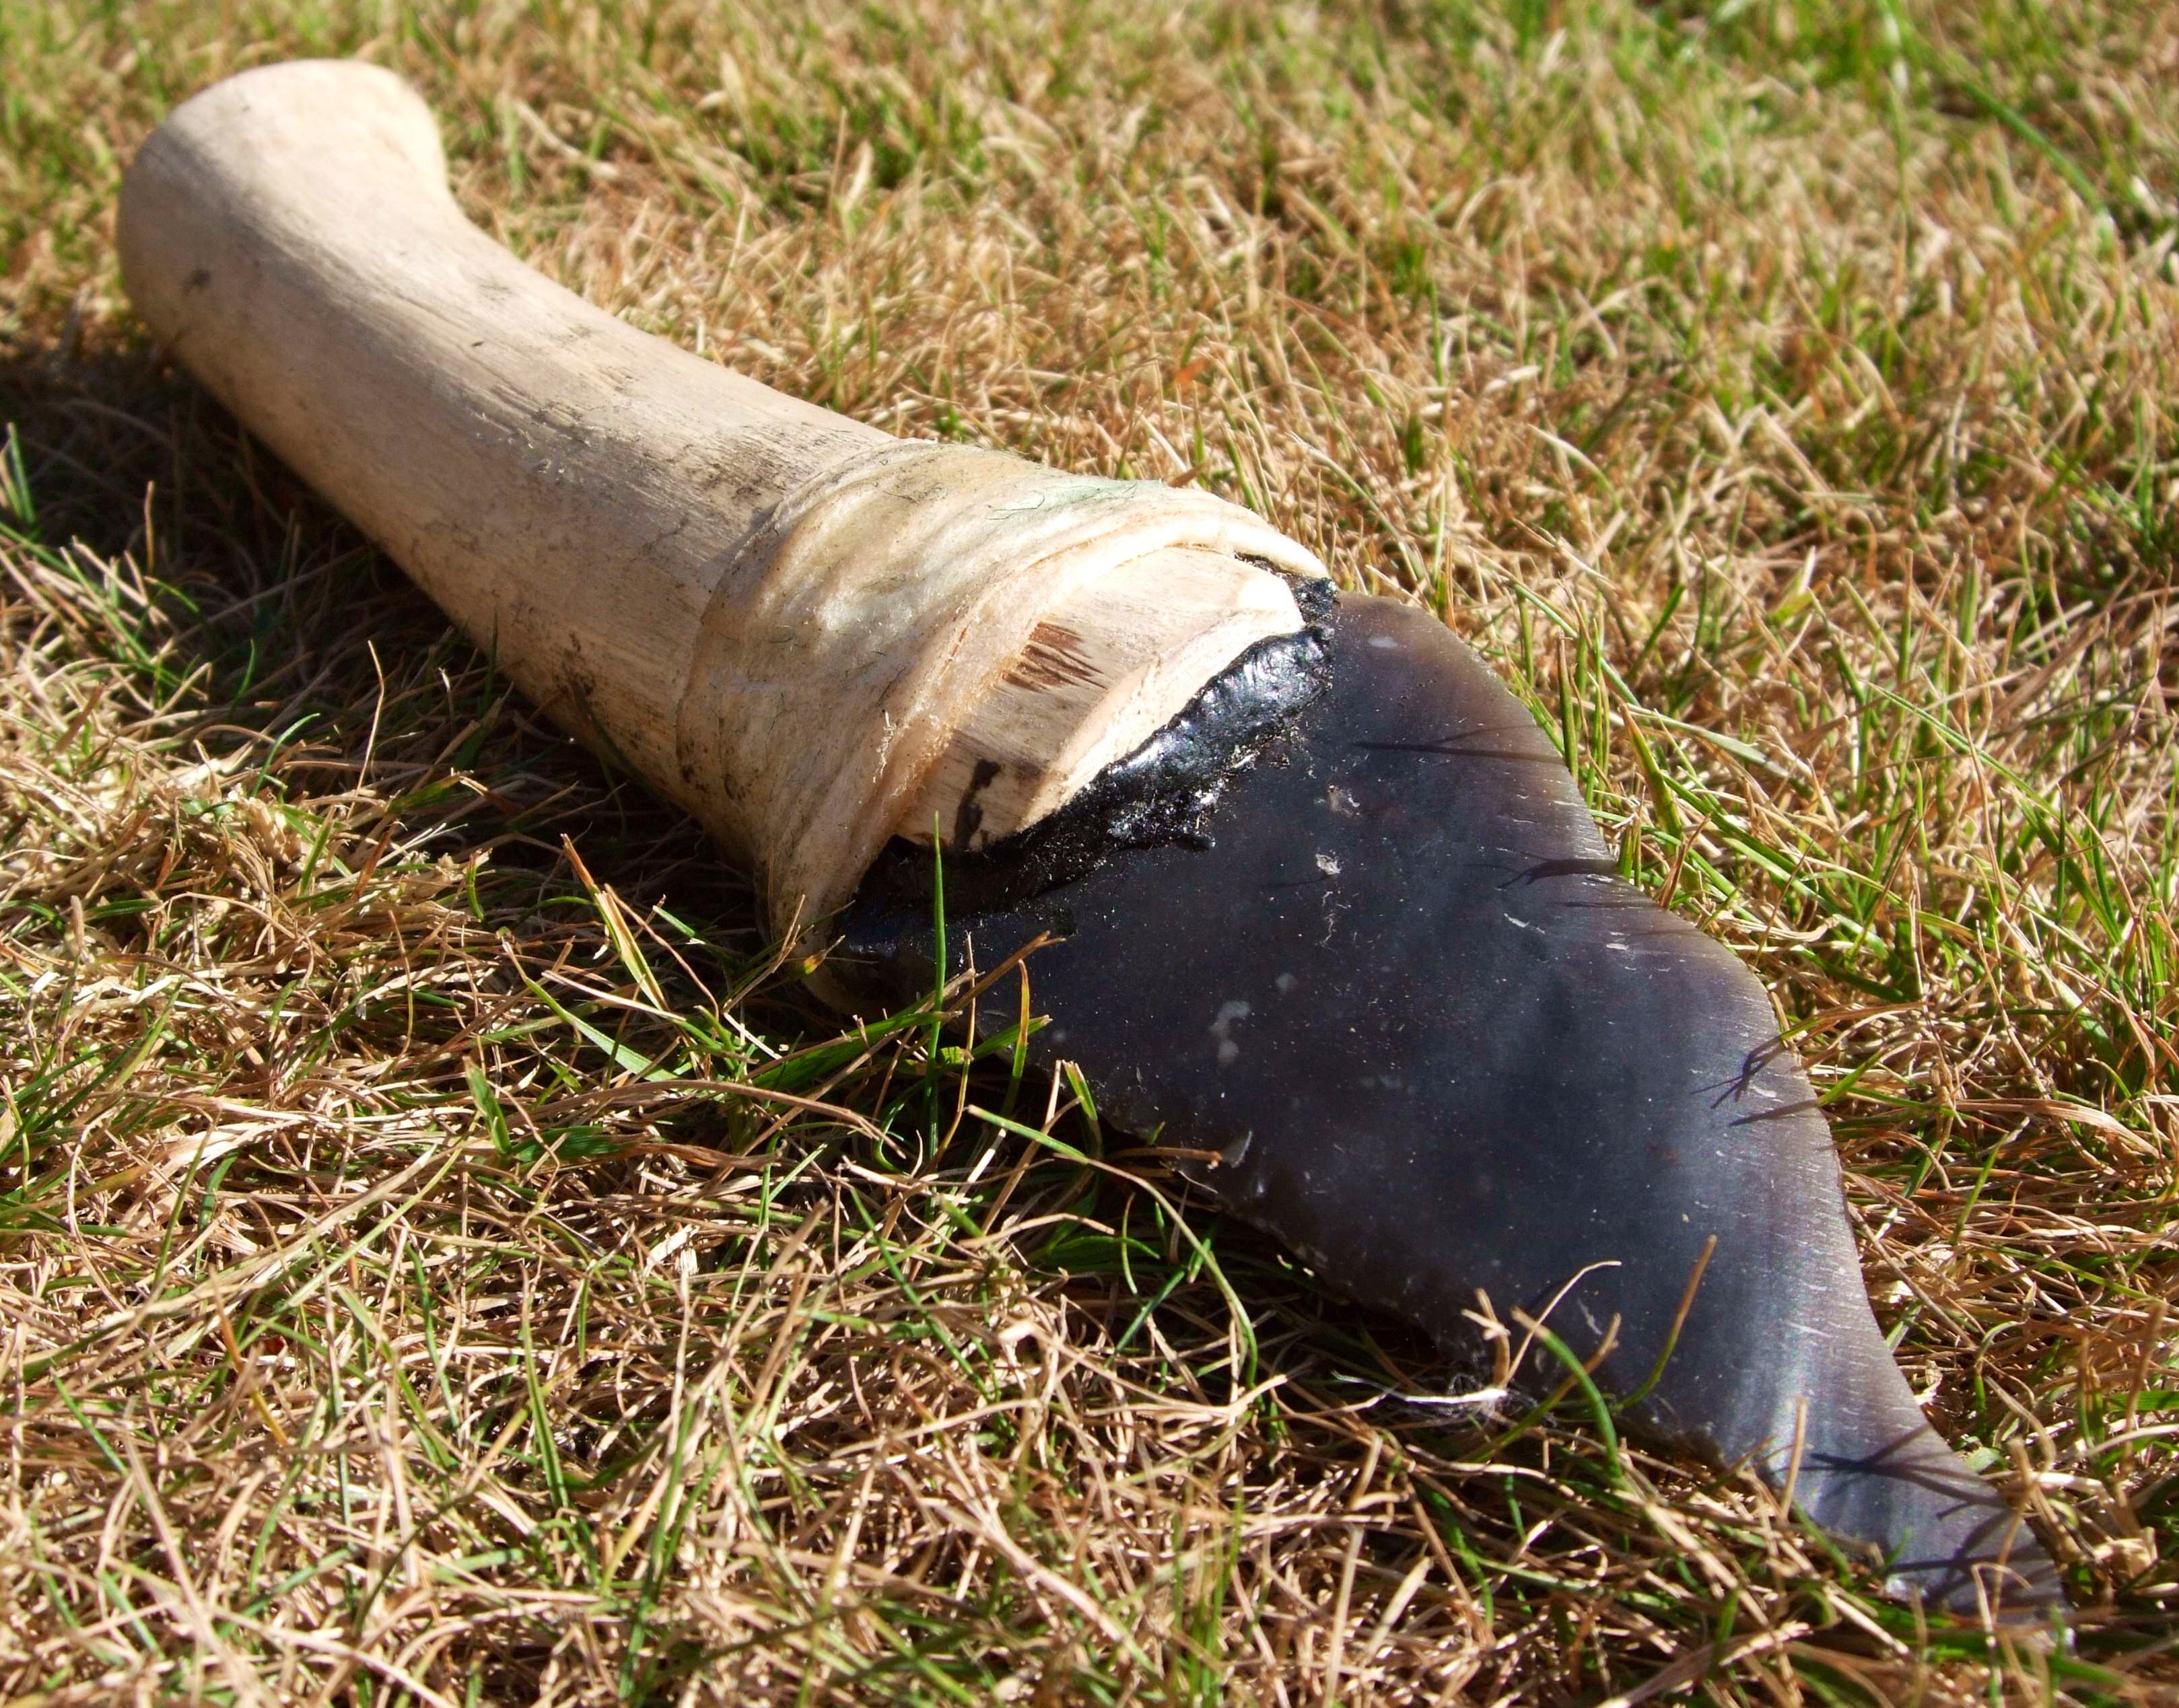
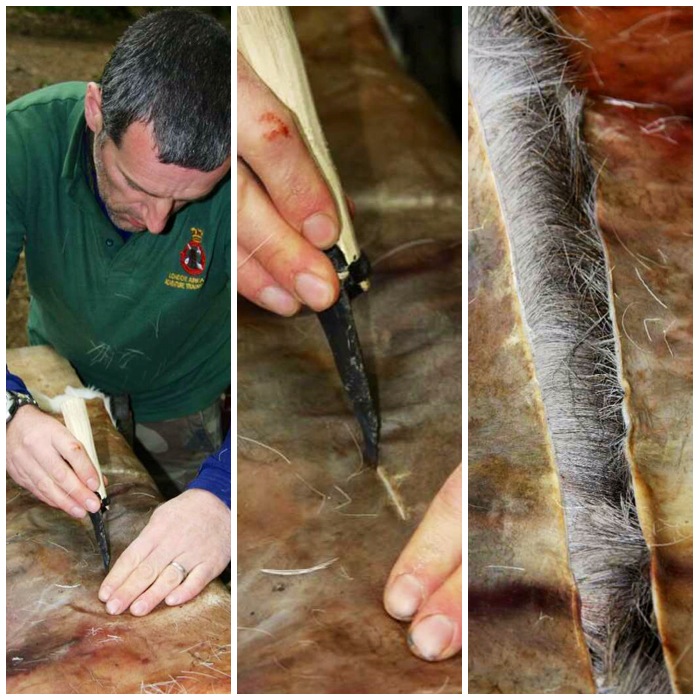
Mark had also purchased pipestone (catlinite) to make a Traditional Ceremonial Elbow Pipe and carved and shaped the bowl himself. The pipestone is only allowed to be quarried by members of recognised Native American Tribes. The wood Mark used for the stem was cherry.
A pipestone elbow pipe with a carved cherry stem
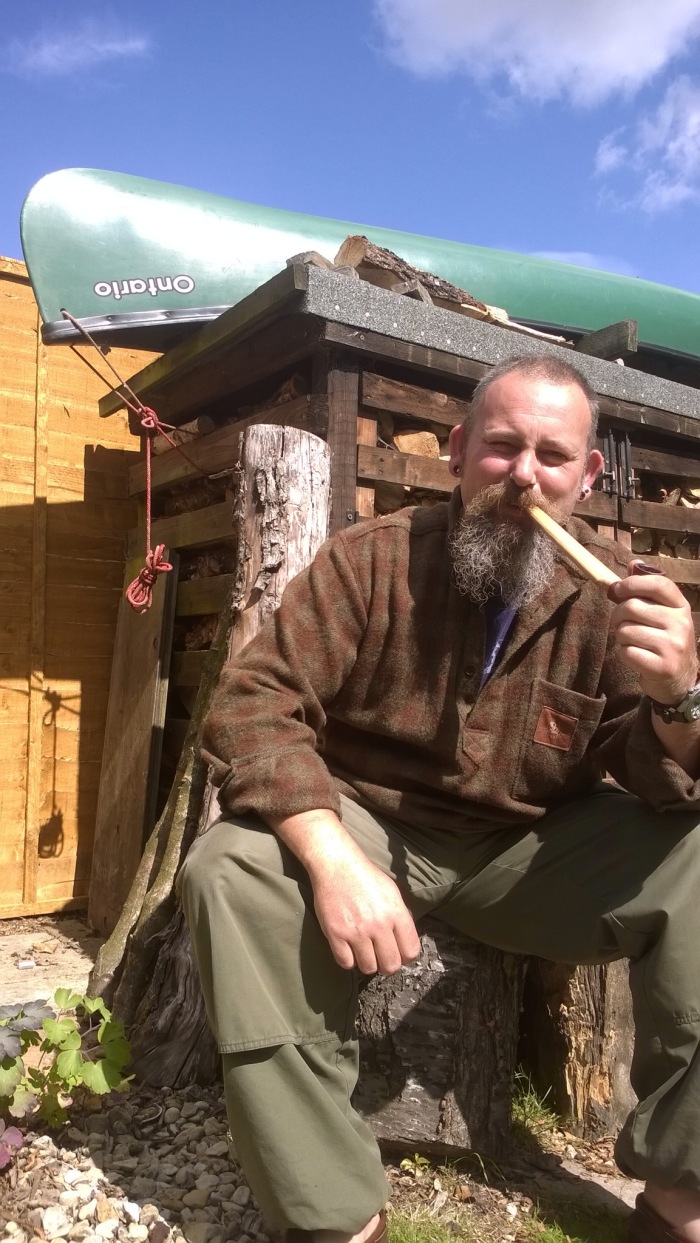
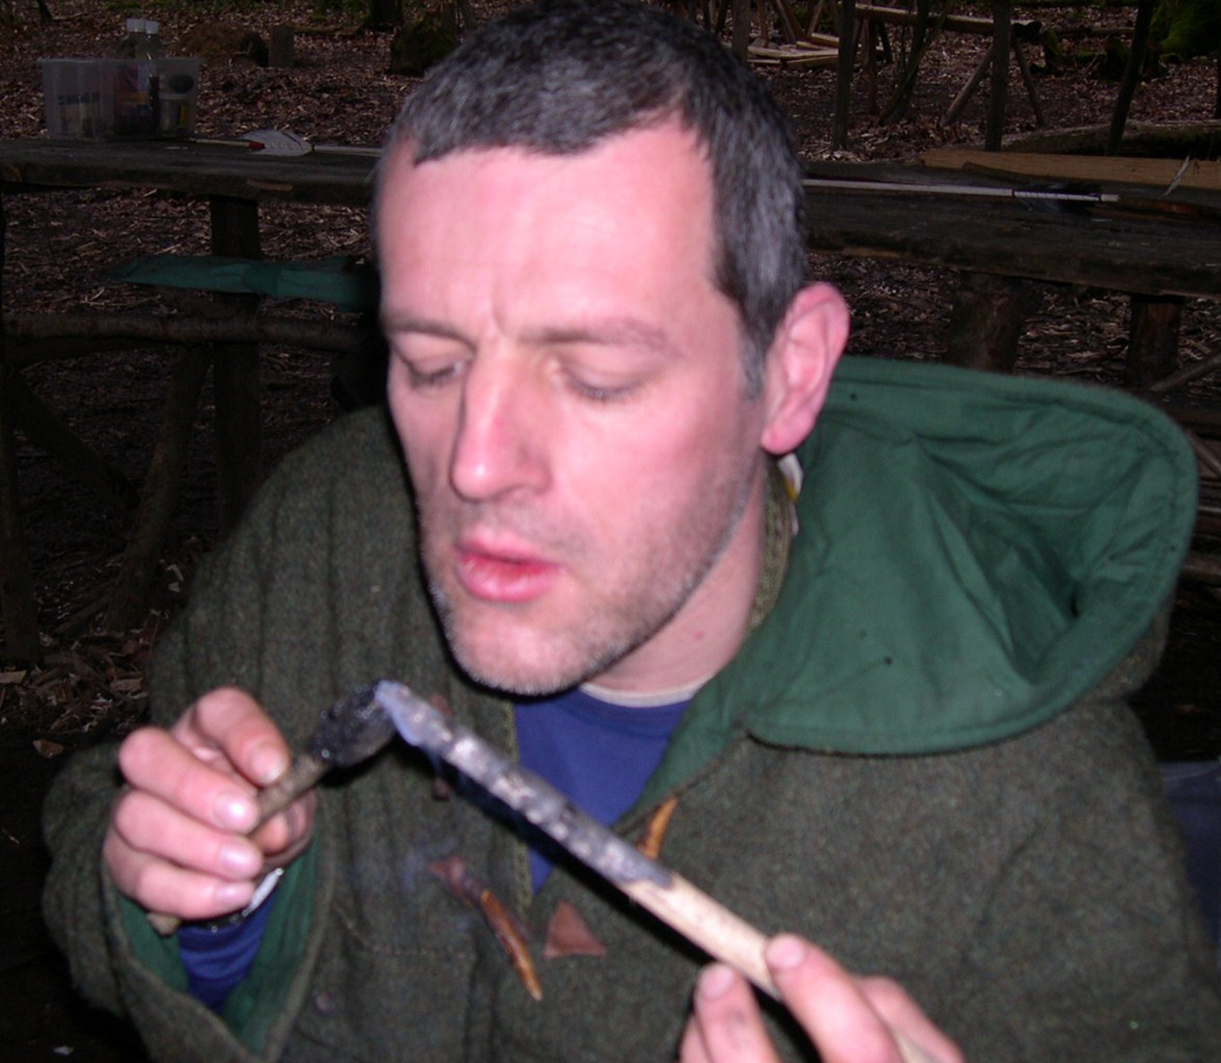
The man himself.
Mark the Carver
Thanks for letting me look at your latest work Mark, and allowing me to photograph these beautiful pieces.
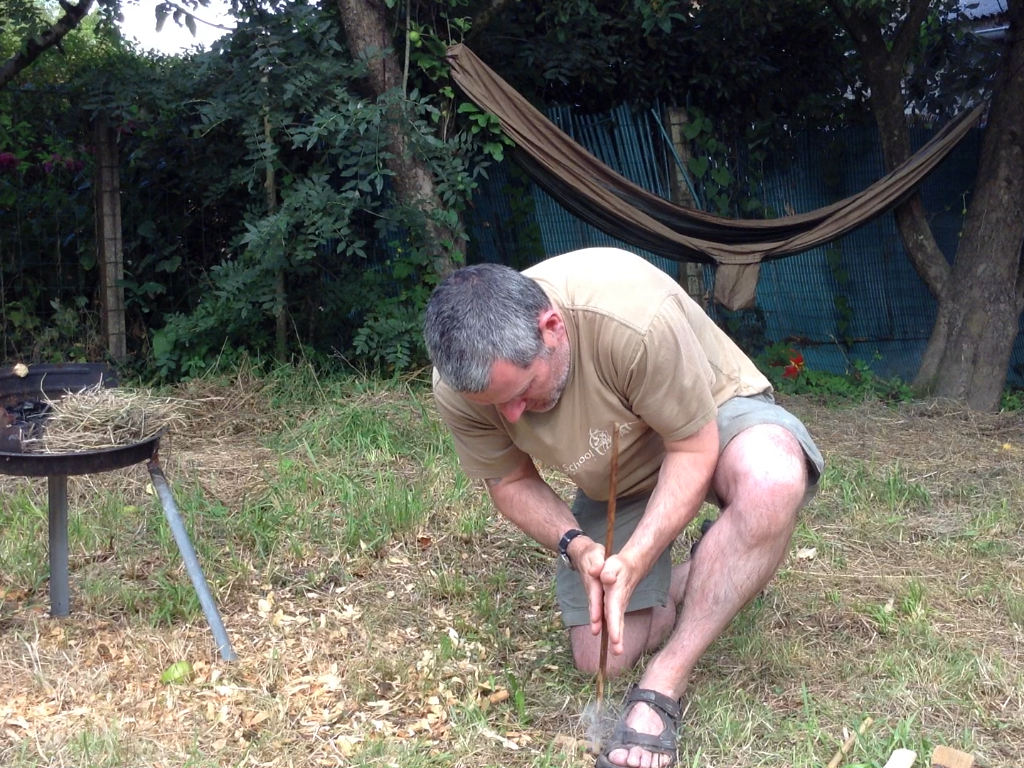
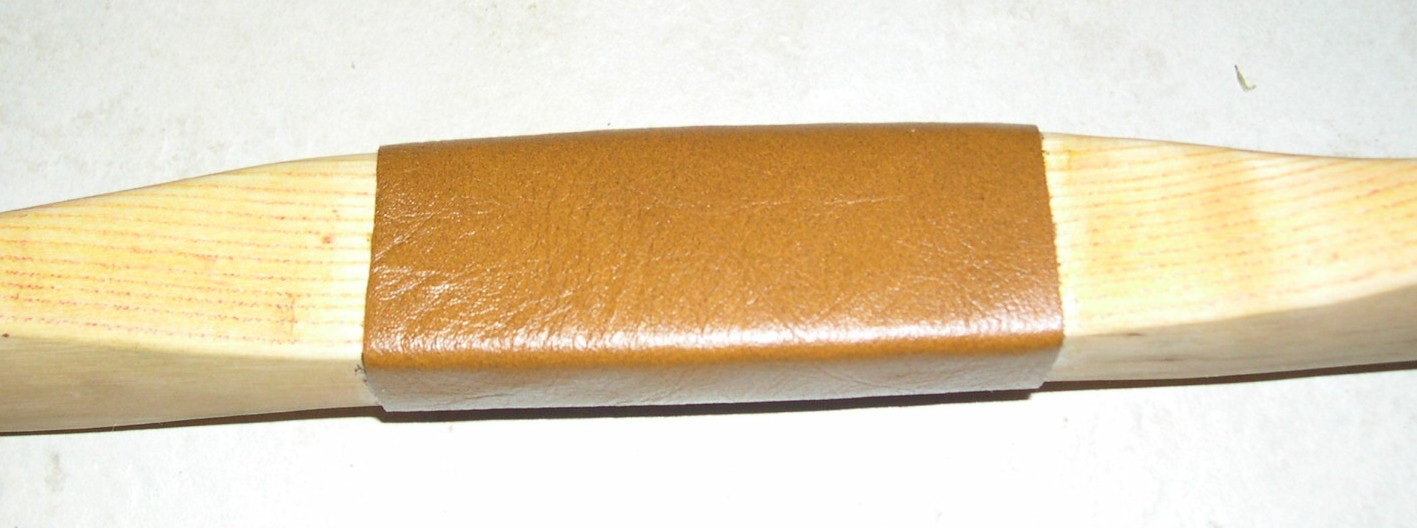
I was taught a few years ago by my friend John Rhyder of Woodcraft School about a version of bowdrill that uses an extended bearing block.
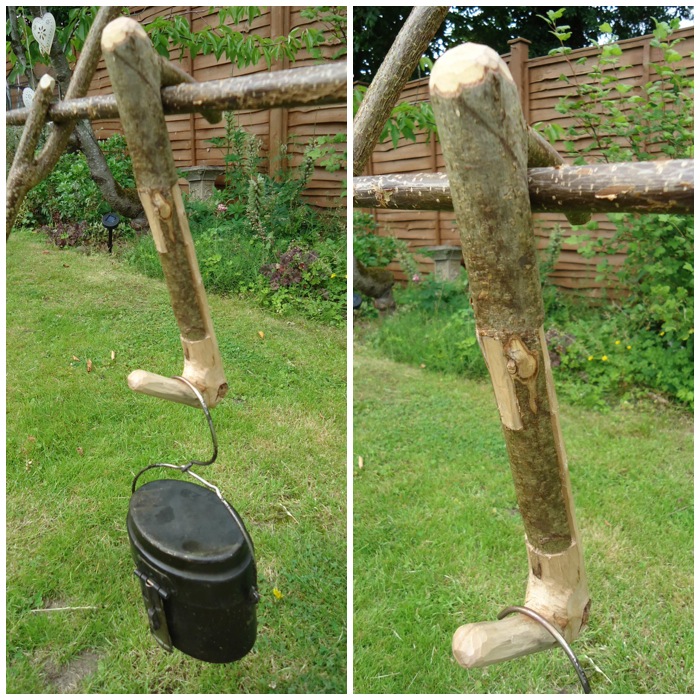
I found the bearing block to be particularly good for learners or for those who had injuries to their back, legs or arms. I call it the ‘assisted bowdrill’, not that you need assistance from someone else but because the bearing block is set up in such a way that it assists you in your stance while bowdrilling
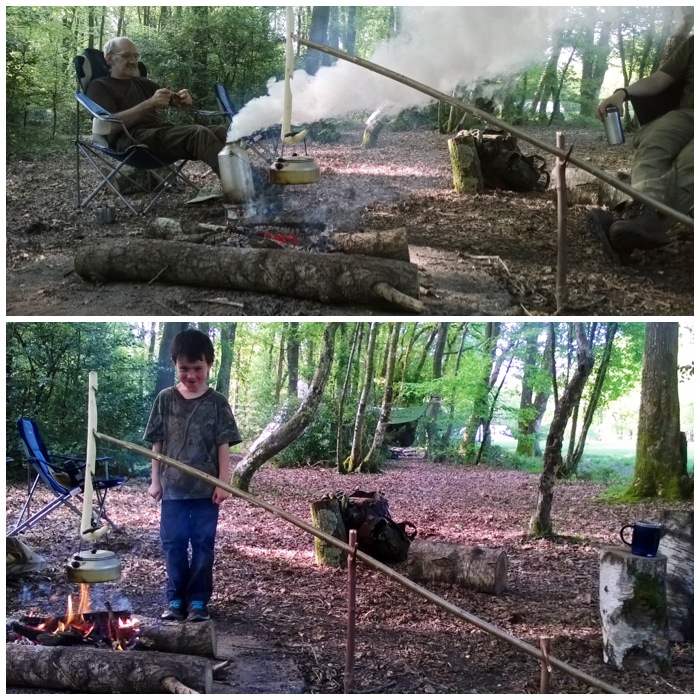
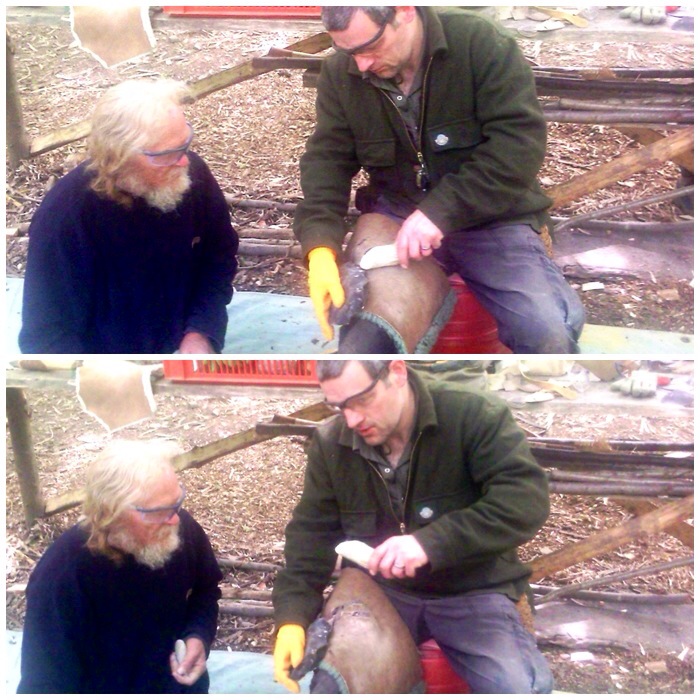
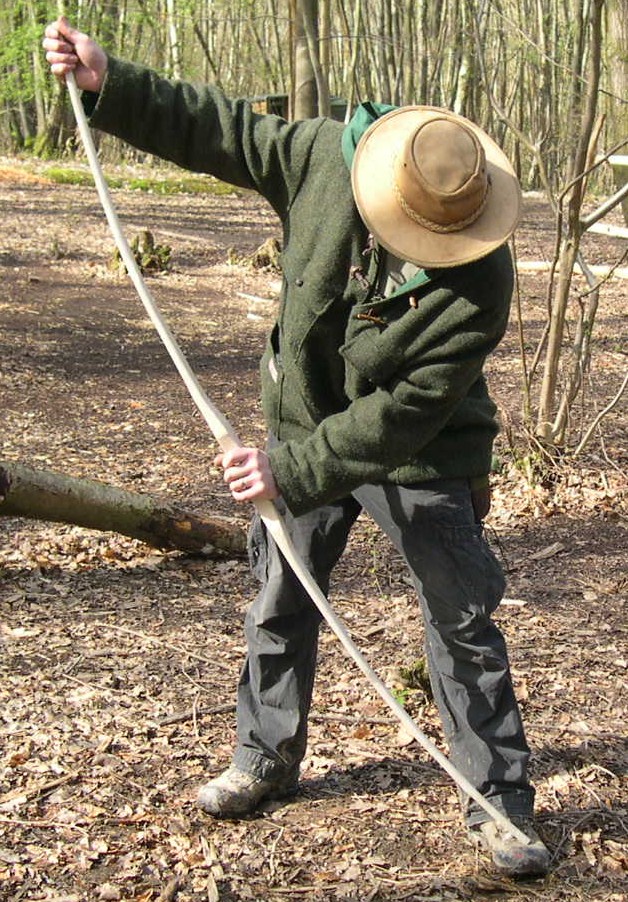
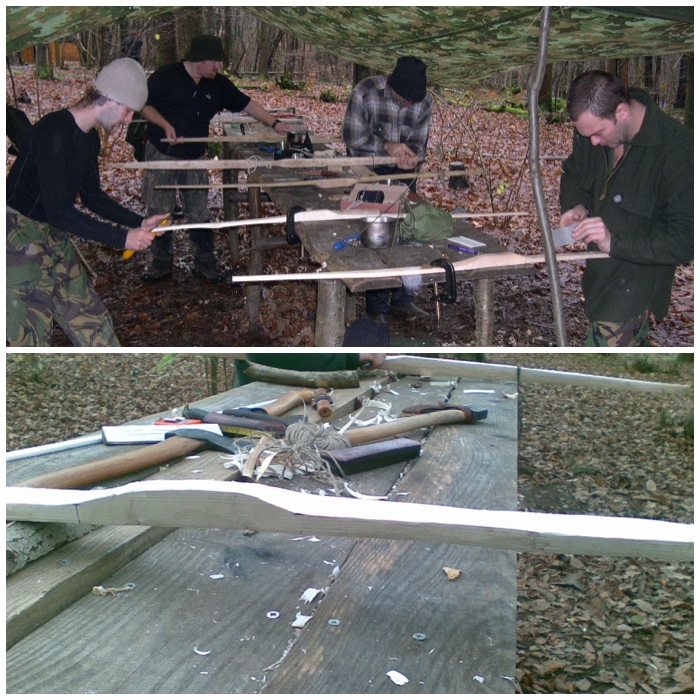
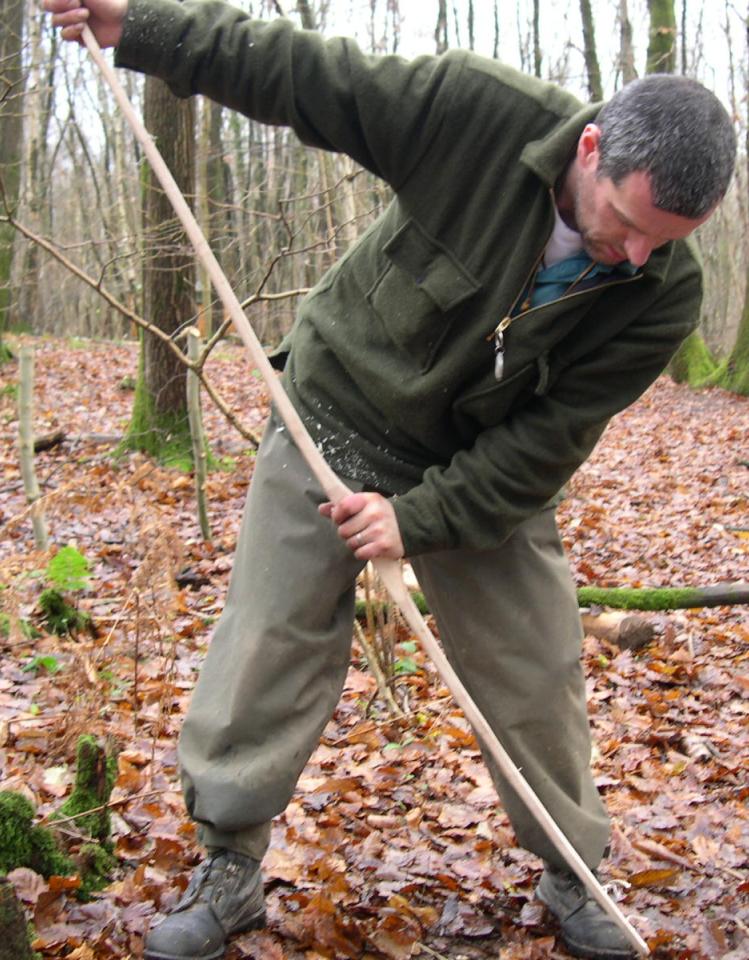
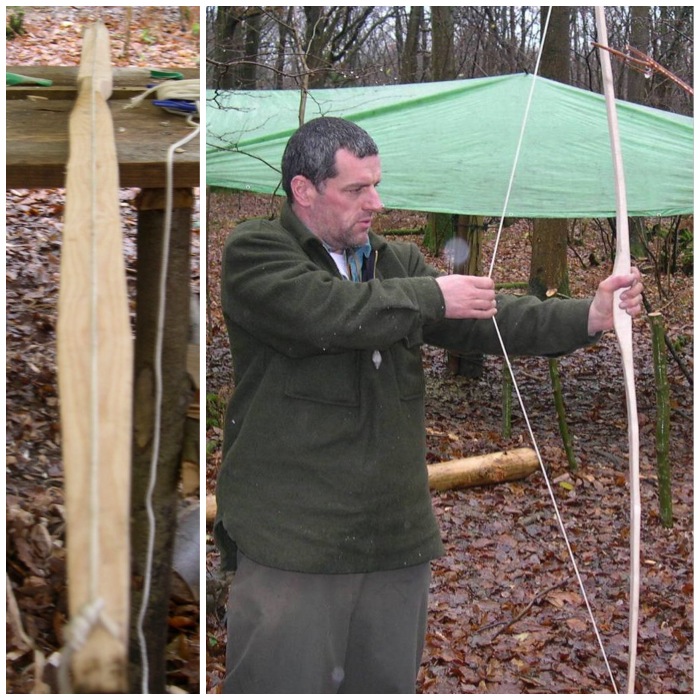
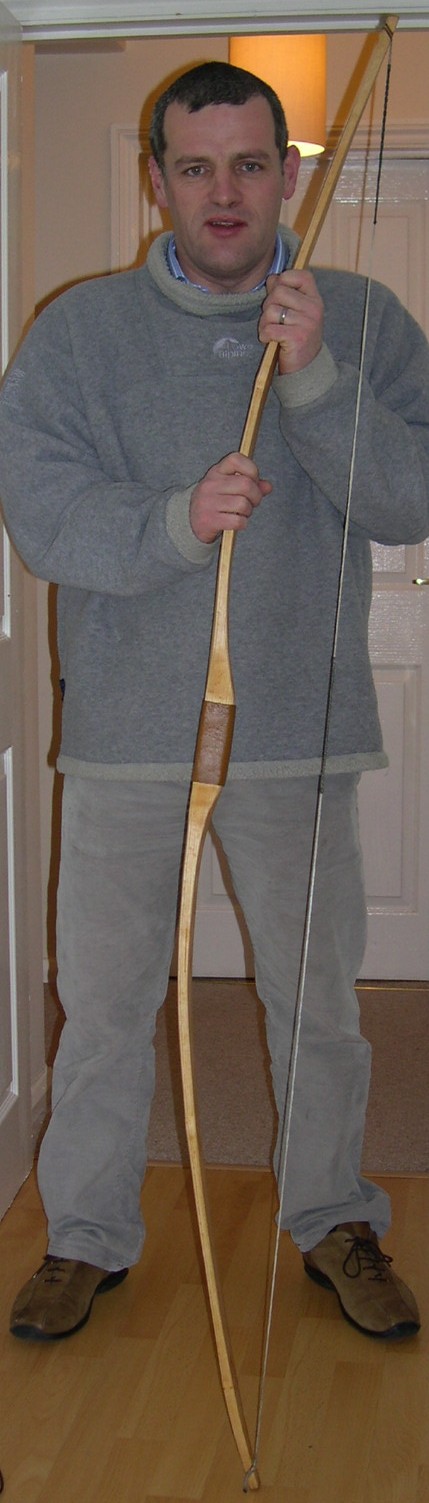
Below you can see my friend David Jones using the set up on a piece of wood. Dave wanted to try this method out as he had (if I remember correctly) some problem with his knee. As he could stand straight on one leg and did not have to grip the bearing block too tightly, he quickly found he could get an ember and then flame.
Dave in action
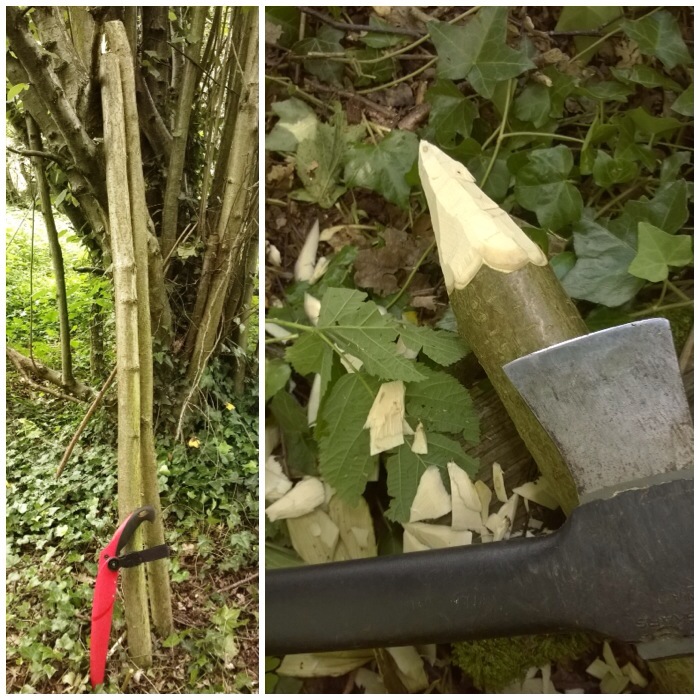
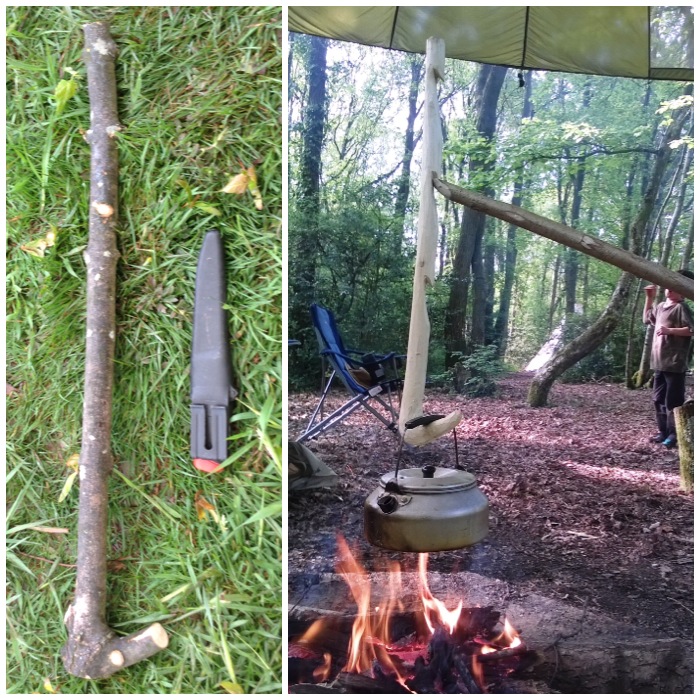
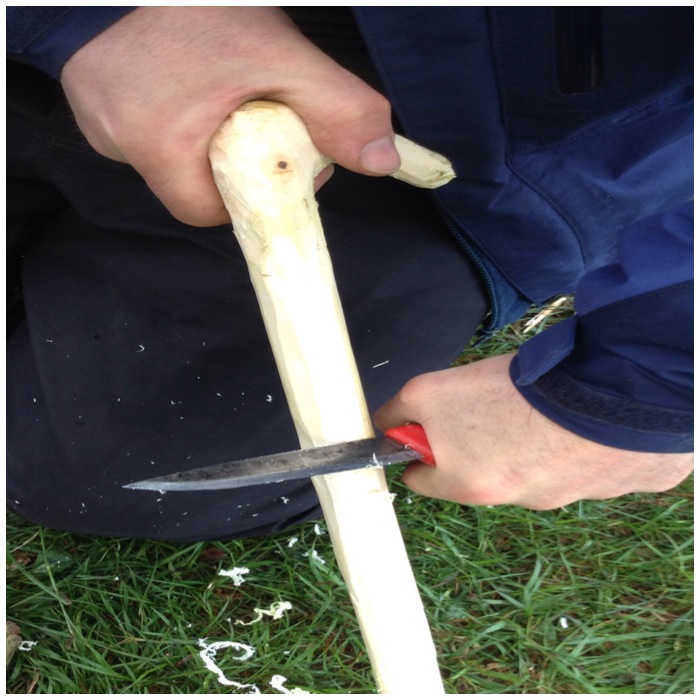
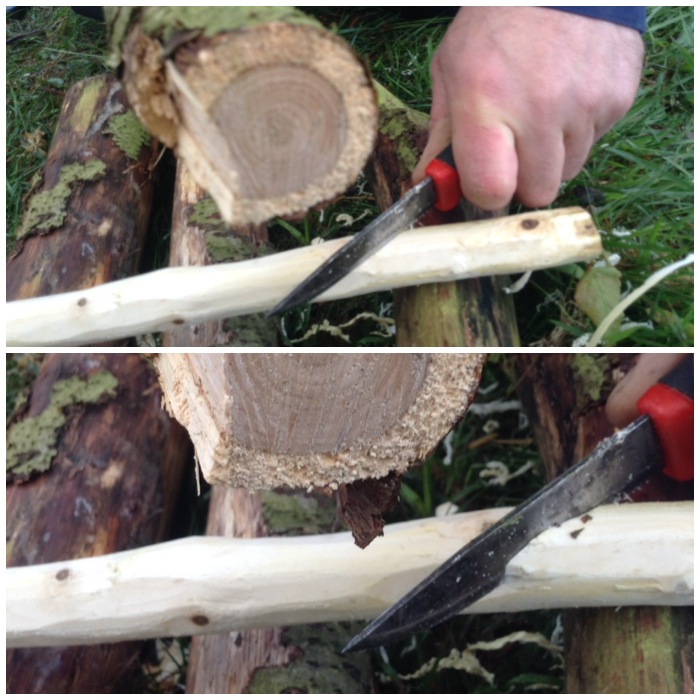
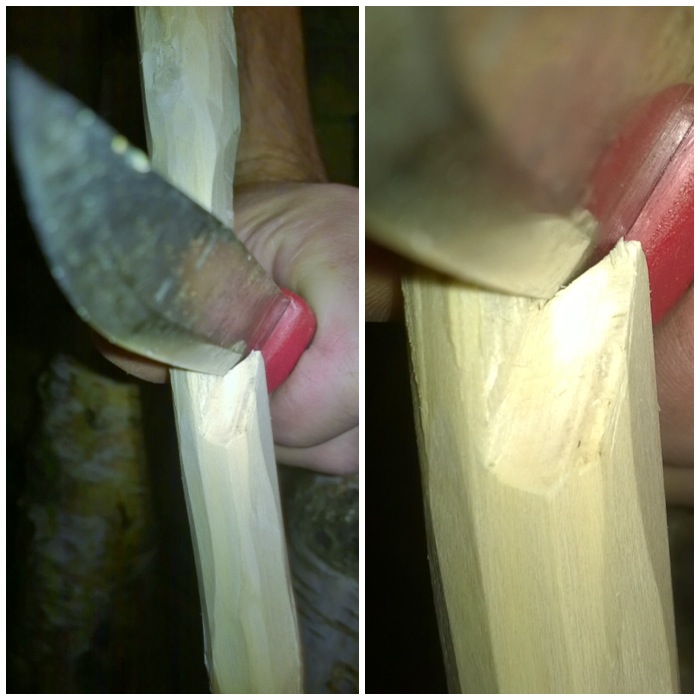
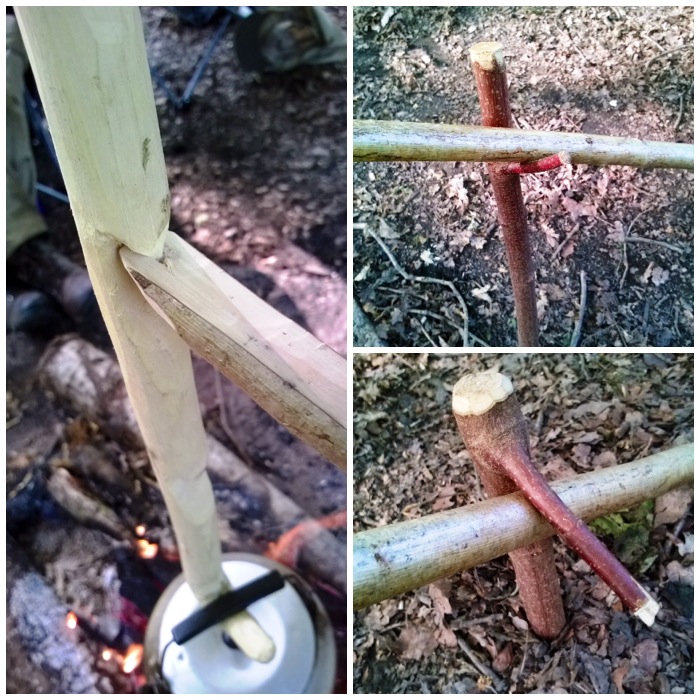
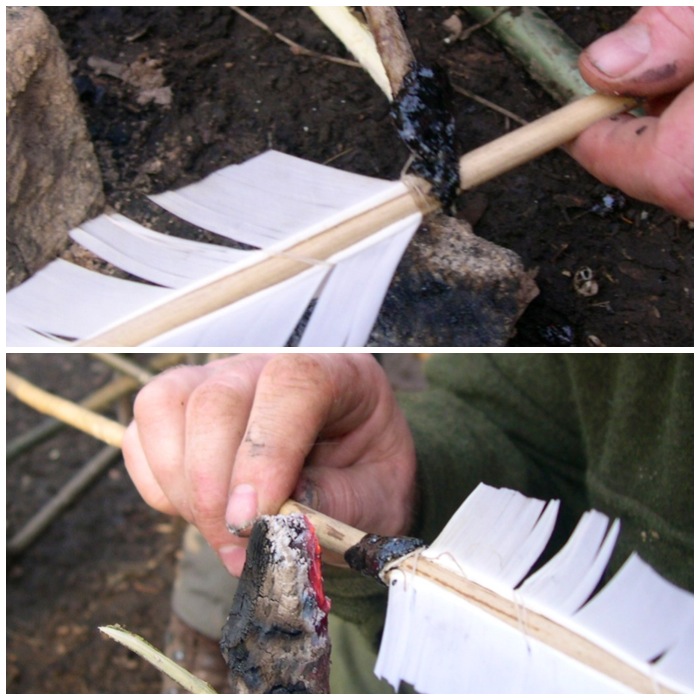
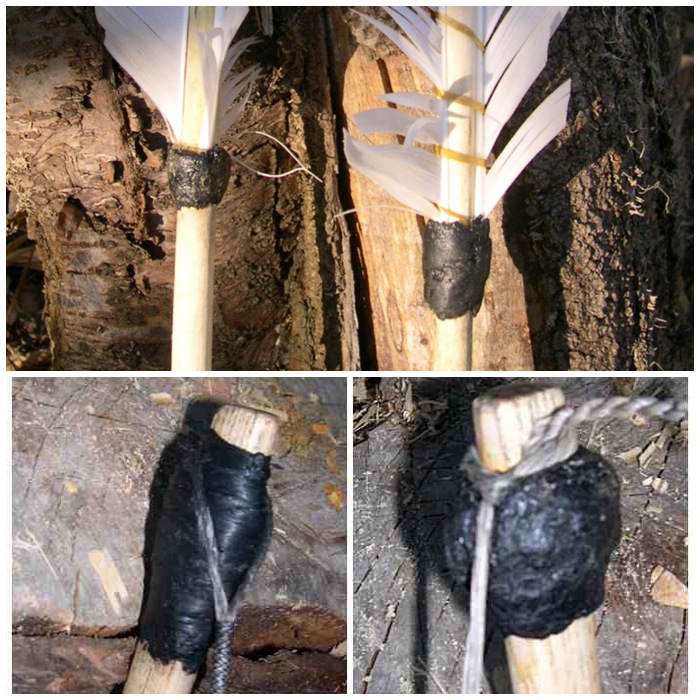
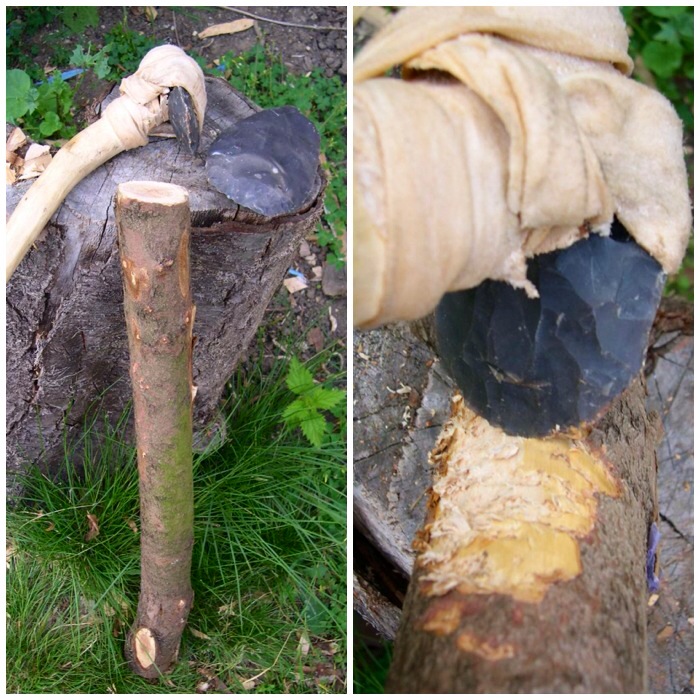
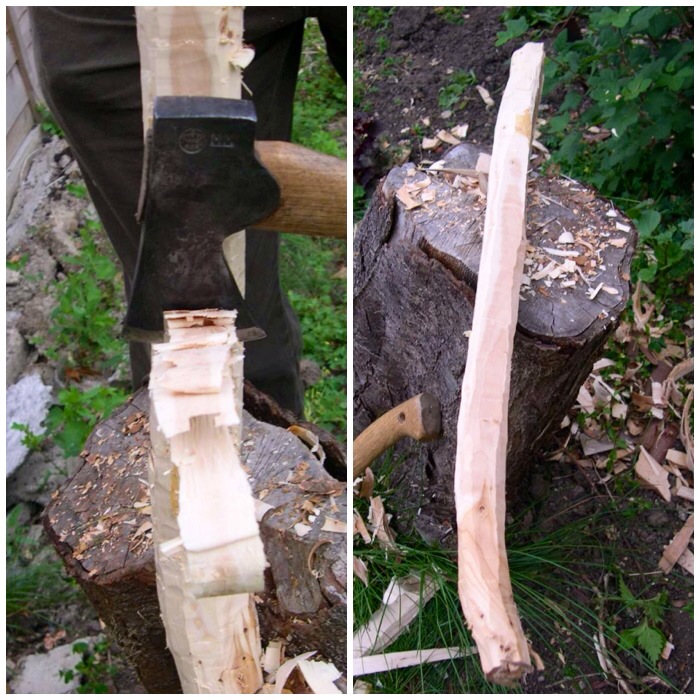
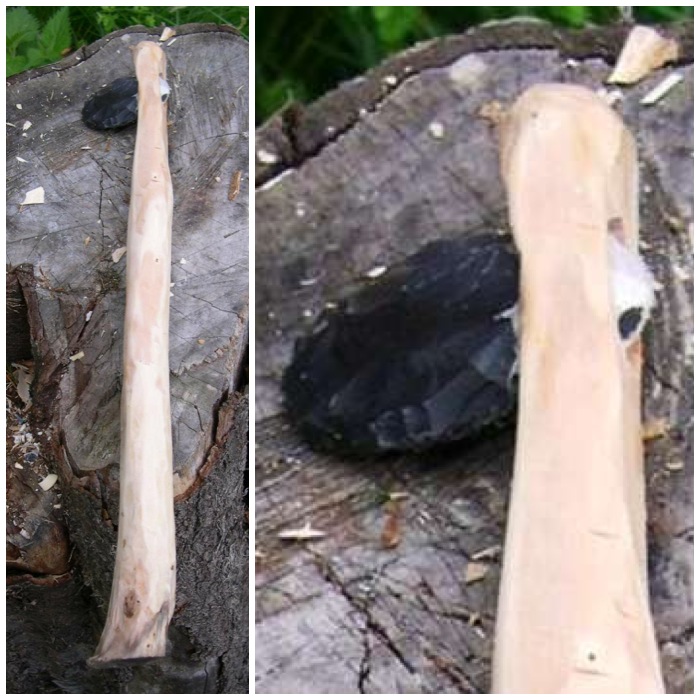
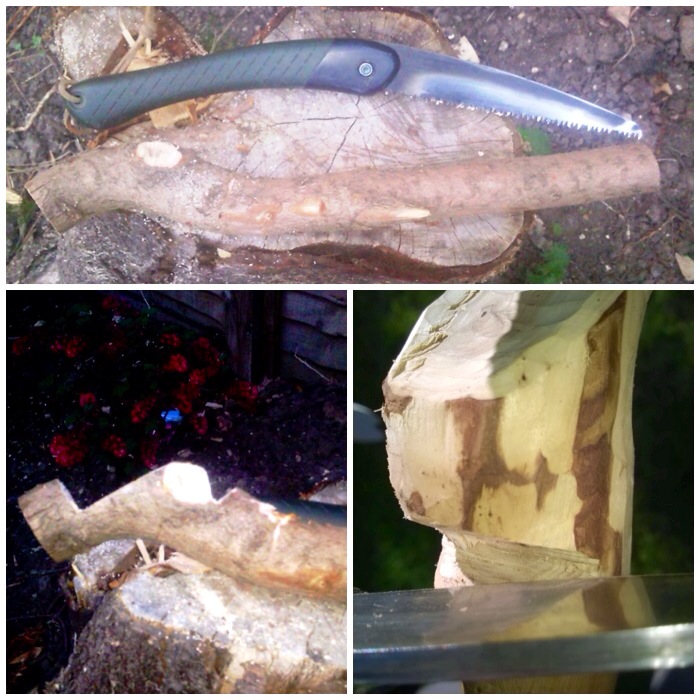
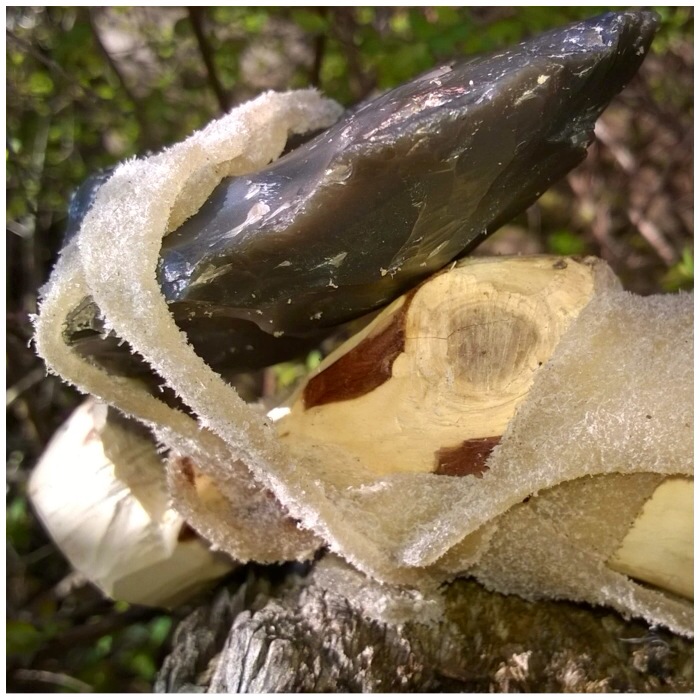
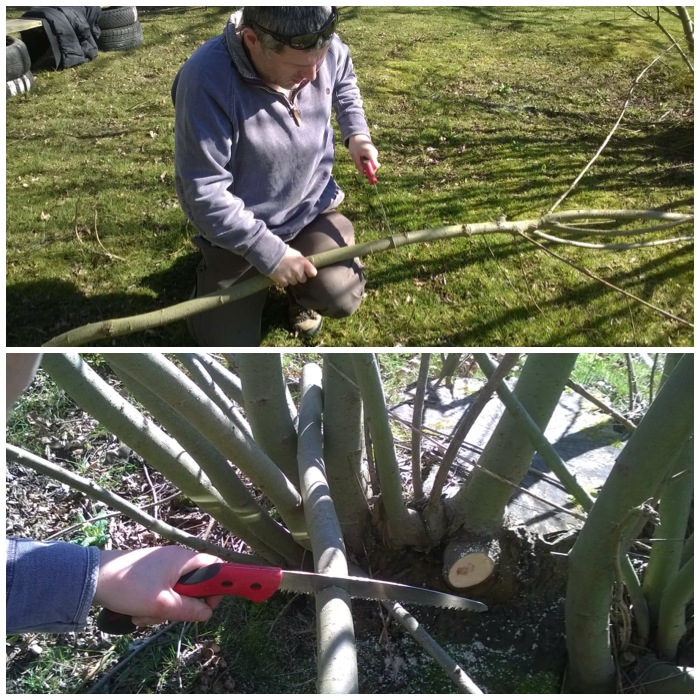
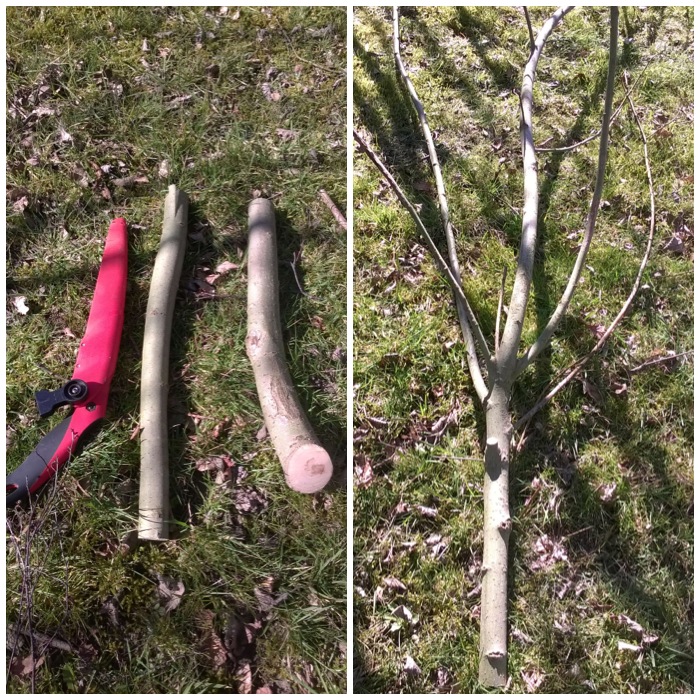
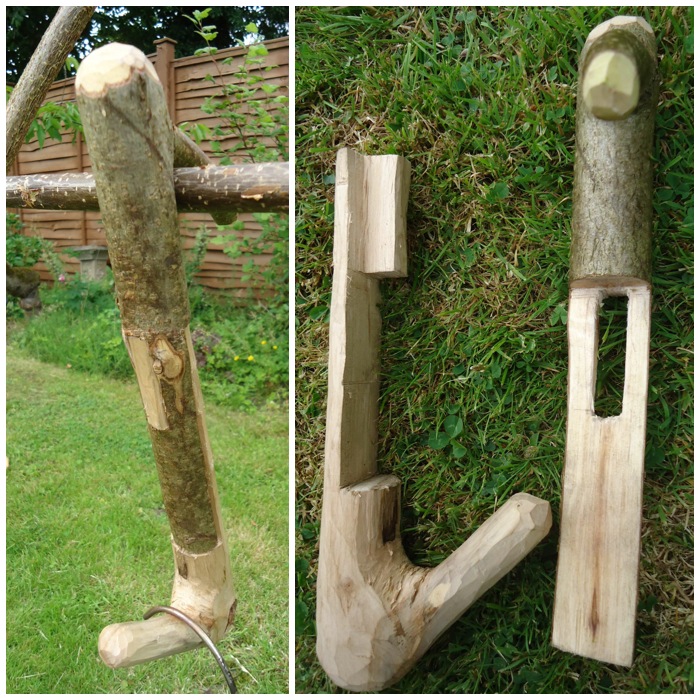
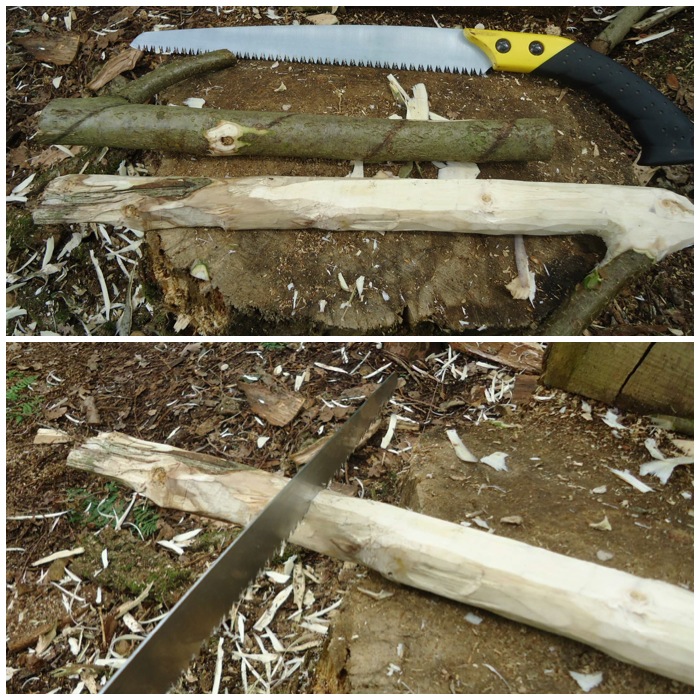
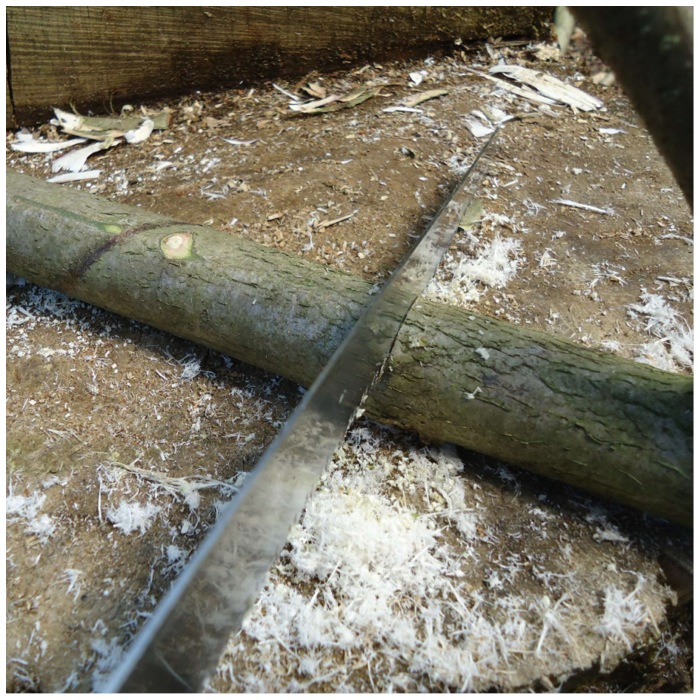
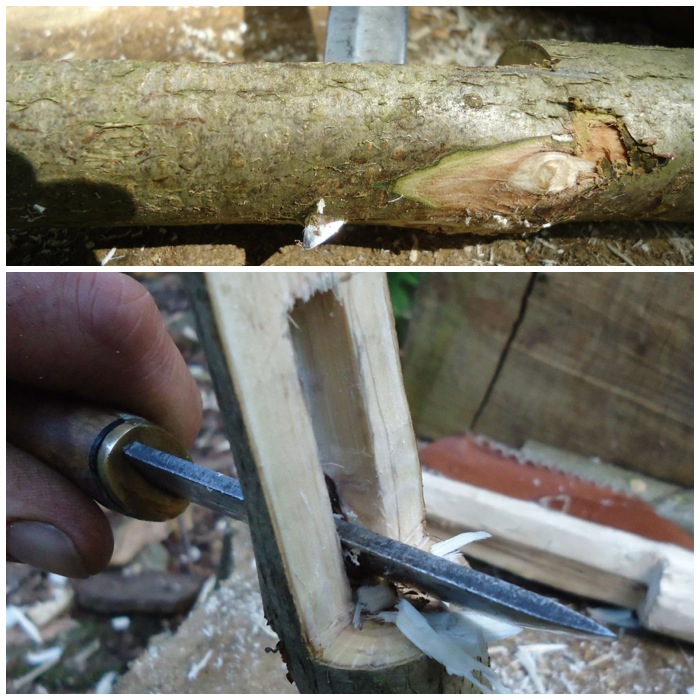
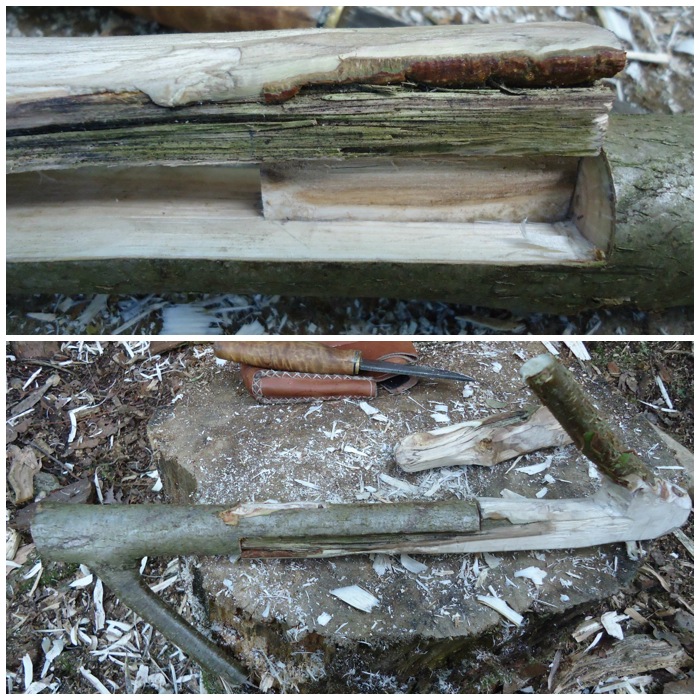
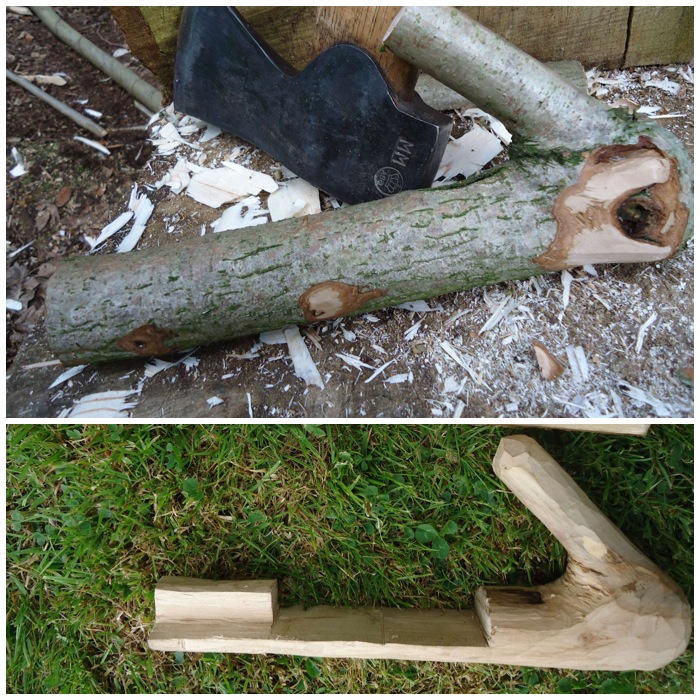
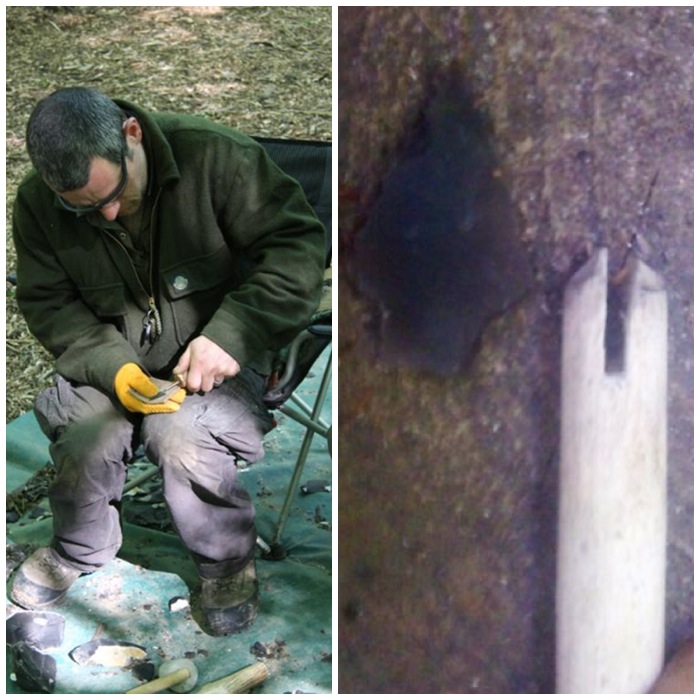
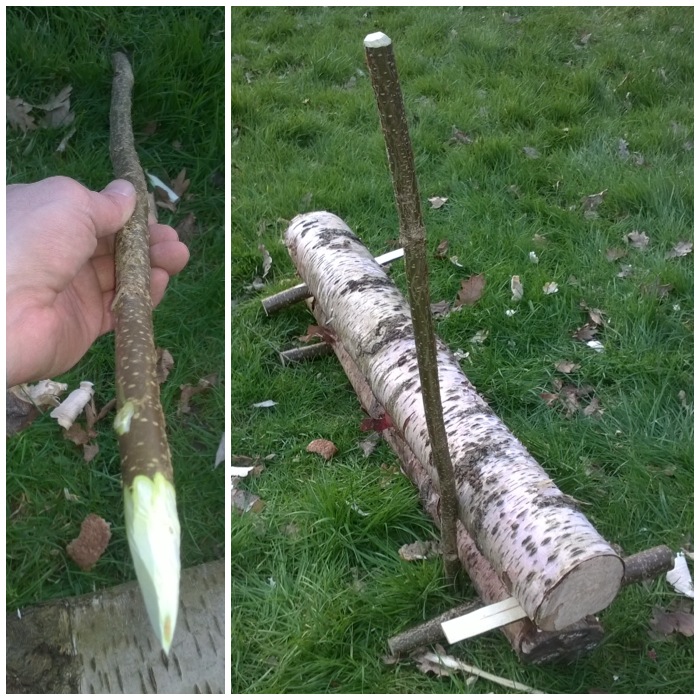
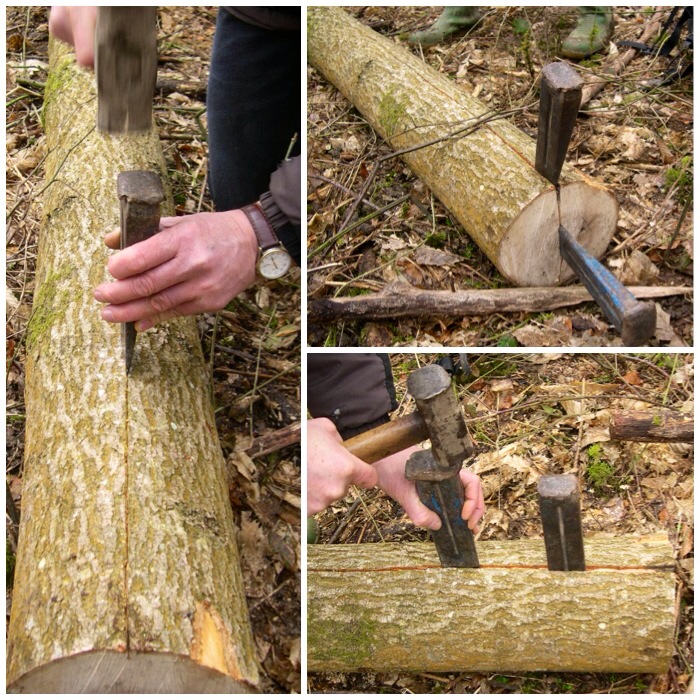
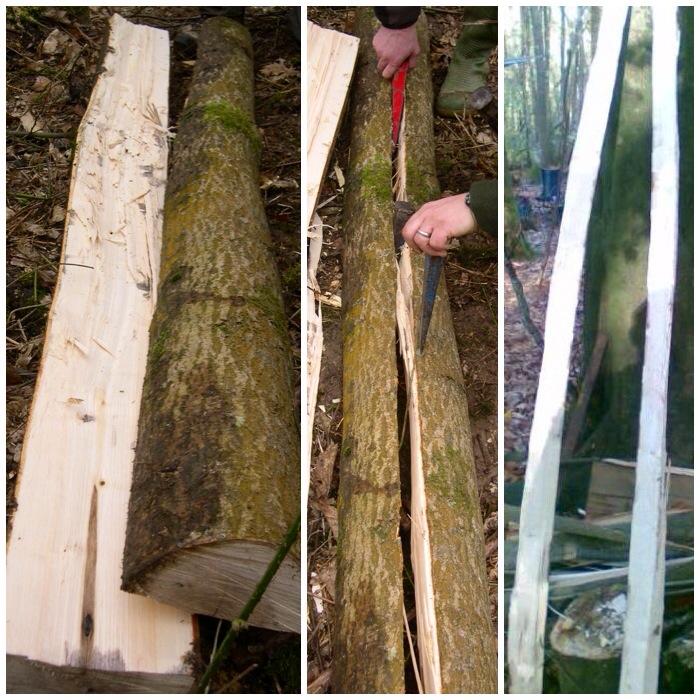
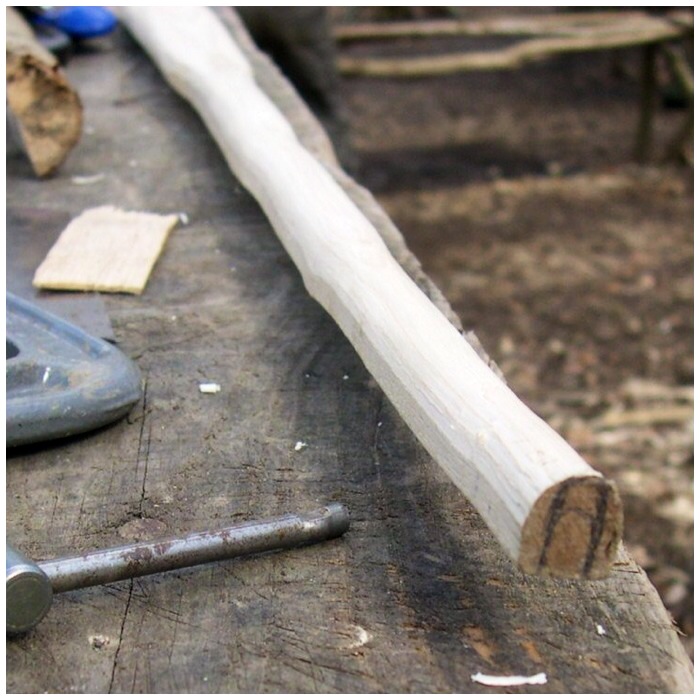
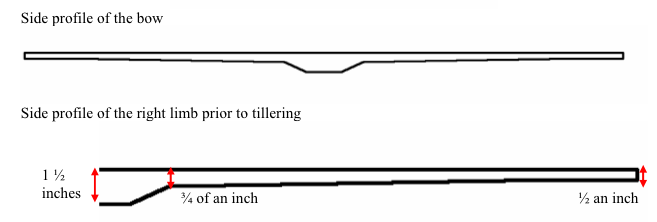
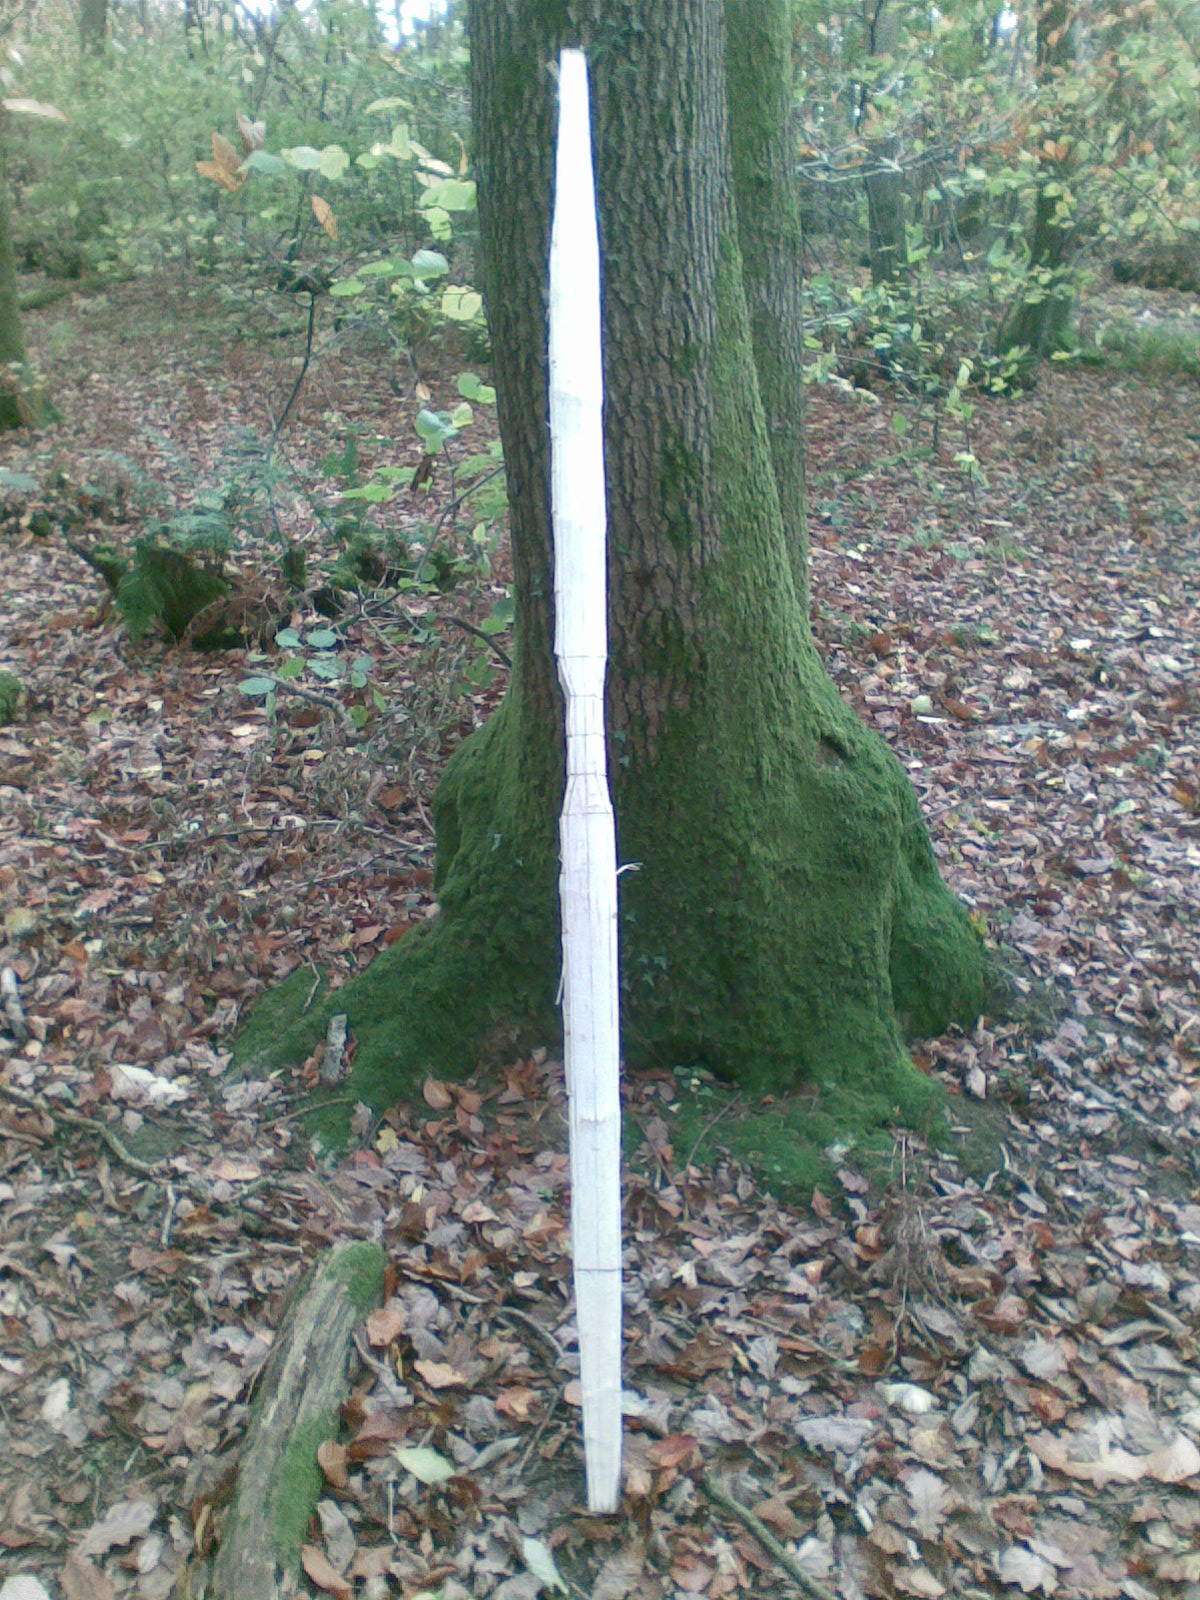
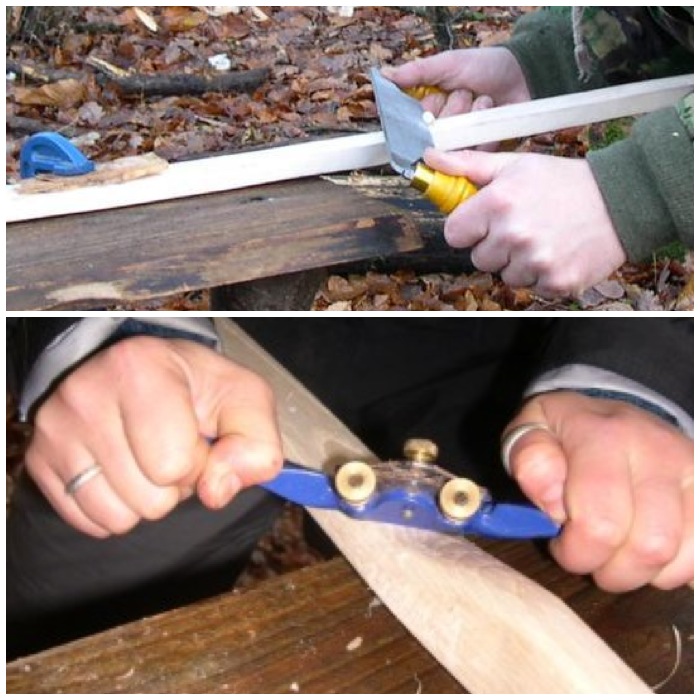
To make the bearing block you need a decent length of branch. I used a decent sized piece of hazel just over a metre long to act as my long bearing block. I then axed out a point on one end of the bearing block, to be jammed into the ground when in use.
Select a limb and sharpen one point
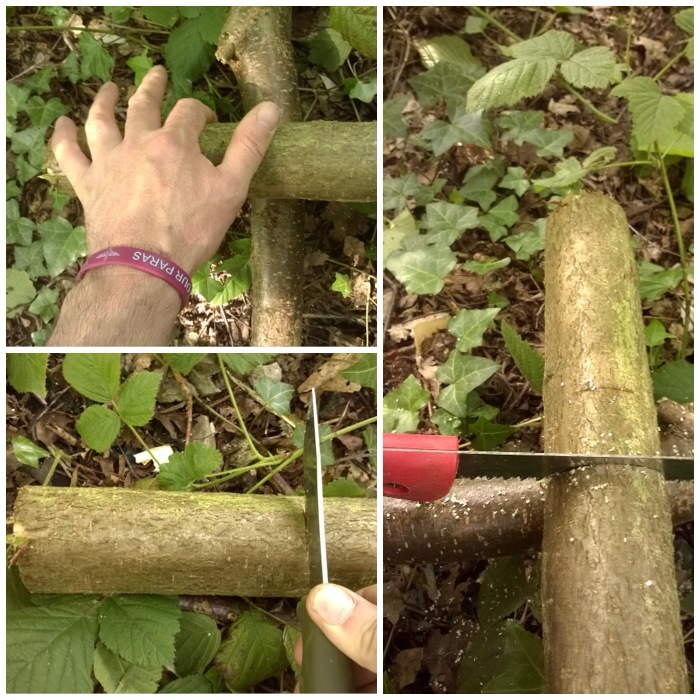
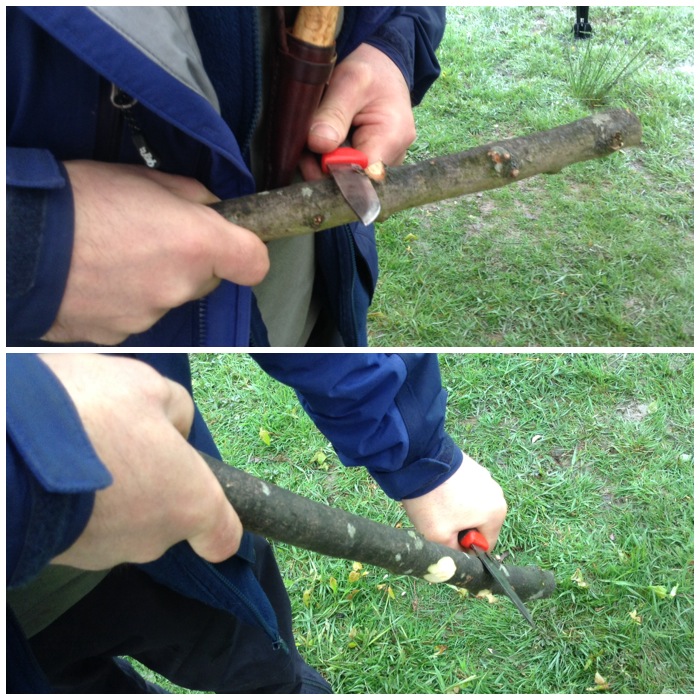
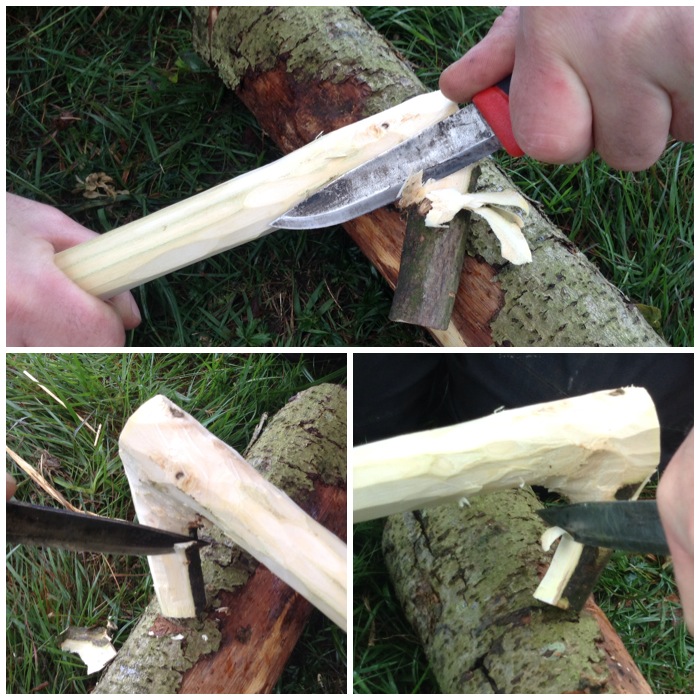
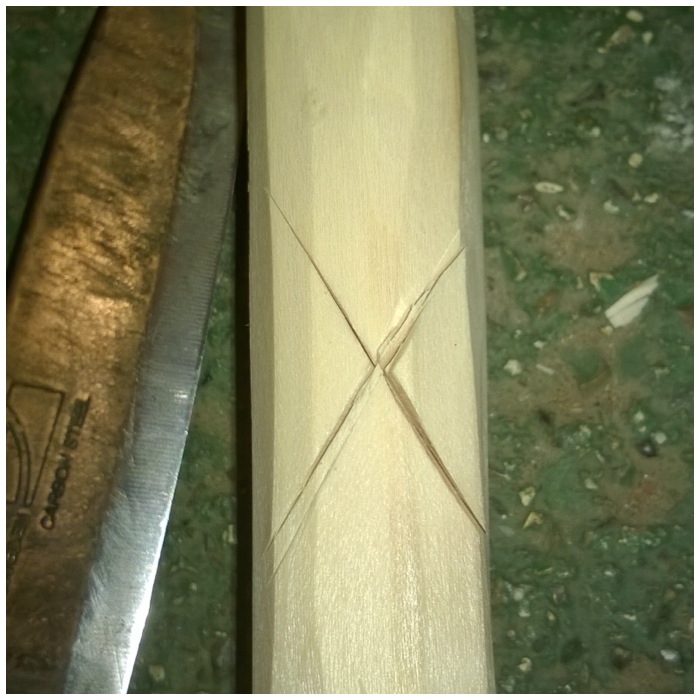
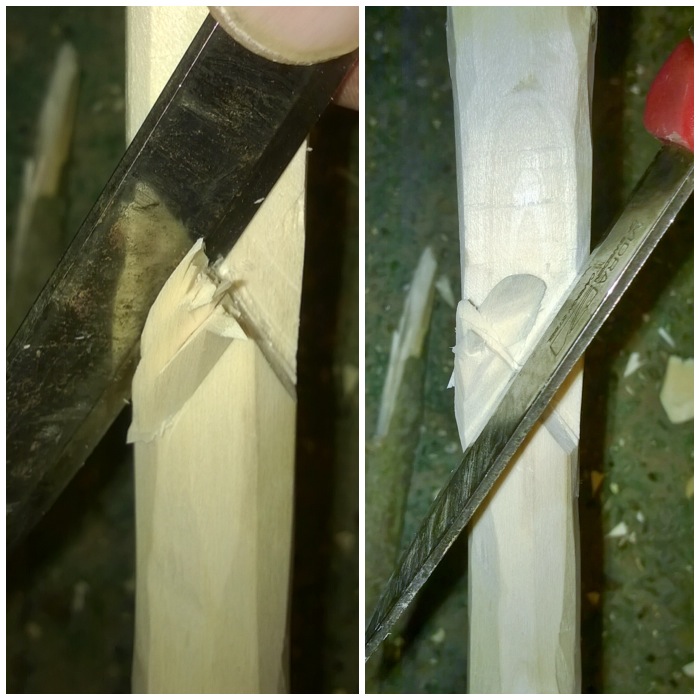
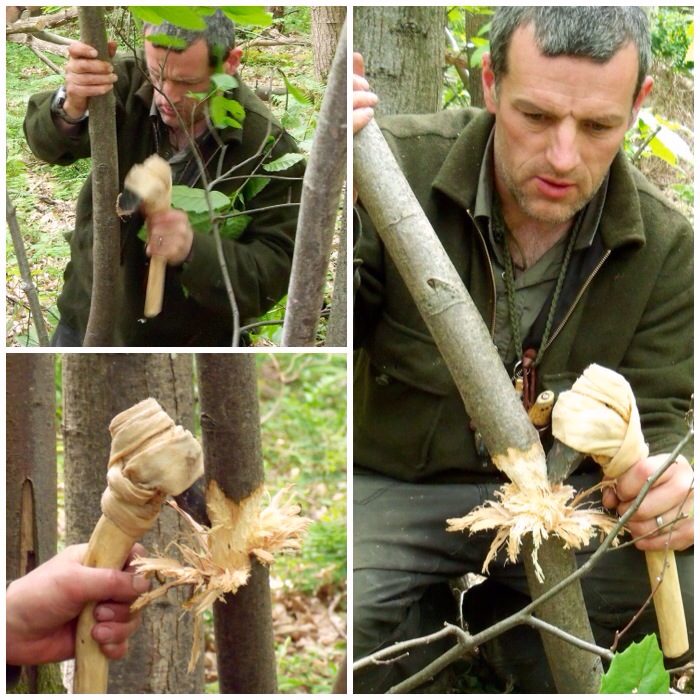
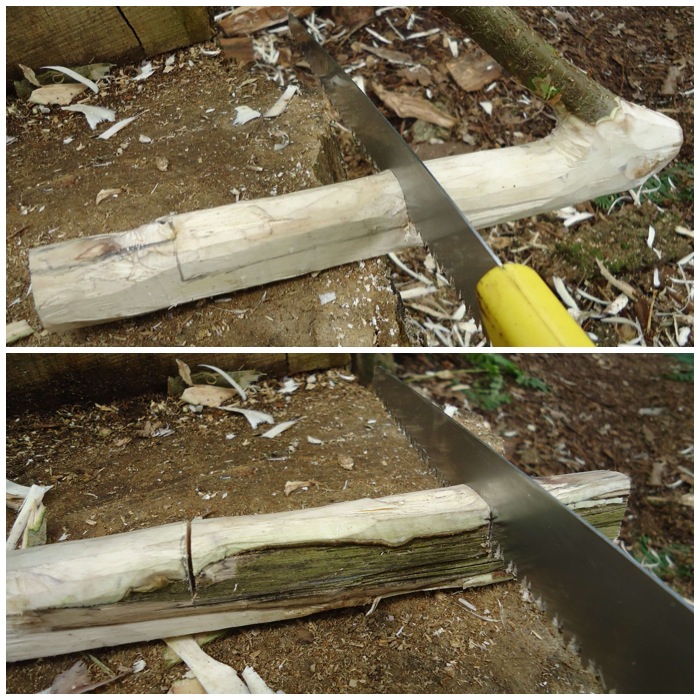
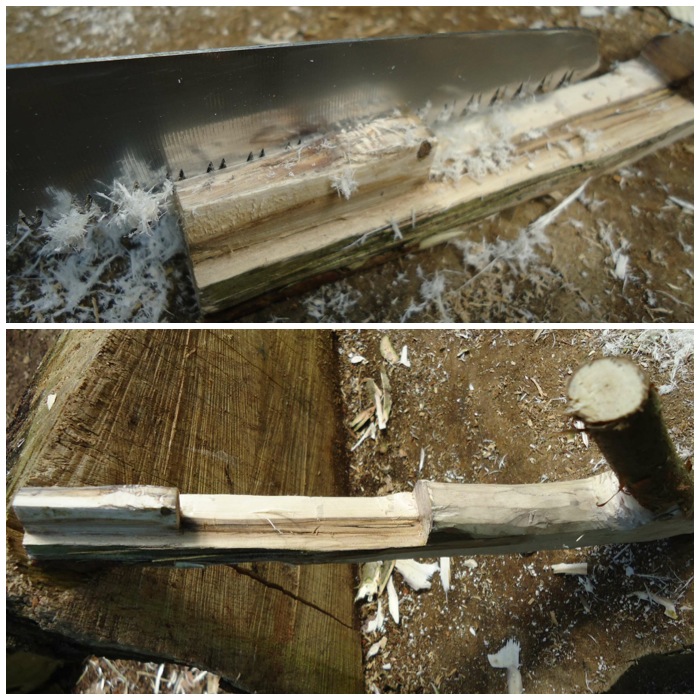
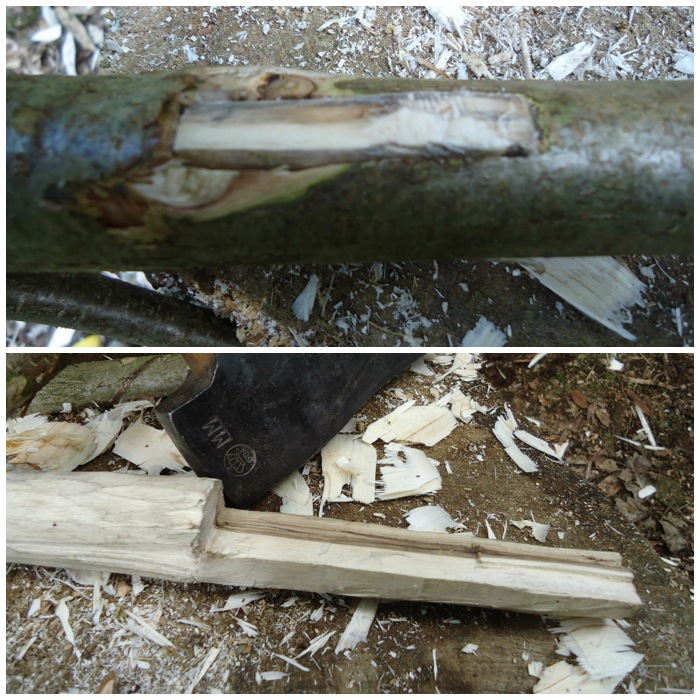
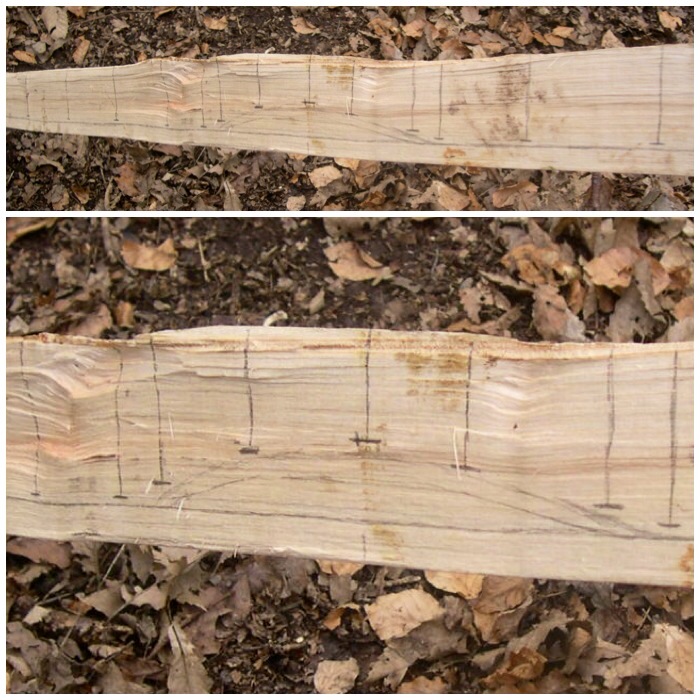
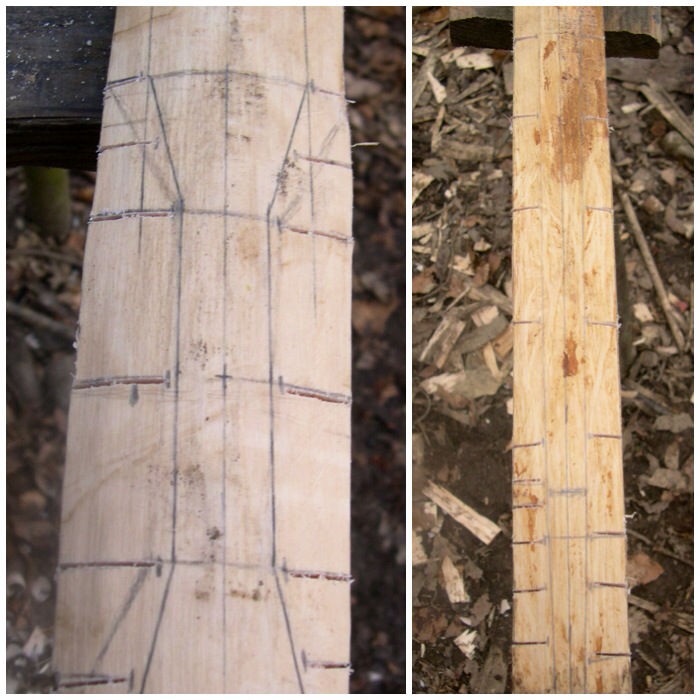
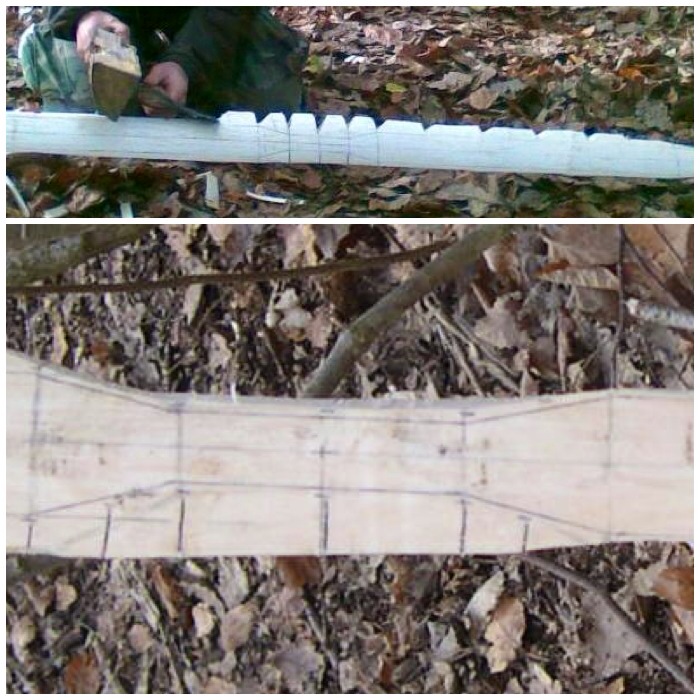
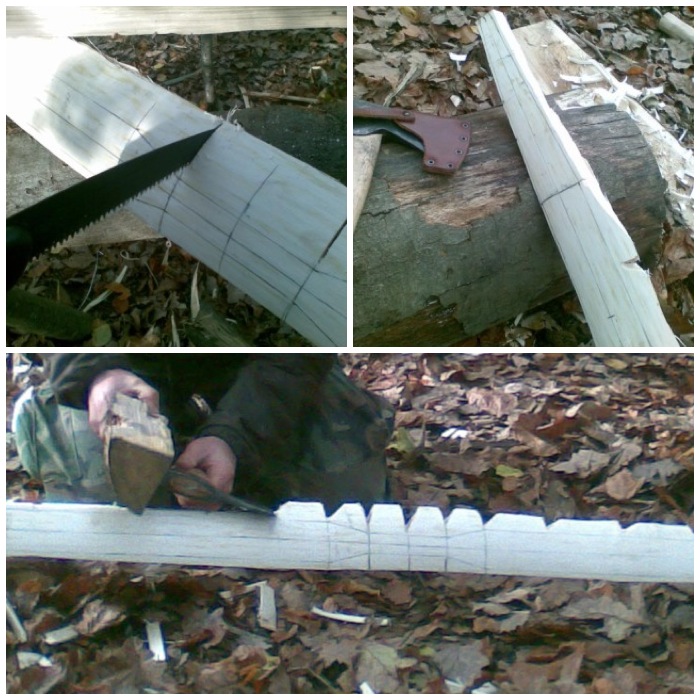
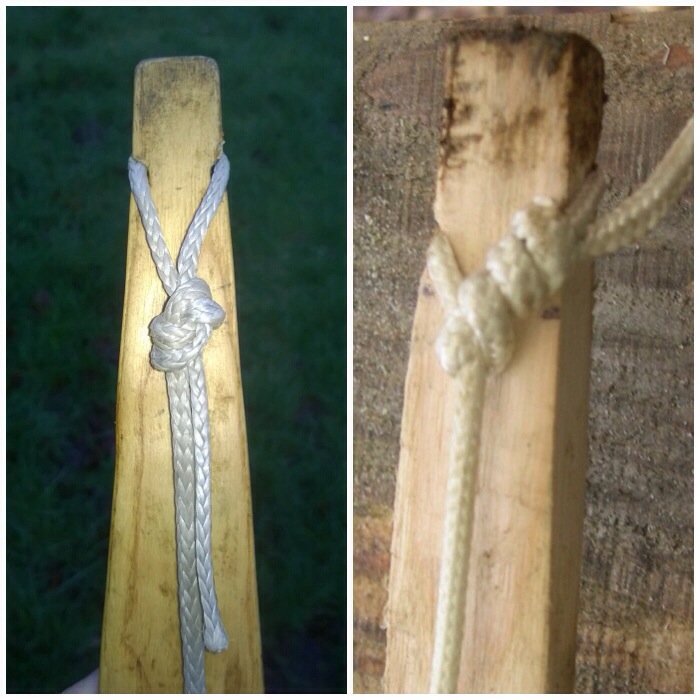
I marked a slight cut with my knife one handspan (outstretched little finger to outstretched thumb) away from the other end of the bearing block. Then, using my saw, I cut into the bearing block a stop cut, about a third of the way into the wood.
Measure a full handspan and cut a stop cut
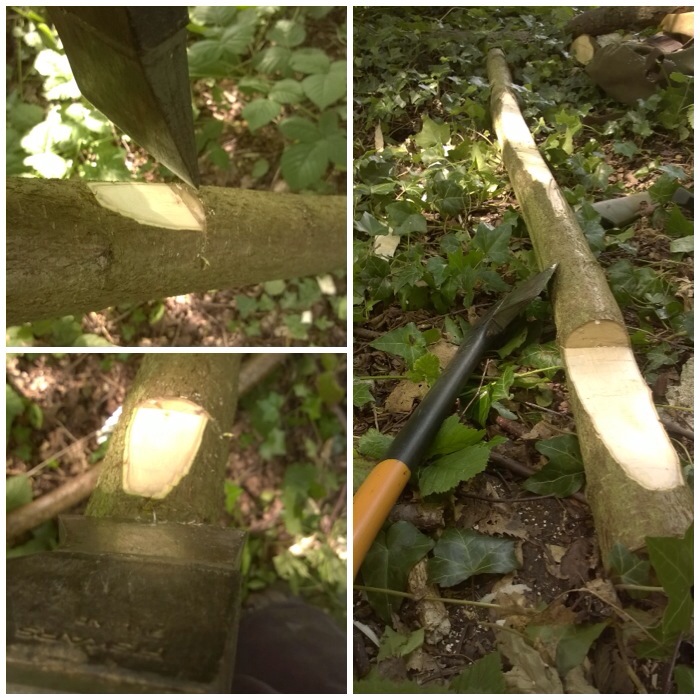
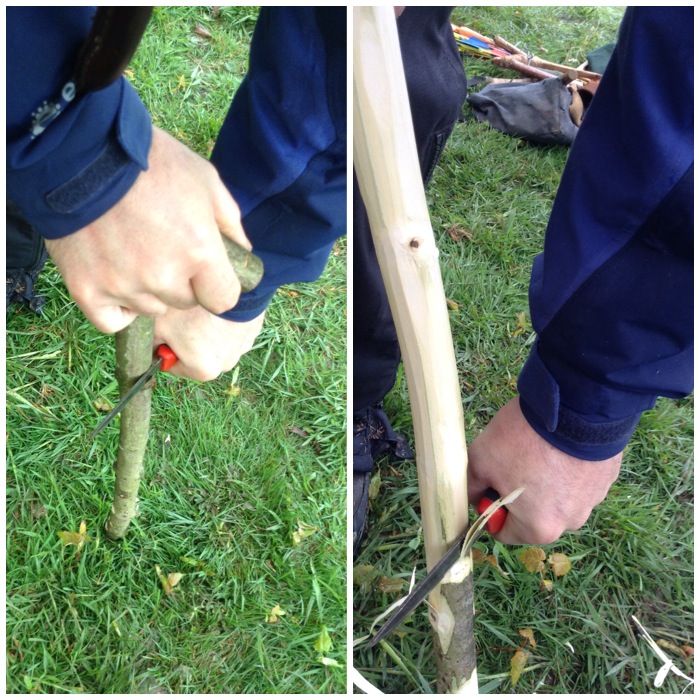
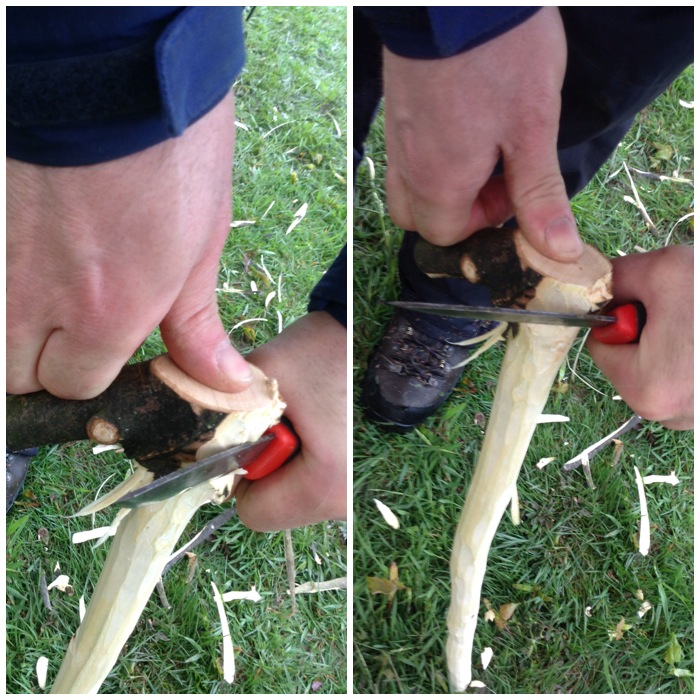
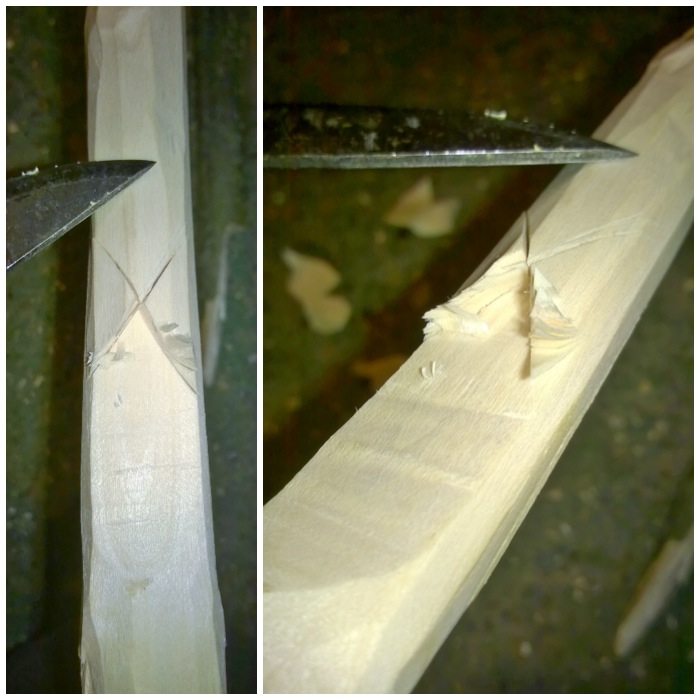
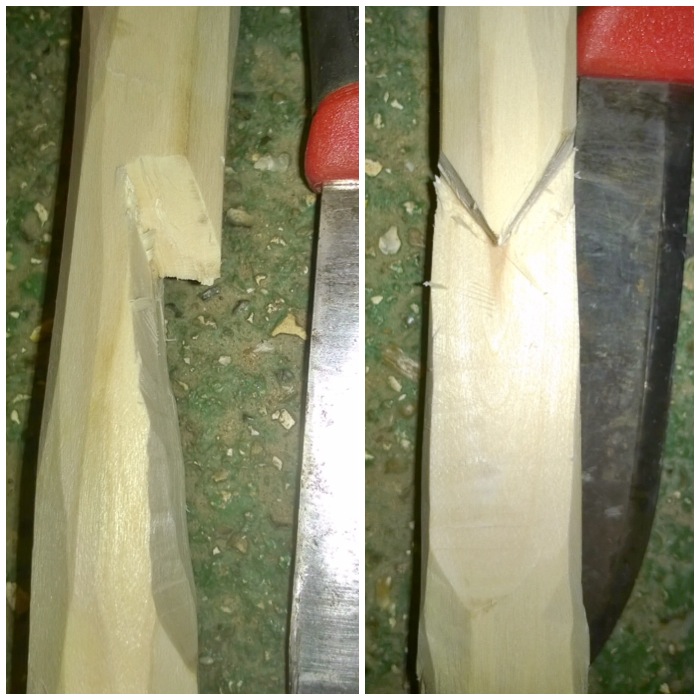
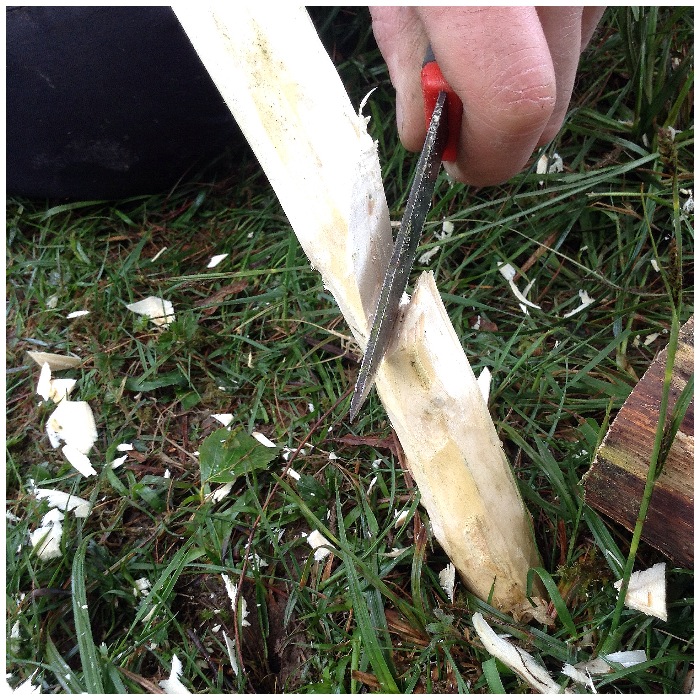
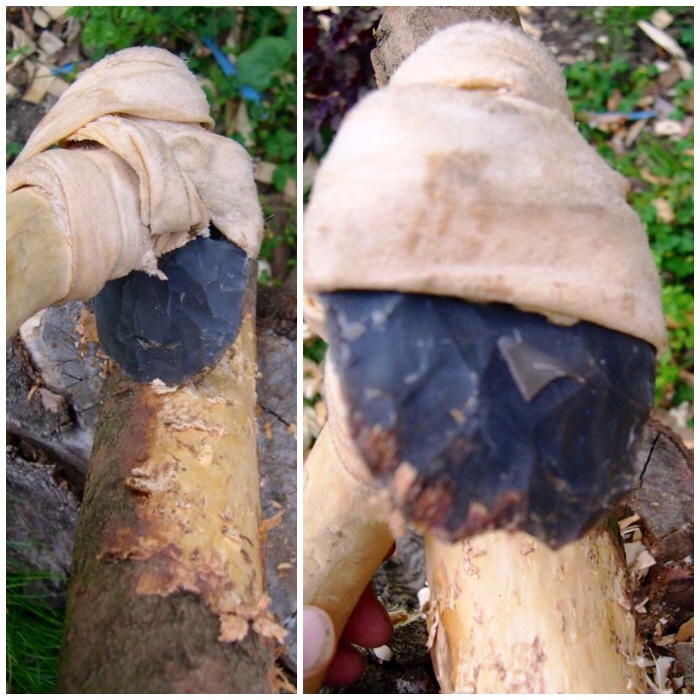
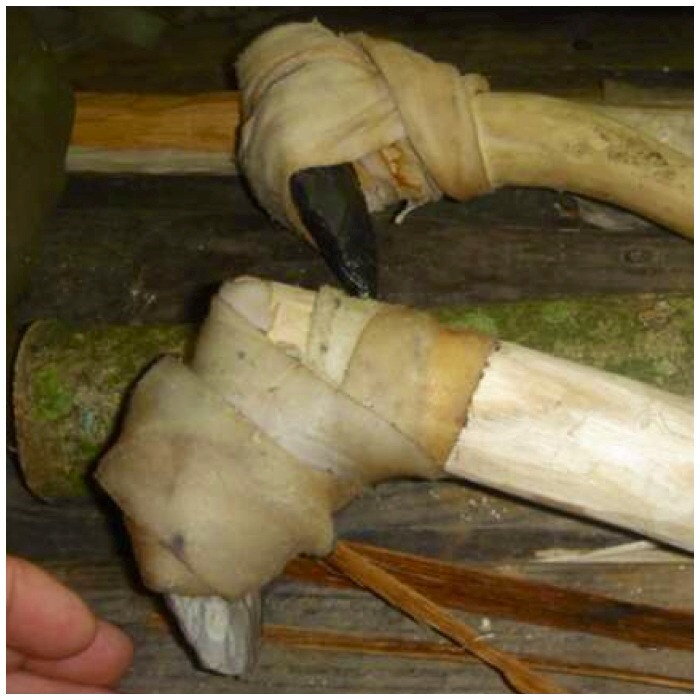
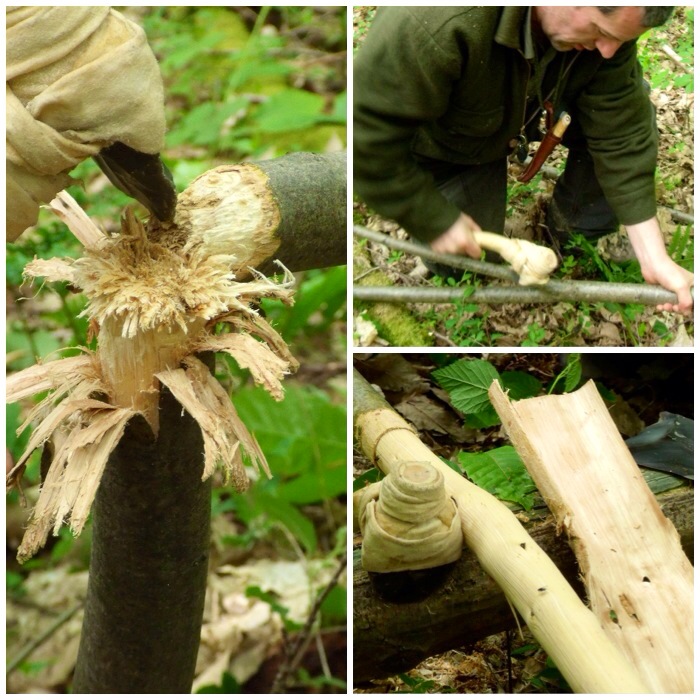
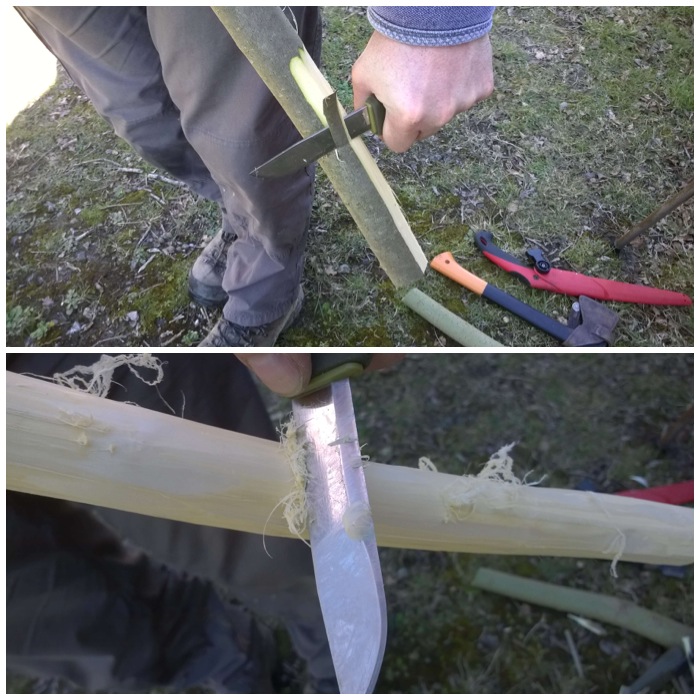
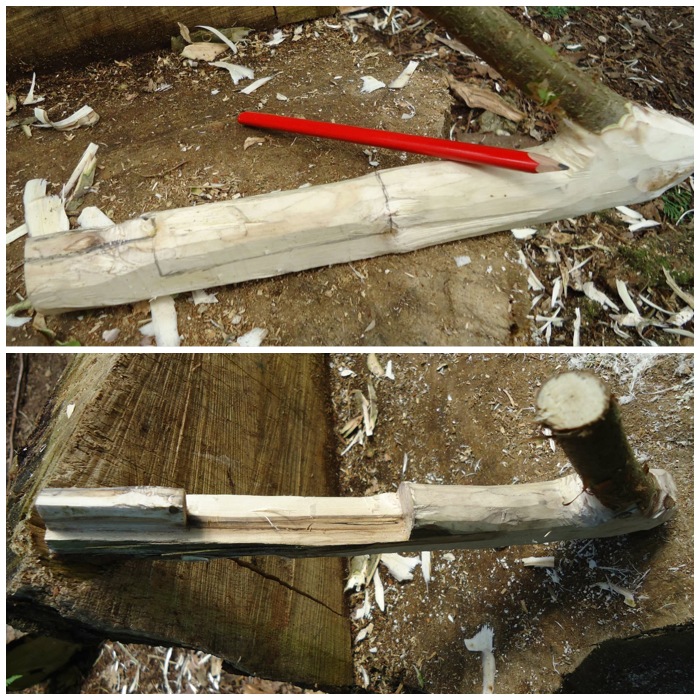
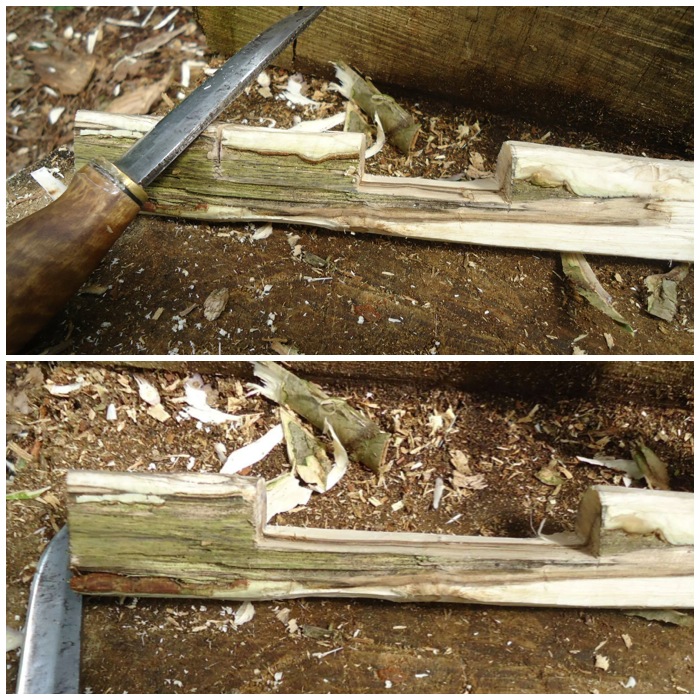
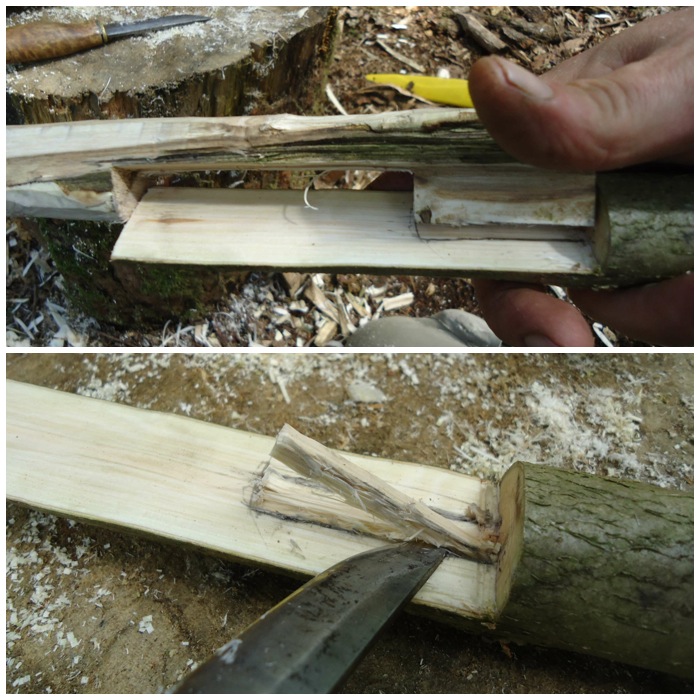
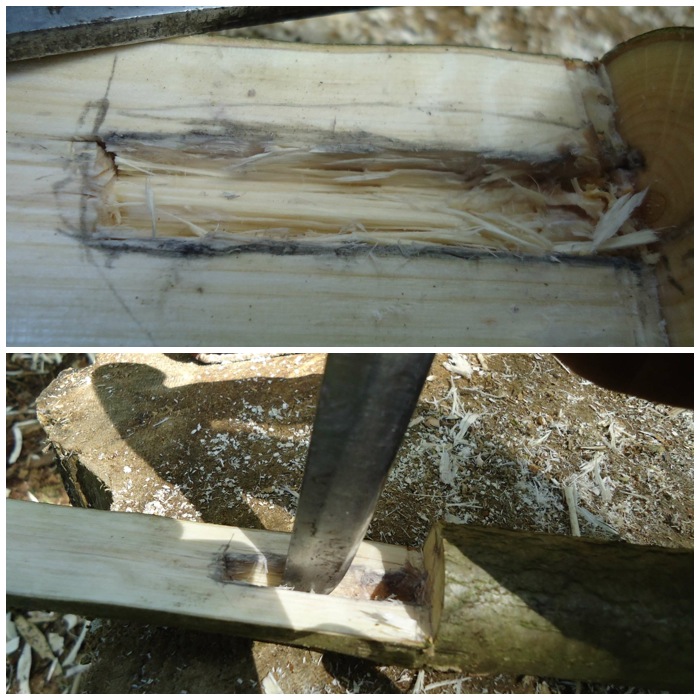
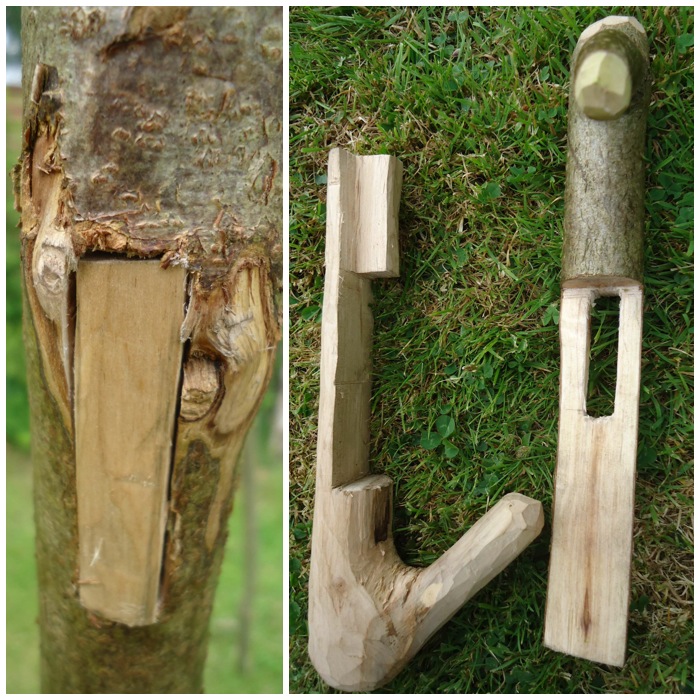
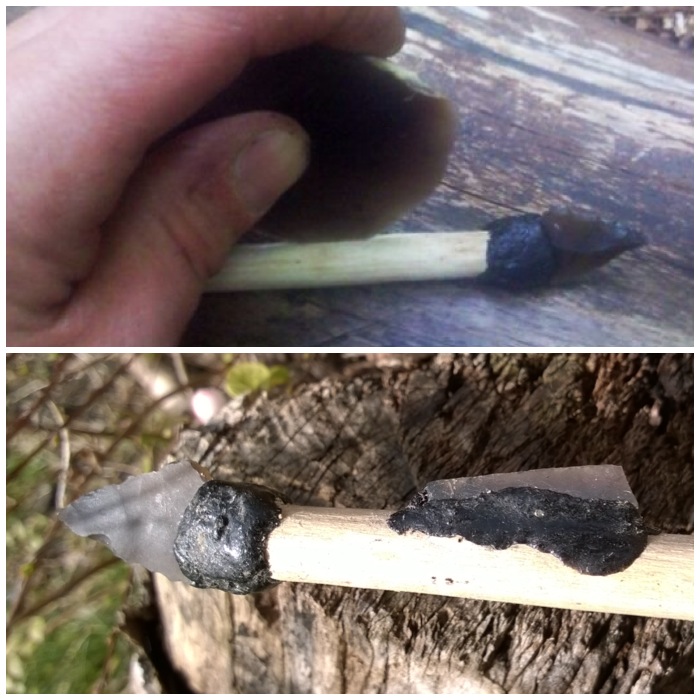
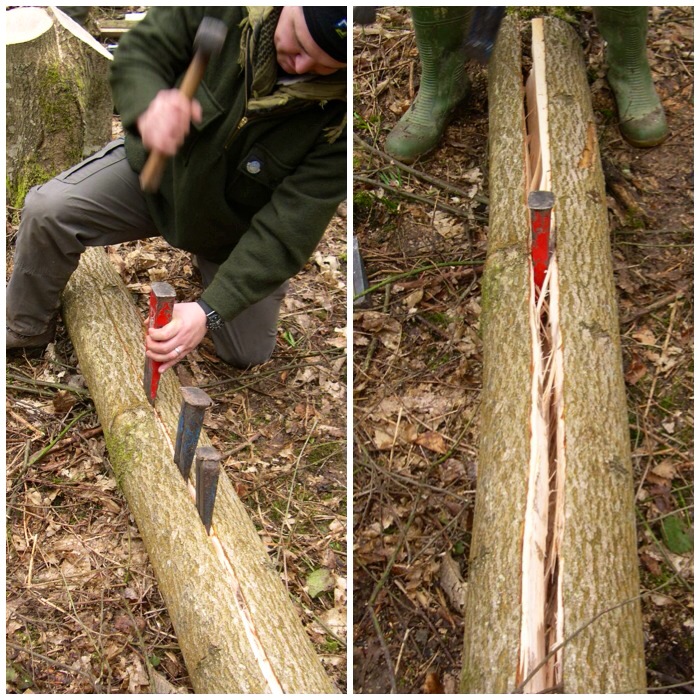
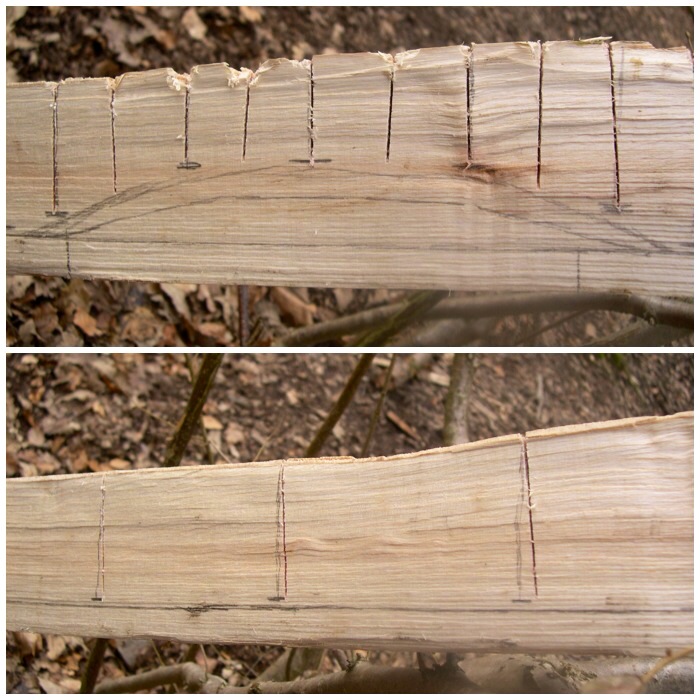
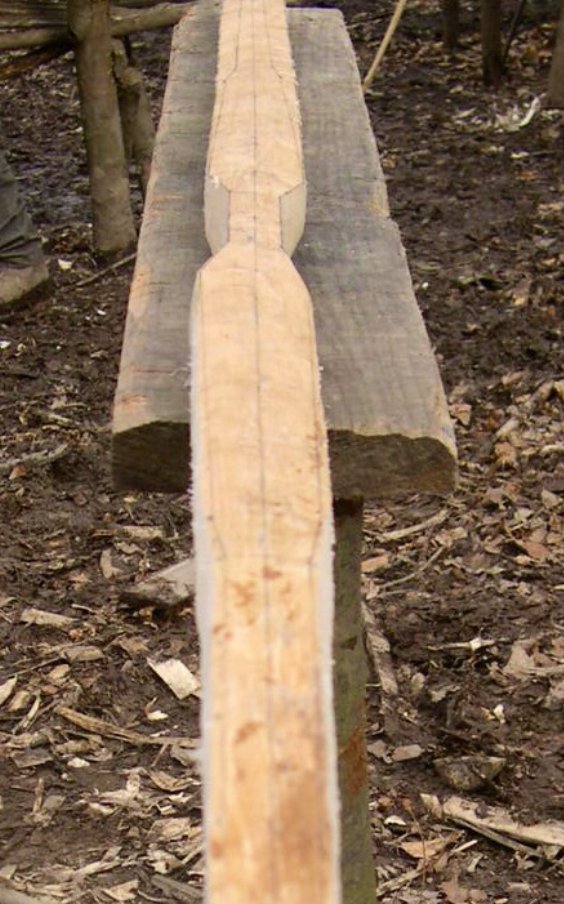
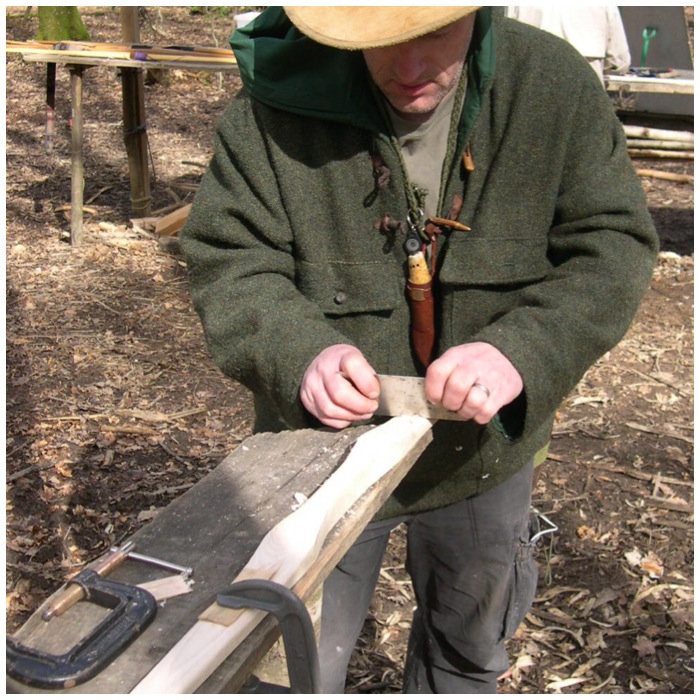
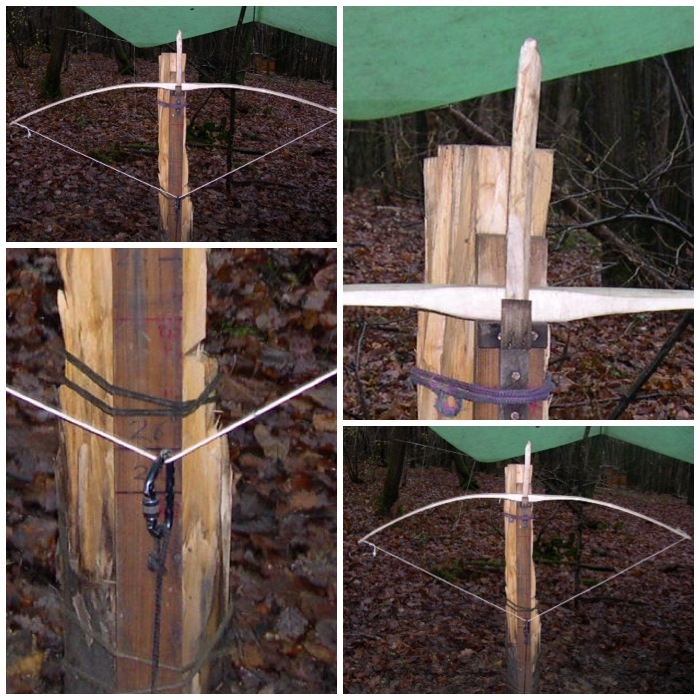
Being very careful and using small chopping motions I cut out the excess wood to make my recess for the drillpiece to be attached. As you can see from the picture below right, I have come back quite a way to the end but not all the way.
Please ensure that the sharpened tip is well dug into the ground when you do this axe work and always make sure you know where your fingers are in relation to the axe when working. I have had a few near misses doing this when I am not paying close enough attention.
An alternative method is to cut a longer limb to create a safety handle, which can be sawn off after you have axed out the area.
Gently axe out to the stop cut
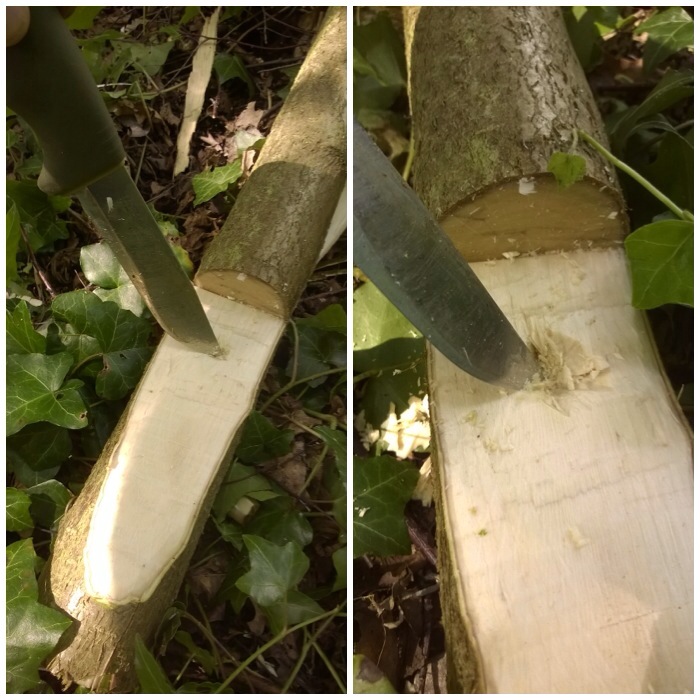
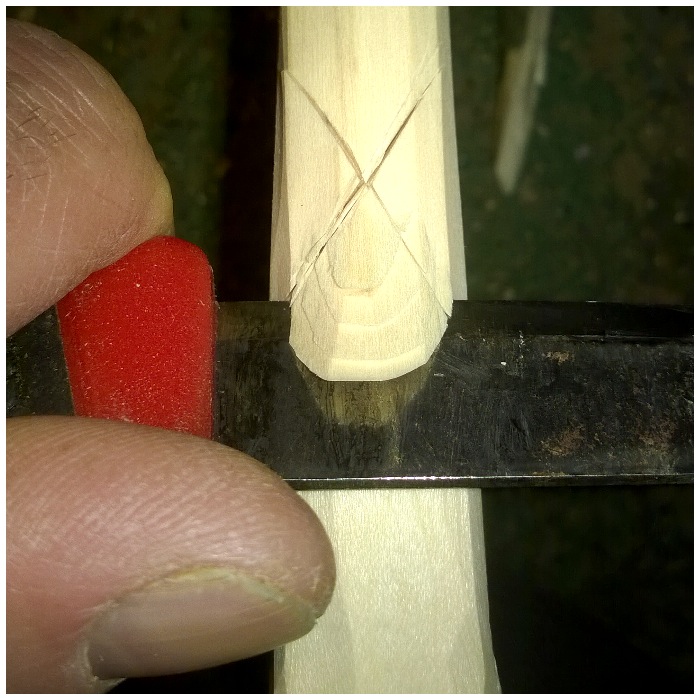
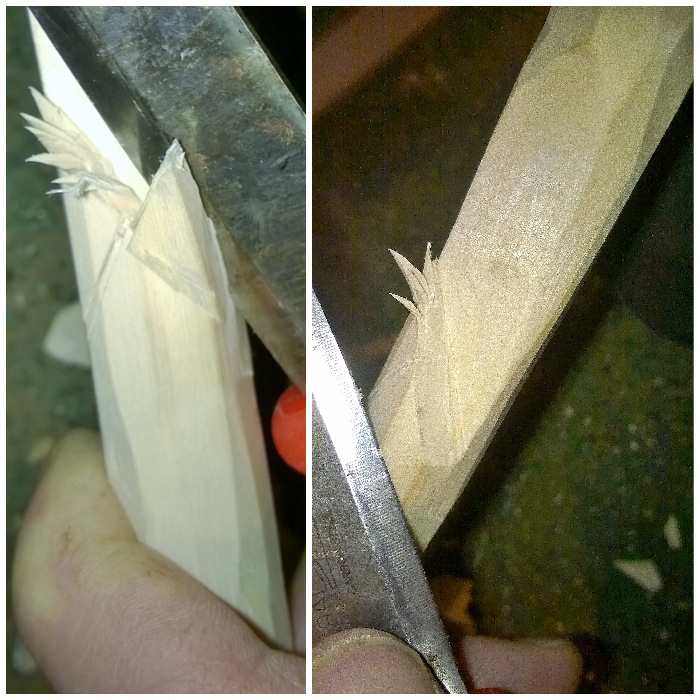
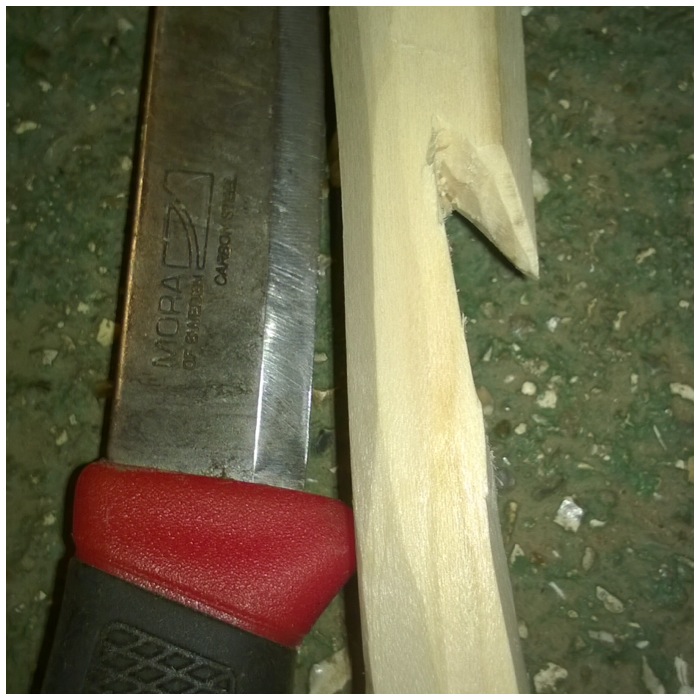
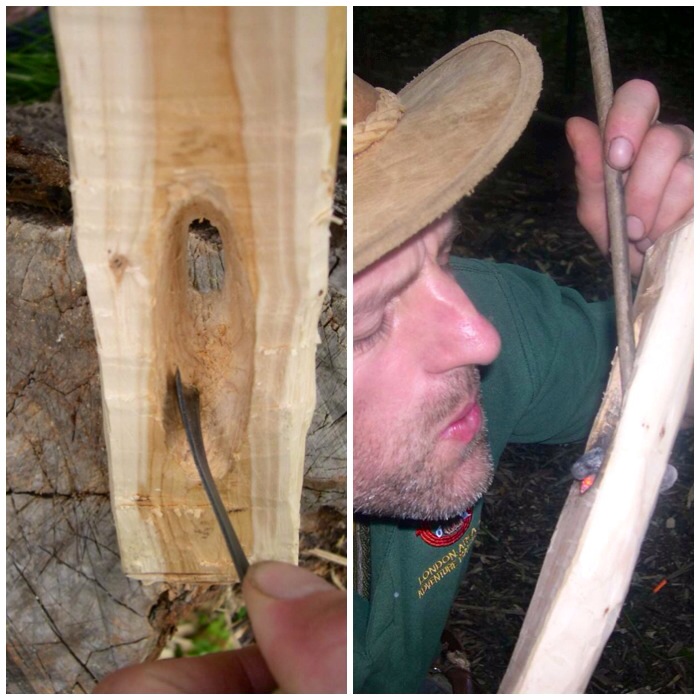
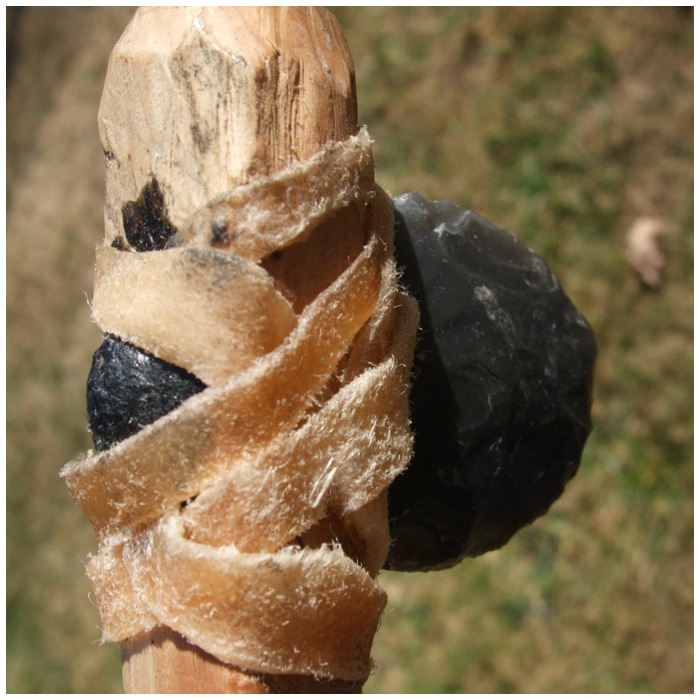
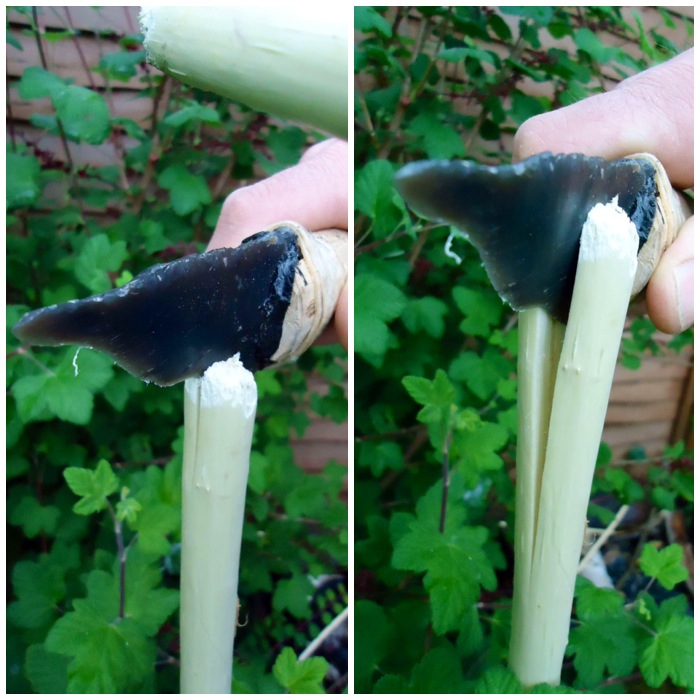
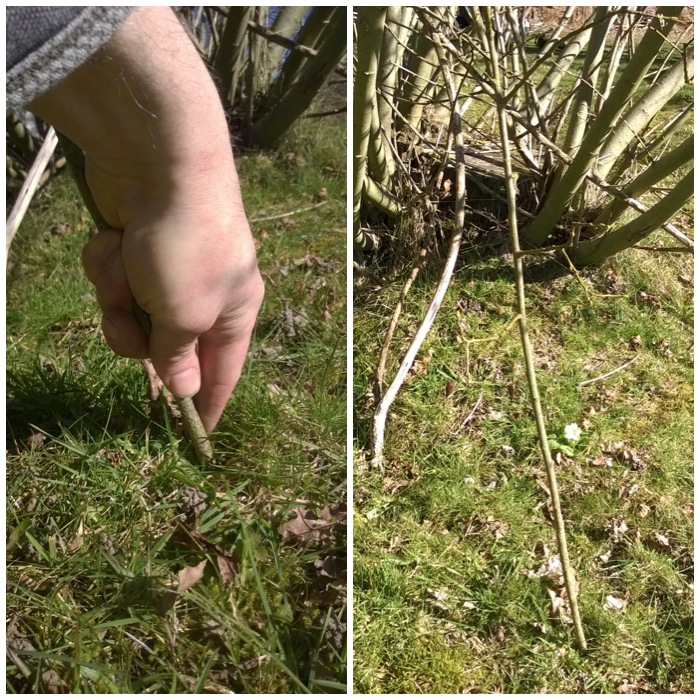
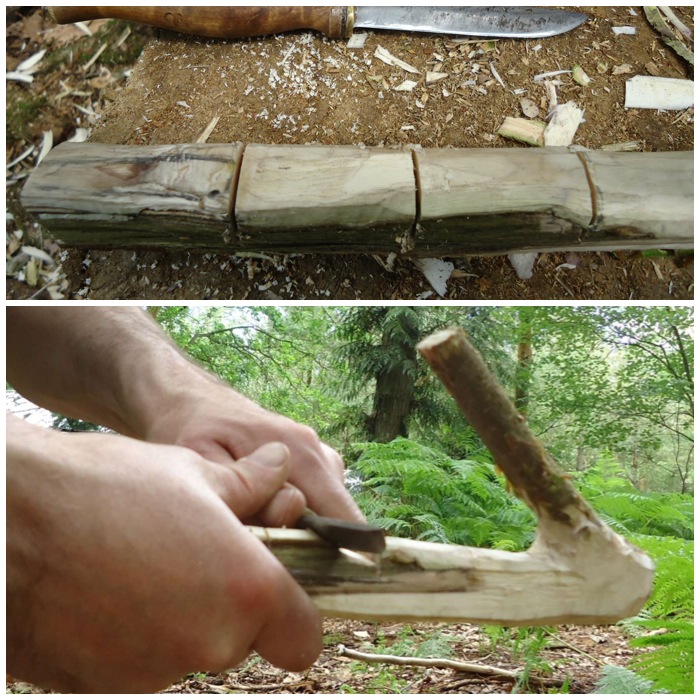
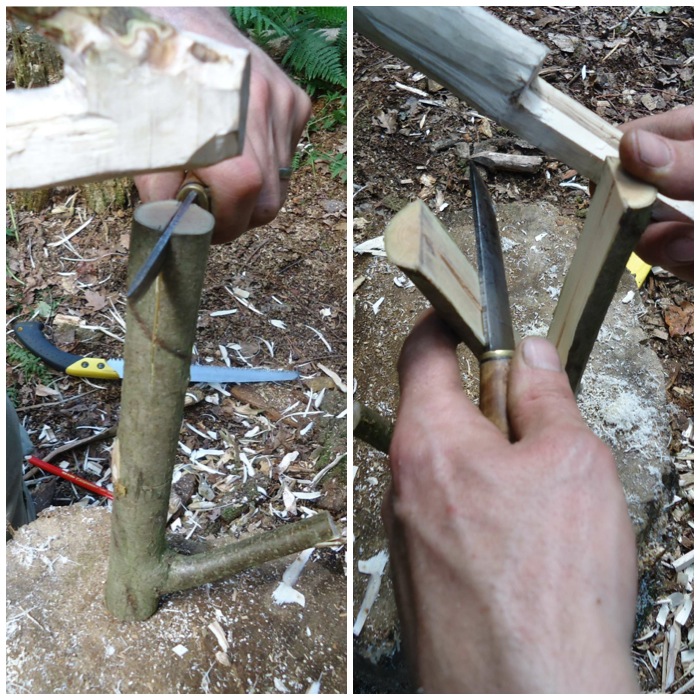
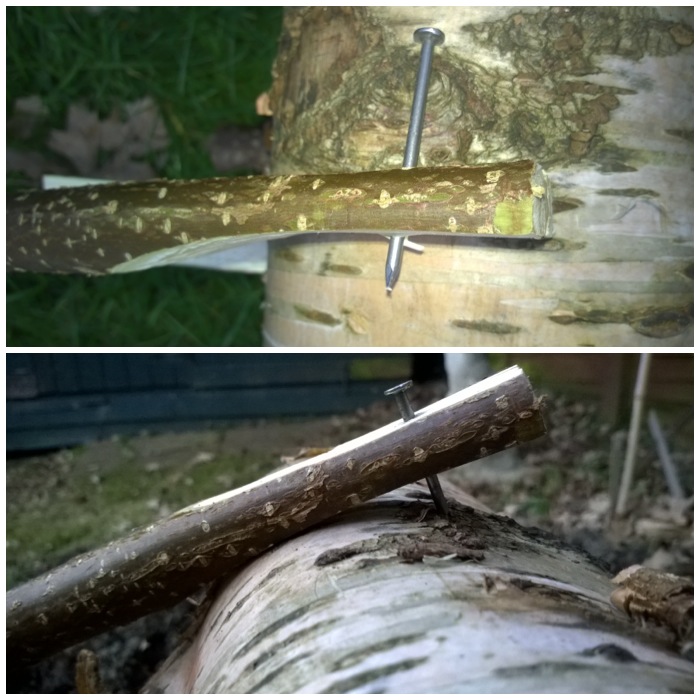
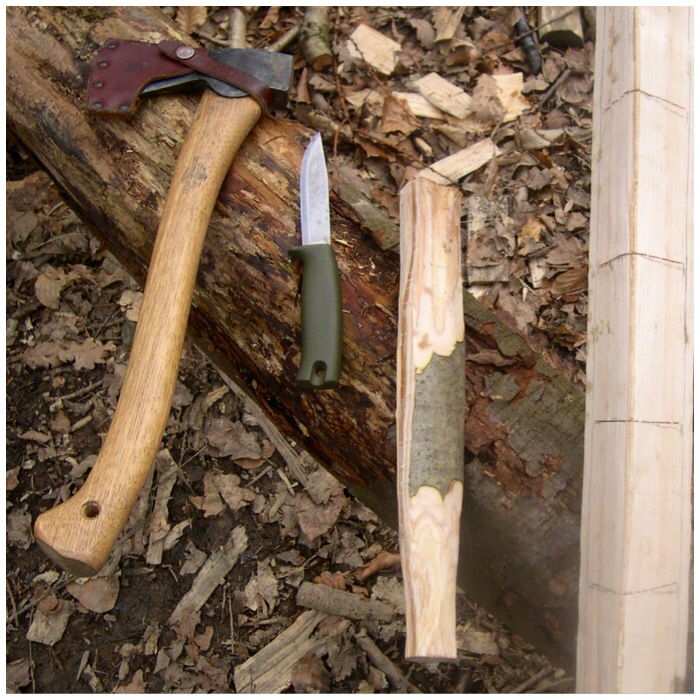
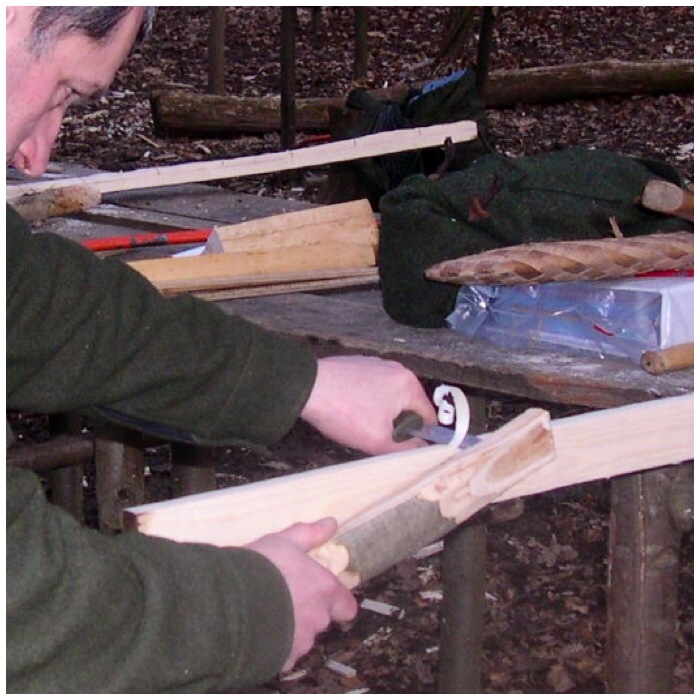
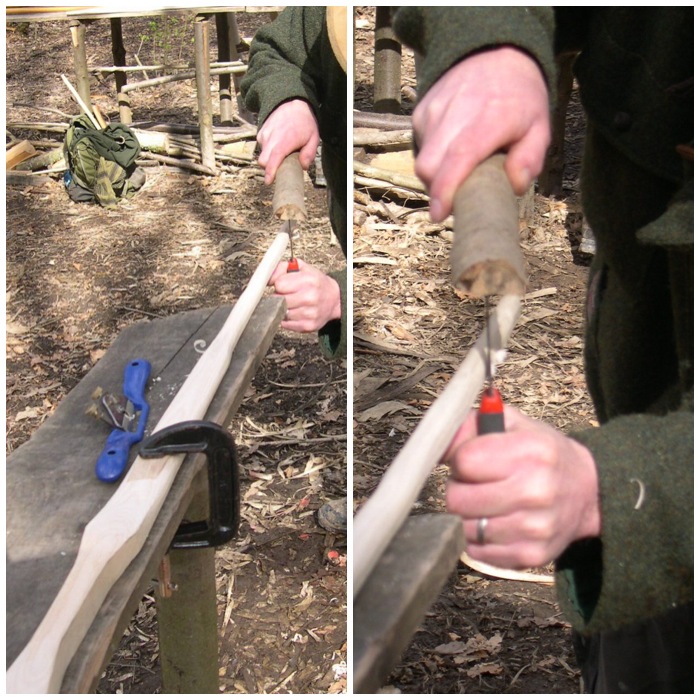
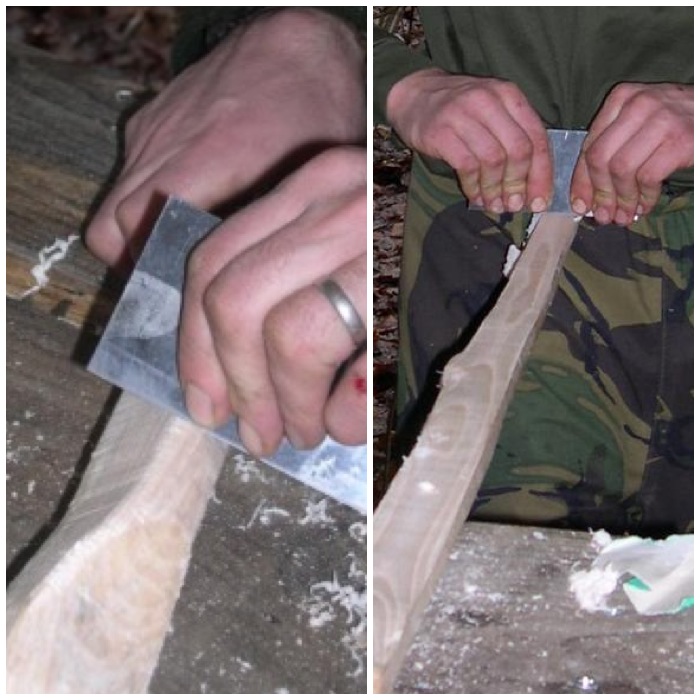
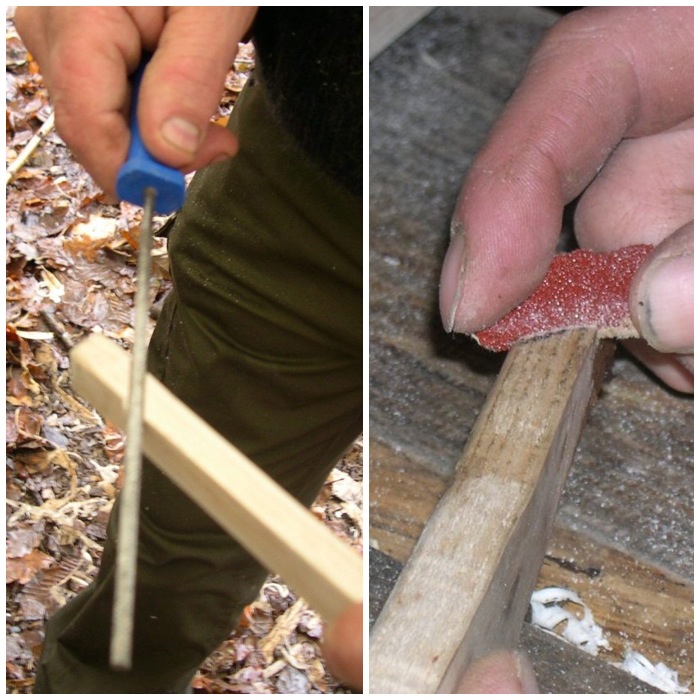
While the bearing block is flat on the ground, use the tip of your knife to make a small hole near the stop cut. This hole will be used to keep the drill piece in place.
Having seen someone put a knife through their hand while doing this, I can tell you just how important it is to make sure that the bearing block is flat on the ground and the hand securing it is well clear of the tip.
On the ground, use your knife tip to make a hole for the drill
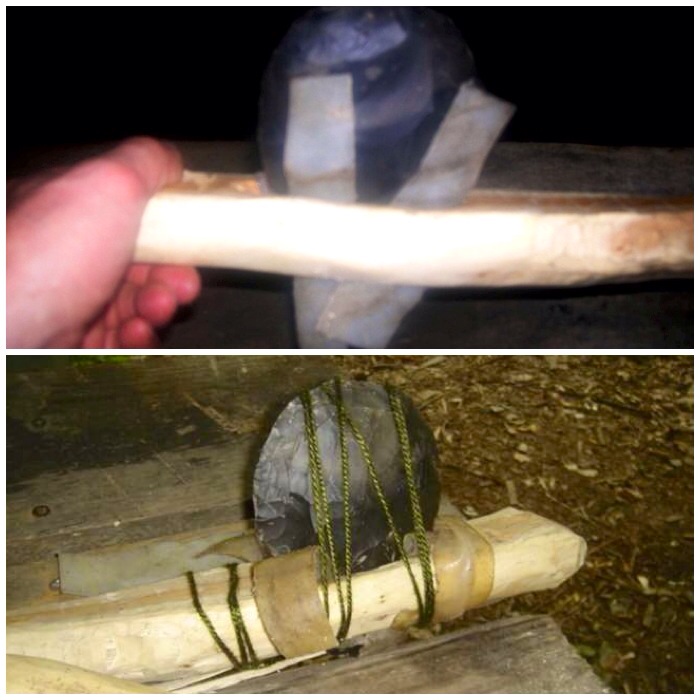
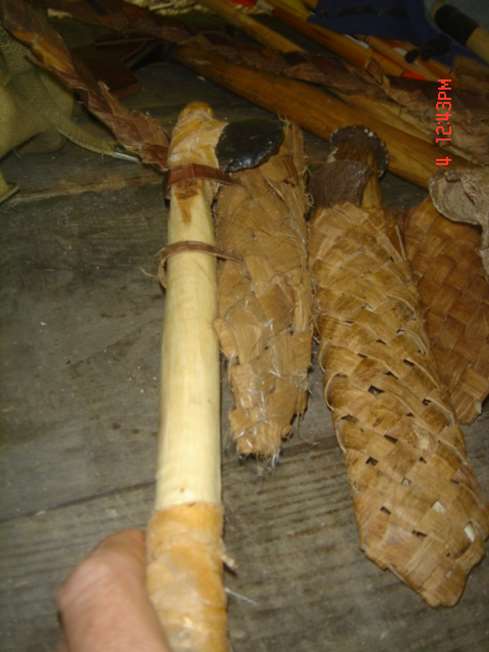
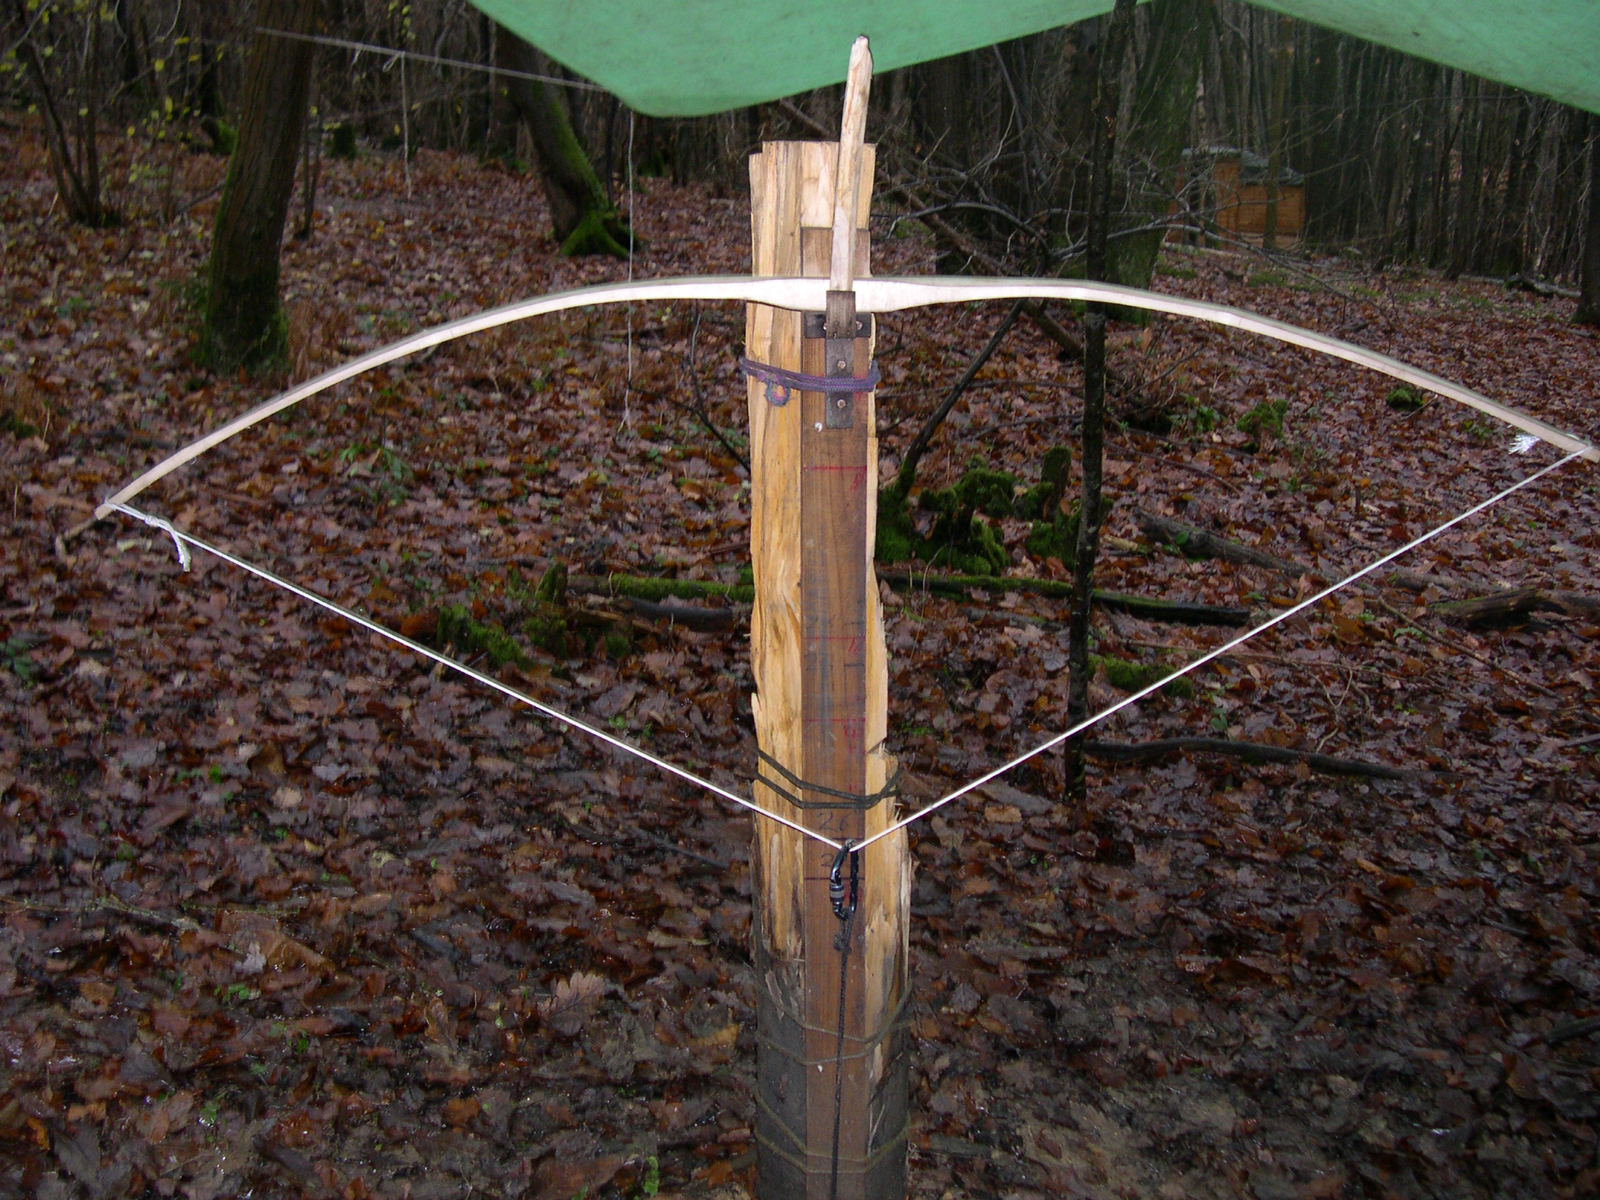
The rest of the set up is similar to a standard bowdrill. I commonly use this method with the Egyptian set up, assisting a person or as a relay race.
In the video below I show you the method where I am assisting someone and also as a relay race.
This method is one I would urge any bushcrafter to try out, whether it’s just to try something different, help someone learn the art, or if you (or someone you know) have an injury that makes the standard set up difficult.
Relay Bowdrill
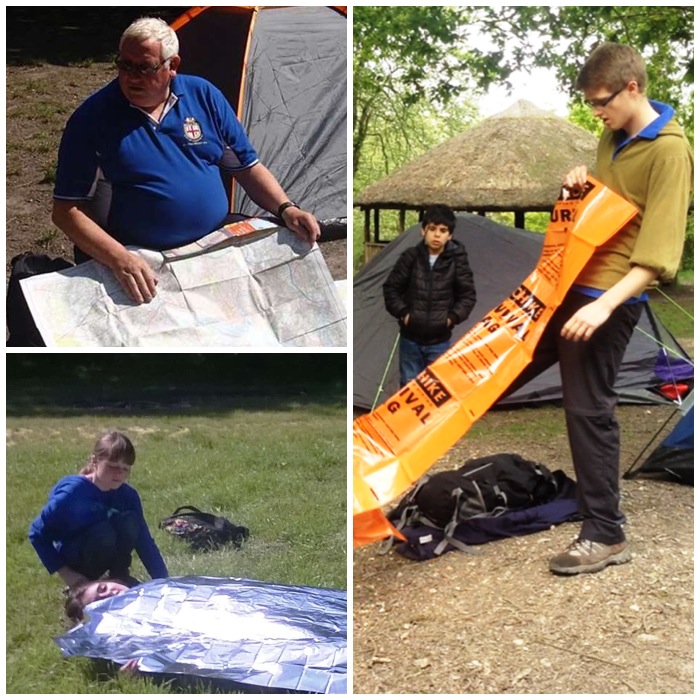
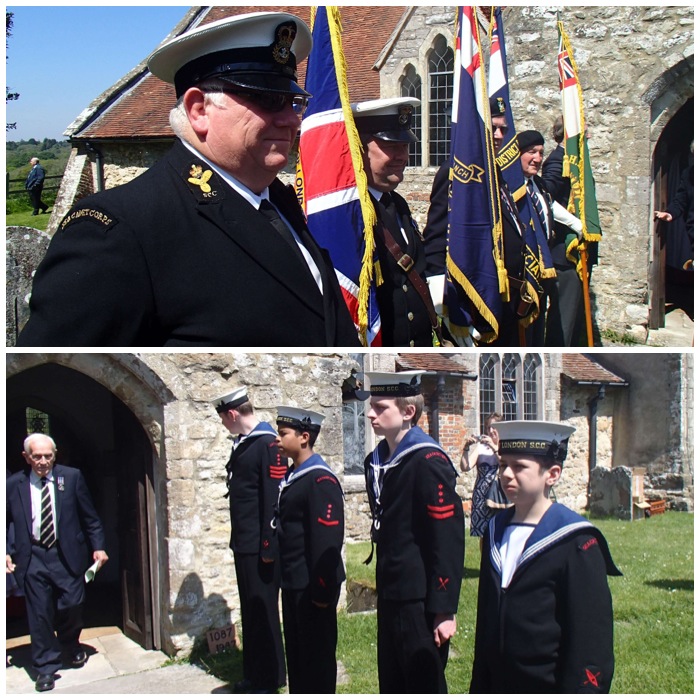
As an instructor in the Sea Cadets, I find this is a stable platform for getting the younger cadets involved as well, be that with an instructor, as a group or on their own.
My 100th post – it seems like only yesterday that I was tentatively writing my first post way back at the end of last September.
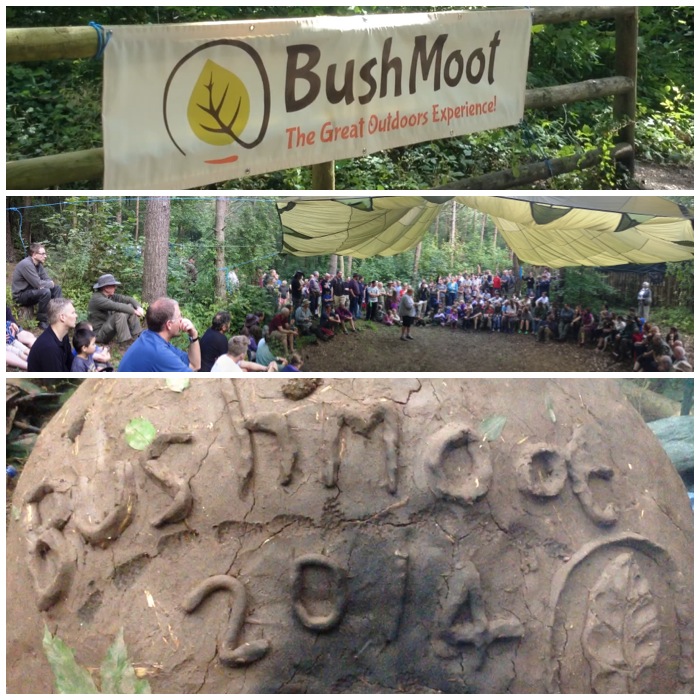
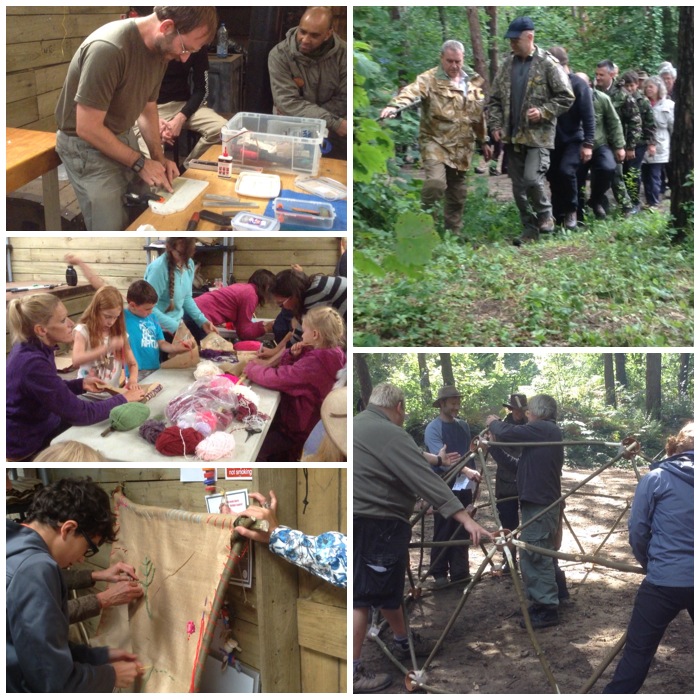
For this 100th post the subject couldn’t be anything other than this year’s Bushcraft UK Bushmoot.
BCUK Bushmoot 2014
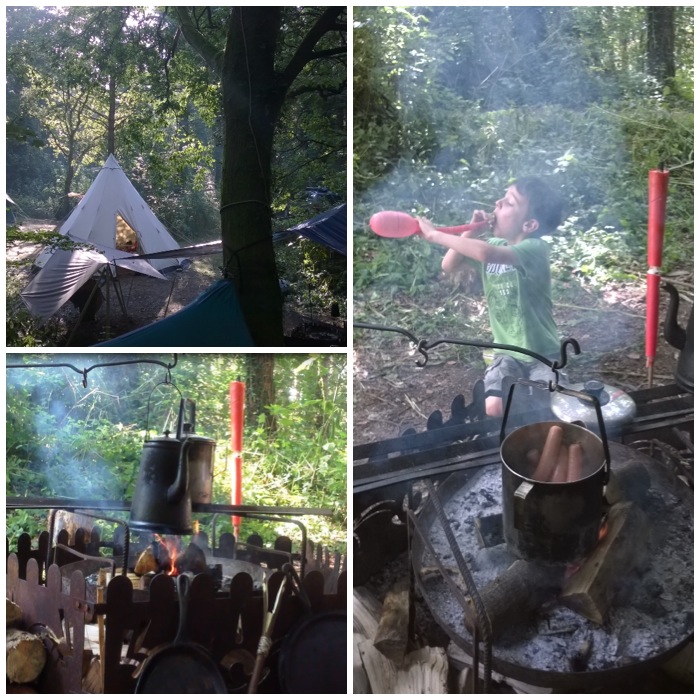
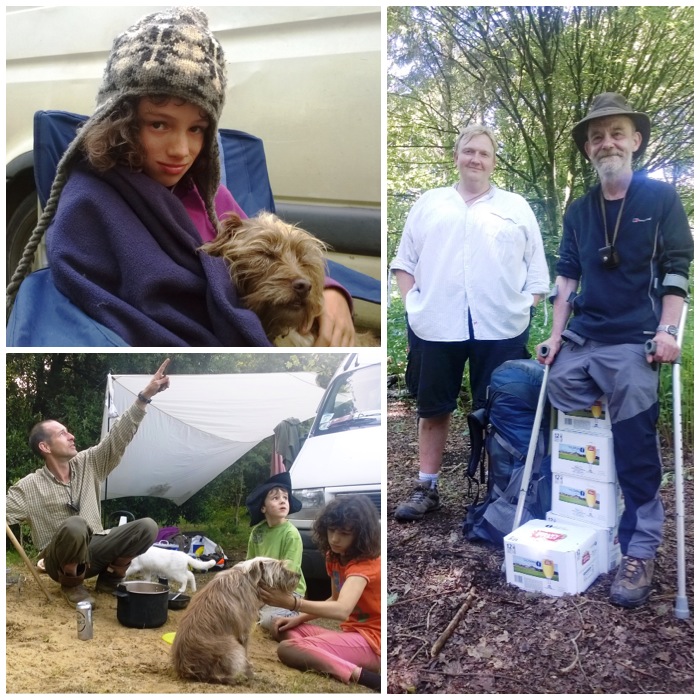
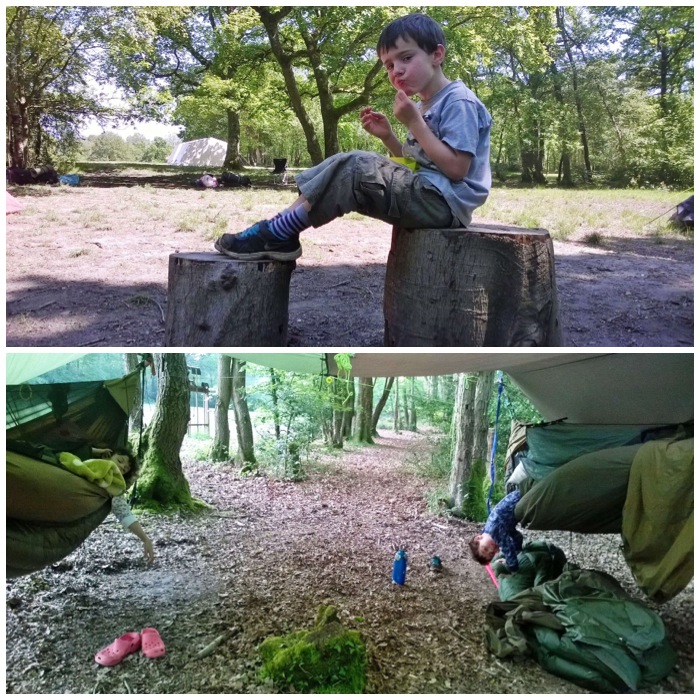
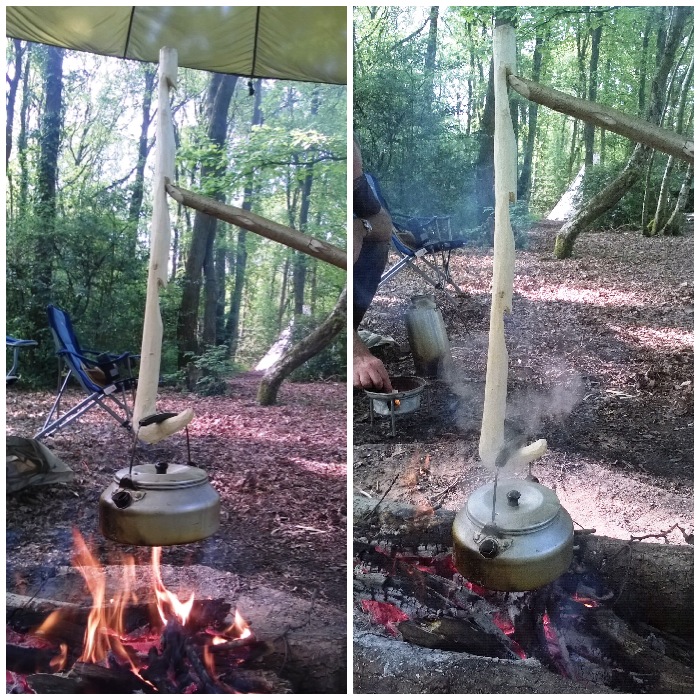
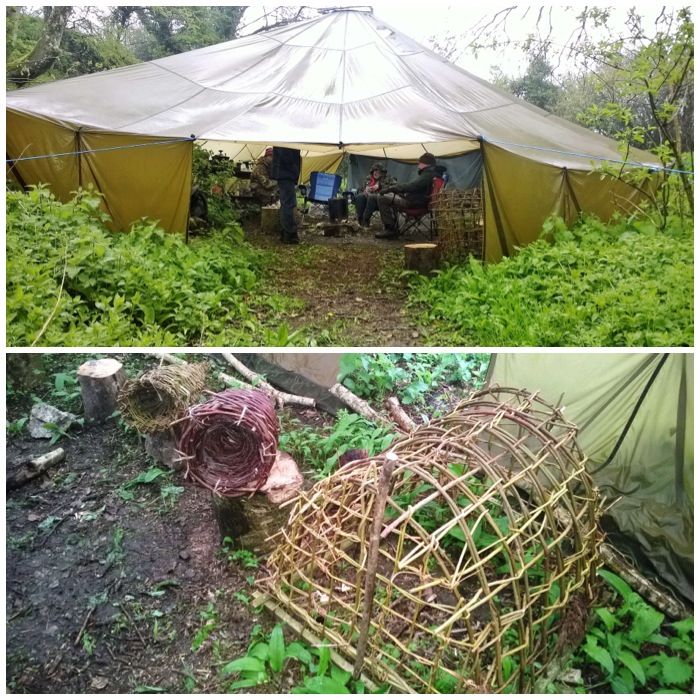
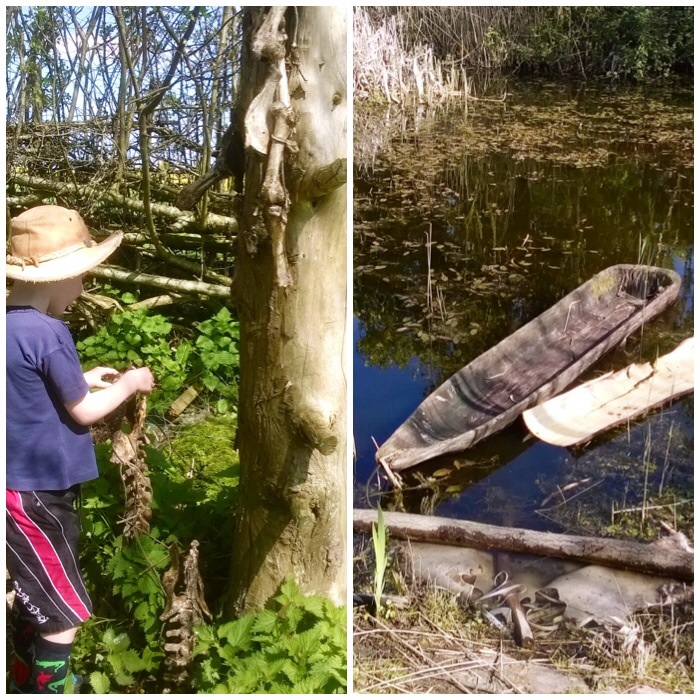
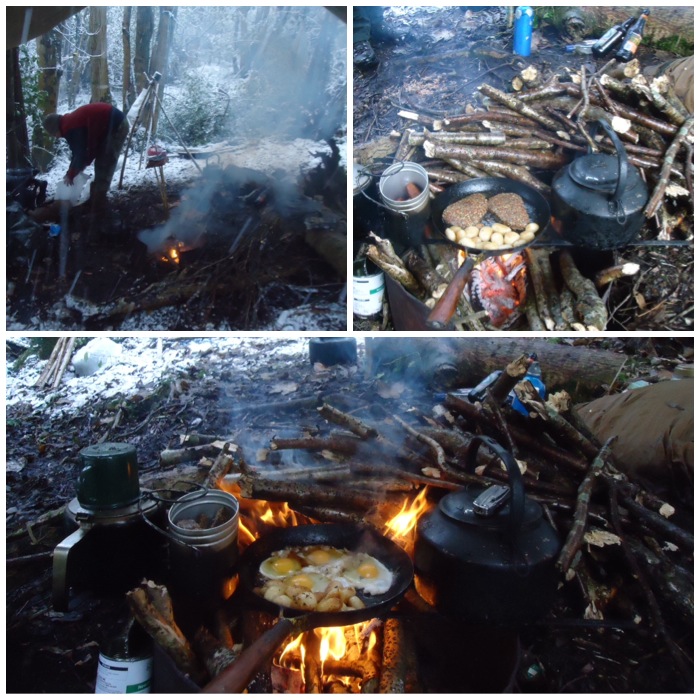
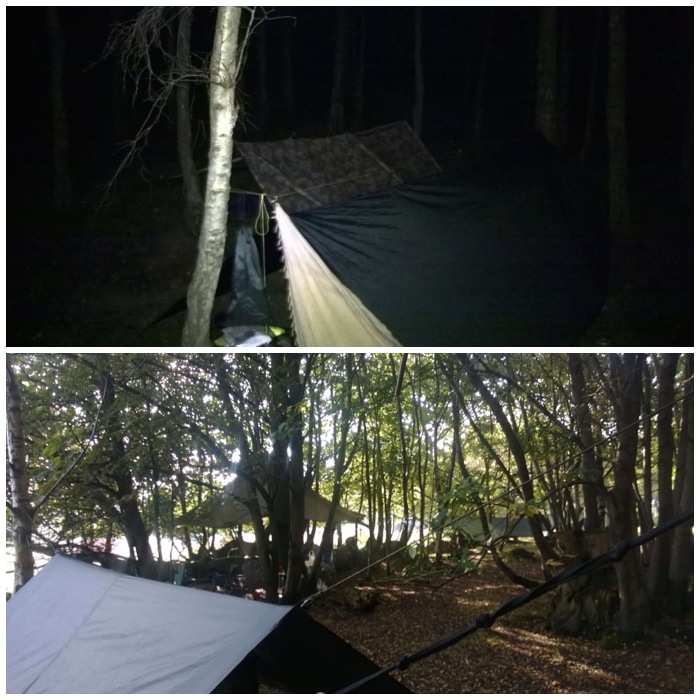
I came back from holiday in France on Saturday the 2nd of August, unpacked then re-packed and headed out with my two kids Catherine and Finlay to Merthyr Mawr in South Wales on Sunday the 3rd of August. Unluckily I had been beaten to my usual camping spot at the Moot by another family but managed to set up nearby with my tipi, kitchen tarp and my hammock stand.
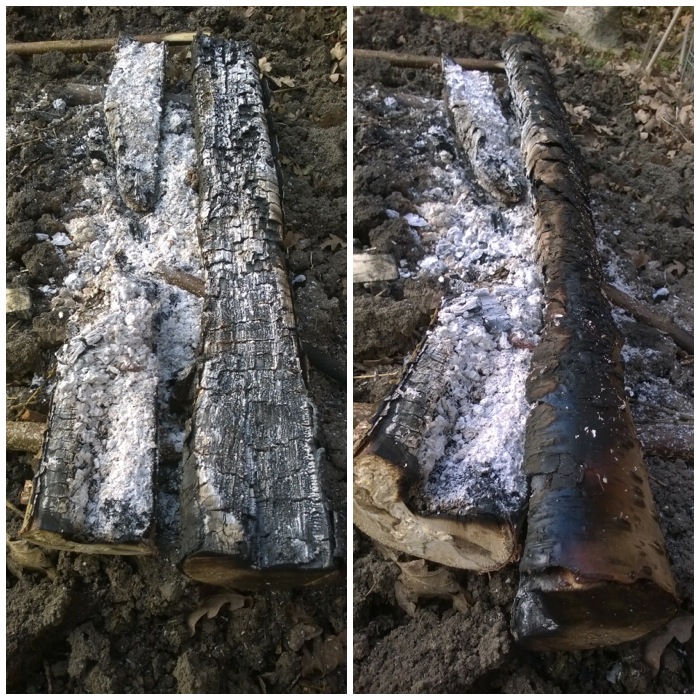
I found a fire guard lying in the sand and after digging it out used it around my fire. It was quite a well engineered piece and I could not understand why anyone would have discarded it.
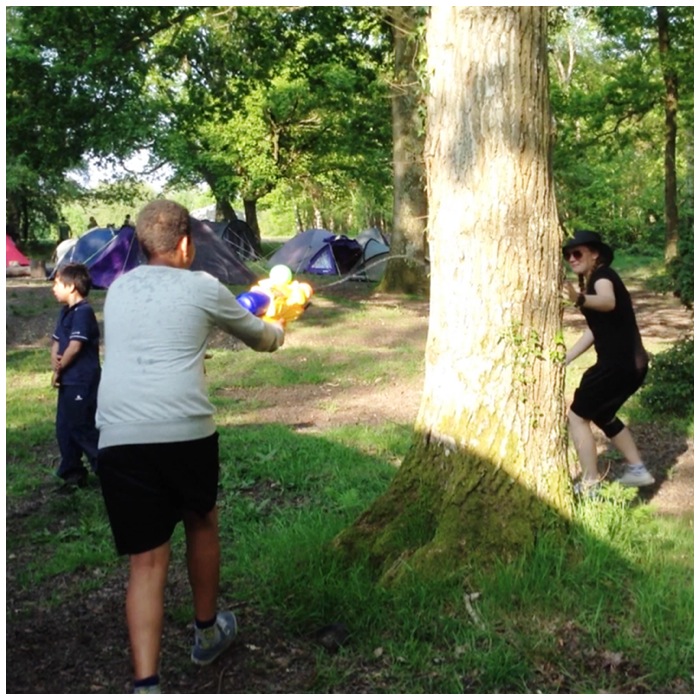
My camp
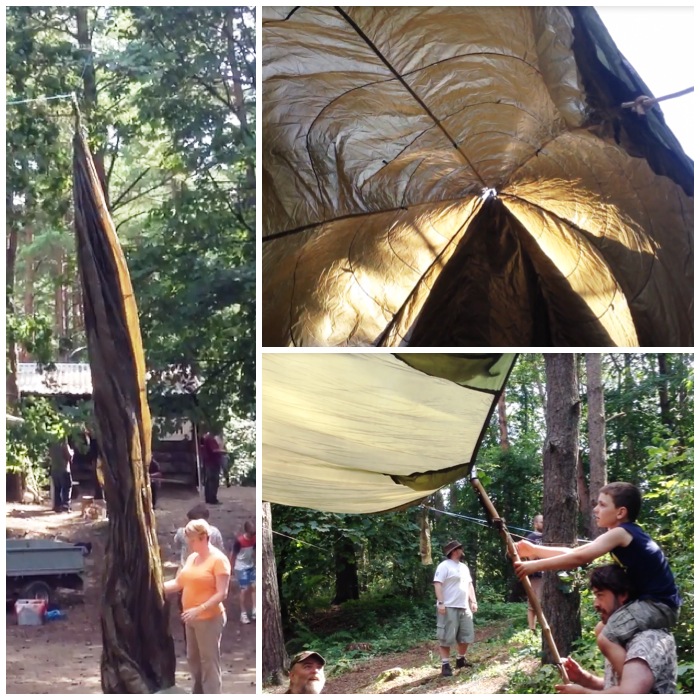
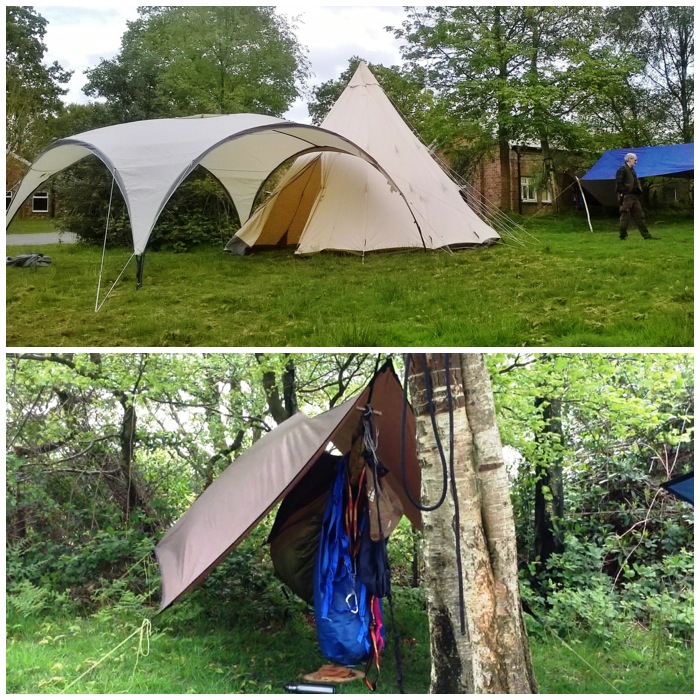
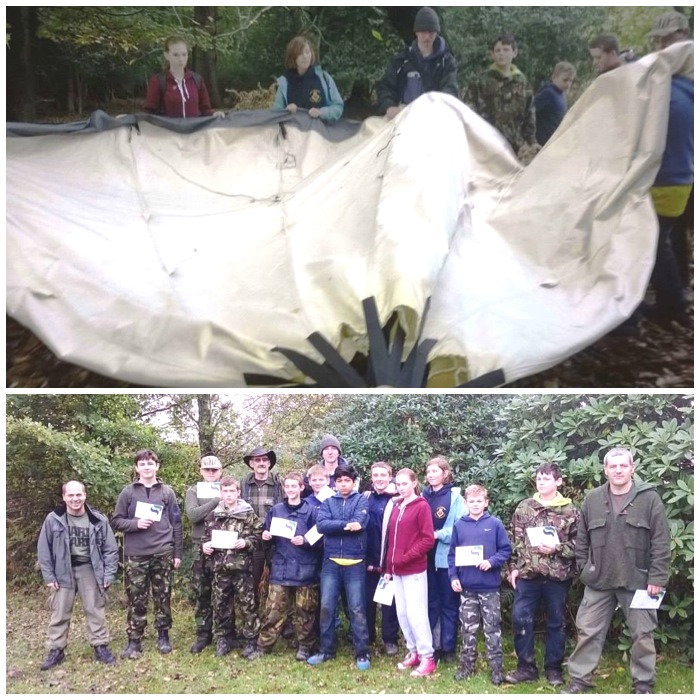
The first few days were mostly spent chilling out with the kids before eventually getting around to putting up the workshop tarps and parachutes. This was the first year I had taken my children to the Moot and they took to it like ducks to water.
Set up
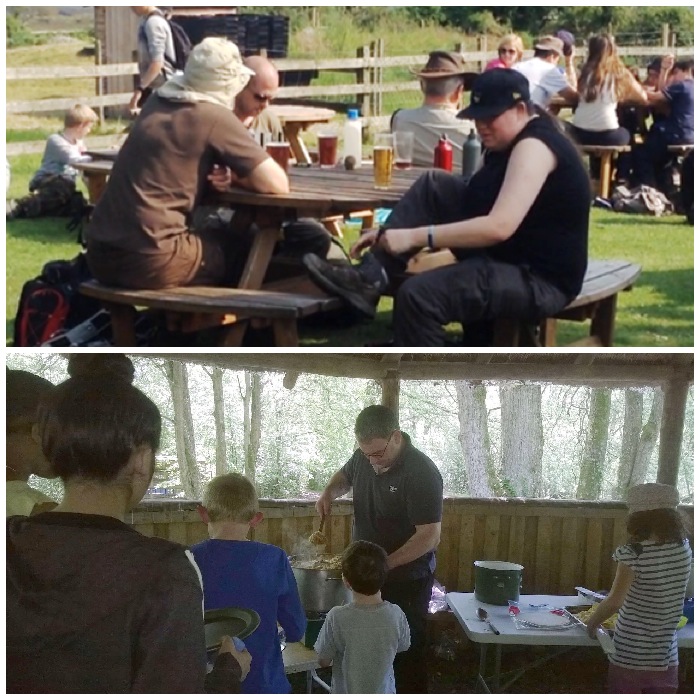
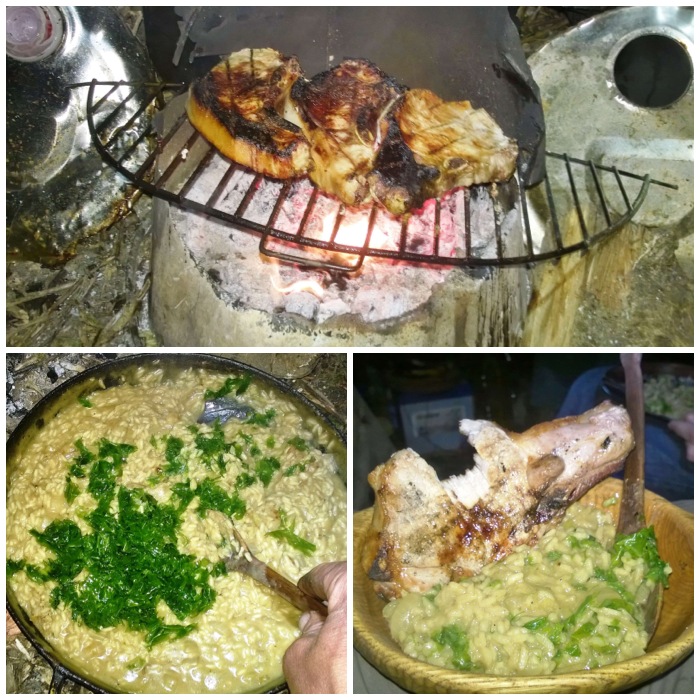
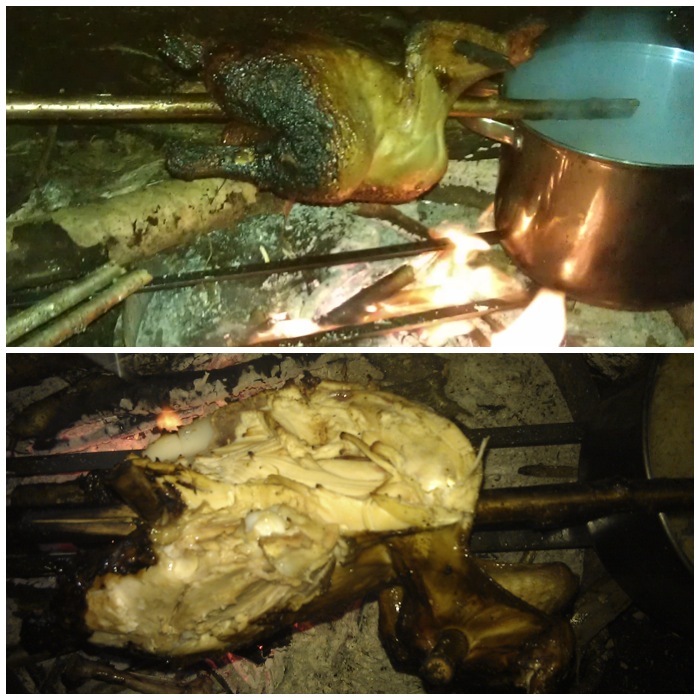
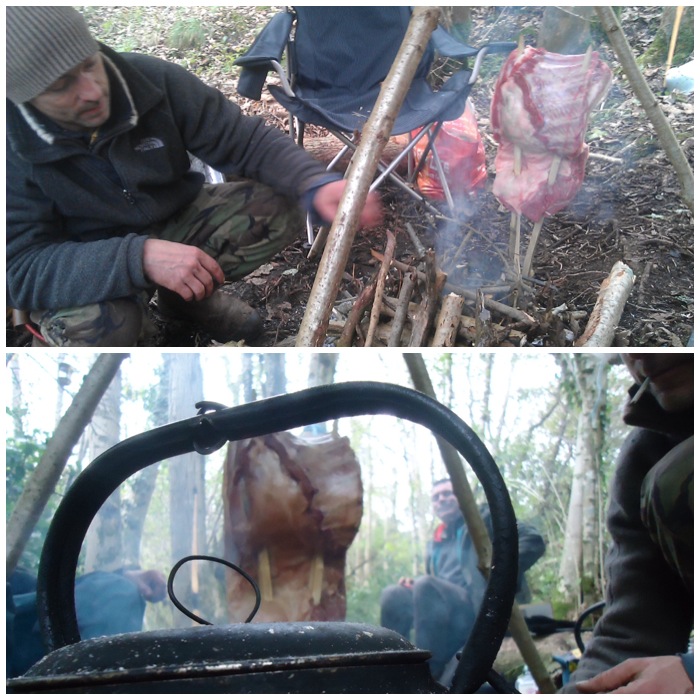
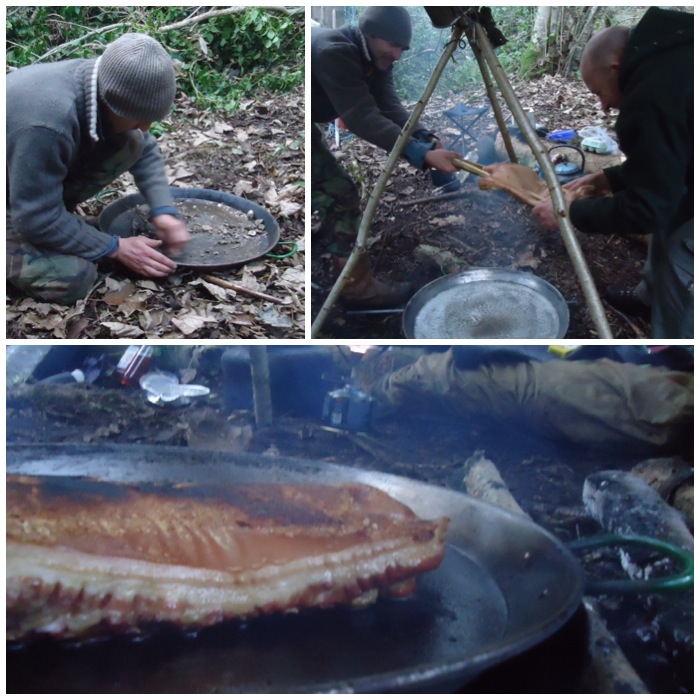
For the first few evenings we had dinner with Fraser from Coastal Survival over in the sand dune area so preparing the evening meal was never an issue for me, thankfully.
I could not resist taking this shot of Stu when he arrived in a taxi and we unloaded his supplies for the Naughty Corner.
It was at this time that my daughter started feeling unwell with a high temperature and feeling very faint. For the next few days she would sleep a lot in her hammock and eat very little. I thought it was just one of those 24 hour bugs but it turned out to be quite a nasty virus and really laid her out.
Settling in and arrivals
This is the first of five videos I took while at the Moot and shows the set up and some of the first courses that were held.
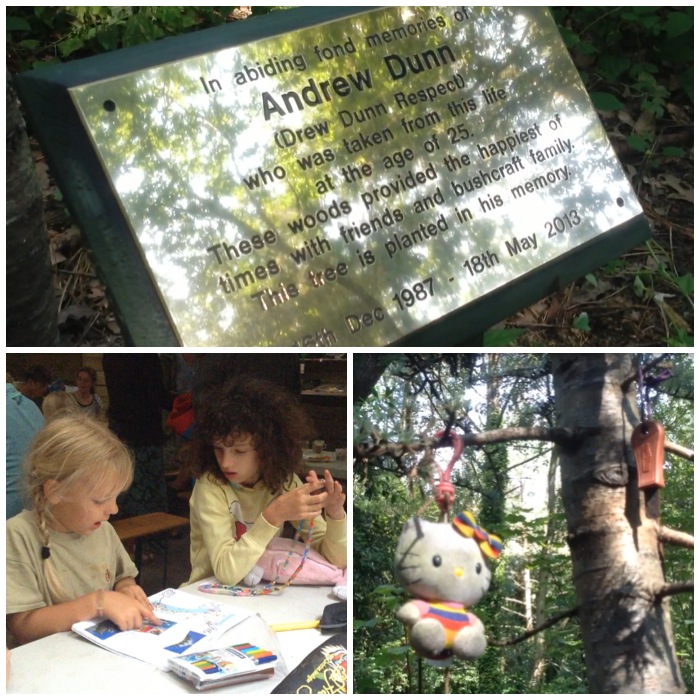
It was good to see all the new growth on Drew’s tree that had been planted last year. People have been leaving little tributes on the tree over the year which I thought made it look very special. While Catherine was feeling a little better she would come out and play with the other kids while she could. She never met Drew but I am sure that they would have gotten on with him like a house on fire. Drew loved to run role-playing games with the kids at the Moot and Catherine and Finlay love these types of games.
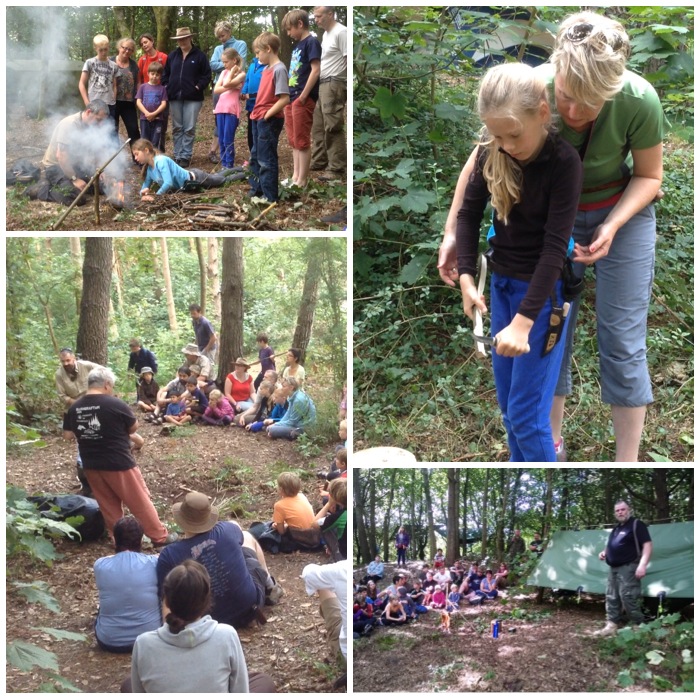
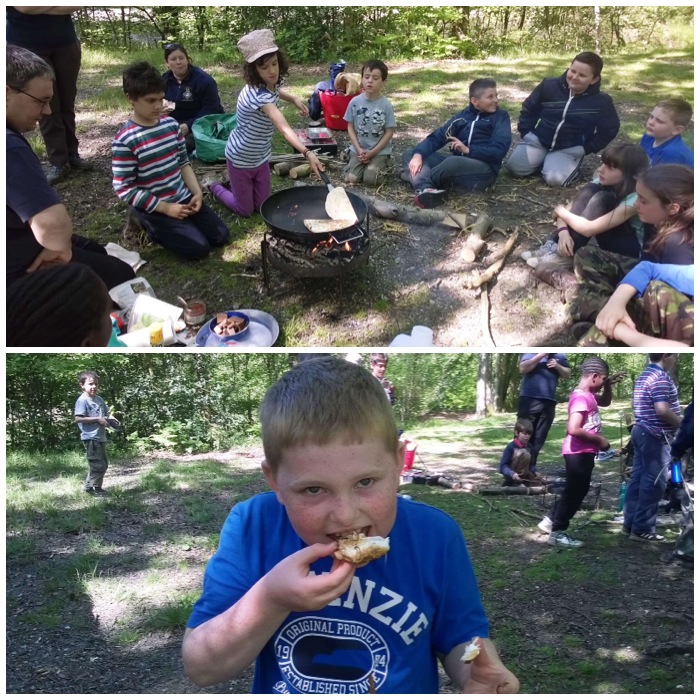
The first course I was involved in was the Starter Course. I have written a separate post on this course on the BCUK forum and you can read about it here – Bushmoot Starter Course. This is the second year we have run the course and it is starting to prove very popular now.
Starters Course
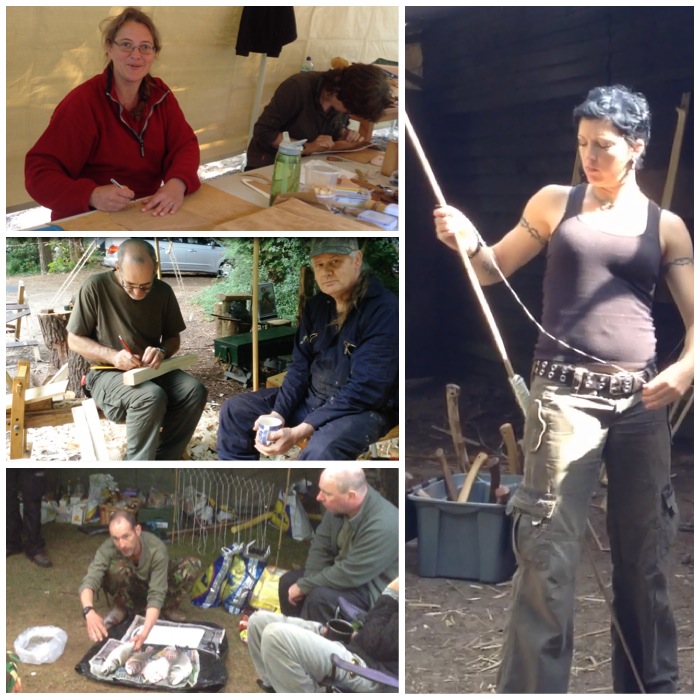
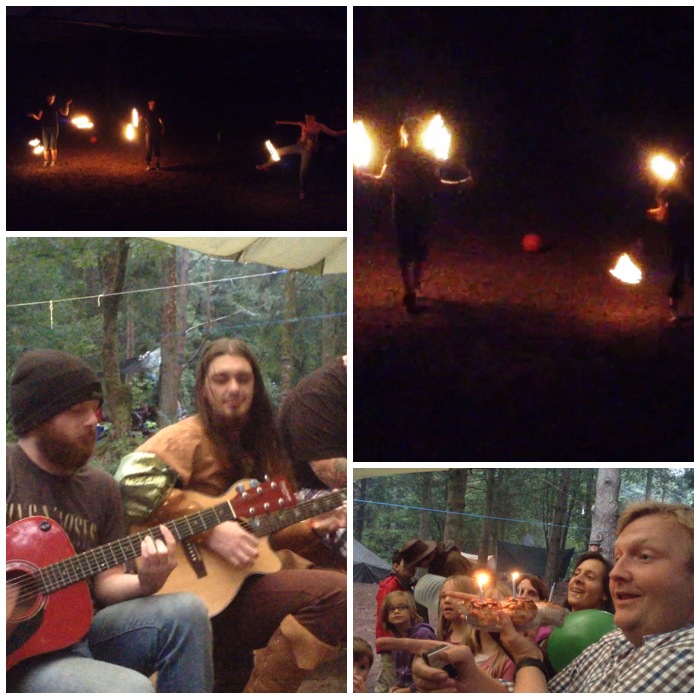
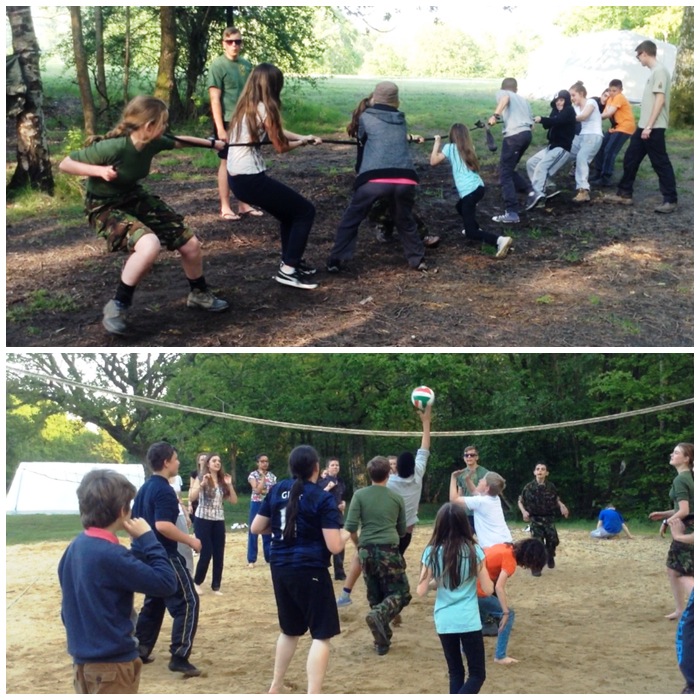
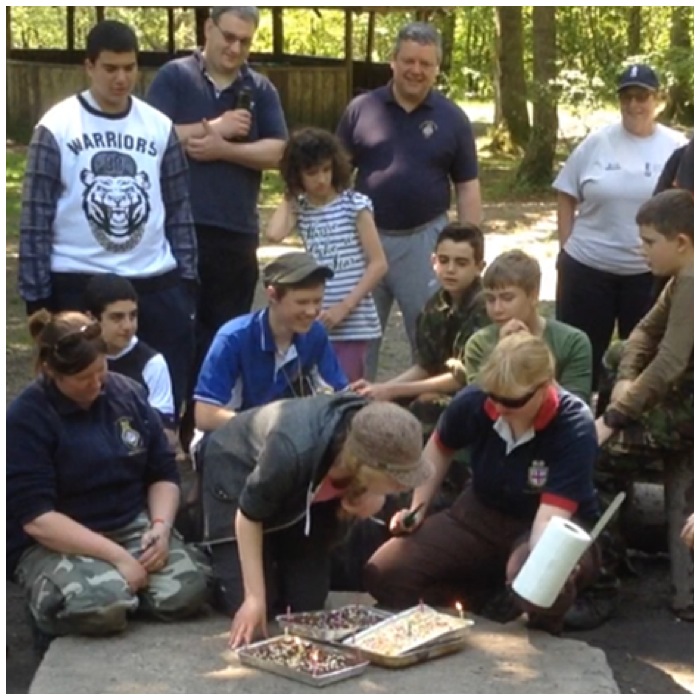
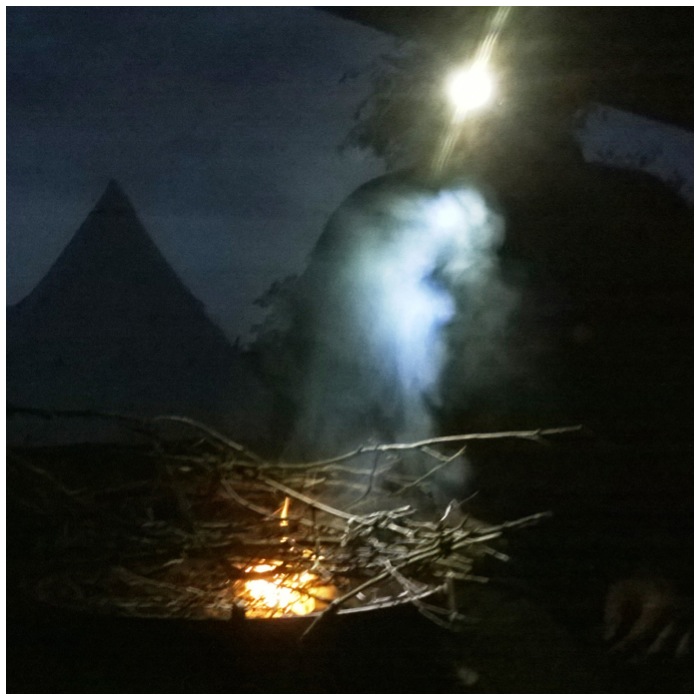
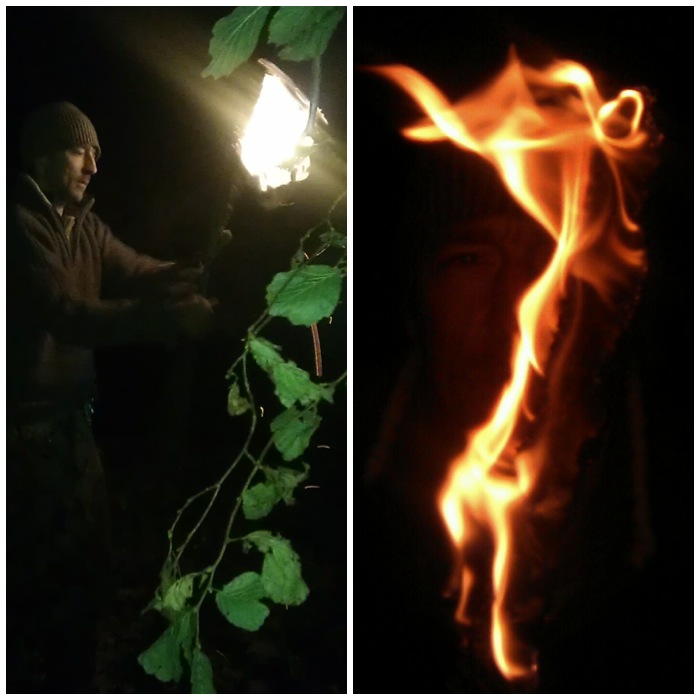
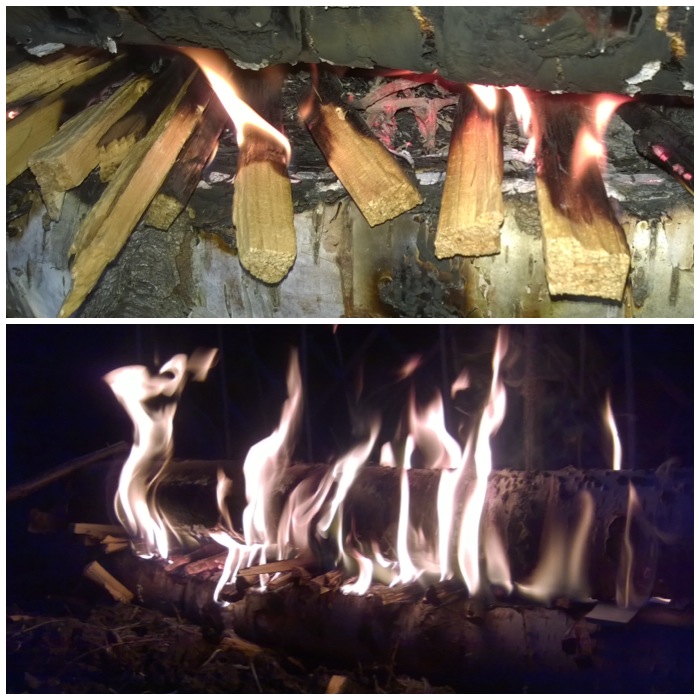
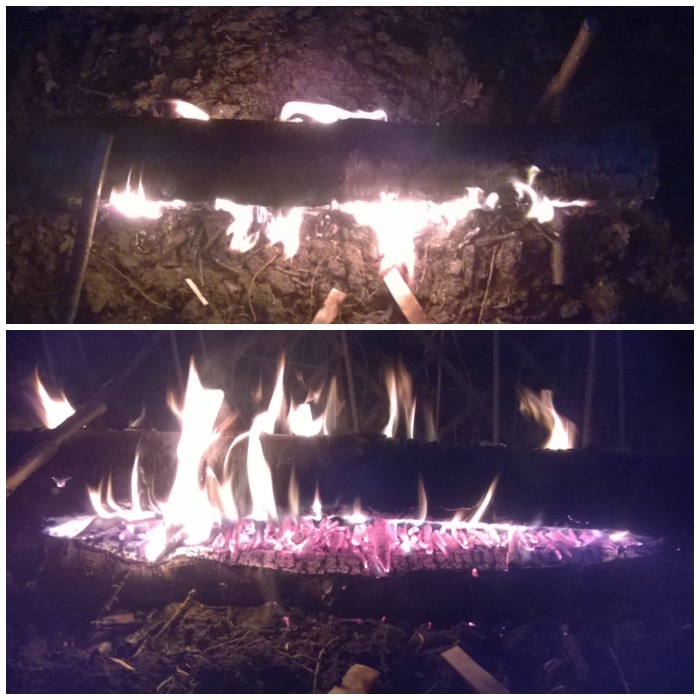
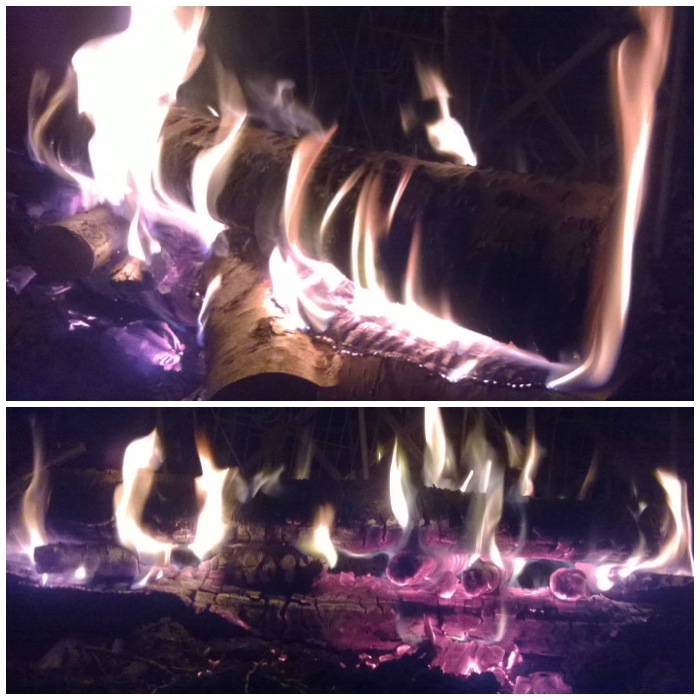
Over three of the nights I was at the Moot there was some great entertainment. On one night some of the lads from the Naughty Corner came down to the main sandpit area and had a great jamming session. Apart from filming them I recorded a couple of their tracks and then used them as backing music for my second video. Tony, the organizer of the Moot, even got himself some birthday cake on the night.
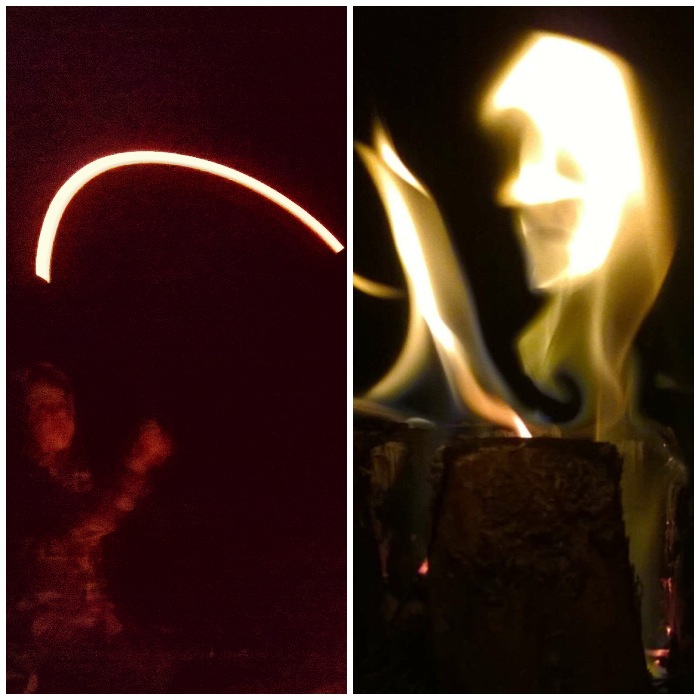
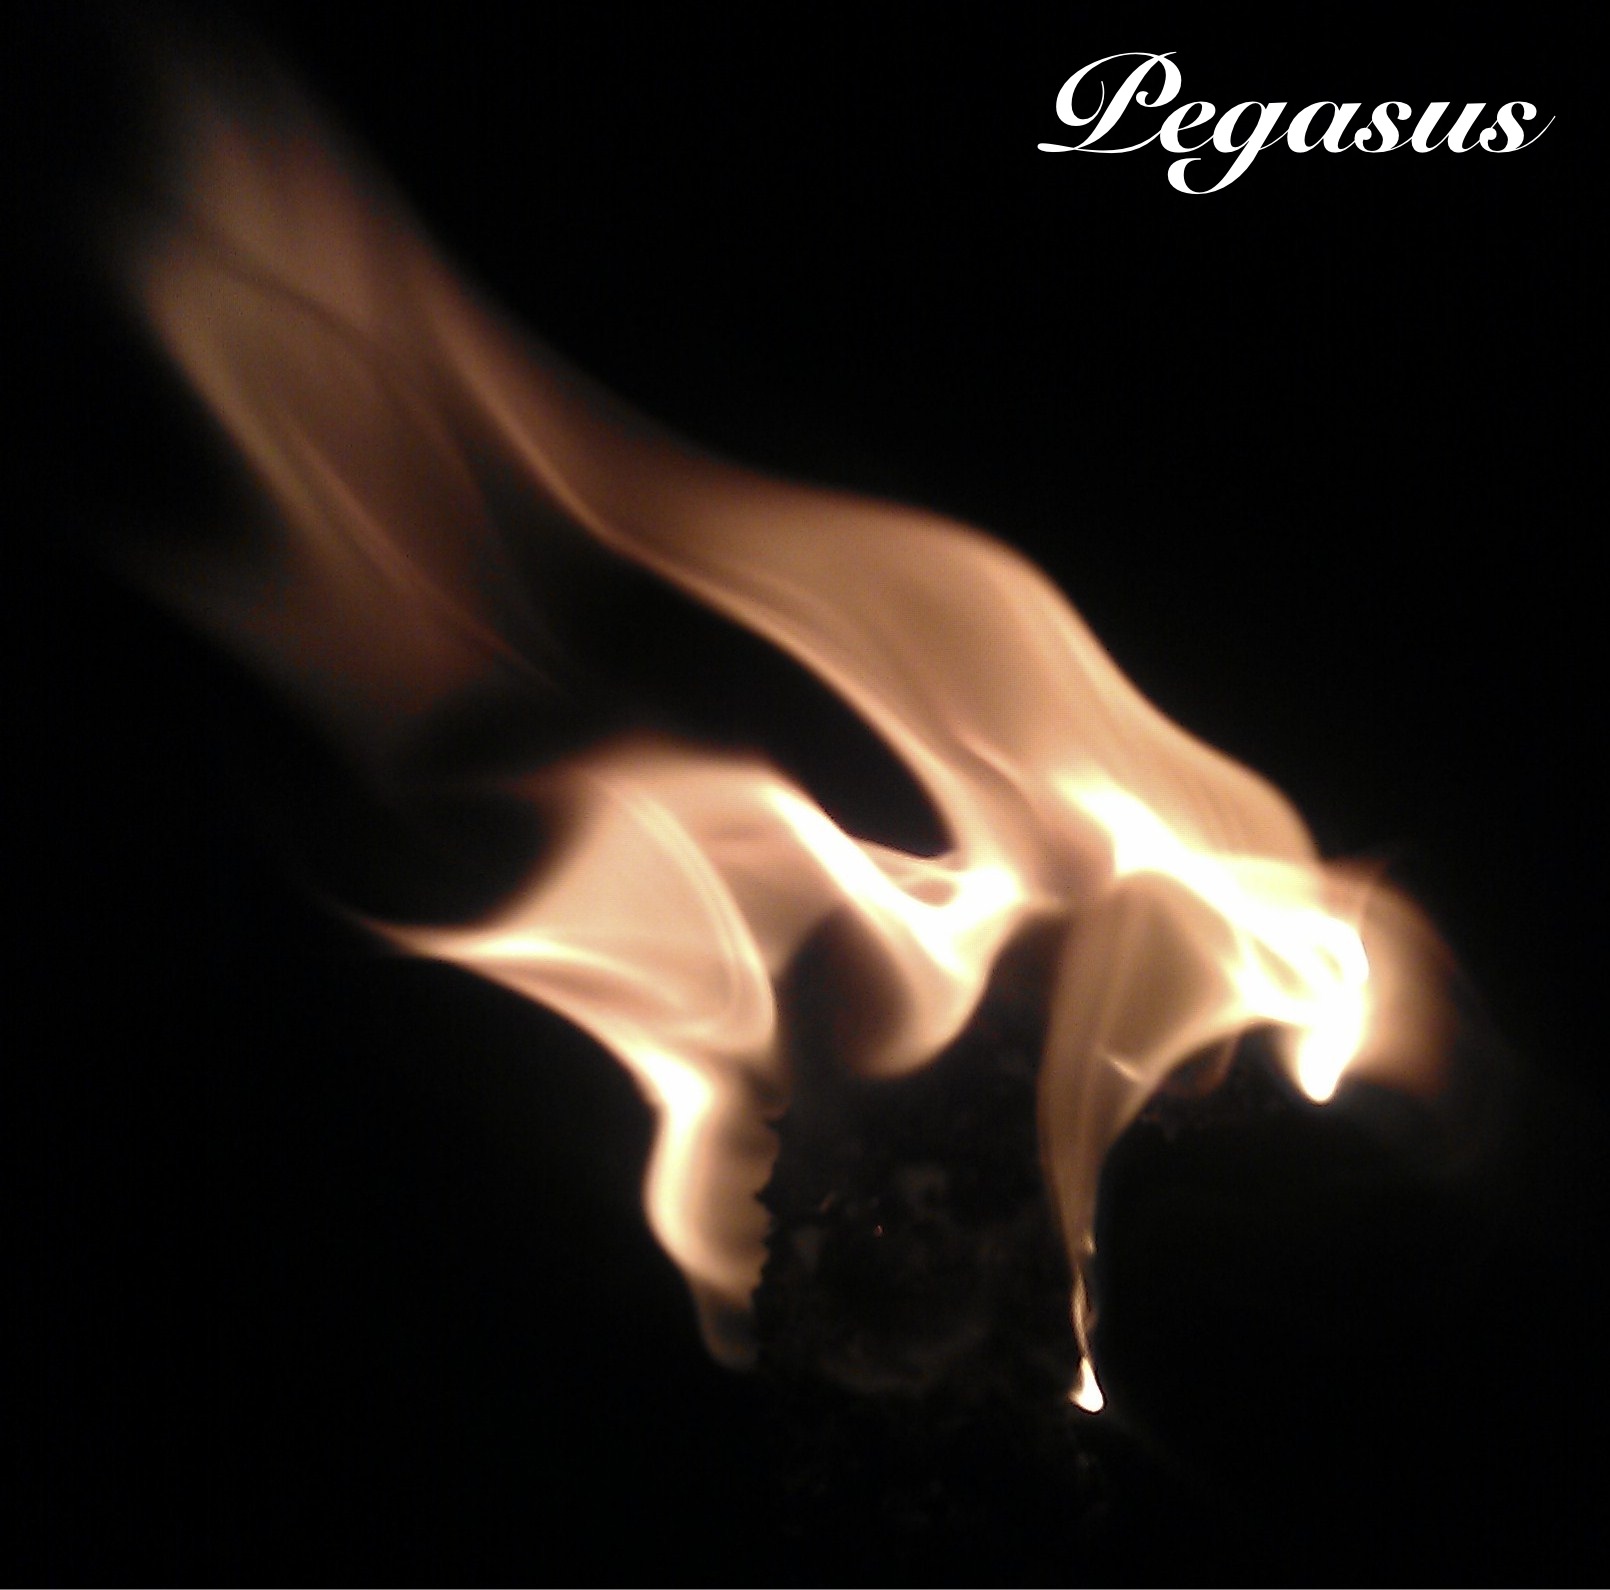
The other two nights we were treated to an amazing fire display by Emily, Liesl and Naomi Cook. These three young ladies are very talented and brave.
Evening Entertainment
Here is the video of Emily, Liesl and Naomi doing their fire show on both nights.
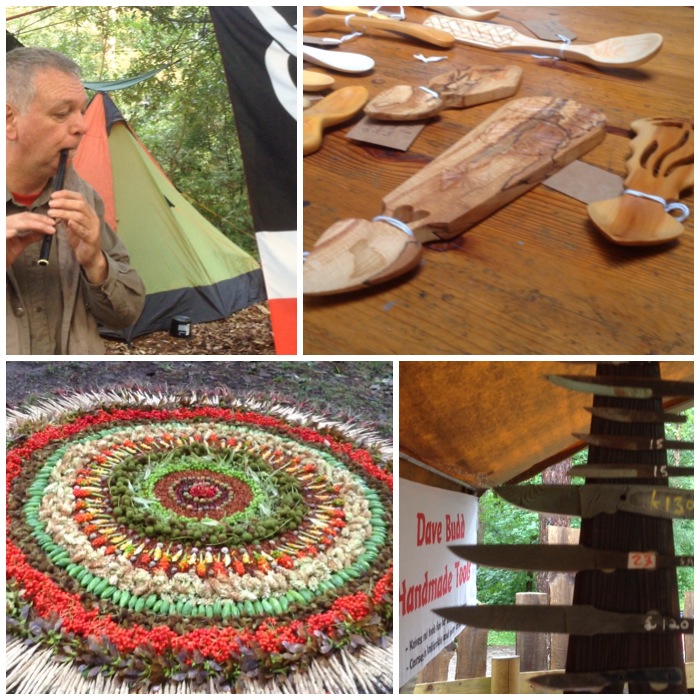
One of the things that has struck me about the Moot is all the different art that you can experience there. Art in the form of music from Stephen Crump (recorded for my third video), Welsh love spoons from Dean Allen, Woodland Plant Art from Keith Beaney and art in the form of iron from Dave Budd.
Bushcraft Art
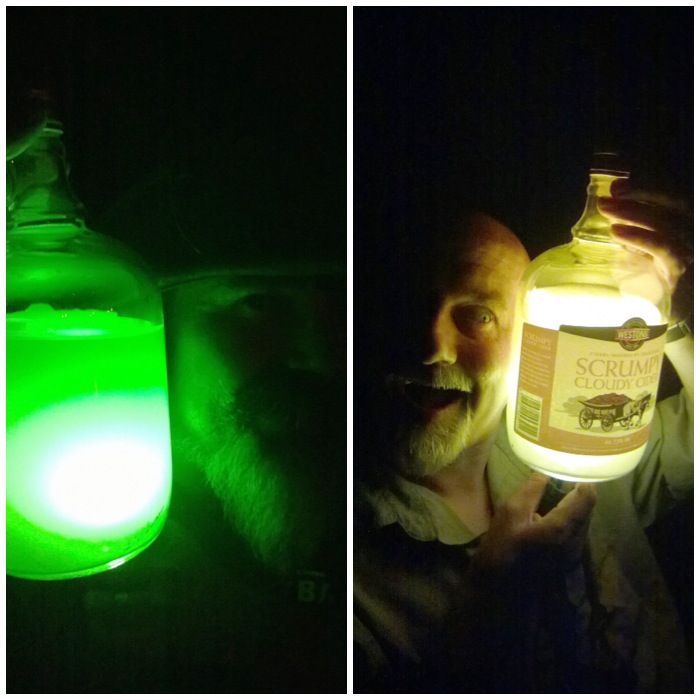
Needless to say Spikey and Badger managed their own version of art up in the Naughty Corner with the use of torches and some evening spirit.
Ye Old Naughty Corner
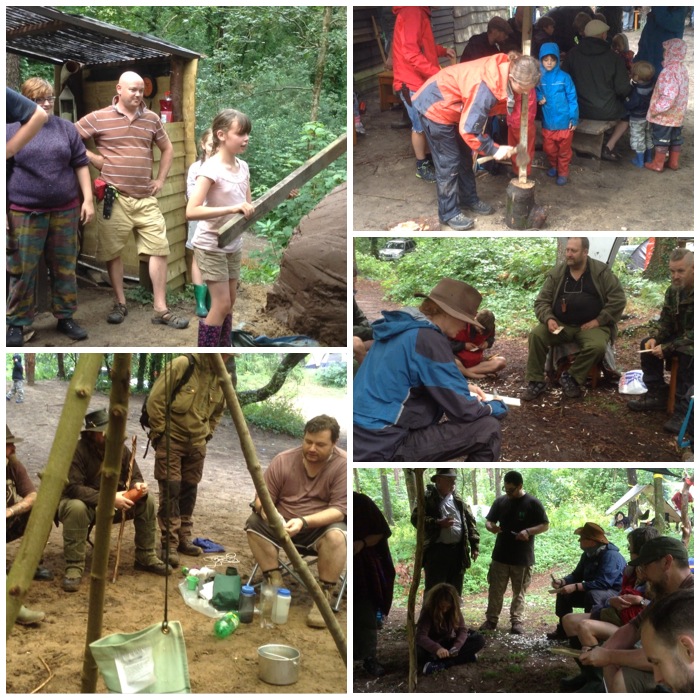
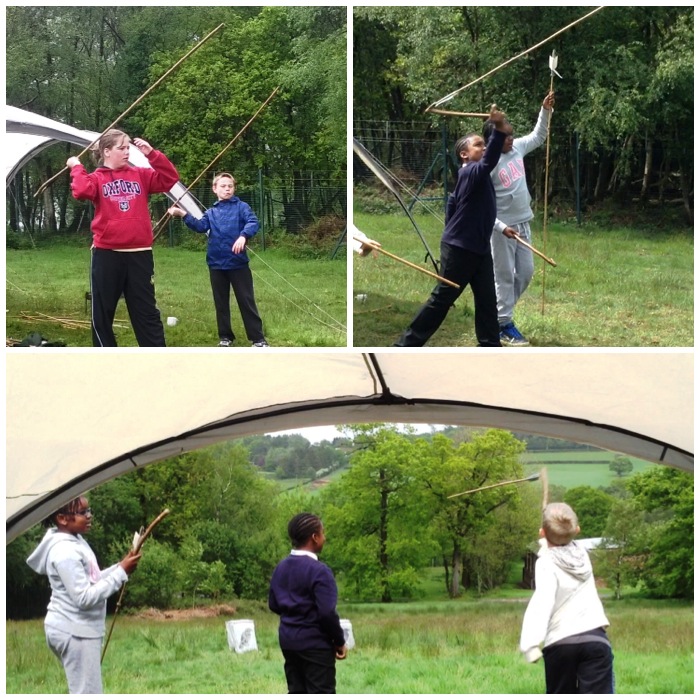
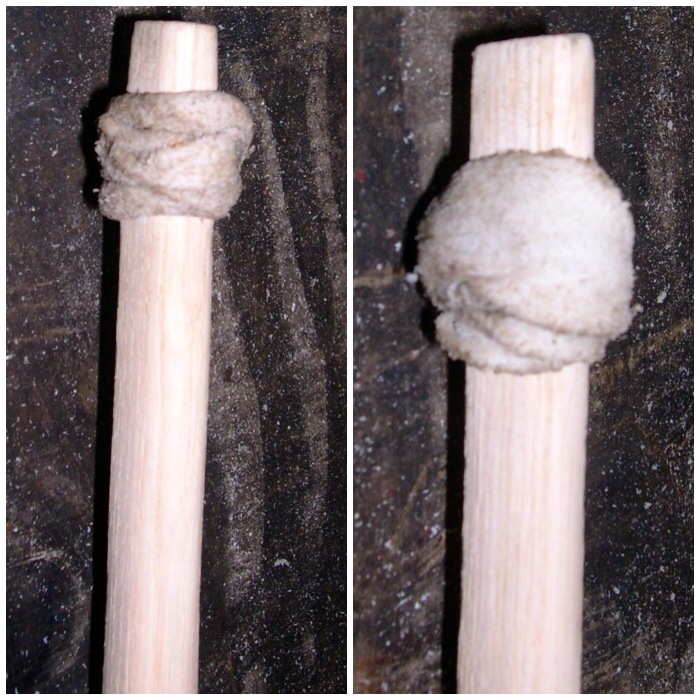
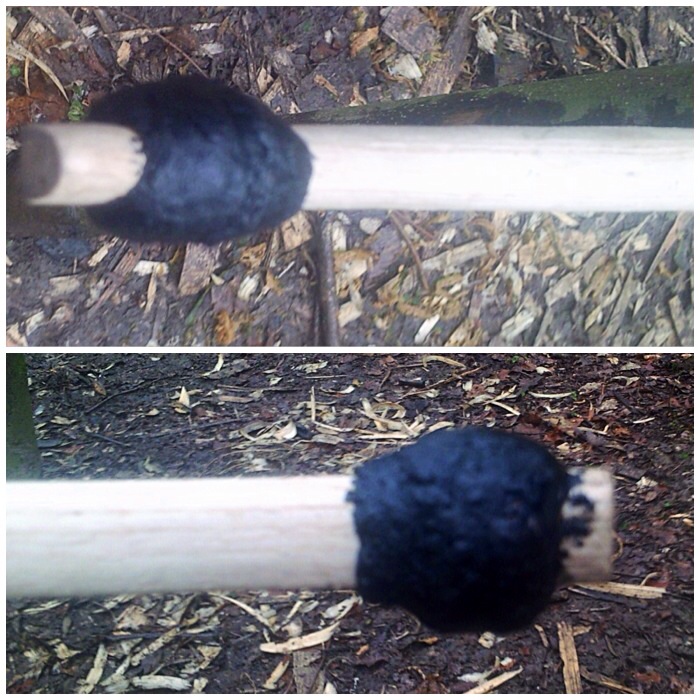
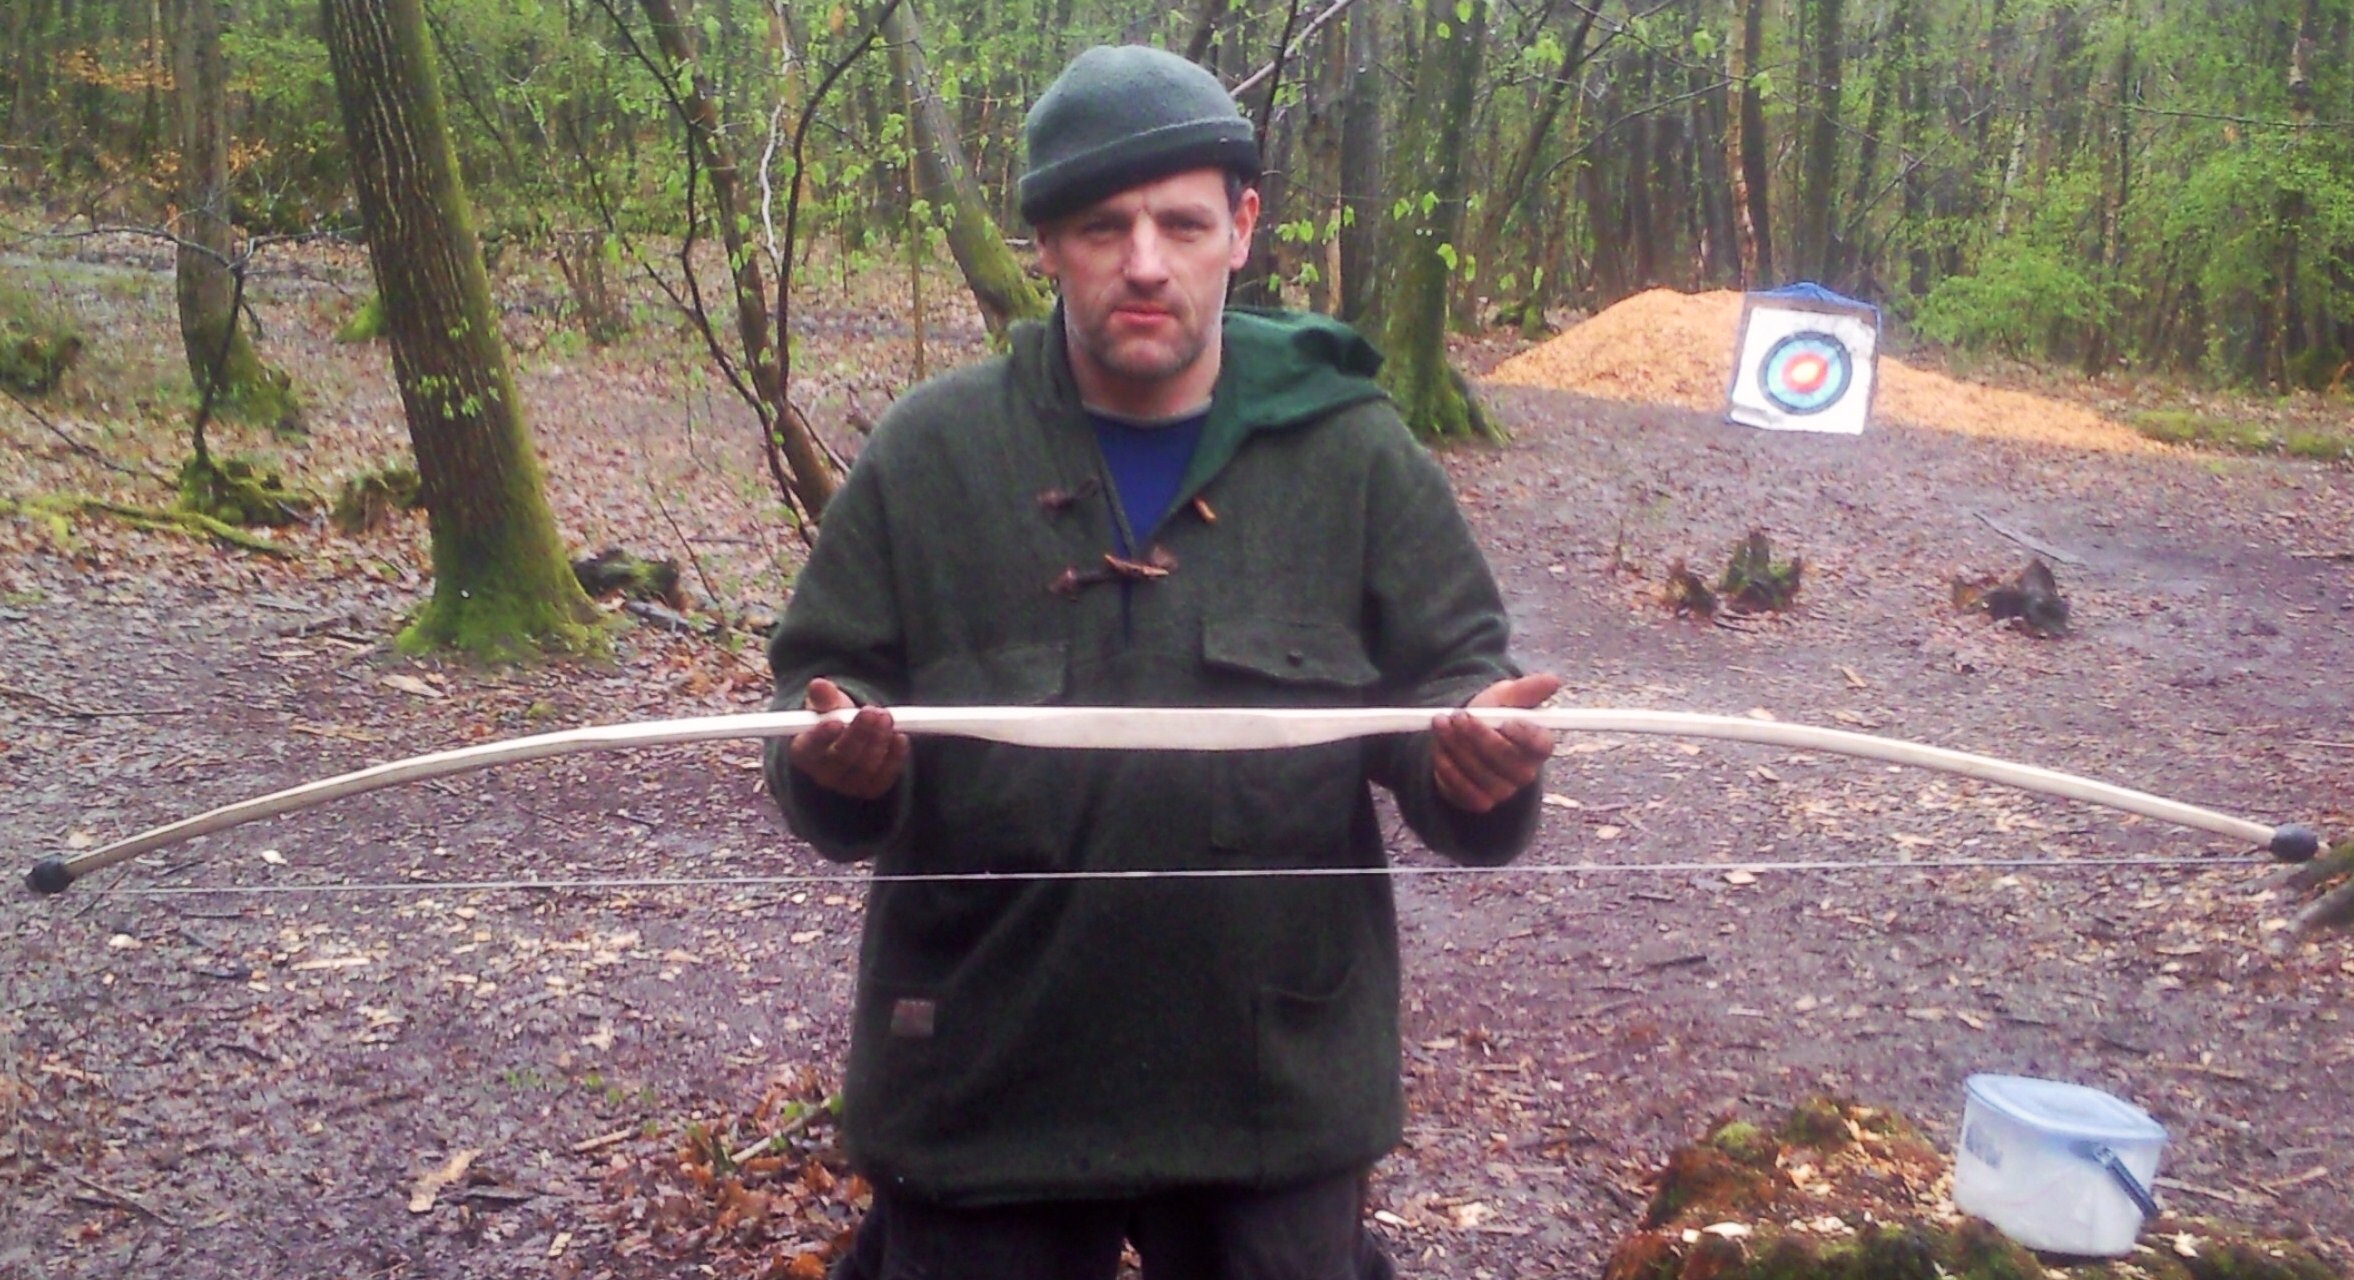
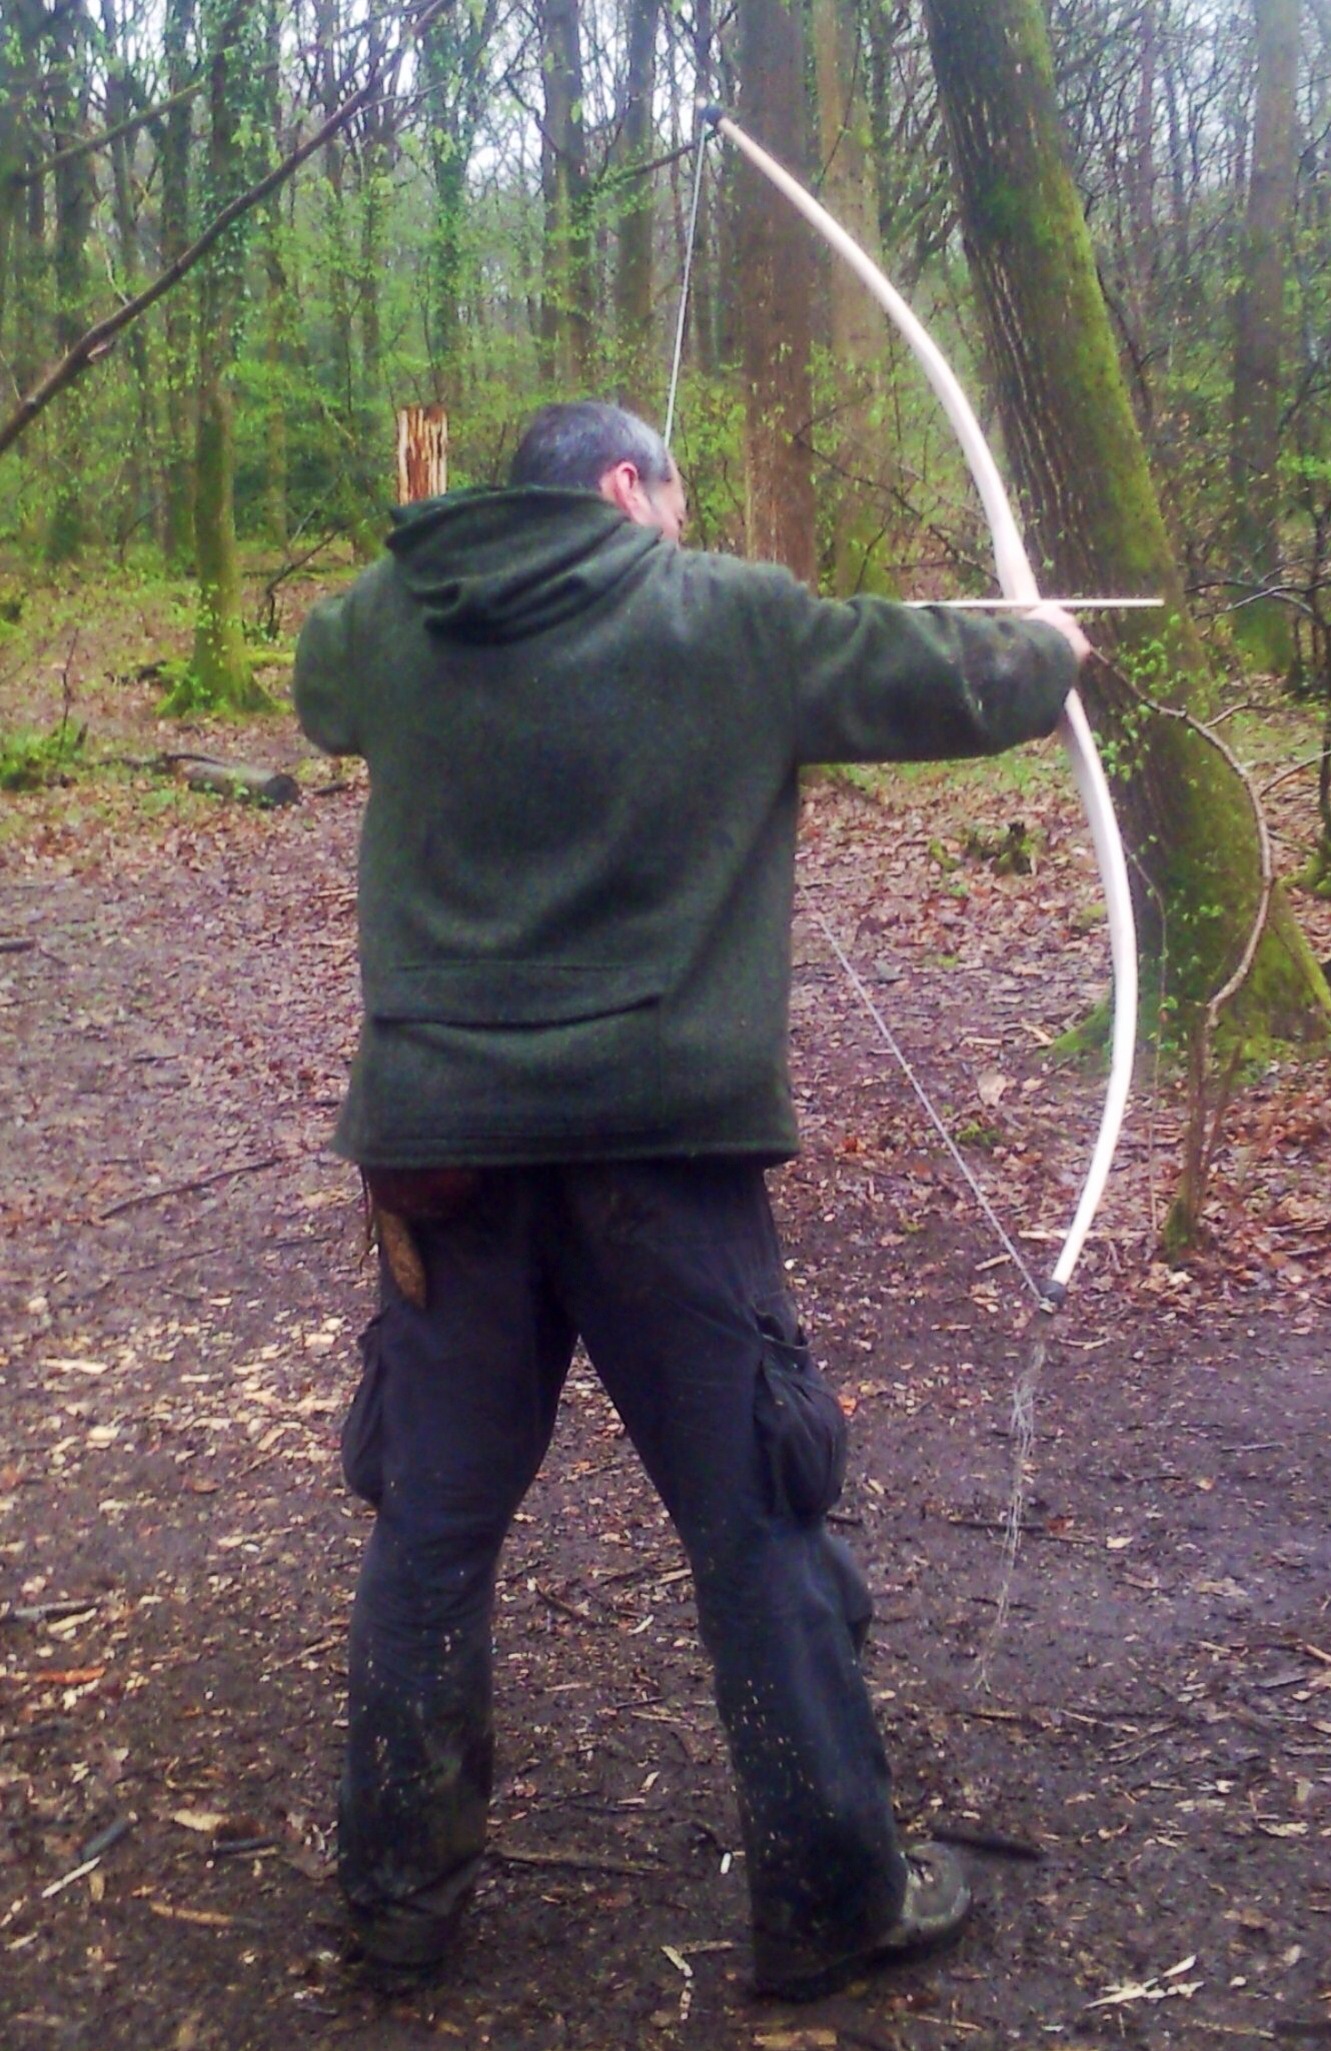
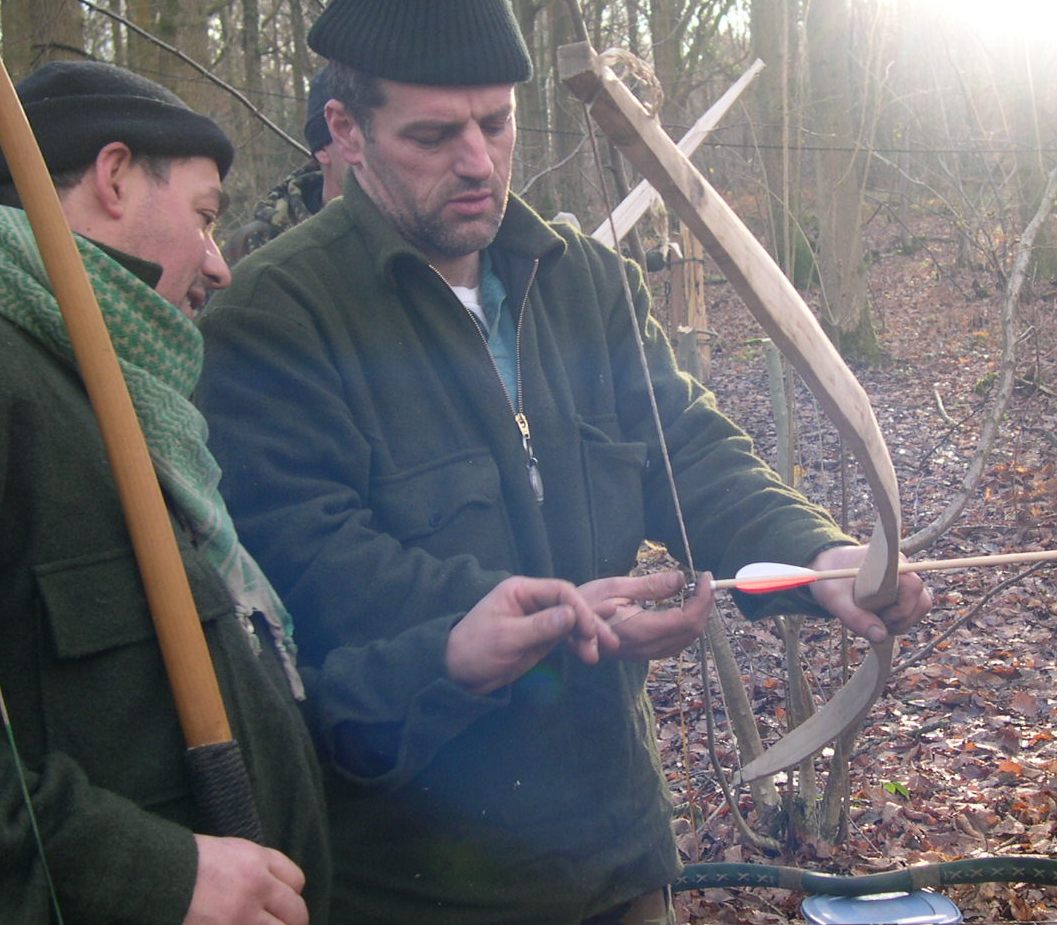
The main Moot kicked off with lots and lots of courses. I have posted pictures from just a small selection of what was on offer: making the pizza oven with Tim, mini bows with Wayne, water purifying with Richard, net needle making with Steve and spoon carving with Dean. There were lots more courses going on but I did not get to see them as I was on the Starter course all day. My wife Alison arrived on the first day of the main Moot and took a lot of the pictures of the day.
It was at this stage that we decided that Catherine was best off at home, so instead of staying, Alison took her back that day with Finlay.
Workshops – 1
The next video is of many of the first day’s workshops, with backing music from the Naughty Corner band.
The Sunday was another day of workshops and I tried to get around to as many as possible. These included knife sharpening with Chris, making tapestries with Shelly, tracking with Perry McGee of the National Tracking School and making a geodesic dome with Tony. There were plenty of other courses going on such as plant walks with Robin Harford and willow basket trap making with Fraser from Coastal Survival.
Workshops – 2
My video of the day has as its soundtrack Stephen Crump playing a tin whistle on a wet afternoon.
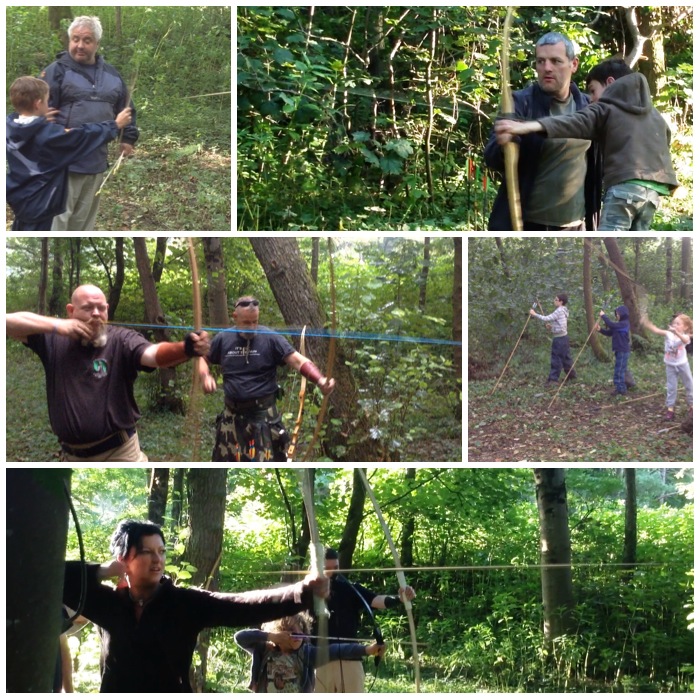
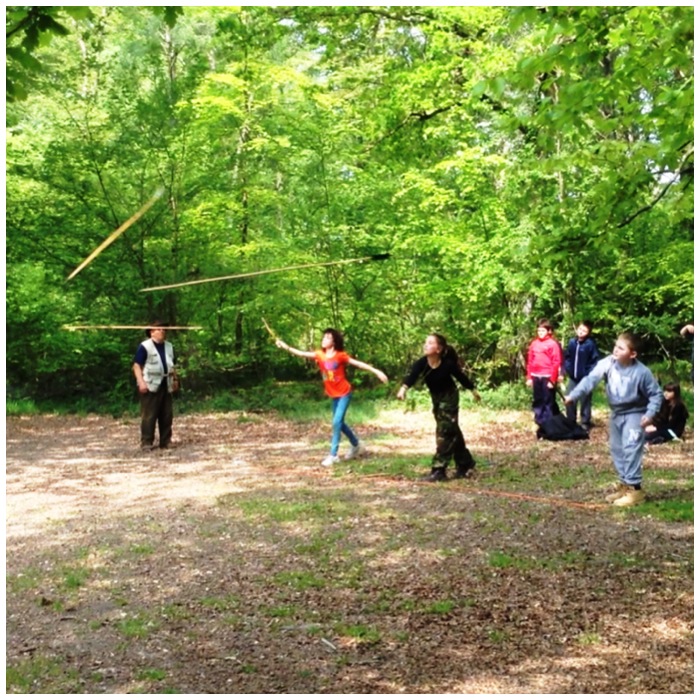
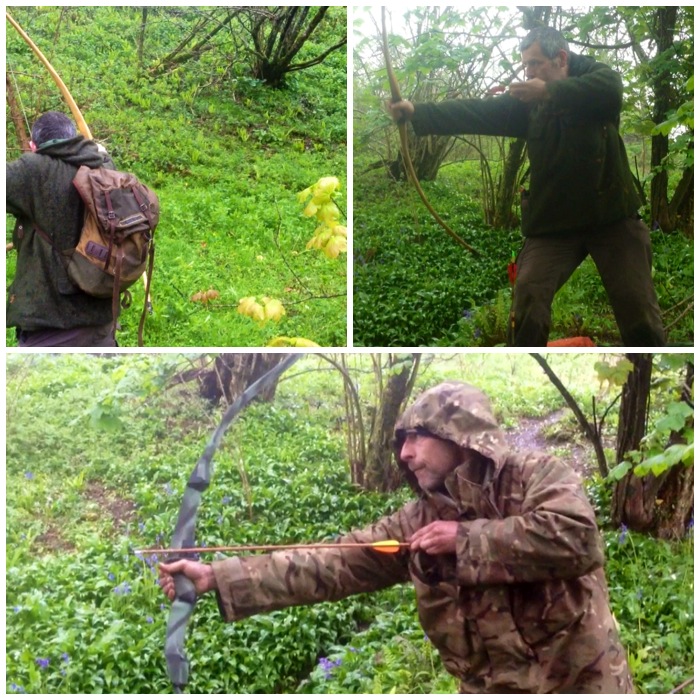
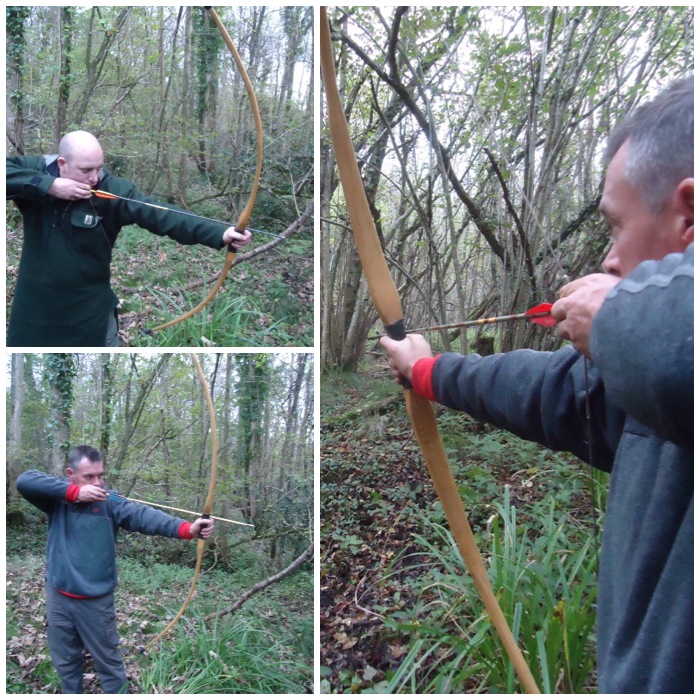
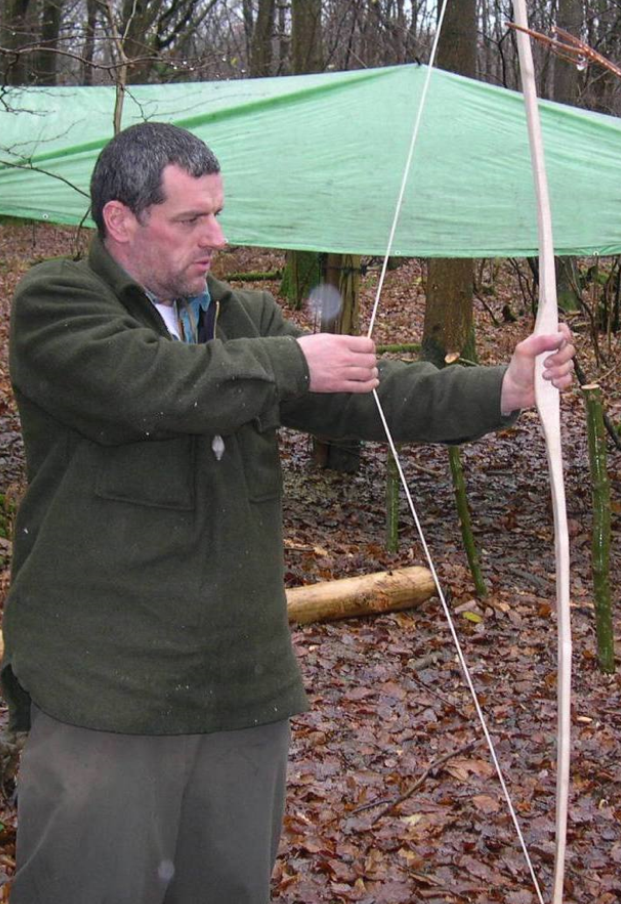
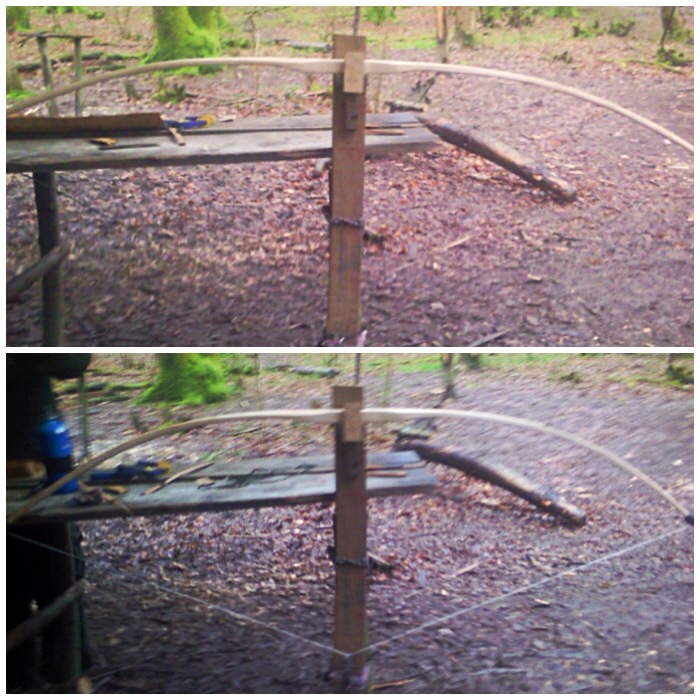
Needless to say I spent a lot of my time down on the archery range shooting arrows or atlatl darts. With all the bows Wayne had been helping people to make we were kept very busy.
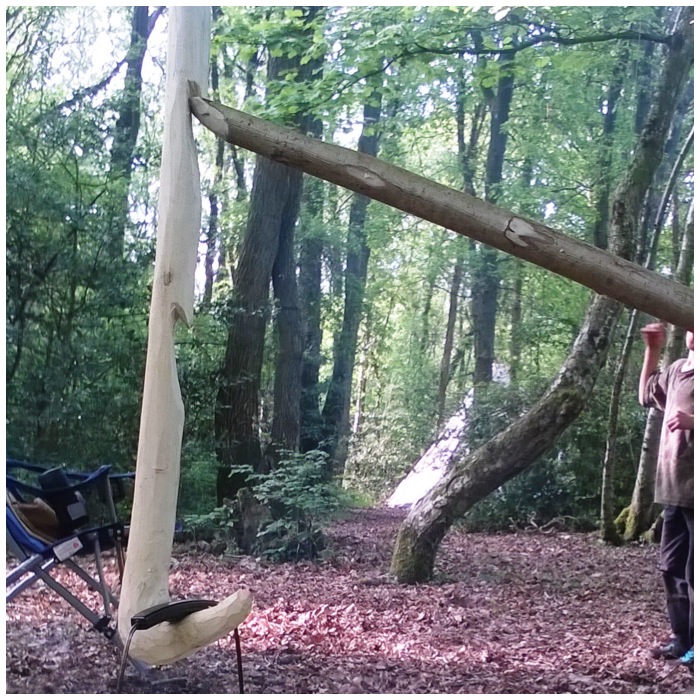
Down on the Range
I made a short but very funny video of Mad Dave and Cap’n Badger helping me to clear the range of a hung up tree.
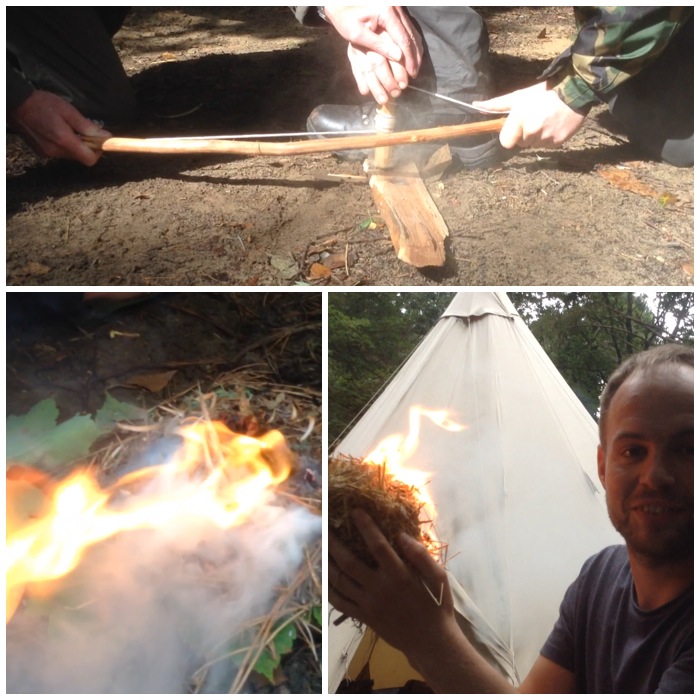
At this stage I had not run any bowdrill classes but I had done a couple of one-to-one sessions. My neighbour Matt Baillie went off after one of the sessions and persevered until he got the bowdrill cracked – well done mate.
A Little Fire Fix
I also did a quick session on the Egyptian bowdrill method and made a short film of it.
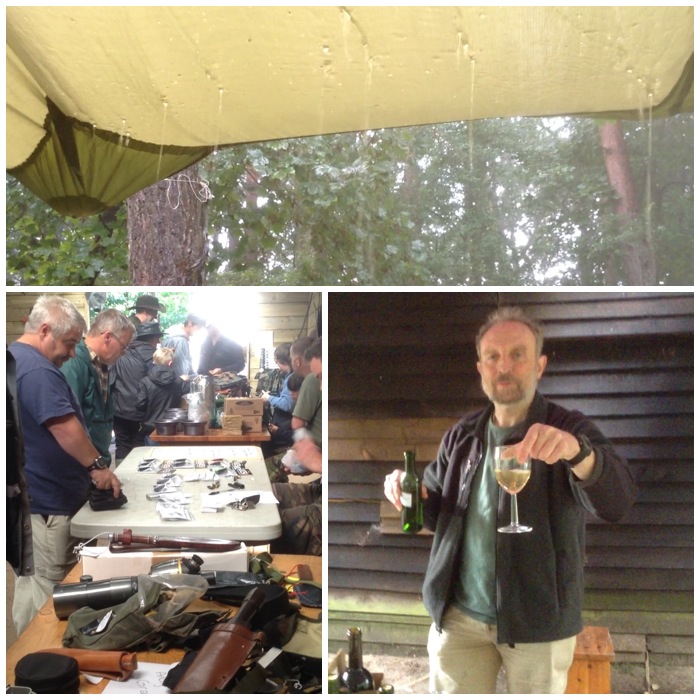
The Monday was a bit of a damp affair but the Traders’ Day went well and I managed to try some more of Richard’s excellent elderberry wine.
Traders’ Day and a Private Wine Tasting
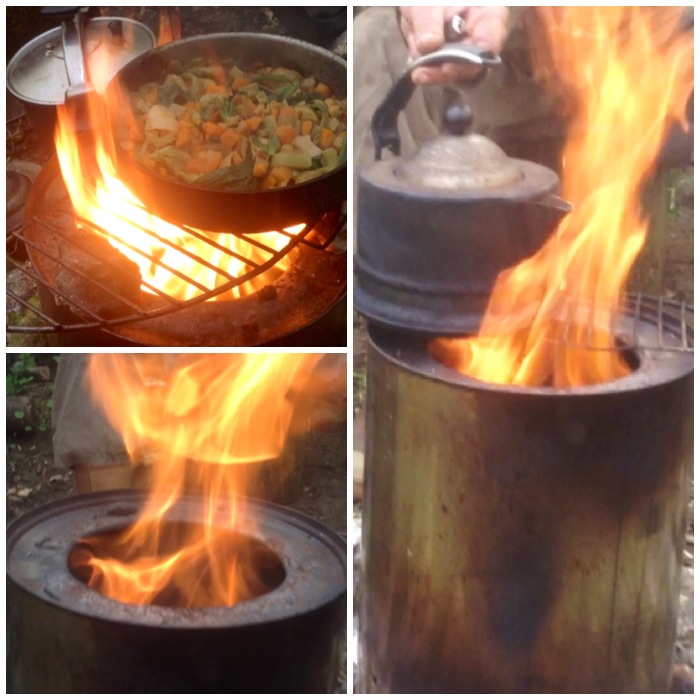
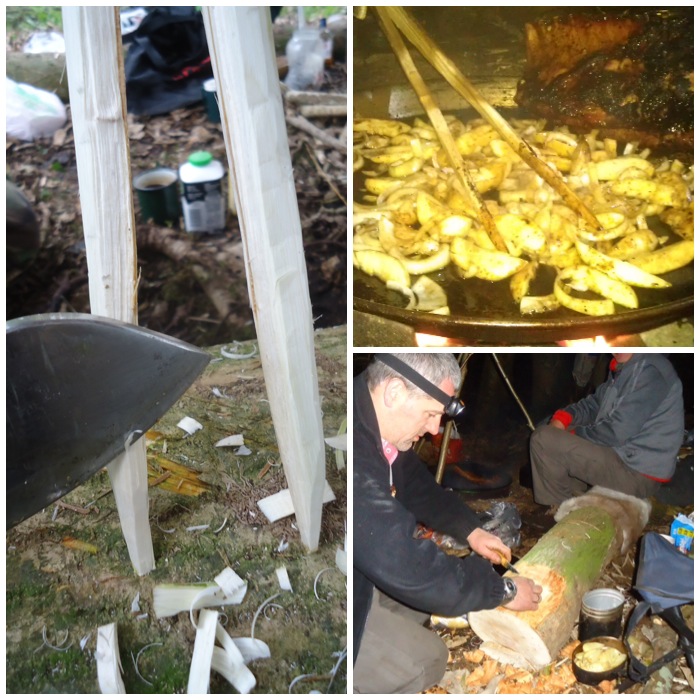
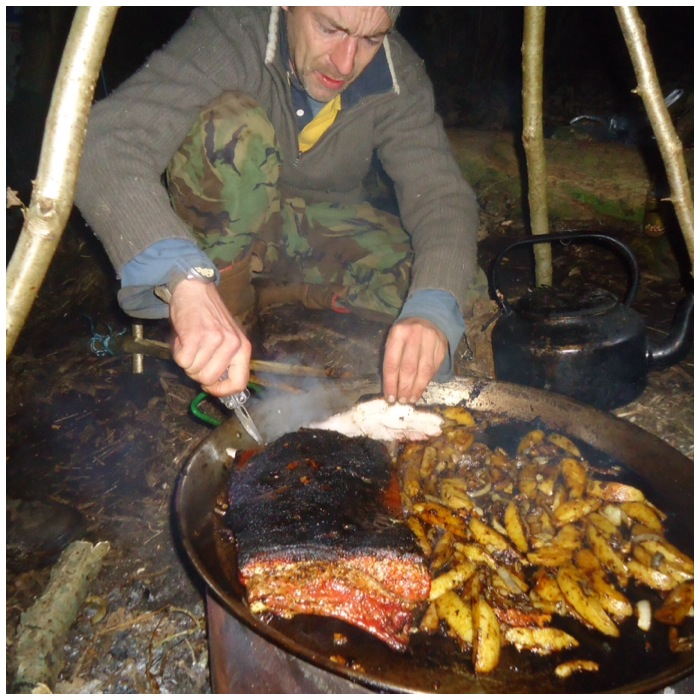
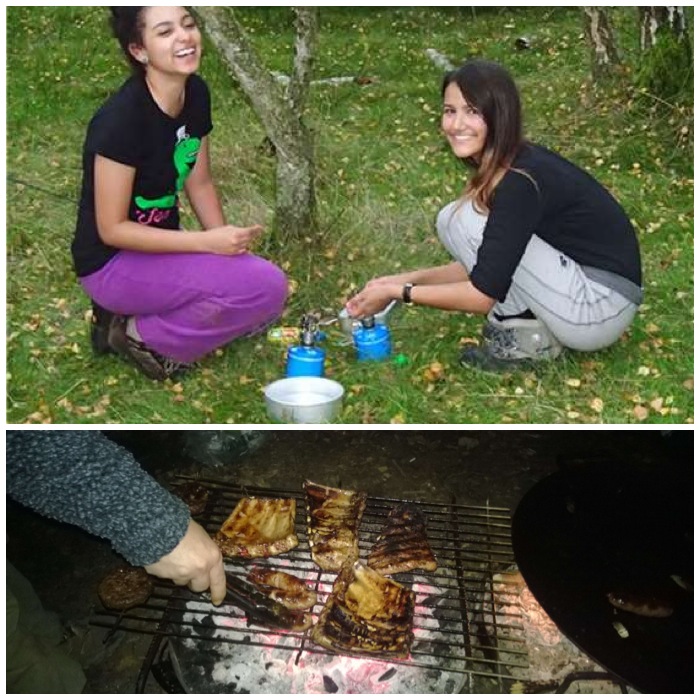
I managed to get a little bit of food at the group meal before it was devoured. This is becoming a bit of a tradition now since we stopped doing the hangis, and it is amazing to see all the different dishes that can be cooked over an open fire in a Dutch Oven.
Group Meal
My last video of the Moot is of the Traders’ Day and the group meal.
I spoke with Alison that evening and decided to head home in the morning as Catherine was still very poorly. I got home by lunchtime on Tuesday and thankfully over the next few days Catherine started to recover and was soon back to her usual self.
I really enjoyed the half of the Moot I attended this year and my kids are desperate to come back again next year. There were another couple of days of workshops that I missed but I think this post will give you a feel for how the Bushmoot works.
I hopefully will see you all again next year and meet a few new faces as well.
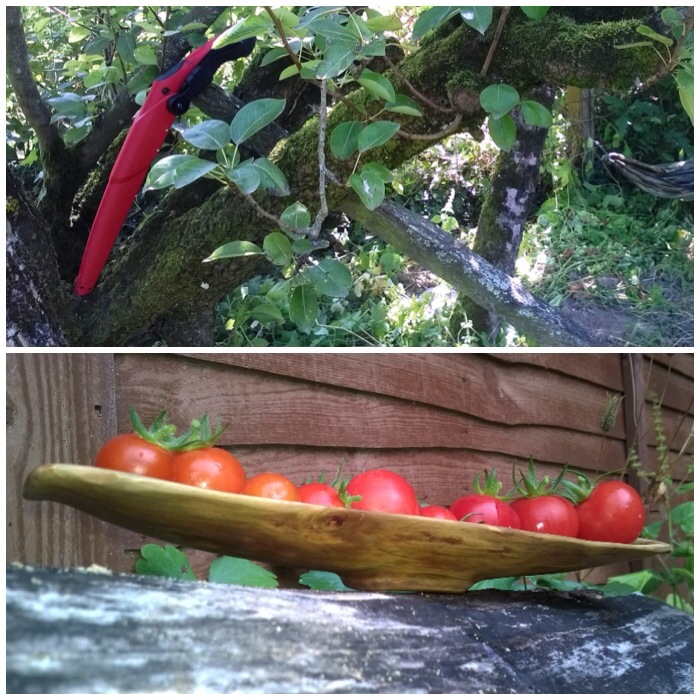
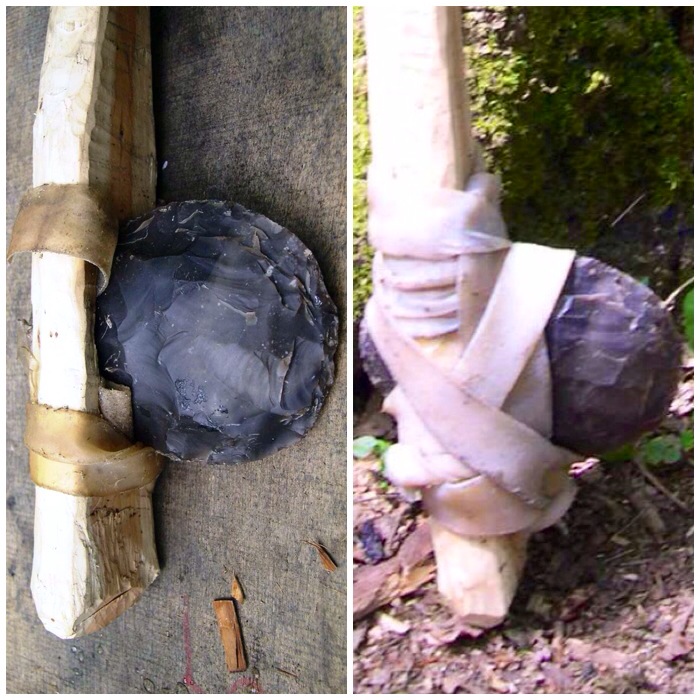
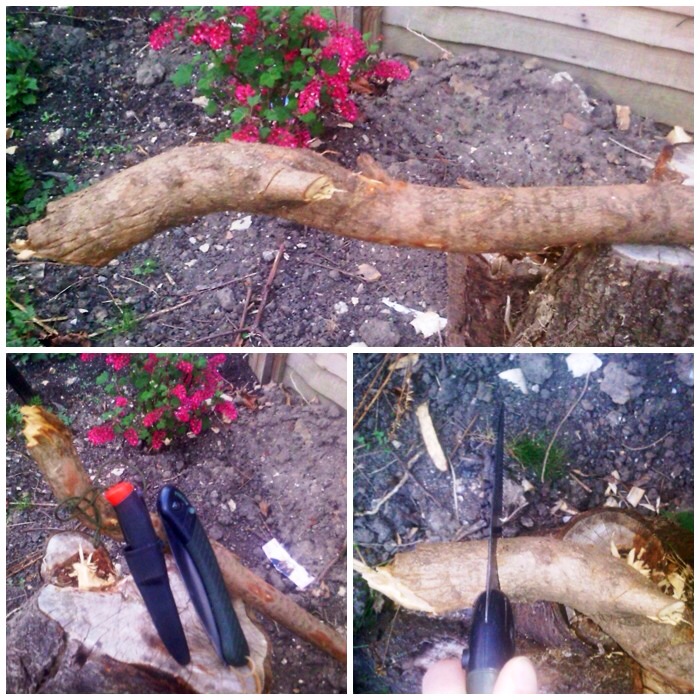
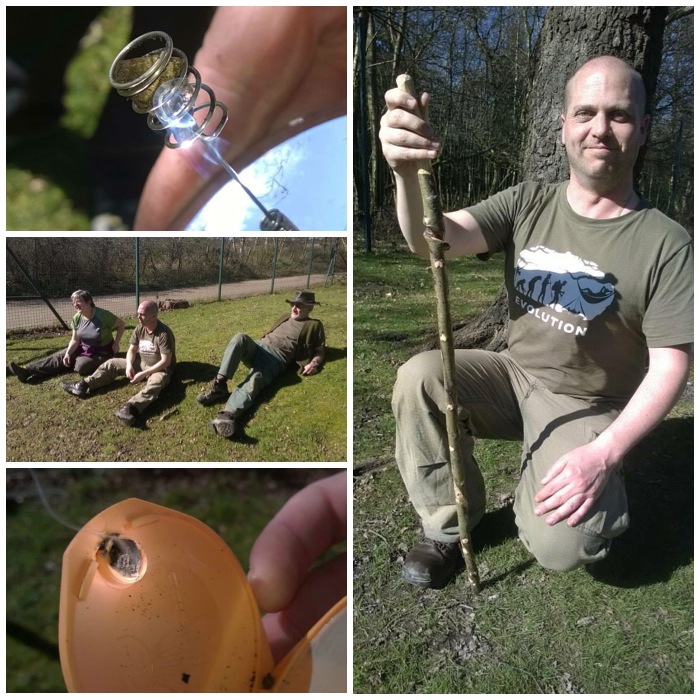
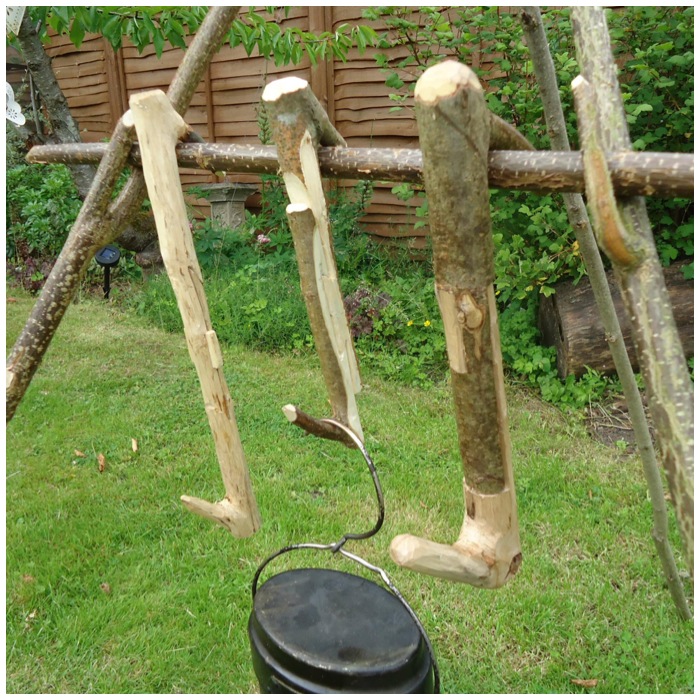
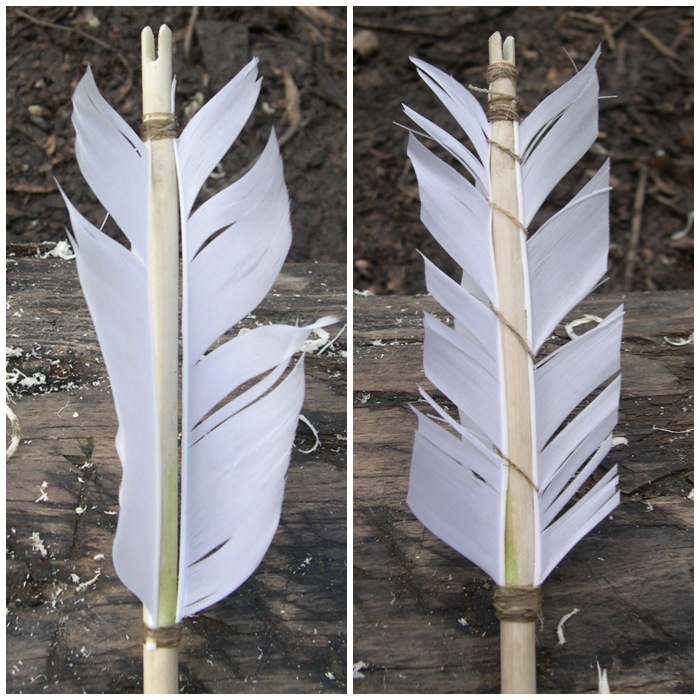
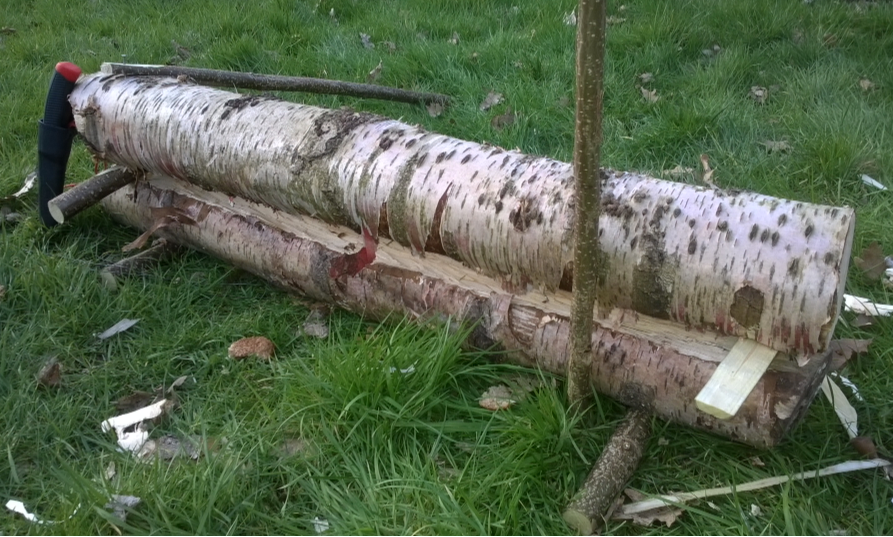
While we were on holiday in France at my friend Rick’s cottage he was telling me about some of the trees in his garden. He has an old, gnarly pear tree currently propped up by sticks as it was blown over in a storm a few years ago. It still bears fruit, but only on one side.
Rick agreed that I could trim a branch off the non-fruiting side as that would take some of the weight off the side that was being supported. I like to carve fruit woods when they are green as the wood is easy to remove.
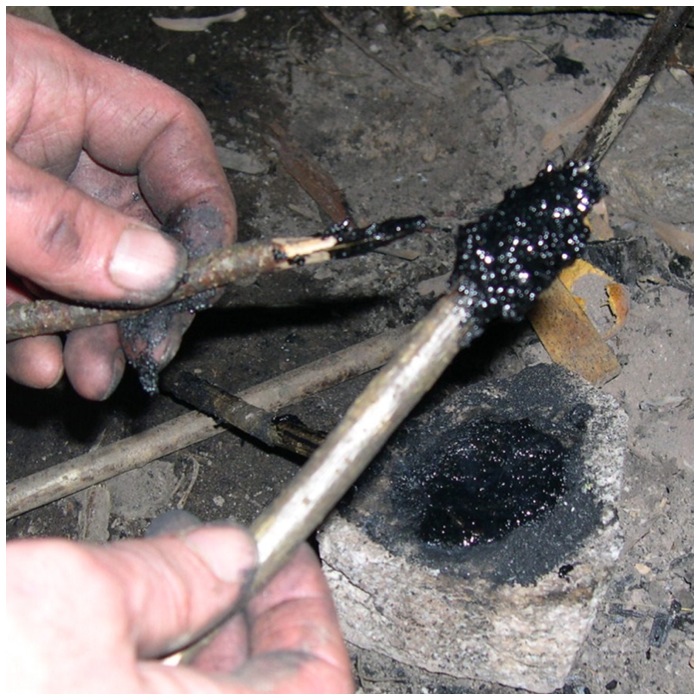
Before and after
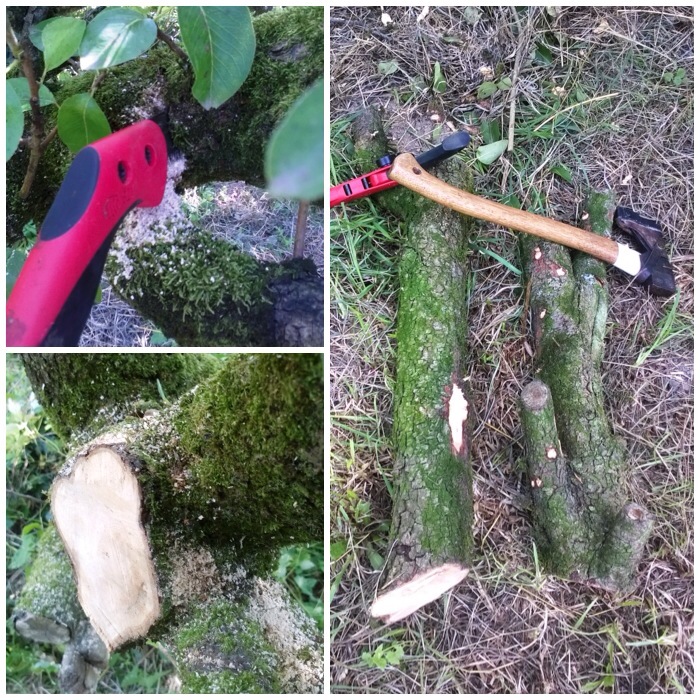
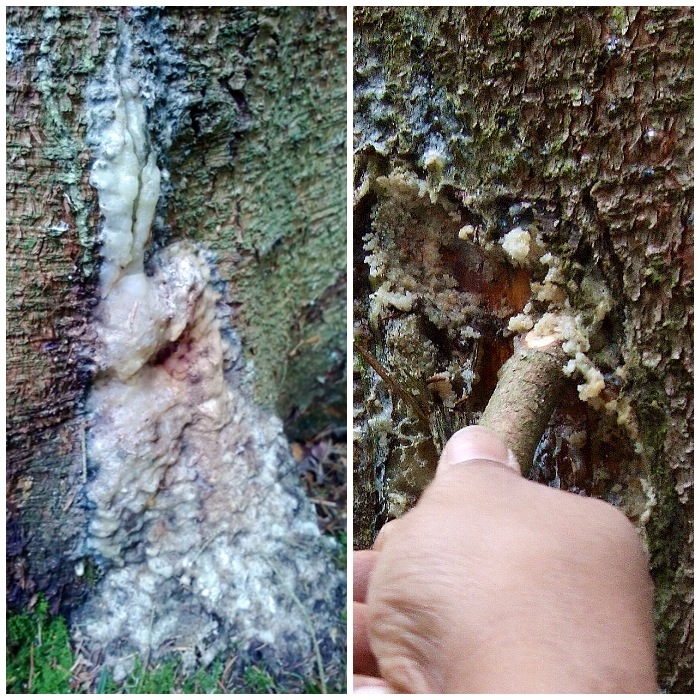
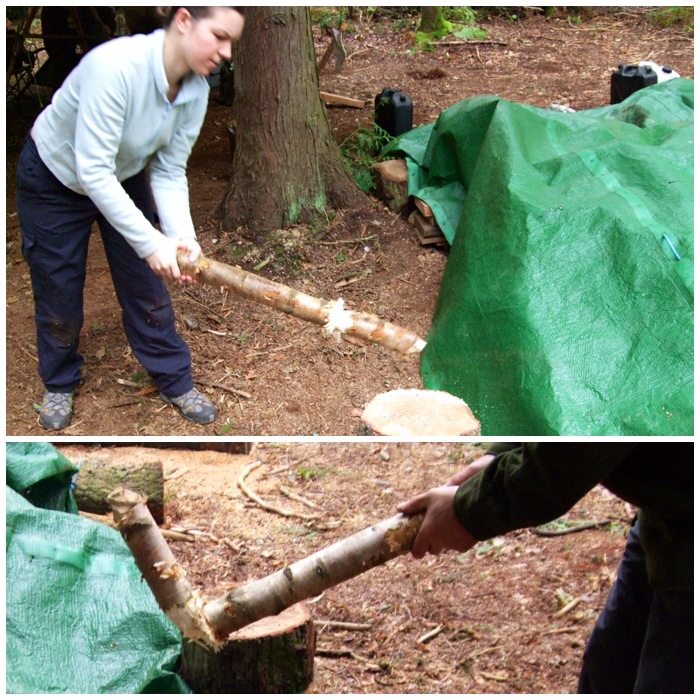
I cut the limb off very close to the trunk so as to minimise the chance of infection damaging the tree. I made a single cut as the branch was easy to support as I cut it. Also the cut was made as close to the Collar as possible so as to give the tree the best chance to heal itself.
De-limbing
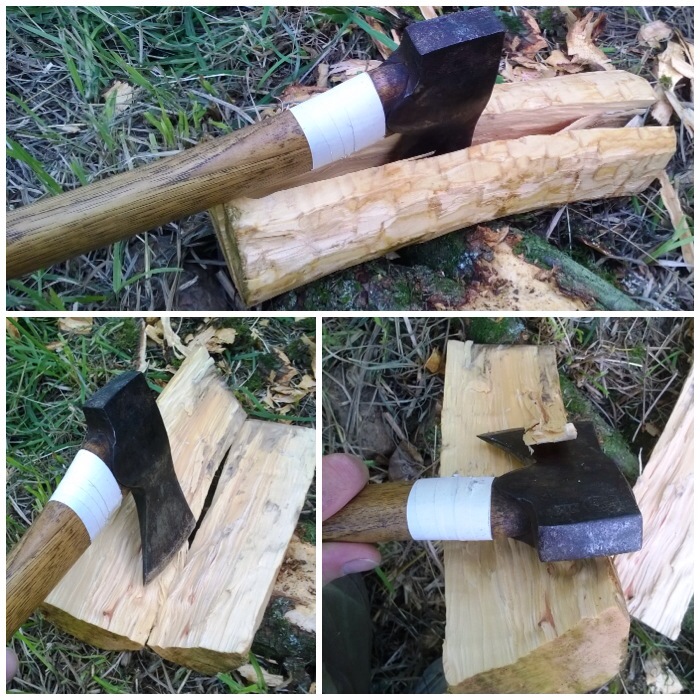
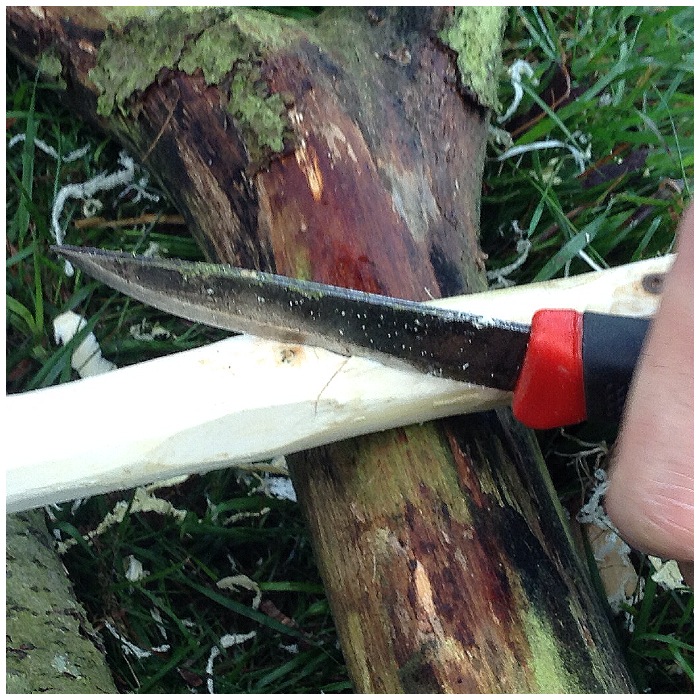
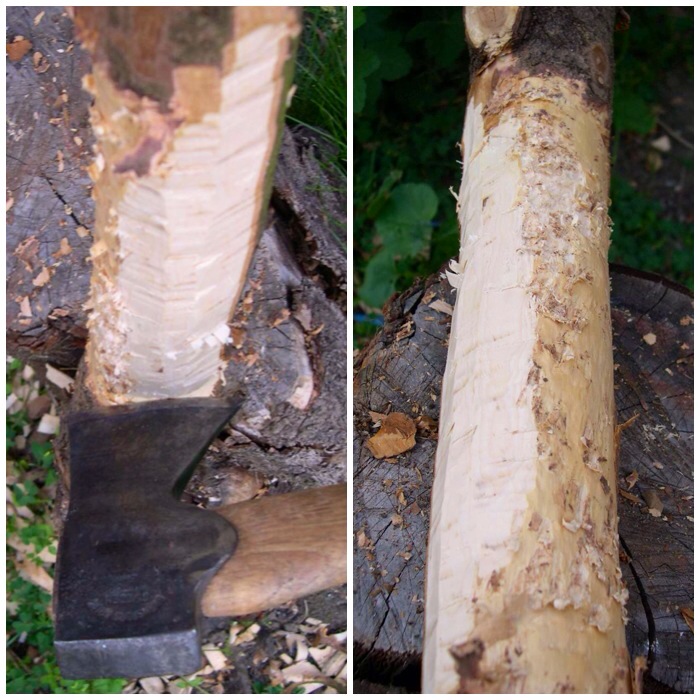
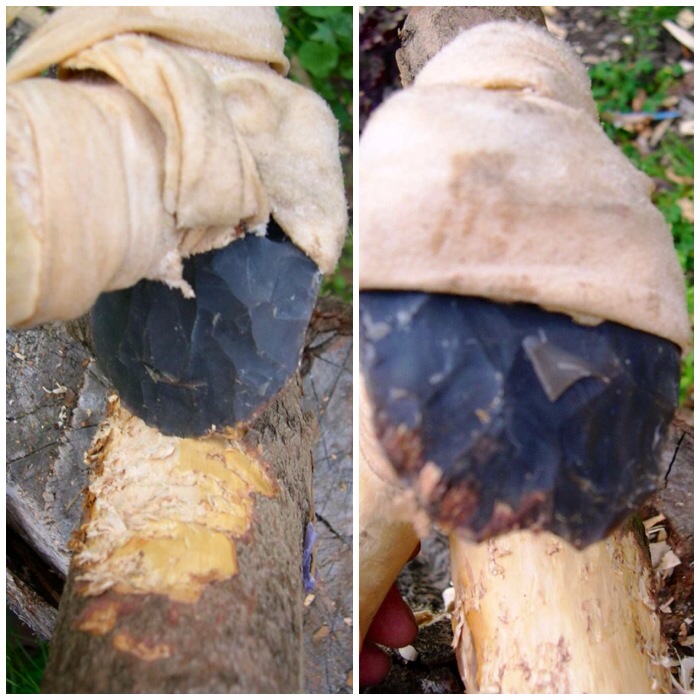
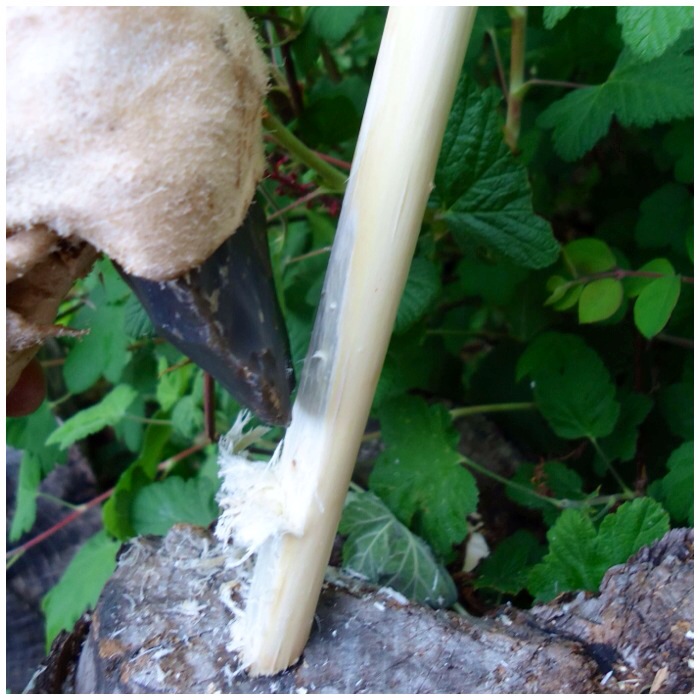
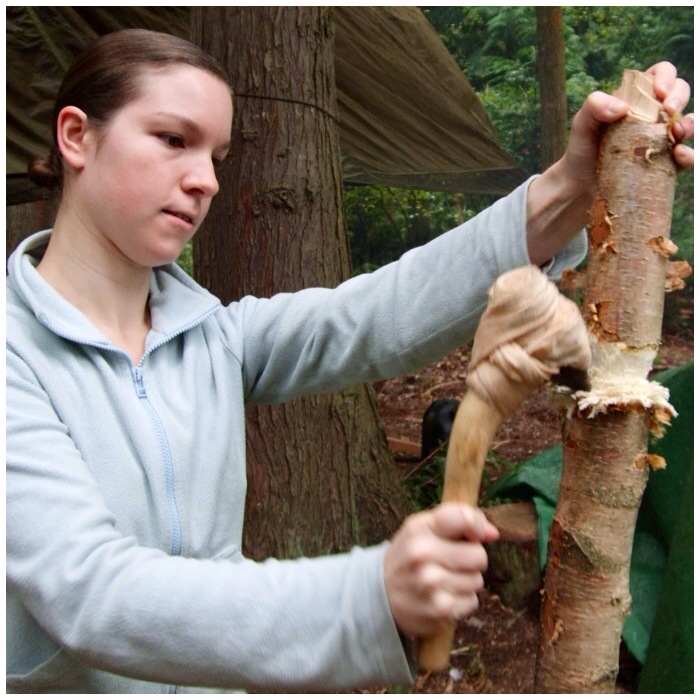
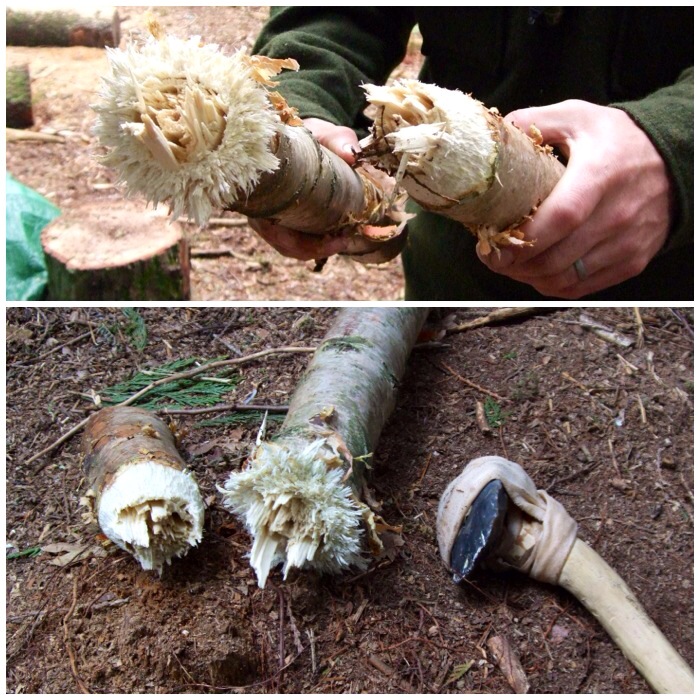
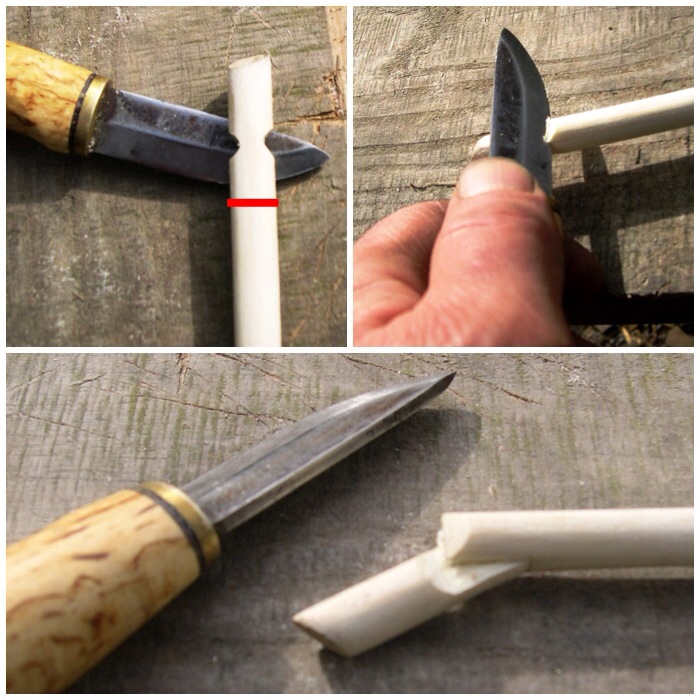
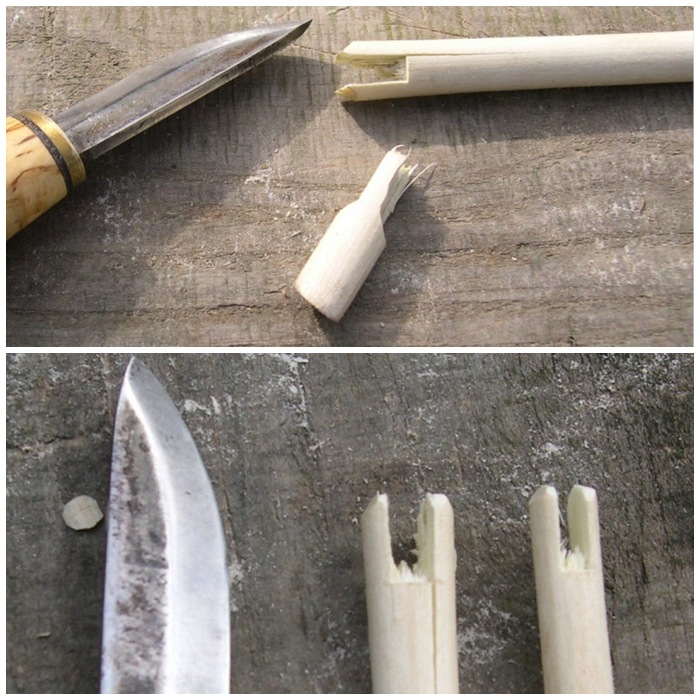
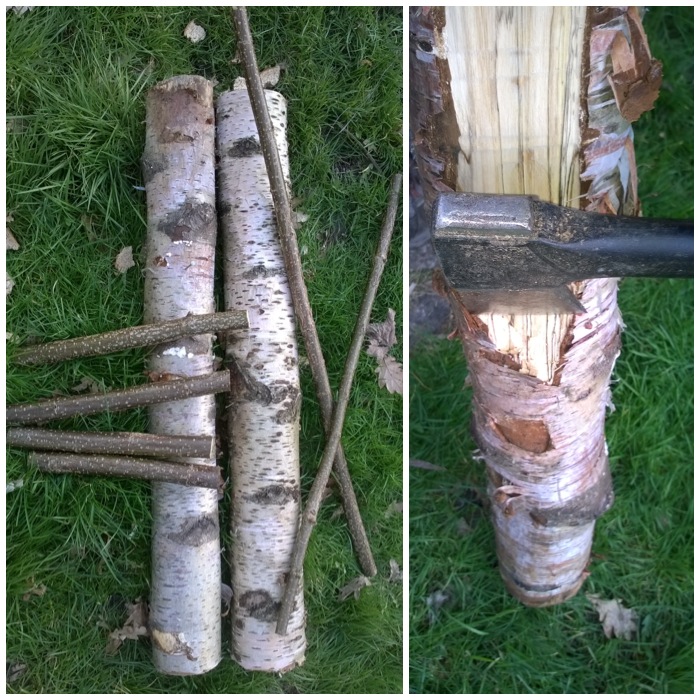
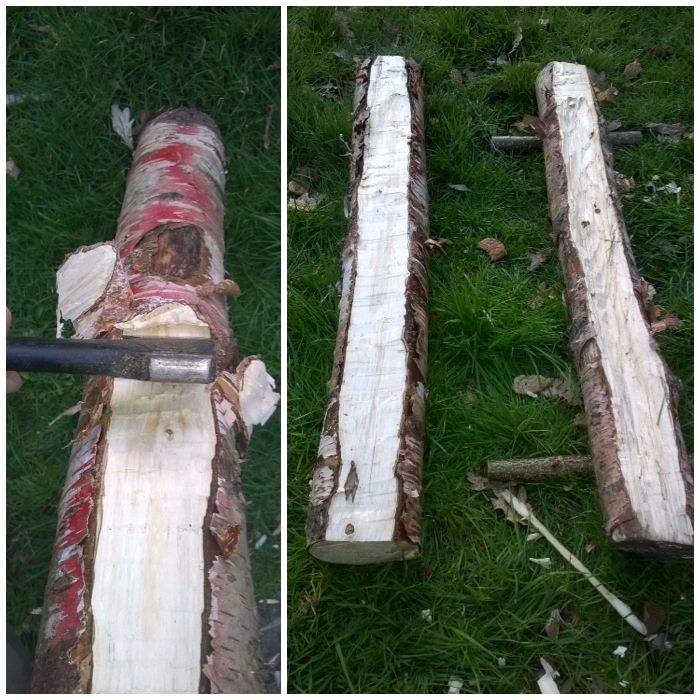
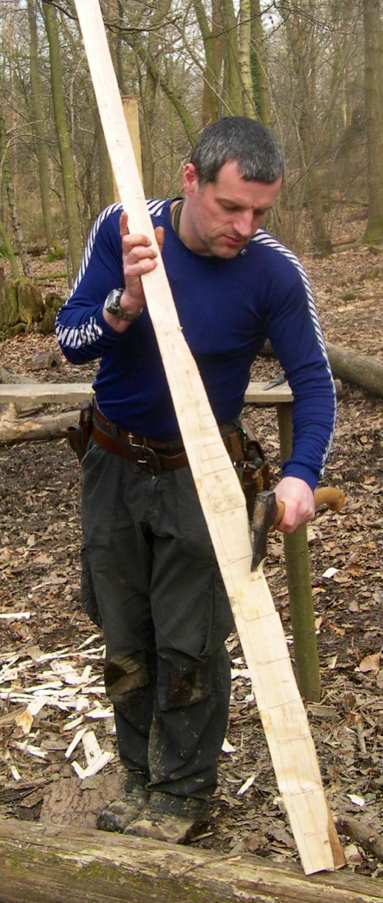
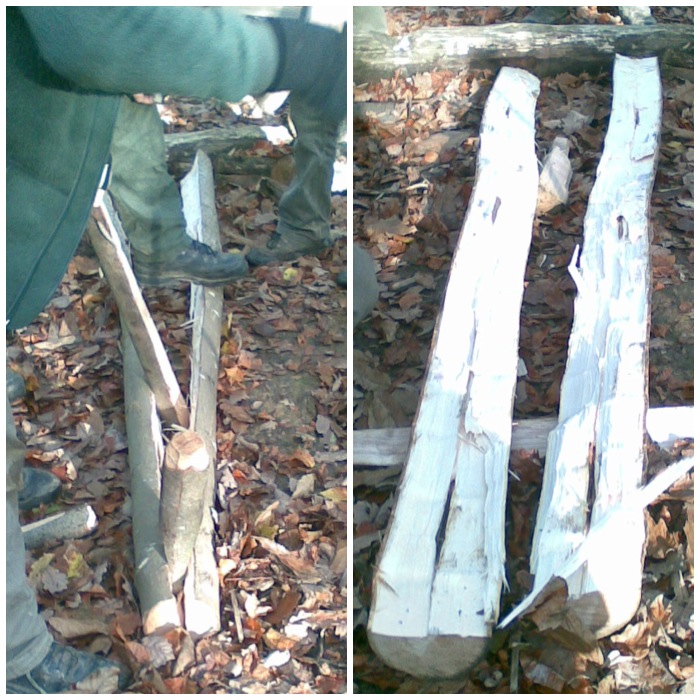
The bark was easy to strip off with my axe – being very careful where my fingers were at all times – and then I used my saw to cut it down further so I had a piece I was happy to carve.
De-barking and trimming to size
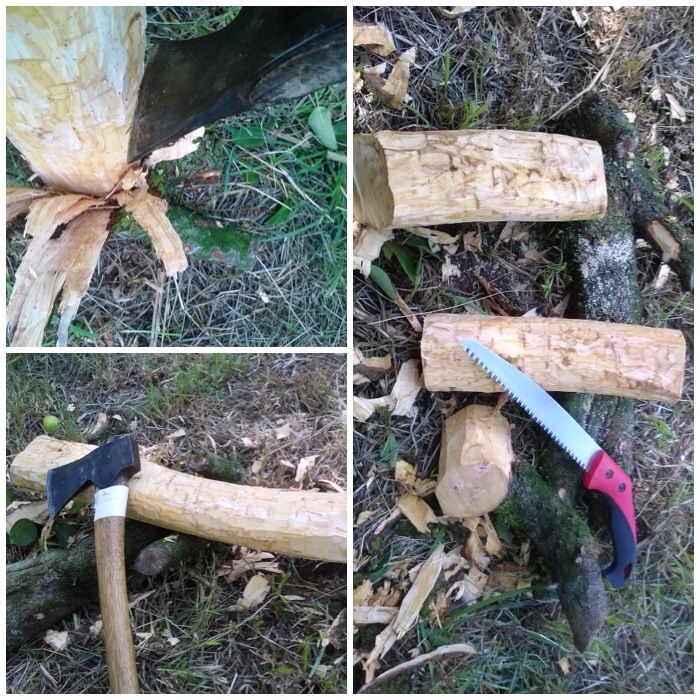
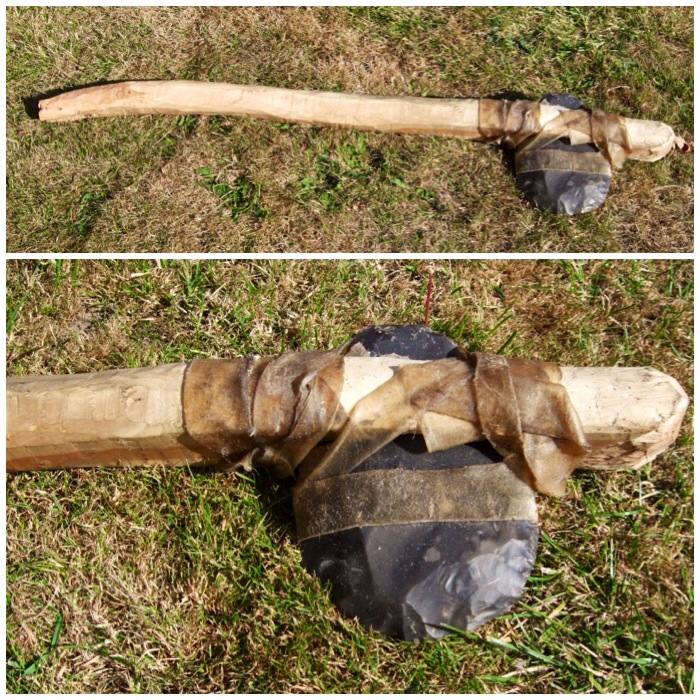
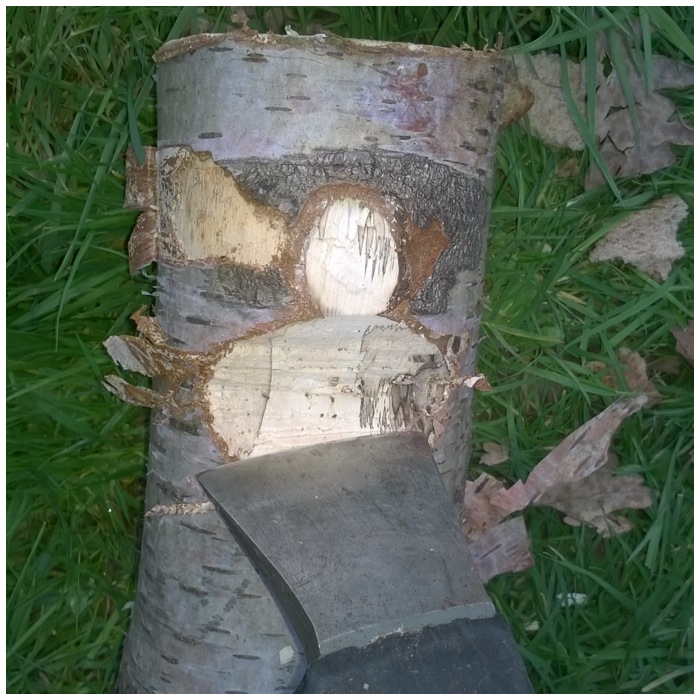
One piece of the branch made a perfect hammer for battoning my work piece in two. I make sure that the blade of the axe is 90 degrees to my body so that if it slips the edge of the axe swings away from me.
This piece did not split evenly as the wood was quite twisted with its age.
Battoning
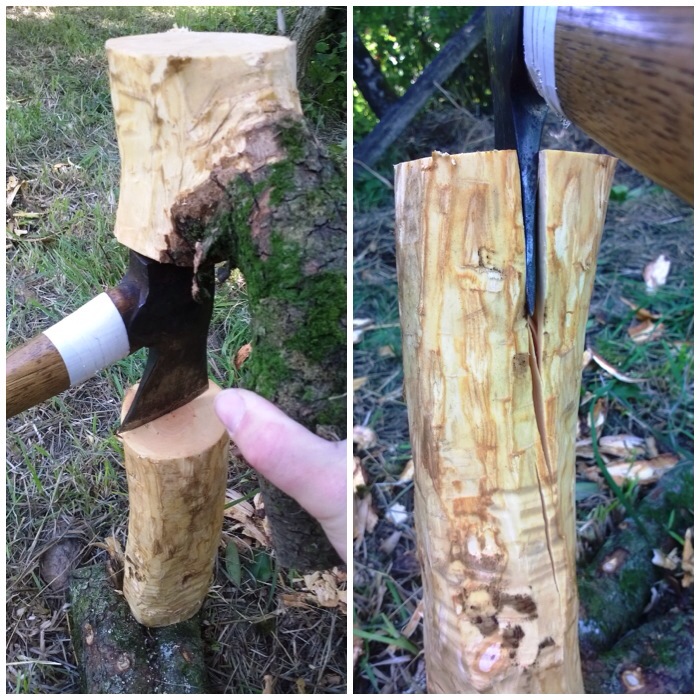
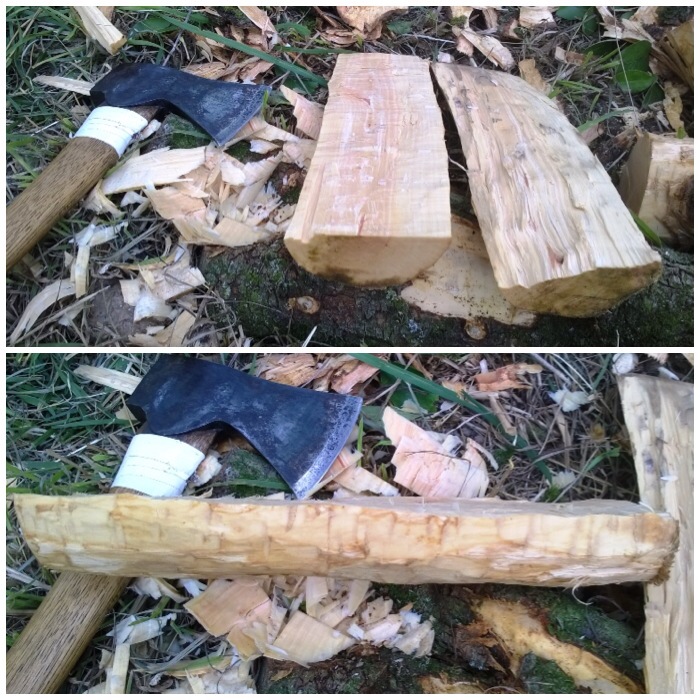
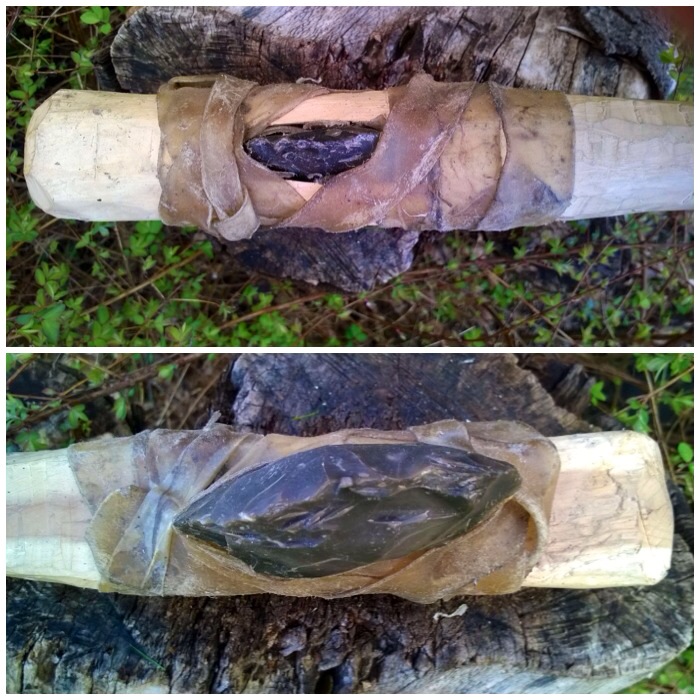
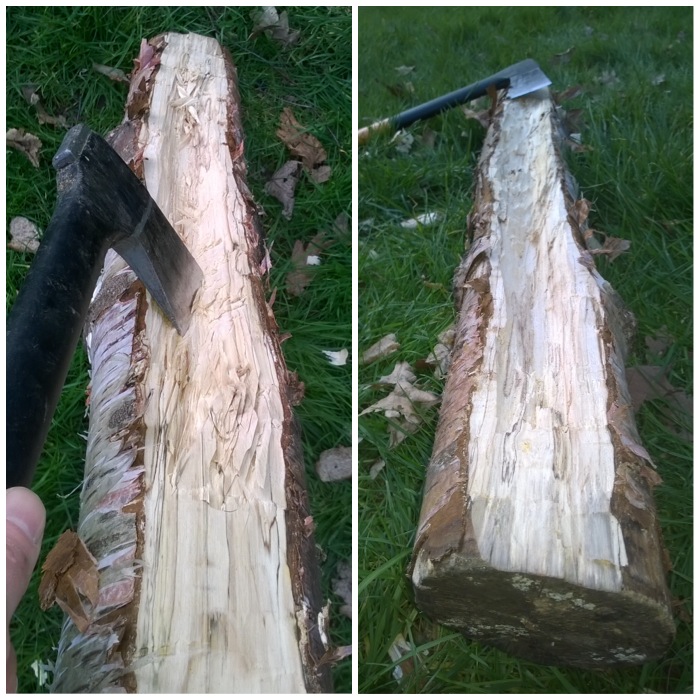
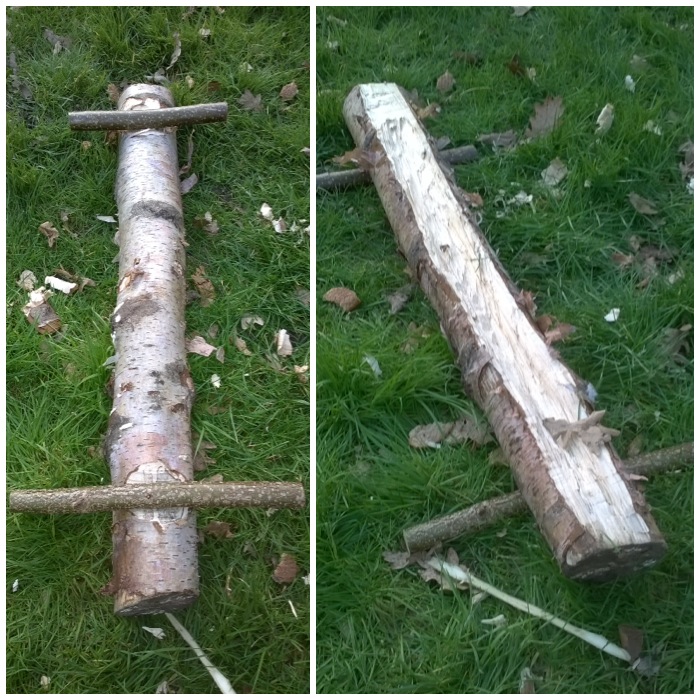
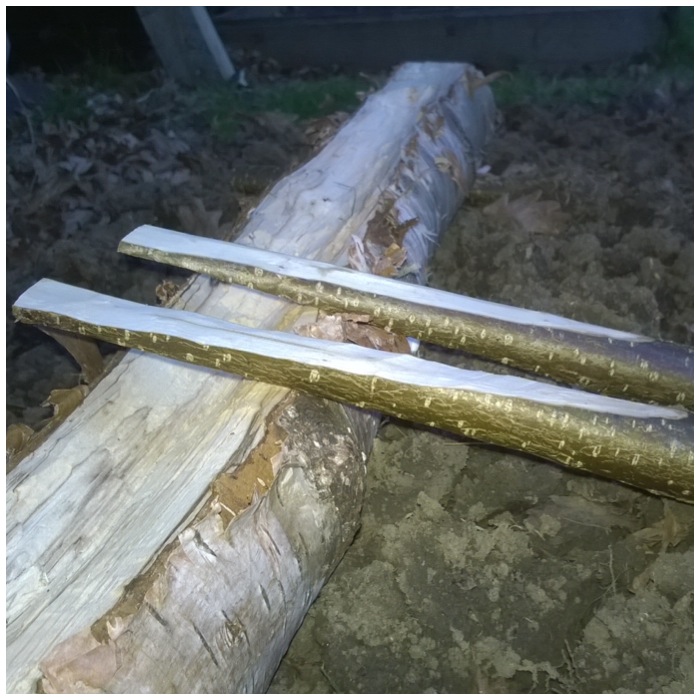
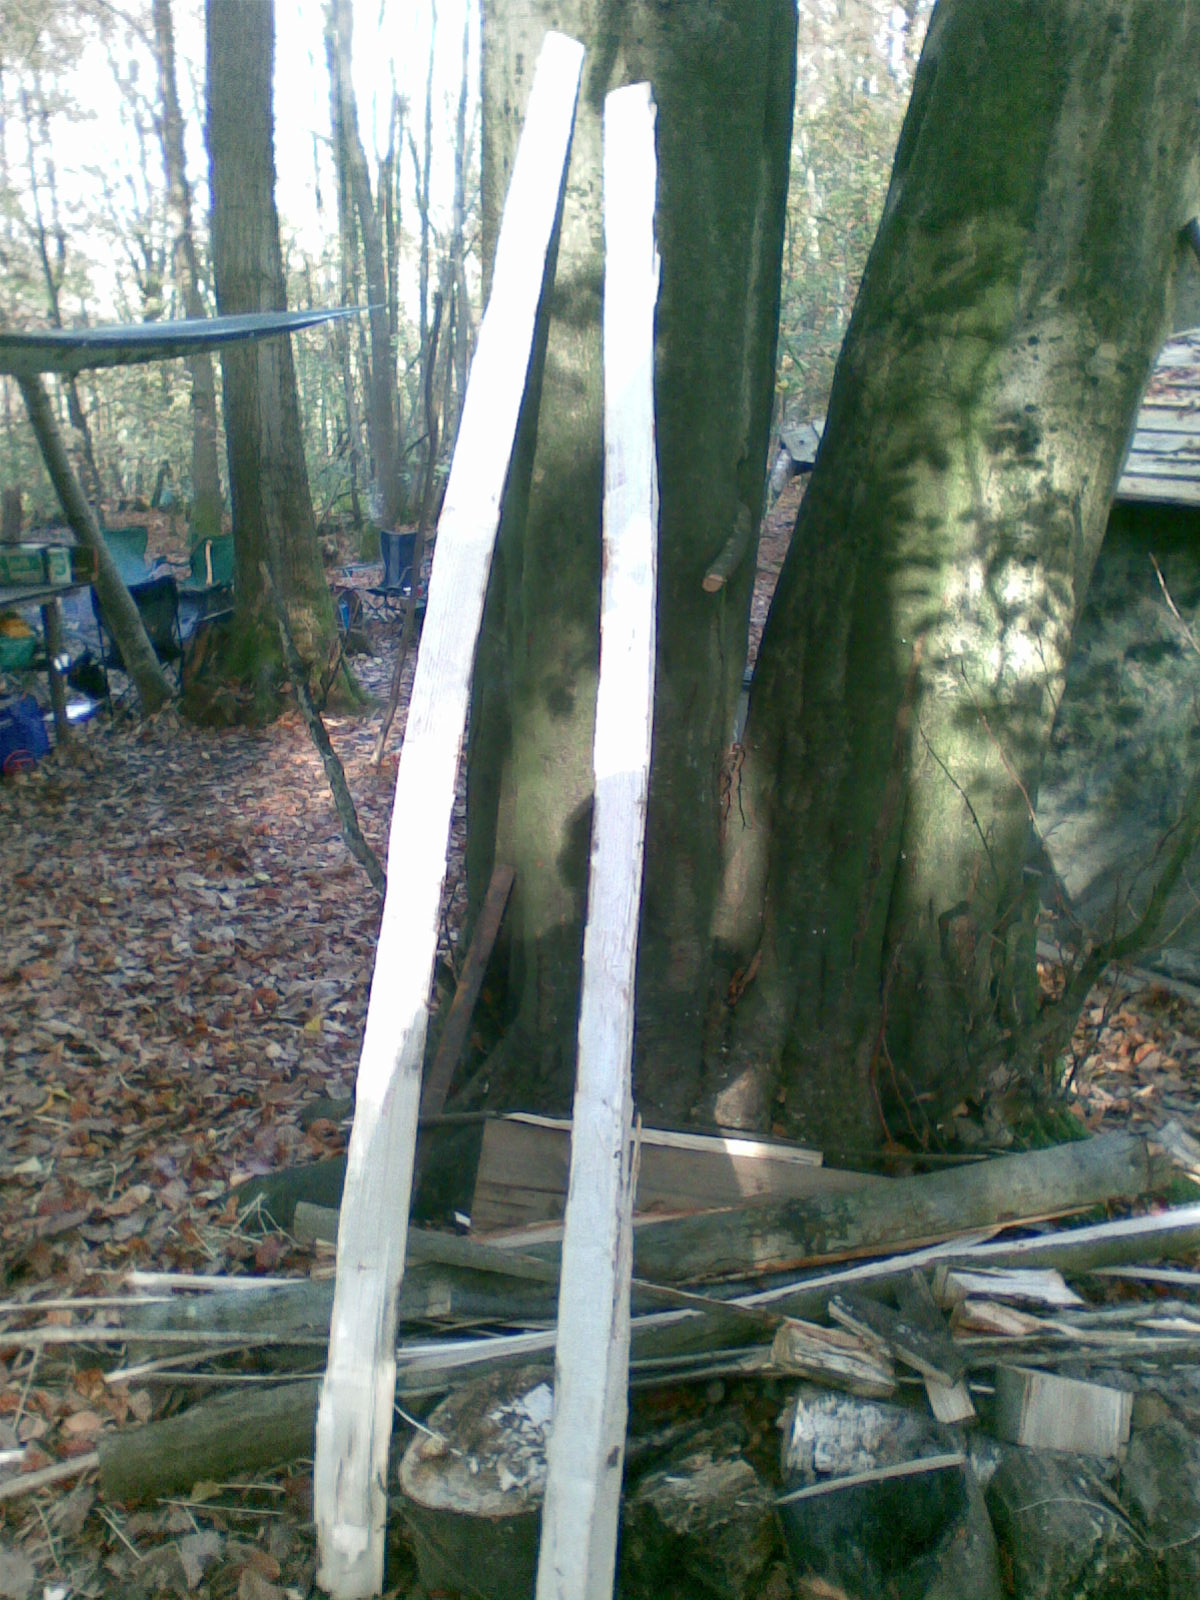
To make the split more even, I put the work piece on its side and split it further. A slower method but more controlled I think.
Splitting out
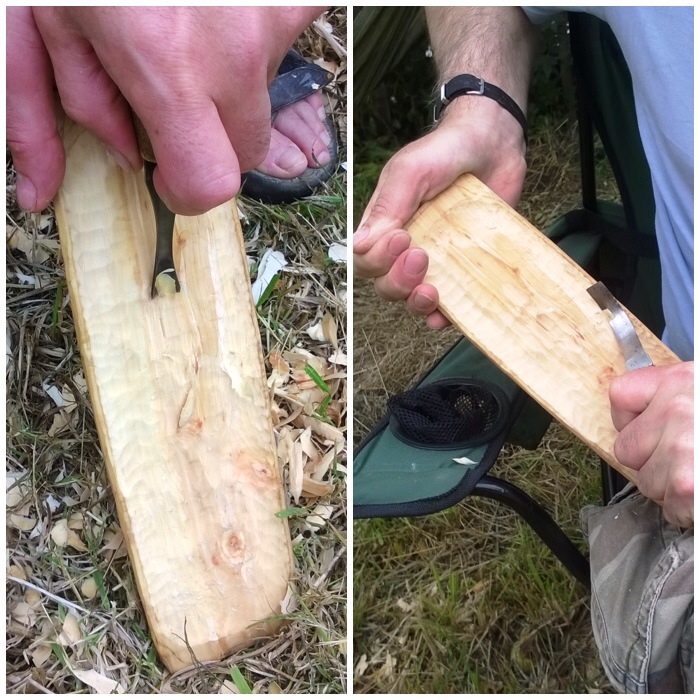
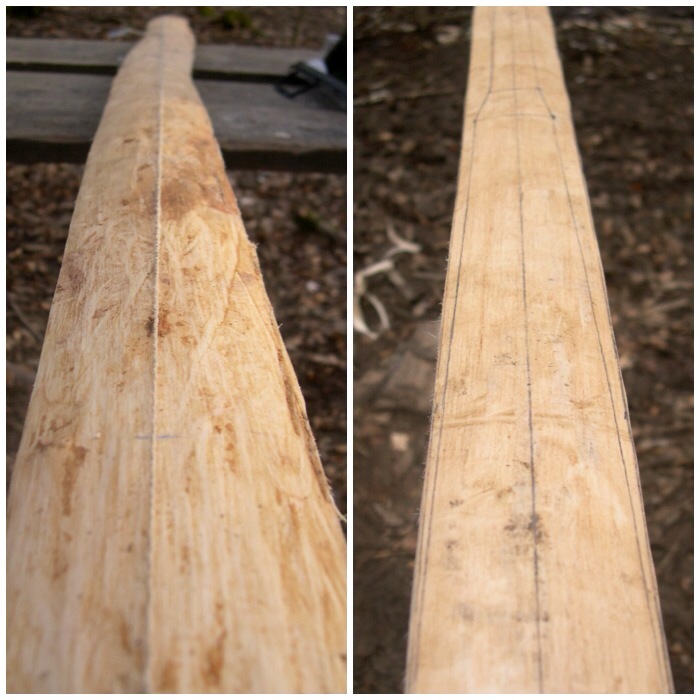
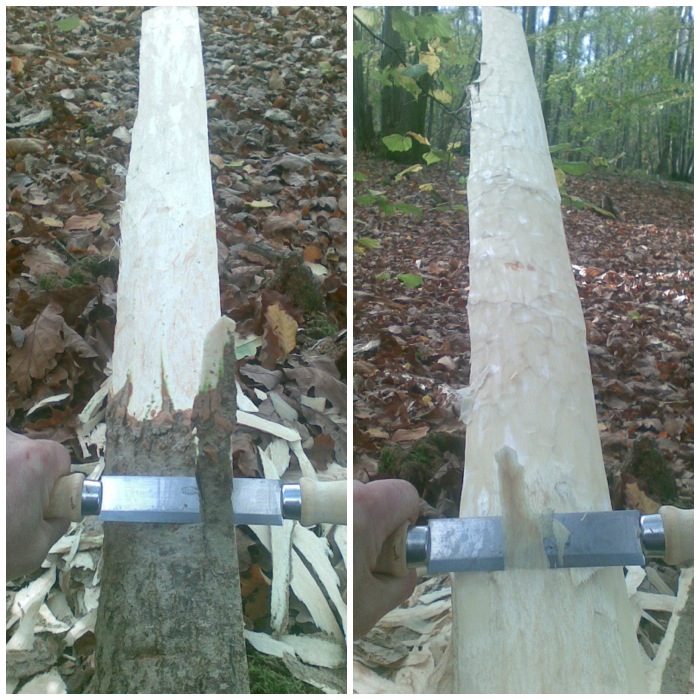
After splitting I cut out some wood from one of the halves to give it a flatter look.
Flattening
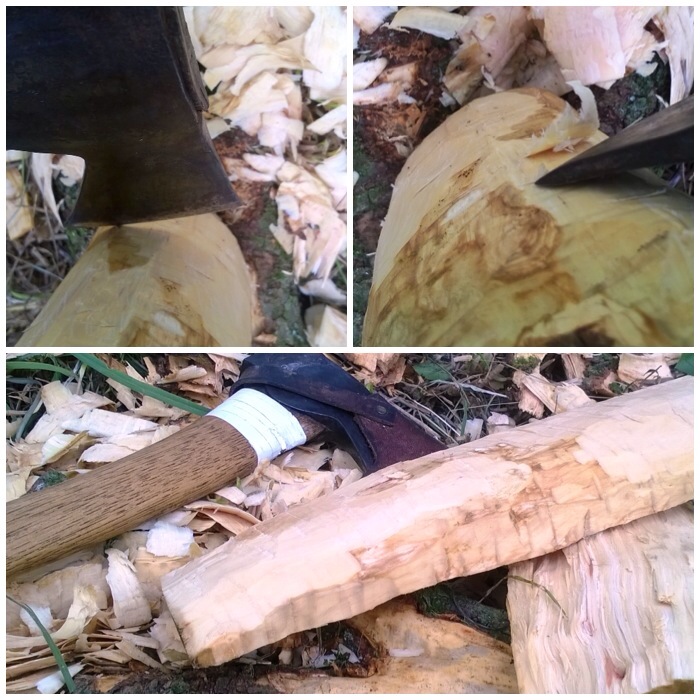
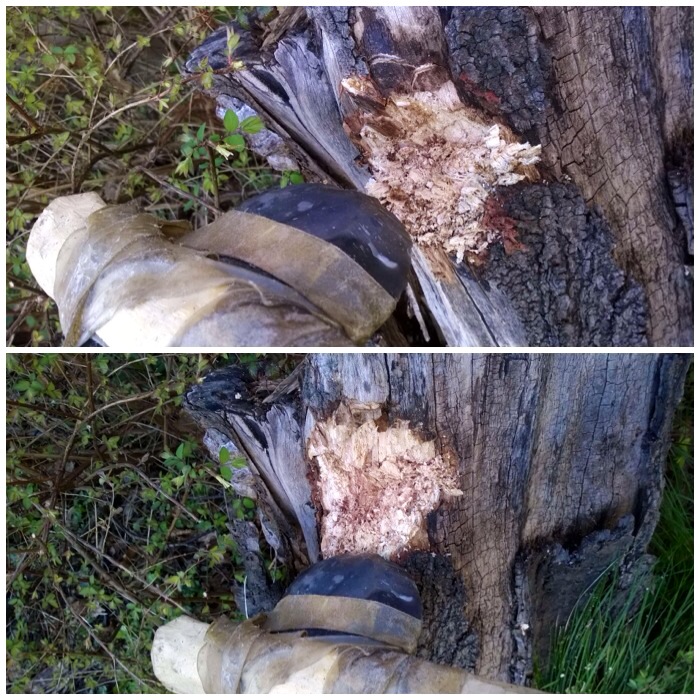
I used my axe to take of some of the excess wood around what would be the bottom of the platter. As the shape was going to be a shallow curve I did not put any stop cuts in but just chipped away, starting from the ends and chasing the wood back to the centre.
Axing out the back
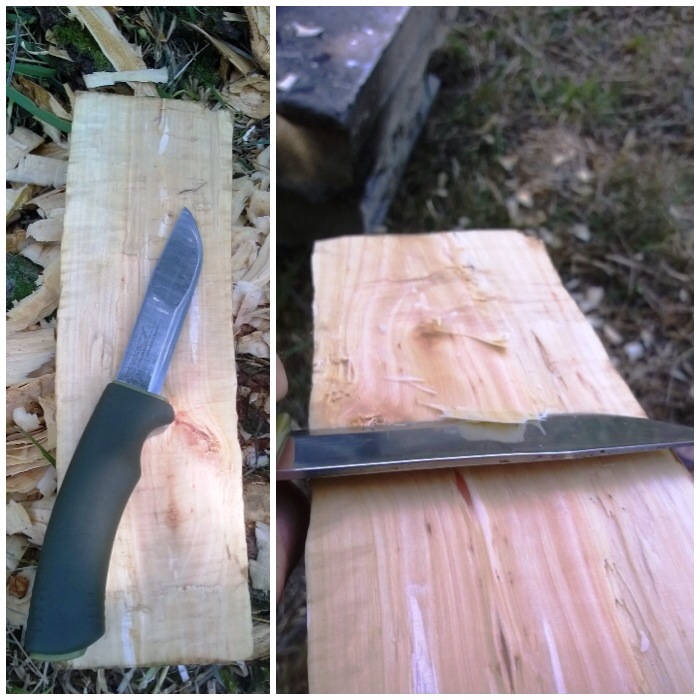
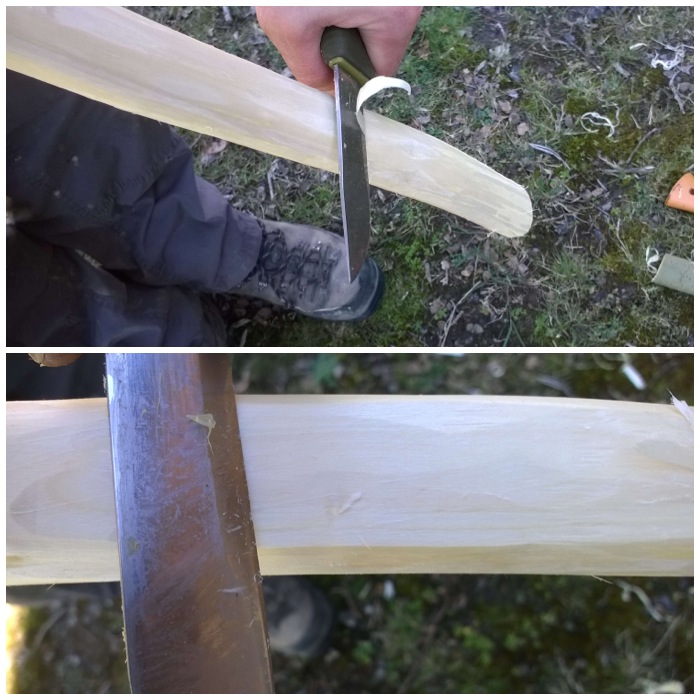
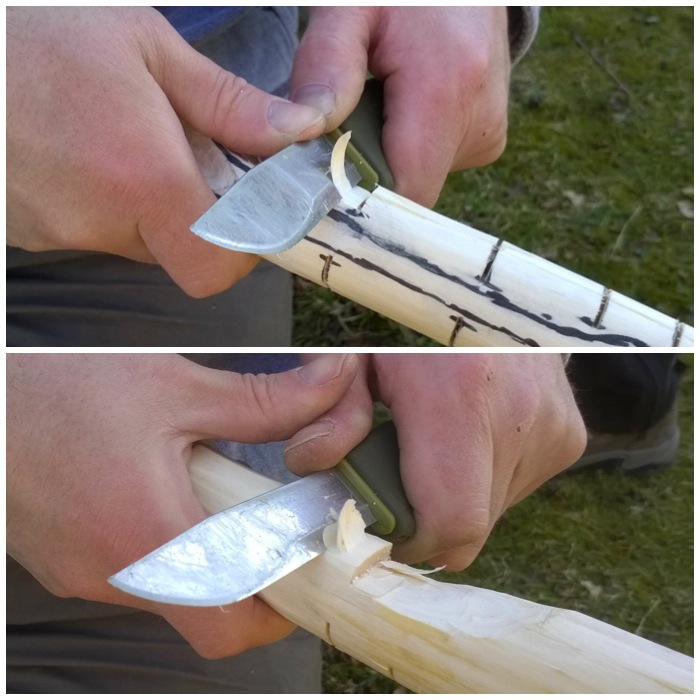
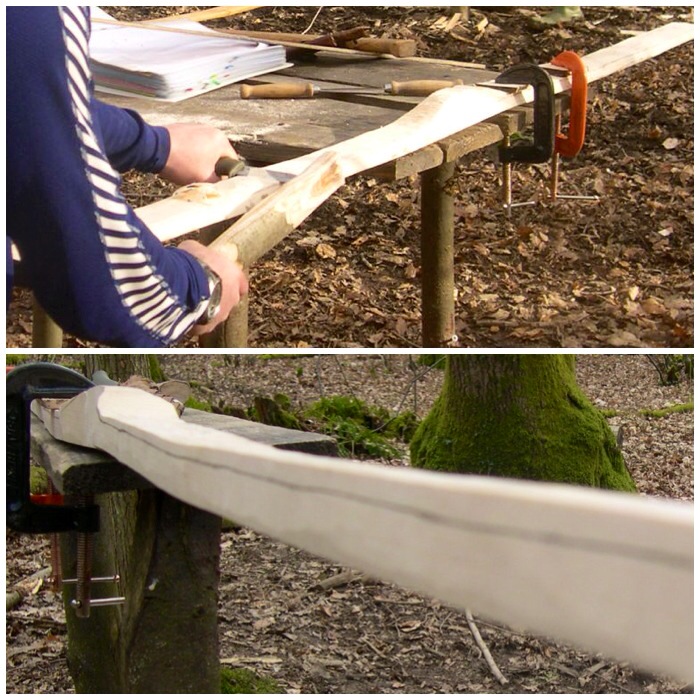
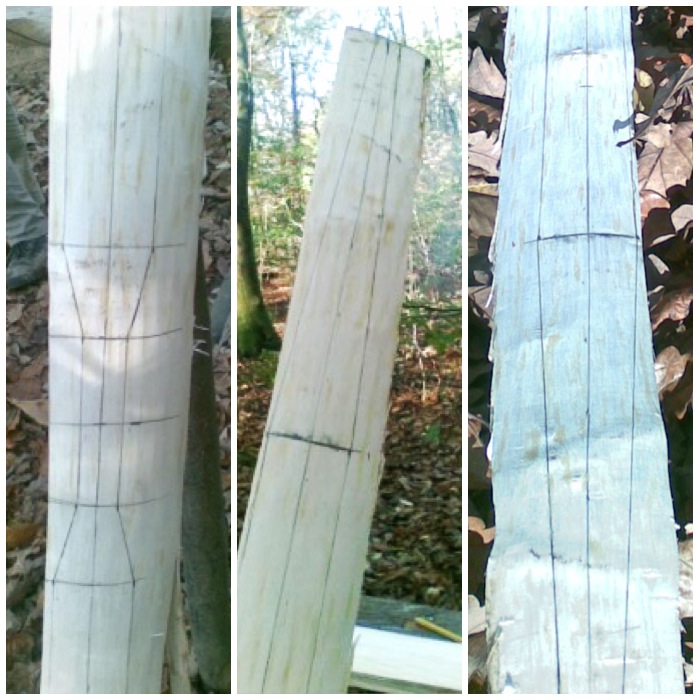
To finish the flattening of the top part of the platter I finished with the axe and moved onto my knife.
Final flatten with the knife
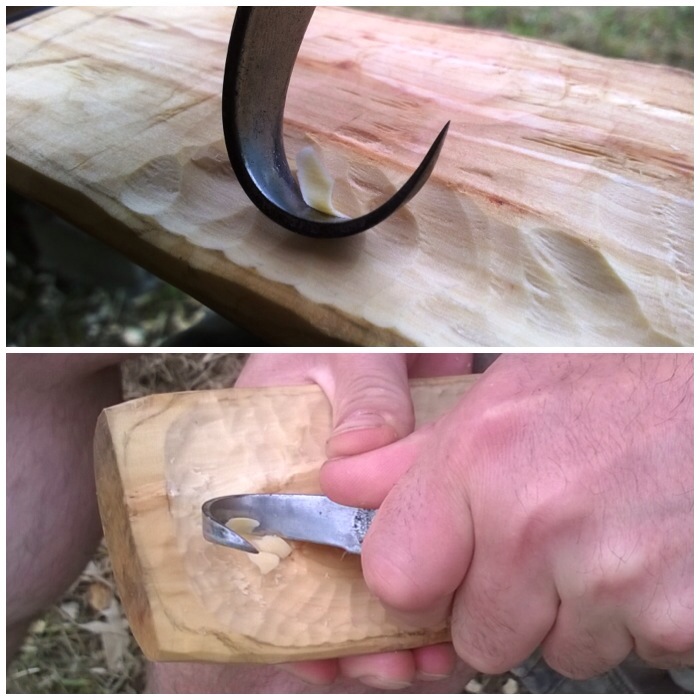
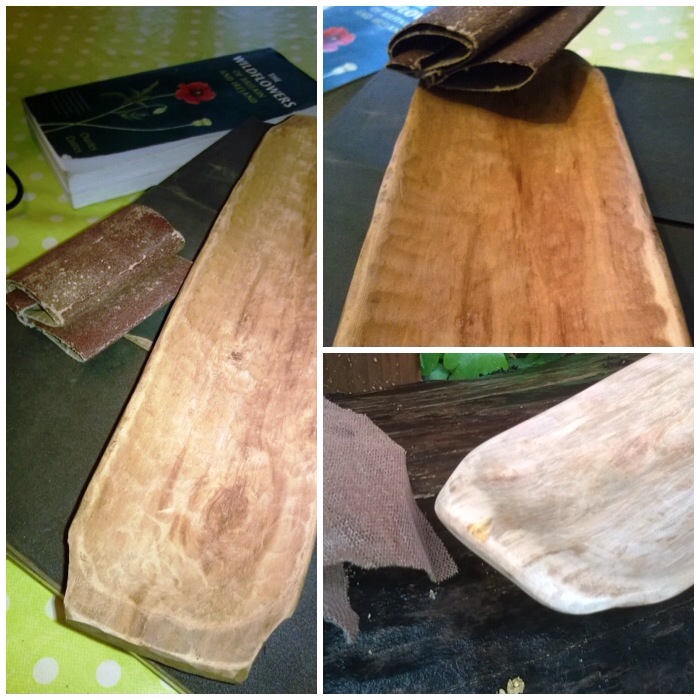
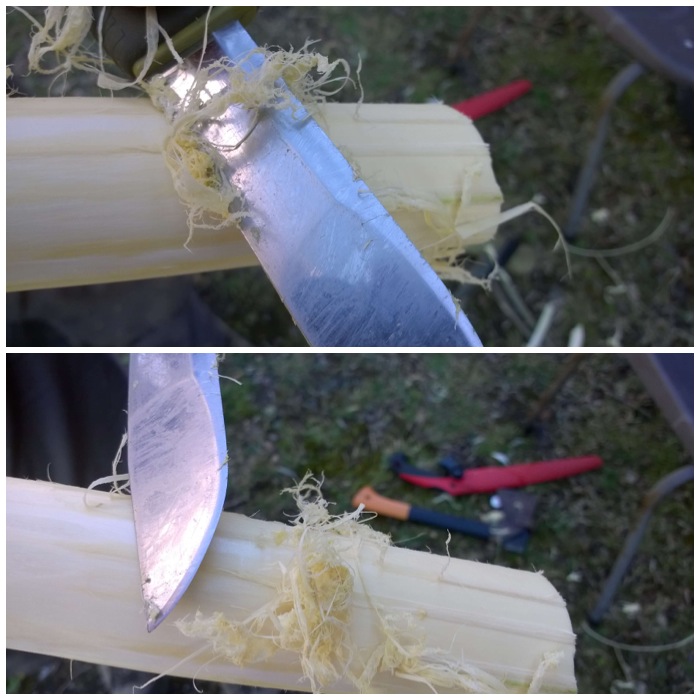
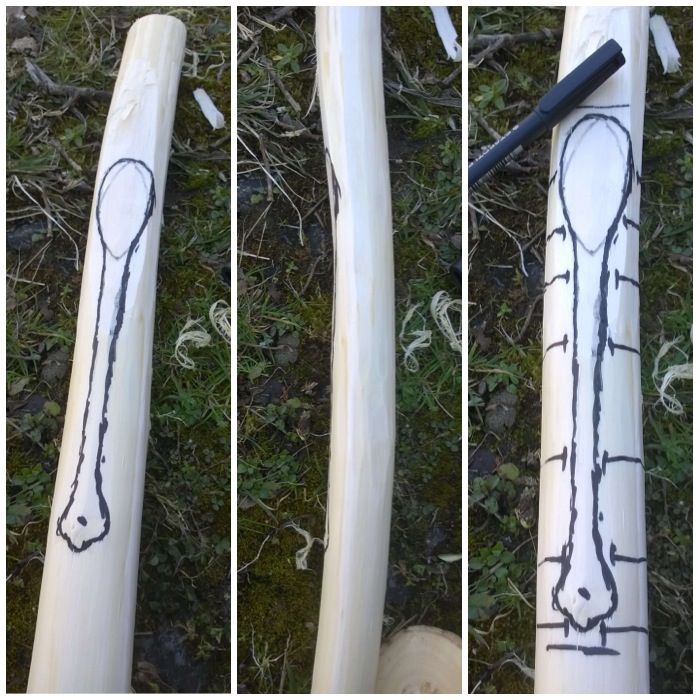
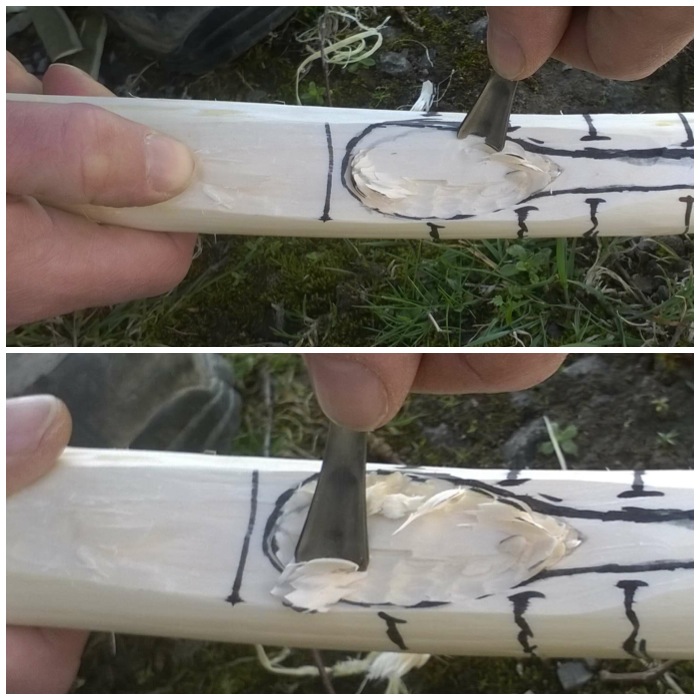
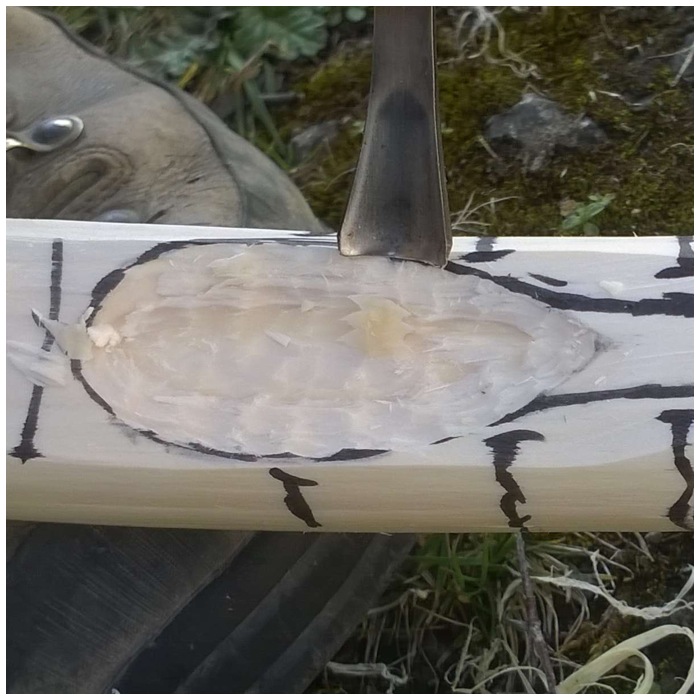
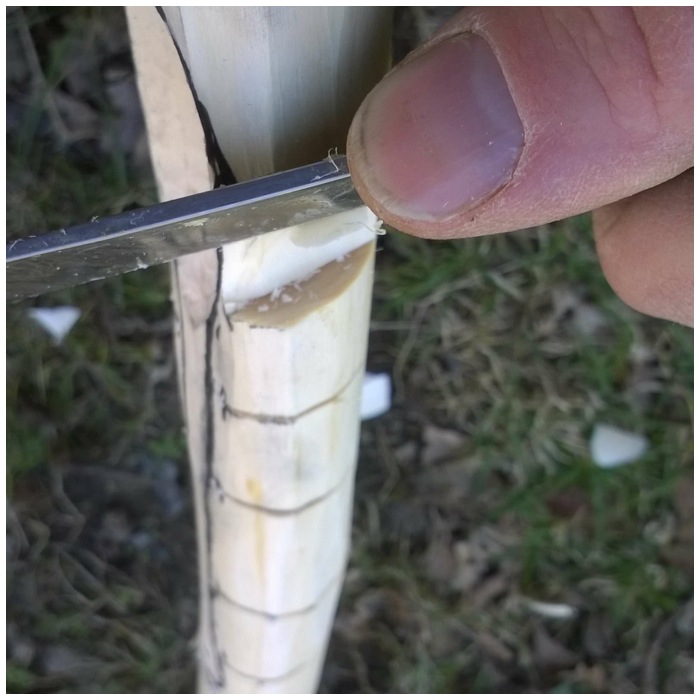
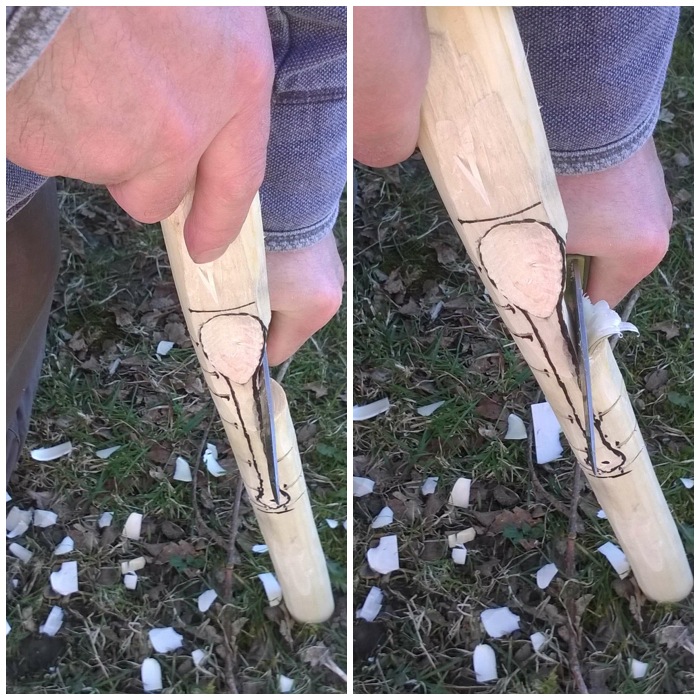
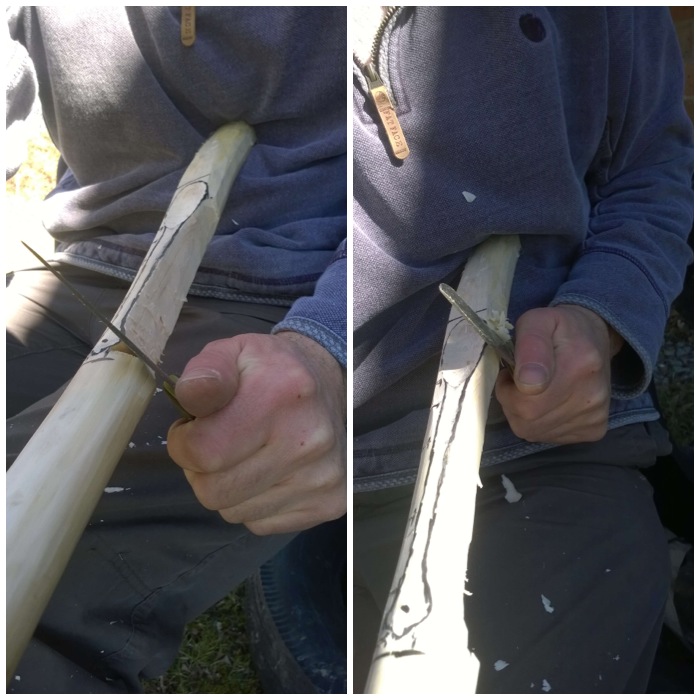
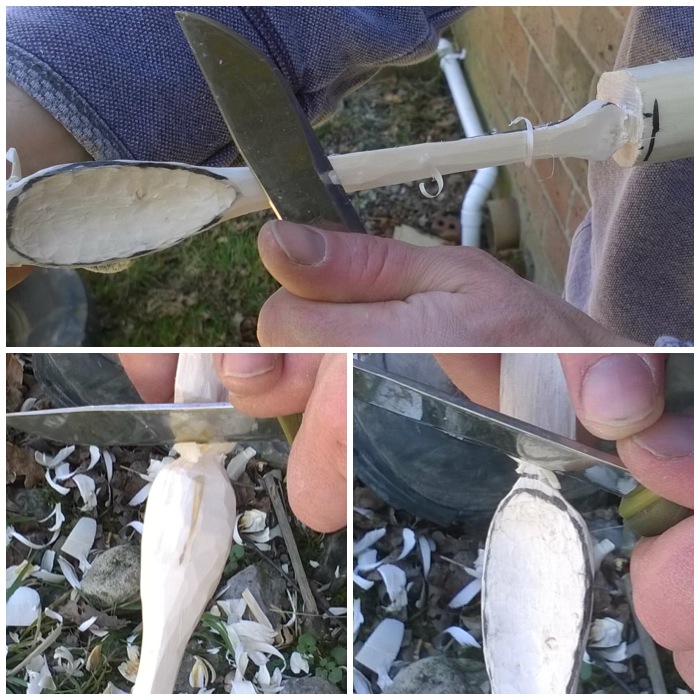
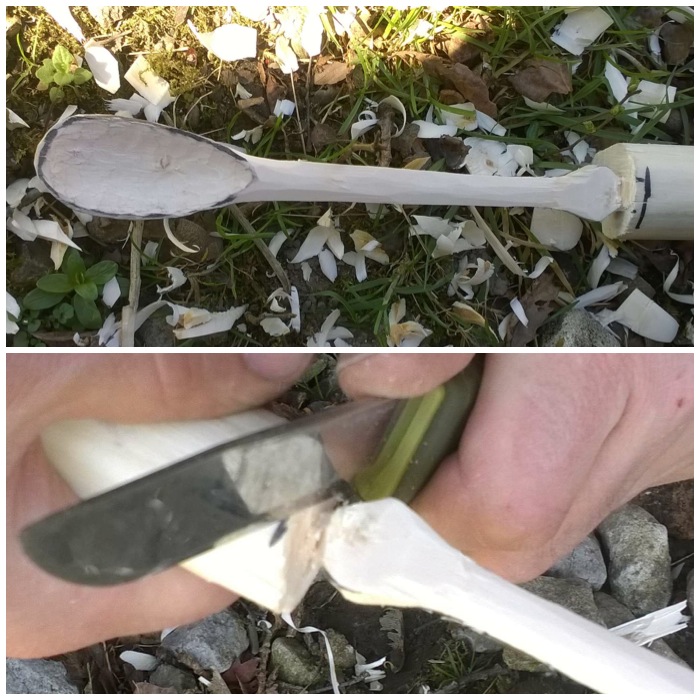
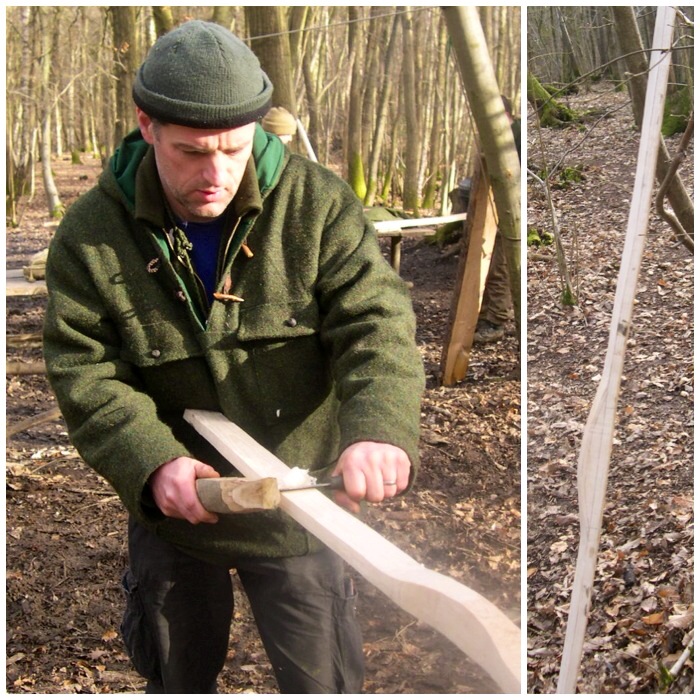
Once the work piece was as flat as I wanted I drew the shape of the bowl area and used my crook knife to start removing the wood from this area. As the wood was very green this excess was removed very easily.
Using the crook knife
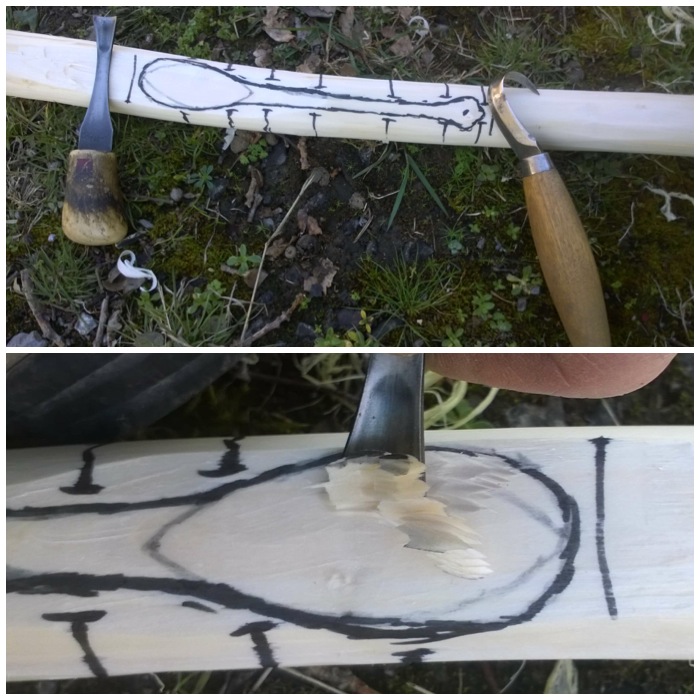
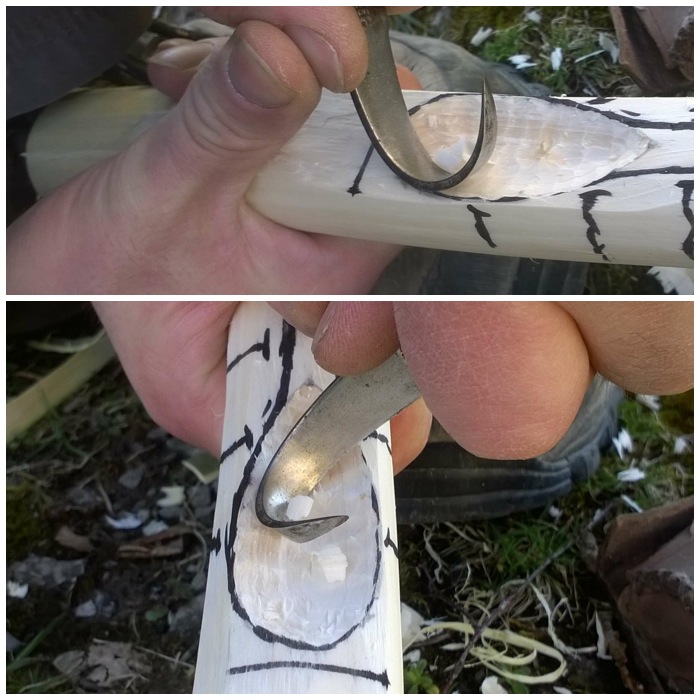
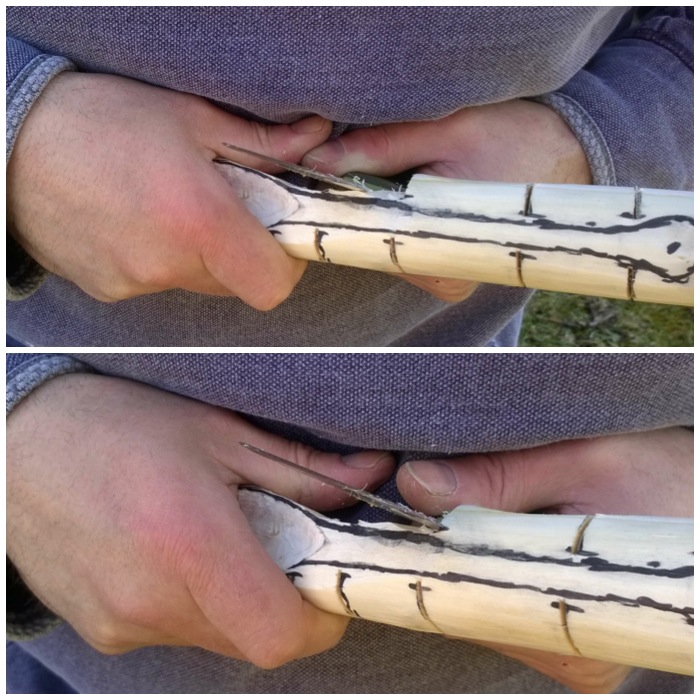
I also used my palm gauge and my bowl knife in this process. These are the only bowl-carving knives I have and I switch between them depending on what the wood is saying to me as I try and carve it out.
These tools make a real difference to carving the bowl area but are ones you really need to practise with a lot to be as safe and efficient as possible with when using them.
Palm gauge and bowl knife
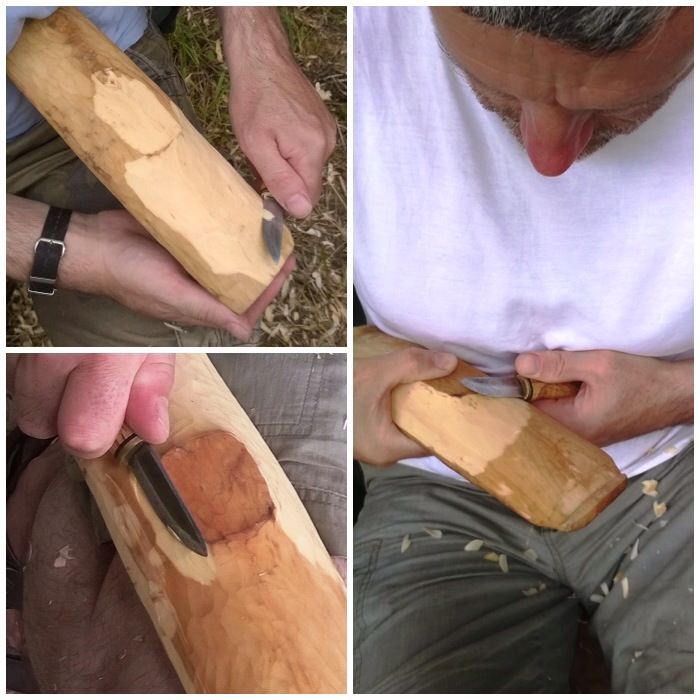
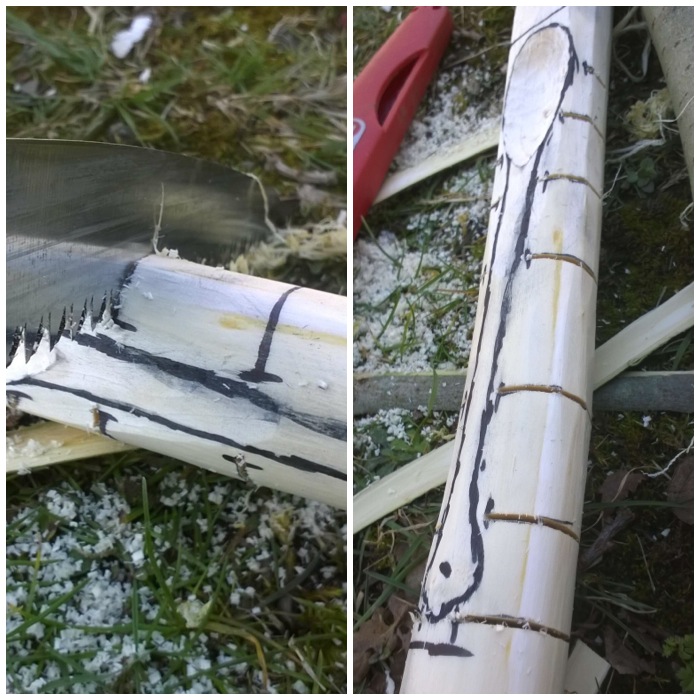
Once I was happy with the amount of wood removed from the bowl area, I moved onto the back. I like to take my time when working on this area as it is all too easy to cut out large chunks of wood and suddenly reveal a great big hole in the bowl. I use a variety of cuts: brake cuts towards me, small pressure cuts using my thumbs and powerful but small chest lever cuts to name just three. With all cuts, the main thing to remember is that you must always be aware where the blade will end up if the knife slips.
Different knife cuts
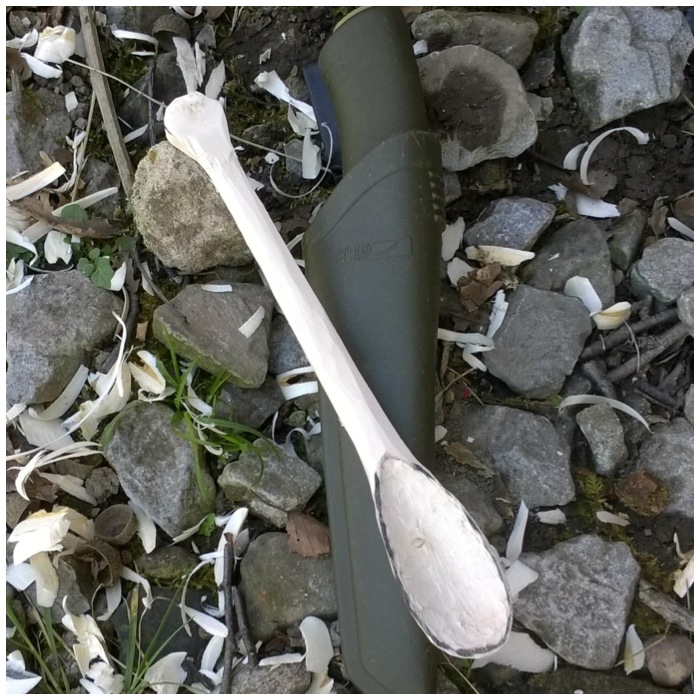
I had a lovely time over a couple of evenings working on this carving – this is what I call relaxing.
Relaxation and fine work
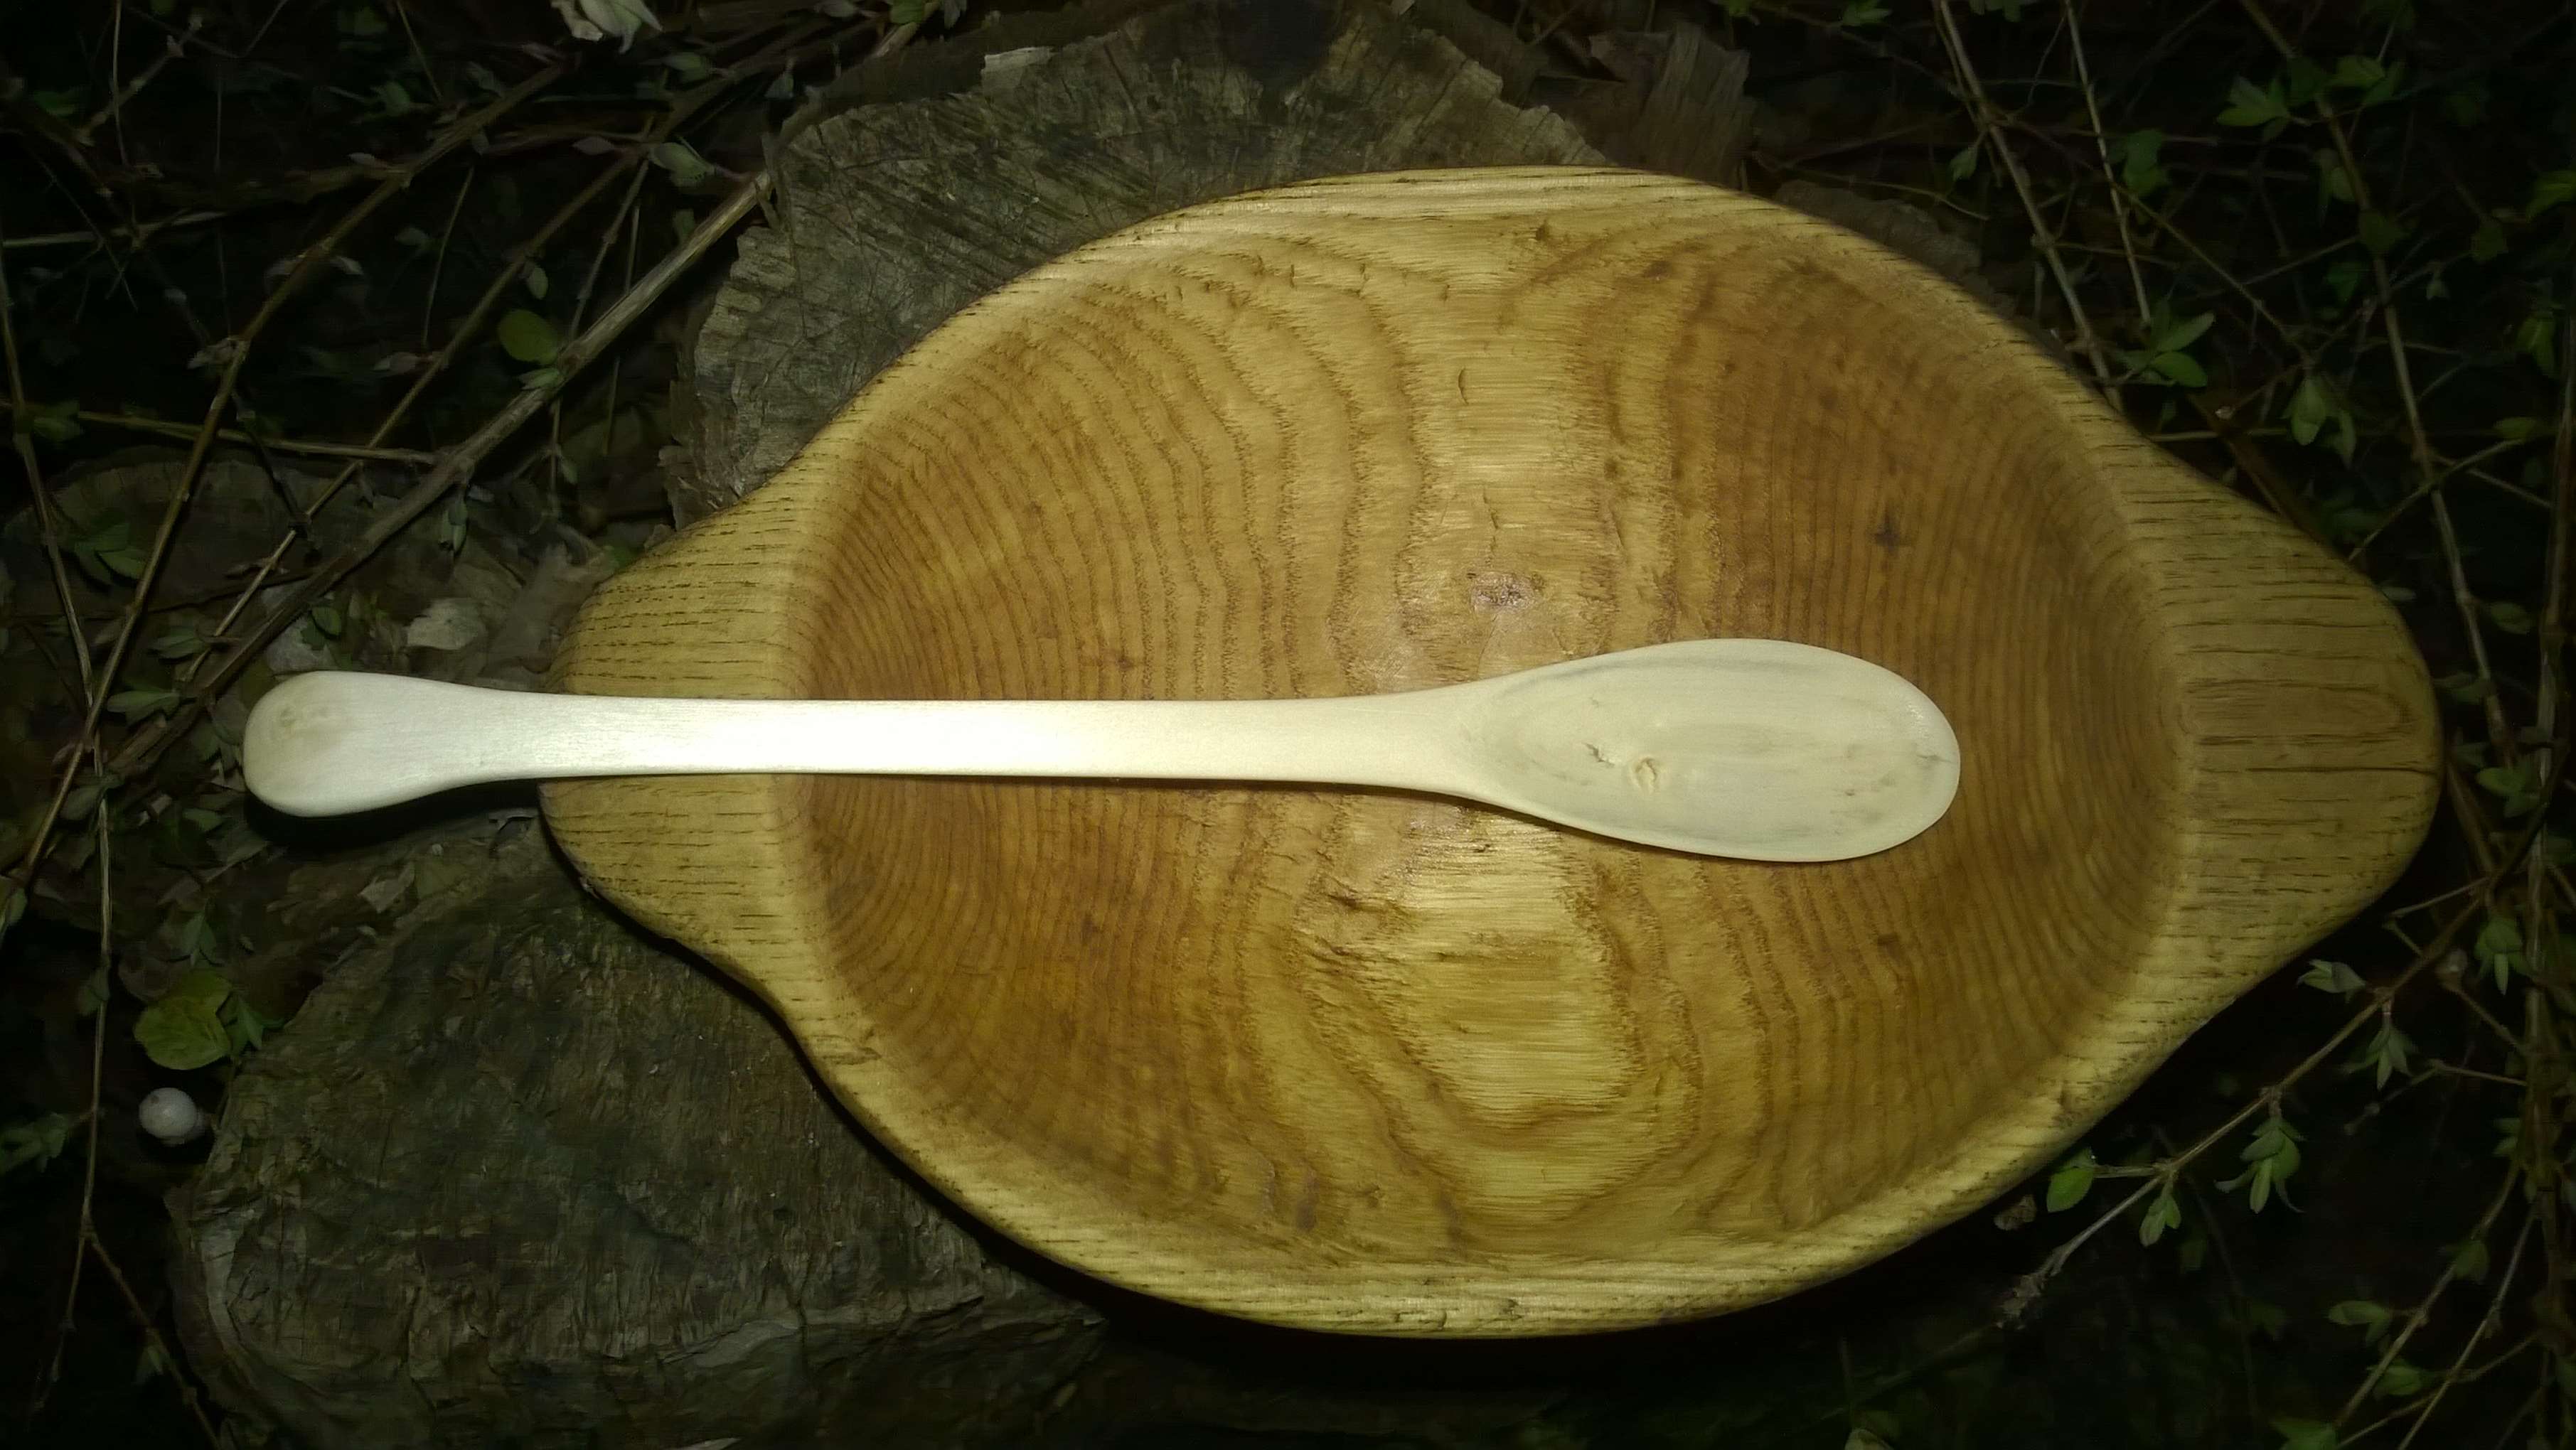
I had kept a lot of the chippings from the carving and when I had removed enough wood I put the platter and lots of the chippings into a plastic bag and kept it in my garage (a nice cool area) for a month to slowly dry out. I added some water to the chippings every few days for the first week to keep them and the platter slightly damp.
This slow drying process allows the whole of the platter to dry in a much more even manner. The platter would potentially crack if the outside dried at a much faster rate than the inside (caused by pressure differences).
Roughed-out platter
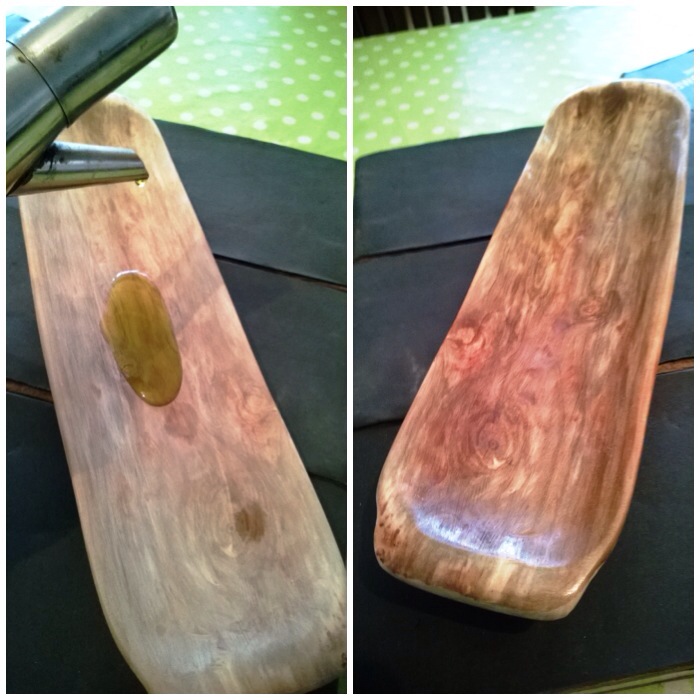
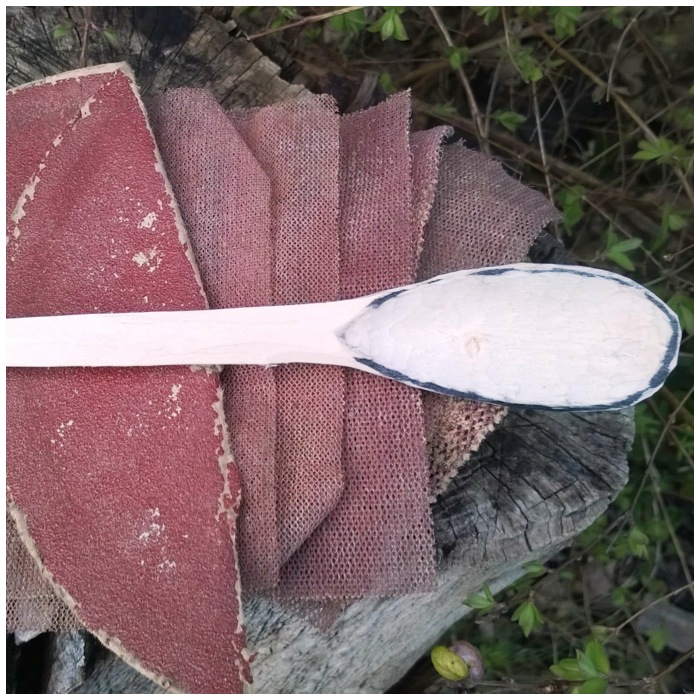
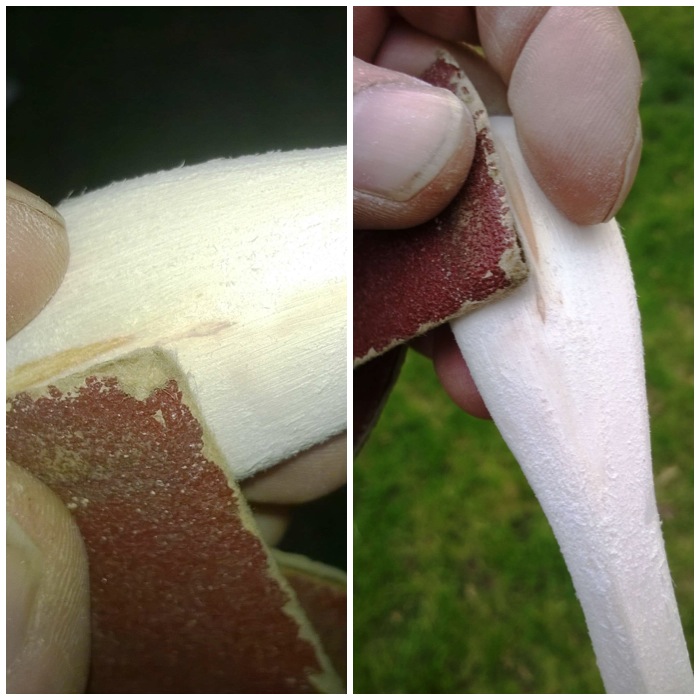
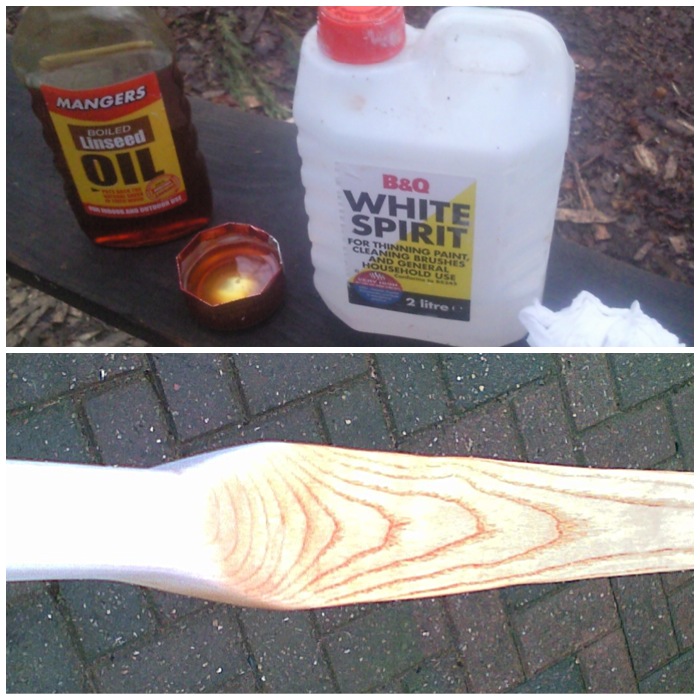
After a month of drying I used different grades of sandpaper from rough to very smooth to get rid of most of the lumps and bumps.
Sanding
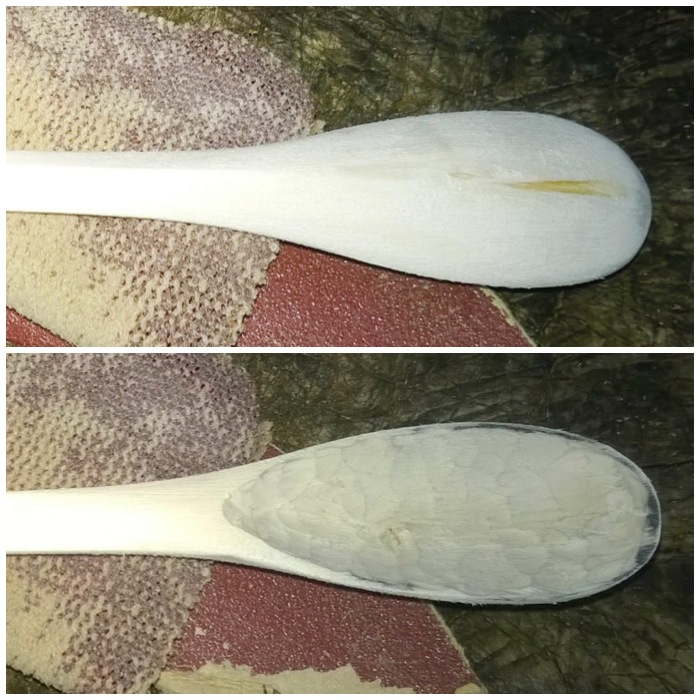
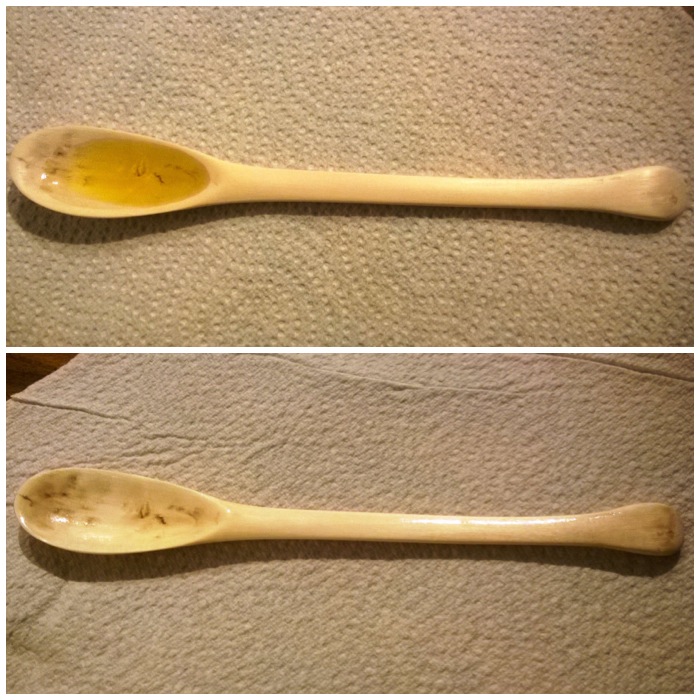
I coated the platter with 3 layers of olive oil (allowing each coat to dry fully before applying the next).
Oiling
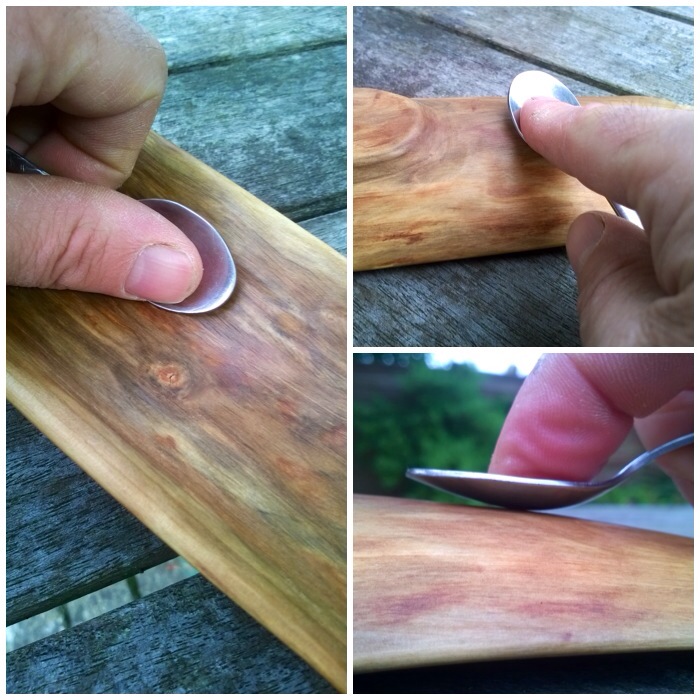
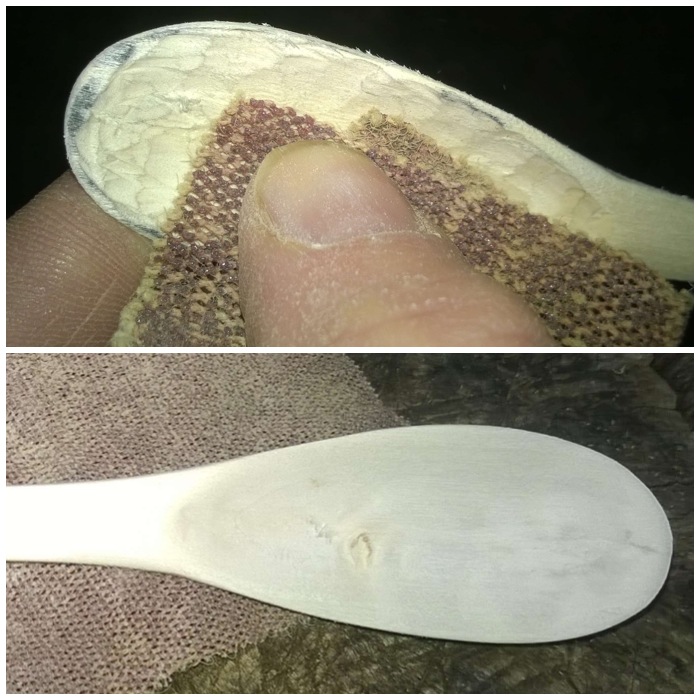
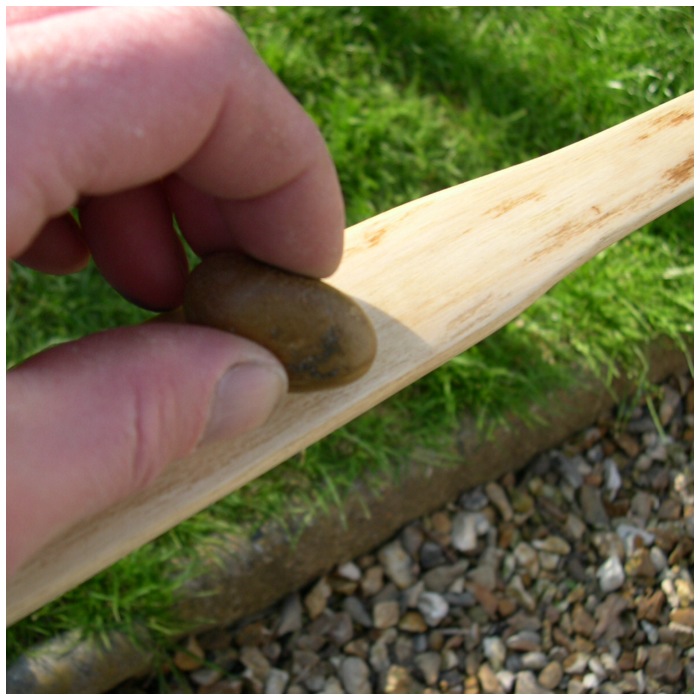
Then over a couple of nights I used the back of a spoon to rub the surface of the platter so that it became silky smooth (known as boning). Sometimes you get a very shiny surface doing this but I think that this wood may need to season for a bit longer as although it became beautifully smooth it stayed a bit dull.
The fibres of the wood may raise up again over the next few weeks but a light sanding and boning will soon have it smooth again.
Boning
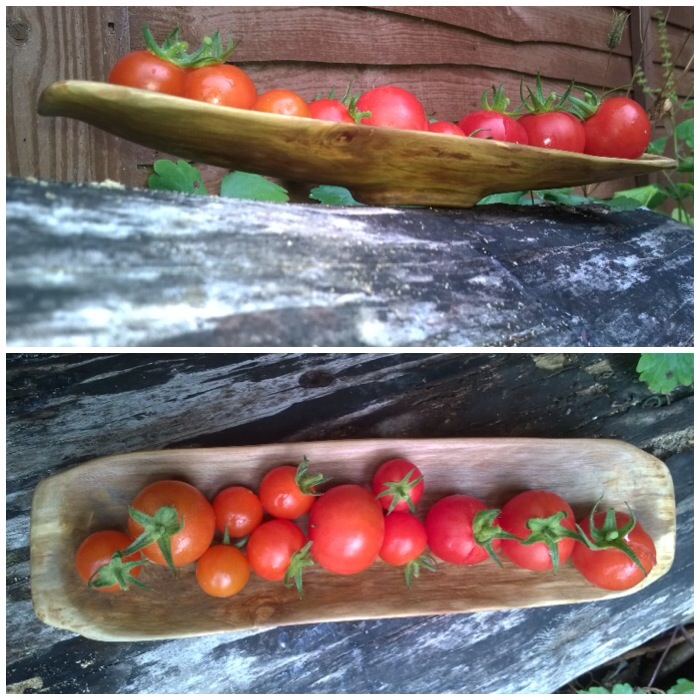
This is my 99th blog post and I am glad it was about something I was very happy to carve. The platter is destined to go back to France as a present to Rick for letting us use his cottage for what was a very lovely holiday – Brittany Adventures.
Part 3 in this series on fire by friction looks at my style of using what I classify as a modern bowdrill set up.
I use the term modern as I am using starter cord on the bow to spin the drill piece. I like starter cord as it does not stretch too much when the drill piece is attached and it is also very hard wearing.
I have focussed primarily on the way I tend to teach the bowdrill to someone who wants to create fire on their own
I filmed this last July in France at early evening time. I appreciate there may be similarities with this post and my previous one on the Egyptian method but I want each of the videos to be stand alone.
So here is the video on Modern Bowdrill – My Way
My next videos on this will start to look at methods for using a bowdrill in a group scenario. I have already added an extra video to Part 2 in this series on the Egyptian method but showing the set up being used by two people – The Egyptian method doubled up
I was at the BCUK Bushmoot in August and was asked by some friends if I could show them how the Egyptian method works.
Rather than me showing them I got the guys to double up and do it themselves to show them how easy it was.
They used two limpet shells as a bearing block (which they told me got eventually quite hot) and also watch out for the drill piece as they stop drilling. Notice how it does not spring away when it is released from the bearing block as the more modern single wrap method will do.
The start of this year’s school holidays found our family in the beautiful Breton countryside. My good friend Rick offered us the use of his place over there for 10 days.
I tried to do a little bit of bushcraft as the holiday went on but it turned out to be a real mixed bag of outdoorsy adventures for the whole family.
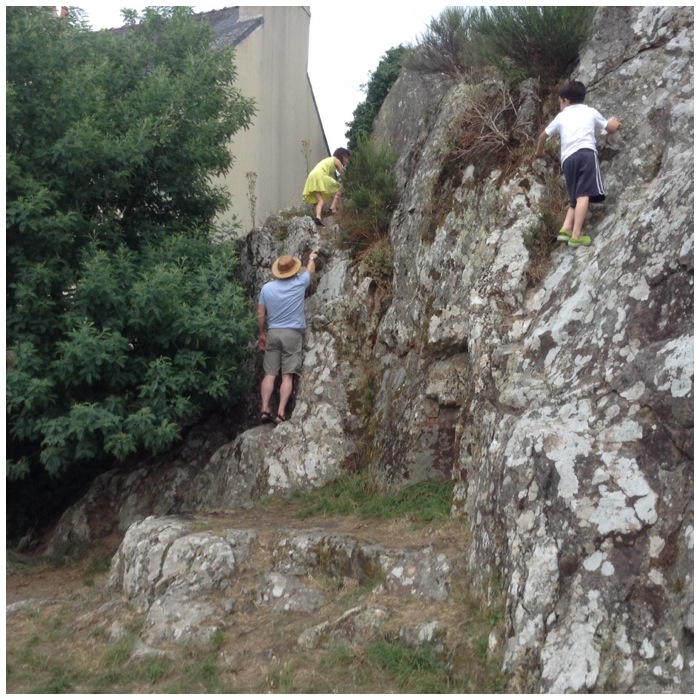
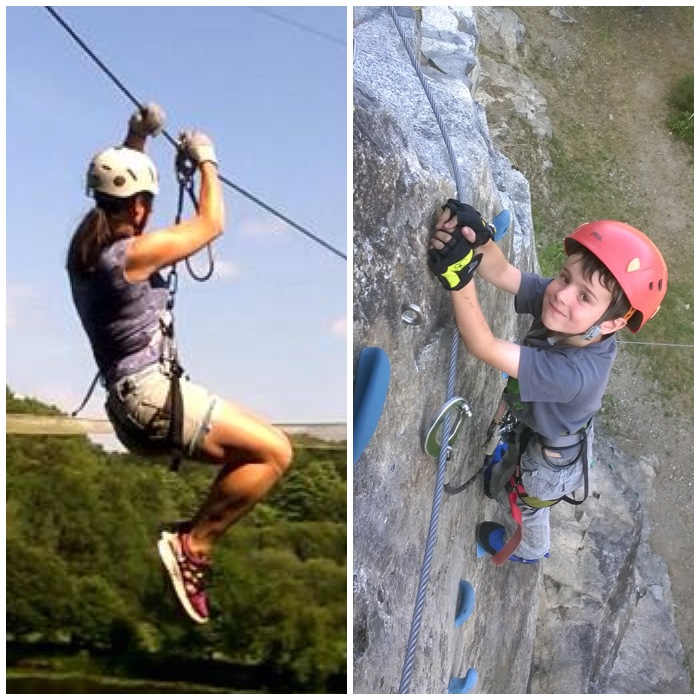
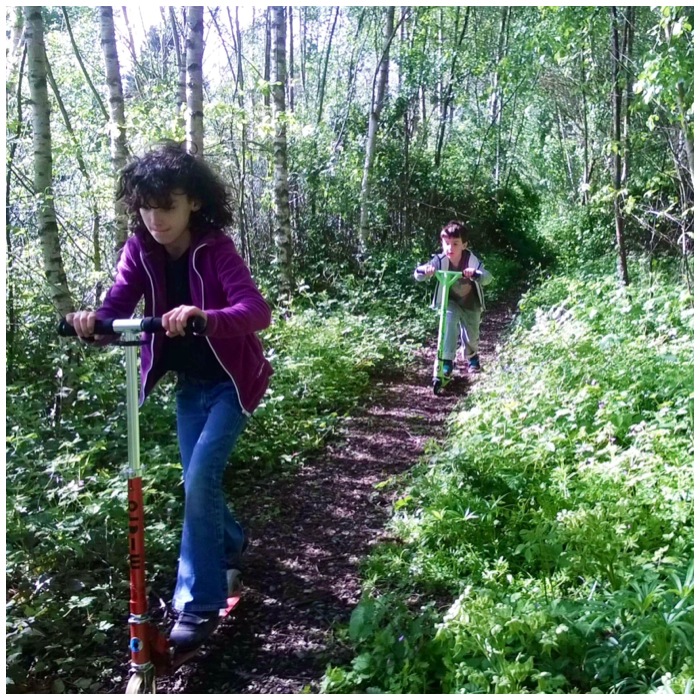
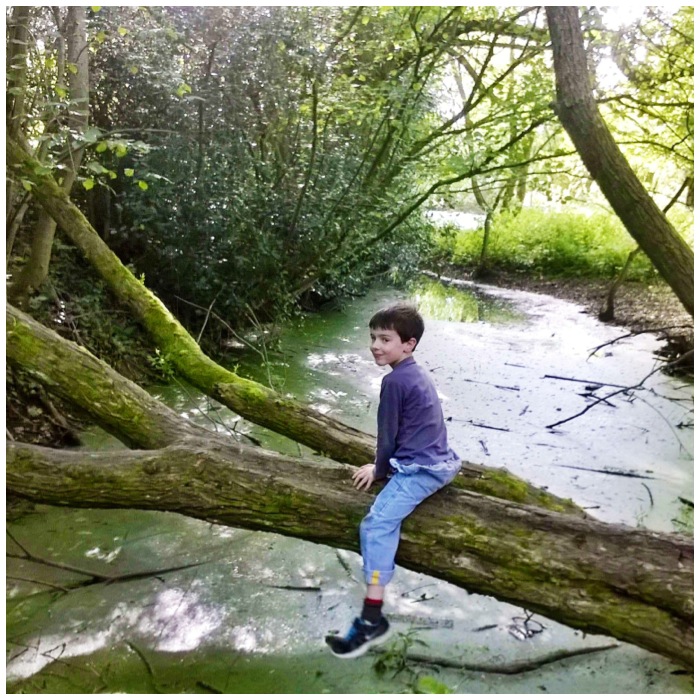
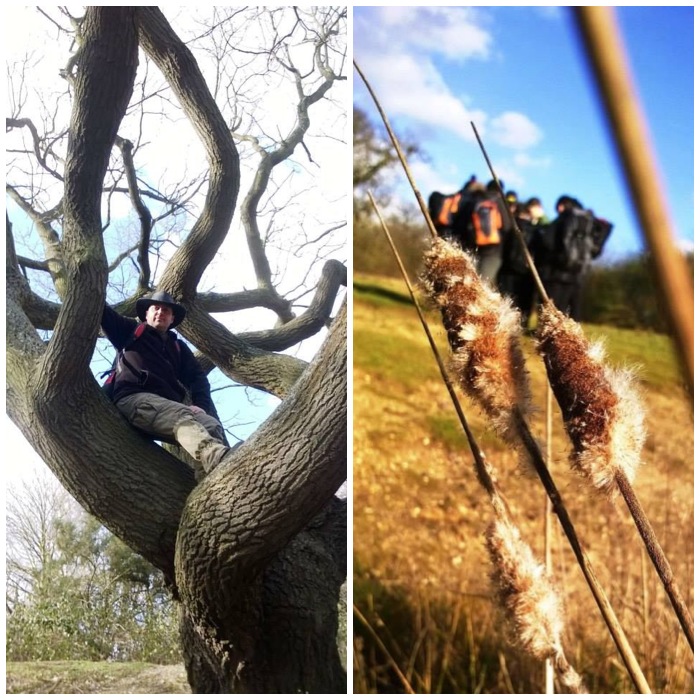
Most days we would head into La Roche Bernard to find one of the cafes that had Wifi and chill/catch up on emails but every day my kids would want to climb the rocks beside the cafe. I tried to keep an eye on them but as you can see Finlay was usually off doing his own thing.
You have your eye on one and the other…………….
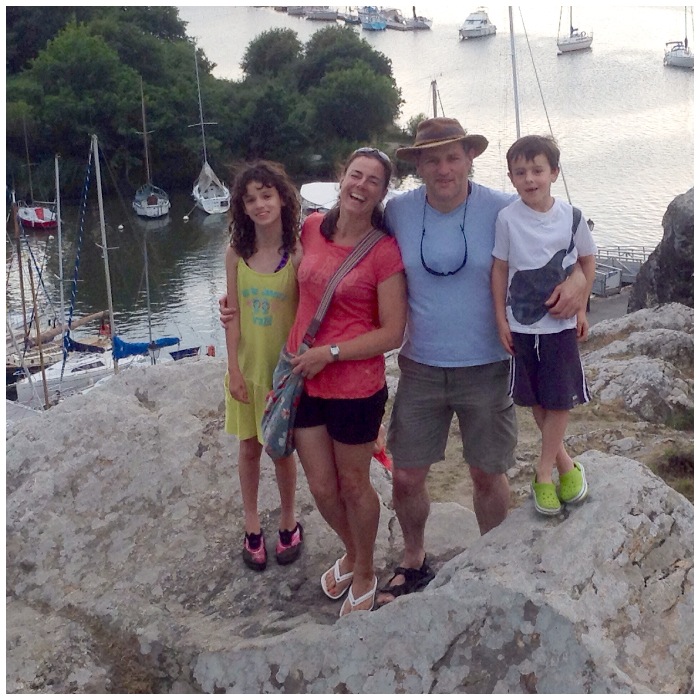
My beautiful family Alison, Catherine and Finlay
Family Fun at La Roche Bernard
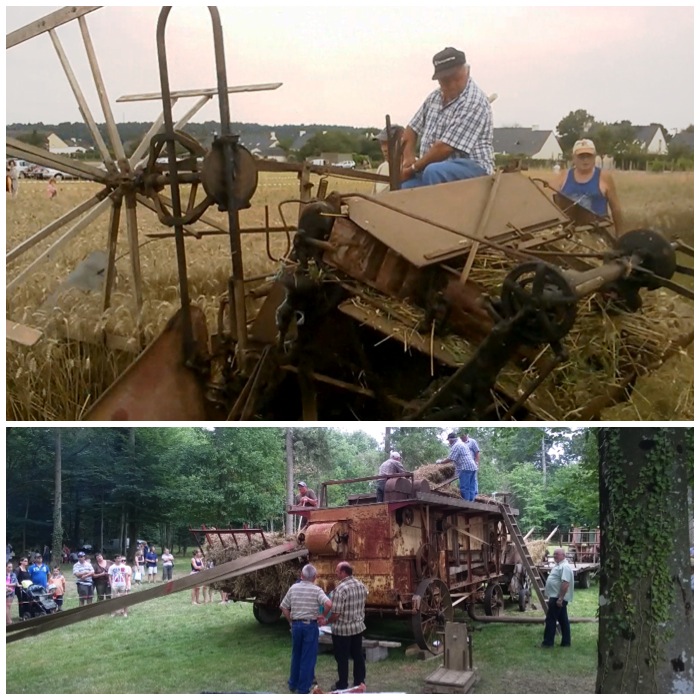
We had a lovely day at a Breton Country Fayre at Nivillac where the focus was on early farm machinery. I looked at some of the tractors and could remember riding on these types when I was a boy.
Traditional farming machinery
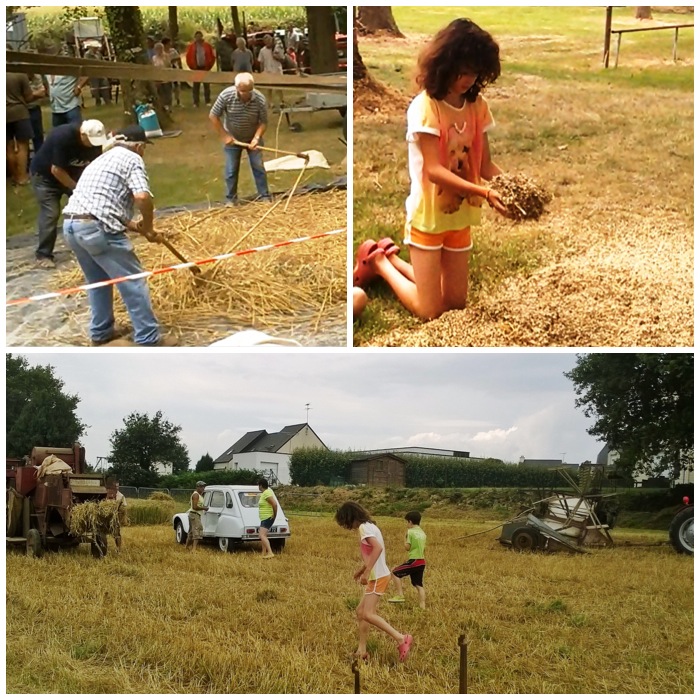
I liked the fact you could get up close to all the action. Catherine was enthralled with winnowing the seed heads but Finlay kept well back as he suffers from hayfever. I was particularly taken with the guys using the hand flails to thresh the wheat. They were so close to each other but not once did they have an accident.
Even older techniques
I made a short video of the day
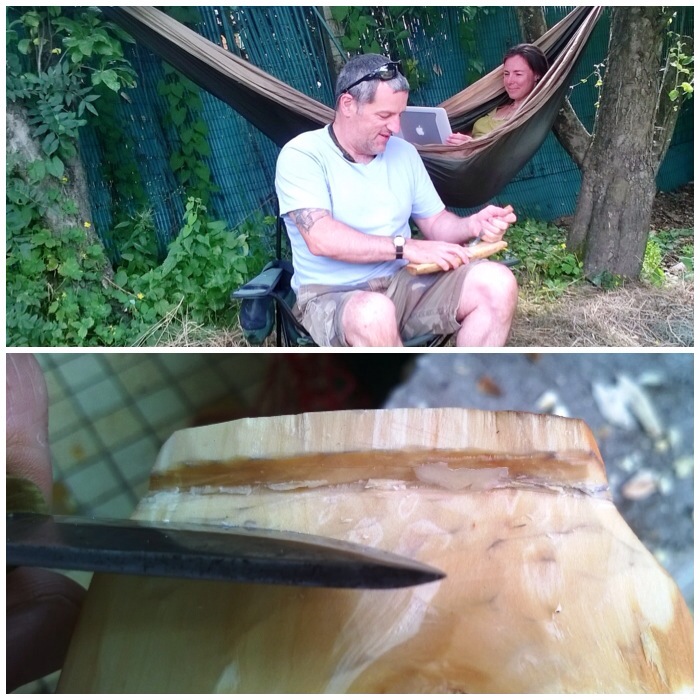
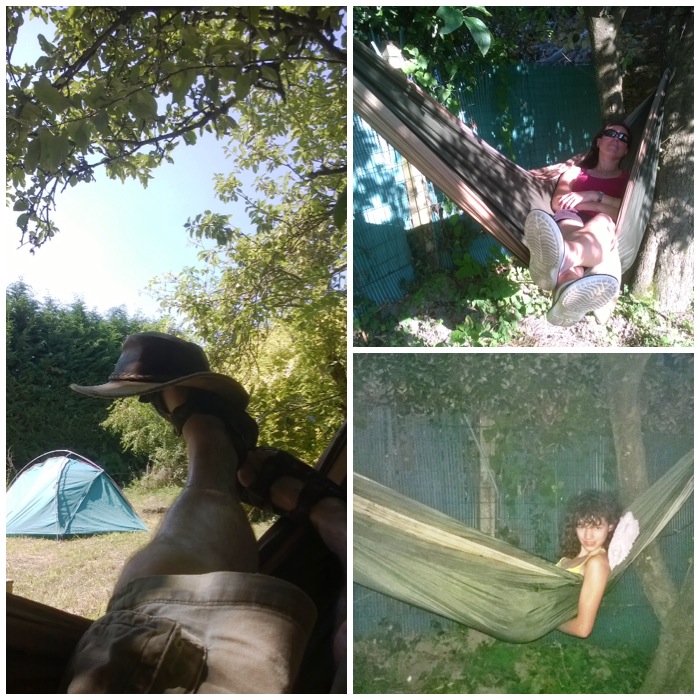
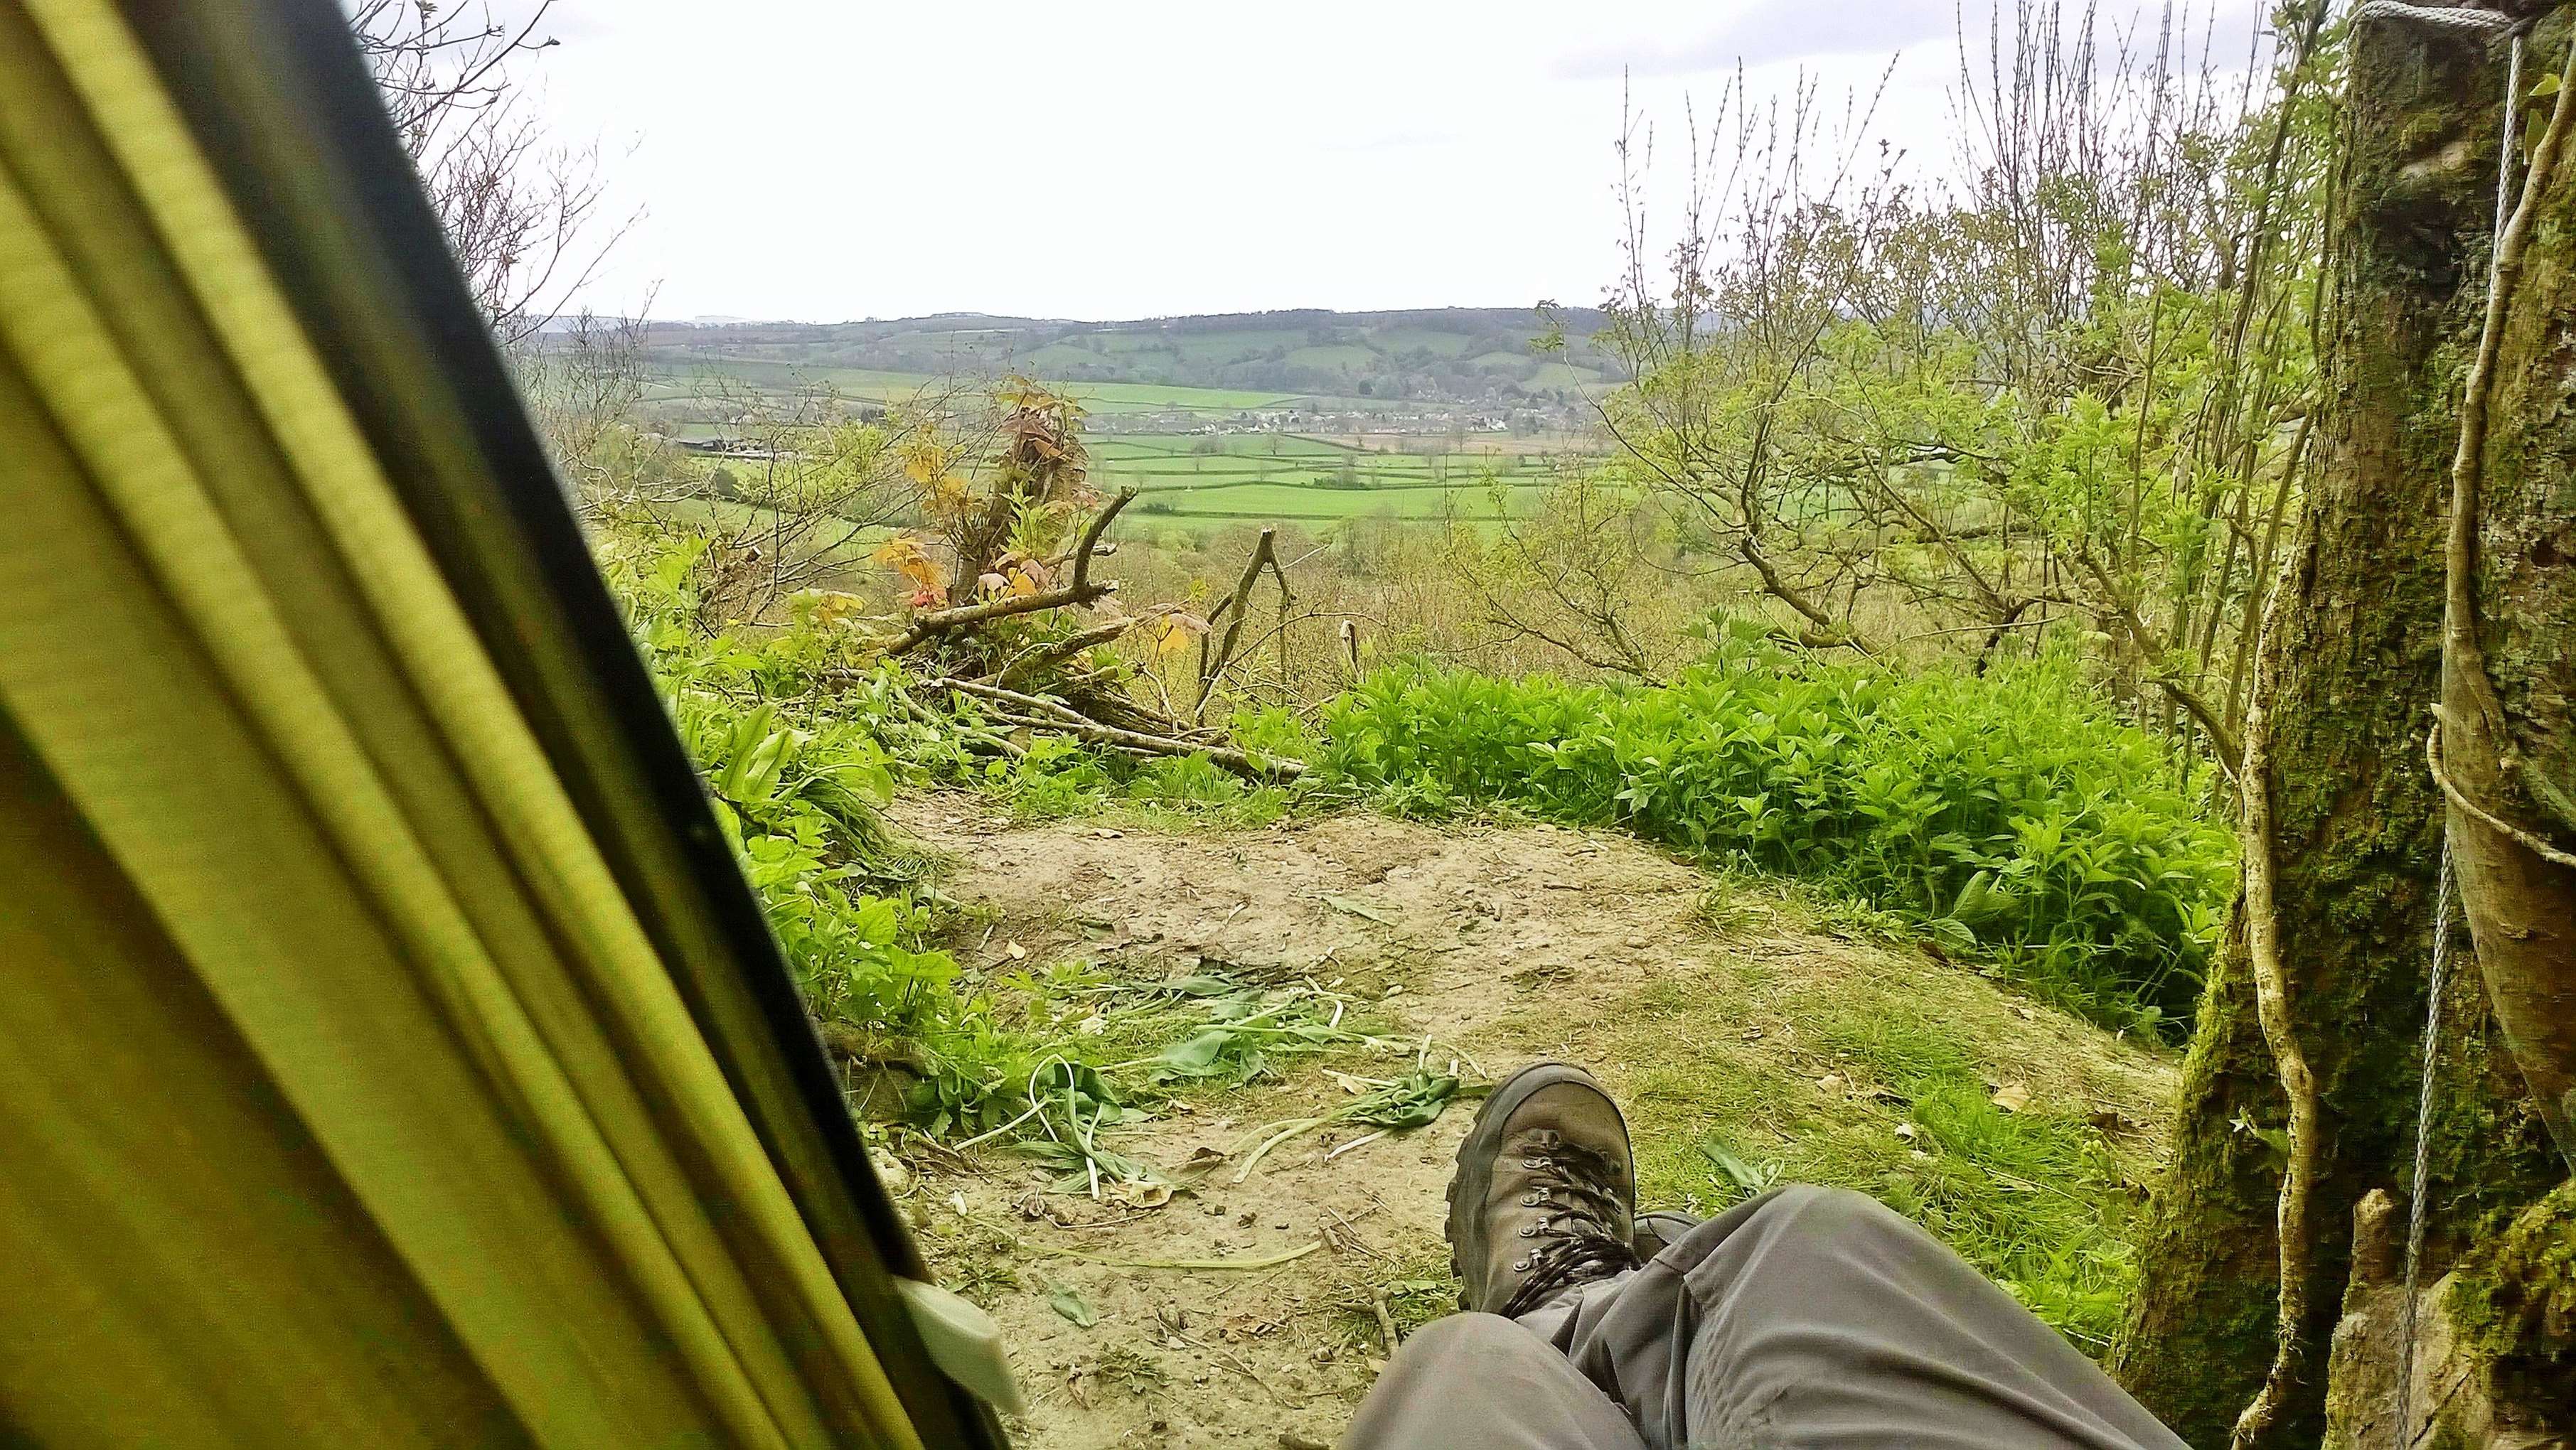
Back at the house, I managed to find a spot in the garden to put up a hammock for some quality chill time.
Chill Zone
I managed to get a spot of carving in as there was a pear tree in the garden that needed a bit of a trimming. I have a roughed-out bowl drying out at the moment waiting for a sanding. It will end up back in Rick’s cottage as a thank you for letting us stay there.
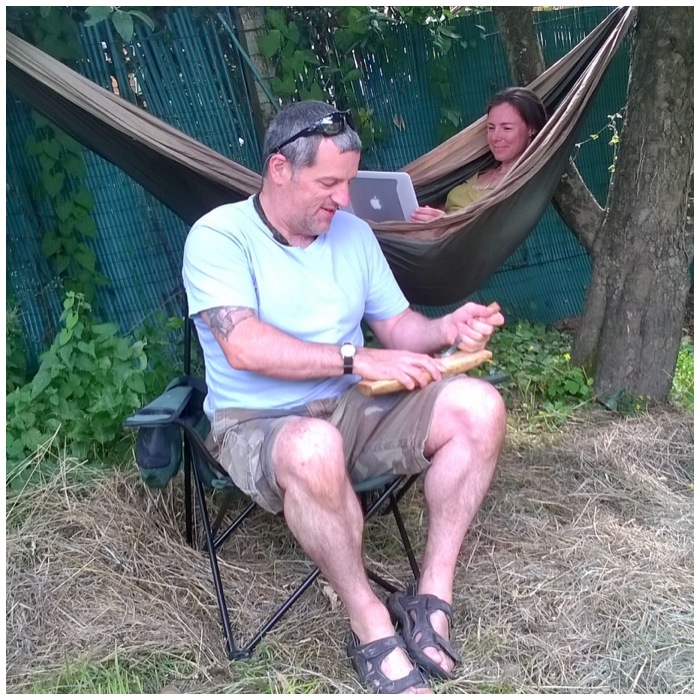
Alison found the hammock great as an office. As a digital publisher she takes her laptop most places but prefers work in style wherever she goes.
Modern and ancient pastimes
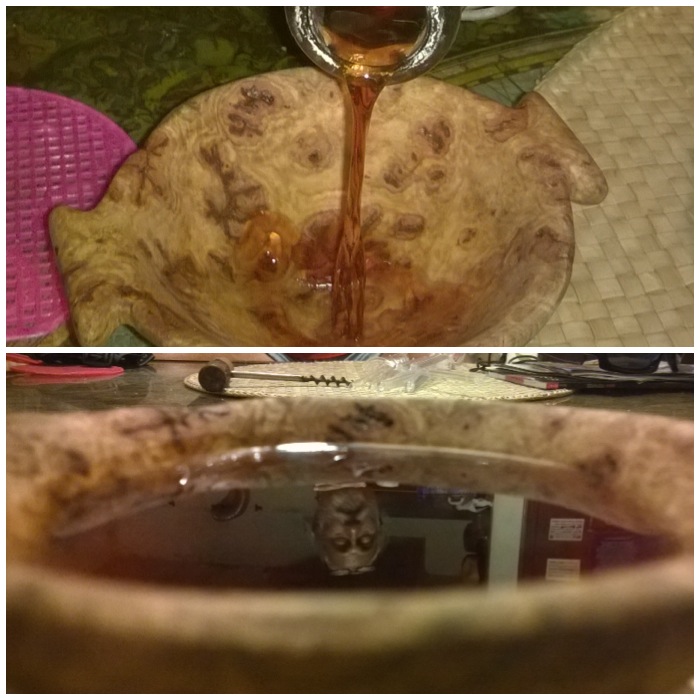
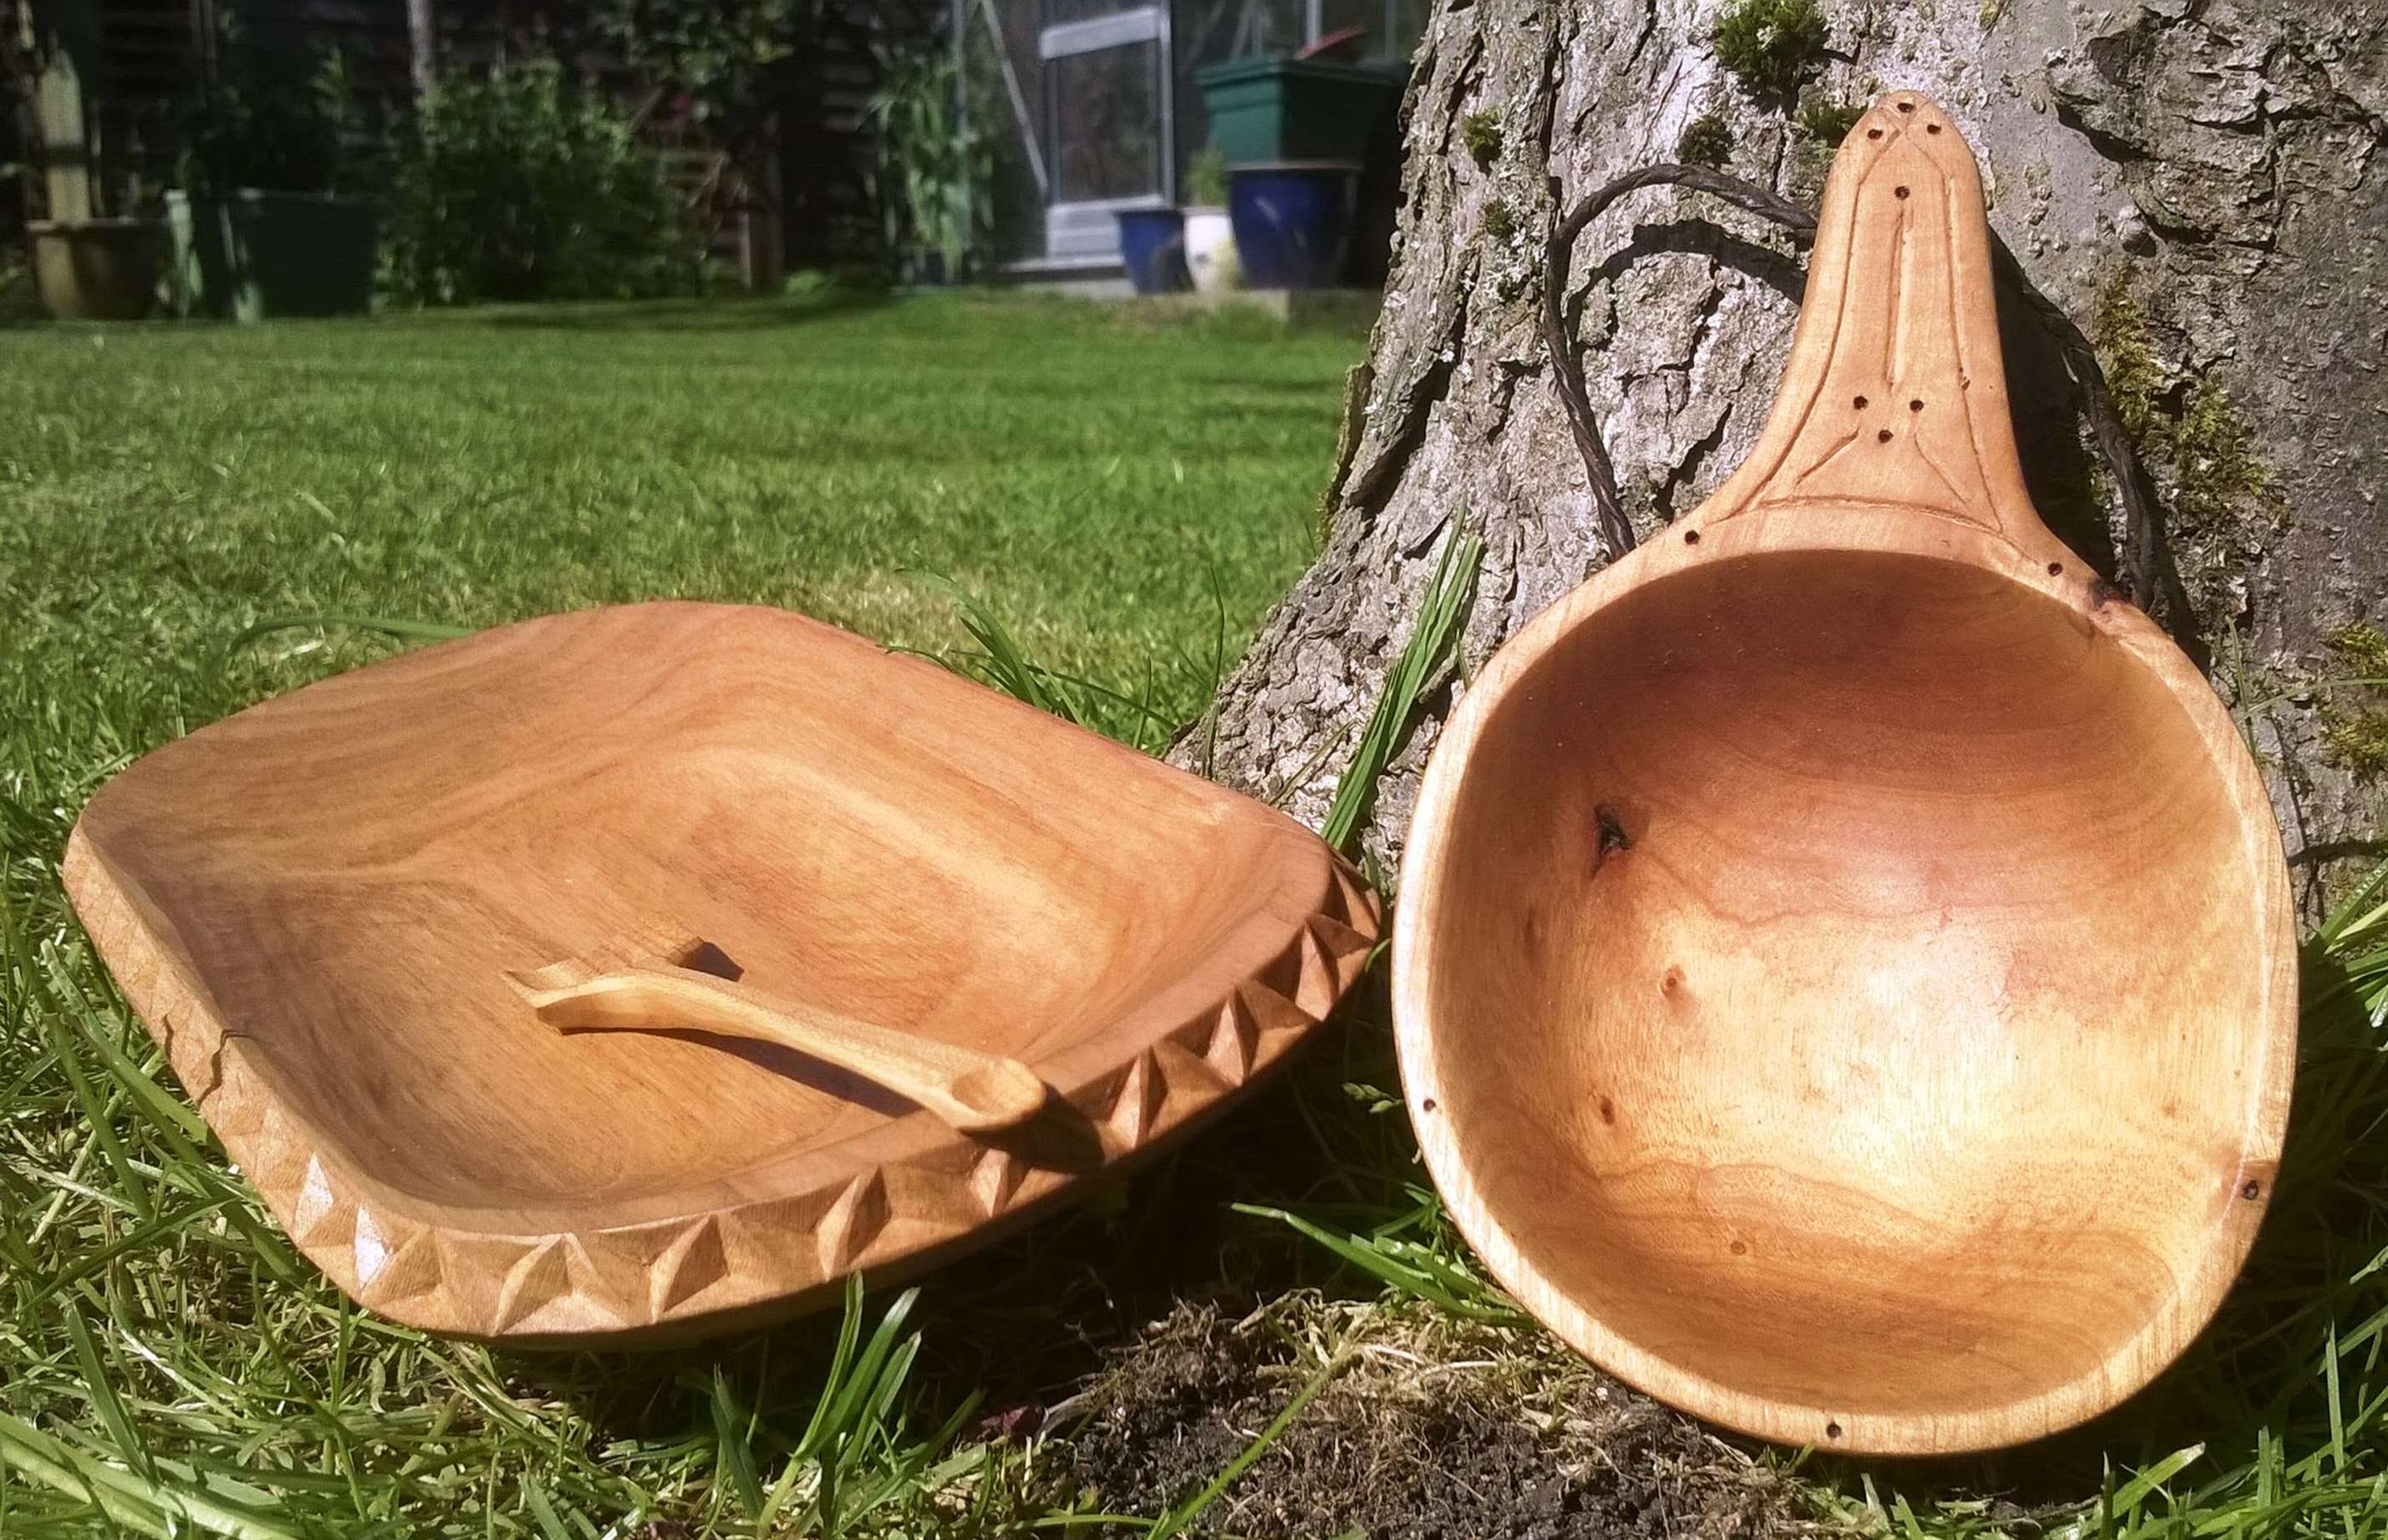
Evenings were a sociable time and my little whisky cup made for an excellent damson liqueur holder. I introduced this sharing cup to some of Rick’s Breton friends and they were very taken with this Celtic tradition – Brittany of course being one of the Celtic nations.
Damson liqueur in the whisky cup
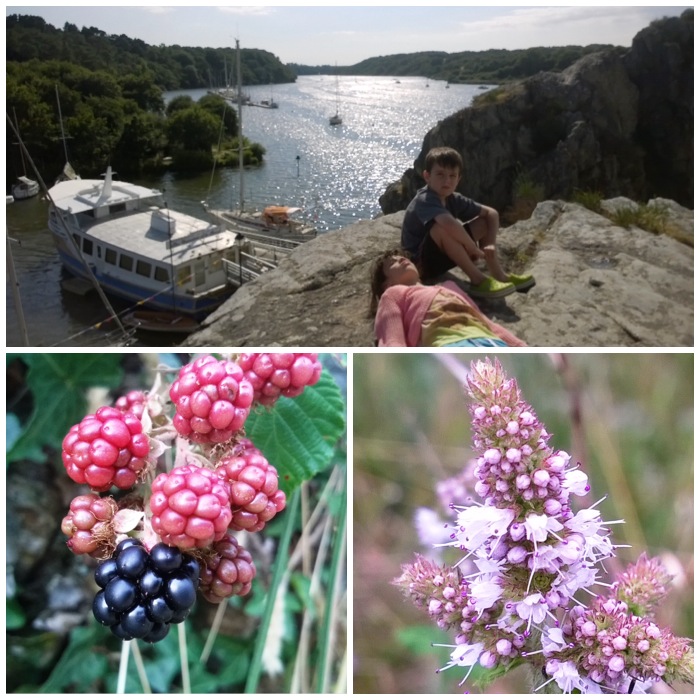
We went for a river cruise along the Vilaine River and while I was watching the world go by at a tranquil pace heard a buzzing sound. Have a look at this little video and tell me you would not want this toy – I know I do.
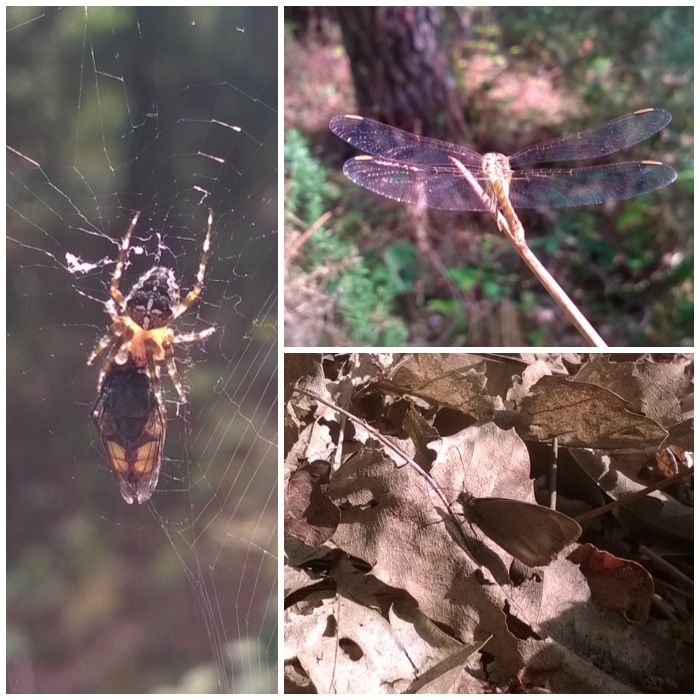
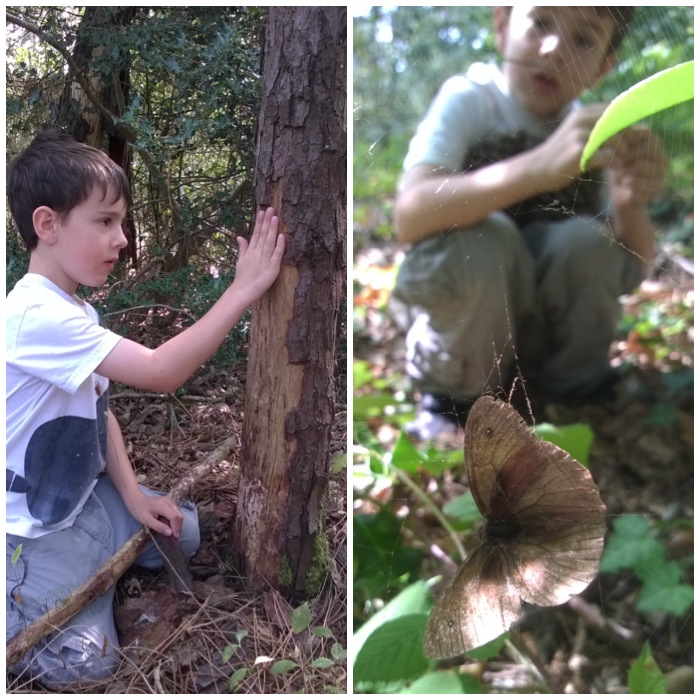
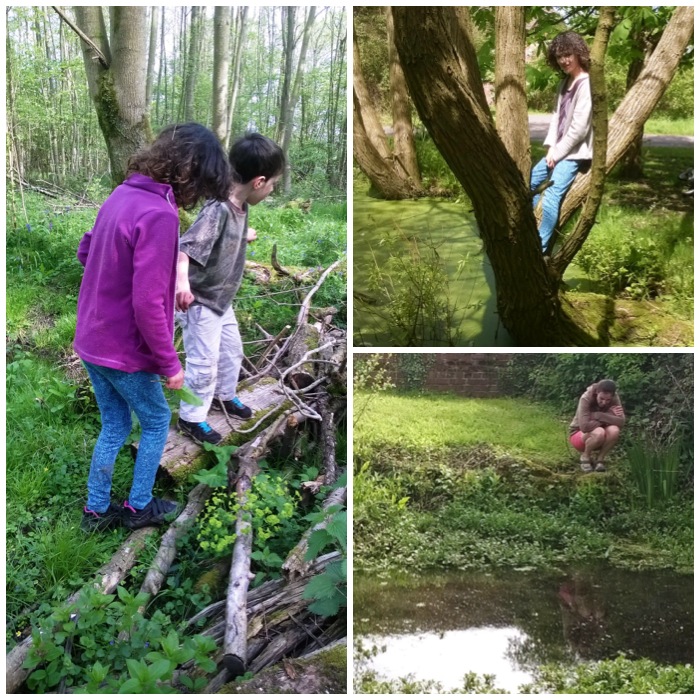
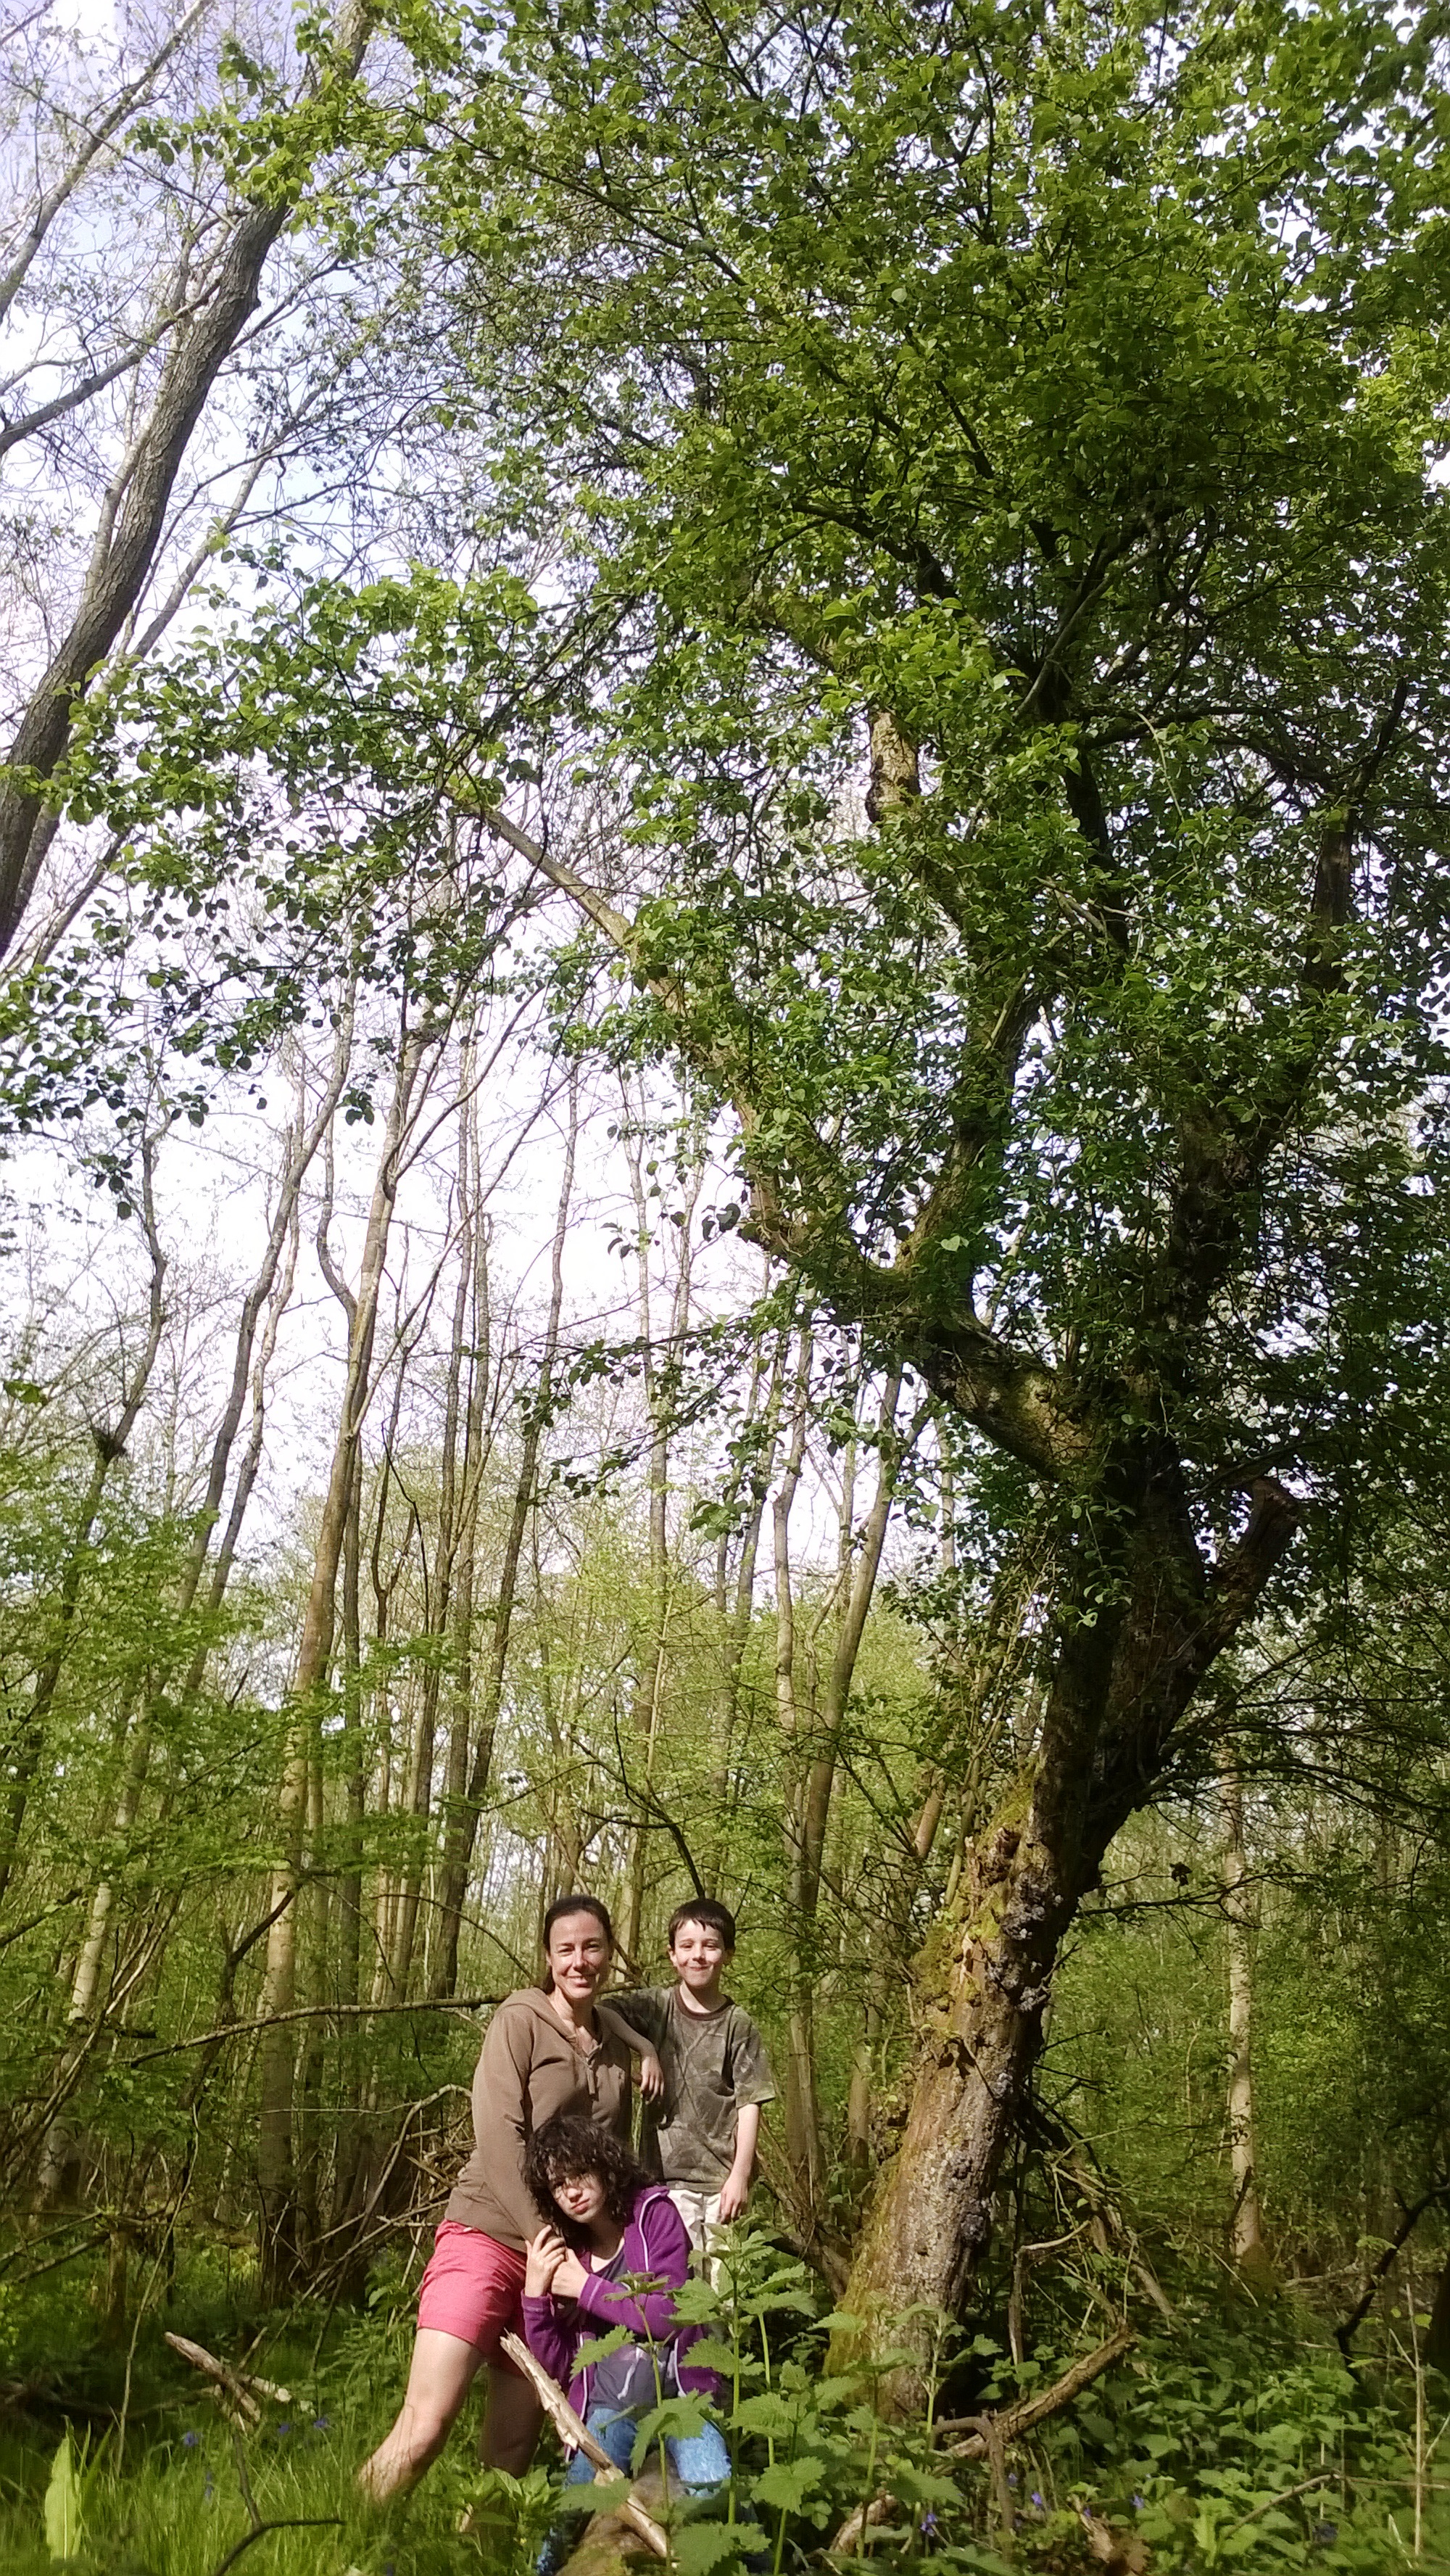
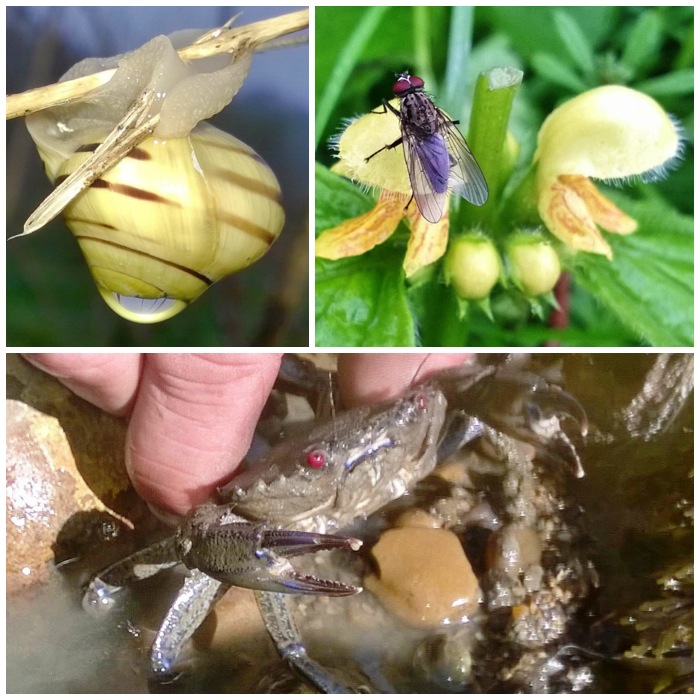
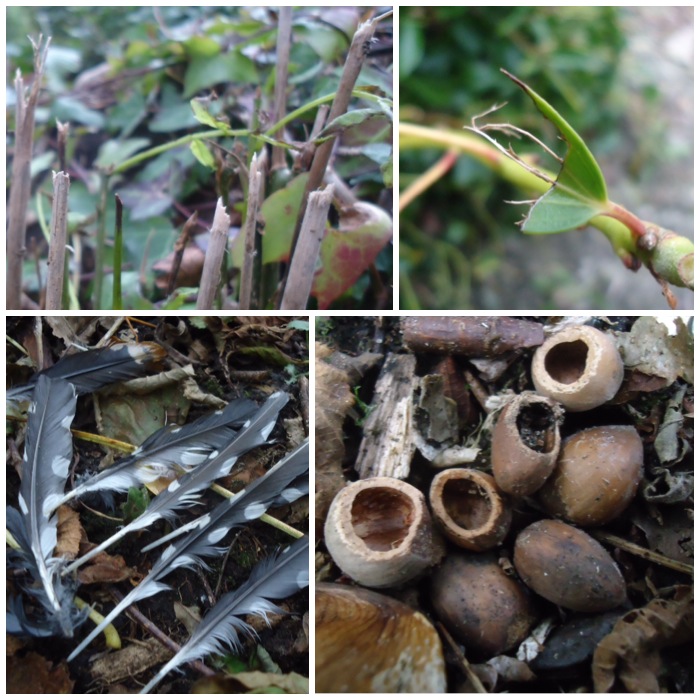
One morning I decided to explore the nearby woods and Finlay asked to come along. We found an area of woodland with a mixture of conifers and deciduous trees. The insect life was much richer than I would normally find back in the UK as it was not managed it seemed to any great extent.
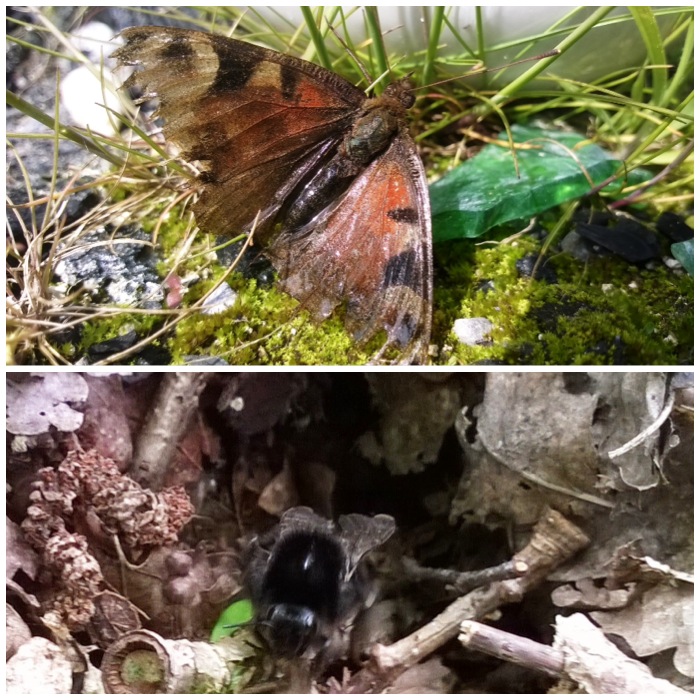
We got up close to the spider’s web you can see at the top left and as the spider detected our movements he sped over to a fly he had wrapped up, protecting his dinner. I thought that the brown butterflies were particularly well camouflaged in amongst the leaf litter.
Insect life
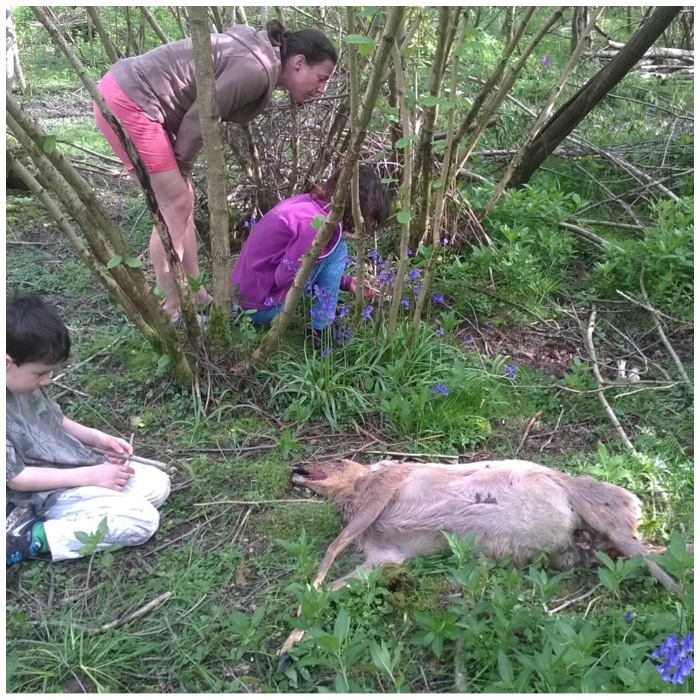
We found plenty of signs of deer (we spotted some out in the fields) such as scratching posts and found this butterfly trapped in a web. I would have left the butterfly if I had thought the spider could have eaten it but all that was happening was the butterfly was trashing the web with the poor spider staying well out of the way. Finlay helped release the butterfly and it flew off, leaving half a web for the spider.
Investigations
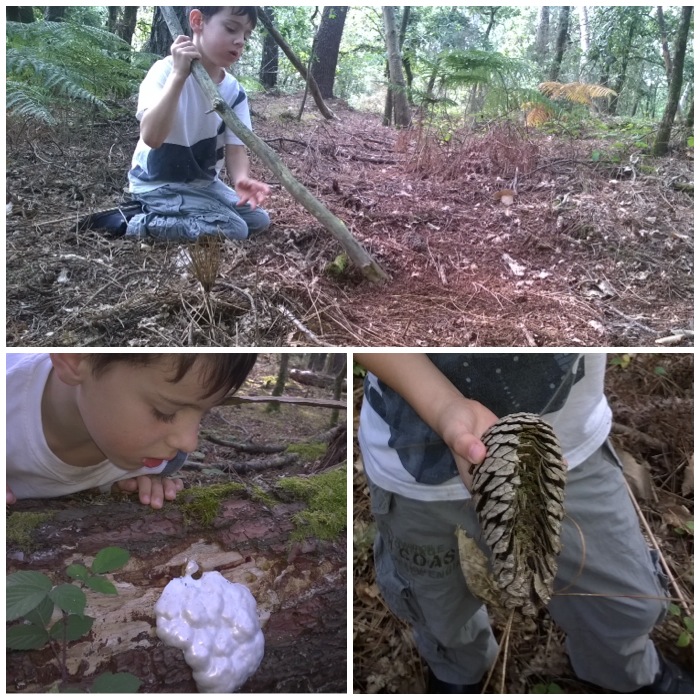
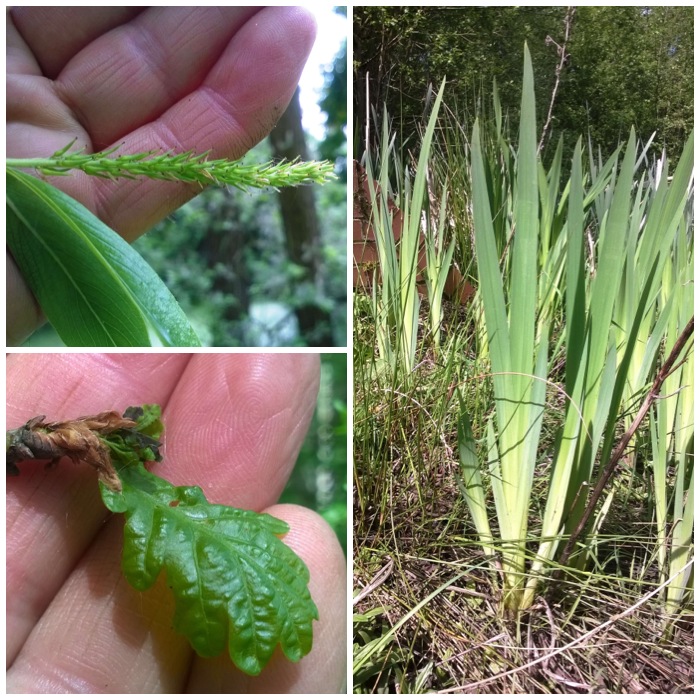
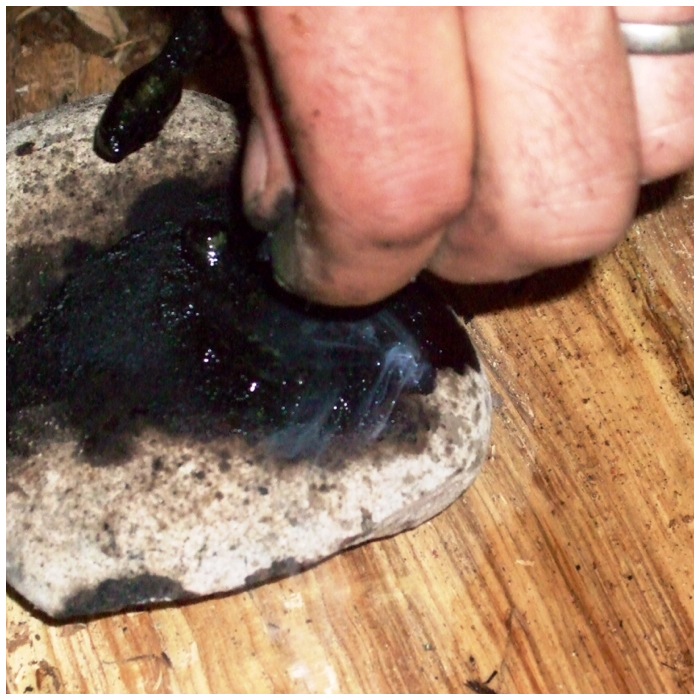
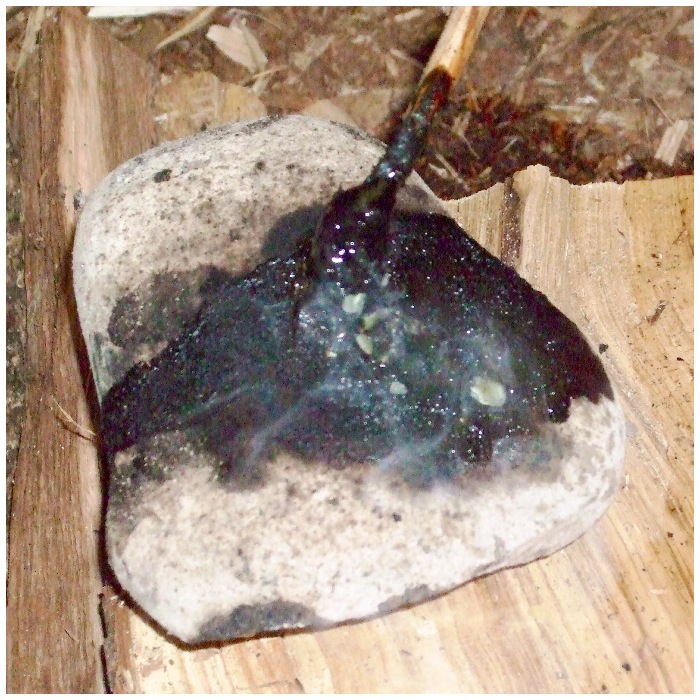
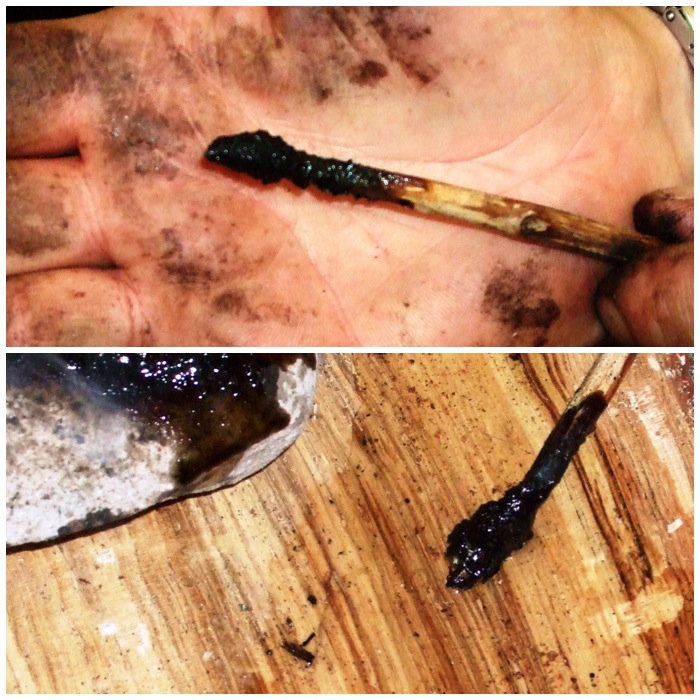
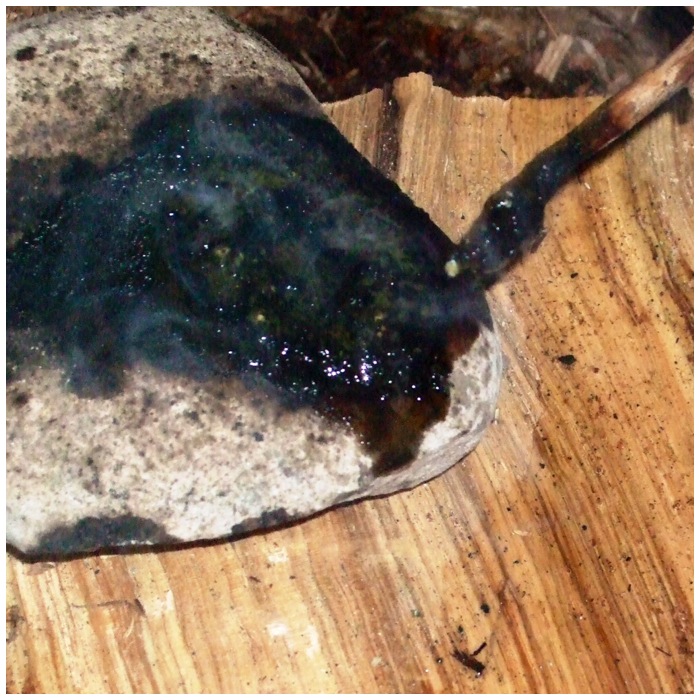
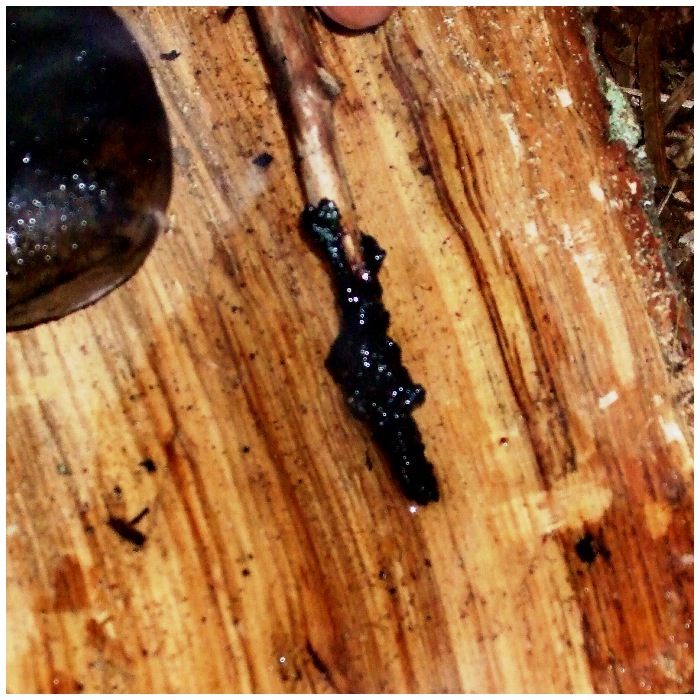
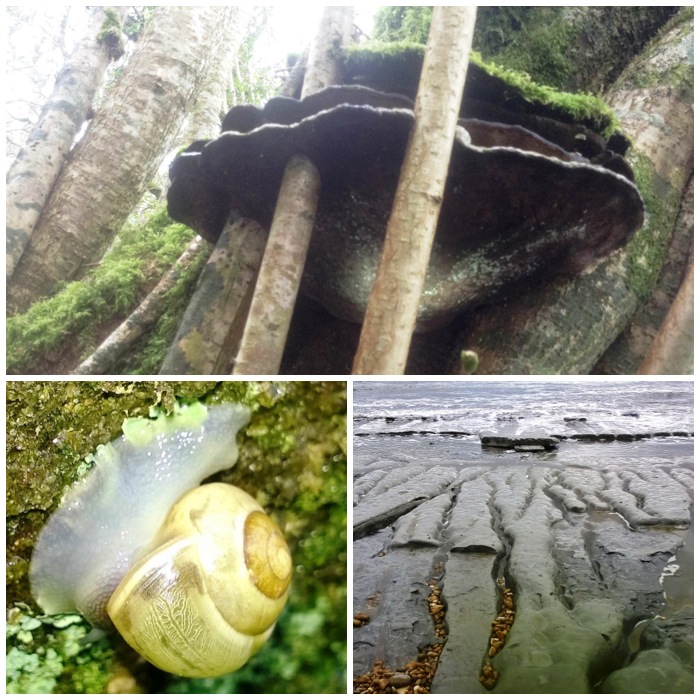
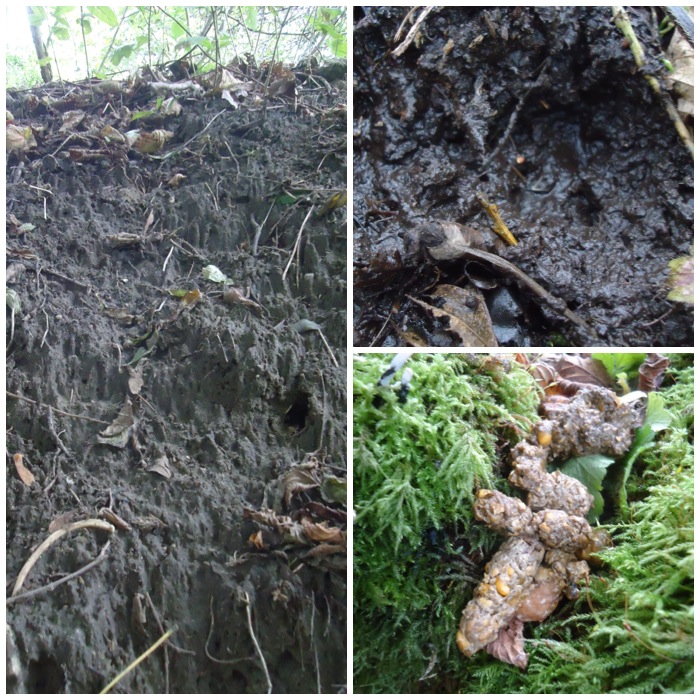
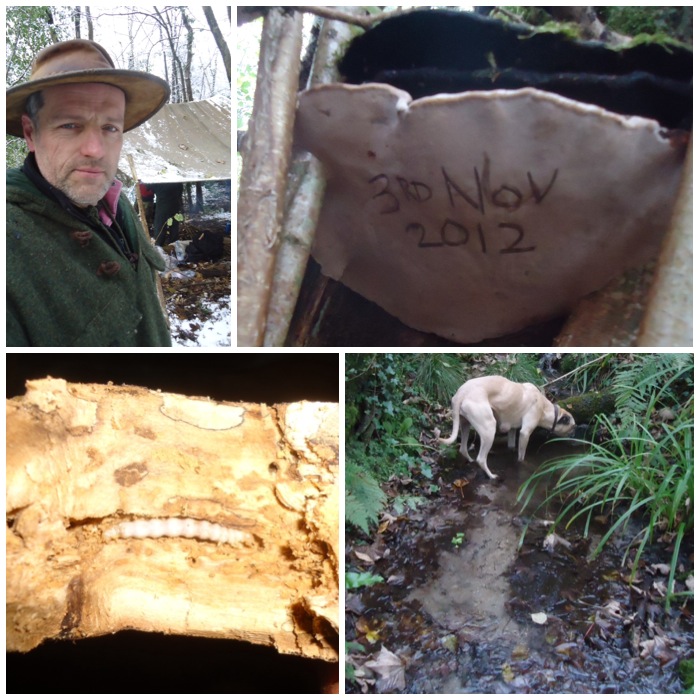
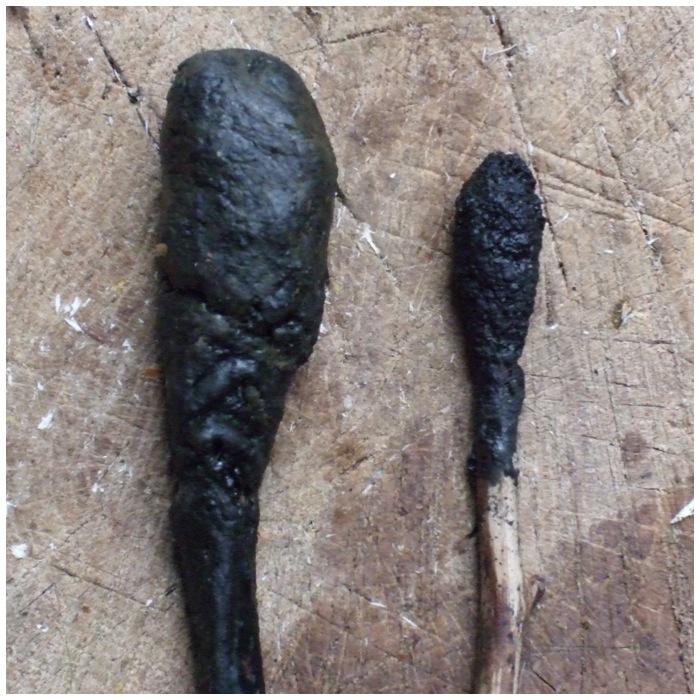
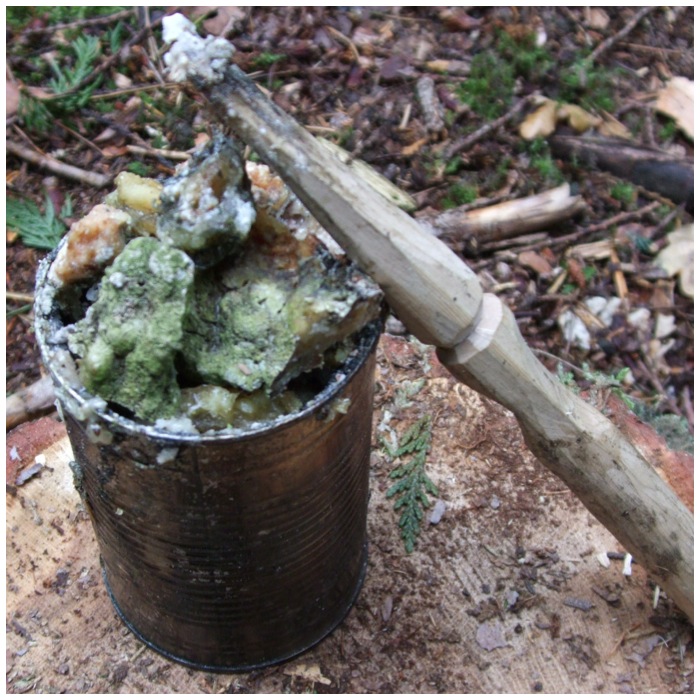
A few other finds were lots of laying up points for the deer, some very strange gooey fungus and a pine cone that had only had one strip of its seeds eaten.
Oddities
Back at the cottage I took down a tent that had been up in the garden and found this ants’ nest under it. In less than an hour every single egg had been removed to safety by the ants. The crickets were particularly tame and were quite happy to sit on your fingers.
Super bugs
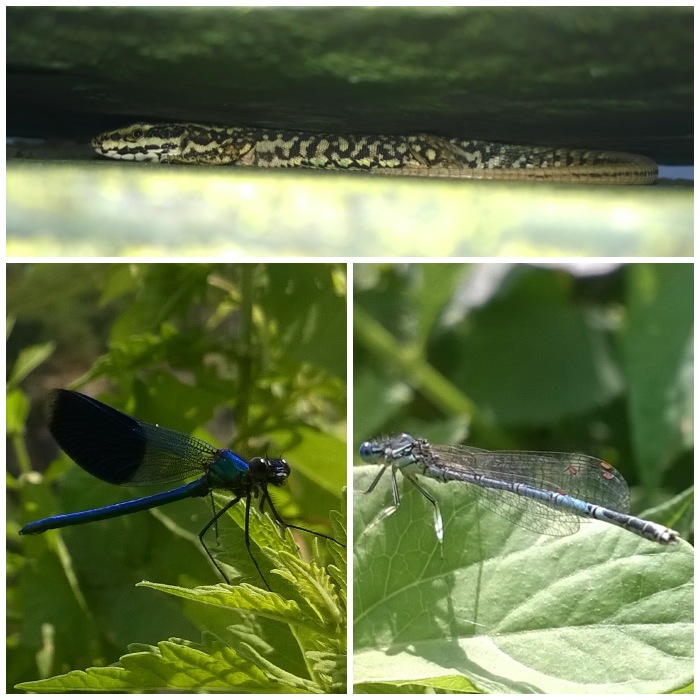
Under some slates covering the well I found this rather beautiful little lizard hiding from me. The damselflies were everywhere and very hard to get up close to to photograph.
Up close and personal
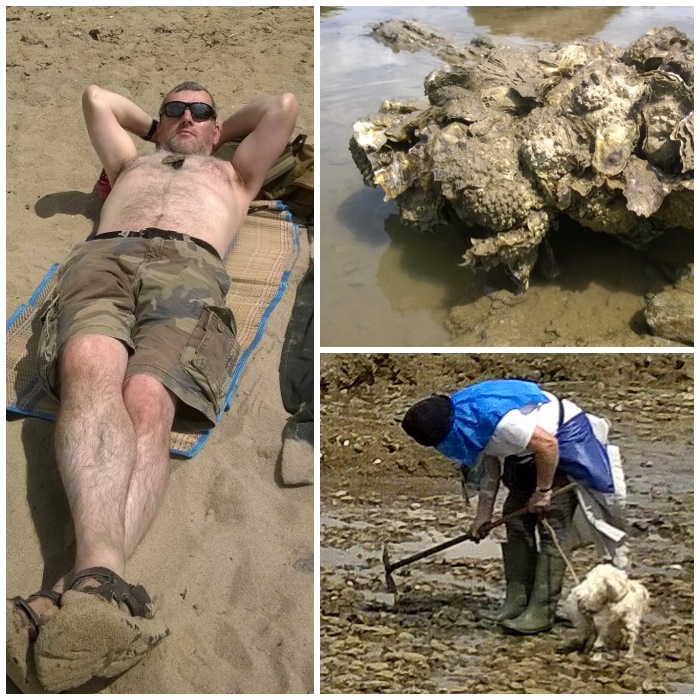
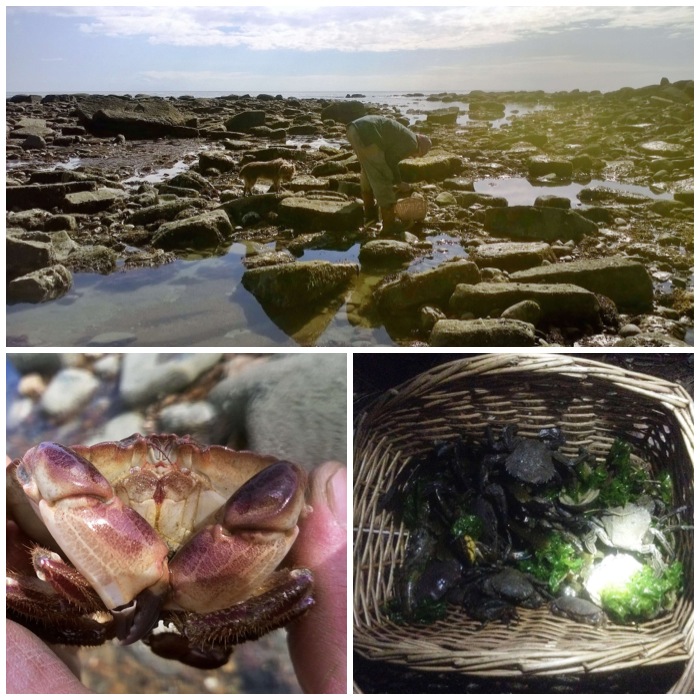
I must admit to spending a couple of days on the beach and as you can see I was never properly dressed for this environment. I salvaged my bushcraft credentials with a good walk over the rocks at low tide looking at all the oysters, and I came across this little Breton lady foraging for buried seafood in the sand.
Bushcrafters on the beach
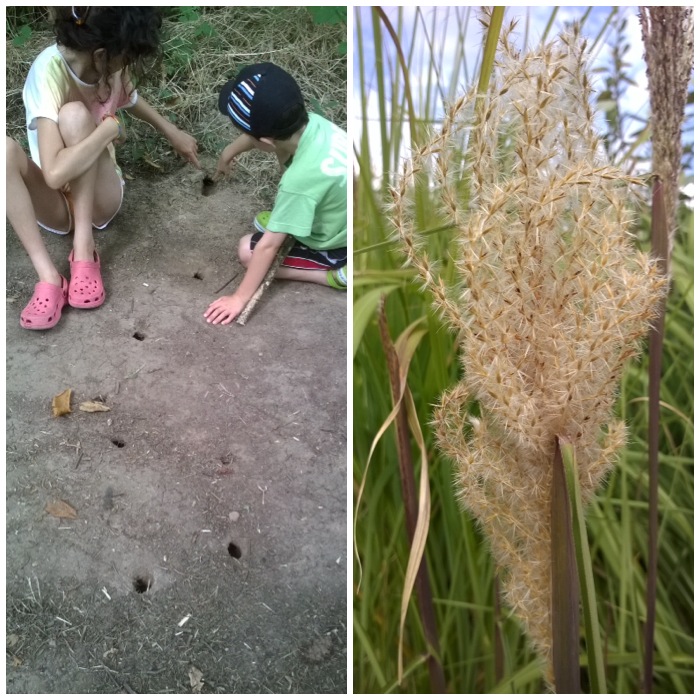
Alison and the kids spotted some unusual holes across a path one day and I came over to have a look. There were no holes on either side of the track but there were little mounds of dirt. From what I could see that had happened was that a mole had dug his way across the path and as the ground was compacted there, when the earth was pushed aside the holes had remained visible.
Moles and Marshes
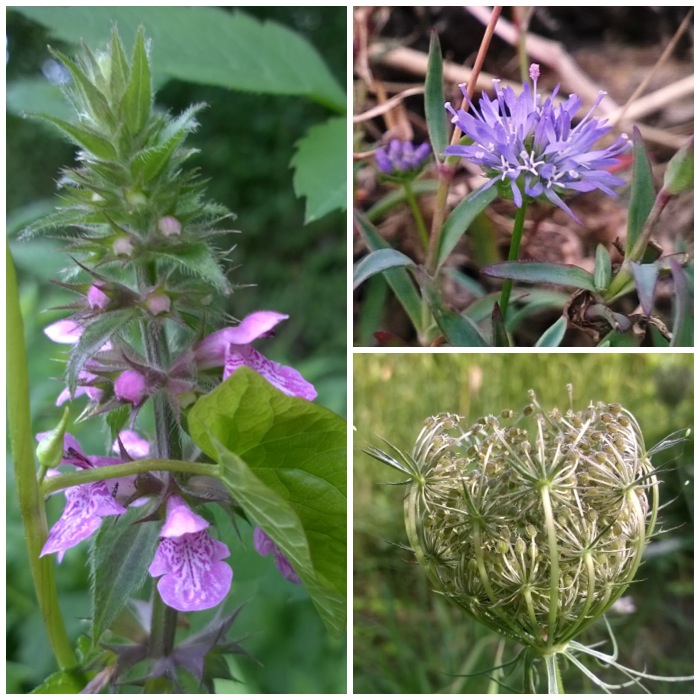
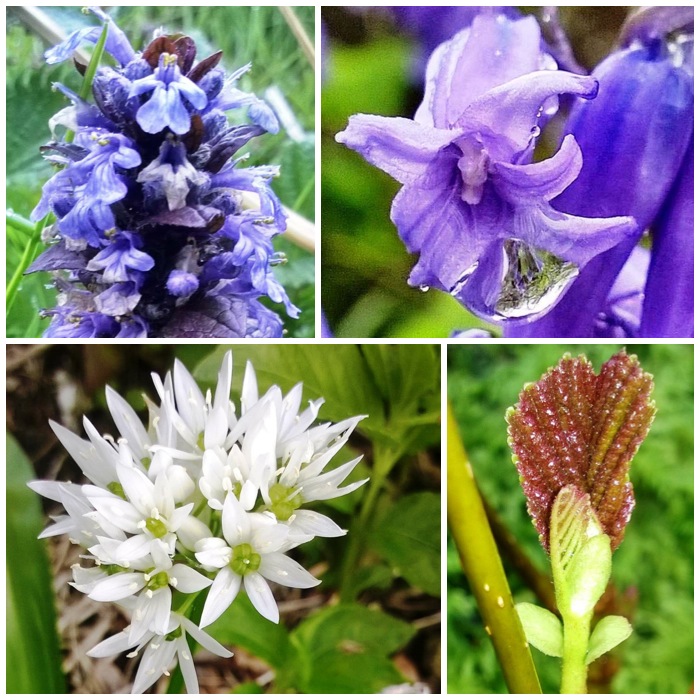
As I have been photographing our UK wildflowers a lot over the last couple of years it was great to be in an environment where new ones were springing up all over.
Stunning flowers
It was nice to see some old favourites too, such as bramble and mint.
Time to relax
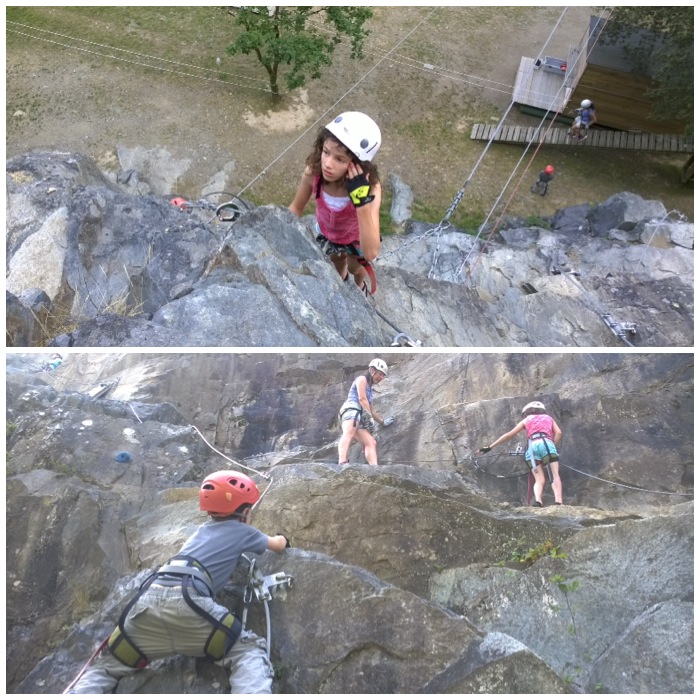
The highlight of the holiday had to be the climbing day. It took us a long time to find the place but it was well worth it. Alison had spotted in a flyer a centre called Escapades Verticales where we could take the kids climbing.
Climbing high
I was very impressed with the set and we had a fantastic time climbing and zip wiring all afternoon.
Zipping and traversing
I managed to put together a short video on it using my phone.
As far as holidays are concerned this one was one of the best and I will always remember it. I must say thanks to Rick for letting us stay at his cottage and also babysitting one night to let us get out for a lovely meal as a couple, a rare treat.
‘for some reason the name Bob comes up time and again’
While helping with a Gold DofE Expedition this July in the Brecon Beacons in South Wales I got photographing as much of the plant life I could that was in flower.
I find that many people who walk these high hills (including many adventure leaders) pay scant regard to what is down by their feet but if you look closely enough you will see a riot of colour.
I have used two good reference guides for this article – these are:
All of the pictures were taken inside the Brecon Beacons National Park mostly on the hillsides.
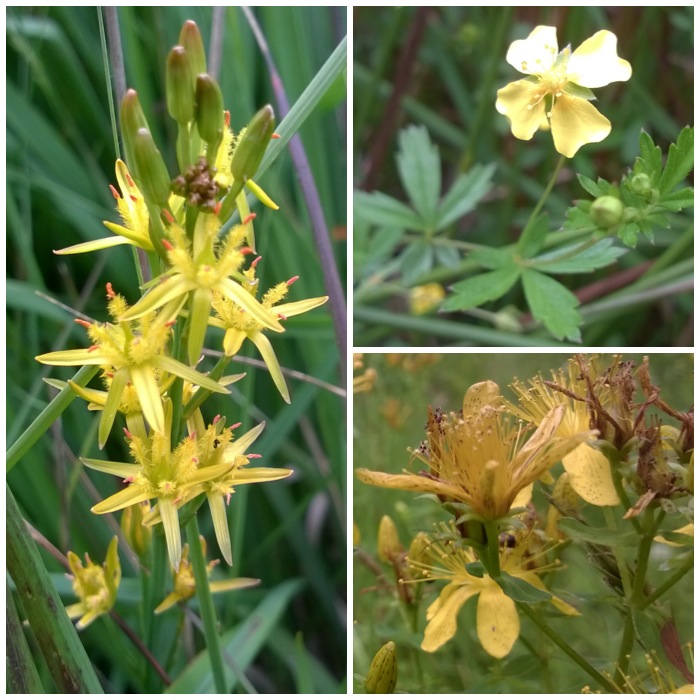
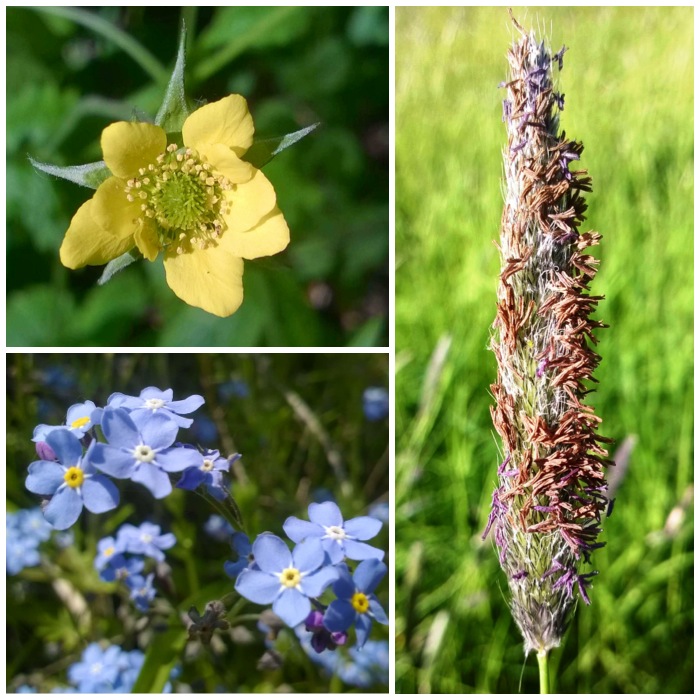
On the left below is Bog Asphodel a beautiful yellow flower that is now in decline. Historically farmers associated this plant with ailments to sheep such as brittle bones or foot rot. It was not the plant that caused the problems but the poor soil the sheep lived on. As farming practices change so does the soil and so the plant is now in decline.
At the top right you see Tormentil and this little plant is always ovelooked but once you become aware of it you see it all over the hills. This is an astringent little plant that was used to treat gum disease and colic. Another common name is bloodroot for the red dye it produces.
At the bottom right you can see Perforate St John’s Wort. I normally spot this plant low down slopes but I found this one in a gully quite high up where it had found some shelter. Herbalists use this plant to treat depression to this day however due to its perforated leaves (hold one up to the sun to see them) it was previously thought to be good for treating wounds and stopping bleeding.
Bog Asphodel, Tormentil and St John’s Wort
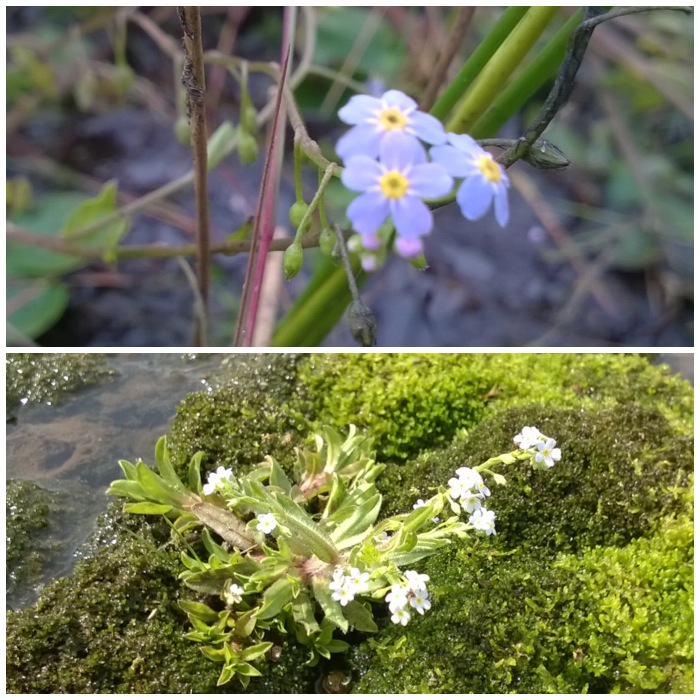
I found Water Forget-Me-Not in a number of locations, sometimes on its own and sometimes in whole carpets but always around water in sheltered spots. Apart from being given to loved ones in the past so they would not feel forgotten this little plant was seen as cleanser of mucus so thought good for treating whooping cough and bronchitis.
A little point on naming plants is that when I am out and about especially with my younger students I do not always tell them the names of the plants. I get them to agree a random name for different plants and say out these names as they go along every time they spot one – for some reason the name Bob comes up time and again (must be a Blackadder thing). Once we are back at camp I then get them to ID Bob for its given name. This seems to make the plant names stick with them more. I got this idea many years ago from a fellow bushcrafter.
Water Forget-Me-Not
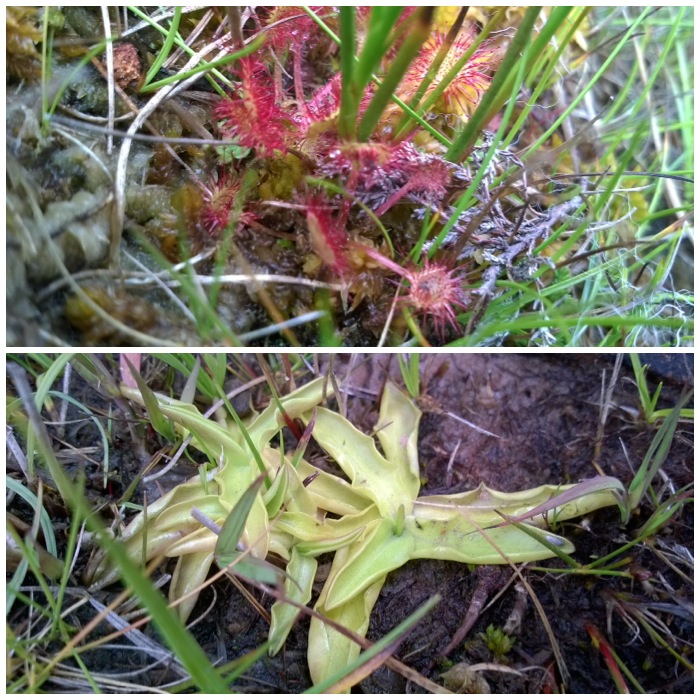
Another couple of plants of wet areas are the Sundew (top) and the Butterwort (below). Both plants exude sticky fluids to catch insects and have been used to treat rough skin to make it smoother (Butterwort) and also to treat sunburn (Sundew).
Sundew and Butterwort
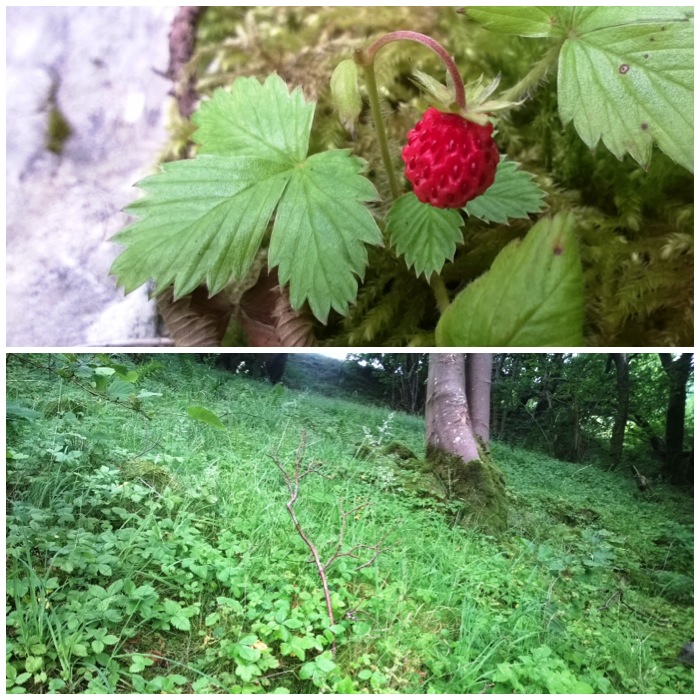
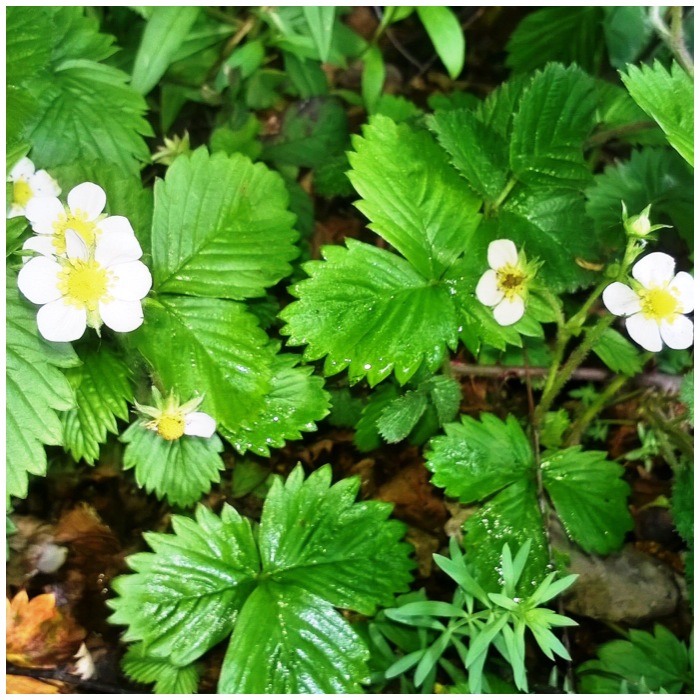
I came across a bank made up of shaped stones to support a small railway and saw that it was completely covered in Wild Strawberries. I have never seen so many Wild Strawberries in one place. The bank was facing the South West over open water so that must have had quite an influence on its growth.
Wild Strawberry
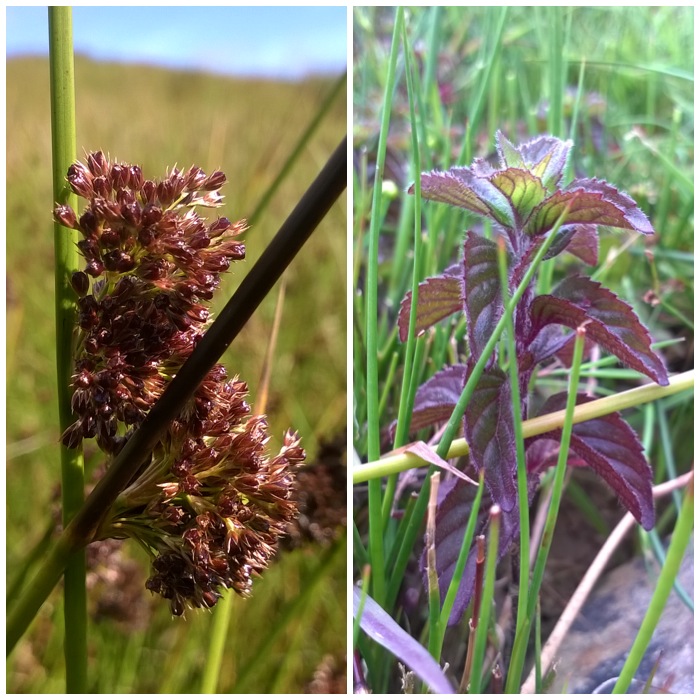
Back out on the moorland the land was dominated by the Soft Rushes. As recently as the second world war the soft piths of these plants were used as candles.
I found the Water Mint in a tiny stream in amongst the Rushes. I did not identify it easily at first as it was not in flower but its smell and square stem gave it away. A great medicinal plant and I like it in my tea.
Soft Rush and Water Mint
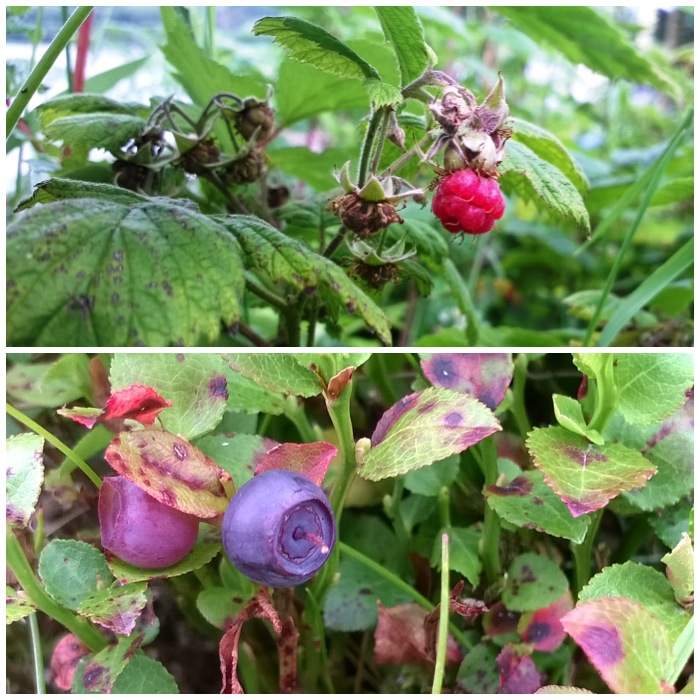
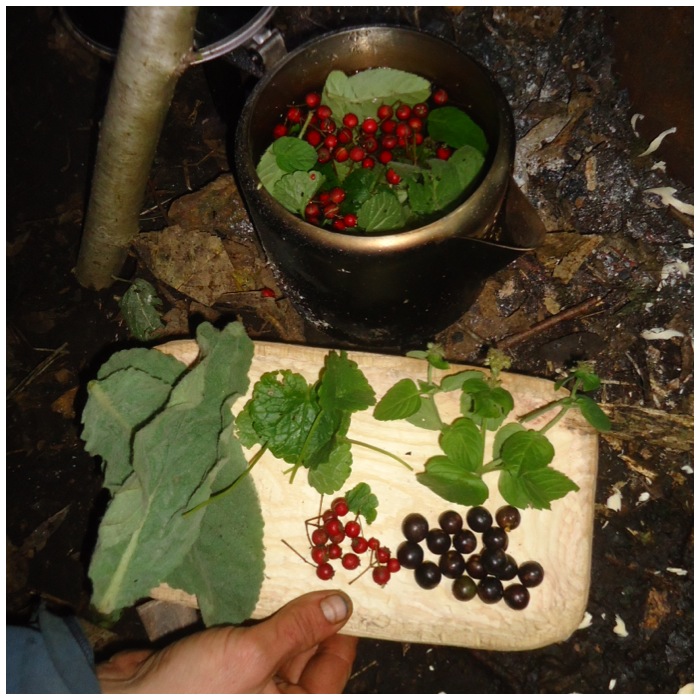
The Brambles (top) I spotted in mid July were just starting to ripen their Blackberries. Is it me or are the blackberries very early this year?
I spotted these Bilberries (bottom) while walking with the cadets where the sheep could not get easy access to so we had a bit of a feast.
Both these fruits make excellent puddings and jams.
Ripening Bramble and Bilberry
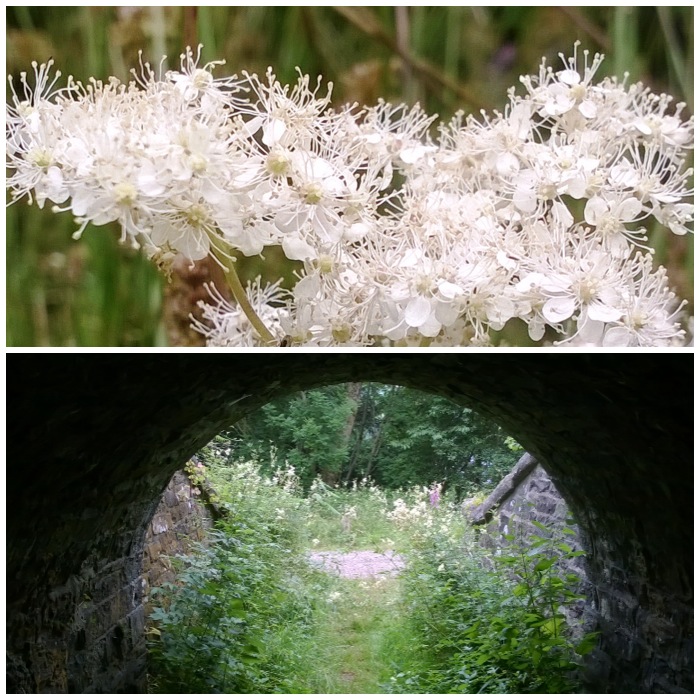
The beautiful Meadowsweet was in full bloom in July and was growing abundantly in the low lying areas around the hills where it had plenty of light and water. This was one of the plants sacred to Druids and was a plant that Bayer used as one of the key ingredients when developing aspirin in the 19th century. It gives off a lovely aroma and was traditionally used in the home to cover up bad smells.
Meadowsweet
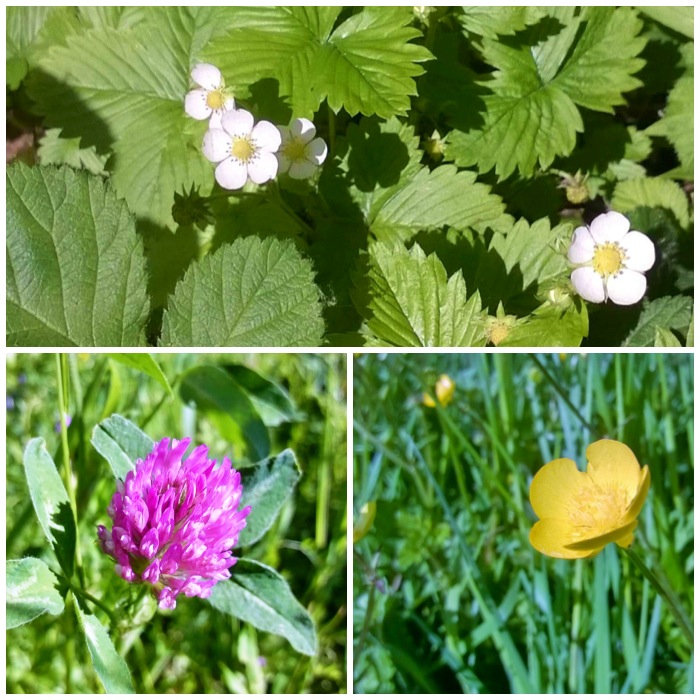
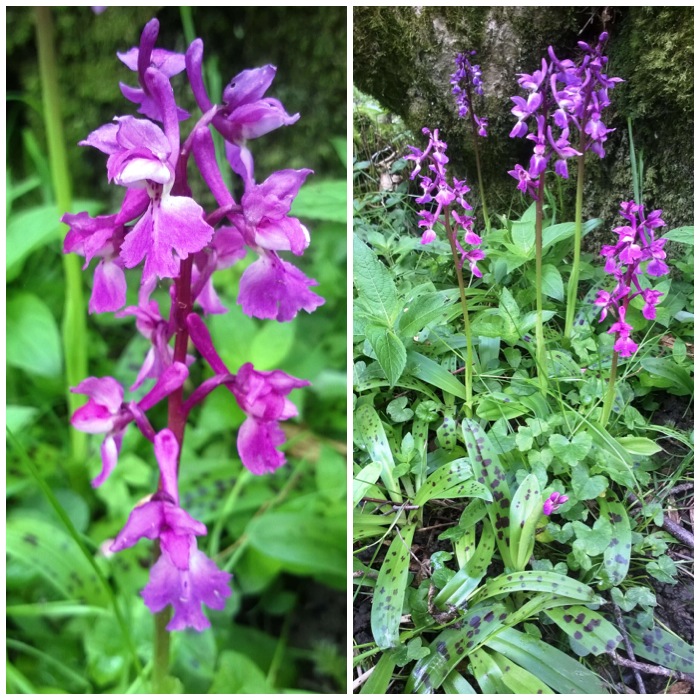
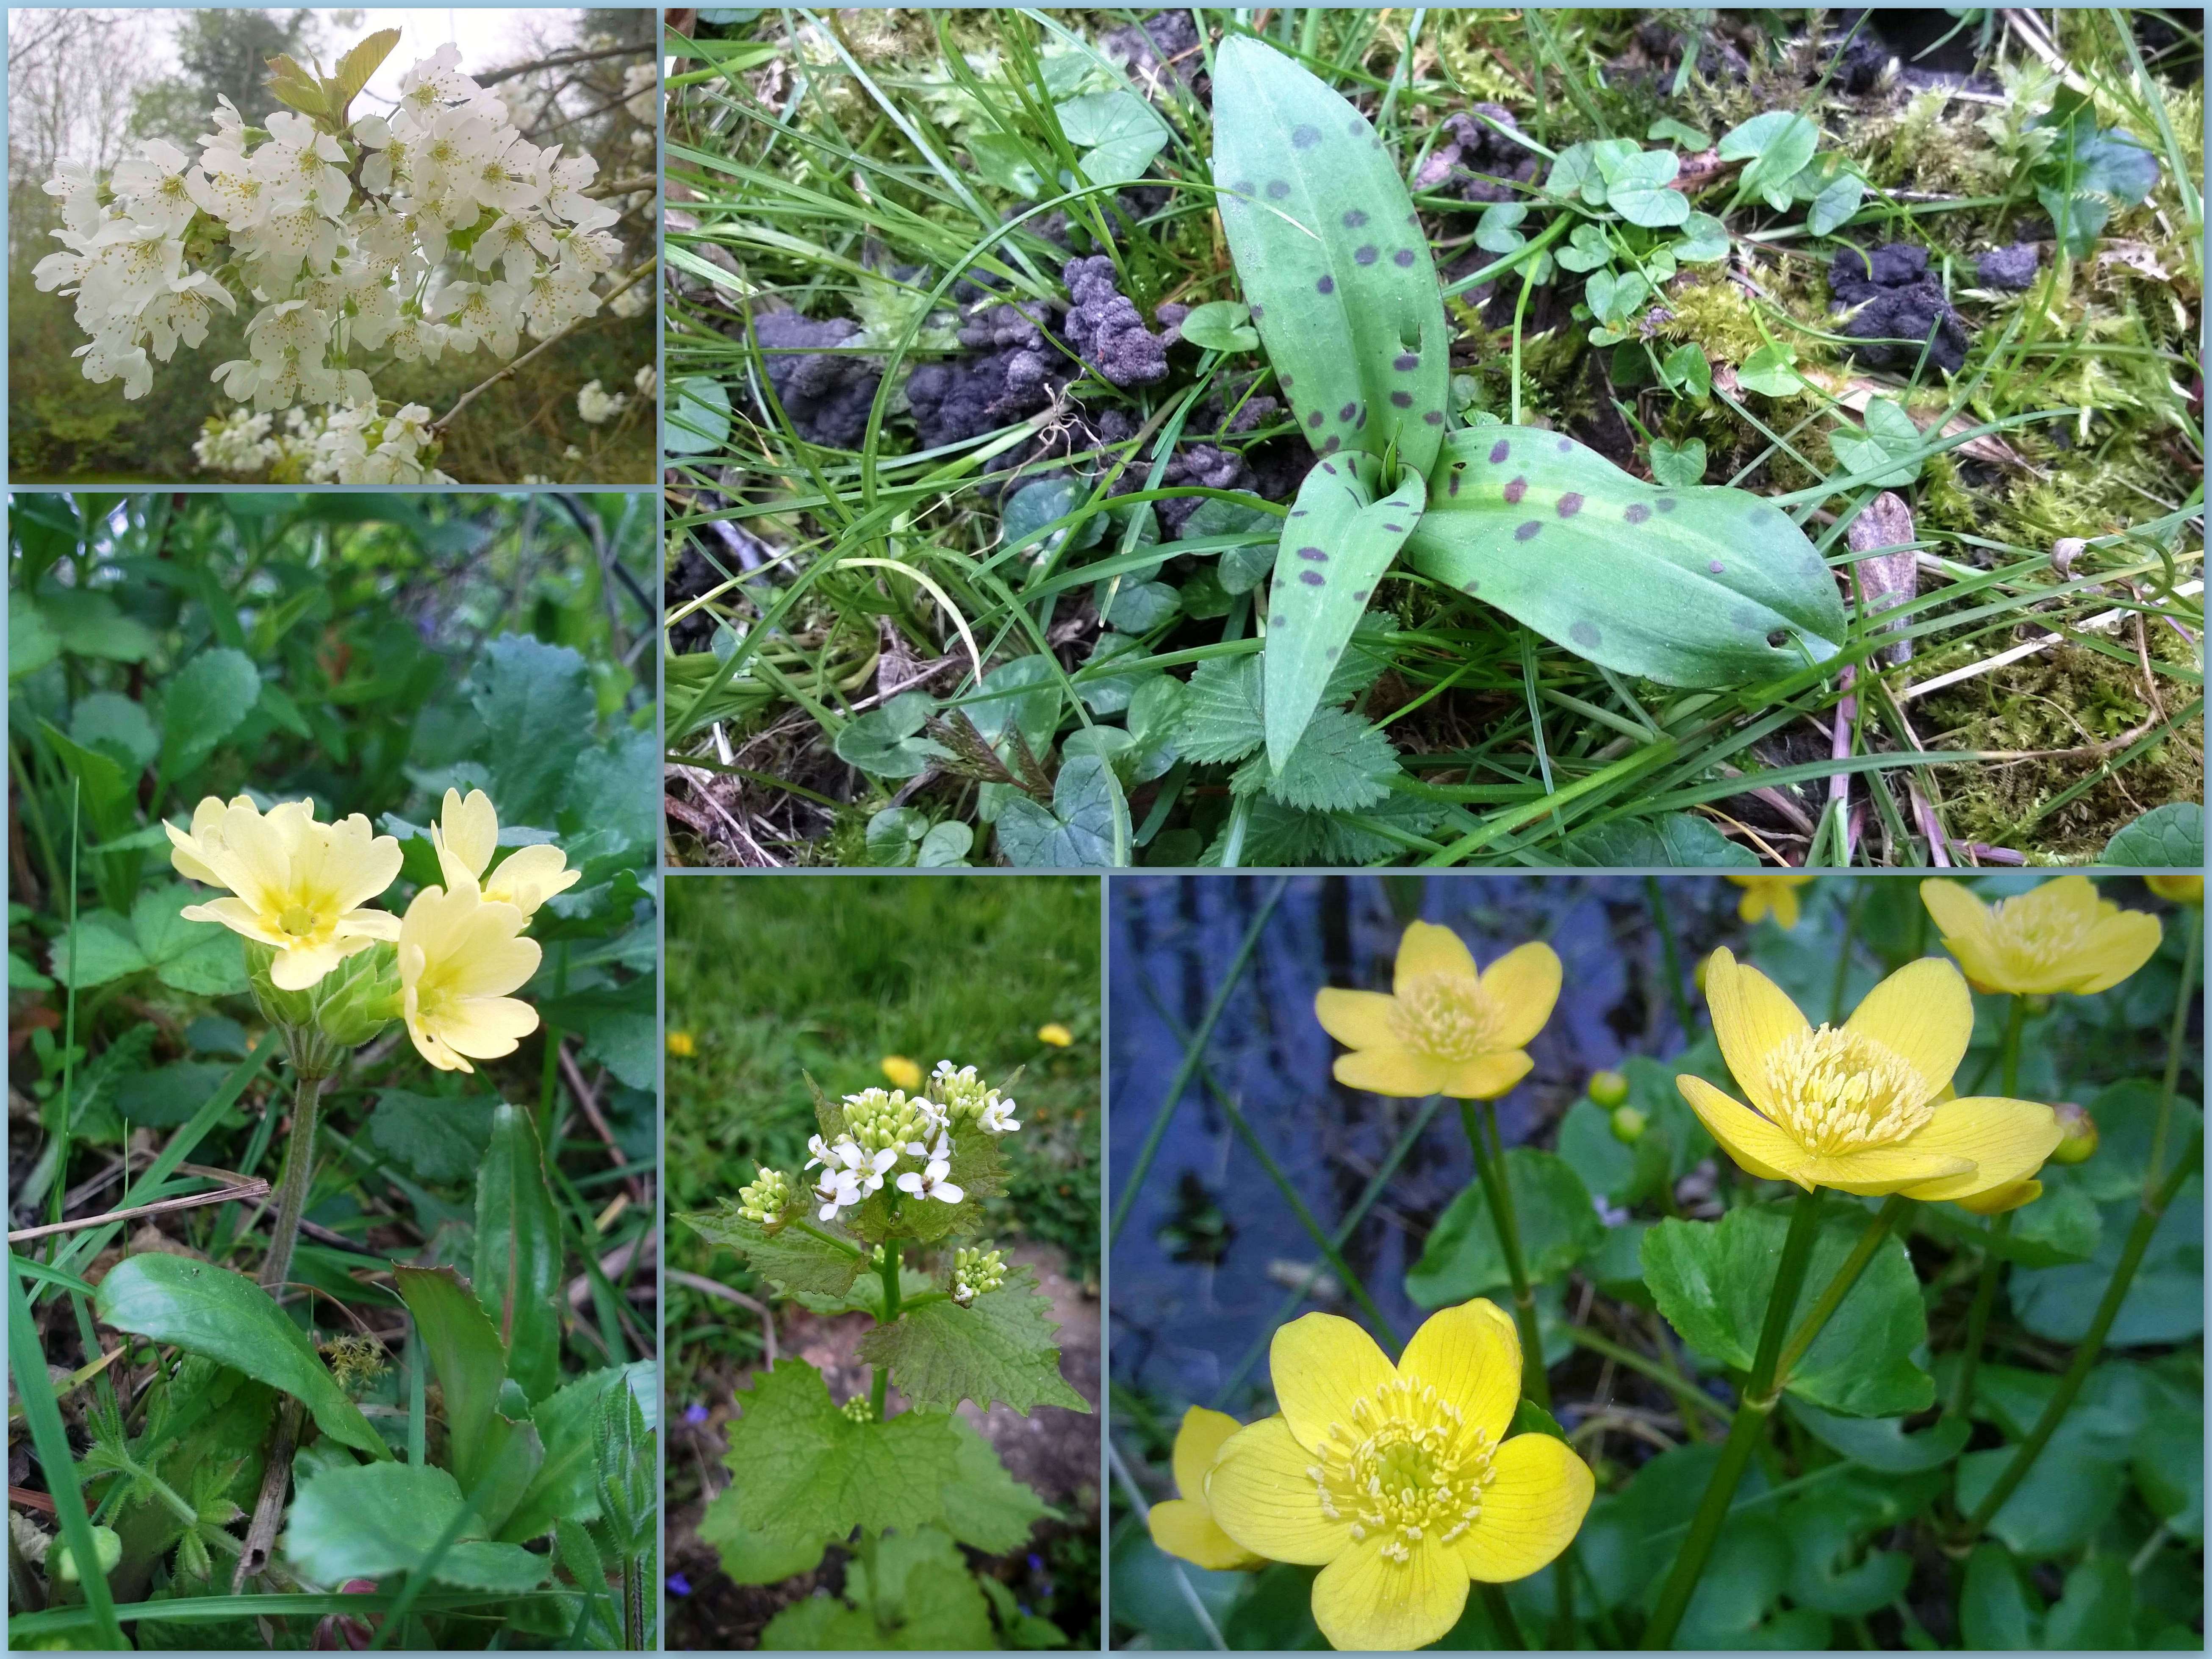
On the left you can see the Common Spotted Orchid. I came across this beautiful flower in the hills but on the steep grassy slope by a river where the soil was not too acidic. A common ingredient in love potions all over the world I am told.
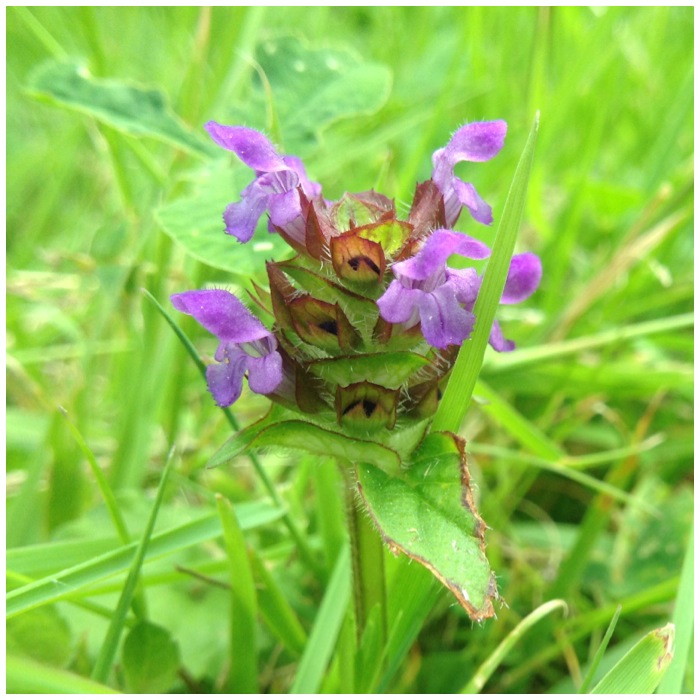
At the top right is the tiny Wild Thyme, a plant I got confused with Self Heal for a long time. As a medicinal plant it was used as a sedative and was good for hangovers.
The Red Clover in the bottom right is a little flower spotted all the time by most people but at this time you can see that it has opened up slightly. This little fella I can remember as a kid providing me with a shot of nectar. It is also loved by farmers as a nitrogen rich fertiliser or as a feed for animals
Common Spotted Orchid, Wild Thyme and Red Clover
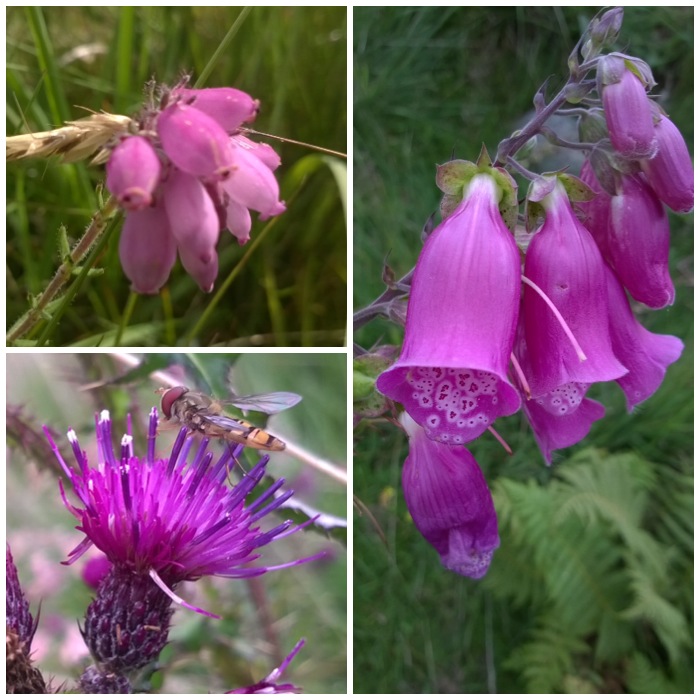
I did not see a great deal of the Bell Heather (top left) as it does not like the soil to be to acidic so it can be an indicator of drier ground. Traditionally this plant has been used in the making of ropes and baskets due to its long fibrous stems.
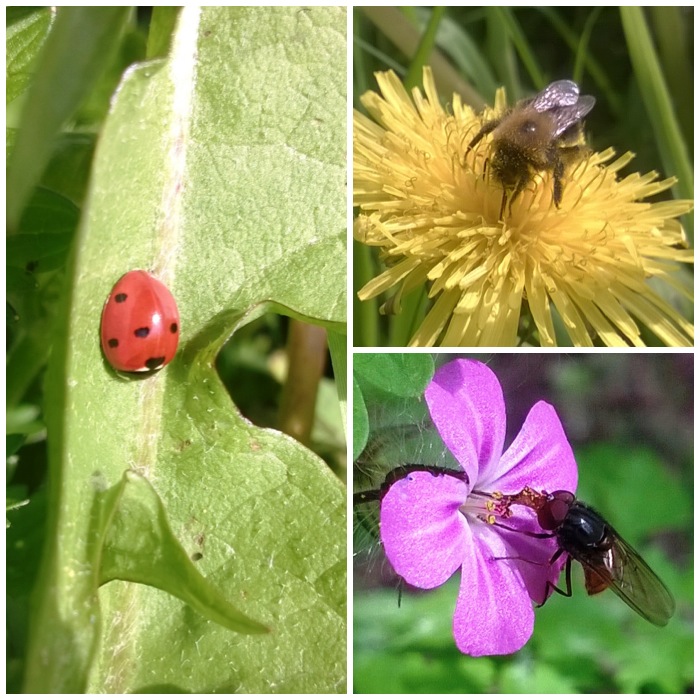
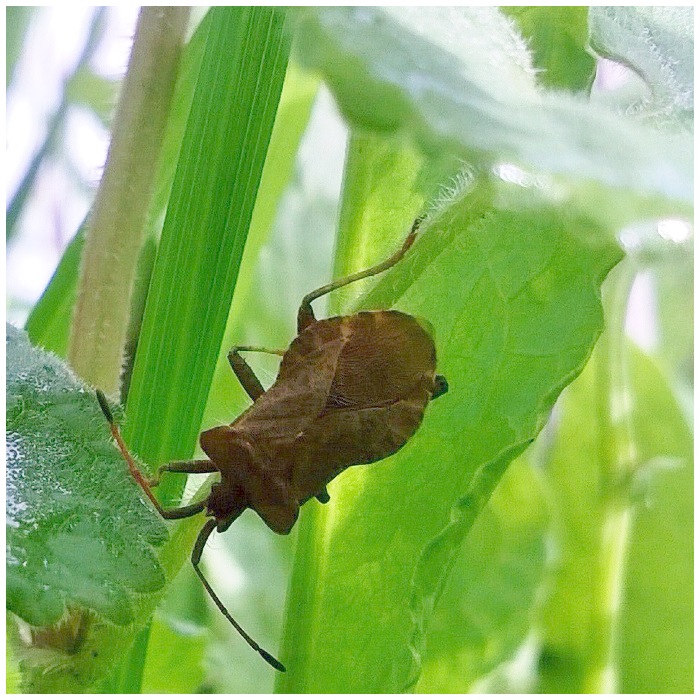
The Marsh Thistle (bottom left) as you can see by the insect feeding on it is a good source of food for many different types of insects. The young shoots are quite tasty too.
On the right is the majestic Foxglove. I did not spot too many high up in the hills but found a few in some of the more protected gulleys. A poisonous plant but one I remember playing finger puppets with as a child. As I know it is poisonous now as a father I do not let my kids go anywhere near it.
Bell Heather, Marsh Thistle and Foxglove
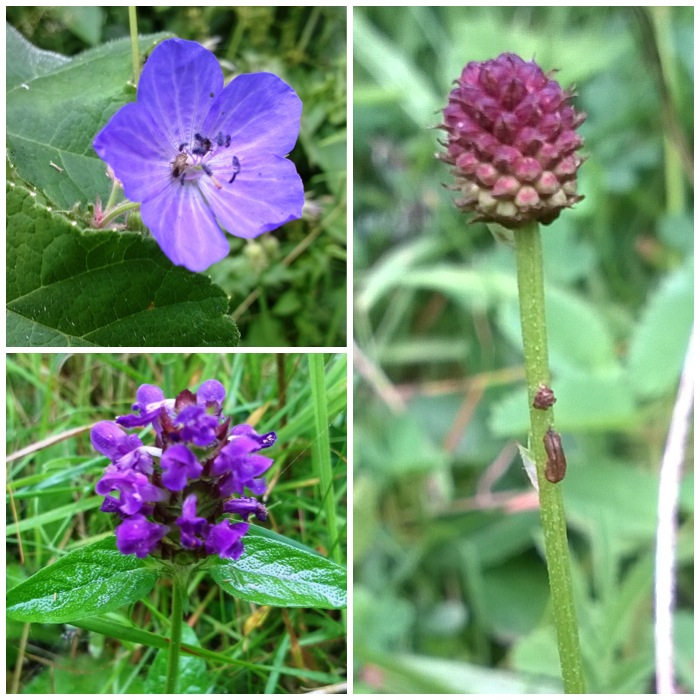
The Meadow Crane’s Bill (top left) named after the fruiting body it grows that resembles a Cranes beak. This is another medicinal plant used historically for treating wounds and nowadays for treating diarrhoea and also as a gargle.
Bottom left is the tiny Self Heal. Another plant that is easily missed but was once seen as the woodmans friend and used to treat small cuts they got from their tools.
On the right is the tall and slender Great Burnet. I found this one in only one spot on my trip near a railway line and nearly walked past it. I like to nibble the young leaves. It’s other name is Burnip due to its ability to help treat burns.
Meadow Crane’s Bill, Self Heal and Great Burnet
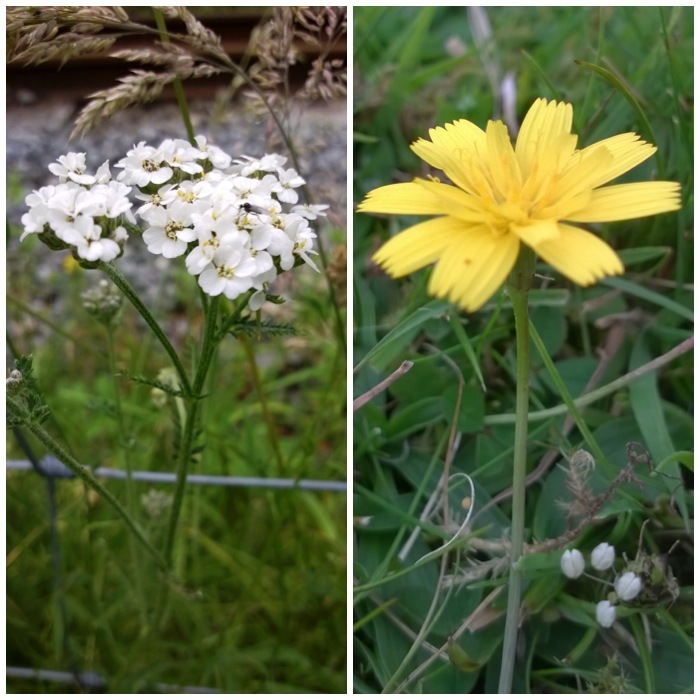
On the left is the well known medicinal plant Yarrow. This tough plant was growing all over the lower slopes. Up high you still saw the odd one but hugging the earth very closely. I remember being on a Bushcraft course, having a cold and being given Yarrow tea laced with honey. That cold did not hang around as it normally would do with me.
I think the yellow flower on the right is a Hawkbit. These little yellow flowers are difficult to identify correctly if you do not look closely at the leaves. I forgot to do this but I think it is a Hawkbit. The genus of this plant is Leontodon which translates to Lions Tooth – referring to the squared of but toothed tips of the flower.
Yarrow and Hawkbit
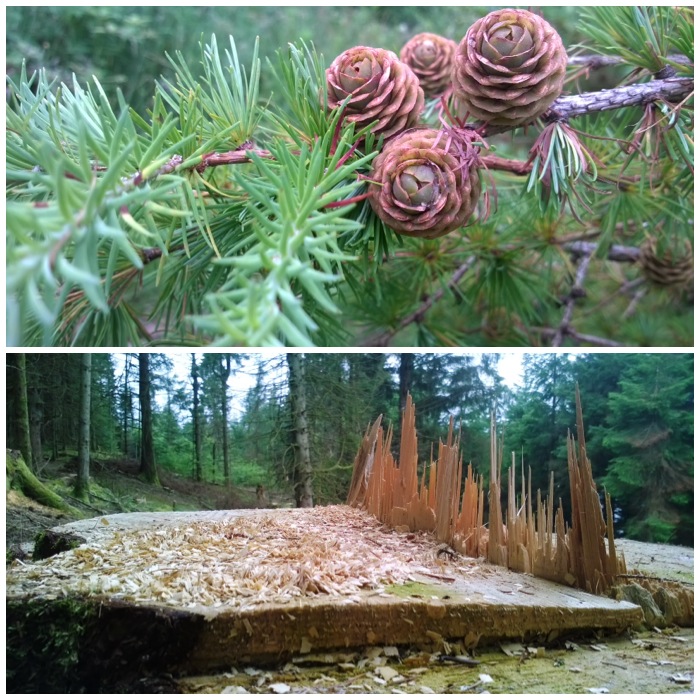
My last picture I included as I came across a lot of logging in the lower slopes of the hills. It is Larch I think and I really liked the contrast between the young green growth, the growing cones and the sharpness of the stump left by the loggers.
Larch
I really enjoyed spotting and photographing these plants (I had to climb down into some steep gullies) however please let me know if you think I have identified any of them incorrectly.
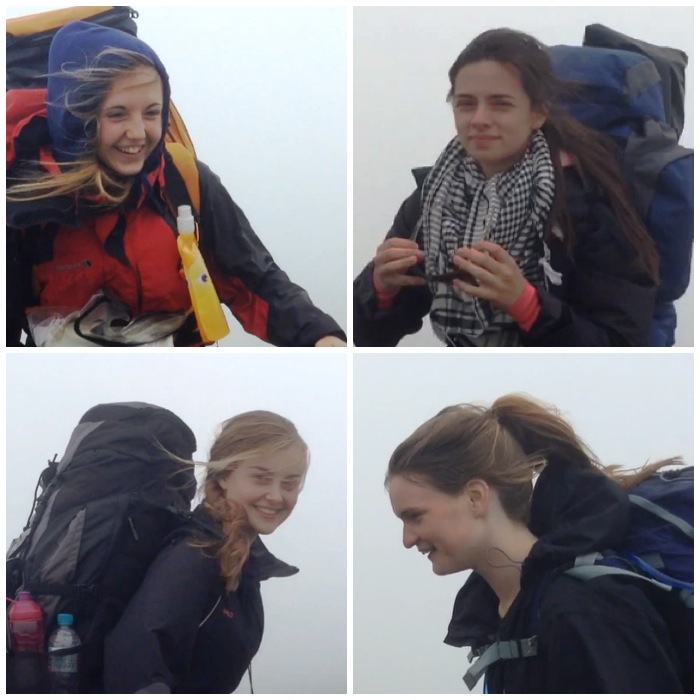
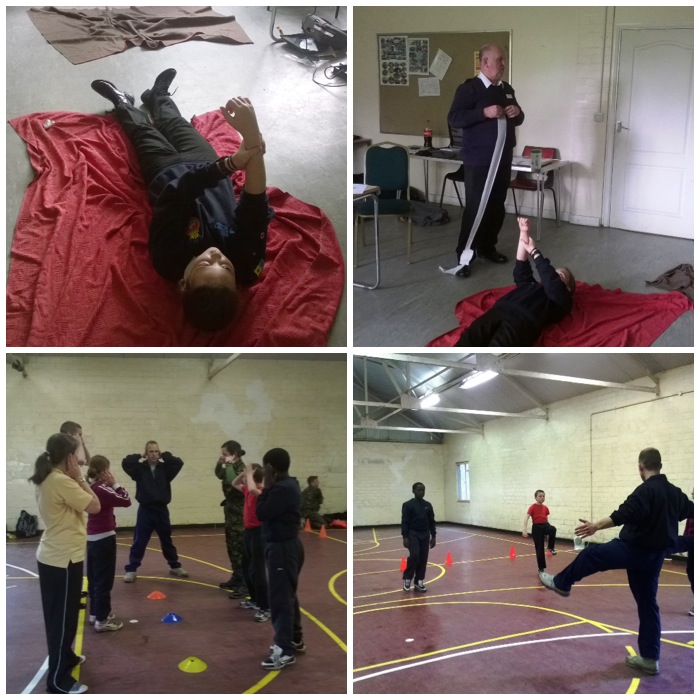
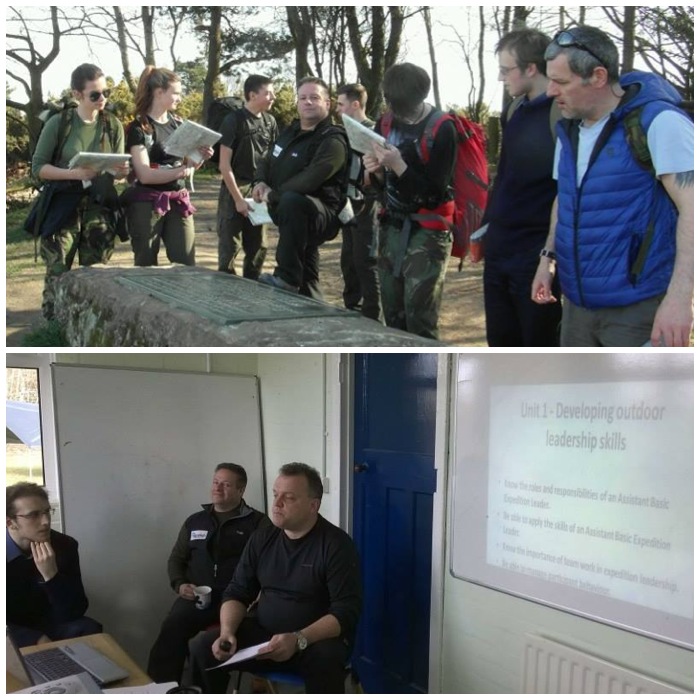
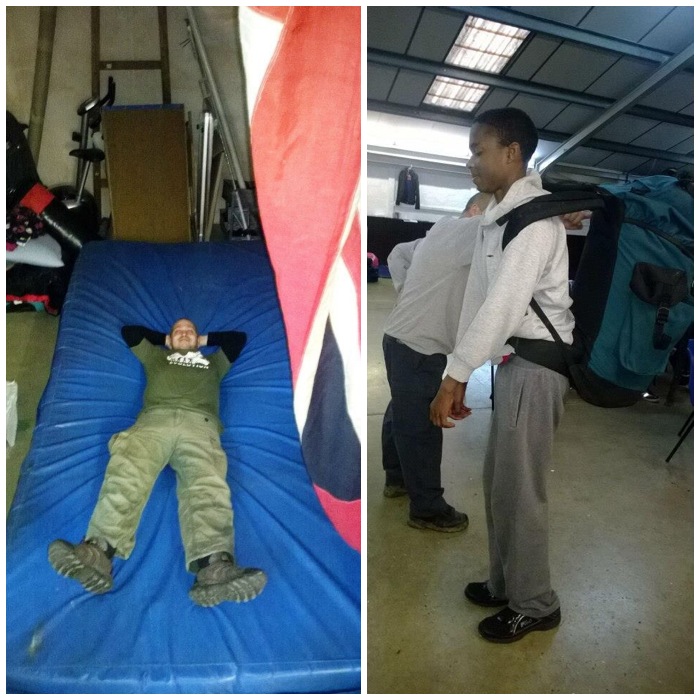
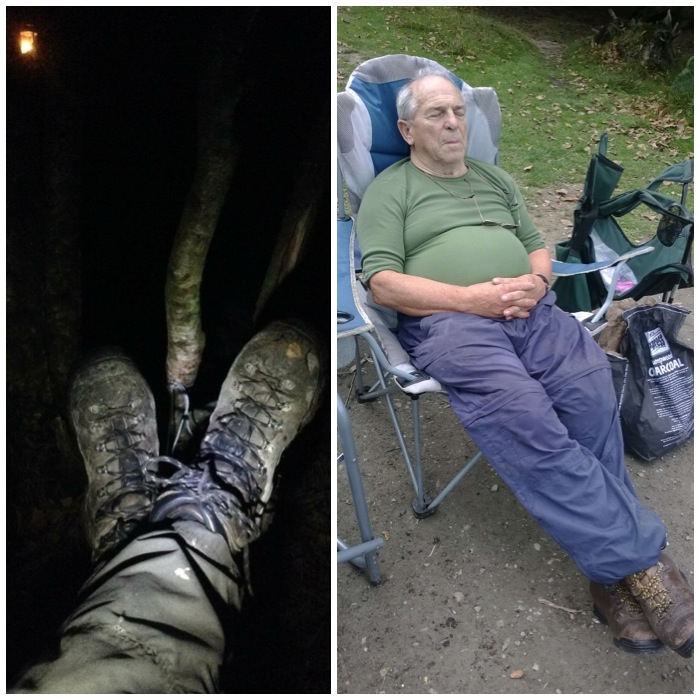
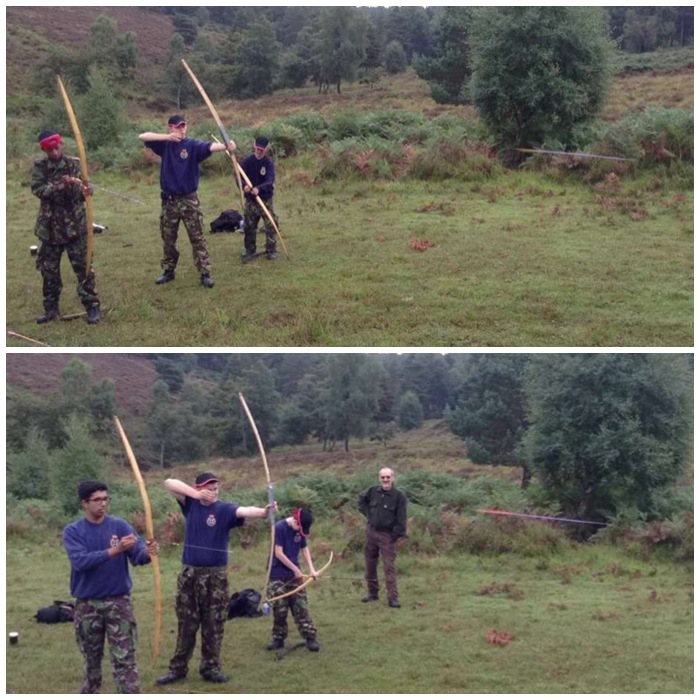
I was asked to attend in a safety role as a Mountain Leader but soon ended up doing safety and training as we had a shortage of instructors. The expedition was over five days and we had one team along for training and two other teams doing their assessed expeditions. All the participants were from the Sea and Royal Marine Cadets (including both cadets and younger staff in the teams). The participants were from London Area and Southern Area Sea Cadets.
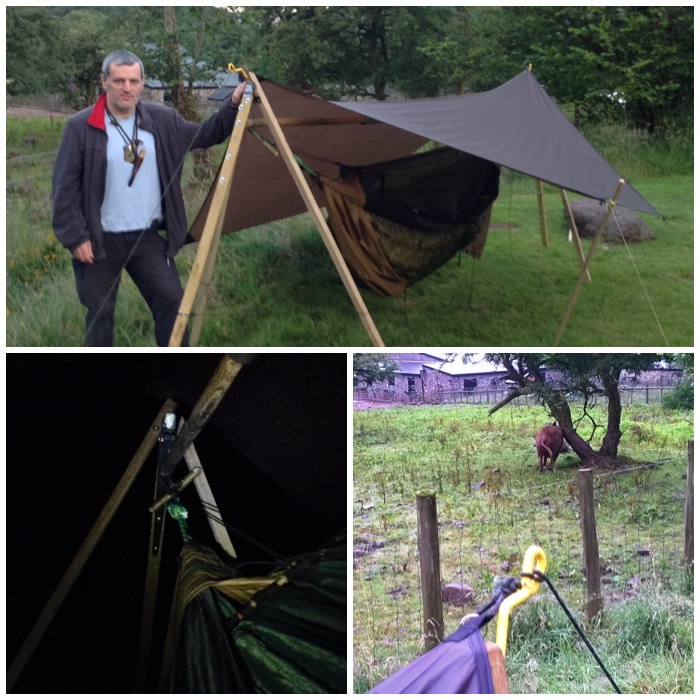
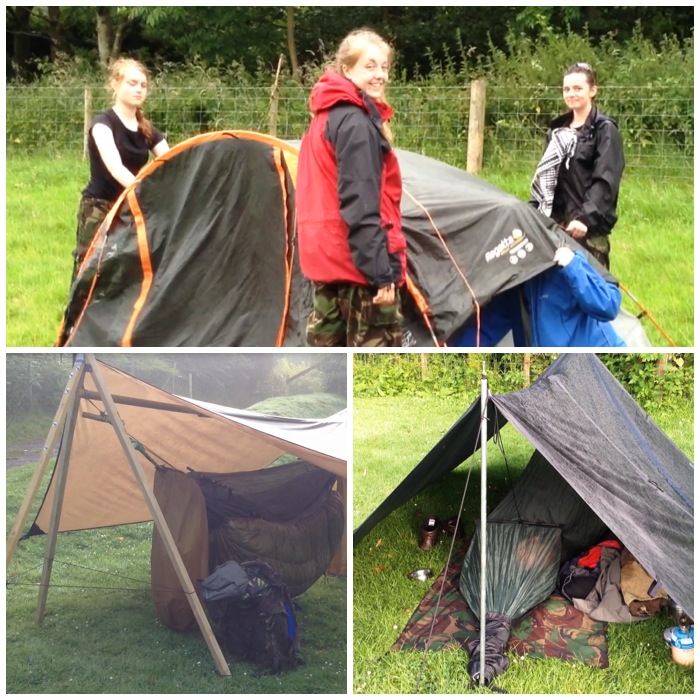
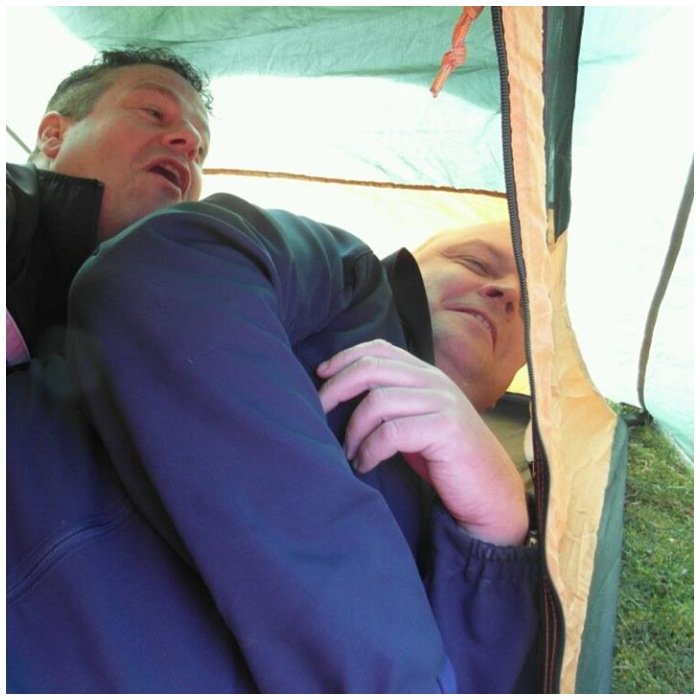
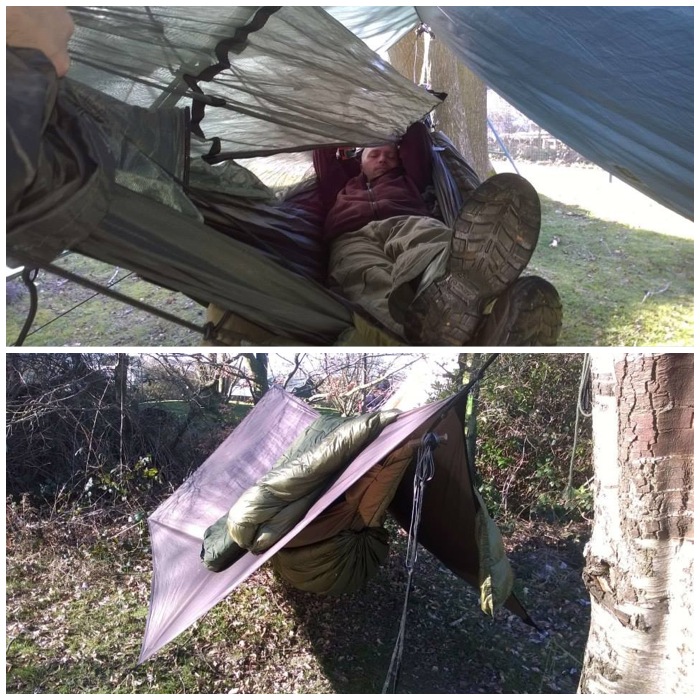
I joined the expedition at the end of the first day at Dan yr Ogofcampsite. The staff and cadets under training were camping there but the assessed teams camped elsewhere remotely. I soon had my hammock stand set up and turned around to see my neighbours were some pigs. At least they were better company than the midgies.
My home for the trip
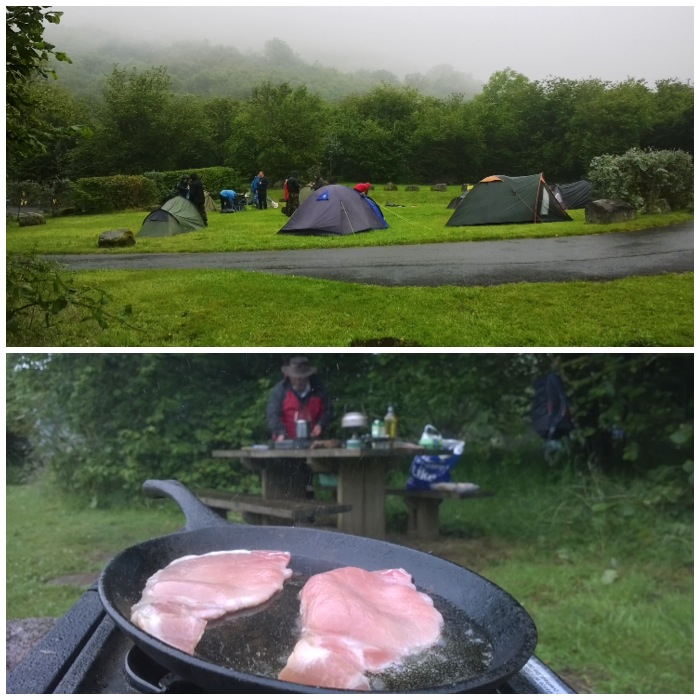
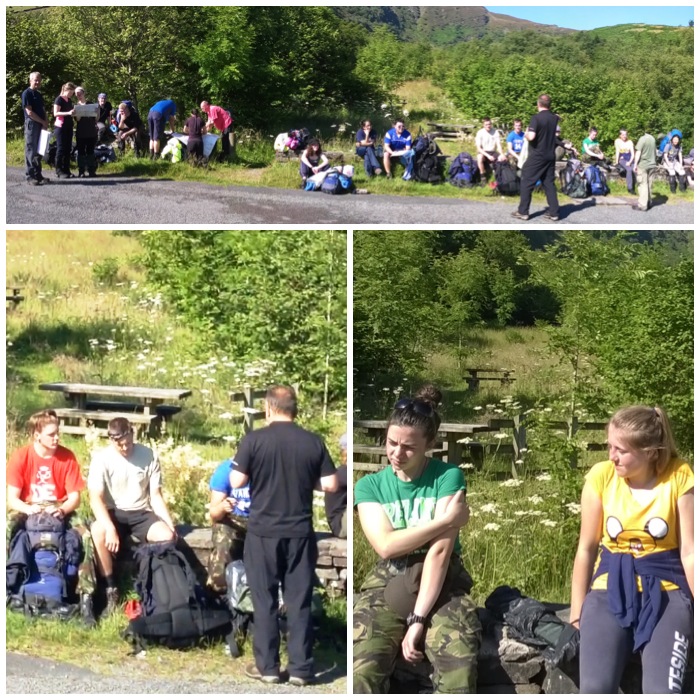
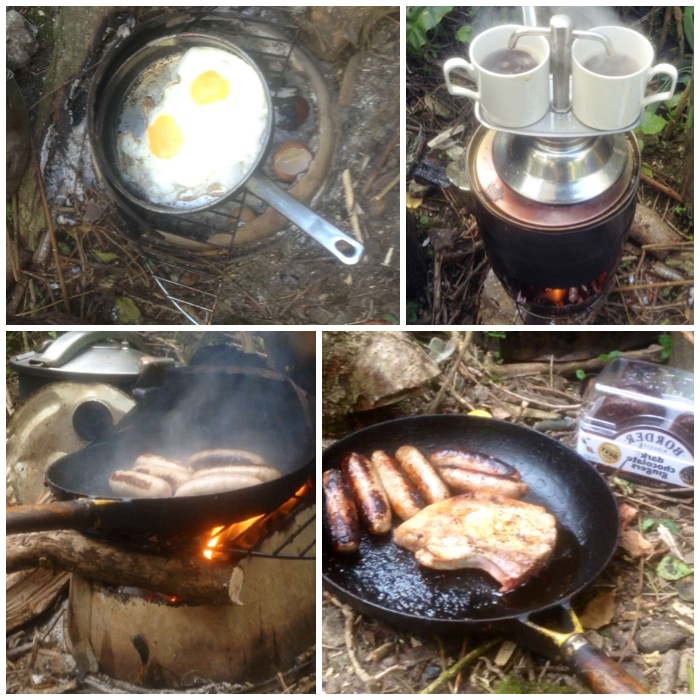
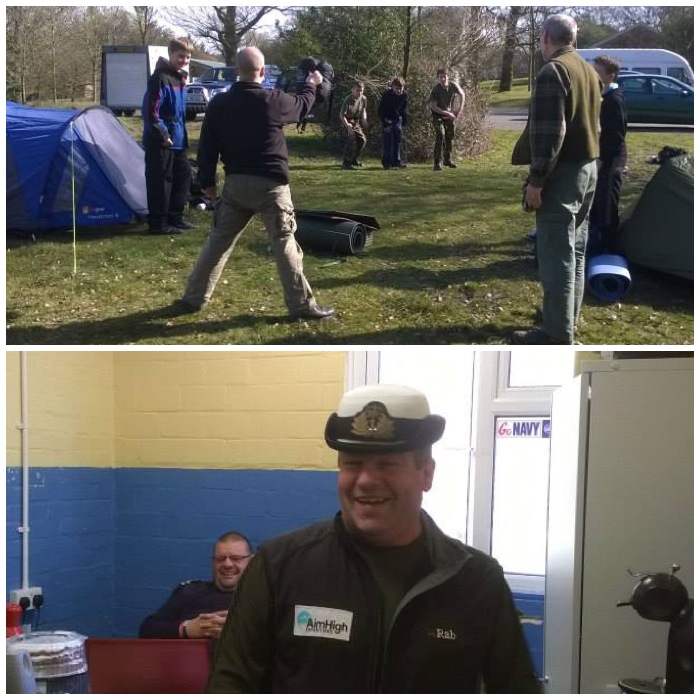
My first morning was a bit of a damp affair but the bacon sandwiches soon made up for that. I was joined by my friends Alan and Dave Lewis, John Kelly, Chris Bonfield and met for the first time Paul Kelly. Paul also holds a Mountain Leader qualification which proved invaluable over the expedition.
A wet start
I took a little bit of video after my first night in my recently modified hammock stand. I had a great sleep and it was nice to get away from the mossies.
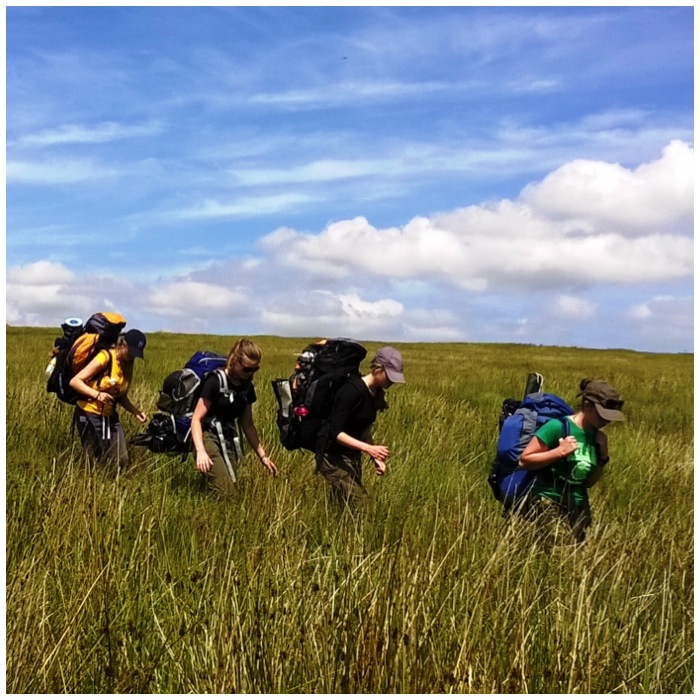
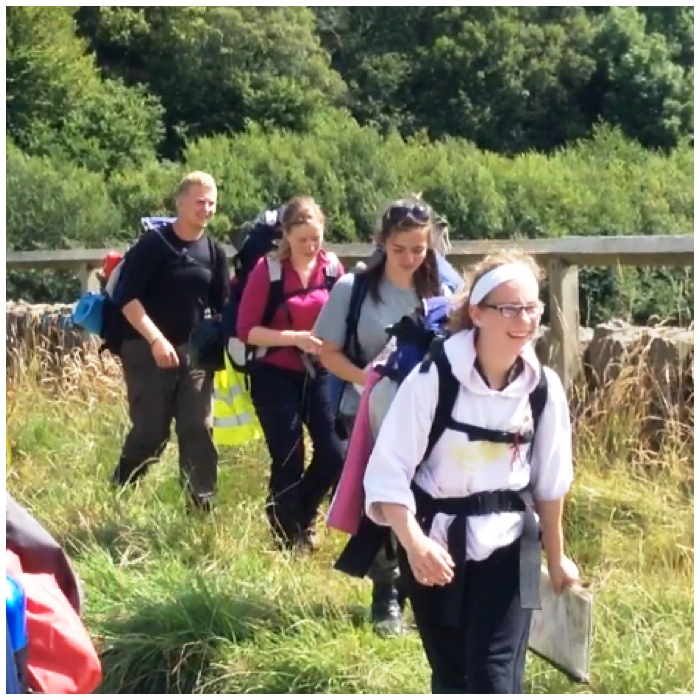
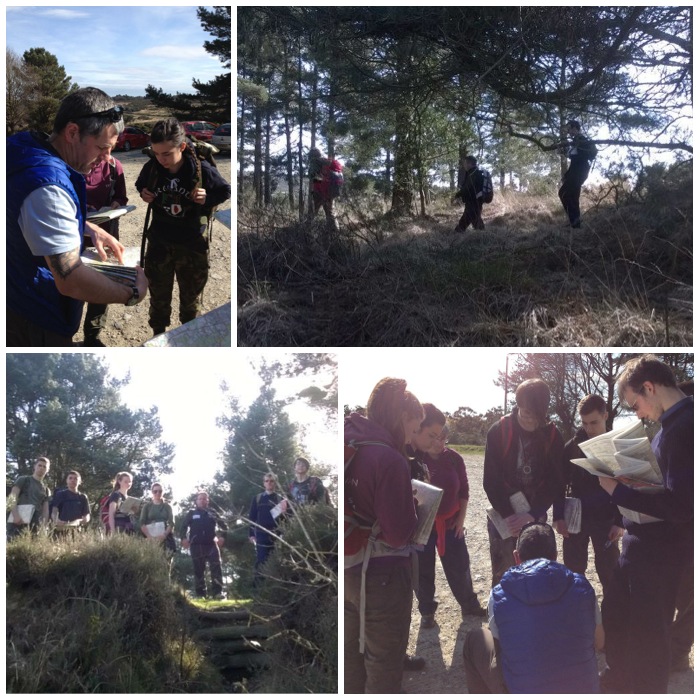
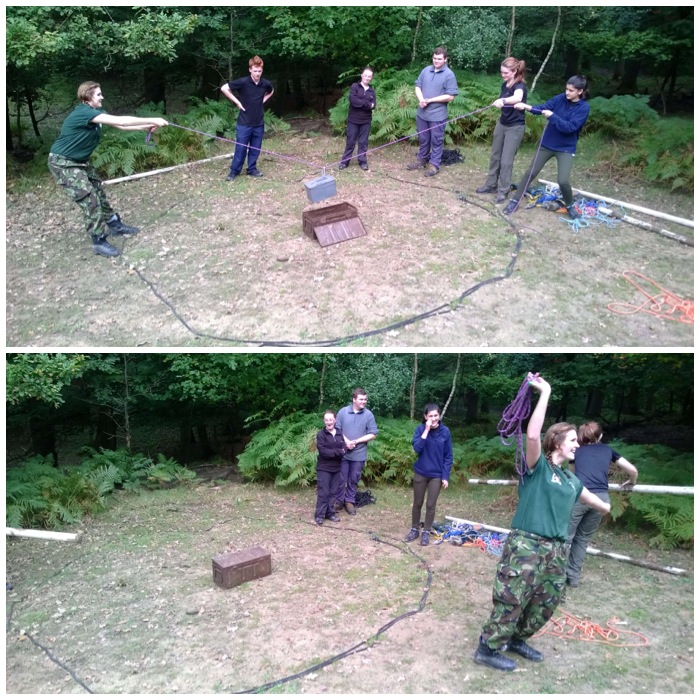
I took out a team who were training for a future expedition. It was made up of Jess, Maisie, Rosie and Tara. Tara and Jess are also working towards theirLevel 2 Assisting Basic Leadershipaward with me so this trip proved great experience for them.
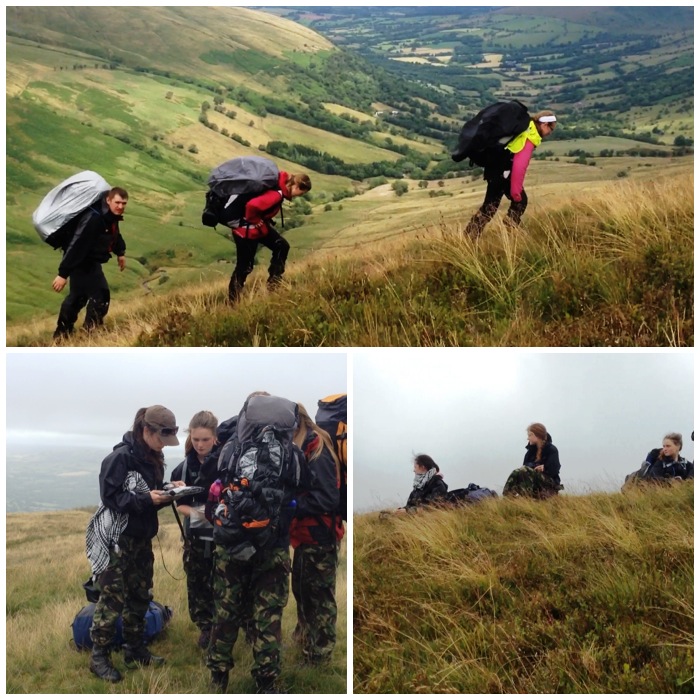
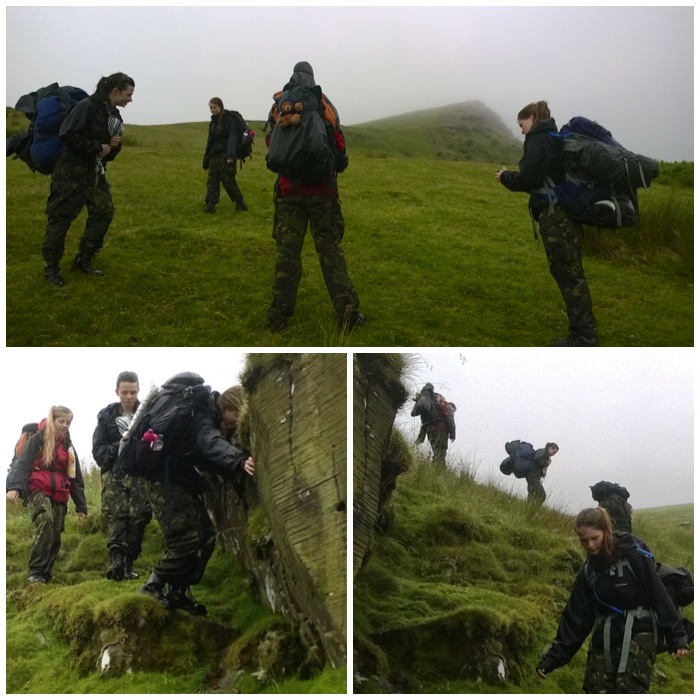
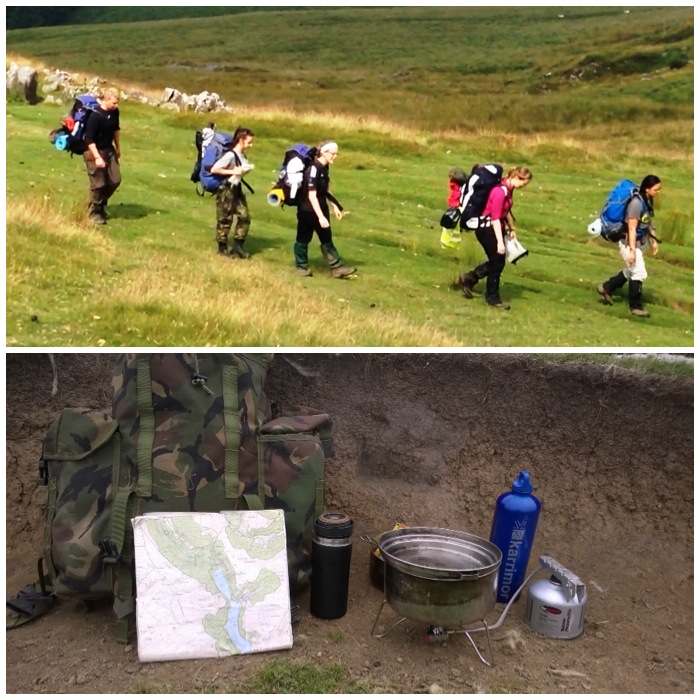
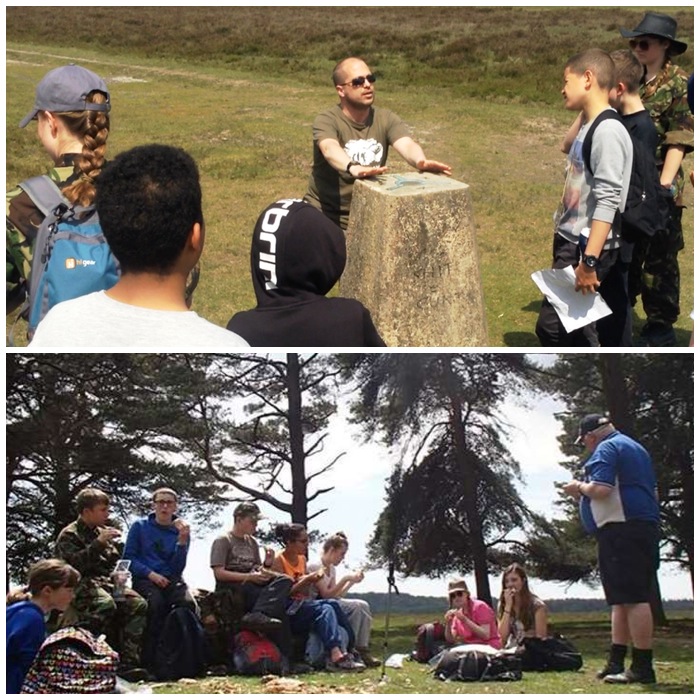
In the role of safety officer I normally like to get up very high in the hills to observe the assessed teams remotely. My team was dropped off atTyle Gawrat the foot ofFan Nedd. The day was blustery but at this point the visibility was clear. We were soon slowly picking our way up the side of Fan Nedd, discussing all the factors of good route selection on a steep slope.
Straight up
The spirits of this team were high and they did not let the wind or the rain get them down at any time (which makes my job far easier).
The Training Team
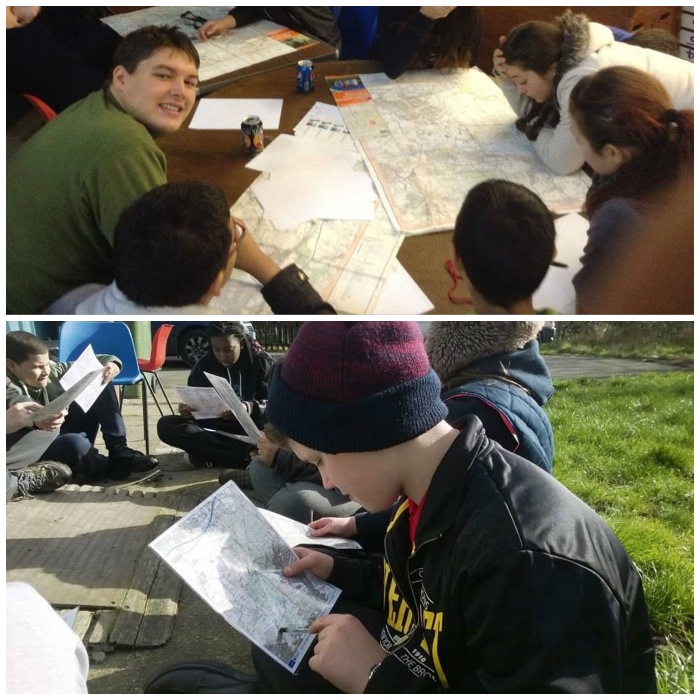
After doing a fair bit of map work, where they had to continually identify where they were, we soon spotted the first of the assessed teams on the hills. Also whilewe were ascending Fan Nedd we were passed by many troops heavily laden down with heavy kit. They seemed to reach some point then turn around and run off down the hill. I said to the team that we would do the same and received an incredulous look from them – we did it anyway and it only took 15 minutes to descend half way down Fan Nedd to the minibuses.
Observing and problem solving
Along the way we did a spot of foraging for bilberriesand did a fair bit of wild flower spotting. I will do a separate post on all the wildflowers we came across later.
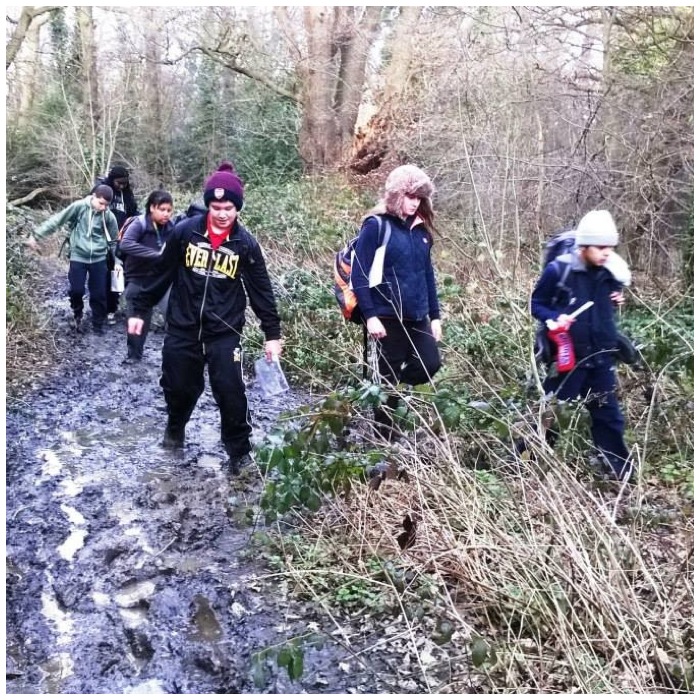
Wanderings and Foraging
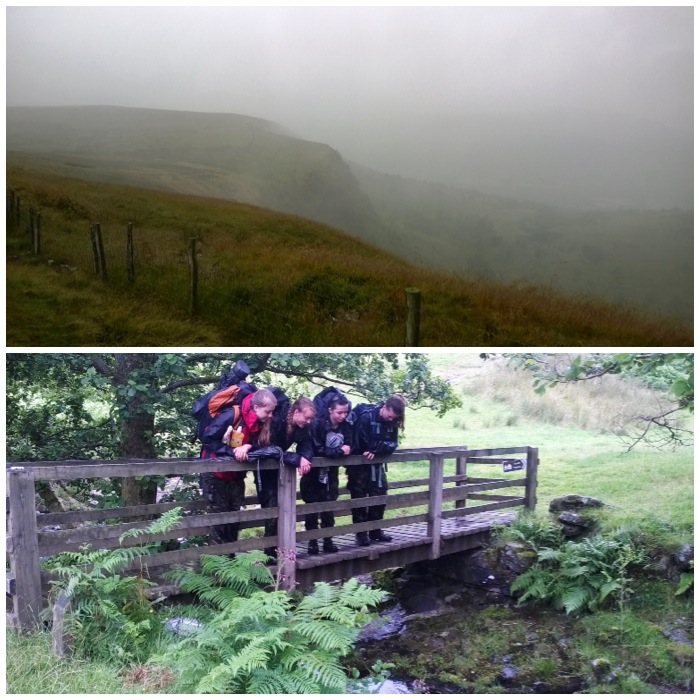
The weather soon closed in but we were still able to navigate easily over very rough ground (with limited use of maps or compasses) and keep an eye on the other teams remotely; thankfully though when we were lower down the visibility was much clearer.
Beautiful views up high and down low
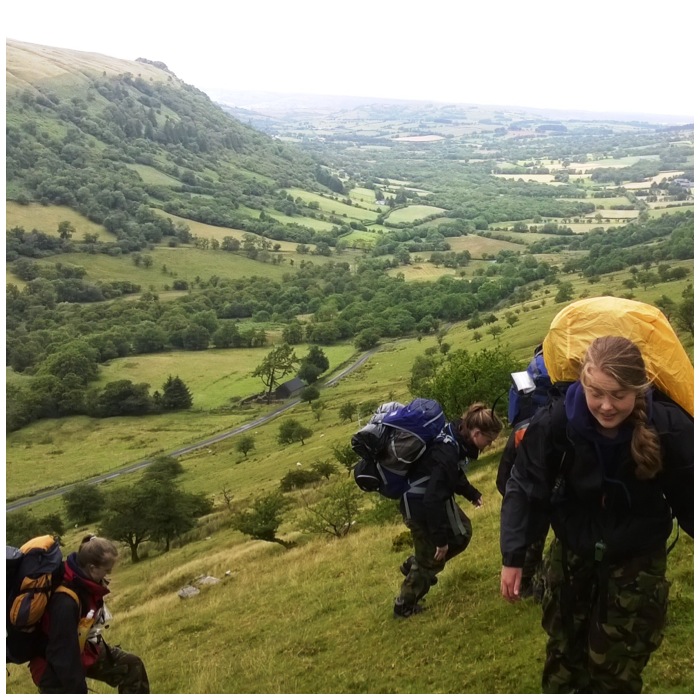
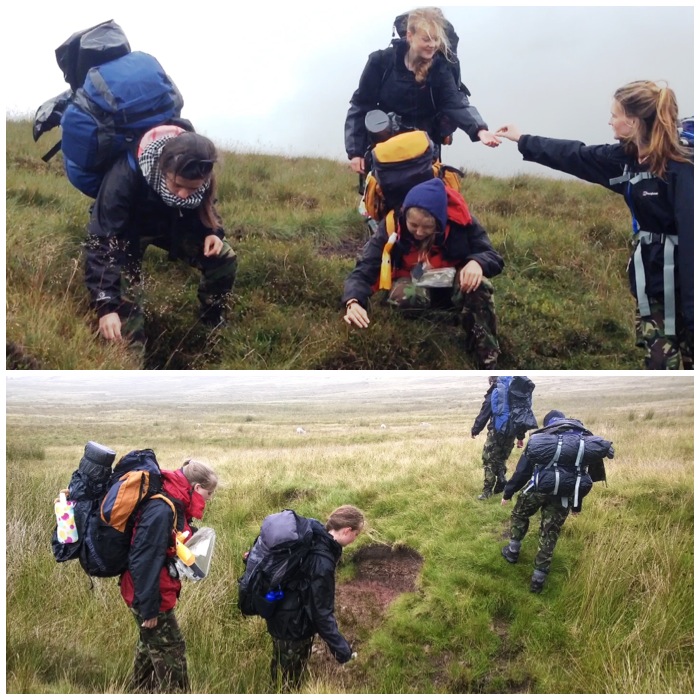
After ensuring that all the assessed teams had descended off the Beacons Way to Blaenglyn Farm campsite, I took my team to recce the steep slope at Craig Cerrig Gleisiadas this had been discussed as a possible point to ascend into the hills the next day. It soon became apparent that,thanks to the recent heavy rain, the steep grassy slopes would be too much of a challenge for the teams the next day. At least the team had a good time practising their route selection skills again as they descended this steep slope to the camp site.
Steep Slopes
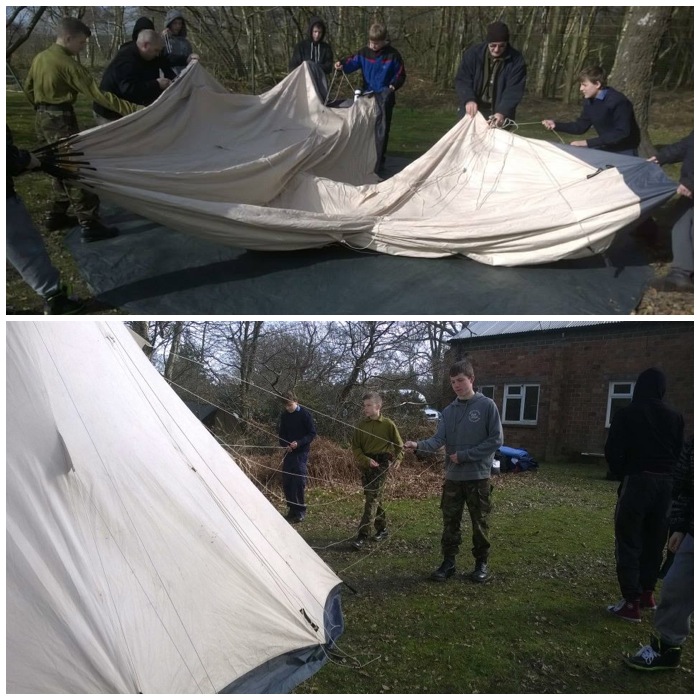
After the end of a long hard day all the tents, tarps and hammocks were soon up. Those on the expedition stayed at Blaenglyn Farm campsite while all the staff stayed at Grawen campsite.
Accomodations
Day two started and finished with excellent weather. The teams were bussed to a new start point just at Twyn Garreg – wen. This day was to be much lower down but the ground was very treacherous with tufty grass before descending into the woods then climbing up ontoCadair Fawr and then to Grawen
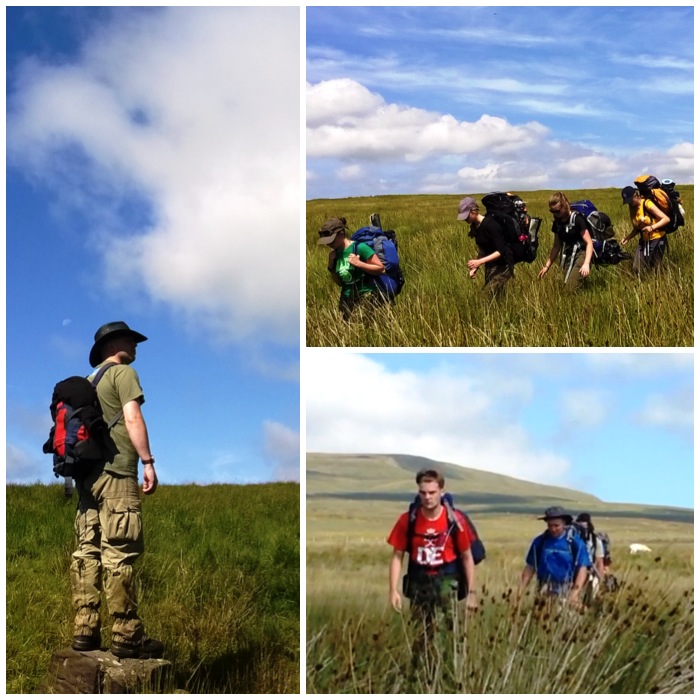
Sunshine
Dave and I spent the morning observing the teams and met them only a couple of times in the day. The training team also spent the day by themselves following the route. With so few landmarks on the open moorland the day was a good test of the teams’ navigation skills.
Moorland navigation
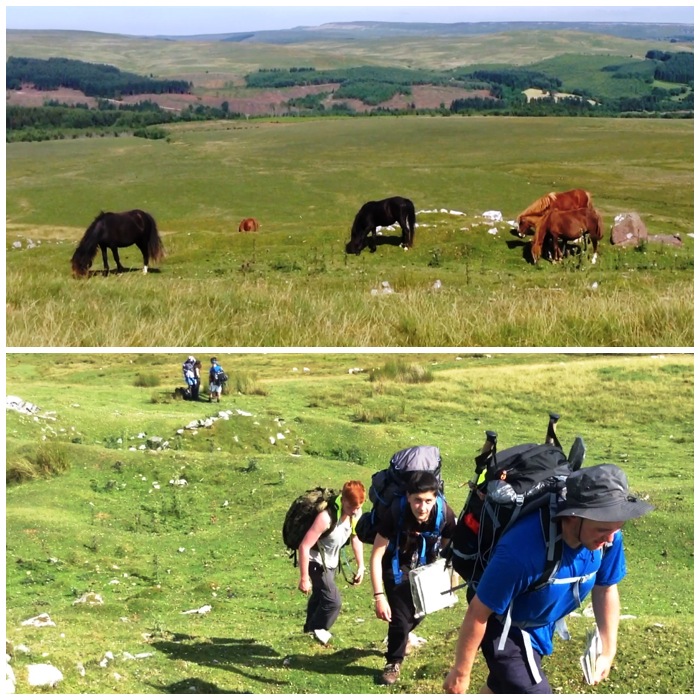
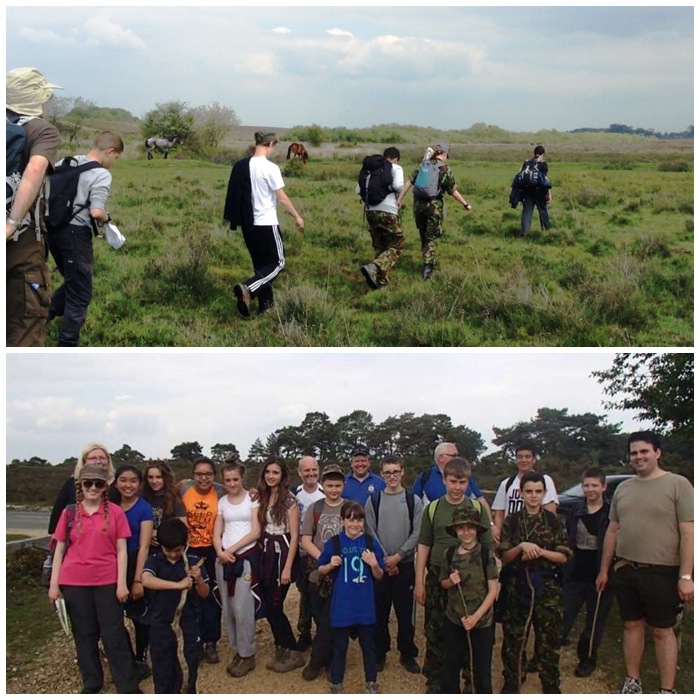
Along the way I came across this group of ponies with a number of foals grazing on the hillside. The teams did not all get to the summit of Cadair Fawr (due to a few minor aches and sprains) but did spend the whole day navigating as much of the route as possible.
Lovely encounters
The last day was spent navigating from Pont Sarn to Talybont dam. I found a spot halfway along the route to wait out the teams passing through at Buarth y Caerau. It was a long wait and I only saw two teams all day. The third team went slightly off track but got to the end on time anyway.
I spent my time watching wildlife (spooked a heron) and taking pictures of wild flowers.
The waiting game
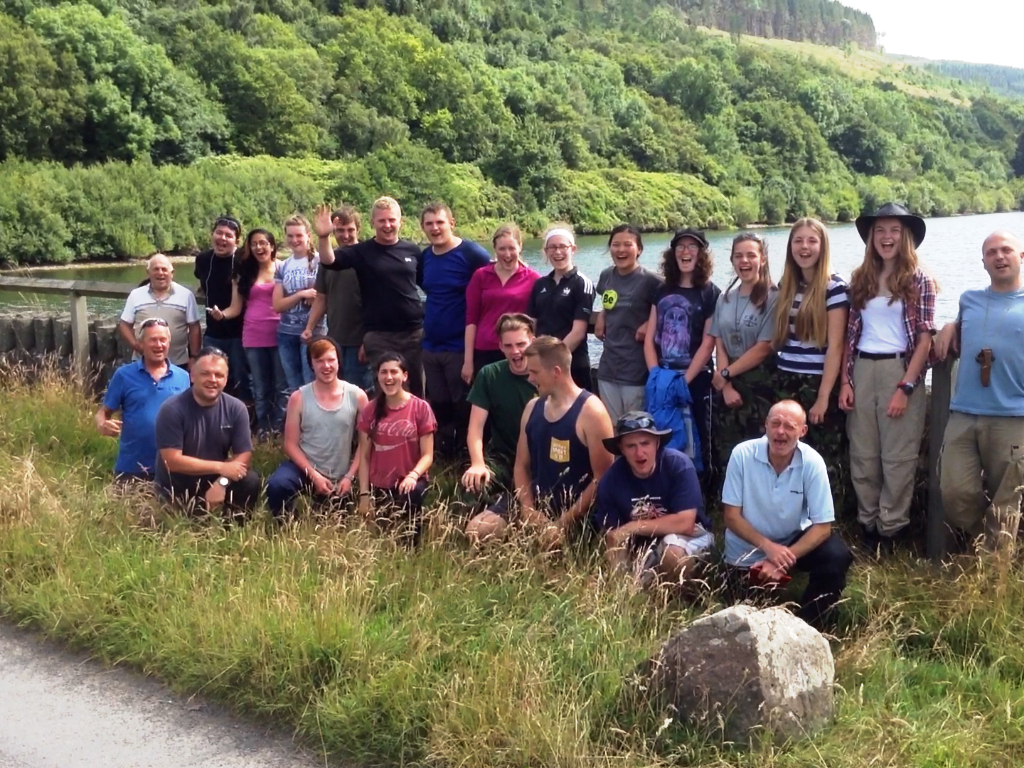
All the teams reached the dam safely and on time. There was a few aches and pains (including the staff) but an over-riding sense of achievement amongst everyone.
Final team in
After a good clean up it was time for one more picture and the long trip home.
Happy Expeditioners
I made a small video of the whole trip.
I hope that this is the start of many more Gold DofE expeditions in the Sea Cadet Corps and look forward to helping out on them in the future.
Part 2 of this series is a short video on a type of bow drilling I came across a few years ago called the Egyptian method (Egyptian hieroglyphs have depicted this method).
I like this set up as it does not put the cordage under a great deal of strain (the cordage is wrapped a number of times around the drill) and it is good for learners as the drill piece does not ping out if the set up becomes loose.
Have a look at the video and try it out for yourself.
My next video in this series will be on my technique I use with a more modern bowdrill set up.
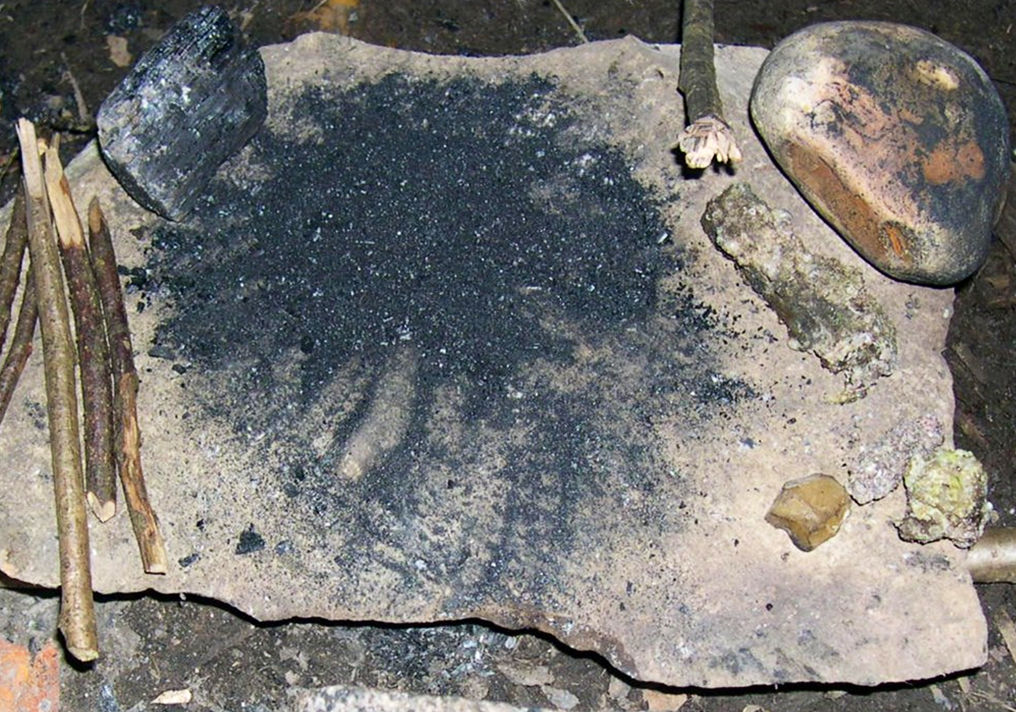
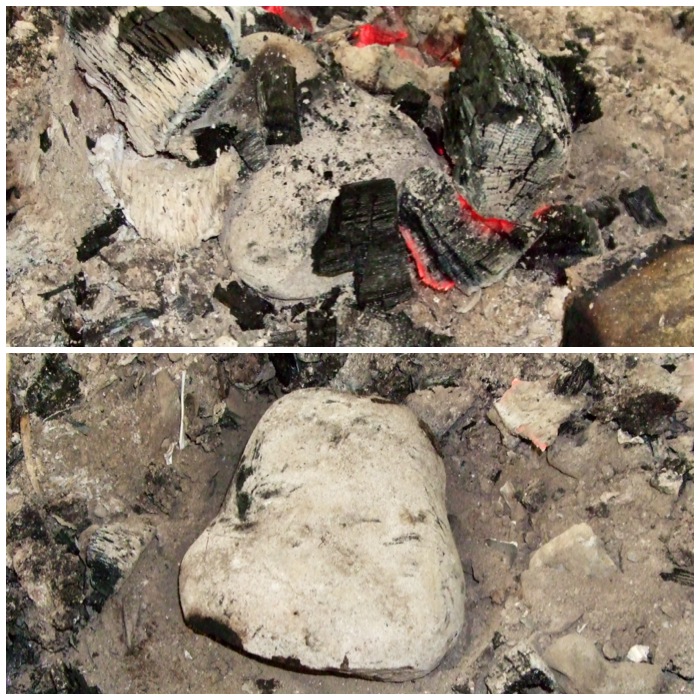
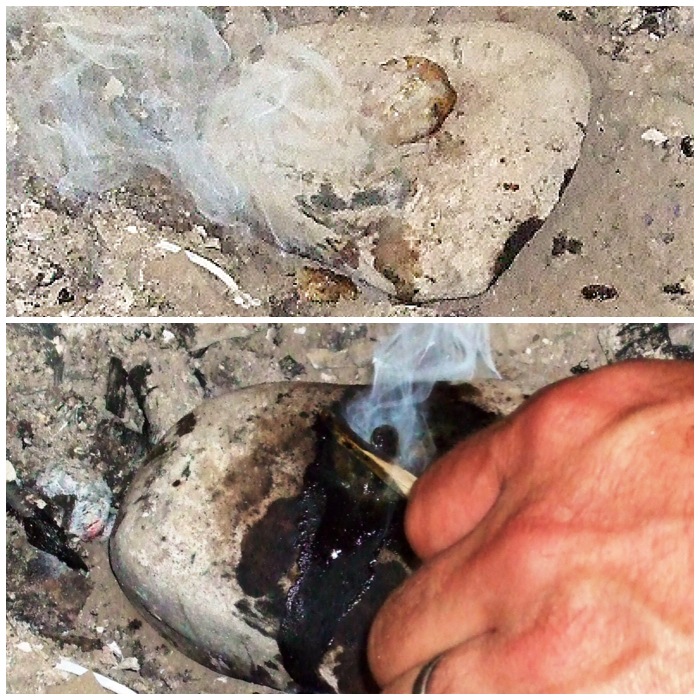
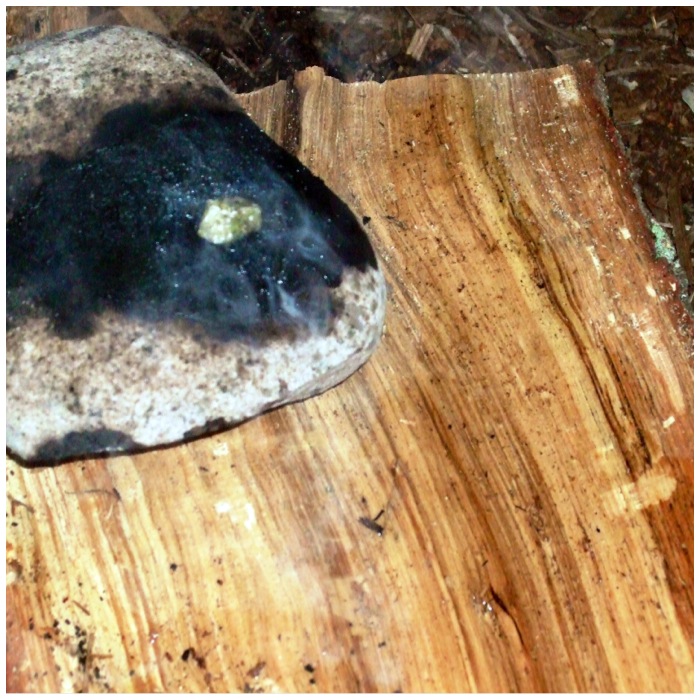
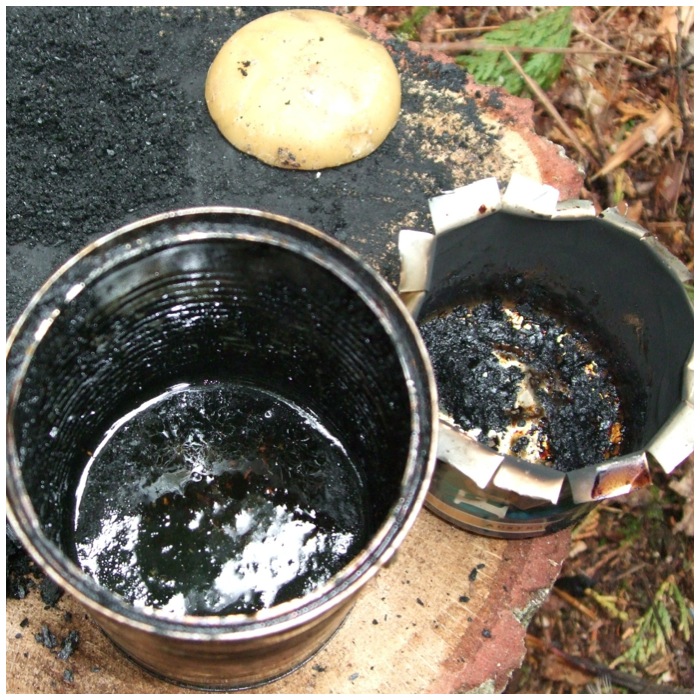
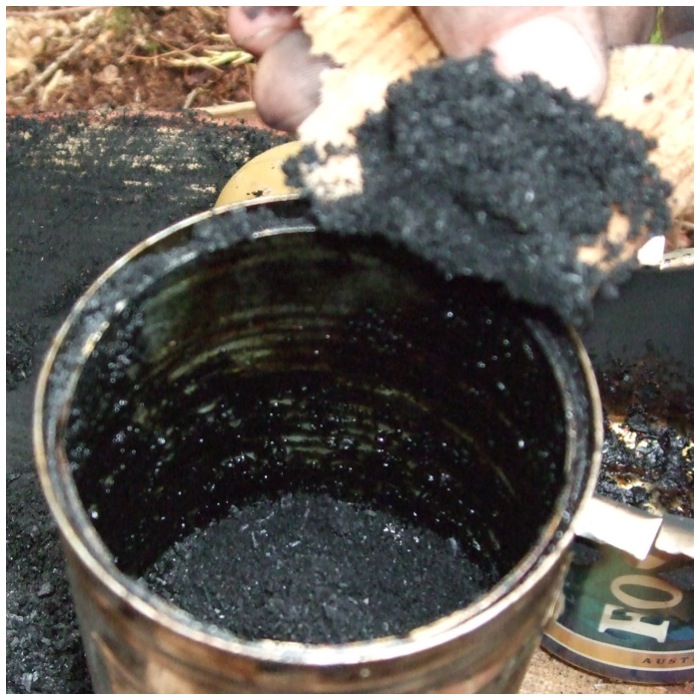
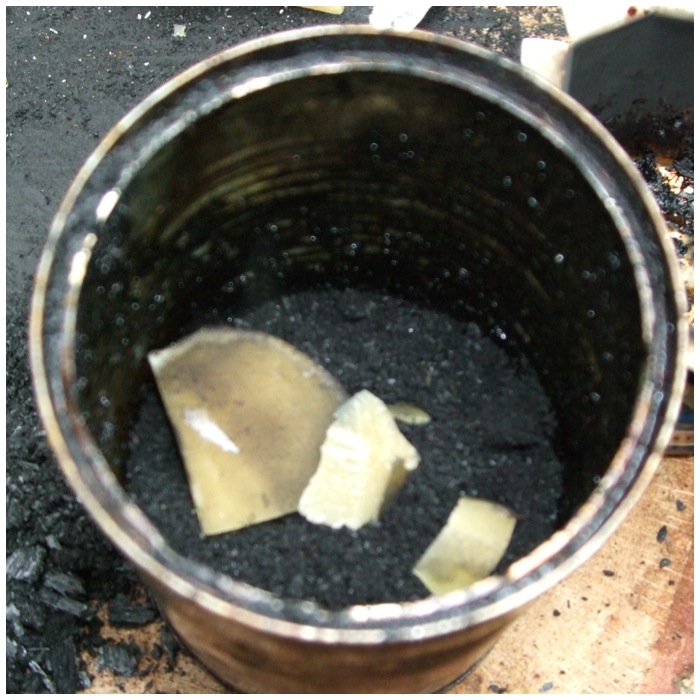
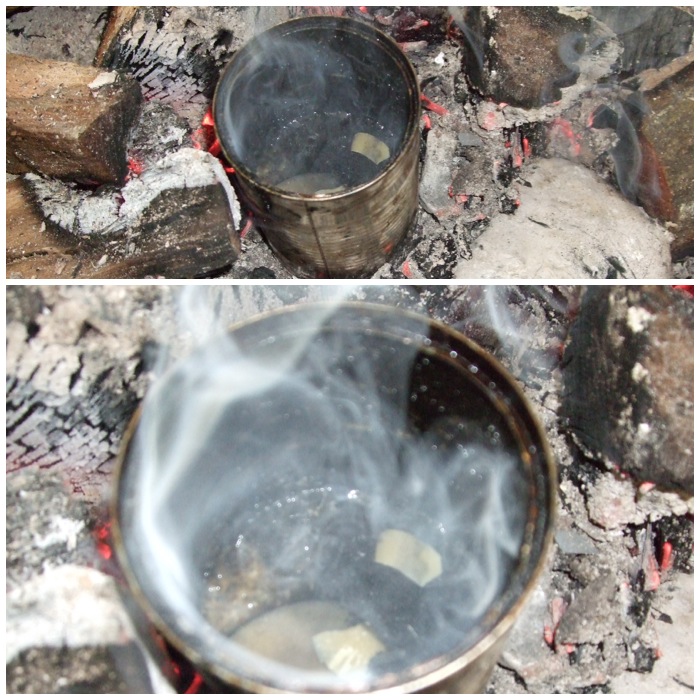
I started researching this summer the recent history around Teine Eigin (Gaelic for ‘rubbing sticks together to make fire’) on the Western Isles of Scotland (where I grew up). Up until the early 19th century records have shown that in times of animal disease (such as cattle with Need Fire) and at particular times of the year, such as the Beltanefestival, fires were lit on these Westerly Scottish Isles using fire by friction methods.
Instead of writing full step-by-step articles on the different methods, I decided to experiment with video. I have read of many different set ups that were used for Teine Eigin so I will film some of the methods I use and explain the steps I follow to create fire.
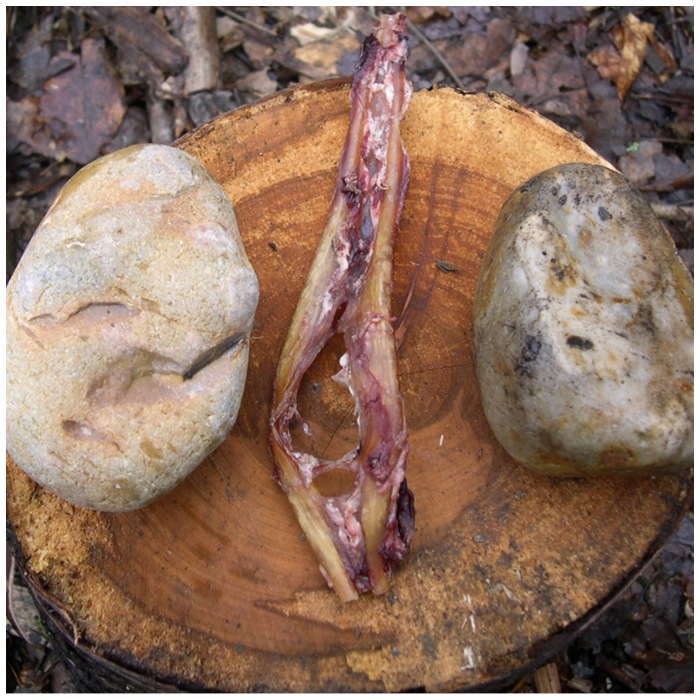
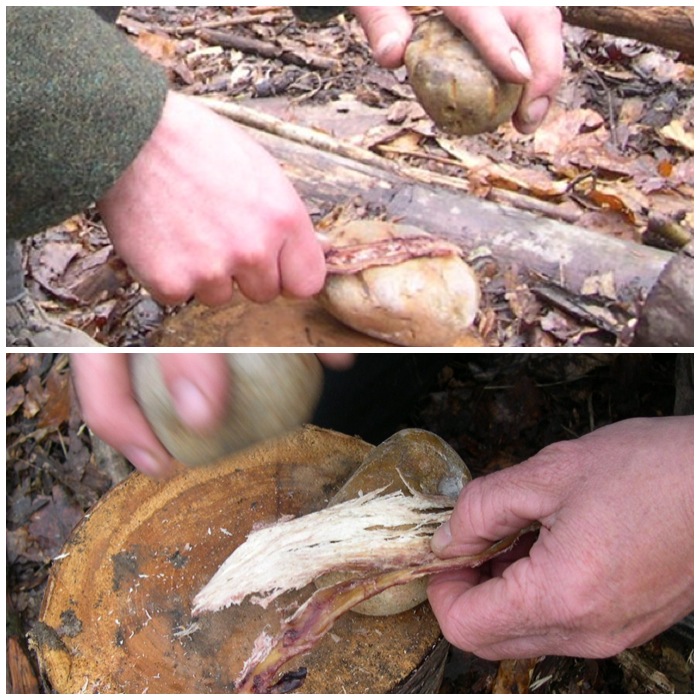
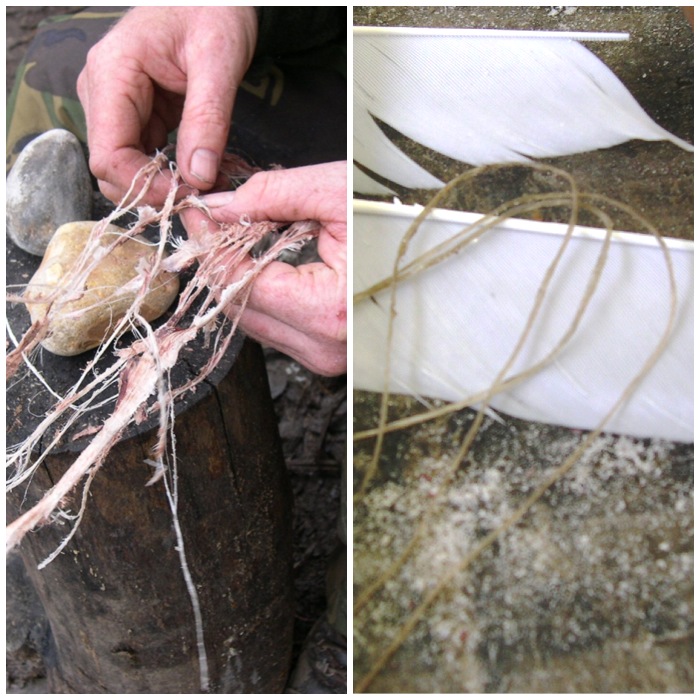
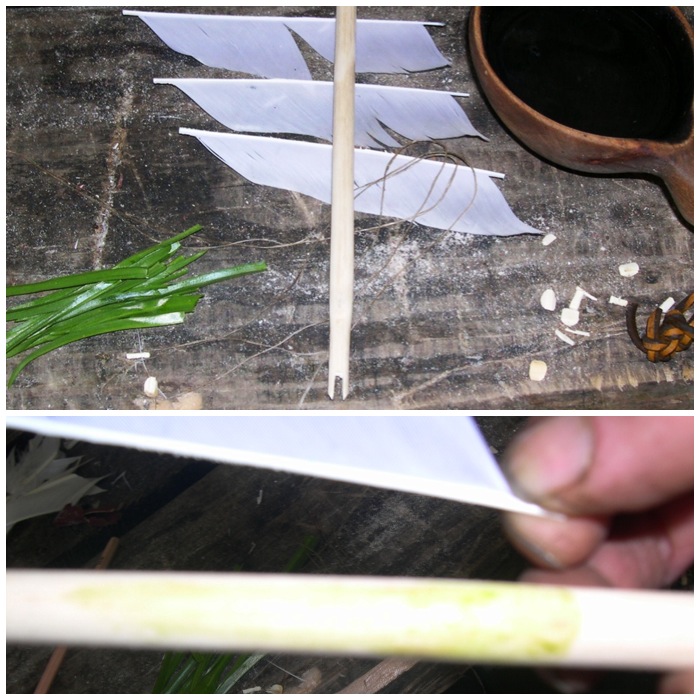
Fire by Friction – The Handrill
This is the first video in the series and it covers how I use one of the simplest, yet sometimes seen as one of the hardest to master, methods of lighting a fire – the handrill.
Part 2 in the series will look at the bowdrill but focussing on the Egyptian method.
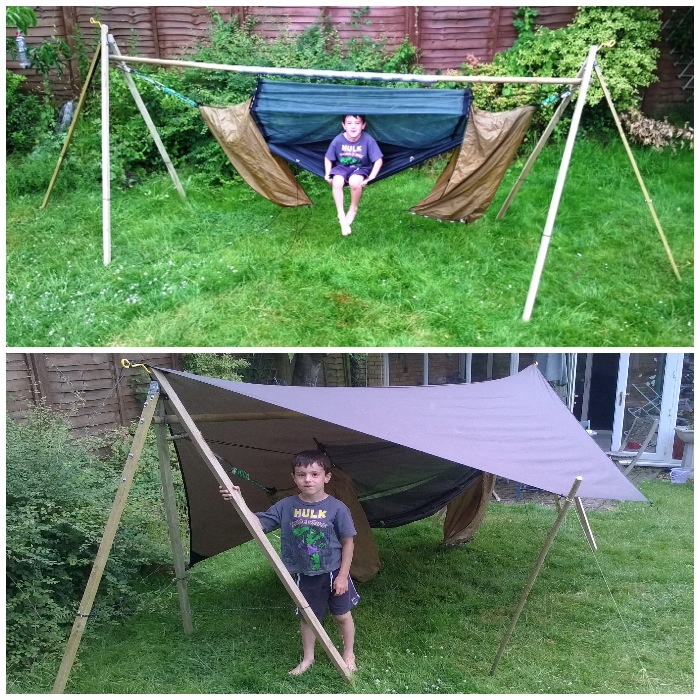
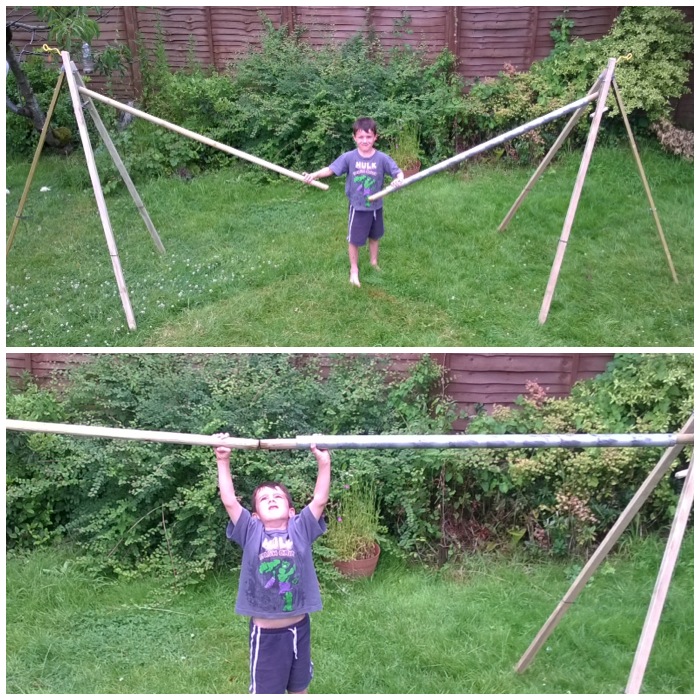
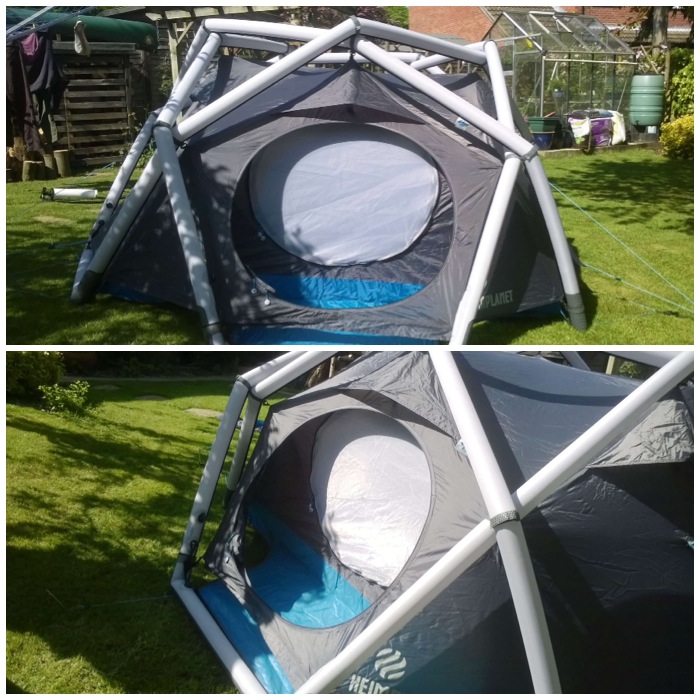
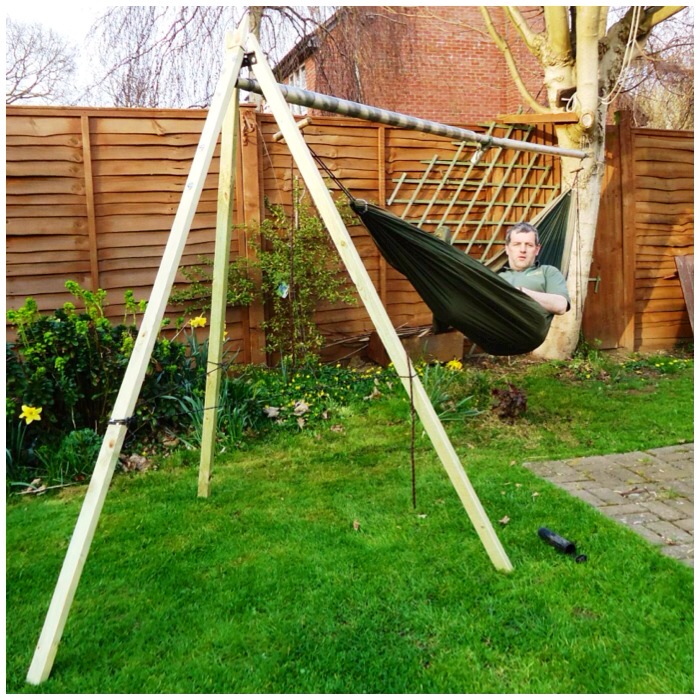
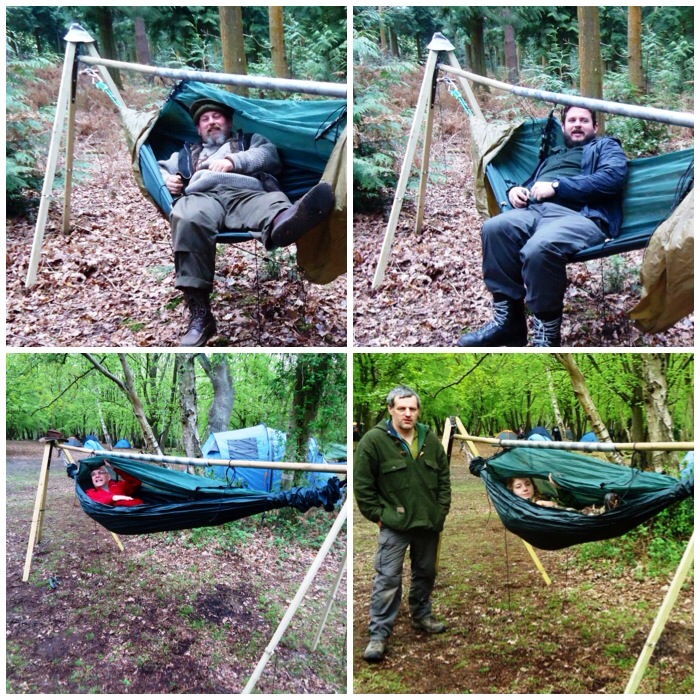
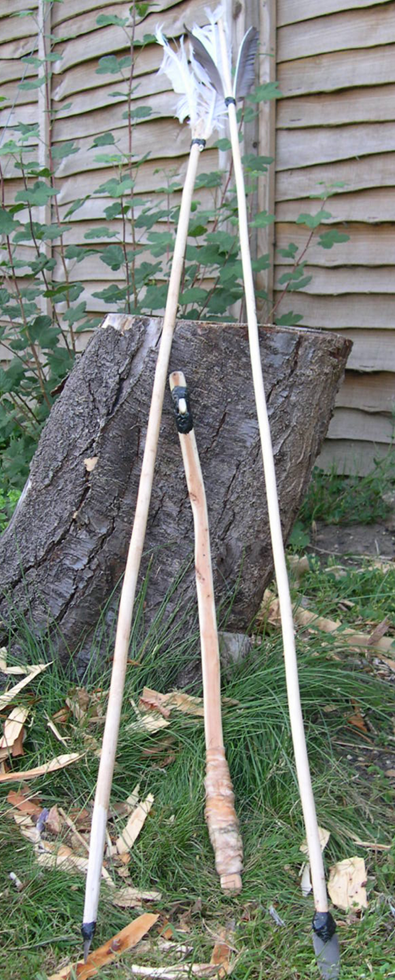
I finally got around to updating my Freestanding Hammock Stand (based on the post from Turtle Lady post on the Hammockforum) last weekend. I replaced two of the limbs on each tripod with stronger ones and devised a new attachment point at the top of each tripod for securely attaching a tarp.
Freestanding Hammock Stand Mk2
I have used the original hammock stand a number of times now and found it quite easy to transport in my van. I recently traded my van in for a car but I have obtained a large enough top box to fit the stand in. I wrote a blog post on this stand last March and it goes into detail on making the Mk1 version. If you have not read it and want the measurements you can find it here – How To…. Make a Free-Standing Hammock Stand.
Freestanding Hammock Stand Mk1
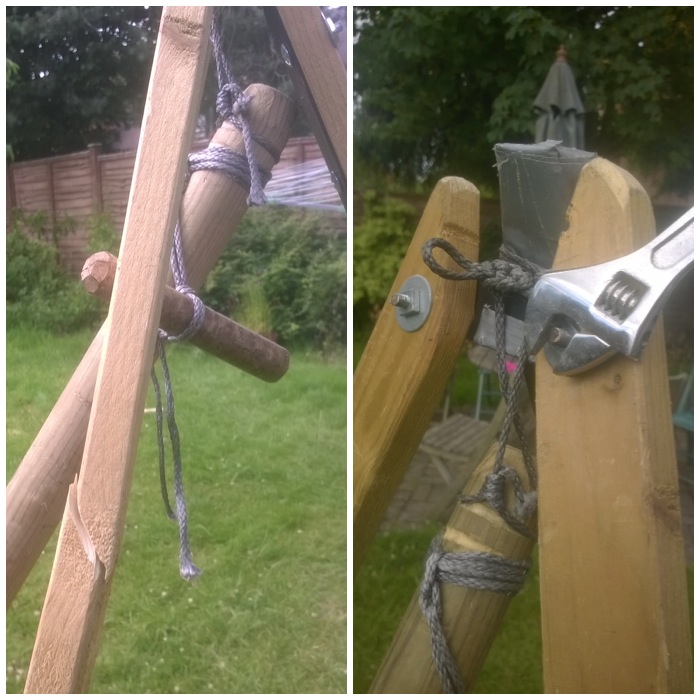
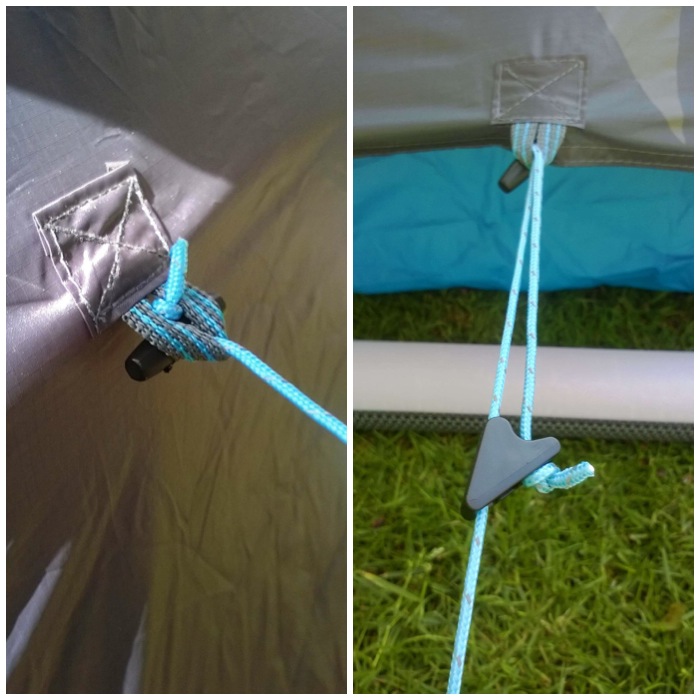
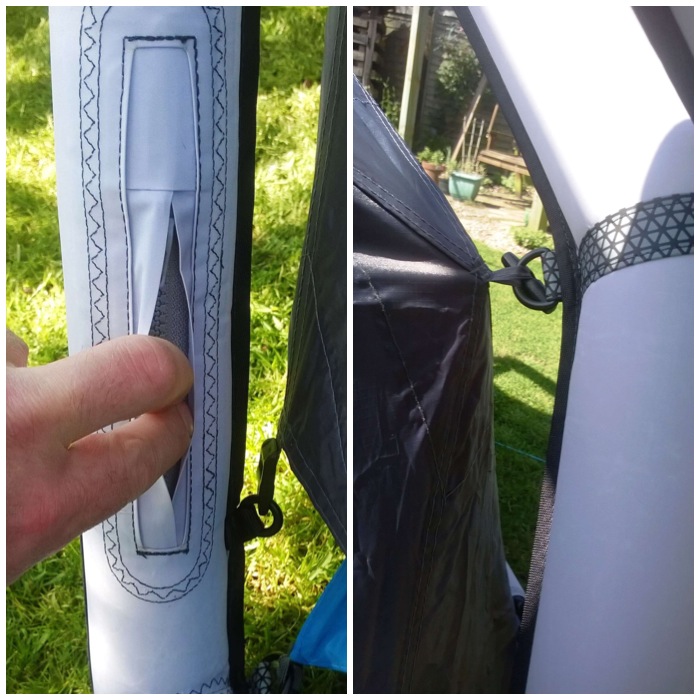
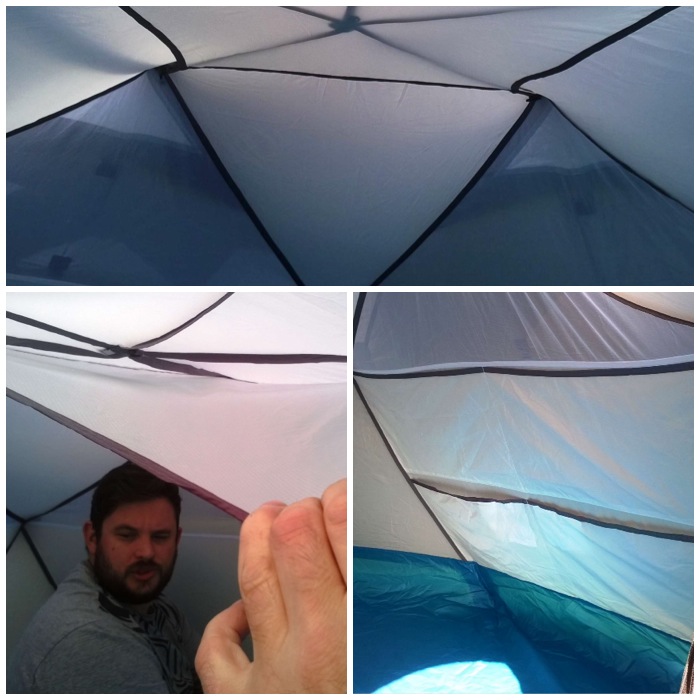
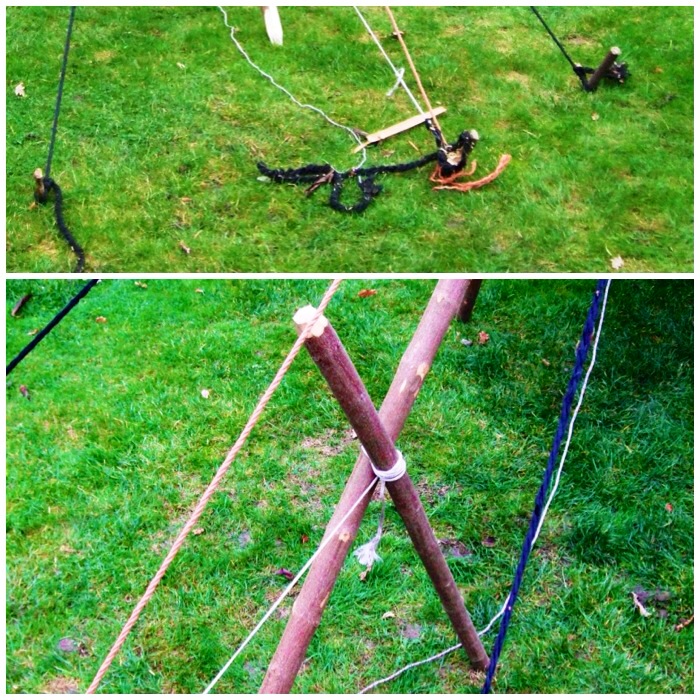
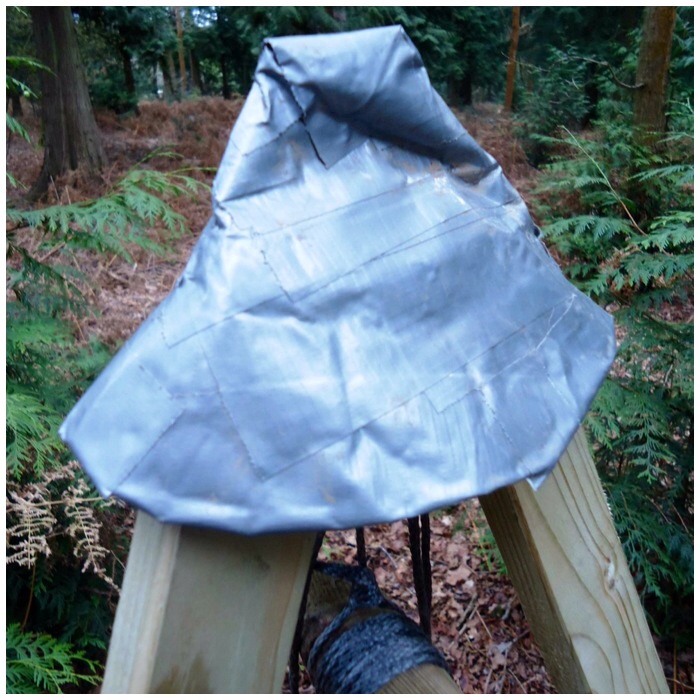
To fit a tarp to the Mk1 stand I made little caps to go over the top of each tripod (so that the tarp would not be ripped by the wood) but I found that the tarp would slip off if the wind got strong.
Loose Tarp attachment in the Mk1
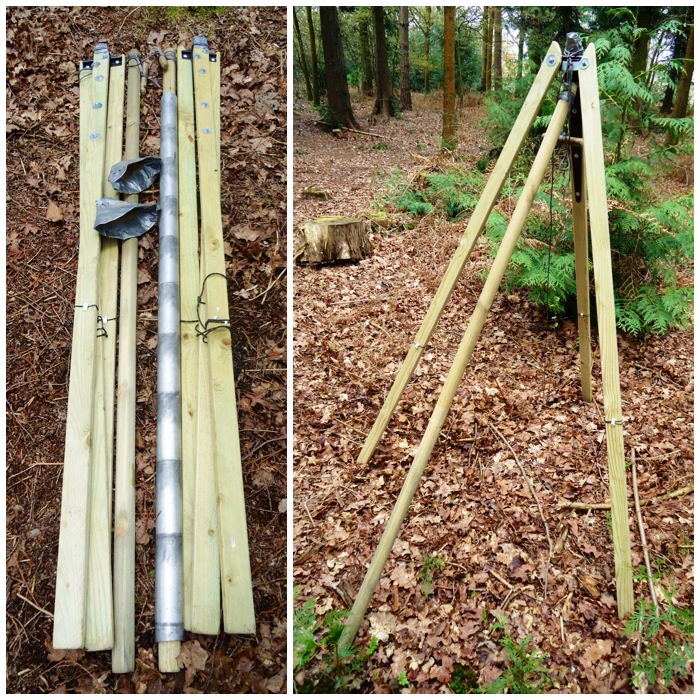
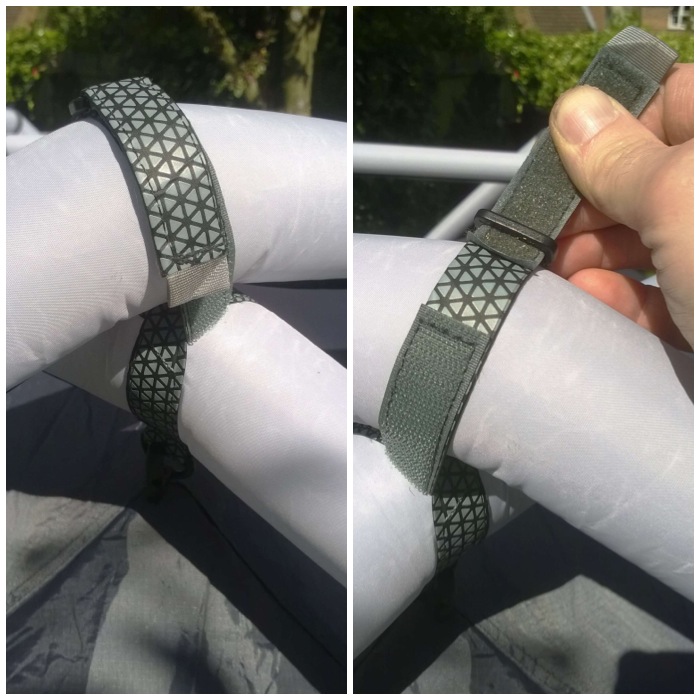
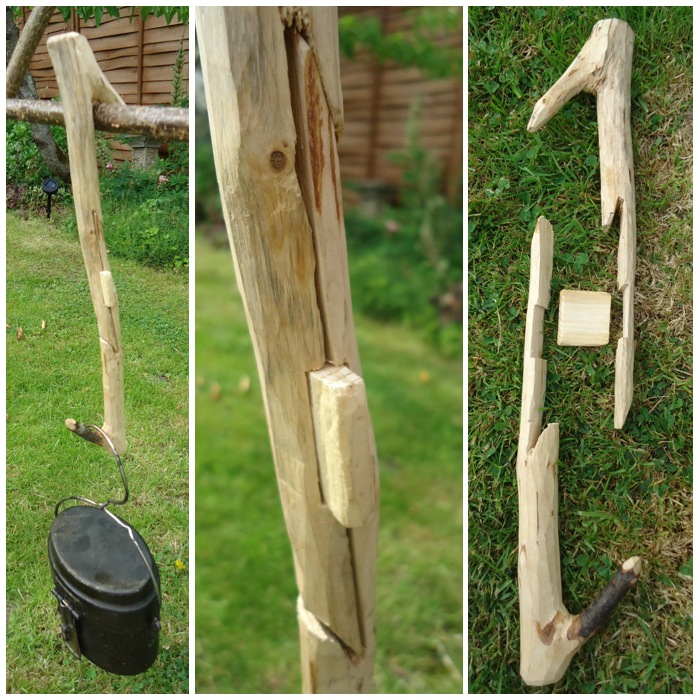
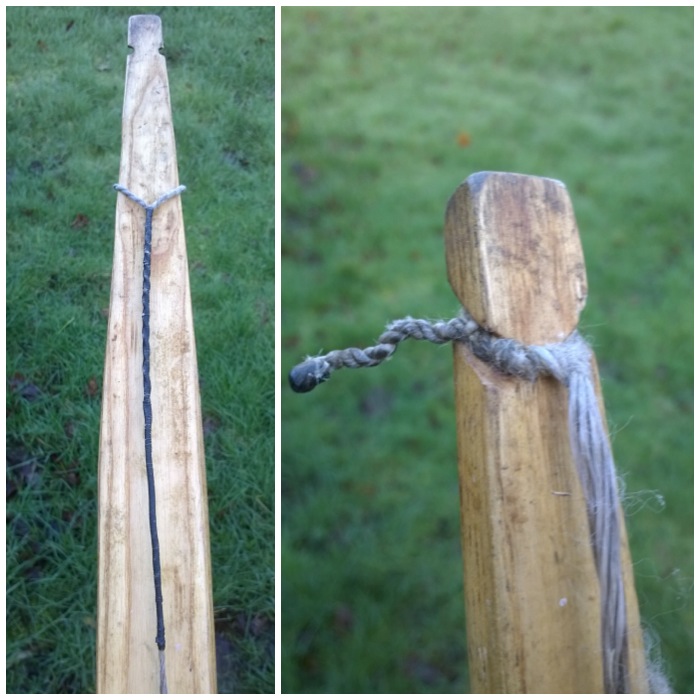
I also noticed two weeks ago that one of the limbs that had a knot in it was looking a bit weak. I applied a lot of pressure to it to see if it would last and the wood failed (left hand picture). I am glad that this did not happen while it was in use. The lesson I’ve taken from this is to make sure I select knot-free wood wherever possible when making one of these stands. To build the new tripods I unbolted the old side limbs from the two hinges and decided to replace all of them with new stronger knot-free limbs.
Broken Limb in Mk1
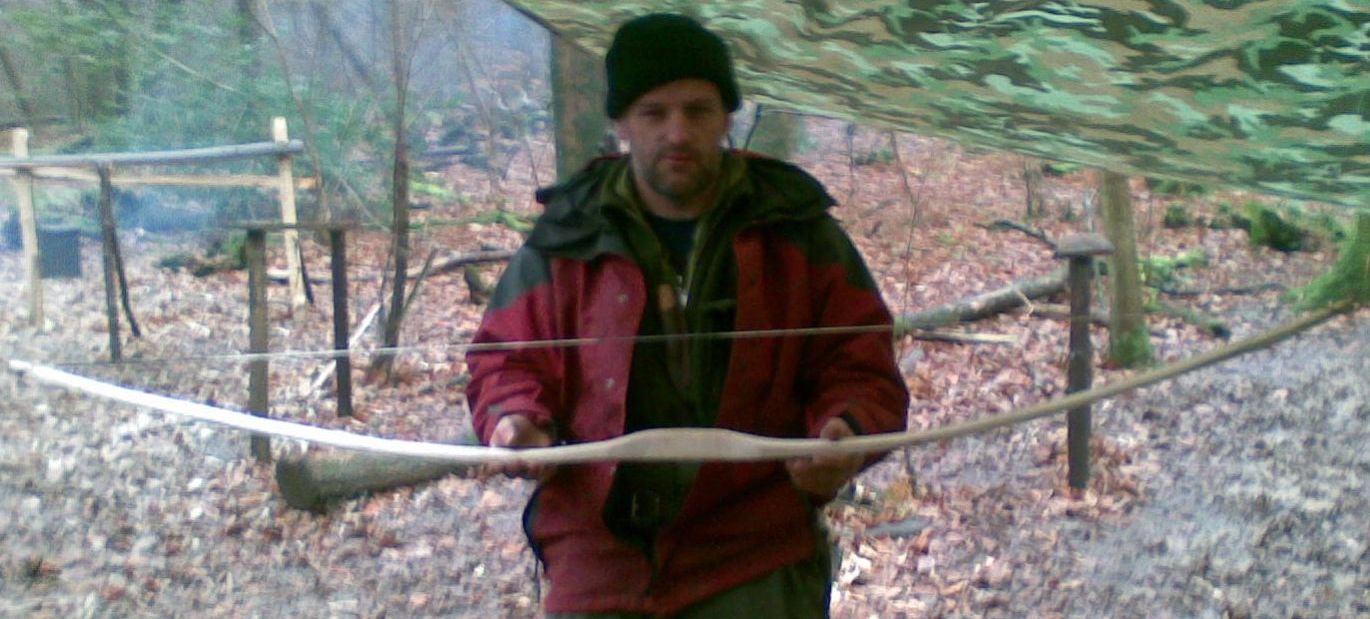
I made a short video of the new set up to give you an overview of it first.
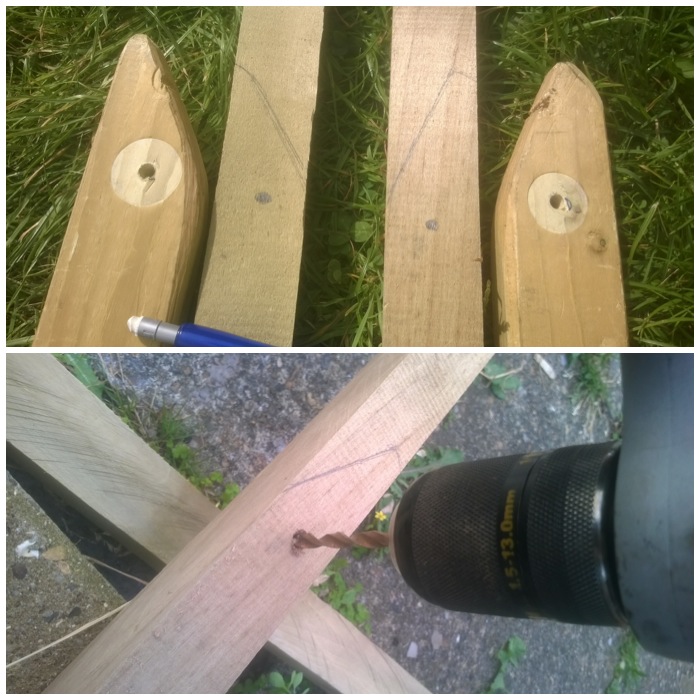
I bought some square tree stakes (2.4m lengths) and used the old limbs to mark out the bolt holes then drilled them out to re-build the first of my two tripods. The new limbs were 35mm by 35mm in diameter comparison to the old ones which were 47mm by 22mm.
Old limbs used to mark out the new limbs
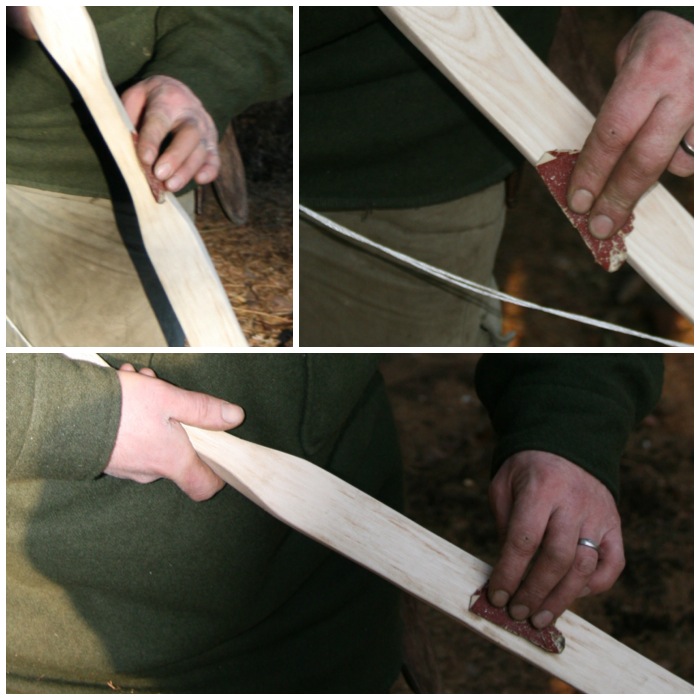
I decided that just one of the new limbs (more on the other limb in a minute) on each tripod would be the same height as the old limbs so trimmed the excess wood off then used my rasp to roughly smooth all the surfaces and edges down.
Trimmed the short limb and rasped smooth
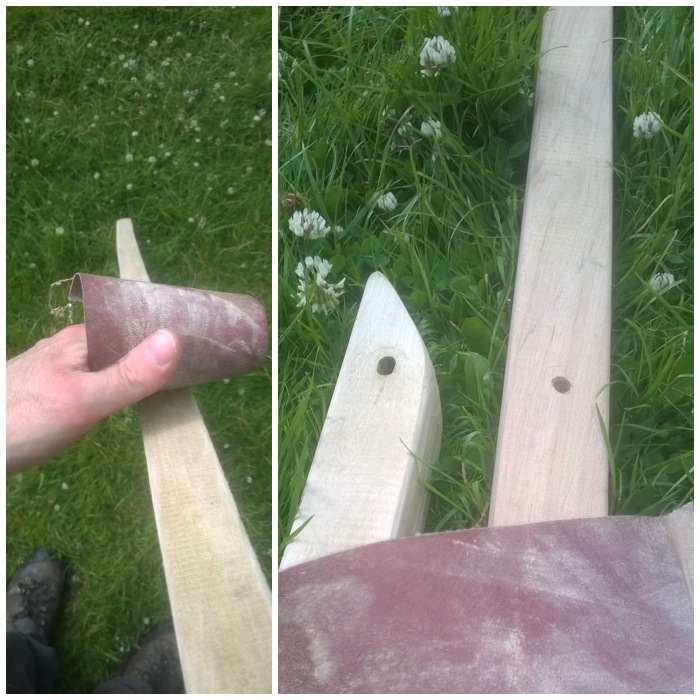
After a quick sanding (I just used a rough piece of sandpaper) the first limb was ready. I rasped the other limb (which was not trimmed to size as yet) and then sanded that one as well. You can see the two finished limbs for the first tripod in the right hand picture. it is important you do not trim the second limb to the same size as the first limb as this one will have the tarp attachment fitted to it.
A rough sanding
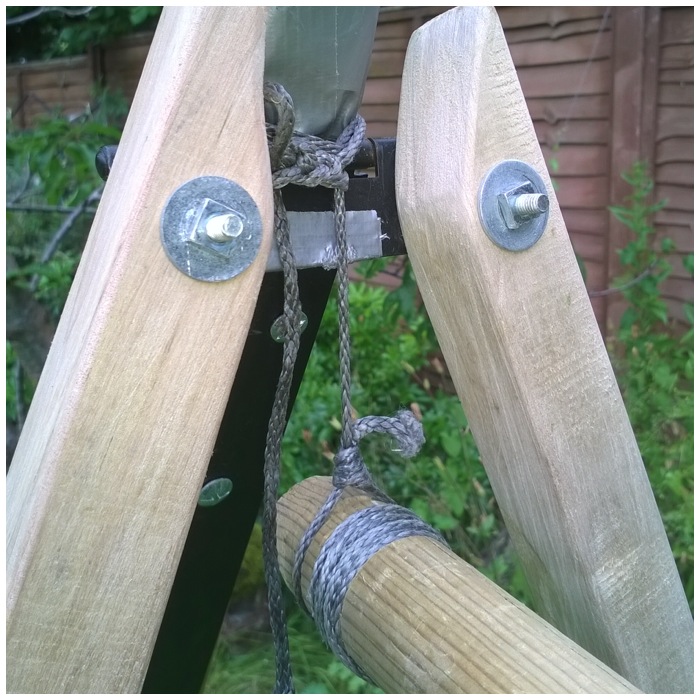
Using the original bolts I then attached the new limbs to the original limb that was fitted with the hinge.
Re-bolted
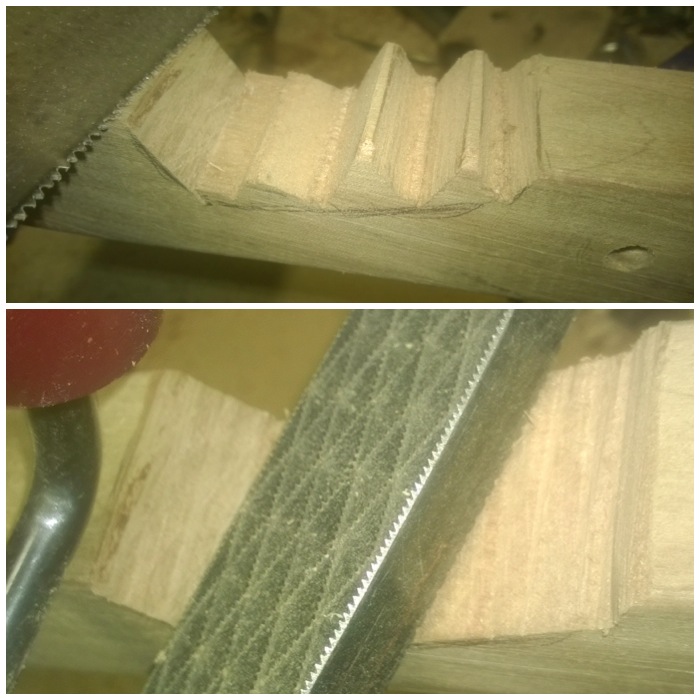
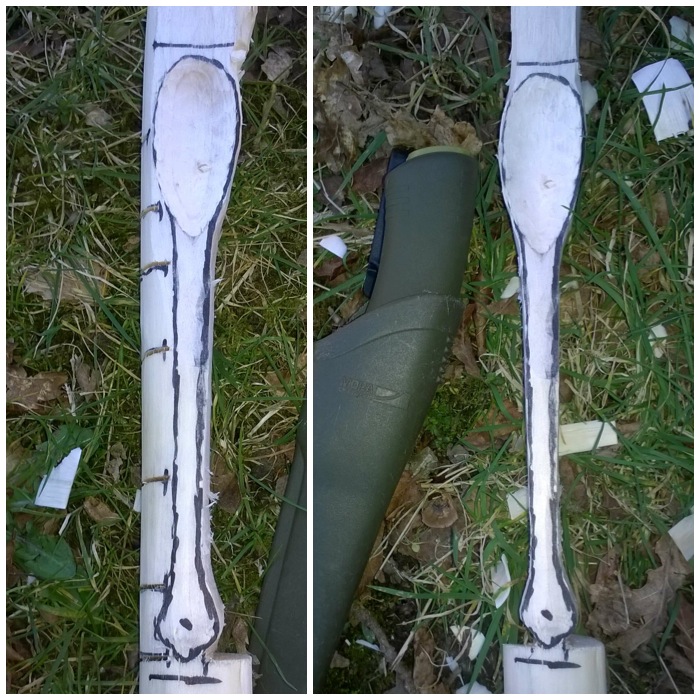
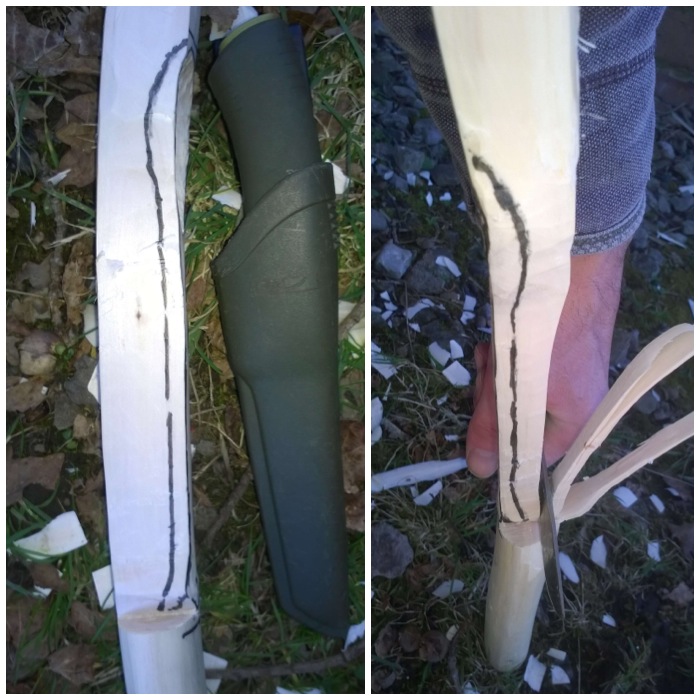
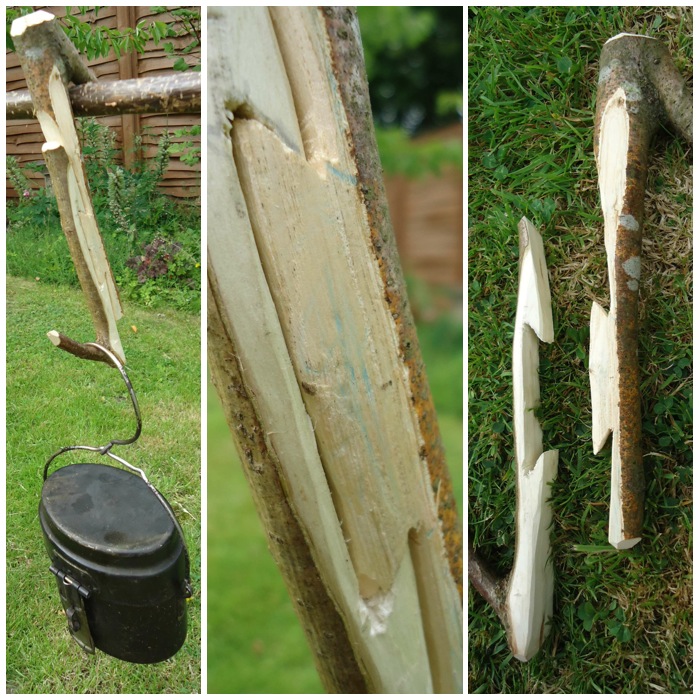
I set the tripod up as best I could with the new limbs spread out at about 1.4m width at the base (the limb with the hinge cannot be opened fully until the excess wood is removed). I then drew around the area on the larger of the limbs the piece of wood that needed to be removed.
Marked out the groove on the long limb
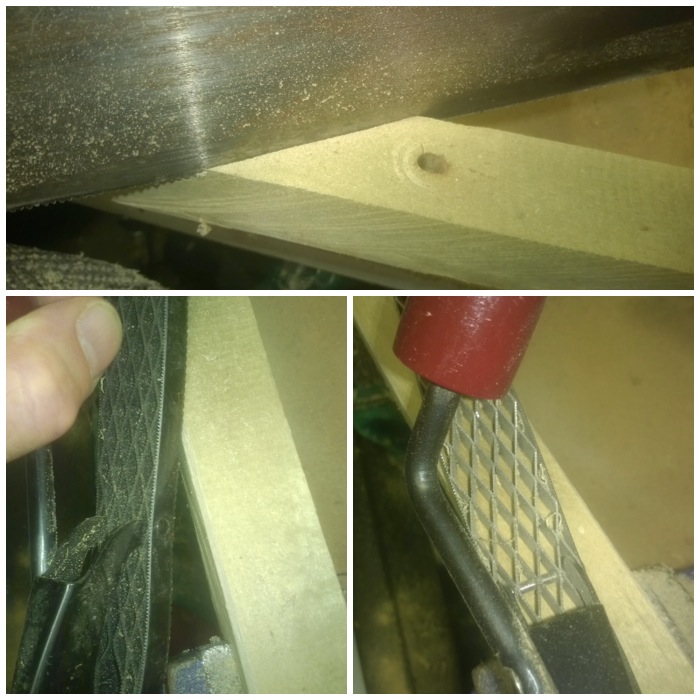
I unbolted the limb and put it into a vice to cut the excess wood out. I just used a small saw but a carpenter’s coping saw would have been far better suited to the job.
Removed the excess wood
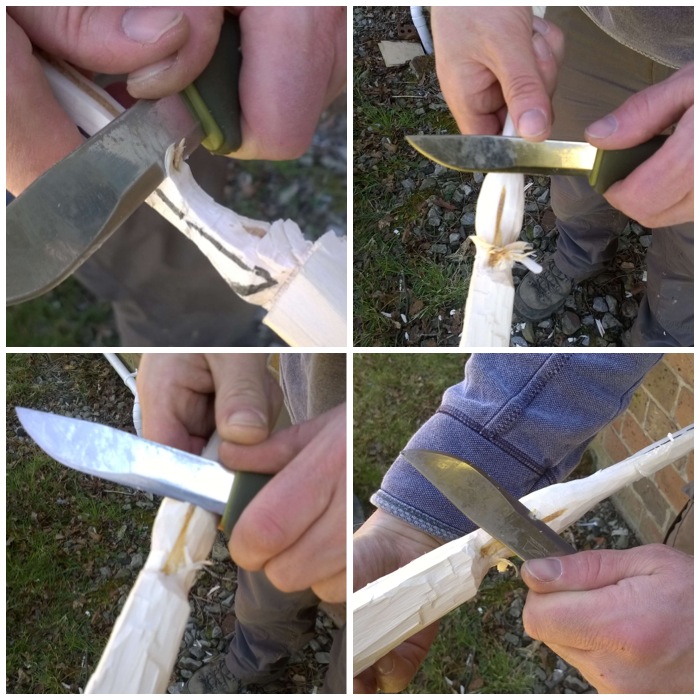
After I removed the excess as best I could I used my rasp to smooth it all out before giving it a final sanding.
Rasped smooth
After re-bolting I checked to make sure there was enough clearance to open all the legs up fully. I actually used my knife at this stage to trim off a little bit more of the wood as the fit was very tight.
Snug fit
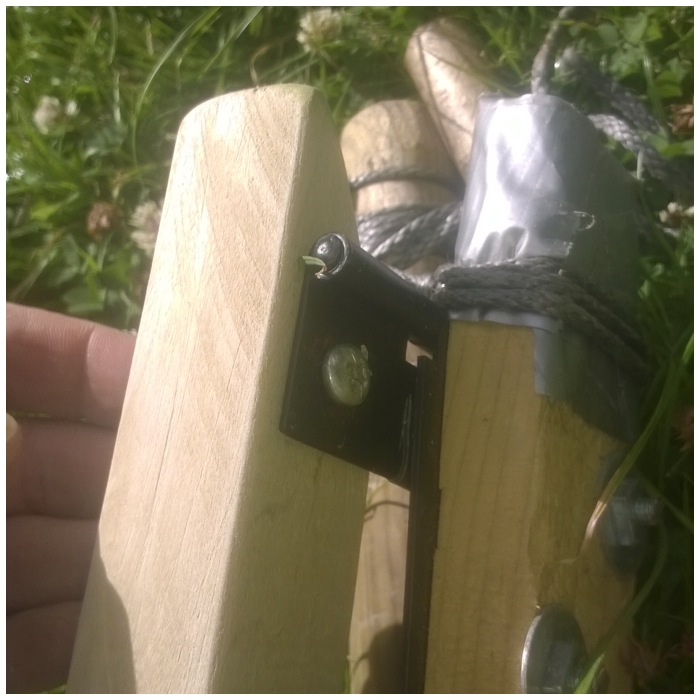
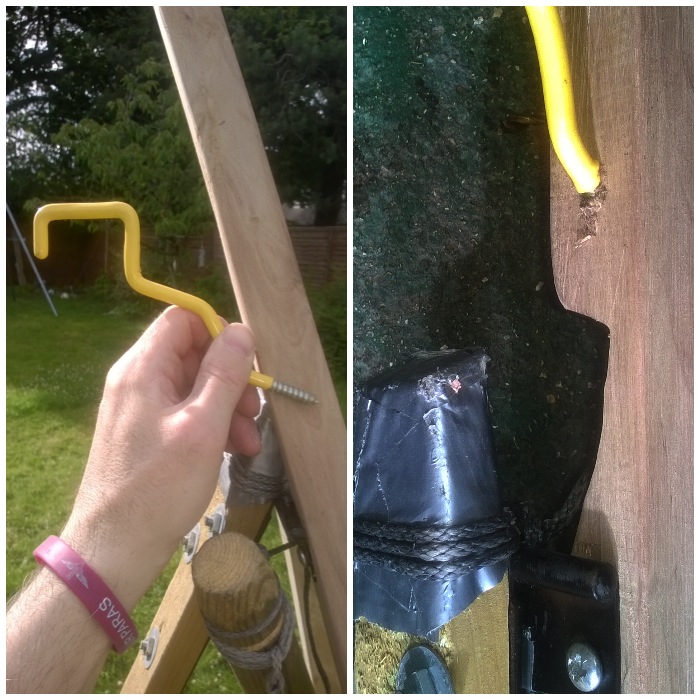
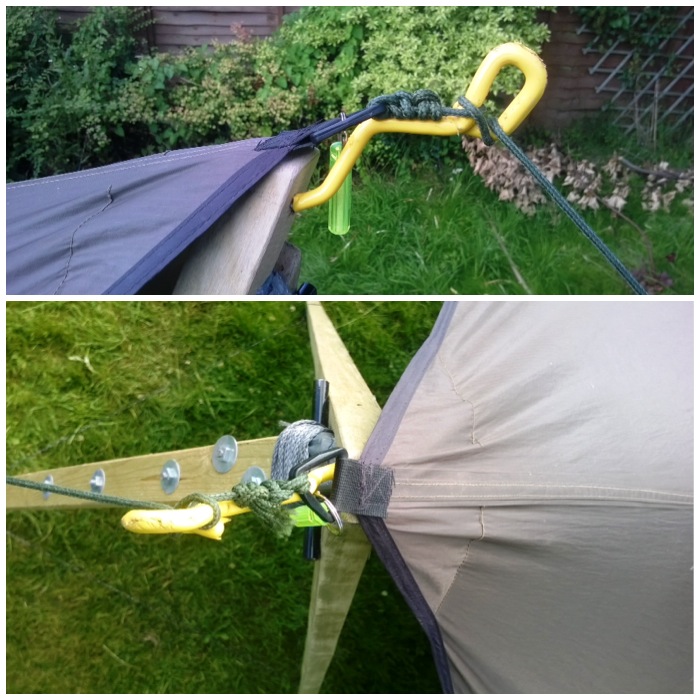
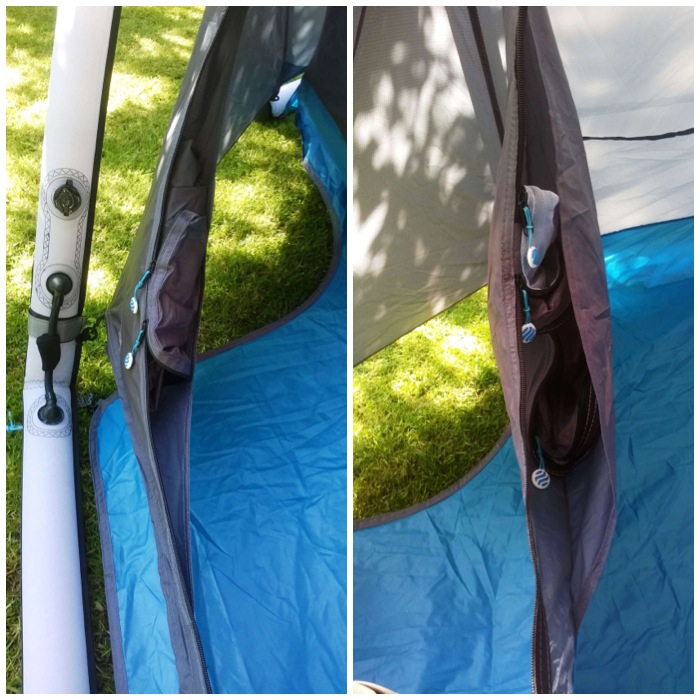
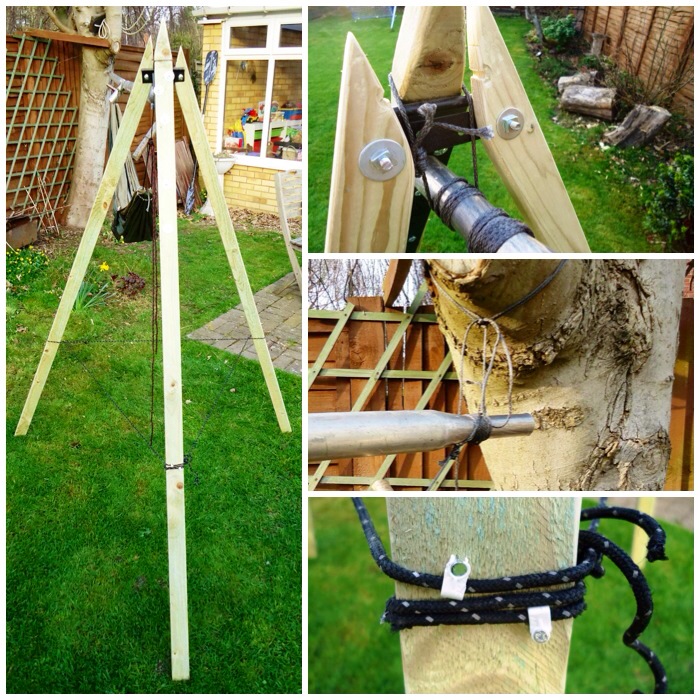
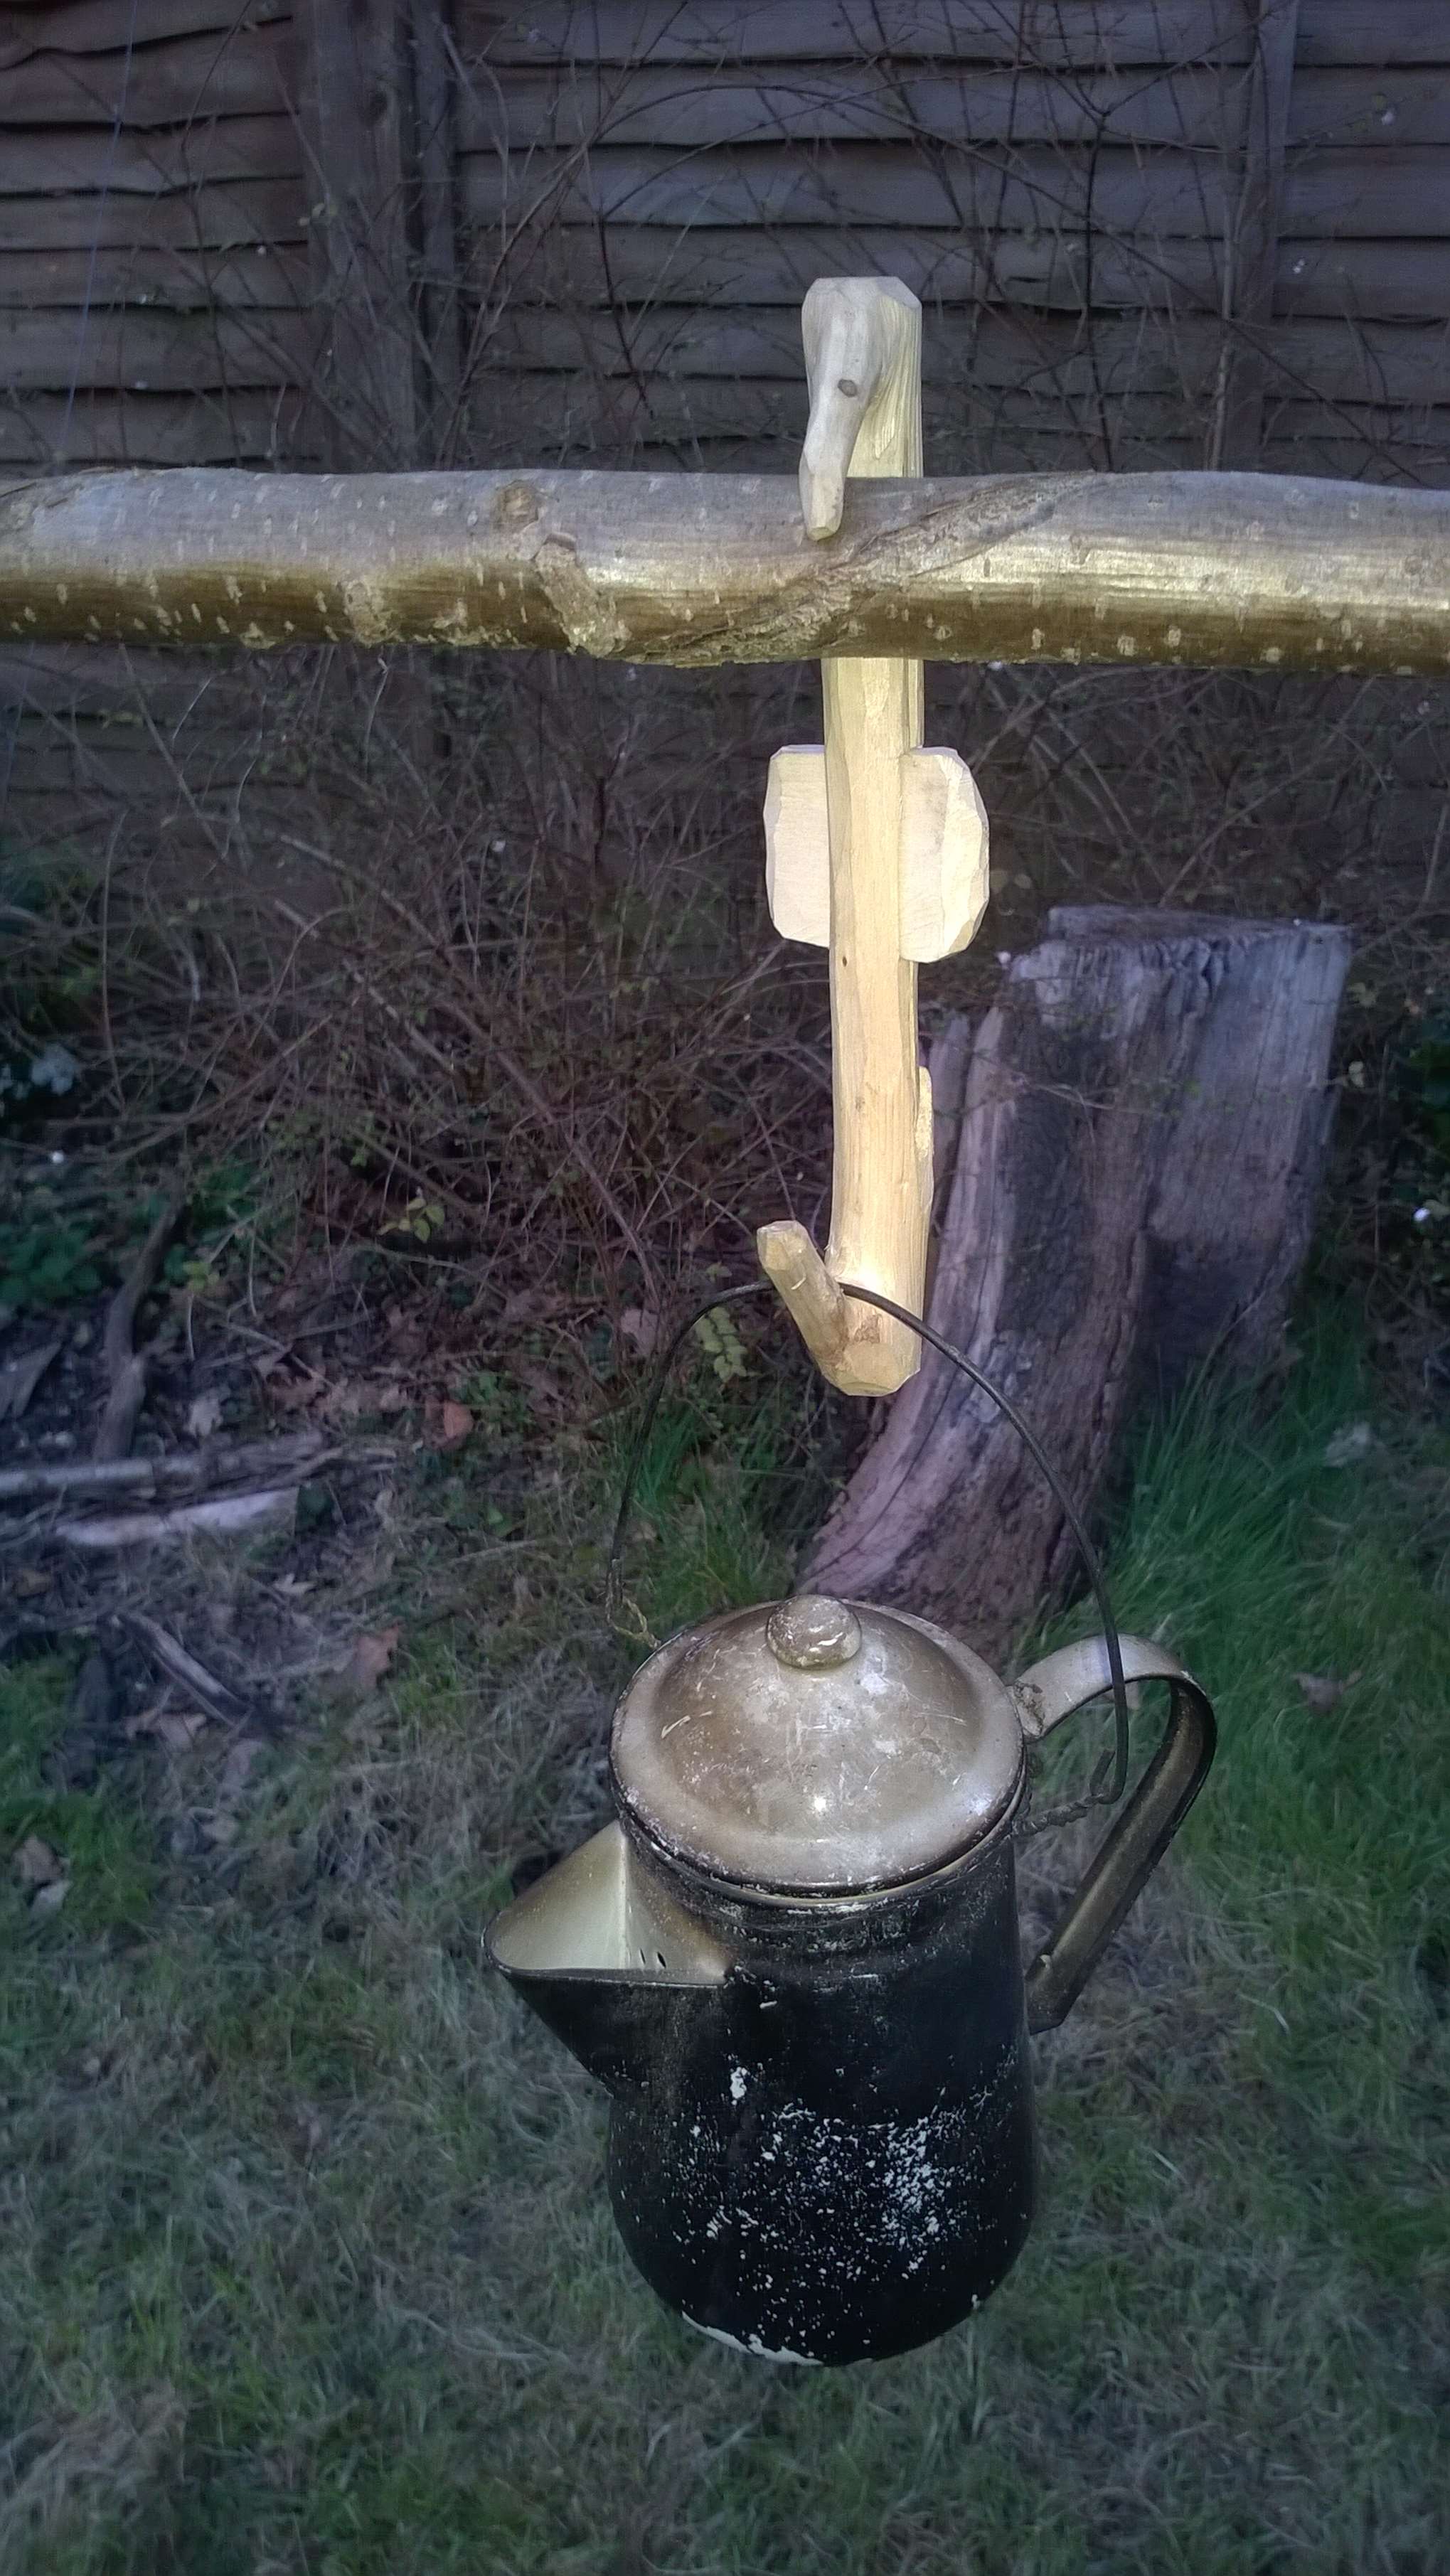
I had thought of lots of different ideas to add a hook to hang my tarp from but in the end remembered I had some of these cheap hooks you can buy to hang things from the rafters of your workshop or garage. They have a tip that allows you to screw it into wood and they can be bent into different shapes using a vice and hammer or pliers. I marked out where I wanted to put the hook, drilled a pilot hole and screwed the hook in.
Attached the hook
I trimmed the limb so that it finished just below the hook point to give the tarp some clearance. The final length of this larger limb was 1.8m.
Trimmed off the excess wood from the long limb
You can see the set up clearly now. I then repeated the whole process to make up the second tripod.
Ready for set up
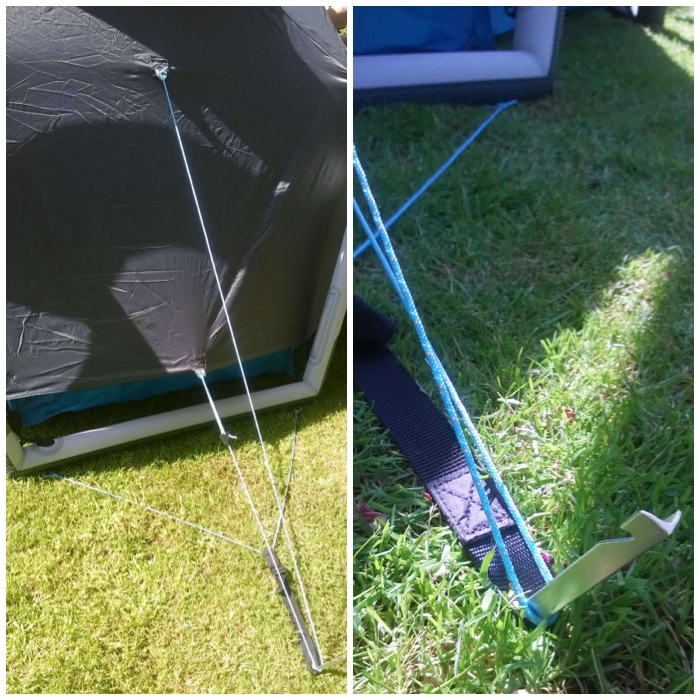
To ensure the legs will always open to the correct distance from each other I attached string to them, secured with small nails. I have found that if the legs are not set far enough apart then there is the potential for the stand to tip over.
Splay lines attached
Eventually I had two stands ready for setting up. The overall height of each tripod is 1.6m and the front limbs on each tripod are spaced 1.4m apart from each other.
Repeated the process for the other tripod
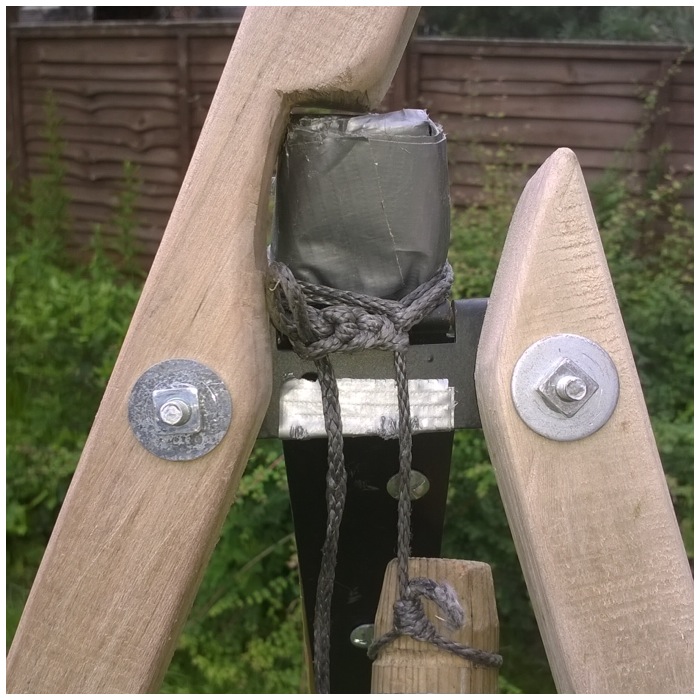
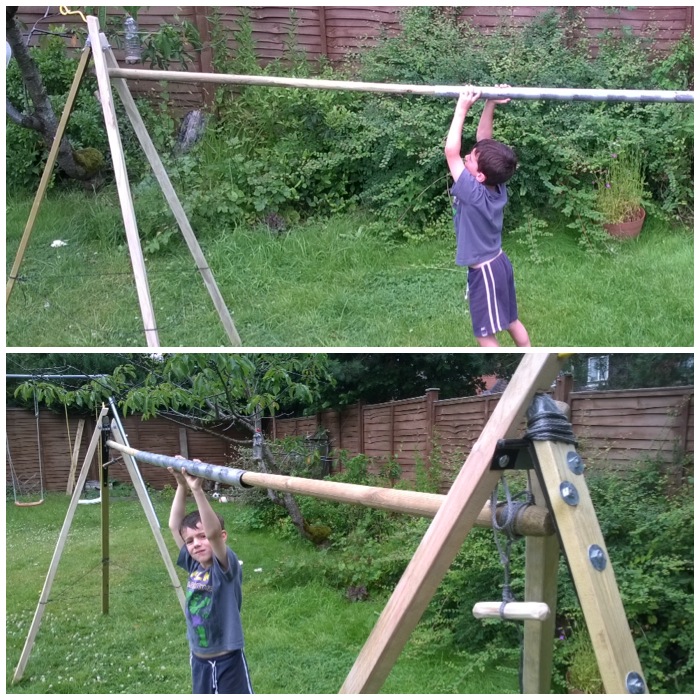
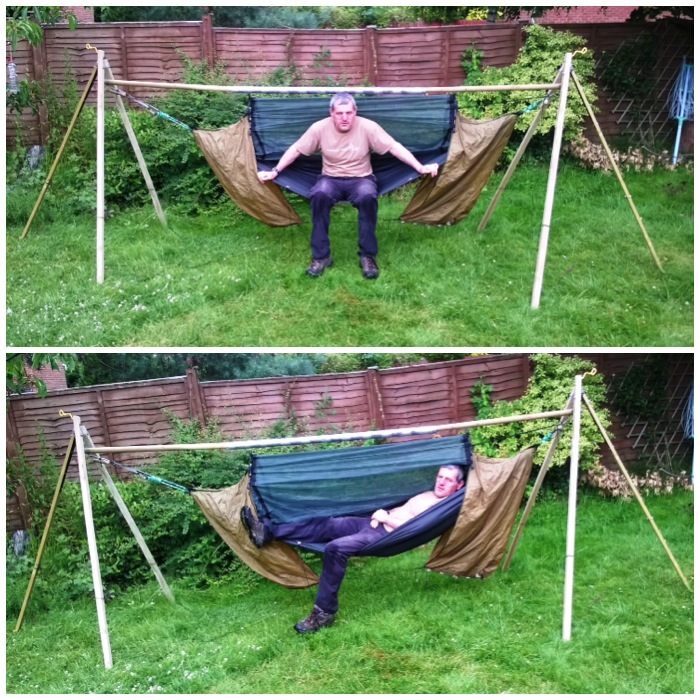
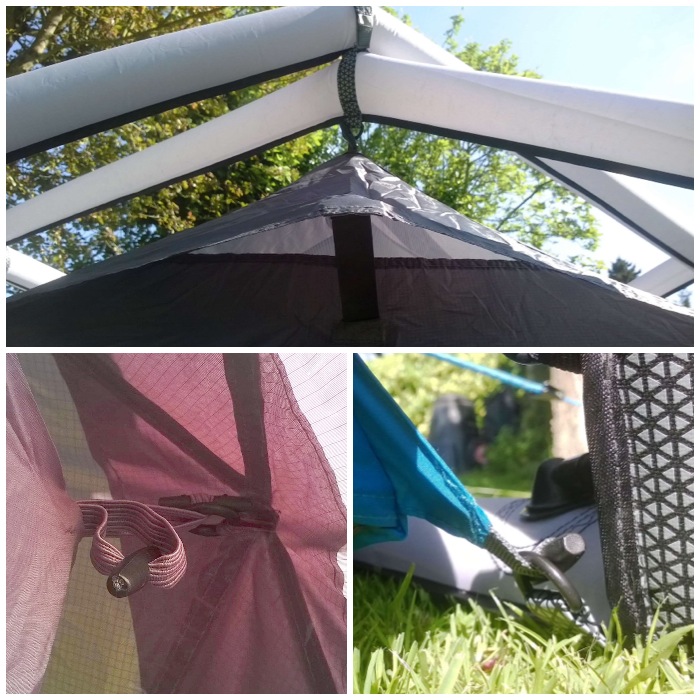
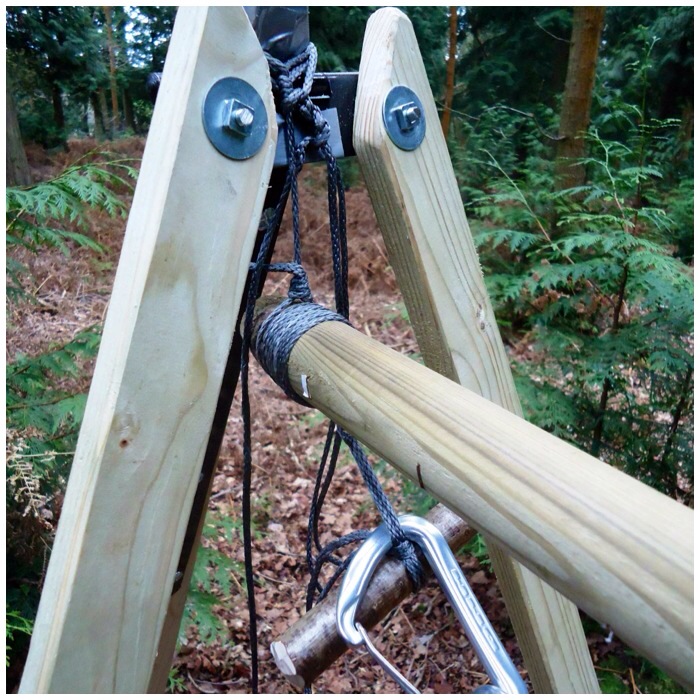
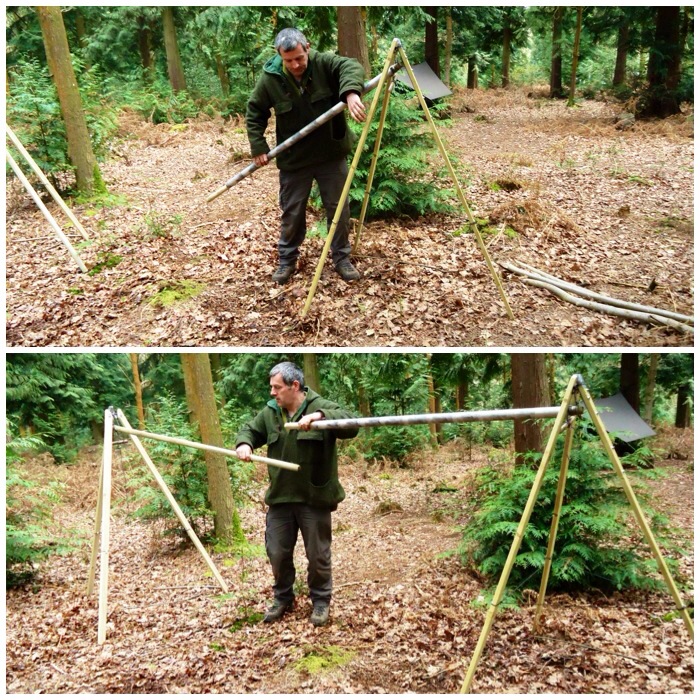
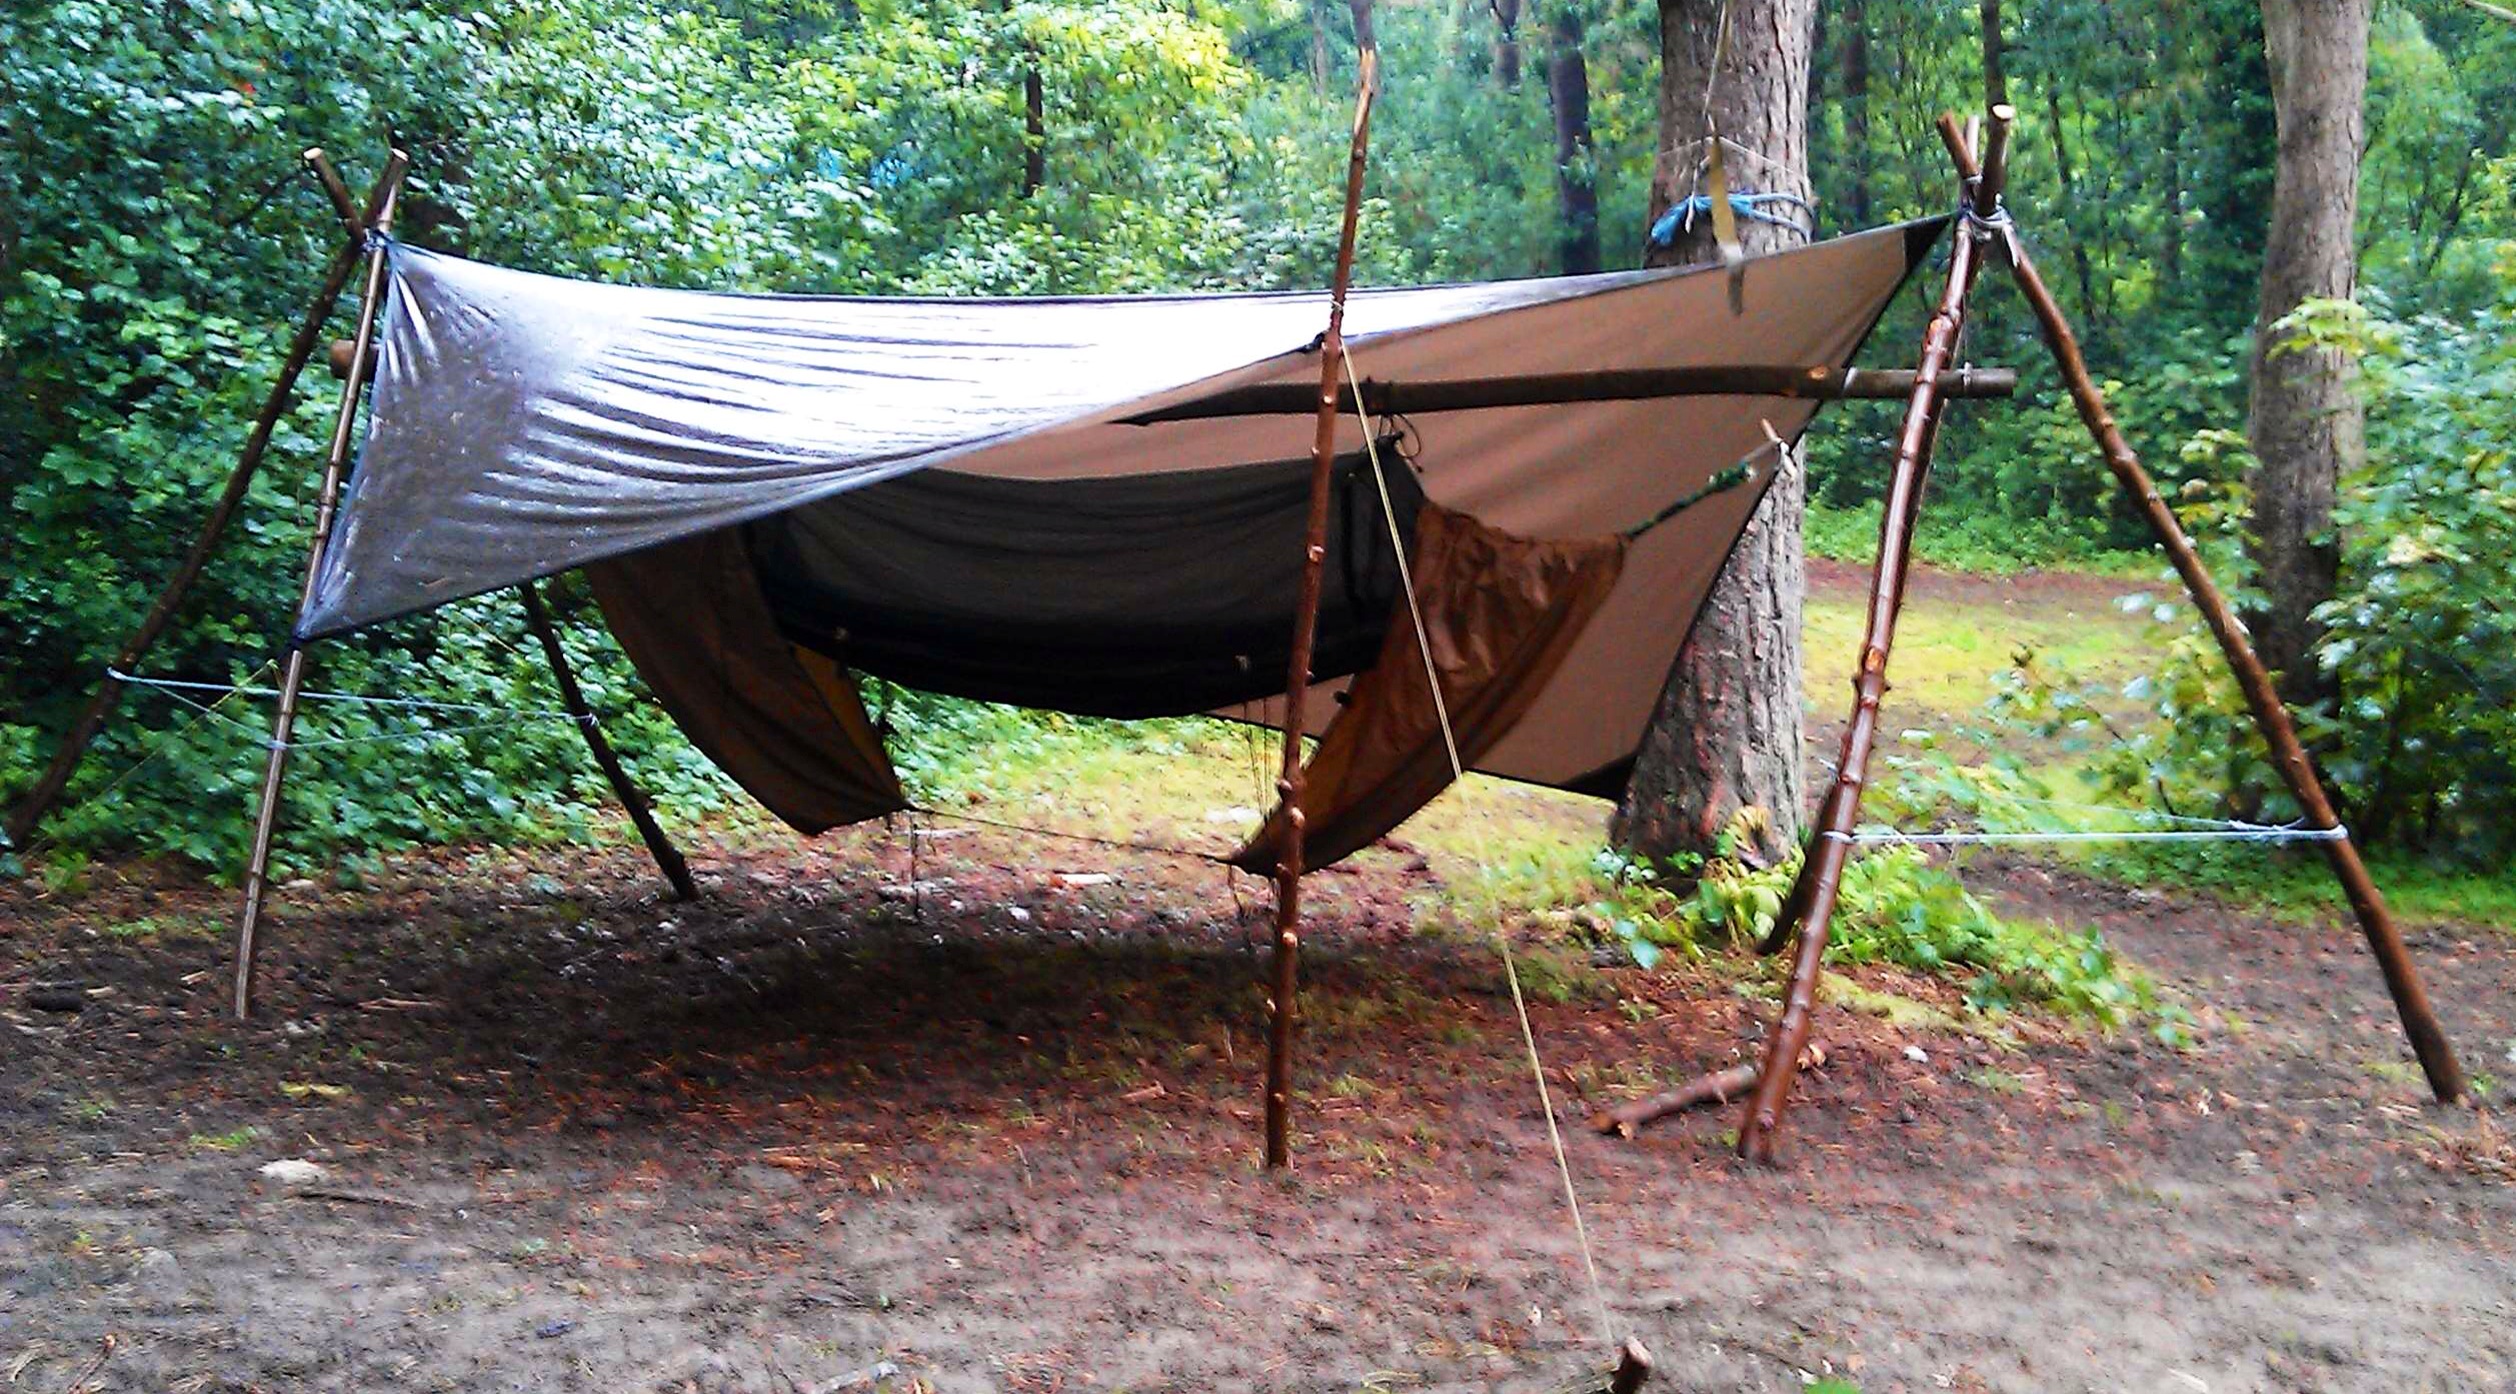
I spent a few minutes getting the tripods well set up (I spread the legs then hung off each one to make sure they were secure) and getting them the correct distance apart (for this set up, about 2.8m apart from the base of the front limbs). The crossbars need to be raised up so that they just touch each other and the Amsteelstring that they are tied onto the tripods with is hanging vertically.
Raise the topbars
Once they are touching it is simply a case of sliding the connecting sheath over until it is centered.
Slide the sheath to secure
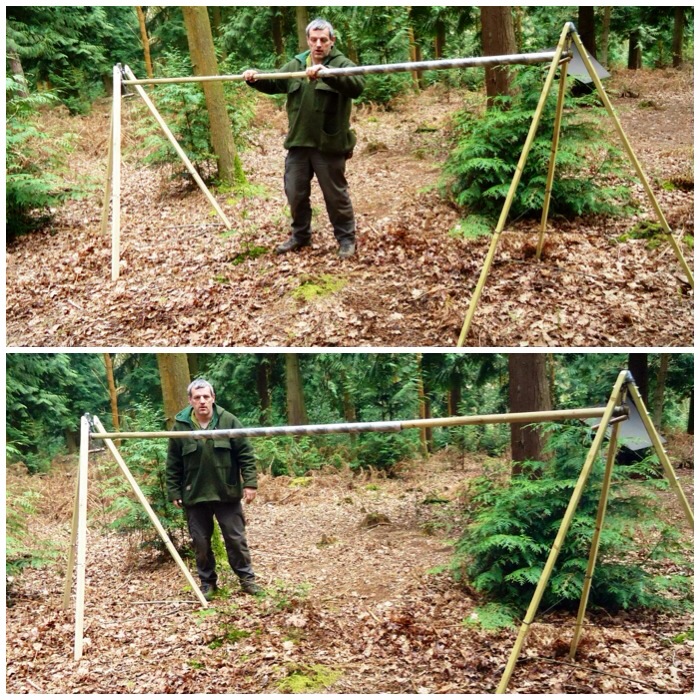
At this stage I tend to make slight adjustments to one of the tripods so that the string is hanging vertically from each tripod as that is very difficult to achieve first time. If you do not have the strings hanging vertically you could end up tipping the tripod over.
Hanging line should be plumb
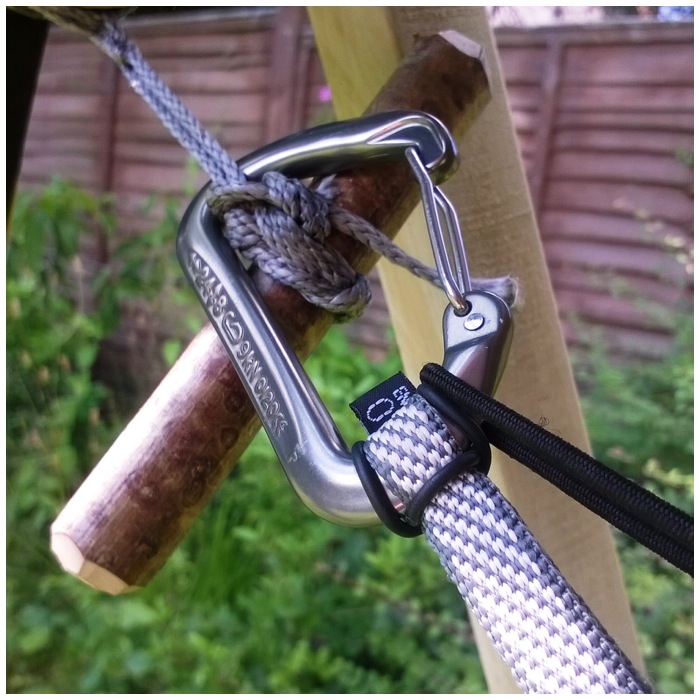
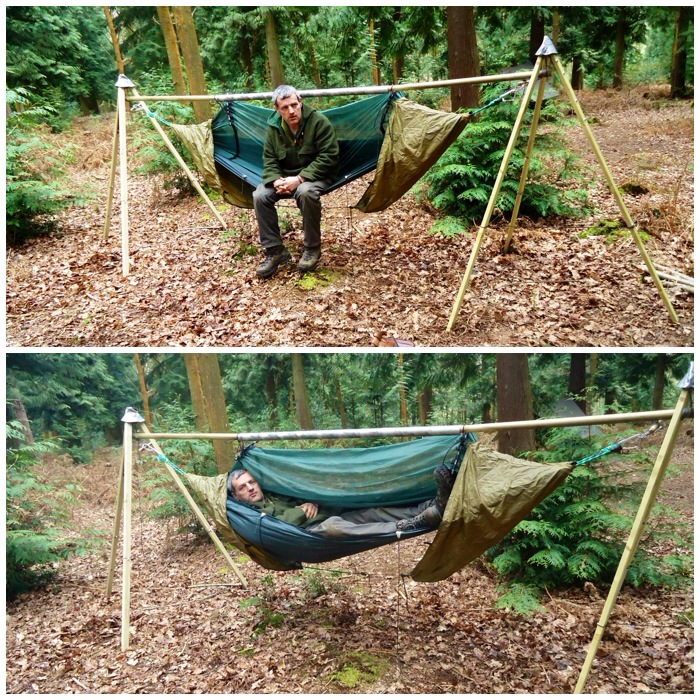
The hammock I use for this set up is my DD Frontline one and I attach it to the Marlinspike Hitch using a quick release Karibiner. The first How To…. covers how I set all this up in more detail.
Karibiner clip around the Marlin Hitch
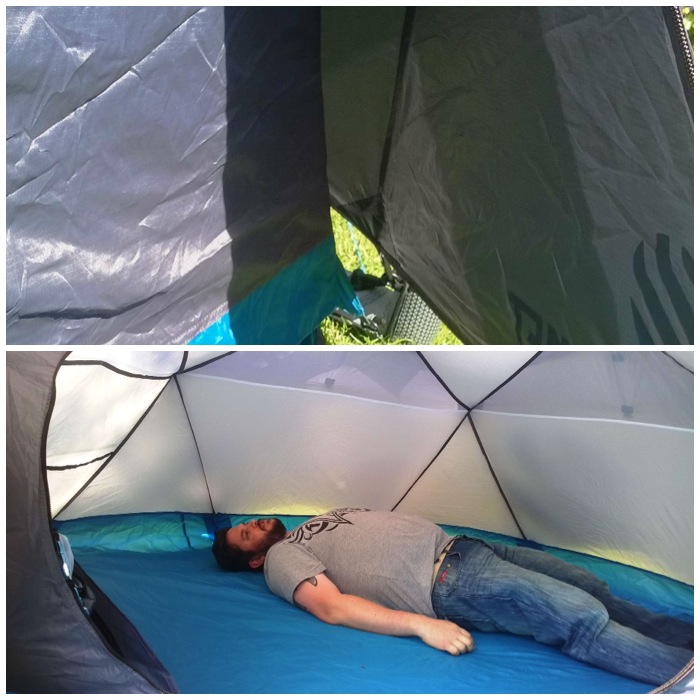
Once it’s finished I test the set up by sitting in it before lying down. All the compression forces I create by lying in the hammock are kept in the crossbar. The tripods take my weight but do not get pulled together using this method. As I move about in the hammock the crossbar moves slightly but the tripods stay still as the bar is suspended from each tripod.
Test by sitting then lying down
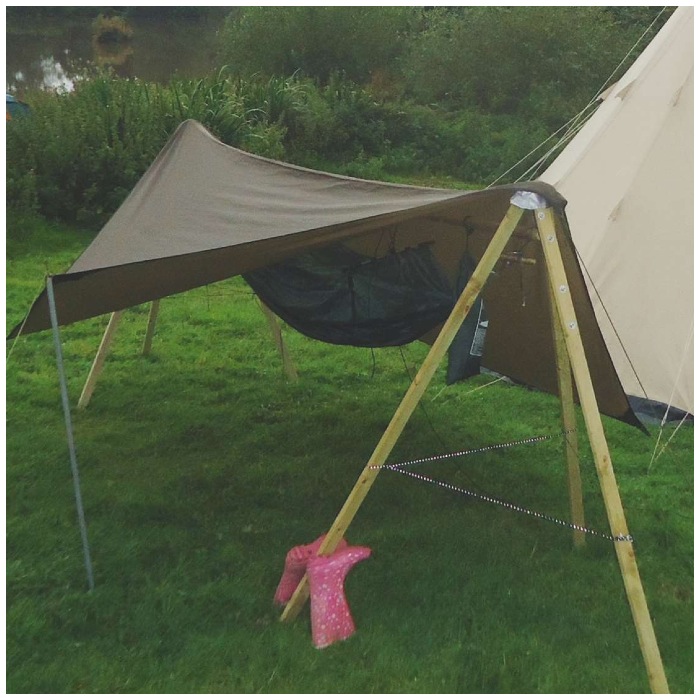
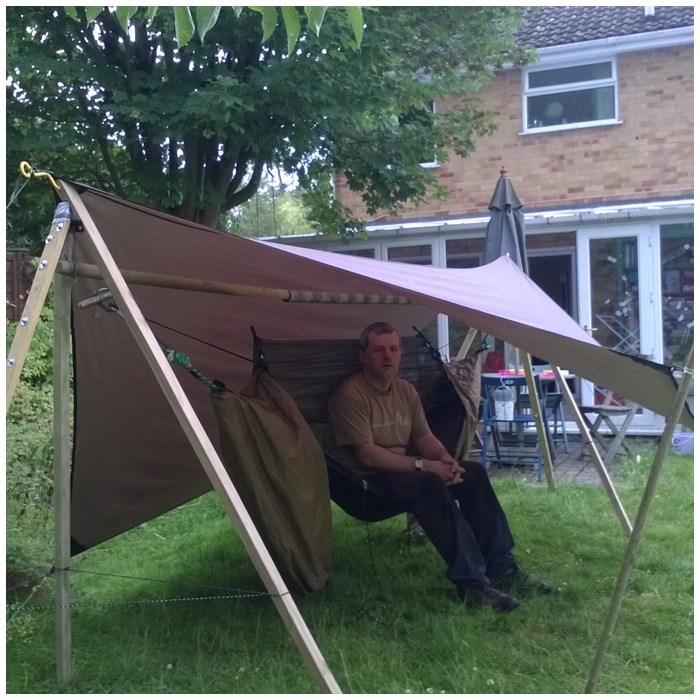
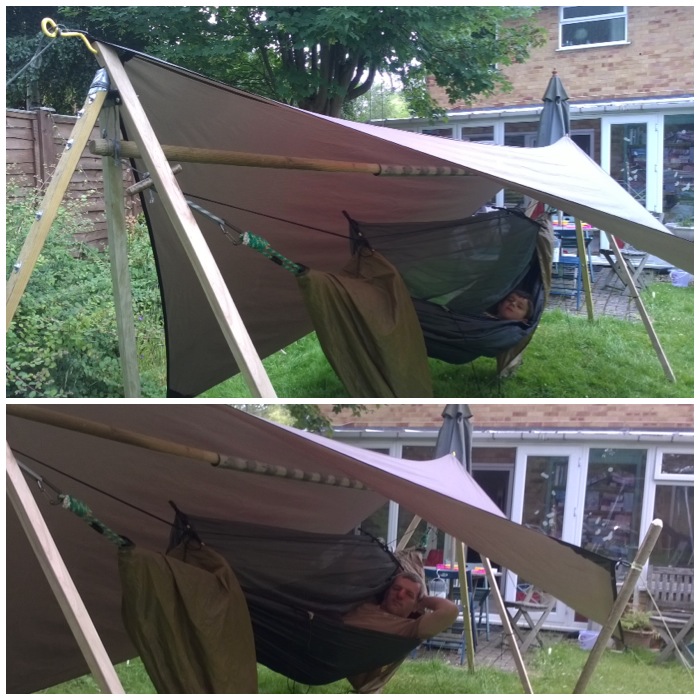
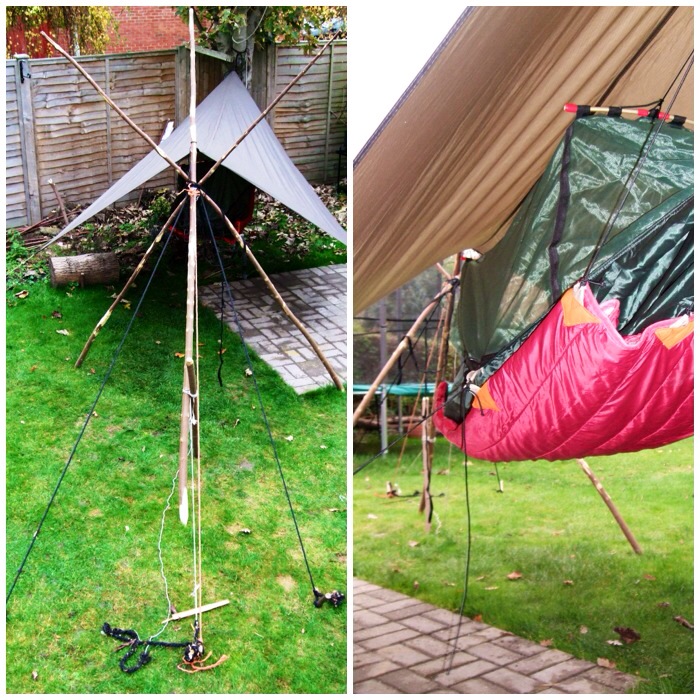
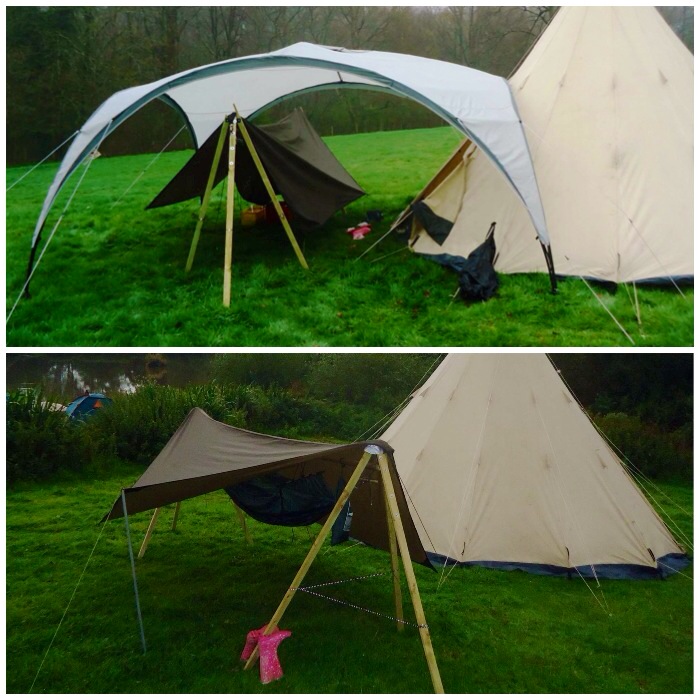
I then attached my Hennessy Hex tarp to the hooks and just used small wooden pegs on the ends and corners to peg it all out.
Attaching the tarp
This set up gives me good head room for sitting and doing my admin.
Good head room
The tarp is a snug fit as the ridgepole was cut to a length to ensure the tarp fitted perfectly. It seems quite strong and I am looking forward to trying it out in the near future at a campsite where I know good hammocking trees are not available. I weigh about 14 stone and I have sat in the hammock with my son who weighs about 4 stone so I am quite confident in this set up.
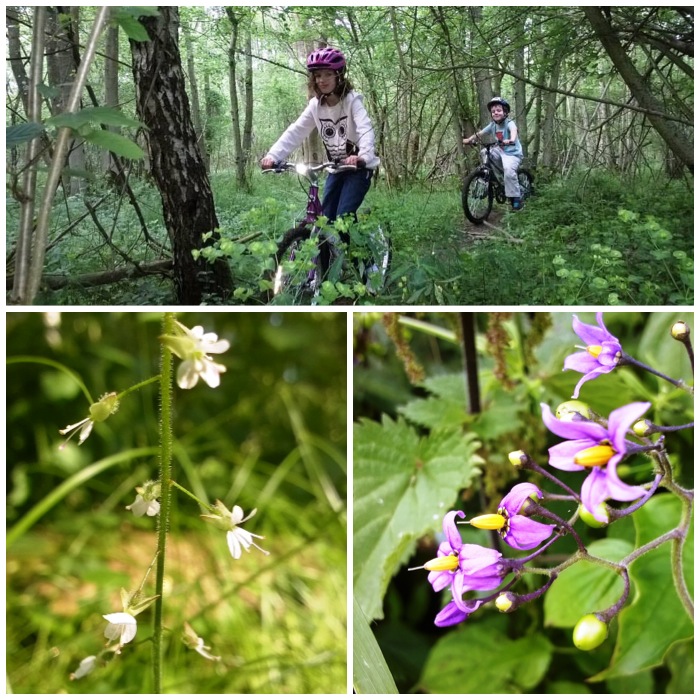
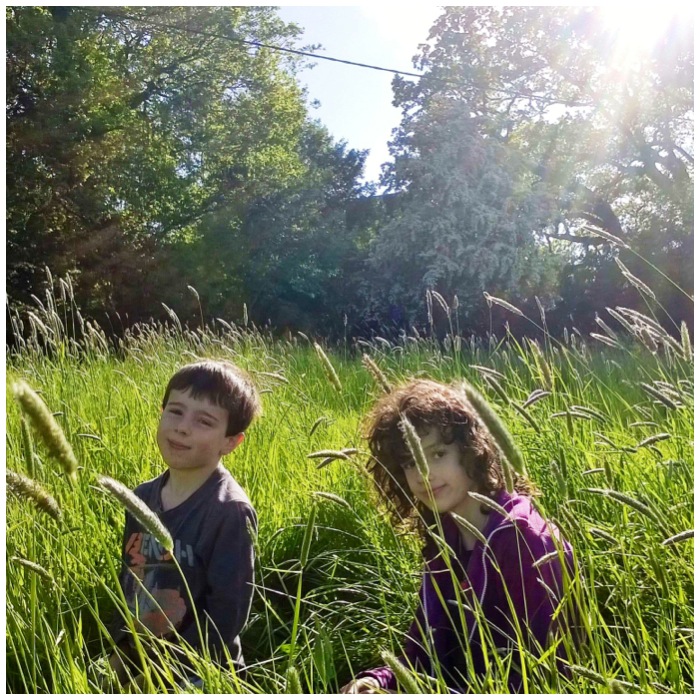
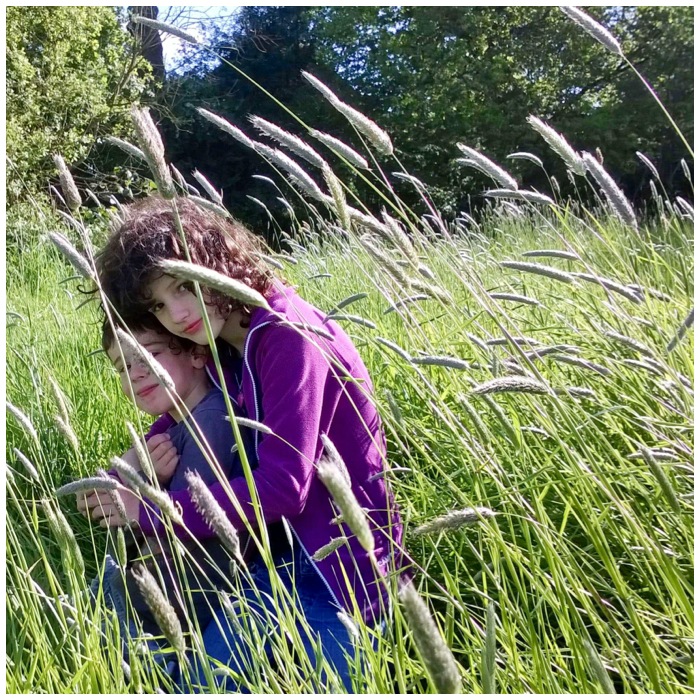
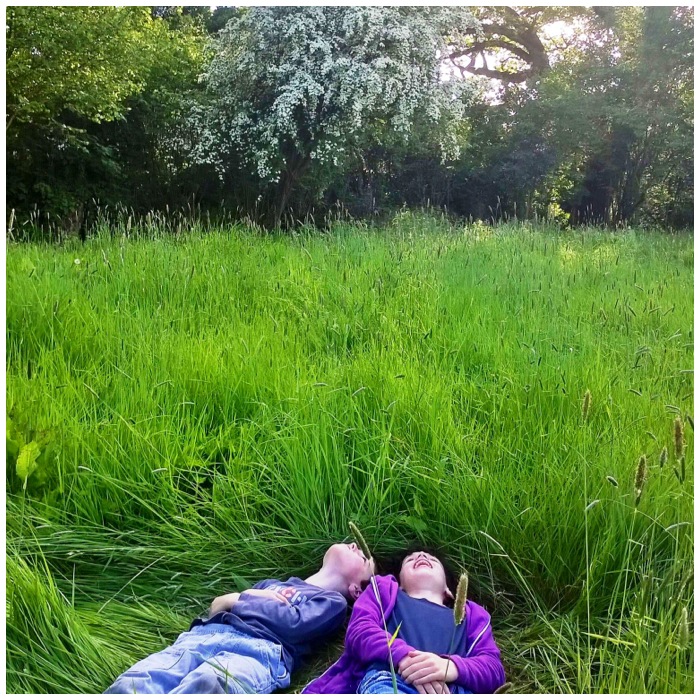
I made a number of bimbles around Bramley in June observing the changes occurring so I have decided to merge the three trips into one report. I took my kids out on two of them: it’s great seeing them starting to observe nature with more of an eye for detail.
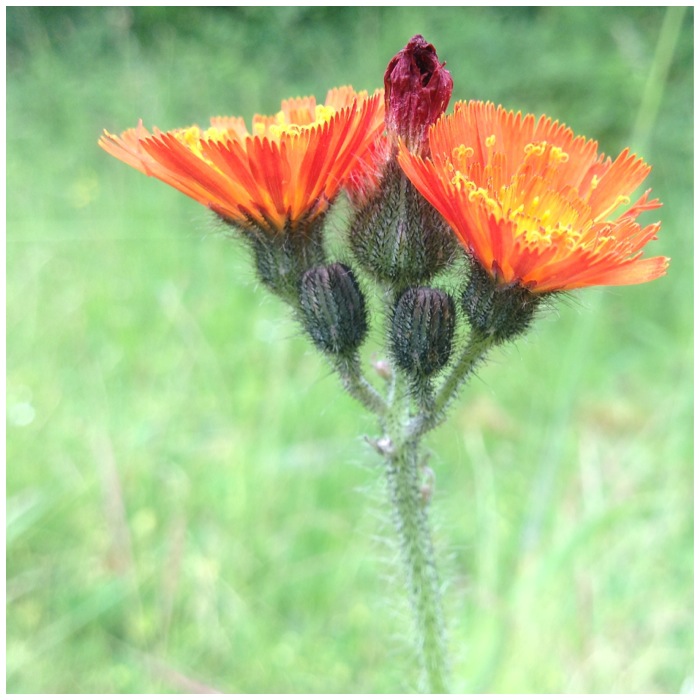
My wife Alison gave me a macro camera lens for my iPad mini for Fathers Day and I took this lovely picture of this orange hawkweed with it.
Orange Hawkweed
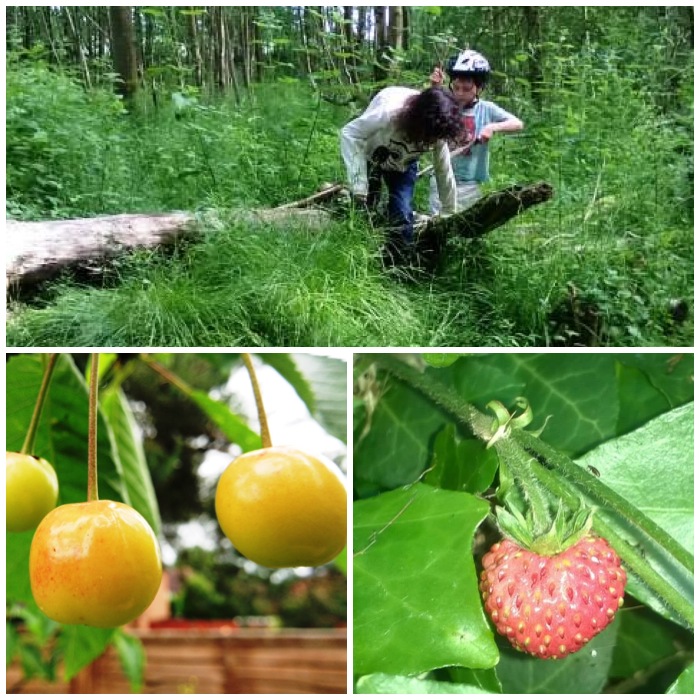
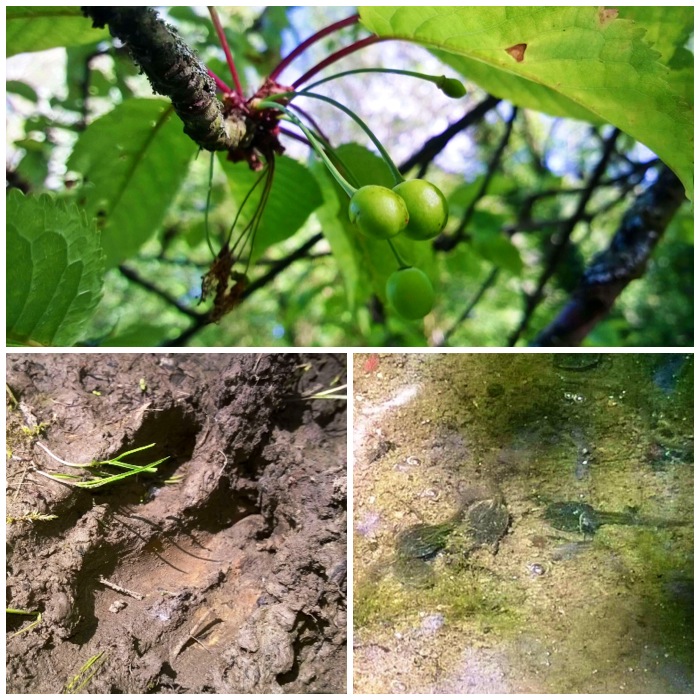
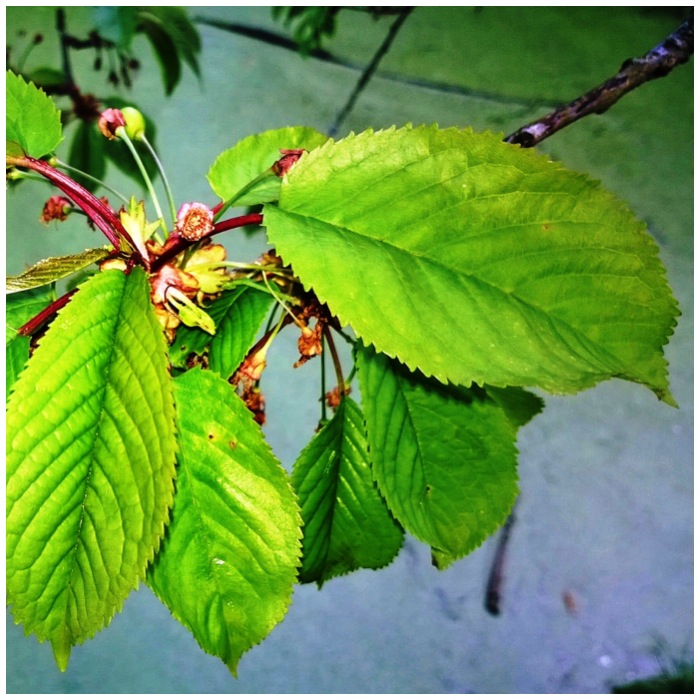
The cherry tree I have been monitoring produced its fruit in June. On the first trip they were yellow, on the second they were red and on the third trip they had all been stripped away by the birds.
I did also manage to find a few wild strawberries over the month but they were soon getting nibbled away at as well.
Cherry and Wild Strawberry
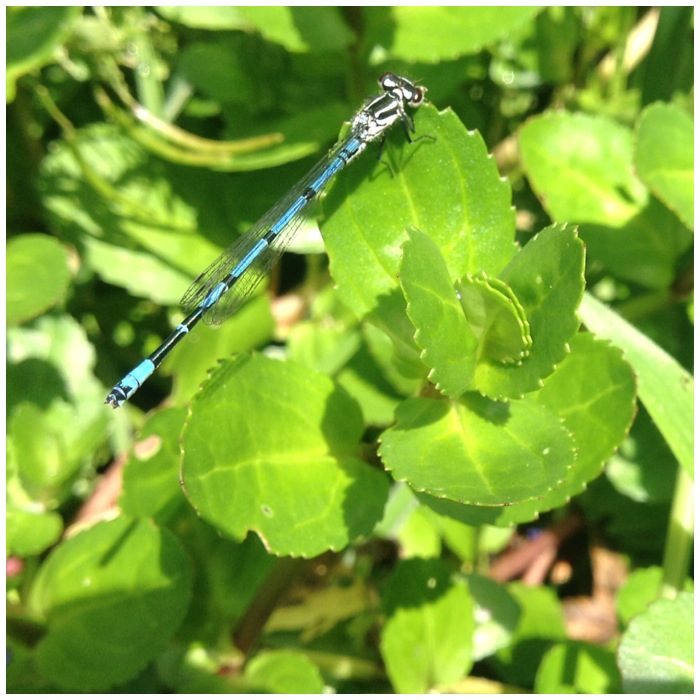
On the second trip I spotted that some damselflies were flitting about a watercress-covered pond. I kept trying to get a decent picture of them but the pictures always ended up fuzzy. On the last trip after a patient wait I managed to snap this picture with the iPad mini using the macro lens.
Damselfly
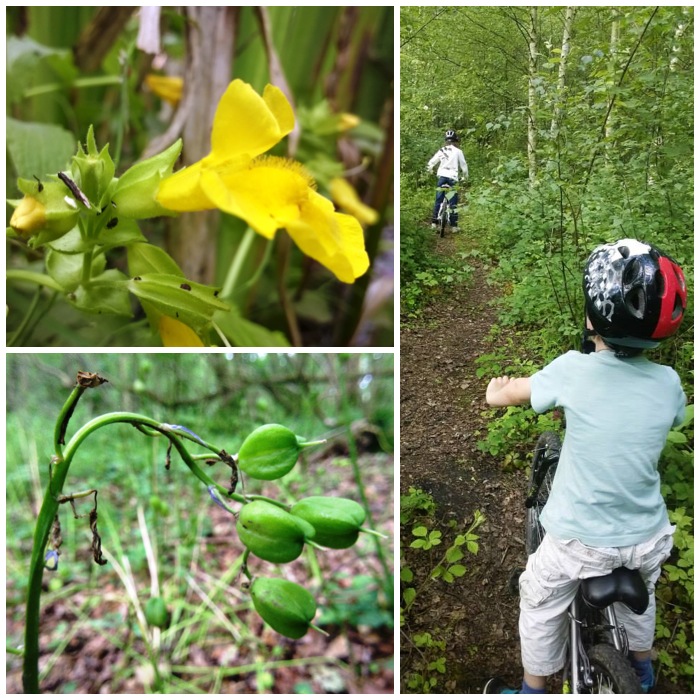
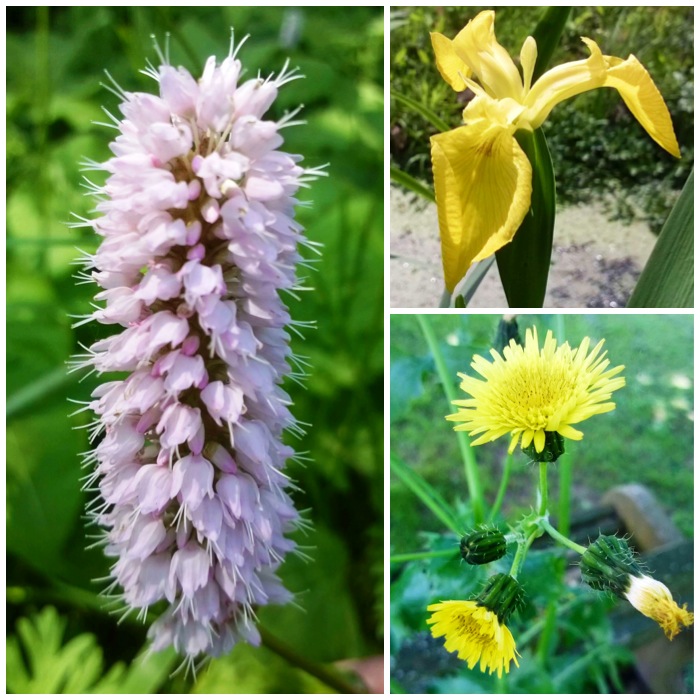
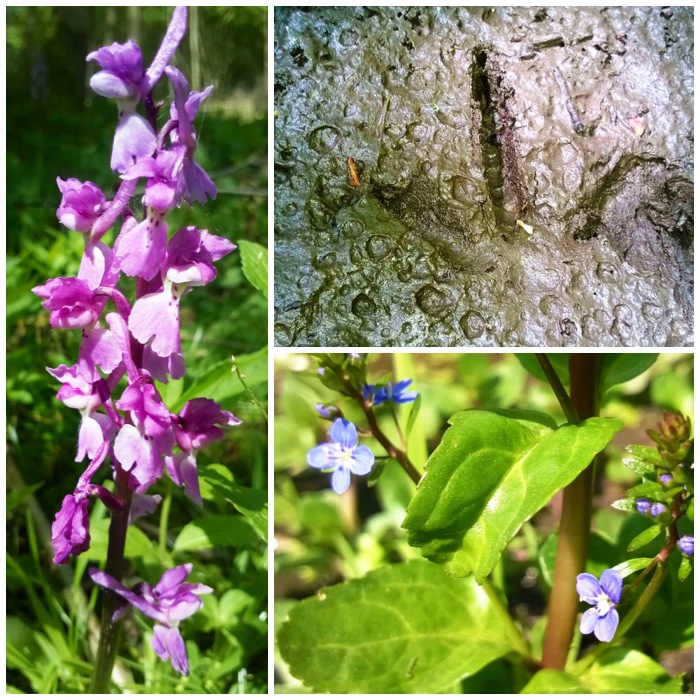
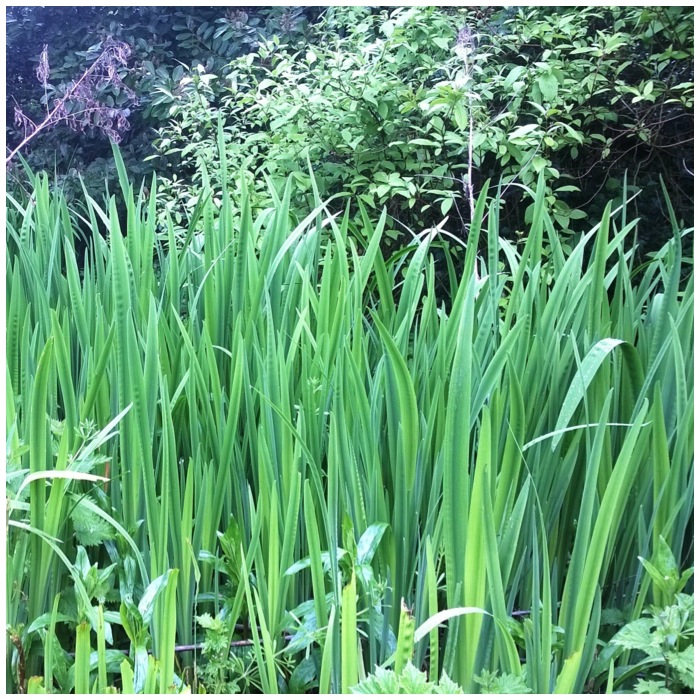
At another pond where I am watching the reedmace growing I came across the yellow flower below. I had never seen this before so had to look it up: the closest I can get to it is a flower called the monkey flower. Happy to be educated by anyone if they can ID it as something else. If it is monkey flower then the leaves and stem were traditionally used by Native Americans as a salt substitute just as colts foot was used here. I was first taught how to dry out the leaves of colts foot by my friend Kevin Warrington – Laplanders Natural Lore Blog.
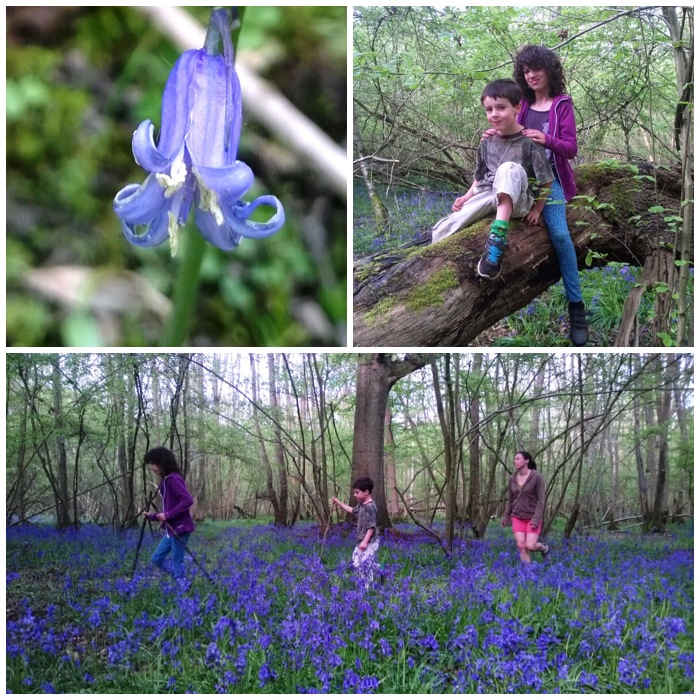
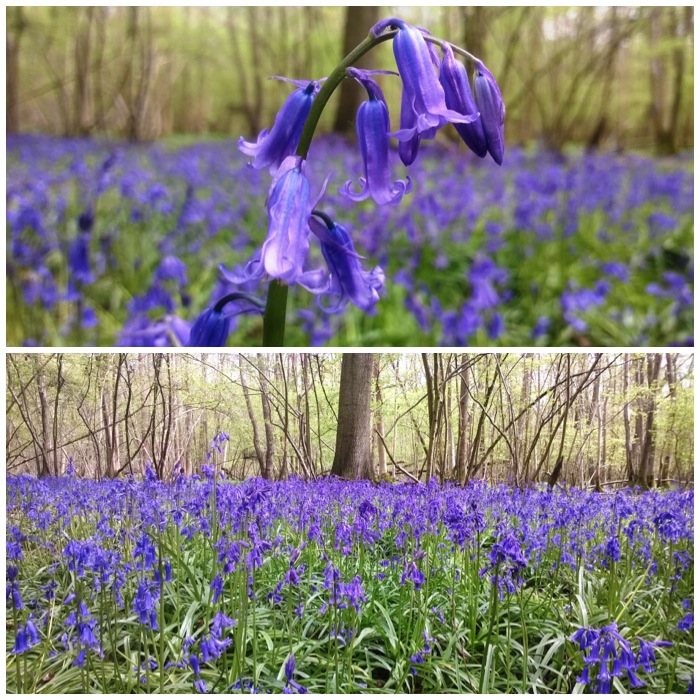
Even though the bluebell has lost its flower I still think it is a beautiful plant in this late stage of its life cycle. These pods will eventually darken before they open to disperse their seeds.
Monkey flower and Bluebell seed pods
This was one of the first self heal flowers I came across this year right at the beginning of the month. It is a wonderful medicinal plant that I have used a number of times along with woundwort, plantain and yarrow to treat small cuts and grazes. It was also known as carpenter’s herb because of this ability to treat small cuts.
As the month has worn on this plant has appeared all around the village in great numbers. It is a pity that most people do not give it a second thought.
Self Heal
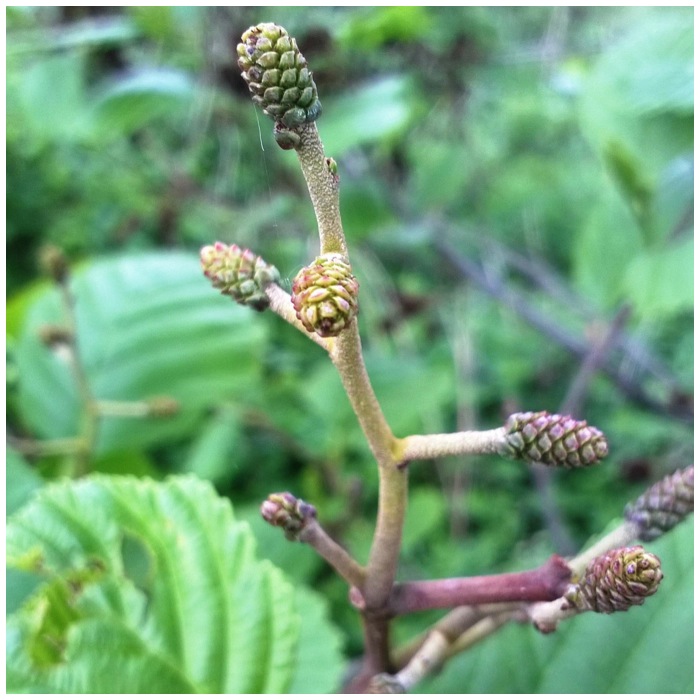
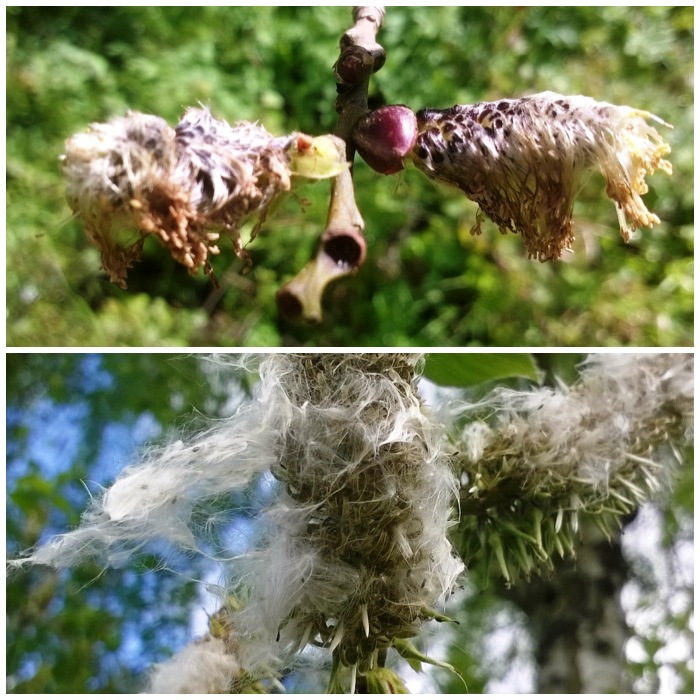
Two very tiny details in abundance at the moment are the cuckoo spit and the tiny green alder cones. The cuckoo spit contains the Froghopper nymph which uses the spit much like a home when it emerges as a place of safety.
Some of the alder cones have a red tongue-like protrusion caused by the fungus Taphrinaalni. The fungus develops in some of the cones and forces the cone to grow these protrusions so as to produce and release its spores – a kind of forced symbiosis I suppose. My source on this was the Donegal Wildlife Blogspot
Cuckoo spit and Alder Cones
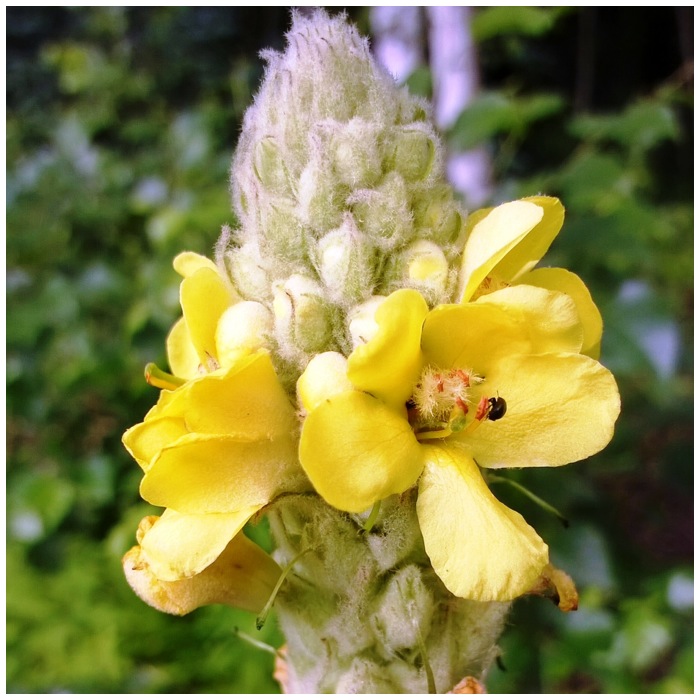
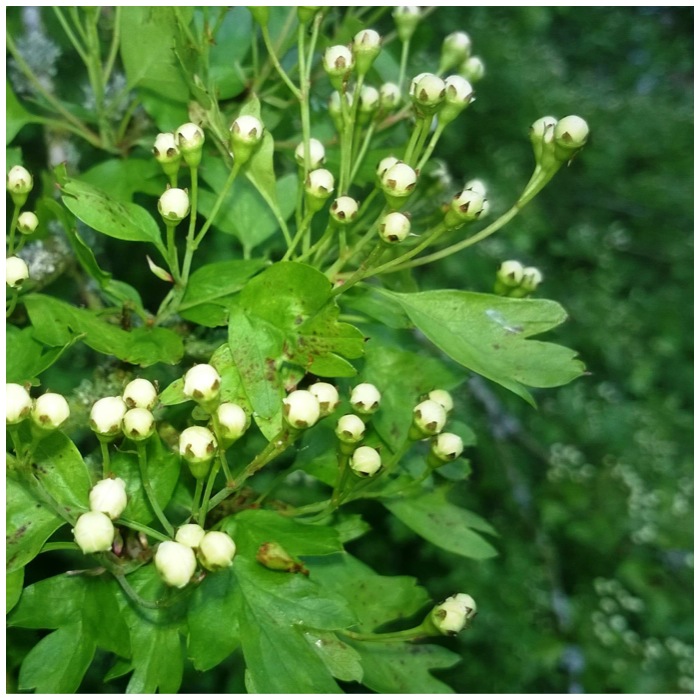
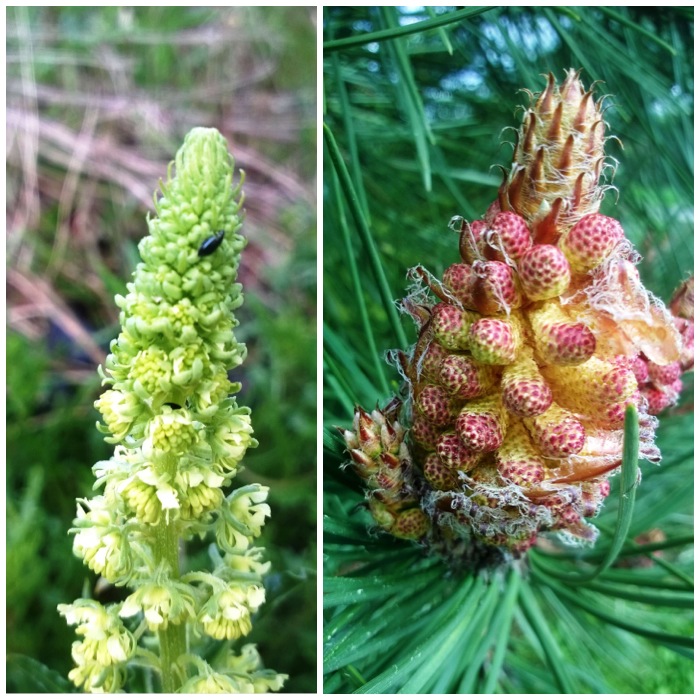
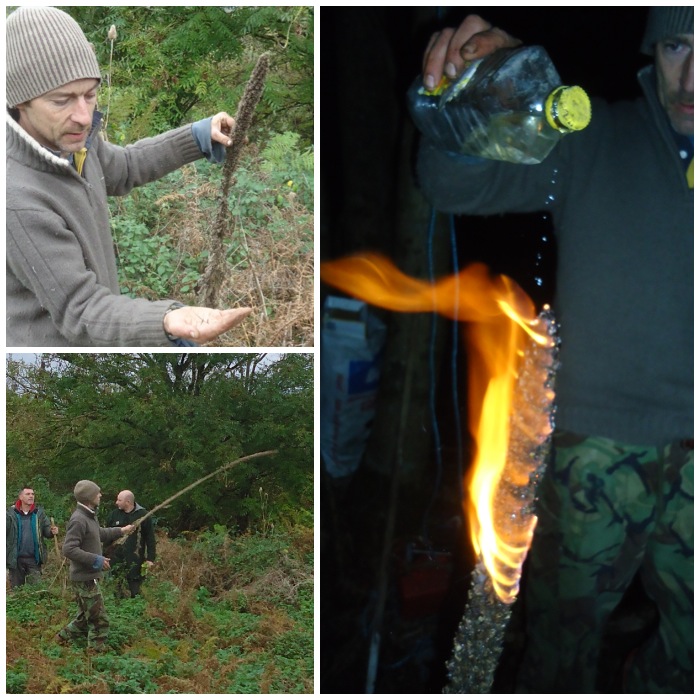
My first mullein flower of the year. This was the only mullein I saw in flower but there are plenty growing around the village. A great medicinal plant used for treating chest infections, TB, digestive problems, sore throats and many more ailments. Nature News has a good page on the plant.
I personally like it as it makes a good handrill, a good torch when covered with oil or fats but also as its leaves are soft and have anti-bacterial properties, which means they make great toilet paper.
Mullein flower
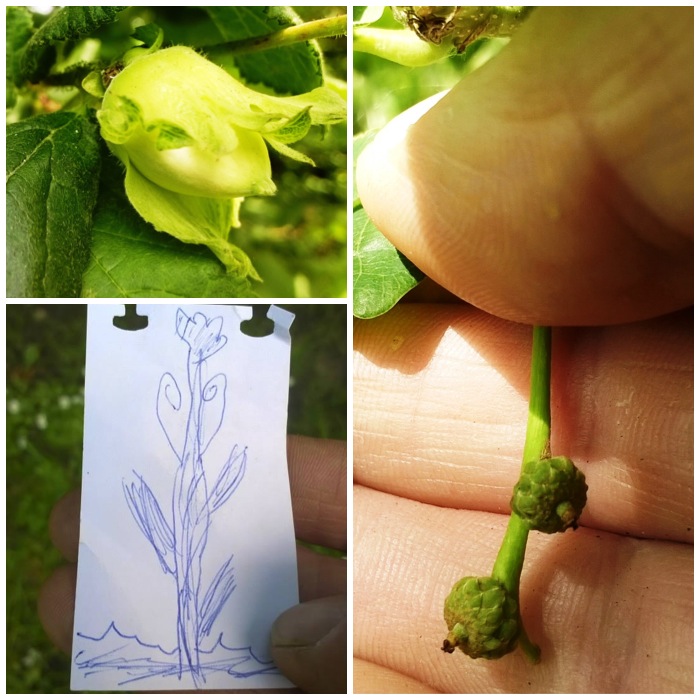
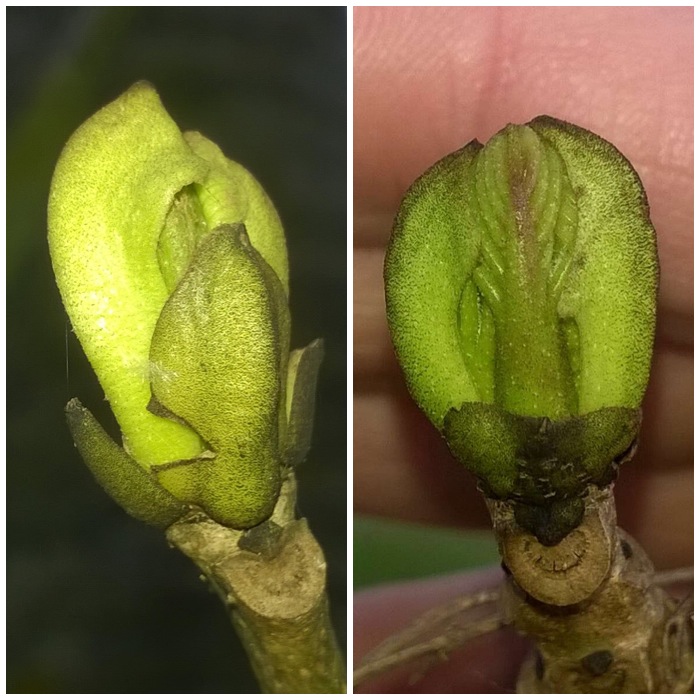
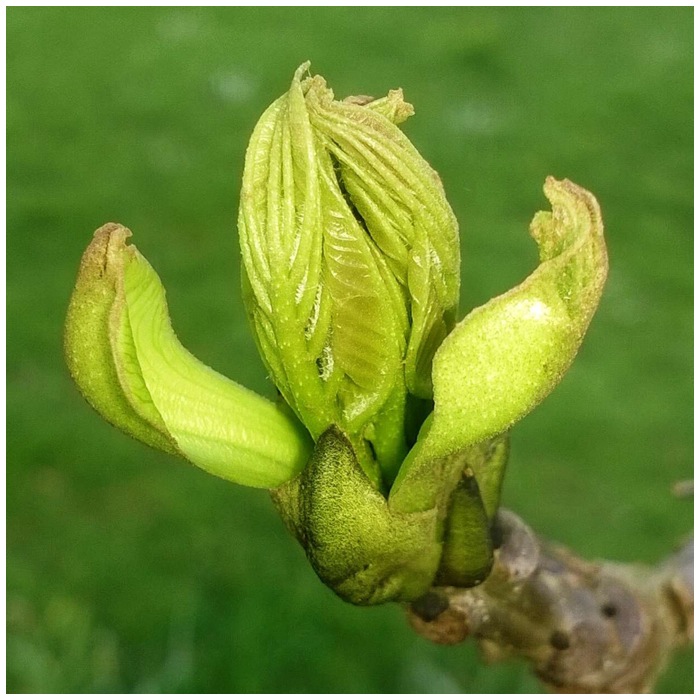
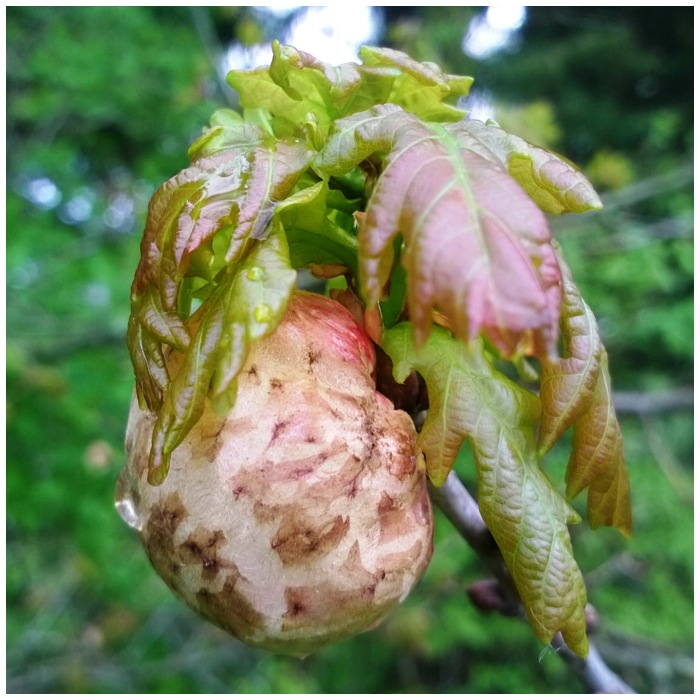
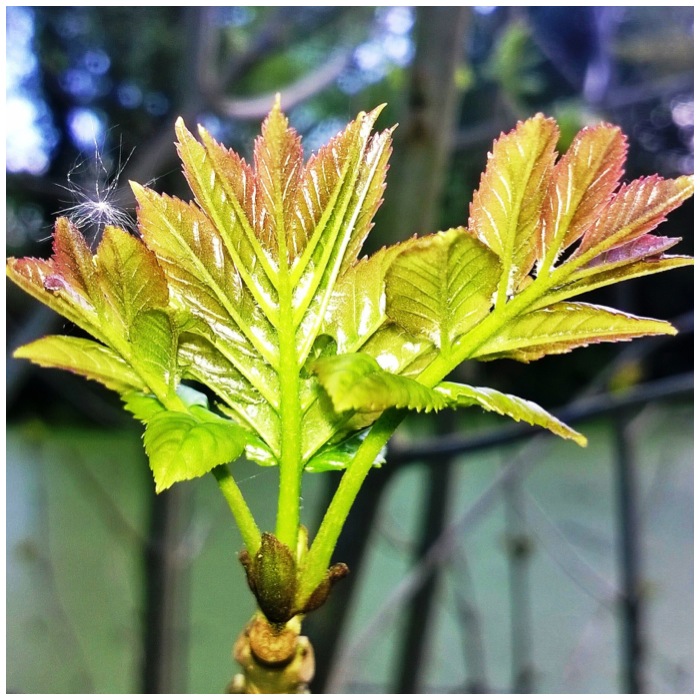
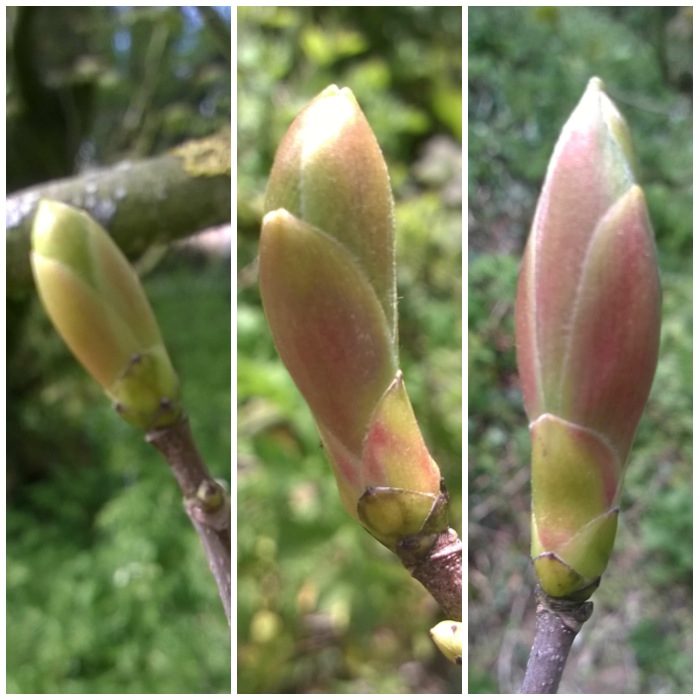
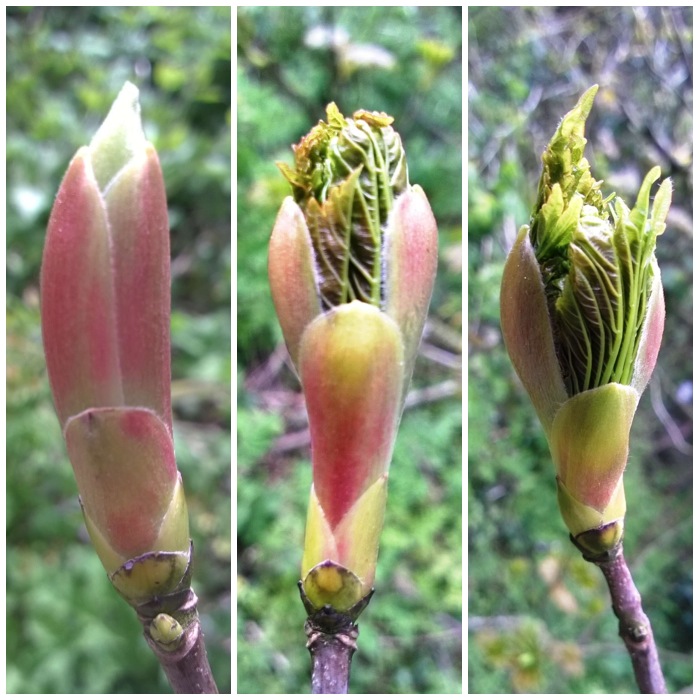
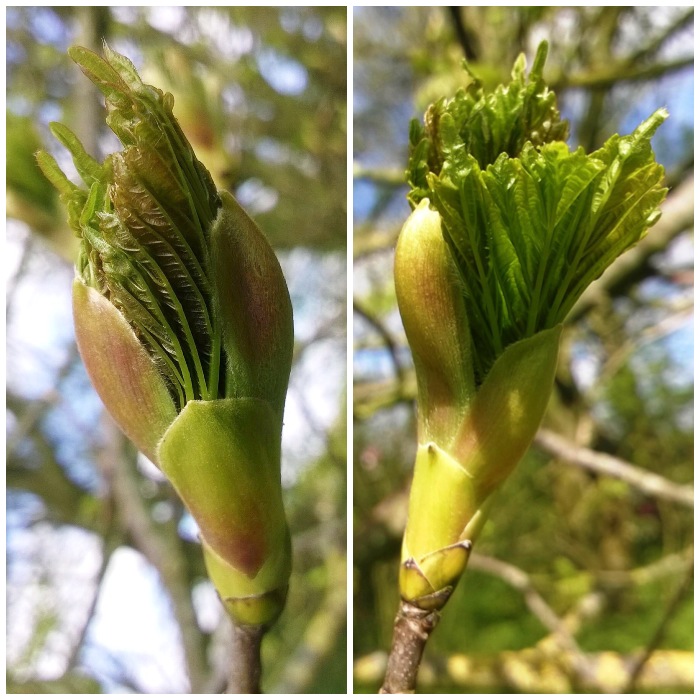
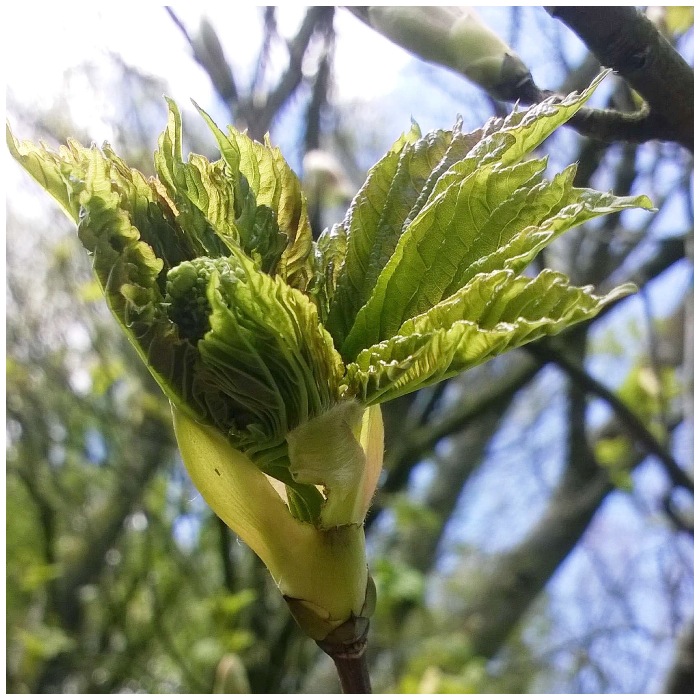
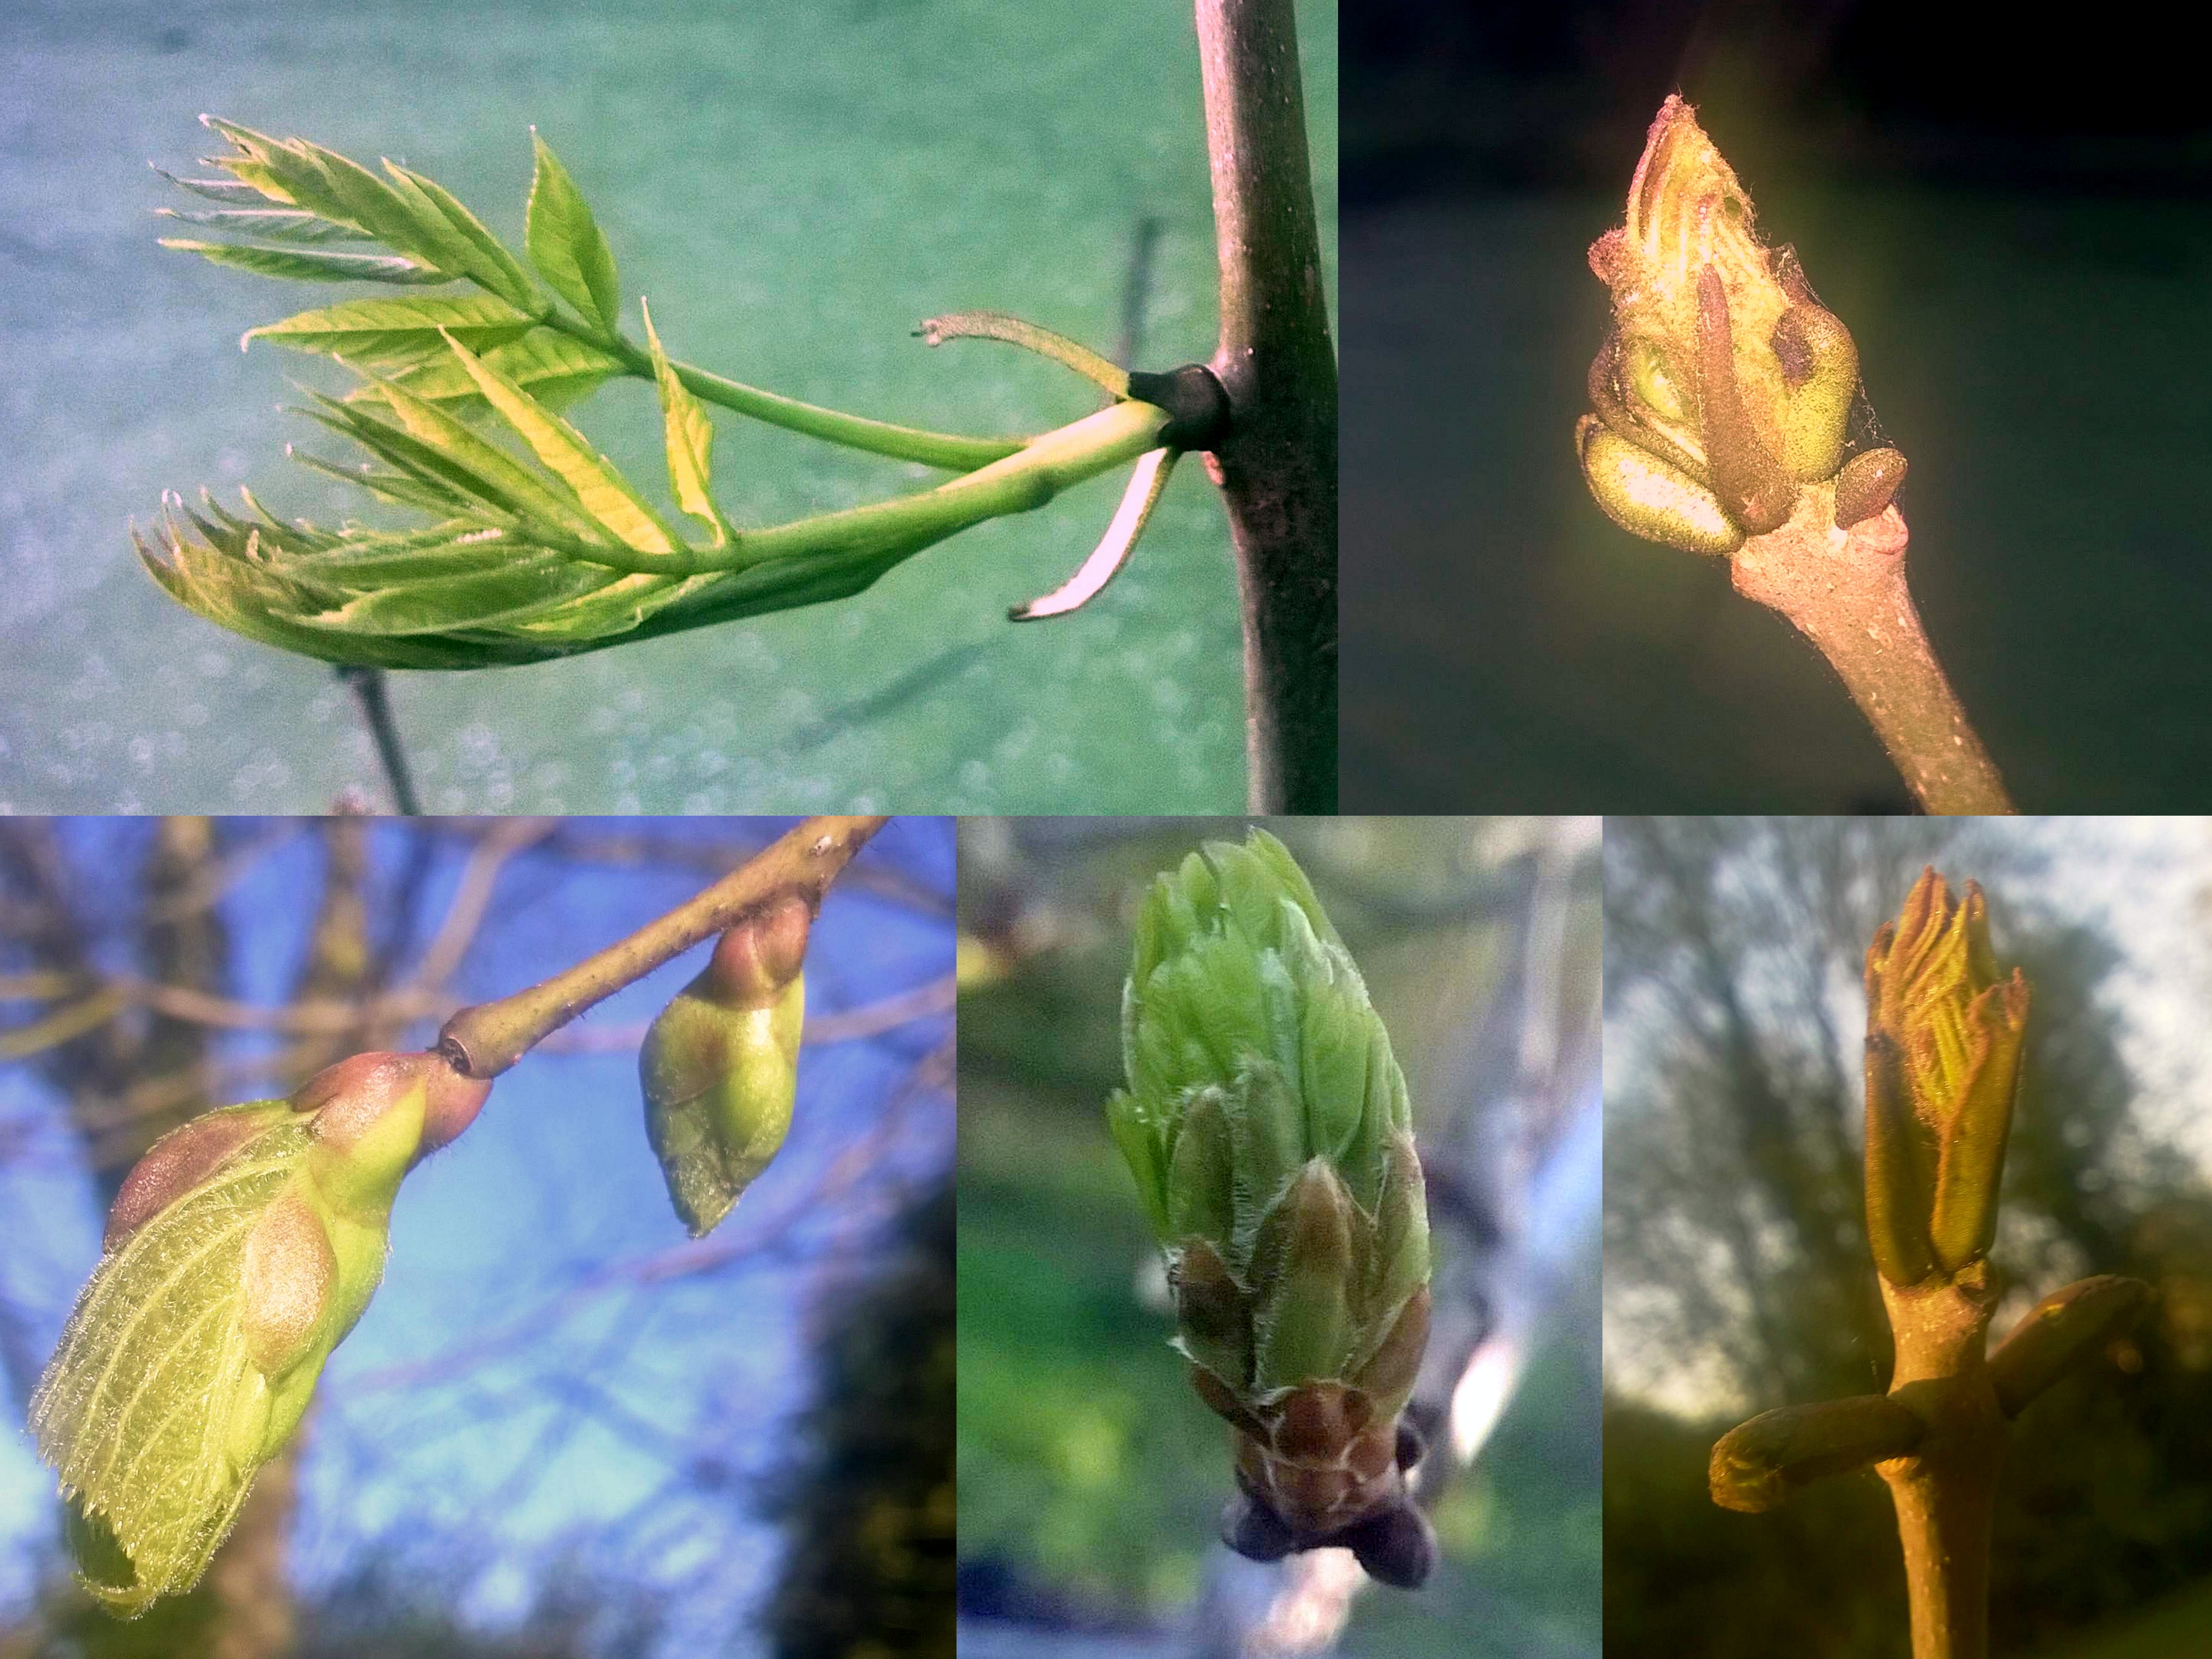
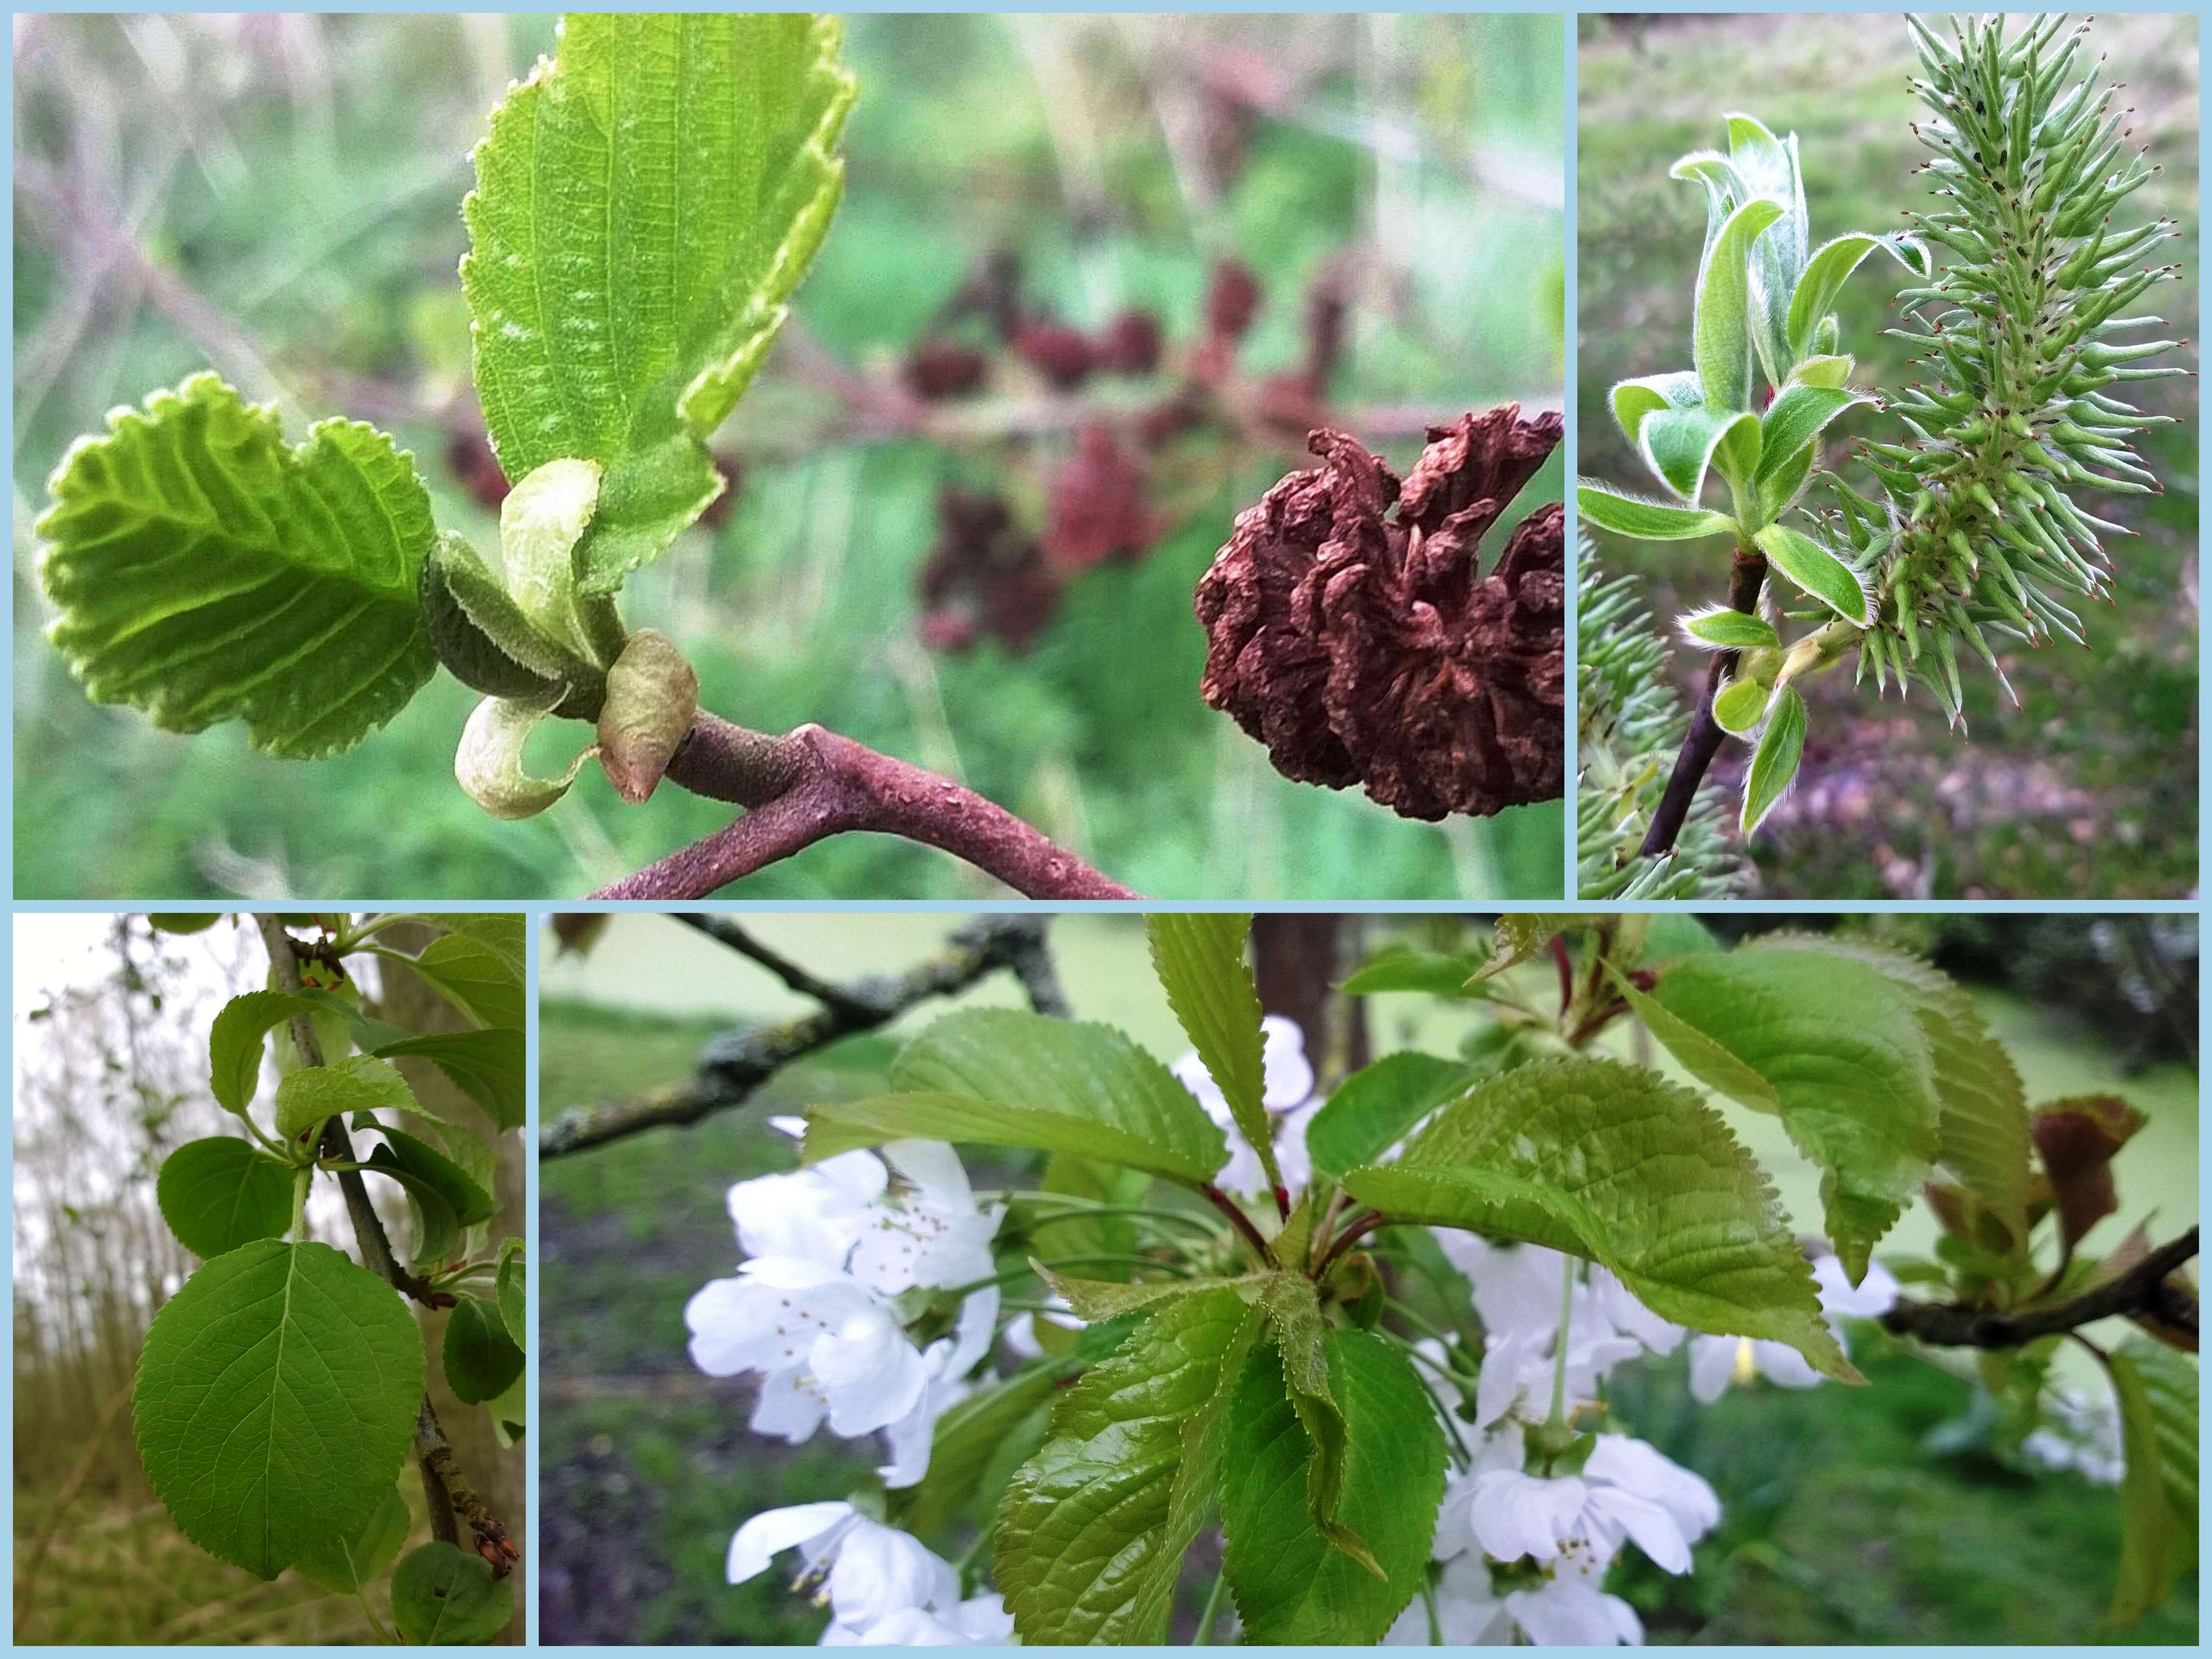
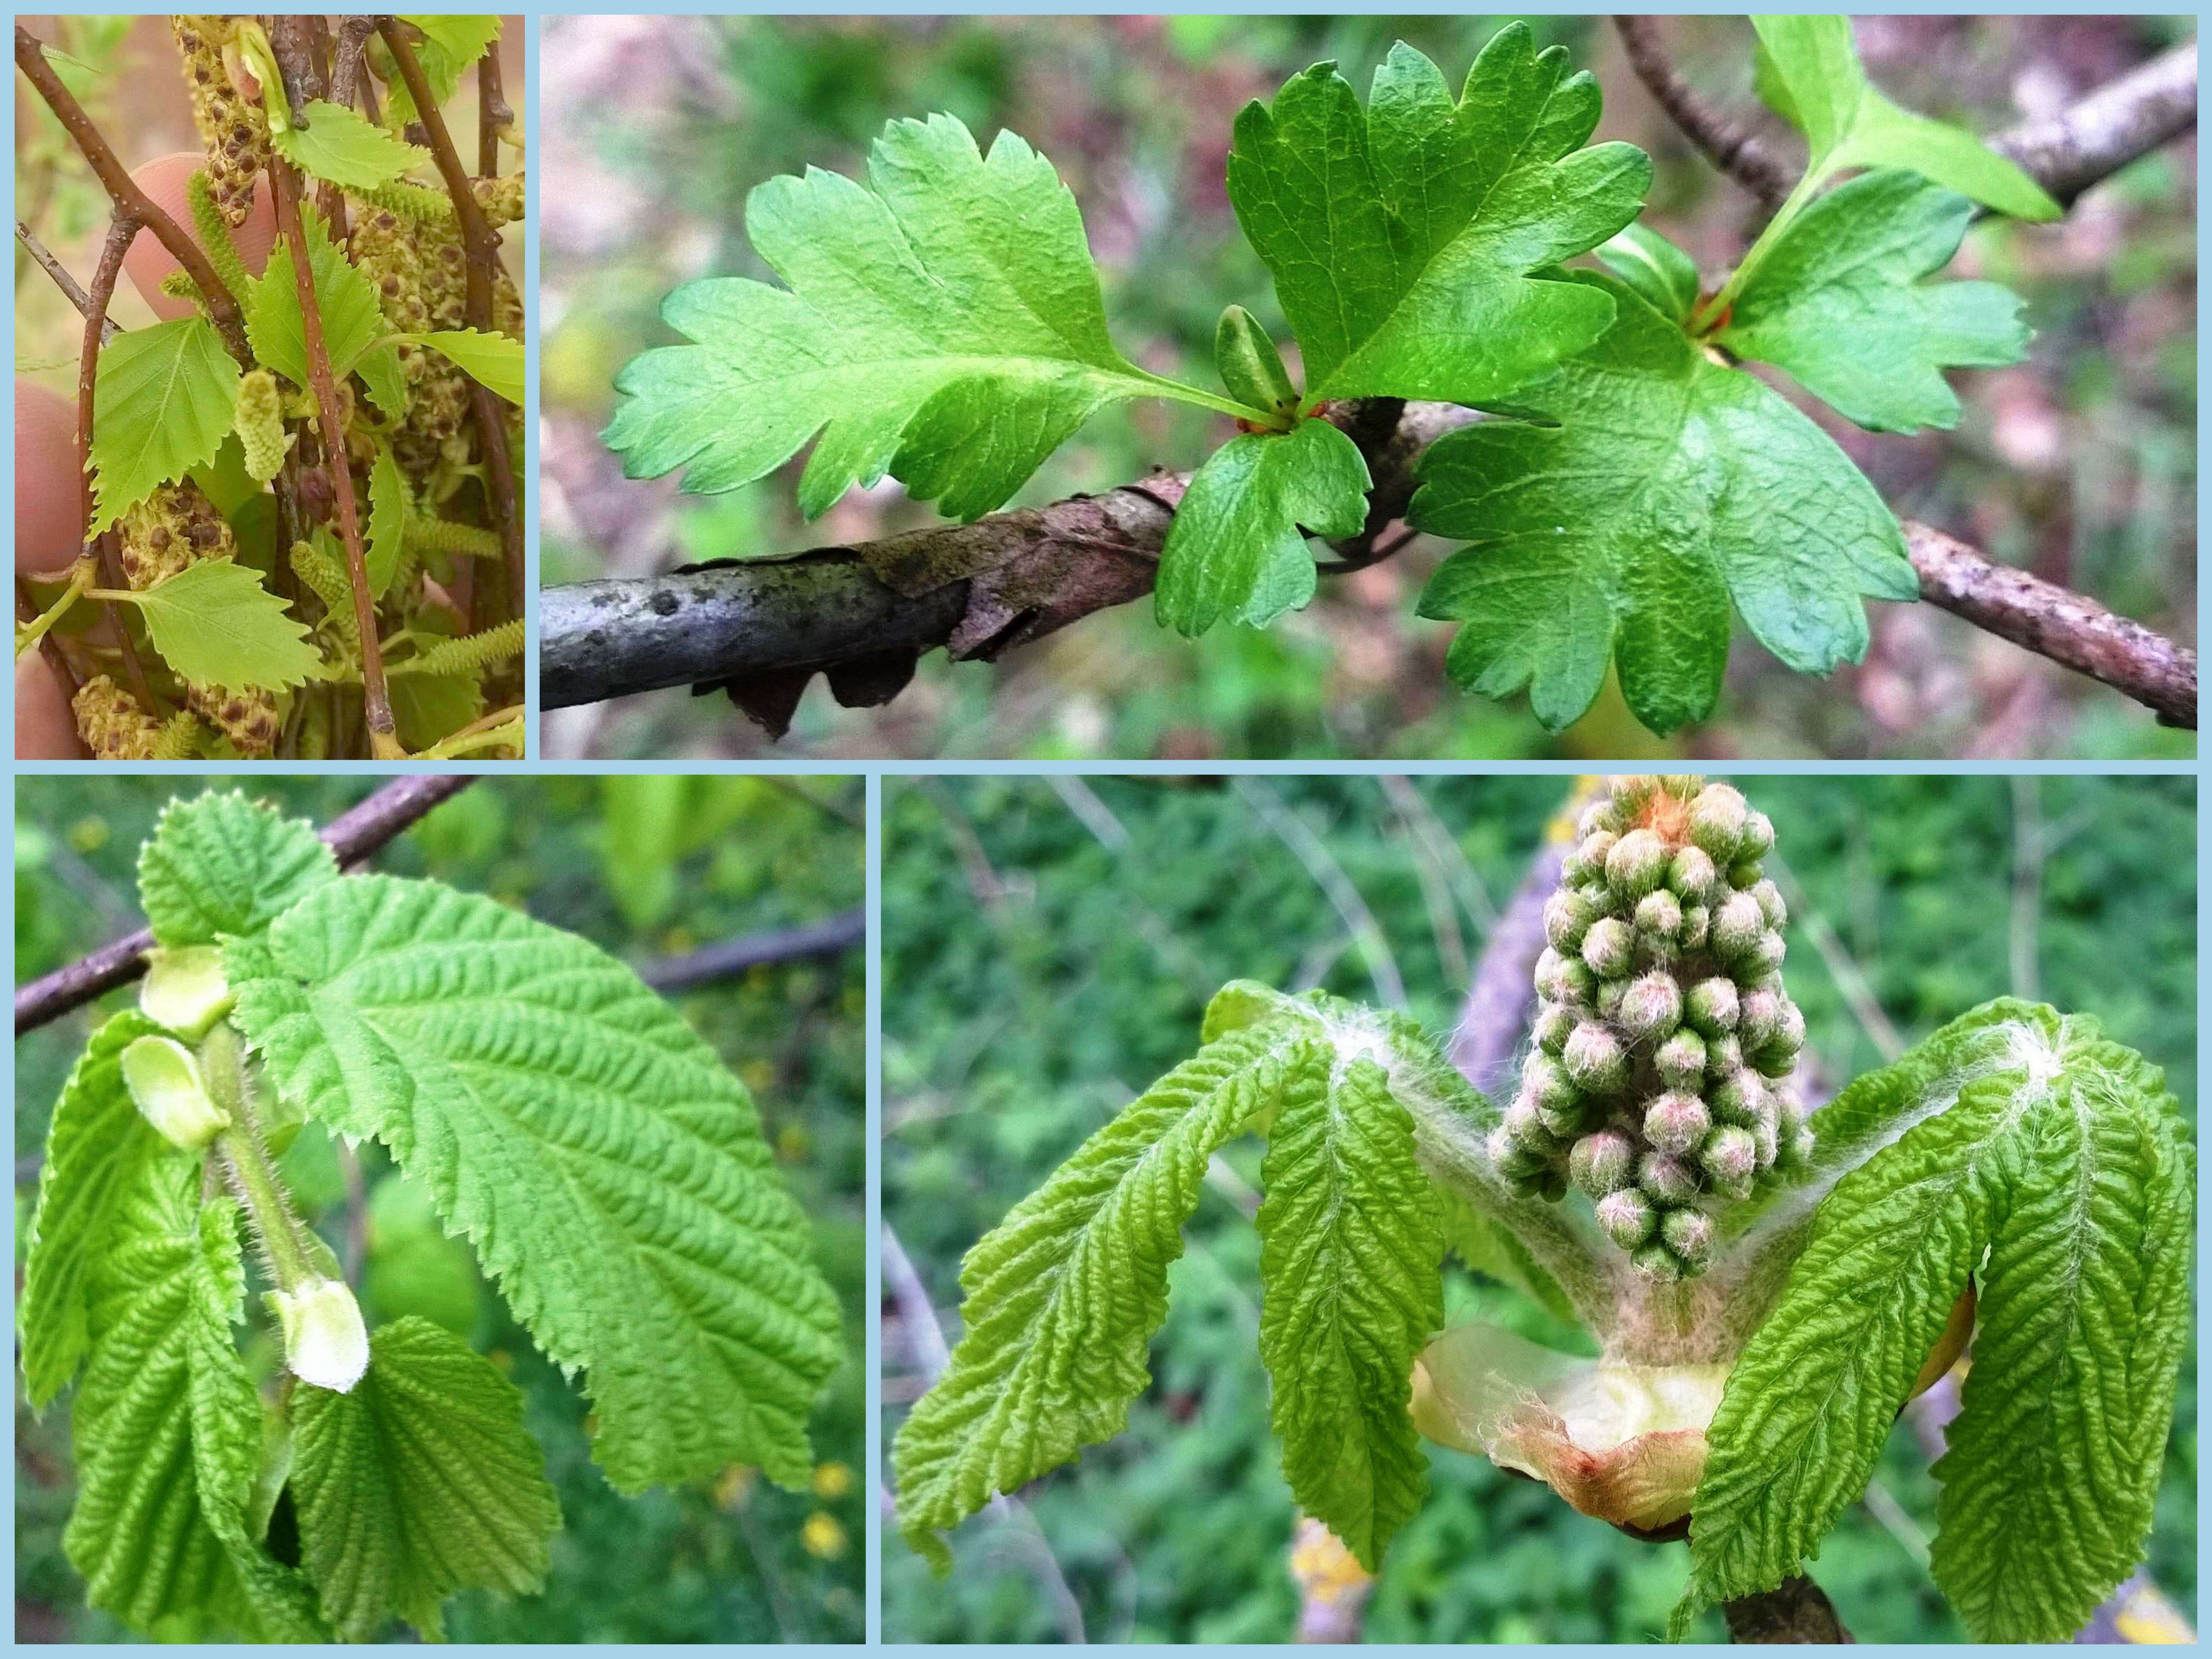
As I have been taking Paul Kirtley’s online Masterclass in Plant ID I have been monitoring a lot of different sites and trees around the village since February and plan to do so for a whole year. It has been great to see all the changes occurring with the flowers and the trees leaves coming through but I was particularly happy to spot my first hazelnut and acorn of the year this month.
Hazel nut and baby acorns
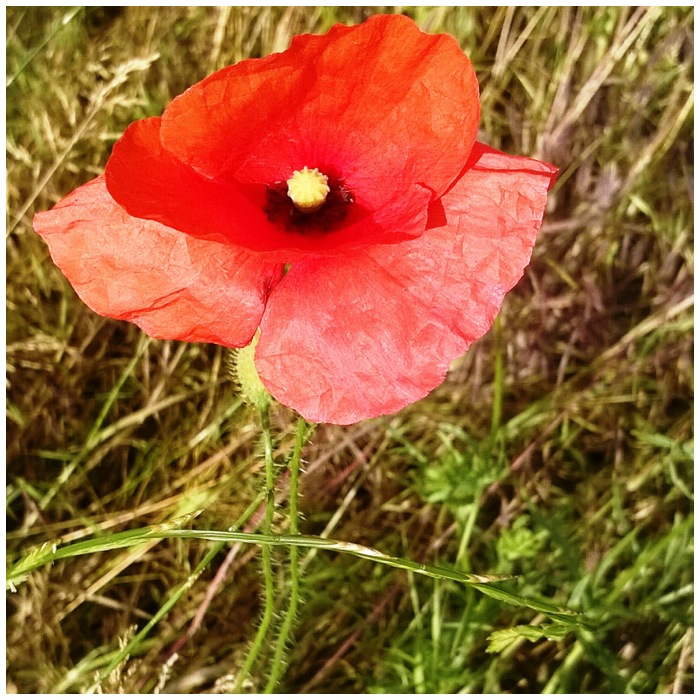
It was not until the end of my last bimble, as I turned my last corner to go home, that I spotted my first poppy of the year. The edible part of the plant is the seed which is used in cakes and also crushed to make an oil.
Poppy
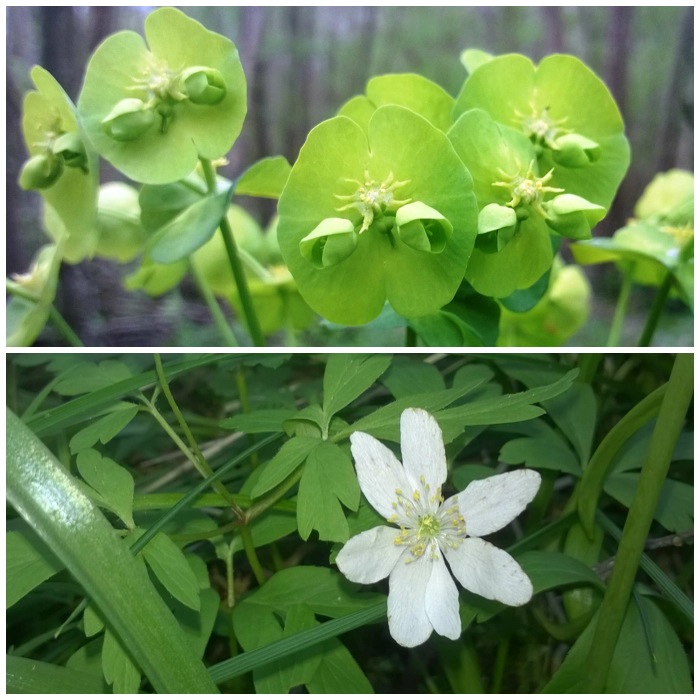
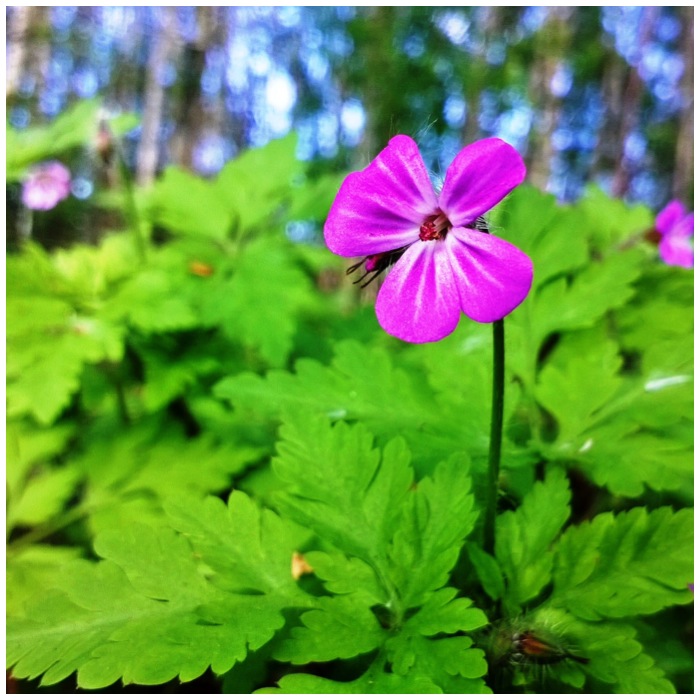
Two other new spots this month were the enchanters and the woodynightshades. The enchanters nightshade I found dotted all around the woodland floor but the woody nightshade I found in a hedge by our local park. They are not related but are both beautiful flowers. The enchanters was known to the Saxons as aelfthone to treat what they saw as elf sickness – any sudden sickness brought on for no known reason.
Woody nightshade is another plant used medicinally in the past and is also known as bittersweet because of the bitter then sweet taste you got when chewing the root of the plant. Large doses of this plant though are deadly so one left to well-trained herbalists.
Enchanter Nightshade and Woody Nightshade
I have found only one patch of ground where I have seen the commonbistort growing. This was taken near the end of its flowering stage and was covered in these moths. I have never tried this plant but I am told that the young leaves and the root are edible. In the Lake District the plant is used in the making of a pudding called the Bistort Easter-Ledge Pudding.
Bistort and Moth
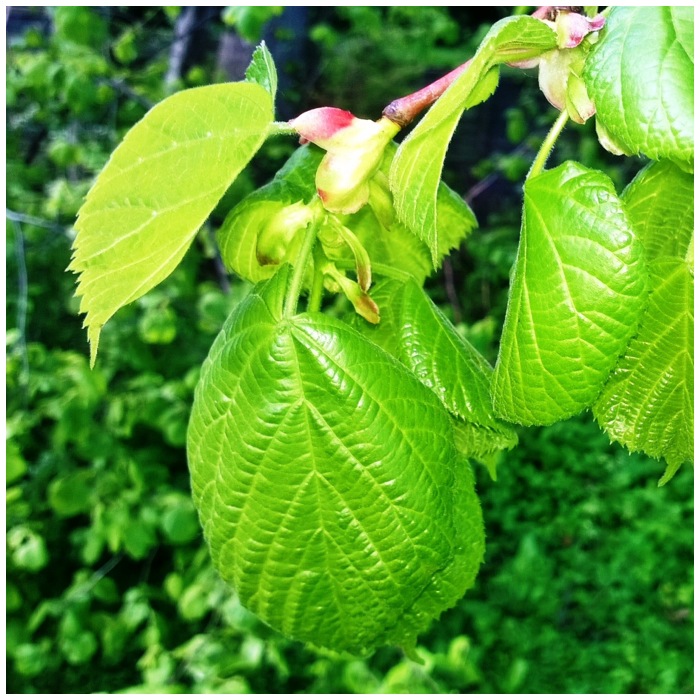
My friend Alan Smylieis an excellent forager and photographer and I was chatting to him about the common mallow and the limeflowers that you can see below. Apart from looking beautiful he is making a wildcherry jelly infused with mallow leaves and he makes a tea from the lime flowers. I hope to do a forage or two with Al at this years BCUK Bushmoot in August and pick his brains a bit more about some of these plants.
Mallow and Lime flowers
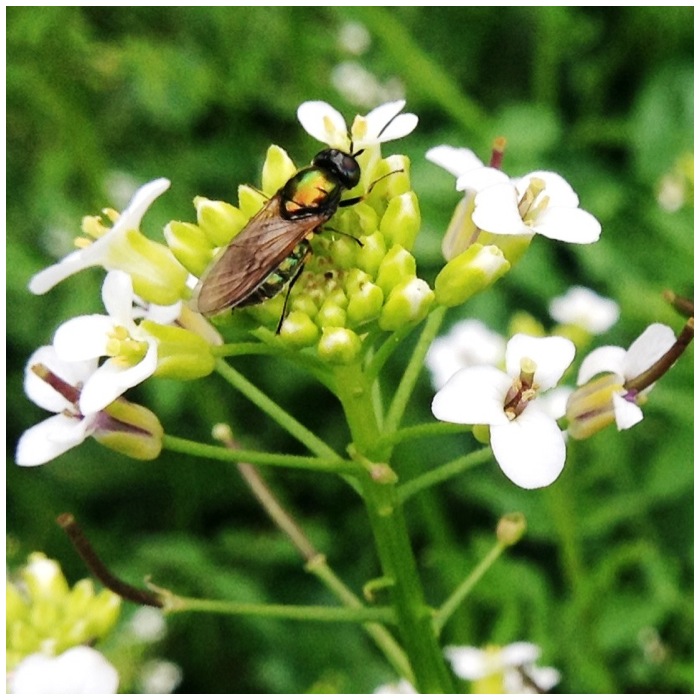
In the stream near our house I have found carpets of watercress growing. The flowers attract a lot of insects and the whole plant can seem to fill a stream. It was not until I got into the stream did I notice that the plant seems to float on the water with the roots of to the side of the stream. The plant is edible but only if you know the water is clean.
Watercress
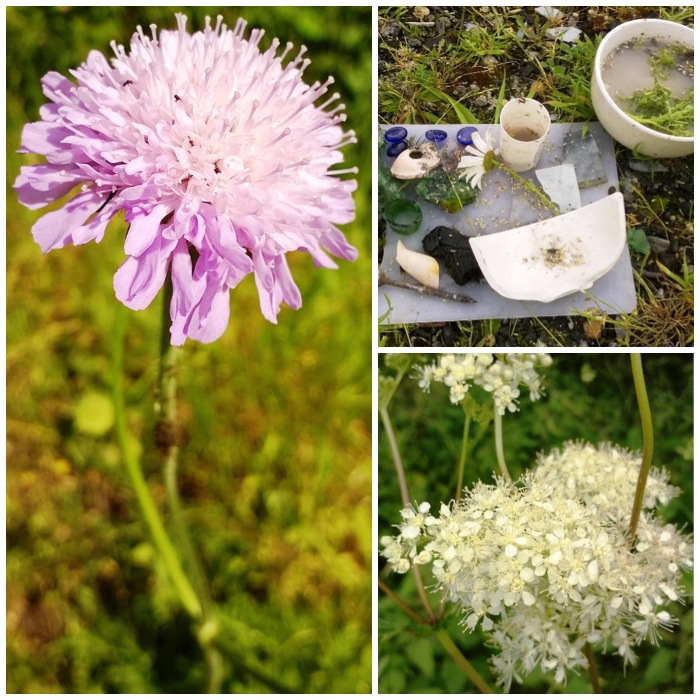
On the left is the pin cushion head of a devilsbitscabious flower. This beautiful flower is a source of food for many insects in the summer. In particular the declining Marsh Fritillary Butterfly relies heavily on this flower. When I see this flower appear each year I know that summer has finally arrived.
At the bottom right is the lovely meadowsweet. This was one of the plants sacred to Druids and was a plant that Bayer used as one of the key ingredients when developing aspirin in the 19th century. It gives off a lovely aroma and was traditionally used in the home to cover up bad smells.
Devils Bit Scabious and Meadowsweet
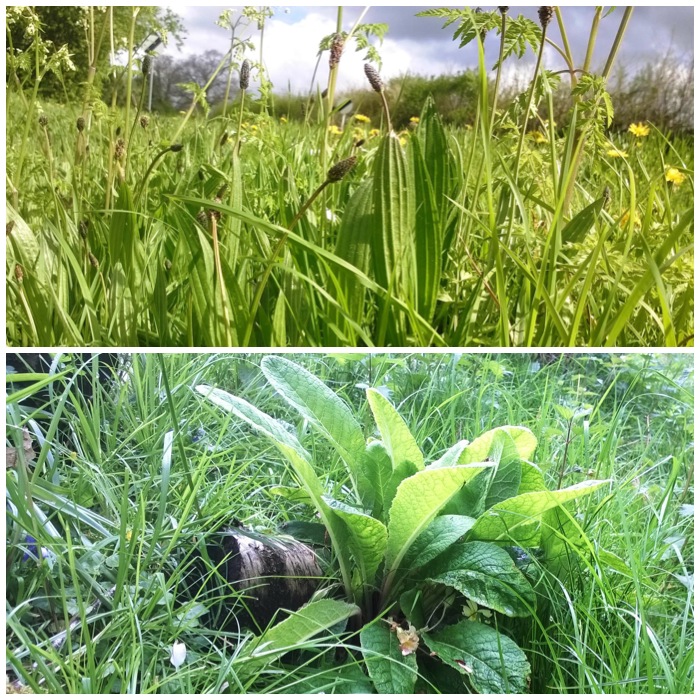
I spotted this little fella taking a rest on the seed head of a Ribwort Plantain plant. He was not at all fazed as my phone camera came in close.
Ribwort Plantain seed head
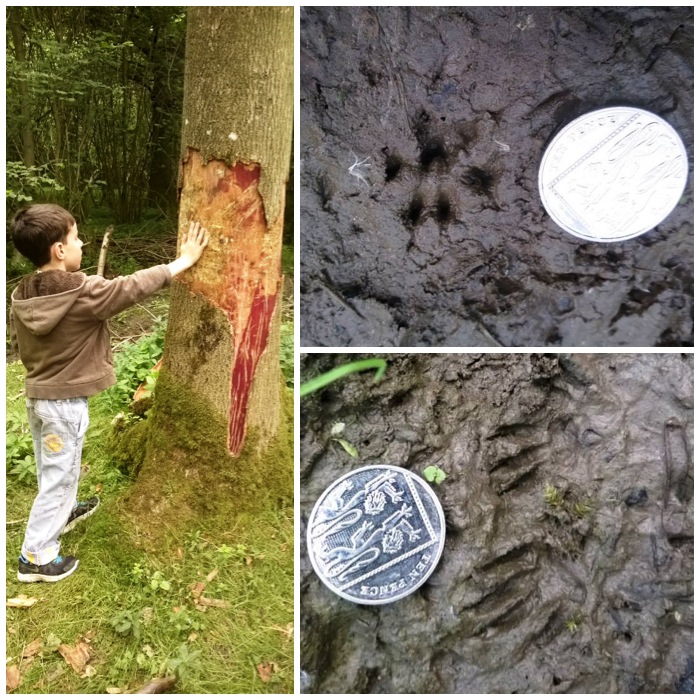
On our second trip out we came across this ash tree that had been used as a scratching post for deer. It looks like they had used the tree to help rub the felt of their antlers. I could see teeth marks on the edges of the ripped off bark and lots of scratches on the wood itself where it appears they were rubbing their antlers.
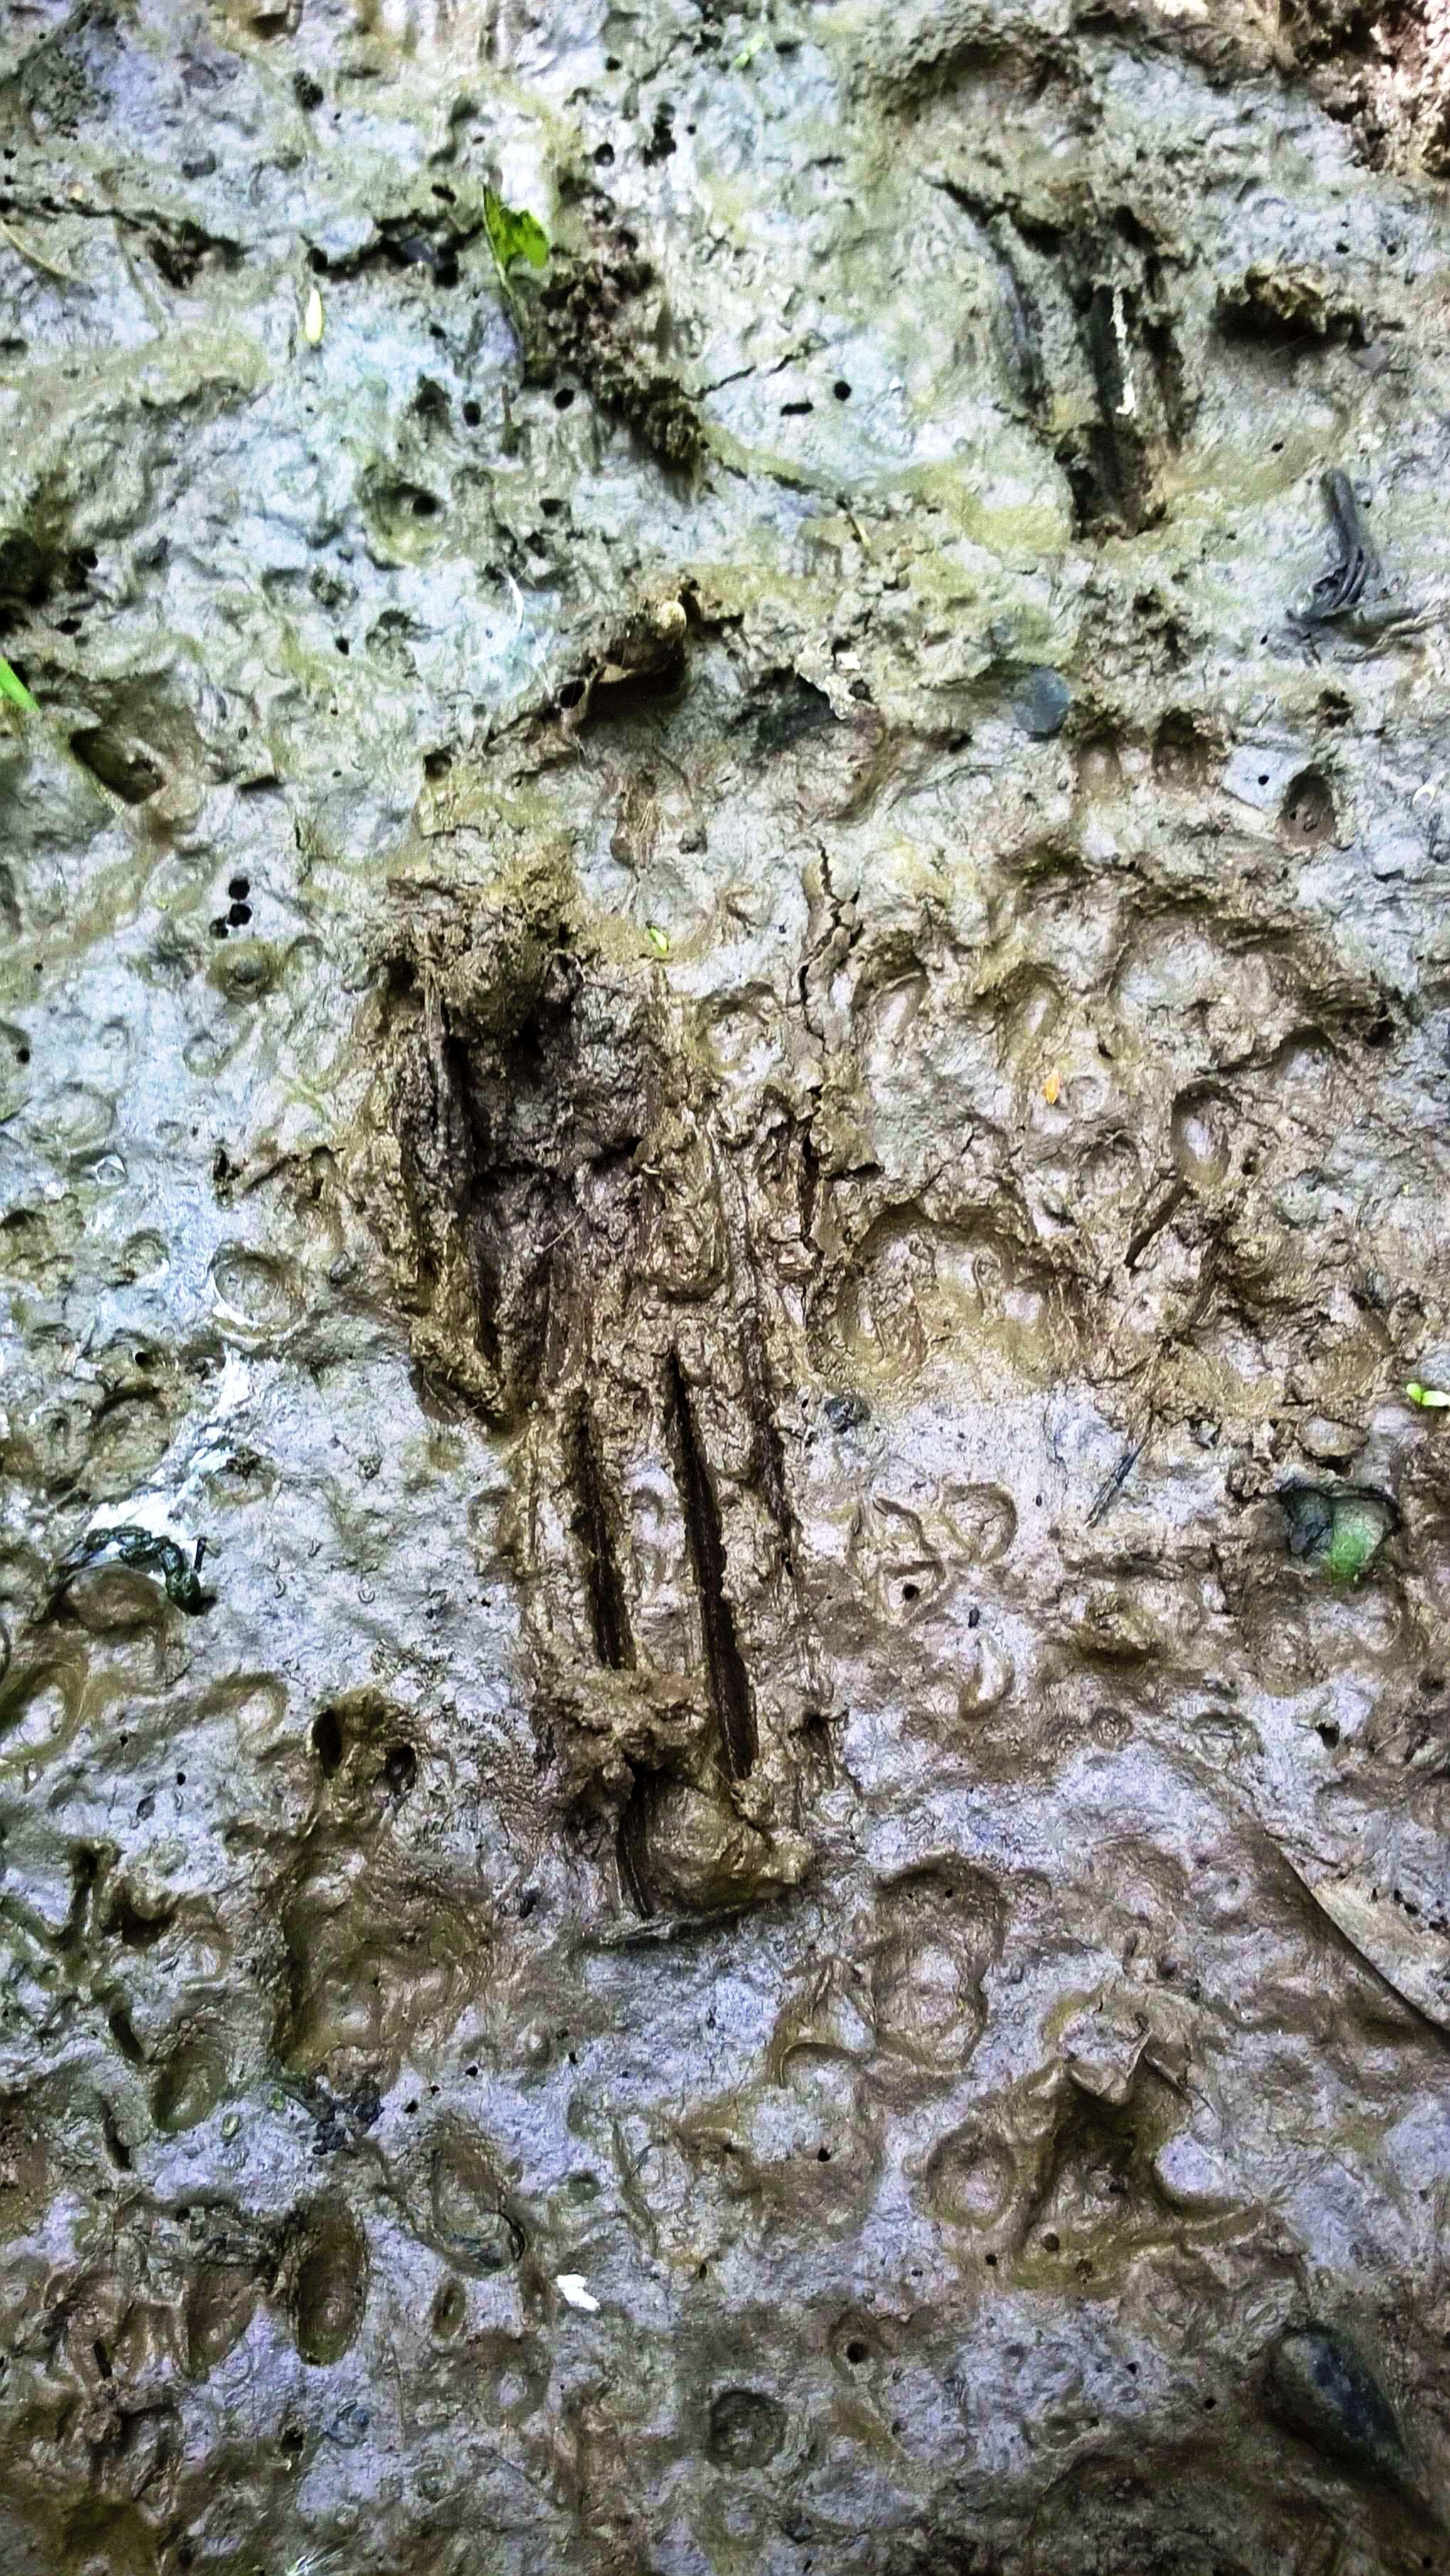
Apart from the sign on the tree there were plenty of tracks. We had lots of deer slots, badger prints, pheasant, squirrel and what maybe a vole print.
I do not know if the top right print is a vole but it is certainly small enough to be one and the bottom one are the tracks of a grey squirrel.
Deer tree damage, unknown top right and Squirrel bottom left
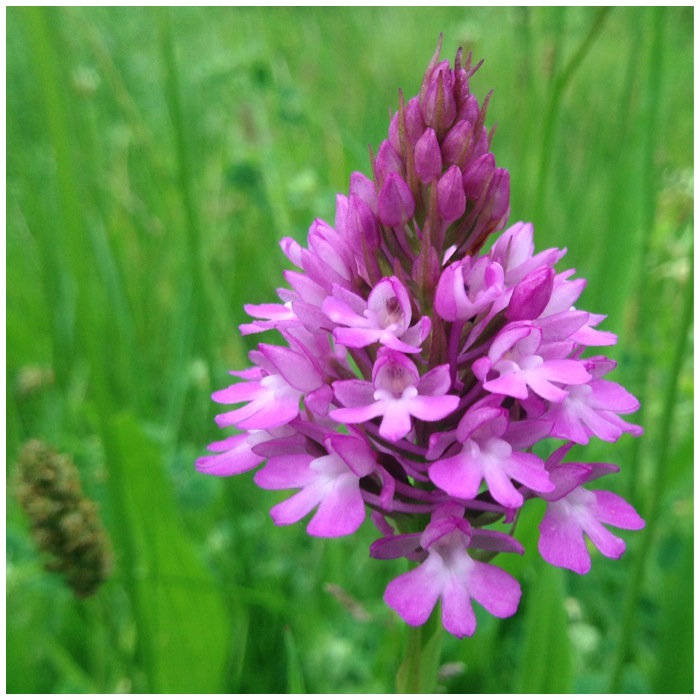
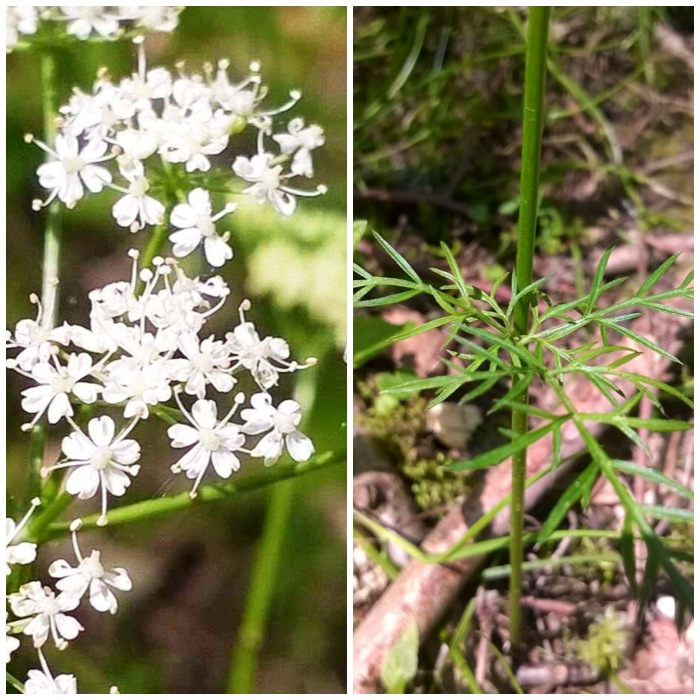
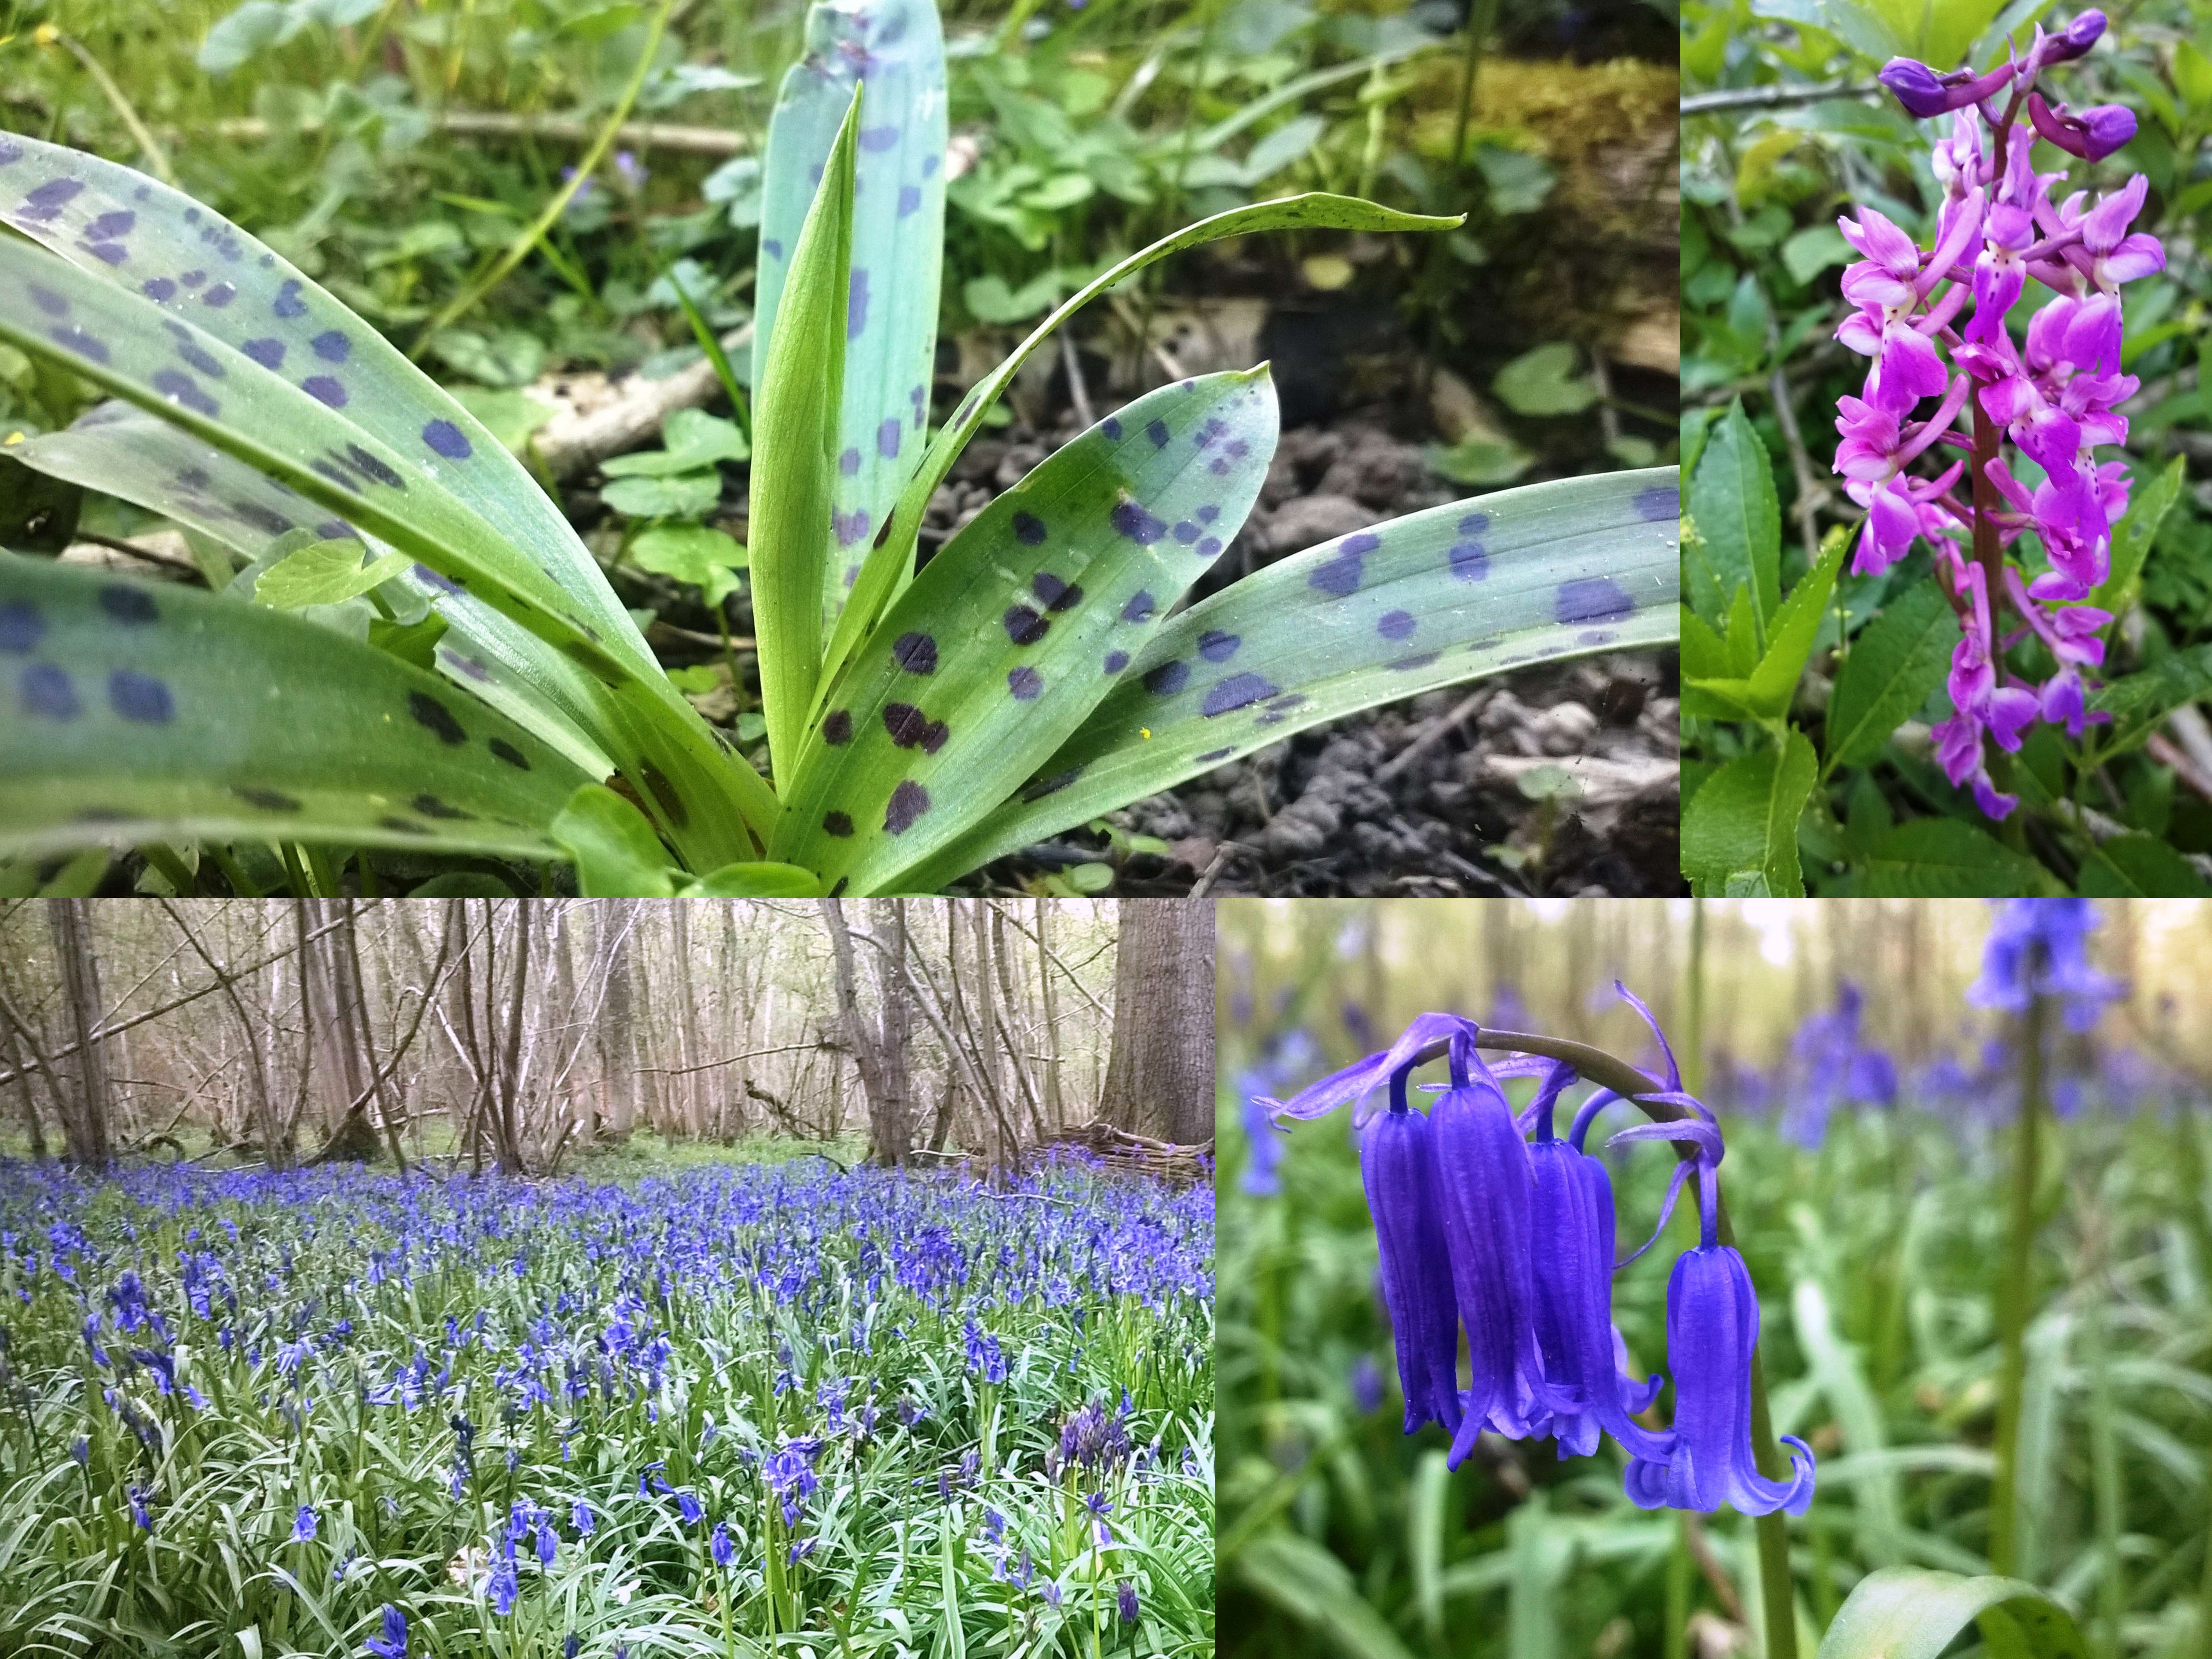
There have been lots of early purple and early marsh orchids in the woods around the village but I have only spotted two of these pyramidalorchids this year. They seem to like drier, more open ground and I found one near the railway line and the other on the edge of a field so they are probably less common due to the fertilizer run-off from fields and toxins from the railways but also because they do not produce nectar themselves but rely on other nearby orchids to attract insects.
Pyramidal Orchid
That was my June when it came to observing nature around Bramley. My kids had a great time and so did I, taking them out, photographing and researching some of the plants.
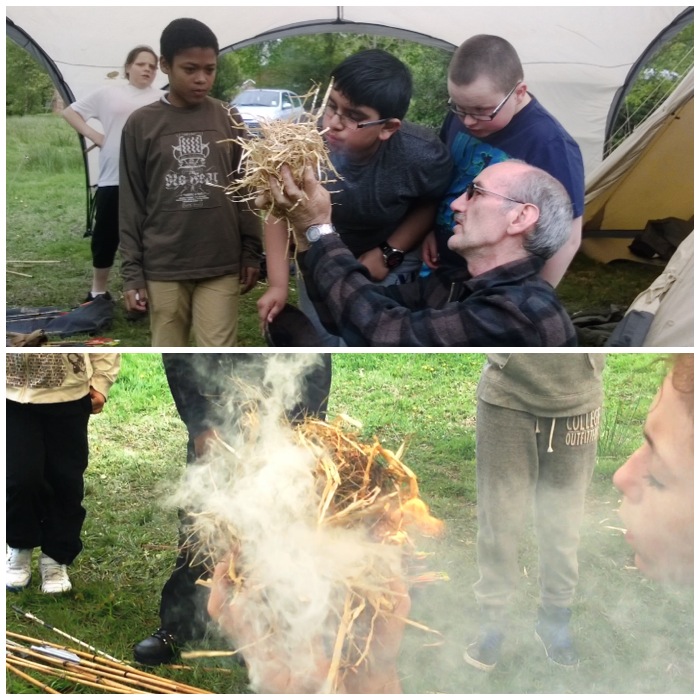
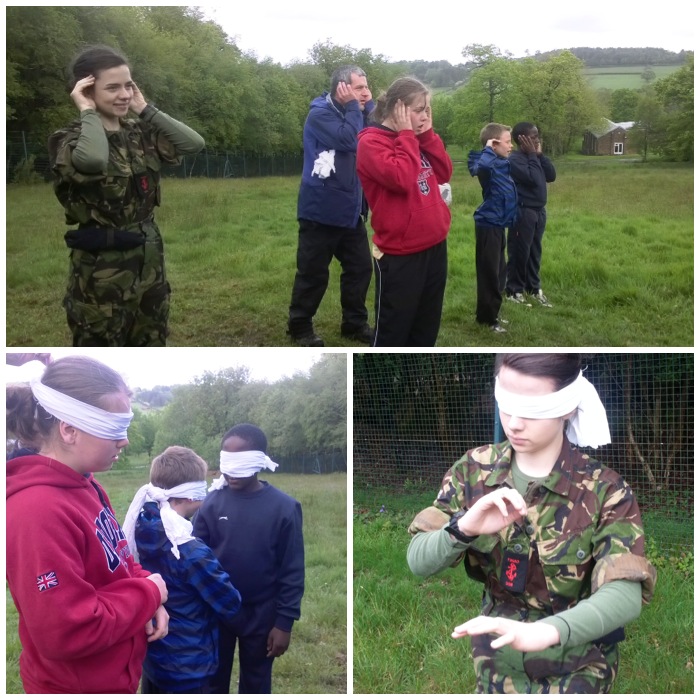
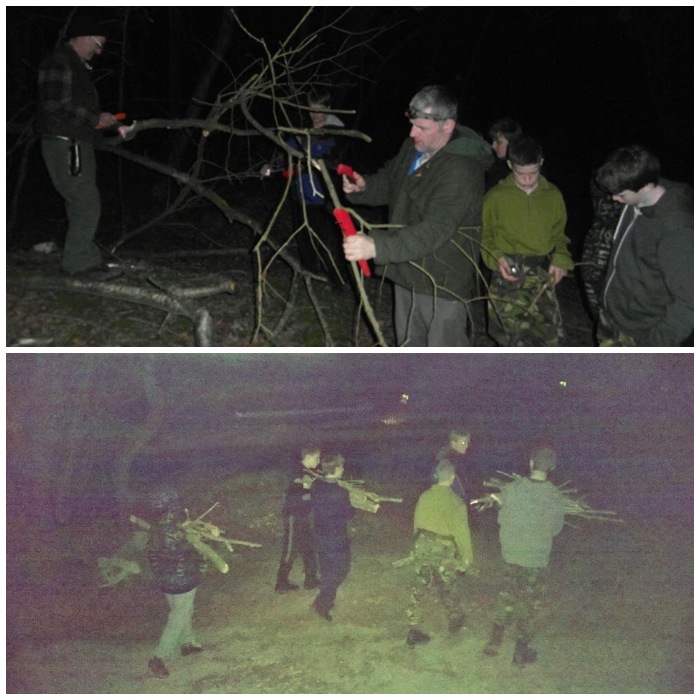
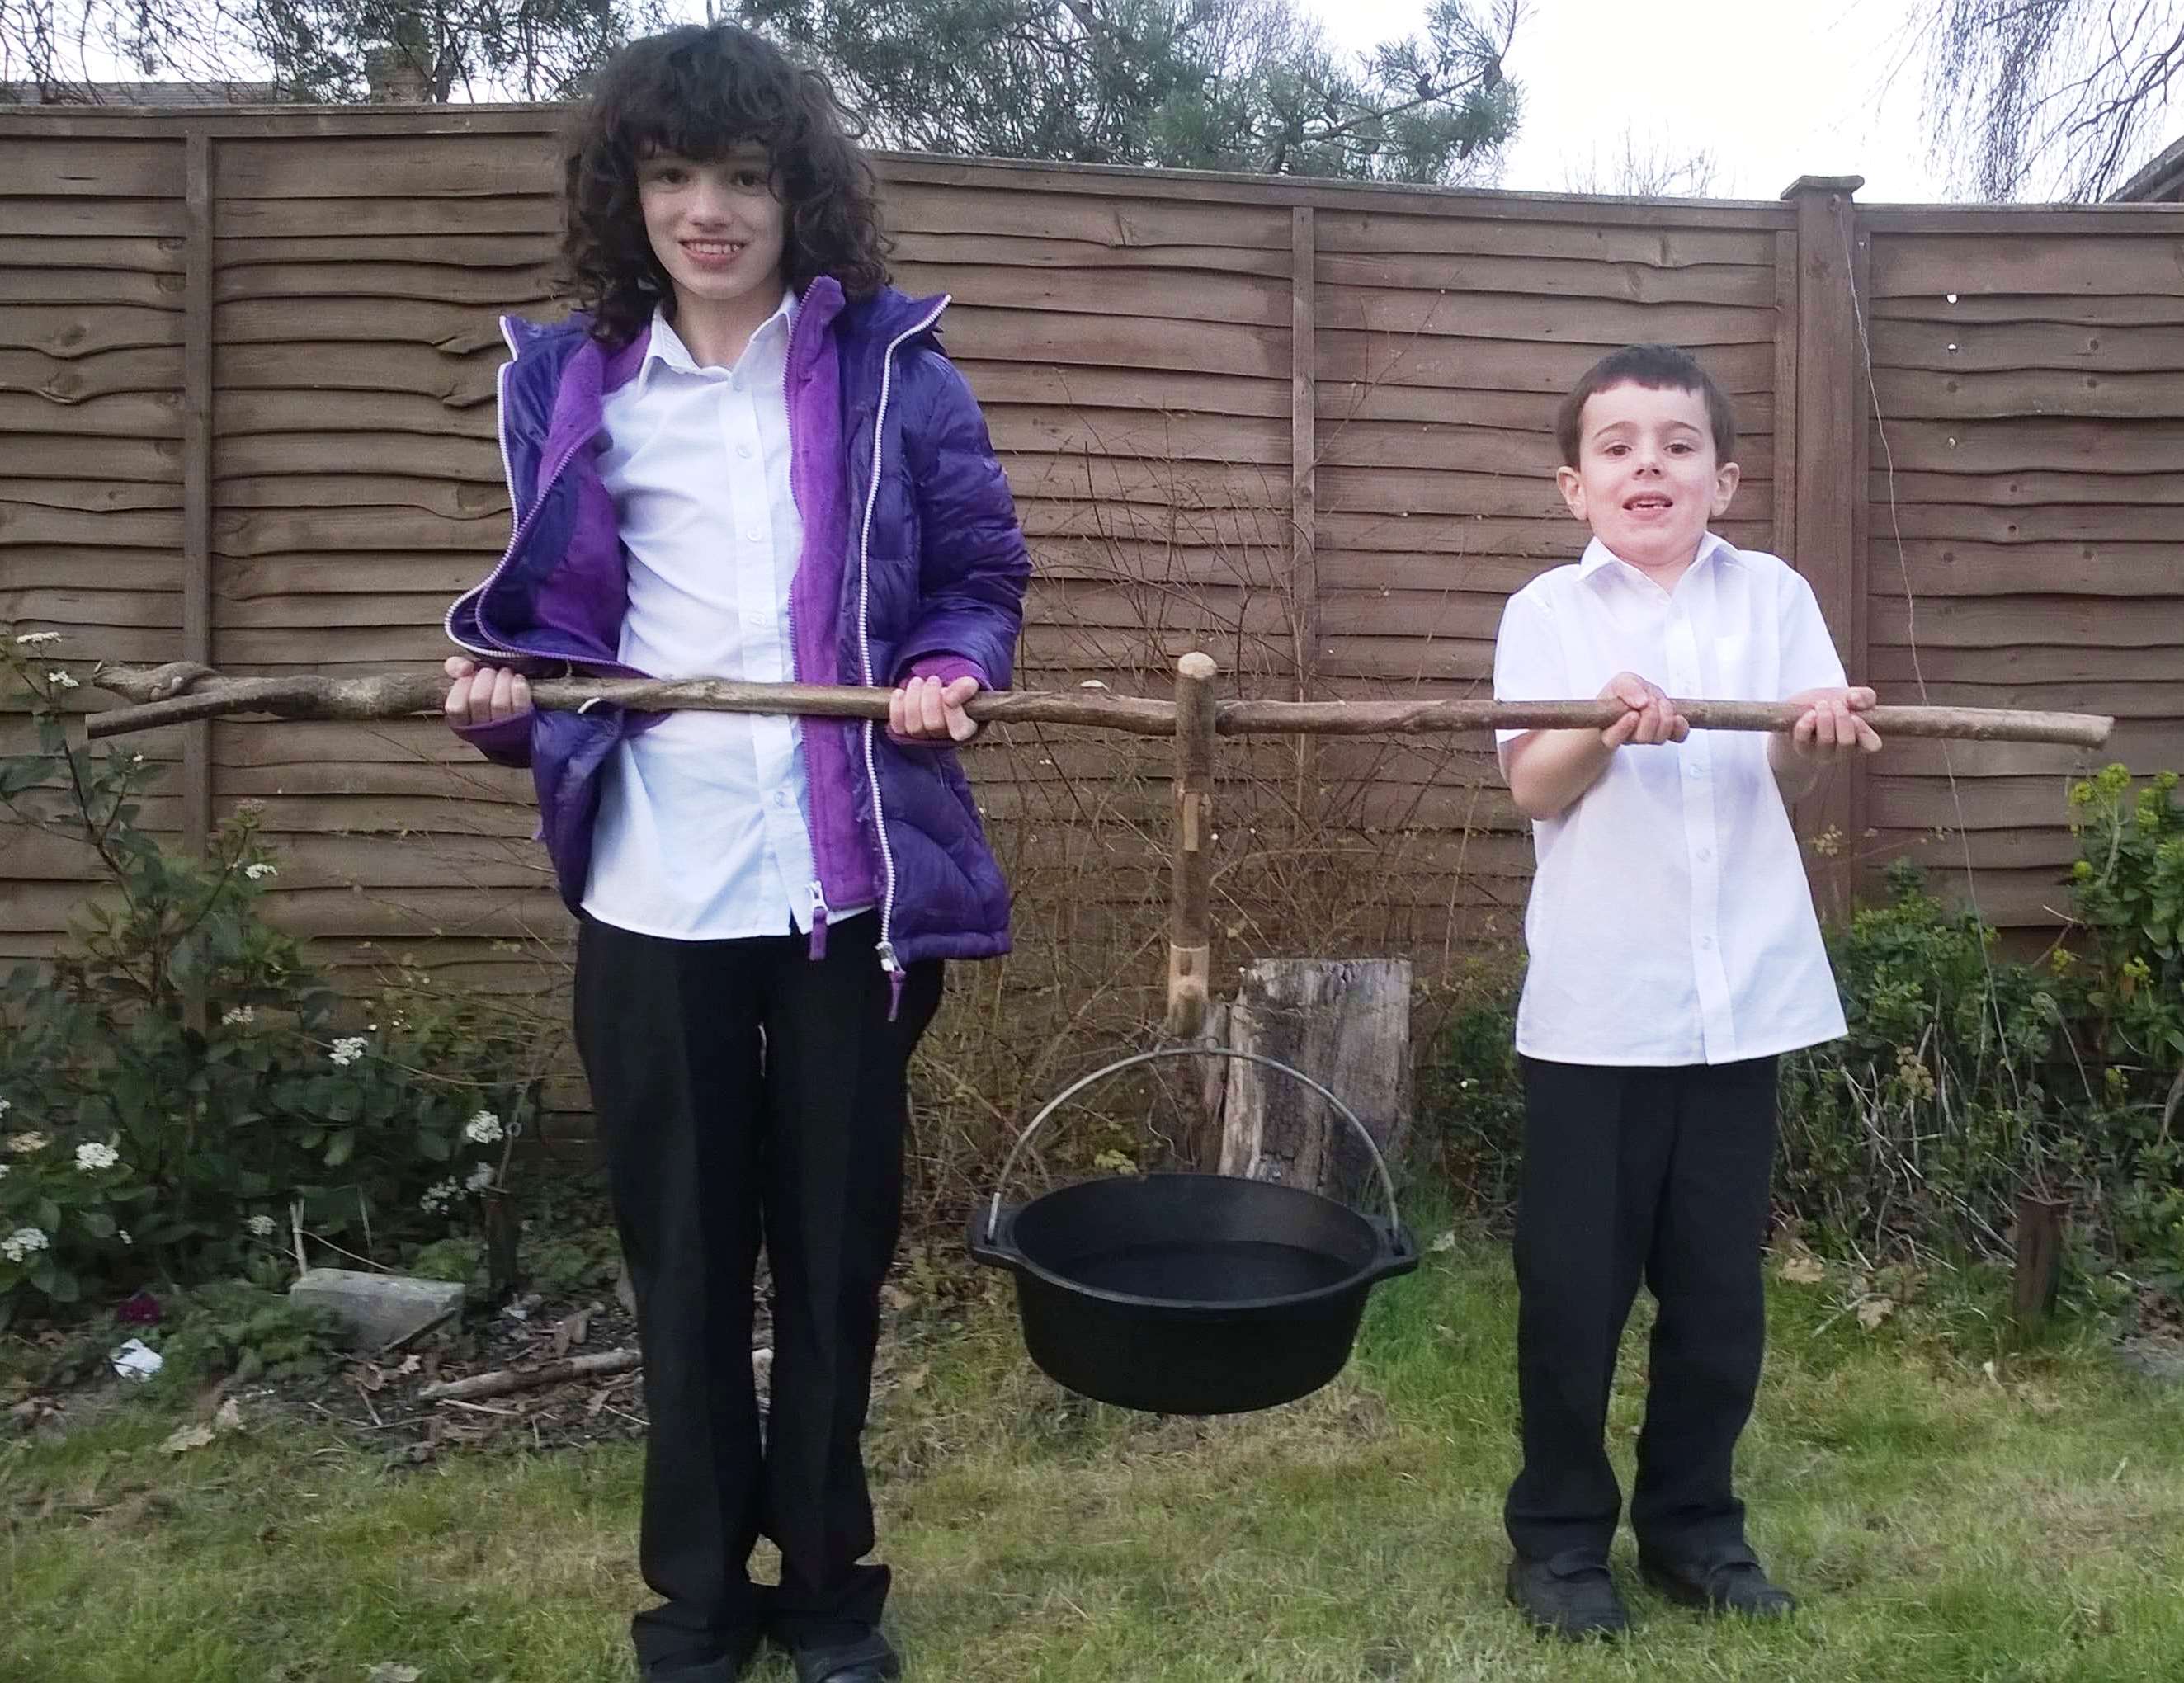
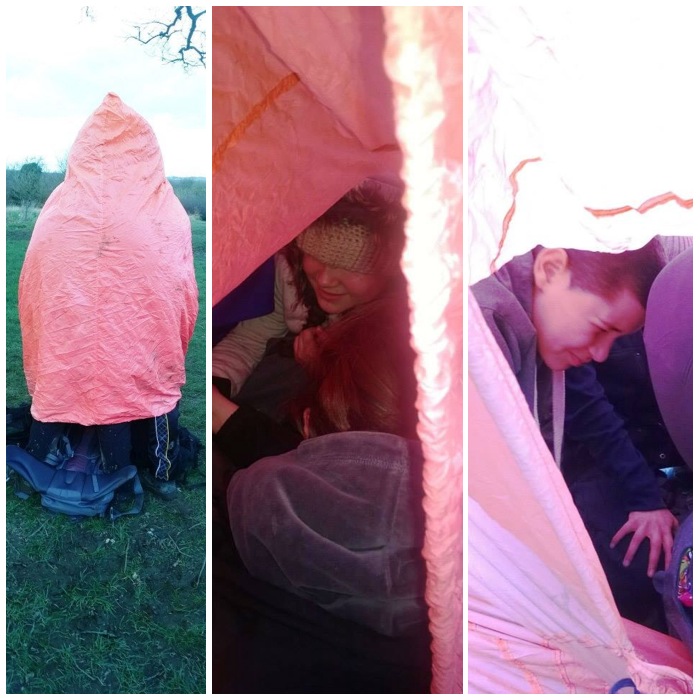
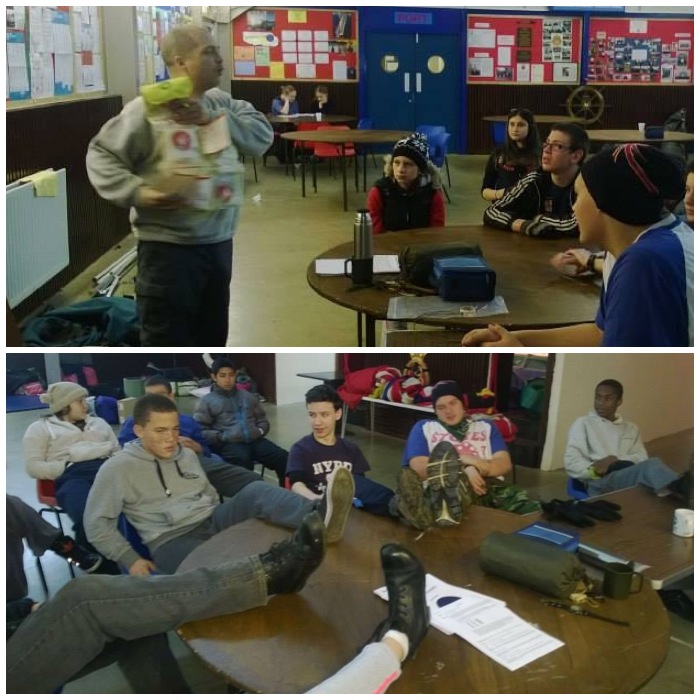
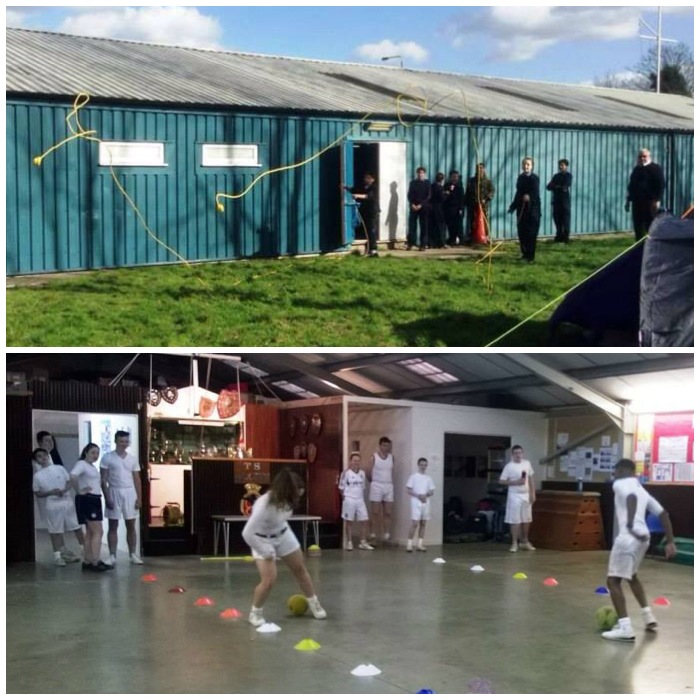
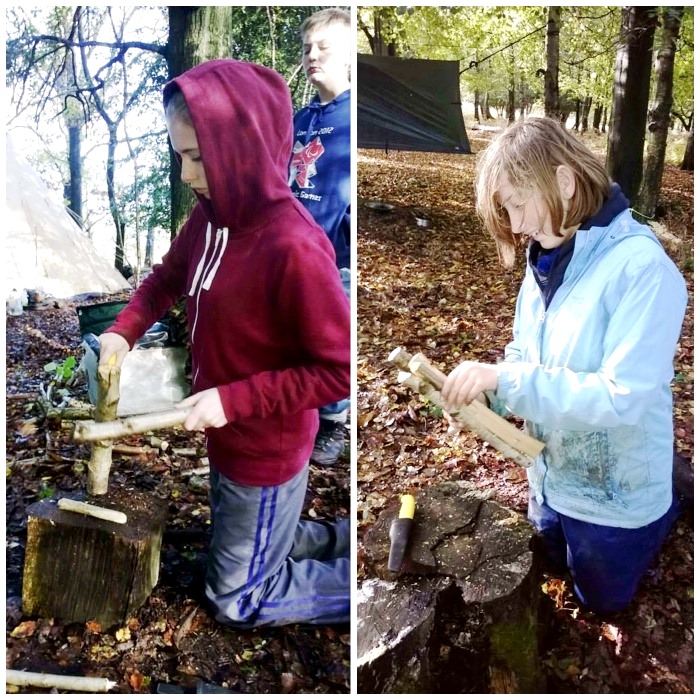
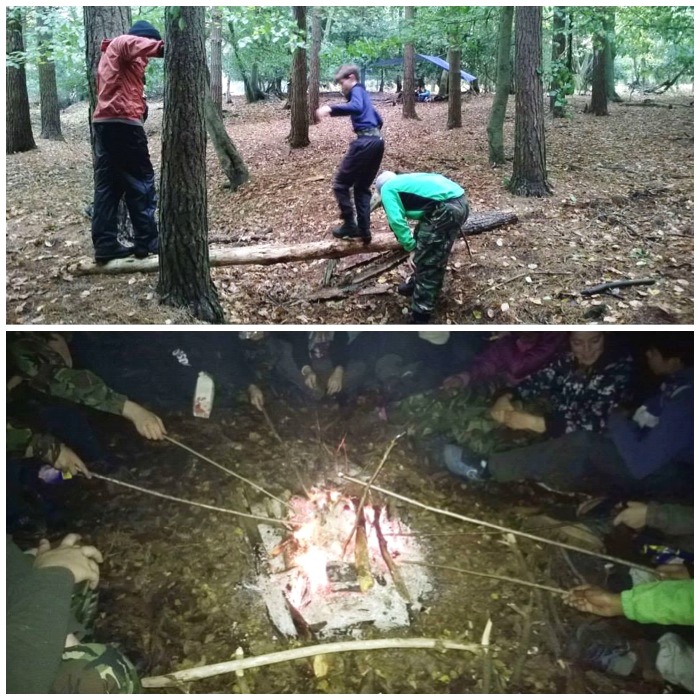
About a month ago I was asked to help out at my local village fete by running some bushcraft activities. Space on the field was quite limited so I could not set up ranges for the bows or the Atlatls– my first choice – so instead I opted for fire, hammocks, camp set-ups and the whimmy diddle.
Bramley Bushcrafting
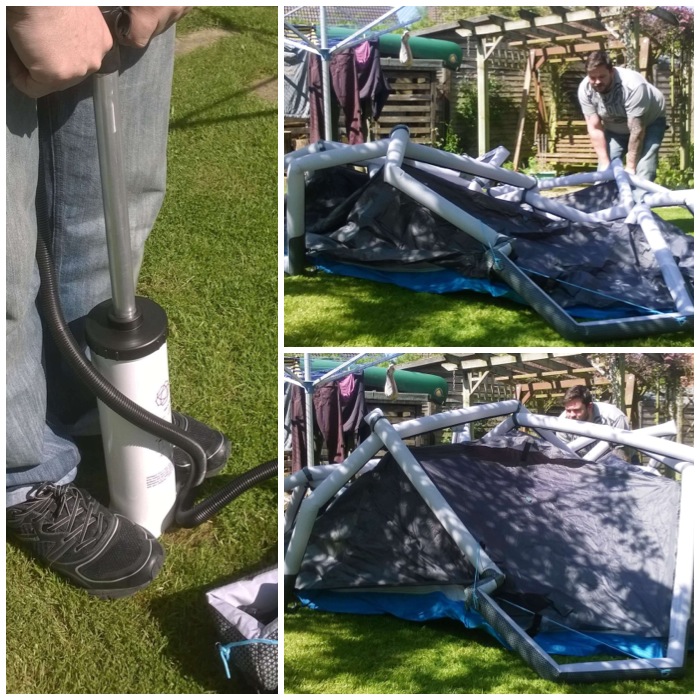
I arrived at 8.20am to be greeted by these dramatic mammatus clouds (known as upside down clouds). They are sometimes spotted preceding a thunderstorm. In a matter of minutes the rain was lashing down and the picture on the right is a still of a lightning bolt I caught on video.
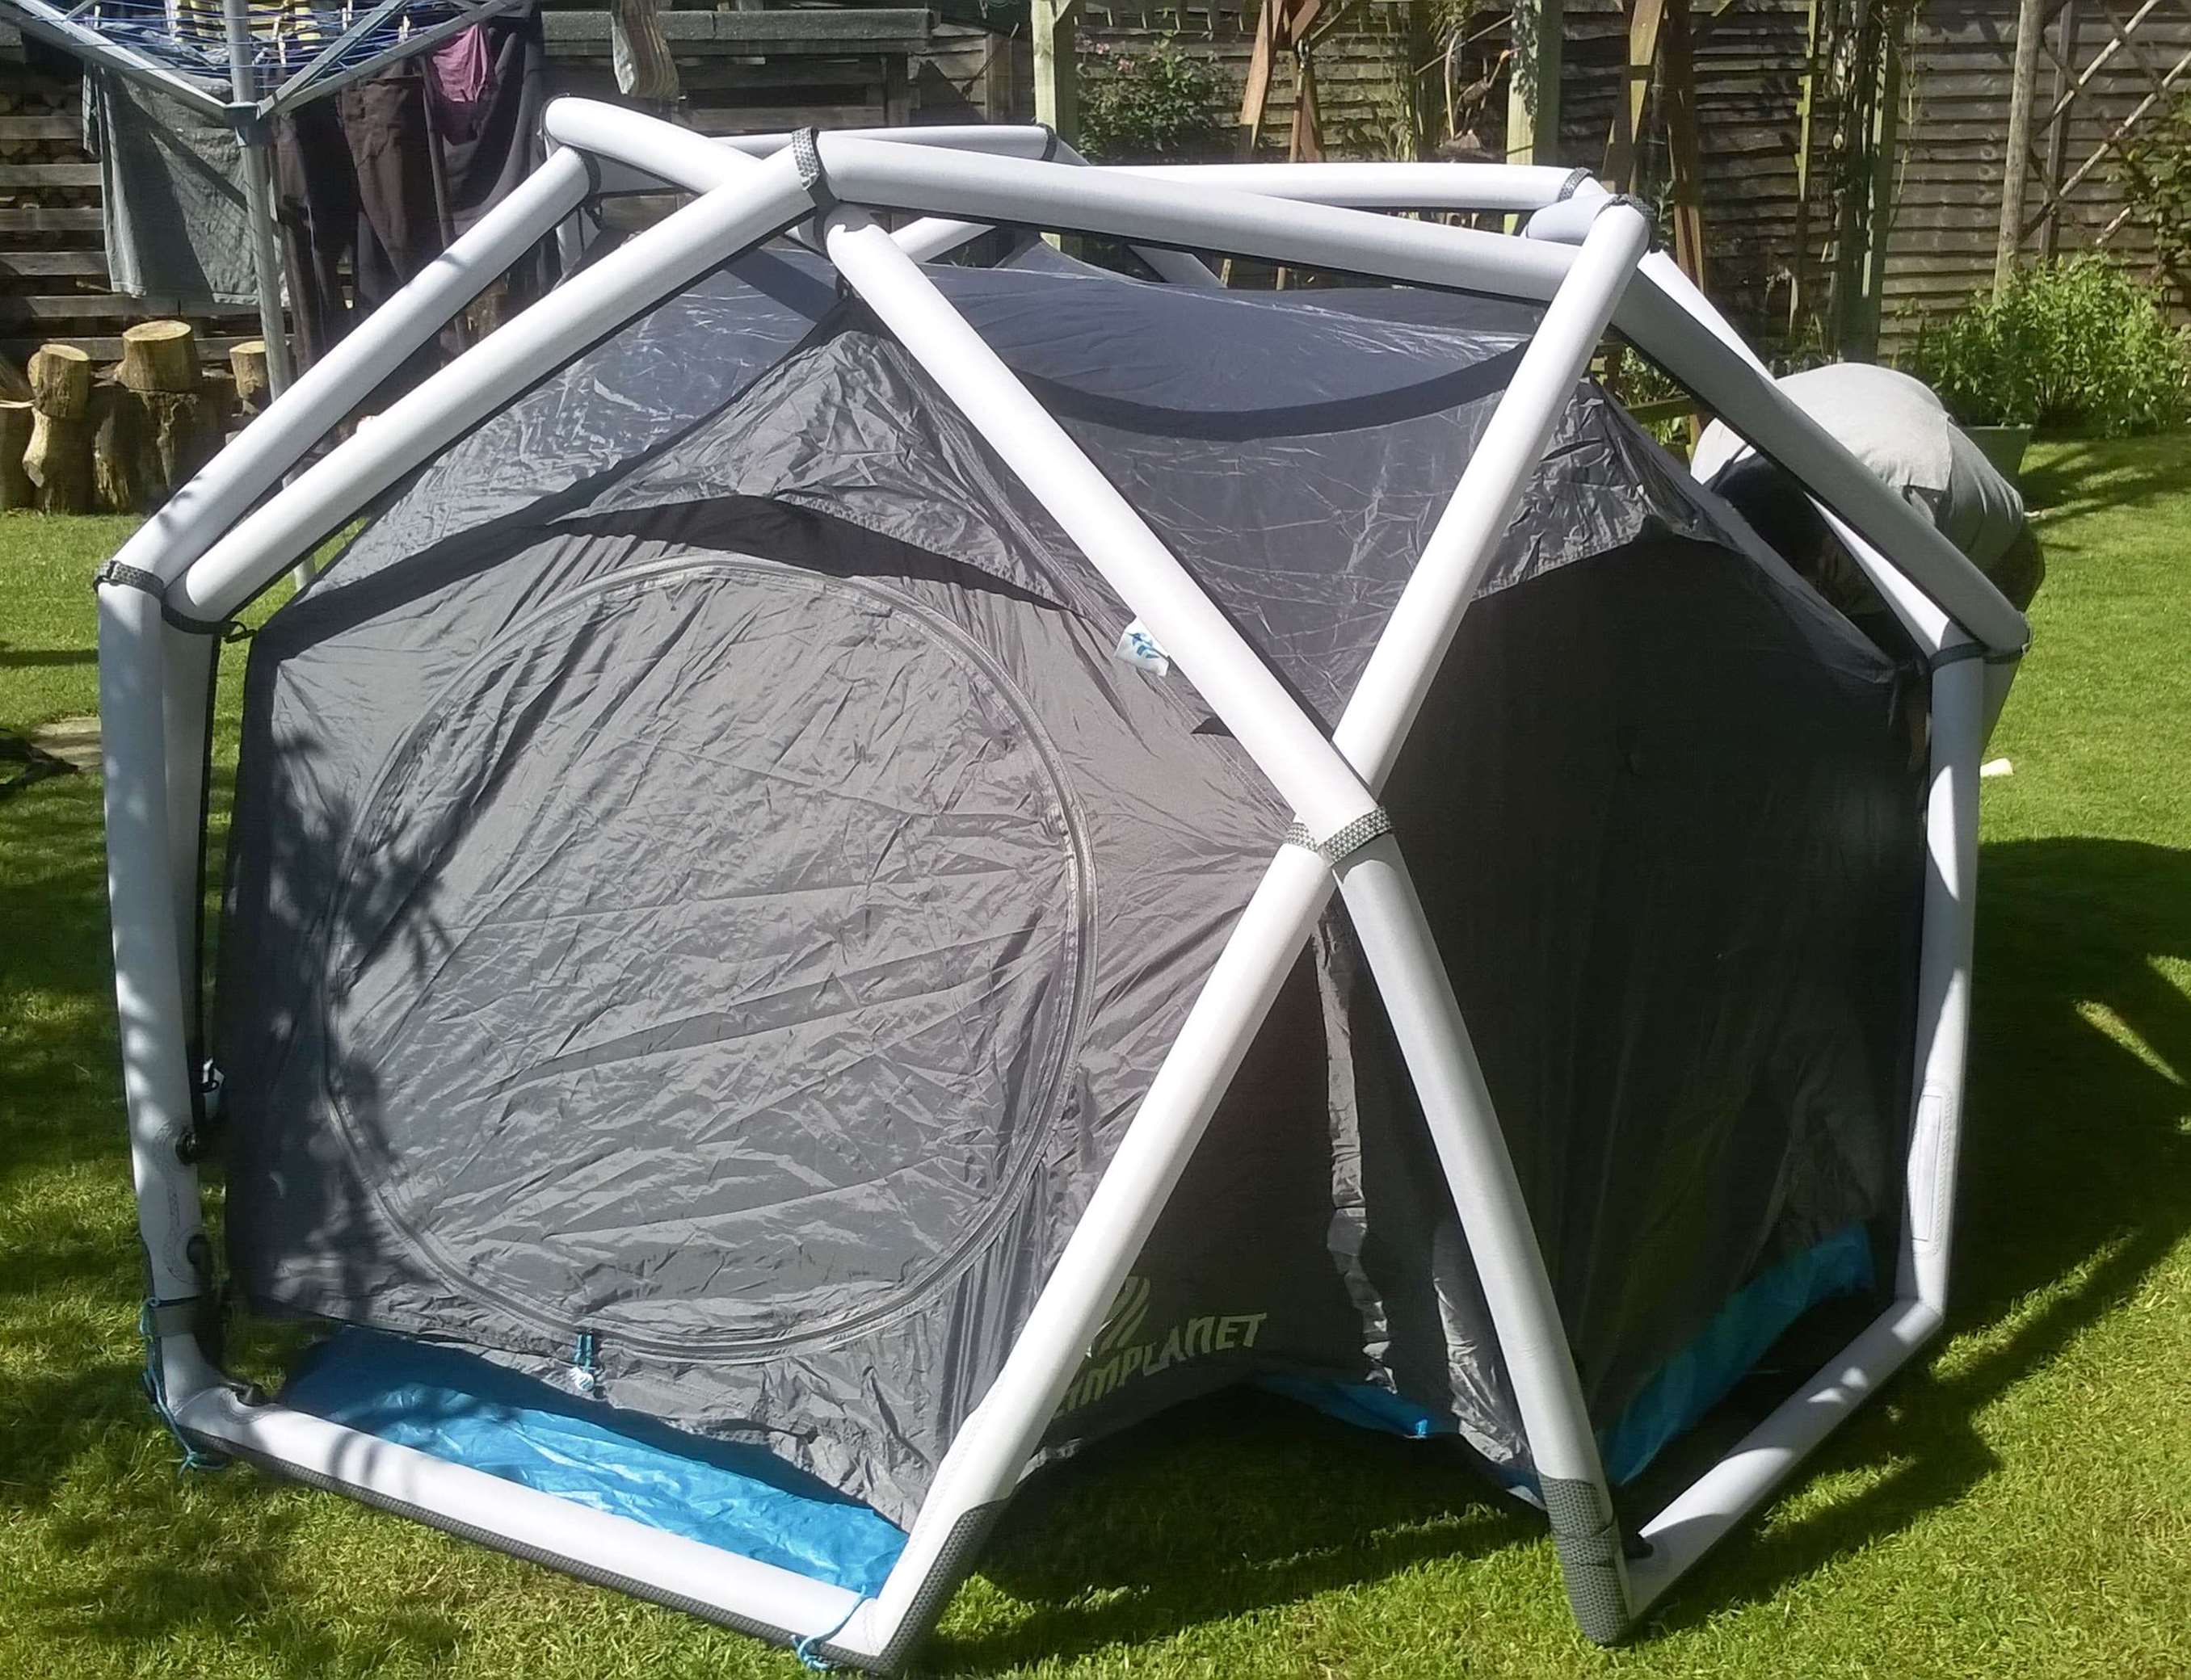
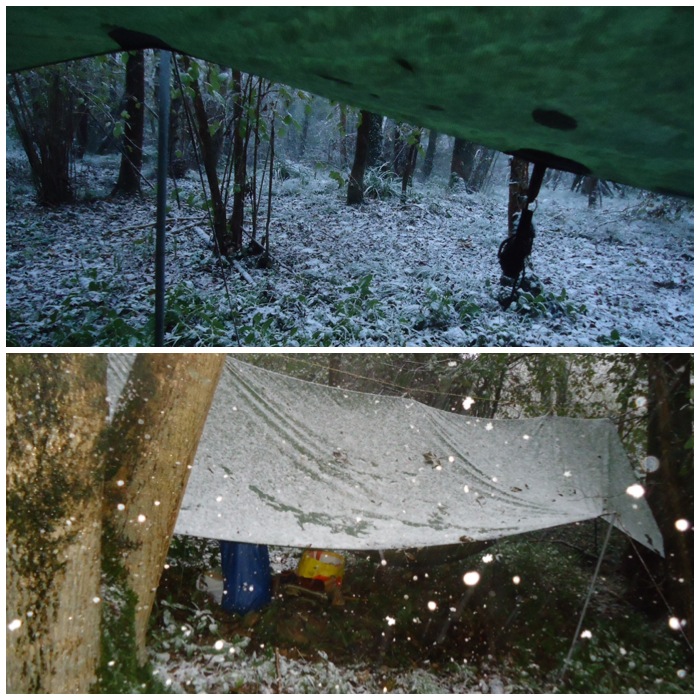
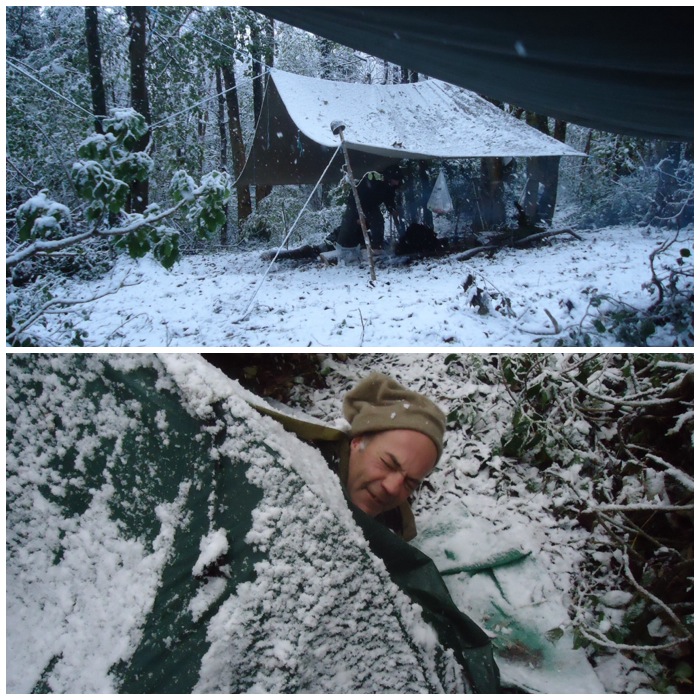
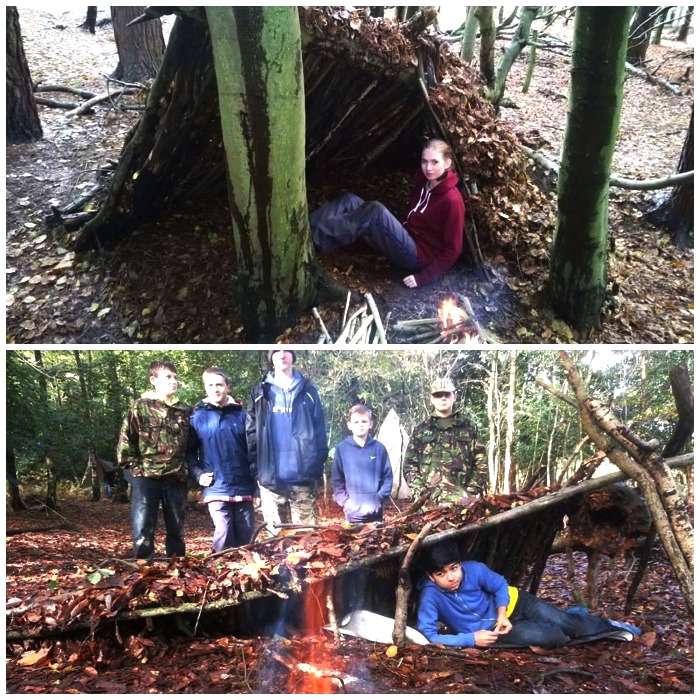
The rain carried on in bursts for the rest of the morning as I set up. I was a bit concerned that all my tinders and fire sets would be a bit damp. I set up my tipi, a fire area, some campfire cooking set ups and a hammock for folk to try out. Thankfully by the time the fete opened at midday the rain had stopped and the skies were clearing and my kit was all still dry.
Stormy Set Up
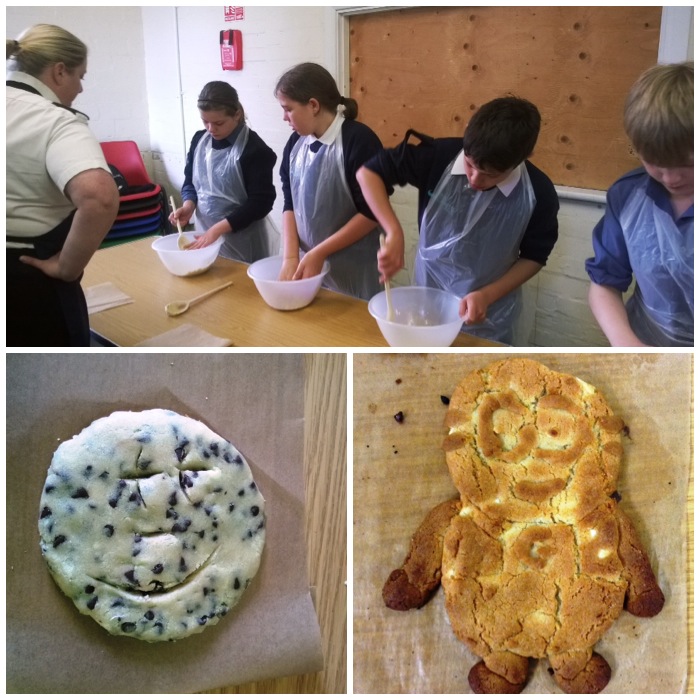
As soon as the fete opened I was kept busy. There were lots of different activities, some you paid for and some you did not pay for. I had agreed to run my activities for free partly because it was a nice opportunity give something to the community and partly because I love seeing people try out bushcraft and discover these ancient skills for themselves.
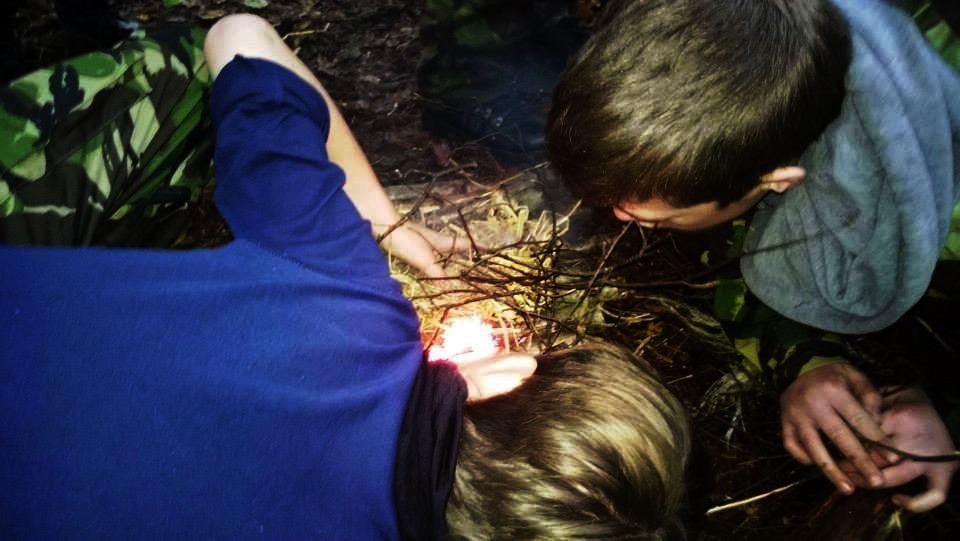
A quick and easy-to-learn activity is the use of modern firesteels. In no time at all the kids were lighting up Vaseline-smeared cotton-wool balls and using smouldering char cloth to get tinder bundles going. I try to make each of these activities into little classes that include a little discussion at the beginning around permissions and the safety of making a fire.
Busy times straight away
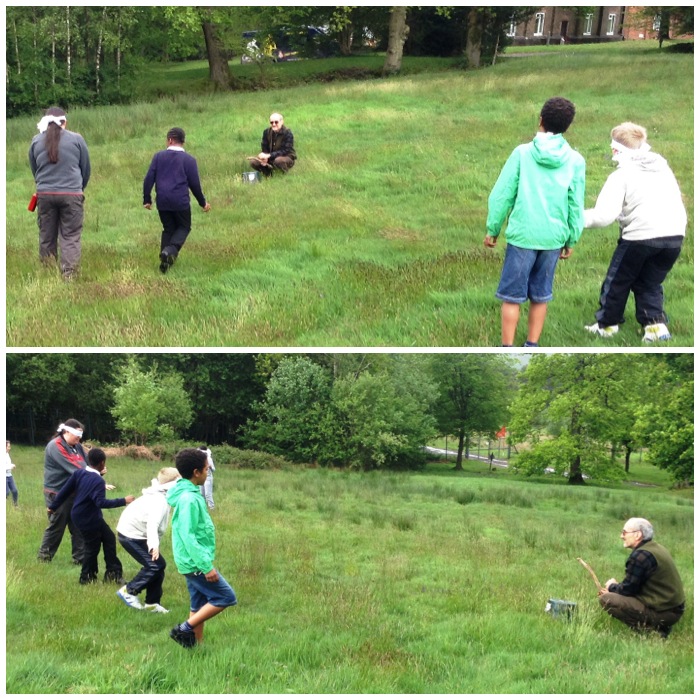
One of my favorite bushcraft toys is the whimmy diddle. This was taught to me a few years ago by the guru of bushcrafting Mors Kochanski. I love the way I can make the little propeller go one way and then the other as if by magic but best of all I love watching other people trying to figure out for themselves how to do it.
Introducing the Whimmy Diddle
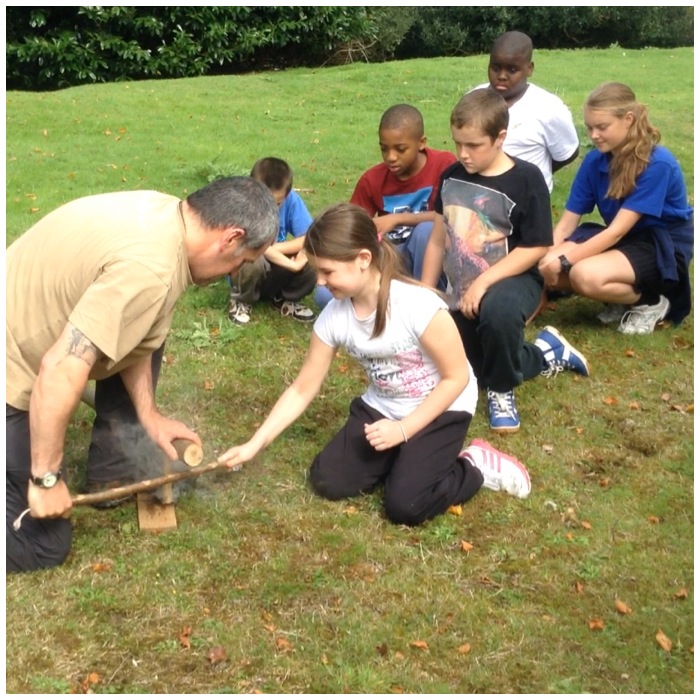
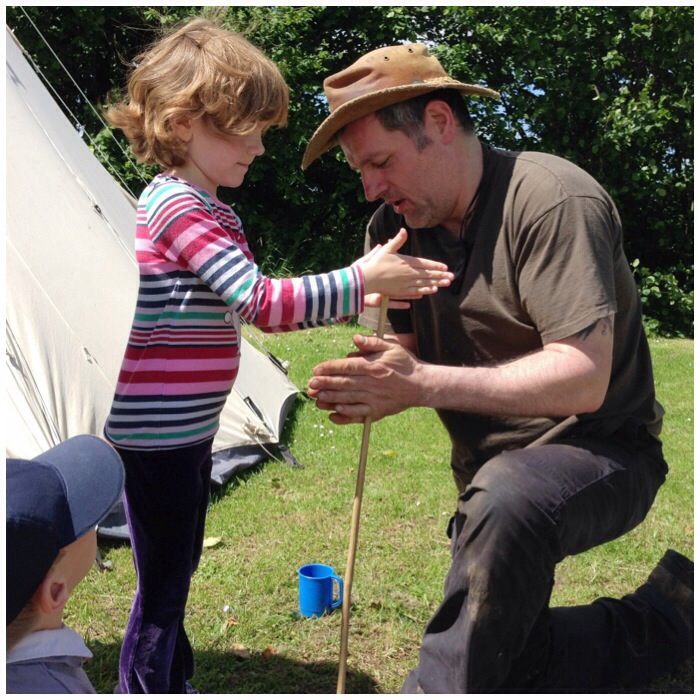
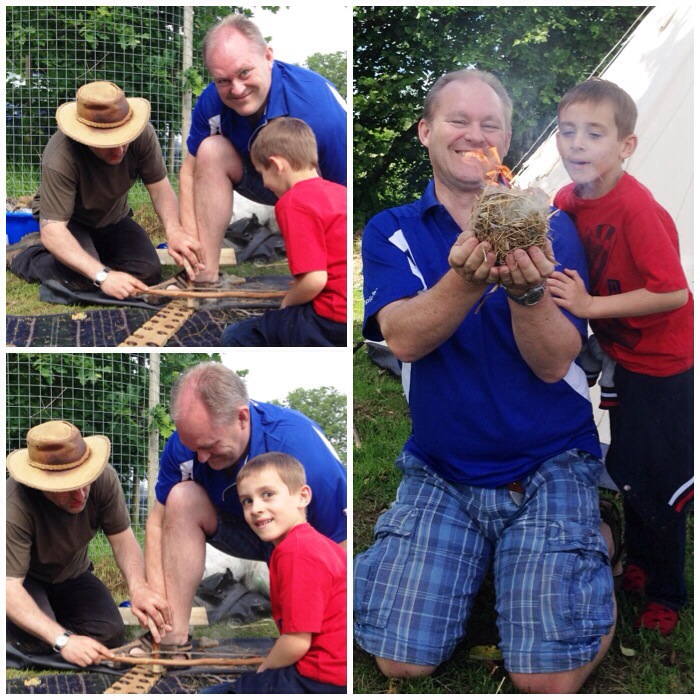
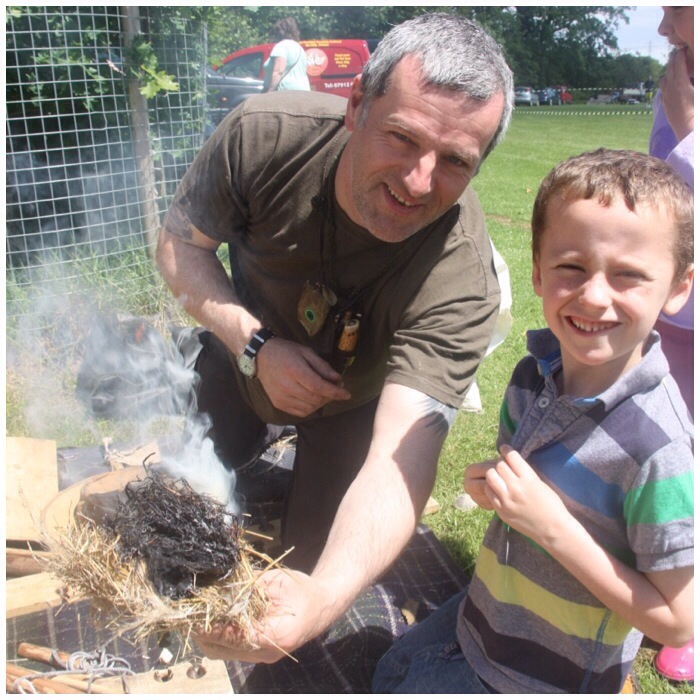
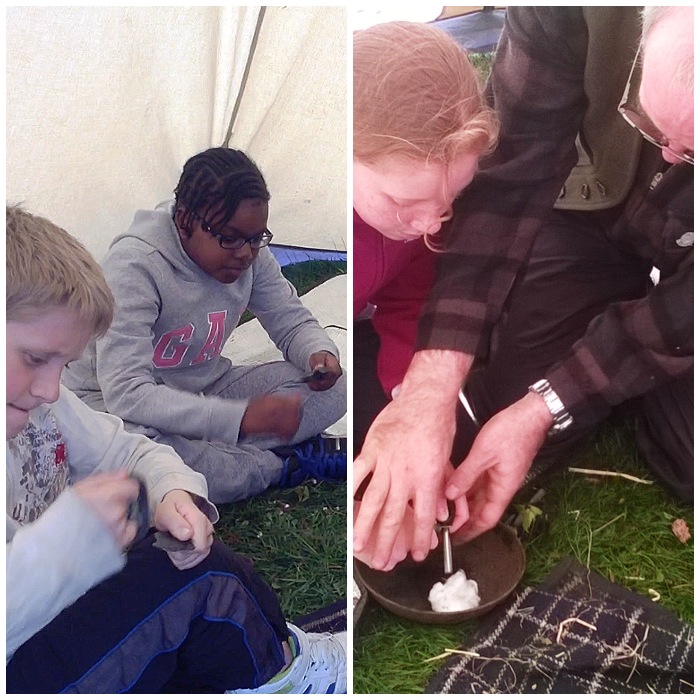
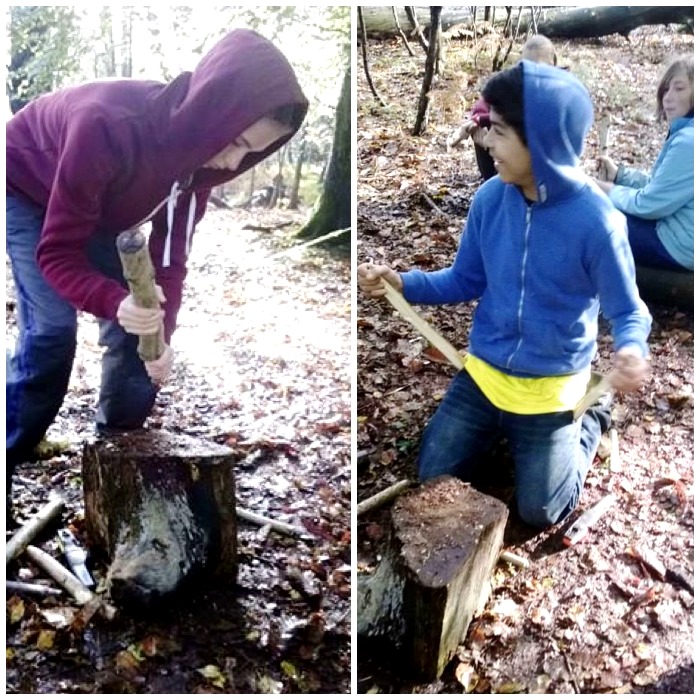
During the day a number of dads came up to me (no mums this time, for some reason) and asked me to help them make fire using the bowdrillwith their sons. I think this set of pictures kind of says it all in terms of how special a moment this can be.
Quality Father and Son time
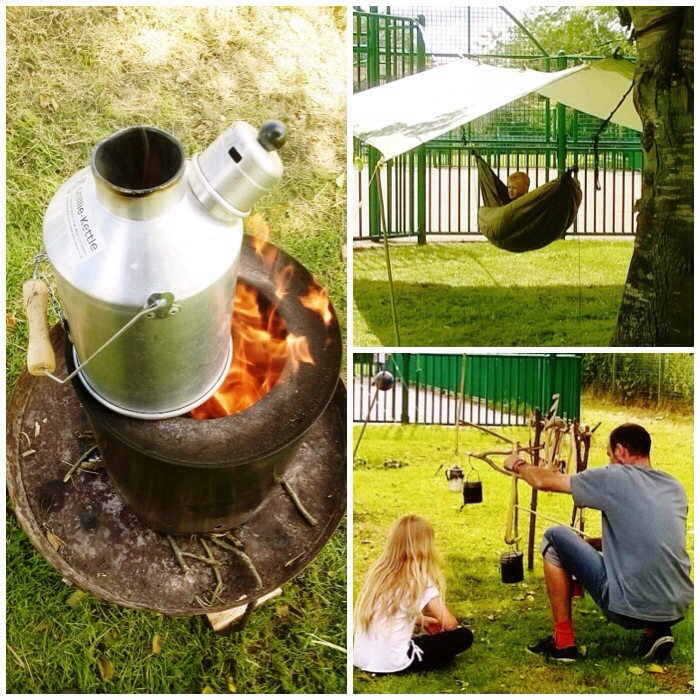
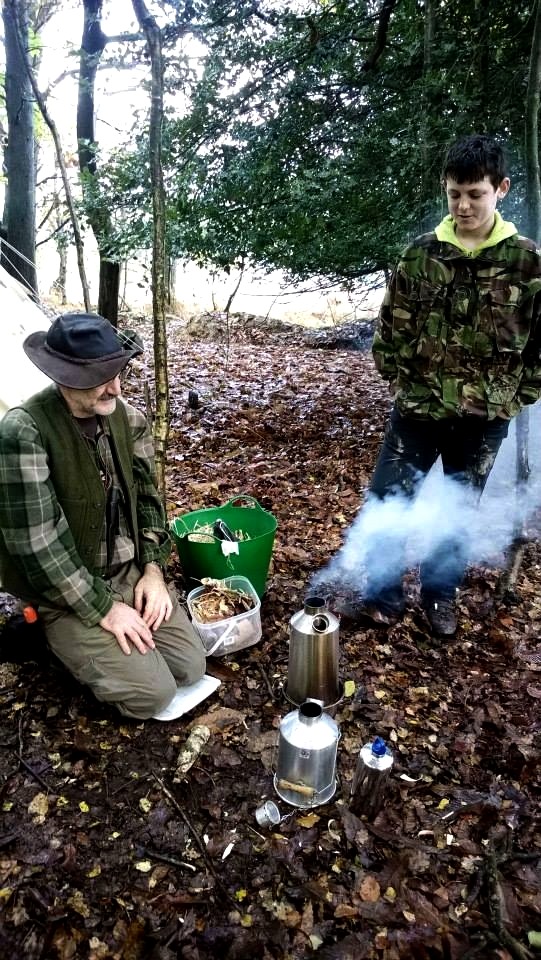
It was not all work work work; I was able to keep the gas wood burning stove my friend Fraser from Coastal Survival gave me and so I always had a brew on the go.
While I was busy teaching, others just chilled out in the hammock (this was very popular and quite a queue formed) or studied the various campfire cooking set-ups I had put up.
Plenty of brews and chill time
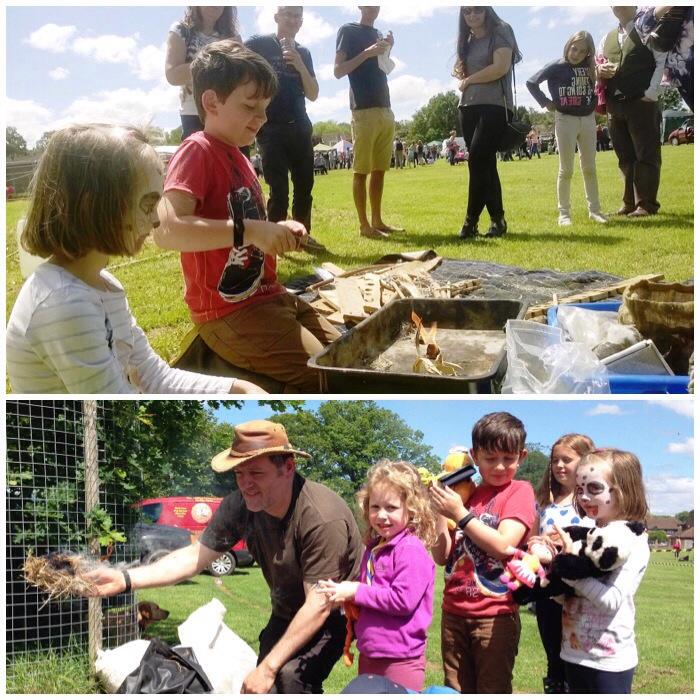
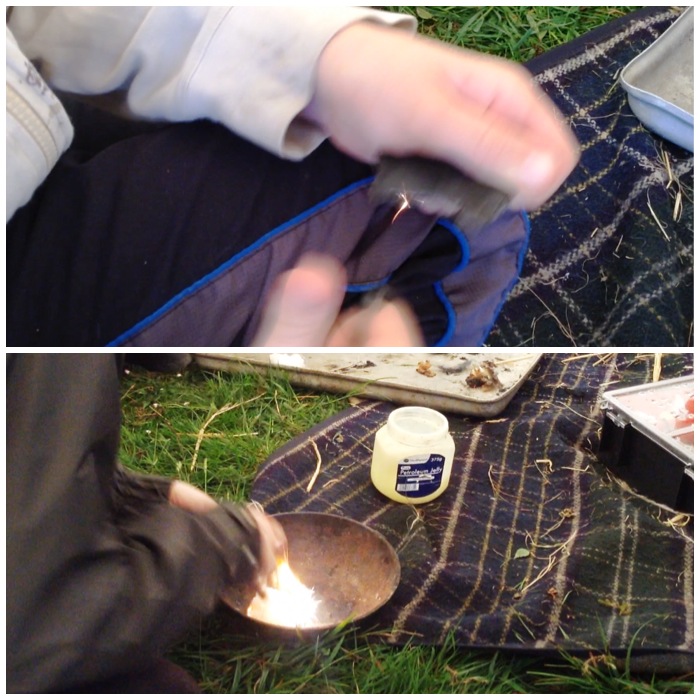
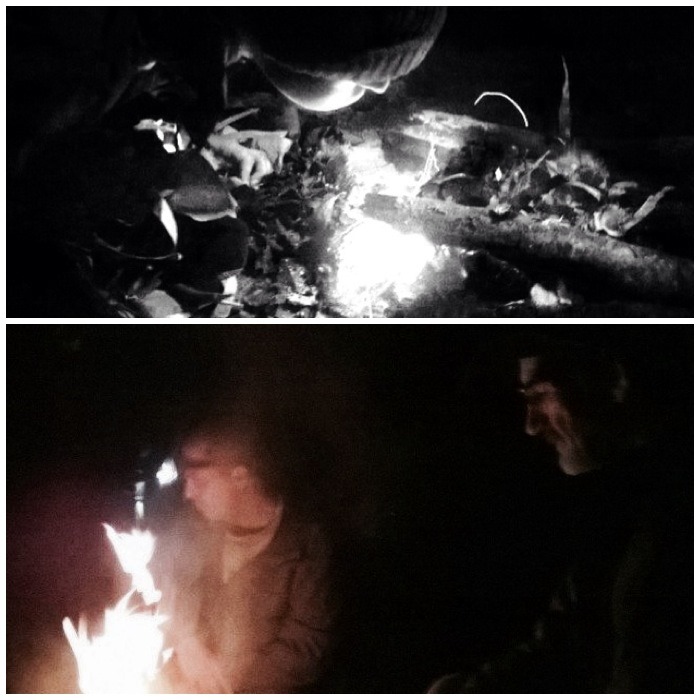
I hadn’t really planned to use the handrill but someone asked about it so I gave a demonstration (thankfully I got an ember), and then before I knew it I had loads of kids asking to have a go. I explained that this would usually be done in family groups (and in some societies still is) so to make it easier for everyone. Before long we were twirling away taking it in turns. I think we only had one failure, but we kept the dust we had produced from that one to help build up a successful ember using the bowdrill instead.
At the end of the day I lost count of the number of handrill sessions I did: I do remember having really sore hands (even sorer the next day) but it was all worth it.
Never too young to learn the handrill
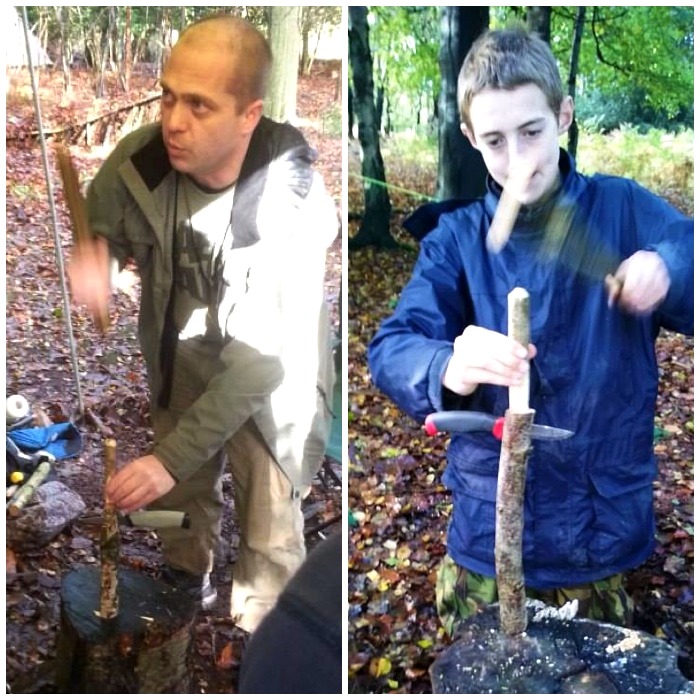
Occasionally I gave some one-to-one tuition on the bowdrill to give my hands a little rest from the handrill.
Adult to Adult teaching
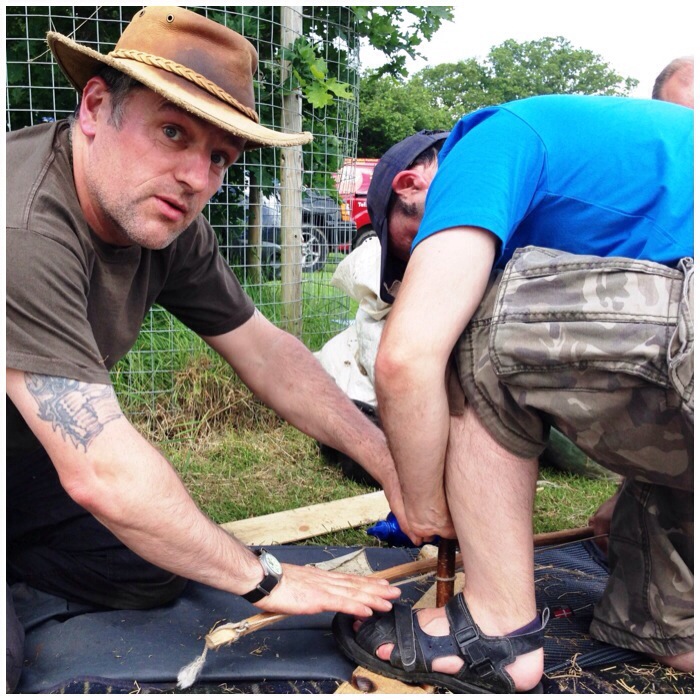
As I did not have a great deal of time with each person I tried to help out where I could. In the picture below all I am doing is showing the student how to keep the bearing block still and my right hand is stopping the bow from see sawing (I am not holding it at all).
Guiding
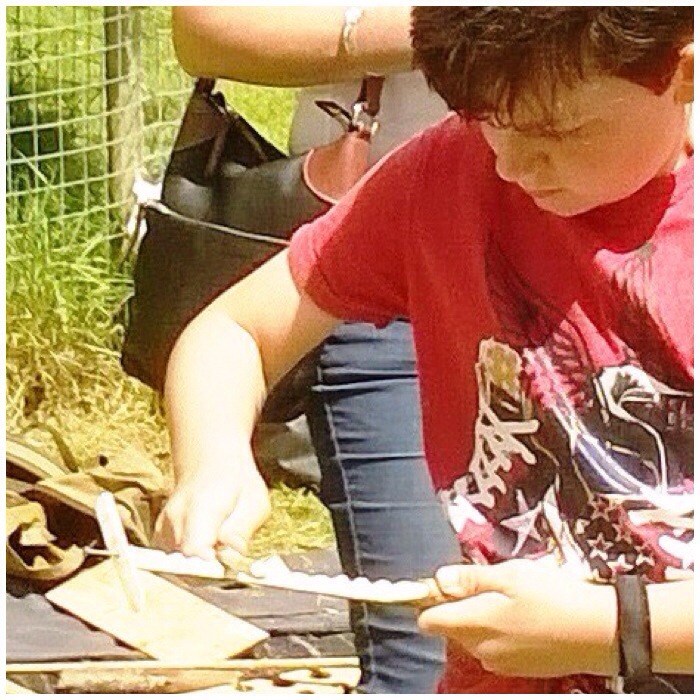
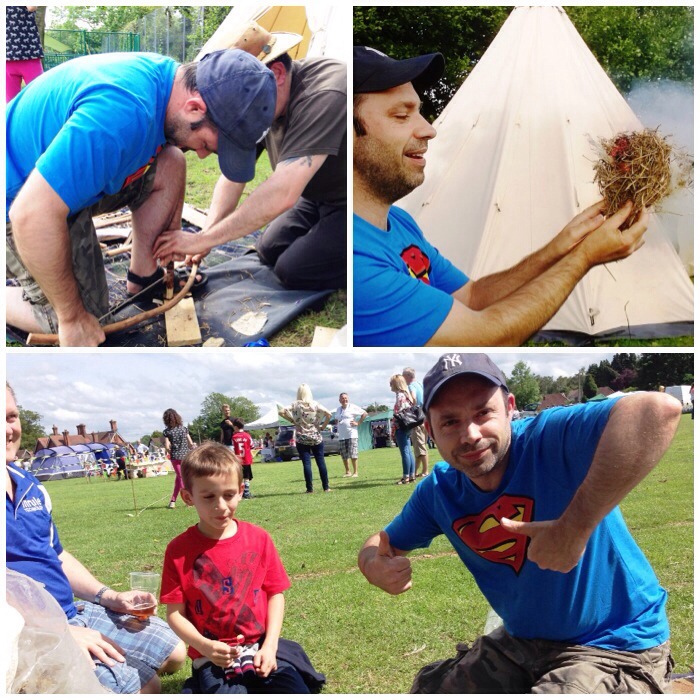
It was not all handrill with the kids – sometimes we got the bowdrill out with spectacular results.
Big kid teaching little kid
Plenty of smiles after each time.
Smilers – Picture courtesy of Ian Evett
All in all I had a fabulous day lighting fires, teaching the whimmy diddle, discussing campfire cooking set-ups and ensuring as many kids as possible got to try the hammock out.
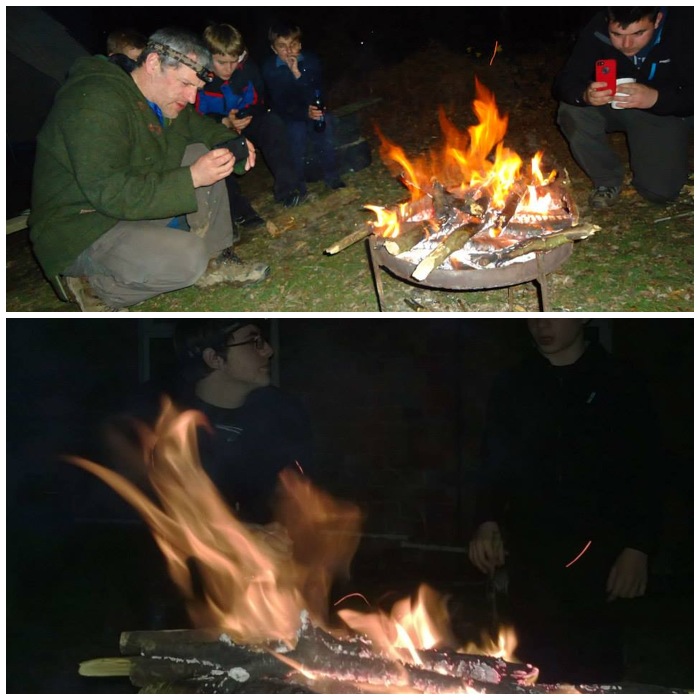
Flamage
I am told that the rest of the fete was a success with loads of activities but I never got to see any of it. I managed to get away from the stand once to go to the toilet and my wife Alison brought me what must have been the largest pork roll ever from the hog roast stand (and for taking all these pictures).
My kids had a great time and managed to pop back to see me every now and then.
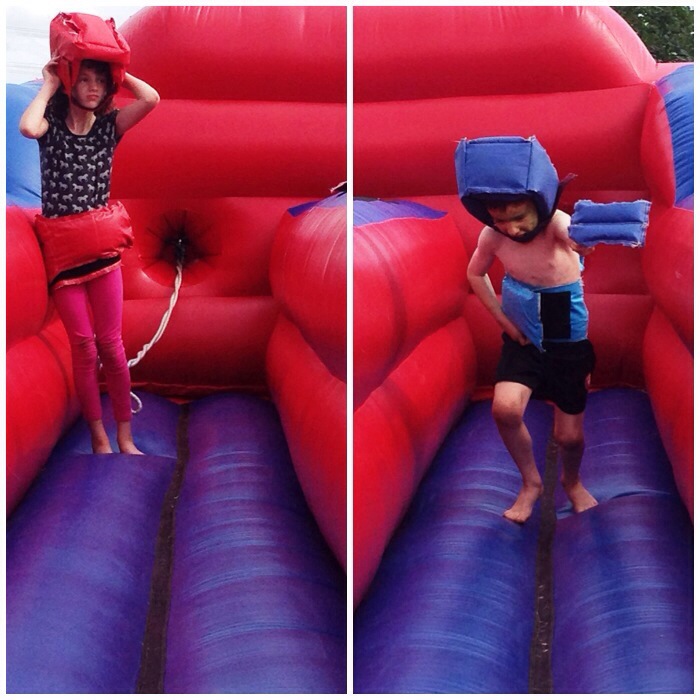
What I missed
The only problem with being part of an event like this is that you miss seeing all the other activities, such as this inflatable tag challenge which my kids obviously loved.
I made two trips to the Isle of Lewis in Scotland this May: the first time to attend my gran’s funeral and the second time to spend a week there on holiday with my family. The island has beautiful beaches, rocky coves, stunning moorland but also some of the most useful and beautiful plants a bushcrafter or forager would want.
Island beauty
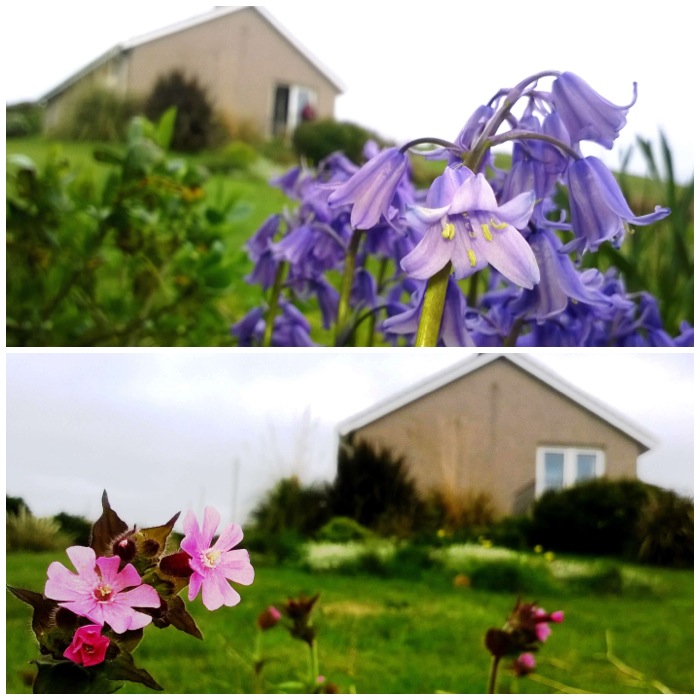
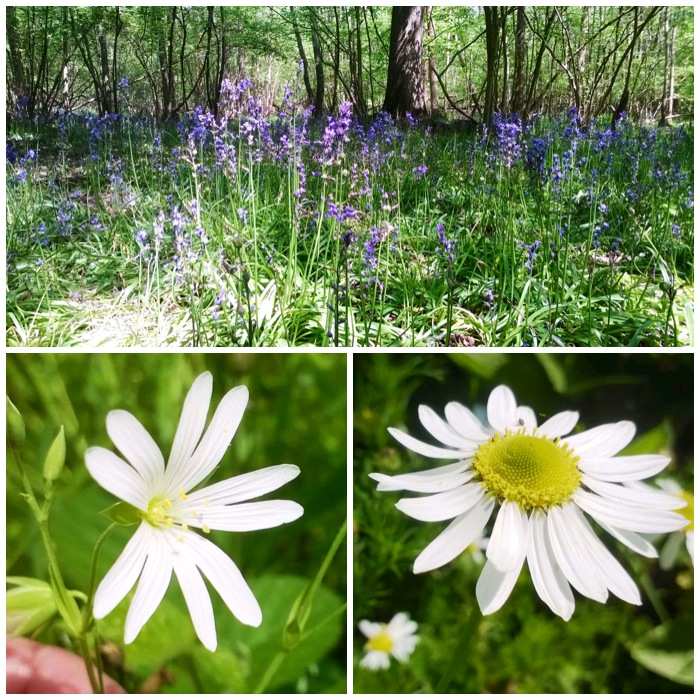
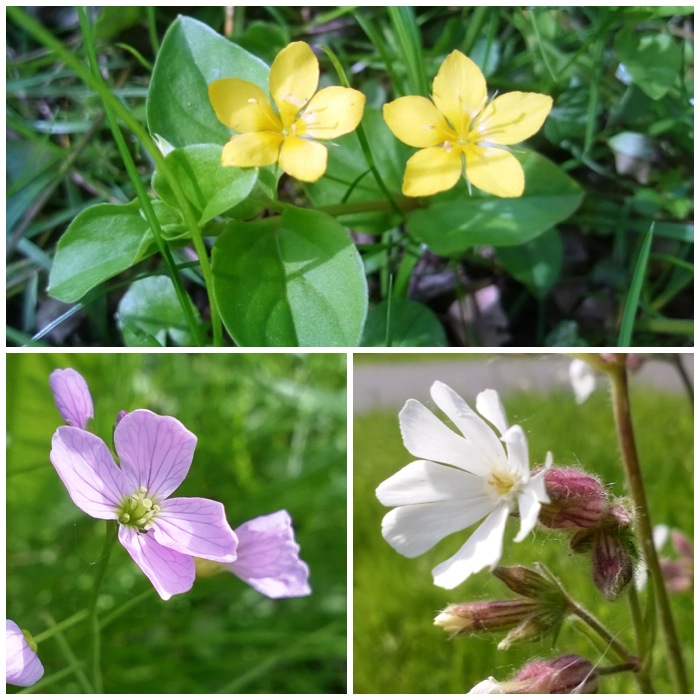
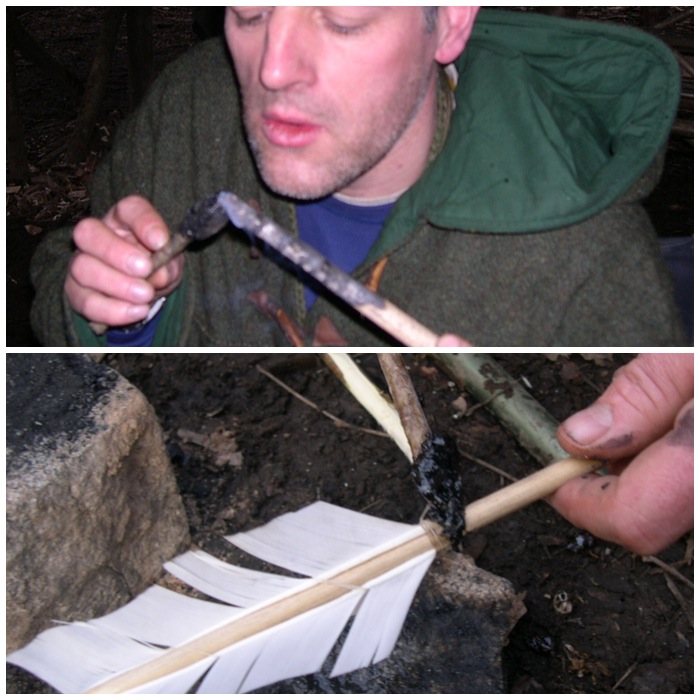
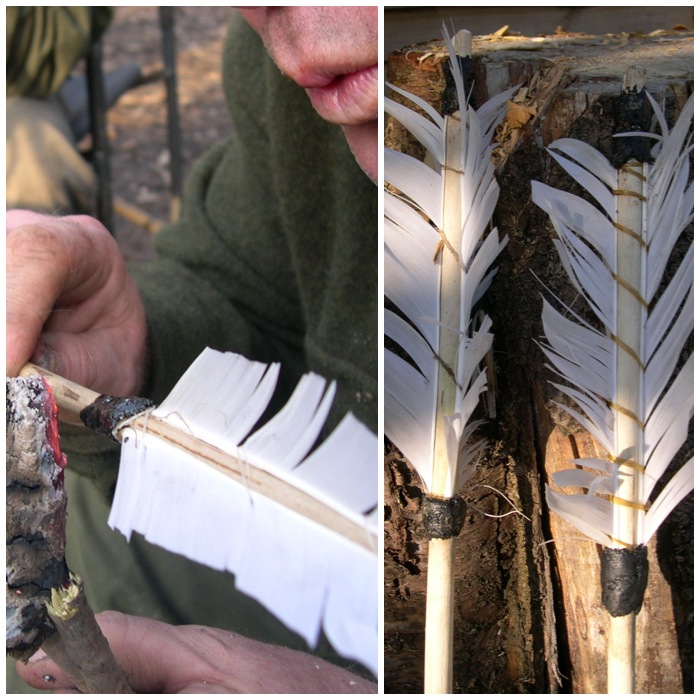
I was initially struck by some of the flowers I spotted in my sister Tina’s garden. The bluebell is very common where I live now in the south of England but not so much on the island. I have used bluebell sap to help attach feathers to arrow shafts as flights (seemingly a common practice up until the Middle Ages) and I have heard that the Elizabethans used it as an early paper glue.
The redcampion was growing right beside the bluebells and this again has many uses historically. The roots contain saponins which are great for making a form of soap. Great for washing clothes but not for the fish – the soap was also used in the past to paralyse fish so making for easier fishing.
Tina’s garden – bluebells and red campion
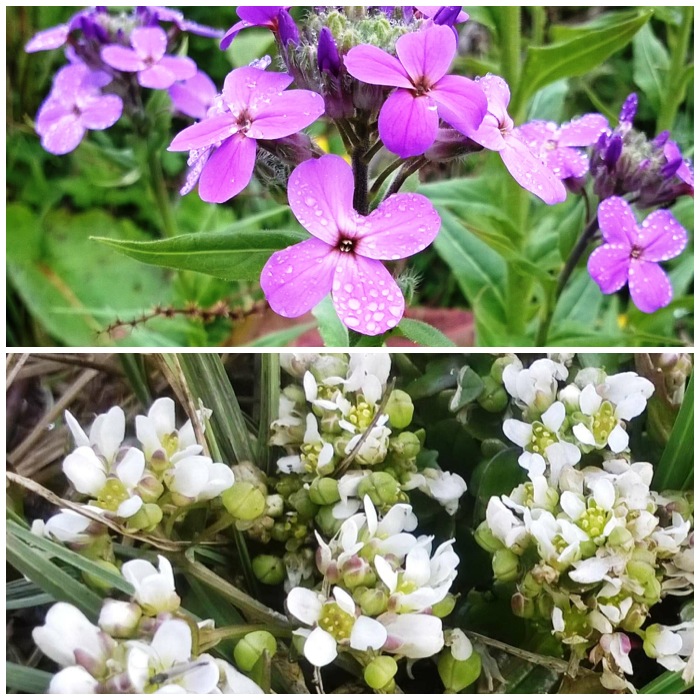
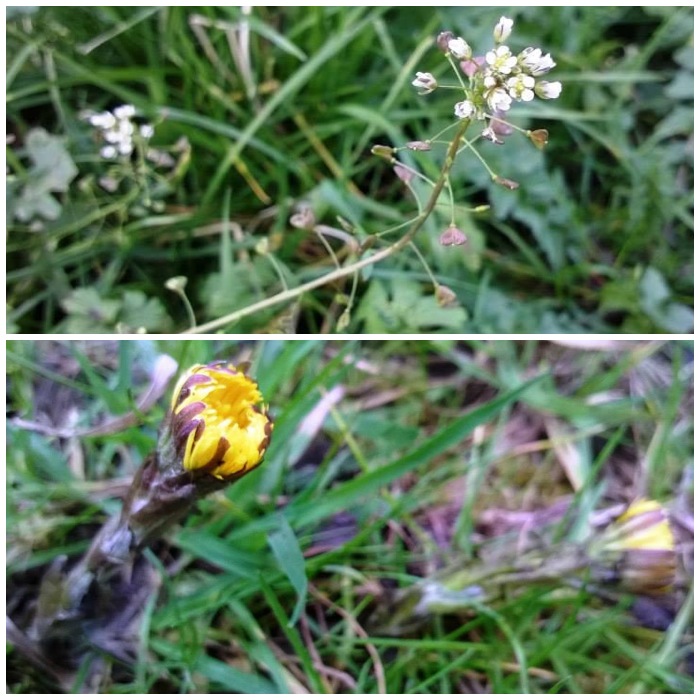
The beautiful pink flower in the top picture is dame’srocket and the lower flower is commonscurvygrass. Both of these are high in vitamin C and both were used in the past to ward off scurvy.
Dame’s rocket is a member of the mustard family and the flowers are edible, making them great for salads. The common scurvy grass is also edible as well as being medicinally important and the leaves were often used in sandwiches prior to the popularity of watercress.
Dame’s rocket and common scurvy grass
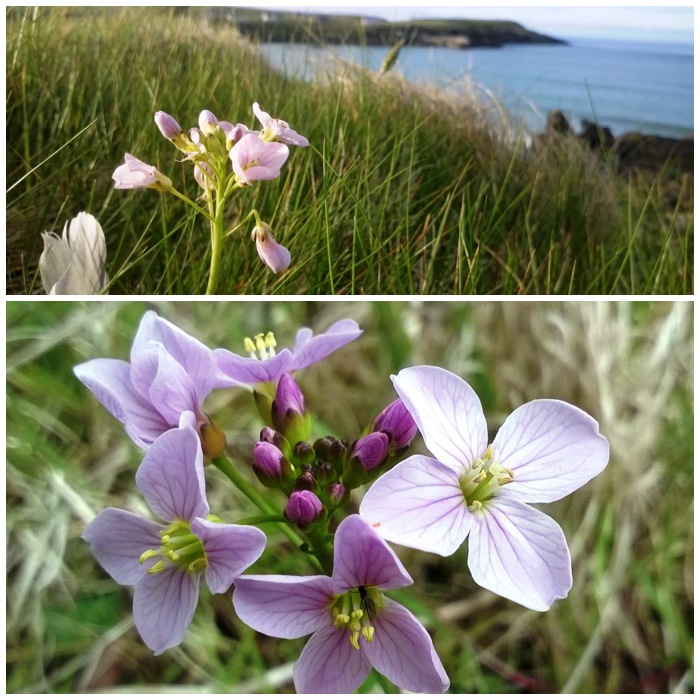
The lady’ssmock (or cuckoo flower) can make for a majestic and striking picture. Sometimes I see this flower growing and think it looks lonely; it really is one of these taller flowers that can withstand some pretty harsh environments.
This was another edible high in vitamin C that was used historically to treat scurvy but also makes for a spicy addition to a salad. The flower in folklore has received a lot of bad press – it has been associated with bad luck and the evil eye so was thought to be best left outside the house (we are a superstitious lot, us Scots).
Lady’s smock
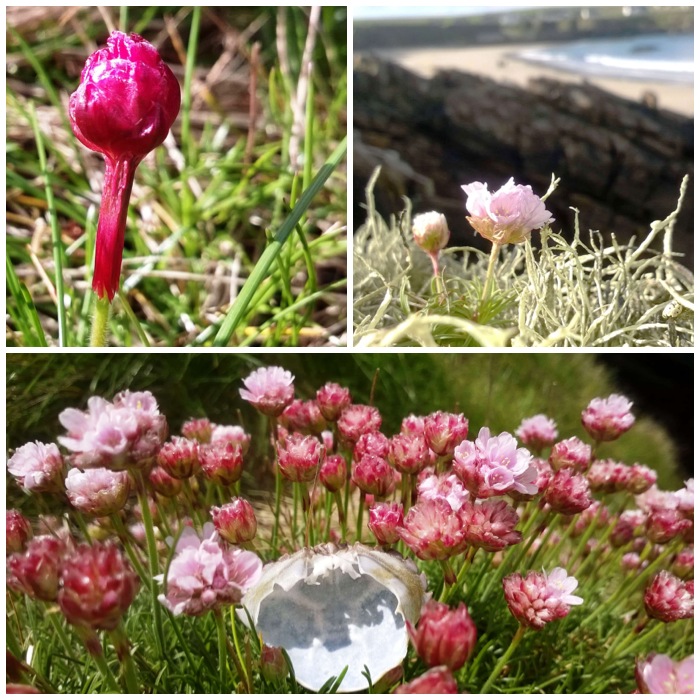
Who would have thought that this delicate little plant called thrift could be so tough and beautiful at the same time? The stalks of this tiny plant were commonly used in the past for basketry. On an island where plants do not grow very tall due to the wind basket weavers would use whatever material came to hand and the stalks of thrift, although short, are strong and flexible.
Up to the 1700s a tonic called arby was made out of the root of this plant in Scotland as a cure for TB but the best use I have heard of for thrift was as a hangover cure for sailors (according to Charles Coates, The Wildflowers of Britain and Ireland).
Delicate thrift
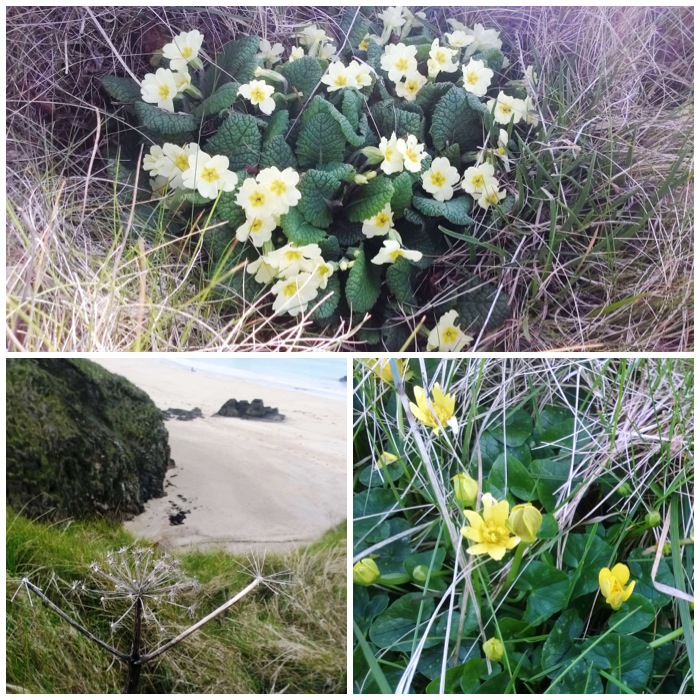
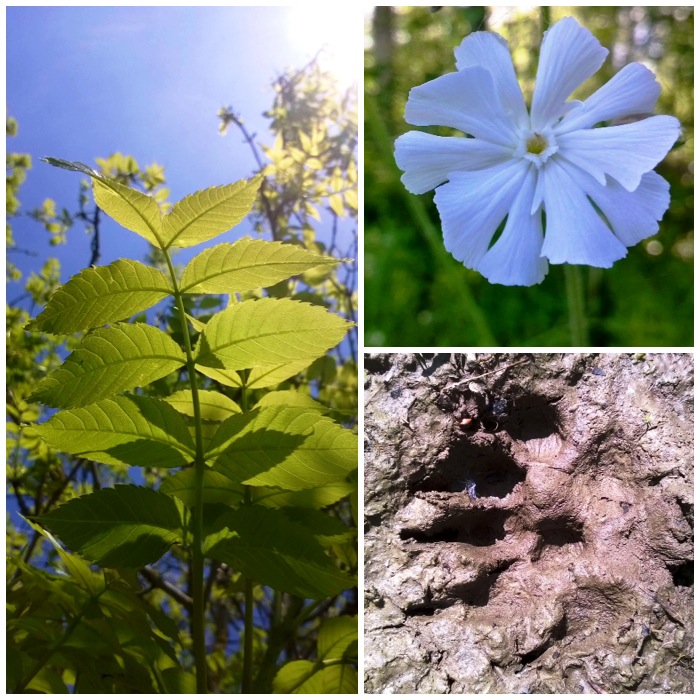
The three flowers below are very common on the island as well as much of the rest of the UK. We found the primroses on Lewis still in full bloom in May: they make for a good snack on the go, though I have read in Paul Kirtley’s blog that they can cause contact dermatitis in some people.
The hogweed stalk you can see in the bottom left is from last year’s growth and I can remember as a lad using the hollow stalks as pea shooters. I have seen people cook the young leaves and shoots but cannot recall trying any. I have, though, had the seeds in various stews over the years.
The final picture is of Wordsworth’s favourite flower – not the daffodil, but grianne (Gaelic for the Sun), known to him and most of us as lesser celandine. This is an edible plant if handled properly, highly toxic if not. It’s best to cook it well and only use the youngest of leaves. Again this is a plant that has good levels of vitamin C and is quite astringent, making it medicinally important. However the sap in its raw format is very corrosive and has been used to remove warts; there are stories in Scotland of beggars using the juice of the plant to create sores in order to gain more sympathy and money. A useful plant in the right hands, but dangerous in the wrong hands.
Primroses, hogweed and lesser celandine
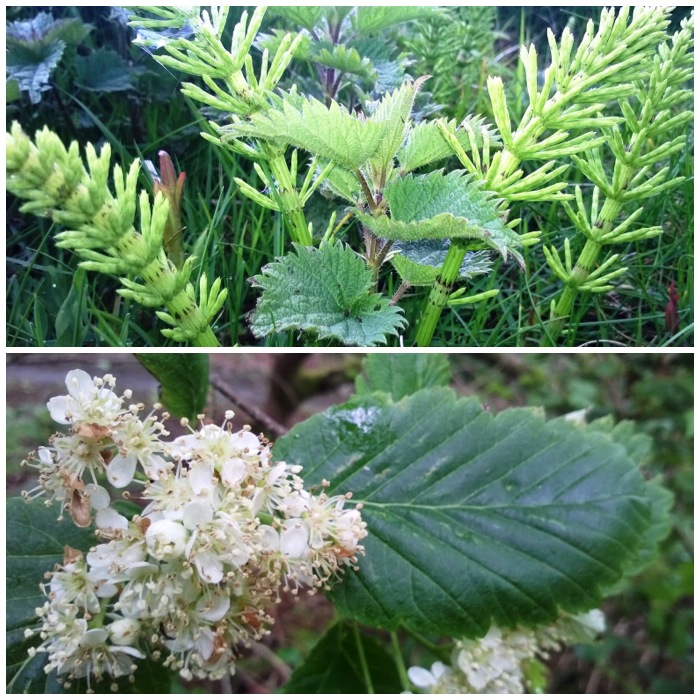
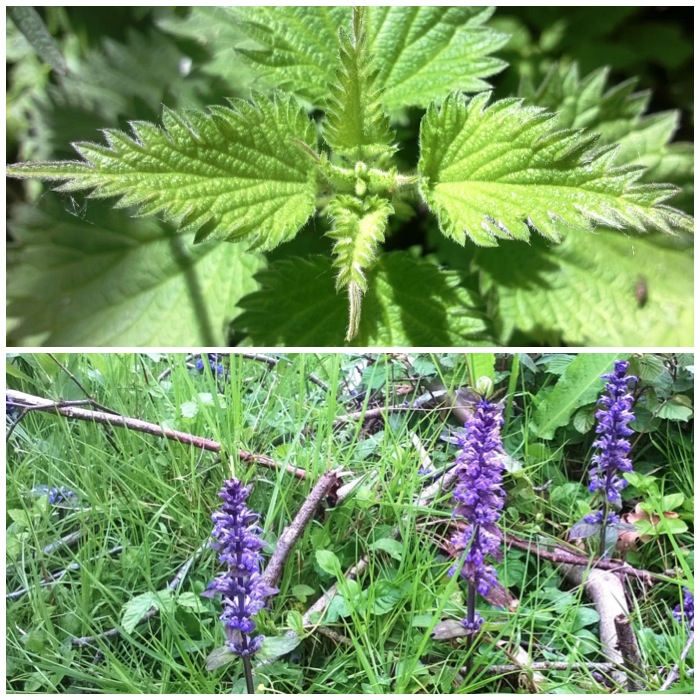
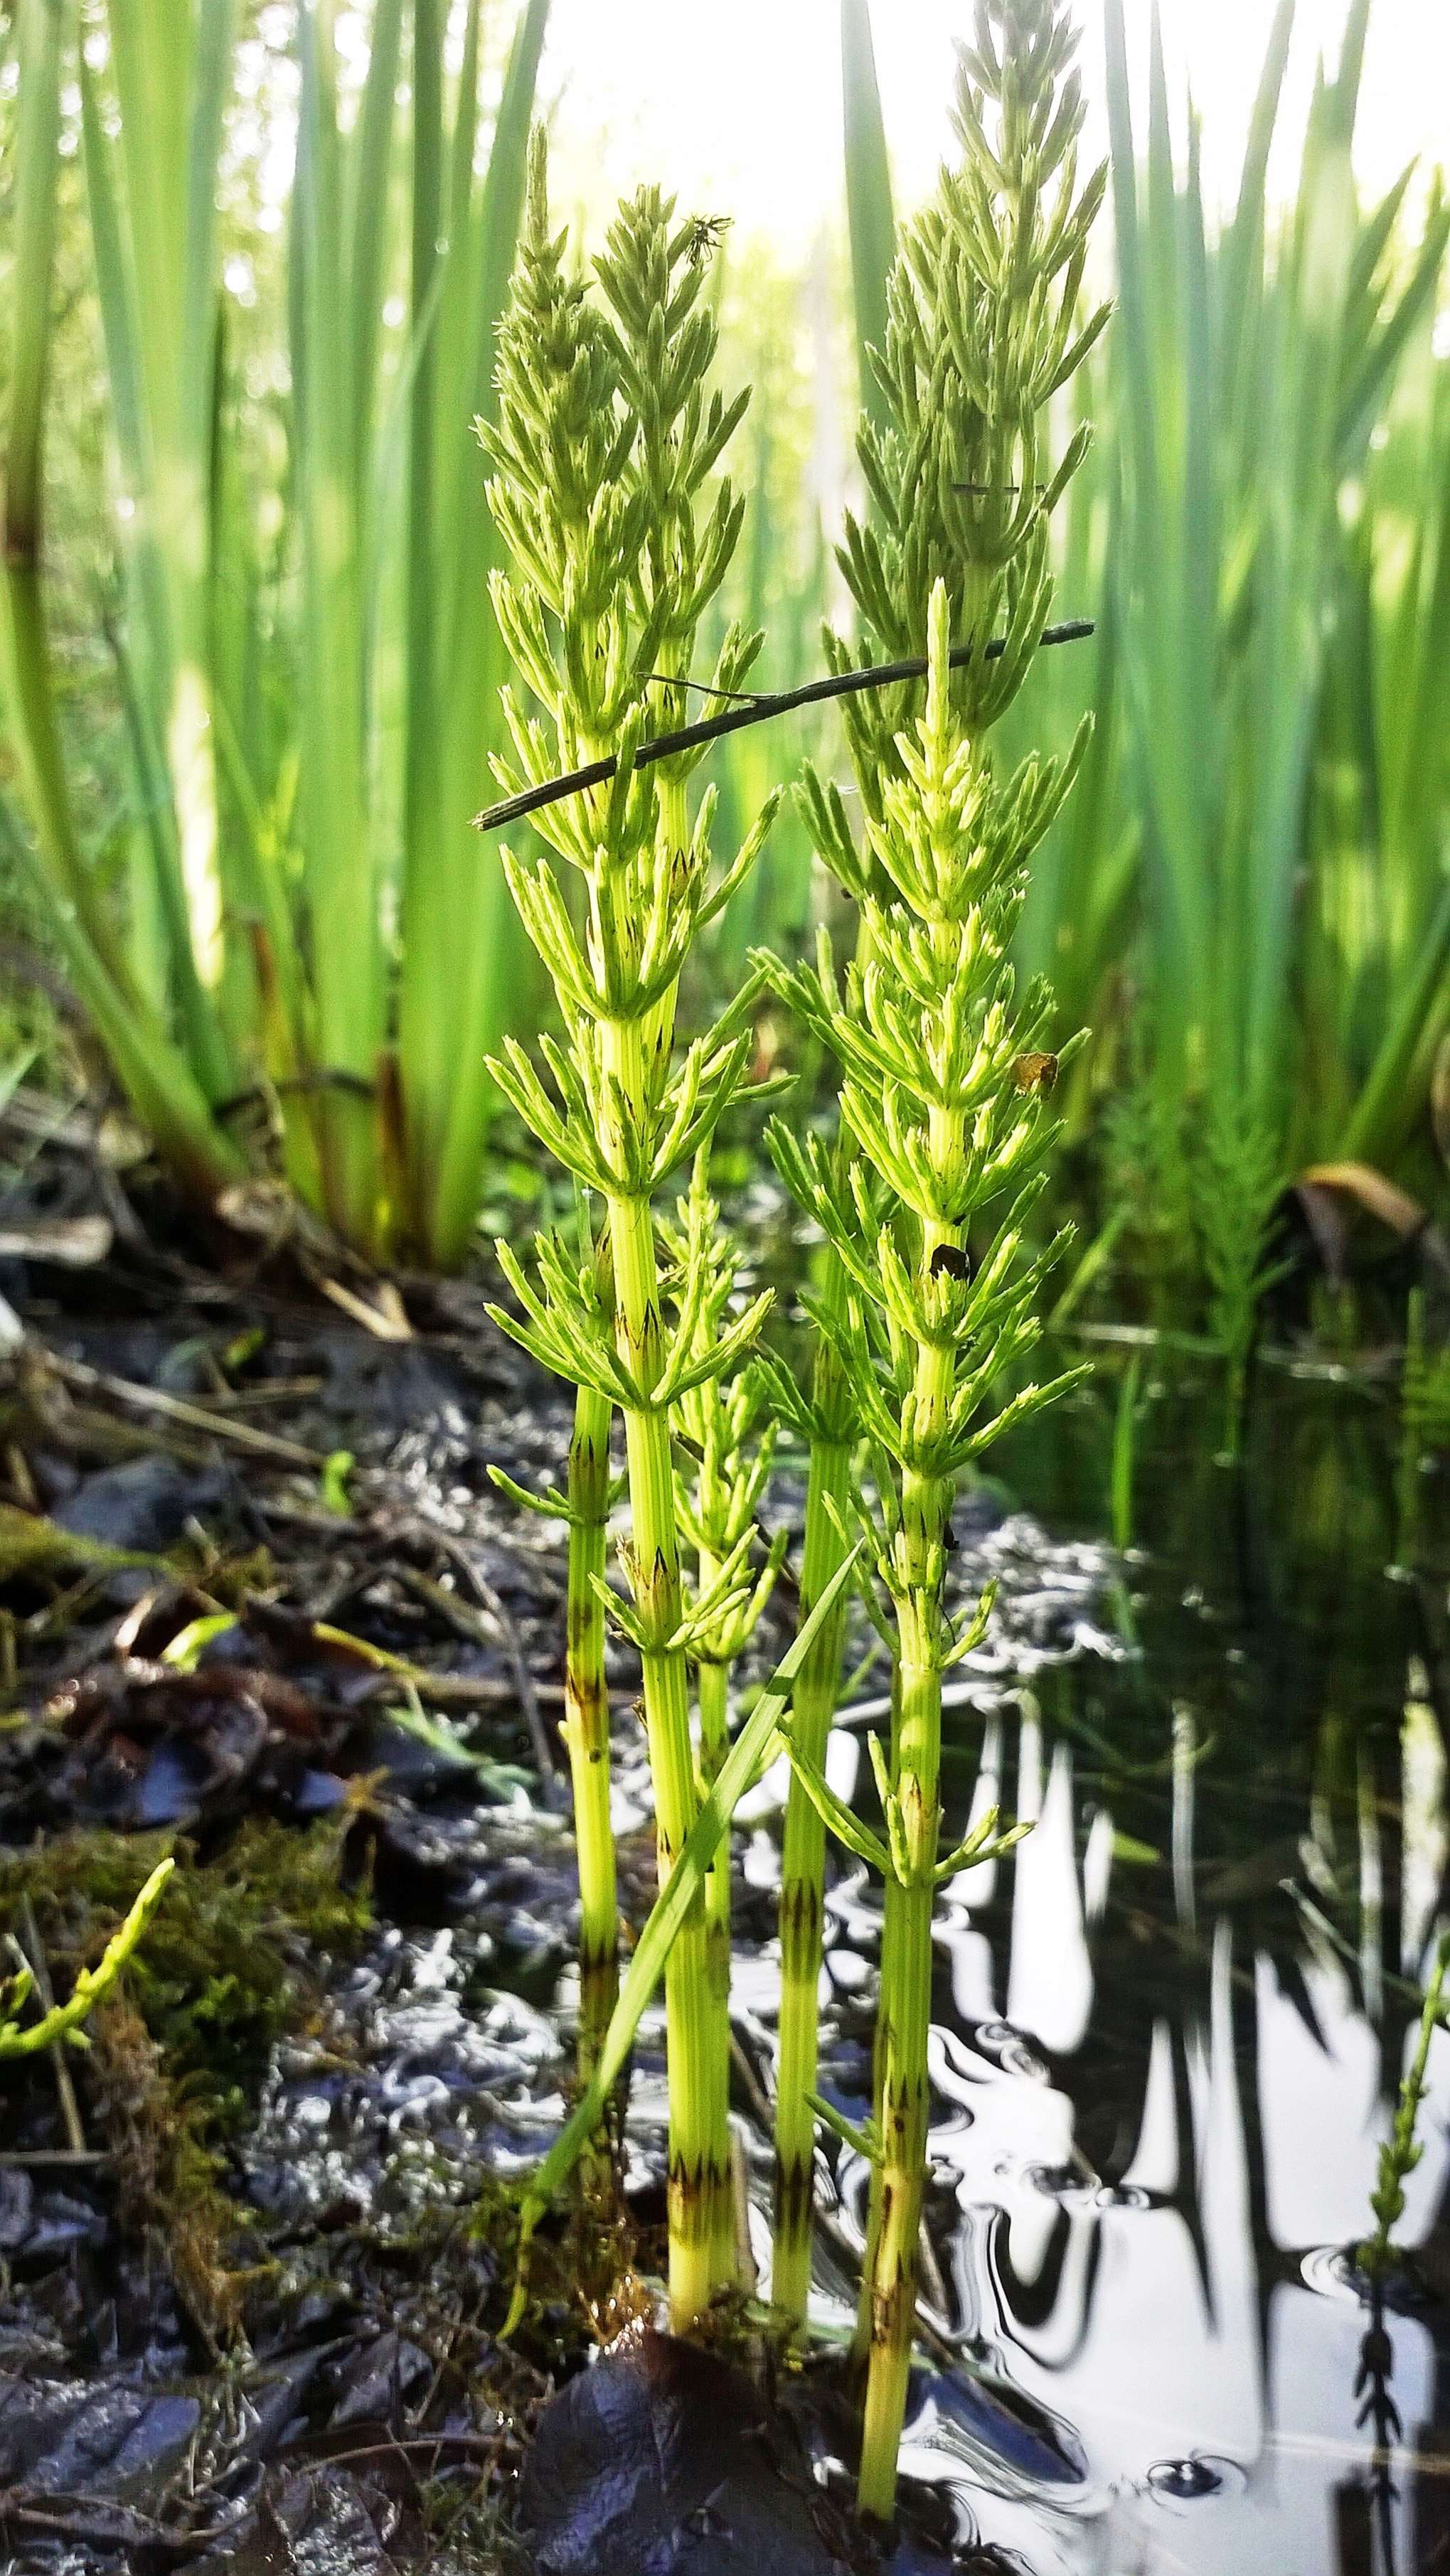
The island seems to be suffering an infestation of horsetail (top picture on either side of the nettle). This plant is a pain for gardeners but a bushcrafter’s friend. I have used horsetail as a pot scrubber many a time, it has a rough texture due to the high content of silica in it. The plant also makes an excellent natural sandpaper.
I spent a couple of days in the grounds of Lews Castle grounds in Stornoway and came across some useful trees there (the sheltered grounds are the only place on the island where there is a large concentration of deciduous trees). The leaf and flower in the bottom picture is from the whitebeam and it produces an excellent smooth wood ideal for tool handles and cogs before the widespread use of iron. My friend PhilBrown from Badger Bushcraft produces an excellent jelly from the tree’s fruit.
Horsetail, nettle and whitebeam
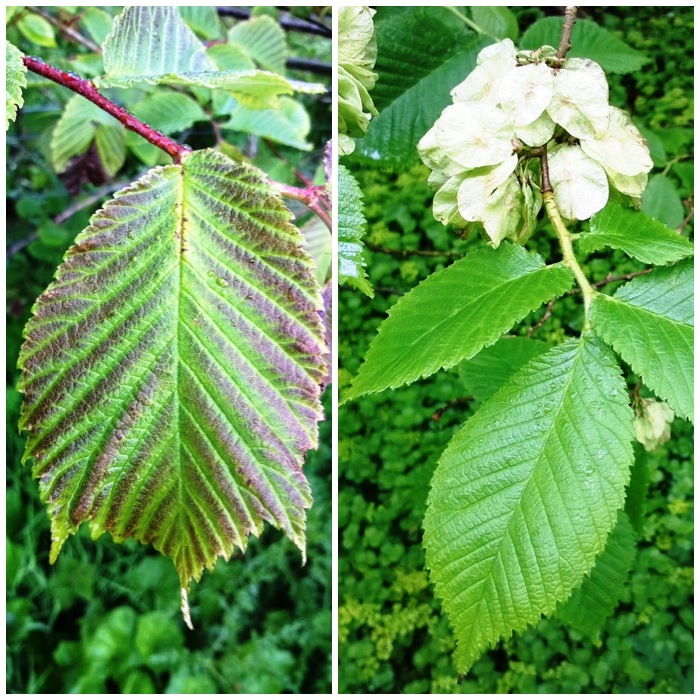
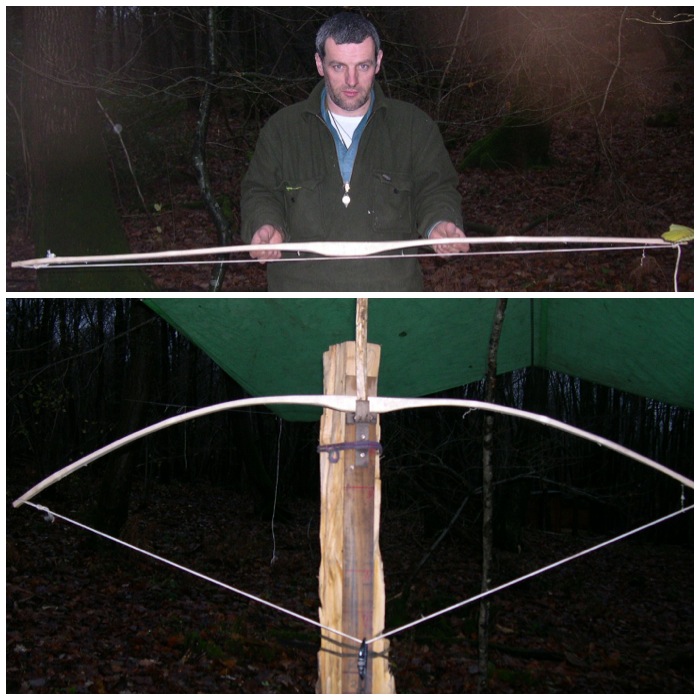
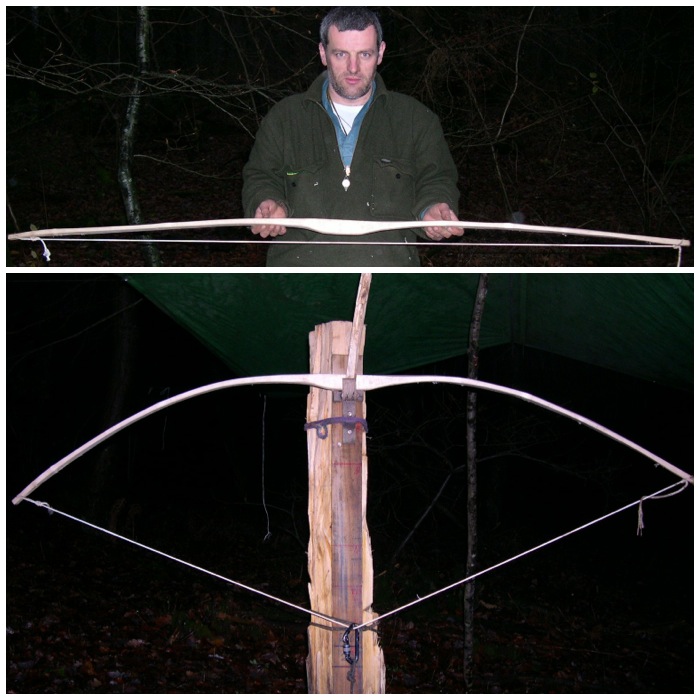
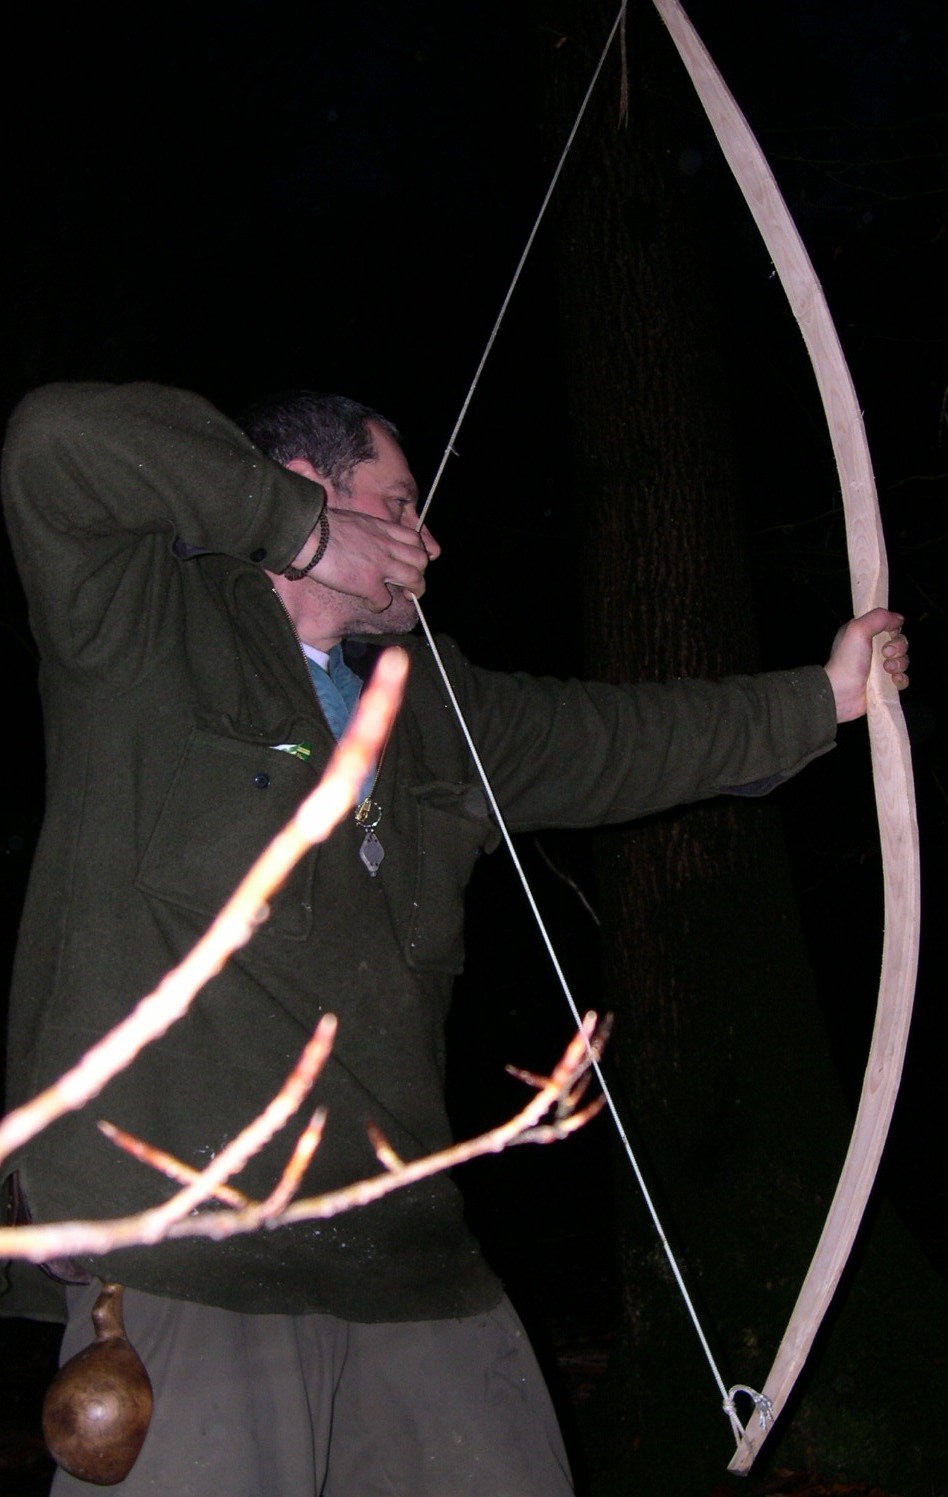
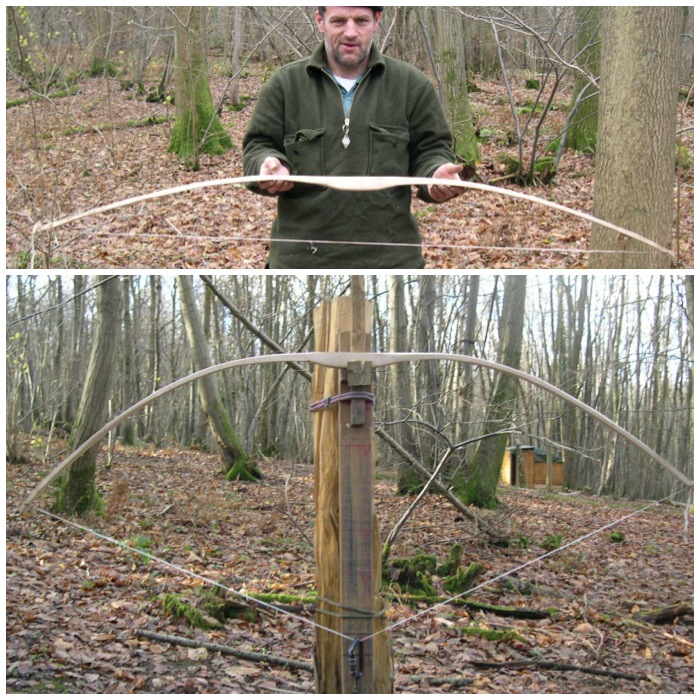
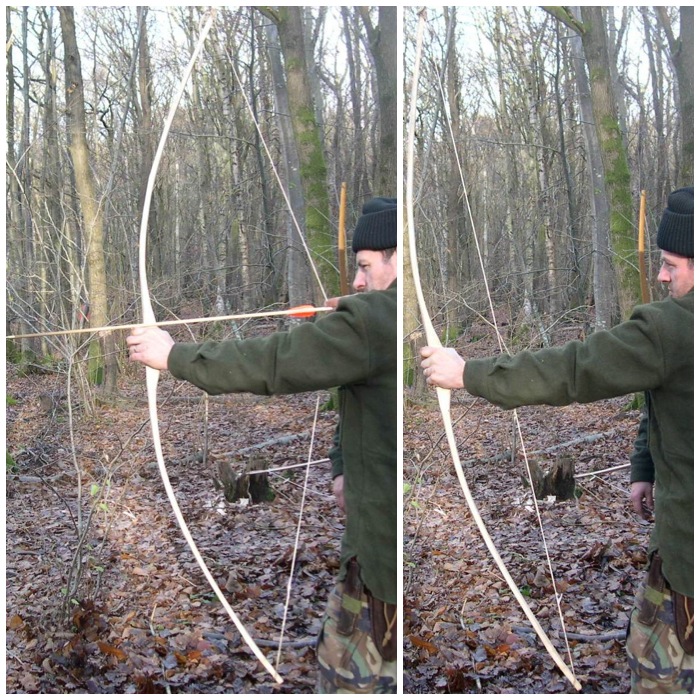
Two other useful trees I came across in the grounds were the wych elm (scotch elm) and what I think what was a white elm. Both are real bushcrafters’ friends as the inner bark makes a great cordage. The word wych is an Old English word meaning pliable and this pilability also extends into the wood as well; these trees make for really excellent bows. A good blog on this can also be found on the Badger Bushcraft site – Wych Elm or Scotch Elm Cordage From Dried Bark.
Wych elm (Scotch elm) and white elm
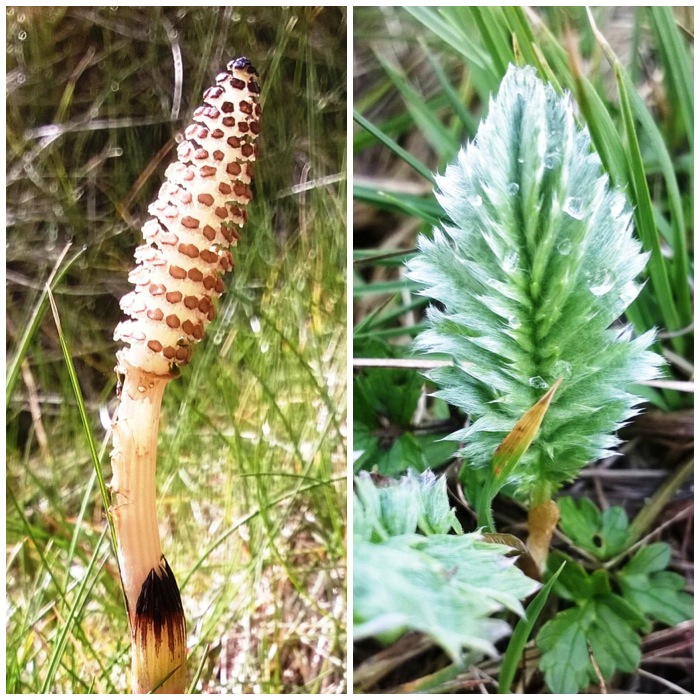
I was visiting my friend Fraser from Coastal Survival earlier in the year and he showed me how you can squeeze the juice out of the marsh horsetail (bottom left) and the combination of fluid and silica make for an excellent handwash (great for helping small cuts heal quickly as well).
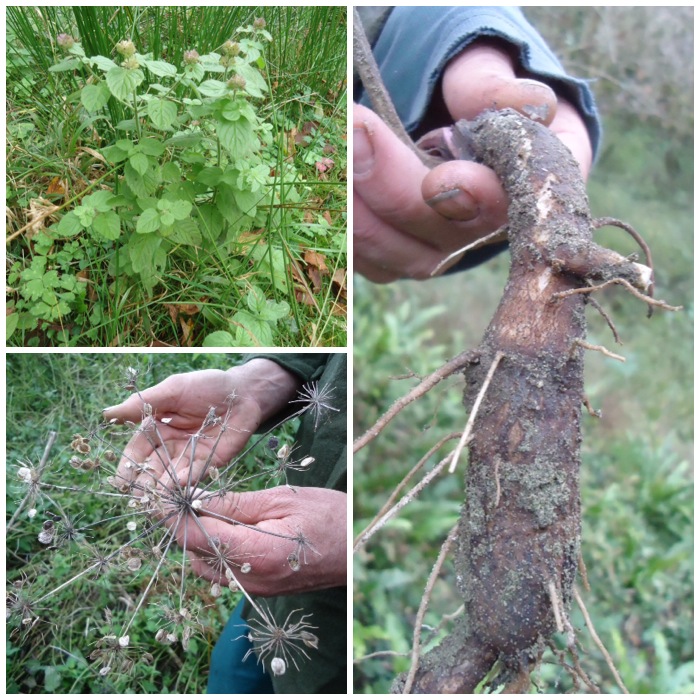
On the right is a young silverweed plant. This is the plant that prior to the introduction of potatoes (and in times of the potato blights) was a staple food on the islands. This plant is known as Seachdamh Aran (the Seventh Bread). It was thought that a man could sustain himself for a year on a patch of silverweed the square of his own height. In North Uist, during the clearances, homeless folk were said to be living on shellfish and on bread made from dried silverweed roots. A good document on this can be found on the BBC website.
Marsh horsetail and silverweed
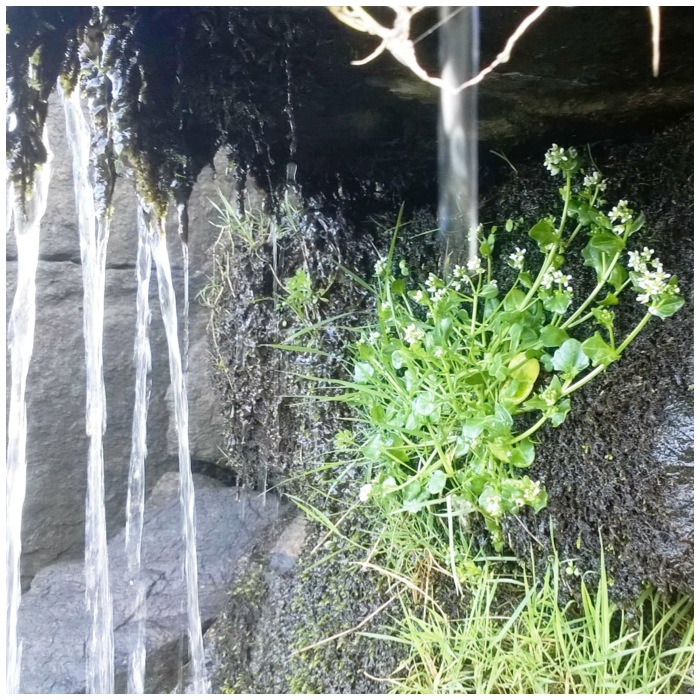
This is one of my favourite pictures was this one. I loved the waterfall and the shelf with the scurvy grass happily growing under it.
Island beauty
It was not until I was reviewing my holiday pictures that I realised that the majority of the plants I had photographed were so useful. I found out a lot about some of these books from my guide book – The Wildflowers of Britain and Ireland by Charles Coates.
It’s a stark reminder of a very different time, when these plants protected peasants against scurvy or starvation – worth remembering if you’re tempted to dismiss them as just ‘pretty flowers’.
I have been bushcrafting on and off for most of my life. Growing up in a remote village on the Isle of Lewis off the west coast of Scotland I was free to get out and about as a boy and really explore my surroundings. I saw this sometimes then as a lifestyle that was stuck in the past: I remember wishing for all those modern gizmos and ways of doing things I saw advertised on the television.
But now, aged 47, I really appreciate that upbringing, even though we did struggle at times. When I teach outdoor skills to kids these days I see the effect on them; having been sat in front of a TV or computer for most of their lives they are afraid at first to explore or take risks outdoors, but with a little bit of encouragement and support it is great to see them discovering a whole new way of learning.
One of the tools I use in that learning process is the ‘force of fire’.
Happy Fire faces
That force of fire can be made in many different ways but my favourite is Teine Eigin – Gaelic for rubbing two sticks together to make fire. Nowadays bushcrafters know this as bowdrill or handrill (though there are many other techniques, such as the plough) but what many do not realise is that this method was used in certain areas of Scotland up until the middle of the 19th century. I wrote a recent article where I put some good links to this tradition – Bushcrafting at Lews Castle College.
This summer I plan to explore some different methods of making fire by rubbing two sticks together – Teine Eigin.
Here is my intro video to the subject.
This is my first video with commentary so I’d love to hear your thoughts or questions.
Cheers, and I will be back over the summer with more articles on these methods in detail.
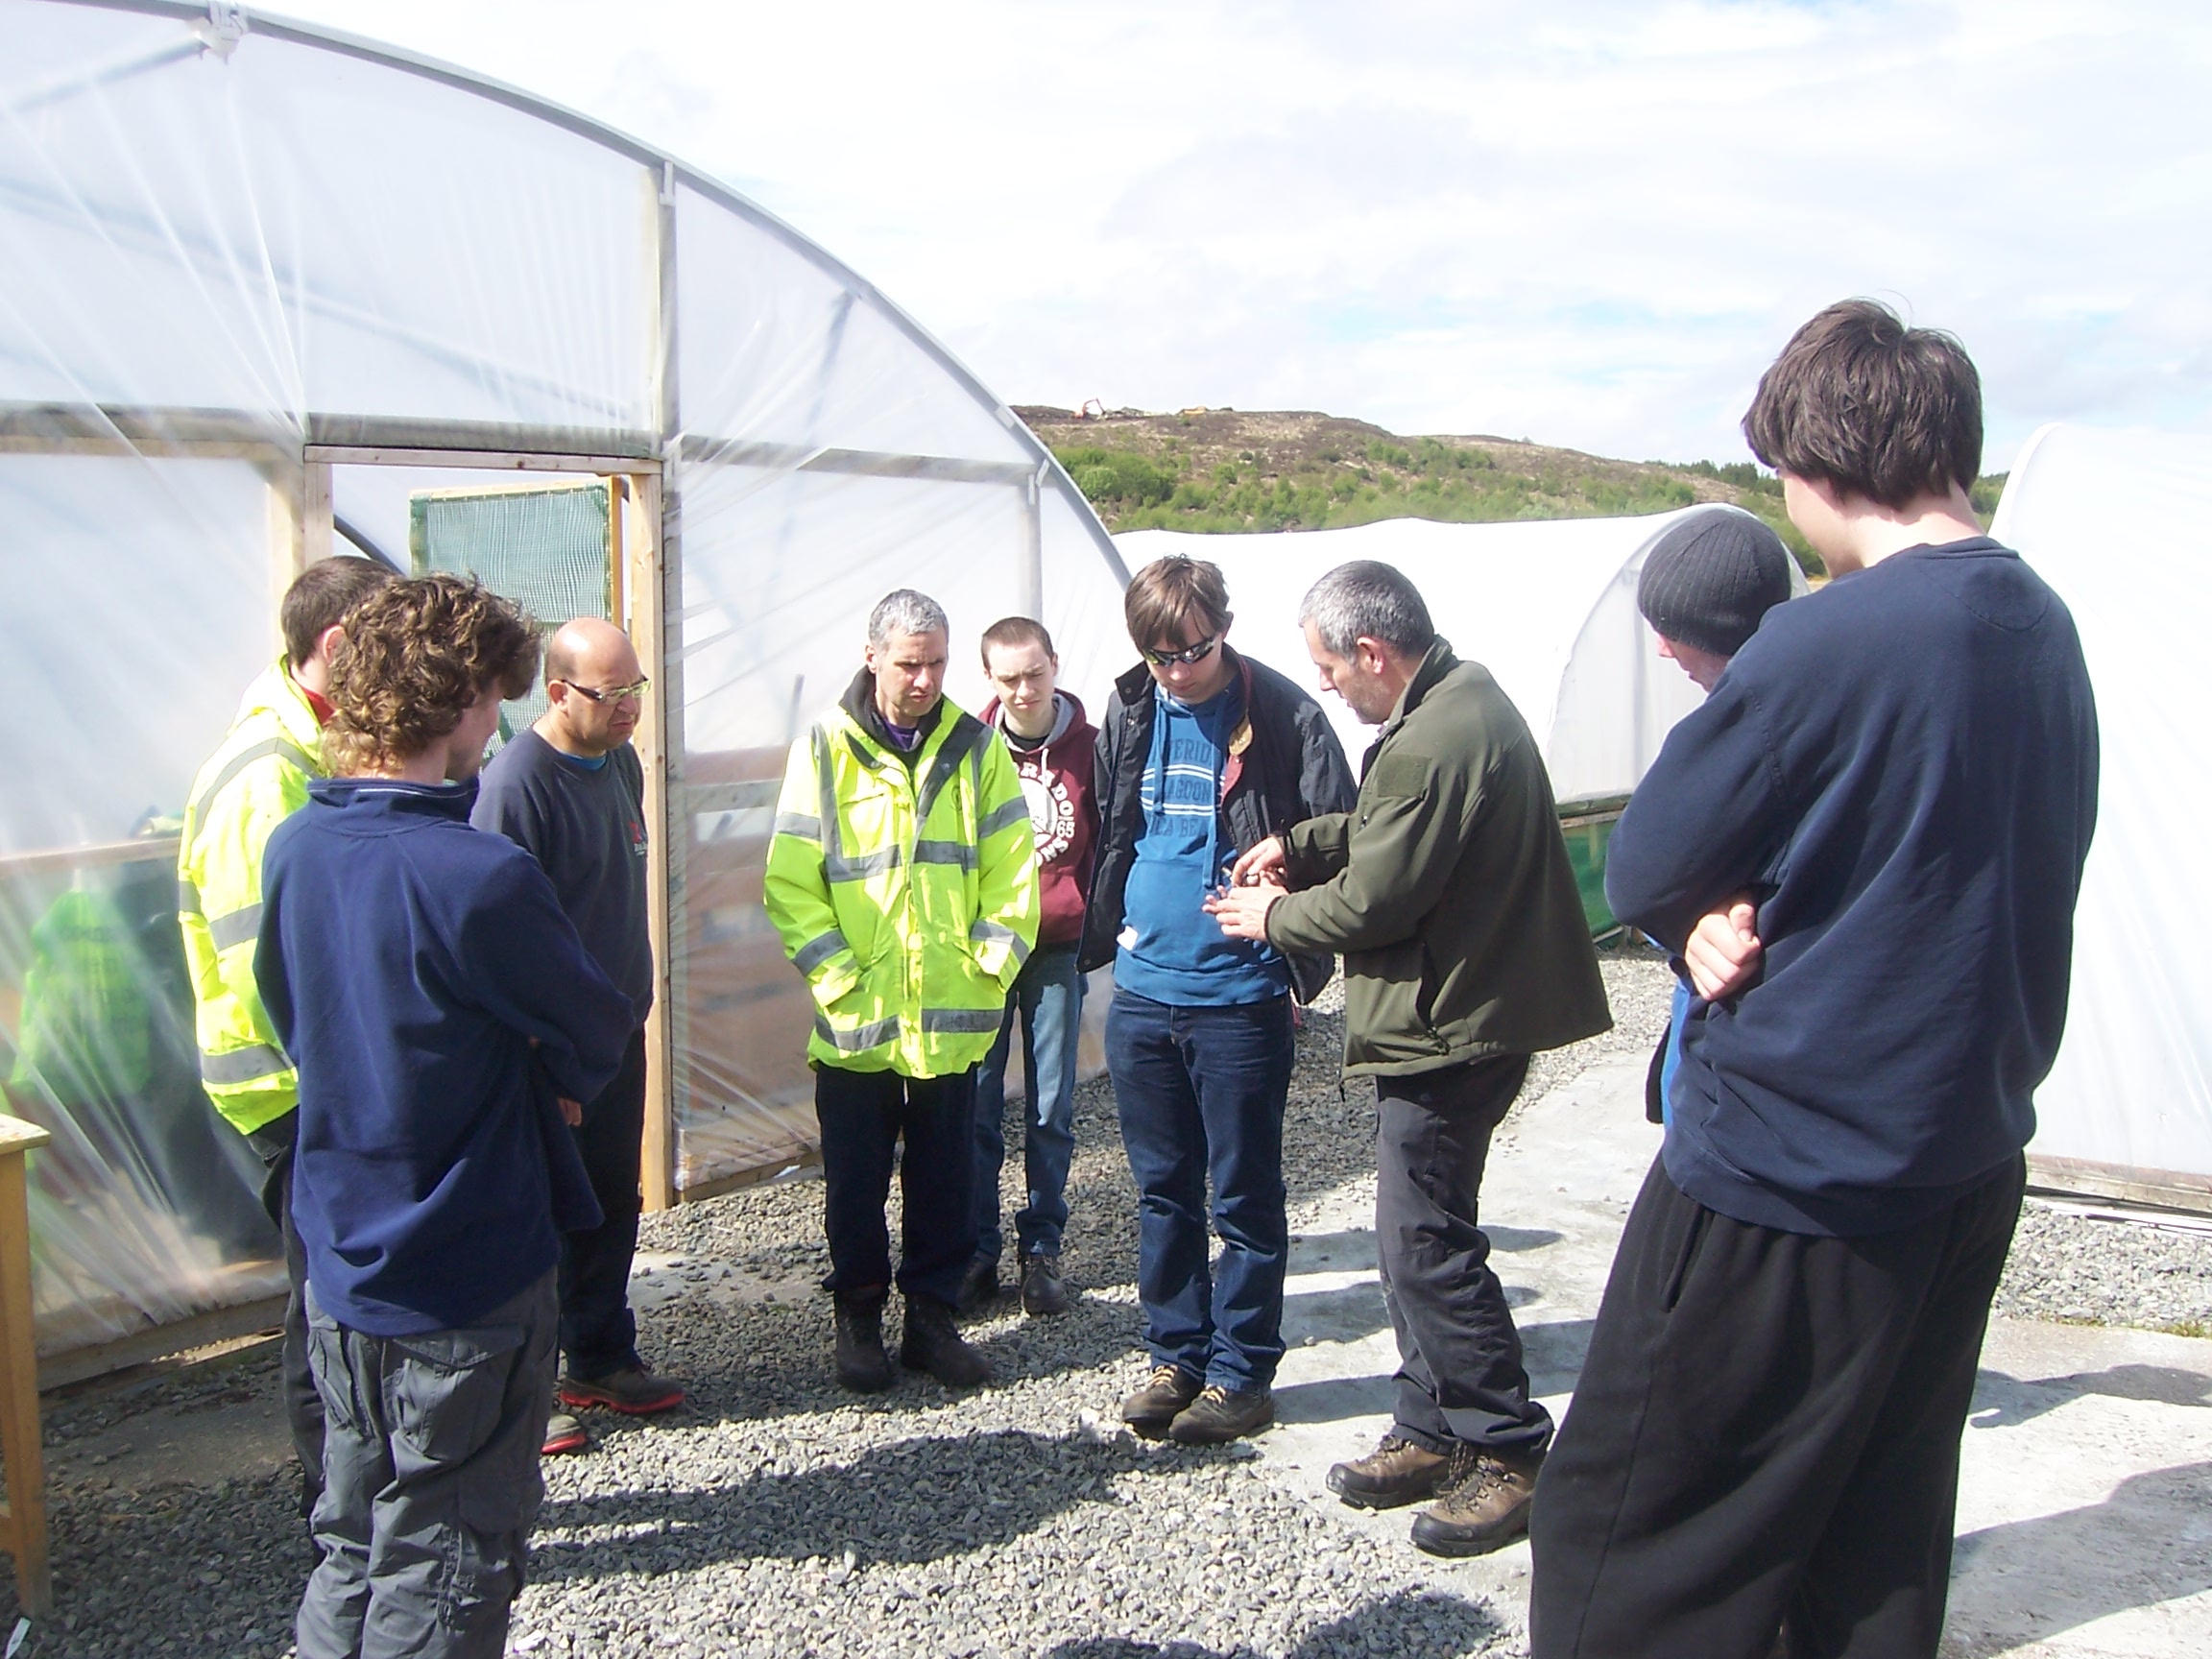
After the day was finished I was really struck by how many of the skills I practice under the title of bushcraft were being practiced on a daily basis on the Isle of Lewis just a few generations ago
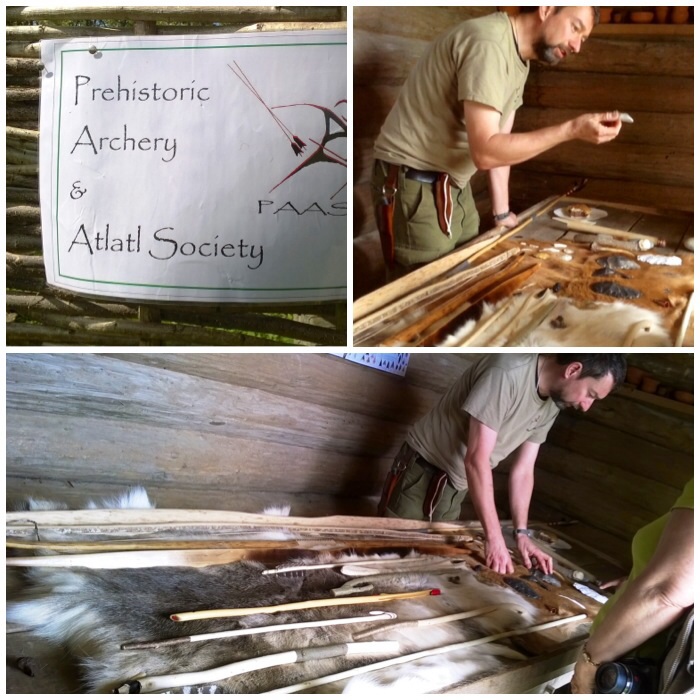
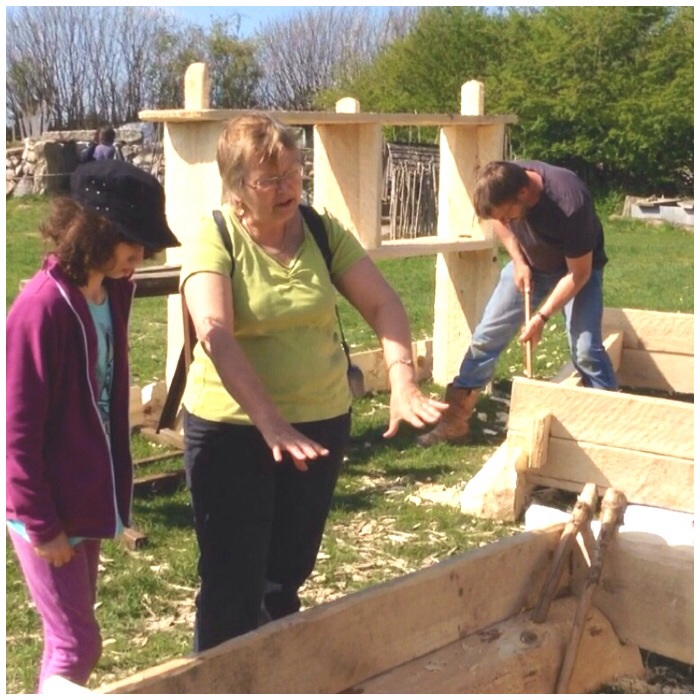
My brother Finlay has been attending Lews Castle College on the Isle of Lewis off and on now for a number of years and I was privileged recently to be asked along for a day to teach him and his fellow students some bushcraft skills. They have a great horticulture area at the college with some impressive greenhouses growing a wide range of plants. Finlay loves working with plants and the college has provided him a good place over the years to develop his skills.
The current course he is attending is called Grow2Work and its aim is to instil a work ethic within the students, giving them confidence and building their self esteem. The students develop a number of skills, such as working as part of a team and following instructions by spending time planting, harvesting vegetables and strimming plants.
A lovely day bushcrafting at my brother’s college
My Grandmother Mary passed away earlier in May this year and while I was up on the island for the funeral my sister Tina had a chat with the course director, John Maclean, and mentioned that I did teaching around wild plants and bushcraft skills. Unknown to me, Tina had volunteered me to do a day’s bushcraft tuition for the whole of Finlay’s class when I was next up at the end of May on holiday to the island with my family.
I found out eventually I was doing the course and so, not really knowing what I was going to do with it, packed an extra bag full of bushcraft and survival kit. I fully expected to have half my kit confiscated at the airport but miraculously the security folk let it all through. If I had been asked to open it up I would have been hard pressed to explain myself.
I had been asked to run the course on the Monday so I managed to do a recce of the castle grounds woodland to find good teaching areas. While I was doing this with the kids my wife Alison ran the Stornoway half marathon. I shot this little video of the day recceing the woods and supporting Alison.
I spent a lot of time as a teenager exploring these woods around the castle and it did feel rather strange to be coming back to teach bushcraft skills in one of the places that my passion for the art started.
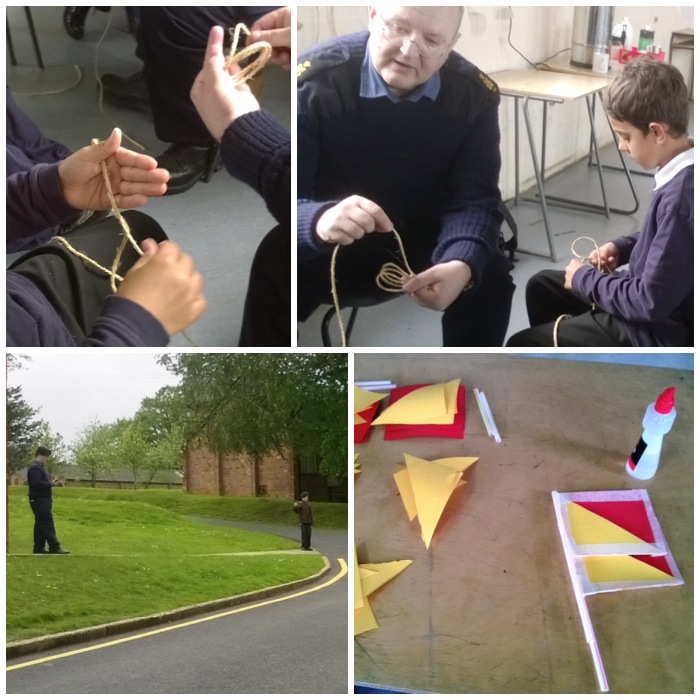
Monday morning arrived: I went off to Stornoway with Finlay Mhor (Big Finlay – my brother) and with Finlay Bheag (Little Finlay – my son). I met the rest of Finlay’s class – Murdo, Matthew, Alistair, Josh, Mark, and John – and the tutors John and David. We had a good chat about what we could do and ended up agreeing to spending some time:
making nettle cordage
identifying some of the wild plants growing around the site
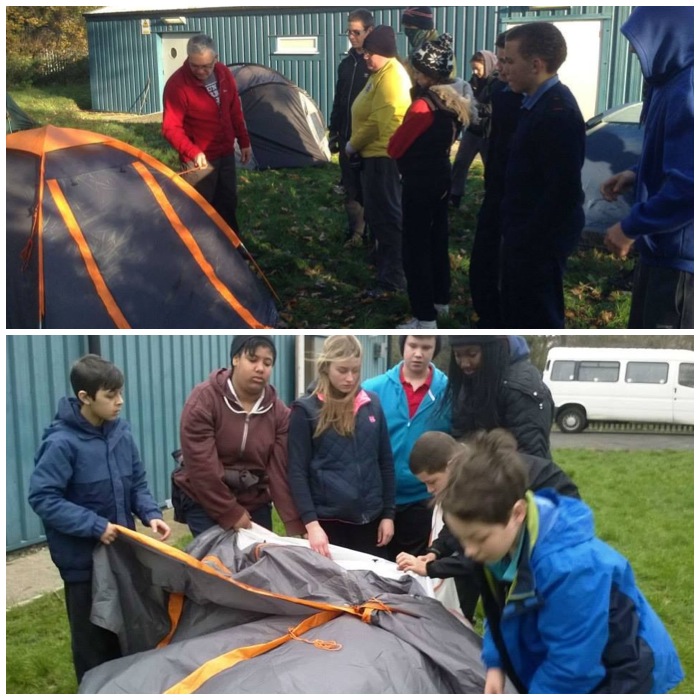
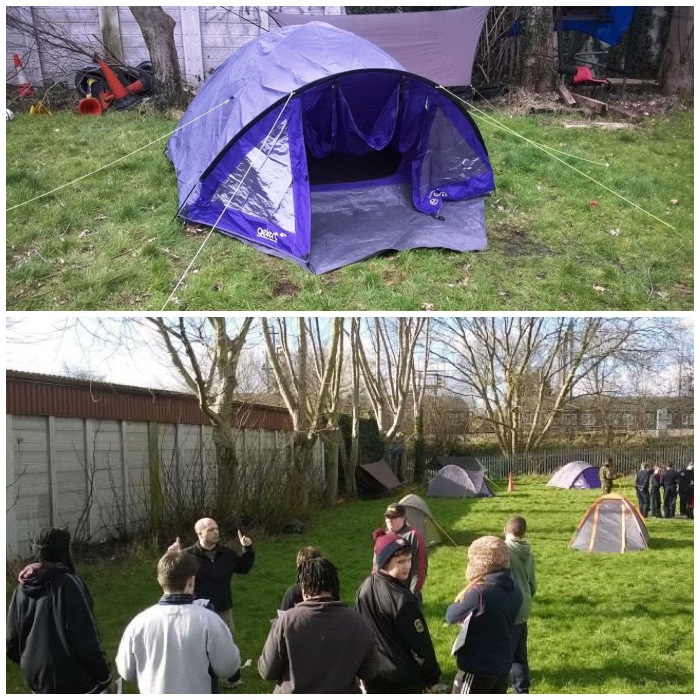
setting up a tarp and hammock to learn some bushcraft knots
trying out some different fire lighting techniques
and finally shooting some Atlatl darts in the wood.
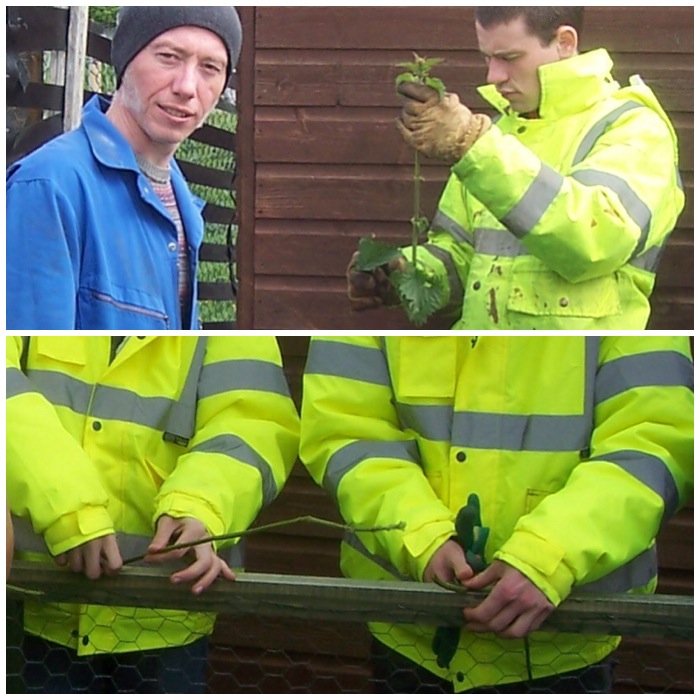
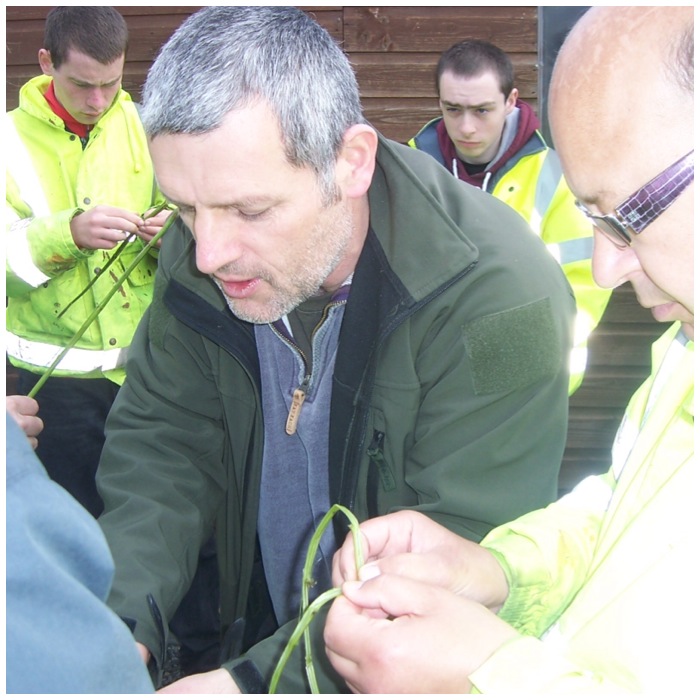
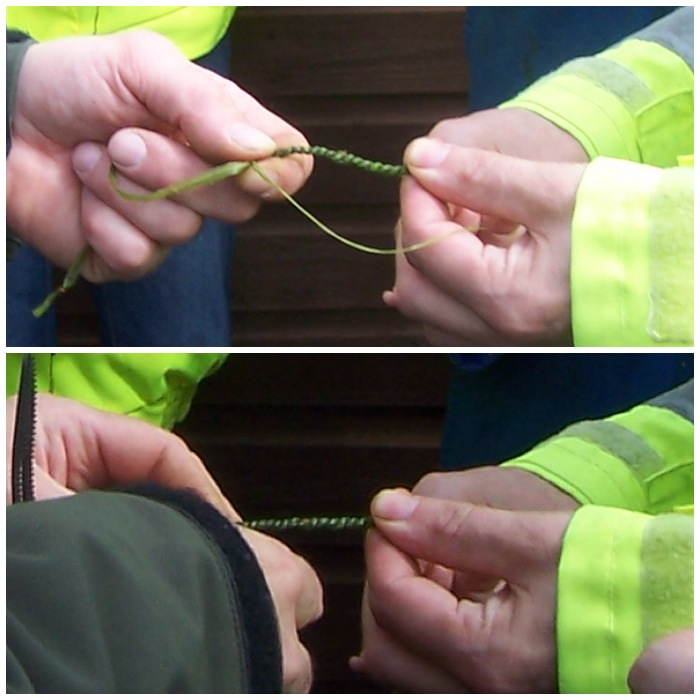
There were a few nettles growing around the edges of the gardens so after putting on some gloves I got the guys to pick some to make some cordage. I explained that it was thought the nettle was introduced to the British Isles by the Romans as a method of producing linen or as a method of keeping warm (urtification).
In Scotland historically nettle was used to make scotch cloth; the poet Thomas Campbell wrote in some of his letters, “In Scotland, I have eaten nettles, I have slept in nettle sheets, and I have dined off a nettle tablecloth. The young and tender nettle is an excellent potherb. The stalks of the old nettle are as good as flax for making cloth. I have heard my mother say that she thought nettle cloth more durable than any other species of linen.”
Stripping and prepping the nettles
After picking the nettles the guys stripped off the leaves and crushed all the nodules in the stalks to make them easier to split open. Nettle cordage would have been made on the island in the past as it has been common on the island for centuries. I got the class to split open the stalks of the nettles along the full length of the stems and then pulled out the hard pithy core to leave long strips of the outer nettle fibre.
Splitting the nettles
We then wrapped the nettles into short strips of cordage. The guys liked this as they could see how they could easily make cordage from nettles in their garden if they did not have any modern cordage to hand.
Making some good cordage
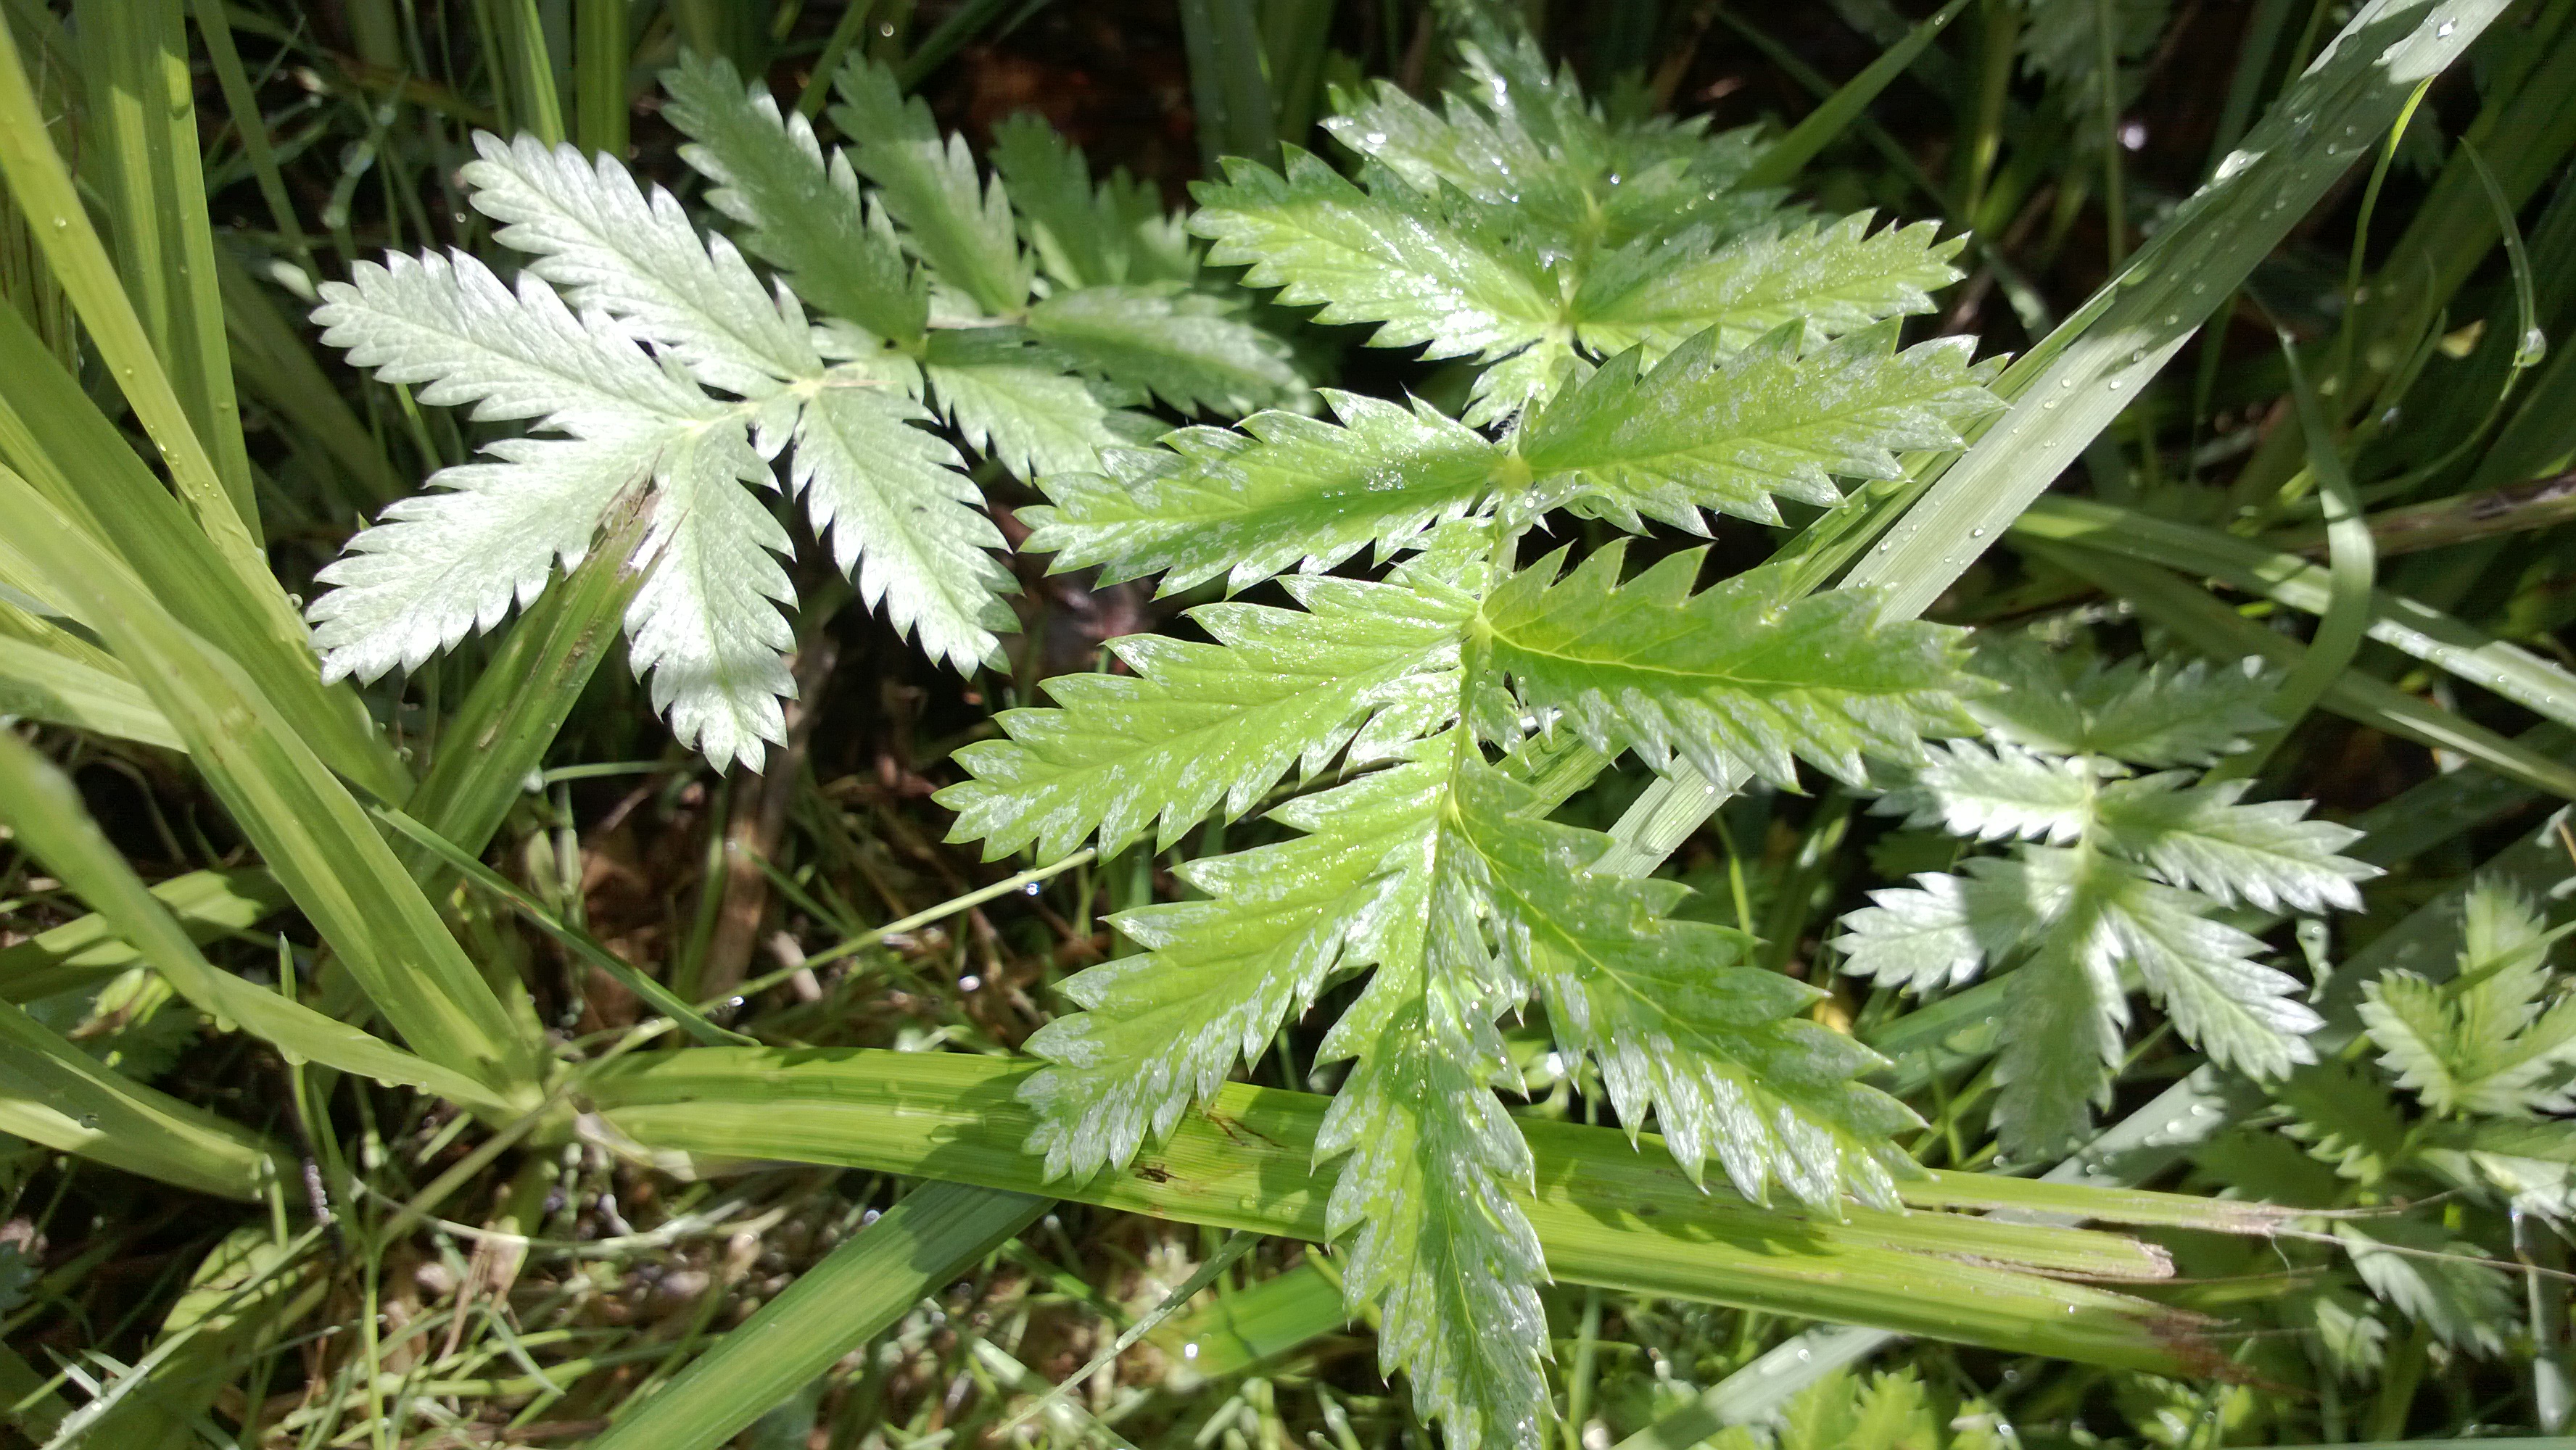
After making the nettle cordage we went for a walk up into the woods. On the way we stopped to chat about many of the wild plants growing around the college. One of the common plants was the Silverweed. I explained this plant was a staple food in Scotland prior to the introduction of potatoes in the 1500s and was known as Seachdamh Aran (the Seventh Bread). It was thought that a man could sustain himself for a year on a patch of silverweed the square of his own height. In North Uist during the clearances, homeless folk were said to be living on shellfish and on bread made from dried silverweed roots. A good document on this can be found on the BBC website.
Silverweed – The Seventh Bread
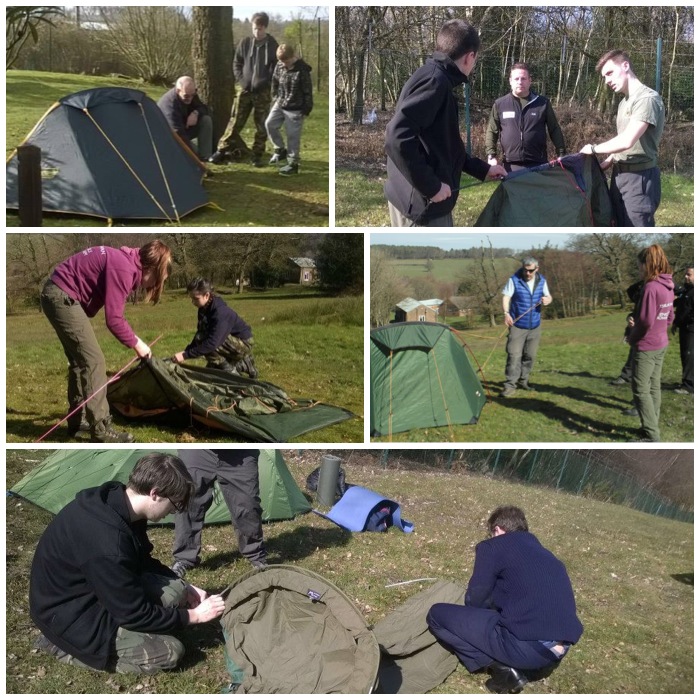
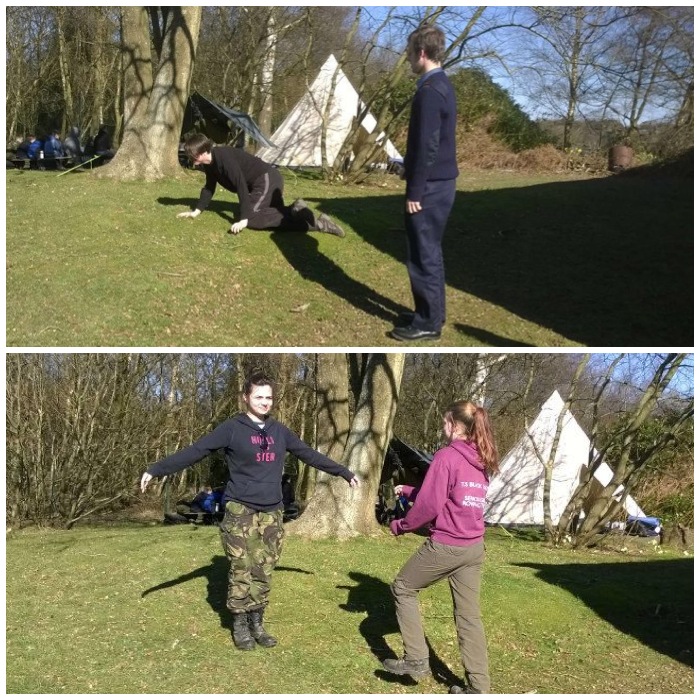
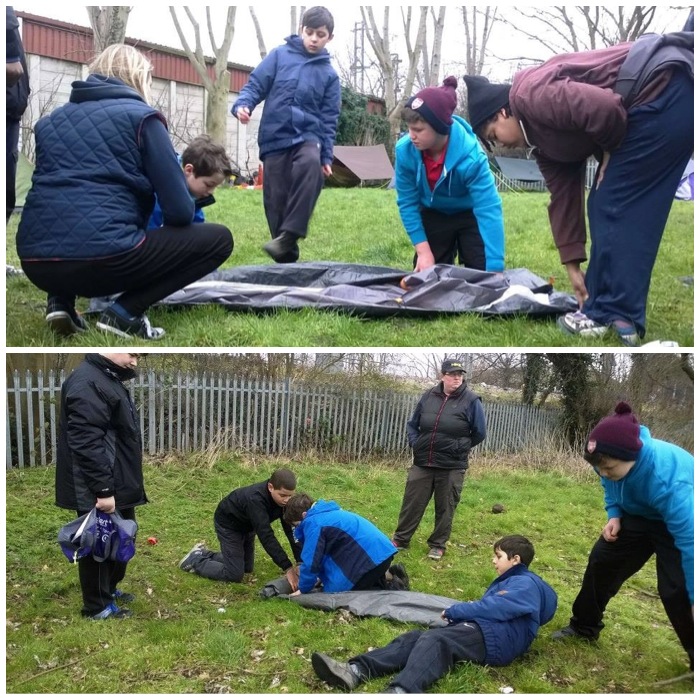
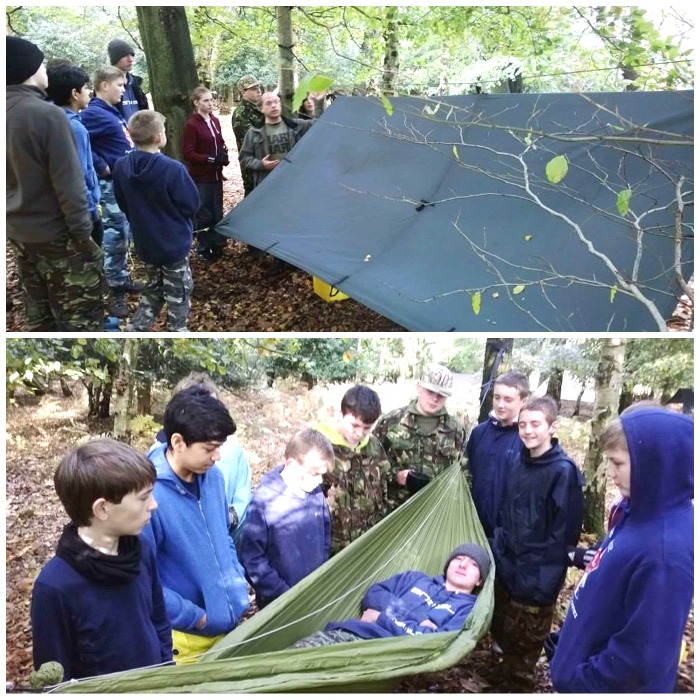
After talking about some other plants including comfrey, thistle and some different types of trees, we set ourselves up a little camp. This was to show the class some of the hammocks and tarps I use when bushcrafting. They were all keen to try out the hammocks. I had brought along two types of hammocks. One was the EDC Chair hammock and the other was the Woodsman hammock. Both hammocks are made by my friend Mat Howes of UK Hammocks. After setting up the hammocks we set up a tarp and practised some knots, including the Evenk, the Tarp Taught and the Clove Hitch.
Hammock time
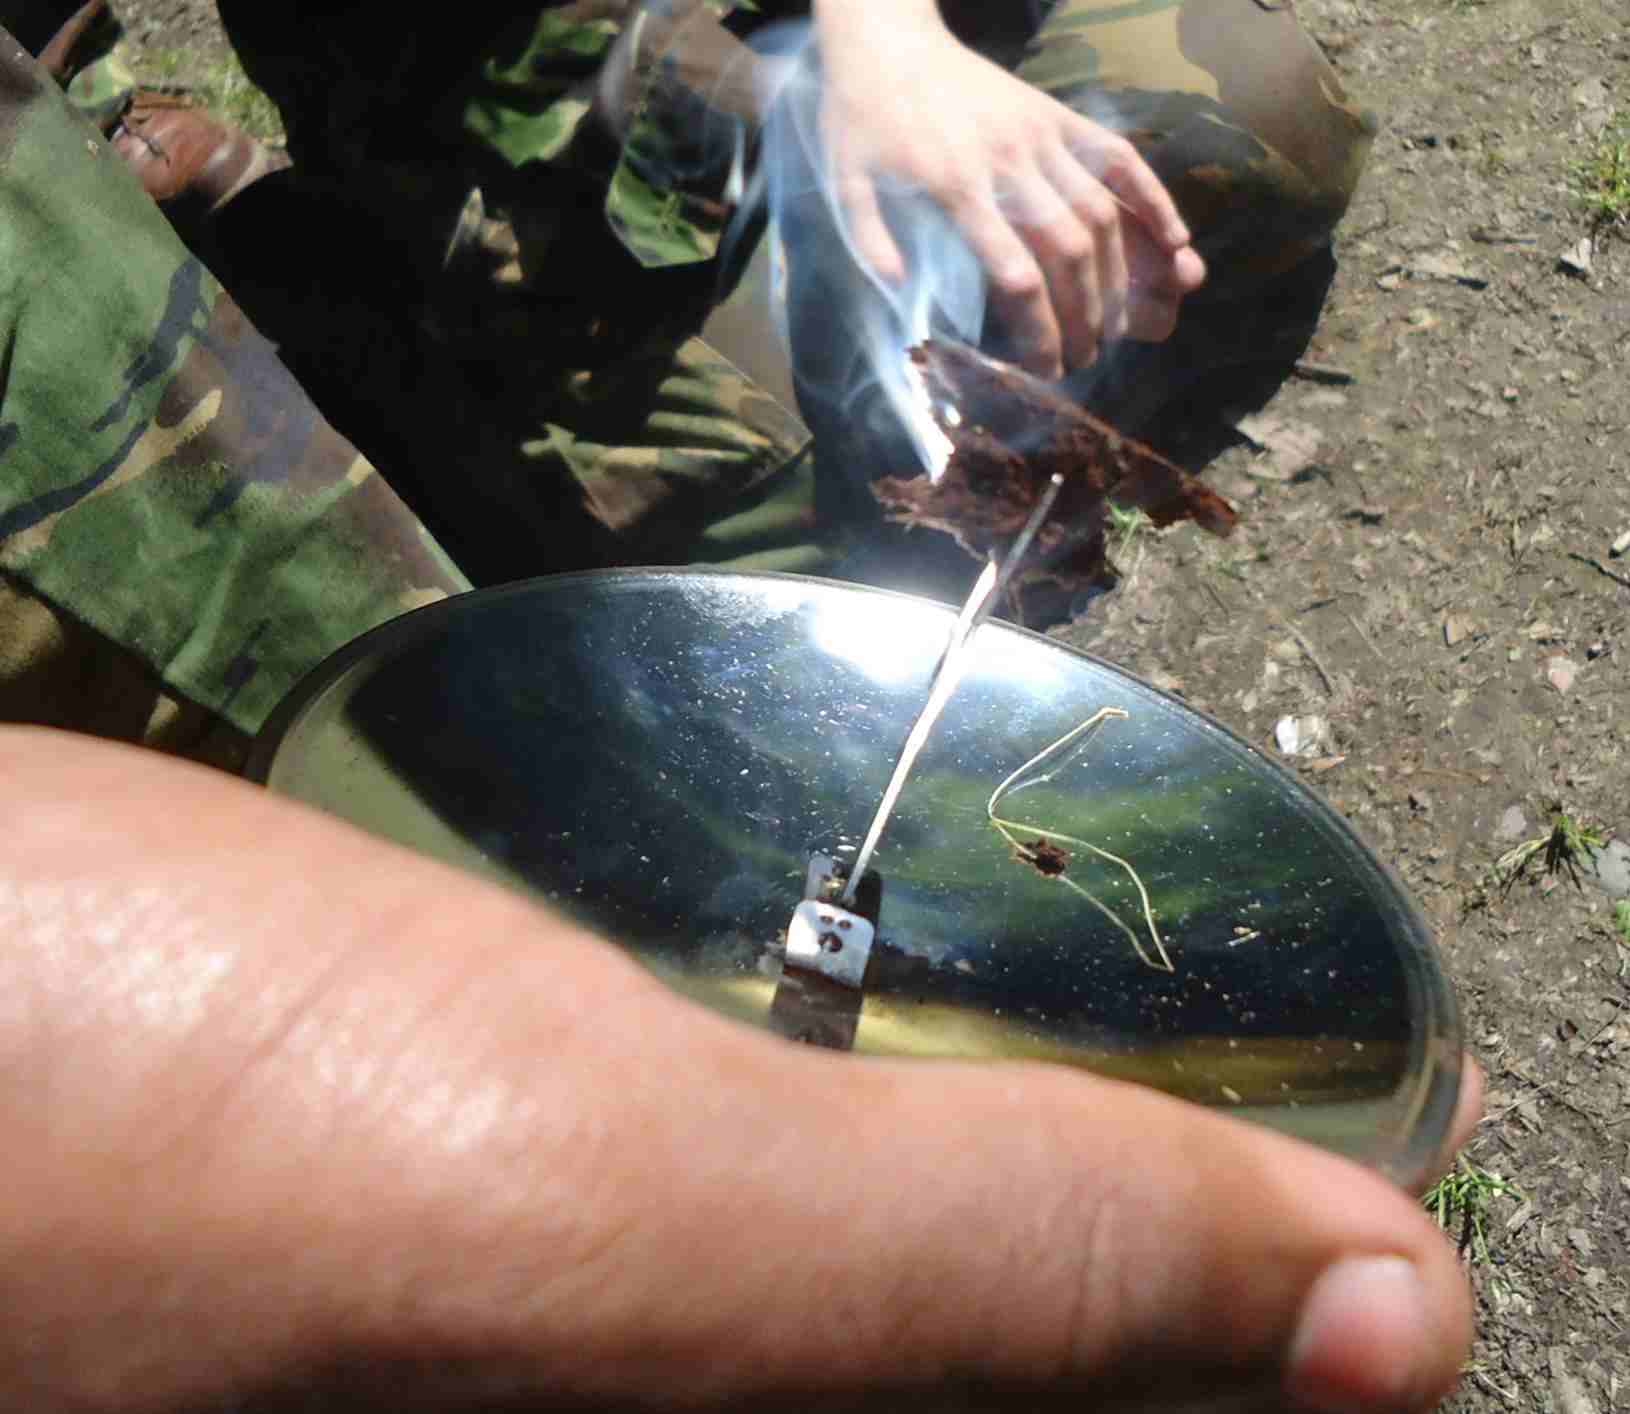
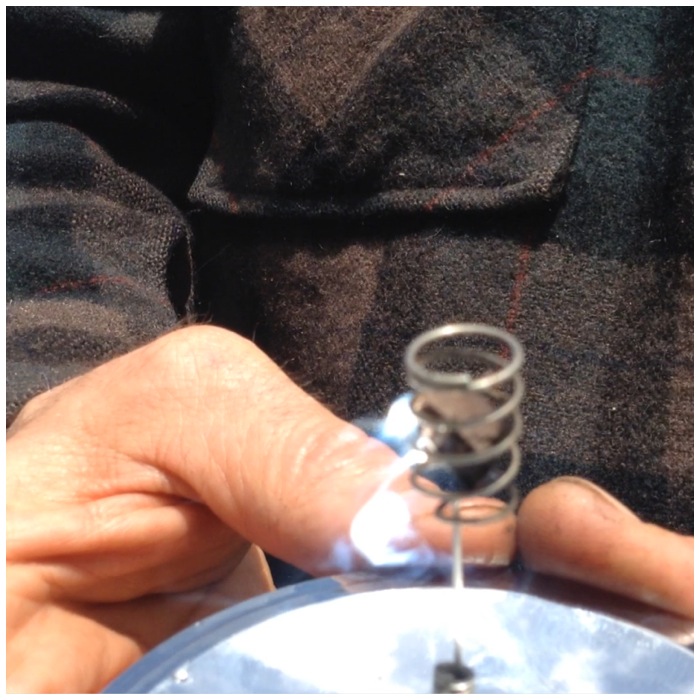
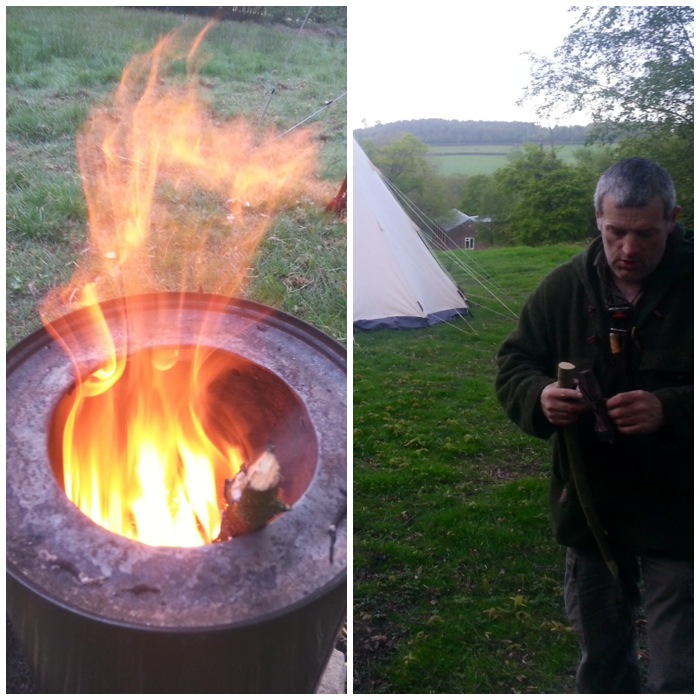
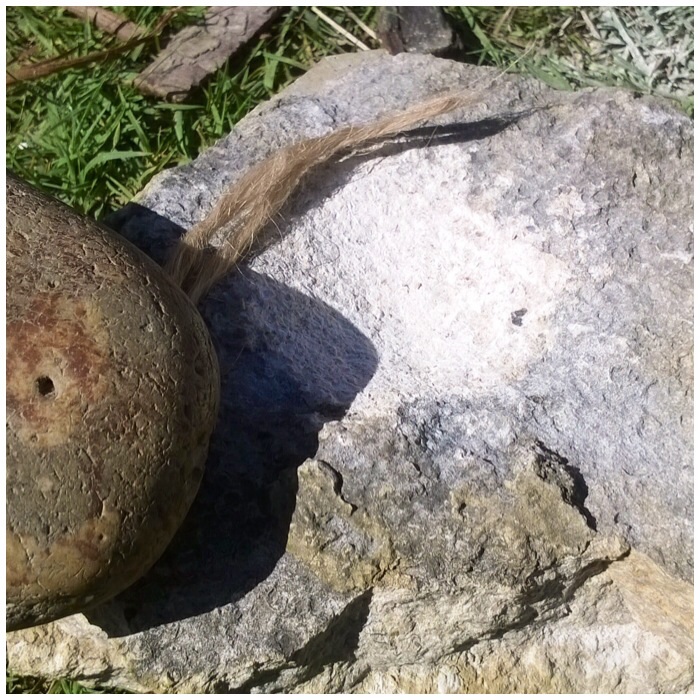
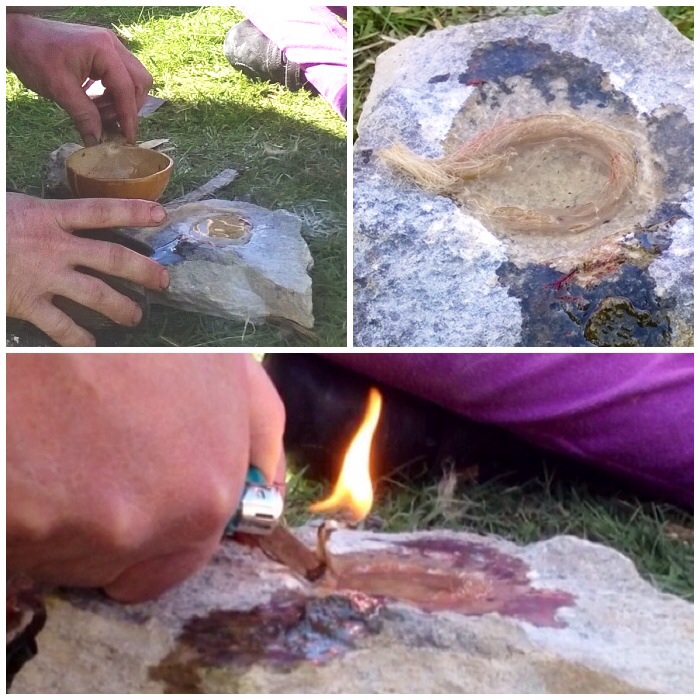
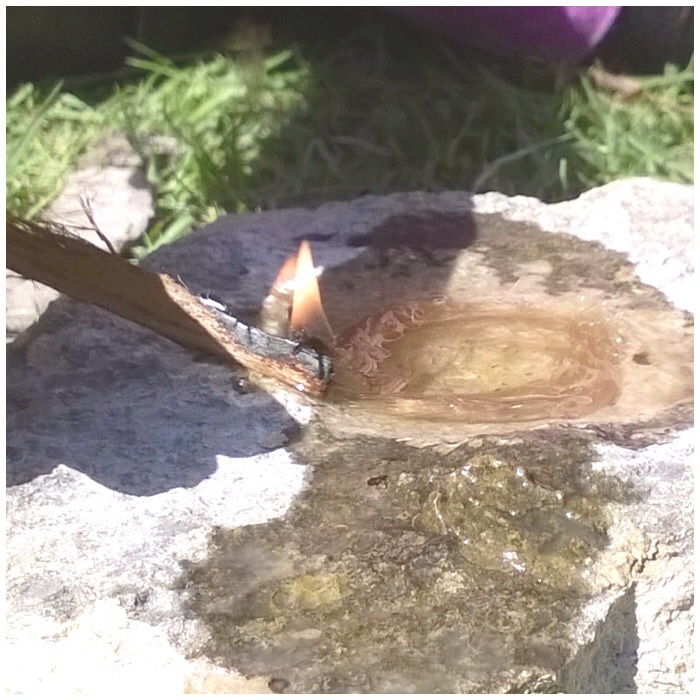
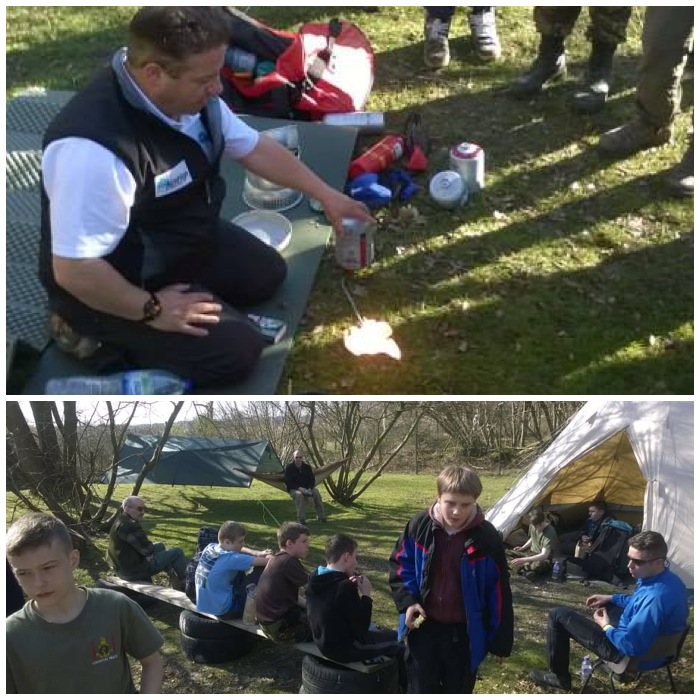
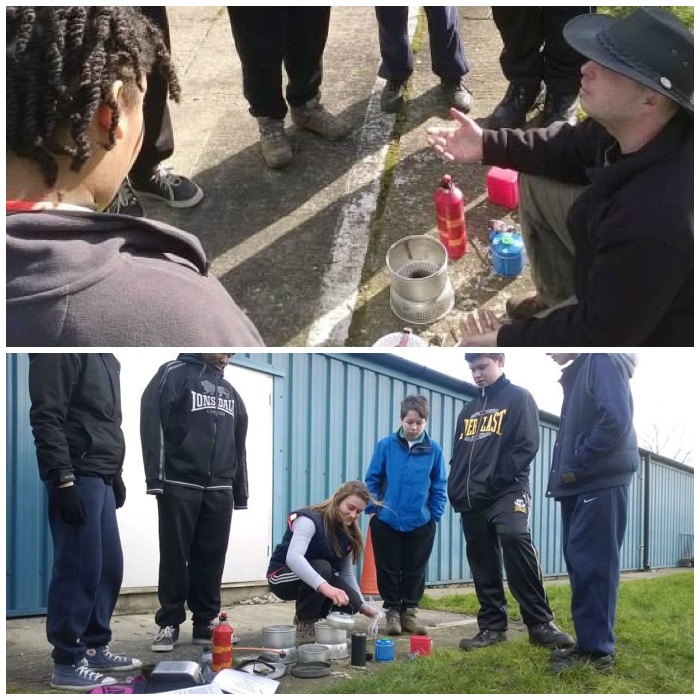
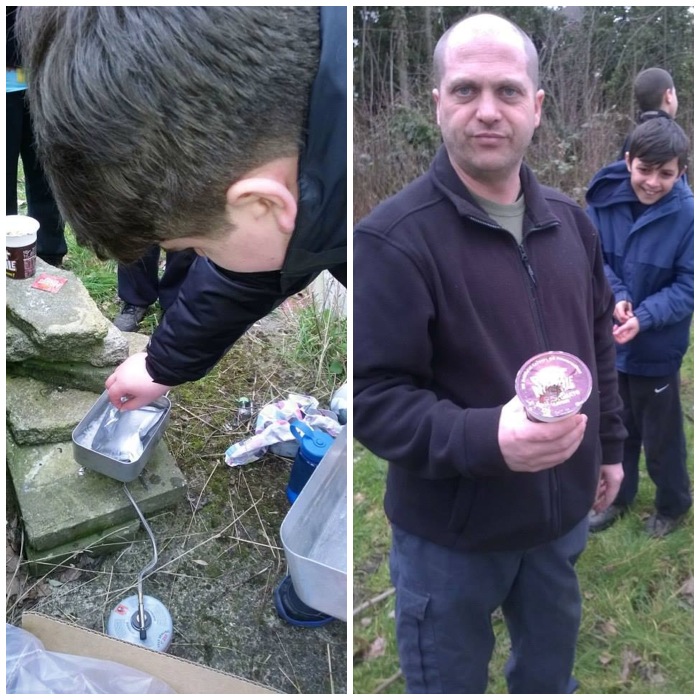
After lunch it was on with the business of making fire. We had already made fire by using a parabolic mirror earlier that morning using the sun’s rays – not often you can do that on the Isle of Lewis. Although I used a modern mirror this technique has recently been shown to have been used for thousands of years – World’s Oldest Solar Device.
Parabolic Mirror
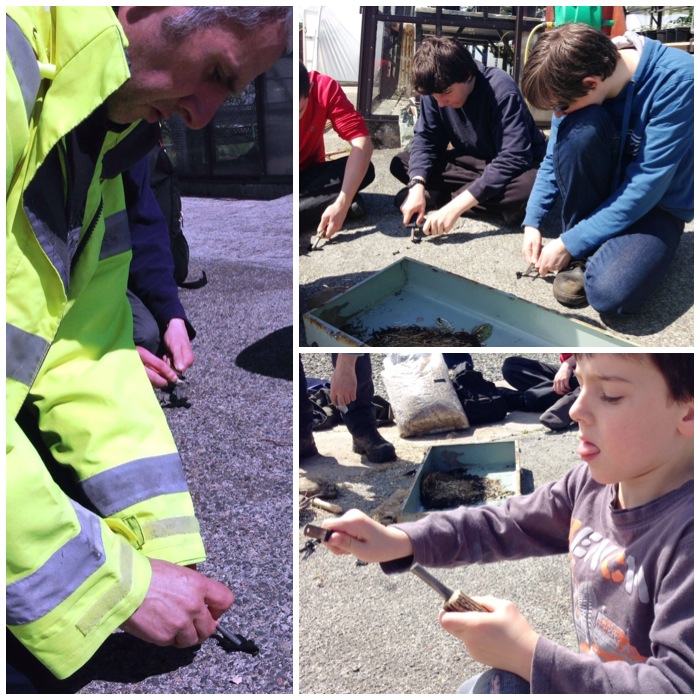
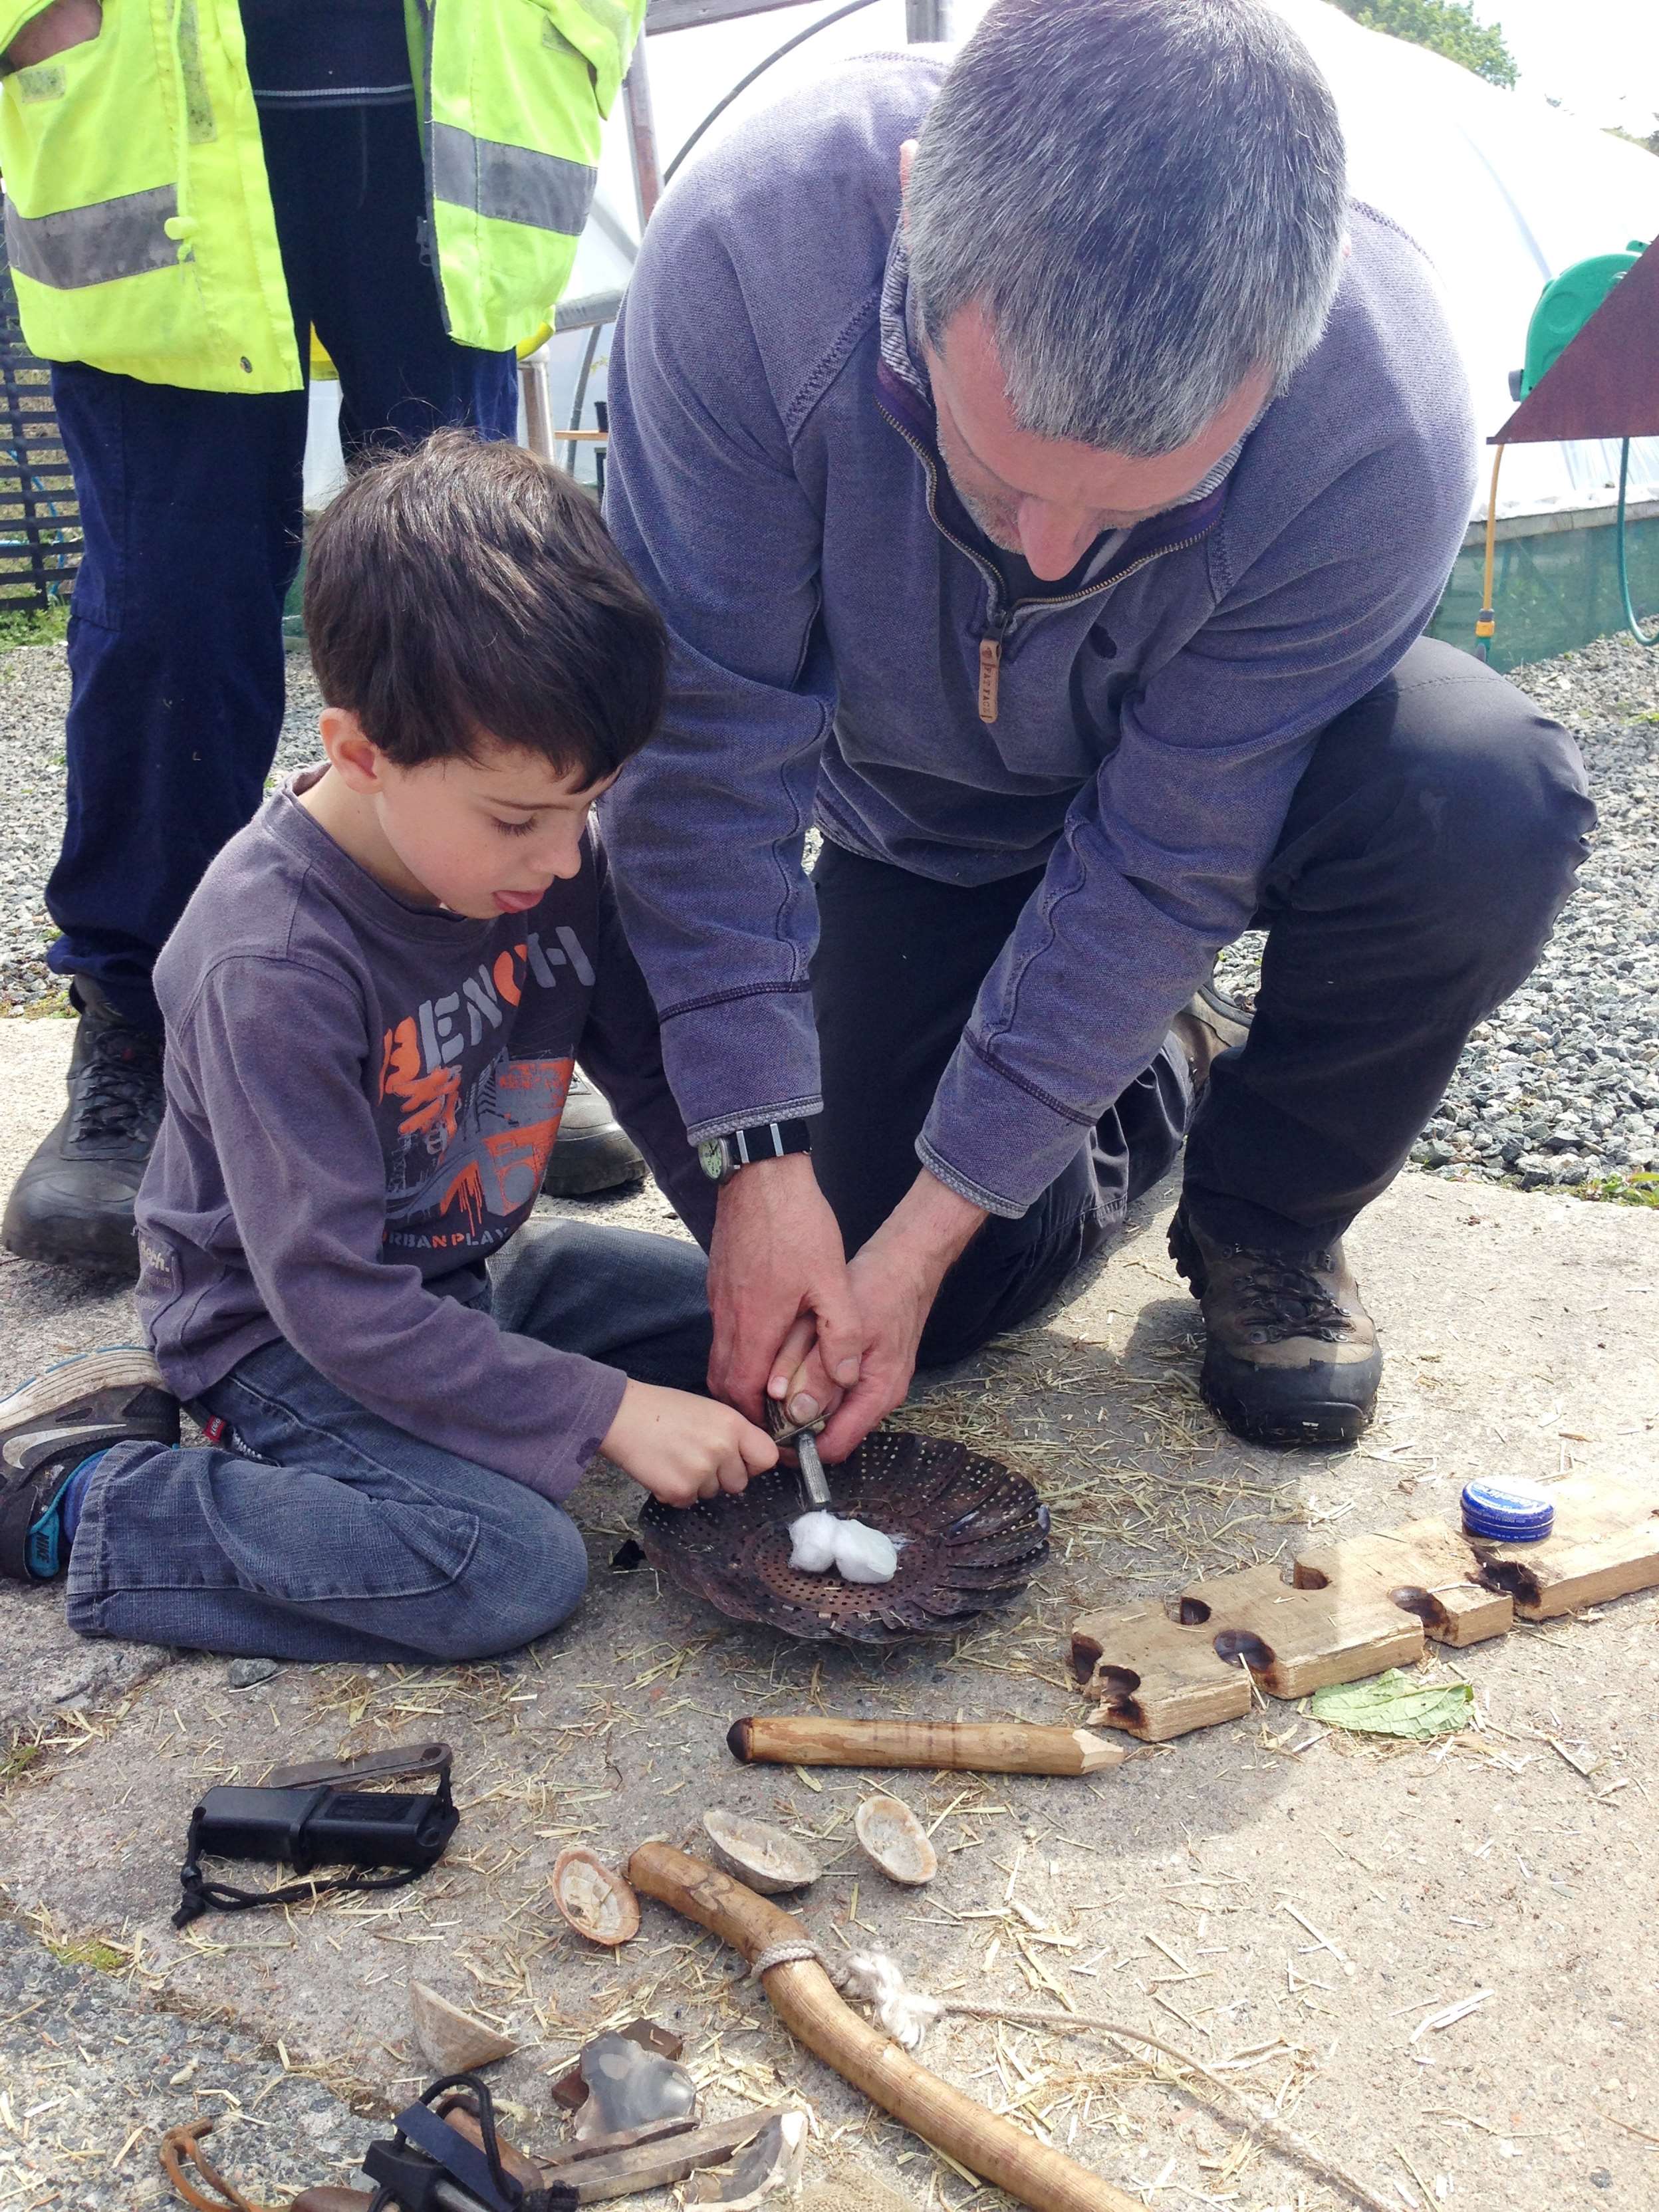
We decided for safety to light our fires on a patch of concrete within the nursery area (normally I would use raised fire pits for this). I taught the class how to use modern firesteels at first and they soon had sparks going strong.
Firesteel session
My son Finlay got in on the act as well and everyone was able to light up some cotton wool balls in no time. I have to say a big thank you to my wee boy Finlay as he was the perfect student all day, getting stuck in with all the others.
Little Finlay had a go as well
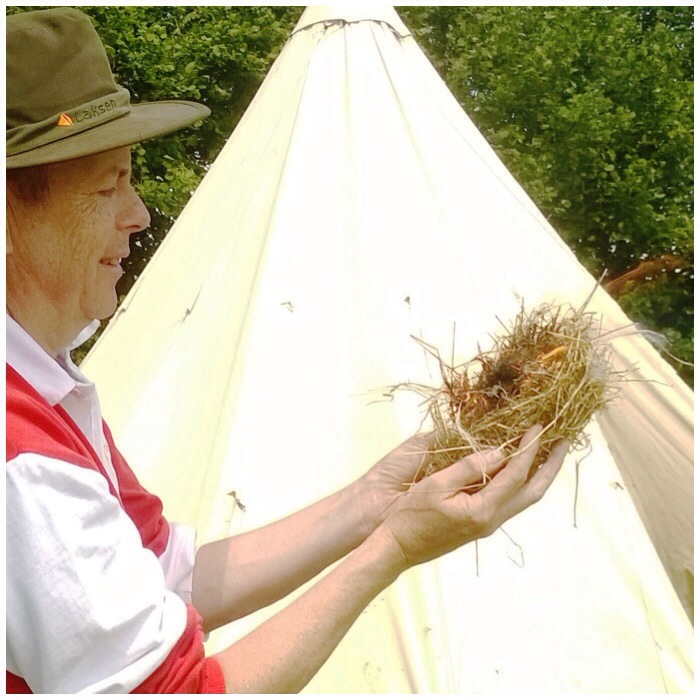
After the cotton wool balls I got the class to catch some sparks onto some char cloth that we then popped into some hay.
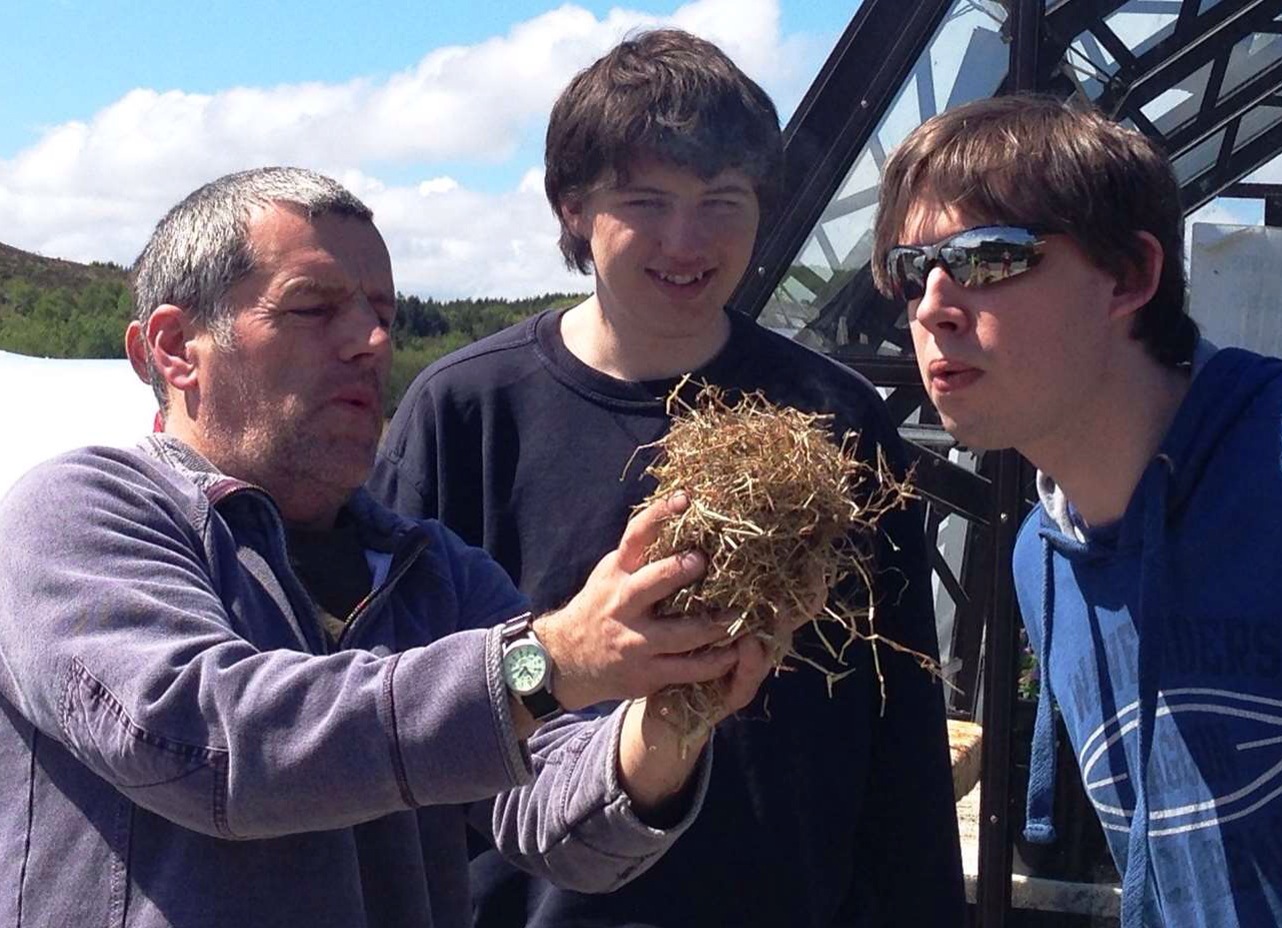
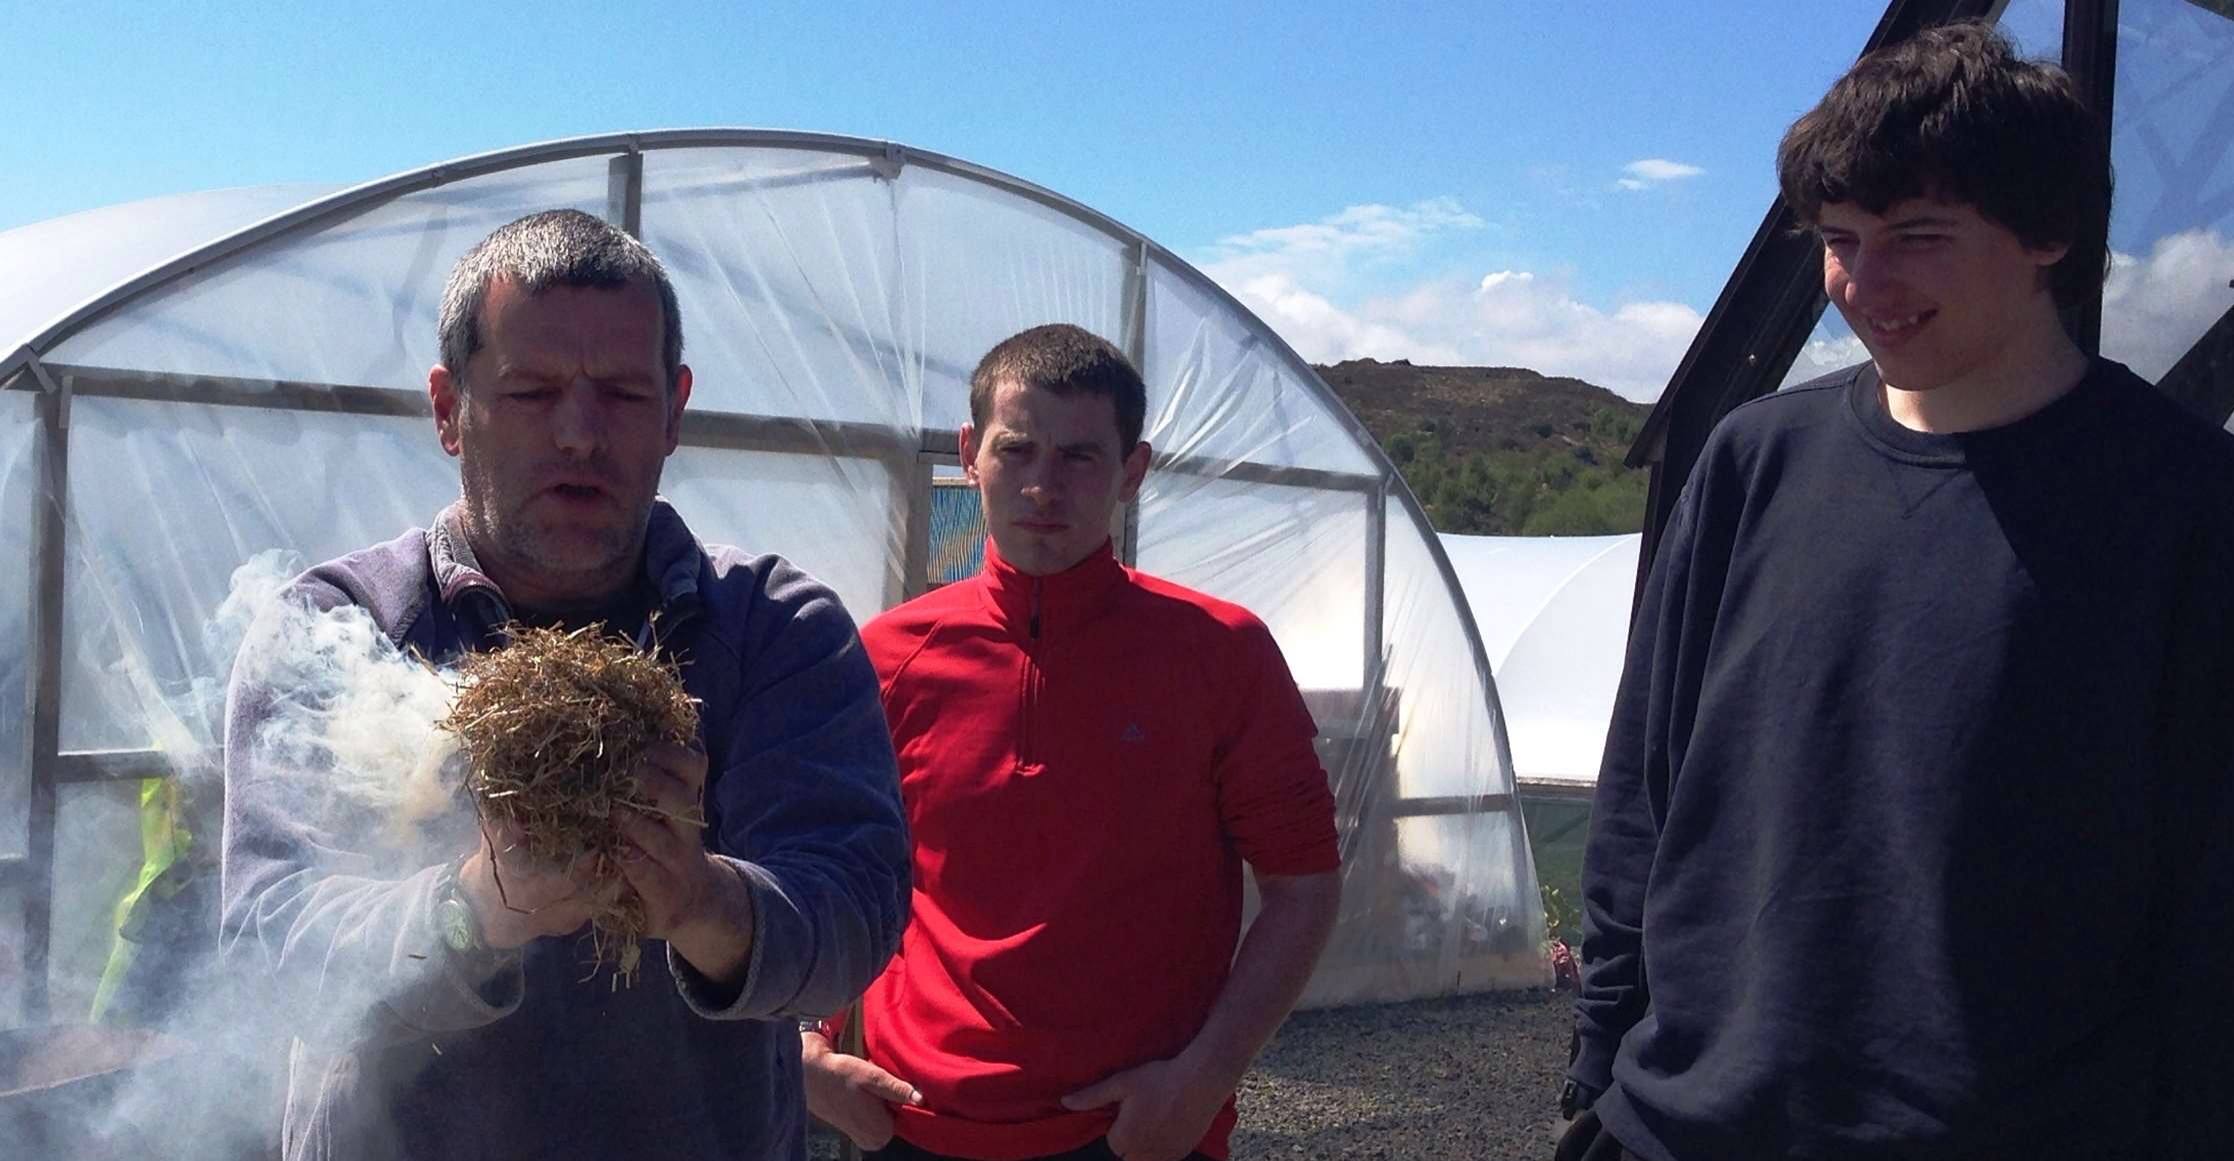
First tinder bundle
Everyone was happy when we got that first tinder bundle burning happily.
First flames
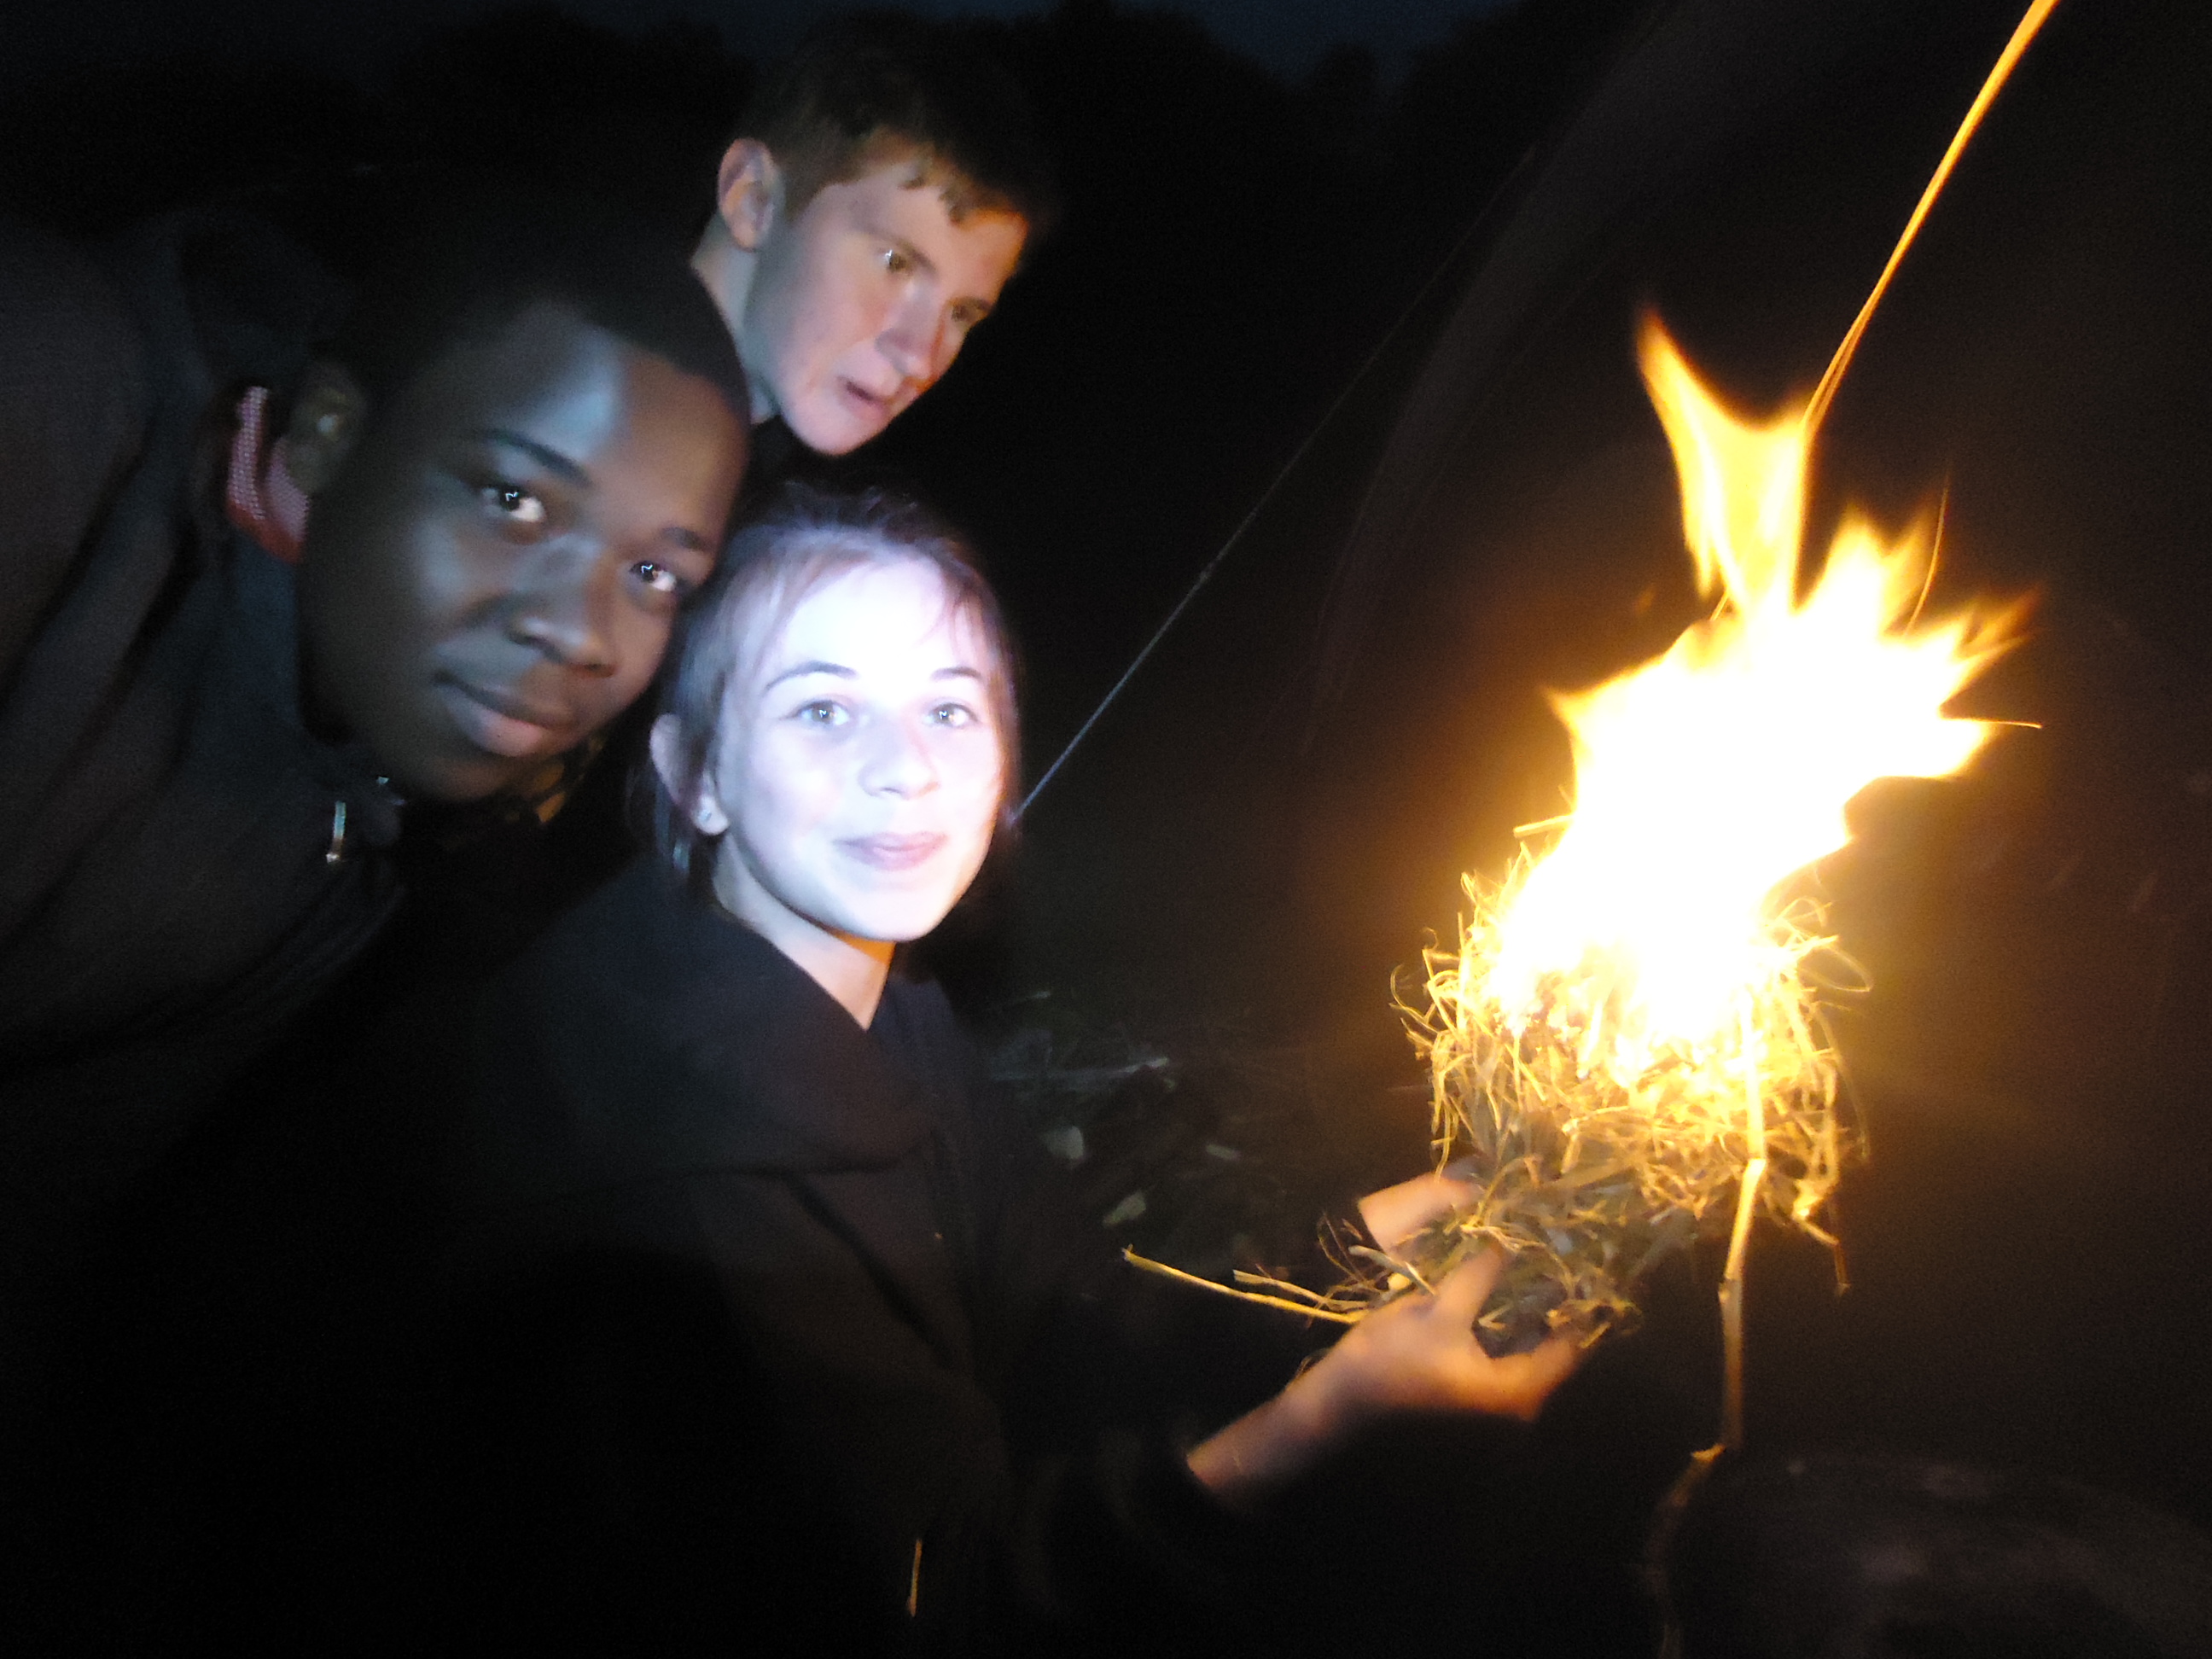
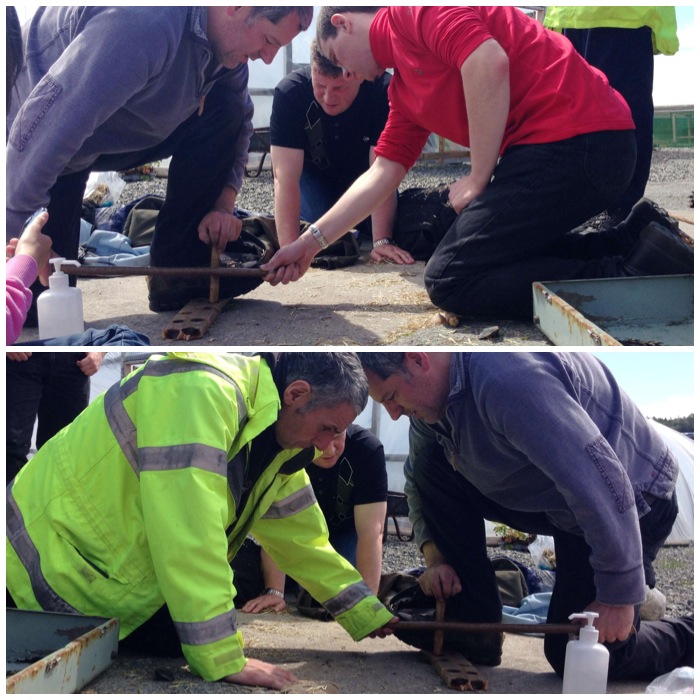
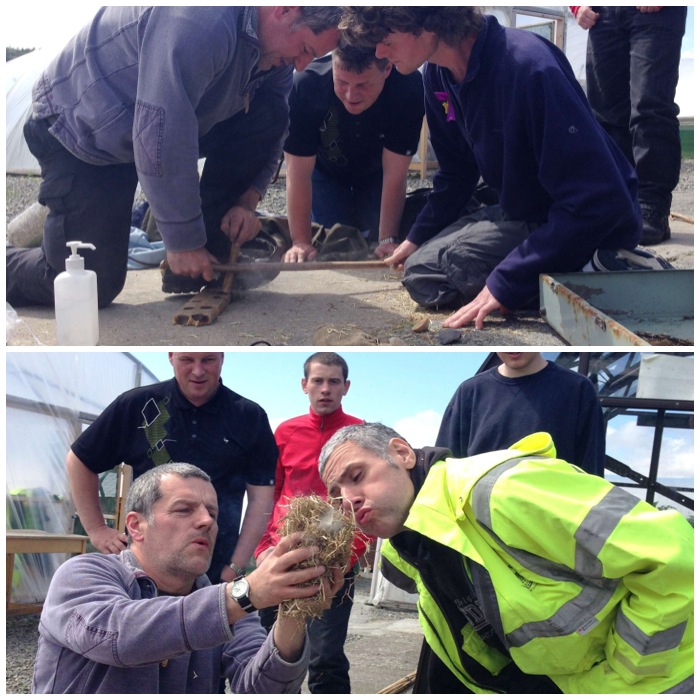
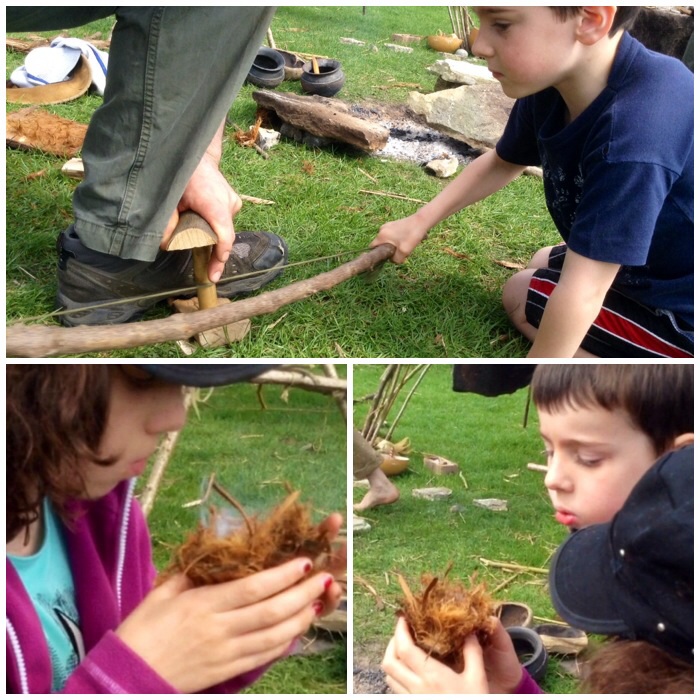
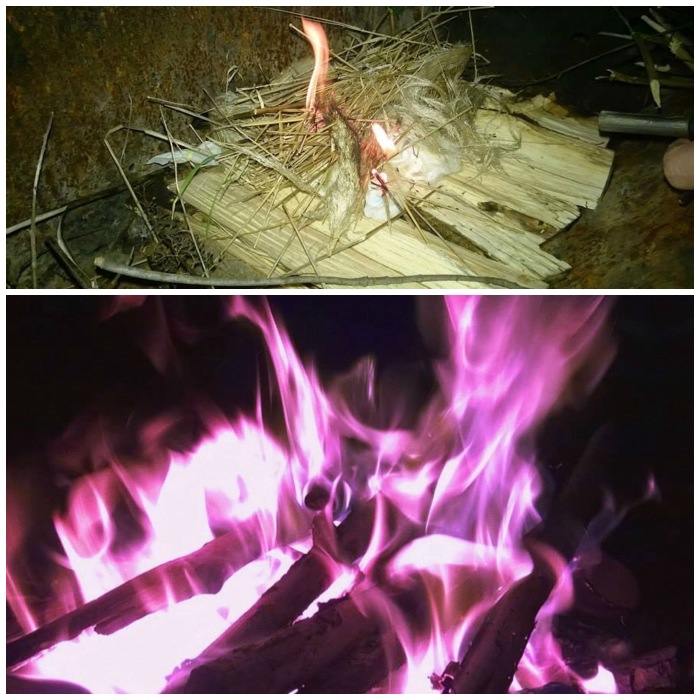
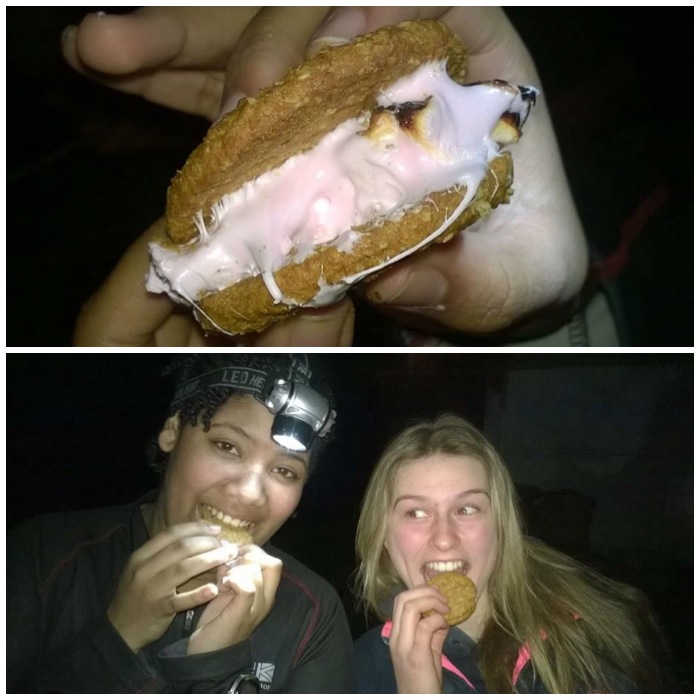
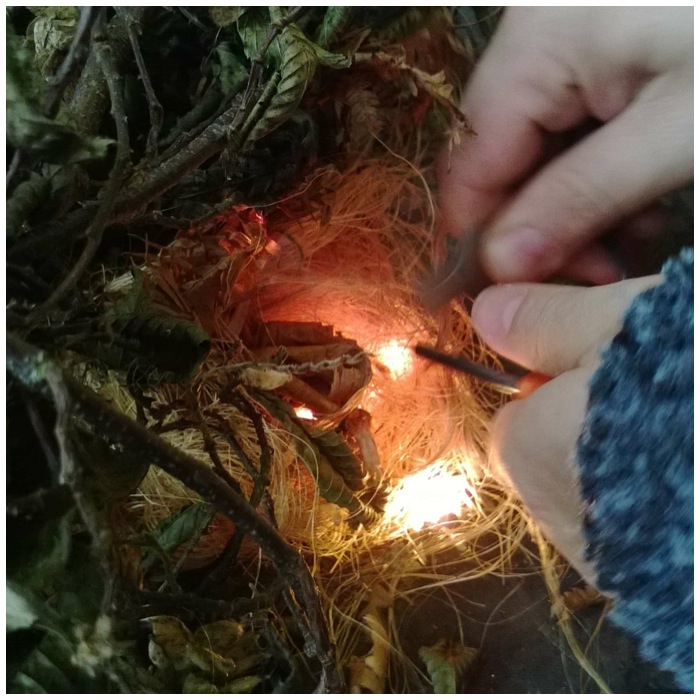
After the firesteels it was time to make some Lucky Fire, sometimes known as the Beltane, the Need fire or Forced Fire on the islands. In Gaelic it is called teine eigin (translates as ‘fire from rubbing sticks together’). Bushcrafters normally call this skill the Bowdrill but what is not commonly known is that this method of fire lighting was used in Scotland in some places to light fires up until the middle of the 19th century.
I doubled up with each of the guys to give them a feel for how it worked but due to a lack of time could not teach them to do this on their own. The wood was lovely and dry due to the sunny day and we soon had some good coals going.
Bowdrill teamwork
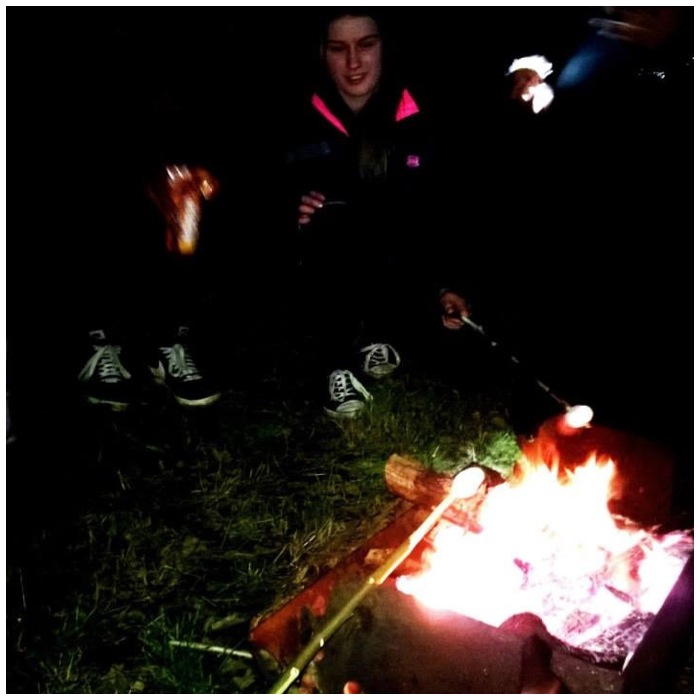
As we were bowdrilling I explained how this technique had been used on the islands until very recently and it would have been quite likely that some of their recent ancestors had used this technique to light a fire. After getting a few coals we popped one into a tinder bundle and started blowing that into flame.
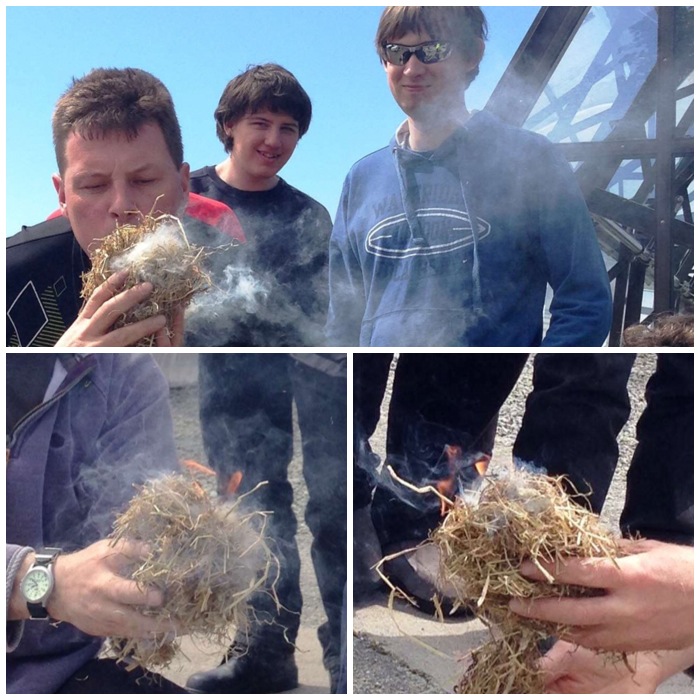
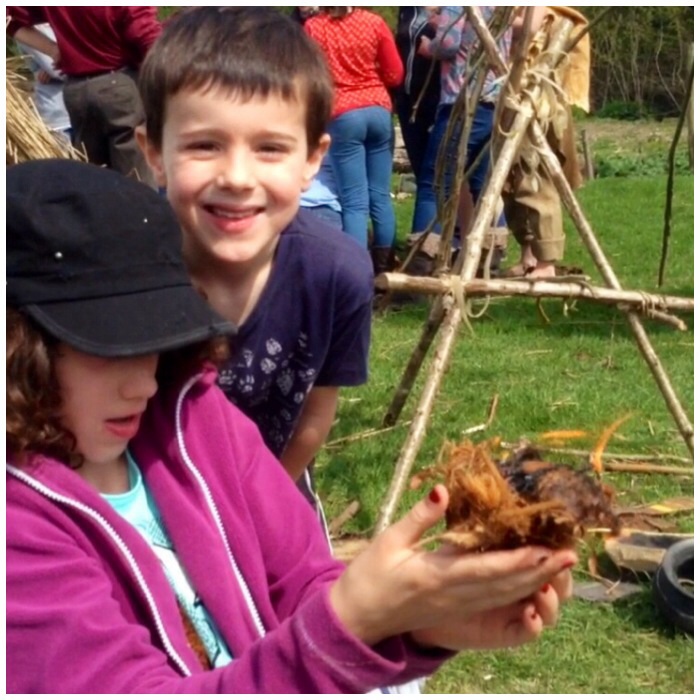
Final strokes and getting the bundle going
Everyone was keen to be involved in all parts of the process of making fire.
Everyone had a go
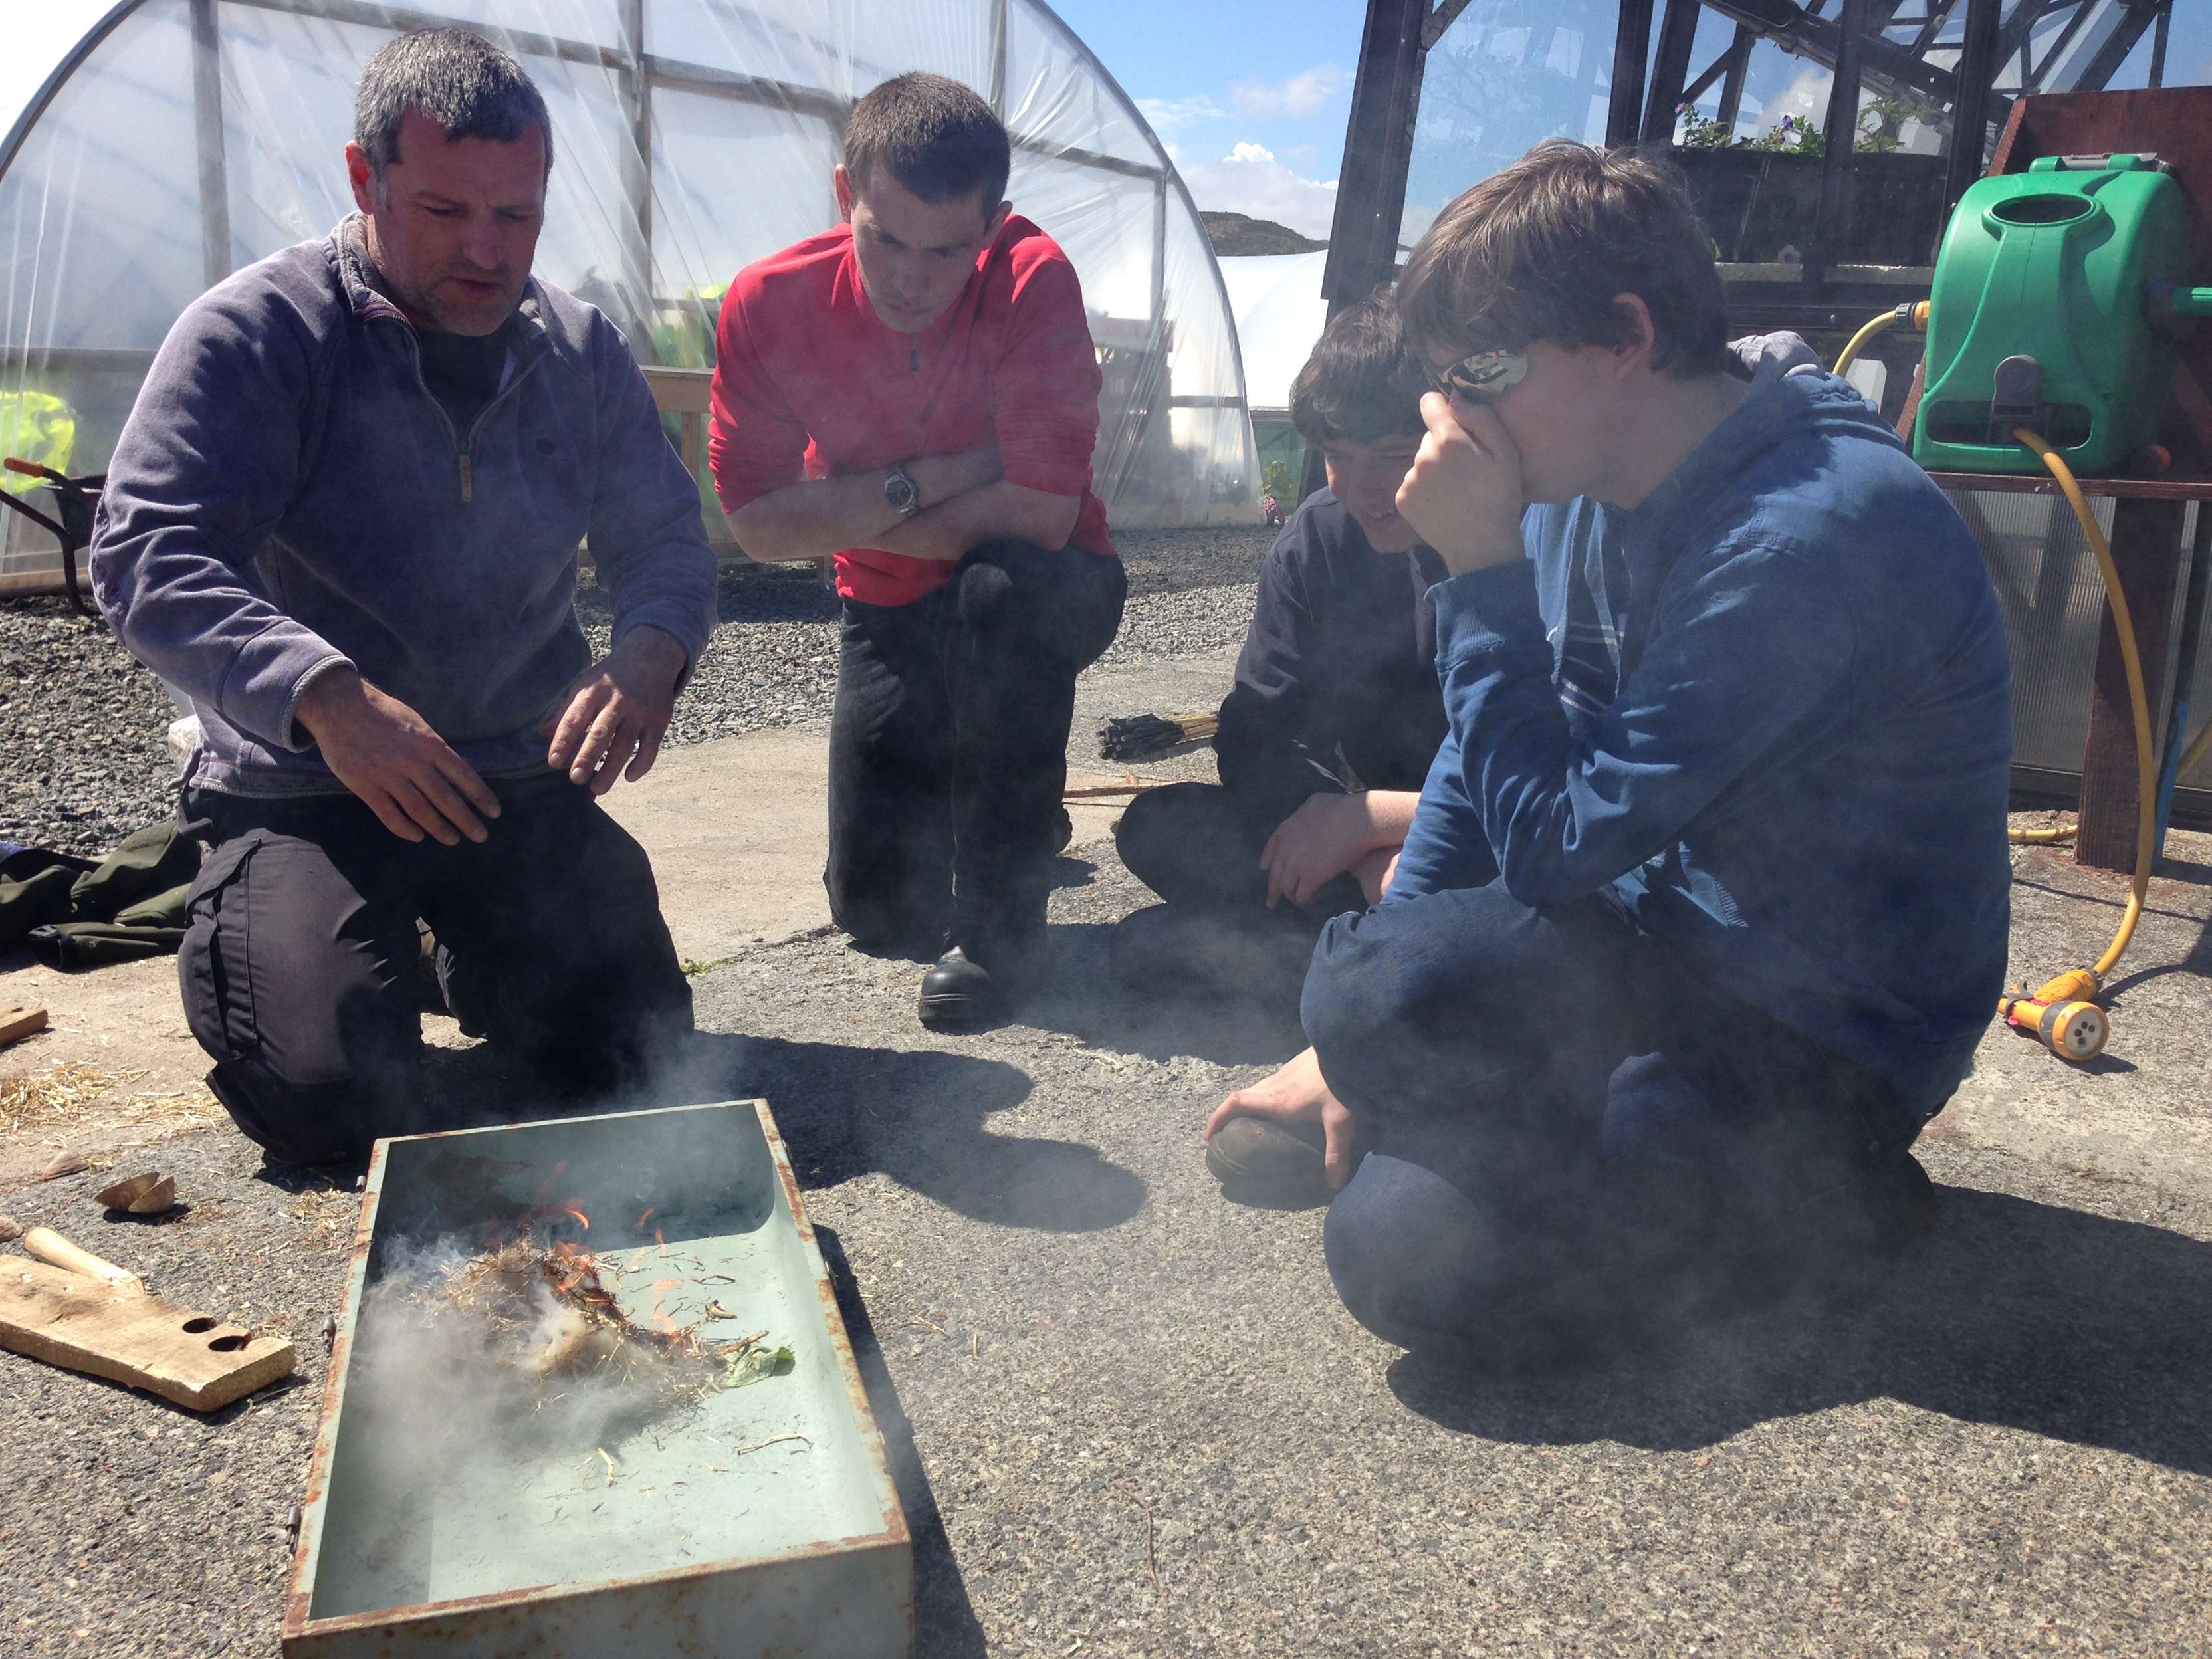
Even the boss John got involved and before we knew it we had flame again 🙂
Even the boss John got a go – then we got flames again
As we could not keep the fire going because of the college safety rules all I could do with the class was to explain at this point how they would go about building their fire up so it became self sustaining.
Flamage
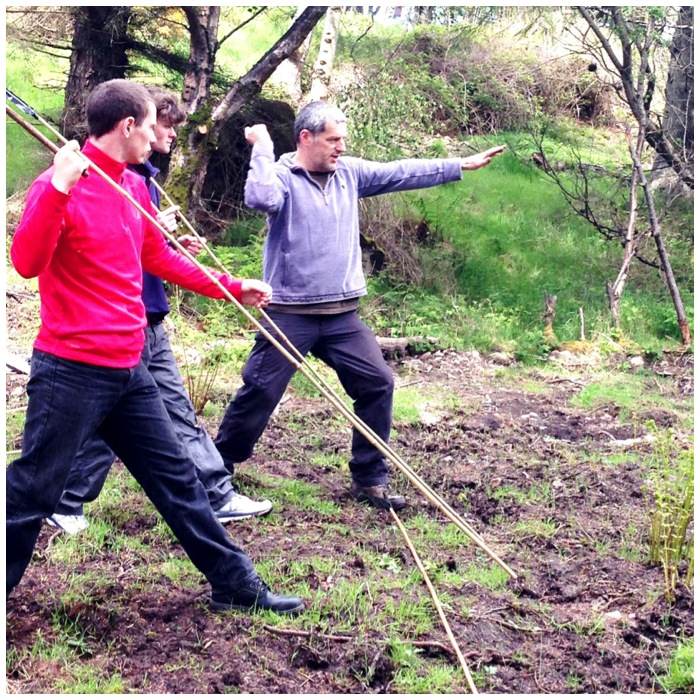
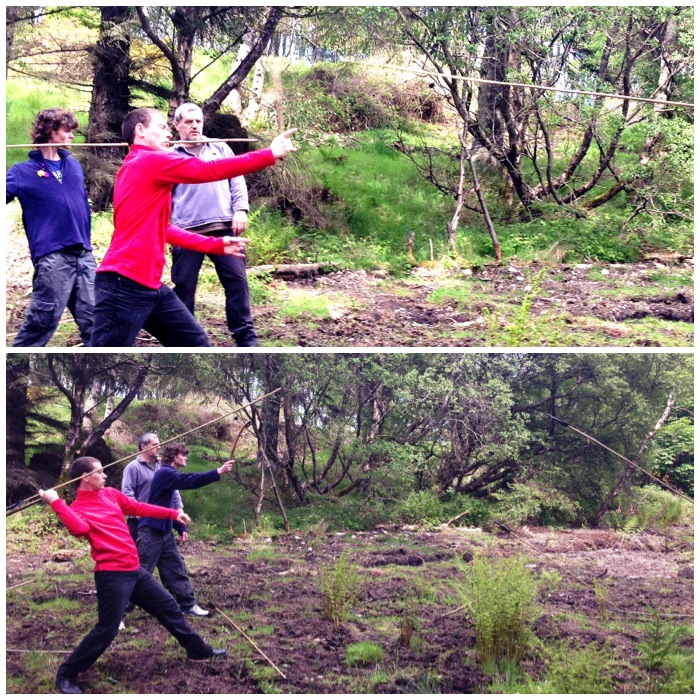
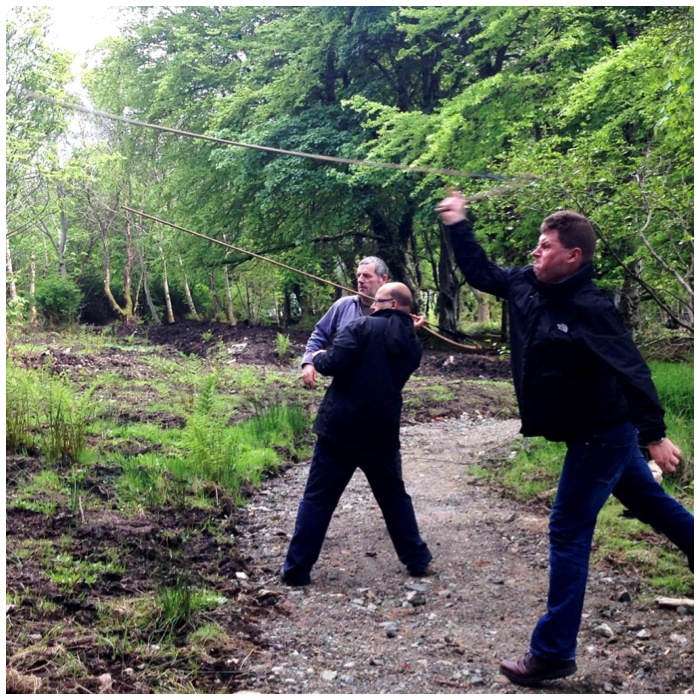
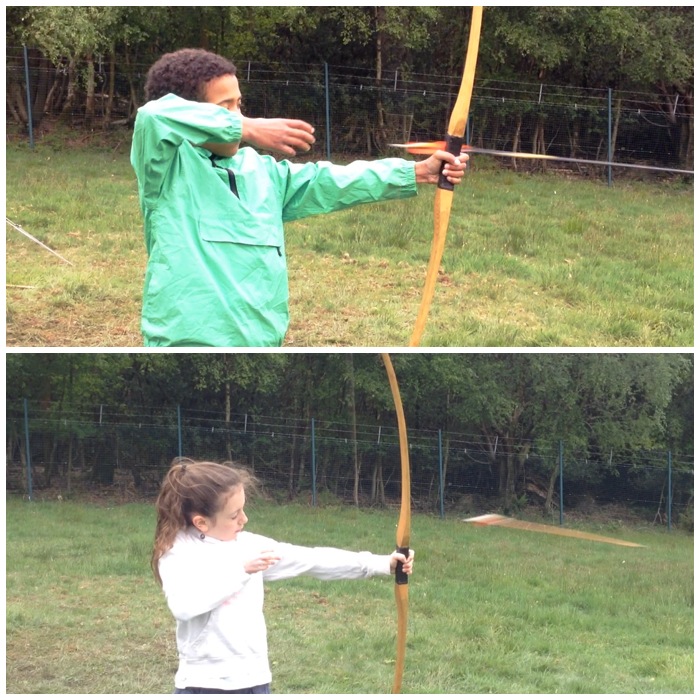
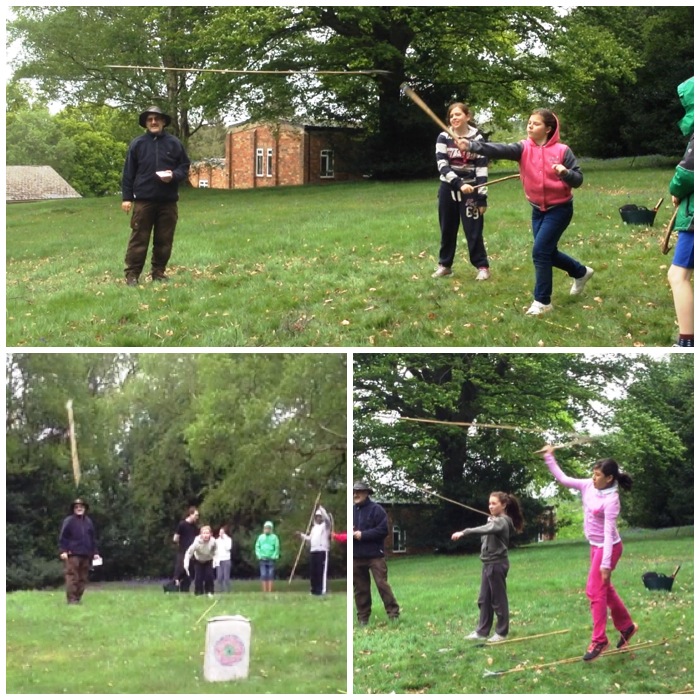
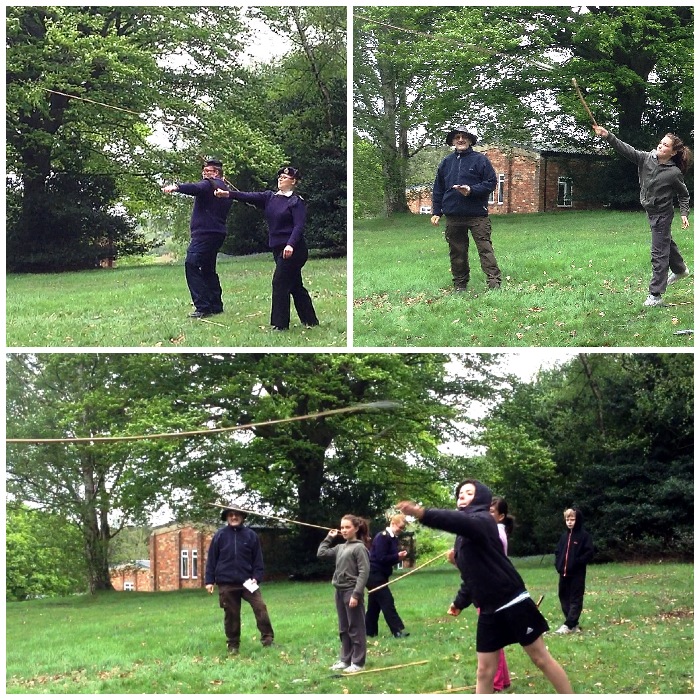
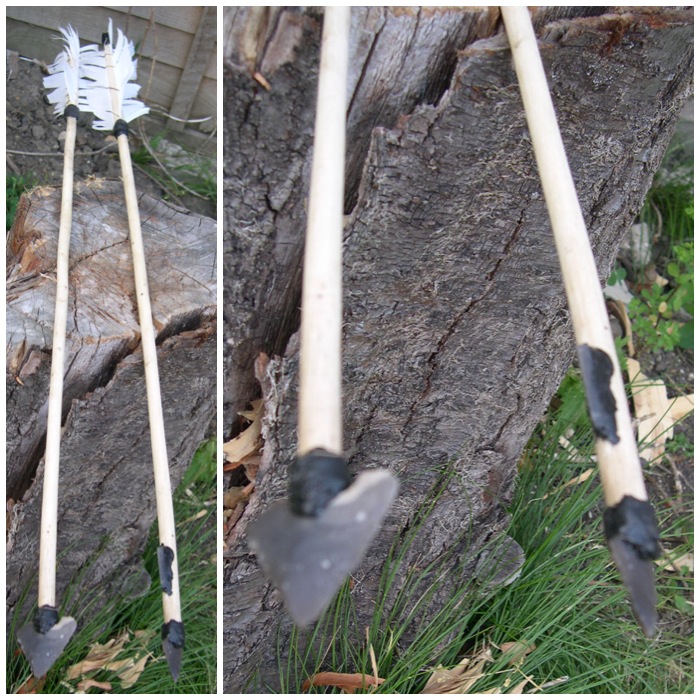
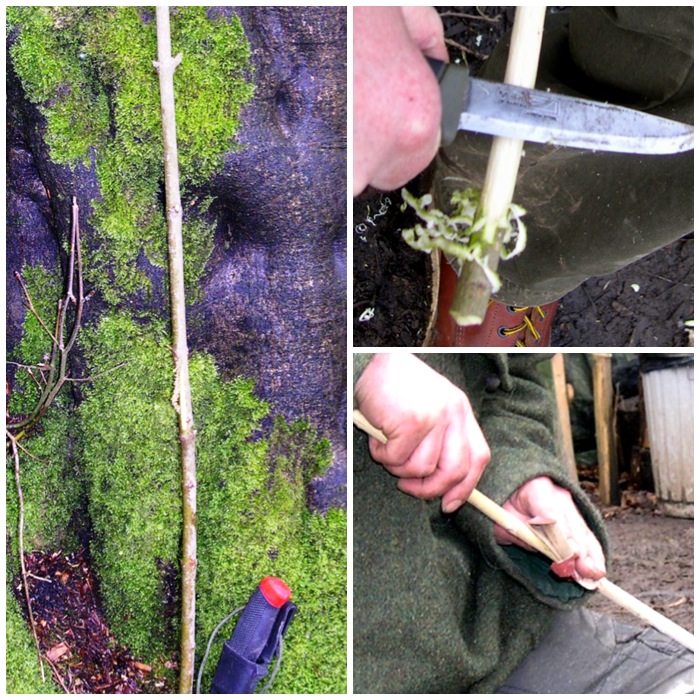
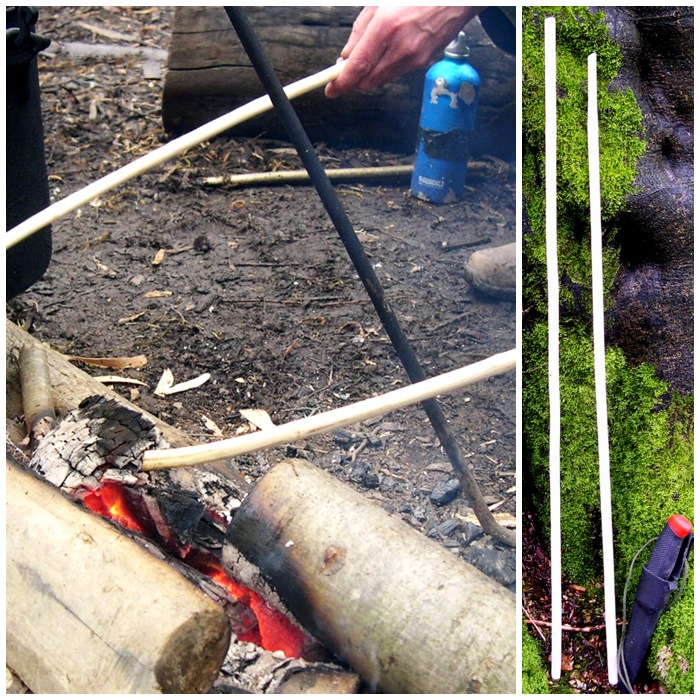
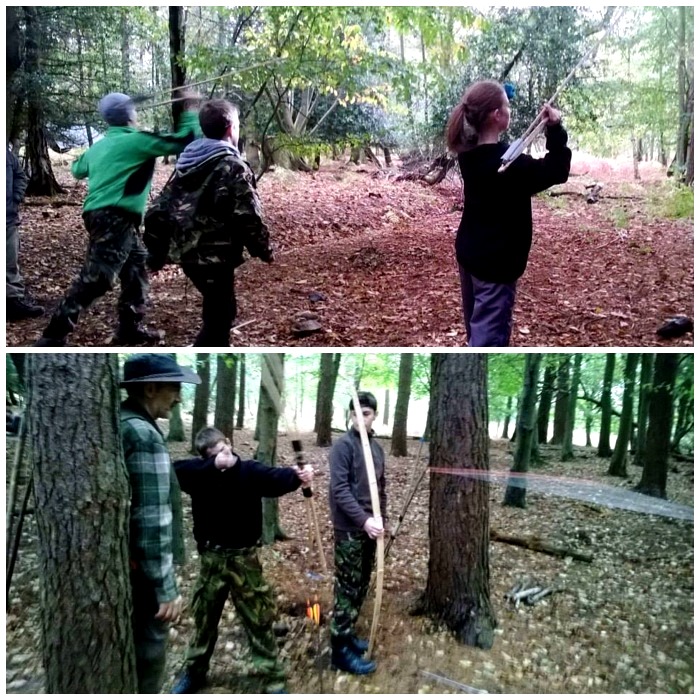
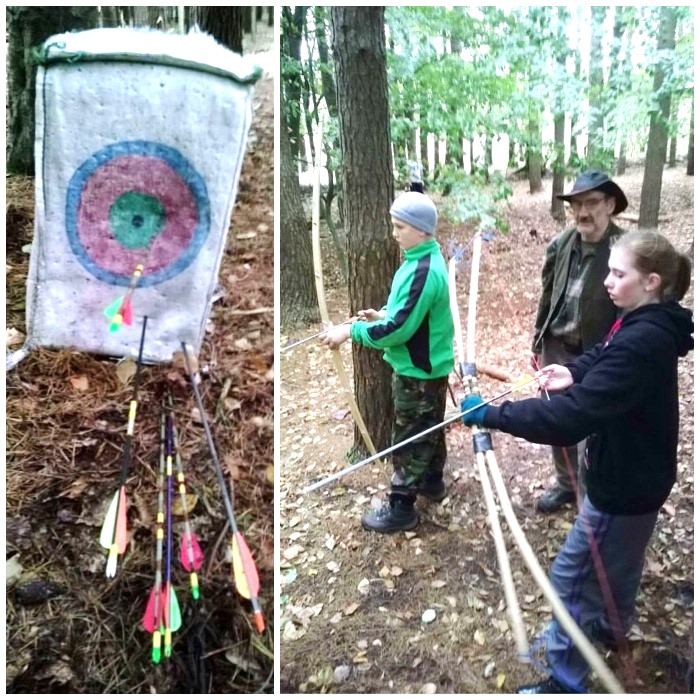
The final activity was to get the Atlatl darts out. I could not bring any with me on the plane so I just bought some bamboo canes locally and made flights out of tape. All in all the set cost me about £6.
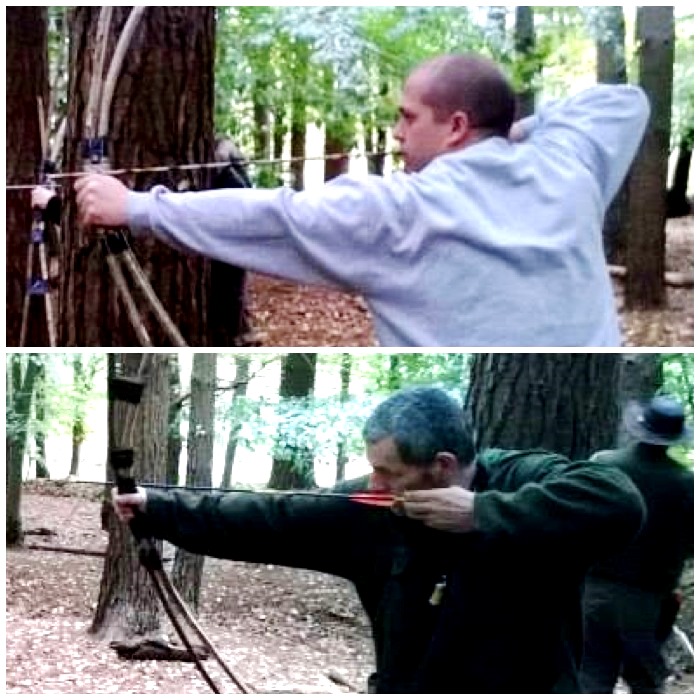
After a bit of tuition to each pair it was time to do some shooting.
A little bit of Atlatl tuition
In no time they were getting the hang of it. We did though have to move our target (thanks for your ingenuity here John) as some golfers had lost a ball and were searching for it in scrubland near the target.
Boys having fun
I think John is a possible convert to the Atlatl by the look of the concentration on his face.
Some good Atlatl throwing
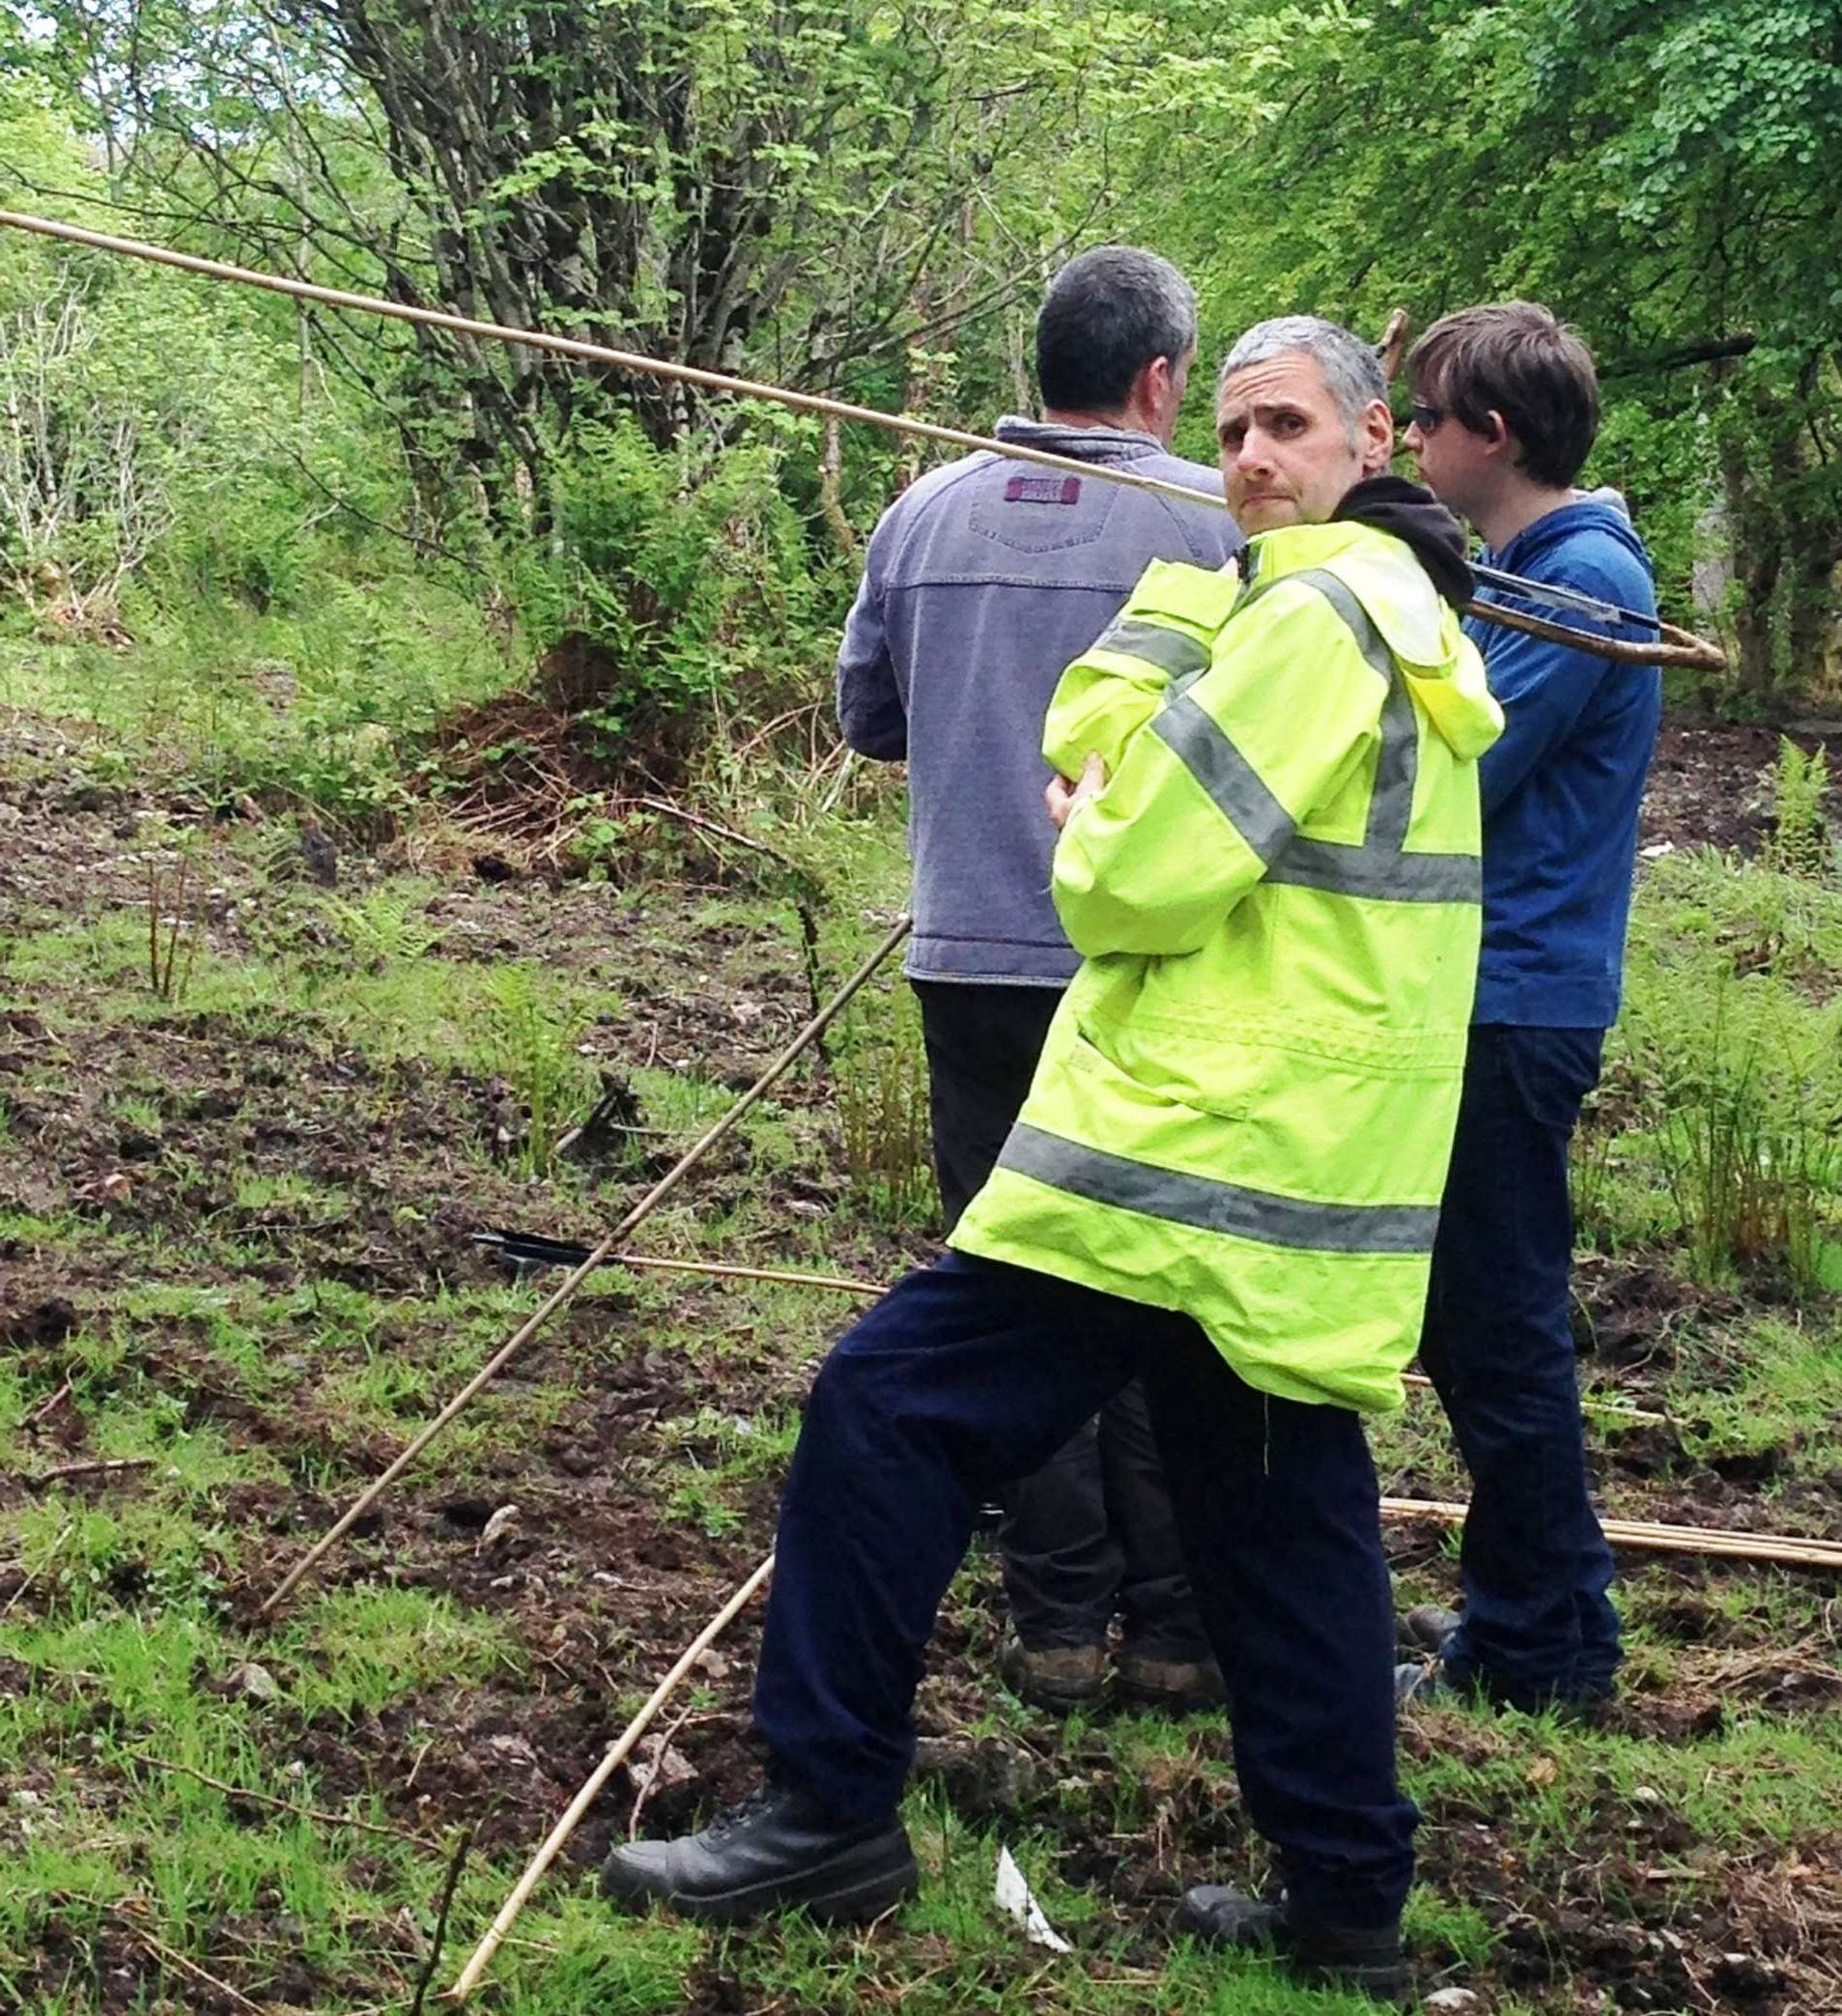
I really enjoyed teaching my brother Finlay to use the Atlatl.
My brother ready to shoot
In the end they all got the hang of it and were happy to be chucking darts down the range.
Dart away
I must in the end thank my sister Tina and John for arranging this day as I had a fabulous time working with everyone in Finlay’s class.
After the day was finished I was really struck by how many of the skills I practise under the title of bushcraft were being practised on a daily basis on the Isle of Lewis just a few generations ago.
May brings about City of London Sea Cadets‘ annual pilgrimage to the New Forest to remember the 1,415 crew members of the mighty Battlecruiser HMS Hood who lost their lives on the 24th of May 1941 and also to provide a range of adventurous activities for our cadets to try out in the beautiful countryside.
Our campsite was in the large Scouting site of Ferny Crofts in the New Forest.
HMS Hood Remembrance Service
This year we had a number of cadets from visiting units of ages ranging from 10 to 17. They were split into a class for the Juniors (10 & 11 year olds), a course on basic campcraft and one on more advanced skills. This weekend was also a chance for us to let the younger members of staff have a go at teaching outdoor skills to the cadets and which I was very happy to see worked out very well. We laid on a variety of classes including navigation rucksack packing, first aid, outdoor clothing, cooking and conservation.
Outdoor classes
For the Juniors the Saturday morning included a class on responsible firelighting. This was run by Charlie who is a fire fighter in his day-to day-life and is always keen to show the cadets how to light and manage fires in a fun but safe manner. Charlie had them using modern and traditional firesteels, and also had the cadets assisting him in creating fire by friction using the bowdrill method.
Bushcraft classes
Soon it was time to head out and about. The day was very hot so I made the decision to try and keep to the woods as much as possible. Even though it was hot, the ground in many areas was saturated, making for wet feet for some.
Out and about in the New Forest
Along the way we would stop to have an impromptu classes on navigation, conservation, first aid or leadership. As far as I am concerned this is the best type of classroom.
Classes on the go
A nice spot for us to stop for a restful break is the hotel near the Beaulieu Railway station. The cadets can relax or run around the small play park for a while while the staff can plan the evening’s activities. it is around this time that Simon heads off to prepare a great meal for everyone in the Roundhouse at our camp.
Rest and excellent food
After all the learning it is time to play and relax. The kids and staff all took part in the the tug of war and the volleyball games.
Fun and fitness
Someone managed to get hold of the water cannons I had brought along for bushcraft games and put them to good use in the evening as well.
Pure fun
After dark we had the usual marshmallows around the fire and I lit a couple of my Scandanavian candles. Dave though had brought along his laptop and small projector. he put a film on (Brave, I think) and projected it onto the inside of the parachute. The whole set up could not be filmed because of the dark and the smoke from the fire but it did work and kept everyone happy.
Nightlife
As my wife Alison was also away that weekend I took my two kids (Catherine and Finlay) along with me. They got on really well with all the cadets and Finlay managed to sleep all weekend in a hammock for the first time. Not bad for a six year old.
Sleepy mornings
As part of their Green Module the cadets learnt how to cook over an open fire on the Sunday morning and I was happy to sample the fare.
Campfire classes
We try and set up lots of events on the Sunday morning, some to really test the cadets and some to just have fun just like they are having on the Atlatl range.
Atlatl fun
Over the weekend one of the cadets turned 18 and so became a member of staff. We managed to get some cakes and candles together for a good old Happy Birthday sing a long.
Birthday celebrations
I have been experimenting with video over the last few months so managed to put a short piece together of the weekend.
While we were running around the woods on the Sunday morning Paul. Andy and some of the older cadets attended the HMS Hood Remembrance ceremony at Boldre church. In all my years attending this event (since 1999) I have never gotten to the church; I’m always left behind in the woods 😉 These are official City of London Sea Cadet pictures.
Remembrance
As usual I am looking forward to my trip to the New Forest next year. I also made a small video of what my kids got up to over the weekend.
The 16th of May was a perfect day for a bimble around the village with the kids. They decided to take the scooters and even managed to keep them going on the rough woodland tracks.
Bimbling with my kids
Looking good now is the common bistort and the yellow iris. I found the large sow thistle up near the Clift Pavilion.
Bistort, Iris and Sow Thistle
I passed by many dandelion seed heads but this one caught the light just perfectly.
Dandelion seed head
The meadow by Lane End proved a good place to explore.
Chilling in the sun
The wild strawberry leaves and flowers are well out around the whole village but I saw my first buttercups and red clover this week.
Wild Strawberry, Red Clover and Buttercup
This large horse chestnut is one of the trees I am monitoring for the whole year. The sun looked nice as it shone through it. The blossom is still looking good on the horse chestnut and at the foot of it I found these ferns uncurling.
Horse Chestnut and unfurling Ferns
We had a good look around the meadow but there are not too many plants flowering yet.
Cuddles
I did spot that the cherry tree near the pond is starting to produce its fruit now. Catherine and Finlay were also on the lookout for tracks (this one is deer) and tadpoles.
Cherry fruit, Deer slots and Tadpoles
One of my favourite snacks while out foraging is the pignut. I found that they had just started to flower in our area now.
Pignut flowers and leaves
I do not really know my birds but Catherine and Finlay took some time out to lie back and see what flew over them.
Watching the sky
The orchids in the Frith are still hanging in there but I expect to see them disappear over the next few weeks. In the damp ground we did find a pheasant track and spotted that the Brooklime was appearing now.
Orchids, Pheasant print and Brooklime
The bluebells have started to die back now but still make a beautiful sight. The stichwort and mayweed are looking at their finest though at the moment.
Bluebells, Stitchwort and Mayweed
The kids had soon had enough of lying about and started scrambling over the alder and willow trees.
The Catherine Shuffle
The ash is finally out: it must be one of the last trees to burst into life in the Bramley area. Out near the playground by the new estate the white campion is in full bloom and in the Frith we spotted what looked like a badger print, deep in the wood well away from dog walking tracks.
Ash, White Campion and possible Badger print
Still to be found there are the lovely yellow wood avens and blue forget-me-nots, and the grass seed heads are standing tall.
Wood Aven, Forget-Me-Nots and Grass Seed head
Needless to say Finlay needed to get in on the tree climbing act.
The Finlay Shuffle
I found what looks like a water hemlock by the stream next to our house. Beautiful but deadly.
Water Hemlock
Last picture is of a couple of tracks from I have no idea what animal: any ideas?
Unknown print?
This was an excellent bimble around Bramley and I am now looking forward to seeing all the early summer flowers that will soon be appearing.
I was trimming an ash tree in my garden recently with my friend Paul and I managed to save a few pieces for Atlatls and pot hangers.
I have previously shown you how to carve a collapsible pot hanger so that it can fit into a pot when not in use but on a lot of occasions I just whittle one when I need one.
The type of pot hanger I am talking about is shown below hanging off a ‘Wagon/Waugan Stick’ (pronounced waygone or worgan – I hear different variations on this from different people) campfire set up. The pot hook is adjustable in that the pot is easily raised or lowered by using the different hooks on the pot hanger.
A simple pot hook
I started off with a piece of ash that had a fork in it at a good angle (to form a hook) and finished up with something that allowed me to be able to quickly or slowly cook/boil something.
On the right you can see the finished pot hanger in action. To help stop any confusion I will refer to the large hook holding the small kettle as the ‘pot hook’ and the small hooks as the ‘adjusting hooks’.
Before and After
To begin with I trimmed off all the knobbly pieces using powerful chest lever and locked arm cuts. See my How To…. on knife Safety for more information on these types of cuts.
Powerful cuts
I then trimmed the bark off using a powerful shoulder cut. I had the work piece placed on the ground here off to one side so as to brace it and to work safely.
Braced
To strip the bark around the hook area I used a gentle chest lever grip.
Fine cuts
The bottom of the pot hanger was more difficult to trim as I had not left any excess wood to hold on to. The main thing I needed to consider here was keeping my eye on where my thumb was on the hand holding the pot hanger.
Work safely near the ends
As I needed to use the point area of the blade to trim around the hook I kept the pot hook resting on a small log so that if the knife slipped it would hit the ground. My friend Charlie showed me how to use the knife and the curve of the pot hook to create a fulcrum, making the stripping of the bark safer. I tried to photograph this but they did not turn out well.
De-barking the hook area
I also rounded the bottom of the pot hanger and then used the back of my knife to strip off the remnants of the inner bark.
De-barking with the back of the knife
To make the adjusting hooks I used a batton (a large stick) to carve a cross into the wood – an X cut. I placed my X cuts in line with the pot hook as much as possible. After a couple of good smacks with the batton the knife had cut well into the wood.
Batton in the first X cut
I then repeated the process for the other part of the X cut.
Then the second X cut
A simple X cut – this cut makes the carving of the adjusting hook much easier.
The X cut
So that the pot hanger can hang properly you must remove the wood at the bottom of the X cut first (the bottom being the quarter of the X cut closest to the pot hook).
I use very fine cuts here and the original X cut acts as a stopper point so that you only cut away the wood that you need to.
Fine cuts
I normally remove a small area of wood just below the point of what will become the adjustable hook.
Remove the bottom of the X first (nearest the hook)
Once I’d removed the wood from the lower quarter I then removed the wood from one of the side quarters.
Remove the sides of the X
Then I removed the wood from the other side quarter leaving only the top quarter to act as the adjustable hook.
Deepen the sides of the X
I kept carving down until I had exposed enough of the wood that I could carve out the final part of the adjustable hook.
Ready for the undercut
The final part I needed to do was to make an undercut below the point of the upper quarter. I kept reducing the wood until a nice point appeared.
Fine cuts again on the point
You can really see that undercut appearing in the picture below now. For safety I kept the pot hanger braced on the ground (a stump works as well) while I was carving it out.
For this pot hook I carved a further 2 hanging hooks along its length.
Carve deep but safely
This is the final rough shape you are looking for. Any further carving or sanding would be purely for decoration only.
A good point
This pot hanger is particularly suited to the Wagon set up – Wagon (‘way gone’) coming as far as I know from the old tale that if you leave this set up standing when you leave your camp, it points the way for the naughty wood spirits to follow you 🙂
Side view of the Way Gone set up
The hanging hooks attach to the Wagon stick by sitting in a small dimple on the end of it. In this set up I also used a forked stick to give the Wagon height and a smaller (Dead Man’s Finger) stick at the bottom of it to counterbalance everything.
In detail
The whole set up is very easy to adjust for a fast or slow boil/cook.
Adjustable height
This is a great project for any bushcrafter to keep their hand in with simple carving techniques. It looks very simple at first but there are some tricky cuts that if you are not careful can cause a nick or two but the main benefit is – that the tea gets made.
No pressure, no assessments, no worries – just fun, fun and more fun – these were the requirements for the recent London Area Sea Cadet Juniors training weekend at Crowborough Army camp.
I was joined by my good friend Charlie Brookes for the weekend teaching some bushcraft skills to the cadets. Also helping us were one our new Adventure Training instructors Emma Deasy and Leading Cadet Jessica Edwards (Jessica is under training to become an Adventure Leader).
We set up our classroom and prepared for all our activities on the Friday afternoon. At this stage it was just Charlie and myself but as he is a top bushcrafter everything got set up in record time.
Our classroom and my billet
As the cadets arrived on the Friday evening Charlie and myself relaxed around a nice fire and discussed how best to run the weekend. We did not have to look after the cadets in the evenings as there were enough ‘Duty Staff’ around to do this.
A relaxing evening
There were lots of activities planned for the cadets. The plan was for us to be given six cadets for an hour or so and then they would be moved onto other activities. On the saturday we had 3 teams in the morning and 3 in the afternoon.
We ran various activities in each slot including the Atlatl, archery, fire lighting and stalking games.
The Atlatl (a spear chucking device) has become a regular event at many of our courses. Just looking at these cadets you can see that they really enjoy this activity. I set up a short range of about 15 meters as I was more focused on accuracy rather than distance.
Atlatls in action
One of the other activities the cadets undertook was a cookery class (Cook Stewards course in the Sea Cadets). I was supplied on a number of occasions with some excellent cookies that were baked in this class and every time I went into the main building I was assaulted by a fantastic smell of baking biscuits.
Cookery class
As you can see that the little fella in the picture just above on the right turned out to be a proper little Minion. This was baked by one of the other instructors Emma.
Emma’s Minion
Charlie spent a great deal of the day teaching the cadets how to light a fire in many different ways and also about the responsibilities they need to think about when lighting a fire. In these pictures the cadets are using traditional flint and steels on the left and more modern firesteels on the right.
Some take to this straight away and others require a little bit of a helping hand.
Flint & Steel and Firesteels
In no time the cadets were creating good sparks from traditional flint and steels and lighting up cotton wool balls smeared in Vaseline with modern firesteels.
Sparks and flames
The cadets also lit lots of charcloth and soon had good tinder bundles going.
Flamage
I put together a short video showing all these activities.
I asked Emma at some time on the Saturday to go around the other classes and get one or two pictures of each one. Emma did get some good pictures but I also found this on my camera – scary stuff 😉
The ladies taking a selfie
A little toy that really caught the attention of the cadets was the parabolic mirror. This is a concave mirror that you can use to light a small piece of material just using the suns rays.
Parabolic mirror
Other classes the cadets undertook included First Aid and Physical Training.
First Aid and PT
One of the activities I like to teach the cadets is about listening correctly while out and about. They all come from London so for many they do not truly listen to the countryside when out and about. to begin with I get them to focus their listening by cupping their hands to their ears. This really increases the sound volume from the direction they are facing and as they turn around they can clearly hear everything coming from quite a distance.
After they get used to this we blindfold them so that they can appreciate how much sound can help us with spotting animals in the woods.
Learning to listen properly
The drum stalk is a game where the participants are blindfolded and have to walk from an unknown spot (to them) and touch the head of the drummer. The drummer gently taps the drum (a bucket in this case) to give the participants a focus to walk to. Each participant has a guide walking by them to make sure they do not fall into any holes or trip over anything.
Drum stalk
Being Sea Cadets a training weekend would not be complete without a class on Seamanship and on Comms skills. In Seamanship the cadets learnt how to make a monkeys fist – this is a type of knot that creates a weight using the rope and is used for throwing a heaving line from a boat to the shore in order to tie it up.
In the comms class the cadets learnt all about how to use radios properly by getting out and about using hand held radios and they also made their own semaphore flags.
Seamanship and communication skills
After each Atlatl session I also got the cadets to shoot some arrows down the range. I managed to get some cracking shots this time of the arrows being released.
Archery action
On the Sunday morning a competition was held and we set up an Atlatl range so that the cadets could try out all the skills they had learnt the previous day.
Atlatl competition 1
The cadets were definitely better than the staff with both accuracy and enthusiasm.
Atlatl competition 2
The PT staff also set up an indoor sports competition for the cadets. I walked into the hall and the noise of all the cadets egging their pals on was amazing.
Sports competition
A staff team was put together and thankfully as I was seen to be too busy filming was left alone. In all the madness and fun that was being had I have no idea who won.
Even the staff took part
In amongst all this fun we did find time to do some other stuff. Charlie tested out a Wood Gas stove and I managed to do a little pot hook carving (a How To on this to follow).
Testing and carving
A great weekend with great Sea Cadets both young and old.
I was shown what I think is quite an ingenious tent two weeks ago by my friend Adam Cottrell. The tent is from a company called Heimplanetand is erected simply by inflating it. This post is not an in-depth review as I have only seen it once for a very short period. My initial impressions of it were very positive and I would be keen to try it out sometime.
The Cave
The tent weighs 11.5lbs (5.2kgs in new money) so one for the car I think rather than the backpack. The quality of the bag was very good with a ‘canoe bag’-type top that you roll down to compress and seal it.
One tent in a compression bag and pump
All the guylines were detached when Adam opened it up so there was nothing tangled up.
Laid out ready for pumping
Dotted around the tent are 5 nozzle points; only one is needed for inflating the tent, but all the tubes can be closed off after they have been inflated so that if you get a puncture in one tube the whole tent does not deflate.
5 possible nozzle points
In about two minutes Adam had set everything up and inflated the tent.
Simple to inflate
I got Adam to re-do the inflation of the tent and took a short film of it to show you how simple the procedure was. I was quite surprised at the size of the tent and can see why they call it the Cave.
Inflated quickly
Each of the five sections of the tubing can be closed off by this simple locking valve that pinches the small connecting tube between the main tubes.
Each tube can be locked off with these valves
The guylines come in an unusual configuration. They are attached to the tent via toggles and one set of lines on each side is pegged out flat on the ground.
Simple low-lying guylines
Here you can see a little more clearly how the toggles attach to the tent.
Toggles attach the upper guylines
Both sets of guylines on each side attach to the same peg keeping things neat and tidy.
All the guylines on each side go to one peg
Everything is connected either by velcro straps or toggles. The tent can be erected without the outer sheet (but that’s probably not advisable here in the UK).
Tubes and the tent are connected with velcro and toggles
The workmanship I observed on this tent was very high. All the seams looked neatly sealed and the stitching was very accurately placed.
Strong velcro straps
As well as a locking valve on each section there are also 5 access points so that the inner tubes can be removed and repaired if need be.
Separate access to each tube
The tent has a small porch and the small front awning will stop rainwater dripping into the tent when you open it (but only just I think). However when this tent was fully inflated and the guylines were secured it was very stable and strong.
A very strong and stable tent
I liked the small pockets for stowing the door flaps. Very neat and a great idea.
Neat pouches to stow the entrance flaps
In terms of space you could fit two adults with lots of kit into it comfortably. If there were three of you then you would just need to be a bit more disciplined about things but you would be comfortable enough.
Good gap between inner and outer. Also plenty of space inside.
The tent had good ventilation with plenty of mossie-style nets on the inner and a number of covered openings on the outer. It also comes with a good loft storage area and loads of pockets. You cannot stand up in the tent but when sitting most folk will not touch the ceiling with their head.
Good internal ventilation and plenty of storage
To deflate, simply unlock the valves and let the air out. The tent simply collapses in on itself.
Easy to deflate
You need to spend a couple of minutes just pushing all the air out of the tubes, otherwise the tent will be very difficult to put back into the bag.
Take your time pushing all the air out
The tent is rolled up to the size of the bag as with most tents but you can use your knee to push out any trapped air. A good enhancement to the tent back would be to install a little valve so that as you rolled the top down the air could escape quicker.
Compression sack gets rid of the last of the air
As I said at the beginning I was very impressed with this tent. I initially thought that this could never work but after looking at the quality and the strength of the tent I soon lost any doubts. I like the fact that the sleeves covering each tube are very strong and that each section of the tubing can be locked off to aid quick repair. Amazon has these tents on sale for about £395 so they’re not exactly cheap for a 2-3 person tent but this certainly scores highly for quality and ease of erection. I had a look at the Heimplanet site and all the specs for the tent can be found here – The Cave.
Meet my friend Mark Beer – a good friend and excellent craftsman.
Mark Beer – Top Craftsman & Good Friend
Mark has been a woodsman all his life and I met him about 8 years ago. I like to carve and since Mark has such skill in wood carving I always keep an eye on what he is producing so as to help develop my own skills.
I plan to spend some time with him this summer and pictorially document him creating one of his bowls at his wood carving studio.
Bowl carving
In the meantime here are some pictures of just a few of the carvings he has done over the years.
Mulberry CupMulberry CupSpalted beech bowl with curved cherry spoonLarge cherry bowl with mulberry spoonChip carved cherry dish with cherry snuff spoon and birch cup
I took my whole family on my rounds of Bramley last weekend. The kids as usual had fun climbing, wobbling and generally getting muddy.
This was the first time that Alison was able to come on my rounds and she was keen to explore the village wildlife in more detail.
Checking out nature
I took a short video of the walk which I titled Happy finds and sad finds.
A few new flowers made an appearance this week.
Yellow pimpernel, lady’s smock and white campion
I particularly like the bottom right picture. You can actually see the the probiscus of the fly. Not bad for a little phone camera.
Feeding time
The moth was found in a bowl of water by my daughter Catherine and seemed to be recovering well as it dried its wings out. In the bottom picture you can just see a solitary bee emerging from its underground home.
Rescued moth and emerging bumblebee
The crab apple tree on my rounds is finally in leaf now. I will be recording the growth of the apples closely over the following months.
The family under the apple tree
The yellow coltsfoot flowers (top left) have gone now and all that is left are the distinctive leaves and the beautuful puffy seed heads. Also the lungwort flowers have gone leaving only the distinctive white spotted leaves (top right).
At the bottom though I found that the orchids were still standing strong.
Coltsfoot seed head, lungwort and orchids
While we were looking for orchids Alison spotted a dead deer nearby. I couldn’t see any obvious cause of death but lying nearby were some deer leg bones recently stripped of flesh. As the deer (as you can see) still had all its legs I assume there must have been another dead deer nearby at some point as well.
A sad sight
It was nice to see the willow and oak finally coming through this week (left-hand pictures). The reedmace leaves seem nearly full grown now so I will be looking out for the stems and flower heads starting to appear.
I have been patiently waiting for the ash(Fraxinus excelsior) tree in my local park to break open its buds. It has done so over the last two weeks and I am glad I did keep a close eye on it as the birth of its leaflets is quite a beautiful process to watch.
With the prospect of the spread of ash dieback increasing over the next few years I wanted to capture this process I have for so long taken for granted. I am studying plants this year in far more detail as part of the online course with Paul Kirtley from Frontier Bushcraft.
The buds of ash are typically black (likened to the shape of a bishop’s mitre) over the winter as they lie dormant and it is only as they are about to ‘break’ (when the green leaf tip first appears) that the bud changes to a slightly greenish tinge.
The black ‘bishop’s mitre’ ash bud
Here you can see the bud on the left is about to break and the ones on the right have just broken.
From black to green and the breaking starts
After this the growing leaves push out from the bud but are wrapped in a protective sheath. I am unsure what this sheath is called but hopefully someone who reads this can tell me. I liken it to an inner scale of the bud.
Truly broken out now
Once released from the bud you can clearly see the inner protective scale that is wrapped around the ash leaves. In the right hand picture you can just make out the small ash leaflets that are growing.
Ash leaves are wrapped in their inner scales
As the leaves and their attached leaflets push up, the inner protective scales are pushed aside to allow more growth to occur.
Inner scales are released
I noticed at this stage that the leaves continued to grow but still had a stickiness about them that kept them together. This causes the leaves to form into what looks like a small rugby ball.
Ready for the final stretch
Finally the leaves were unfolded (that is when their full length is showing from tip to attachment at the stem).
The individual stems have separated and the leaves have unfolded
The individual leaflets then parted from each other; all that is left now is for them to grow to maturity.
The ash leaflets finally appear
I have noticed that the oak leaves round here have appeared a few weeks before the ash this year so if the old saying – ‘If the oak before the ash, then we’ll only have a splash, if the ash before the oak, then we’ll surely have a soak” – is correct then we should be in for a nice summer (here’s hoping, anyway).
All in all I think that this is a particularly beautiful sight and if you go out around now and look at some of the ash trees you will see it happening for yourself.
I have done a similar post called Stunning Sycamore if you’d like to see more of these amazing unfurling leaves.
I managed to get out around Bramley this morning before all the rain came in and it was well worth the effort.
The bluebells are looking particularly impressive at the moment but if you look closely you will find so much more.
Here is a little taste of what I found this morning.
Iris – yellow flag leavesHawthorn blossom budsBluebellsYoung alder catkinsWillow catkins gone to seedWood spurge and wood anemoneWild mignonette and a bursting pine conePossible large oak gallHorse chestnut blossomFresh nettle leaves and bugleEarly purple orchidRibwort plantain and elderly primroseCow parsley
I take a wander around my village (Bramley, Hants, UK) every week or two and photograph certain sites to see all the changes that are happening here with the flaura and fauna.
I will post what I think are the best pictures of these bimbles here. Currently I am using a Nokia Lumia 820 phone camera to take these pictures.
HorsetailA little Shield Bug possiblyMarsh MarigoldEmerging AshCherryWillowVisiting the VetchHerb RobertYoung OakWild StrawberryFresh Young Lime
Pitch can be made with many different materials and I have covered some of these in that previous post. On this occasion I used spruce resin, beeswax and charcoal dust. Instead of a nice handy tin to prepare it all though I opted to try this out using more primitive materials: hot rocks. I touched on this method previously in the post How To…. Make a Flint-Tipped Arrow but feel it needs its own stand-alone post.
Hot Rock Pitch
I collected a lot of resin from some spruce trees in my local area with the use of a stick as I find that this does not damage the trees as a knife would do. Also I look for areas where the resin has pooled at the base of the tree as you can collect all of this without affecting the tree.
Spruce Resin
My other ingredients are charcoal dust to give the pitch body (I used the small rock to crush the charcoal) and beeswax to make it flexible. I used the sticks to make the finished pitch stick.
Preparation
While I was out collecting resin and preparing everything else I had a rock heating up in the fire. I used a rock that had been heated before so I could be sure it would not crack. (If there is any trapped air or moisture in a rock there is a chance it will crack or, in the worst case scenario, explode.)
To handle the rock I used some wooden tongs I had made up (sorry, no photo).
Hot Rock
The rock I had chosen had a slight hollow in the top surface which I thought would help stop the resin from flowing away instantly as it melted. I dragged the rock to the side of the fire, popped a piece of resin onto it and with a small twig moved it around until it had all melted. Some resin did run off but enough was kept in the hollow for me to use.
Melting the resin
I then moved the rock onto a piece of curved bark which held some water to act as a coolant as I built up my pitch stick.
Once this was all set up I popped a piece of beeswax into the melted resin and allowed it to mix in (experiment for yourself with ratios).
Melting the beeswax
Then I sprinkled a good-sized pinch of charcoal dust into the mixture and carried on mixing it up.
Adding the charcoal dust
As the rock was quite small I could only make a little batch of pitch at a time so it did not take long to all melt and mix together.
Mix it all up
I used a sliver of wood to scrape the hot, sticky pitch onto a squared-off stick.
Scrape onto a twig
The pitch you create using this method is a bit lumpy but still perfectly useable. As soon as I had some pitch on the stick I dipped it into the water to cool it down rapidly. This cooling-down process allowed me to use wet fingers to mould the pitch and smooth it out.
I kept repeating this process until all the melted pitch was on the stick and then mixed up another batch.
Cool rapidly in water
The rock was so hot that I was able to keep melting and mixing the ingredients several times to build up the pitch on the stick.
Mix more resin, beeswax and charcoal
I found that the curved piece of bark was very effective for storing water to cool the pitch.
Scrape onto the twig and cool again
The pitch stick on the right was made using hot rocks and the one on the left using a tin can. The primitive hot rocks method takes longer and produces a coarser pitch but in my opinion was far more satisfying to make.
Keep repeating until you build your own pitch lollipop
The pitch is great for waterproofing things like sinew on arrows. I prepared a ember stick to help melt the pitch so I could cover the sinew you can see in the picture below.
Ready to be used
To melt the pitch, simply blow on the ember stick while holding the pitch stick close to it.
Heat the resin with an ember stick to melt it
Drip the melted pitch onto what you want to cover and with wet fingers spread it around. Keep re-applying more pitch until you are happy everything that needs to be covered is covered. I sometimes re-heat the area I have covered with the ember stick to further smooth it out.
Drip it onto whatever you want to cover, fill or attach
With a little patience this primitive method can produce some very good pitch. I have seen some master primitive technology craftsmen makes some wonderful pieces with the use of pitch.
It was great to be back down at Fraser’s place once again, it is a proper playground
Every now and then I head off into the hills with some friends. This time it was to be Gordon and Rick, whom I have worked with for a number of years at the Crisis Open Christmas shelters, and I had arranged with my friend Fraser from Coastal Survival that we would come down and spend time at his place in the woods in Dorset.
Rick drove us down there in his campervan so it did feel as though we were off on a holiday from the start. I took this picture as we neared Fraser’s place. The angle is such that you can’t see the horse and it looks like the little dog at the back is pushing the Barrel Top along.
Arrival in Bearminster
I found myself a nice spot for my hammock, on a bit of a slope so slightly slippy but the view was worth it. I had also brought along a couple of other hammocks for Gordon and Rick to use.
The rest of the Friday was spent teaching the guys how to put their hammocks and tarps up, carrying all the kit up to the site and chilling around the fire eating excellent food cooked by Fraser.
My home for the weekend
Food is always a dominant part of any visit to Fraser’s place. Breakfasts were a slow relaxed affair with plenty to eat and the coffee was excellent as well.
Breakfasts were good
As usual whenever I spotted some beautiful plants out came my trusty phone camera. I am very impressed with the results I get from the camera on my Nokia Lumia 820 phone (not being sponsored to say that!).
Figwort, Horsetail and Scarlet Pimpernel
That first morning was spent collecting ramsons, or wild garlic (Allium ursinum), to pickle for later use. I’ll do a separate post on this later.
Ramson forage
Lunch was a tortilla cooked on the open fire with the ransom adding that lovely garlicky flavour.
Ramson tortilla lunch
One of my main aims of the weekend was to find some chill-out time. I did that with my trusty EDC hammock chair from UKHammocks. The views were wonderful.
Post-lunch relaxing in my EDC hammock chair
Saturday afternoon was spent down on the coast near Bridport foraging for crabs, small fish, limpets and seaweed. We met some other friends on the coast – Paul Burkhardt and Paul Newman – while we were there. Both Pauls were also looking for fossils. This part of the coast is full of fossilised sea creatures and it doesn’t take long to find them once you get your eye in.
Coastal Forage
The walk along the coast was a very pleasant affair but I was ever mindful of the risk of the clay cliff faces collapsing. With all the recent rain they did look rather unstable, with lots of collapsed areas.
Man’s best friends
I made a couple of videos on the Saturday:
Easter with Coastal Survival – Foraging
Dinner that night was a lovely risotto made with shellfish stock and a garnish of seaweed, topped with a chop for the non-vegetarians. It all went down a treat.
Seafood risotto and pork chops
The Saturday evening was a quiet affair chilling out around the fire and testing out Fraser’s large gas wood burners (or more properly re-burners, as the gases produced are recirculated and reburned). I got a few fire faces and particularly like the Ent’s face (Lord of the Rings tree giant) in the one on the left.
Fire faces
On the Sunday morning we had a beautiful walk through the woods looking at the new growth, the animal tracks and the views. I took the top two pictures that morning just to see what kind of detail my phone camera could give me. The crab picture was from the day before.
I took a video that morning but encountered a few problems making it. The problem with the second video was that I managed to delete the original files before saving the clip in iMovie. I could then only view the clip in iMovie and couldn’t upload it to YouTube. To get round this I ran the clip on the iMovie app and re-videoed it with my phone camera (I hope that all makes sense). Not as high quality as the first one but I still want to post it here.
Easter with Coastal Survival – Day two walk
After the woodland walk I brought my bows up for a bit of stump and target shooting.
Bringing up the bows
I do like wandering around just shooting at stumps or the bases of trees. While I was out with Gordon that morning we stumbled across two large fallow deer. It was quite a sight, but they were too quick for me to get my camera out.
Archery time
Three of the more unusual things I spotted over the weekend: some hazel coppice growing through an artist’s fungus, scores of these beautiful snails, and fresh-water tracks in the blue clay of the beach.
Wonderful finds
Some lovely close-ups of bugle, bluebells (top row), ramsons and alder (bottom row).
Spring bloom
A lot of Sunday, though, was spent under the parachute staying warm by the fire and listening to the rain hammering down. In the bottom picture you can see the different traps Fraser has made for fishing and catching small animals on the ground.
The classroom
After all that rain we decided it was time to head off down to the local pub for a few beers and a game or two of pool.
Wood gas re-burner
I now have one of Fraser’s gas wood (re-)burning stoves that you can see in the above picture and intend to really test it out over the summer.
On that final evening in the pub I edited the last of my clips to make this short video:
Easter with Coastal Survival – Bimbling and Bows
Monday morning was a pack-up-and-away day to try and miss the Bank Holiday traffic. It was great to be back down at Fraser’s place once again, it is a proper playground.
Last weekend I stopped for a break at one of the roadside services you find on most main roads these days. I decided to have a wander while the rest of the lads got what they wanted from the shop.
I was lazily staring at the trees and noticed something about one tree in particular, a sycamore (Acer pseudoplatanus). The tree had buds on it at every stage of growth. I could track in a zig zag pattern across just one small part of the tree all these stages.
When the lads arrived they asked what I was doing and shook their heads pityingly as I took out my phone to capture the pictures.
Here are all the stages I saw. No need for me to try and describe them as the pictures say it all.
A stretching budPeeking outUnfurlingThe small leaf bundle then appearsGathering in that first sunlight – like a young butterfly drying its wings outPreparing to unfurl the central leavesUnfurled, growing and working
I have been trying to capture this process of growth on different trees this spring but was struck by the sight of all these stages on just a few branches of the same tree.
As the spring growth is coming thick and fast I popped back out on Monday to see what was coming through around Bramley.
I found that the ash had started to burst through but only on some trees. The top two pictures are of ash as well as the bottom right picture.
Bottom left is lime and in the centre (bottom) I found one English oak tree that was starting to push its leaves out.
Bursting buds
That English oak had just one solitary leaf showing when I photographed it so as I write this three days later I expect it will be well covered now. The beech tree (bottom left) that I have been monitoring had been chopped in two as they had been doing some mechanical hedgecutting in the area. Thankfully as you can see the bottom half of the beech is managing to push some leaves out.
The silver birch in the middle picture has produced masses of leaves and they taste exceptionally good at the moment. On the right looking very shiny the lime tree I have been watching has just a few leaves showing now. Finally on the bottom right the alder is well established with leaves as it had started two weeks ago.
Young leaves
There are plenty of flowers out there still, including primroses, stichworts, wood anemones and wild strawberries to name a few, but two caught my attention this trip. The top two show the early purple orchid and the bottom two the masses of bluebells that have appeared over the last week.
New Flowers
My kids had a great time looking for these orchids so we decided to make a little video of it.
I was catching up on what was happening on Facebook last week and spotted that the Ancient Technology Centre (ATC) was holding a Stone Age Weekend the following week. Thankfully for me my calendar was free and as my kids love this sort of interactive show it was not hard to sell it to them. The centre is in Dorset, just over an hour’s drive from our house, and on this weekend the weather was perfect for my Scottish skin (warm but not too hot).
The Ancient Technology Centre
My main aims for the visit were to let my kids have lots of hands-on fun and pick up some ideas for myself for future projects. The ATC caters well for parents and kids and as it is a place where lots of experimental archaeology is undertaken it ticked all the boxes for me.
The top picture below is taken from the bottom of the roof of one of the roundhouses.
Great for kids (of all ages)
We took a walk around the whole site at first just to show Catherine and Finlay what they could do. In the end the kids had to drag me away from one of the roundhouses as I wanted to explore every item in it and how it was built.
After a five-minute wait Catherine and Finlay were using Bronze Age axes and happily chopping away. They did come back for a second go later and I managed to have a chop as well. This was the first time for me using a Bronze Age axe and it is different to using modern or flint axes. I liked the fact that the queues here were in single-figure minutes (currently writing this in a queue – 35 minutes at Legoland and counting) and everybody was really relaxed.
Bronze Age axes
The centre also experiments with primitive pottery and had set up a work area where we could all make a pot and decorate it using old bones shells and feathers. We left our pots to dry in the sun before taking them home. We will have to let them dry for at least another two weeks before firing them over an open fire. I don’t know if we’ll do this final stage as they may crack.
Primitive pottery
While Catherine and Finlay were happily engrossed in cave painting techniques I managed to slip off and see what else was going on.
Cave painting
I popped over to see what was on display on the Prehistoric Archery and Atlatl Society (PAAS) stand. PAAS make some beautiful craft items based as close as possible to archaeological finds and are also keen experimental archaeologists. Last year PAAS visited us at the Bushcraft UK Bushmoot and gave some great classes on archery, atlatls and slings. They plan to be at the Bushmoot this year as well.
PAAS
We watched a demonstration next of Bowdrill using just a primitive set. The couple doing the demonstration were from Outback2Basics and put on a great show. We missed the first class on making campfire bread and cooking salmon but managed to get some time bowdrilling.
Bowdrill with primitive kit
Finlay and myself took a twirl on the bow and then Catherine took over on blowing the ember into flame.
Family bowdrill
With a little help from Finlay we soon had a flame. The tinder was the inner bark from a Leylandi tree.
Flamage
The next class with them was making a fat candle using a rock as a holder. We chipped away on a soft rock with a hard rock to create a small scoop to hold the fat.
The wick we made out of some jute string by untwisting it and then loosely putting it all back together.
Fat candle – prepping the stone
The scoop took us about 20 minutes to chip out.
Fat candle – fat well and jute wick
I cannot remember what type of fat was used but once it was poured in the wick was added, leaving about a centimeter protruding from the fat so that it could be lit.
Fat candle – set up
The winds were quite light but would gust a little so we had to protect the flame.
Fat candle – alight
I managed to capture a lot of the day on this short video.
Afterwards we had a look at the wood carving section and Catherine learned all about how beds were constructed in the past.
Woodcarving
I picked up some ideas on making a circular stack for my kindling and the kids had fun on the Roman turntable.
Kindling wheel and Roman turntable
Two good finds of the day for me were the drying post for bones and the wooden dugout in the pond.
Bones and dugout canoes
I would thoroughly recommend you visit the ATC if you ever find yourself down near the New Forest as the work they undertake is quite amazing.
It was magical to lie there and watch the snow falling in the perfectly quiet woodland.
A winter weekend with Coastal Survival
It was on a wet weekend back in November 2012 I first went to visit my friend Fraser from Coastal Survival at his woodland in Dorset. I was reviewing my photos as I will be visiting him again soon and thought that the ones I had taken on this weekend warranted their own post even though the trip was over a year and a half ago.
The snow you see in the picture above did not arrive until the Sunday but I did have a great time even with all the rain and mud before the snow arrived. The weekend was a relaxed affair with no formal teaching planned, just a get together to relax and explore the beautiful Dorset hills.
The gang below included (from the left) Steve, Rich, Fraser, Si and myself.
The gang for the weekend
We did a little bit of work on the weekend but only a little. That work included sawing up these logs for classroom seats and pitching properly what was one massive tarp.
Now that’s what you call a tarp
After sorting my hammock out, Friday night was spent sitting around the fire chatting and watching our dinner slowly roasting over the fire. You may have noticed with previous posts about Fraser that food seems to play a central role in everything we do 🙂
Friday night dinner
After breakfast Fraser prepared a side of pork and set it up on a stake to slowly be smoked by the side of the fire. The pork remained there most of the day, gradually absorbing the woodsmoke.
Smoking Saturday night’s dinner
After a few brews we struck out to do a bit of foraging and tracking. I think I am a better forager than tracker and may one day have to find the time to study tracking under the likes of JP and Pablo from Woodlifetrails. In the bottom picture we found what looked like badger tracks in some soft ground.
Striking out for the day
On the left you can see the claw marks made as the animals scrambled up the bank and on the right a possible badger paw print. The picture at the bottom right was scat from a fox, I think. It was full of yellow maize/corn so the animal may have visited a farm recently.
Plenty of signs
Another sign we came across was grazing by deer. The top two pictures show the tell-tale deer nibble, where the bite is not clean. Fraser found these woodpecker feathers in a pile and they still had all the points on the quills suggesting a kill by a bird of prey. I found all the nutshells in the bottom right picture and it looks like a dormouse or something similar has been nibbling away.
Nibbling
We foraged quite a bit over the weekend and even though this was November there was still a lot to be found. The water mint was destined for the teapot and the large burdock root was chopped up and added in with the other vegetables for the evening meal. The bottom left picture shows hogweed seeds which Fraser collected for using later.
Foraging
After all this hard work of spotting signs and foraging we relaxed by wandering around the woods doing some stump shooting.
Stump shooting
Fraser has a large paella pan that he wanted to use for cooking that night. It was a tad blackened from previous use so he used mud and small pices of gravel as a scouring agent to get it clean. It worked a treat as you can see in the other pictures. After the cleaned pan was rinsed with fresh water he heated it up and put the side of pork on it to start cooking.
Scrubbing, Stripping and Searing
The fork you can see being made on the left was actually for using as a stand for the pork to be smoked during the day. Once the pork was cooking they made excellent tongs for mixing all the vegetables. Si had flattened a piece of one of the logs for me to use as a chopping block for cutting all the vegetables up on. As he had just stripped the bark and the wood was still green it was a very clean surface to work on.
Prepping tools and veg
While all the food was cooking we made a fresh herb tea. The ingredients included sloes, haws, ground ivy, water mint and mullein. Very tasty it was too.
Time for a brew
Fraser as usual managed to make a banquet (well, what I call a banquet) in very cramped conditions with minimal tools and taught us all along the way.
Final touches
During the day we came across some live mullein (also known as Aaron’s Rod) that had not produced a stalk as yet but we also found one mullein that had grown a stalk and had died. The stalk was dry so Fraser took the time to release the seeds and spread them around to promote future growth. I like to use this stalk as a hand drill for making fire by friction but another use for this plant in the past was making torches. The seed head would be dipped in fat, grease or tallow and then set alight. For speed we stuck with some vegetable oil and soon had a good flame going.
Aaron’s Rod
The picture on the left shows how much light the candle actually throws out. I took the picture on the right with the focus of the camera directly on the flames. When you do this you can get some interesting shapes. I see a climbing fox in this one. It has a long tail, distinctive legs and you can just make out its snout – and I am not talking about Fraser’s face in the background 😉
Mullein candle
One of my favourite pictures of this candle is the one that produced Pegasus the winged horse.
The flaming horse
While I was compiling the pictures for this post I was struck by these two pictures. I have inverted the right hand one and call it the Crimson Climber. The pictures were taken one after each other. You can clearly see the figure on the left about to start climbing but look closely and you will see on the right with two small arms and a hunched back a figure at the top of the flame.
The Crimson Climber
Sunday morning was a relaxed affair at first. I could hear the pitter patter of rain on my tarp as I lay there but it all went quiet soon after. As I turned in my hammock I glanced out and saw the view you see in the top picture. It was magical to lie there and watch the snow falling in the perfectly quiet woodland. This magic did not last long as the snow started to accumulate my tarp started to droop. I had set it up on a shallow angle more suited for the good view rather than to shed lots of snow.
Wintry Wake Up
So it was time to get up and over the next half hour I had to keep clearing snow from all the tarps to stop them collapsing. Steve eventually got up wandering what all the racket was about.
Morning Steve
Breakfast was soon on the go and it was time to pack up to head home.
Heartening breakfast
A few pictures to finish on. It was a great weekend chilling out in the company of some great guys.
Extras
I am hoping to pop down and visit Fraser in the next couple of weeks and see what changes he has done with his site.
I have written various posts now on creating primitive tools and in my article on making arrows I showed you how to make some spruce pitch using hot rocks. This How To…. will lay out all the steps I take to make spruce pitch using tin cans. I find that when I want to make a lot of pitch quickly that this method works well for me however I do appreciate that there are many other methods for making pitch.
The resin produced using this method gives you a much finer pitch than the hot rocks method as you can see in the picture below. The pitch stick on the left was made using the tin method and the smaller rougher pitch stick on the right was made using hot rocks.
I took these pictures while out bushcrafting with my friend Mark Beer in the woods around Silchester in Hampshire (UK)
Pitch – Using a tin (left) – Using hot rocks (right)
I tend to use spruce resin when making pitch as this is more readily available where I am and do not tend to use pine resin as this is not so readily available to me. I normally use pitch as a filler material, for example, when fitting a flint axe head into its socket or use it as a covering to waterproof rawhide wraps.
The knife below has had the rawhide wrap covered in the fine pitch from the tin method and is very easy to produce. I am sure that with time I would be able to produce fine pitch using hot rocks but as yet I do not have that skill level.
Spruce Pitch – a wonderful material
I collect spruce resin using a flattened stick and a tin (or plastic bag). I use the stick as it does not damage the tree as a knife tip would do. Also it is a messy job to clean the resin of a knife blade and the stick also saves my fingers becoming covered in resin which can be hard to clean off when you do not have access to hot running water.
I collect the resin wherever possible where branches have been broken off and the tree has excreted the resin to protect the damaged area. I do not clean out all the resin but just take a little from many different sites. If you are lucky enough to find a spot where the resin has flowed away from the damaged area and pooled into a big clump then it is fine to collect it all. A good spruce tree will keep excreting the resin so if you are careful you can return at a later date to harvest more.
Collecting stick
It did not take long to collect this large tinful of resin as Mark and I managed to find spots where the resin had pooled into large clumps.
A good haul
To make pitch I use two baked bean style tins with a small improvised colander in one made out of half a beer can with holes punched through the bottom.
The sticks in the picture below are ready for rolling the pitch on to when it is ready. An alternative is to use a stick like elder with the pith taken out and the pitch poured into the cavity, which makes a kind of pencil.
The charcoal and the beeswax are for binding and tempering the pitch to make it strong but flexible.
Equipment
I packed the colander with resin then set light to it. The disadvantage of this method is that you lose a little of the resin but the big plus is that it melts quickly, collects quite cleanly in the bottom of the tin and leaves the detritus in the colander. Two good friends of mine Mark Oriel and Keith Coleman introduced me to this method: previously I’d just put the resin into a tin, placed it into some embers and scooped out the detritus when it had melted.
Packing and firing
As the resin burns and melts in the tin I then take the time to crush the charcoal down to fine dust with a small stone. This fine dust acts as a binding agent that the resin can cling to and make the pitch you produce stronger. There are many other materials that you can experiment with as binding material such as ash and rabbit droppings. The Primitive Ways website has an excellent article on making pine pitch using a tin but in a different way and discusses other binding agents.
Making charcoal powder
Soon all the resin had melted and dripped down into the tin (it looks black from previous pitch making). As the detritus is left in the colander the resin in the tin is very fine, which makes for very smooth pitch.
Liquid resin and remnants
I tend to put in as much charcoal dust as there is spruce resin and mix it all together while the resin is still hot.
Add some charcoal
I then added some lumps of beeswax. I have heard some folk say that they put in the same quantities for everything but I usually just put in a small block or two of beeswax. I also use beeswax balsam as this is easy to buy in shops and it seems to work just as well as pure beeswax. Experiment for yourself with quantities to see what works for you.
Then some beeswax
I then put the tin into the embers of my fire and mix it all up. Watch out that you don’t overheat it as it will froth up and spill over. I normally have some tongs nearby so that I can move the tin around the embers so as to better control the heat.
Melt and mix
I use the tongs to move the tin out of the embers when all the beeswax has melted and been thoroughly mixed in. The tin will be scorching hot and the liquid pitch will scald you badly if it comes into contact with your skin.
Remove from heat carefully
I let the pitch cool slightly and so it becomes a little bit tacky. While it is cooling down I make sure I have a little pot of water ready.
I then put one of the sticks into the mixture and roll it a few times (I try to square off the stick as this helps catching the tacky pitch) until I have some pitch on the stick. I then dunk the stick into the water to rapidly cool the pitch down. The pitch will not dissolve in the water due to the oils, charcoal and beeswax in it and but will bind to the stick.
Roll and dip
I then repeat the process again and again to build up more layers of pitch on the stick. You will find loose bits of pitch will float in the water so just fish them out and pop them back into the tin and they will melt back into the mixture.
Roll, dip and wet your fingers
After two or three times doing this you will need to use your fingers to mold the pitch into a tight blob on the end of the stick and also to smooth it out. As the pitch can still be quite warm and sticky you need to keep your fingers wet during this process. If your fingers are dry then the pitch will just stick to them.
Smooth the hot pitch down
In no time at all you will have a good amount of spruce pitch to help you with making primitive craft items.
Pitch Sticks
To use a pitch stick I just heat the end of it with a glowing ember until it starts to melt and then drip the liquid pitch onto whatever I am making.
To use just heat
I have used pitch for waterproofing bindings on arrows.
Great for arrows
It is also great as a filler as in this small hatchet. I filled the socket with pitch, inserted the flint axe head and then bound it all up with rawhide.
And great for axes
I have also published an article on making pitch in a primitive fashion using hot rocks instead of a tin – How To…. Make Hot Rock Spruce Pitch.
I have been out and about again seeing what has been appearing in the woods around my village.
I took my son out this time and we used our bikes to get around. Normally I would walk so I would not miss anything but this time I wanted to try something new, that is to video my ’round’. My round consists of 12 sites I visit every week or two to see what is appearing at each site and in between each site photographing the growth appearing on certain trees.
Here are some of the pictures I took as I filmed. From left to right they are (top row) cherry blossom, orchid leaves, (bottom row) oxlip, hedge garlic and marsh marigold. All of the flowering parts of these plants – apart from the orchid, which hasn’t flowered yet – have been appearing in just the last week.
Spring flowers, leaves and blossom appearing
Lots of trees have finally been bursting their buds. Below from left to right are (top) alder, goat willow, (bottom) apple and cherry.
Leaf burst 1
Also appearing have been the silverbirch, hawthorn, hazel and horse chestnut:
Leaf burst 2
Some trees are still waiting to leaf and they include the English oak, lime, beech and (bottom right) the ash. I haven’t yet identified the bud shown in the middle right picture: any ideas?
Still in bud
While I was doing all this photography I tried a little experiment using my mini iPad camera filming my route. Sorry about the quick change between scenes and all the movement, I will try and work on making this easier on the eye in future.
Sometimes a flint knife or adze is just not enough and you need something with a bit more clout. At times like these, what you need is a flint axe.
Here’s how I constructed the large flint axe you can see below, with a few pictures at the end about its little brother, the hatchet.
Two good tools
I made these tools on the Woodcraft School Primitive Technology course and had some excellent tuition from John Rhyder and John Lord.
John Lord gave an excellent demonstration on knapping a flint axe head. It was a joy to watch this master take a lump of flint and transform it into a work of art.
When it came to the turn of us students to knap out our axe heads John gave everyone lots of one-to-one tuition. If it hadn’t been for this (and John knapping the tricky bits) I would have been lucky to have ended up with an arrow head, never mind a large axe head.
Some tuition from the master Mr Lord
I like to think that this axe head has some of me in it but truth be told it’s more John Lord than me. I did however have a great time seeing this axe head appear out of the flint knowing at least part of it is me.
One knapped flint axe blade
I used a well-seasoned piece of yew for the handle as that was what I had available at the time.
Initially I used my flint adze to try and shape the yew, but although the bark came off easily enough it didn’t make much of an impression on the hard wood beneath.
You can see the tool marks left on the wood by the adze in the right-hand picture below. As a Time Team enthusiast I have watched the archaeologists discuss such marks on many ancient pieces of worked wood they have found so it was good to see it in action for myself.
Stripping the handle
At first I used short chopping motions to tear away at the bark and wood with the adze. Ever experimenting, I tried a few strikes with a bit more force and eventually took a chip out of the adze blade. I was able to re-sharpen the edge of the adze by pressure flaking it but decided that the yew was just too tough for the adze (notwithstanding my lack of patience and skill).
Too tough for the flint adze
I reverted to my modern axe which took the excess wood off easily. In the picture on the right below you can see the very different tool marks left by the iron axe in comparison to the flint adze marks.
Time for an iron axe
This piece of yew had a slight curve to it which I thought would give added strength to the handle. I left the handle fairly rough, just ensuring I would have a comfortable grip and not get any splinters.
One rough handle
I initially started using a discoid all-flint knife to cut out the socket for the axe head but I did not take any pictures of this part. I did not do this for long as the yew was just too hard and the flint blade kept slipping. A few of the other students did just use flint for this stage but since the woods they were using were slightly softer they had more success. I ended up using my little palm gauge for the job and it worked very well.
I did try and burn out the wood with embers but soon got put off this with the fumes (yew wood being highly toxic).
Carving and burning
The socket finished – front and back.
The finished socket
A good fit but too loose for use.
Test fit
I wrapped the flint axe head in a piece of rawhide to see if that would secure the axe head in the socket (apologies for the poor quality of the pictures), but with one piece wrapped around it the axe head would not fit into the socket.
Prepping rawhide
Instead I cut up some strips of rawhide and held it all in place with some string. As the rawhide dried out it really gripped the axe head and the wood of the socket.
Securing with rawhide
After that it was a case of wrapping a load more rawhide around the axe head and leaving it to dry for a couple of days.
Drying and adding more rawhide
After the rawhide had dried out it became almost translucent but it was a very strong hold.
Side profiles
Top and bottom profiles of the axe head.
Top and bottom profiles
I tested the axe out on an old stump in my garden. Like the adze, the axe tears into the wood as opposed to slicing into it as a modern iron axe would do. It was still very effective in its own way.
Leaves the wood torn
The blade edge is not particularly sharp and has a good shoulder area behind it. This shoulder area really supports the edge so that it does not break off when the axe is used.
Up close
I had a small flint axe blade I had made at the same time as the larger one, so I just scaled everything down to make a hatchet.
Hatchet blade jammed in with rawhide
As well as using rawhide I filled the socket with some spruce pitch to fill up any gaps and to help secure the head more.
Gaps filled with resin
I have never used this tool on anything – it would have been used mostly to dispatch small game that had been caught in traps. I do like it a lot though, in some ways more than the larger axe.
Rawhide wrap
This hatchet sits nicely on my primitive belt order.
I started an online plant masterclass this year with Paul Kirtley of Frontier Bushcraft. The aim of the course is to learn more about the plants around us in a very structured way. As the course is spread out over a year, one of the benefits of this type of learning is to observe plants as they change throughout the seasons.
So far I have been compiling pictures on a variety of plants and sites around my village (Bramley in Hampshire, UK) by taking pictures of them every two weeks or so.
The first pictures I took in early February showed a very quiet time with most of the tree buds lying waiting for these longer spring days but there were a few gems around like the snowdrops.
Everything is quiet apart from the snowdrops early in February
My last trip out was on 30th March: I came across quite a few plants like primrose that have been around for a while now but also spotted some new orchid growth and a wood anemone. The hawthorn and apple that I had been photographing had also just burst into life.
Bursting with life in late March -hawthorn, apple, orchid, primrose and wood anemone
I was taken aback by the sheer number of flowers that had popped up and the leaves that were starting to show themselves on the tree branches. I am still waiting for the oak and ash to start appearing but will be keeping a close eye for these buds opening.
Also forget-me-not, dog violet, wood aven, damson, speedwell and stichwort
I am really enjoying this course as it is making me look at plants in detail again. Over the last few years I have concentrated on the craft side of bushcraft and failed to maintain all that knowledge of plants I had worked so hard to learn when studying at Woodcraft Schoolback in 2008. Looking at all these plants a second time round and throughout the whole year can’t help but increase my level of knowledge.
I have compiled a short You Tube compilation of pictures (set to music) I have taken over the last couple of months showing this transformation from winter dormancy to the rush of spring growth so far.
When I want a bowl fast a modern adze is what I use, but if I have the time and I want to create something in a more leisurely fashion then I love to use a flint adze
Any self-respecting Stone Age woodworker would always have had a decent flint adze to hand. So to become that self=respecting Stone Age woodworker I had to go out and make myself one as they do not turn up in the shops that often.
I needed one to undertake my final project on my Woodcraft School Primitive Technology course: to create a bone bodkin and a bark sheath. The aim was to make them without the use of modern tools and I would need an adze to help me craft the sheath.
The adze I created for this has been extremely useful since then on other projects such as hollowing out this long bowl.
Chunking out a bowl
I ended up making two adzes out of flint, rawhide and curved branches.
Two well used adze’s
I took my inspiration from the Cheddar Gorge Museum where I came across this very basic but beautiful flint adze.
Cheddar Gorge Museum replica
I had kept some flint from the course I had done with John Lordand I got a couple of good strong blades from this chunk of flint. The flint axe blade shouldn’t be overly sharp as that will make it fragile. It needs to have a well-defined edge that has good strong shoulders.
Knapped adze blade
This piece of yew was cut down in my garden and then sawn to its basic shape with a modern saw.
The handle-to-be
I used the curve to give the flint blade a flat surface to sit on and carved out the notch to give the rawhide some additional surface area to hold on to. I did not cut so deep so as to weaken the handle as this tool was destined for some hard use.
Carving the shape
After shaping I stripped the bark off and roughly smoothed it with sandpaper. I did not smooth the handle down too much, as I wanted to retain some natural grip.
The platform for the blade
Traditionally rawhide was used to bind the flint to the handle alongside sinew, buckskin or other natural cordage. I like to use rawhide as it was commonly used and is easily obtained these days from dog chews (I buy the biggest I can find).
I boiled the dog chew in water for about twenty five minutes in order to soften it enough to be able to cut it into strips.
Rawhide from a dog chew
After laying the rawhide out flat I just used a sharp piece of flint to cut it into strips I could use to bind the adze together.
Cutting out strips
I wrapped thin pieces around the blade and the handle initially. Don’t pull too tight as this will snap the rawhide. Just tighten slightly, and tie off the ends when you are finished. I left this one to harden in a warm area for a couple of days. As rawhide dries out it shrinks and goes very hard (almost rock hard).
Initial rawhide wrap
For the next layer of rawhide I used wider strips, which allowed me to really pull them tight without worrying too much about it splitting. They were quite difficult to tie off but I settled for simple overhand knots to finish.
I left these adzes to dry out and tighten for a month until they were needed on the final part of the course.
Drying out
The first job I had to do with the adze was to take down a small sweet chestnut limb. I needed this to make bark strips for weaving a sheath out of the bark and the wood for carving spoons. I took the limb down using a rosette cut, chipping away at the wood all the way around the limb until it fell over. I did not use any large swings or try and gouge the wood out with it, just a steady chipping rhythm, and eventually worked my way through the limb.
First job – taking down a sweet chestnut limb
It took me about 20 minutes to fell the tree. (I used a modern saw to trim the stump, leaving a clean cut to help stop infection setting in and to help the stump re-grow a new limb.)
The Rosette cut
The next project I put the adze to was the shaping of a yew handle for a large flint axe. The yew piece I was using was well seasoned and proved too much for the flint adze. After about half an hour of chipping away at the bark and outer layer of wood I chipped the blade of the adze quite badly.
It was quite easy to re-profile the edge with a bit of pressure flaking but I resorted to using a modern axe for carving the flint axe handle.
Too tough for this adze
When working with green wood woods like this goat willow the adze worked very well. I used the adze here to create a wedge for my Split Stick Atlatl.
Chipping out a wedge for an atlatl
My friends have all been keen to try these adzes out. The silver birch that Angela is splitting was fairly well seasoned but still quite easy to cut with the adze.
Cutting into more seasoned wood as a test
When Angela had the branch weakened enough it was just a case of tap tap and…………………………………..
Final tap
…………we had two more logs for the fire.
Quite a beautiful finish
The adze really did come into its own when my friend Stephen Herries found this burnt-out log lying in a ditch. The adze was perfect for chipping out all that charcoal so that in the end I had a rather lovely long bowl to add to my collection.
Great for bowl work
In comparison to a modern steel/iron adze you have to invest more time in whatever you are creating when using a flint adze. Unlike a modern adze, which will slice wood off cleanly, a flint adze rips the wood off and leaves totally different tool marks.
When I want a bowl fast a modern adze is what I use, but if I have the time and I want to create something in a more leisurely fashion then I love to use a flint adze. It kind of takes me back in time I suppose.
It was at this point Spikey had his Eureka moment: ‘Why not try and find a piece of sycamore that’s oval shaped instead of round?’
This post is for my friend Spikey who had one of those Eureka moments that pop up out of the blue. It happened when we were experimenting with the building of a green-wood, free-standing hammock stand at the 2012 BCUK Bushmoot. If it hadn’t been for his inspired idea this hammock stand would never have worked. More on that later but to begin with I need to explain how I got into building these free-standing hammock stands and explain a bit more about what they are.
A free-standing hammock stand comprises a couple of tripods with a ridgepole hanging down between them. The ridgepole is not directly attached to the tripods but slung on some Amsteel cordage. I like to use Amsteel cordage as it is fantastically strong, does not stretch easily and is very rot resistant. The hammock is tied off to the ridgepole so that the compression forces from someone lying in the hammock are solely on the ridgepole. The tripods only take the vertical forces caused by the person’s weight. As the forces are separated there are no compression forces on the tripods that could cause them to topple over, which means you do not need ground anchors.
The two pictures below show two free-standing hammocks I made, one with green wood and one from machined wood.
Woodland-made and workshop-made free-standing hammock stands
To me there is nothing better than finding a nice spot with two perfectly placed trees where you can set up a hammock, have a great sleep and waken up in the morning to a great view. Sadly this is not always possible: the trees may not be placed perfectly, or may not be strong enough to support a hammock, or there may simply be no trees about.
At times like this you have to start thinking out of the box if you want to still sleep in your hammock.
Relaxing hammocking when the trees are perfectly placed
If you have the tools and the ability to transport your own hammock stand you can make something as good as my friend Mat made for displaying his UK Hammocks.
The deluxe version
I can’t transport or store a hammock stand like Mat’s so I started experimenting with what I called the one-tree hammock stand. I set up a tripod made of sycamore rods that had lots of wooden anchors to hold the tripod in place. I then tied one end of my hammock to the only big tree in our garden and the other end to the tripod.
The tripod was held in place by lots of anchor points and worked well until my wife Alison pointed out all the holes I was making in the garden, and muttering about ‘trip hazards’.
One-tree hammock stand with multiple ground anchors
Not only did I need anchors to stop the tripod from toppling over, I needed to set up further spikes on the tripod to give it extra strength and keep it in place. I suppose this was due to the fact I was using wooden pegs and ropes of different strengths which tended to stretch a bit.
A lot of rope is required for this set up, and backwards facing pegs
My friend Paul Bradley (Bardster) cracked all this with a hammock stand he made that had 10″ screw anchors and used top-quality non-stretch rope. Paul plans to experiment with delta anchors in the future. I however did not have screw anchors and had never heard of delta anchors.
I wanted something I could just put up in my garden for the kids to use, as and when required, something that did not take up much space, was not dependent on land anchors and could be easily transported in my van.
Paul Bradley’s single ground anchor hammock stand (Photo courtesy of Paul Bradley)
Turtlelady’s post gave me ideas for experimenting with just one tripod and a single tree. I suspended the ridgepole (two old army tent poles) between the tree and the tripod using Amsteelrope and then slung the hammock directly to the ridgepole. As the hammock was not tied directly to the tree or the tripod the ridgepole absorbed all the compression forces, meaning no ground anchors were required.
One-tree free-standing hammock
The tripod I made was from ‘Sawn Treated Softwood’. I bought a pack of 8 x 1.8m length pieces (47mm x 22mm) which cost just under £10. I cut the legs of the tripod to approx. 1m 70cm lengths so as to fit easily in my van.
To connect the tripods I used a ‘T’ Hinge (about 45cm in length) at a cost of about £2.50. I attached the hinge to one of the legs using bolts of about 4cms (cost about £3). As you can see in the top right picture below I shaped the wood as best I could so that when the tripod was open the tops did not touch each other.
I used Amsteel rope to connect the ridgepole to the tripod. As you can see the ridgepole is hanging off the centre tripod leg on a length of Amsteel. I bought 5 metres of Amsteel rope for this job costing me about £5.
The other end of the ridge pole I hung directly from the tree (I now use a hammock strap to go round the tree and tie the Amsteel rope directly onto the strap). This tree has a handy branch coming off the side to tie directly onto, allowing the rope to hang down directly. Where you have only the trunk of the tree, a strap grips the bark better than just cordage.
Finally I tied off some old guyline rope around the tripod legs to stop them splaying out when they were under load.
Make up of the one tree free standing hammock
After testing out the one-tree set up I made another tripod and changed the ridgepole.
I made the second ridgepole from two large tree stakes from from a local garden centre (cost about £3.50 each). Each stake was 1.8m x 40mm but I cut each one down to 1m 74cm to get rid of the points.
I connected the rods with an old army aluminium tent pole. I cut the ends off the tent pole to allow it to slip easily over the tree stakes. I saw these old army aluminium tent poles for sale on eBay for about £6 (a single ridgepole would never have fitted it in my van).
Below you can see both tripods collapsed and ready for transport and one of them set up. The little caps you can see in the left-hand picture are protectors for a tarp.
Freestanding – tripod set up
Below you can see a close up of the ‘T’ bar hinge set up and how the ridgepole is connected to the tripod.
I carved 3 grooves all the way round the the ends of the ridge poles to give the Amsteel rope something to grip onto. The ridgepole is attached by means of an adjustable loop that is hung from the tripod and around the first groove on the ridgepole.
The wrapping of Amsteel you can see on the ridgepole is a common whipping that is wrapped around the area where I had carved the other two grooves. This whipping has a tail on it that can be used to create a marlinspike hitch to allow the hammock to be hung off.
Free standing – tripod back
Below you can see the marlinspike hitch and the hammock clipped to it with a carabiner. This set up makes attaching the hammock very easy and the common whipping ensures that the Amsteel does not slip when I get into my hammock.
Free standing – tripod front
To put it all together I simply open up the tripods and place them roughly the correct distance apart from each other (the length of the two ridgepoles).
Free standing – set up part 1
I then connect the two ridgepoles with the tent pole sleeve. I usually re-position the tripods so that the two ridge poles are touching inside the sleeve and that the Amsteel rope attaching the ridgepole to the tripod is hanging vertically.
Free standing – set up part 2
As the tripods are not that far apart the tarp will actually lie on top of them, so I made a cap for each so that the wood would not damage the material. I took an old hessian sack and cut off two of the corners, then covered these corner pieces with duct tape to make them more durable.
Tri pod cap
Whenever I use a hammock, whether slung between trees or tripods, I always test it by pushing down on the material of the hammock first, then I sit in it gently before finally lying back into it. This tests all your knots, tightens them up and gives you confidence that everything is ok.
With the free-standing set up what you need to watch for is the ridge pole over-bending with the compression forces you are placing on it from lying in the hammock. In this set up the old tent pole sleeve is so strong that there is very little bend in the ridgepole. I weigh about 14 stone (including all the kit I generally wear while bushcrafting) so if it takes my weight easily I am happy for my kids to use this set up.
Testing and relaxing
Over a few months I used this hammock at various meets and got different people to test it out. After some initial trepidation most people got on well with it. You just have to remember not to bang your head on the ridgepole when you get up.
Further testing
Setting the tarp up on this is quite simple as I just lay it on top of the tripod caps and peg it out. The first night I slept in the set up I put it under our group shelter as it was very windy and wet. I figured if the tarp came off in the night the big shelter would offer me some protection from the rain.
I slept well that night apart from wakening a couple of times to the creaking of the ridge pole as I changed position in my sleep. I have got used to these noises now and trust the ridge pole to take my weight. Now I am happy to set this up with just the tarp for cover. In the bottom picture I had the hammock stand set up at the Wilderness Gathering last year for my daughter to use as a nest to go and relax in during the day and for visitors to come and see the design.
Tarp testing
Back in 2012 I had promised some of the guys at the BCUK Bushmoot I’d bring the stand along for them to look at. In all the usual confusion of preparing and setting off for the Moot I forgot to put the stand into my van. Undeterred, I decided to try and make a similar stand using sycamore poles, of which there are plenty on the site at Merthyr Mawr, so I set off to gather the wood I would need: this is when my friend Spikey spotted that I was up to something and asked if he could help.
After I explained the concept Spikey helped me cut the poles to make up two tripods. We lashed the tripods with Amsteel rope and made little adjustable loop danglers to hang from each tripod for a ridgepole. Also each tripod had rope tied around each leg to stop them from splaying out when put under load. We tested each tripod by both doing pull ups together on each one. Our combined weight is about 28 stone so we were quite happy each tripod would be up to the job.
Green wood tripod set up
I did not have a handy old army tent pole to act as a sleeve for the ridgepole this time so I had to find a length of sycamore that was long enough (about 3.5 metres) and strong enough not to bend with the compression forces. I wanted a piece that was fairly uniform in girth along its length and as straight as possible. Spikey and I spent quite a few hours trying to find this perfect pole but when we found a couple that seemed to be ideal they both bent horribly when a load was applied. I did not want to put a massively thick ridgepole above my head and was getting quite frustrated at this point.
It was at this point Spikey had his Eureka moment: ‘Why not try and find a piece of sycamore that’s oval shaped instead of round?’ I could see what he meant – an oval pole would have two sides with fairly flat surfaces and two sides with sharply curved surfaces. These sharp curves would take far more load without bending than the flat surfaces, so off we went to find this magical ridgepole.
As you can see below we found it, and set it up so that the ridgepole hung beneath each tripod. I attached more Amsteel with some simple whipping to each end of the ridgepole for the hammock to hang off and slung my tarp over it all. The ridgepole hardly bent as the sharply curved sides of the pole were very rigid. I got lots of different people to try this set up out and it took the weight of everyone who tried it out easily.
Green-wood free-standing hammock stand
I slept for 5 nights in this set up and had a great sleep every time. I like the fact now that if I am stuck for somewhere to sleep in my hammocks (if for example there are no lovely big trees around) I can now set up a system that will still keep me well clear of the ground.
As part of a primitive technology course I was taking with Woodcraft School back in 2009 I had to make various craft pieces. The aim of the course was to slowly take away our modern tools so that by the end of the course we would only be using primitive tools to make our craft items.
I was using hand-held flint tools such as discoidal knives in the beginning but about halfway through the course I decided something a bit better was required. This How To…. is designed to show you the simple steps I took to make my flint knife and show you some of the uses I have put it to since.
A simple flint knife
During the course (spread out over 5 months) I came across the knife you can see below left in the Museum of Prehistory at Cheddar Gorge. Not only was the knife beautifully constructed it also looked strong and practical. I knew I was to be taught on the next part of the course by top flint knapper John Lord so was keen to keep my eye out for a suitable piece while I was knapping flint with him. The knife I made on the course is on the right, not as strong or anywhere near as beautiful but for my needs very practical.
My inspiration
It was while I was knapping my flint axe head that I saw this piece pop off. The piece had a strong back, a sharp edge with good curves and a perfect point. I re-touched the back to smooth it down a bit and pressure flaked a groove where the sinew wrap to the handle would be.
The blank blade
I’m afraid I didn’t take many pictures of the handle preparation as it wasn’t going into my portfolio: I used a modern saw and knife for this part to save time. (As I said at the beginning of the post the course was designed to introduce me to primitive crafts by gradually reducing my reliance on modern tools.)
I selected a piece of dead standing wood that was well seasoned and had a slight curve in it, to make for a more comfortable grip and also to reduce the amount of carving necessary. I then used my saw to cut two stop cuts in a ‘V’ shape into the end of the wood. Since finishing the course I now know that a piece of serrated flint would have done this job just as well, if a bit slower.
The handle-to-be: starting the slot
Once I had the stop cuts in place I used the tip of my steel knife to cut out the centre of the ‘V’ for the tang part of the flint blade to fit into. Then using my steel knife I carved the wood down into the final handle shape.
Stop cuts in place
I filled the ‘V’ notch with some spruce pitch (see my article on arrow making for making spruce pitch) and slid the tang of the flint blade into the notch. I then bound the hilt of the handle with sinew to secure it and covered the sinew with more pitch to protect it. Within 24 hours this knife was ready to use.
Rawhide and pitch wrap
Not the best pictures I am afraid but as you can see this knife was the perfect size and shape to use on many of the jobs I would normally use a steel knife for.
A perfect size and very sharp
The purpose for which I created the knife was tanning some deer skin on the course. When splitting the hide of the deer the knife was comfortable to use and the top curve near the tip cut through the hide like a knife through butter.
First job – cutting a deer hide
My final craft item was to make a bark sheath for the small bone bodkin you can see on the right. The knife allowed me to easily cut out many strips of bark in a very controlled manner so that the strips were all of the same width. I added a wrap of rawhide at this stage to protect the pitch and sinew from general wear and tear.
Creating bark strips and a new rawhide wrap
When I was finishing the sheath I found the knife edge was brilliant for trimming off all the excess bark.
Perfect for trimming
Finally, to hang the sheath on my bark belt I cut up lots of buckskin with the knife to make some rough cordage.
Good for cutting up buckskin
Since the course I have used the knife on a few other projects. So long as I am respectful of the fragility of the flint edge, the knife has produced some wonderful results. It’s great for scoring lines in bark, shaving pieces of green wood down to points and for making rosette cuts in small branches to snap them.
Scraping, point work and splitting
When I was making my Split Stick Atlatl and had to batton open a piece of green wood I found that the thick back of the blade was able to withstand a lot of force from my wooden hammer, which was a pleasant surprise, although I was very nervous throughout the process.
Robust enough for battoning
Eventually I made the knife its own bark sheath and it now sits proudly as a well-used tool on my primitive belt order.
I got a lovely sunny weekend in Crowborough – not often I can say that in March
The London Area Sea Cadet Adventure Training has run over the last few years a couple of Level 3 Certificate in Basic Expedition Leadership (BEL) courses for our instructors. This is a nationally recognised qualification and we as a team have worked very hard with the trainees to get them trained up and assessed. Our training team in the London area has grown quite a lot now with more and more camps taking place.
The downside to this was that as more and more cadets were being trained up there was a point when they hit 16 years old there was little in the way of camping qualifications we could offer them. My boss Perry Symes has worked hard to bring in a brand new qualification for these 16 and 17 year old cadets – the Level 2 Award in Assisting in Basic Expedition Leadership (BEAL).
The course comprises at least two training weekends, a couple of weekends where the cadets assist on other camping courses, and an assessment weekend. The first training weekend this year took place in (for once) a rather sunny Ashdown Forest. Most of the training takes place outside but as we were also using Crowborough Army Camp we did have the use of a classroom as well.
Lots of outdoor work and a little indoor work
We had six cadets over the age of 16 on the course but could have had another six if they had not applied too late. The course instructors were Perry Symes, John Kelly, Liz Rowan and myself. John and Liz passed the BEL a couple of years ago so they came on the course to gain valuable experience. John in particular is working towards his Walking Group Leaders award so running this course will give him valuable experience.
We also had another course running alongside this one for the younger cadets covering all the subjects for their Basic Campcraft badge. This course was run by Dave Lewis, Charlie Brookes, Lloyd Martin and Dean Barnett. Lloyd has passed his BEL course recently as well so it was good to see him in action and Dean is just starting out in his training to becoming an Adventure Leader.
Learning to erect tents so they can teach the art in the future
I think Perry and John were trying to prove to the cadets that if they could both fit into one of the smaller tents then they would have no problems at all 🙂
A squash and a squeeze
While the BEAL students were doing some class work, Dave and Charlie had the younger cadets put up my tipi. They used this over the weekend as a group shelter and temporary classroom, and some of the cadets slept overnight in it.
Teamwork for the team tent
In between all the classes we do try and have a bit of fun wherever possible.
Fun and games
Both teams set out in the afternoon on the Saturday to focus on navigation. The young ones at this stage get an introduction to using a map and working as a team in the outdoors. The BEAL students had already shown us they could use a map and compass in the morning so we set them to work in pairs with some challenging places to find.
Serious time
On our travels we came across the memorial plaque to A.A. Milne. There are fantastic view from this spot so it is great for more macro work with the compass. We got the cadets to take ‘back bearings’ on known locations they could see to identify exactly where they were and also to use their compasses and maps to try and identify far-off unknown features they could see.
Perry wanted a proper picture taken of him but I seemed to get in the way:-)
100 Acre Wood
What we aim to do with this course is to train the BEAL students up to a standard that can be assessed for a nationally recognised qualification so that one day they can take over from us. In the meantime I am very happy to continue teaching outdoors skills but recognise that one day others will need to take our places.
Current instructors and future instructors
While we were doing compass work the younger cadets had found the Airman’s grave. This is not an actual grave but a memorial site to the crew of a Wellington bomber that crashed here on the 31st of July 1941 returning from a mission over Germany.
Basic Campcraft group
Later that evening after all the classes were finished, Charlie, Liz and myself took the younger cadets off for an evening’s walk. I insist that the cadets do not use torches to show them how quickly their eyes adjust to the dark. Most of these cadets had never walked in the woods at night, let alone without torches. Thankfully we had a good moon that night with a clear view of the skies.
I took them down to an area of the military camp that is heavily wooded but is the site of some old World War 1 training trenches. In no time the cadets were running all over the place having a great time and had totally forgotten that they were nervous about being in the dark. We took them through various types of woodland and heathland and also met the Royal Marine Cadet instructors out training.
Night time wanderings
Just before we got back to camp we got the torches out and cut up some dead standing wood for a fire to toast some marshmallows. On the way back after this we managed to get a bit of star gazing in as well.
Wood Party
One of my usual nightly chores is to carve some marshmallow sticks for the cadets to use. Thankfully though we have some good willow shoots nearby. While I was doing this Charlie was teaching Dean how to light a fire properly and maintain it. I got this little video of it all in between carving the sticks.
Marshmallow sticks
After the fire got going it was time for a photography shoot to get some fire faces. You can see a small one on the left in the bottom picture.
Fire Faces
Then it was onto the serious job of teaching the art of toasting a marshmallow. It still amazes me to find so many children in their teens who come on these courses and have never had the simple pleasure of toasting a marshmallow over an open fire.
Marshmallow time
Next morning in between classes I managed to get some time in spotting some unusual fungi (cheers Liz for finding these) and a bit of spoon carving. I have a tutorial on carving this spoon here – How To…. Carve a Simple Spoon: the double-handle technique.
A touch of bushcraft
It turned out that running these two classes at the same time worked quite well. The younger cadets had to learn all about camping like using stoves and the BEAL students had to re-learn the same subjects so that they could prepare themselves for teaching the cadets themselves in the near future. In the top picture Perry is showing the cadets how that if a gas bottle is shaken too much it may flare up and become dangerous.
Classes
While Perry got on with the class with all the cadets and other instructors Dave took a well earned break and I got my sleeping bags out for an airing.
Hammock time
Part of the course is designed to get the BEAL students to come up with different ways to get the learning across. Here they are using Charades to explain the Country Code. They felt a bit embarrassed at first but soon got into it.
Trying to make teaching the Country Code interesting
It is not often you come down to a weekend at Crowborough in March and manage to make fire using parabolic mirrors. I even found a nice honeysuckle-wrapped shoot that could be turned into a nice walking stick. I gave it to Dave as I’d broken one of his walking poles a few years ago – it was after he had tripped in a ditch and bent it and I had tried to straighten the thing 🙂
That was the end of a very successful weekend. All the BEAL students went off with areas of navigation to work on and a date for another course which they would help to run. Some of the new instructors gained some valuable experience and I got a lovely sunny weekend in Crowborough – not often I can say that in March.
I am looking forward to the second training weekend later in the year for this course.
This How To…. illustrates some simple steps to carve a small spoon you can easily make when you are out and about.
A simple spoon
I was training on campcraft in Crowborough (Ashdown Forest in the UK) recently and in between classes decided to carve this simple spoon. A nearby willow tree had been felled a few years ago and lots of shoots had re-grown from the stump.
Local Willow
I selected a shoot and sawed it off near its base. Cutting the limb cleanly at the base will allow the tree to heal itself quickly and send out a replacement shoot the following year.
Cut right back
I selected the limb because of its curves, which help in making a strong spoon. I trimmed the limb in a safe position and used the live limbs as a vice to do the final sawing.
Trimmed safely
I took two pieces to make a couple of spoons and then trimmed off a couple of the smaller shoots from the top.
The spoons-to-be
These smaller pieces I re-planted around the base of the tree by pushing them into the ground, as willow has the ability to re-grow from these shoots.
Re-planting
The next job was to strip off the outer and inner barks. I tried to strip the bark off in one piece but as the sap had not yet risen it was very difficult to do. If the bark had peeled off easily I could have made some nice cordage from it.
I used the back of my knife to scrape off the remnants of the inner bark to get right down to the wood.
Taking off the outer bark
This inner bark does clog up on the back of the blade so you have to continually scrape it off. The whole process of stripping the bark took about 5 minutes.
Removing the inner bark
I flattened out the area of wood that would make the bowl of the spoon to give myself a little bit more area to work with.
Creating a working surface
I like to draw out my spoon leaving areas of waste wood at each end as these act as handles when carving. Also, I prefer to carve the spoon from the top down as this cuts through many different rings thereby making the spoon stronger. I also mark out at this stage all the stop cuts I will need. (The technique of leaving handles to work with was taught to me by my good friend Mark Beer a few years ago and I find they are particularly useful when you are teaching novices.)
Drawing out the spoon
I like to carve the bowl of the spoon first. To do this job I usually use a palm gouge (on the left) and a crook knife (on the right).
The bowl tools
I use the palm gouge first, tracking around the edge of the bowl to cut out the waste. Having the two handles in the wood means I can use the same hand to do this (I am left-handed). They also allow me to keep my other hand well away from the sharp edge of the gouge.
The palm gouge
The gouge makes short work of the waste wood but it does not leave a smooth surface.
Rough bowl
To smooth the bowl out a bit more I usually switch to the crook knife. I find that the crook knife helps to accentuate the curve of the bowl more than the gouge does. With both tools I always try and cut across the grain of the wood but this is not always possible near the ends so I need to be extra careful there not to lose wood on the edges.
Smoothing out the bowl with the crook knife
After the bowl is roughed out I saw all the stop cuts. These stop cuts help to stop splits occurring in the wood as I carve the rest of the waste wood away.
Creating the stop cuts
Stop cuts are particularly important when carving around the bowl; they act like small breaking points for the knife edge, stopping splits occurring.
Removing the waste
I take my time at this stage and make small cuts to remove each piece of waste wood between the stop cuts. In these two pictures I am using my thumbs on the back of the blade to apply pressure. You can push either with both thumbs on the back of the blade or with one thumb on top of the other.
Thumb pressure
When I am on a straight section like the handle I tend to use the chest lever grip. This is a very controlled and powerful cut. I have my hands tight against me and use my chest muscles to push my hands apart. This pushes the knife edge into the wood in small, controlled but powerful cuts.
Chest lever grip
Another cut that can be used here is the shoulder cut. With the work piece off to your side and the bottom of it on a log or on the ground (if the handle at the bottom is long enough), keep your arm locked straight and push down with your shoulder muscles to cut into the excess wood. You can cut big or very fine pieces with this technique.
Shoulder power cut
I learnt this technique from Mors Kochanski when he was over in the UK at the BCUK Bushmoot a few years ago. I pushed one end of the work piece (perfect when you have these handles on each end) and then, using the knife like a draw knife, cut slivers of wood towards me. This is one of the few cuts where the blade comes towards you. The key to this technique is to keep the arm that is holding the work piece bent and well away from the knife tip. Also the arm that is holding the knife is clamped against my side which stops any big movements. If my knife were to slip with this technique the blade would actually only move a few centimeters.
Mors Kochanski style
Using these techniques I quickly removed the waste wood around the spoon.
Top plane cut out
I then marked out the side of the spoon and started to remove the waste wood using the shoulder cut. I could have put stop cuts in at this stage but decided not to as there was not much curve to the spoon on this plane.
Side plane
Finishing the tail and the bowl requires a lot of fine work. You have to find how the grain of the wood is flowing and just chip away at it with small cuts to form your final shape.
Fine work
After some final work on the handle of the spoon I slowly carved around the tip of the bowl to remove one of the working handles. Take your time with this so that you get down to the last few fibres of wood before twisting the handle off. Any big cuts here can damage the bowl.
Trimming the handle and removing one handle
I then repeated the whole process at the other end to remove the other working handle.
Removing the other handle
The wood was green so full of moisture. Normally I would dry the wood slowly for a few weeks before sanding it down. Sanding green wood can be hard work and no matter how smooth you get it you will need to repeat the process in a few days as small fibres of wood will start to rise up again, giving the spoon a furry texture.
I accept that when making these spoons as I normally want to use it straight away. Ideally I should have used a piece of seasoned wood so that this would not happen but you sometimes have to use what is available. I left the spoon to dry out for a couple of days before sanding it down.
A blanked out spoon
I used sandpaper of different grades and luckily have some cloth sandpaper that works well when sanding the bowl out.
Sandpapers
I used the rough sandpaper first and you can see in these pictures how the fibres of the wood are being ripped out here rather than being sanded smooth. All the sandpaper is doing at this stage is flattening out the tool marks.
Rough first
Eventually the spoon started to take on a more smooth appearance. The bottom picture shows the bowl untouched but the handle is now smoother.
Taking shape
The cloth sandpaper is ideal for getting into the bowl and smoothing it out. I like this sandpaper as it does not break apart in the bowl as traditional paper-backed sandpaper tends to.
Smoothing the bowl
After sanding the spoon down using a mixture of grades from rough to very fine (about a half hour’s work) I added some oil to the spoon. I generally use vegetable oil as that is what I usually have in my cooking kit when out in the woods.
After the first coating had soaked in I applied a second coating and left the spoon to dry out.
First oiling
I like to add a finishing touch by boning the spoon. You can do this with the back of a spoon, a rounded pebble or with a rounded piece of bone. I rub the spoon with the rounded surface in a circular motion covering the whole of the surface area of the spoon. I normally do this for an hour or so as this seals the fibres of the wood down and adds a beautiful shine to the spoon.
Boning
This spoon will need to be re-sanded, oiled and boned again in a few weeks as the fibres rise up as it dries out. You can see that the bowl is not perfectly smooth and there are slight imperfections in it. Hopefully these will disappear with that second sanding but for now it is a spoon I can use.
Imperfections but a working spoon
The different profiles of the spoon.
Profiles
Ready to go.
Ready to do its job
Have a go and try out some of these different cutting techniques.
When I first started venturing into the world of bushcraft I got into carving spoons and bowdrill sets. It’s like a rite of passage with most bushcrafters to crack these skills. As time went on I began to explore the world of pot hangers and eventually these little devilish collapsible pot hangers.
This post will take you through the steps I went through to make a mortise-and-tenon collapsible pot hanger. I have included a couple of other types and links to show you how they are made or used. As you can see in the picture on the left, one of the hooks is pointing down and one is pointing upwards. This set up makes for a great pot hanger but sadly you don’t find many trees with this configuration of branches.
Mortise and Tenon Pot Hanger
Here are the three different types of pot hangers I will discuss here, from left to right: the wedge hanger, the dovetail hanger and the mortise-and-tenon hanger.
The trio
The wedge hanger
I call this the wedge hanger as the two pieces are kept in place by a single wedge of wood in the middle. There are a lot of angles to take into account with this hanger and as with all of the hangers in this post I would advise you to make it out of dead standing wood. If you were to use green wood you might find that the pieces do not fit together any more as it dries out. I found a good tutorial on making this hanger on the Bearclaw Bushcraftsite.
Wedge Pot Hanger
The dovetail hanger
This hanger replaces the wedge with a dovetail joint in the middle. I found it surprisingly easy to carve. The trick is to make the joint snug but not too tight. You want just enough friction between the two pieces to hold it all together but still be easy enough to pop apart when you are finished with it. A good video by GJohnridge11 on You Tube shows this hanger but I am afraid not how it is carved.
Dovetail Pot Hanger
All the hangers so far have hooks pointing in opposite directions and on opposite sides. I have had discussions with fellow bushcrafters on this and some argue that a pot may slip off if the hooks are on opposite sides. I have made a few hangers now with hooks on opposite sides and on the same side as in the picture below. As of yet I personally have not had problems with either method.
Wedge Pot hanger with both hooks on the same side
The reason I like these hangers is that they are easy to store and carry with you. Once broken apart they fit inside your pot or kettle snugly.
Neatly stowed away
Mortise-and-tenon hanger
I found two dead pieces of wood of similar widths with good strong branches leading off them. After stripping the bark off one I noticed there was a fungal infection inside it. I decided to try using it anyway as the wood still felt strong. I left the bark on the other piece of wood as it had attractive honeysuckle markings going around it.
I trimmed the bottom piece so it was the same length as the top piece.
Trimming to size
The tenon limb
Using a pencil I marked out all the areas of wood I was going to cut out. (I should have shaded the areas of wood I would be cutting out with my pencil for the camera, see the bottom picture for how this limb will finally look.) This limb is called the tenon limb.
Mark out the shape of the tenon
I used a small hand saw to make some stop cuts on the pencil marks. These stop cuts are particularly useful when you start carving with your knife to stop any splits running off into areas of wood you want to keep.
Stop Cuts – Part 1
The stop cuts done, I used my knife to start carving the excess wood away. I used small cuts all the time, my thumbs on the back of the knife for fine control. This is a great activity to do while sitting around the campfire where you can relax and take your time.
Stop Cuts – Part 2
Once you get one block out it is time to take out the next block of excess wood. I am keeping the wood that is under the blade and removing the wood directly to the right of it.
Forming the tenon – Part 1
Finally I used my saw to cut out the tenon at the end of the piece of wood. This is a small rectangular piece of wood at the end of the limb as you can see in the bottom picture.
The finished tenon
The mortise limb
I cut a stop cut into the mortise limb where I had measured that the tenon limb would fit snugly against it. You have to judge this by using the tenon limb as a measuring stick and saw to a depth that will make the limbs fit together well.
Mark a stop cut
Once the stop cut is in place you can easily batton the excess wood out with your knife. I am using the tenon limb as a hammer at this stage.
Batton out the waste wood
You can see in the top picture that the two pieces fit well together now so I marked out the area of the joint I needed to cut out on the mortise limb. I used the protruding rectangle of wood on the tenon limb to mark out the corresponding section of wood I needed to carve out of the mortise limb.
Once marked out I used the tip of my knife to start carving out the rectangular hole I needed to make in the mortise limb.
Draw out the mortise
Again this was a piece of carving I took my time with. I placed the mortise limb on a work surface rather than holding it in my hand, where any slip of the blade could have meant a nasty cut.
Carve out the mortise
Eventually I worked my way through the limb and carved out a rough rectangular shape.
Form a neat rectangle
If you have taken your time and not cut outside of the pencil markings the fit of the Tenon and the Mortise should be snug. If it is too tight make some cuts where you feel there is resistance and keep trying to see if both pieces will fit together.
The fit should be snug but not overly tight
Eventually both pieces fitted well together but disaster struck for me here. I was showing the hanger to a friend and was explaining it is very strong on the vertical plane, ie when holding a pot, but very weak on any other plane, ie if you twist this hanger it will break.
Just as I was explaining this my friend did indeed twist the hanger as he tried to pull it apart and the tenon joint simply snapped. The fact that the tenon had some rot in it did not help but I had tried it out earlier and it did take the weight of a heavy Dutch Oven. To separate the limbs you need to push on the rectangular tenon so it pops out of the mortise slot: do NOT twist!
A trimmed but flawed tenon
Still, it didn’t take long to make up another tenon limb to fit the original mortise limb.
Tenon Mark 2
All that was left to do was tidy up the hooks, put the limbs together and hang a pot.
Mortise-and-tenon hanger in use
I can’t remember where I came across this hanger (somewhere on the internet) so if anyone knows where this hanger originated please drop me a message. Even though it looks complex to begin with, once you get working on it it is easy enough to do and a joy to craft as long as you take your time with the fiddlier saw and knife tip bits.
Closed and open
I filled this Dutch Oven with water and got my two little helpers to show you how strong this hanger can be.
One very strong pot hanger
Some other sites on the wedge hanger you might find interesting:
I put this How To…. together to show how to construct a couple of primitive arrows. I used mainly primitive tools with the exception of a few modern touches: the occasional use of a steel knife, adding false sinew when I ran out of real sinew, some sandpaper, a copper-tipped flaker and bleached feathers.
Preparing the arrow shafts
I made these arrows while on the Woodcraft School Primitive Technology course in 2009. John Rhyder the course instructor supplied us with pre-cut branches from a spindle(Euonynus europaeus) tree, which has traditionally been used for the manufacture of arrows as it is a hard wood and takes a point well. Another option that was available to us was hazel(Corylus avillana) as there was some on site. I chose to use spindle as I had never used it before to make arrows.
Flint-tipped arrows
I used the back of my knife to scrape the bark off the wood but this would traditionally have been done with a piece of sharp flint or other such stone. For safety I kept the knife still and pulled the green stick backwards, scraping bark off with the back of the blade. I like this method as the blade stays still making it very safe. I then roughly sanded each of the branches with sandpaper. This could have been completed traditionally with either a handful of sand or a soft rock such as sandstone.
De-barking
I then heated the branches over an open fire. I was careful not to scorch the wood as this changes its properties and makes it brittle. The trick is to slowly turn the branch in a circular fashion, heating evenly all around the section of wood that needs straightened. This in effect creates steam in the wood as the sap heats up and so allows you to slowly straighten the arrow (this method works best on green wood). To straighten the bumps in the wood you need to hold it in position (as straight as possible) until it cools and sets into its new shape.
Heating and straightening
Making a Self Nock
Next I needed to make the nock for the string. I cut two small grooves (opposite each other) at the thin end of each shaft. Then about a centimeter down the shaft (showed here in red) I rolled the knife edge to mark a thin line at 90 degrees to the first grooves (too fine to see in the picture).
I then placed the edge of the knife into one of the larger grooves to split the wood down to the lower line. The small cut in the wood at the lower line helps stop the split running off too far. I then repeated the procedure on the opposite groove.
I wiggled the centre section back and forth until it started to break away from the main arrow shaft. In the bottom picture you can see the nock starting to appear.
Self Nocks
The resulting peg finally pops out after a lot of wiggling about. Freejutube has an excellent video on making a primitive nock using a slightly different method – Arrow snap self-nock – with flint and bone tools
The knocks
Preparing the Flights
John Ryder provided feathers for us to use. Due to health and safety requirements John had to supply his students with feathers that had been washed: traditionally of course the remnants of bird kills would have been kept and the feathers used for this job. If the feathers are from the same wing they make excellent flights, making your arrows more accurate.
The Flights to be
I used my knife tip to start the split of the feathers to create the flights – a sharp piece of flint would have worked just as well. After the initial split had been made I used my fingers to split the rest of the feather. I tried to be very careful here to keep the split in the centre of the spine of the feather all the way to the end. It gets a bit tricky as it tapers out near the end.
I split and trimmed the feathers leaving enough of the spine at each end for wrapping purposes.
Splitting out the flights
Making Sinew Cordage
To wrap the feathers onto the shaft I used deer sinew. This needs to be pounded gently between two stones until all the sinew fibres separate.
Sinew
This takes time but it is worth it to see all the strands of sinew start to appear.
Breaking down the sinew
Here you can see the fibres starting to really fall apart. There wasn’t enough real sinew for everyone so I had to supplement it with some false sinew: dental floss is another possible alternative.
I rolled the sinew strands to make them stronger and wet each strand with saliva. This allows the sinew to bind to the shaft as the fats in it act like a glue when wet. On the right you can see some sinew that is ready to use as wrapping.
Finished sinew
Attaching the Flights
To aid in the process of attaching the flights to the shaft I tried out another type of glue made by crushing bluebell leaves to a pulp between my fingers. The resulting gloop was supposed to act as a first fixing to help keep the flights in place before wrapping; it turned out to be a little bit tacky but nowhere near strong enough to act as a glue. In the bottom picture you can just make out the shaded area on the shaft where the bluebell ‘glue’ was placed.
Bluebell glue
In the end I just used sinew to hold the flights in place. You can see the bluebell stain on the shaft in this picture.
First tie off
I then wrapped the flights at the top with sinew (bottom left) and then to finish this stage I wrapped the body of the flights with more sinew (bottom right).
I also wrapped sinew just below the nocks on each arrow to strengthen them. You can see this clearly in the arrow on the right. If I hadn’t reinforced the nocks with sinew they could easily have split with the forces of the bow string as soon as I shot them.
Tied off with sinew
Creating and Using Pitch
Once the sinew was attached to each arrow I decided to put together some pine pitch. This was to cover the sinew to protect it from fraying and also to waterproof it. The name pine pitch is a bit misleading as I used spruce resin, since that was what was readily available in the area. After collecting the resin that had oozed from spruce trees (the tree uses the resin to seal any damaged areas on its bark) I mixed it with fine charcoal (to give it strength) and beeswax (to give it flexibility).
I used the small rock (left hand picture) to grind the charcoal and a large flat rock (top right) as a preparation table. I heated the square rock in the fire to help with melting and mixing everything together. The sticks were used as mixers and to store the resin (see below). The hot rock I used had been heated before many times so there was no risk of it exploding (which can happen if they contain trapped air).
On the heated rock (bottom right) I heated the first lump of resin, and as it melted I scraped off any debris such as bark.
Pine Pitch Prep
I kept adding more and more resin, charcoal and beeswax (I just added charcoal until the mixture thickened slightly and added beeswax in little lumps) until it had all melted. The rock was super-heated so I had to take great care not to burn myself.
Mixing
The rock had a slight indentation to collect the melted resin. It doesn’t look like there is much resin here but it was enough for what I had to do.
Hot Pine Pitch
Using two sticks, one to scrape the pine pitch up and one to hold the cooling pitch, I coated the holding stick with the pitch mixture then submerged it in a pot of cold water to harden it. I would then repeat the process adding more and more layers. Using cold water speeded up the whole process.
Here you can see the pine pitch building up on the stick. This primitive method does not give you very fine pitch as you would get using a modern method but it does work surprisingly well
Creating a Pine Pitch Stick
I made up two pine pitch sticks in the end. The stick on the far left has been charred and can be re-ignited quickly by dipping it into a fire to create heat to melt the pine pitch again to coat the sinew on the arrows. This protects the sinew and gives the arrow a nice finish
Prepping to coat the sinew
After re-lighting the charred stick I used it to to re-melt the tip of a pitch stick (top picture). I found it fairly easy to drip the melting pitch onto the area of sinew on the arrow I wanted to cover (bottom picture).
Heat and coat
As I dripped the pine pitch onto the sinew I wet my fingers so that I could smooth the resin out and spread around evenly (John the course instructor is in the left hand picture demonstrating this). If you do not wet your fingers the hot pitch could burn you and also it will stick to your fingers (out in the woods without hot running water this is a pain to clean up).
Re-heat and smooth out
Knapping the Arrow Tips
The next stage in the process was to make some arrow tips. I had collected up some shards of flint left over from the course we had with John Lord. Thankfully there was a mass of leftover flint for me to look through and choose from. All of the pieces shown below I thought could be made into decent arrow tips or barbs with the minimum of effort.
Possible points
The next stage was to pressure flake the pieces with a copper tipped pressure flaker and an antler tine (I wanted to try both tools) into usable arrow heads. The glasses were worn to protect my eyes from flying pieces of flint and the glove protected me against cuts. I placed under the flint a strip of leather to give support and further protect my hand.
The picture on the right did not turn out very clear (a smear on the lens of my camera) but I soon had an arrowhead ready to insert into my arrow shaft. Using the same method as I used to make the knock, I created a groove at the arrow tip.
A bit of knapping
I re-worked the other pieces and after a little touching up these other flint points were ready to be used.
The rest of the finished points
Attaching the Tips
I then coated the arrowhead with some pine pitch and placed it into the groove on the shaft. I then coated the tip of the shaft in more pitch and wrapped sinew round it to keep the arrowhead secure.
Update 13/03/2014 – I have been advised by one of the Primitive Arts Society members David Colter that it is very important to securely bind the shaft immediately below the point for a length of about a centimetre to prevent it from splitting on impact and failing to drive the point into the target. There is a very good experiment showing this in the Traditional Bowyers Bible Vol 3. I did not bind it for a full centimeter in my example (thanks for the update David).
Attaching points
I finally added more pitch to cover the sinew to waterproof it all.
Well attached
Based on archaeological evidence I decided to add a barb to the arrow. I firstly scraped a groove along the arrow shaft then put some pine pitch into it.
I then placed a long thin piece of sharp flint onto this pitch and coated more around the base of it (bottom picture) The barb is designed to cause maximum damage to the prey animal as the arrow enters its body.
Attaching a barb
I finished two arrows in this project. The one I completed for this tutorial is the one on the right.
Finished arrows
Using similar techniques I was able to produce an Atl atl set as well.
Atlatl extras
I have never shot these arrows at a modern target as I don’t want to break off the tips but I did shoot them into some bales of loose hay and was very impressed with their accuracy.
This was a great project as it introduced me to some primitive but very effective techniques in arrow making.
While writing my posts on my Scandinavian Candle series I recollected a long log fire I was taught how to set up by my good friend Kevin Warrington of Natural Lore. I like to think of it as a candle, but horizontal instead of vertical. The set up is basically two logs (usually pine) laid horizontally with one on top of the other.
This post is a step-by-step recording of how I set up what I have discovered is called the Rakovalkea Gap Fire.
Finnish Rakovalkea Gap Fire
Back in 2007 I was on a bushcraft course with Kevin Warrington and he showed me how to set up a long log fire. This isn’t quite the Finnish Rakovalkea but the idea is basically the same. These fires are great when you’re sleeping outdoors in a lean-to shelter or under the tree canopy in very cold or arctic conditions. Last weekend I came across an excellent post on making a large full length Rakovalkea Gap Fire by SKW Bushcraft(I used Google Chrome to translate the page).
Where it all began
While out last weekend in the woods I came across some dead standing birch logs that looked ideal for the fire (normally pine is used but I do not have access to any at the moment), and luckily there were some handy, biddable children around to help transport it home.
Foraging
The component parts are two logs and various green sticks for supports and wedges. I flattened one of the logs in preparation for cutting out a groove in which to start the fire, keeping all the chippings for getting the fire going later. The log was not wet, exactly, but it was slightly damp owing to the heavy rain we have had recently. I could have left this experiment for the summer but thought that if I could get a damp log going then that would be a more realistic test for the UK environment. This type of fire is normally used in dry arctic environments where dead standing pines are abundant.
Component parts – Create a flat surface on one log
Once the log was flattened I carved out the channel. This is the dangerous bit, so cut the channel out with small cuts and with the log on the ground or well off to your side. I left flattened areas off to the sides but on reflection I think I should have made the channel the full length to maximize airflow.
Axe out a channel
On the underside of the log with the channel I axed out two grooves for the support poles.
Under the log with the channel axe out a groove at each end
The support poles help to stop the log from rolling off to one side. I think if they were big enough they must help when the log is resting on snow to keep it secure.
Bottom log set up
On the log that I was going to place on top I just flattened one side of it so it would rest securely on top of the bottom log. Again, on reflection, as the log was damp I should have made multiple cuts in this area with my axe to increase the surface area of the log and let the flames catch hold better. I came across this method when researching the Raappanan tuli candle.
Flatten out along a section of the top log
I carved two wedges that were to be used to vary the gap height between the two logs. These also proved useful as tongs later.
Green wood wedges for adjusting height
On one of the poles of green wood I carved a point and dug it into the ground beside the set up as support. I made this extra long as I was setting this up on soft earth (on the potato bed my wife had just dug over, in fact, but as it’s not been planted yet no potatoes were harmed in the making of this fire, and as I keep telling her ash is good for the soil).
One sharpened pole for support
I slimmed down the end of another green stick and hammered a nail into it. One end of the stick is dug into the ground and nailed into the top log (diagonally opposite to the vertically upright green pole)
Nail pole support
This is the basic set up without any tinders in the middle. All in all (not including foraging the wood) this set up took me about 15 minutes to do. I have read that with the much larger set ups (full body length) someone with good axe skills can set one up in an hour or so.
Basic set up without tinder
To get the fire going I used a mixture of waxed wood shavings, cotton wool balls smeared in Vaseline, and a lot of dry larch twigs. I did try and find some pine or spruce resin but to no avail. Resin is traditionally used along with pine fat wood.
Filled with tinders
I lit the whole thing with just a couple of matches and in a few seconds the whole set up was alight.
Firing up
It was lovely to see the flames spread so quickly and on both sides.
Initial burn
After about 5 minutes I started to add lots of pine kindling along the whole length. There was no wind so I had a small plastic plate to use as a wafter. The wooden wedges really came into their own as they allowed me to adjust the height of the gap so as to insert the kindling.
I tested the heat (with the back of my fingers) along the full length of the set up and it felt very uniform along its full length.
Adding small kindling
For the next hour I just kept giving the fire the occasional waft and added more and more kindling. I made a short video (the sound is quite poor I am afraid) of the fire at this stage.
Main logs starting to go
After I had used up the kindling the gap had widened a fair bit between the logs so I did not need to use the green wood wedges anymore. I used the wedges after this to insert larger pieces of wood into the gap along the length of the fire. This greatly helped combating the dampness in the main logs. I had to use the wedges as tongs at this stage as the heat was quite fierce.
Adding larger pieces of wood
After two hours the bottom log was alight quite nicely and if I was sitting in front of this in the woods I would have been toasty warm. In comparison to a traditional set up I would normally use (criss cross lay for example) I needed to use very little wood to feed the gap.
Final flames
In the morning I found that the bottom log had burned through where I had placed the last of my small logs (I concentrated them on the centre section).
The next day
The top log due to its dampness had still not burnt through after all that heat but I was very impressed with this set up.
Top log too damp to burn through
I am looking forward to later in the year when I can try this again but with larger pine logs and one day soon sleeping out in a lean-to shelter in an arctic environment with one of these fires to keep me warm.
There are some excellent long log fire pictures here on the Bushcraft UK forum to view and the Winter Trekking forum shows some good pictures of the Finnish army using the method.
Best to learn the tricks of campcraft here so that when you are sorting your life out on that wet and windy morning in Brecon – life is a breeze.
This post documents the last of my courses with the Sea Cadets for 2013 and one of the first of 2014. It was a very good year (2013) for expeditioning in the Corps as far as I was concerned. Some of our cadets will eventually find themselves climbing mountains in the Alps and great fun they will have too, but they have to start somewhere before this high-level work can happen
In November last year and in February of this year I helped run two Northern District (London Area Sea Cadets) Basic Campcraft weekends. These weekends are designed to introduce the cadets in a constructive but fun way to the skills they will need to develop to reach their higher goals – be that completing a Gold Duke of Edinburgh’s expedition or climbing in the Alps.
Basic Campcraft with the Sea Cadets
The areas we cover in the course are:
Providing shelter
Food and Cooking
Packing and carrying equipment
Safeguarding health and well-being
Recognising suitable clothing and equipment
Navigation skills
Safeguarding the environment and countryside
Planning and preparation
The pictures in this post come from both courses to show all the activities the cadets undertake. Some of the cadets who come on this introductory course have never camped in their lives. Most are city kids who have had little chance to get out and about into the woods and hills so the pace is taken gently as we slowly expand their comfort zones.
After introductions, discussions on safety and a kit check it is time to start learning how to read a map properly. I find it best if the cadets start to read maps like a book, and the only way to do that is to understand the symbols. Everything else such as scale, slope aspect and compass use comes later.
Learning how to use a map
We get out and about as soon as possible but will vary the timings depending on the weather. On the left below is Chief Petty Officer Dave Lewis, who is as keen as I am in getting the cadets adventuring. On the February course Dave and I took a step back to let one of the younger instructors, Emma Deasy, run the course. We were there for safety, to add extra detail when required and to assess Emma for her Adventure Leader qualification. This is an in-house Sea Cadet qualification but is a first step towards gaining the nationally recognised Basic Expedition Leader Award.
While Emma briefed the cadets (picture on the right) Dave and myself watched from on high.
Getting out there
The cadets are not expected to lead the navigation at this level but just get used to using a map and to start to get an understanding of how it relates to the real world. In between all this learning it is always good to find some mud.
Finding muddy trails
These are the two groups we had, the top picture from February this year and the bottom picture from November last year. Pictured in the bottom picture in the red jacket is Lt (SCC) Keith Coleman RNR. Keith like Dave is a great friend of mine; I didn’t know at that time that this was to be the last Sea Cadet course I would work with Keith.
The cadets and staff
I had to get this picture in as I always like to take my EDC hammock chair with me on trips. Sometimes I get a rest, more often the cadets nick it. The trip in February was hard for me as I forgot to take it with me – poor skills on my part.
Time for a brew
It is not all navigation: it’s good to get close to nature too – be that alive or dead. The bottom picture shows some wood pigeon feathers found by one of the cadets. After some initial hesitation the cadets got up close to investigate them. On close viewing you can see the blunt bite marks typical of a fox but some of the quills have the single score line on them typical of a bird of prey. I am no expert in tracking or hunting but it’s clear there is a story to tell here and it is great for the cadets to see this and start to open their own eyes and mind to what is happening all around them.
Watching nature
Along the way we teach the cadets about the plants that are in season at that time and they are then expected to start to look for more of them along the way. I don’t expect the cadets to remember all the names, just to start noticing them more.
Plant ID – Shepherds Purse and Coltsfoot (taken in February)
No introduction to campcraft would be complete without trying out an emergency bothy. Most instructors will carry one of these whether they are on the hills or just wandering around the woods. I have used these for real on a couple of occasions in high winds and rain on mountains. When you get inside as a group the bothy traps warm air so that the temperature rises quickly. They are not waterproof but do cut out the wind and can make all the difference.
For the cadets it is a fun if squashed couple of minutes.
An intro to the emergency bothy
These two courses were run at the Waltham Forset Sea Cadet Unit in North London. As we had access to the main building we ran some of the classes indoors (some other courses are based solely outdoors). As I said at the beginning, this course is about an introduction to campcraft where we slowly expand the cadets’ comfort zones.
Speaking of comfort zones, as you can see (below left) Dave has mastered the art of getting comfortable no matter where he finds himself. In the picture on the right the cadets are being taught what to look out for when buying or using a rucksack.
Indoor breaks and classes on kit
Next up were classes on First Aid kits and footwear. You can see that not all the cadets fully appreciate the need to wear walking boots at this stage and some do turn up in trainers thinking they will be OK. On both weekends there were a few cadets with wet feet.
First Aid and footwear
While we were running about doing this adventure training stuff there were other courses being run out of the unit, including Seamanship, Communications and Physical Training (PT).
In the pictures below you can see cadets learning how to throw a heaving line properly and taking part in games on the PT course.
Other courses – Seamanship and PT
Usually when the cadets turn up on the Friday evening the staff have to help them set their tents up. A few bring their own but most cadets are given a tent to use by their own Sea Cadet unit. Most of them won’t have set a tent up before and some will never have slept outdoors in their lives.
On the Saturday we normally have a class on the different types of tents you can buy and how to erect them. Here Keith is leading the class and once he had shown them the basics it was over to the cadets to have a go.
Setting up tents
Sometimes things go pop in more ways than one. In the top picture the cadets have failed to secure the pole over the entrance; in the bottom picture the pole had actually snapped. In the former case the pole is easy to re-position but with a snapped pole a little bit of imagination, a tent peg and some duct tape are essential. Everyone got a good night’s sleep in the end.
Dealing with problems
Eventually the tents were all up properly. The staff hammocks and tarps are right at the back. I do not usually let cadets on this course sleep in hammocks, but when they advance to other courses they will be offered the chance to do this. Here the cadets get to see what hammocks are all about and to try one out if they wish. I like to see the cadets using hammocks as they do have a real historical association with the sea.
Getting it right
In the evening wherever we are running this course I do try and have a camp fire lit. I remember as a young lad what camping meant to me – sitting around the fire in the evening eating toasted marshmallows (yes they were around then).
Evening fire
We do not cook food over the open fire on this course as it is not on the syllabus but it is our tradition now to have Shmores whenever possible.
Time for marshmallows
A Shmore is a toasted marshmallow or two inside a couple of biscuits. Why some people find this unappealing (Dave) I will never know.
Who could resist a Shmore
The cadets do have to cook a meal for themselves on the course so need to be introduced to some different types of stoves. After some safety tips and basic tuition it is over to them to have a go under close observation.
Learning how to use stoves
We try to keep the cooking simple with foodstuffs such as pasta, beans or even just boil-in-the-bag ration pack food. Dave though takes a strong dislike to seeing the inevitable pot noodle rear its head out of some cadet’s rucksack. Have a guess who the culprit is on the right? Although pot noodles are quick to heat up with boiling water they generally have only about 300 calories in them, not enough to keep a cadet going on these weekends.
Trying it out for themselves and some less-than-desirable food
Put the tents up – then learn to put them away properly as a team. It is easy to do in this controlled environment when the weather is dry and there is little wind; it is a bit more challenging on the side of a hill in Brecon on a wet and windy morning.
Best to learn the tricks of campcraft here so that when you are sorting your life out on that wet and windy morning in Brecon – life is a breeze.
Packing away properly
There were many more classes including different types of clothing to wear, first aid scenarios, planning, the countryside code and packing kit that the cadets have to cover.
At the end of the course all the cadets receive their certificate and basic campcraft badge. For some this is as far as they will go with camping but for most I will see them again on more advanced courses leading them into the mountains and the world of bushcraft.
The Awards
These two courses were an end of an era for Keith and the beginning of a new era for Emma.
Emma managed to pass her Adventure Leader assessment after working hard towards it over the last few years. This qualification is not easy to attain due to the complexities of all the different situations you can find yourself facing – so welcome to the team Emma and well done.
Keith has now left the Sea Cadets but it was always a pleasure working with him. Keith is a good friend and we will work again on other courses, in particular bushcraft courses, as that is where his heart truly lies. As well as being an excellent Adventure Leader Keith is a great organiser – Dave, that leaves you and me to do the paperwork now 🙂
The second bow I ever carved was a Holmegaard-style bow made out of ash. The bow on which I based my replica was found in a peat bog in the Holmegaard area of Denmark in the 1940s and is thought to be over 9000 years old. I made this bow while studying at John Rhyder’s Woodcraft School doing a Primitive Technology course. The wood that was available to us at the time for bowmaking was ash but the original bow found in Holmegaard was made of elm. The bow is a mixture of styles with the limbs that have a flatbow shape for half their length and ‘D’ sectioned like a longbow on the limb tips.
The Holmegaard
I really like this bow as it is very light in terms of draw weight but fast and whippy when it shoots owing to its ‘D’ sectioned tips. I have included in my previous post on Carving an Ash Flatbow explanations on different bow terminology and the differences between flatbows and longbows. Below are the rough dimensions I made my bow to – I tried to replicate the dimensions of the original bow as much as possible.
Holmegaard dimensions
An ash tree had recently been felled and a section of the trunk cut down to just over 6 foot. I scored a line in the bark with a wedge down to the wood to help with guiding the split of the log. Note that the wedge is positioned to one side of the person scoring the line. This maintains a safe position for the worker. I then drove a wedge into the scored line to start the split at one end of the log (upper wedge in the top right picture). A second wedge was driven in at the base of the log to further split the log (lower wedge). Putting in the second wedge loosened the first wedge so I pulled it out and drove it in further down the line to widen the split.
Start of split
I just kept repeating this process of ‘leap frogging’ the wedges, and the scored line helped greatly with controlling the direction of the split.
First complete split
Once the log had been split I kept repeating the process again and again until all the staves were split out.
Finished staves
Using a wooden wedge I shaved off the bark of the stave. I was very careful to remove only the outer and inner bark and not to touch any of the wood. The wood found just under the bark is the most flexible part of the bow and will form the back of the bow. Apart from light sanding this area of the bow will not be touched.
De-barking with a wedge
This is the side profile of the stave (top picture). The side profile has been roughly drawn out leaving plenty of room for error. A close up of the handle area can be seen in the bottom picture and the vertical lines are for the stop cuts.
Side profile
These stop cuts help greatly when getting rid of the excess wood. As the excess wood is cut out, the stop cuts prevent splits from travelling down the length of the bow. The top picture shows the area around the handle ready to be cut out and the bottom picture shows one of the limbs ready for work.
Stop cuts
Some of the tools that are used to take off the excess wood: the axe for the start of the process and a knife and batton to finish it off.
Tools for initial shaping
Keeping the stave off to one side of me and resting on a log, I trimmed the excess wood off. As the stave was off to one side I was in a safe position to work with the axe. If the axe had slipped its follow-through path would have been to my side.
Axing out
The tool on the left is a draw knife and can be used to finely trim the bow shape. If you do not have a draw knife you can embed the tip of a knife into a piece of wood to act as a second handle and use it as a draw knife. If you choose this method make sure that the piece of wood is on a secure flat surface before pushing the tip into it – never hold the piece of wood in your hand while you do this.
Professional and impromptu draw knives
I clamped the bow securely to a workbench and then could easily start to use the draw knife. Here you can see the impromptu method in action; it works surprisingly well if your knife is sharp enough. It does not take long to work your way down to the line.
Using the draw knife
A lot of the time I braced the tip of the bow against my stomach as I removed the excess wood. As I worked towards the tip I repositioned the bow on the workbench so that it was held securely without needing to brace it. You can see the side profile of the bow emerging on the picture of the stave propped up against the tree on the right.
Side profile blanked out
The next stage was to mark out the top profile of the bow. I used a string to mark out a centre line down the length of the stave (picture on left). Then using my measurements (shown at the beginning) I marked out the shape of the bow (picture on right).
Marking out the top profile
The picture on the left is the handle area I drew out and the one on the right is of one of the limbs. Both now have stop cuts sawn in to help with chopping out the bow shape.
Stop cuts in place
I enlarged some of the stop cuts to make sure that no split would travel very far. I find that jamming one end of the bow against a tree helps with the axing-out process and that it can be done in a much more controlled, safe manner so that the axe blade can never swing into me. It’s important too to use the axe in a safe and controlled manner. In the bottom picture you can start to see the handle shape appearing.
Axing out the top profile
As well as taking off a lot of wood quickly, the draw knife method is useful for taking off fine shavings as you get down close to the line.
Draw knife on the top profile
The top profile slowly started to appear as I finely carved the excess wood down to the line.
Top profile getting there
The draw knife was very easy to use as the angle of the limb changed from a Flatbow (near the handle) to a more ‘D’ shaped Longbow limb near the tips.
The Holmegaard shape is appearing
The ‘D’ sectioned shape of the tips soon started to appear. It was at this stage I decided to let the wood season for a month before doing any more work.
Limb tip needing trimming
I seasoned the wood for one week in my garage and for three weeks in a cool spot in my house. This allowed the wood to season enough to start the fine work. During this seasoning process I tied the bow into a frame to induce some reflex into it.
Tied back to keep the shape while drying
One month later it was time to finish the bow. I started work on the tips of the bow so that they would have more of a ‘D’ section shape to them. Making the tips smaller meant there would be less weight in them, allowing them to move forward faster when shooting an arrow. Using my knife as a draw knife I was able to finely carve the shape of the ‘D’ section on each limb. As the tip of the knife is firmly embedded into a piece of wood it is very safe to use and highly manoeuverable.
Fine draw knife work
On each tip I came right down to the line but not past it with the draw knife.
Limb tip finished
Up to this point I had tested the bow’s flexibility by floor-tillering it. This involves pushing down on the limb and checking to see if I was getting a nice curve or if there were areas of stiffness.
Lots of hand tillering
To take off excess wood from areas of stiffness I used a metal cabinet scraper. The scraper only takes off minute pieces of wood and is ideal for this part of the process. I carried on this process of scraping and floor tillering until I got a fairly good curve on both limbs.
Time for the cabinet scraper
Before using the tillering pole to finely check the curvature, I had to add knocks to the bow. Some Holmegaard bows have been found without knocks carved into them and it is thought that they may have had bone-tipped knocks added, or some sort of wrap on each limb as a knock. I decided as an experiment to make a knock from some material wrapped around the tips of the limbs. I first tried cordage made from western red cedar bark, but I found that this did not grip the wood firmly enough and kept slipping.
Failed cordage knocks
Next I tried rawhide, soaking it in hot water and then wrapping strips onto each end. This took about one and a half days to harden but allowed me to string the bow.
Successful sinew knocks
I coated the rawhide in pine pitch to waterproof it so it would not soften and slip if it got wet.
Rawhide knocks covered in pine pitch
I just used some strong nylon string at first as a bowstring before starting the tillering process, tying on one end of the string with an overhand loop and the other end with a timber hitch. The string was just tied loosely, with no brace height. This picture is from when making my ash flatbow but the principle was exactly the same. Dick Baugh wrote a good article on tillering on the Primitive Ways website that is worth a read.
Tillering string
I then placed the bow on the tiller and in increments slowly bent it to view the curve on each limb. The pictures are of the bow during the tillering process. After viewing it each time I would return to the workbench to scrape wood from areas of stiffness using the cabinet scraper or spoke shave. Also I would raise the brace height a little by shortening the bow string to see how the bow reacted under pressure when braced. This whole process ensures you get a good even curve on each limb and also trains the bow to bend properly.
Tillering followed by scraping
This picture was taken at the end of the tillering process with a 4 inch brace height: I was happy to take my first shot now.
Ready to shoot
Having seen a few bows in my time still fail (split) at this point, I only drew back on the string about two thirds of my normal draw length for this first shot.
First shot
I then set about making my proper bowstring, which consisted of a Flemish twist on one end, a timber hitch on the other and serving the bowstring. Two good sites on this are Sam Harper’s site Poor Folk Bows for the string making and the Archery Talk forum for serving the string.
Flemish twist and timber hitch
I used various grades of sandpaper to sand the bow down to get rid of any marks and sharp edges.
Hours of sanding
To protect the bow I stained the wood slightly. Then I applied a mixture of boiled linseed oil and white spirits (50/50 at first). After this had dried I reapplied more oil, but with less white spirits each time until by the end I was applying just oil.
Coats of linseed oil and white spirits
The next stage was to bone the wood by rubbing the whole bow with a small smooth pebble. This helps to close the fibres, making the bow very smooth, and also helps to lock in the oil. The whole process of boning can take a few hours but leaves a very smooth and shiny finish.
Boning with a pebble
Lastly I wrapped on a small leather handle secured with a little glue. I thought about stitching one on but felt the seams might be too uncomfortable when holding it.
Leather handle
The completed bow showing the belly, side profile and the back..
One bow I am very proud of
I am so glad that the rawhide knocks worked so well on this bow as they were something of an experiment. I don’t know if the size of the knocks slows the limbs down when shooting, but she does shoot fast.
This bow is particularly liked by youngsters as it is so easy to draw but still shoots fast. I managed to capture this arrow just after it had been released by the Holmegaard bow.
The cadets knuckled down, worked hard, had great fun and made things comfy for themselves – that’s bushcrafting for you.
The end of October last year found me down at Crowborough Army camp in the Ashdown Forest. I set up a bushcraft area in the woods near for the camp to run a course to introduce some of our younger Sea Cadets to bushcraft.
Helping me on the weekend were Dave Lewis and Charlie Brookes (and at different times Christine Weston and Emma Deasy).
The weekend’s weather was pretty poor to say the least with a lot of rain and some quite high winds.
A team of hardened Sea Cadet Bushcrafters
The high winds were a concern for me so I told the cadets that sleeping in hammocks over the weekend was not an option. A few were upset but soon got on with things. The cadets ended up sleeping in their tents in the grounds of the main camp nowhere near any trees.
They had to set up the main tarps to work under, after a bit of instruction on knots they were left to their own devices and managed to get two big tarps up by themselves.
They had to set up their own campsite
Once the tarps were up the cadets had to collect dry wood from the surrounding area. As it had been raining heavily there was very little in the way of dry wood lying around so we taught them how to identify dead standing wood. Thankfully the woodland had been coppiced in the past and left untouched for many years so there were plenty of dead standing coppice poles in the area.
Once all the wood had been collected and graded it was time to play with some firesteels.
Learning how to use a fire steel
(NB The light levels in the woodland were poor and I only had my phone camera to hand so some of the pictures have been brightened slightly or have had the colours in them deepened slightly.)
Once they got the hang of lighting char cloth the cadets experimented with other tinders such as pampas grass and birch bark.
Practising using different tinders
Everything was very damp but the cadets persevered and eventually had two good fires going to get a hot brew on. As we were running the course in the woodland within the grounds of the camp all the cadets were being fed from the main camp galley. This freed us up to concentrate on different bushcraft activities without having to worry about getting food cooked over the open fires.
They kept persevering through all the rain
One of these activities was to introduce the cadets to a bit of safe knife use. After discussing safety issues and the legalities of using a knife, the cadets learnt how to carve themselves a small wedge. I like this simple activity as it involves using a variety of carving techniques.
Good knife safety was practised
The cadets practised cutting techniques safely, making cuts away from themselves and in front of them or off to the side. We spent a good hour trying out different cuts and everyone managed to finish their wedges.
Working well off to the side
The wedges were needed because the next lesson was about battoning – where you use your knife more like an axe to split small logs. I did a demonstration to the class showing the whole process and then we split into two groups to let the cadets have a go themselves.
I find battoning is best done kneeling down and with the use of a stump on which to rest the piece of wood that needs to be split.
The knife is positioned on top of the piece of wood at 90 degrees to the body and the back of the blade is struck with the ‘hammer’ (a small but weighty stick) so that the edge of the blade is driven into the wood. I published an article on knife safety last year that covers battoning in more detail.
Later we introduced the cadets to the art of battoning
Here you can see that the knives have been driven well into the wood and the wedges are now being used to widen the split further.
Dave and Charlie led one class while I led the other
The cadets got the hang of it pretty quickly and were soon splitting the wood down.
Using the knife and then the wedge to batton
Here the knife has been removed and the cadets are using the stump to help drive the wedge into the wood to split it.
Hammering the wood and wedge into a stump to split the wood
Later that afternoon we started on two shelters. Normally I would ask for volunteers to try and sleep out in them but due to the high winds I did not offer the cadets the option this time. The weather was quite cold, but this activity kept them moving and warm.
An early start to shelter building
It was not until well after dark that I called a halt to the shelter building but they did a good job and worked well together.
They worked well into the evening
Even though the weather was not kind to them and we worked them hard there was still time to play and chill out around the fire with a marshmallow or two.
Plenty of time to just play and chill with a marshmallow
We stayed a couple of hours around the fire before sending the cadets back to the main camp and getting our own heads down. All the instructors stayed in the woods with our hammocks and it was a slightly ‘swaying’ night to say the least with lots of creaking from the trees above us.
An evening around the fire
Charlie had a brew on first thing and also showed the cadets how to use the Kelly Kettles safely.
The day starts with a brew
There was time for a couple of posed pictures in front of the shelters before the cadets dismantled them both and scattered the debris back around the site so as to leave no trace of them. Apart from becoming unstable if left up, shelters tend to attract rodents to the site (since it’s not just humans who seek shelter) – so down they came.
A few daylight shots of their shelters before dismantling them
For the next couple of hours it was time for Atlatls, bows and stalking games.
A morning of games including Atlatls and Bows
Once the cadets got their eye in some had pretty good groupings.
Some good groupings
Even the staff managed to get a shoot in 🙂
Not that the staff were competitive 😉
Even though the cadets did not get to use the hammocks and tarps this time we did get some out for them to try.
Checking out tarps and hammocks
The final part of the weekend was to return the campsite to the condition we found it in, if not better. This was the easy part of the weekend as the teams were now working well together and everything was stripped down and packed away quickly.
Wrap up and home time
I hope to run one or two more bushcraft courses for the cadets this year and give them the chance to sleep out in a hammock.
Even though the weather was against us this time the cadets knuckled down, worked hard, had great fun and made things comfy for themselves – that’s bushcrafting for you.
I carved this Ash Flatbow back in 2008 while I was on my Bushcraft Instructors course with Woodcraft Schooland has sincebeen used by scores of my Sea Cadets, and many of my friends and family. The two instructors who taught me to make this bow were John Rhyder (head instructor at Woodcraft School) and Nick McMillen (now of the Field Farm Project). Both of them as well as being professional outdoorsmen are top bowyers.
An Ash Flatbow about to have its first shoot
This How To…. is designed to lay out all the main steps I undertook to make this bow and if you have reasonable woodworking skills then it will aid you in building a bow for yourself. If you think your skills are a bit rusty then I advise that you attend a bow-making course. In addition to John and Nick who still offer courses I can recommend Wayne Jones of Forest Knights School, Paul Bradley from The Bushcraft Magazine (though I’m not sure if he runs courses anymore) and Will Lord as excellent bowyers to learn from.
I made some drawings on my initial write-up in 2008 and thought it easiest to take some screen grabs of this bow theory for this blog.
Bow theory, terminology and scale
So the first question is – What is a bow?
So what is a bow
Some bow terminology for you to remember as I will be mentioning some of this in the post:
Some bow terminology
Not to scale, but these are the dimensions I mapped out for my bow:
My bows dimensions
Splitting out staves
The ash tree was felled by the course instructor, John Ryder.
We scored a line down the length of the log, all the way through the bark and just into the sap wood, using an axe. This helps with guiding the split of the log.
We then drove an axe into the scored lined to start the split.
Note that the axe is at 90 degrees to the person hammering it in. This maintains a safe position for the worker.
Splitting out the staves – Step 1
The first axe is followed by a wedge and another axe to widen the split.
The scored line helped greatly with controlling the split.
Splitting out the staves – Step 2
As other wedges are driven deeper into the split the previous ones can be removed to be used again.
An axe can also be used to cut the wood fibres not split by the wedges.
Splitting out the staves – Step 3
Once the log has been split the process is repeated again and again until you have the staves you require.
Splitting out the staves – Step 4
Here are two staves ready for shaping.
Split Staves
Shaping the bow
Using a draw knife I shaved off the bark of the stave. I was very careful only to remove the outer and inner bark and not touch any of the wood.
The sap wood found just under the bark is the most flexible and will form the Back of the bow. Apart from light sanding, this area of the bow is left untouched. All of the work on shaping the bow will be done on the sides and on the Belly (the part of the bow facing your belly when shooting).
Trimming off the bark
Using a string I marked out a centre line down the length of the stave.
I then drew onto the stave the shape of my bow (using the measurements shown at the beginning of this post).
The first picture is the handle area and the other two are of the limbs.
Marking out the bow
I then sawed stop cuts all along the stave: as a piece of wood is cut out with the axe the stop cuts stop a split running through the whole bow, meaning you only cut out the wood you want to remove.
Here you can see the stop cuts. Note too how the bow is wedged against a tree and resting on a stump and the axe is in front of me and at 90 degrees away from my body for safety.
Stop cuts and axing out
Once the top profile is cut out the side profile is next.
Using stop cuts again I roughed out the stave until I got the basic shape of the bow. The drawing below shows the shape of the side profile (I didn’t take a picture of this I am afraid).
Side profile
A finished blank stave ready to be seasoned for a while.
Blanked out bow ready to season a bit
At this point I left the bow to season for a month: one week in my garage and then three weeks in a cool spot in my house.
This allowed the wood to season enough to start the fine work.
In the pictures below the bows are clamped down for the fine work.
A clear picture of the bow’s rough profile can be seen in the bottom picture.
Clamped out bows ready for fine work
To begin with I used a draw knife and then moved onto a spoke shave.
Having the bow clamped allowed me to use these tools safely and with precision. I took the pictures so the hands you see aren’t mine: the top picture is Phil Brown of Badger Bushcraft using the draw knife and the bottom picture is Mollie Butters of the Field Farm Project using the spoke shave.
Draw Knife and Spoke Shave
For very fine shaving I used a cabinet scraper. With all of these tools I only worked on the belly and the sides of the bow working down to the tips of each limb. I was looking to get a neat taper effect from the handle to the tips as shown in the plan in the picture on the bows dimensions.
Cabinet scraper taking off minute amounts
Tillering
Throughout this fine work I tested the bow’s flexibility by floor tillering it.
This involves pushing down on each limb to test its flexibility (check out this thread on the Primitive Archer site on floor tillering).
I was looking for an even flexibility in each limb.
Hand Tillering to begin with
Once floor tillering couldn’t tell me any more I needed to move to the tiller stand, so I carved out the knocks on each limb to hold the string using a round wood file.
The knock needs to be at an angle of 45 degrees and deep enough so that the string doesn’t slip off.
Finally I sanded the knock so that the edges would not abrade the string.
At this stage the bow was not put under any tension by the string. This was so that I could train the bow to bend incrementally by using the upright tiller. Putting the bow under too much tension would lead quite quickly to it snapping or cracking.
Dick Baugh wrote a good article on tillering on the Primitive Ways website that is worth a read.
Ready for the Tiller Bar – No Brace Height
I then placed the bow on the tiller post and in increments slowly bent it, carefully watching the curve on each limb.
First Tiller
The following pictures are of the bow during the tillering process. After viewing it each time I would return to the workbench to scrape wood from areas of stiffness using the cabinet scraper or spoke shave. The close up pictures show in detail the top and bottom of the tiller when set up.
Further Tillers
The shape of the limbs can be viewed easily on the tiller: here I could see that the right hand limb was still stiff and needed working on.
Left limb is good – right limb a bit stiff
The next stage involves shortening the bow string so as to raise the brace height (the height of the string above the handle when the bow is strung up) then testing the bow on slowly increasing brace heights on the tiller. To do this you have to unstring the bow (at this stage that simply means sliding the loop off the knocks and loosening the Timber hitch) and adjust the Timber hitch to shorten the string.
To re-string the bow after the Timber hitch has been adjusted and re tightened, hold the bow with the bottom limb (the one with the Timber hitch) trapped against your instep of your foot. Have the back of the bow facing you and with your left hand (if you are right handed) firmly hold the handle, then with your right hand slide the loop back up to the knock.
The first brace height I set the bow at was very low (the string touching the handle) as I only shortened the string by about an inch. A good site explaining how to string a bow can be found on the Archery Library website.
Bow Braced very slightly (string just tensioned)
A two inch brace
A 2 inch brace
Tillering by hand with a two inch brace
Checking the feel of the bow as I went on – Still a 2 inch brace
Final brace about six inches. Tillering now complete with evenly curved limbs
Six inch brace
After a bit of tuition from Scott it was time to take my first shot and I even managed to hit the target.
Preparing for the first shot
I did not pull a full draw on the first shot in case the bow split.
Arrow away
In the picture below you can see one that did not make it: Charlie’s bow had developed a hingein one limb that gave under tension.
I think he took it in his stride.
One that did not make it – Charlie took it well
String making
The next stage is to make the string for your bow.
Traditionally natural materials such as sinew, rawhide, plant fibres (nettle) or linen were used but we used modern materials for our bows. As modern string such as Dacron B-50 (50lb) is non biodegradable there is less chance of the string breaking, which means less chance of your bow breaking.
To make the string we used a plank with a clamp at either end, at a distance from each other of 18 inches longer than your bow length. Tie one end of the string to a clamp and run the string around the other clamp, then around the first one again. Keep doing this for five more cycles.
String making set up
Cut the string at each clamp and you should be left with two sets of five strings.
Then follow the steps in Sam Harper’s site Poor Folk Bowsto make a Flemish string. I did not document this step but he has a good tutorial on making the loop, twisting the string together and making the timber hitch at the other end.
Stringing up
The new string is attached by sliding the loop over one end down past the knocks and attached at the other end with a Timber hitch. You need to adjust the Timber hitch so that the string length is the correct length for the brace height you want. When you have the string set at the correct length, restring the bow and clamp it to a workbench.
The string now needs to be ‘served’ in the centre of the bow where the arrow will be knocked. The Archery Talk forum has a good thread on serving a bow string. Have a look, as my pictures on this part of the process are not the best.
Bow clamped ready to serve the string
The serving of the string is basically a whipping to keep the individual pieces of string that are loosely wrapped around each other together and provide a firm area to knock into your arrow. I also served the top of the string near my loop to stop it unraveling. The little device you see in the pictures is known as a Serving Jig. After finishing serving the string I put some superglue at the end to keep it in place
Serving the string
The finished loop needs to be wide enough to slip off the knocks but small enough to grip them when in place. In the picture on the left below you can see that it has been served for about 12 cms right up to the loop. The bottom limb just needs a timber hitch, though I did twist the end as if making cordage to keep it neat.
Finished bow string
Final touches
The bow was now ready for some final sanding and oiling.
Ready for the final touches
Using various grades of sandpaper, I sanded the bow down to get rid of any marks and sharp edges.
Lots of sanding
To protect the bow I stained the wood slightly then applied a mixture of boiled linseed oil and white spirits (50/50 at first). After this had dried I reapplied more oil, but with less white spirits each time until finally I just applied oil.
Oiling and staining
Lastly, I glued on a small leather handle. I thought about stitching one on but wanted to keep the clean line of the flat leather.
Simple leather handle glued on
The completed bow.
One Finished Ash Flatbow
This bow has been used by scores of my Sea Cadets over the last six years and still shoots as sweet as the day I finished her.
I enjoyed making this bow, it was my first but it was definitely not my last.
Early October brought me to the beautiful Pippingford Park in the Ashdown Forest. This is a military training area that is not open to the general public and so makes for an ideal place to run adventure training activities. This year London Area Sea Cadets decided to hold their annual Chosin Cup Adventure Training competition here.
The beautiful Pippingford Park in the Ashdown Forest Top picture courtesy of the Welsh Harp boat station. Bottom picture is the view from my hammock.
Nine teams took part this year (eight teams from London Area and one team from Southern Area). Each team has up to six cadets and the weekend consists of a navigational course with stances for the teams to complete. Points are awarded for technical skills, leadership, team work and overall enthusiasm. The stances are a mixture of seamanship and improvised skills. There are rigging type activities as well as other rope skills alongside tests of fitness and problem solving.
My Commanding Officer Paul Townsend explained the Chosin Cup nicely on the City of London web page :
A team of six Cadets competed in the annual London Area Adventure Training Competition. This is known as the Chosin Cup after the actions of the 1st US Marine Division, supported by 41 Commando Royal Marines, around the Chosin Reservoir in November 1950, during the Korean War. Vastly outnumbered by Chinese troops, and in mountainous terrain where the temperatures dropped to minus 37C, 1st Marines fought their way out of an encirclement.
Well, brilliant though the London Area Adventure Training Team are- they couldn’t manage minus 37C and the People’s Liberation Army failed to oblige, on this occasion. Nevertheless, the Cup consists of a gruelling, and very muddy, series of tests of brains, brawn and stamina. Raft building, orienteering, assault course, rope work and other challenges- some conducted in darkness. Our youngish team, including Gemma Knowles, aged 12, did brilliantly to come third out of the eight London Area teams.
The Trophies
I arrived at lunch time with Graham Brockwell, Perry Symes, Charlie Brookes and John Kelly to help set up the event. The cadets arrived in the early evening. They were given a kit check and then some six figure grid references to plot on their maps and so find their bivvy site for the night.
While I was driving around the park on the Friday evening two stags shot out in front of me and proceeded to lock antlers furiously with each other. I tried to get a picture of this but my phone could not cope too well with the darkness – plus my hand was shaking a little 🙂
Night arrival
I ended up sitting out in my hammock chair for most of that evening in the woods to stop the cadets from wandering too far off course. On this course the staff have to do a lot of waiting around for teams to appear, then there is a burst of activity and then it is time to settle down again. As you can see our Alan Lewis has mastered the art.
A lot of waiting around
Meet a few of the team. Graham had been given a Pith helmet as a Father’s day present and in no time we all tried it on. I think the guys were all born in the wrong century and should have joined the army (though I am not too sure about Sarn’t Big Yin Kelly 😉
Meet my colleagues Top Left – Sarn’t John (Big Yin) Kelly Bottom Left – Sarn’t Major Perry (Smiler) Symes Far Right – The Honorable Gentleman Explorer Major General Graham (Ever So Mad) Brockwell
The Saturday starts out with some team planning and finalising of route cards before setting off. This year we kept the cadets within the military training area concentrating on micro navigation and lots of stances to test their team working and problem-solving skills.
Lots of team planning and quizzes
I managed to get out and about and had a great time spotting the many different fungi that can be found in the park. On my travels I stopped off at any stance I came across to see how things were going along. At one stance I found Dave Lewis and Paul Townsend and quickly spotted that Dave had his small hammock set up. As I said at the start there is a lot of waiting around so it was time for a quick lie down:-)
A view from Mr Dave Lewis’s day hammock – Cheers Dave
When the next team arrived it was time to get up and get some pictures. The cadets had to get the small blue box into the large brown box without entering the rope circle. They had been given lots of rope, poles, and various blocks and tackles to do the job. This team though elected to try out an alternative method using just rope and an open karabiner. Unusual, but it worked.
Stance – Sealing the radioactive waste
My friend and fellow bushcrafter Charlie Brookes ran the archery stance. The cadets were all given a little practice and training before shooting a marked round.
Archery
In between the stances the cadets would find time to heat up some food. As far as the staff went it was a case of grabbing some food on the go but Dave and Perry put together a midnight barbecue for all the staff when the cadets had gone to bed.
Making time for some food – Top picture courtesy of City of London Unit
On the Saturday evening our colleagues from the Welsh Harp Boating Station arrived with lots of canoes and raft-building equipment. The cadets had to move camp after they had finished all the stances and then prepare for a night navigation exercise through the training area. This exercise involved a lot of night-time map work and crossing a lake in canoes in the dark. What they did not know was that they were not heading back to their tents when they finished.
I did not get any pictures of the canoe crossing but it all went very easily as the cadets are quite at home operating on water.
The Dockers arrive
Dave Lewis managed to get a bit of bushcraft in and got the evening fire going while we were out doing the night navigation.
Getting the evening fire going
The cadets were told to head to a particular spot in the woods where they were handed a couple of tarps per team. They set the tarps up and eventually bedded down for the night. Thankfully I was able to retire back to the staff area where my nice comfy hammock was waiting for me.
Camp set up on the Saturday for cadets and staff
Sunday was another day of activities. All the teams had to build themselves a raft and row out to the centre of the lake and back again. Some made it, a few rafts did break up when they started rowing, but they all had a great time.
The Welsh Harp Station Dockers also put together an excellent video containing video and pictures of this event – Chosin Cup – Raft Building
Raft building – Pictures courtesy of the Welsh Harp Boat Station
Charlie Brookes ran the fire-making stance where the cadets had to build a small fire after gathering all the materials to get it going. They gathered all the tinder and twigs to get the fire going (apart from some hay and char cloth to start it which we supplied). They used firesteels to light the charcloth which they then used to blow the hay into flame. They had to build a fire as quickly as possible so that the flames would burn through a piece of birch bark that was attached to the string you can see in the pictures below. Most teams burnt through the bark and string within a minute or two of starting their fires.
Fire making stance – Pictures courtesy of Charlie Brookes
Paul ran the seamanship stance on the Sunday where the cadets had to build a tripod, known as a Gyn, to be able to lift a heavy log off the ground. This is a skill that the cadets learn in their units and works well when we are running these competitions to assess their team-working abilities.
Seamanship stance – The Gyn
While all this was going on I spent most of my time back at the troop shelter we had set up as our HQ. In between dong admin I spent much of the morning drying out 20 or so tarps that the cadets had used the night before so I did not get to see much of what had been going on.
Work back at HQ – Admin and drying out more than 20 tarps
One of the Marine Cadet instructors, Kev Lomas, set up an excellent Endurance race. I only got to see the cadets as they came back from it but they all seemed to have a great time.
Endurance race – in with a splash – Pictures courtesy of City of London Unit
The route for the race was set up through the trees and over the local stream.
Endurance race- Over and under – Pictures courtesy of City of London Unit
As you can see not everyone got across dry. Jacob Leverett took a great video of cadets from Sunbury & Walton, Twickenham and Feltham Units running the course – Endurance race video.
Endurance race – Over and in – Pictures courtesy of City of London Unit
After everyone had gotten cleaned up and packed away it was time for the awards.
Leading Cadet Jess Edwards from Enfield Unit was the clear winner of the trophy for the best team leader of the weekend.
Team Leader Winner – LC Jess Edwards (Enfield Unit)
We had one team from outside of London Area on the competition, from Guildford RMCD Unit. As they are not in London Area they are not eligible to win the Chosin Cup but we do have a trophy for the winning visiting team. Even though they were the only team from outside London Area this year they did come third overall so well deserved the trophy.
As City of London Unit came fourth overall they were the third place London team so they collected their certificate and medals as well.
Guilford RMCD Unit from Zulu Company Royal Marine Cadets – Winning visiting team City of London Unit – Third place overall
Second place went to Bexley unit and first place to Enfield Unit. City and Enfield are both in Northern District, to which I am attached, so I was very pleased with the high scoring of our teams in the competition.
Bexley Unit – Second place Enfield Unit – First place
So ended a fantastic weekend. It would not have been possible without the dedication of all the staff involved in its organization, the staff training the cadets up over the year and the cadets themselves who worked hard and, as you can see from the pictures, also played hard.