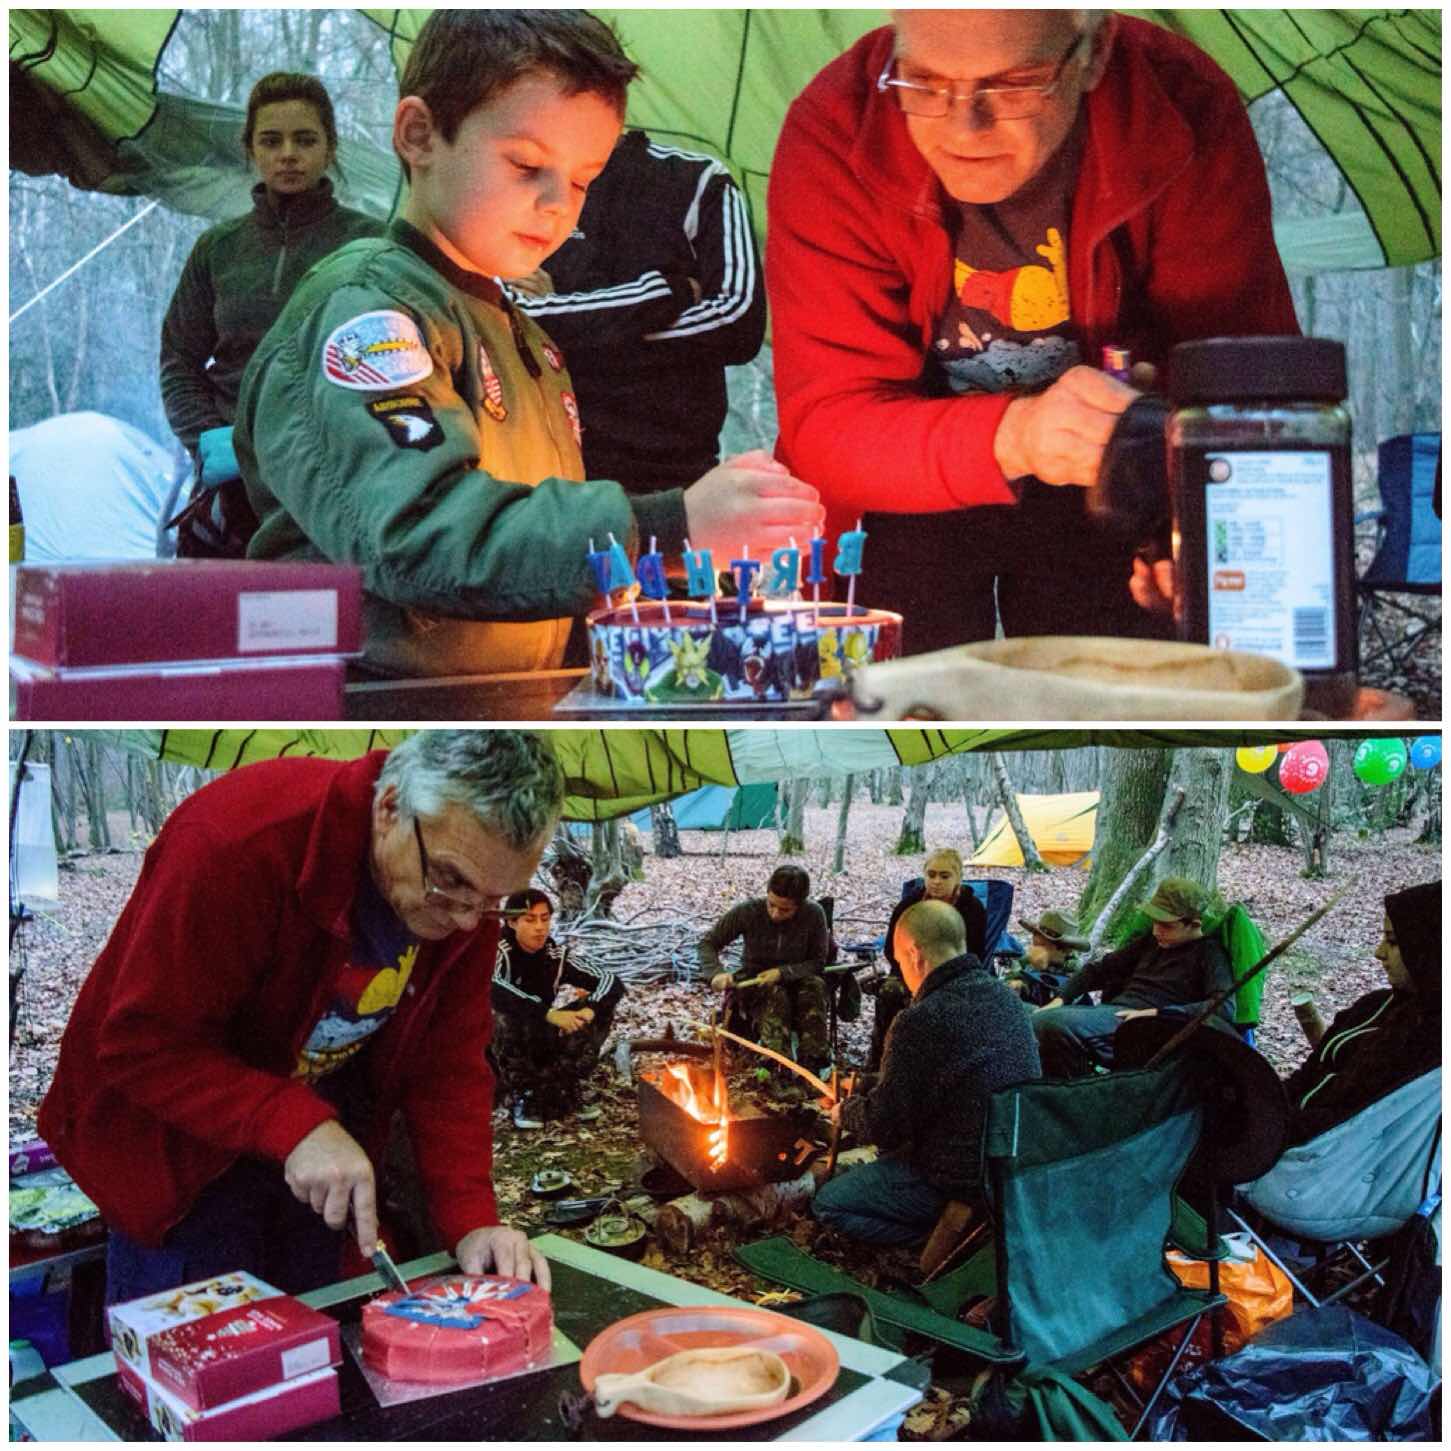
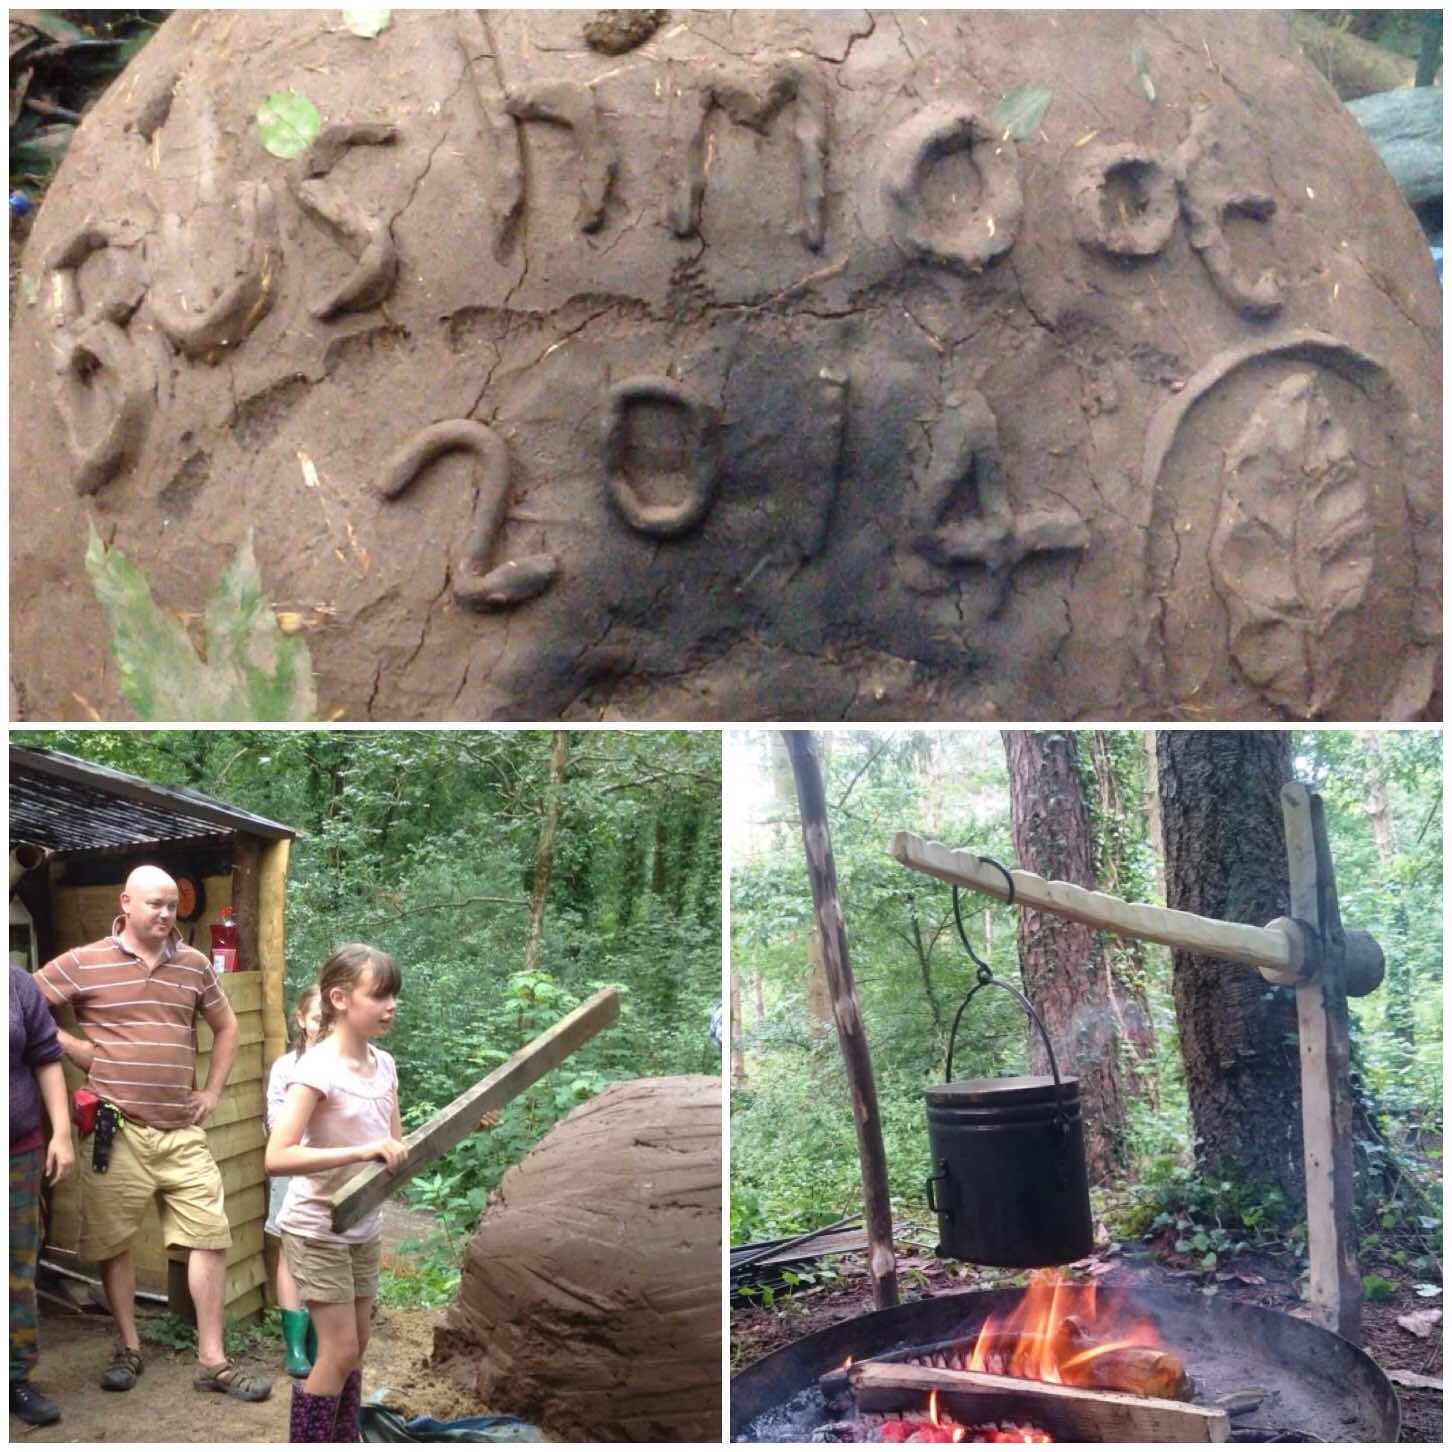
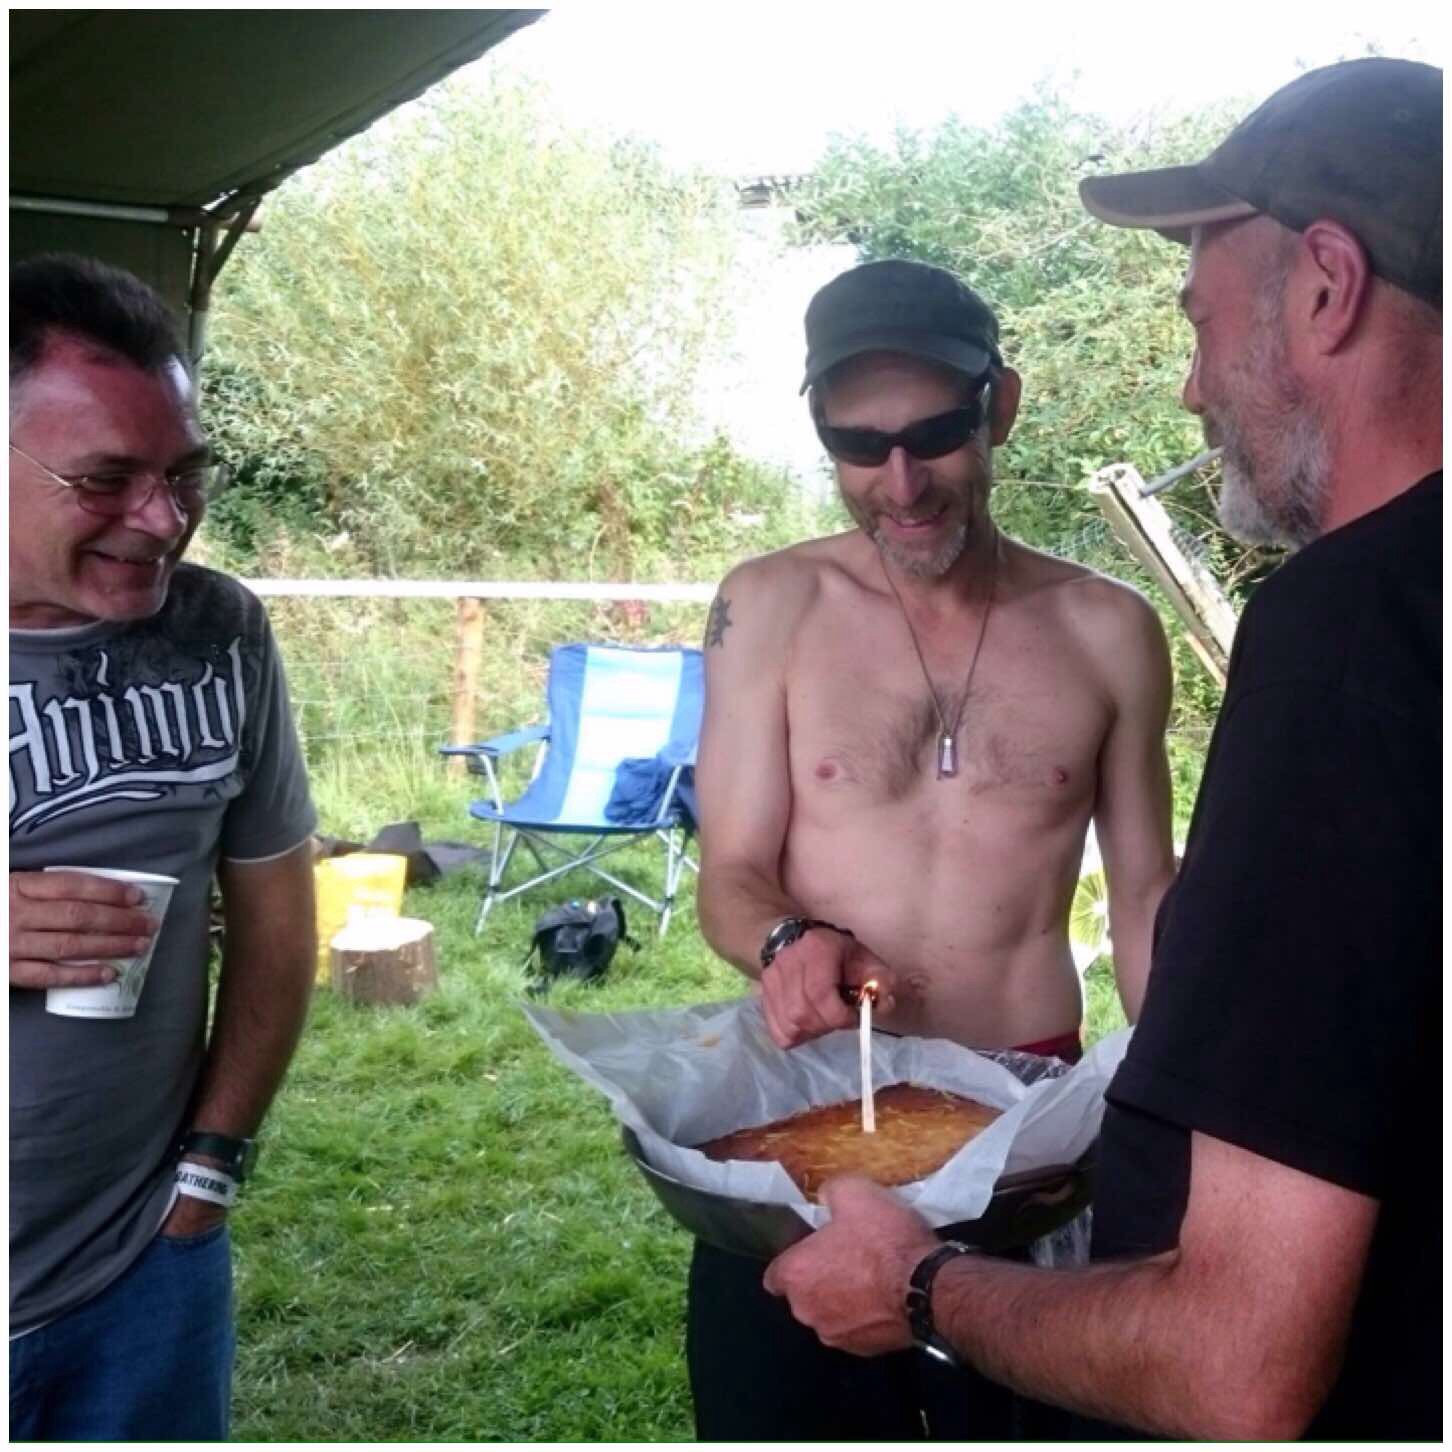
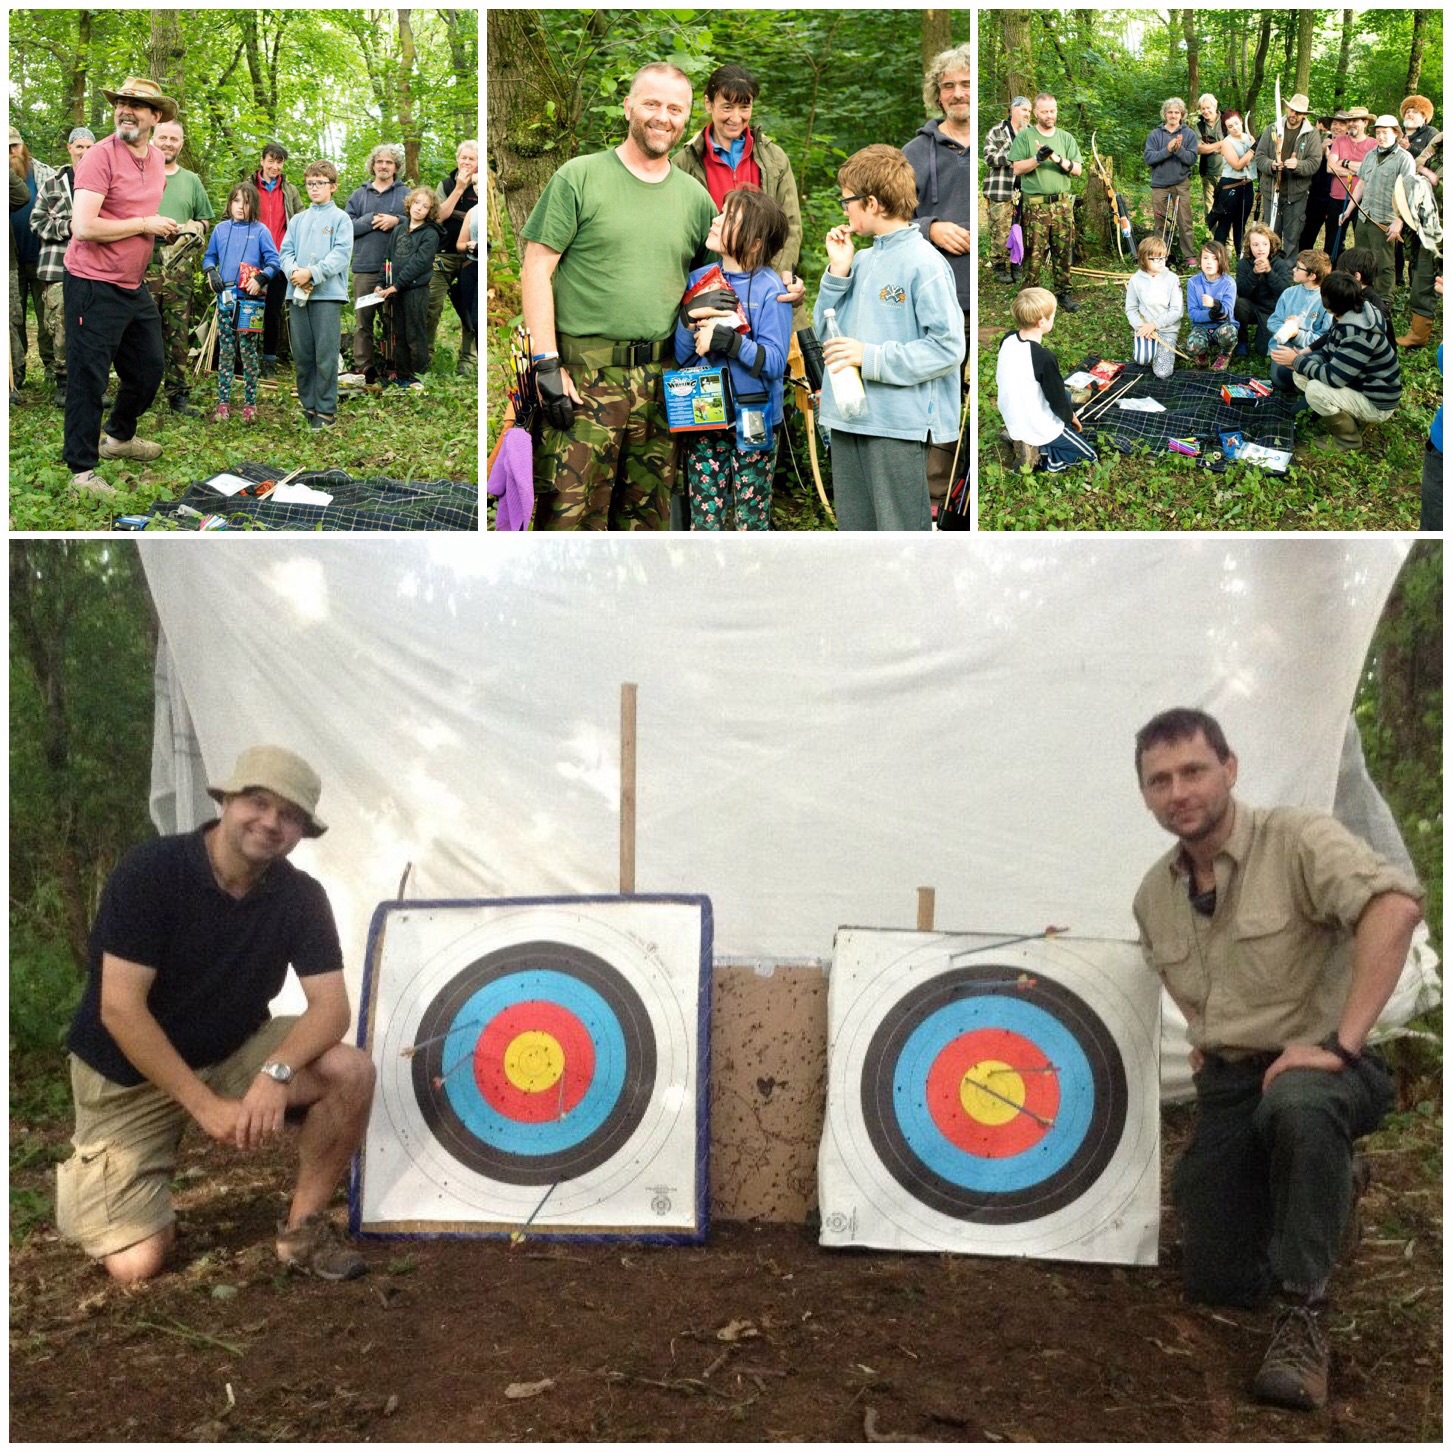
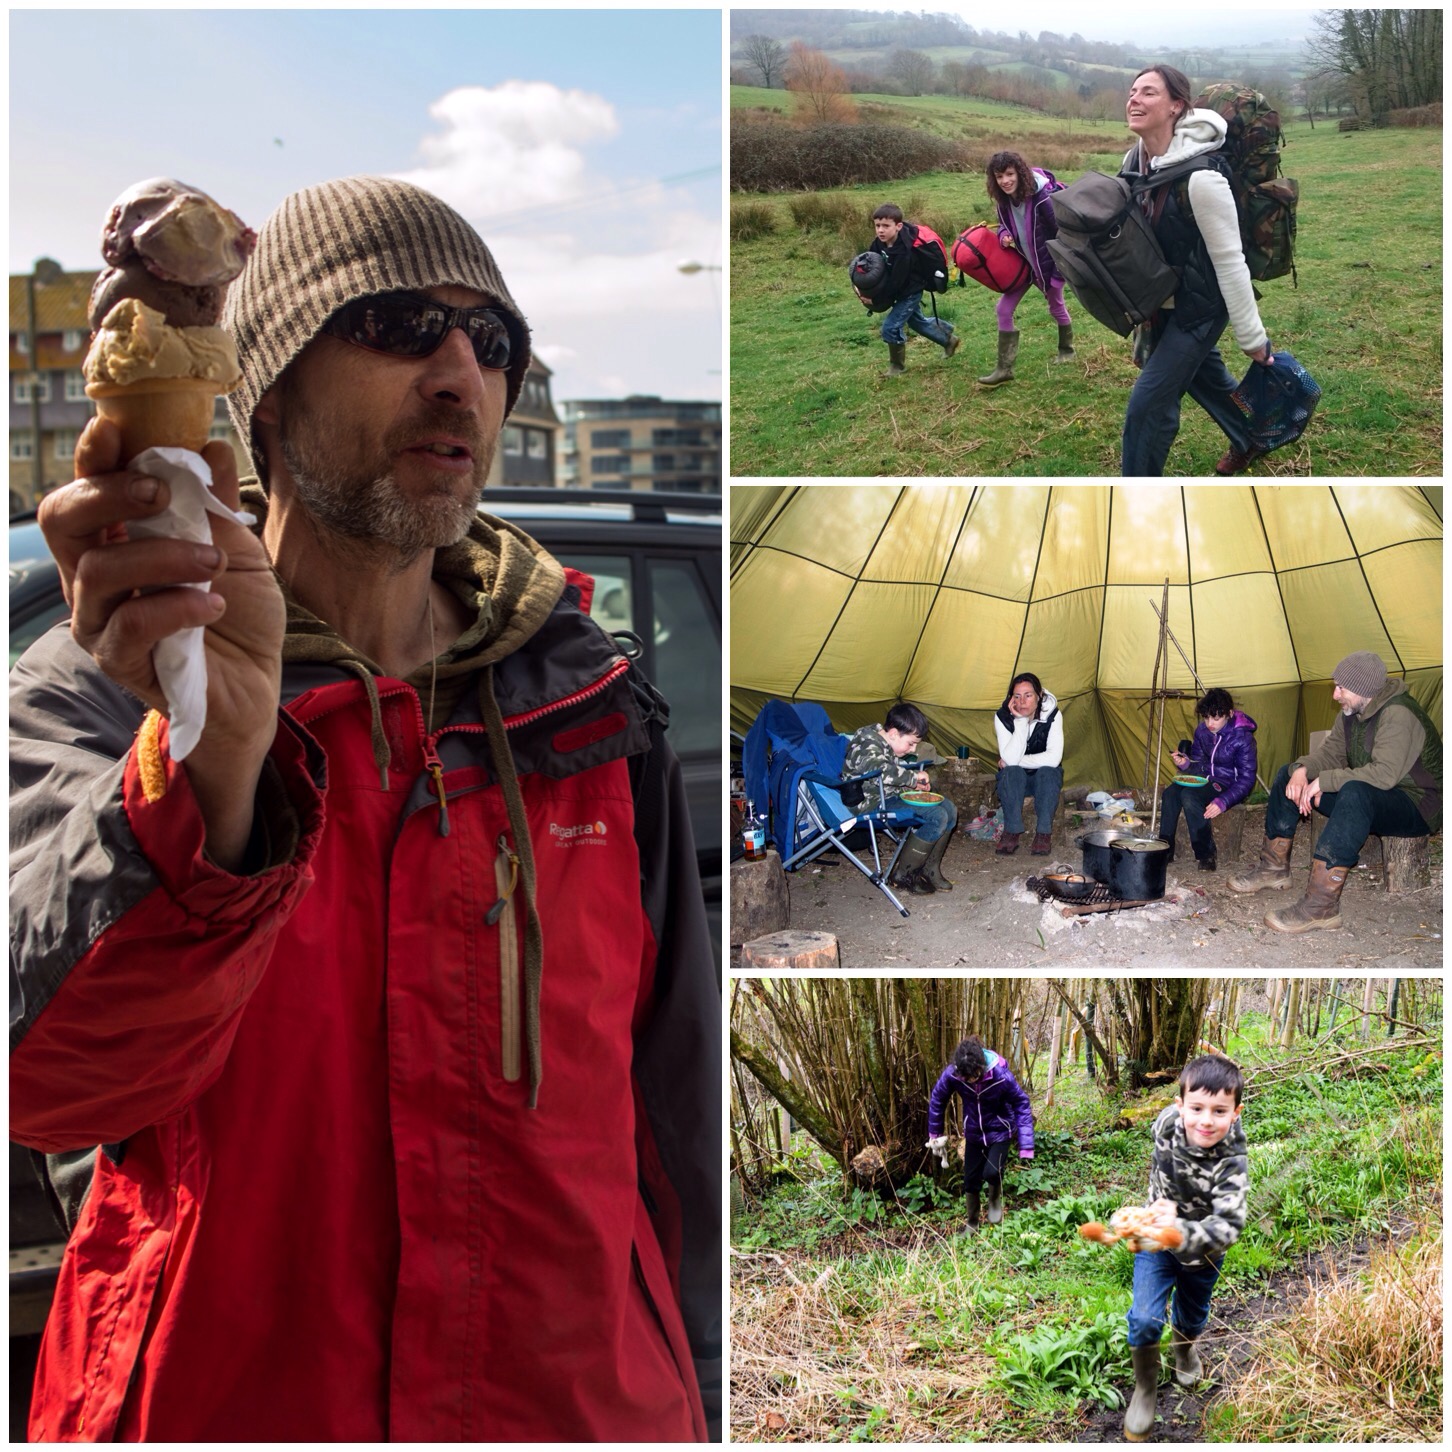
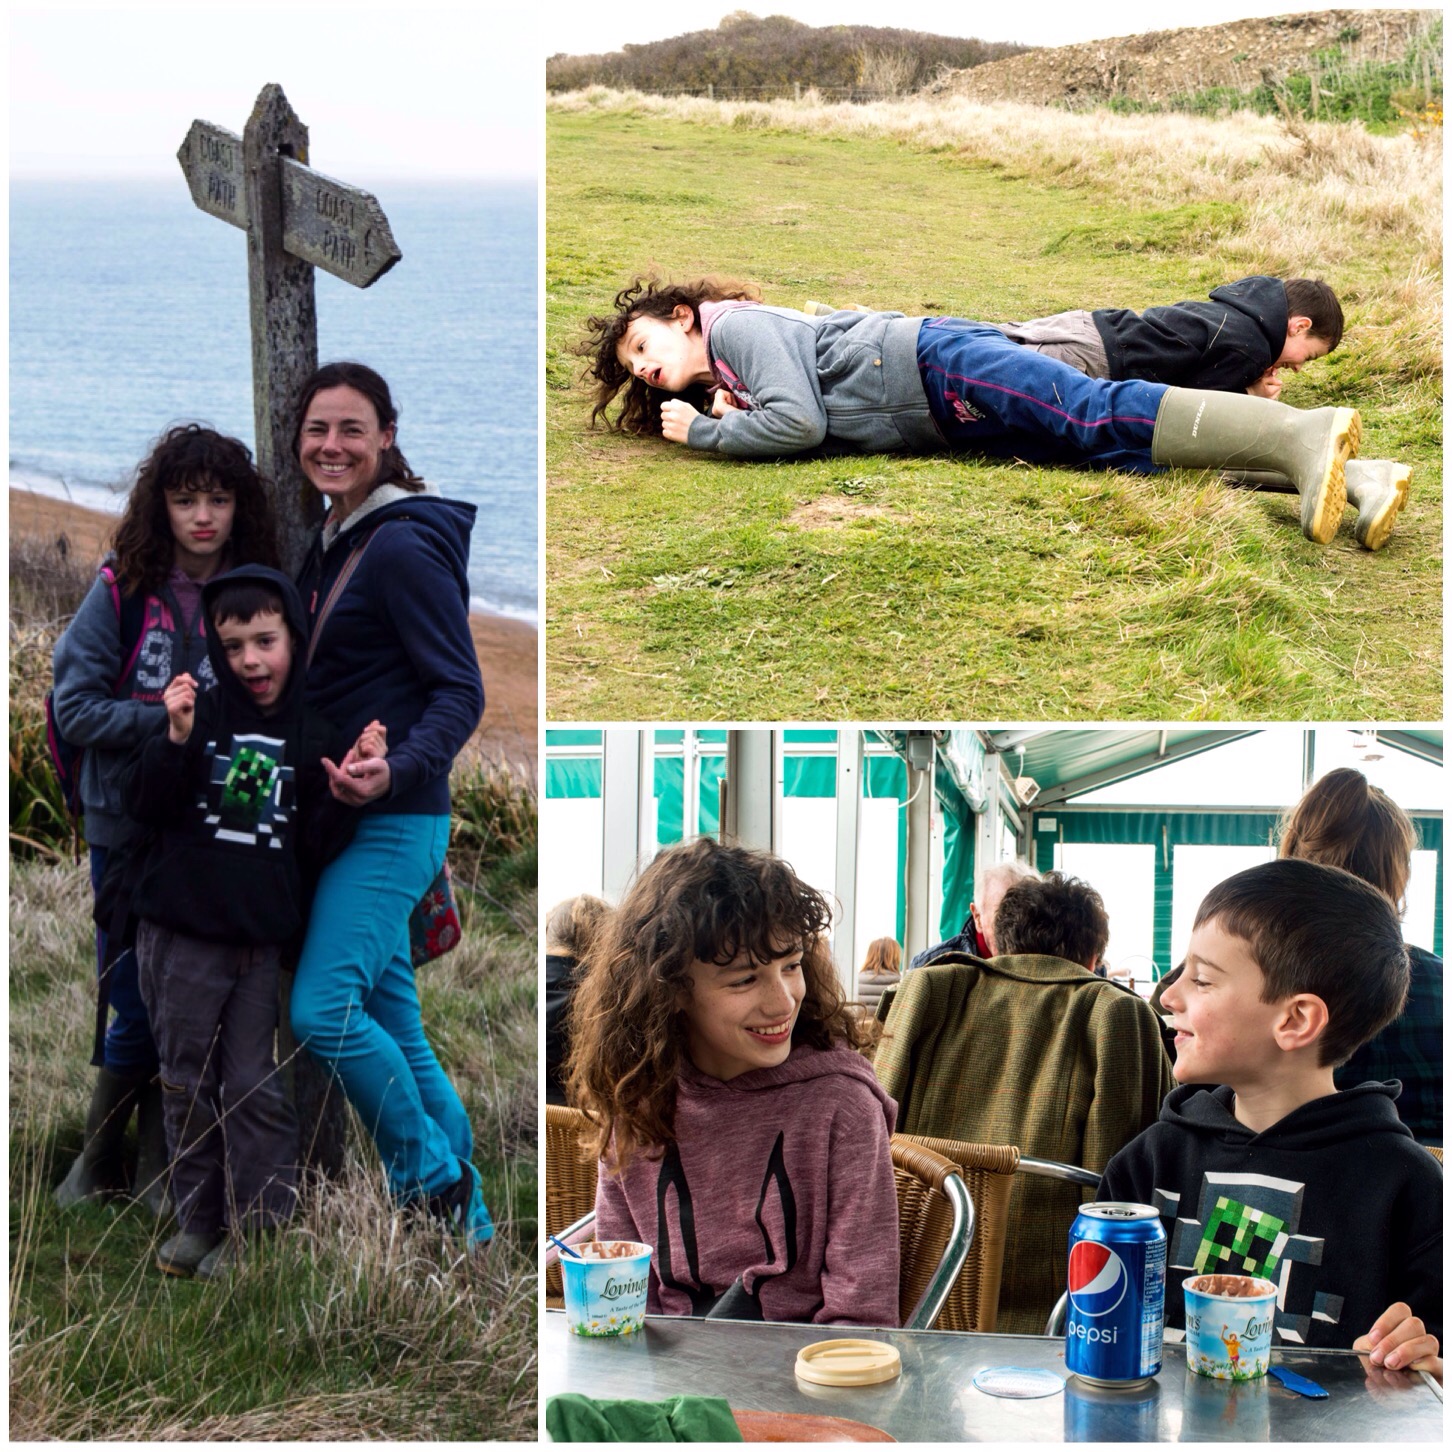
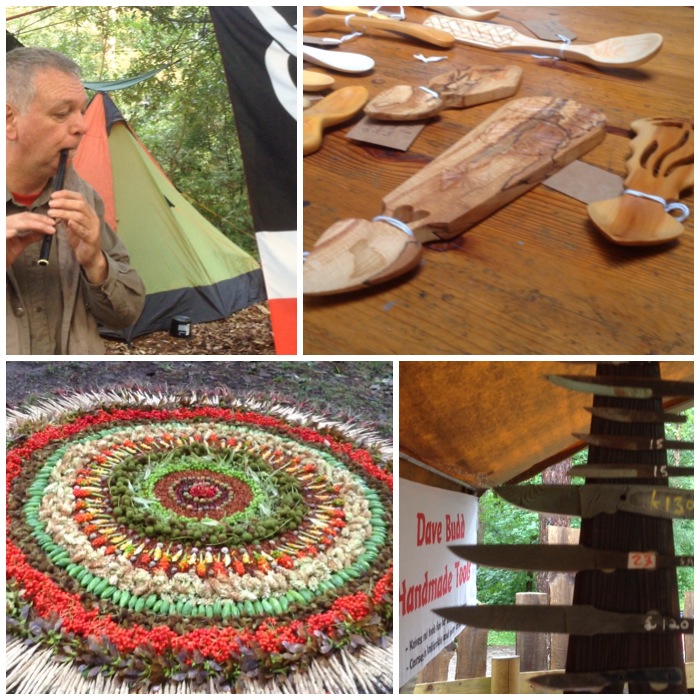
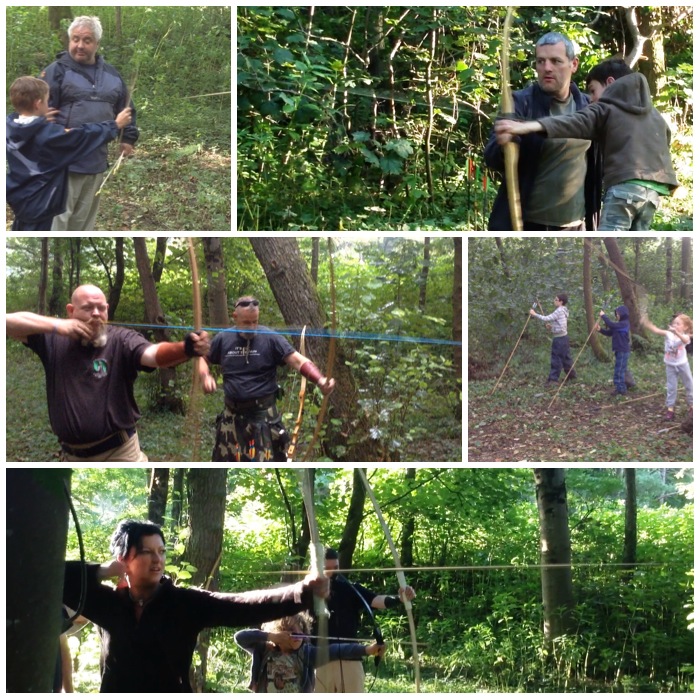
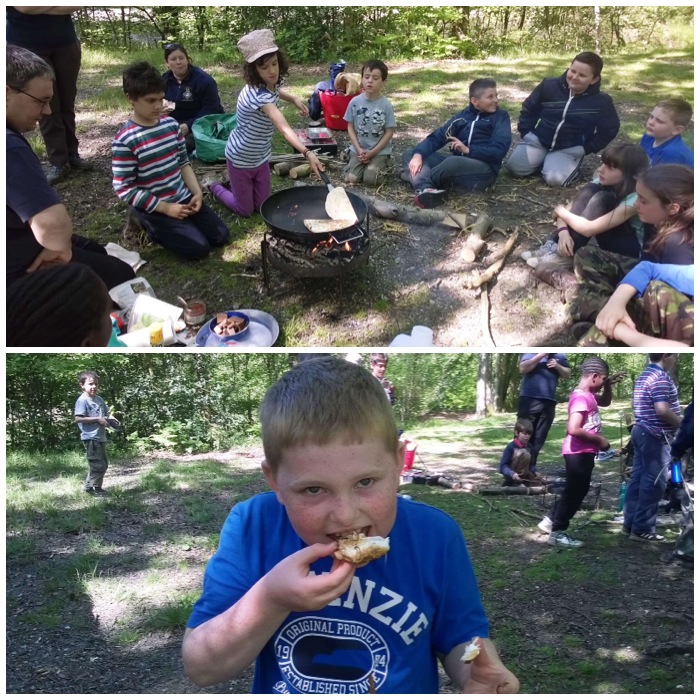
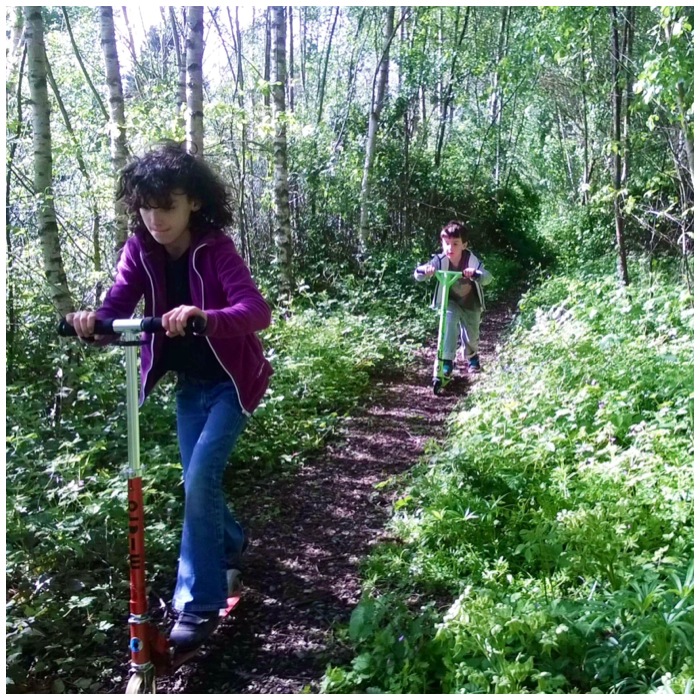
My last trip out for 2015 was a particularly nice one as we were celebrating the 6th birthday of a little bushcraft boy called David. He loves the outdoors and his Grandfather Keith Coleman had organised to celebrate the event out in the woods at Danemead Scout camp.
Keith was also out with a few of his cadets to practice some navigation skills and I was going to practice some bushcraft skills with my friends Dave, Alan and Jess.
Bushcraft Skills
David’s Mum Maria was who is a good friend of mine was also at the campsite so it was great to catch up with her as we had not met up for a long time.
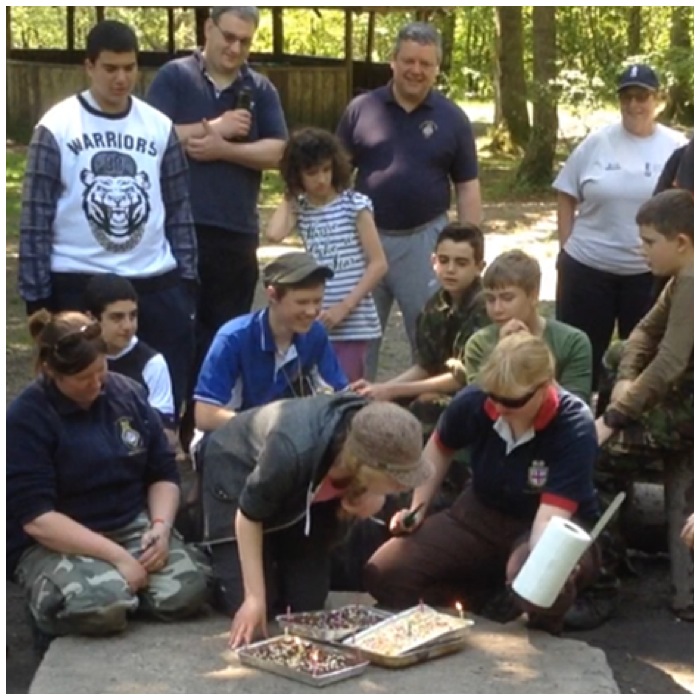
Keith soon had the candles lit with David and we were soon tucking into a slice of Birthday cake.
Birthday Boy
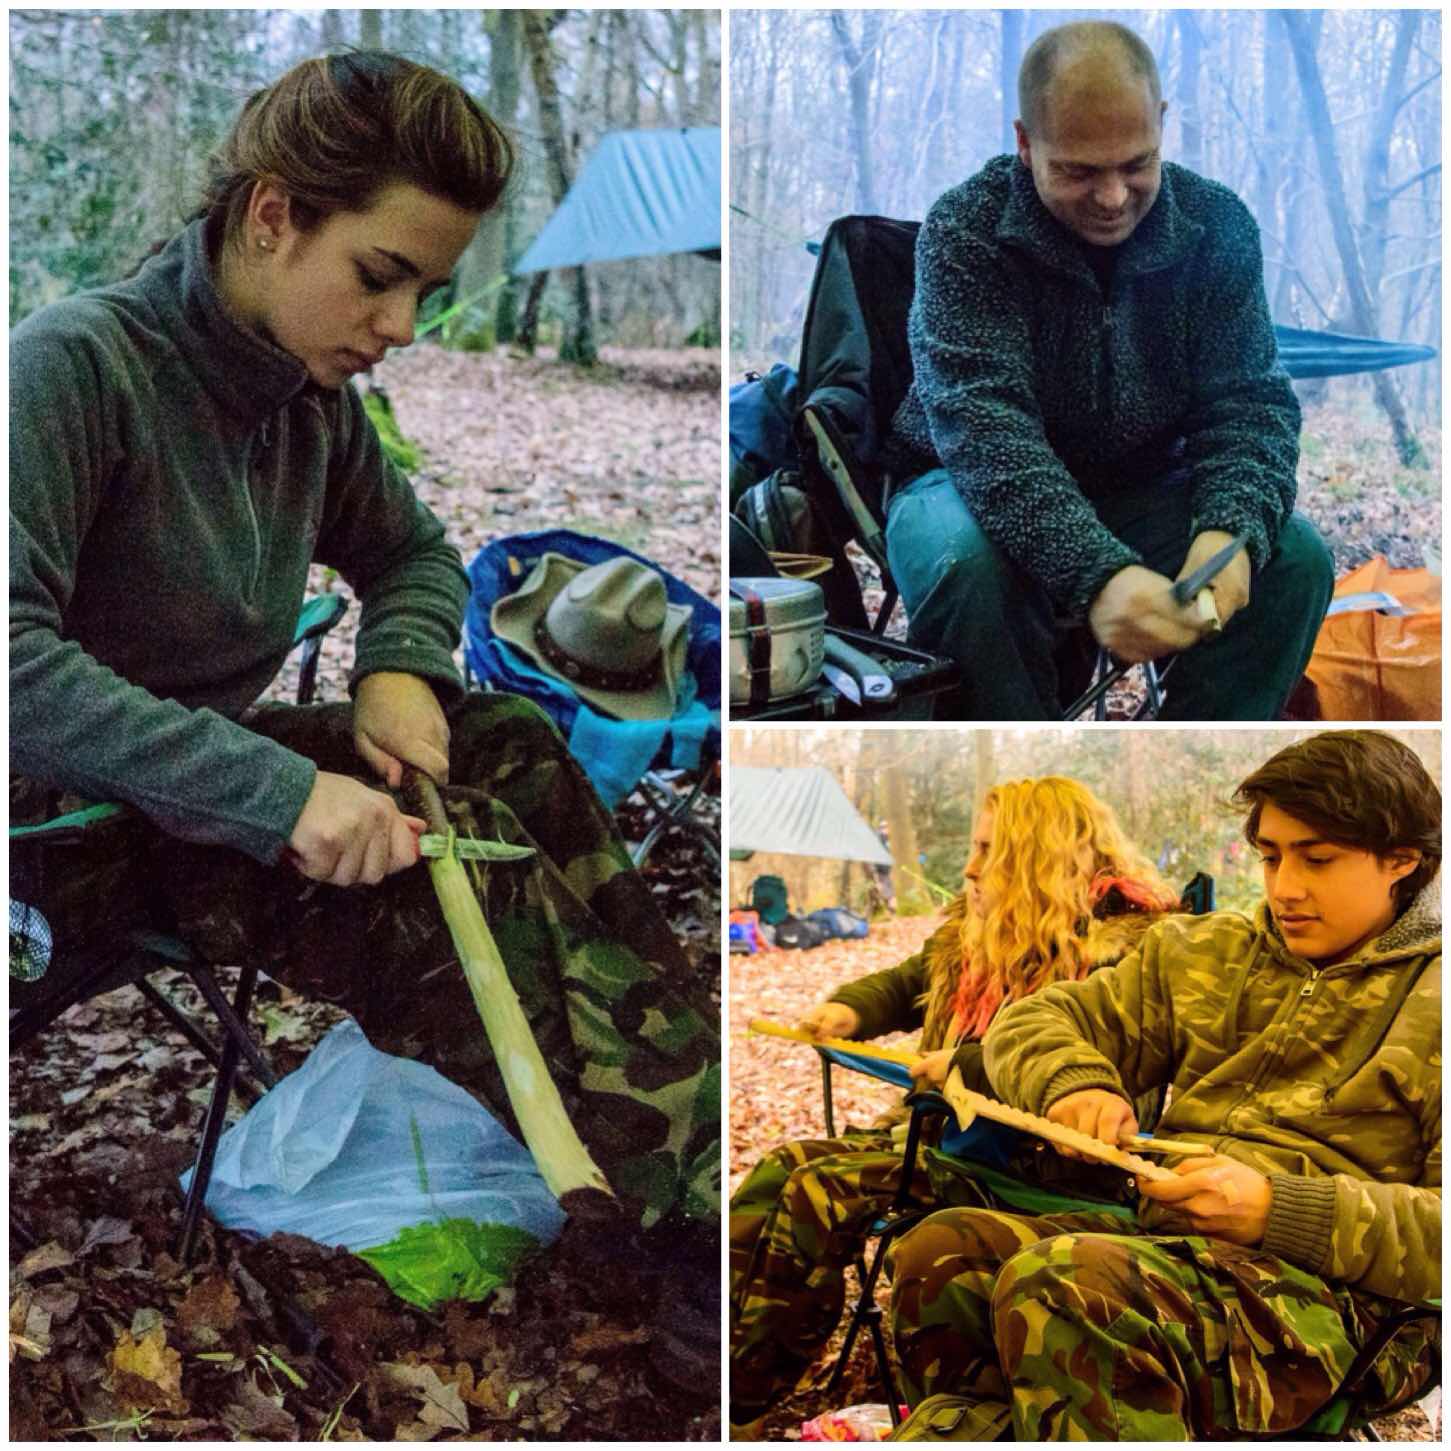
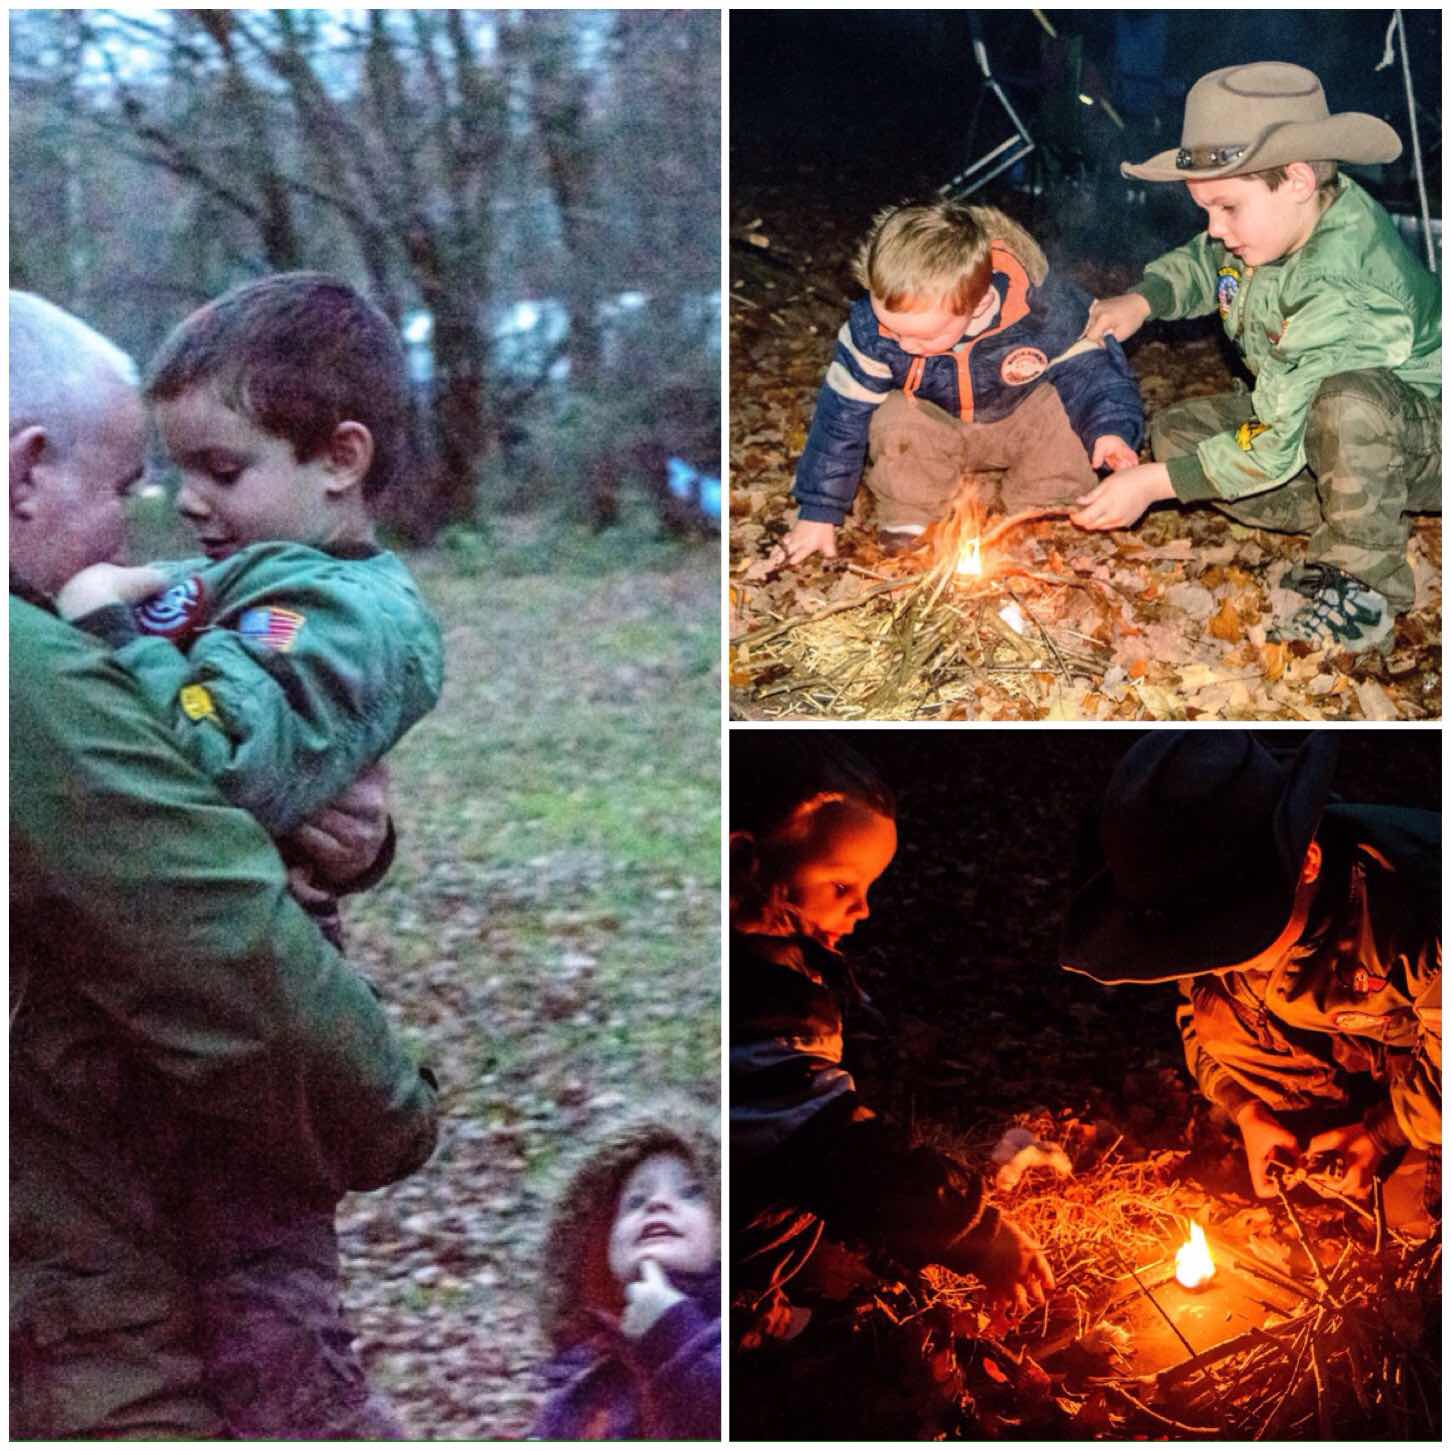
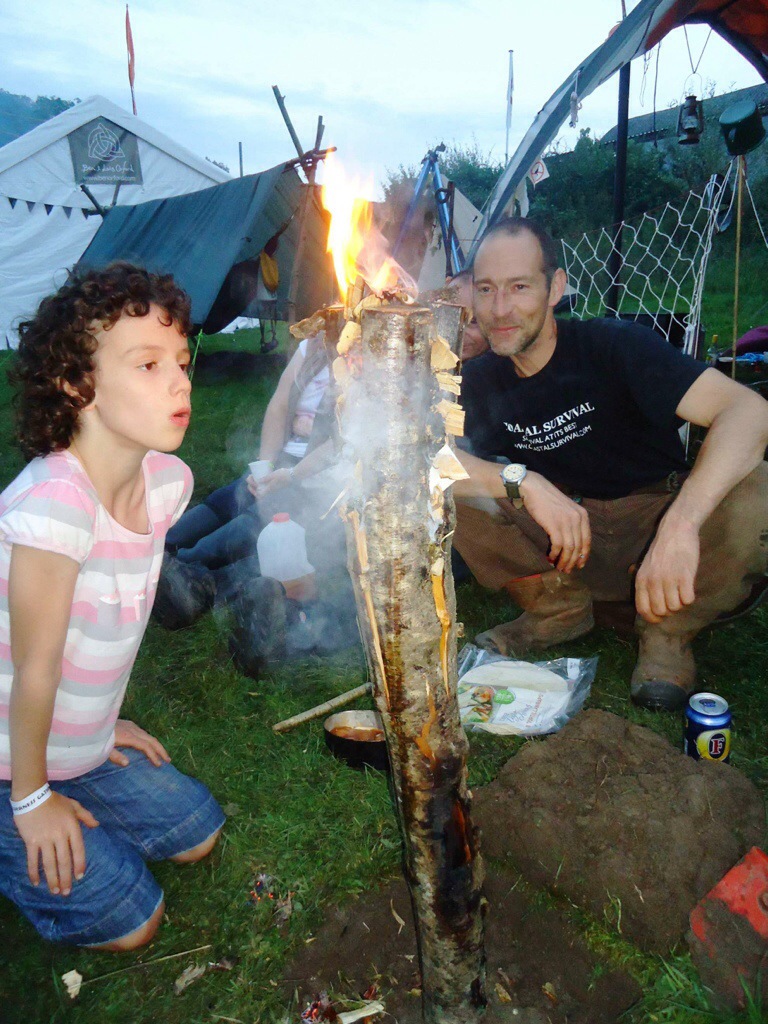
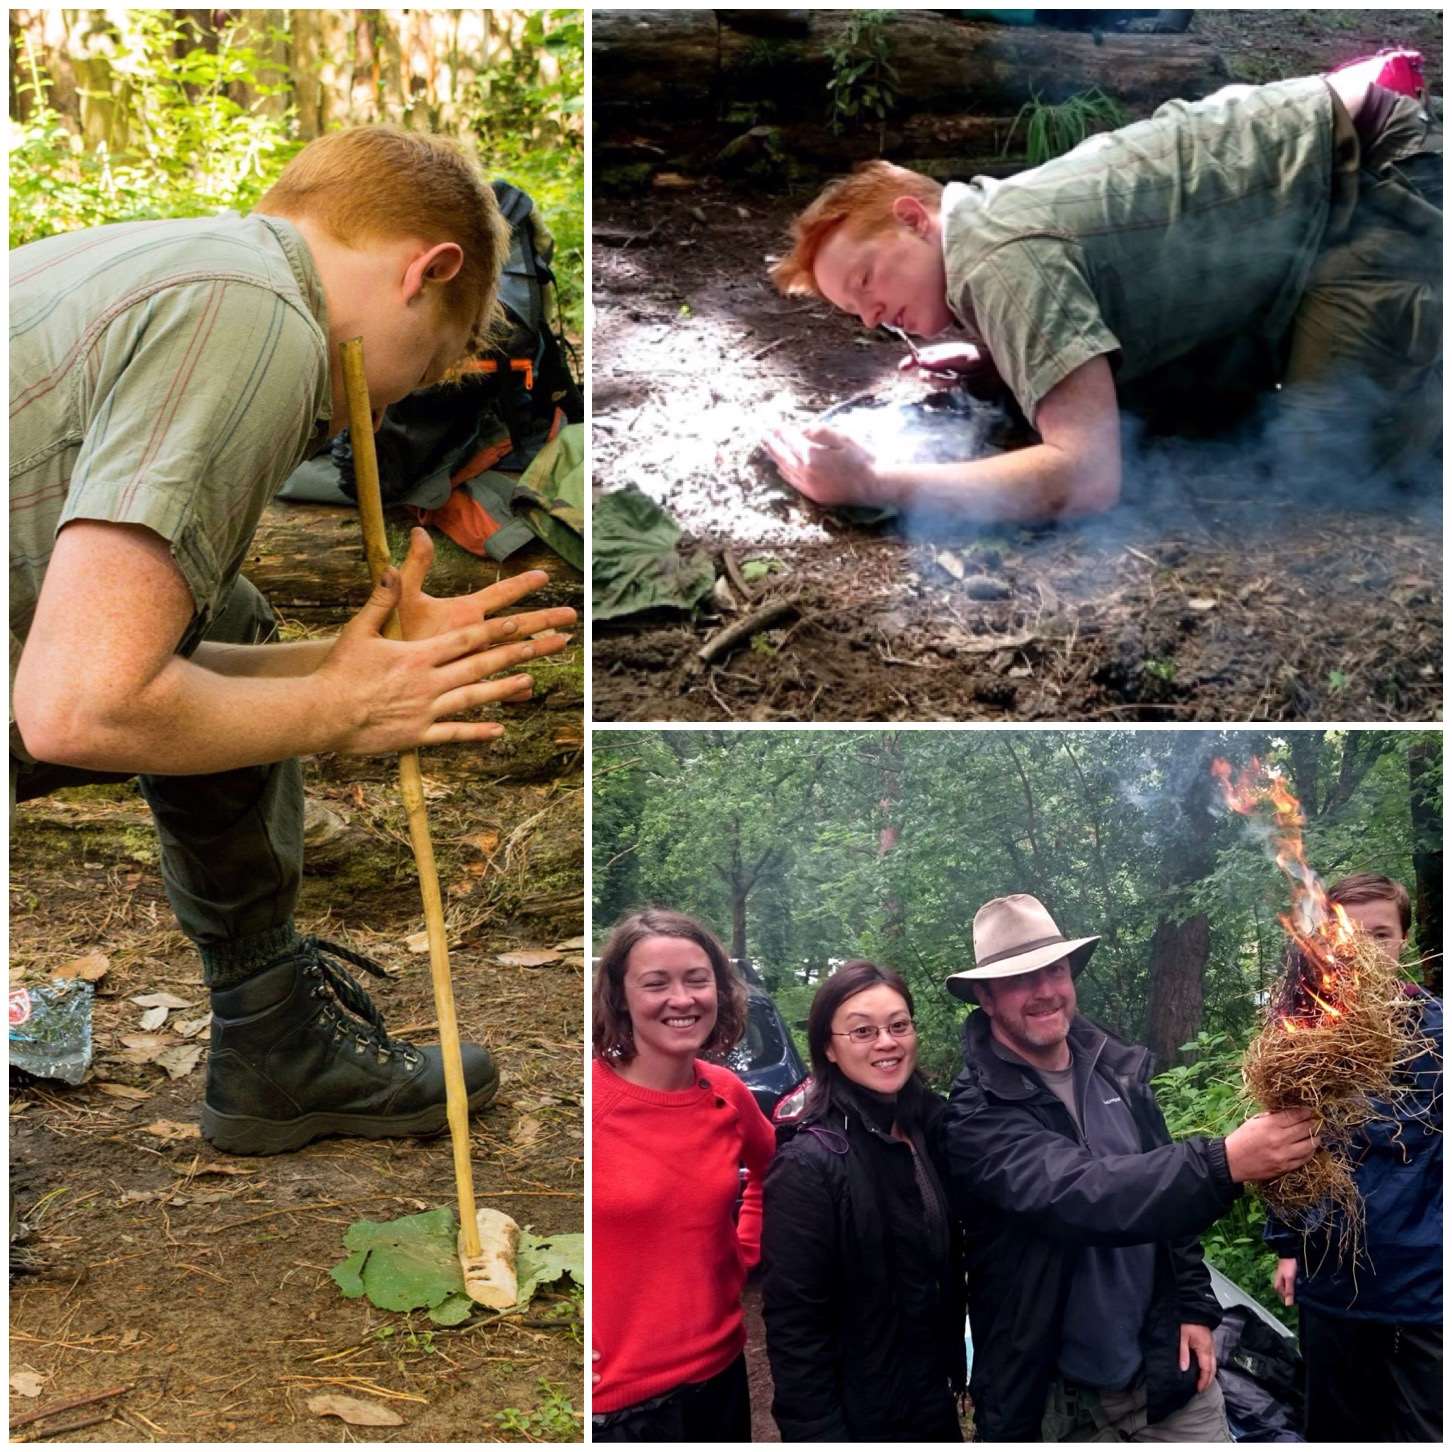
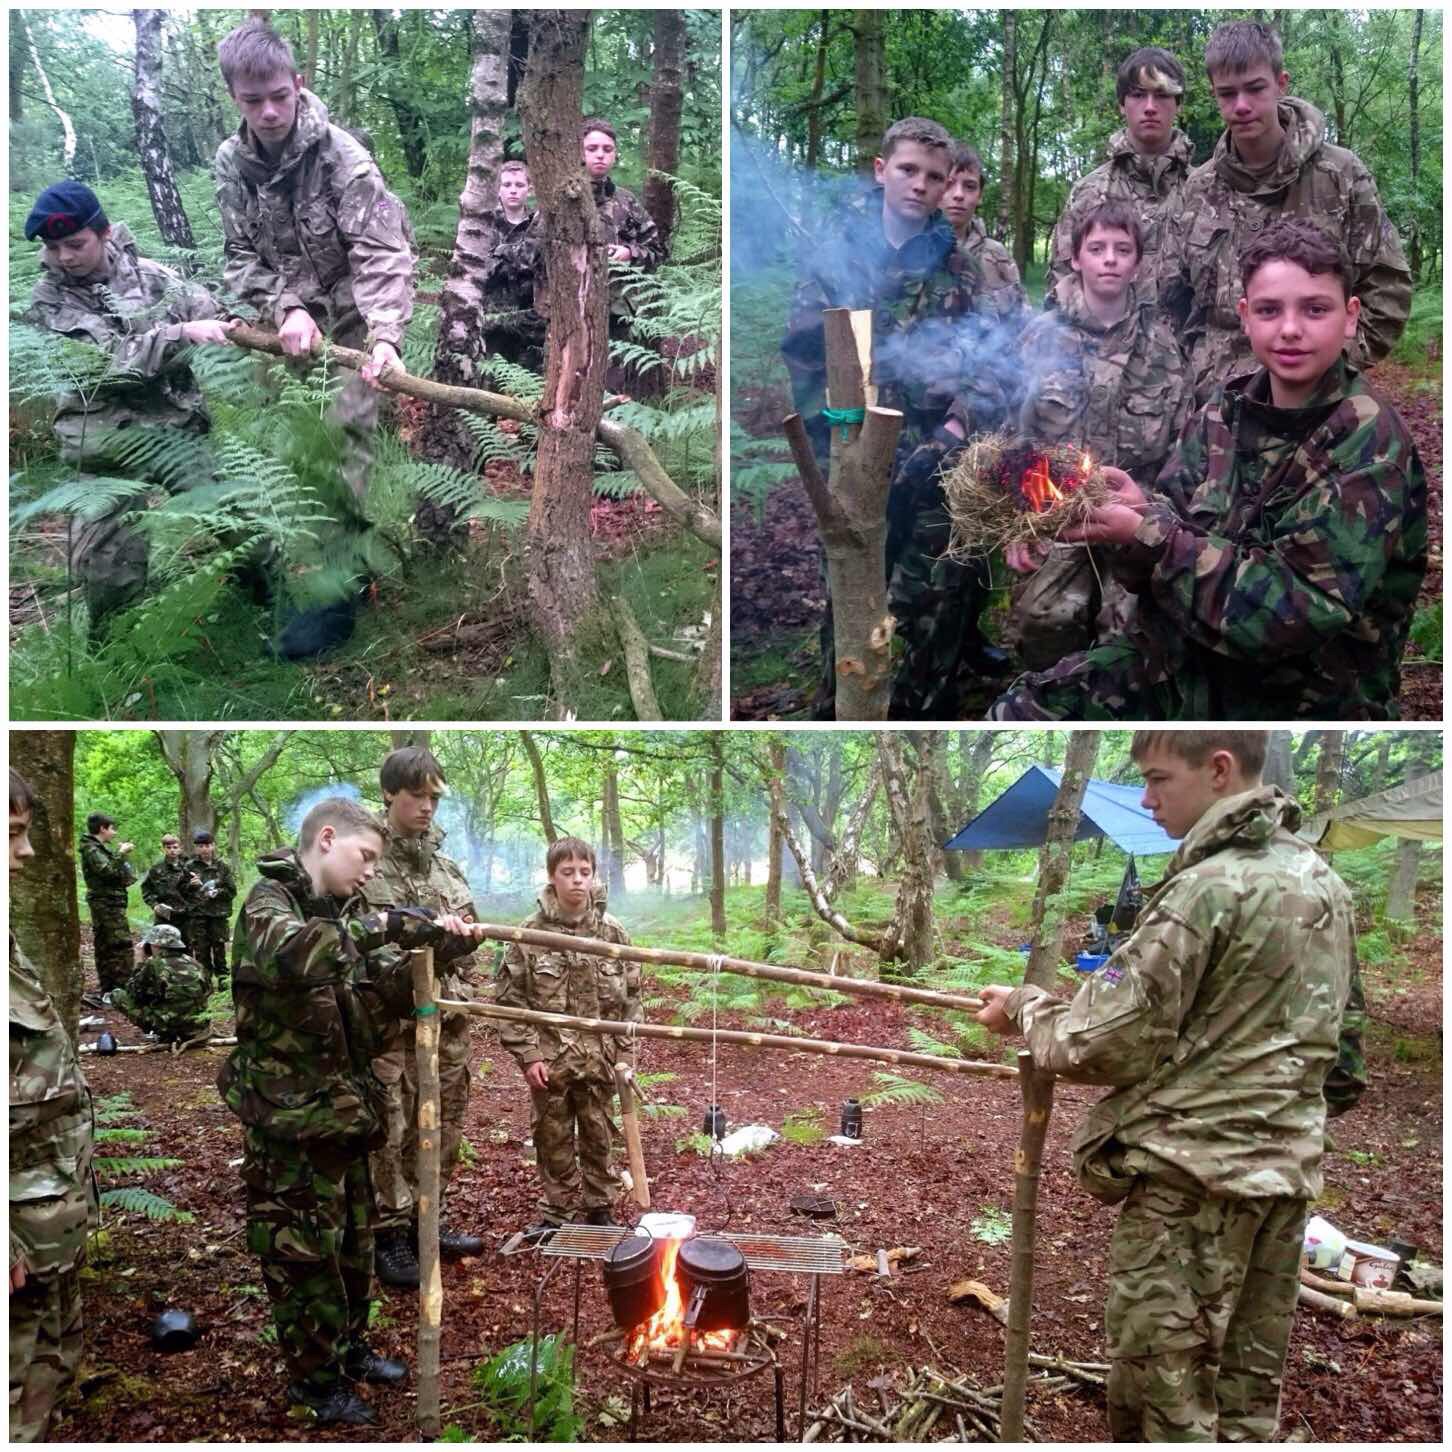
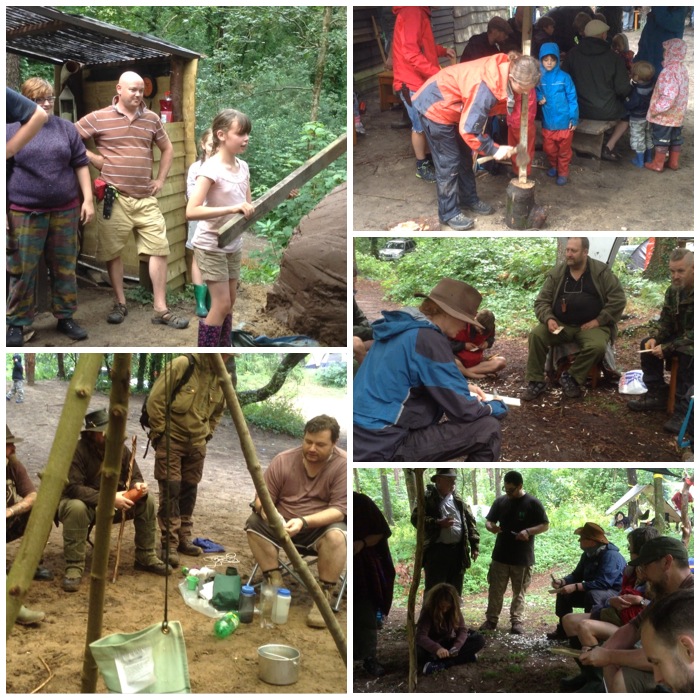
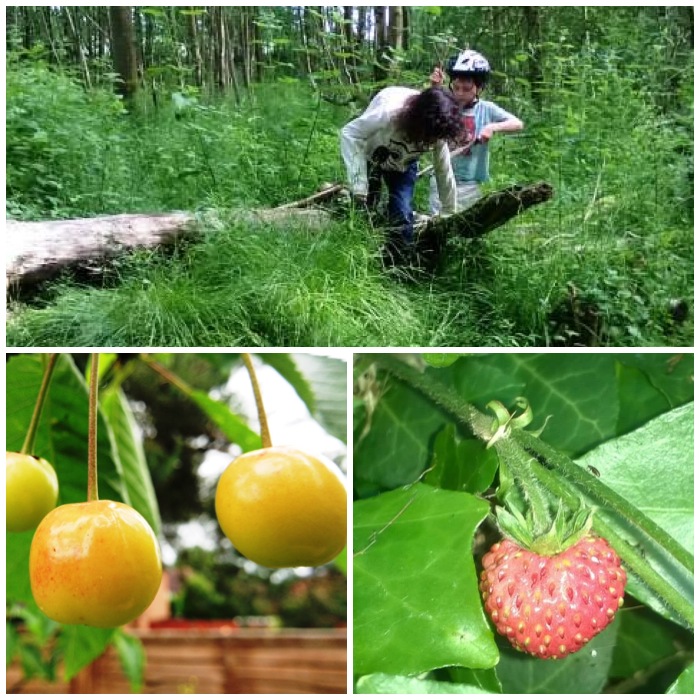
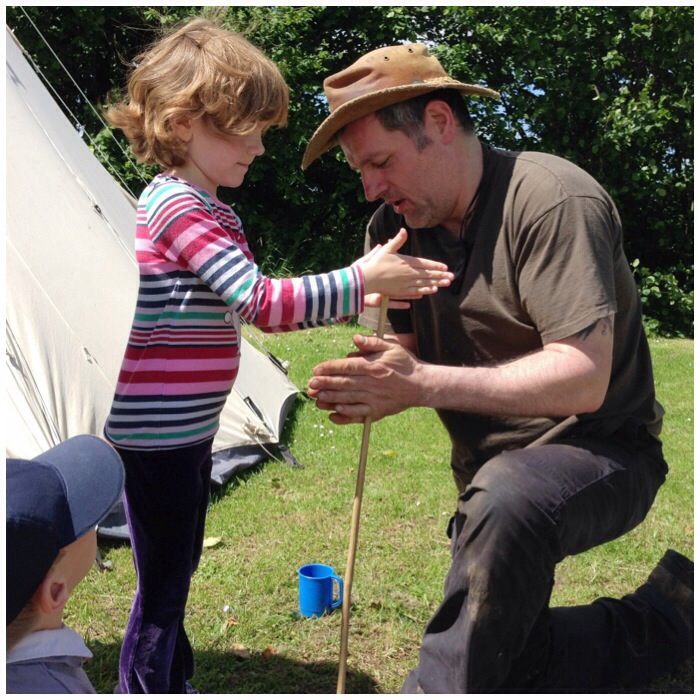
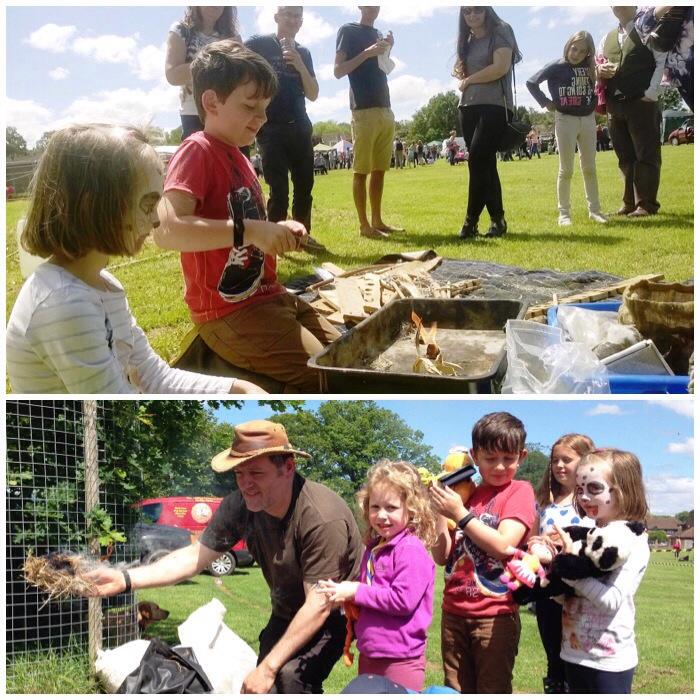
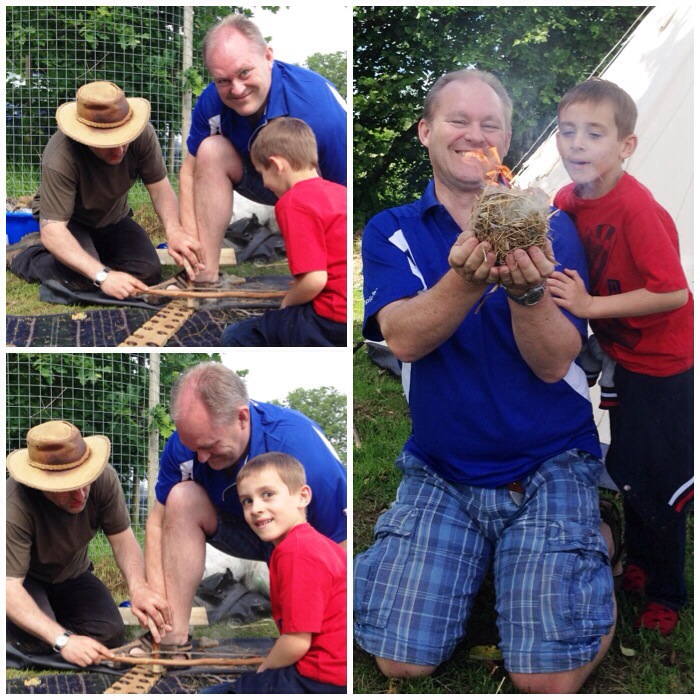
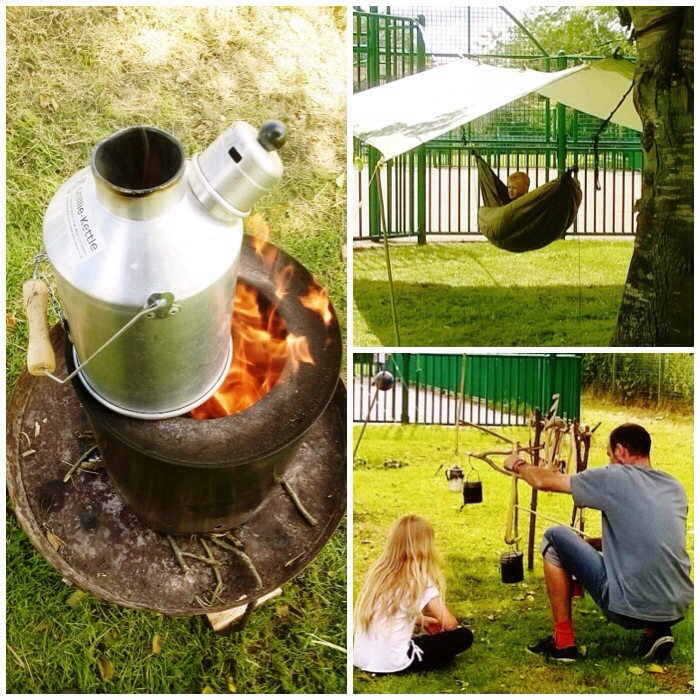
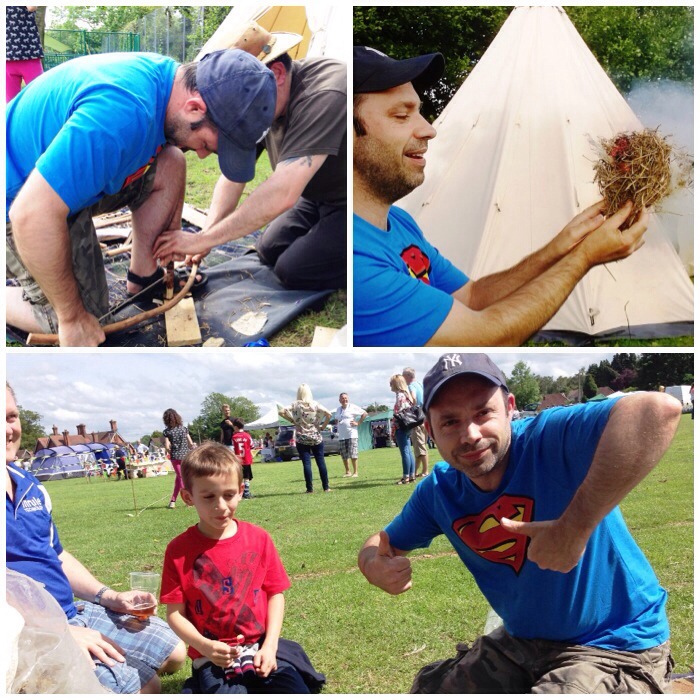
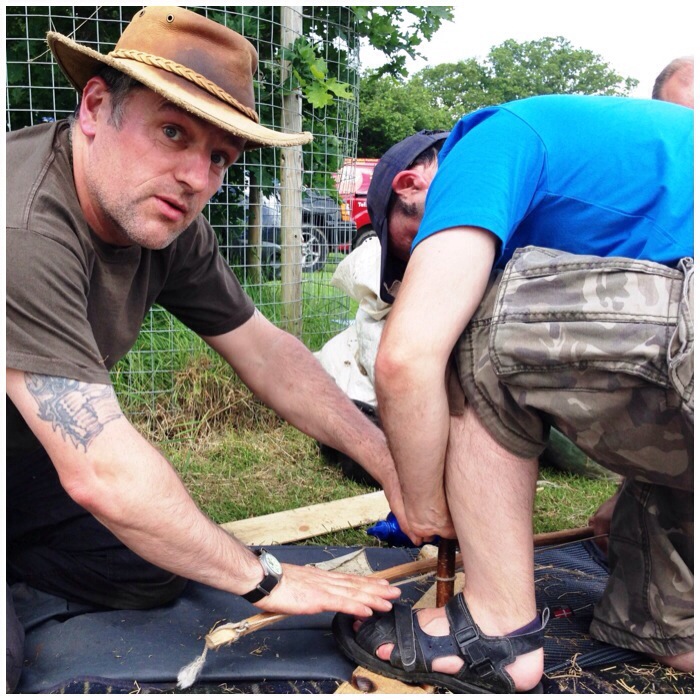
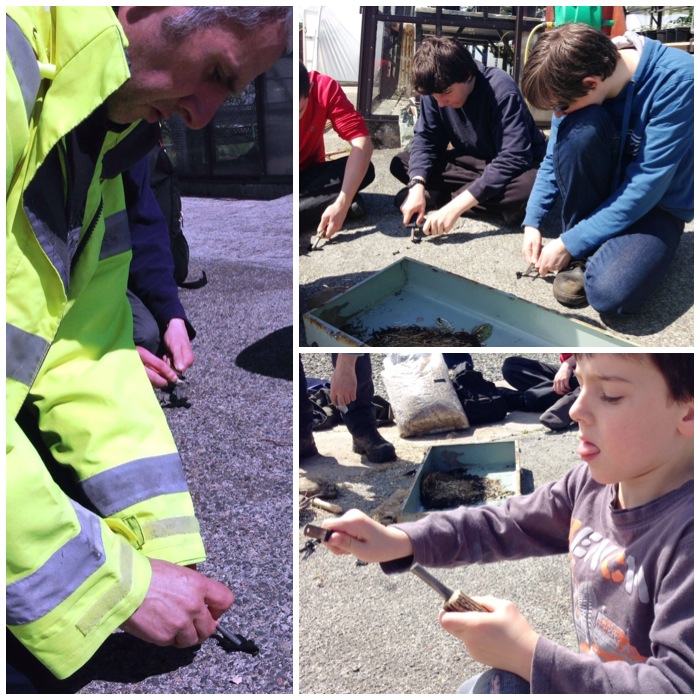
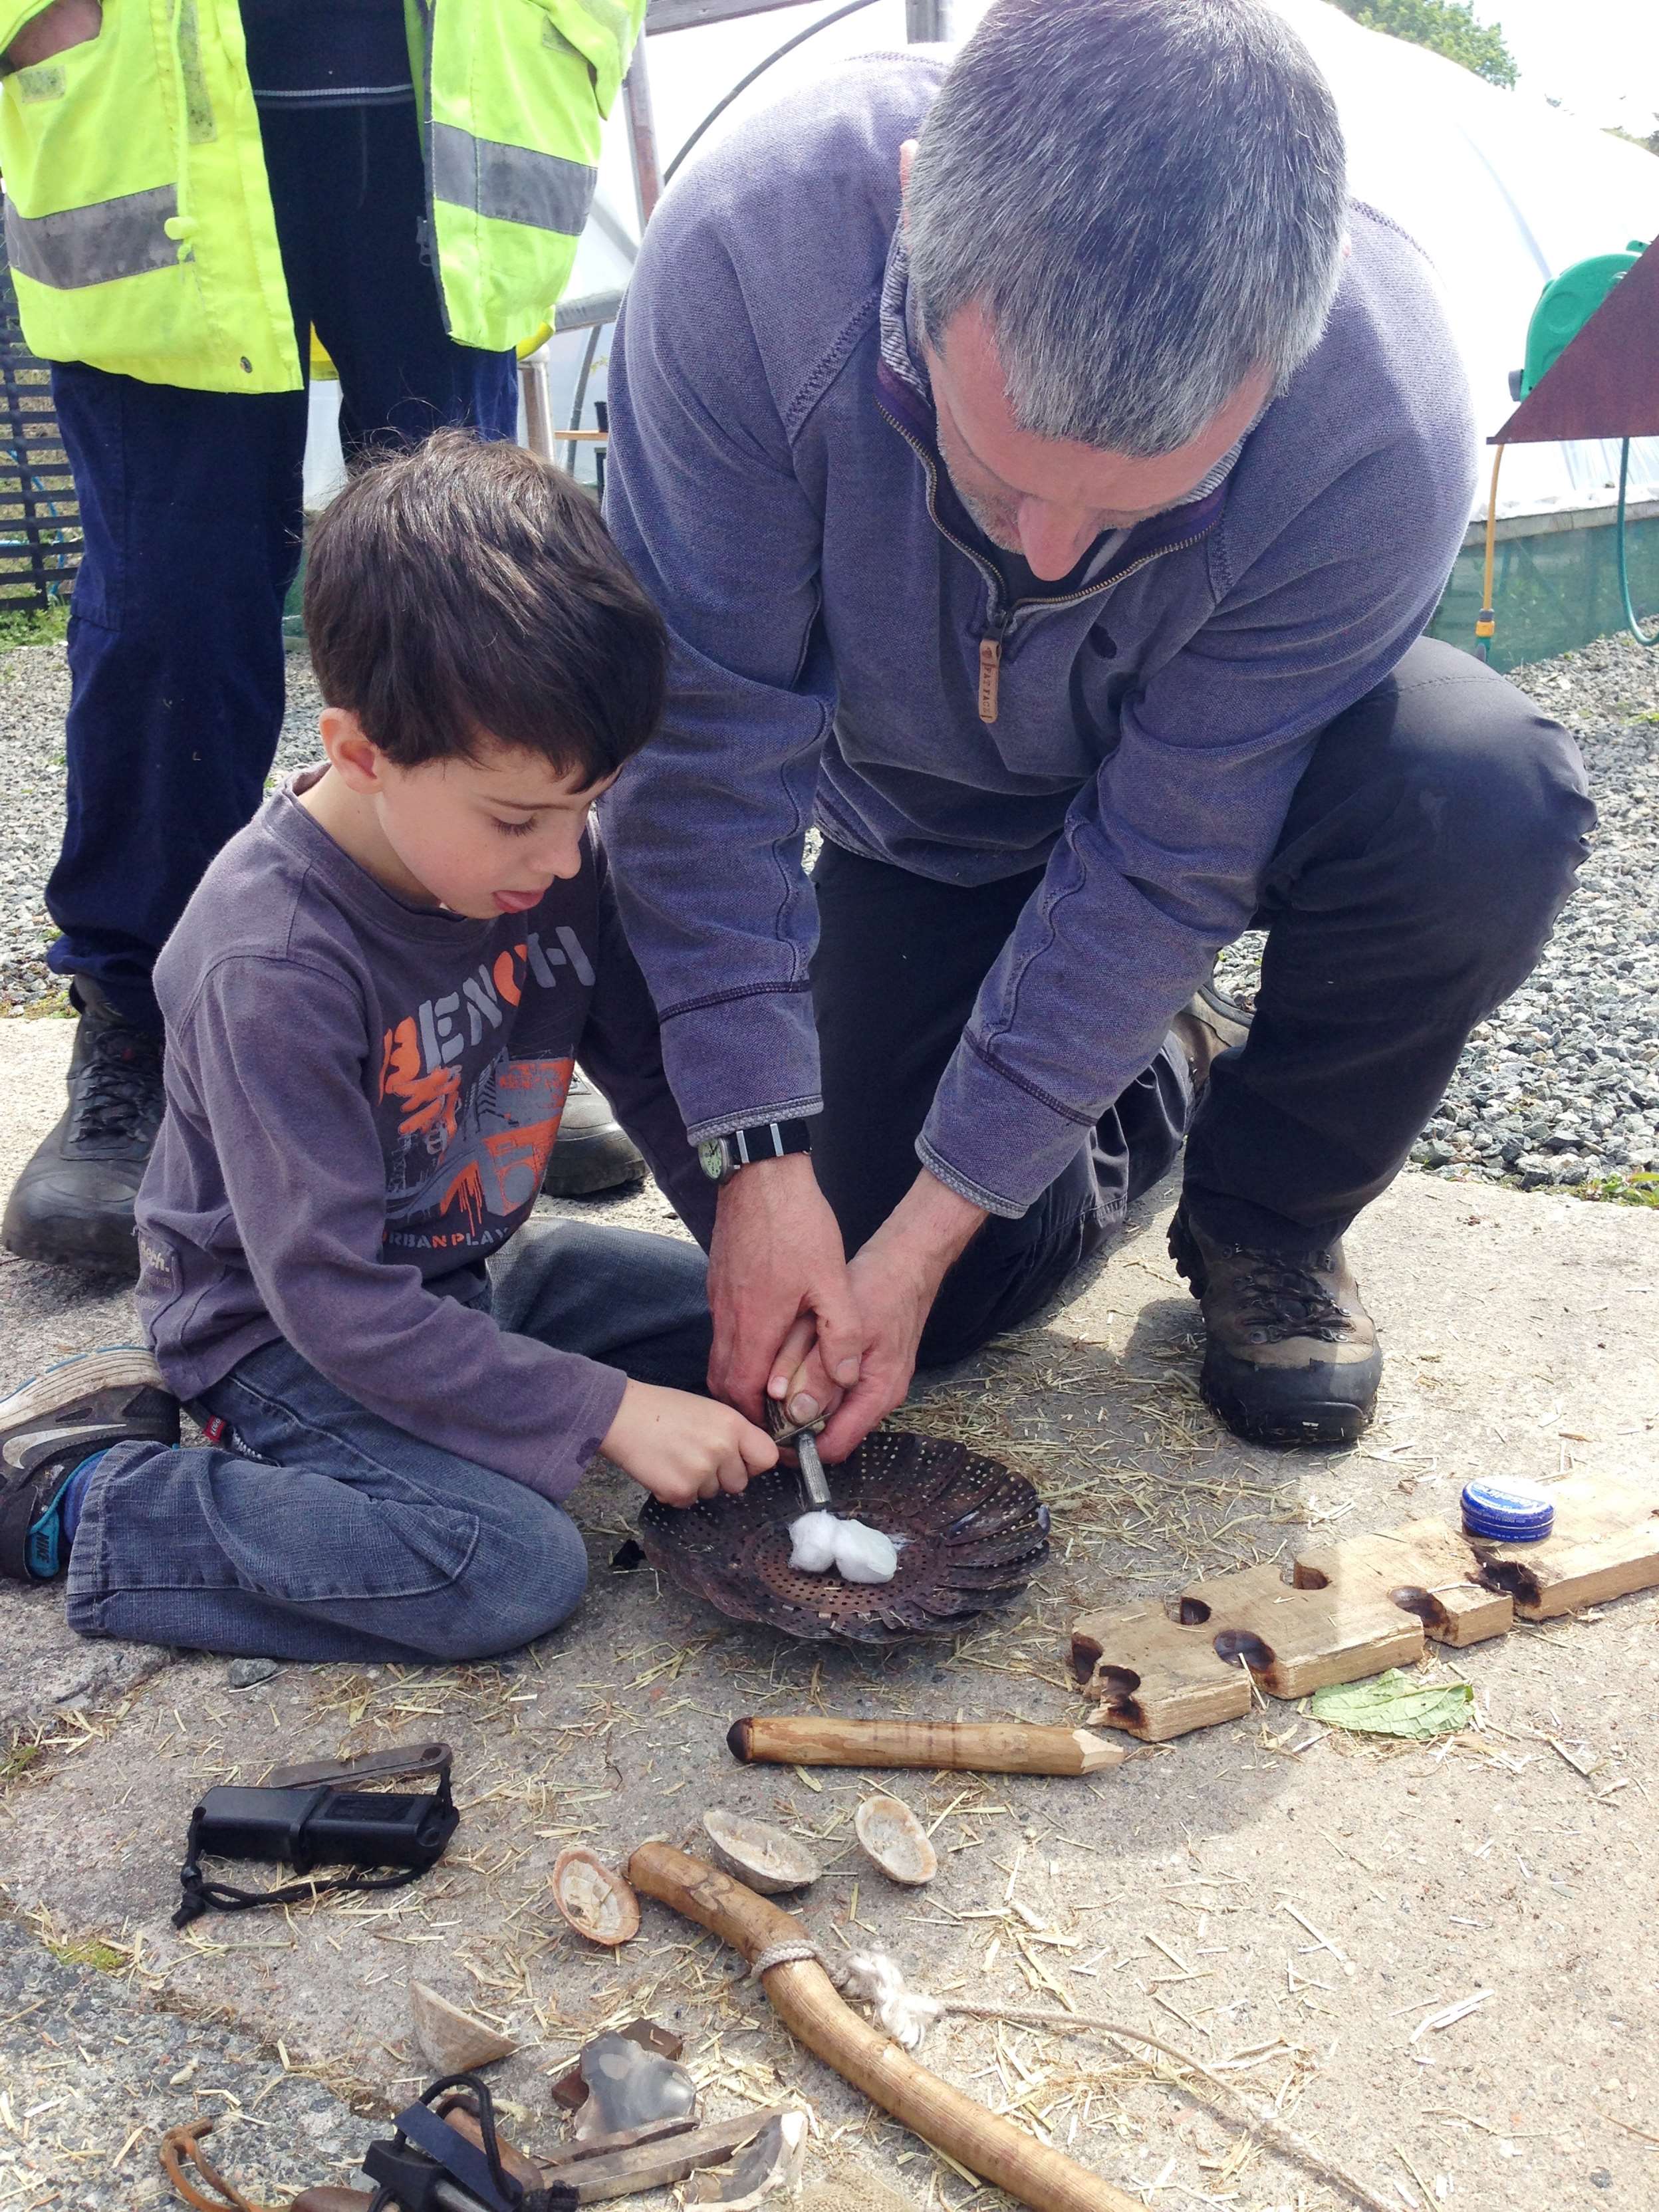
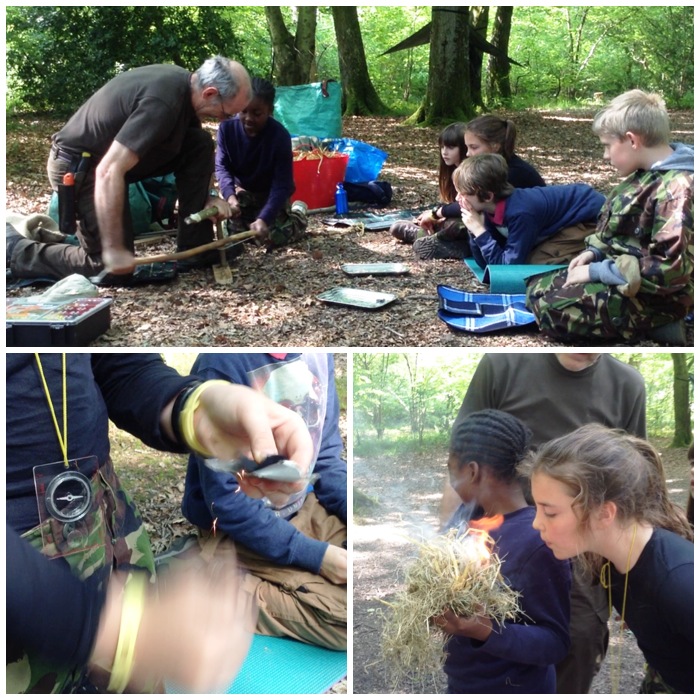
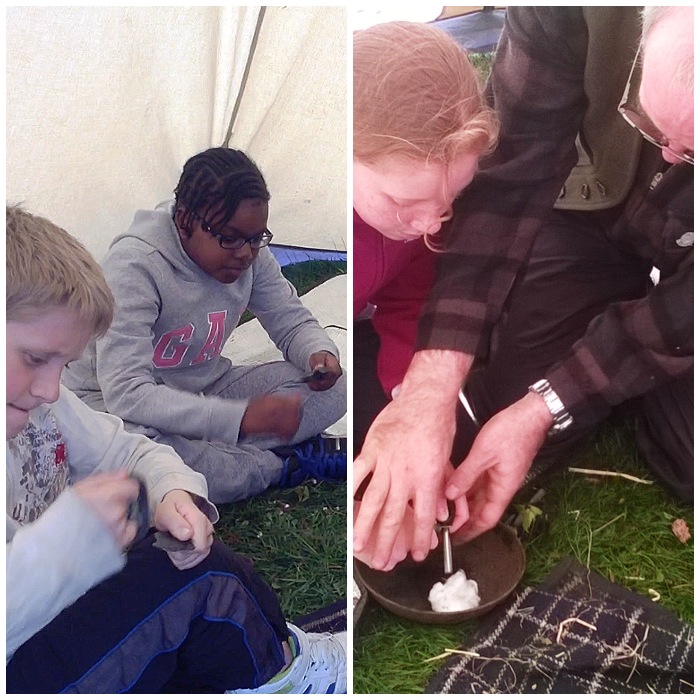
Later on the boys Dad Jim turned up with David’s little brother James. Jim has been a good friend of mine for many years so It was good to catch up on goings on again with him. While we were chatting the boys asked if they could light their own fire.
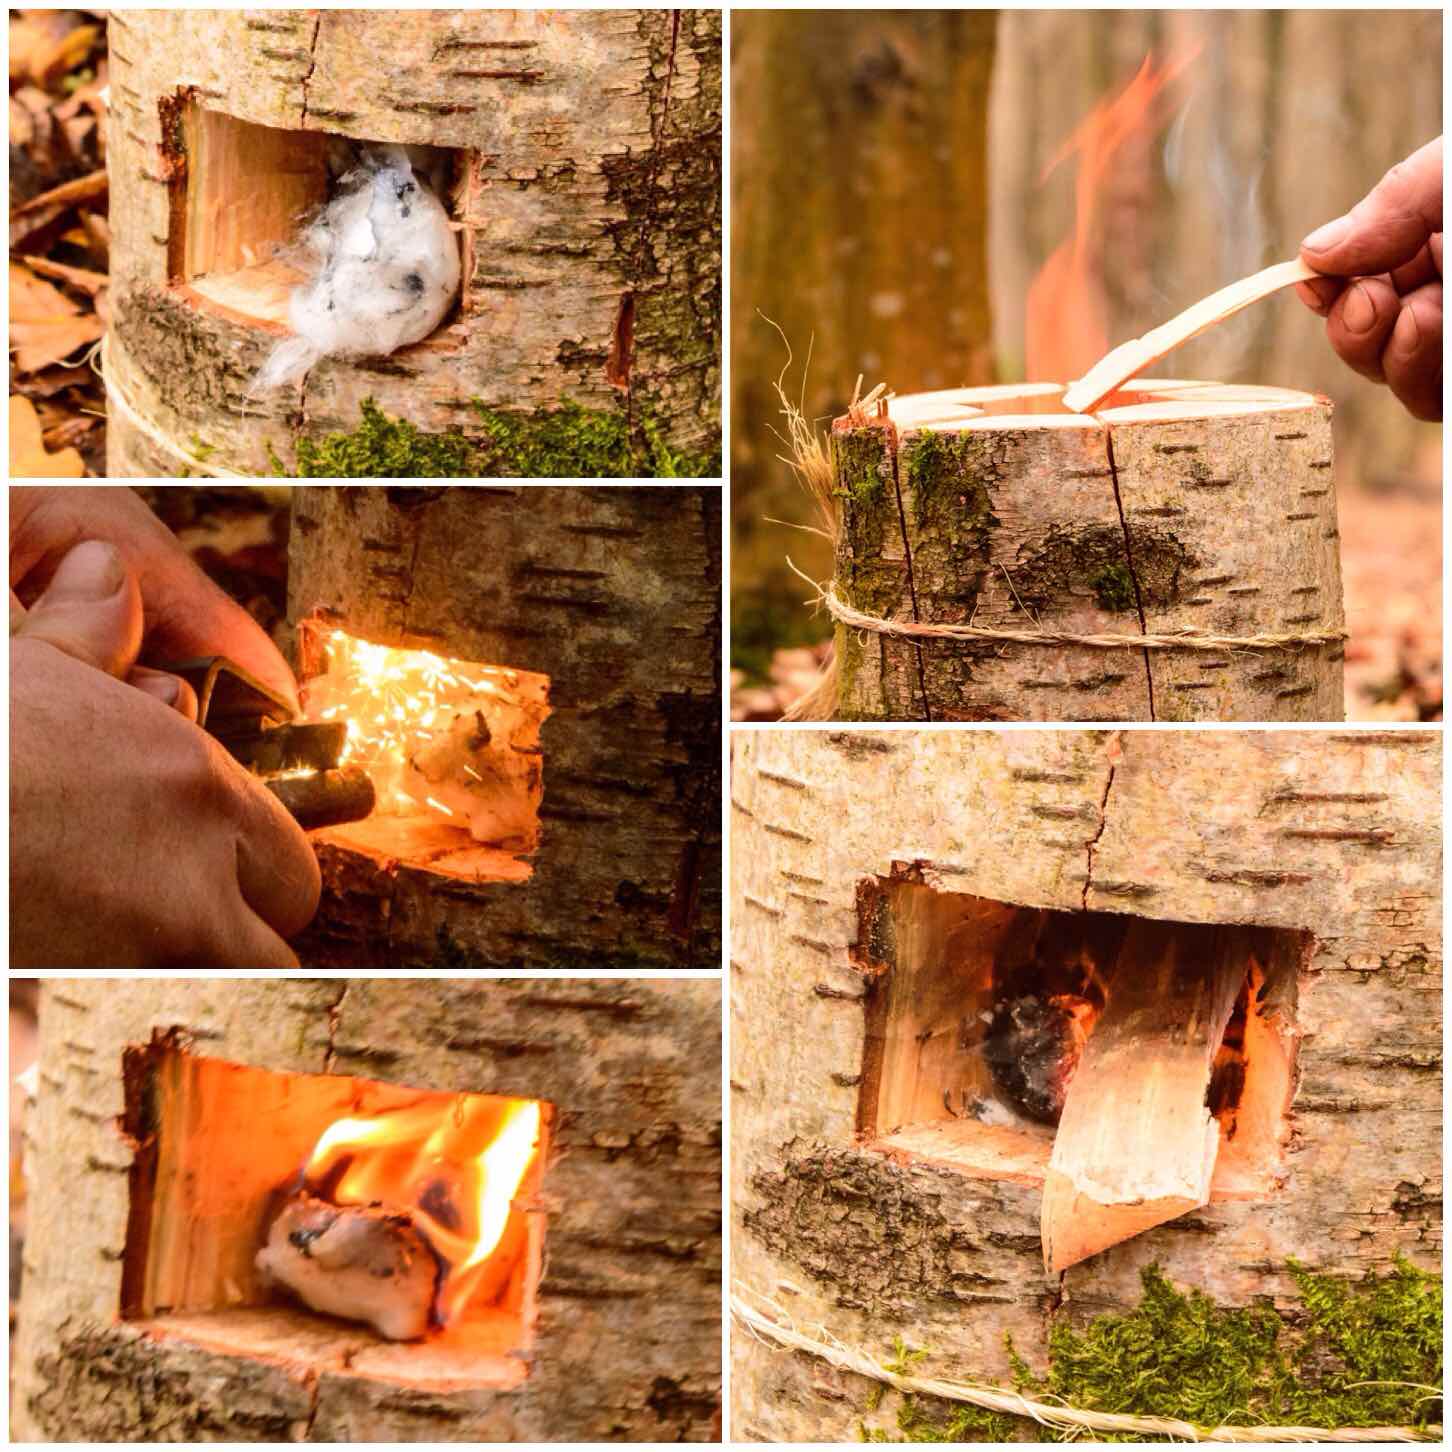
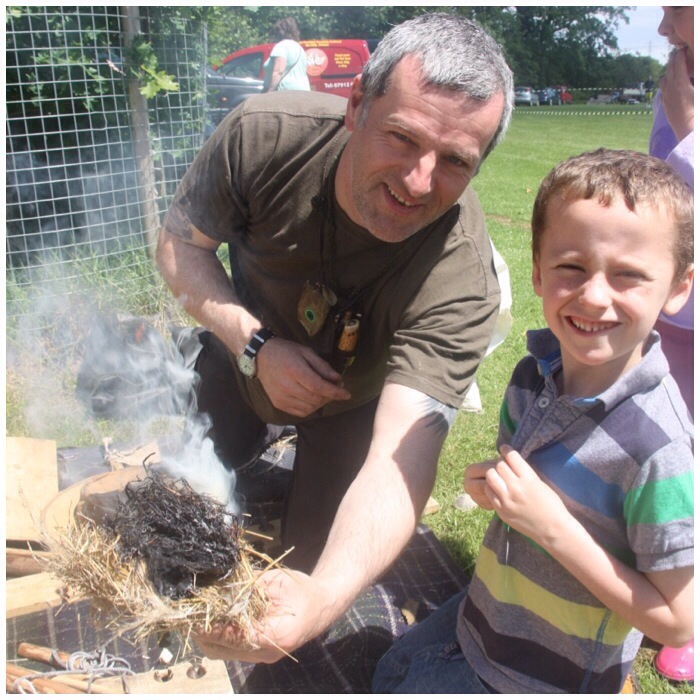
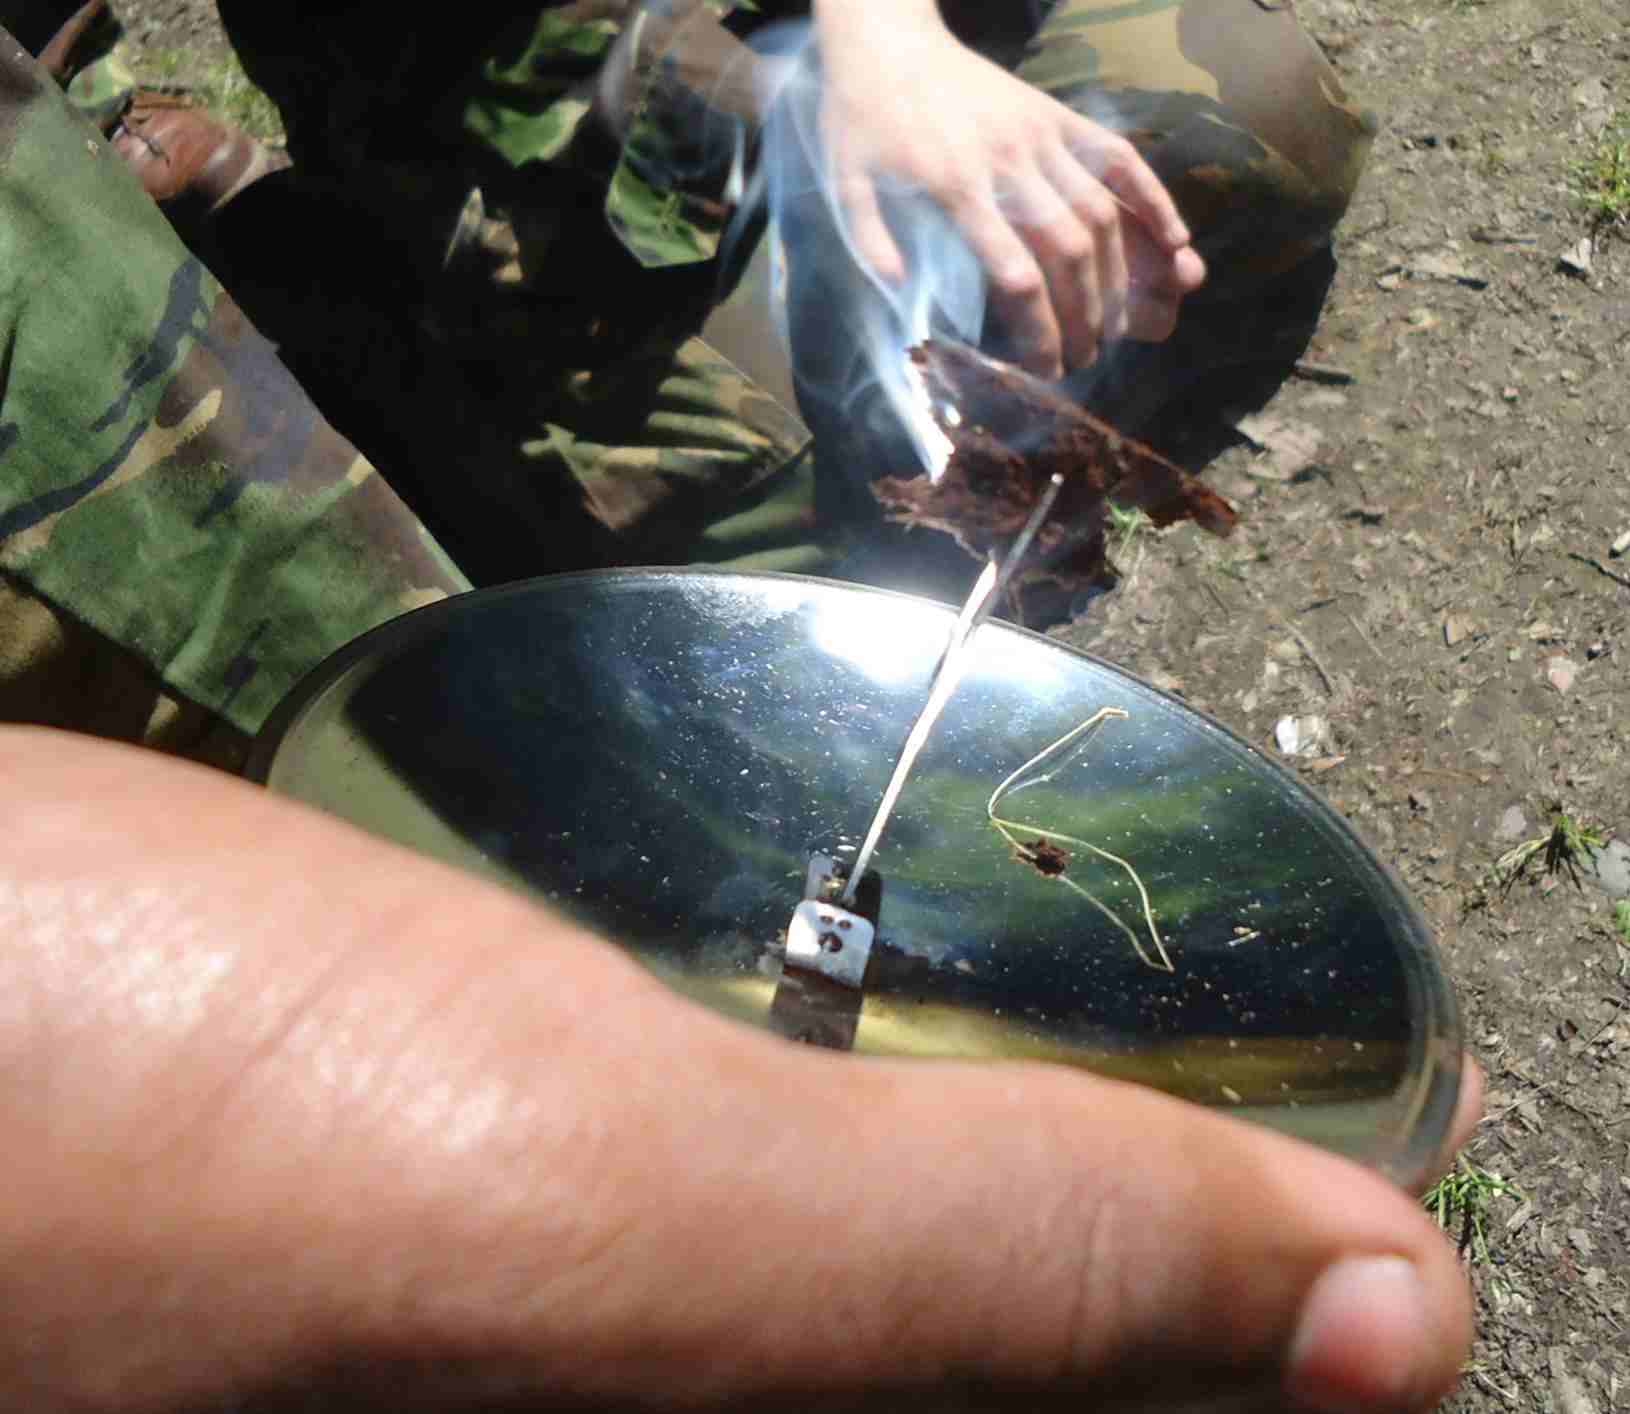
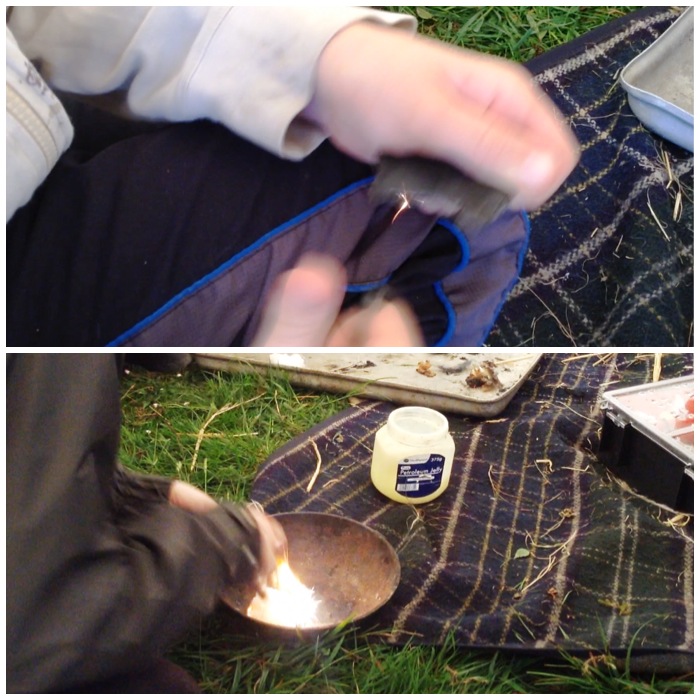
We spent a little while collecting some dry birch bark and small twigs and then got the Firesteels out. I also gave them some cotton wool and Vaseline to help get the fire going as everything was very damp.
It was great to watch the two lads sparking away and then slowly building up their fire until it was well lit. Needless to say when it was time for them to go home they were very reluctant to leave their well nurtured fire.
Bushcraft with the Boys
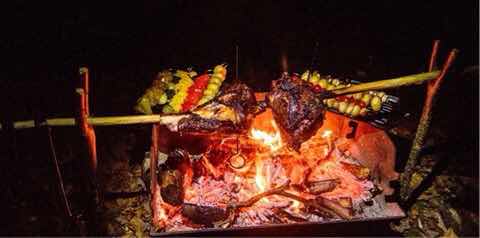
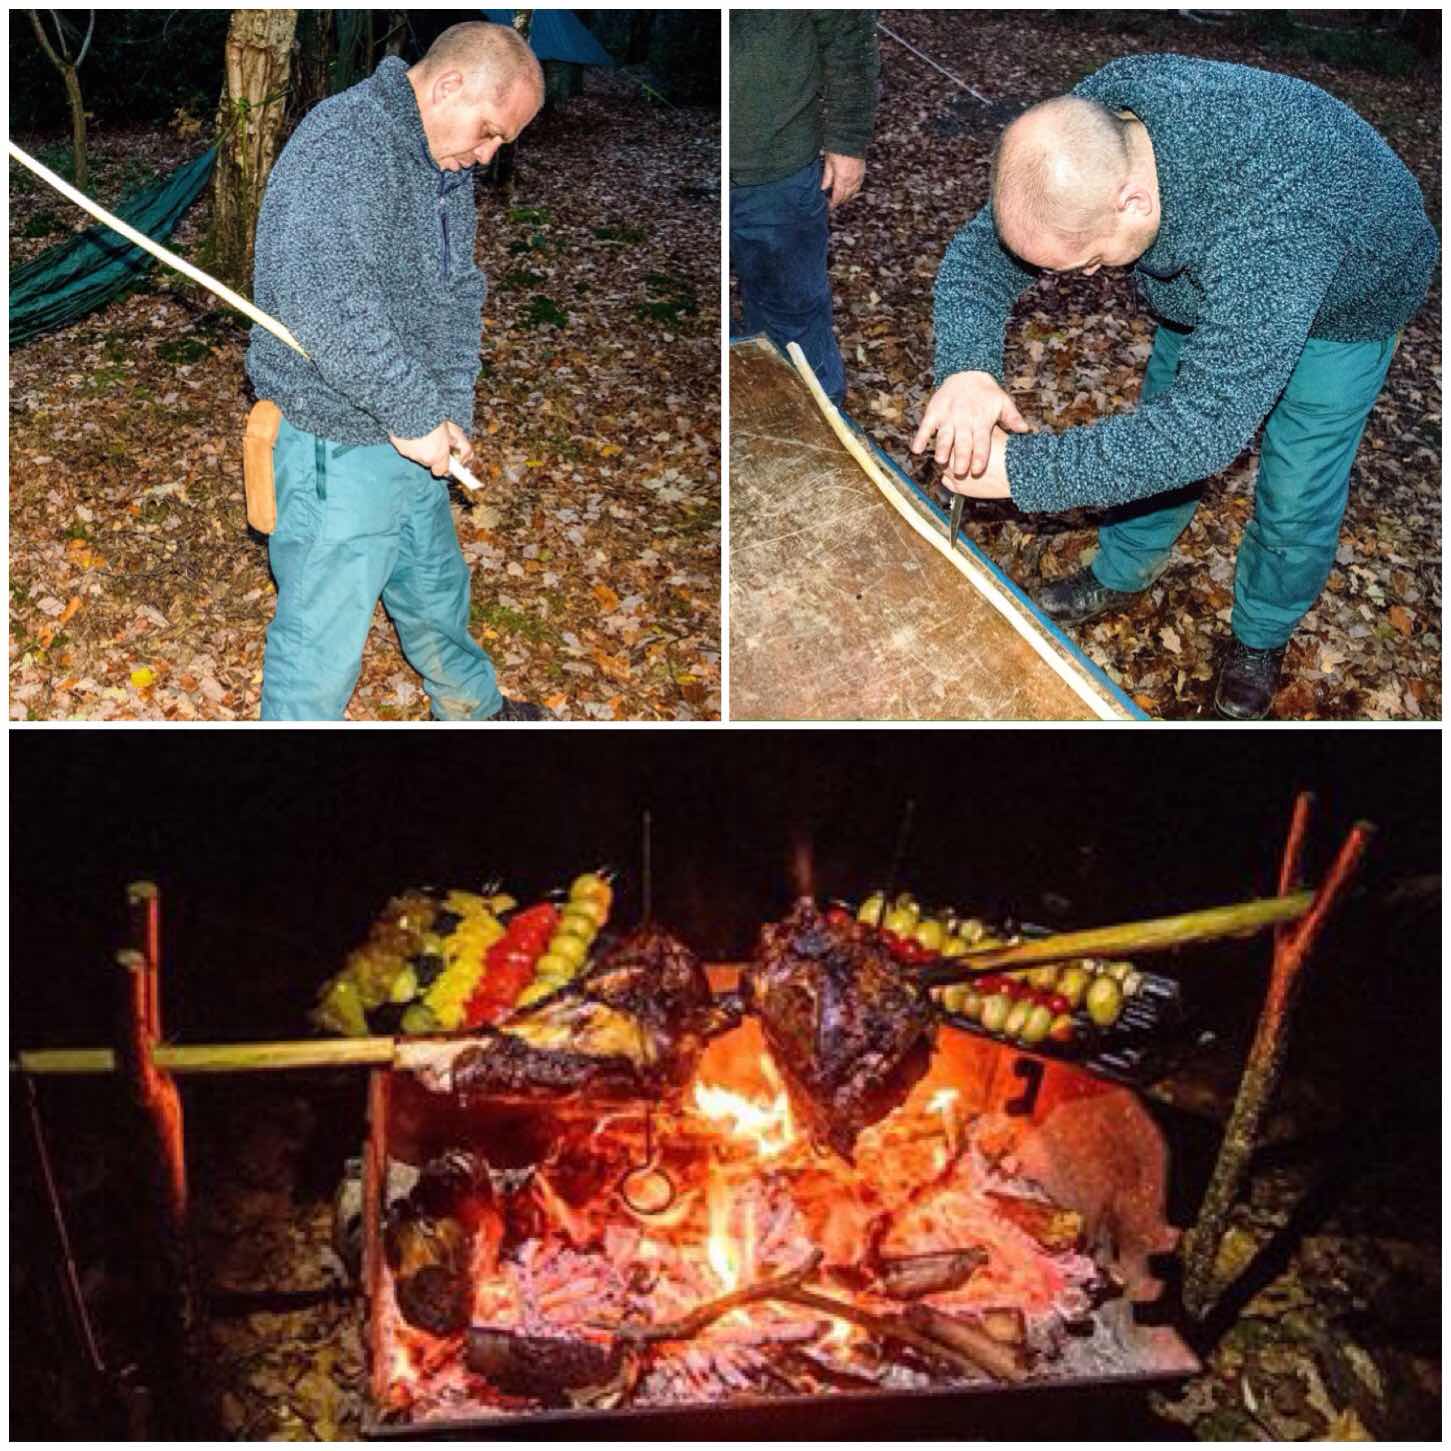
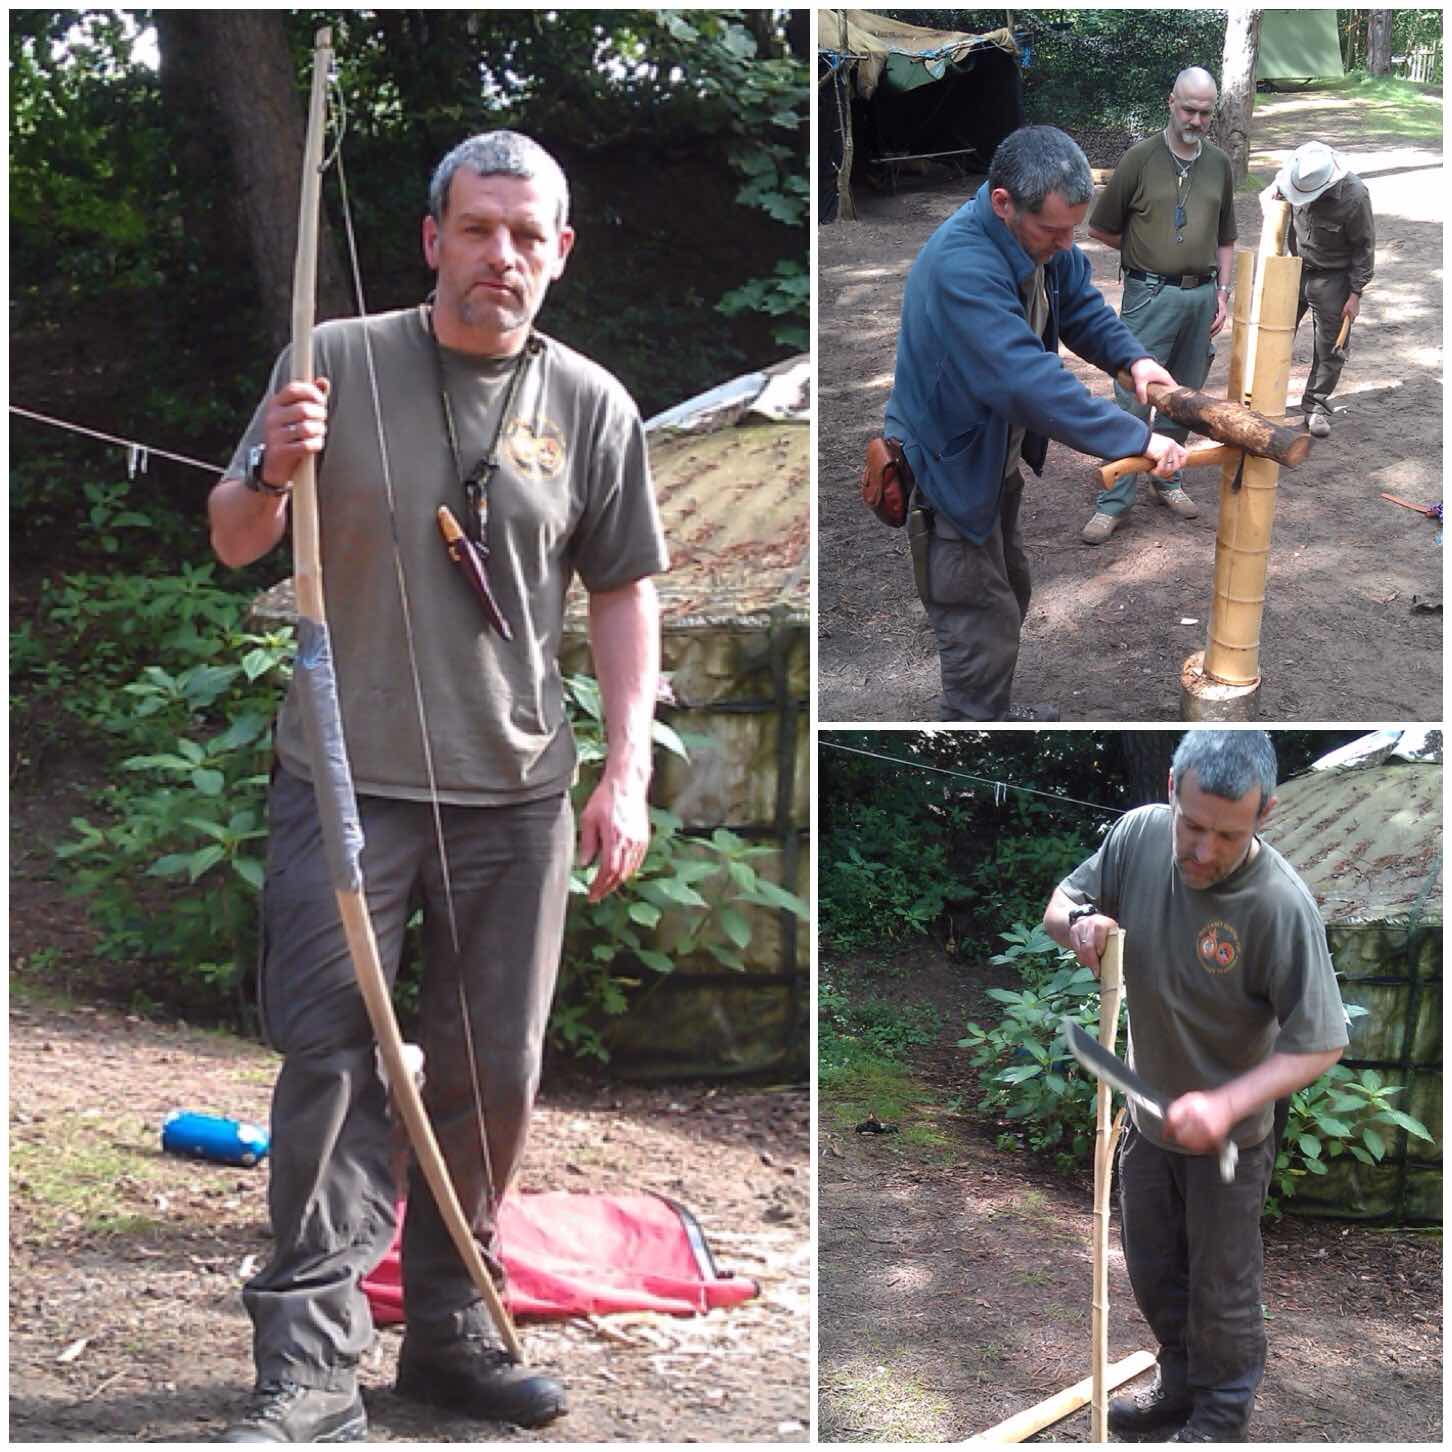
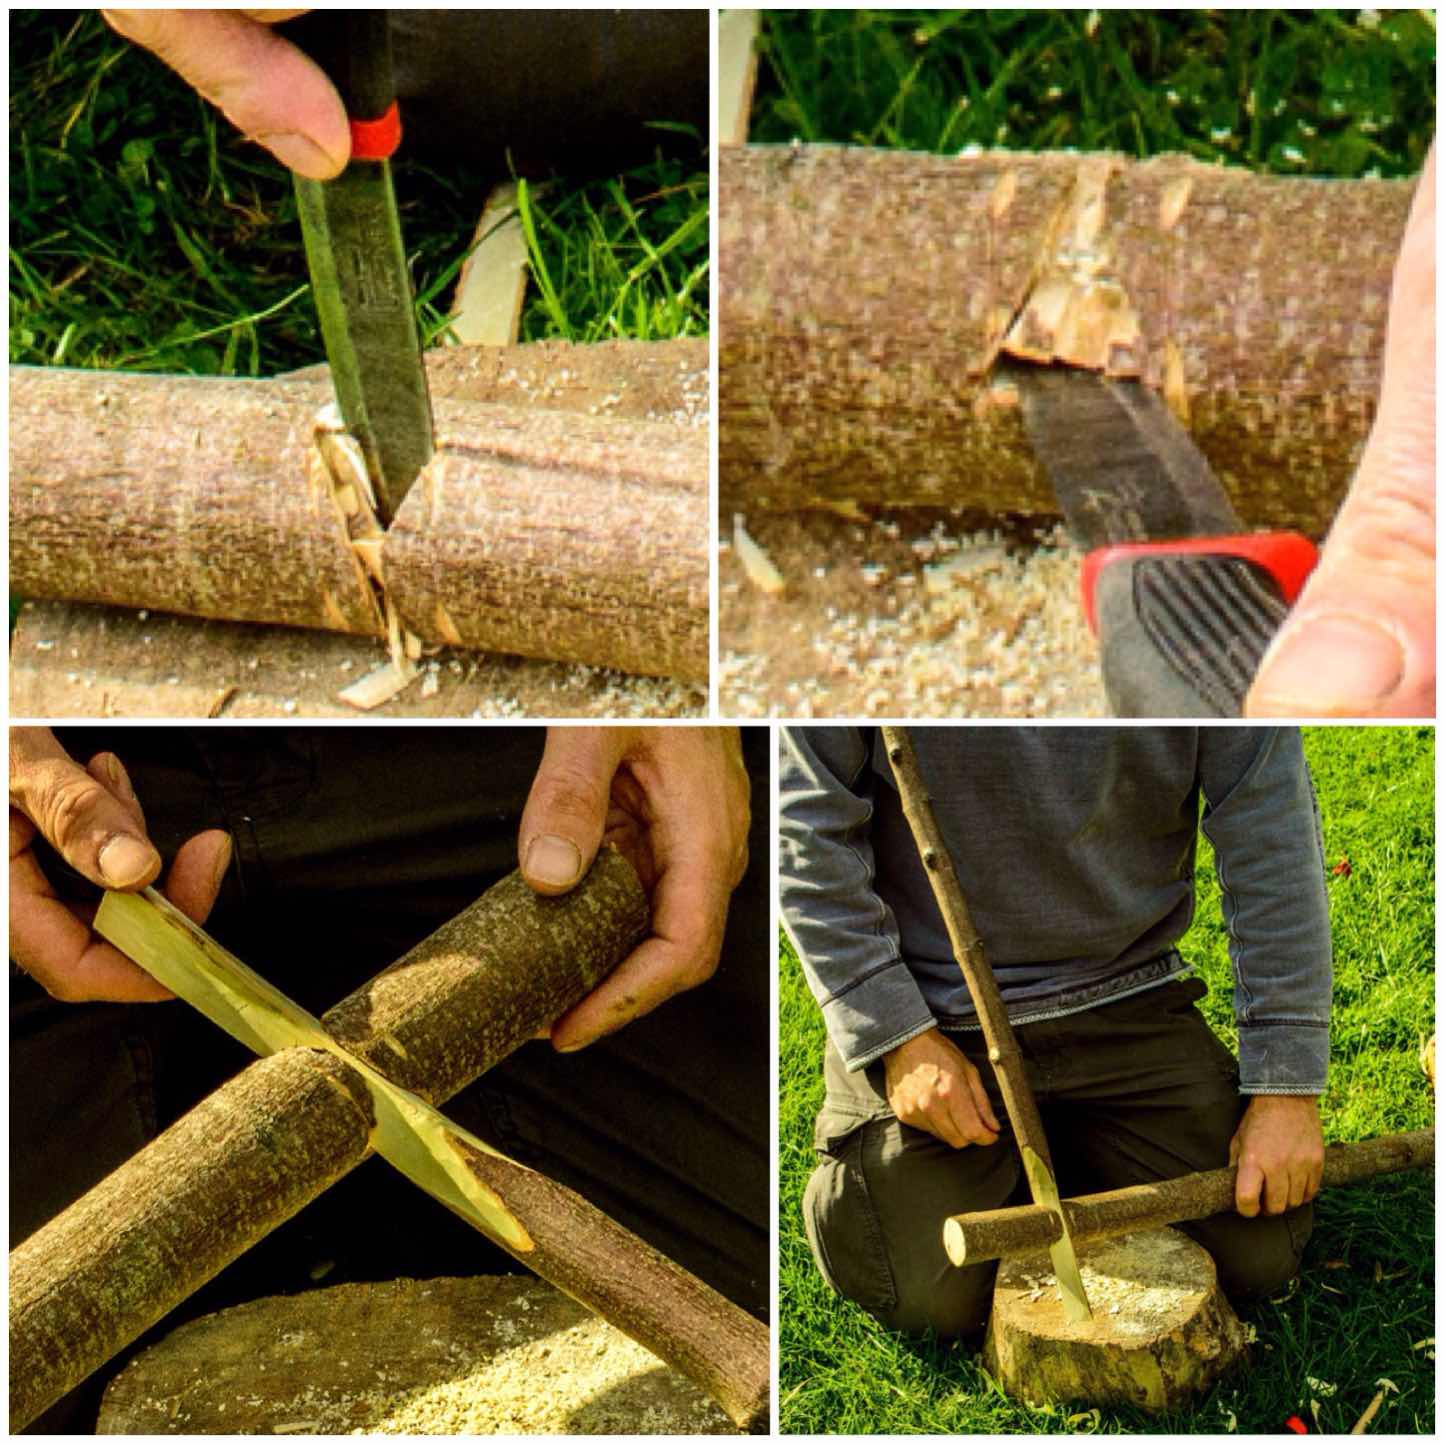
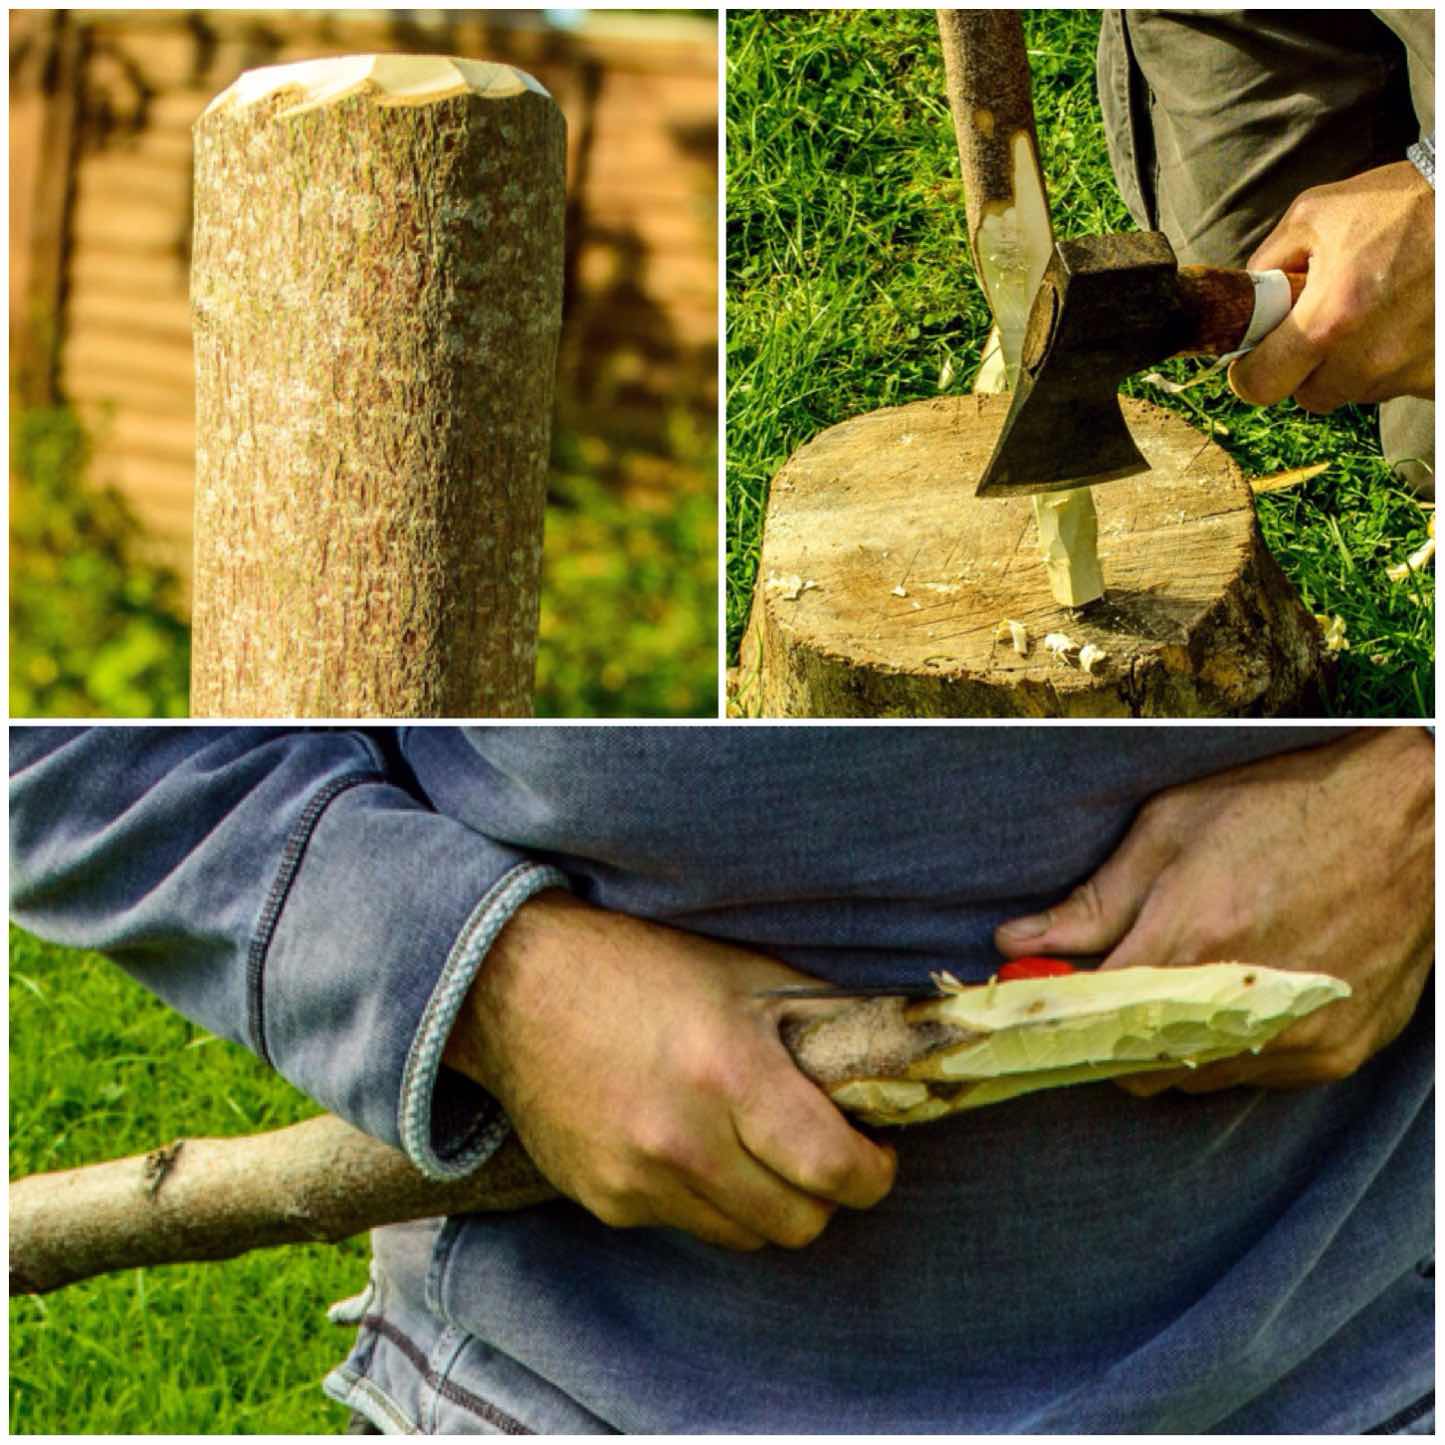
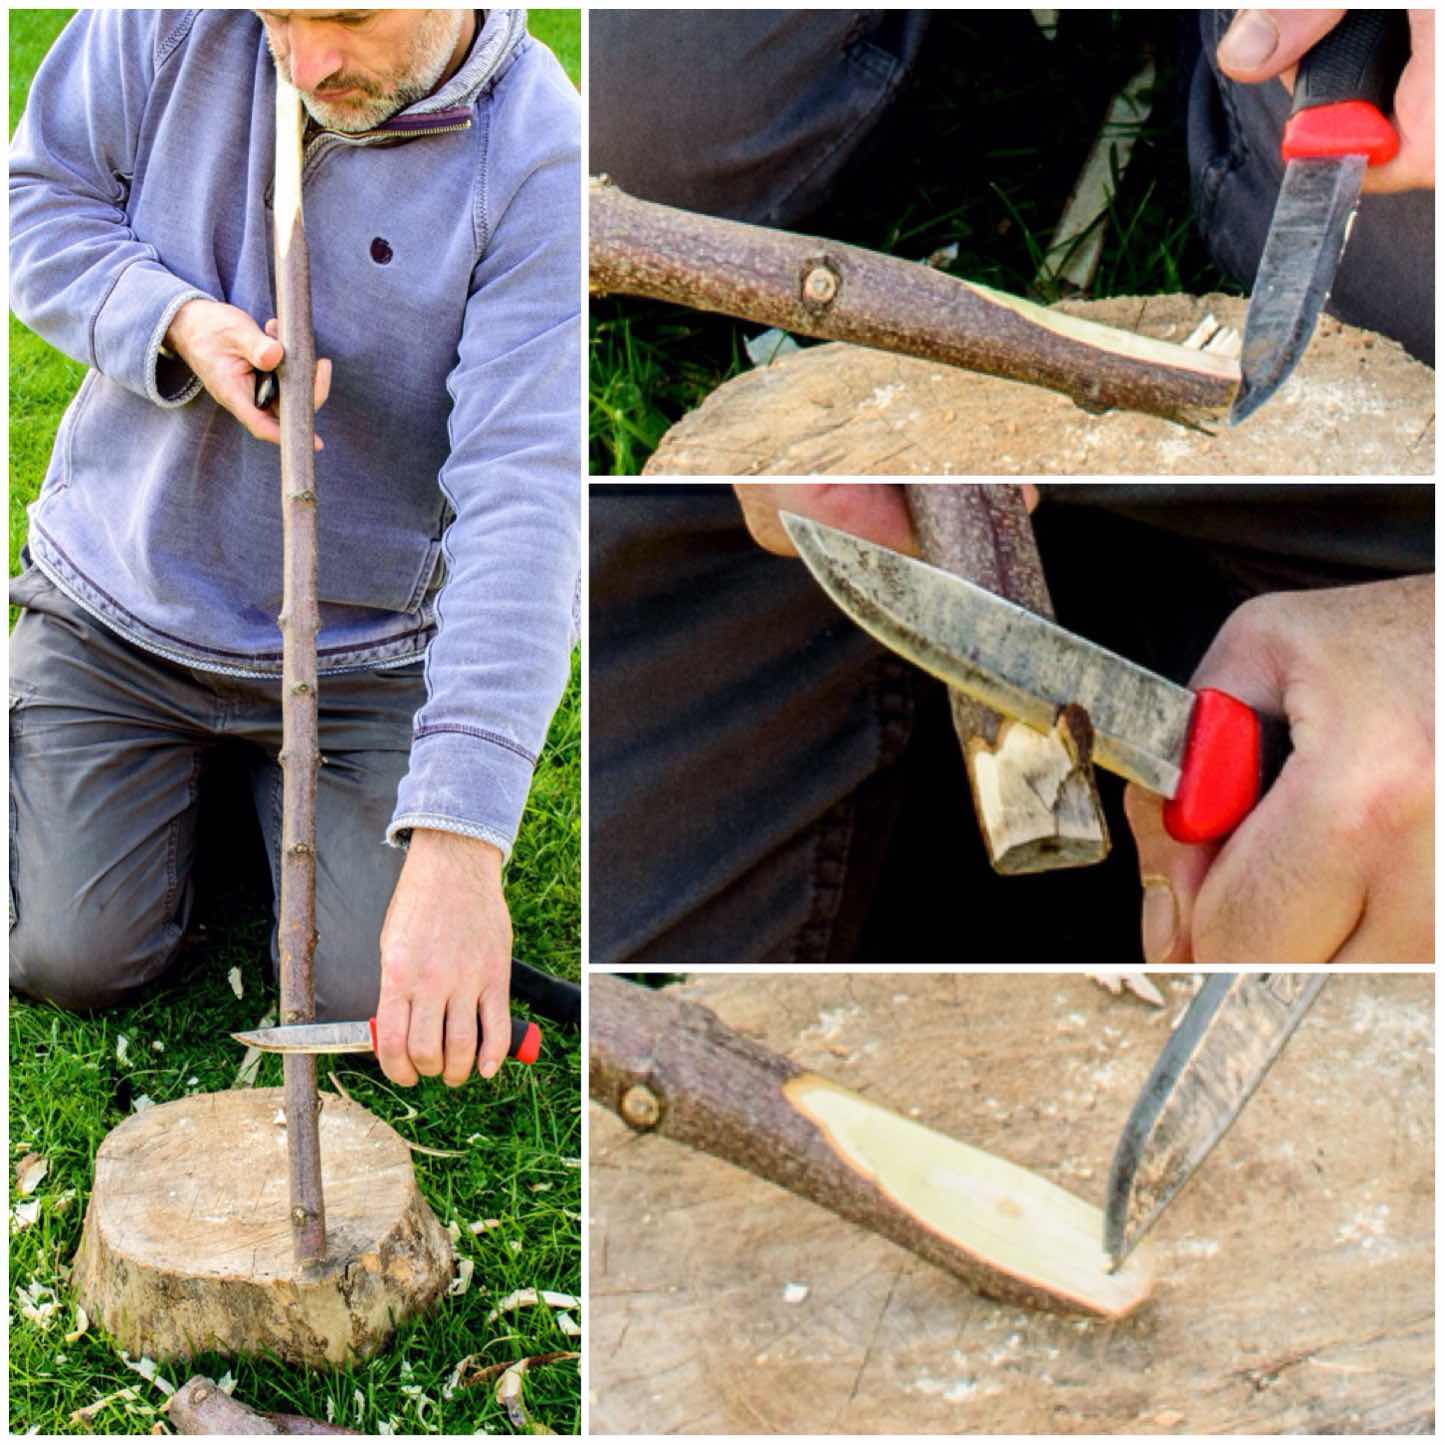
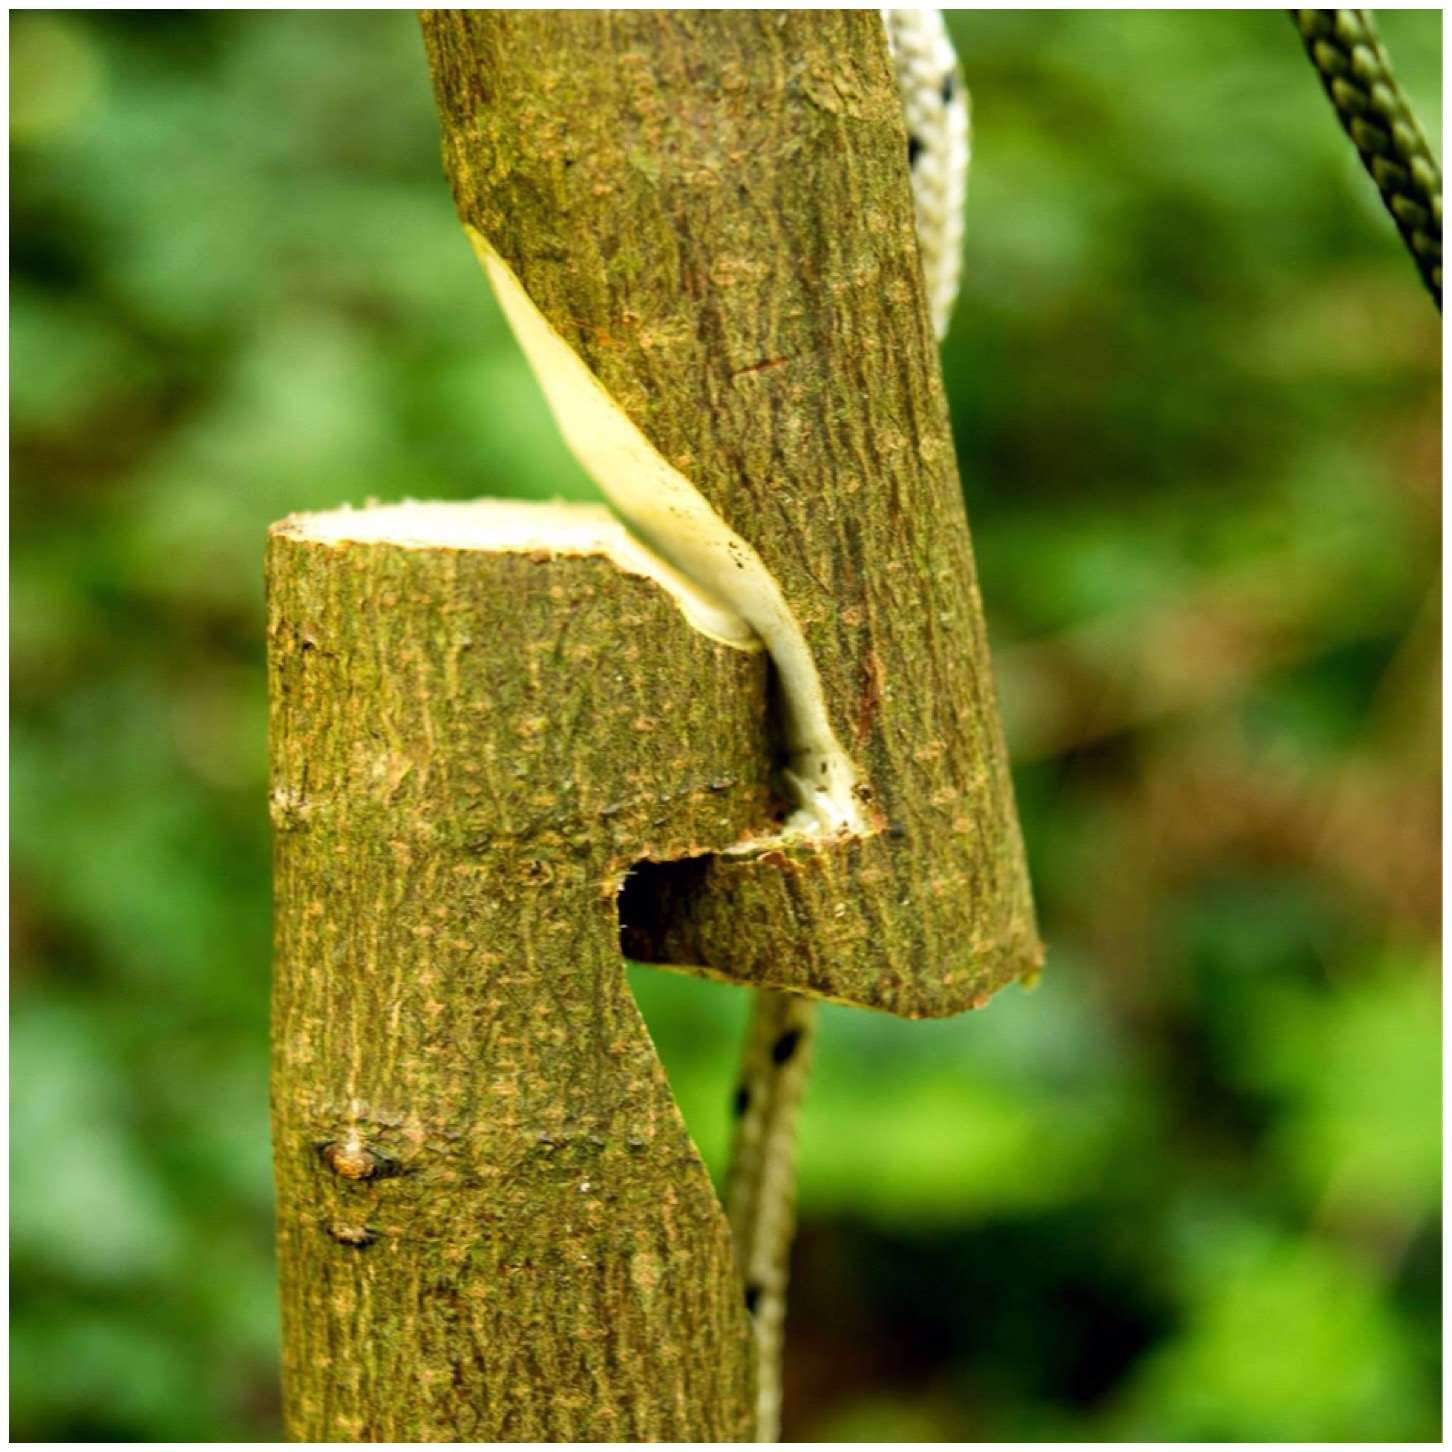
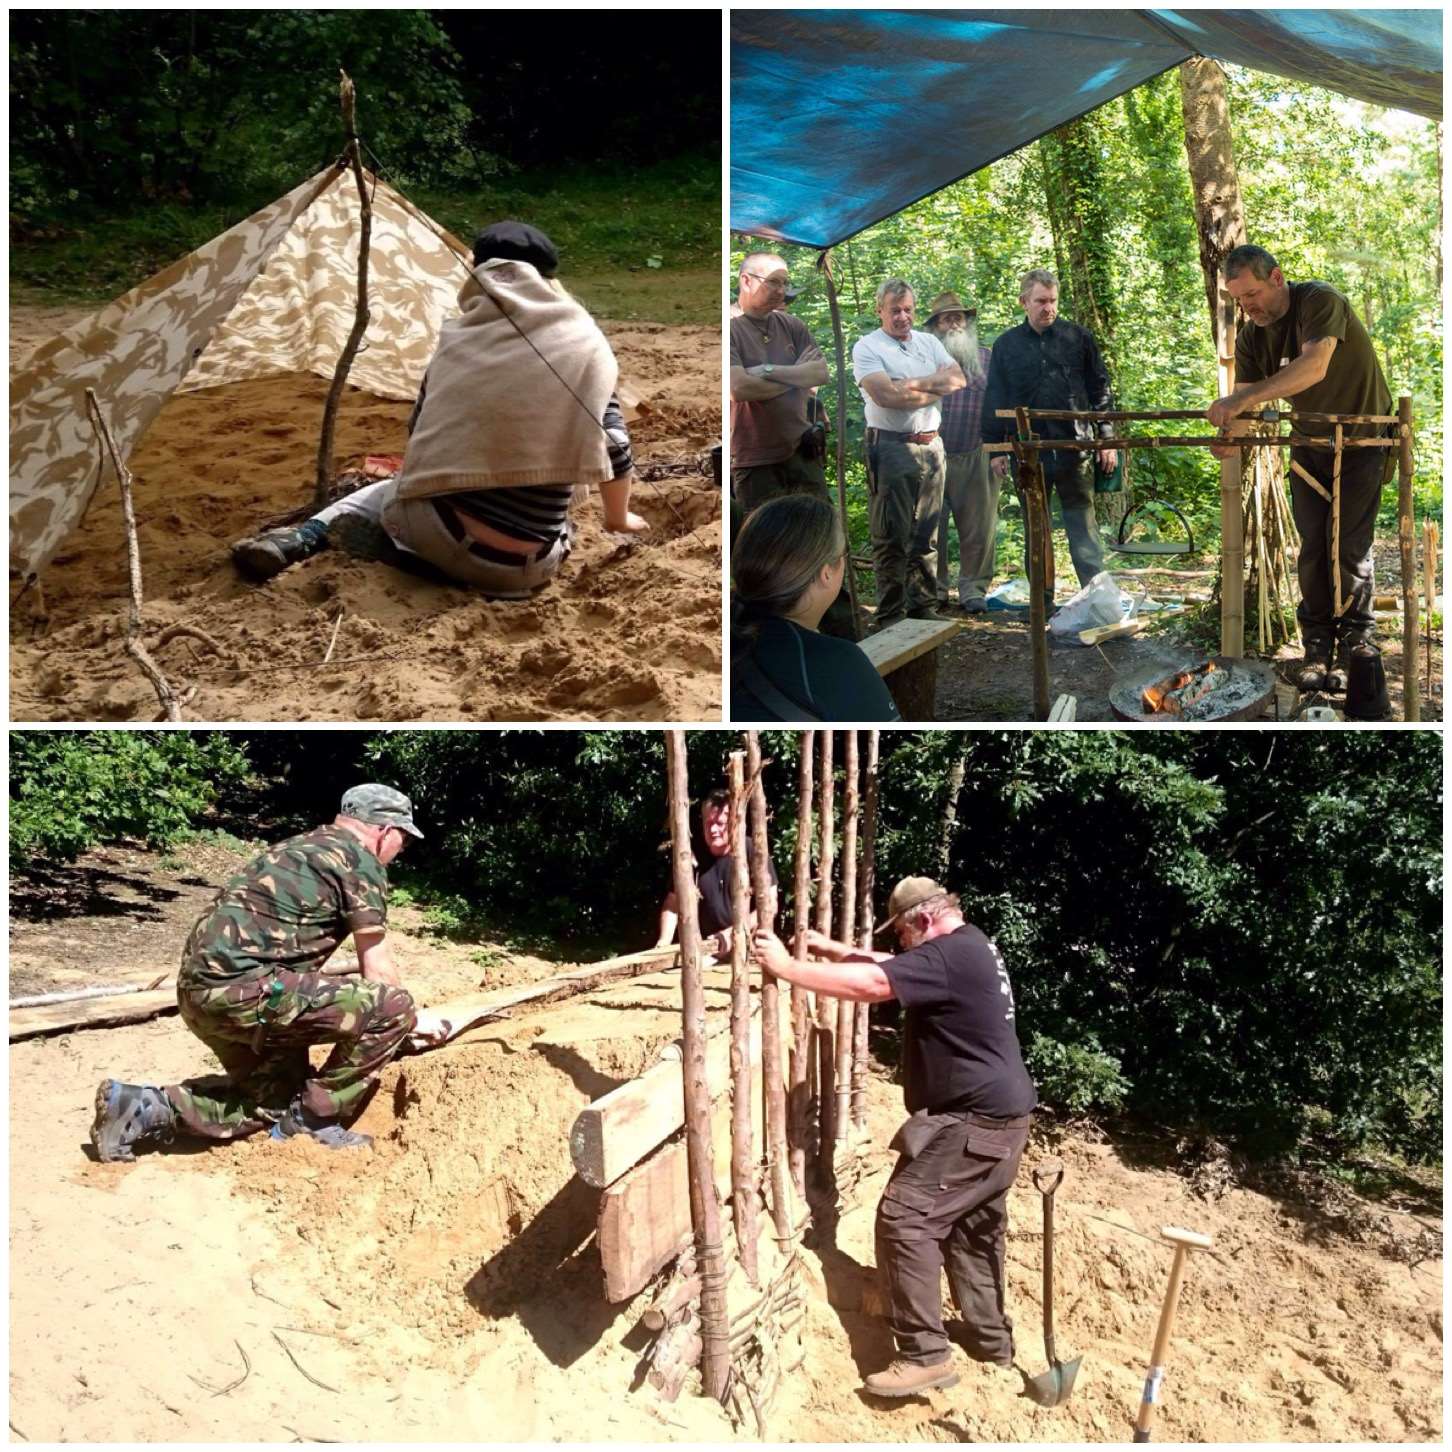
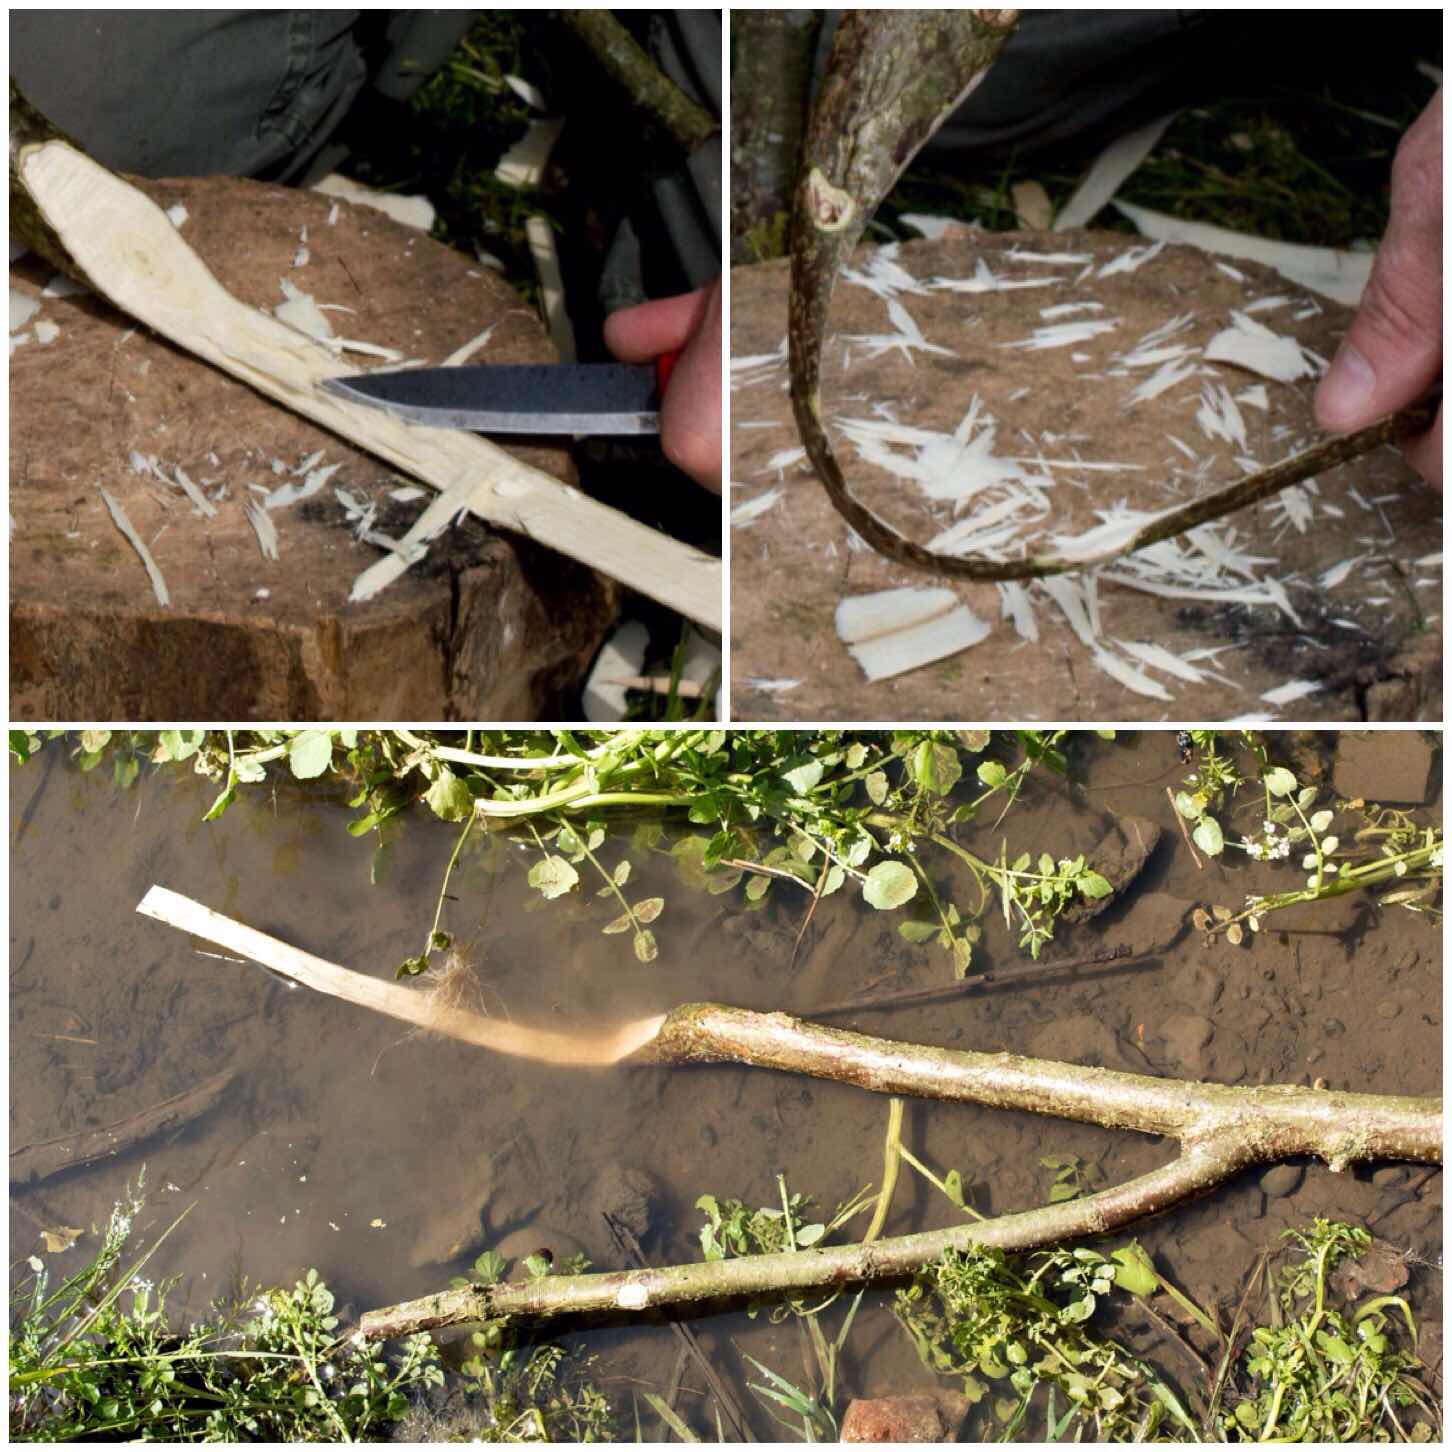
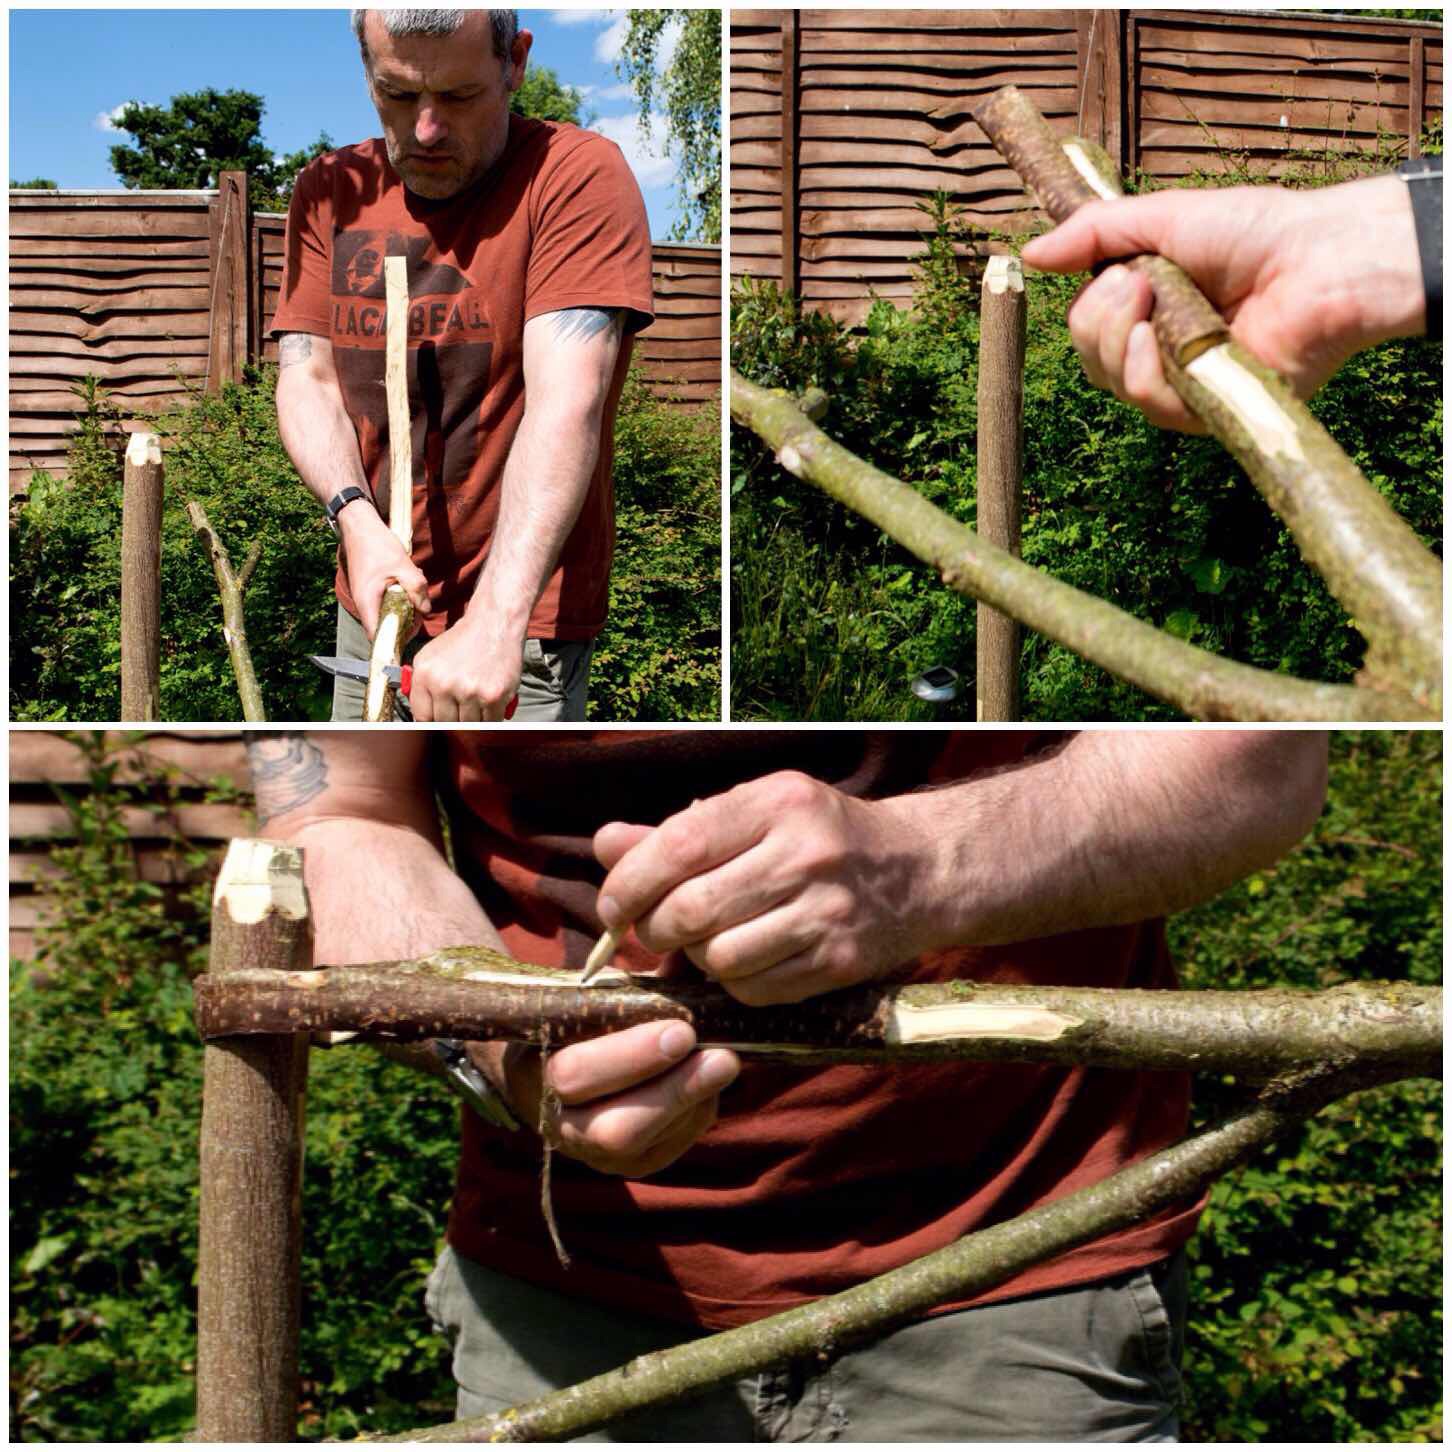
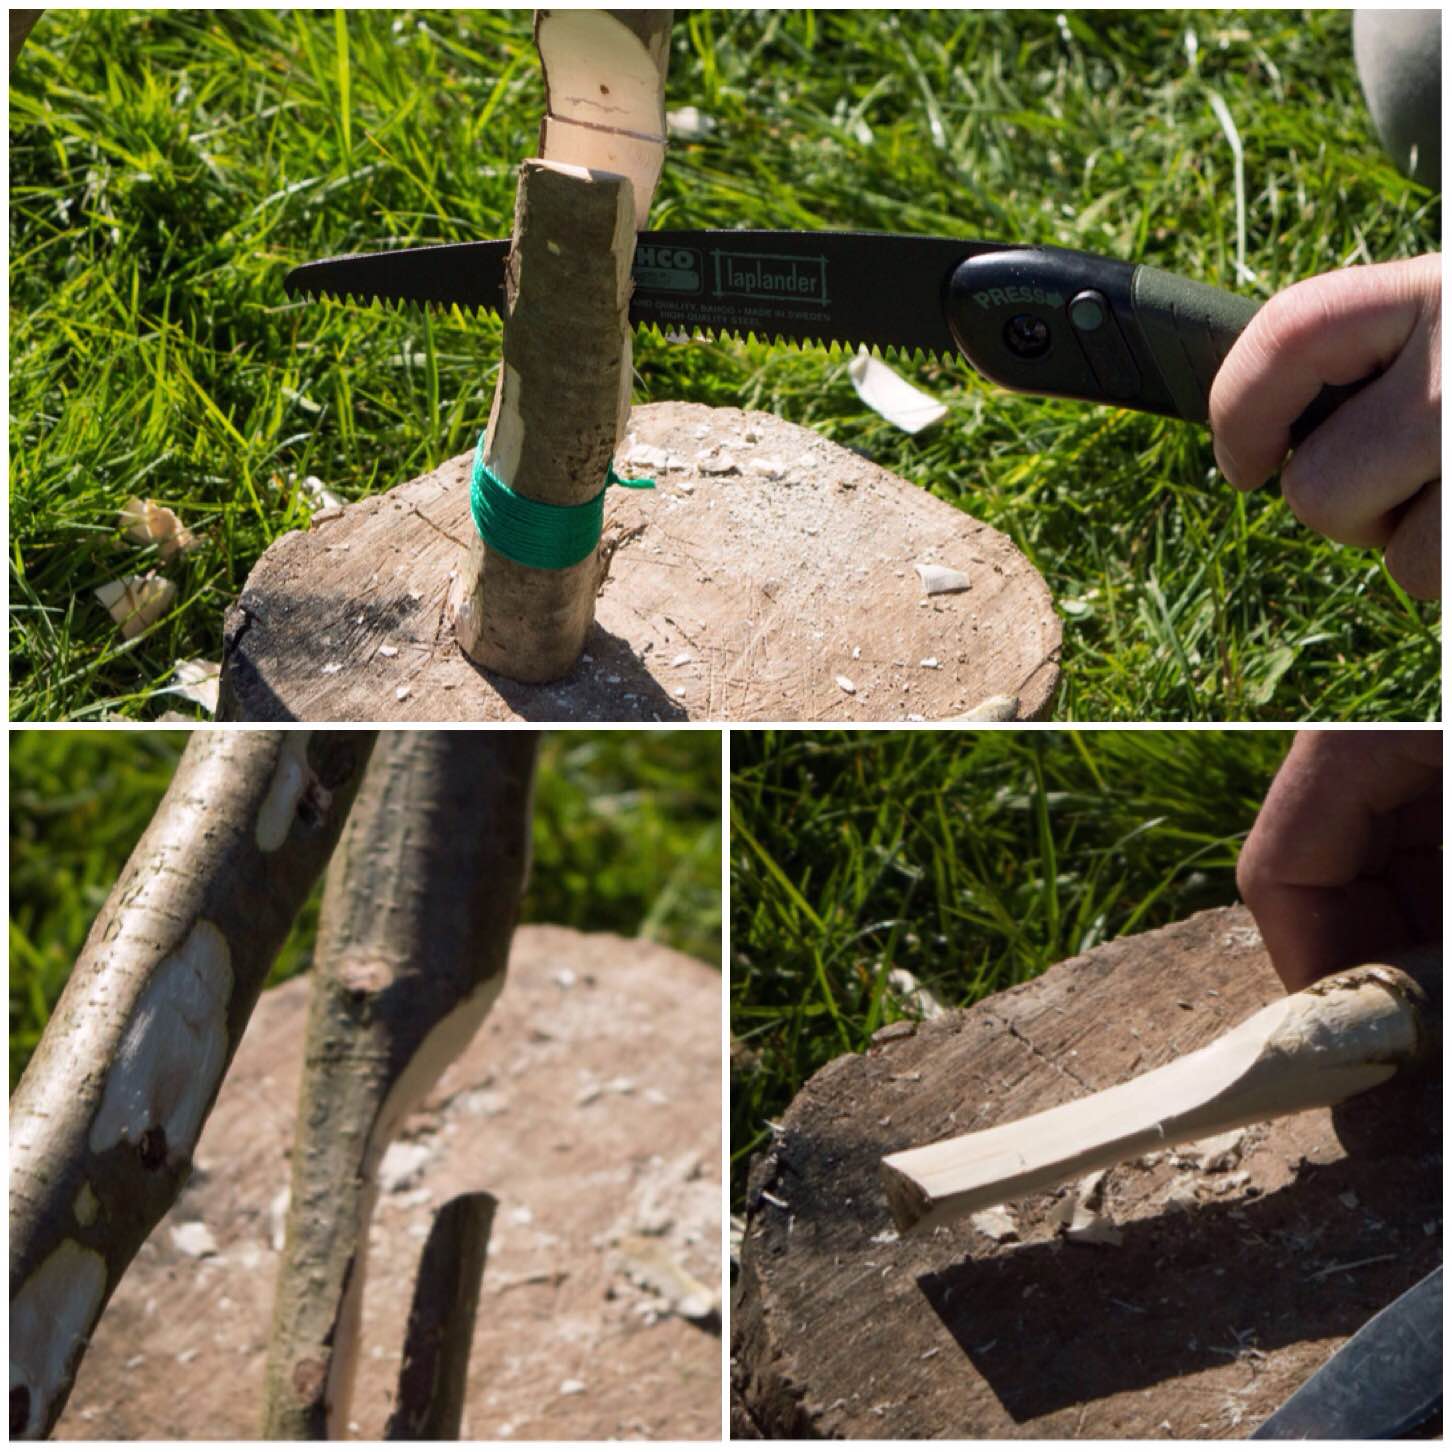
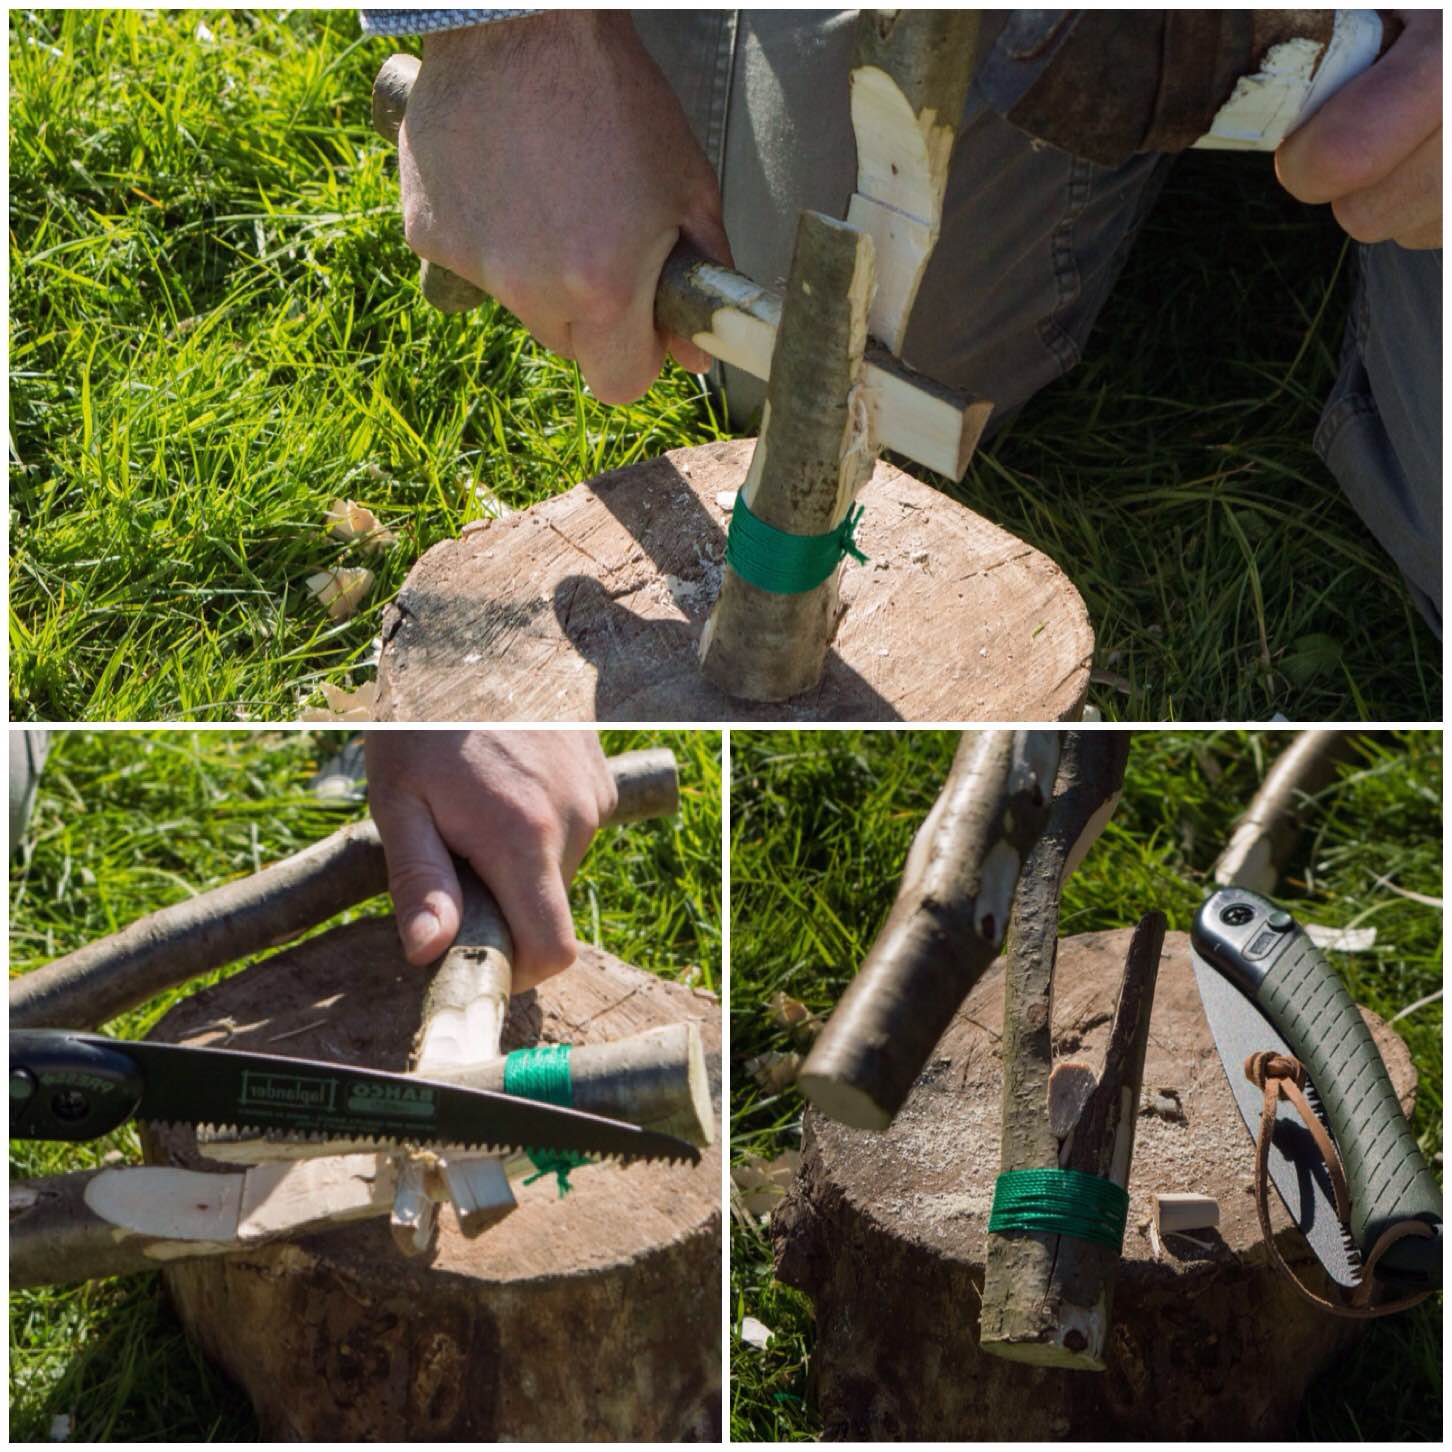
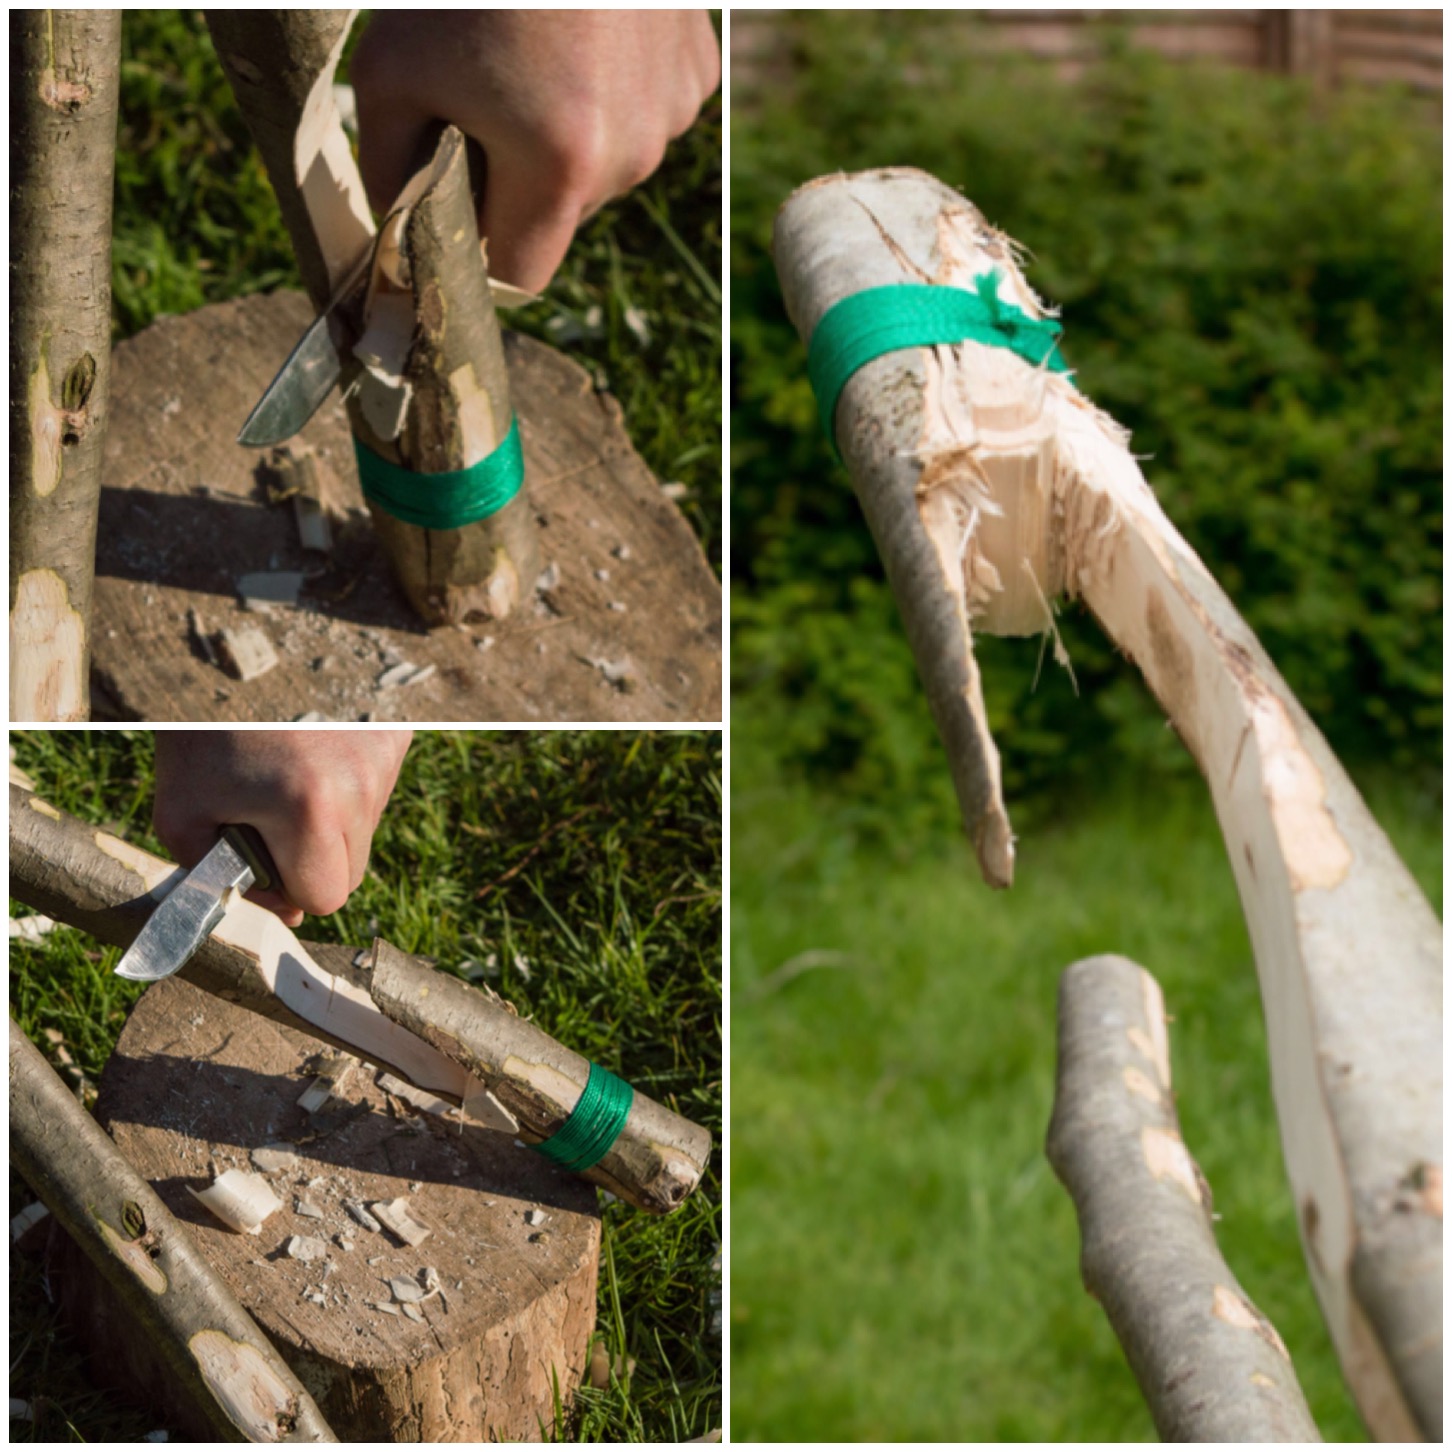
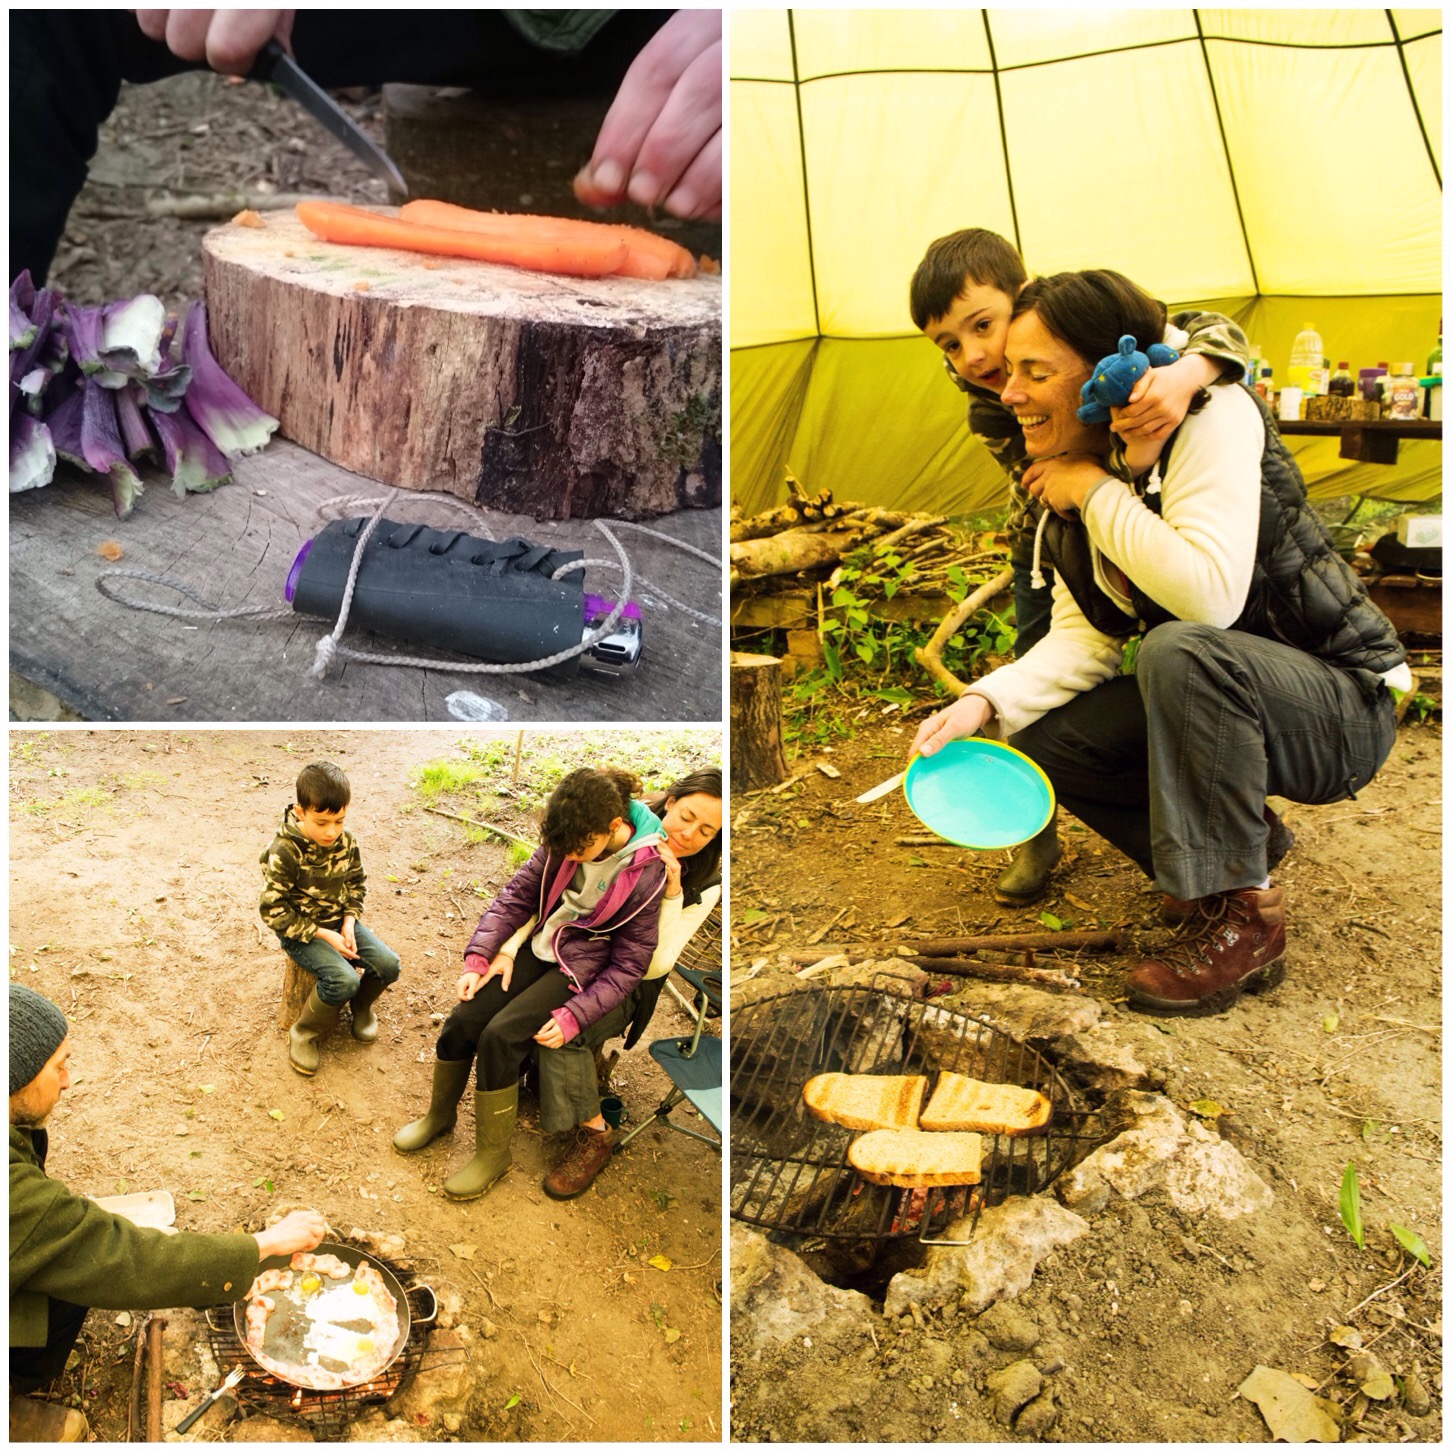
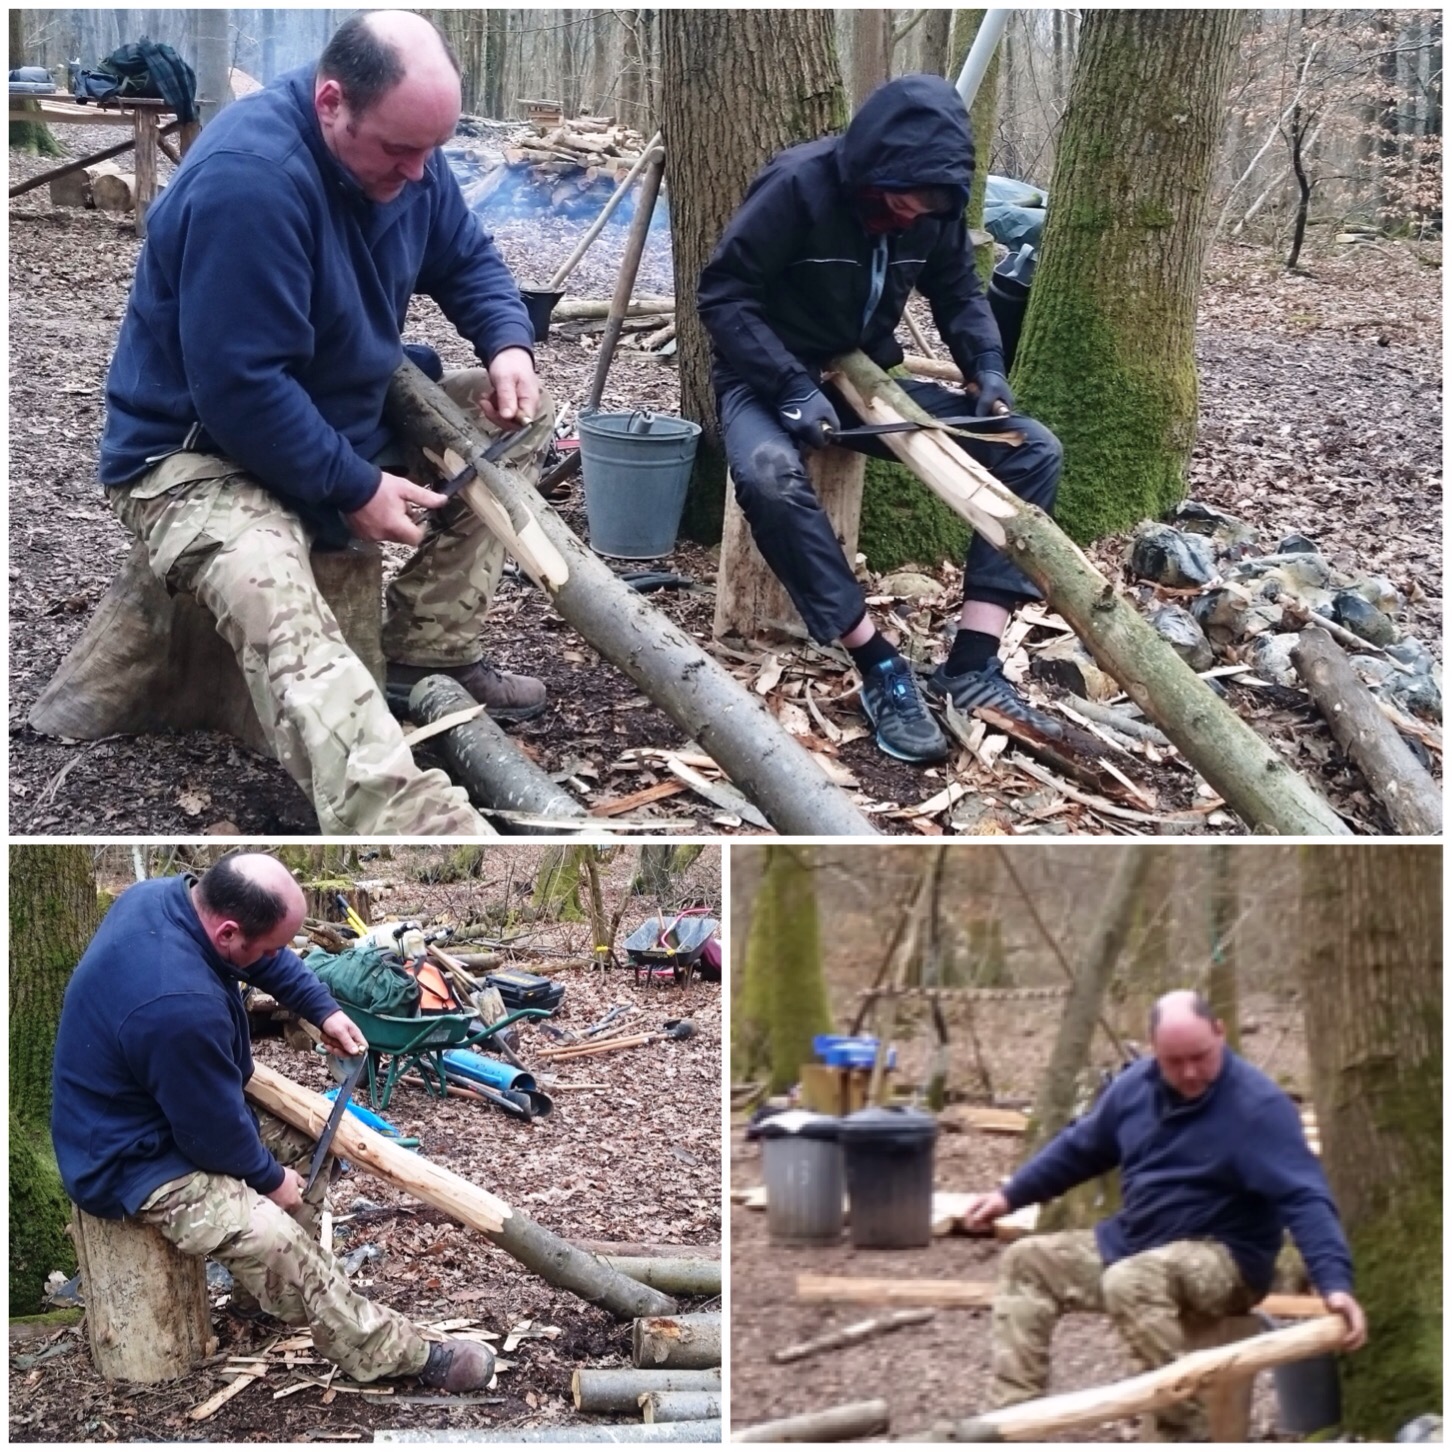
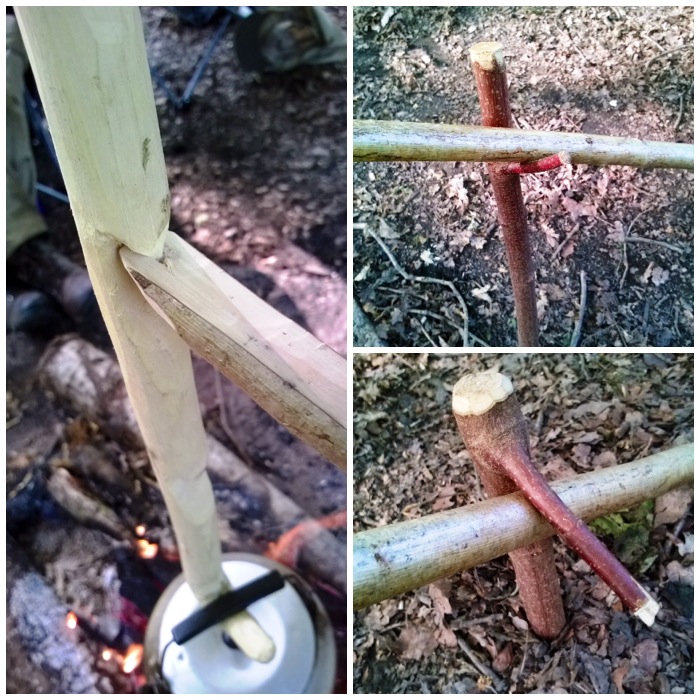
While the lads were busy making their fire Dave was busily building a spit to cook a joint of beef on. He stripped a green hazel sapling and put a split through the the middle of it with one end squared off. Then he carved a couple of flat skewers to go through the beef and the split. This method keeps the joint fixed to the hazel rod as it is turned over the fire.
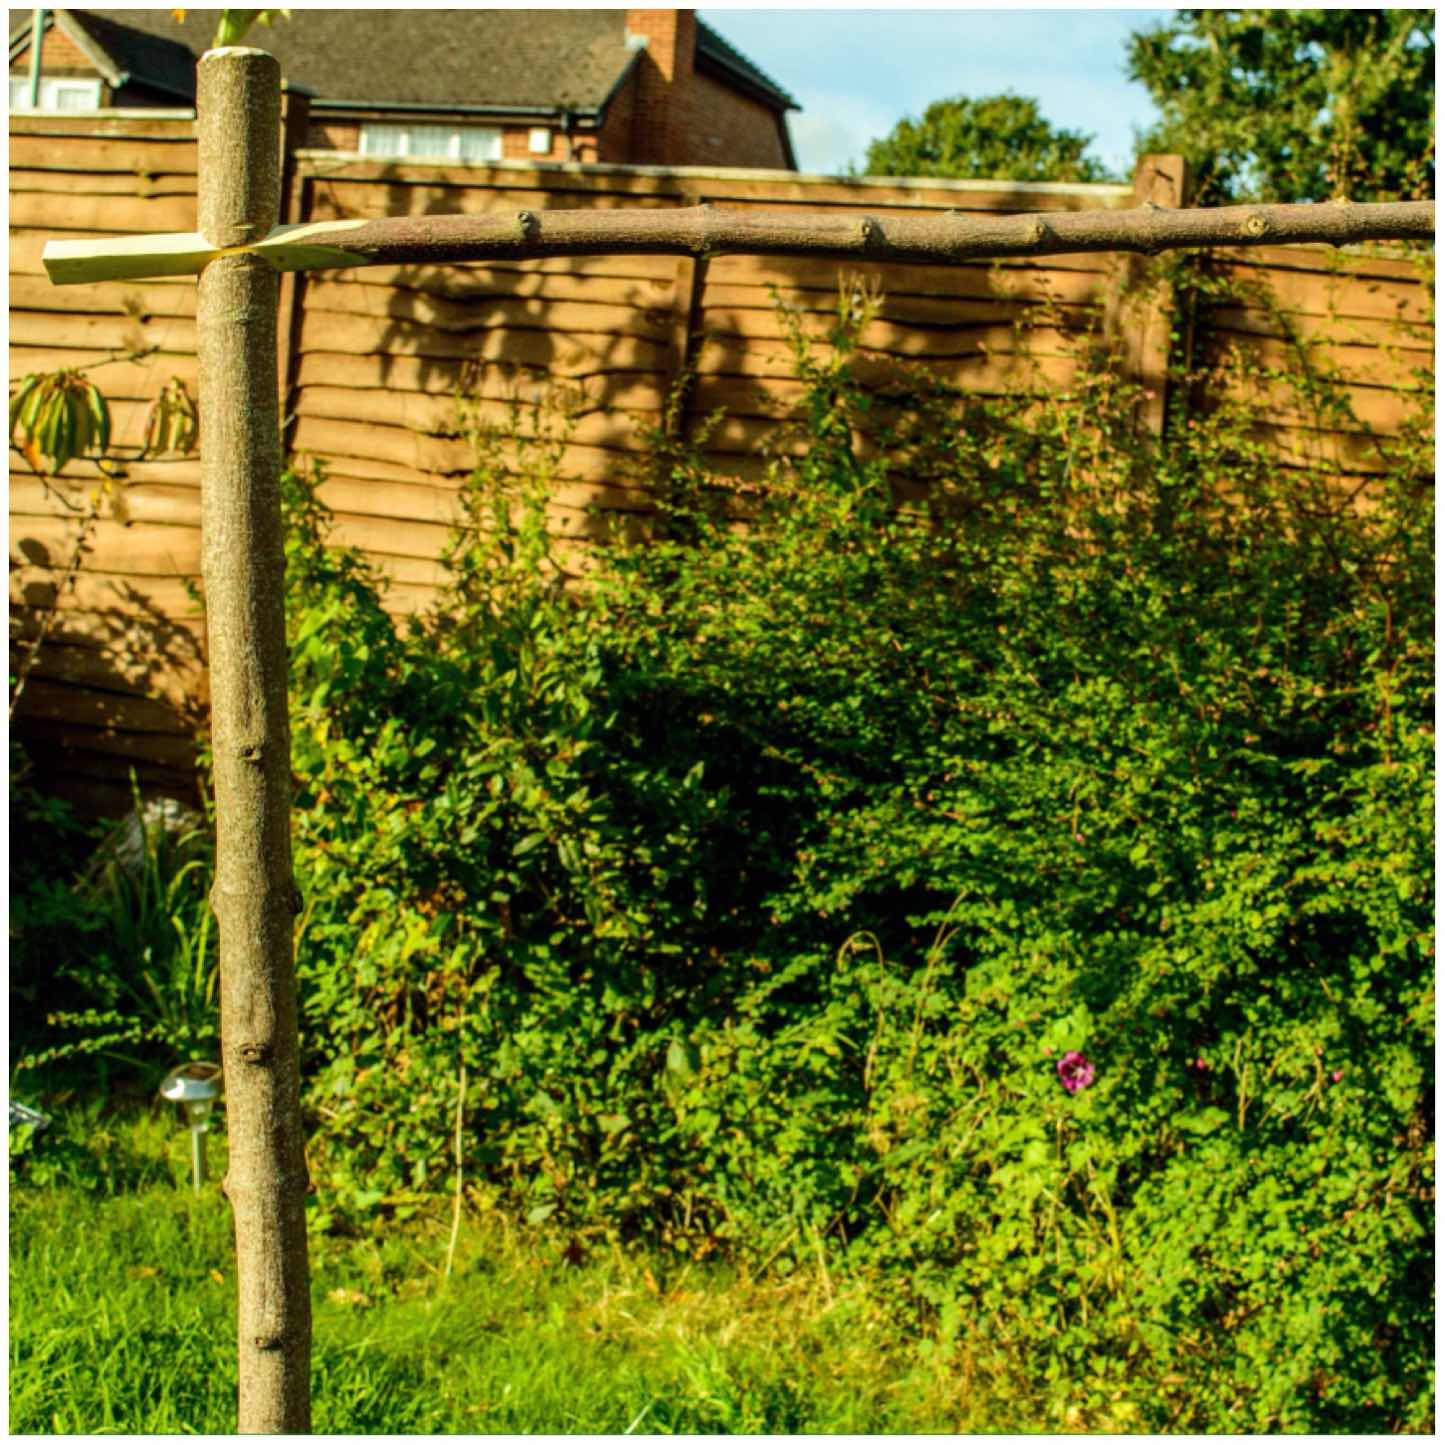
Once that was done he made two uprights to sit the hazel rod in over the fire. One of the uprights had a square notch carved into it for the squared end of the hazel rod to rest in. This ensured that as we turned the it it always remained fixed in the position we had set it.
Spit making
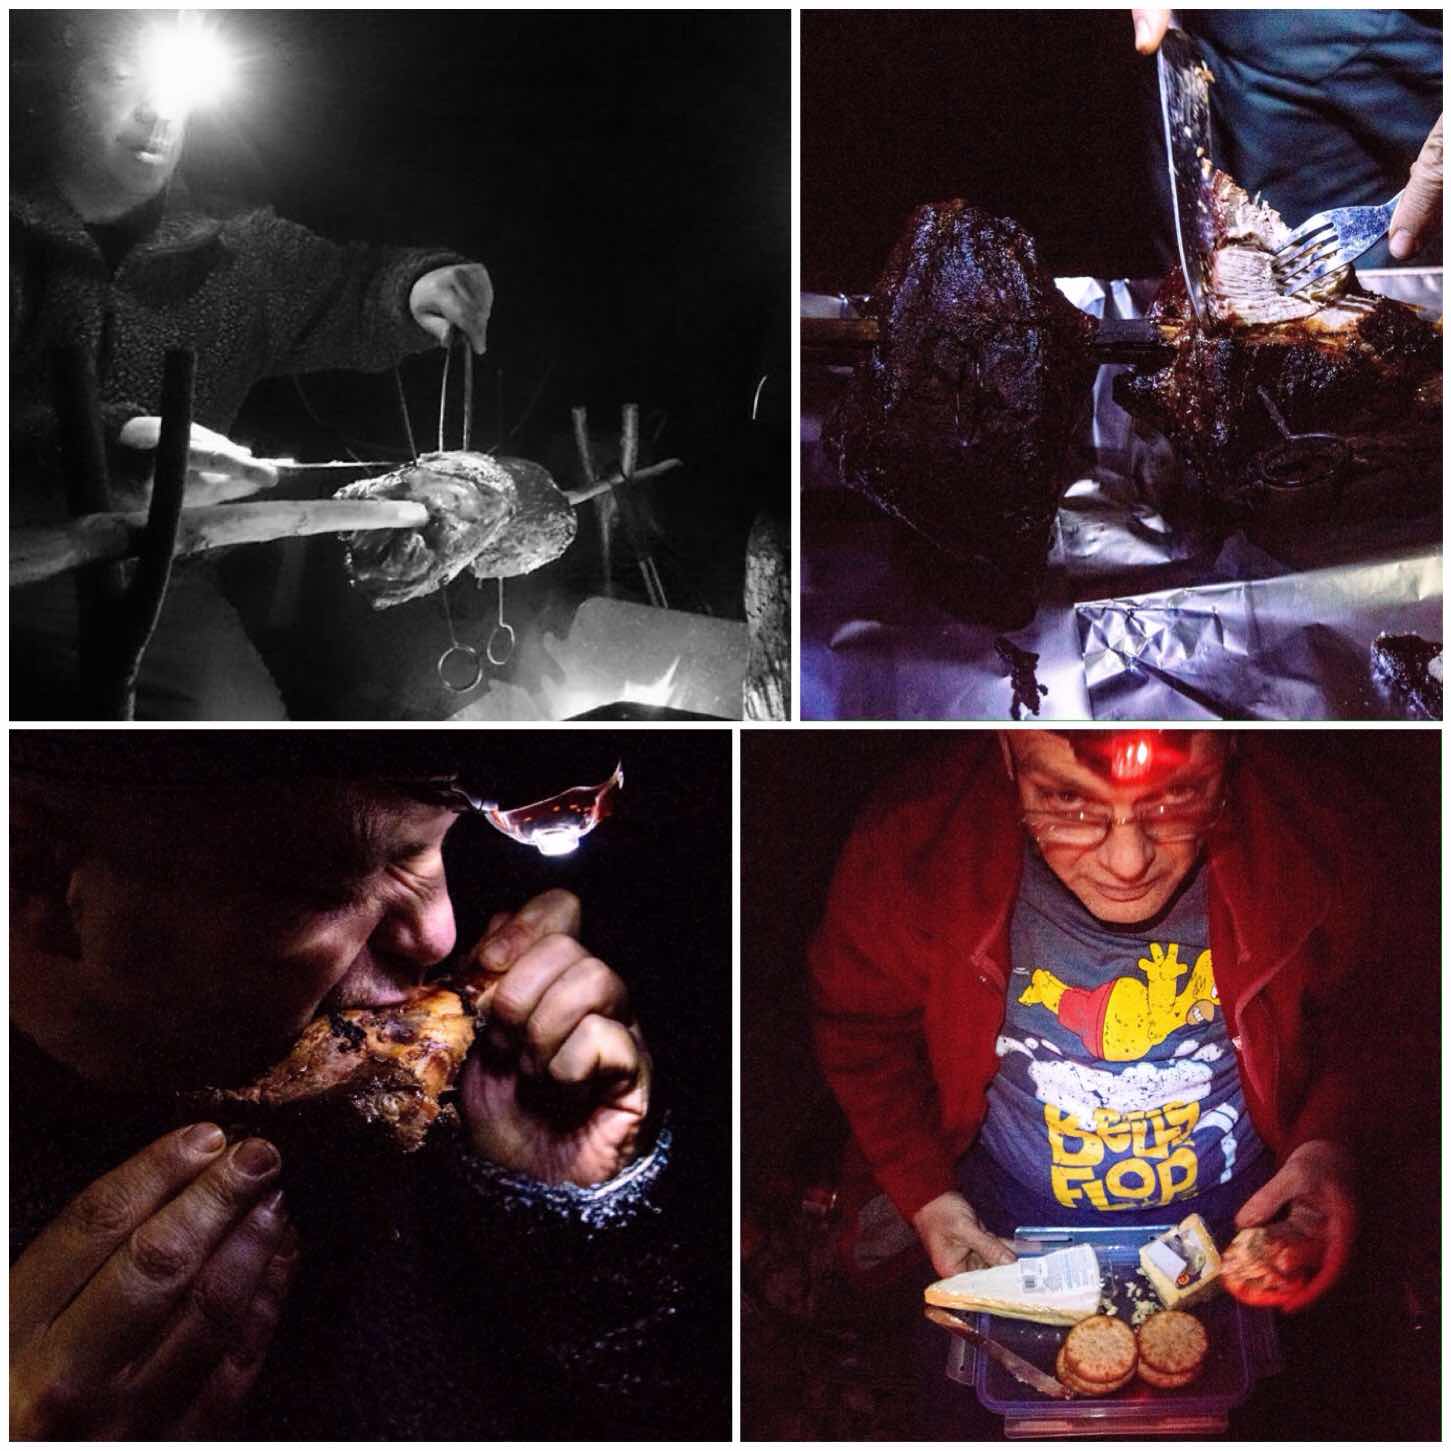
Dave’s father Alan is an excellent chef and he had been busily working away making up a whole range of different veggie kebabs. After a couple of hours turning the spit dinner was ready.
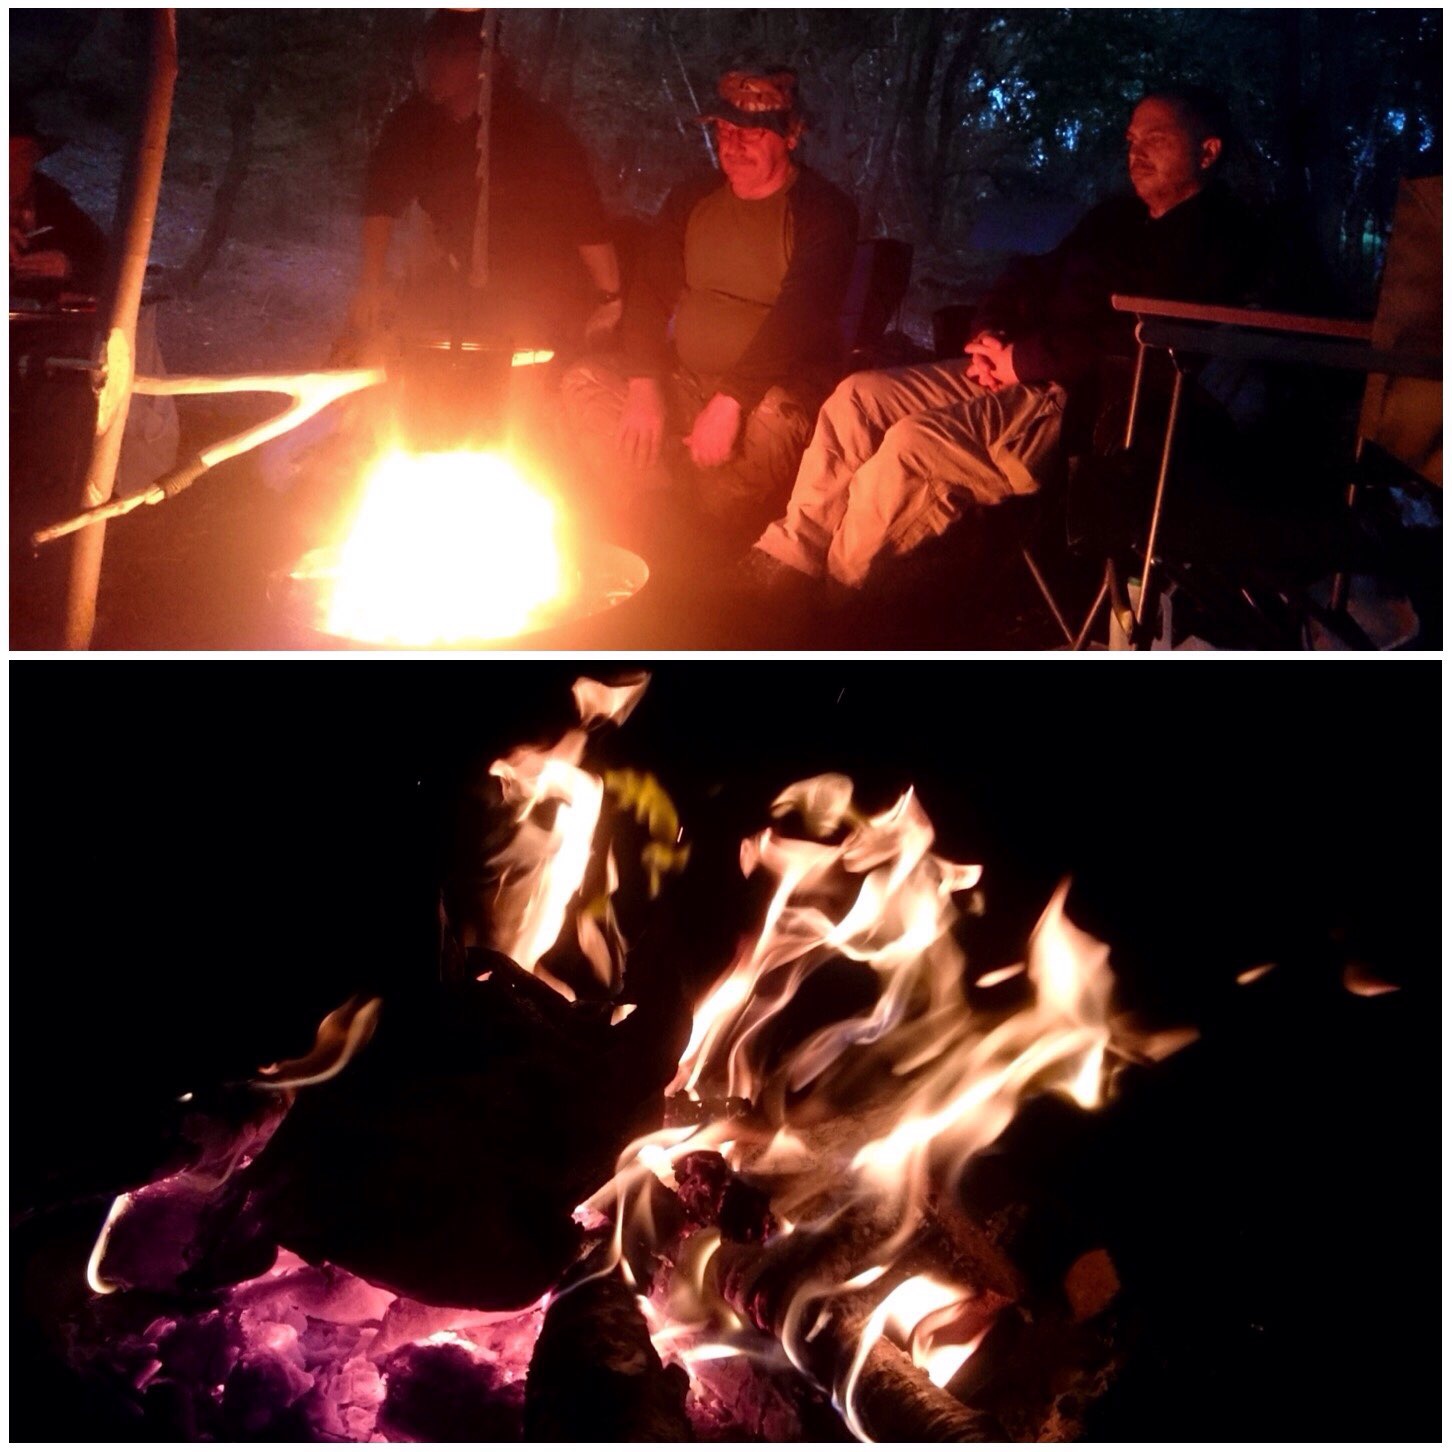
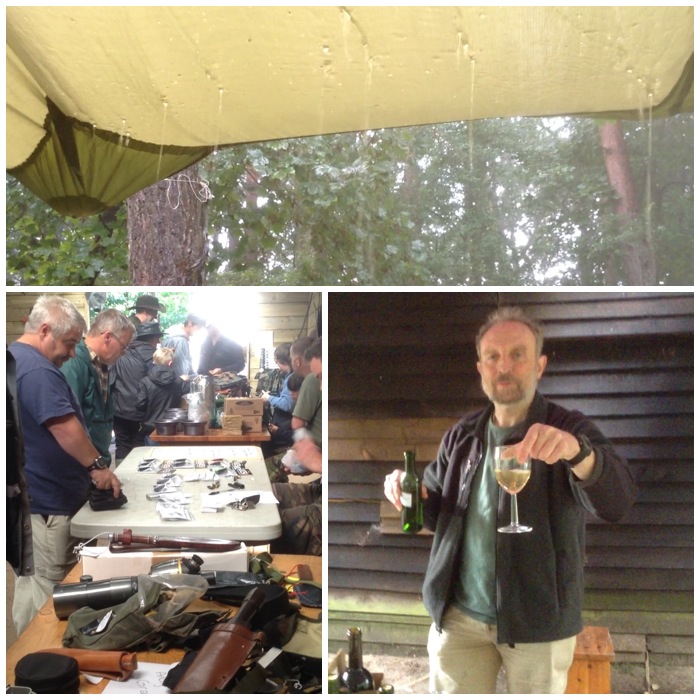
As we try to be civilised 😉 at these events the cheese board was produced by Keith and a relaxing evening was had around the fire.
Dinner time
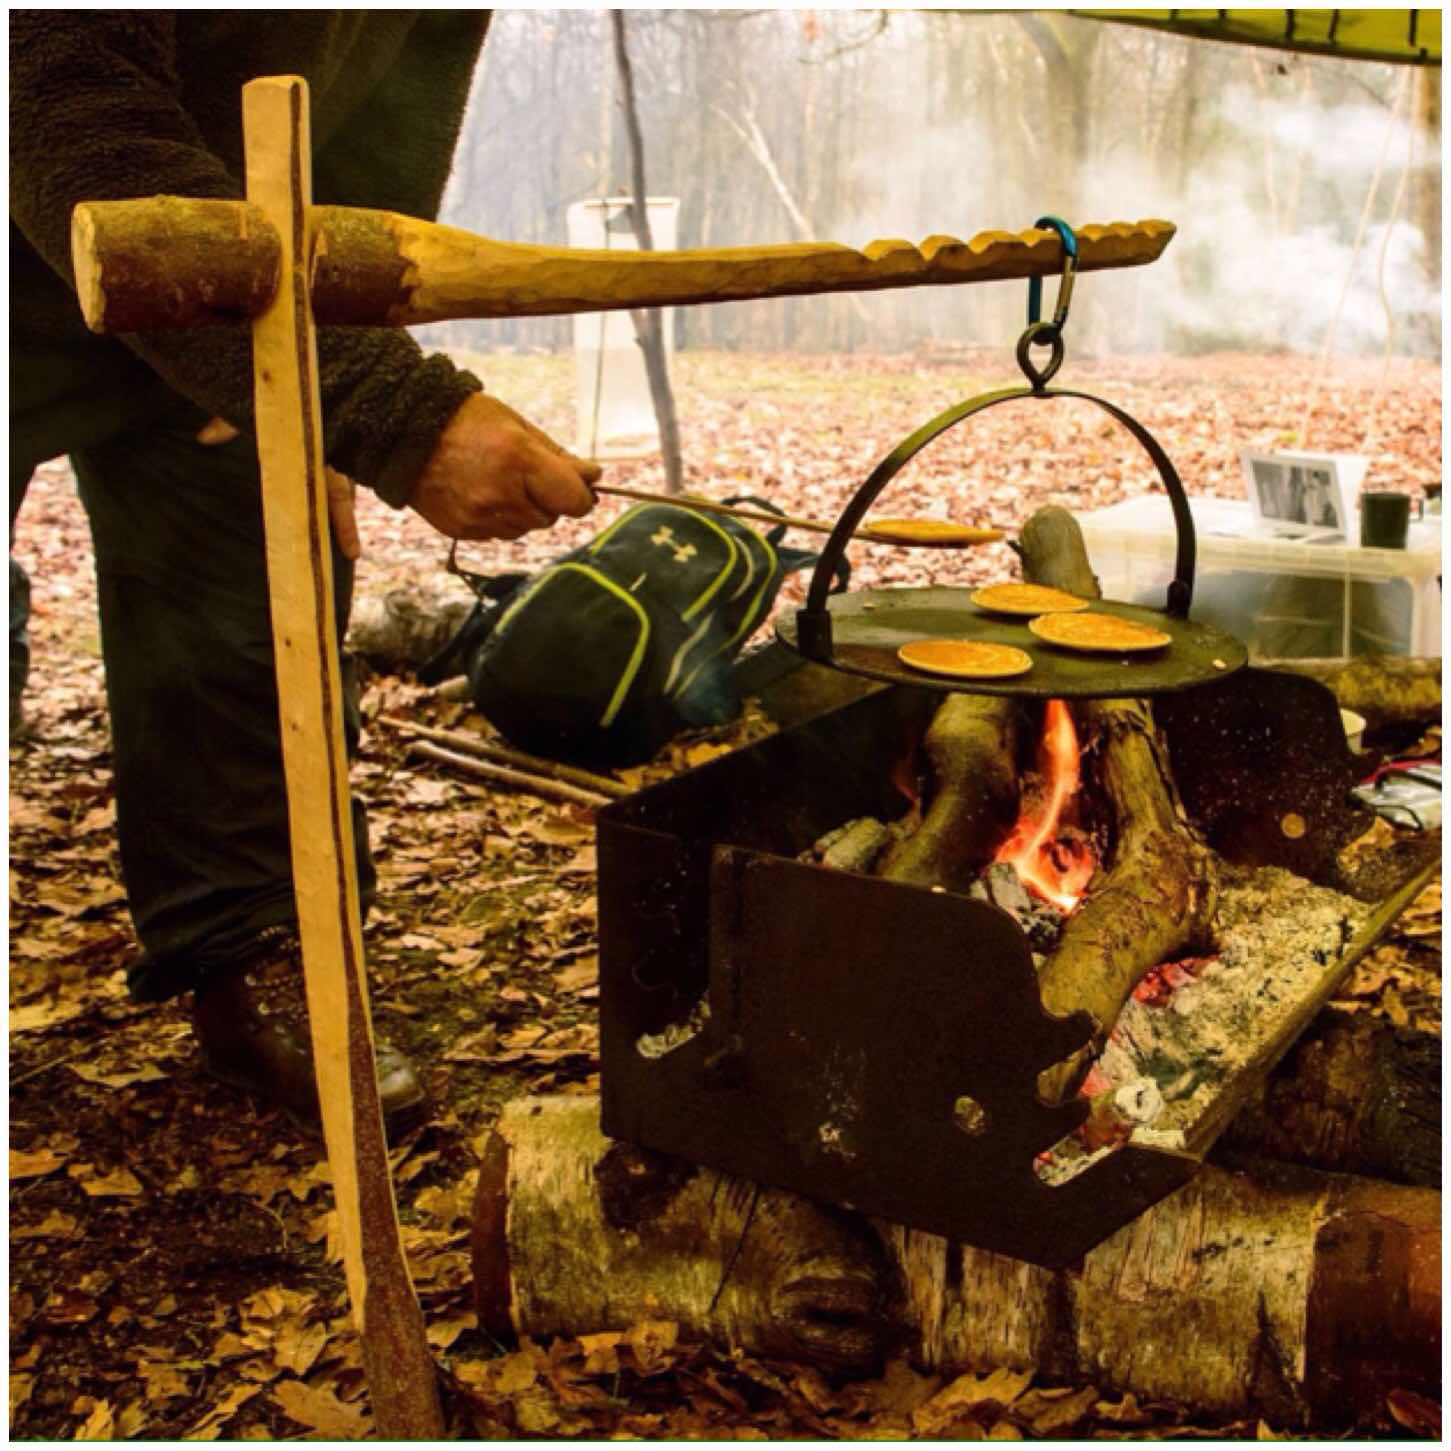
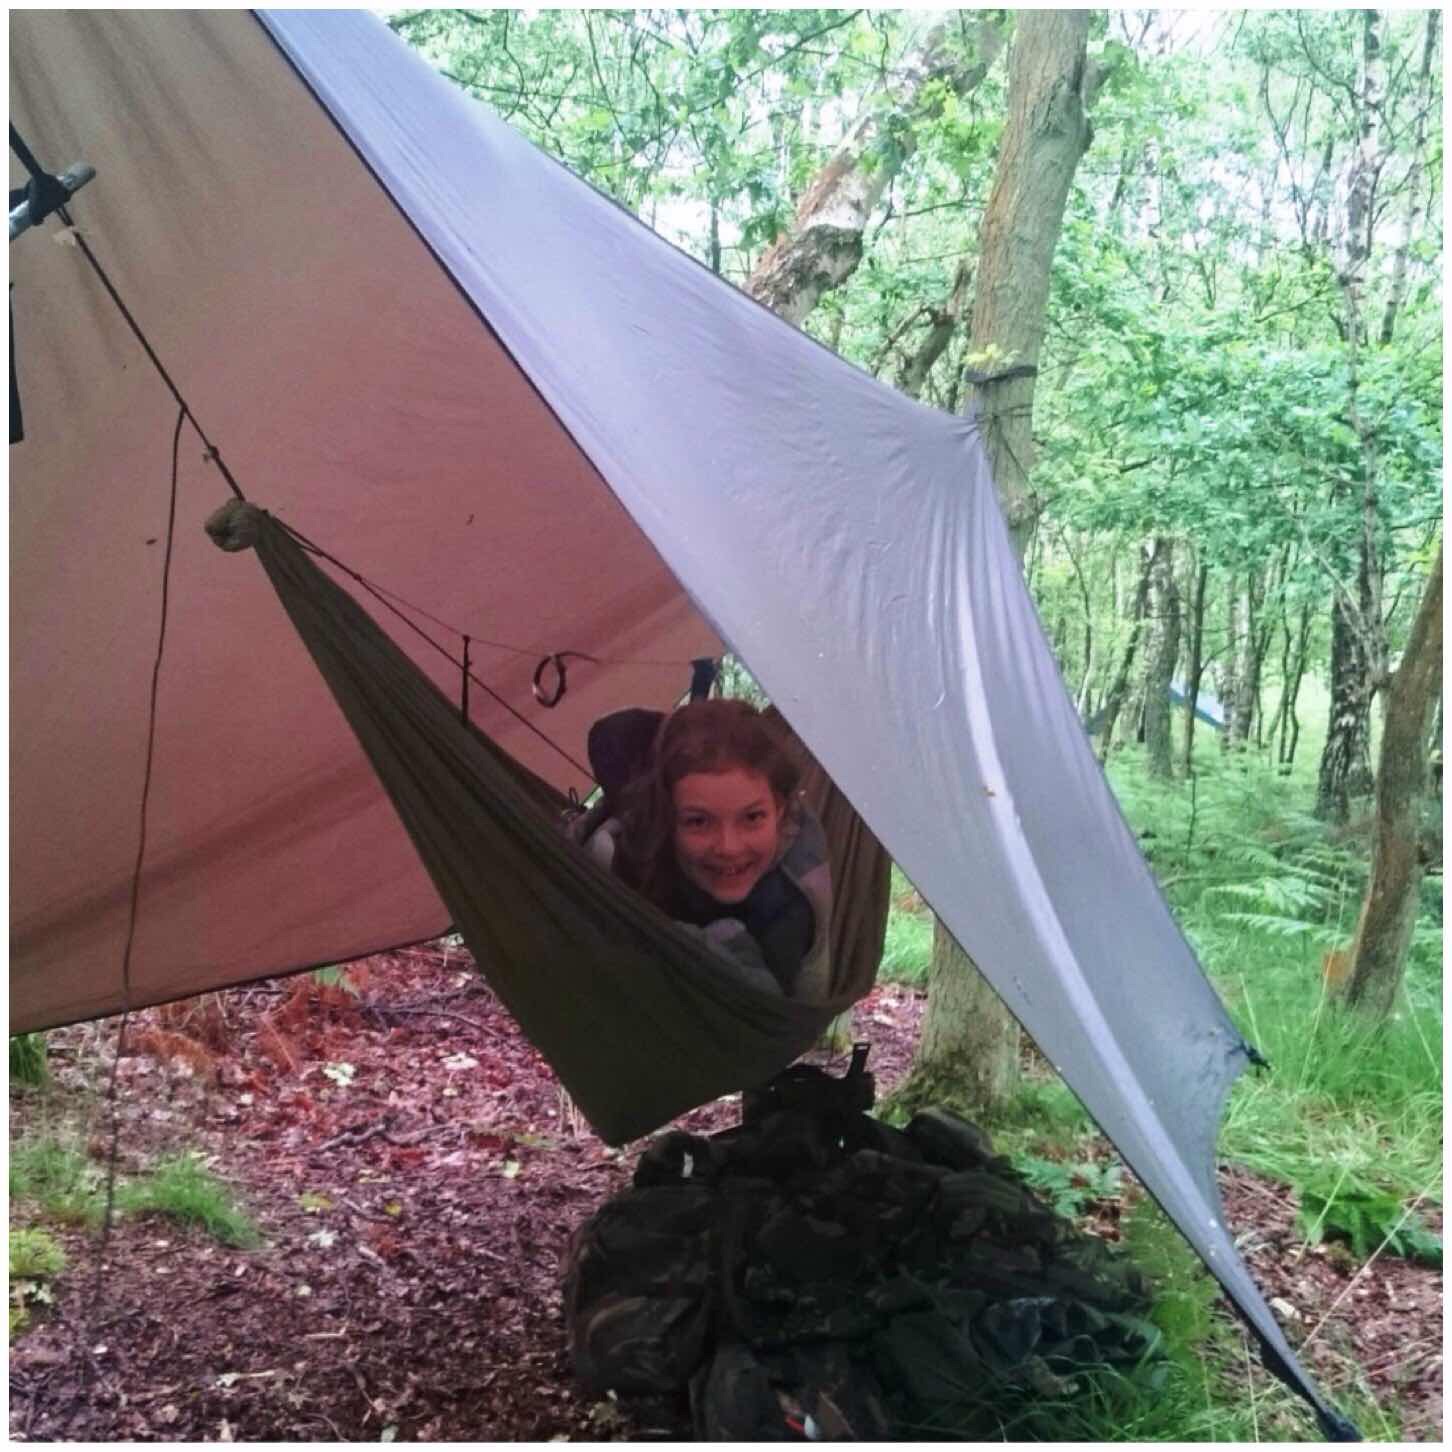
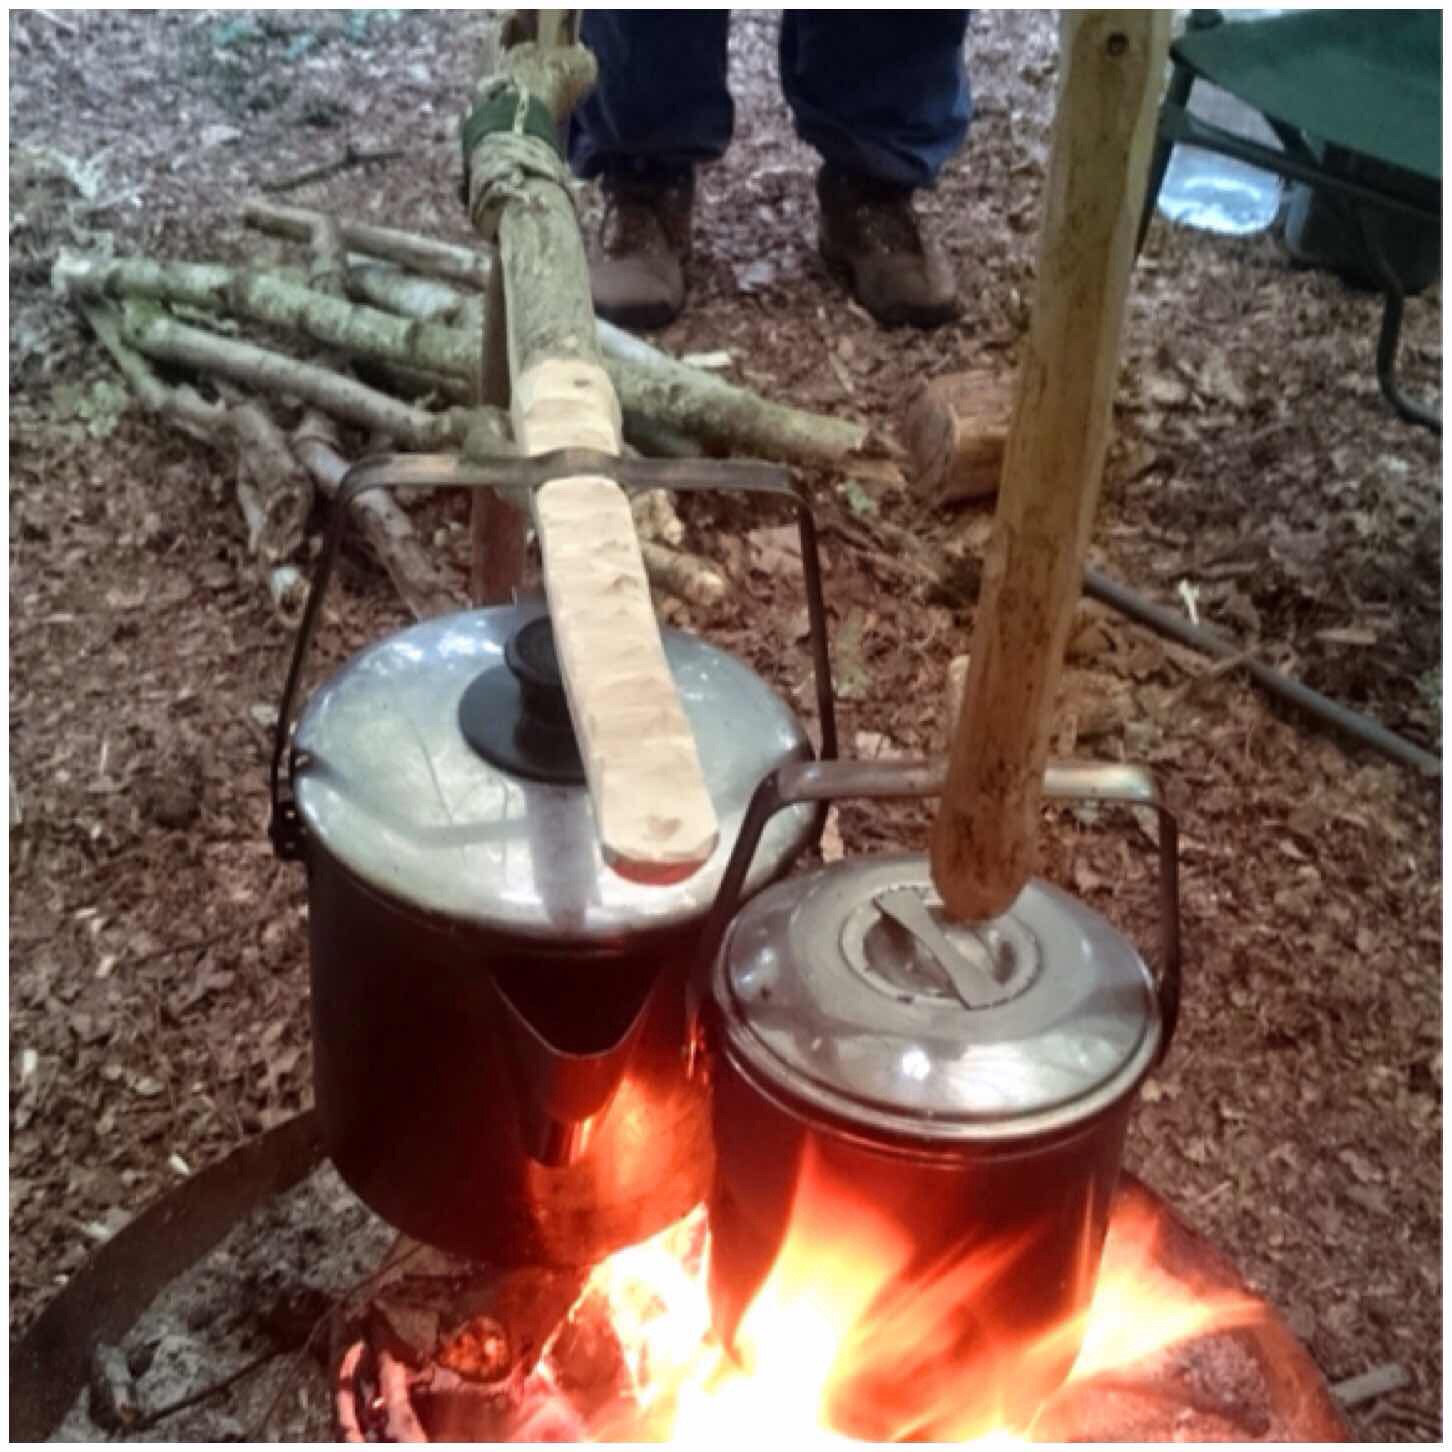
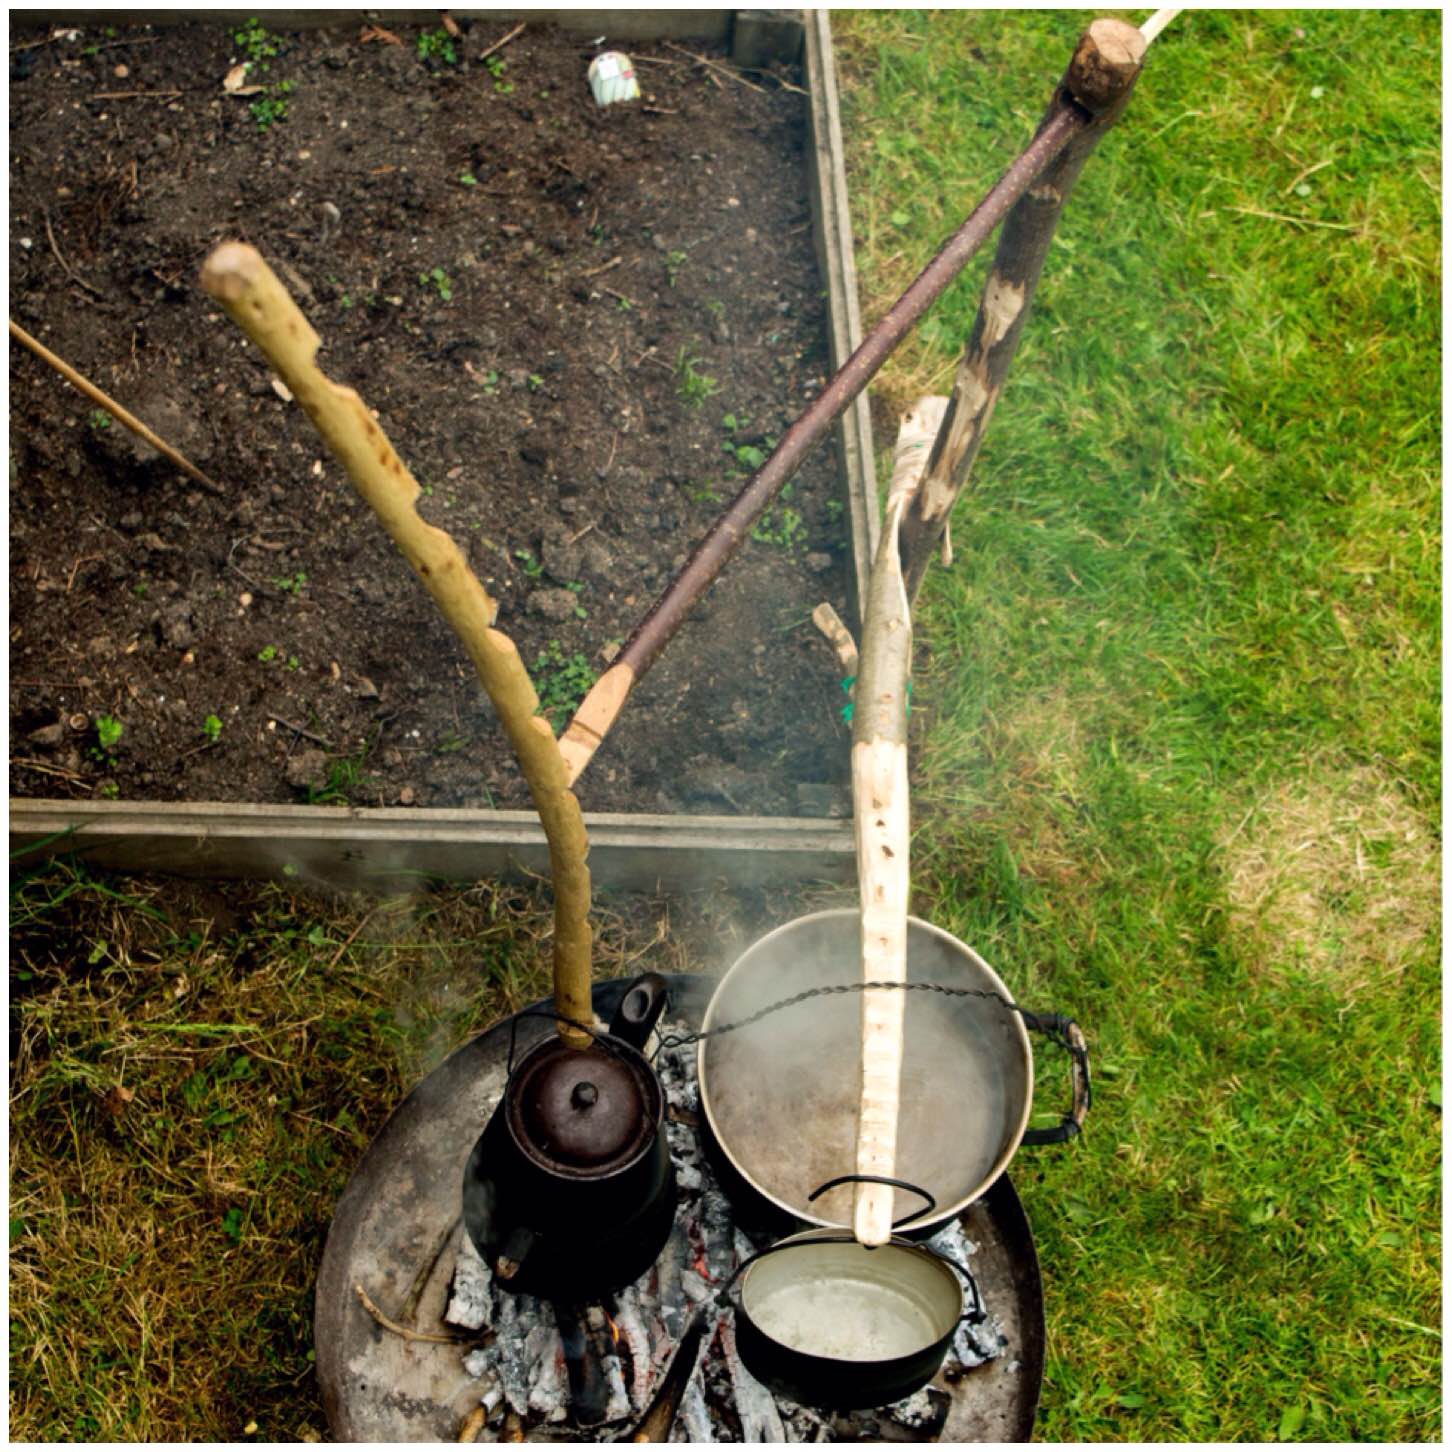
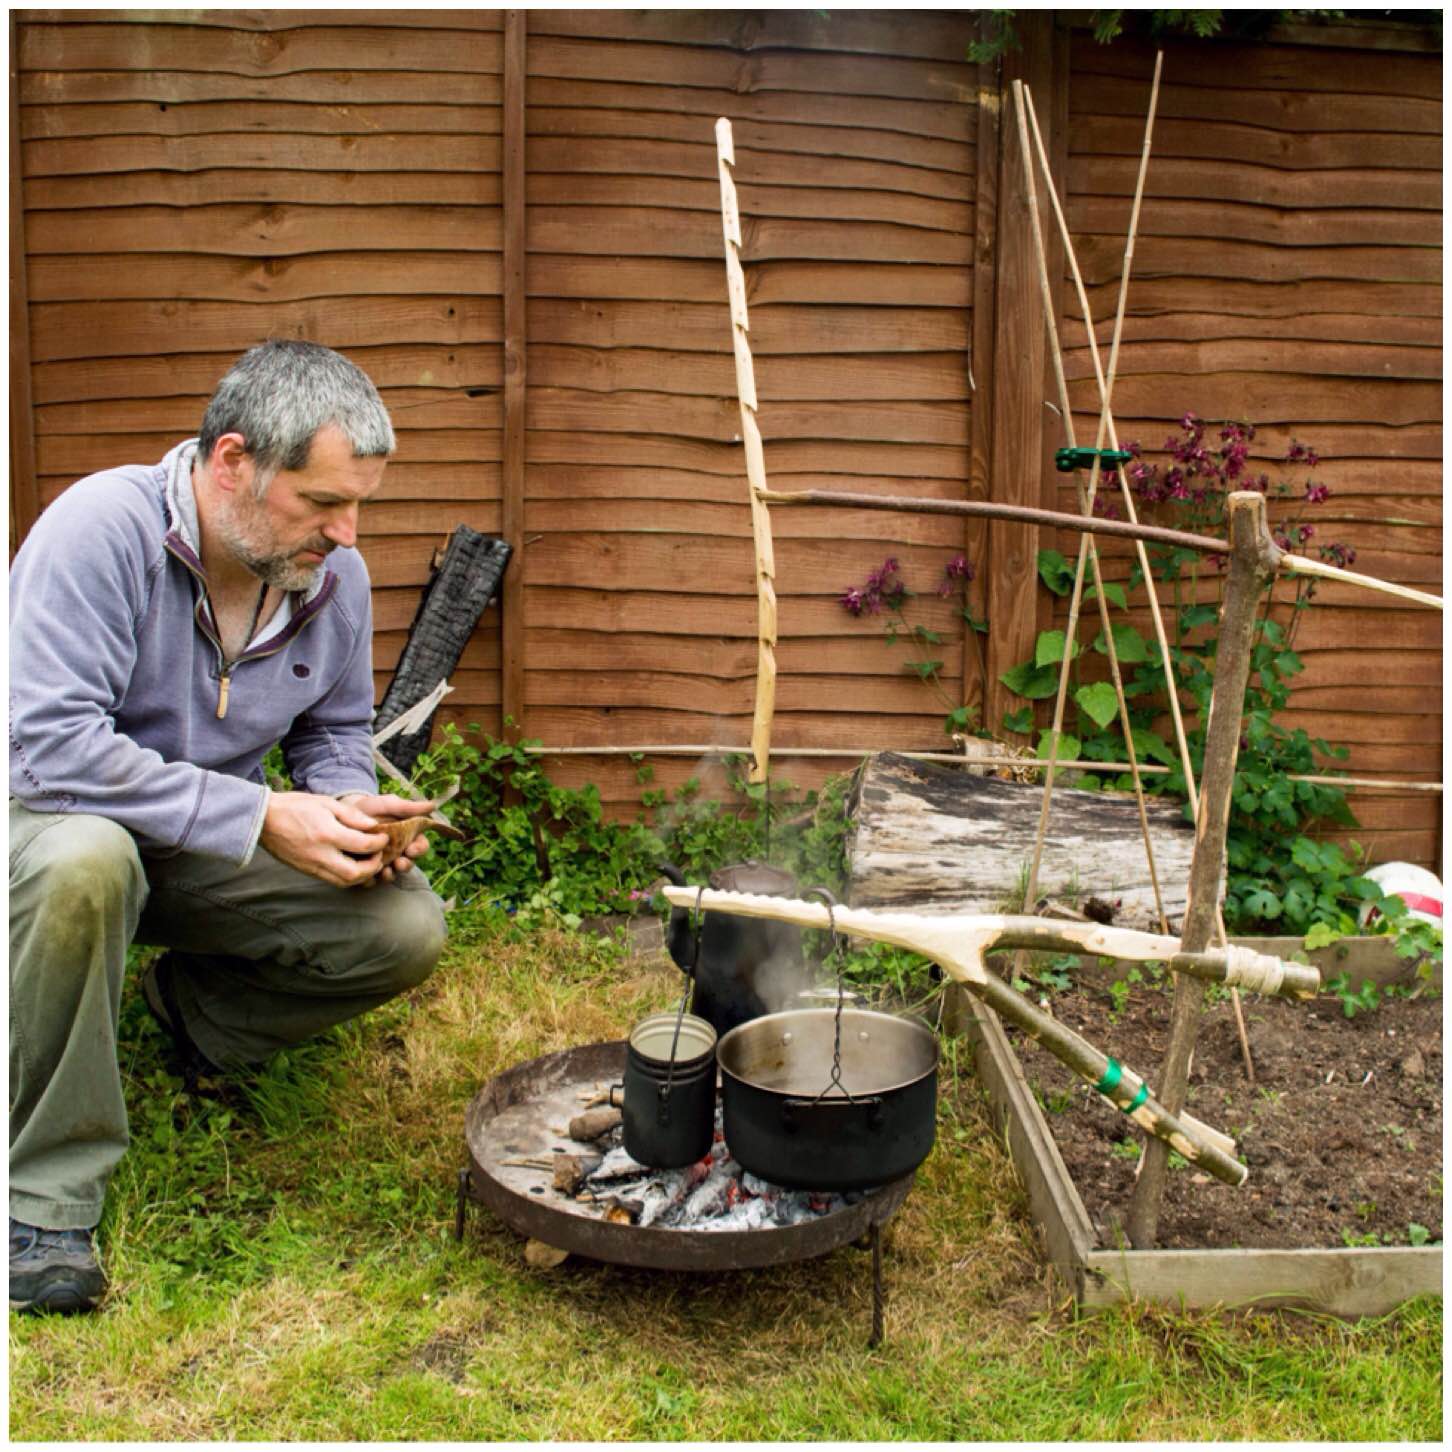
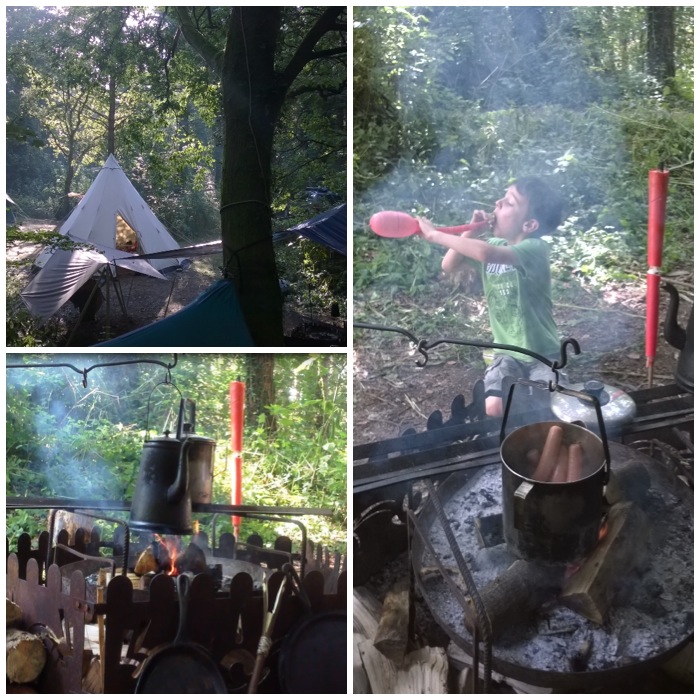
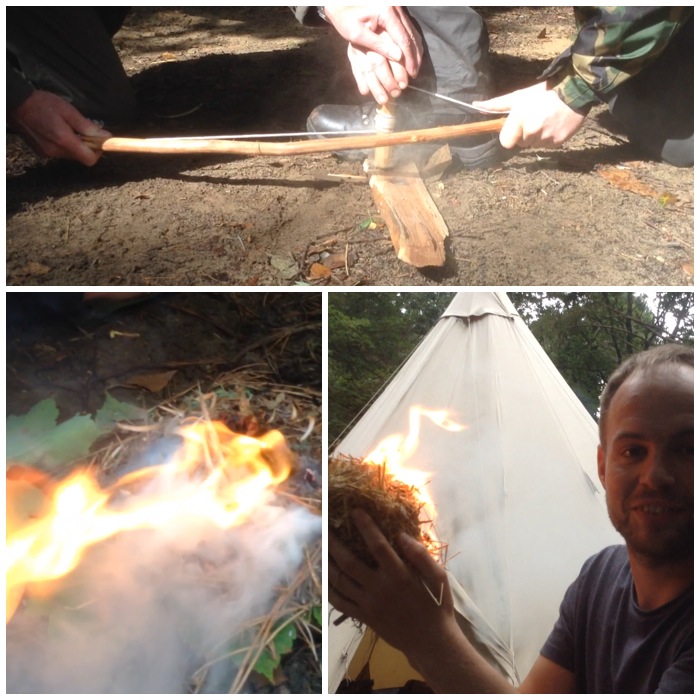
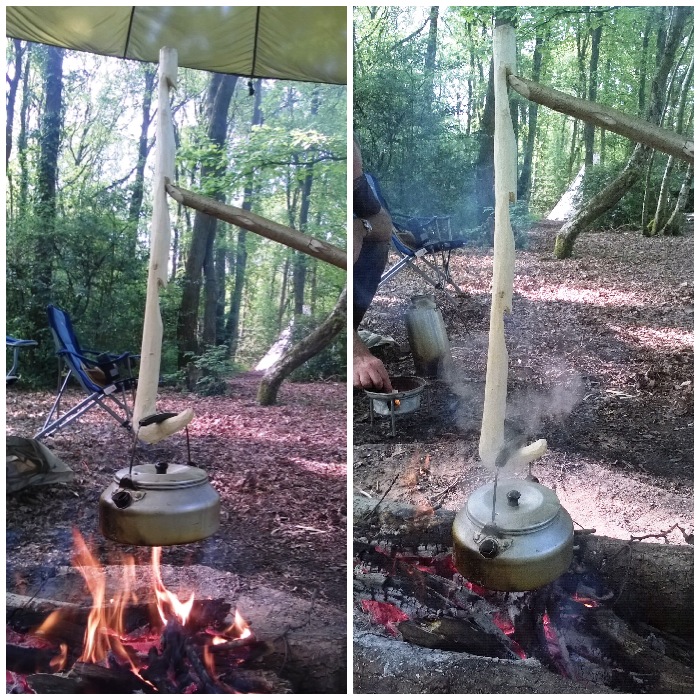
After a very restful sleep in my hammock I was awoke by our chef Alan busily working away around the fire preparing some pancakes for breakfast.
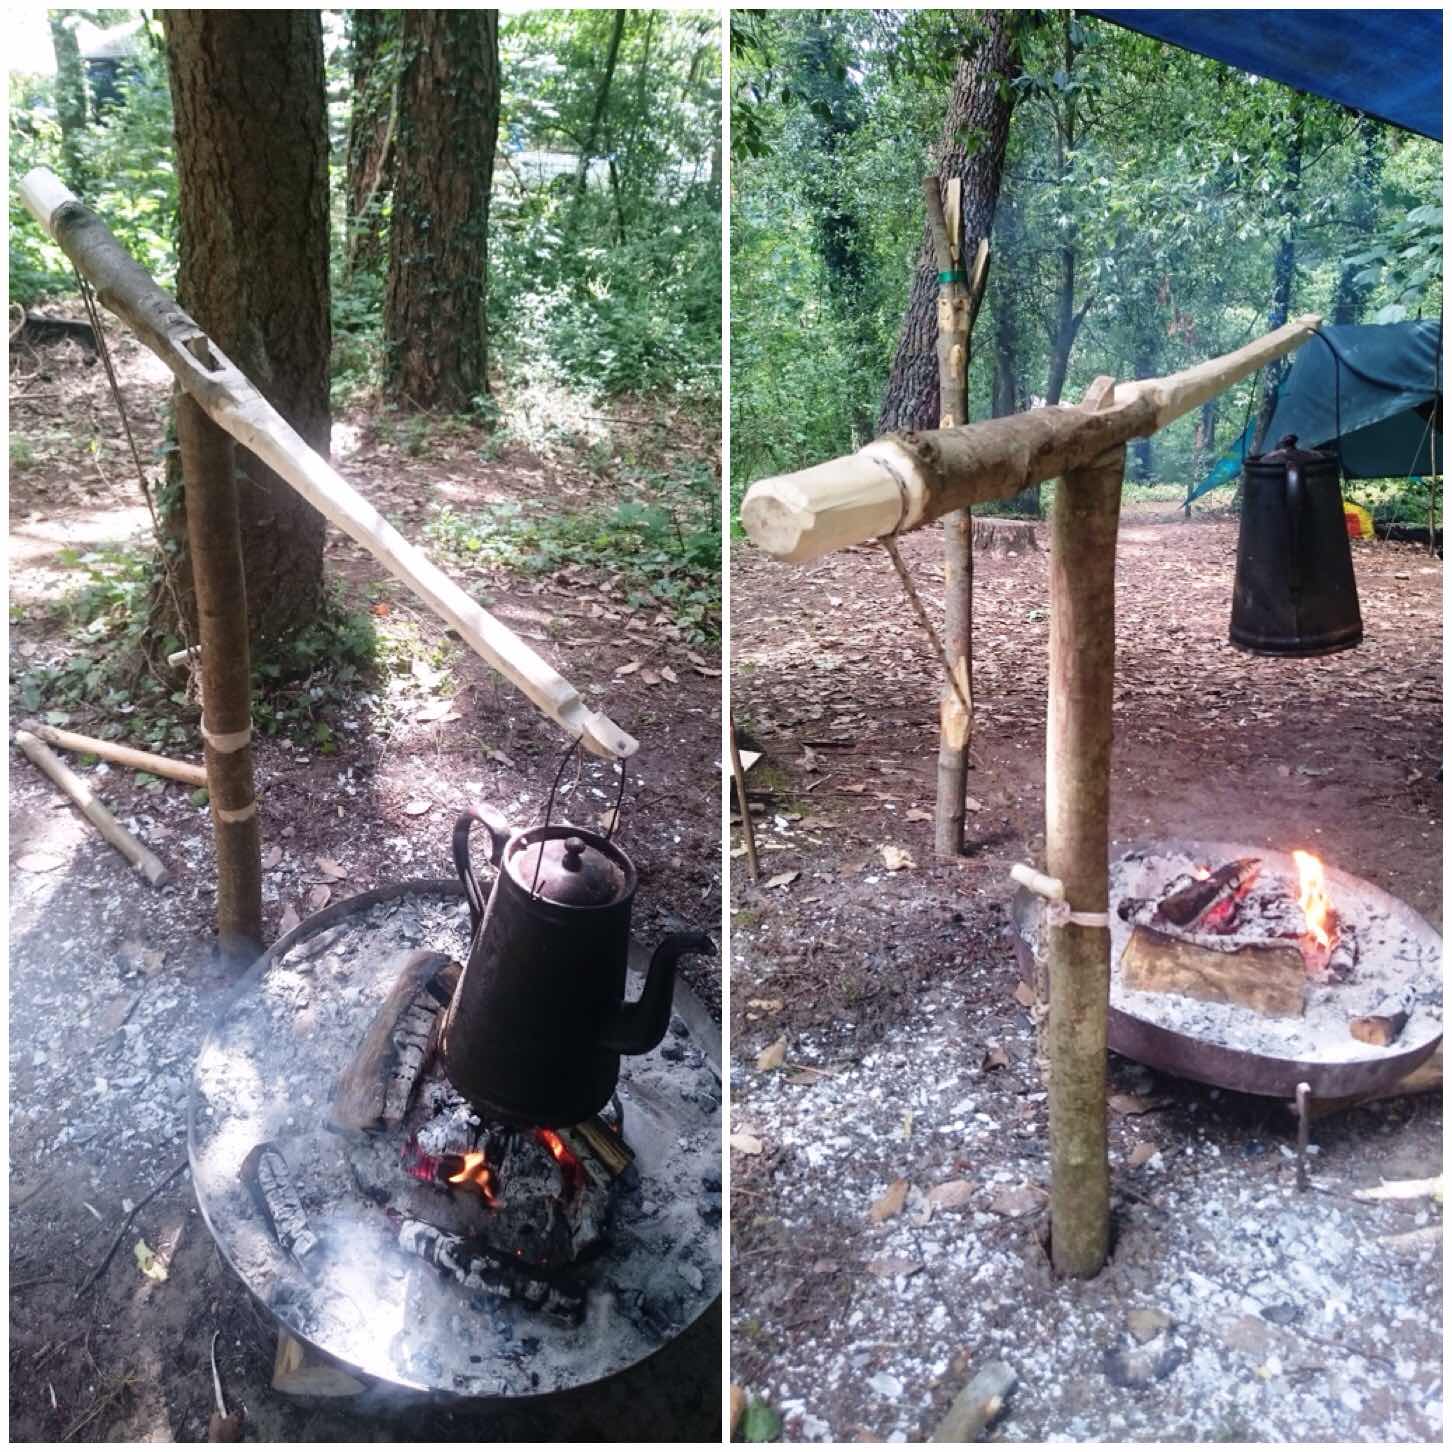
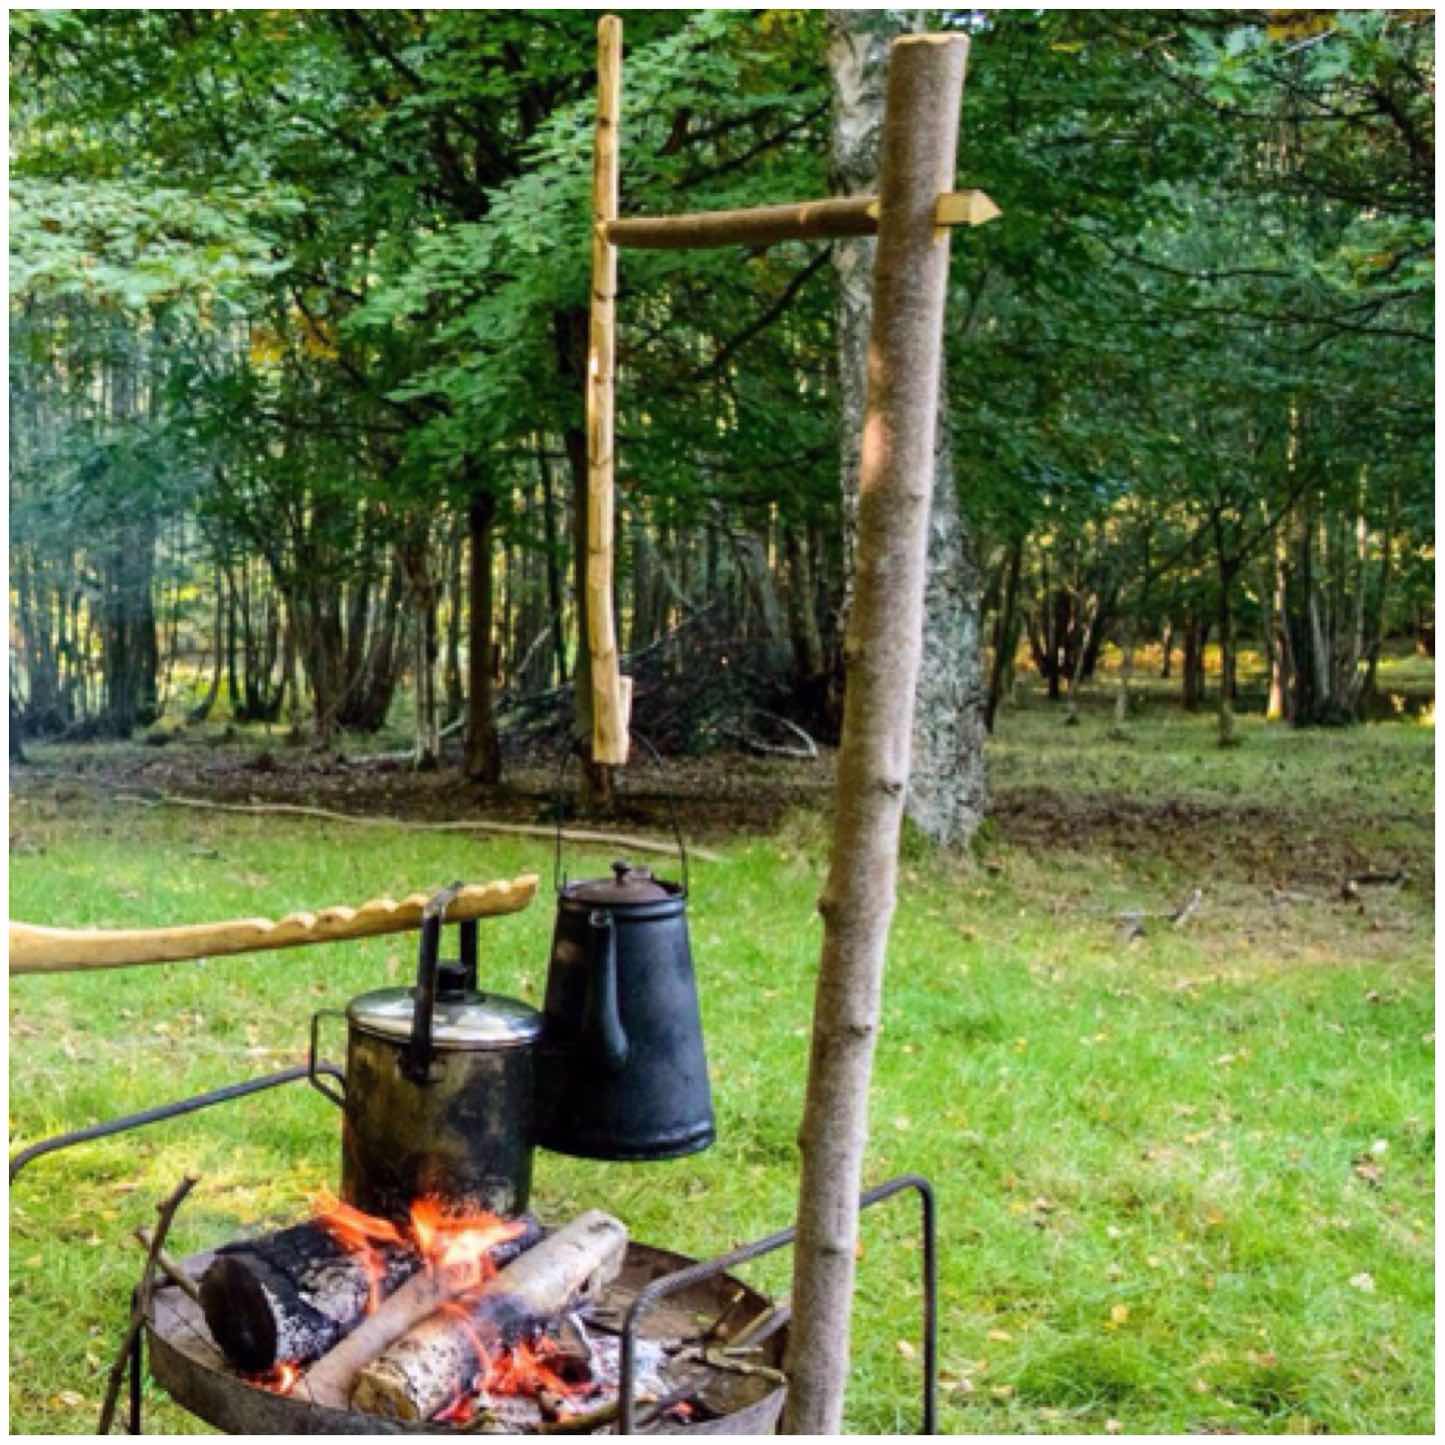
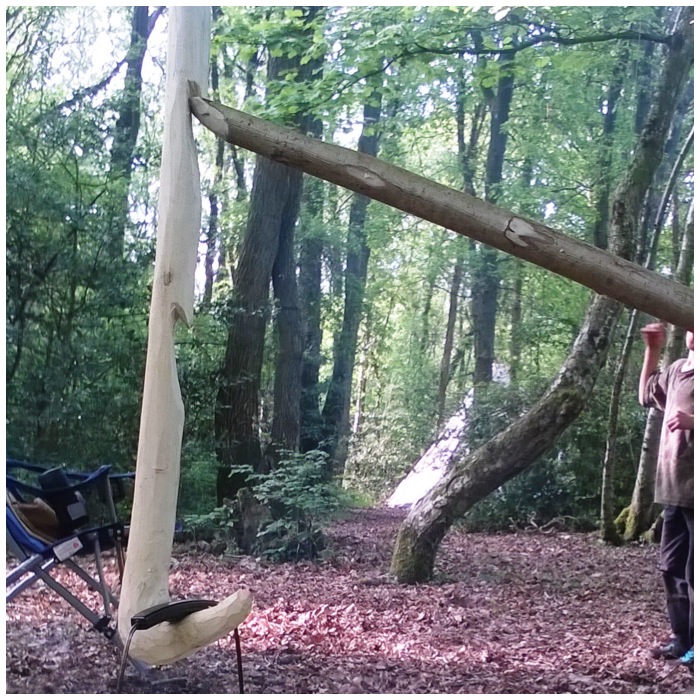
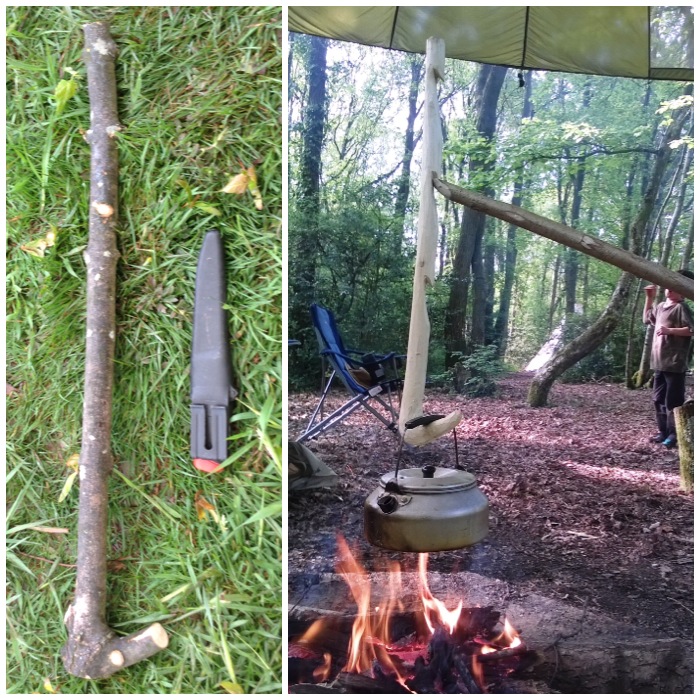
Alan was using my griddle for this job (if you do not own one I would highly recommend that you invest in one) and it was hanging off my Dovetail Crane. This crane is made out of one piece of wood, is easy to make and offers you a wide range of cooking heights.
Pancakes using the Dovetail Crane
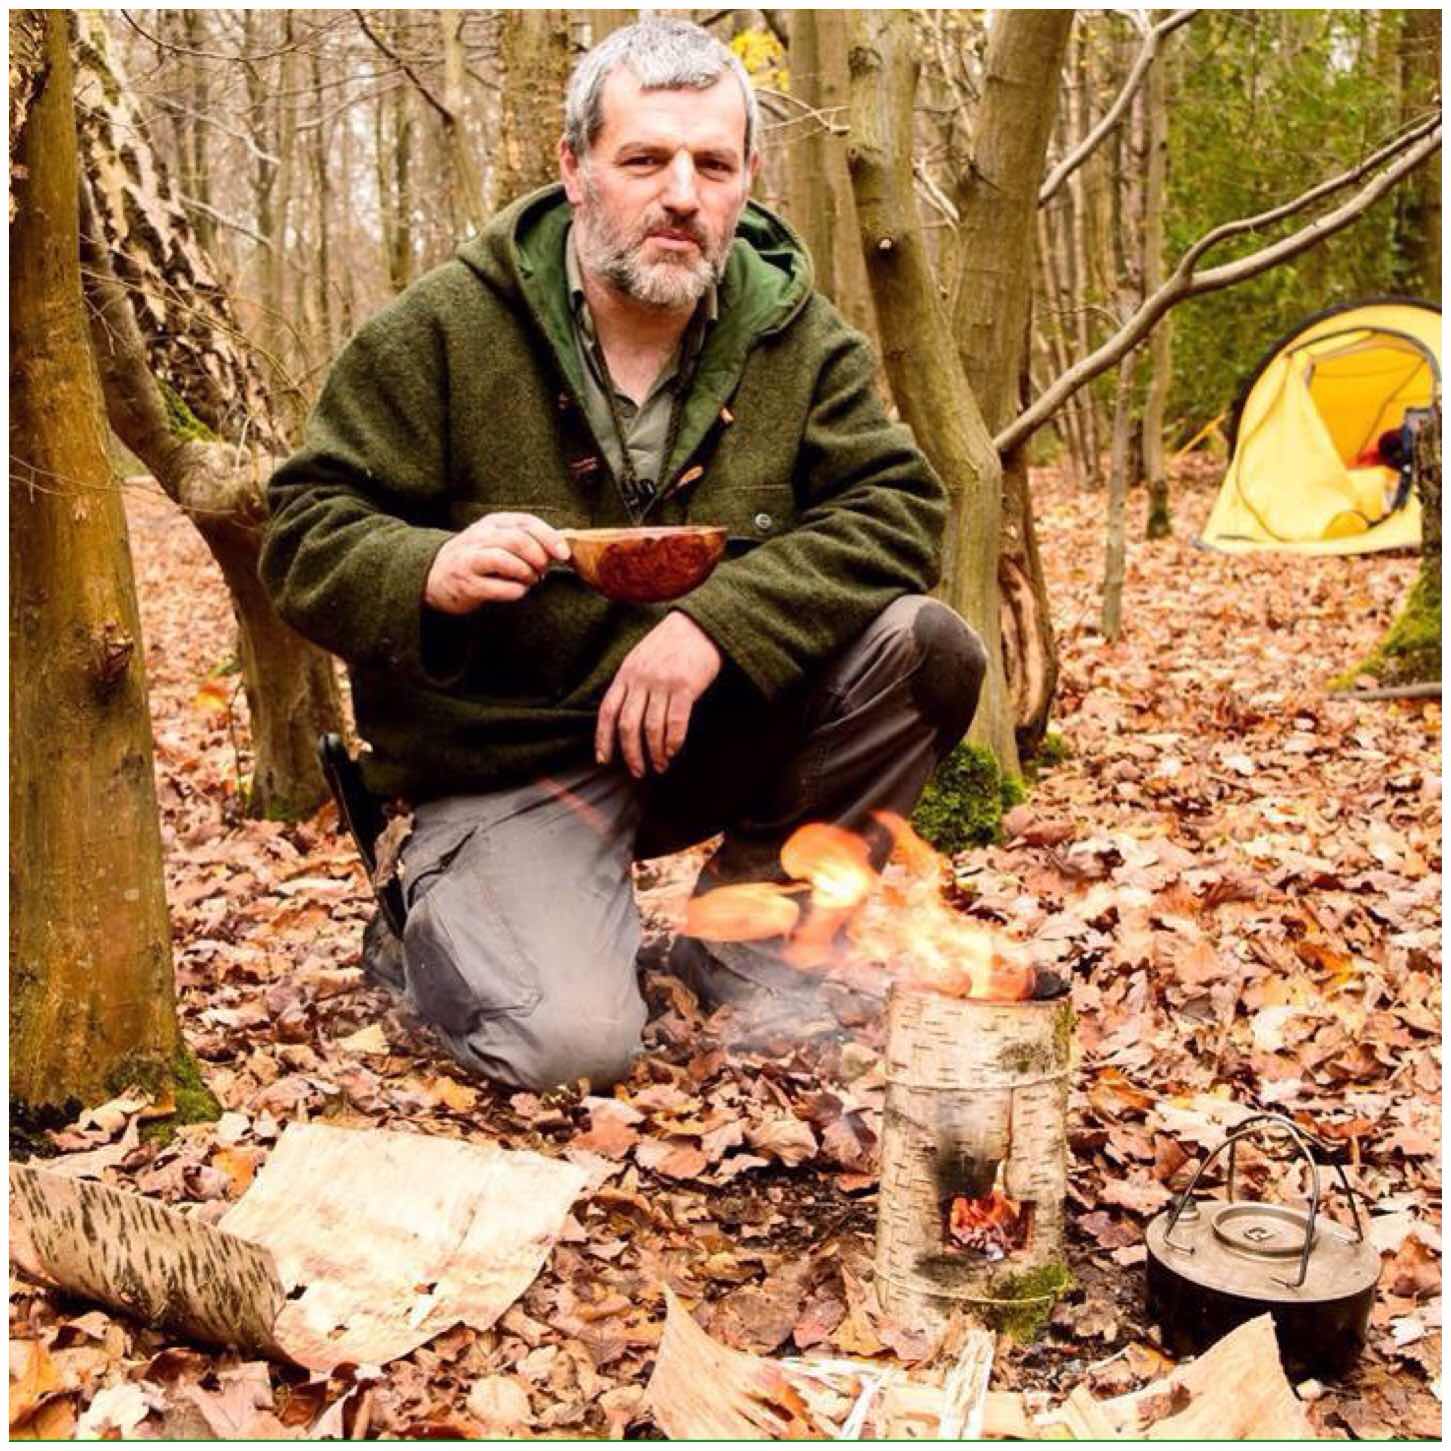
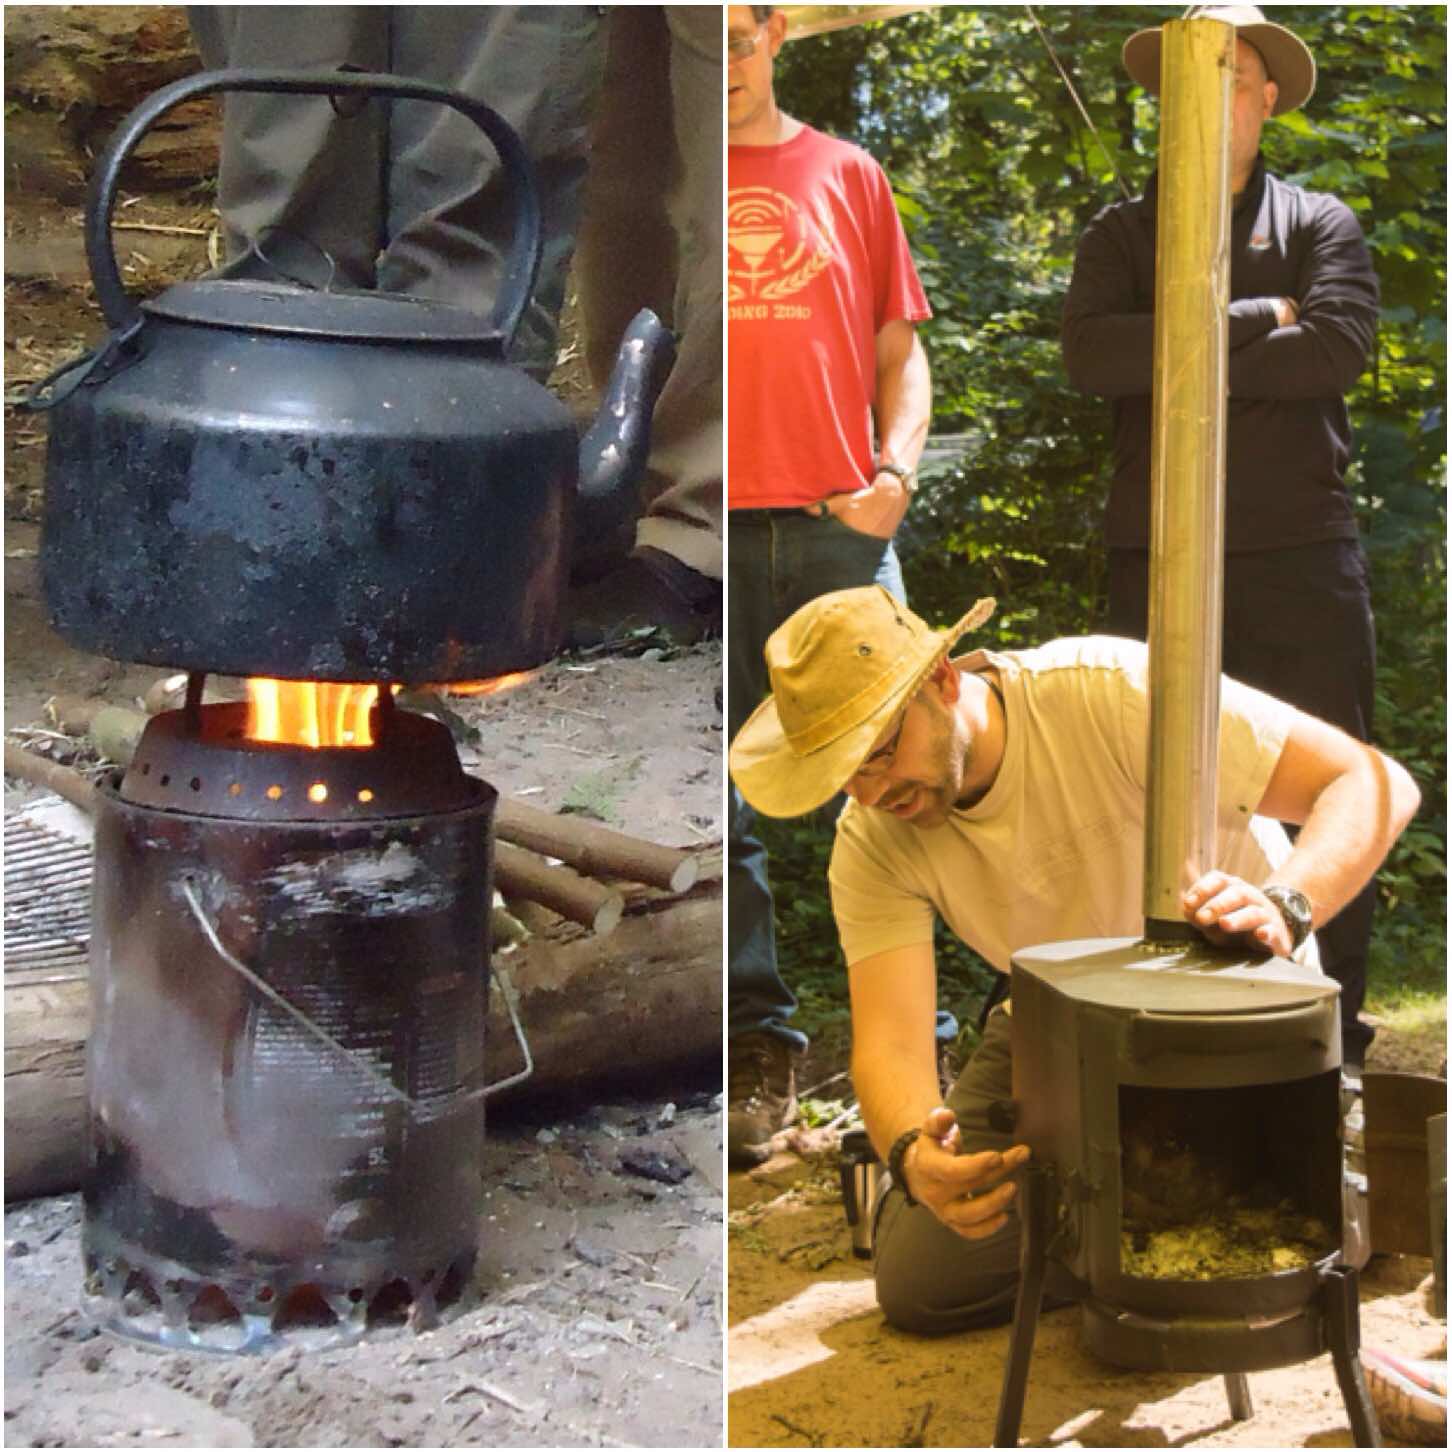
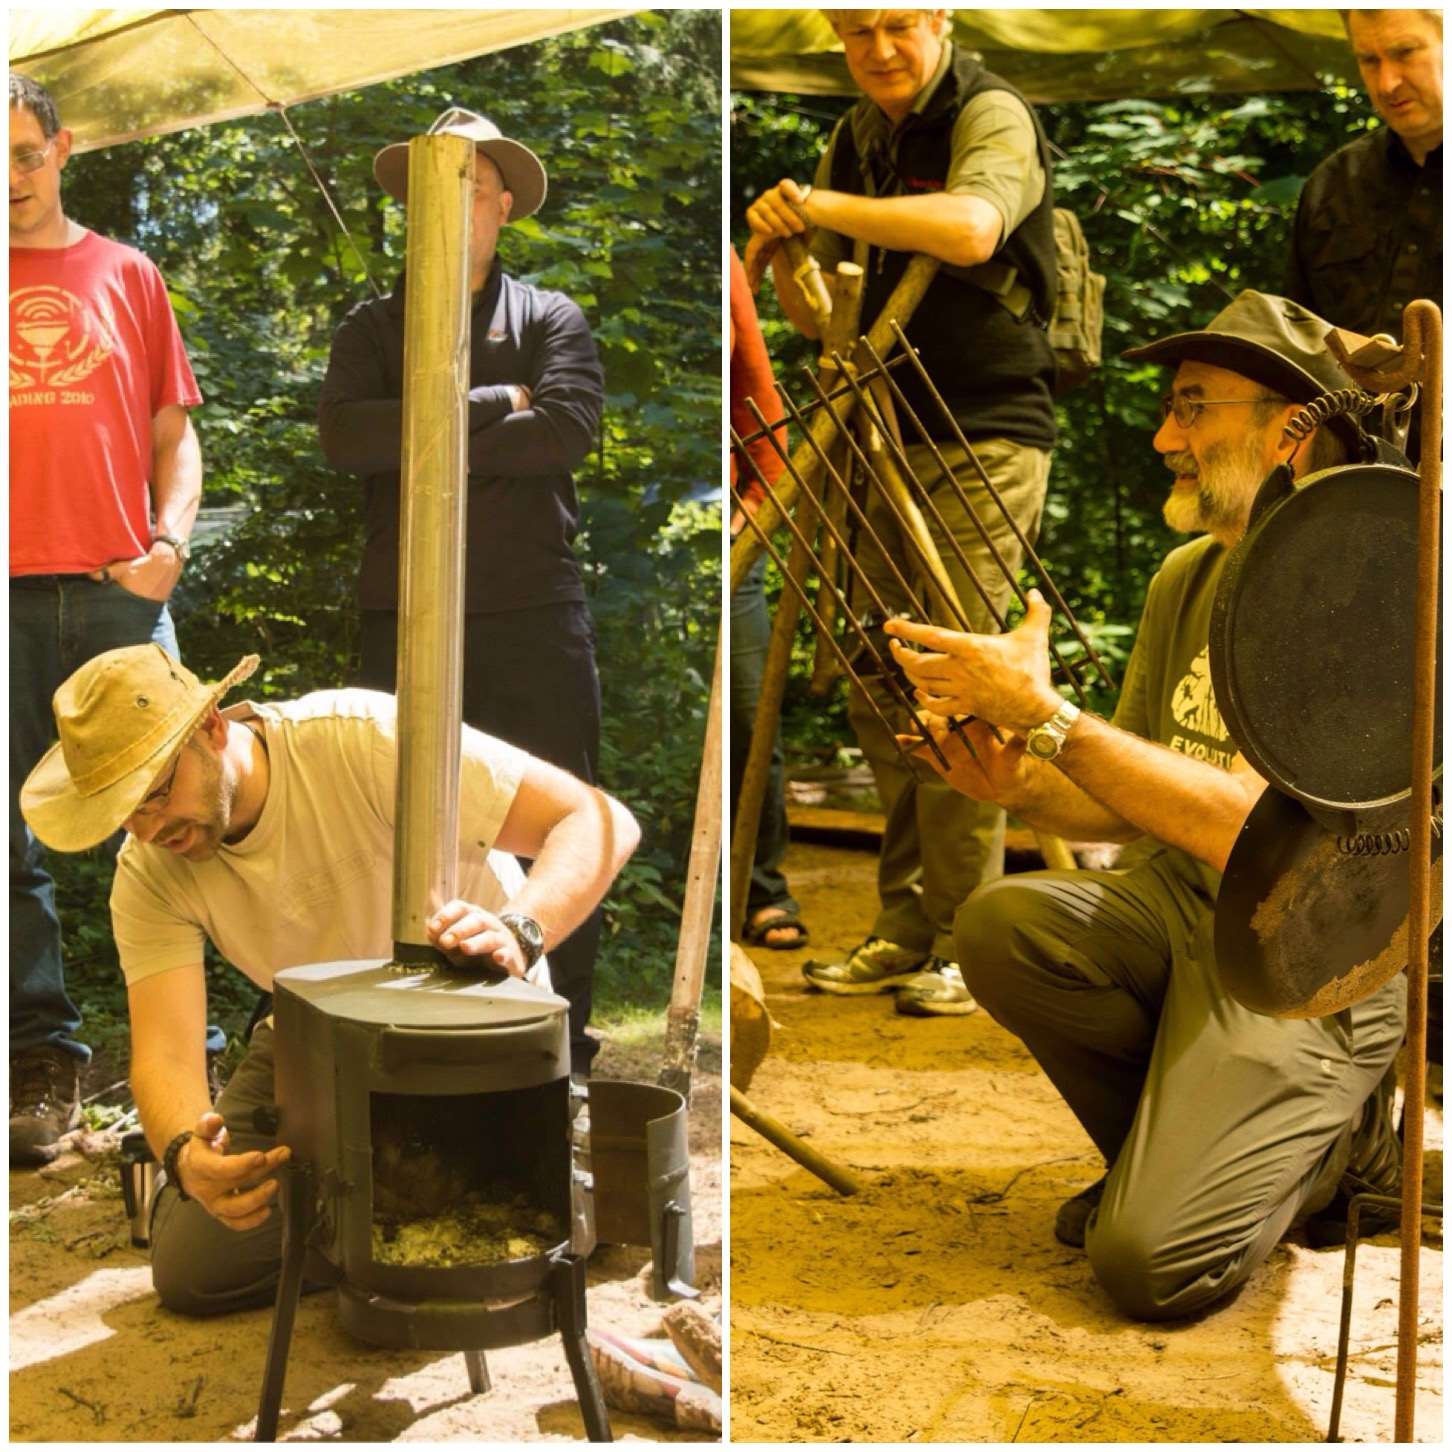
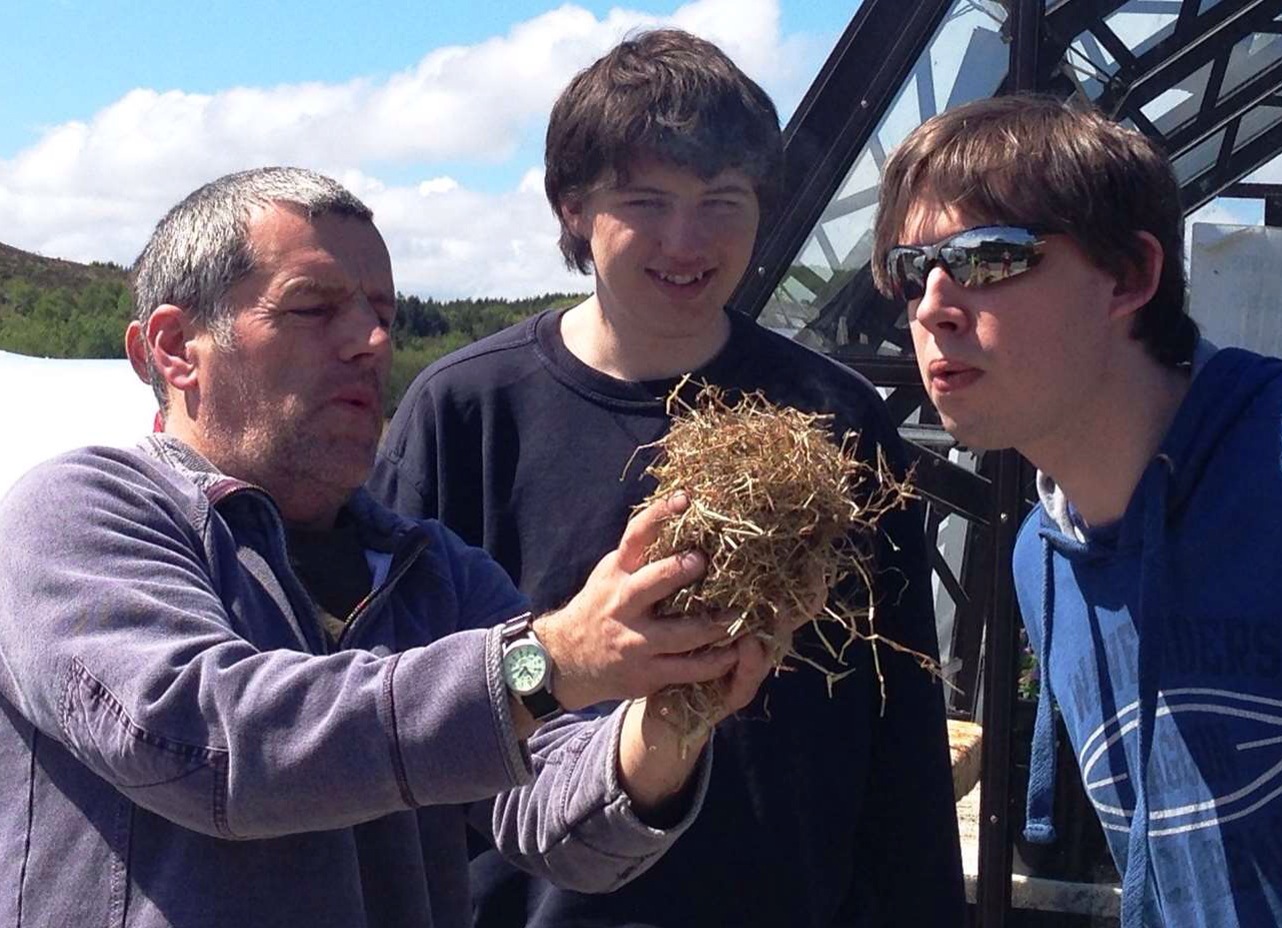
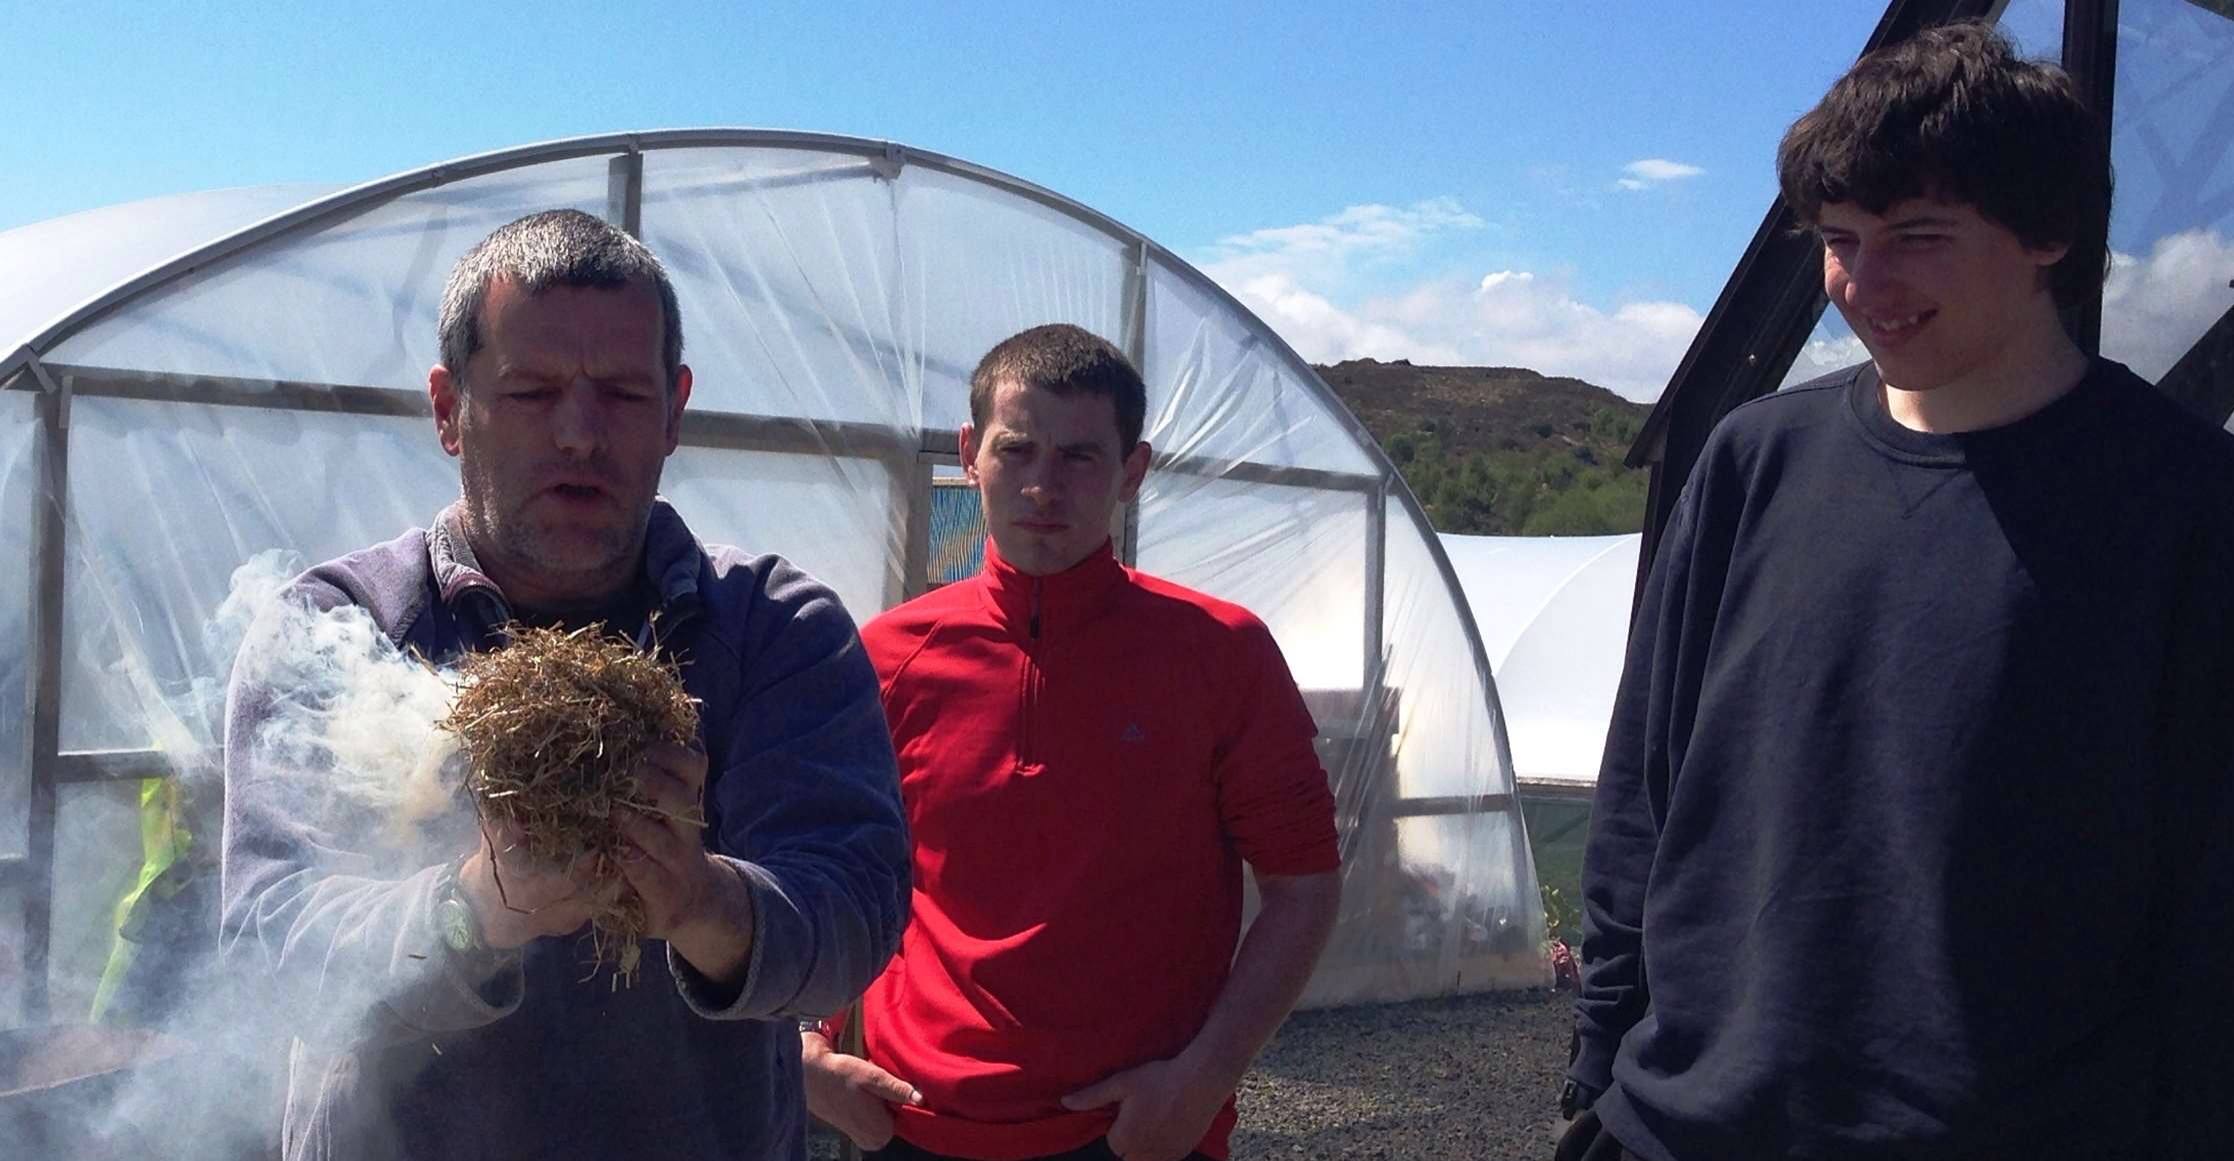
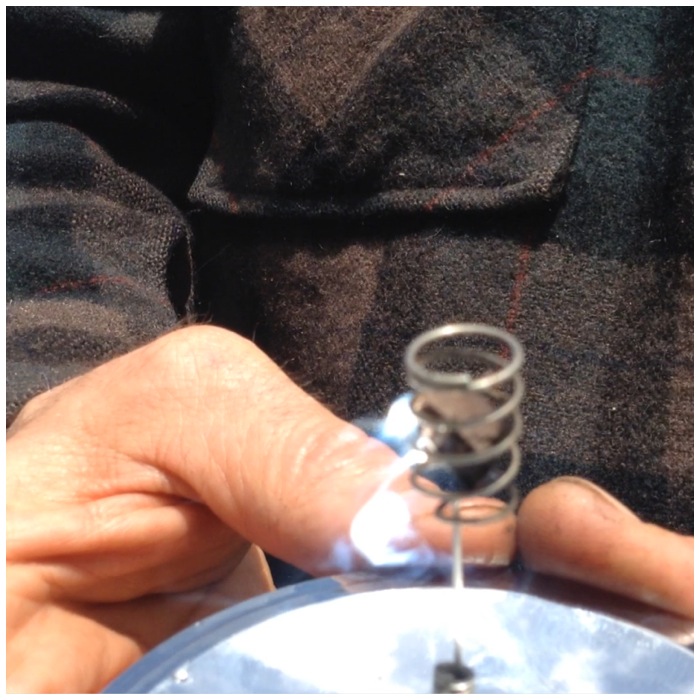
While Keith was off doing some navigation work with his cadets I spent my morning constructing a Damp Wood Log Rocket Stove. These are easy to make and great to get a fire going in damp conditions.
I must thank Jess for helping me at this stage to take a lot of my photographs as my hands were full with constructing the stove. Thankfully Jess is an excellent photographer so I did not need to worry if the right shot was being taken or not leaving me free to concentrate on the stove.
Log Rocket Stove
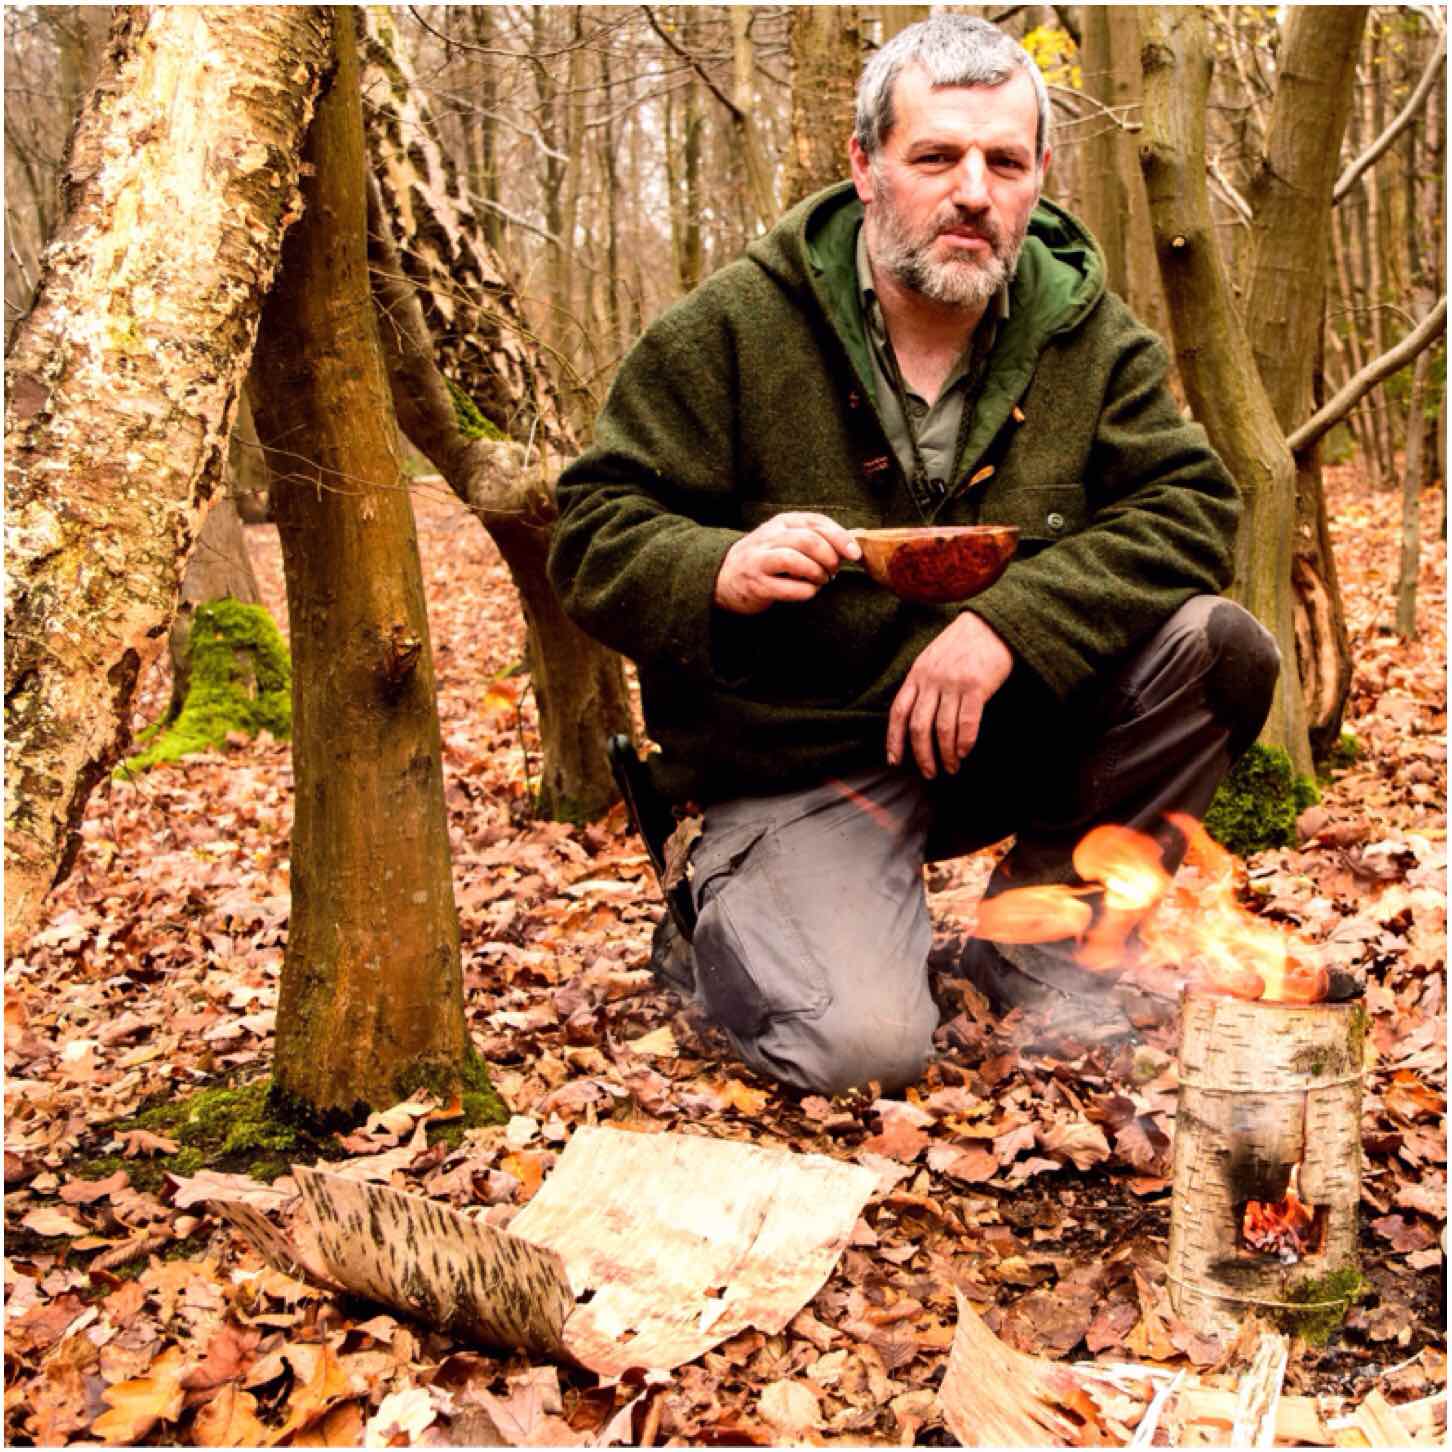
All that was left after this was to have a brew and pack up for the trip home. This was an excellent trip to round my year off amongst friends, eating well and celebrating the birthday of a budding bushcrafter.
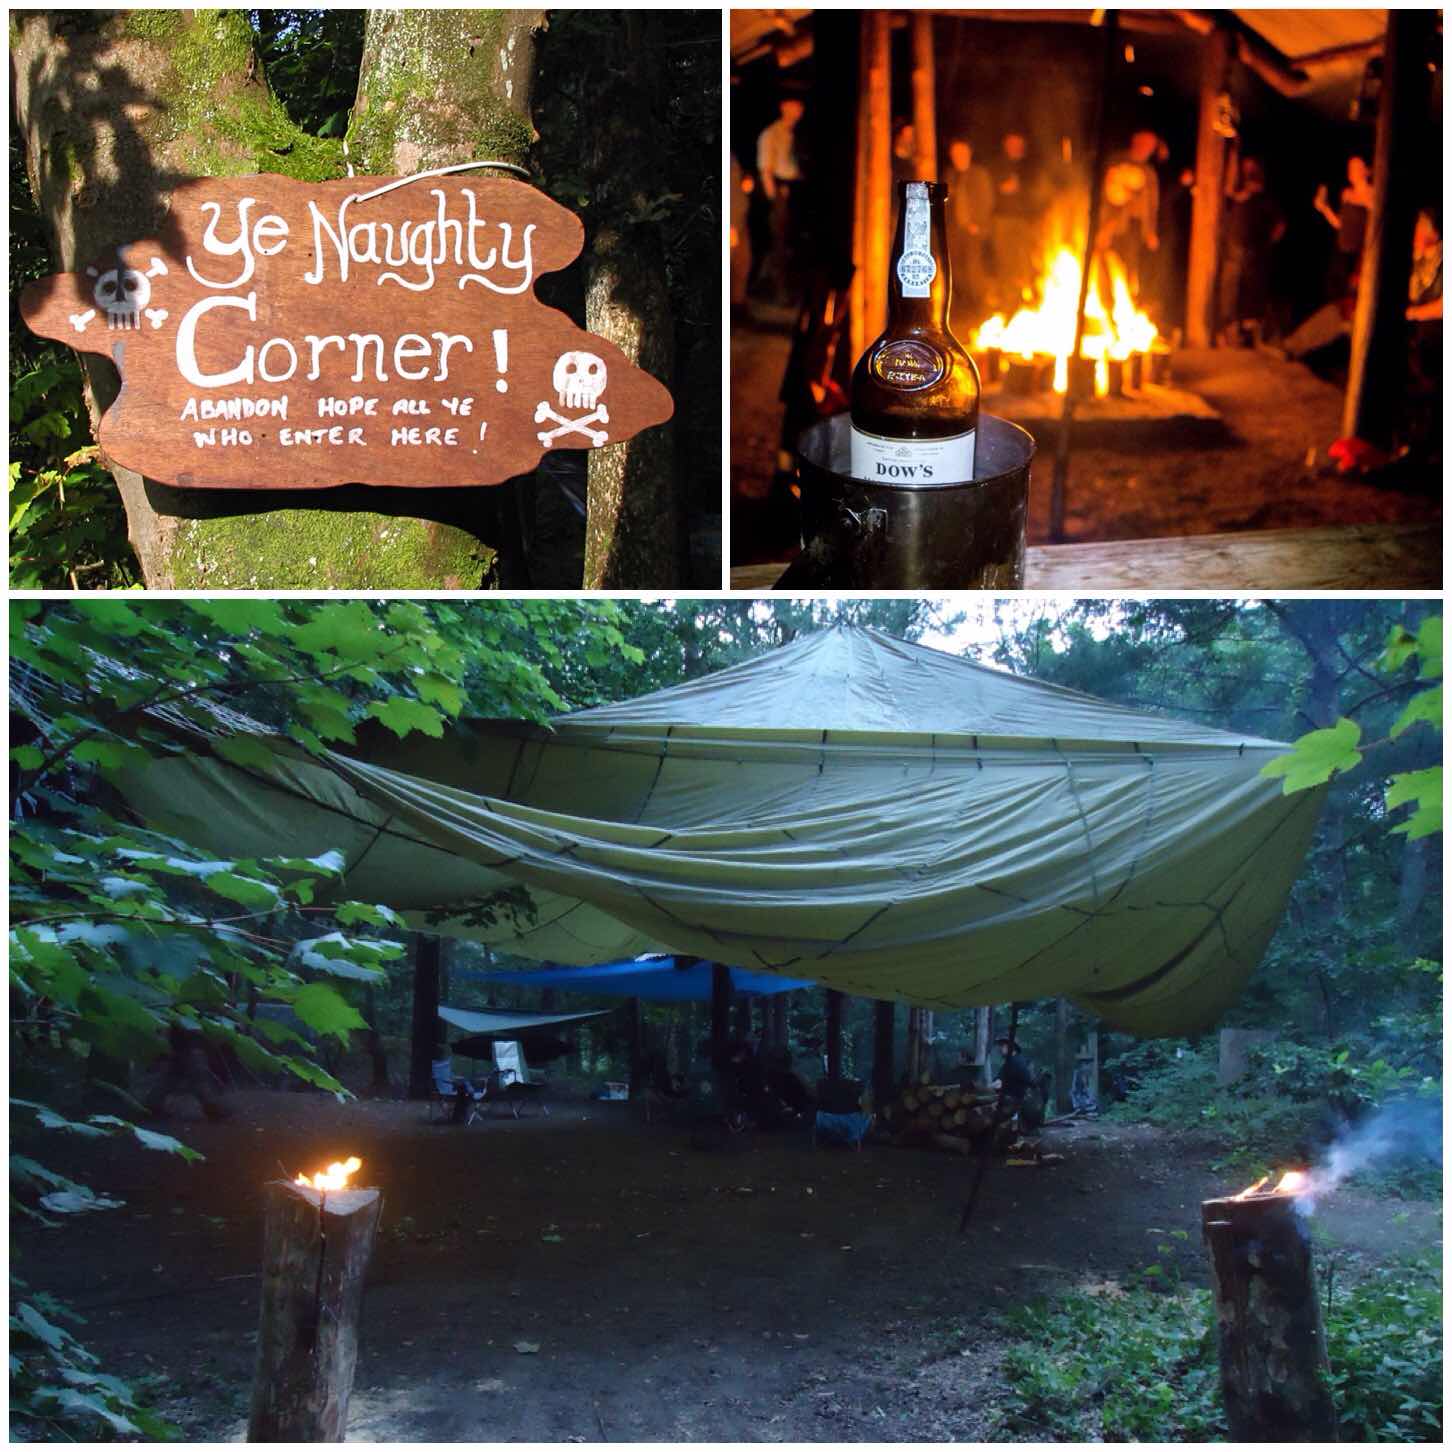
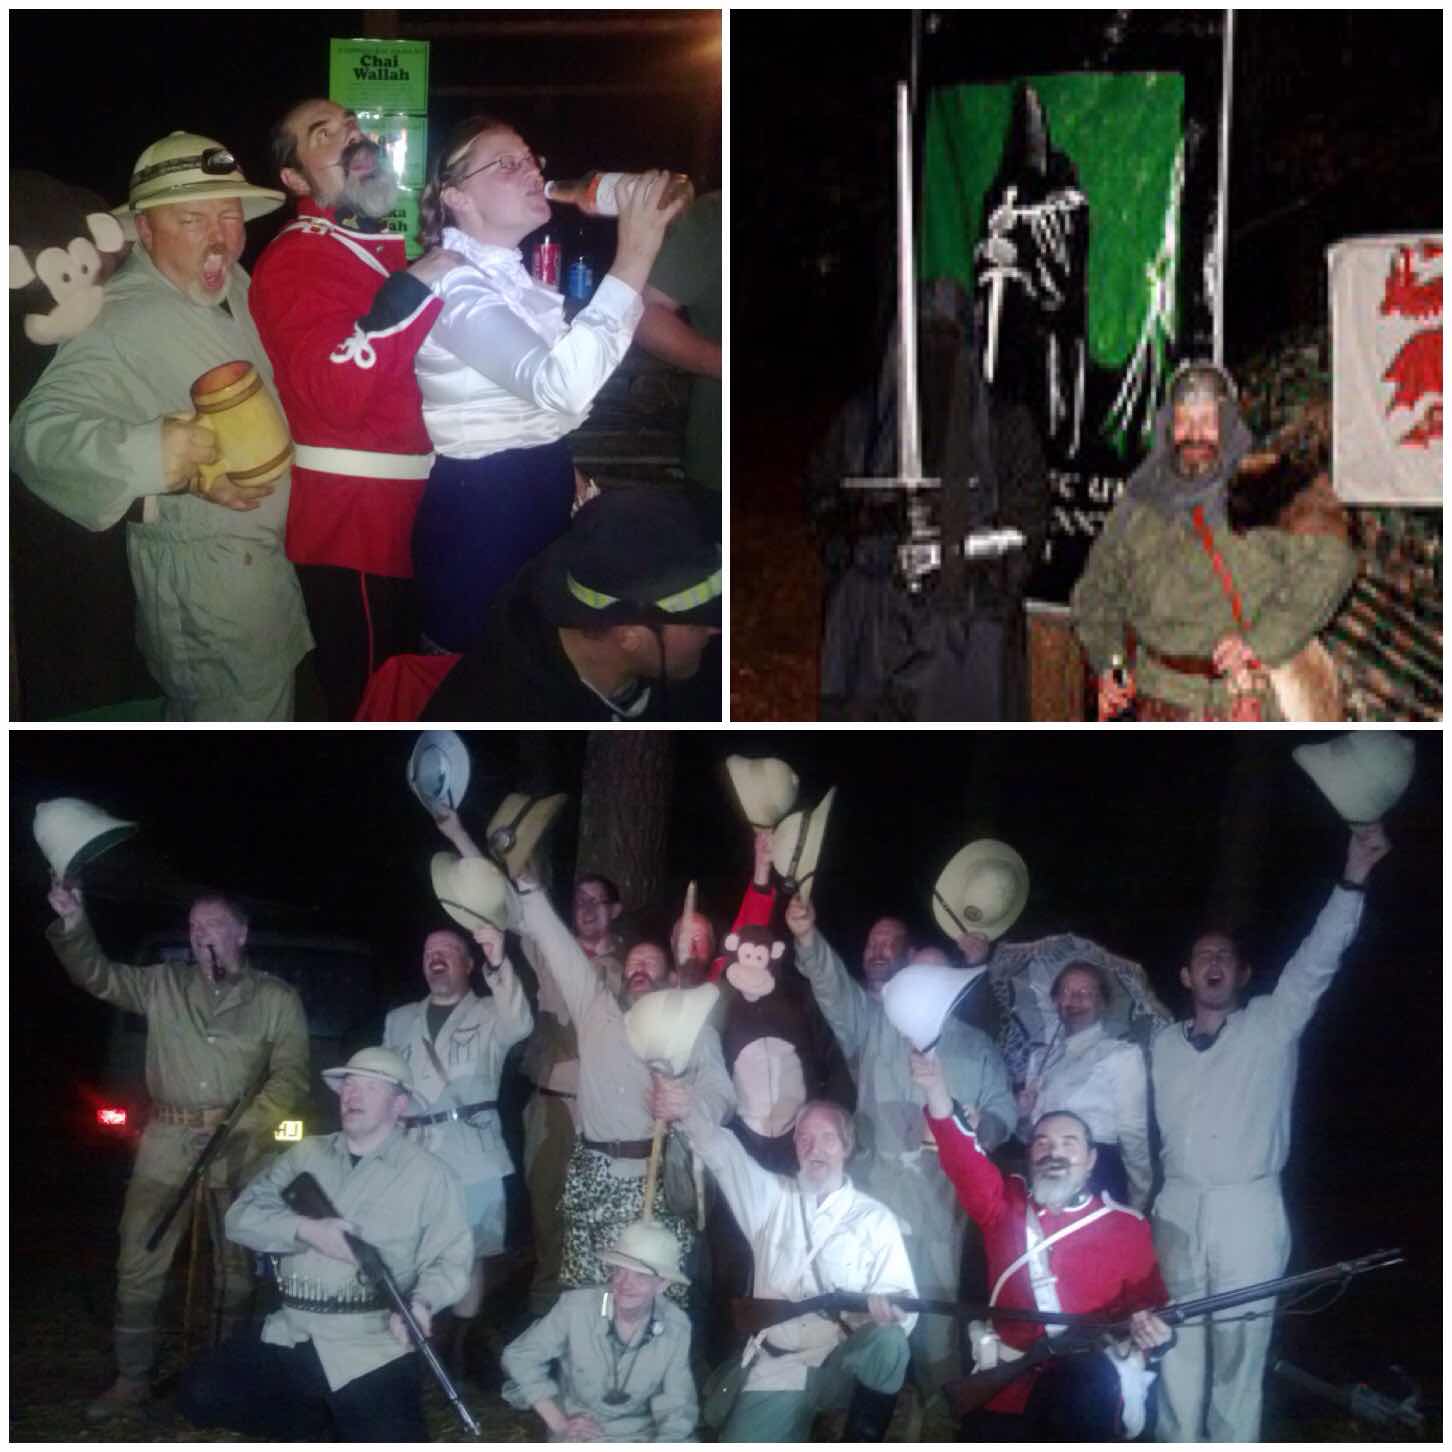
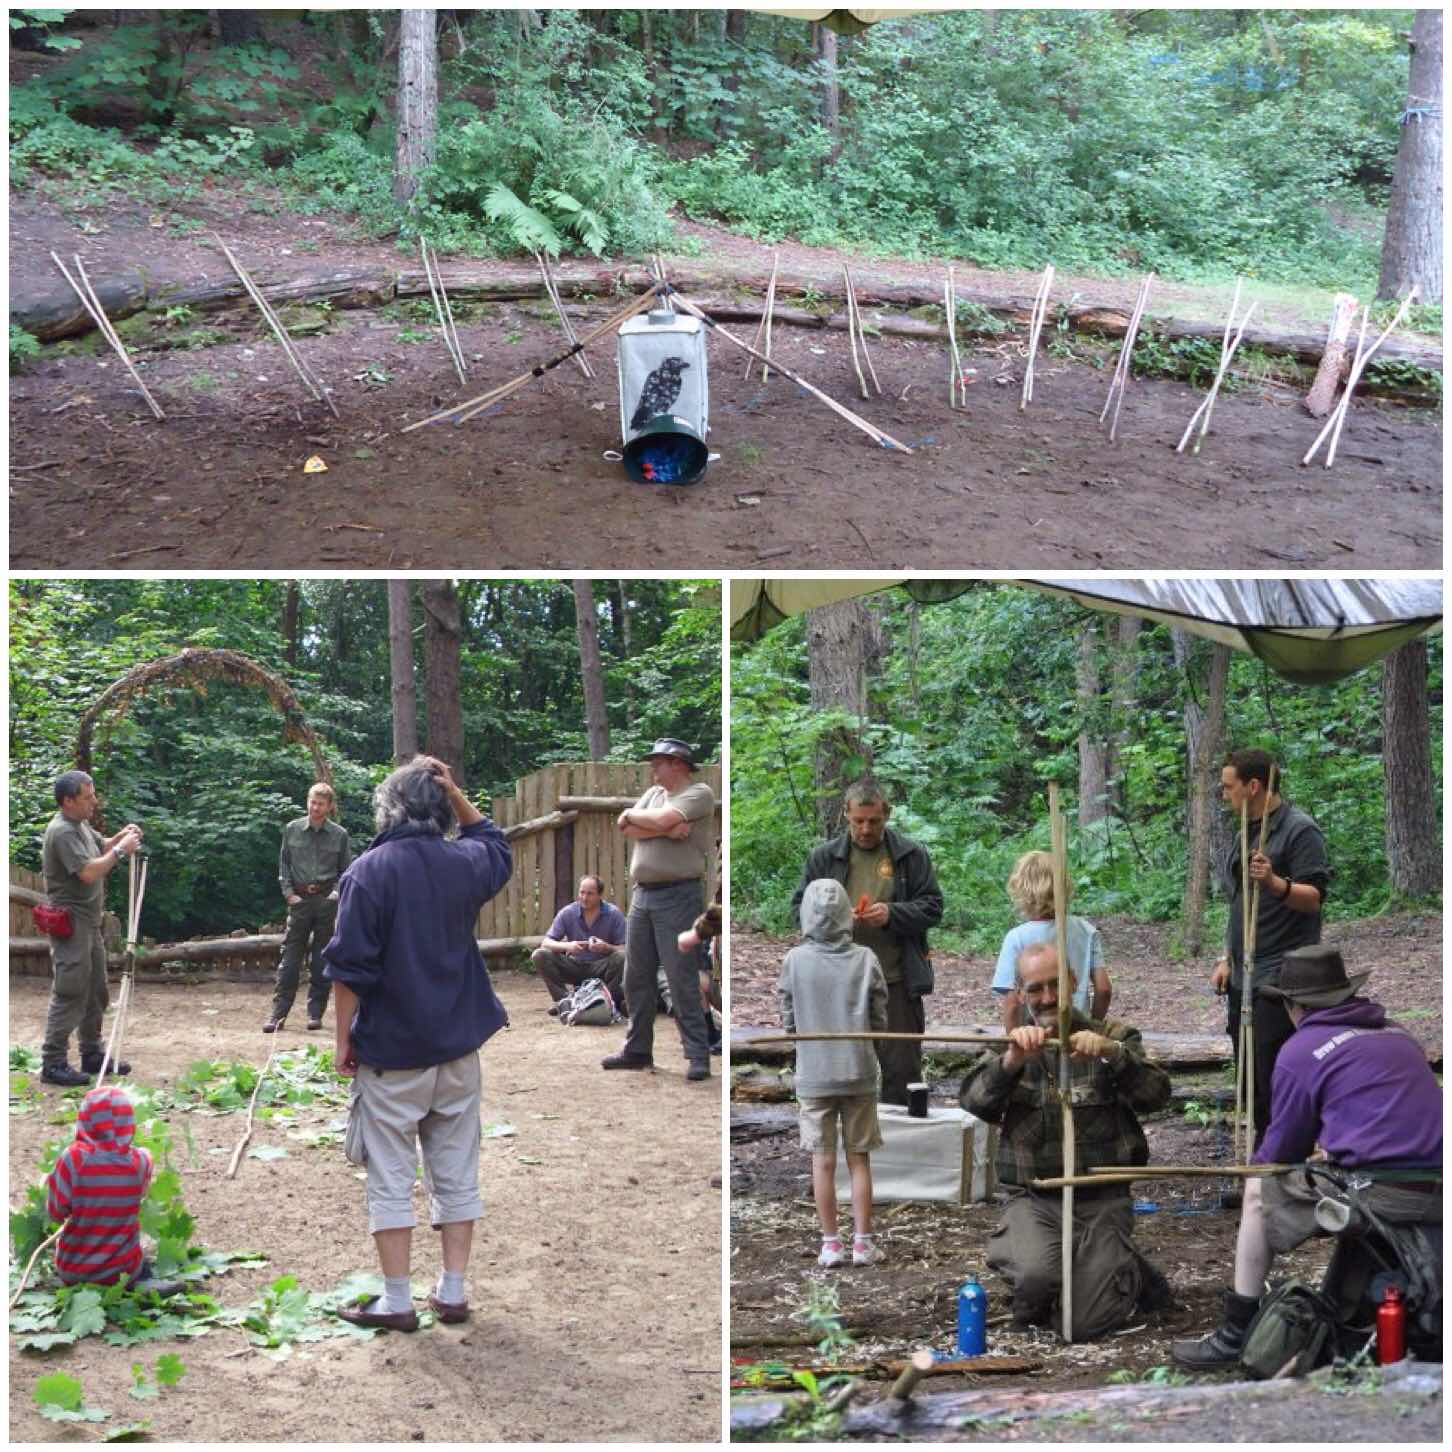
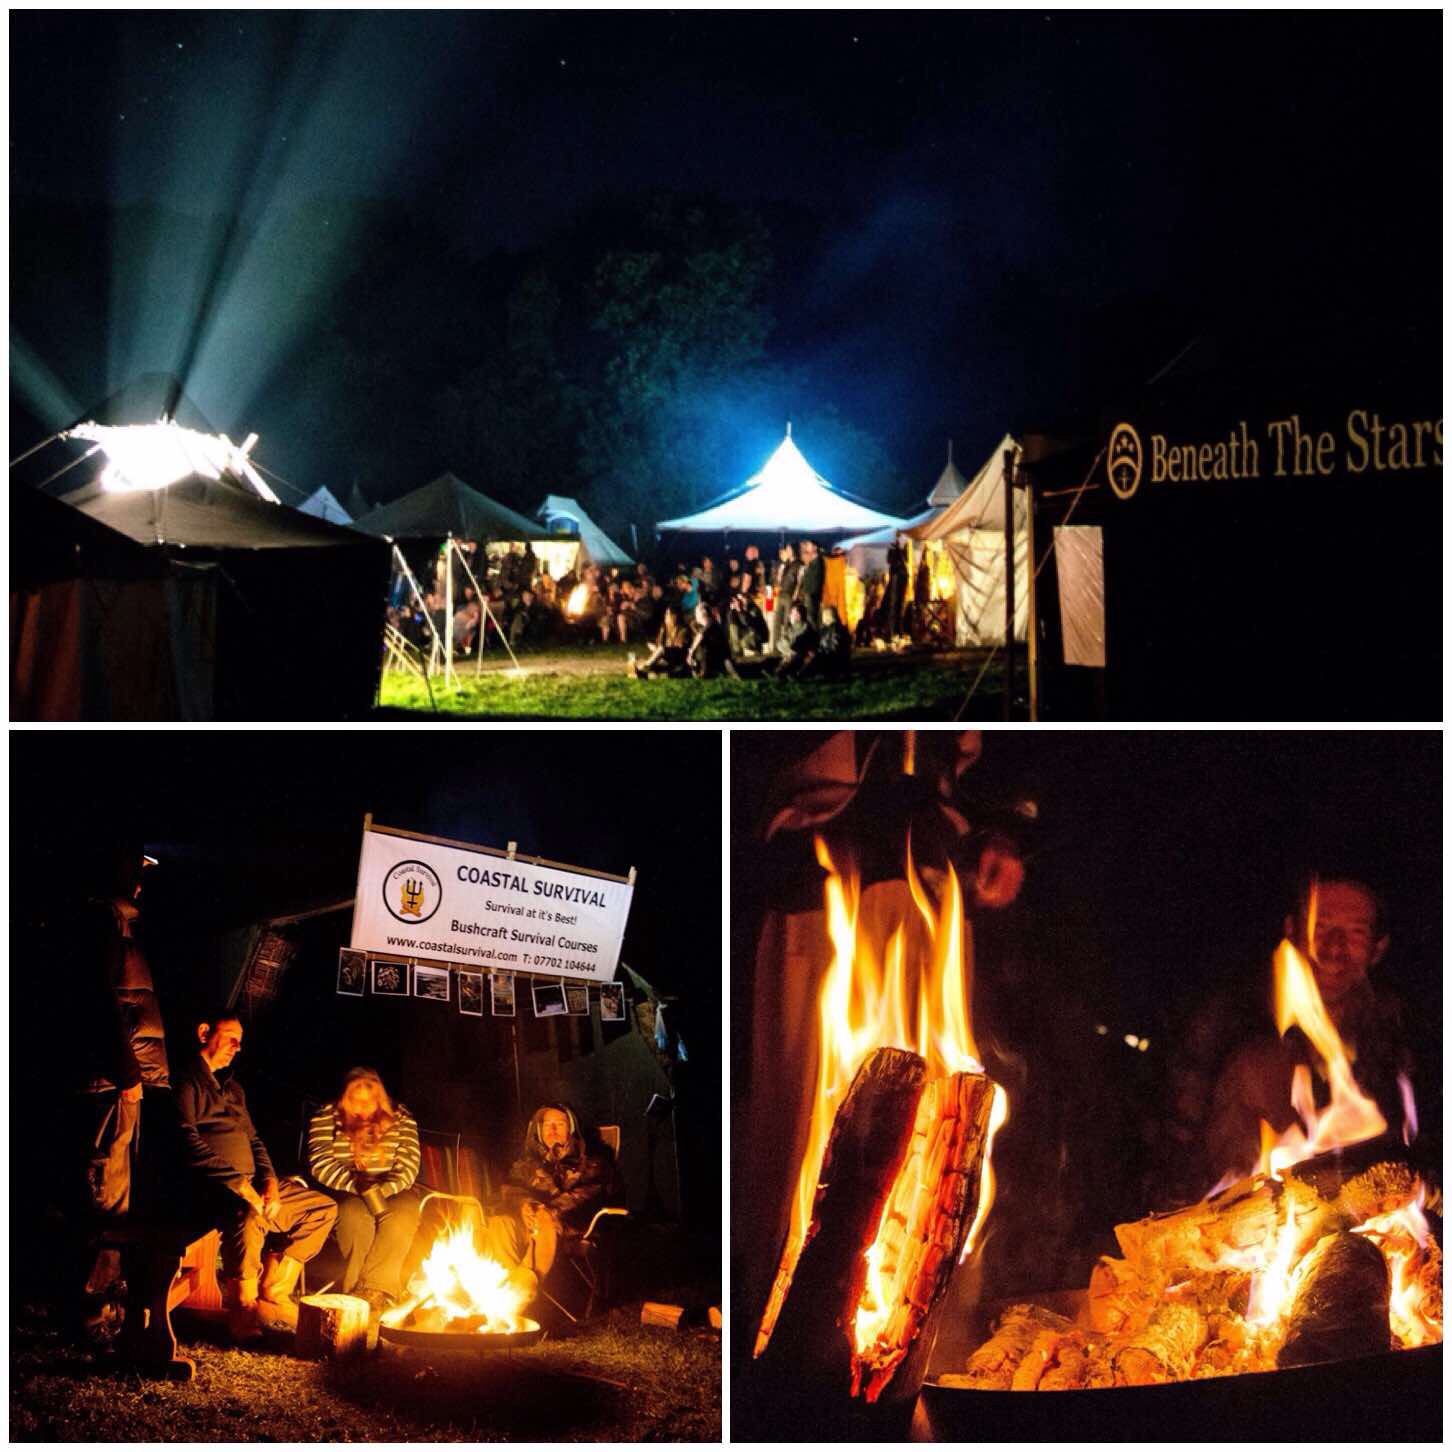
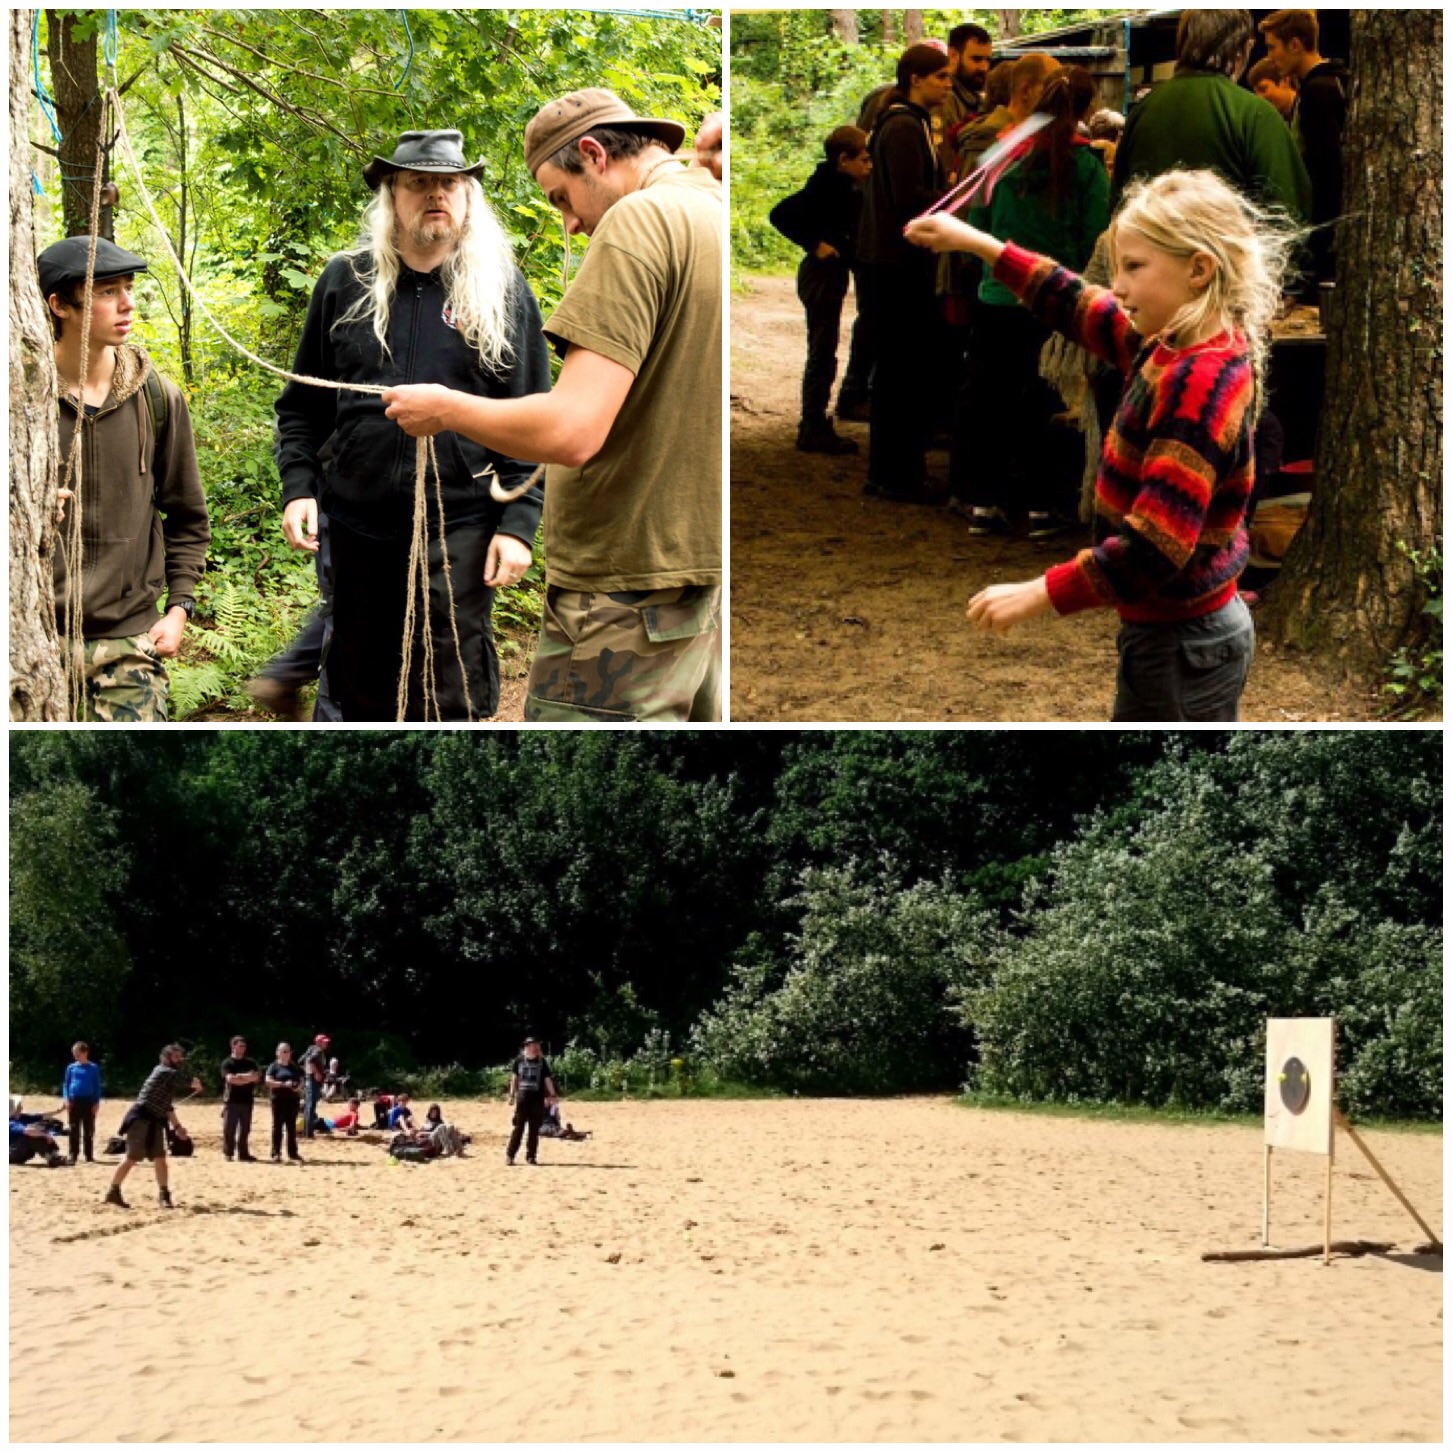
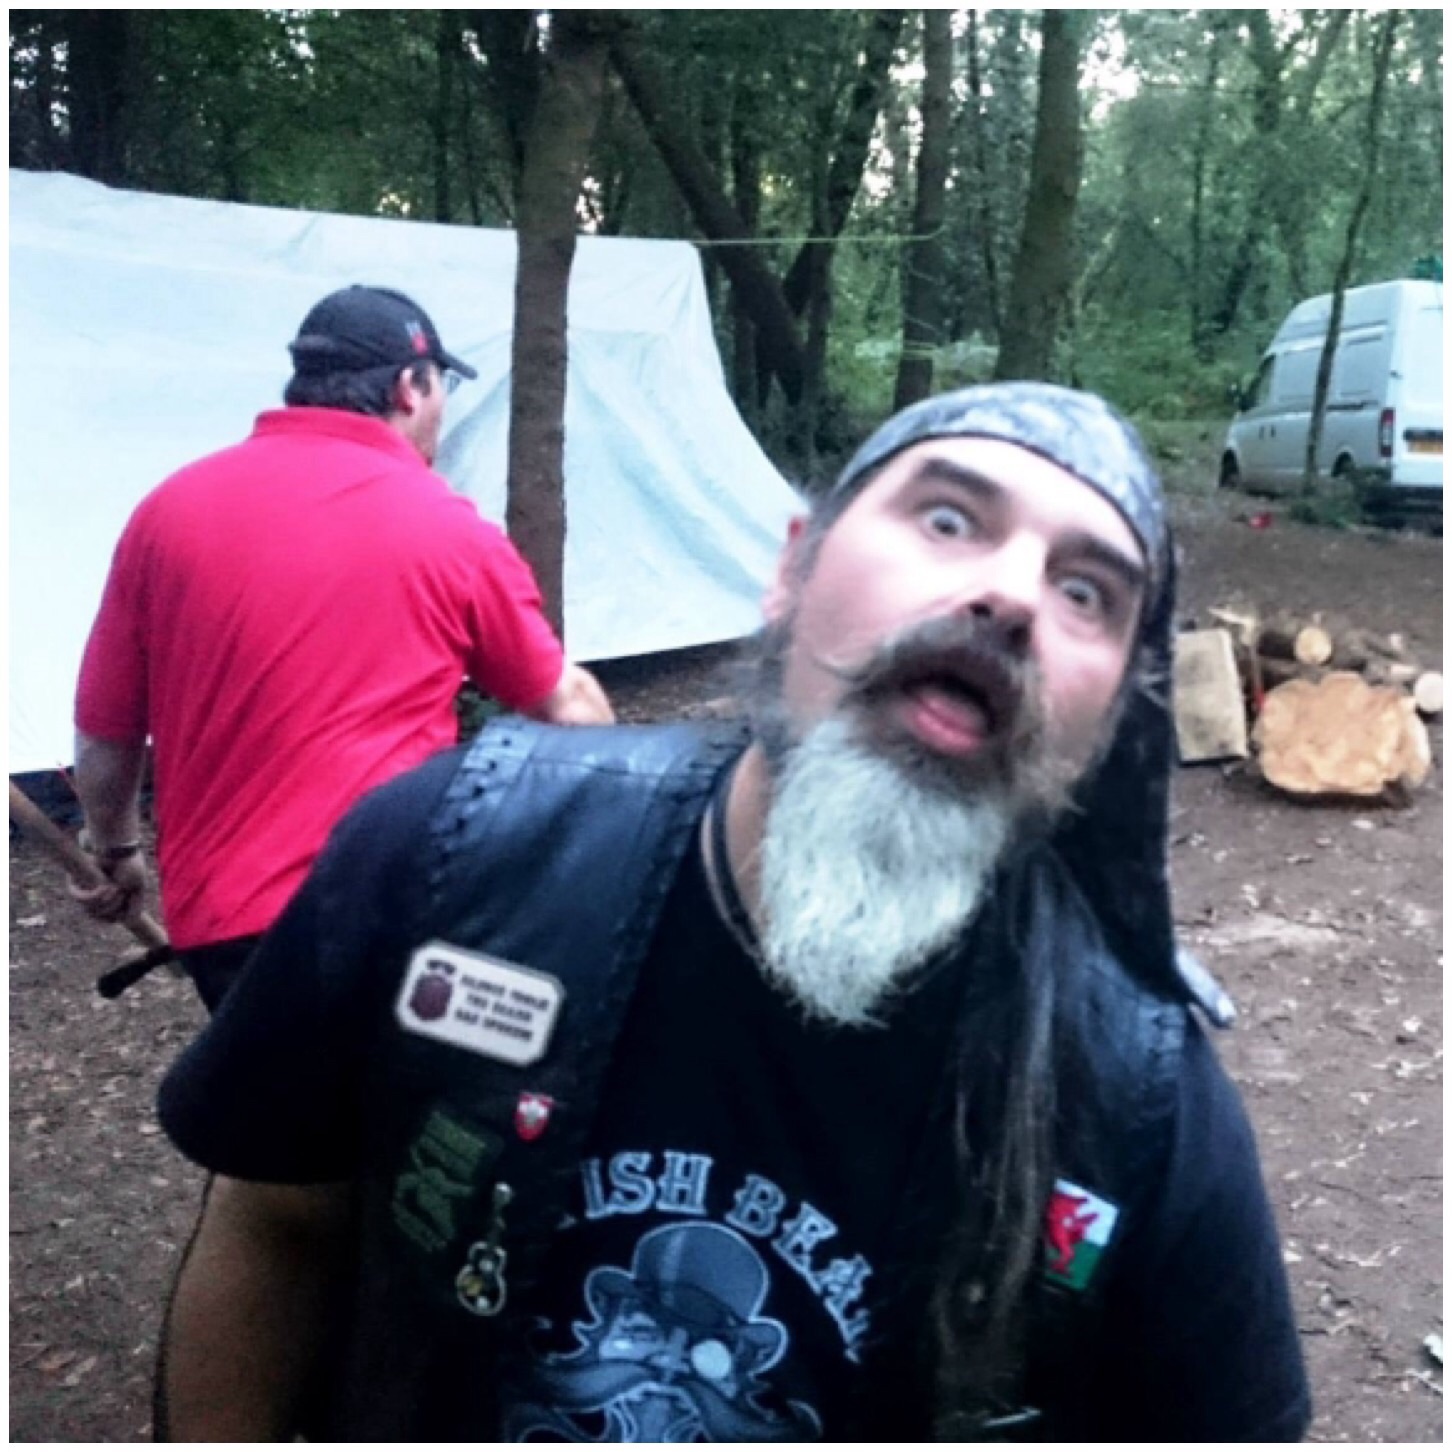
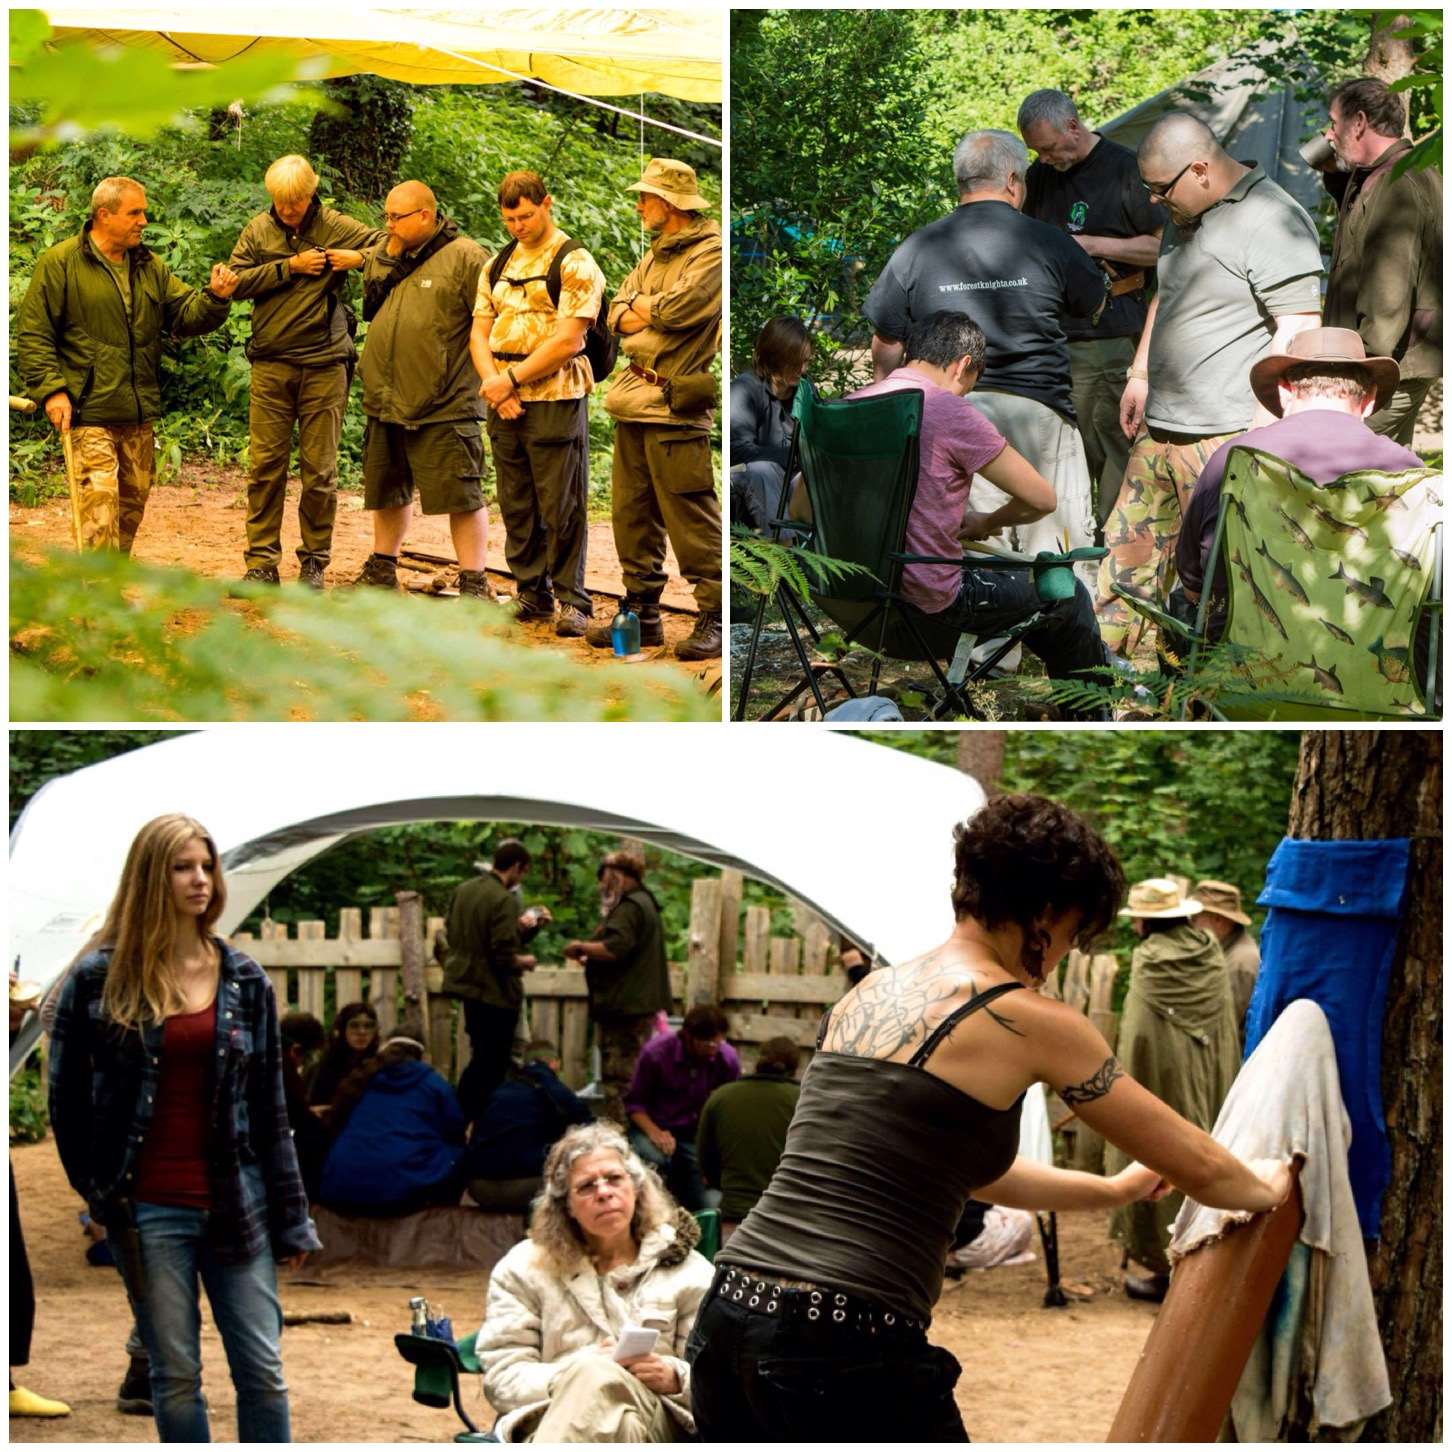
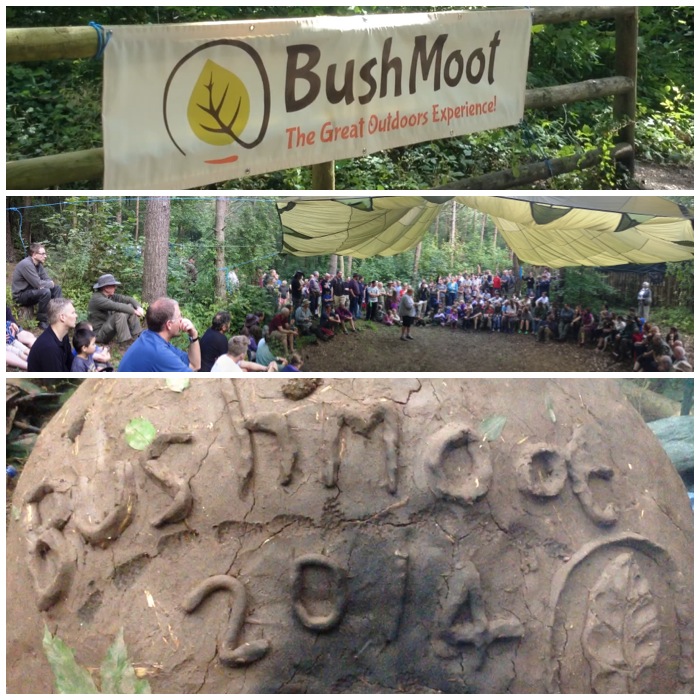
No series on the Bushcraft UKBushmoot would be complete without a mention of ‘Ye Naughty Corner’ – I will refer to it as the NC in the rest of the post.
The NC is many things to many different people who visit the Bushmoot. There is usually a fire on the go at most hours however it is in the evening that the NC really livens up. Some folk love the place and spend a lot of time there, some folk just pop in for a visit every now and then, however some folk steer well clear as it can be busy and noisy. I personally like to visit the NC of an evening and catch up on the days goings on around the fire while enjoying a medicinal tot or two.
Ye Naughty Corner (top left picture courtesy of Susannah Parsons)
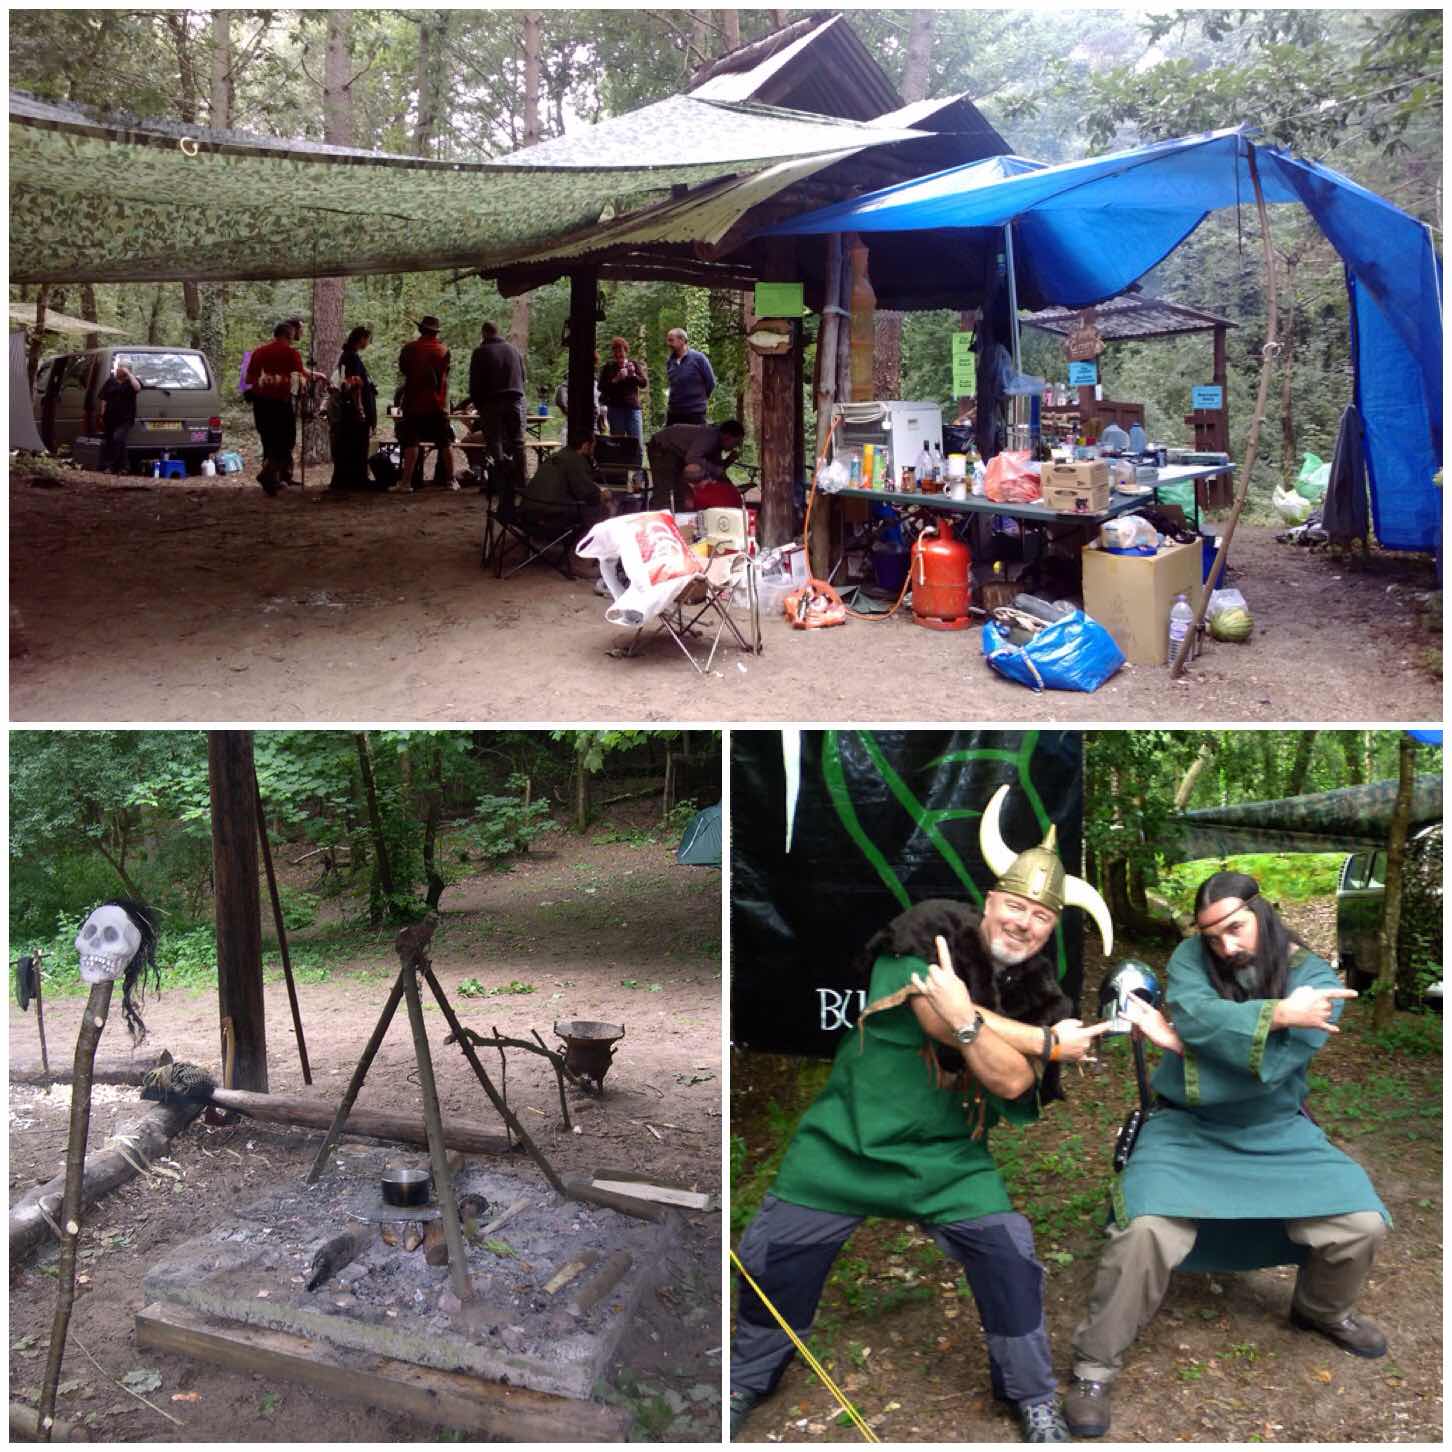
Cap’n Badger and Mad Dave (our resident Pirates) normally manage the NC though Dave had to miss the Bushmoot last year. The NC has been around for a number of years now and it has grown in size as each year has passed. Some say that is a good thing and others do not – you will need to decide for yourself.
It has always been a noisy place in the evenings (folks are warned about it if they camp near it for the first time) and as a regular over the years I am quite comfortable there however as the feel of the NC has changed from a small to a big community some folk have drifted off elsewhere on an evening.
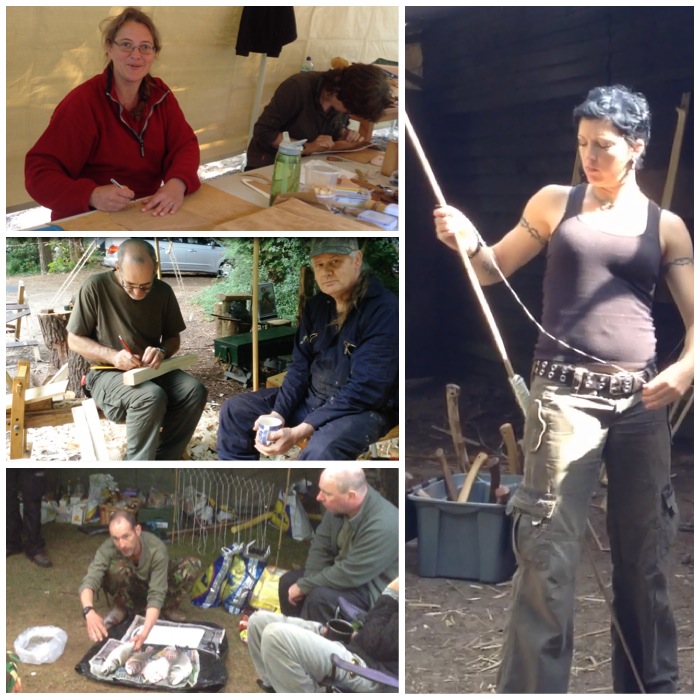
Set up and the managers (Top and bottom right pictures courtesy of BCUK)
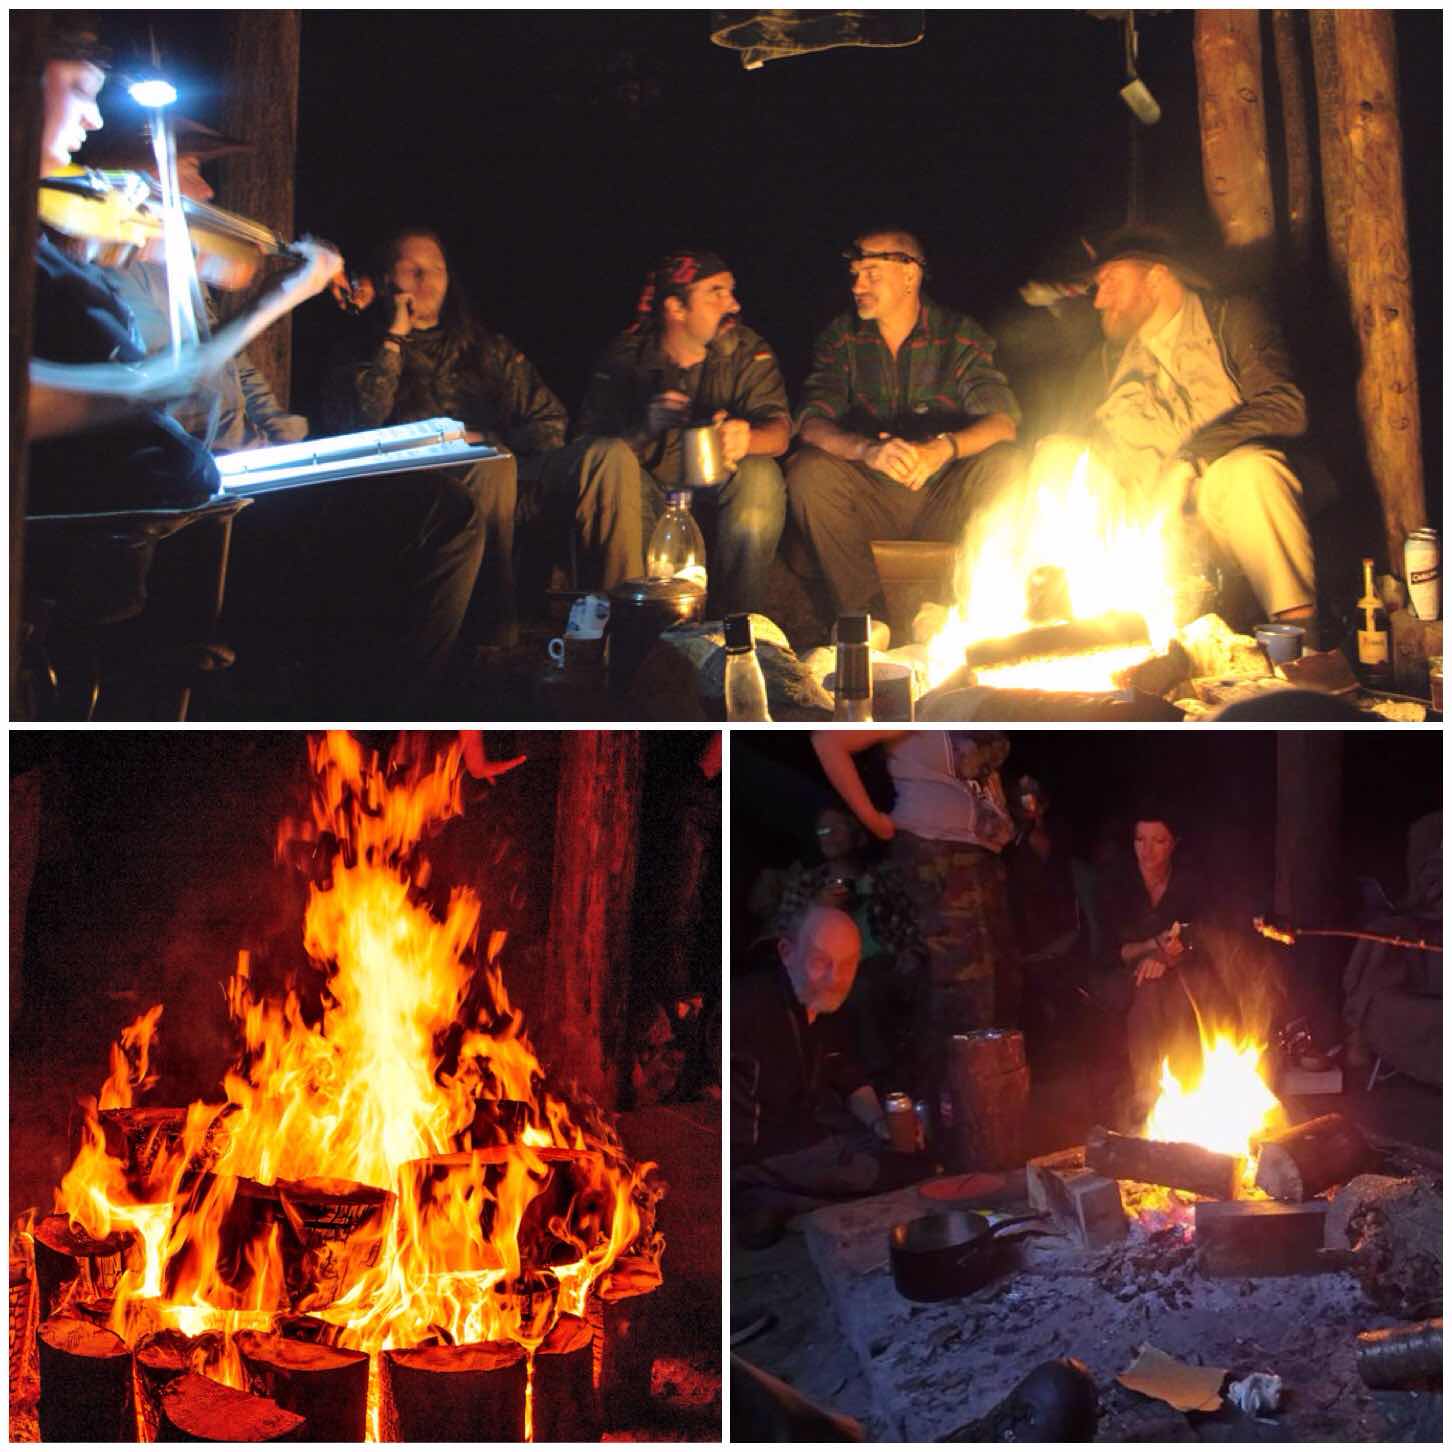
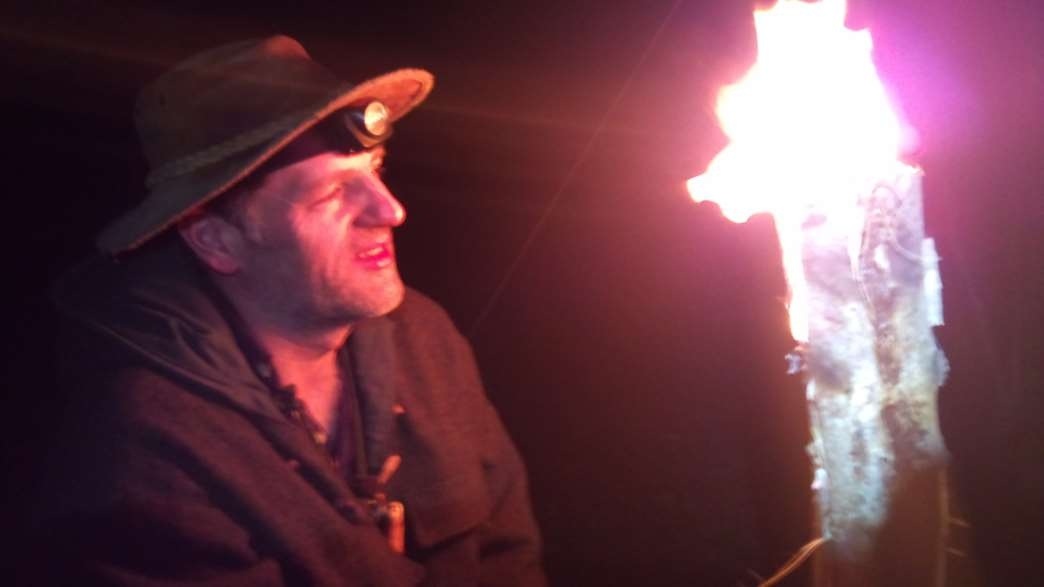
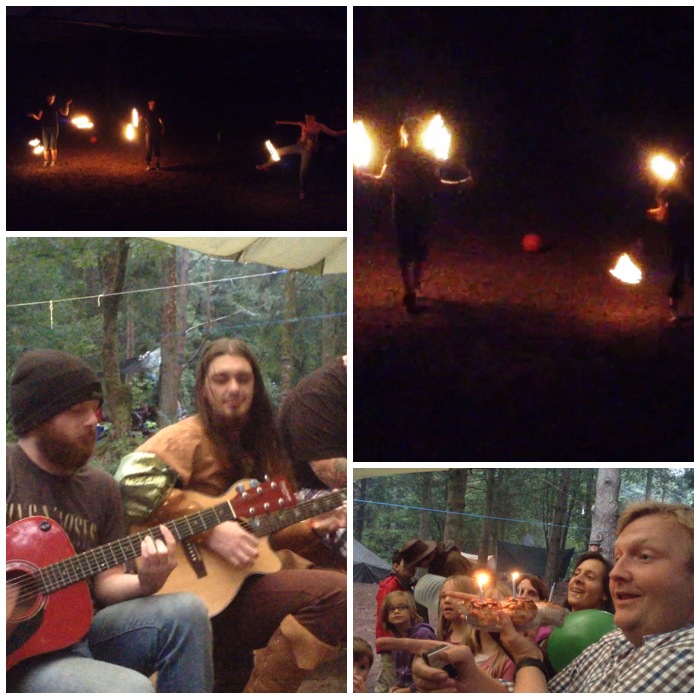
The central point of the NC is the fire and it makes for a great woodland TV. On some of the busy nights you will be lucky to get anywhere near it however if there is a decent stock of wood it is soon lit up well. I have snapped many a fire face picture in these flames over the years.
One thing you are guaranteed is the option to try out a number of different tipples while sitting around the fire. There is usually a bottle or two of Kraken rum, meade, port or whisky making the rounds to try. The nost memorable one for me was when I was passed a bottle of Dave Budd’s Chilli rum – never to be forgotten.
A place to relax in the evening (Top picture courtesy of Susannah Parsons)
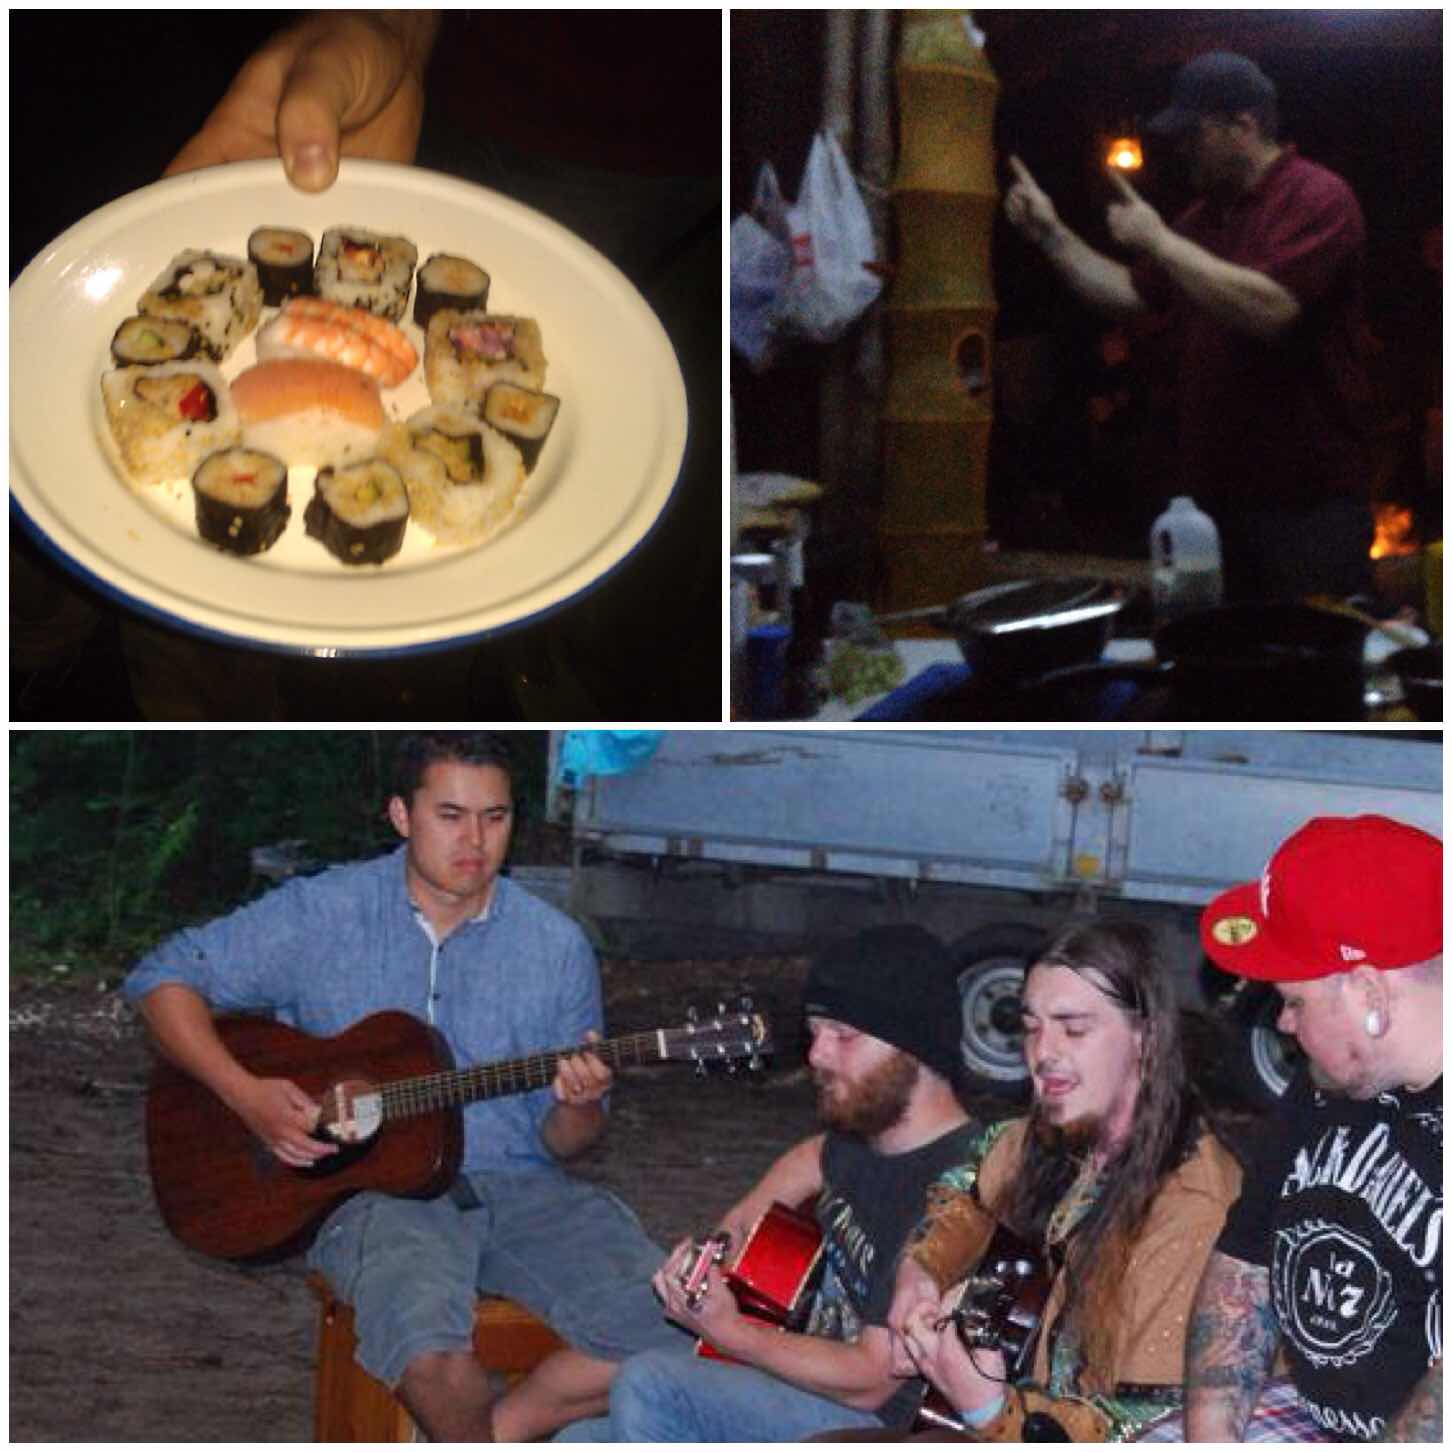
I think one of the reasons the NC has become so popular is that there is usually some music and food on the go.
Initially folks would cook there own food and come along to the NC for a drink and a chat. Nowadays our resident Phil is on the go all night cooking and serving a wide range of excellent food (we do run a group kitty to cover the cost of the food).
Great food and great music (Bottom picture courtesy of BCUK)
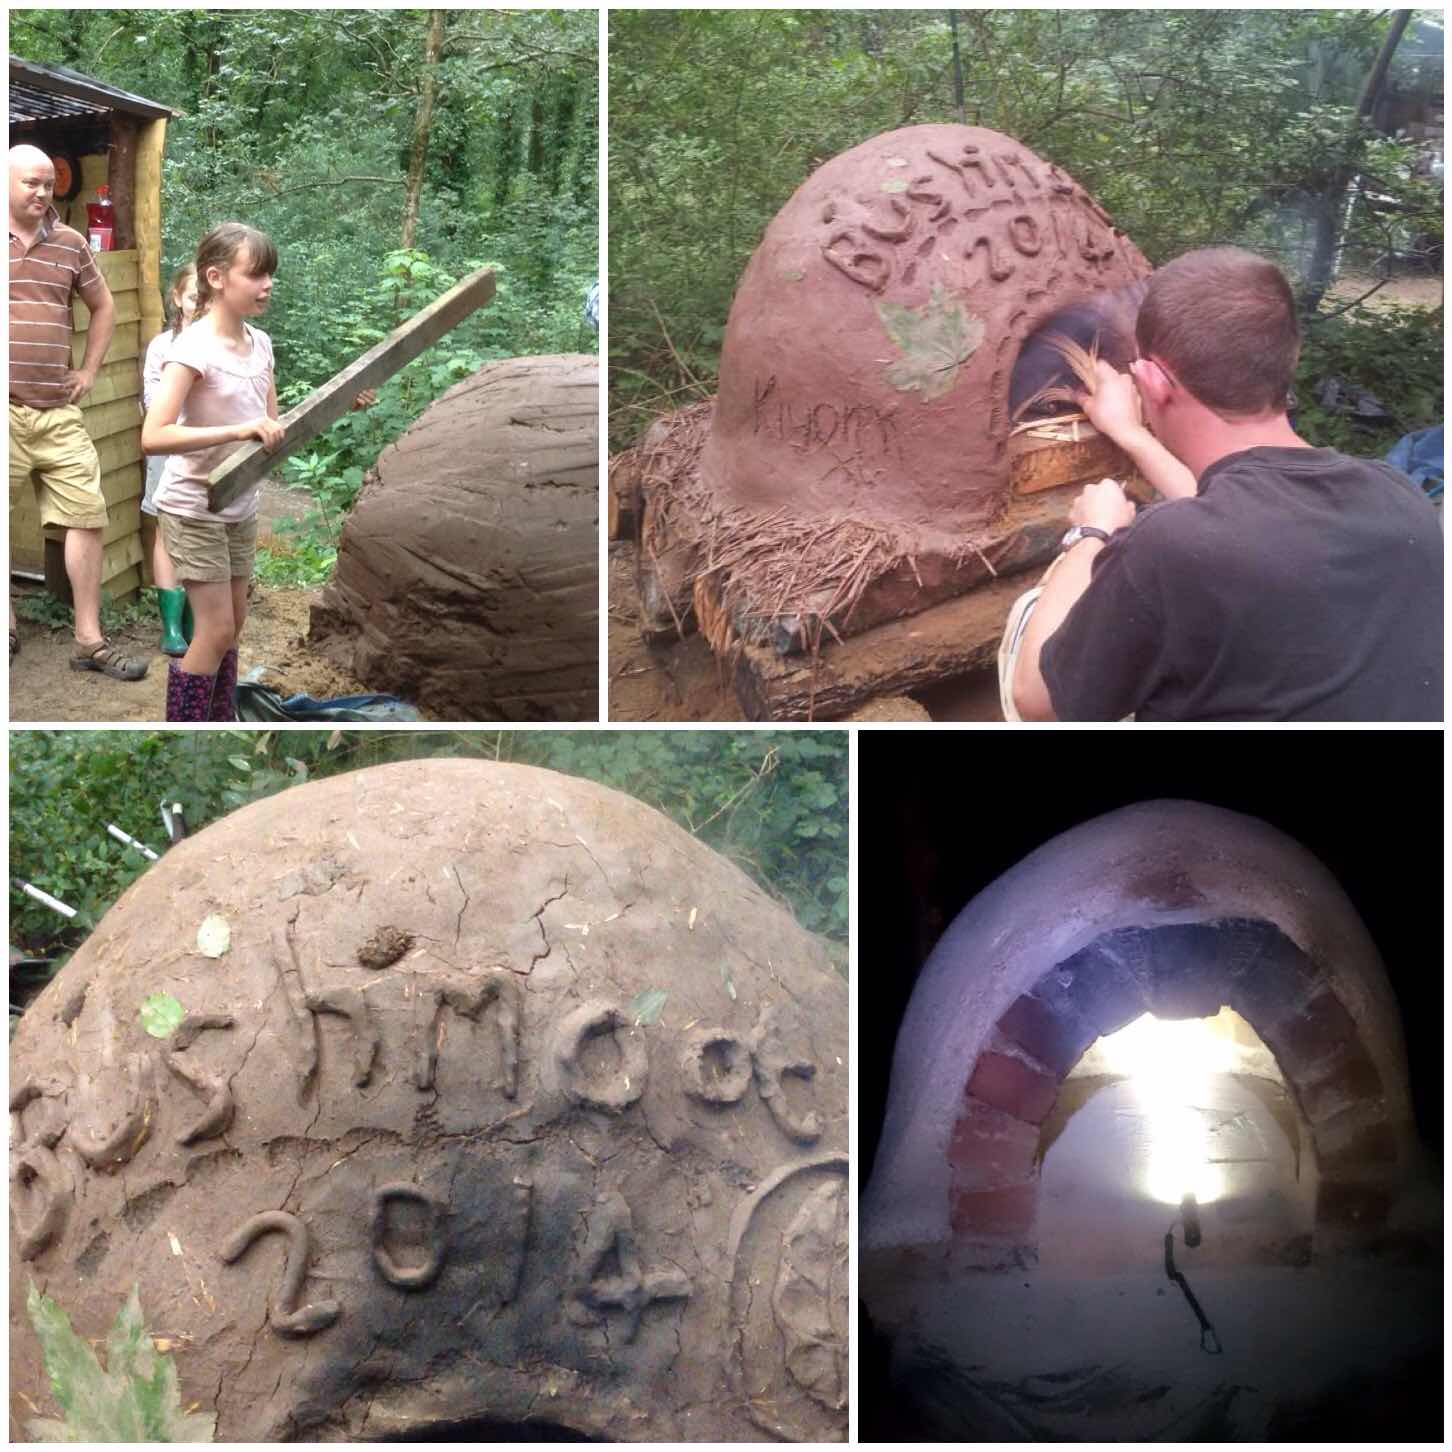
A couple of years ago Tim Neobard ran a class at the NC to build a cob oven for baking pizzas. The pizzas proved to be very popular with the residents of the NC so everyone was looking forward to having some pizzas the following year.
When we returned last year we found that someone had decided to destroy the pizza oven. Un-dettered Neil re-built the oven this year out of brick instead of cob so hopefully it will be there this year.
Constructions (Top right picture courtesy of BCUK)
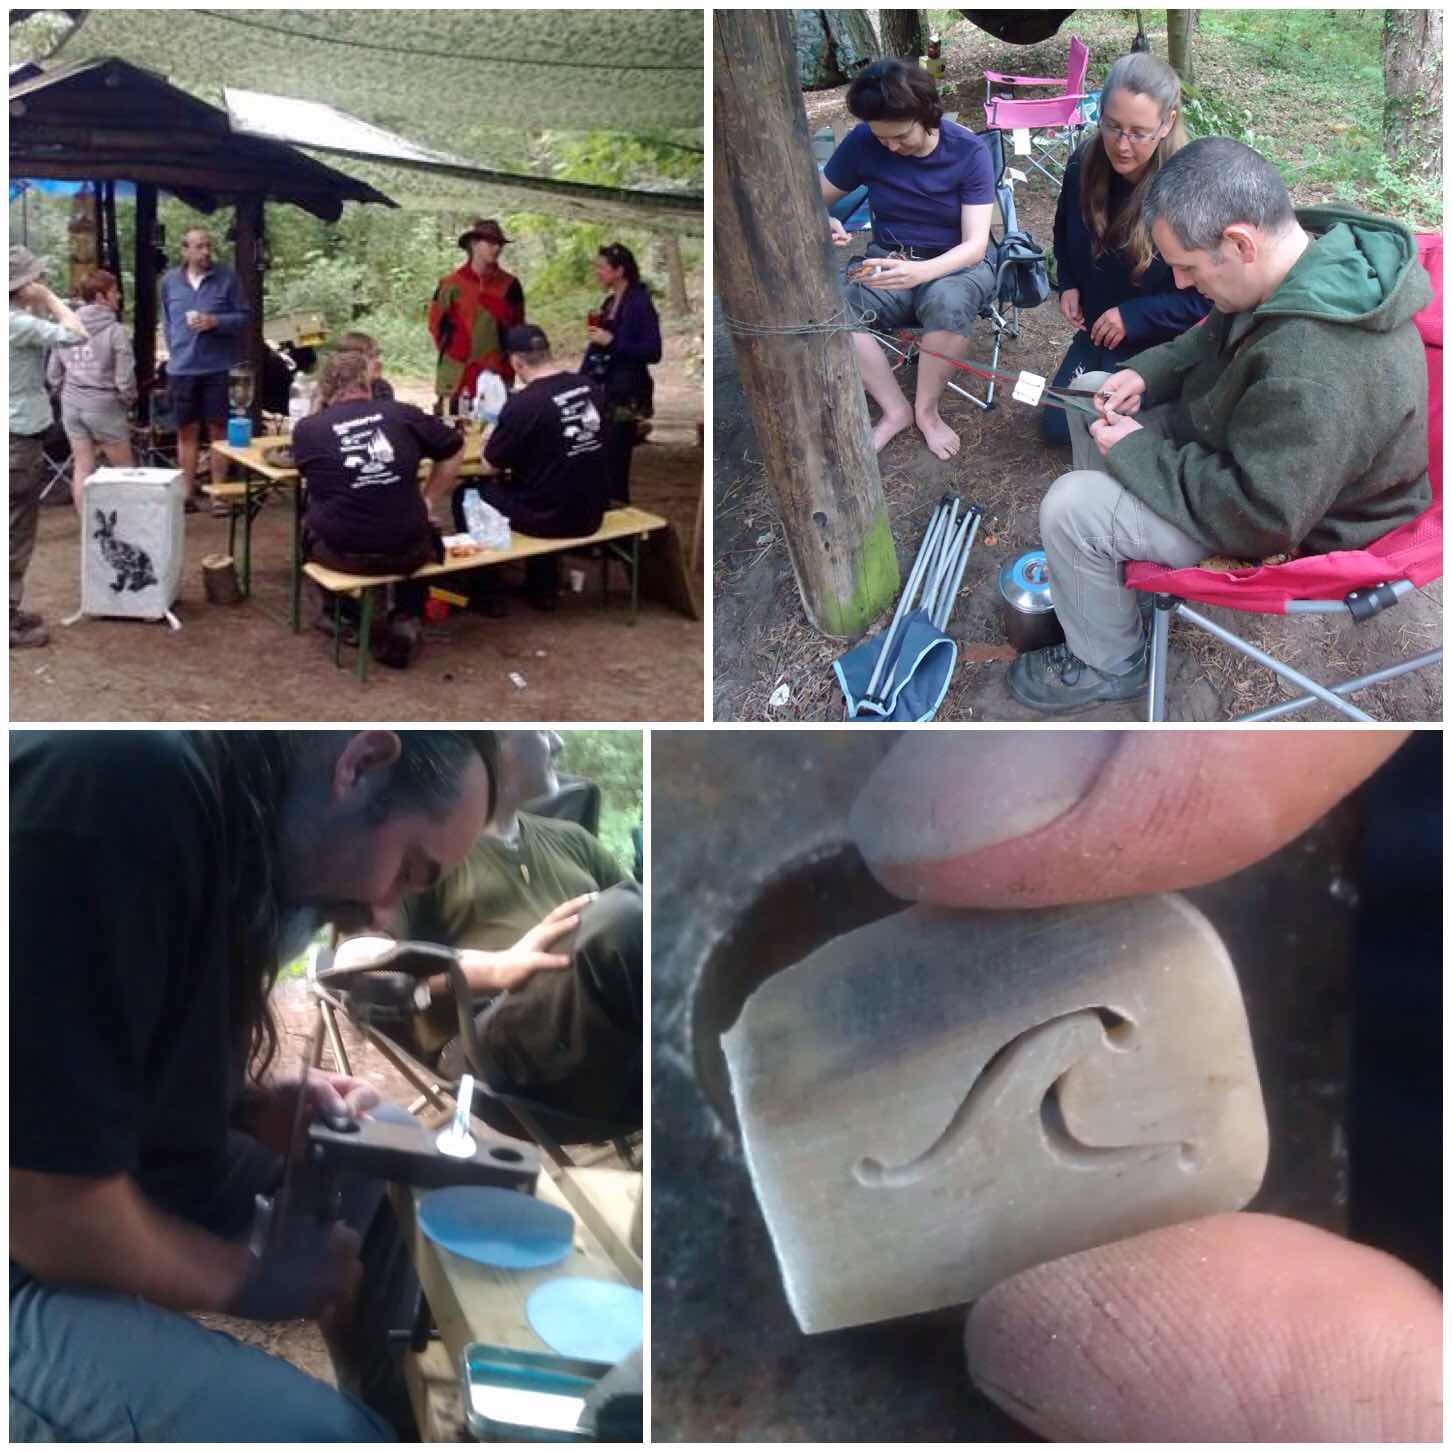
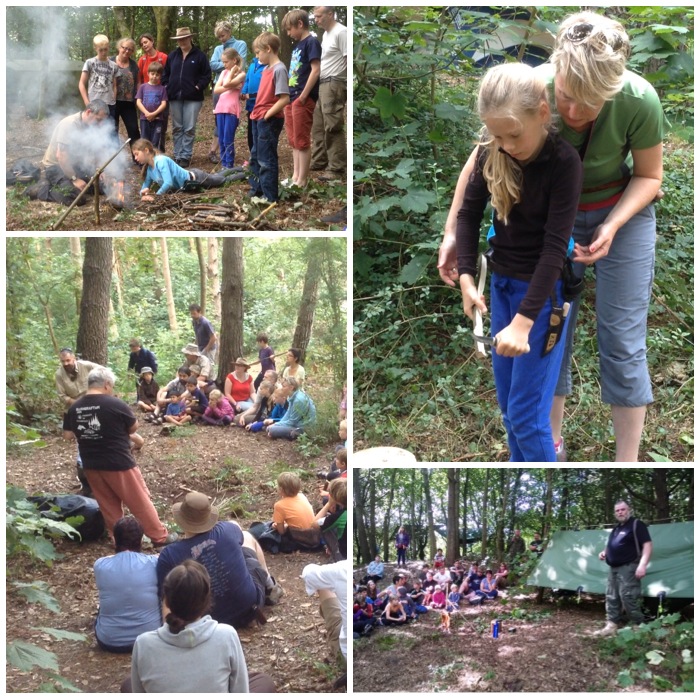
I like to pop by the NC during the day to see what is going on. Sometimes it is pretty quiet as folk are off at all the classes however sometimes you will find a class or two going on at the NC.
Classes (Top left picture courtesy of BCUK)
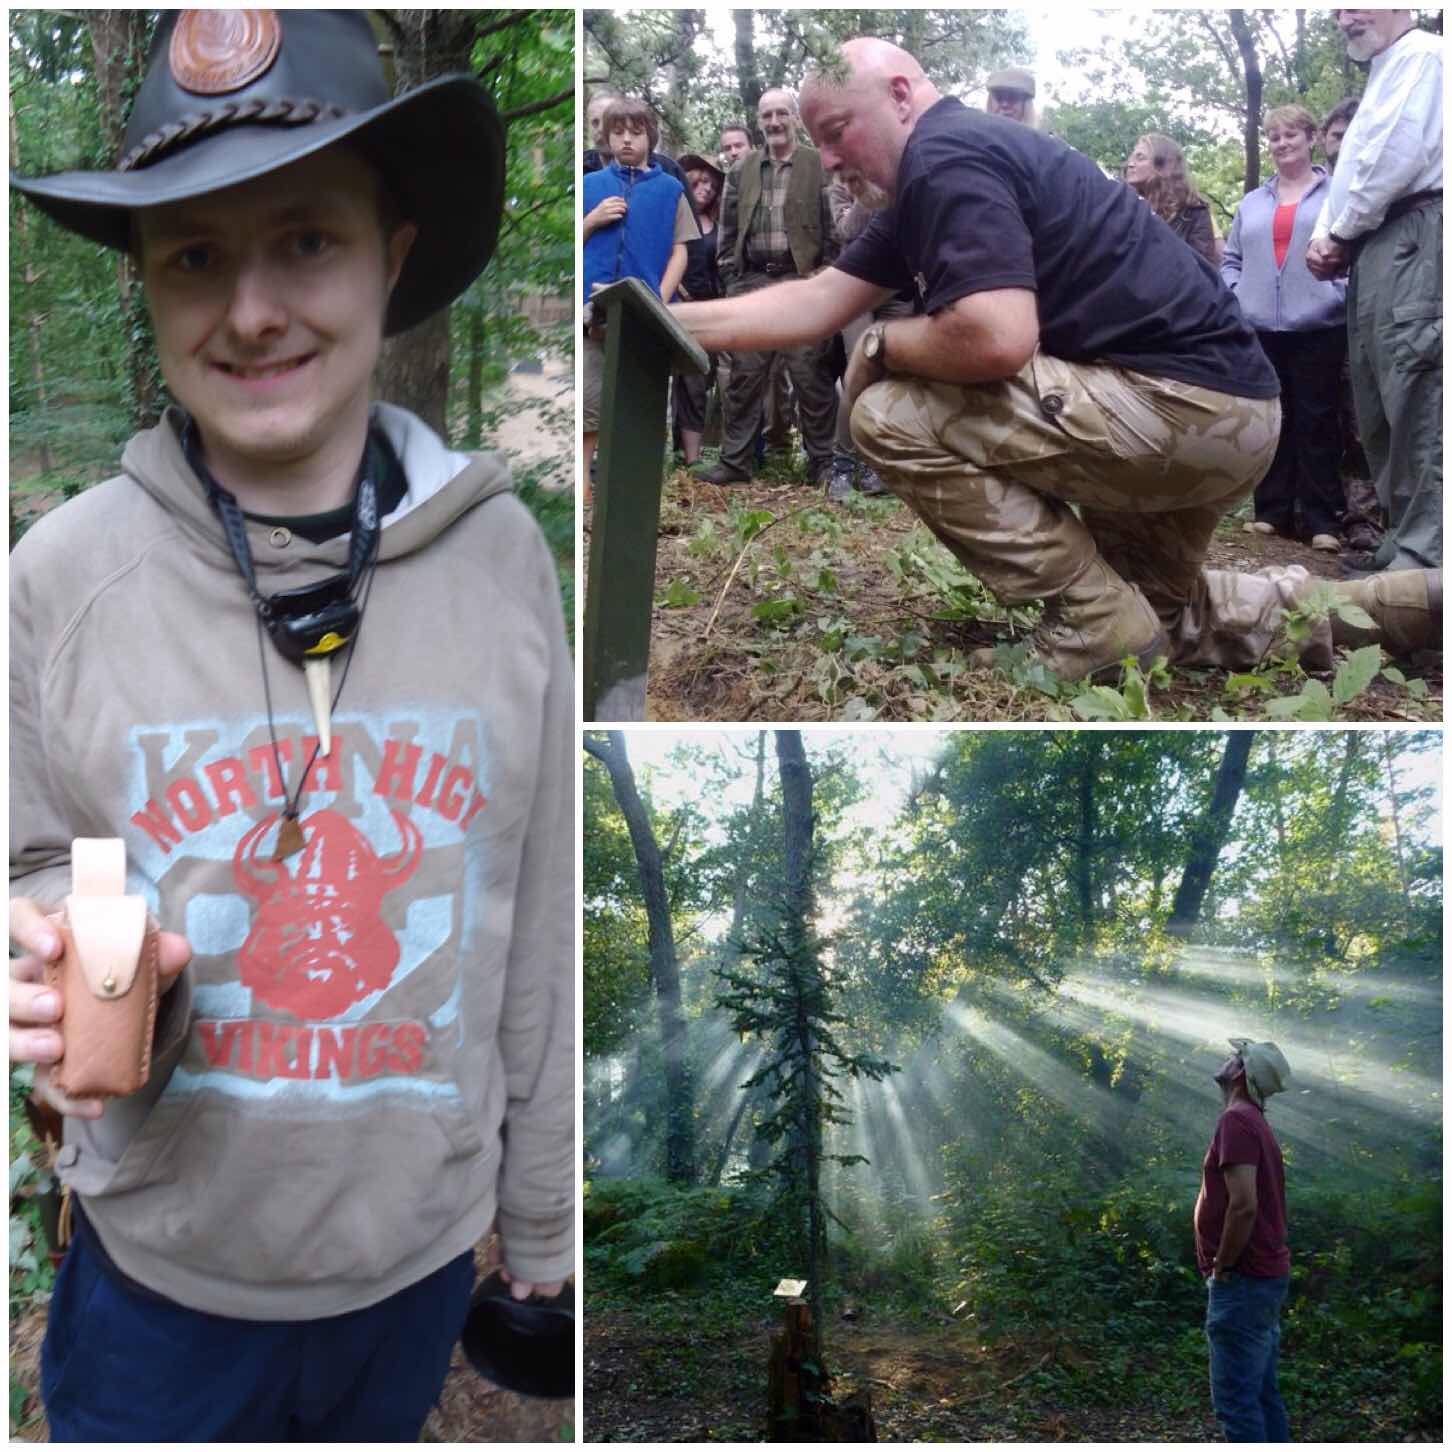
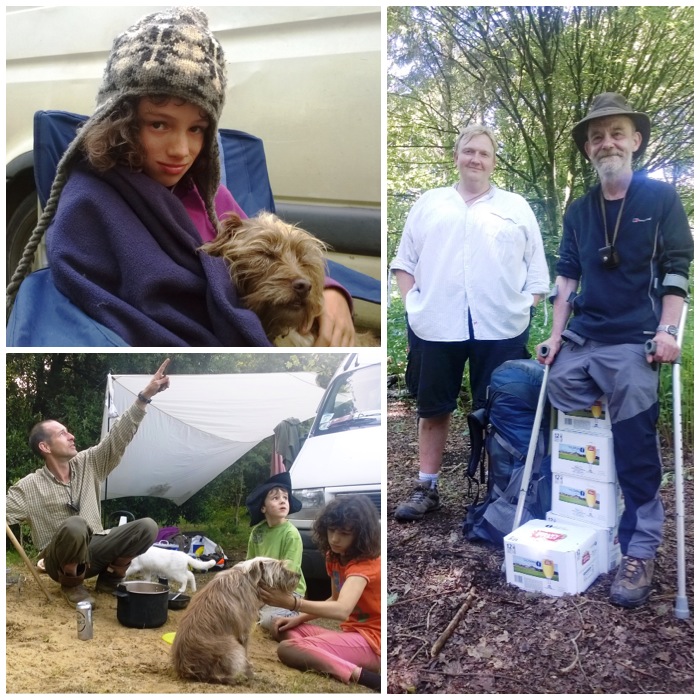
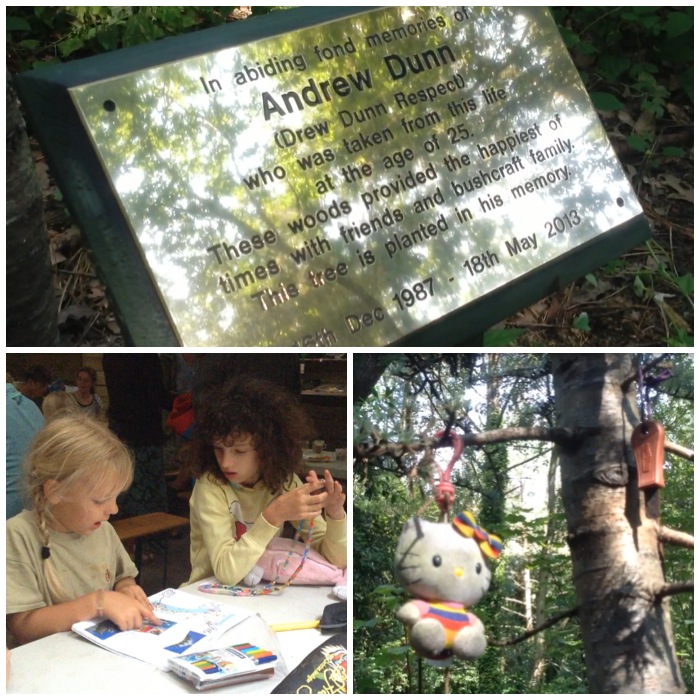
A few years ago one of our regular NC residents Drew Dunn passed away in a road traffic accident. This tragic loss really affected many of us at the Bushmoot as we had grown to love Drew. When I met Drew for the first time his first words to me were ‘Where can I find the Naughty Corner’.
Drew loved the NC so much that Cap’n Badger and Mad Dave organised the planting of a tree and plaque in his honour. The tree and plaque sit just behind the NC where Drew used to camp.
In memory (Bottom right picture courtesy of BCUK)
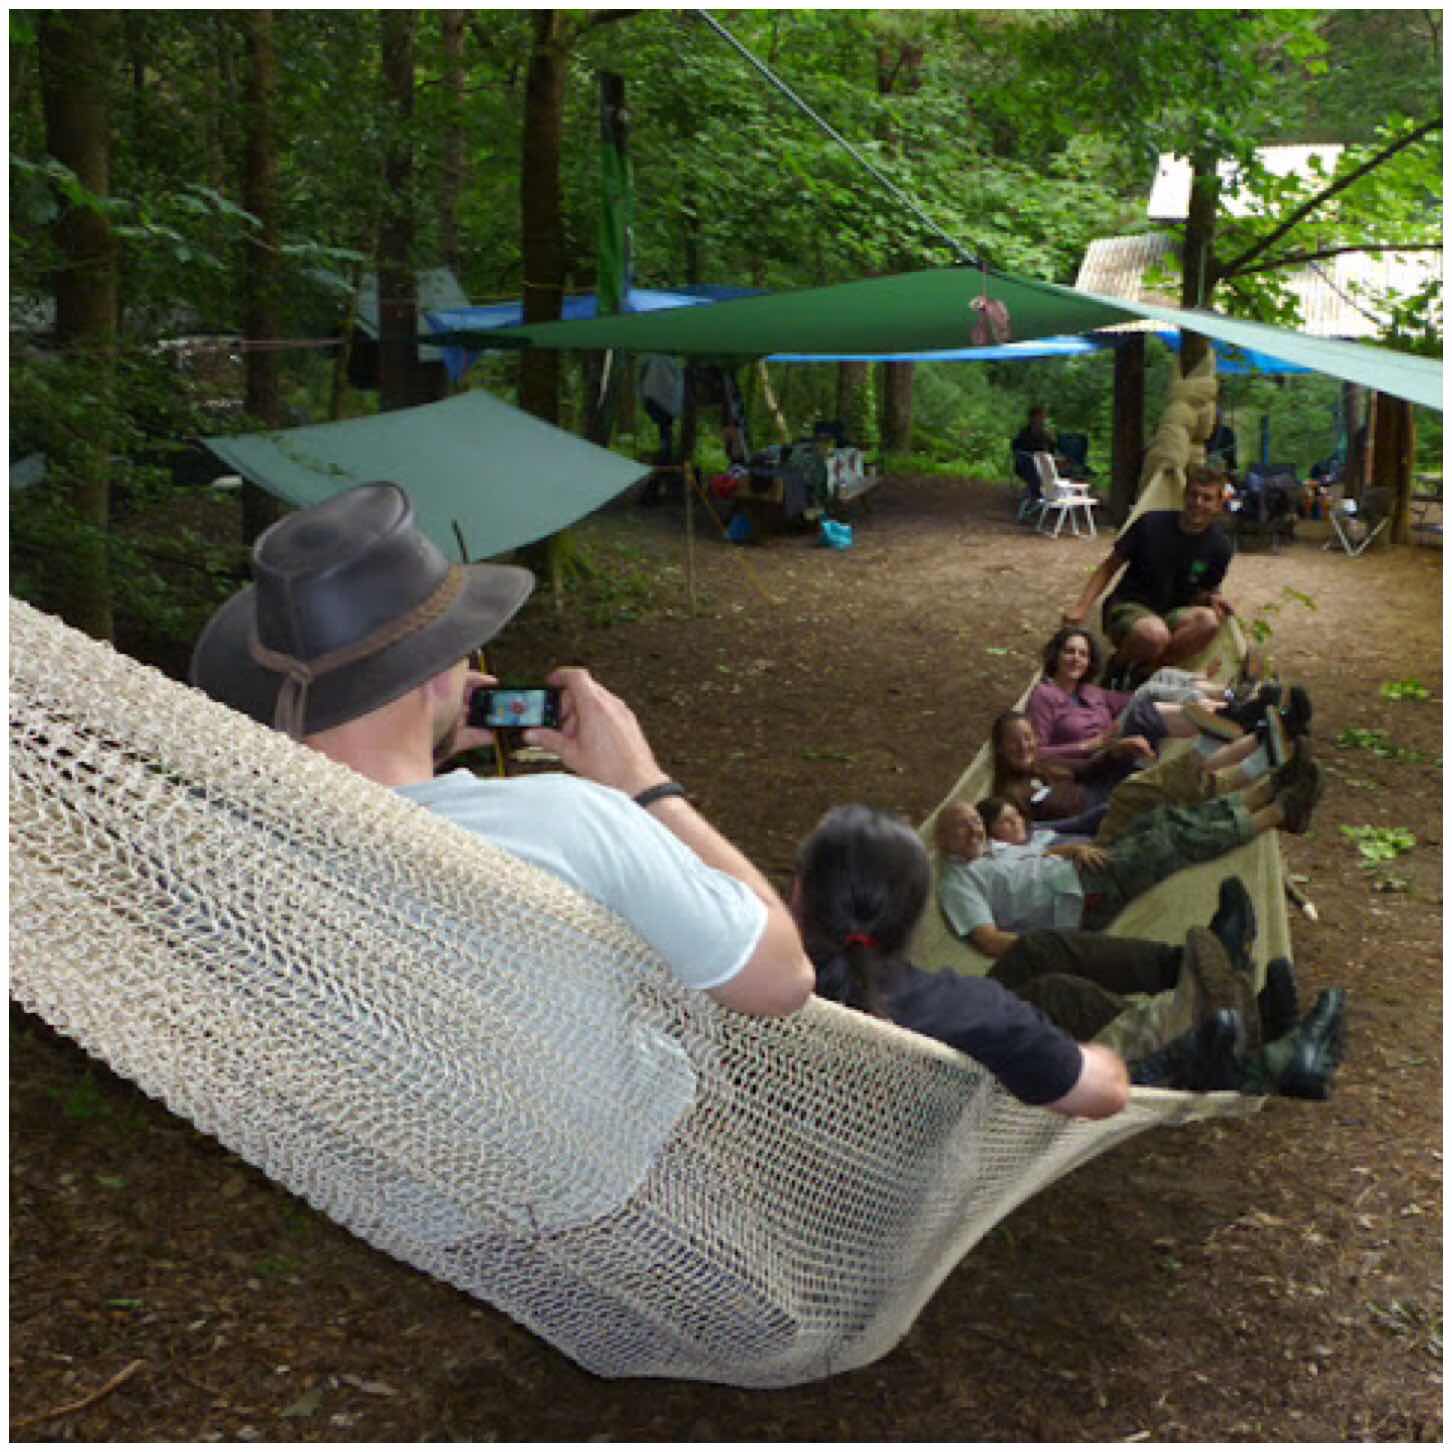
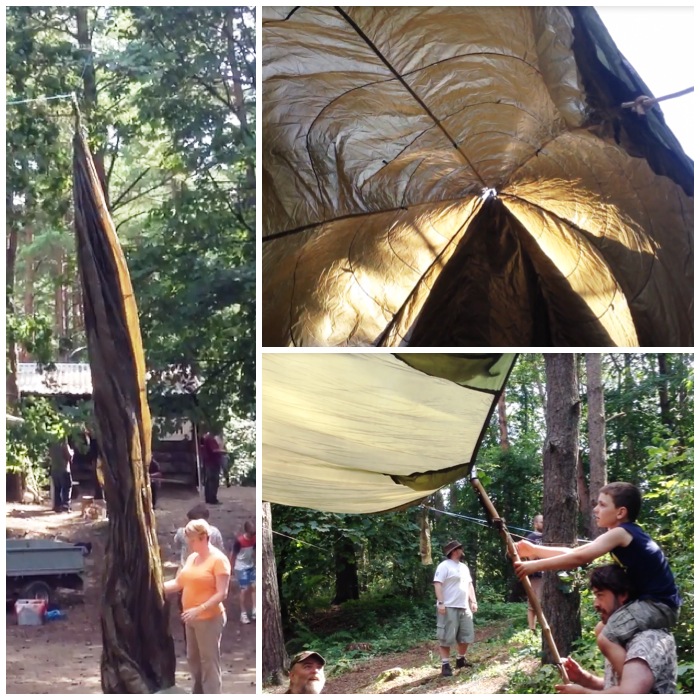
The NC does throw up some strange sights I must admit. A few years ago this massive net was strung up and it was termed the Mammock. I have no idea how many folk got crammed into the Mammock in the end but it proved a star attraction.
The memorable Mammock (Picture courtesy of Mad Dave Delaney)
Each year a fancy dress themed night is run. Last year it was Monty Python, the year before it was a Victorian explorer theme and I think next year it is a horror theme.
Not something I have gotten round to doing but there are plenty of folks who do and they do put in a lot of effort to look the part.
A different theme every year (Top right picture courtesy of Susannah Parsons)
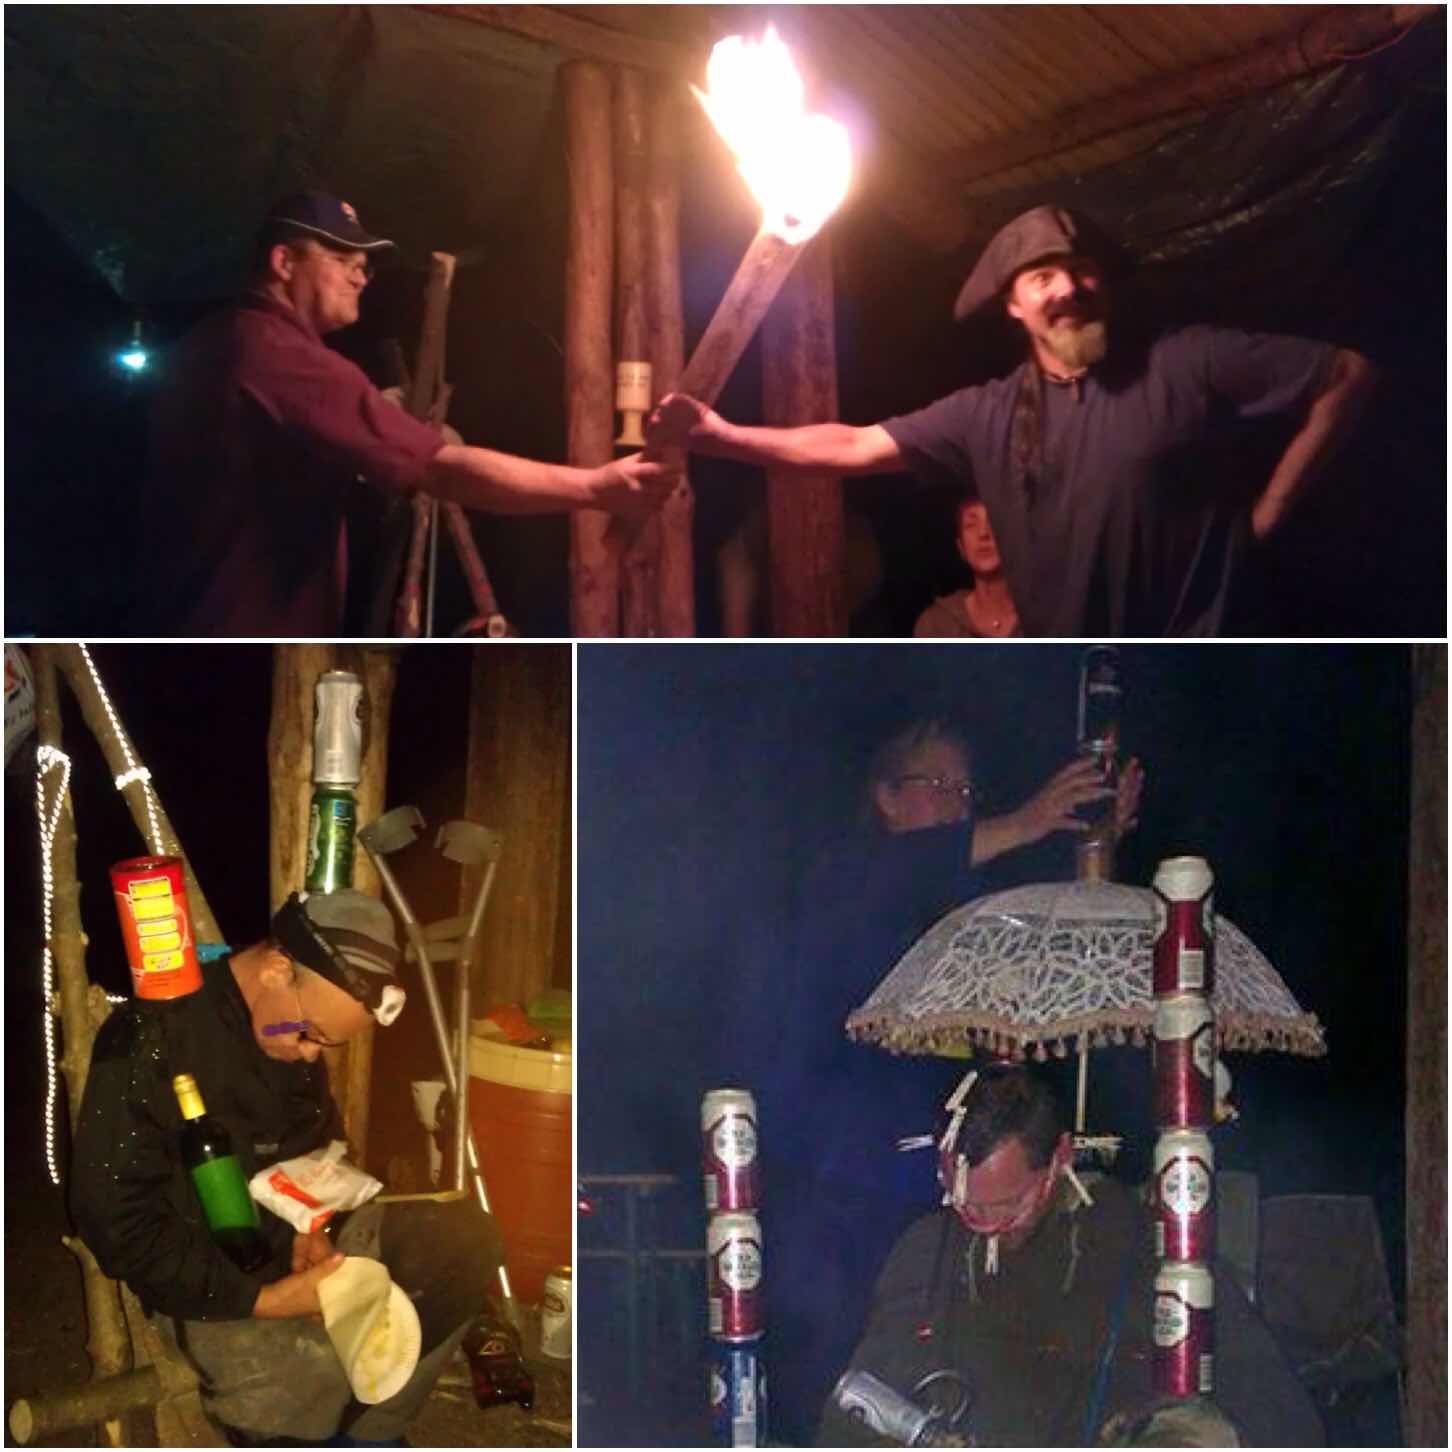
As the evening gets on though the reason why the NC corner gets its name starts to become apparent. It might be that you find yourself getting covered in lots of little clothes pegs if you are not careful, you may inadvertently get passed the bottle of chilli vodka, or you may get buckarooed if you fall asleep.
There is an skill to buckarooing as you need a steady hand. The poor soul who is asleep has tins of beer (empty) and pegs (and other adornments) heaped on top of them before a picture is taken. Everything is then taken away so that when the poor soul wakens up they are none the wiser until they see the picture the next day.
It can get naughty (Bottom right picture courtesy of BCUK)
I appreciate that the NC is not for everyone as it can be a busy and noisy place however I personally like to spend an hour or two of an evening there.
To me it is one of the highlights of my year where I can relax and have a bit of fun while catching up with my friends.
Light in the night
There are plenty of campfires to visit at the Bushmoot where you can sit and relax and chat. The NC is just another one of them however it is one of the livelier ones.
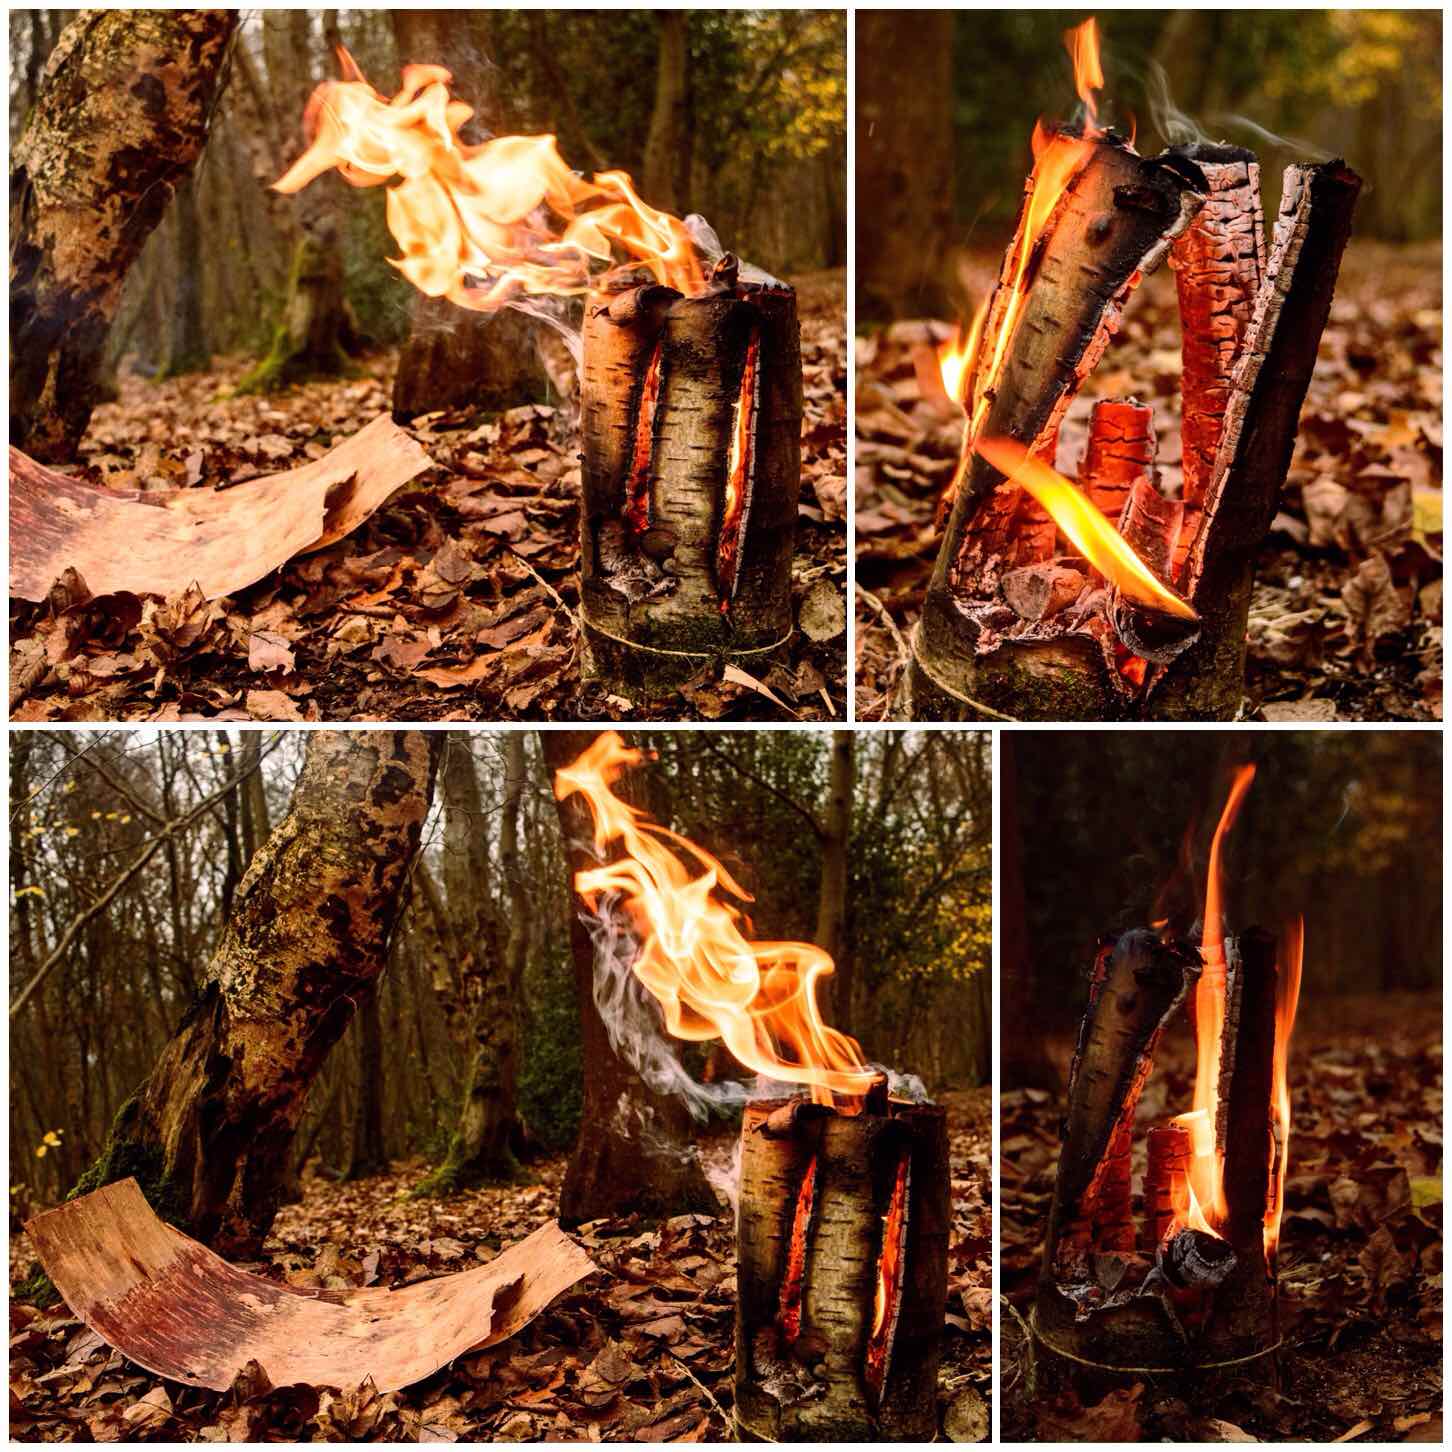
It has been a dream of mine to one day head on over to Scandinavia to practise my bushcraft skills, particularly in winter time. Time and money have so far not allowed me to do that however that has not stopped me from researching some of the ways of lighting fires in the snow or wet conditions.
I have seen many a Scandinavian (sometimes referred to as Swedish candles though Finnish seems the origin for many ) candle at bushcraft meets that have been carved using a chainsaw however I do not own one. My research showed me that chainsaws were not required and there are many other ways to light a fire in the snow or on wet ground other than candles, such as long fires and log rocket stoves.
This post brings together all my posts over the last couple of years on this subject. You will find if you click on the title for each section it will bring you to a more detailed post on making these fires.
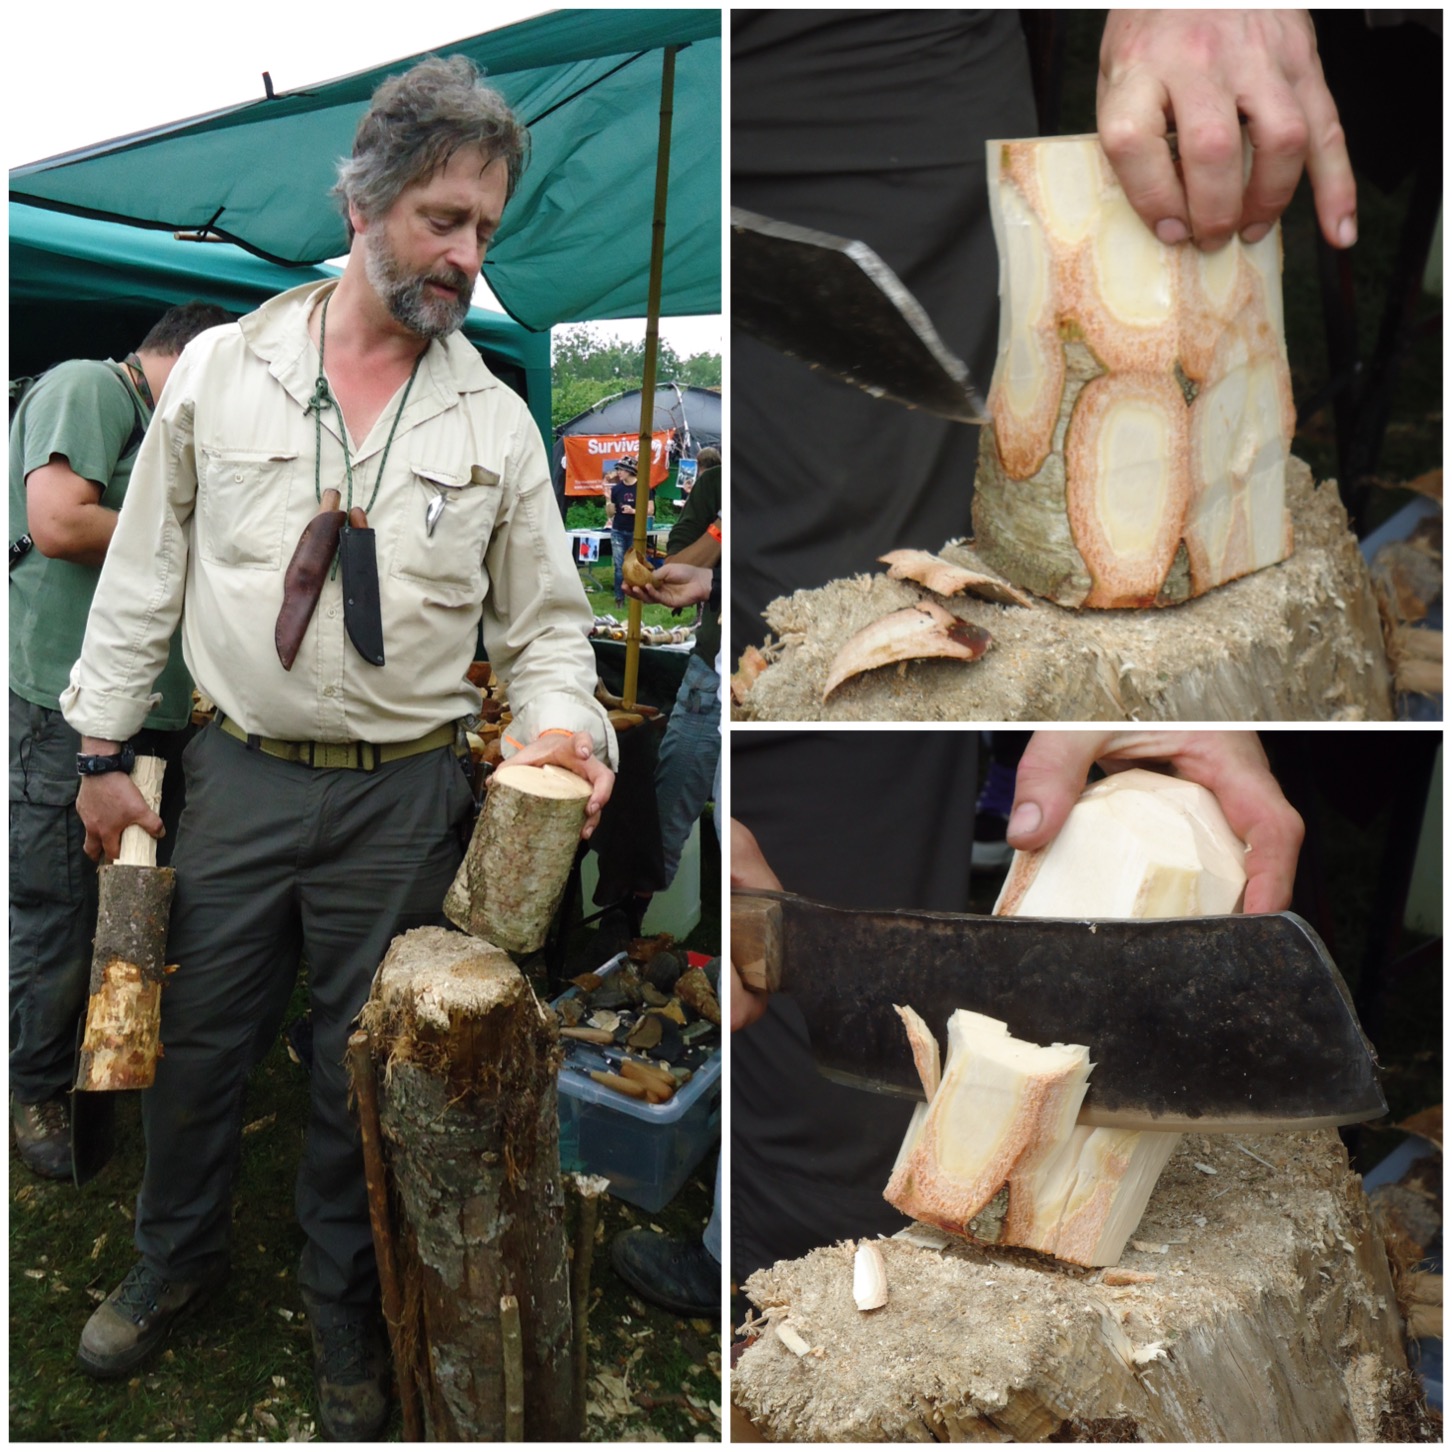
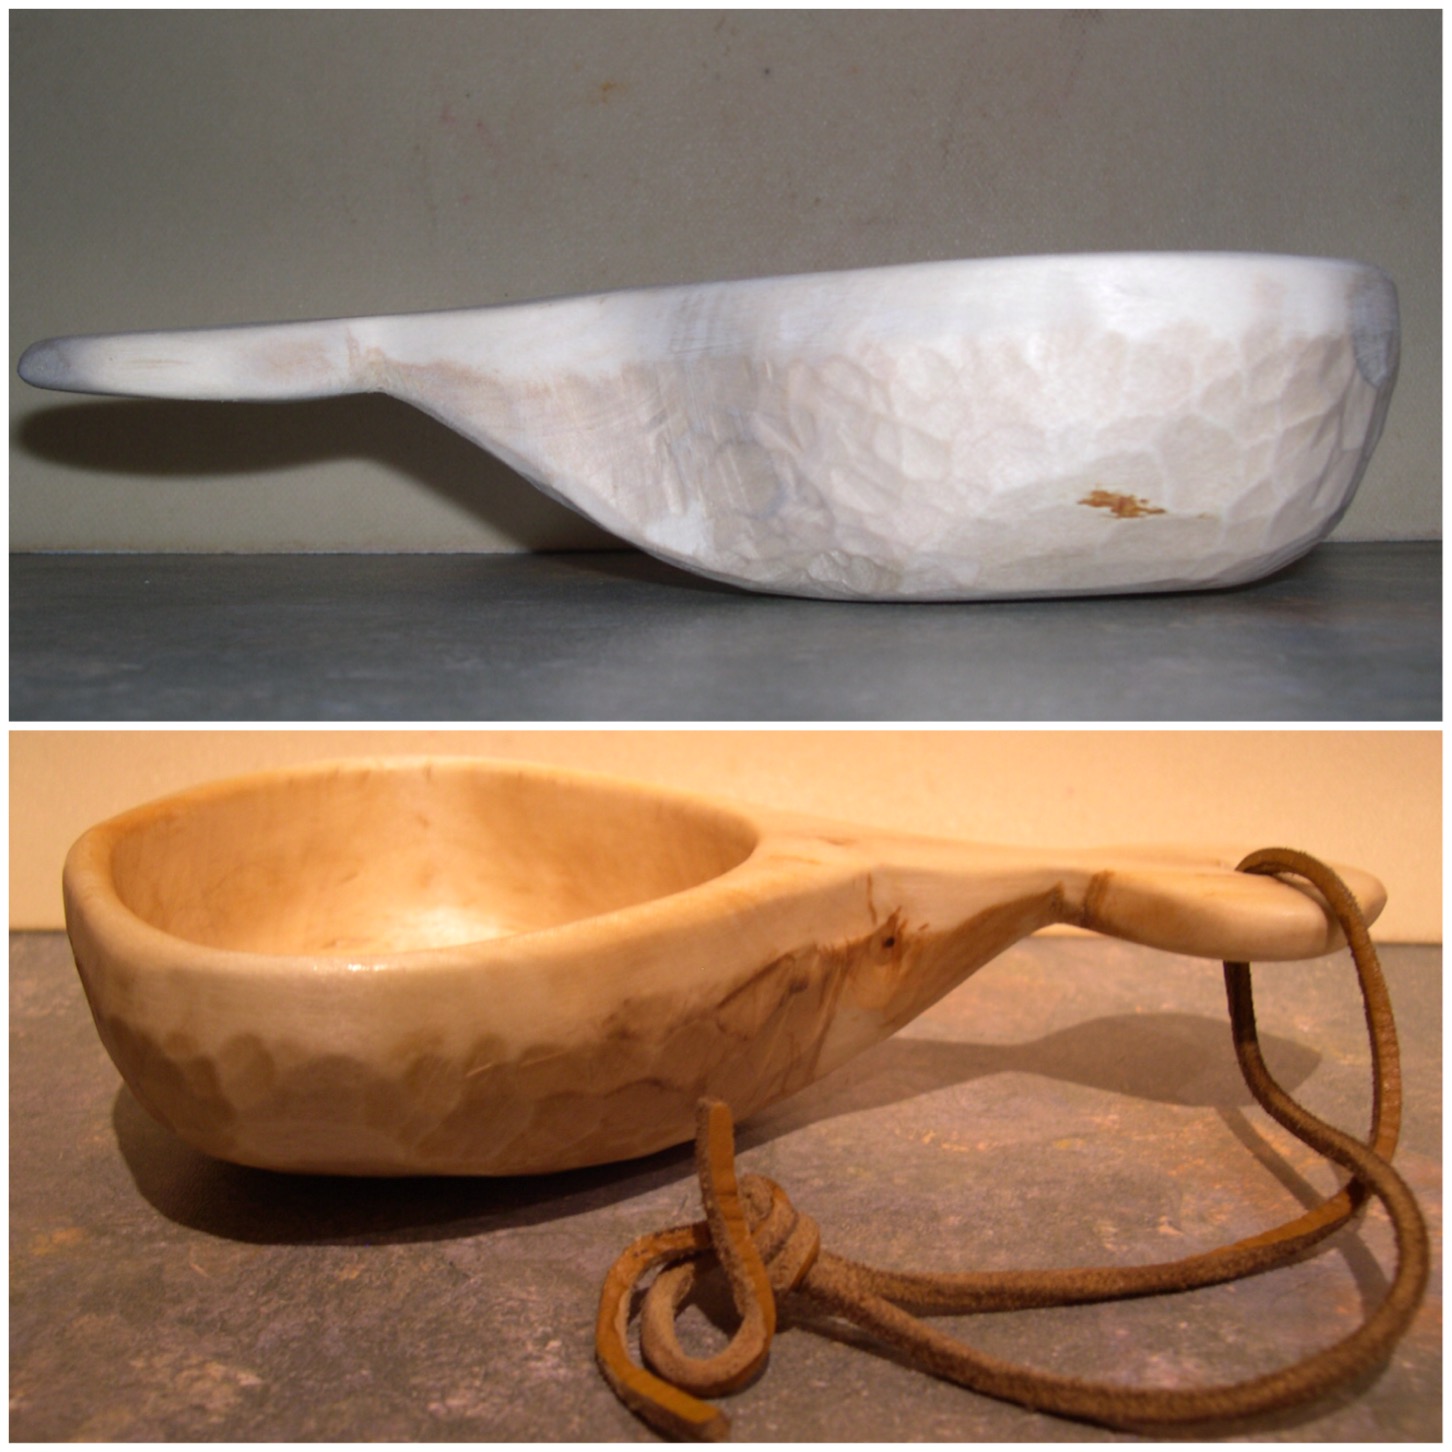
Trawling You Tube one evening a few years ago I came across a video titled the Log Stove from Hobbexp. Up until that point I thought to make a candle you needed a chainsaw. Hobbexp showed me that you could make a perfectly good candle with just an axe and some kindling.
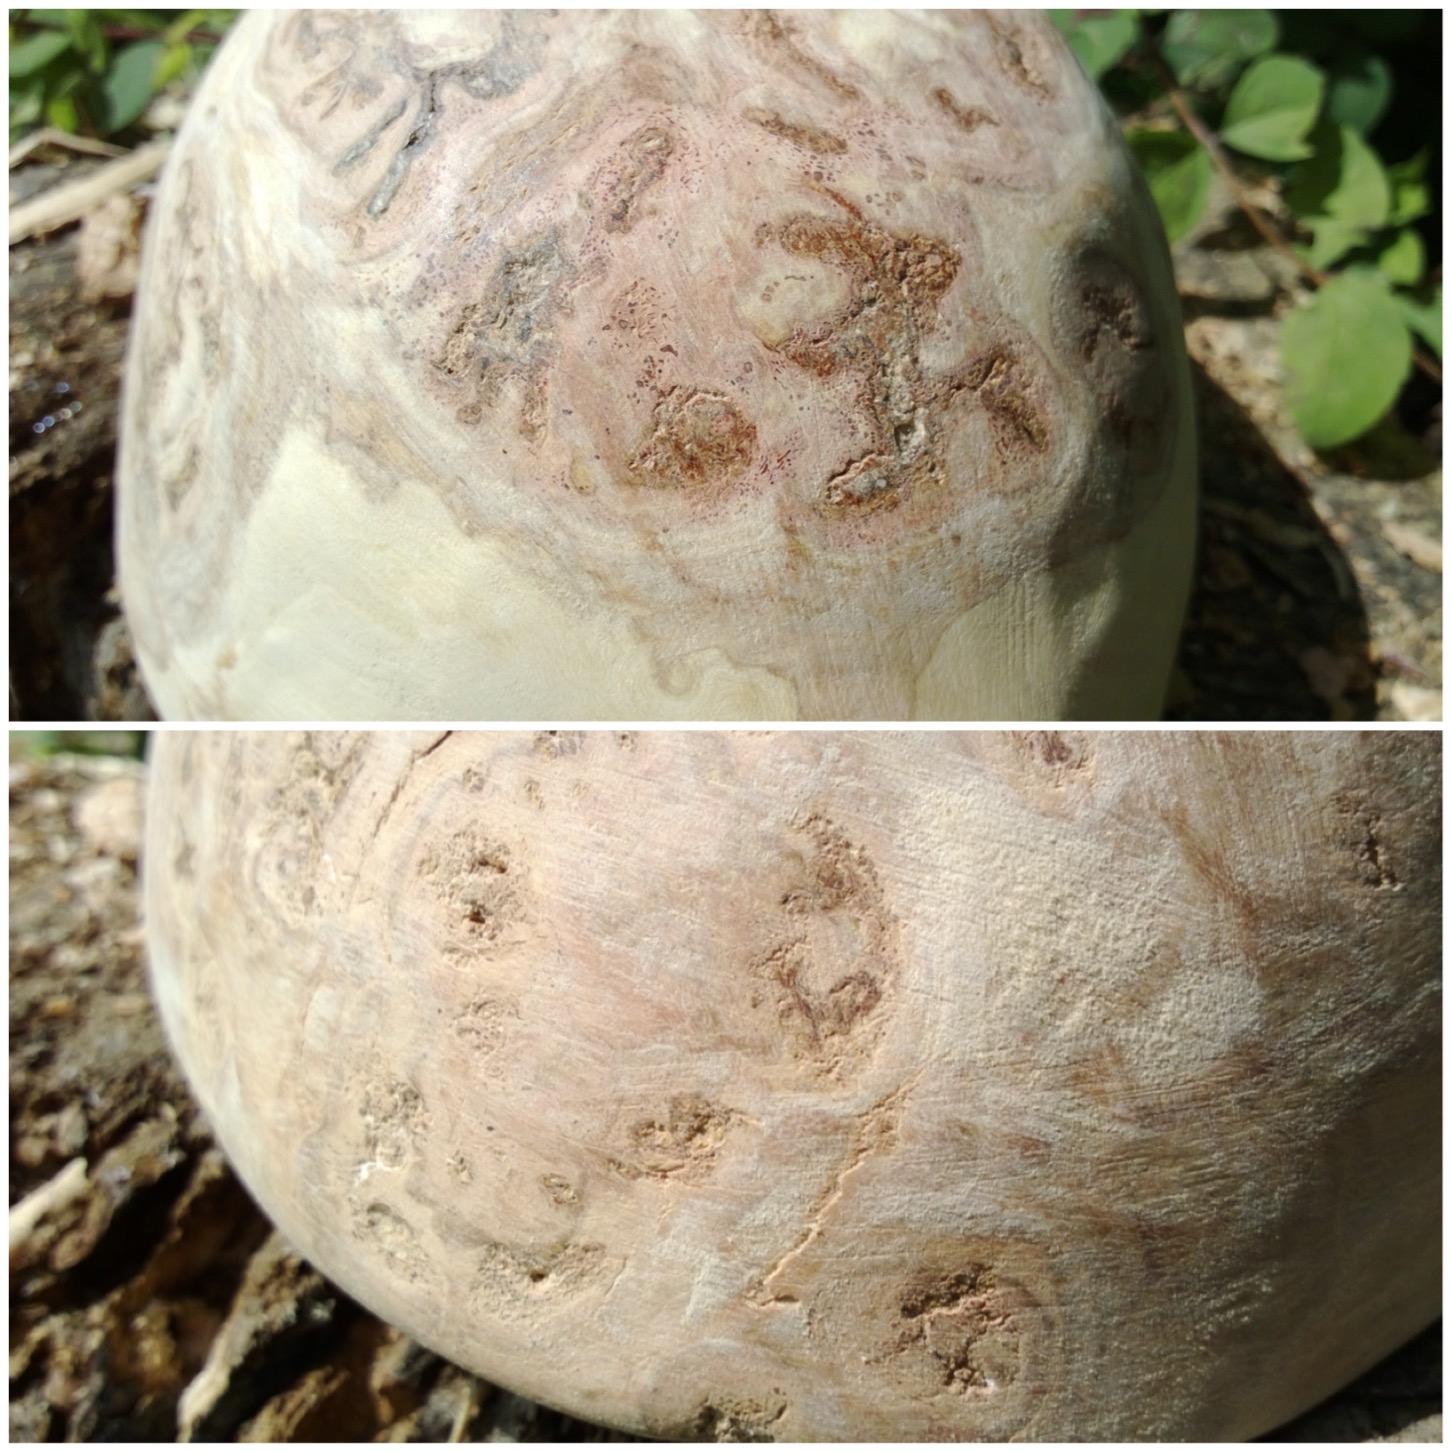
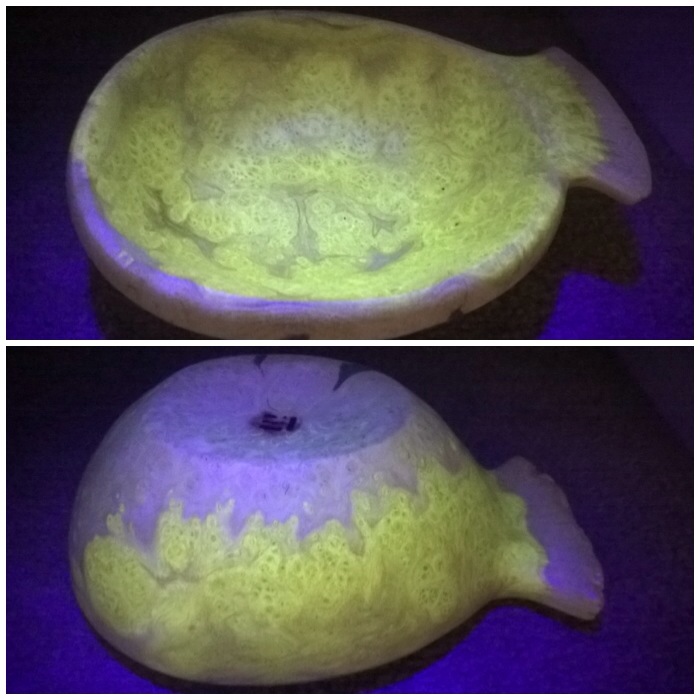
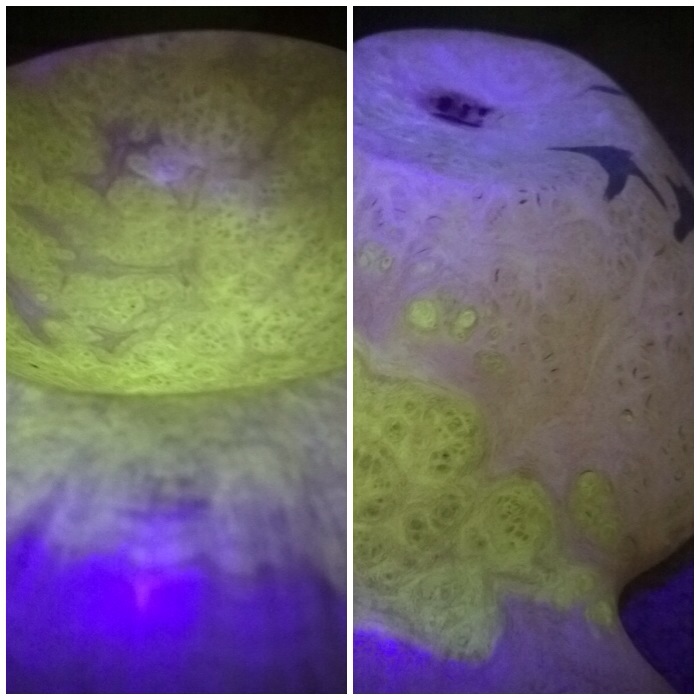
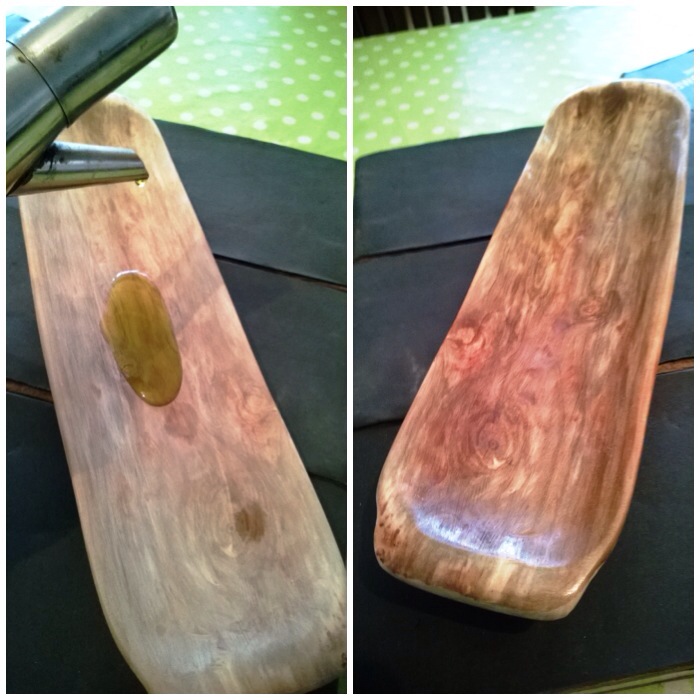
The one below was made using a birch log and stuffed with birch bark and spruce resin (and a couple of battoned-down pieces of green wood to keep the splits open). These candles can burn for a good couple of hours, are easy to set up and look great. I have no idea how many I have made over the last couple of years.
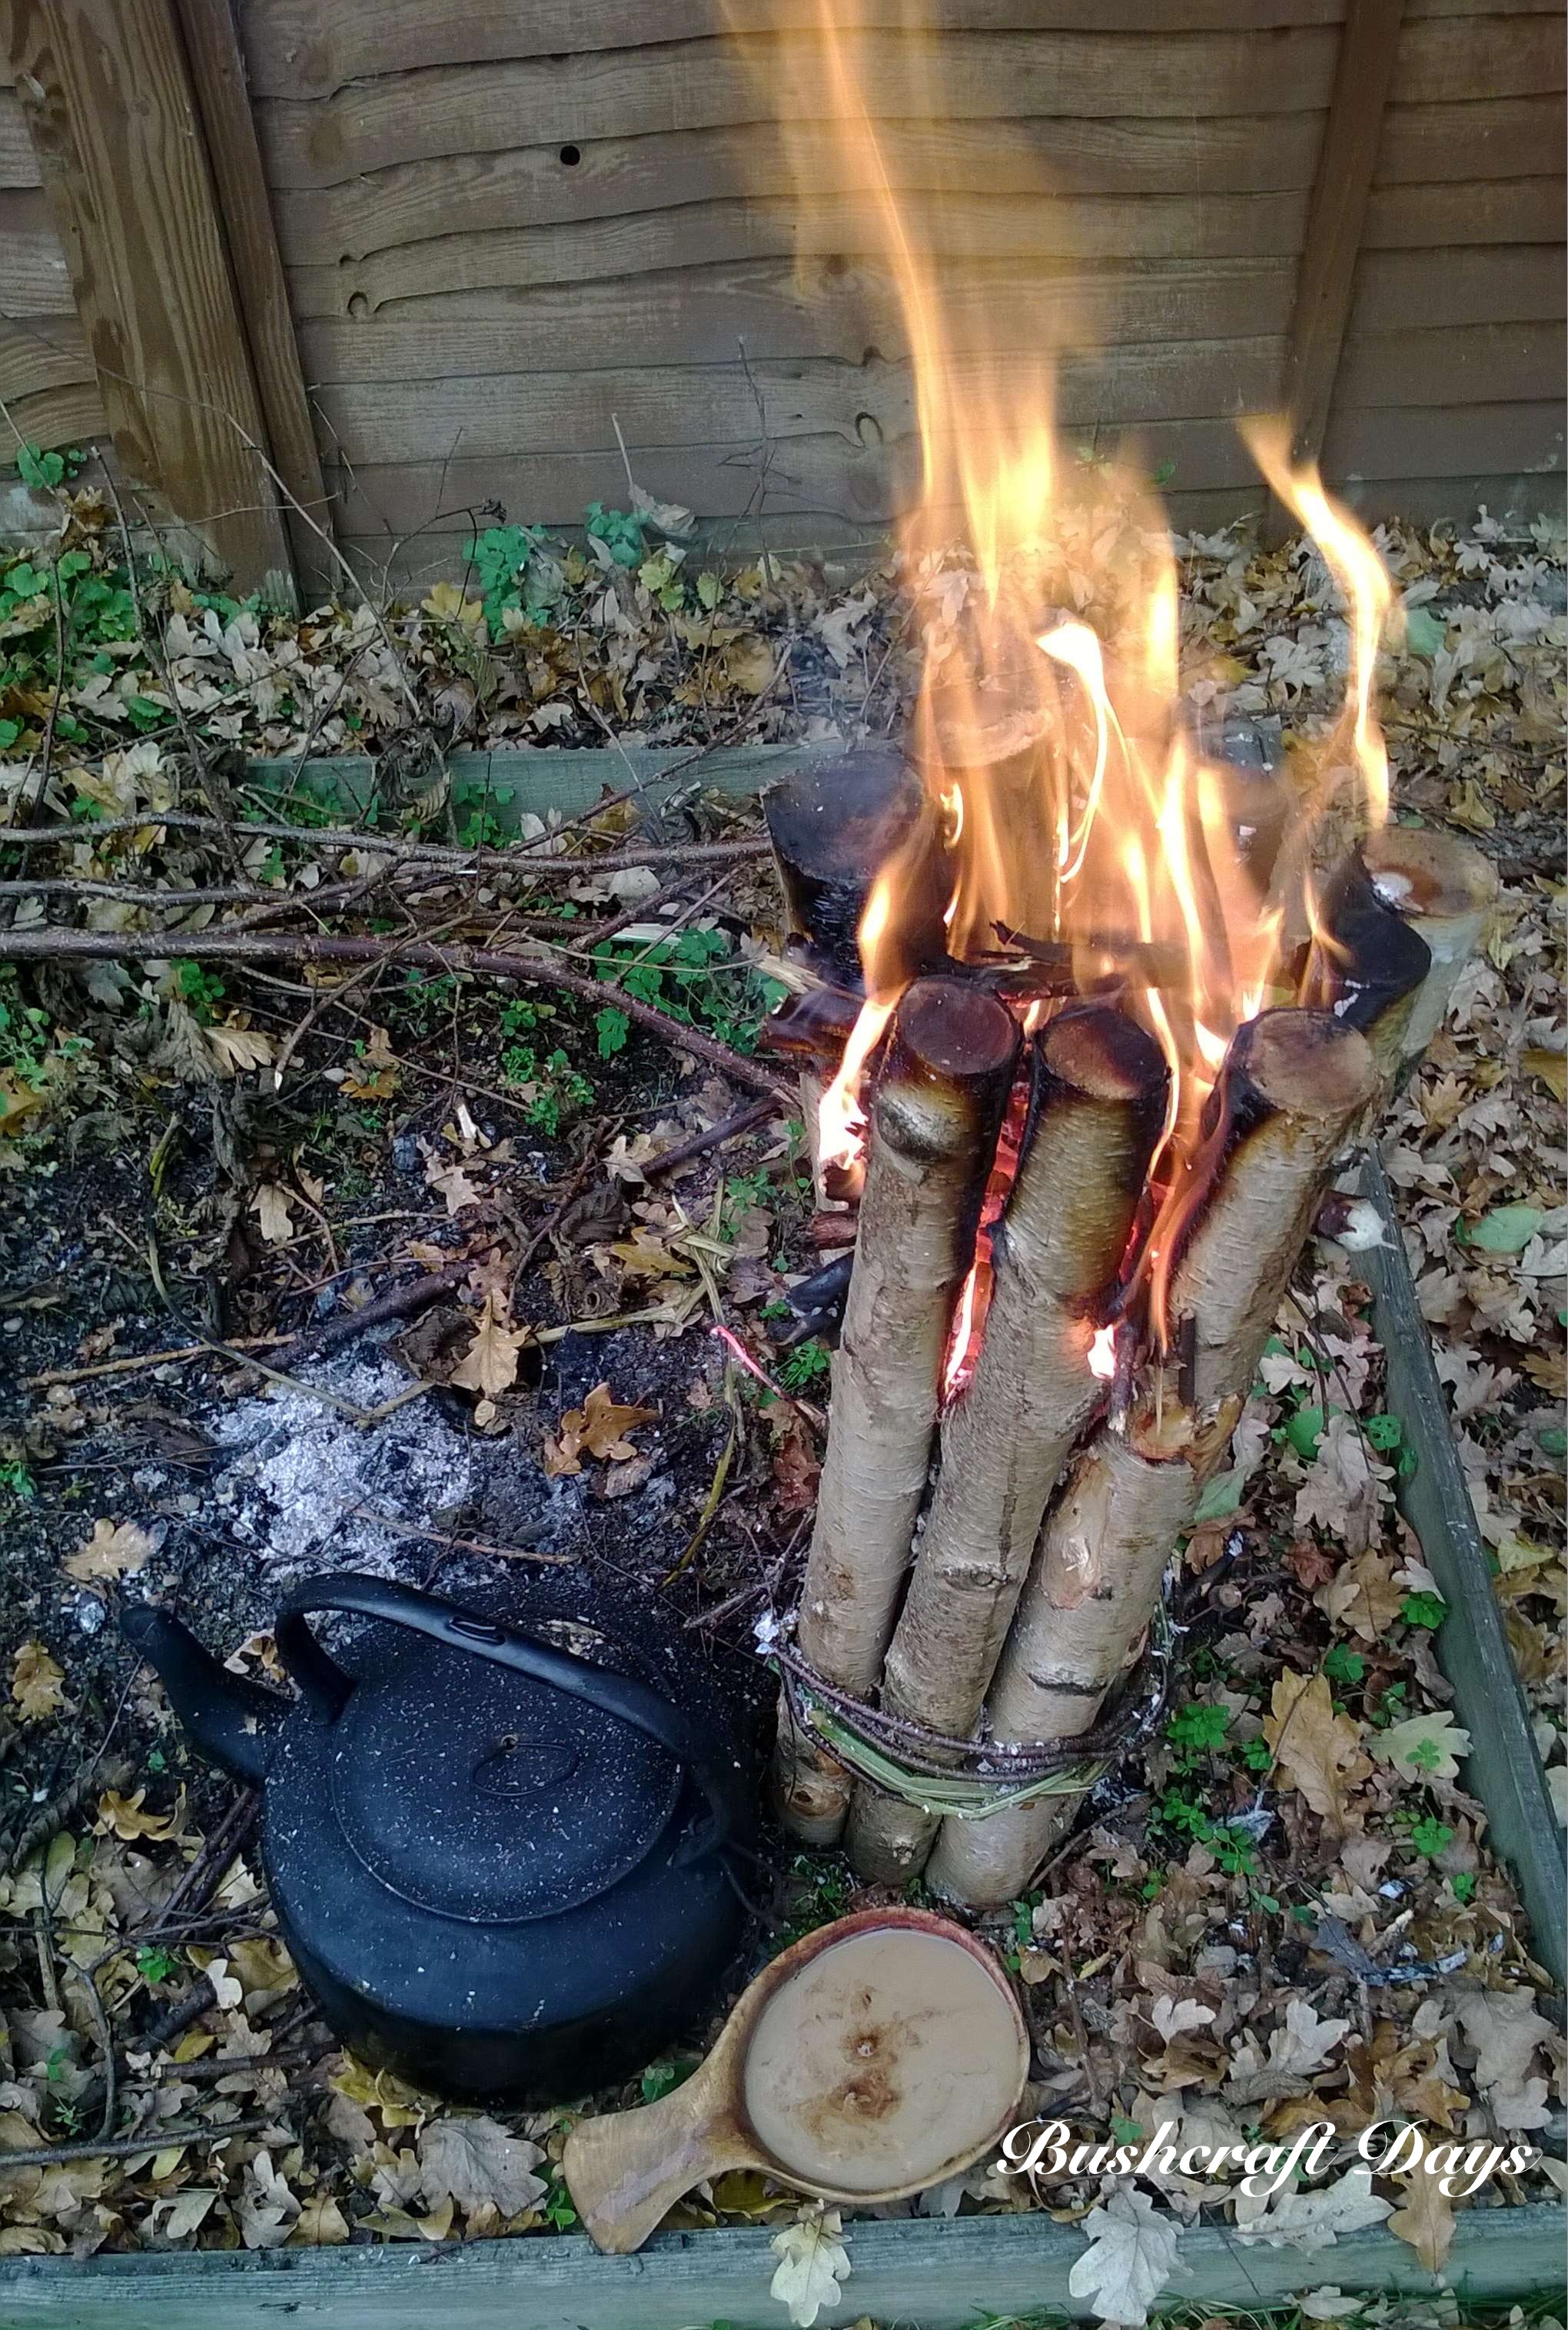
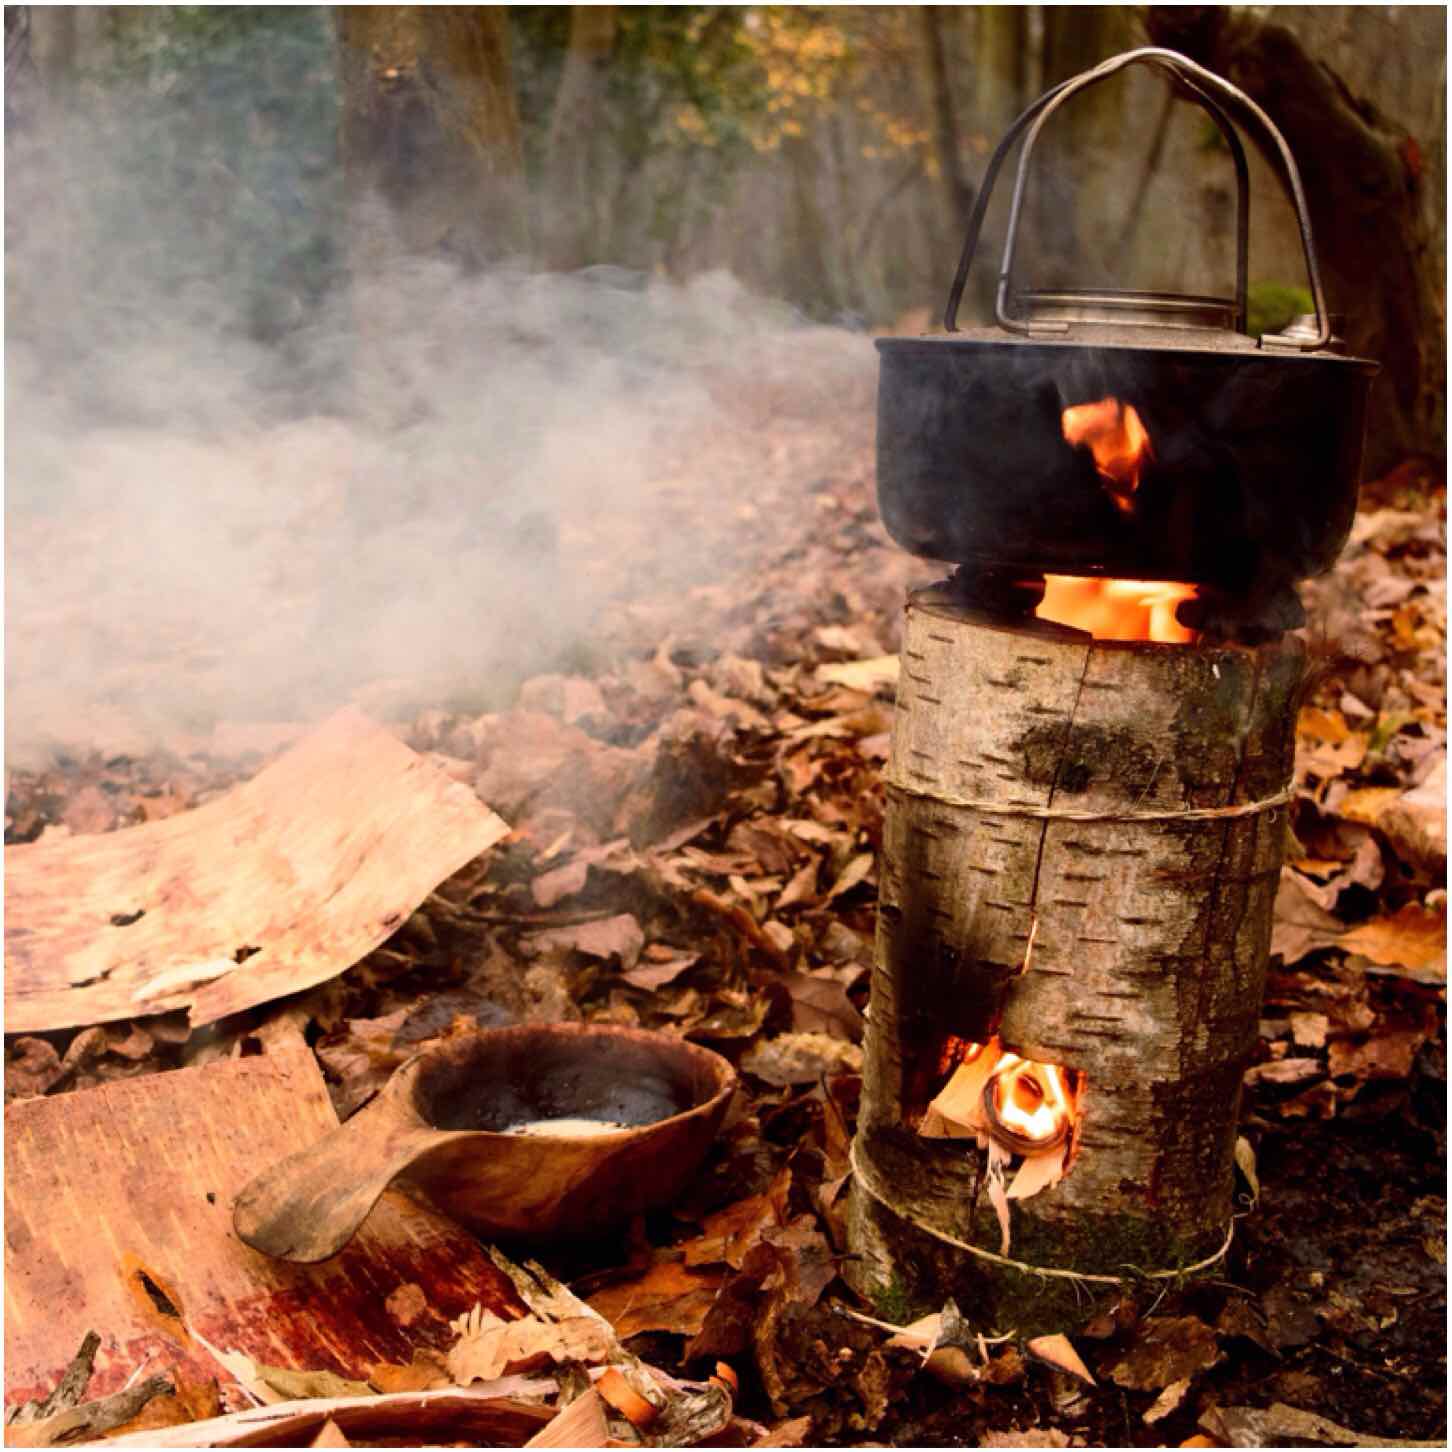
I got another idea for a candle during my research once again from You Tube from ‘bushcraftmyway’ titled the swedish torch/stove – my way. I liked this stove as it could be made from damp wood (ideal in the UK).
I tied some seasoned but damp birch rods together with bramble strips and willow bark then stuffed in tiny pieces of kindling and Vaseline-coated cotton wool. I decided to use the Vaseline and cotton wool so as to give the damp wood a chance to dry out.
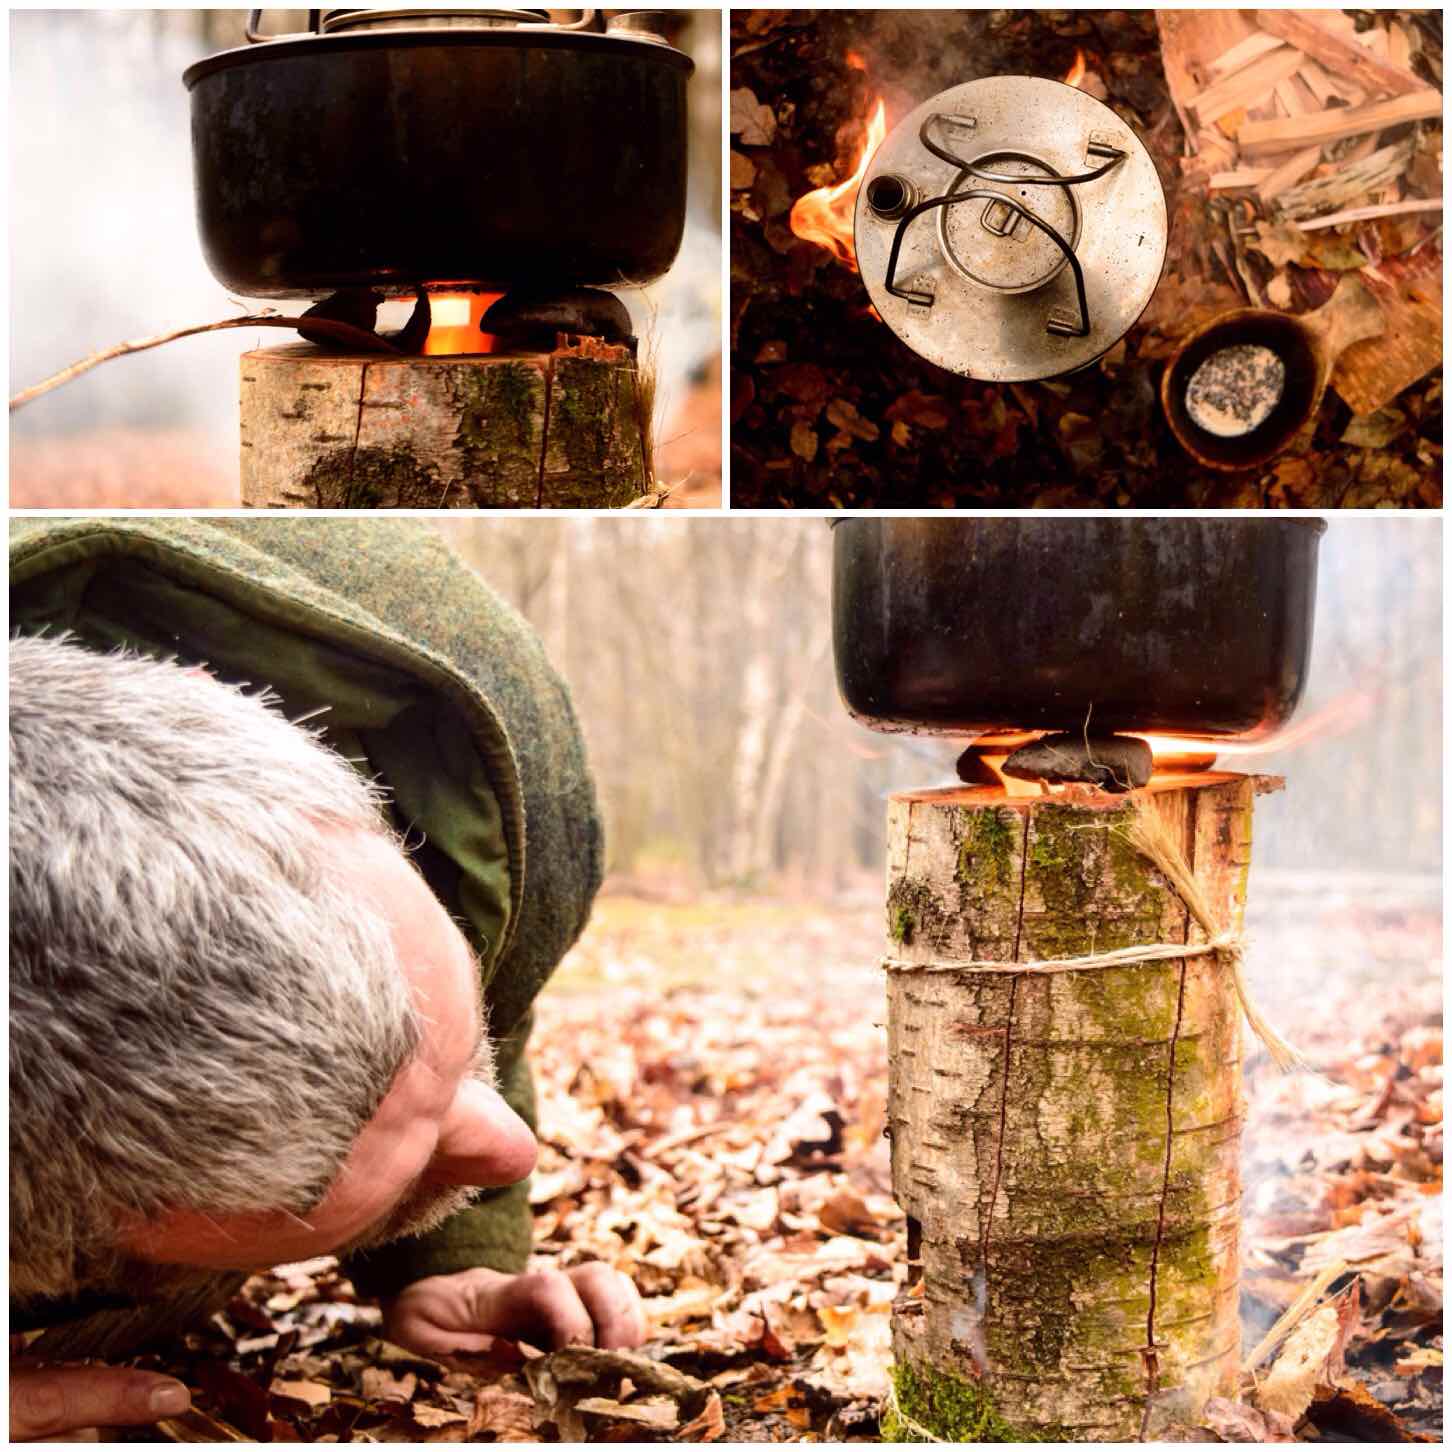
After a bit of tender care the wood started to dry out and I easily managed to boil a kettle on it. This is an excellent way to get a fire going in damp/wet conditions. The remains of the candle after it had burnt down provided me with a great bed of coals to maintain a more traditional firelay.
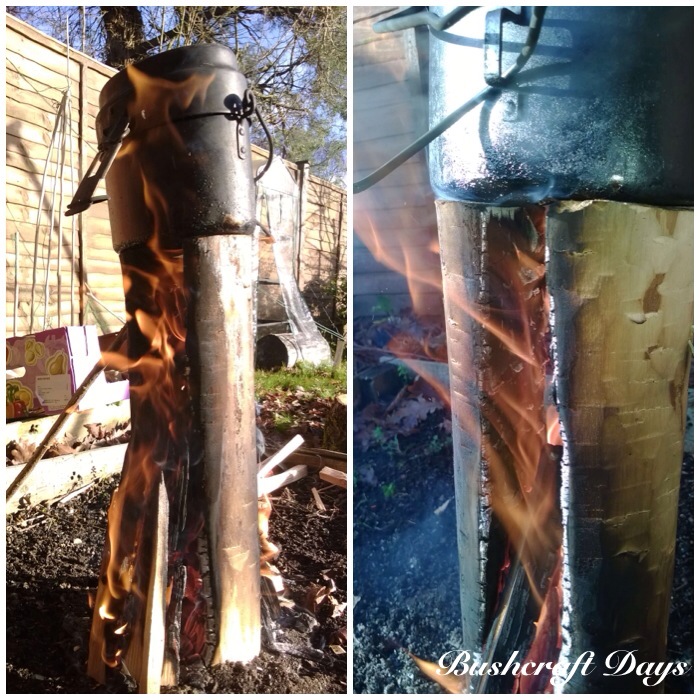
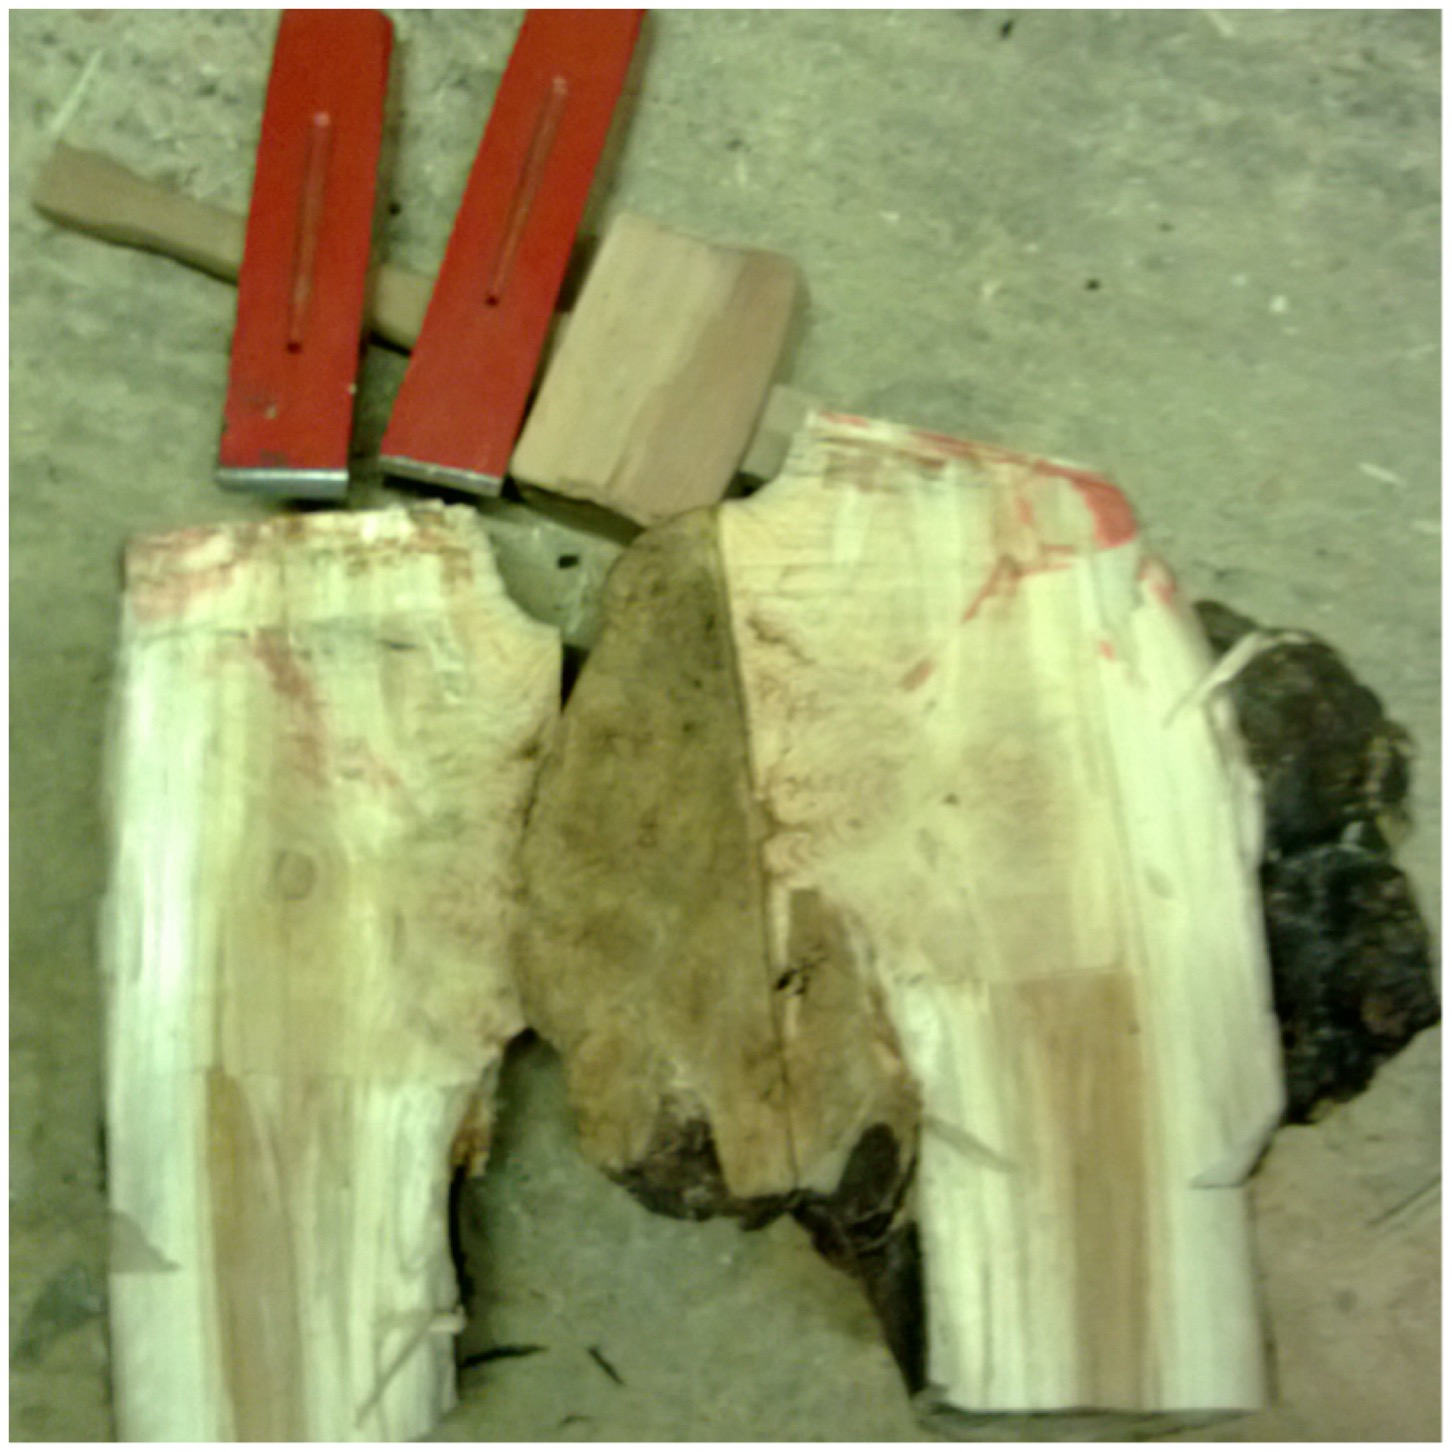
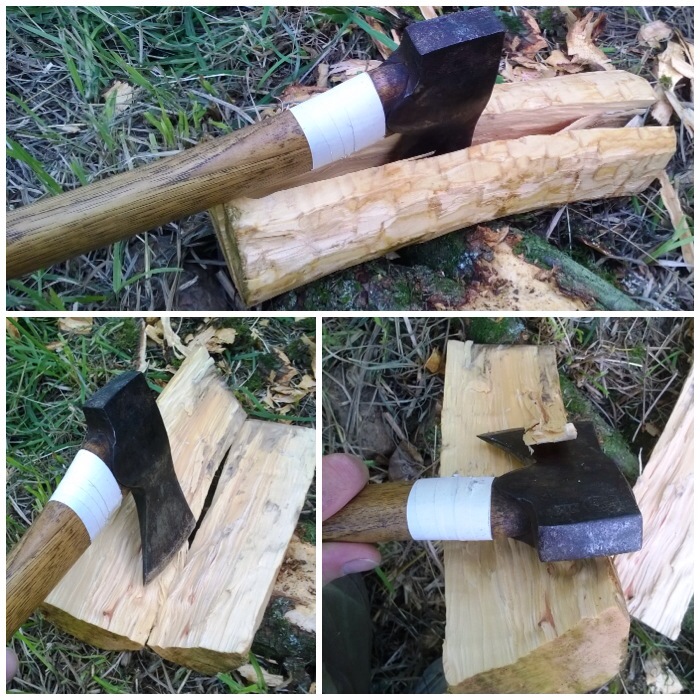
All this research led me to compare this rod style of candle with the more commonly split log candle. I set up the rod candle this time with very dry rods and split a spruce log with my axe into a number of wedges.
I tied them all together with natural cordage and lit them. The rod candle took off very quickly as it was stuffed full of very fine kindling however the split log candle lasted longer as it took longer to fully get going.
Again I managed to easily boil a kettle on both of these candles. Both are simple and easy to make.
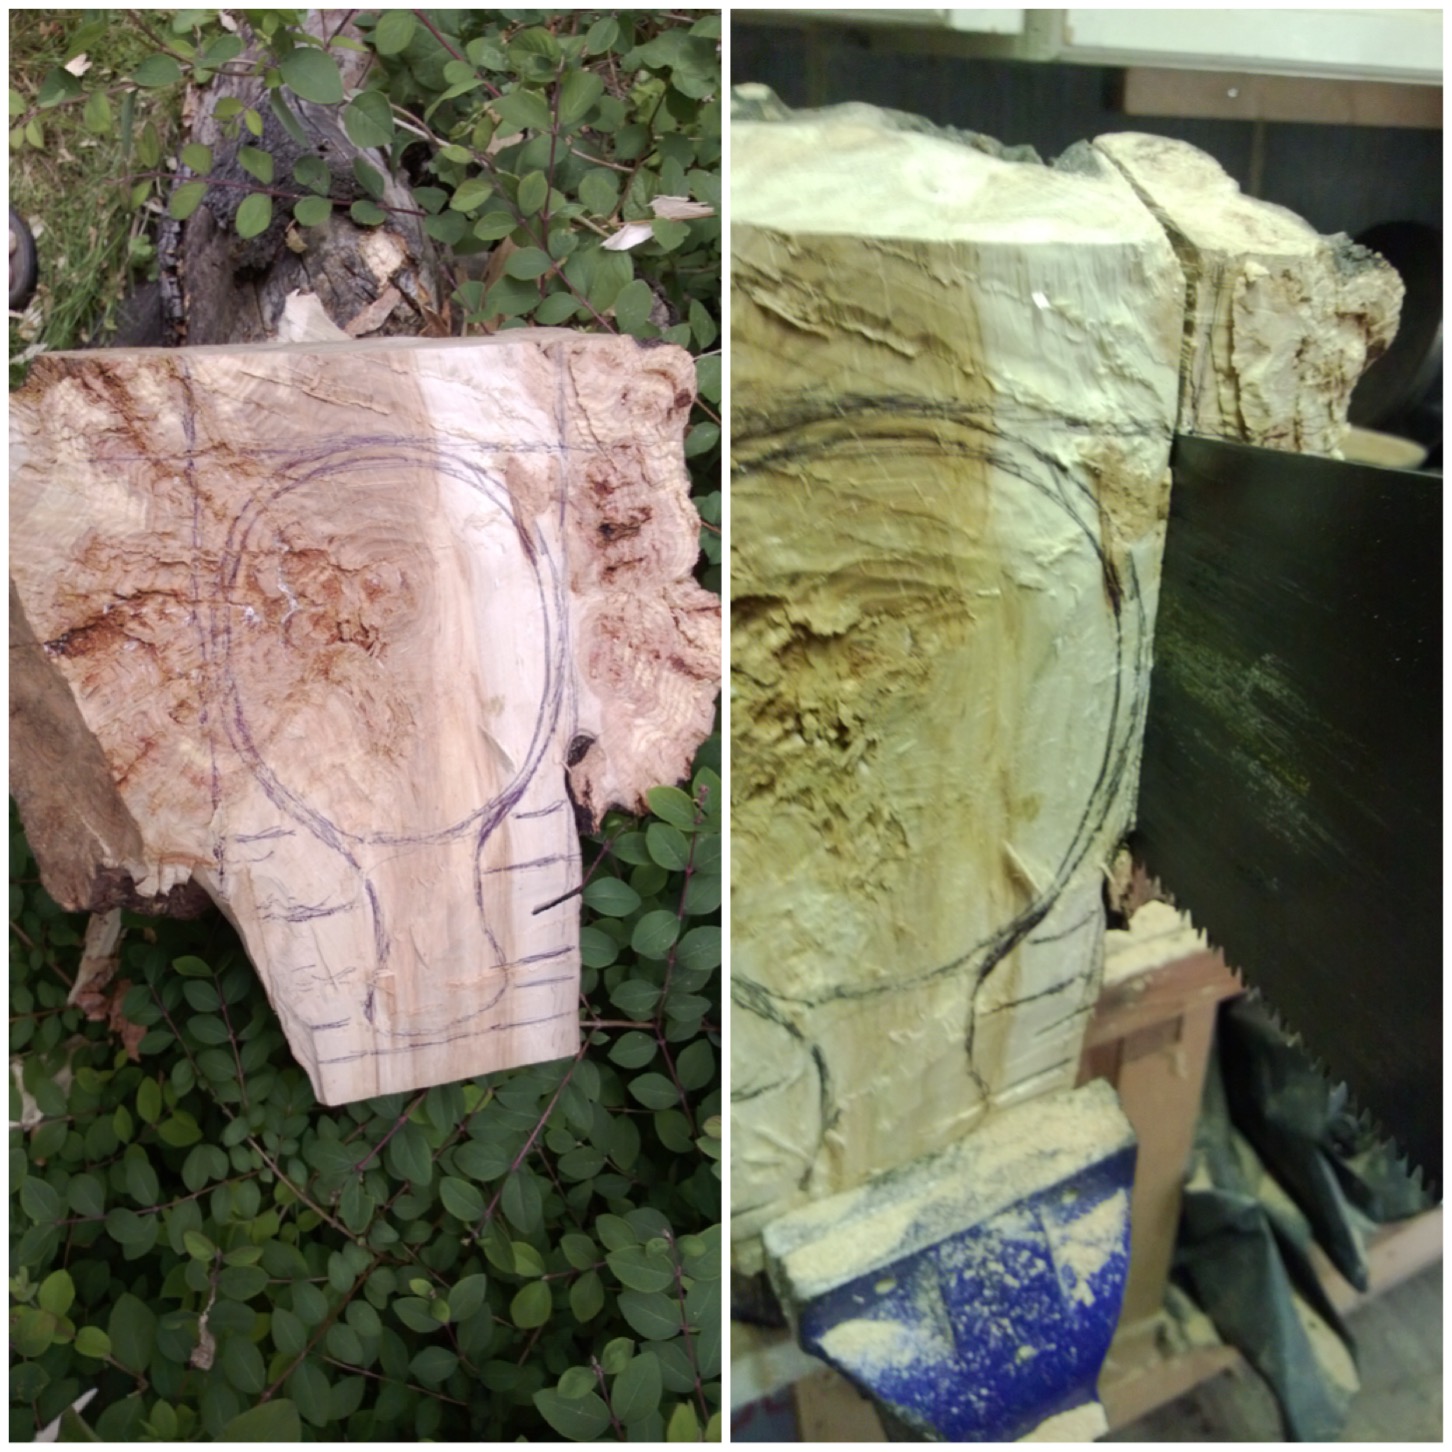
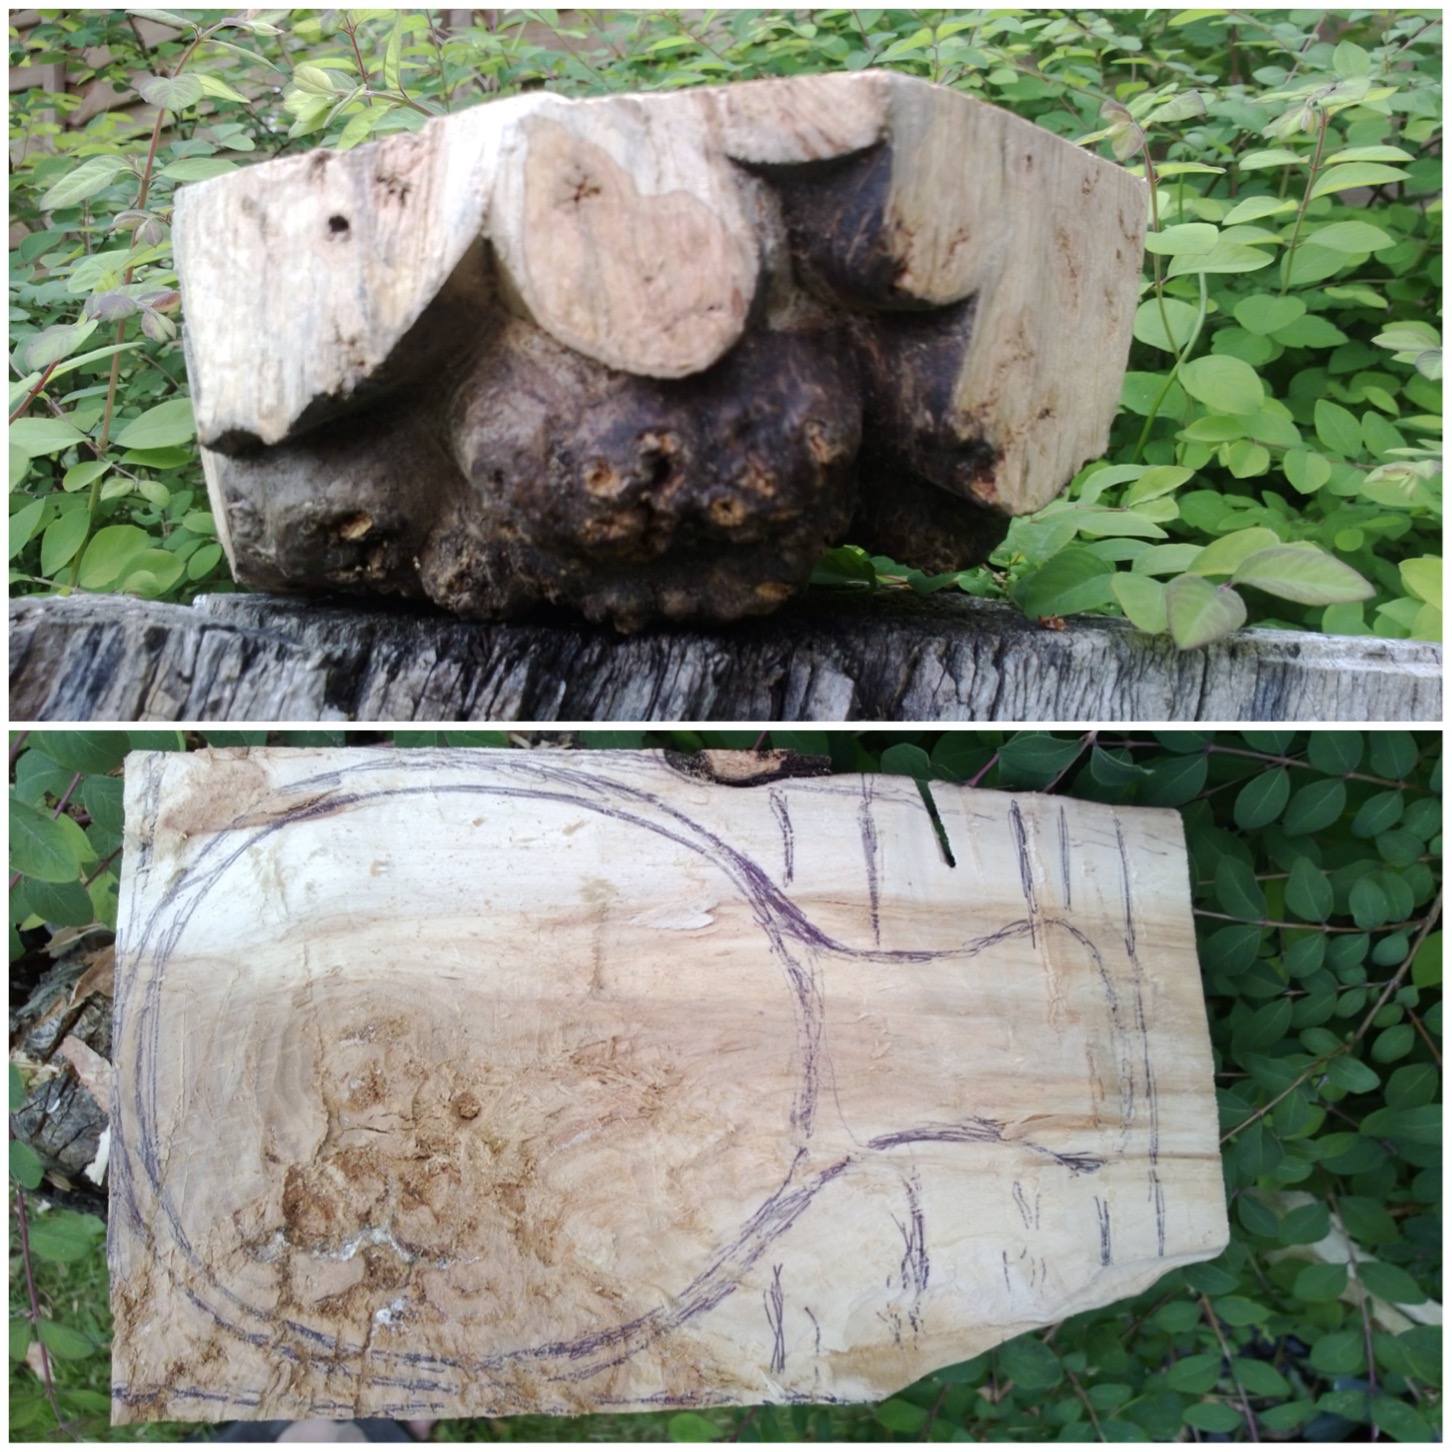
The idea for this one came from Perkele’s Blog Spot but the post is no longer available. I think this candle is regarded by many as the original Finnish Candle.
A log is split from top to bottom and pieces from the central core are then axed out to act as kindling. Lots of cuts are made into the inner faces of the candle to give the flames plenty of surface area to catch onto.
It took me a while to get the flames self sustaining, but once they’d caught the candle worked well. It looked precarious as the two pieces of wood are not lashed together but they stayed upright till the end.
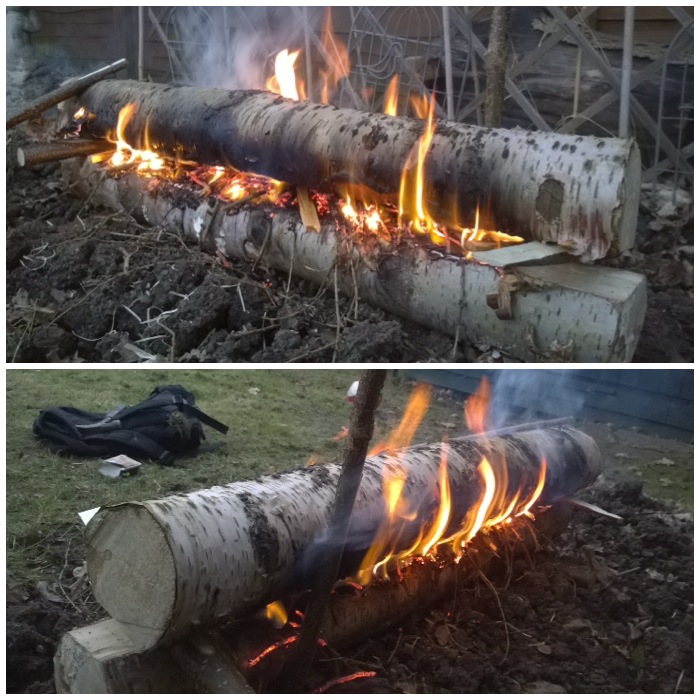
The Rakovalkea Gap fire hails from Finland and I was taught a similar method by my friend Kevin Warrington (Laplanders Natural Lore) back in 2007. I came across the term Rakovalkea around about 2011 after seeing pictures of this fire being made by the Finnish army on the internet.
This is a scaled-down model I made however it was fully functioning and its set up makes for a long burn time with easy adjustment to increase or decrease the flames. This has proved to be the most most popular post on my website.
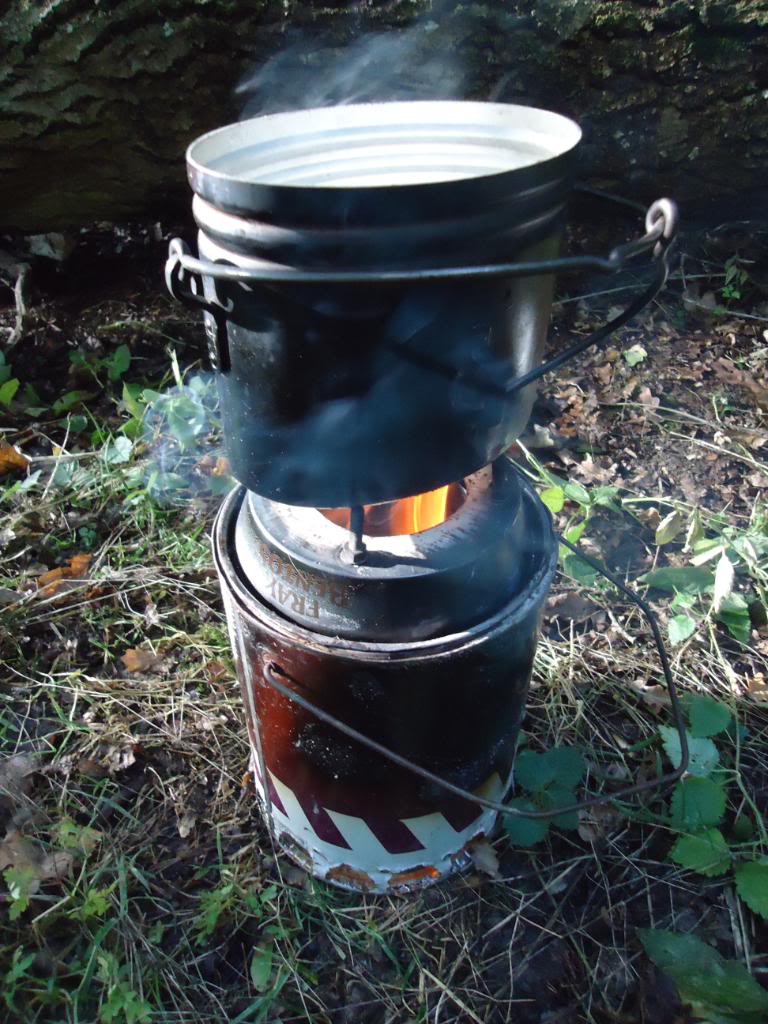
I decided to include this little fella as it is excellent for cooking in damp or wintry conditions. It is a wood gas stove and burns very efficiently. I was shown this by my friend Ian Woodham back in 2011 at the Bushcraft UKBushmoot. As soon as I got home I made one up and documented it on my blog.
I made this out of a metal paint pot, a large dog food tin, a Fray Bentos pie tin and a few bits and bobs. It works a treat and needs very little fuel to keep it going. I like to use dry seasoned pine/spruce/larch cones in the stove as they burn for a good length of time.
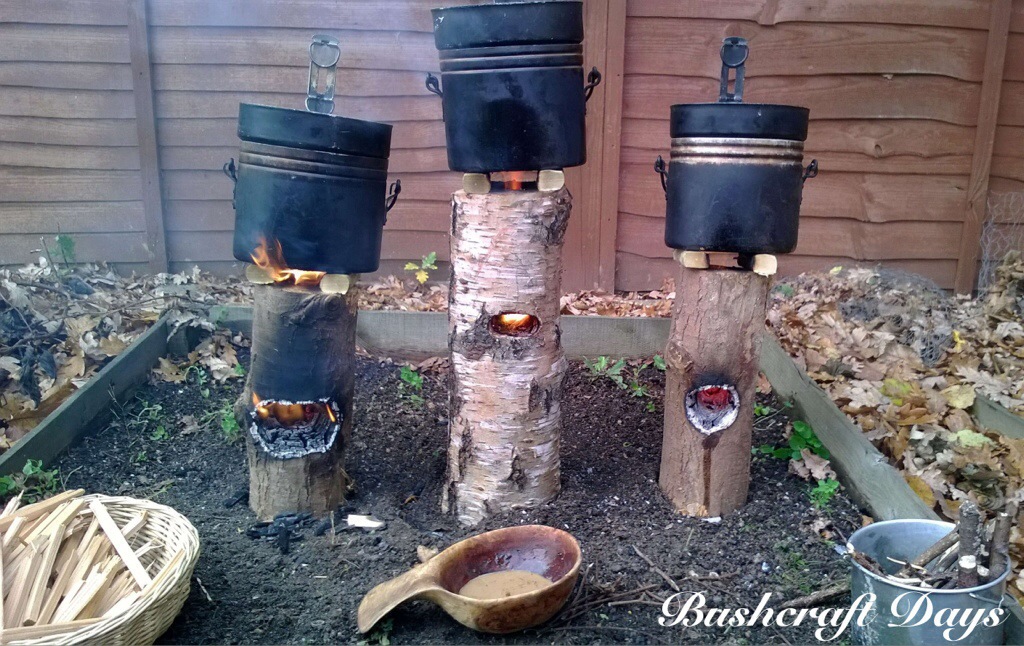
The next type of candle I came across was what has been termed the log rocket stove. I spotted a video by James Hookway and soon set to work in my workshop creating 3 stoves from different woods.
Log rocket stoves really intrigued me as they require very little kindling to keep them going (the damper the log the more kindling you require).
Have a look at the original post here to see how they compared.
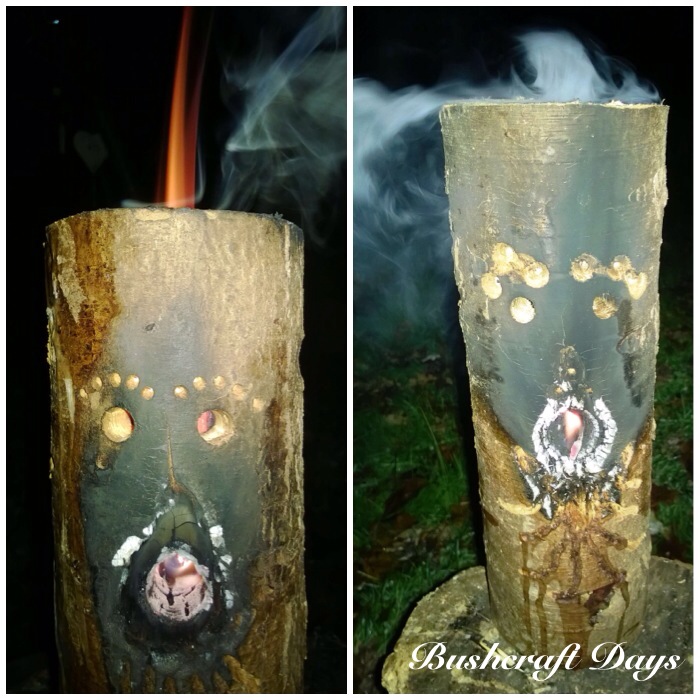
Now the kids love this stove – whenever you are having a barbie in the garden or if you are having a family camp make one or two of these up.
The principles are the same as the log rocket in the previous post except for the faces you can carve on them. Once they get going the faces really light up. They are perfectly able to be used as a normal log rocket stove for cooking or boiling but have the extra appeal factor of the face. A good video on this is the one made by Marcels Workshop.
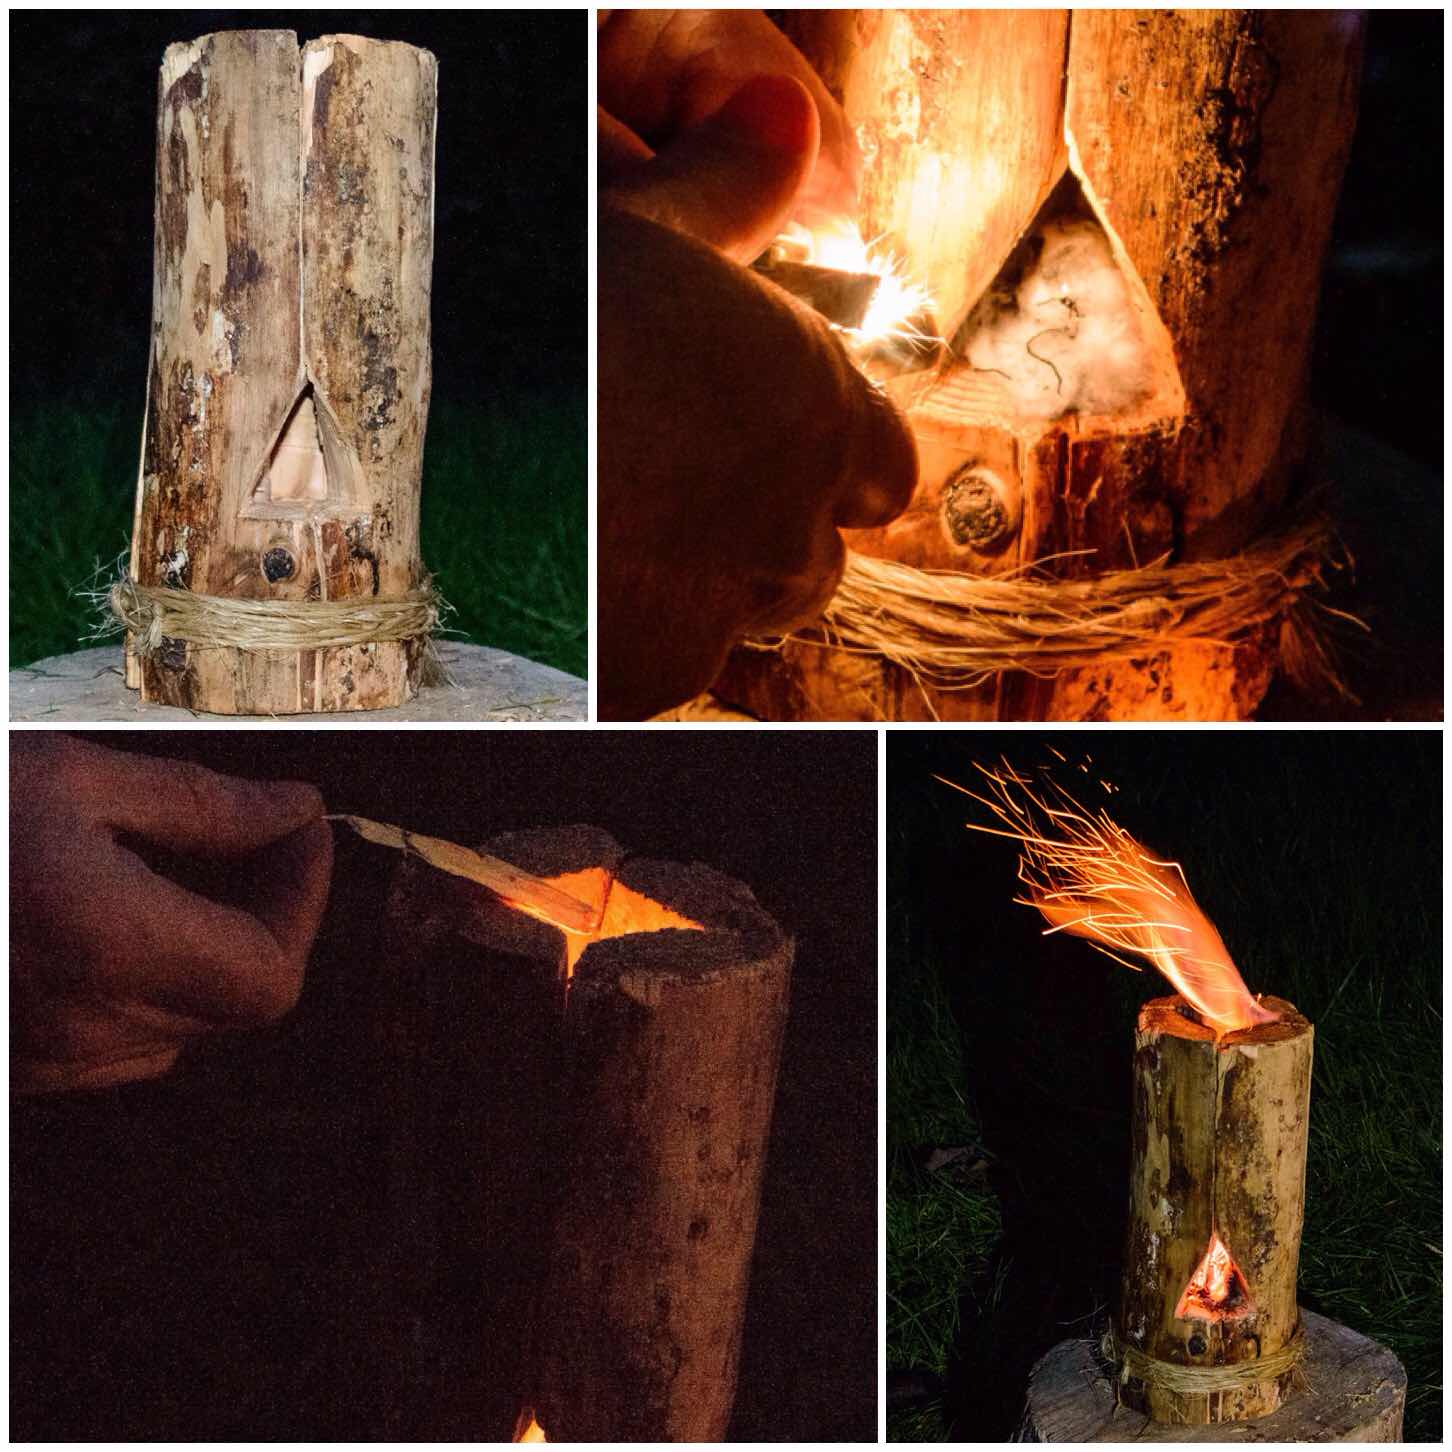
Log rocket stoves have always appealed to me as a woodsman however when I am lightweight camping I do not fancy carrying around pre-prepared ones. Recently on Facebook Paul Hasling posted an article on making one with an axe and saw with no need for a drill. One of the other Scout leaders posted up a step by step guide on making one but it is in Spanish – the pictures though speak for themselves – Rocket Stove de Madeira.
I was instantly attracted to this method however when I was next out in the woods I could only find damp logs. To overcome this I split the log into six pieces and added Raappanan tuli cuts inside the chimney. This damp log rocket stove took slightly longer to get going as the internal wood slowly dried but once it was going there was no stopping it.
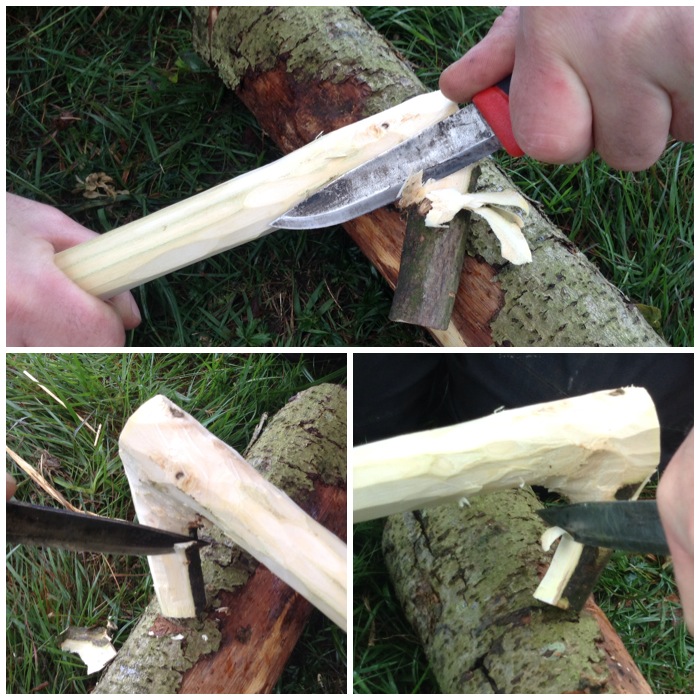
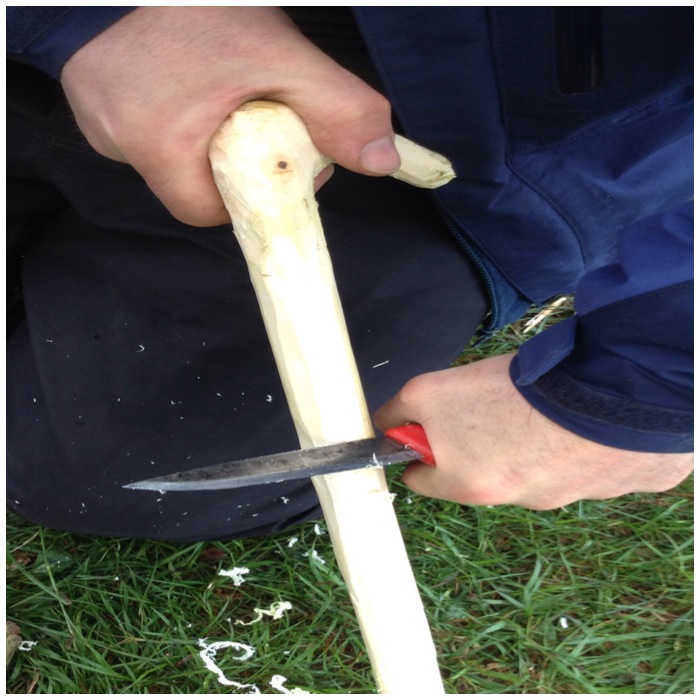
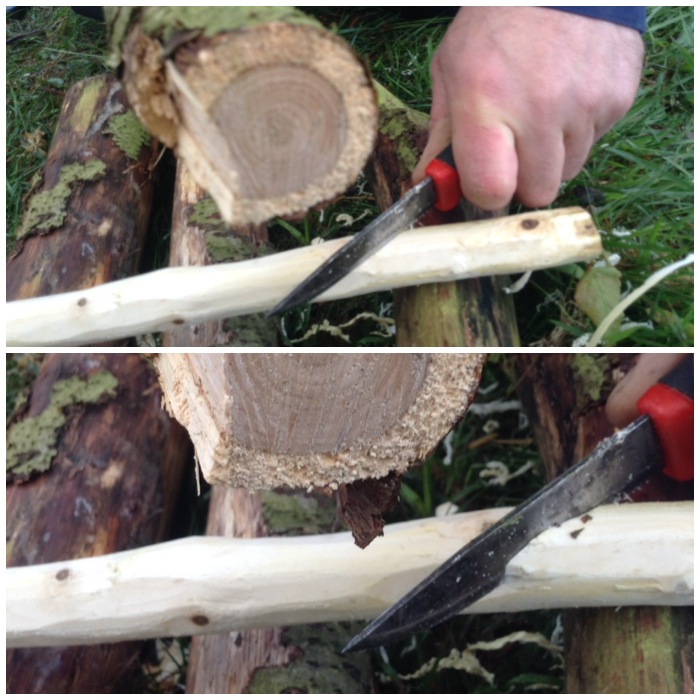
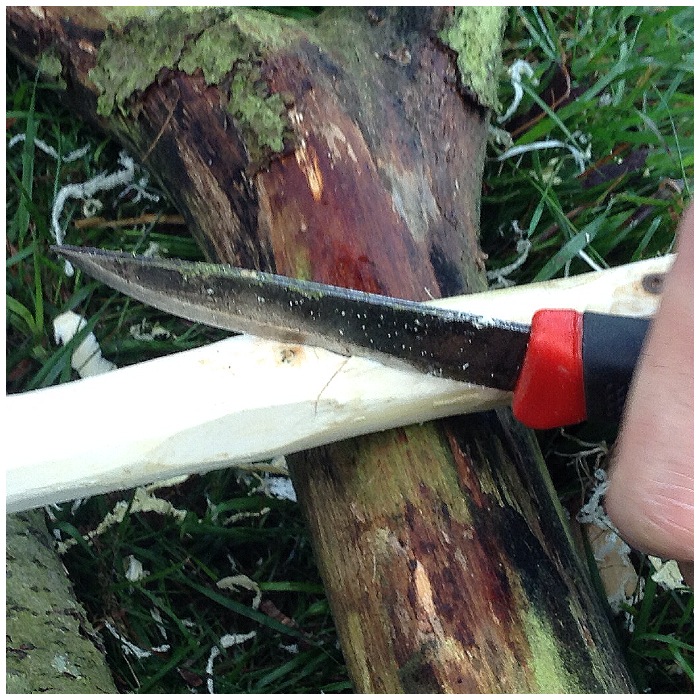
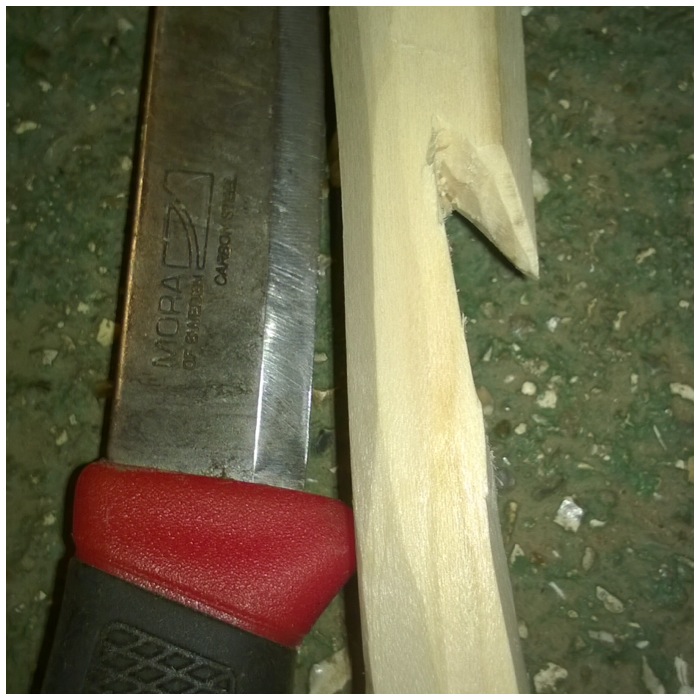
The final post in this series came to me one evening when I was wondering how I could operate in the woods without an axe. I figured it was worth a go trying to make a log rocket stove with just my Mora knife (I did use a small saw to trim the log).
With some battoning and the use of a wooden wedge I was able to split a decent sized log and fashion a perfectly good log rocket stove.
This exercise really is an excellent way to test out your knife skills.
Log Rocket using a Knife
Is the story over on candles, long fires and log rocket stoves? – I think not. I will continue to research this intriguing subject and if you have any ideas that I could try out to add to this library of knowledge I would really appreciate hearing from you.
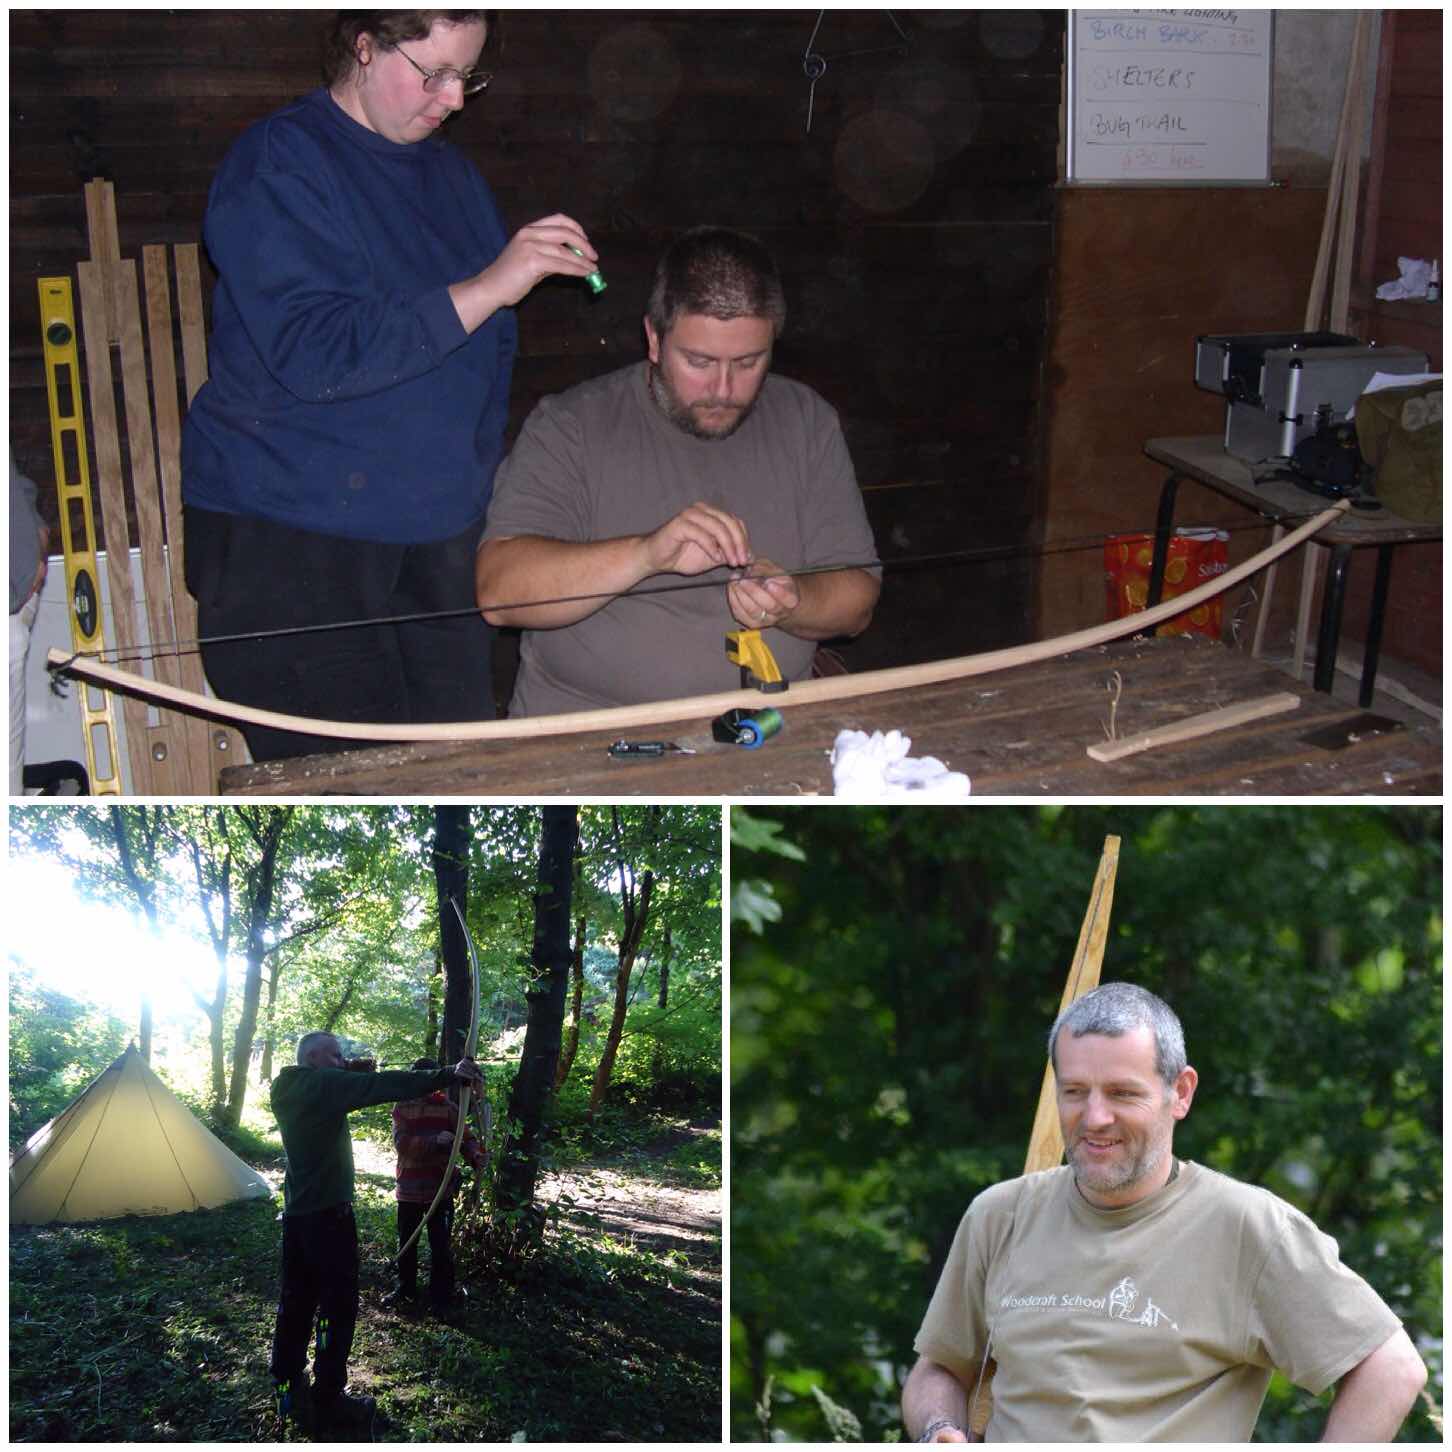
It has been 8 or 9 years now since I started making my own bows and Atlatls. In that time I have enjoyed making a number of different types and have brought them all together in this post. I am no expert in making them however I do like to carve them.
If you want to know how to make any of these tools just click on the title for each section to see a detailed How To…. guide on making them. This post will concentrate on my thoughts on them through my own personal use and that of my students.
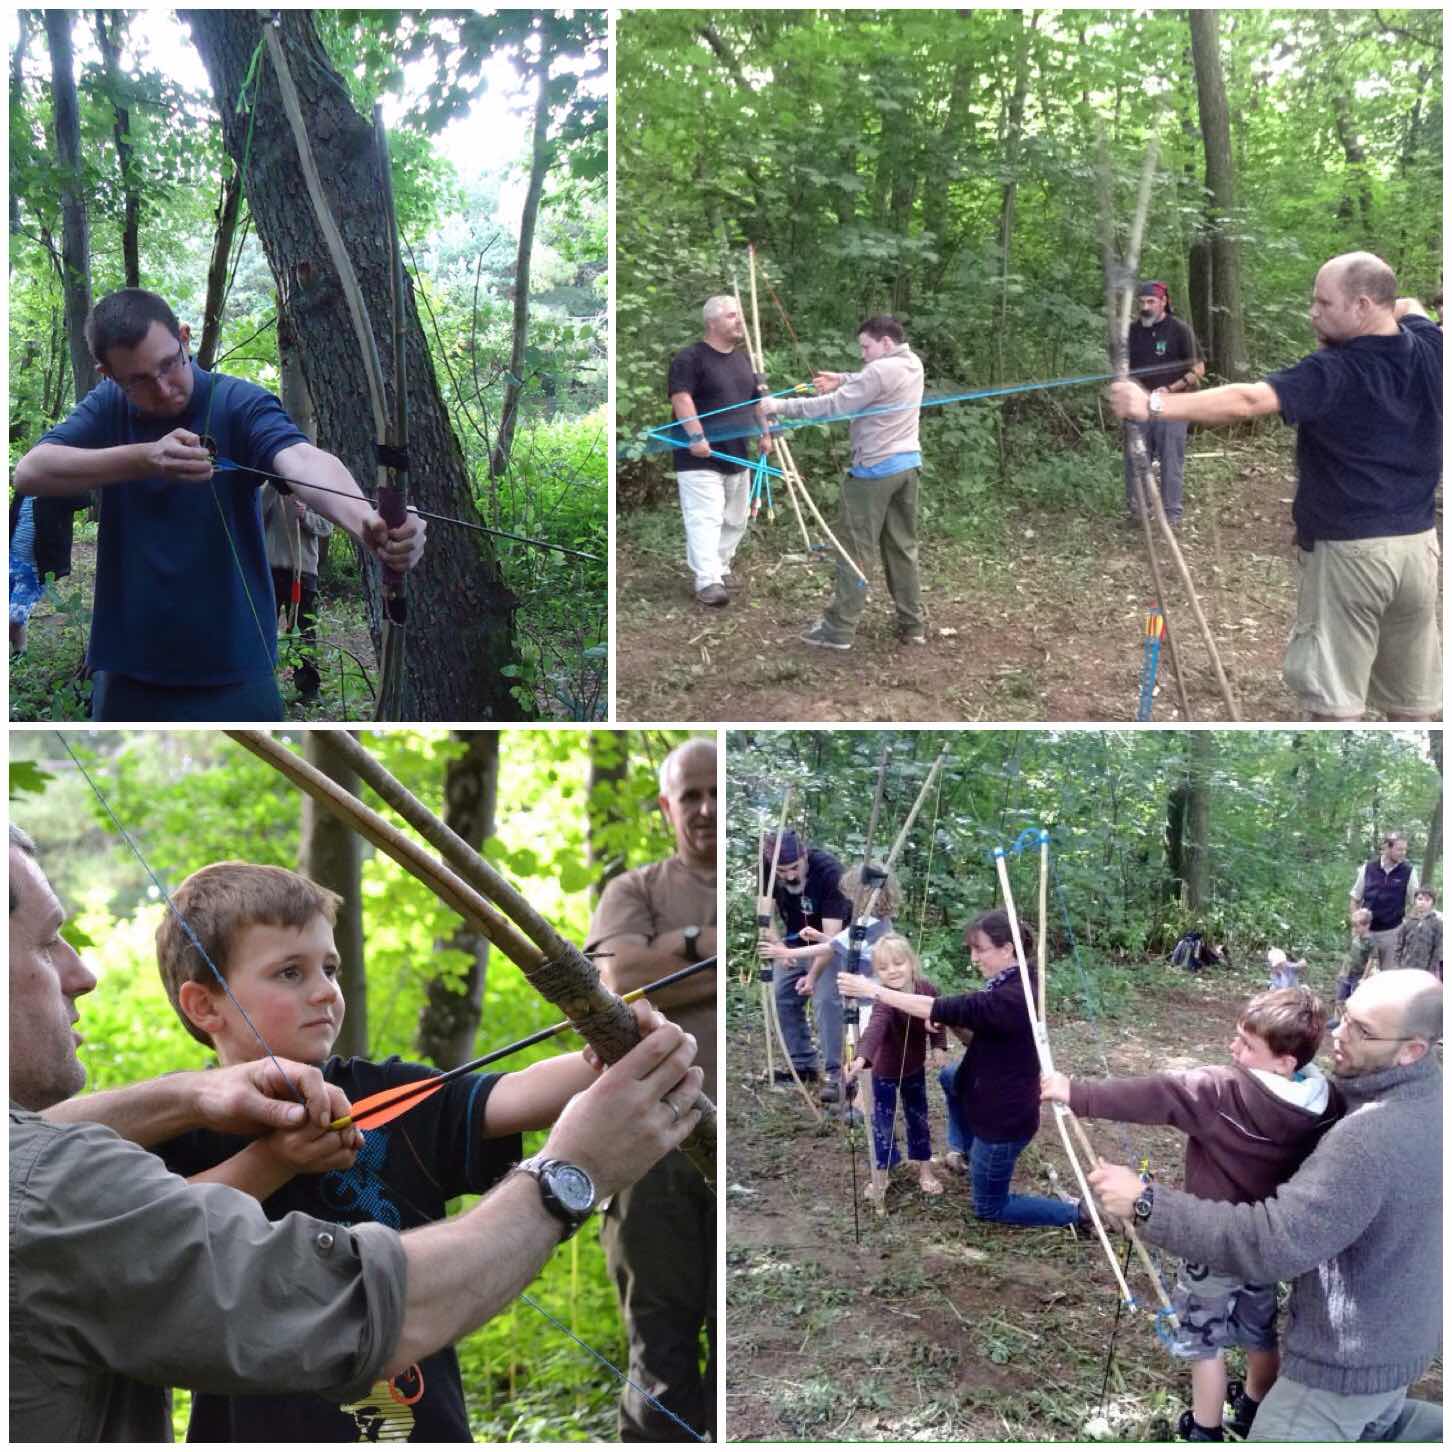
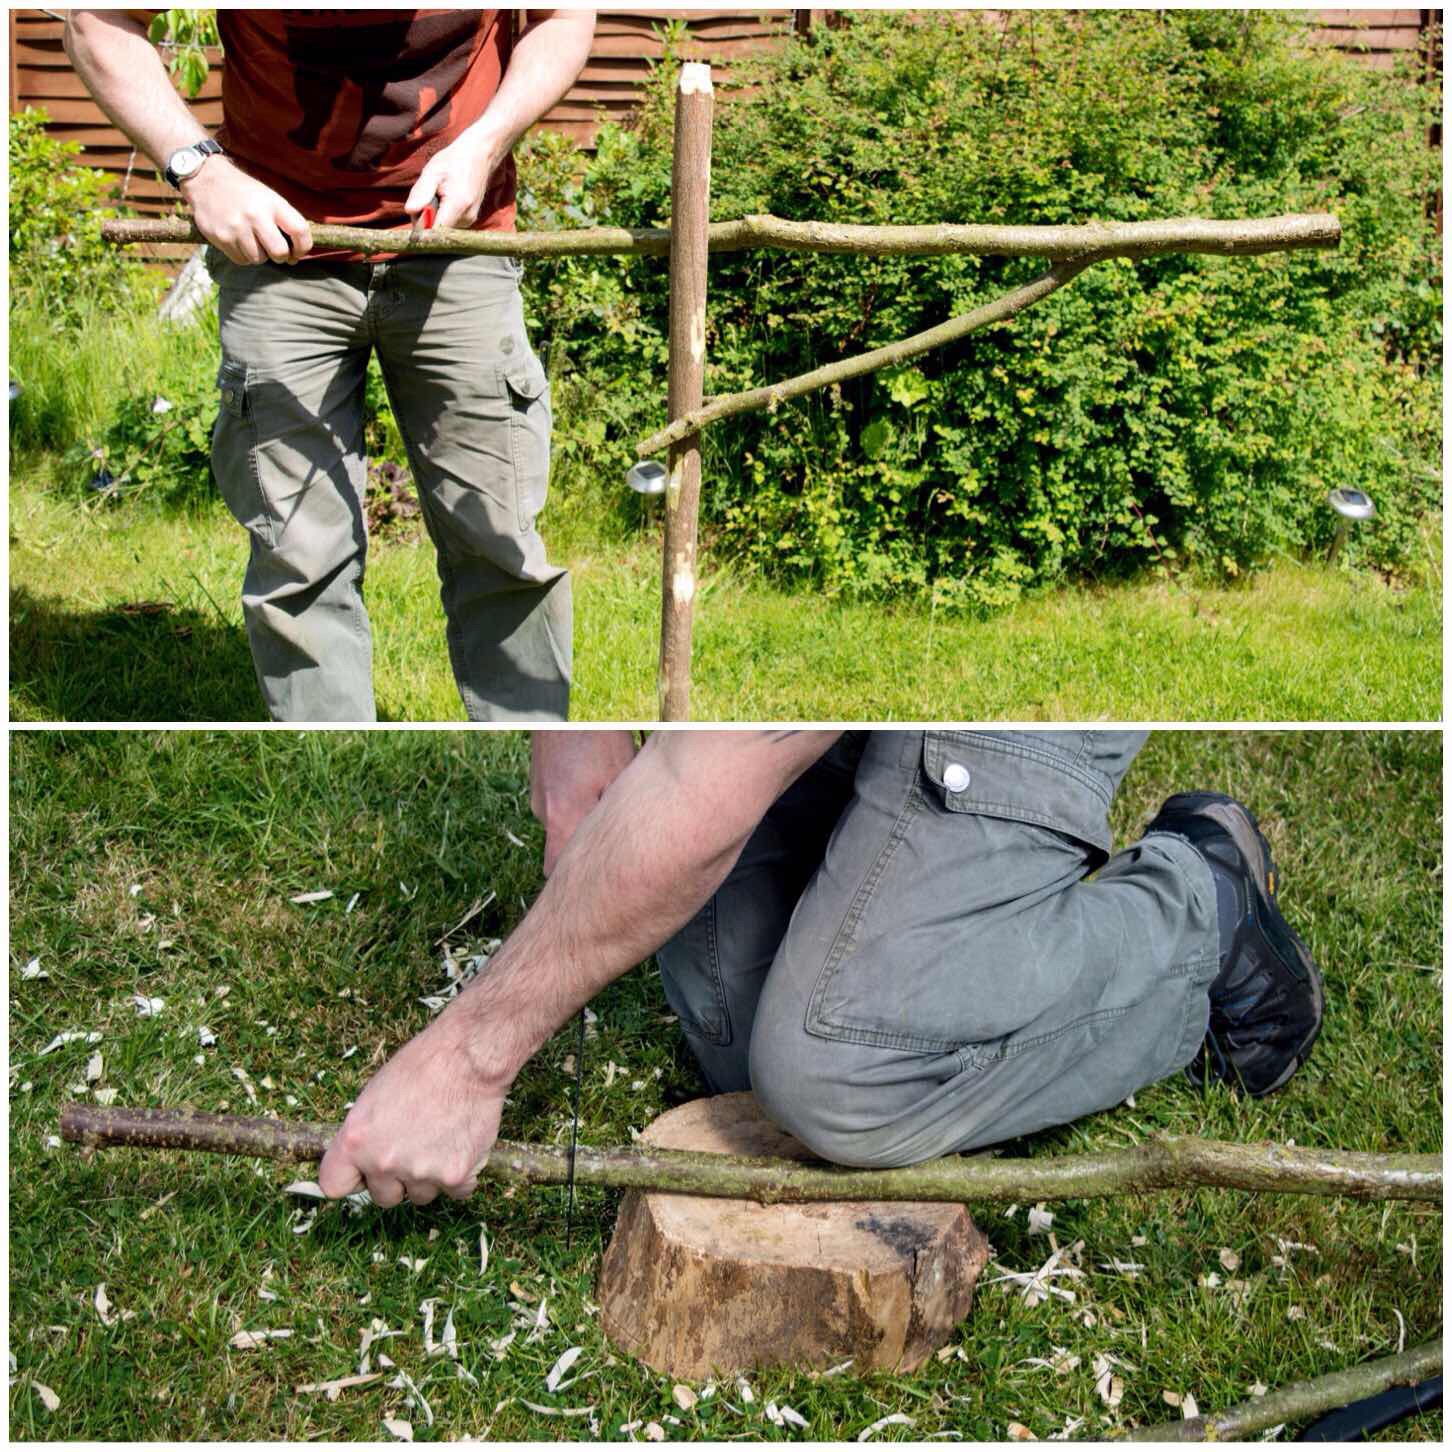
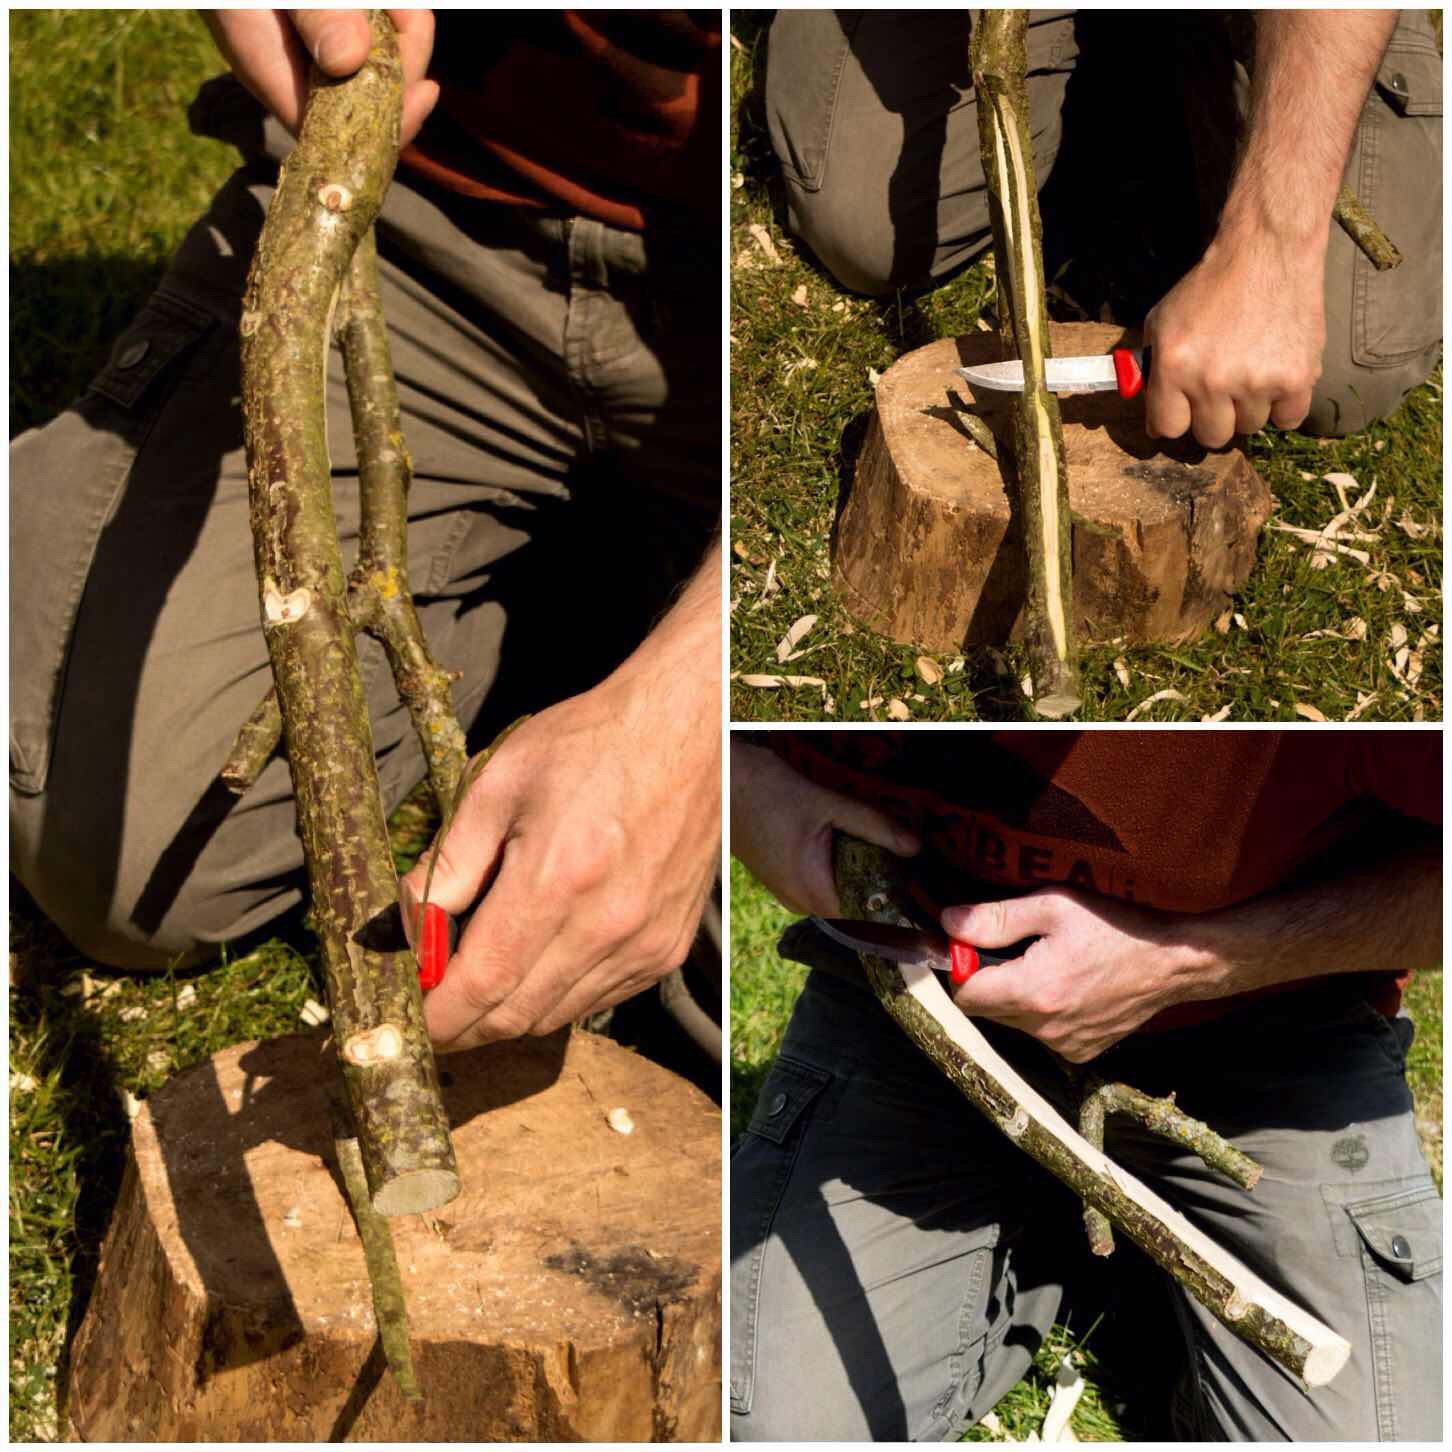
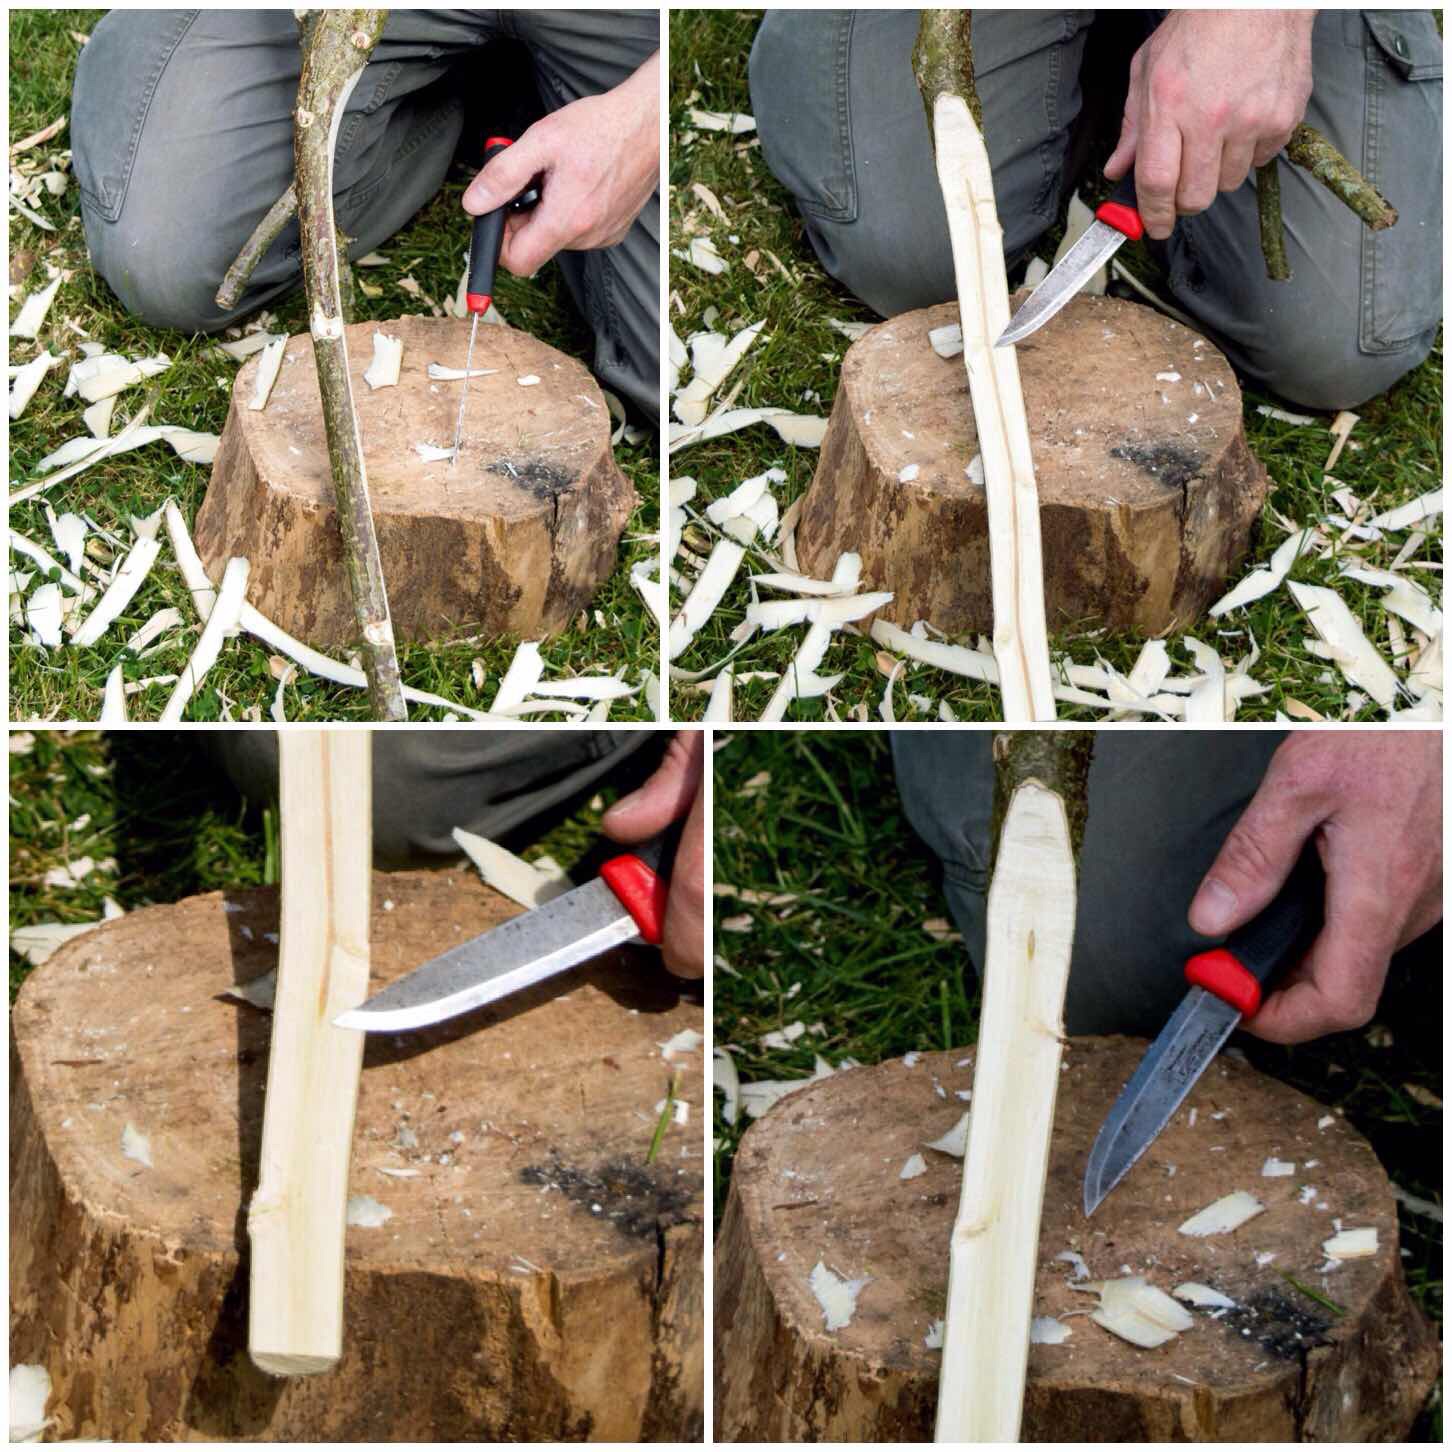
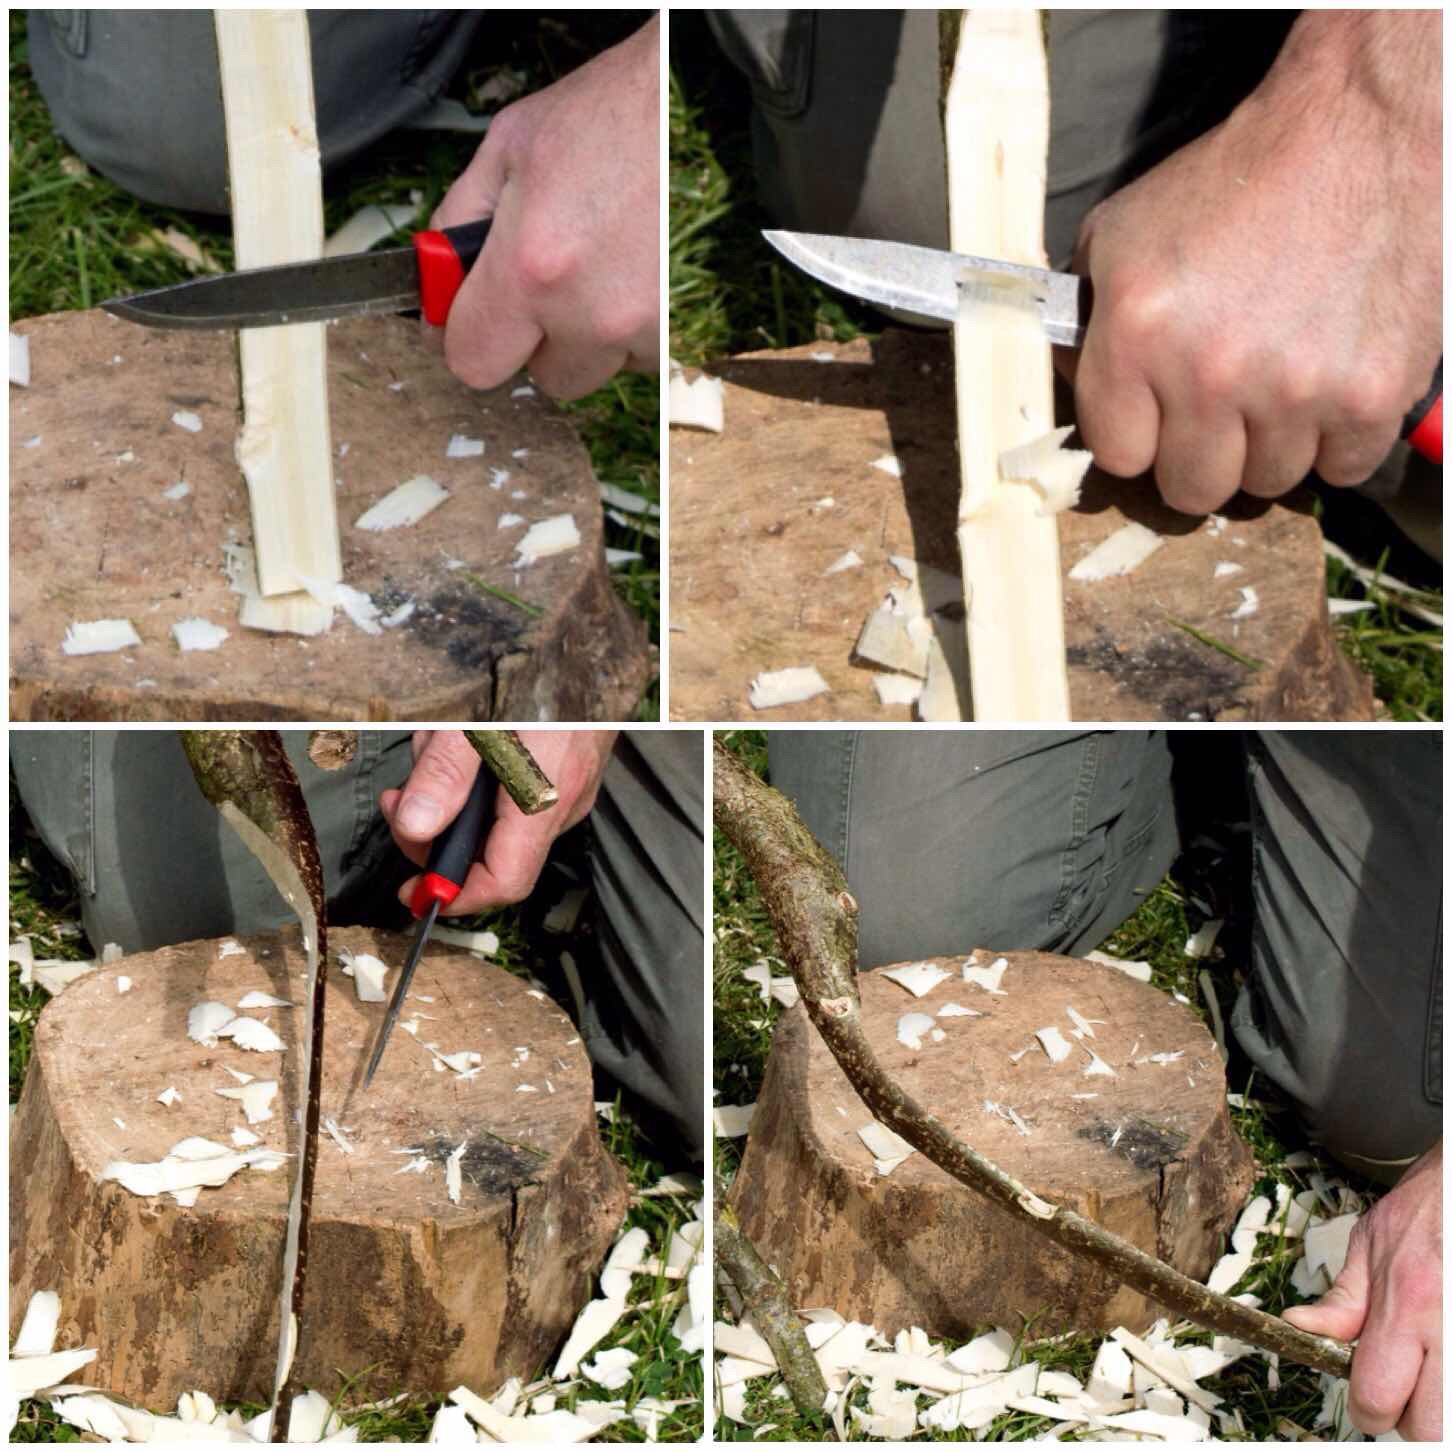
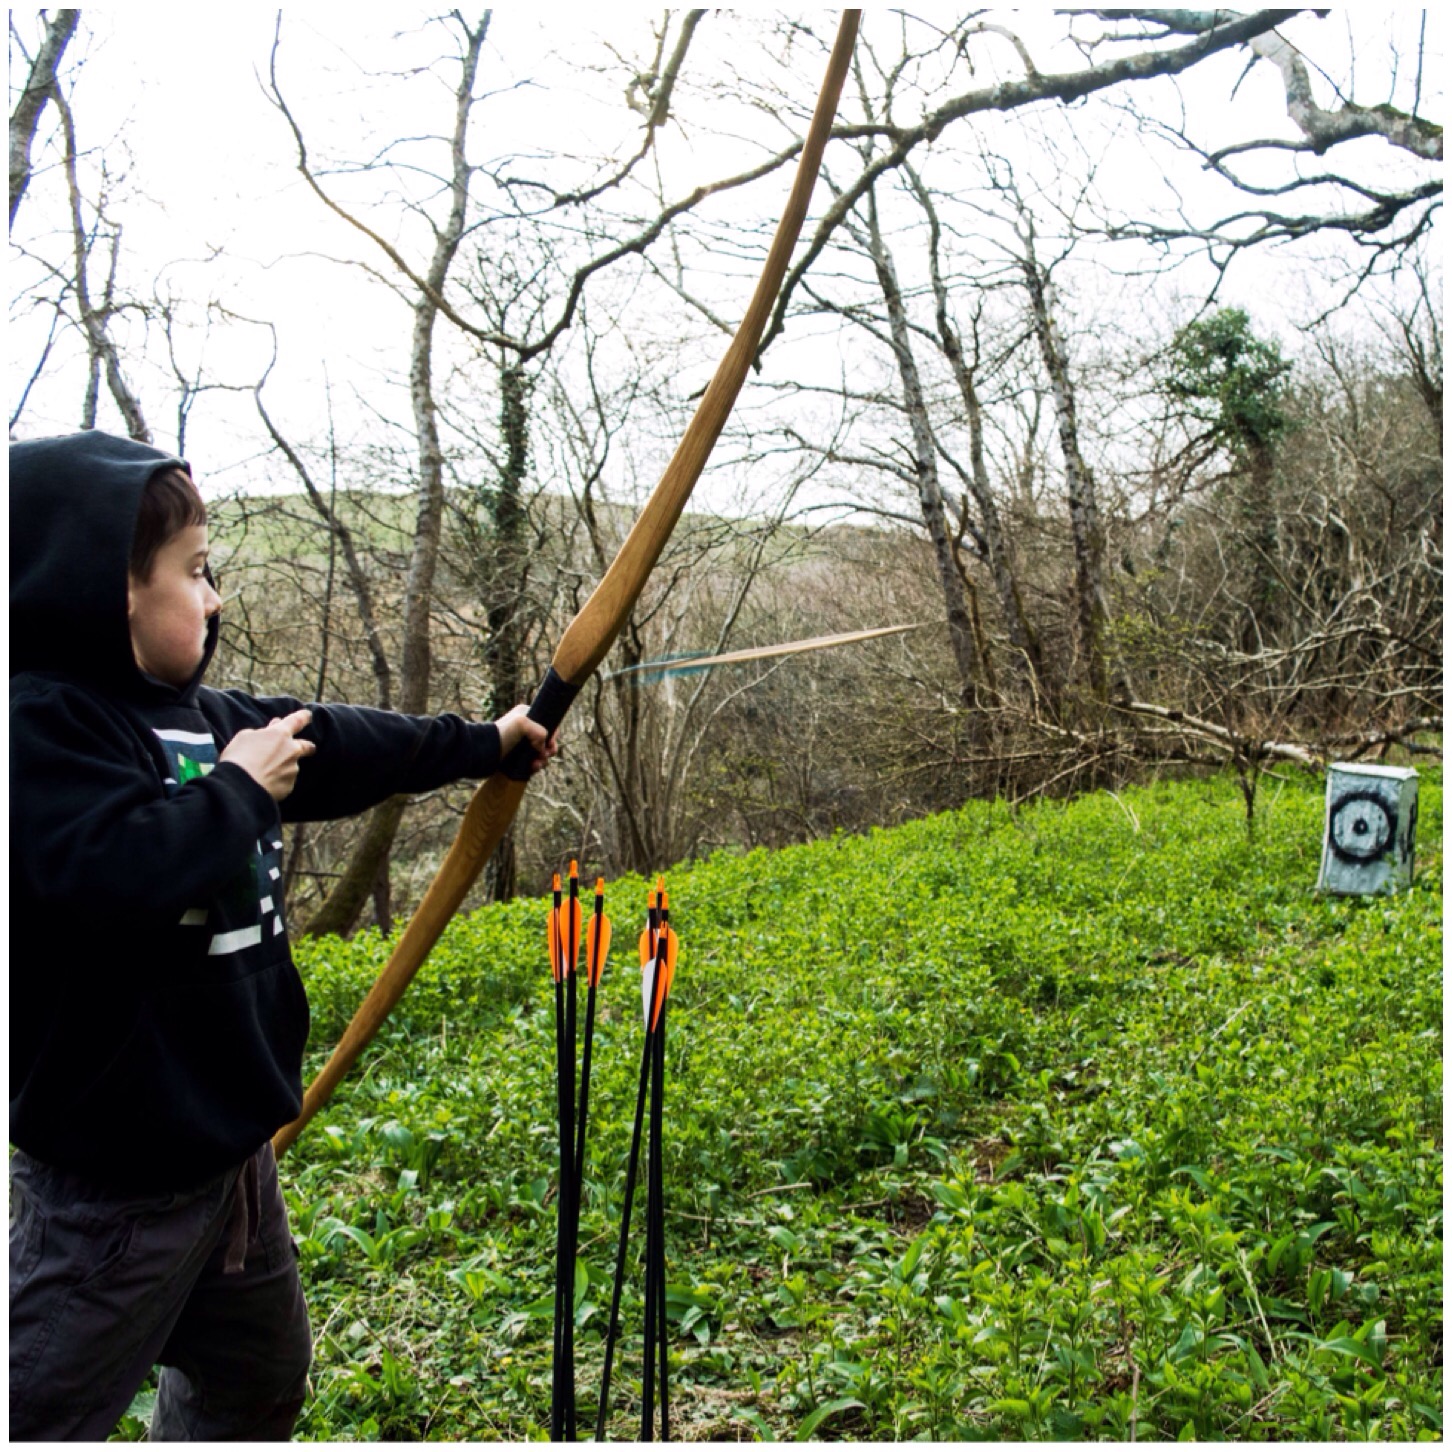
I have probably made at least a dozen of these quick bows and taught many students to make them since 2009. They take no more than a couple of hours to make and are quite powerful for green wood bows. I normally use two hazel or ash rods taped together to make them.
I learnt how to make them after watching a You Tube video by Mark Emery (Sussex Woodsman) who is an expert woodsman.
Father & Son Bow
The bow themselves are very light in terms of poundage (20 to 30lbs in draw weight) but on a high arc I can generally get them to shoot an arrow 60 to 70 metres. I usually shoot them on short ranges of less than 20 metres in the woods.
These have proven a massive hit at the Bushcraft UK Bushmoot and there has been a class run on them since 2009 with folks of all ages making them. I particularly like to see a family making one and then coming down to the range of an evening to shoot. I still have ones I made all these years ago and they still shoot well.
This was the very first bow I made back in 2008 on a Bushcraft Instructors course with John Rhyder of Woodcraft School.
As a group we felled an ash tree , split it into staves and carved our own bows. We did this over two weekends with a month in-between so allowing the stave to season before the tillering process. The ash flatbow has to be made wider than it is deeper due to its deep rings however if it is tillered well it will still shoot fast.
Ash Flatbow
This bow comes in at about 40 lbs in draw weight and has a tendency to ‘twat’ the inside of your forearm so a arm guard is a must.
I give this bow mostly to adults to shoot because of its draw weight but with a good eye and a steady hand she can be very accurate. I started shooting right handed as that is how I was taught to shoot a rifle many years ago however my friend Charlie Brookes suggested one day to try left handed shooting and suddenly I started to hit the target. I am left handed and left eye dominant but the muscle memory from using a rifle made it difficult to shoot left handed at first – however with a lot of practice that has gone, so I am now happy to shoot with either hand.
I made this bow about four years ago at the BCUK Bushmoot and was taught by Wayne Jones (Forest Knights). It is similar to the ash bow in that it is wider than it is deeper however it is made out of two pieces of bamboo (the HowTo…. goes into detail of why two pieces are used).
Bhutanese Bow
Traditionally the two pieces would be joined together with wooden pins and strapping but on the day all we had was tape. In the courses Wayne runs nowadays he uses the pins and strapping.
It is quite a light bow (about 30lbs in draw weight) however it has the advantage of being made very quickly (a couple of hours in competent hands).
Bhutanese Bow
Another unusual feature of this bow is that the hard outer shell of the bamboo becomes the Belly (the part of the bow facing you when shooting) of the bow and the softer inner part of the bamboo becomes the Back of the bow (the part of the bow facing away from you when shooting). I am told that this is to do with the characteristics of the bamboo – because it is a grass technically and not wood.
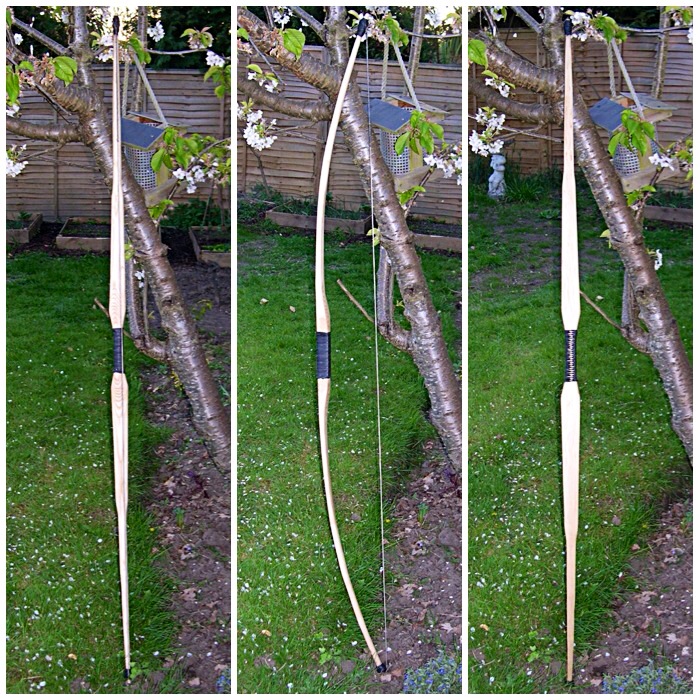
This is my favourite bow. I carved it while doing a Primitive Technology course at Woodcraft School.
I carved the bow based on the dimensions of the ones found in the peat bogs at Holmegaard in Denmark. The bow has the lower parts of its limbs shaped wider than they are deeper much like the ash flatbow. The upper parts of the limbs are more ‘D’ shaped so making them stiffer but thinner than the lower parts of the limbs.
Holmegaard Bow
This unusual shape works well with ash as it is not a particularly strong wood for thin bows. The wide lower limbs give it strength while the thinner and stiffer ‘D’sectioned tips allow the limbs to shoot forward at a very fast speed so making it an excellent hunting bow where you get fairly close to your prey..
Holmegaard Bow
I also decided to make the nocks out of rawhide and spruce pitch rather than carving them in. I did this as some Holmegaard bows have been found with no nocks carved into them. Whether they had bone nocks attached or rawhide as I experimented with will probably never be known but they work well.
This bow is a favourite amongst the children I teach as they can draw it easy. Personally I just love the shape of the bow and it shoots well for me,
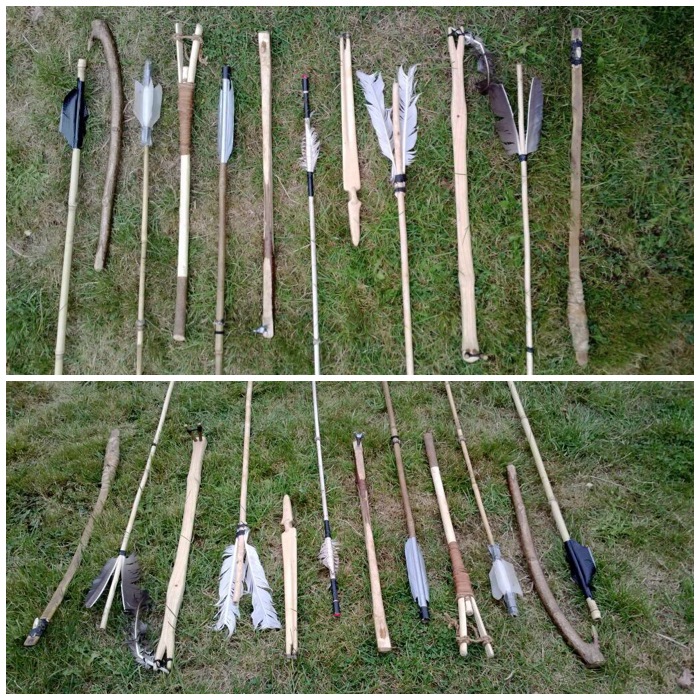
I have written a number of posts on these little devices. When asked about them by children I teach I liken them to these modern ball throwing devices dog walkers use nowadays. So if you imagine replacing the ball with a spear (technically called a dart) you will get the idea.
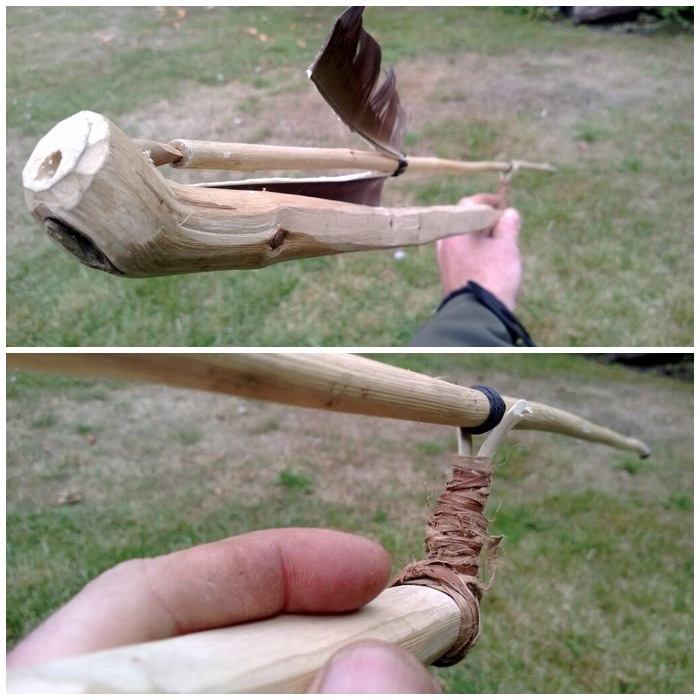
My Atlatl Set
The set is made up of two parts – the Atlatl (the throwing device) as shown below and a dart (seen above). My post on the Atlatl goes into detail on the history of them and the different designs you can find.
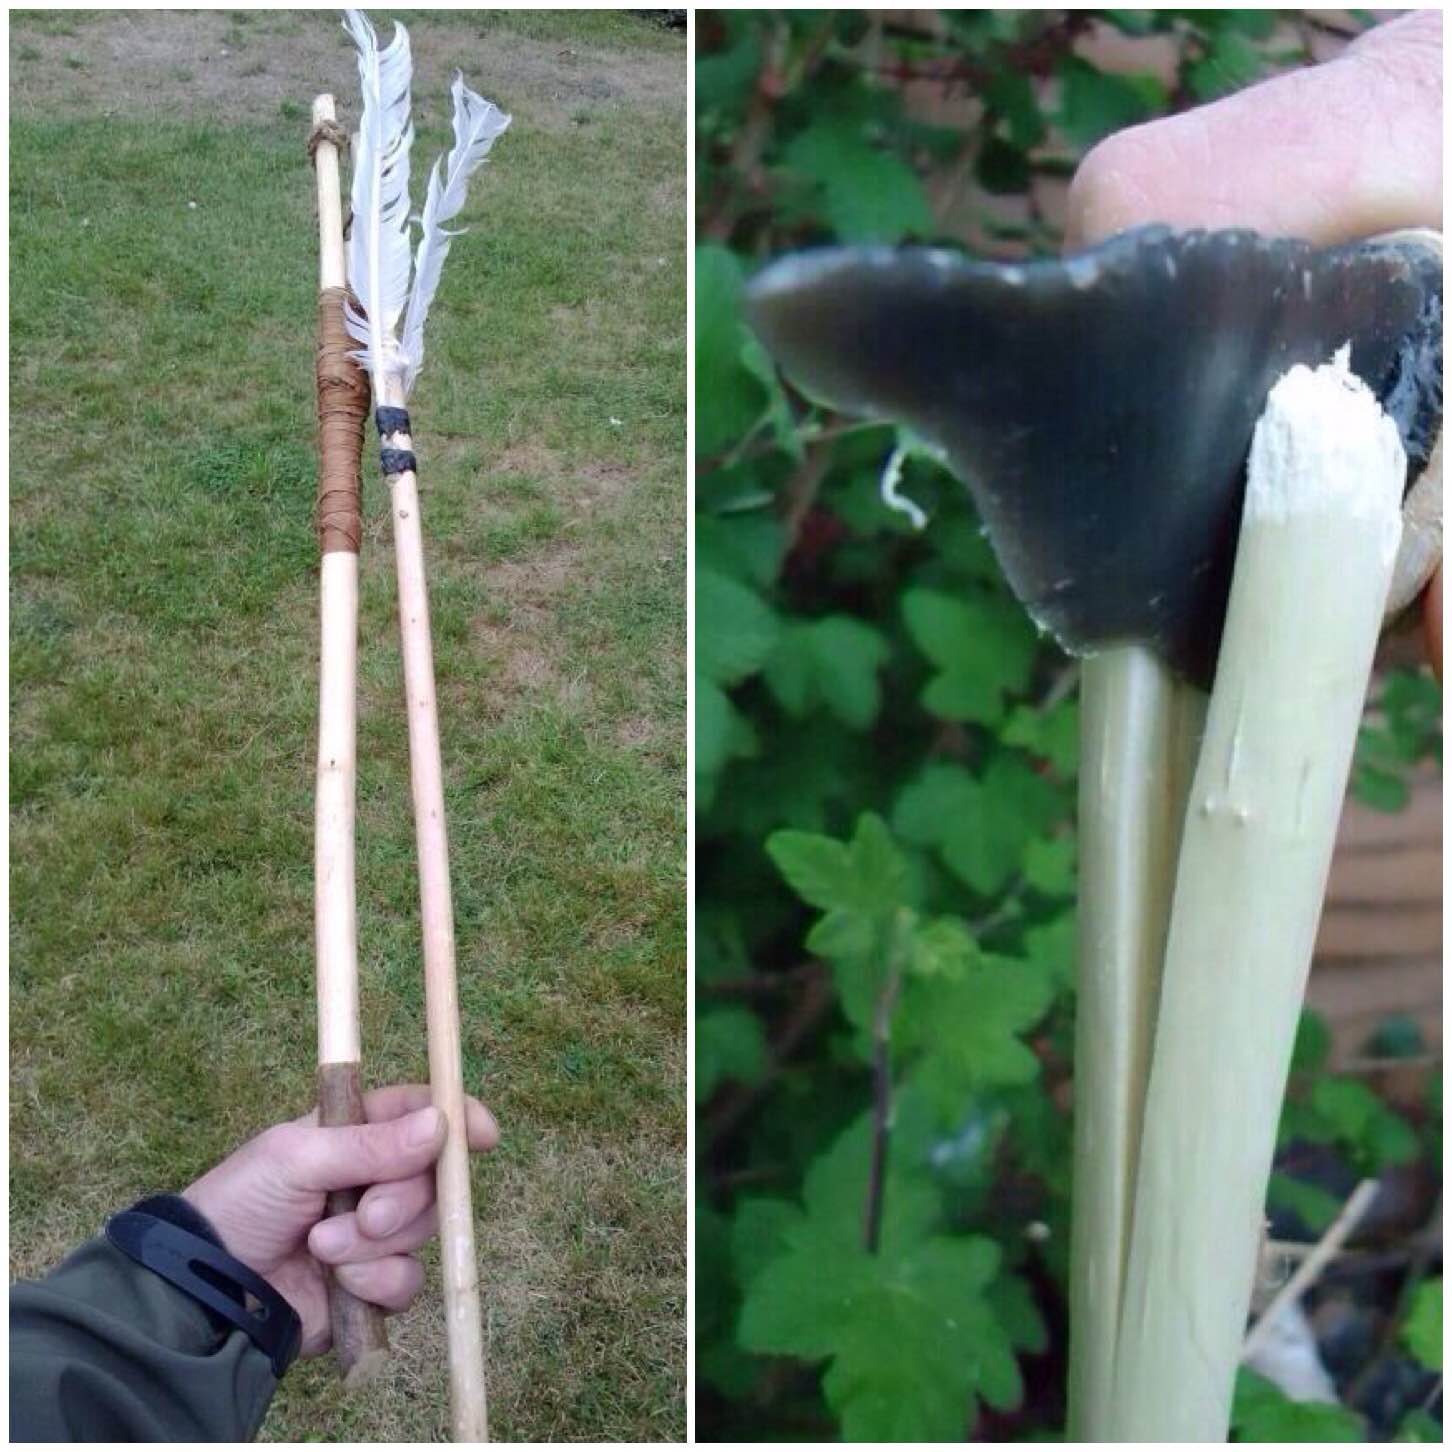
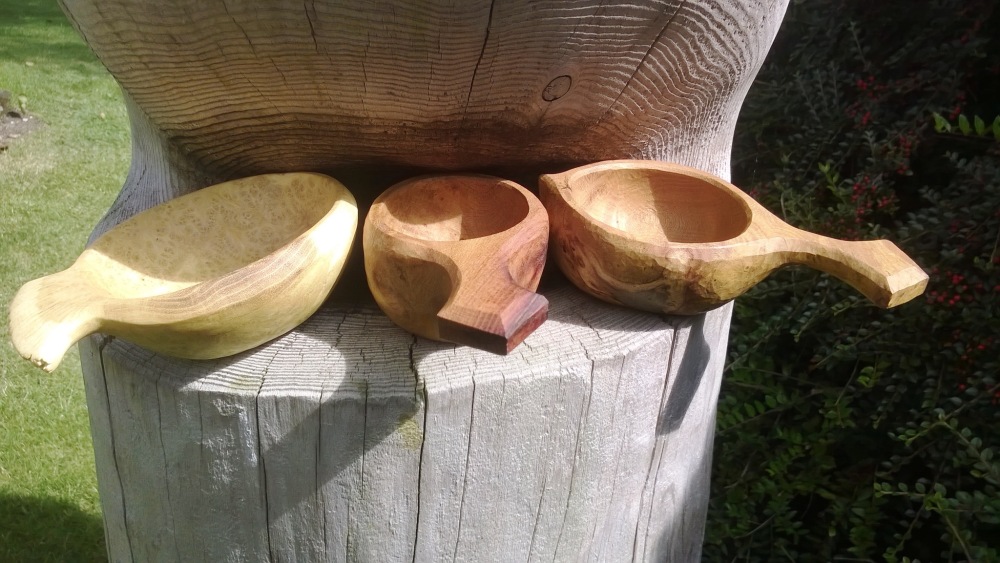
The ones below are very simple ones. The left hand one has been carved from a hazel rod and the one on the right is from a piece of yew with an antler tip attached by sinew and spruce pitch.
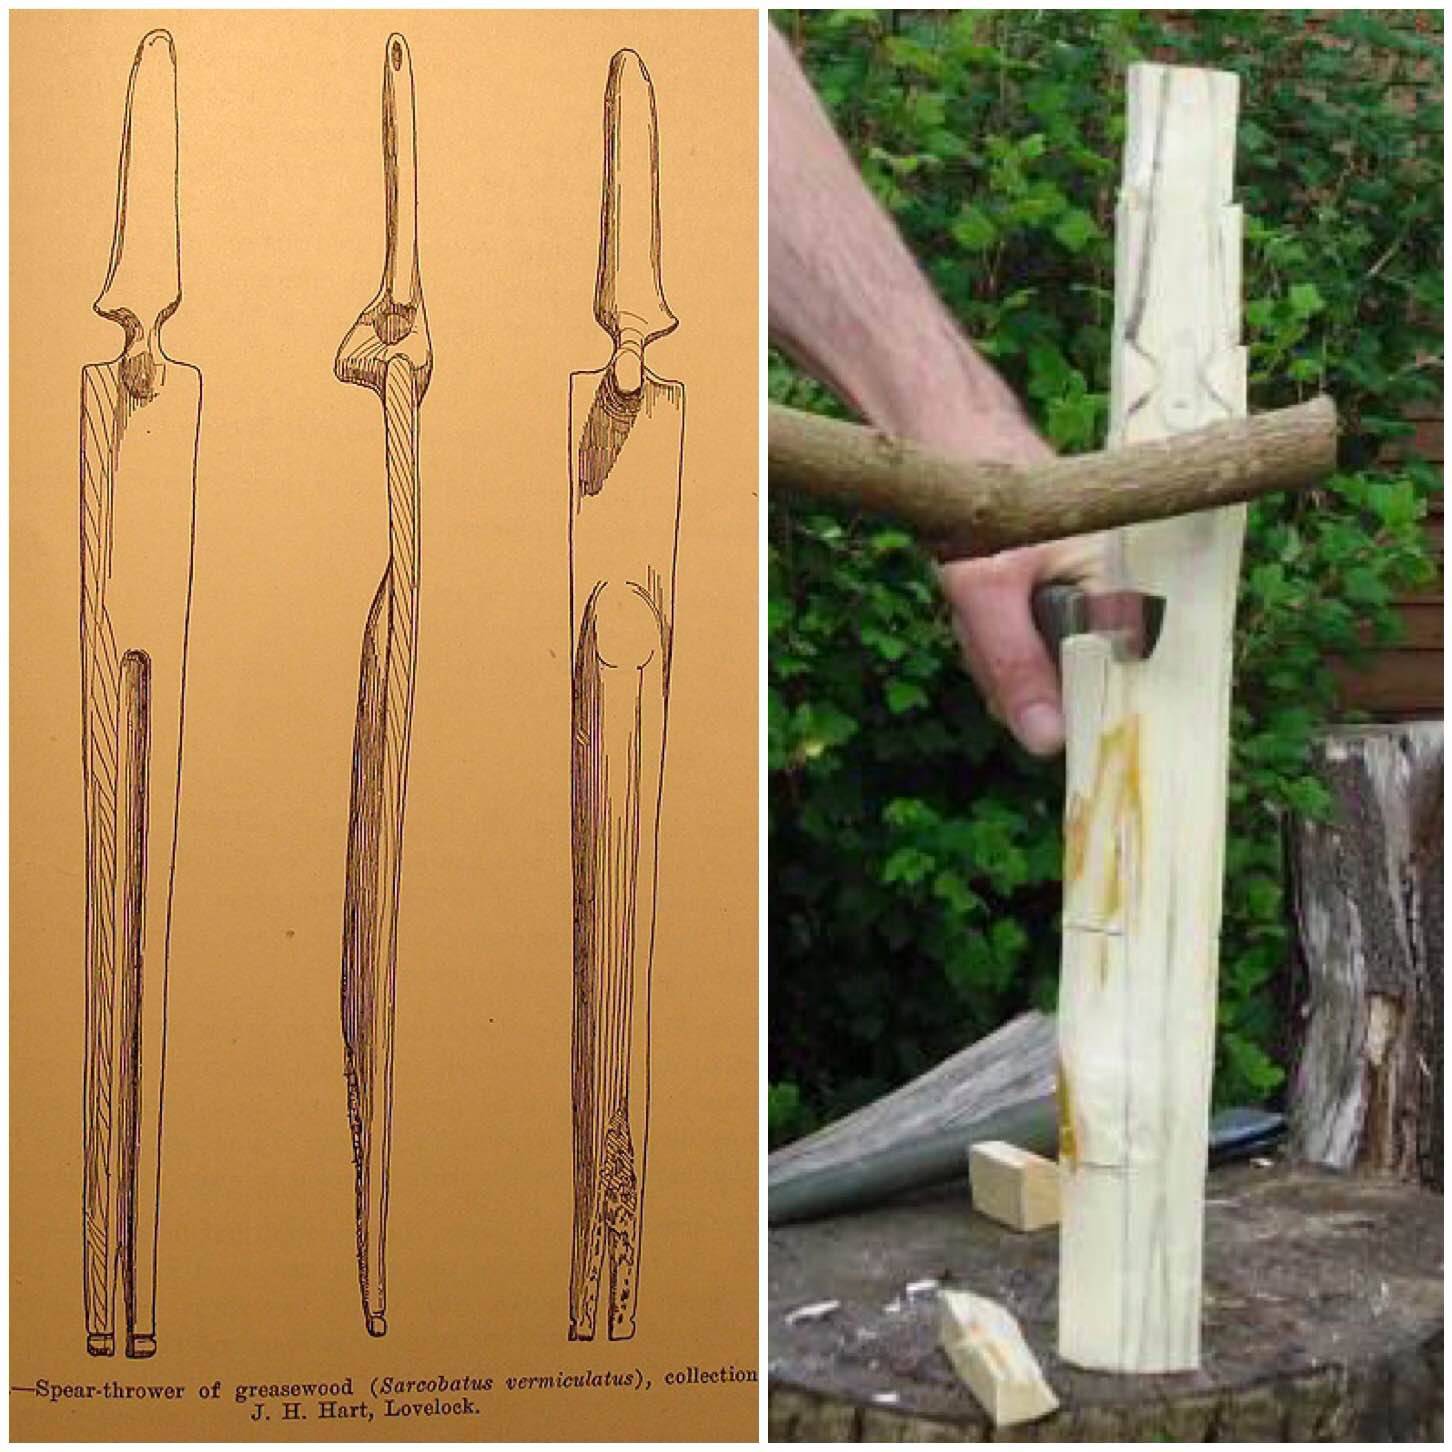
I have tried to make a number of different Atlatls over the years and a favourite of mine is called the Lovelock Cave Atlatl (named after where it was found in the USA). I came across some drawings of this Atlatl on the web and set about making one.
Lovelock Caver Atlatl
It was thought to have had a bone or wooden point at the end to attach the dart to it but I experimented with just cordage. This seems to work quite well however there is no archaeological records that this adaptation was ever used.
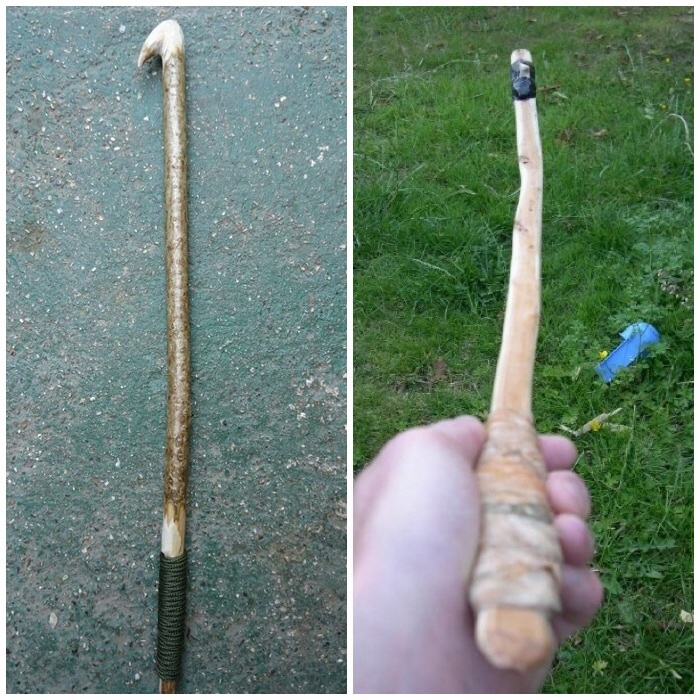
I set myself a challenge a while back to produce a split stick Atlatl from just one piece of willow and limited myself to just my primitive tools.
I scraped and carved the wood with my flint knife and used the bark as cordage. It turned out to be quite a nifty little Atlatl in the end.
One Stick Atlatl
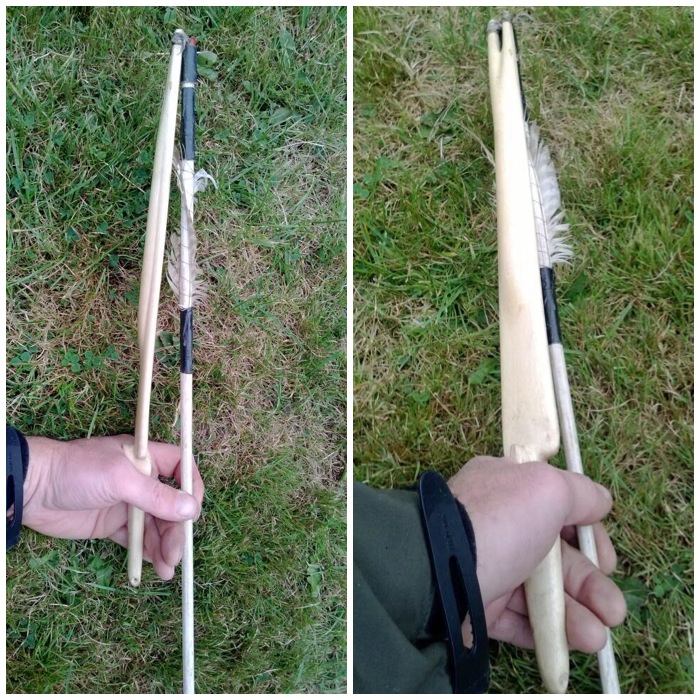
Atlatl with a Rest
I carved this Atlatl after reading about hunters in Arctic environments using this type of Atlatl. The rest allows the hunter to wear a glove while waiting to shoot the dart. The dart has a piece of cordage wrapped tightly around it that is pushed up against the rest so fixing the dart in place. With a quick flick the dart is away with no ill effect on its flight.
Atlatl with a Rest
Thats it for me on bows and Atlatls (unless I make some more).
I had a great time constructing contraptions to use around the campfire last year so I thought a little summary post of them all was in order.
This post is not about how to construct any of the contraptions themselves (I will link to the relevant How To…. guides in the title of each section) but my personal thoughts on them. I appreciate campfire gadgets are not for everyone and they may be seen as overcomplicating the cooking process however I think they are great fun to construct.
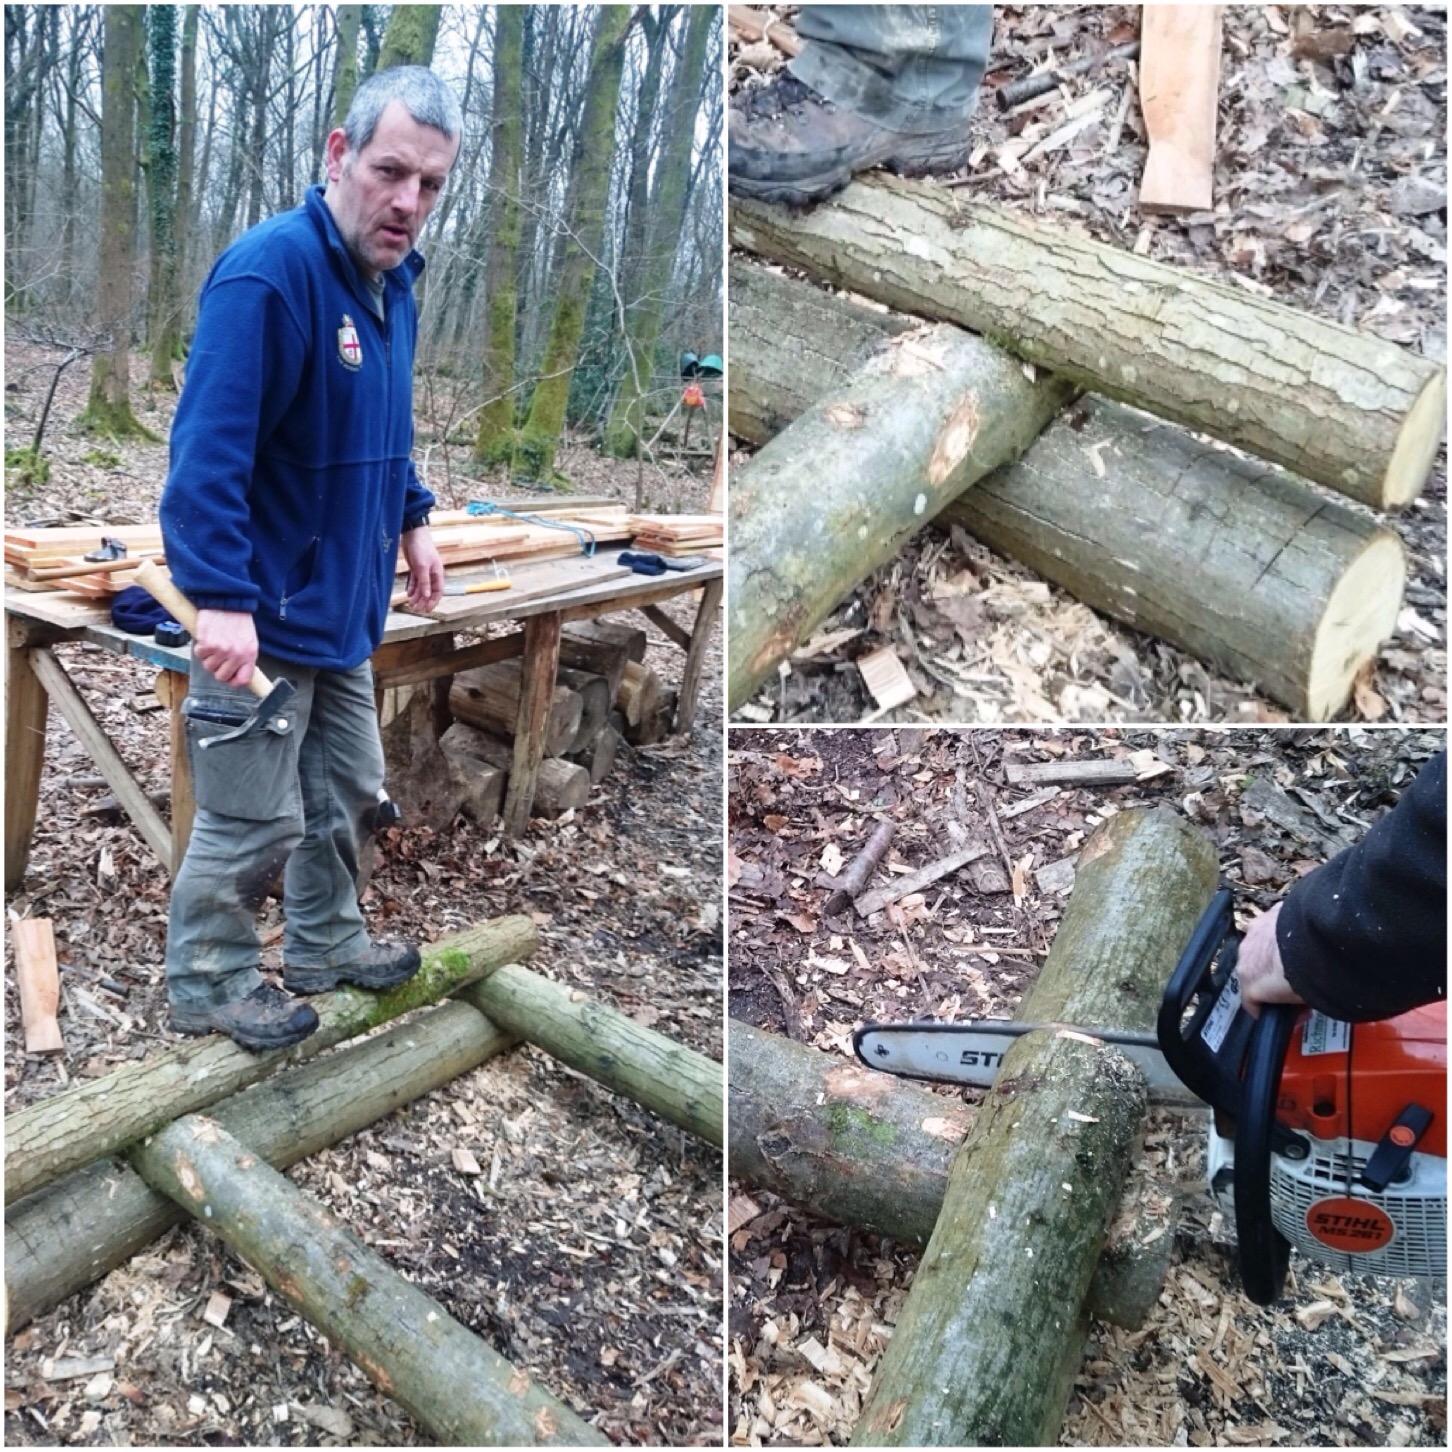
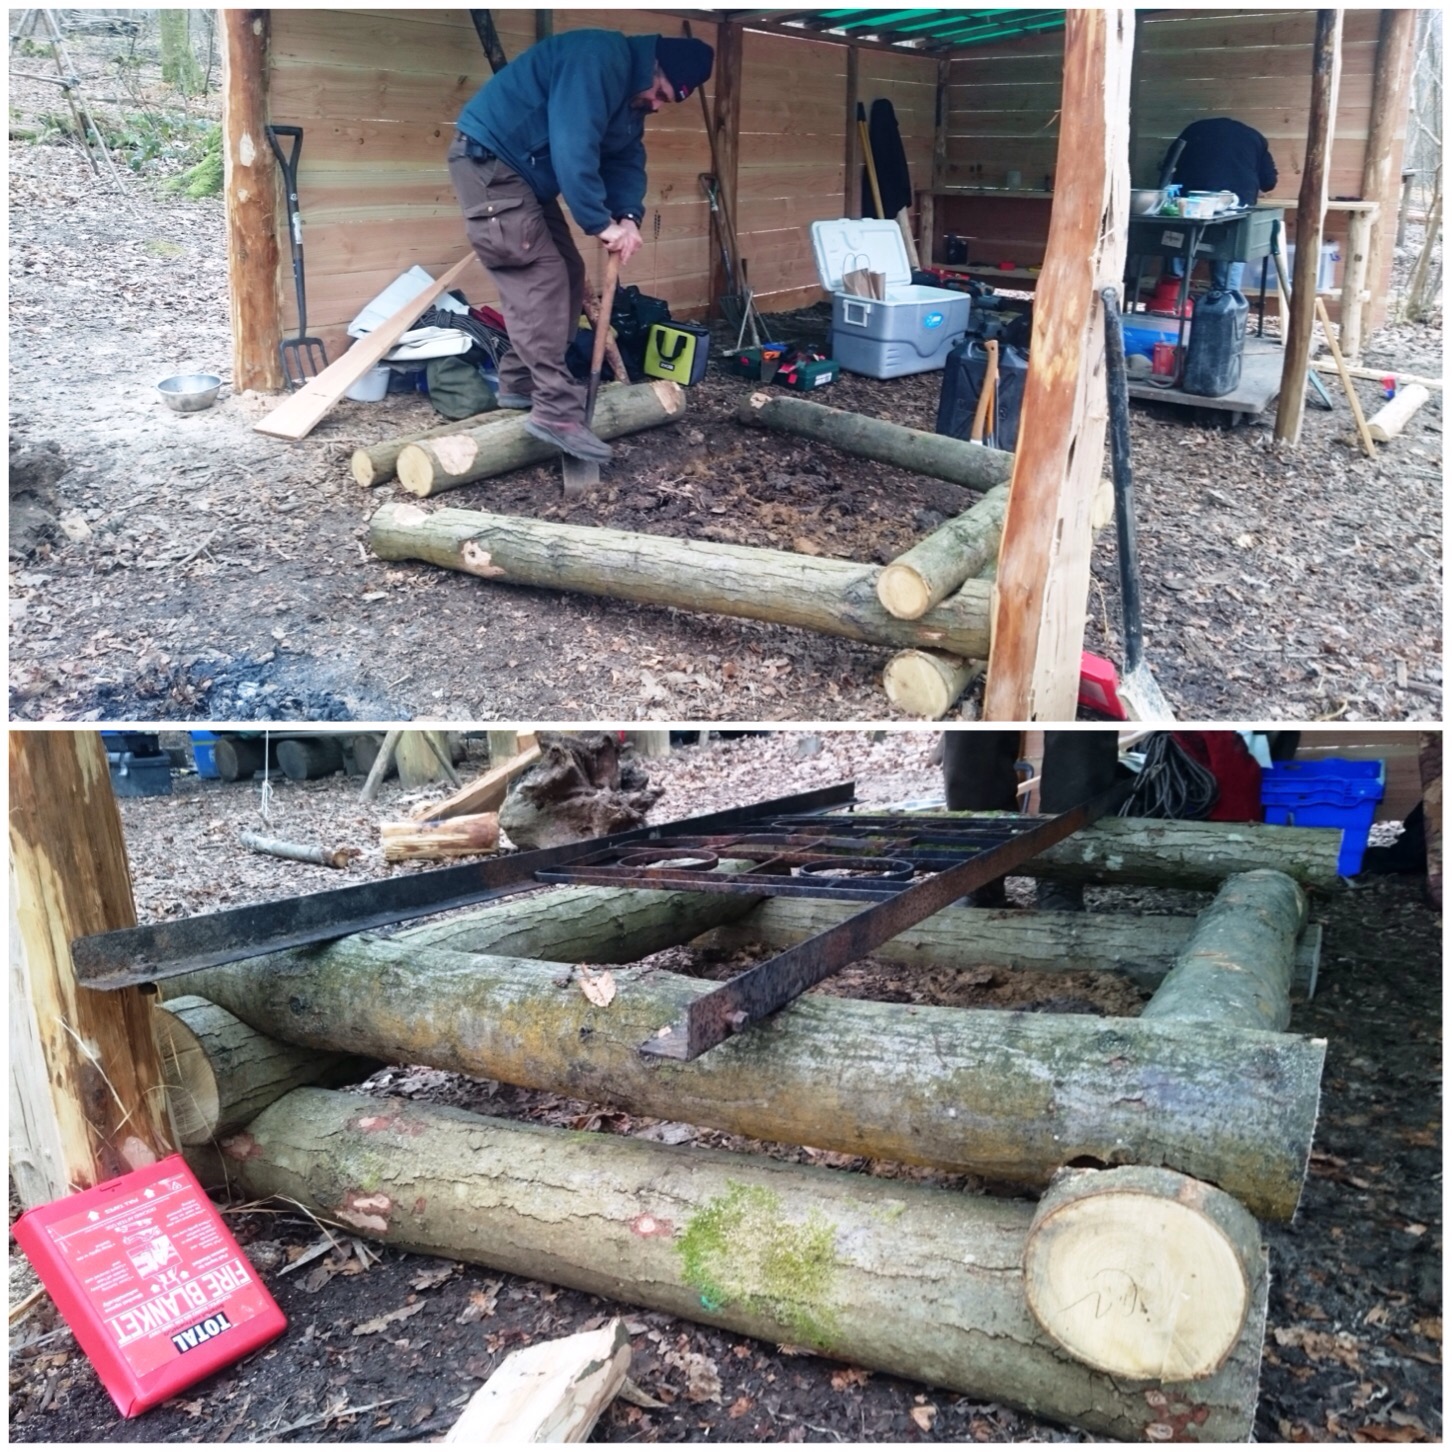
Raised Firepit/platform
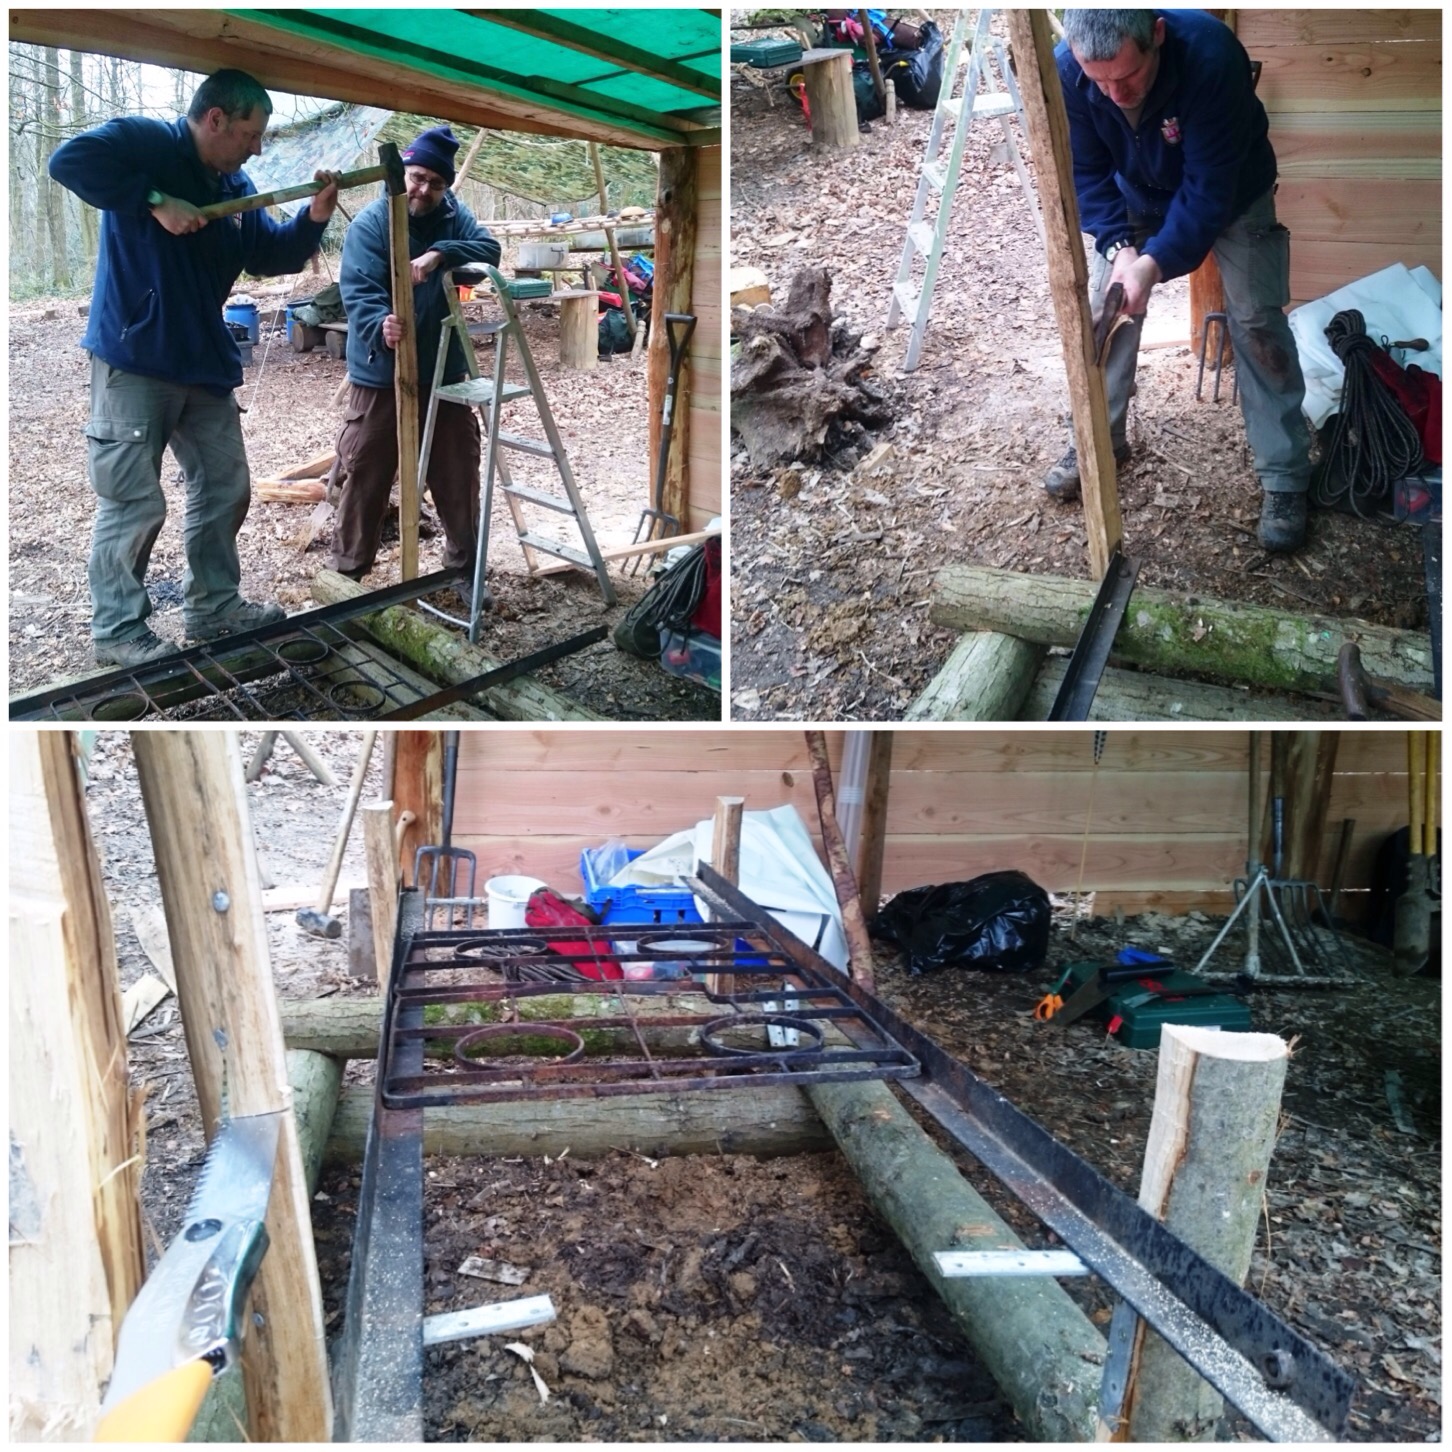
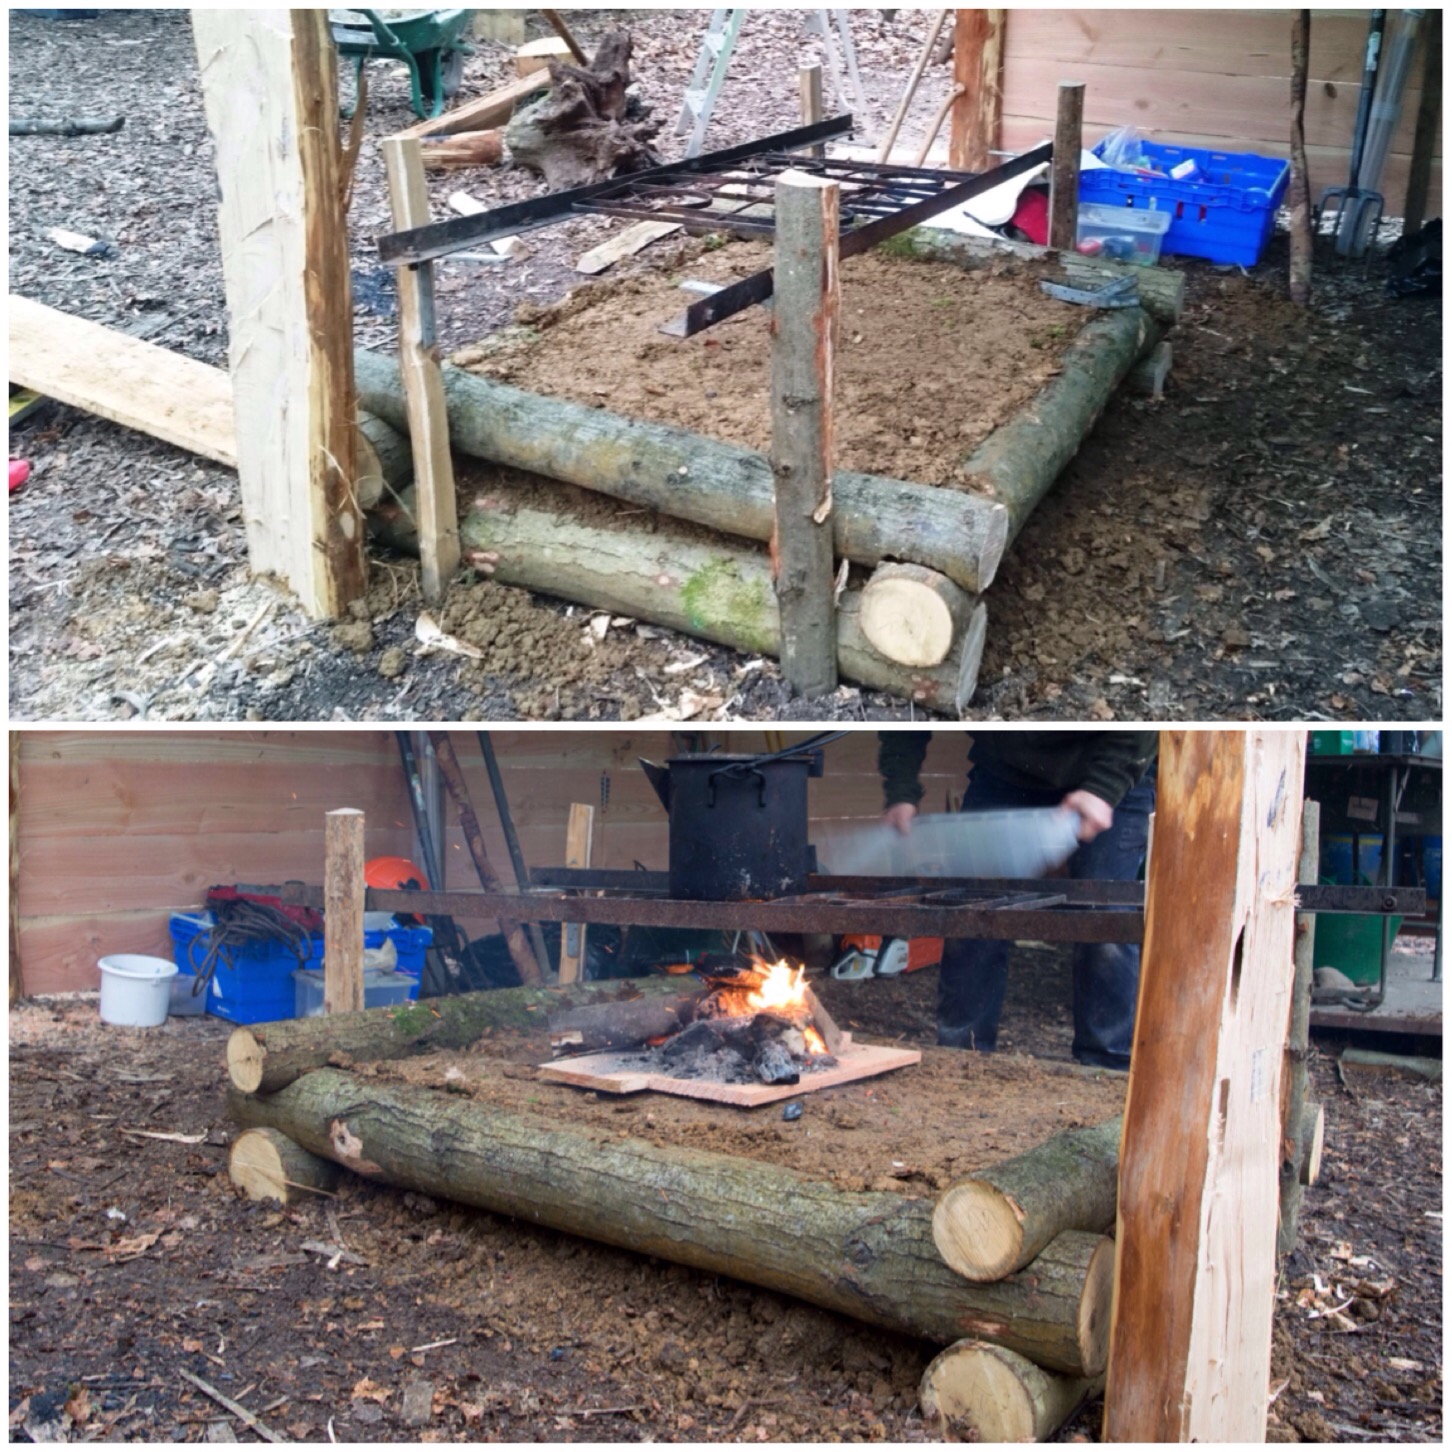
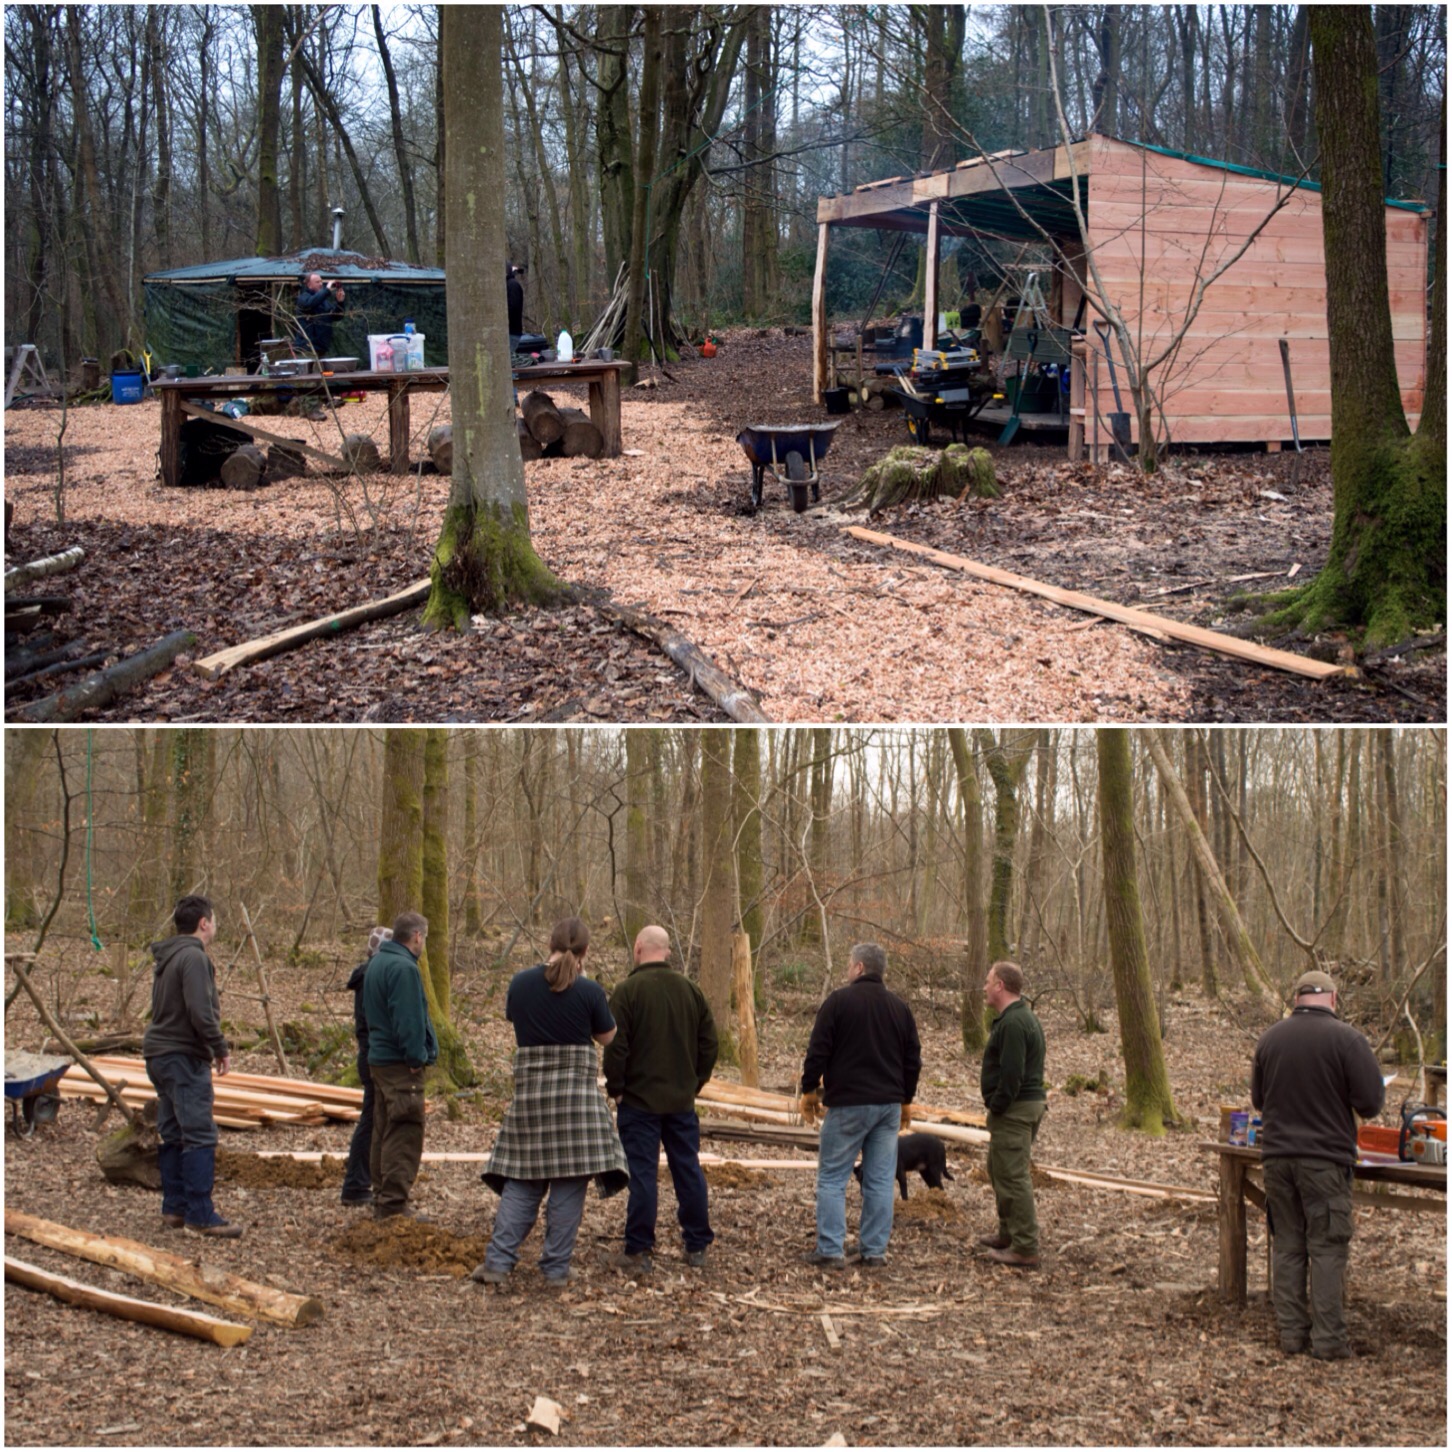
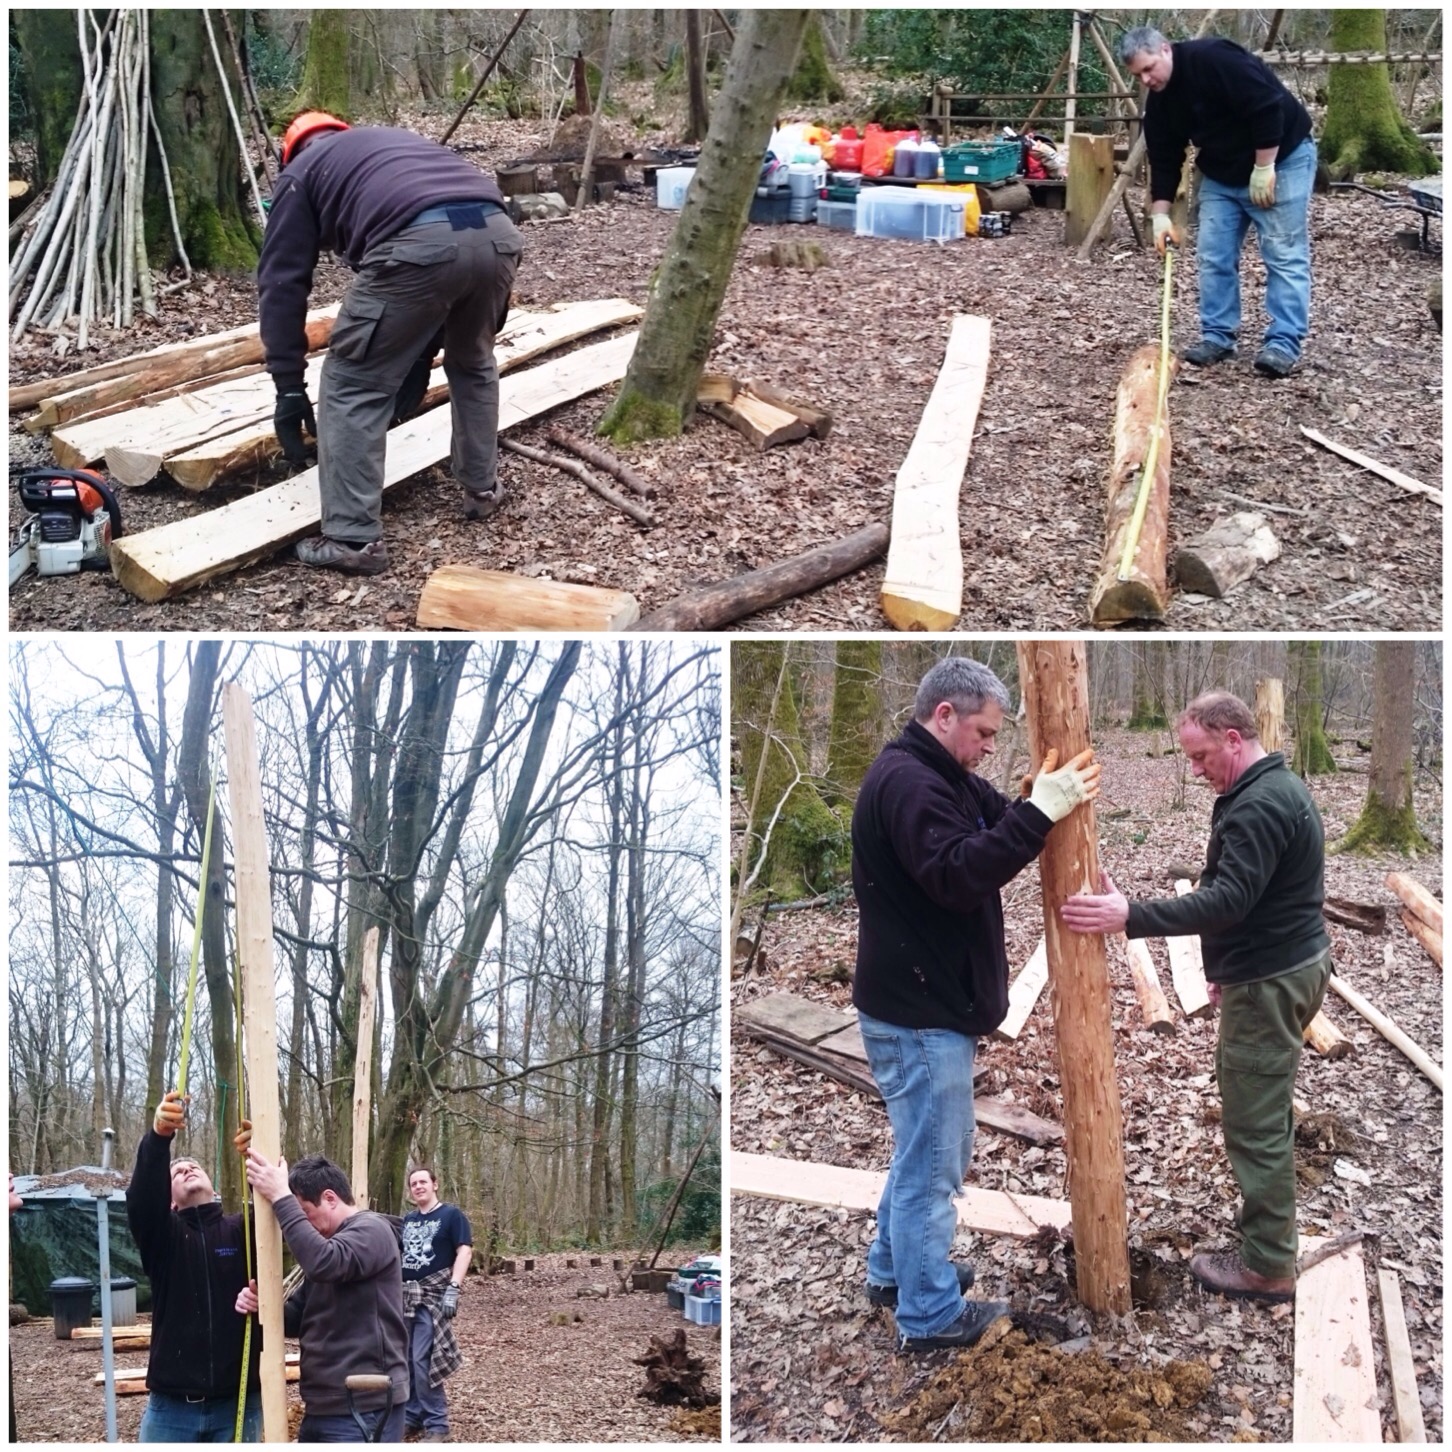
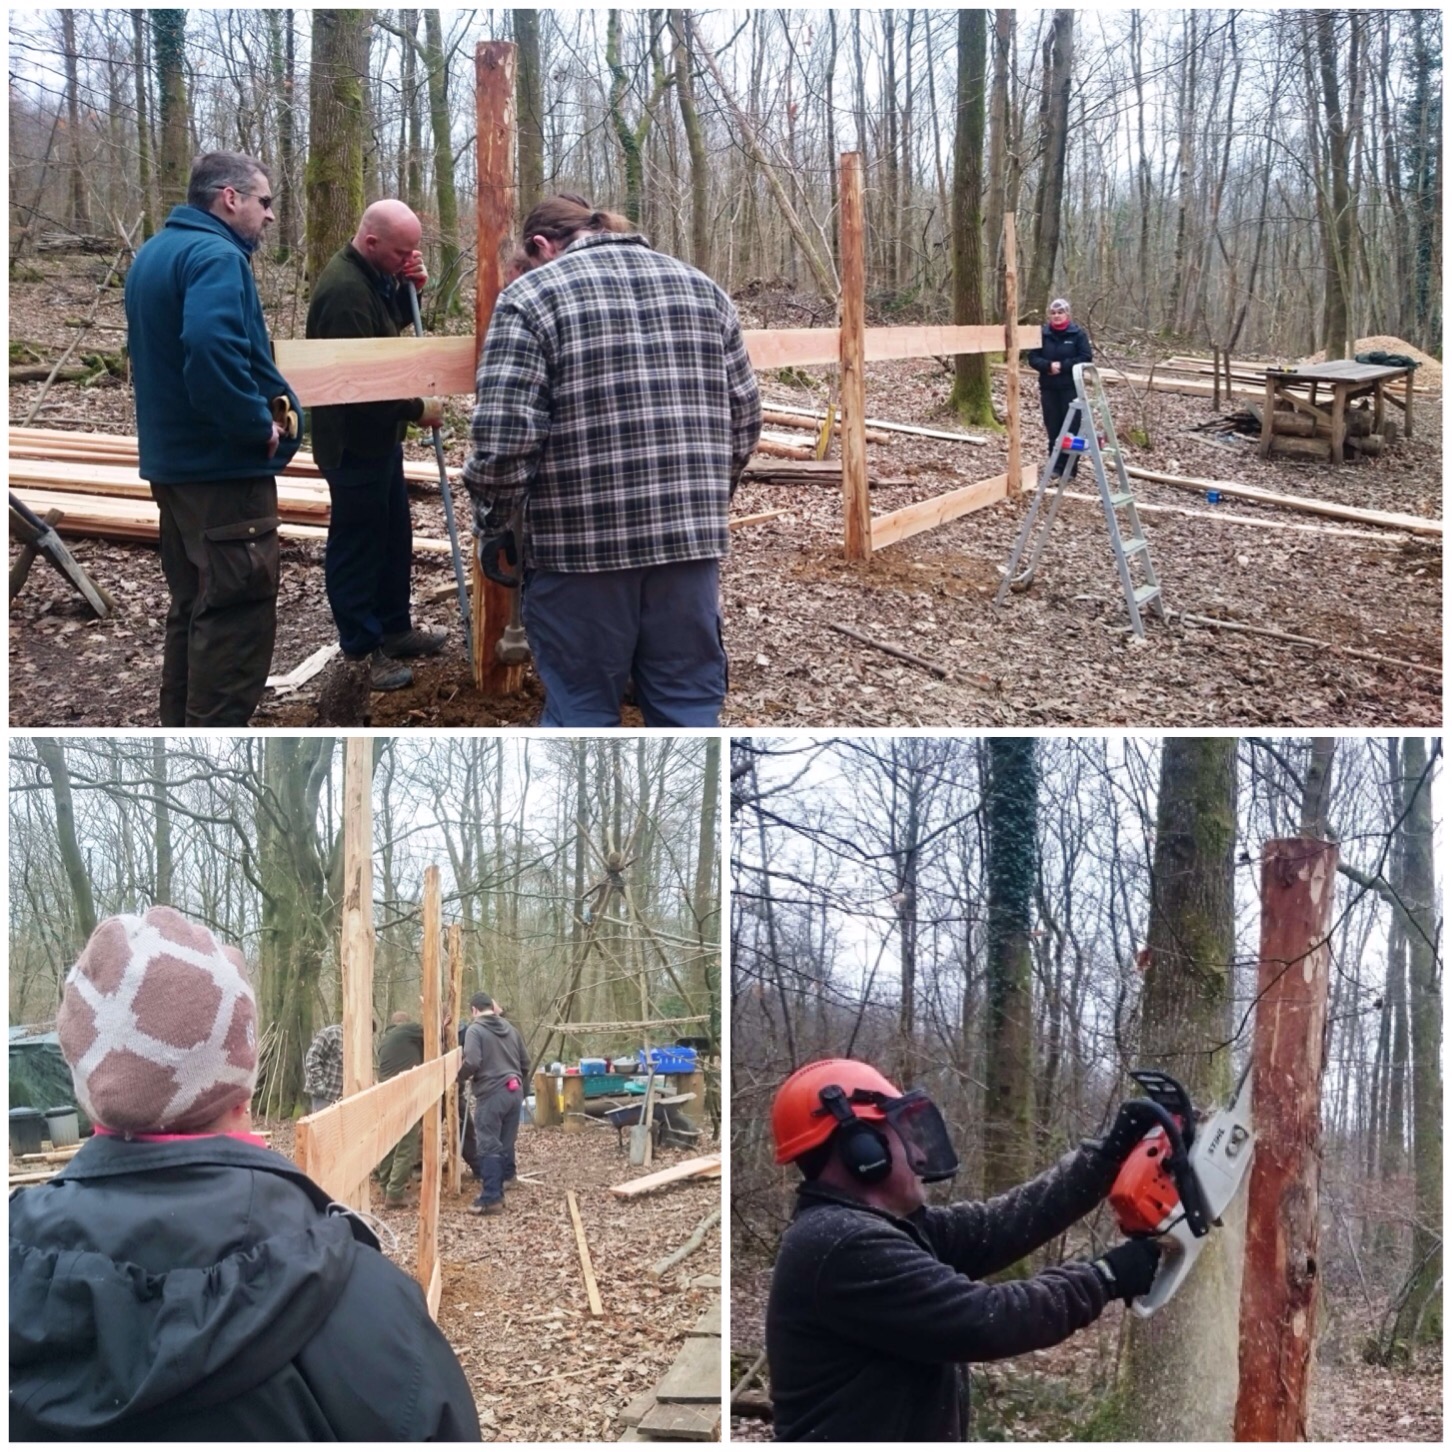
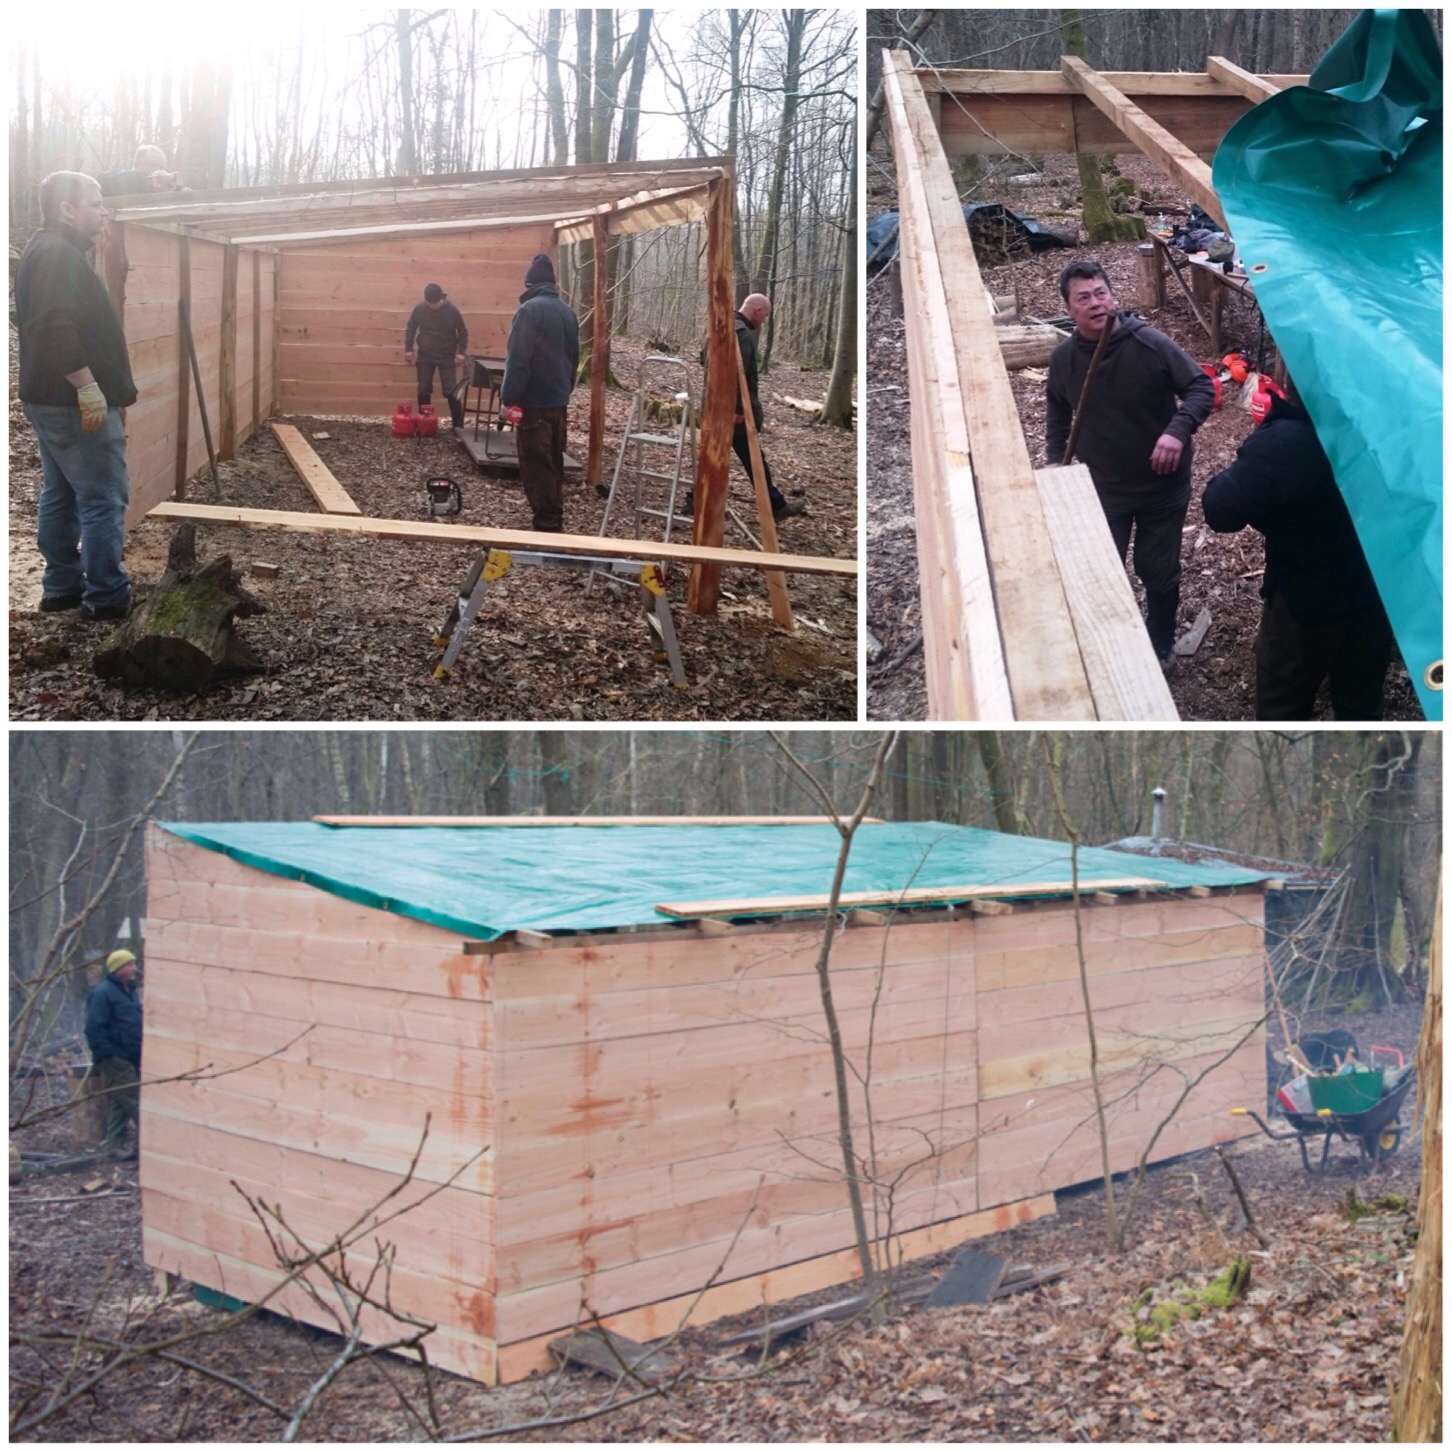
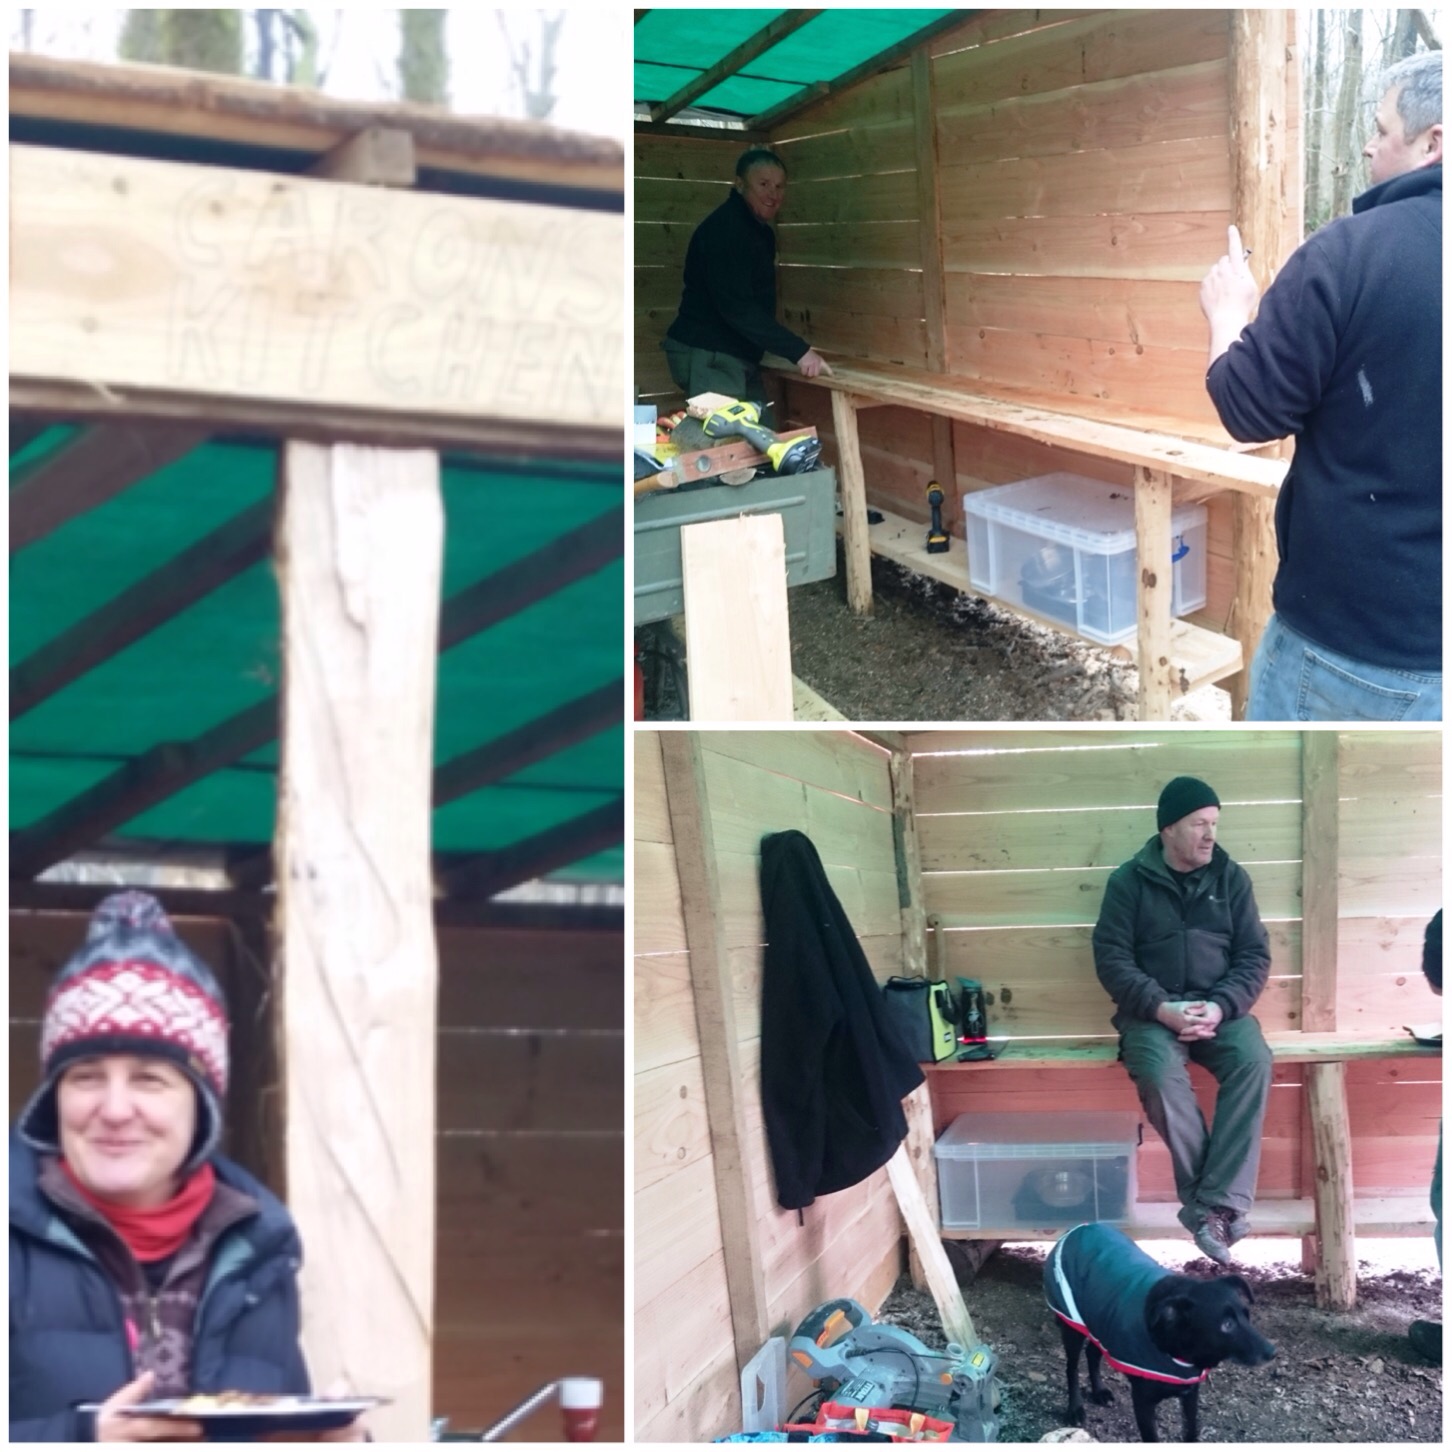
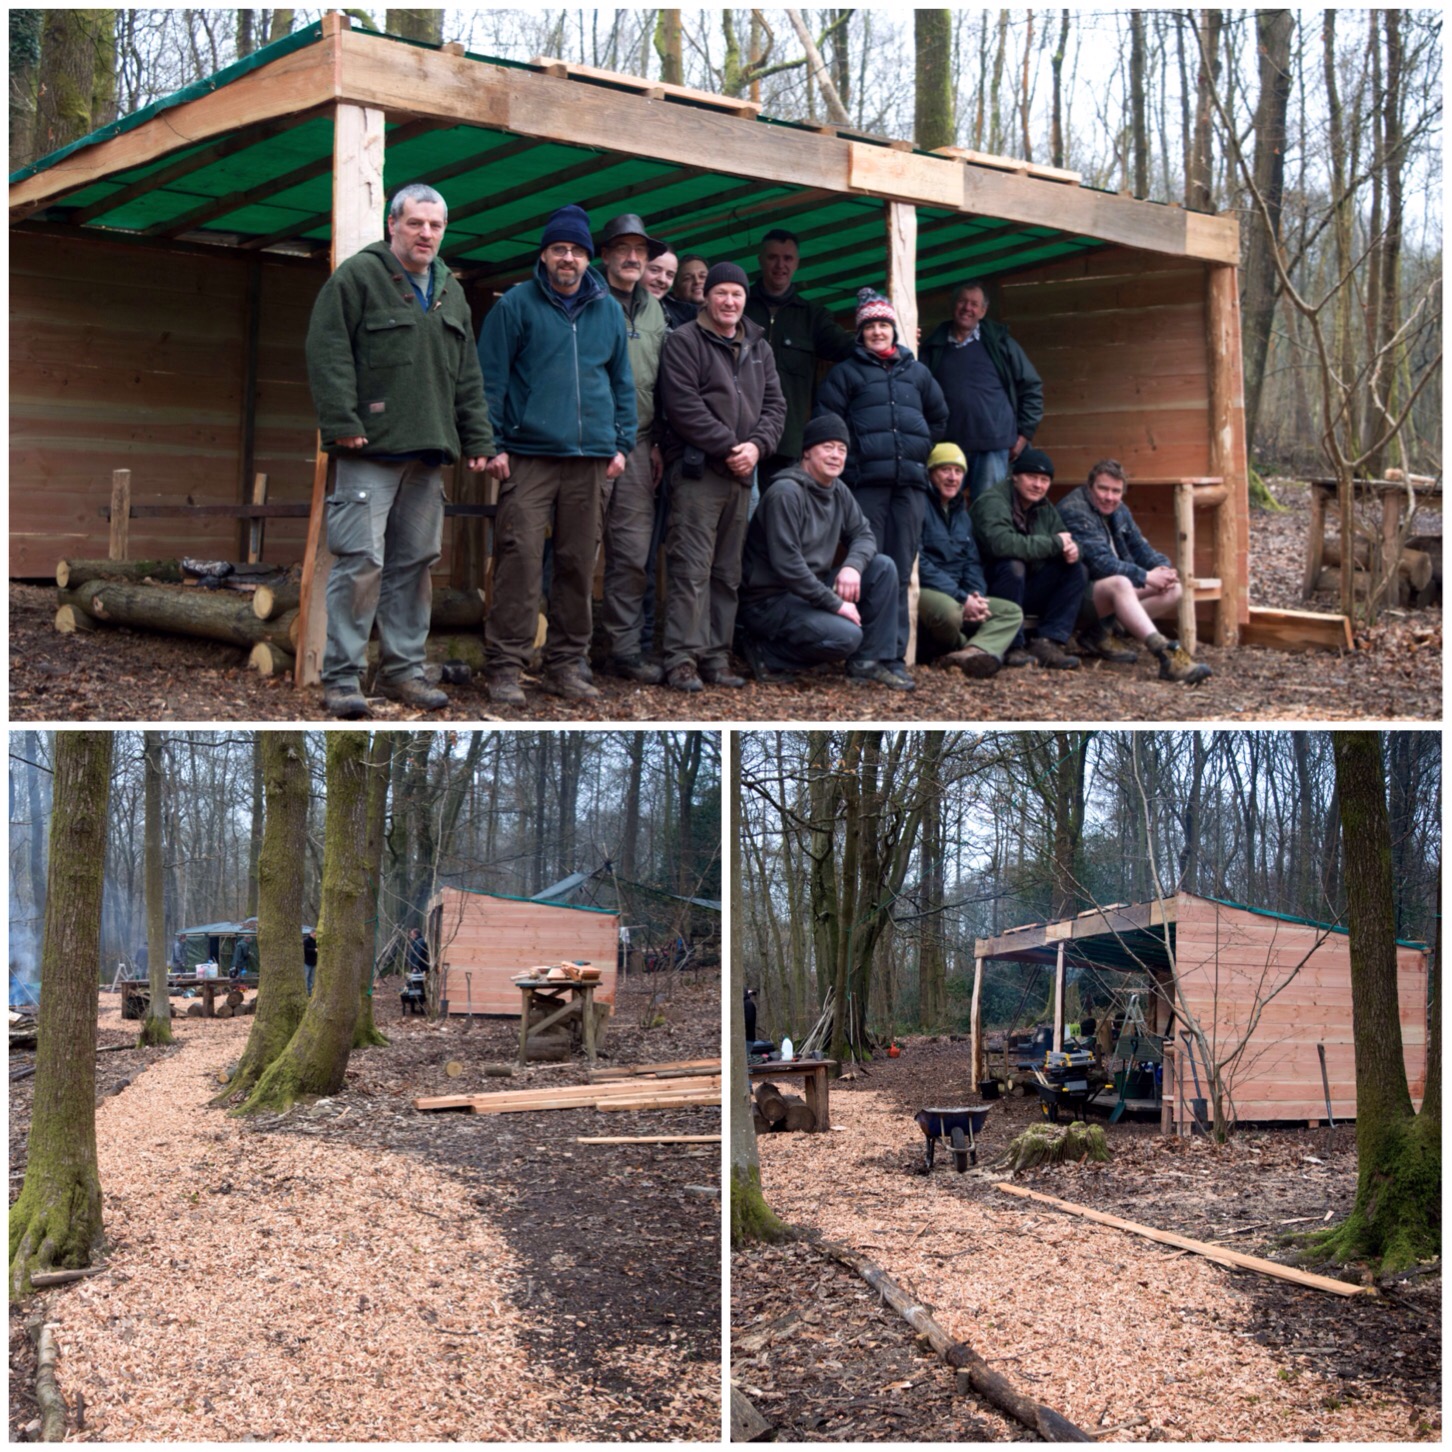
Before building any gadgets it is good to have an actual fire. I was asked to help build a raised firepit/platform by my friend John Rhyder at the Woodcraft School training area. John wanted a dedicated area for his students to cook on without having to bend down too far.
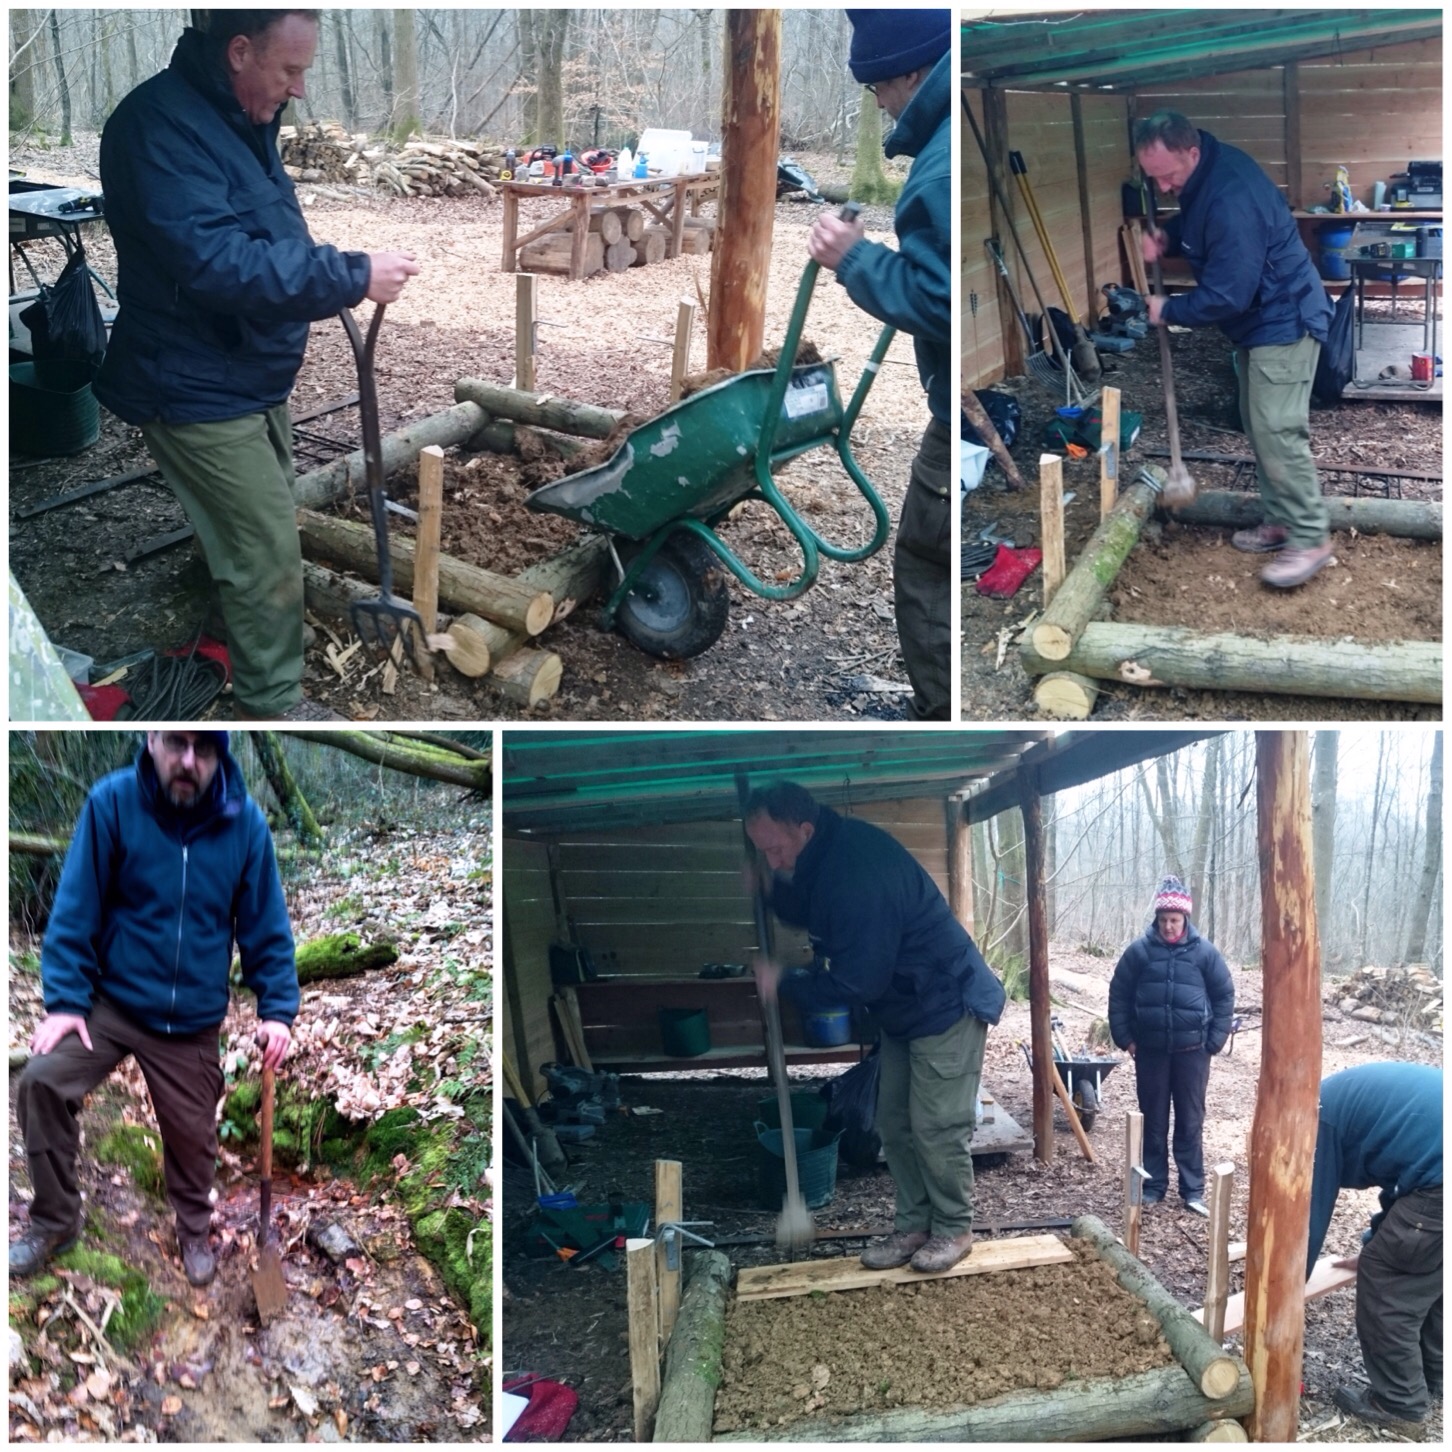
After a lot of discussion with his wife Caron we opted for a rectangular shape instead of a square. Caron argued that this shape would give a large cooking area but would be safer than a square, as the students would not have to stretch too far to reach the centre of the fire. This is an ideal construction for a fixed-base camp, with plenty of room to cook on and to sit around.
Raised Firepit
Collapsible pot hanger
I love little wooden contraptions and these little collapsible pot hangers are ideal for the lightweight bushcrafter. They can be made in numerous different ways and are easily broken down to be stored inside your pot. One of the things I like about carving them is that the joints that hold them together are generally simple but need to be carved perfectly if the hanger is to take the weight of a heavy pot without coming apart.
Collapsible pot hook
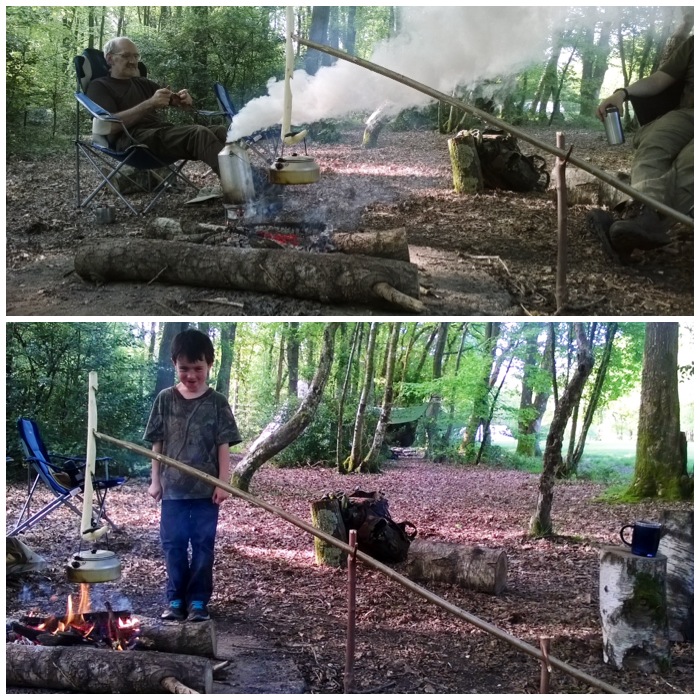
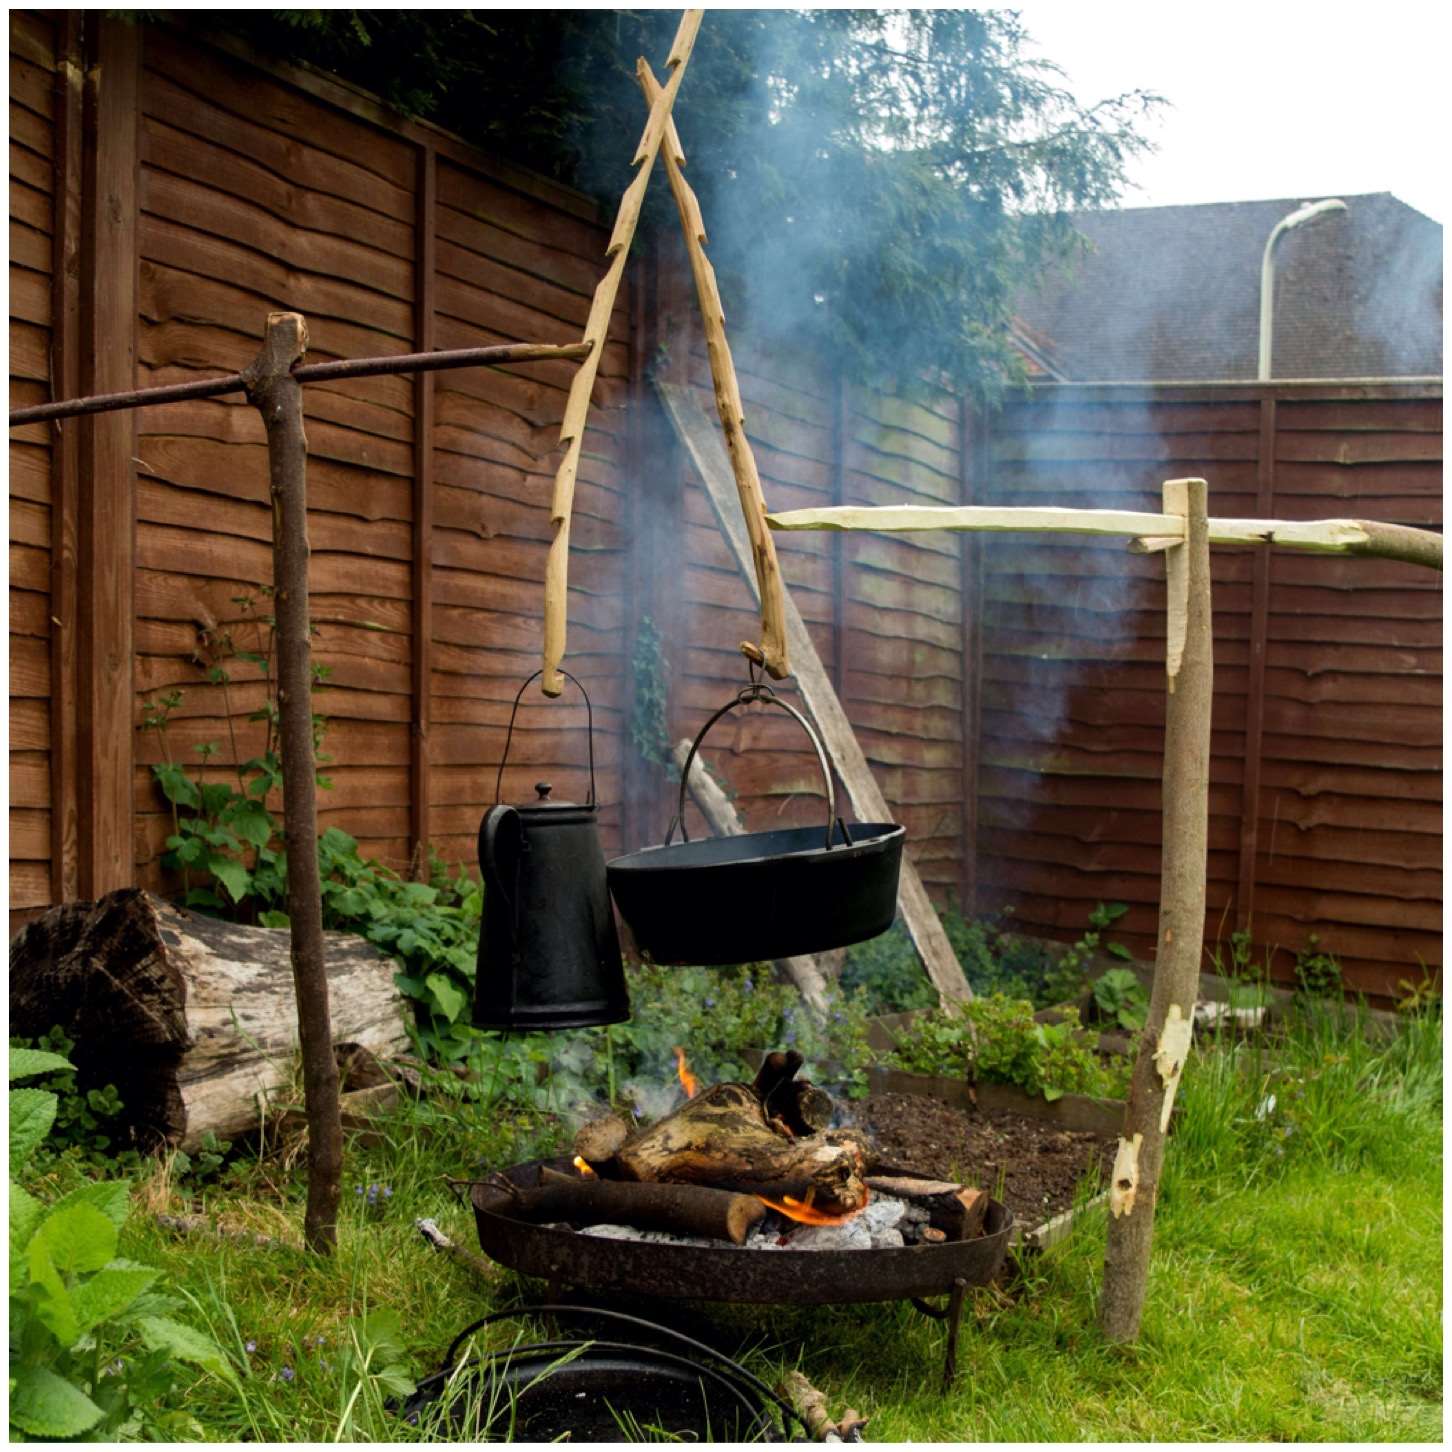
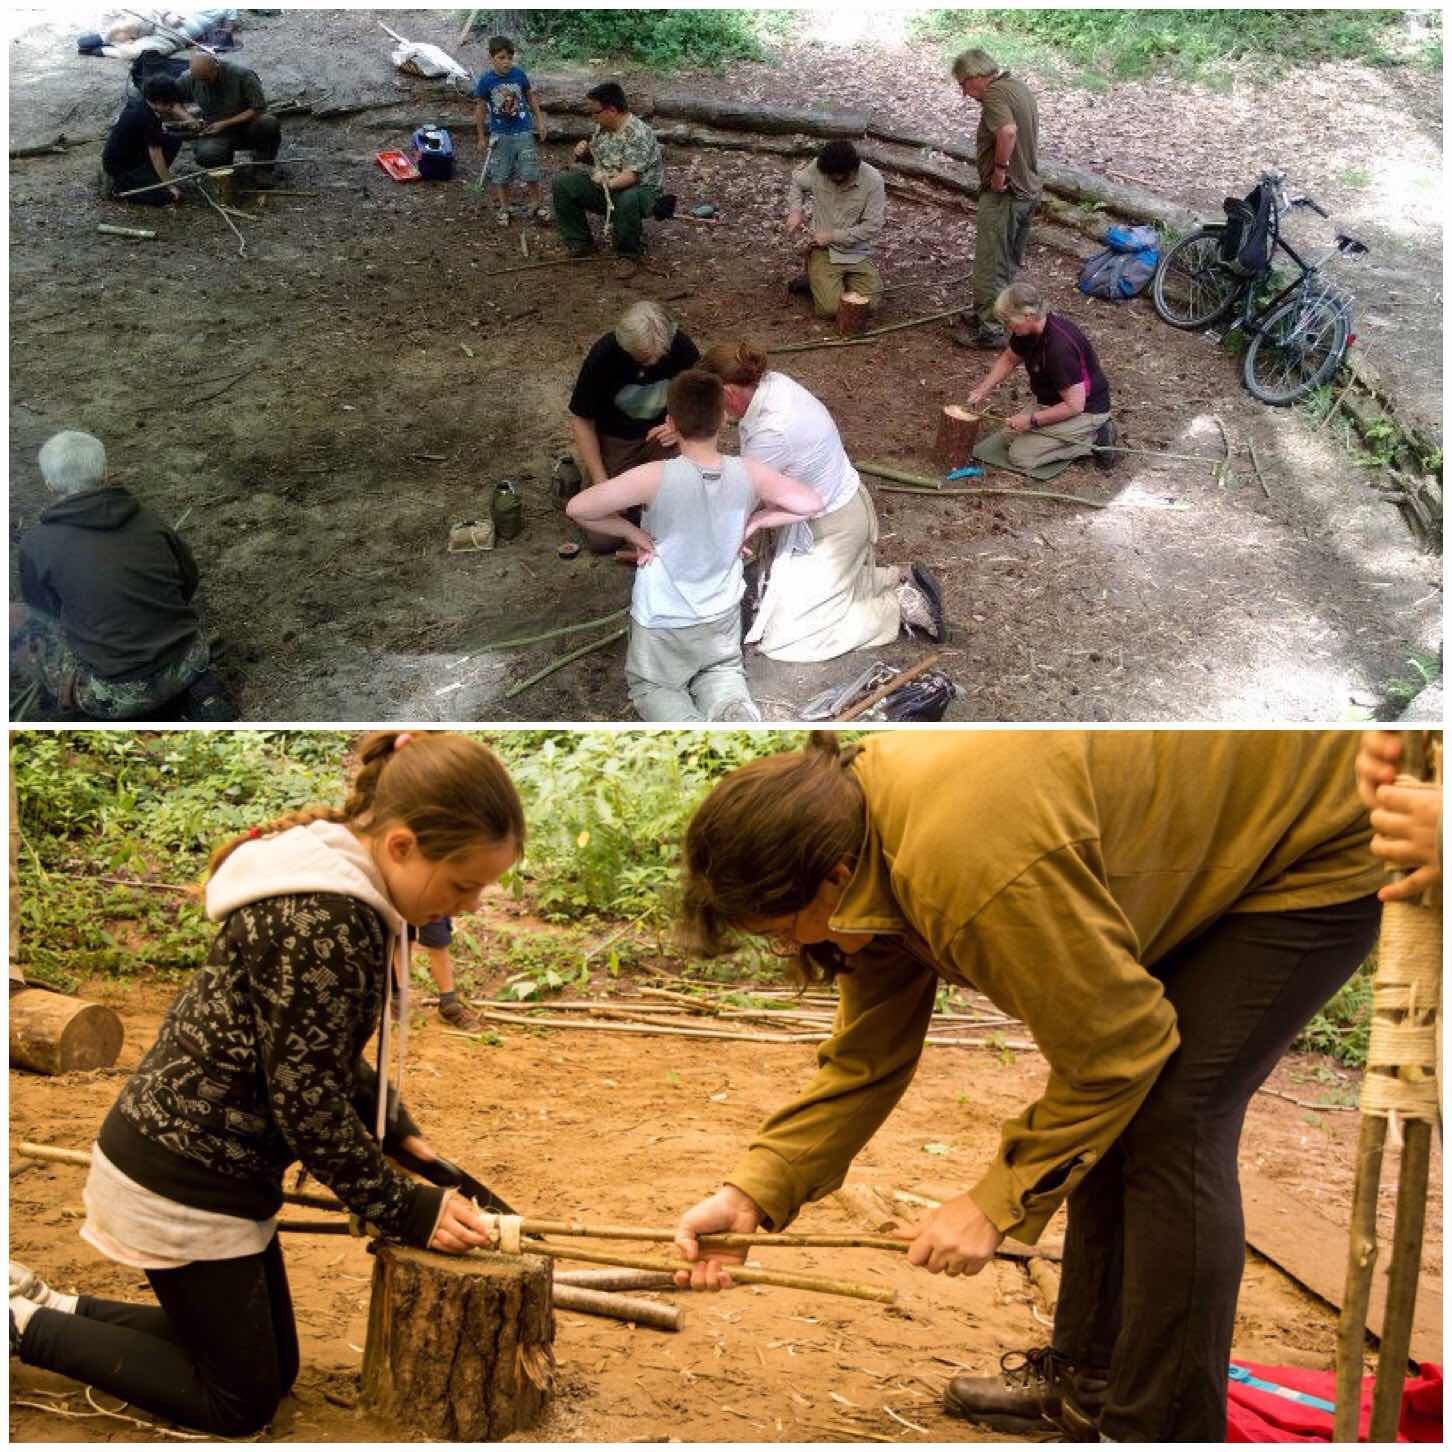
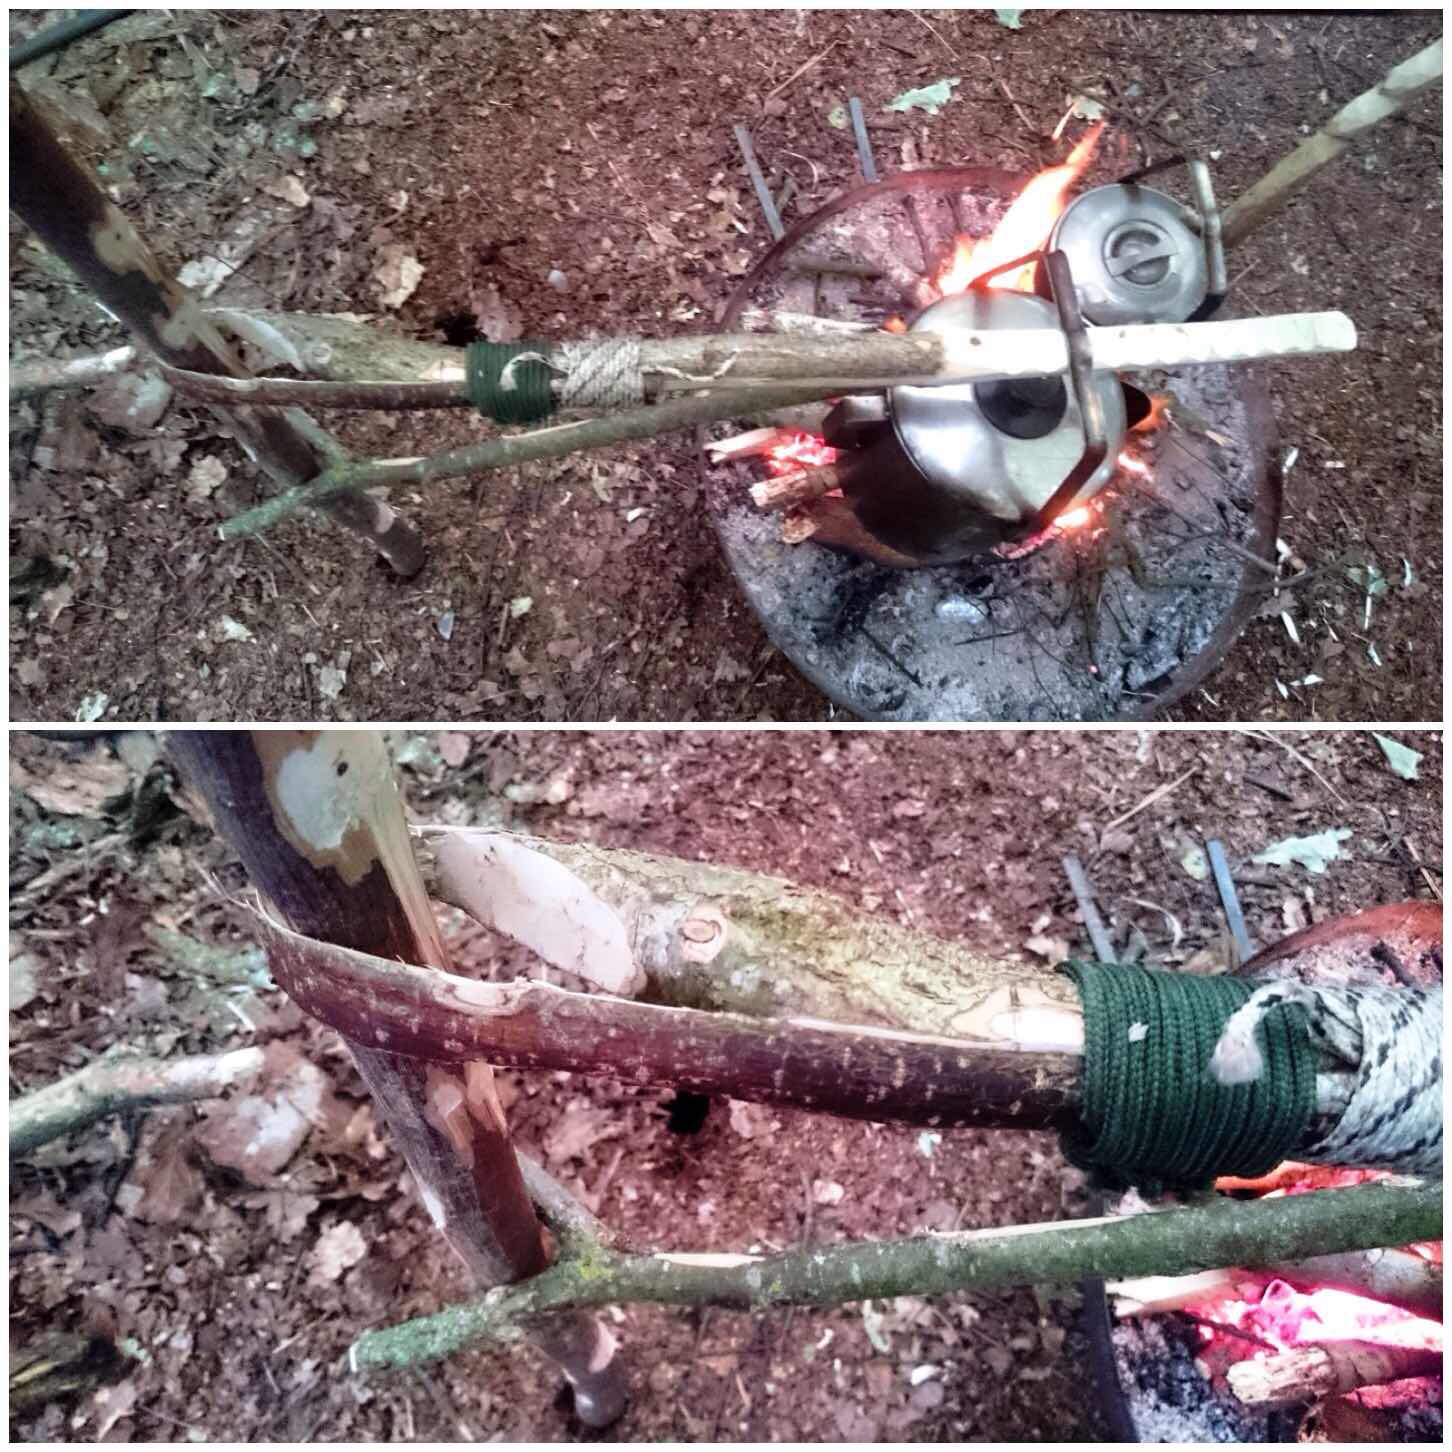
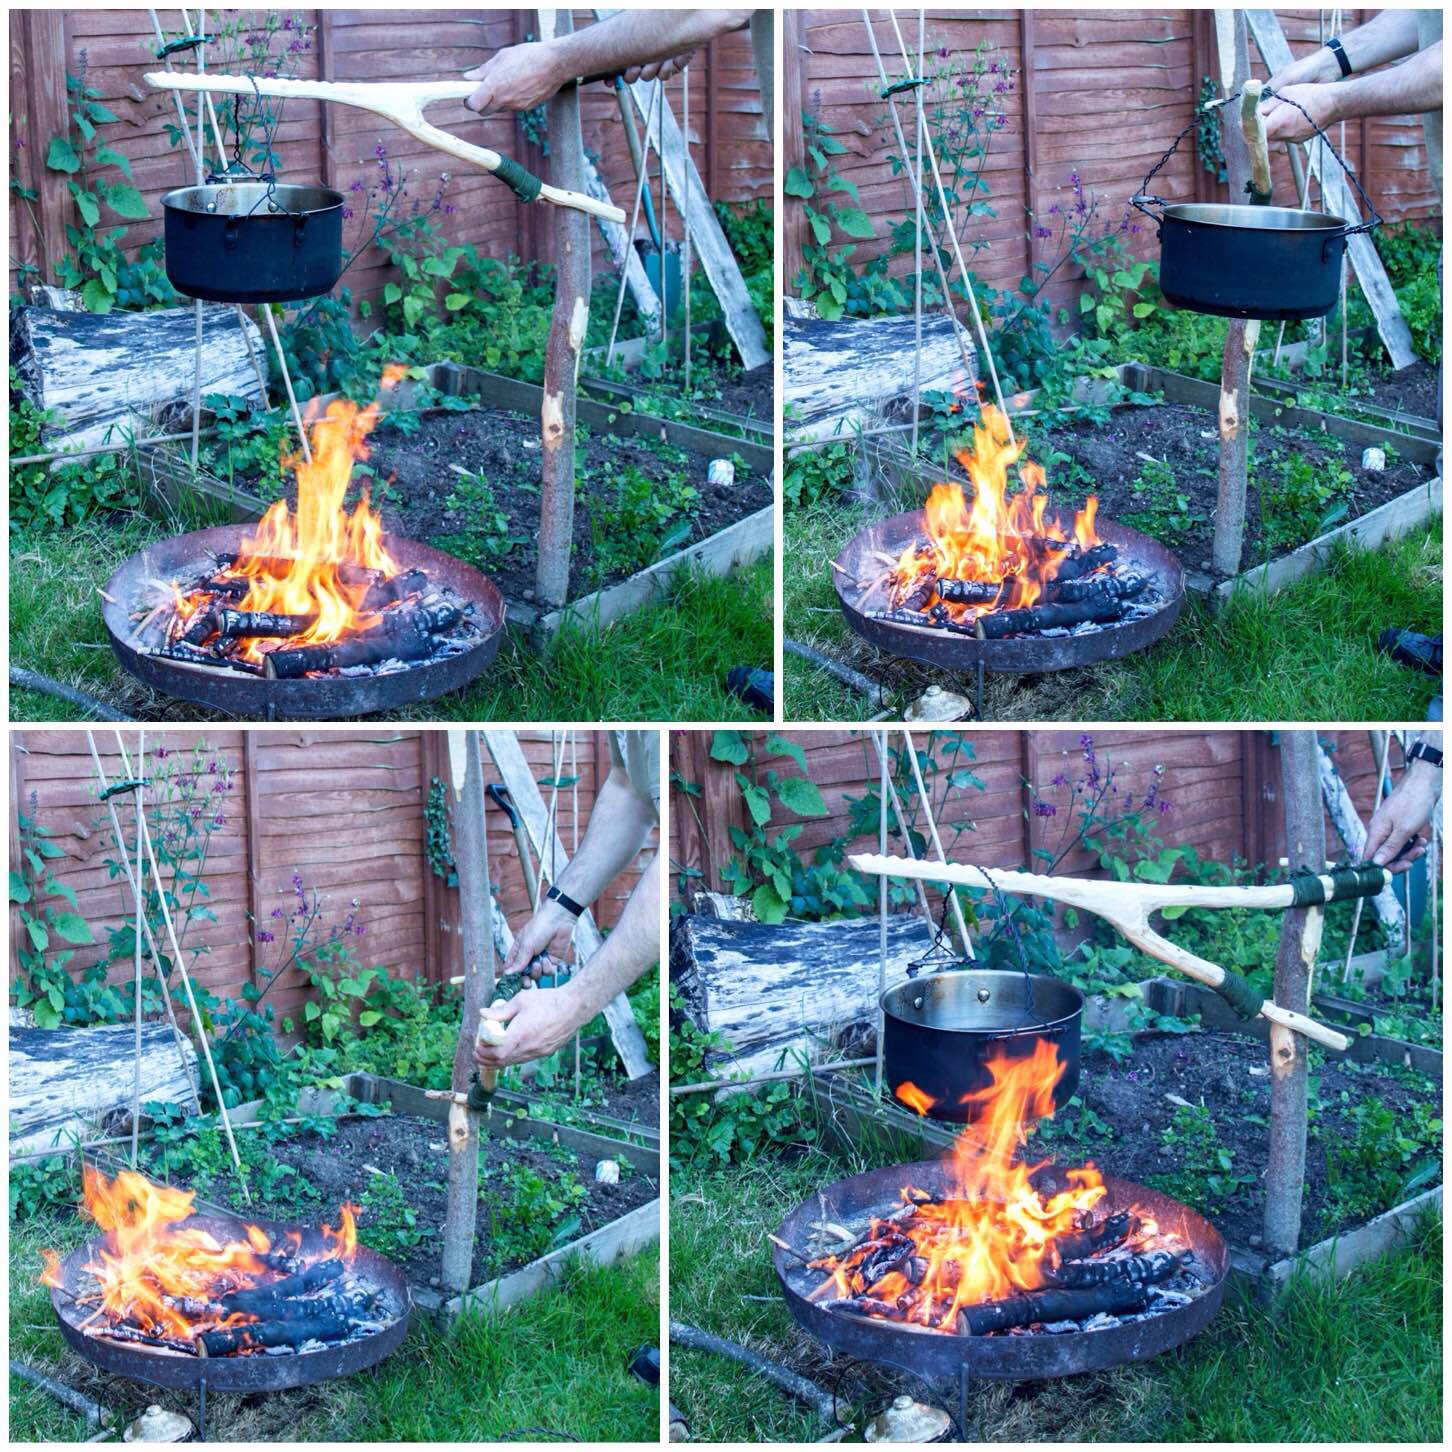
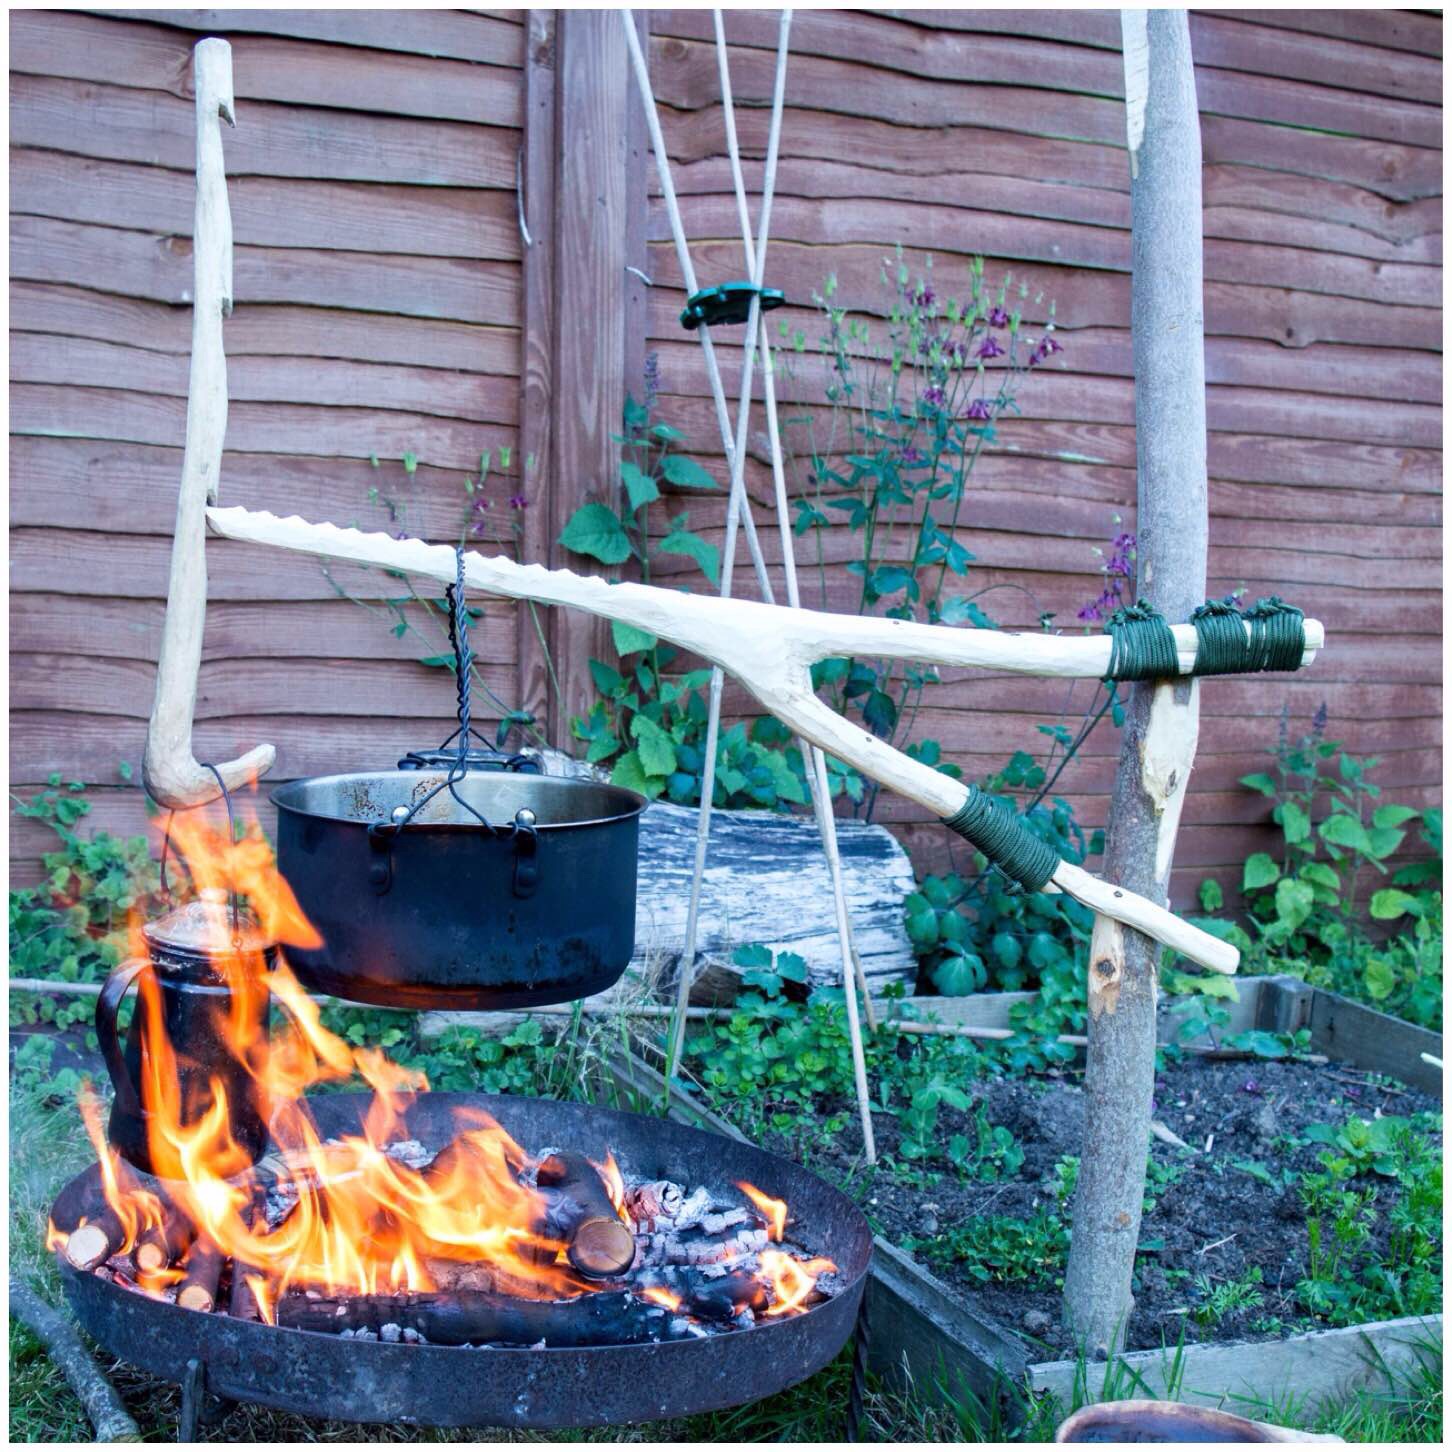
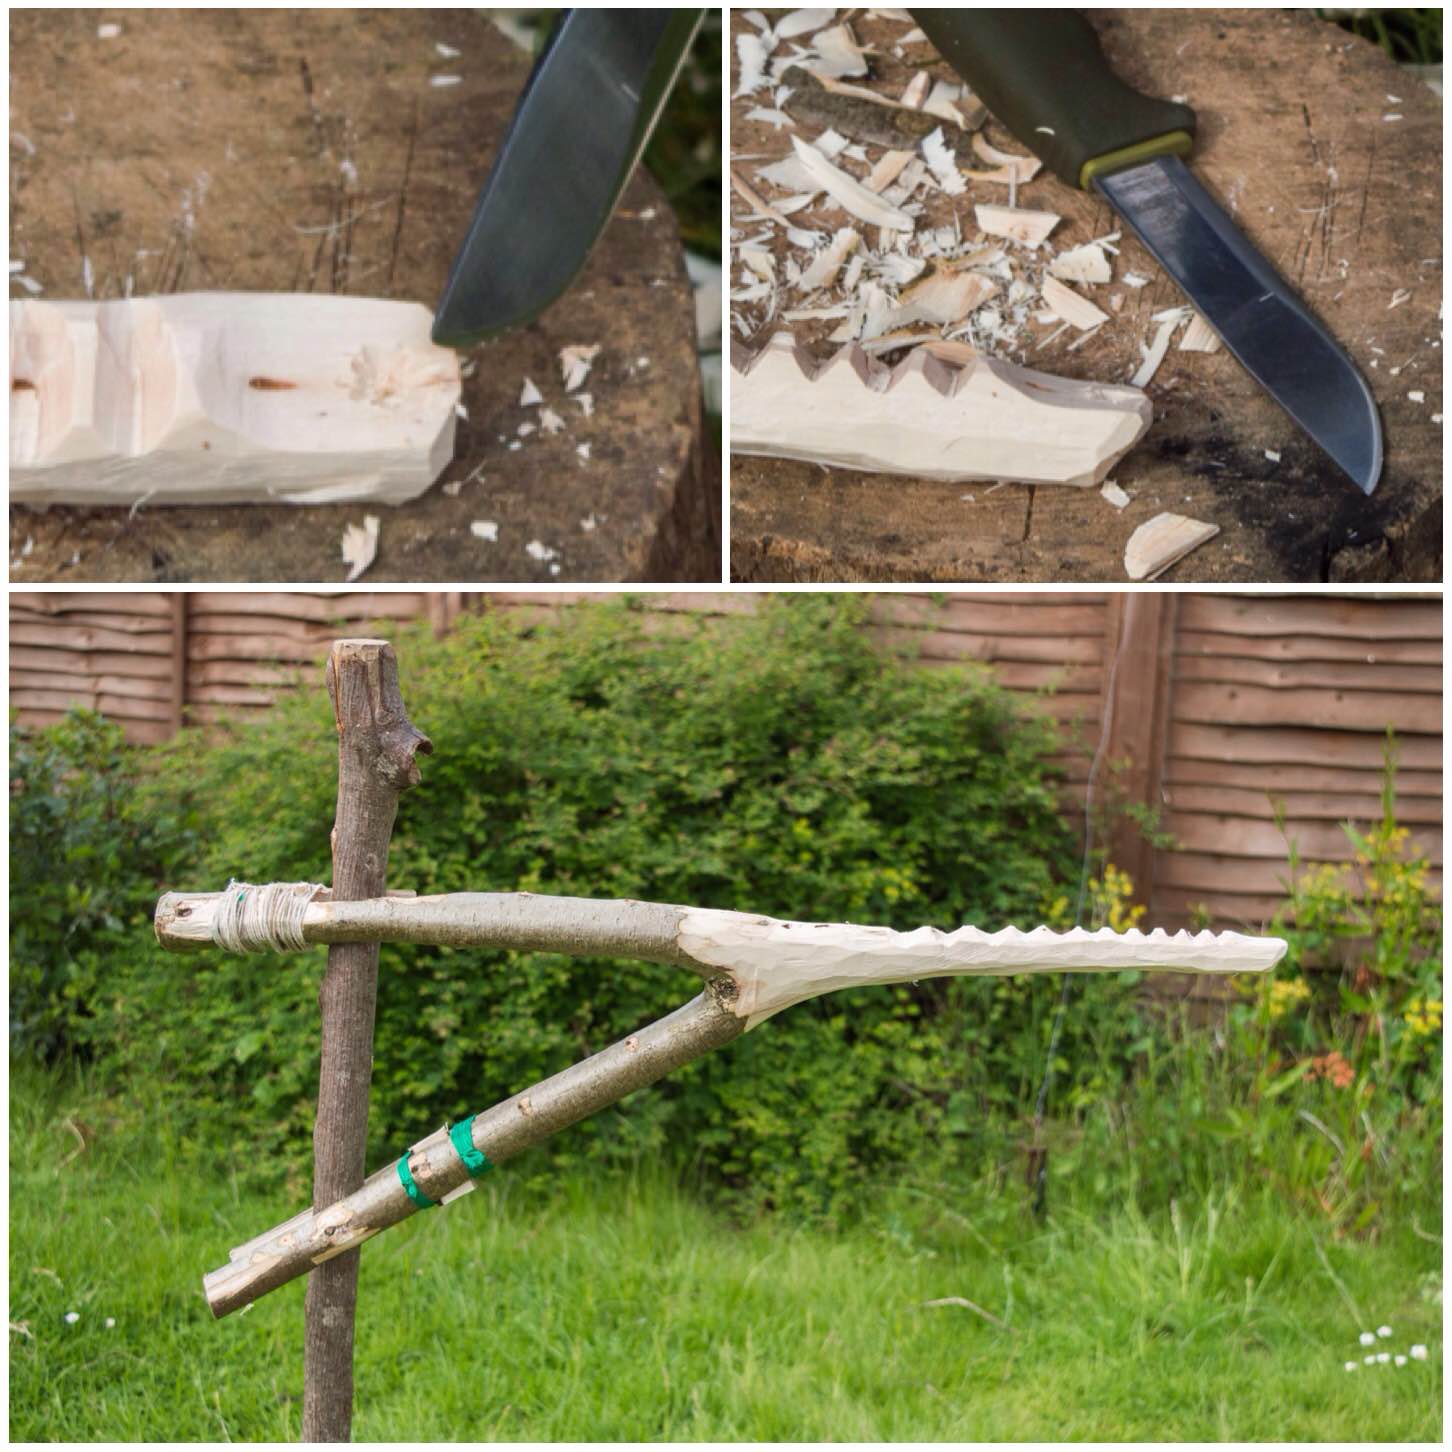
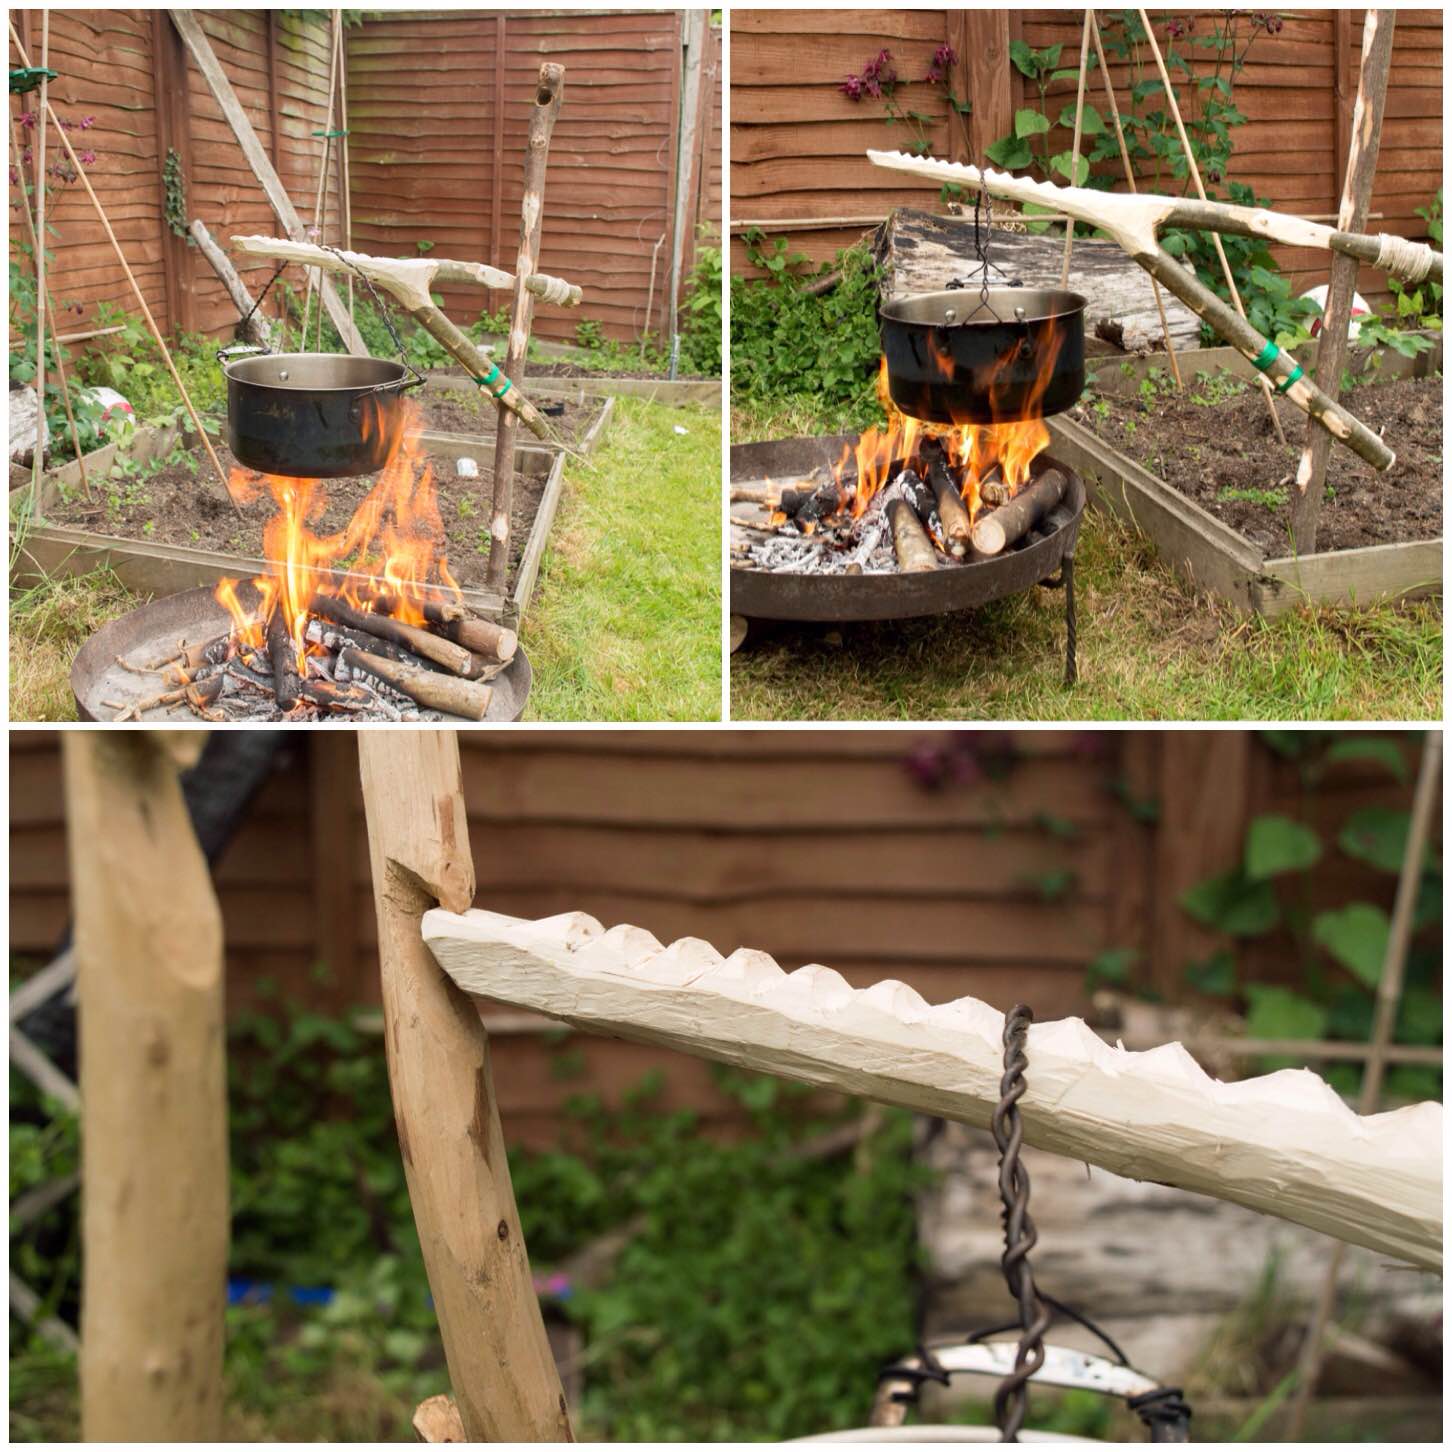
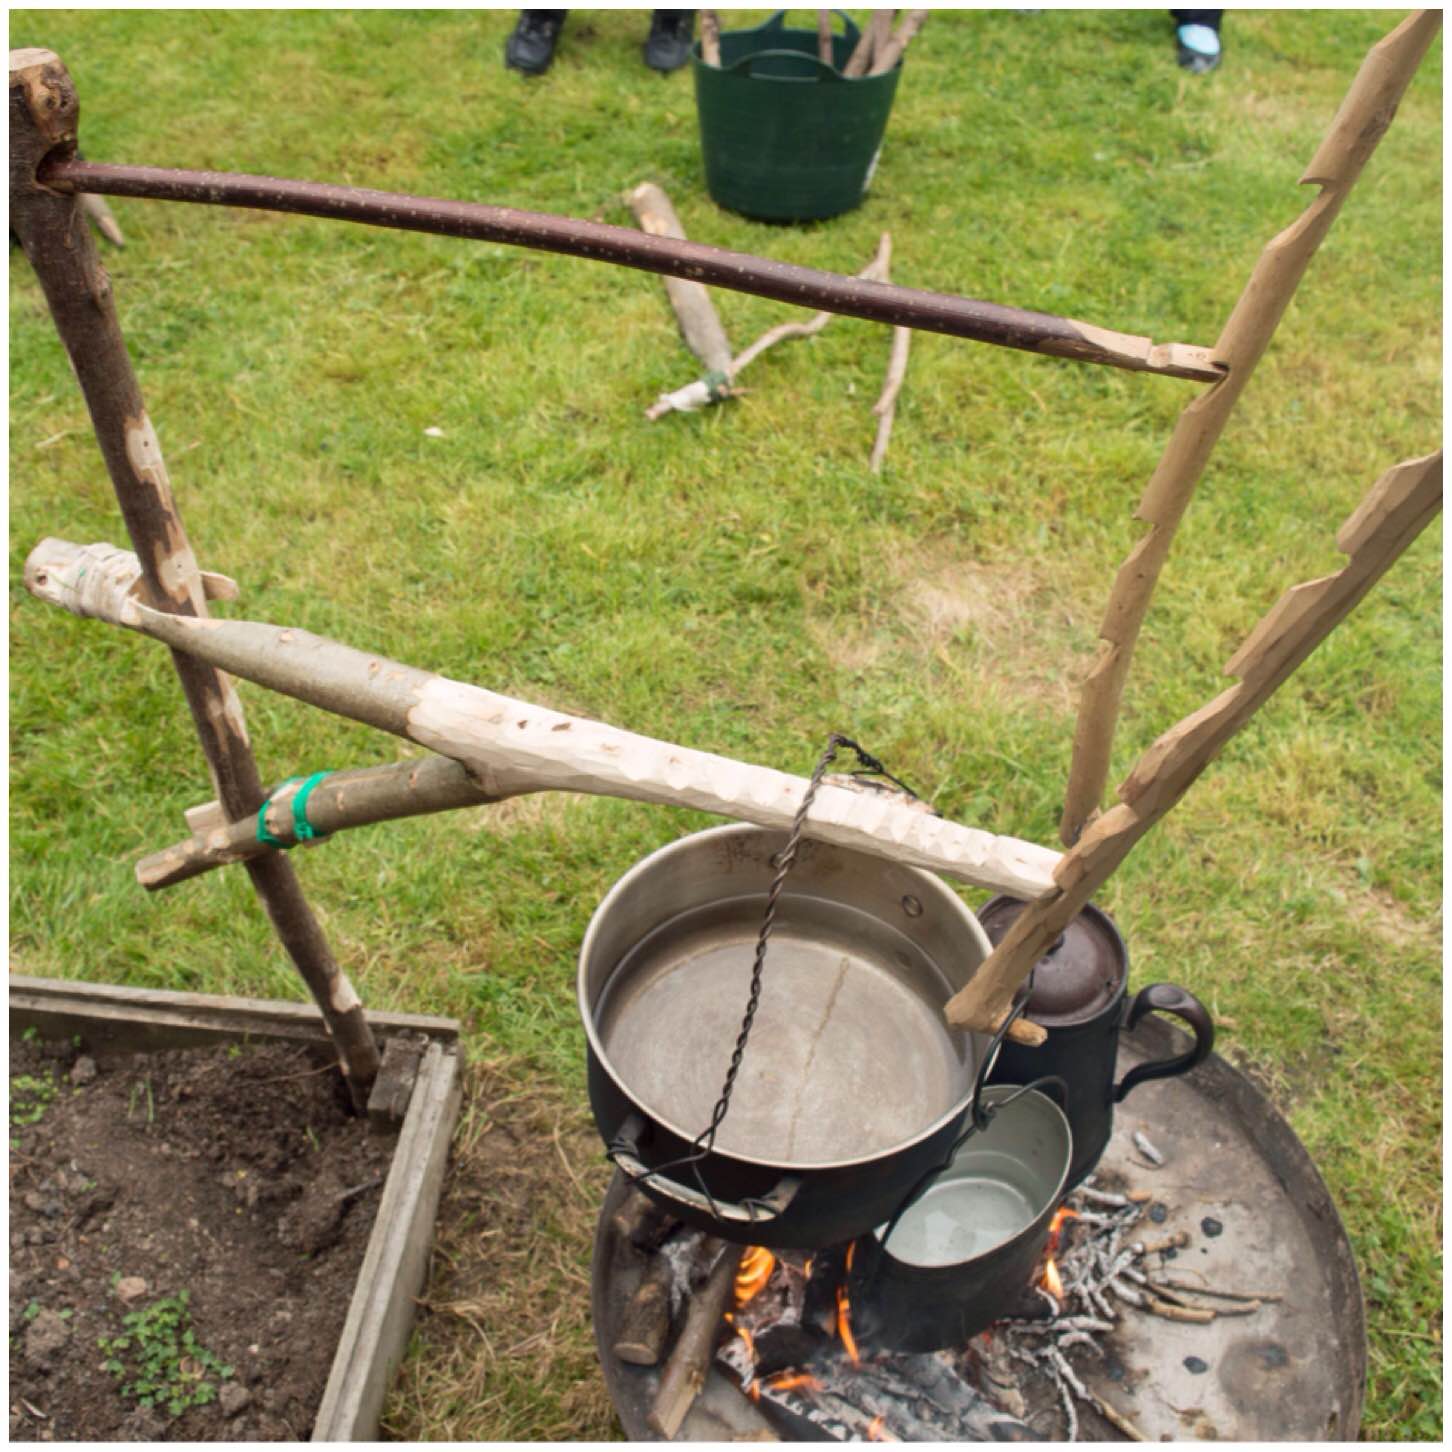
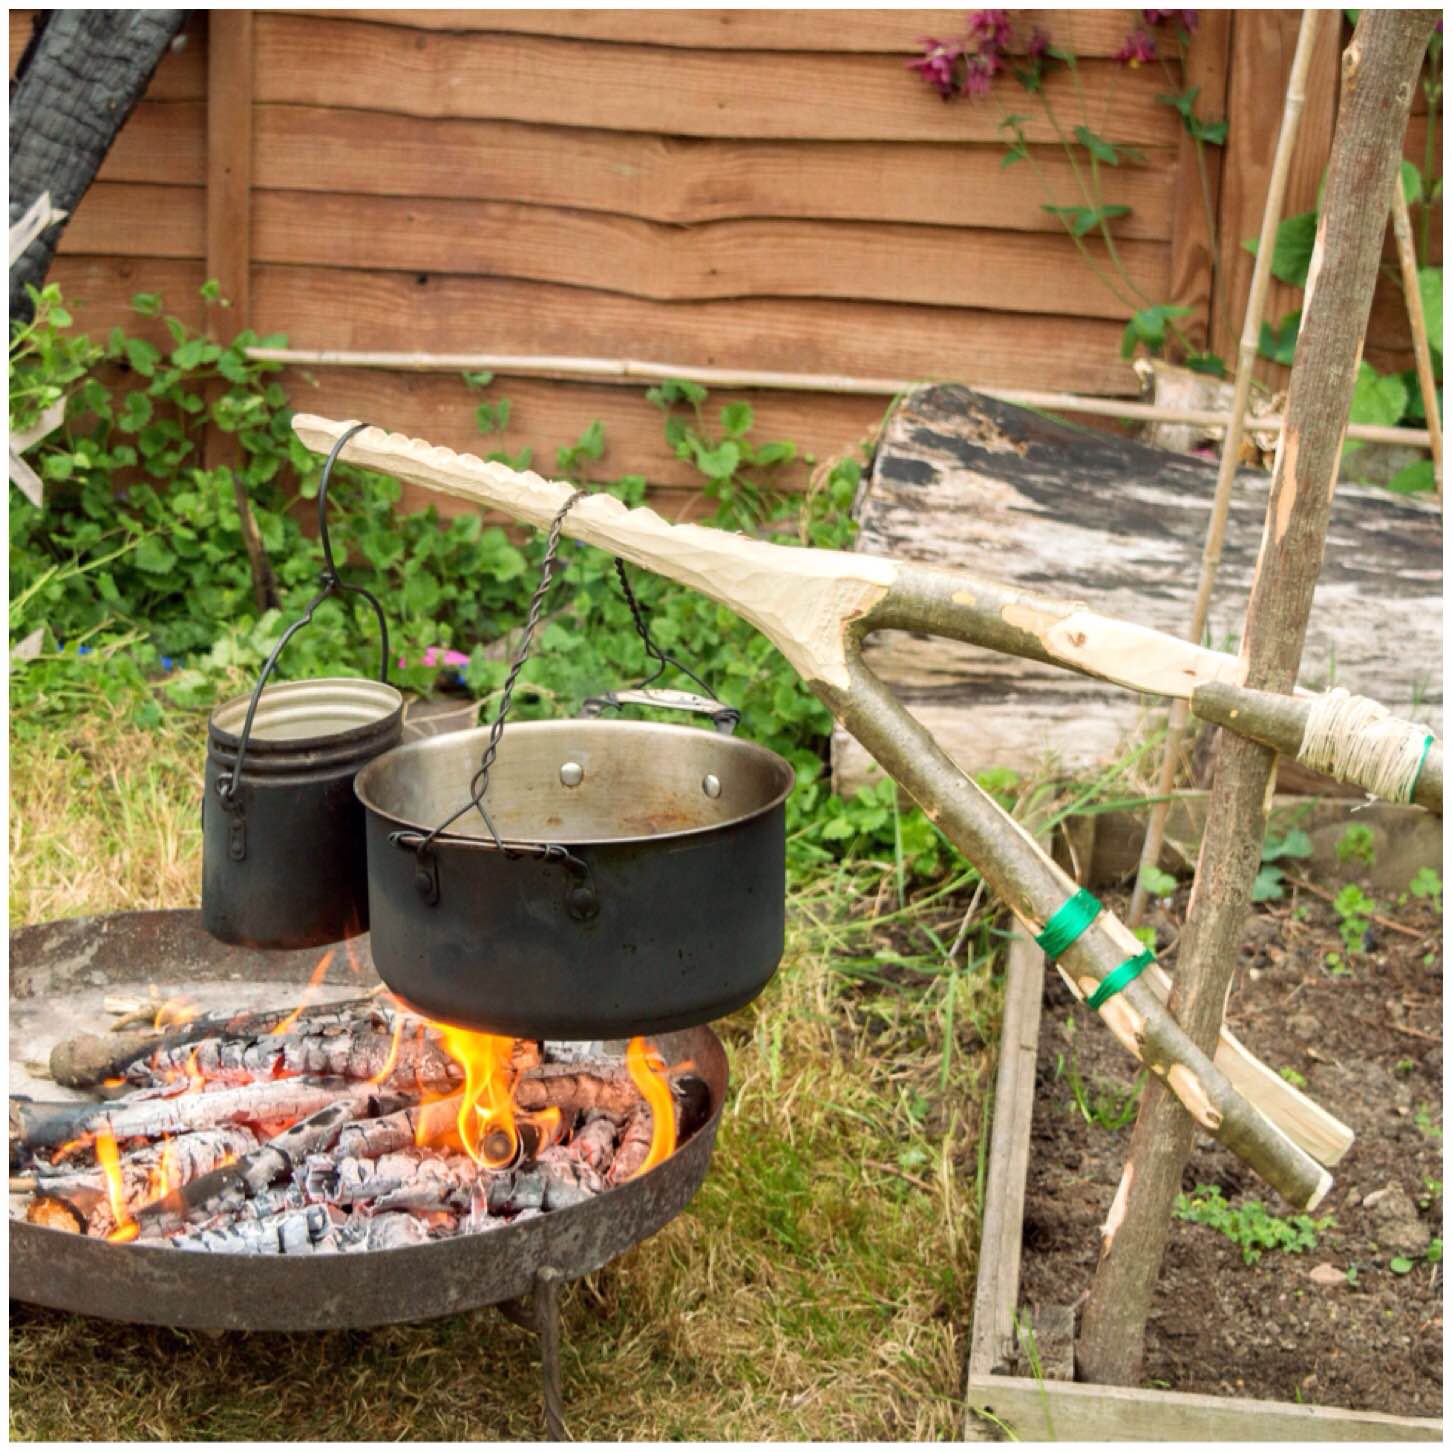
Wagon/Waugan Stick or Burtonsville Rig
This is an excellent cooking rig for bushcraft beginners to learn. It has lots of different parts and requires a number of different knife cuts to produce the hanger and the hanging poles. I have heard this set up called many different names from Waygon or Waugan stick and Mors Kochanski refers to it as the Burtonsville rig. All have their own stories behind them however the common factor is that it a very easy set up and offers the bushcrafter a wide range of cooking heights.
Wagon/Waugan Stick or Burtonsville Rig
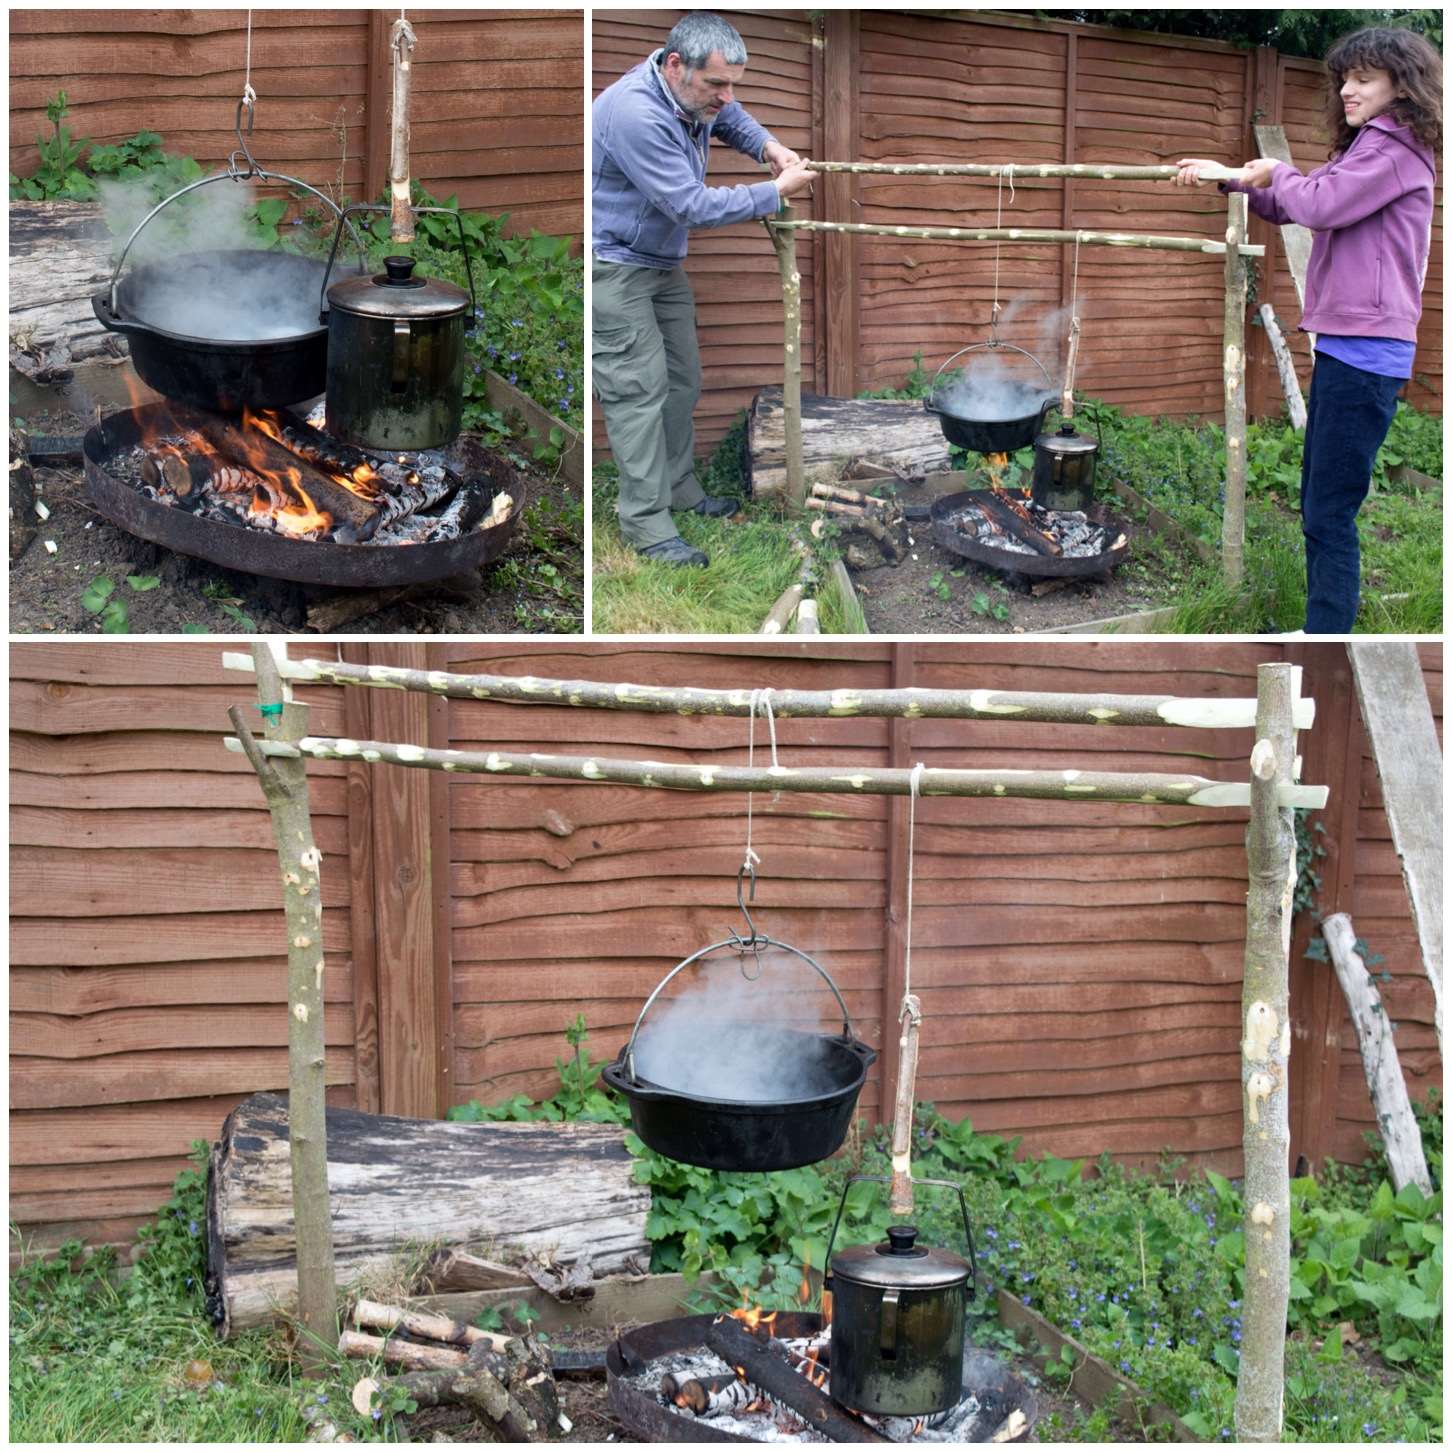
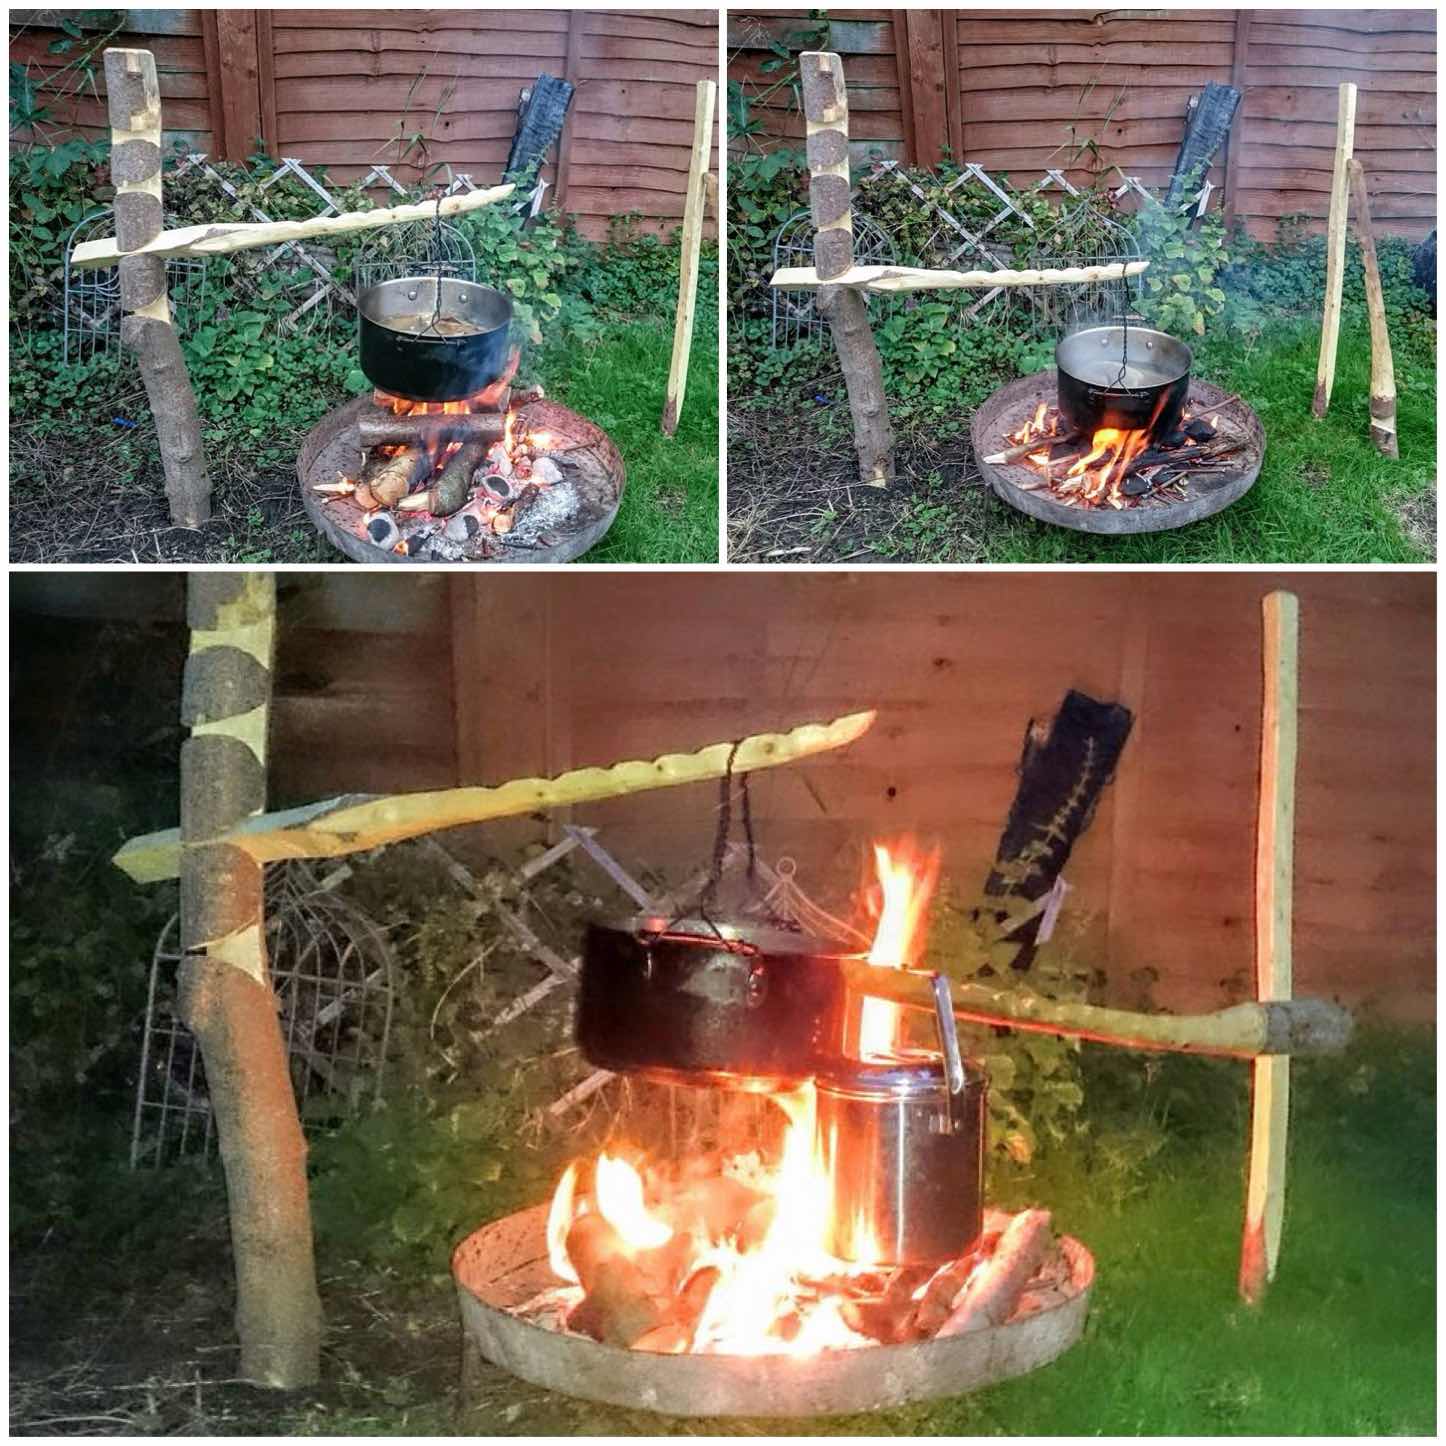
Double French Windlass
The Double French Windlass is a cracking cooking rig. I was taught this by my friend Steve ‘Mesquite’ Harral at the Bushcraft UK Bushmoot a number of years ago. I used it at this year’s Bushmoot for two weeks and it allowed me to cook with a number of different pots at one time with the ability to have them all at different cooking heights.
Double French Windlass
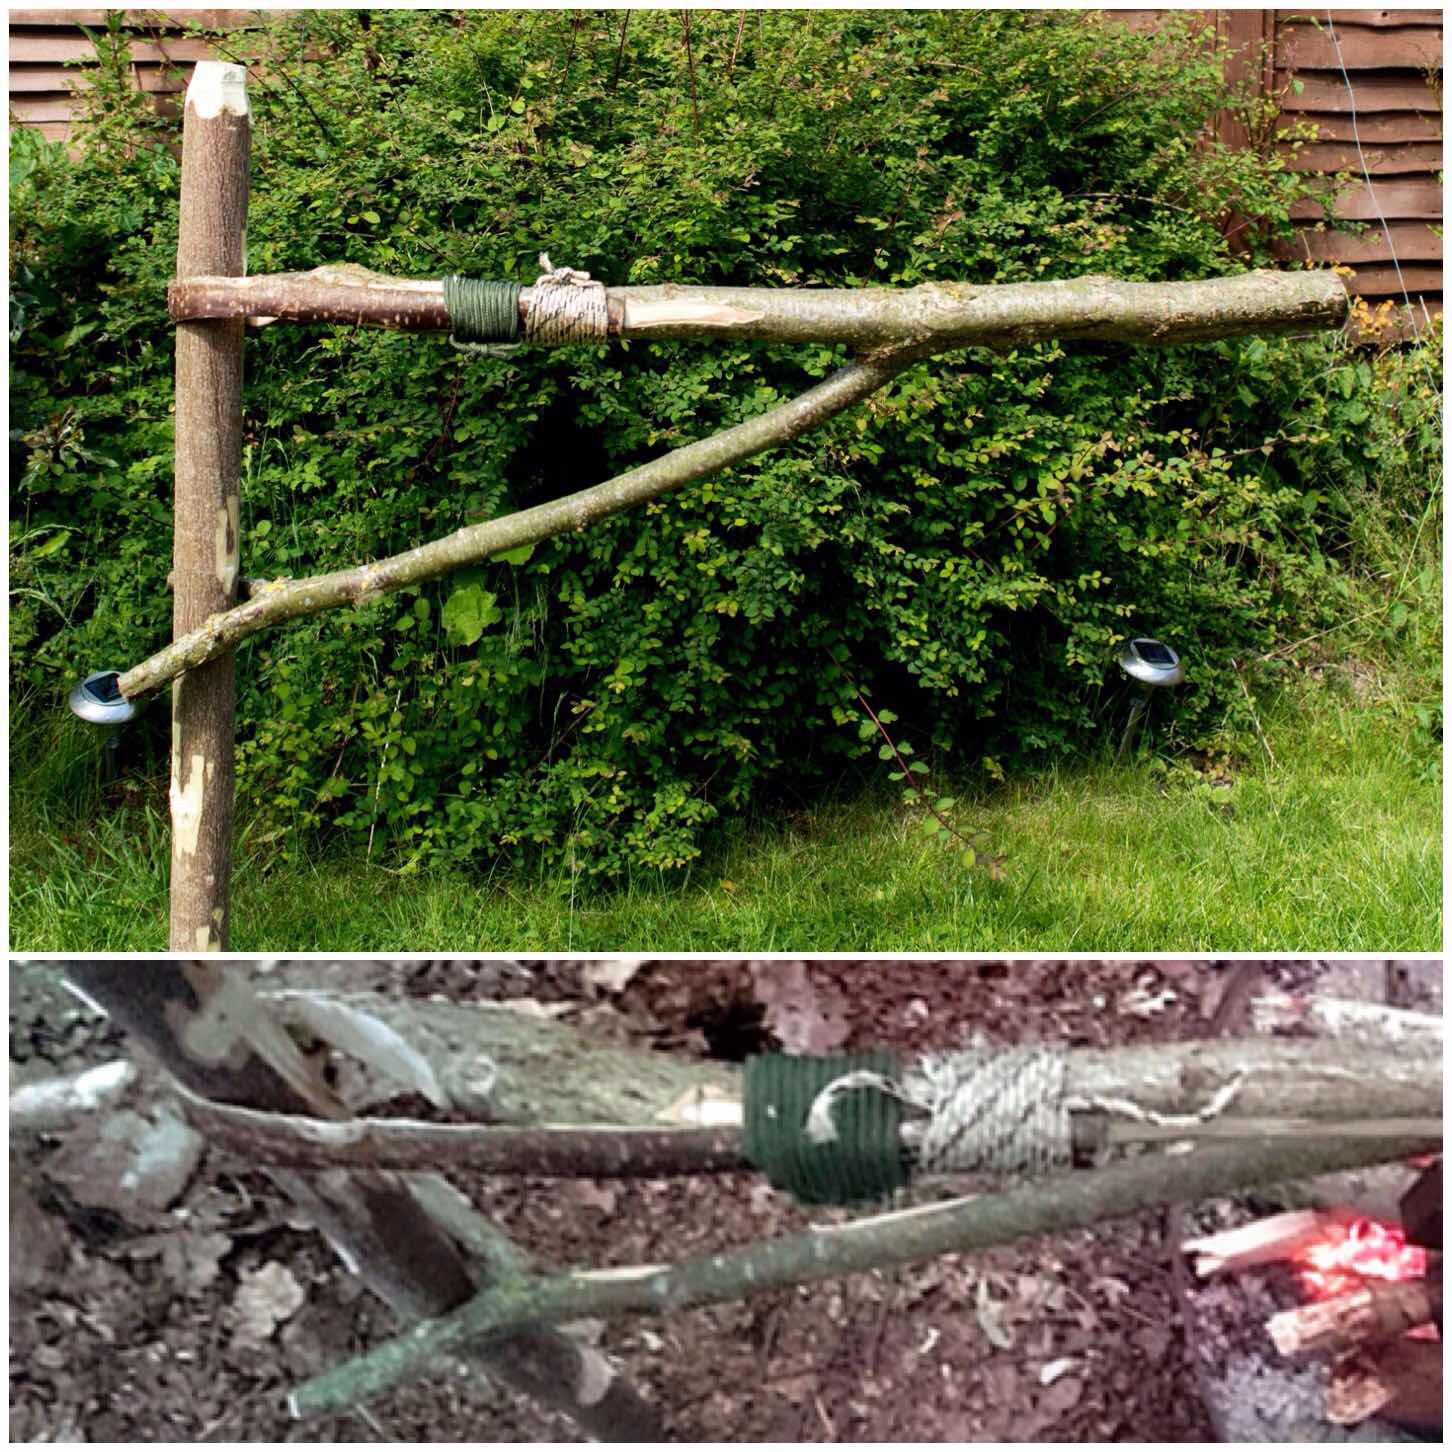
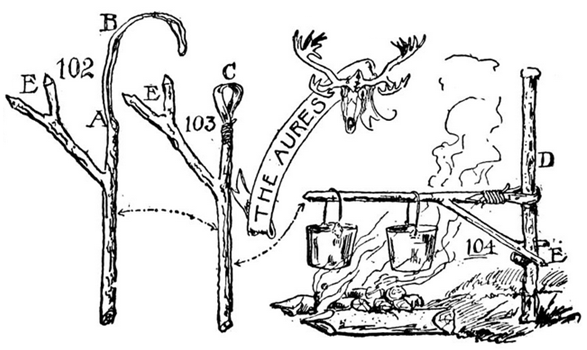
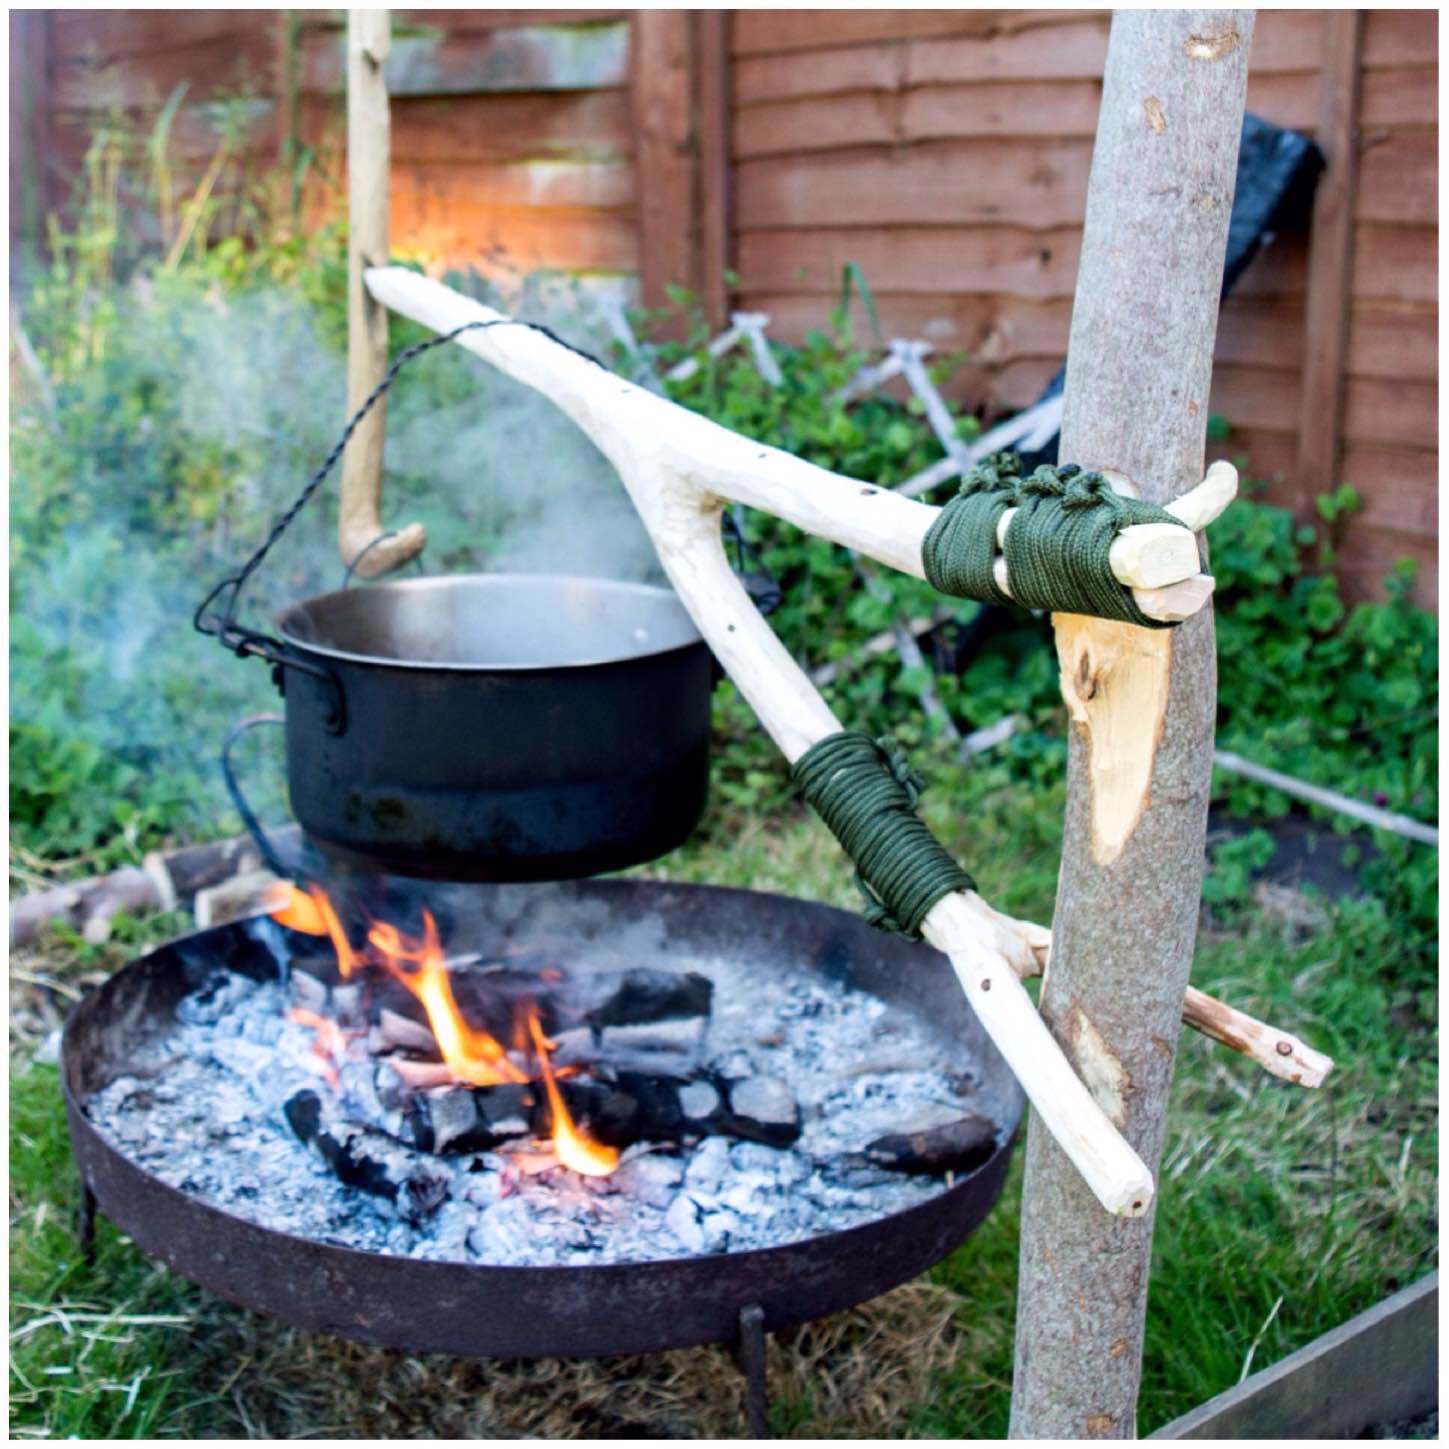
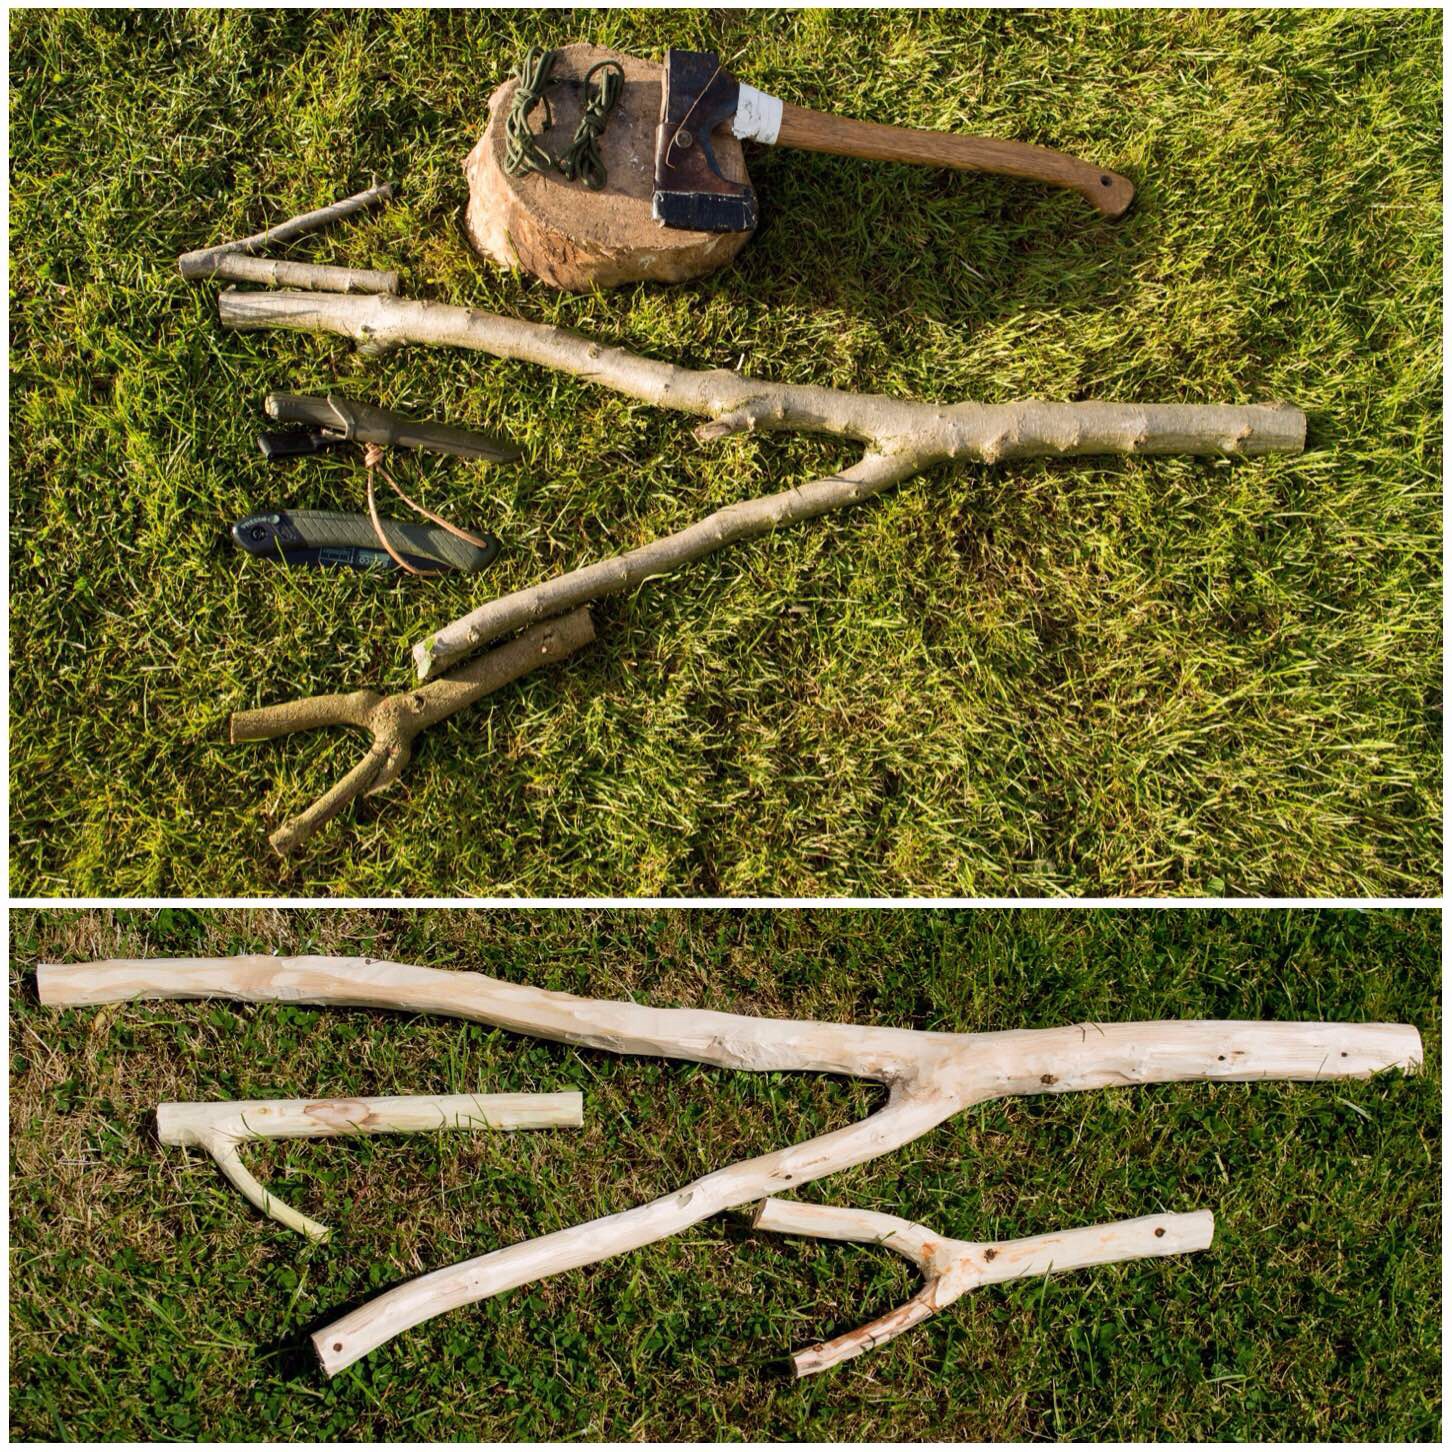
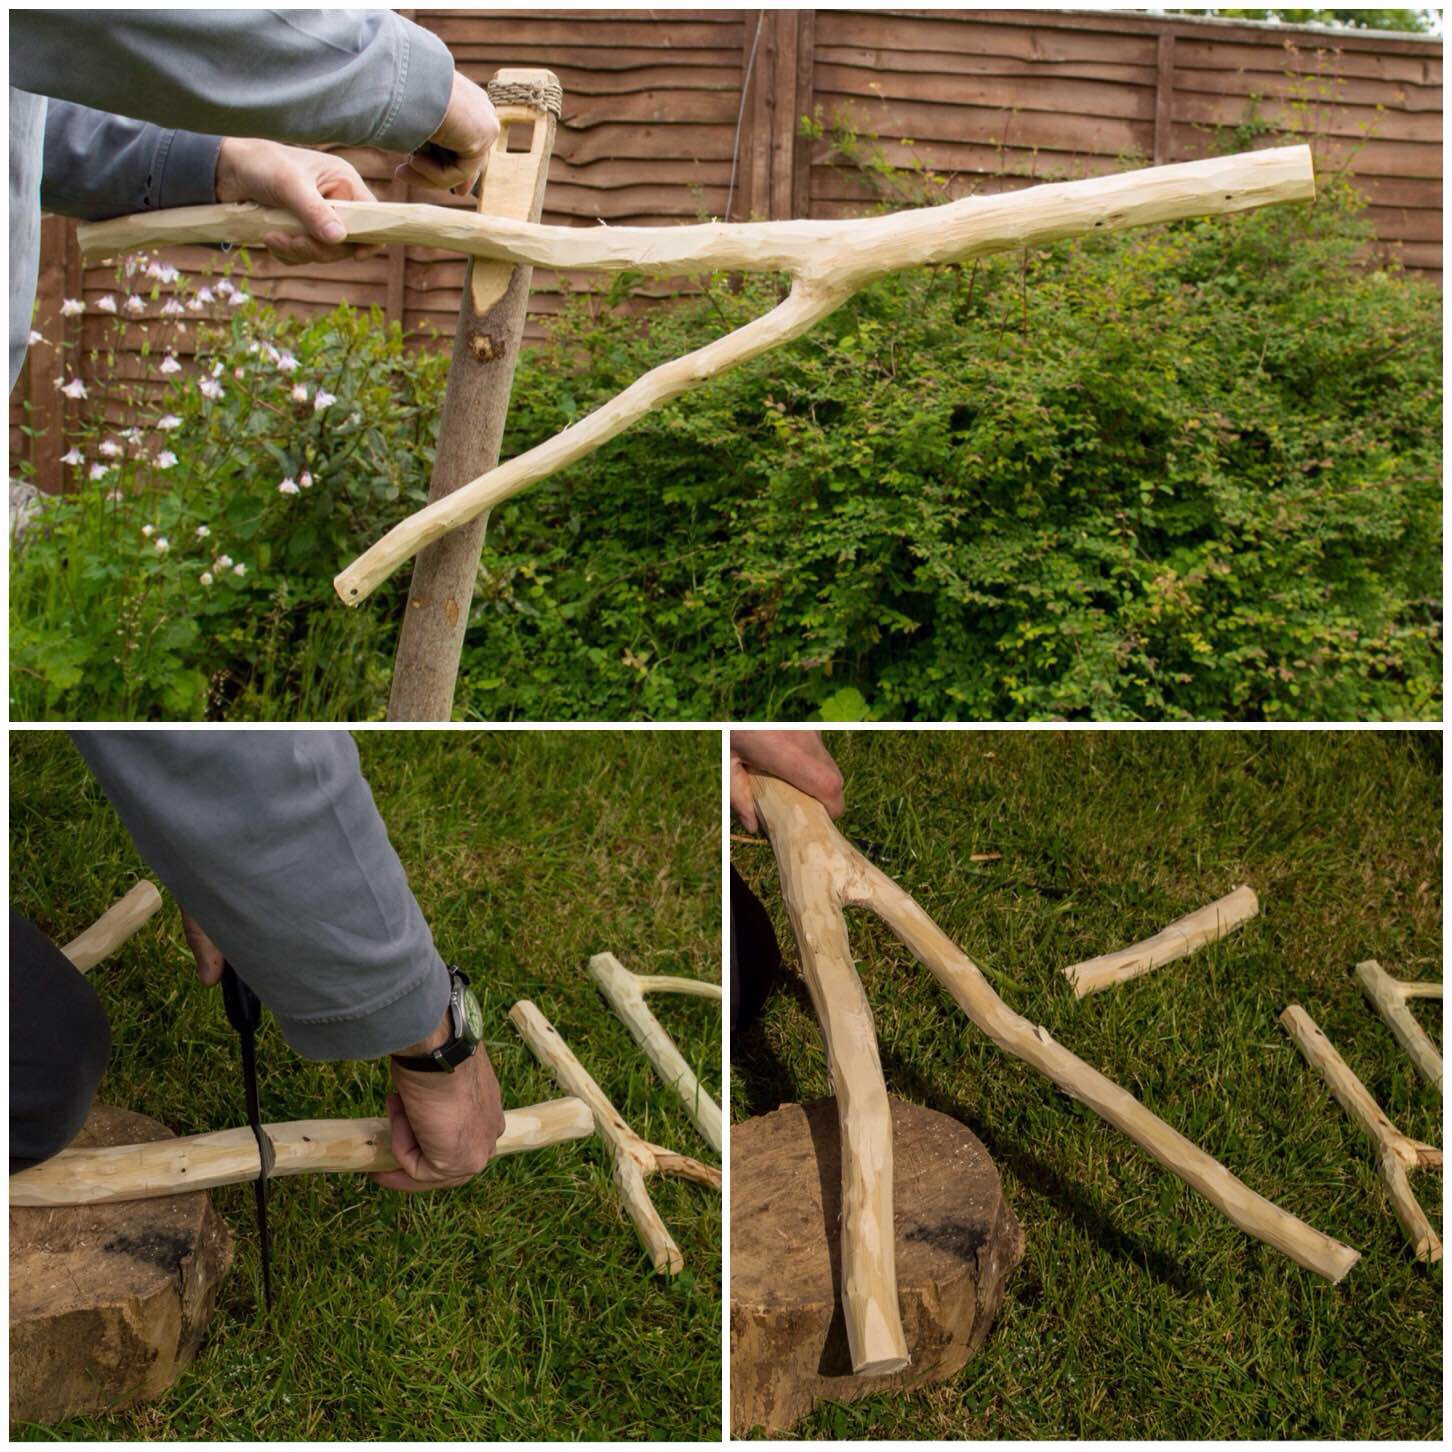
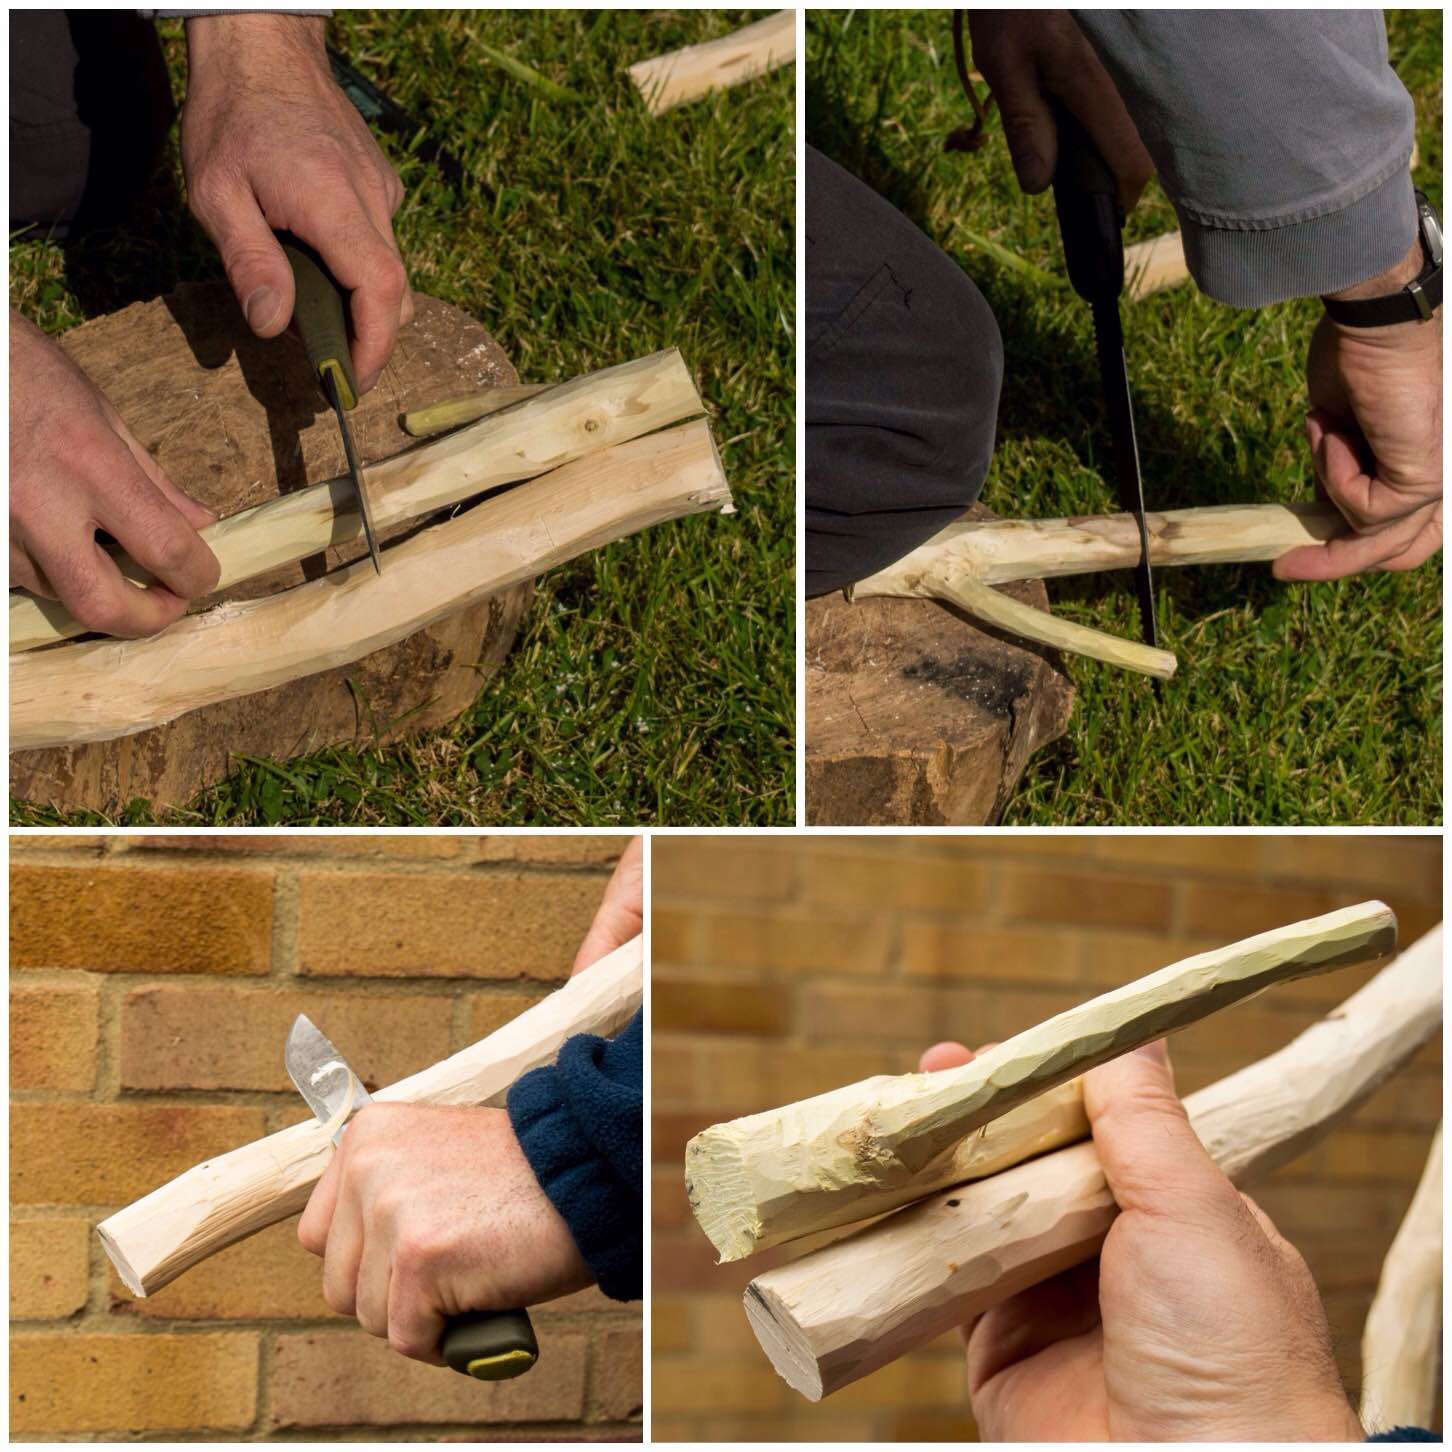
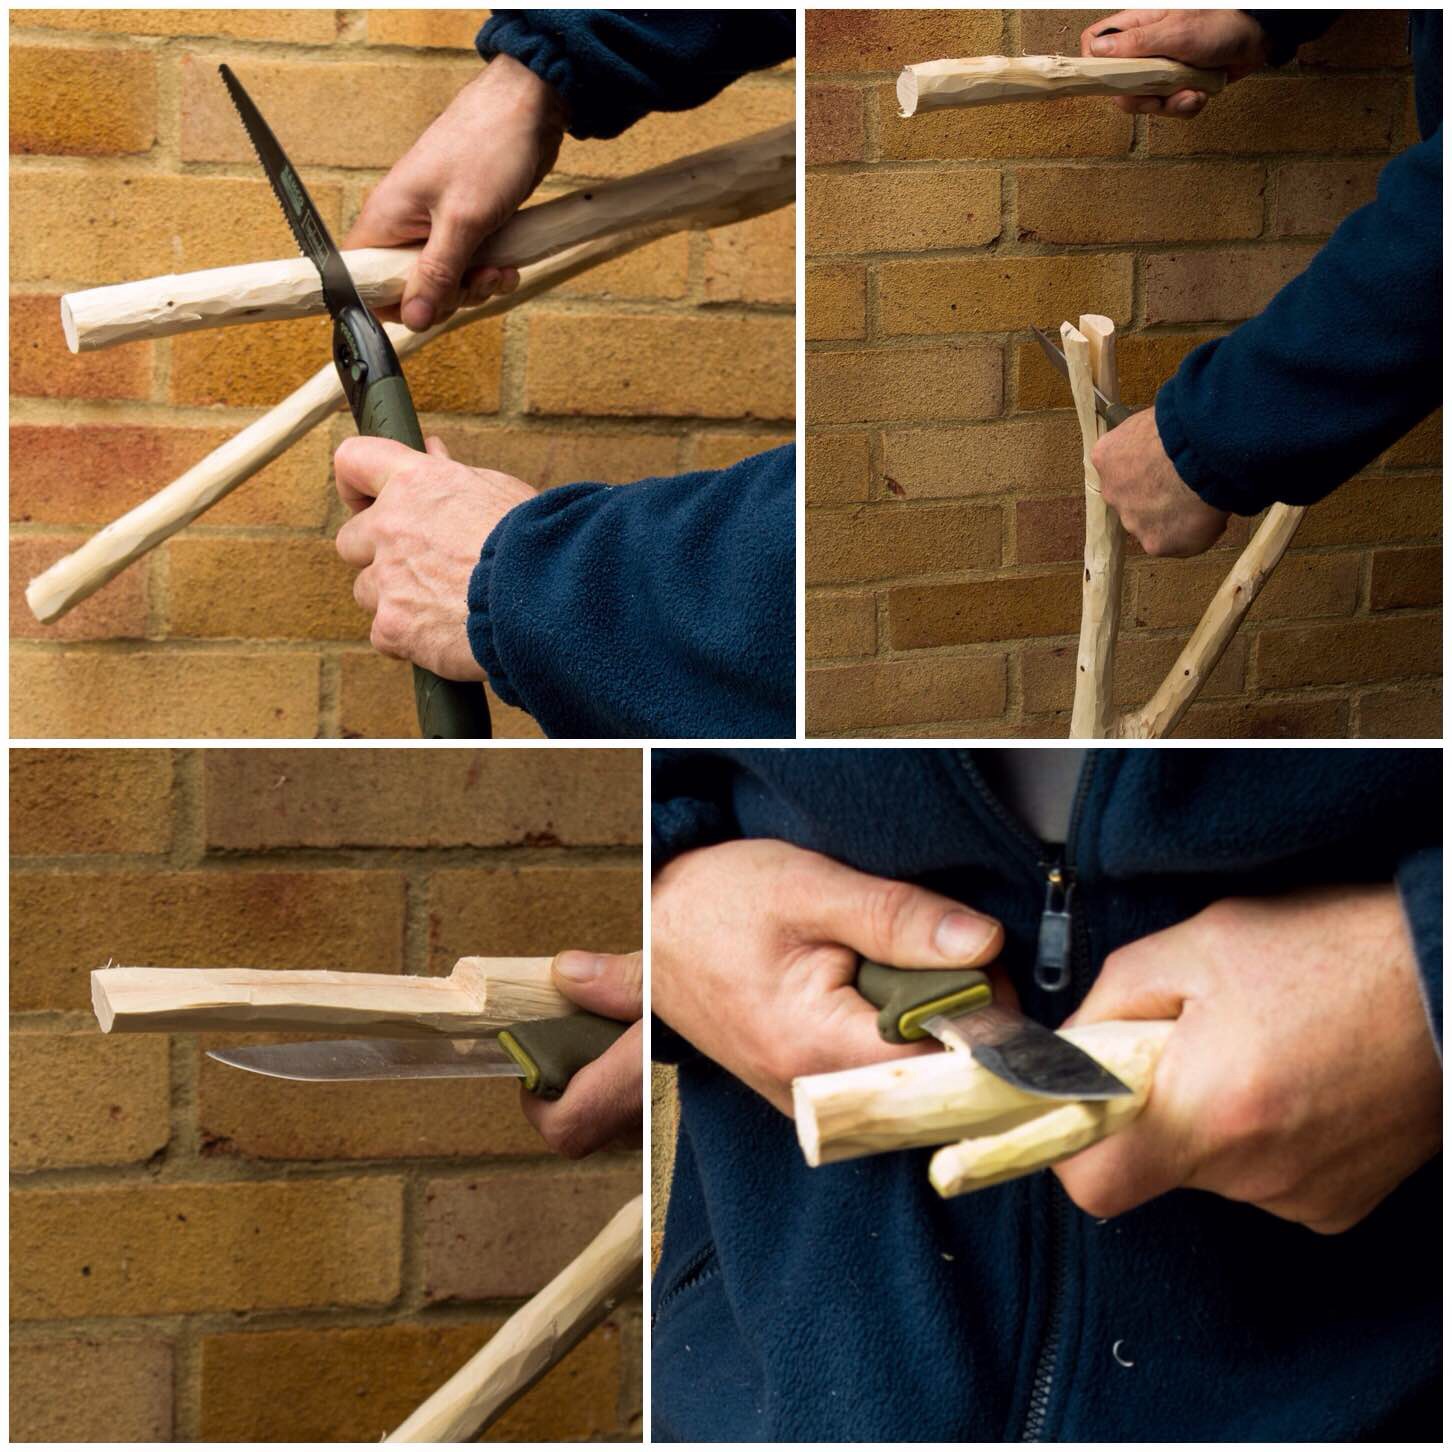
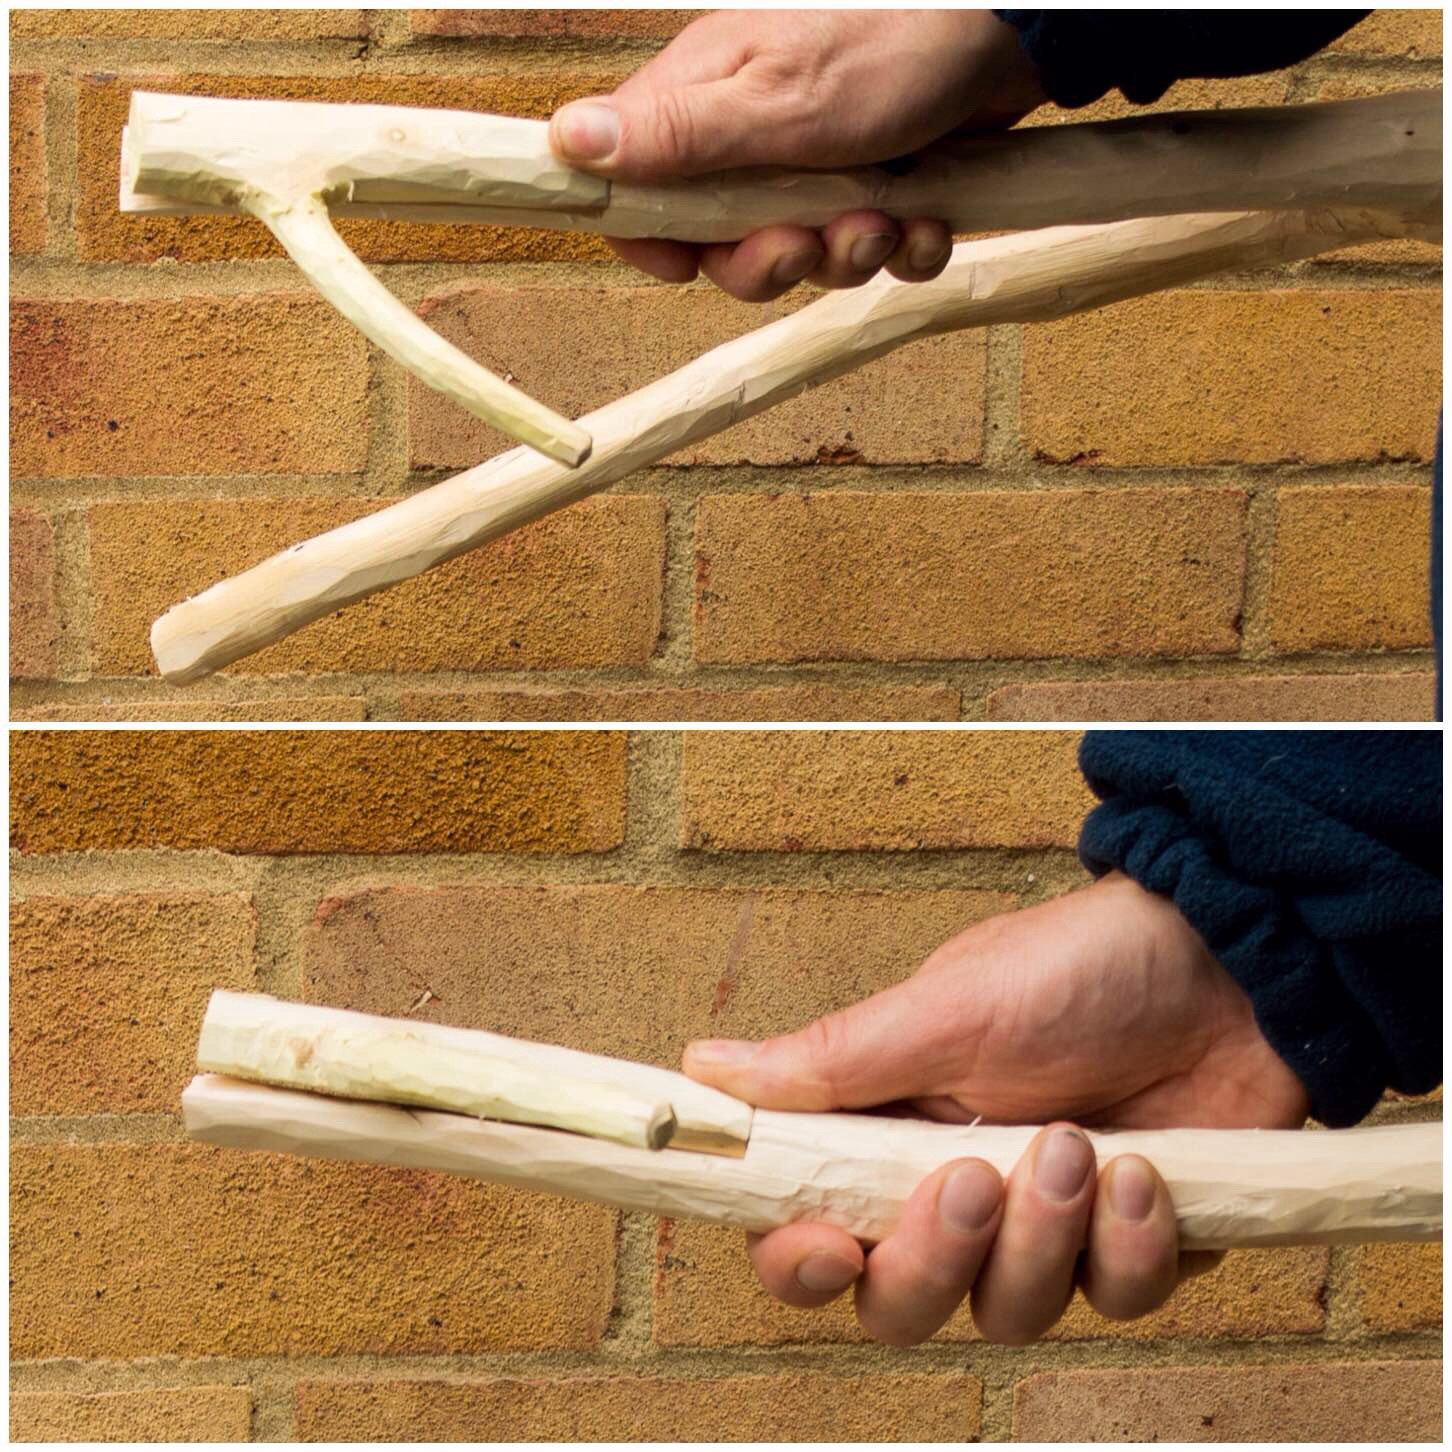
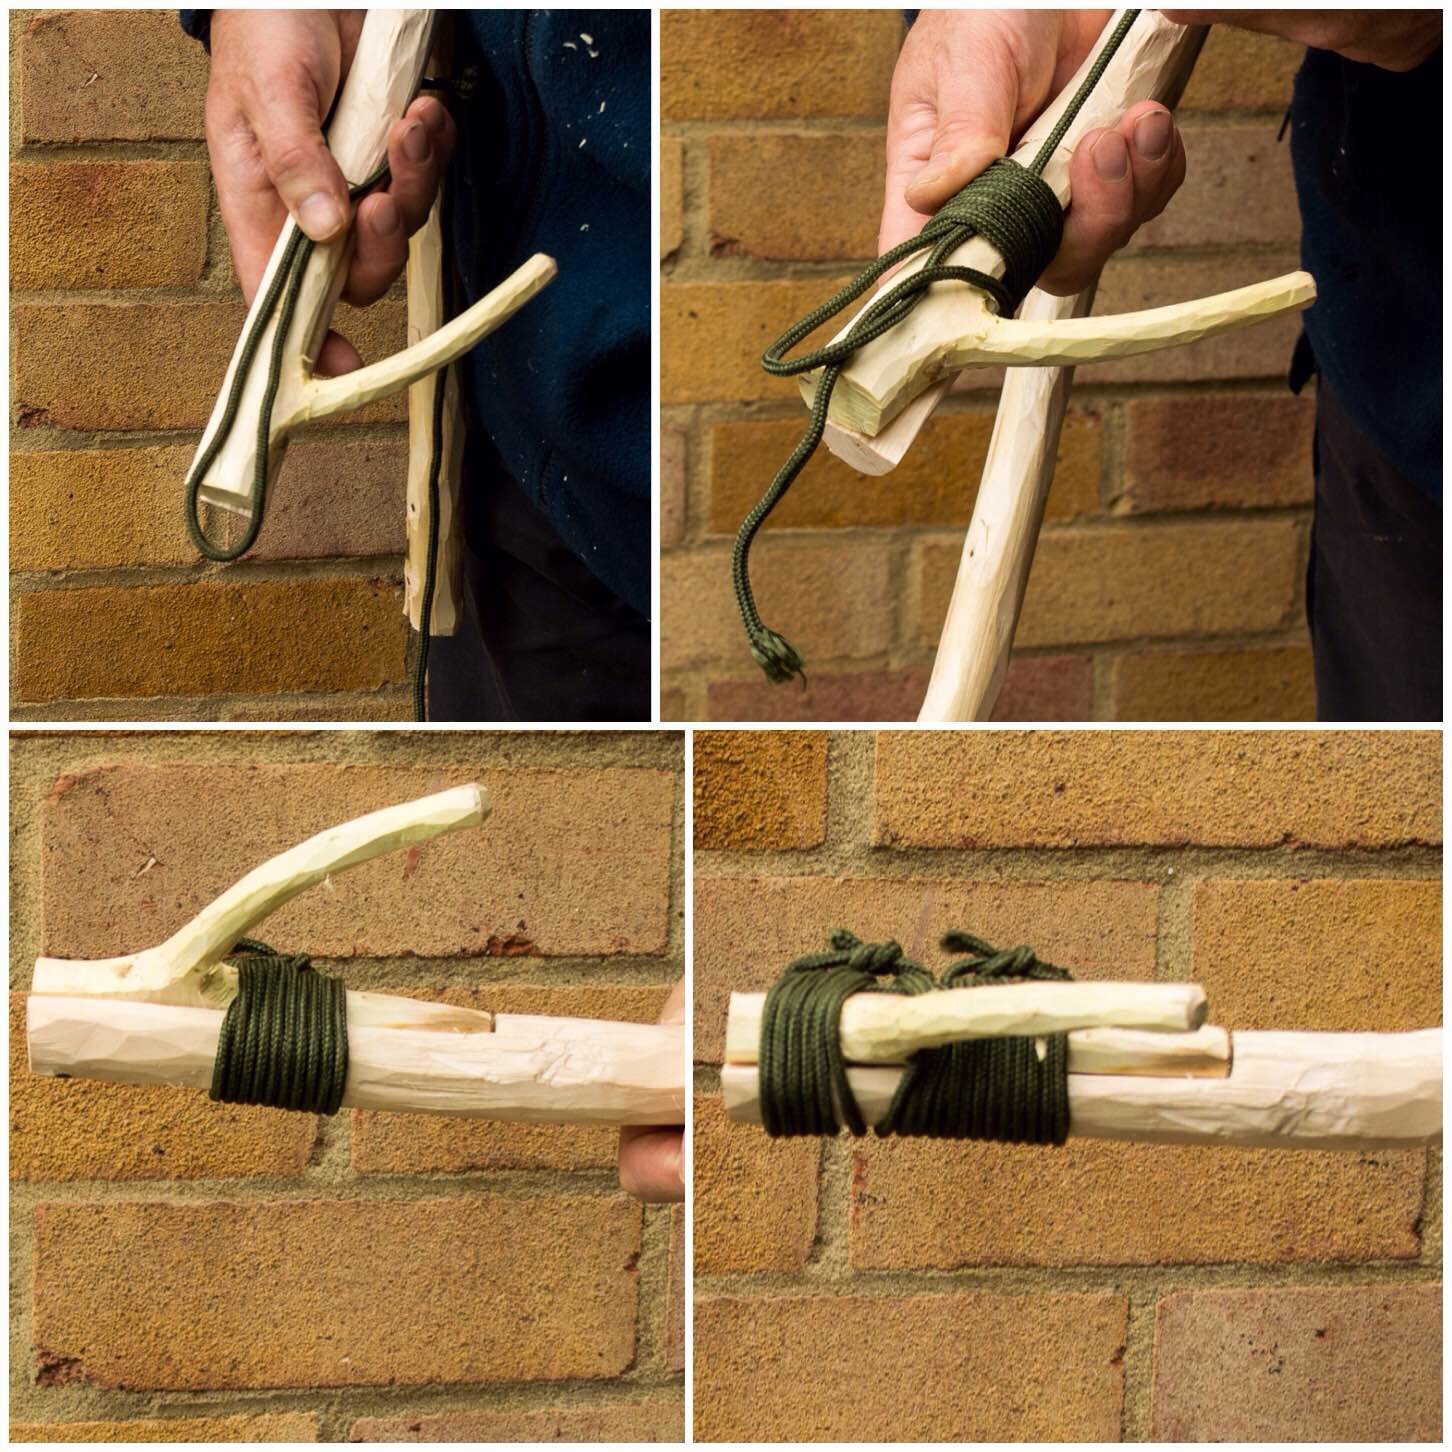
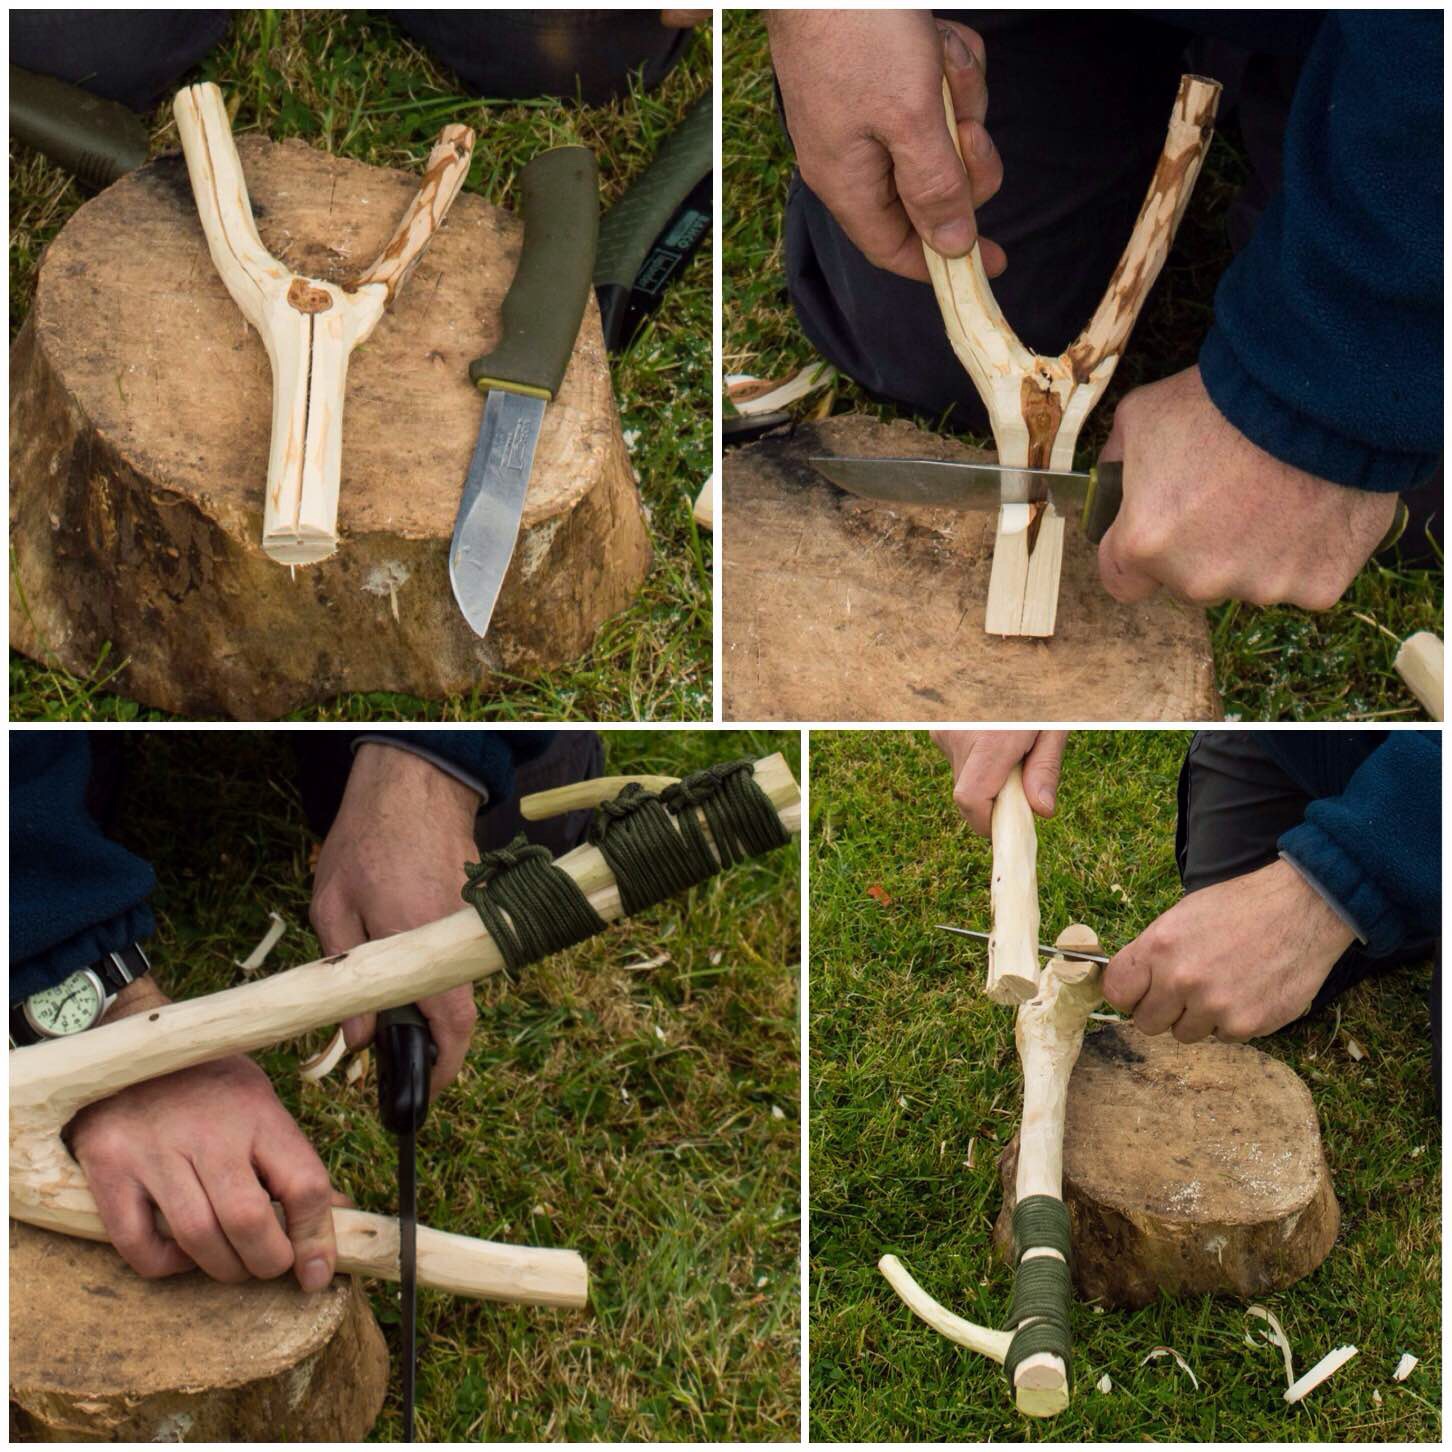
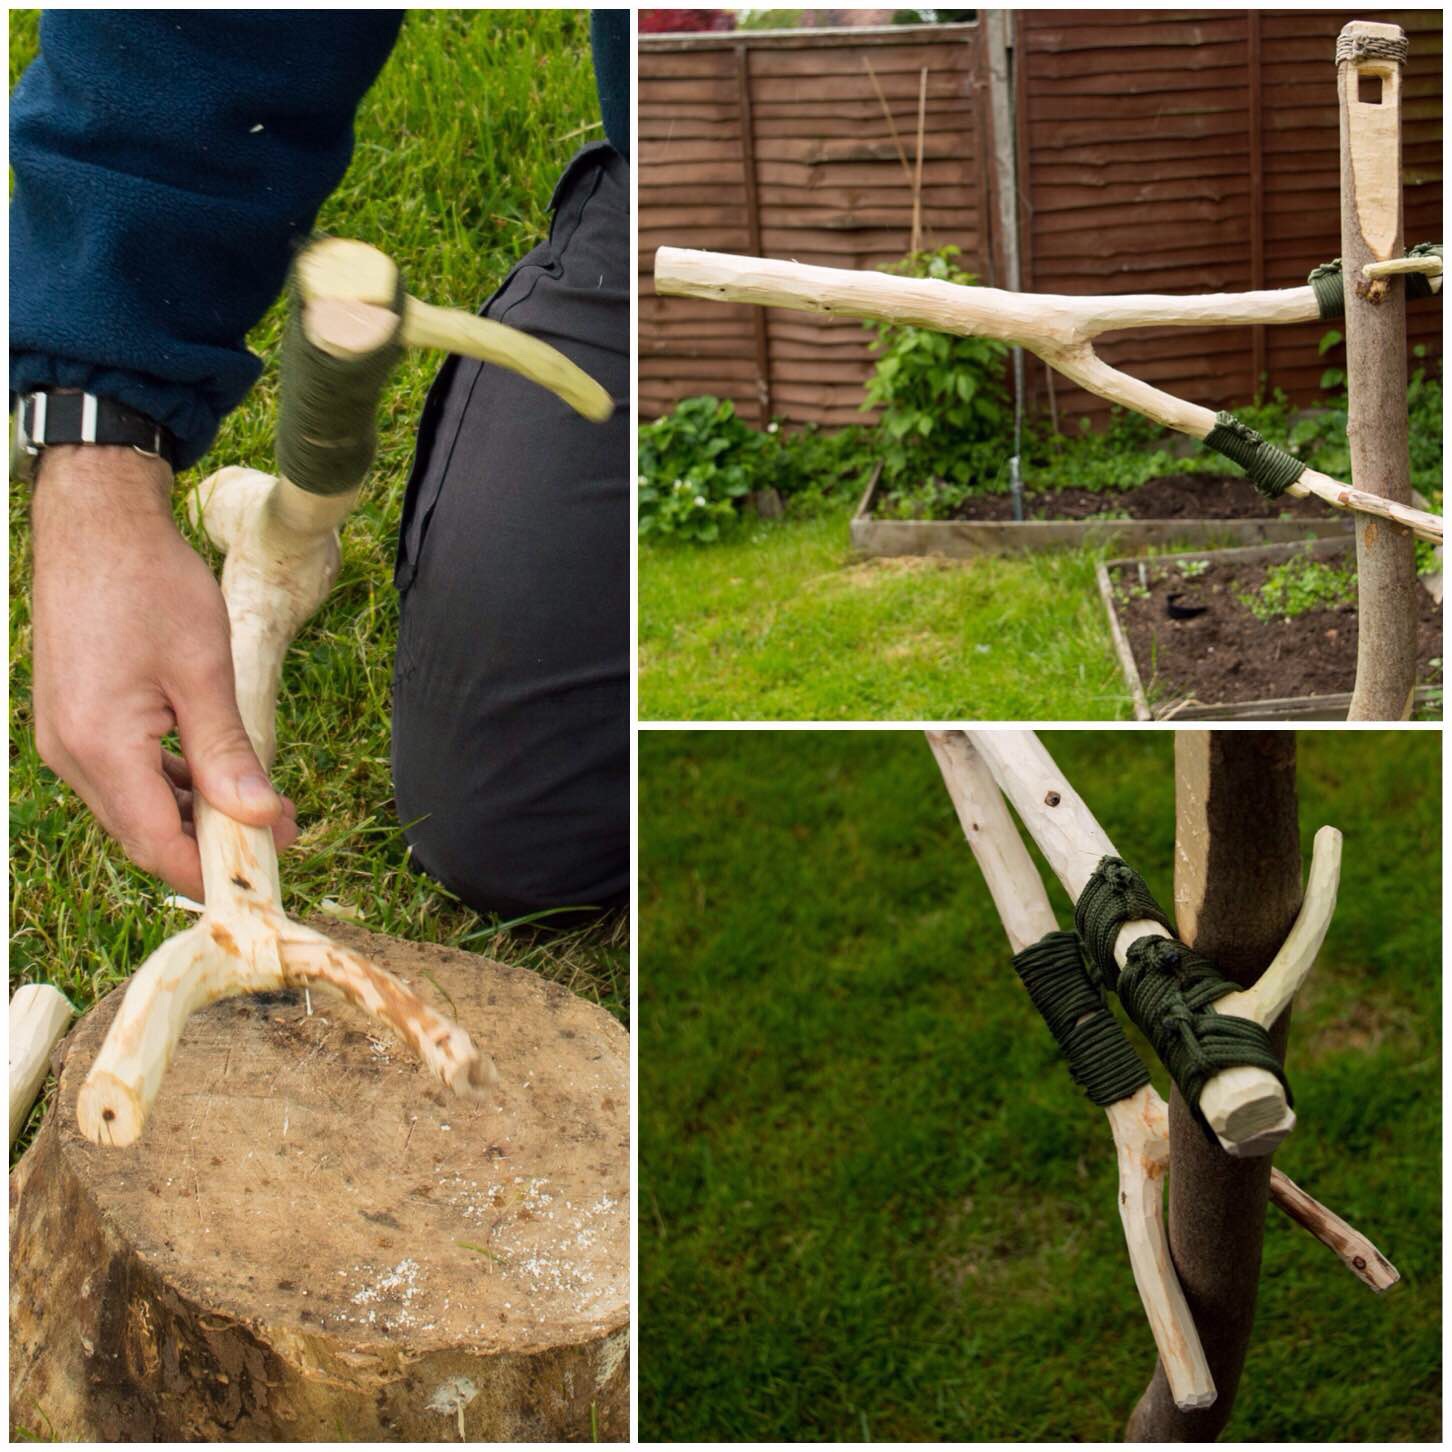
Single Fork Aures
I read in the Wildwood Wisdom book of a type of adjustable crane first documented in the early 20th century by a Scout Master called Victor Aures. It is a simple device however it is reliant on finding a branch with a specific set of smaller branches off it. I discovered a variation on this crane a number of years ago that required only a single fork in the branch and after a bit of splitting and splicing you have a fully adjustable crane.
Single Fork Aures Crane
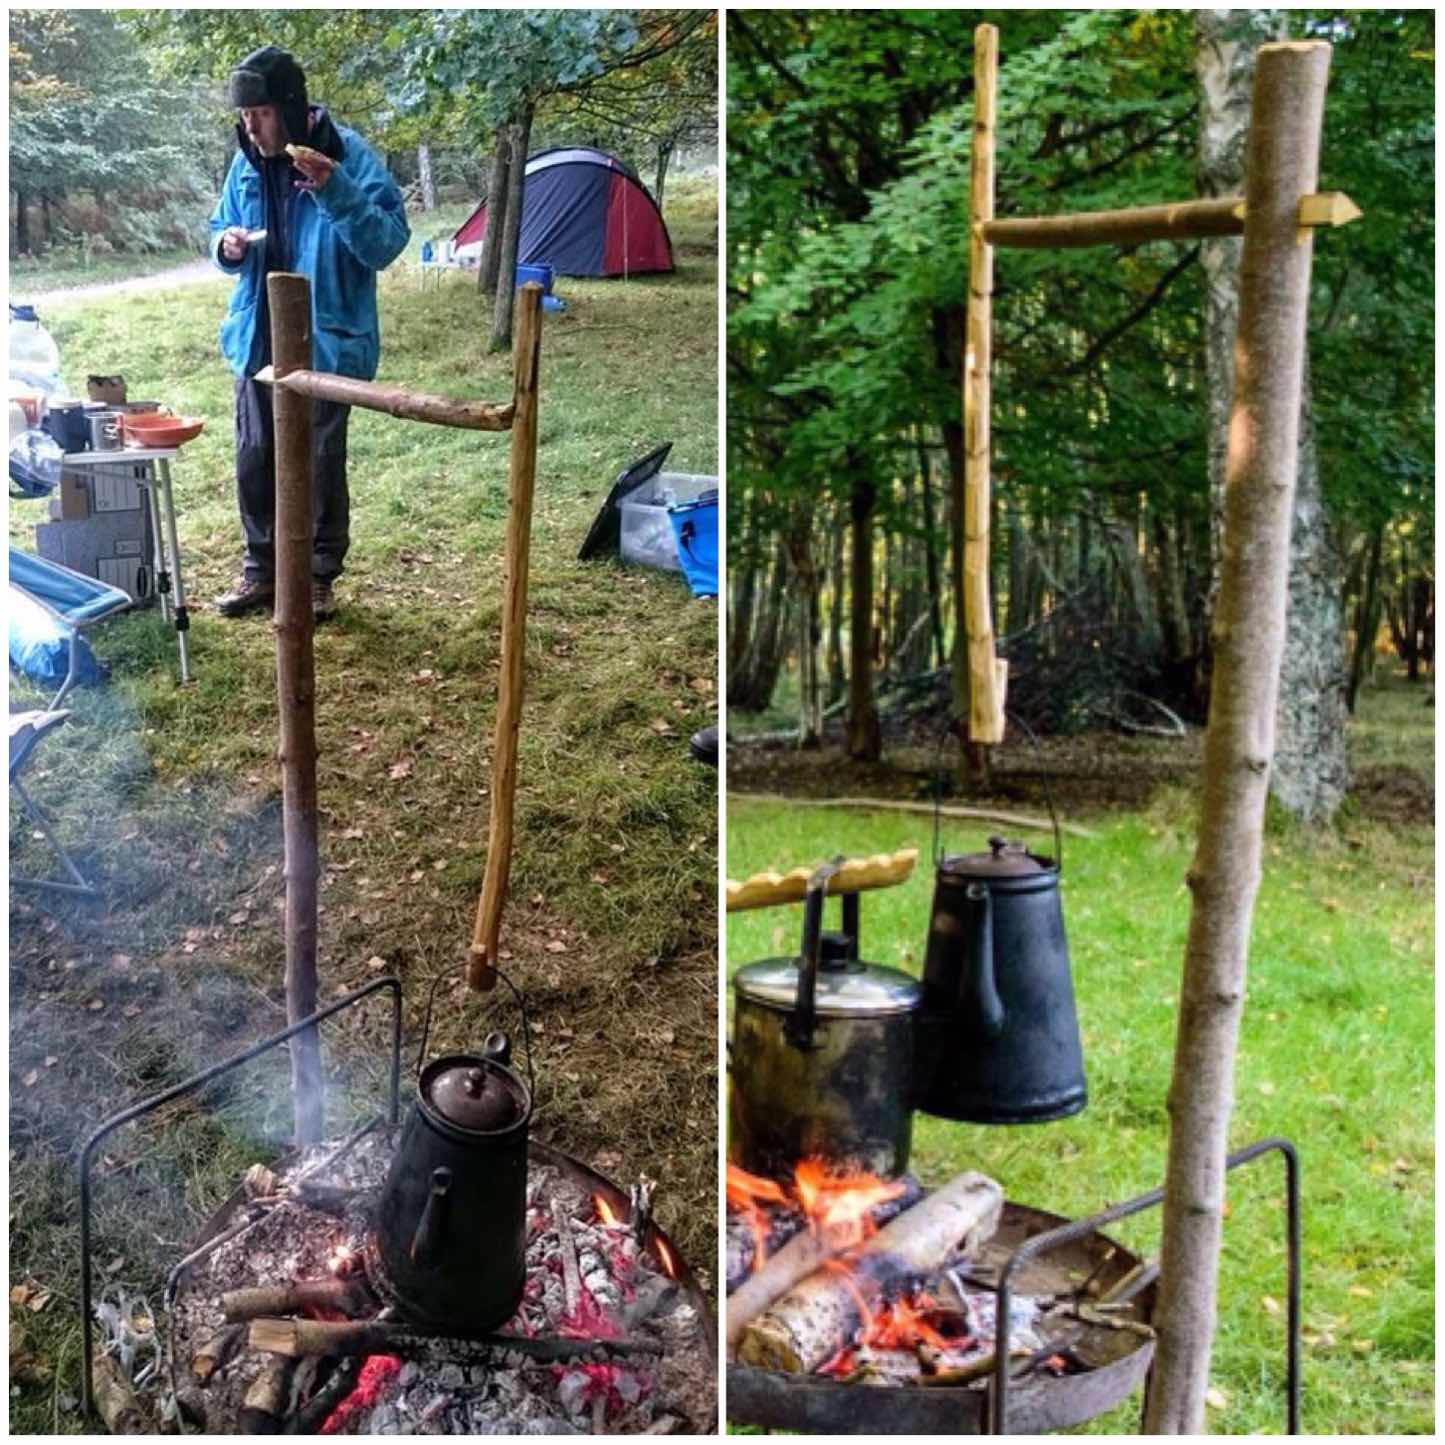
Gibbet Aures Crane
This variation on the Aures crane does not rely on splitting the wood but on the addition of other branches so that the whole thing hangs off your upright pole. It is easy to find all the parts which is probably why this is the version of the Aures cranes I most commonly see around campfires.
Gibbet Aures Crane
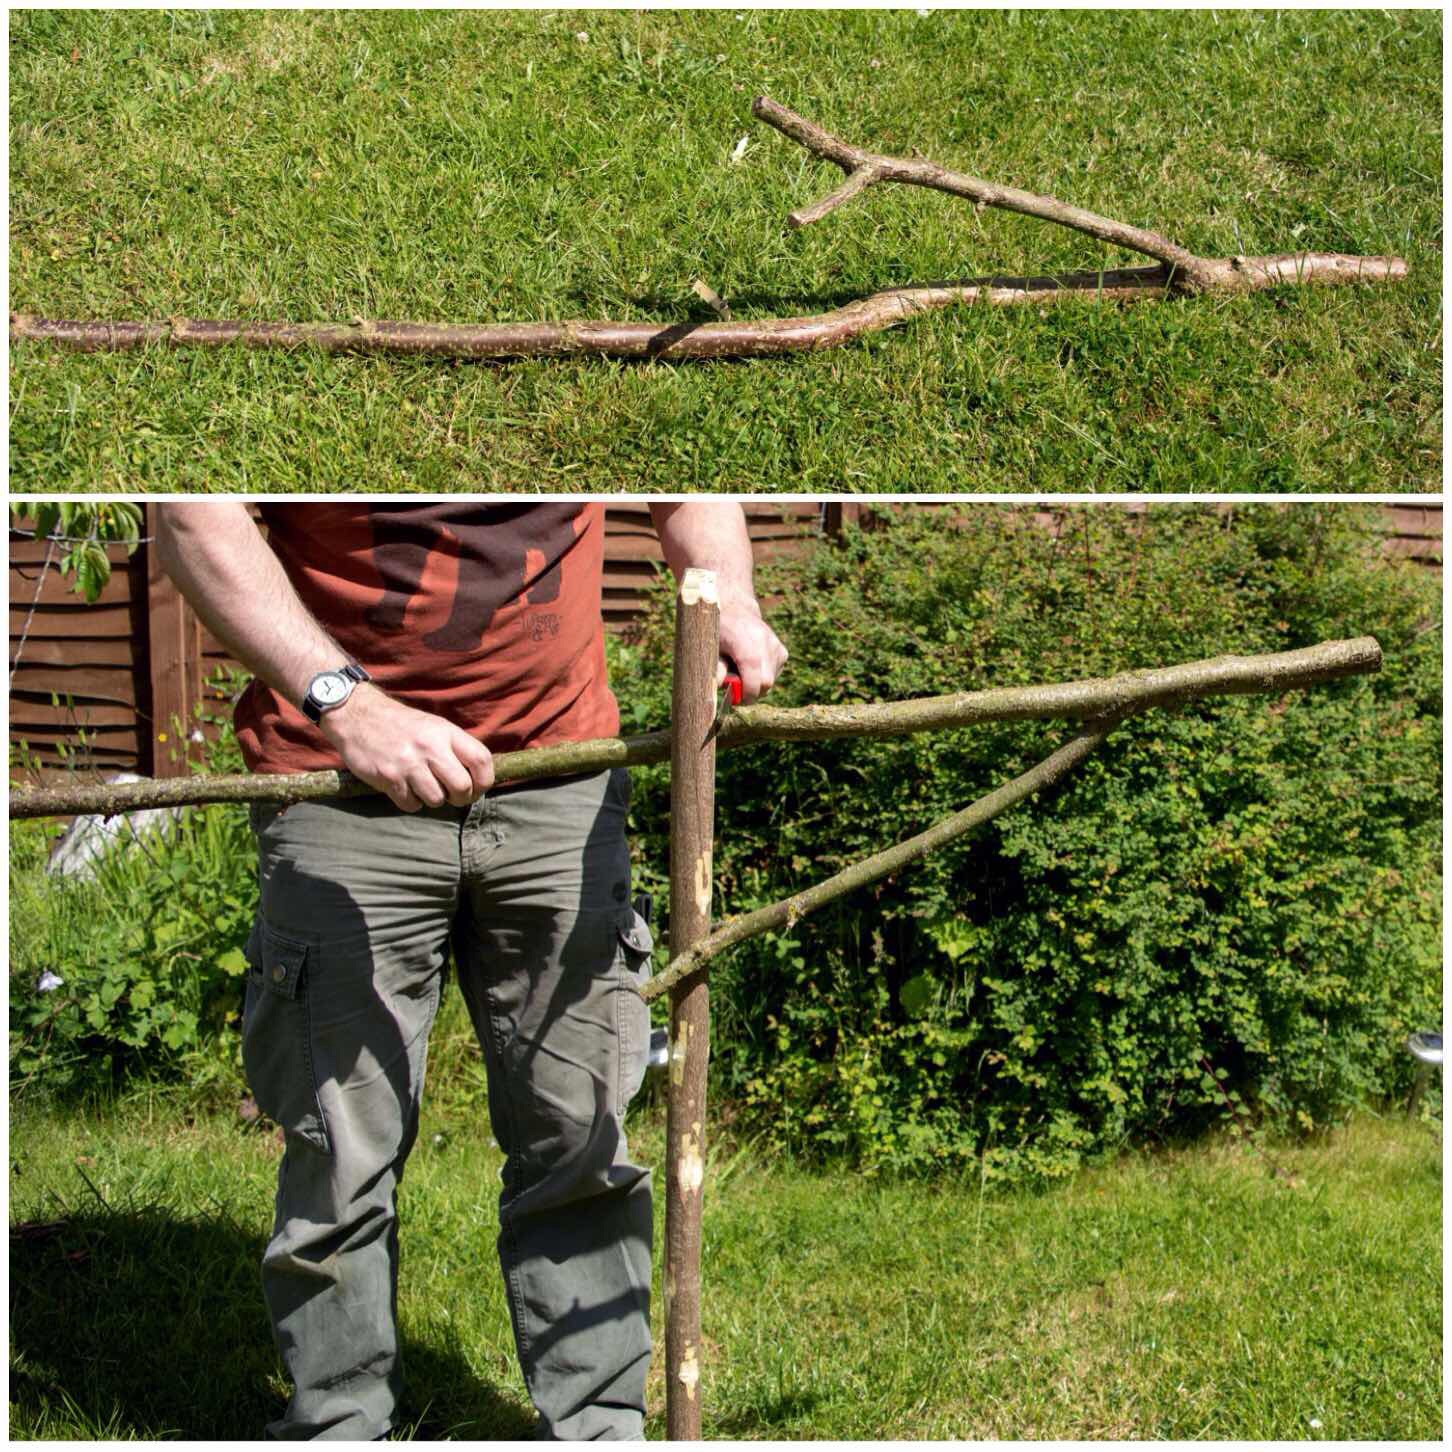
Classic Aures Crane
It took me a long time to find the perfect combination of branches for this crane. I have never seen another one before except as a drawing in the Wildwood Wisdom book. The hardest part in making this crane is the thinning of the wood to create the loop. It is a real challenge but also very enjoyable and satisfying.
Classic Aures Crane
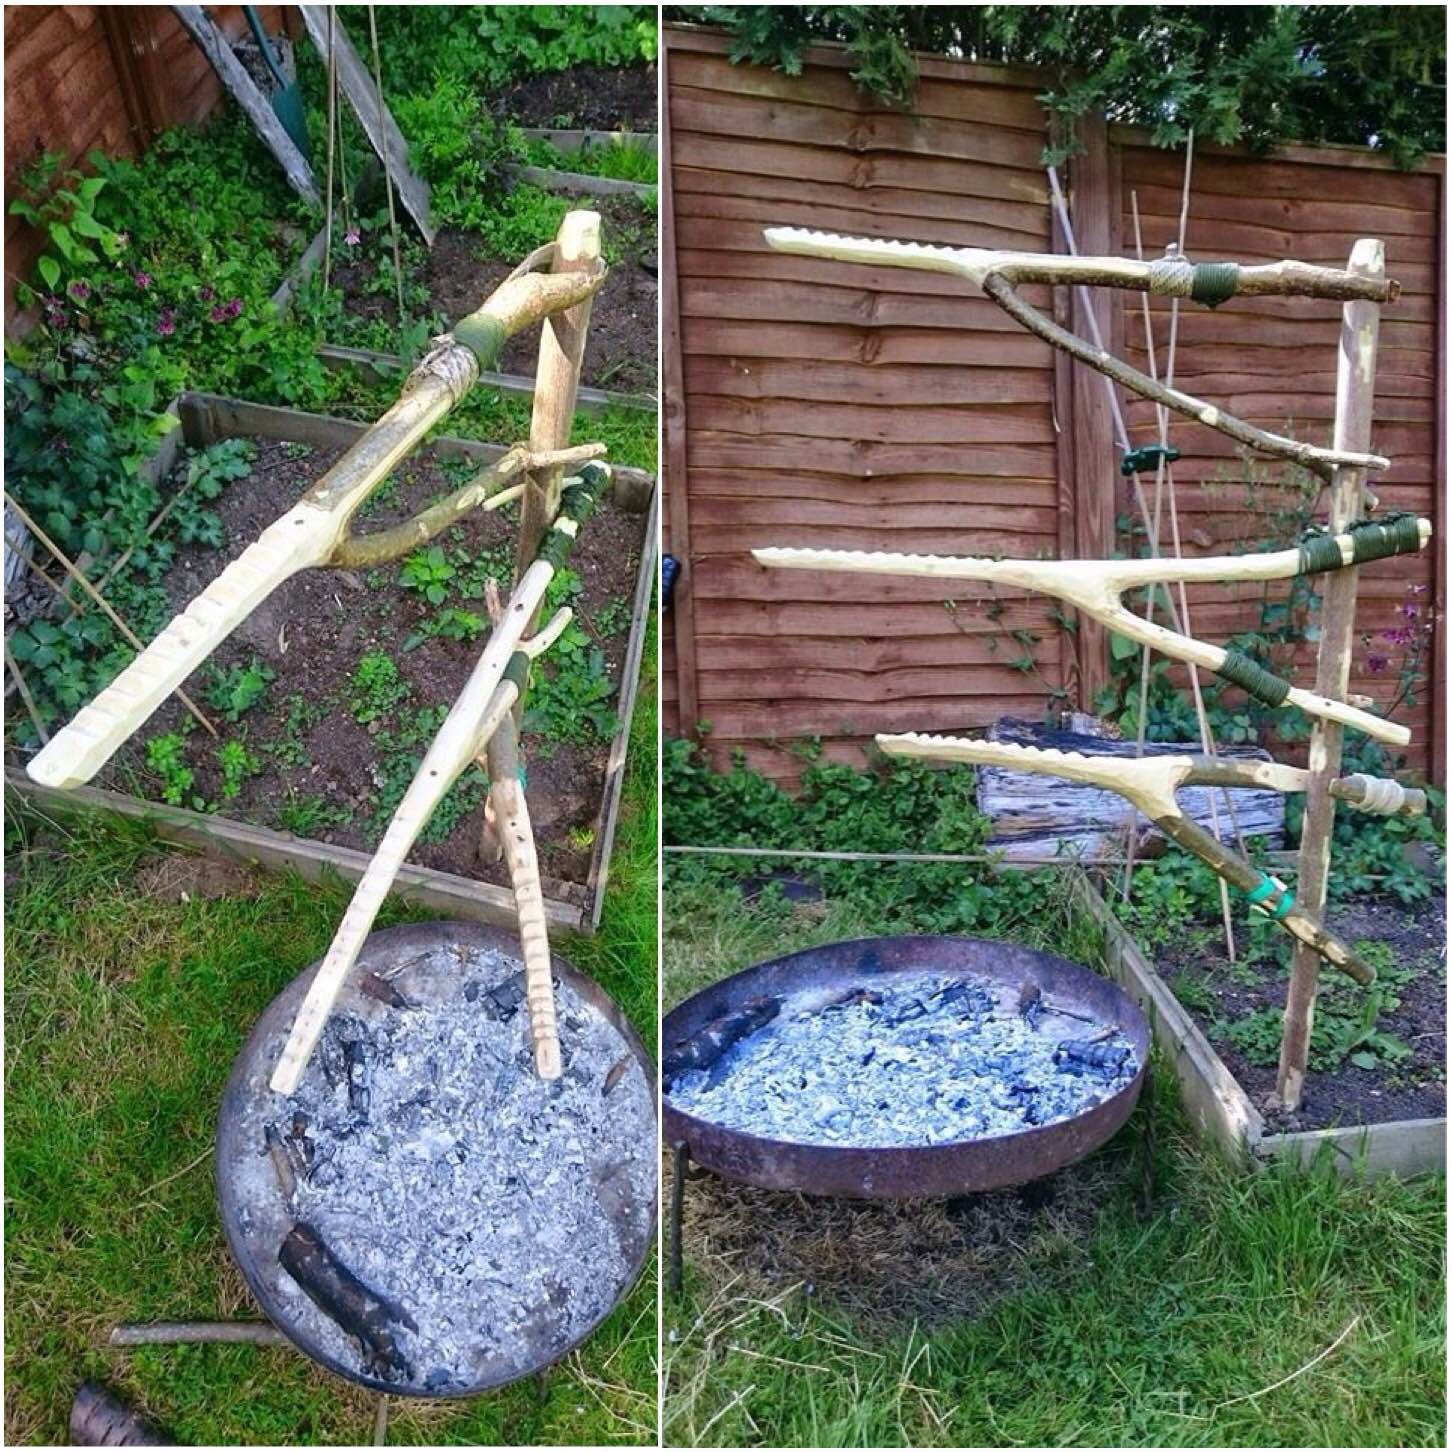
The Three Cranes
I really liked making these cranes and would encourage you to have a go at them if you like campfire projects. They are not for you if you prefer simply to put your pot on the fire, but if you like to tinker and experiment, have a go.
The Three Aures Cranes
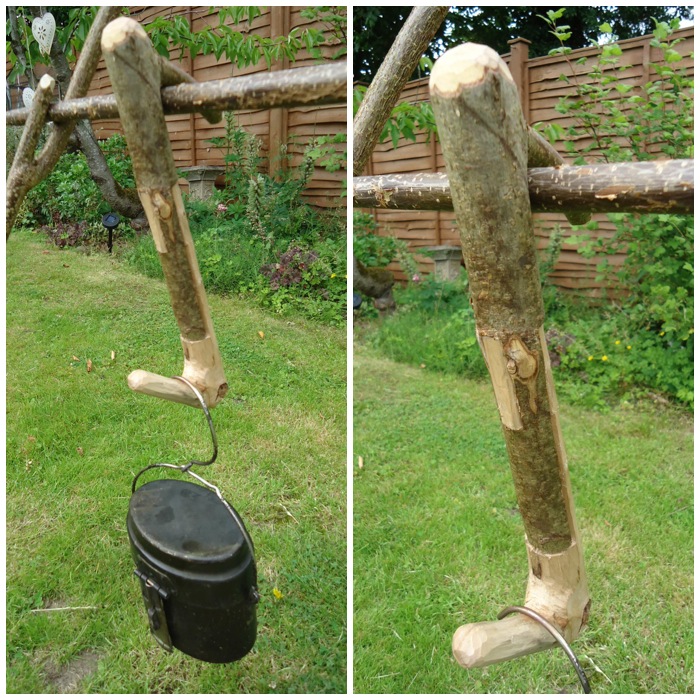
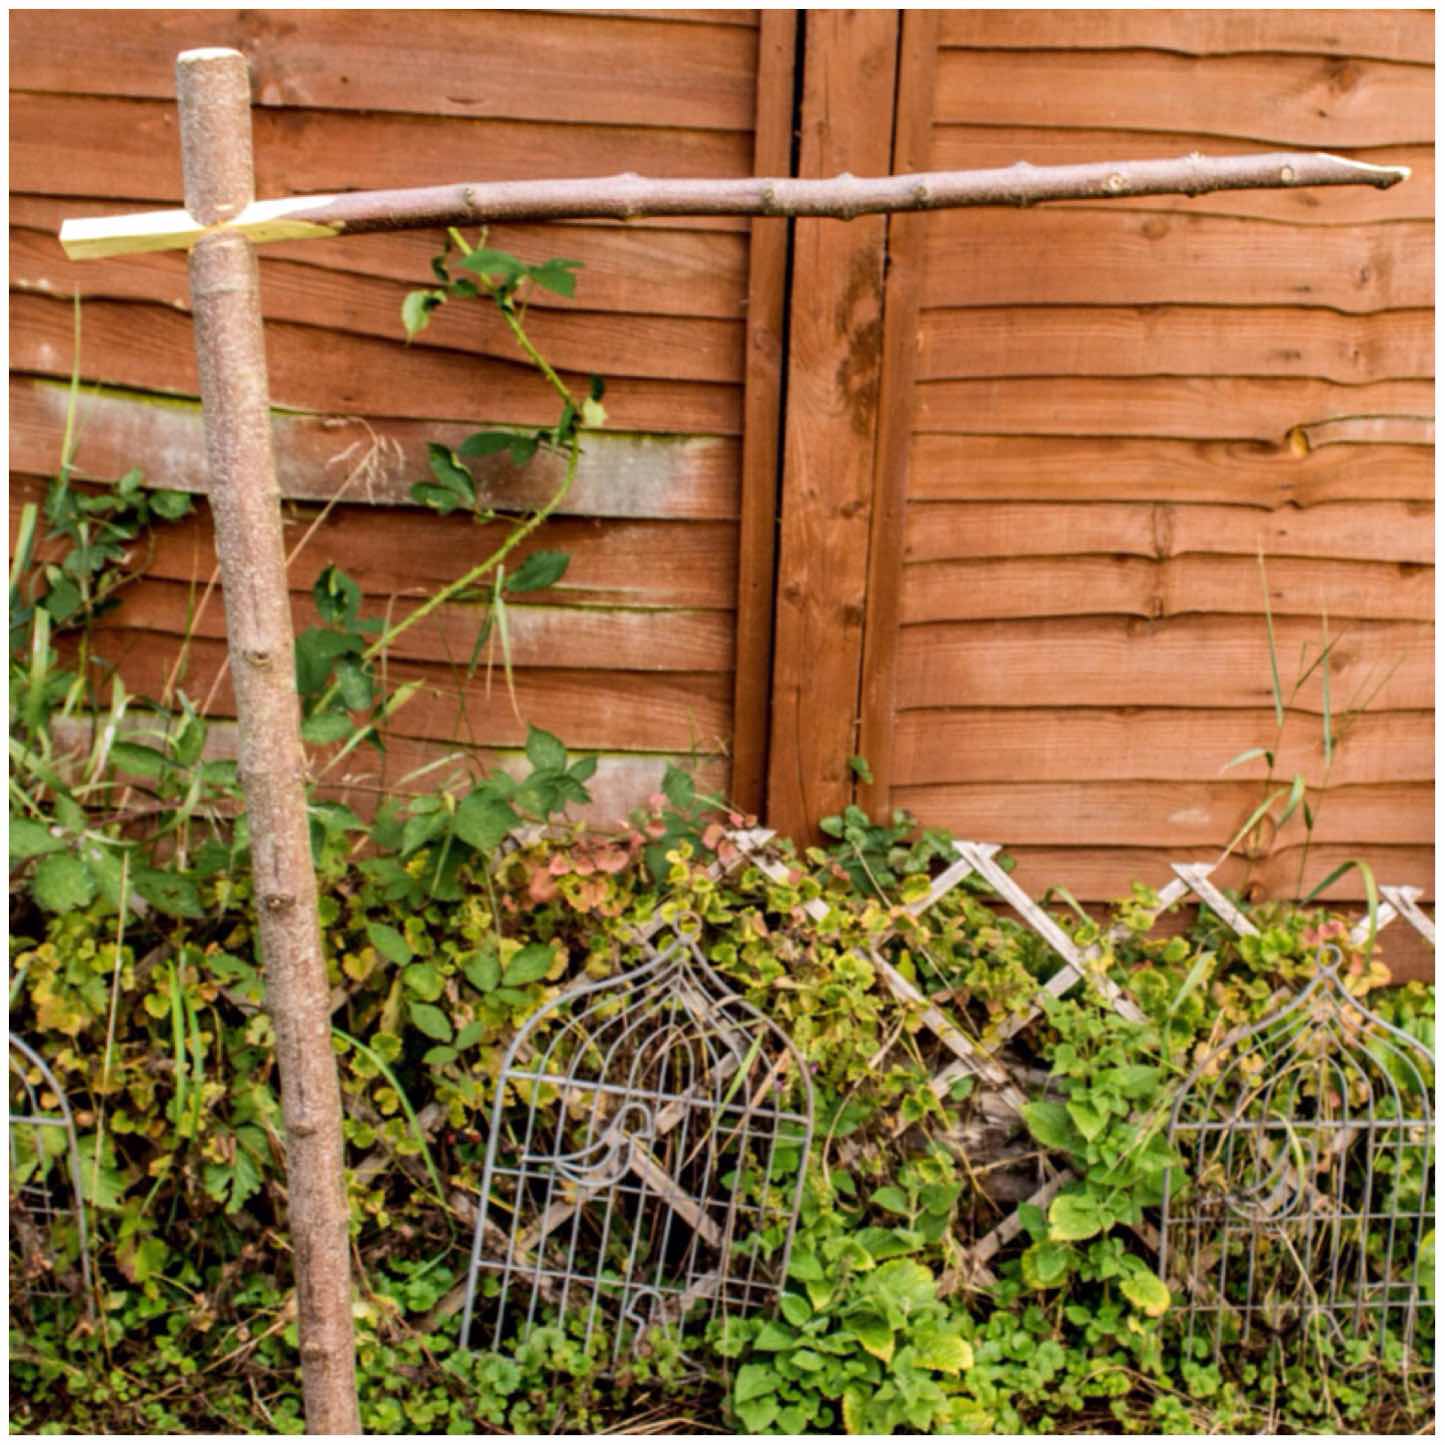
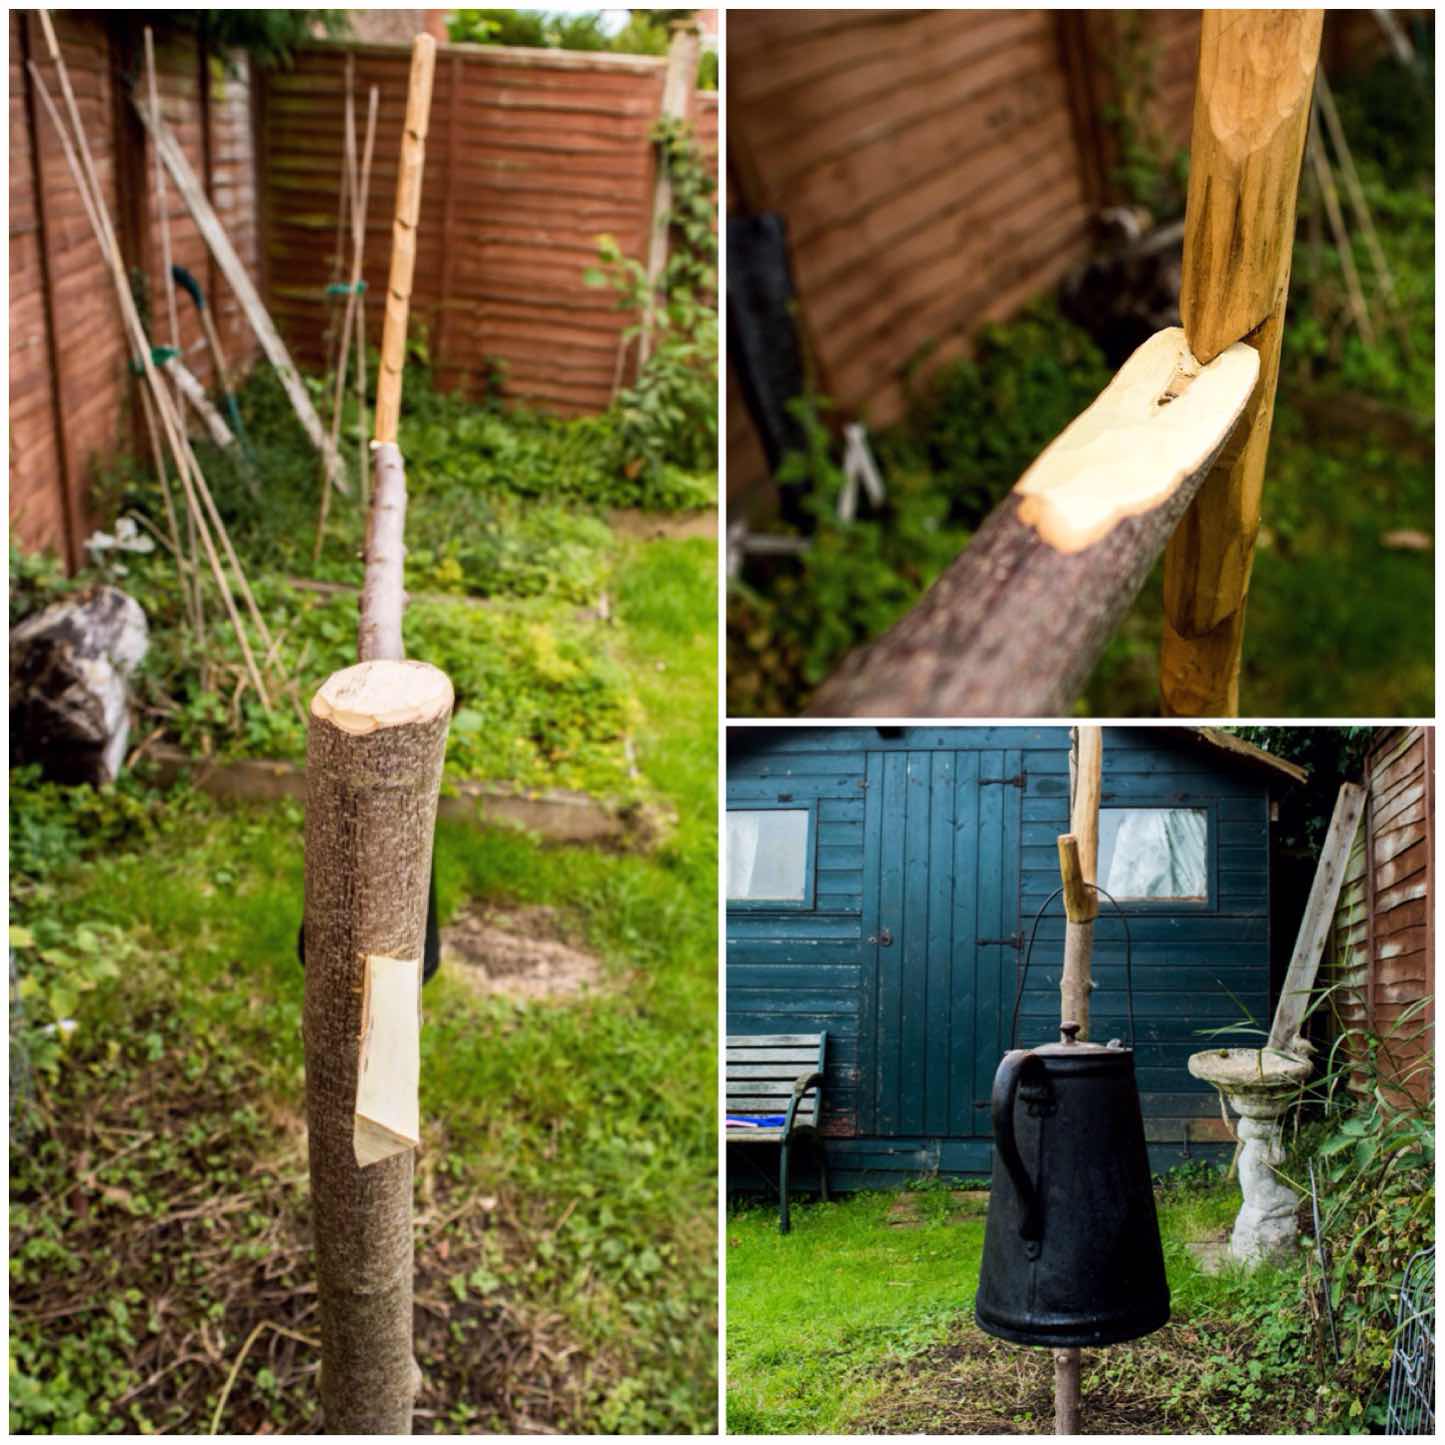
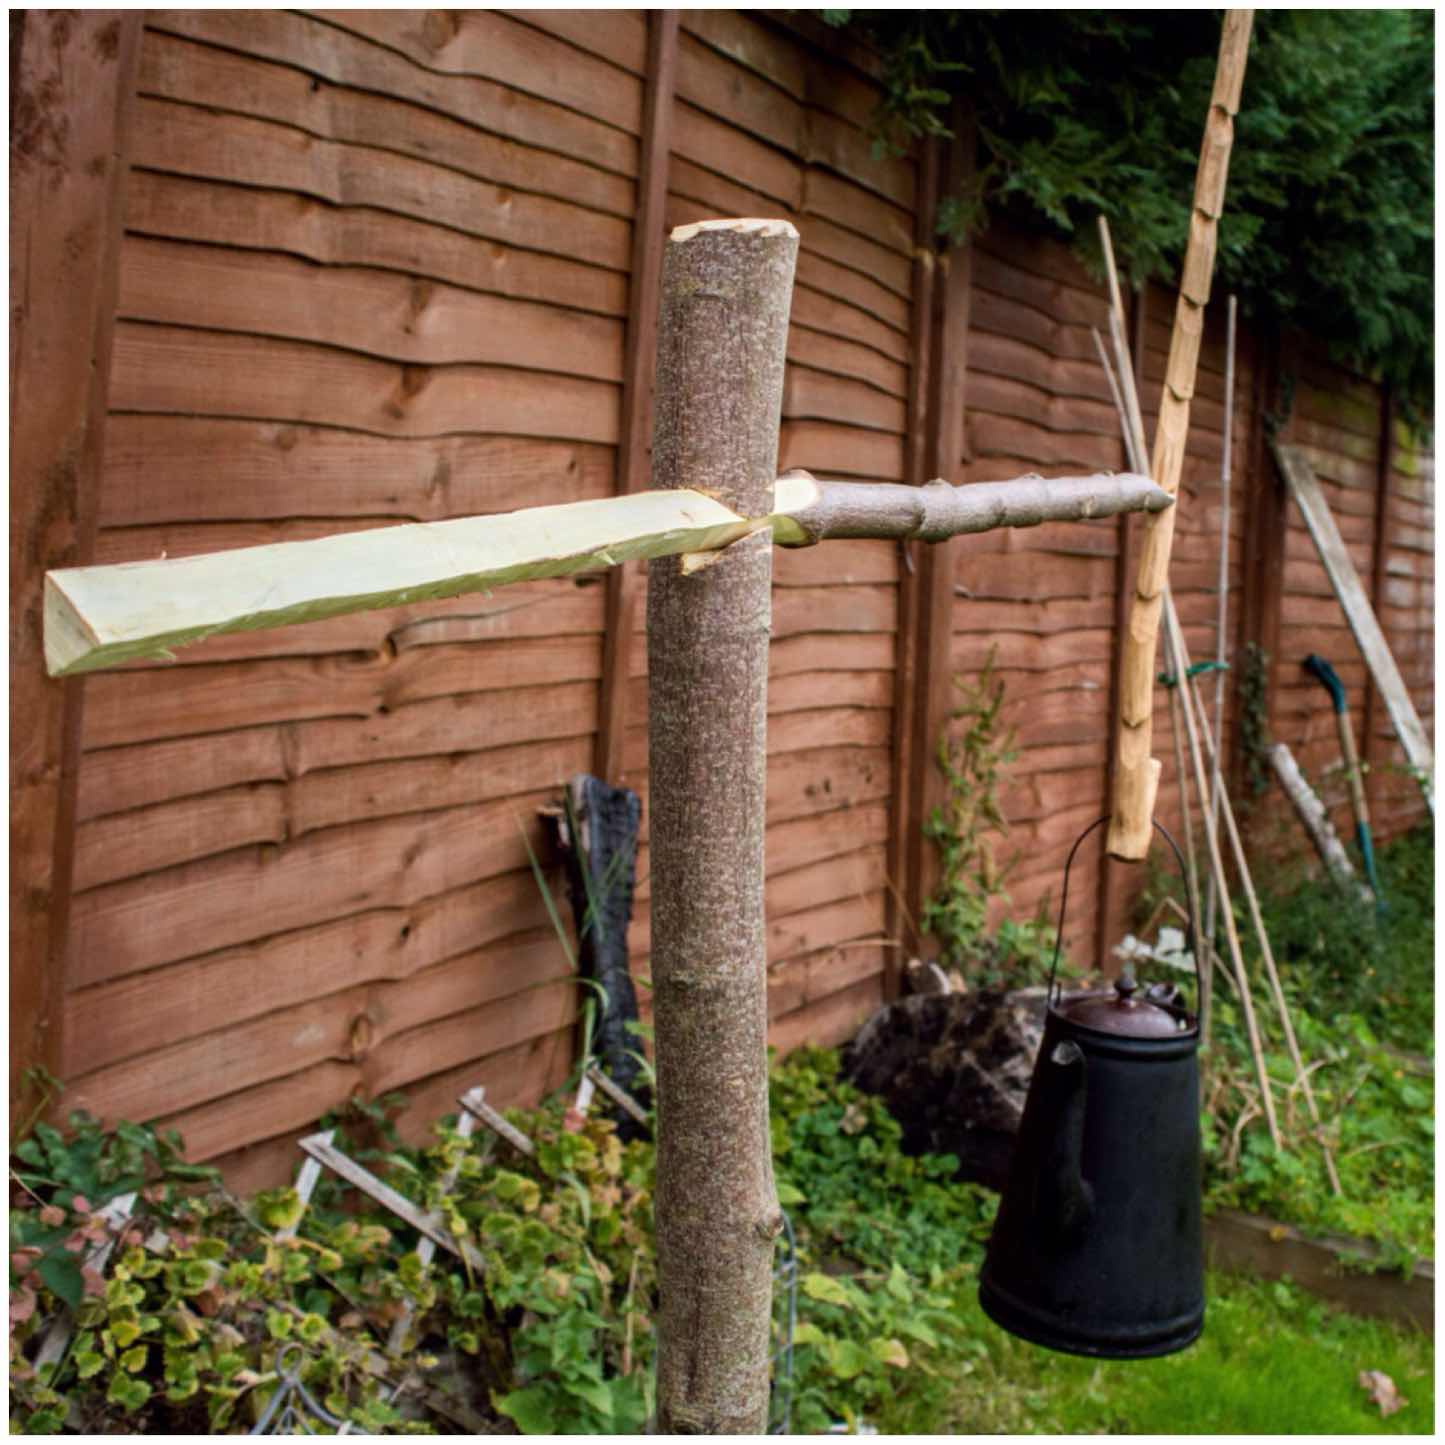
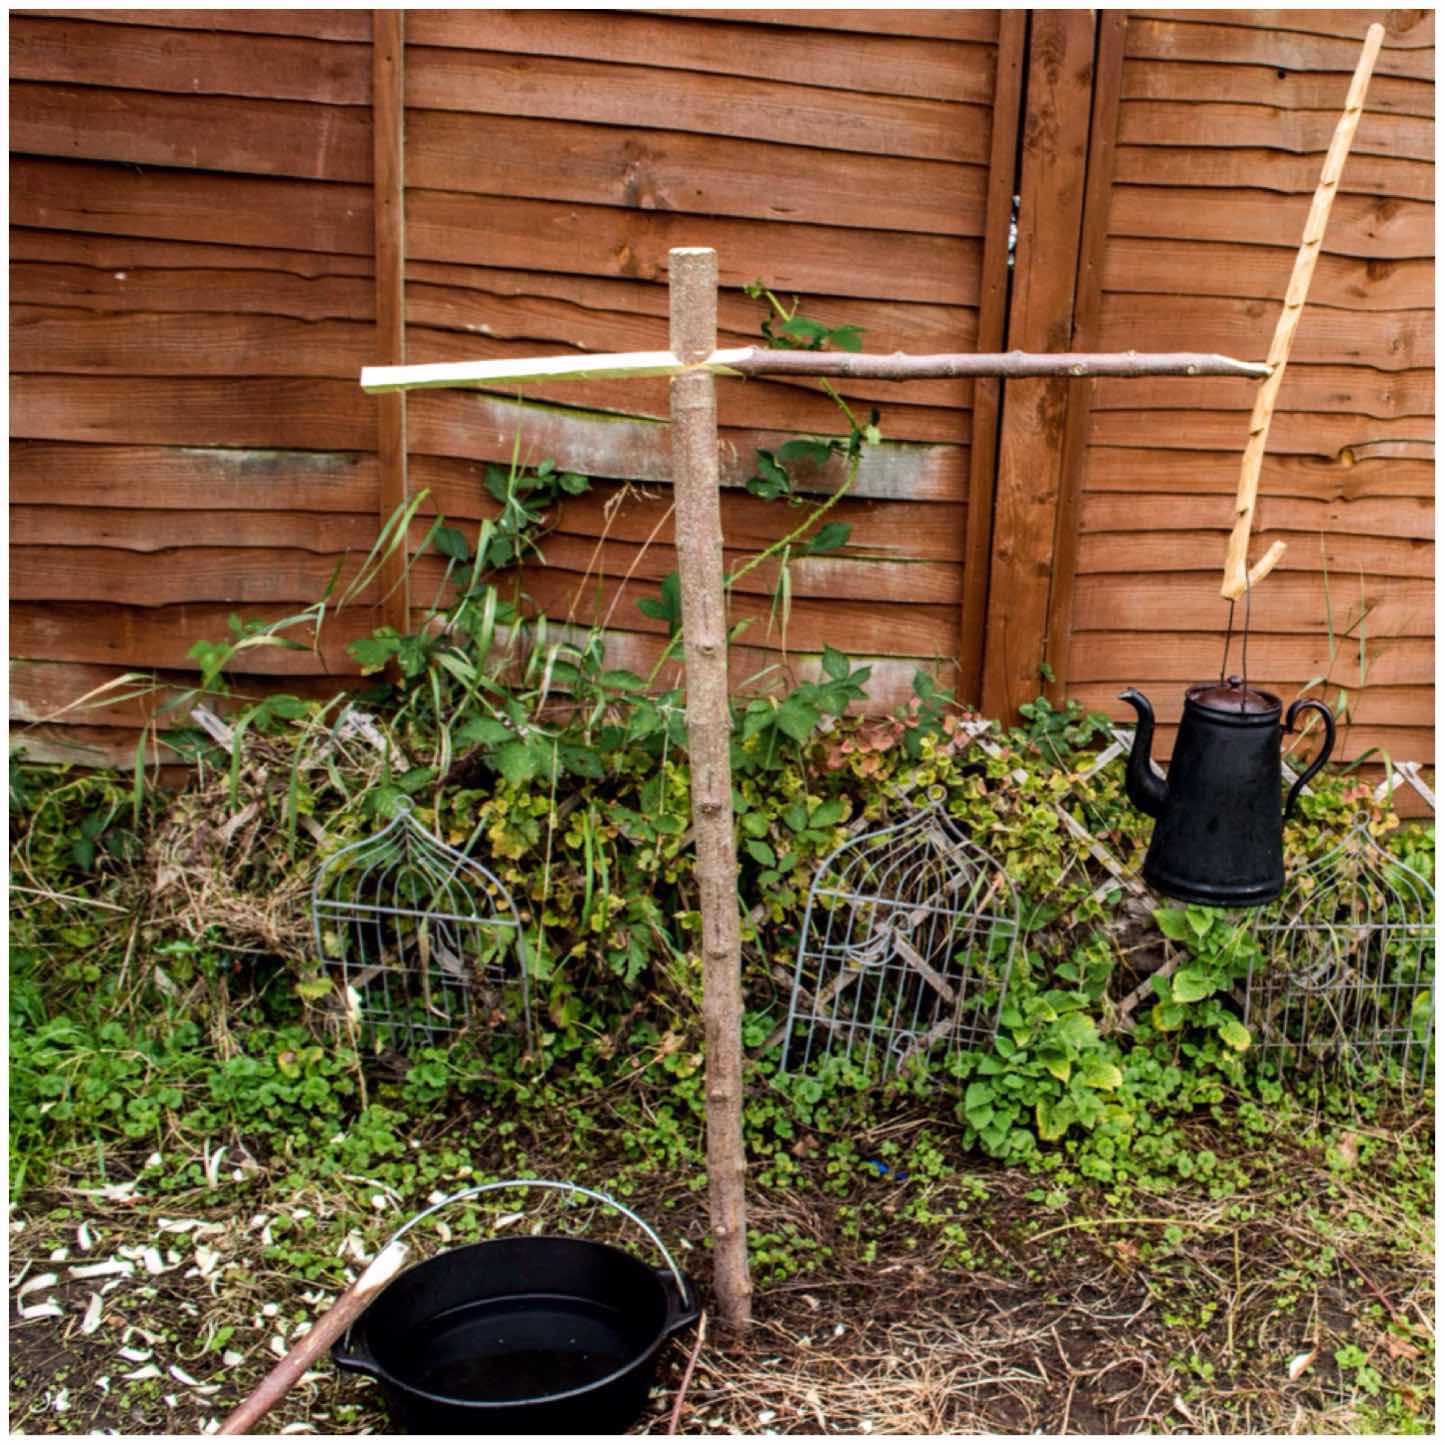
Notched Crane
The idea for this crane came to me a number of years ago while making myself up a little squirrel cooker from some metal rods. I have cut the notch out using an auger in the past but nowadays I usually just use my knife. I like this set up as you can make your crane out of one pole. With the addition of an adjustable pot hanger you have a crane that offers a variety of cooking heights without having a bulky tripod set up over the fire.
The Notched Crane
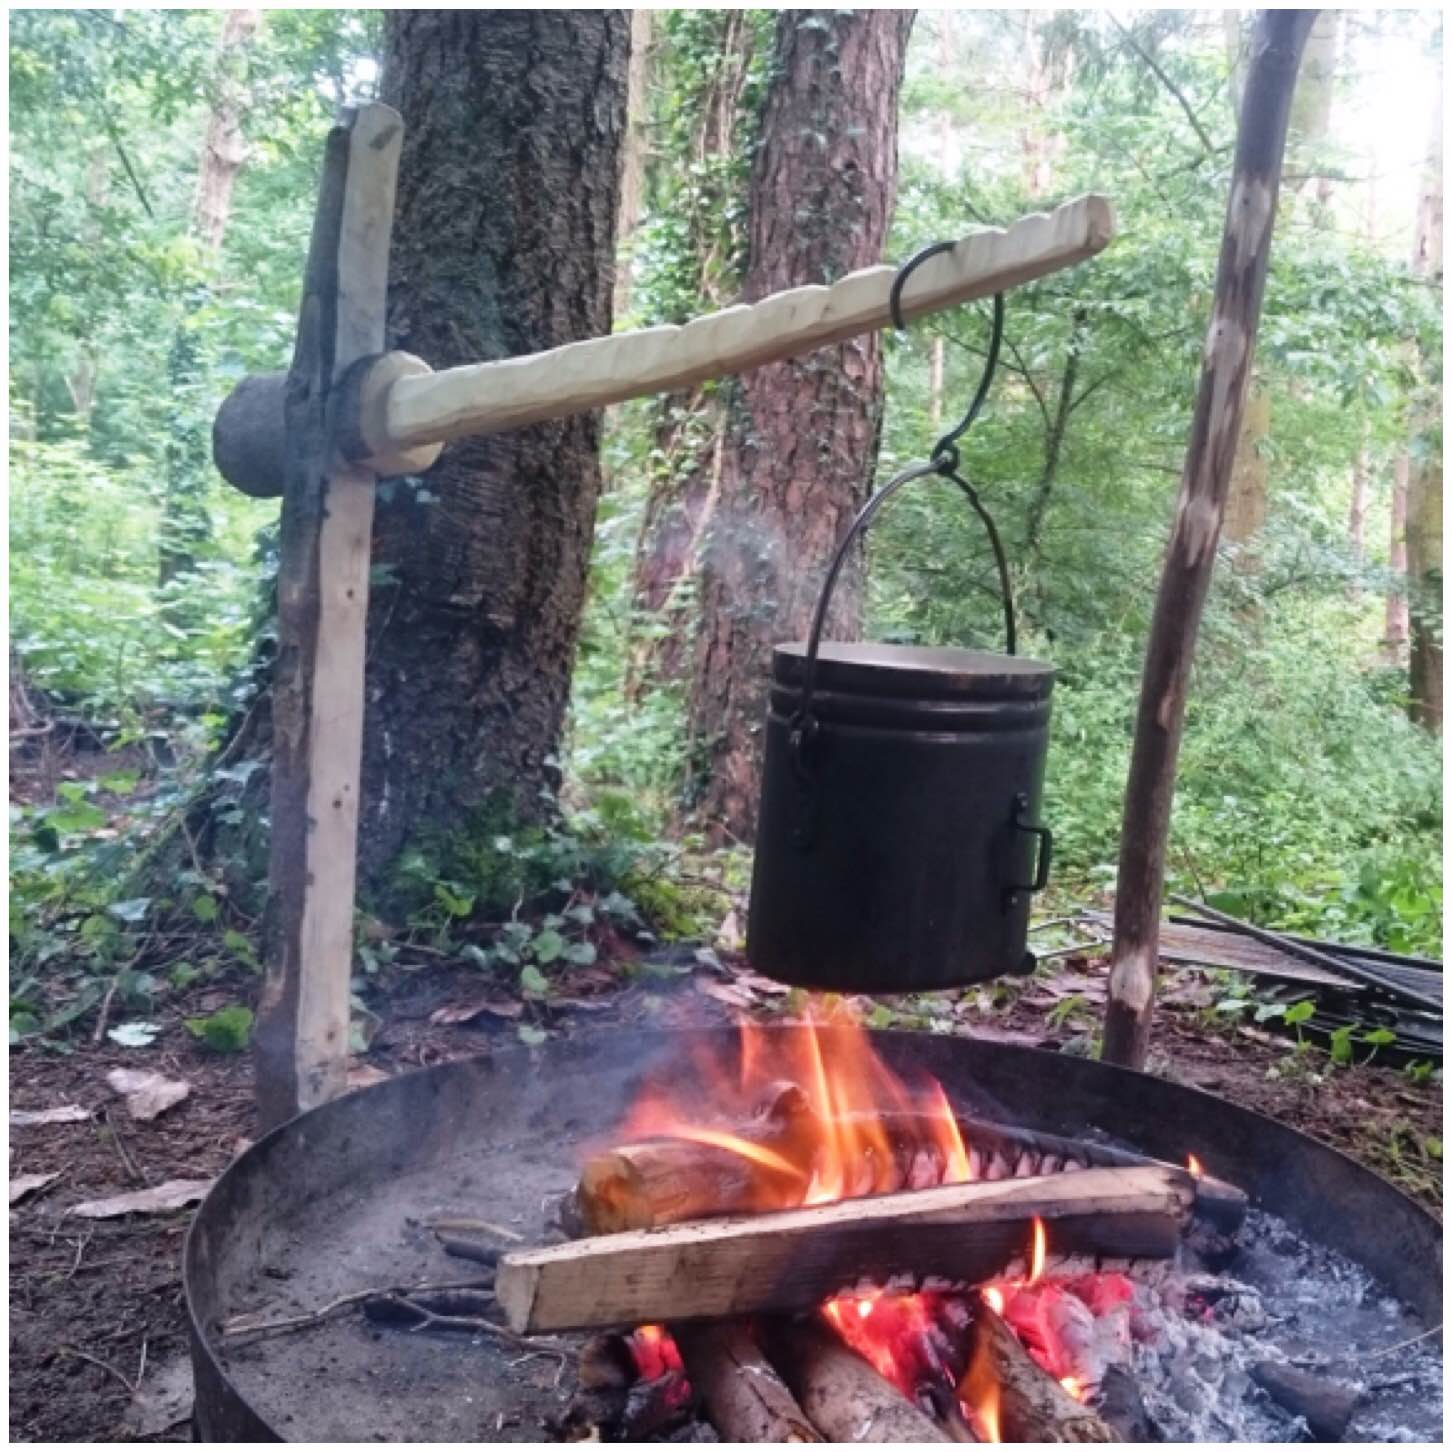
Simple Dovetail Crane
I got this idea from a Scouting page a number of years ago and it is very simple and quick to carve. The part that takes the longest to make is the adjustable pot hanger. I would recommend if you decide to experiment with making these cranes that you start with this one as the dovetail notch is so easy to cut out.
Simple Dovetail Crane
Lap Joint Crane
Still sticking with the single pole theme, another easy crane to make is the Lap Joint crane. The main thing to remember is to make sure that the squared-off fit of the upright is consistent along its length with the notch in the arm.
Once weight (eg a pot) is applied to the end of the arm, everything locks together. I have found that this crane works best when the pot is hung off the very end of the arm. I have experimented with hanging the pot half way along the arm only to find it all collapses. It is a good and simple crane to make – treat this one with respect, though.
Lap Joint Crane
Dovetail Crane
This is my all-time favourite crane. With the dovetail notch the arm cannot fall off (unlike the Lap Joint crane) and it offers a wide variety of heights to choose from when cooking. The arm is very easy to adjust even when there is a pot attached and will take you no more than an hour to carve.
Dovetail Crane
Heavy Duty Crane
This one came about from an article I spotted in a Scouting site. Some of the Dutch Oven pans I use can be extremley heavy. This crane offers a number of different cooking heights and will not bend in the slightest even with the heaviest pot attached (well, the heaviest I have, at least). I have though learned to take the pot off the arm with this one before changing the height.
Heavy Duty Crane
Mortice and Tenon Crane
This was the last crane I worked on last year and the one that is the most technical, I think. The joint is a simple tenon and mortice set up however there were a lot of angles to consider (I have discussed then in the article) and the string I used to adjust the height could possibly do with further development. It is however an excellent crane with lots of movement up and down and side to side.
The Mortice and Tenon Crane
In time I hope to add a few more How To’s…. to this series as I find the whole subject of campfire contraptions so fascinating.
When the weather is inclement and the ground is really wet then the option of making a rocket stove needs to be considered.
This How To…. sets out the steps I took on a wet and windy December morning to make a Damp Wood Log Rocket Stove with only the tools I normally carry in my rucksack.
The damp wood log rocket
I have dabbled with making different types of Finnish Candles for cooking on and they are excellent for when the ground is wet. Over the years I have also experimented with making Log Rocket stoves but restricted my activities to the workshop as I used drills to make them.
I recently stumbled on an idea on Facebook from the 1st Facebook Scout Group by Paul Hasling. This is the first time I have seen a log rocket stove done without the use of drills so I was instantly taken with the idea. Another Scout instructor José Xavier put Paul’s pictures together into a quick helpcard called the Rocket Stove de Madeira. This is a very simple design where a log is split four ways, a chimney and firetray are carved out and it is all put back together again with string. I will certainly be showing my Sea Cadets how to make one.
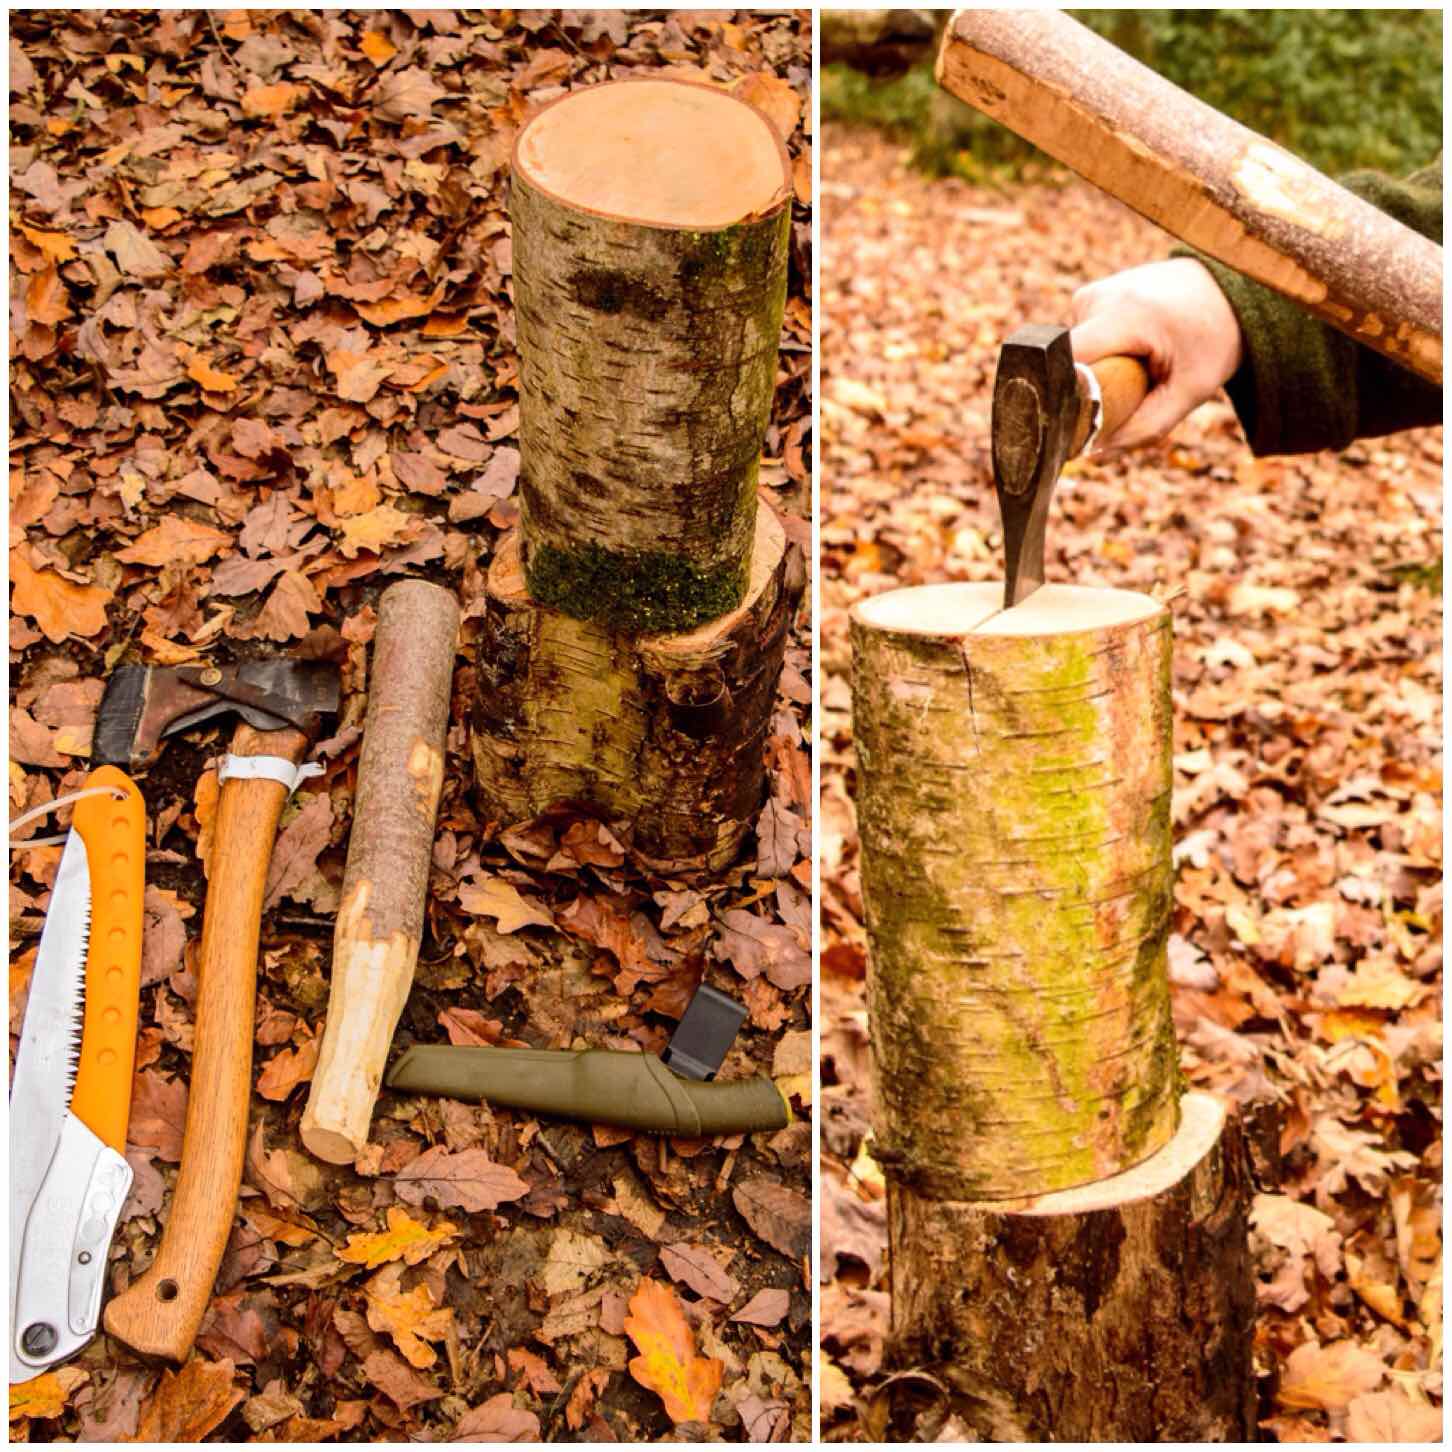
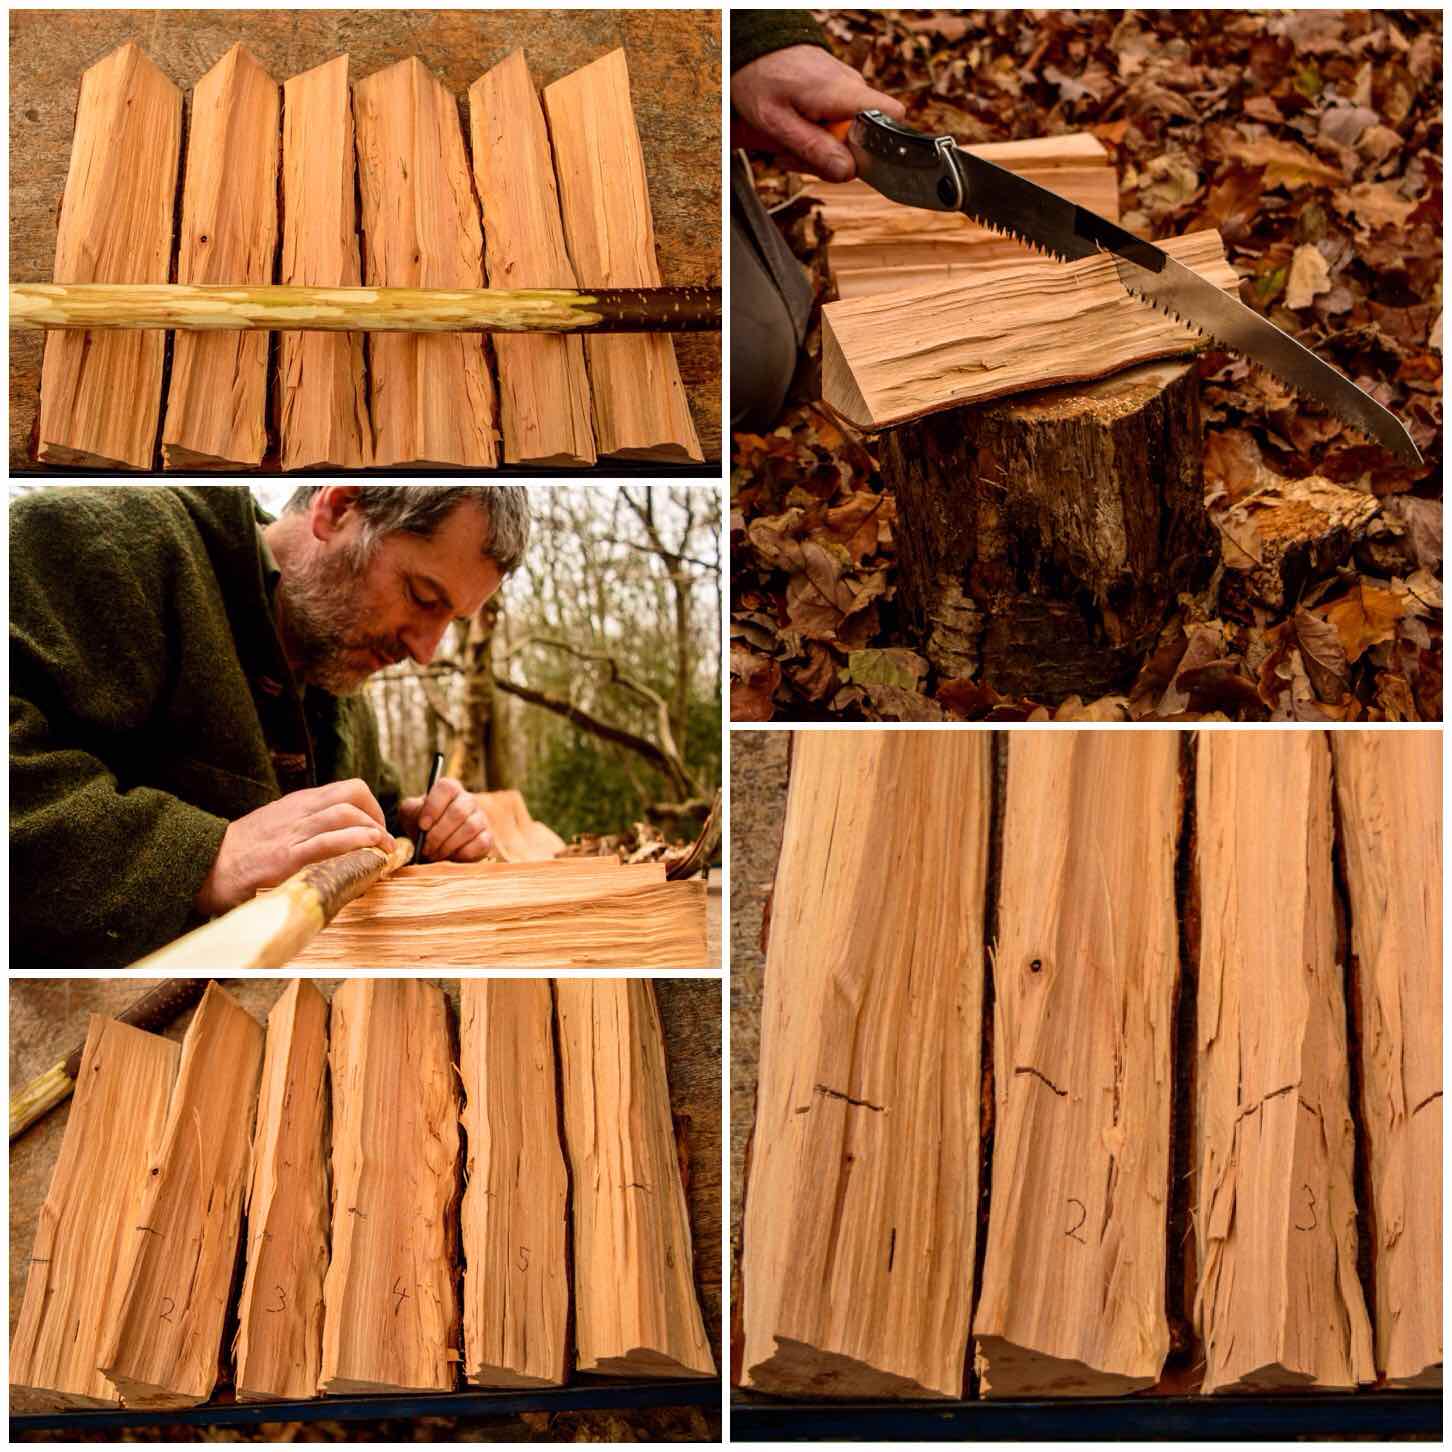
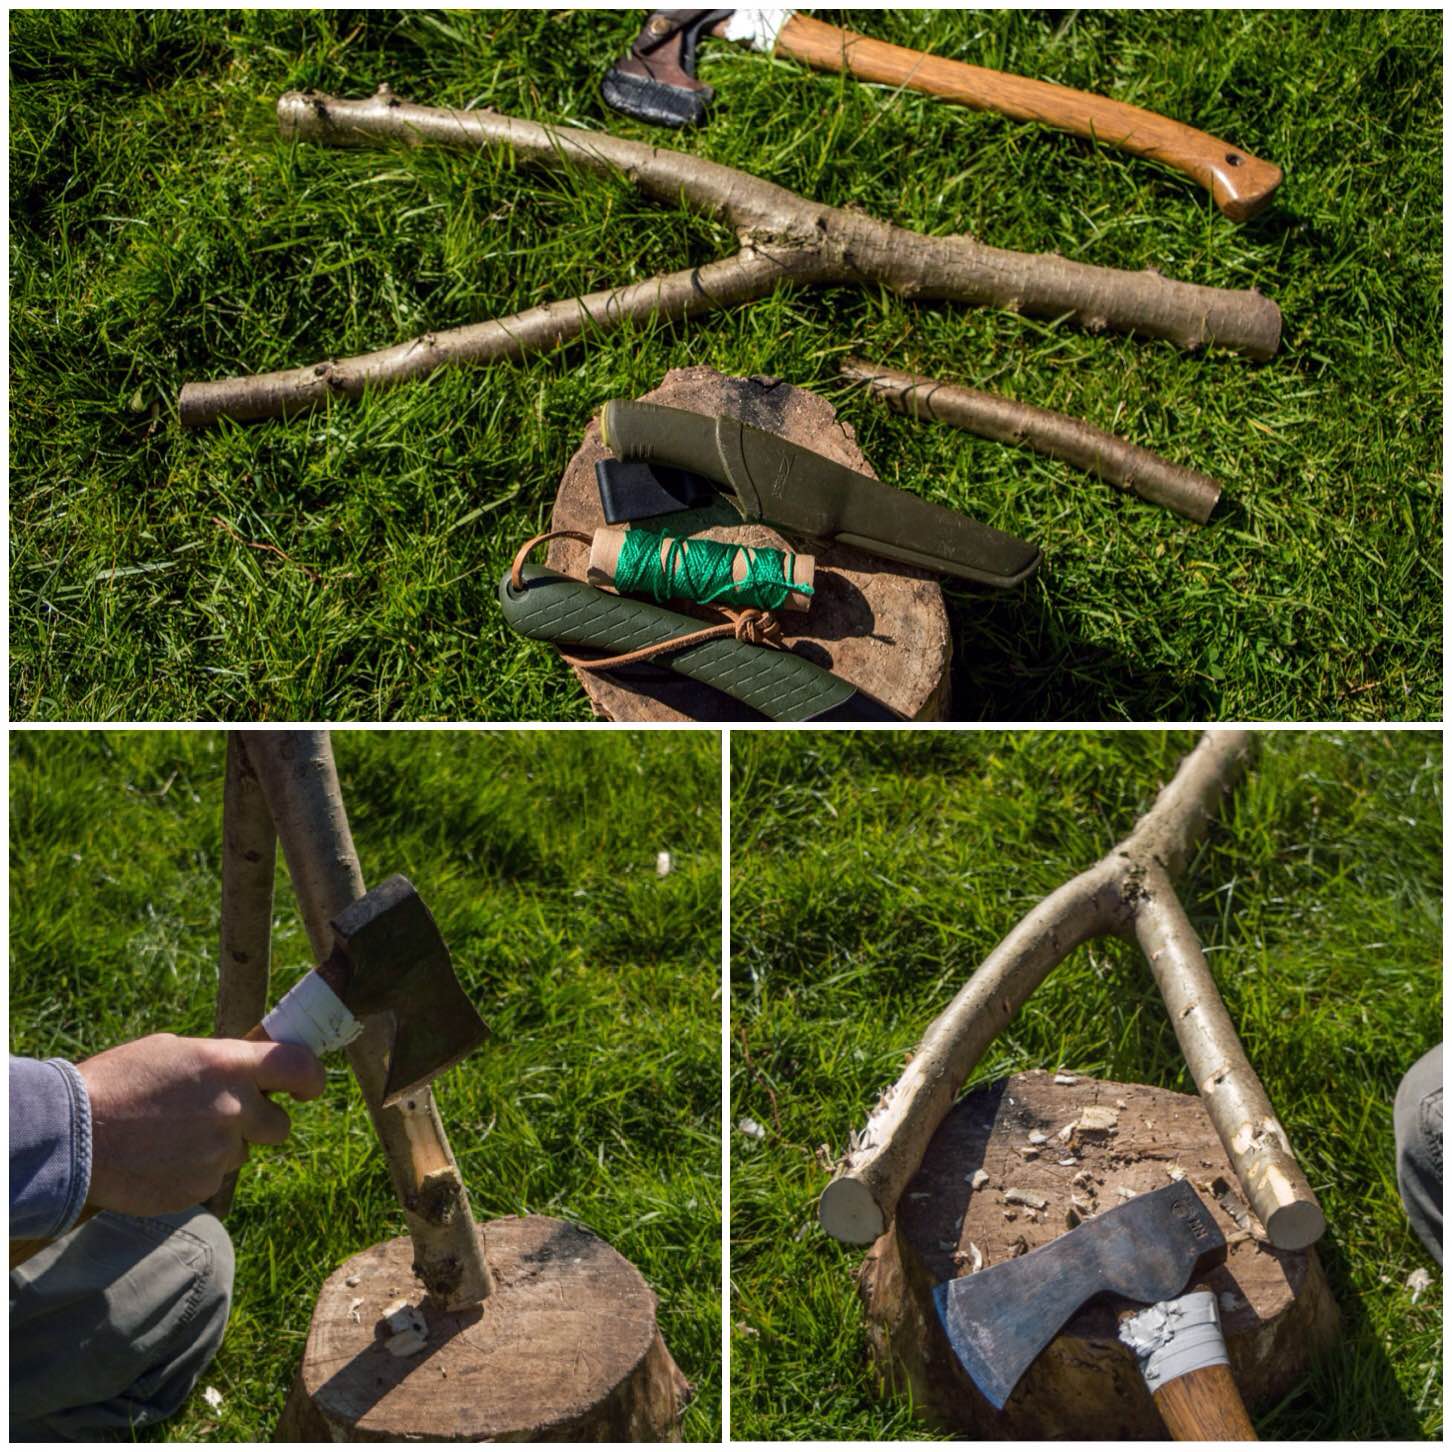
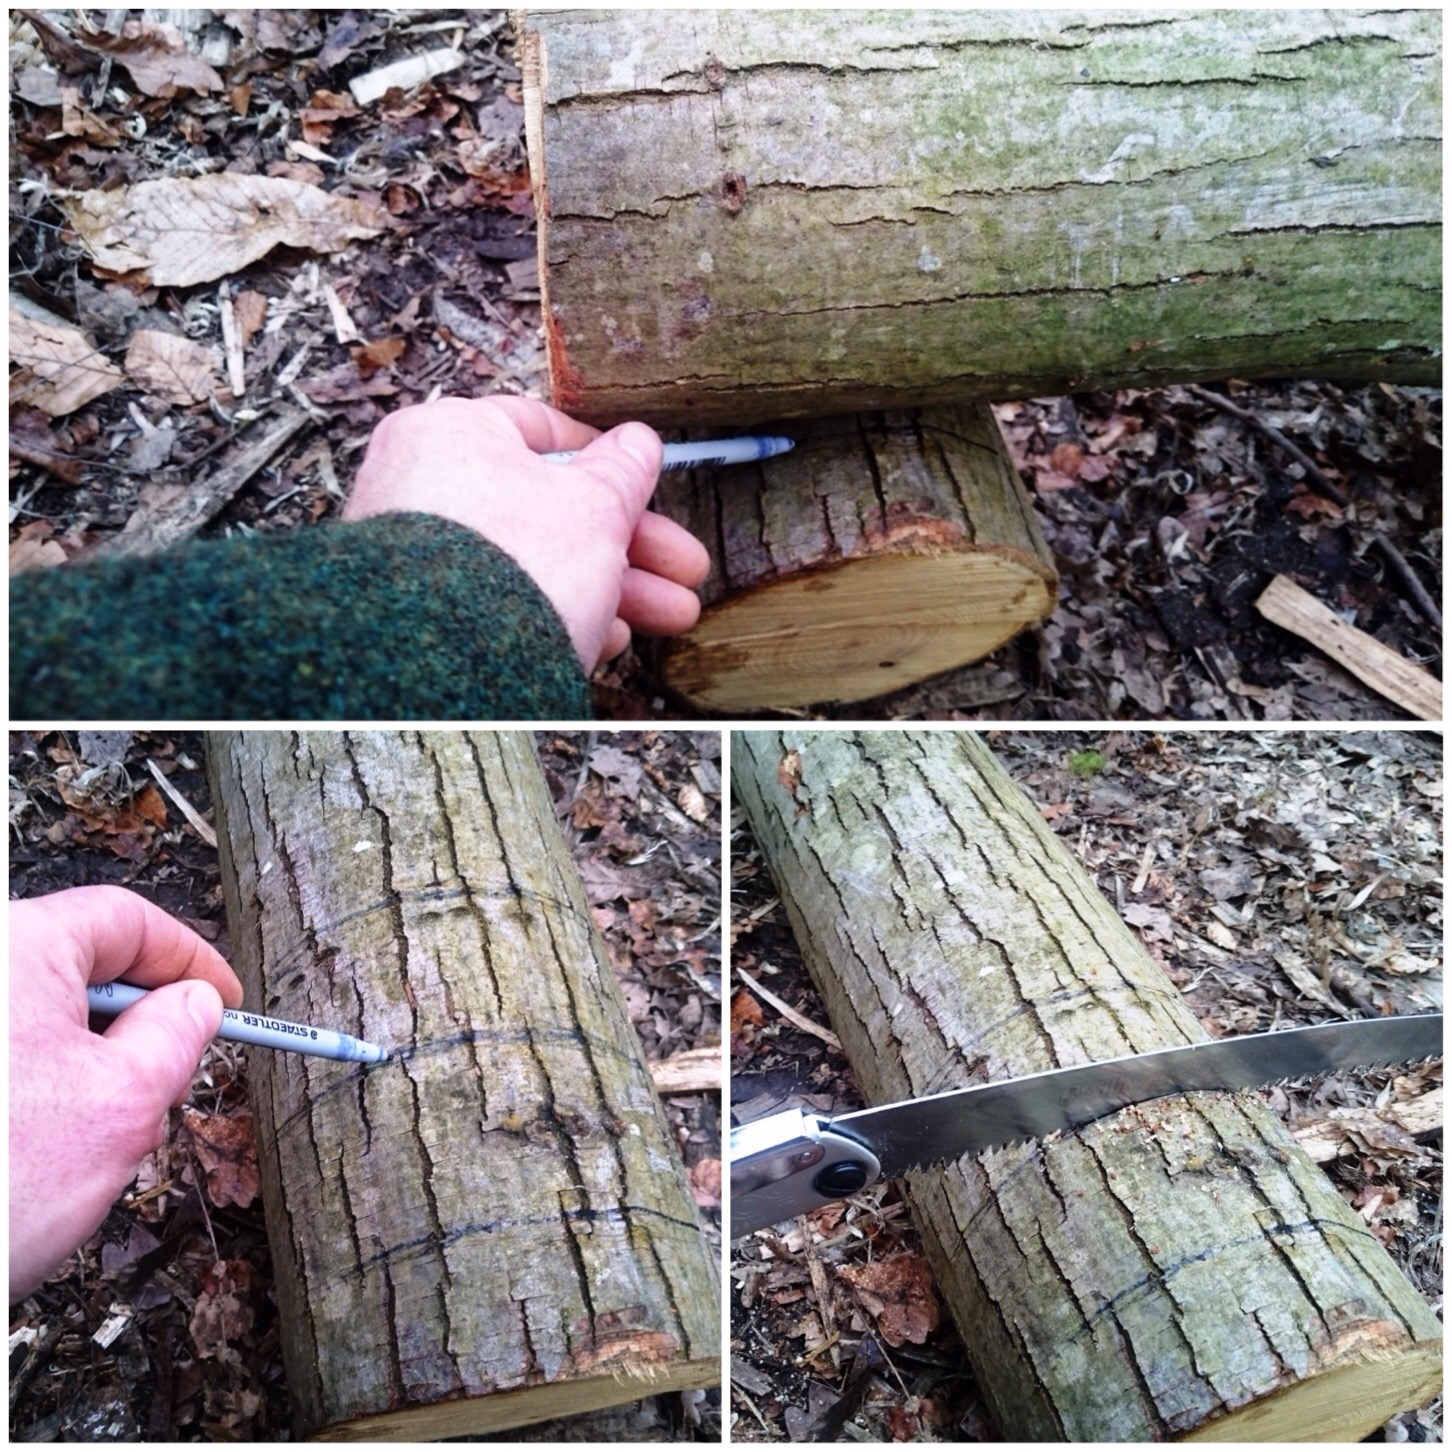
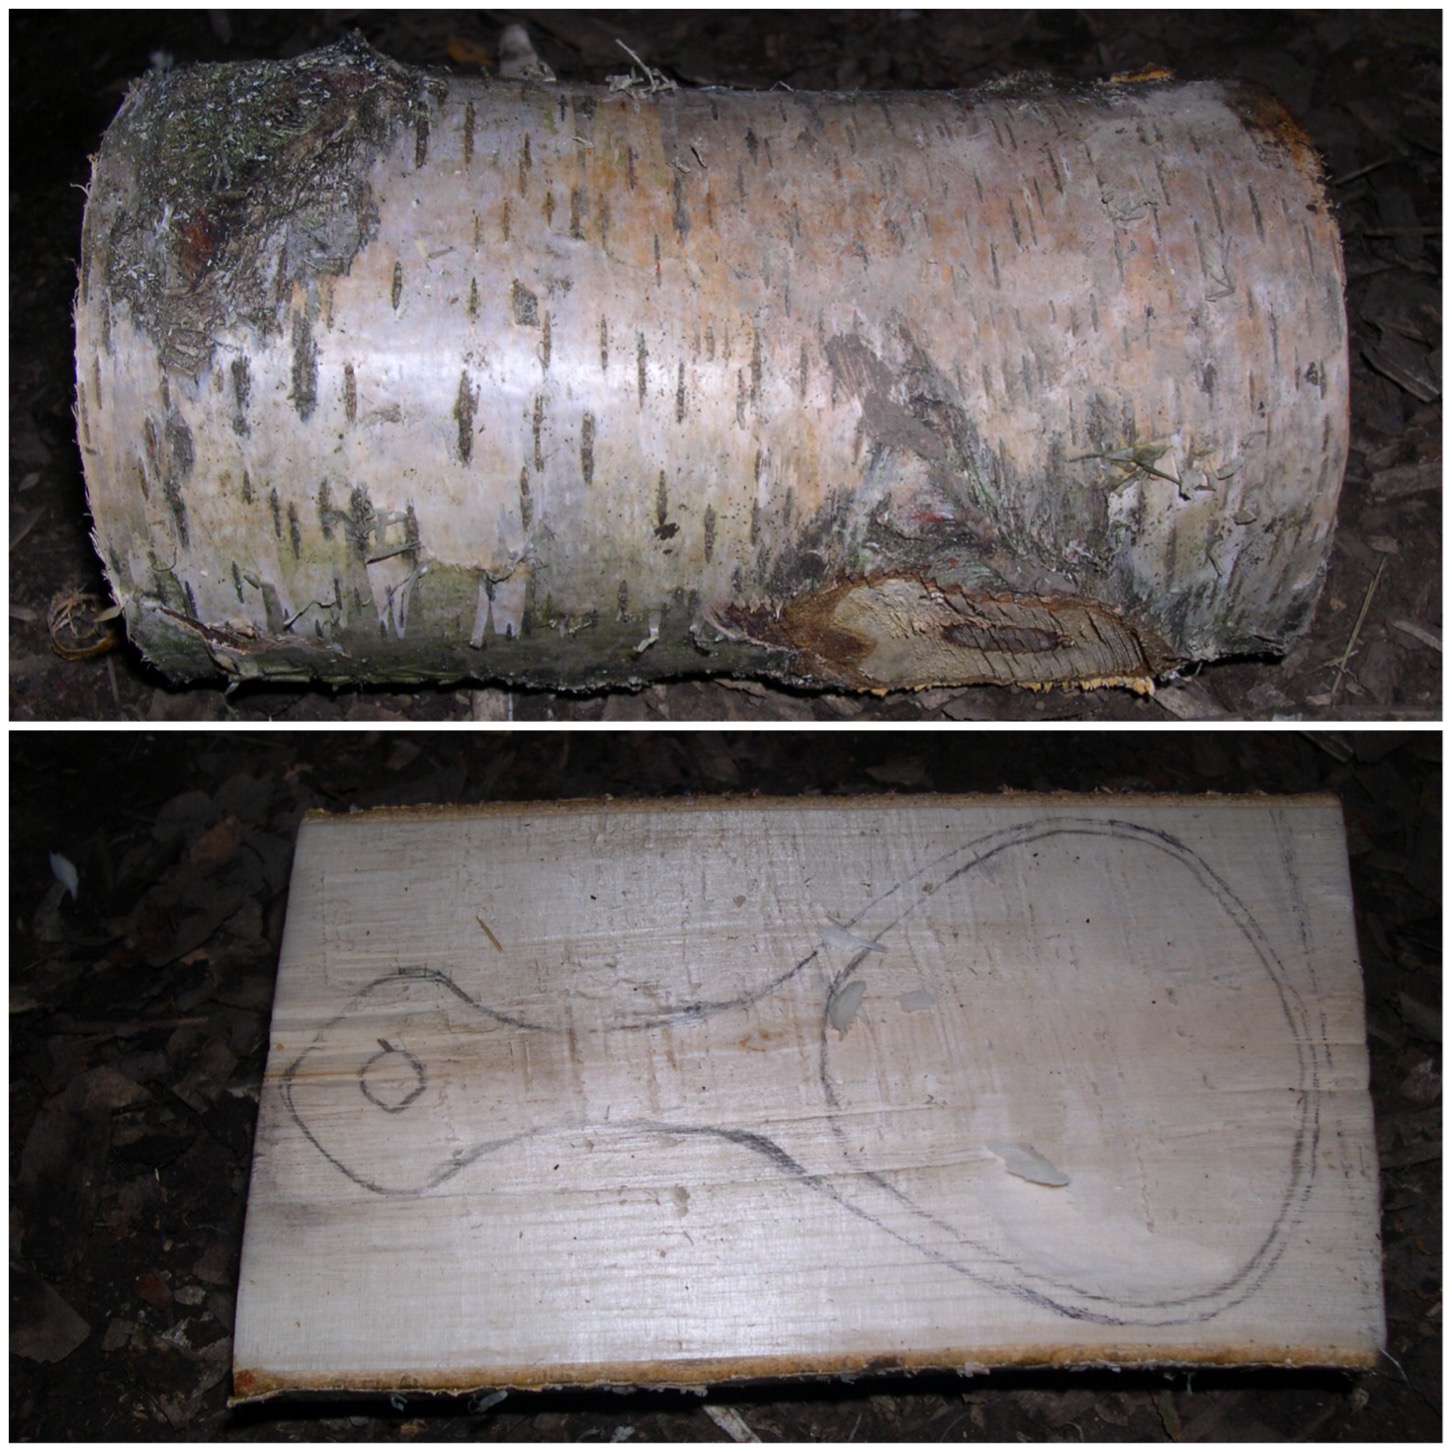
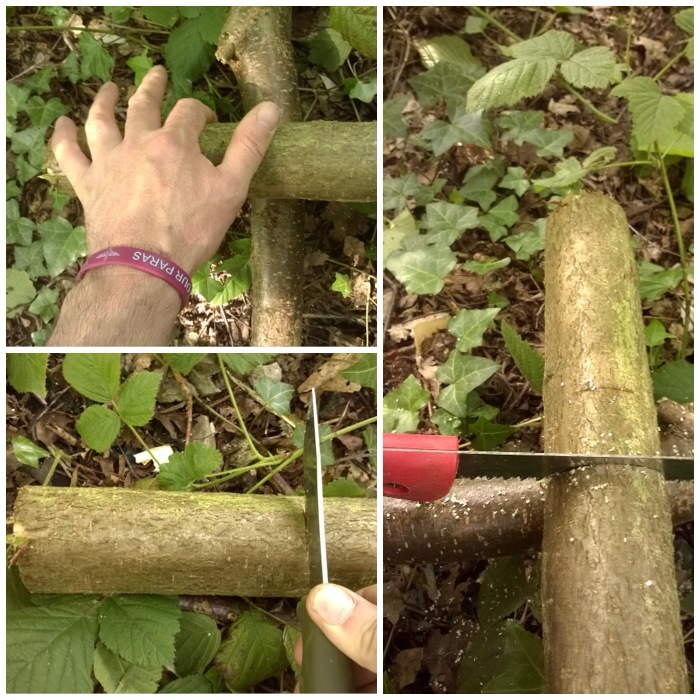
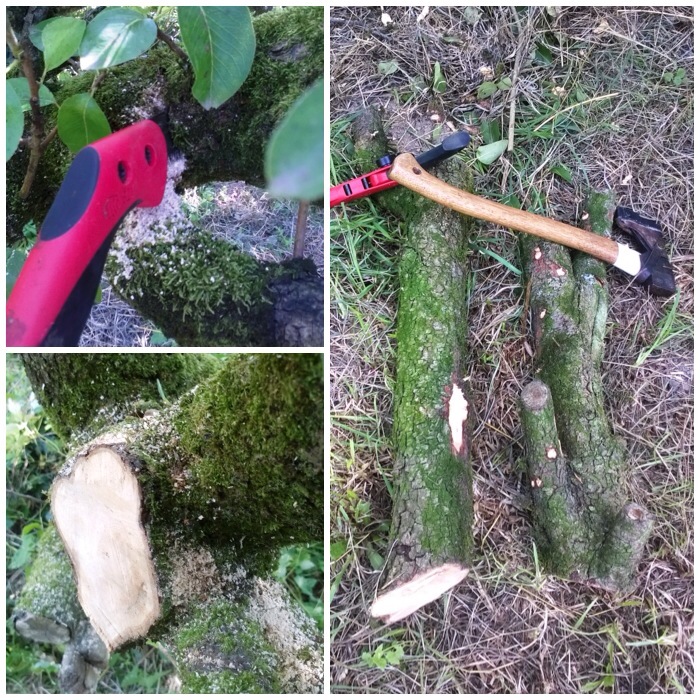
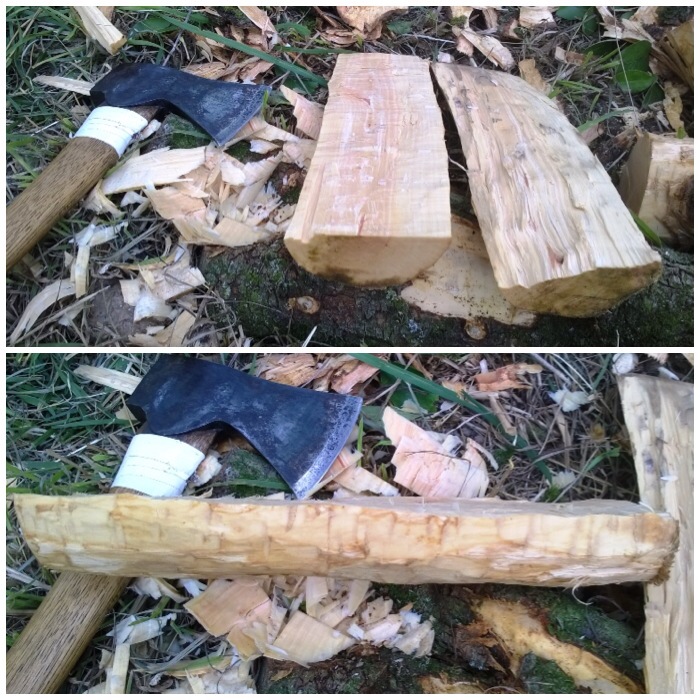
First though I wanted to make one when out in the woods with only what was to hand. It being December, there was nothing that was bone dry so I found a dead Birch and cut a section off. It was still damp to the touch, however it had been dead for over a year so it was slightly seasoned.
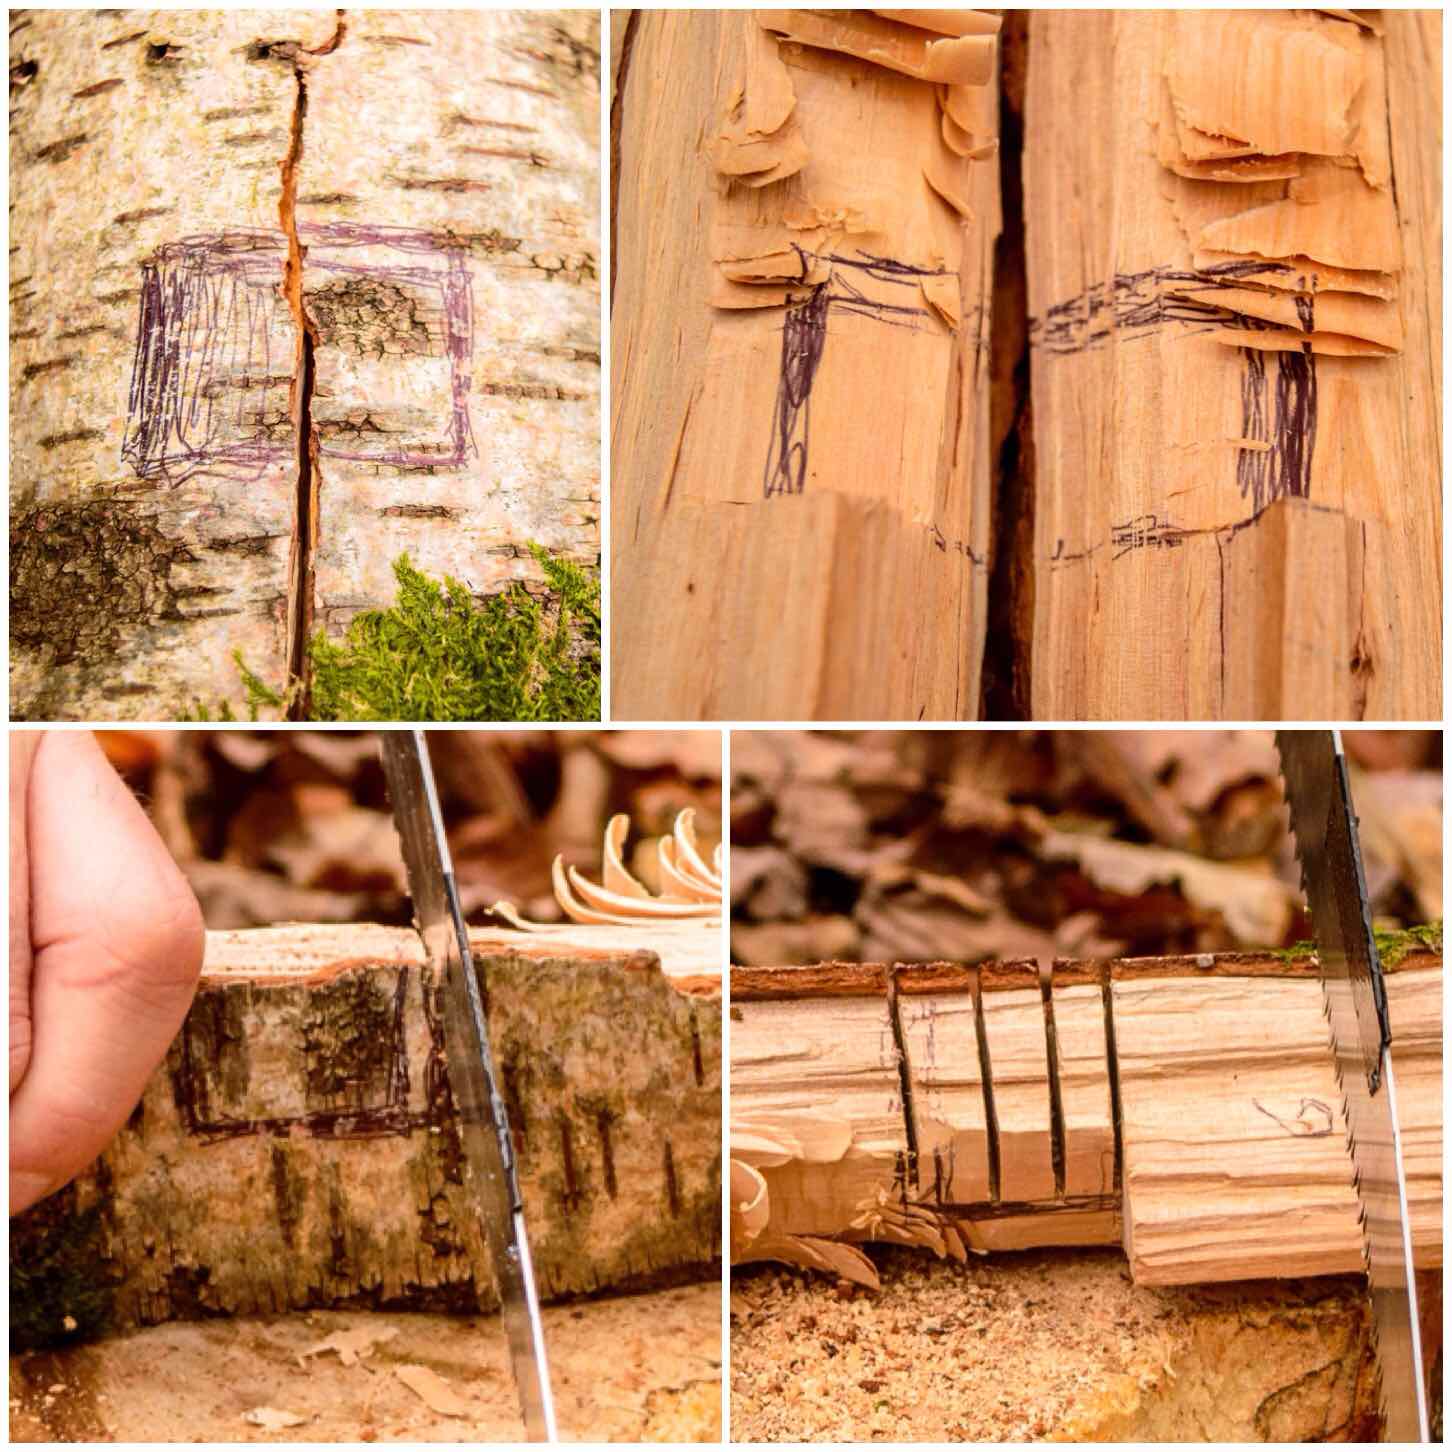
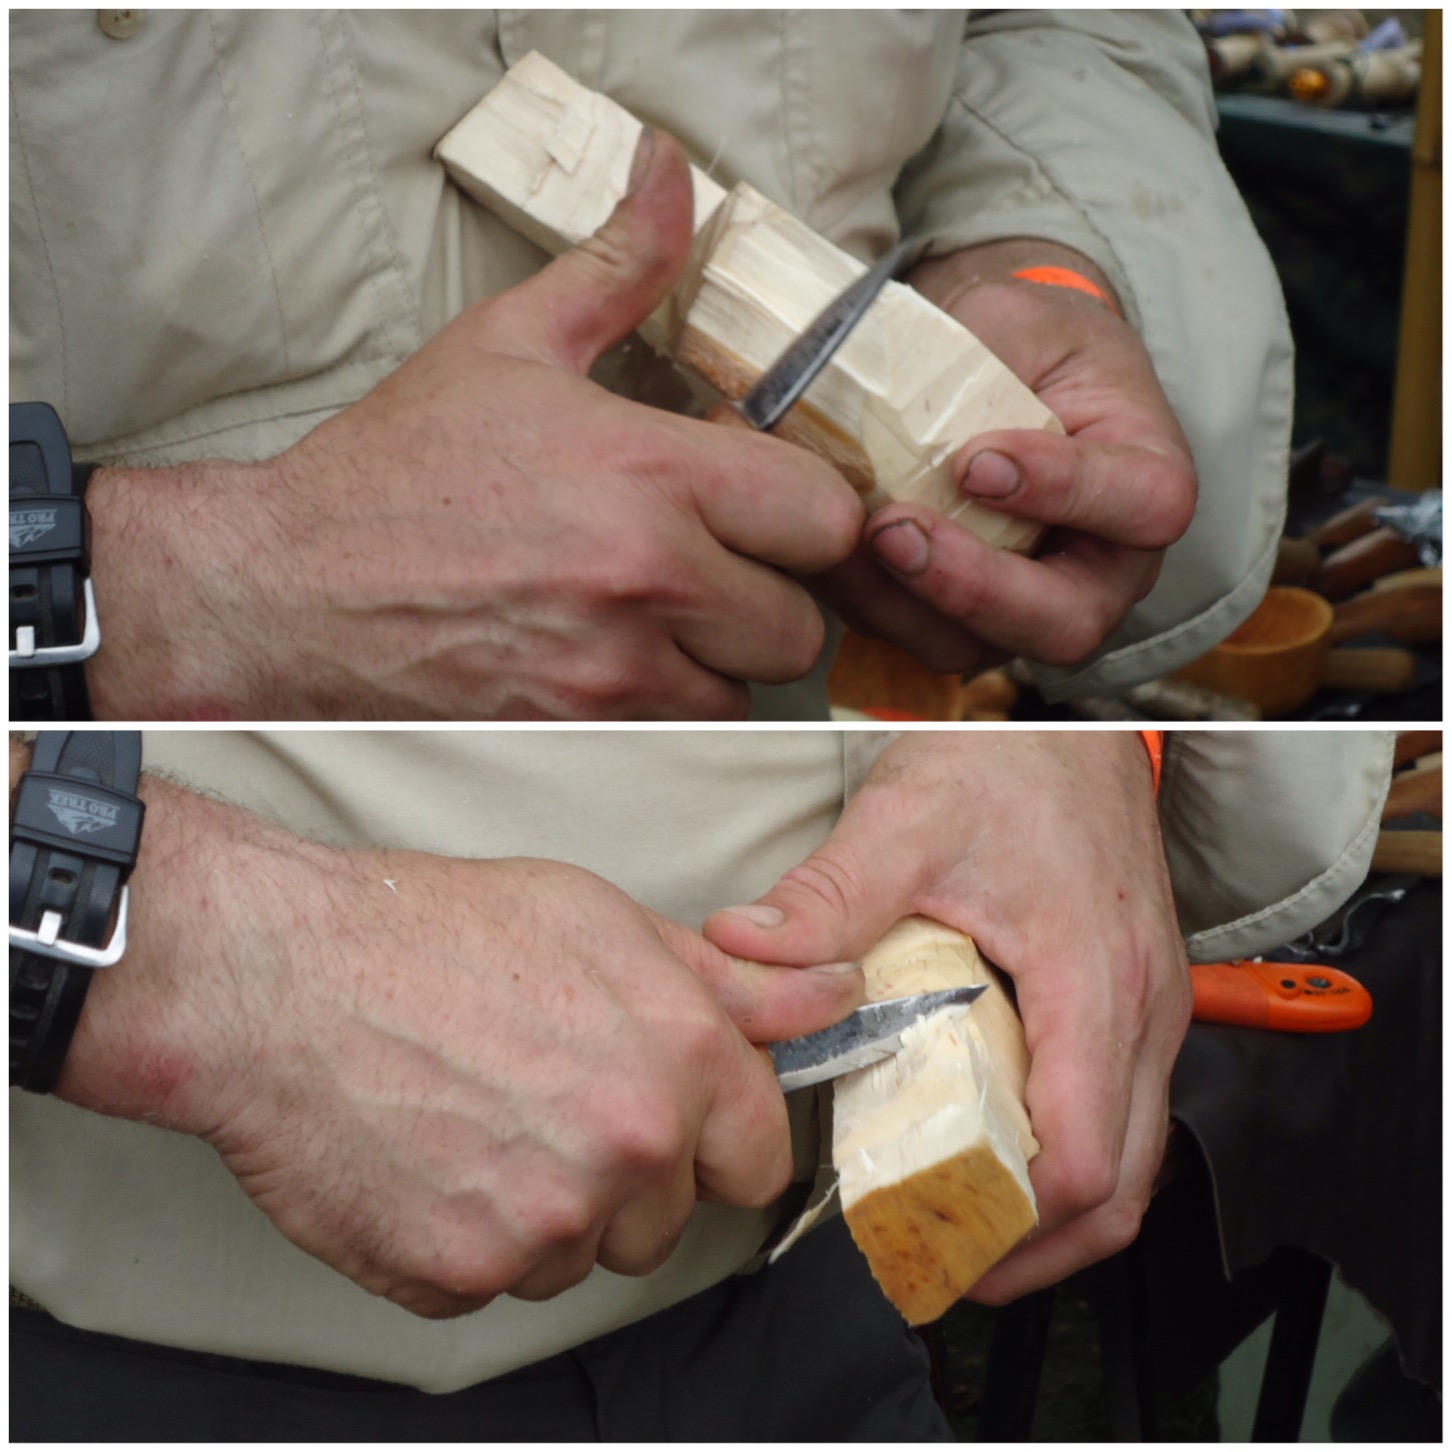
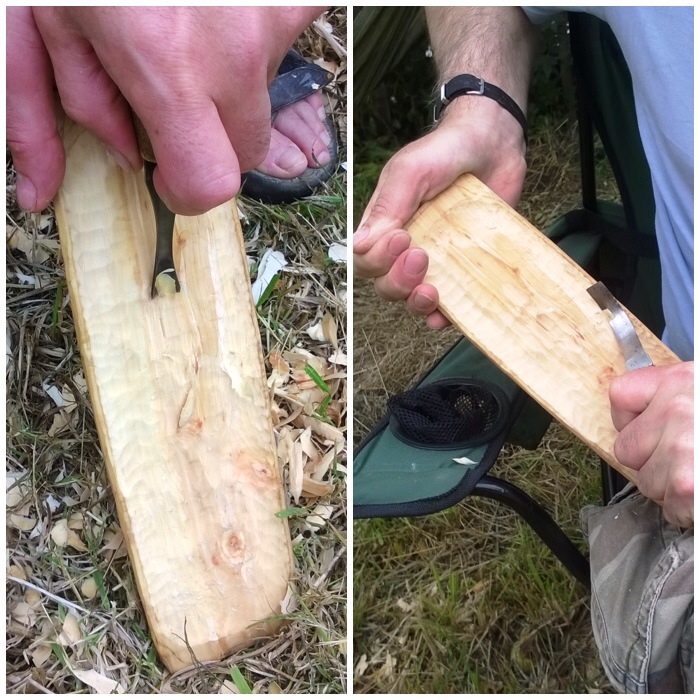
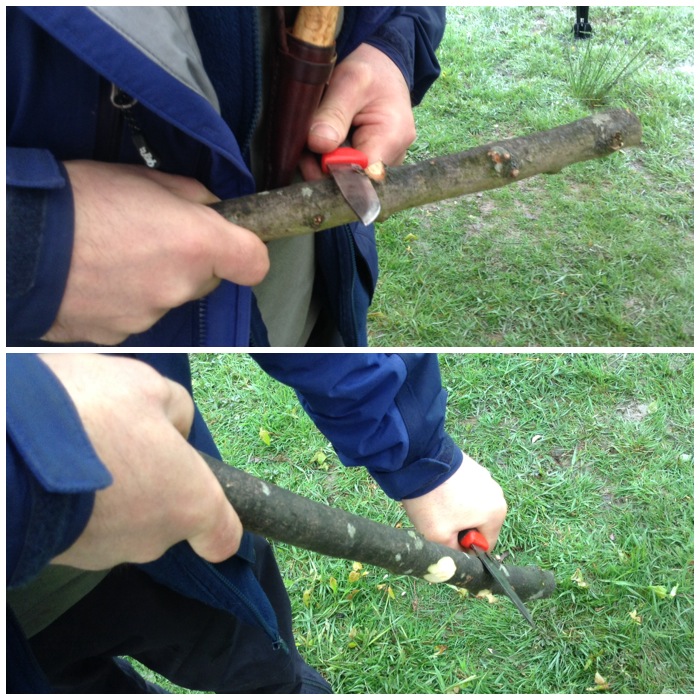
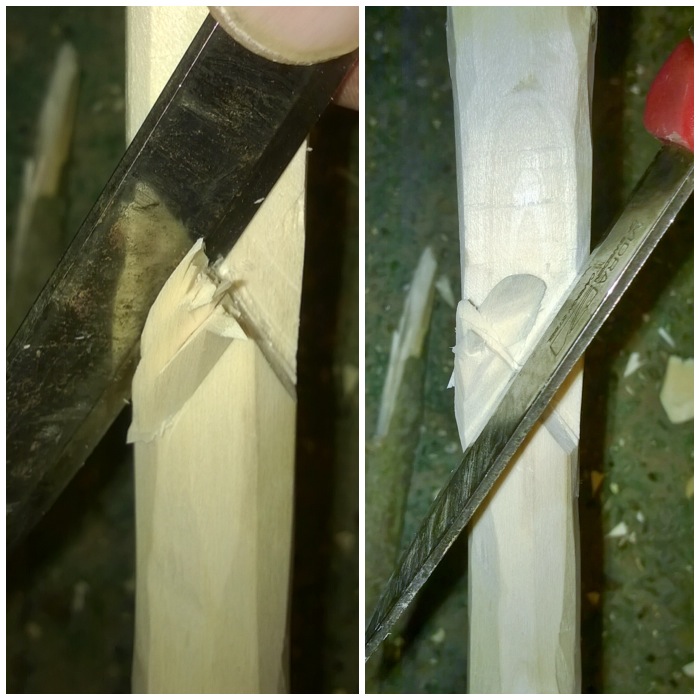
Splitting
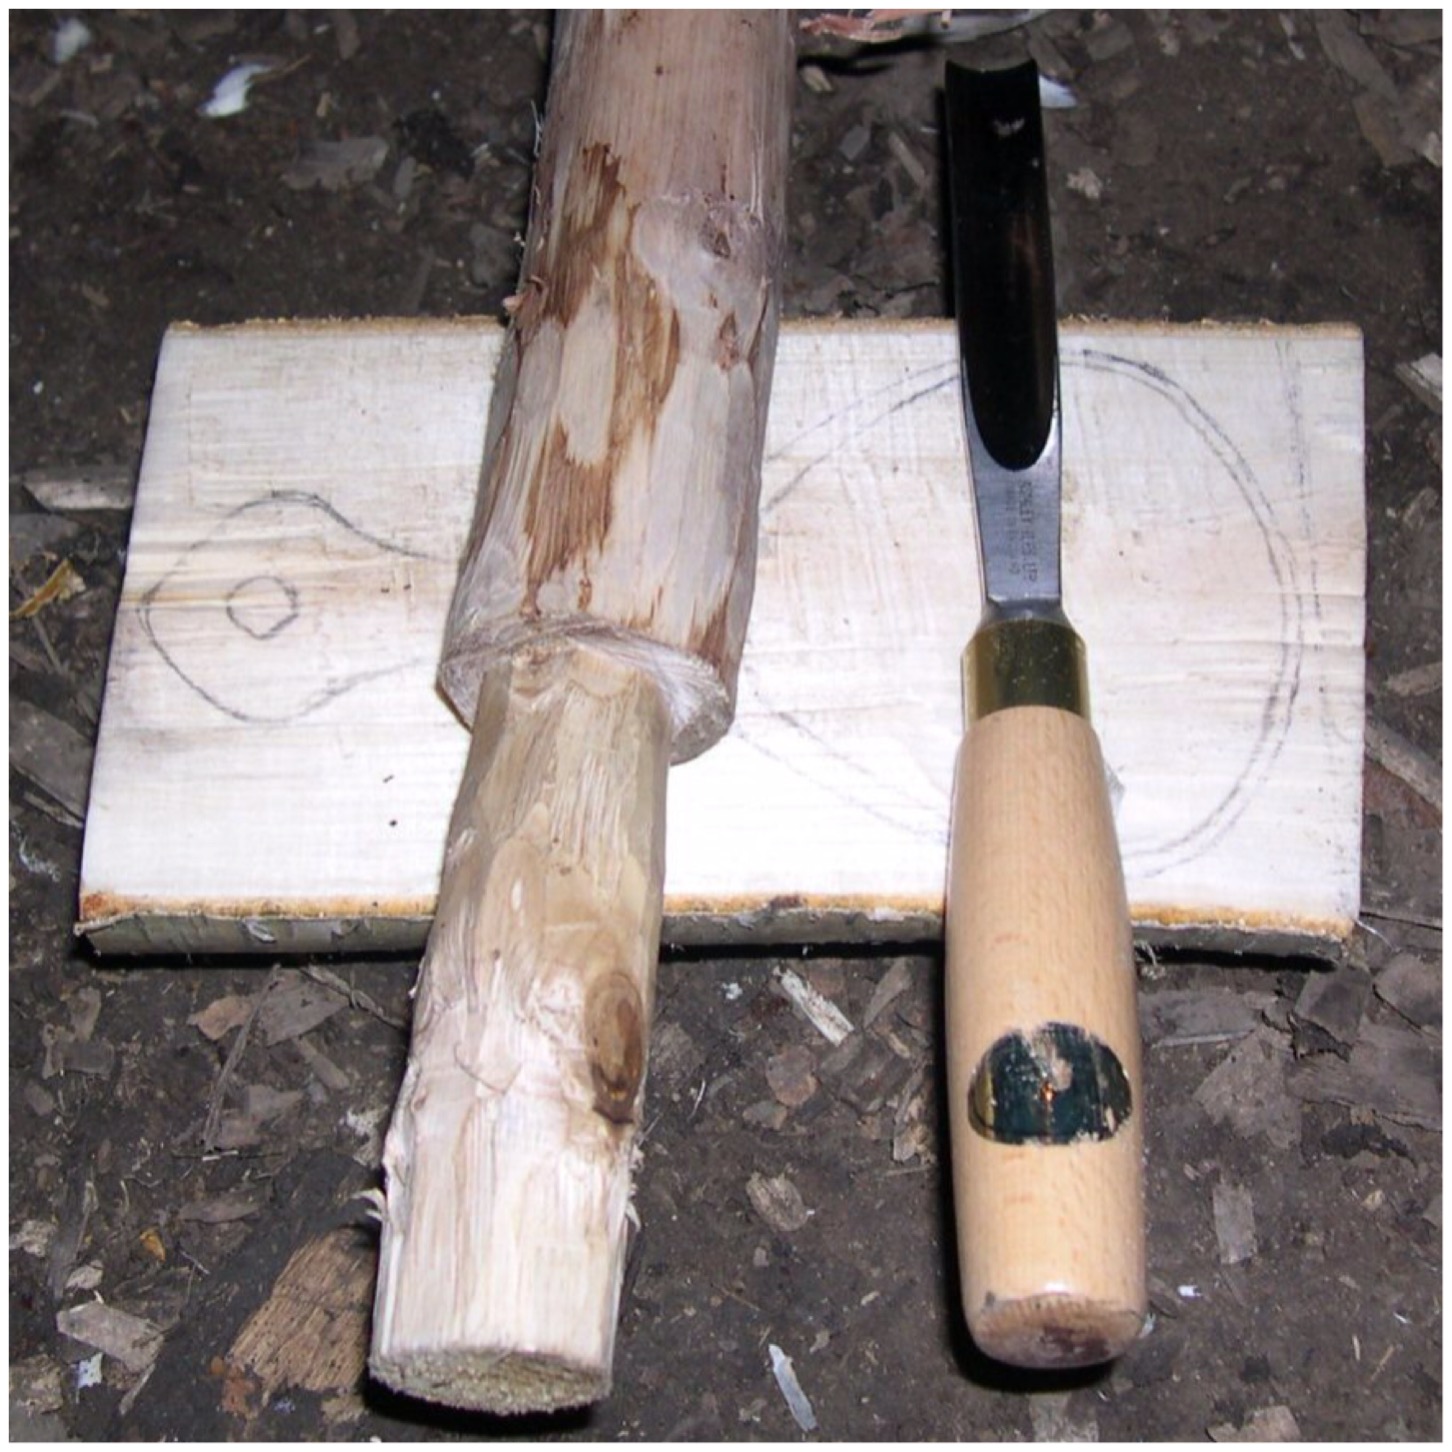
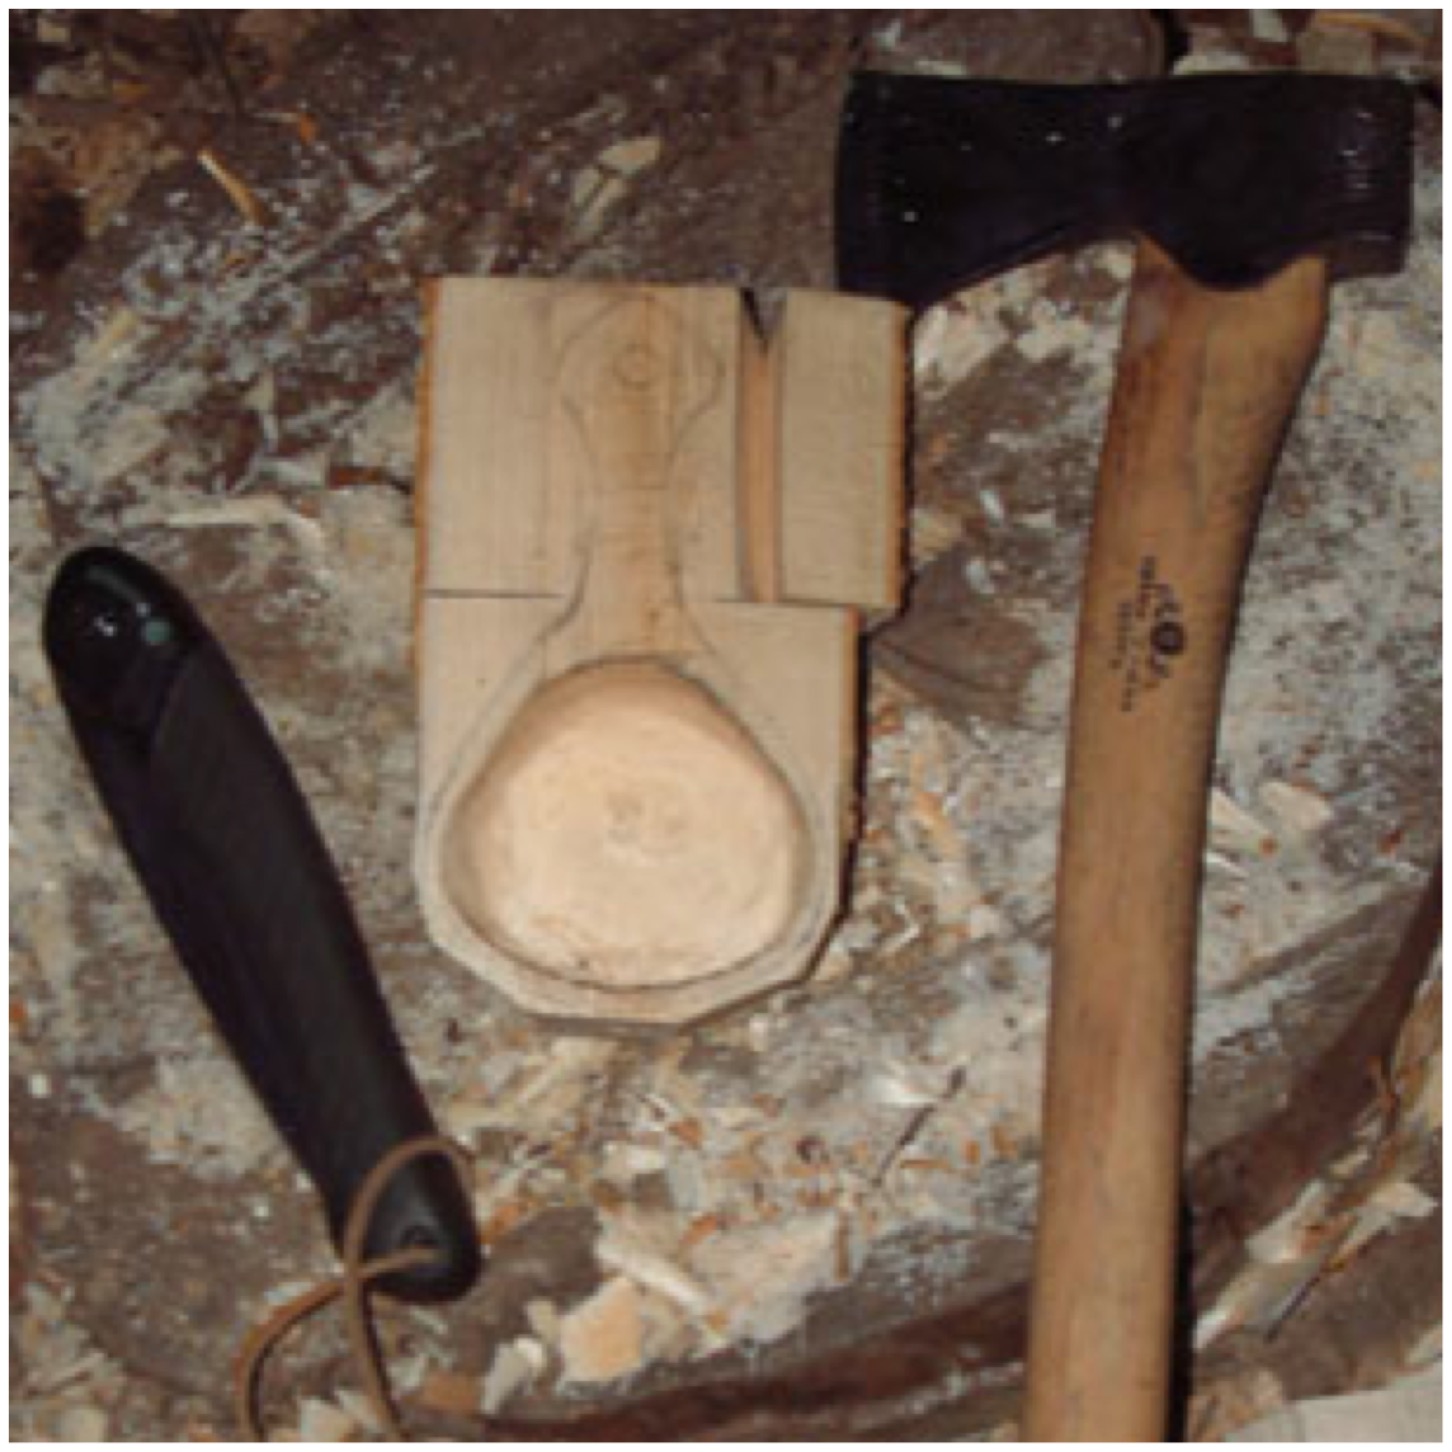
For the job I had my knife, saw, axe and a pen. Using another round of wood I split the log in half by battoning it with my axe (keep the blade of the axe at 90 degrees to your body when you do this).
Tools and battoning
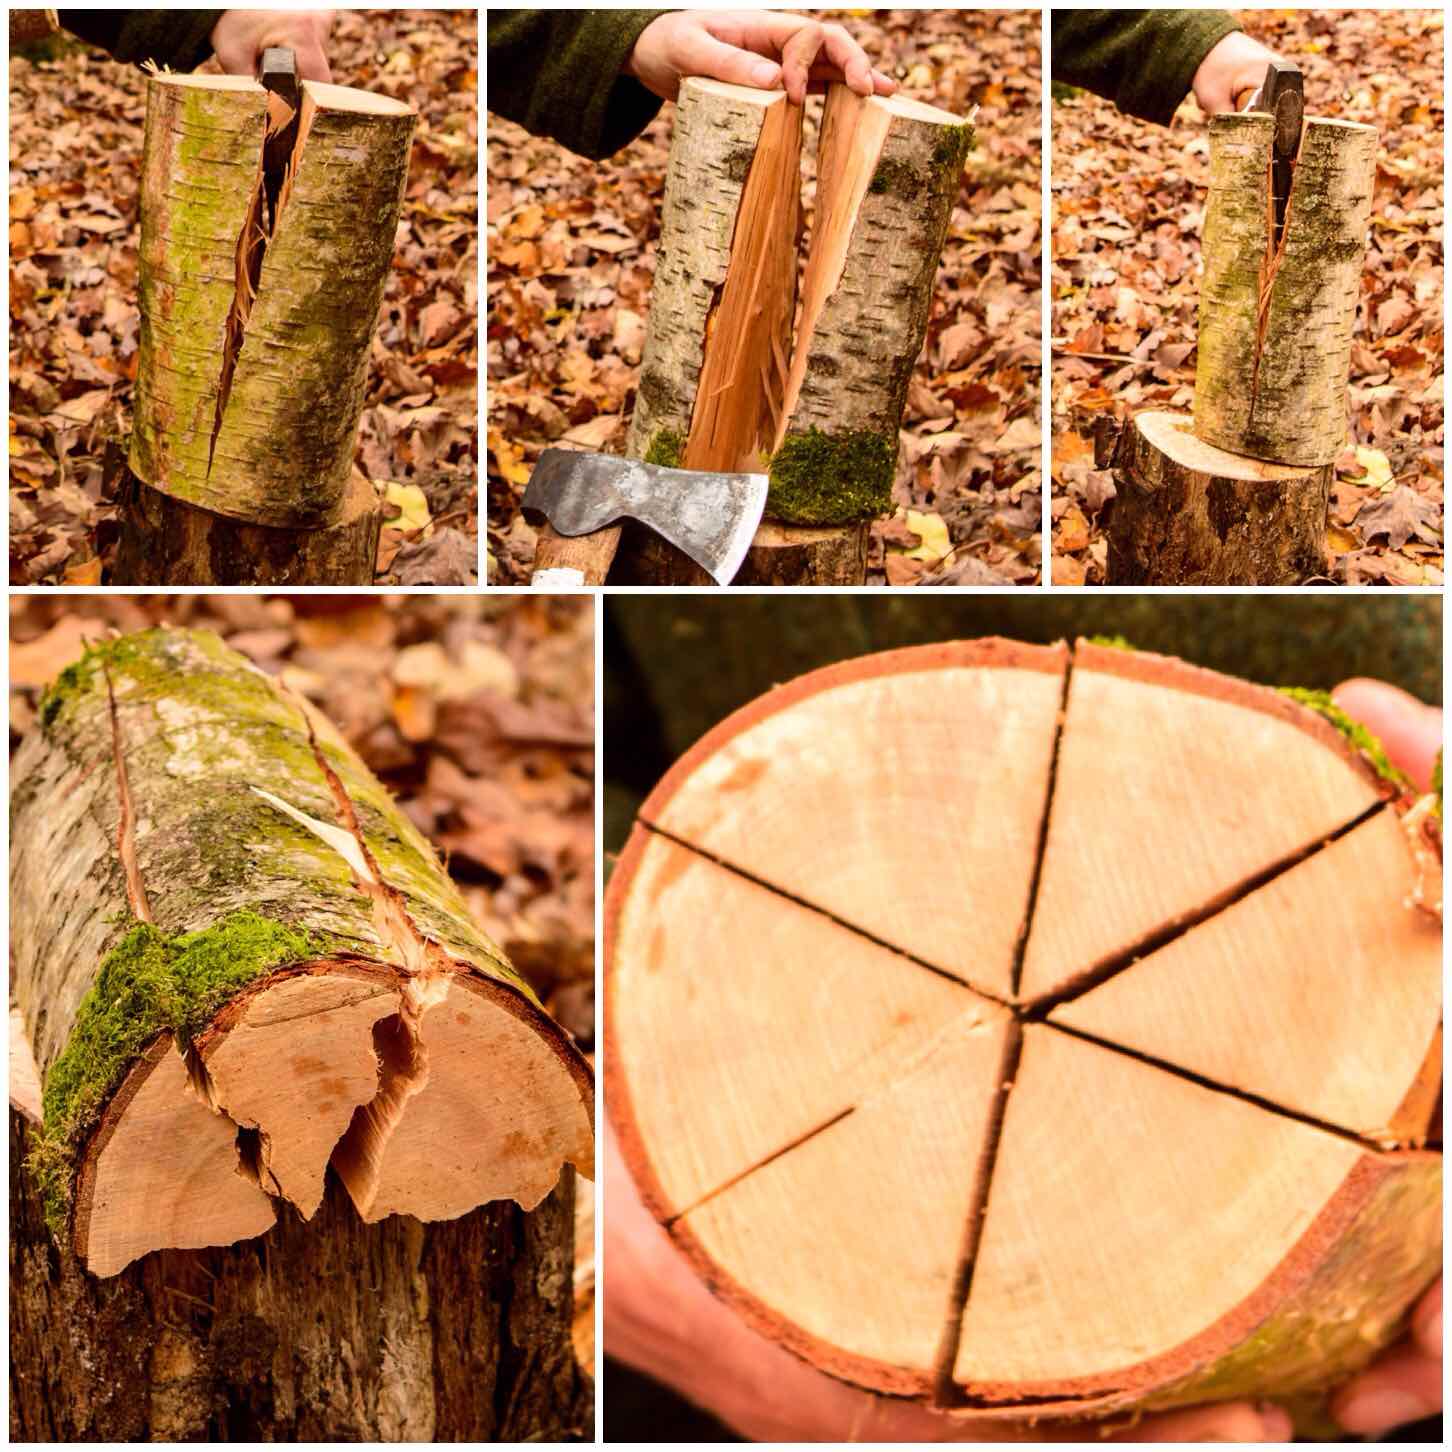
After splitting the log in half I split each half into three even sections. With very dry wood you only need halve the halves again to make four sections however my wood was damp so I wanted to produce as much surface area as possible which is why I opted for six sections.
The splits
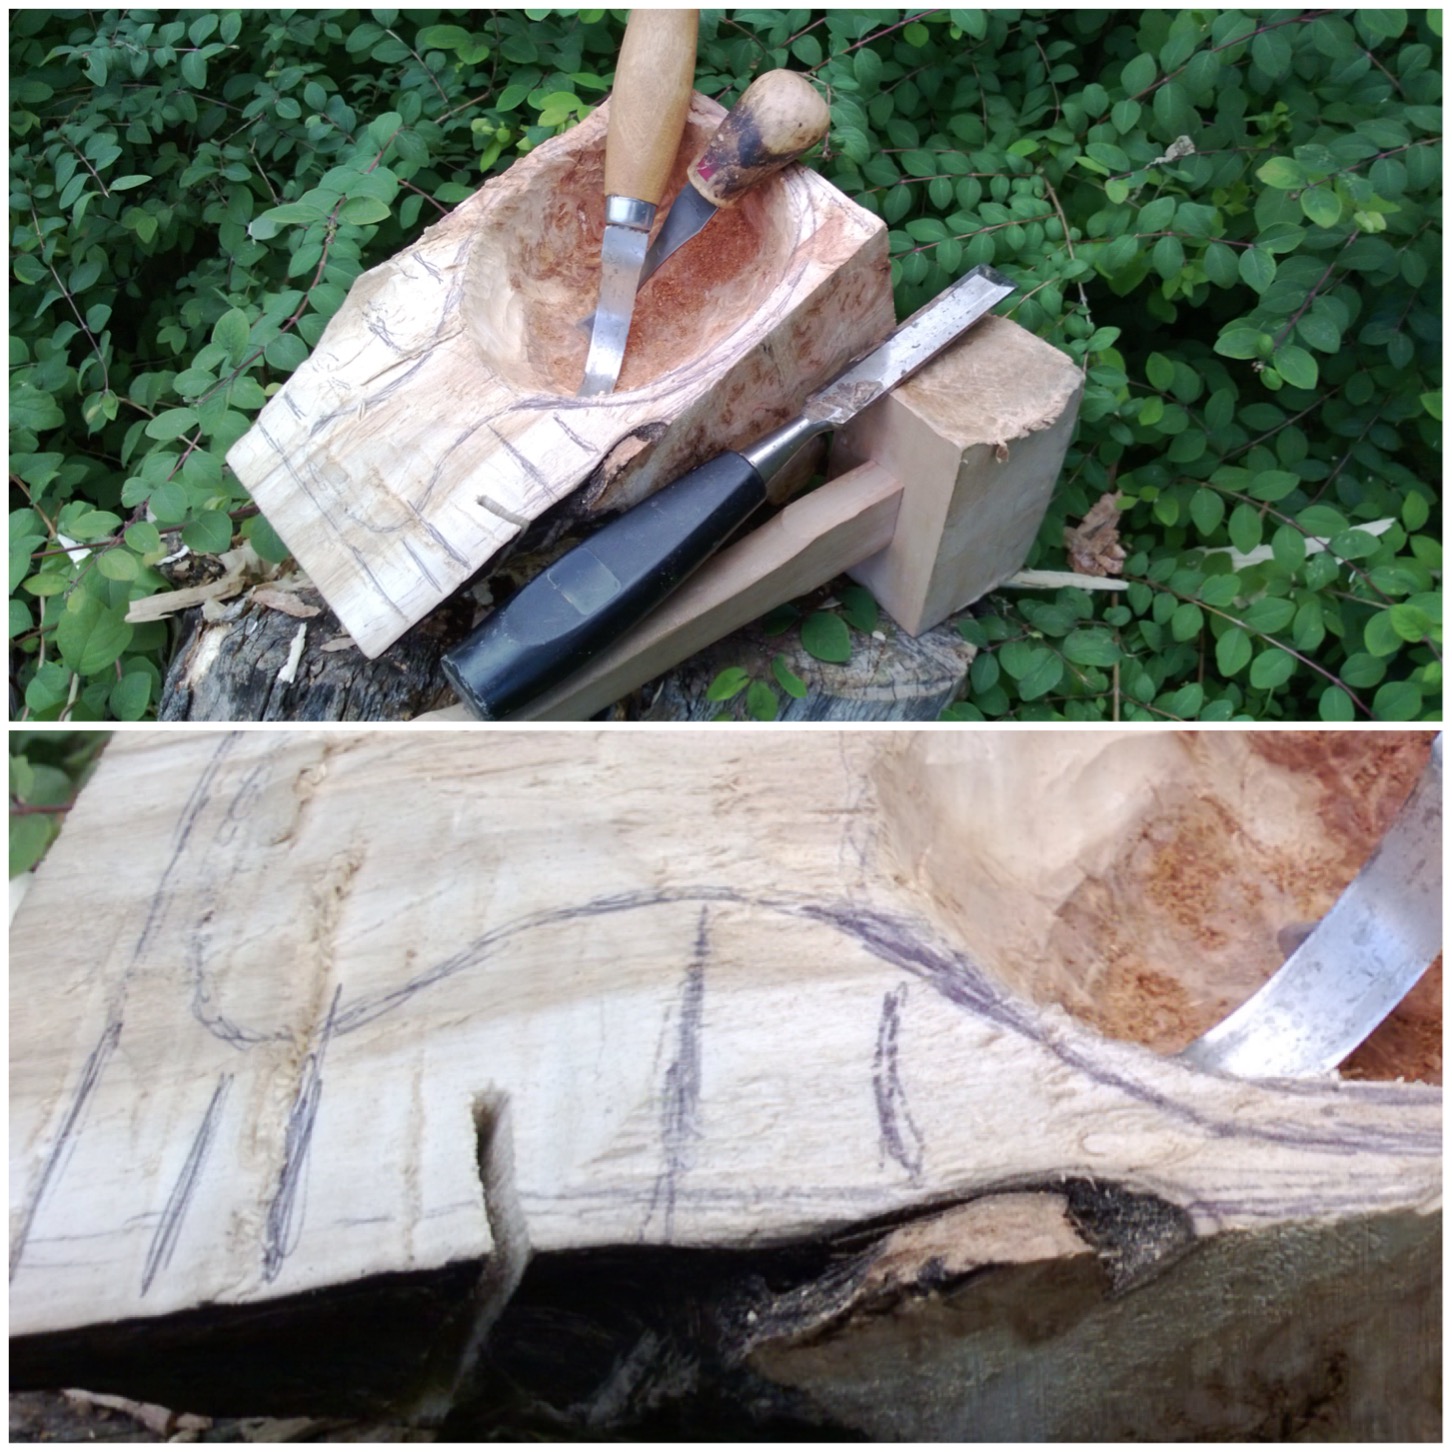
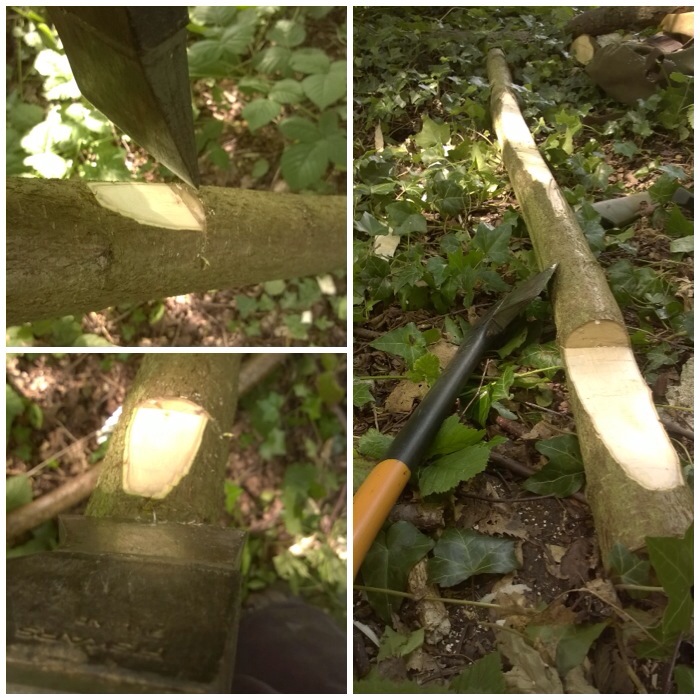
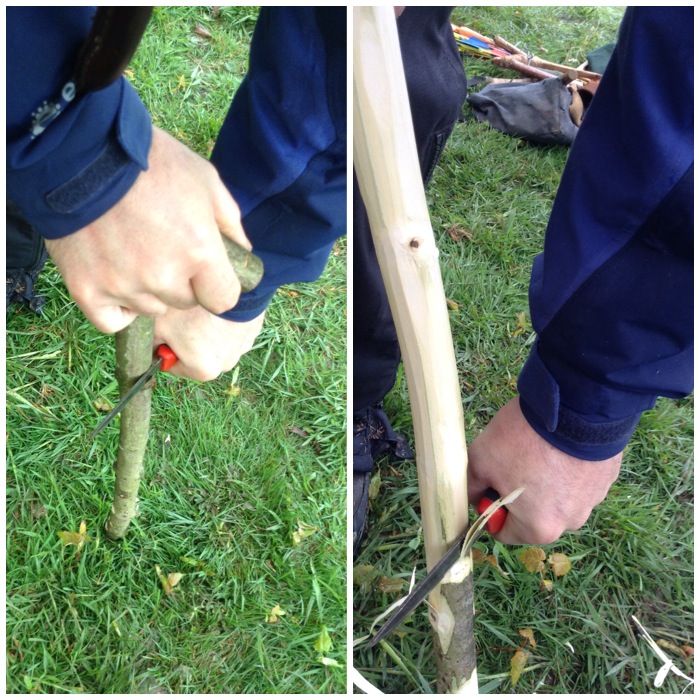
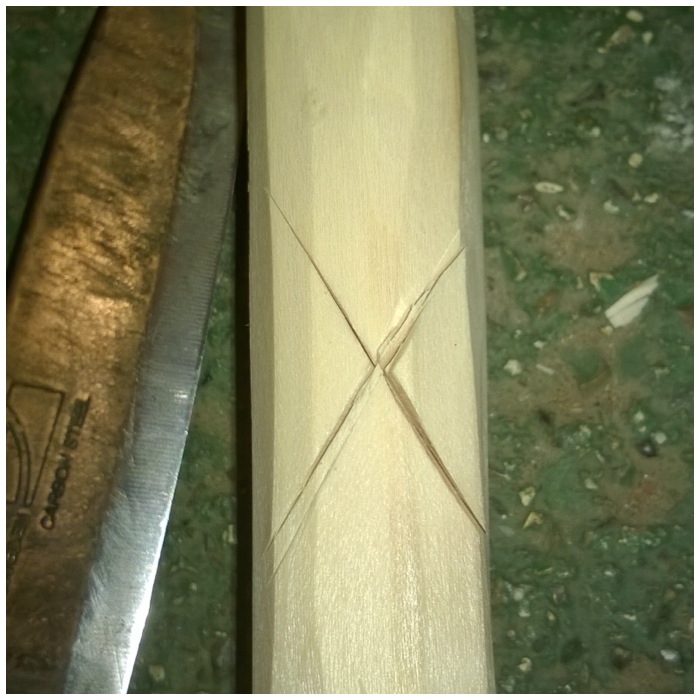
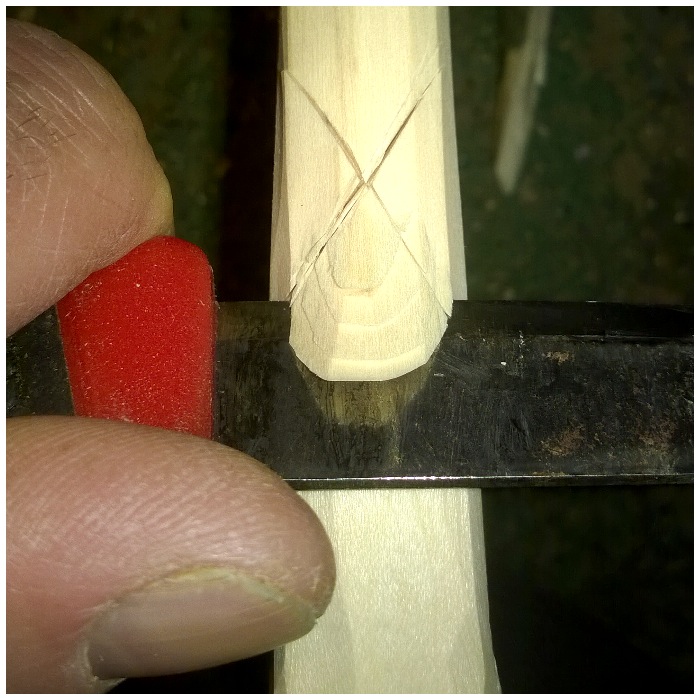
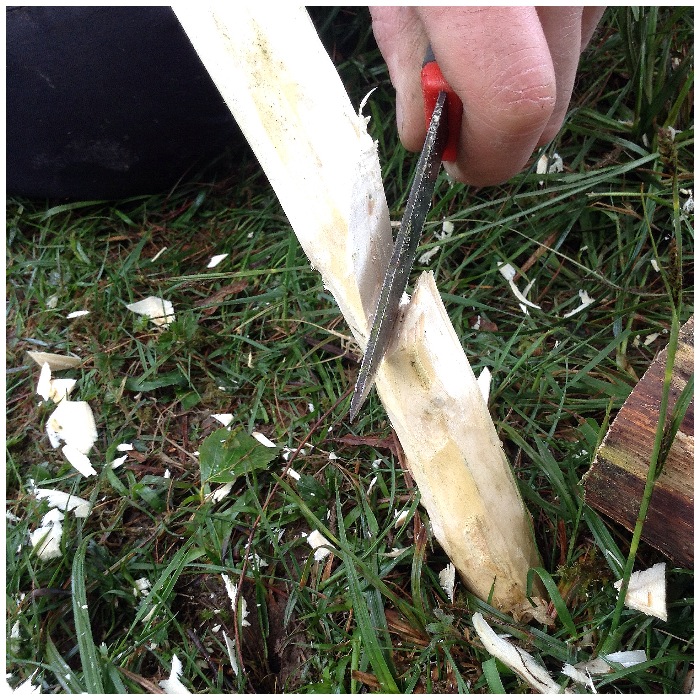
Stop Cuts
Using a stick and a pen I marked a line on each section about a quarter of the way from the bottom and also numbered each section. These marks were put in so that I could cut in stop cuts so to make it easy for me to cut out the chimney section.
My friend Keith Coleman suggested using tape as a depth gauge for this and it worked a treat, with each stop cut ending up the same depth.
Stop cuts
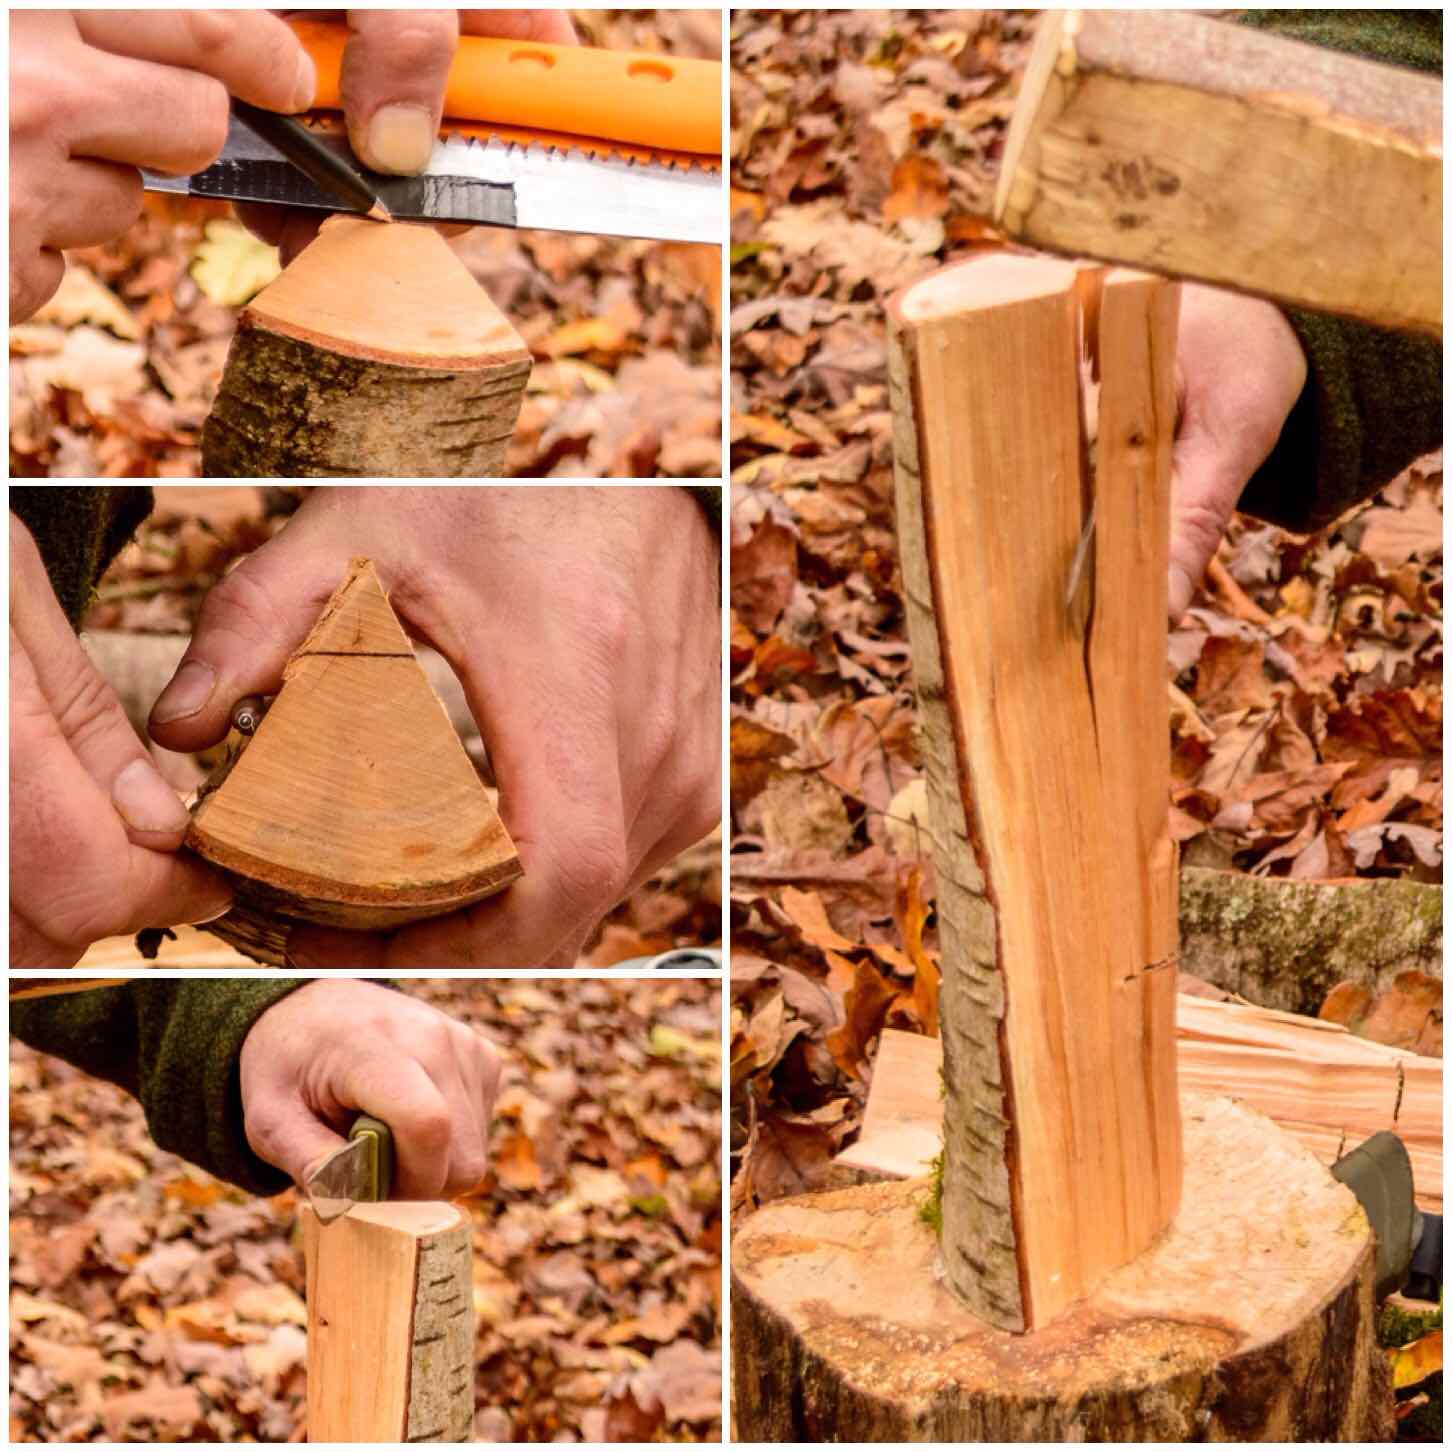
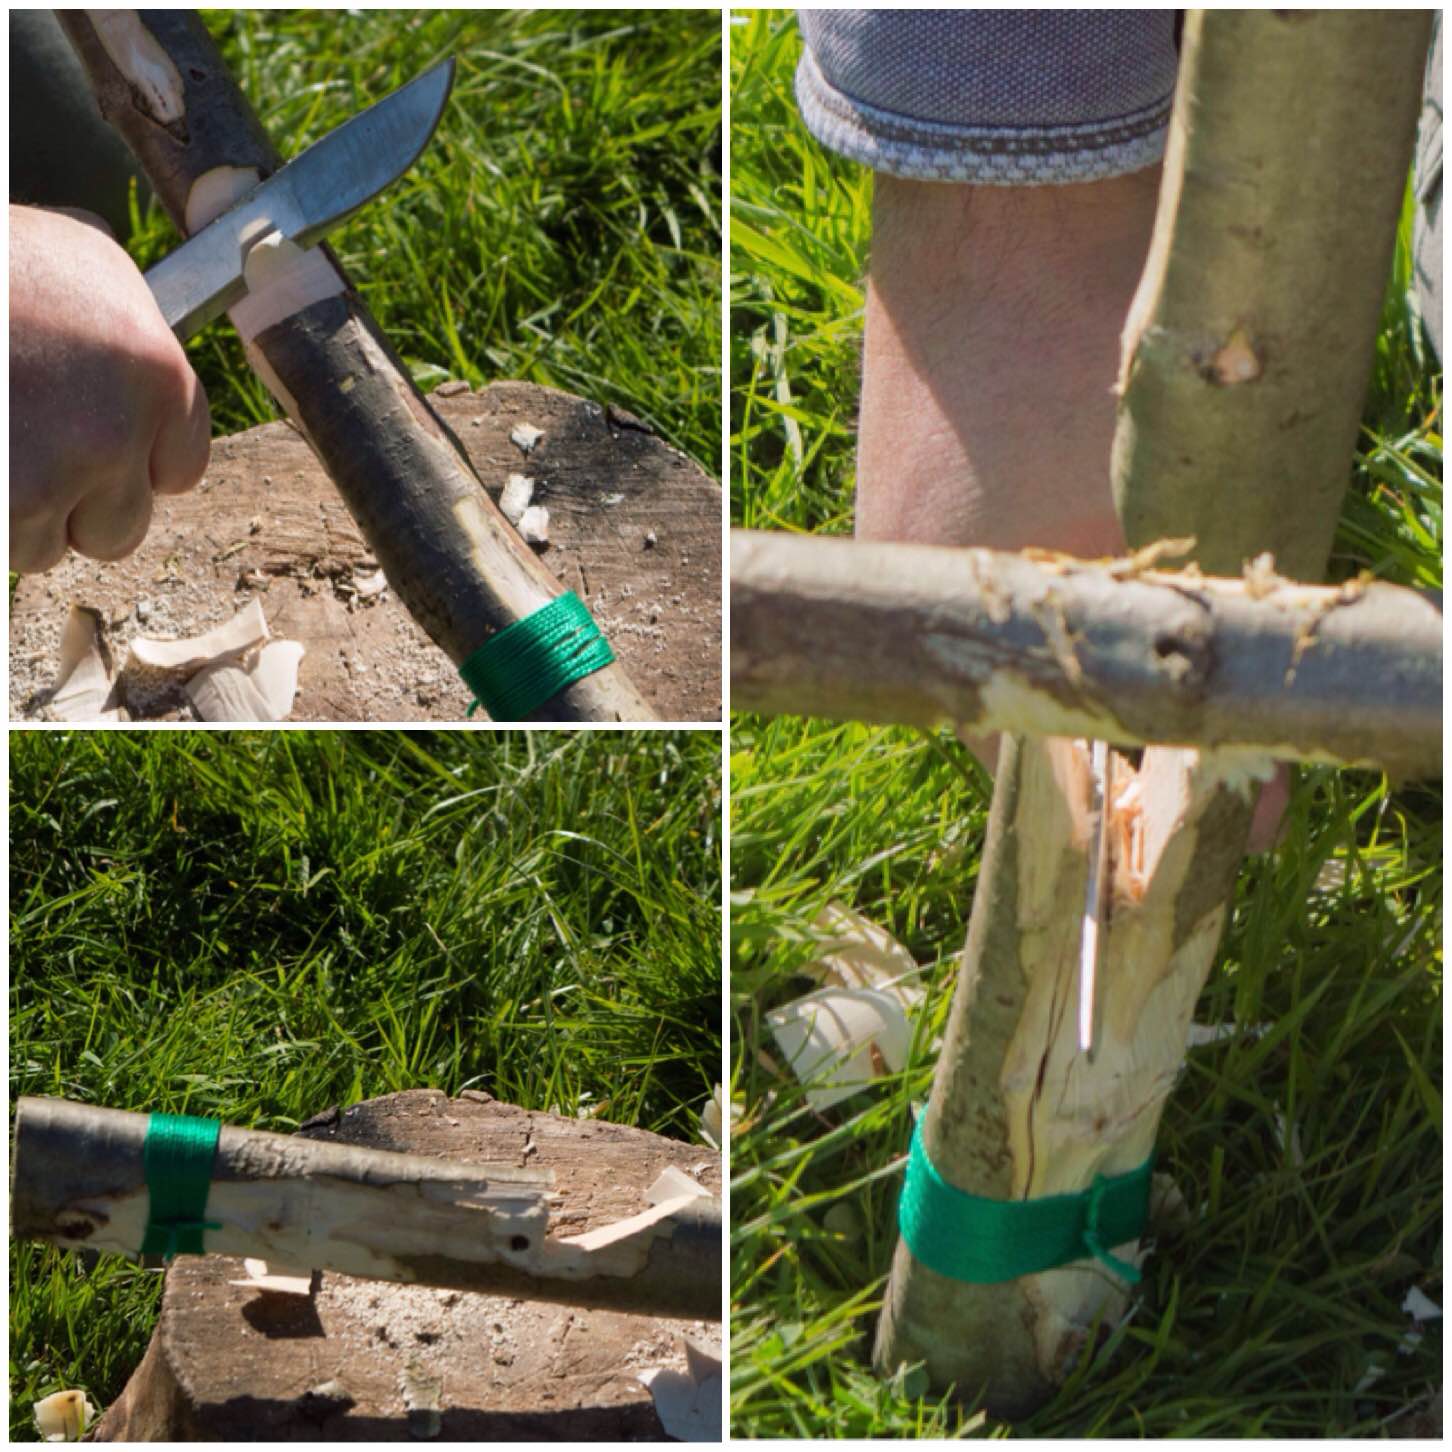
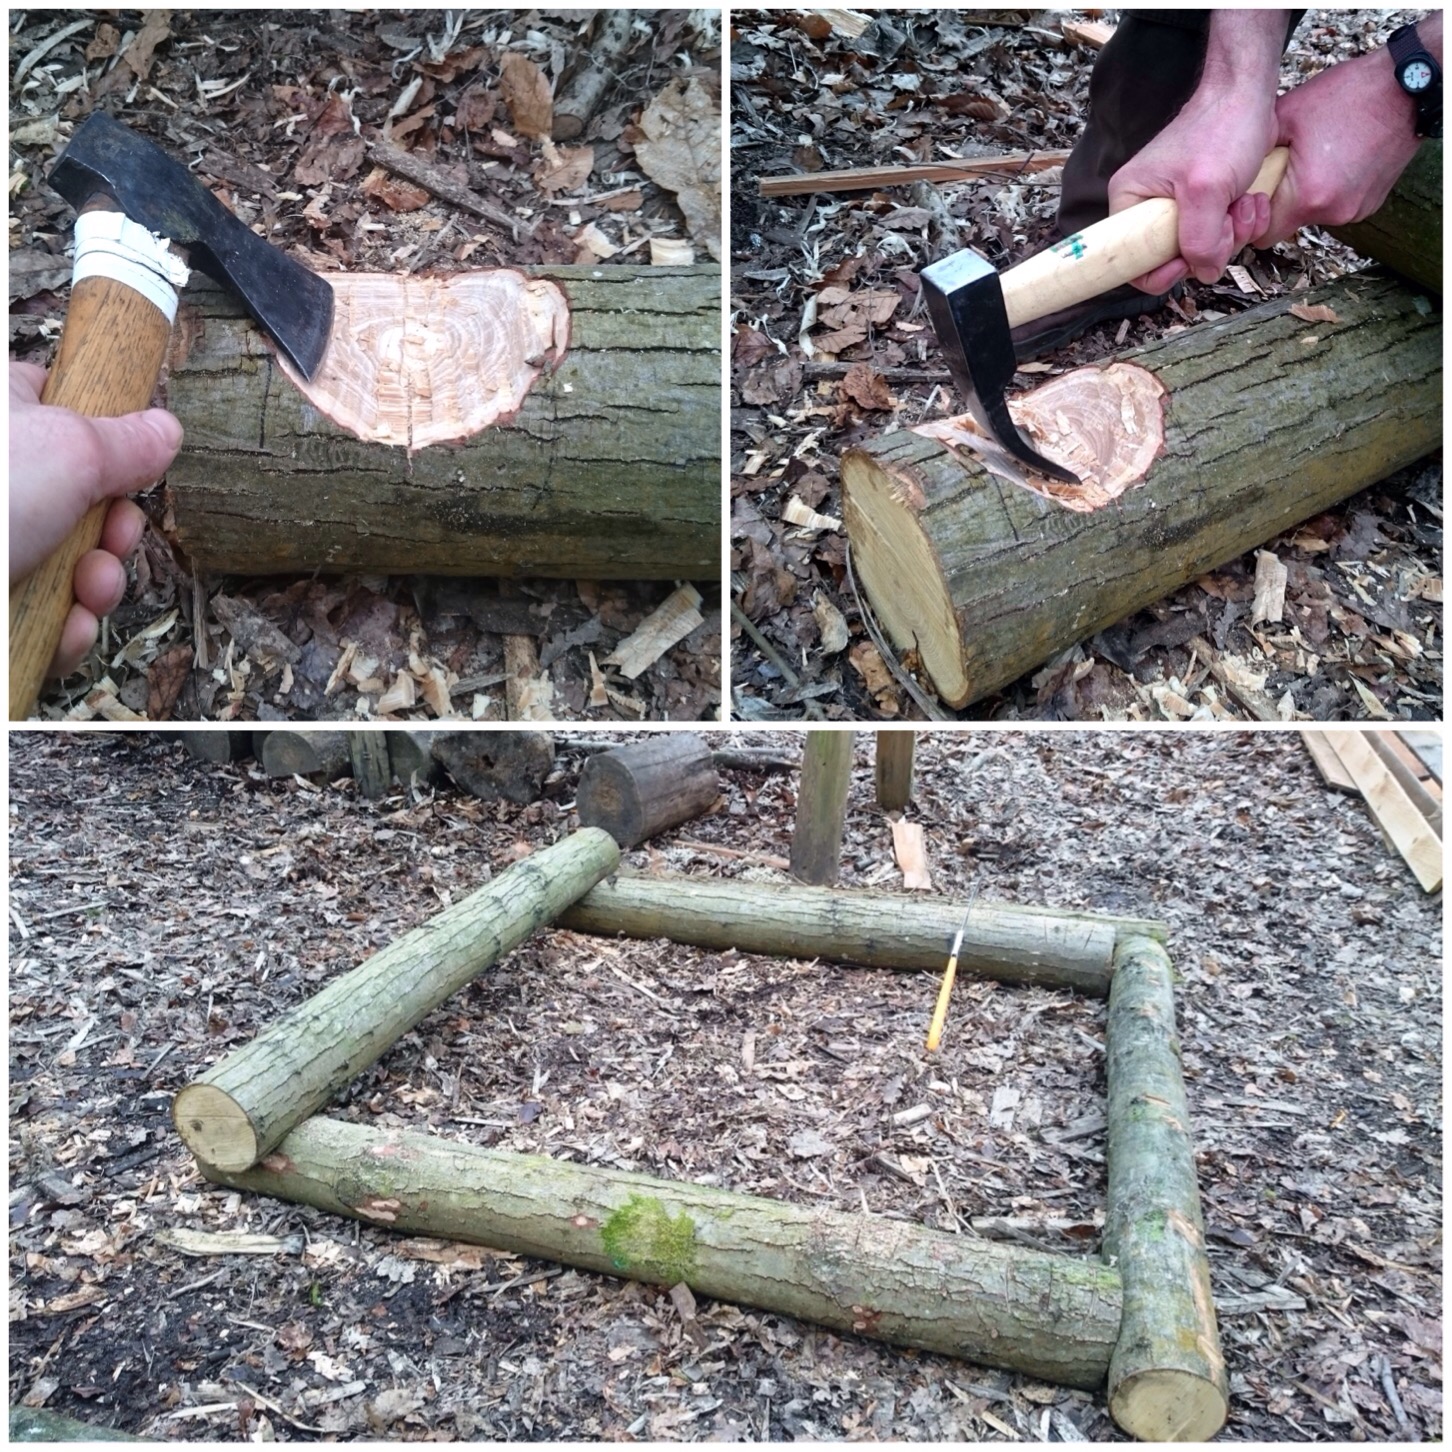
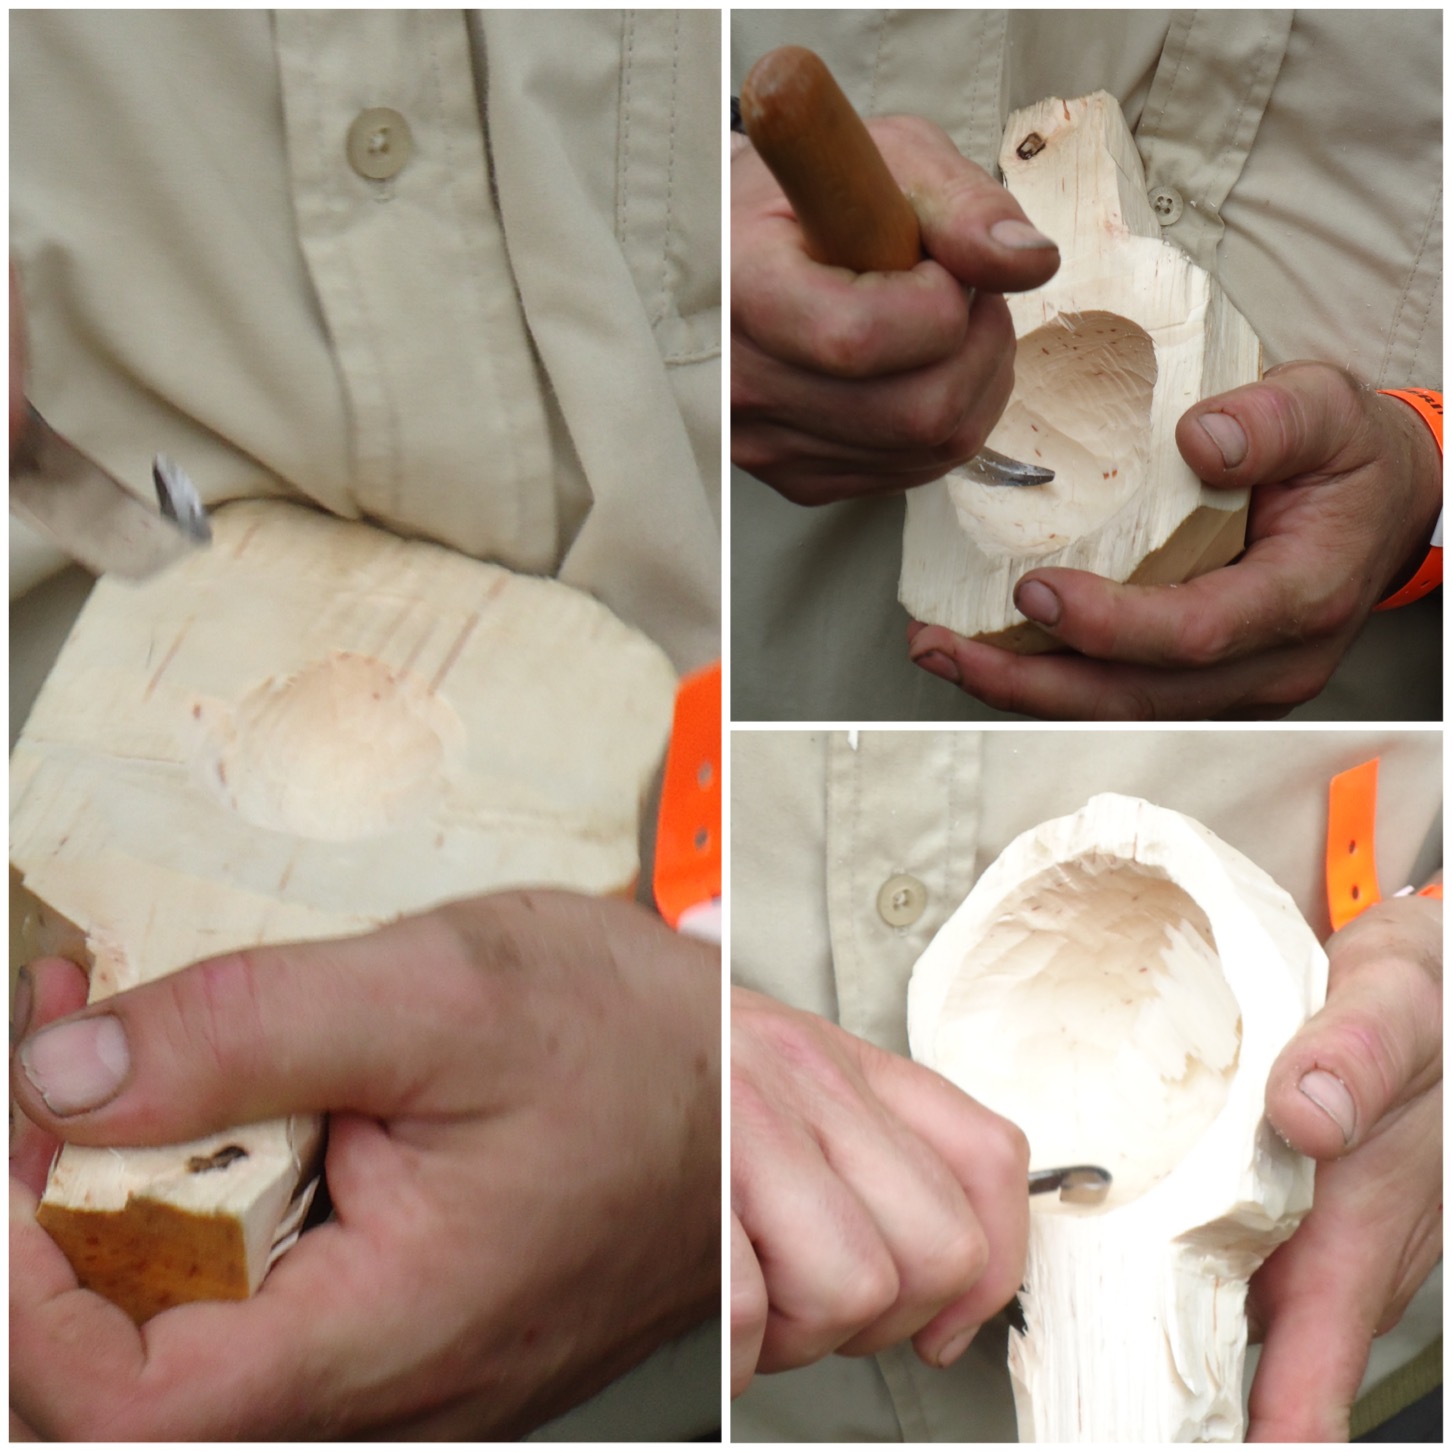
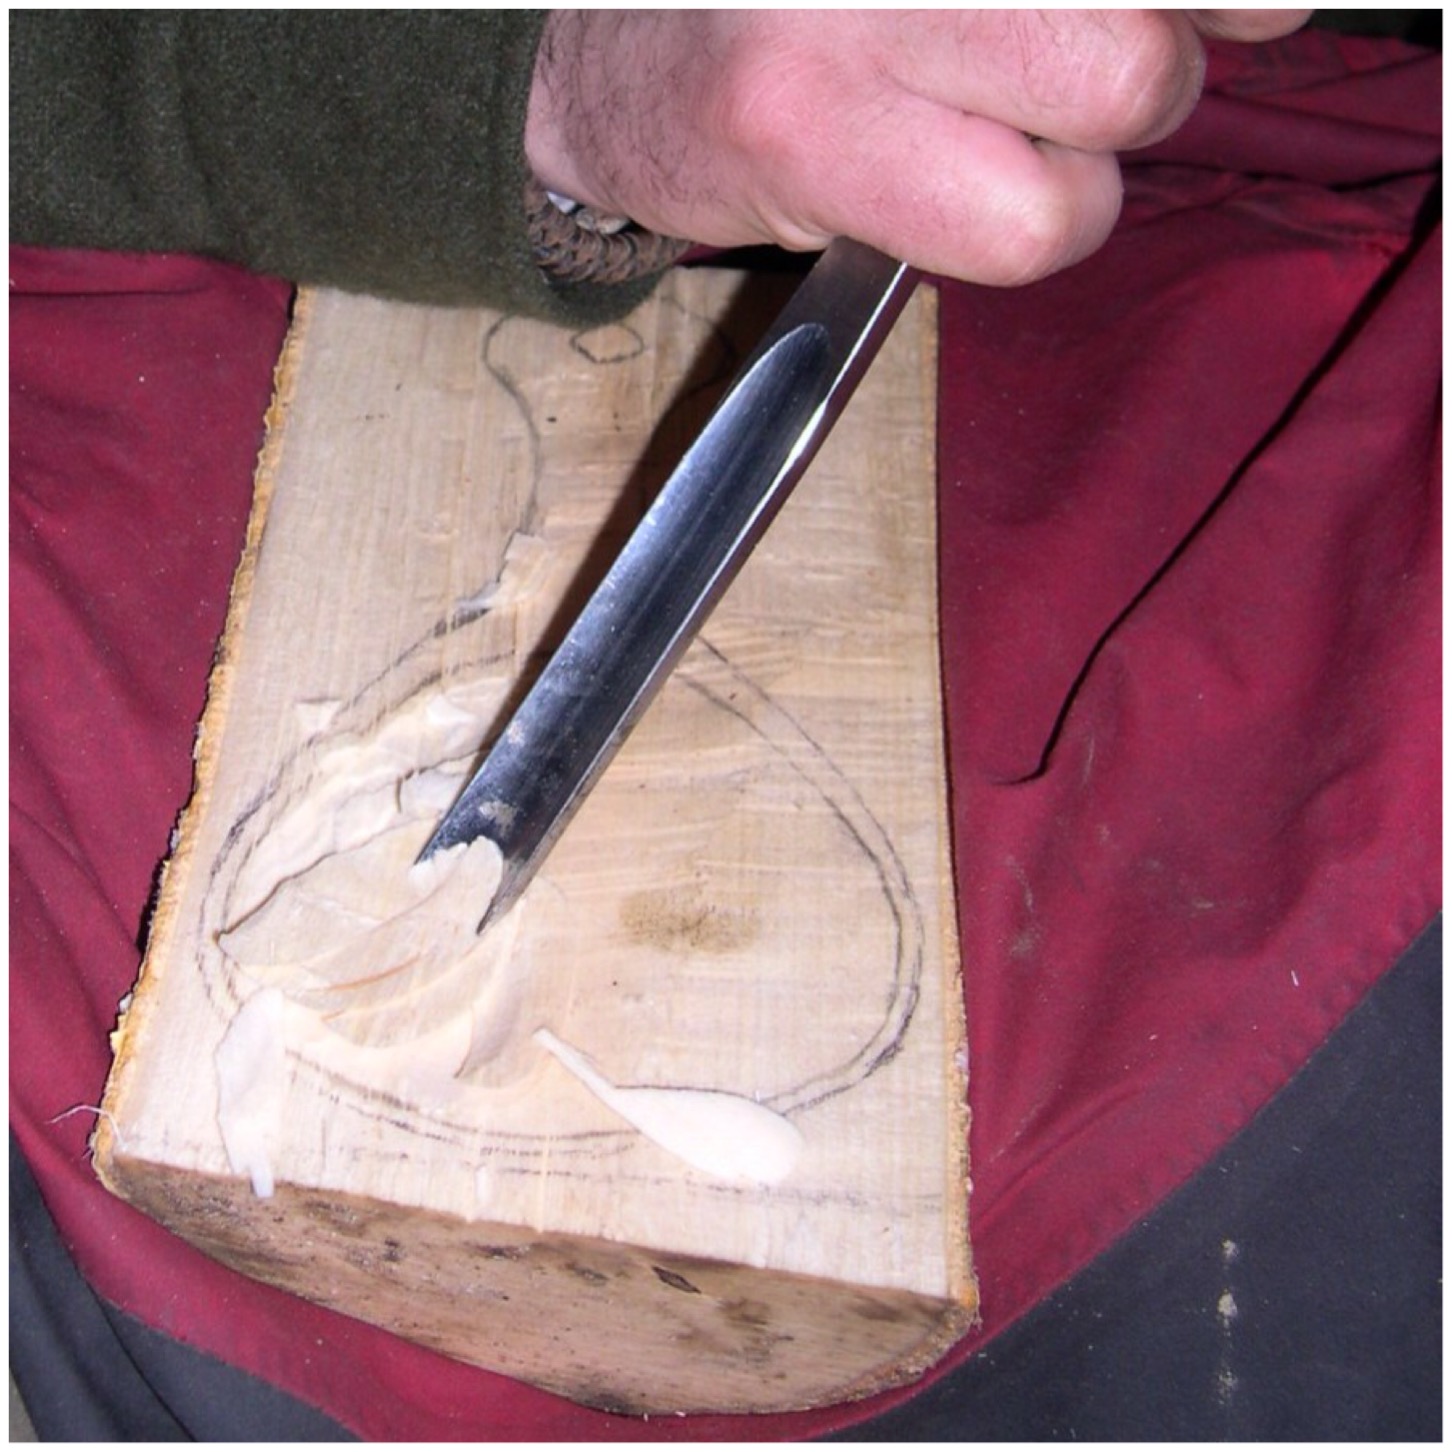
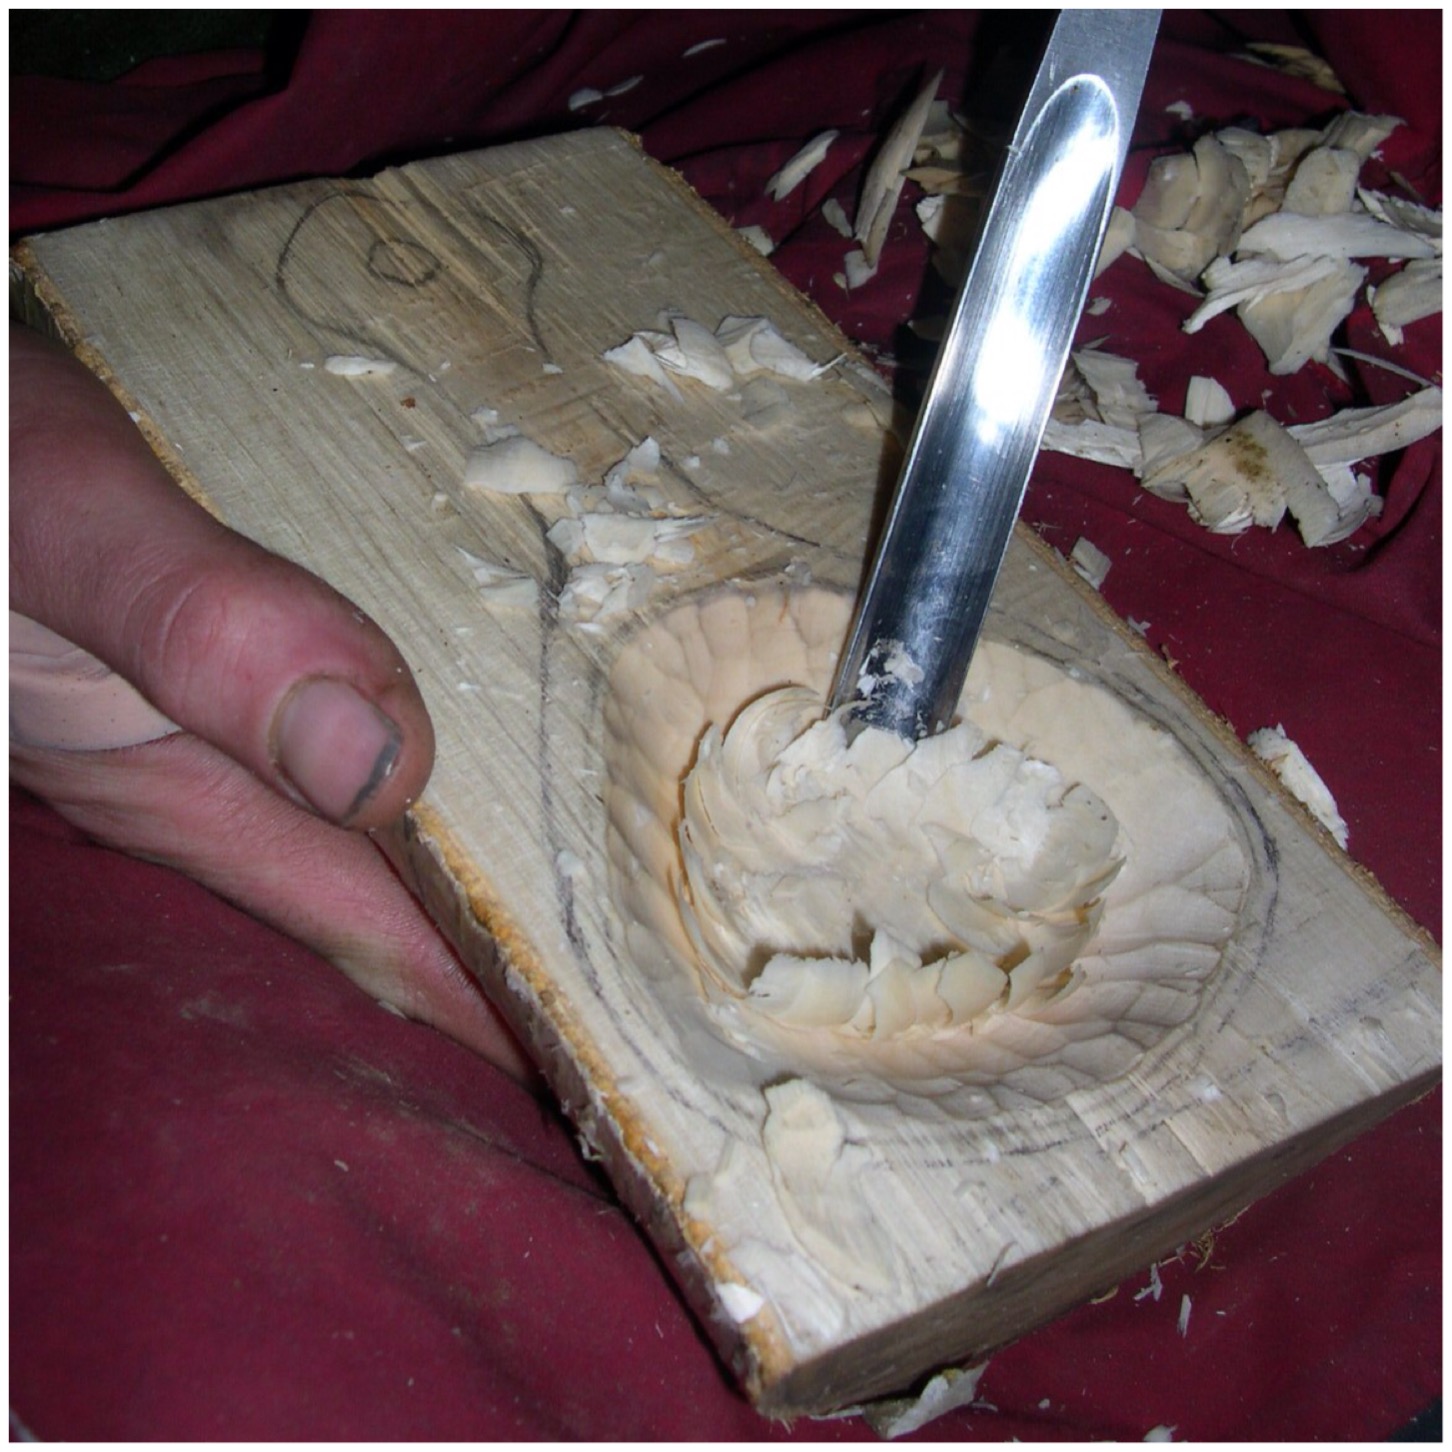
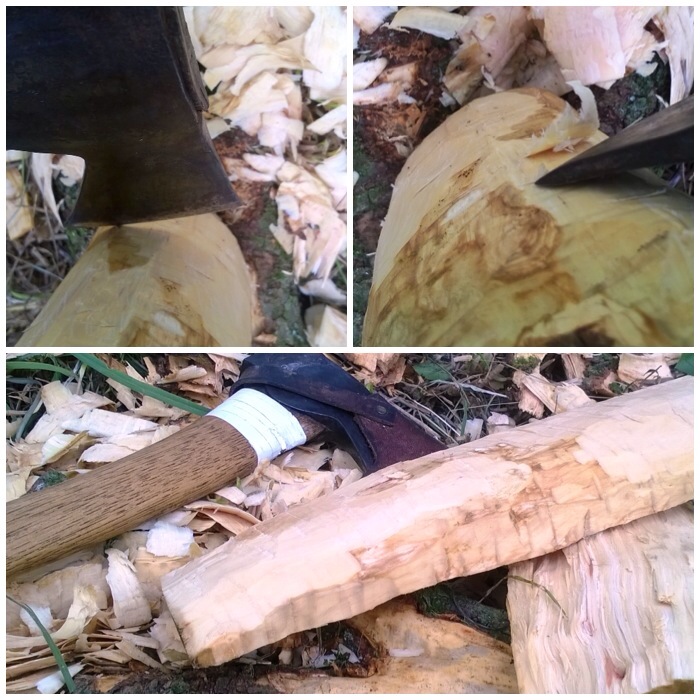
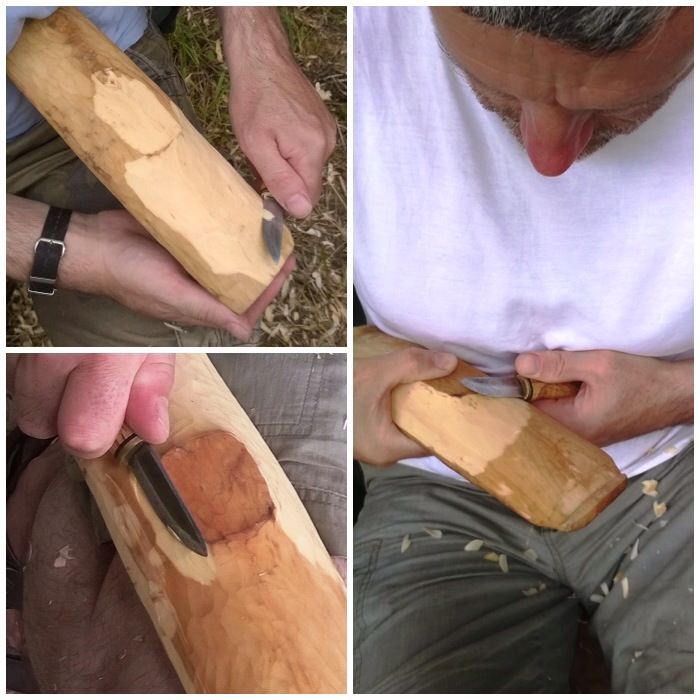
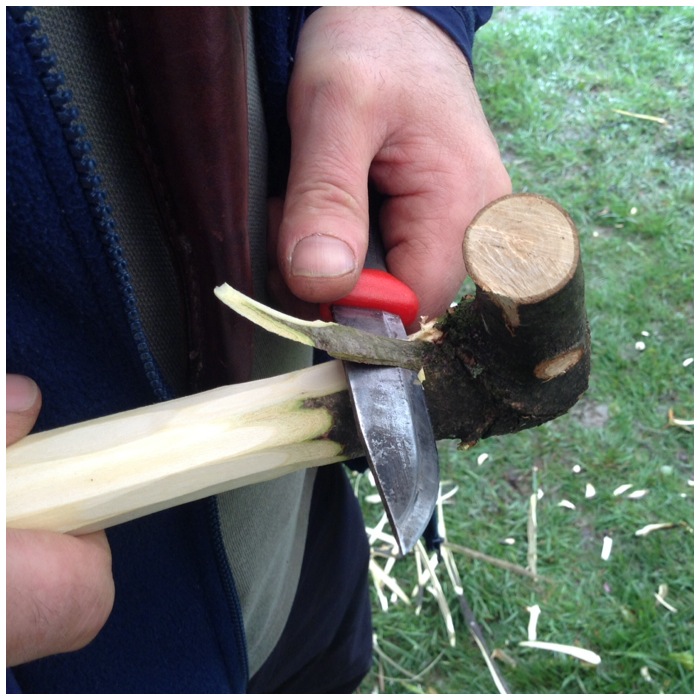
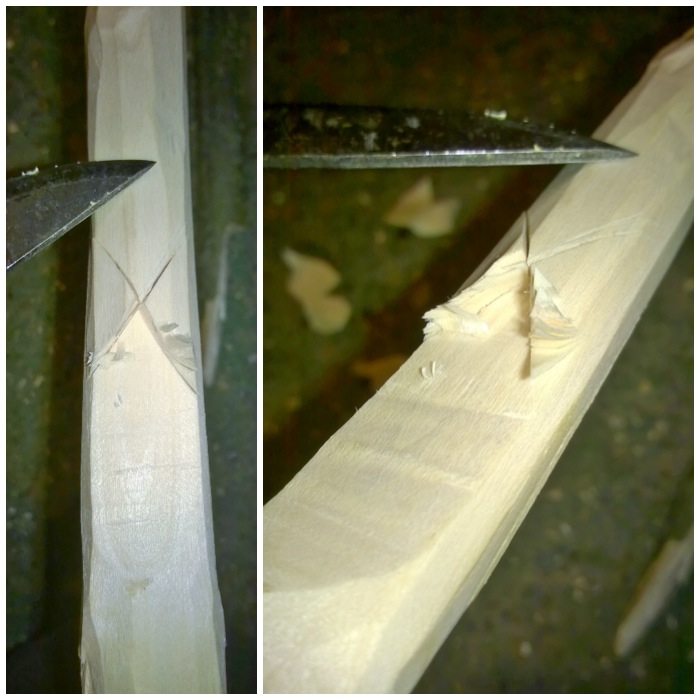
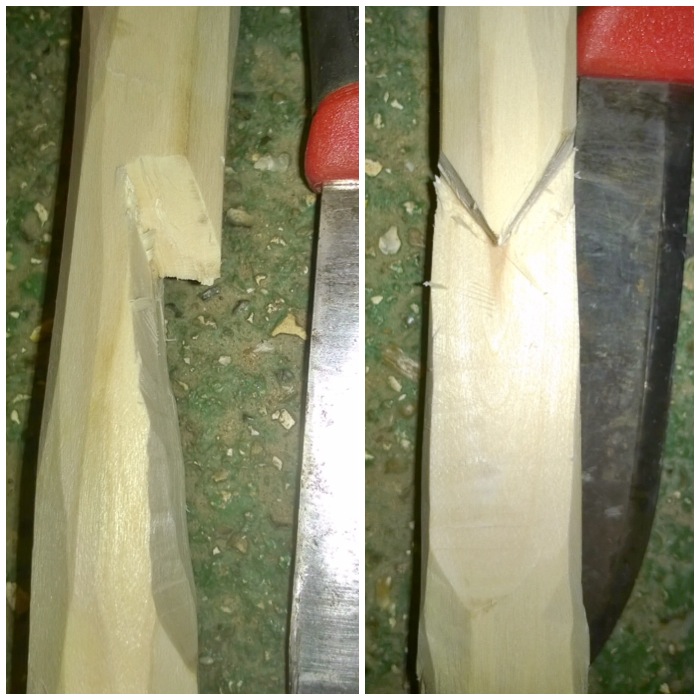
Creating the Chimney
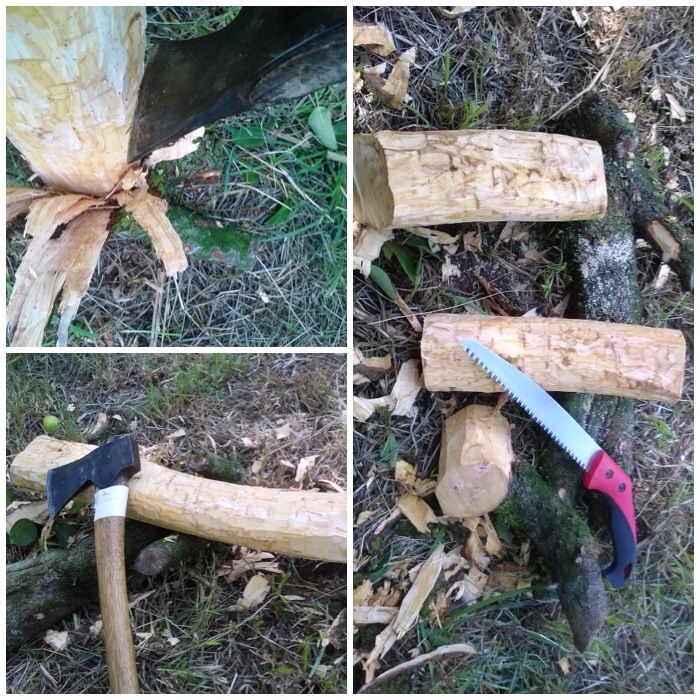
Using the tape as a gauge again I marked a line at the top of each split section and then, using my knife, battoned off the excess wood.
The stop cuts help as the split does not travel all the way to the bottom and so creates a lintel that the fire will sit in.
Battoning out the chimney
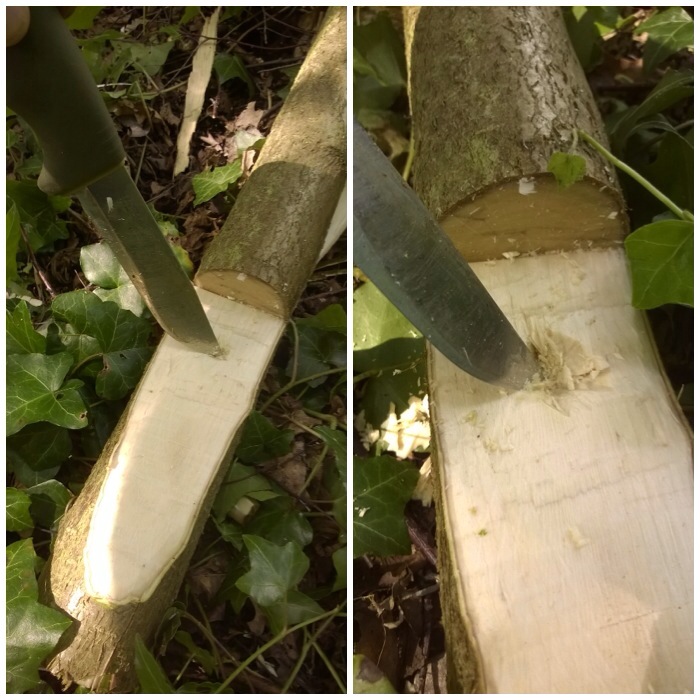
After a little bit of whittling with my knife each segment had the wood removed so that the chimney would be formed when it was all put back together.
It is important to keep all the shavings and little chunks of wood from this process as it can be used as kindling for the stove.
Trimming the chimney
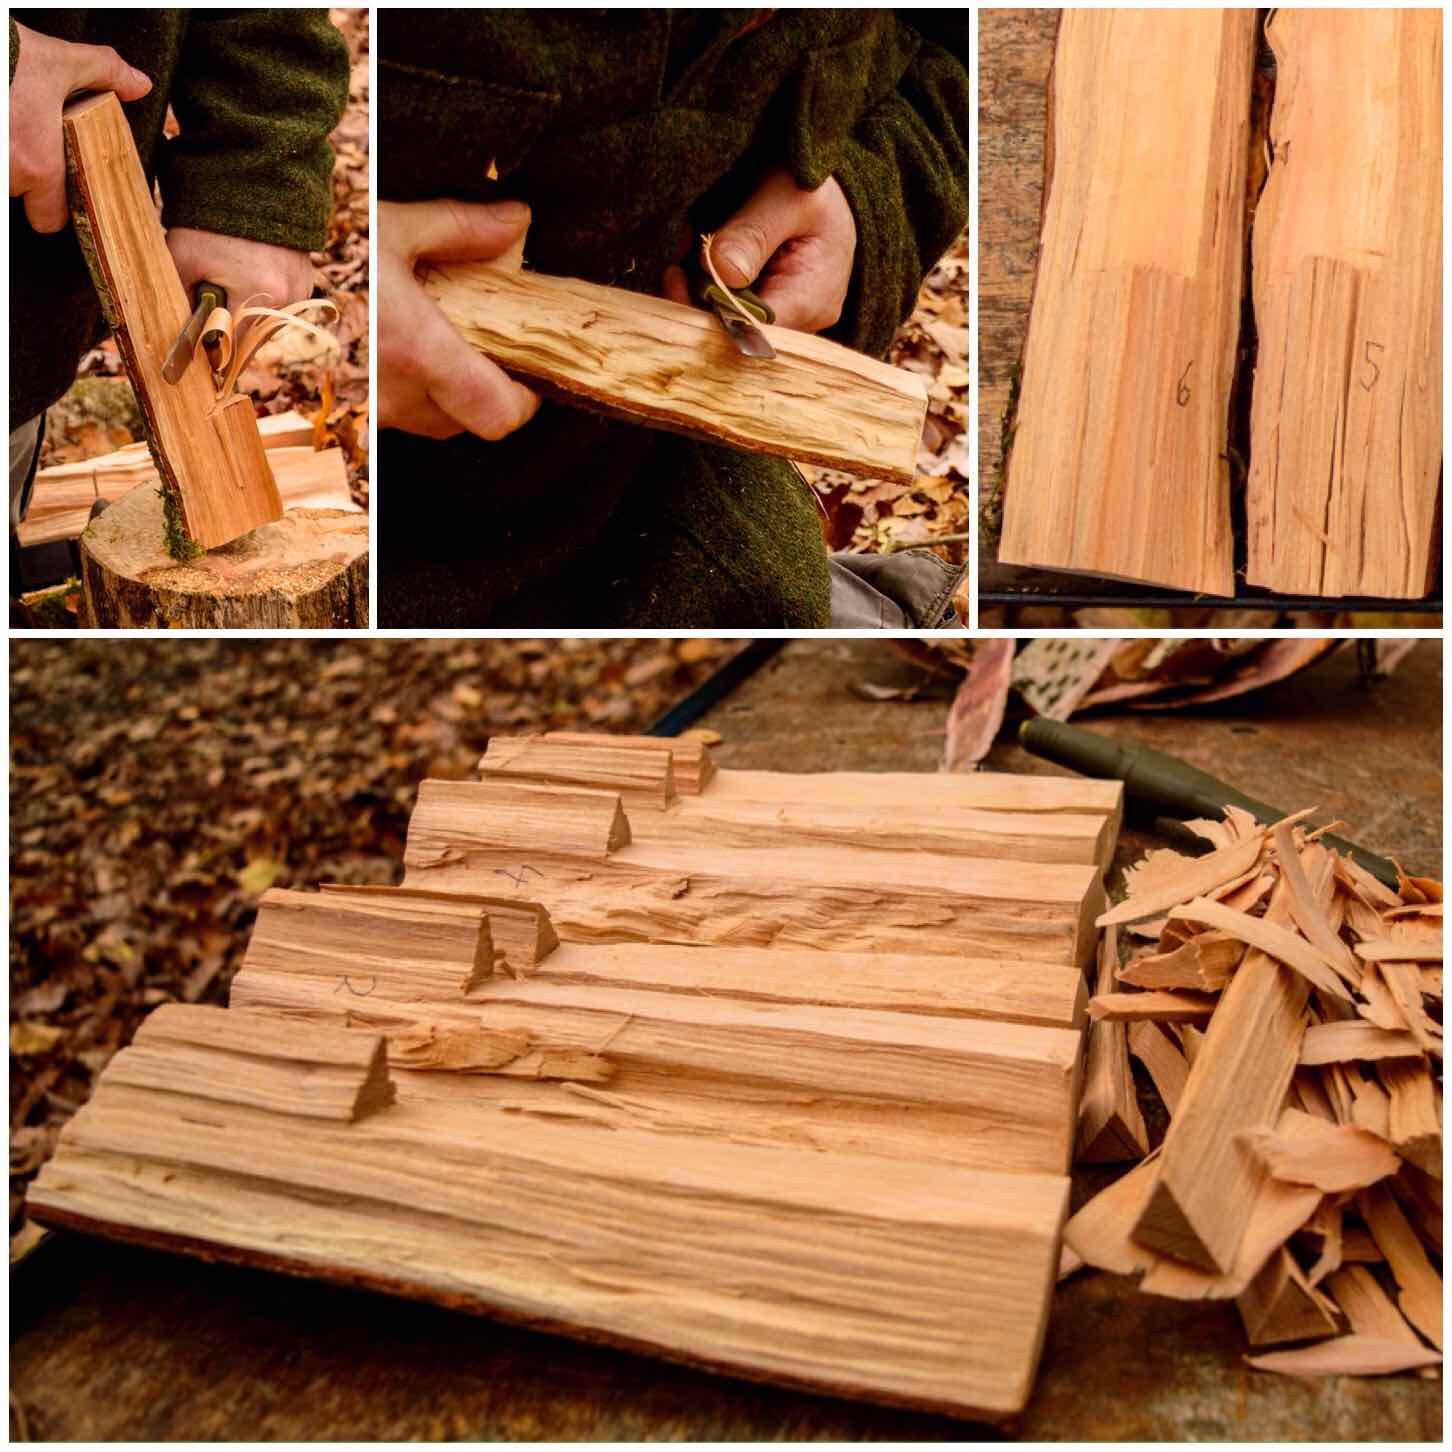
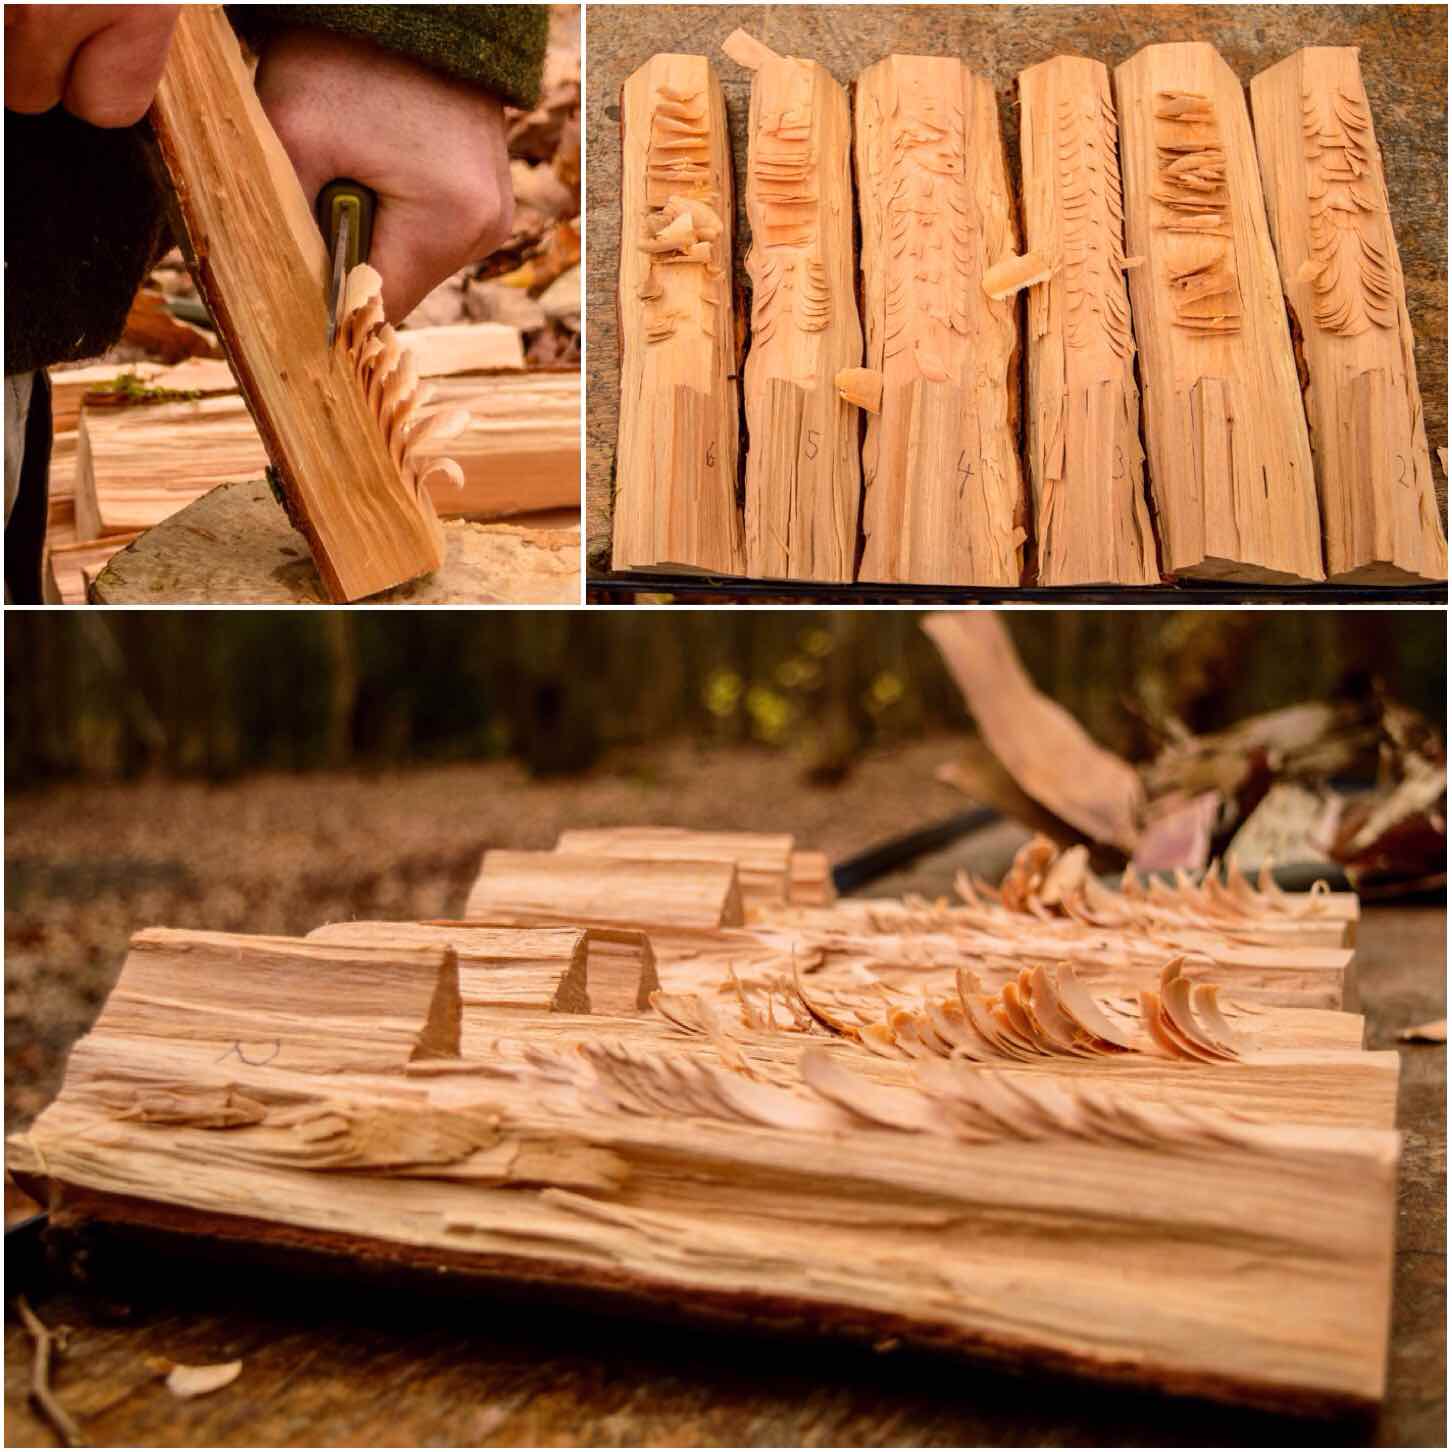
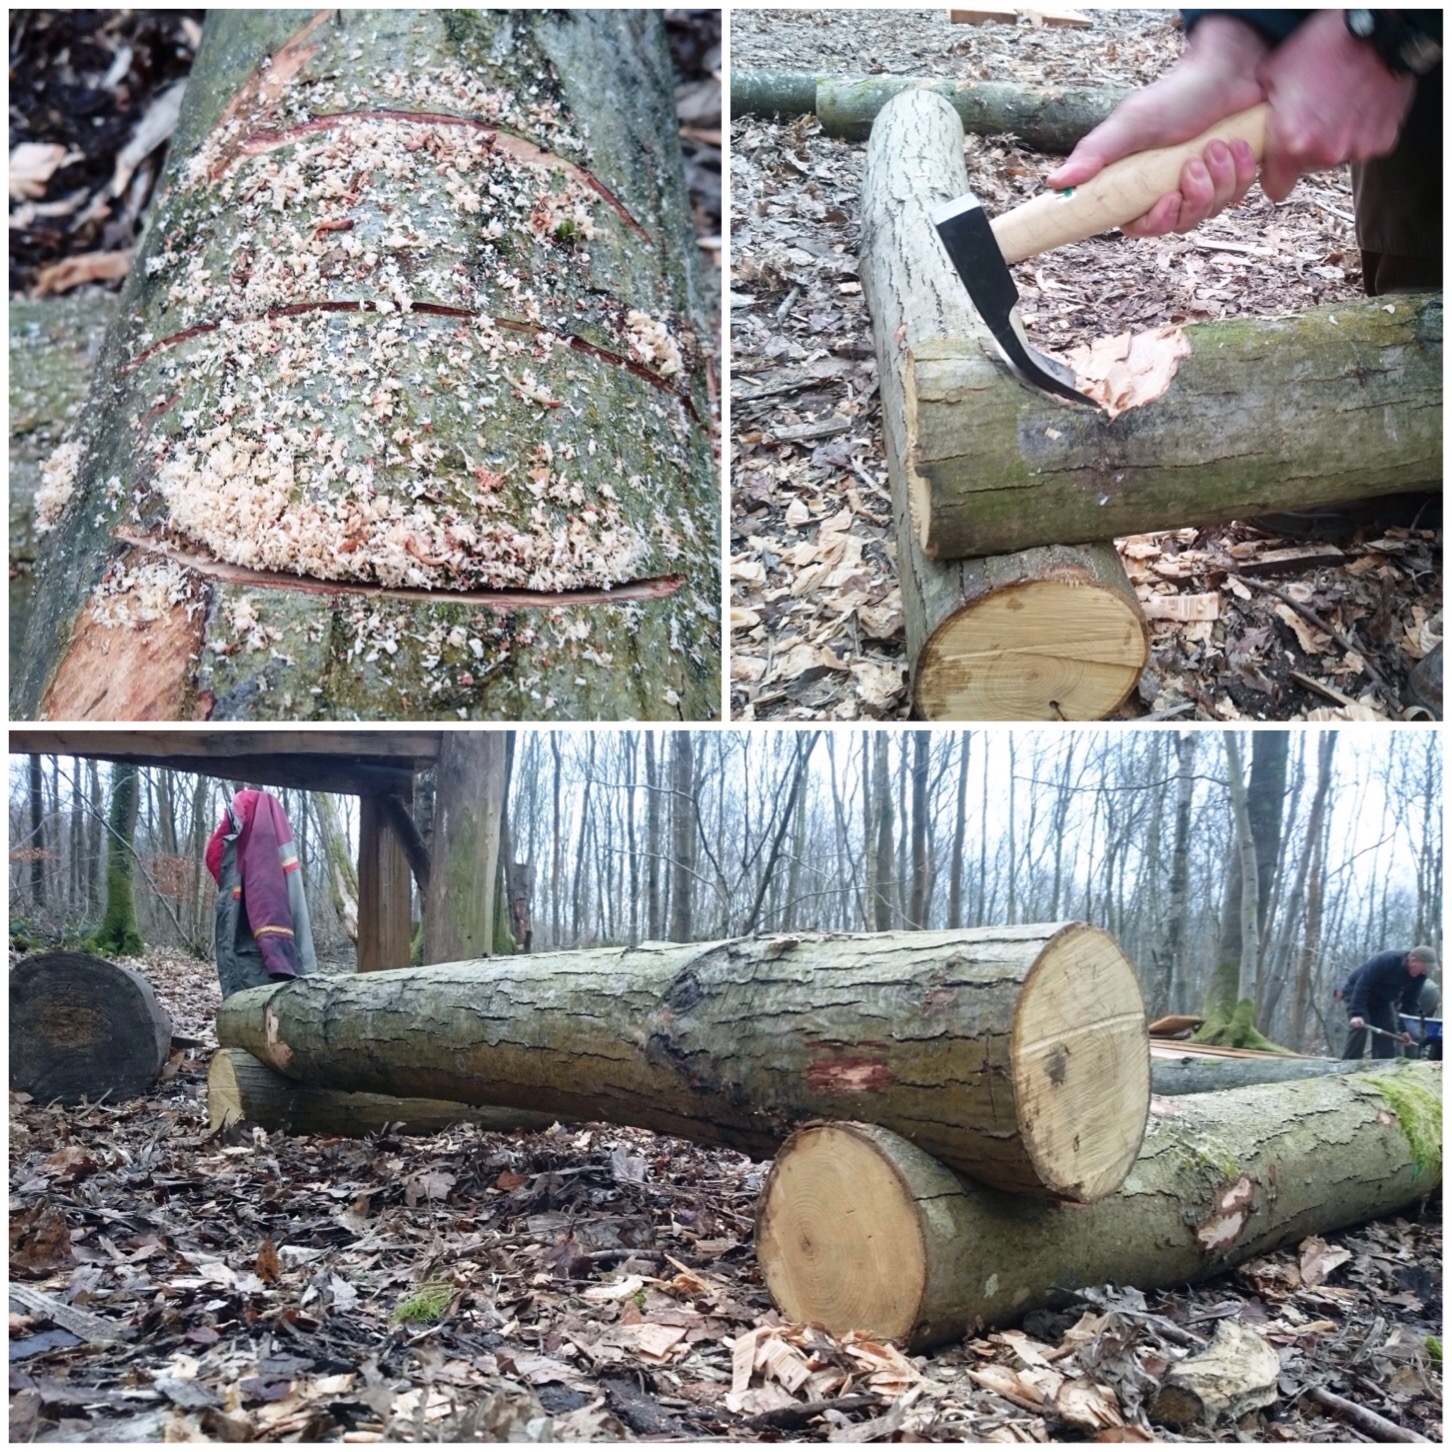
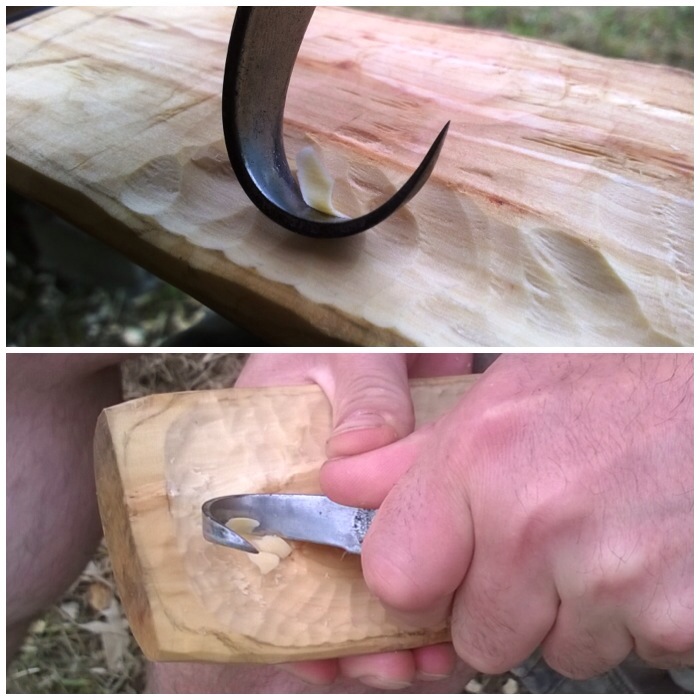
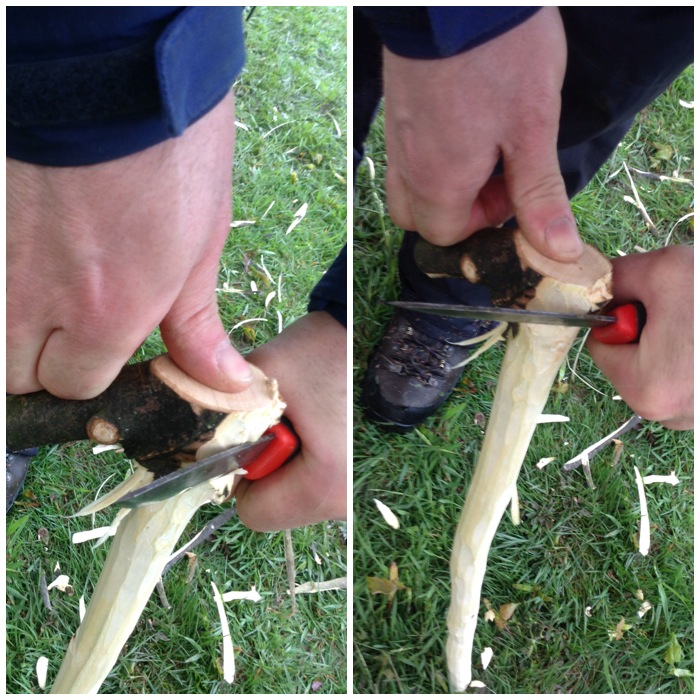
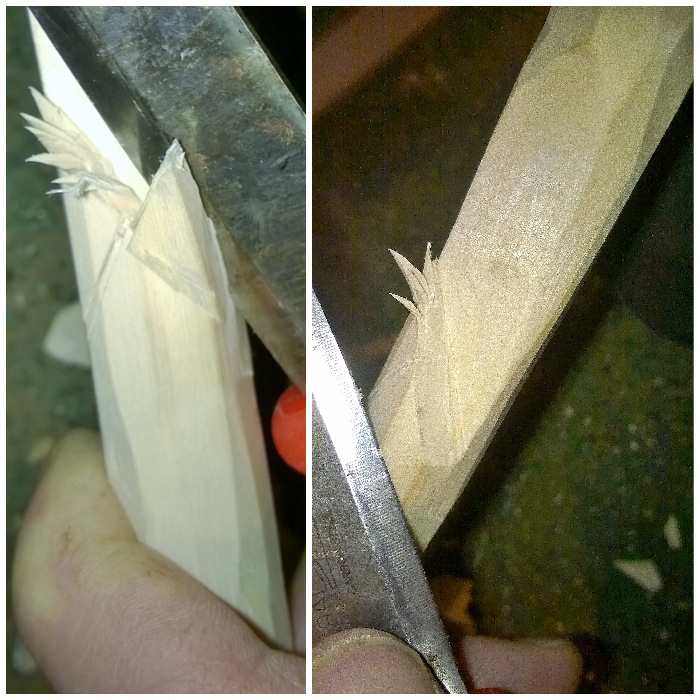
The Raappanan Tuli style
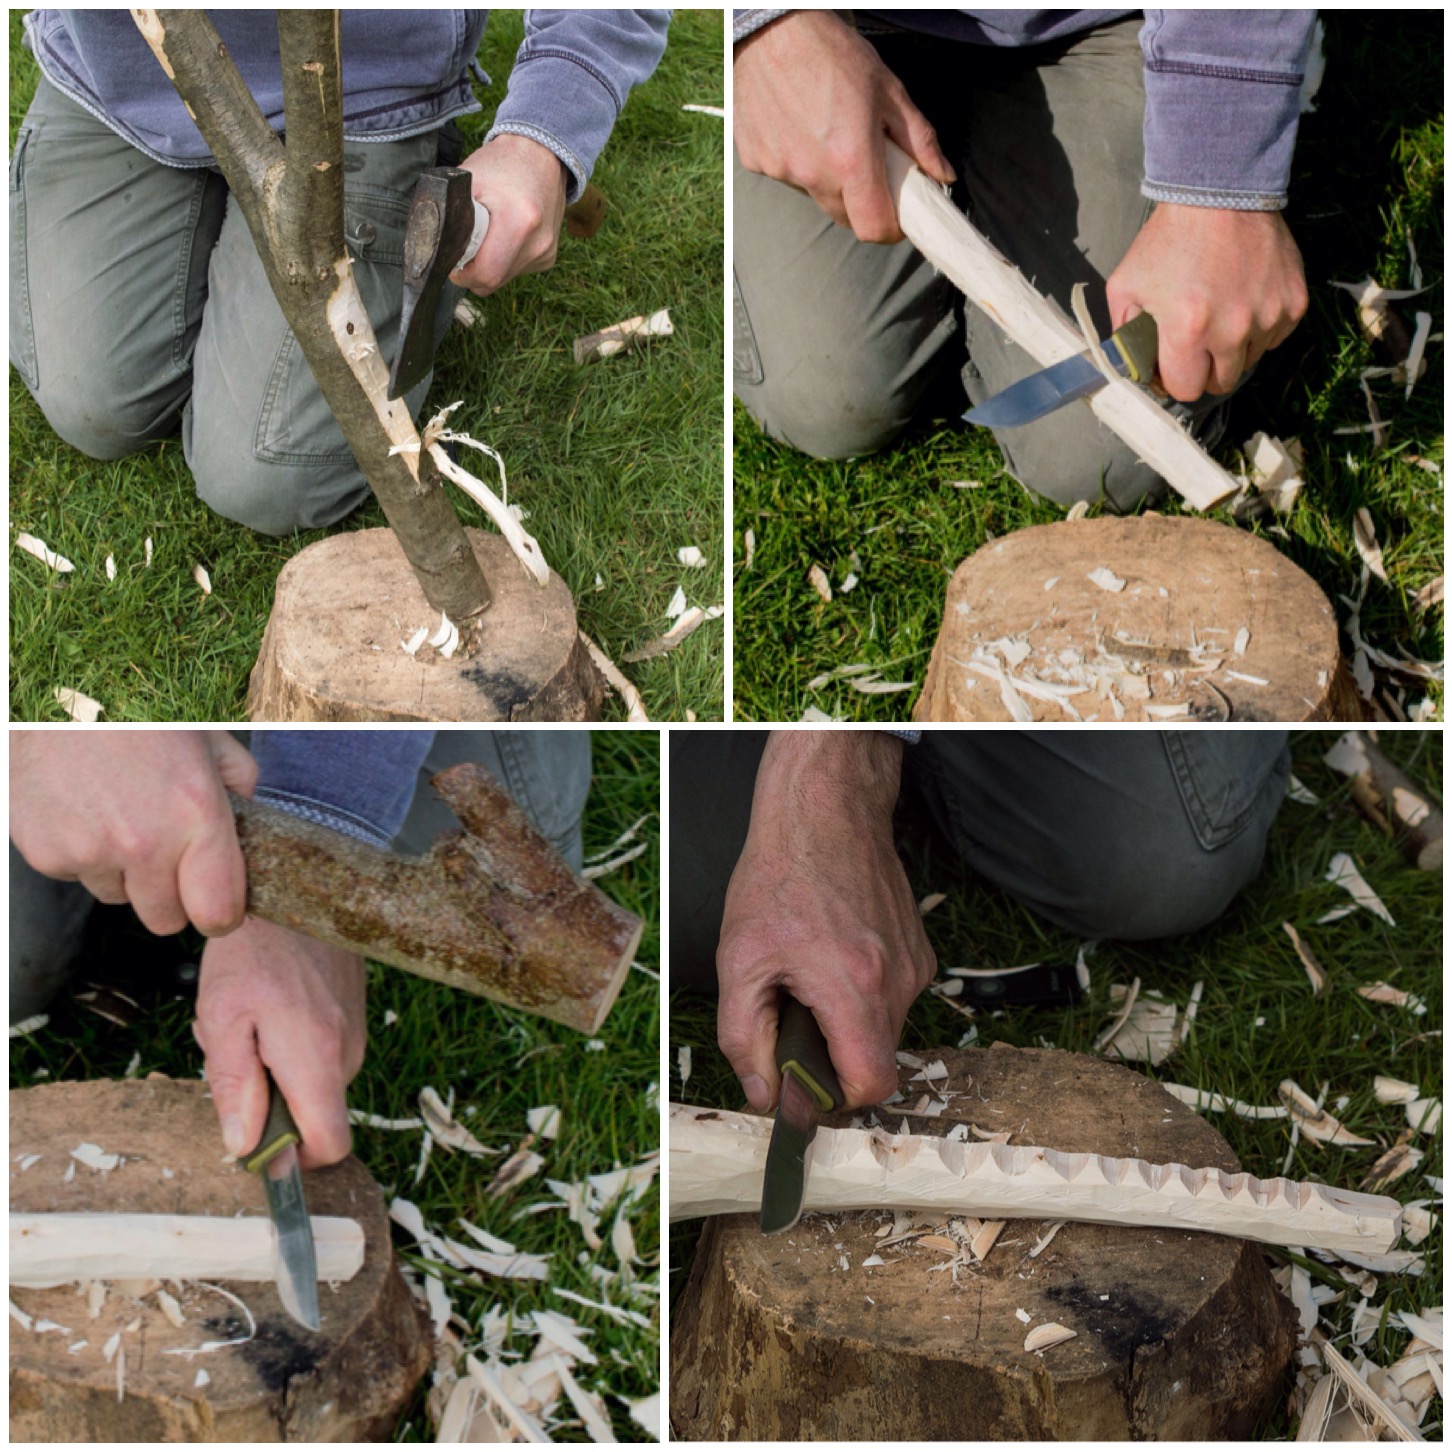
Now the secret of making damp wood burn is to produce as much surface area as possible for the flame to catch. I learnt this from researching and making the Finnish Raappanan Tuli candle.
On the inside of each segment cut as many burrs as you can so that the flame from your kindling has something to catch onto. I tried out different types of cuts here and some were easier to carve than others – your wood will soon tell you what works well.
The Raappanan Tuli style
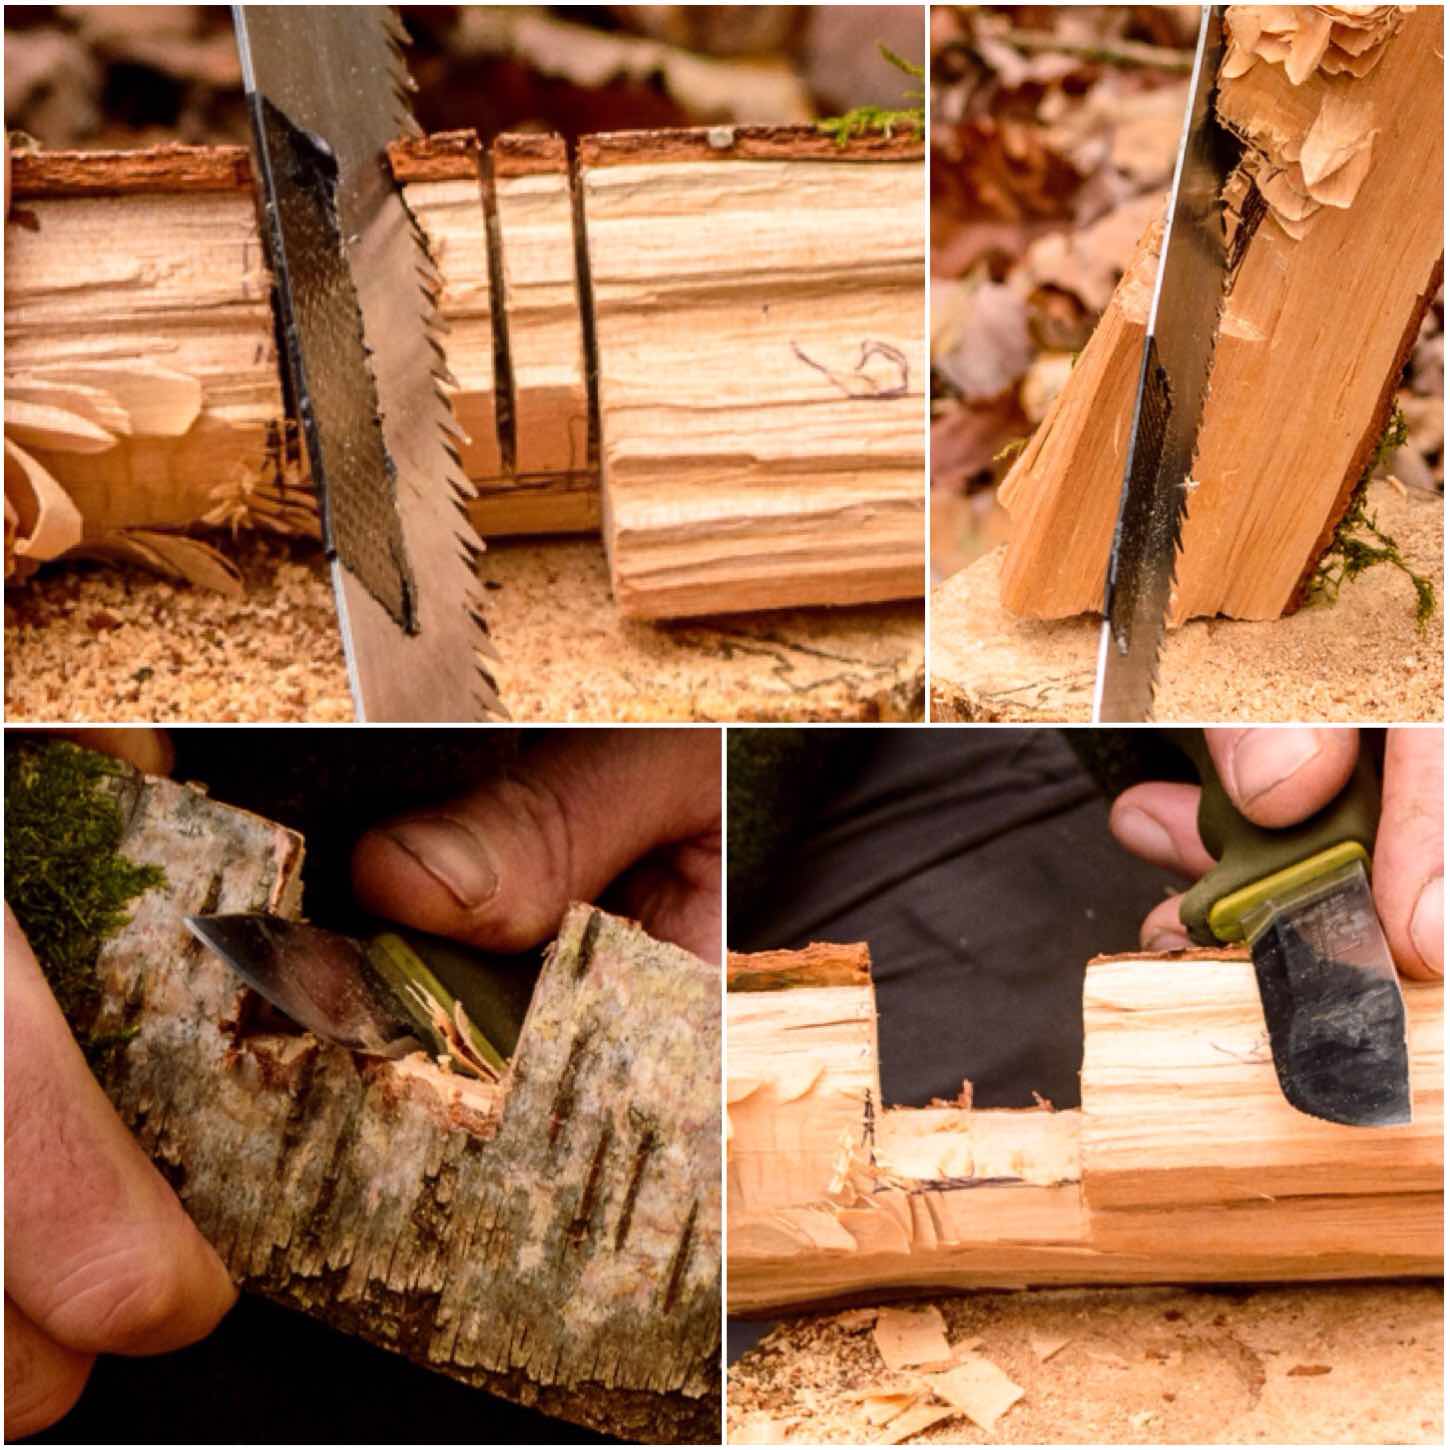
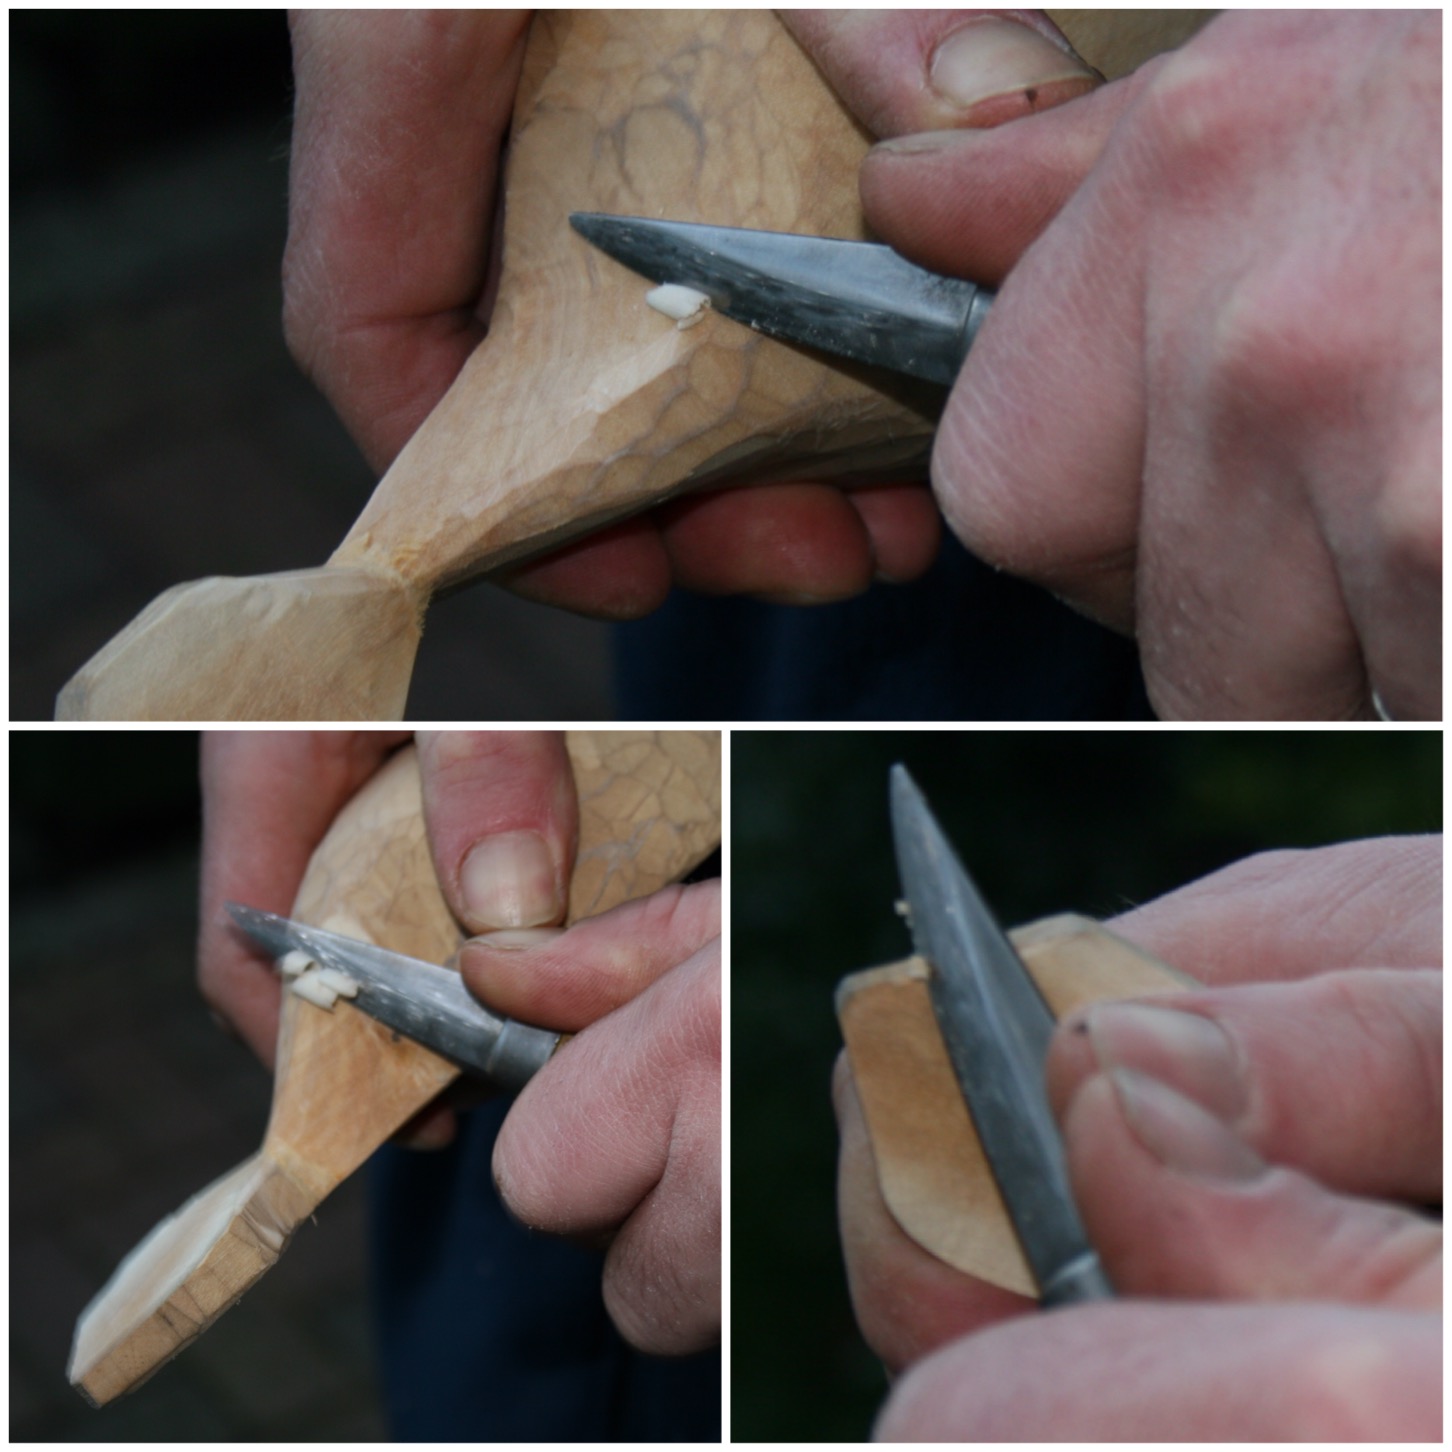
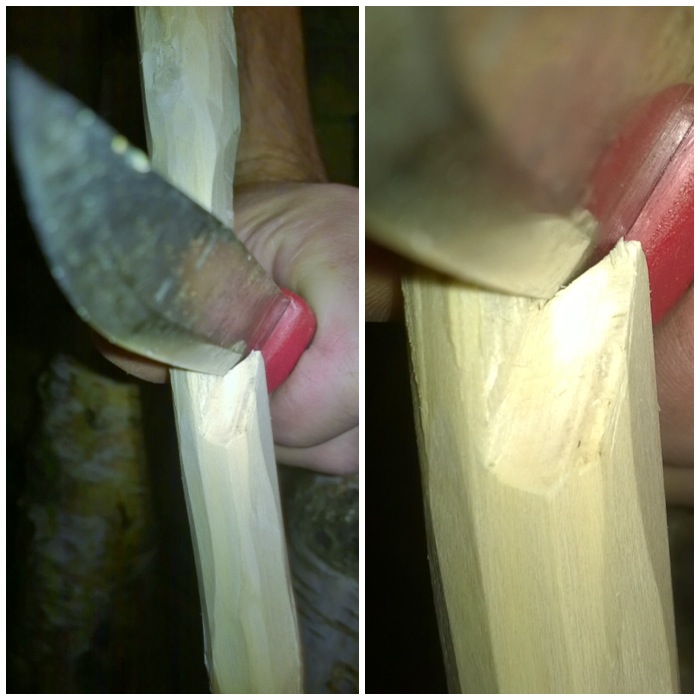
The Firebox
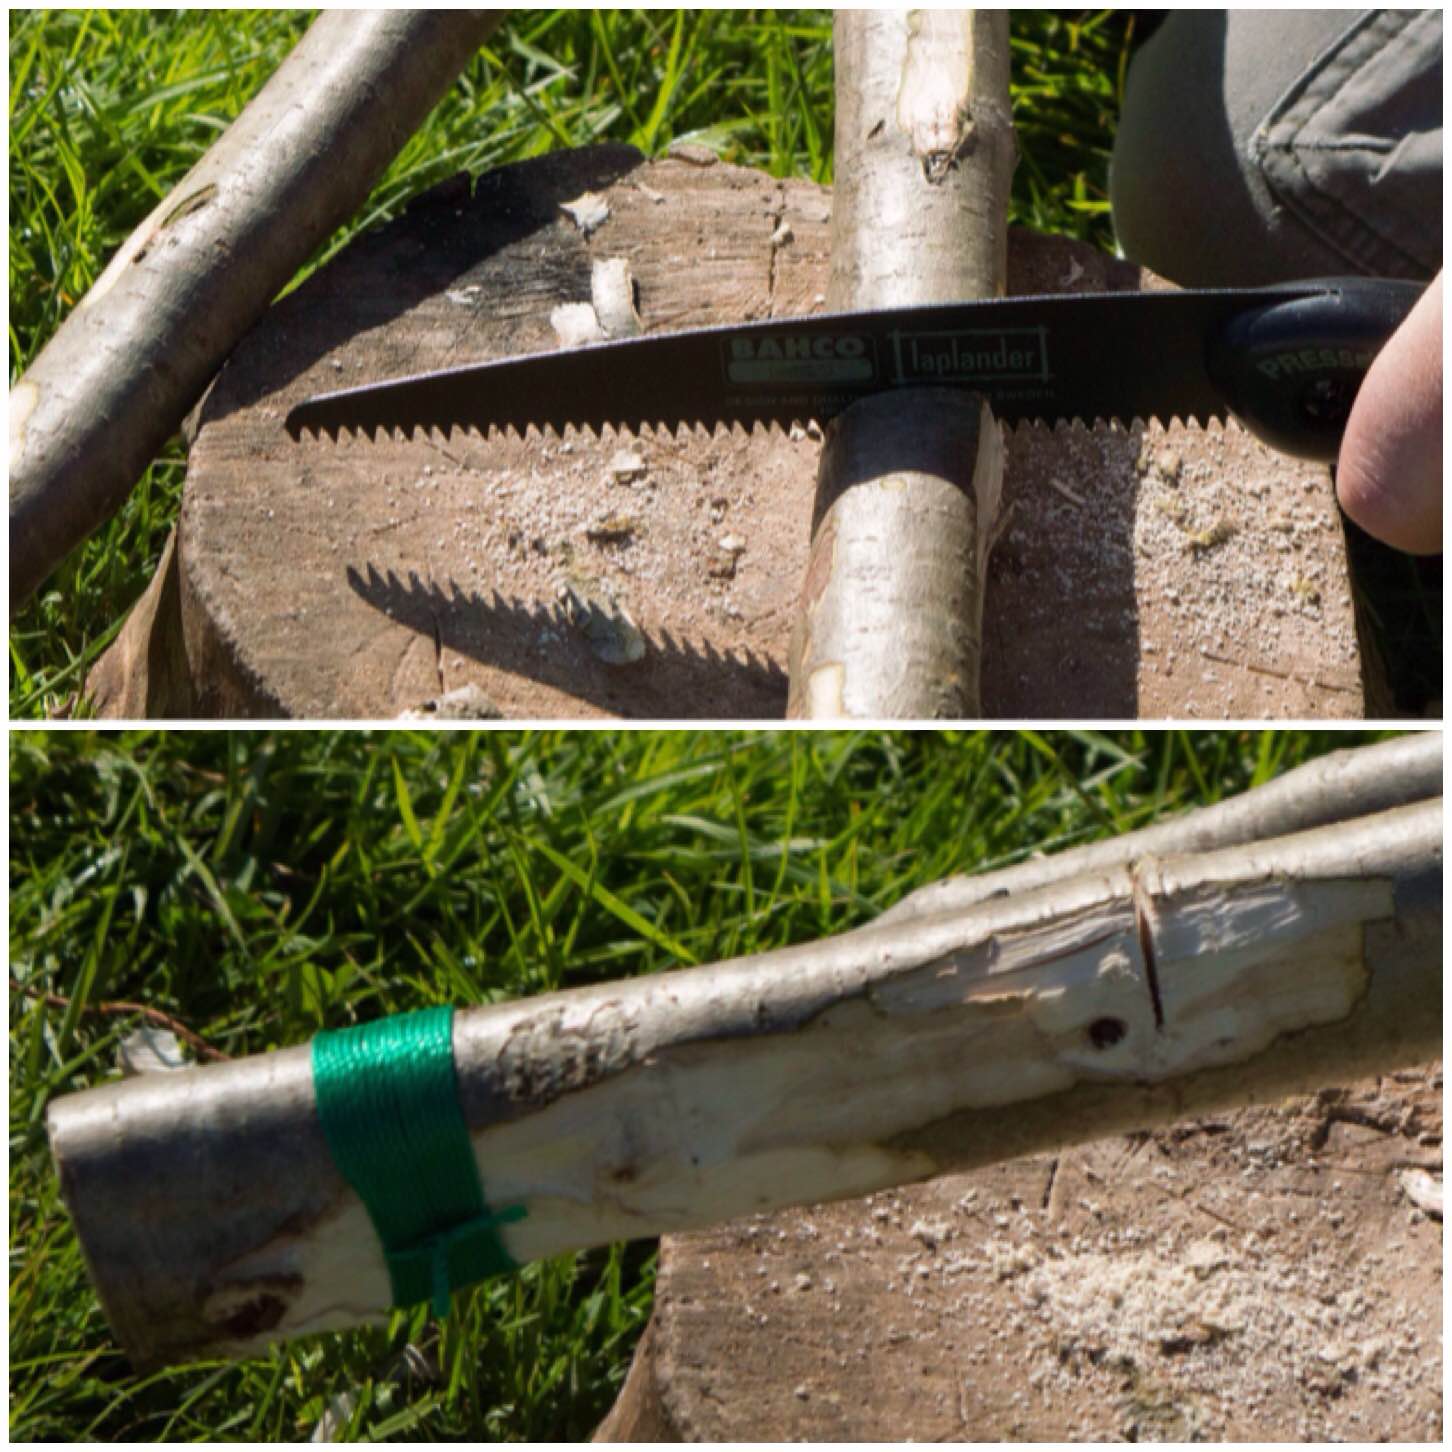
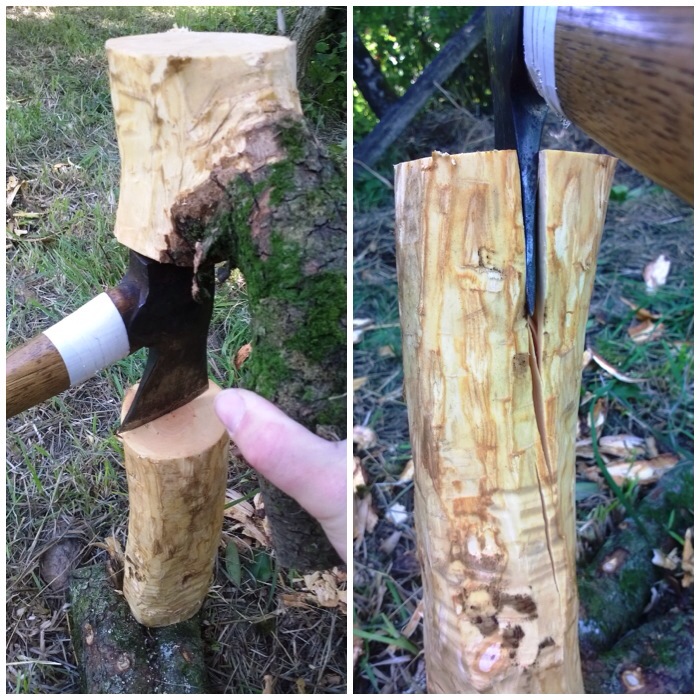
Next up is the opening for the firebox. I selected two segments that fit together (having them numbered really helped here) and marked out with a pen two rectangular areas just above the sill I’d created. I made sure the marking went all the way round to the other side of each segment.
I then used a saw to cut into the wood in the shaded area. Do as many cuts as you can as this makes it easier to remove this waste wood.
Carving the firebox – stage 1
I then used my saw at an angle to cut out the wood and finished the job off with my knife.
Carving the firebox – stage 2
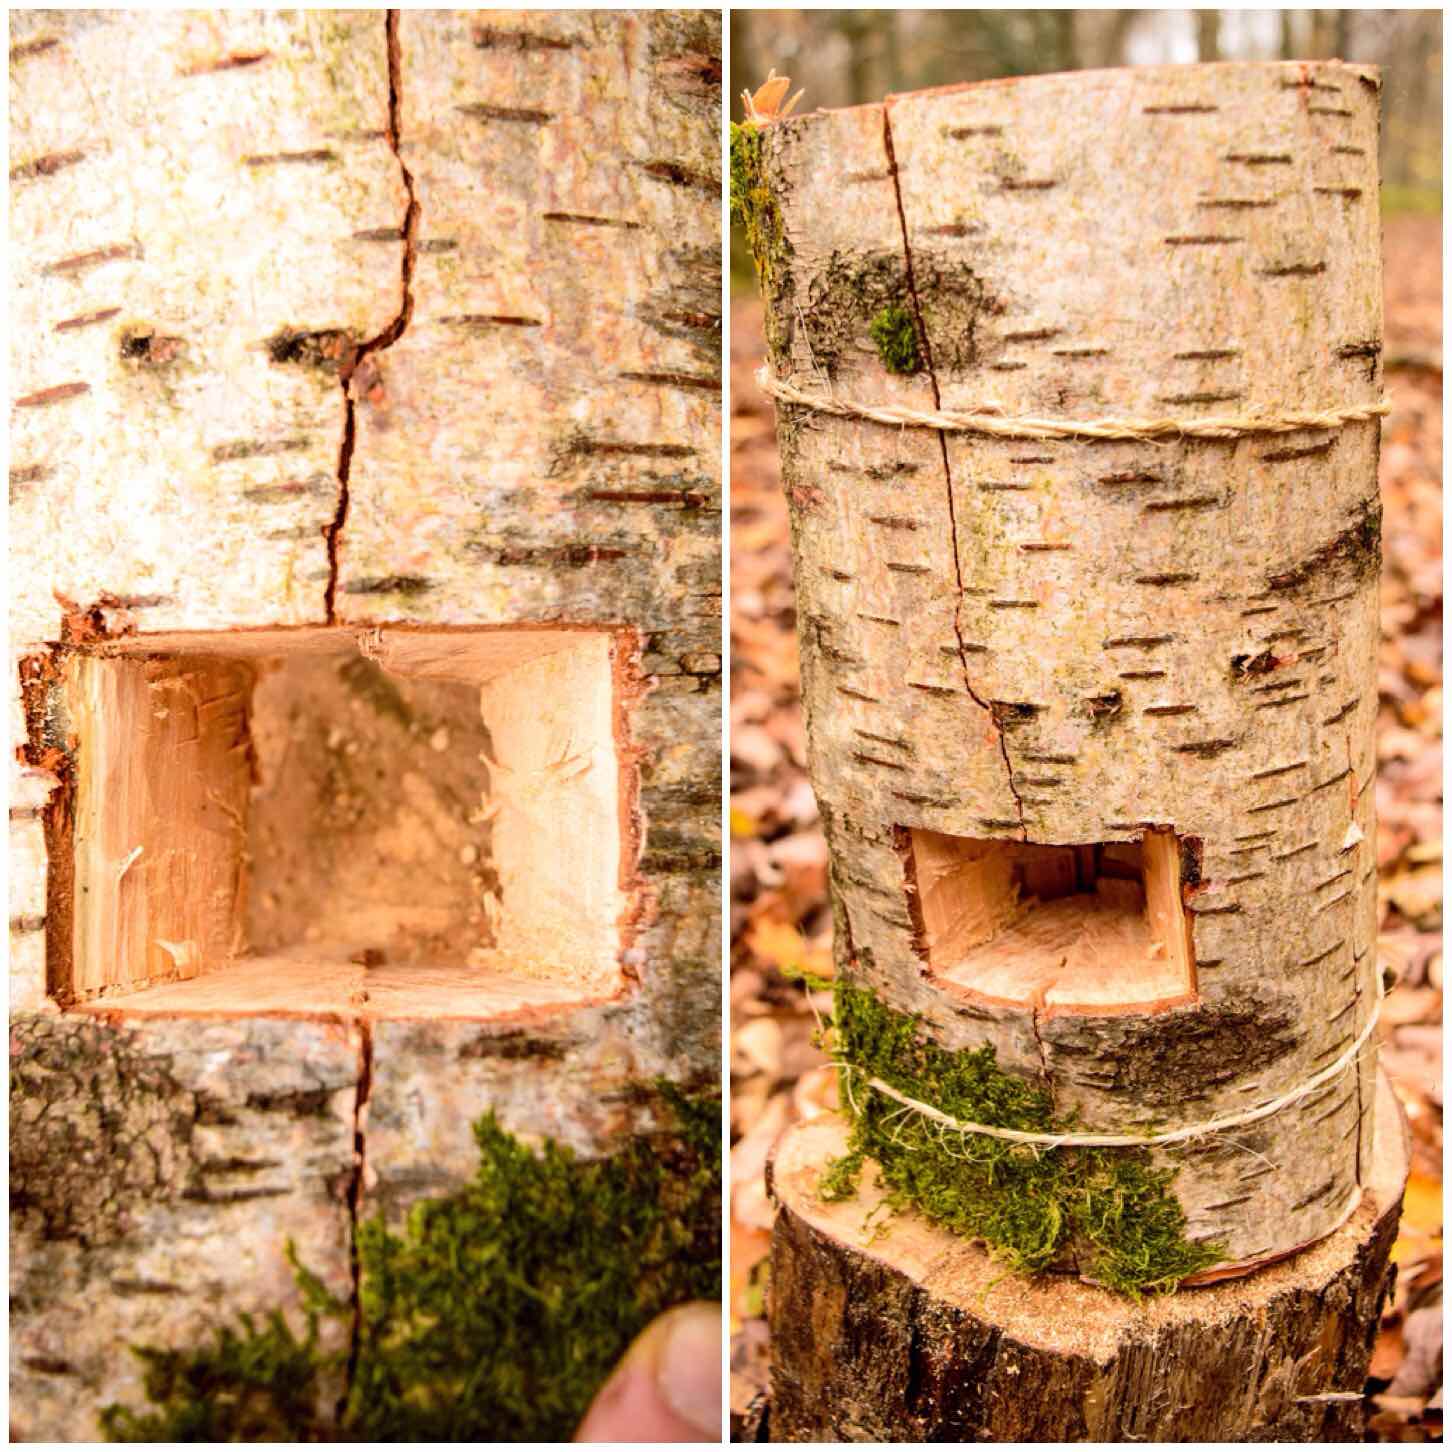
When finished the idea is that you want an access point big enough to put your kindling into the firebox area at the bottom of the chimney.
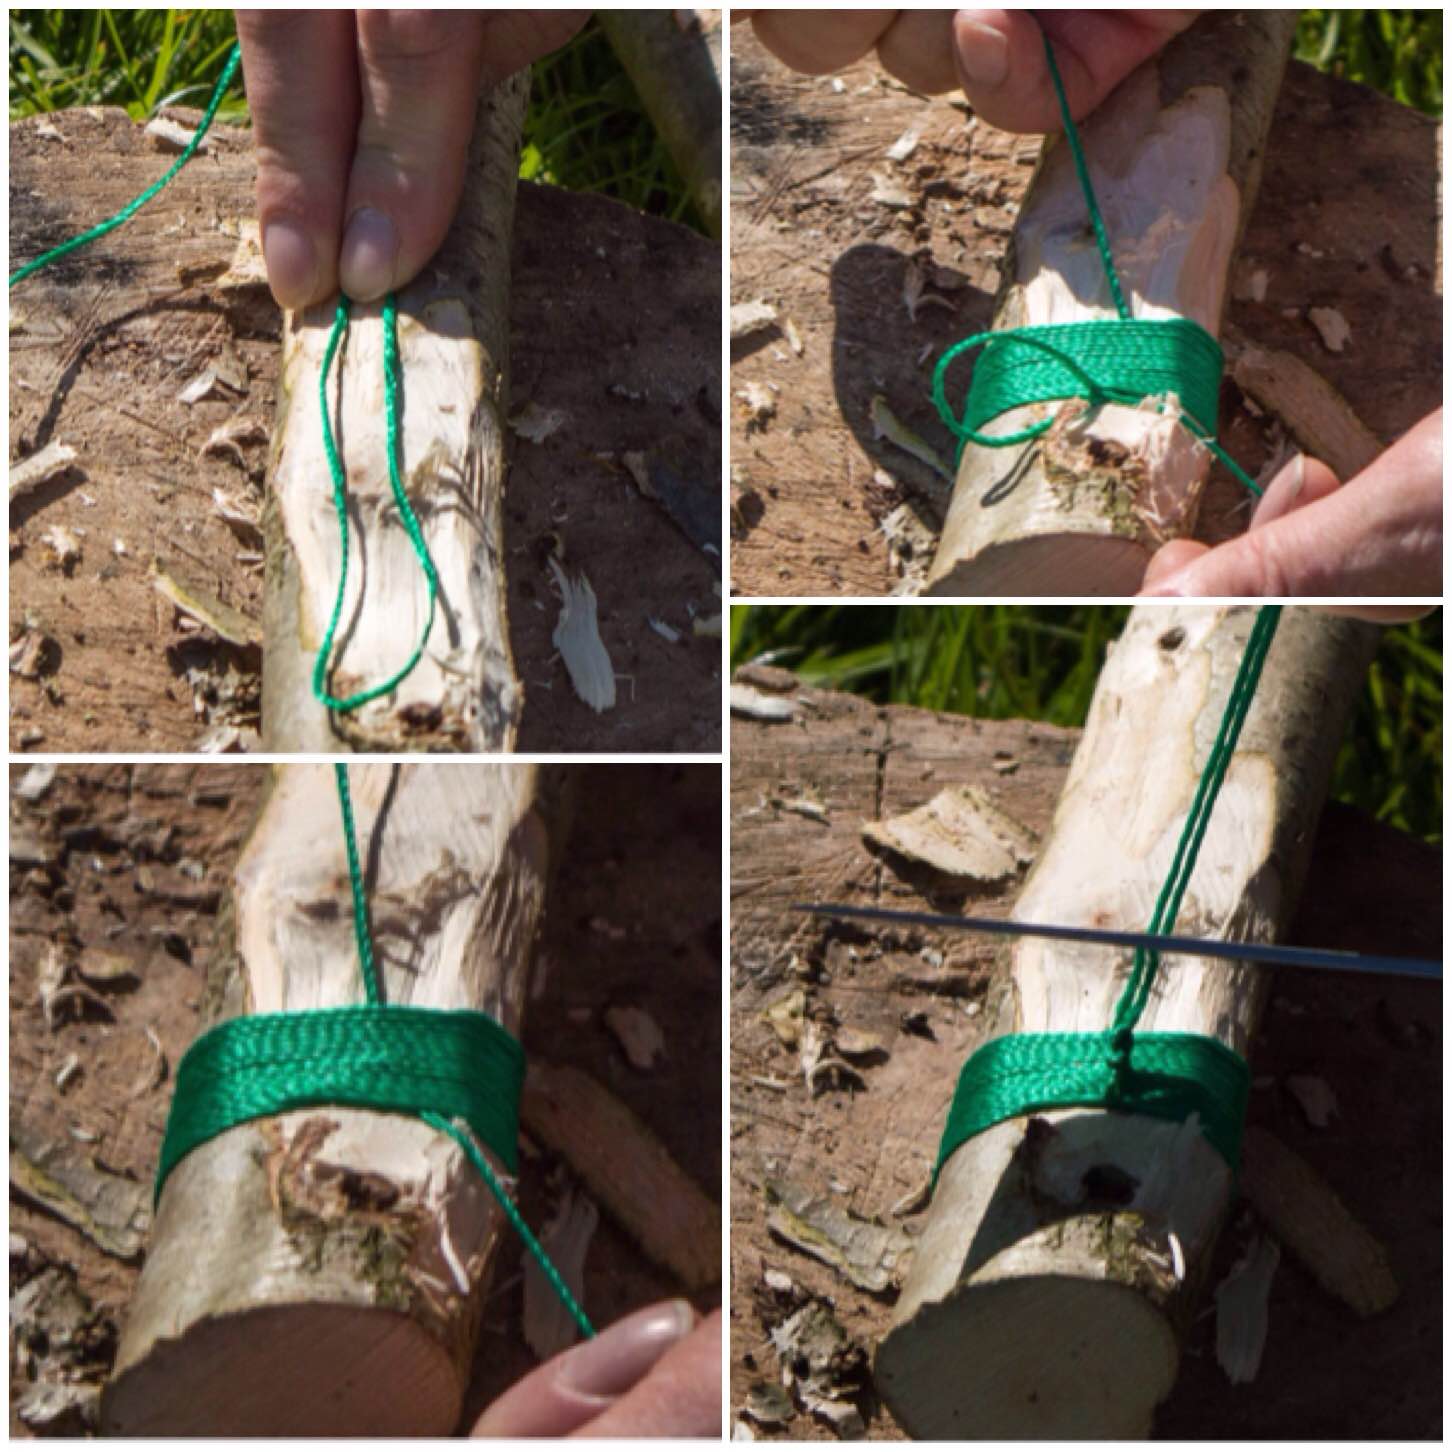
I found some old sisal string tied to a tree and used that to tie everything back together. It was pretty damp anyway and I hoped that would last longer than the copious amounts of paracord I tend to carry around with me. I think some thin wire would be the ideal thing to use though.
Firebox and all wrapped up
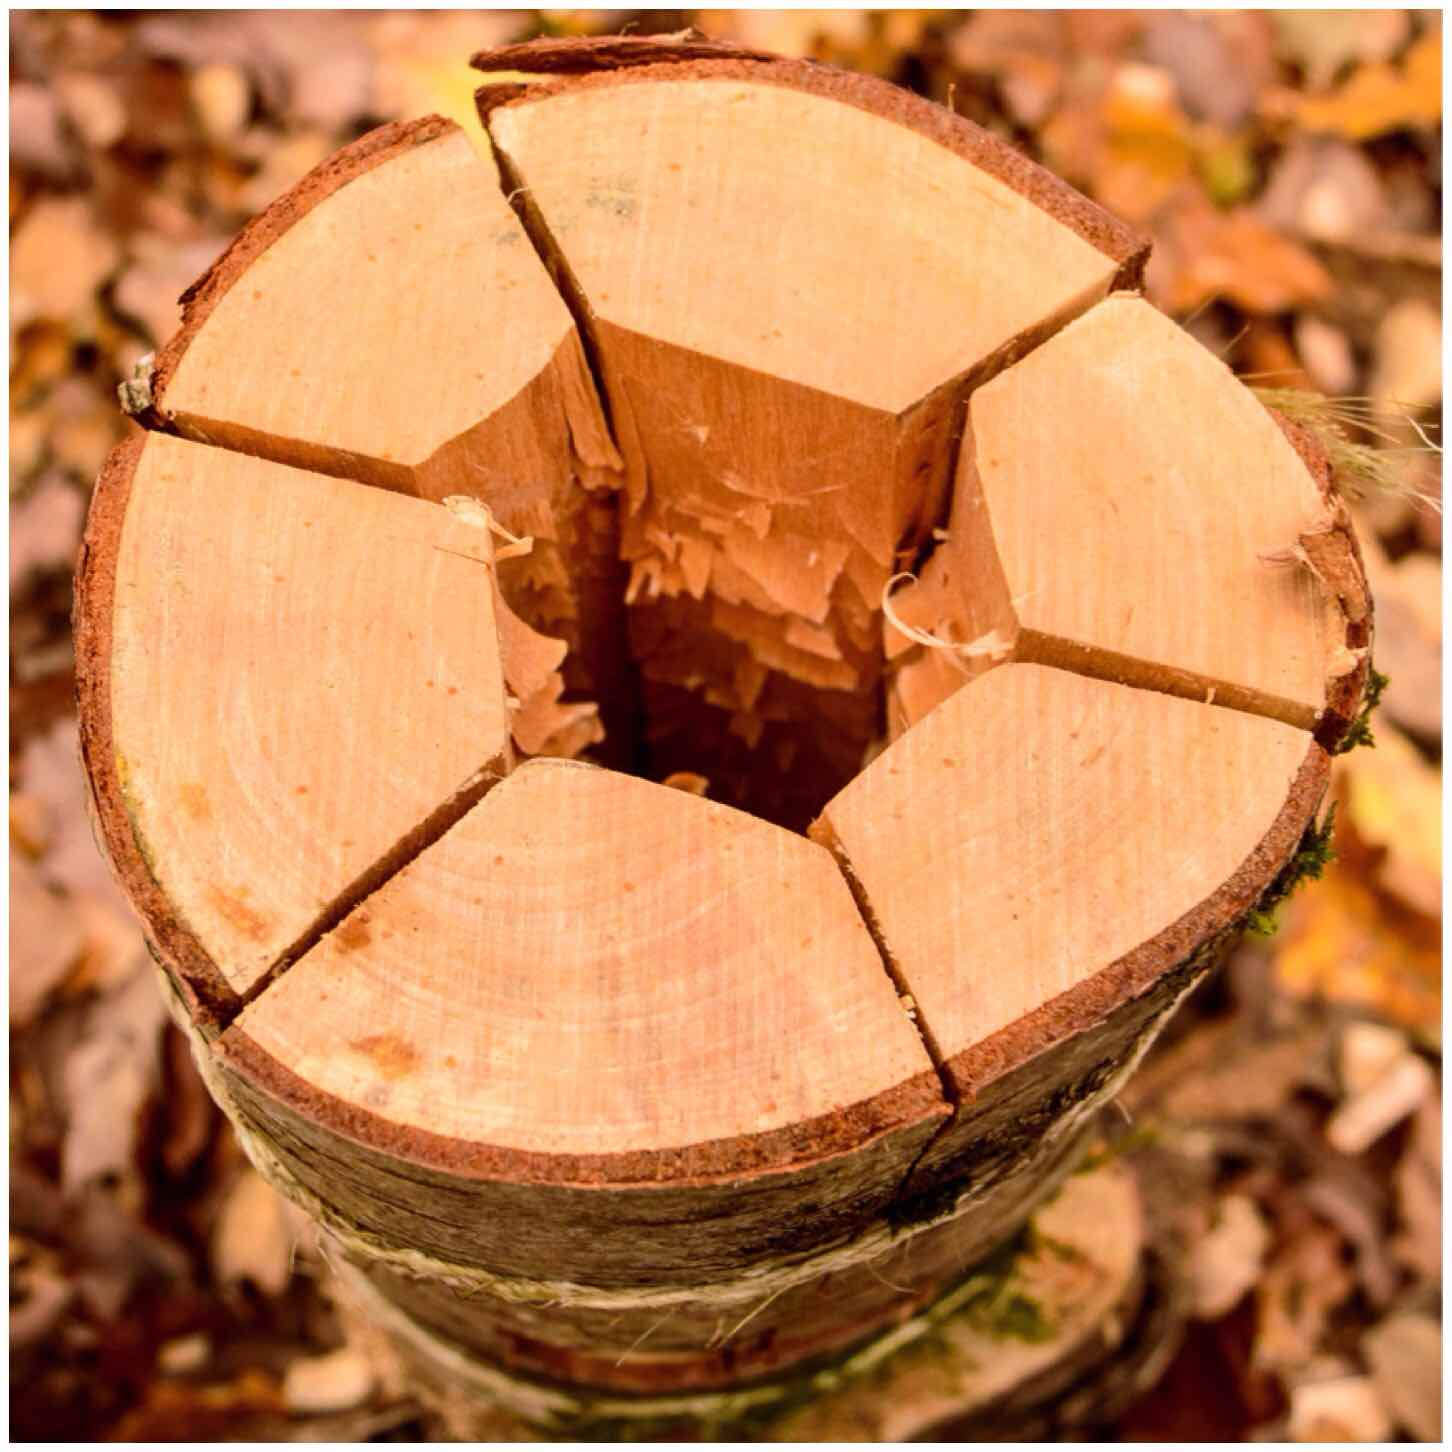
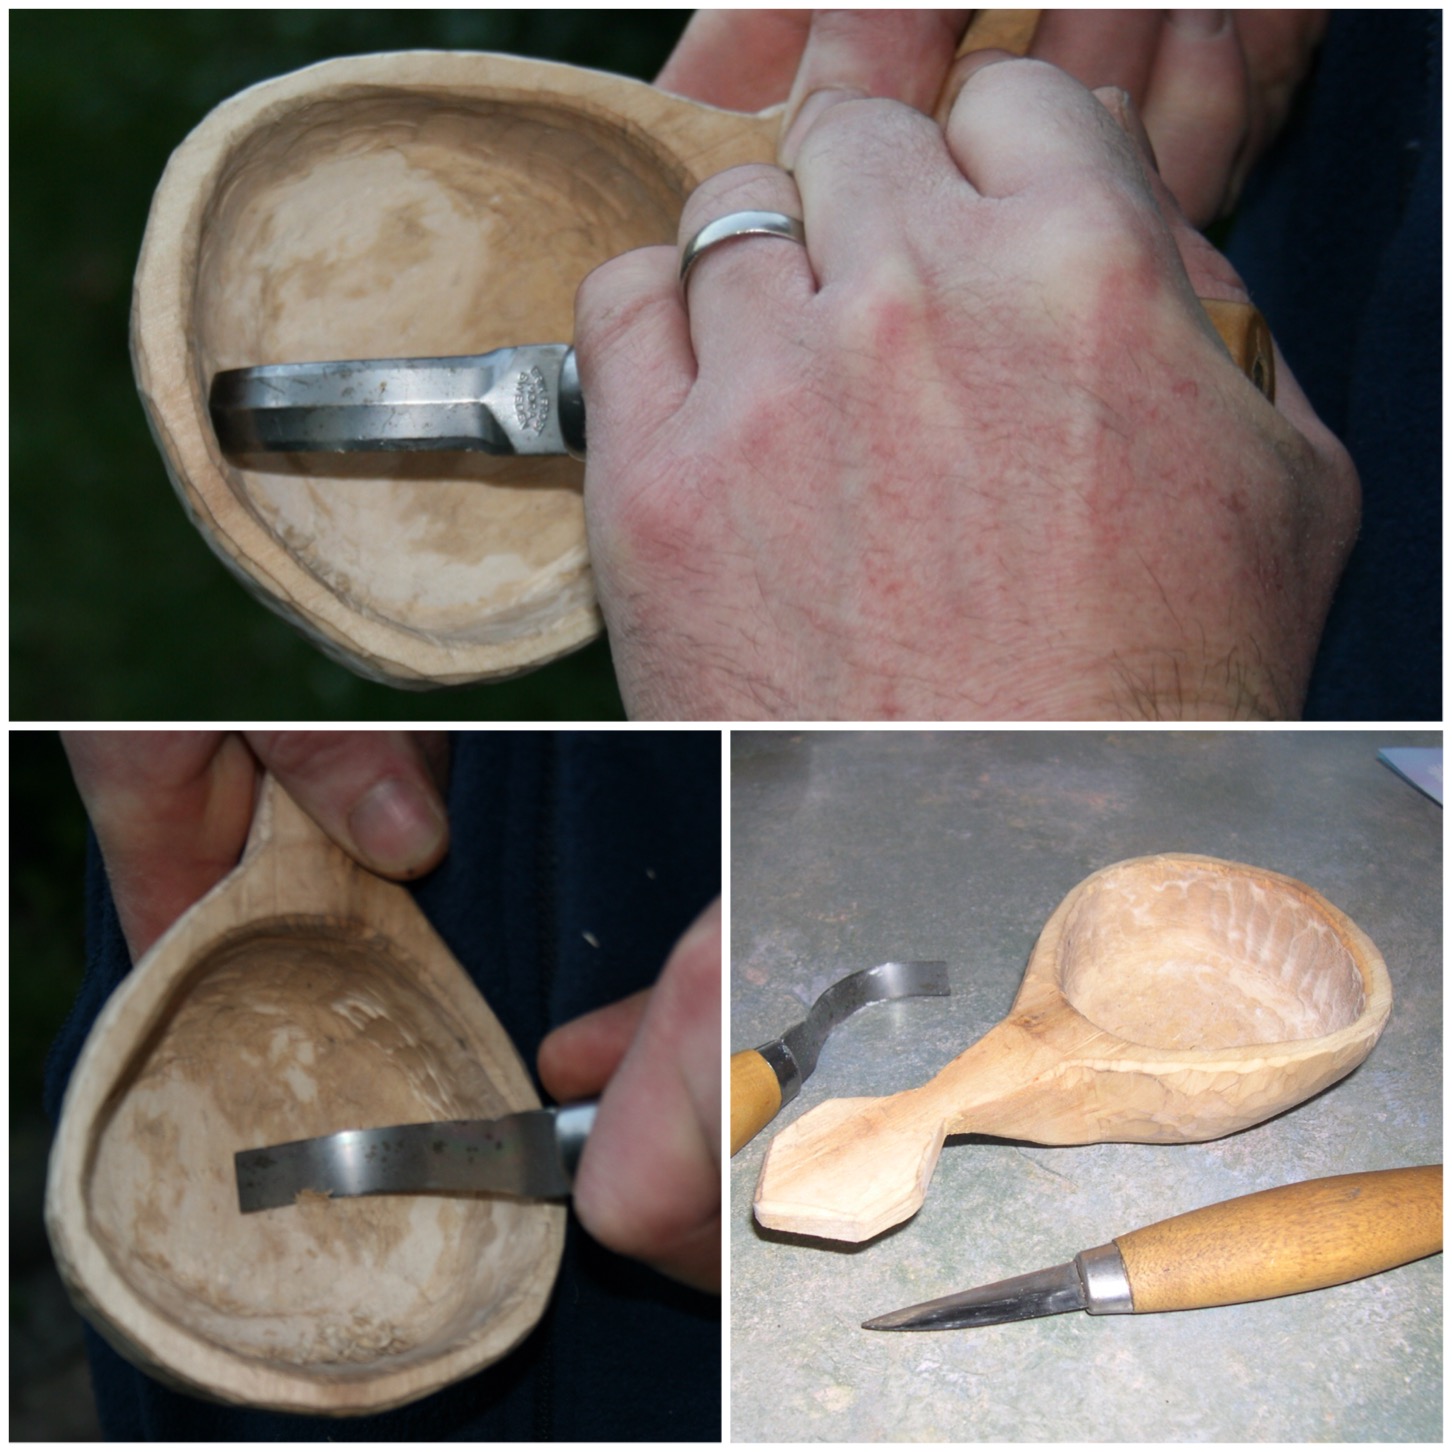
From the top you can see how wide the chimney was. I have no idea what would be the optimal size to have so you may need to experiment for yourself.
The chimney
Firing Up
As the wood was so damp I decided to go for the sure-fire method of lighting the stove up – good old cotton wool and Vaseline. This worked well however I needed to use 4 Vaseline-coated cotton wool balls to maintain the fire.
I have used shredded birch bark mixed with spruce resin on a number of occasions to light Finnish candles before but I didn’t have the time to collect the resin this time.
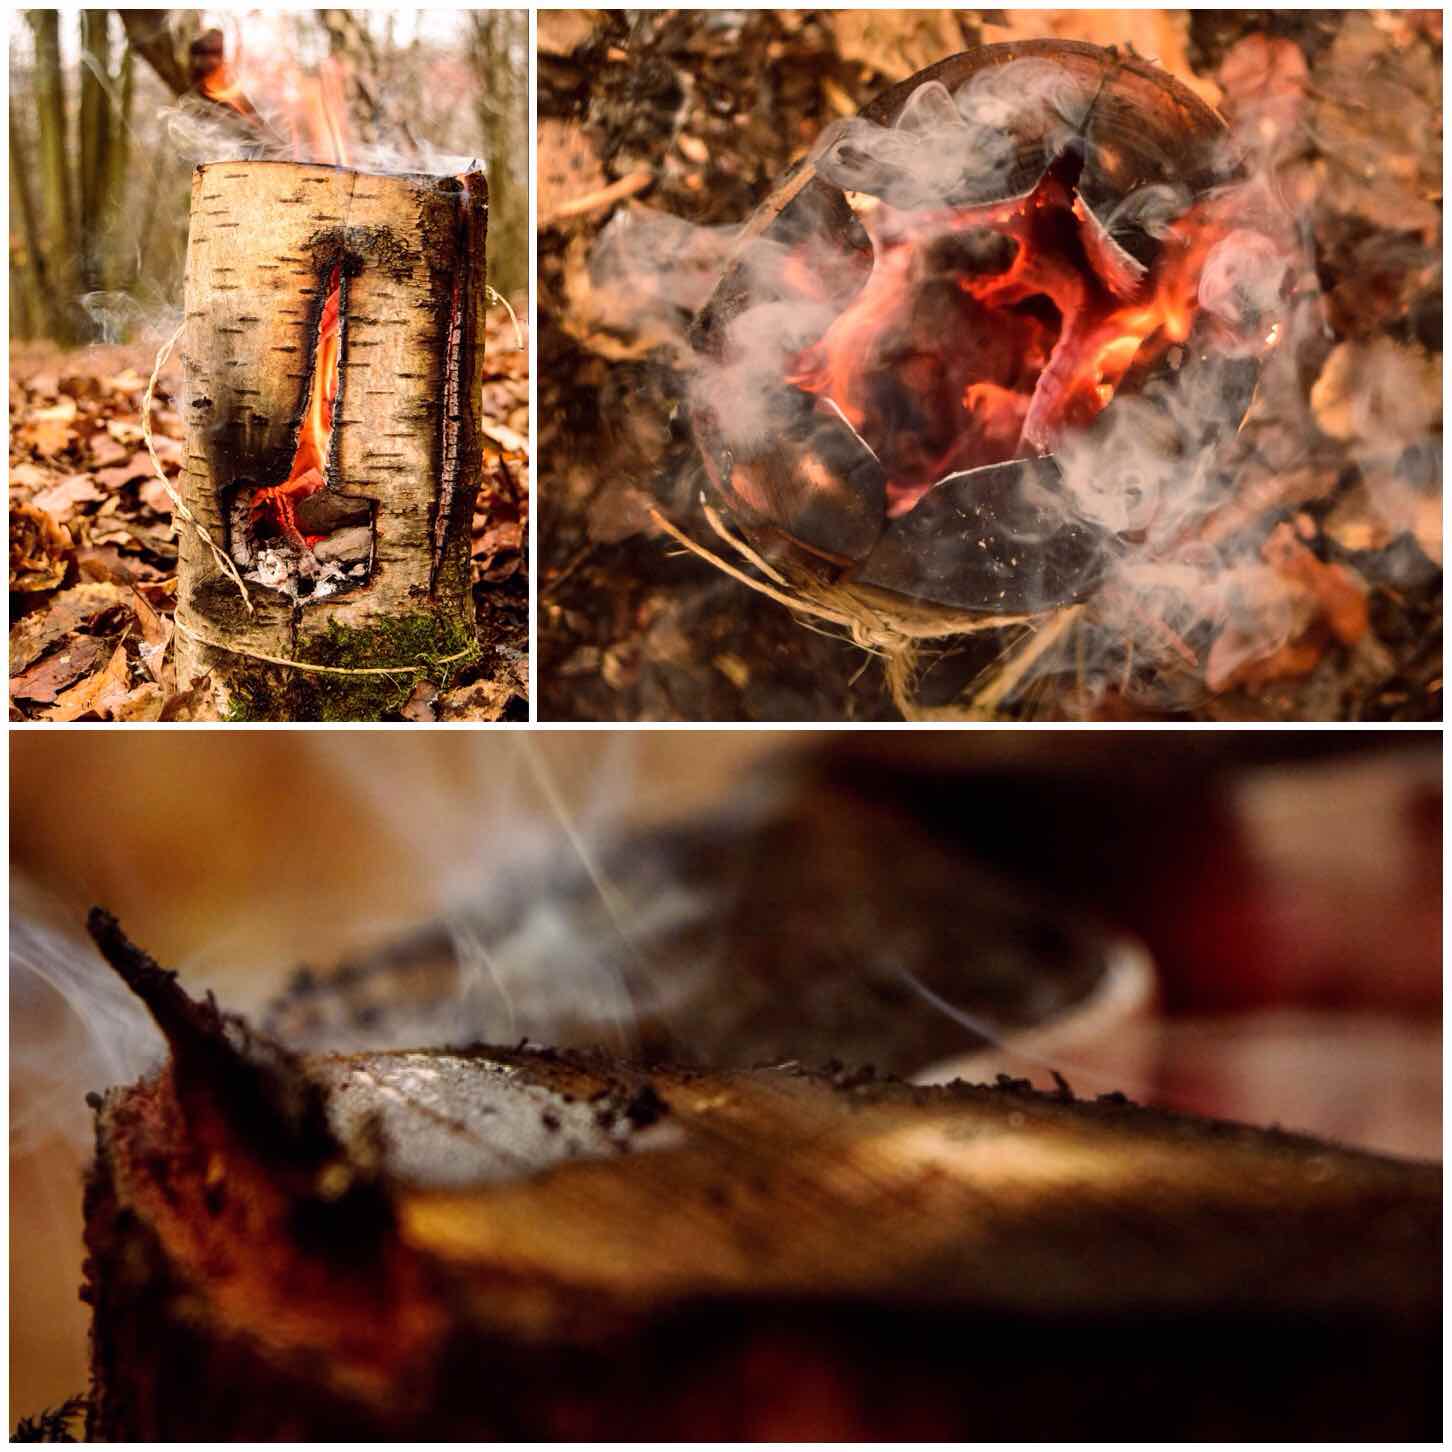
Once the fire had started I added tinder/kindling down through the chimney and in through the firebox. The main thing at this stage is to not over-fill the firebox but allow the airflow to be maintained. It means about 10 minutes of work but the damp wood inside the chimney area will dry out and the overall heat of the fire will increase.
Firing up
Maintaining the Fire
I placed three pebbles on the top of the stove for the kettle to sit on securely.
The gap created by the pebbles also allows you to drop tinder/kindling down the chimney. I like to use strips of birch bark here as it is so pliable and flammable.
If the wind is low or changes direction you may need to get down low and blow directly into the firebox to keep the fire going. Once the wood has dried out a bit you will not need to do this so much.
Maintaining the heat
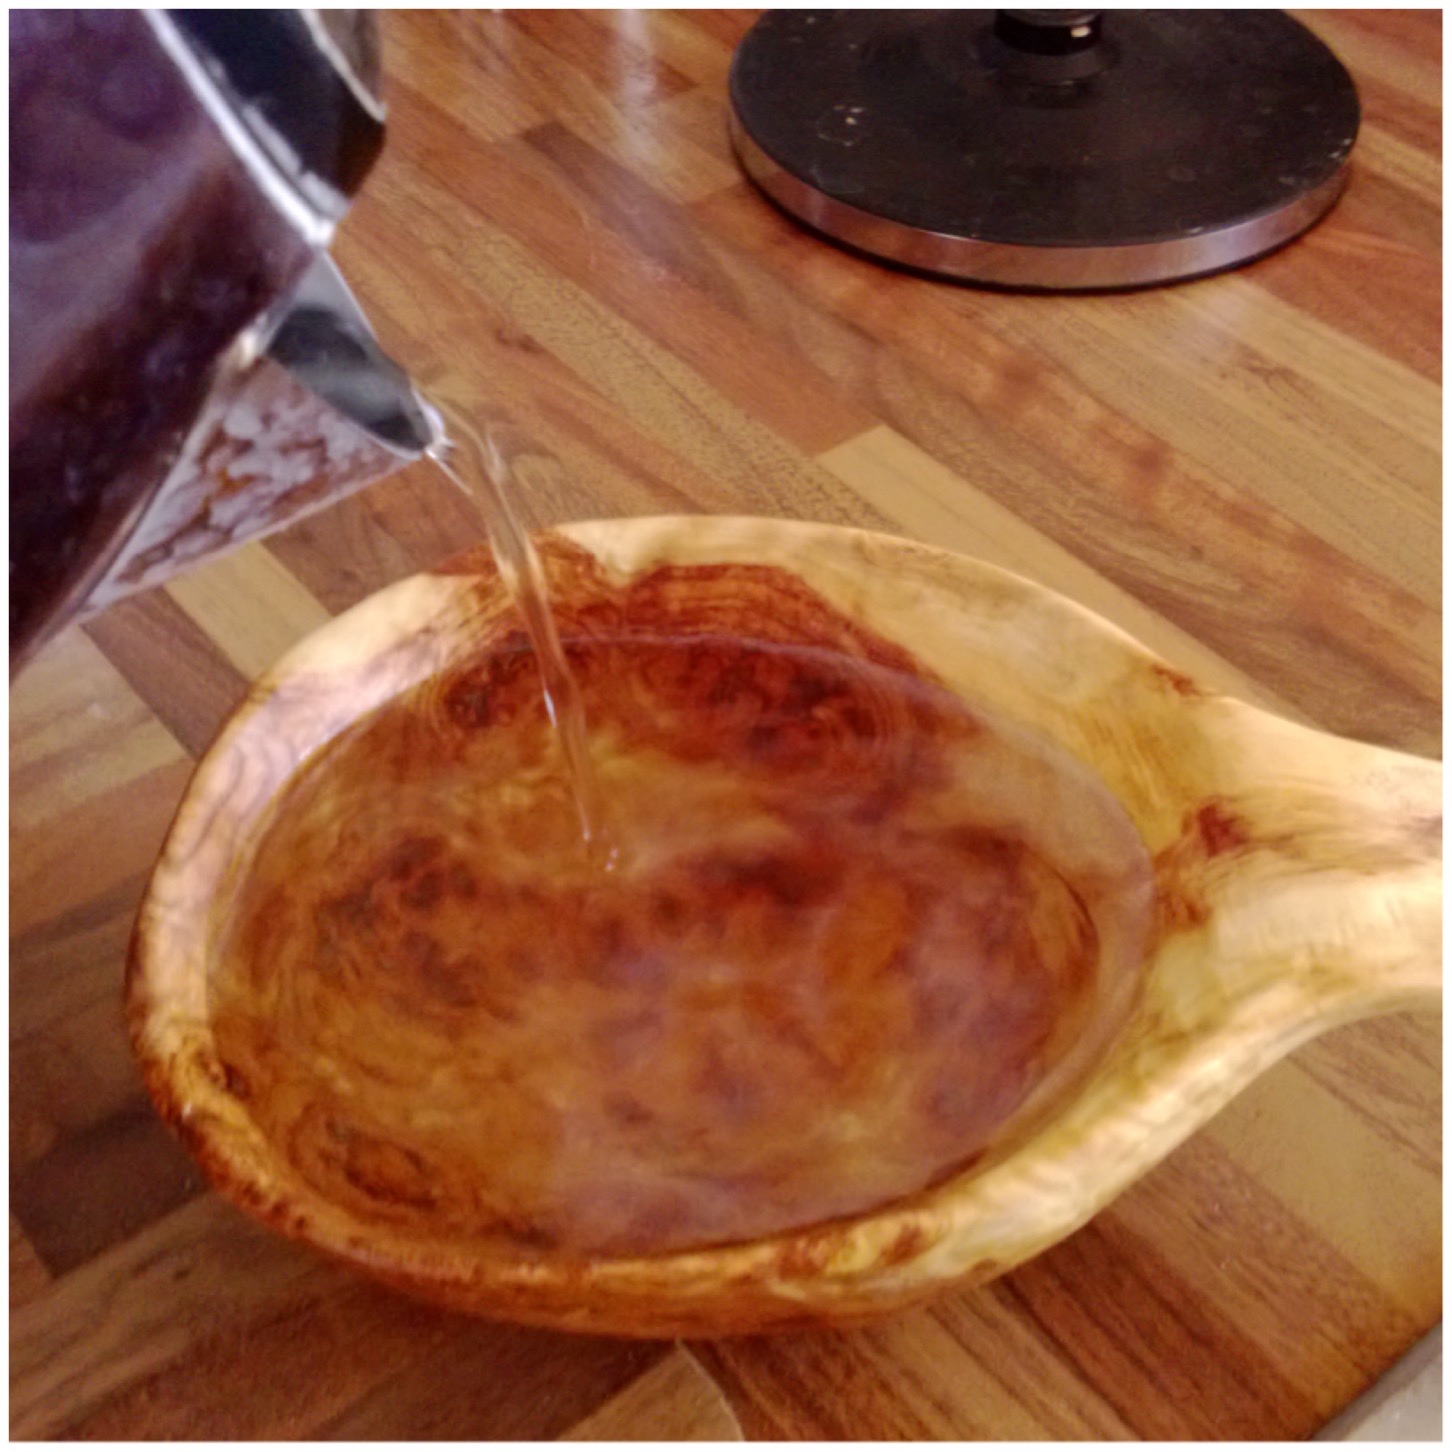
I gave the stove about 10 minutes before putting the kettle on and then in about 15 minutes the kettle was boiling. Not as fast as modern stoves but for what is in effect a wet log not bad.
Waiting for the kettle to boil
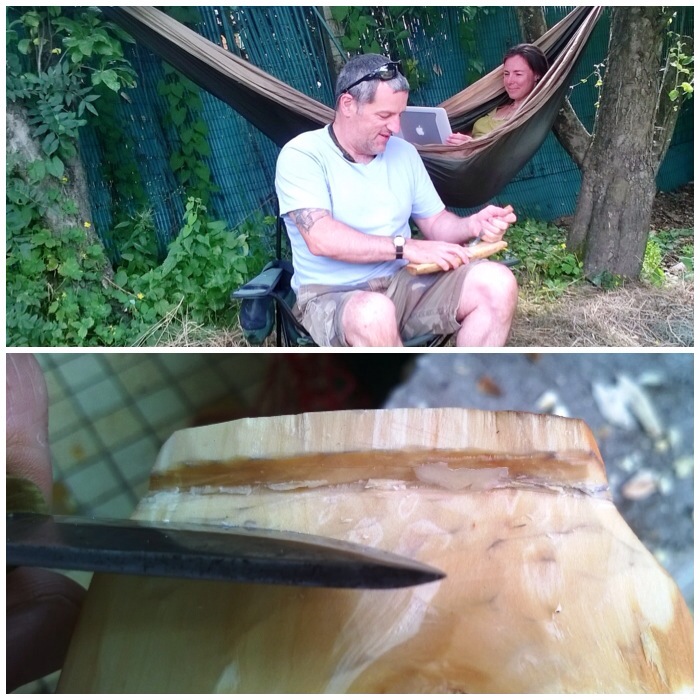
I have to thank Jess Edwards for a number of these pictures at the end. Jess is a great photographer and keen bushcrafter so it was great to concentrate for once on the tinkering and leave the photography aspect in someone else’s capable hands.
Brew time
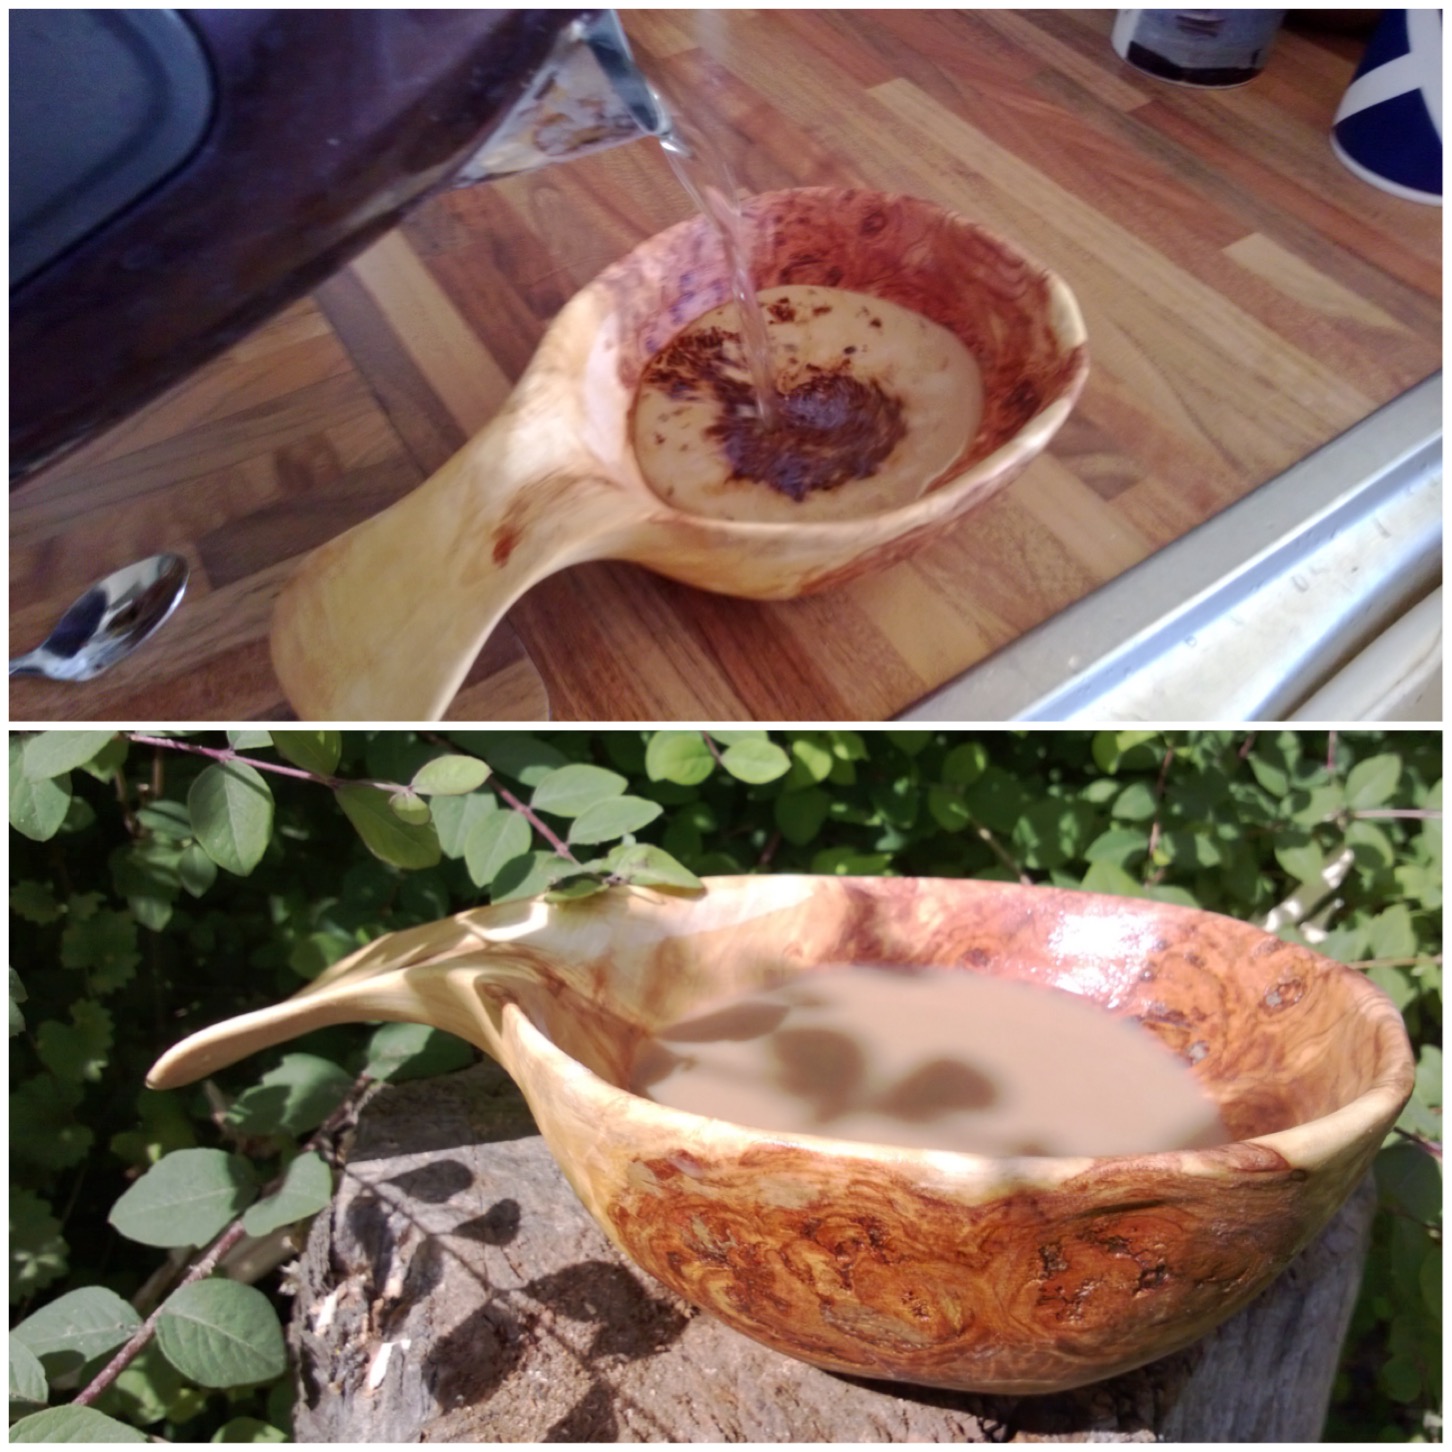
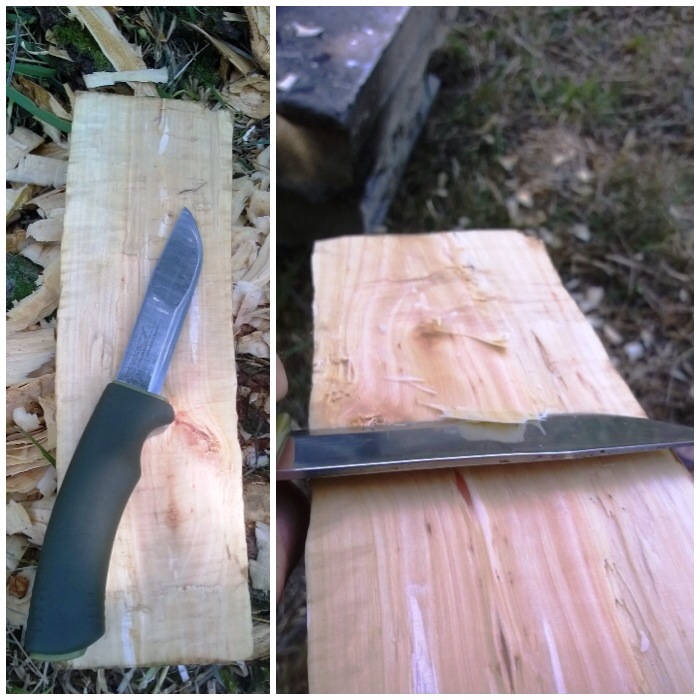
Observations
Once the coffee was made I was able to have a good look at what was happening with the stove. As I looked closely I could see the moisture in the wood boiling off. If you look in the bottom picture you can see the water boiling away on the surface.
Drying off
The stove kept going for another hour before I had to put it out as we were leaving.
Overall I was very impressed with this Log Rocket stove with the Raappanan Tuli twist and I will be using it again on my courses.
A glorious farewell
Thanks again to the Scouts for documenting this stove – I hope you like my little twist on it?
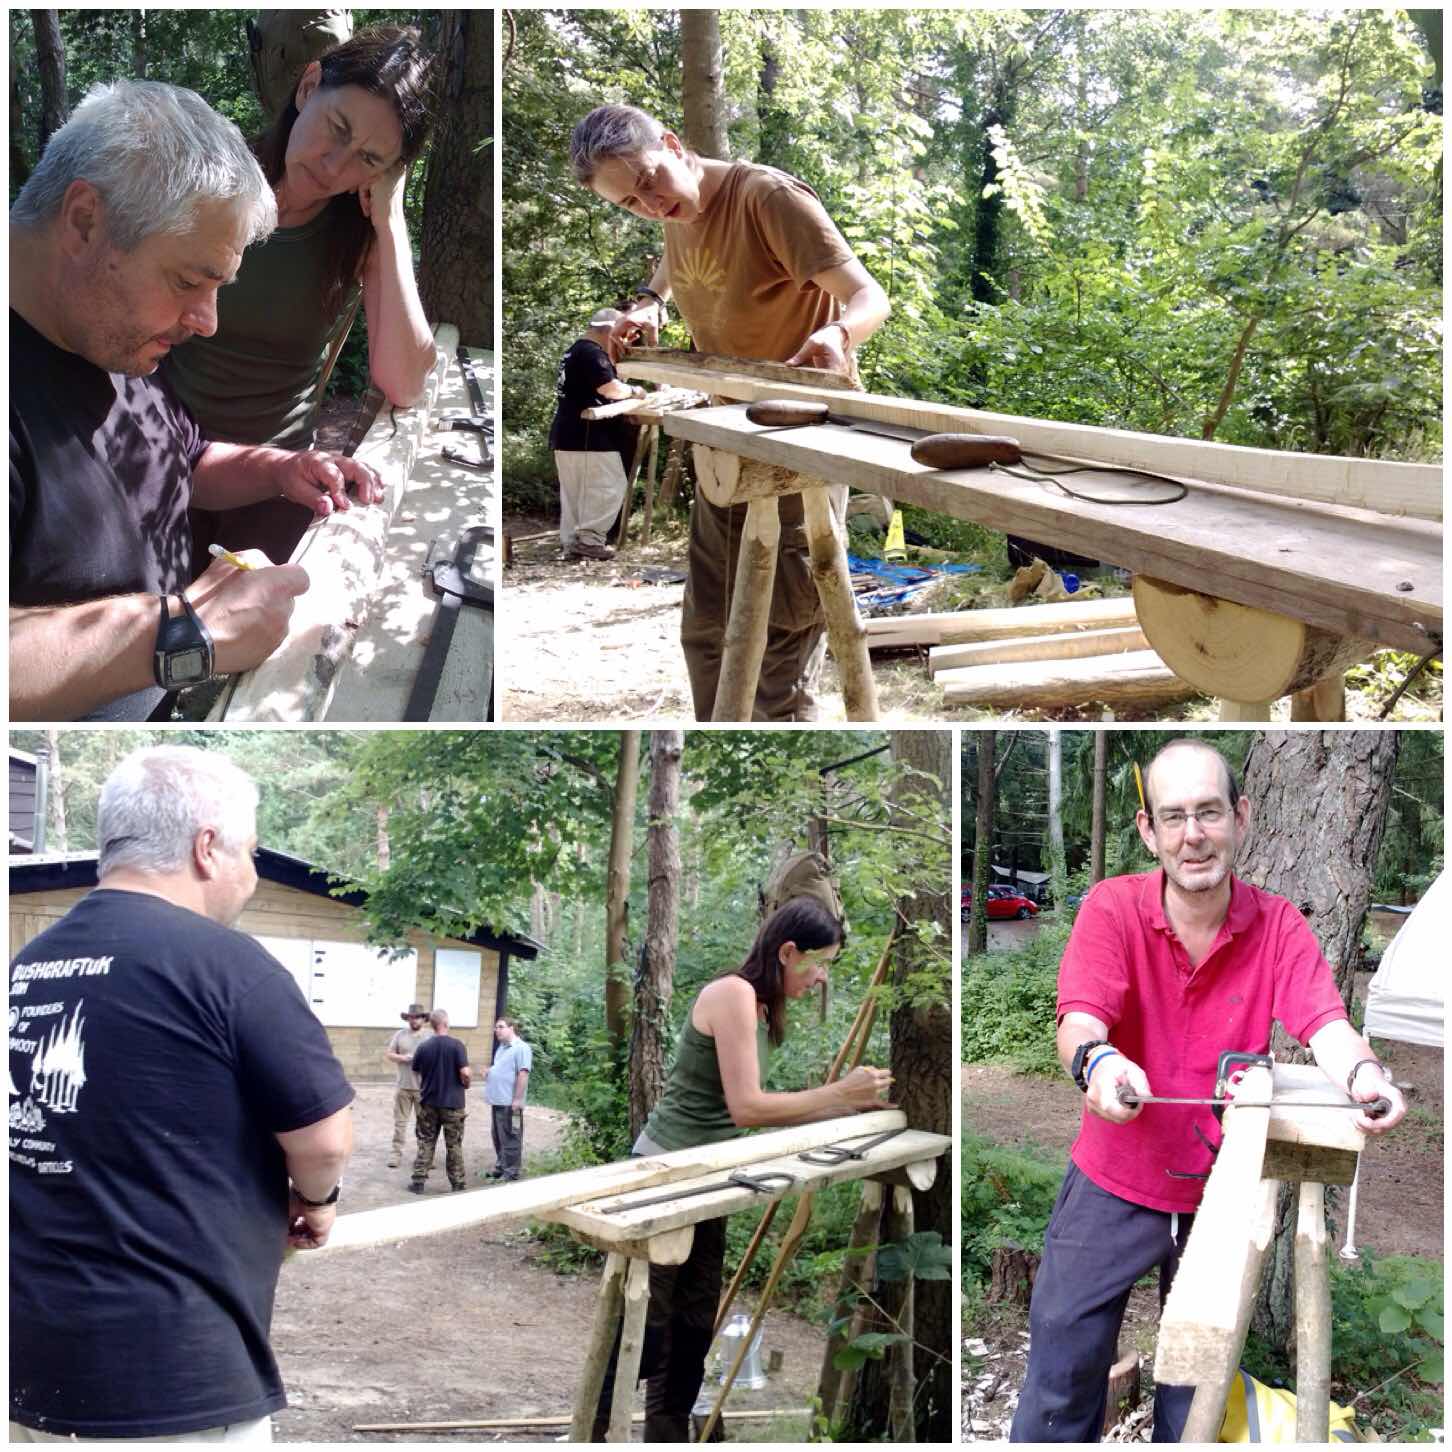
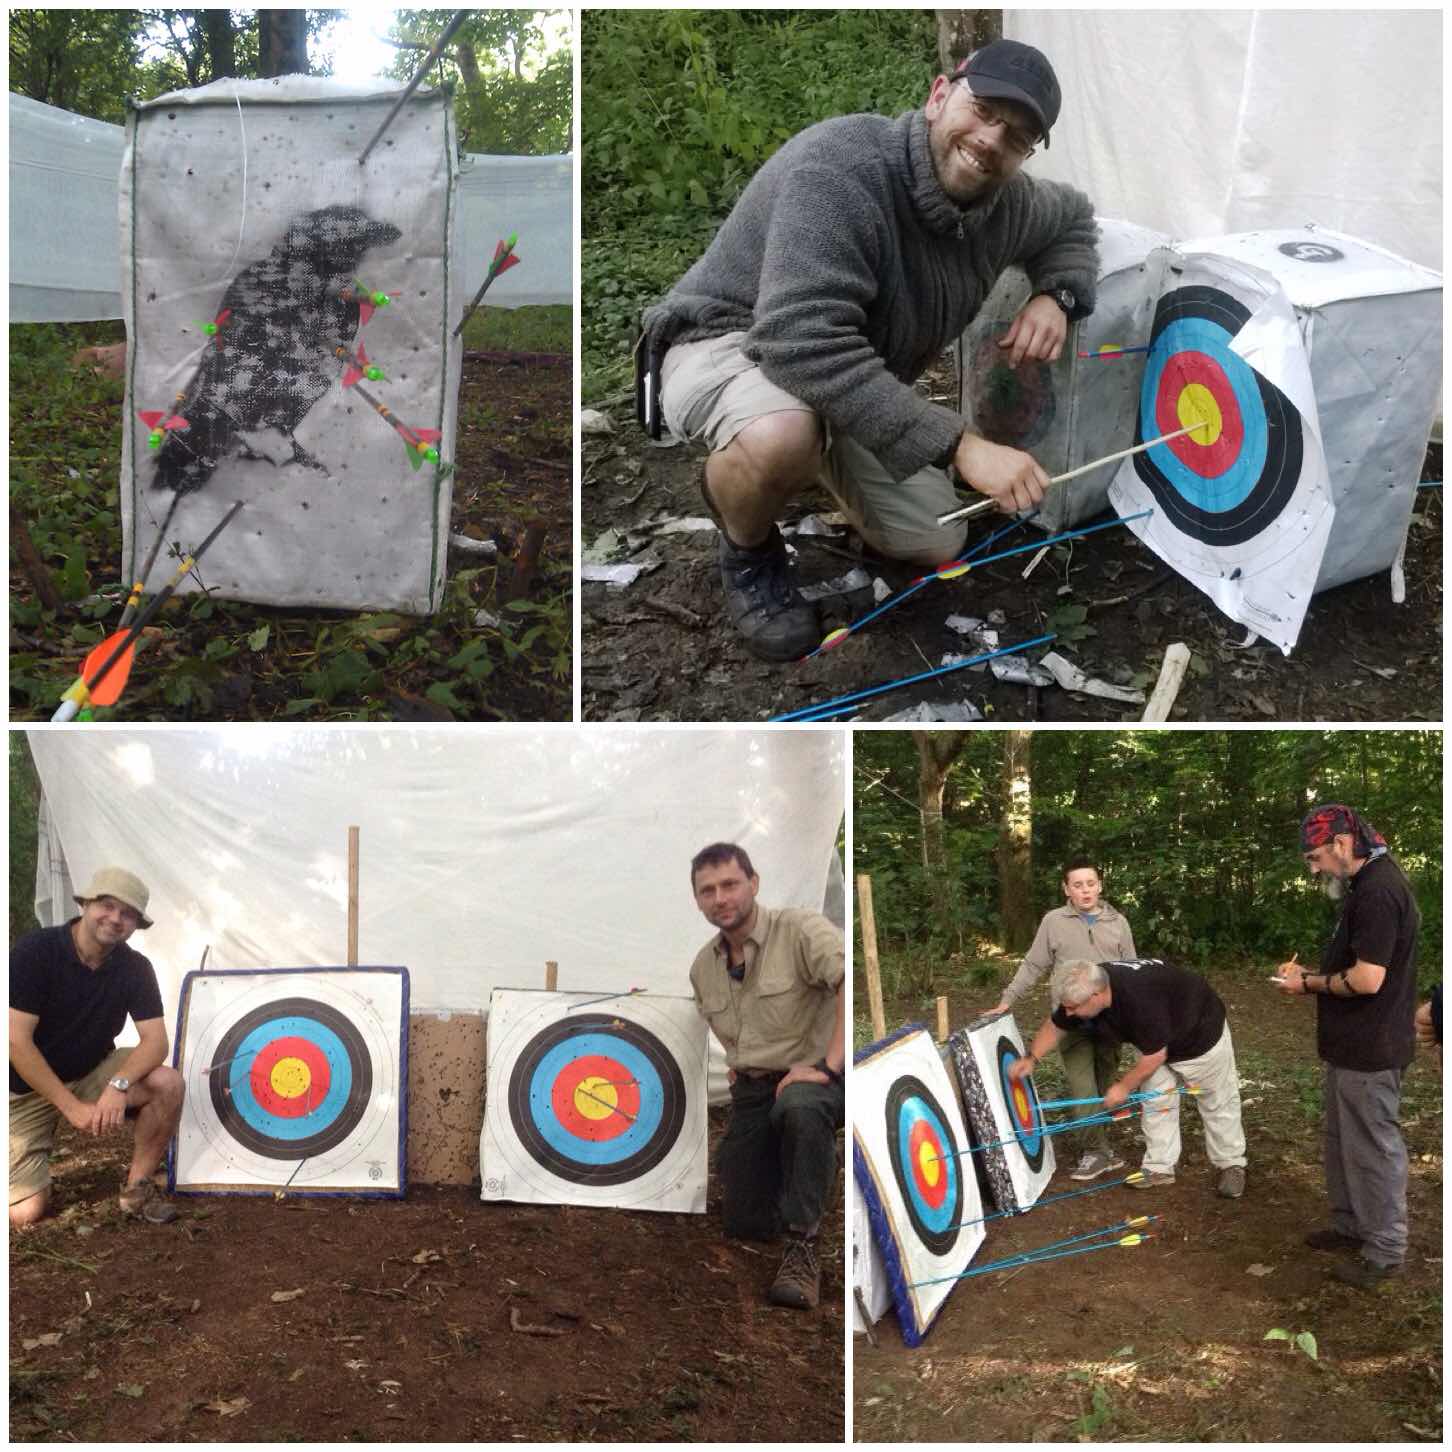
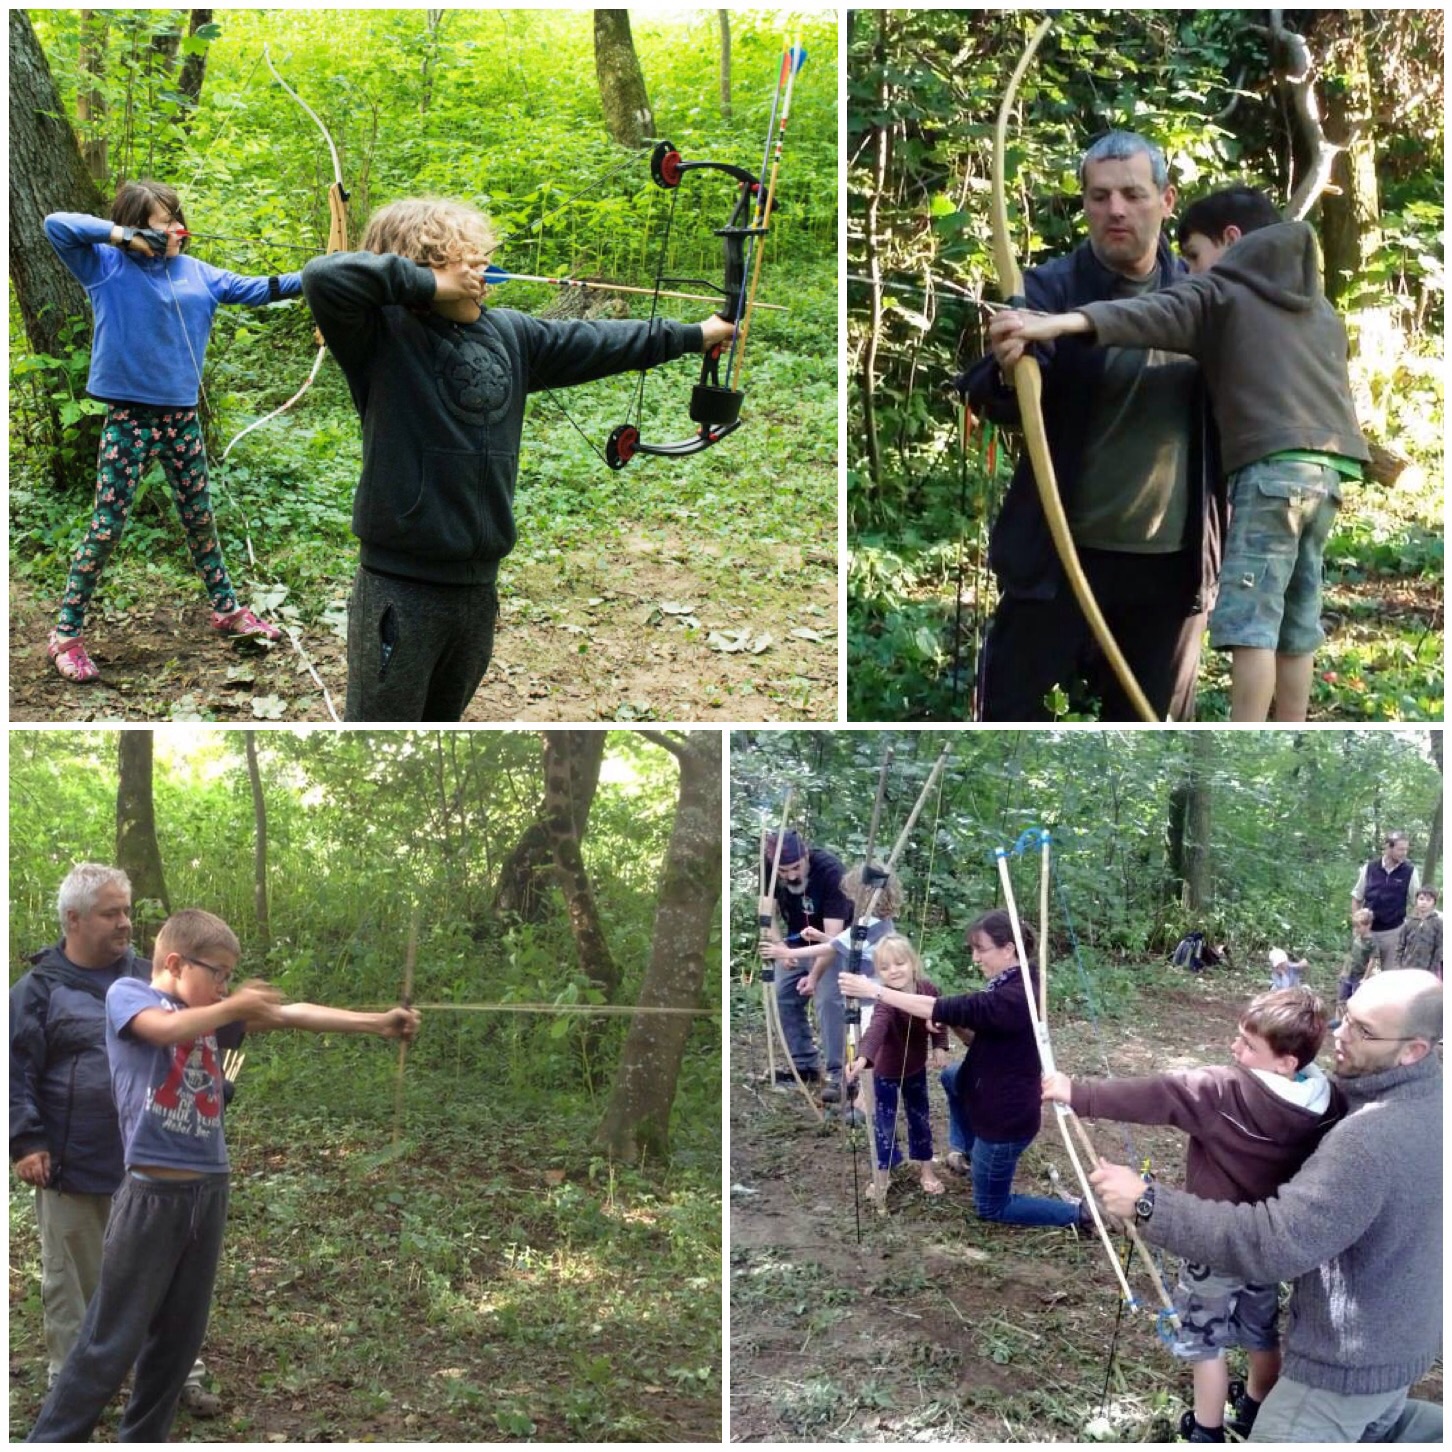
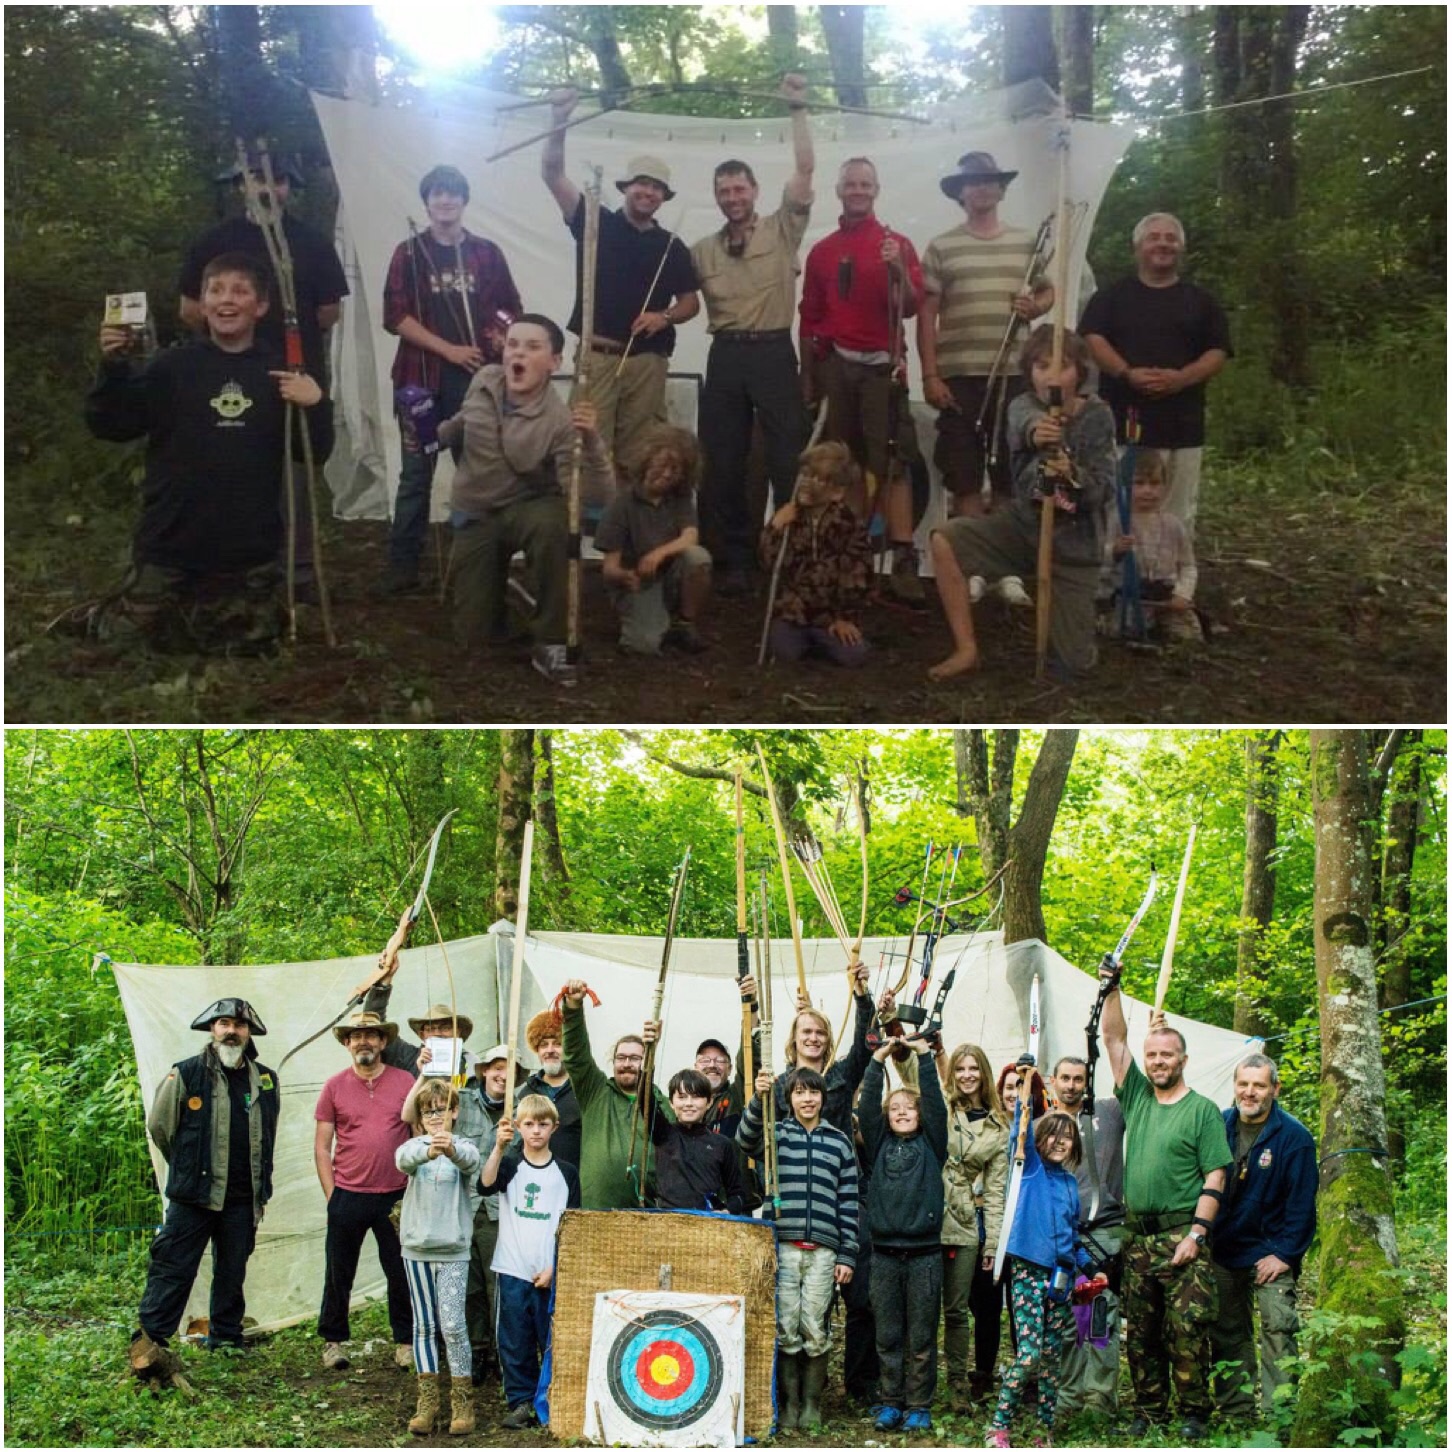
My annual holiday to the BCUK Bushmoot would not be complete without a bit of bow making and some time down on the range.
About ten years ago I was introduced to bowmaking by my friend Bardster (Paul Bradley). Bardster used to run workshops at the Moot which were always well attended. I then studied under John Rhyder of Woodcraft School and made a number of different bows from Ash Flatbows, Holmegaards and the Father & Son bow.
Bushmoot Archery
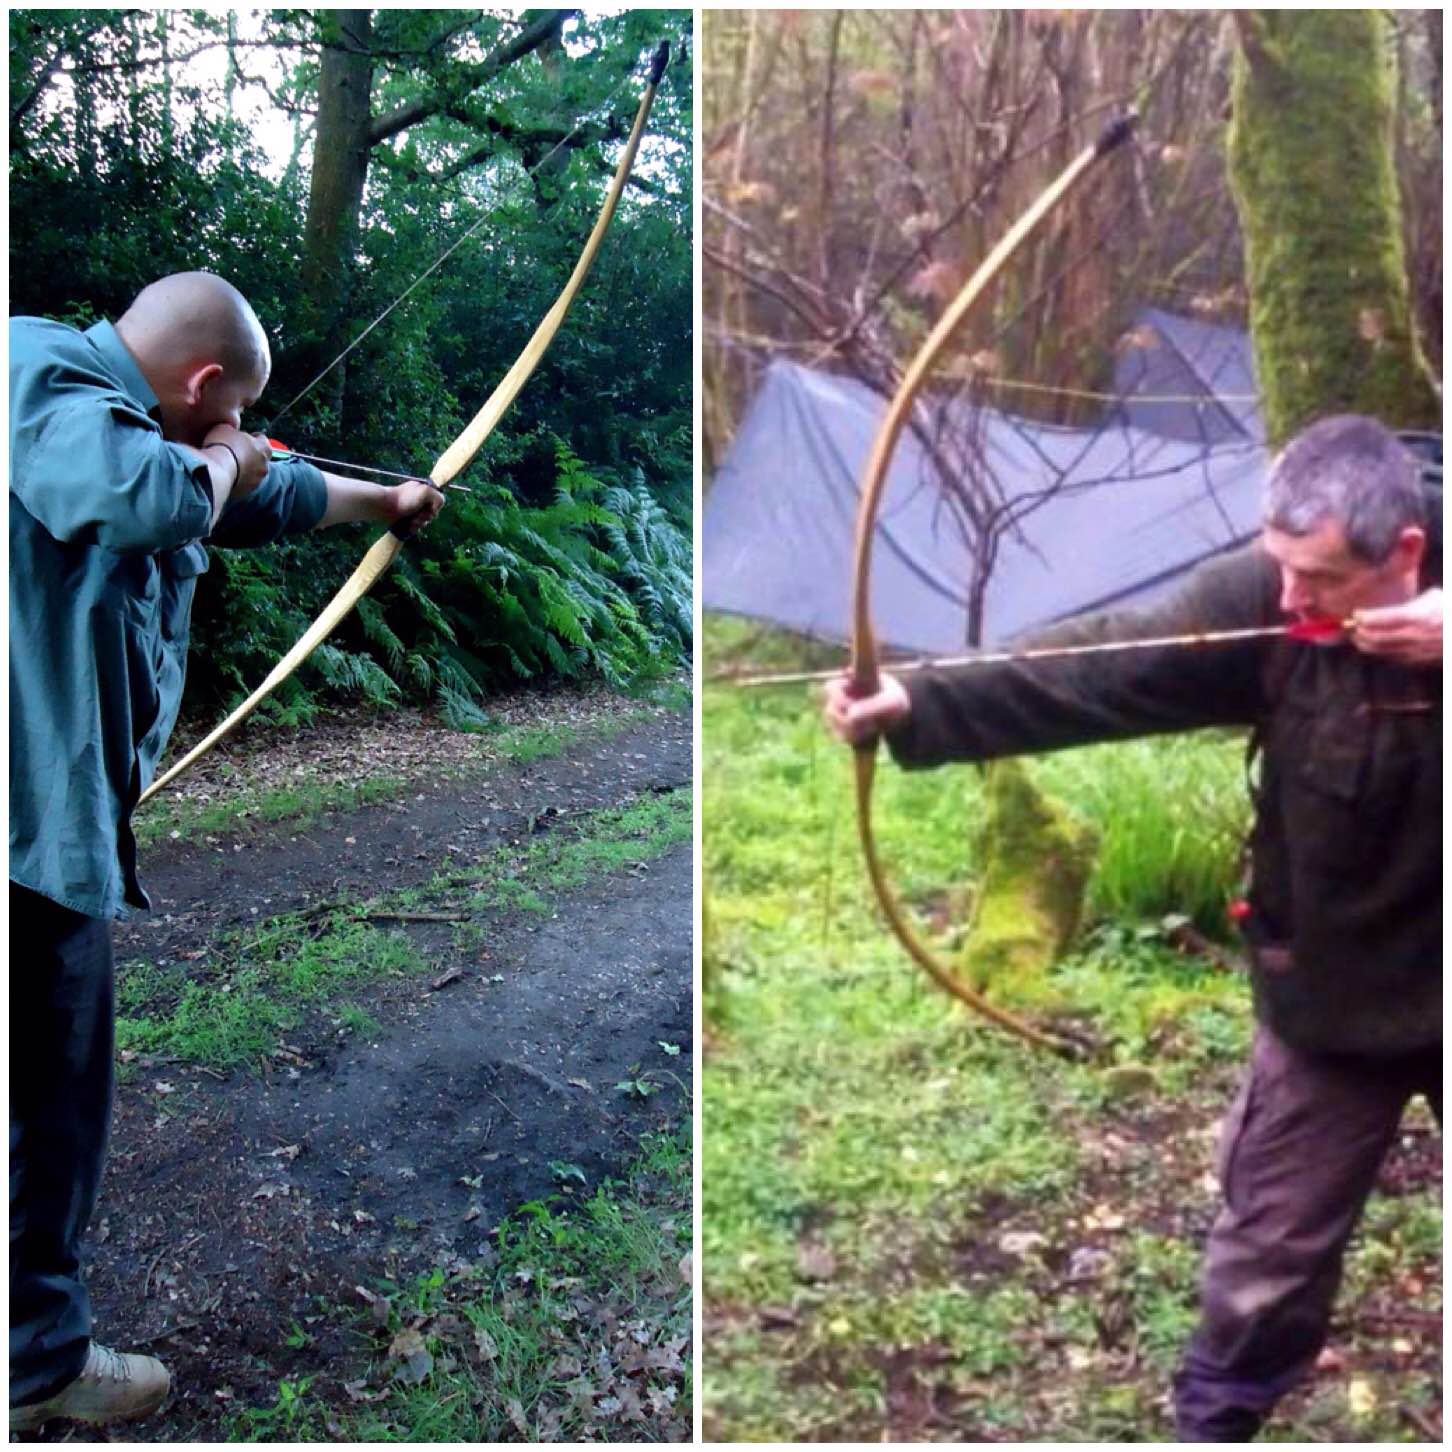
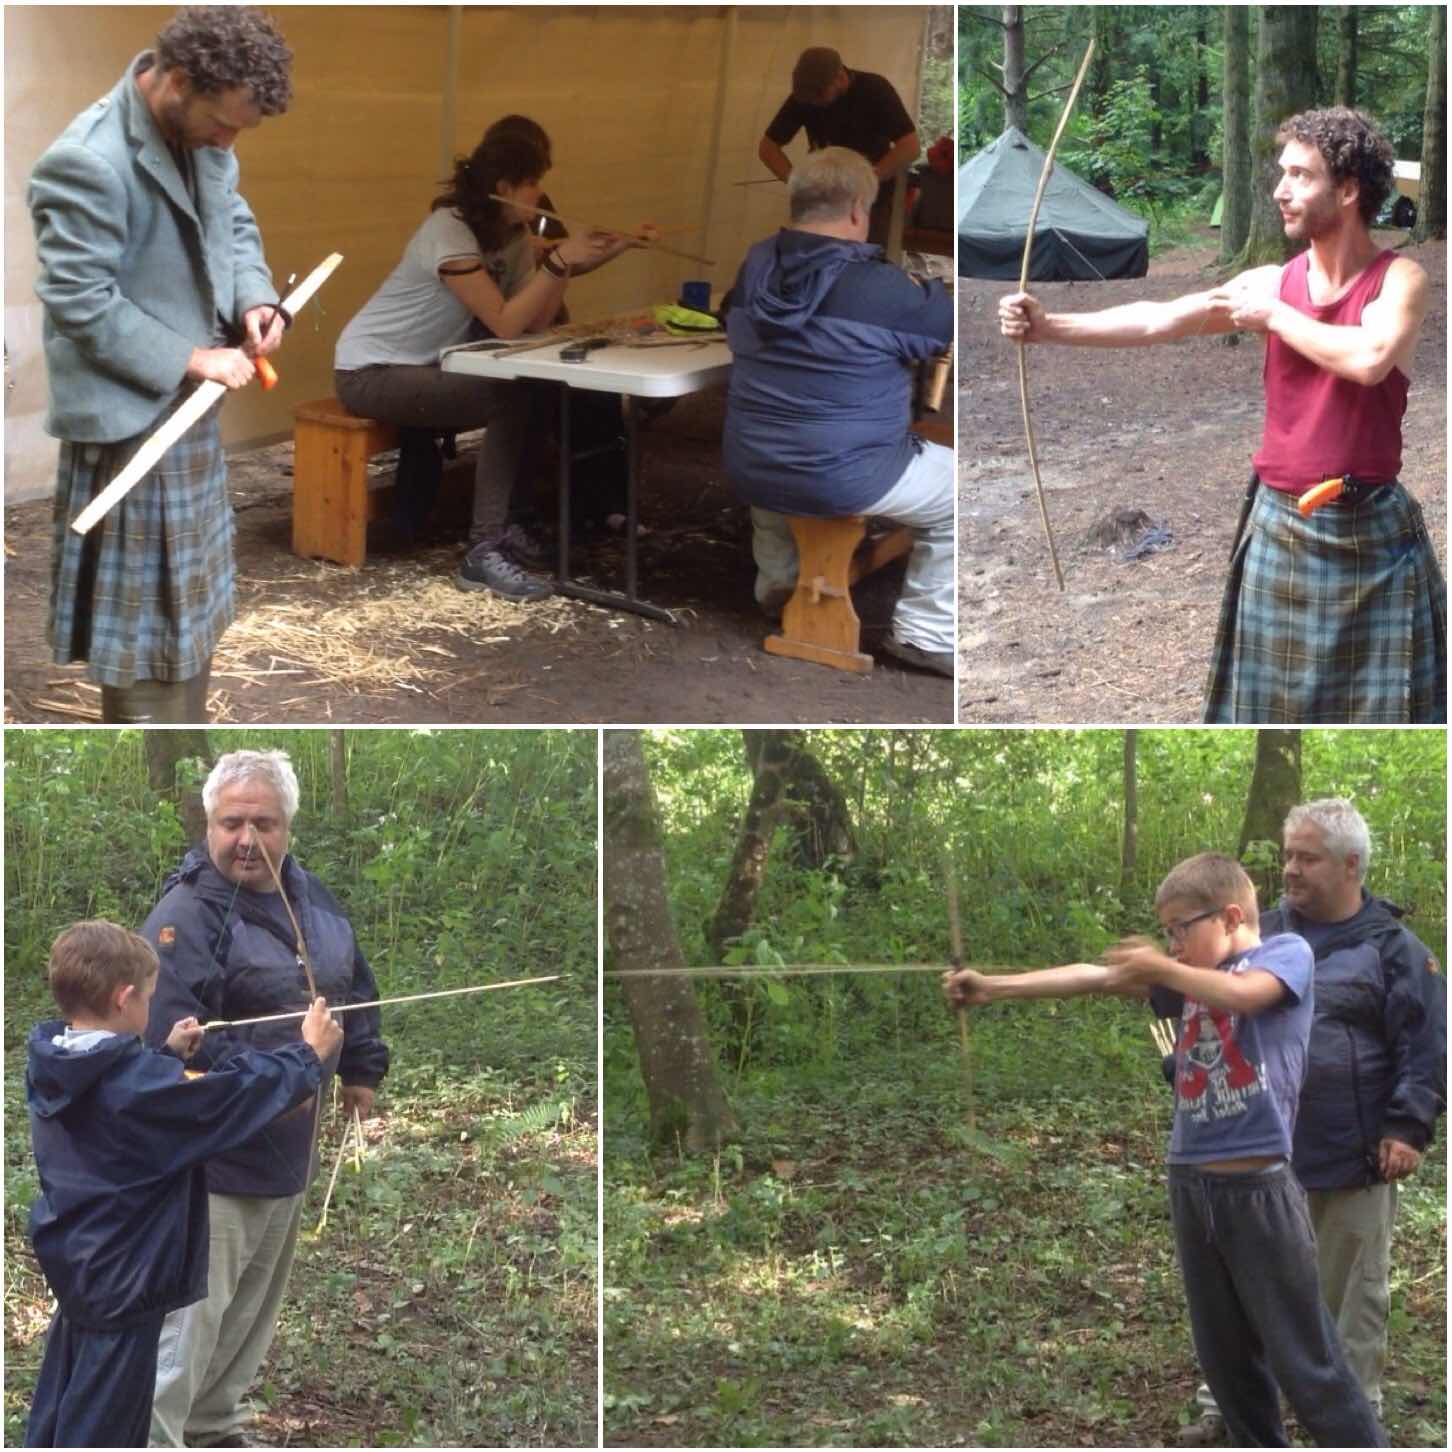
The Father & Son Bow
I introduced to the Moot a number of years ago the Father and Son bow (I had learnt this of my friend Mark Emery of Kepis Bushcraft) This is a ‘quickie’ bow to make and comprises two rods (usually hazel) strapped together. The bows take only an hour or two to make if you know what you are doing although they may take up to a day to make if you are new to it all.
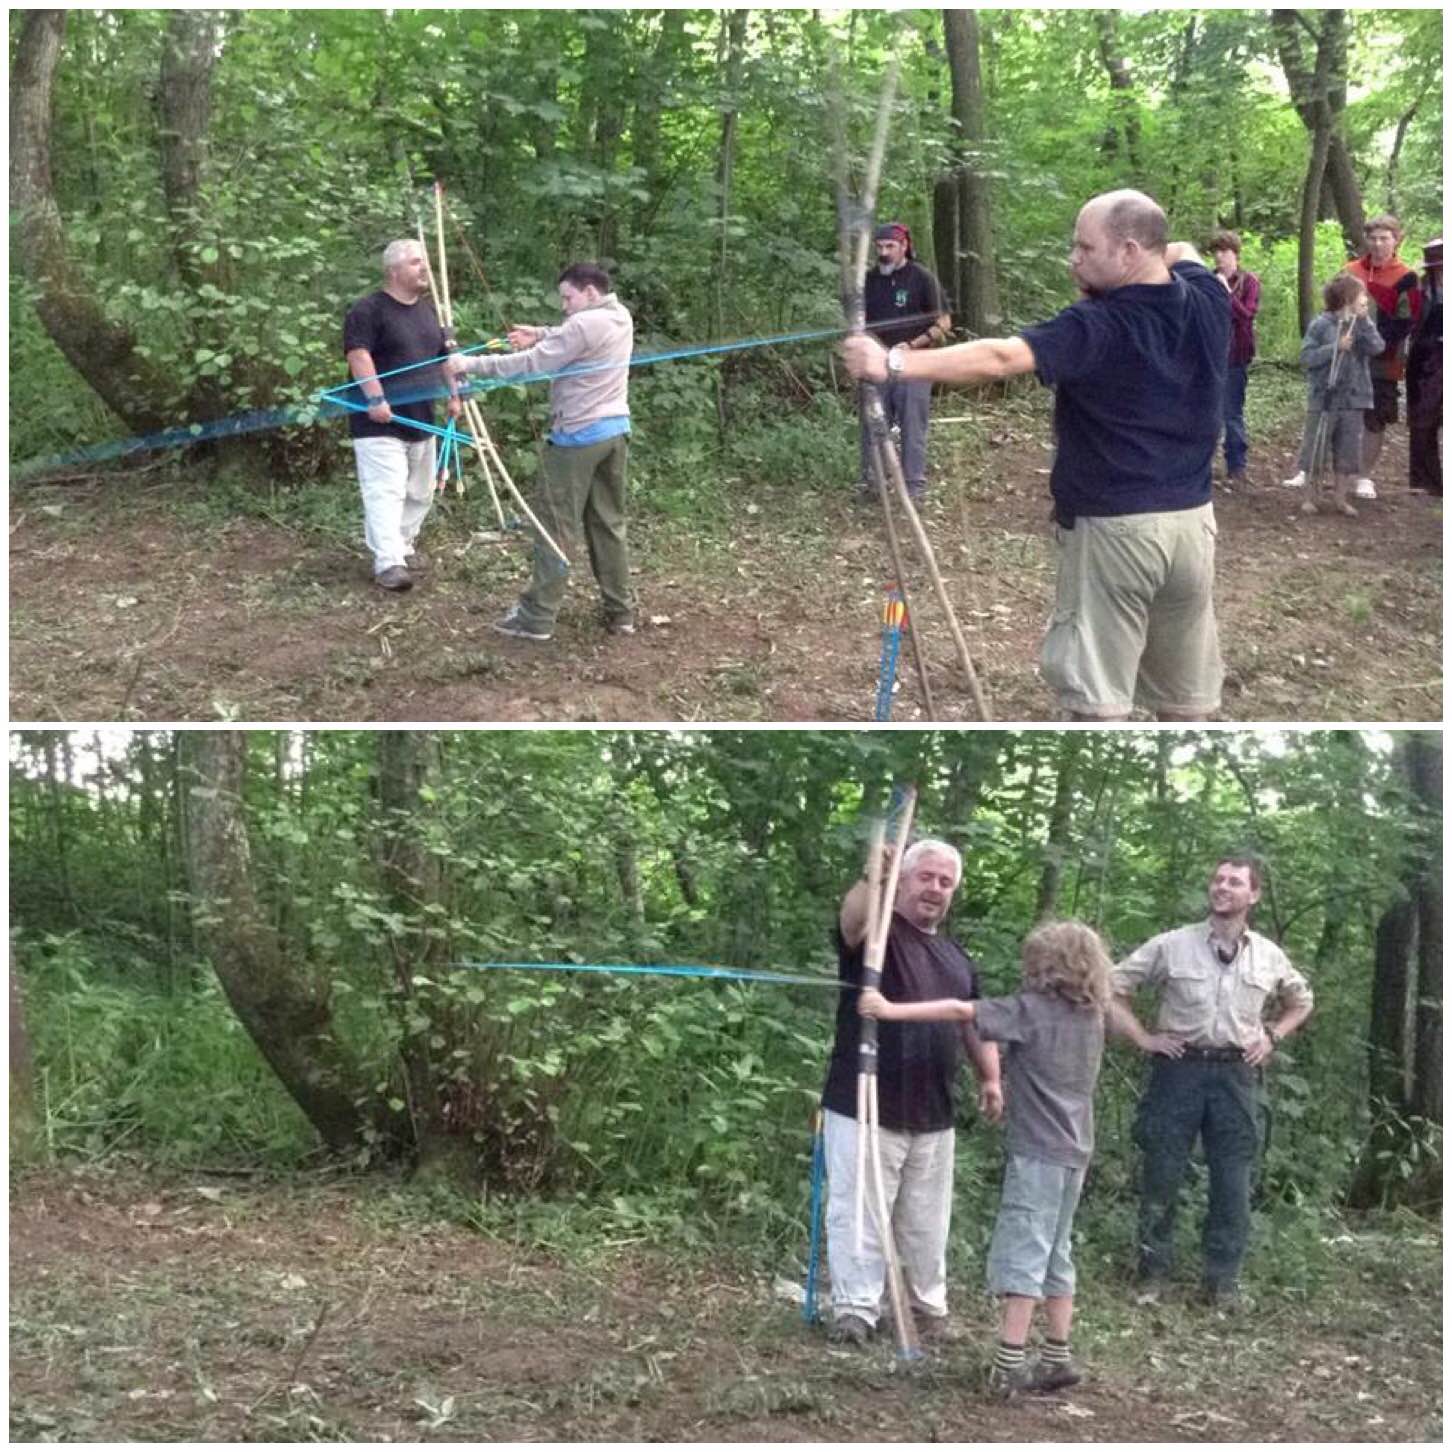
I have run quite a few classes over the years at the Moot on the Father & Son bow. As you can see in the pictures below they were large classes.
The Father & Son bow
Nowadays Chris Pryke runs this class and it is well attended each year. The bows if made properly can last you years. I still have and use my first one which is over 6 years old now.
In new hands
I have had hours and hours of fun making and using these bows over the years. They are cheap to make, very accurate with practice (normally I shoot them between 10 and 20 metres) and will shoot on a high arc about 60 to 70 metres.
Father & Son Bow in action
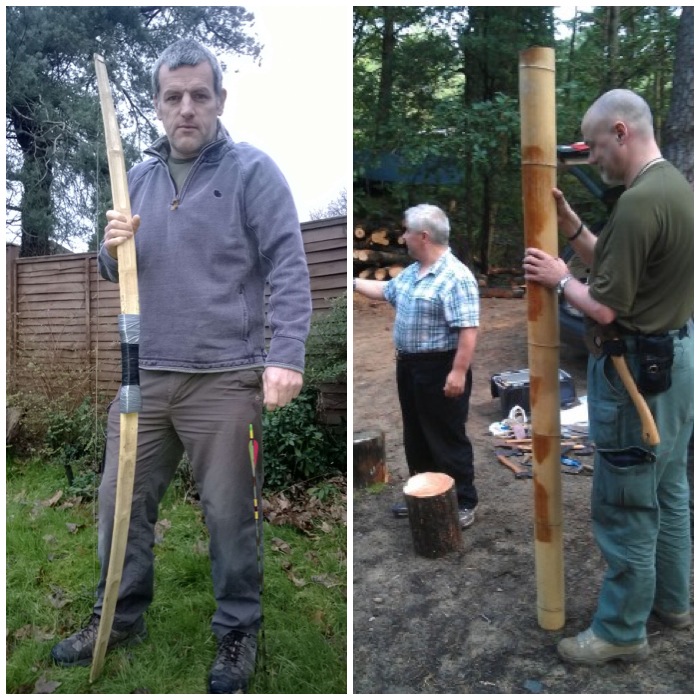
The Bhutanese Bow
One of our long-term members is Wayne Jones of Forest Knights bushcraft school. Wayne is an expert bowyer and taught me a few years ago to make a Bhutanese bow. This type of bow is made of a large piece of bamboo and relatively quick to make (about half a day I think it took me)
The Bhutanese Bow
The bow is constructed of two separate pieces of bamboo joined in the centre. The join can be with, tape, cord or with pins.
Building the Bhutanese bow
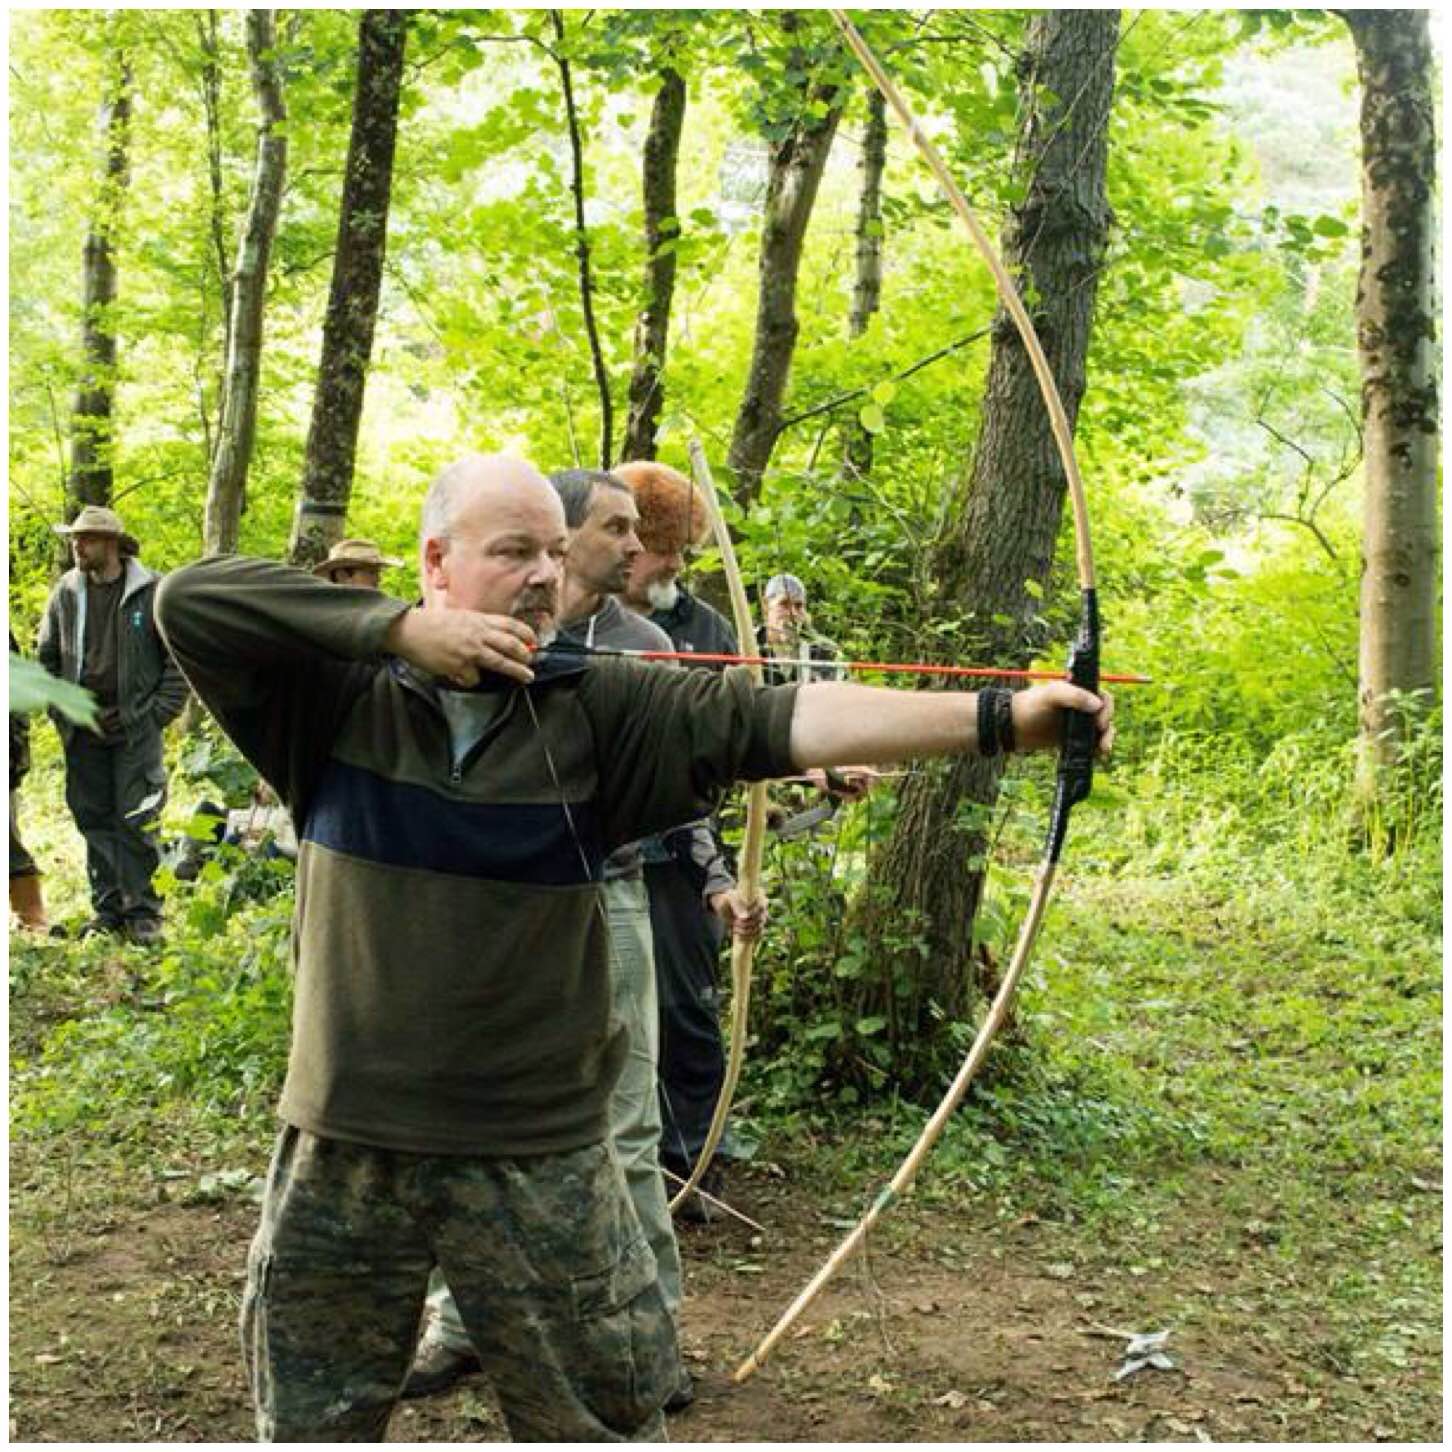
Most folk who start one of these bows can be found down on the range in the evening.
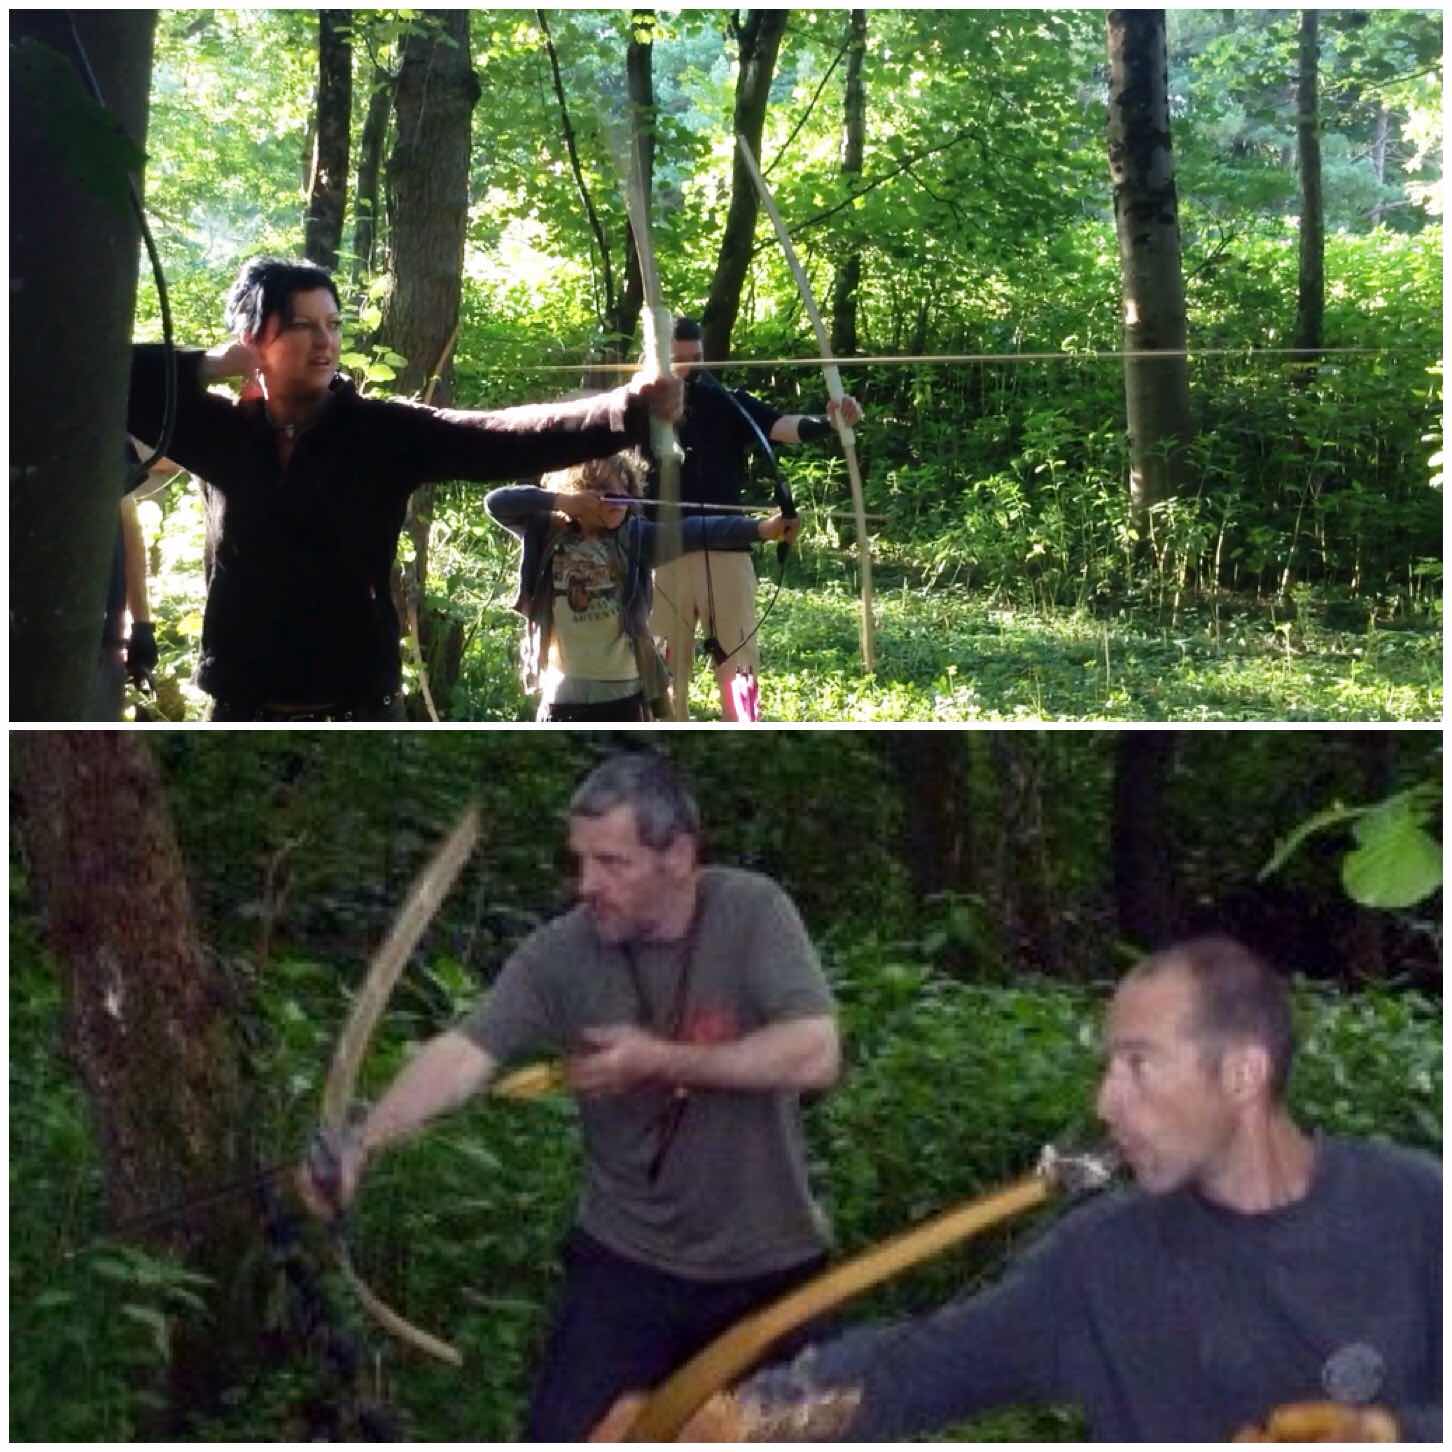
We started the range at the Moot about six years ago. it is well away from all the camping areas surrounded by wooded sand dunes. There are two Bhutanese bows in the top picture below in action and I am holding one in the bottom picture below.
Bhutanese bows in action
Traditional Bows
Wayne sometimes runs workshops similar to the ones Bardster did in the past making more traditional style flatbows. I hope to one day make time to study under Wayne as it has been a few years since I have made an Ash Flatbow.
Classic bows
The Mini Bow
The final type of bow that is produced at the Moot is the Mini bow. Wayne uses the large pieces of bamboo he brings along for the Bhutanese bows to also make these very small Mini bows. The kids absolutely (and a few adults) love them.
They do not take long to make and are small enough to be made as one piece.
The Mini bow
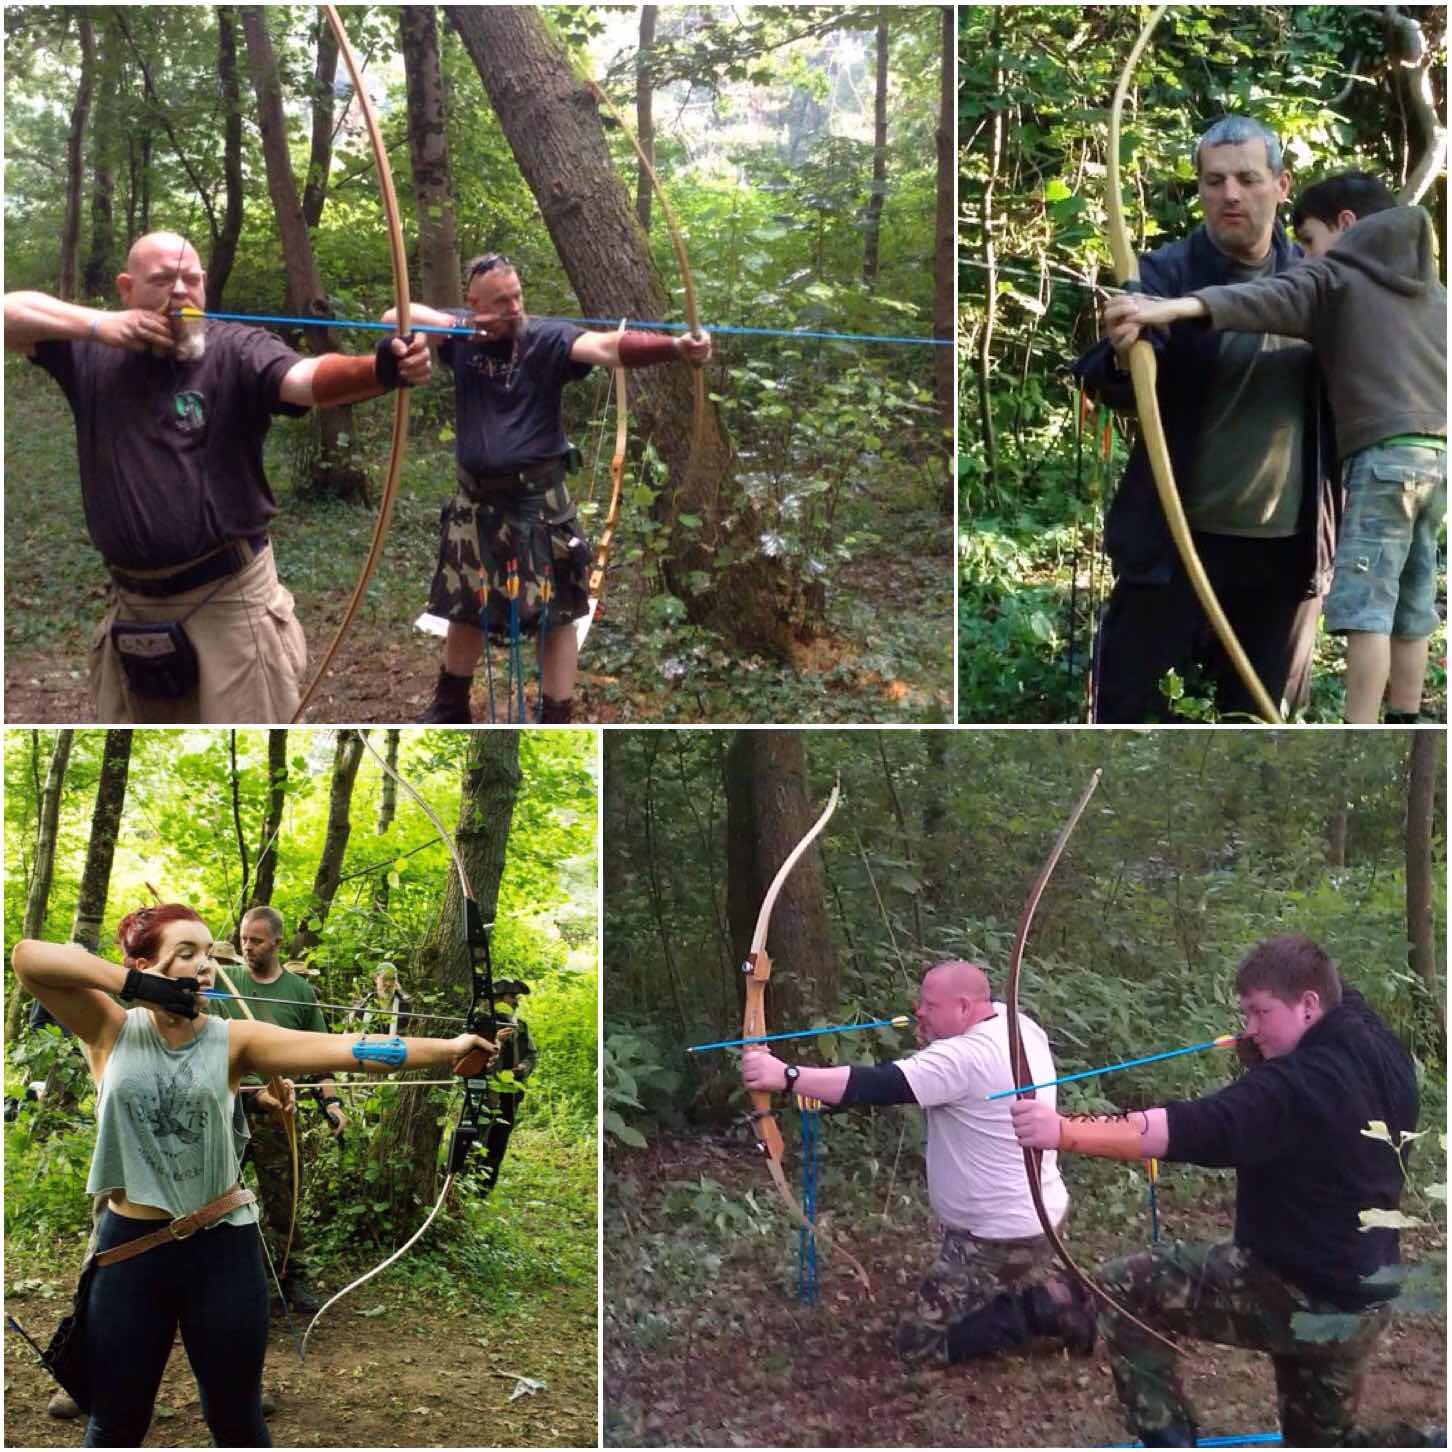
Different Bows
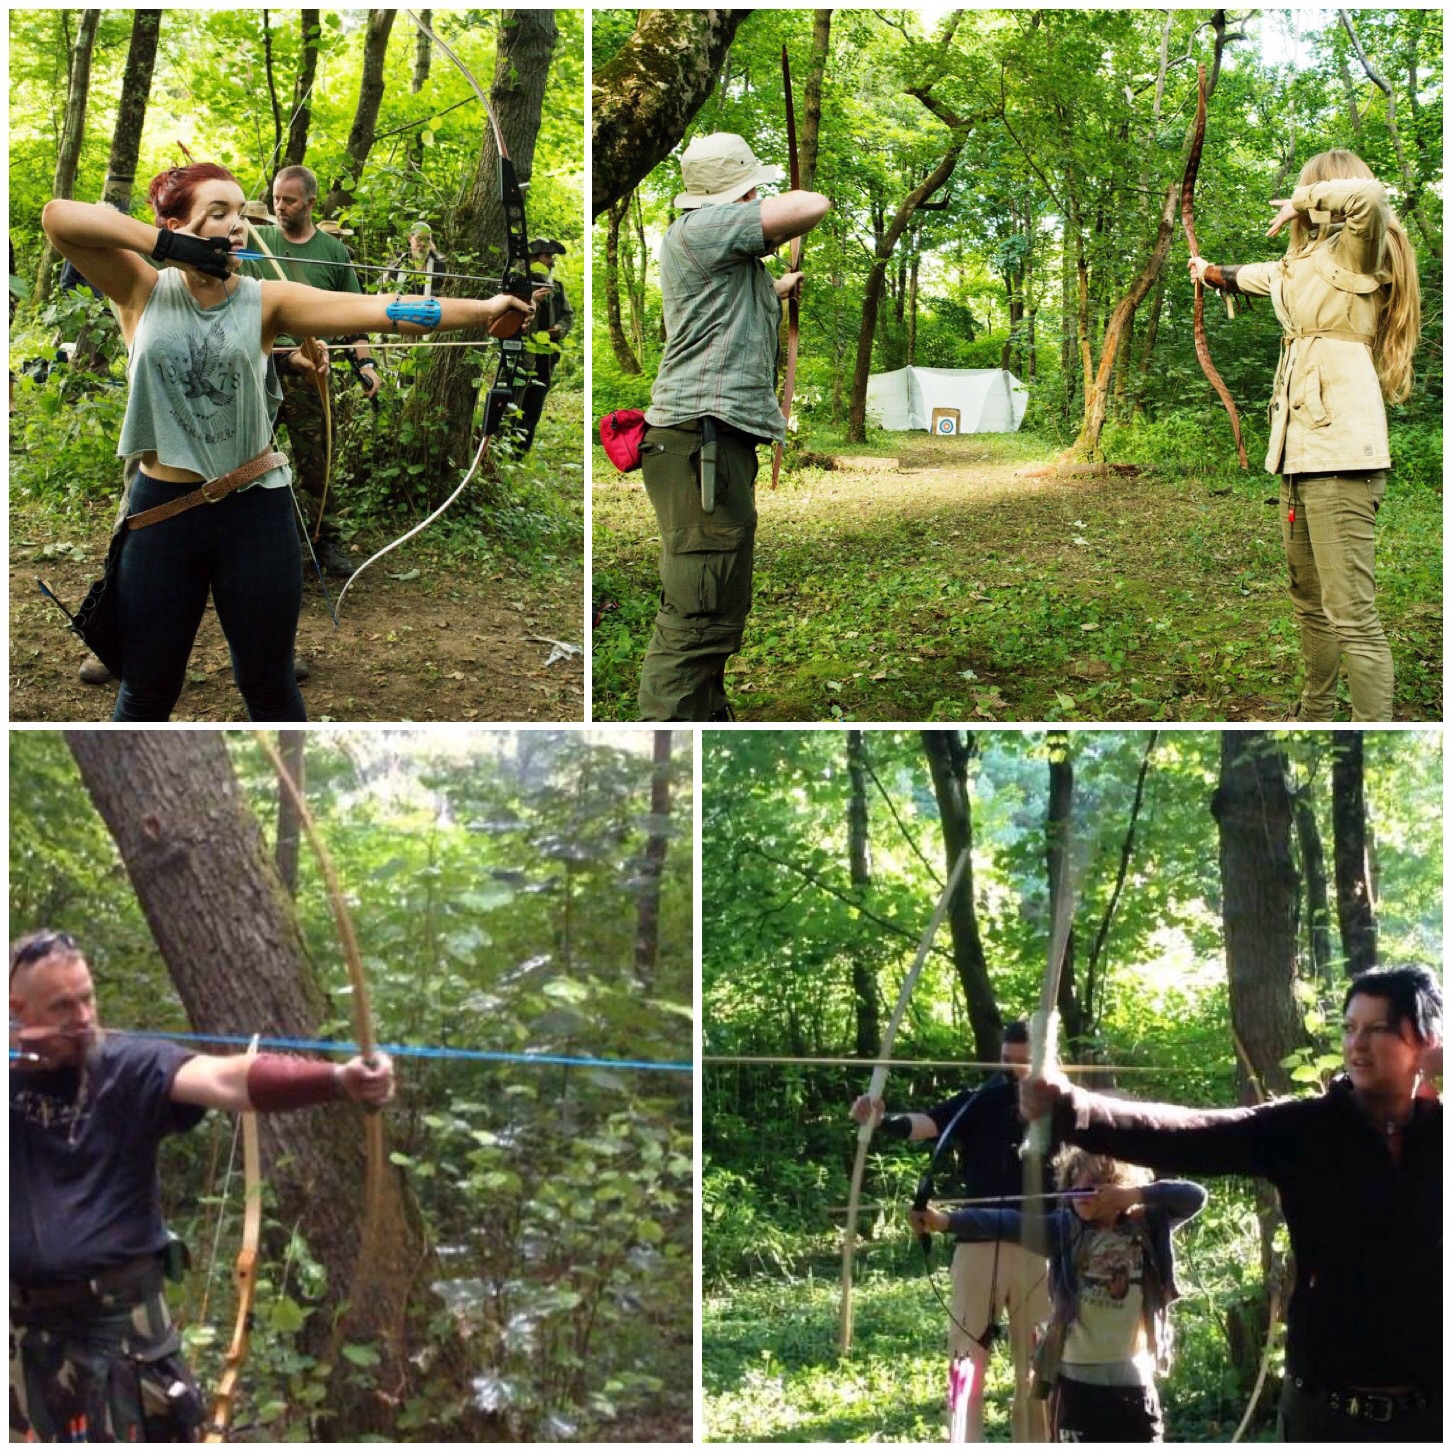
On the range you will see a wide variety of bows in action from the traditional (top two have my Ash Flatbow and my Holmegaard in use.
Below them are some of the modern bows people bring along to the Moot. Some are very powerful and come with all manner of attachments. When it comes to the competition we hold we do not mind what type of bow you use as long as it does not have extras such as stabilisers, sights or gears attached.
Old and new
I am always intrigued with the different bows that appear and was particularly interested in the Mongol style bow Lisa had brought along as I had never seen one before (bottom right).
Bows in all sizes
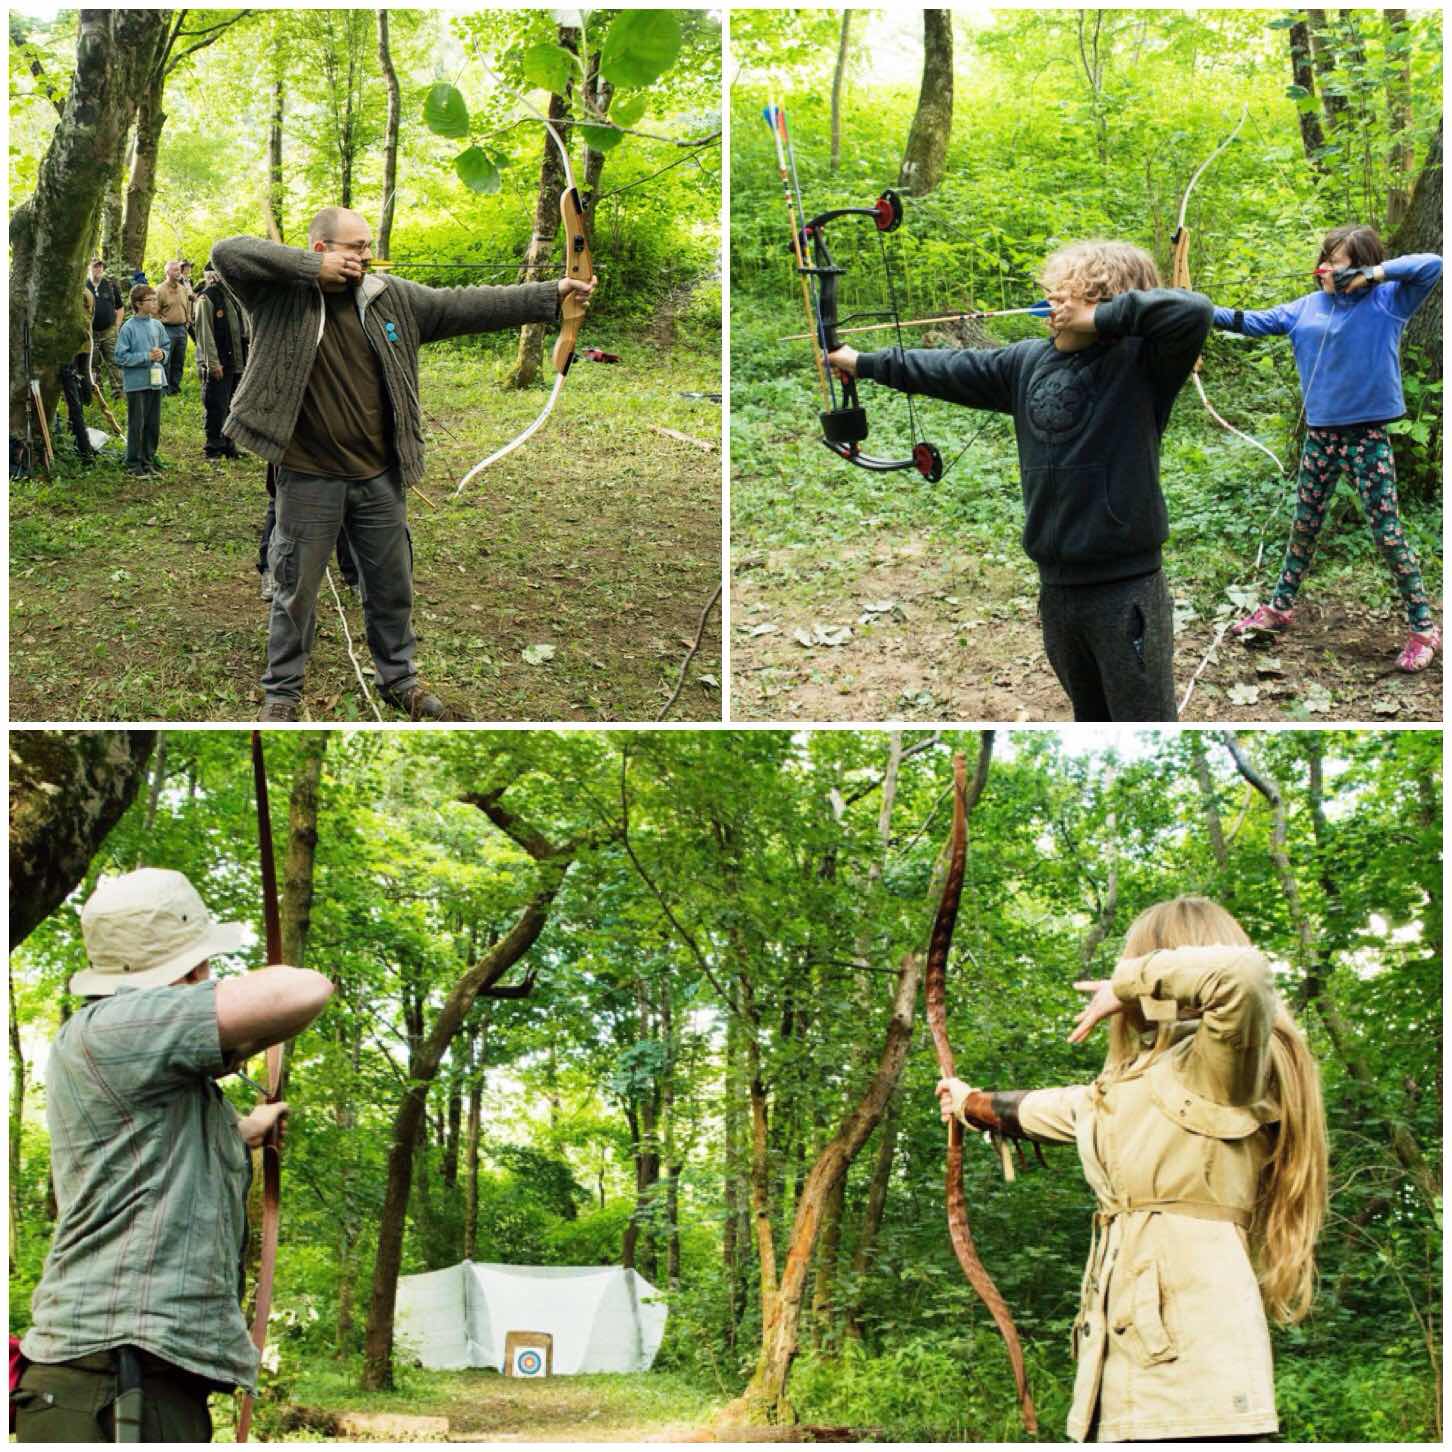
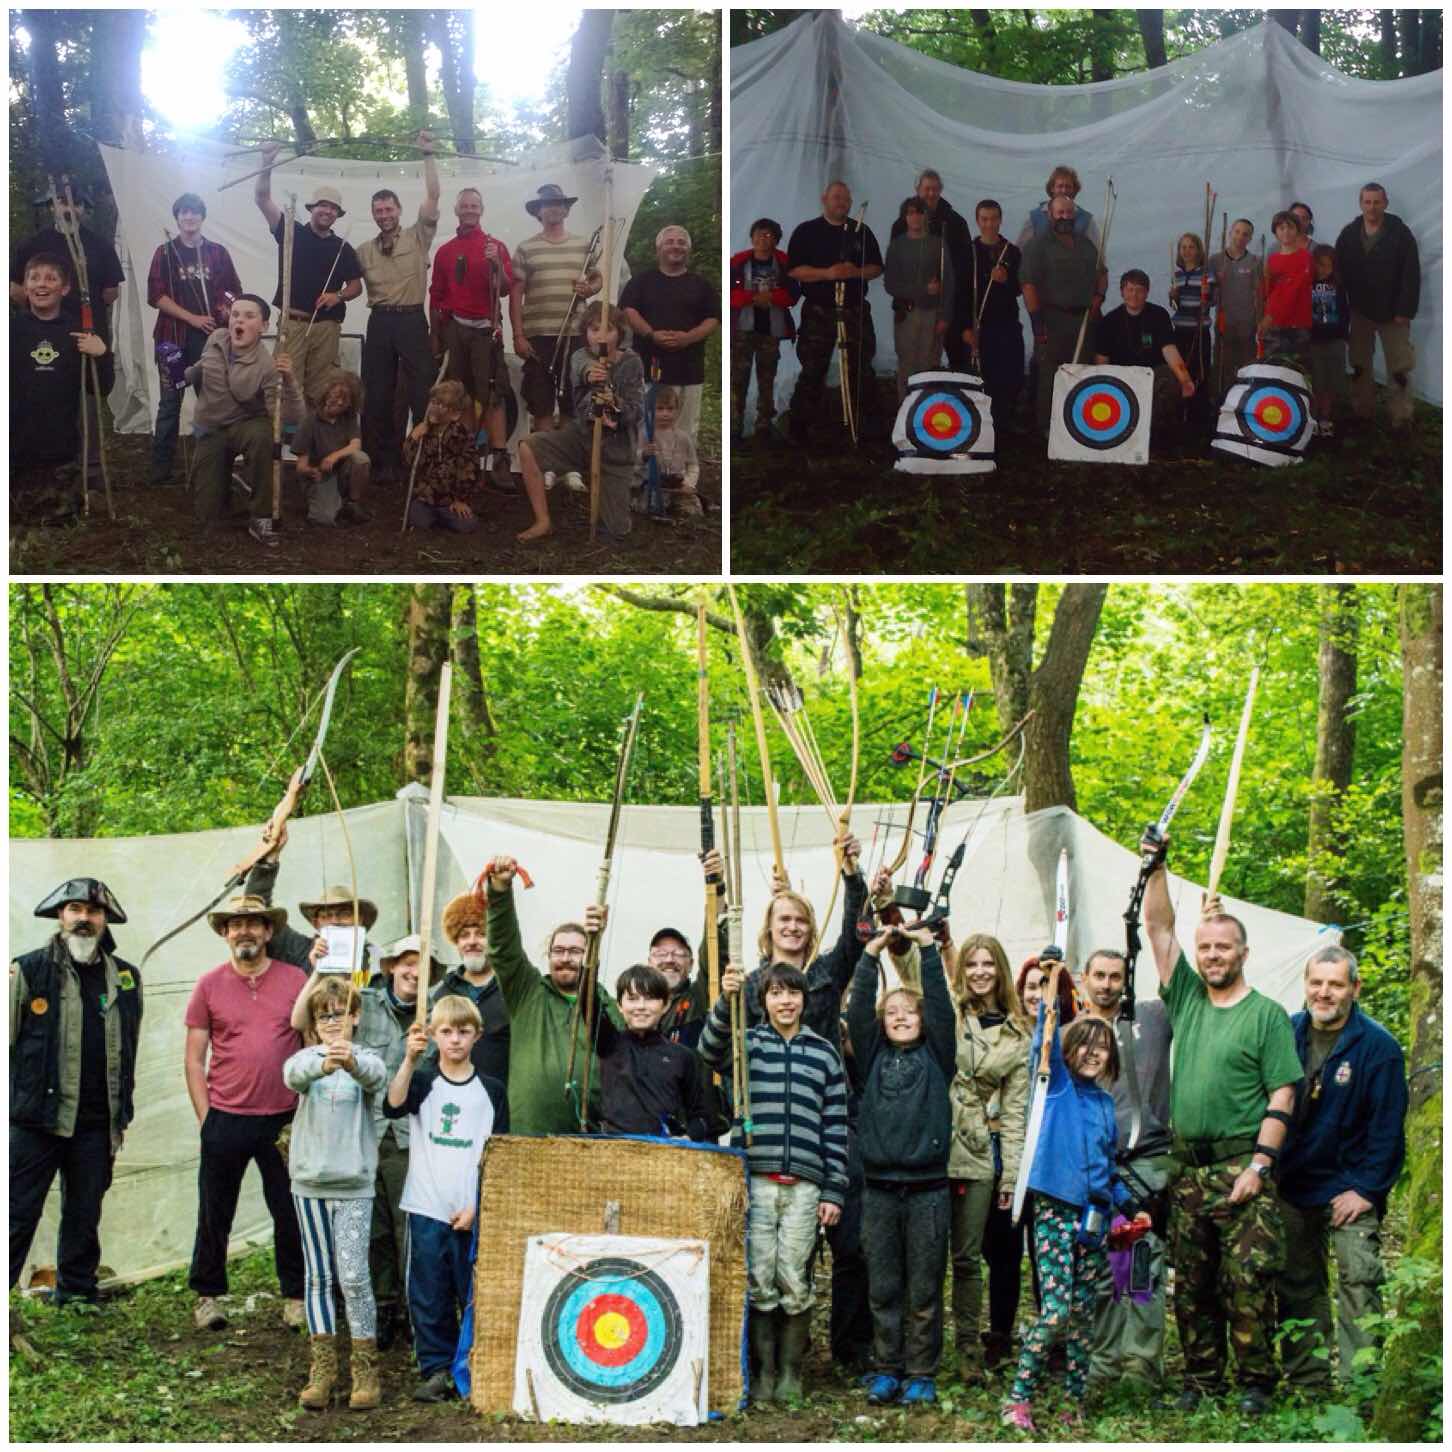
Each evening during the Moot (and sometimes during the day) a few of us troop down to the range for a shoot. Running the range is usually Cap’n Badger, Paul Pomfrey, Ian Woodham and myself.
We try and balance the time between teaching novices and letting the ‘Old and Bold’ have time to keep their eye in. After a full days teaching bushcraft having to do this can initially feel like a chore to me however once I have shot in a few arrows it can be quite relaxing, especially after a very busy day.
Hard contests
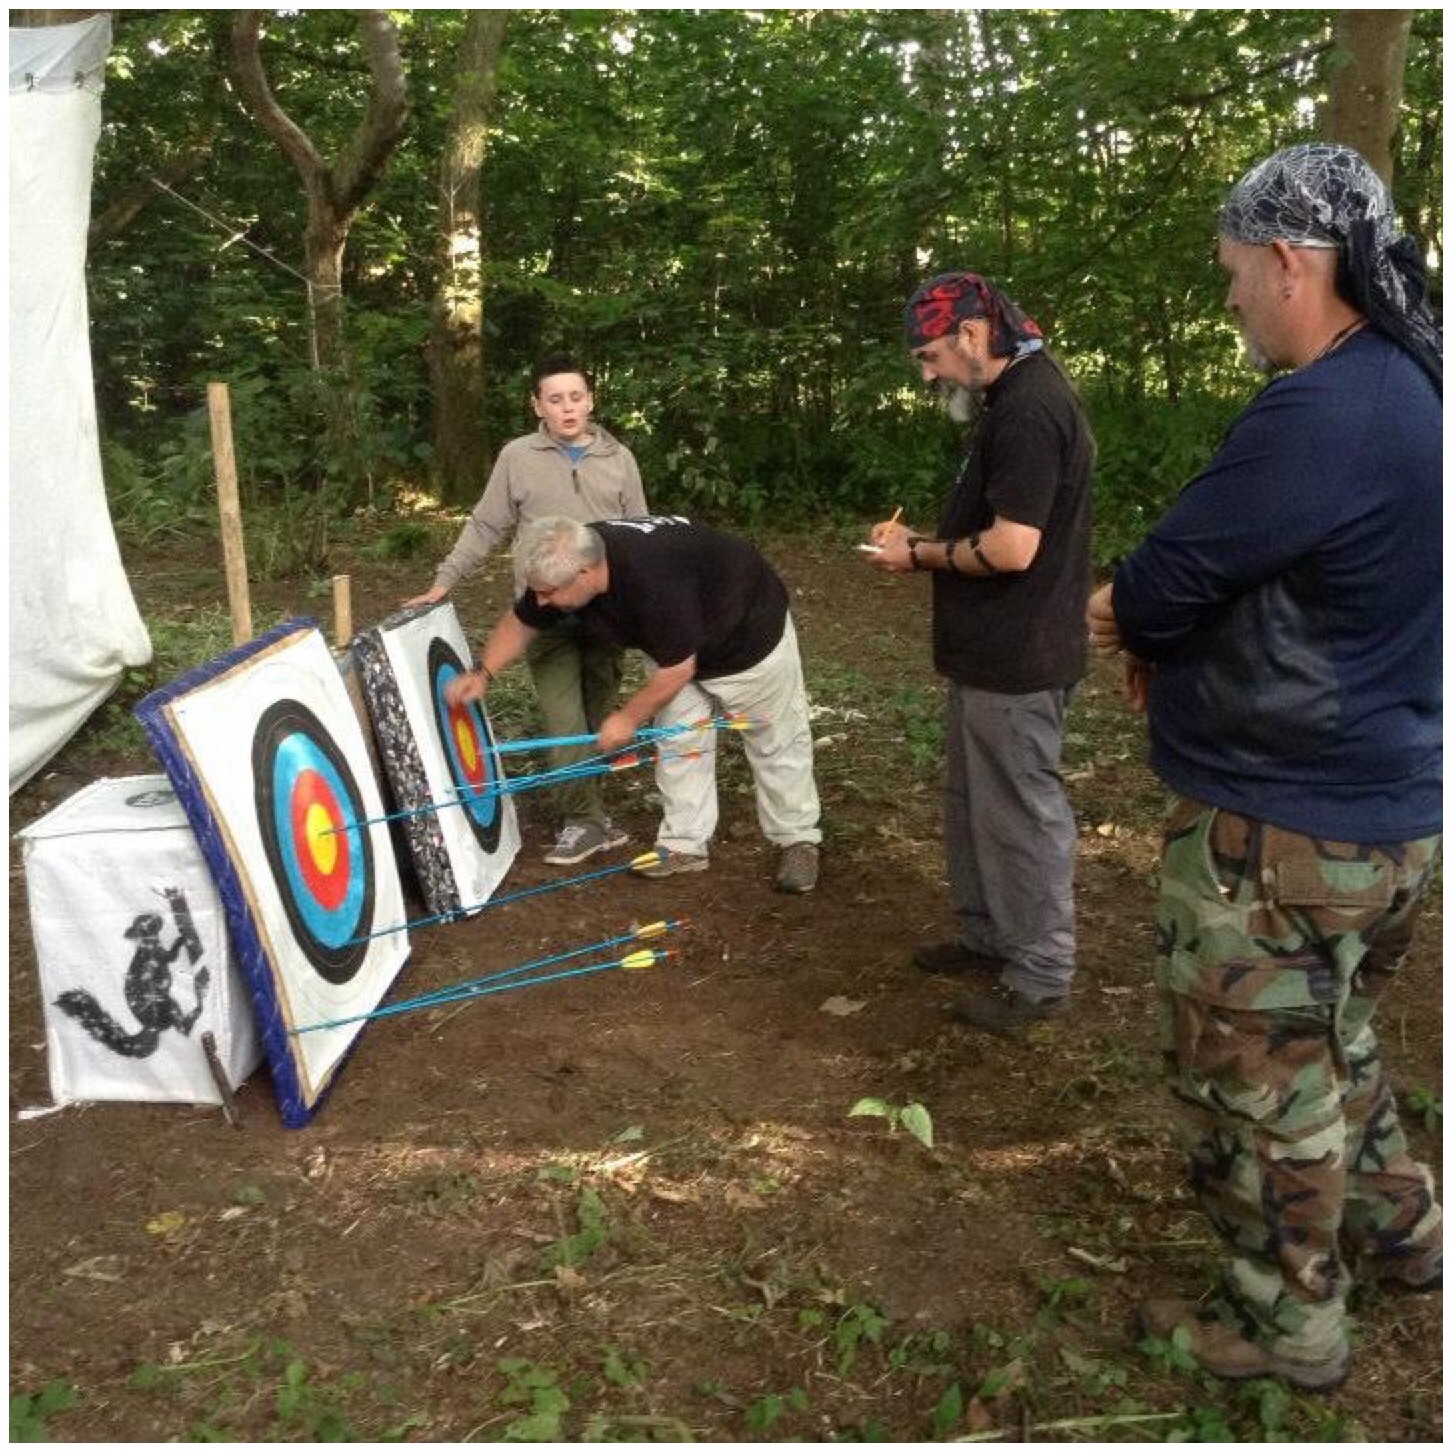
Competition day happens usually in the second week of the Moot and it gets very competitive. We normally run two competitions, one for the kids and one for the adults. They have to shoot at different ranges and are closely marked by the referees as there are usually some very good prizes up for grabs.
Over the years
Afterwards when all the scores have been tallied up the thing I really like about this time down on the range is how good natured everyone is.
The winners get first dibs at the prizes (everyone brings a prize for the pot with a few extras donated) however everybody walks away with a prize at the end.
Having fun
I have been to many different types of bushcraft shows, courses and meetings over the years but it is only at the BCUK Bushmoot that I see such a wide range of archery on display.
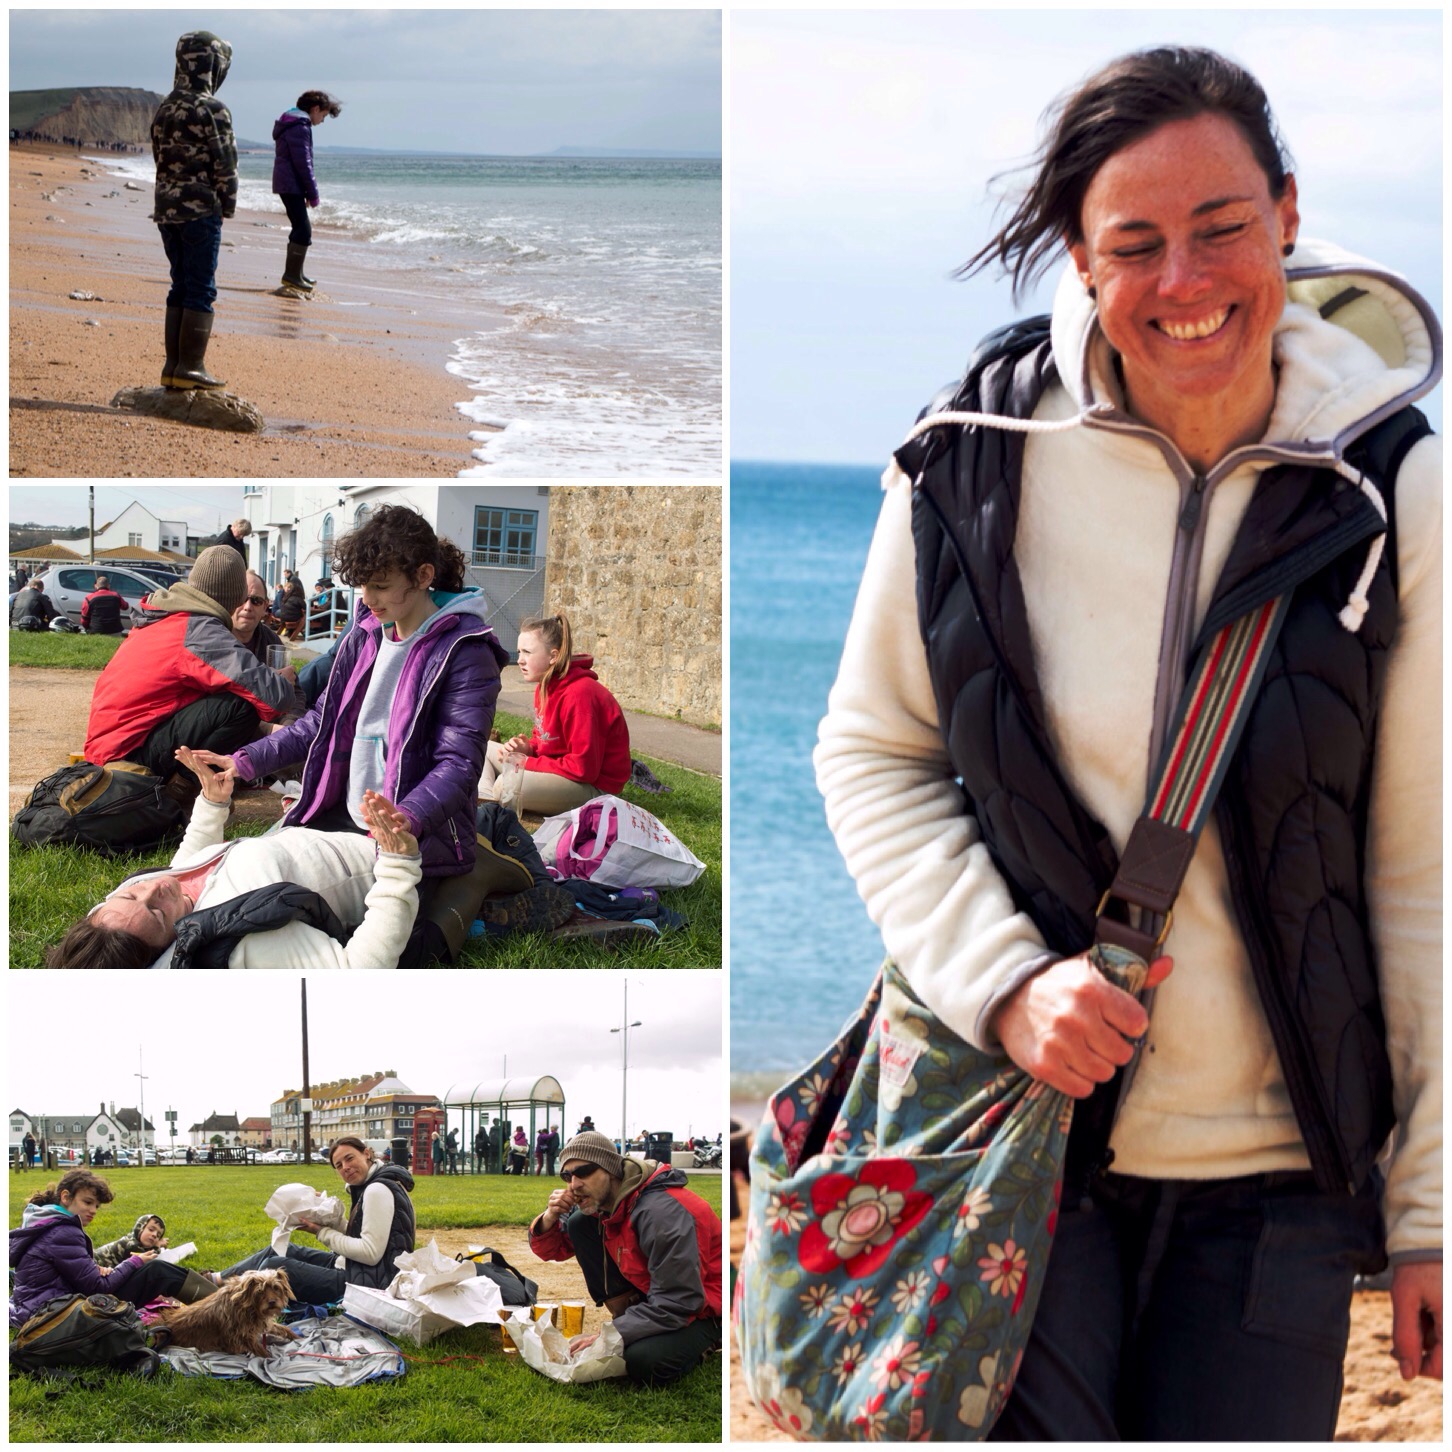
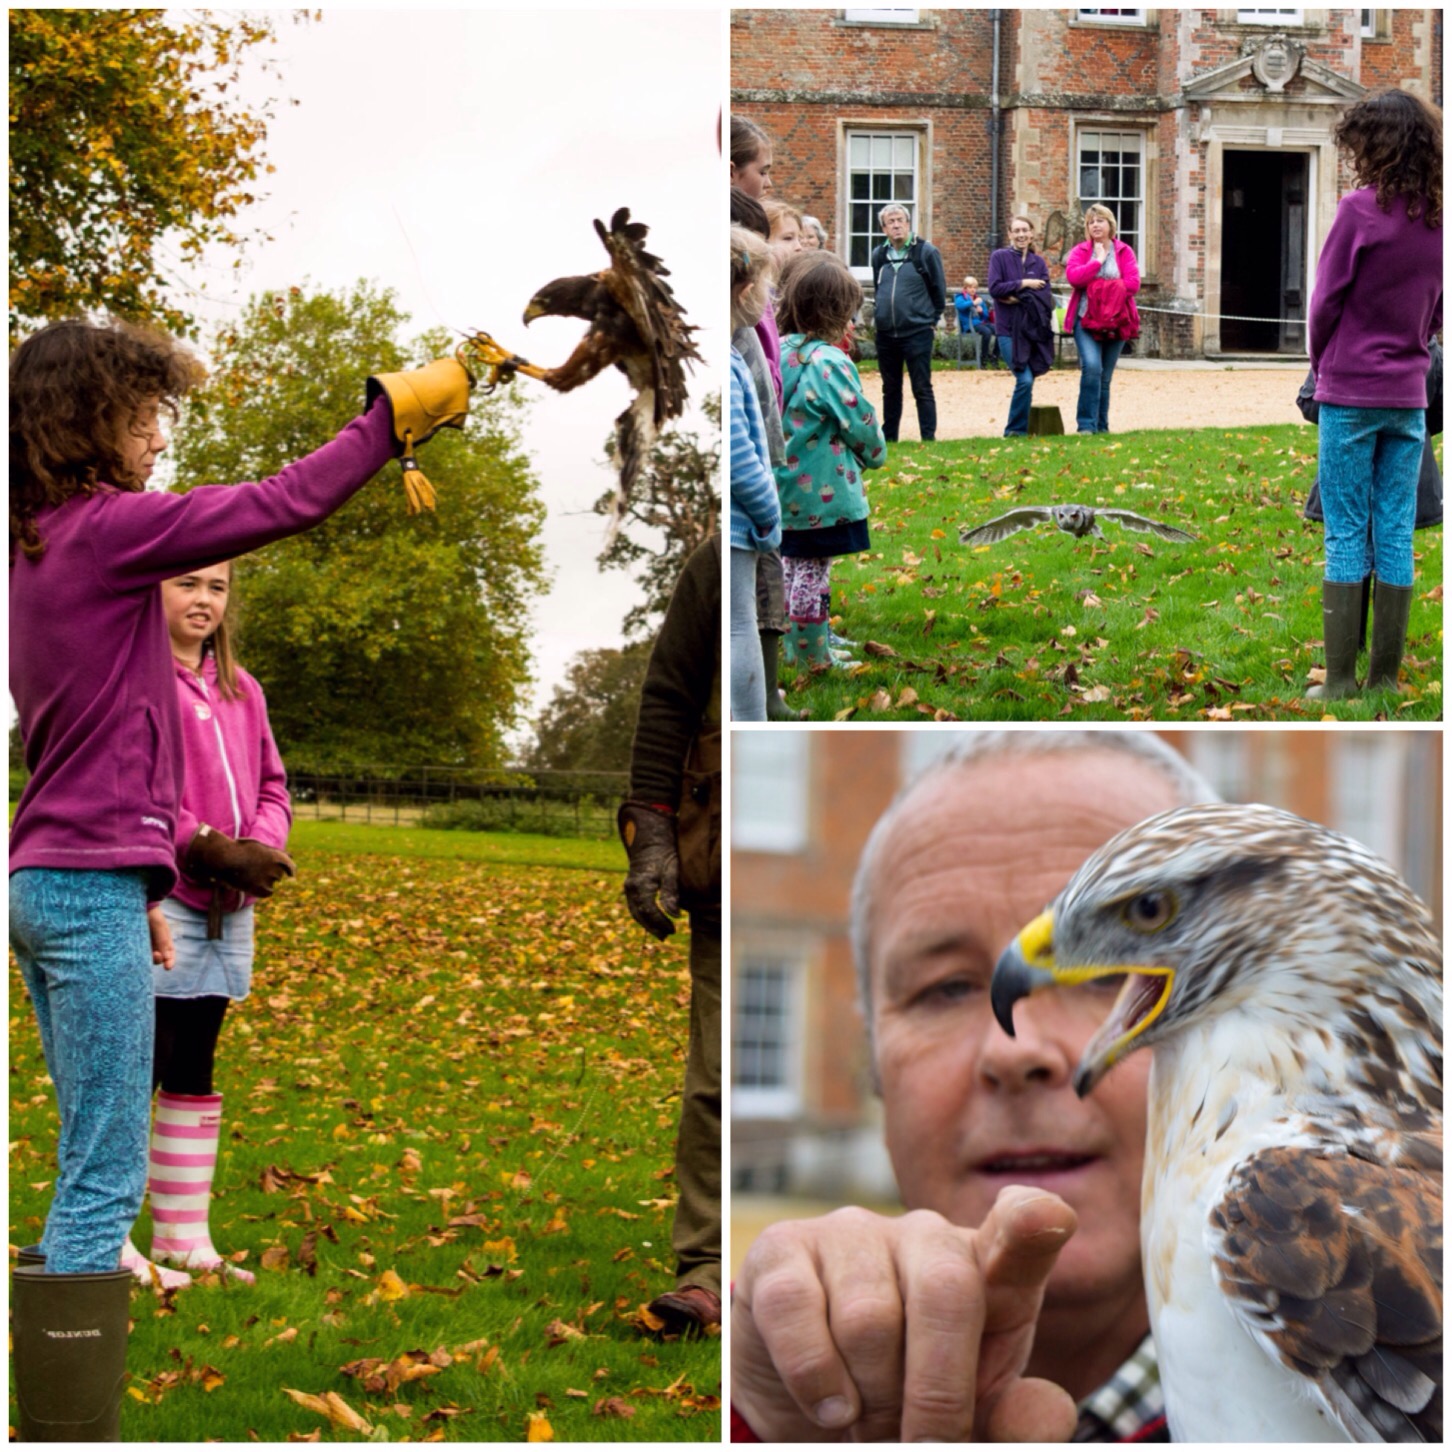
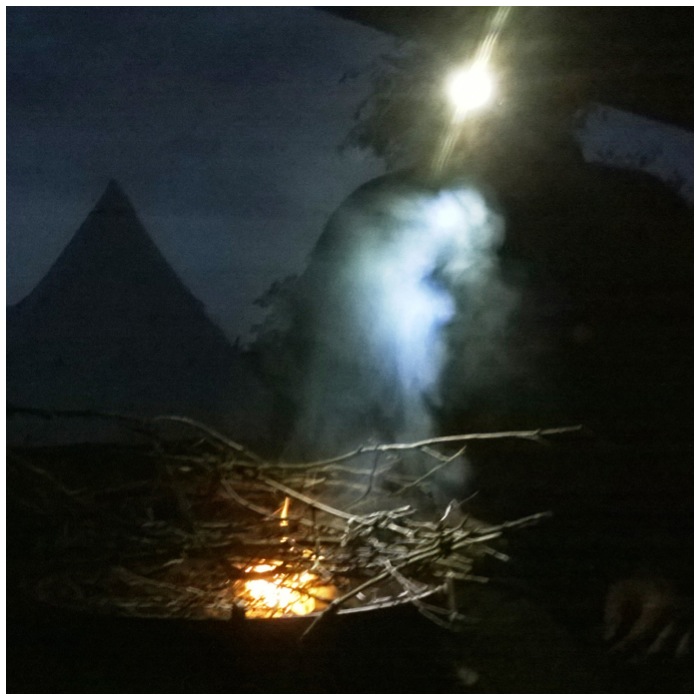
Sometimes in your life a little trip comes along that really lifts your spirits. This happened to me last September when my good friend Dave Lewis invited me along to a camp he had organised for Enfield Sea Cadet unit. The camp was at Tolmers Activity Centre near Potters Bar (just North of London) and turned out to be a quite magical weekend.
Dave was leading a training session for his older cadets for the upcoming Chosin Cup competition and he wanted me to work with his Junior cadets on their campcraft skills. After setting up camp I spotted a load of folks heading down to a small pond so I decided to follow on and see what was afoot.
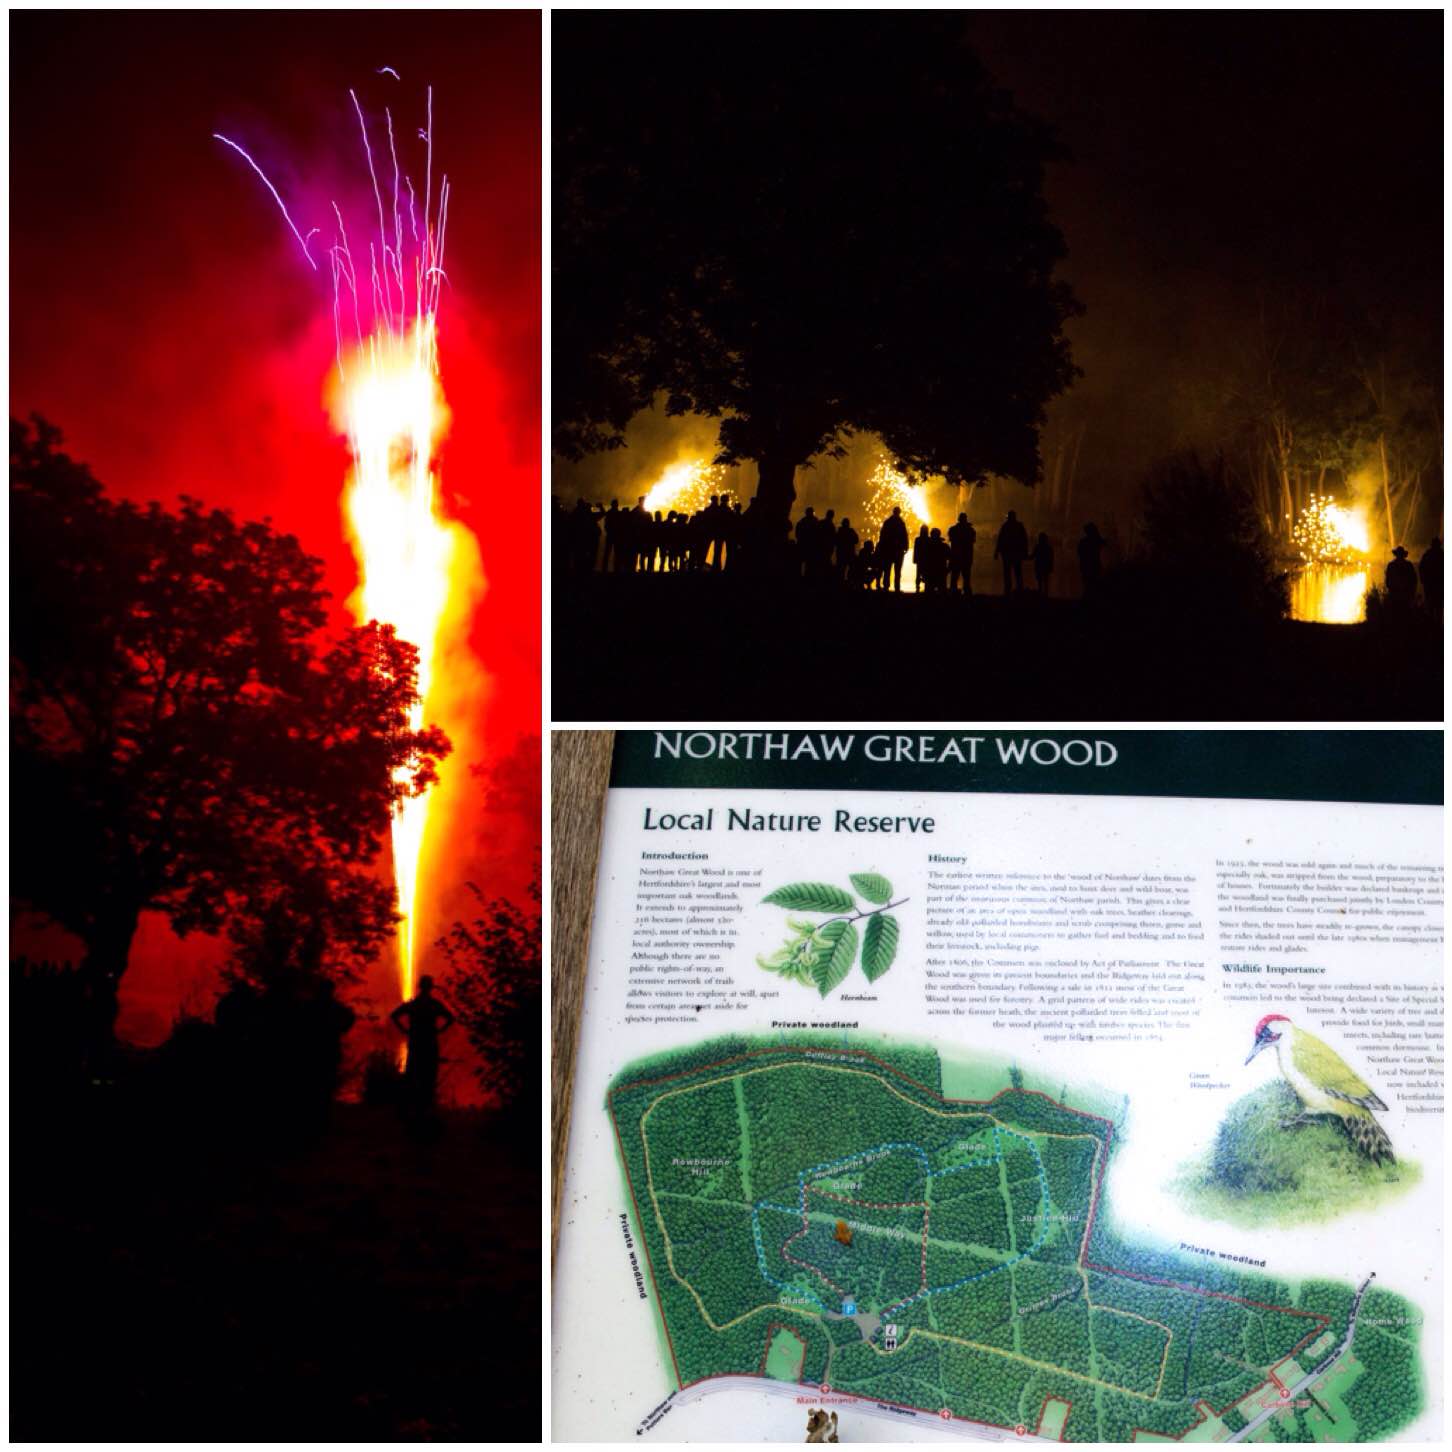
As I approached the pond I could hear a story being told about the ‘Lady in the Lake’ and all of a sudden the skies lit up. As I was just approaching the pond at that time I managed to get these two cracking shots of the fireworks going off.
Friday fireworks and our playground
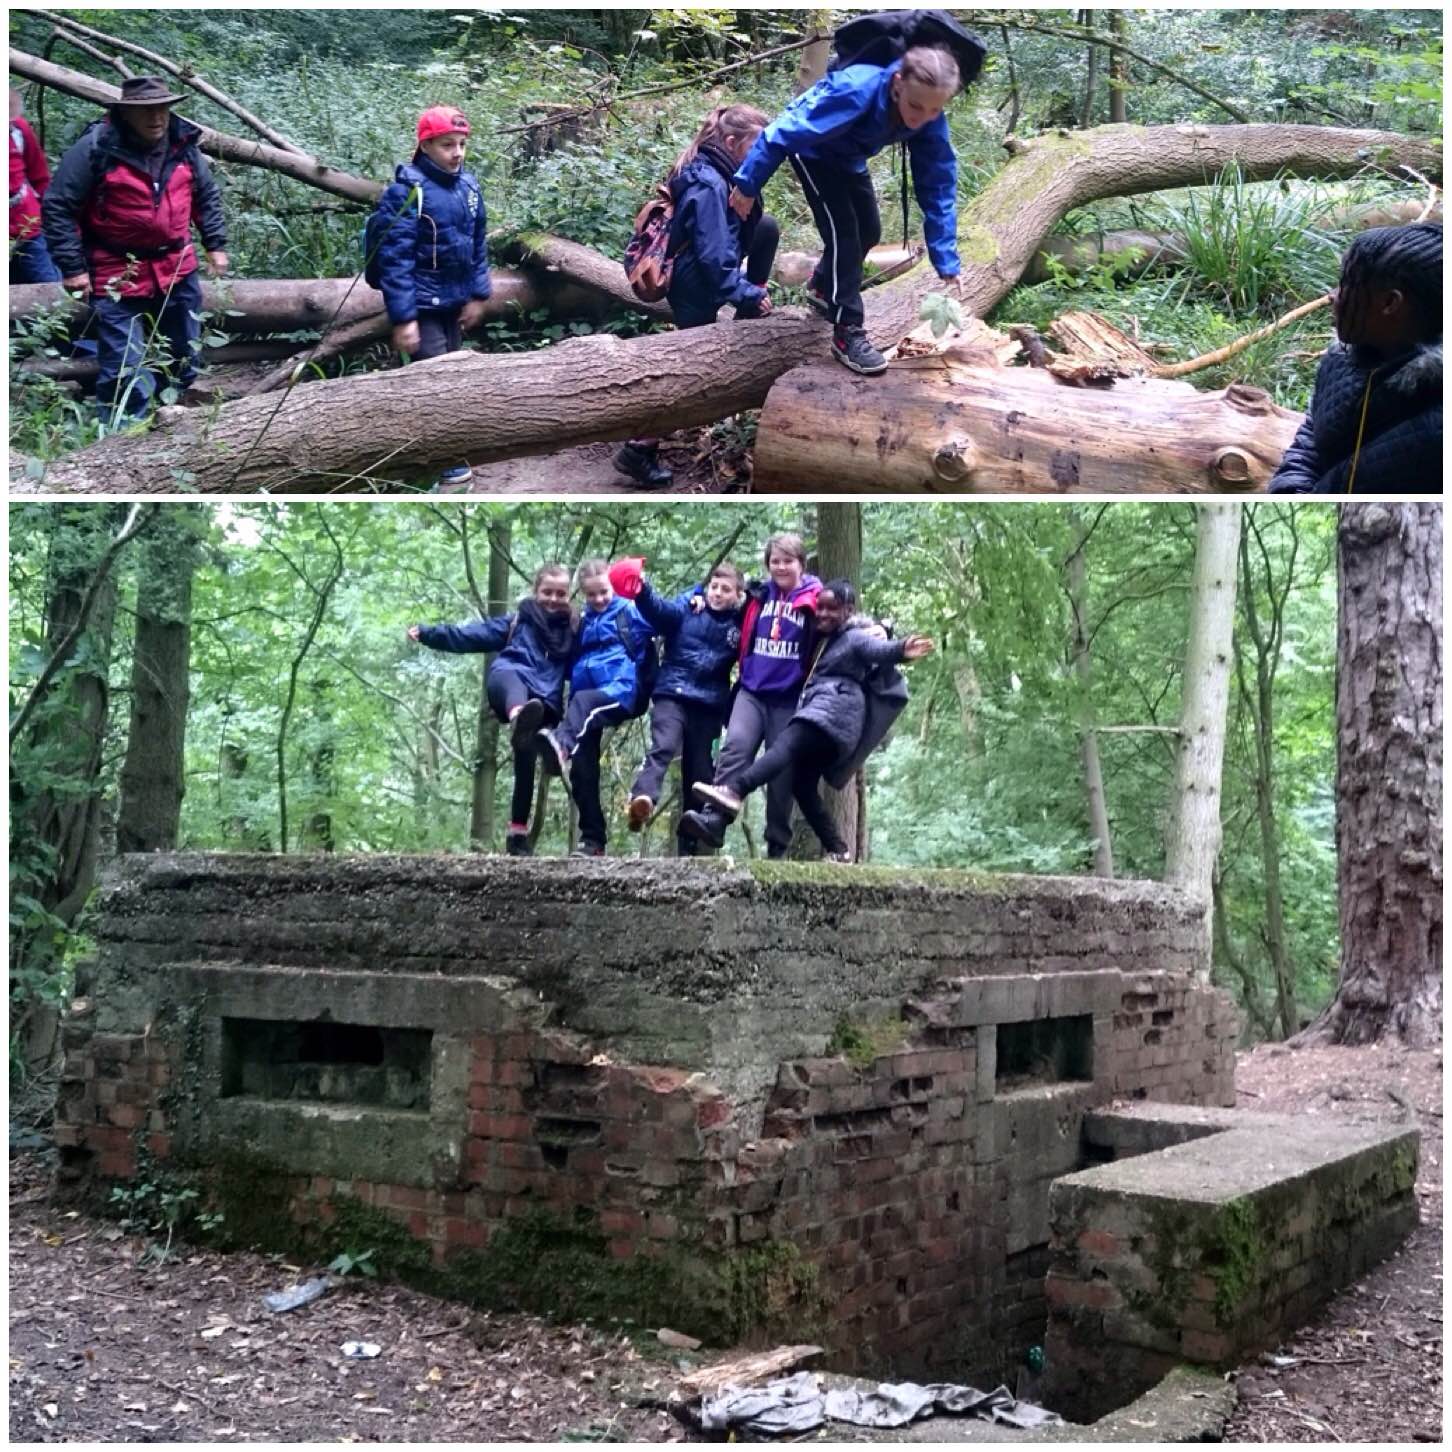
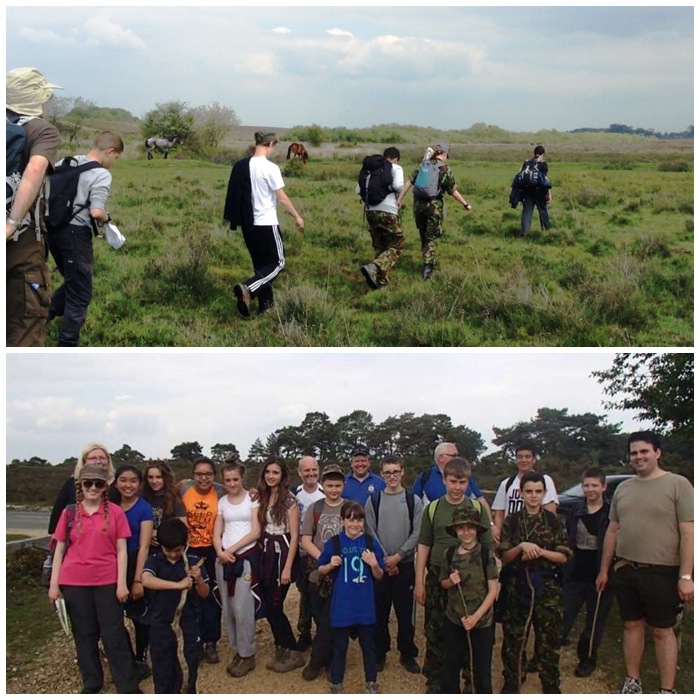
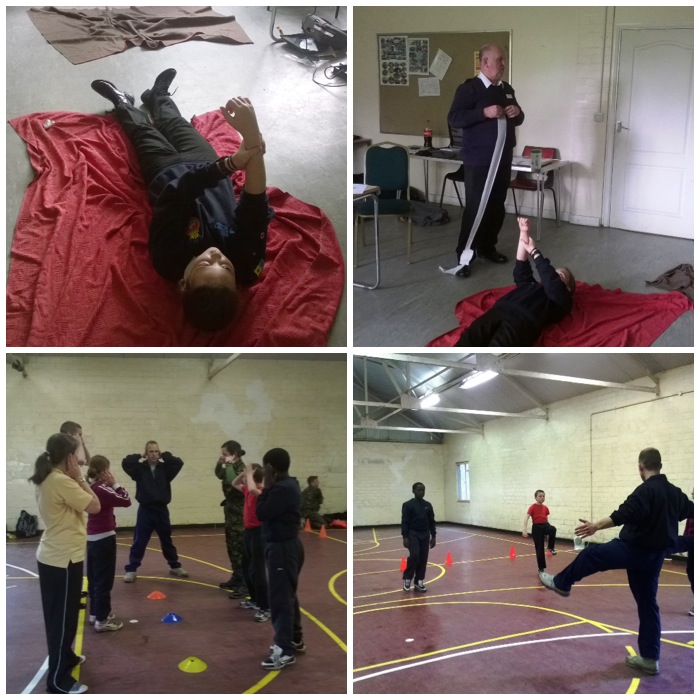
In the morning I took the cadets with some other staff members out towards Northaw Great Wood (a local nature reserve). Along the way we had to scramble over some tricky terrain but managed to have a bit of fun when we found an old World War 2 Pillbox.
Scramble and a dance
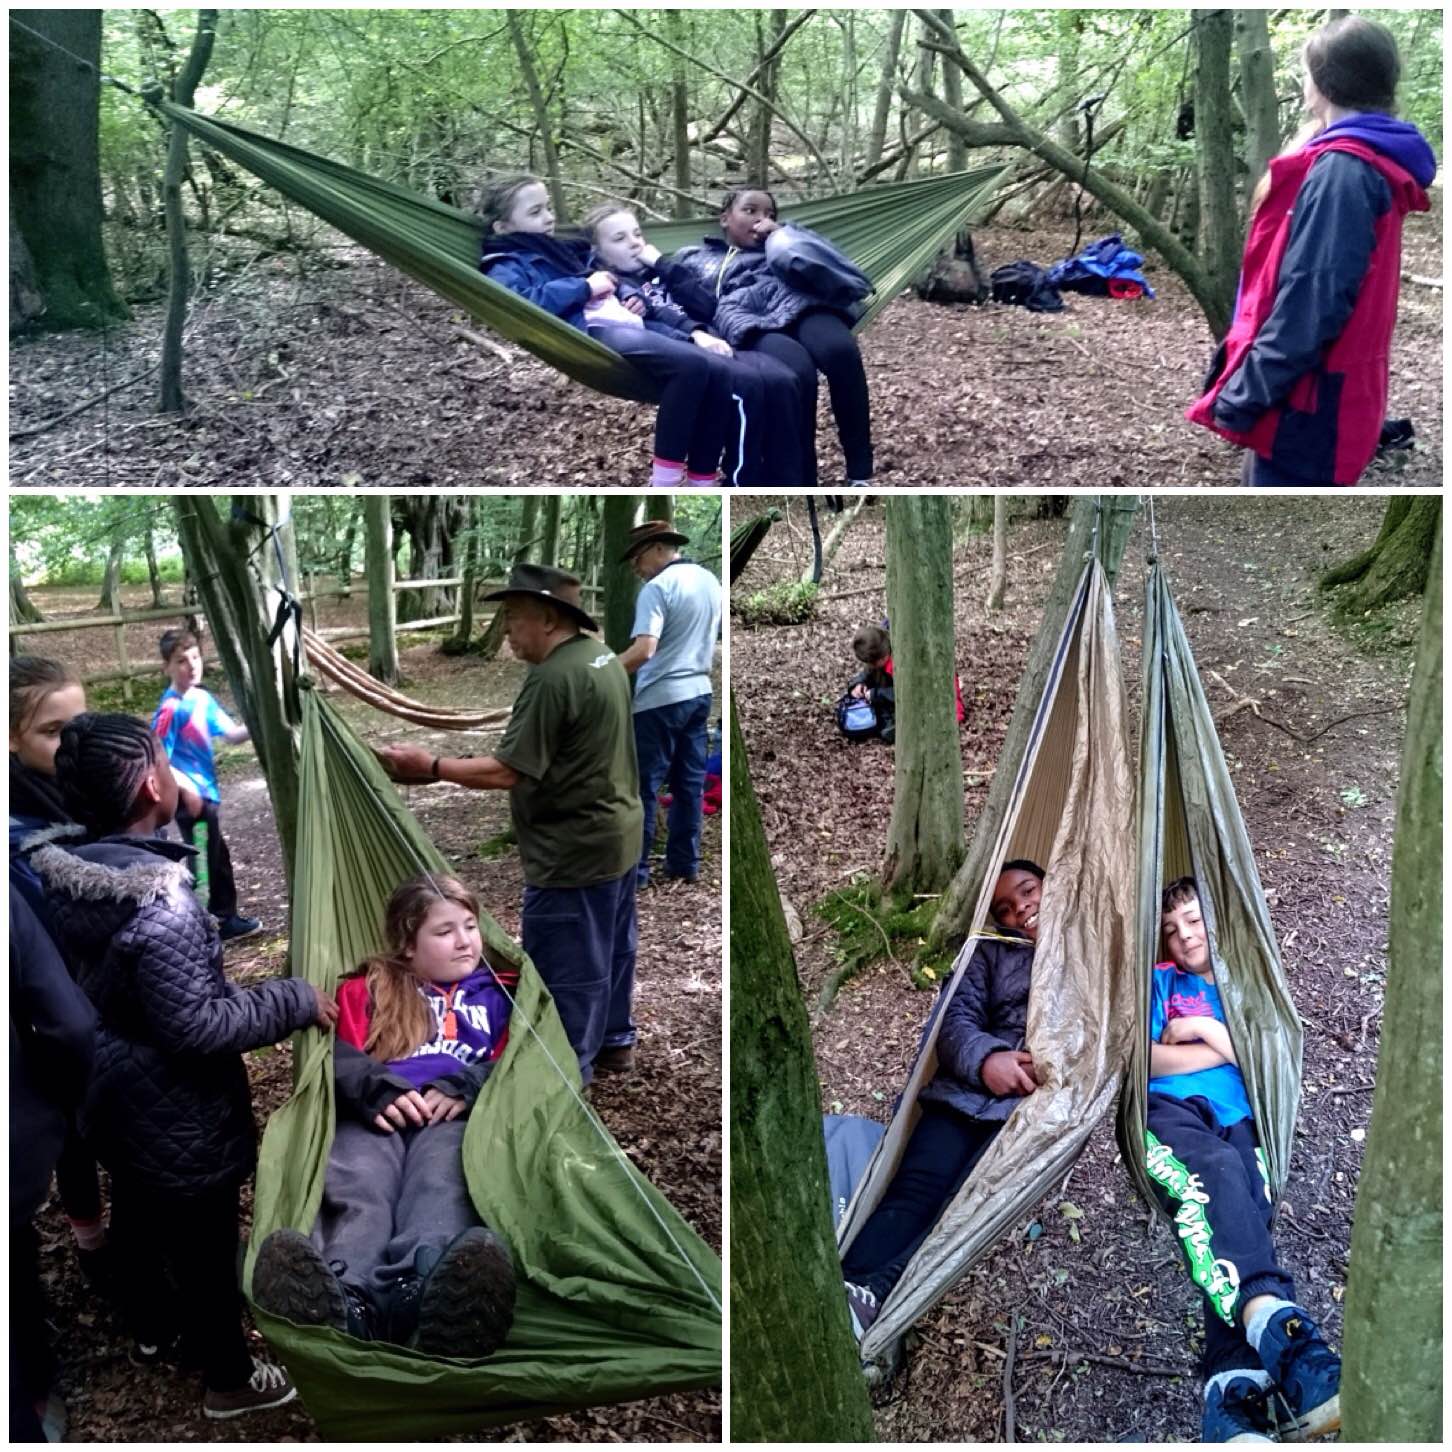
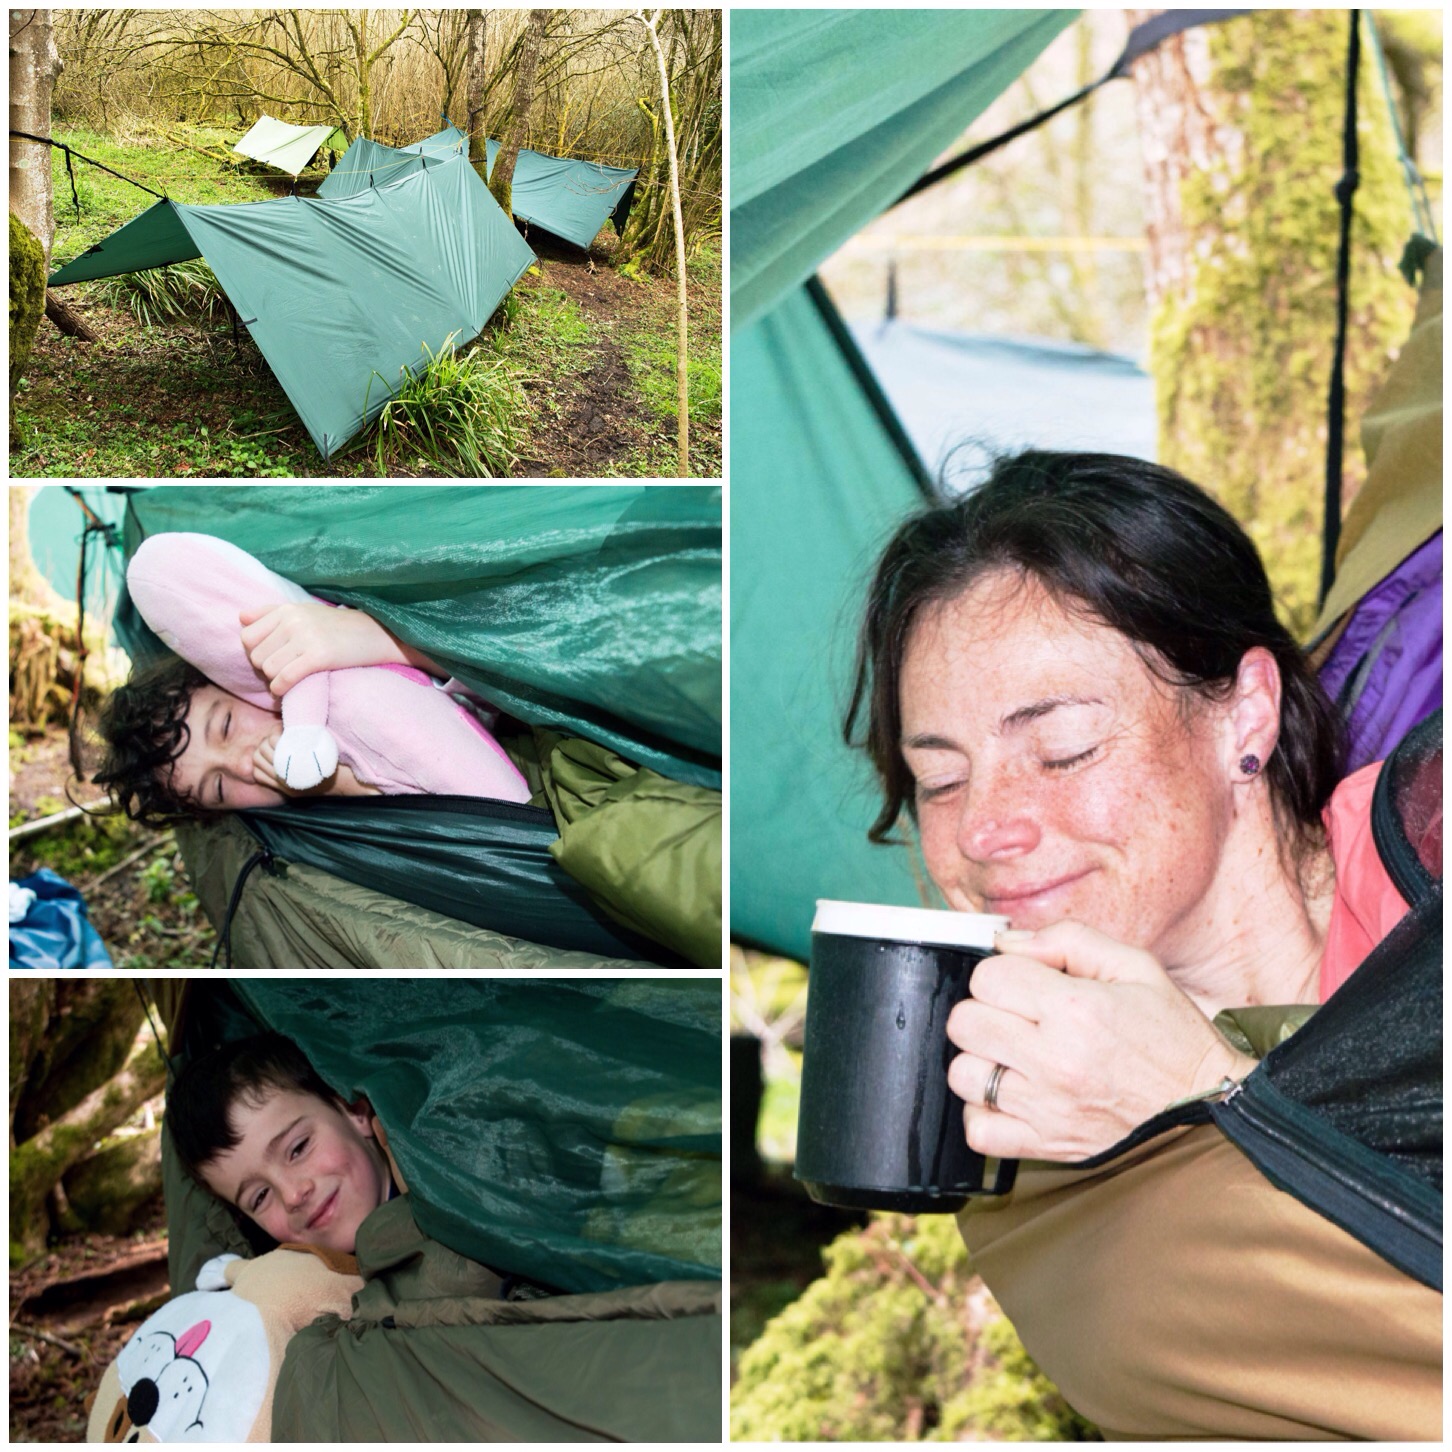
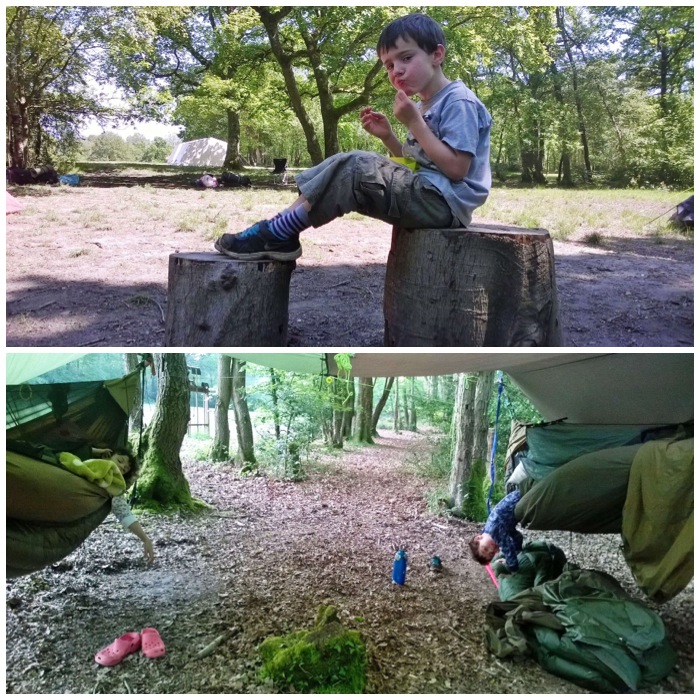
Once we got into the woods we found a lovely spot by a dried out stream to try out our hammocks. The Juniors had never tried hammocks before but soon got into the ‘Swing’ of things.
Chillaxing
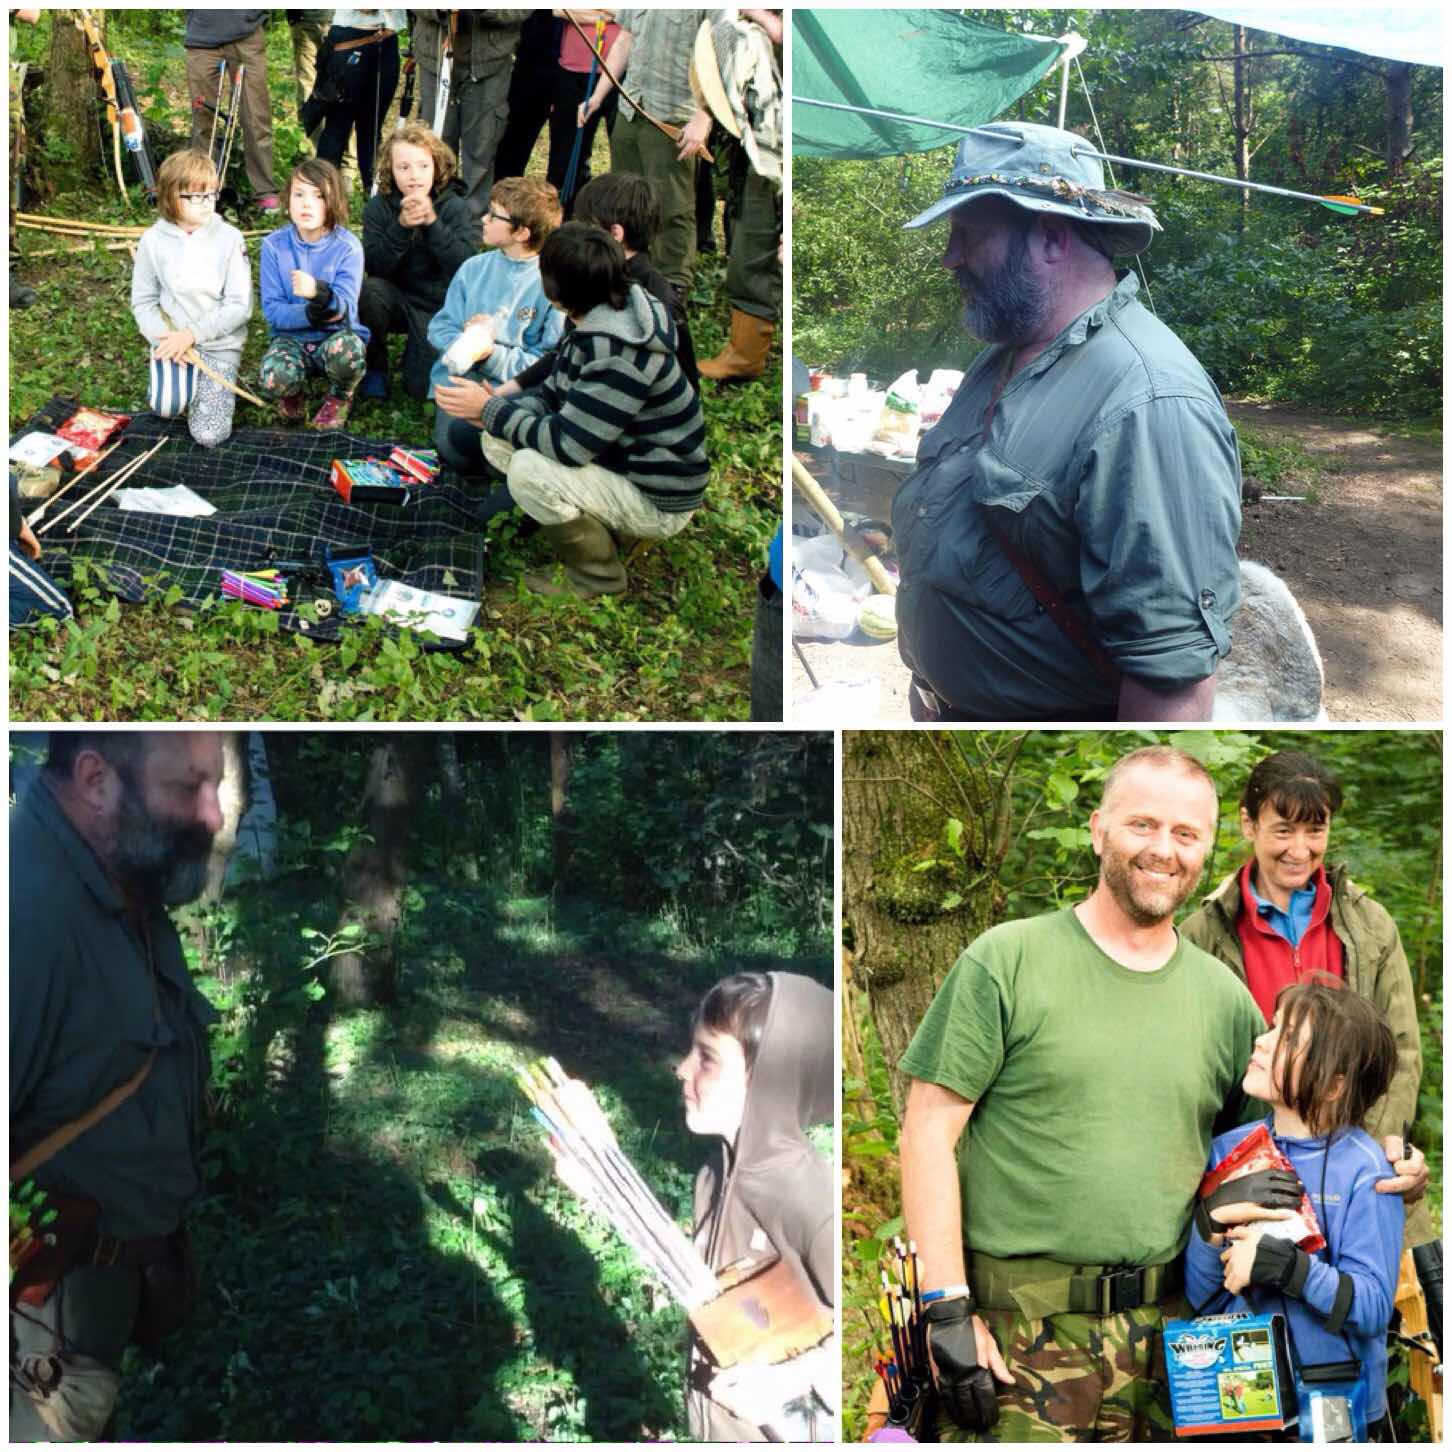
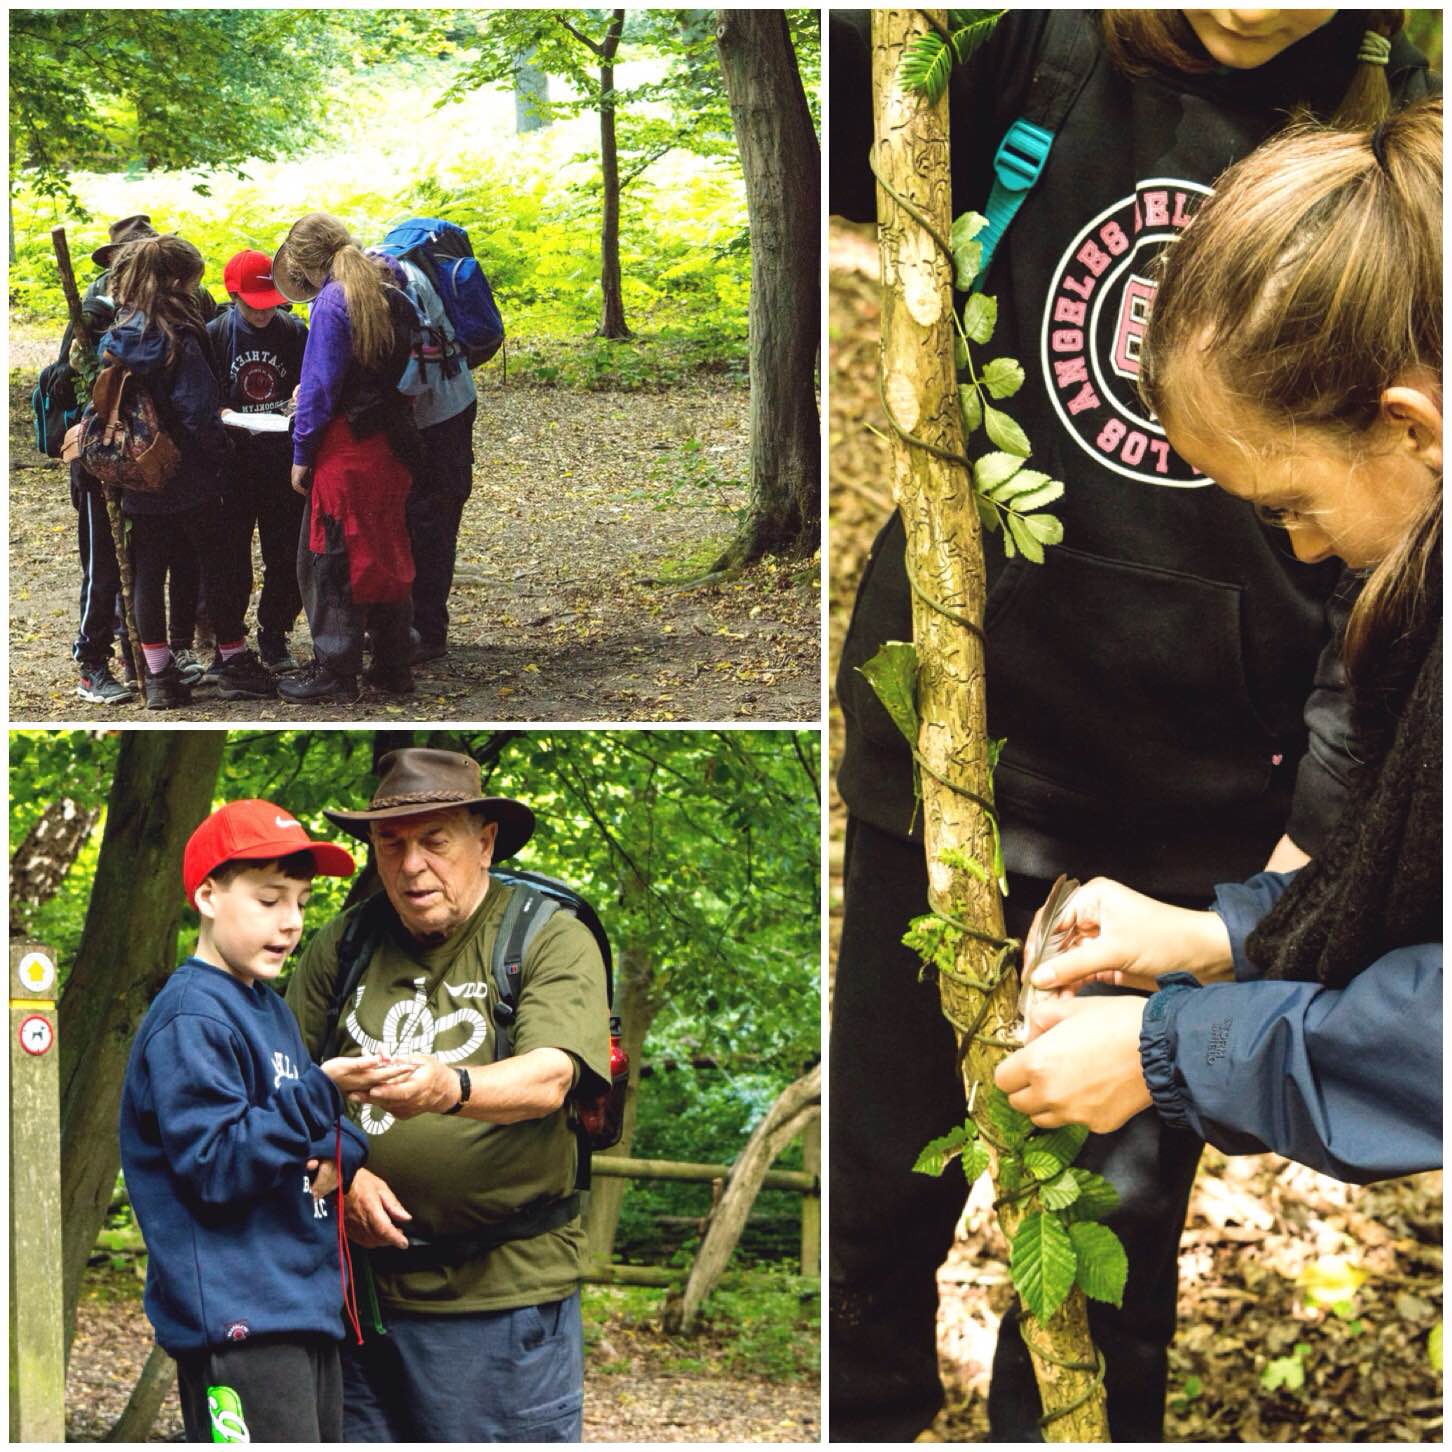
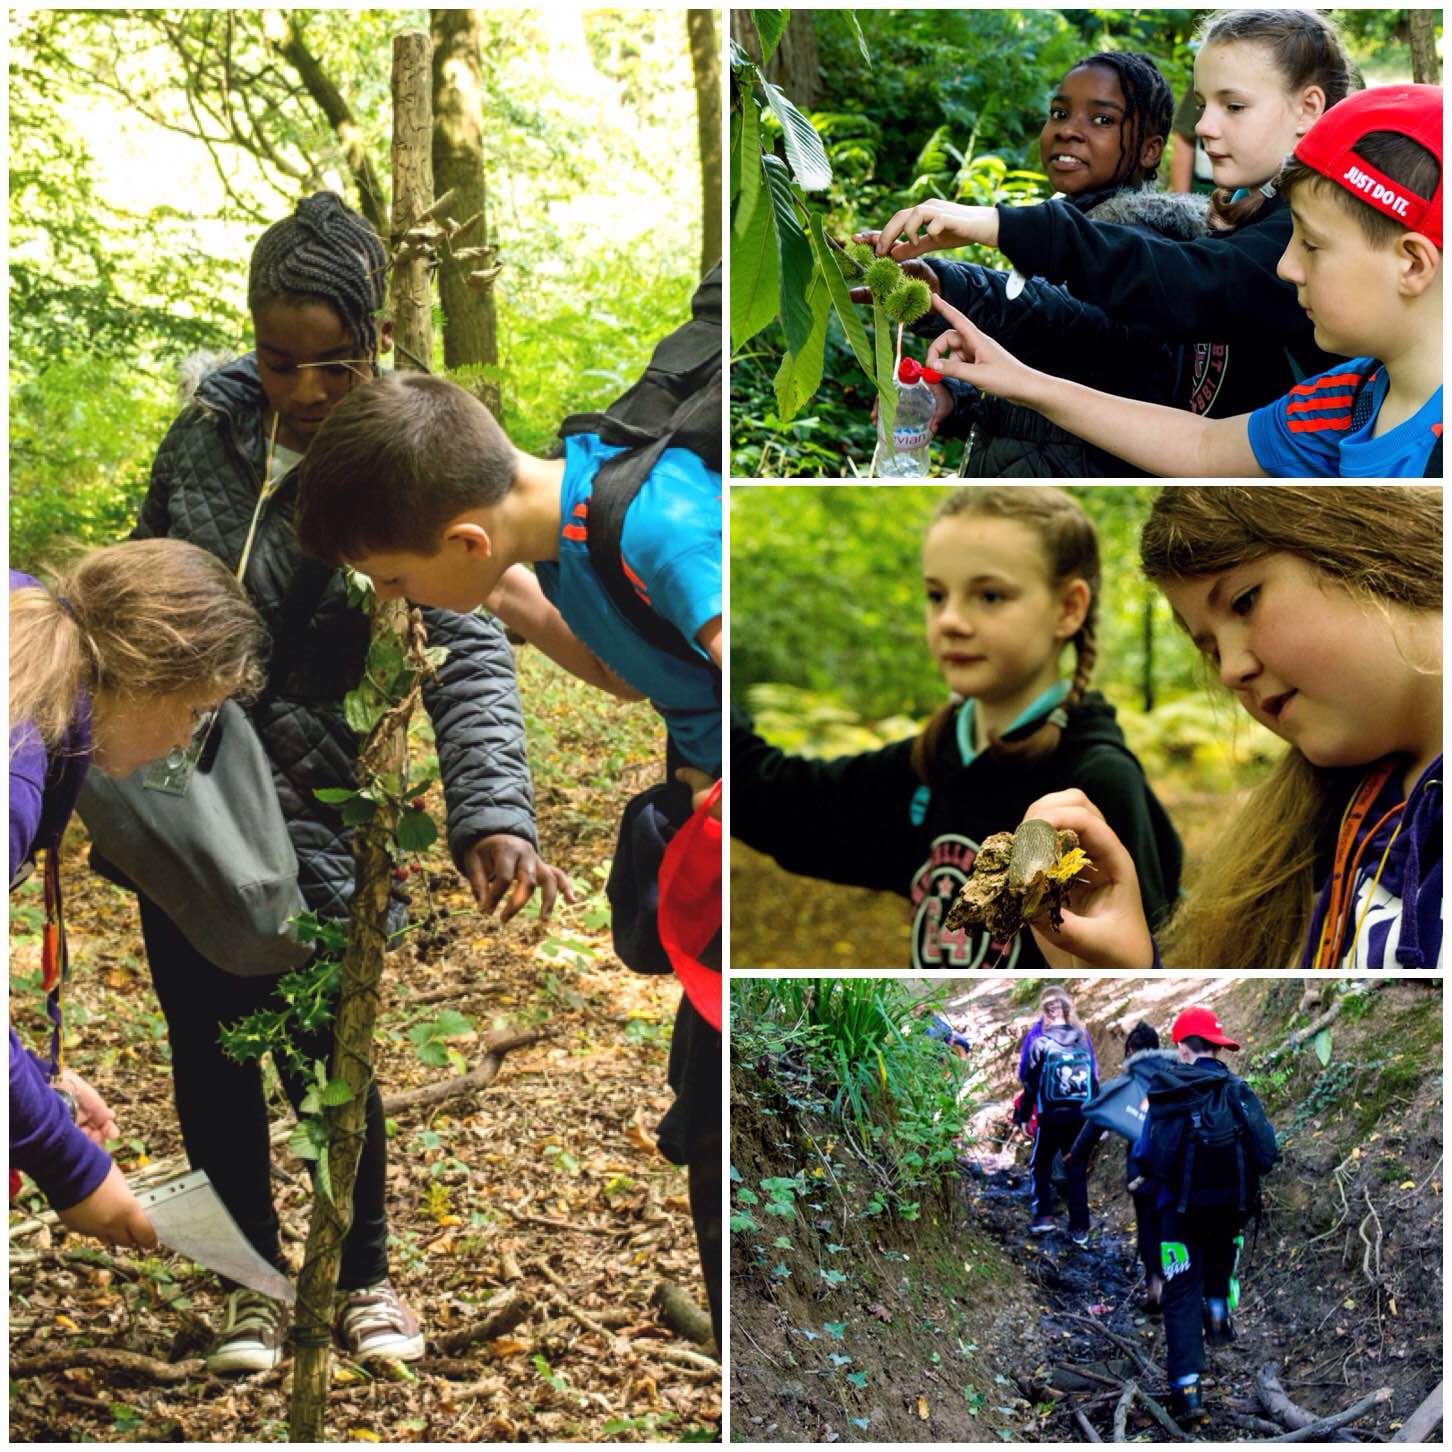
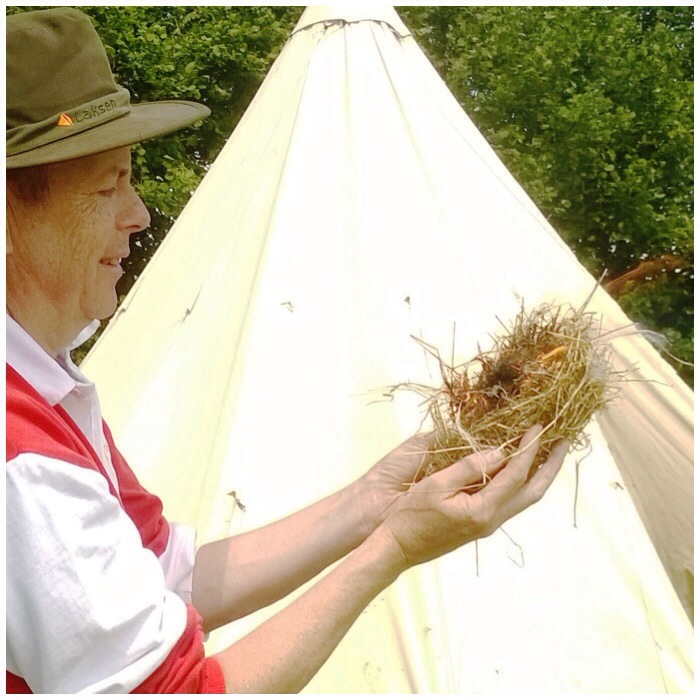
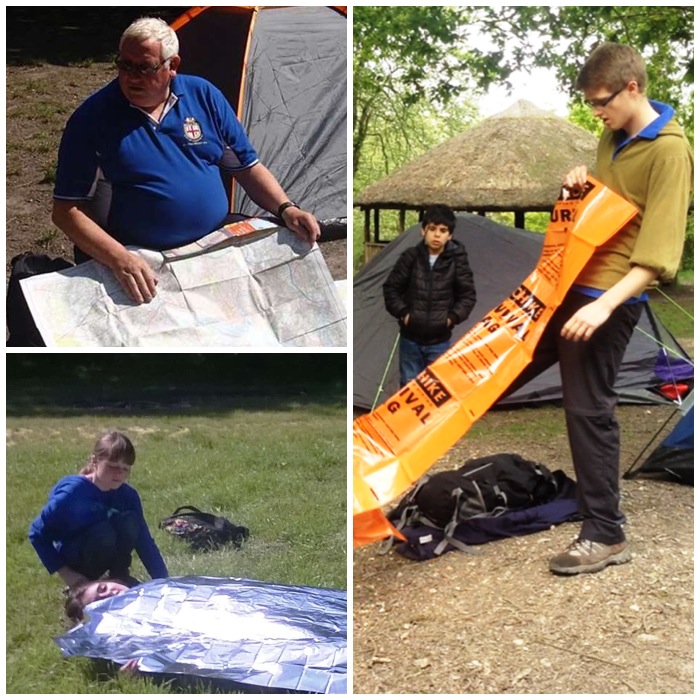
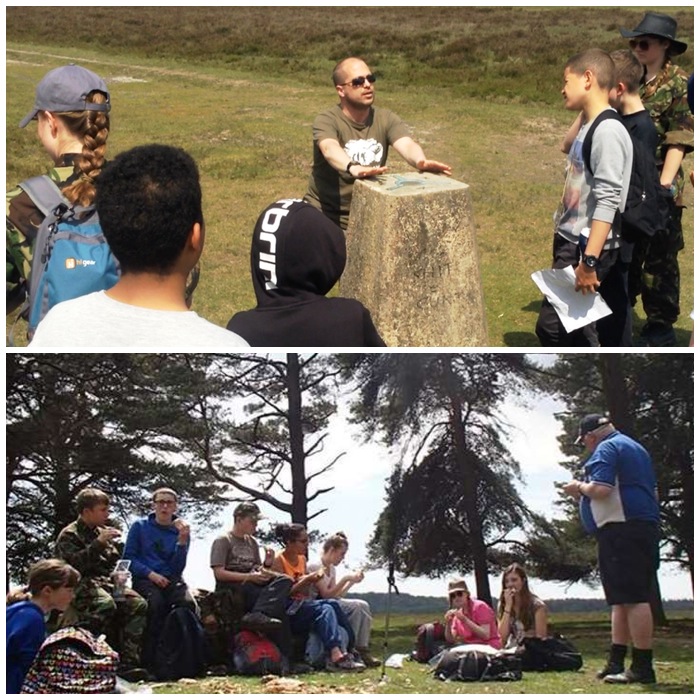
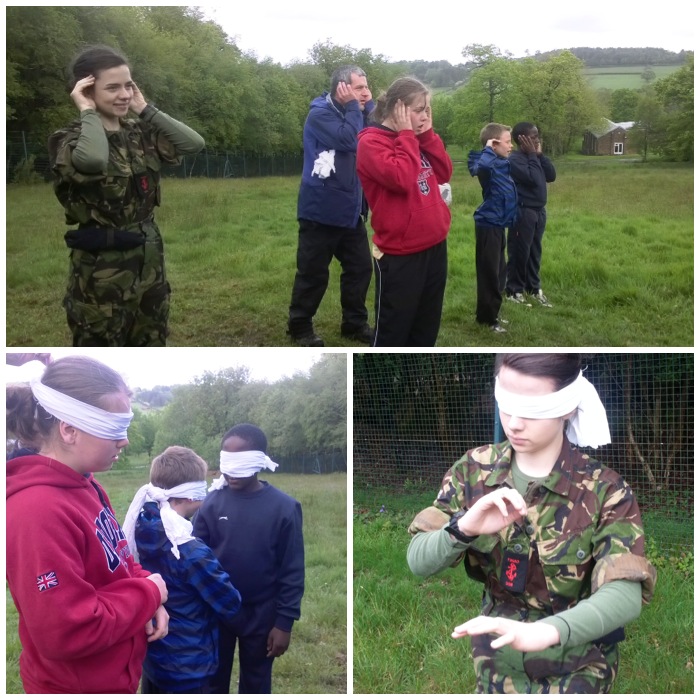
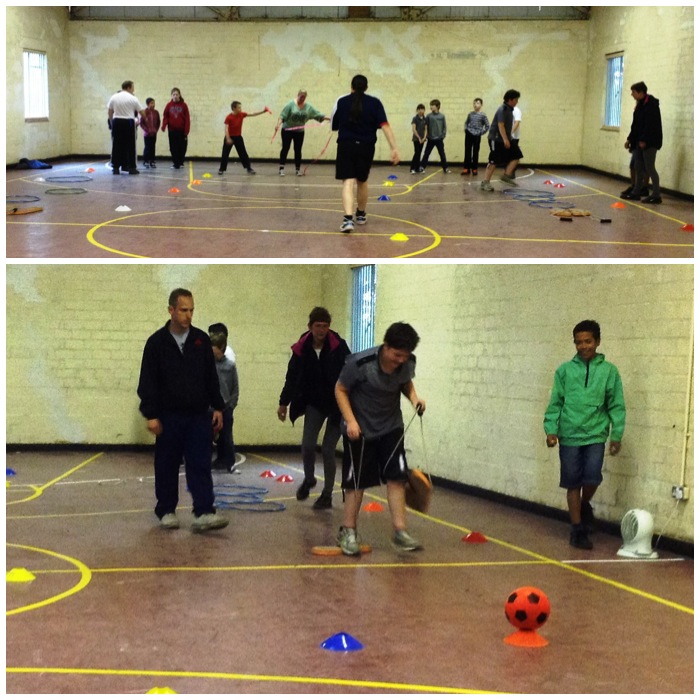
Our task on the weekend was to introduce the Juniors to basic Adventure Training skills such as using the map and compass, and to get an understanding of their natural surroundings.
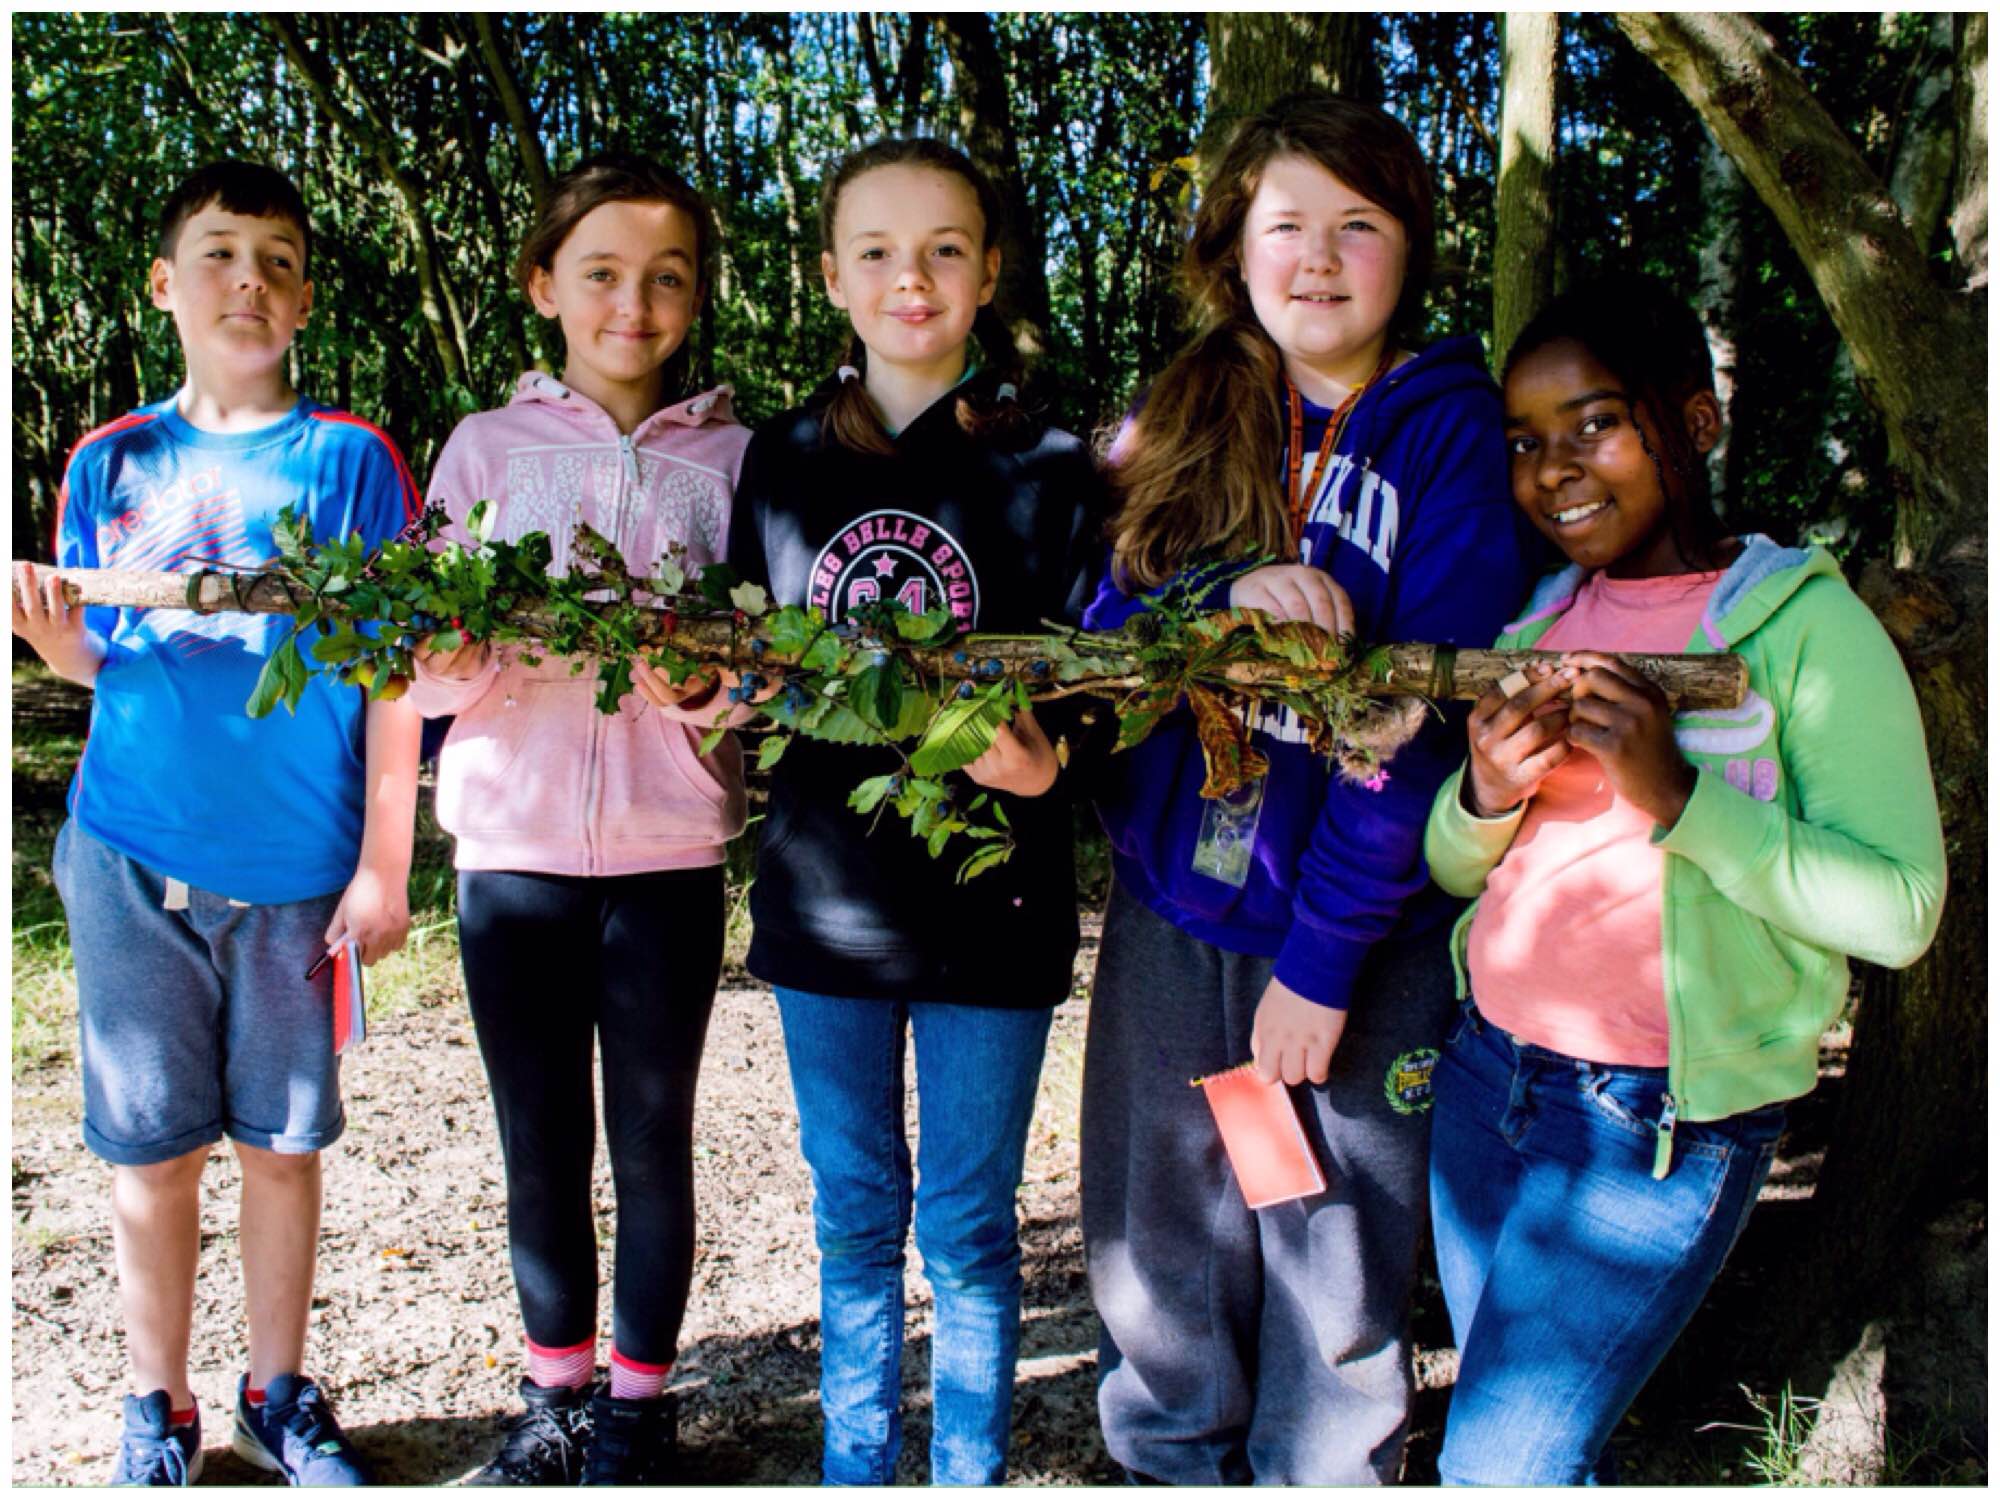
So as we were learning to use the map and compass we carried a Journey stick with us. This stick had string and elastic bands wrapped around it so that we could add different items we found along the way to it.
The aim of the Journey stick was to ensure that the Juniors kept a good look out for different plants and objects so that they could add some of them to the stick and so tell a story of their journey when they had finished at the end of the day.
Green module learning
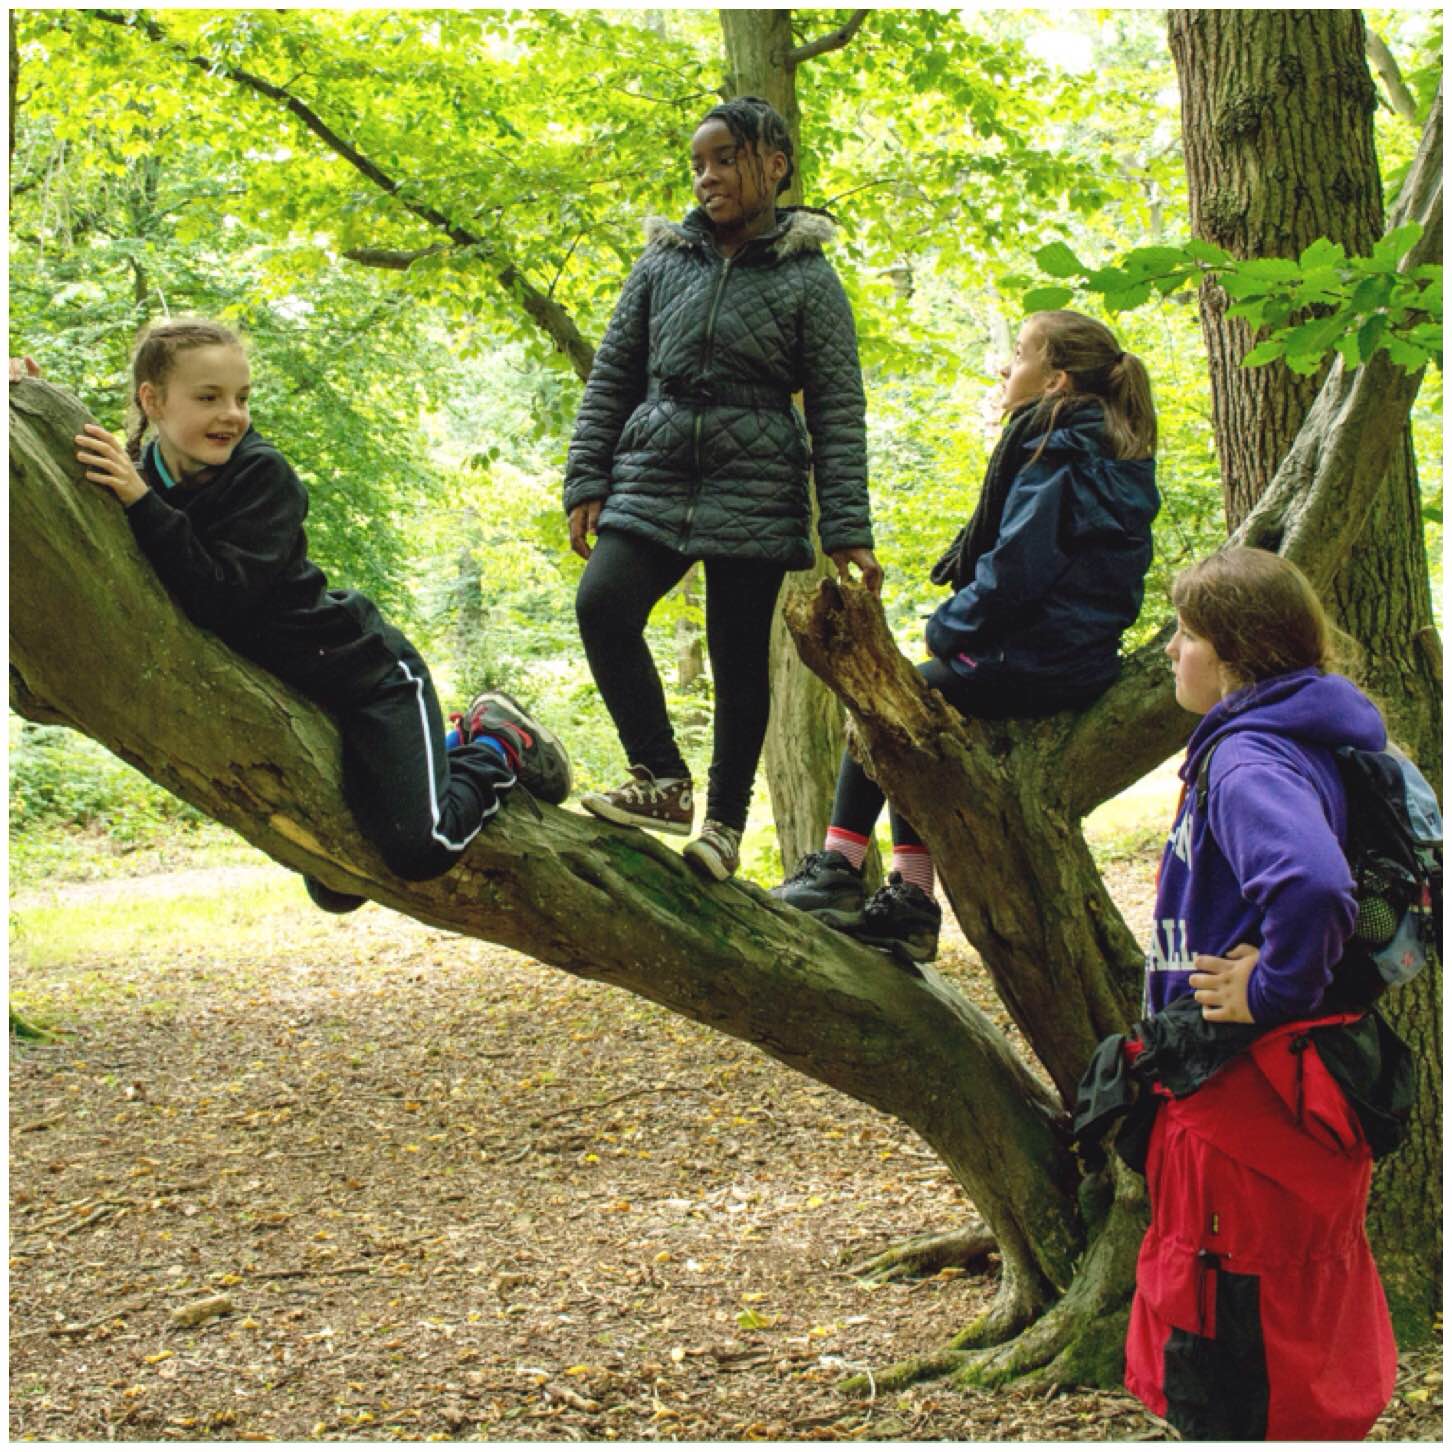
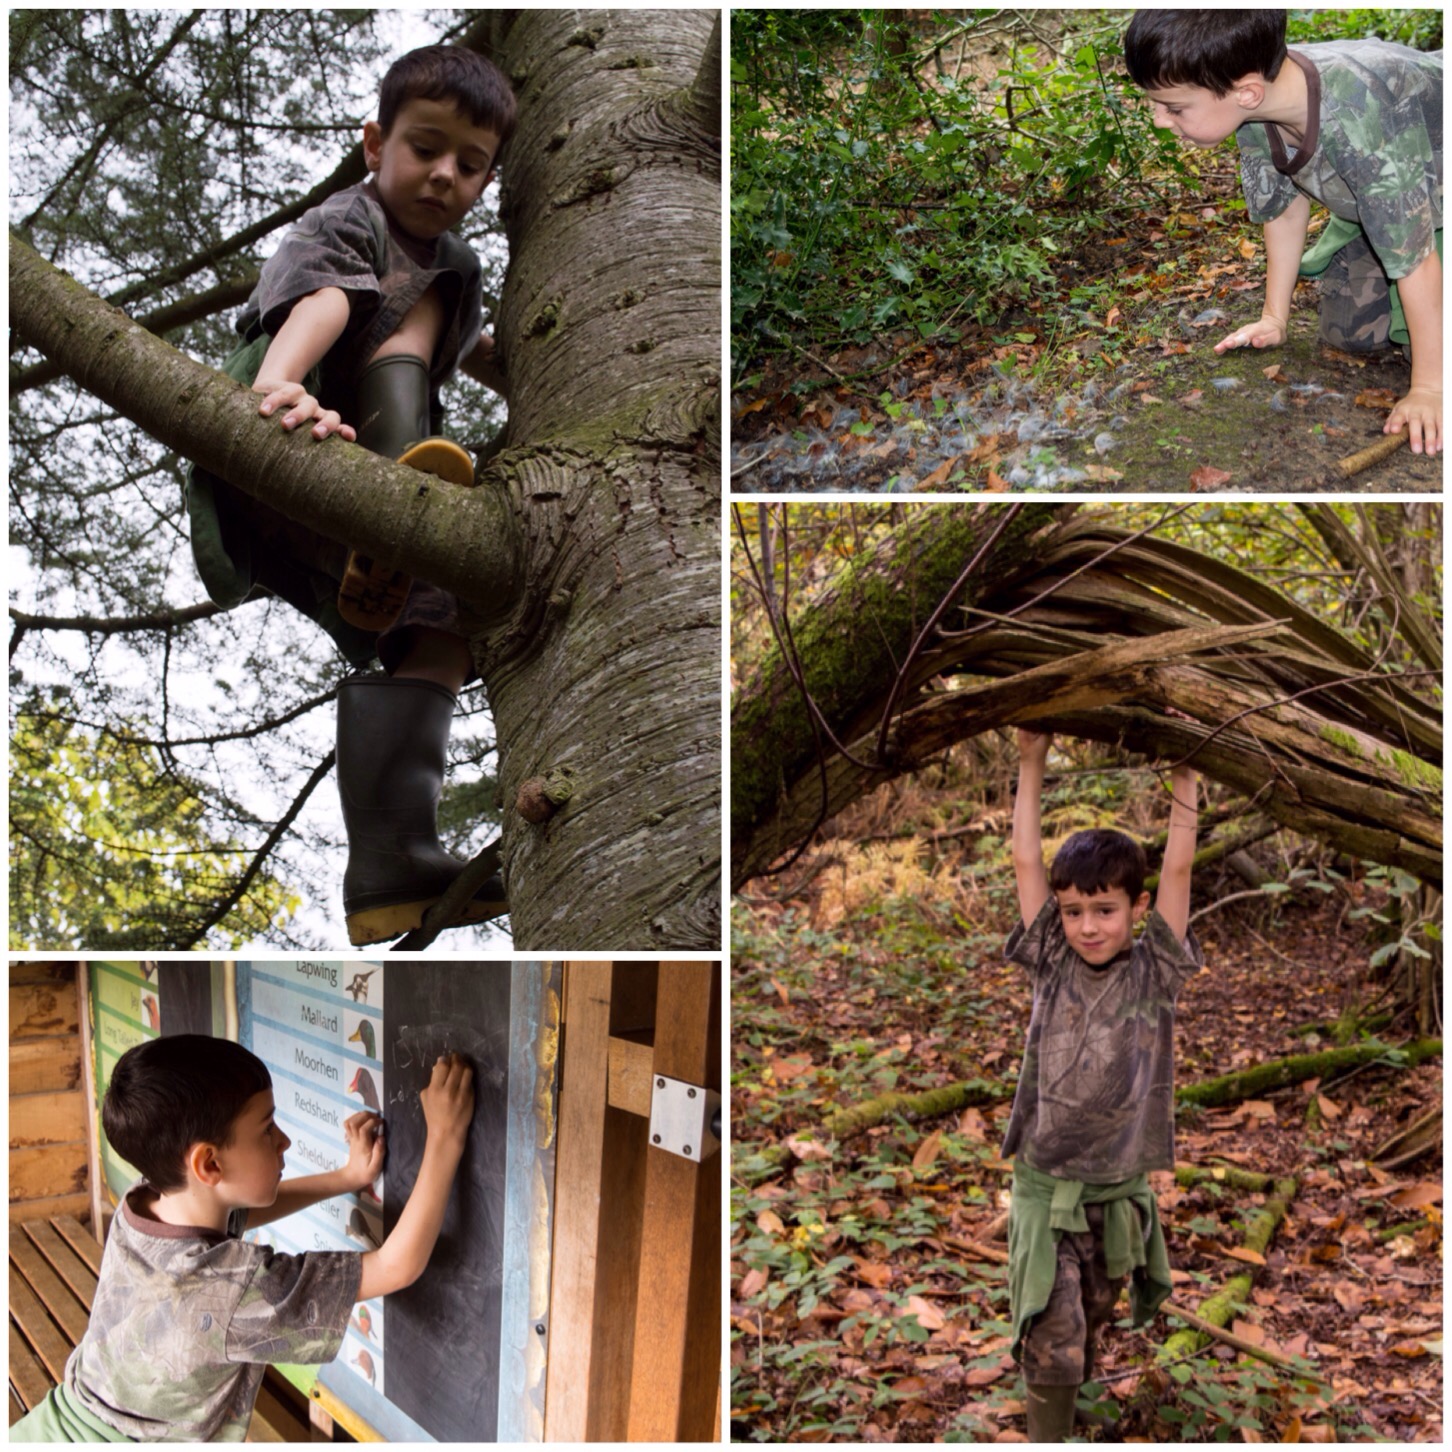
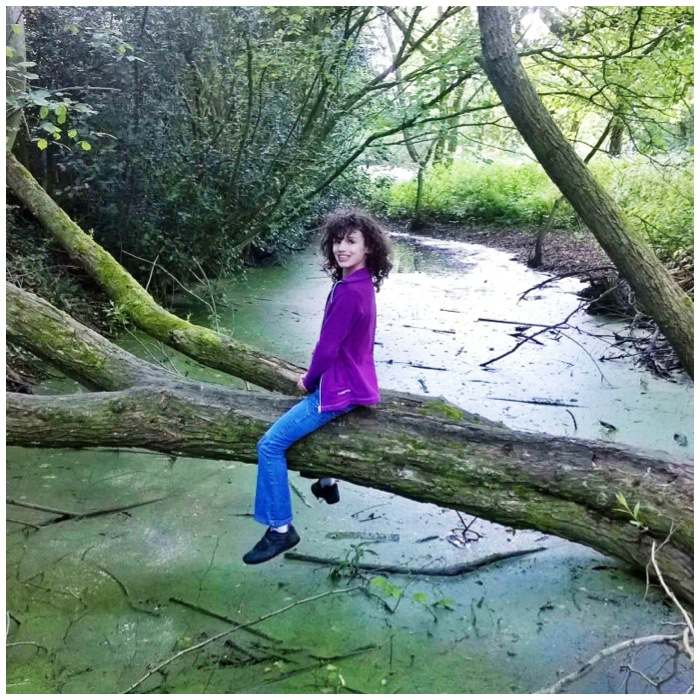
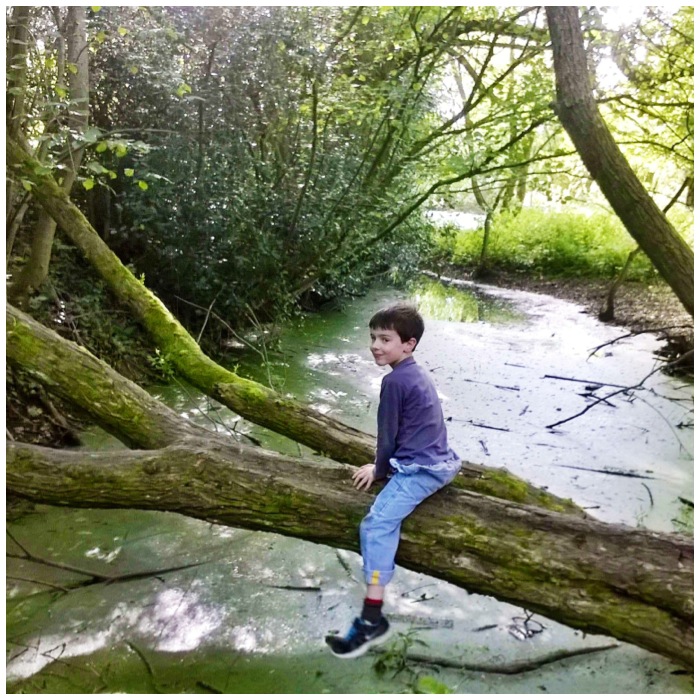
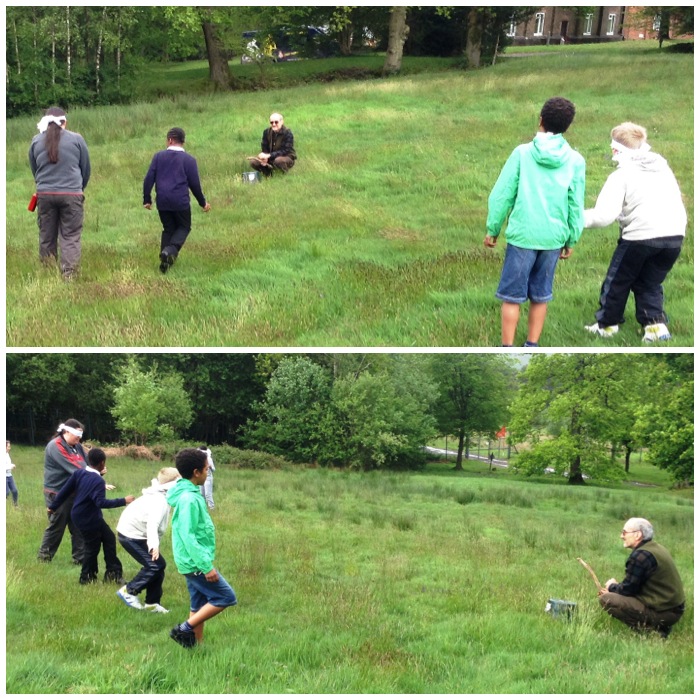
In amongst all this learning we took time out to climb the odd tree or two and just relax (the staff just tended to relax though).
In touch with nature
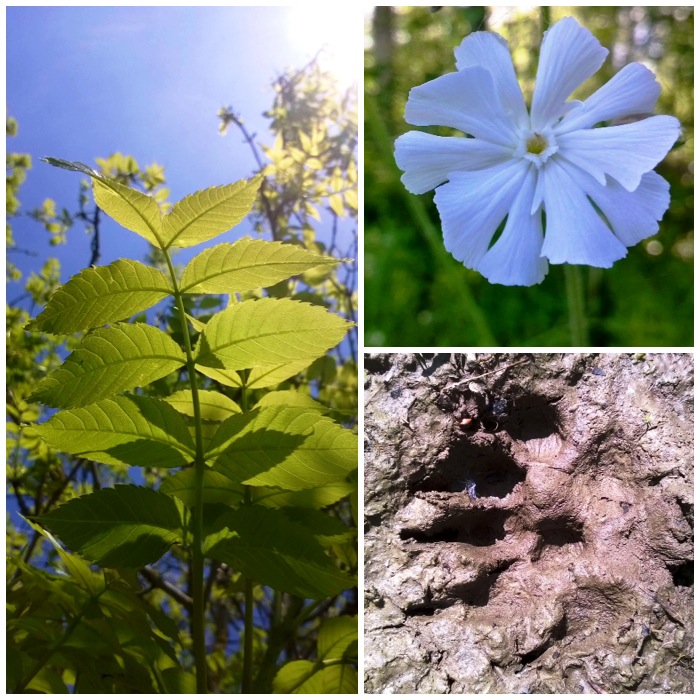
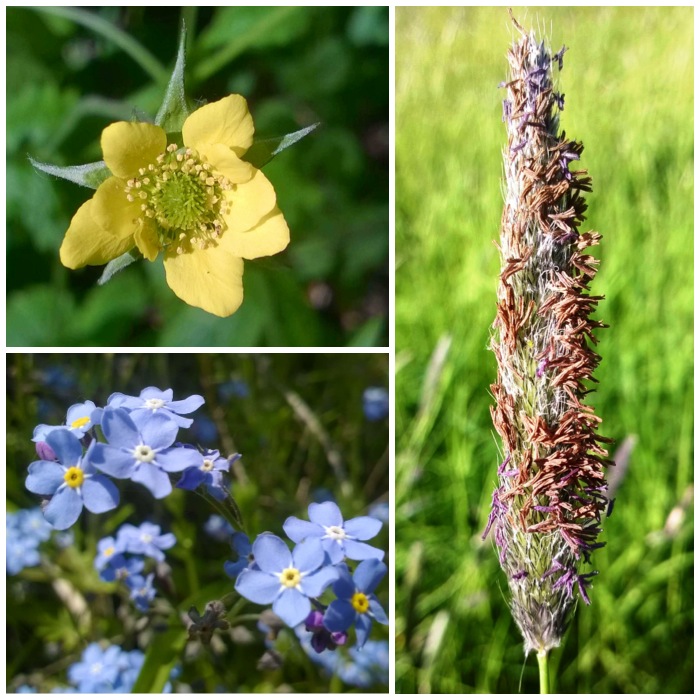
We spotted many different types of flaura and fauna on our travels and played a little naming game on the way. I got the Juniors to spot different trees and name them something they all agreed on – so the Sycamore became the Star tree, the Ash tree was named the Centipede and so on. They would walk through the woods shouting “There’s a Star tree” or “There’s another Centipede”.
At the end of the day I gave them a chart so that they could figure out their given names. This method I find works well as I find that kids learn best when they are having fun along the way.
Journey stick stuff
When we got back to camp we had a very full Journey stick with no two items the same. The Juniors really worked hard to finish the stick and each took it in turn to walk with it.
The Journey stick
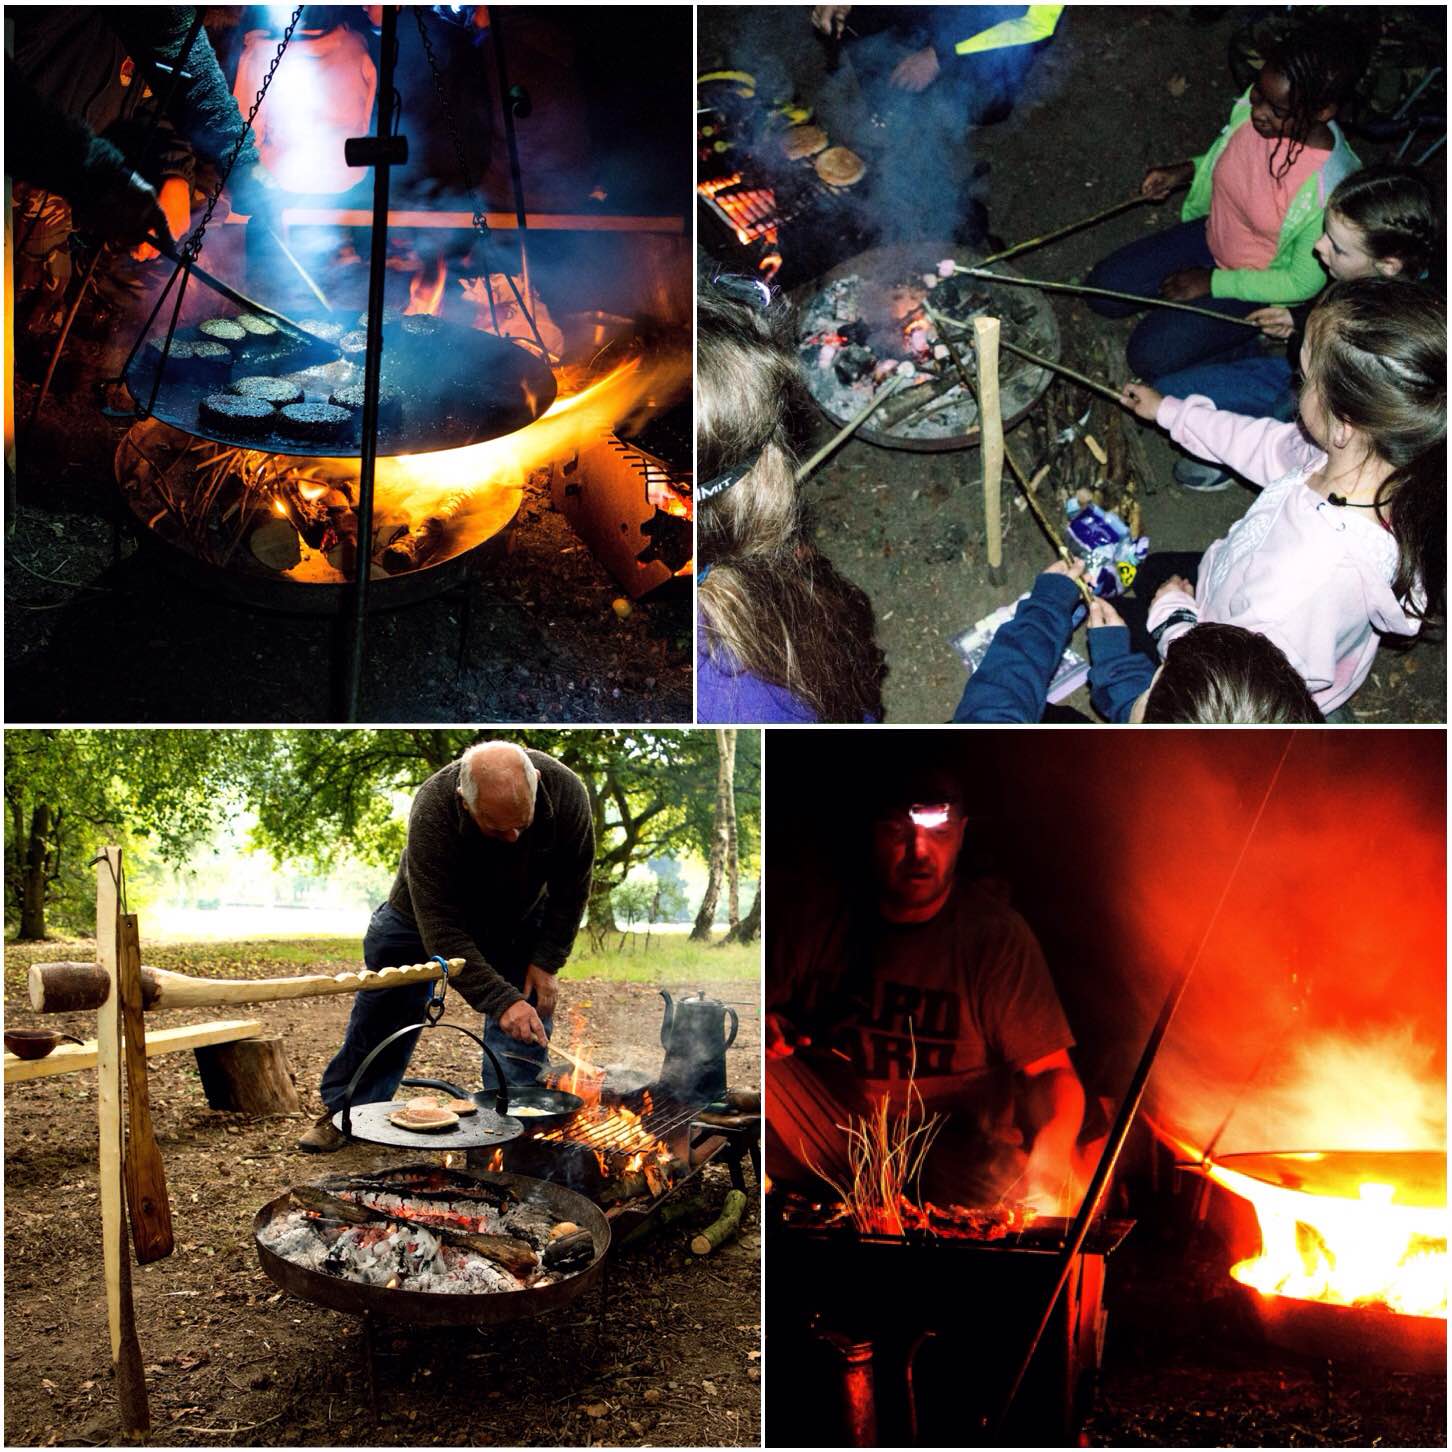
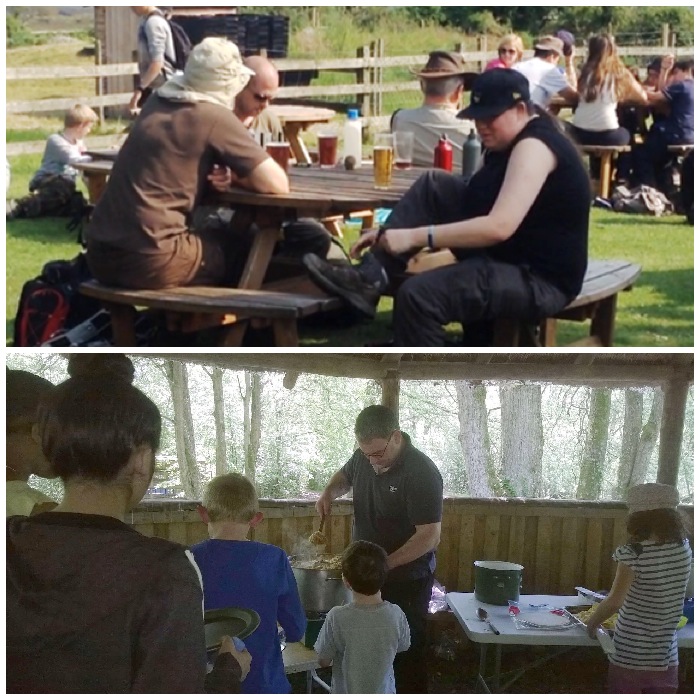
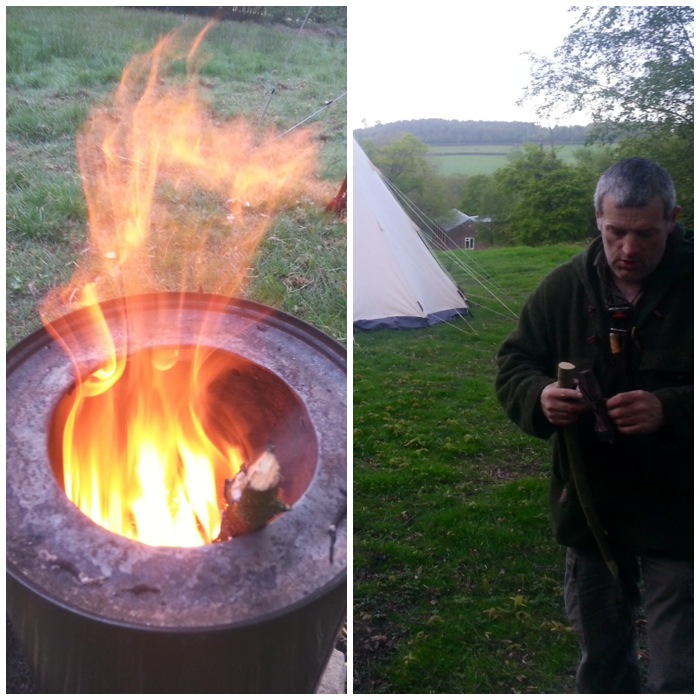
Back at camp we had a very busy campfire on the go with some great food being prepared by Alan and Dave Lewis. On the Saturday night we had a barbie and marshmallows, and each morning Alan cooked a fantastic breakfast with some lovely pancakes.
Bust campfire
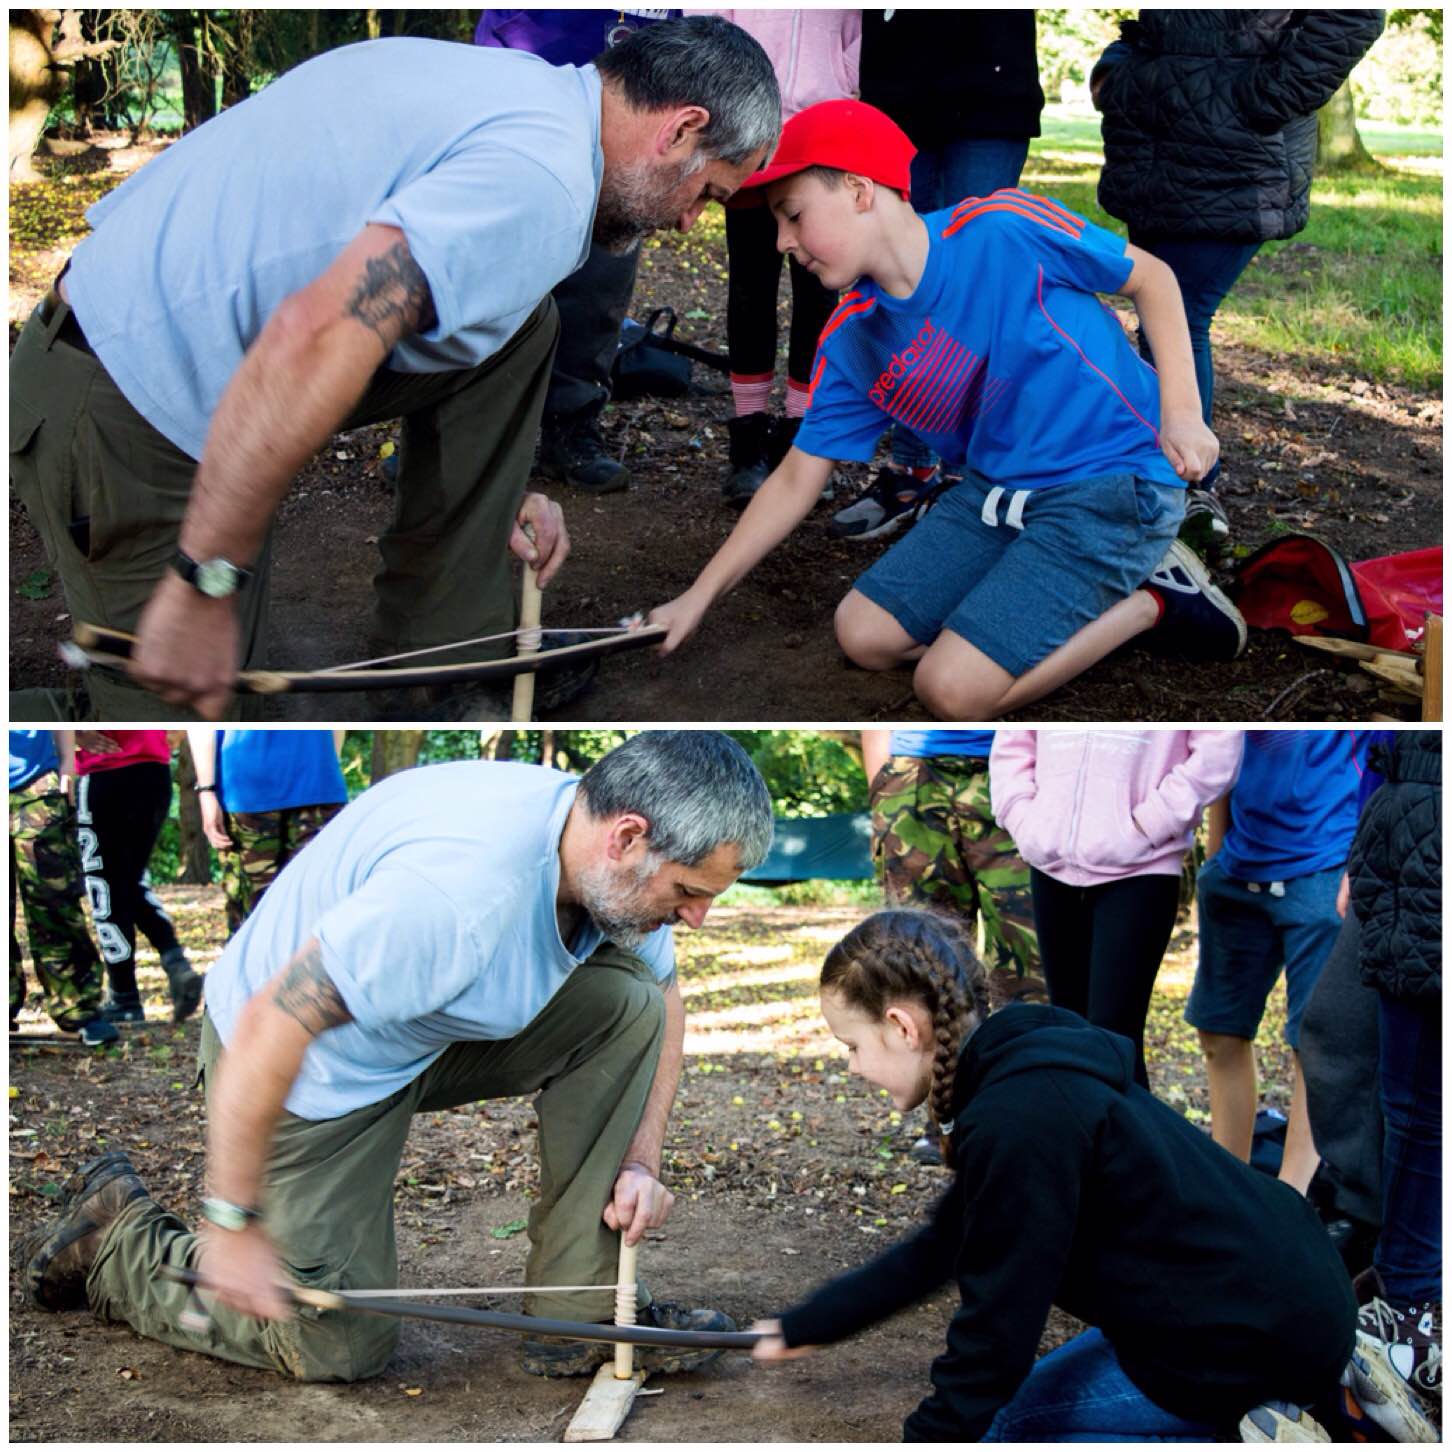
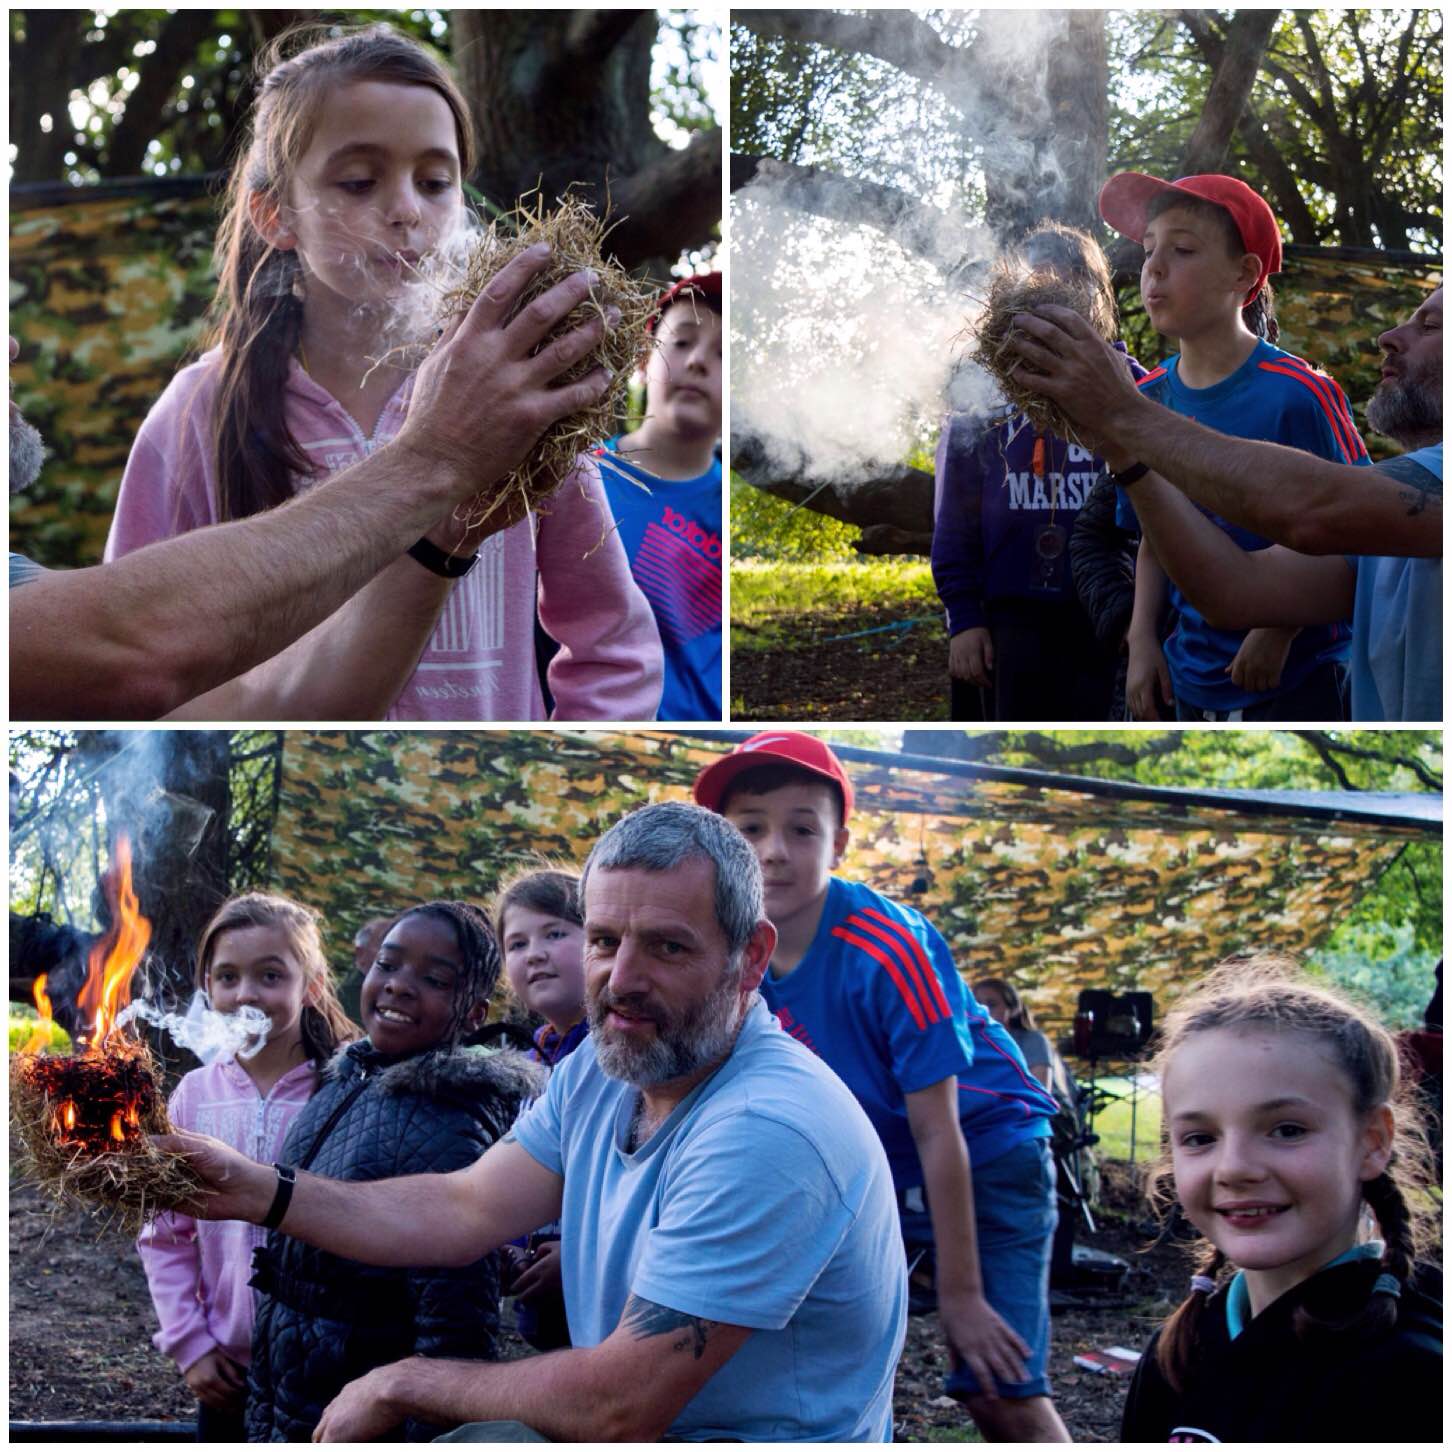
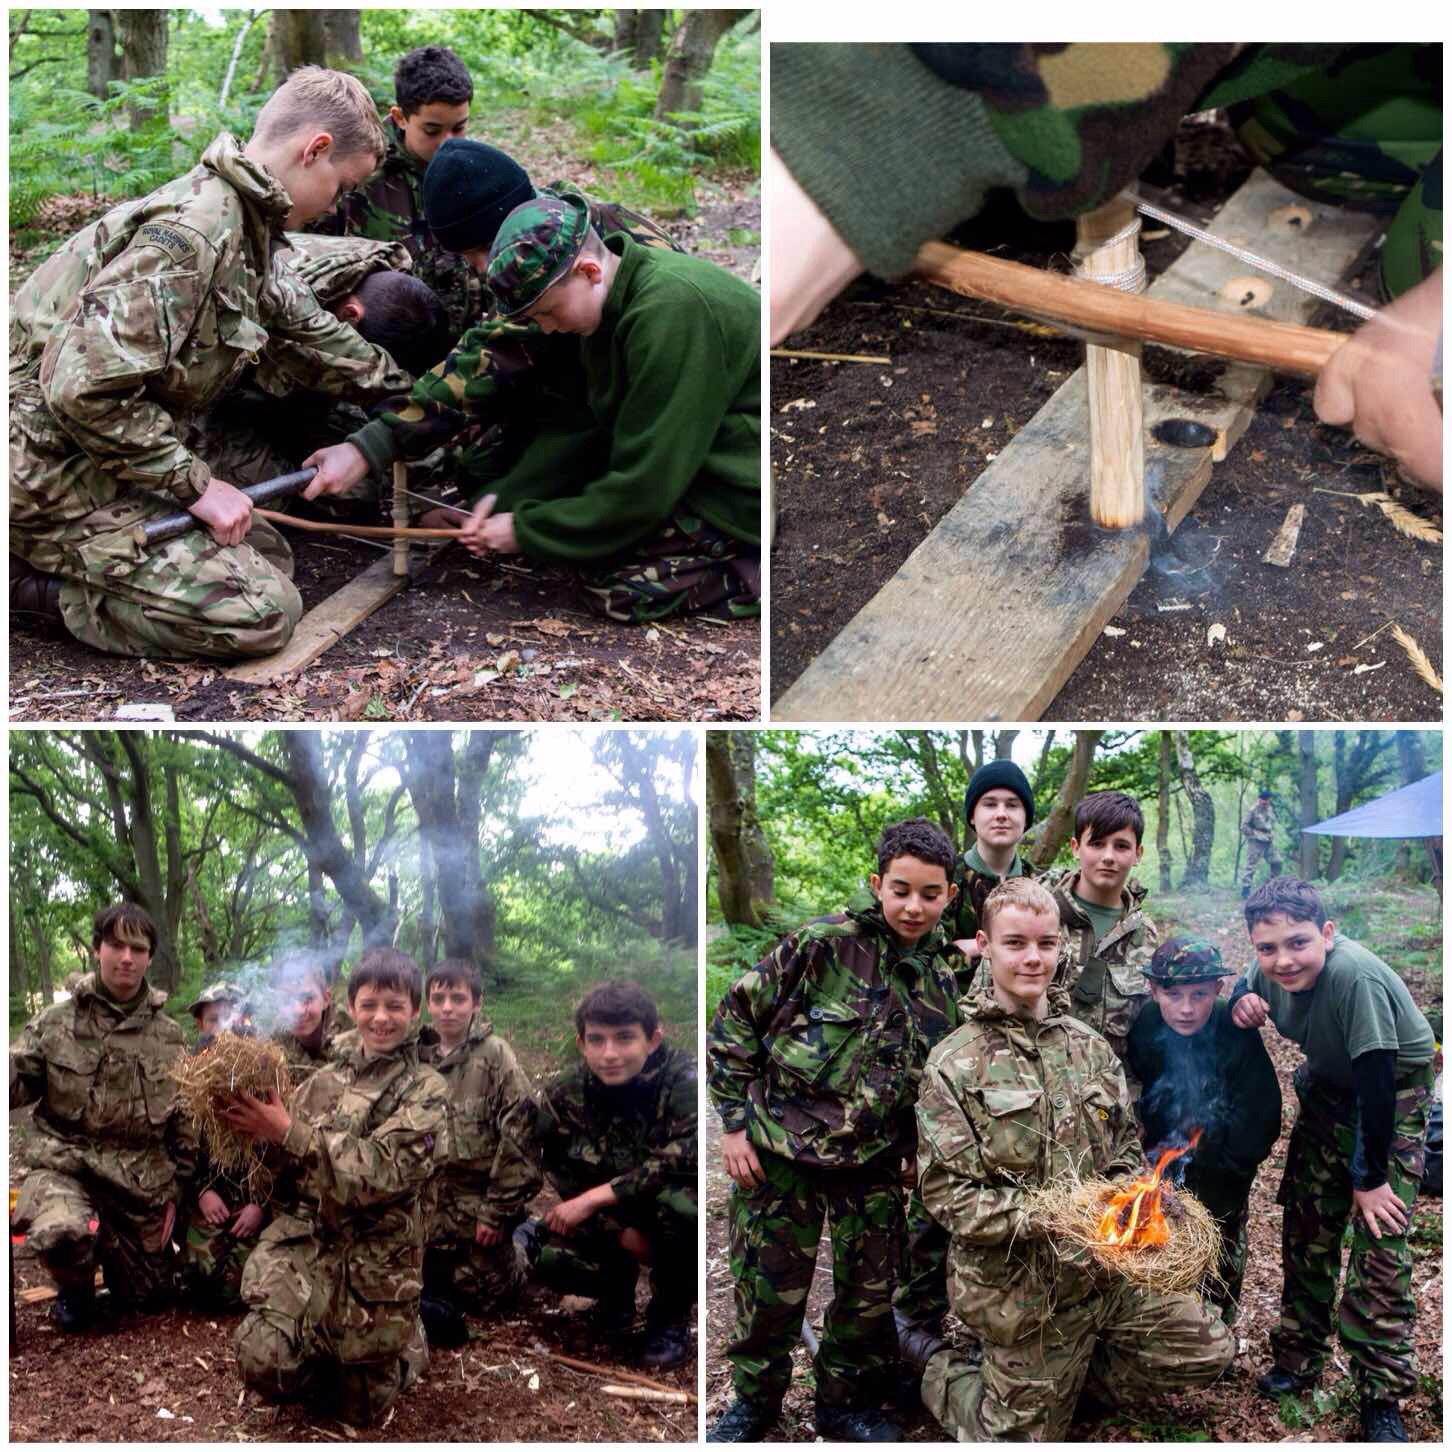
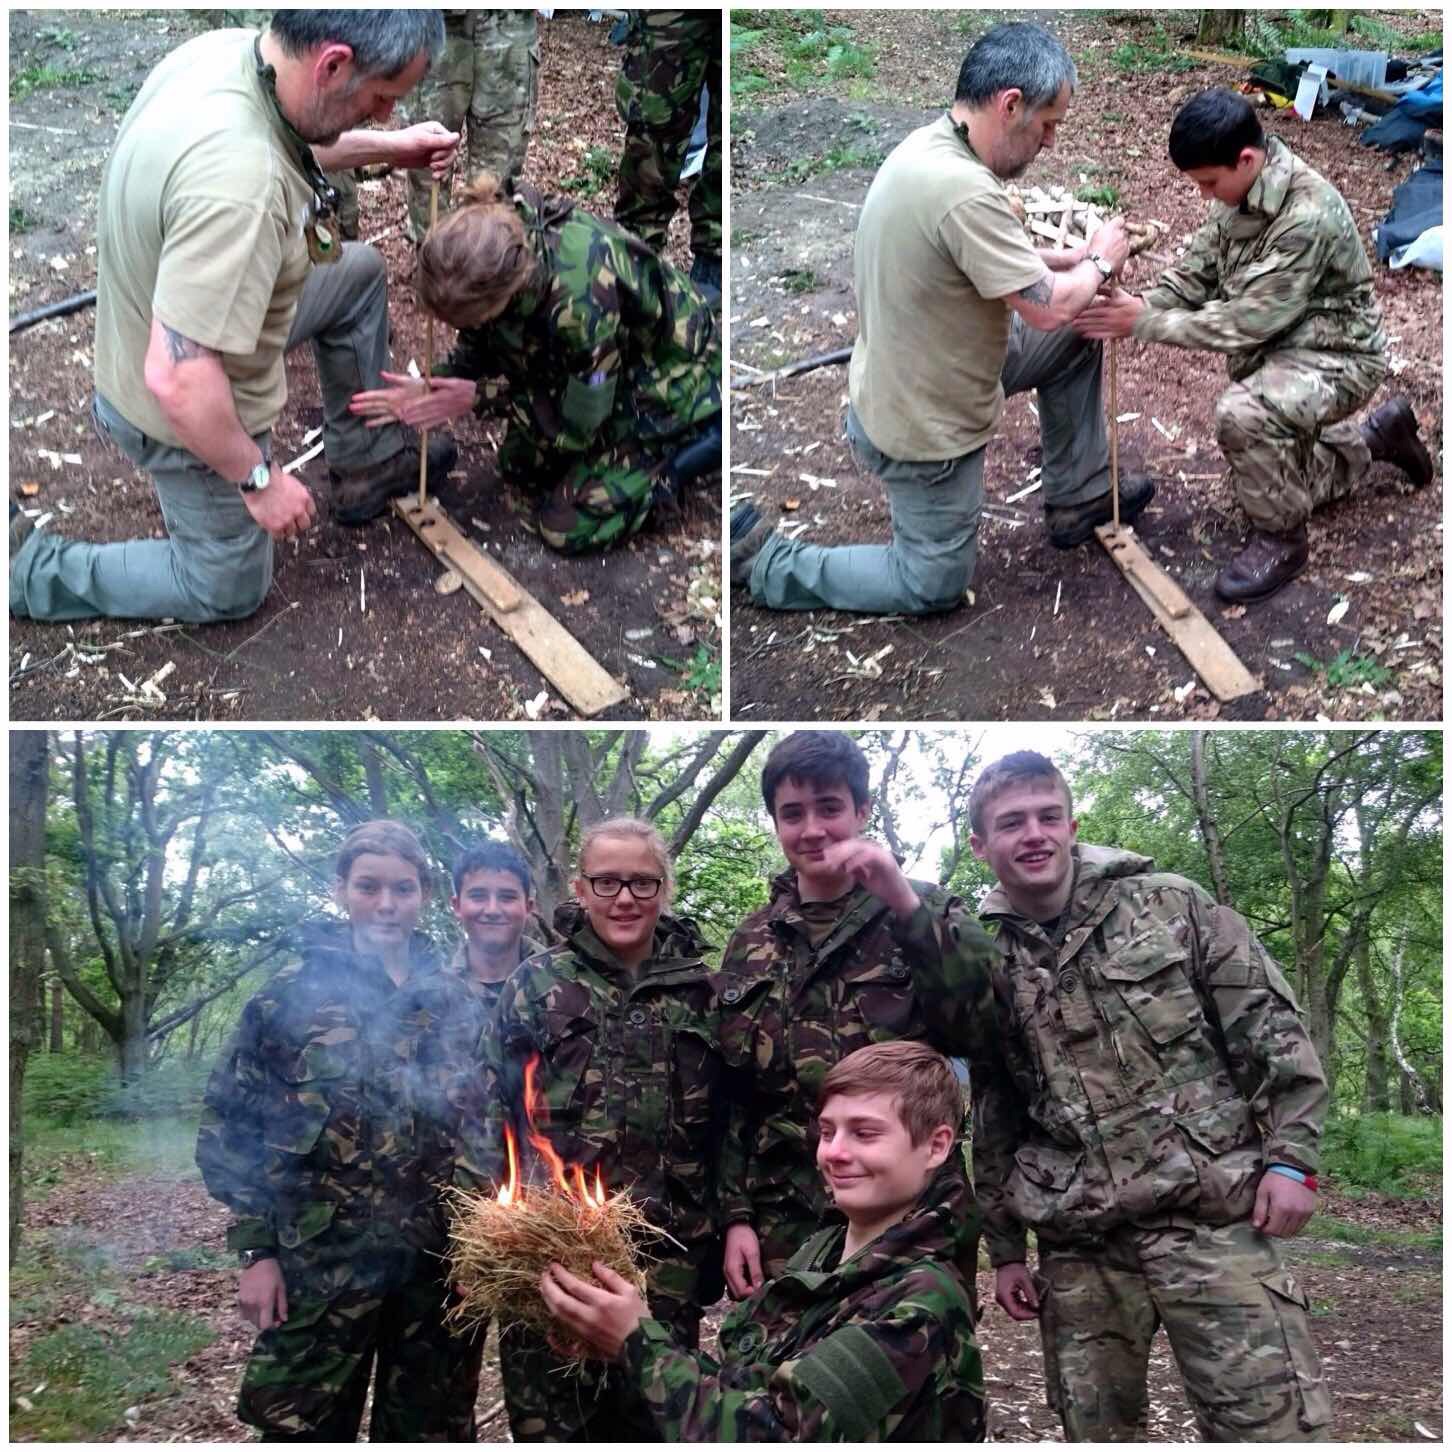
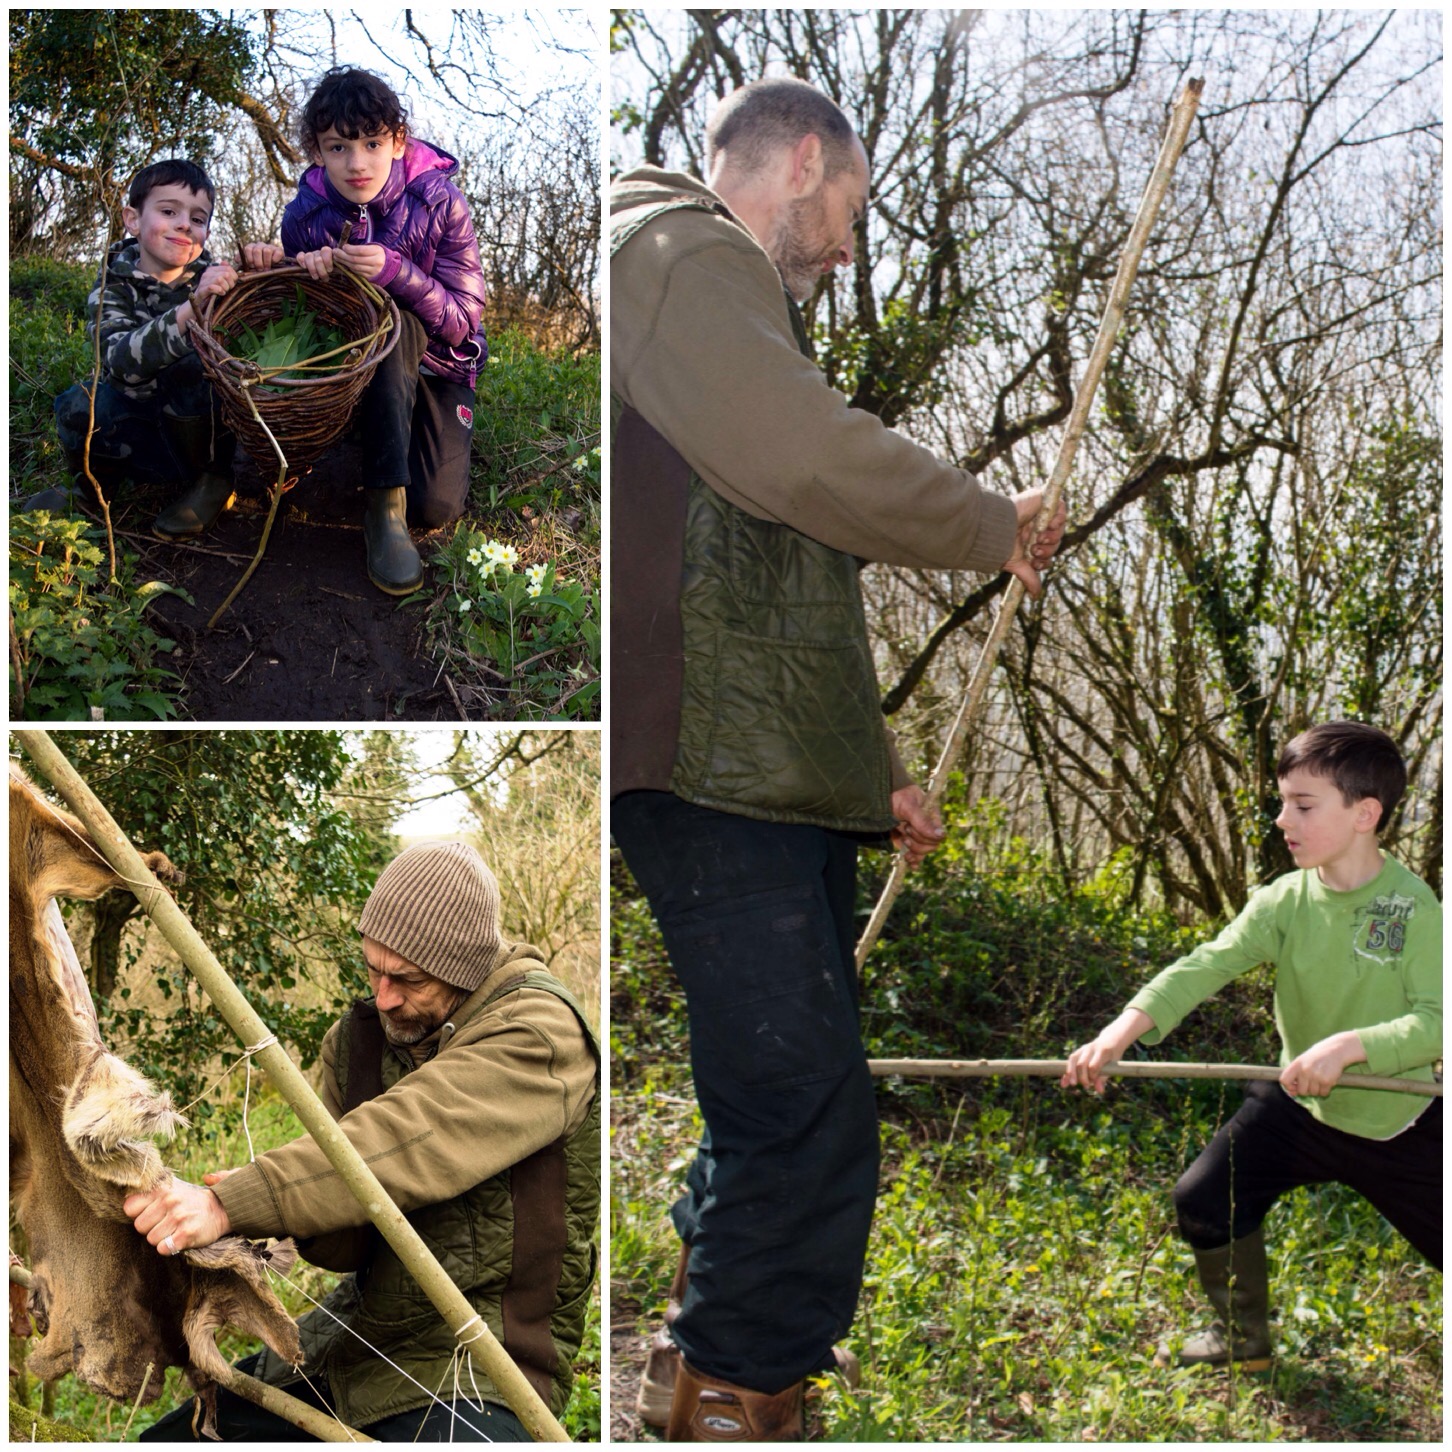
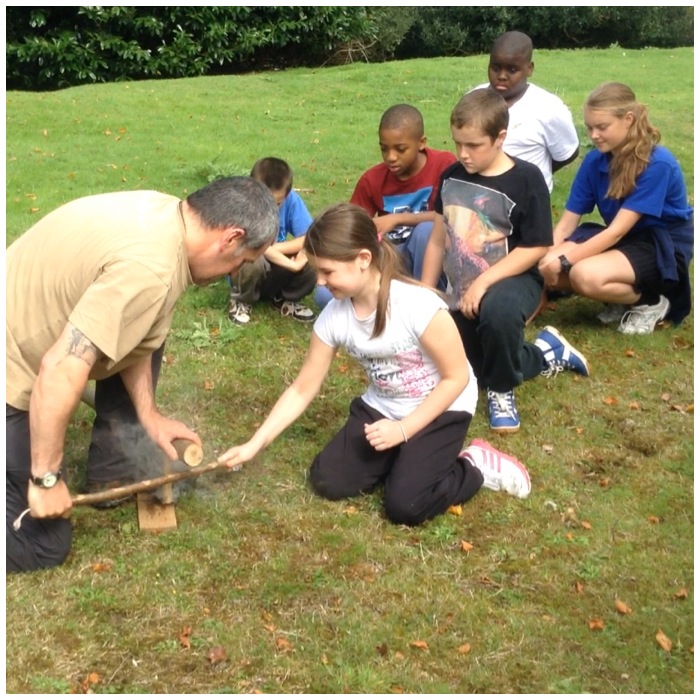
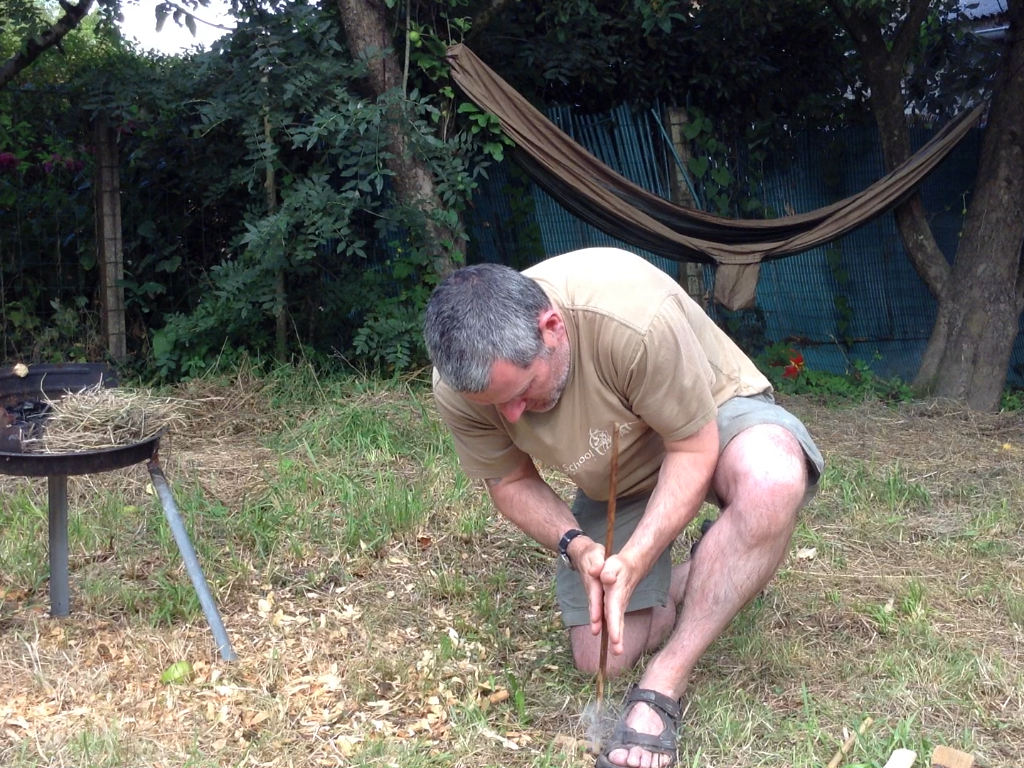
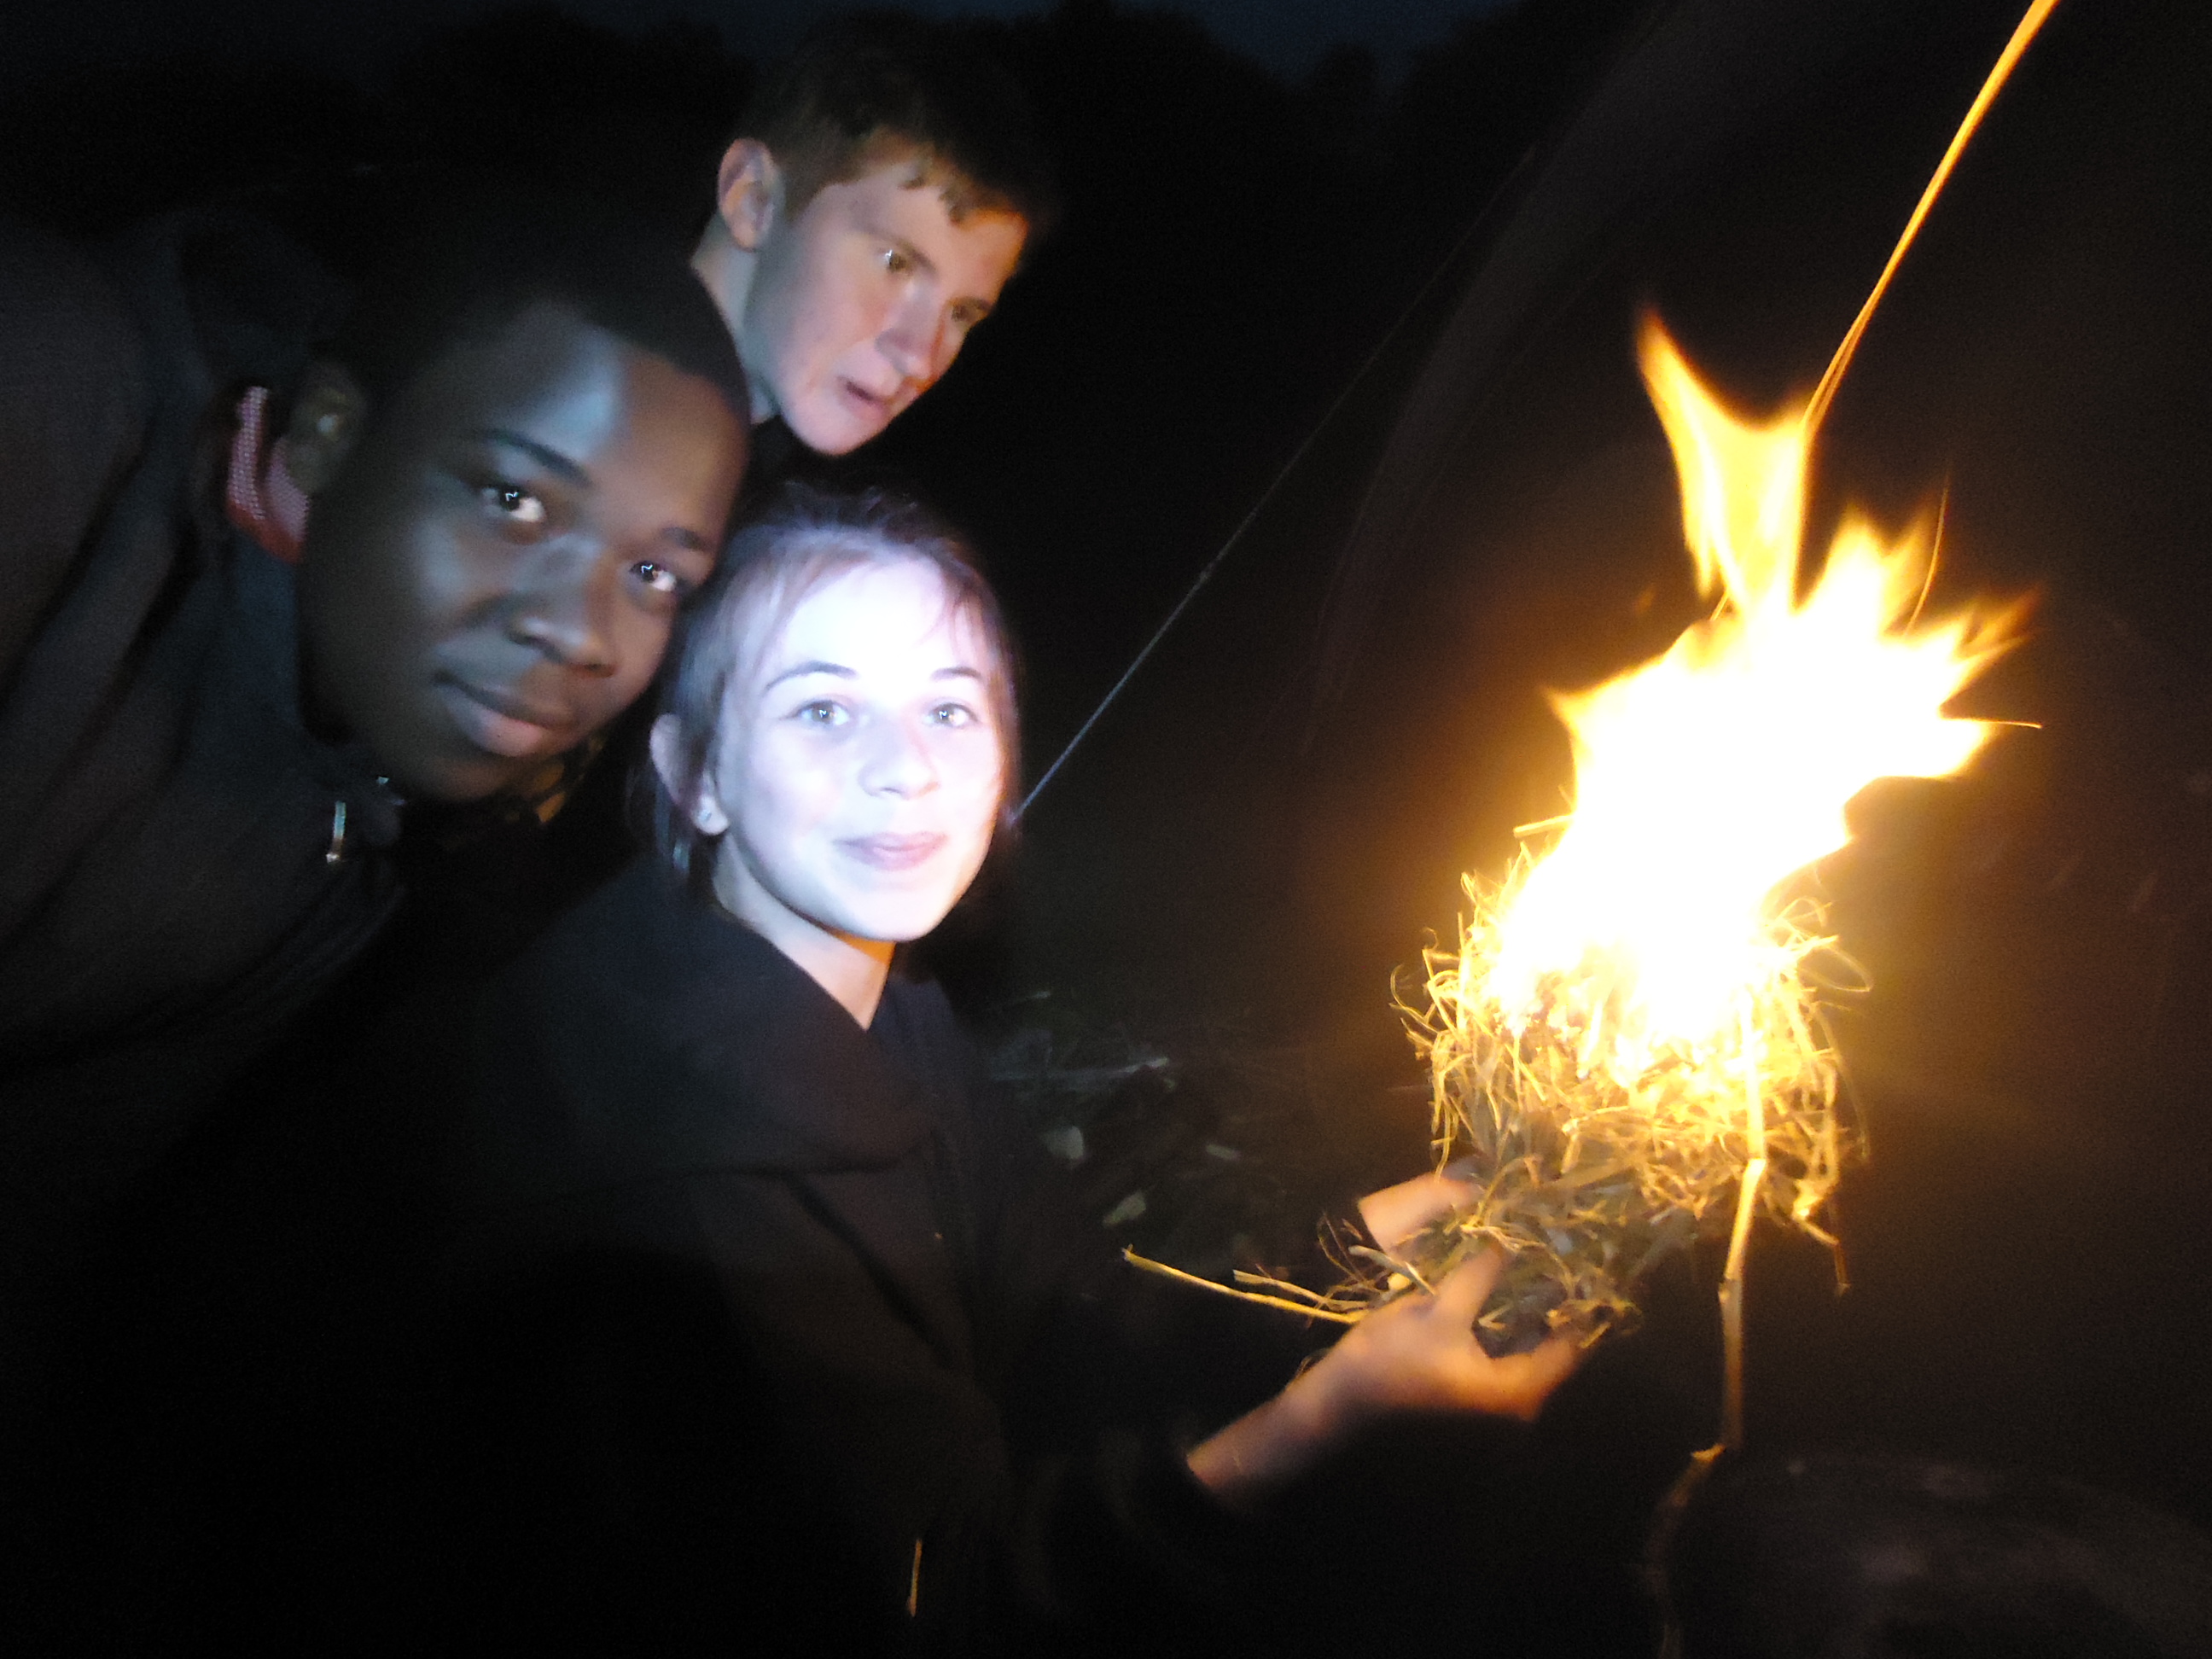
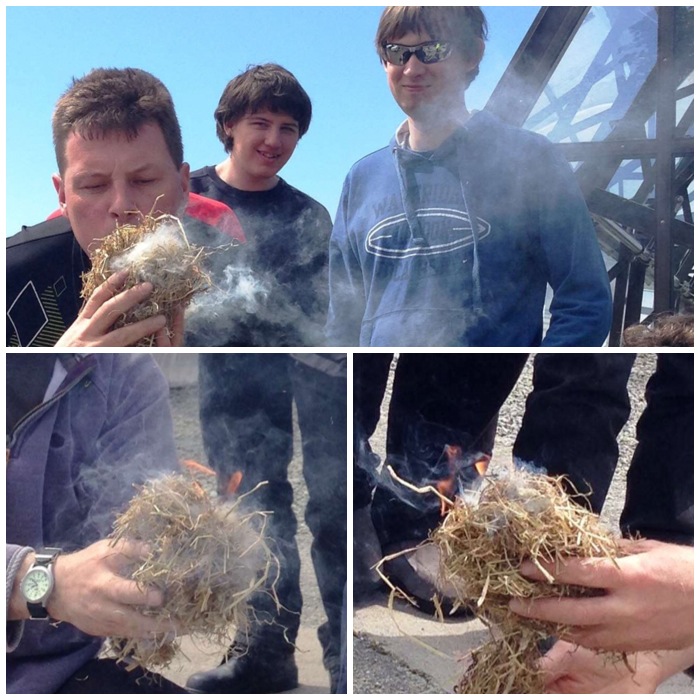
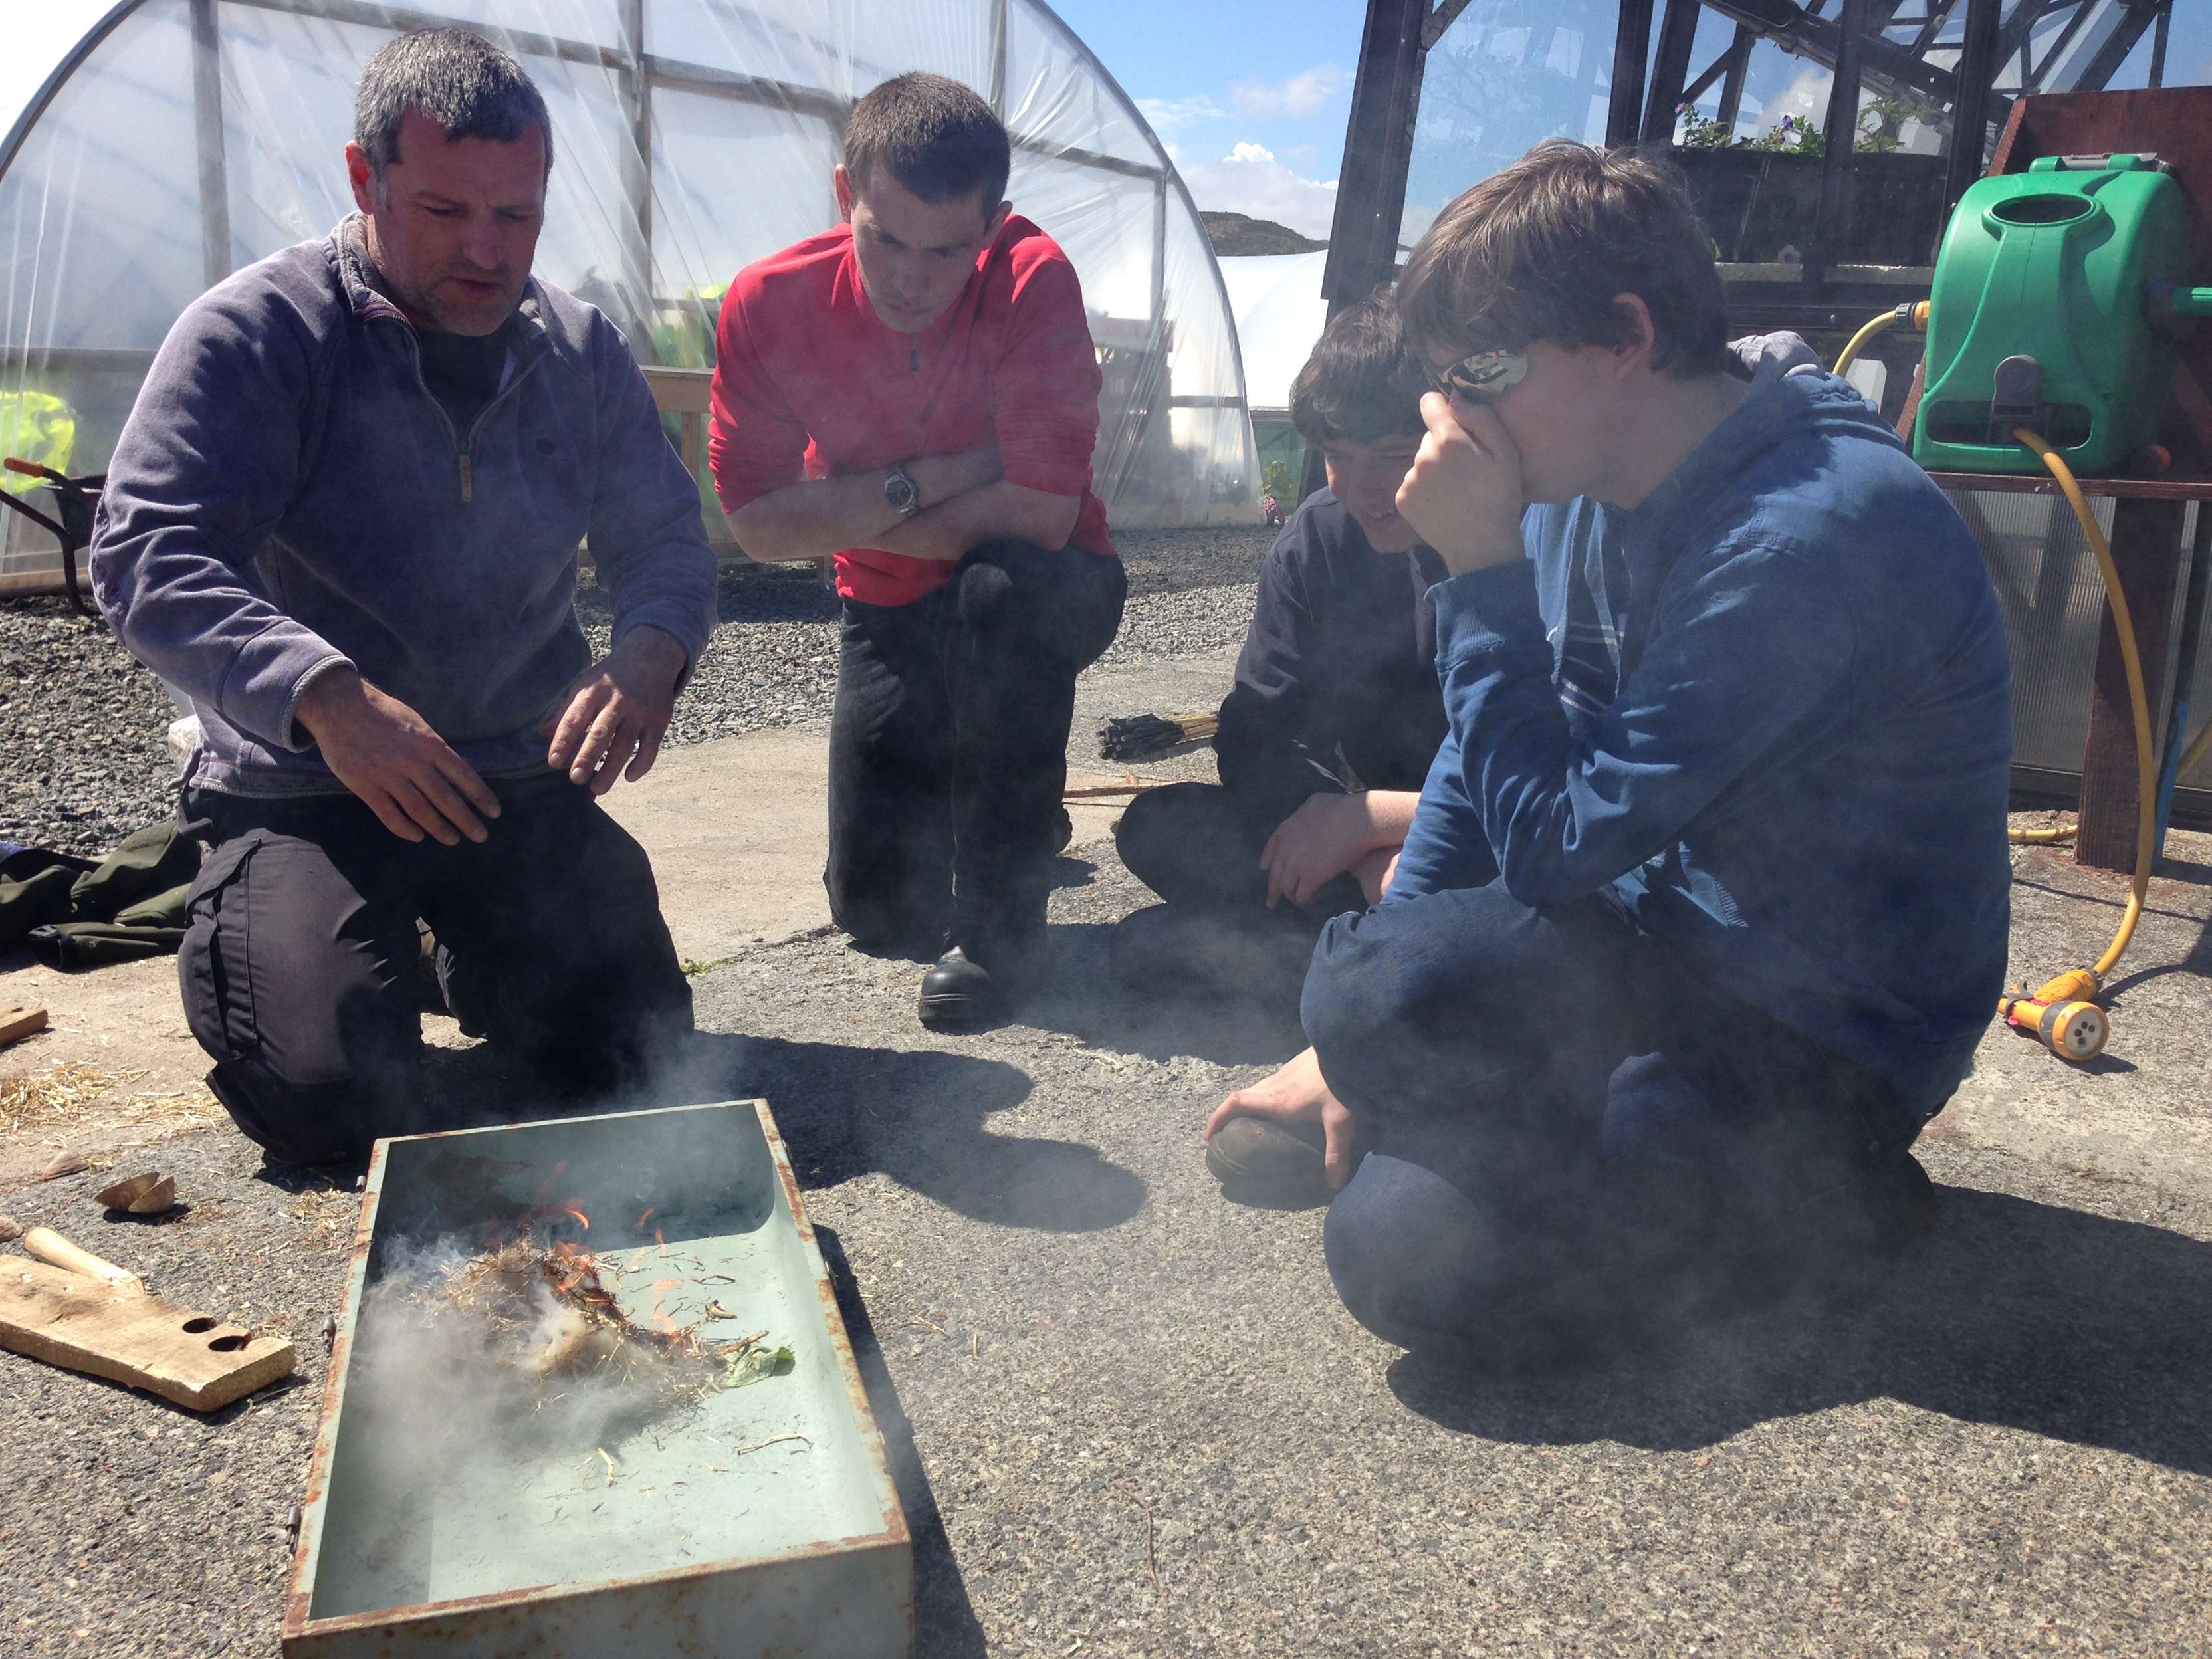
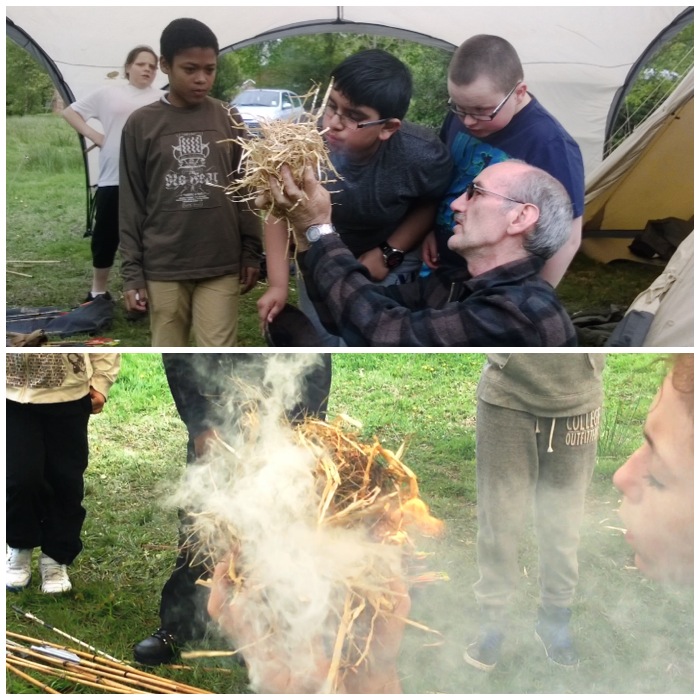
On the Saturday I had taught the Juniors how to light a fire using Firesteels so on the Sunday they all helped me to get an ember using the bowdrill. Each junior took part and we soon had a great big glowing ember.
One Junior said that he had watched the recent programme by a ‘well known survivalist’ where it had taken the contestants two days to get a fire going so he was over the moon to get an ember in just a couple of minutes.
Team bowdrill
Once the ember was stable we popped it into a tinder bundle and everyone took it in turn to blow it into flame.
I think the smiles on their faces kind of say it all about the experience they just had.
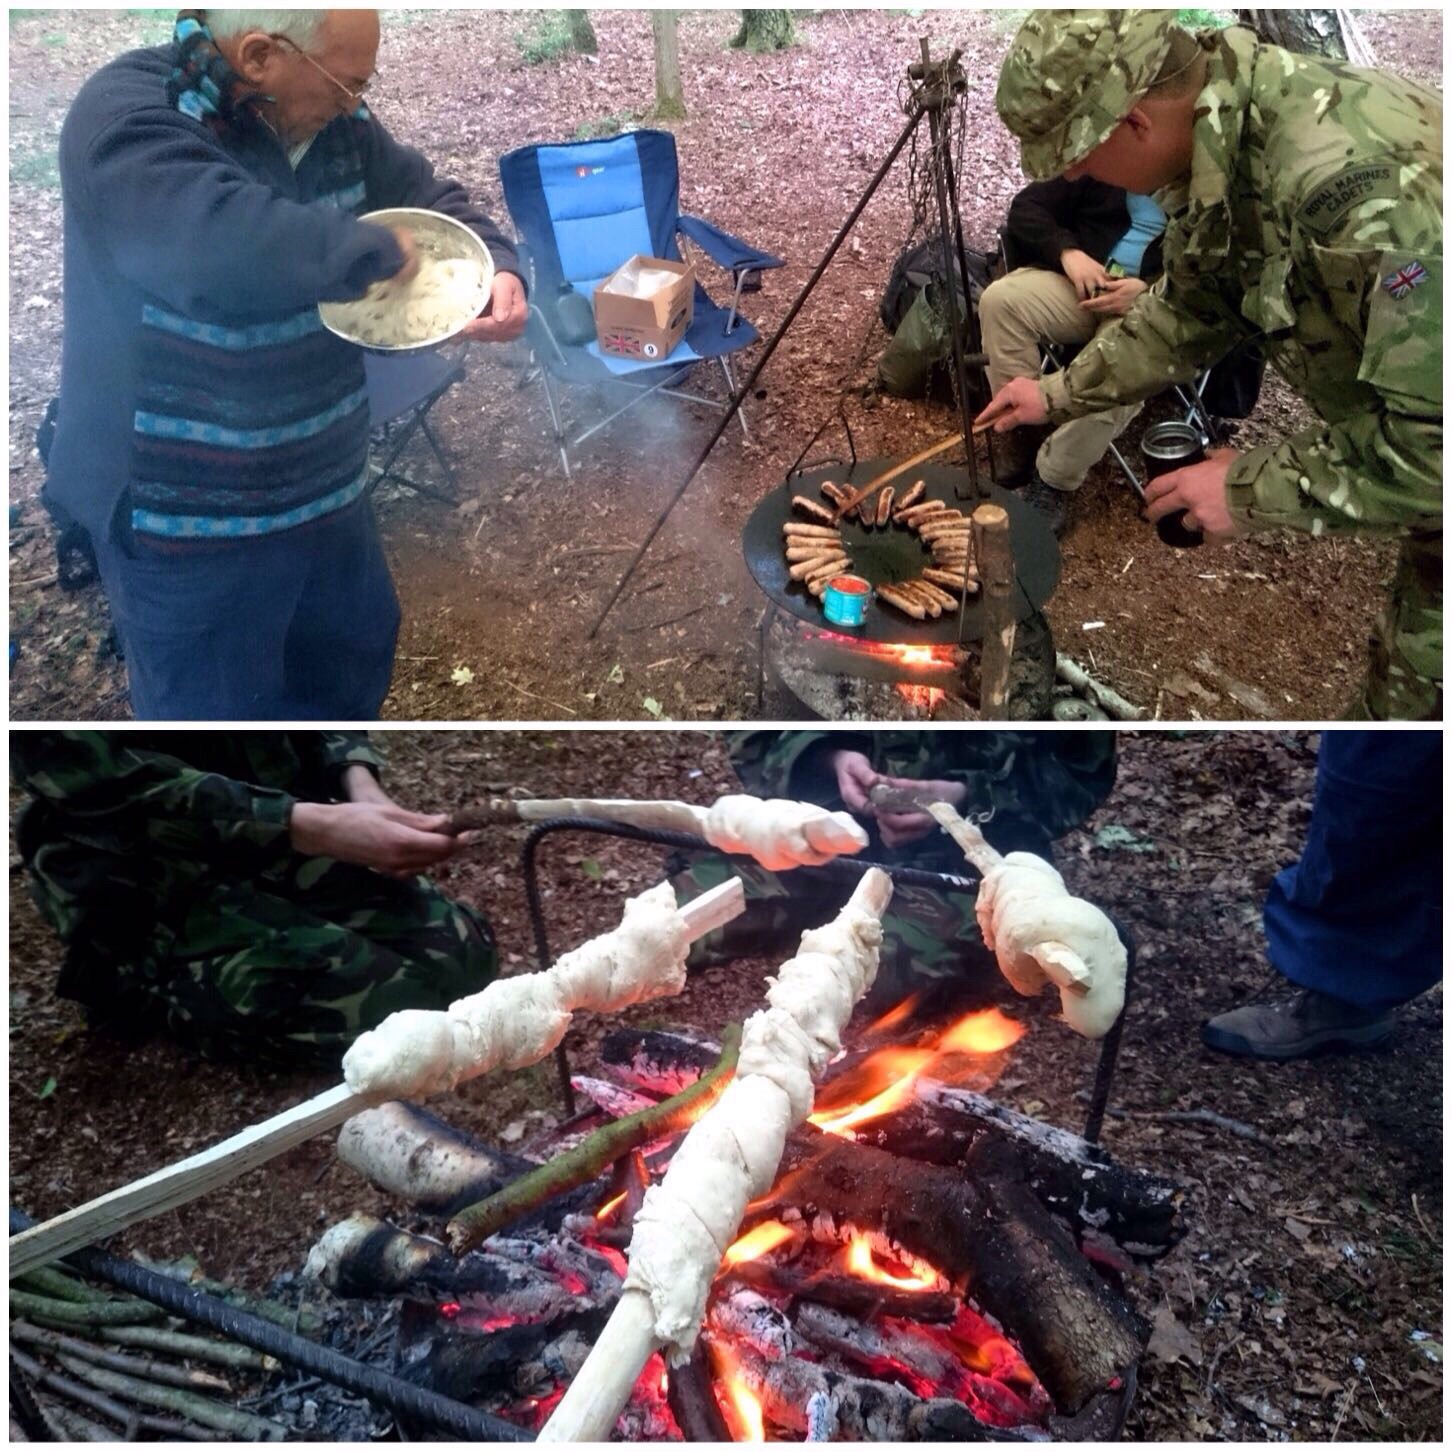
Flammage
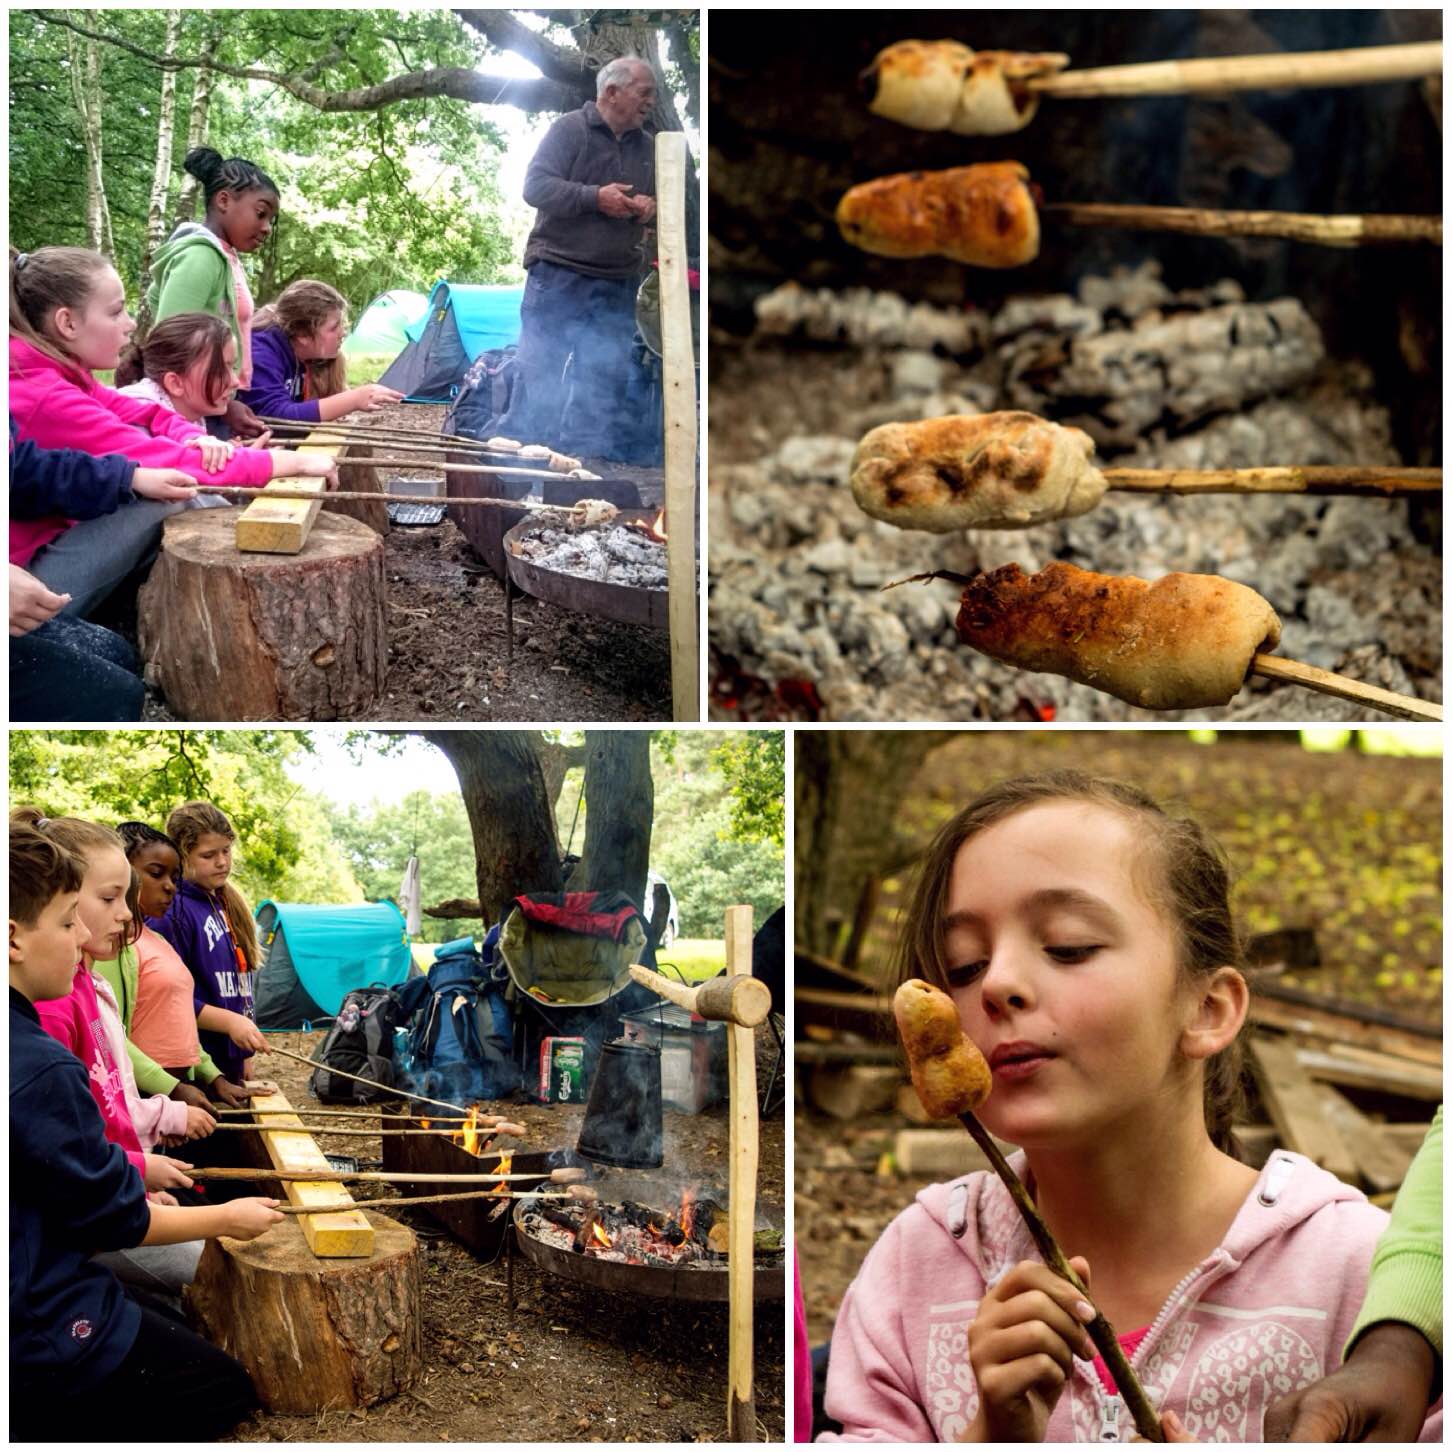
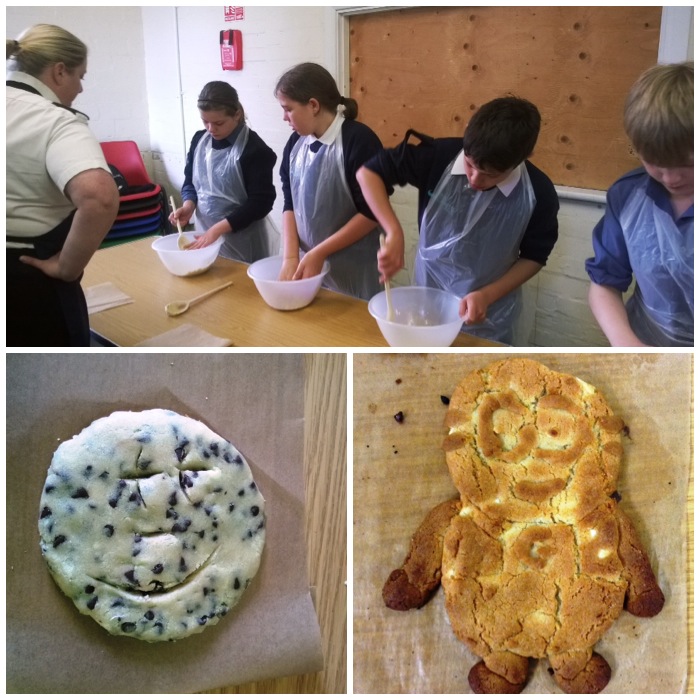
Once we got the fire going properly Alan Lewis took the juniors on a cookery class. He got them to cook sausages over the fire and then to make up a bread mix. The bread mixture was then wrapped around the cooked sausages and in no time they all had their own hand made sausage rolls.
Morning cooking
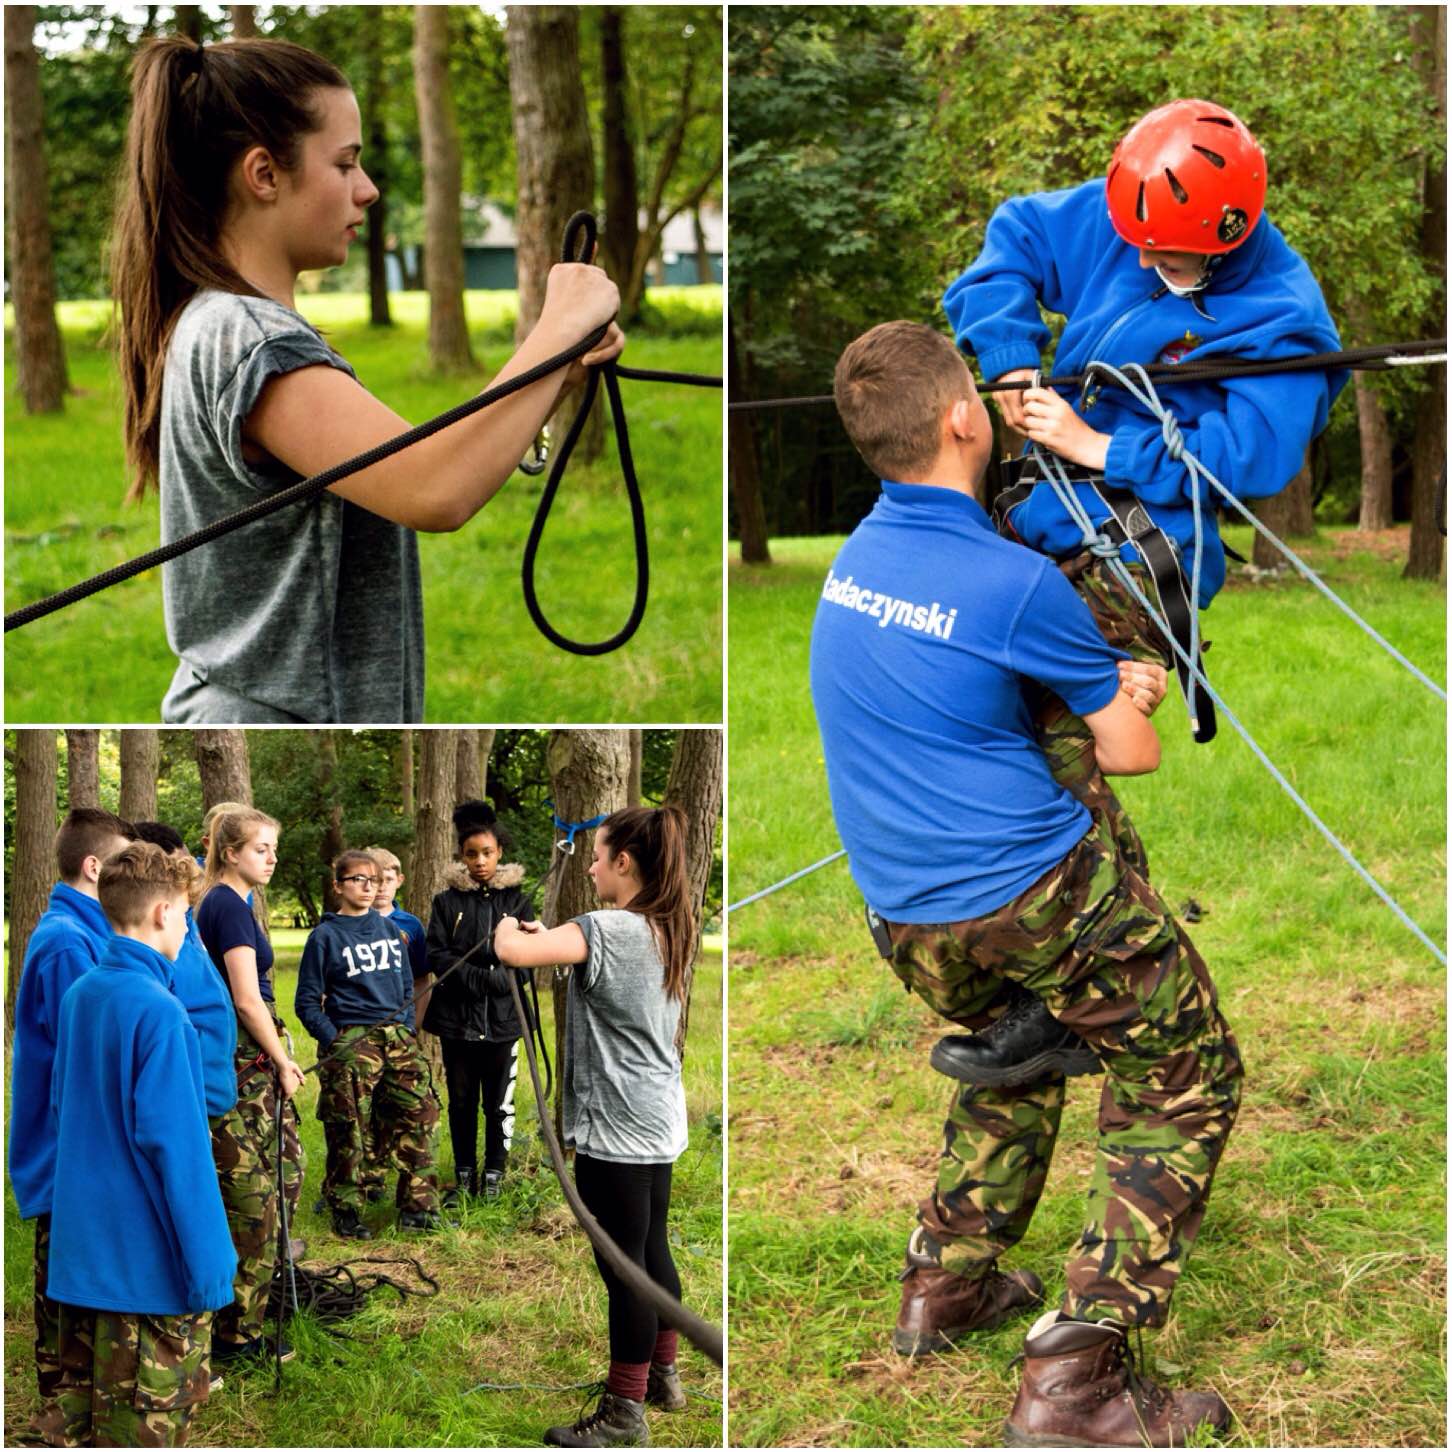
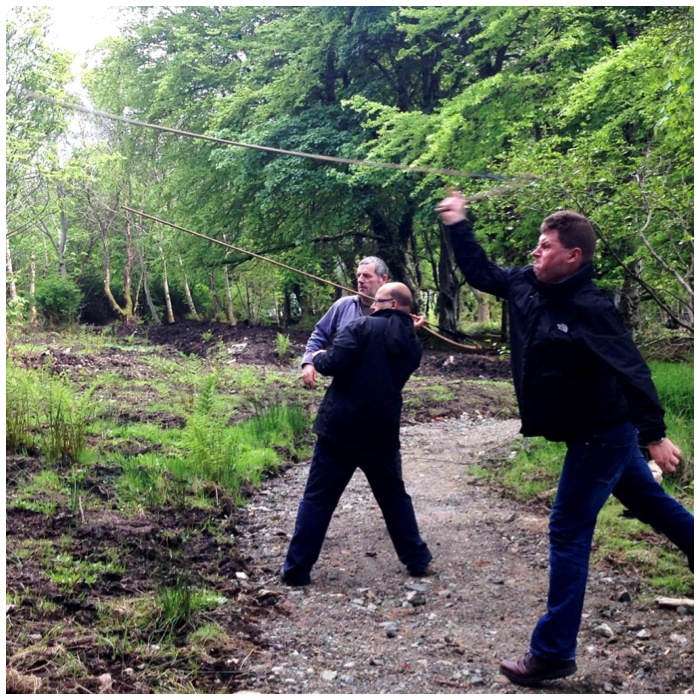
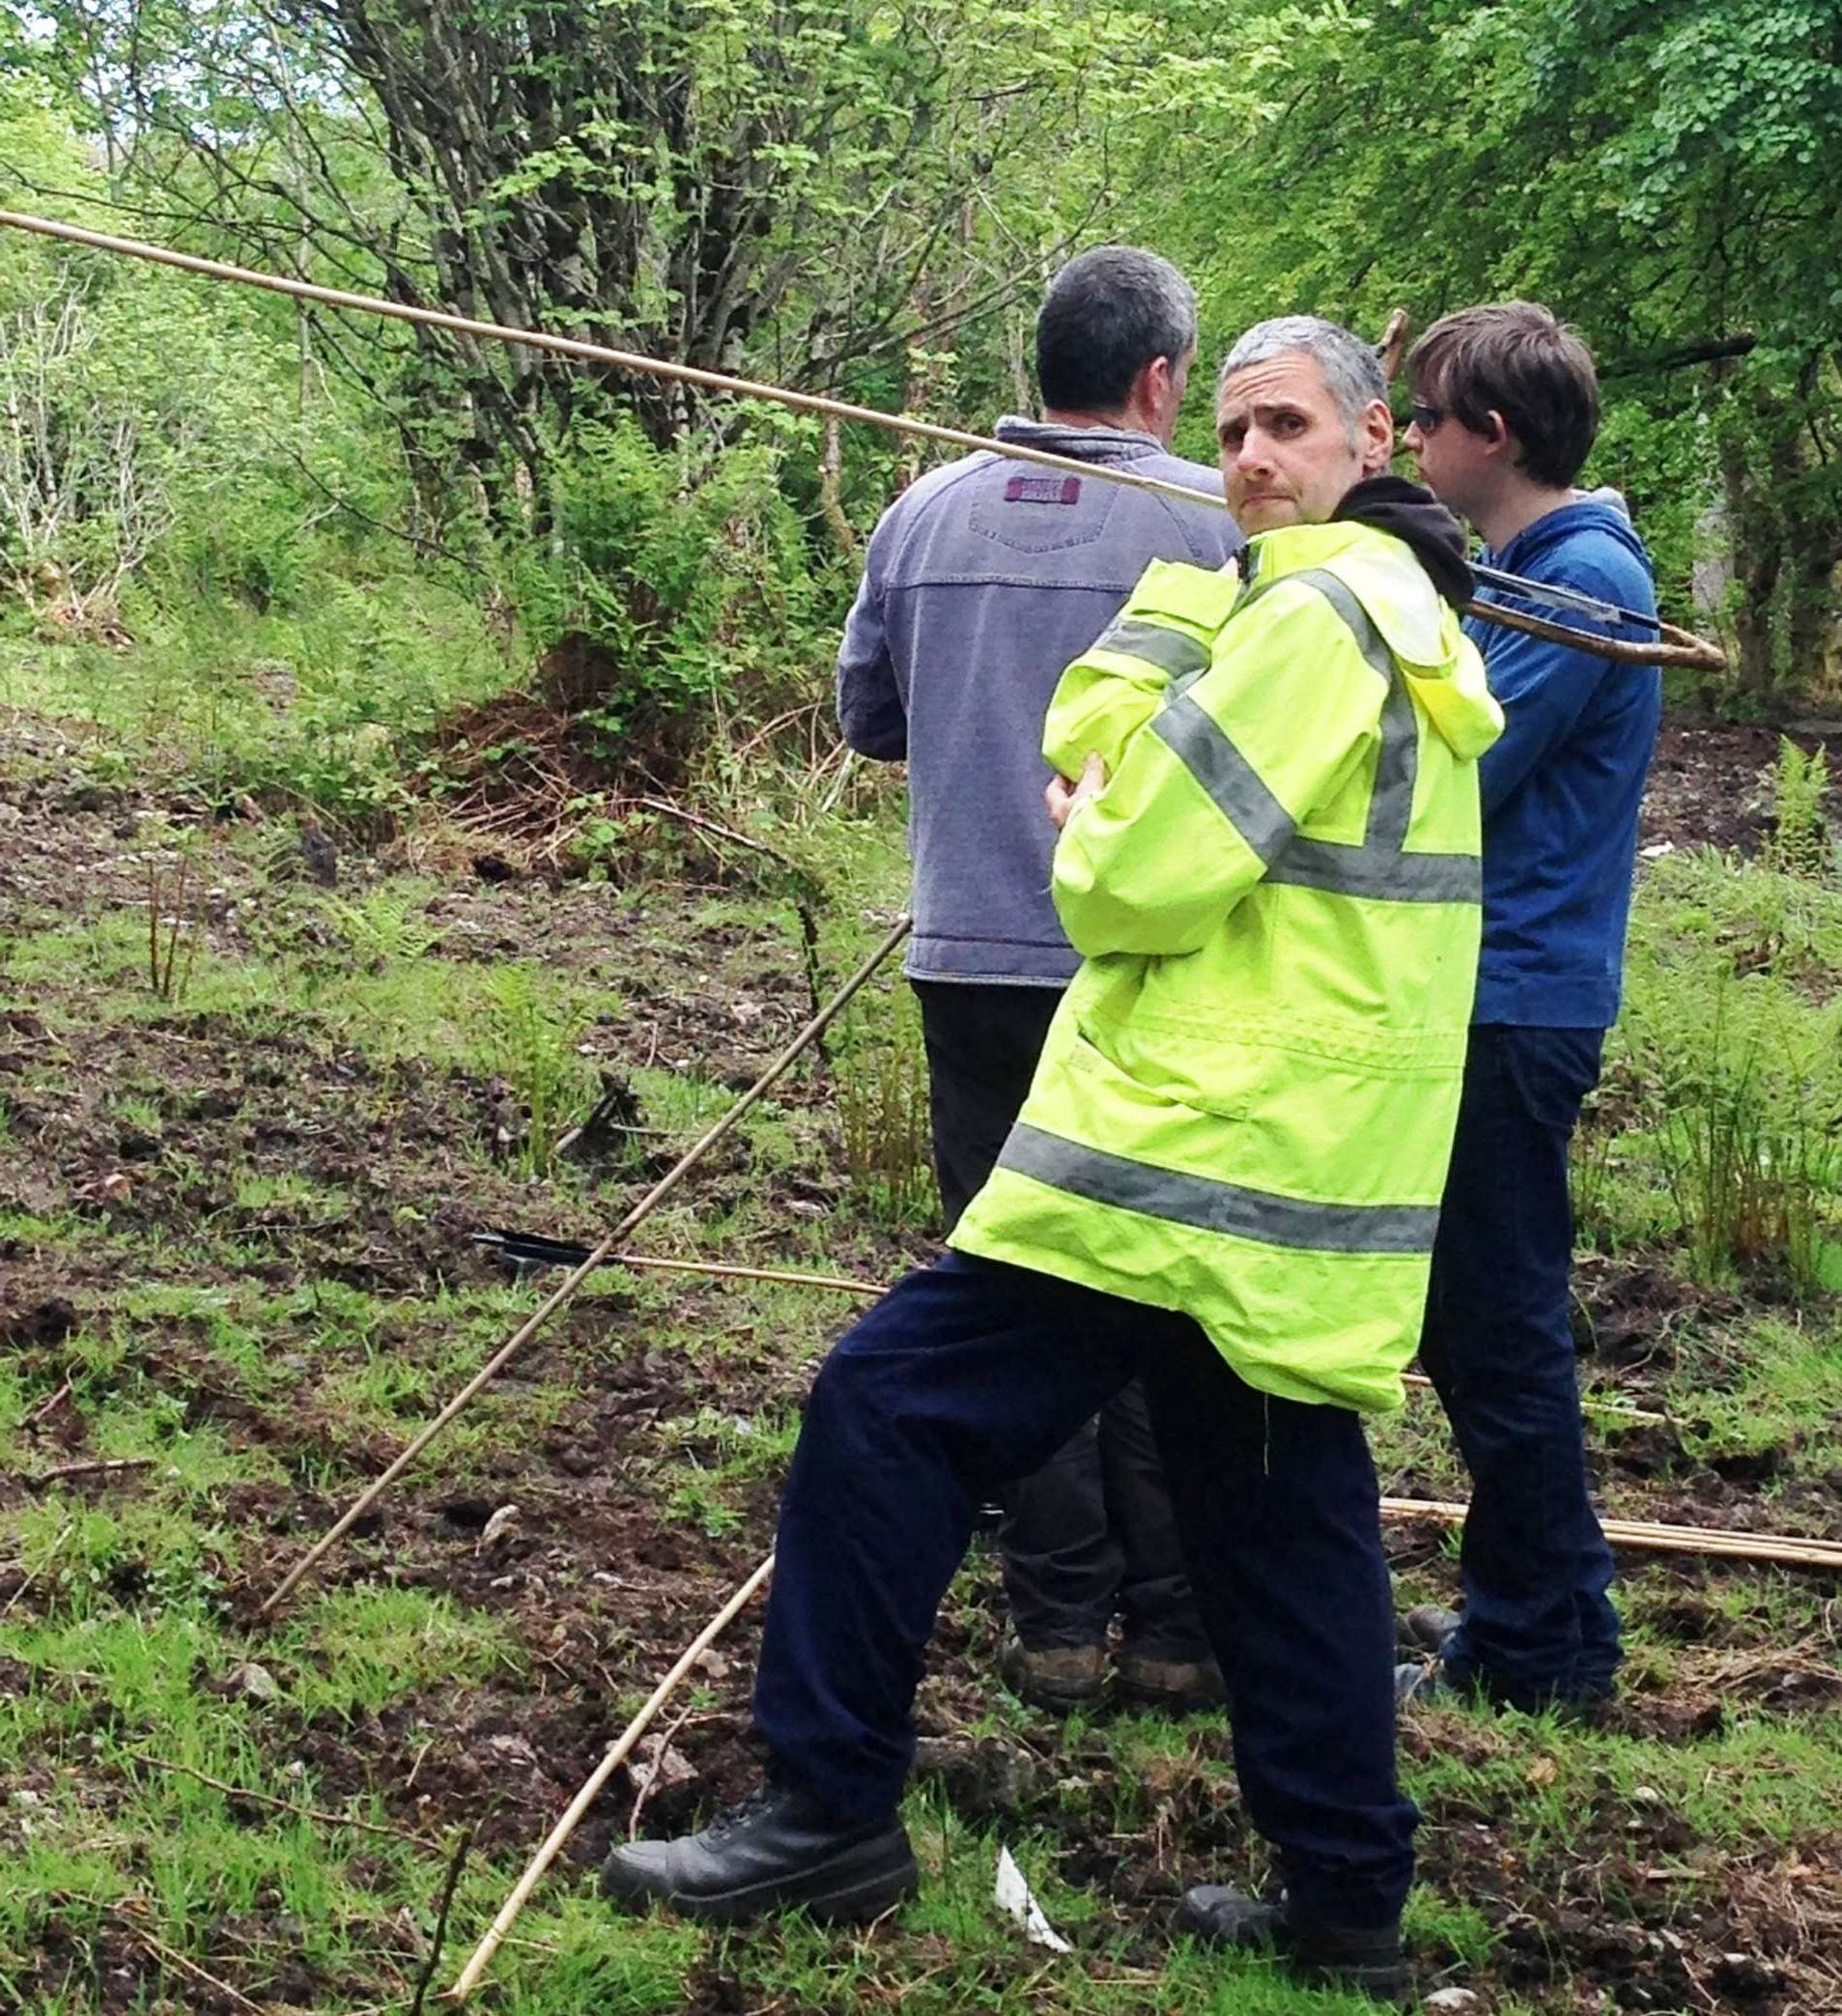
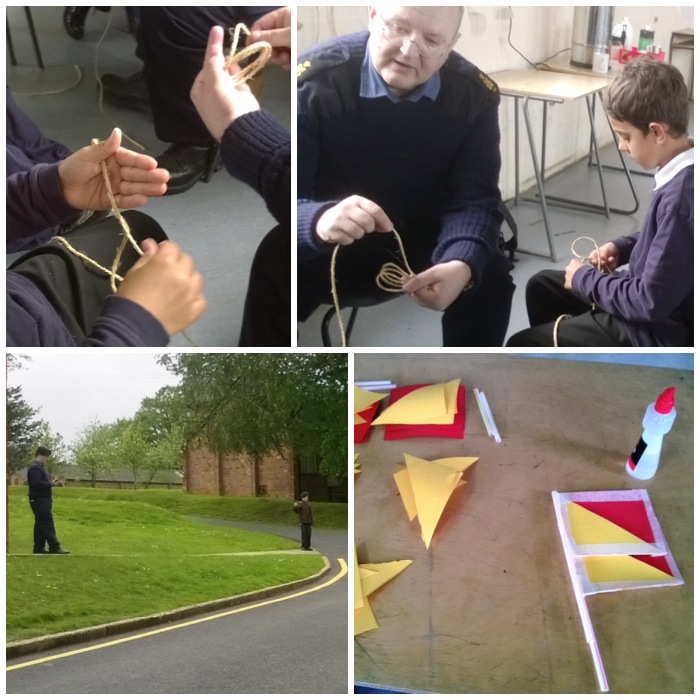
While the Juniors were cooking their sausage rolls I wandered over to where Dave was working with his older cadets. They were practising some ropework to set up a retrievable rope system for crossing a river. All this was in preparation for the forthcoming Chosin Cup competition in early October.
Older cadets practising for Chosin Cup
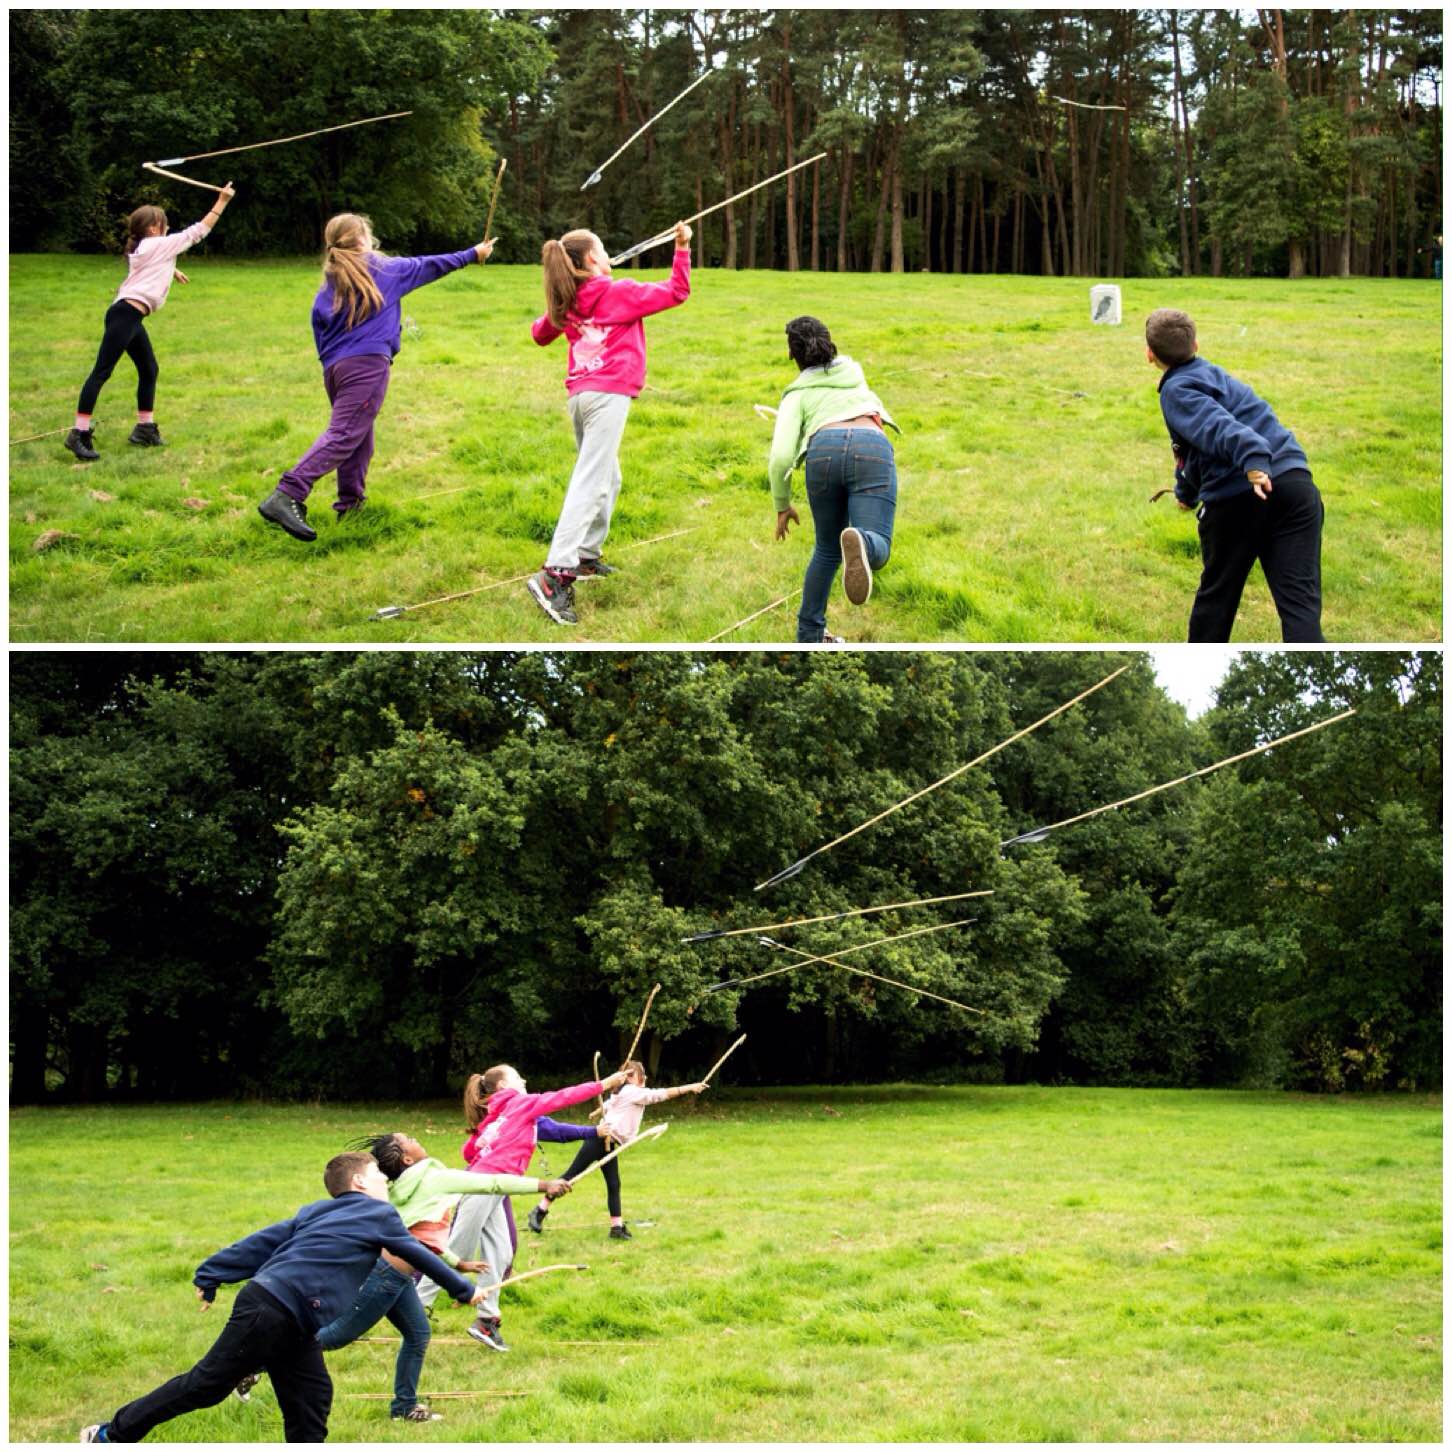
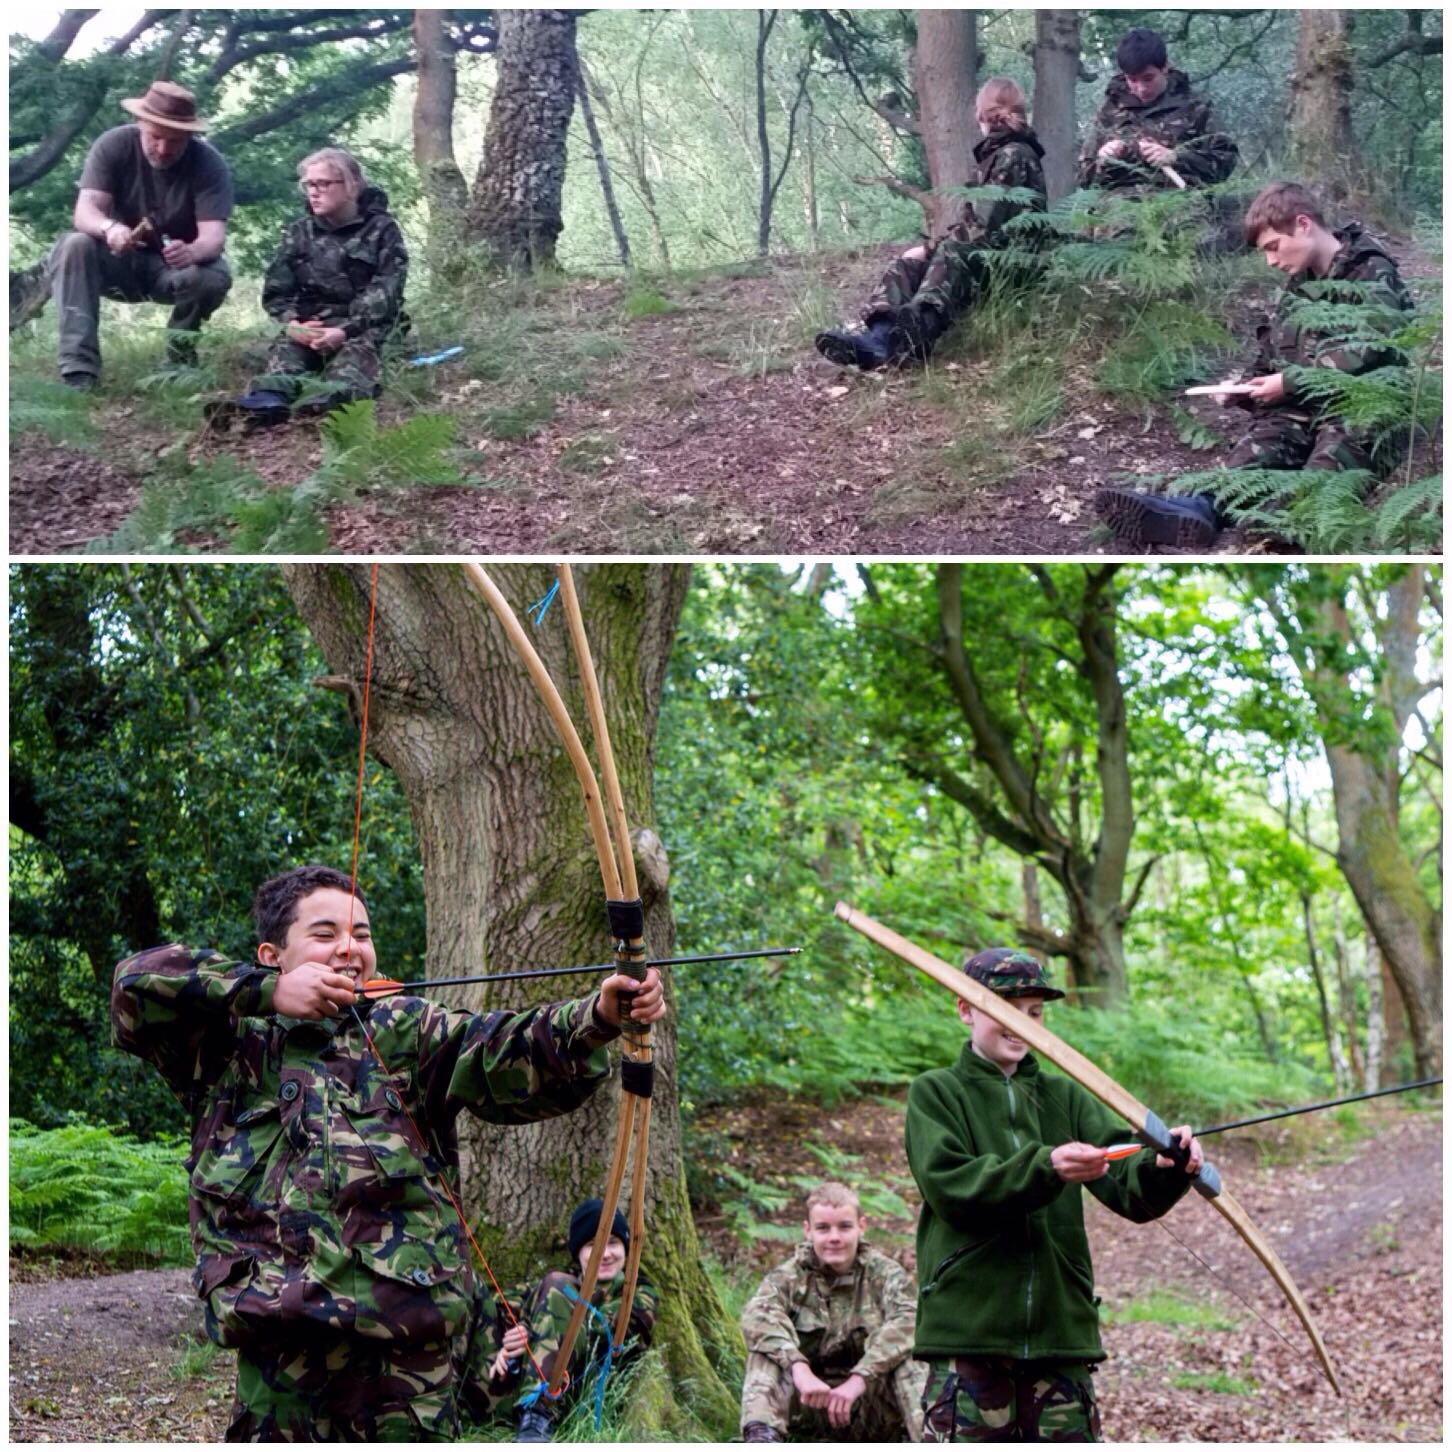
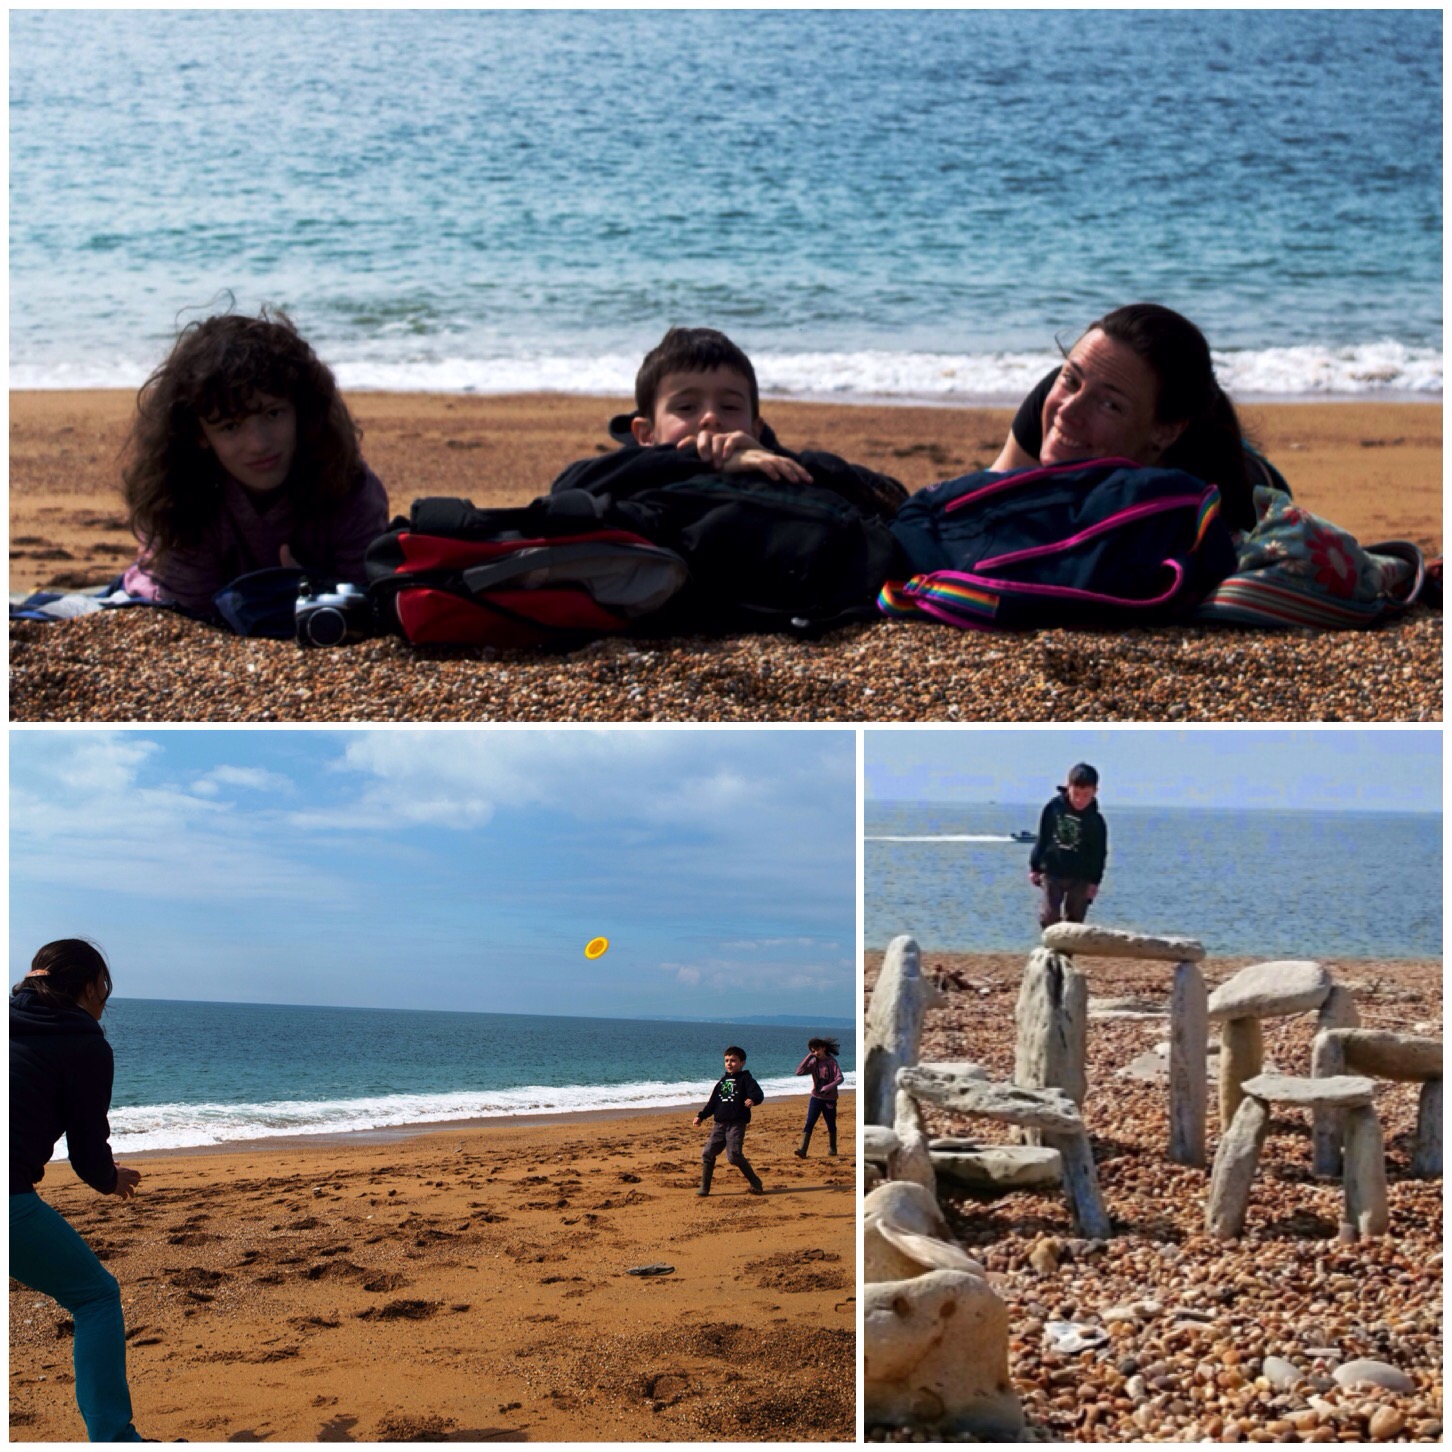
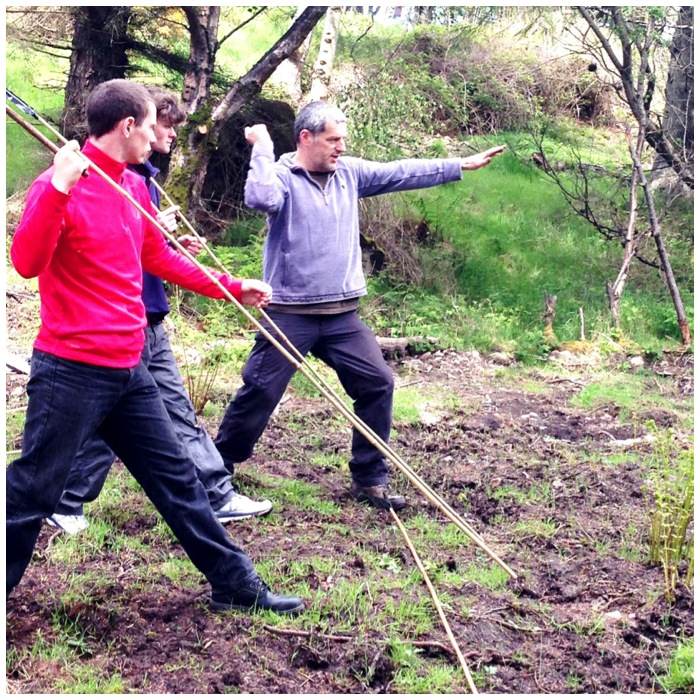
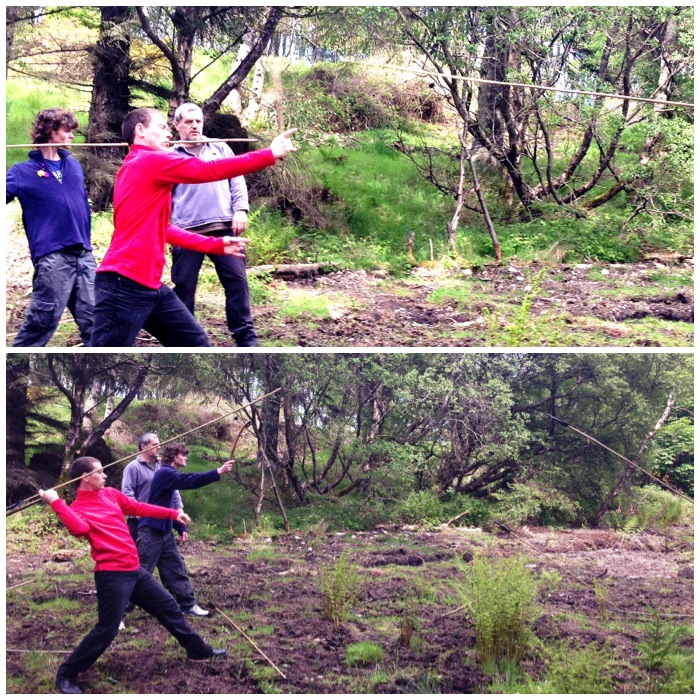
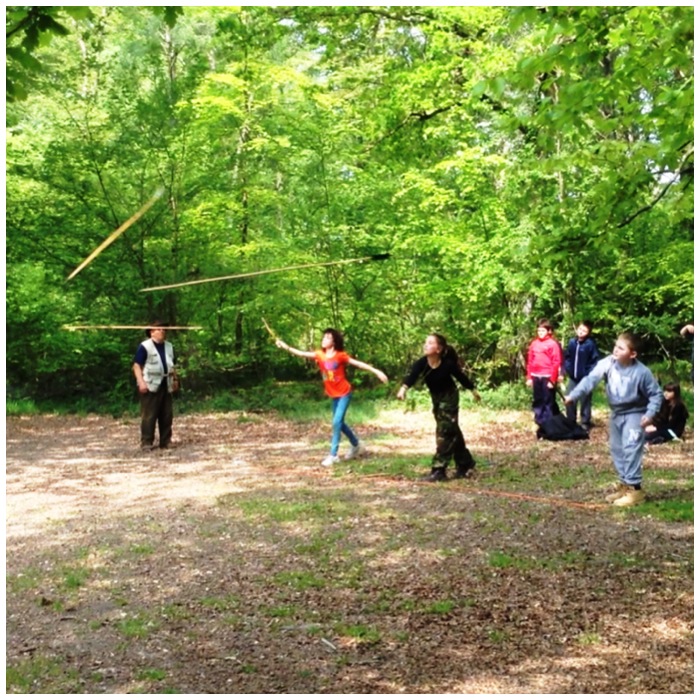
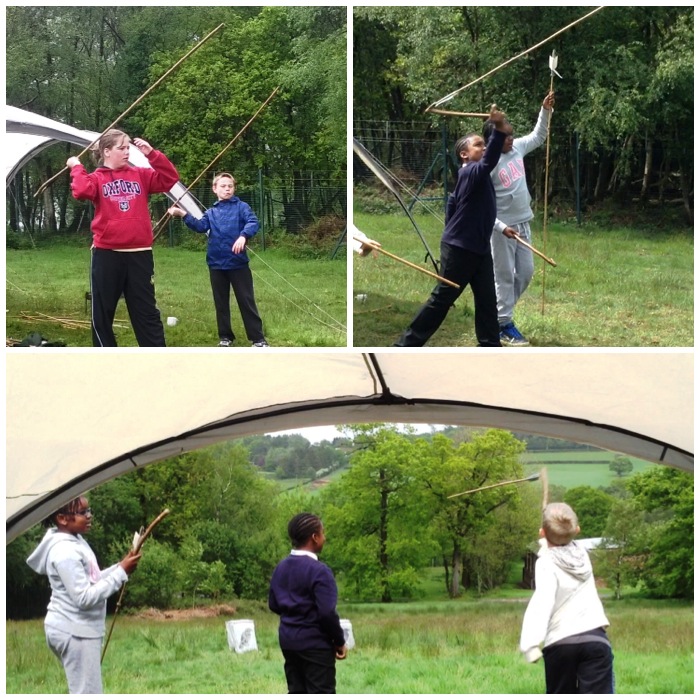
To finish the course off for the Juniors I set up the Atlatl range on an open slope. It was not long before they got a hang of this primitive hunting technique and were soon landing darts on the targets.
An Atlatl finish
I finished the weekend still feeling as fresh as I started. It is not often I can say that about Sea Cadet weekends (I usually need a day or two to get over them) but the juniors were so keen to learn and were a real bright and keen bunch that I look forward to being invited again next year.
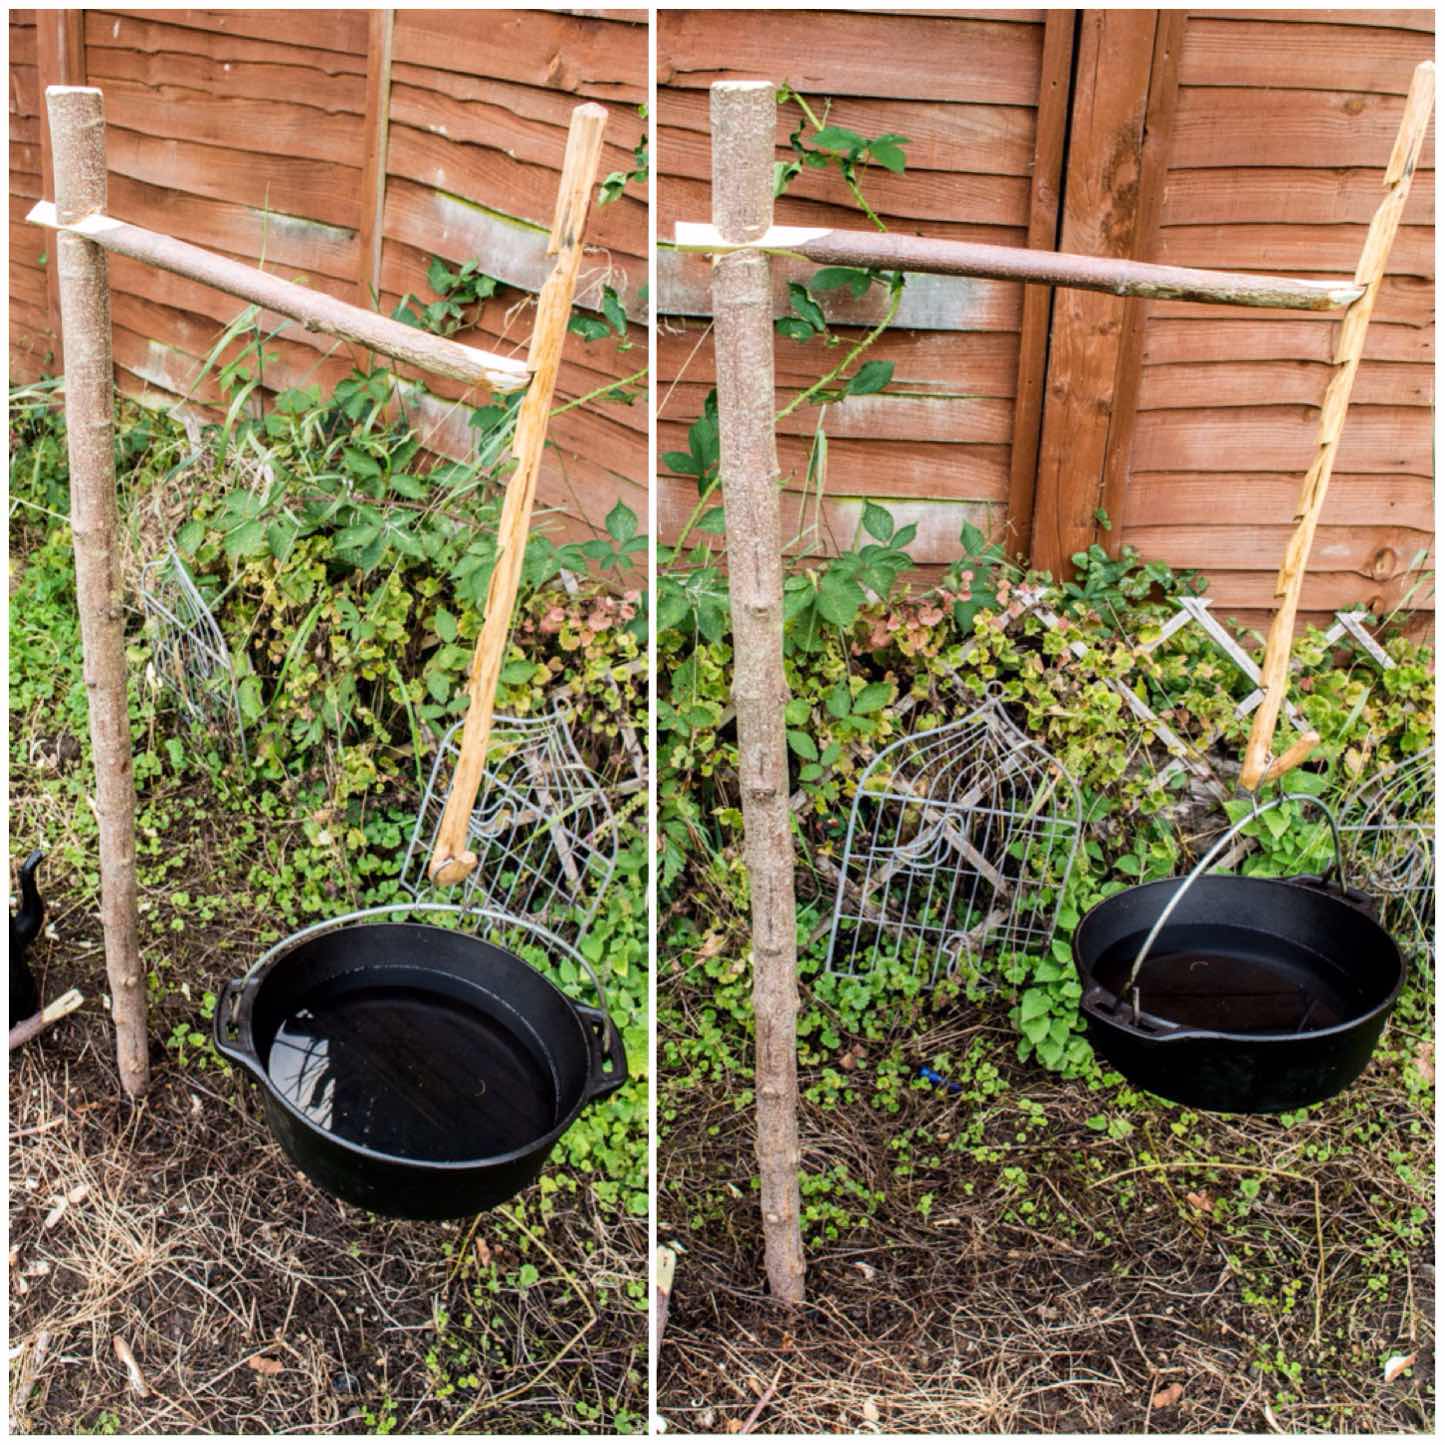
My search to find and document as many different campfire cranes brought me to this simple type of dovetail crane. I first came across this idea from a blog post by Ken Cole Jr on the Scout Pioneering site. I expanded on their idea with adding an adjustable pot hanger to the crane.
It is similar in concept to the Cooking Crane I documented previously except that the socket on the upright is created by cutting into the side of it instead of through the middle of the upright. This leads to a far quicker construction time.
Simple Dovetail Crane
I also like these vertical campfire cranes as there is little for people to trip up on around the campfire and like my previous post on the adjustable dovetail crane this simpler version is built using just a single pole.
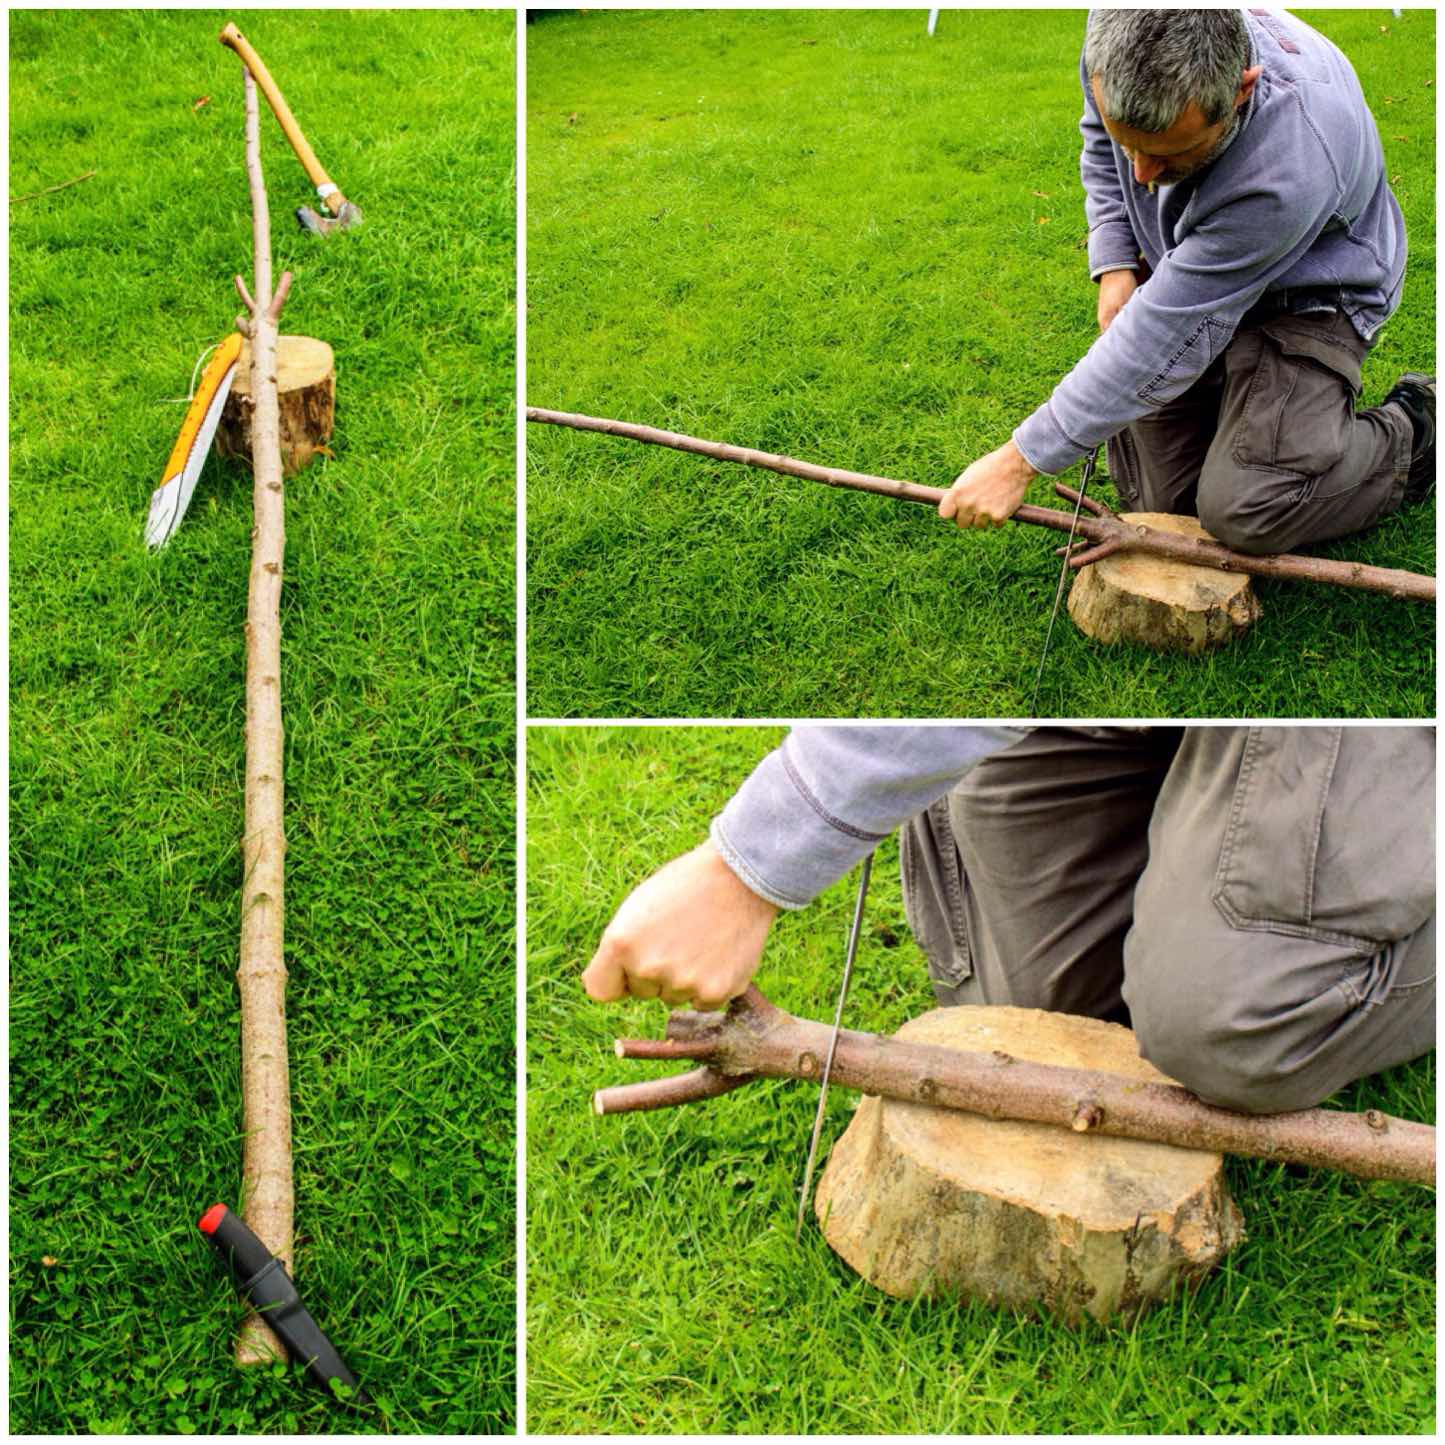
Trimming
I used a sycamore pole on I had on hand trimmed it into two pieces using my folding saw.
One pole trimmed to size
The larger pole you can see below was destined to be the upright and the thinner piece was to be the cranes arm.
The arm
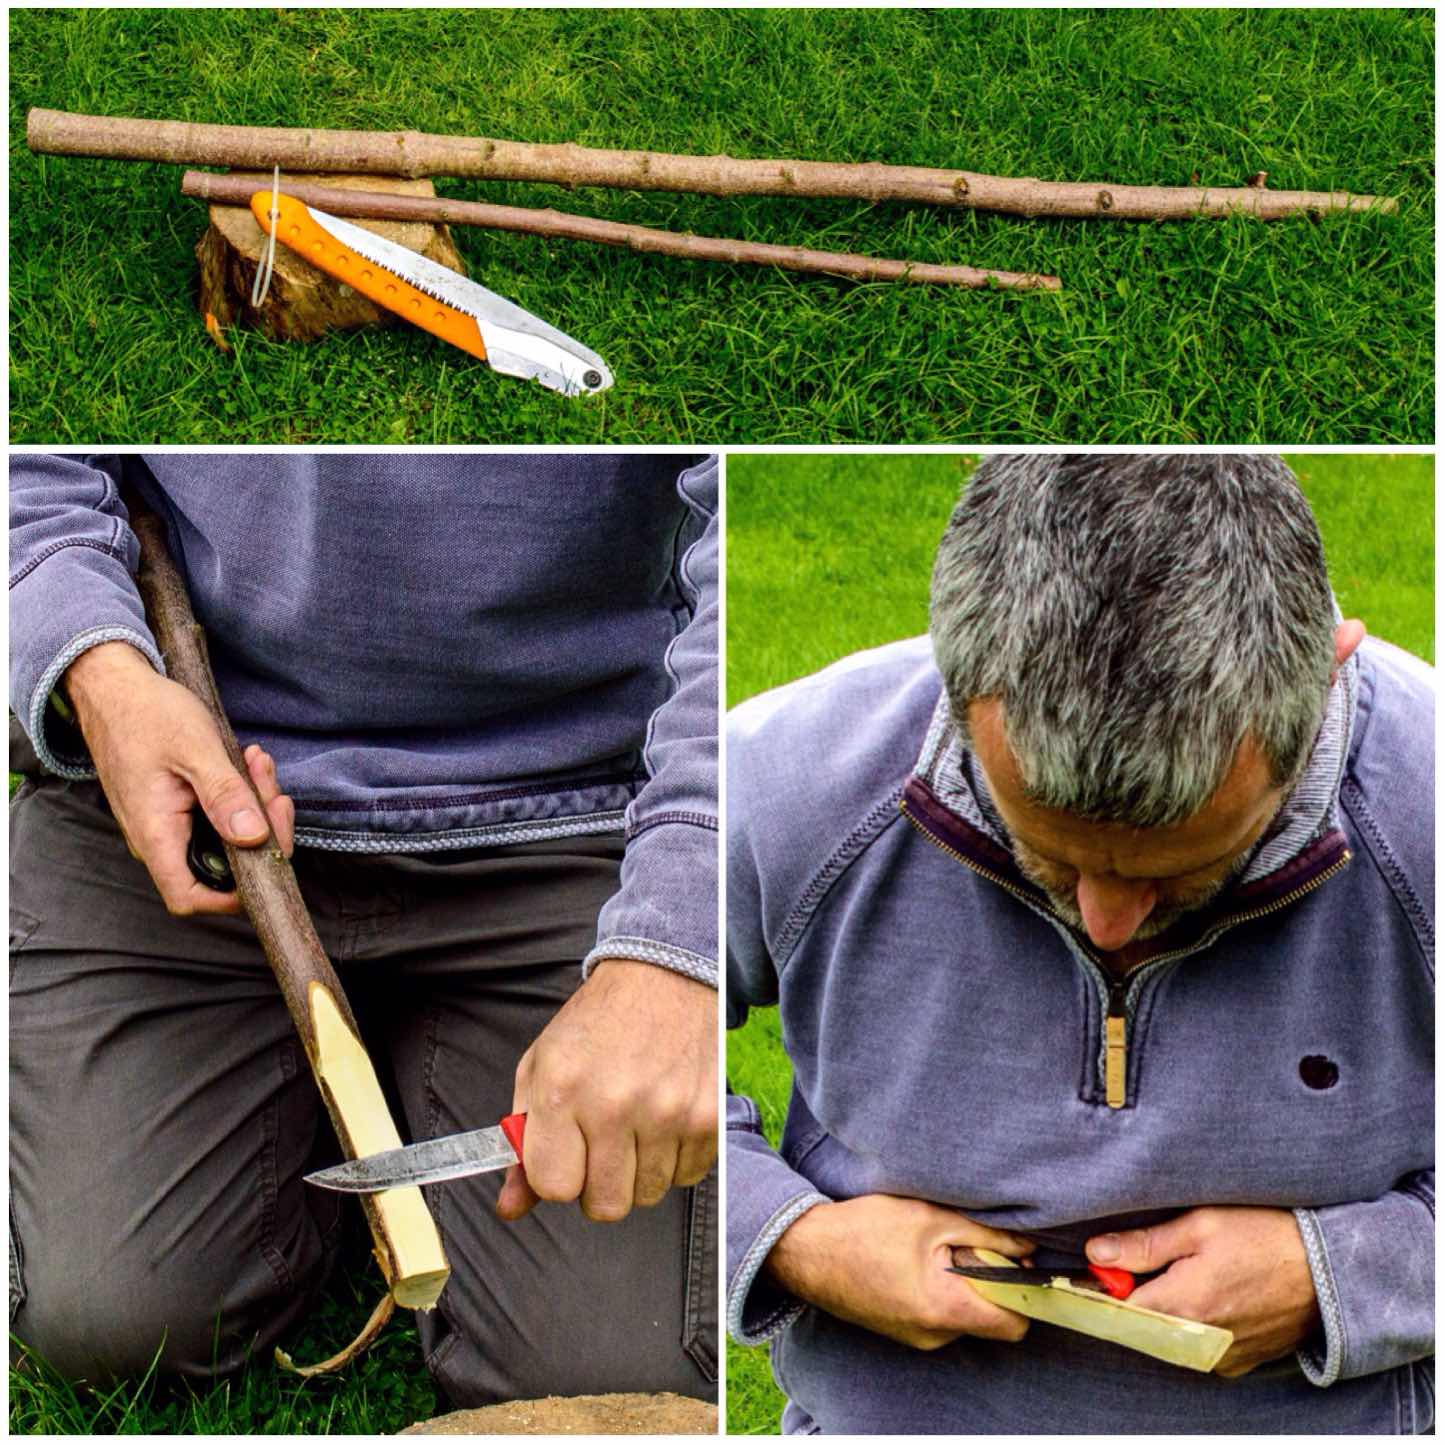
I started work on the arm first carving a triangular end on one side. I took my time here to make all the sides even in shape.
Carving the triangular bed of the arm
Once the arm had the correct shape carved out I used it as a template to mark out the dovetail socket I would cut into the upright.
The upright
It is worth the time doing this as you want to produce a socket that the arm will fit into snugly.
Using the arm to score out the shape of the socket
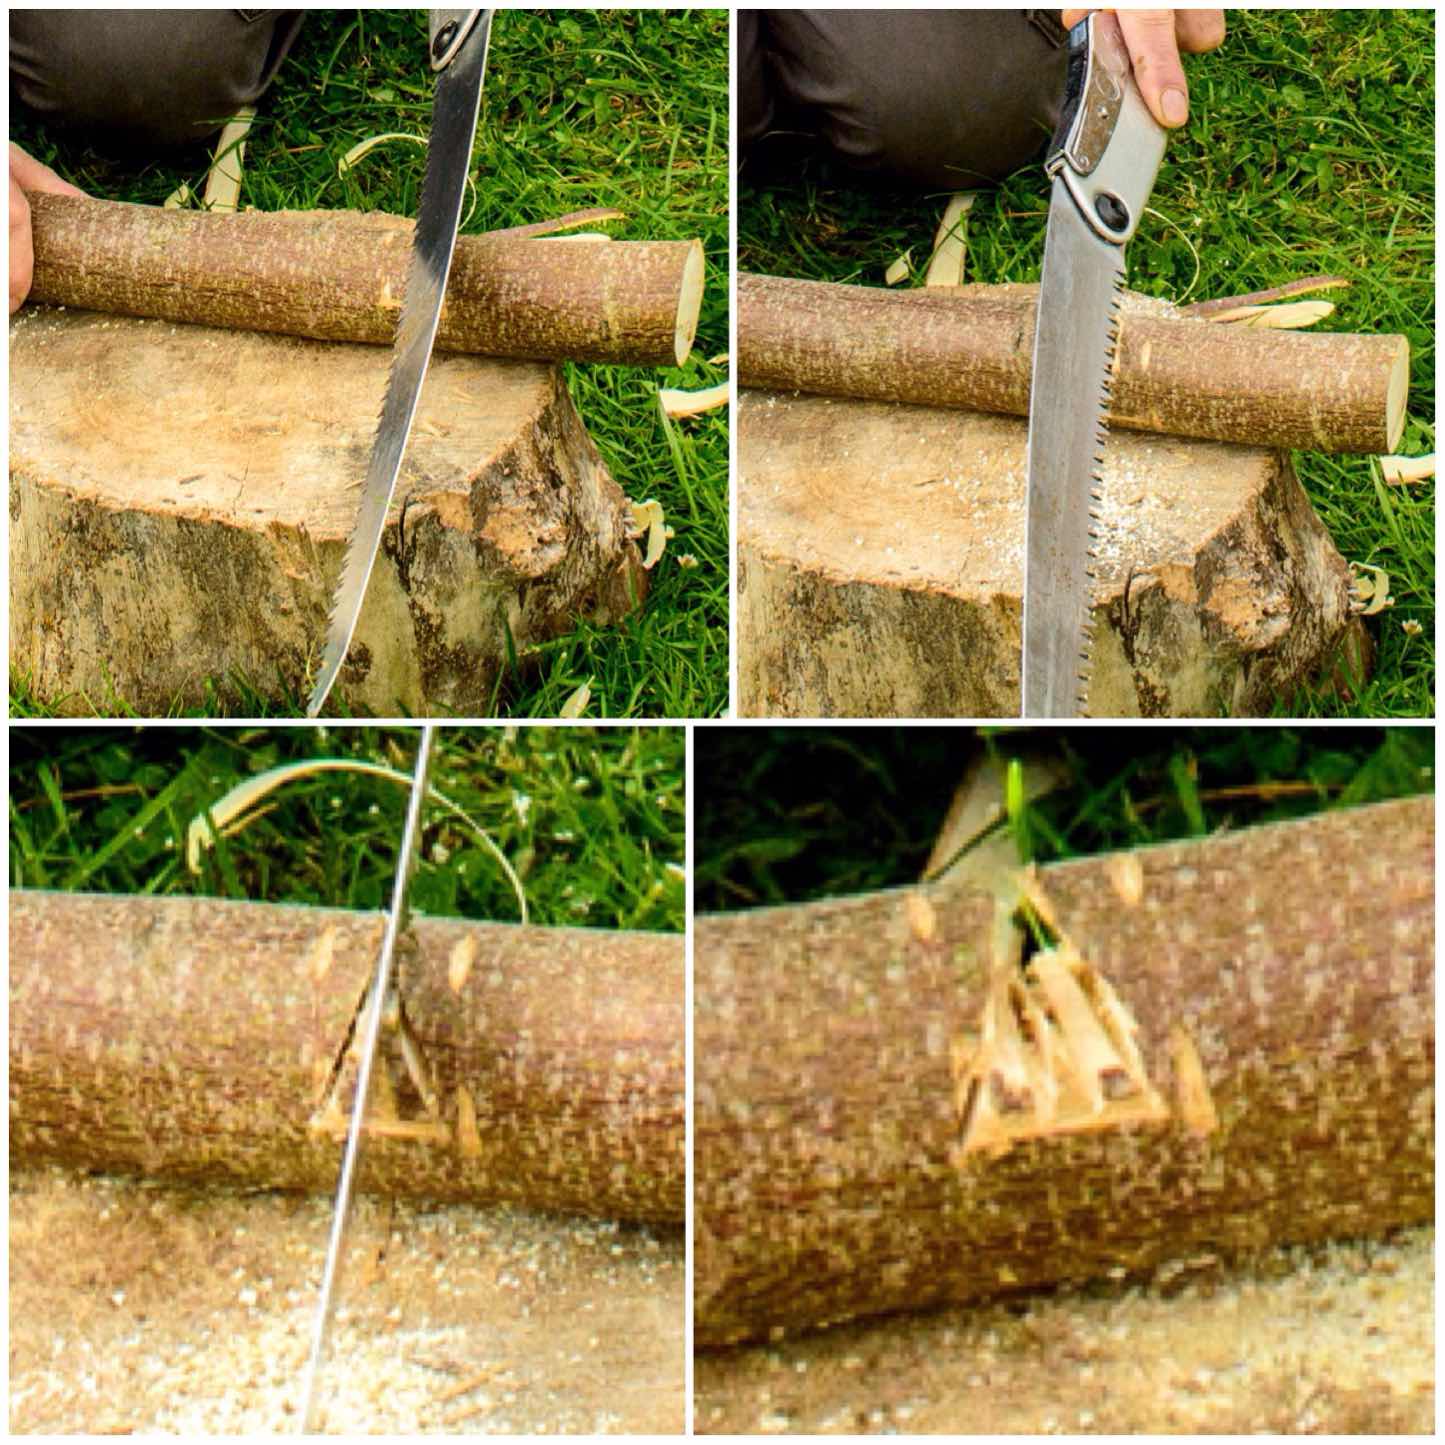
Once the shape had been marked out with my knife I used my saw to cut into the upright, one on each side and then a couple of cuts through the middle.
Roughing out the socket
I used my knife then to carve out all the loose excess wood and to smooth all the sides out.
I continually kept trying to insert the triangulated end of the arm to see if it would fit. As I wanted to keep as much wood on the arm I just used my knife to keep carving of more wood from the socket area on the upright to enlarge it. Eventually the arm was able to be inserted into the socket and released without too much force but still fitted snugly.
Finishing with the knife
To finish the upright I chamfered the top so that it would not split when I hammered it into the ground and carved a strong point on the other end.
Chamfering and pointing the upright
I hammered the upright and checked to make sure all the angles looked good. I like to have my crane uprights to have a little lean away from the fire but not too much as this could cause the arm to swing when it had a heavy load.
Checking the angles
Hanging the pot hanger
The arm needs a little flat platform carved on the end with a little dimple in it the pot hanger to balance on. I have explained in a previous post on carving an adjustable pot hanger on how to make one of these.
Just make sure that you carve the flat platform on the correct plane in relation to how the arm fits into the upright – I used the triangular end as a guide for this.
Carving the pot hanger end of the arm
You can see in the picture below the end of the arm has a slightly flattened surface and a slightly curved surface underneath it.
Completed
If your pole is long enough you could carve your pot hanger from it. In this case I had plenty on hand so just used one I had made before.
Testing
You can see in the picture below how the pot hanger sits on the tip of the arm in the little dimple. It looks very fragile but it can hold a lot of weight if everything is carved properly.
Attaching a pot hanger
I decided to shorten the arm of the crane as it bent a bit with the weight of the full kettle so rather than cut the end with the dimple I just extended the triangulated area of the arm so that it could be adjusted easily(I did trim the back of the arm later).
Shortened arm
I was quite happy with the arm being this length for the weight of the full kettle.
I also brought out one of my Dutch Ovens and filled it with water to test out the crane. I decided though to carve another shorted arm so that it would stand up to the extra weight better.
A full kettle – little bend in the arm
This shorter arm did bend a little bit but it did not break. Just to make sure I left the pot hanging off the crane for two days without any problems.
Shorter arm for a heavy pot – more pronounced bend but still workable
I took the crane to a Sea Cadet camp last weekend and it was used all weekend to keep the kettle on the go. There were a lot of staff around the campfire most of the time but due to its minimal footprint the crane did not get in anyone’s way.
Kettles on
I really like this crane for various reasons, these being it is simple, quick to make, tidy and strong.
If you have never made a crane before I recommend this type as one to experiment with.
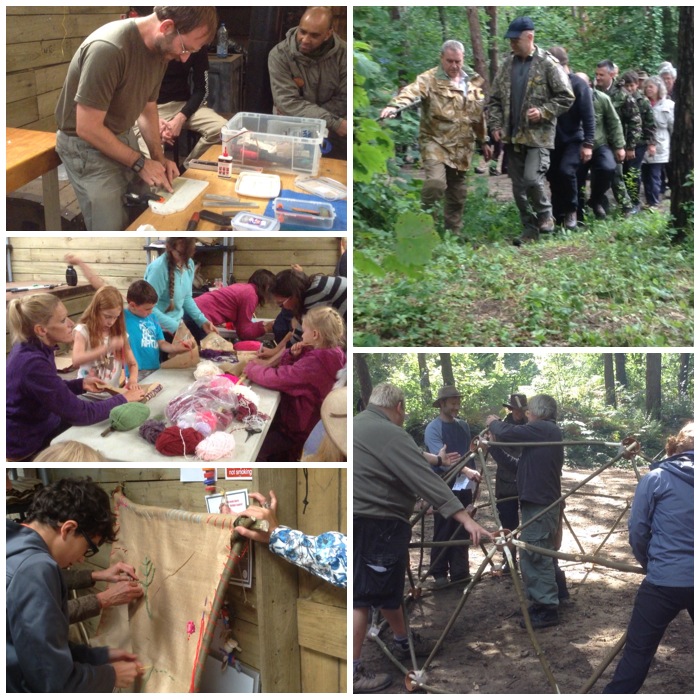
For ten years now I have been going to the BCUK Bushmoot and I have had great fun learning new crafts, making some amazing constructions and occasionally dabbling in a bit of art.
Craft, art and constructions
This post cannot do justice to the wide variety of crafts, constructions and artistic endeavours that are undertaken however I have trawled through my picture library to try my best.
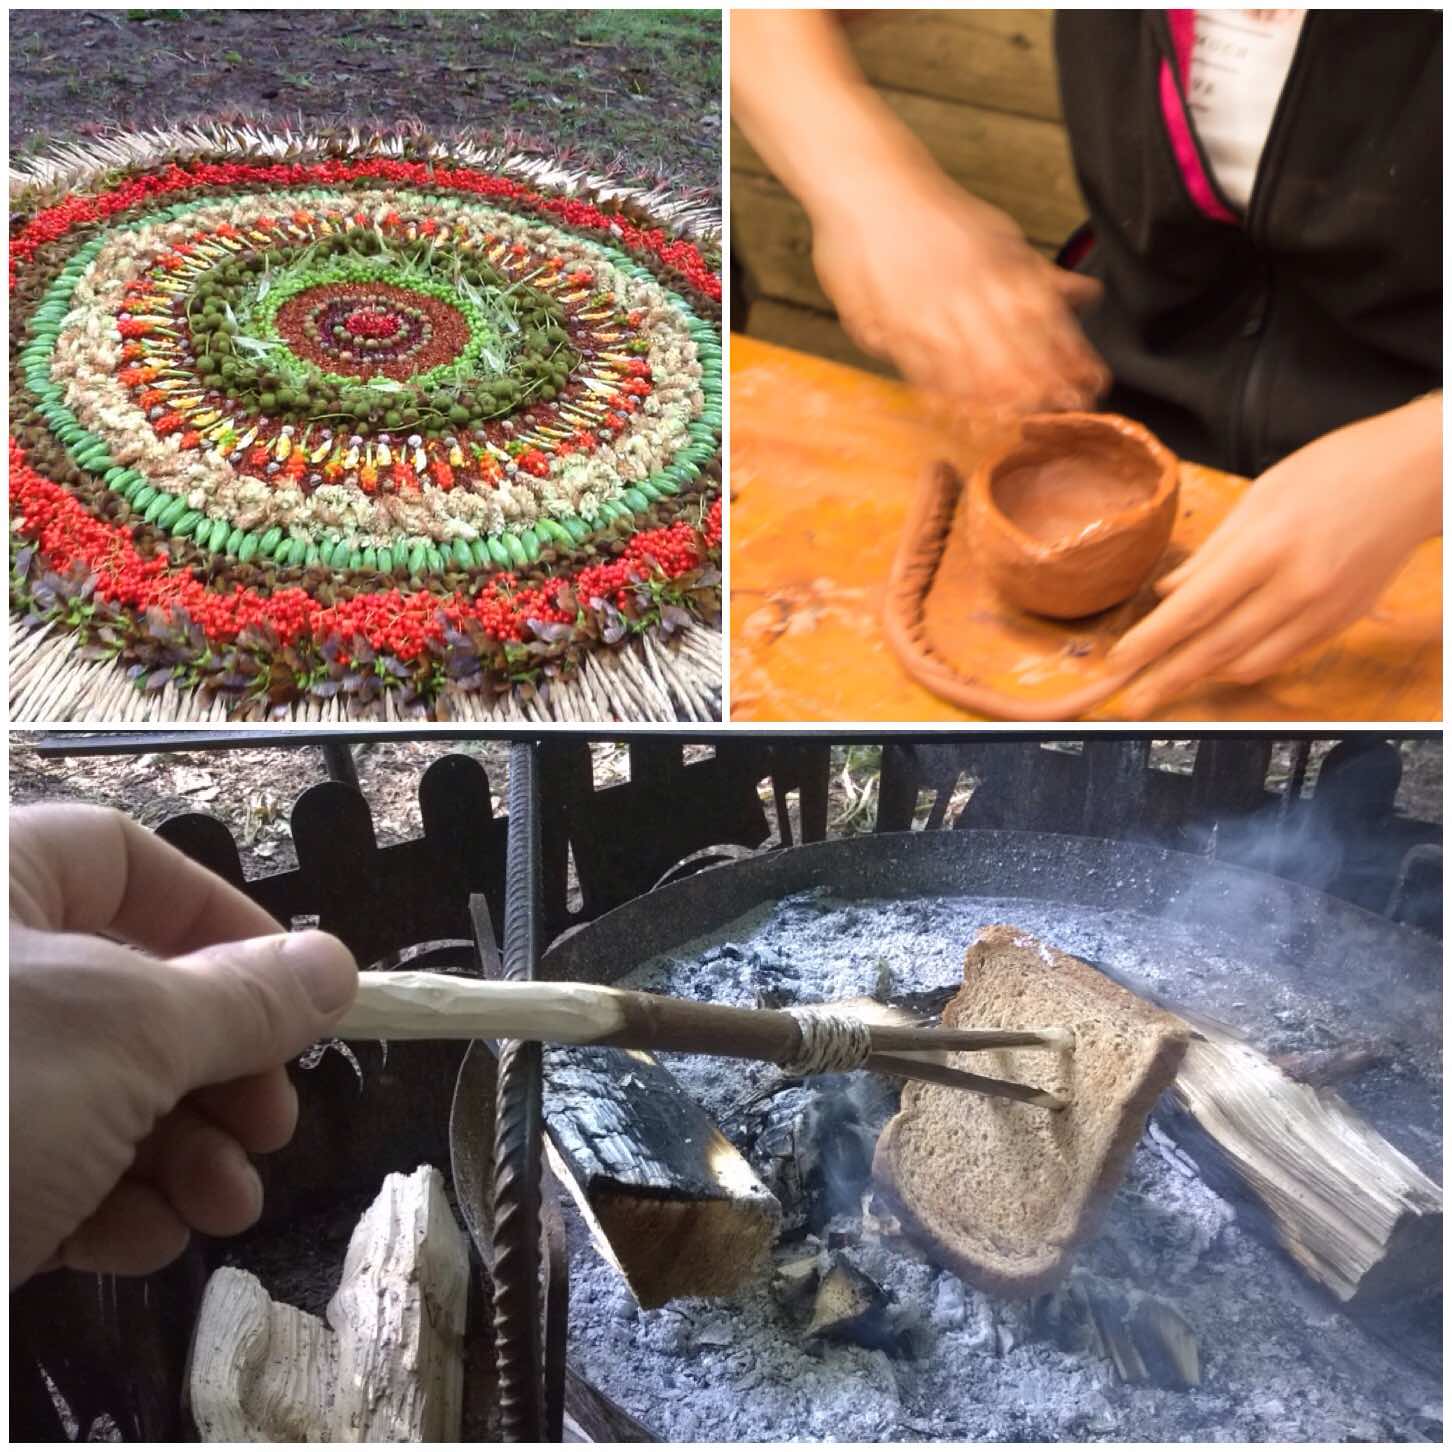
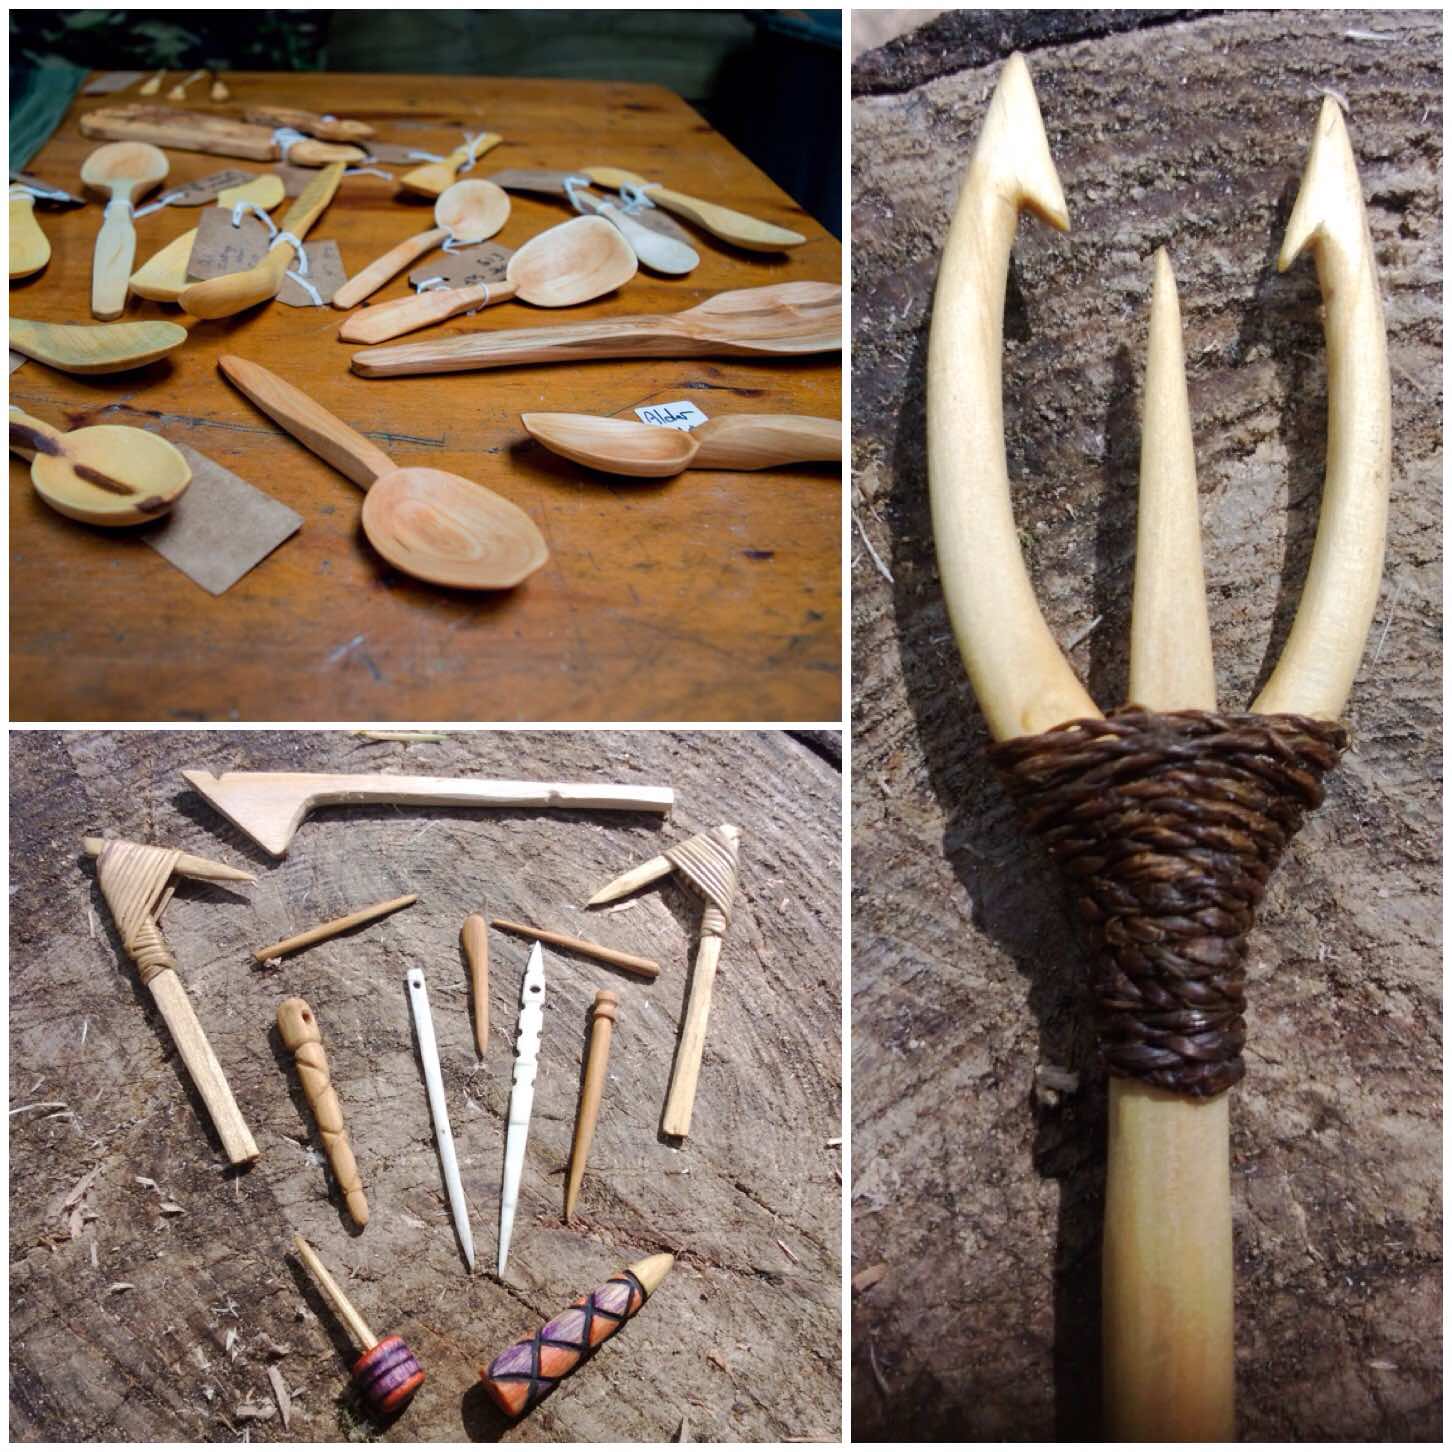
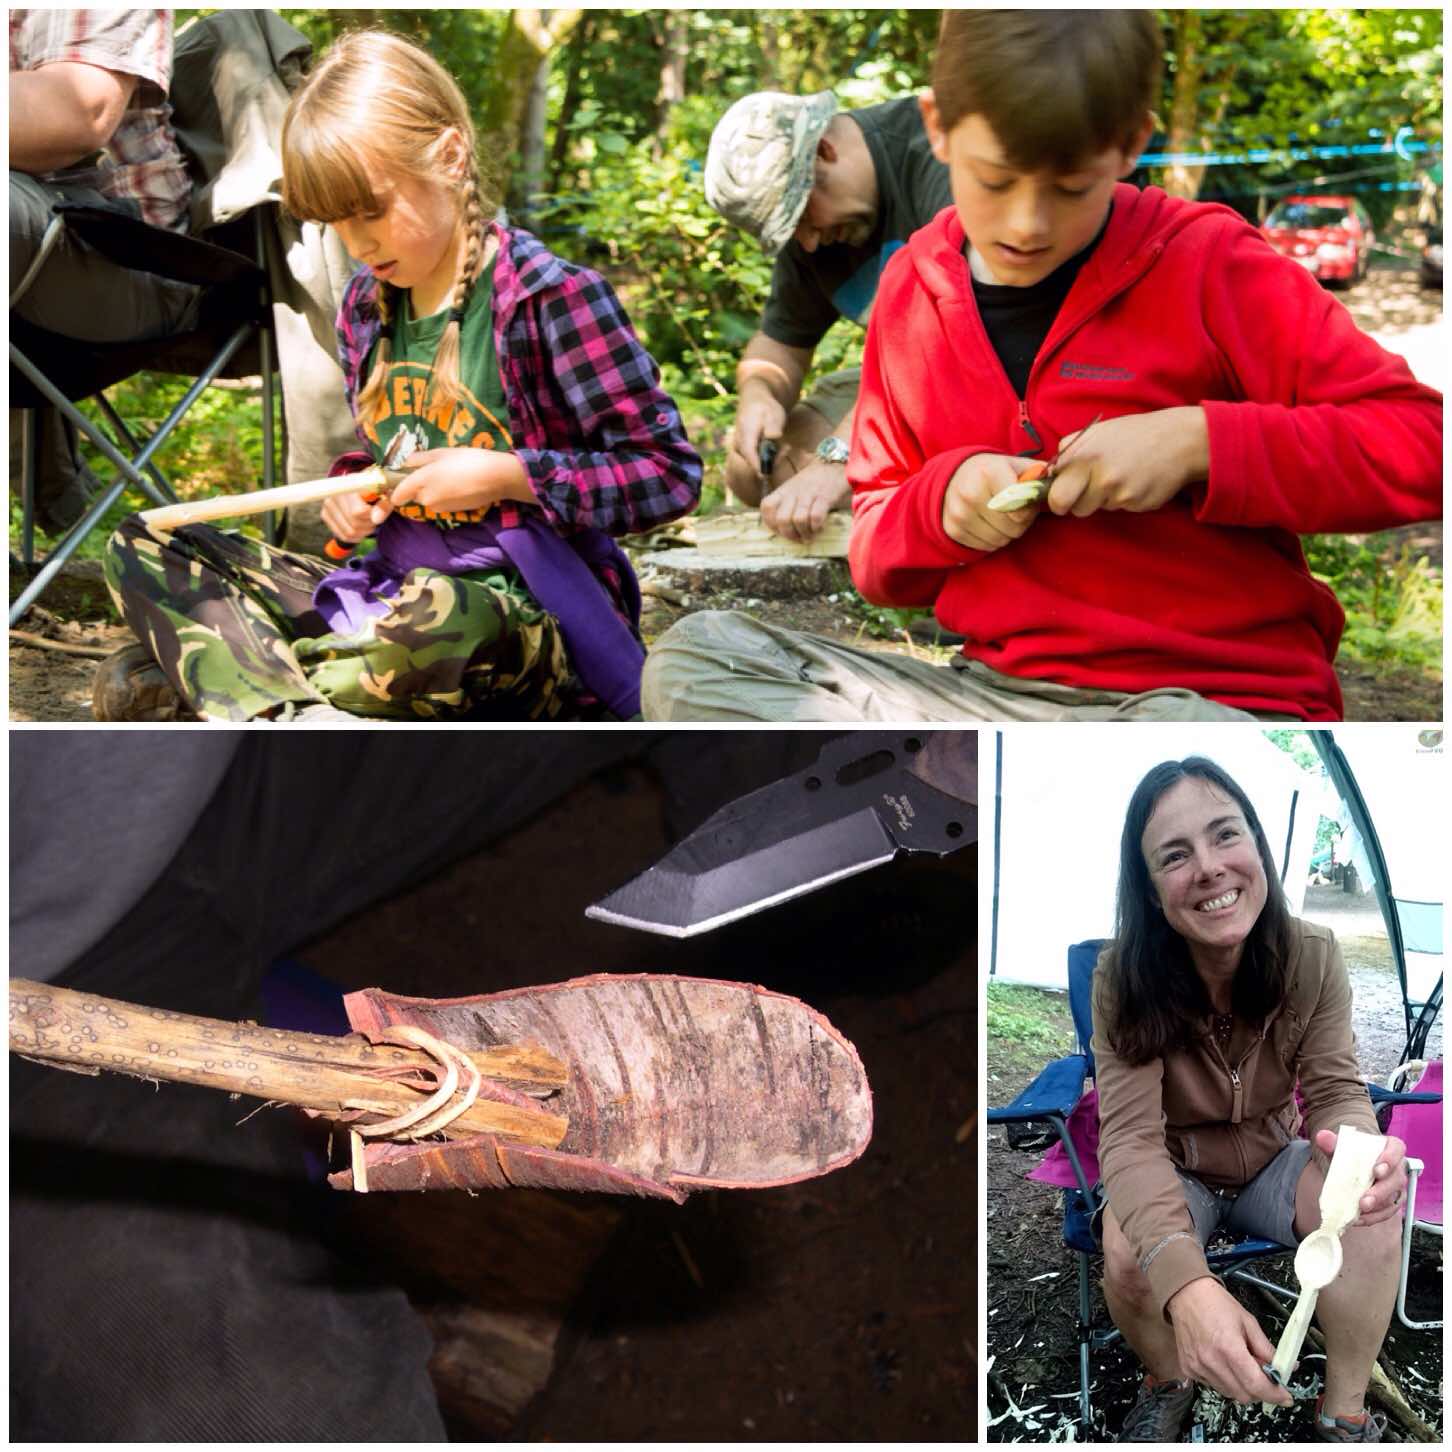
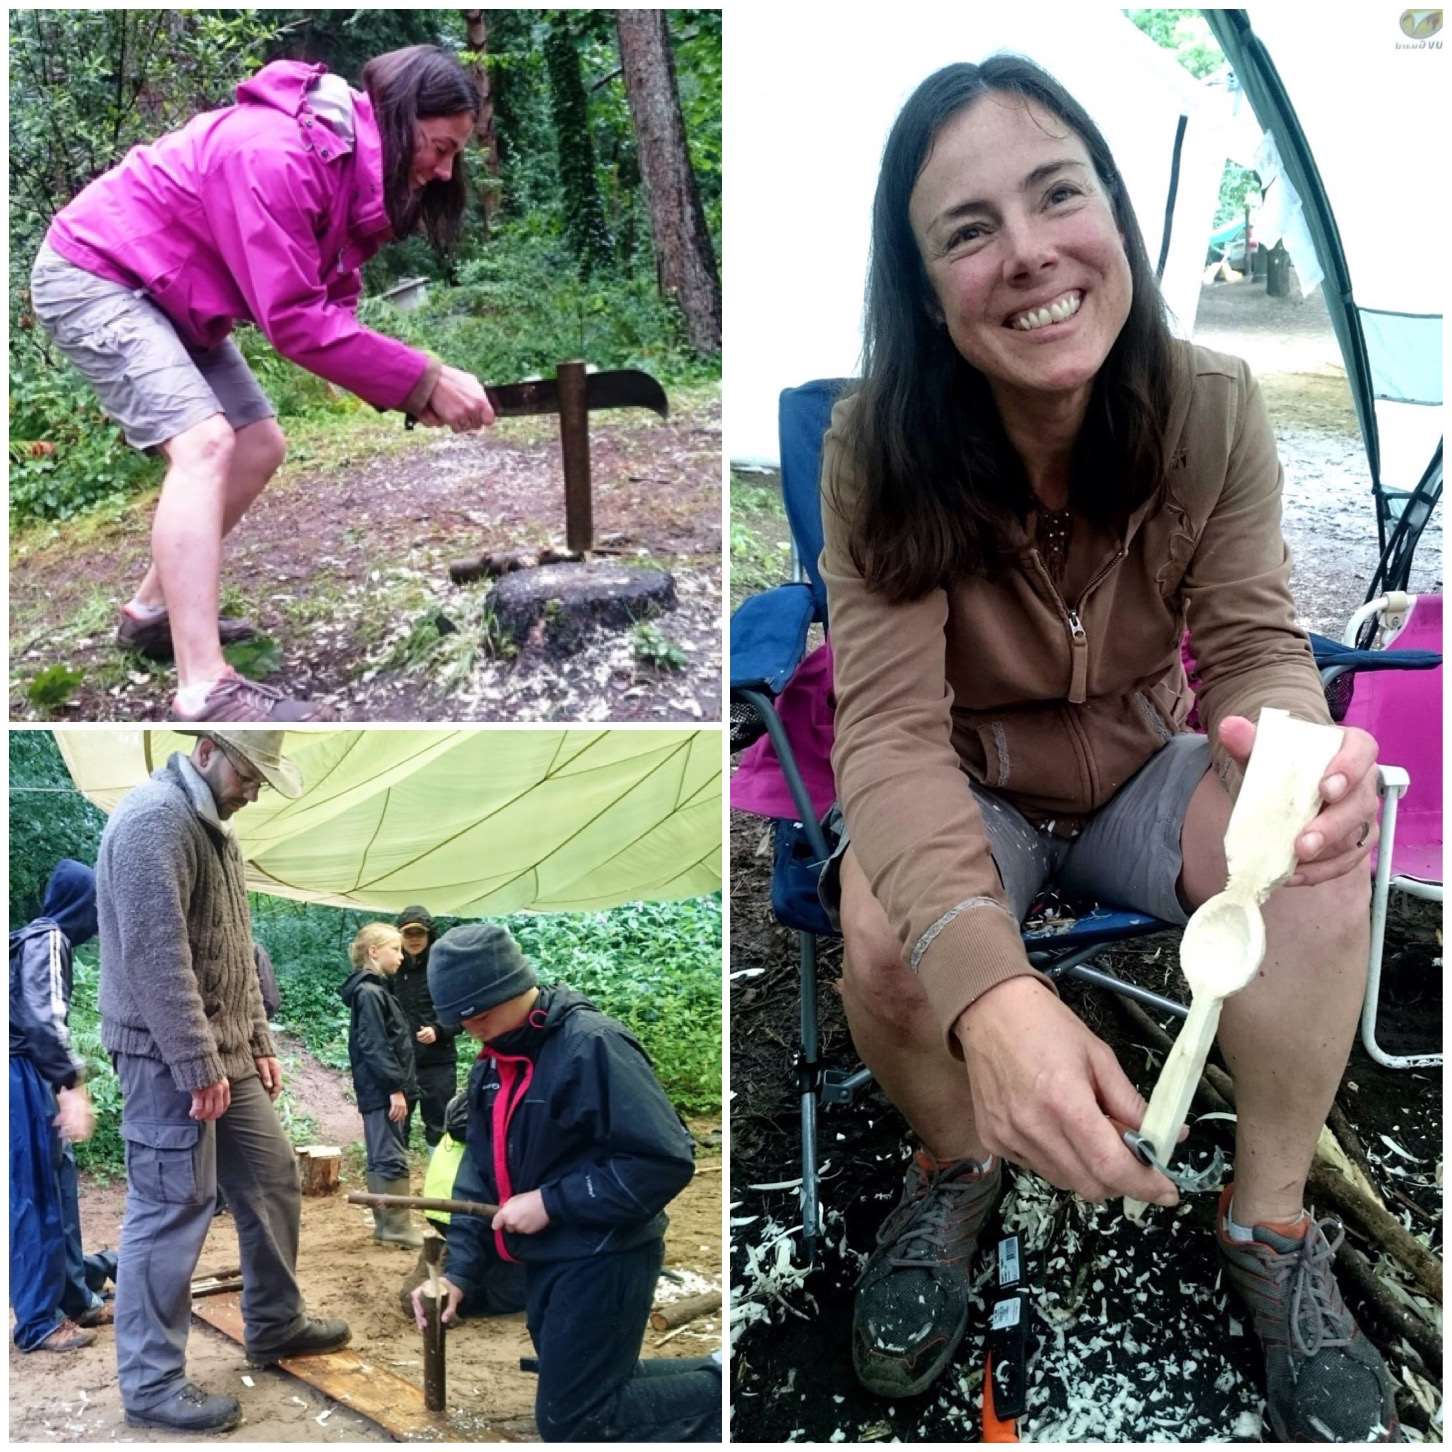
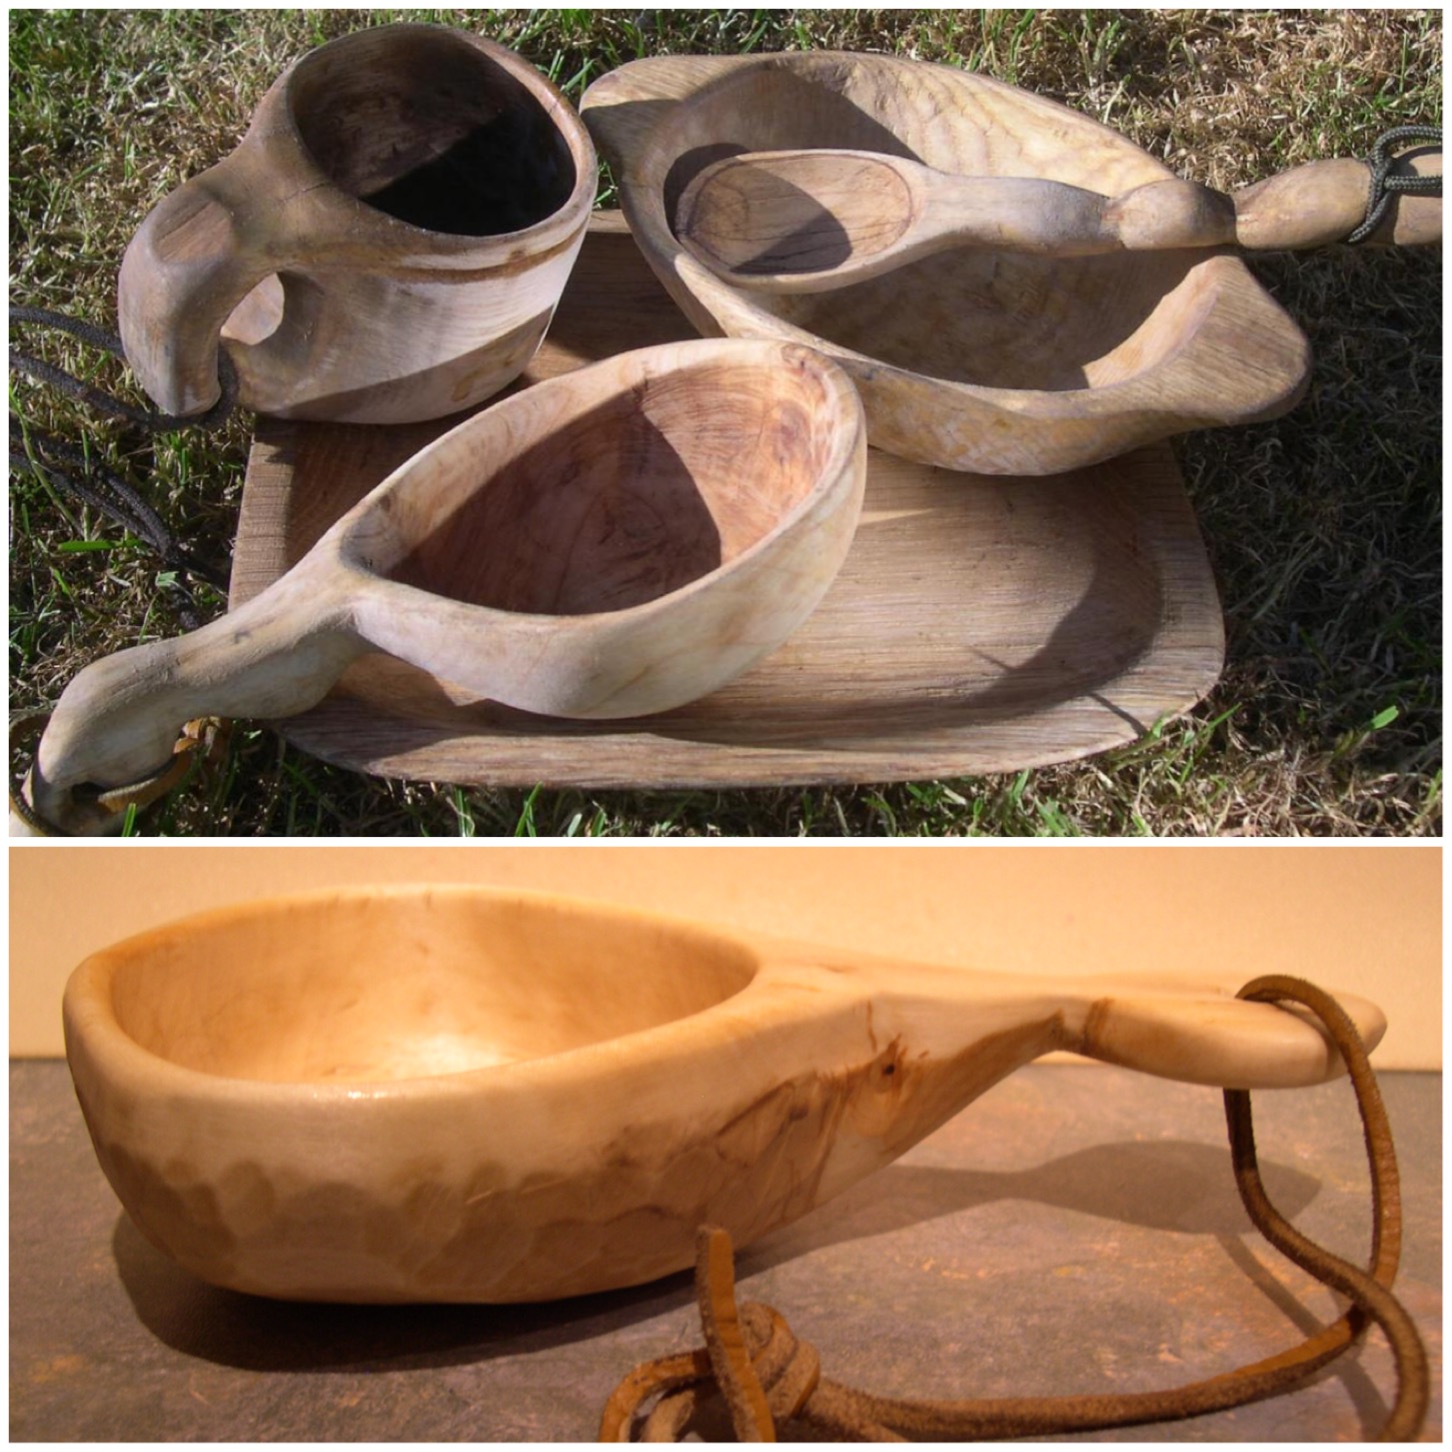
One of the most talented carvers who attends the moot regularly is Dean Allen. Dean makes beautiful spoons (particularly Welsh Spoons) and some fine primitive crafts as well.
Carving craft from Dean
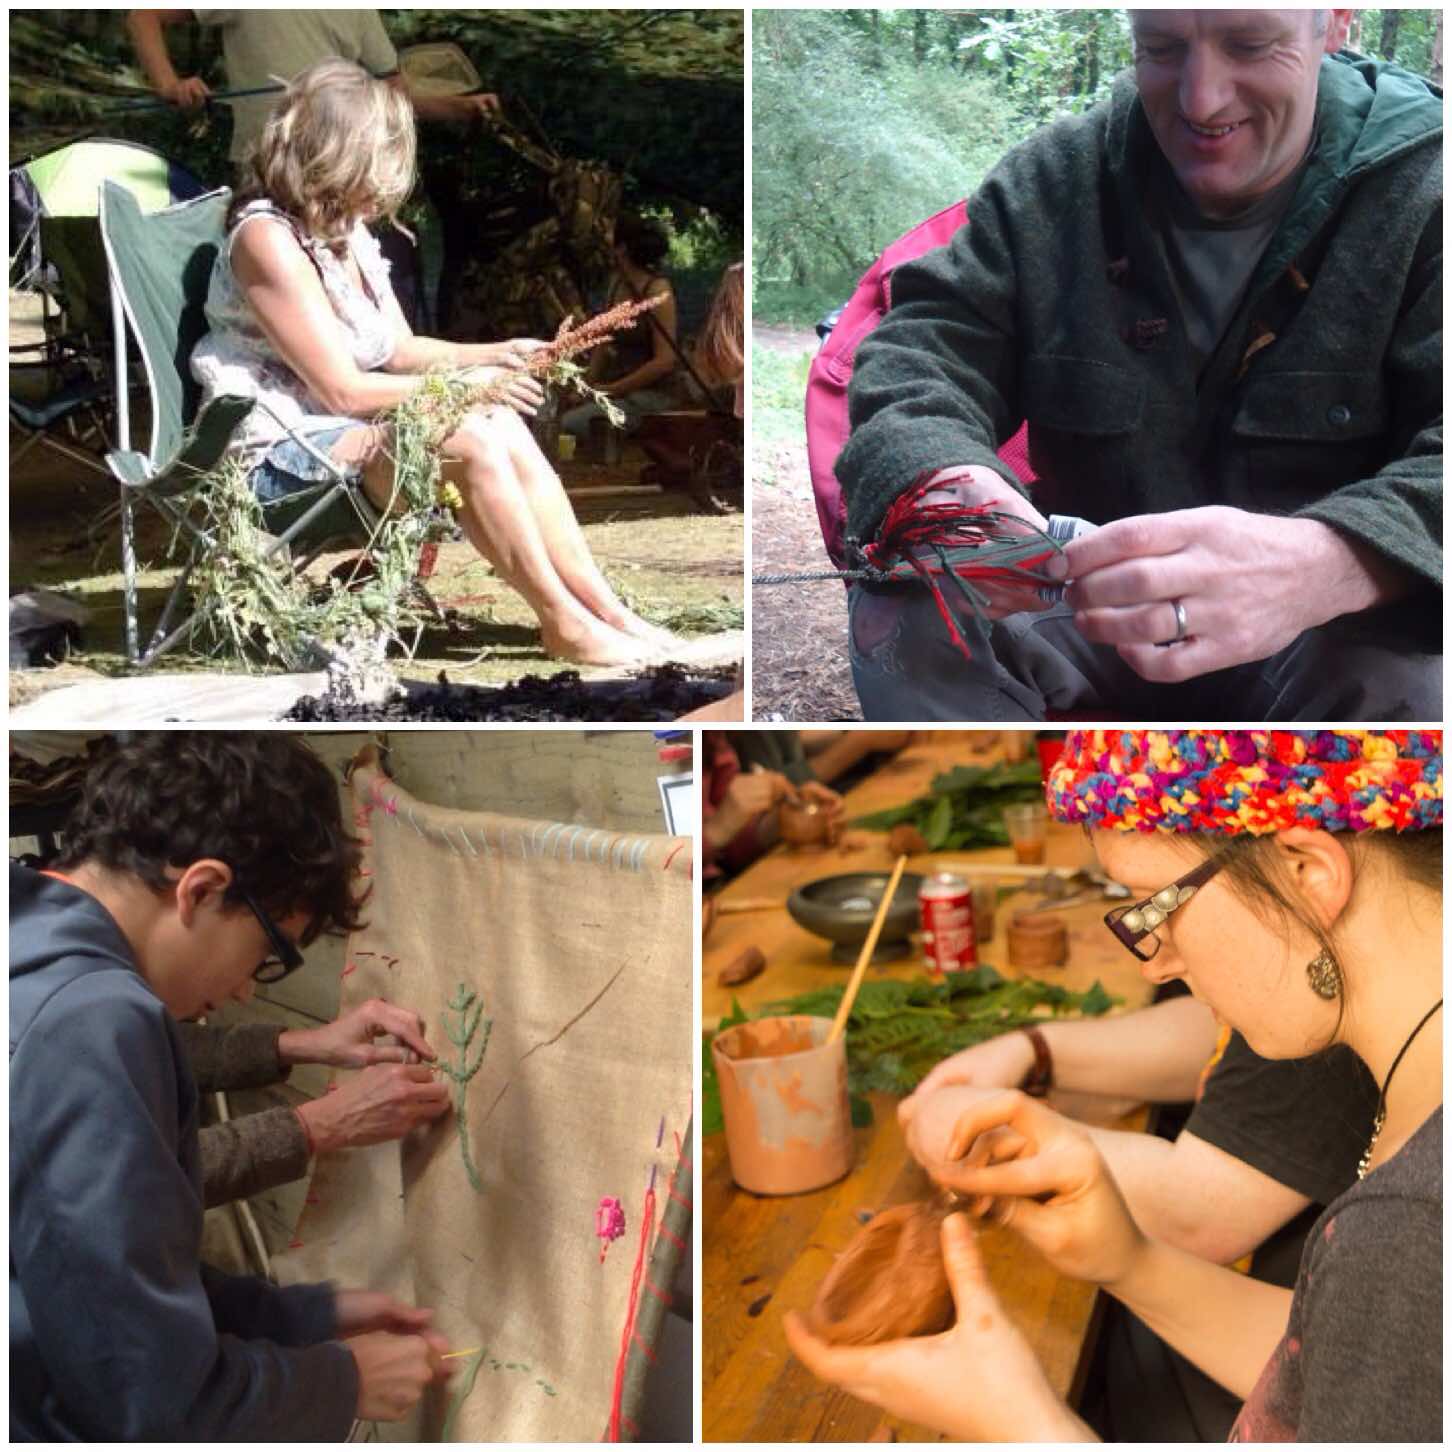
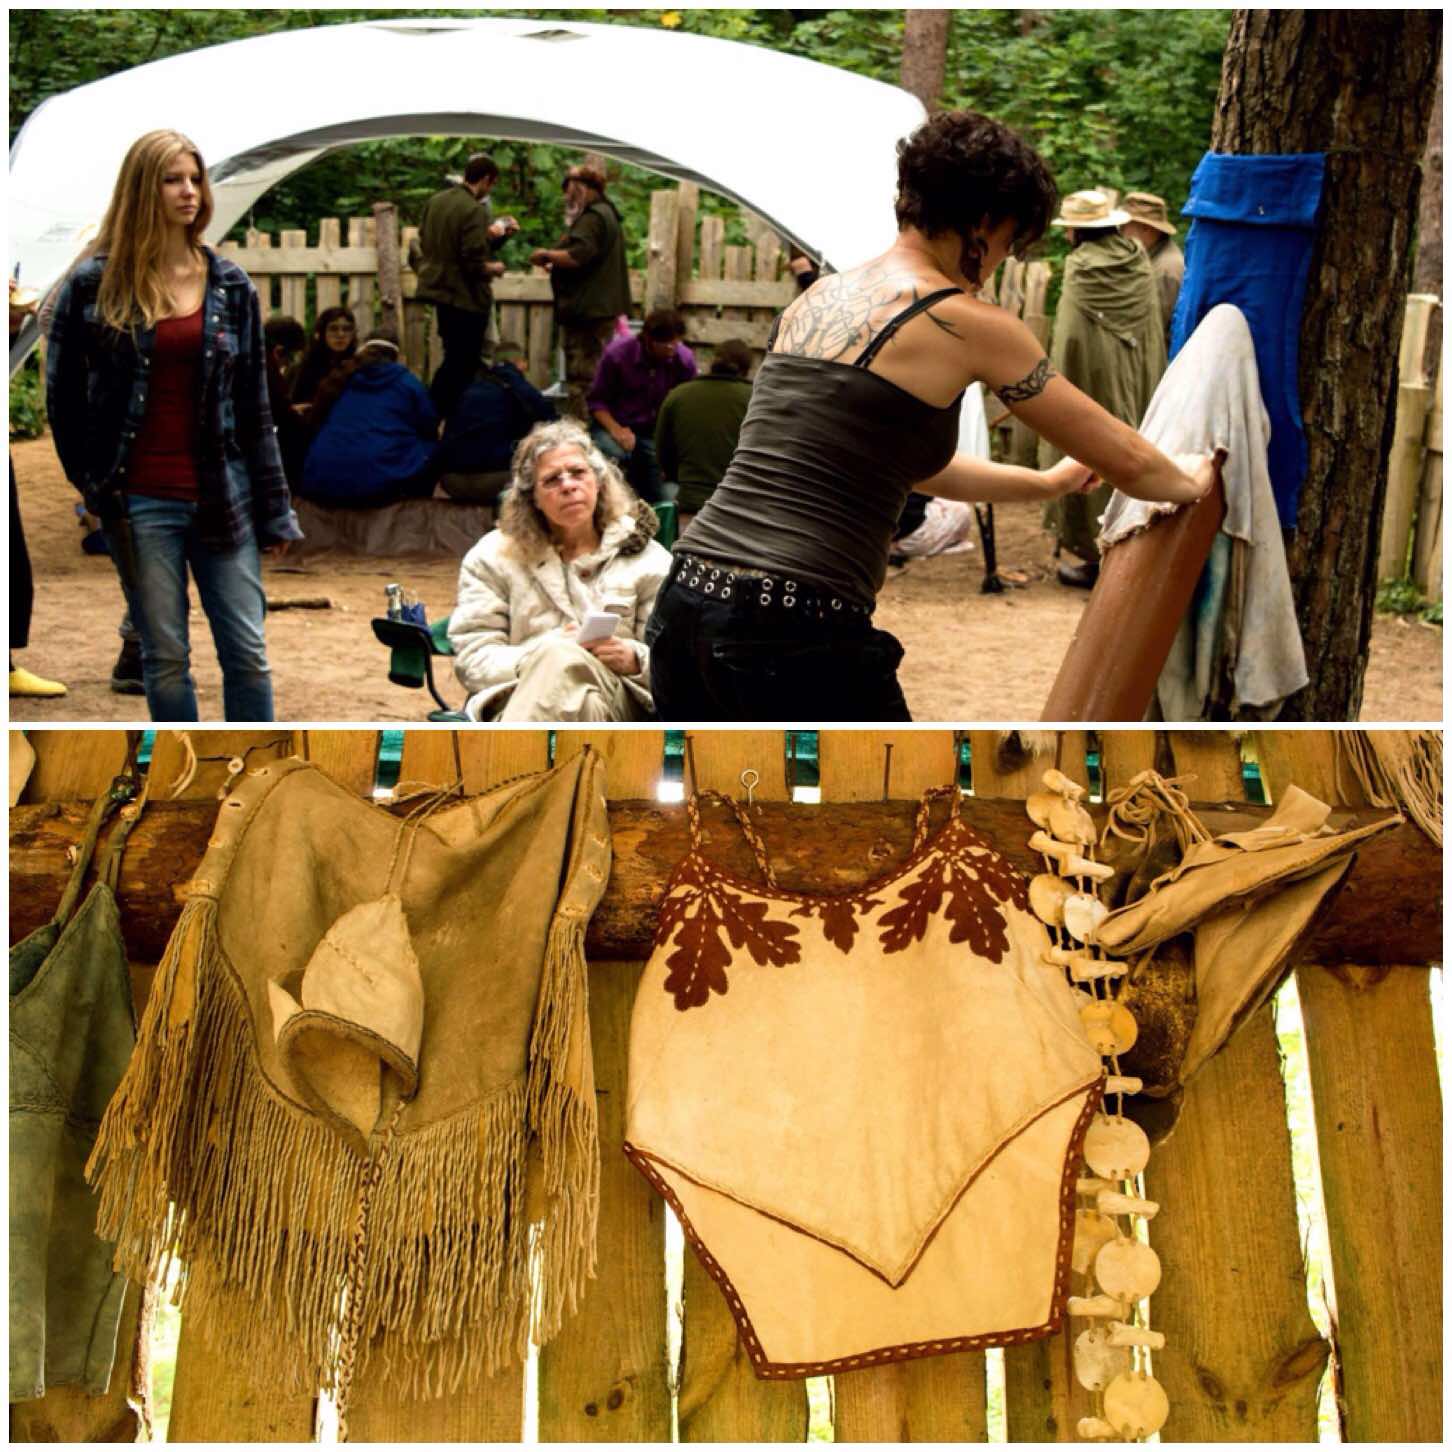
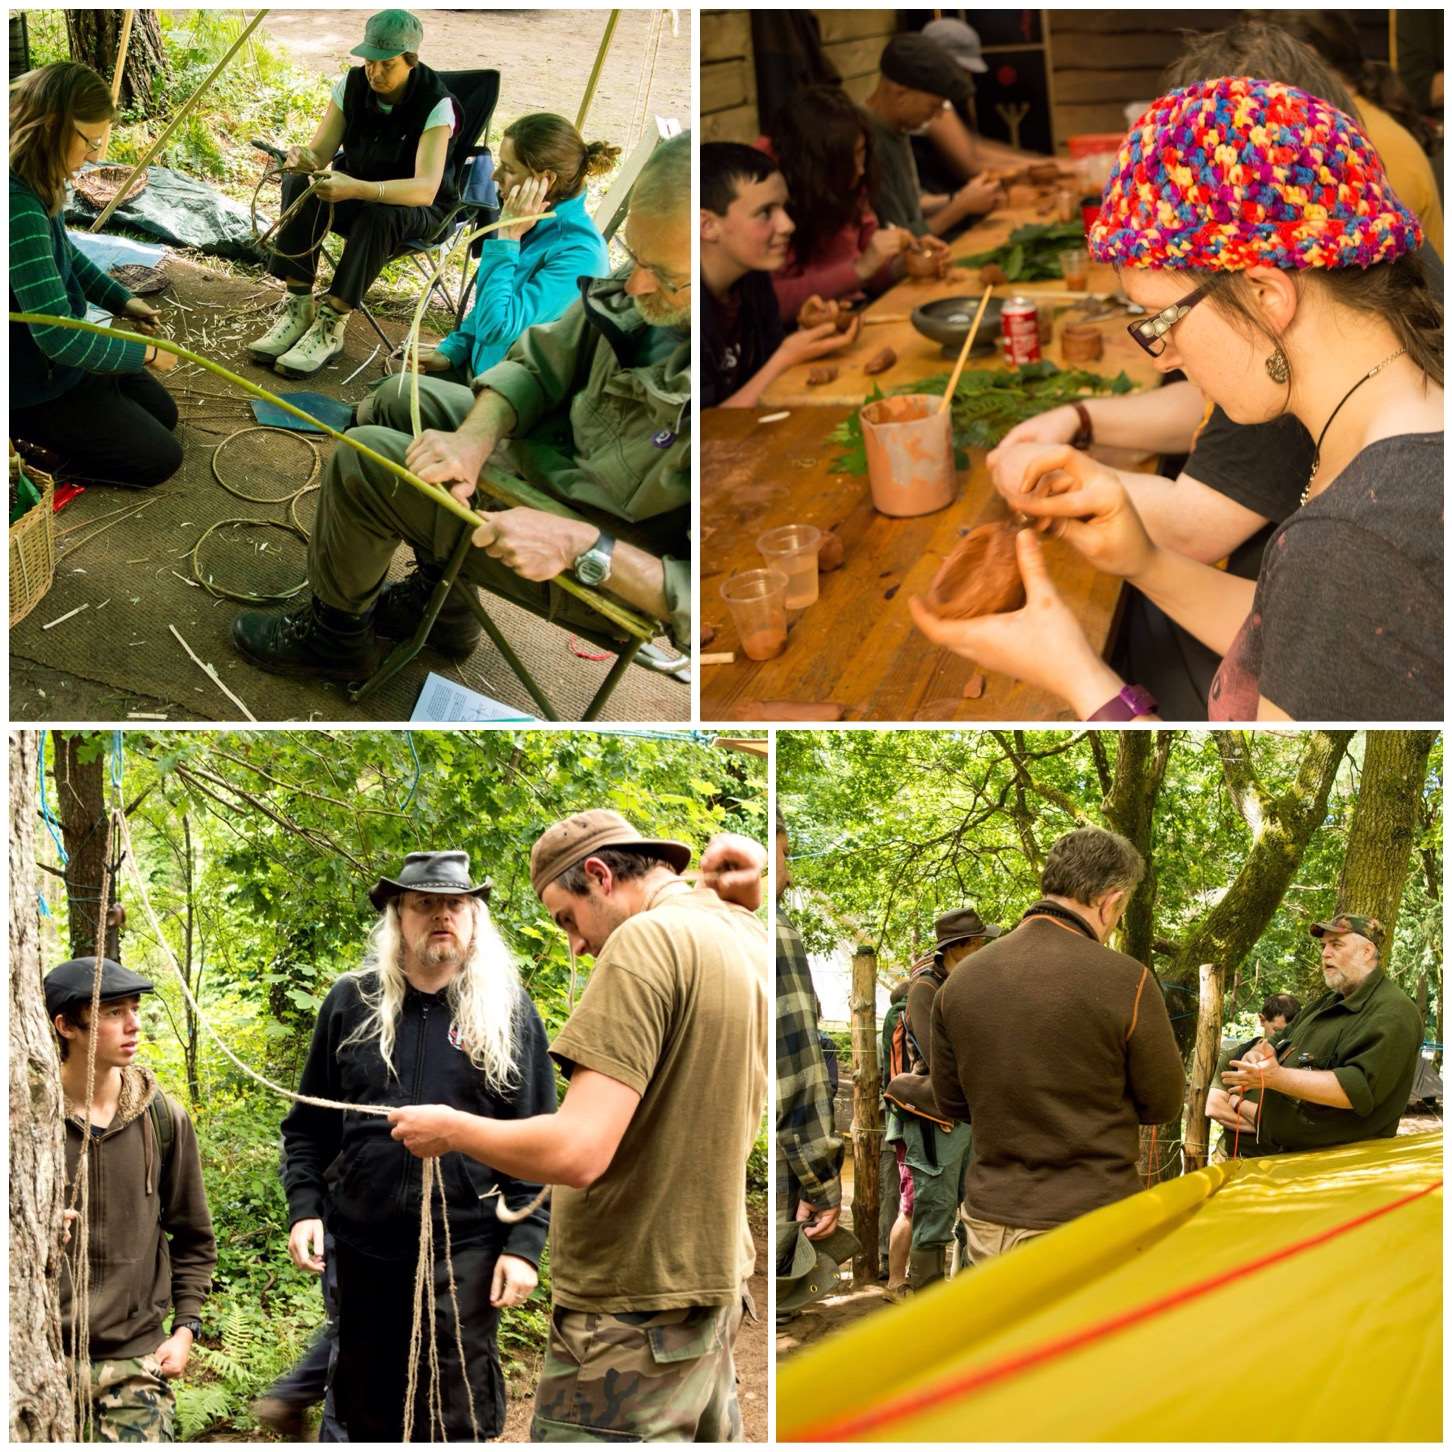
Hands are always busy doing something at the Moot – twisting grass rope, weaving beautiful tablet bands, embroidering flags and constructing clay pots – to name just a few activities.
I have attended the classes with Perry McGee on grass rope making and tablet weaving with Susannah Parsons. Both classes were hugely enjoyable as these instructors are experts in their craft.
Hands on with it all
I have dabbled in animal hide work from scraping to tanning, and I know it is hard work (see my earlier blog How To….Make Buckskin from a Deer Hide). Theresa Kamper however makes it look so easy. She studied everything to do with working with animal hides for her PhD and is fantastically knowledgeable on the subject of everything we regard as ‘Primitive Skills’, and is happy to share that knowledge at the Moot.
Primitive skills craft from Theresa
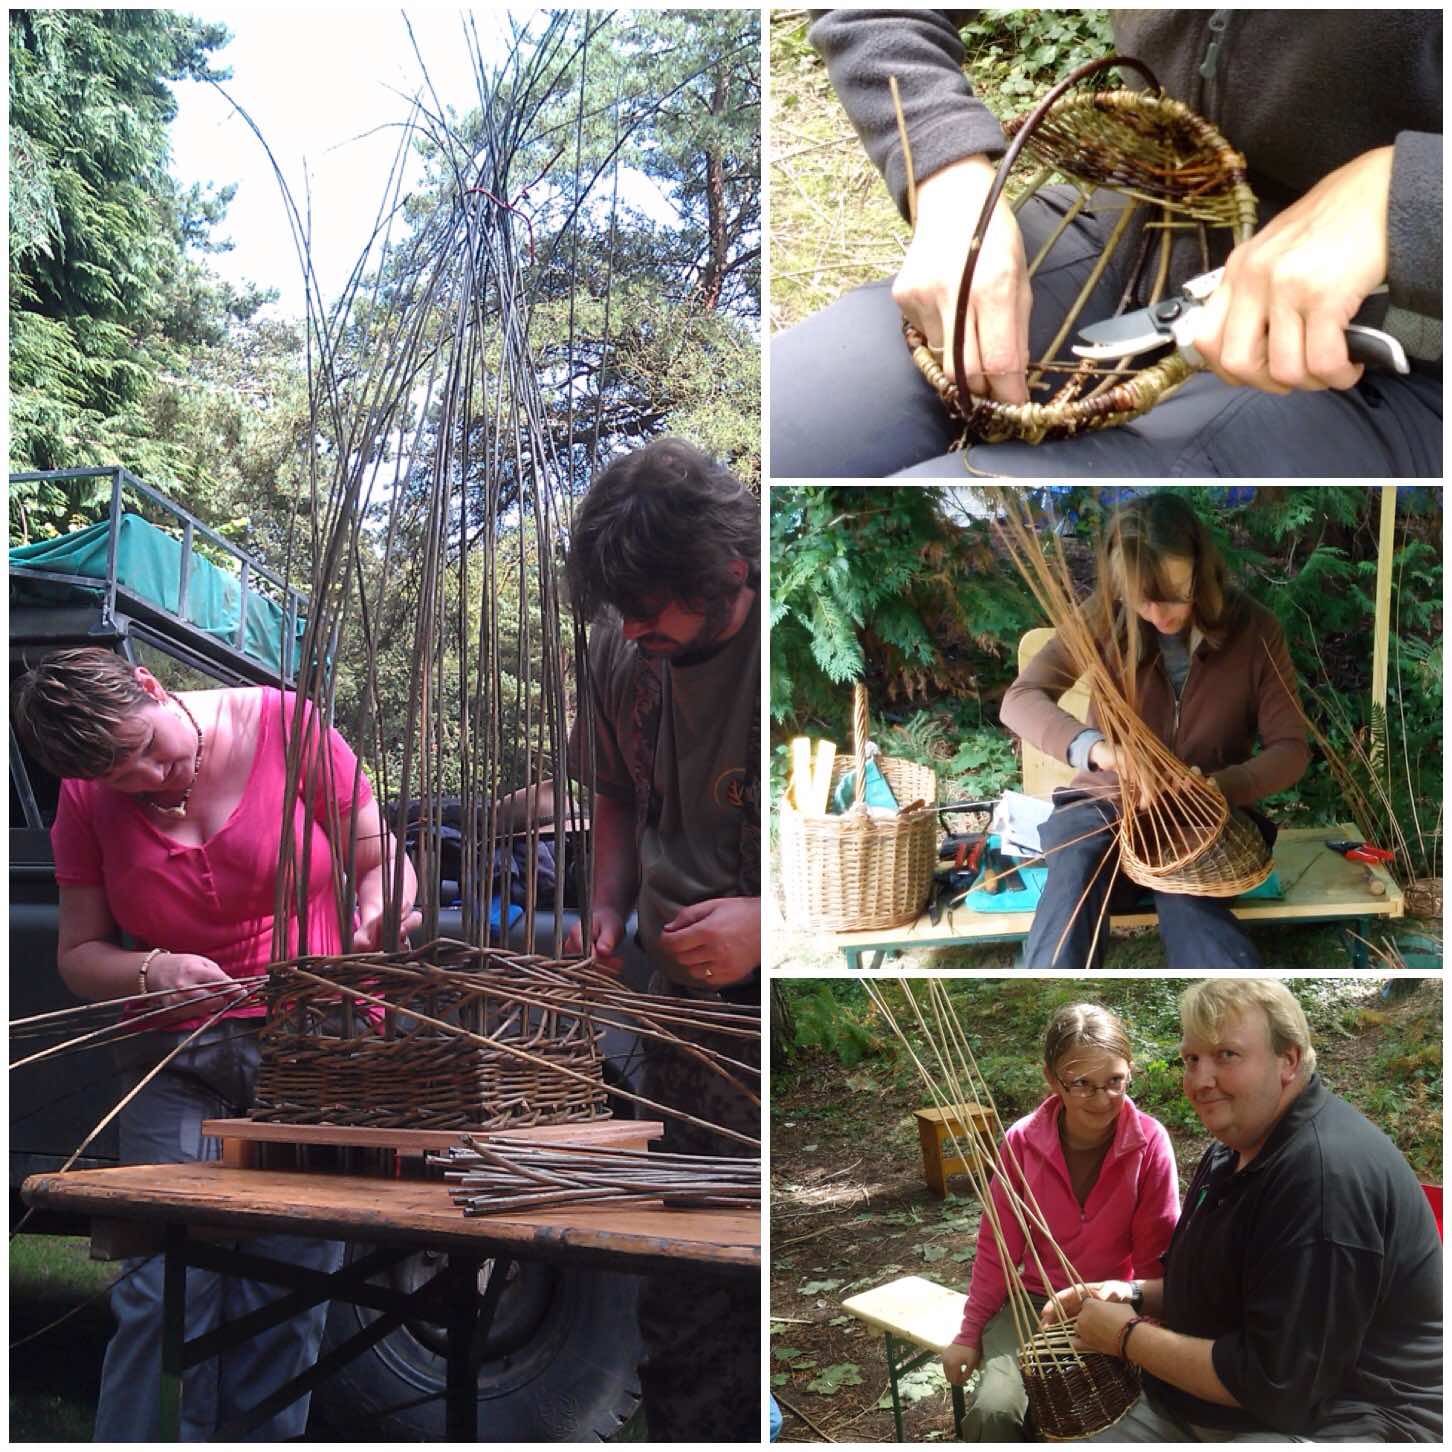
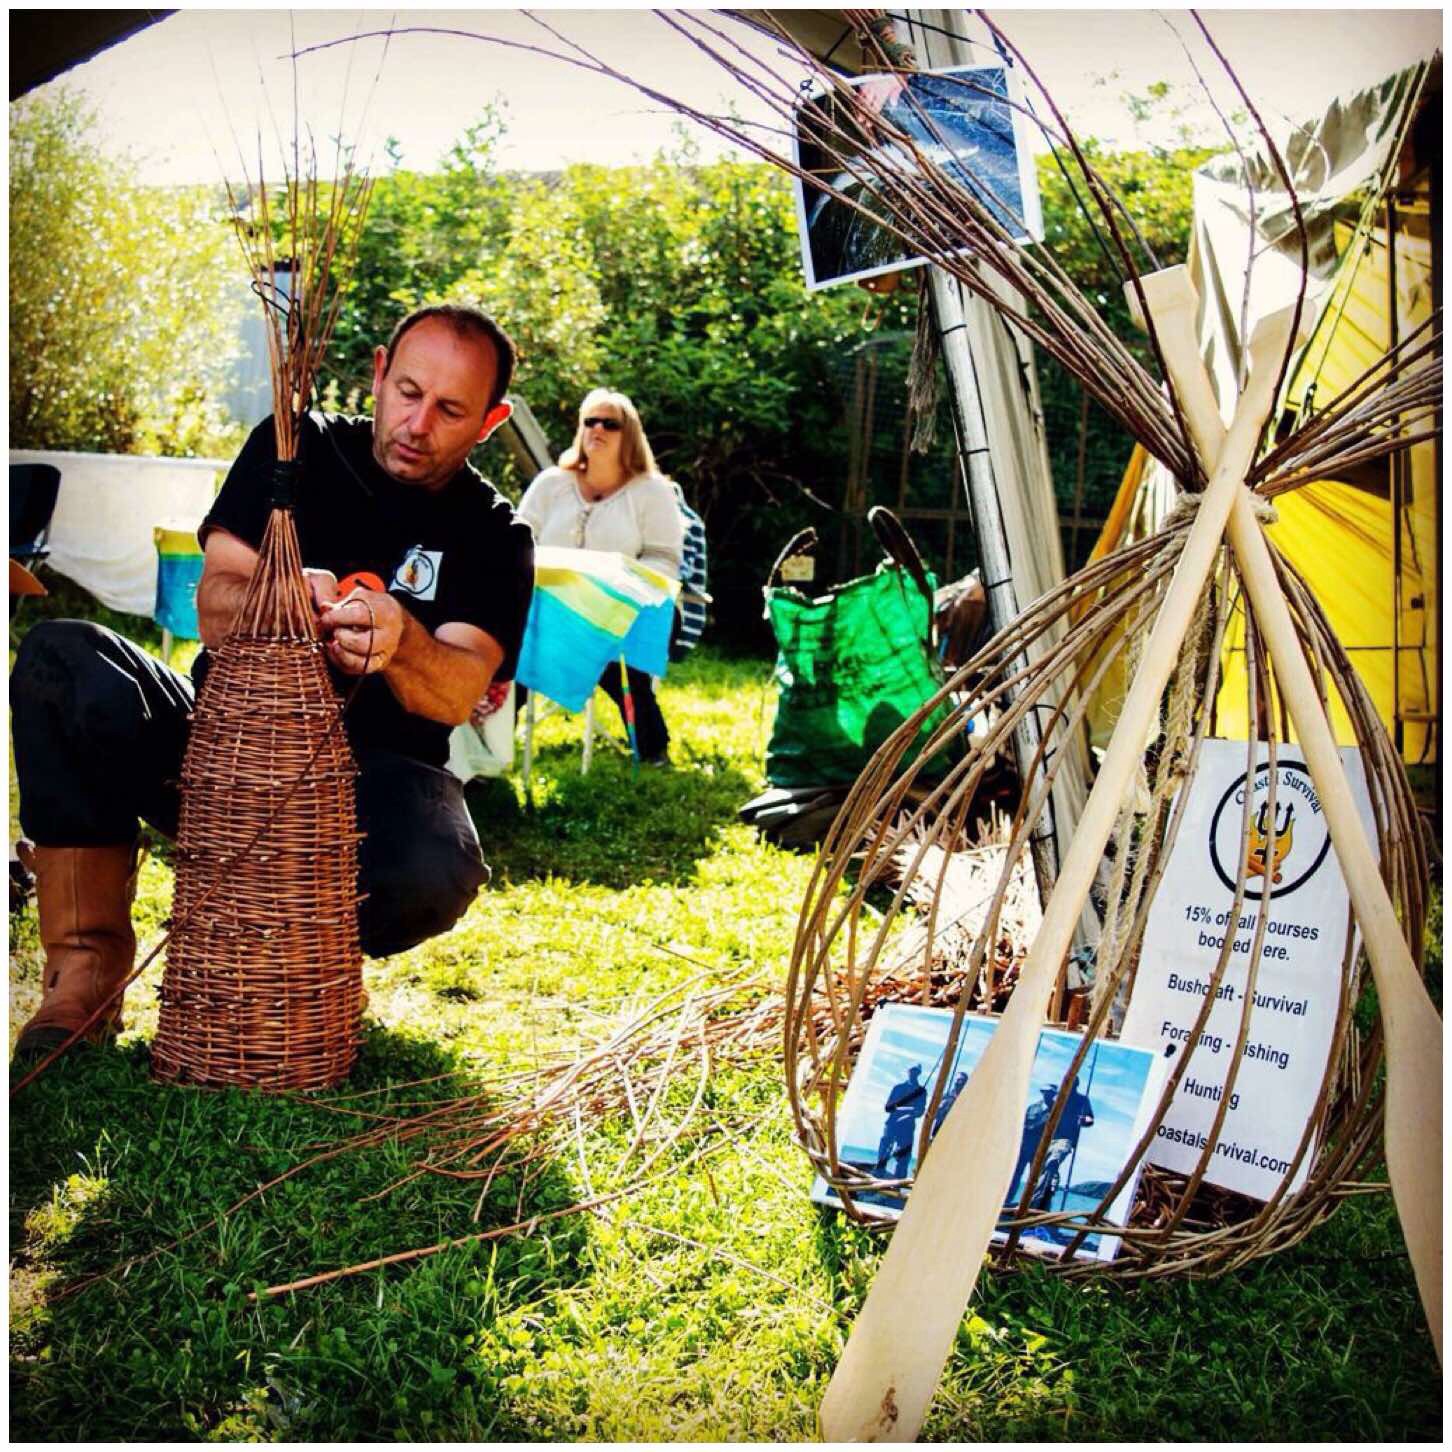
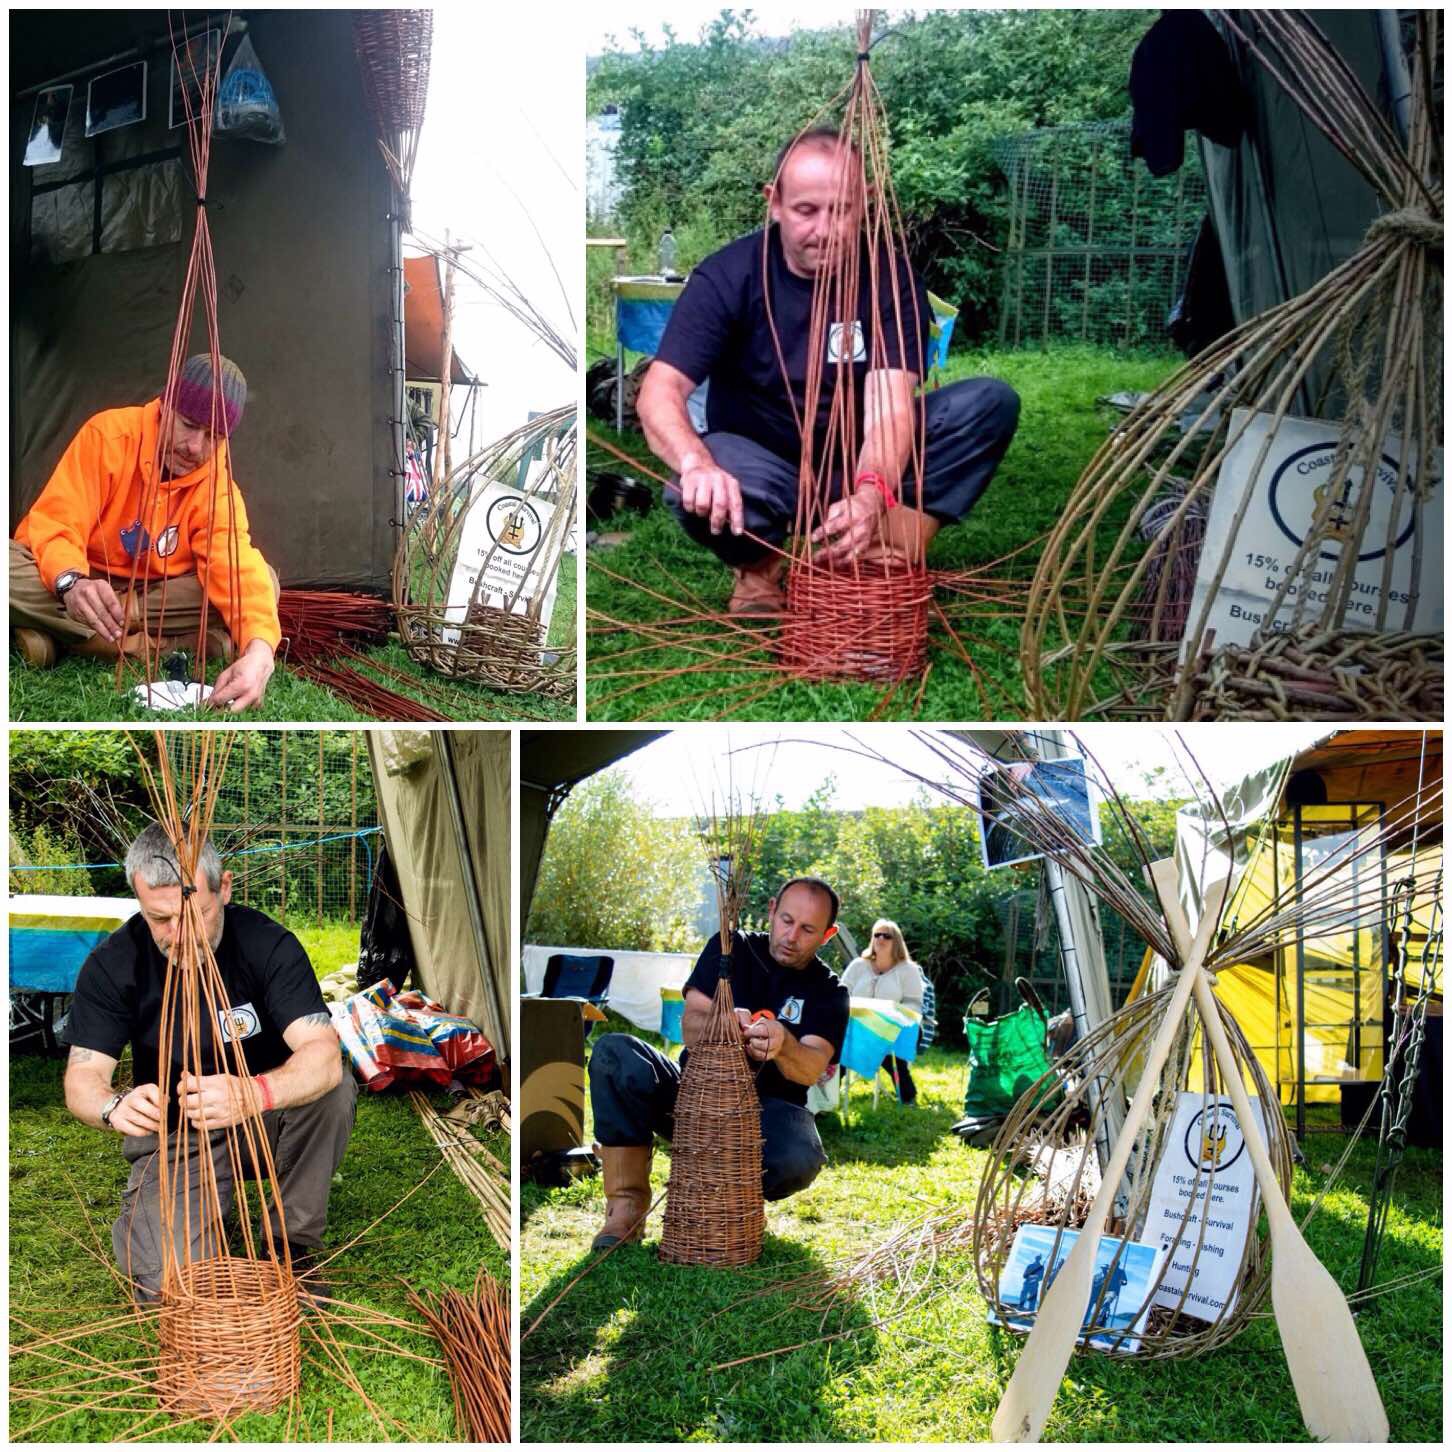
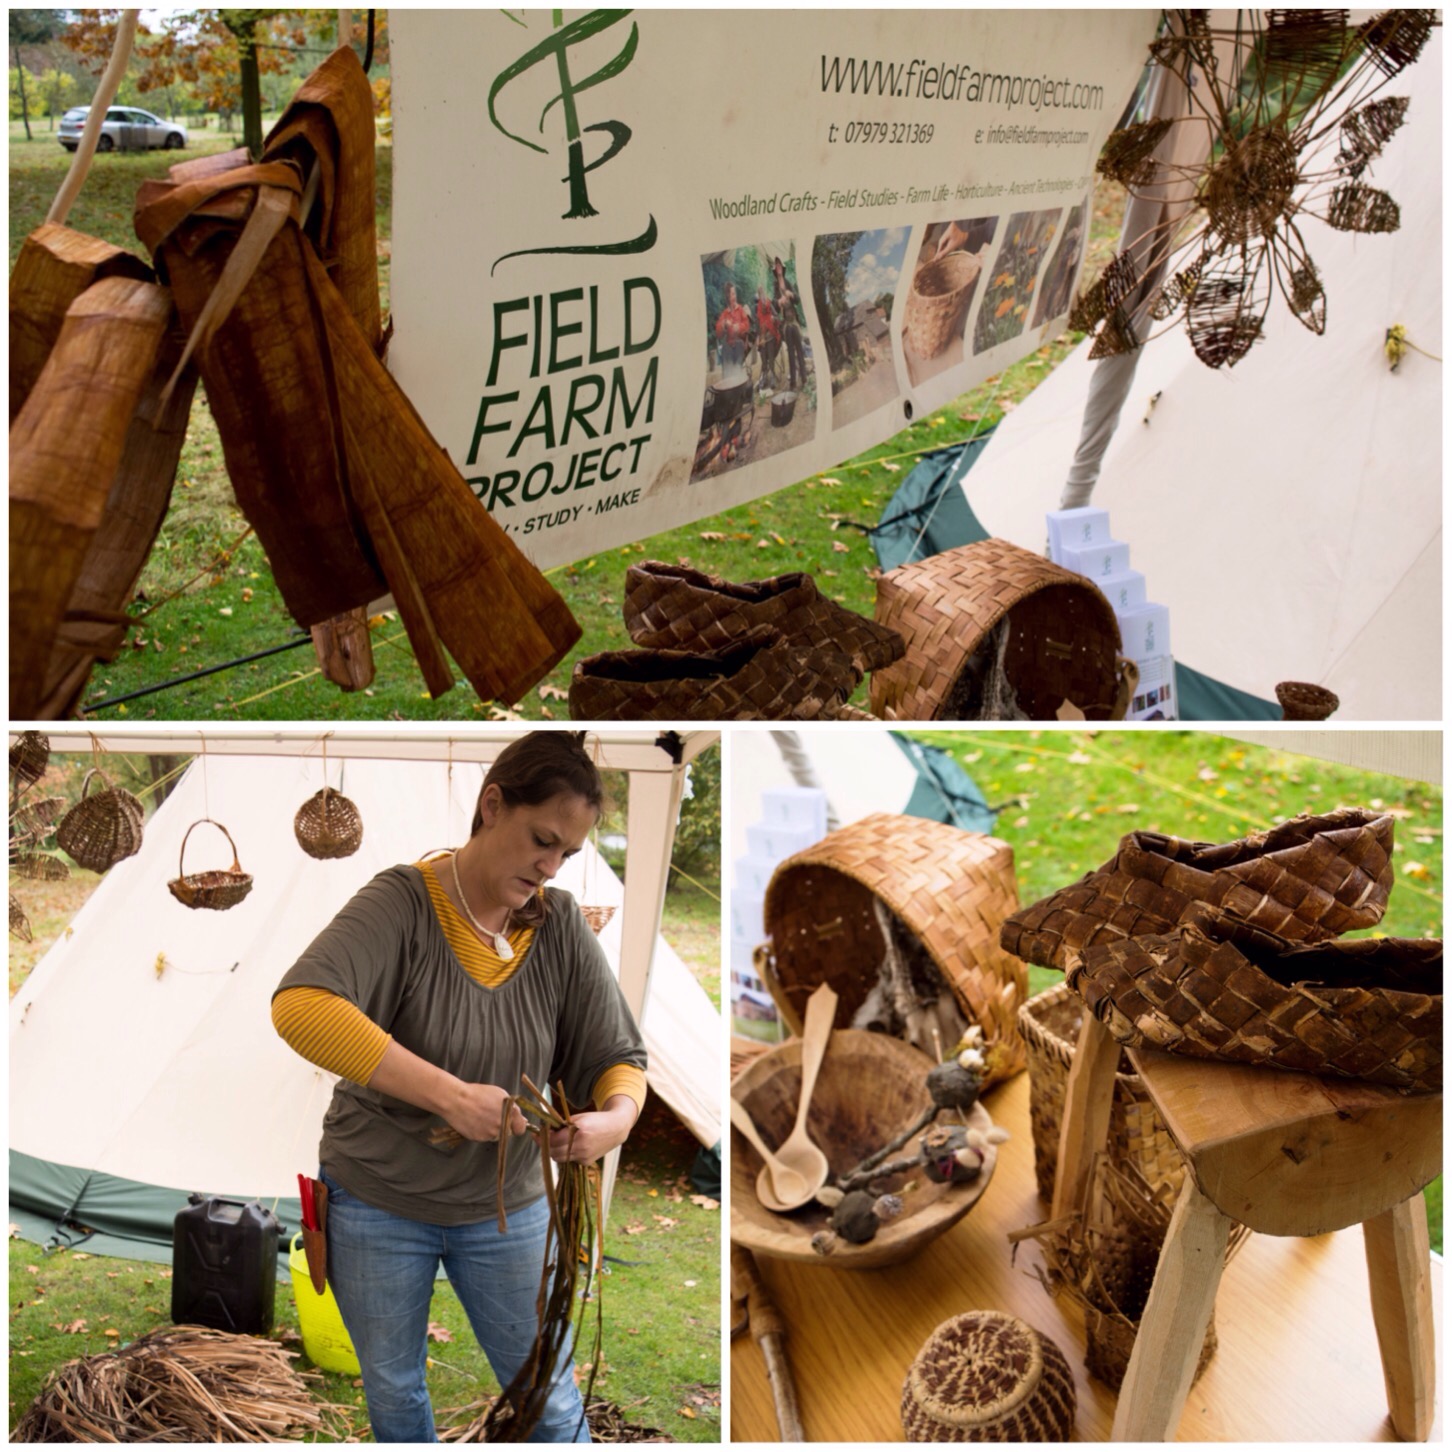
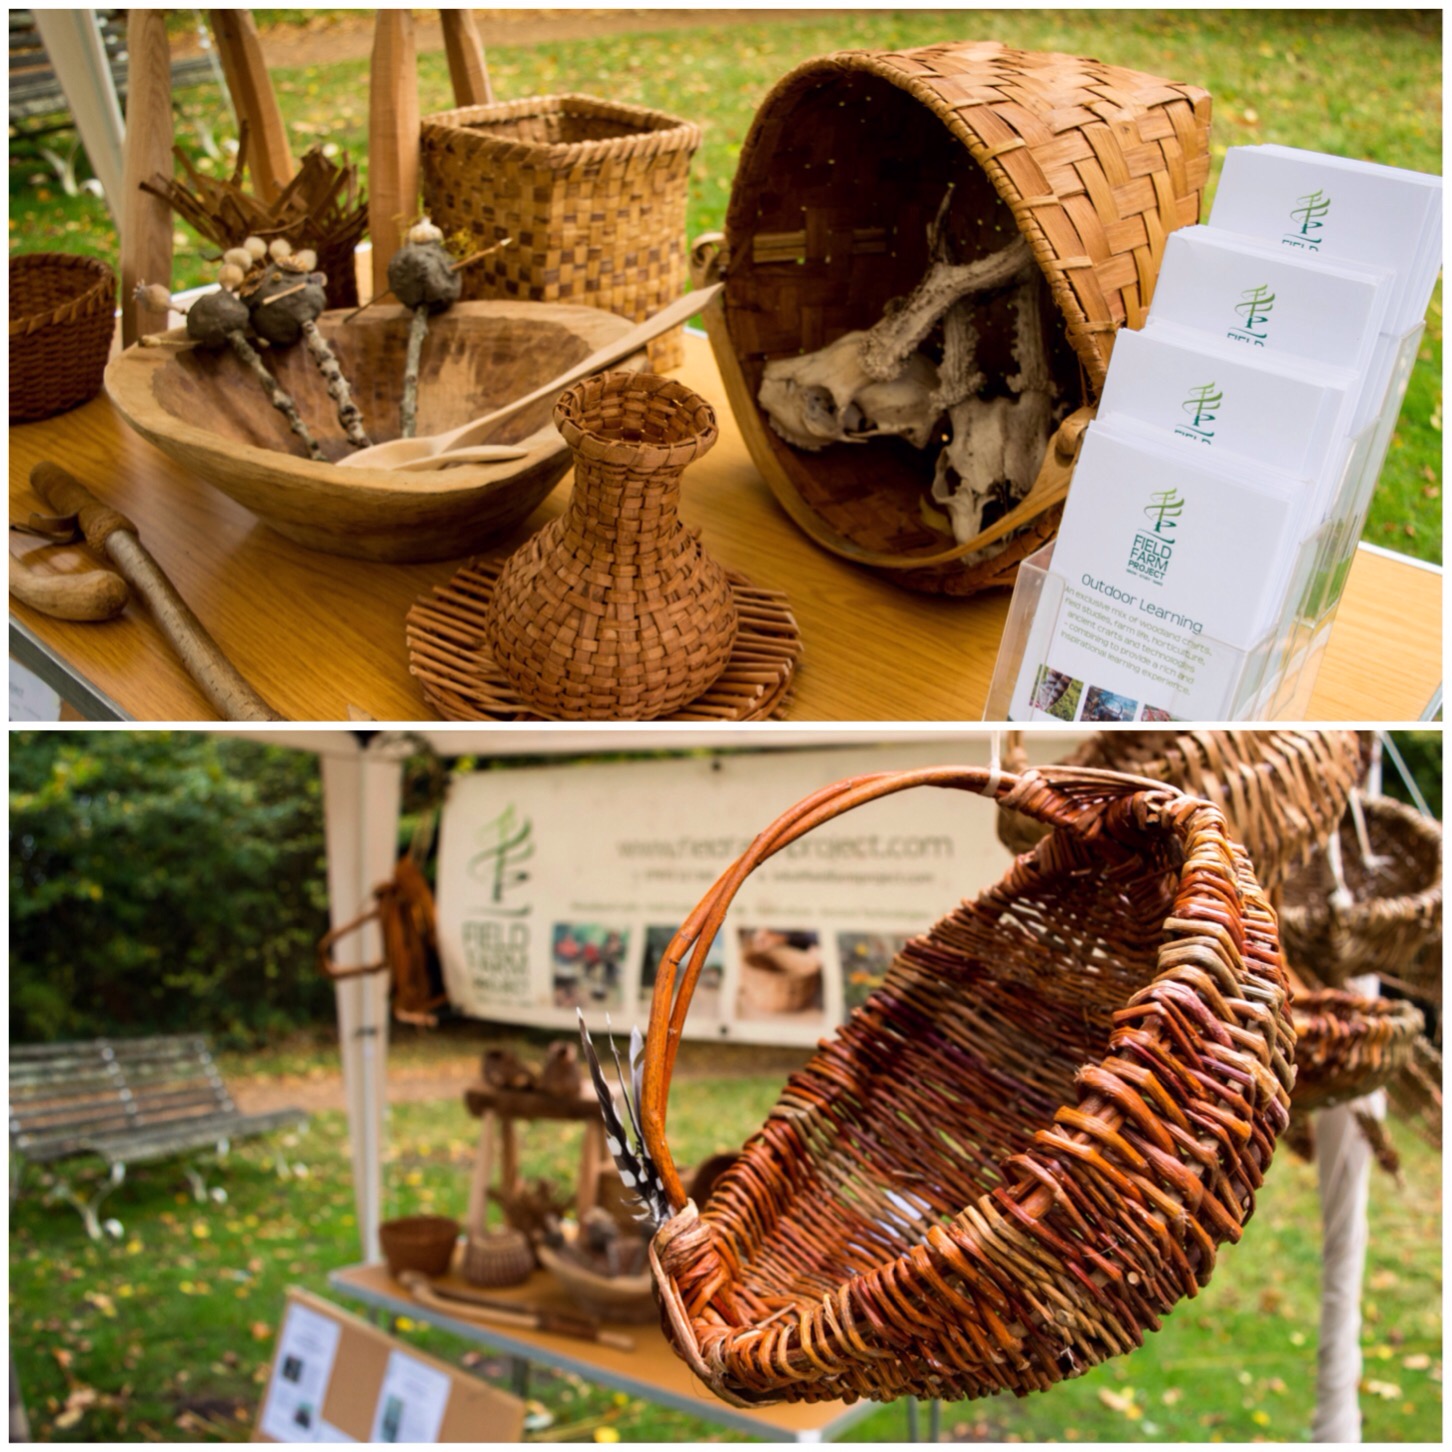
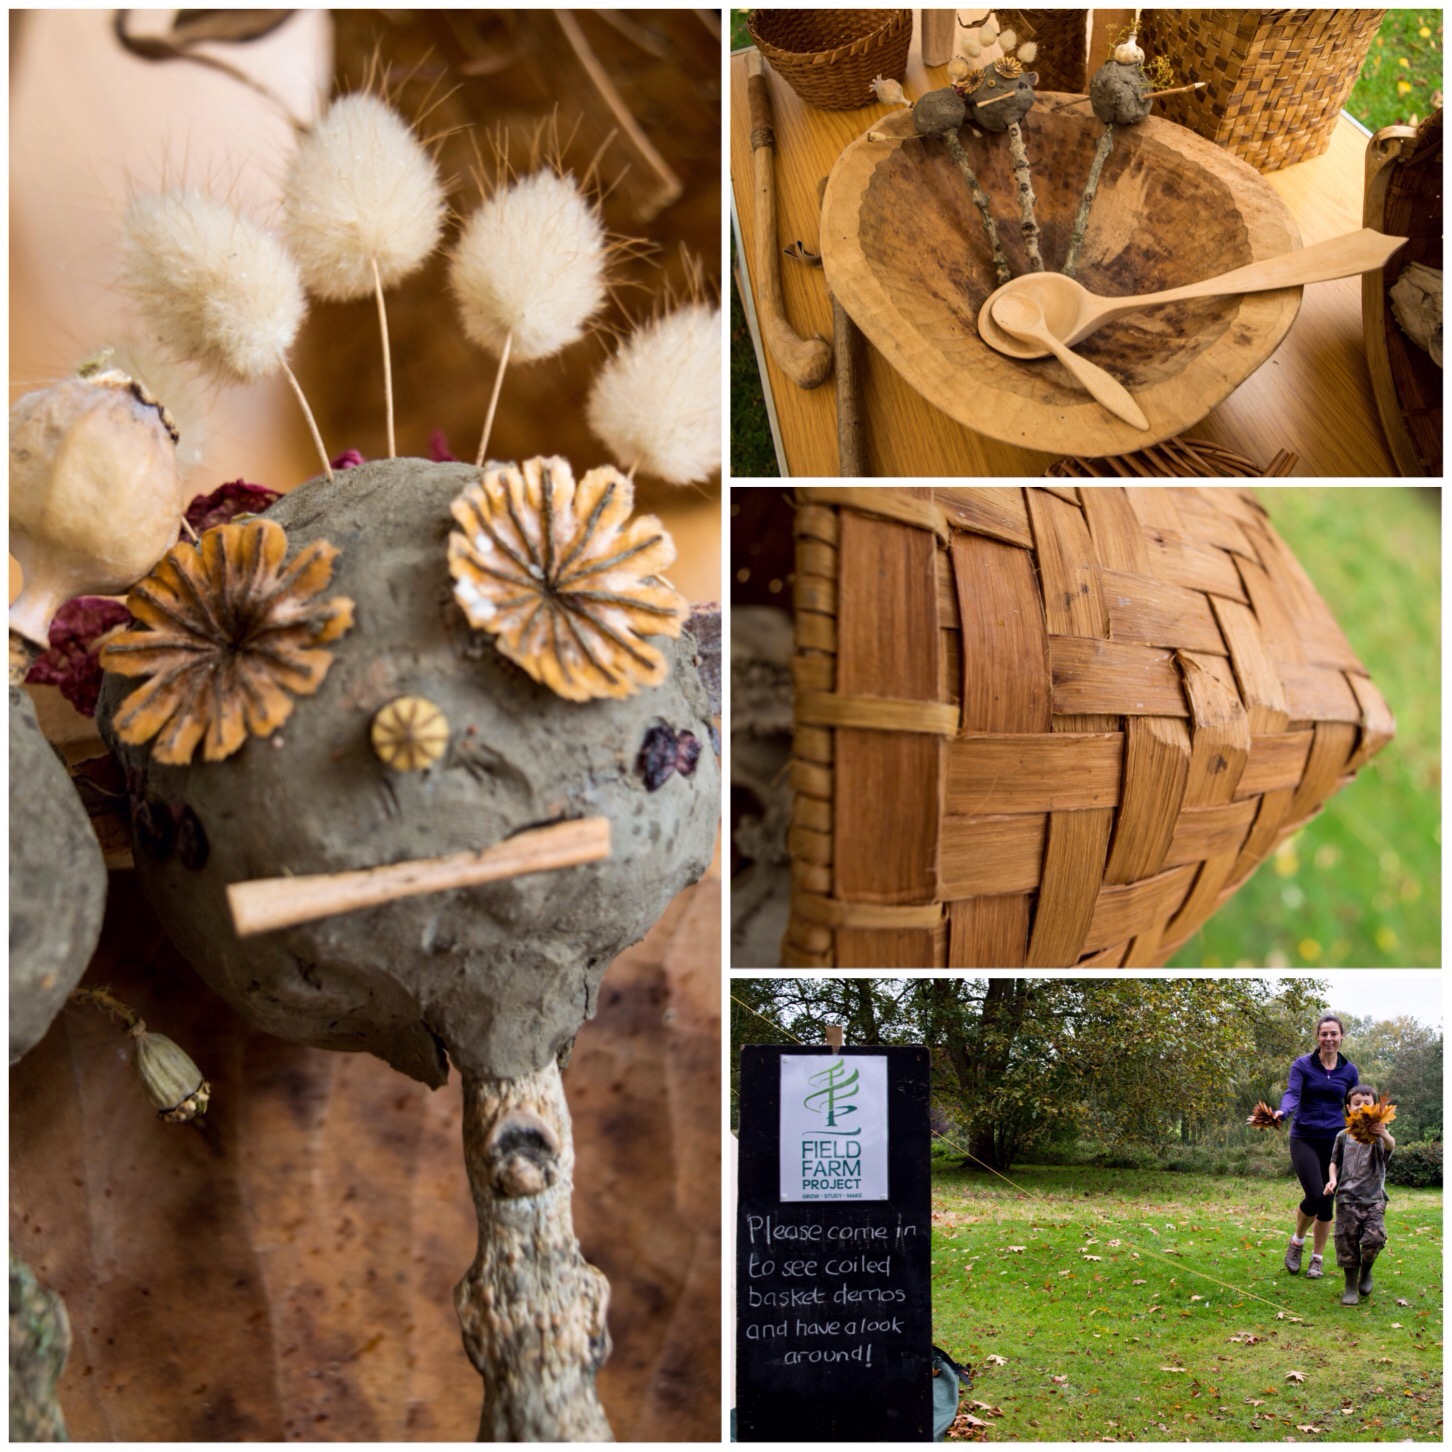
Basket- and lobster-pot making is very popular at the Moot. Our regular instructor on this is Julie Wagstaff from the Welsh Willow Works.
I have never had the time to do one of Jules’s classes however everyone I have spoken with has really learned a lot from her. Jules has a really patient nature and a very creative pair of hands.
Basket making
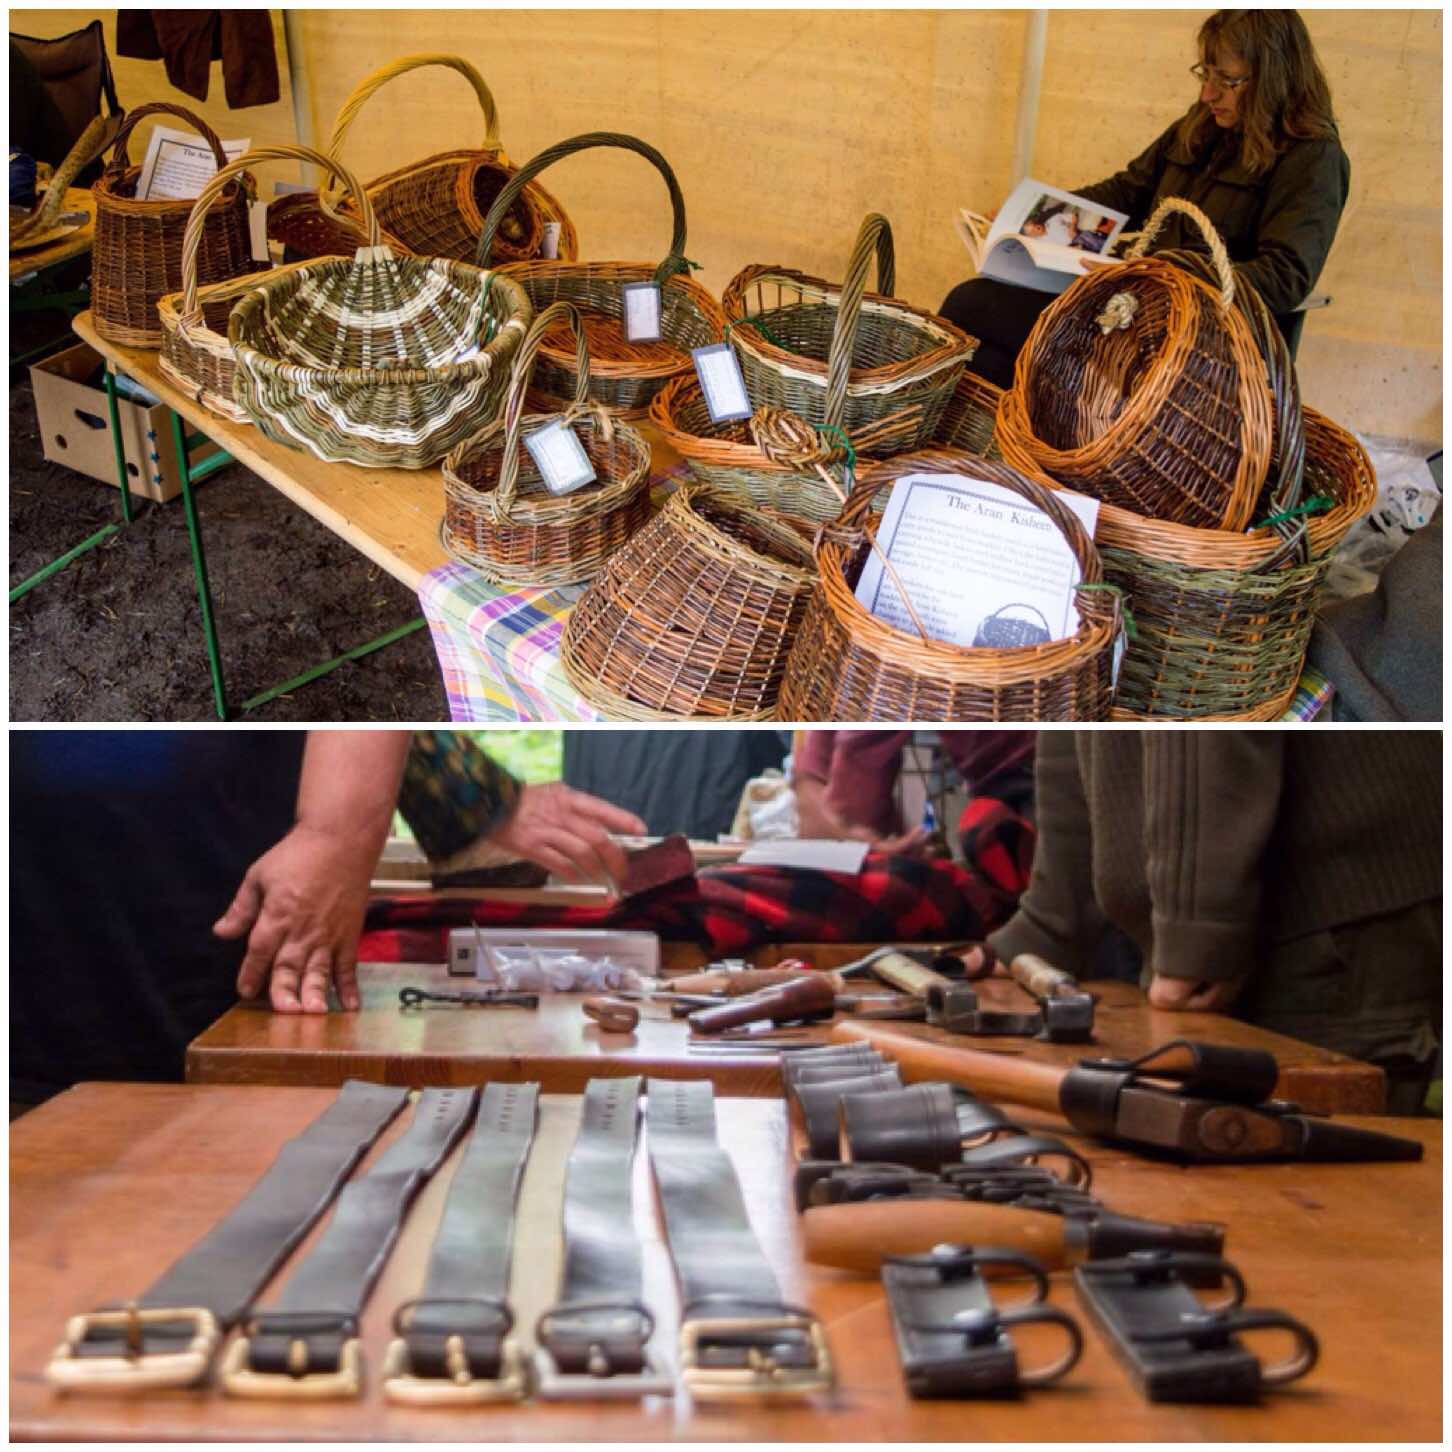
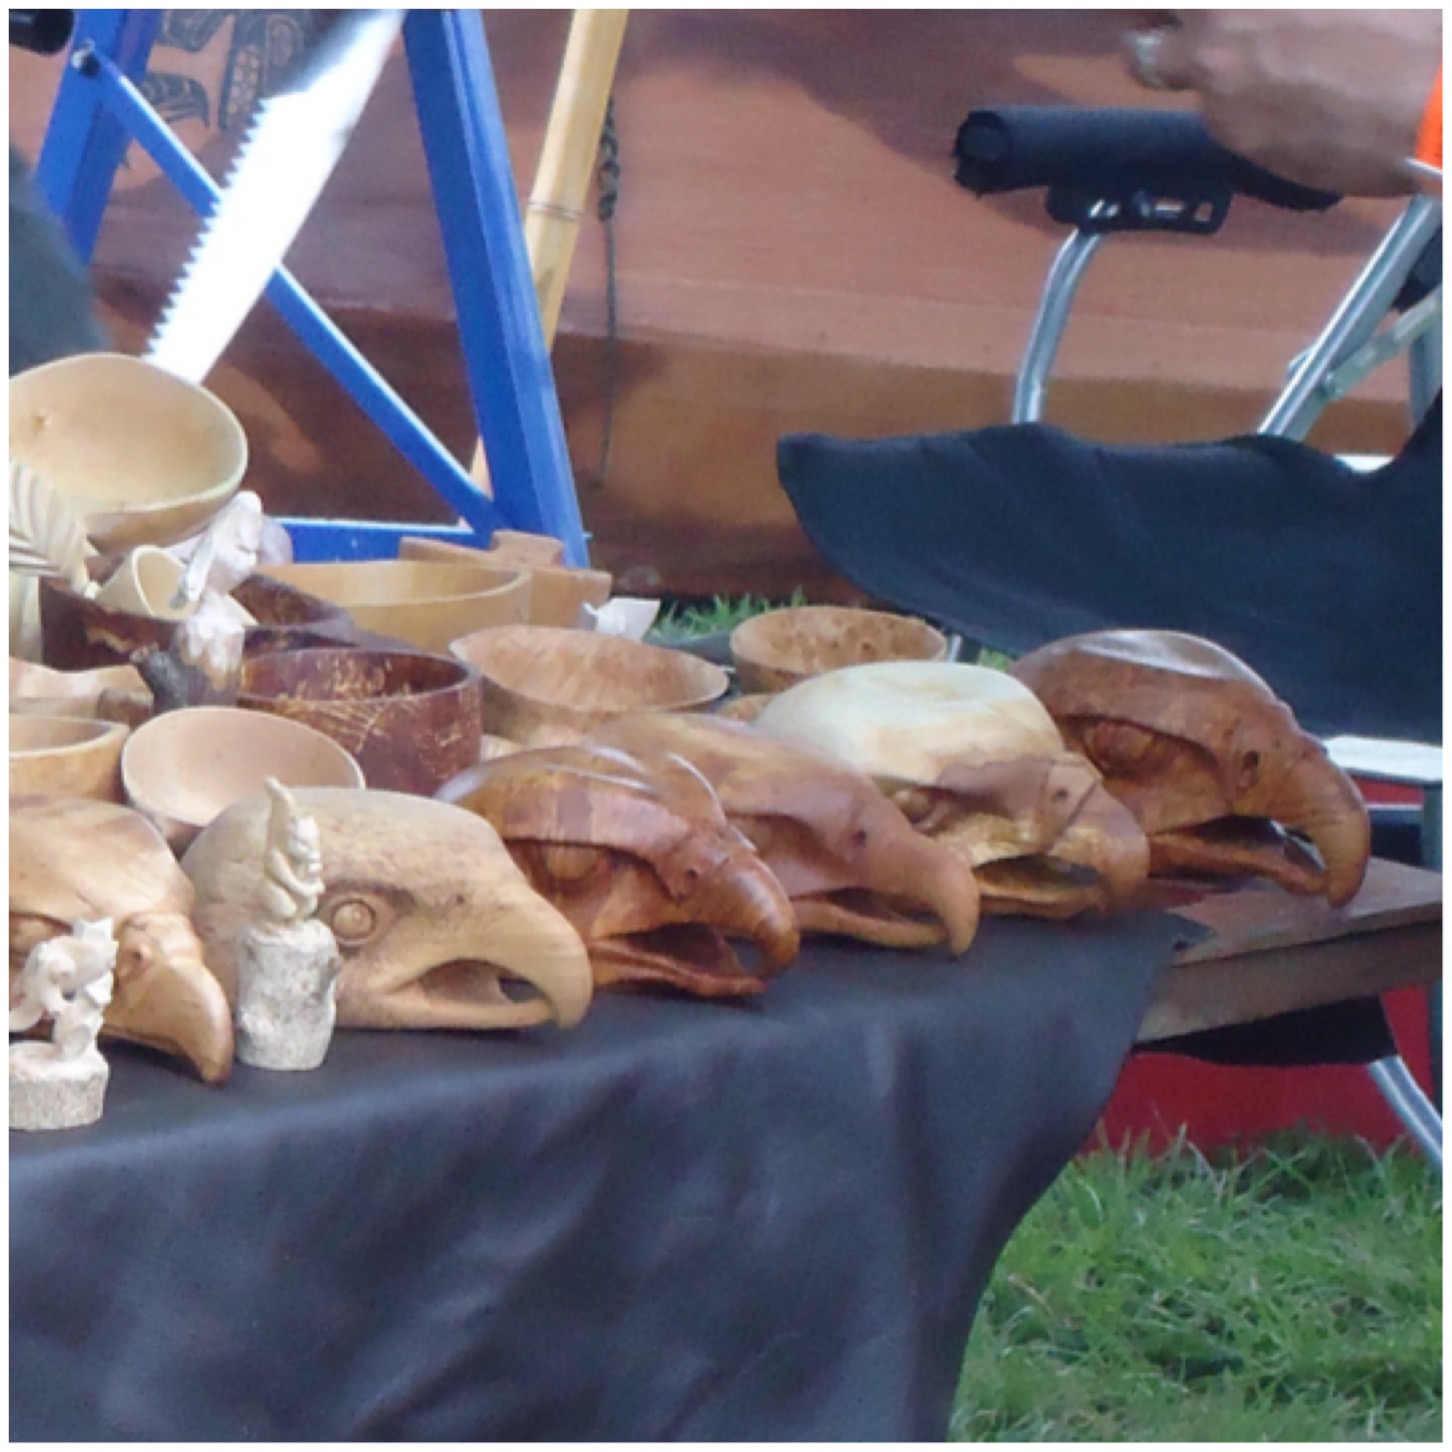
One day of the Moot is set aside as Traders Day. The Moot is not a particularly commercial event for traders however we do have a small shop open most days with a bring and buy stand.
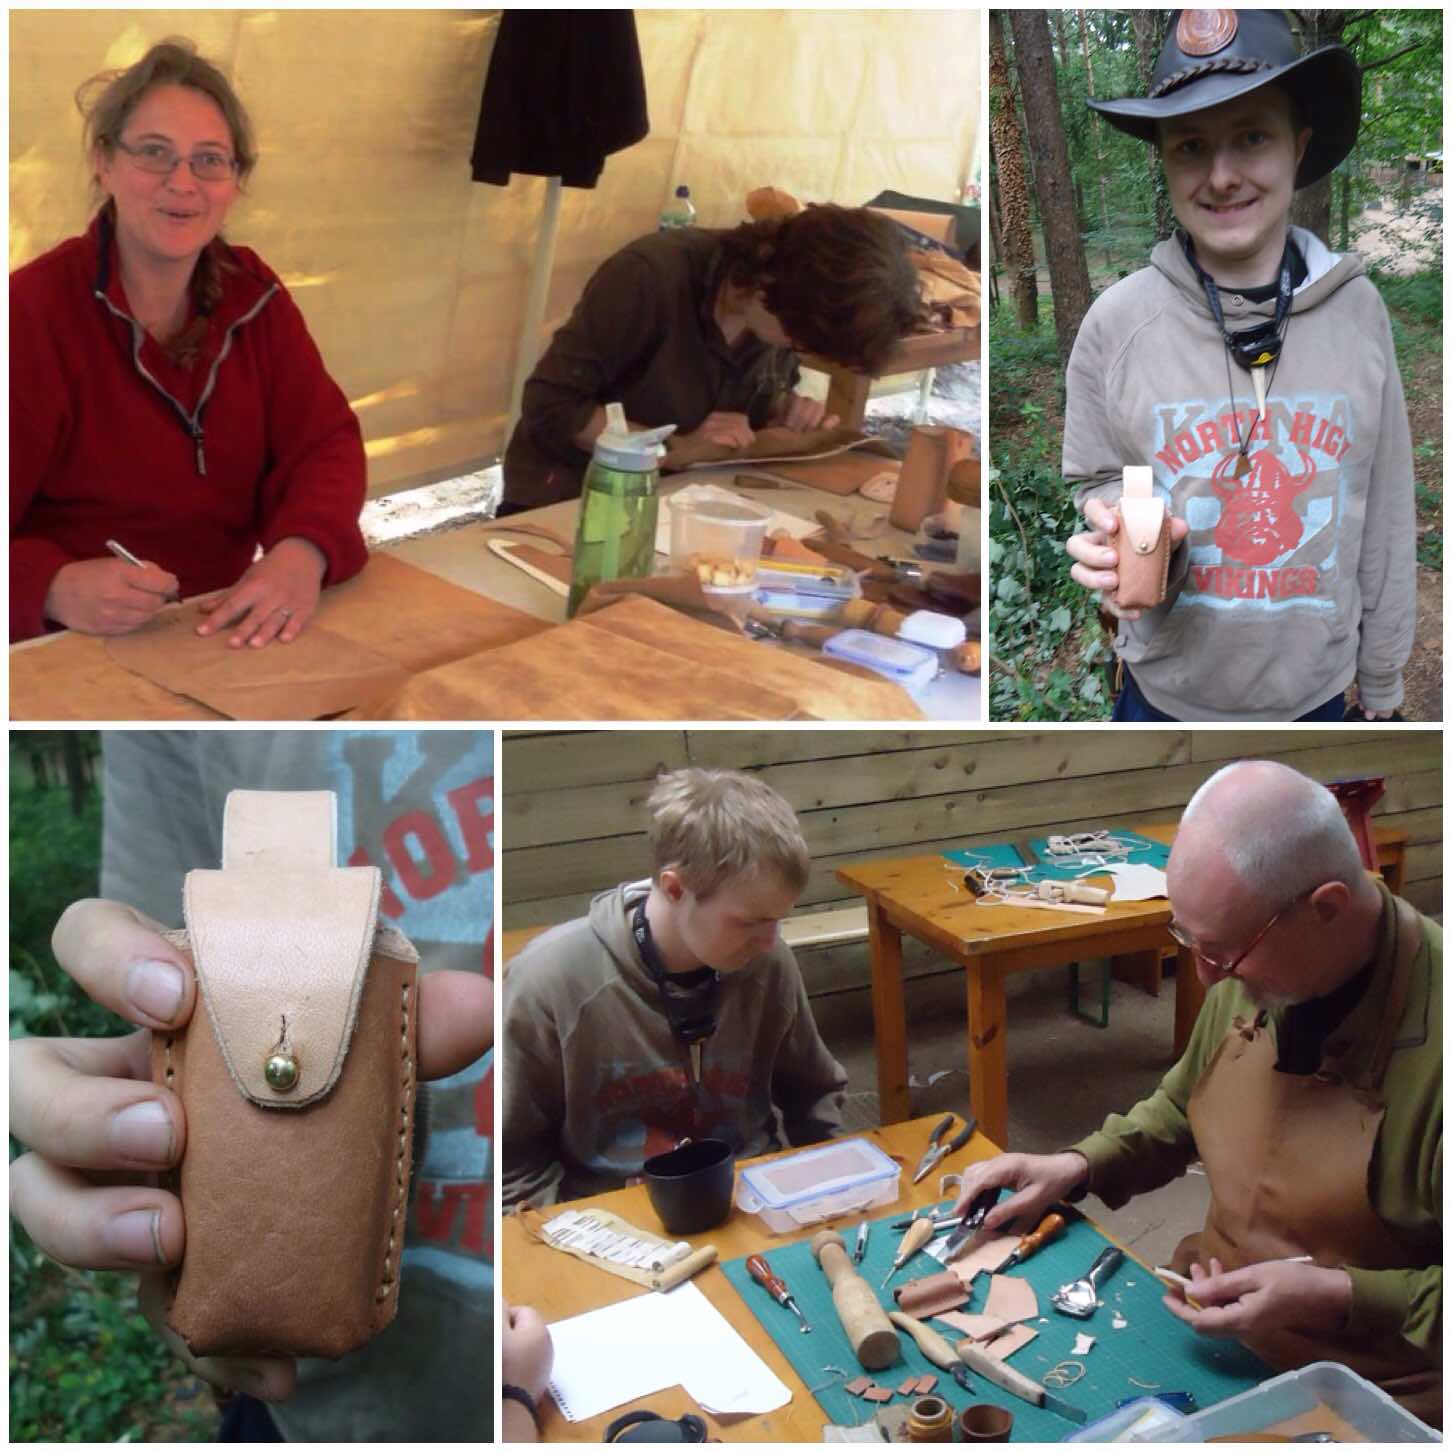
On Traders Day many of the members set up a stand to sell their ‘wares’. Some of this is second hand, others have brand new bought-in goods, and a few sell their own creations. Some of these items like the baskets and the leather work you can see below are highly crafted and intricate.
Traders day
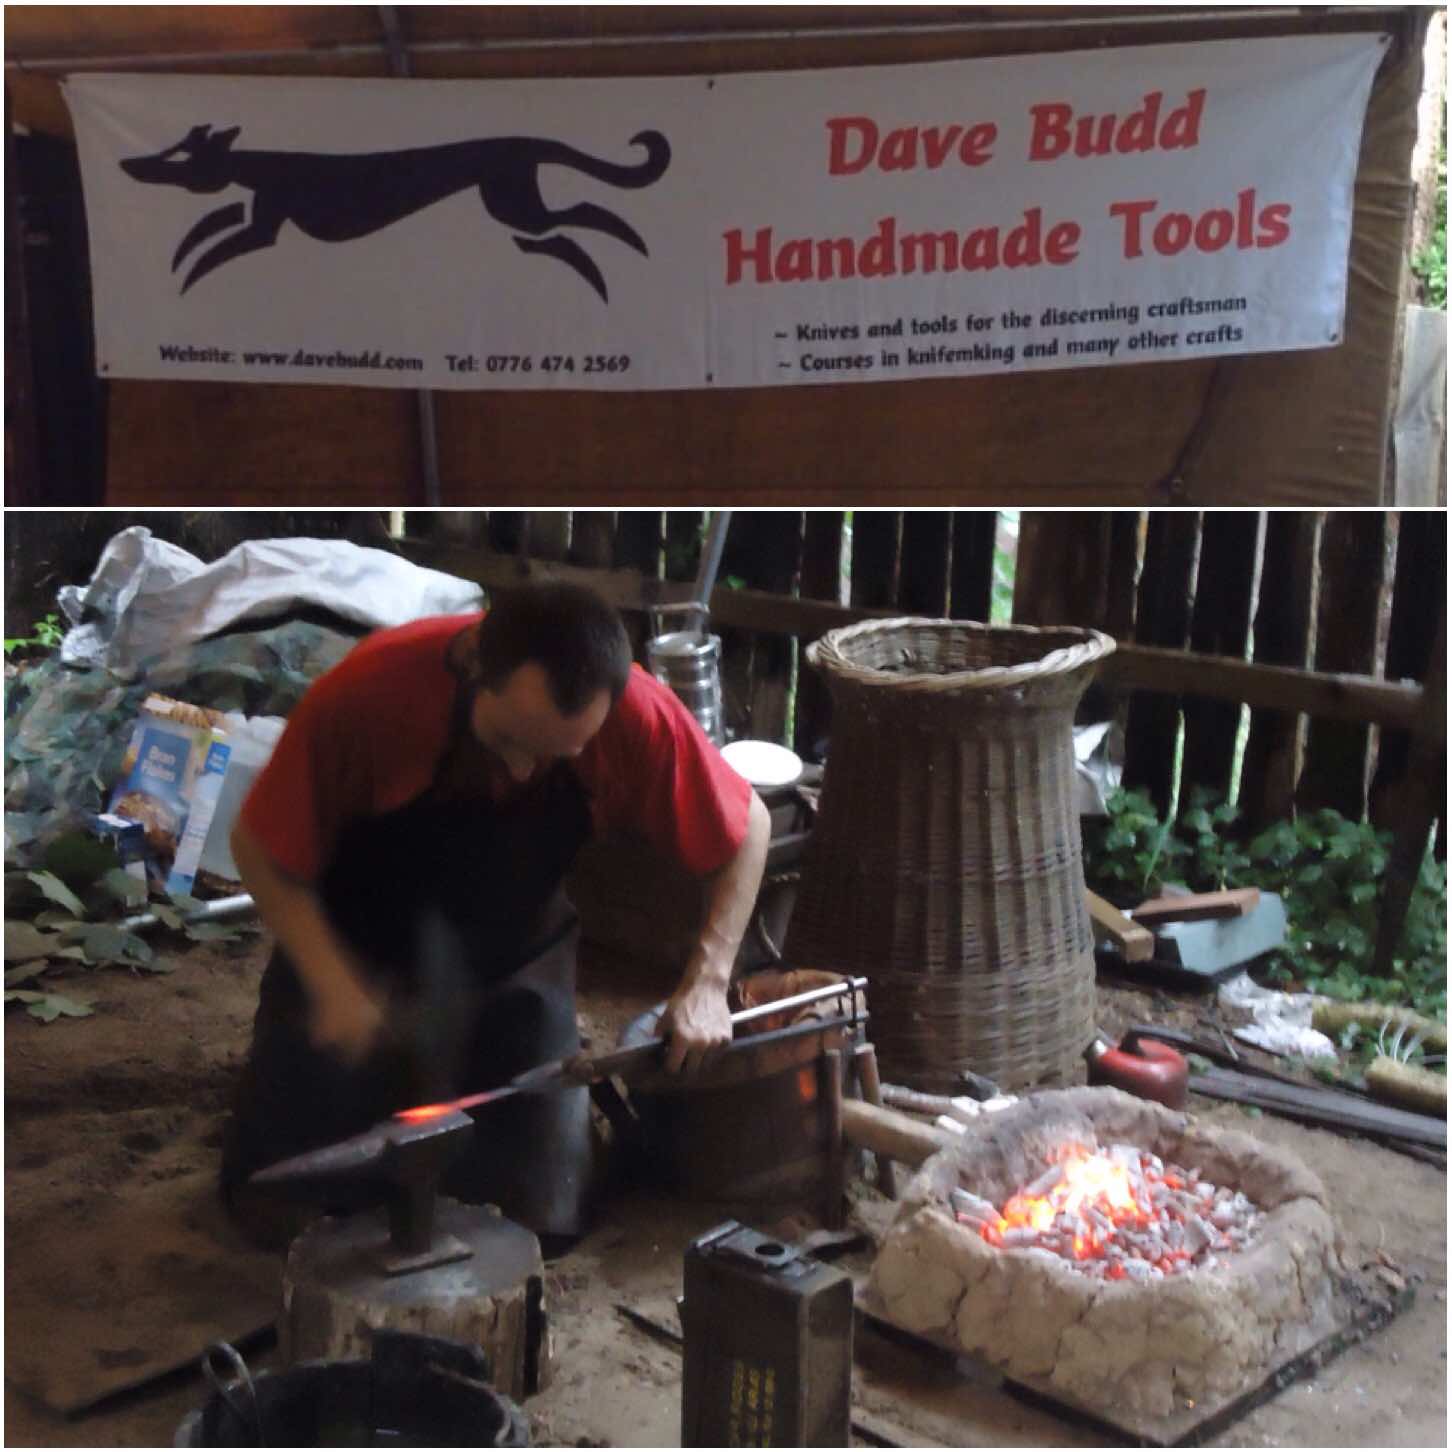
A post on craft cannot be complete without mentioning Mr Dave Budd. Dave is a master craftsman when it comes to metalwork, Using only the most rudimentary (but highly suited to the job) equipment he runs his own forge for us every year.
Dave makes excellent knives and other woodland working tools. My daughter Catherine enjoys being the ‘Pump Monkey’ – keeping the pump going to heat the forge. Dave also donated this year a beautiful knife and a bodkin arrow point as prizes for the archery competition.
Dave Budd iron craft
Another metalworker who is starting to experiment with this material is my Bushmoot neighbour Ian Woodham. A few years ago Ian showed a class I was running how he built a gas wood-burning stove out of a paint can. I was so impressed with it that I made one myself and wrote a tutorial on it – How To….Build a Wood Gas Stove.
This year Ian brought along a new stove he had built out of two gas bottles. The stove had a burner on one side and an oven on the other and I can confirm it did make excellent pizzas and cakes. Since then he has built another one which I am hopefully going to be trying out soon (as soon as I can figure out how to transport it from Yorkshire to Hampshire).
Cooking construction from Ian
We have had a number of leatherwork instructors over the years however Eric Methven has been teaching this art at the Moot the longest. Eric can turn his hand to most things when it comes to working with leather from water bottles, tankards and sheaths to the likes of beautiful arm guards for archery (we got one of these guards as a prize for the archery competition one year).
Our good friend Drew passed away a few years ago and he was a keen student of Eric’s. I still remember clearly Drew coming up to my camp to show me the new sheath he had just made for his Leatherman multitool.
Leather craft from Eric
No Moot would be complete without some spoon carving. Our expert carver is Dean however quite a few of us lend a hand with this class. It is great to see all the kids learning to carve their first spoon (and adults too – that is my wife Alison with her first spoon below).
My first spoon at the Moot (way back in 2005) was quickly constructed from birch bark. It did not take long to make but it did impress me.
Spoonage
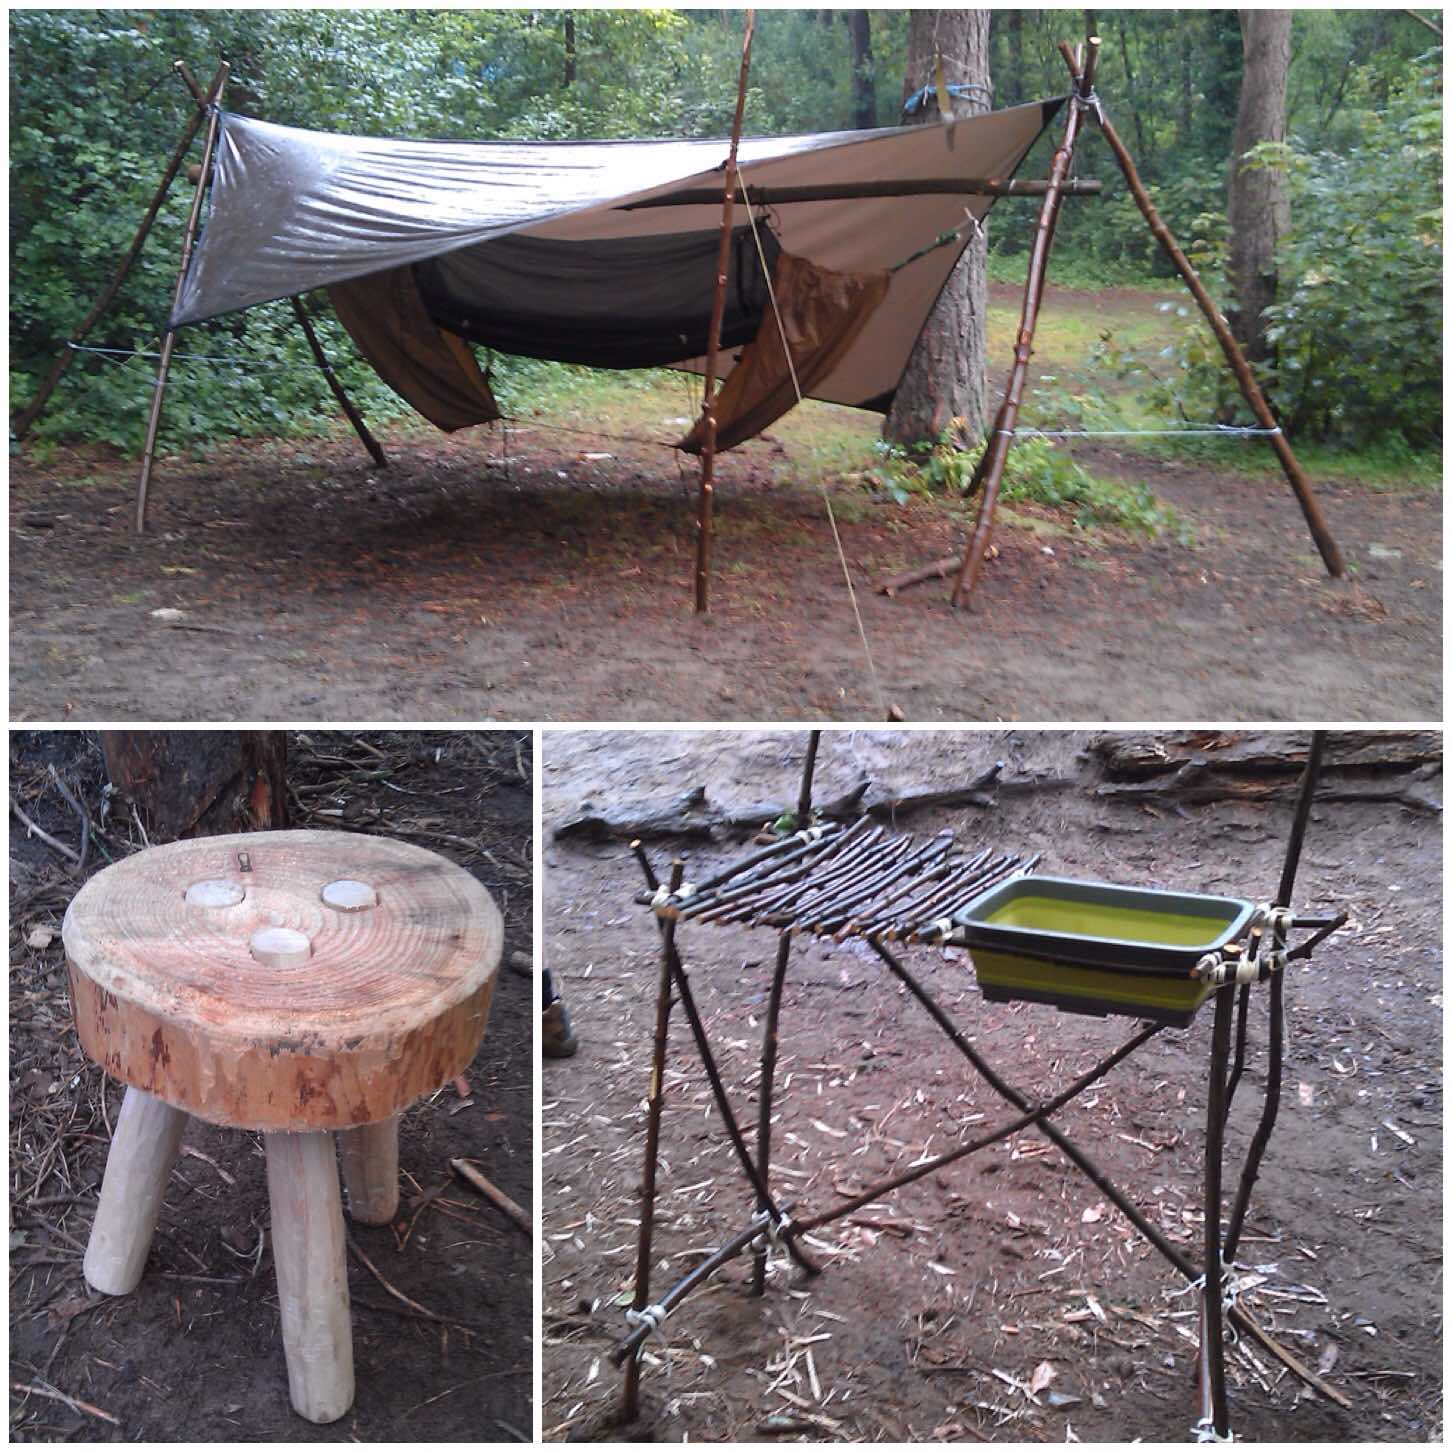
I ran a competition one year where everyone was tasked with constructing something for a bushcraft camp. There were many entries and you can see three below.
I loved the little stool and the washing rack, which had a lot of love and care put into its construction. My entry was this freestanding hammock stand (no land anchors were needed) .
Camp constructions
A couple of other construction projects have been around the theme of cooking. Tim Neobard built this fantastic pizza oven out of clay and straw last year. It baked some excellent pizzas (sadly some idiots smashed it up after the Moot finished).
Happily the oven was re-built by Neil this year using bricks as a skeleton so hopefully it will last for a few years.
My project this year has been on building campfire cranes and I tested out my Lap Joint crane at the Moot. It is a very simple device made out of one pole and I am happy to say it passed with flying colours. Since then I have been busy building other cranes with as many variations as I can think of.
Fireside constructions
One thing you can be guaranteed about at the Moot is being astonished by the numerous things you can do with string, be that Dream Catchers, crochet or making whoopie slings.
We also had David Colter making Balearic slings out of string at the Moot and running a competition with them. Most bushcrafters are quite happy at the Moot to show you what they think are the best knots to use in any given situation.
String craft
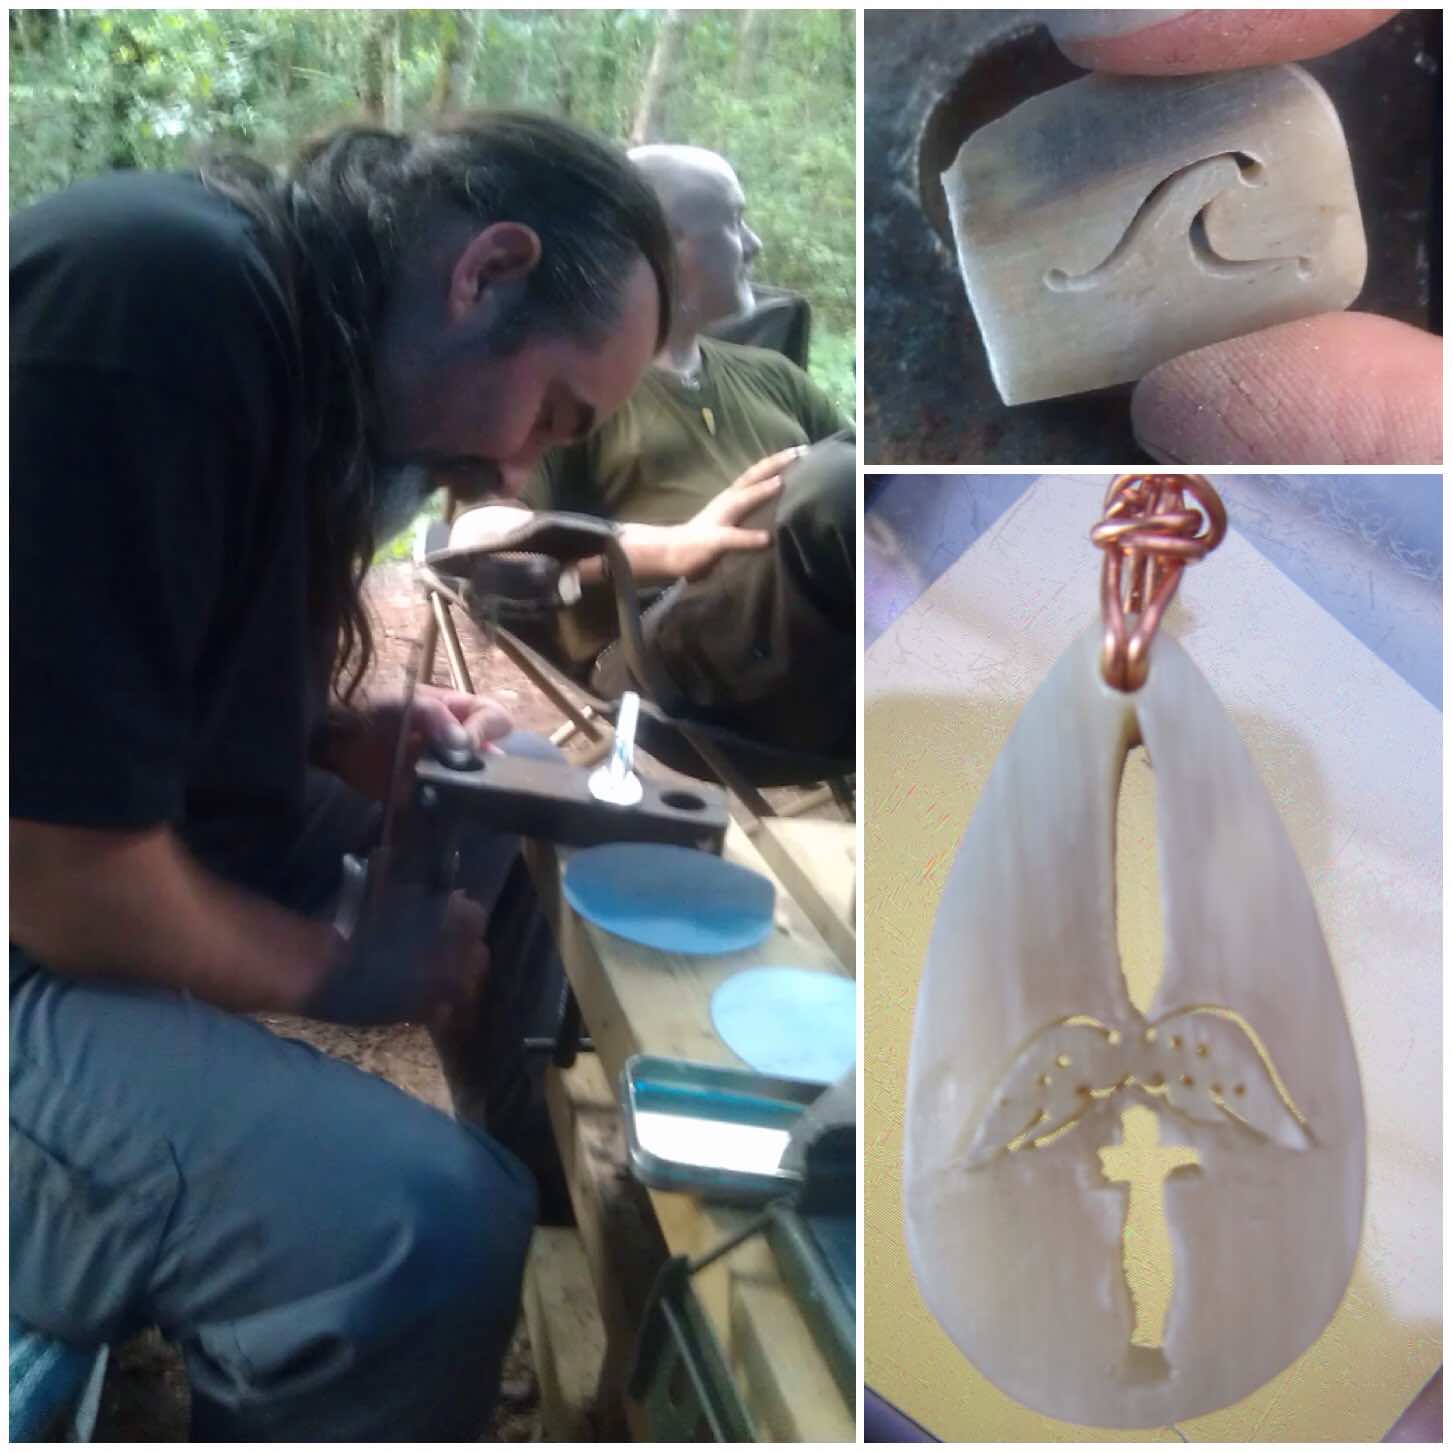
A very quiet craftsman is our very own Cap’n Badger. He uses a fine saw to carve bone and antler into beautiful pendants. You can see a couple of his designs in the picture below.
The pendant on the bottom right is the one he carved for me a few years ago. The design was very intricate (a Royal Marine dagger and parachute wings). Badger also made some more pendants this year and donated them to the archery competition where they were quickly snapped up by the competitors.
Fine bone craft from Cap’n Badger
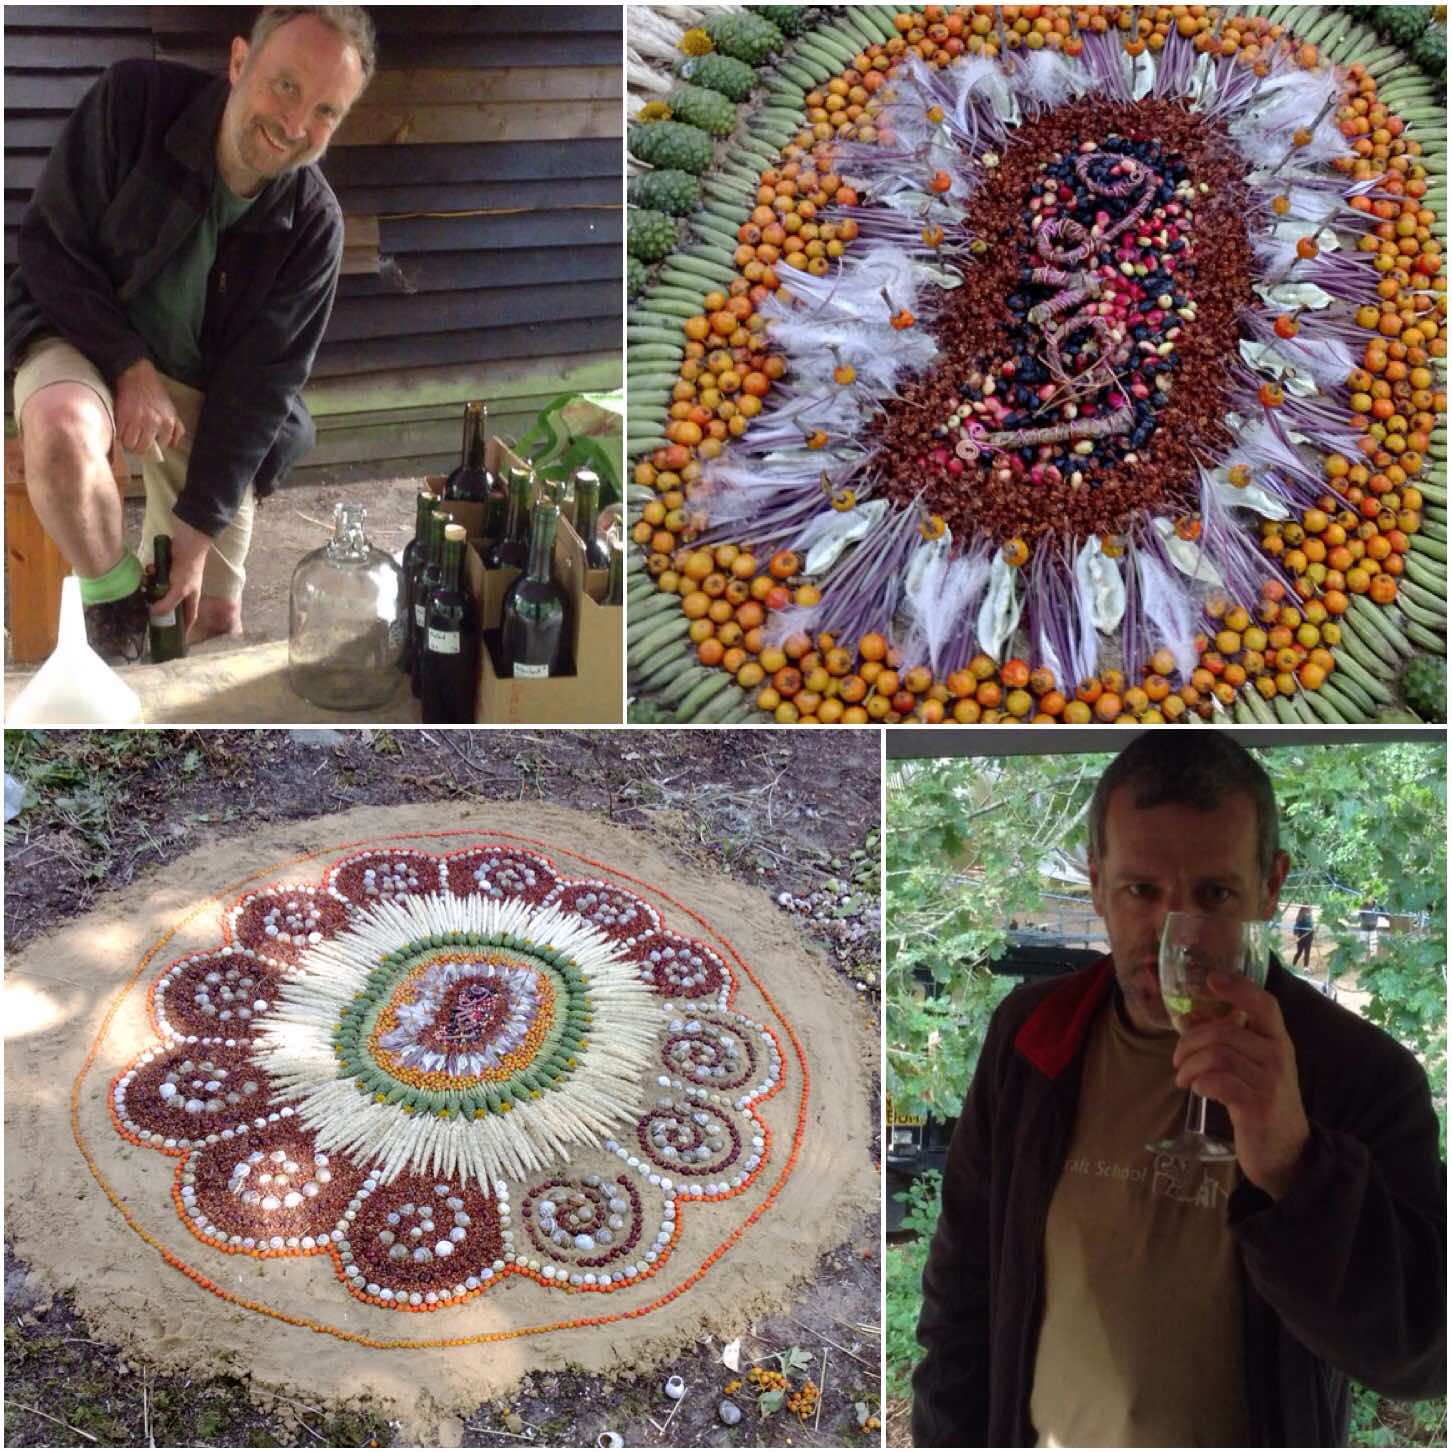
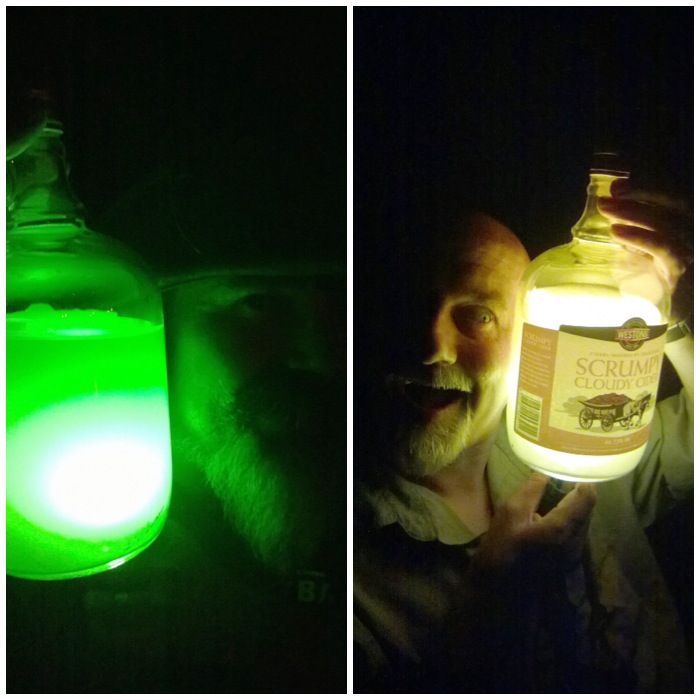
Now it is not all hard graft when it comes to the Moot. Last year my friend Richard brought along a number of his bottles of white elderberry wine. I managed to get a private tasting session and I was very impressed with the quality of the wine that he had produced.
Richard has managed to cultivate his own ‘orchard’ of elder trees that produce white elderberries. This has taken him years to do and it has paid off for him with some excellent wine.
I think though that the most beautiful sight you will come across at the Moot must be the fantastic mosaics of plants made by Keith Beaney (Keith refers to them as Land Art and you can see why clearly). Keith will spend hours producing these wonderful spectacles for us to marvel at. Many of the children head off to collect materials, inspired by his creations, and leave their own mosaics dotted around the woods.
Liquid art from Richard and plant art from Keith
I could have added lots more on this subject but I have to end somewhere.
I am looking forward to next year when I can practice some of these arts and crafts again and learn new ones.
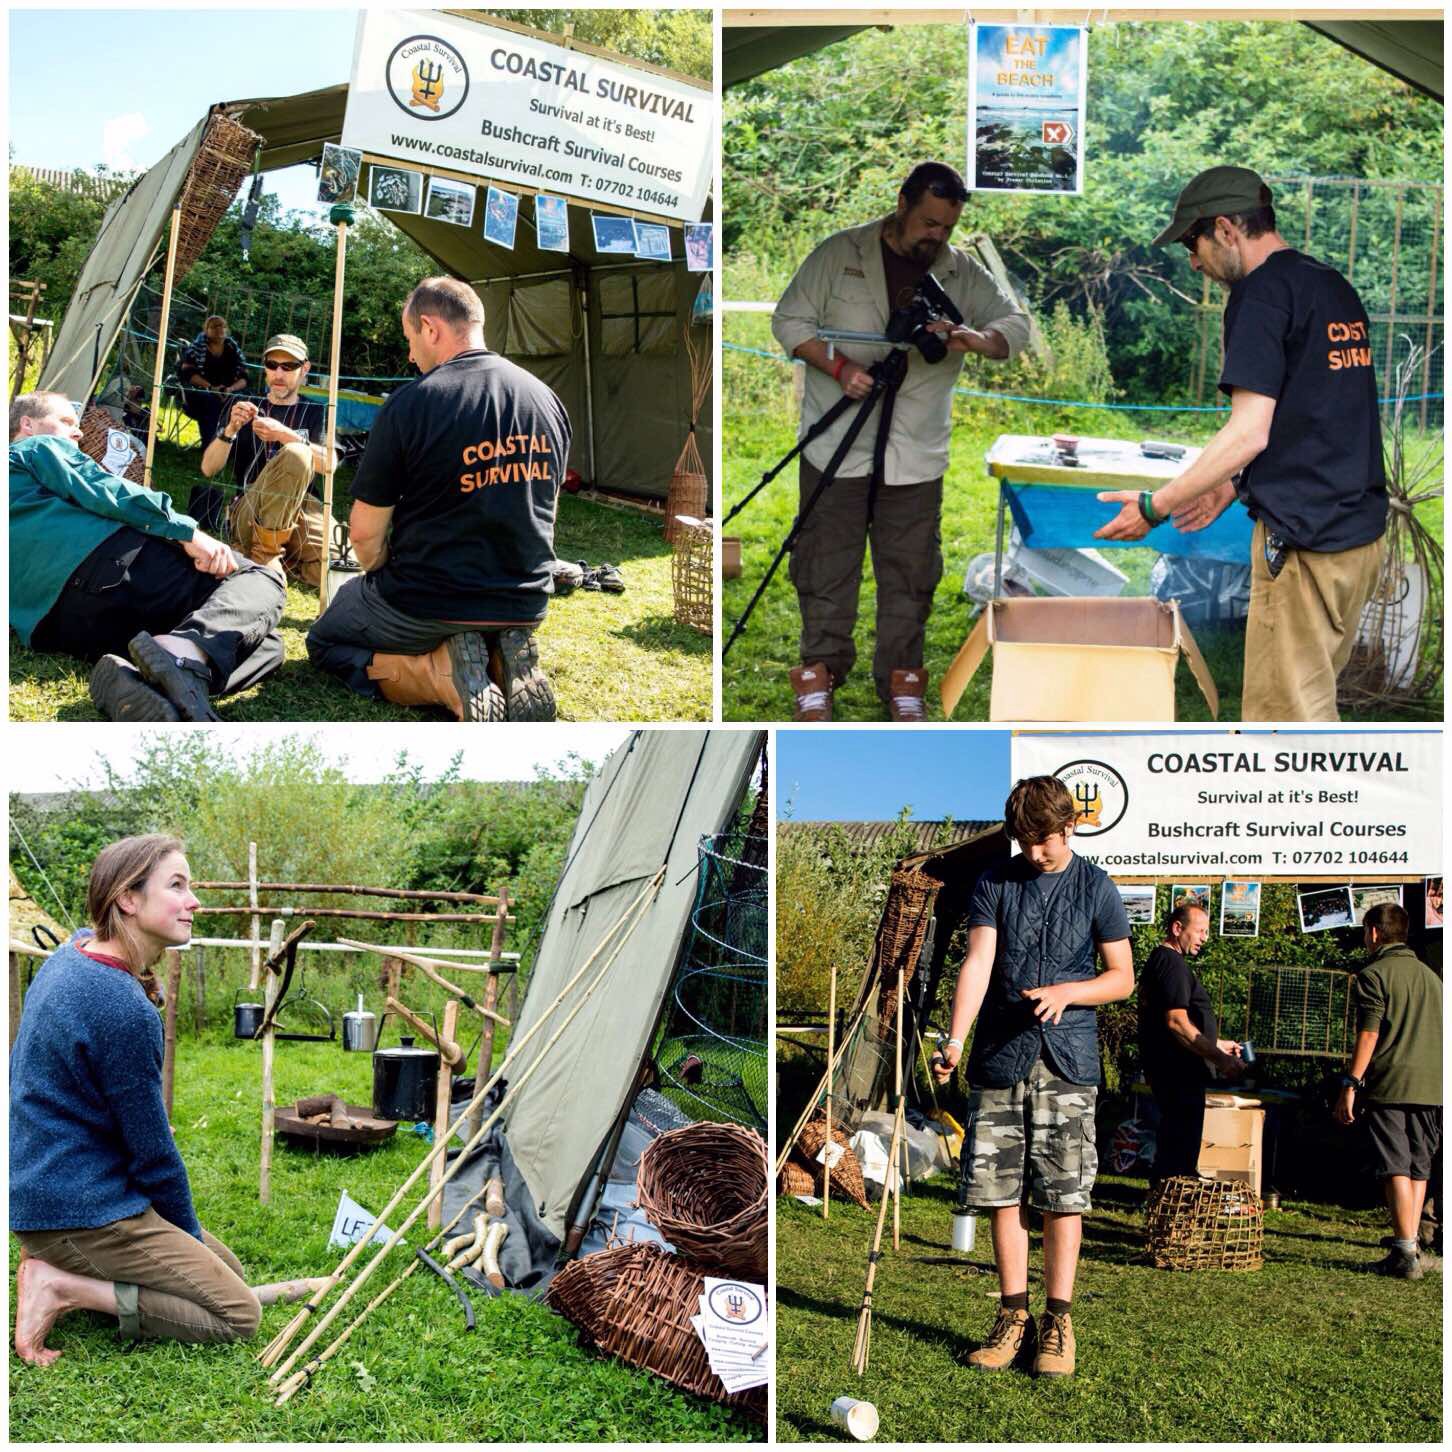
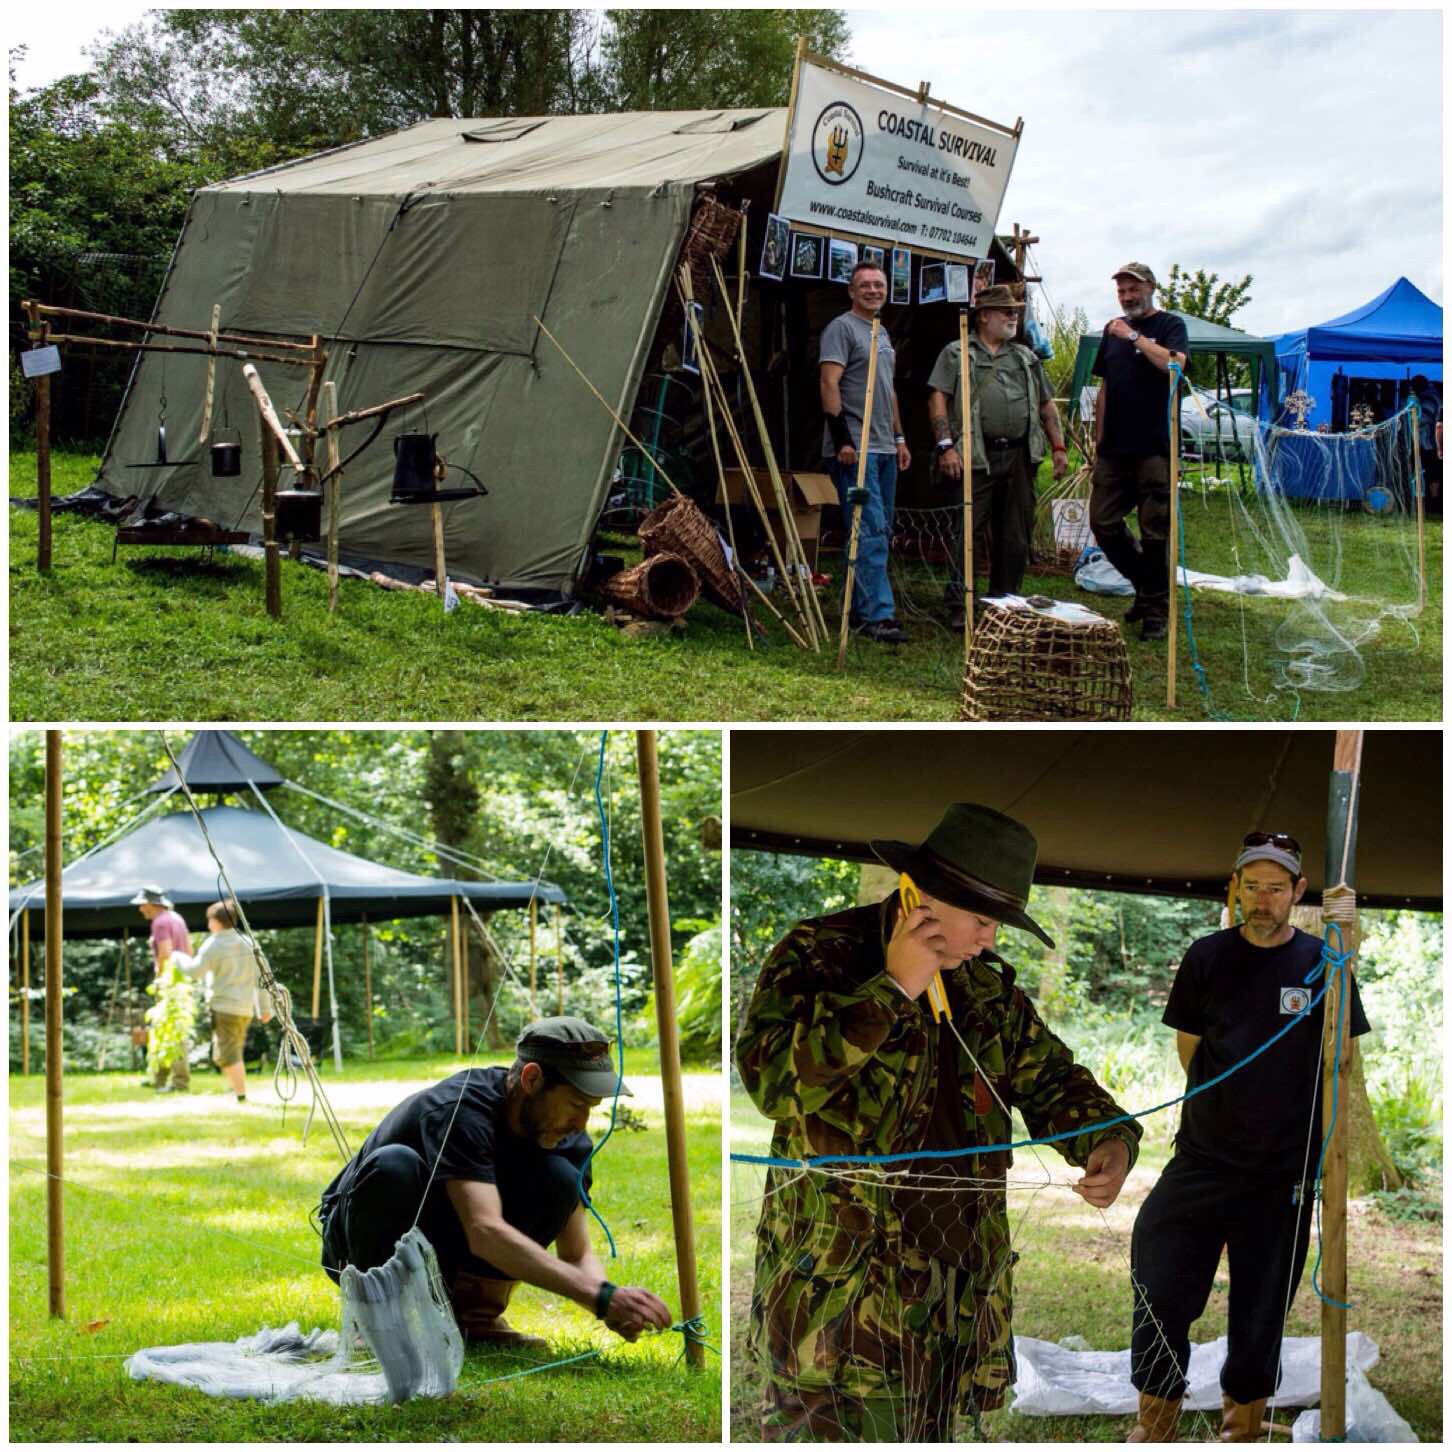
Last August found me back at the Wilderness Gathering with my good friends Fraser Christian (from Coastal Survival), Stephen Herries, Danny Stocks and Si Parker.
I have been going to the Gathering so long now that I feel part of the furniture (I did miss the very first one) but I would not miss it for the world.
Coastal Survival at the Wilderness Gathering
Work kept me busy this year so I did not get down to West Knoyle until the Friday so the guys had set everything up before I arrived. I also met Danny’s wife Lorna for the first time this year.
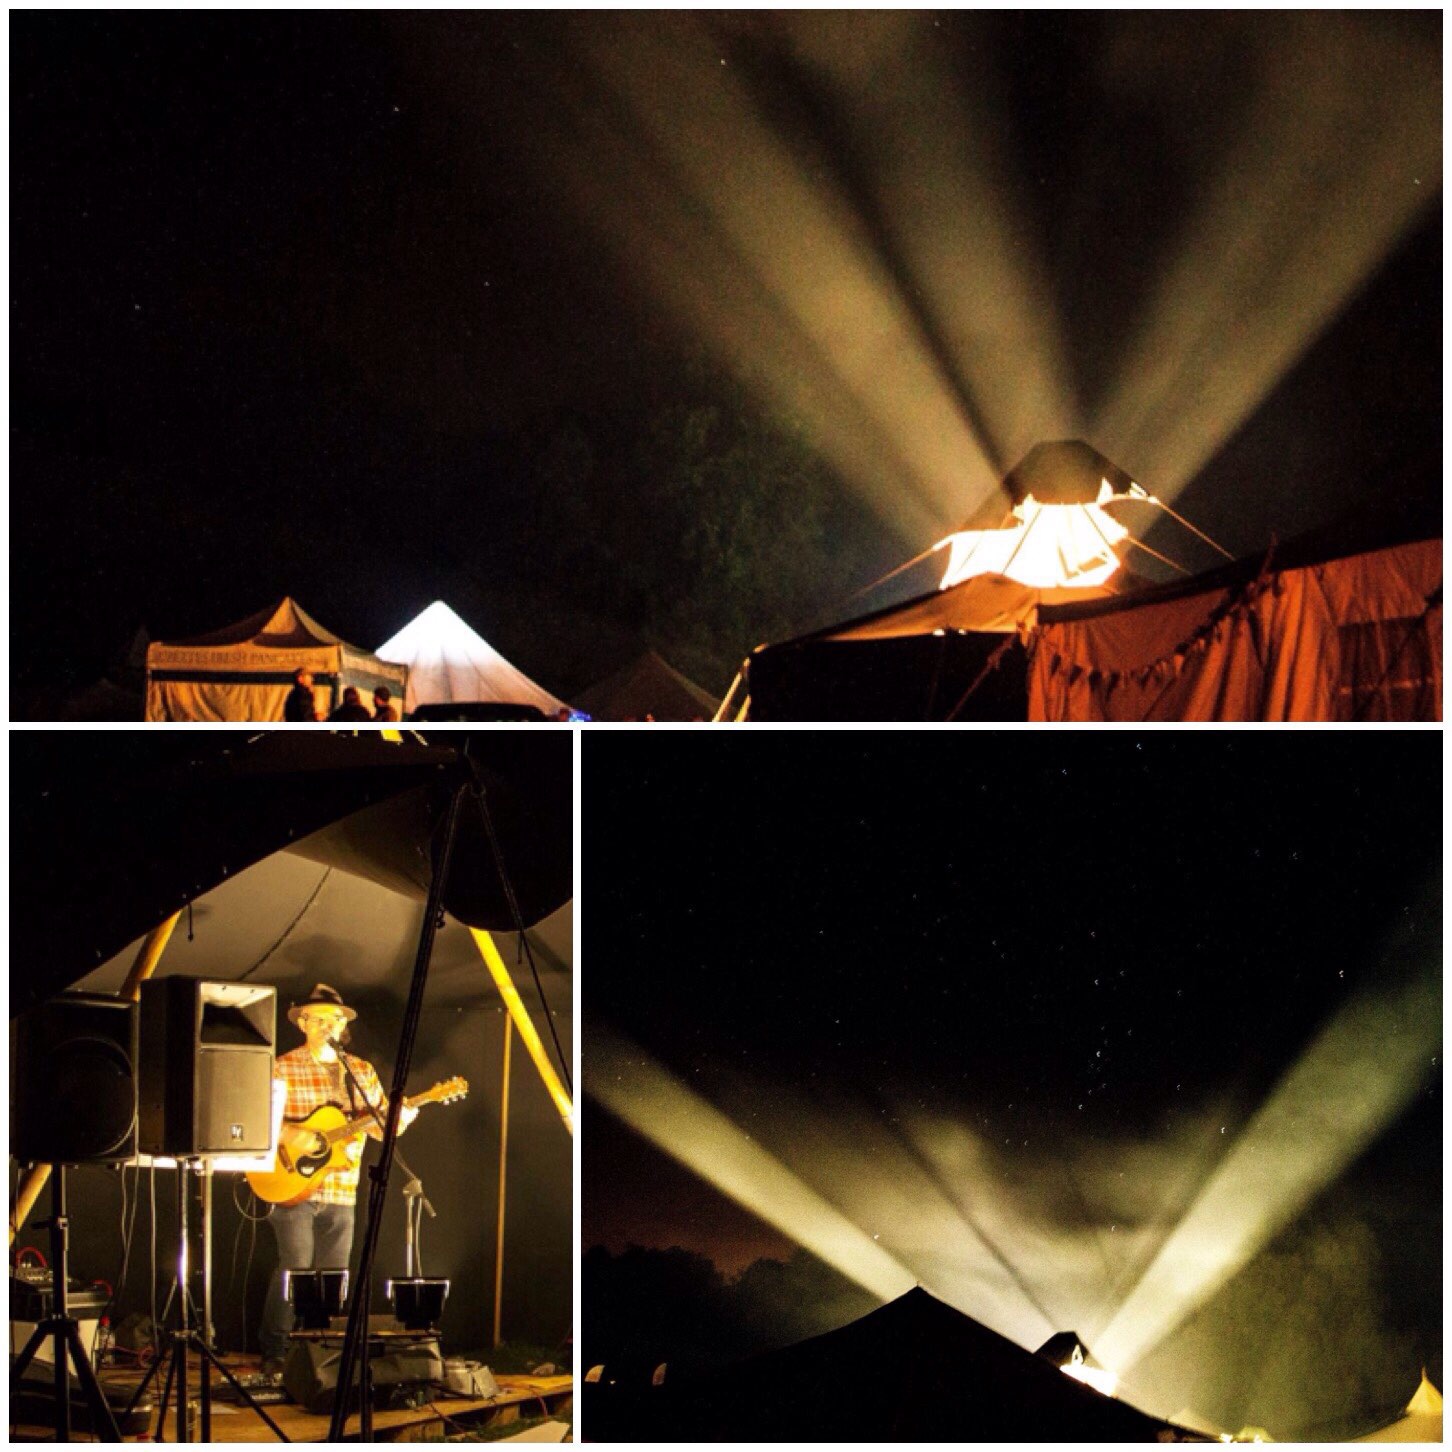
The Friday for me was a relaxed affair setting up my tent and catching up with old friends. That evening found us all relaxing to the music and light show from the band area.
Great evenings
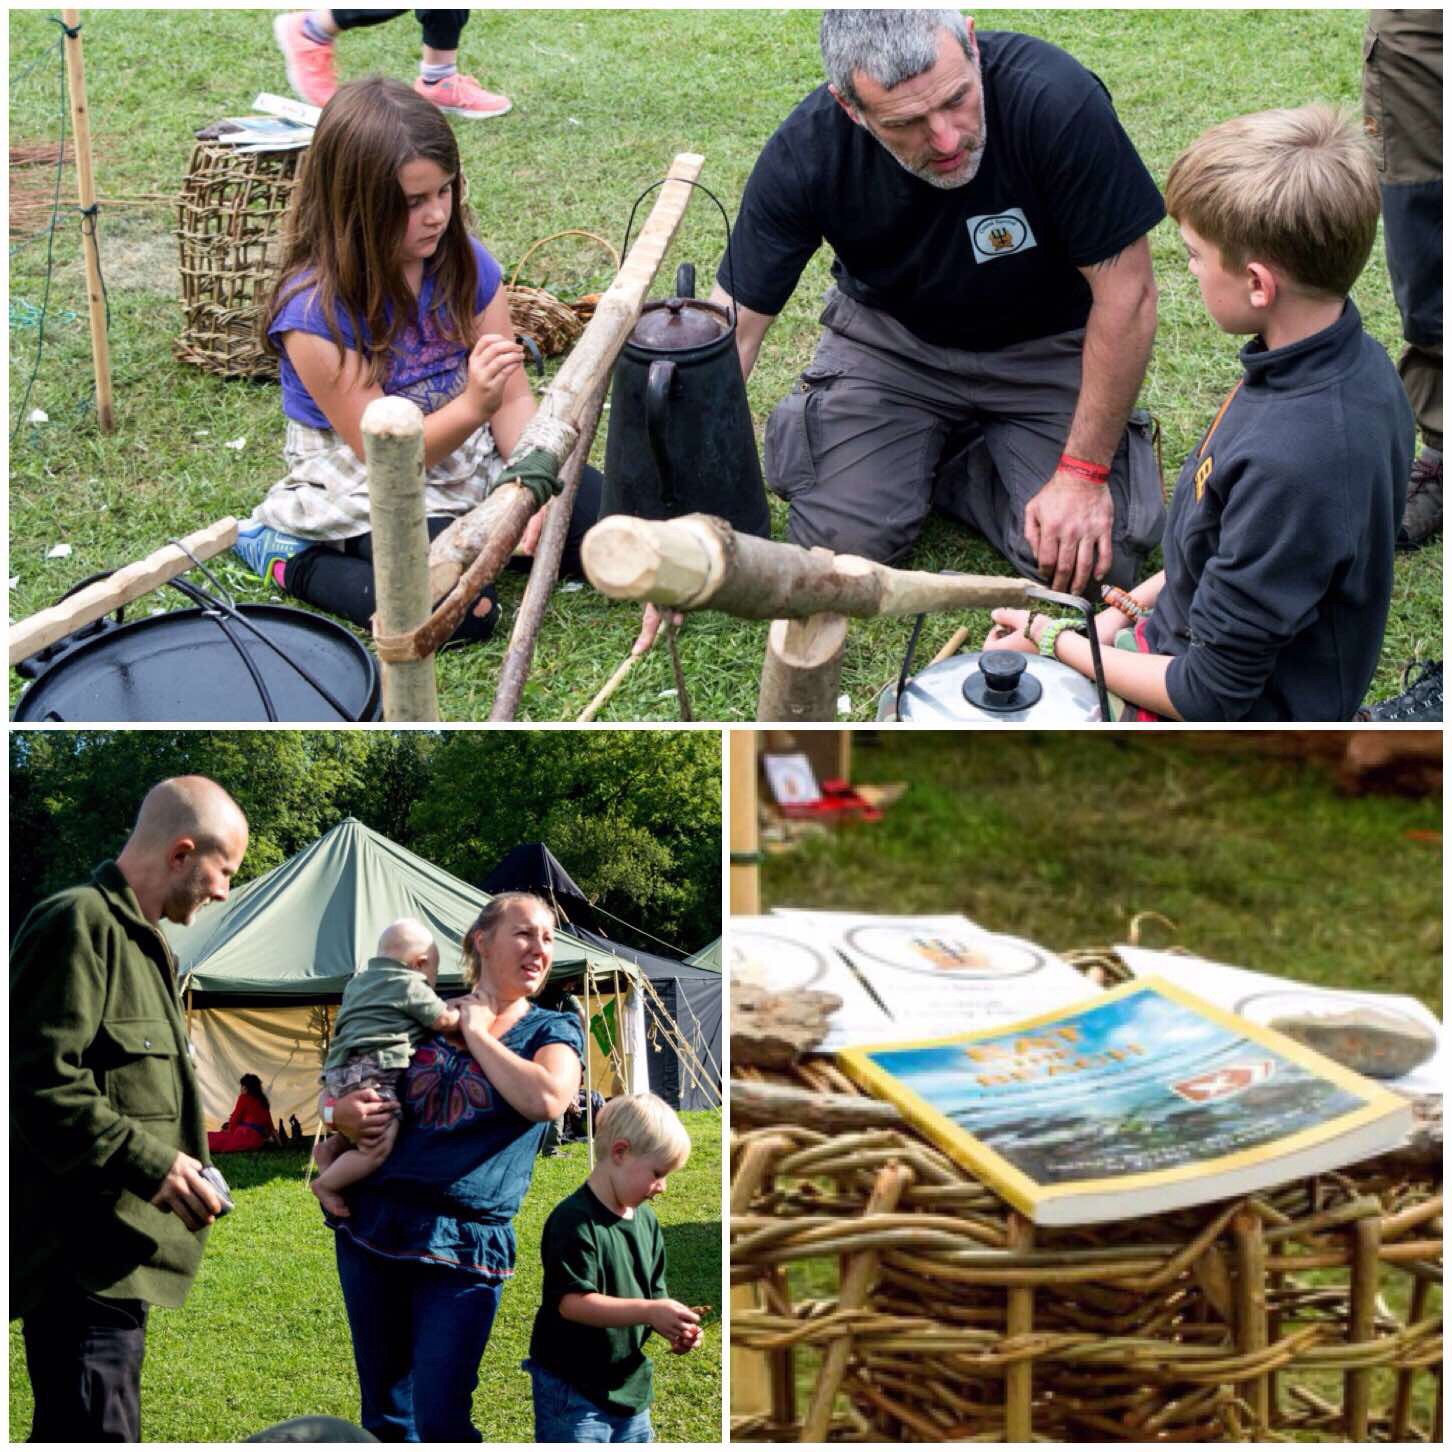
Throughout the whole weekend we would spend time weaving a willow trap for catching crabs and lobsters. This was harder than it looked and I must admit that Danny did the majority of the weaving.
Lots of craft
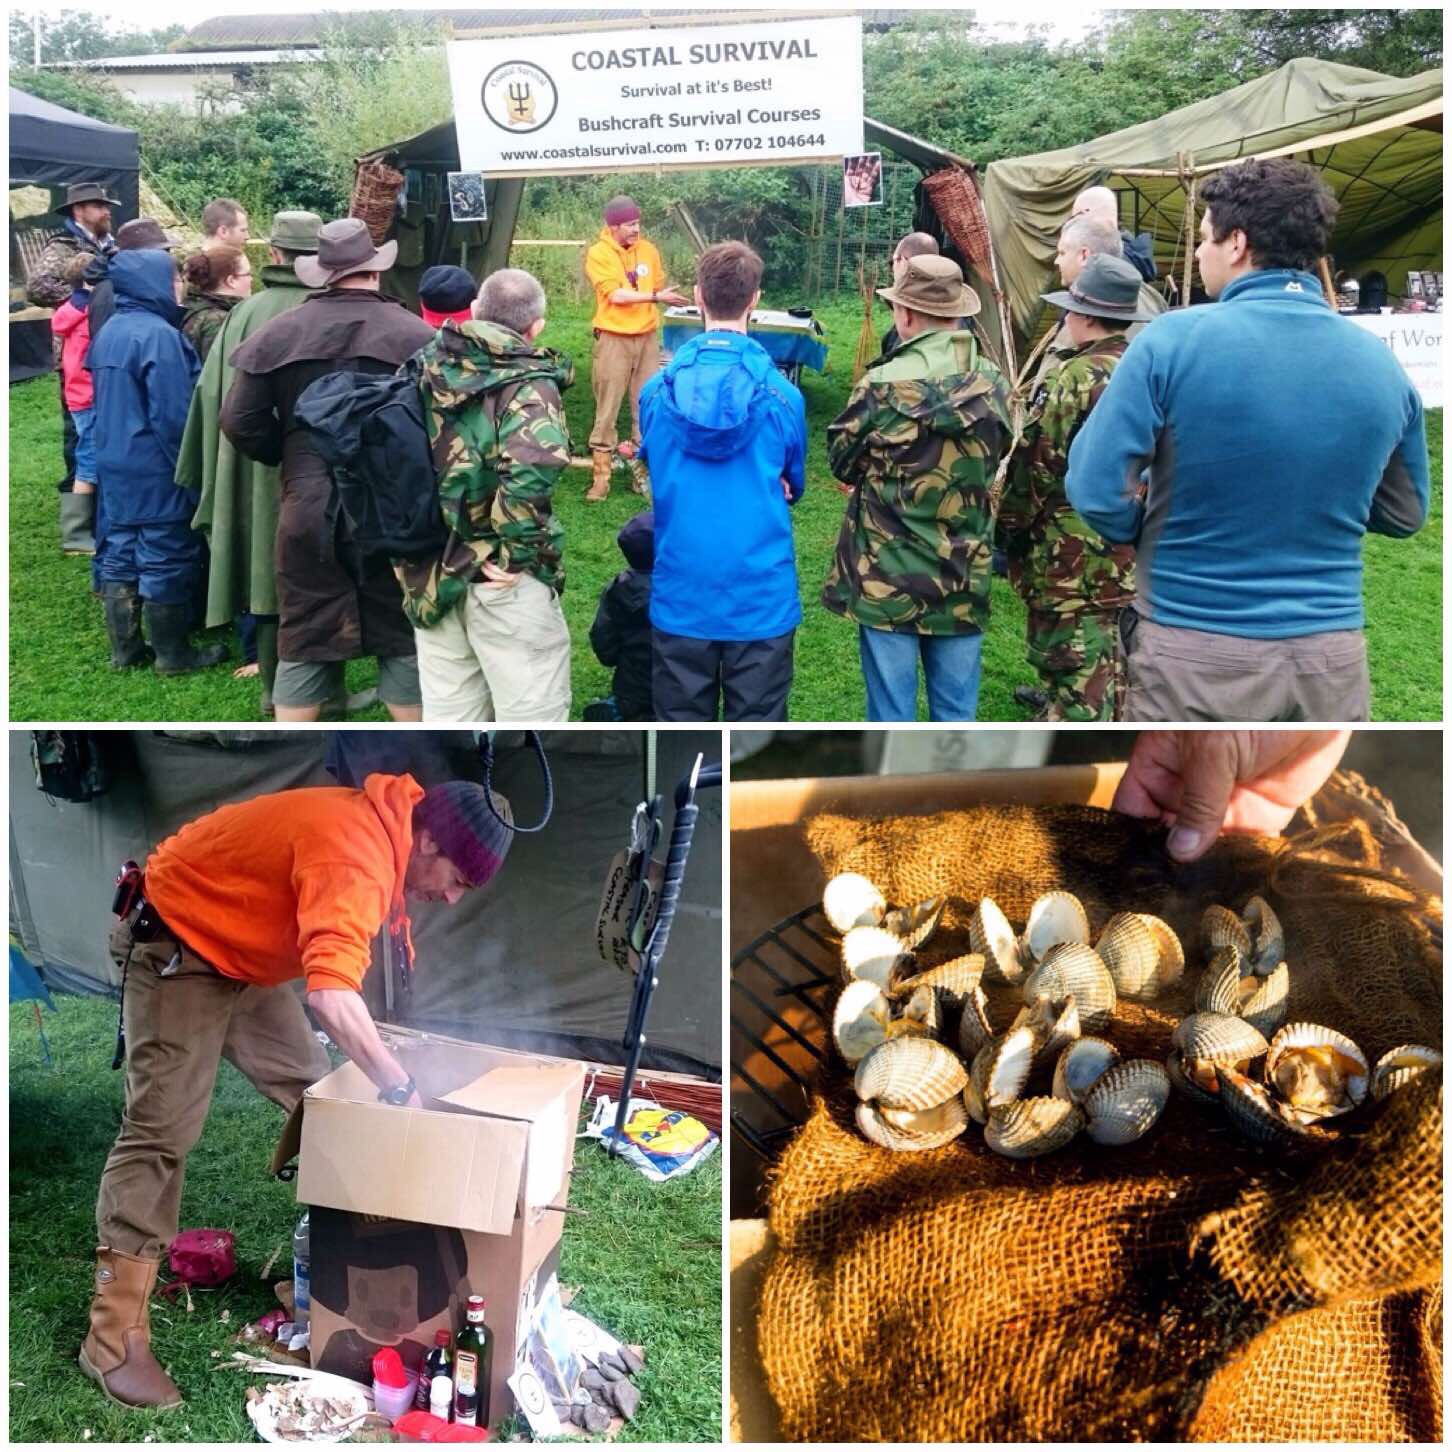
Last year Fraser had a cold smoker set up on his stand and this year he decided on setting up a hot smoker made out of a cardboard box.
It is called a hot smoker as the small smudge fire that generates the smoke is inside the box as opposed to the cold smoker that has the smudge fire located outside of the box.
Hot smoking
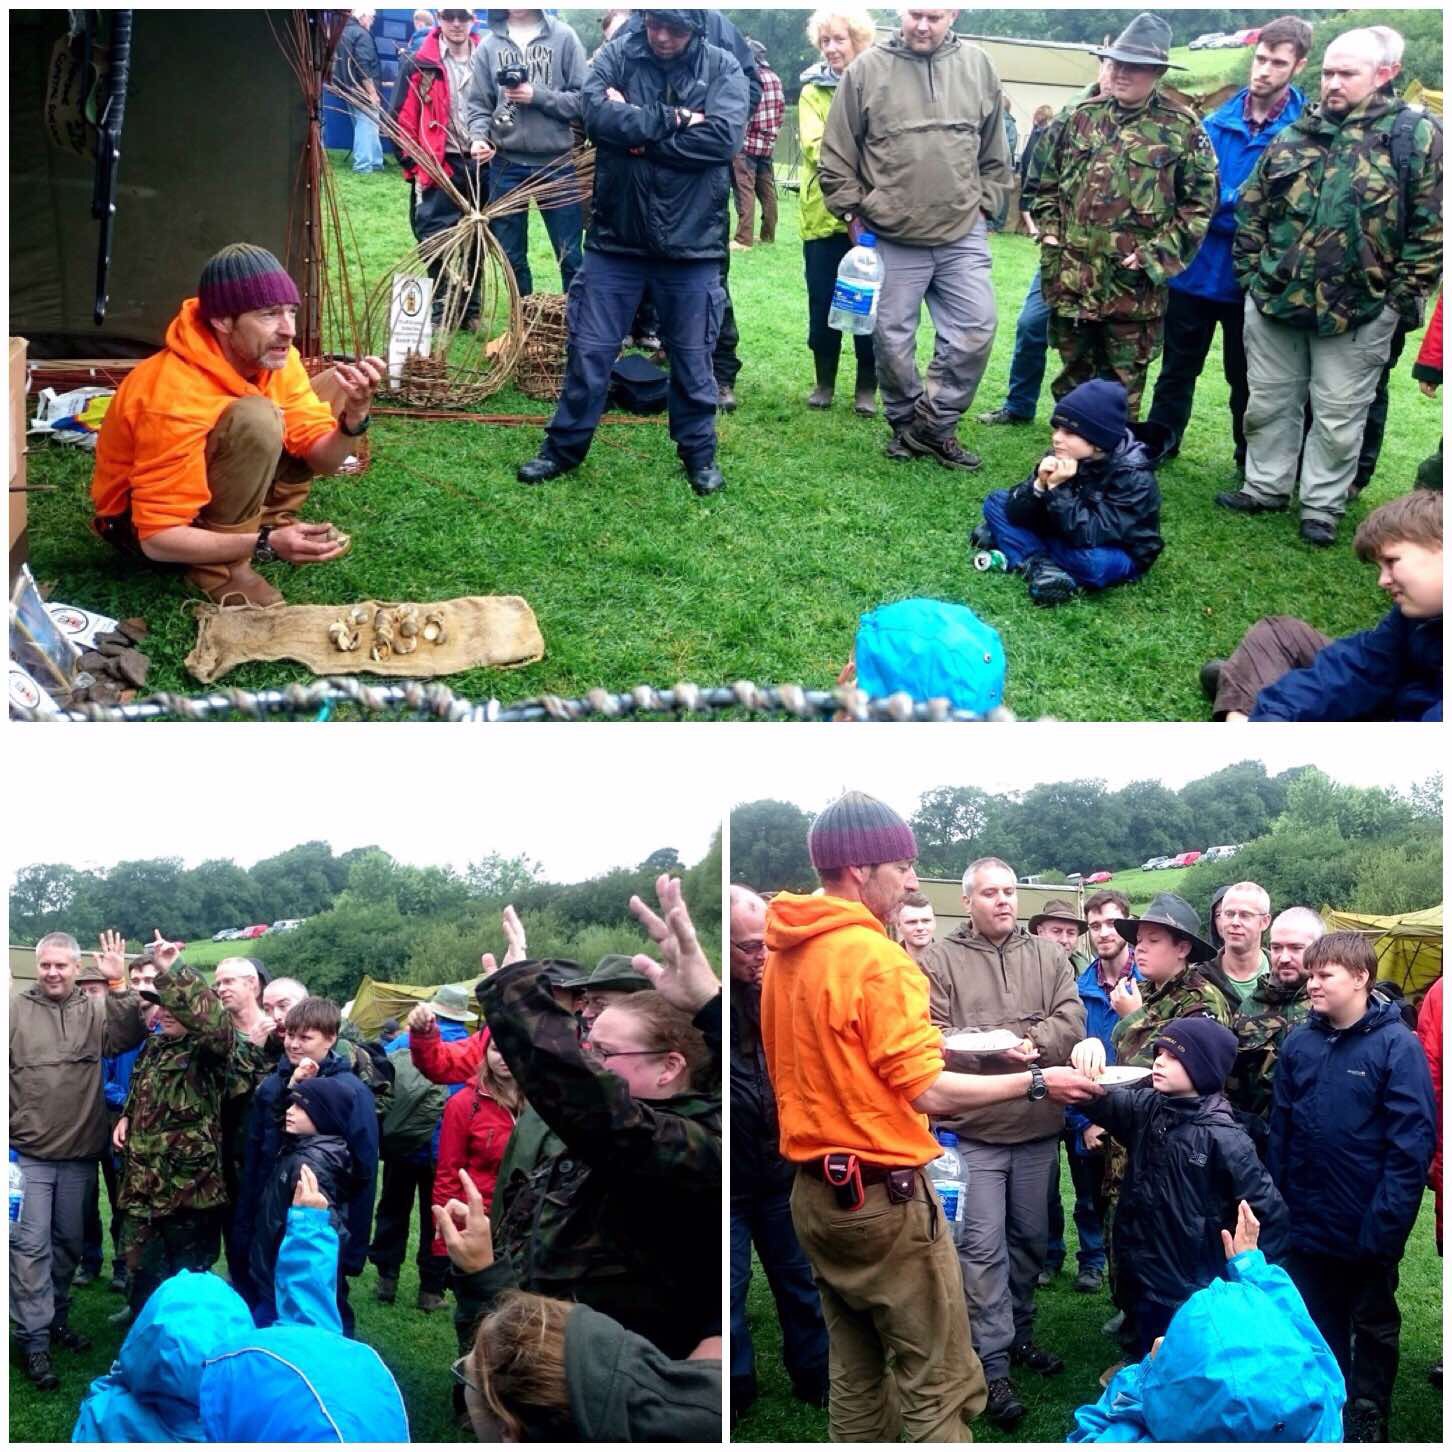
Due to an algal bloom along the Sputh West coast of the UK we could not get fish for smoking however Fraser did get some delicious cockles from Scotland that he smoked. After smoking the cockles Fraser explained how he further preserved them using either oils or vinegar.
The class he ran from the stand was well attended and I did not manage to get a taste of the cockles before they were all eaten by an appreciative audience.
Tasty treats
Being the Coastal Survival stand we spent time demonstrating net making and Fraser managed to get himself filmed by what looked like a very professional looking film maker. I do not know who he was but he did look the part and Fraser being a bit of an extrovert loved it.
A busy stand
The whole weekend was very busy however I did manage to get out and see the rest of the Gathering a few times.
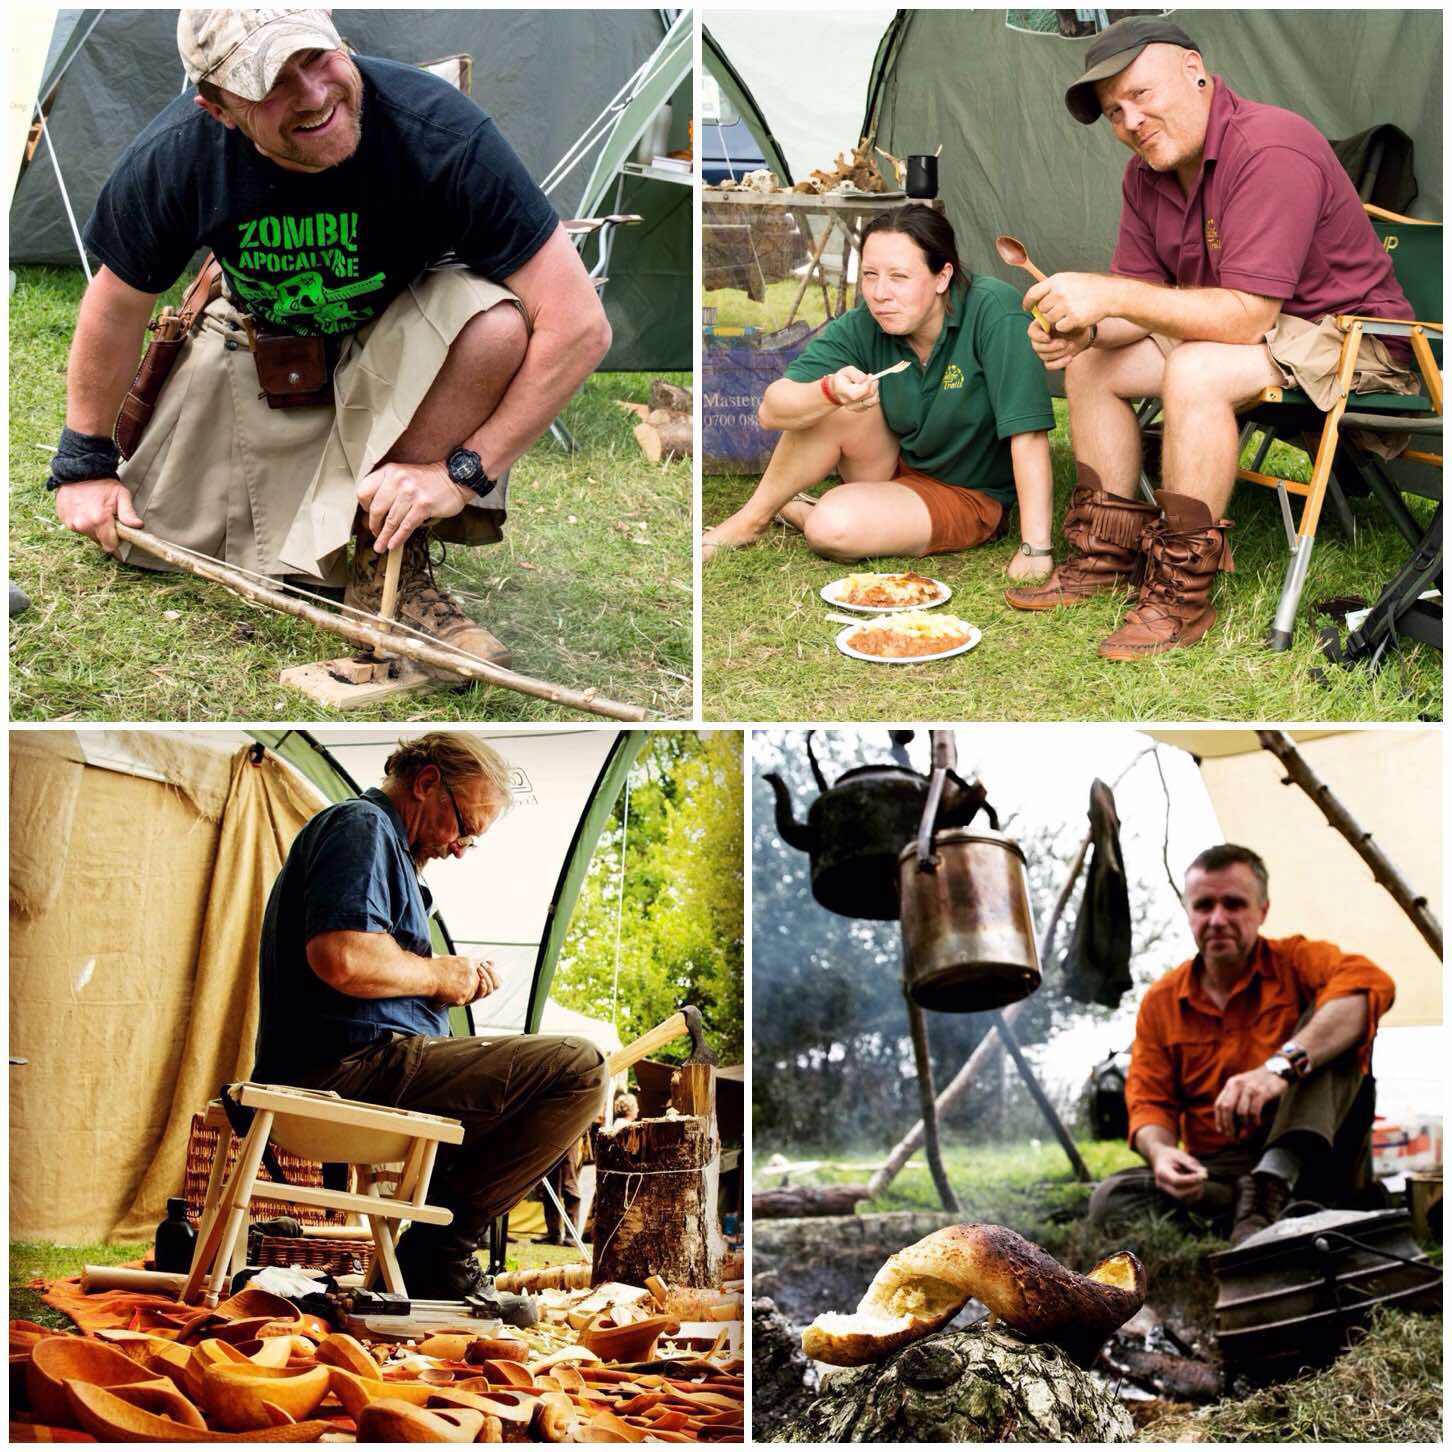
Across from us I found Jason demonstrating his bow drill skills and getting the kids to join in with him. It was also great to catch up with Pablo, JP, Hannah and Richard from the Woodlife Trails team across the way from our stand.
I had a great chat with Jon Mac (of Spooncarvingfirsteps fame) and was really chuffed to be allowed to handle many of the new knives he and Chris Grant are jointly working on. Jon has since gotten married since I spoke with him to Sarah so I want to extend my congratulations to them both now.
While I was on the stand my friend David Willis asked if I could take some pictures of his baking class. David had a busy time demonstrating and teaching folk to bake bread over an open fire. The good thing about being his photographer was that I got to test all the bread.
Friends
Saturday night was another night of great music and catching up with friends and the light show was again very impressive.
Great music
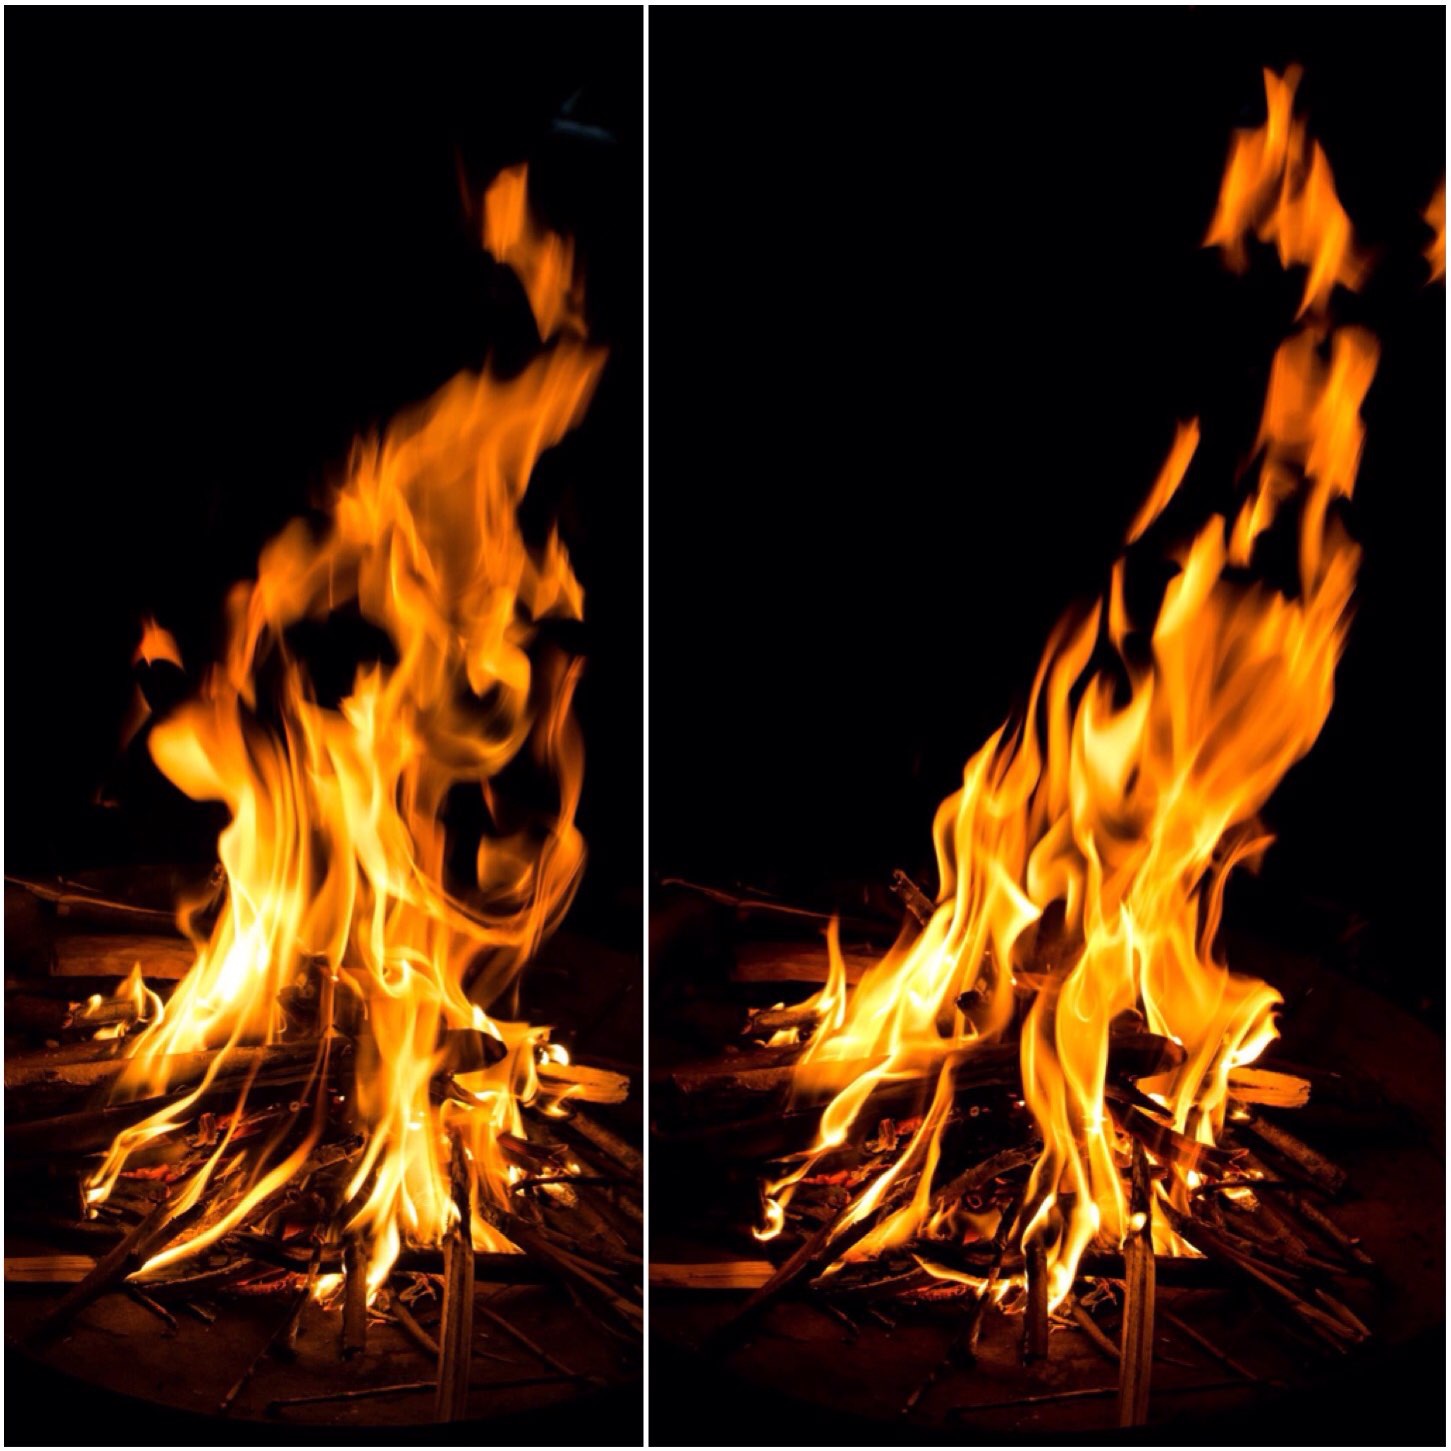
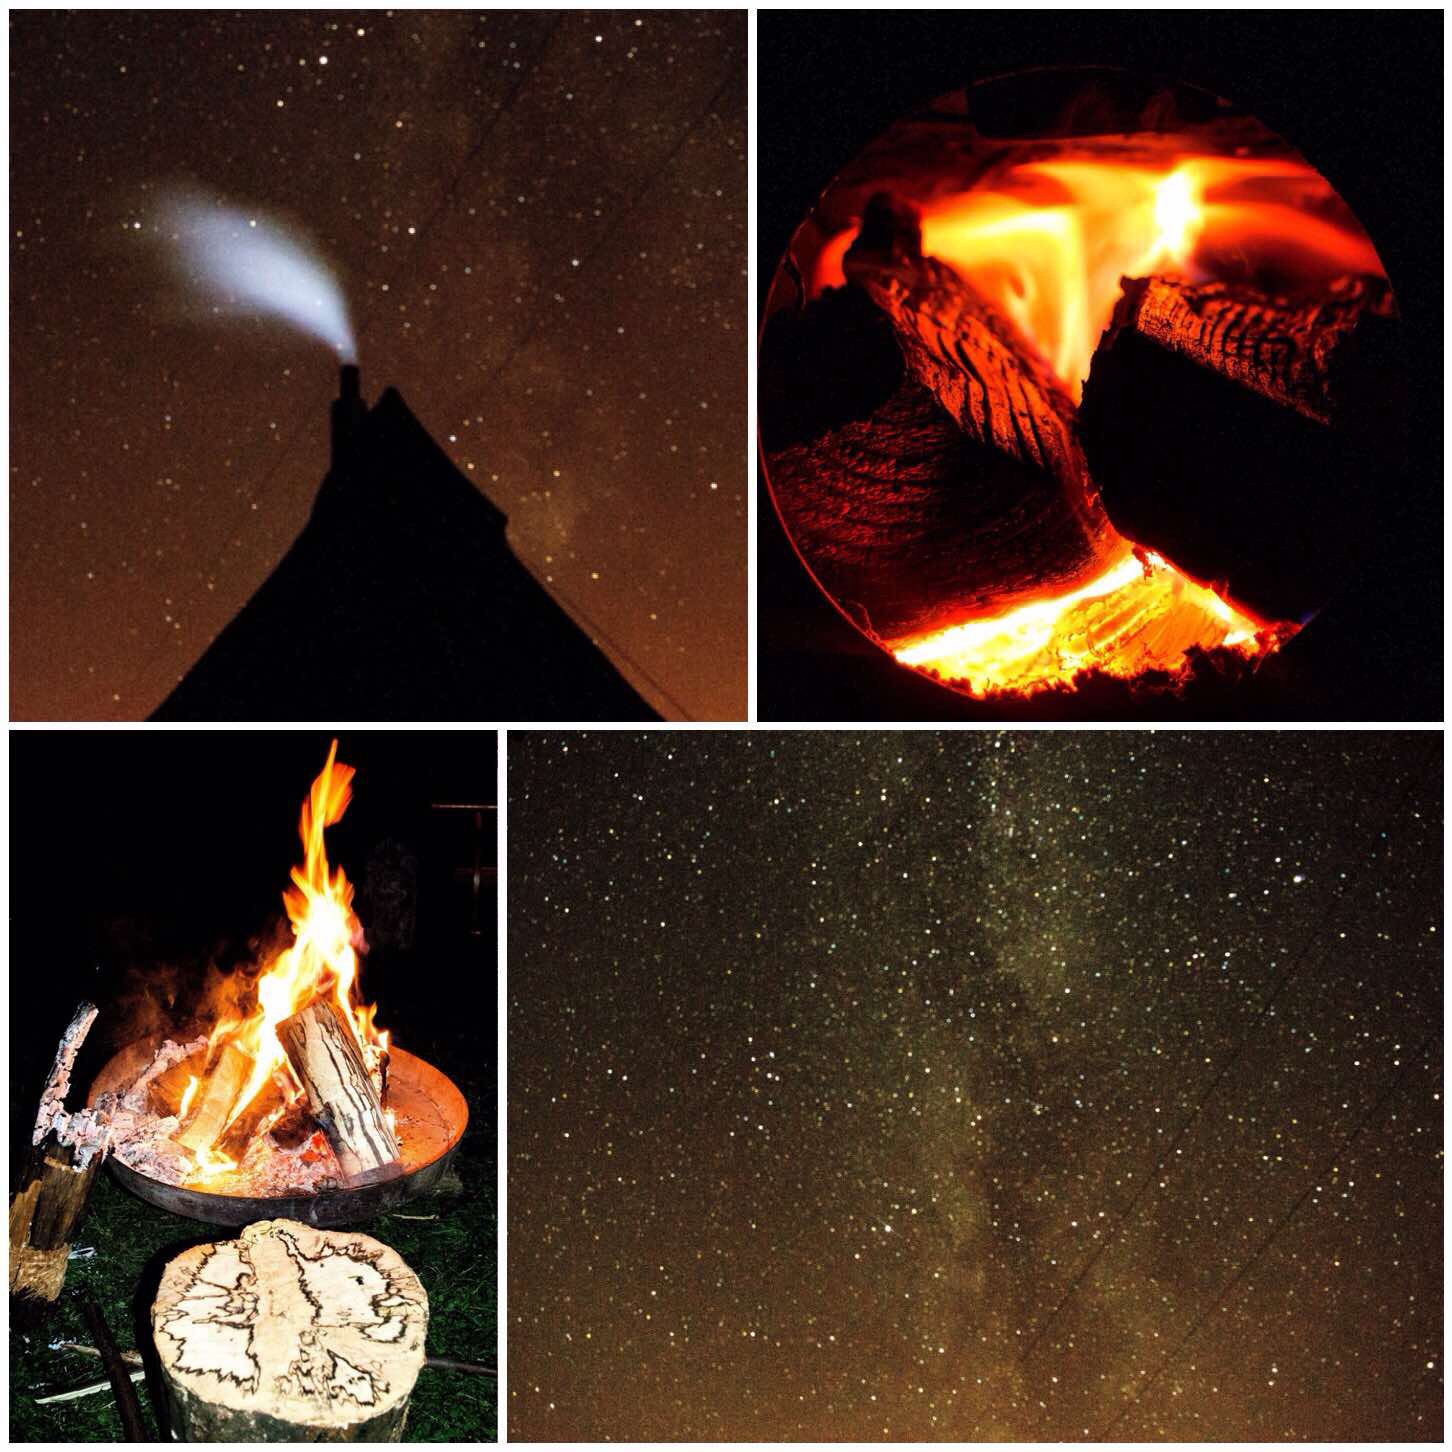
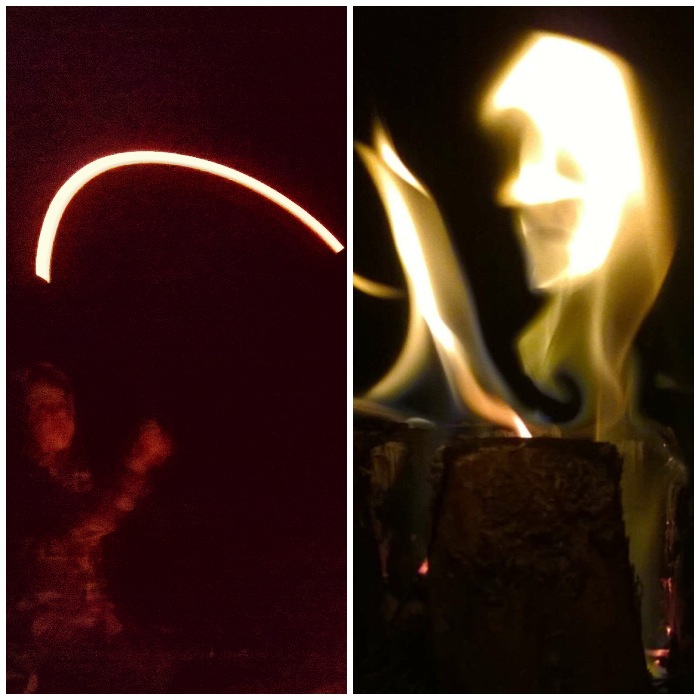
I spent quite a bit of time taking many pictures of the flames of our fire and was rewarded with these cracking Fire Faces. I can see one howler in the left hand picture and at least three faces in the right hand picture.
How many can you see?
Fire Faces – How many can you see?
Later that evening I spent some time with Martin Burkinshaw learning the art of low light level photography. Martin gave me some great tips and let me try out his tripod to capture the picture of the Milky Way you can see below.
Lowlight photography
Sunday found me catching up with our friends Rich and Dave. Rich had recently broken his wrist however that did not stop him getting out and about, though he did take a bit of flak for his nice new black armband.
Lots of net making
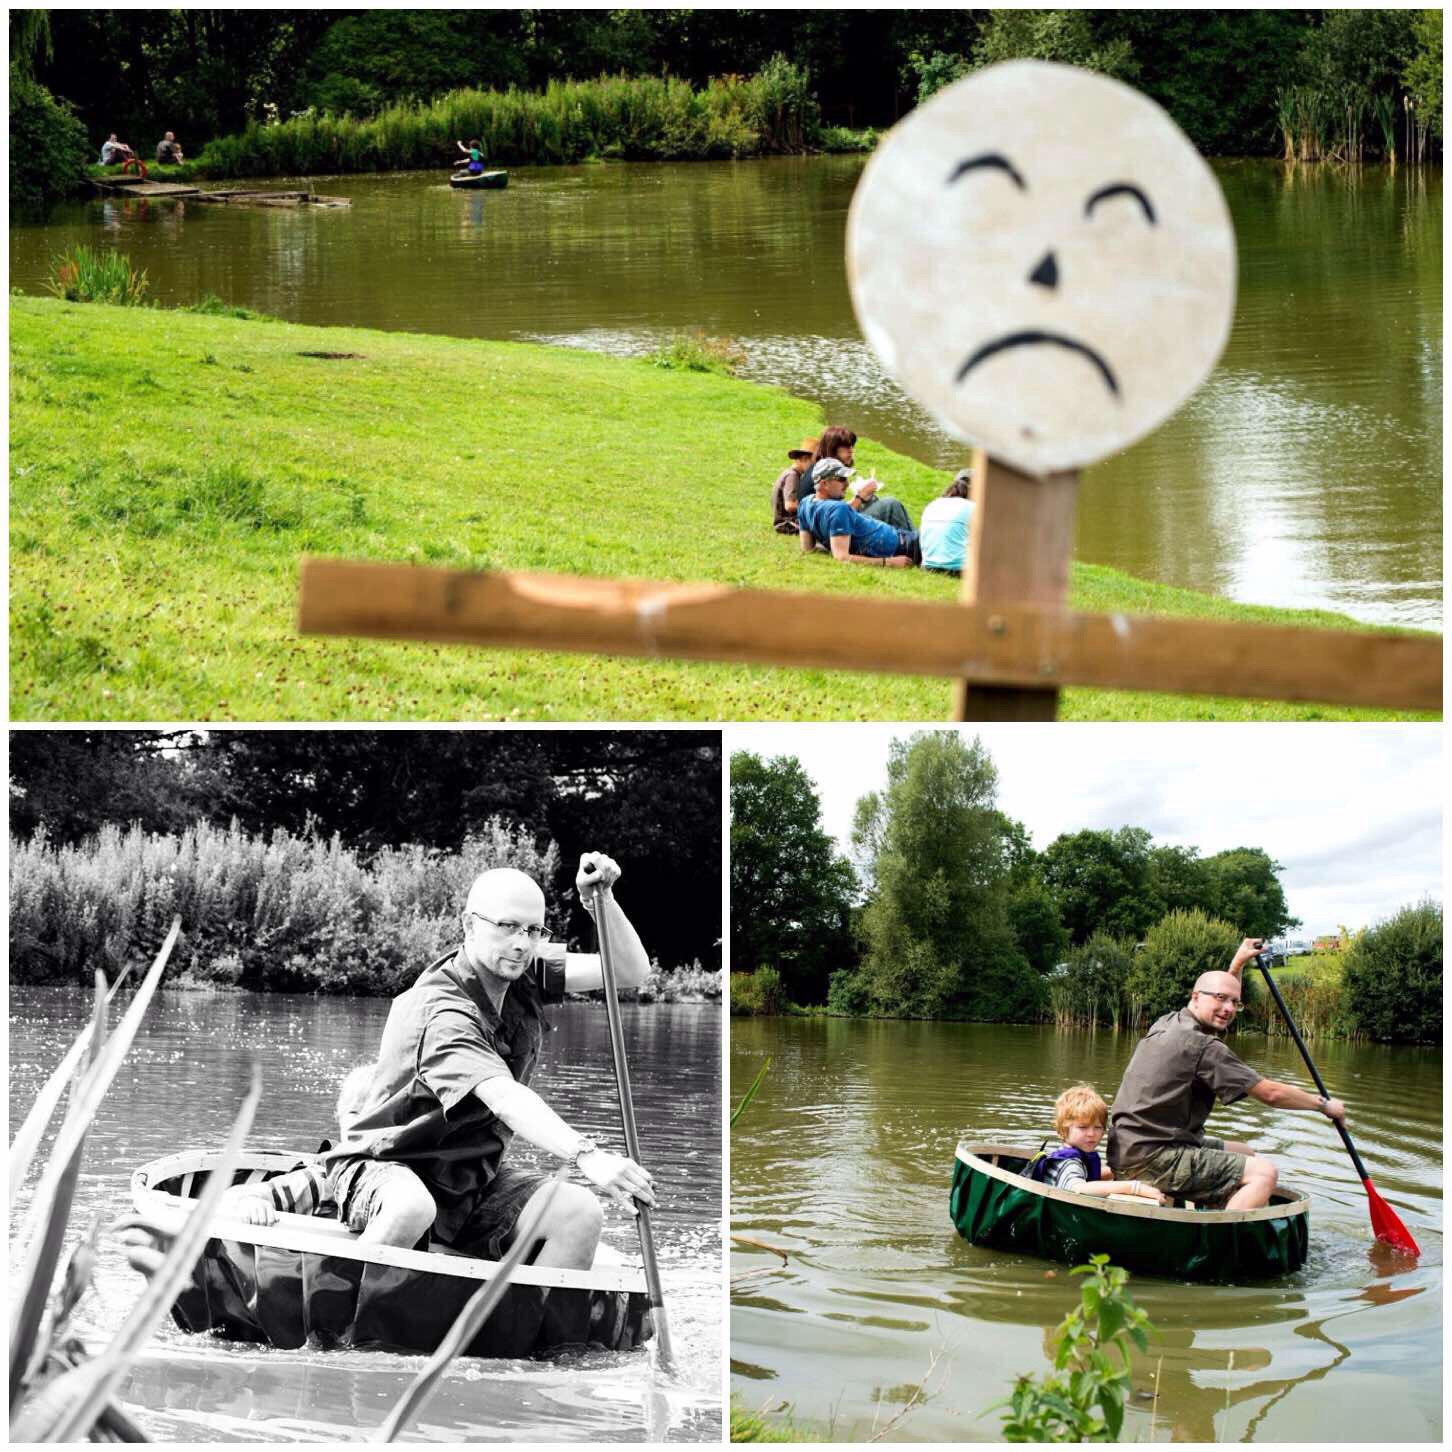
I spotted some movement on the lake on the Sunday afternoon and managed to get these great snaps of this father and son combo out for a cruise on their newly crafted coracle.
Caravel spotting
I did not get out to see as much of the Gathering as I did last year when I managed to film much of it however I had a great time teaching lots of kids how to make fishing spears and chatting with our neighbours Sonni and Angela.
This year has also been a good year for Fraser’s book Eat the Beach as we managed to sell quite a few copies for him over the weekend.
Keeping busy
To finish up we got given a lovely Lemon Drizzle cake for free by the kitchen staff at the Gathering and somehow it ended up as a birthday cake for our own Stephen Herries. I have no idea how old he is but he was happy anyway :-).
Birthday treat
Another year over for the Wilderness Gathering however I hope it is nowhere near my last one.
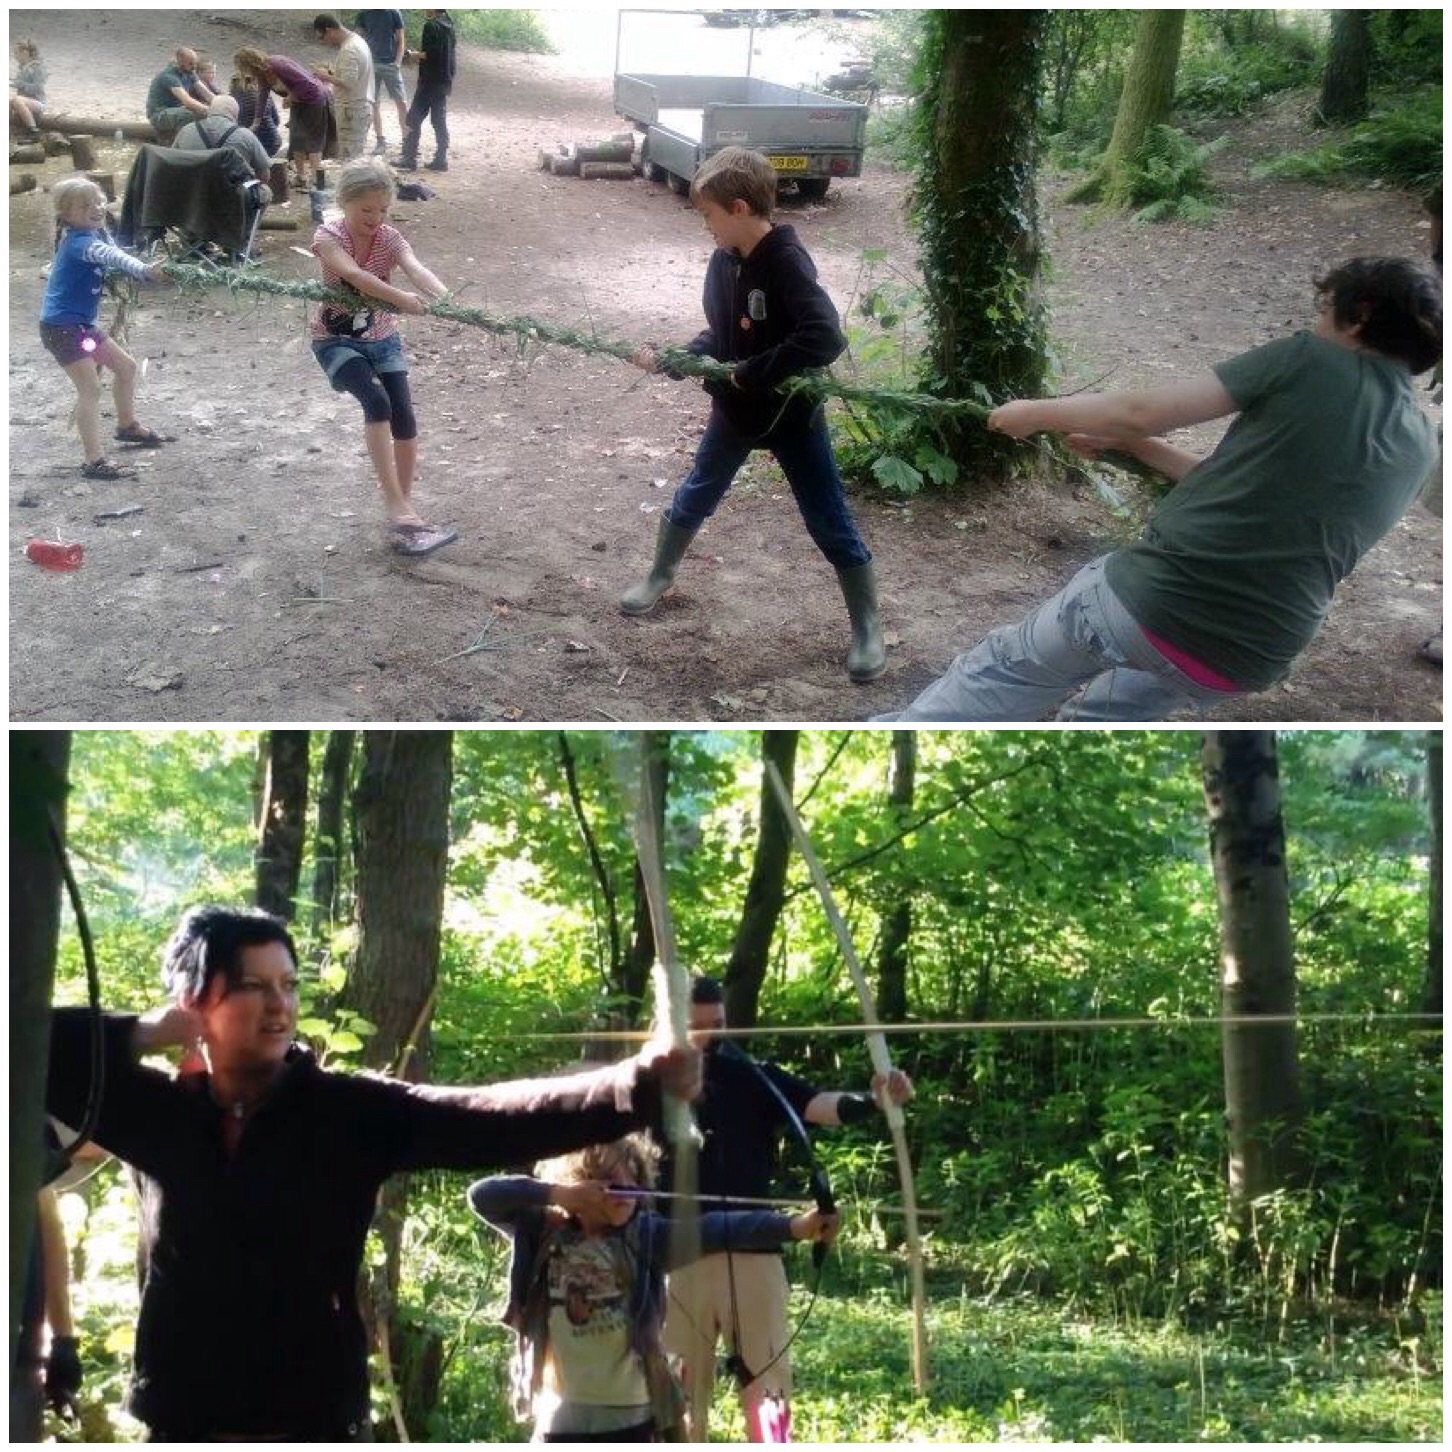
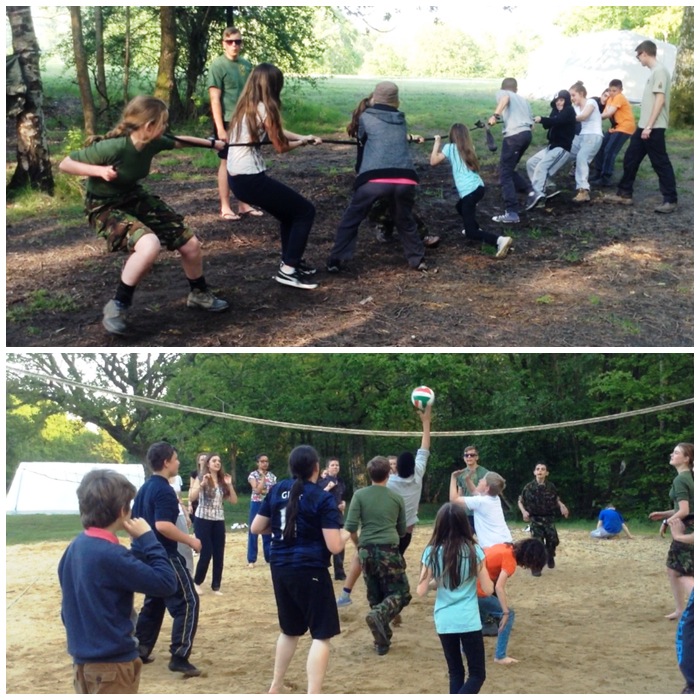
The BCUK Bushmoot is about sharing knowledge however one thing it does bring out in me is my competitive spirit. That may be through making a tug of war rope out of grass through to the serious competitiveness of the archery range.
Competition time
This sharing of knowledge may come about in many ways such as workshops, one to one sessions, presentations and competitions. This post is focussed on the many competitive activities we undertake over the two weeks of the Bushmoot.
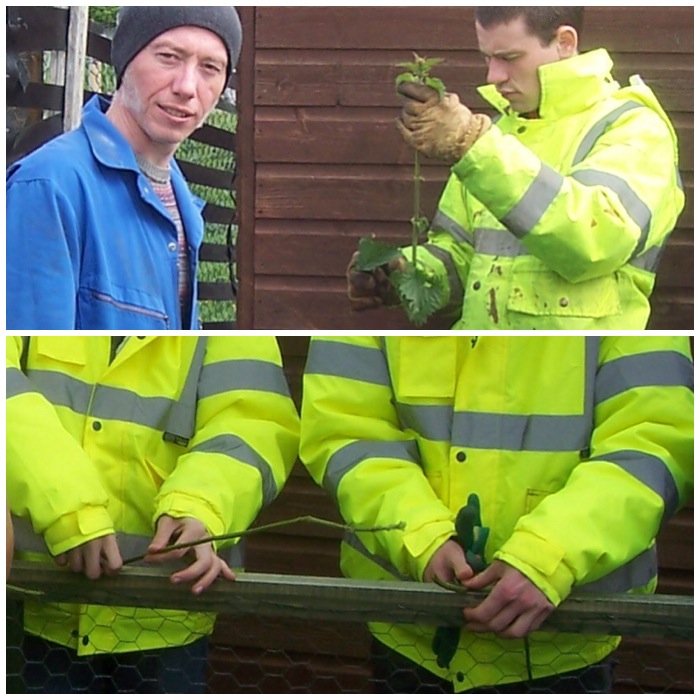
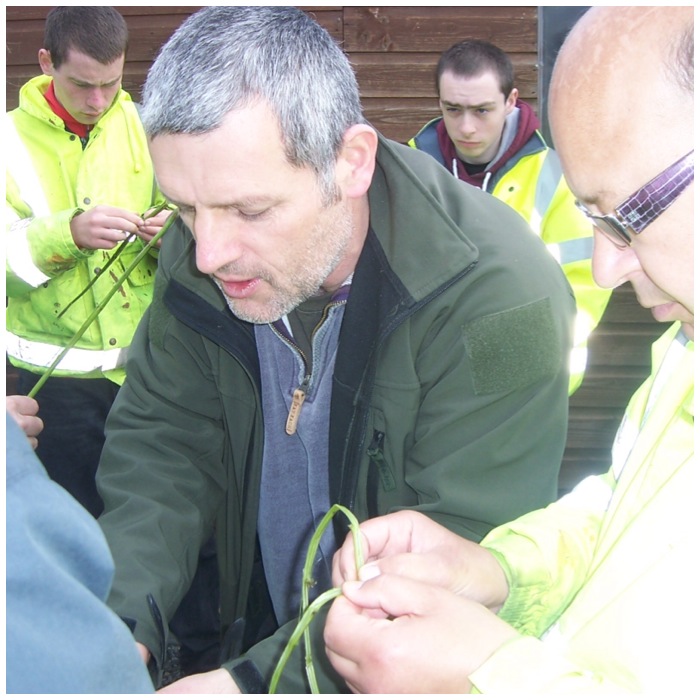
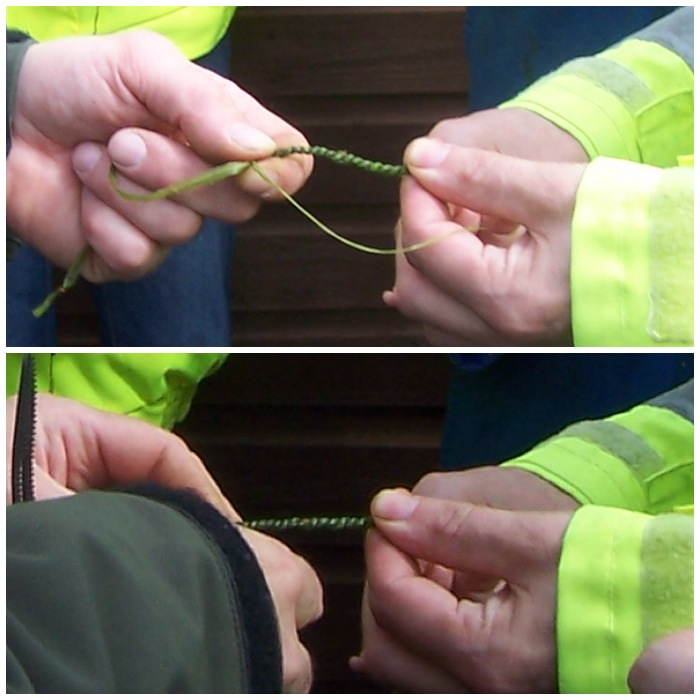
The first picture I shared was of the grass tug of war we undertook under the watchful eye of Perry McGee from the National Tracking School. Perry showed us how to quickly gather grass, twist it, create rope and most importantly how to have fun with what we created.
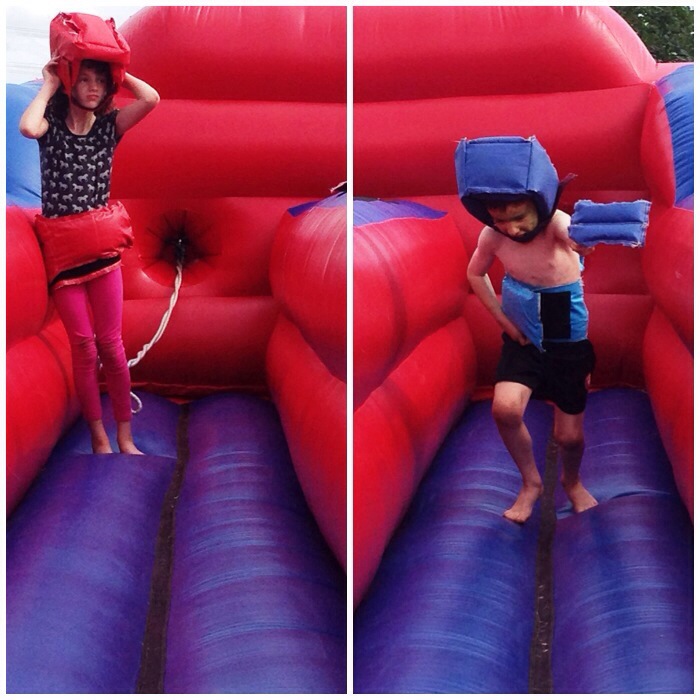
Catapult
One of the activities that attracted participants from all age ranges was the catapult. The catapult is a tool for all ages I think – sometimes we were aiming for accuracy and sometimes aiming just for the fun of it 🙂
Cattie time
The Sling
My friend David Colter has introduced the sling and in particular the Balearic style of sling. The throwers all made their own slings from string and leather and it attracted participants of all age groups.
David has run classes on this for a number of years and he had a great time running a competition on the sand dunes this year. The sling throws the projectile at very high speed so I think they used tennis balls for safety’s sake.
Next year David is making this official by running the Balearic slinging world championship event at the Bushmoot.
The Slingshot
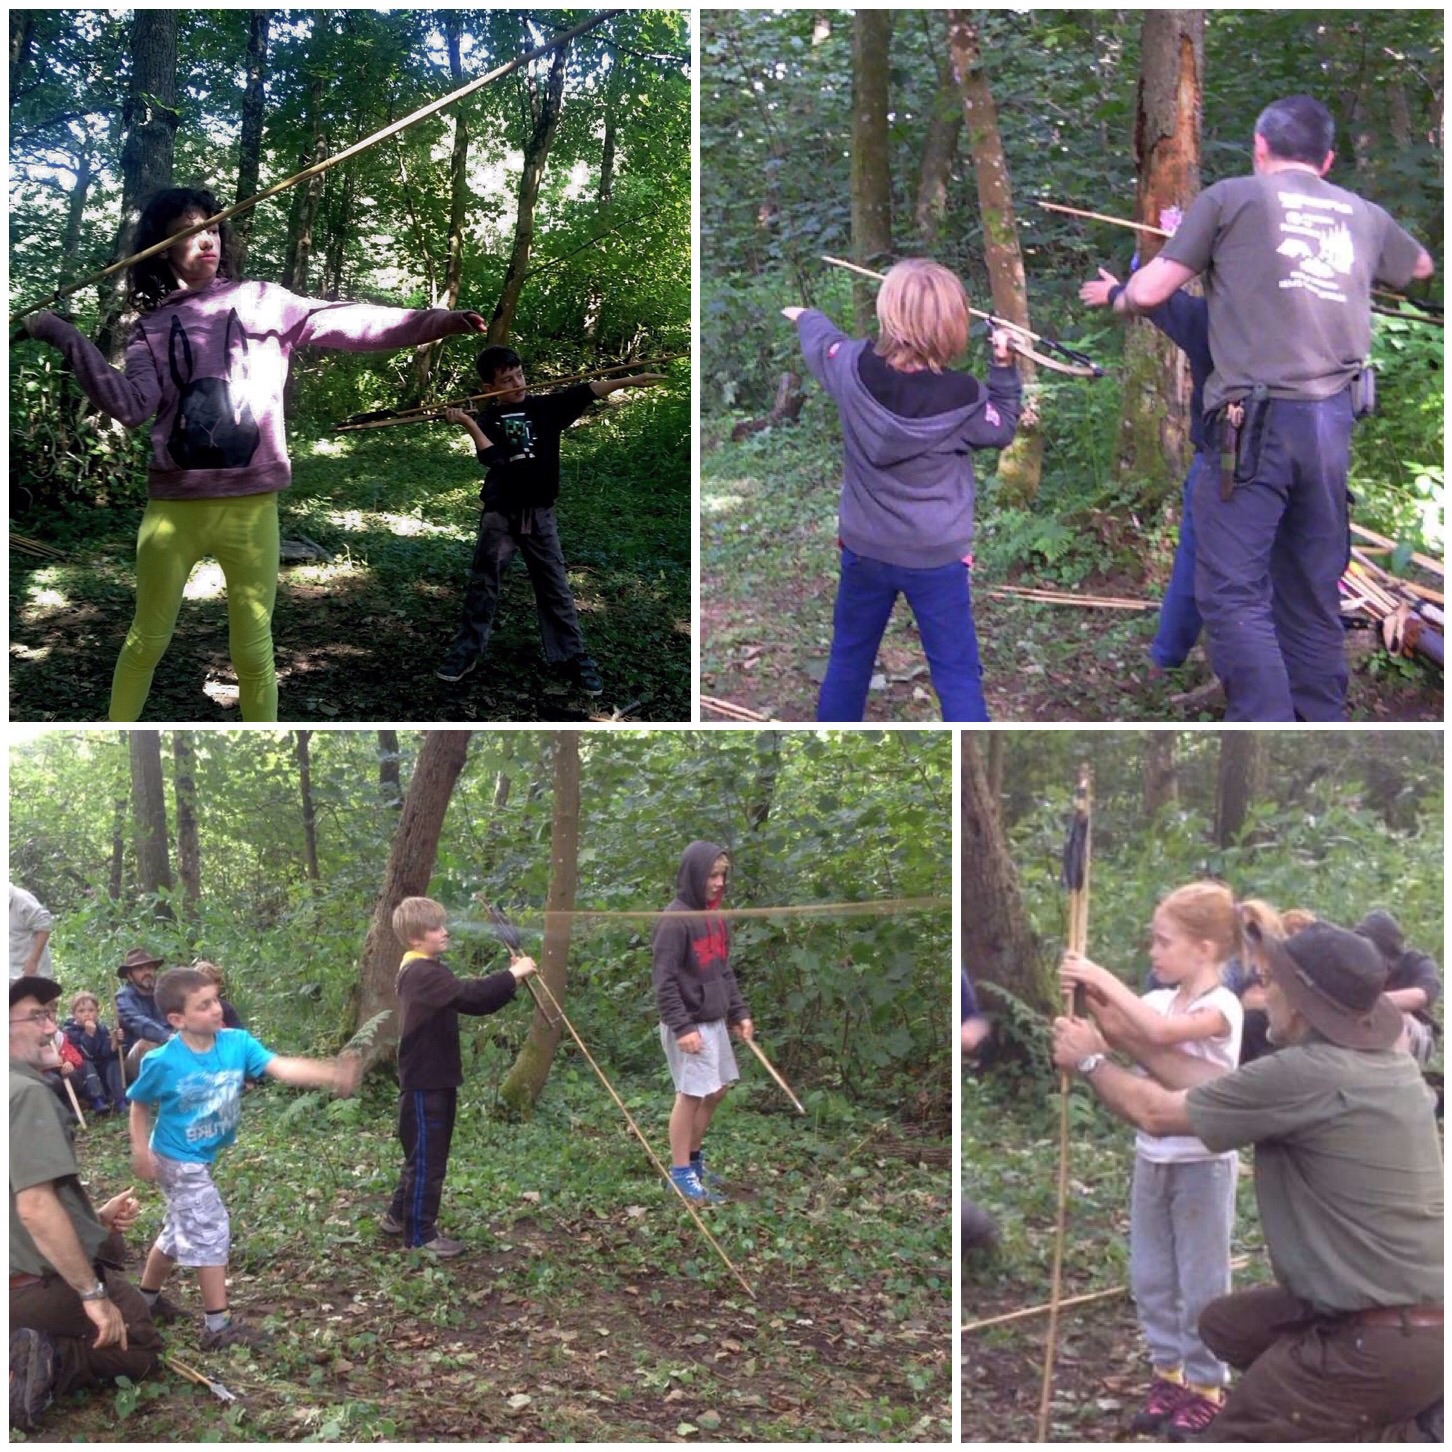
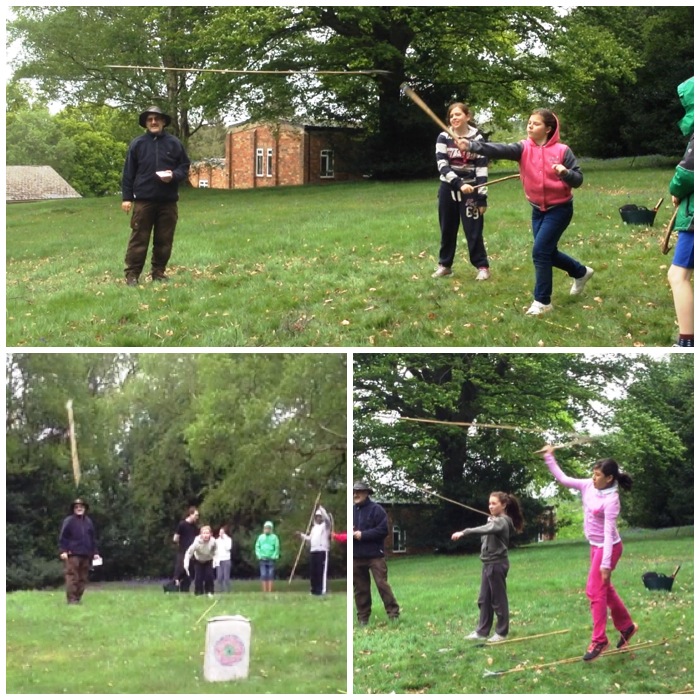
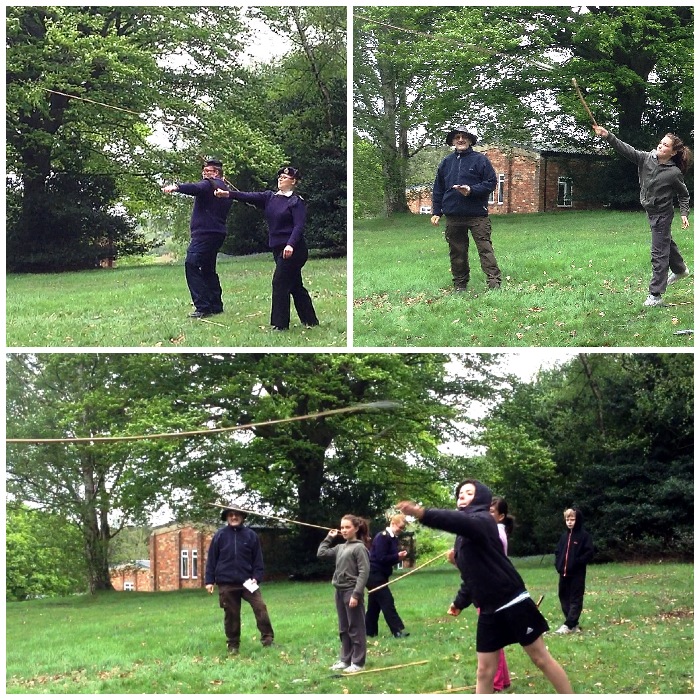
Atlatl
One of my favourite events is the Atlatl. This again is a very ancient art and was (and still is in certain parts of the world) used as a hunting tool.
I have lots of different types of Atlatl throwers and darts however I use unsharpened bamboo canes for training. I use Atlatl throwers with rest attachments for the kids to use (they can be difficult to hold) and spend many an hour with my friend Charlie Brookes on the range teaching them to throw.
This is a particularly popular activity for kids of all ages (most adults at the Bushmoot come under this category as well) as the appeal of throwing Atlatl darts down range can be quite addictive.
The Atlatl
Axe/Spade throwing
We run an axe and spade throwing range as well ( more difficult than it looks) and it provokes stiff competition. I have not done this to any great degree (though I hope to throw more next year) but it does make for great viewing and photography.
I noticed the guys were throwing next to Cap’n Badger’s white tarp and positioned myself to try and capture the axes and spades in flight. Needles to say I had my lens well zoomed in and the shutter speed really fast.
Axe/Spade throwing
I think Cap’n Badger was trying to tell me here what he thought of Phil’s throwing technique 😉
Cap’n Badger
Archery
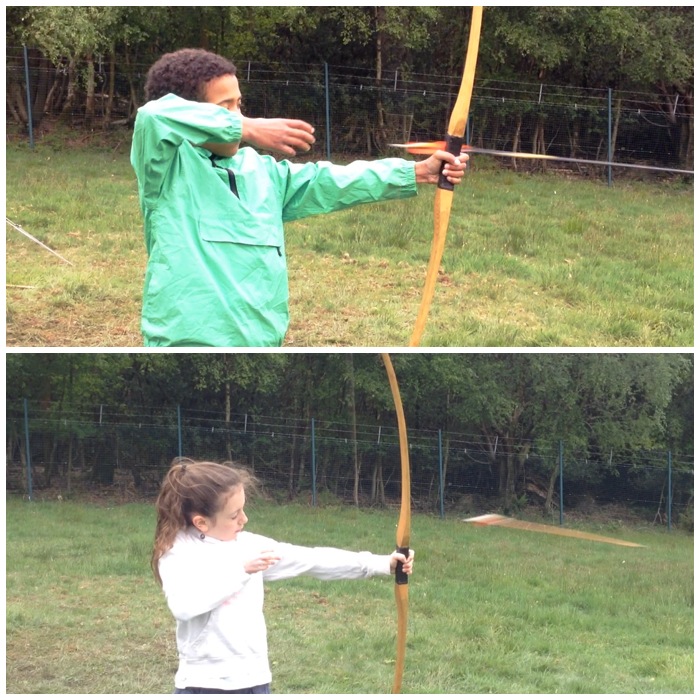
Each year we (that is usually Cap’n Badger, Paul Pomfrey and myself) run the archery range for an hour or two in the evening. This allows anyone who wants time to get in a bit of practice.
We run lots of classes for the kids offering tuition or time for parents to teach their own kids. For many who come to the Bushmoot this is the first time they have ever shot a bow.
Many of the bows are made on site including the Bhutenese bows (with Wayne Jones) and the Father and Son bows by Chris Pryke (I used to make these at the Bushmoot as well).
Little ones archery
The archery range is situated well away from the main camping area in the centre of a beautiful copse. The range is managed well by a core team and there is plenty of time to practise before the competition.
We have a competition for the kids and one for the adults. Everyone who enters brings a present along and we also have prizes donated by others so the so the spirit of competitiveness can be quite fierce.
Big ones archery
Usually we have three rounds of shots at different distances and the judges make sure everything is tallied up correctly.
Keeping an eye on things
The award ceremony is always great fun (especially as the scores are read out) and everyone walks away with at least one prize.
As the years have gone by and the competition has become a normal part of the Bushmoot many people look forward to this event so that they can walk away as champion.
Prizes
The Bushmoot is a great place to learn however it is also a great place to come and test yourself against others, be that making grass rope the quickest through to being crowned archery champ for 2016 – who knows it could be you 🙂
The Bushmoot(referred to generally as the Moot) is an annual event here in the UK and for many years now has taken place at Merthyr Mawr in South Wales. The name Bushmoot comes from the word Bushcraft (as popularised by Richard Graves and Mors Kochanski) and the Saxon word Moot (used to describe a gathering of people).
I like the Moot as it is a gathering of like-minded people with a multitude of skills to share with each other. Not only can kids run free and have fun but so can the adults and I am a firm believer in learning through fun .
Fun learning
I am writing 10 blog posts on the Moot this year and this first one is on the theme of Learning. I tried to write just one post however I really struggled to choose just a few pictures out of the many hundreds I took. My wife Alison suggested a number of short blog posts on different themes from the Moot and so here we are.
A couple of well-attended courses nowadays are the Startercourse (a full breakdown of the course can be seen here on the BCUK site) and the Spoon carving course run by Dean Allen. Alison and our kids did the spoon carving course this year with Dean and carved their very first spoons.
The basics
I managed to fit in a few courses this year and did a cracking traps course with Perry McGee.
The Moot is usually run over 2 weeks with a core 5 days in the middle where many short courses (2 hrs to 1 day) such as fire making, bow making, spoon carving, tarpology, knife safety, axe work, net making, cordage making, bread making, foraging, atlatl making and knotwork, to name just a few, are run.
There are other longer courses run either side of the core days (with an additional fee) such as an accredited First Aid course, Bhutenese bow making, coastal survival, tracking and lobster pot making with willow.
Fine detail
Many of the courses are based on using different materials, from basket making, pottery, sling making to learning about different knots.
I enjoyed running the ‘show and tell’ workshop on campfire cooking constructions and observing the father and son bows being made.
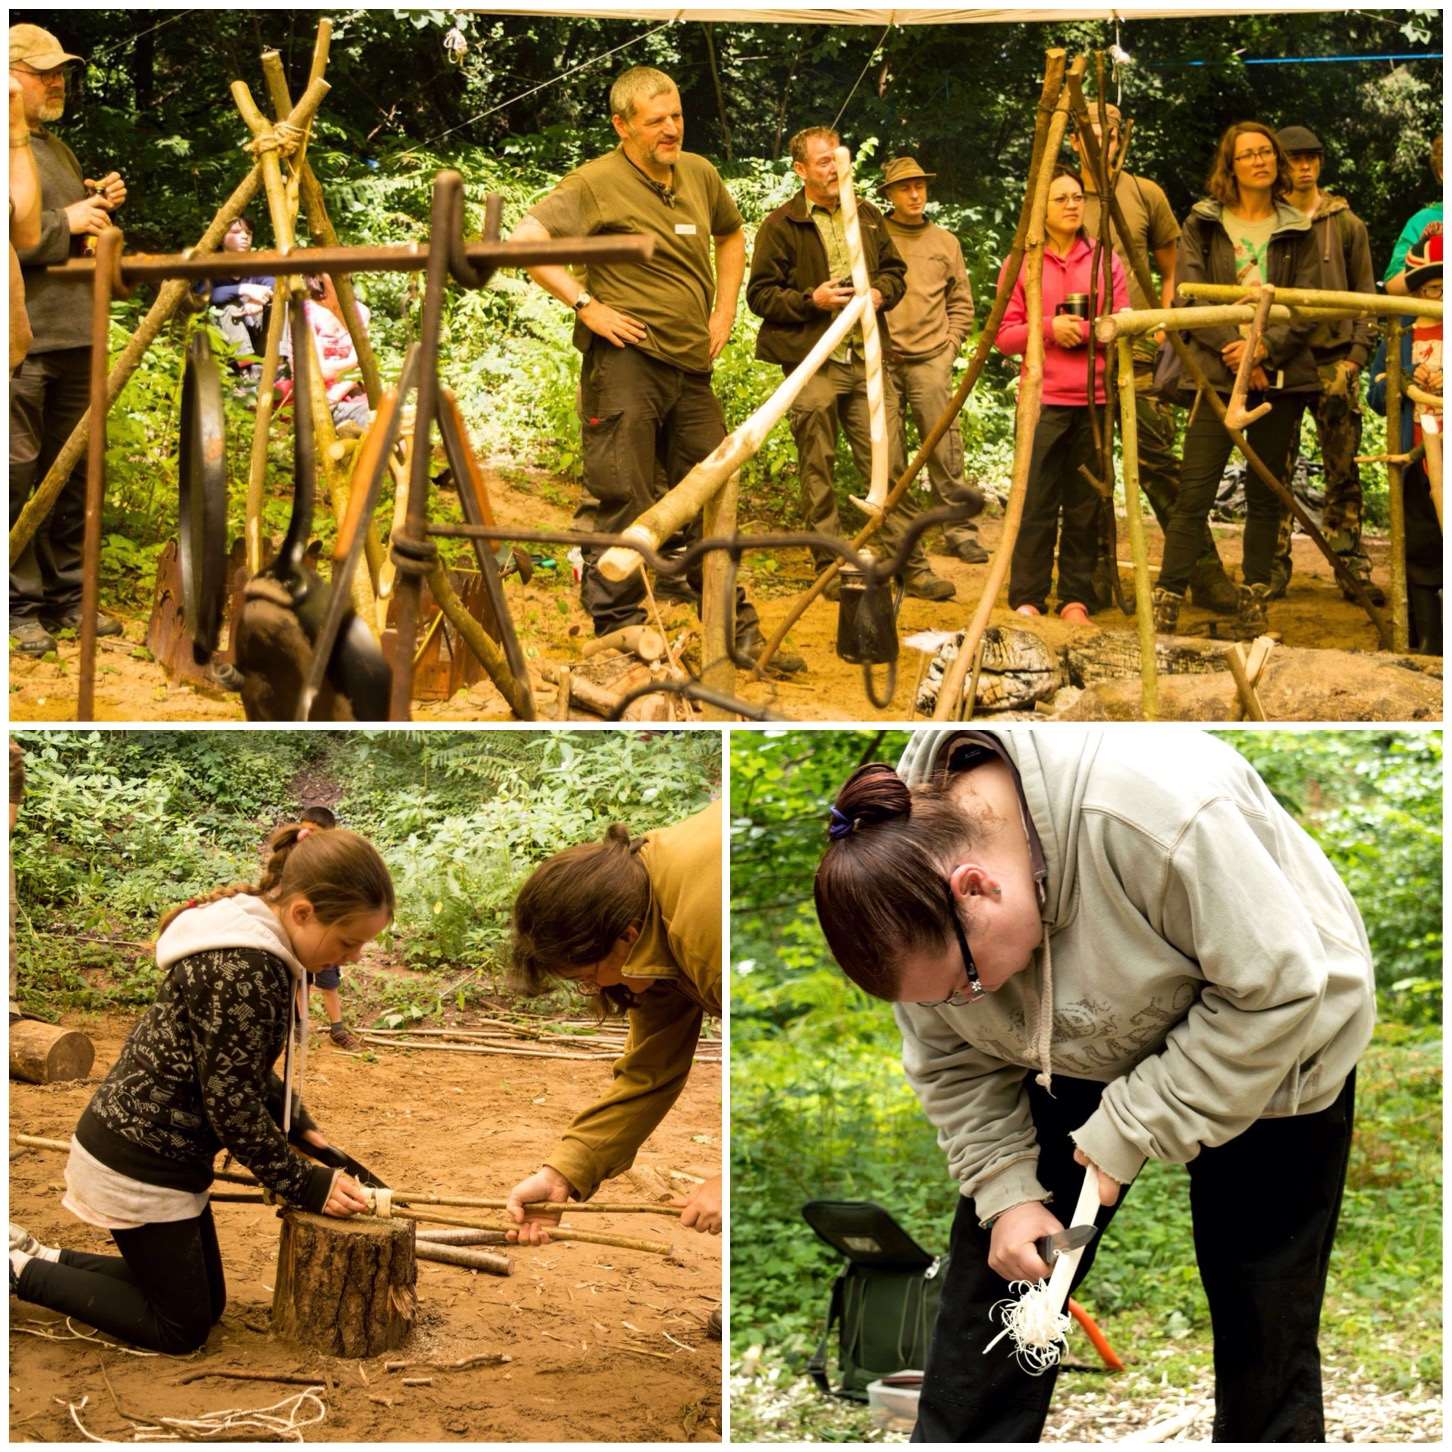
Working with wood
One of the things I love about the Moot is the sharing of knowledge such as how a stove was constructed or that Ikea make good quality drying racks that double up as brilliant cooking grills.
A bit of metal
A favourite of mine is the art of fire making. At the Moot you can learn about making fire with firesteels (old and modern), bowdrill, handrill, with damp tinder, pump drills and in many other ways.
Flamage
Shelter building is a big subject and is covered well, from simple tarps and debris shelters to large group tarps, permanent constructions and the magical art of tarpology.
Shelter in many forms
There are many other courses to attend at the Moot with new ideas coming up each year. I have found that the Moot has really broadened my knowledge of all things Bushcraft over the years and I expect will continue to do so for many more to come.
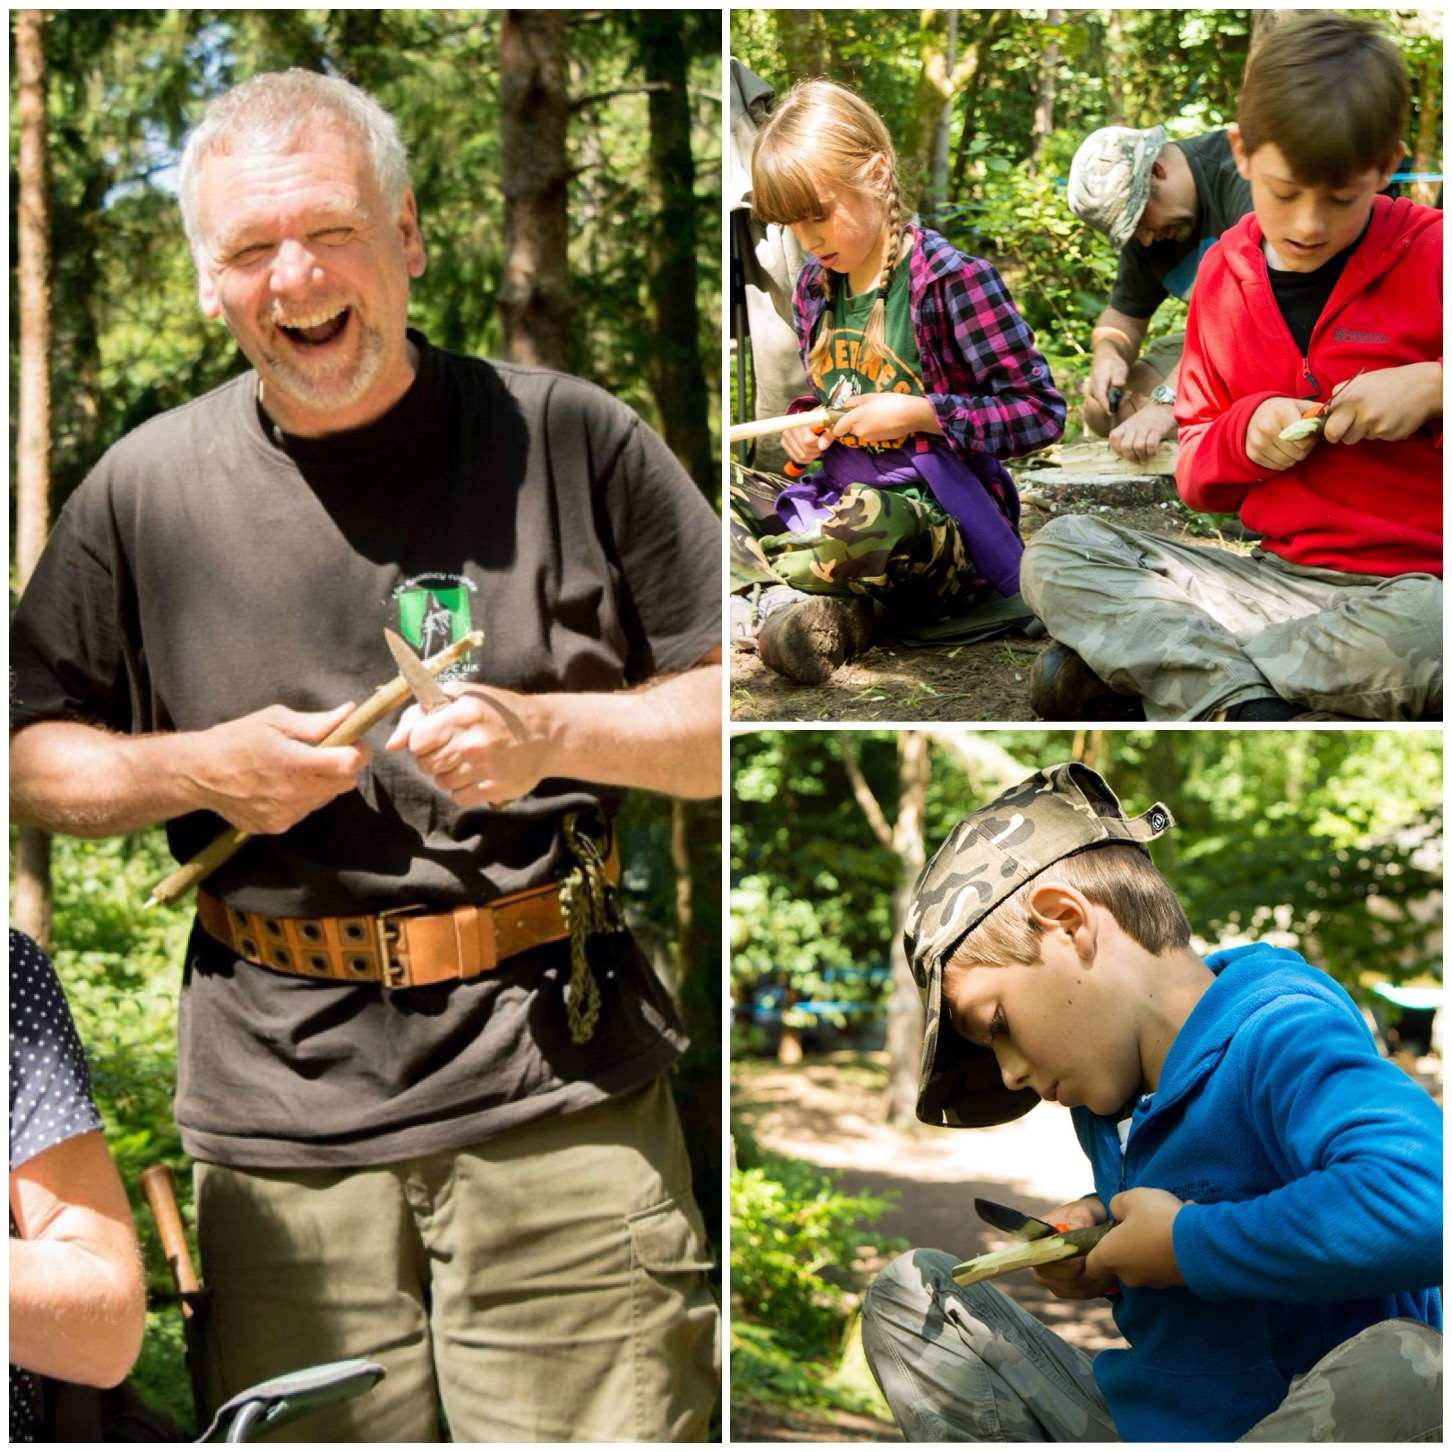
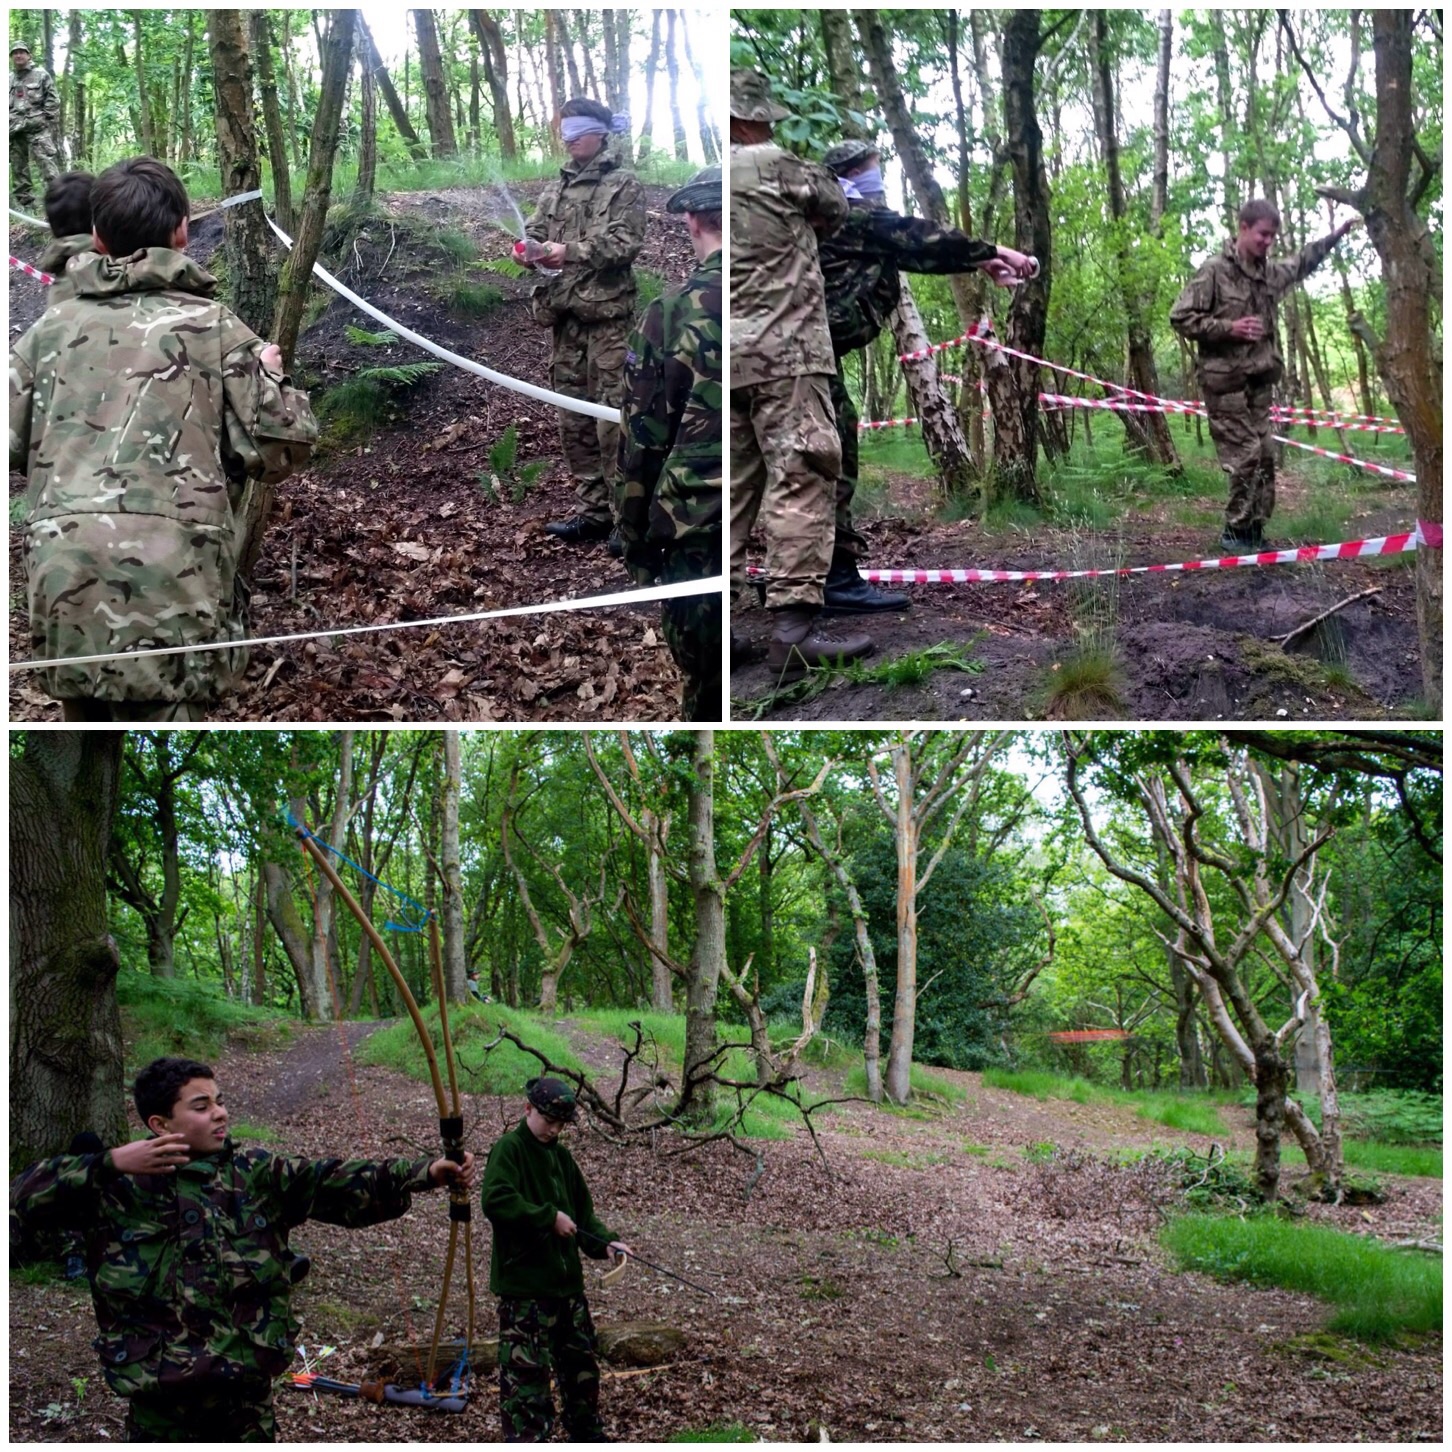
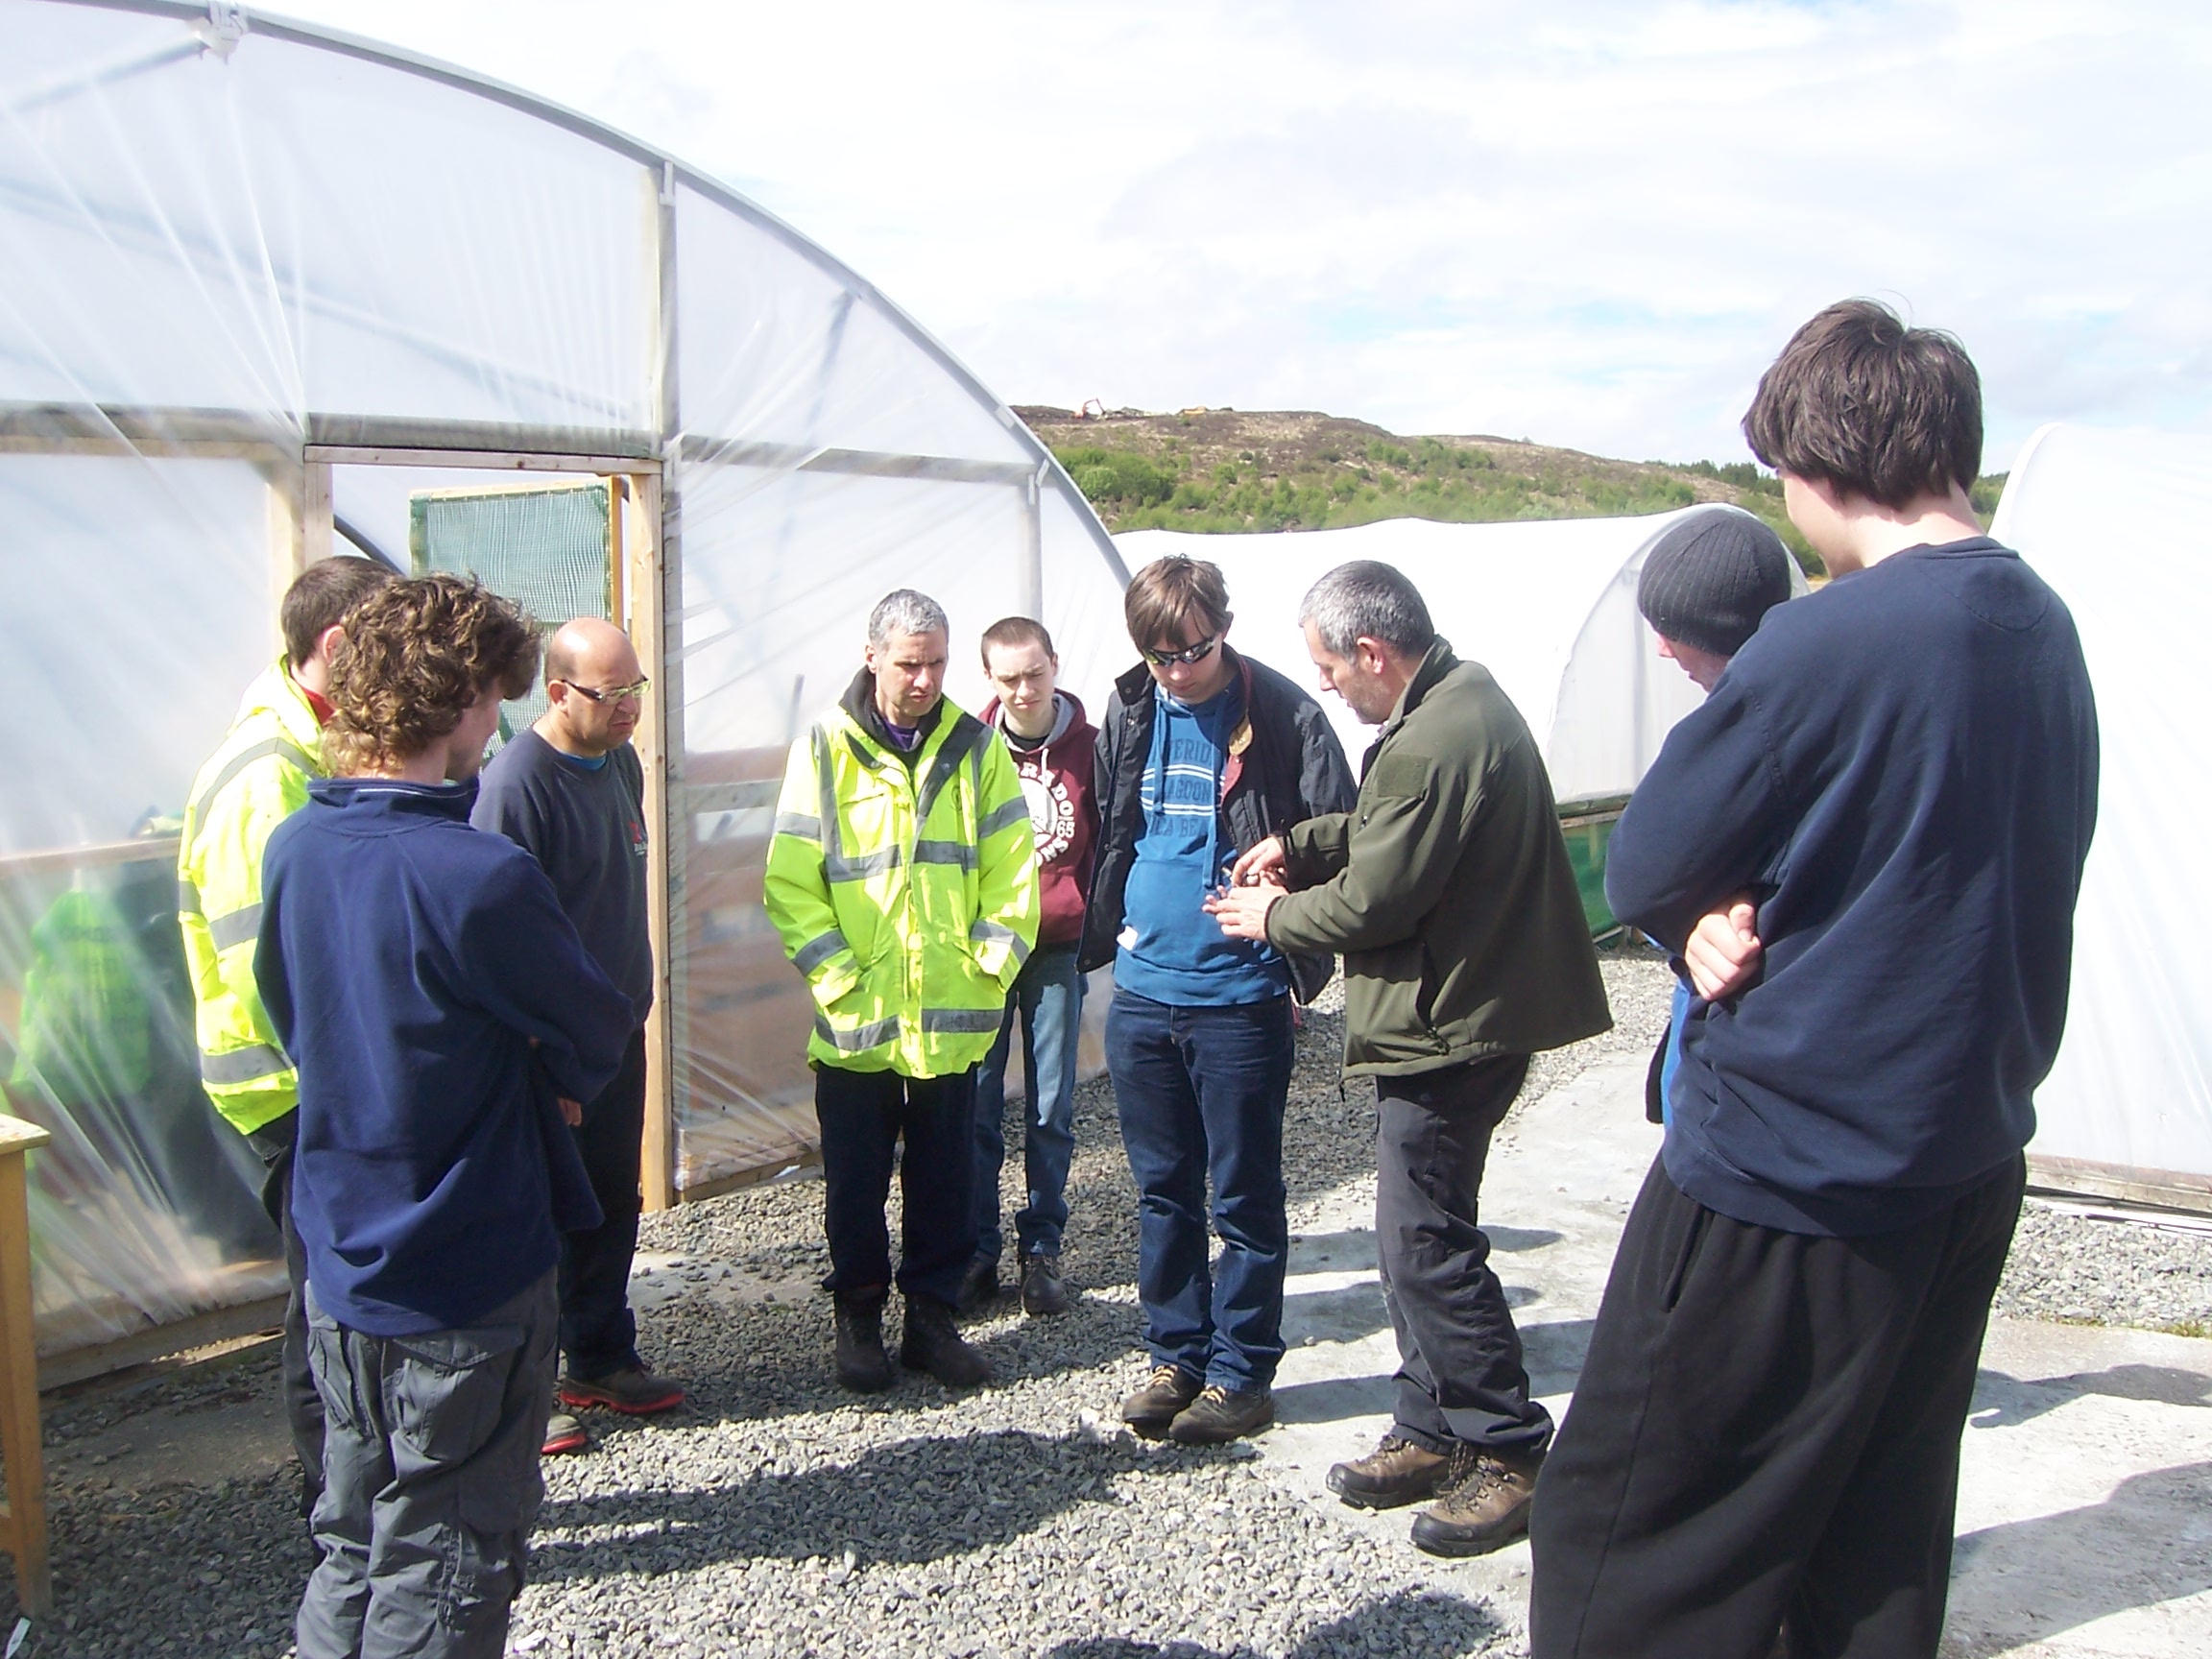
Catch up time again – I ran a bushcraft course with my colleagues Charlie, Dave, Cliff and Alan for the Southern Area Royal Marines Cadets last June in the military training area around Aldershot here in the UK.
This is an excellent area with lots of woodland to roam around and learn about the art of bushcraft.
A great bushie weekend
I wrote three short articles about this weekend back in June for the Wildlife Trusts 30 day Challenge I undertook however this is the full report on the weekend now.
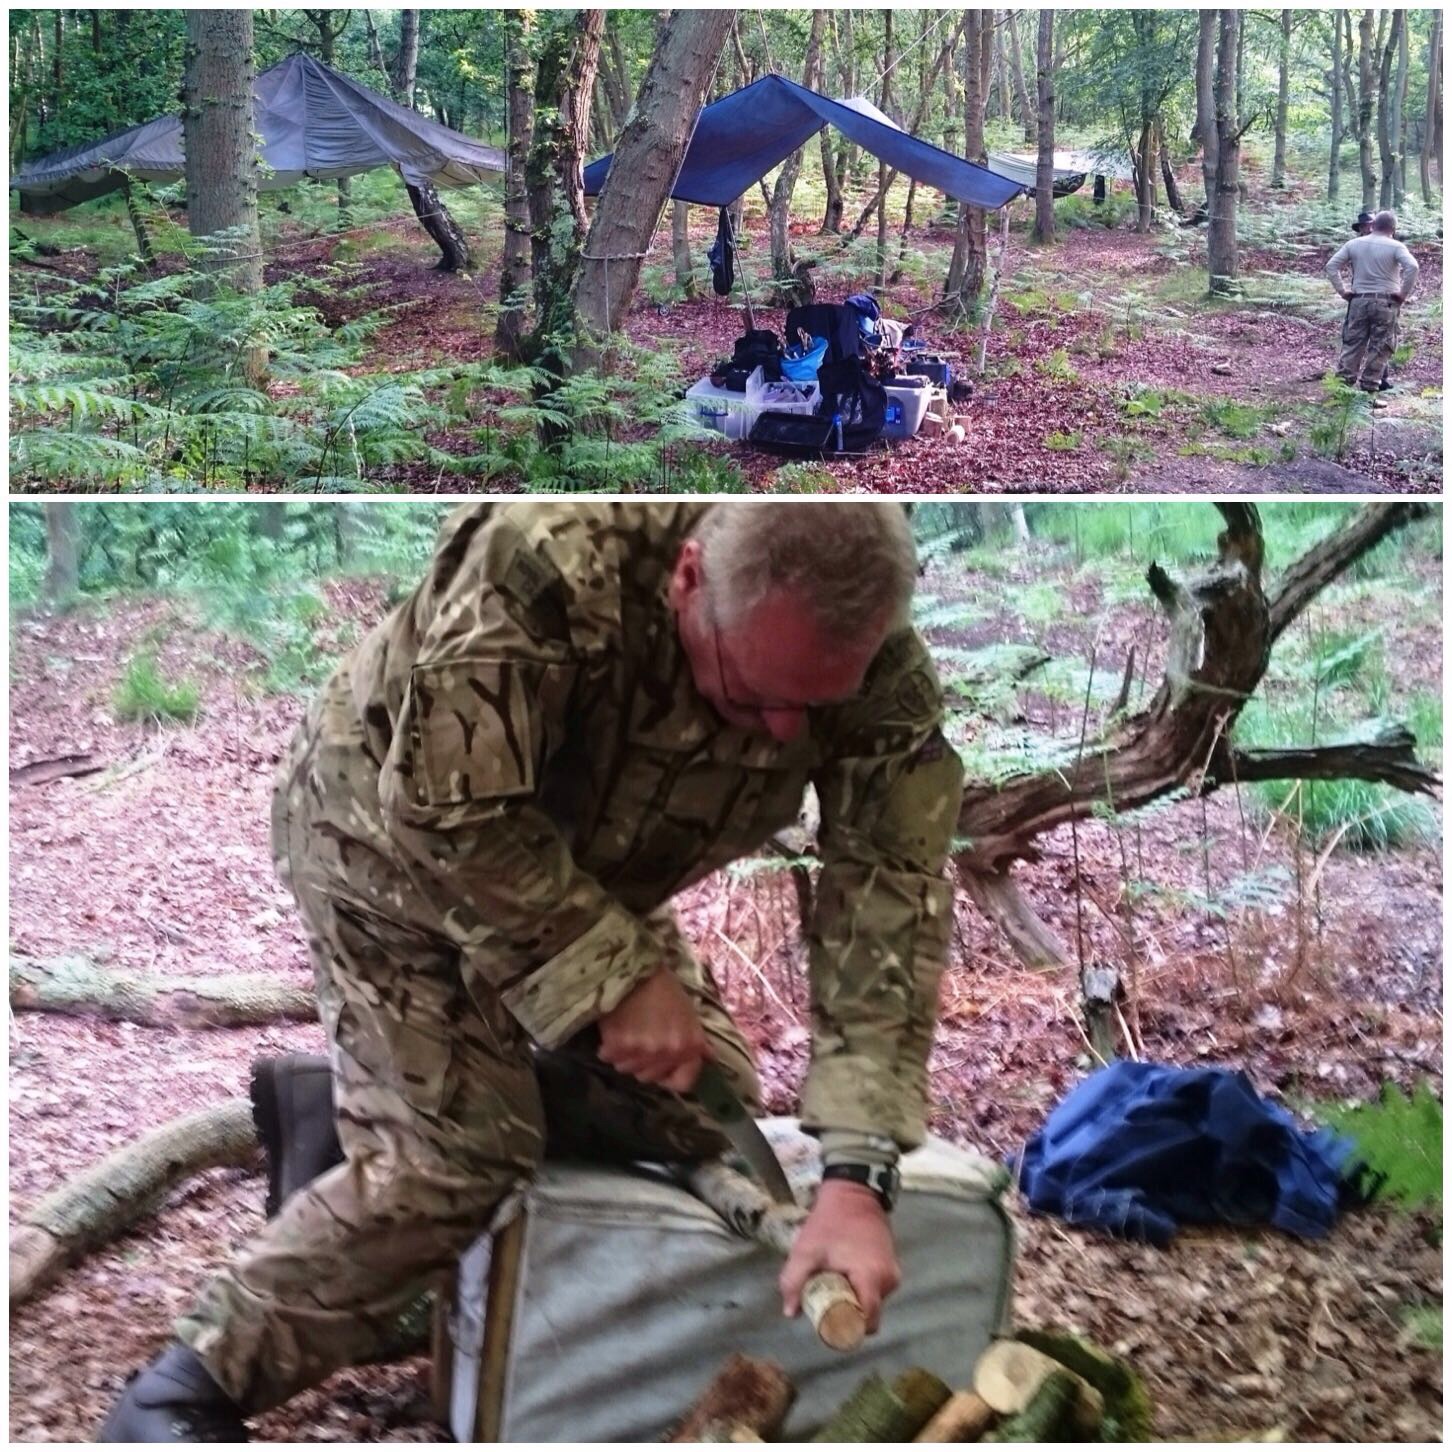
Set up took most of the Friday and we were joined by a number of the Royal Marines staff so it did not take too long.
Setting up the HQ
I wanted the cadets to experience sleeping in hammocks so brought a dozen or so along. They took a while to set up but it was worth it in the end.
A dozen tarps and hammocks to put up
The cadets arrived in the evening and after a safety briefing, some supper and a stroll it was time to bed down for the night.
Some cadets were in the hammocks and some under their tarps on the ground. It was a wet night however everybody was mostly dry in the morning.
Bedding down
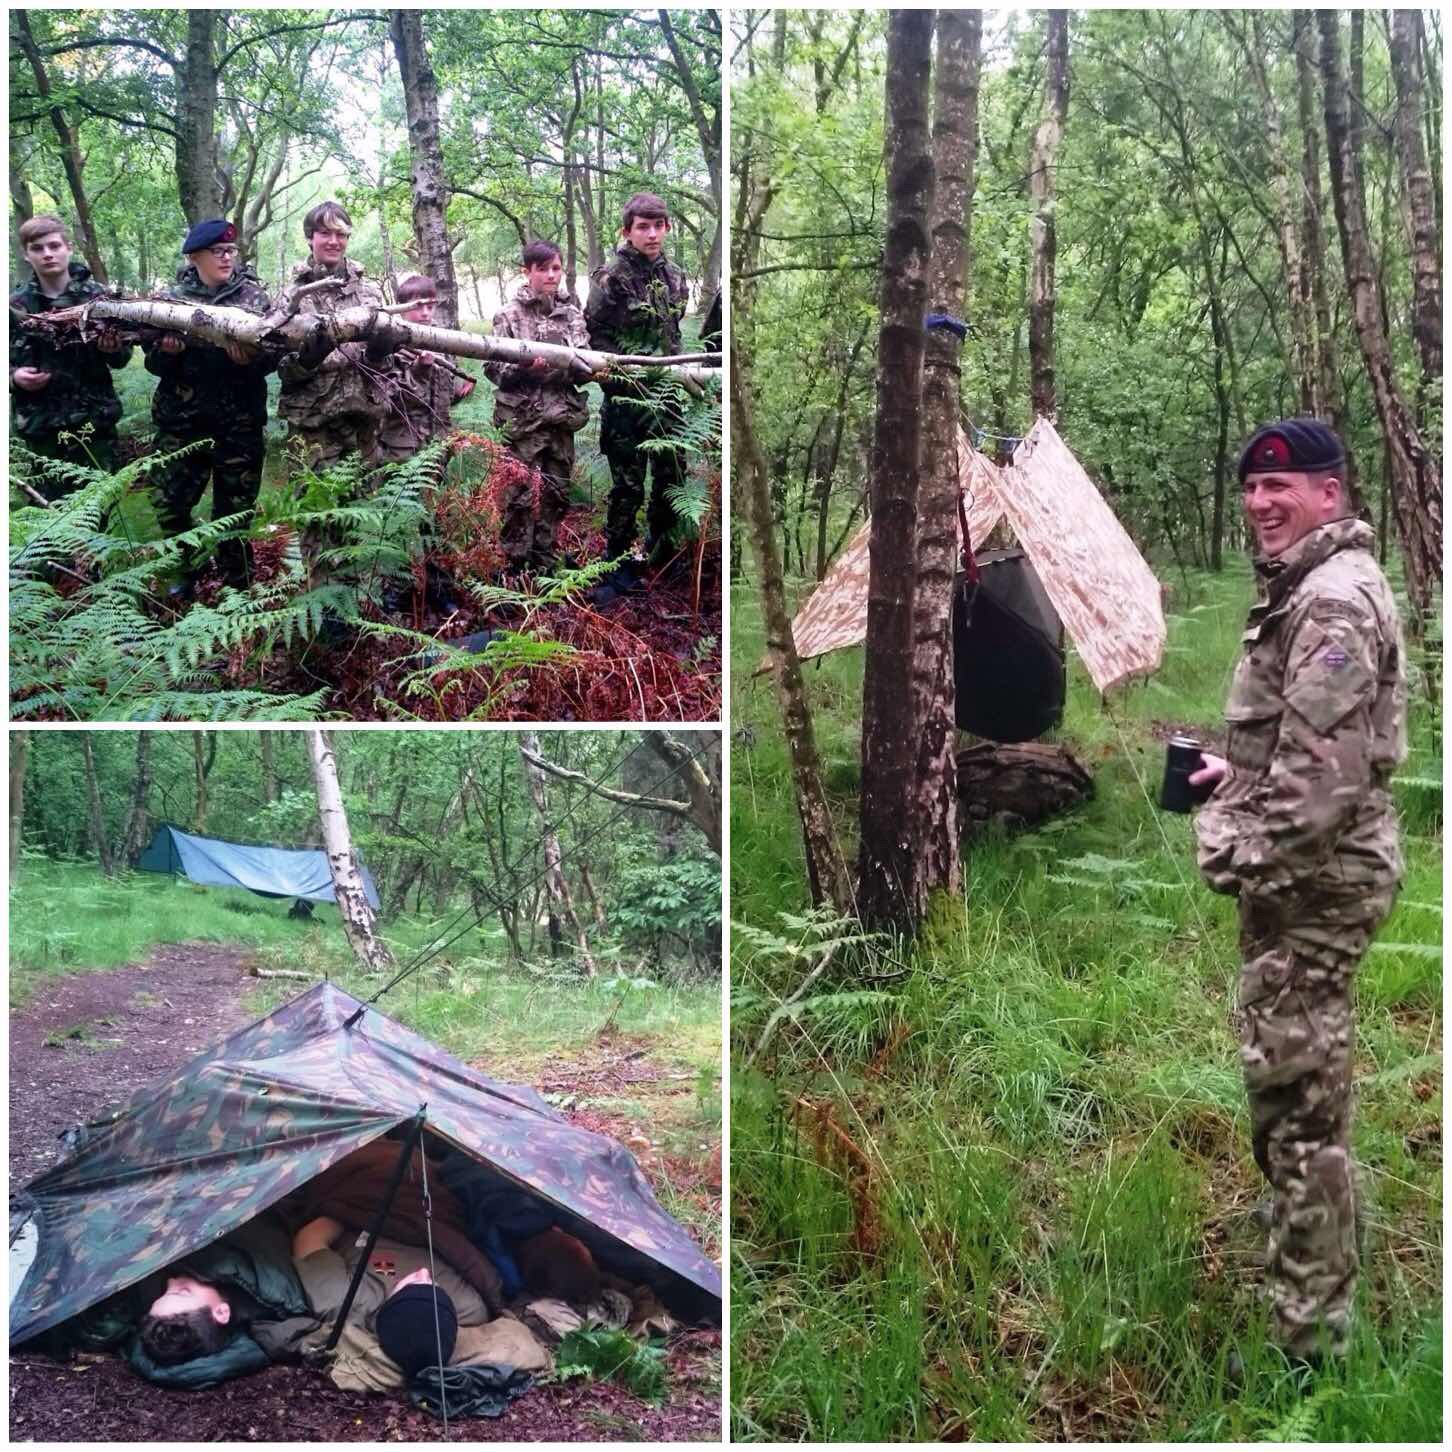
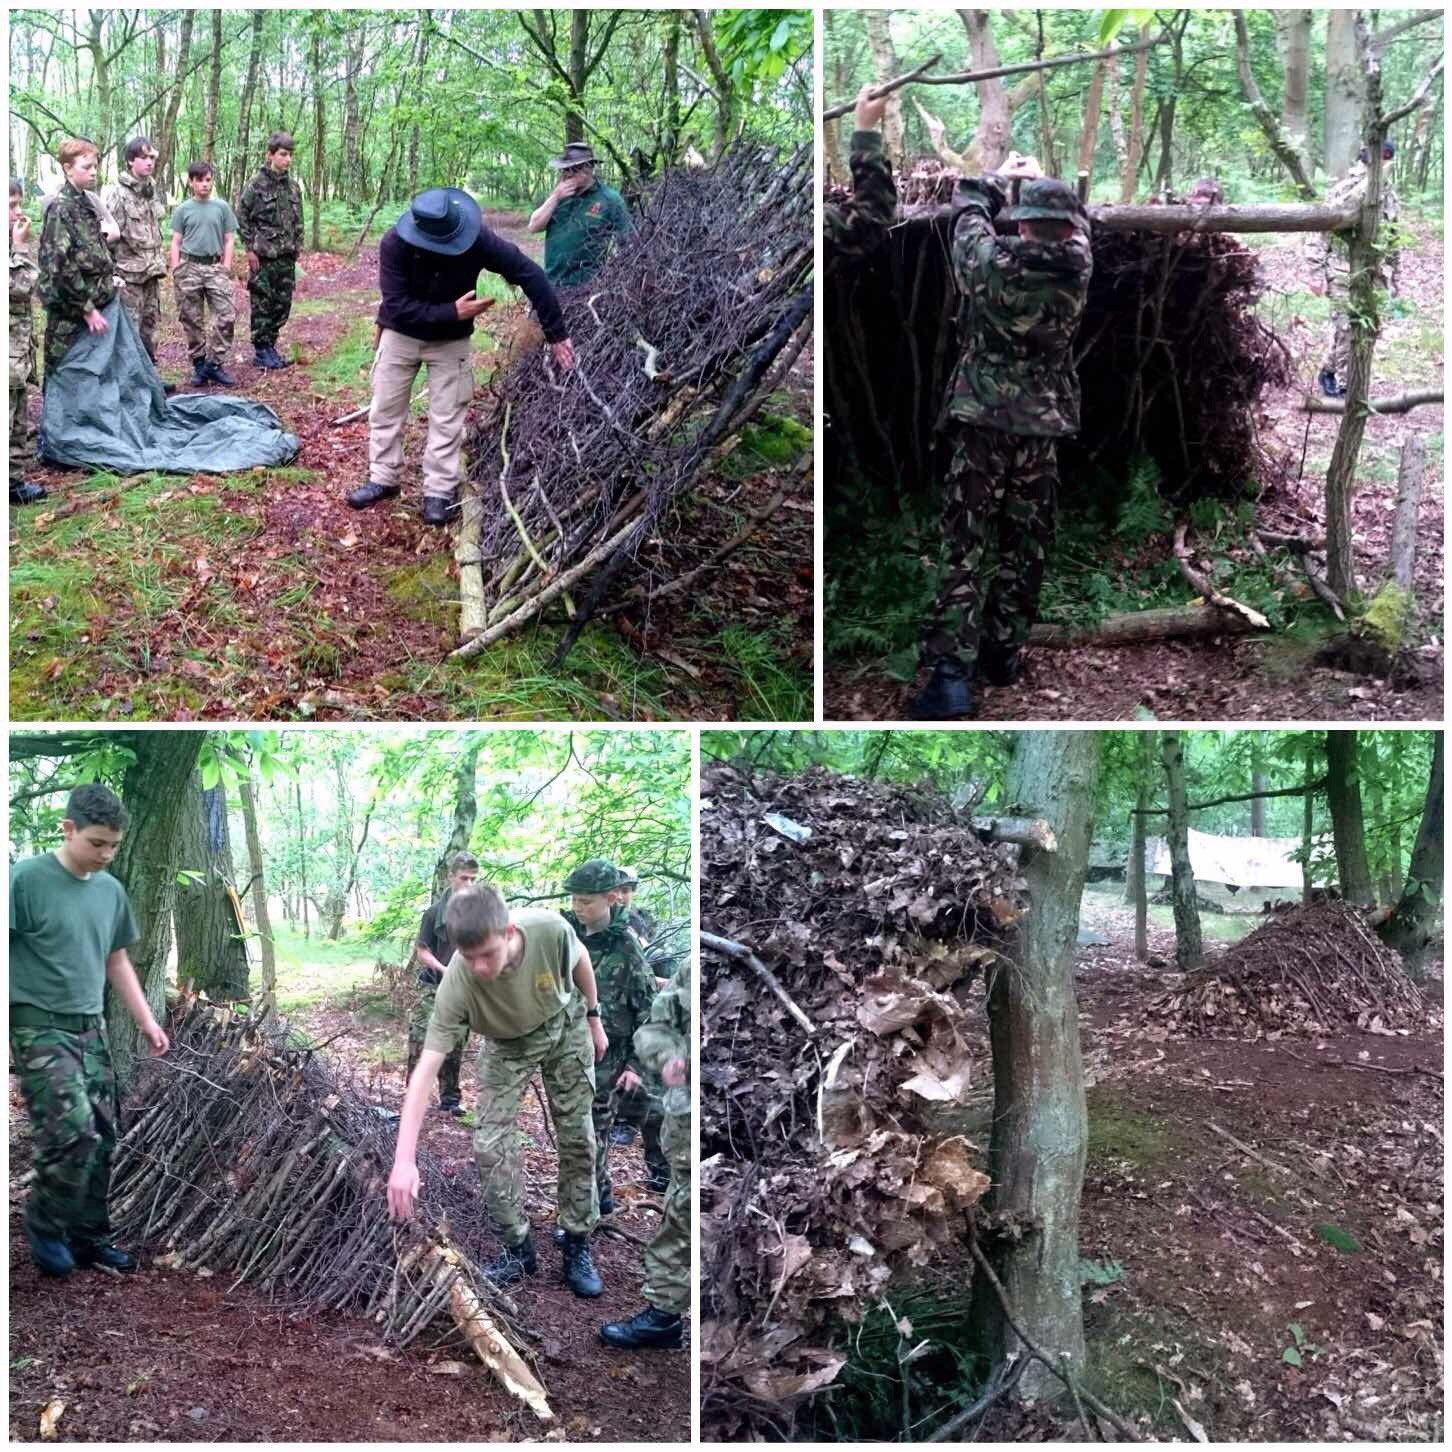
We ran a number of classes starting with building different types of shelters, and looking at how the tarps and hammocks were set up.
Shelter building
The camp chores such as gathering wood and getting fires going were soon under way. At this stage we taught the cadets how to use firesteels to light their fires.
I had also brought a number of cooking rigs for them to try out. The one in the bottom picture is the Double French Windlass rig and is one of my favourites.
Setting up the cookhouse
I wanted the cadets to feel comfortable so we spent quite a lot of time setting up different apparatus for cooking such as this Broiling rig or just taking time to chill out (bottom left).
One rule I had made at the very beginning was that unless there was an emergency there was to be no running. Quite hard for Marine Cadets to do I know however the feel of the weekend was to be one of a relaxed atmosphere.
Learning the art of Broiling and doing nothing
So relaxed that magically some cup cakes appeared in Dave’s lap.
Charlie had a good time ponnasing some trout around the fire and it tasted equally as good as it looked cooking.
Taste comes in many forms
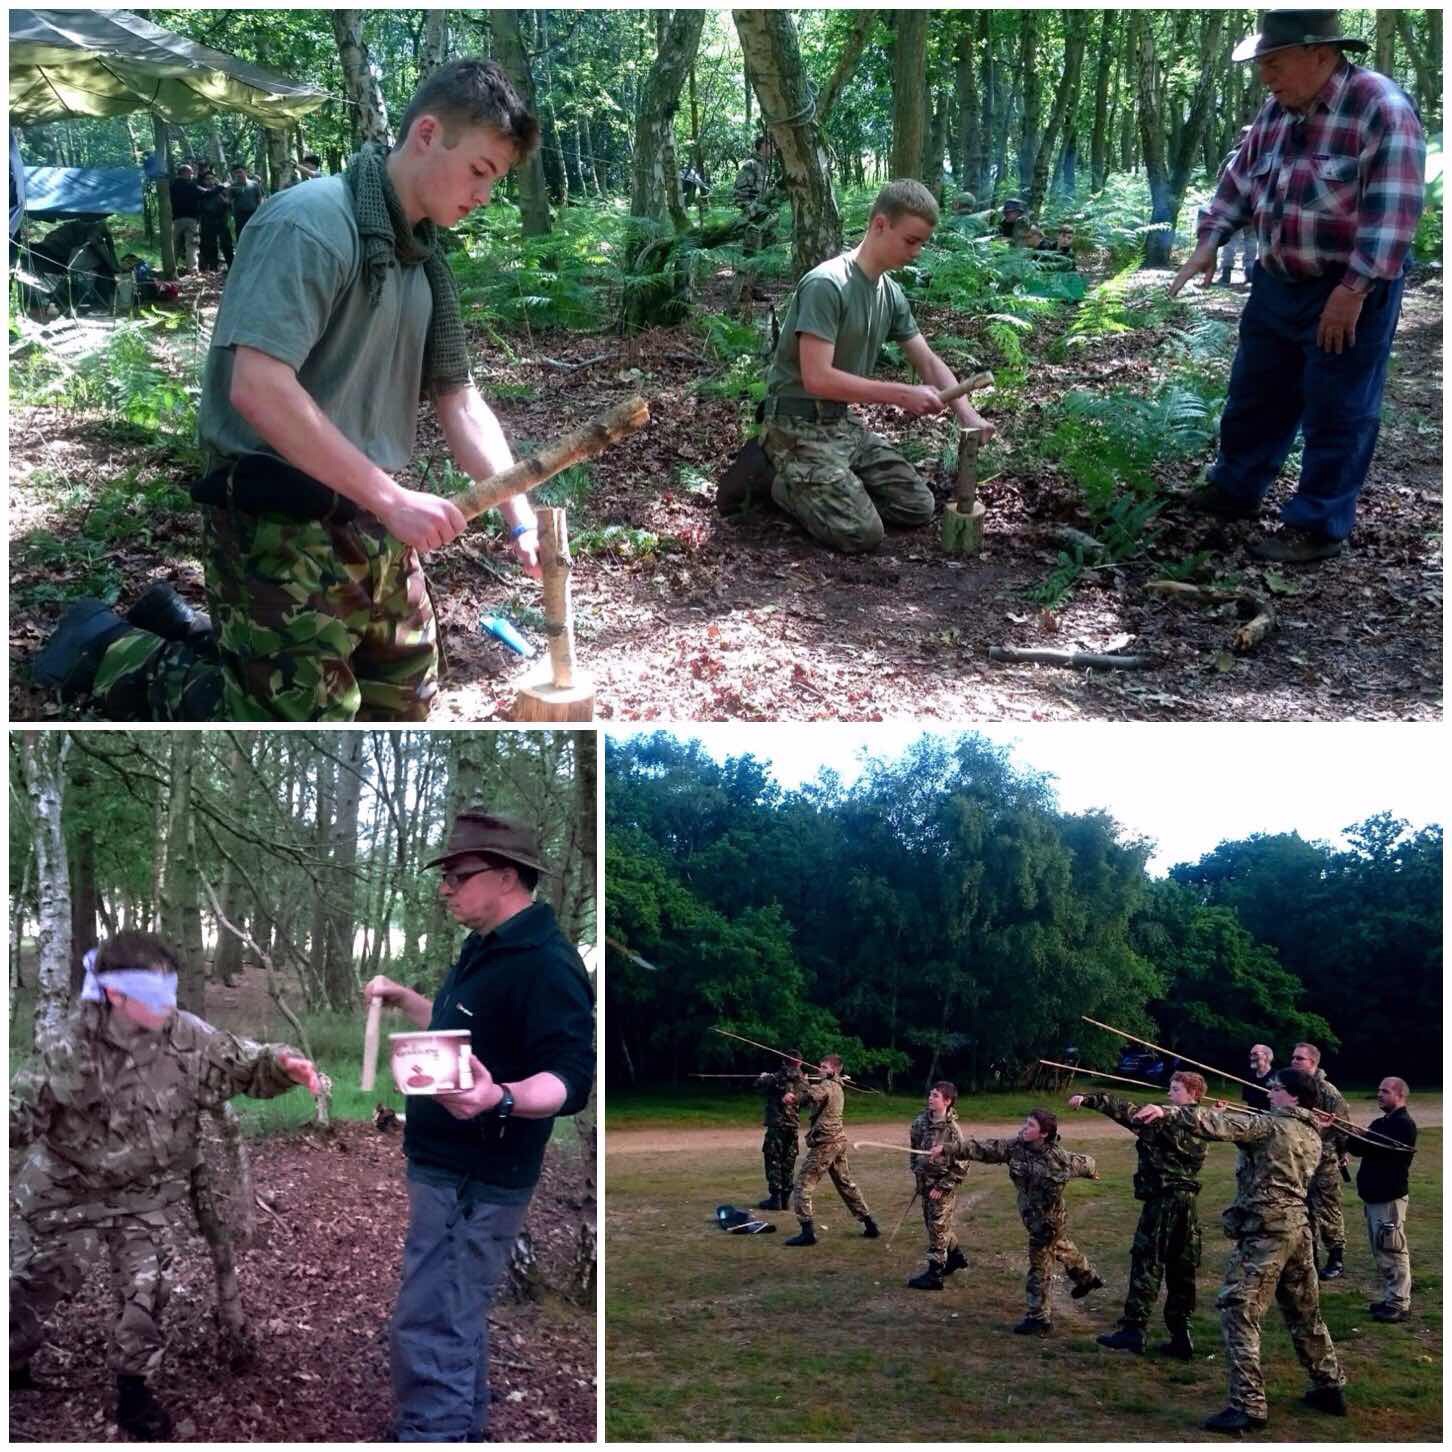
We spent quite a while learning about knife safety, battoning and carving. Then later in the evening Dave and Cliff ran a stalking game and Atlatl range.
Knife work, stalking and Atlatl
Once the cadets were bedded down the staff relaxed around the woodland TV to plan the next day out (and have a cupcake or two).
Some Woodland TV
I think you can tell by the happy smile on this cadets face that the hammocks were a success.
Morning all
Our resident master chef Alan soon had breakfast organised with plenty of sausages and bread on the go.
Brekkie time
Classes began again soon after and I ran the group bowdrill sessions. Every team that did this got an ember and successfully blew it to flame. No mean feat considering how damp everything was.
Group Bowdrill
We tried out the handrill however without success. The cadets and myself gave it our best shot but the conditions were not with us for this one so we went back to using the bowdrill.
Having a go at Handrill
Some groups also carried on with carving their butter knives. Some ended up as pointy sticks (teenagers tend to do this for some reason) however we did get a number of very nicely shaped and functioning wooden knives carved in the end.
More knife work and archery
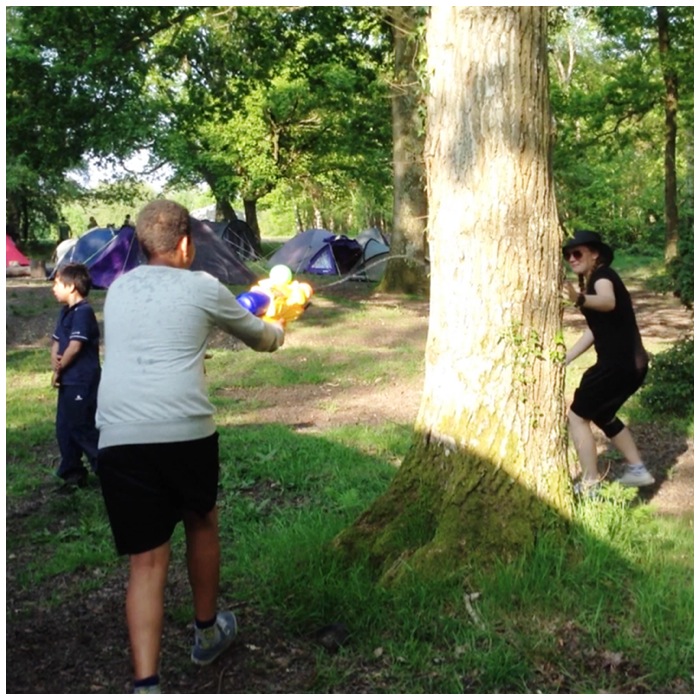
Cliff ran another stalking game involving water pistols however they all failed to work so improvised with squeezy bottles instead (worked a treat so I will be using them in the future).
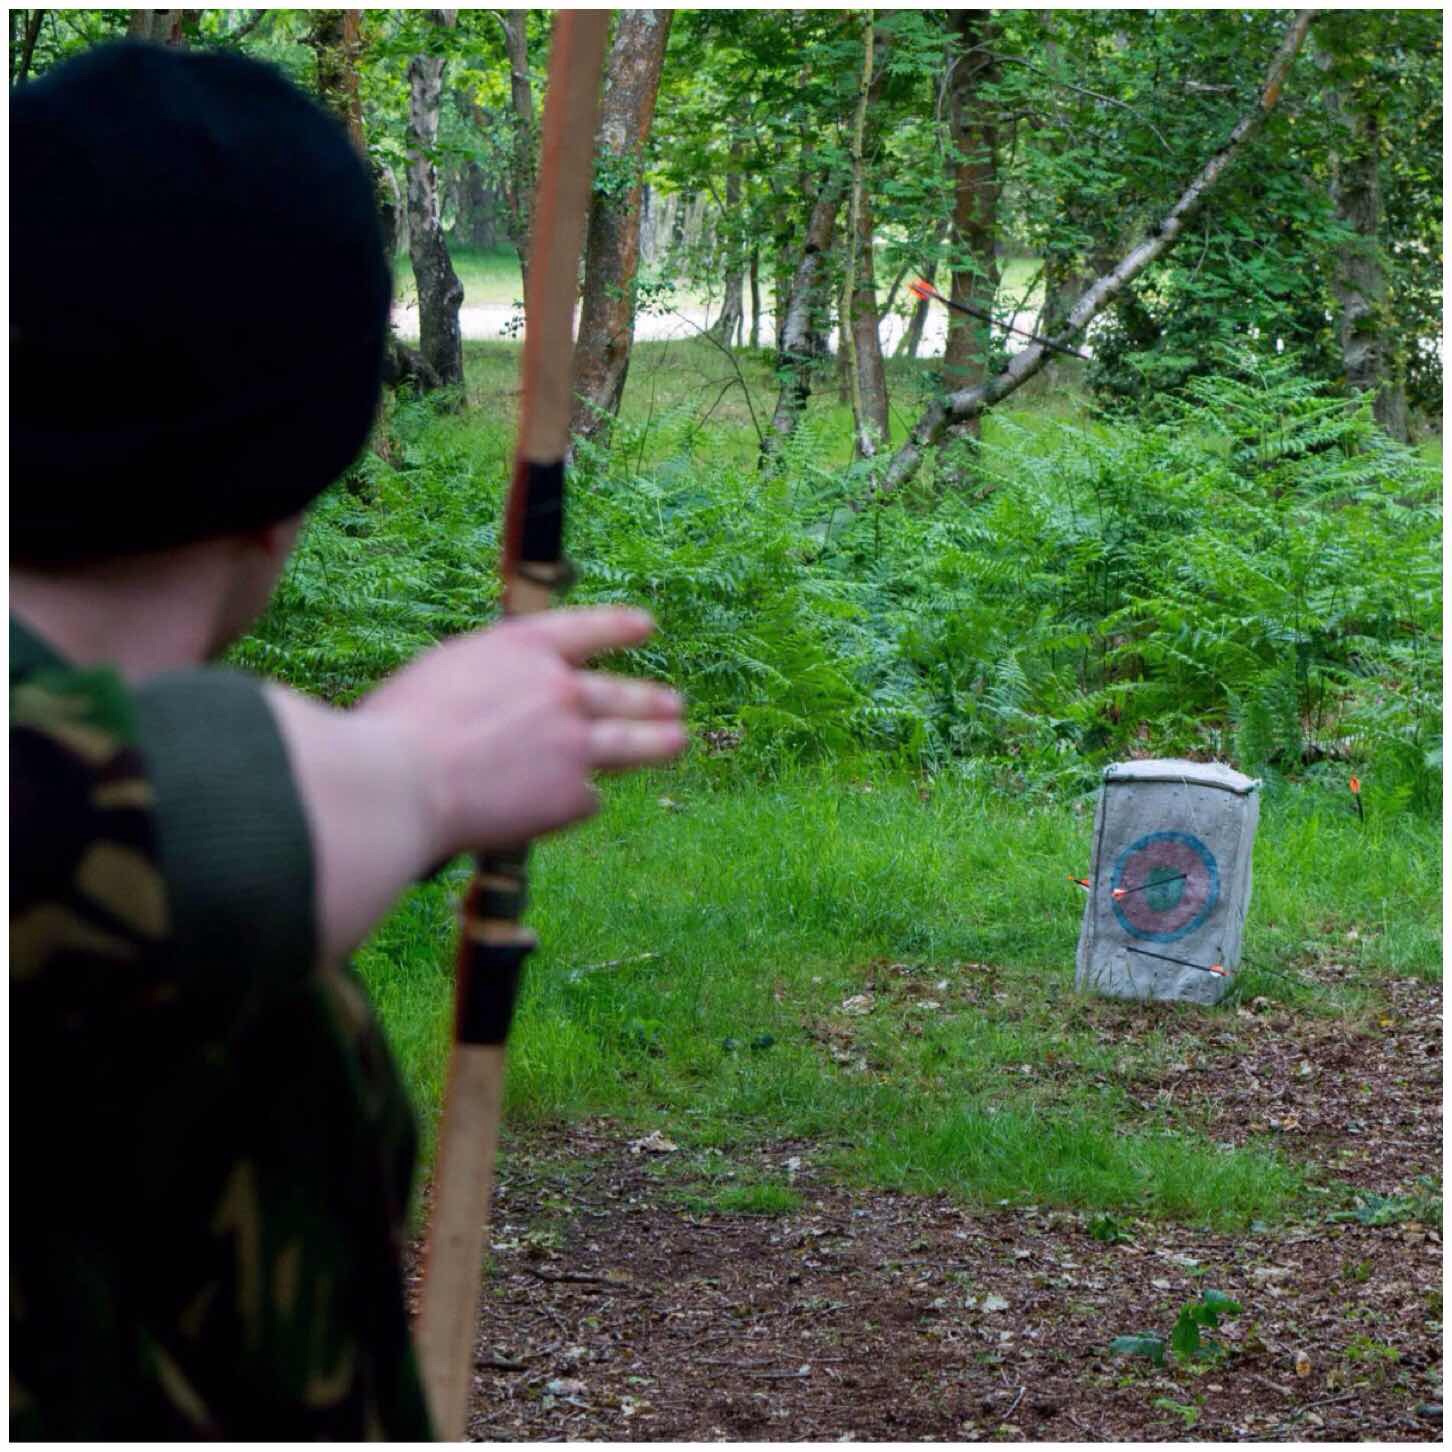
I had also brought along a number of Father and Son survival bows for the cadets to use on a short range and they were soon happily pinging the arrows down range.
Stalking and archery to finish
We had to pack up on the Sunday lunchtime so it was over before we knew it however it was a great weekend.
My aim was to show the cadets how to make themselves comfortable in the outdoors and to have fun so that when they went back out again to practice their field craft skills they would have a wider and better understanding of the nature around them.
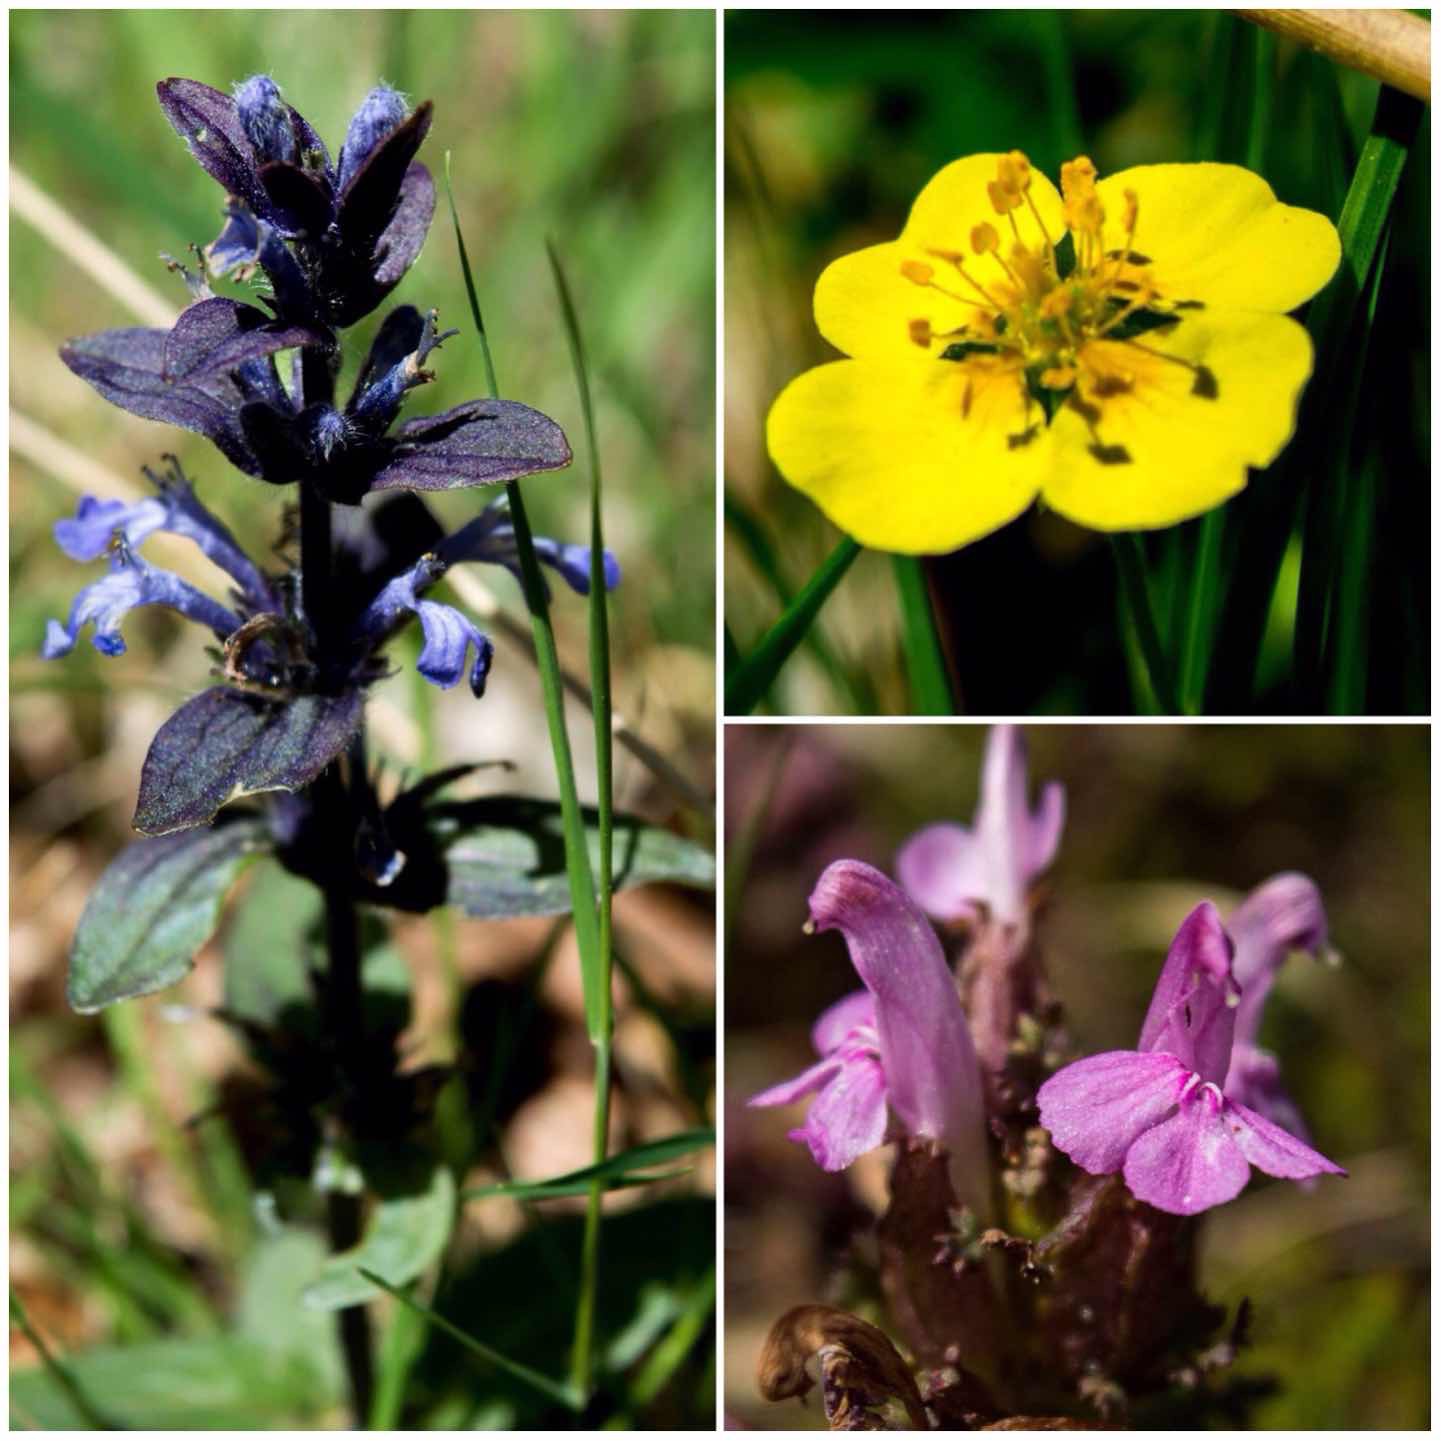
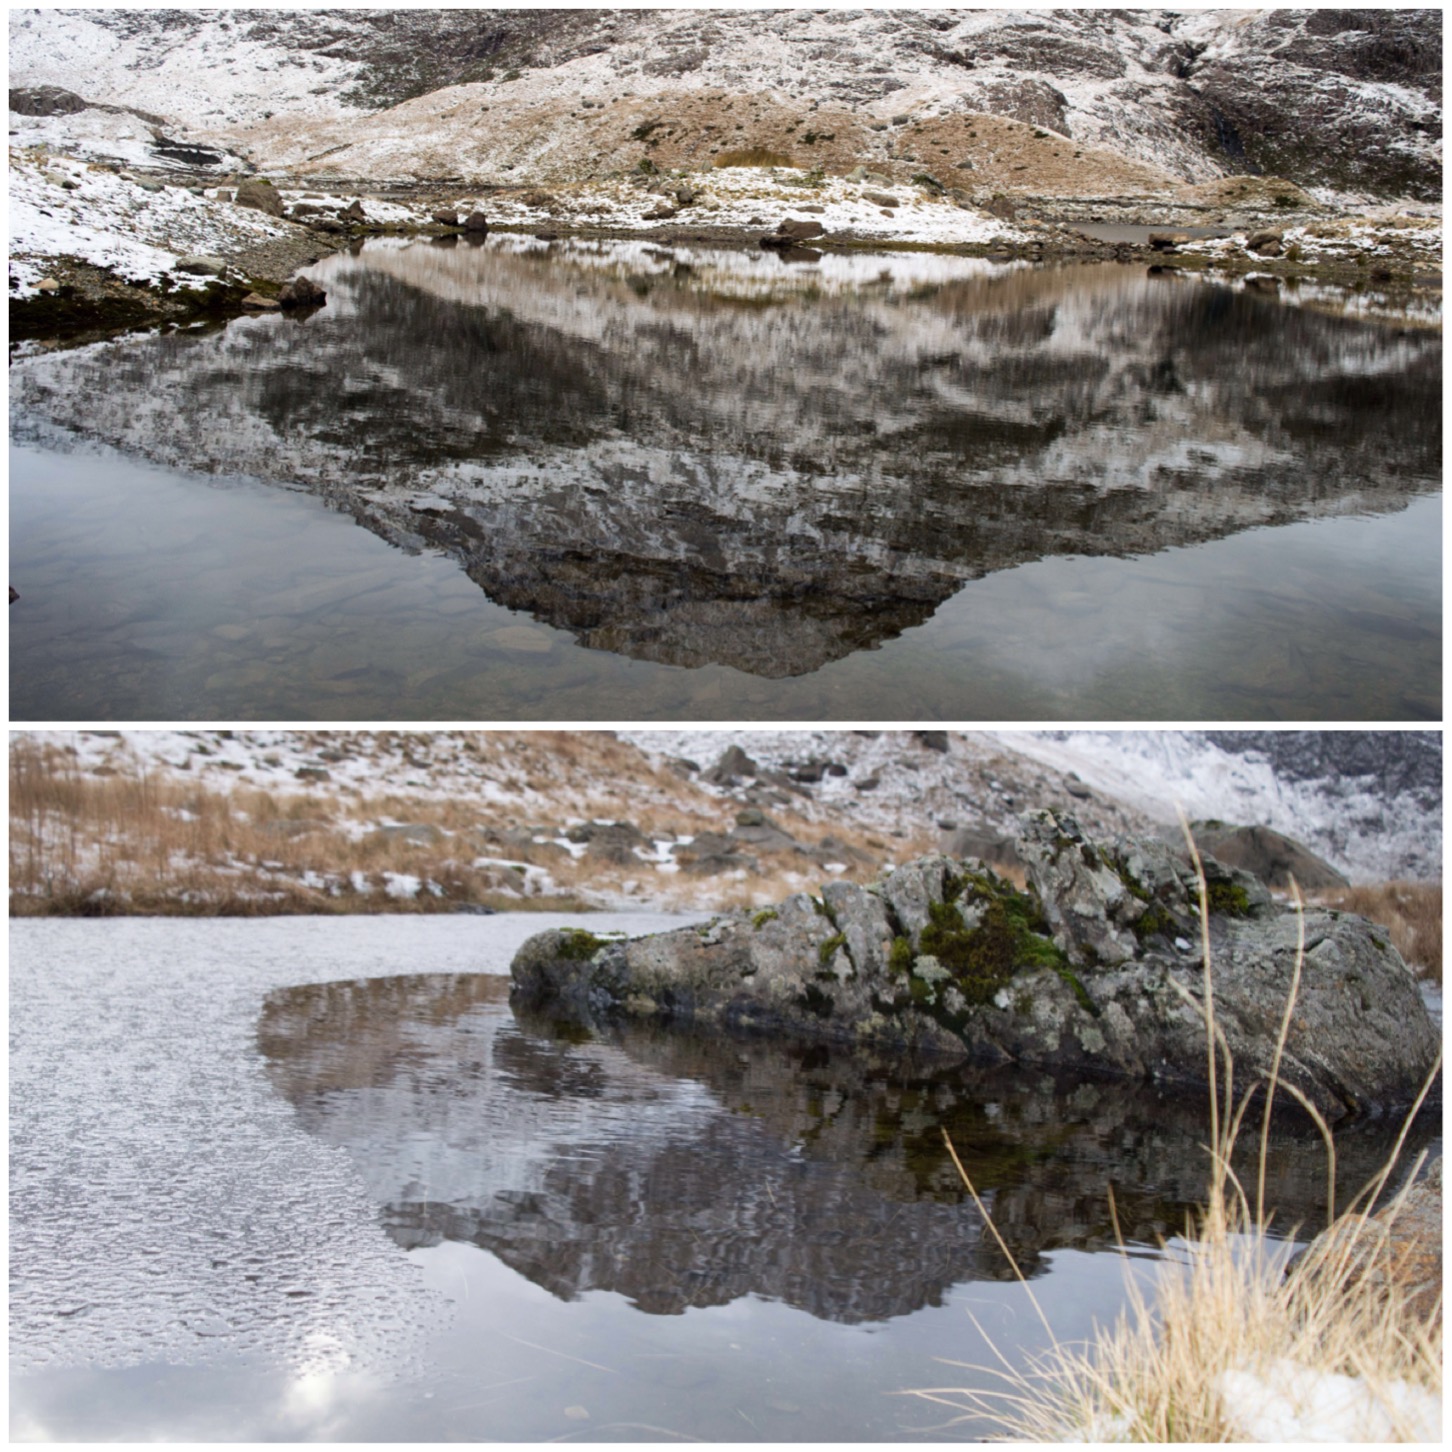
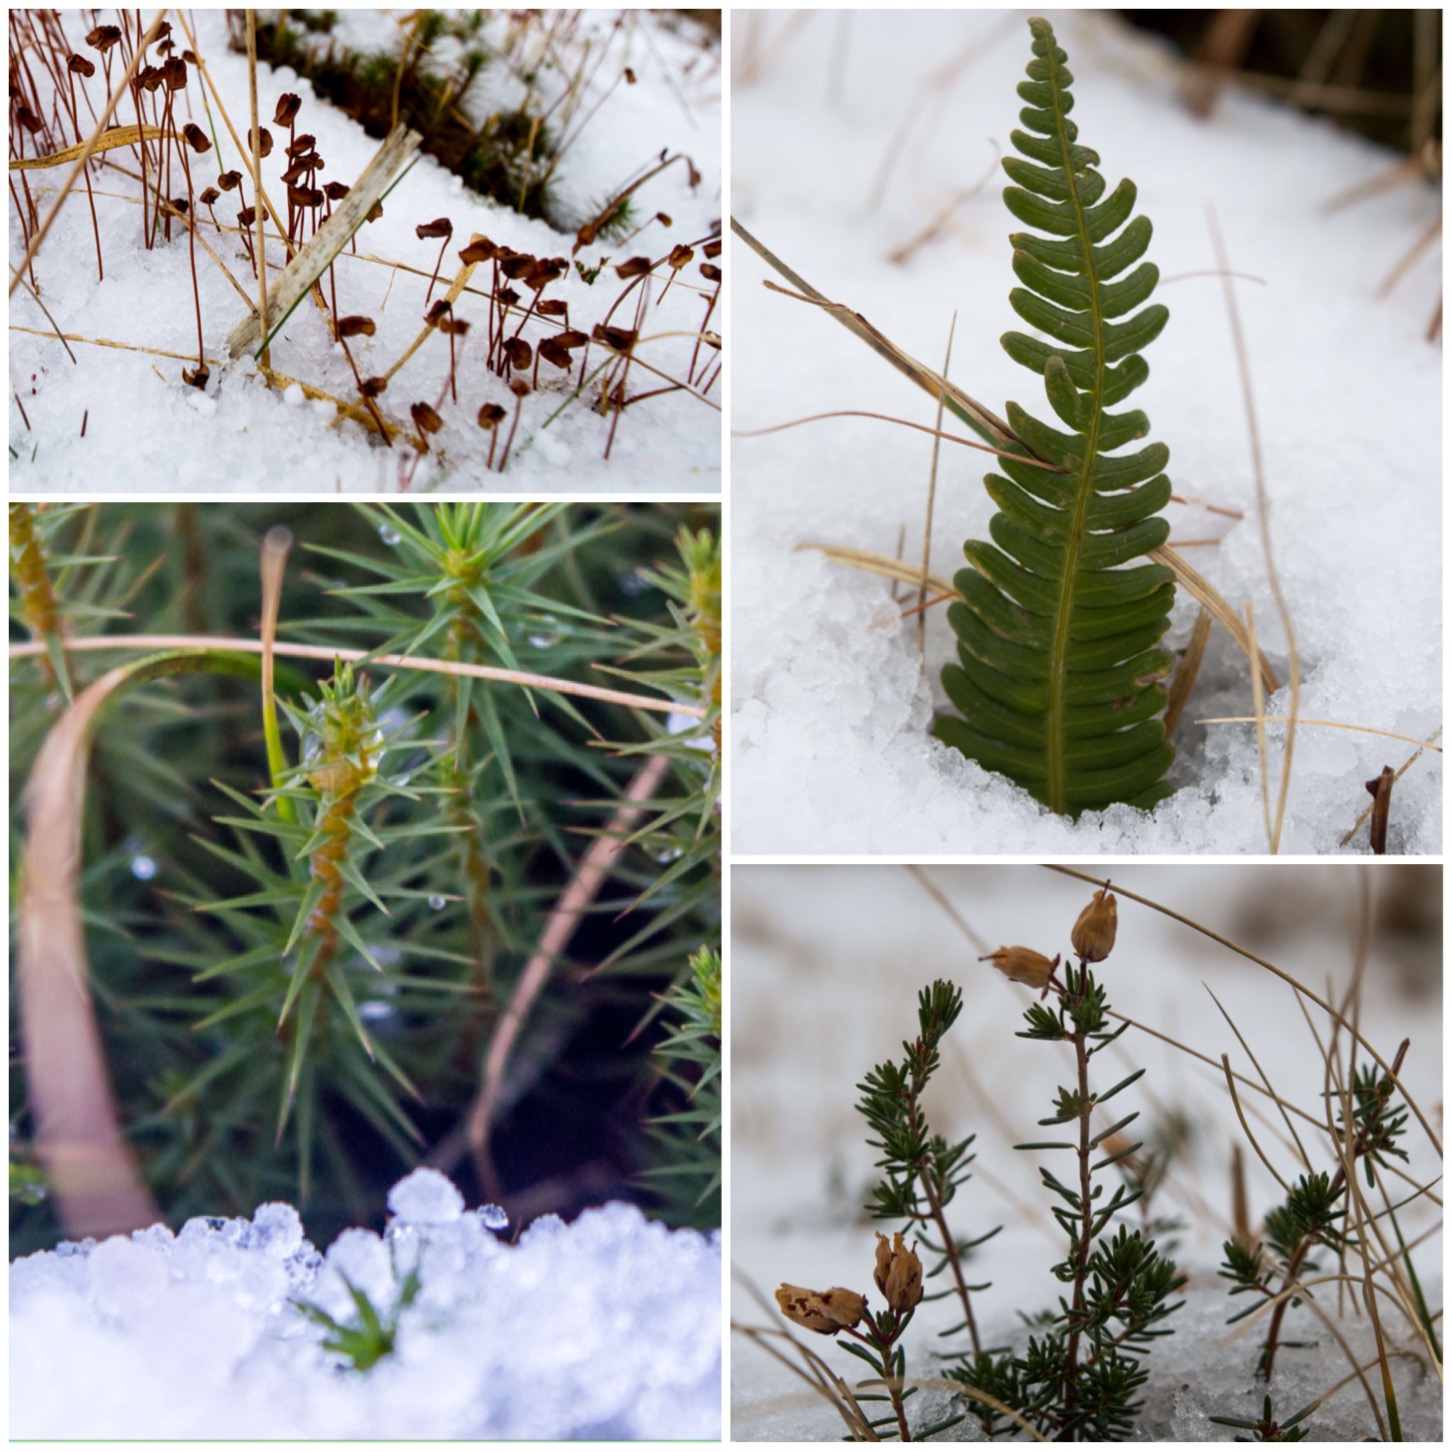
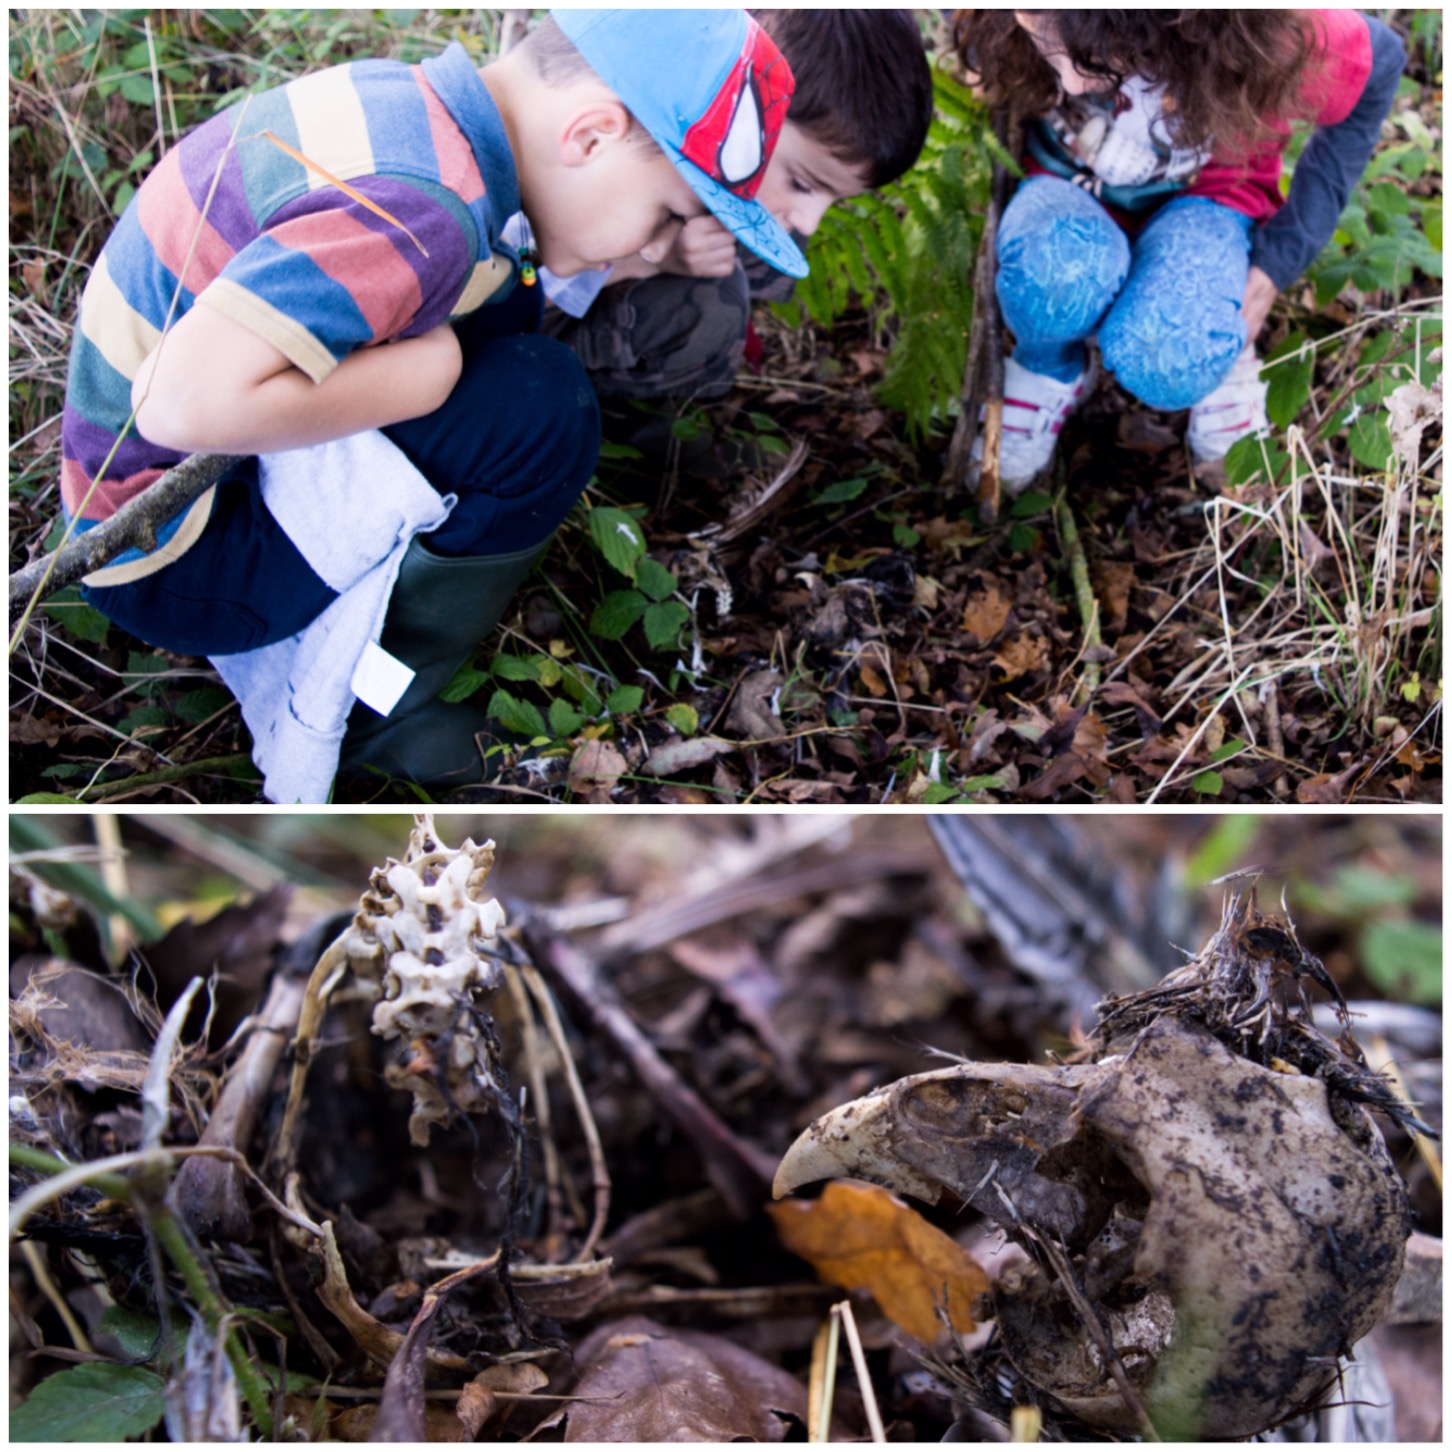
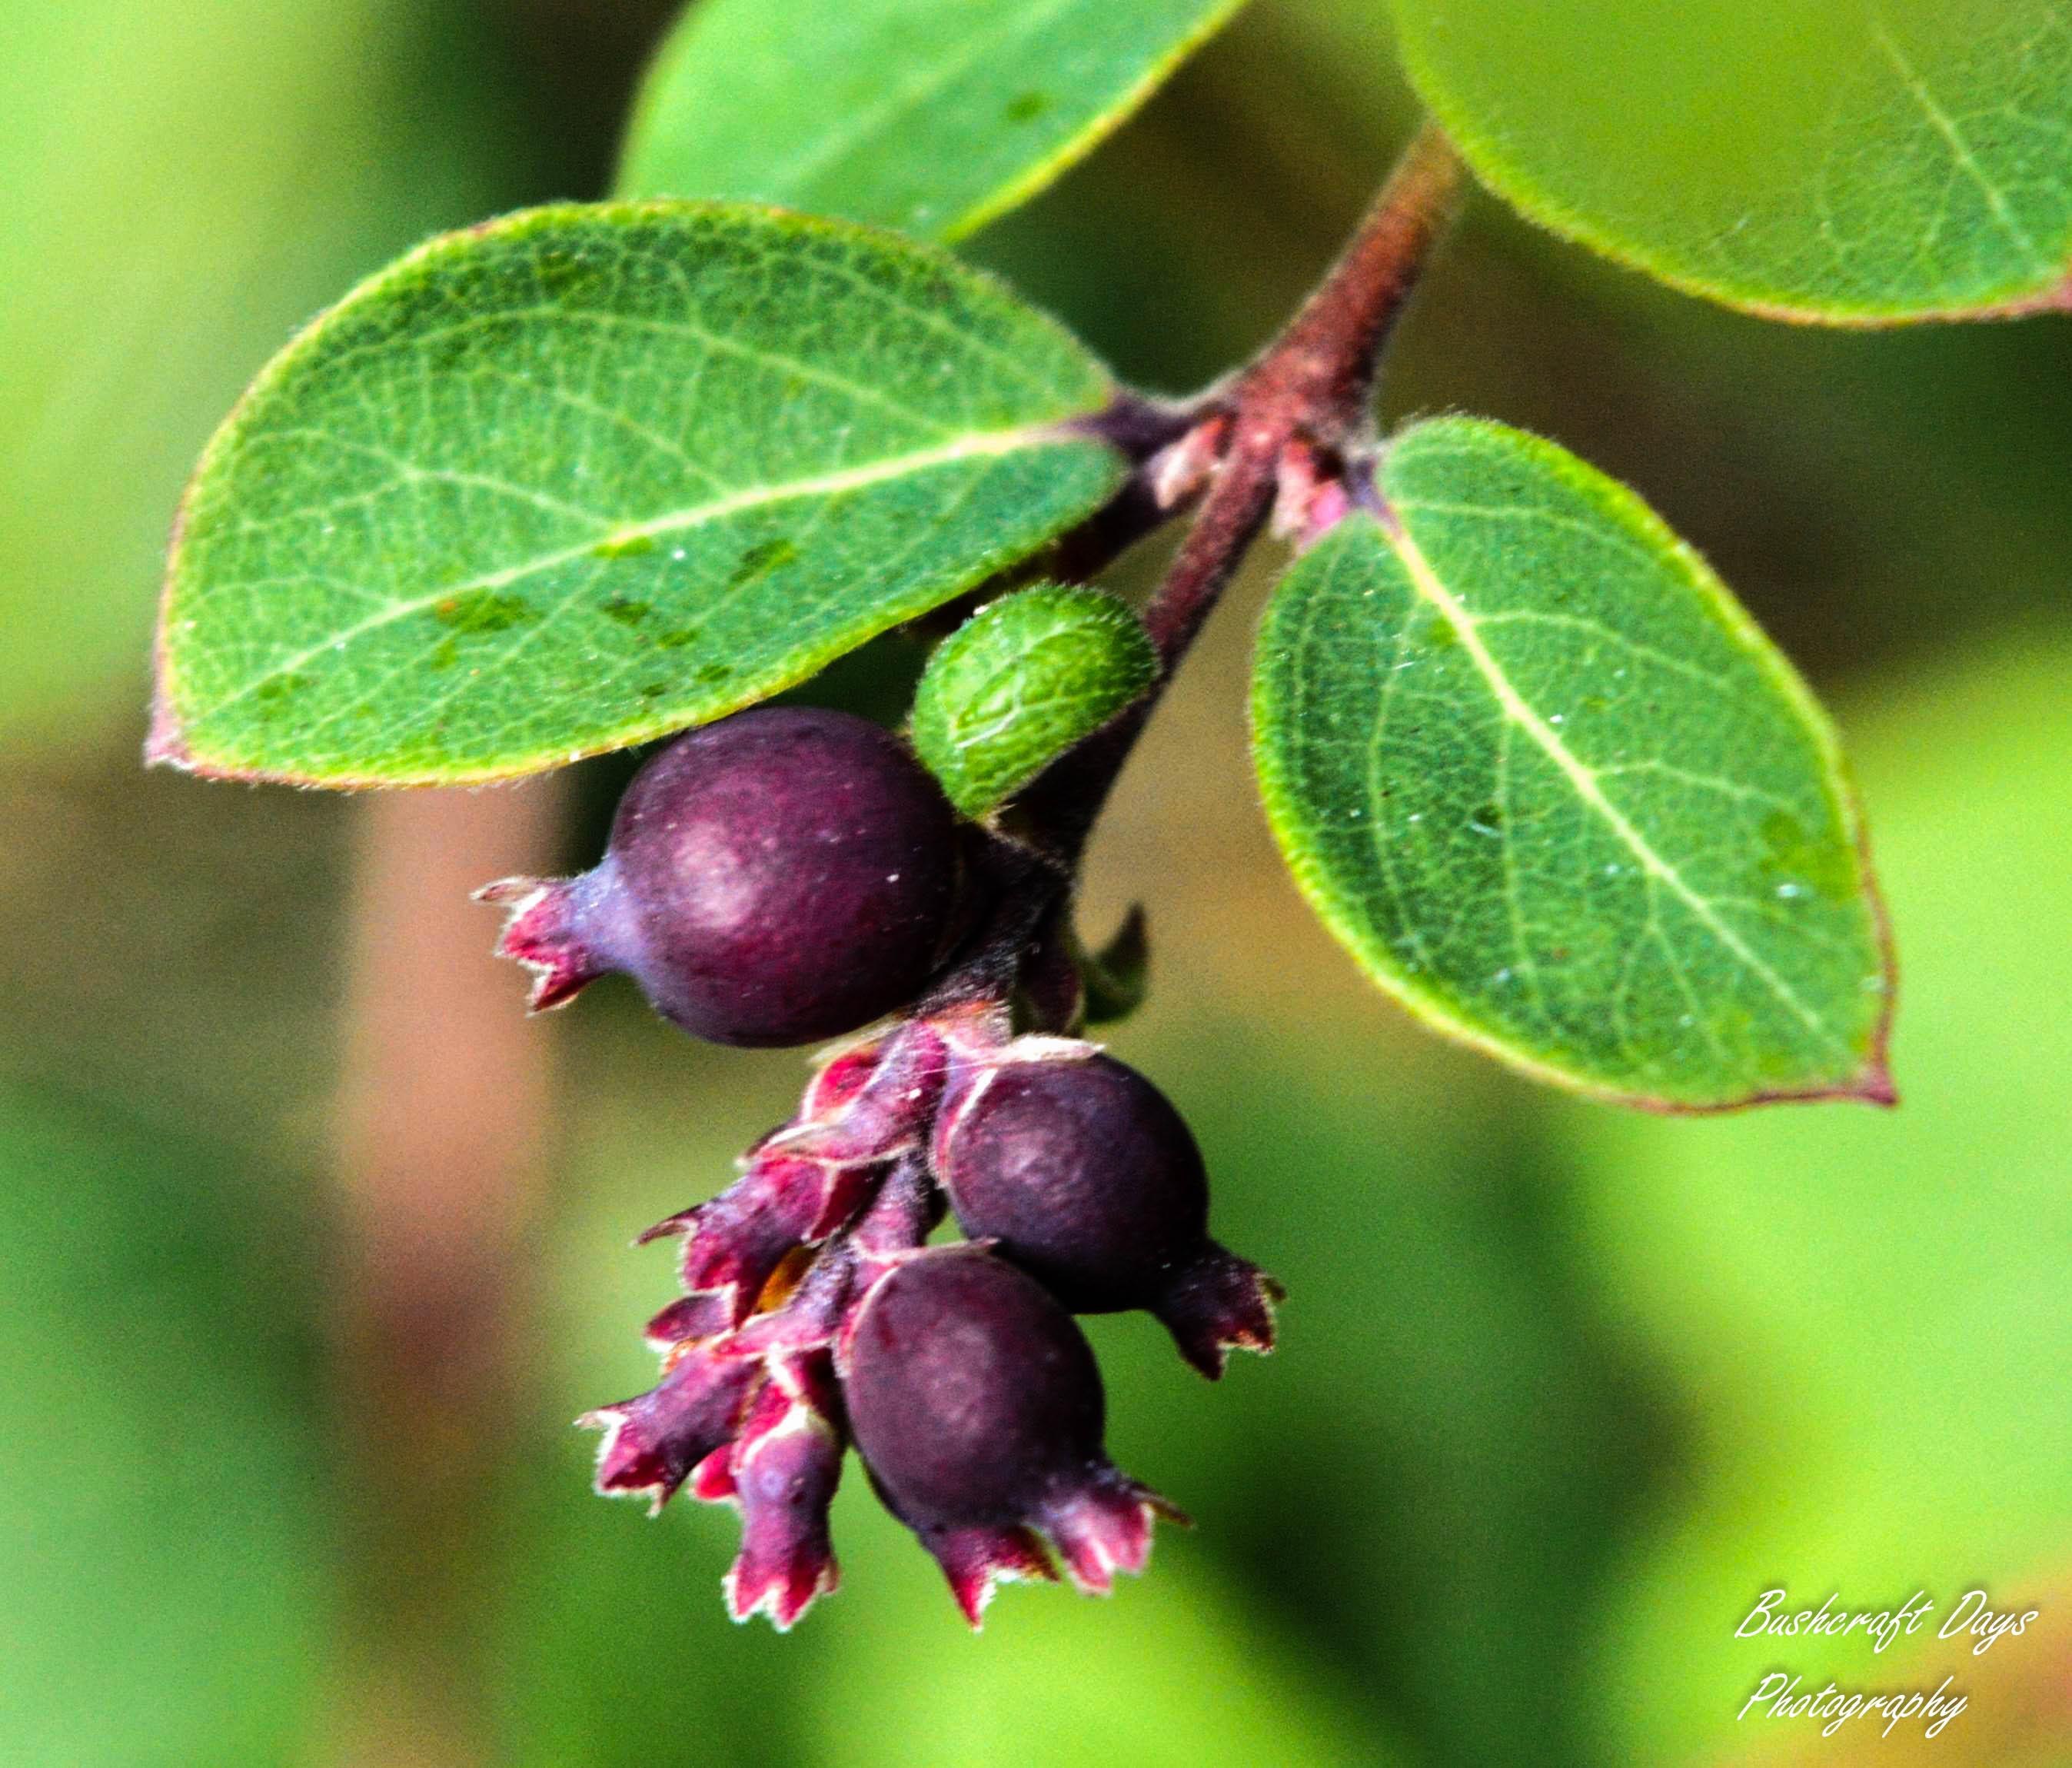
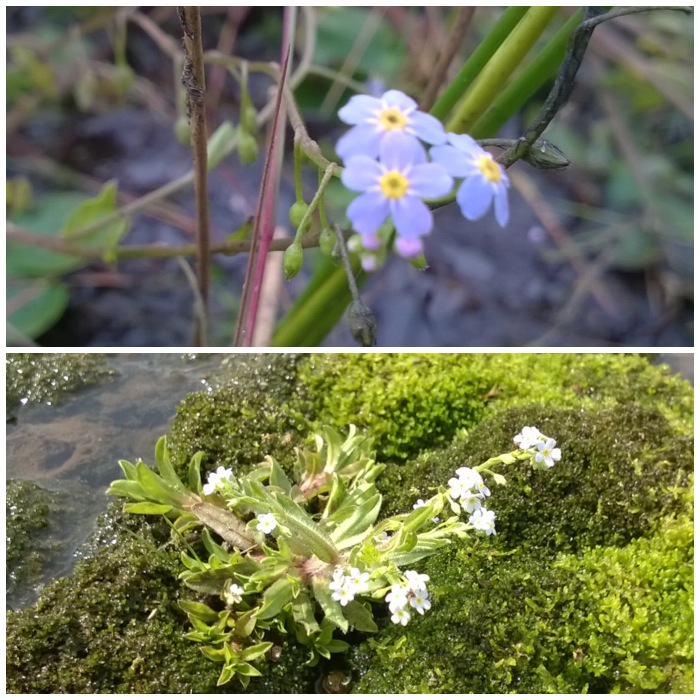
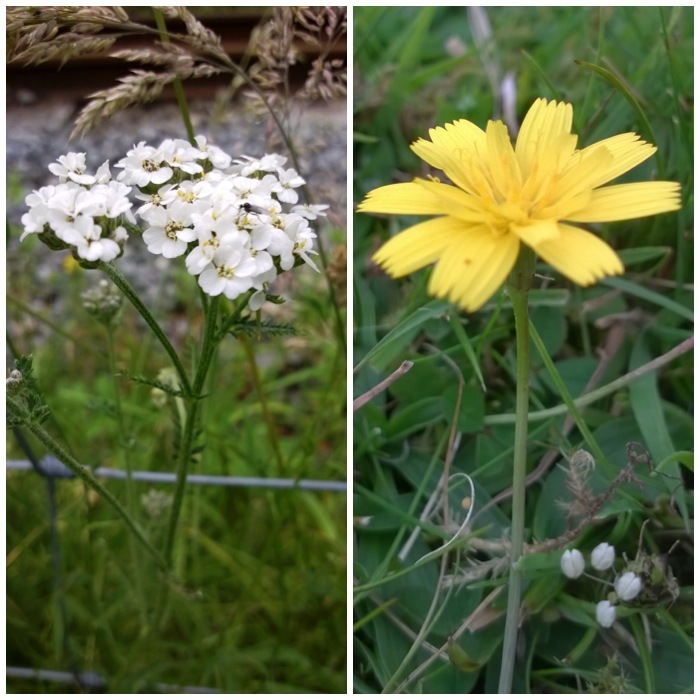
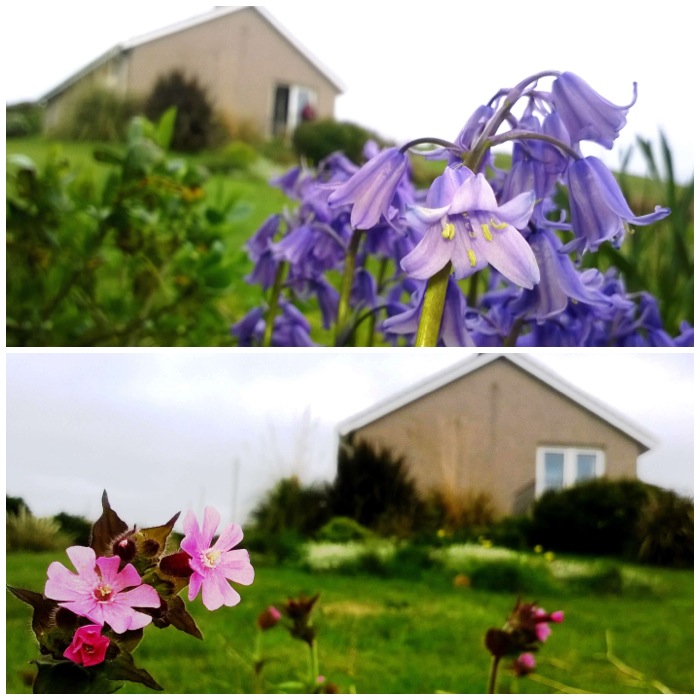
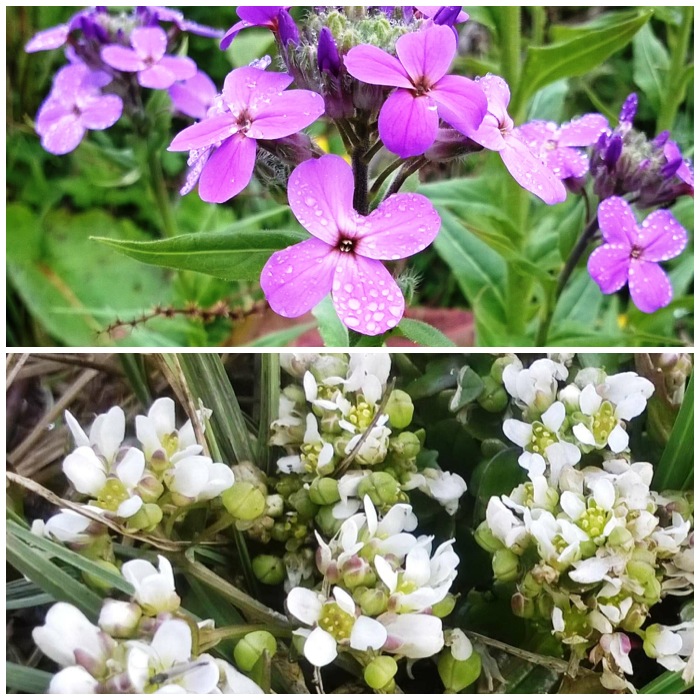
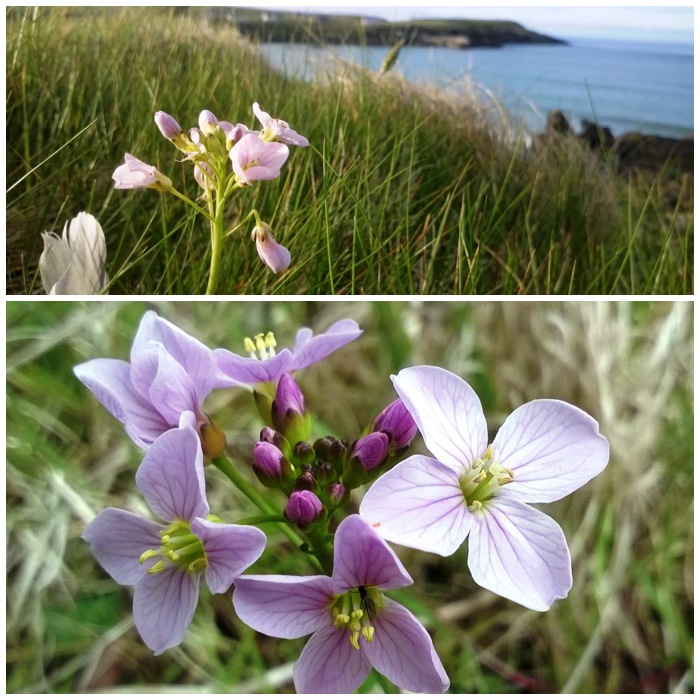
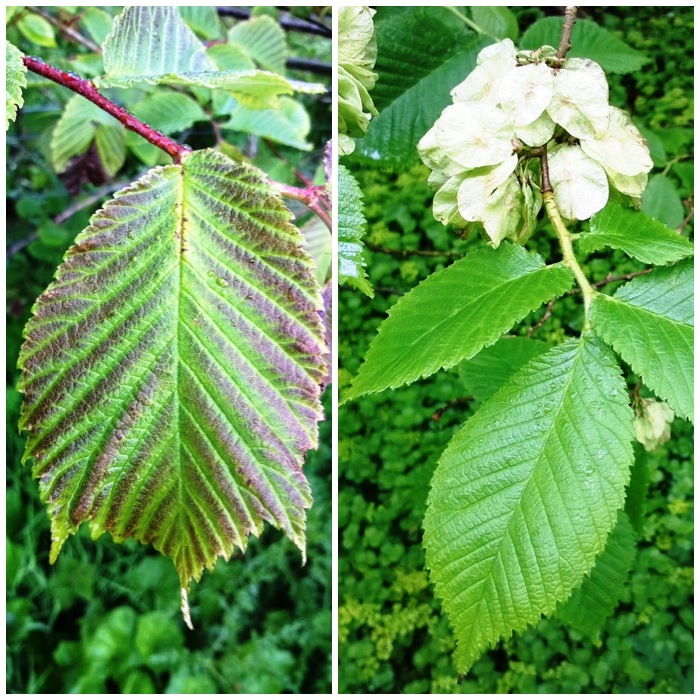
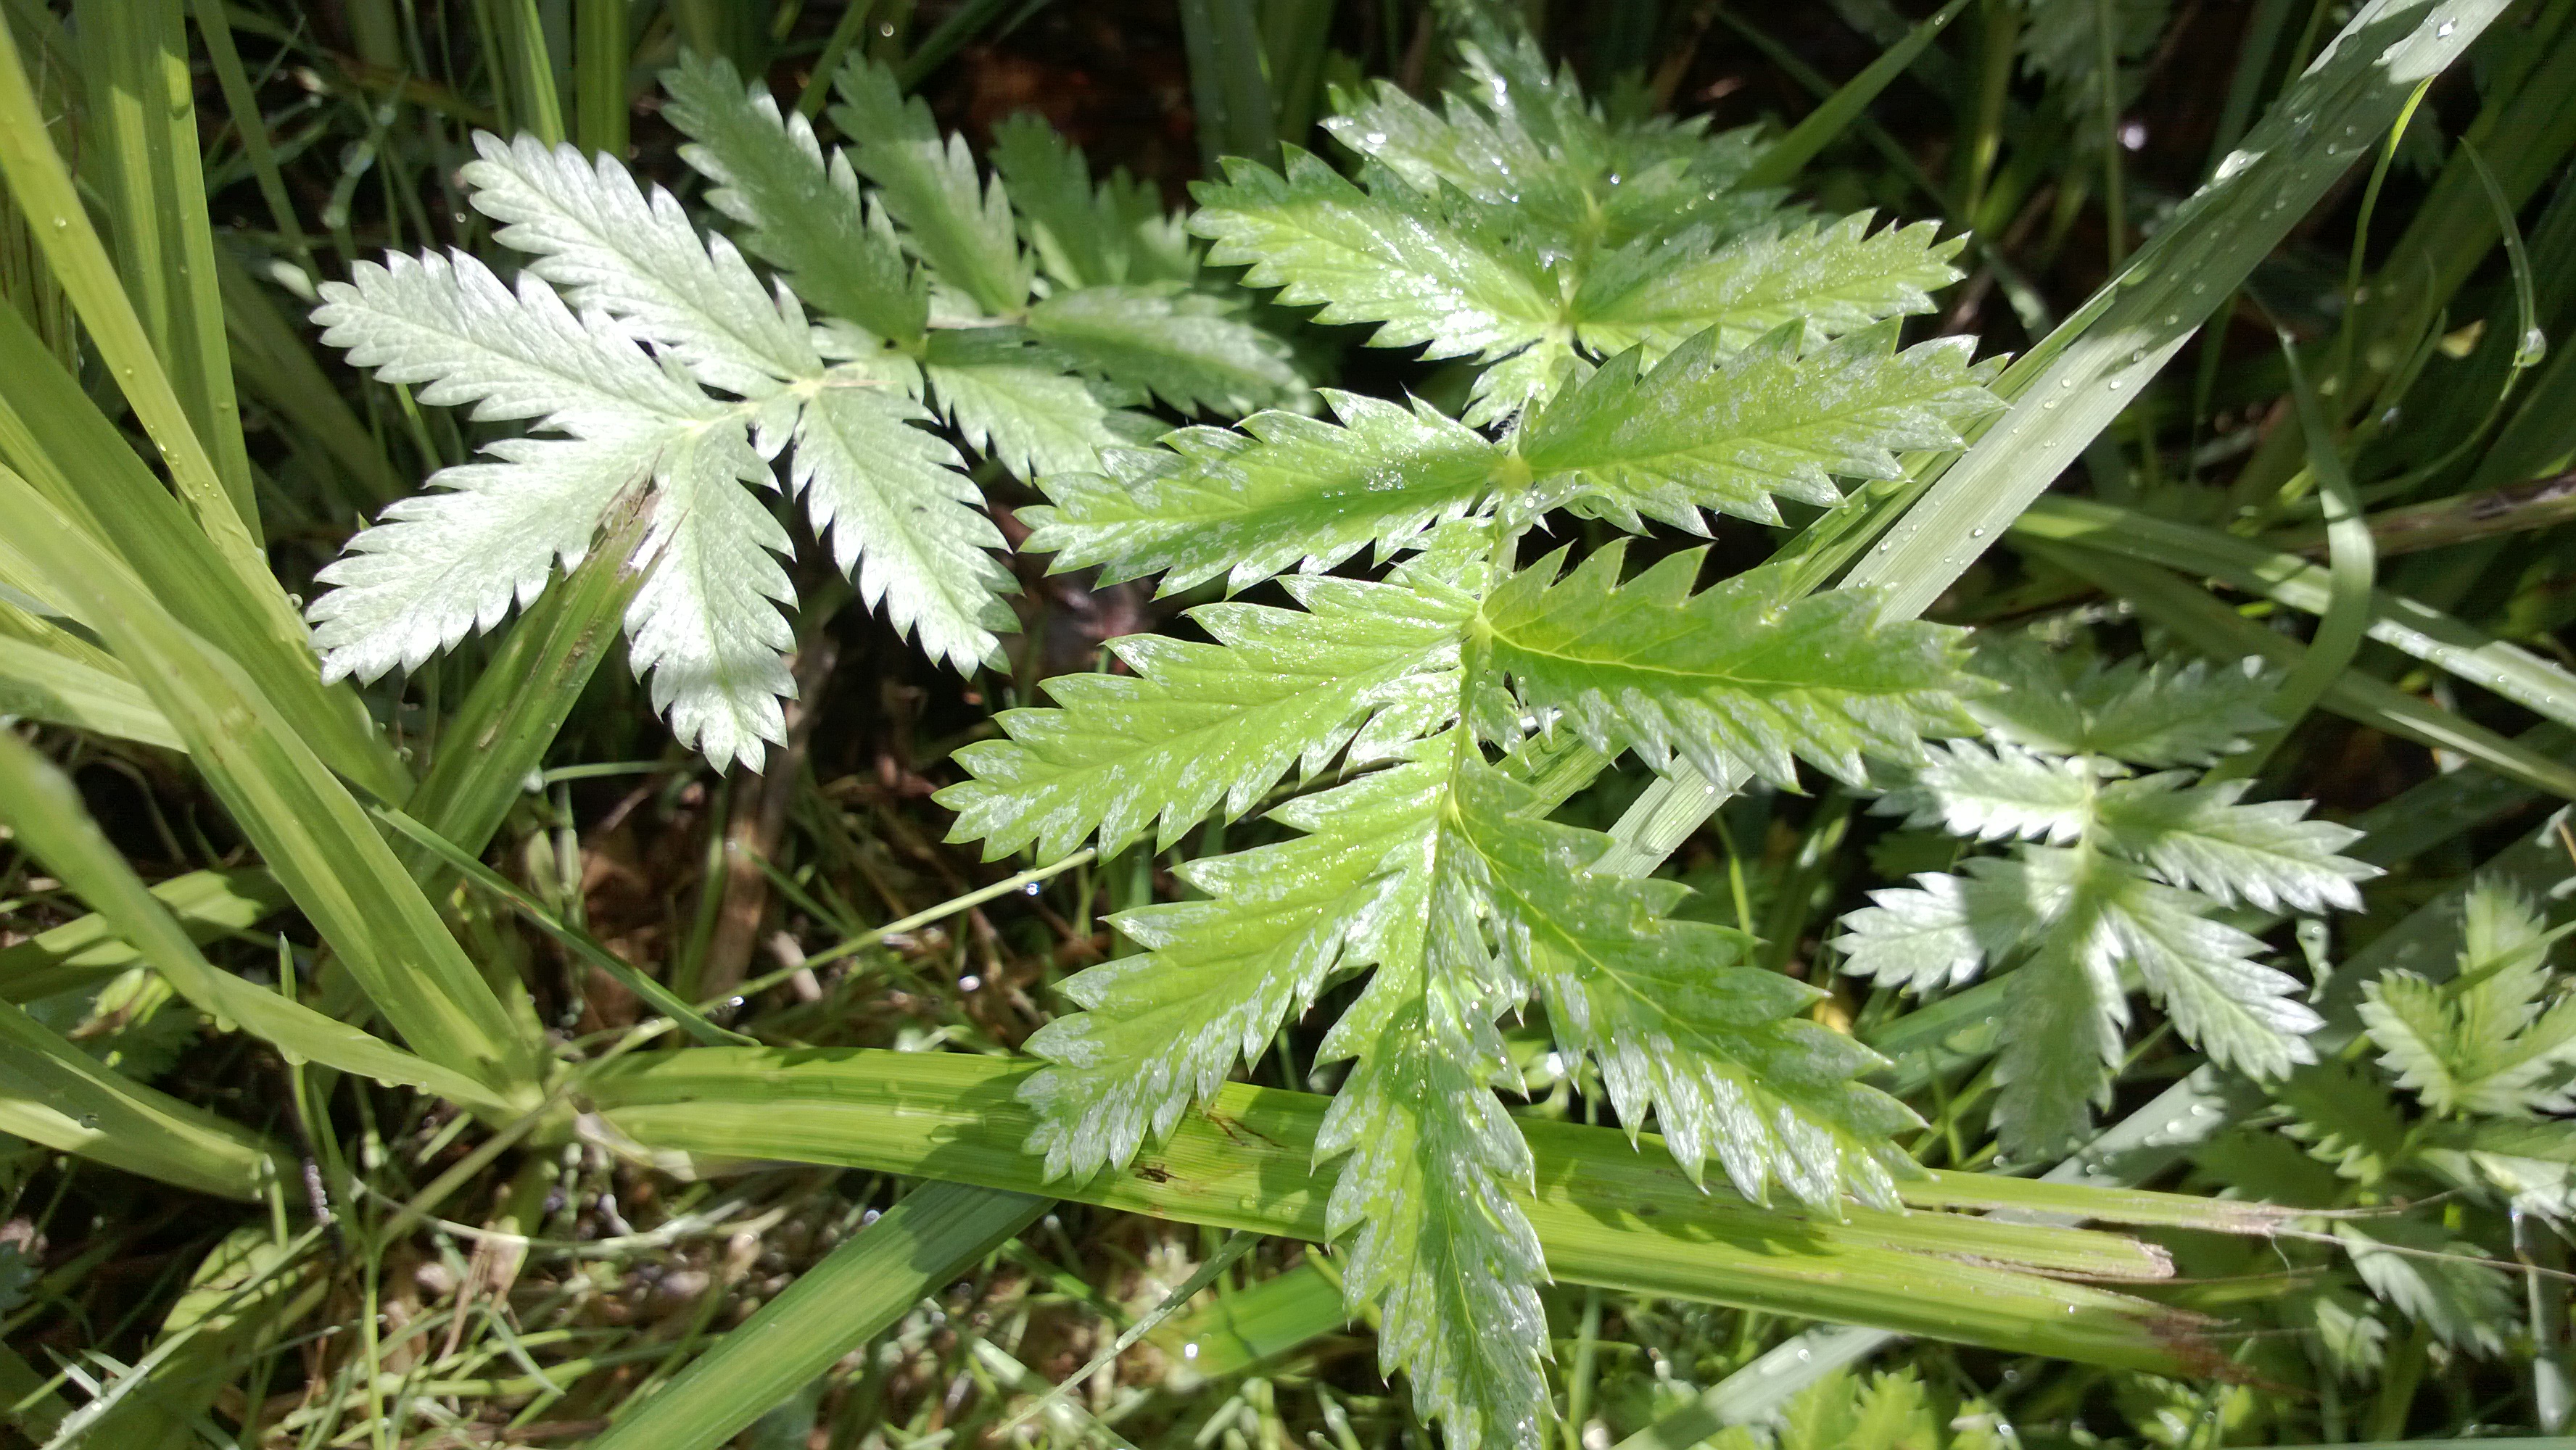
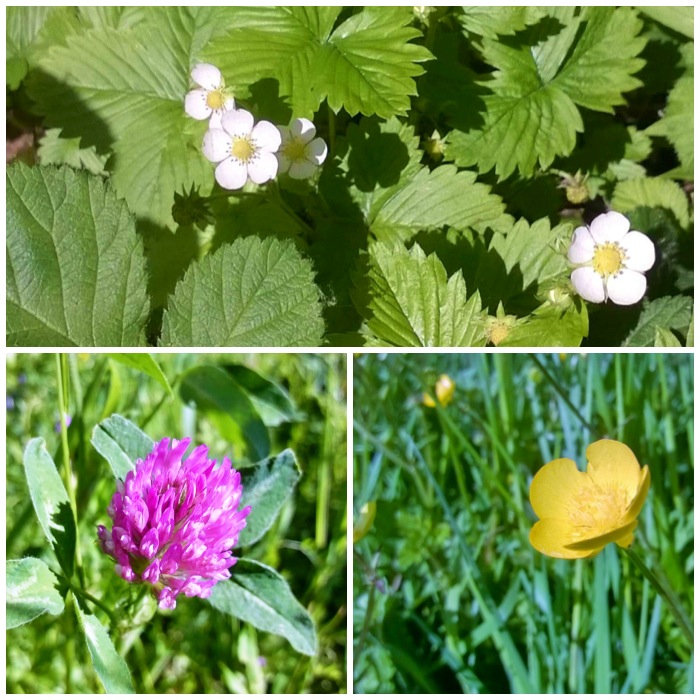
On my trip to the New Forest last May with the Sea Cadets there were a few unusual and beautiful sights to be found.
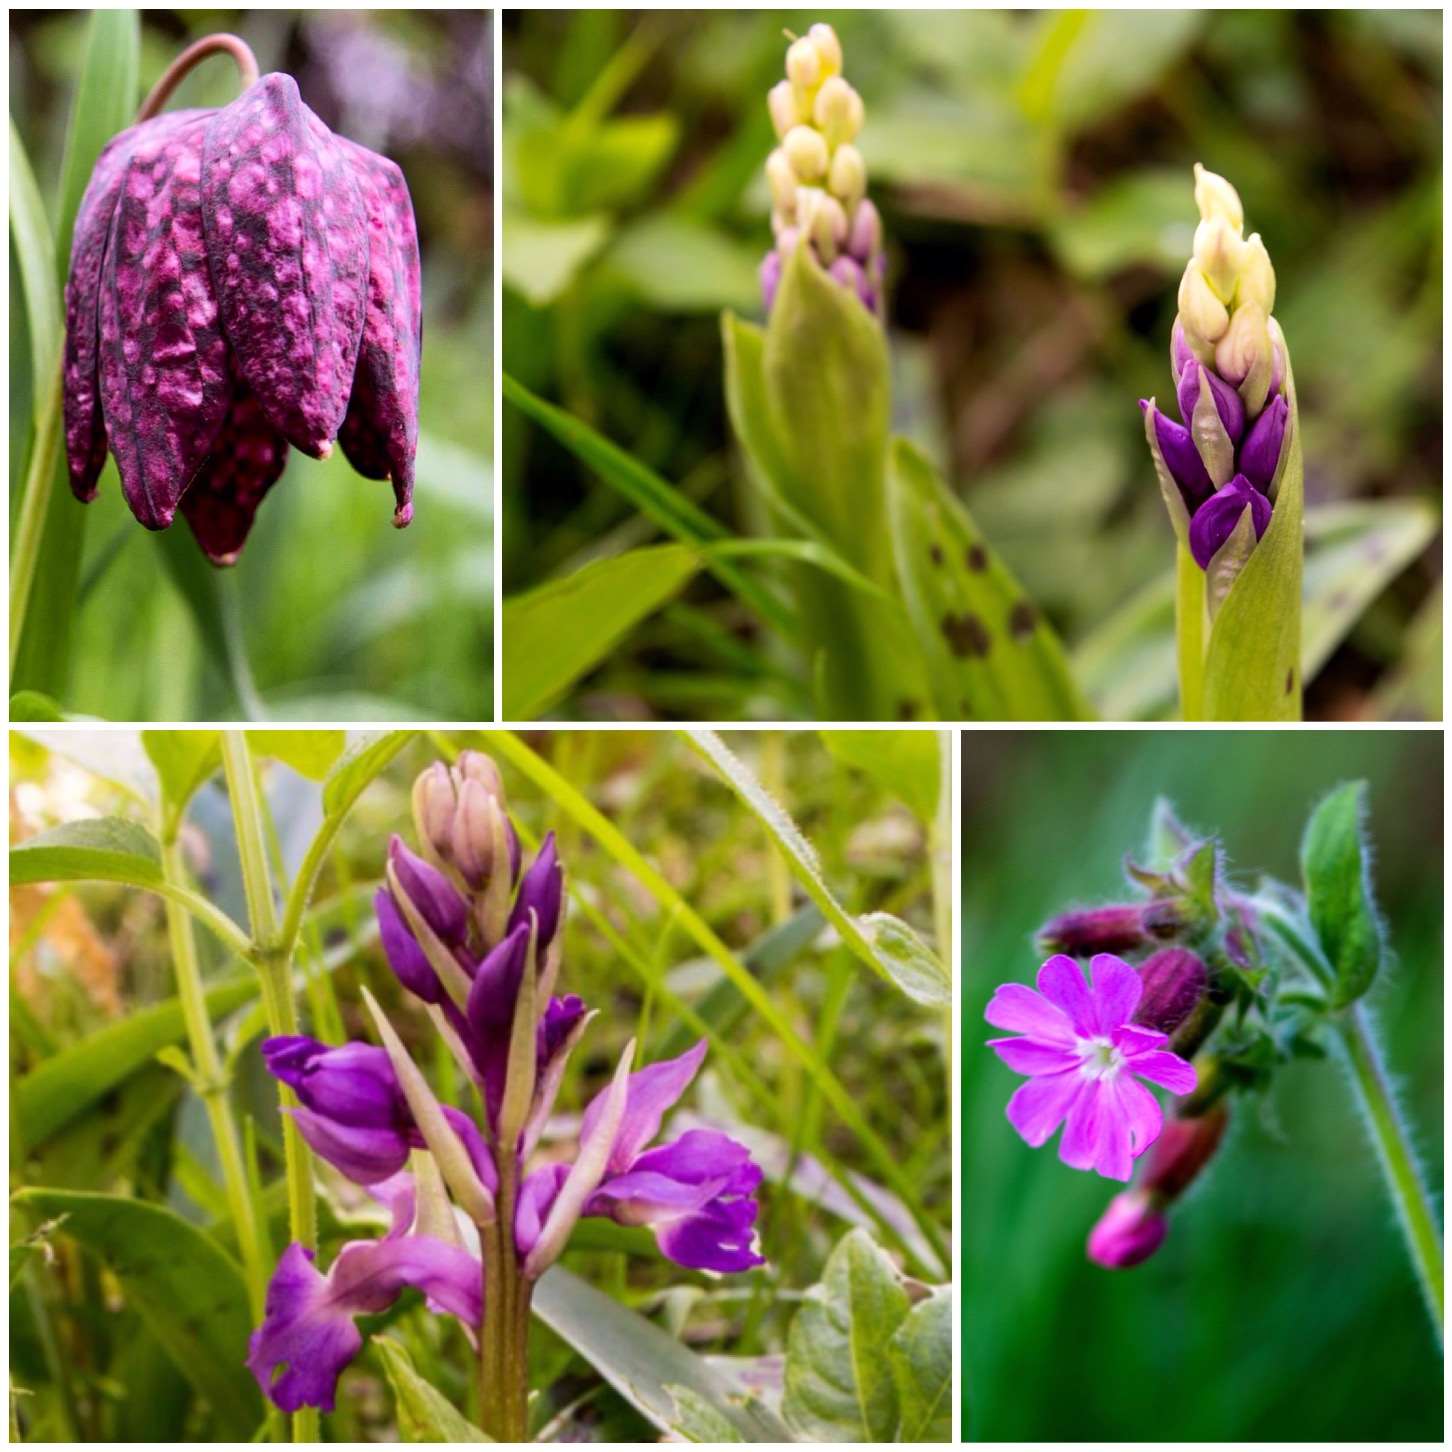
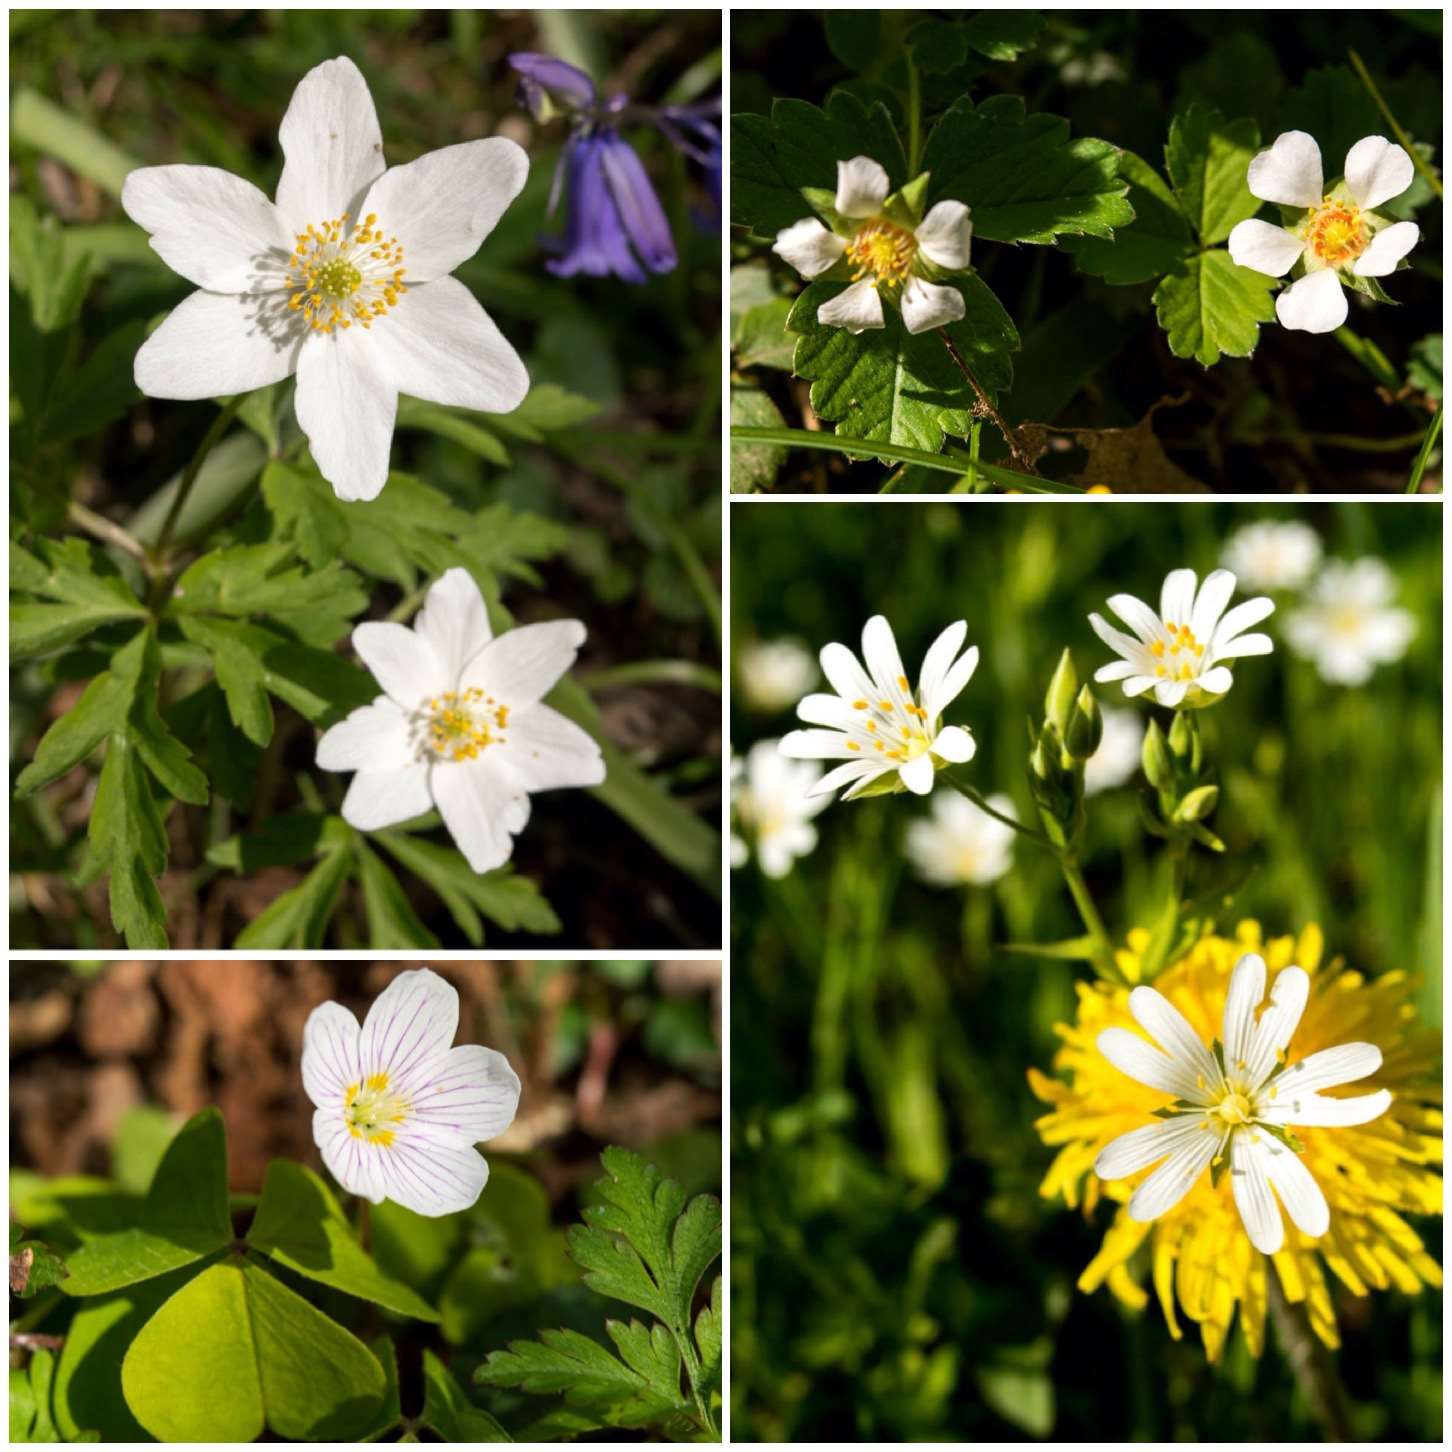
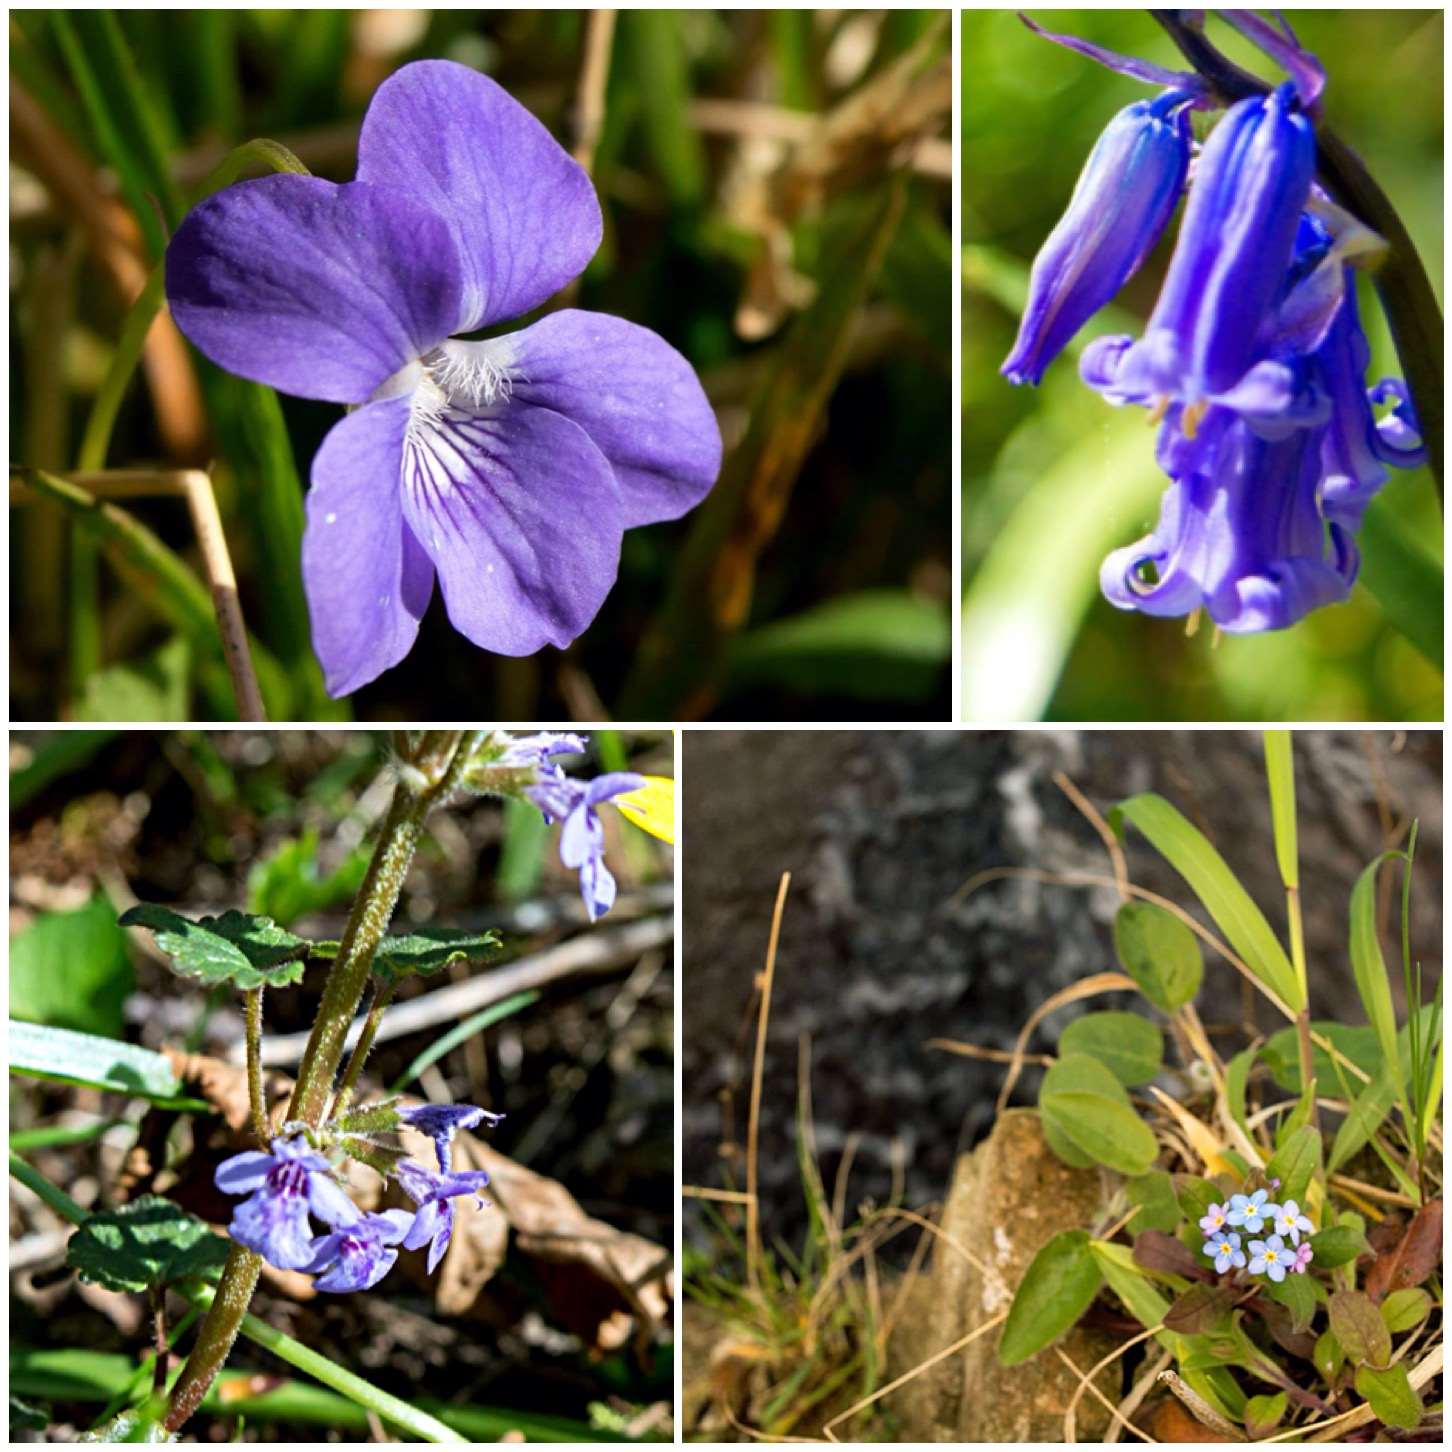
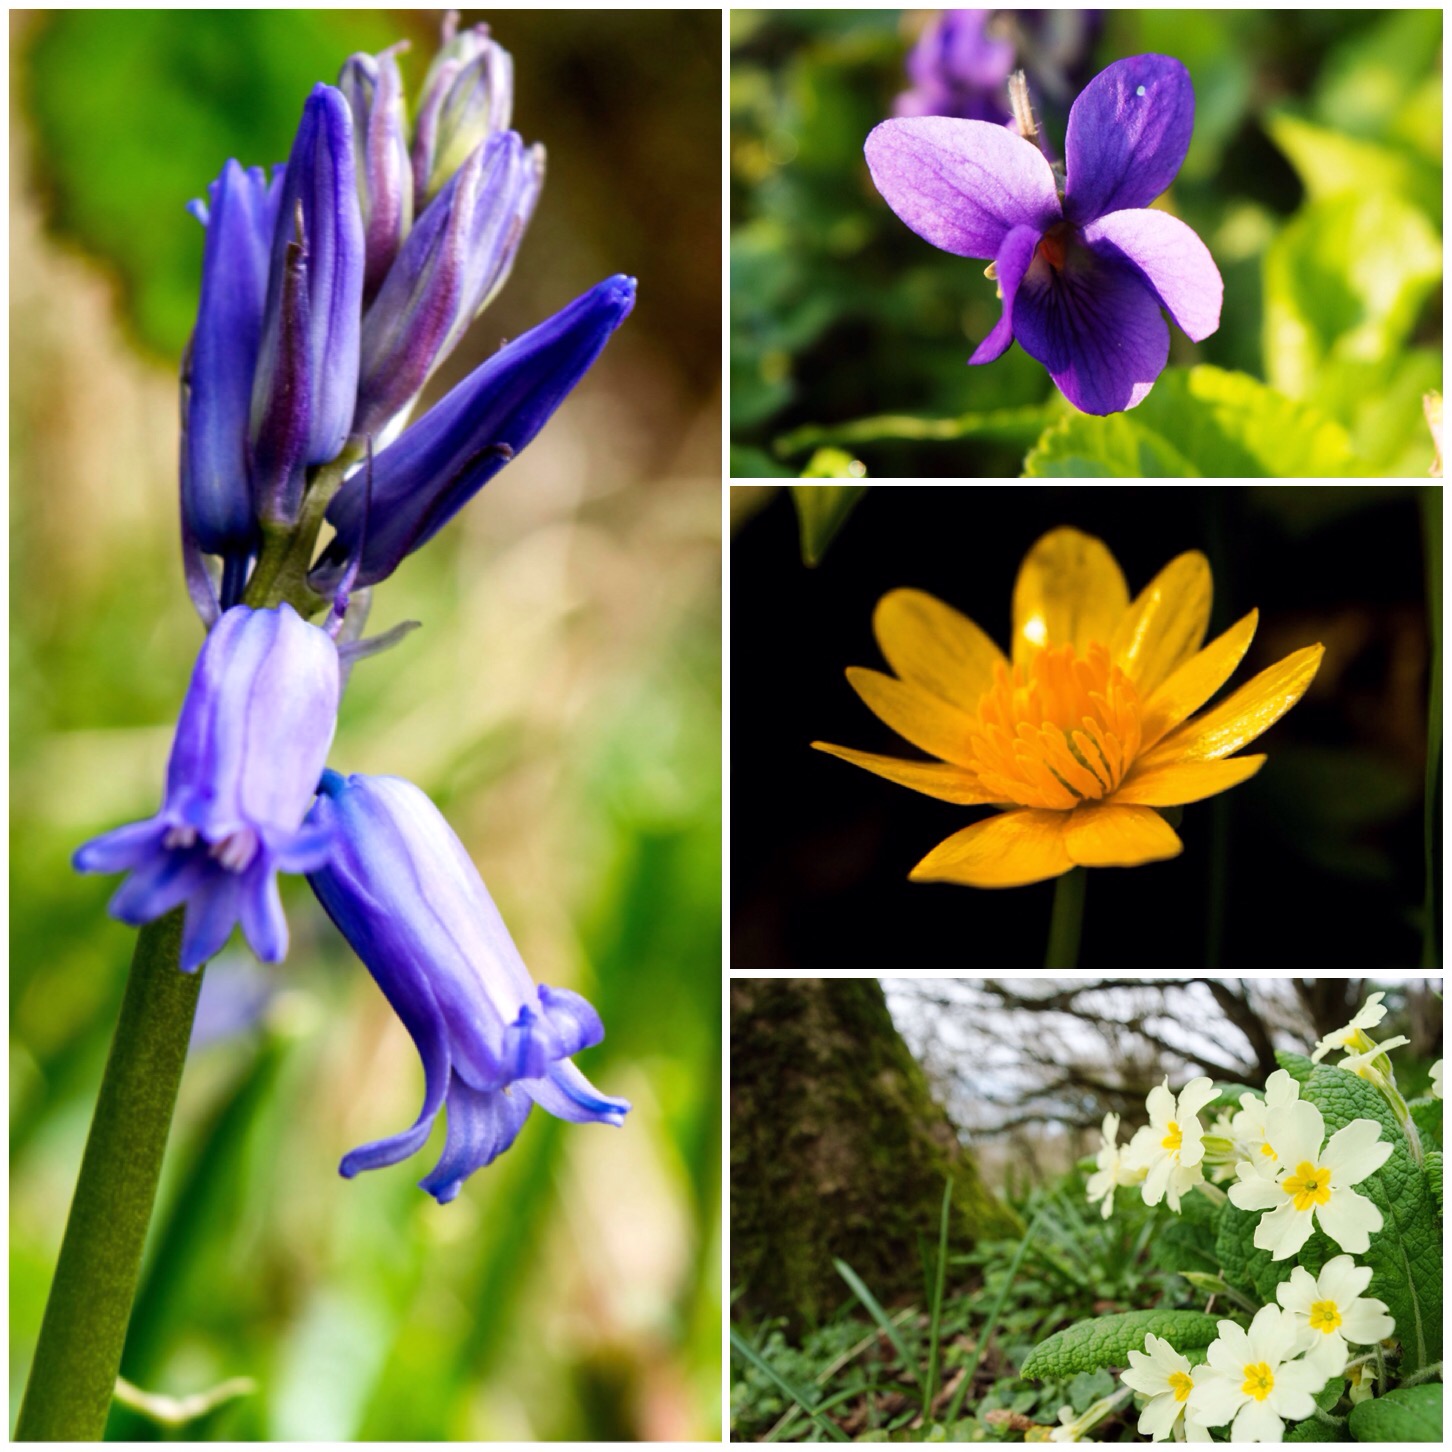
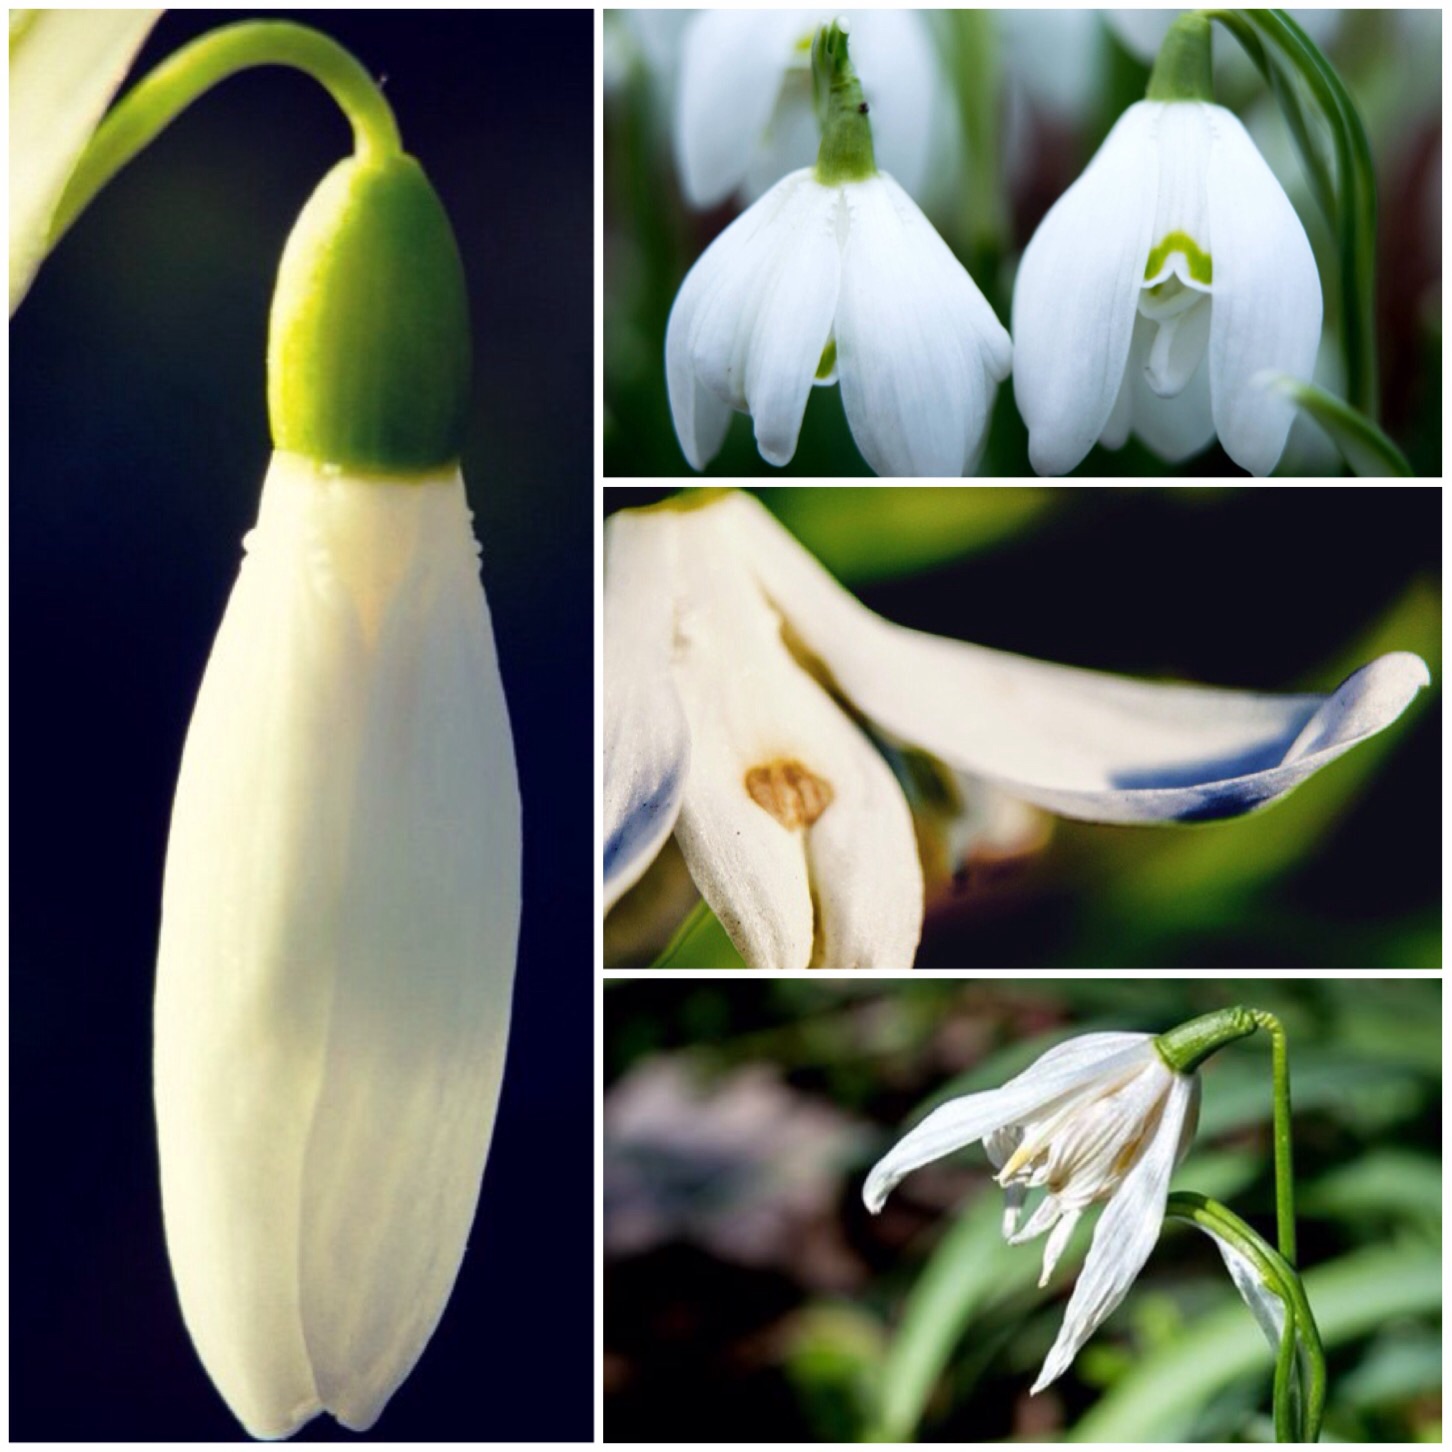
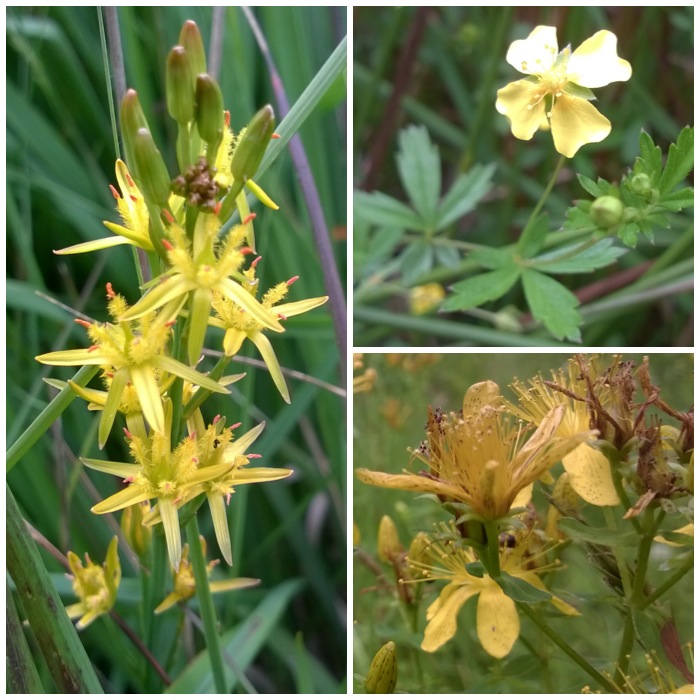
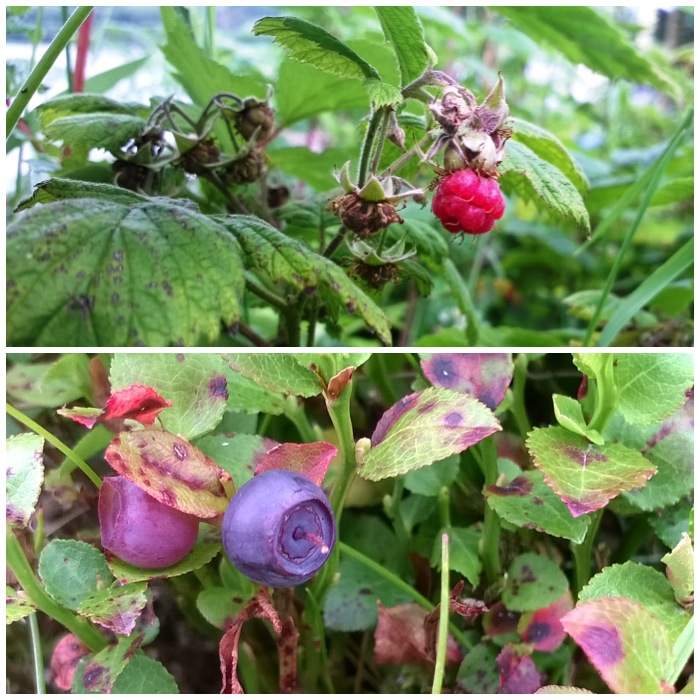
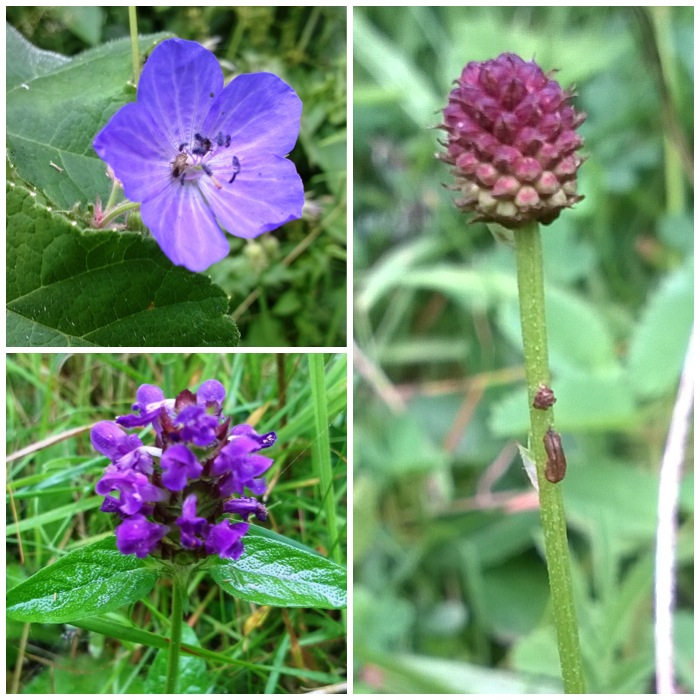
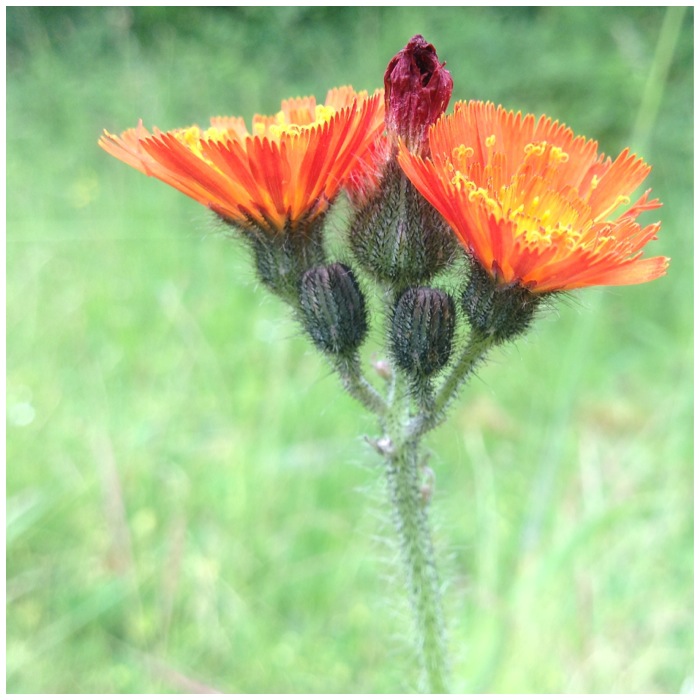
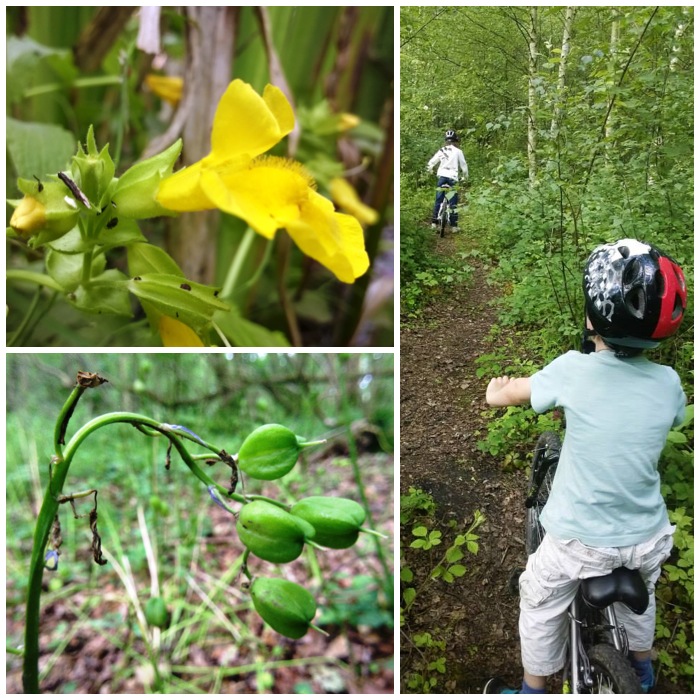
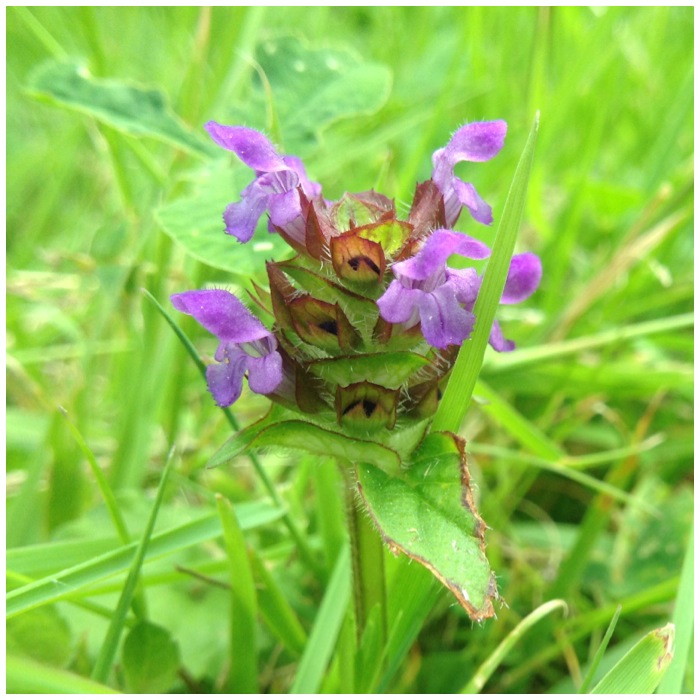
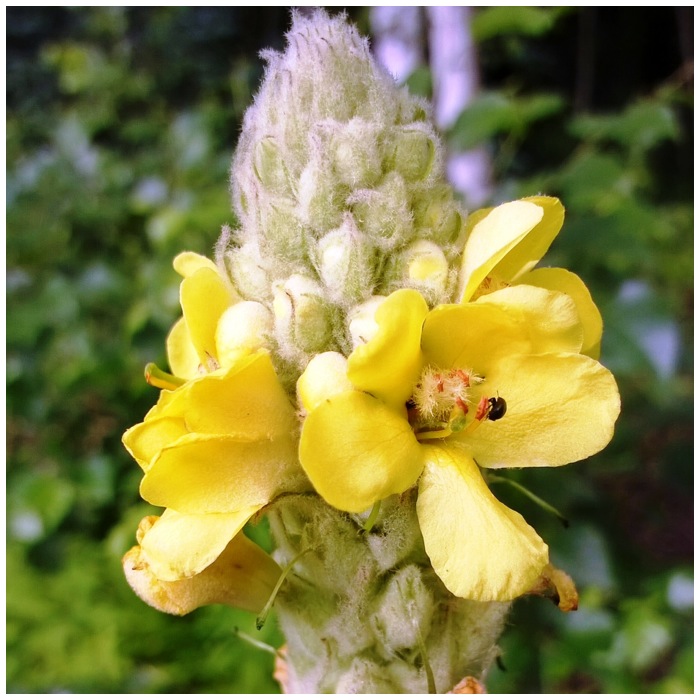
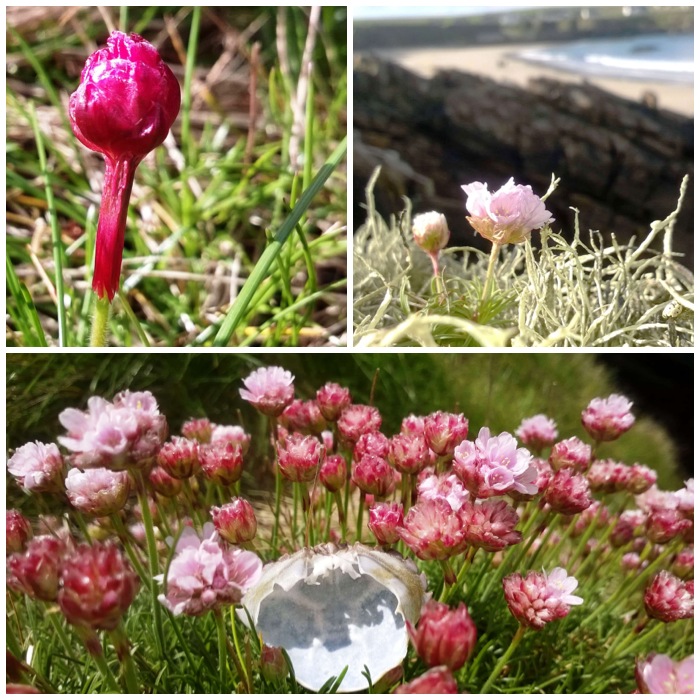
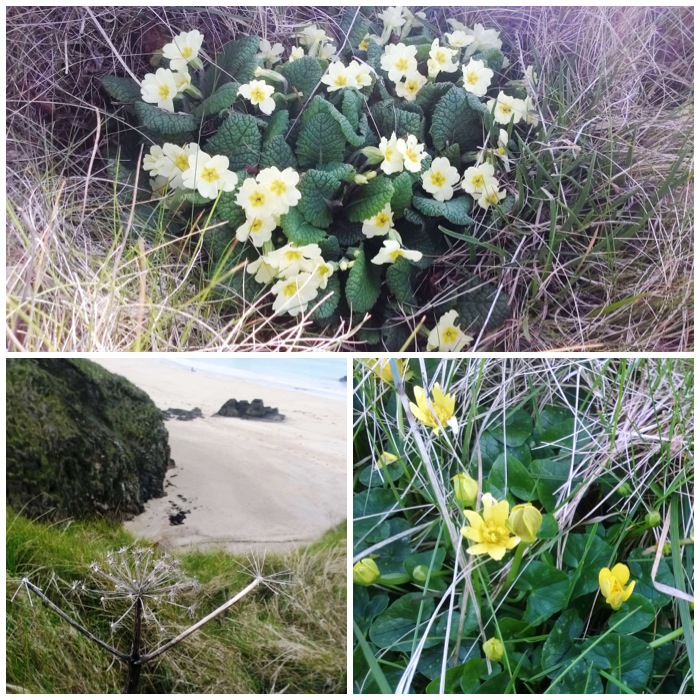
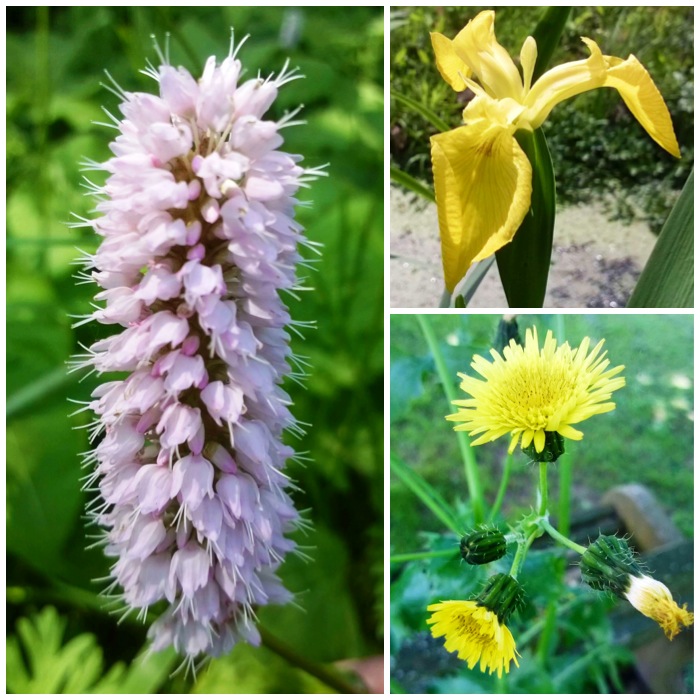
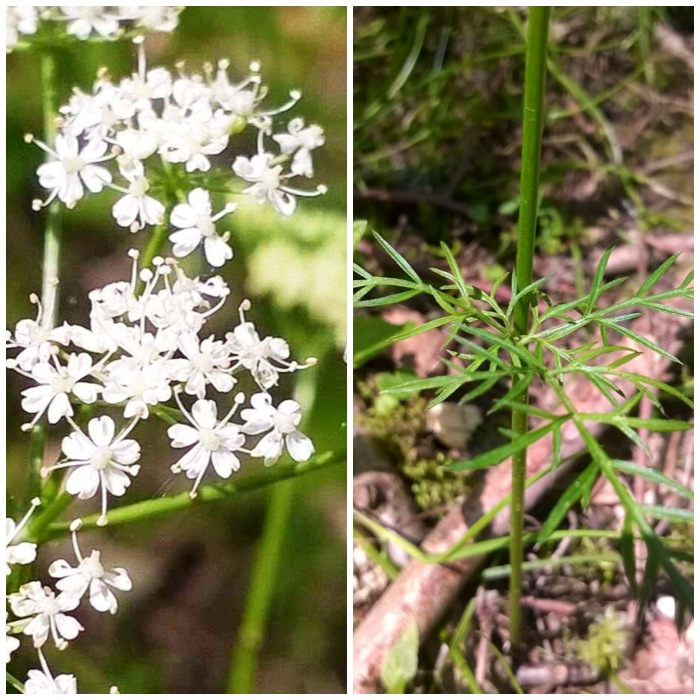
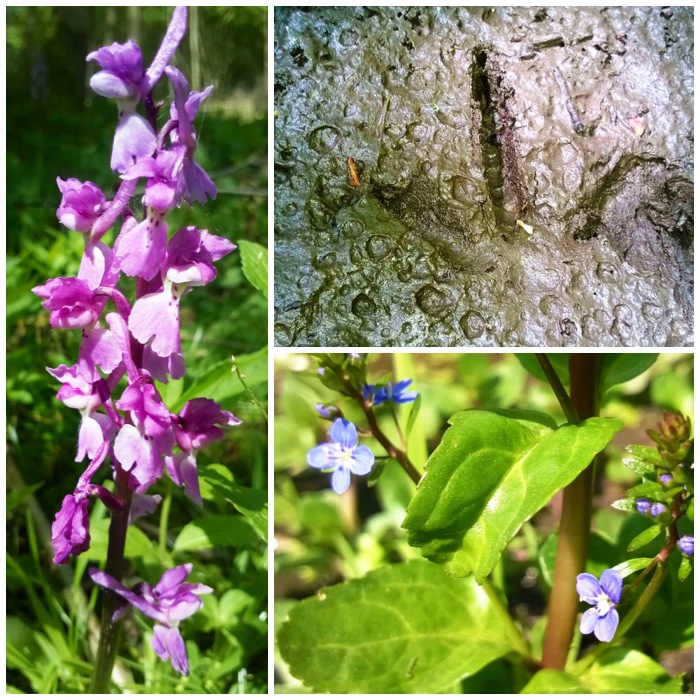
Many of the wildflowers in the New Forest get cropped back by all the animals grazing but looking closely I found some lovely Bugle, Tormentil and Lousewort.
Cool Colours
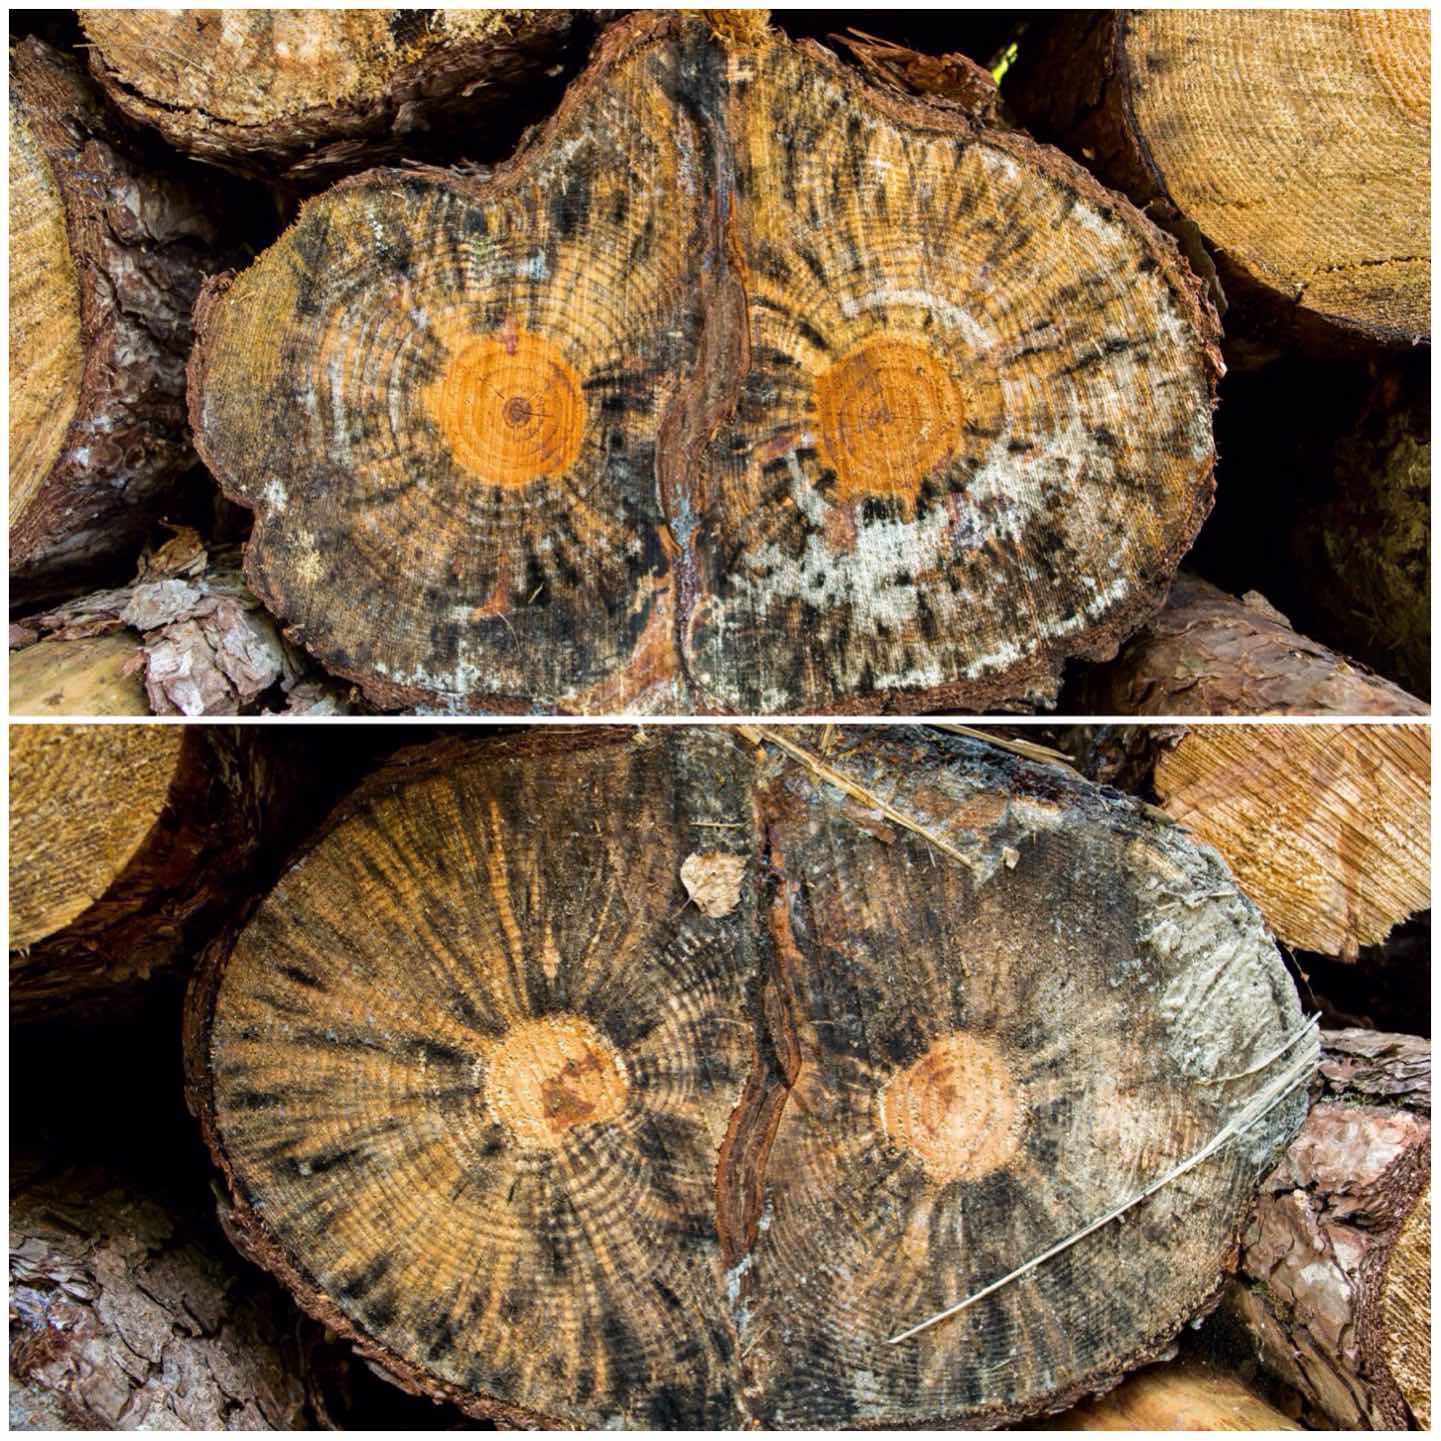
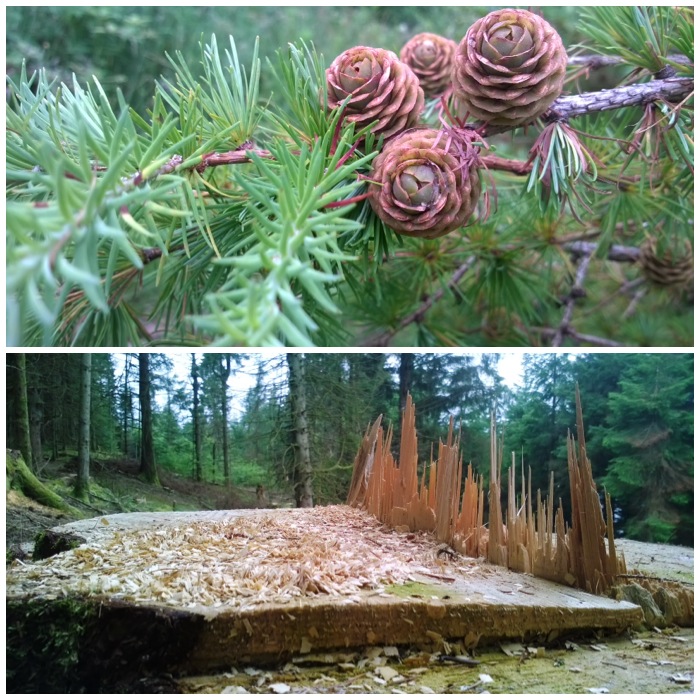
I spotted a log pile of conifer wood and a number of the trunks were made up of two trunks merged together. Quite a weird sight to see what looked like weird robotic eyes looking out at you as you passed by.
Tree Eyes
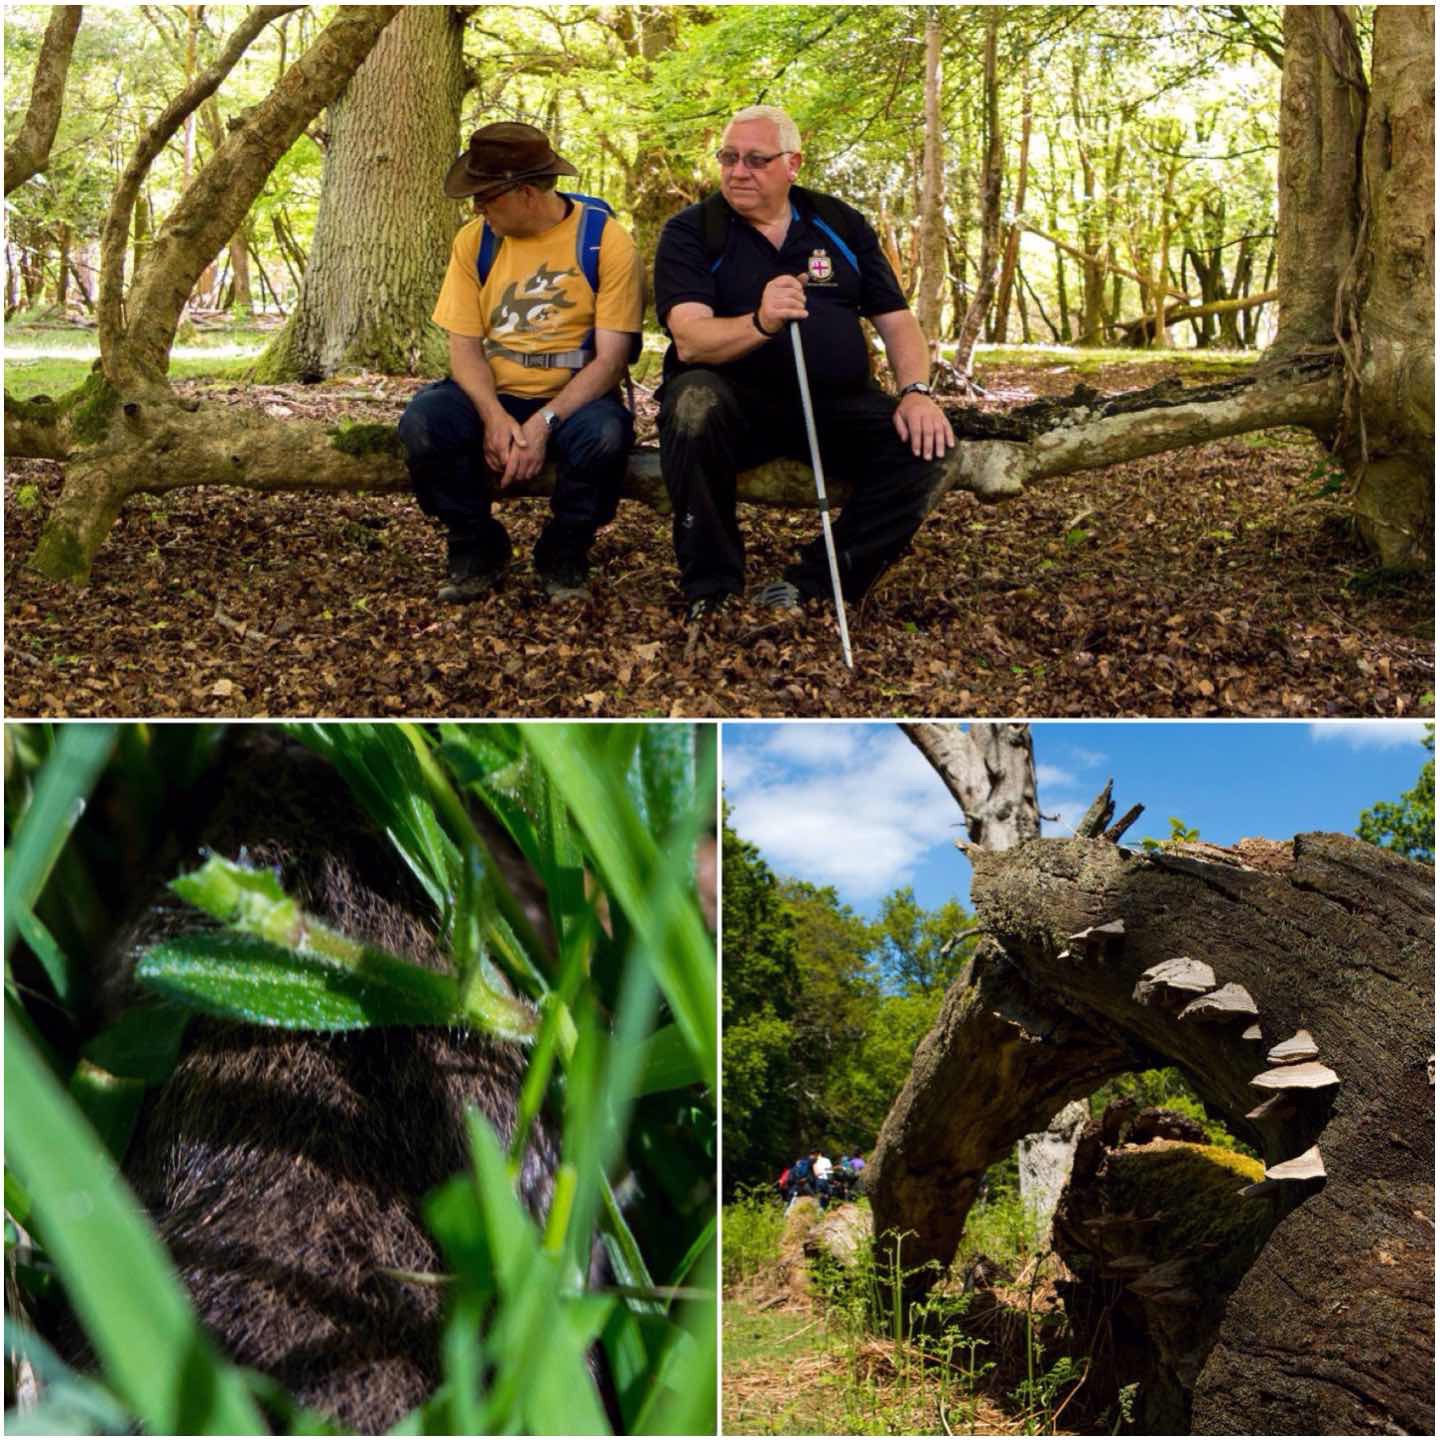
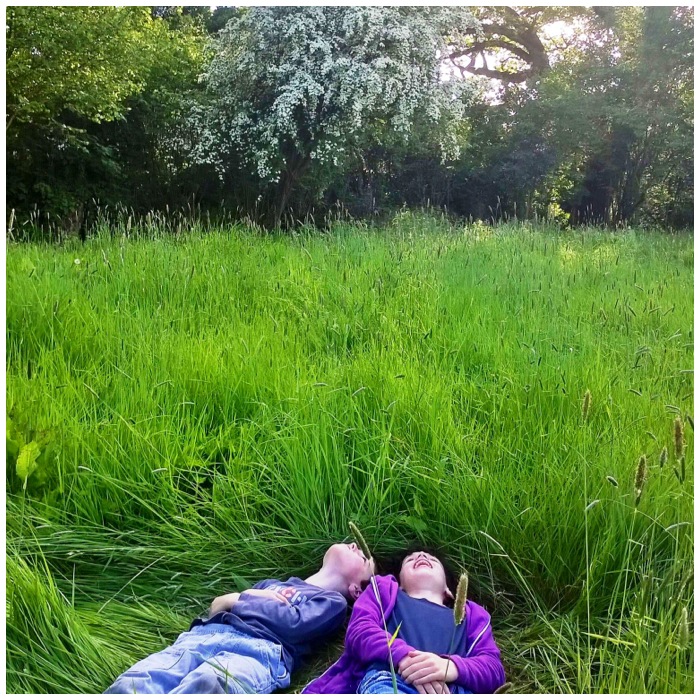
While walking around we came across two Holly trees that were joined together by a horizontal trunk. It made for the perfect seat.
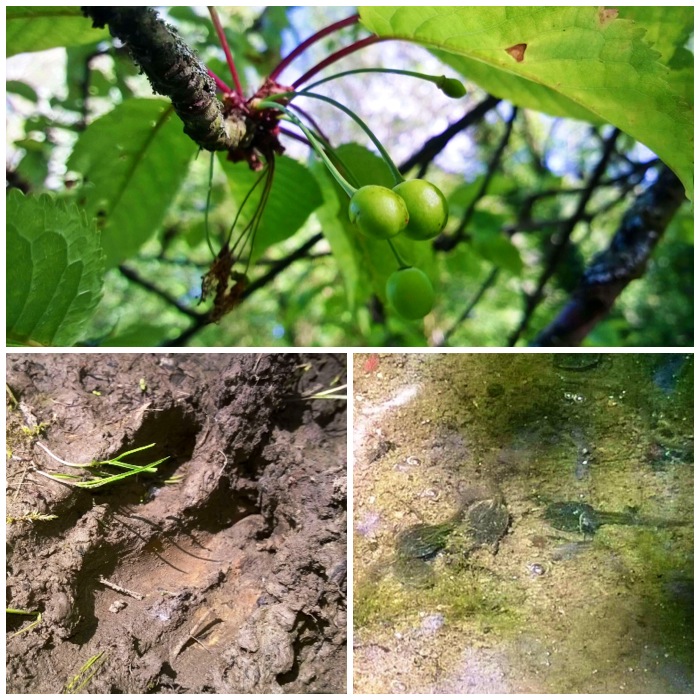
Also I spotted what looked like a small vole rummaging around in the grass (bottom left). He spotted me and played dead so letting me get up real close.
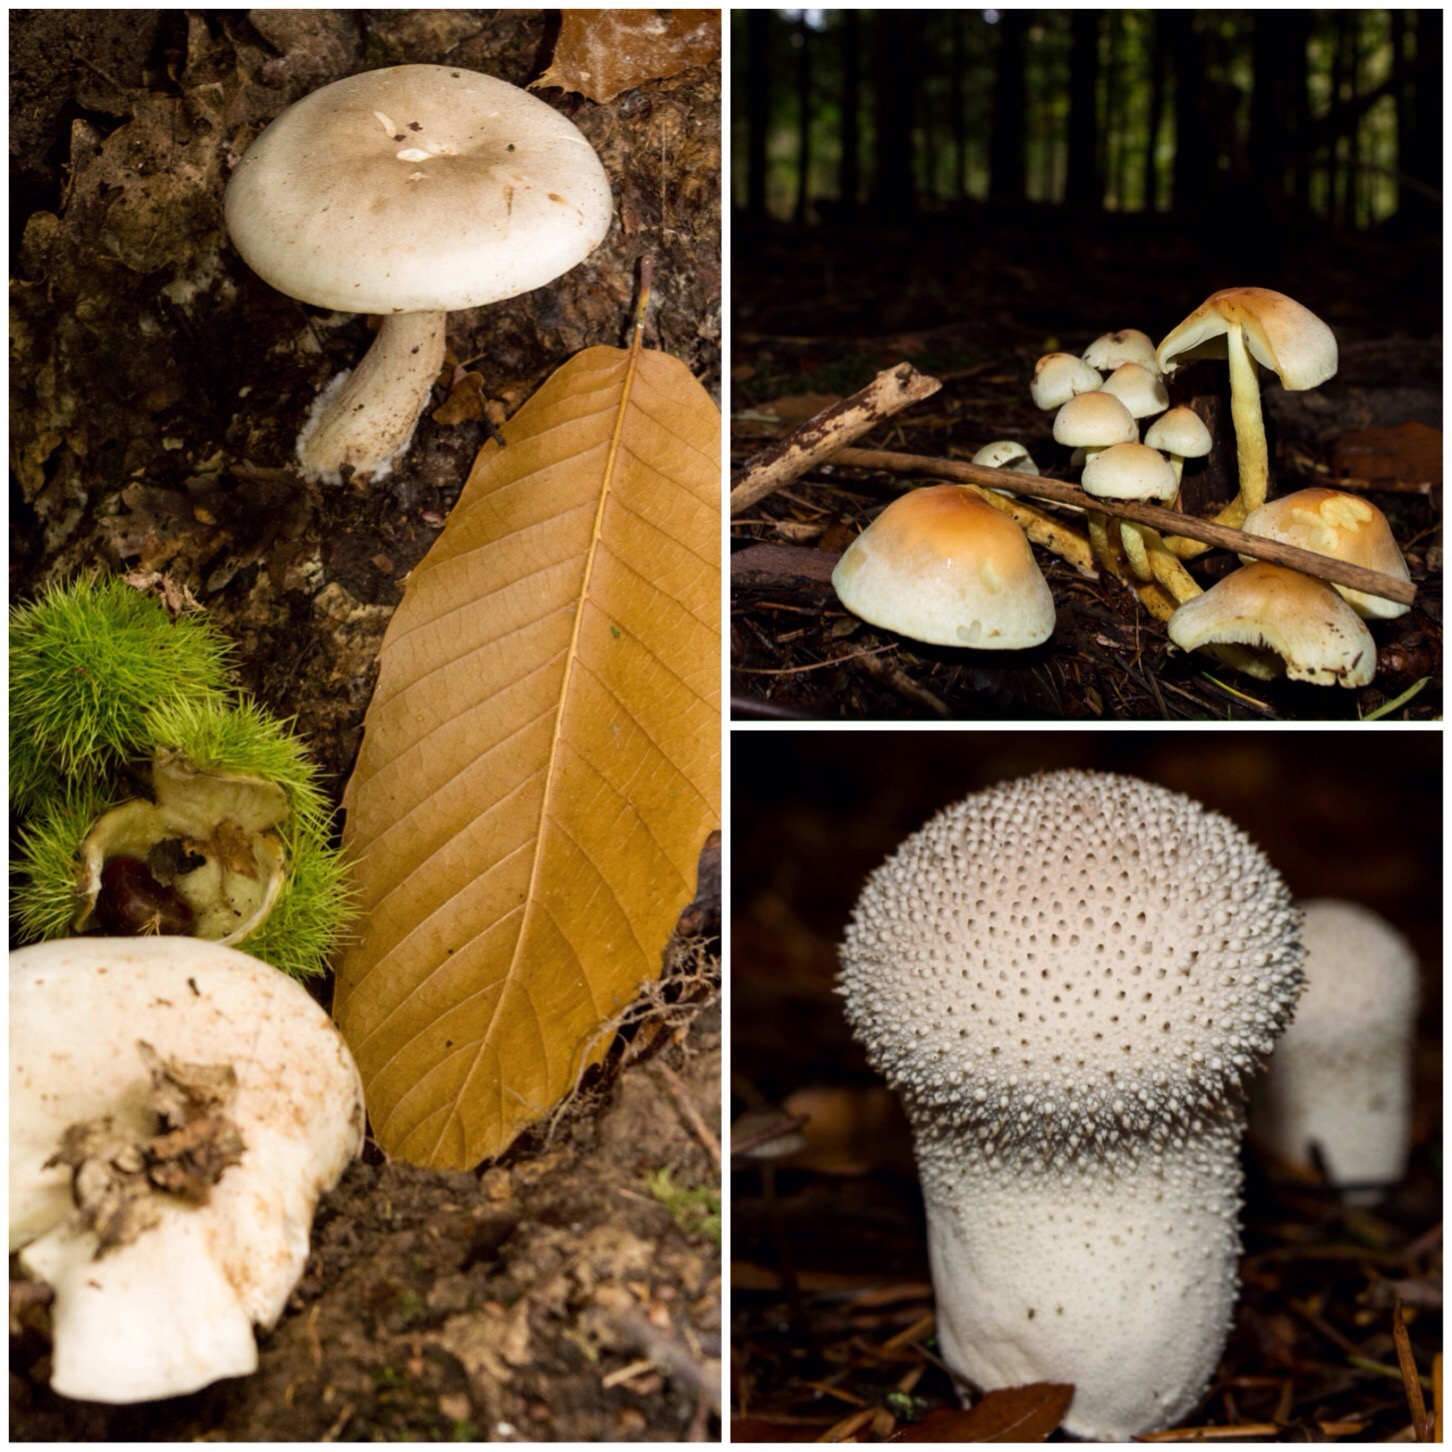
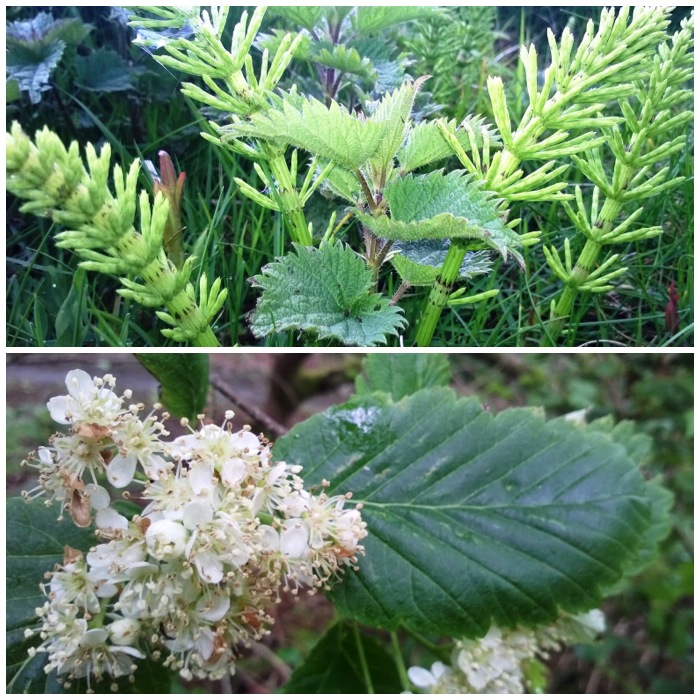
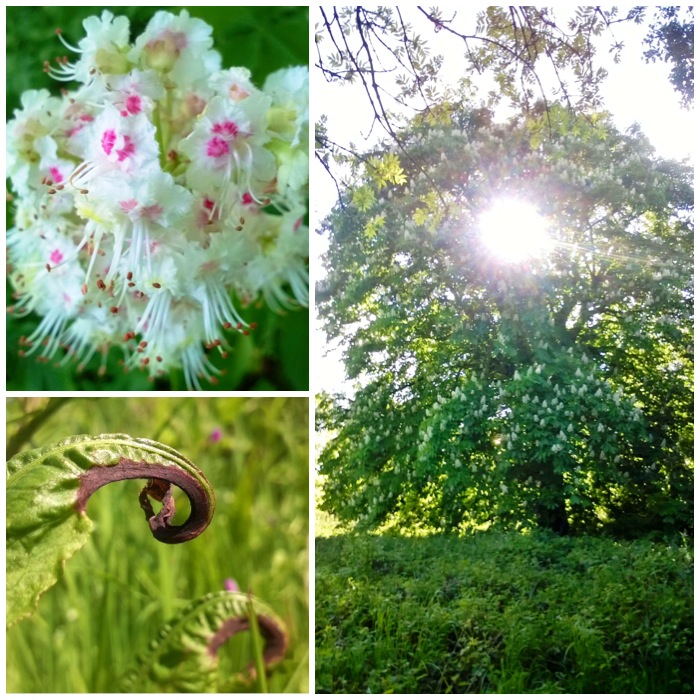
And as usual there were plenty of bracket fungus to be seen across the whole forest.
Micro and Macro
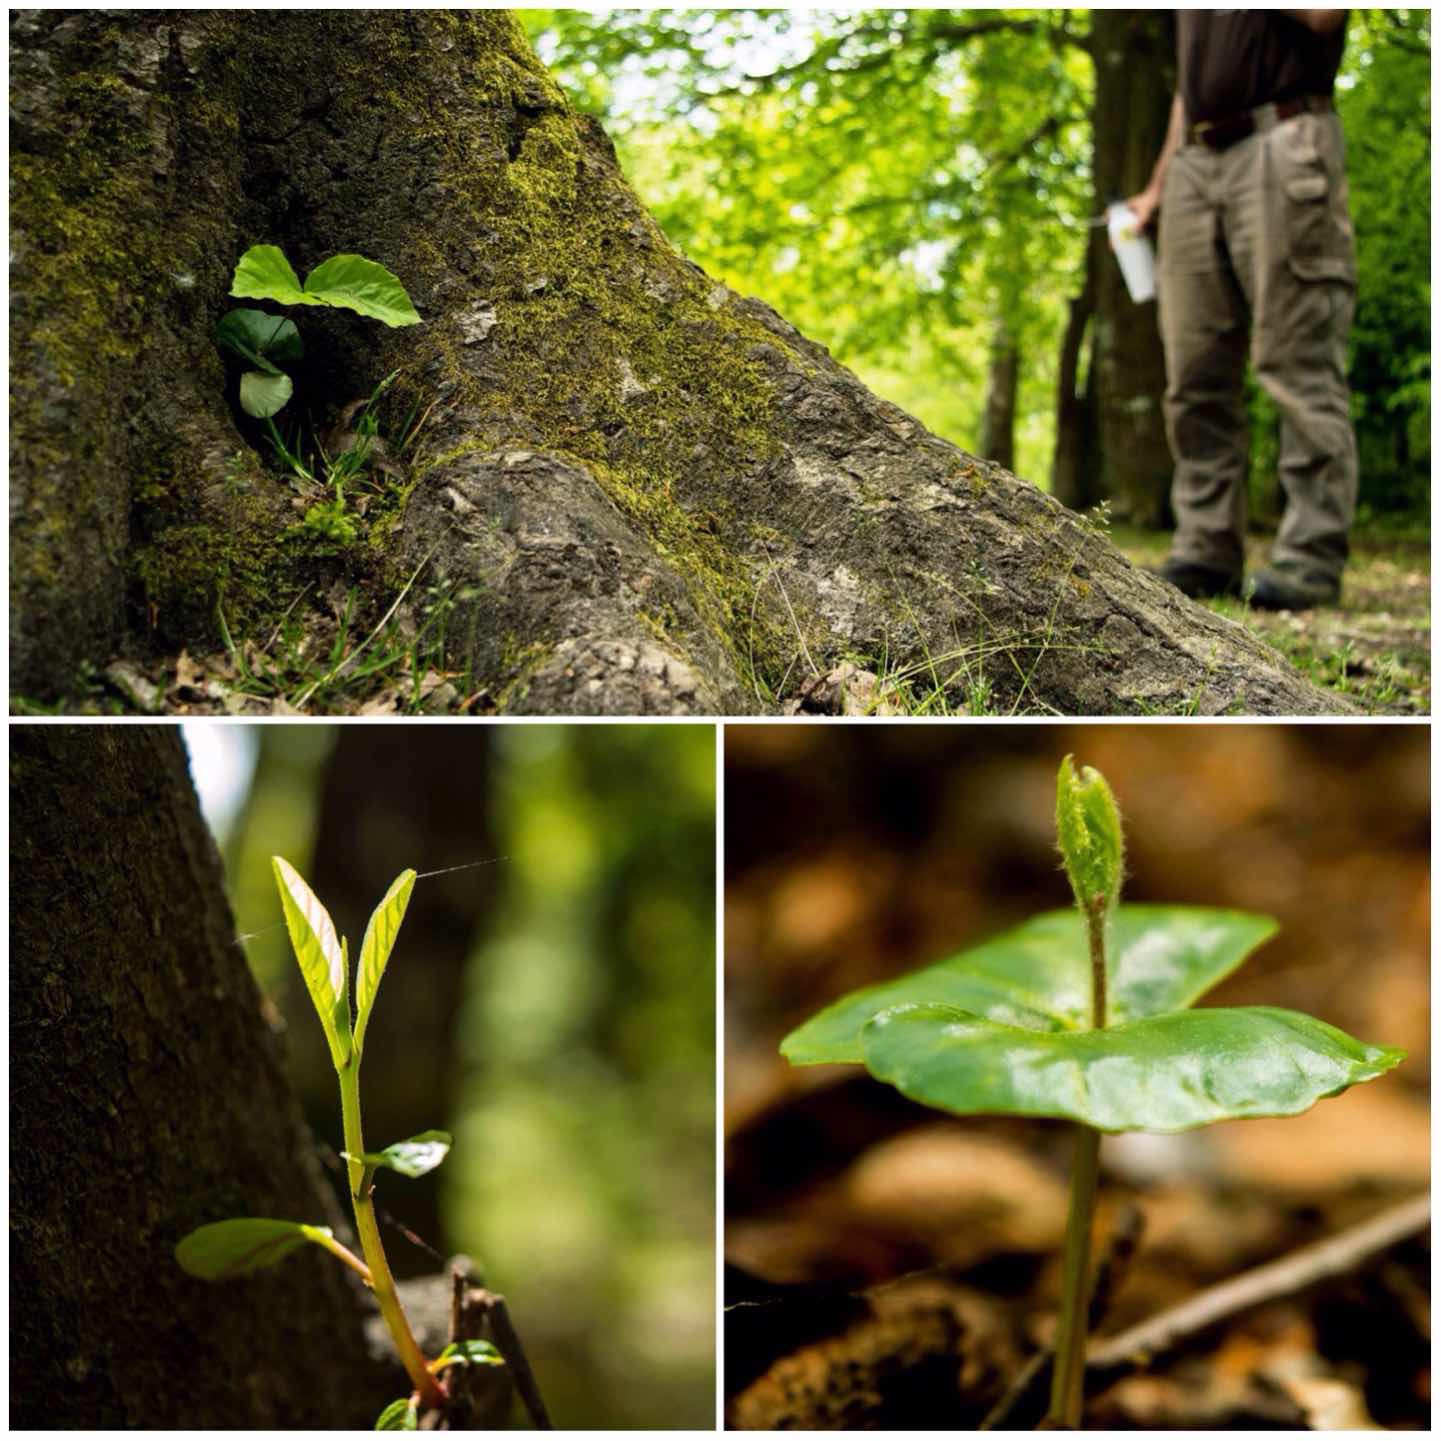
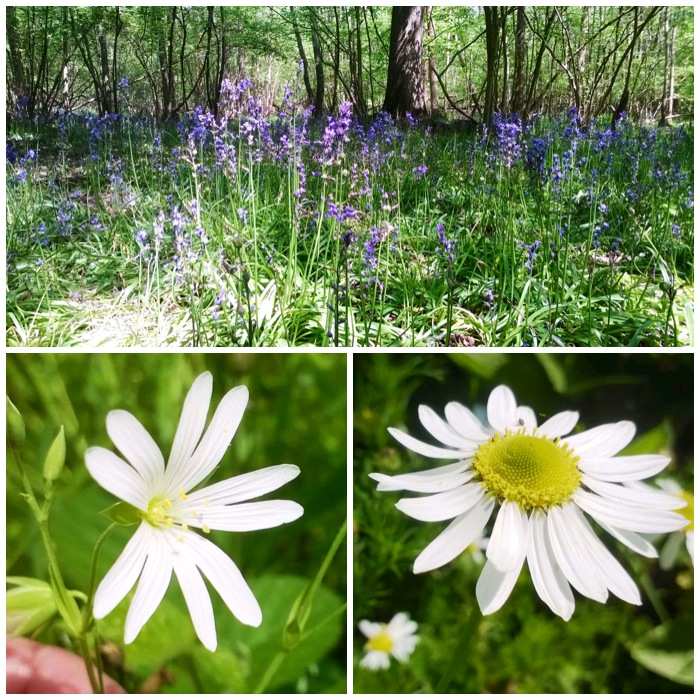
Since it was May there were plenty of seedlings around. There were plenty of Beech seedlings on the ground but I did spot one snuggled into a hollow at the base of an Oak tree. It looked lovely however not a good place in the long term I think.
The final part of the Aures Crane Trilogy – The Classic.
I call this one the Classic as it is the design laid out in the book Camp-Lore and Woodcraft. The author Daniel Beard called it a rustic crane fashioned along similar lines as the iron cranes found commonly over 100 years ago over open fireplaces.
The crane is named after Victor Aures, a Scout Master from Buffalo, NY. I found a good article on this from an issue of the Boy’s Life from 1915.
The Classic Aures Campfire Crane
You do not see the classic crane often since it requires a specific configuration of angles on the forks and it’s all too easy to cut through the thin layer of bark and sap wood needed to form the loop on one end.
The Aures – Picture from Camp-Lore and Woodcraft
Measuring
I stumbled upon a good piece of hazel recently with a strong main fork and the necessary secondary fork at right angles to the main one.
The basic parts & measuring up
I had a good pole that I was going to use as the upright and measured the top limb for trimming. I estimated with my eye the amount of wood I would need on the top limb to form the loop (I call this section the tail before it is formed into a loop).
Trimming the excess
Trimming
After sawing off the excess I started the slow process of removing all the excess wood on the tail. It is easy to remove the wood at first but try and remove it evenly as you work.
Removing the excess wood from the wrap
I tend to work from the end of the tail and work up the crane towards the fork. This helps in reducing the chance of chunking through the wood and destroying the crane.
In the pictures below I have worked my way down to the pith and then just passed it. I forced myself at this stage to take my time and work methodically.
Important to trim evenly from bottom to top
Eventually I could make the wood bend slightly (it was only a couple of centimetres wide now). I scared myself when the bark cracked but that is OK – it is the sapwood that needs to bend.
When bending down the wood do it slowly and do not try and force it.
Trimming and flexing
I finally had just a thin piece of sap wood left that could be bent a bit more but not fully. To help this process along I used the tip area of my knife to cut out some more of the wood without making it any thinner than a couple of centimetres.
To help the bending process I left the crane in a stream to soak up some water. If you have the tools to steam bend wood the job would be much easier.
Last few scrapes and softening
Once the tail was very pliable I flattened an area where the tail would be whipped to the crane then marked the tail and the main body of the crane with a pencil so that I retained the size of loop I wanted while I whipped it.
Prepping for some whipping
Whipping
In the book Camp-Lore and Woodcraft, Beard’s drawing shows the tail being tied off with strips of bark. I will use bark when the crane has fully seasoned (it will shrink in the process) but for now I whipped it with some old paracord. I whipped it twice with different cord as that is what I had to hand.
Whipping the wrap
The loop should be big enough for your upright and positioned so that when the crane is hung on it and braced on the fork, the pot arm is level and pointing slightly upwards.
Hangs well
The Pot Arm
I then went to work on the pot arm, carving out little notches so that I could adjust the position of the pot easily along its length.
I also put my usual dimple on the end for hanging another adjustable pot hanger off it.
Carving the pot arm
I took the crane out on a Bushcraft course with the Royal Marine’s Cadets and it was soon in action.
In use alongside another pot hanger
It is very easy to move the crane up and down with light pots (I advise removing heavy a pot from the crane before adjusting the height then replacing it).
The crane also swings easily away from the fire. If you do not trust the loop to hold a heavy pot, you can back it up with a loop of cord.
From above
The Three
I really enjoyed making these three Aures Cranes and hope to see a few more over fires at Bushcraft meets in the future.
All three versions – Classic, Gibbet and the Single Fork
That is it for me on the Aures Crane (I am sure you can come up with some more variations on this), however in the course of my research I discovered a Single Pole Crane – that is next on the list.
This is the second of my blog posts on the Aures campfire crane trilogy. I call it the Gibbet crane based on a pot hook I found mentioned in the book Camp-lore and Woodcraft. The crane does look a bit like a traditional gibbet but the name apparently refers to the overlapping joints used in its construction rather than its likeness to an instrument of execution.
This is a great project for the longer-term camp or if you want a bit of practice carving joints and whipping.
The Gibbet Aures Crane
As usual the tools for making the crane are to be found in most bushcrafters’ backpacks – a knife, saw and axe. I saw this crane set up many years ago at a camp however I have seen little written up about it in books or online.
I found one piece of wood with a strong fork and a smaller catapult-shaped fork (bottom left below) and I cut a limb with a branch coming out (top left below).
The first job I did was to strip off all the bark from all the pieces.
Tools and basic parts
I placed the large fork up against the pole it would hang off to measure where I needed to trim each limb. To do that I just used my knife to mark the limbs. The top limb needs to be marked to the left of the pole (as you see in the picture below) and the bottom limb needs to be marked to the right of the pole as you see it below.
Carving the top limb
To begin with I trimmed the top limb at its mark with my saw, leaving the bottom one for the moment.
Measuring and trimming the top limb
I laid the small hook beside the end of the top limb so that the hook was pointing towards the big fork and marked where I wanted to trim it. I did not want to leave it too big – just big enough to be whipped to the big fork.
Measuring and trimming the top hook
I wanted the joint to be strong so I put a stop cut into the top of the upper limb so I could cut out a lap joint (also known as a Gib joint).
I then battoned off the excess so I was left with one half of the lap joint, then I trimmed the bottom of the small hook flat to fit snugly against it.
Cutting out the Gib cut on the top limb and hook
Not a perfect fit but good enough.
Putting them together
I then used paracord to whip the two together, on both sides of the hook. I left excess string tied in a knot as the wood was green. As it dries out the wood will shrink and I will have to redo the whipping.
Whipping The Gib joint
Carving the bottom limb
I flattened the upright of the ‘Y’ piece and split out a Gib joint on the lower limb. You have to make sure all the cuts are done on the correct planes so that the hanger will fit on the upright pole without twisting.
Cutting the Gib joint on the bottom limb and fork
After a bit of whipping it was time to set it up and make sure it worked correctly. In the bottom right picture you can see clearly how it all comes together.
Fitting and splicing
Carving the pot arm
I have a particular way of carving the hanging arm (you be as creative as you like). I axe out the basic shape I want, trim it smooth with my knife and cut in lots of grooves along the upper part to allow the pot to be hung on various areas of its length.
Carving the pot arm
Once all the grooves are cut I tend to put a dimple in the end so I can attach an adjustable pot hook. This allows me to hang two or three pots from the crane.
Finishing touches
Using the Crane
This sequence of shots shows the method I use for adjusting the height of the crane when it has a heavy pot attached to it. I swing the crane away from the fire, remove the pot, adjust the height of the crane, attach the pot again and swing it back over the fire.
With light pots you do not need to remove the pot but just lift the crane slightly so it detaches from the upright and then just move it up and down.
In use
In this picture you can see how the arm works with an adjustable pot hook attached to the end of the crane arm.
It looks precarious but with the usual level of care you take around any fire I have found this system works well.
Added adjustable pot hook
Dinner could be in one pot and the kettle on the other leaving plenty of room to sit comfortably around the fire without having lots of uprights protruding out (which can be a problem with other campfire cooking rigs).
Works a treat
I took the set up out on a recent bushcraft course I was running to show some colleagues and set it up with a fixed crane. All in all it worked a treat.
I could never call myself a chef however I could call myself a campfire engineer. I love to make different cooking rigs that I can use around the fire depending on the circumstances I find myself in.
The Aures crane is one of these projects for the more long-term camp and is so easy to make. The crane is named after Victor Aures, a Scout Master from Buffalo, NY. I found a good article on this from an issue of the Boy’s Life from 1915.
The Aures Crane – a version using a single-fork branch
I also found a book called The Book of Camp-Lore by Dan Beard on the Project Gutenberg website that shows the original idea of wrapping the bark of one limb around an upright and a forked lower limb.
The Aures Crane – Picture courtesy of The Book of Camp-Lore and Woodcraft, by Dan Beard – Sourced from Project Gutenberg
I have been making these cranes for many years now but it was only once I started researching them that I discovered its correct name. This post does not cover the making of the Aures crane as shown in the Boy’s Life magazine or on in the Book of Camp-Lore (I will do that one later) but a variation of it.
The picture below shows a classic Aures crane with a good secondary fork to rest against the upright. It’s not easy to find the exact combination of forks needed for this classic style so I set out to re-create the Aures crane using a branch with only one fork, as these are so much more common.
The ideal Aures Crane with a perfectly placed fork
I chose a sturdy green piece of hazel wood with a single fork. After trimming the ends to the size I wanted I used my axe to get rid of all the lumps and bumps on the wood.
In the bottom right picture the limb on the left I will be calling the upper limb and the one on the right the lower limb.
The not-so-ideal single fork – much easier to find
Top Limb
Next I whipped some strong non-stretchy string onto the top limb of the crane. Grogs knots have a good tutorial on this, however it’s not necessary to whip in any particular way- just do it in whatever way works for you and binds that end of the limb tightly.
Whip the end of what will be the top limb
One of the reasons I selected a fairly sturdy fork was that I needed to put in a stop cut about a third of the way down the top limb. This stop cut will help you greatly in controlling the split you need to make to form the hook.
I sawed my stop cut to about two thirds of the diameter of the limb.
Put a stop cut into the limb
Using small cuts I then cut out a groove just above the stop cut towards the fork to the depth of the stop cut (the two bottom left pictures). This allowed me enough space to get my knife blade in to start battoning down to split the wood.
I was very careful when battoning not to let the blade touch the string that I had whipped onto the limb. Take care to wiggle the knife to remove it, keeping your non-knife hand well clear. I battoned a number of splits so as to easily carve them out.
Carve and batton
I also found that sawing down into the split helped with removing the wood. Once I had sawn or battoned down a number of times I carved out the excess wood by pressing down with my knife at a slight angle (you can just see the carved out area in the bottom left picture).
Next I took a small stick and carved it into a wedge shape to batton into the fork to expand it further.
Use a saw and knife then make a small wedge
Double check that your whipping is secure and batton the wedge into the fork to expand it. Once it is securely fixed, trim the wedge so it fits neatly.
Insert to widen and trim
I used my knife to carve some more wood from the inner part of the fork to expand it a bit more. At this stage I was trying the fork out on the upright pole to see how it fitted. Don’t take off too much wood as you need to maintain strength in the fork so it will hold a heavy pot.
Use a knife to carve out more wood
Bottom Limb
I split the lower limb nearly all the way down to the main fork. Do this slowly so that the split remains even on either side.
Make sure you get your angles right so that when the crane is placed on the upright everything fits neatly without twisting.
Split the lower limb by battoning
I carved another wedge to fit the lower limb split and whipped string on either side. To finish this section off I trimmed the wedge with my saw.
Insert another wedge and whip
Pot Holder Limb
I removed a lot of wood with my axe and knife from the limb that would become the pot holder bar. I also battoned out some little grooves so as to hang pots safely.
Carving the pot holder bar
At the end of the bar I also carved out a little recess on which to hang an adjustable pot hook.
After that I added some more binding to the top bar to make it really bomb proof.
That’s it in terms of construction.
Pot holder bar in detail
Aures crane in action
All the hard work is done now so all you have to do is light your fire, insert the upright, attach the crane and pot, adjust the height for optimum cooking and sit back.
The picture at the bottom shows how you can also attach an adjustable pot hook to the end if you want.
High, low and balanced
I have attached the Aures crane to the upright for my fixed crane allowing me to hang multiple pots. I have discussed how to make a fixed crane in my previous post How To…. Build a Campfire Cooking Crane.
The adjustable pot hook is only needed if you want different temperatures for the pots hanging off the Aures crane.
Top down with fixed crane above
If you are happy for both pots to be at the same height both can be hung directly off your pot bar if it is long enough.
The crane is easy to adjust for height with the pots attached and you can easily swing it away from the heat when required.
Heavy duty
A view from above – one upright – two cranes – three pots
One upright – two cranes – three pots
Do not be put off by the length of the instructions: this crane is very easy to make. Some of my bushcraft friends say that it’s not worth the bother – that may be so for a short term camp but if you want to practice your carving skills it’s perfect for the job.
The ultimate aim – to have a brew
I have a feeling I may be writing about a few of the other variations of the Aures crane in the near future.
Spring is well and truly under way now and I have been getting out as much as possible either by myself, with my family or with friends.
There is a lot to see if you look close enough as my son is with this suspended feather trap. I love feather traps (that is anything that catches a feather) as they make for beautiful pictures.
Feather Trap
While reviewing my spring pictures I noticed there were dominant colours coming through. Below (from left to right) are the purples of the snakes head fritillary, two emerging and an emerged early purple orchid, and a lovely red campion.
I was particularly pleased to capture the orchids just emerging from their leaf sheath.
Purples
The woods and the hedgerows are awash with small white flowers at the moment. I was pleased to see that our local woods (The Frith near Bramley, Hants) sports such a wide range.
For a few weeks at this time the wood anemone’s can be easily spotted (top left) and if you look close enough you will spot the delicate wild strawberry flowers (top right) just coming through. One day I will take the time to work out whether they are the barren or the fruiting types.
Also hiding out in the woodland glades are the beautiful but tasty (the leaves that is) wood sorrel (bottom left). Like the wood anemone the wood sorrel is best viewed on sunny days while it is fully open.
Bottom right is stitchwort (‘greater’ I think). I have been finding this in great patches alongside hedges where they receive a lot of sunlight. I particularly liked this picture with the single stitchwort being framed by the dandelion.
Whites
As I write this the early dog violets (top right) where I live are on the wane but the beautiful bluebells are really coming through now in great carpets.
Bottom left is the often overlooked blue flower of ground ivy. As this little plant grows easily on disturbed ground you find it in your vegetable patches if you do not clear it out regularly. I like it though as it does add a lovely tinge of blue to an otherwise mass of green.
One of the nicest blue flowers (even more than bluebells I think) out at this time is the forget-me-not (bottom right). I took this picture by a riverside outside Dundee as it clung precariously to an old stone wall.
Blues
The last dominant colour I have noticed this spring is yellow. One of the earliest and for some reason this year one of the most abundant (top left) is the primrose. I am finding this delicious little plant everywhere.
The other three (top right), the cowslip, the buttercup and the male goat willow catkins are just coming out around here. There are so many dandelions out at the moment so it is good to see that carpet of yellow being broken up by other yellows.
Yellows
The final picture is of the odds and sods I have taken over the last few weeks. The horsetail and the female goat willow catkin up close look very striking but it is the picture of the kids getting out and about from their usual digital world and enjoying a bit of sun and flowers that I love the most.
The Easter holidays were fast approaching and the question in our household was – where should we go? A camping trip was asked for but also a bit of seaside fun on the side.
The answer was not difficult as my good friend Fraser Christian of Coastal Survival had been asking when we would come down to visit him in Dorset. Fraser lives off grid and runs excellent courses on the coast – All the boxes were ticked so off we went.
Family Fun at Fraser’s
I have written before about the food that Fraser collects and cooks up and this time there was no change in that high standard (Memorable Meals). My kids Catherine and Finlay had to be very careful in who they said was the best cook around the campfire – just for the record I was not included in any of that praise 😉
I did though collect the Sea Kale you can see in the top left picture below (the purple coloured stems).
Fantastic Food
Last time I was at Fraser’s the weather was wet and windy, this time even though it was still windy it was dry (and warm when not in the wind). The sun was out and the skies were clear leading to cold but pleasant evenings around the campfire. Stories were told, woodland TV was watched, marshmallows were toasted and a relaxing time was had.
Fireside Fun
Catherine and Finlay had great fun all weekend – they made their own secret den (into which I was eventually initiated) and had great fun searching for lots of Easter eggs.
When I was a kid it was expected that I’d go out in the morning, return for lunch and dinner but otherwise do my own thing. Even though we live in a village my kids do not normally have that freedom but here at Fraser’s they experienced so much more freedom: off they went exploring the woods and every now and then they popped back to the main campsite to have cuts, bruises and empty tummies attended to.
Adventuring
As usual I was on the lookout for some spring flowers and find them I did.
I found my first bluebell of the year at Fraser’s as well as plenty of primroses (is it just me or has this year been particularly good for primroses?). Also in evidence were plenty of early dog violets and lesser celandine.
Spotting Spring
One of the tick boxes for the weekend was time at the sea. I do not do beach holidays where you just sit about tanning yourself (my Scottish skin doesn’t like the sun too much) but like to spend time on the coast exploring and being generally active.
Our first day at the sea was sunny but very windy. The kids had their wellies on but were soon in paddling. We tried to fly a kite but it was just too windy: after nearly hitting a few people I put it away (quite grumpily) and we headed inland to find some of the best fish and chips I have ever had (washed down with a nice pint).
Seaside Snaps
The kids learned about wild garlic and went out on their own to collect a massive basket full. Finlay and Fraser had fun practising some woodland ninja techniques (they are both competitive types so this was fun to watch).
Fraser had recently found a deer that had been killed by a car and he had the hide loosely stretched as he de-fleshed it
Being Busy
Our accommodation for the weekend was in hammocks. My kids are very happy now to sleep in them. I set up four under individual tarps. Each hammock had an under blanket attached to keep out the cold air, a roll mat, sleeping bag and top quilt.
Everyone was as snug as a bug in a rug you could say.
A tradition we have these days is for Alison to get a cup of coffee in the morning while still in her hammock – I failed with this on the first morning I am afraid but tried to make up for it on the other mornings.
Hammock Heaven
Our second day on the beach was spent playing with a frisbee, watching the fishermen cast and discovering and building little beach henges.
Sun, Sand and Sea
We had a lovely stroll along the coast foraging for sea kale and some scurvy grass. I found plenty of sea kale but no scurvy grass (as expected, comments were made about my poor foraging skills).
We found a nice beachside café to rest up in and a lovely grassy slope for the kids to roll down – perfect.
Together Time
On the last evening before we left I asked the kids if they wanted to shoot some arrows. Only Finlay took me up on my offer and off we went. Finlay is seven and has shot before with his own smaller bow or with me on the larger holmegaard you can see here. This was the first time he had shot the holmegaard on his own. It is a full-sized bow but not heavy in terms of draw poundage.
I was impressed with his stance and his ability to shoot with so large a bow and equally chuffed to capture this great shot of the arrow in flight.
Airborne Arrows
So all the boxes were ticked and we took a group picture of the happy campers before heading off.
Fraser was a great host and we were all sad to leave, however we will be back again if Fraser will have us.
Farewells
As well as taking my usual mass of pictures I put together this short video of the weekend.
Carrying on in the winter wonders theme I took a close look at the snowdrops this year. All the way through their life cycle they are a beautiful little plant . From the simple beauty of the drooped heads as they emerge, to the majesty of them as they open, through the dramatic flaring as they mature and finally to their dignified withering as they die.
The snowdrop in its glory
The buds on the trees at this time of year at first glance seem very simple and not worth a second glance but when you get up real close you start to really appreciate the complexity of these little compact power houses. Some like the long pointed beech bud look very smooth, others like the oak and cherry are covered in scales and the dark mitre of the ash looks rough to the touch. All though are biding their time to start that cycle of life again.
Buds biding their time
A lot of the colour over the winter is to be found with the seeds and nuts hanging everywhere. The red of the hawthorn (haw) berry can still be very striking but the deep red of the rosehip has gone as it has shrivelled up. The ivy seeds are all still hanging in there in their regimented clusters but emerging through are the tiny snowdrop seeds and the furry little pods of the lungwort nutlets.
The final project I was involved in during the working weekend at John Rhyder’s Woodcraft School Hampshire HQ was to build a raised firepit for the students to use. John wanted this placed inside the new cookhouse to protect it from the elements.
The raised firepit
I volunteered to do this with Jumbo Jim (he flies planes) and after a bit of a chat we decided to make it out of sweet chestnut logs that had been cut down to about 5ft lengths. There were plenty to choose from so after a bit of a trimming we lugged them back to the main camp.
Selecting the logs
We found a flat area to work on (to make the build easier) as its final placement was to be on a slope. After we finished the build we moved everything to its final location in the cookhouse.
We decided to lock the logs together by carving notches out near the end of each log to form a square. We used each log as a template for marking another one out before sawing in some stop cuts.
Marking up and putting in stop cuts
The axing and adzing out (these were the tools we had available) did not take long. I thought we might need to go for a square cut for each notch but we decided to try a curved notch at first as they are quicker to carve. Even though the curve would not lock the logs perfectly the curved notches worked surprisingly well, with no movement on the logs when they were locked together.
Axing and adding the connection points
Once we were happy with the style of the notch it was then just a case of repeating this on each end of the logs so that everything locked together well.
Repeating the process
I tested the strength of the locks between the logs by walking and jumping (with the odd jig) on each level as we built it up.
Initially we’d planned a 5ft square but after discussing this with Caron and John we went for a 5ft by 4ft rectangular shape. This was to allow the students easy access to most of the firepit without having to lean too far to reach the centre. You can see the excess wood at the ends in the bottom right picture that needed to be trimmed off.
Testing and re-adjusting the size
After some more notch cutting, locking together and jumping around we got John to trim the excess wood off with his chainsaw.
More testing and trimming
We positioned the firepit where it was to sit in the cookhouse and dug out a small trench on the upslope section to flatten the firepit out a bit and lock it in place. On reflection I think we could have dug the trench a bit deeper but the depth we dug held that top log well enough even though the firepit was not perfectly flat..
Digging in the firepit
When we had locked all the logs into place we had a chat with John and agreed that we would drive in four stakes to act as supports for the grill. We found four brackets to attach to the stakes to hold the bars of the grill in place and left enough room on the stakes to add another four brackets so the grill could be raised (we left John to attach these later when he got some more brackets).
Constructing the grill stand
The filling in of the firepit was the easy bit as we simply dropped about 5 wheelbarrow loads of earth into it. Nigel was on hand while we dug the earth to tamp it all down.
The top layer of fill was taken from the edge of a small stream where there was a high concentration of clay. I hope that over time this layer of clay will harden and make for a good surface to light a fire. I suggested to John that as the top layer dries out he could add a few more layers of clay to build the surface up a little more to be in line with the top of the logs.
Filling in the firepit
When we had finished tamping the soil down it was just a case of putting the grill back on and lighting a fire. I placed some dry off-cuts over the damp soil to give the fire a good chance to get going. With a little bit of waftage from Kev it was soon going nicely.
As soon as John adds a layer or two more the surface will get a bit closer to the grill for a fast cooking time and when the other brackets are added higher up they’ll allow for slower cooking too.
Topping off and first firing
The grill is as flat as we could make it although it appears to slope, because the ground isn’t level.
I had a great time building this firepit with Jim, figuring out how it would all link together and finally putting it all in place with the grill on top.
A happy team
There are two more posts on projects we did that weekend. They are:
Earlier I wrote up a post on re-building the roundhouse at John Rhyder’s Woodcraft School HQ in Hampshire. This post is all about the new cookhouse we built that weekend as well.
In the top picture below is the open-fronted cookhouse we built and in the bottom picture how it all looked on the Saturday morning when we first arrived – a few post holes in the ground.
After and before
In the group building this were Scott Batty, Kev Howlett, Jumbo Jim, Nigel Painter, Paul Workman, Chen, David Willis, John Rhyder and myself. John had split a load of sweet chestnut to use as the uprights and brought into the site a load of timber to build up the walls and for battoning and rafting.
We selected six pieces for the uprights and started on the back wall first. The plan was to have the kitchen closed off on two sides (to protect from the prevailing wind) and to have it open on two sides.
The first post went in easy enough and we compacted earth and stones around it to keep it secure.
Measuring up and digging in
The other posts were put in and we used large pieces of straight timber to make sure the these posts lined up properly (mark one eyeball – carpenters measures).
John then used his chainsaw to make the facings of the uprights smooth so we could attach the timber for the walls.
Aligning and smoothing
We actually built the back wall rather quickly. One person would select the timber, another held it in place, then pilot holes were drilled in by someone and finally someone else screwed the planks in. We all took turn about and soon had the back wall up.
The plan initially was to overlap the planks of wood so as to let the water drain off but we estimated at the start there were not enough to do that so we had to place them directly on top of each other.
Racking up
There was excess wood on one side so after using a plank as a measuring device John trimmed the excess off with his chainsaw. We left just a lip of wood at the edge to overlap with the side wall that was to go up next.
Trimming off
Once the back was completed we built the side wall in the same way as the back wall (no pictures I’m afraid) and then started on the front.
The cookhouse is on a slope and John and Caron wanted a decent slope to the roof to help with runoff of rain (but not so tall as to be a problem in high winds). The first thing we did was decide on the height, then we marked it off on the uprights and got John to trim each pole to the right height.
Preparing the open front
We built a strong lintel at the front and I trimmed a couple of sweet chestnut poles to act as main rafters. We also had a selection of smaller machined battons to act as rafters.
I secured one of the sweet chestnut rafters in the middle and the other one at the open end of the cookhouse. The other machined rafters were all spread evenly along the roof and screwed down.
Rafting up
We did not have the shingles for the roof so we just nailed down a large tarp as a temporary cover.
In the bottom picture you get a feel for the angle of the slope the cookhouse sits on.
The temporary roofing
You can just make out the sign above Caron naming her kitchen (I have no idea who wrote it). In the pictures on the right you can see the shelving unit that Paul and Nigel built. Seemed pretty secure as it offered a perfect seat for John to survey it all.
You can also see the internal battoning (to the left of the jacket in the bottom tight picture and also to the right of John). This really strengthened the walls as we dug the battons deep into the ground.
Signs, shelves and snagging
Kev and Chen moved the kitchen platform from its old spot to inside the cookhouse. They did spend a good bit of time getting it secured properly on poles and perfectly flat.
We had some great food over the weekend with our dinner on the Saturday evening and breakfast on Sunday morning cooked inside it.
First cooking
There were some other projects going on involving re-building the shower house, laying new chippings on the paths and building the raised firepit you can see in the picture below (that will be my next post in this series).
The Sunday was a very frantic day as we strived to get everything done. When we took the group photo some of the lads had already left (about three or four I think) so apologies if i have not mentioned everyone involved in this project.
I went for a woodland walk with my kids last weekend to try and spot some signs of spring. We came across an area of the woods that had been recently thinned out and all the trimmed logs were lying around in piles.
My kids started to build themselves a little den from this wood but wanted me to show them how to make something both of them could get under.
A little shelter for two
We only had an hour to build something so I decided to show them how to construct a quick lean to shelter. We spotted a large piece of wood and after a quick chat they inserted one end in between two trunks of Goat willow and snapped it to the size the wanted for a main roof beam.
Snapping the main beam
Then we found a flat area of ground and laid one end of the beam into a crux in the coppice stool and laid the other end on the ground.
Picking a site
They cleared the floor of all the sticks and stones lying there and used the sawn off cuts of wood from the log pile to construct the wall of the shelter. I helped them out with this but as it was already pre cut it was just a matter of finding the right lengths.
Rafting
While we were building the shelter my daughter Catherine came across this rather lovely little squirrel skull. I am glad she spotted it quickly as it could so easily have been trampled under foot.
Squirrel find
As we only had an hour we did not have time to lay thatch on the roof or make a raised bed but the kids got the idea and thoroughly enjoyed making their den. When we go camping in the summer I think this will be a good project for them to do so that it is fully weather tight.
Half finished shelter
Lastly I got them to return the site to the way they found it by stripping all the logs of and putting them back on the pile.
Leave no trace
I appreciate that we did not finish the shelter but it did give my kids a little bit more insight into shelter building so that the next time we build one they understand the basics of what they are doing.
If anyone reading this has been on one of the Woodcraft School courses run by John Rhyder at his woodland site in Hampshire you will certainly remember the roundhouse. This little building has been a refuge on many a cold night for many people including myself.
Every now and thenthe roundhouse needs a bit of TLC. John had recently replaced the roof beams, so now it was the turn of the walls.
A group of us who are all ex students of John’s agreed to spend the weekend with him working on improving the camp facilities at his woodland HQ. I was not involved in working on the roundhouse (I was helping to build the new kitchen and raised fire pit) but I did get a number of pictures of the guys working on it.
Stripping out the old poles
Working on the roundhouse were Charlie Brookes, Keith Bosely, Scott Batty, Jack (aka Warren Frost) and Pete Bastable, helped from time to time by Fin Rhyder.
The guys stripped the tarps away from the sides to expose the outer ring of poles. They were well worn but some were showing signs of damp at the base. The guys started in one section by putting braces in to keep the roof in place and then dug out the outer pole for that area. They would then slot in a new piece of split sweet chestnut and trim it to size. You can see all that happening in the pictures above.
Preparing the lintels
The new uprights had already been split and de-barked so Pete and Fin got to work de-barking the poles that would be uses as lintels between the uprights to support the roof.
Soon the guys had a few of the uprights in place and they put some temporary lintels in place until the permanent ones had been finished.
Putting in the new uprights
After the lintels had been debarked, the lintels ends were carved so that they could be attached securely to each upright. This involved a bit of axing out to produce a flat platform at the end of each lintel.
Inserting the lintels
The door of the roundhouse also got a makeover and was rebuilt to fit in with the lintel above it. Also as each section was finished the tarp walls were put back securely in place with some battons.
John uses these tarp walls as they can be easily rolled up in the summer to give good airflow through the roundhouse.
The re-built door and snagging
The roundhouse has a small extension at the back covered in wood instead of tarps on the walls. This area is used for storing wood for the stove . The uprights and lintels were replaced here but the wood panels had deteriorated so they were stripped off as well and replaced.
I think the guys did a good job of this area making it secure and water tight in a very short period of time.
The back extension – the storage area
The job took the guys a day and a half to do and by the Sunday afternoon the outside of the roundhouse was looking good and strong again. At some stage John will be adding new shingles to the roof as tiles instead of just the tarp they have at the moment.
Looking good
This is just a brief summary and no doubt misses out many of the issues they faced as I did not work on this project, but I do know they did a cracking job.
While we were walking and climbing in the park I set myself the challenge of photographing the beauty of the park in as many ways as possible.
I aimed to try and capture the big scenes, the little ones, the natural ones and the man made ones. This is my record of that attempt.
Stunning Snowdonia – big or small – natural or man made
Those who have ever been to Snowdonia will know that water is a very dominant force in this mountainous terrain. I found beauty in simple drips hanging off branches, the outflow from a stream monitoring station and the drip drip from an icicle.
Water – beauty in many forms
I have always been fascinated by reflections on water. I tried to capture the full reflection of Crib Goch in the picture below but could not quite get the angles right to get the top of the mountain in the picture as well.
The bottom picture I liked not just for the reflection from the mountains and the small rock but the texture of the water surface, with half of it semi frozen and half of it unfrozen.
Reflections – big and small
The geology of the park always catches my eye. I aimed in these two pictures below to capture the ruggedness of the scenery both in the sharpness of the rocks in the near distance and the rolling majesty of the land in the far distance.
Geology – sharp and rolling
While walking around Snowdon I came across these hardy little souls. The mountain goats were well at home on the steep slopes and hardly fazed by our presence.
I stood watching them for a good half hour as they jumped about in search of green shoots and even got some of their tracks in the snow.
Fauna – the beautiful mountain goat
The pictures below of a large bird of prey do not do the actual moment any justice at all. My lens is not the telephoto type so I could not get tight onto the bird to get a close up.
We were walking as a group in the woods near Capel Curig when I spotted the large brown bird land in a tree. We walked as close as we could to it and managed to snap these long range shots as it flew away. I am not sure if it was an owl, a hawk or buzzard but it was big and beautiful and majestic in its flight.
Fauna – the airborne sort
Lastly not to forget the beauty poking its head out of the snow. I spent a lot of time lying in the snow getting close up shots of whatever plant life I could see.
At this time of year the ferns, mosses, grasses and heathers are the dominant flora on the mountainside. To really appreciate this beauty you need to get down close and personal.
Flora – spikes in the snow
I find that photography is starting to awaken in me a greater awareness of all the beauty that surrounds me, even in environments where I think at first glance very little is going on.
I had pollarded a sycamore in my garden during the winter and had stacked up all the rods for use in bushcraft projects this year.
One pollarded sycamore
My kids though had other ideas and wanted a den built with the rods. As the rods were laid up against the tree I got the idea for a quick tipi style of den for them.
We stripped away all the rods that were either too big or too small.
A little help from the kids
We laid the remaining rods around the tree in a tipi style and then wrapped some old tarp around it all.
Wrap some old tarps
I cut up the middle of the tarp to form an opening and then with the kids tacked it all down with wooden pegs. I then added another tarp to reduce the size of the opening.
Cut and tuck
I added a few old sleeping bags to make it comfy and the job was done.
One den ready to go
My kids spent a lovely afternoon in the early spring sunshine playing out in their new den and it took about 45 minutes to make.
I came across a fallen hornbeam tree one day while teaching my Sea Cadets some map reading. Attached to it was a burl that produced this beautifully swirled kuksa cup.
My kuksa
Before I could drink out of my new kuksa I had to sort the small matter of carving it. As I explained in my previous How To… on Carving a Small Noggin cup the name kuksa (also known as kåsa in Sweden) is probably not the correct term for the cup as it was not carved in a Scandinavian country by the Sami peoples. Also it was not carved out of a birch burl but I like the word kuksa and it was carved out of a hornbeam burl at least.
After cutting the burl section from the fallen tree I left it to season for 3 years in a cold but dry area (my garage).
I wanted to create a kuksa that had the swirl of the burl wood and the clean lines of the heart wood. I started trying to saw down the length of the heartwood but that proved too difficult for my hand saw.
Hornbeam Burl
In the end I inserted two of my log splitting wedges into the saw cut and hammered down on them with a wooden mallet.
Splitting out
Thankfully they split cleanly leaving me a fairly smooth surface to start axing out the shape of the kuksa.
Dark wood of the burl
The heartwood was well seasoned and required quite a bit of axe work to get it down to the level I wanted.
Axing out the blank
I stopped axing out the top of the kuksa when I started to reach the burl wood but kept the heartwood for the handle. I was inspired by Jon Mac with his kuksa handle in the style of an otter’s tail and felt that the heartwood would prove a stronger option to the burl wood.
I drew out my general shape and used my saw again to cut off the excess on the sides. All the excess burl was carved later into either a quaich or a bowl.
Making most of the burl
The burl was of a very good depth and even though there were some deep fissures I knew for once I would get a decent sized cup out of it.
Ready to carve the bowl
I did not take any pictures of me carving the bowl or shaping the kuksa as I was too busy carving and there was no one around to photograph for me.
I looked in my archive though and came across these pictures of the master craftsman John Arthur from the Woodlife Makers Guild at the 2011 Wilderness Gathering demonstrating how to quickly blank out a kuksa.
John Arthur – Master Wood Worker
After chopping out the basic shape, John used a saw to put some stop cuts in. Stop cuts allow you to remove wood from specific areas without any split running off into wood you want to keep (in this case the area that will become the bowl).
Stop cuts and blanking out the cup
Once John had the basic shape he used his crook knife to carve out the bowl. He kept the knife in his right hand and continually turned the kuksa to carve out the bowl.
Carving the bowl
Finally he used a small knife to shape the outside of the kuksa. He used a number of cutting styles cutting towards himself and away from himself but he was always in full control of the knife and soon had the basic shape of the kuksa made.
As this was green wood he then explained he would let it dry slowly over a number of weeks before finishing it off.
Deft knife work
Here are some of John’s finished kuksas on display at the Gathering. With this level of detail you can see why he is a master craftsman.
John’s creations
Back to my kuksa – the burl wood of the bowl came out very easily with a chisel and my crook knife.
I put lots of stop cuts into the sides of the blank so as to help get rid of the excess here in a controlled way (you can see all the pencil marks where I was to put them). I really took my time here to get rid of the excess wood and not damage the bowl.
Stop cuts
The whole process of removing the burl wood took quite a while as the outer bark was very hard and the burl wood underneath the bark because of its curving nature was very soft in places and very hard in others.
When I had formed it into the shape you see in the top picture (below) I started using different grades of sandpaper, working up from very rough to very fine, until it reached the smoothness you see in the bottom picture.
Carving the Kuksa shape
The inside of the bowl was very stable, smooth and did not contain any holes.
The underside was a different matter with small holes in a number of places.
Smooth bowl but imperfect base
In the up close pictures below you can see that they were fairly deep. I felt I needed to fill these holes to prevent any leakages (never a good thing when you are desperate for a brew).
Holes – big and small
To fill the holes I used a mixture of wood glue and sawdust from the sanding as a kind of filler. I rubbed the mixture all over the underside of the bowl, allowed it to dry, sanded it and repeated the process again. This all took a couple of days to allow for the drying process.
Wood glue and shavings on the base
There was still some roughness left over even after the sanding but I felt that went with the character of the kuksa.
Drying and sanding
To seal the cup I melted beeswax and poured it over the cup. I then re-melted the beeswax with a hairdryer so that as much of it as possible would soak into the burl wood to fill all the pores. I repeated this a number of times, covering the whole cup until no more beeswax would soak into the wood.
Beeswax filler
The beeswax did what the sanding alone never could; it smoothed out the wood and gave it a lovely shine as well. The swirls of the burl wood really stood out after this process.
Beautiful swirls on the sides
I particularly liked the contrast of the burl wood of the bowl with the heartwood of the handle. This is what I was hoping for and was very pleased with the outcome.
Contrasts – heart wood and burl wood
Next up was to test out the waterproofness of the cup. To begin with I poured cold water into the cup and let it stand for an hour. Thankfully there were no leaks.
Waterproofing test – cold water
Then it was time to add hot water. I started with warm water and in stages moved up until I was pouring just-boiled water into the kuksa. I was fairly happy that there would be no leakages now.
Waterproof test – hot water
Next up was to see how a brew tasted with all that beeswax in the wood. I poured myself a coffee and could taste nothing of the beeswax. I think the boiling water helped with removing any excess beeswax.
Taste test 1 – Coffee
A final test was at my friend Fraser’s place (of Coastal Survival) when he made me a beautiful cup of mint and blackberry tea.
Taste test 2 – Herbal tea
I used more of the burl to make a bowl to go with the cup and it too turned out quite beautifully (in my opinion at least!).
Alison had always wanted a one carved for her so I thought it was time to get on with it. These cups were traditionally made out of burls (I will cover this in more detail in my next How To…) however I did not have one available at the time and used silver birch wood instead.
Noggin carving is a skill that has been practiced for millennia but due to modern industrial practices it is now something generally limited to green woodworkers, bowl turners and bushcrafters. These are a few of my carvings, all utilitarian and nothing fancy. The cup at the bottom is the one I made for this How To…
Carvings
Wood selection and splitting
For this noggin I selected a green piece of silver birch that had no crack lines starting on either end. The log had a few knots in it but looked quite easy to carve.
I split the log on a stump with my axe and drew out the basic shape of the noggin with a pencil. My intention was to carve a shallow flat-bottomed noggin with steep sides as the log was not that big.
Beginnings – splitting the log and drawing
Tools & the bowl
As the sides were to be steep I opted to use a curved wood chisel and a mawl. I carved out the bowl first for various reasons:
To locate any cracks deep in the bowl area quickly
Working with the whole piece makes it more stable
There is less chance of the side of the bowl cracking
Mawl and curved wood chisel for the bowl
Carving the bowl
To begin with I worked my way around the edge of the bowl taking out small chippings. I tapped the chisel with the mawl quite gently at this stage. The work piece was placed on my lap with 3 thick layers protecting my legs – two jackets and a small day sack.
I positioned the log so that the chisel was always pointing away from me. A work bench with a vice would have been safer but not available at the time (we were working in the winter in a small roundhouse).
Fine work to begin with on the bowl
Going Deeper
Once the initial edge area was carved out I was able to use more force with the chisel. By this time I did not need to use the mawl but cut into the wood by just pressing down with force on the chisel. This seemed to work quicker than using the mawl all the time.
Working my way around the bowl I was able to take out a lot of wood rapidly until I had the basic shape roughed out.
Chunking out the bowl
Axing out the basic shape
Once the bowl was created I axed out the basic shape of the noggin. I used the saw to make ‘stop cuts’ first though so that when I was using the axe I did not cut out areas of wood that formed part of the cup.
I did this work on a stump placed on the floor. The work piece was always well in front of me so that the follow through from any slippage (from the axe) went to the side of me.
Here you can see the two stop cuts created by the saw coming in at either side of the work piece. I then used the axe to cut out the areas of wood I did not require.
Stop cuts and axe work
Carving with the Sloyd knife
After using the axe to blank out the basic shape of the noggin I then switched to using my Mora Sloyd knife. This small knife is ideal for more detailed, controlled carving.
I was able to carve in a very controlled and safe fashion with my thumbs pressing on the back of the blade. Even though the cuts were always small it did not take long for me to fine tune the shape as the blade itself was very sharp and the wood was green.
Knife work
The crook knife
When I had the outside of the noggin ready for sanding I decided to use the crook knife on the inside of the bowl.
This was to take out as many of the small ridges produced by the chisel as possible and also to try and flatten out the bottom of the bowl some more. The crook knife enabled me to smooth out a lot of the ridges that the Sloyd could not reach.
After finishing with the bowl I left the noggin in a paper bag to dry slowly over a two-week period as it is easier to sand down dry wood.
Finishing the bowl with the crook knife
Sanding the Noggin
I used a variety of different sandpapers on the noggin including:
Top left – 80 grit
Top right – 150 grit
Bottom left – 320 grit
Bottom right – 1200 grit
The sandpapers used
I started with the coarsest, 80 grit, ensuring I covered the whole noggin and that all the edges were rounded off. The bottom of the noggin did take a considerable period of time to roughly sand (I should probably have done more knife work) but I wanted to create a small flat area so that it would be stable when set down with liquid in it.
I did not sand the whole of the noggin smooth as I wanted to leave some of the tool marks showing but I did give the rim of the cup an extra bit of sanding as I wanted that bit particularly smooth.
Sanding
I really focused on making the rim smooth as I wanted that smoothness to contrast with the tool marks on the lower area.
Once I had finished with the 80 grit I worked my way up through the other sandpaper slowly smoothing the noggin down until I reached the finest, 1200 grit.
Smoothing the rim
Boning the noggin
After sanding I oiled the noggin lightly (I used vegetable oil as that was all that was available) then used the back of a spoon to really smooth the surface. This is known as boning and as well as smoothing the surface it helps to seal the oil into the wood (a small rounded pebble works just as well).
Boning
This whole process took a couple of hours and I added more oil as I went along. I find boning quite therapuetic, and it leaves a beautifully smooth satiny finish.
Lastly I carved a hole in the handle, fixed a leather loop and oiled the noggin once again.
Before and after oiling
Lovely carvings for lovely ladies (although sadly Alison couldn’t christen hers with a dram of whisky on Christmas Day: she was pregnant with our son Finlay, who was born just a couple of weeks later!).
Back in October last year I heard that my good friend Mollie Butters would be demonstrating some of her many bushcraft skills at our local National Trust (NT) property – The Vyne. The whole family were keen to go and this is a little report on our wonderful day.
I met Mollie while studying bushcraft with John Rhyder at Woodcraft School back in 2008 and have been firm friends since.
Mollie has set up an outdoor education school called the Field Farm Project with her partner Nick McMillen and to quote their Facebook page it is ‘an exclusive mix of woodland crafts, field studies, farm life, horticulture, ancient crafts and technologies – combining to provide a rich and inspirational learning experience‘.
Mollie had already set up her stand when we arrived and had a lot of her beautiful creations on display. One of Mollie’s specialisations is basketry and she loves to pass that knowledge onto others. Mollie had planned to run classes that day but due to some last-minute changes by the local NT organisers she was only allowed to run some demonstrations.
Meet Mollie
The Vyne is a large estate so we spent the day going off on adventures and then popping back to Mollie’s stall to sneak in a bit of basketry.
My wife Alison and the kids got chatting to one of the NT volunteers who was using a rather strange device, an oval-shaped nest of wires, designed to pick up fallen apples. It was a simple but genius system allowing you to collect lots of apples without bending over, and without damaging them in any way. As the wires rolled over each apple they parted to let it in, then sprang back into shape again to hold it securely inside with all the others.
Once the apples were collected it was off to the device that shredded them ready for pressing.
Apples galore
As this was October the leaves were just turning. I loved the browns, yellows and greens that were all around. The yew was heavy with red fruit and the dew was still lingering in shaded areas of the grass – all quite beautiful.
Autumn colours
My kids wandered off to the woods to play and I bimbled back to chat with Mollie. The Field Farm Project is really gaining strength nowadays with a wide range of courses being run. They have bushcraft courses for children, basketry courses and bow-making courses and they are experimenting with growing many different foodstuffs all year round. For schools, Mollie and Nick offer courses for Key Stages 1 through to 4 covering many different types of learning in the natural environment.
I spent a long time just looking at Mollie’s baskets trying to figure out how she had made them – I can do the basics but that is all 🙂
Field Farm Baskets
I found my family later at the falconry display. Catherine was lucky enough to get picked to fly one of the birds. I was very chuffed to capture the picture at the top left just as the bird landed – Catherine did not move in the slightest – brave girl 🙂
Fun Falconry
Finlay was a bit disappointed not to get in on the act but we had some great adventures in the woods together that day.
I teach outdoor education to city children and I am fully aware that the majority of kids do not truly get to explore outdoors these days – I try wherever possible to let my kids run free and discover nature for themselves. We had a great time climbing, finding kill sites, spotting birds and just generally larking about.
Finlay Fun
I love to find fungi and photograph them. I can identify ones that I know are edible or have some sort of bushcraft use but in the set of pictures below the only one I could hazard a guess at would be the small puffball in the bottom right.
Finding Fungi
As well as the basketry and the carvings on Mollie’s stall, I spotted what I know as a Blobster, a character made out of clay (shown on the left). Mollie works with youngsters making these beautiful woodland creations and it is amazing to see what children can make from just the resources they find lying around them.
I love this activity myself – the trick is to mould the clay around a small twig to provide support. You can create whole communities from mud, twigs and leaves.
Field Farm fun
To finish my day I spent a little while trying out coiled basketry. This is such a simple art but has the potential to create very beautiful baskets in the right hands. Mollie can do that but I think I need a bit more practice.
A great way to relax
It was great to catch up with Mollie again and I know that Alison, Catherine and Finlay had a great day as well.
The Field Farm Project is going from strength to strength and I am looking forward to seeing all the adventures they get up to in the coming year.
I was out on a Bramley Bimble a couple of days ago and came across a sad little find. Just by the public footpath in the Frith woods is a bridge under which the kids love to play trolls, but as they were playing I spotted some feathers and called them over – not much stops my kids from playing trolls but the mention of a dead bird got them moving.
Our find out on a Bimble
I was unsure at first what it was (I thought it was a bird of prey) so just took a couple of pictures and left it there. I put a picture (the one above) up on Facebook and Pablo from Woodlife Trails identified it as a Tawny Owl.
I went back to the site tonight and carefully collected up as many of the bones and feathers as I could find. The owl had pretty much decomposed but I did find the majority of the bones. They were in two piles so something had been along and had a nibble but had not totally destroyed the skeleton.
Everything I collected
There were not many feathers left but I did manage to salvage some good ones. These ones will end up on an atlatl shaft one day.
Feathers, talons and skull
The pads and talons were still attached to the leg bones so were easy to find but when I looked at the skull more closely I noticed damage. The beak was twisted to one side so whatever animal tried to eat it must have chewed the head a bit before giving up.
Up close on a leg and the skull
Below are some close ups of the talons, still looking razor sharp, and the small picture at the top right is all that was left of the spine and the hips.
Talons and spine
I have no idea how the bird died but it was great to find it and in such good condition.
I have been experimenting with my Nikon D3200 DSLR for a month now and I am very impressed with the results so far.
Also I have got Adobe Lightroom which really helps me get the best out of the pictures I take while in my learning state. I am shooting more and more in the RAW format as if I take a bad shot I have a chance of making something out of it in Lightroom.
Also I took the plunge and got the Nikon D3200 for Dummies ebook and am plowing my way through it in the hope of it all making sense one day.
Here are a selection of some of my close up work over the last month. I am enjoying this type of photography and so have been looking into lens tubes to help in this macro photography.
I hope you enjoy these pictures as much as I enjoyed shooting them and playing with them in Lightroom.
The Comma ButterflyPopping out of the hedgeCatherine investigatingGarden seed headHoverfly (I think) on an Ivy seed headCommon fly sunbathingDaddy Long Legs in some rushesHoverfly 2SpideyWillowherb seedDandelion and flyHazlenutHazel stem and next year’s budCornflowerUnknownThe red gall created by the Gall Wasp larvaeWillowherb seedsMr SquirrelIvy Seed HeadBeautiful BorageUnknownSeen better daysAn apple and rosehip harvest
I like to think I can carve the odd decent spoon, bowl or cup from time to time but I know my skill level is only fair to middling as I do not spend enough time practising the art, but I do have a number of good friends who are absolute expert carvers and from whom I can get inspiration.
Mark Beer is one of them. He is an excellent all-round woodsman and carver and on a recent visit to his place I was quite taken aback by his latest creations. As usual I insisted on taking loads of pictures of his work and when he explained the fluorescent properties of Robinia (False Accacia) wood the photographer in me became quite excited.
The cup on the left is carved from Robinia and the other two are from mulberry.
Robinia and mulberry make for beautiful carvings
The cups were carved from burls found on the trees so you can see lots of swirls in the wood. The robinia under normal light is a light cream colour that contrasts well with the darker parts caused by the haphazard growth of the burl.
Robinia under natural light
Under an ultraviolet light (I made an impromptu studio in his closet) the wood is transformed into a magical range of colours. I was as usual only taking pictures with my phone but I think you can really see the green, yellow and purple coming through.
Robinia under infrared light
And up very close – quite psychedelic really.
Robinia up close
The smallest of the cups was made from Mulberry. I find carving small cups quite difficult as you need to carve deep but have so much less wood to hold while carving. This small cup is simple in its design but because of the growth of the burl is rather beautiful with shades of light and dark.
Mini Mulberry
The third cup also made out of mulberry has a larger bowl with a pointed tip. The inside of the bowl was finished using his knife only with very fine cuts to make it smooth but the outside still had the tool marks clearly showing. These tool marks blended in well with the swirls of the burl.
All angles and curves
In terms of function these cups perform the exact same job but in terms of form each is a unique piece of beautiful art.
Contrasts
Mark had also purchased pipestone (catlinite) to make a Traditional Ceremonial Elbow Pipe and carved and shaped the bowl himself. The pipestone is only allowed to be quarried by members of recognised Native American Tribes. The wood Mark used for the stem was cherry.
A pipestone elbow pipe with a carved cherry stem
The man himself.
Mark the Carver
Thanks for letting me look at your latest work Mark, and allowing me to photograph these beautiful pieces.
I was taught a few years ago by my friend John Rhyder of Woodcraft School about a version of bowdrill that uses an extended bearing block.
I found the bearing block to be particularly good for learners or for those who had injuries to their back, legs or arms. I call it the ‘assisted bowdrill’, not that you need assistance from someone else but because the bearing block is set up in such a way that it assists you in your stance while bowdrilling
Below you can see my friend David Jones using the set up on a piece of wood. Dave wanted to try this method out as he had (if I remember correctly) some problem with his knee. As he could stand straight on one leg and did not have to grip the bearing block too tightly, he quickly found he could get an ember and then flame.
Dave in action
To make the bearing block you need a decent length of branch. I used a decent sized piece of hazel just over a metre long to act as my long bearing block. I then axed out a point on one end of the bearing block, to be jammed into the ground when in use.
Select a limb and sharpen one point
I marked a slight cut with my knife one handspan (outstretched little finger to outstretched thumb) away from the other end of the bearing block. Then, using my saw, I cut into the bearing block a stop cut, about a third of the way into the wood.
Measure a full handspan and cut a stop cut
Being very careful and using small chopping motions I cut out the excess wood to make my recess for the drillpiece to be attached. As you can see from the picture below right, I have come back quite a way to the end but not all the way.
Please ensure that the sharpened tip is well dug into the ground when you do this axe work and always make sure you know where your fingers are in relation to the axe when working. I have had a few near misses doing this when I am not paying close enough attention.
An alternative method is to cut a longer limb to create a safety handle, which can be sawn off after you have axed out the area.
Gently axe out to the stop cut
While the bearing block is flat on the ground, use the tip of your knife to make a small hole near the stop cut. This hole will be used to keep the drill piece in place.
Having seen someone put a knife through their hand while doing this, I can tell you just how important it is to make sure that the bearing block is flat on the ground and the hand securing it is well clear of the tip.
On the ground, use your knife tip to make a hole for the drill
The rest of the set up is similar to a standard bowdrill. I commonly use this method with the Egyptian set up, assisting a person or as a relay race.
In the video below I show you the method where I am assisting someone and also as a relay race.
This method is one I would urge any bushcrafter to try out, whether it’s just to try something different, help someone learn the art, or if you (or someone you know) have an injury that makes the standard set up difficult.
Relay Bowdrill
As an instructor in the Sea Cadets, I find this is a stable platform for getting the younger cadets involved as well, be that with an instructor, as a group or on their own.
My 100th post – it seems like only yesterday that I was tentatively writing my first post way back at the end of last September.
For this 100th post the subject couldn’t be anything other than this year’s Bushcraft UK Bushmoot.
BCUK Bushmoot 2014
I came back from holiday in France on Saturday the 2nd of August, unpacked then re-packed and headed out with my two kids Catherine and Finlay to Merthyr Mawr in South Wales on Sunday the 3rd of August. Unluckily I had been beaten to my usual camping spot at the Moot by another family but managed to set up nearby with my tipi, kitchen tarp and my hammock stand.
I found a fire guard lying in the sand and after digging it out used it around my fire. It was quite a well engineered piece and I could not understand why anyone would have discarded it.
My camp
The first few days were mostly spent chilling out with the kids before eventually getting around to putting up the workshop tarps and parachutes. This was the first year I had taken my children to the Moot and they took to it like ducks to water.
Set up
For the first few evenings we had dinner with Fraser from Coastal Survival over in the sand dune area so preparing the evening meal was never an issue for me, thankfully.
I could not resist taking this shot of Stu when he arrived in a taxi and we unloaded his supplies for the Naughty Corner.
It was at this time that my daughter started feeling unwell with a high temperature and feeling very faint. For the next few days she would sleep a lot in her hammock and eat very little. I thought it was just one of those 24 hour bugs but it turned out to be quite a nasty virus and really laid her out.
Settling in and arrivals
This is the first of five videos I took while at the Moot and shows the set up and some of the first courses that were held.
It was good to see all the new growth on Drew’s tree that had been planted last year. People have been leaving little tributes on the tree over the year which I thought made it look very special. While Catherine was feeling a little better she would come out and play with the other kids while she could. She never met Drew but I am sure that they would have gotten on with him like a house on fire. Drew loved to run role-playing games with the kids at the Moot and Catherine and Finlay love these types of games.
The first course I was involved in was the Starter Course. I have written a separate post on this course on the BCUK forum and you can read about it here – Bushmoot Starter Course. This is the second year we have run the course and it is starting to prove very popular now.
Starters Course
Over three of the nights I was at the Moot there was some great entertainment. On one night some of the lads from the Naughty Corner came down to the main sandpit area and had a great jamming session. Apart from filming them I recorded a couple of their tracks and then used them as backing music for my second video. Tony, the organizer of the Moot, even got himself some birthday cake on the night.
The other two nights we were treated to an amazing fire display by Emily, Liesl and Naomi Cook. These three young ladies are very talented and brave.
Evening Entertainment
Here is the video of Emily, Liesl and Naomi doing their fire show on both nights.
One of the things that has struck me about the Moot is all the different art that you can experience there. Art in the form of music from Stephen Crump (recorded for my third video), Welsh love spoons from Dean Allen, Woodland Plant Art from Keith Beaney and art in the form of iron from Dave Budd.
Bushcraft Art
Needless to say Spikey and Badger managed their own version of art up in the Naughty Corner with the use of torches and some evening spirit.
Ye Old Naughty Corner
The main Moot kicked off with lots and lots of courses. I have posted pictures from just a small selection of what was on offer: making the pizza oven with Tim, mini bows with Wayne, water purifying with Richard, net needle making with Steve and spoon carving with Dean. There were lots more courses going on but I did not get to see them as I was on the Starter course all day. My wife Alison arrived on the first day of the main Moot and took a lot of the pictures of the day.
It was at this stage that we decided that Catherine was best off at home, so instead of staying, Alison took her back that day with Finlay.
Workshops – 1
The next video is of many of the first day’s workshops, with backing music from the Naughty Corner band.
The Sunday was another day of workshops and I tried to get around to as many as possible. These included knife sharpening with Chris, making tapestries with Shelly, tracking with Perry McGee of the National Tracking School and making a geodesic dome with Tony. There were plenty of other courses going on such as plant walks with Robin Harford and willow basket trap making with Fraser from Coastal Survival.
Workshops – 2
My video of the day has as its soundtrack Stephen Crump playing a tin whistle on a wet afternoon.
Needless to say I spent a lot of my time down on the archery range shooting arrows or atlatl darts. With all the bows Wayne had been helping people to make we were kept very busy.
Down on the Range
I made a short but very funny video of Mad Dave and Cap’n Badger helping me to clear the range of a hung up tree.
At this stage I had not run any bowdrill classes but I had done a couple of one-to-one sessions. My neighbour Matt Baillie went off after one of the sessions and persevered until he got the bowdrill cracked – well done mate.
A Little Fire Fix
I also did a quick session on the Egyptian bowdrill method and made a short film of it.
The Monday was a bit of a damp affair but the Traders’ Day went well and I managed to try some more of Richard’s excellent elderberry wine.
Traders’ Day and a Private Wine Tasting
I managed to get a little bit of food at the group meal before it was devoured. This is becoming a bit of a tradition now since we stopped doing the hangis, and it is amazing to see all the different dishes that can be cooked over an open fire in a Dutch Oven.
Group Meal
My last video of the Moot is of the Traders’ Day and the group meal.
I spoke with Alison that evening and decided to head home in the morning as Catherine was still very poorly. I got home by lunchtime on Tuesday and thankfully over the next few days Catherine started to recover and was soon back to her usual self.
I really enjoyed the half of the Moot I attended this year and my kids are desperate to come back again next year. There were another couple of days of workshops that I missed but I think this post will give you a feel for how the Bushmoot works.
I hopefully will see you all again next year and meet a few new faces as well.
While we were on holiday in France at my friend Rick’s cottage he was telling me about some of the trees in his garden. He has an old, gnarly pear tree currently propped up by sticks as it was blown over in a storm a few years ago. It still bears fruit, but only on one side.
Rick agreed that I could trim a branch off the non-fruiting side as that would take some of the weight off the side that was being supported. I like to carve fruit woods when they are green as the wood is easy to remove.
Before and after
I cut the limb off very close to the trunk so as to minimise the chance of infection damaging the tree. I made a single cut as the branch was easy to support as I cut it. Also the cut was made as close to the Collar as possible so as to give the tree the best chance to heal itself.
De-limbing
The bark was easy to strip off with my axe – being very careful where my fingers were at all times – and then I used my saw to cut it down further so I had a piece I was happy to carve.
De-barking and trimming to size
One piece of the branch made a perfect hammer for battoning my work piece in two. I make sure that the blade of the axe is 90 degrees to my body so that if it slips the edge of the axe swings away from me.
This piece did not split evenly as the wood was quite twisted with its age.
Battoning
To make the split more even, I put the work piece on its side and split it further. A slower method but more controlled I think.
Splitting out
After splitting I cut out some wood from one of the halves to give it a flatter look.
Flattening
I used my axe to take of some of the excess wood around what would be the bottom of the platter. As the shape was going to be a shallow curve I did not put any stop cuts in but just chipped away, starting from the ends and chasing the wood back to the centre.
Axing out the back
To finish the flattening of the top part of the platter I finished with the axe and moved onto my knife.
Final flatten with the knife
Once the work piece was as flat as I wanted I drew the shape of the bowl area and used my crook knife to start removing the wood from this area. As the wood was very green this excess was removed very easily.
Using the crook knife
I also used my palm gauge and my bowl knife in this process. These are the only bowl-carving knives I have and I switch between them depending on what the wood is saying to me as I try and carve it out.
These tools make a real difference to carving the bowl area but are ones you really need to practise with a lot to be as safe and efficient as possible with when using them.
Palm gauge and bowl knife
Once I was happy with the amount of wood removed from the bowl area, I moved onto the back. I like to take my time when working on this area as it is all too easy to cut out large chunks of wood and suddenly reveal a great big hole in the bowl. I use a variety of cuts: brake cuts towards me, small pressure cuts using my thumbs and powerful but small chest lever cuts to name just three. With all cuts, the main thing to remember is that you must always be aware where the blade will end up if the knife slips.
Different knife cuts
I had a lovely time over a couple of evenings working on this carving – this is what I call relaxing.
Relaxation and fine work
I had kept a lot of the chippings from the carving and when I had removed enough wood I put the platter and lots of the chippings into a plastic bag and kept it in my garage (a nice cool area) for a month to slowly dry out. I added some water to the chippings every few days for the first week to keep them and the platter slightly damp.
This slow drying process allows the whole of the platter to dry in a much more even manner. The platter would potentially crack if the outside dried at a much faster rate than the inside (caused by pressure differences).
Roughed-out platter
After a month of drying I used different grades of sandpaper from rough to very smooth to get rid of most of the lumps and bumps.
Sanding
I coated the platter with 3 layers of olive oil (allowing each coat to dry fully before applying the next).
Oiling
Then over a couple of nights I used the back of a spoon to rub the surface of the platter so that it became silky smooth (known as boning). Sometimes you get a very shiny surface doing this but I think that this wood may need to season for a bit longer as although it became beautifully smooth it stayed a bit dull.
The fibres of the wood may raise up again over the next few weeks but a light sanding and boning will soon have it smooth again.
Boning
This is my 99th blog post and I am glad it was about something I was very happy to carve. The platter is destined to go back to France as a present to Rick for letting us use his cottage for what was a very lovely holiday – Brittany Adventures.
Part 3 in this series on fire by friction looks at my style of using what I classify as a modern bowdrill set up.
I use the term modern as I am using starter cord on the bow to spin the drill piece. I like starter cord as it does not stretch too much when the drill piece is attached and it is also very hard wearing.
I have focussed primarily on the way I tend to teach the bowdrill to someone who wants to create fire on their own
I filmed this last July in France at early evening time. I appreciate there may be similarities with this post and my previous one on the Egyptian method but I want each of the videos to be stand alone.
So here is the video on Modern Bowdrill – My Way
My next videos on this will start to look at methods for using a bowdrill in a group scenario. I have already added an extra video to Part 2 in this series on the Egyptian method but showing the set up being used by two people – The Egyptian method doubled up
I was at the BCUK Bushmoot in August and was asked by some friends if I could show them how the Egyptian method works.
Rather than me showing them I got the guys to double up and do it themselves to show them how easy it was.
They used two limpet shells as a bearing block (which they told me got eventually quite hot) and also watch out for the drill piece as they stop drilling. Notice how it does not spring away when it is released from the bearing block as the more modern single wrap method will do.
‘for some reason the name Bob comes up time and again’
While helping with a Gold DofE Expedition this July in the Brecon Beacons in South Wales I got photographing as much of the plant life I could that was in flower.
I find that many people who walk these high hills (including many adventure leaders) pay scant regard to what is down by their feet but if you look closely enough you will see a riot of colour.
I have used two good reference guides for this article – these are:
All of the pictures were taken inside the Brecon Beacons National Park mostly on the hillsides.
On the left below is Bog Asphodel a beautiful yellow flower that is now in decline. Historically farmers associated this plant with ailments to sheep such as brittle bones or foot rot. It was not the plant that caused the problems but the poor soil the sheep lived on. As farming practices change so does the soil and so the plant is now in decline.
At the top right you see Tormentil and this little plant is always ovelooked but once you become aware of it you see it all over the hills. This is an astringent little plant that was used to treat gum disease and colic. Another common name is bloodroot for the red dye it produces.
At the bottom right you can see Perforate St John’s Wort. I normally spot this plant low down slopes but I found this one in a gully quite high up where it had found some shelter. Herbalists use this plant to treat depression to this day however due to its perforated leaves (hold one up to the sun to see them) it was previously thought to be good for treating wounds and stopping bleeding.
Bog Asphodel, Tormentil and St John’s Wort
I found Water Forget-Me-Not in a number of locations, sometimes on its own and sometimes in whole carpets but always around water in sheltered spots. Apart from being given to loved ones in the past so they would not feel forgotten this little plant was seen as cleanser of mucus so thought good for treating whooping cough and bronchitis.
A little point on naming plants is that when I am out and about especially with my younger students I do not always tell them the names of the plants. I get them to agree a random name for different plants and say out these names as they go along every time they spot one – for some reason the name Bob comes up time and again (must be a Blackadder thing). Once we are back at camp I then get them to ID Bob for its given name. This seems to make the plant names stick with them more. I got this idea many years ago from a fellow bushcrafter.
Water Forget-Me-Not
Another couple of plants of wet areas are the Sundew (top) and the Butterwort (below). Both plants exude sticky fluids to catch insects and have been used to treat rough skin to make it smoother (Butterwort) and also to treat sunburn (Sundew).
Sundew and Butterwort
I came across a bank made up of shaped stones to support a small railway and saw that it was completely covered in Wild Strawberries. I have never seen so many Wild Strawberries in one place. The bank was facing the South West over open water so that must have had quite an influence on its growth.
Wild Strawberry
Back out on the moorland the land was dominated by the Soft Rushes. As recently as the second world war the soft piths of these plants were used as candles.
I found the Water Mint in a tiny stream in amongst the Rushes. I did not identify it easily at first as it was not in flower but its smell and square stem gave it away. A great medicinal plant and I like it in my tea.
Soft Rush and Water Mint
The Brambles (top) I spotted in mid July were just starting to ripen their Blackberries. Is it me or are the blackberries very early this year?
I spotted these Bilberries (bottom) while walking with the cadets where the sheep could not get easy access to so we had a bit of a feast.
Both these fruits make excellent puddings and jams.
Ripening Bramble and Bilberry
The beautiful Meadowsweet was in full bloom in July and was growing abundantly in the low lying areas around the hills where it had plenty of light and water. This was one of the plants sacred to Druids and was a plant that Bayer used as one of the key ingredients when developing aspirin in the 19th century. It gives off a lovely aroma and was traditionally used in the home to cover up bad smells.
Meadowsweet
On the left you can see the Common Spotted Orchid. I came across this beautiful flower in the hills but on the steep grassy slope by a river where the soil was not too acidic. A common ingredient in love potions all over the world I am told.
At the top right is the tiny Wild Thyme, a plant I got confused with Self Heal for a long time. As a medicinal plant it was used as a sedative and was good for hangovers.
The Red Clover in the bottom right is a little flower spotted all the time by most people but at this time you can see that it has opened up slightly. This little fella I can remember as a kid providing me with a shot of nectar. It is also loved by farmers as a nitrogen rich fertiliser or as a feed for animals
Common Spotted Orchid, Wild Thyme and Red Clover
I did not see a great deal of the Bell Heather (top left) as it does not like the soil to be to acidic so it can be an indicator of drier ground. Traditionally this plant has been used in the making of ropes and baskets due to its long fibrous stems.
The Marsh Thistle (bottom left) as you can see by the insect feeding on it is a good source of food for many different types of insects. The young shoots are quite tasty too.
On the right is the majestic Foxglove. I did not spot too many high up in the hills but found a few in some of the more protected gulleys. A poisonous plant but one I remember playing finger puppets with as a child. As I know it is poisonous now as a father I do not let my kids go anywhere near it.
Bell Heather, Marsh Thistle and Foxglove
The Meadow Crane’s Bill (top left) named after the fruiting body it grows that resembles a Cranes beak. This is another medicinal plant used historically for treating wounds and nowadays for treating diarrhoea and also as a gargle.
Bottom left is the tiny Self Heal. Another plant that is easily missed but was once seen as the woodmans friend and used to treat small cuts they got from their tools.
On the right is the tall and slender Great Burnet. I found this one in only one spot on my trip near a railway line and nearly walked past it. I like to nibble the young leaves. It’s other name is Burnip due to its ability to help treat burns.
Meadow Crane’s Bill, Self Heal and Great Burnet
On the left is the well known medicinal plant Yarrow. This tough plant was growing all over the lower slopes. Up high you still saw the odd one but hugging the earth very closely. I remember being on a Bushcraft course, having a cold and being given Yarrow tea laced with honey. That cold did not hang around as it normally would do with me.
I think the yellow flower on the right is a Hawkbit. These little yellow flowers are difficult to identify correctly if you do not look closely at the leaves. I forgot to do this but I think it is a Hawkbit. The genus of this plant is Leontodon which translates to Lions Tooth – referring to the squared of but toothed tips of the flower.
Yarrow and Hawkbit
My last picture I included as I came across a lot of logging in the lower slopes of the hills. It is Larch I think and I really liked the contrast between the young green growth, the growing cones and the sharpness of the stump left by the loggers.
Larch
I really enjoyed spotting and photographing these plants (I had to climb down into some steep gullies) however please let me know if you think I have identified any of them incorrectly.
Part 2 of this series is a short video on a type of bow drilling I came across a few years ago called the Egyptian method (Egyptian hieroglyphs have depicted this method).
I like this set up as it does not put the cordage under a great deal of strain (the cordage is wrapped a number of times around the drill) and it is good for learners as the drill piece does not ping out if the set up becomes loose.
Have a look at the video and try it out for yourself.
My next video in this series will be on my technique I use with a more modern bowdrill set up.
I started researching this summer the recent history around Teine Eigin (Gaelic for ‘rubbing sticks together to make fire’) on the Western Isles of Scotland (where I grew up). Up until the early 19th century records have shown that in times of animal disease (such as cattle with Need Fire) and at particular times of the year, such as the Beltanefestival, fires were lit on these Westerly Scottish Isles using fire by friction methods.
Instead of writing full step-by-step articles on the different methods, I decided to experiment with video. I have read of many different set ups that were used for Teine Eigin so I will film some of the methods I use and explain the steps I follow to create fire.
Fire by Friction – The Handrill
This is the first video in the series and it covers how I use one of the simplest, yet sometimes seen as one of the hardest to master, methods of lighting a fire – the handrill.
Part 2 in the series will look at the bowdrill but focussing on the Egyptian method.
I made a number of bimbles around Bramley in June observing the changes occurring so I have decided to merge the three trips into one report. I took my kids out on two of them: it’s great seeing them starting to observe nature with more of an eye for detail.
My wife Alison gave me a macro camera lens for my iPad mini for Fathers Day and I took this lovely picture of this orange hawkweed with it.
Orange Hawkweed
The cherry tree I have been monitoring produced its fruit in June. On the first trip they were yellow, on the second they were red and on the third trip they had all been stripped away by the birds.
I did also manage to find a few wild strawberries over the month but they were soon getting nibbled away at as well.
Cherry and Wild Strawberry
On the second trip I spotted that some damselflies were flitting about a watercress-covered pond. I kept trying to get a decent picture of them but the pictures always ended up fuzzy. On the last trip after a patient wait I managed to snap this picture with the iPad mini using the macro lens.
Damselfly
At another pond where I am watching the reedmace growing I came across the yellow flower below. I had never seen this before so had to look it up: the closest I can get to it is a flower called the monkey flower. Happy to be educated by anyone if they can ID it as something else. If it is monkey flower then the leaves and stem were traditionally used by Native Americans as a salt substitute just as colts foot was used here. I was first taught how to dry out the leaves of colts foot by my friend Kevin Warrington – Laplanders Natural Lore Blog.
Even though the bluebell has lost its flower I still think it is a beautiful plant in this late stage of its life cycle. These pods will eventually darken before they open to disperse their seeds.
Monkey flower and Bluebell seed pods
This was one of the first self heal flowers I came across this year right at the beginning of the month. It is a wonderful medicinal plant that I have used a number of times along with woundwort, plantain and yarrow to treat small cuts and grazes. It was also known as carpenter’s herb because of this ability to treat small cuts.
As the month has worn on this plant has appeared all around the village in great numbers. It is a pity that most people do not give it a second thought.
Self Heal
Two very tiny details in abundance at the moment are the cuckoo spit and the tiny green alder cones. The cuckoo spit contains the Froghopper nymph which uses the spit much like a home when it emerges as a place of safety.
Some of the alder cones have a red tongue-like protrusion caused by the fungus Taphrinaalni. The fungus develops in some of the cones and forces the cone to grow these protrusions so as to produce and release its spores – a kind of forced symbiosis I suppose. My source on this was the Donegal Wildlife Blogspot
Cuckoo spit and Alder Cones
My first mullein flower of the year. This was the only mullein I saw in flower but there are plenty growing around the village. A great medicinal plant used for treating chest infections, TB, digestive problems, sore throats and many more ailments. Nature News has a good page on the plant.
I personally like it as it makes a good handrill, a good torch when covered with oil or fats but also as its leaves are soft and have anti-bacterial properties, which means they make great toilet paper.
Mullein flower
As I have been taking Paul Kirtley’s online Masterclass in Plant ID I have been monitoring a lot of different sites and trees around the village since February and plan to do so for a whole year. It has been great to see all the changes occurring with the flowers and the trees leaves coming through but I was particularly happy to spot my first hazelnut and acorn of the year this month.
Hazel nut and baby acorns
It was not until the end of my last bimble, as I turned my last corner to go home, that I spotted my first poppy of the year. The edible part of the plant is the seed which is used in cakes and also crushed to make an oil.
Poppy
Two other new spots this month were the enchanters and the woodynightshades. The enchanters nightshade I found dotted all around the woodland floor but the woody nightshade I found in a hedge by our local park. They are not related but are both beautiful flowers. The enchanters was known to the Saxons as aelfthone to treat what they saw as elf sickness – any sudden sickness brought on for no known reason.
Woody nightshade is another plant used medicinally in the past and is also known as bittersweet because of the bitter then sweet taste you got when chewing the root of the plant. Large doses of this plant though are deadly so one left to well-trained herbalists.
Enchanter Nightshade and Woody Nightshade
I have found only one patch of ground where I have seen the commonbistort growing. This was taken near the end of its flowering stage and was covered in these moths. I have never tried this plant but I am told that the young leaves and the root are edible. In the Lake District the plant is used in the making of a pudding called the Bistort Easter-Ledge Pudding.
Bistort and Moth
My friend Alan Smylieis an excellent forager and photographer and I was chatting to him about the common mallow and the limeflowers that you can see below. Apart from looking beautiful he is making a wildcherry jelly infused with mallow leaves and he makes a tea from the lime flowers. I hope to do a forage or two with Al at this years BCUK Bushmoot in August and pick his brains a bit more about some of these plants.
Mallow and Lime flowers
In the stream near our house I have found carpets of watercress growing. The flowers attract a lot of insects and the whole plant can seem to fill a stream. It was not until I got into the stream did I notice that the plant seems to float on the water with the roots of to the side of the stream. The plant is edible but only if you know the water is clean.
Watercress
On the left is the pin cushion head of a devilsbitscabious flower. This beautiful flower is a source of food for many insects in the summer. In particular the declining Marsh Fritillary Butterfly relies heavily on this flower. When I see this flower appear each year I know that summer has finally arrived.
At the bottom right is the lovely meadowsweet. This was one of the plants sacred to Druids and was a plant that Bayer used as one of the key ingredients when developing aspirin in the 19th century. It gives off a lovely aroma and was traditionally used in the home to cover up bad smells.
Devils Bit Scabious and Meadowsweet
I spotted this little fella taking a rest on the seed head of a Ribwort Plantain plant. He was not at all fazed as my phone camera came in close.
Ribwort Plantain seed head
On our second trip out we came across this ash tree that had been used as a scratching post for deer. It looks like they had used the tree to help rub the felt of their antlers. I could see teeth marks on the edges of the ripped off bark and lots of scratches on the wood itself where it appears they were rubbing their antlers.
Apart from the sign on the tree there were plenty of tracks. We had lots of deer slots, badger prints, pheasant, squirrel and what maybe a vole print.
I do not know if the top right print is a vole but it is certainly small enough to be one and the bottom one are the tracks of a grey squirrel.
Deer tree damage, unknown top right and Squirrel bottom left
There have been lots of early purple and early marsh orchids in the woods around the village but I have only spotted two of these pyramidalorchids this year. They seem to like drier, more open ground and I found one near the railway line and the other on the edge of a field so they are probably less common due to the fertilizer run-off from fields and toxins from the railways but also because they do not produce nectar themselves but rely on other nearby orchids to attract insects.
Pyramidal Orchid
That was my June when it came to observing nature around Bramley. My kids had a great time and so did I, taking them out, photographing and researching some of the plants.
About a month ago I was asked to help out at my local village fete by running some bushcraft activities. Space on the field was quite limited so I could not set up ranges for the bows or the Atlatls– my first choice – so instead I opted for fire, hammocks, camp set-ups and the whimmy diddle.
Bramley Bushcrafting
I arrived at 8.20am to be greeted by these dramatic mammatus clouds (known as upside down clouds). They are sometimes spotted preceding a thunderstorm. In a matter of minutes the rain was lashing down and the picture on the right is a still of a lightning bolt I caught on video.
The rain carried on in bursts for the rest of the morning as I set up. I was a bit concerned that all my tinders and fire sets would be a bit damp. I set up my tipi, a fire area, some campfire cooking set ups and a hammock for folk to try out. Thankfully by the time the fete opened at midday the rain had stopped and the skies were clearing and my kit was all still dry.
Stormy Set Up
As soon as the fete opened I was kept busy. There were lots of different activities, some you paid for and some you did not pay for. I had agreed to run my activities for free partly because it was a nice opportunity give something to the community and partly because I love seeing people try out bushcraft and discover these ancient skills for themselves.
A quick and easy-to-learn activity is the use of modern firesteels. In no time at all the kids were lighting up Vaseline-smeared cotton-wool balls and using smouldering char cloth to get tinder bundles going. I try to make each of these activities into little classes that include a little discussion at the beginning around permissions and the safety of making a fire.
Busy times straight away
One of my favorite bushcraft toys is the whimmy diddle. This was taught to me a few years ago by the guru of bushcrafting Mors Kochanski. I love the way I can make the little propeller go one way and then the other as if by magic but best of all I love watching other people trying to figure out for themselves how to do it.
Introducing the Whimmy Diddle
During the day a number of dads came up to me (no mums this time, for some reason) and asked me to help them make fire using the bowdrillwith their sons. I think this set of pictures kind of says it all in terms of how special a moment this can be.
Quality Father and Son time
It was not all work work work; I was able to keep the gas wood burning stove my friend Fraser from Coastal Survival gave me and so I always had a brew on the go.
While I was busy teaching, others just chilled out in the hammock (this was very popular and quite a queue formed) or studied the various campfire cooking set-ups I had put up.
Plenty of brews and chill time
I hadn’t really planned to use the handrill but someone asked about it so I gave a demonstration (thankfully I got an ember), and then before I knew it I had loads of kids asking to have a go. I explained that this would usually be done in family groups (and in some societies still is) so to make it easier for everyone. Before long we were twirling away taking it in turns. I think we only had one failure, but we kept the dust we had produced from that one to help build up a successful ember using the bowdrill instead.
At the end of the day I lost count of the number of handrill sessions I did: I do remember having really sore hands (even sorer the next day) but it was all worth it.
Never too young to learn the handrill
Occasionally I gave some one-to-one tuition on the bowdrill to give my hands a little rest from the handrill.
Adult to Adult teaching
As I did not have a great deal of time with each person I tried to help out where I could. In the picture below all I am doing is showing the student how to keep the bearing block still and my right hand is stopping the bow from see sawing (I am not holding it at all).
Guiding
It was not all handrill with the kids – sometimes we got the bowdrill out with spectacular results.
Big kid teaching little kid
Plenty of smiles after each time.
Smilers – Picture courtesy of Ian Evett
All in all I had a fabulous day lighting fires, teaching the whimmy diddle, discussing campfire cooking set-ups and ensuring as many kids as possible got to try the hammock out.
Flamage
I am told that the rest of the fete was a success with loads of activities but I never got to see any of it. I managed to get away from the stand once to go to the toilet and my wife Alison brought me what must have been the largest pork roll ever from the hog roast stand (and for taking all these pictures).
My kids had a great time and managed to pop back to see me every now and then.
What I missed
The only problem with being part of an event like this is that you miss seeing all the other activities, such as this inflatable tag challenge which my kids obviously loved.
I made two trips to the Isle of Lewis in Scotland this May: the first time to attend my gran’s funeral and the second time to spend a week there on holiday with my family. The island has beautiful beaches, rocky coves, stunning moorland but also some of the most useful and beautiful plants a bushcrafter or forager would want.
Island beauty
I was initially struck by some of the flowers I spotted in my sister Tina’s garden. The bluebell is very common where I live now in the south of England but not so much on the island. I have used bluebell sap to help attach feathers to arrow shafts as flights (seemingly a common practice up until the Middle Ages) and I have heard that the Elizabethans used it as an early paper glue.
The redcampion was growing right beside the bluebells and this again has many uses historically. The roots contain saponins which are great for making a form of soap. Great for washing clothes but not for the fish – the soap was also used in the past to paralyse fish so making for easier fishing.
Tina’s garden – bluebells and red campion
The beautiful pink flower in the top picture is dame’srocket and the lower flower is commonscurvygrass. Both of these are high in vitamin C and both were used in the past to ward off scurvy.
Dame’s rocket is a member of the mustard family and the flowers are edible, making them great for salads. The common scurvy grass is also edible as well as being medicinally important and the leaves were often used in sandwiches prior to the popularity of watercress.
Dame’s rocket and common scurvy grass
The lady’ssmock (or cuckoo flower) can make for a majestic and striking picture. Sometimes I see this flower growing and think it looks lonely; it really is one of these taller flowers that can withstand some pretty harsh environments.
This was another edible high in vitamin C that was used historically to treat scurvy but also makes for a spicy addition to a salad. The flower in folklore has received a lot of bad press – it has been associated with bad luck and the evil eye so was thought to be best left outside the house (we are a superstitious lot, us Scots).
Lady’s smock
Who would have thought that this delicate little plant called thrift could be so tough and beautiful at the same time? The stalks of this tiny plant were commonly used in the past for basketry. On an island where plants do not grow very tall due to the wind basket weavers would use whatever material came to hand and the stalks of thrift, although short, are strong and flexible.
Up to the 1700s a tonic called arby was made out of the root of this plant in Scotland as a cure for TB but the best use I have heard of for thrift was as a hangover cure for sailors (according to Charles Coates, The Wildflowers of Britain and Ireland).
Delicate thrift
The three flowers below are very common on the island as well as much of the rest of the UK. We found the primroses on Lewis still in full bloom in May: they make for a good snack on the go, though I have read in Paul Kirtley’s blog that they can cause contact dermatitis in some people.
The hogweed stalk you can see in the bottom left is from last year’s growth and I can remember as a lad using the hollow stalks as pea shooters. I have seen people cook the young leaves and shoots but cannot recall trying any. I have, though, had the seeds in various stews over the years.
The final picture is of Wordsworth’s favourite flower – not the daffodil, but grianne (Gaelic for the Sun), known to him and most of us as lesser celandine. This is an edible plant if handled properly, highly toxic if not. It’s best to cook it well and only use the youngest of leaves. Again this is a plant that has good levels of vitamin C and is quite astringent, making it medicinally important. However the sap in its raw format is very corrosive and has been used to remove warts; there are stories in Scotland of beggars using the juice of the plant to create sores in order to gain more sympathy and money. A useful plant in the right hands, but dangerous in the wrong hands.
Primroses, hogweed and lesser celandine
The island seems to be suffering an infestation of horsetail (top picture on either side of the nettle). This plant is a pain for gardeners but a bushcrafter’s friend. I have used horsetail as a pot scrubber many a time, it has a rough texture due to the high content of silica in it. The plant also makes an excellent natural sandpaper.
I spent a couple of days in the grounds of Lews Castle grounds in Stornoway and came across some useful trees there (the sheltered grounds are the only place on the island where there is a large concentration of deciduous trees). The leaf and flower in the bottom picture is from the whitebeam and it produces an excellent smooth wood ideal for tool handles and cogs before the widespread use of iron. My friend PhilBrown from Badger Bushcraft produces an excellent jelly from the tree’s fruit.
Horsetail, nettle and whitebeam
Two other useful trees I came across in the grounds were the wych elm (scotch elm) and what I think what was a white elm. Both are real bushcrafters’ friends as the inner bark makes a great cordage. The word wych is an Old English word meaning pliable and this pilability also extends into the wood as well; these trees make for really excellent bows. A good blog on this can also be found on the Badger Bushcraft site – Wych Elm or Scotch Elm Cordage From Dried Bark.
Wych elm (Scotch elm) and white elm
I was visiting my friend Fraser from Coastal Survival earlier in the year and he showed me how you can squeeze the juice out of the marsh horsetail (bottom left) and the combination of fluid and silica make for an excellent handwash (great for helping small cuts heal quickly as well).
On the right is a young silverweed plant. This is the plant that prior to the introduction of potatoes (and in times of the potato blights) was a staple food on the islands. This plant is known as Seachdamh Aran (the Seventh Bread). It was thought that a man could sustain himself for a year on a patch of silverweed the square of his own height. In North Uist, during the clearances, homeless folk were said to be living on shellfish and on bread made from dried silverweed roots. A good document on this can be found on the BBC website.
Marsh horsetail and silverweed
This is one of my favourite pictures was this one. I loved the waterfall and the shelf with the scurvy grass happily growing under it.
Island beauty
It was not until I was reviewing my holiday pictures that I realised that the majority of the plants I had photographed were so useful. I found out a lot about some of these books from my guide book – The Wildflowers of Britain and Ireland by Charles Coates.
It’s a stark reminder of a very different time, when these plants protected peasants against scurvy or starvation – worth remembering if you’re tempted to dismiss them as just ‘pretty flowers’.
I have been bushcrafting on and off for most of my life. Growing up in a remote village on the Isle of Lewis off the west coast of Scotland I was free to get out and about as a boy and really explore my surroundings. I saw this sometimes then as a lifestyle that was stuck in the past: I remember wishing for all those modern gizmos and ways of doing things I saw advertised on the television.
But now, aged 47, I really appreciate that upbringing, even though we did struggle at times. When I teach outdoor skills to kids these days I see the effect on them; having been sat in front of a TV or computer for most of their lives they are afraid at first to explore or take risks outdoors, but with a little bit of encouragement and support it is great to see them discovering a whole new way of learning.
One of the tools I use in that learning process is the ‘force of fire’.
Happy Fire faces
That force of fire can be made in many different ways but my favourite is Teine Eigin – Gaelic for rubbing two sticks together to make fire. Nowadays bushcrafters know this as bowdrill or handrill (though there are many other techniques, such as the plough) but what many do not realise is that this method was used in certain areas of Scotland up until the middle of the 19th century. I wrote a recent article where I put some good links to this tradition – Bushcrafting at Lews Castle College.
This summer I plan to explore some different methods of making fire by rubbing two sticks together – Teine Eigin.
Here is my intro video to the subject.
This is my first video with commentary so I’d love to hear your thoughts or questions.
Cheers, and I will be back over the summer with more articles on these methods in detail.
After the day was finished I was really struck by how many of the skills I practice under the title of bushcraft were being practiced on a daily basis on the Isle of Lewis just a few generations ago
My brother Finlay has been attending Lews Castle College on the Isle of Lewis off and on now for a number of years and I was privileged recently to be asked along for a day to teach him and his fellow students some bushcraft skills. They have a great horticulture area at the college with some impressive greenhouses growing a wide range of plants. Finlay loves working with plants and the college has provided him a good place over the years to develop his skills.
The current course he is attending is called Grow2Work and its aim is to instil a work ethic within the students, giving them confidence and building their self esteem. The students develop a number of skills, such as working as part of a team and following instructions by spending time planting, harvesting vegetables and strimming plants.
A lovely day bushcrafting at my brother’s college
My Grandmother Mary passed away earlier in May this year and while I was up on the island for the funeral my sister Tina had a chat with the course director, John Maclean, and mentioned that I did teaching around wild plants and bushcraft skills. Unknown to me, Tina had volunteered me to do a day’s bushcraft tuition for the whole of Finlay’s class when I was next up at the end of May on holiday to the island with my family.
I found out eventually I was doing the course and so, not really knowing what I was going to do with it, packed an extra bag full of bushcraft and survival kit. I fully expected to have half my kit confiscated at the airport but miraculously the security folk let it all through. If I had been asked to open it up I would have been hard pressed to explain myself.
I had been asked to run the course on the Monday so I managed to do a recce of the castle grounds woodland to find good teaching areas. While I was doing this with the kids my wife Alison ran the Stornoway half marathon. I shot this little video of the day recceing the woods and supporting Alison.
I spent a lot of time as a teenager exploring these woods around the castle and it did feel rather strange to be coming back to teach bushcraft skills in one of the places that my passion for the art started.
Monday morning arrived: I went off to Stornoway with Finlay Mhor (Big Finlay – my brother) and with Finlay Bheag (Little Finlay – my son). I met the rest of Finlay’s class – Murdo, Matthew, Alistair, Josh, Mark, and John – and the tutors John and David. We had a good chat about what we could do and ended up agreeing to spending some time:
making nettle cordage
identifying some of the wild plants growing around the site
setting up a tarp and hammock to learn some bushcraft knots
trying out some different fire lighting techniques
and finally shooting some Atlatl darts in the wood.
There were a few nettles growing around the edges of the gardens so after putting on some gloves I got the guys to pick some to make some cordage. I explained that it was thought the nettle was introduced to the British Isles by the Romans as a method of producing linen or as a method of keeping warm (urtification).
In Scotland historically nettle was used to make scotch cloth; the poet Thomas Campbell wrote in some of his letters, “In Scotland, I have eaten nettles, I have slept in nettle sheets, and I have dined off a nettle tablecloth. The young and tender nettle is an excellent potherb. The stalks of the old nettle are as good as flax for making cloth. I have heard my mother say that she thought nettle cloth more durable than any other species of linen.”
Stripping and prepping the nettles
After picking the nettles the guys stripped off the leaves and crushed all the nodules in the stalks to make them easier to split open. Nettle cordage would have been made on the island in the past as it has been common on the island for centuries. I got the class to split open the stalks of the nettles along the full length of the stems and then pulled out the hard pithy core to leave long strips of the outer nettle fibre.
Splitting the nettles
We then wrapped the nettles into short strips of cordage. The guys liked this as they could see how they could easily make cordage from nettles in their garden if they did not have any modern cordage to hand.
Making some good cordage
After making the nettle cordage we went for a walk up into the woods. On the way we stopped to chat about many of the wild plants growing around the college. One of the common plants was the Silverweed. I explained this plant was a staple food in Scotland prior to the introduction of potatoes in the 1500s and was known as Seachdamh Aran (the Seventh Bread). It was thought that a man could sustain himself for a year on a patch of silverweed the square of his own height. In North Uist during the clearances, homeless folk were said to be living on shellfish and on bread made from dried silverweed roots. A good document on this can be found on the BBC website.
Silverweed – The Seventh Bread
After talking about some other plants including comfrey, thistle and some different types of trees, we set ourselves up a little camp. This was to show the class some of the hammocks and tarps I use when bushcrafting. They were all keen to try out the hammocks. I had brought along two types of hammocks. One was the EDC Chair hammock and the other was the Woodsman hammock. Both hammocks are made by my friend Mat Howes of UK Hammocks. After setting up the hammocks we set up a tarp and practised some knots, including the Evenk, the Tarp Taught and the Clove Hitch.
Hammock time
After lunch it was on with the business of making fire. We had already made fire by using a parabolic mirror earlier that morning using the sun’s rays – not often you can do that on the Isle of Lewis. Although I used a modern mirror this technique has recently been shown to have been used for thousands of years – World’s Oldest Solar Device.
Parabolic Mirror
We decided for safety to light our fires on a patch of concrete within the nursery area (normally I would use raised fire pits for this). I taught the class how to use modern firesteels at first and they soon had sparks going strong.
Firesteel session
My son Finlay got in on the act as well and everyone was able to light up some cotton wool balls in no time. I have to say a big thank you to my wee boy Finlay as he was the perfect student all day, getting stuck in with all the others.
Little Finlay had a go as well
After the cotton wool balls I got the class to catch some sparks onto some char cloth that we then popped into some hay.
First tinder bundle
Everyone was happy when we got that first tinder bundle burning happily.
First flames
After the firesteels it was time to make some Lucky Fire, sometimes known as the Beltane, the Need fire or Forced Fire on the islands. In Gaelic it is called teine eigin (translates as ‘fire from rubbing sticks together’). Bushcrafters normally call this skill the Bowdrill but what is not commonly known is that this method of fire lighting was used in Scotland in some places to light fires up until the middle of the 19th century.
I doubled up with each of the guys to give them a feel for how it worked but due to a lack of time could not teach them to do this on their own. The wood was lovely and dry due to the sunny day and we soon had some good coals going.
Bowdrill teamwork
As we were bowdrilling I explained how this technique had been used on the islands until very recently and it would have been quite likely that some of their recent ancestors had used this technique to light a fire. After getting a few coals we popped one into a tinder bundle and started blowing that into flame.
Final strokes and getting the bundle going
Everyone was keen to be involved in all parts of the process of making fire.
Everyone had a go
Even the boss John got involved and before we knew it we had flame again 🙂
Even the boss John got a go – then we got flames again
As we could not keep the fire going because of the college safety rules all I could do with the class was to explain at this point how they would go about building their fire up so it became self sustaining.
Flamage
The final activity was to get the Atlatl darts out. I could not bring any with me on the plane so I just bought some bamboo canes locally and made flights out of tape. All in all the set cost me about £6.
After a bit of tuition to each pair it was time to do some shooting.
A little bit of Atlatl tuition
In no time they were getting the hang of it. We did though have to move our target (thanks for your ingenuity here John) as some golfers had lost a ball and were searching for it in scrubland near the target.
Boys having fun
I think John is a possible convert to the Atlatl by the look of the concentration on his face.
Some good Atlatl throwing
I really enjoyed teaching my brother Finlay to use the Atlatl.
My brother ready to shoot
In the end they all got the hang of it and were happy to be chucking darts down the range.
Dart away
I must in the end thank my sister Tina and John for arranging this day as I had a fabulous time working with everyone in Finlay’s class.
After the day was finished I was really struck by how many of the skills I practise under the title of bushcraft were being practised on a daily basis on the Isle of Lewis just a few generations ago.
May brings about City of London Sea Cadets‘ annual pilgrimage to the New Forest to remember the 1,415 crew members of the mighty Battlecruiser HMS Hood who lost their lives on the 24th of May 1941 and also to provide a range of adventurous activities for our cadets to try out in the beautiful countryside.
Our campsite was in the large Scouting site of Ferny Crofts in the New Forest.
HMS Hood Remembrance Service
This year we had a number of cadets from visiting units of ages ranging from 10 to 17. They were split into a class for the Juniors (10 & 11 year olds), a course on basic campcraft and one on more advanced skills. This weekend was also a chance for us to let the younger members of staff have a go at teaching outdoor skills to the cadets and which I was very happy to see worked out very well. We laid on a variety of classes including navigation rucksack packing, first aid, outdoor clothing, cooking and conservation.
Outdoor classes
For the Juniors the Saturday morning included a class on responsible firelighting. This was run by Charlie who is a fire fighter in his day-to day-life and is always keen to show the cadets how to light and manage fires in a fun but safe manner. Charlie had them using modern and traditional firesteels, and also had the cadets assisting him in creating fire by friction using the bowdrill method.
Bushcraft classes
Soon it was time to head out and about. The day was very hot so I made the decision to try and keep to the woods as much as possible. Even though it was hot, the ground in many areas was saturated, making for wet feet for some.
Out and about in the New Forest
Along the way we would stop to have an impromptu classes on navigation, conservation, first aid or leadership. As far as I am concerned this is the best type of classroom.
Classes on the go
A nice spot for us to stop for a restful break is the hotel near the Beaulieu Railway station. The cadets can relax or run around the small play park for a while while the staff can plan the evening’s activities. it is around this time that Simon heads off to prepare a great meal for everyone in the Roundhouse at our camp.
Rest and excellent food
After all the learning it is time to play and relax. The kids and staff all took part in the the tug of war and the volleyball games.
Fun and fitness
Someone managed to get hold of the water cannons I had brought along for bushcraft games and put them to good use in the evening as well.
Pure fun
After dark we had the usual marshmallows around the fire and I lit a couple of my Scandanavian candles. Dave though had brought along his laptop and small projector. he put a film on (Brave, I think) and projected it onto the inside of the parachute. The whole set up could not be filmed because of the dark and the smoke from the fire but it did work and kept everyone happy.
Nightlife
As my wife Alison was also away that weekend I took my two kids (Catherine and Finlay) along with me. They got on really well with all the cadets and Finlay managed to sleep all weekend in a hammock for the first time. Not bad for a six year old.
Sleepy mornings
As part of their Green Module the cadets learnt how to cook over an open fire on the Sunday morning and I was happy to sample the fare.
Campfire classes
We try and set up lots of events on the Sunday morning, some to really test the cadets and some to just have fun just like they are having on the Atlatl range.
Atlatl fun
Over the weekend one of the cadets turned 18 and so became a member of staff. We managed to get some cakes and candles together for a good old Happy Birthday sing a long.
Birthday celebrations
I have been experimenting with video over the last few months so managed to put a short piece together of the weekend.
While we were running around the woods on the Sunday morning Paul. Andy and some of the older cadets attended the HMS Hood Remembrance ceremony at Boldre church. In all my years attending this event (since 1999) I have never gotten to the church; I’m always left behind in the woods 😉 These are official City of London Sea Cadet pictures.
Remembrance
As usual I am looking forward to my trip to the New Forest next year. I also made a small video of what my kids got up to over the weekend.
The 16th of May was a perfect day for a bimble around the village with the kids. They decided to take the scooters and even managed to keep them going on the rough woodland tracks.
Bimbling with my kids
Looking good now is the common bistort and the yellow iris. I found the large sow thistle up near the Clift Pavilion.
Bistort, Iris and Sow Thistle
I passed by many dandelion seed heads but this one caught the light just perfectly.
Dandelion seed head
The meadow by Lane End proved a good place to explore.
Chilling in the sun
The wild strawberry leaves and flowers are well out around the whole village but I saw my first buttercups and red clover this week.
Wild Strawberry, Red Clover and Buttercup
This large horse chestnut is one of the trees I am monitoring for the whole year. The sun looked nice as it shone through it. The blossom is still looking good on the horse chestnut and at the foot of it I found these ferns uncurling.
Horse Chestnut and unfurling Ferns
We had a good look around the meadow but there are not too many plants flowering yet.
Cuddles
I did spot that the cherry tree near the pond is starting to produce its fruit now. Catherine and Finlay were also on the lookout for tracks (this one is deer) and tadpoles.
Cherry fruit, Deer slots and Tadpoles
One of my favourite snacks while out foraging is the pignut. I found that they had just started to flower in our area now.
Pignut flowers and leaves
I do not really know my birds but Catherine and Finlay took some time out to lie back and see what flew over them.
Watching the sky
The orchids in the Frith are still hanging in there but I expect to see them disappear over the next few weeks. In the damp ground we did find a pheasant track and spotted that the Brooklime was appearing now.
Orchids, Pheasant print and Brooklime
The bluebells have started to die back now but still make a beautiful sight. The stichwort and mayweed are looking at their finest though at the moment.
Bluebells, Stitchwort and Mayweed
The kids had soon had enough of lying about and started scrambling over the alder and willow trees.
The Catherine Shuffle
The ash is finally out: it must be one of the last trees to burst into life in the Bramley area. Out near the playground by the new estate the white campion is in full bloom and in the Frith we spotted what looked like a badger print, deep in the wood well away from dog walking tracks.
Ash, White Campion and possible Badger print
Still to be found there are the lovely yellow wood avens and blue forget-me-nots, and the grass seed heads are standing tall.
Wood Aven, Forget-Me-Nots and Grass Seed head
Needless to say Finlay needed to get in on the tree climbing act.
The Finlay Shuffle
I found what looks like a water hemlock by the stream next to our house. Beautiful but deadly.
Water Hemlock
Last picture is of a couple of tracks from I have no idea what animal: any ideas?
Unknown print?
This was an excellent bimble around Bramley and I am now looking forward to seeing all the early summer flowers that will soon be appearing.
I was trimming an ash tree in my garden recently with my friend Paul and I managed to save a few pieces for Atlatls and pot hangers.
I have previously shown you how to carve a collapsible pot hanger so that it can fit into a pot when not in use but on a lot of occasions I just whittle one when I need one.
The type of pot hanger I am talking about is shown below hanging off a ‘Wagon/Waugan Stick’ (pronounced waygone or worgan – I hear different variations on this from different people) campfire set up. The pot hook is adjustable in that the pot is easily raised or lowered by using the different hooks on the pot hanger.
A simple pot hook
I started off with a piece of ash that had a fork in it at a good angle (to form a hook) and finished up with something that allowed me to be able to quickly or slowly cook/boil something.
On the right you can see the finished pot hanger in action. To help stop any confusion I will refer to the large hook holding the small kettle as the ‘pot hook’ and the small hooks as the ‘adjusting hooks’.
Before and After
To begin with I trimmed off all the knobbly pieces using powerful chest lever and locked arm cuts. See my How To…. on knife Safety for more information on these types of cuts.
Powerful cuts
I then trimmed the bark off using a powerful shoulder cut. I had the work piece placed on the ground here off to one side so as to brace it and to work safely.
Braced
To strip the bark around the hook area I used a gentle chest lever grip.
Fine cuts
The bottom of the pot hanger was more difficult to trim as I had not left any excess wood to hold on to. The main thing I needed to consider here was keeping my eye on where my thumb was on the hand holding the pot hanger.
Work safely near the ends
As I needed to use the point area of the blade to trim around the hook I kept the pot hook resting on a small log so that if the knife slipped it would hit the ground. My friend Charlie showed me how to use the knife and the curve of the pot hook to create a fulcrum, making the stripping of the bark safer. I tried to photograph this but they did not turn out well.
De-barking the hook area
I also rounded the bottom of the pot hanger and then used the back of my knife to strip off the remnants of the inner bark.
De-barking with the back of the knife
To make the adjusting hooks I used a batton (a large stick) to carve a cross into the wood – an X cut. I placed my X cuts in line with the pot hook as much as possible. After a couple of good smacks with the batton the knife had cut well into the wood.
Batton in the first X cut
I then repeated the process for the other part of the X cut.
Then the second X cut
A simple X cut – this cut makes the carving of the adjusting hook much easier.
The X cut
So that the pot hanger can hang properly you must remove the wood at the bottom of the X cut first (the bottom being the quarter of the X cut closest to the pot hook).
I use very fine cuts here and the original X cut acts as a stopper point so that you only cut away the wood that you need to.
Fine cuts
I normally remove a small area of wood just below the point of what will become the adjustable hook.
Remove the bottom of the X first (nearest the hook)
Once I’d removed the wood from the lower quarter I then removed the wood from one of the side quarters.
Remove the sides of the X
Then I removed the wood from the other side quarter leaving only the top quarter to act as the adjustable hook.
Deepen the sides of the X
I kept carving down until I had exposed enough of the wood that I could carve out the final part of the adjustable hook.
Ready for the undercut
The final part I needed to do was to make an undercut below the point of the upper quarter. I kept reducing the wood until a nice point appeared.
Fine cuts again on the point
You can really see that undercut appearing in the picture below now. For safety I kept the pot hanger braced on the ground (a stump works as well) while I was carving it out.
For this pot hook I carved a further 2 hanging hooks along its length.
Carve deep but safely
This is the final rough shape you are looking for. Any further carving or sanding would be purely for decoration only.
A good point
This pot hanger is particularly suited to the Wagon set up – Wagon (‘way gone’) coming as far as I know from the old tale that if you leave this set up standing when you leave your camp, it points the way for the naughty wood spirits to follow you 🙂
Side view of the Way Gone set up
The hanging hooks attach to the Wagon stick by sitting in a small dimple on the end of it. In this set up I also used a forked stick to give the Wagon height and a smaller (Dead Man’s Finger) stick at the bottom of it to counterbalance everything.
In detail
The whole set up is very easy to adjust for a fast or slow boil/cook.
Adjustable height
This is a great project for any bushcrafter to keep their hand in with simple carving techniques. It looks very simple at first but there are some tricky cuts that if you are not careful can cause a nick or two but the main benefit is – that the tea gets made.
No pressure, no assessments, no worries – just fun, fun and more fun – these were the requirements for the recent London Area Sea Cadet Juniors training weekend at Crowborough Army camp.
I was joined by my good friend Charlie Brookes for the weekend teaching some bushcraft skills to the cadets. Also helping us were one our new Adventure Training instructors Emma Deasy and Leading Cadet Jessica Edwards (Jessica is under training to become an Adventure Leader).
We set up our classroom and prepared for all our activities on the Friday afternoon. At this stage it was just Charlie and myself but as he is a top bushcrafter everything got set up in record time.
Our classroom and my billet
As the cadets arrived on the Friday evening Charlie and myself relaxed around a nice fire and discussed how best to run the weekend. We did not have to look after the cadets in the evenings as there were enough ‘Duty Staff’ around to do this.
A relaxing evening
There were lots of activities planned for the cadets. The plan was for us to be given six cadets for an hour or so and then they would be moved onto other activities. On the saturday we had 3 teams in the morning and 3 in the afternoon.
We ran various activities in each slot including the Atlatl, archery, fire lighting and stalking games.
The Atlatl (a spear chucking device) has become a regular event at many of our courses. Just looking at these cadets you can see that they really enjoy this activity. I set up a short range of about 15 meters as I was more focused on accuracy rather than distance.
Atlatls in action
One of the other activities the cadets undertook was a cookery class (Cook Stewards course in the Sea Cadets). I was supplied on a number of occasions with some excellent cookies that were baked in this class and every time I went into the main building I was assaulted by a fantastic smell of baking biscuits.
Cookery class
As you can see that the little fella in the picture just above on the right turned out to be a proper little Minion. This was baked by one of the other instructors Emma.
Emma’s Minion
Charlie spent a great deal of the day teaching the cadets how to light a fire in many different ways and also about the responsibilities they need to think about when lighting a fire. In these pictures the cadets are using traditional flint and steels on the left and more modern firesteels on the right.
Some take to this straight away and others require a little bit of a helping hand.
Flint & Steel and Firesteels
In no time the cadets were creating good sparks from traditional flint and steels and lighting up cotton wool balls smeared in Vaseline with modern firesteels.
Sparks and flames
The cadets also lit lots of charcloth and soon had good tinder bundles going.
Flamage
I put together a short video showing all these activities.
I asked Emma at some time on the Saturday to go around the other classes and get one or two pictures of each one. Emma did get some good pictures but I also found this on my camera – scary stuff 😉
The ladies taking a selfie
A little toy that really caught the attention of the cadets was the parabolic mirror. This is a concave mirror that you can use to light a small piece of material just using the suns rays.
Parabolic mirror
Other classes the cadets undertook included First Aid and Physical Training.
First Aid and PT
One of the activities I like to teach the cadets is about listening correctly while out and about. They all come from London so for many they do not truly listen to the countryside when out and about. to begin with I get them to focus their listening by cupping their hands to their ears. This really increases the sound volume from the direction they are facing and as they turn around they can clearly hear everything coming from quite a distance.
After they get used to this we blindfold them so that they can appreciate how much sound can help us with spotting animals in the woods.
Learning to listen properly
The drum stalk is a game where the participants are blindfolded and have to walk from an unknown spot (to them) and touch the head of the drummer. The drummer gently taps the drum (a bucket in this case) to give the participants a focus to walk to. Each participant has a guide walking by them to make sure they do not fall into any holes or trip over anything.
Drum stalk
Being Sea Cadets a training weekend would not be complete without a class on Seamanship and on Comms skills. In Seamanship the cadets learnt how to make a monkeys fist – this is a type of knot that creates a weight using the rope and is used for throwing a heaving line from a boat to the shore in order to tie it up.
In the comms class the cadets learnt all about how to use radios properly by getting out and about using hand held radios and they also made their own semaphore flags.
Seamanship and communication skills
After each Atlatl session I also got the cadets to shoot some arrows down the range. I managed to get some cracking shots this time of the arrows being released.
Archery action
On the Sunday morning a competition was held and we set up an Atlatl range so that the cadets could try out all the skills they had learnt the previous day.
Atlatl competition 1
The cadets were definitely better than the staff with both accuracy and enthusiasm.
Atlatl competition 2
The PT staff also set up an indoor sports competition for the cadets. I walked into the hall and the noise of all the cadets egging their pals on was amazing.
Sports competition
A staff team was put together and thankfully as I was seen to be too busy filming was left alone. In all the madness and fun that was being had I have no idea who won.
Even the staff took part
In amongst all this fun we did find time to do some other stuff. Charlie tested out a Wood Gas stove and I managed to do a little pot hook carving (a How To on this to follow).
Testing and carving
A great weekend with great Sea Cadets both young and old.