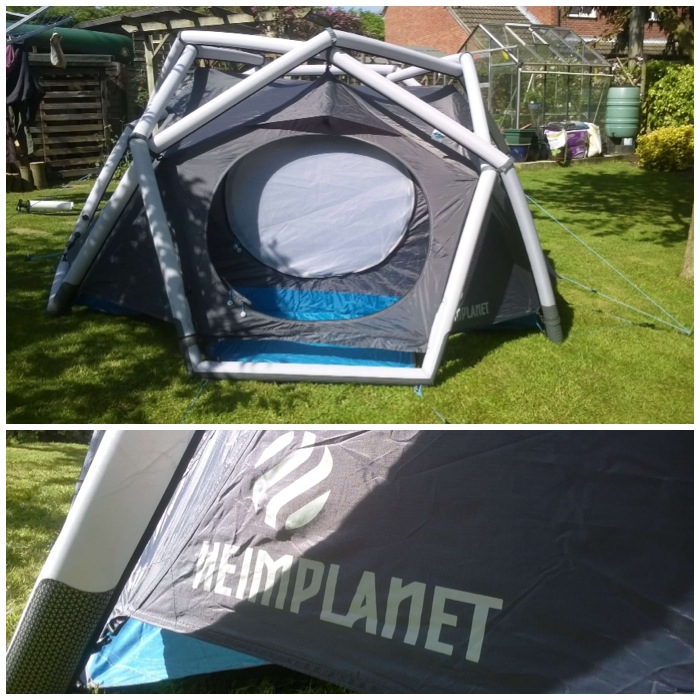
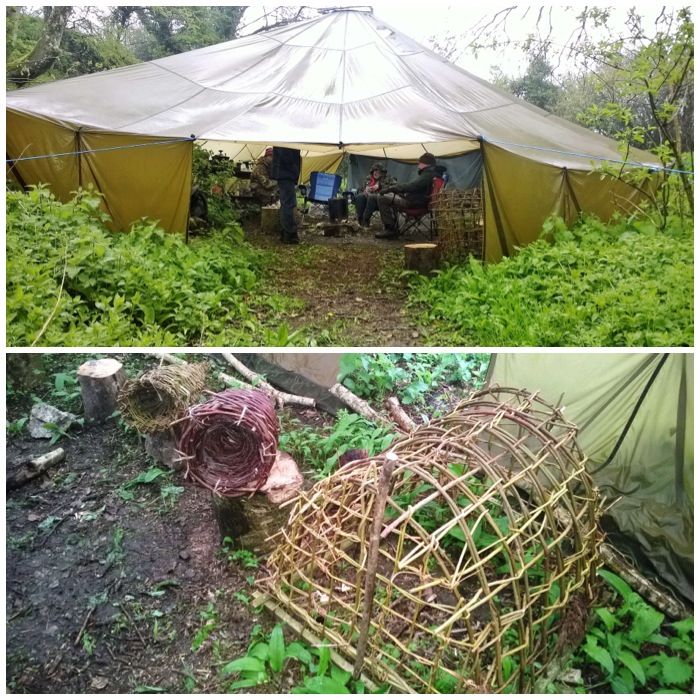
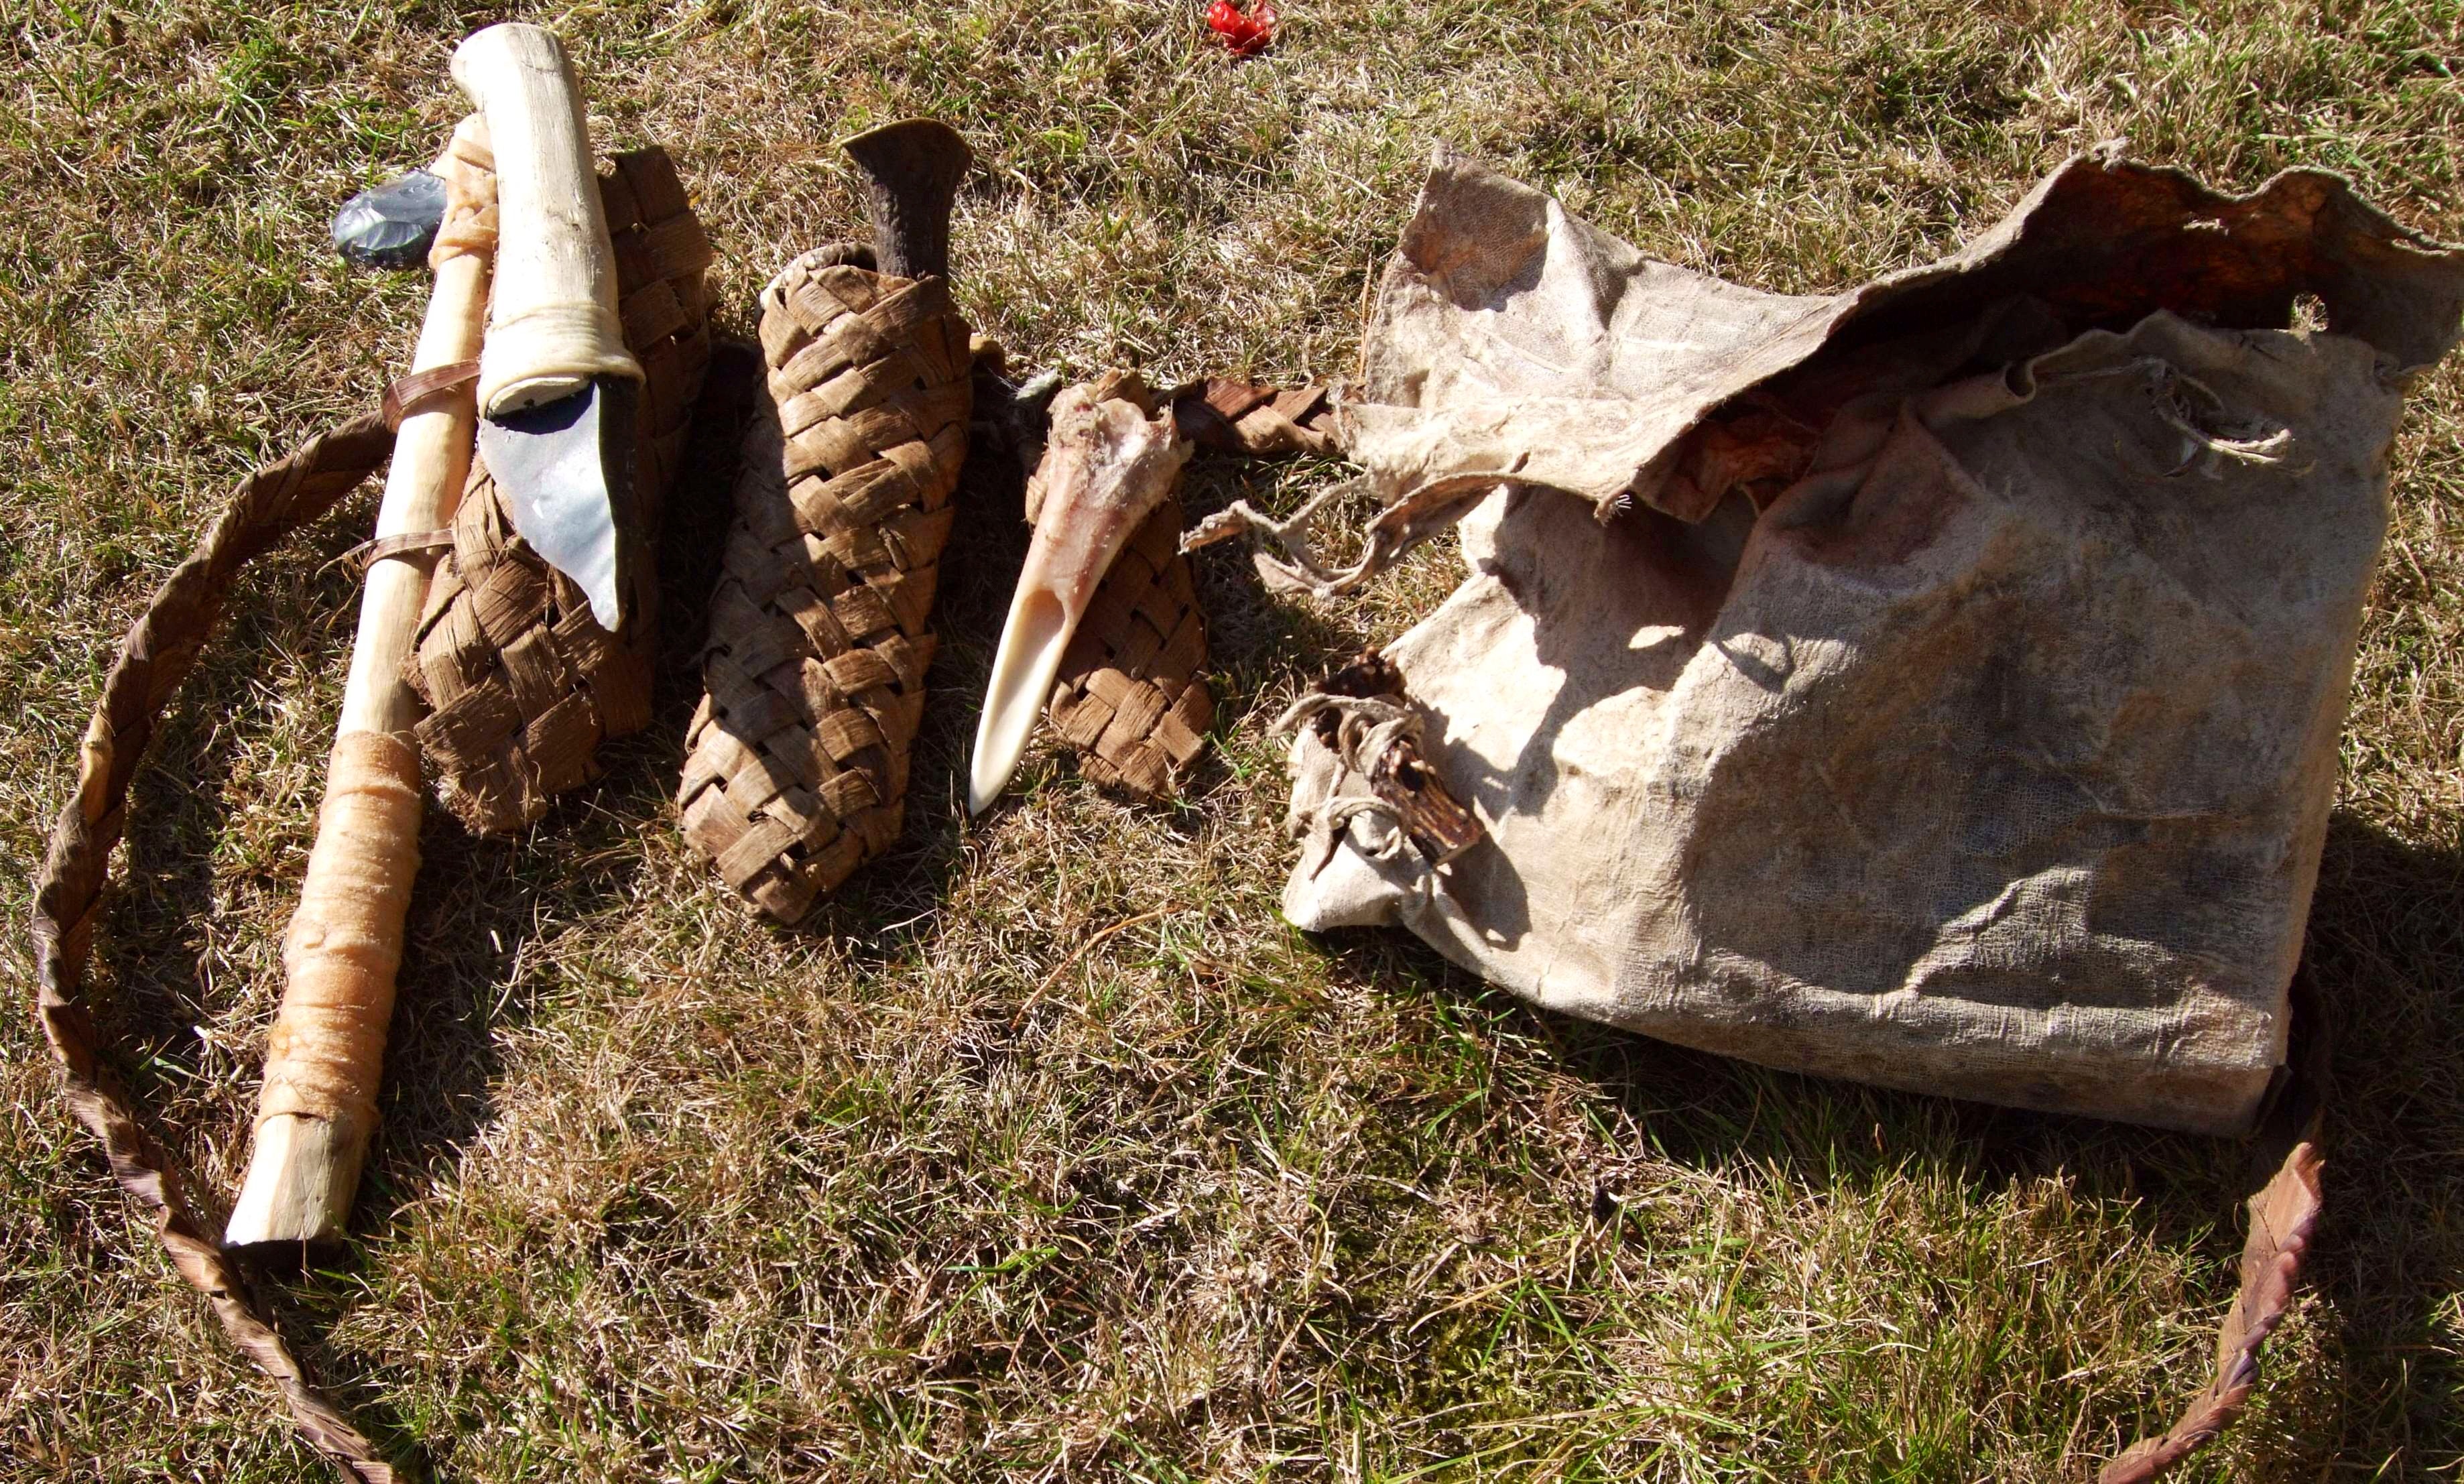
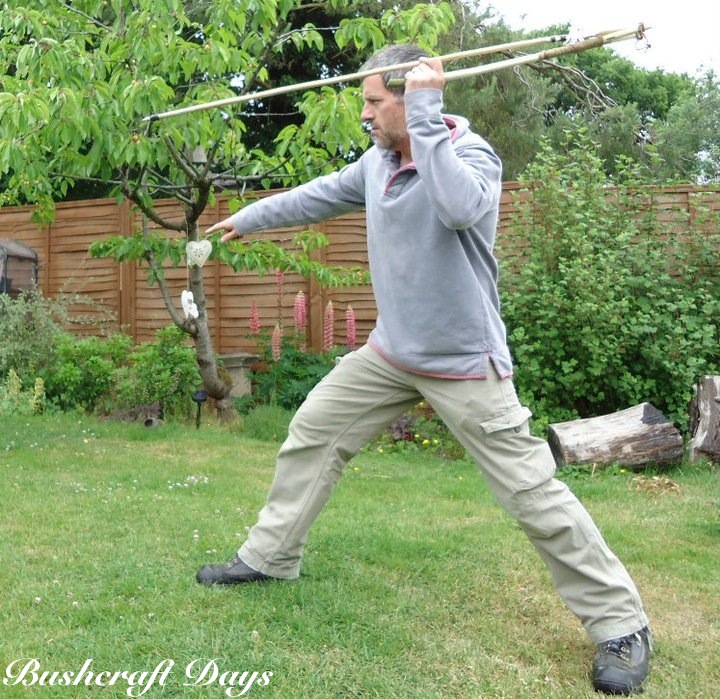
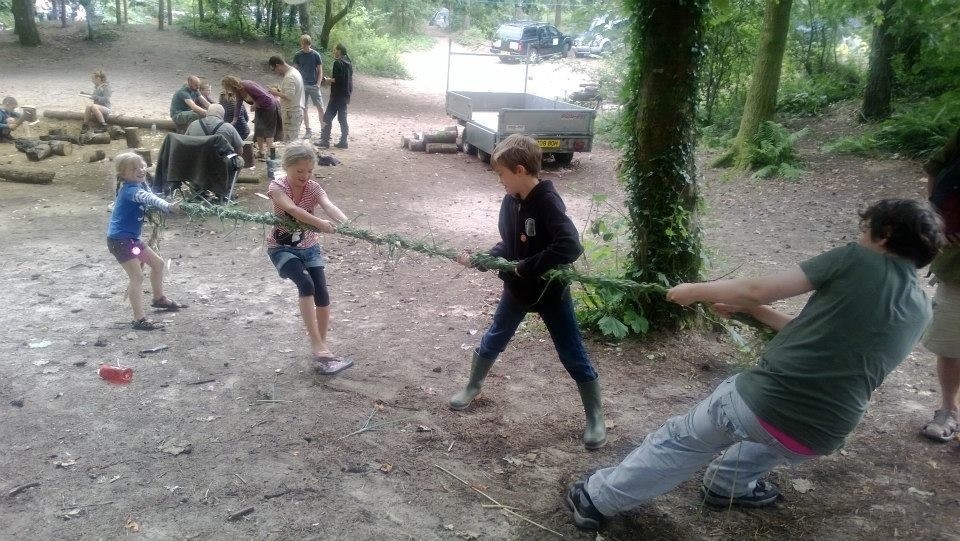
I was shown what I think is quite an ingenious tent two weeks ago by my friend Adam Cottrell. The tent is from a company called Heimplanetand is erected simply by inflating it. This post is not an in-depth review as I have only seen it once for a very short period. My initial impressions of it were very positive and I would be keen to try it out sometime.
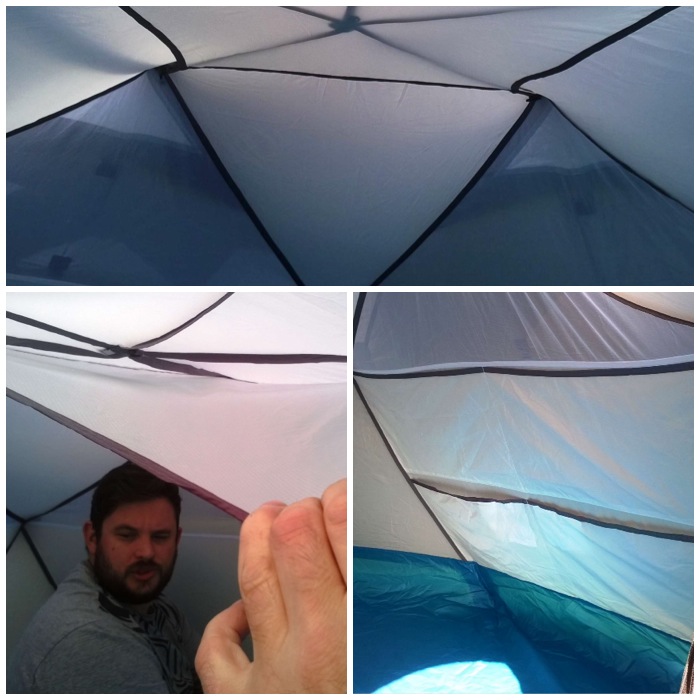
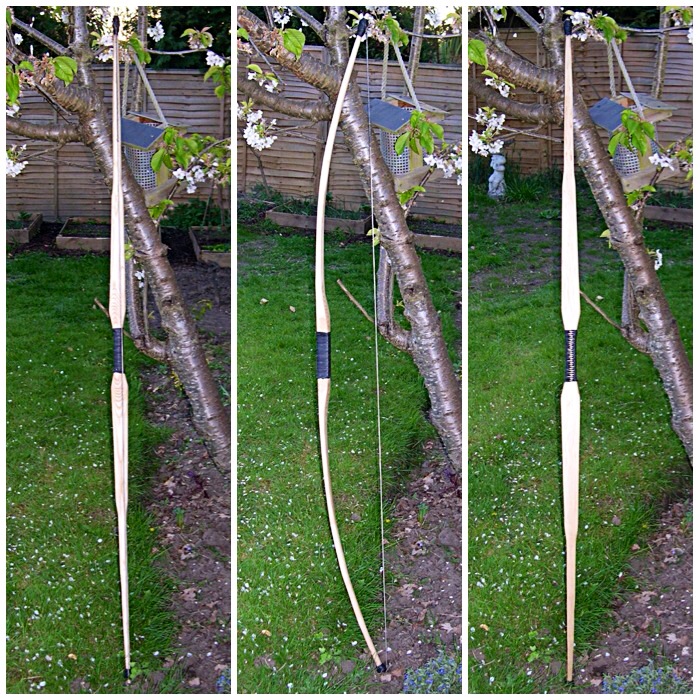
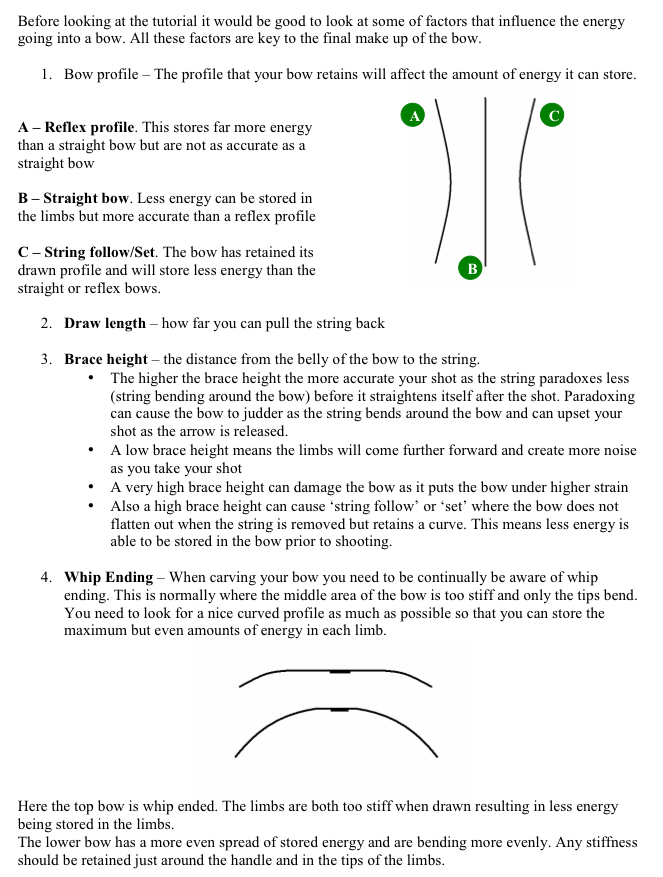
The Cave
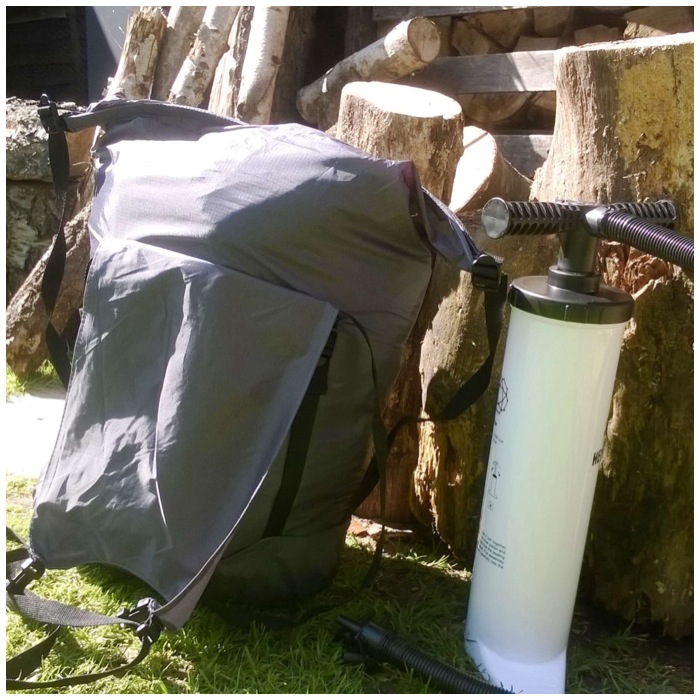
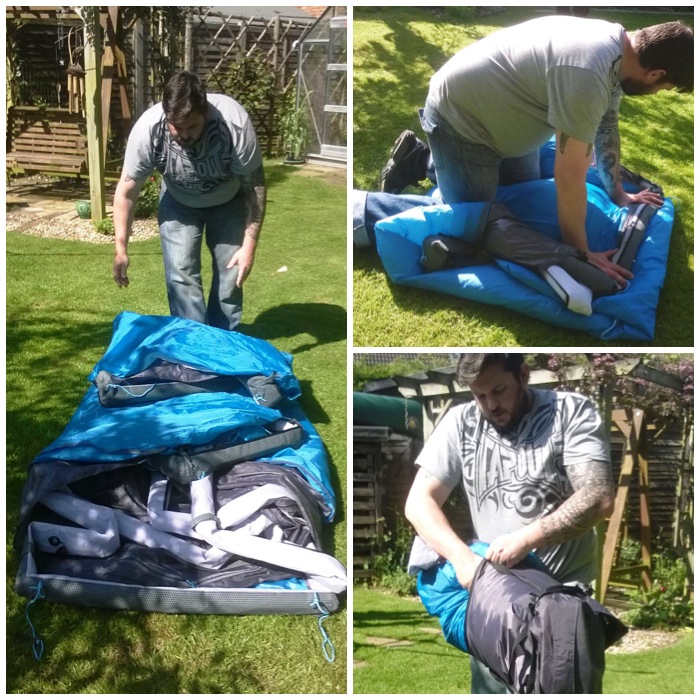
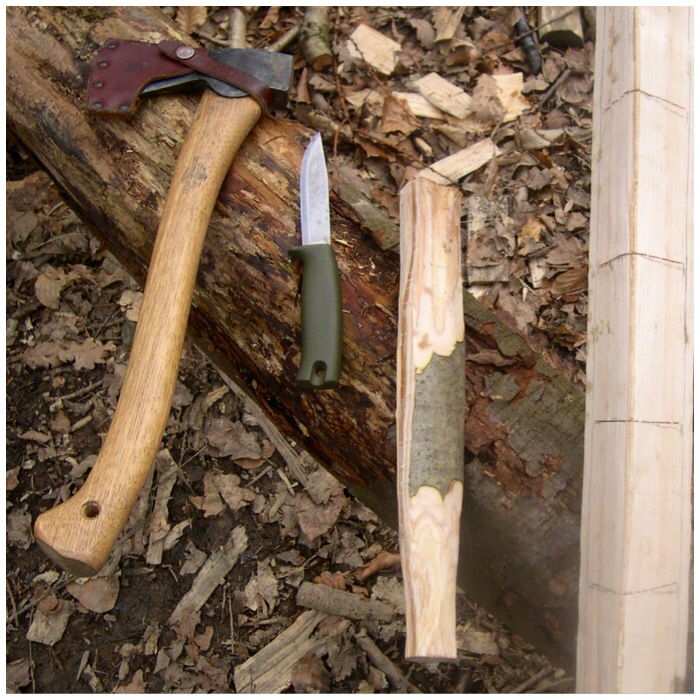
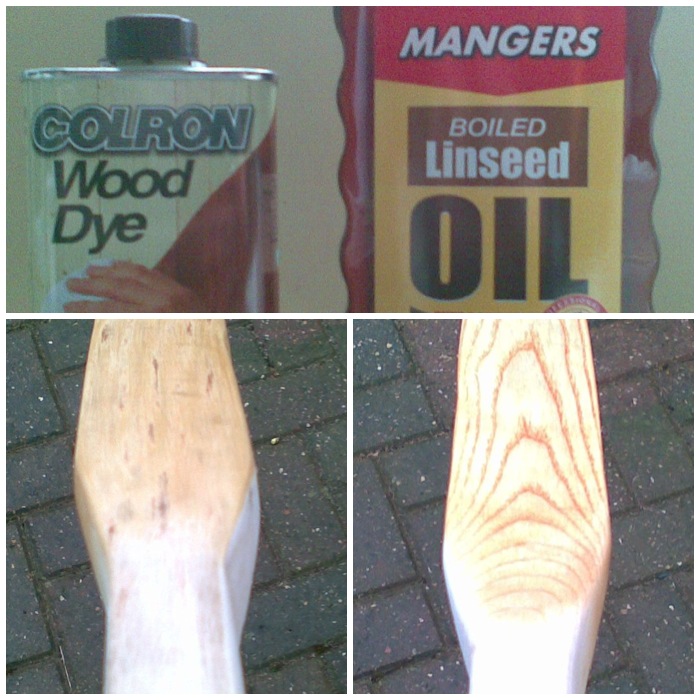
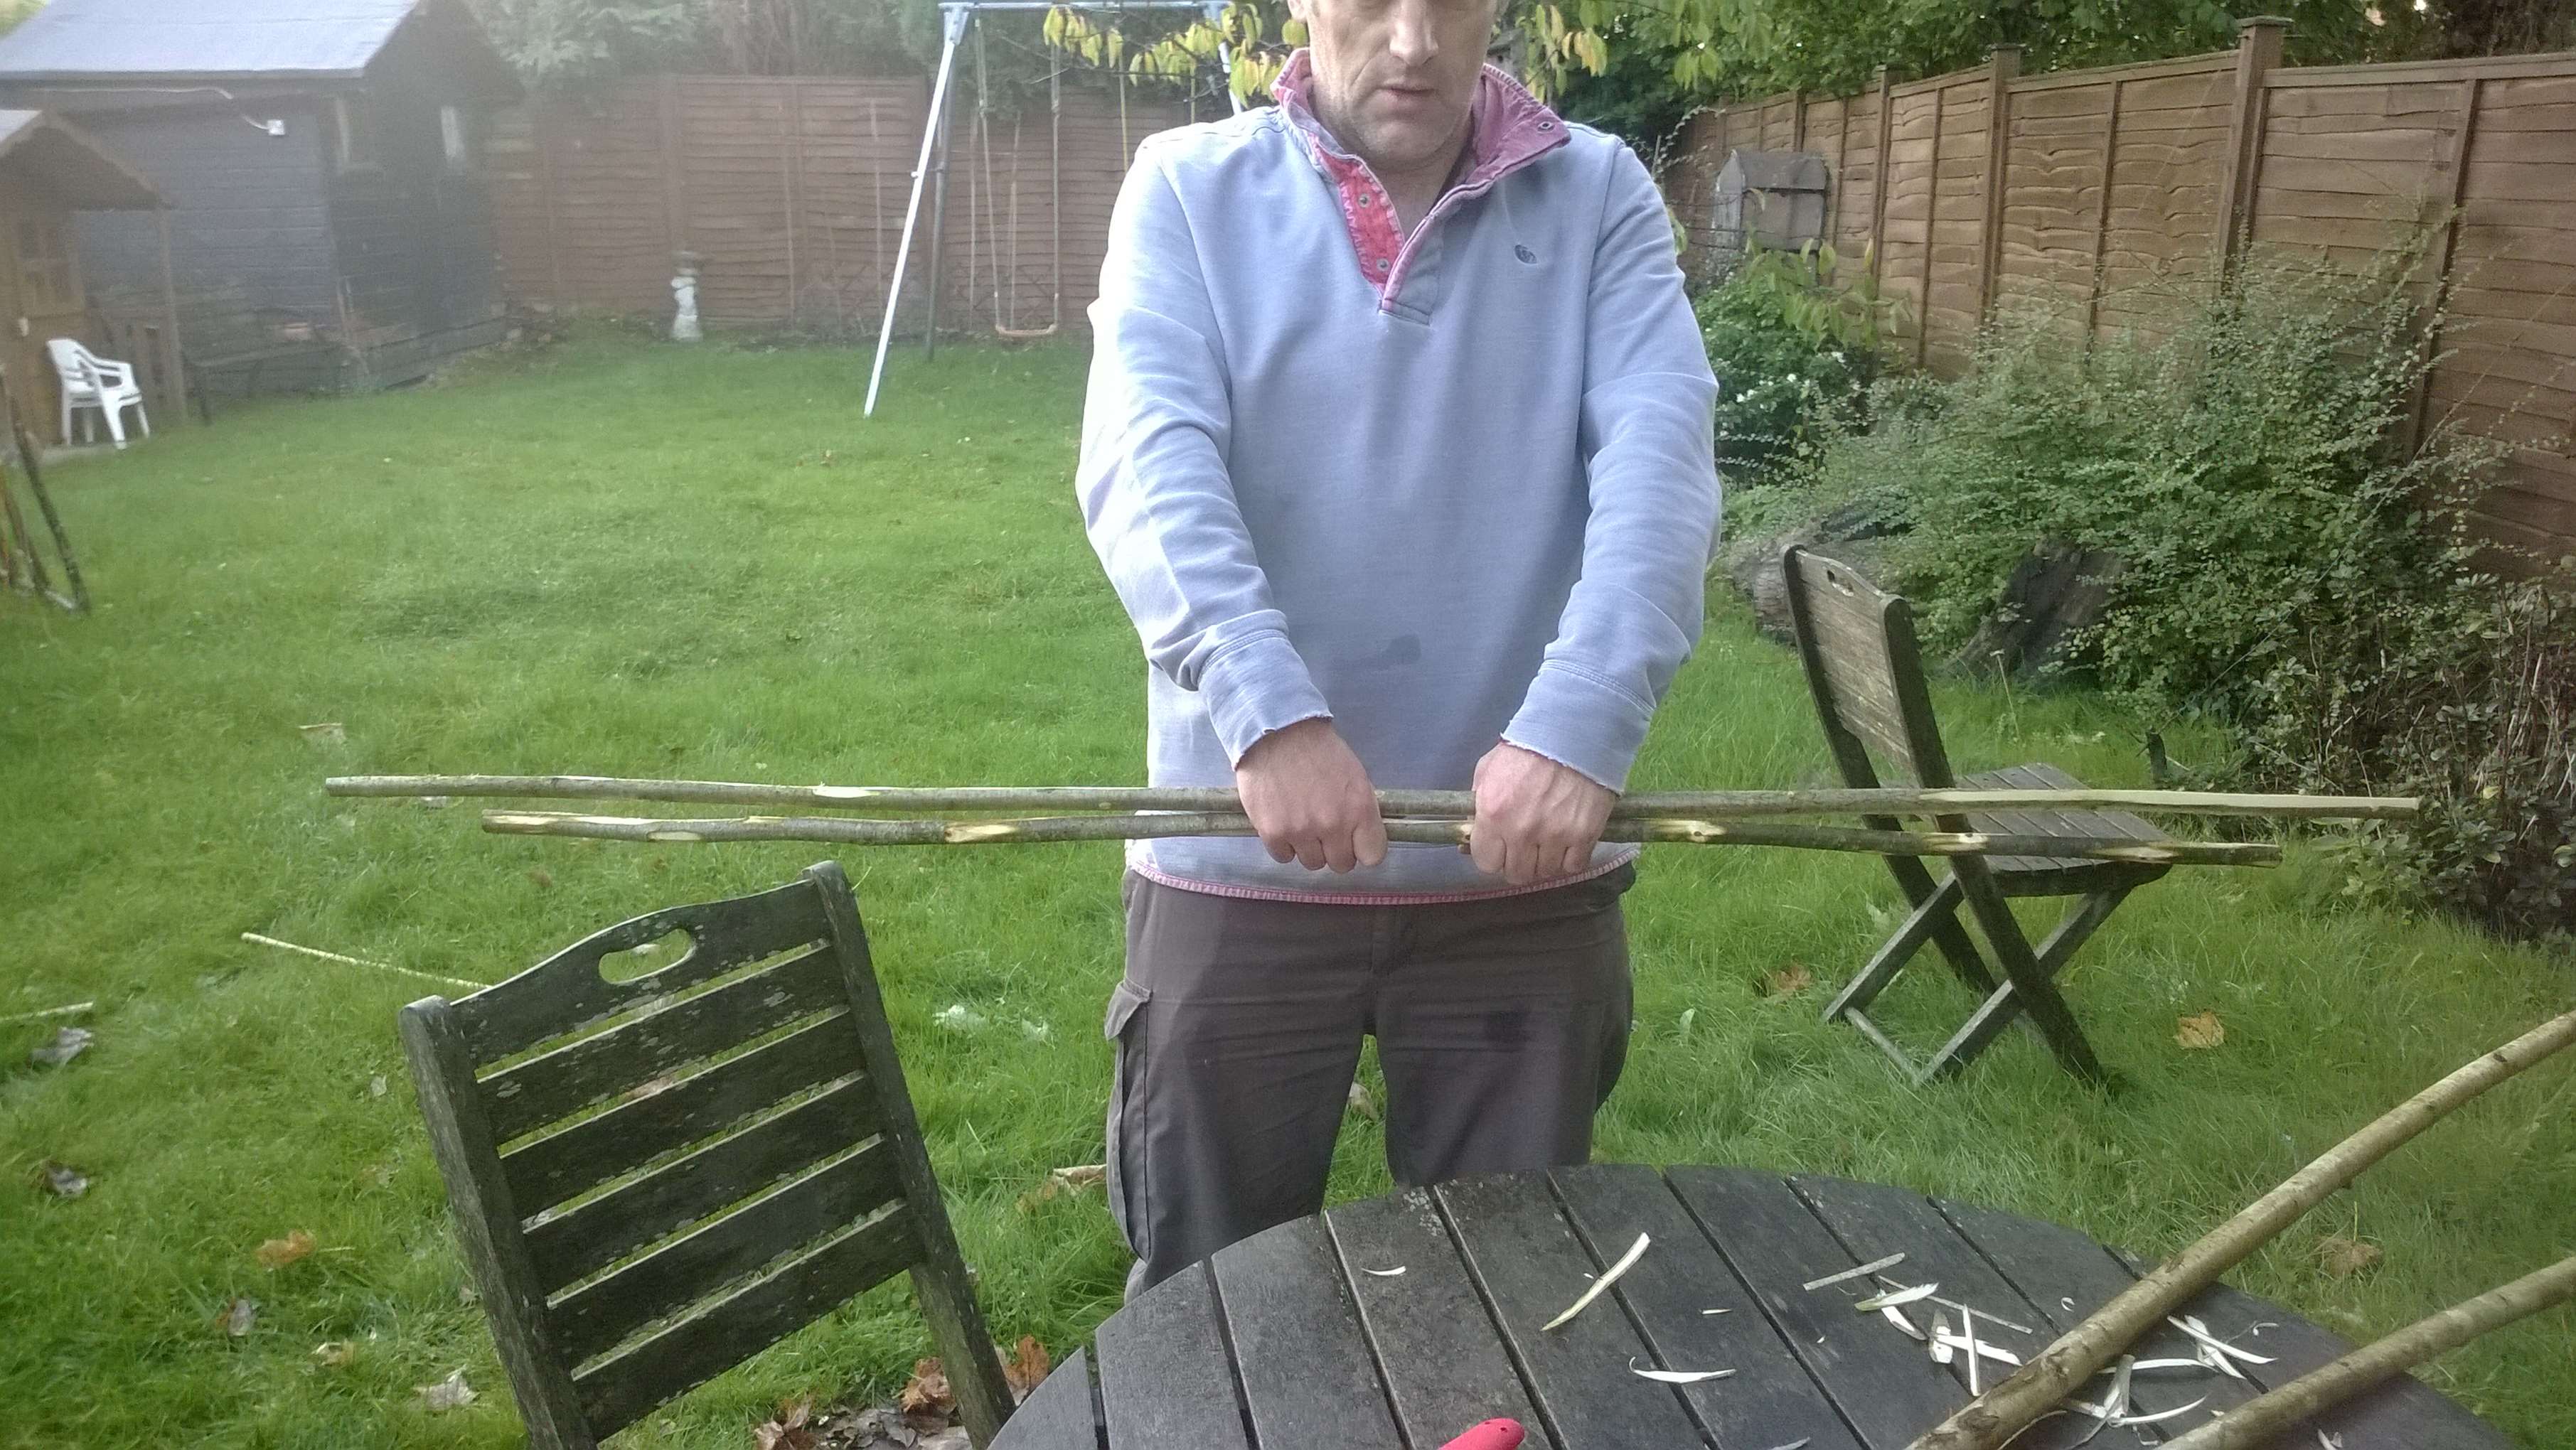
The tent weighs 11.5lbs (5.2kgs in new money) so one for the car I think rather than the backpack. The quality of the bag was very good with a ‘canoe bag’-type top that you roll down to compress and seal it.
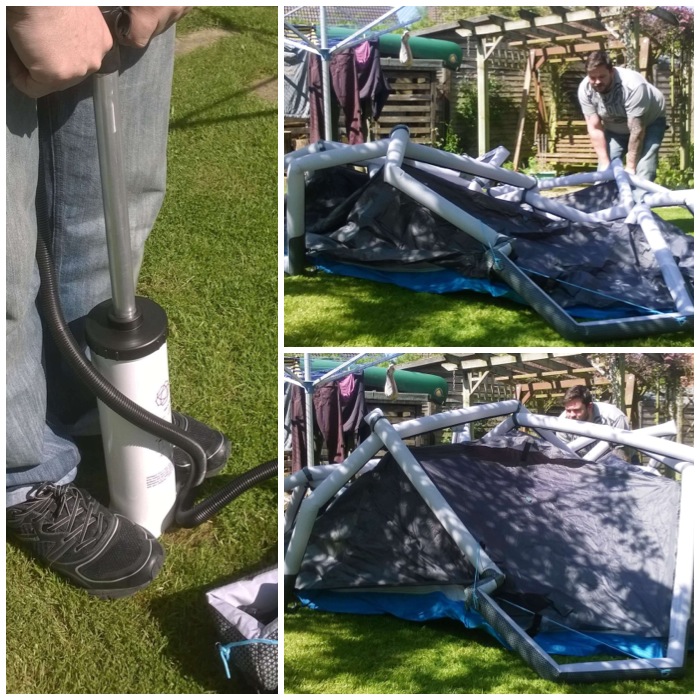
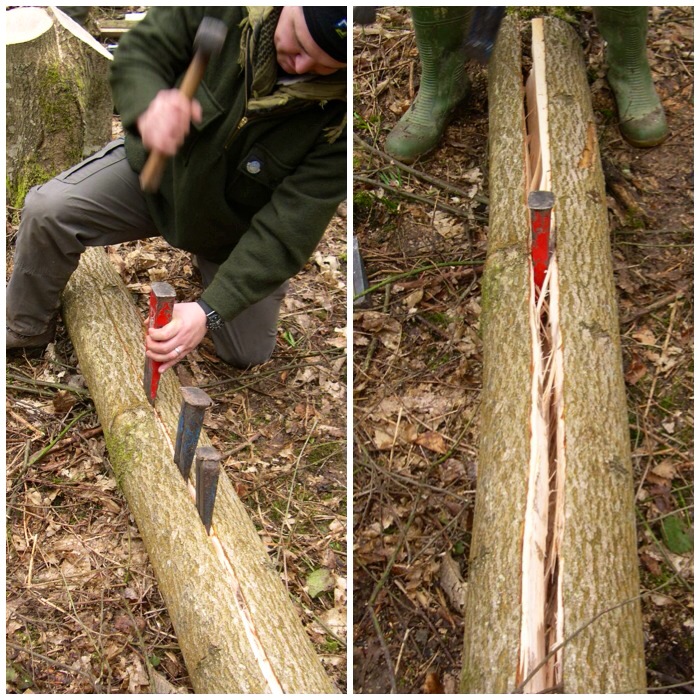
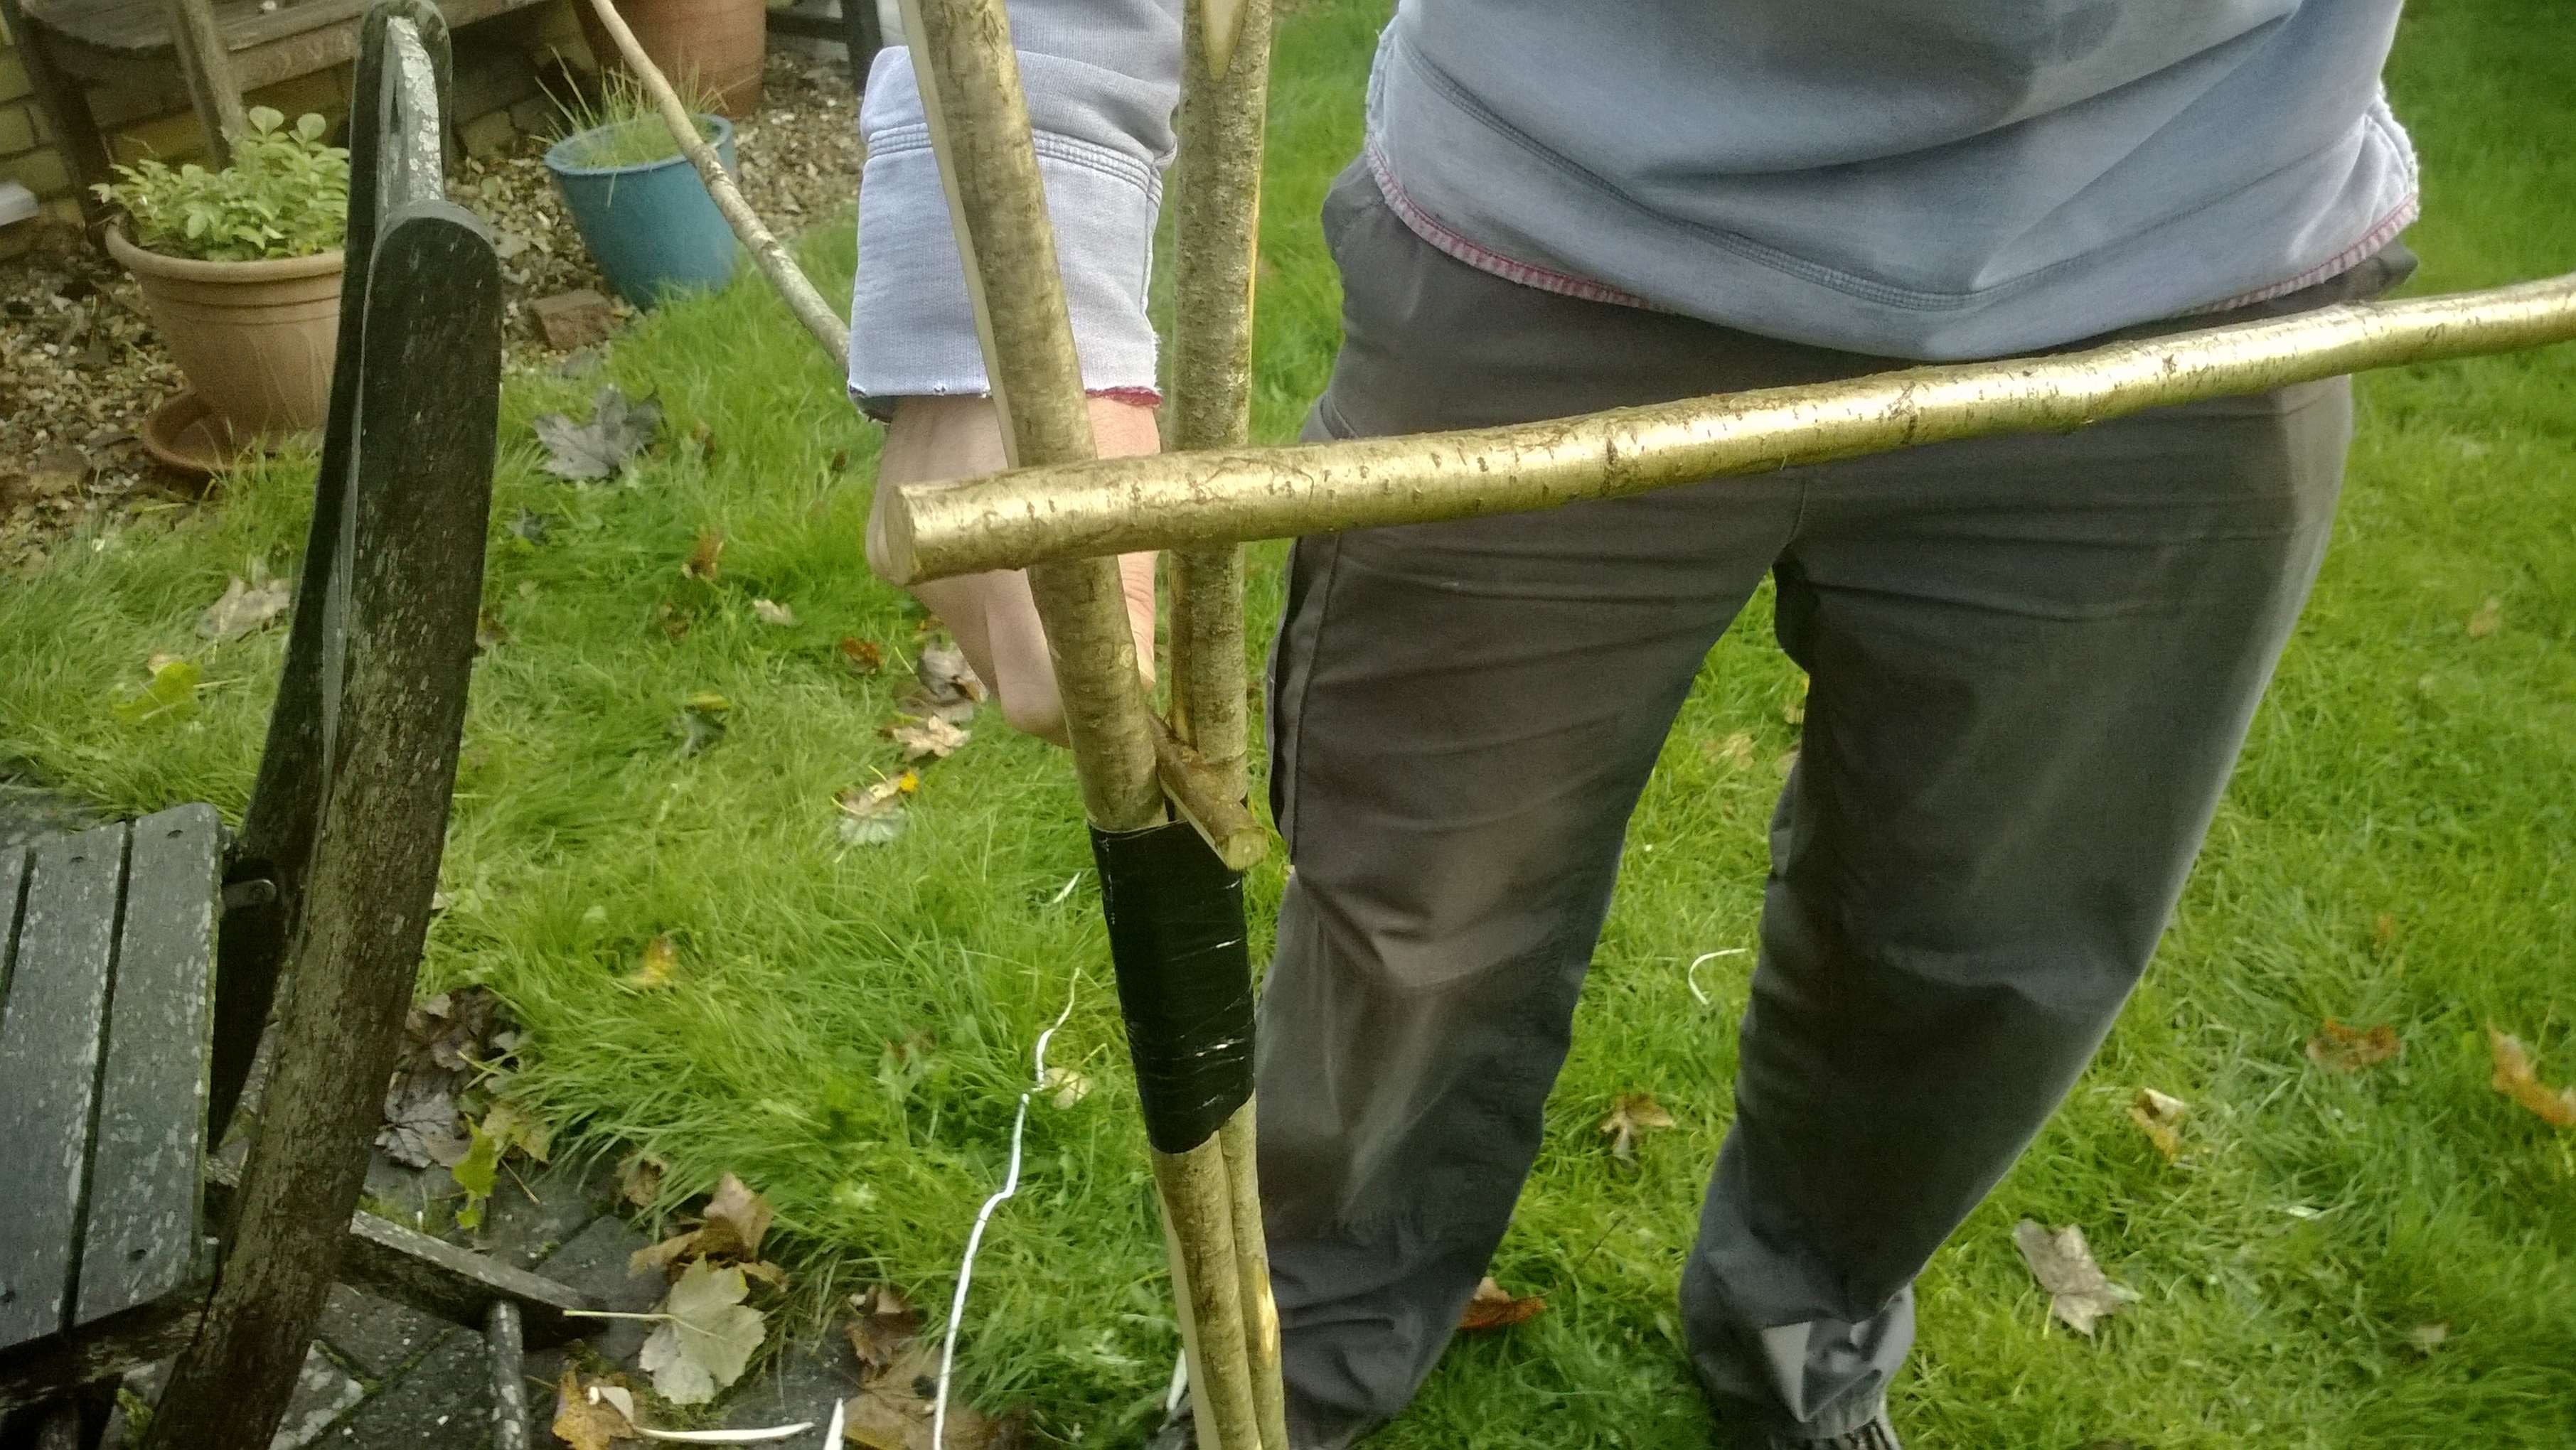
One tent in a compression bag and pump
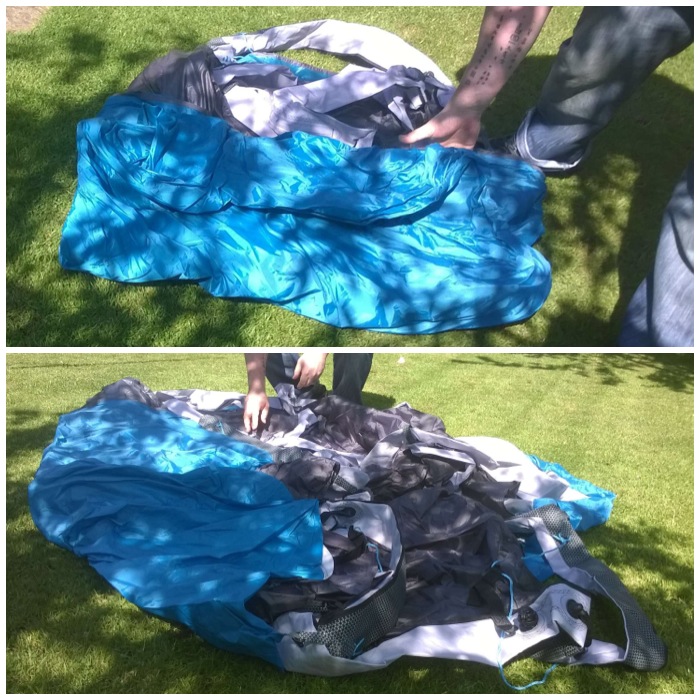
All the guylines were detached when Adam opened it up so there was nothing tangled up.
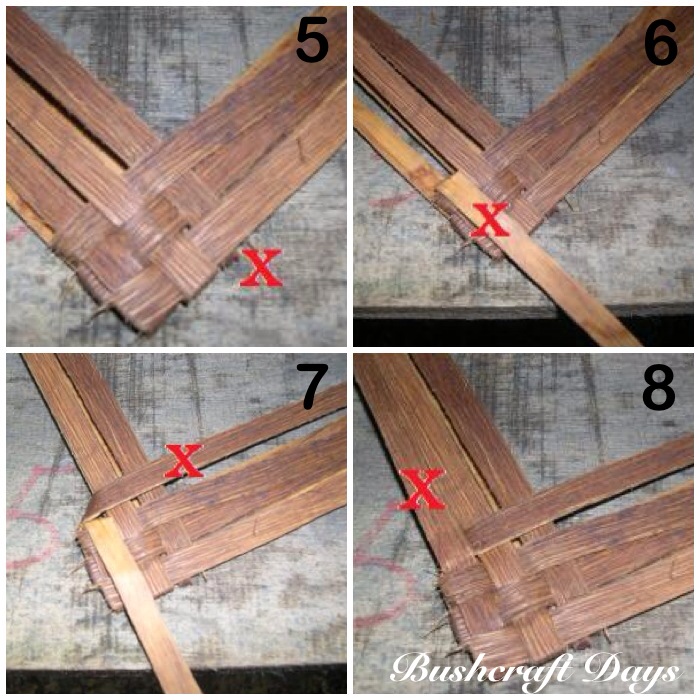
Laid out ready for pumping
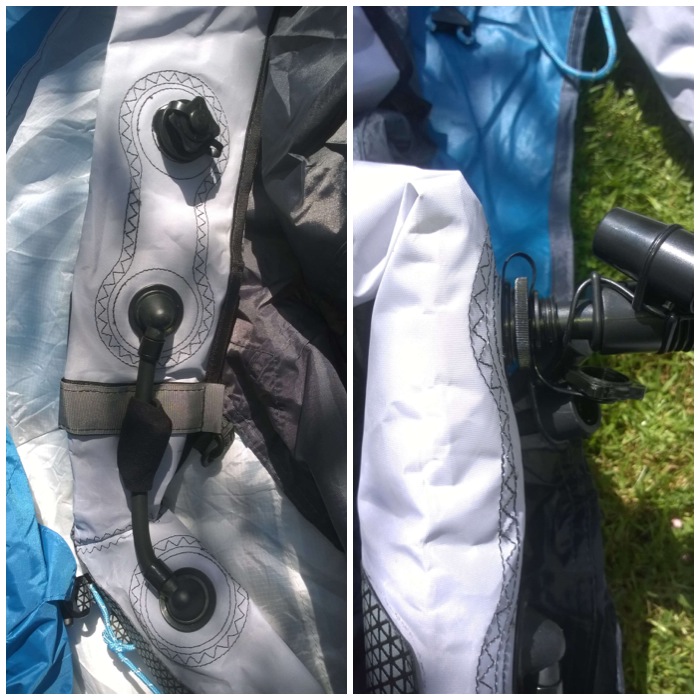
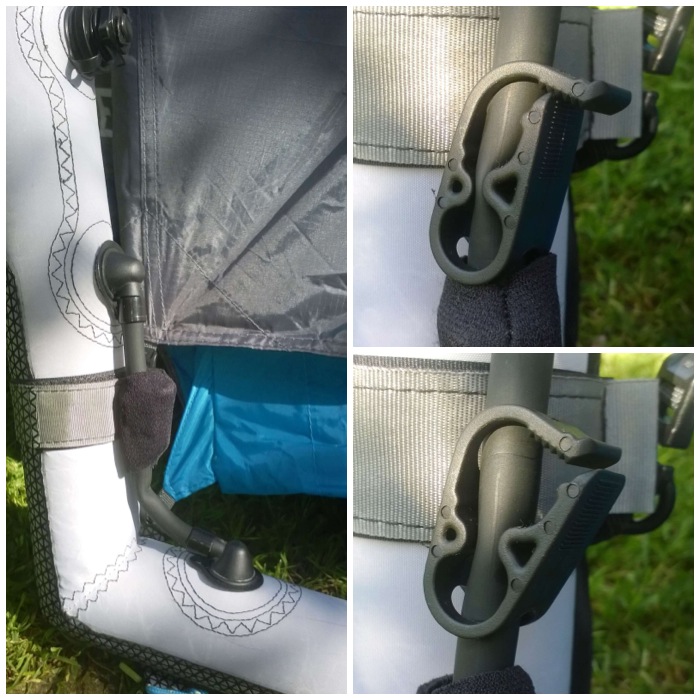
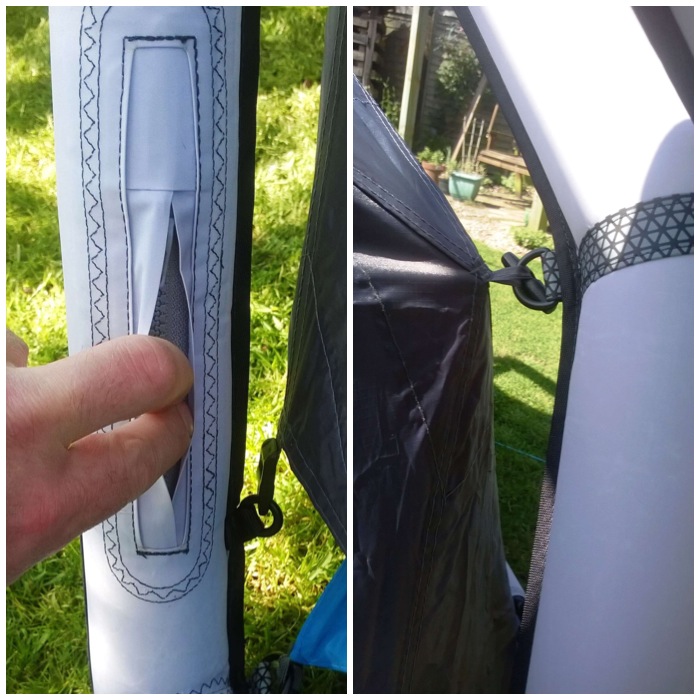
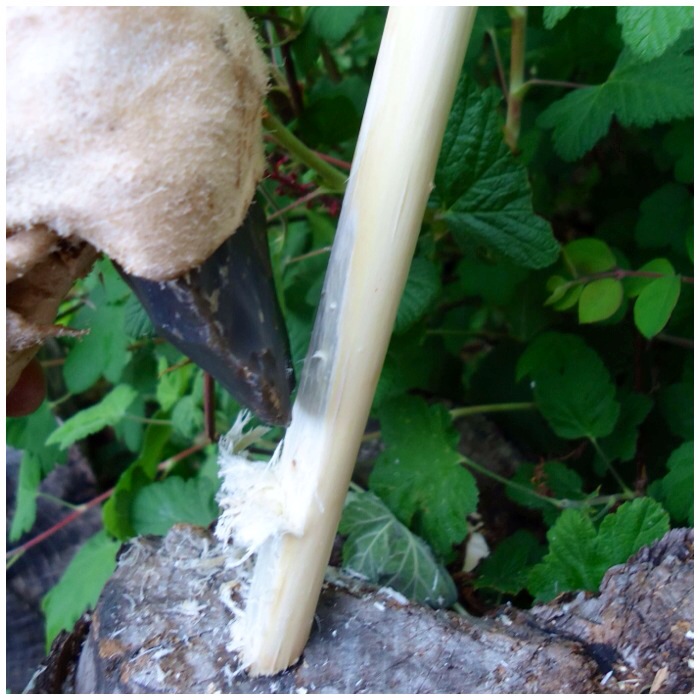
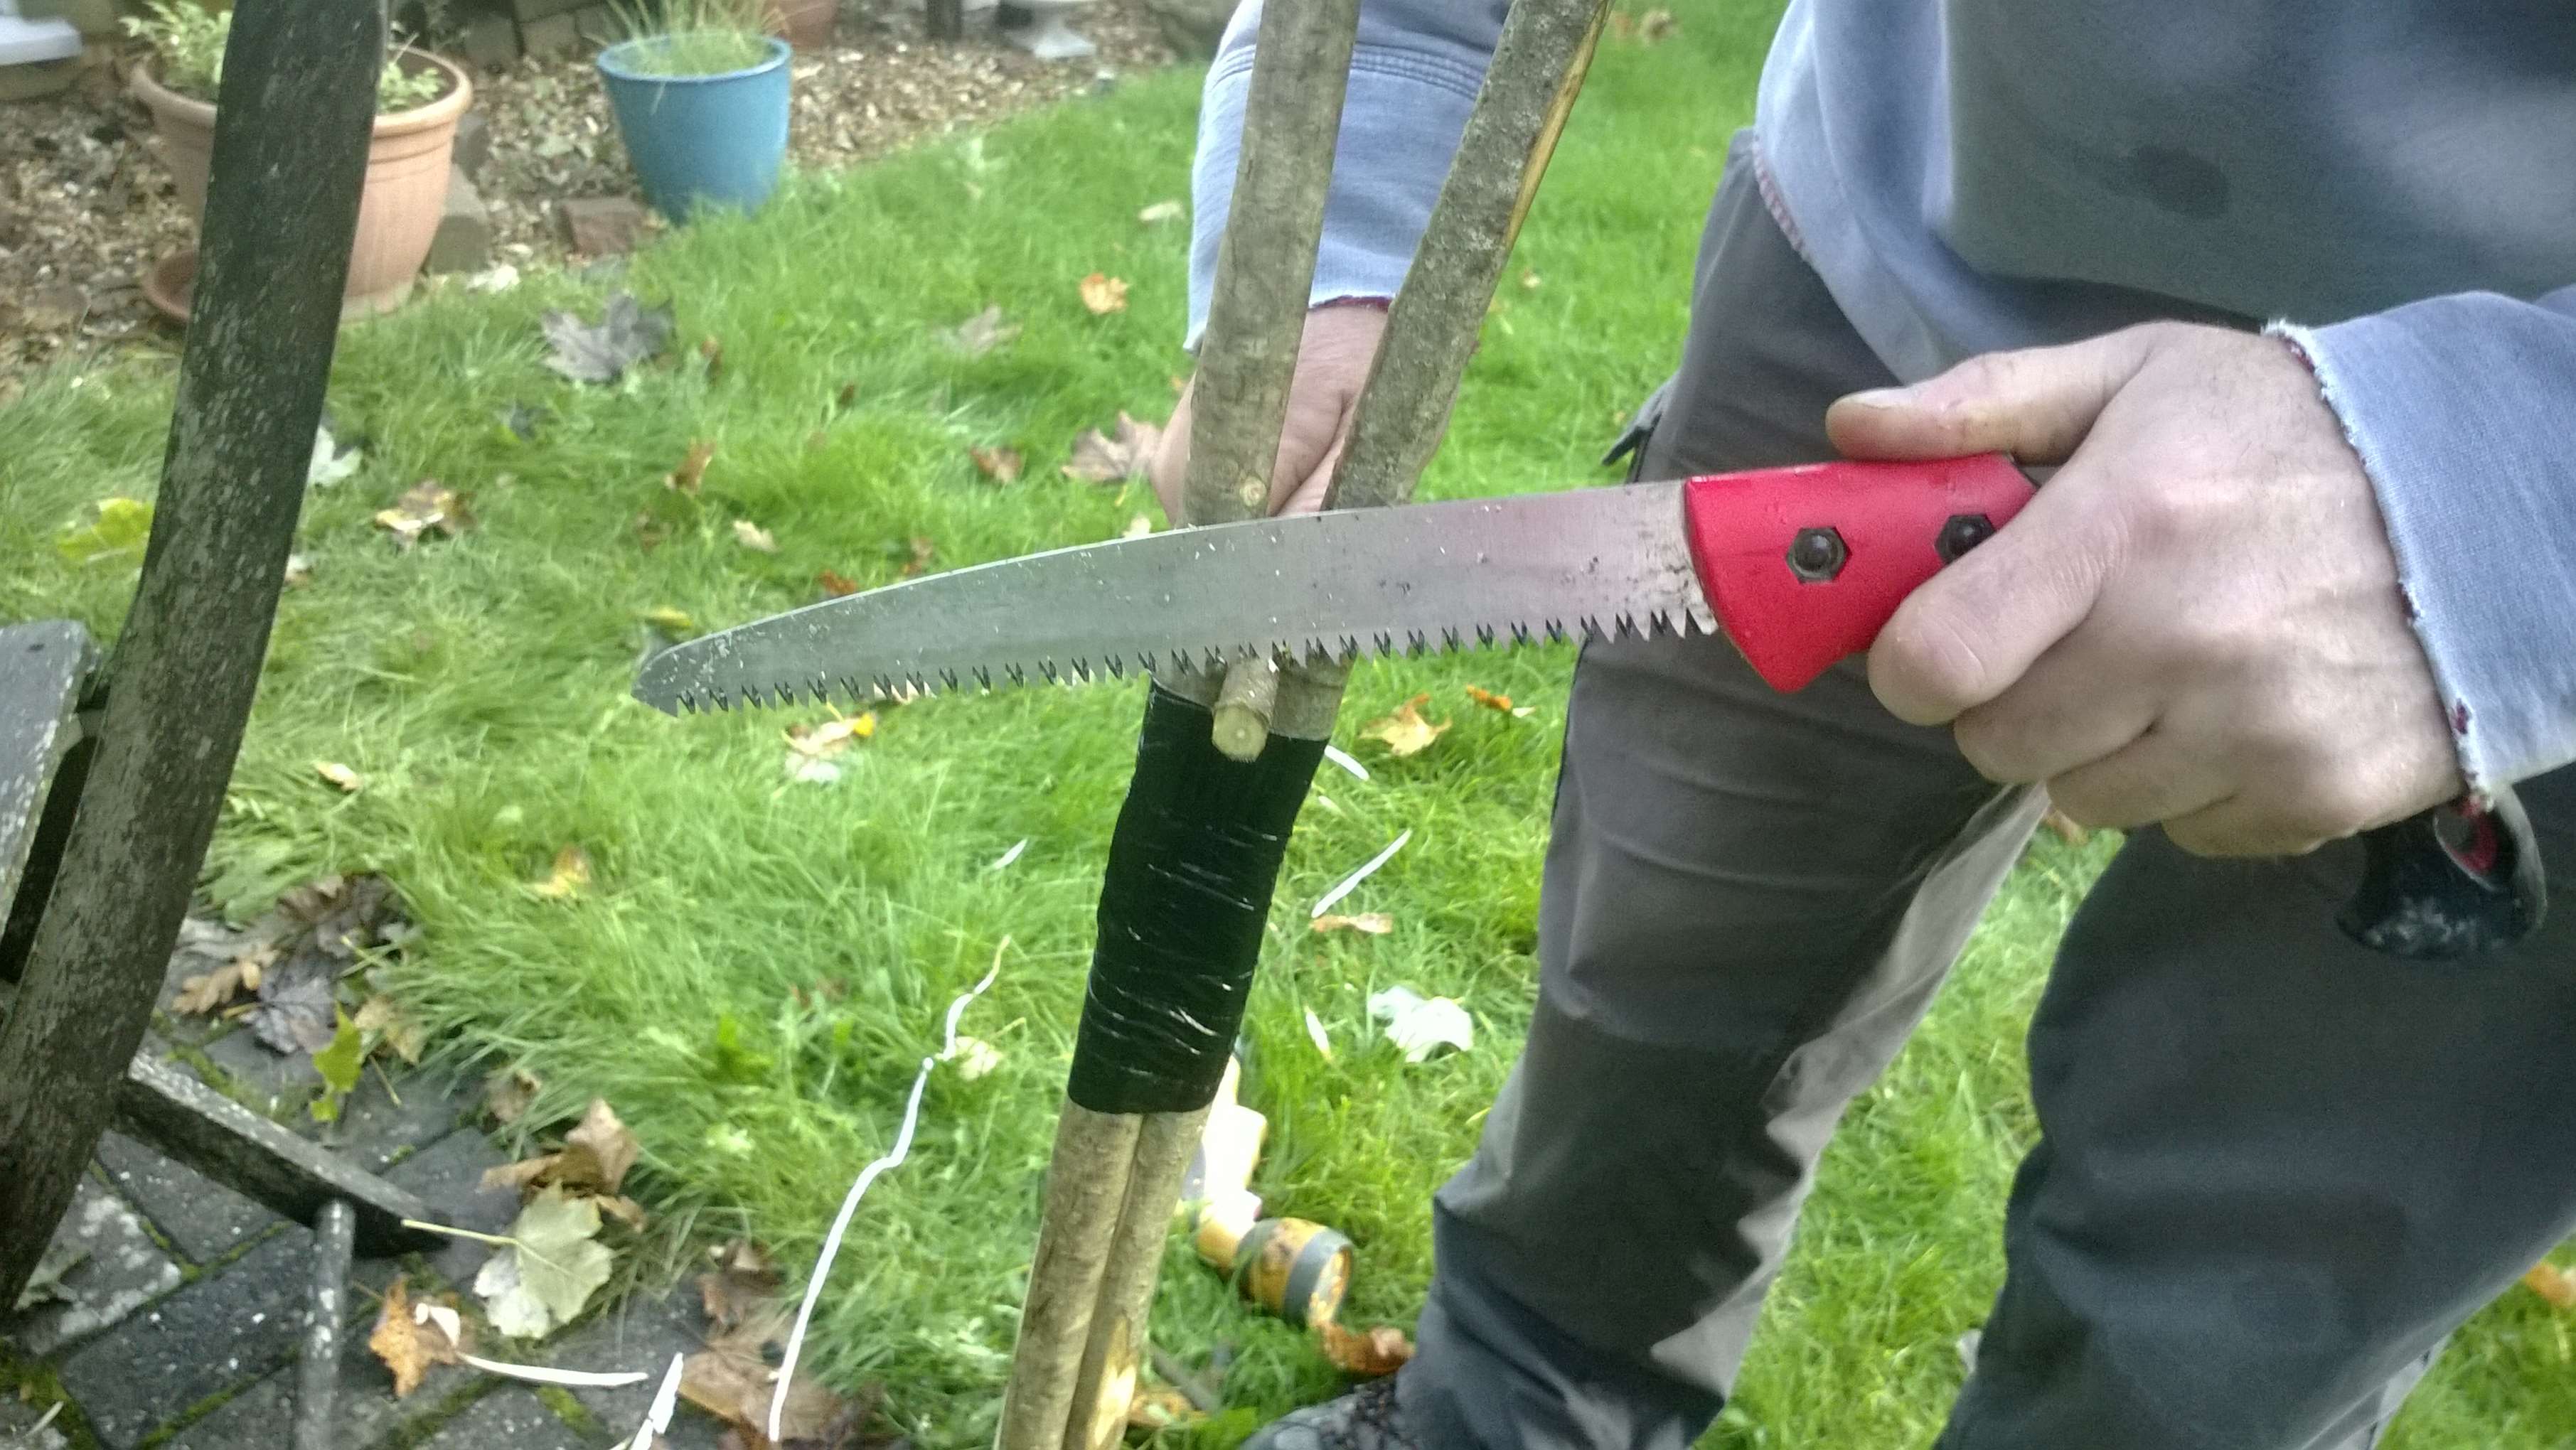
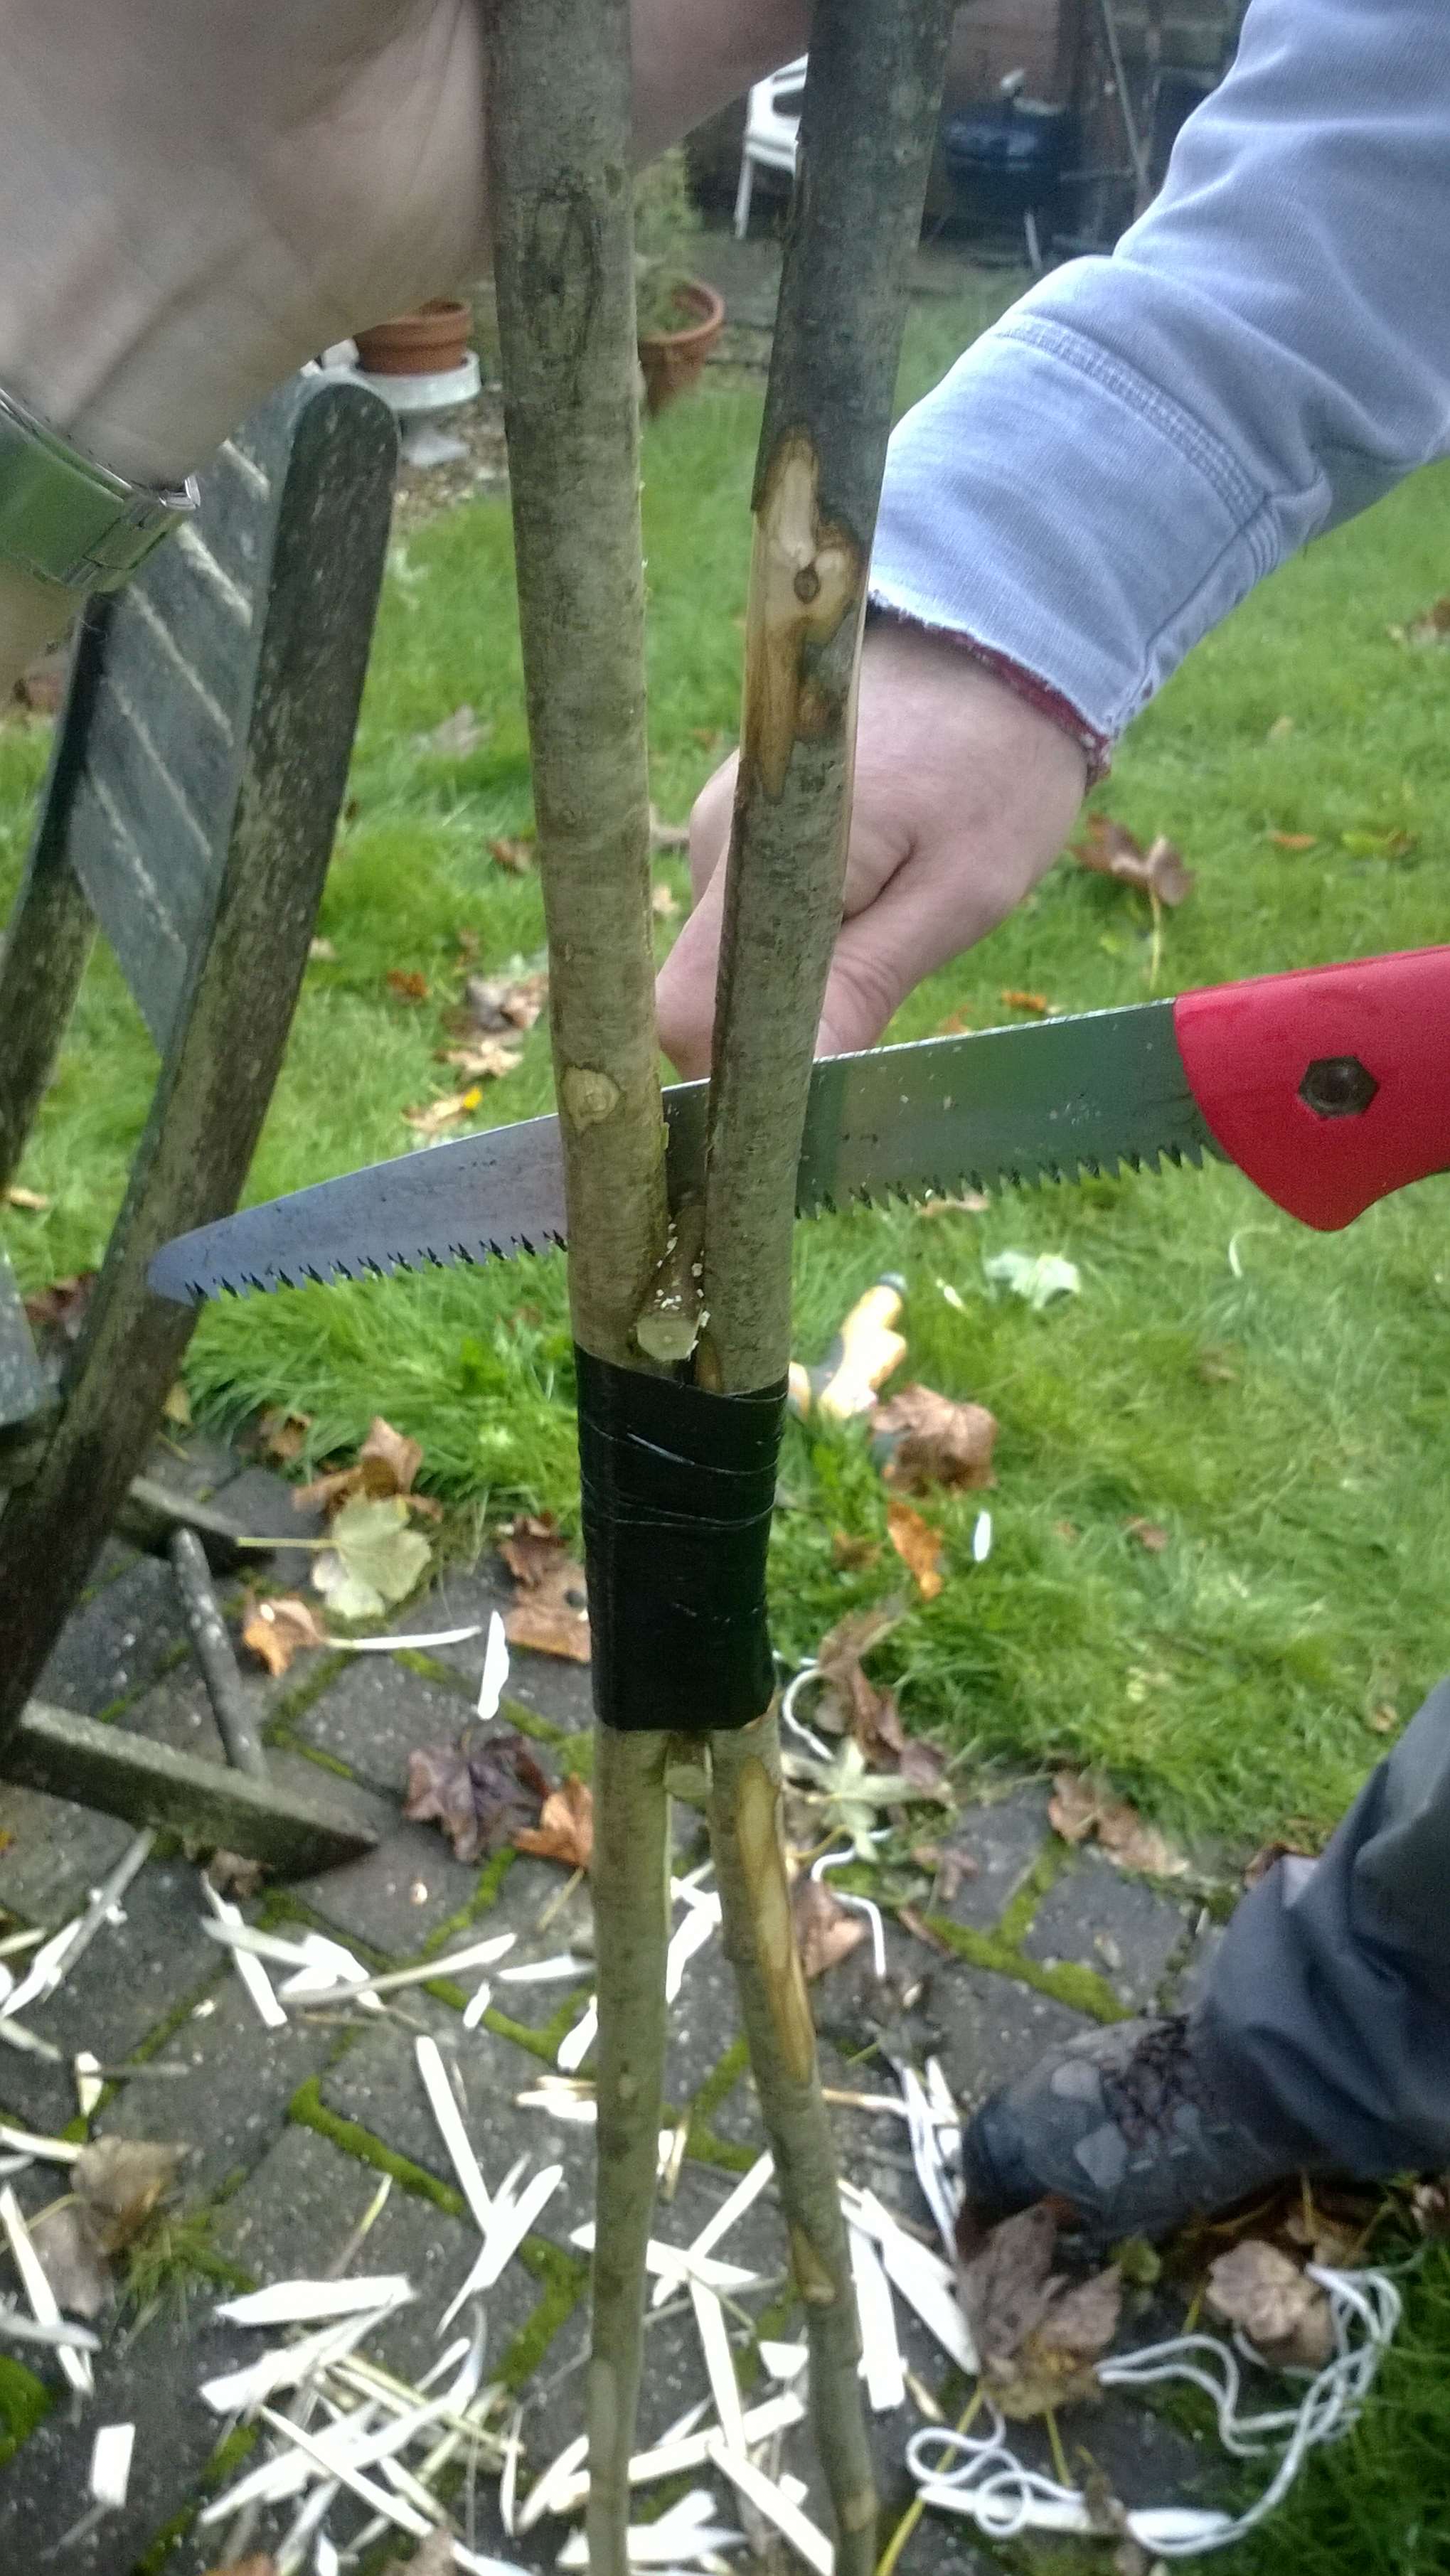
Dotted around the tent are 5 nozzle points; only one is needed for inflating the tent, but all the tubes can be closed off after they have been inflated so that if you get a puncture in one tube the whole tent does not deflate.
5 possible nozzle points
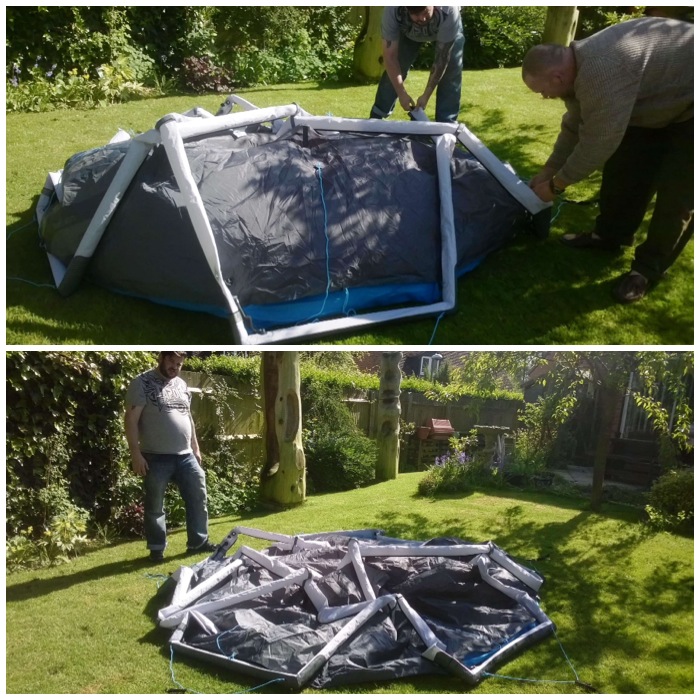
In about two minutes Adam had set everything up and inflated the tent.
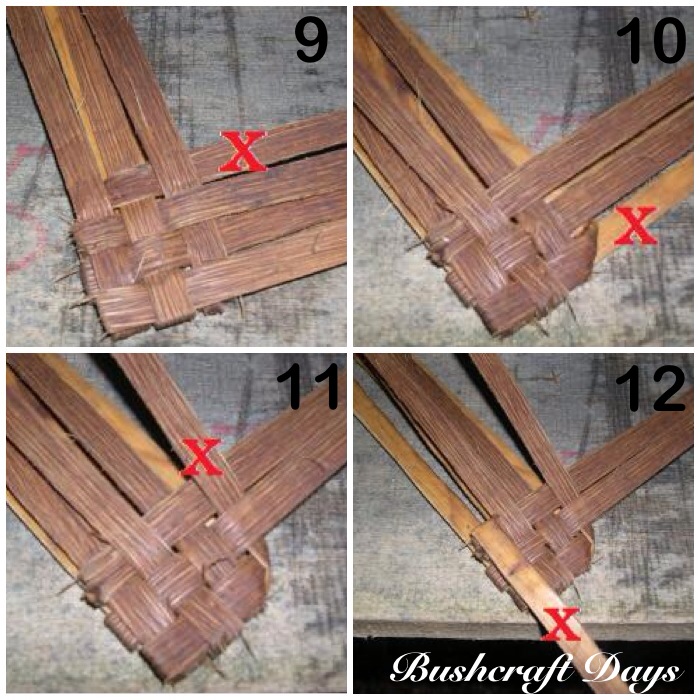
Simple to inflate
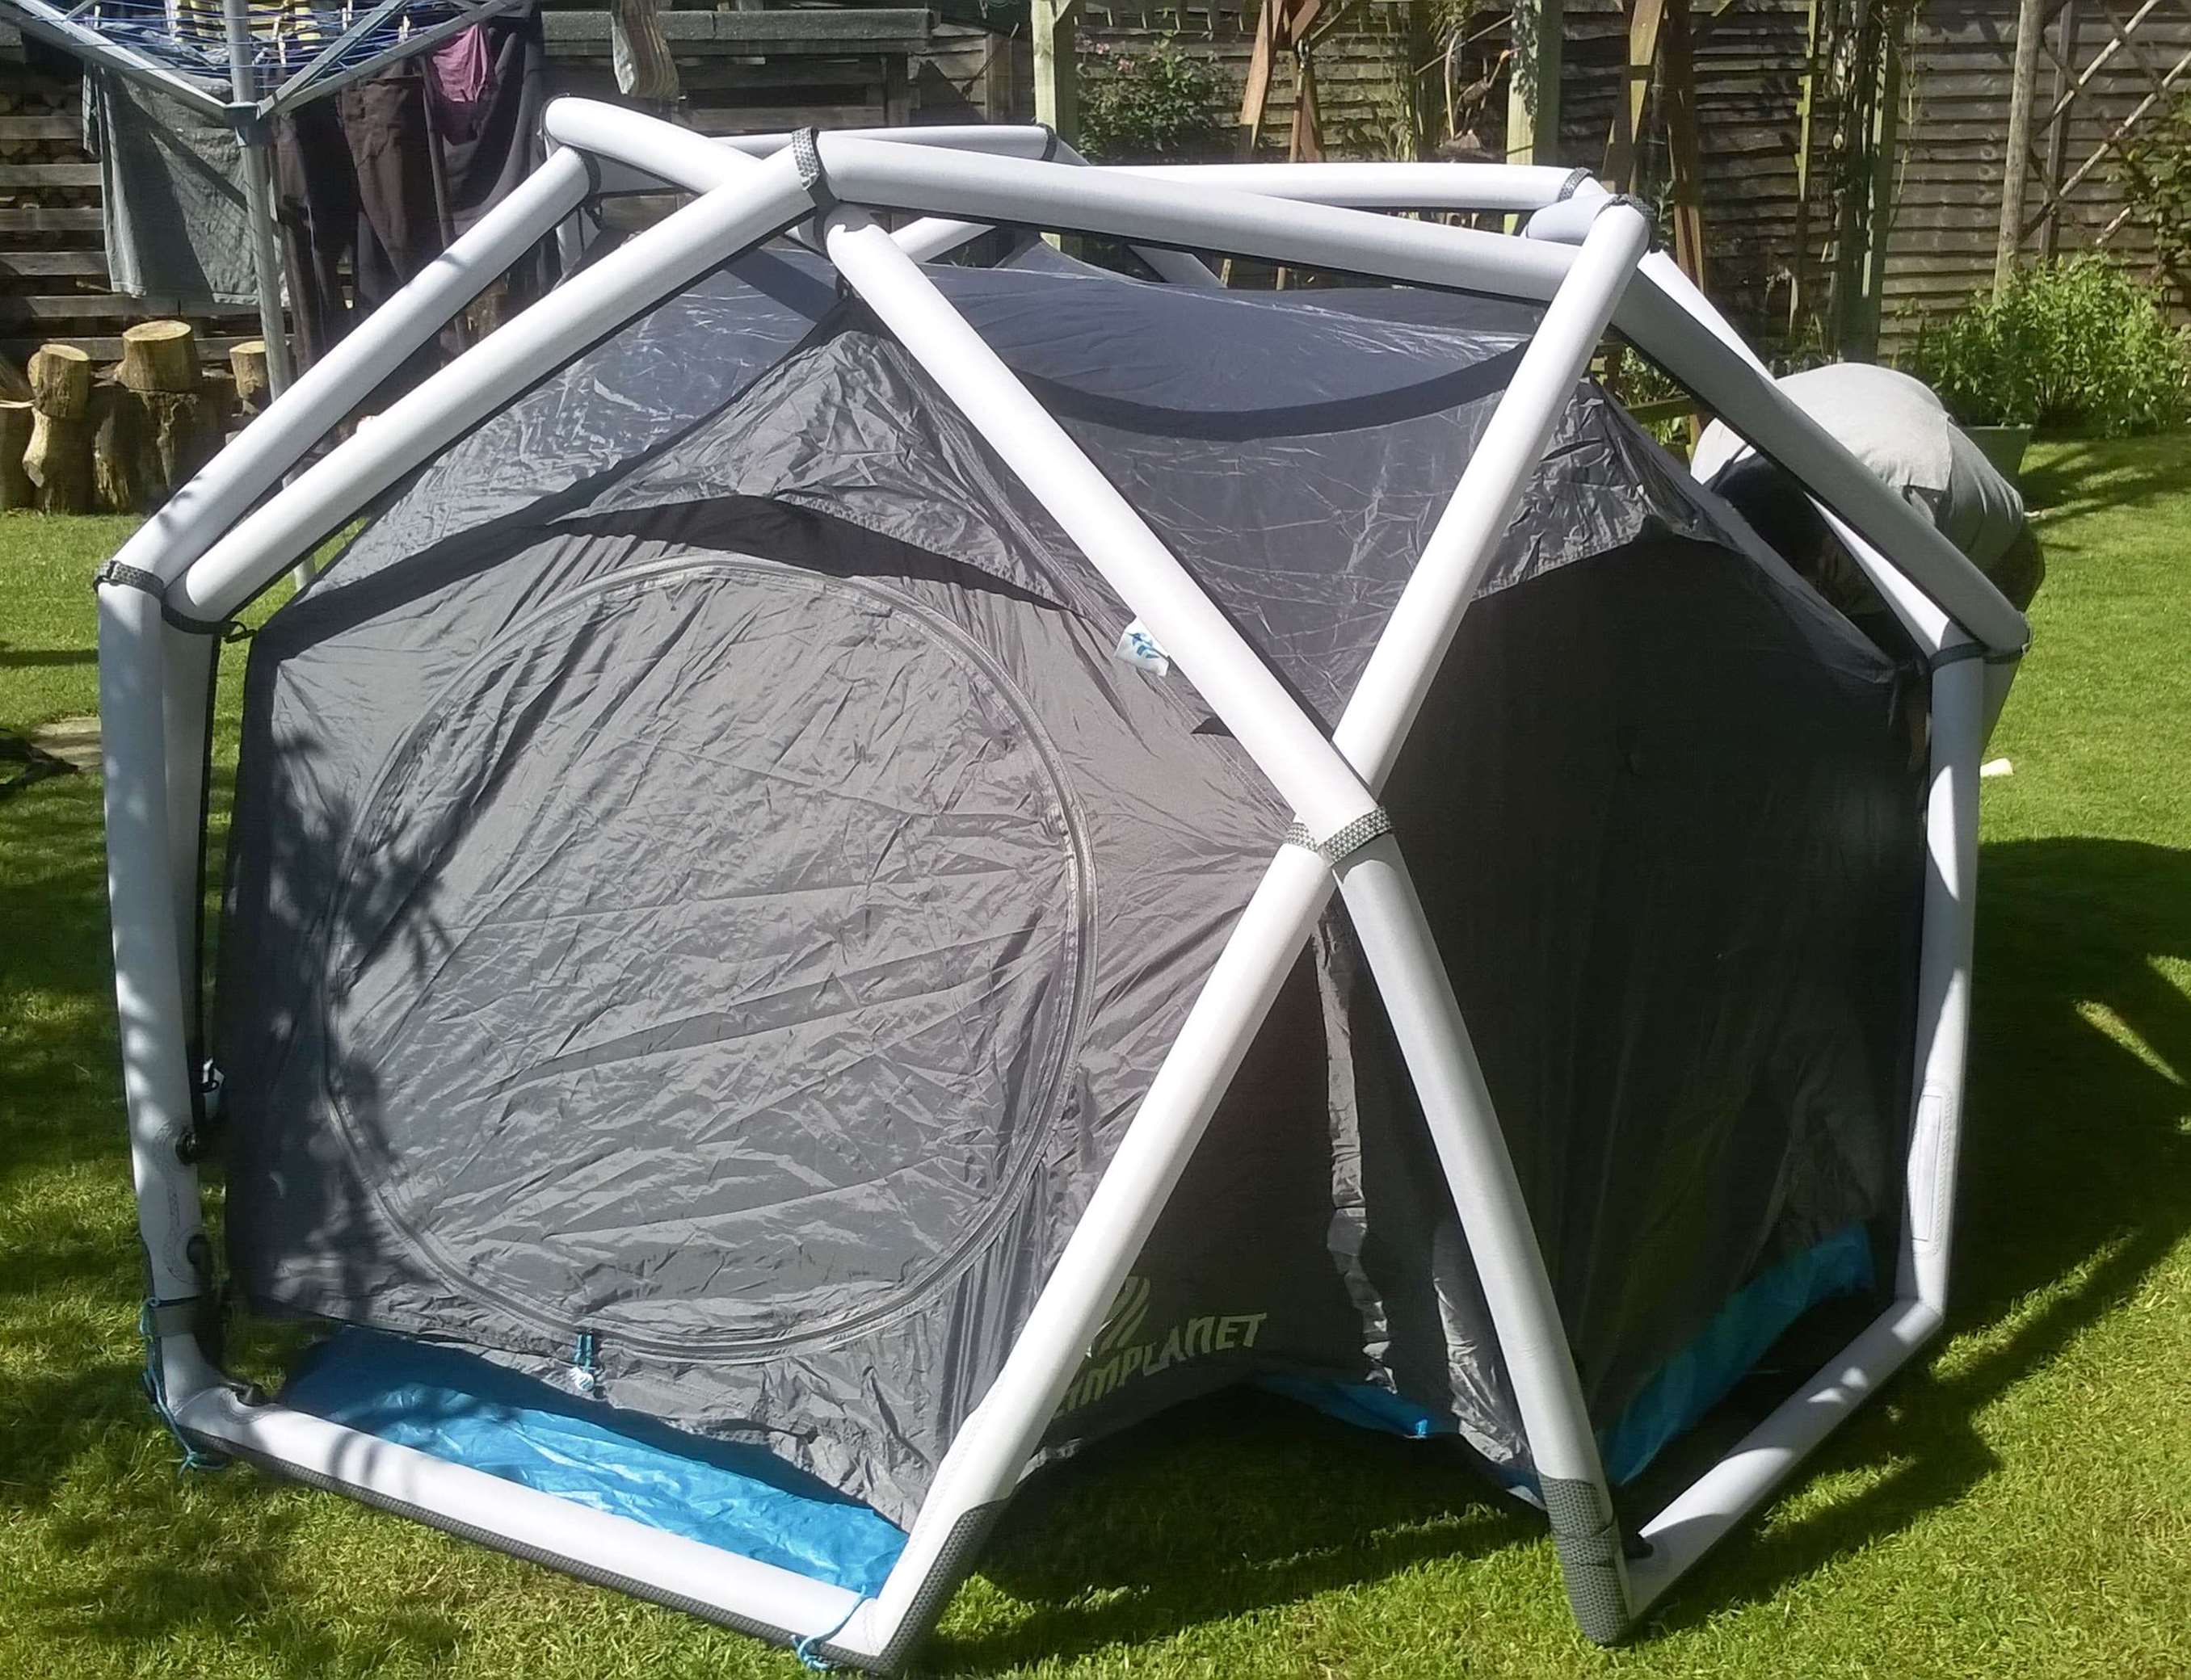
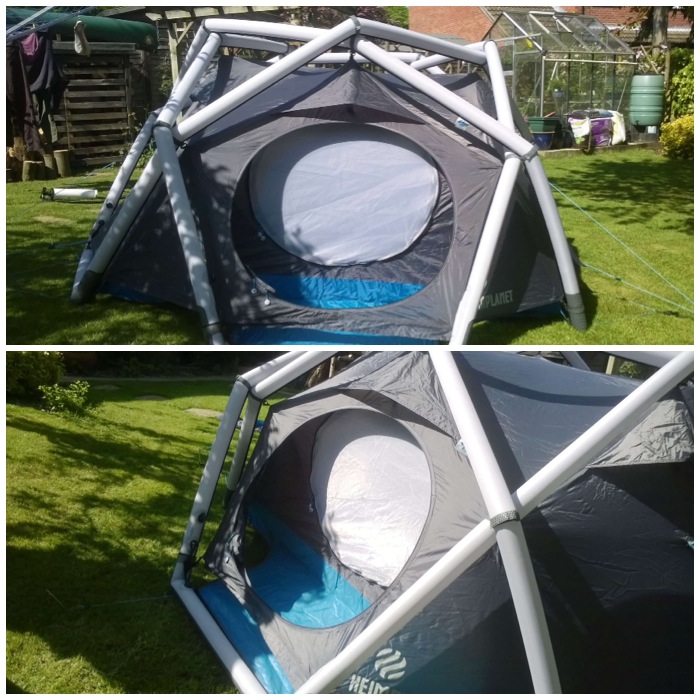
I got Adam to re-do the inflation of the tent and took a short film of it to show you how simple the procedure was. I was quite surprised at the size of the tent and can see why they call it the Cave.
Inflated quickly
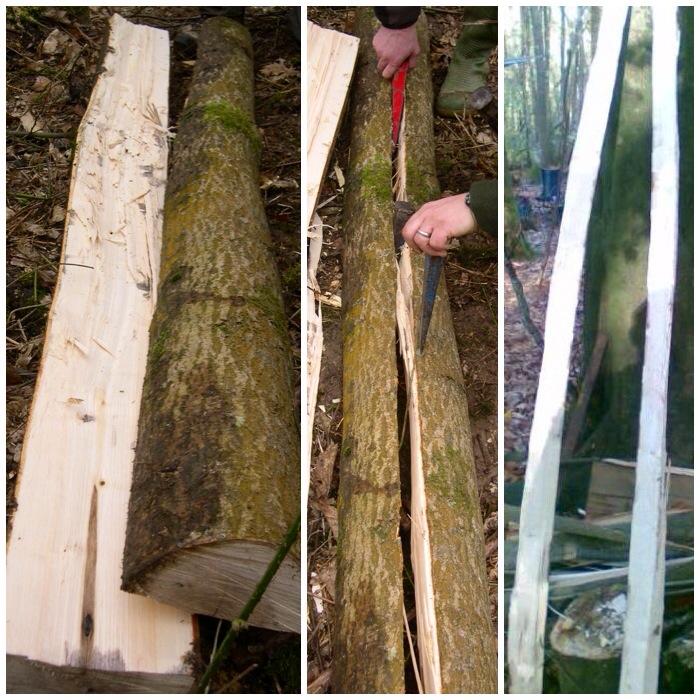
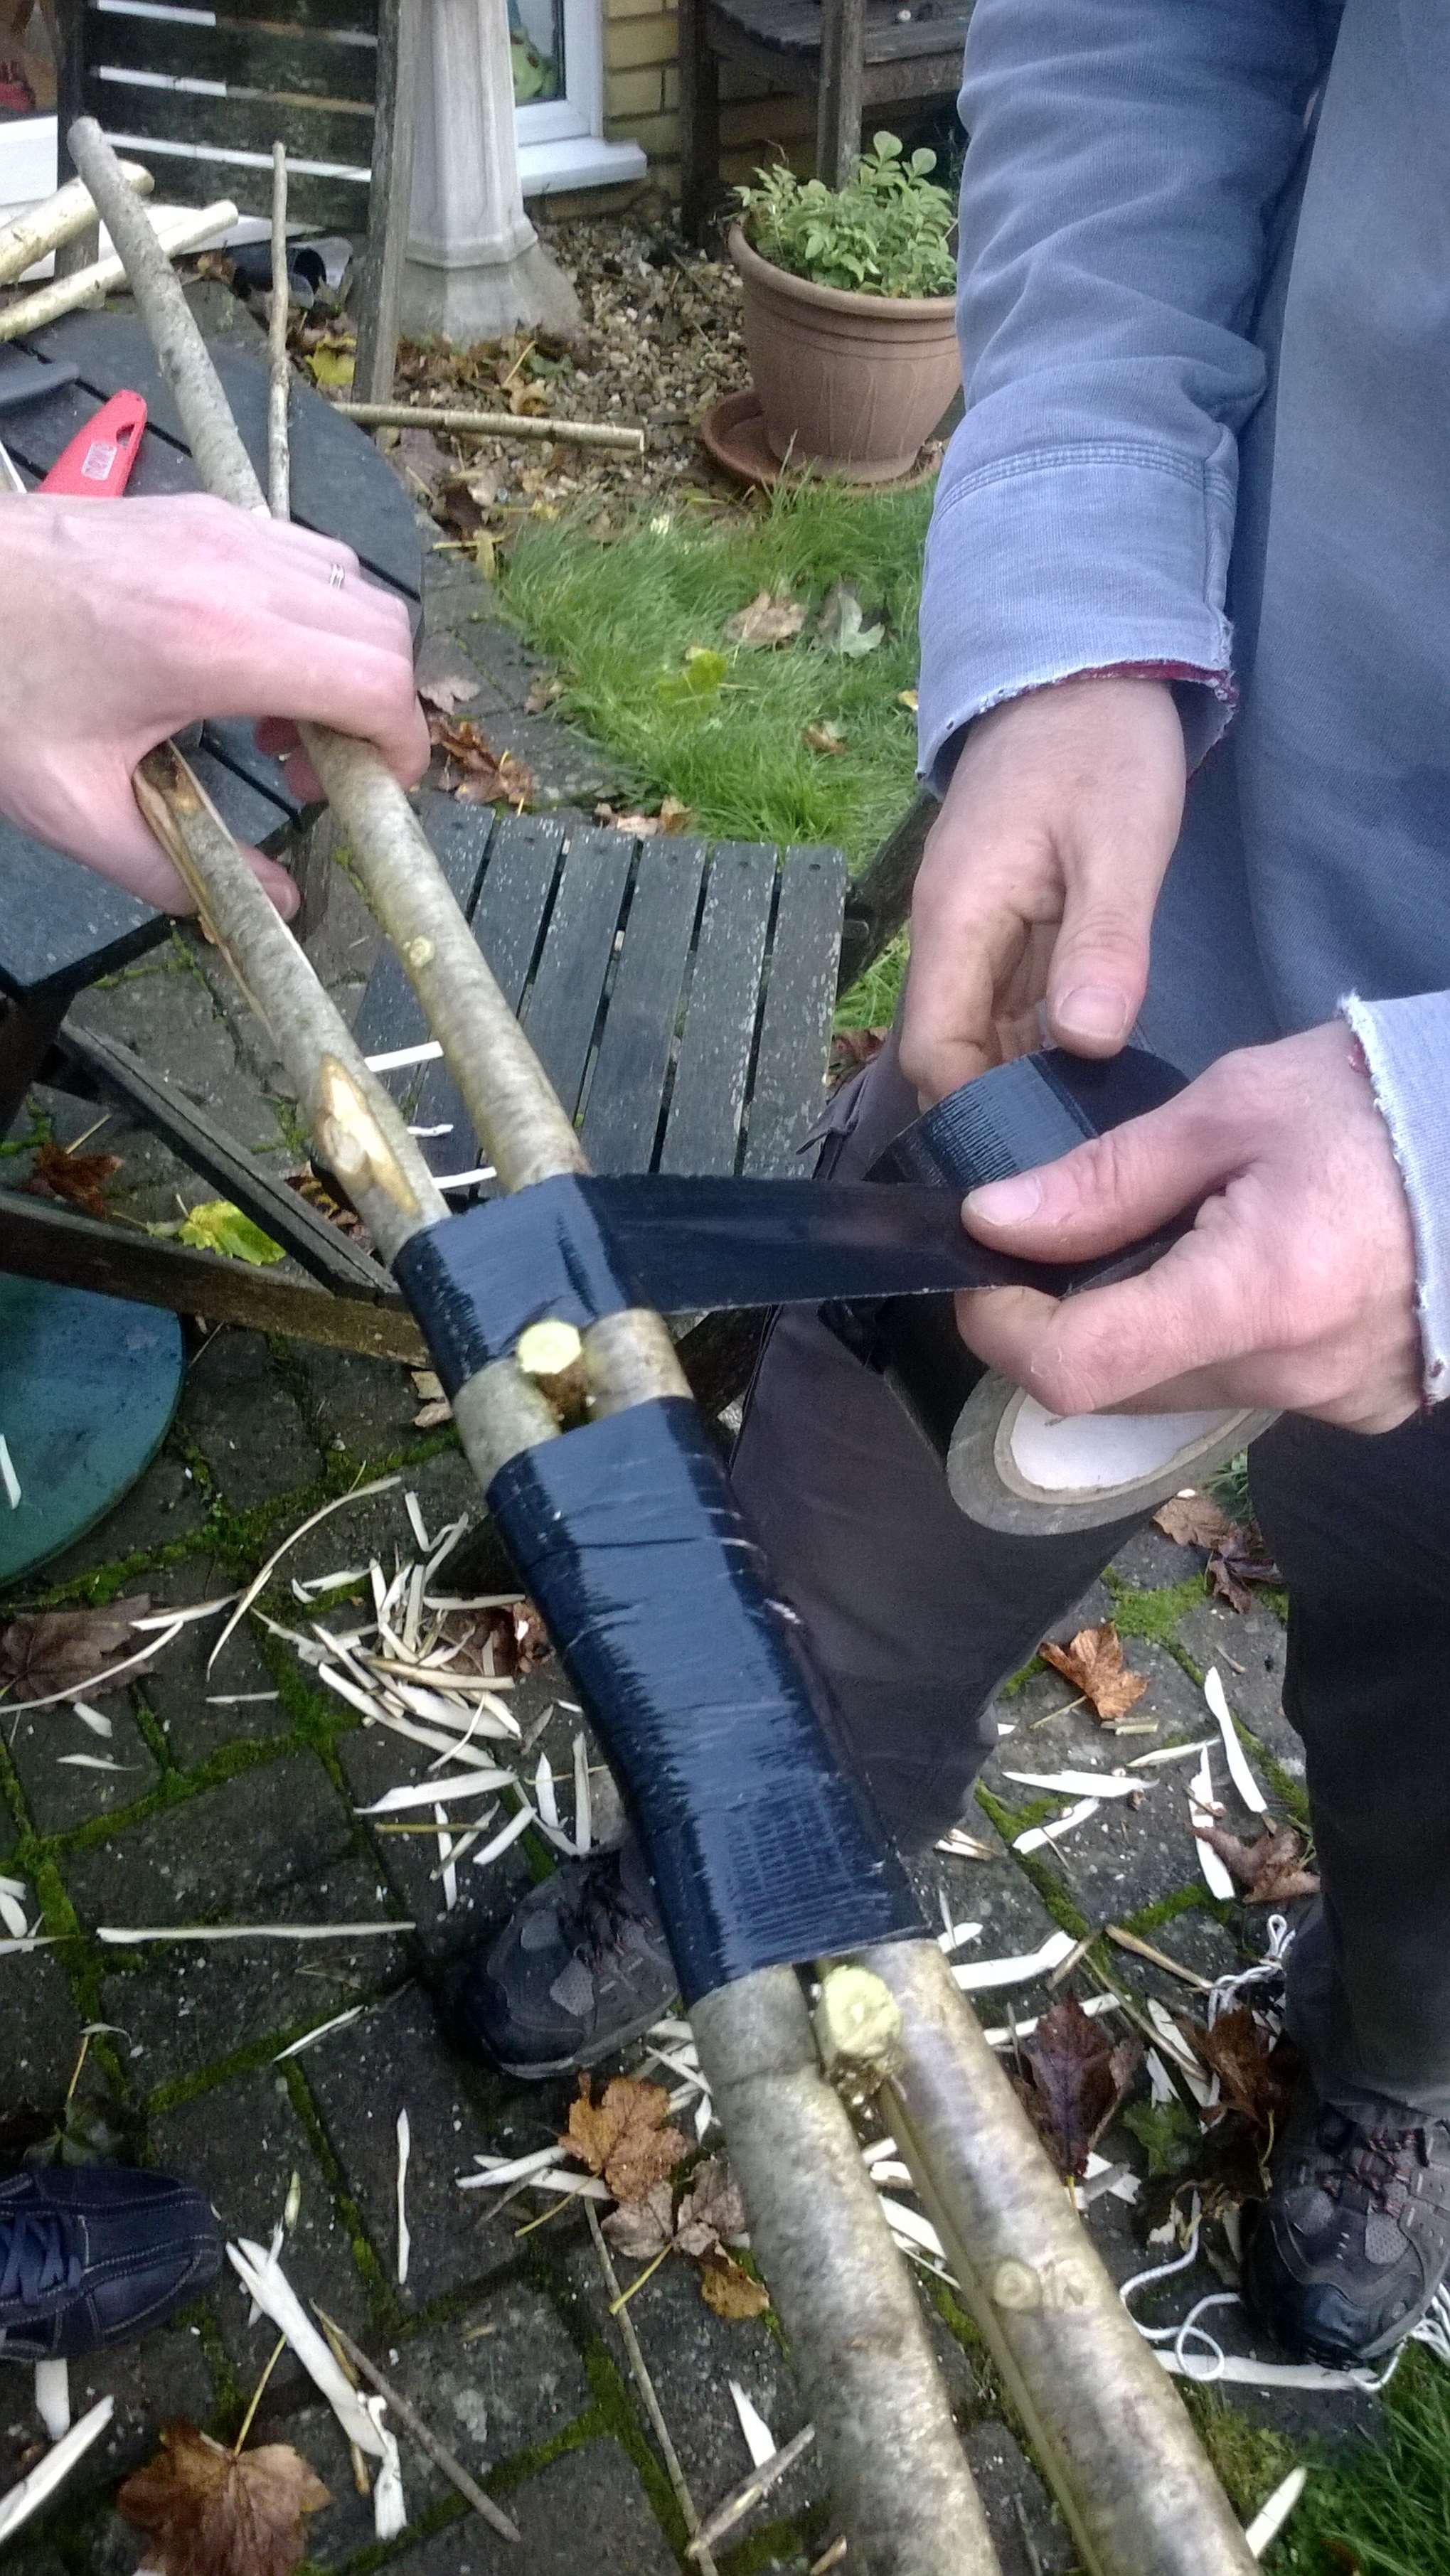
Each of the five sections of the tubing can be closed off by this simple locking valve that pinches the small connecting tube between the main tubes.
Each tube can be locked off with these valves
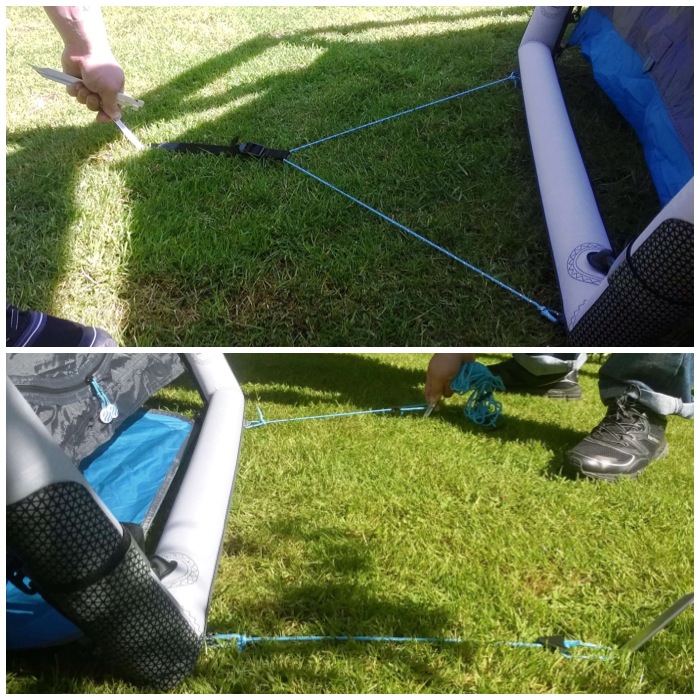
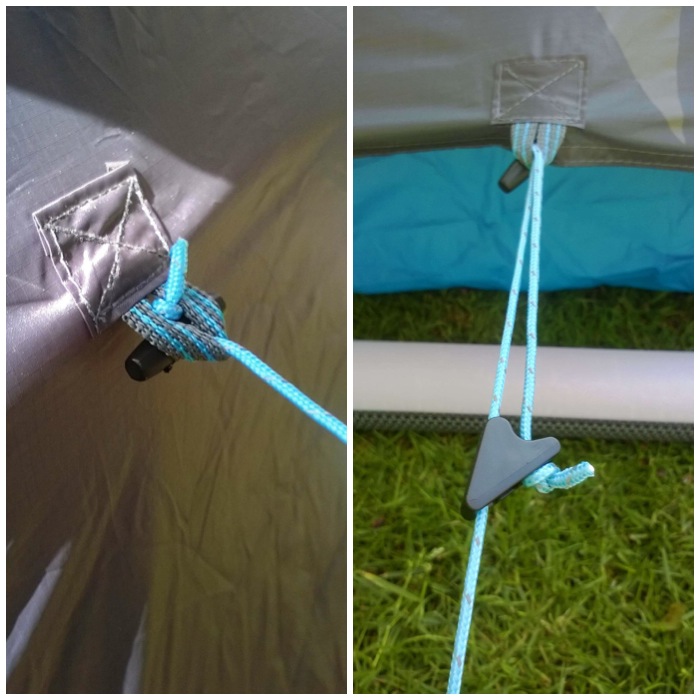
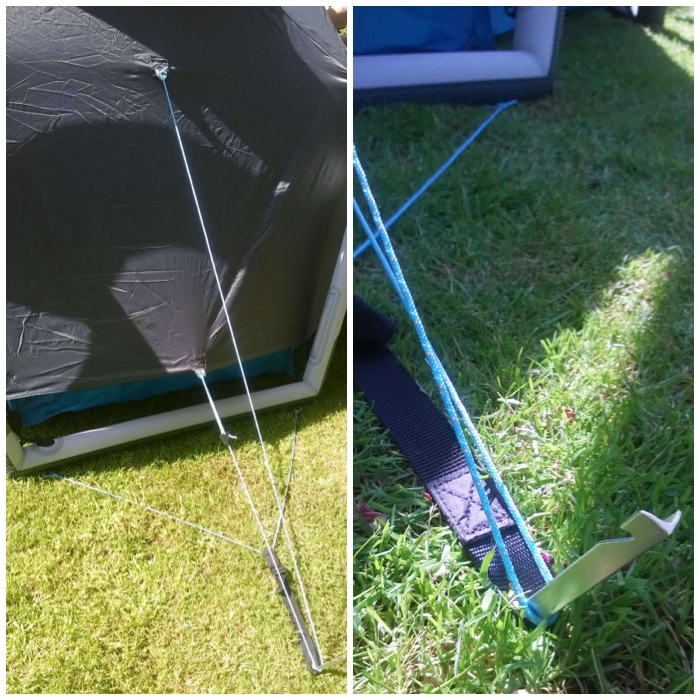
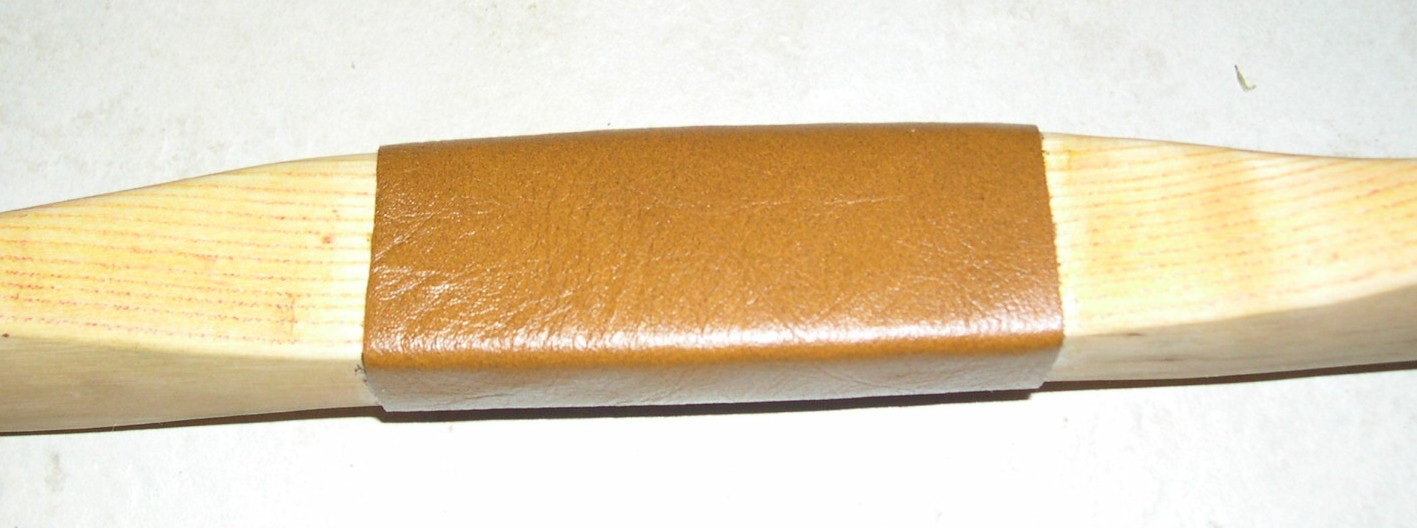
The guylines come in an unusual configuration. They are attached to the tent via toggles and one set of lines on each side is pegged out flat on the ground.
Simple low-lying guylines
Here you can see a little more clearly how the toggles attach to the tent.
Toggles attach the upper guylines
Both sets of guylines on each side attach to the same peg keeping things neat and tidy.
All the guylines on each side go to one peg
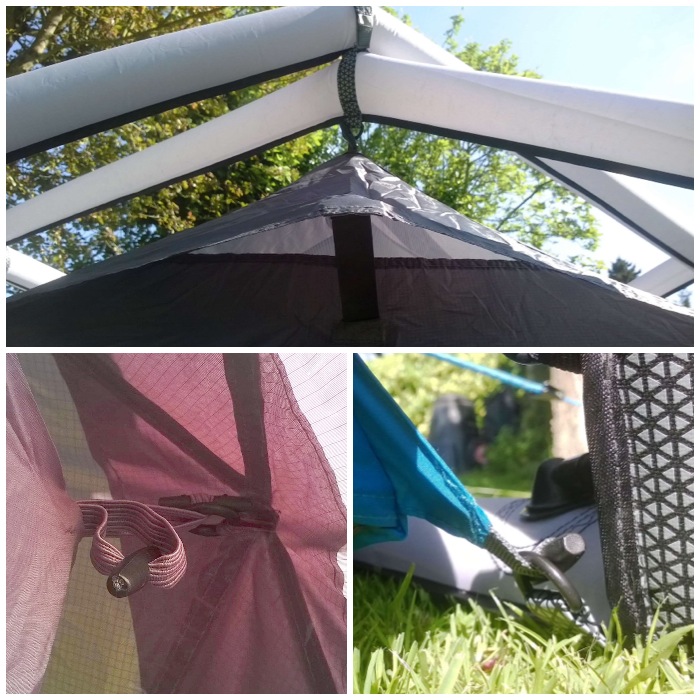
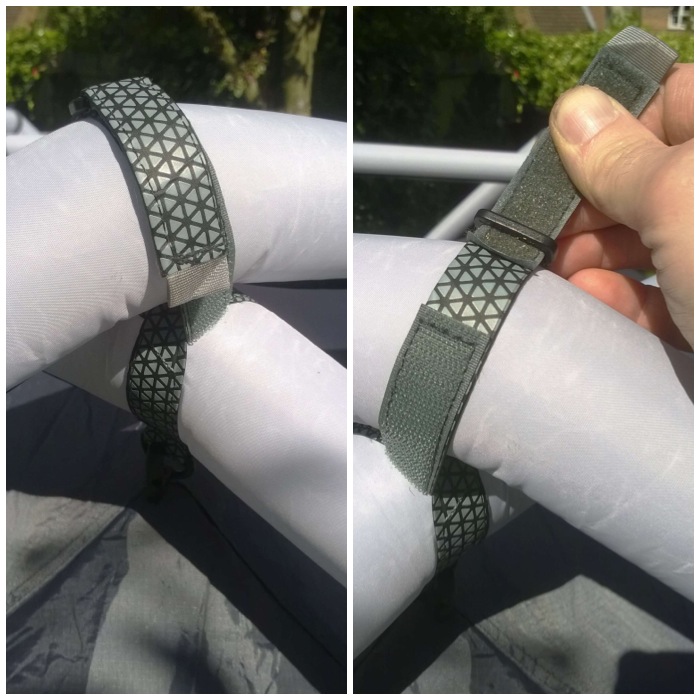
Everything is connected either by velcro straps or toggles. The tent can be erected without the outer sheet (but that’s probably not advisable here in the UK).
Tubes and the tent are connected with velcro and toggles
The workmanship I observed on this tent was very high. All the seams looked neatly sealed and the stitching was very accurately placed.
Strong velcro straps
As well as a locking valve on each section there are also 5 access points so that the inner tubes can be removed and repaired if need be.
Separate access to each tube
The tent has a small porch and the small front awning will stop rainwater dripping into the tent when you open it (but only just I think). However when this tent was fully inflated and the guylines were secured it was very stable and strong.
A very strong and stable tent
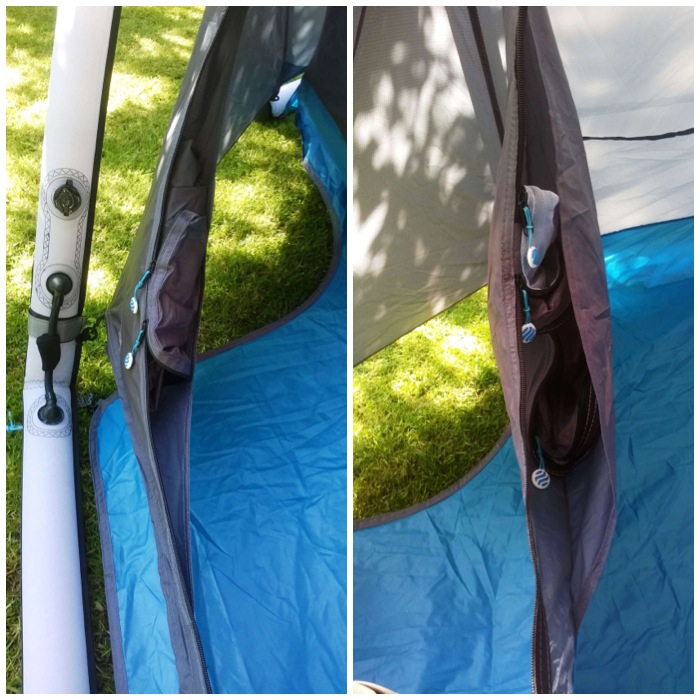
I liked the small pockets for stowing the door flaps. Very neat and a great idea.
Neat pouches to stow the entrance flaps
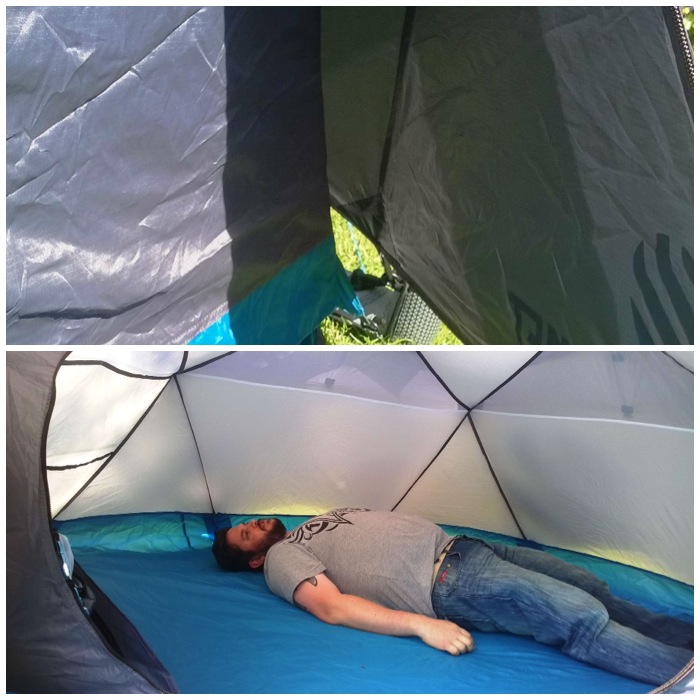
In terms of space you could fit two adults with lots of kit into it comfortably. If there were three of you then you would just need to be a bit more disciplined about things but you would be comfortable enough.
Good gap between inner and outer. Also plenty of space inside.
The tent had good ventilation with plenty of mossie-style nets on the inner and a number of covered openings on the outer. It also comes with a good loft storage area and loads of pockets. You cannot stand up in the tent but when sitting most folk will not touch the ceiling with their head.
Good internal ventilation and plenty of storage
To deflate, simply unlock the valves and let the air out. The tent simply collapses in on itself.
Easy to deflate
You need to spend a couple of minutes just pushing all the air out of the tubes, otherwise the tent will be very difficult to put back into the bag.
Take your time pushing all the air out
The tent is rolled up to the size of the bag as with most tents but you can use your knee to push out any trapped air. A good enhancement to the tent back would be to install a little valve so that as you rolled the top down the air could escape quicker.
Compression sack gets rid of the last of the air
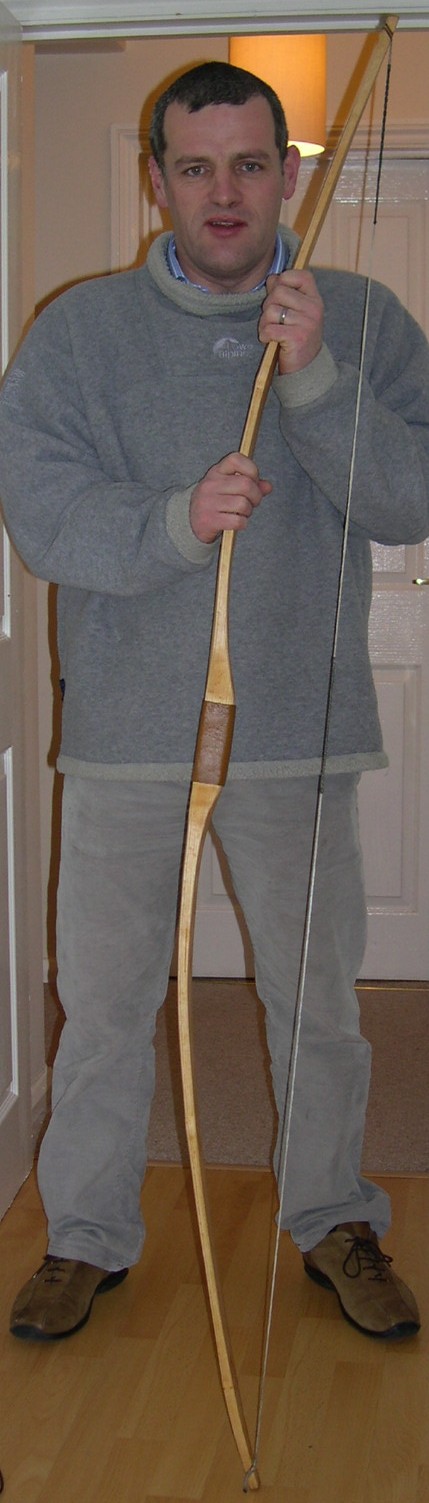
As I said at the beginning I was very impressed with this tent. I initially thought that this could never work but after looking at the quality and the strength of the tent I soon lost any doubts. I like the fact that the sleeves covering each tube are very strong and that each section of the tubing can be locked off to aid quick repair. Amazon has these tents on sale for about £395 so they’re not exactly cheap for a 2-3 person tent but this certainly scores highly for quality and ease of erection. I had a look at the Heimplanet site and all the specs for the tent can be found here – The Cave.
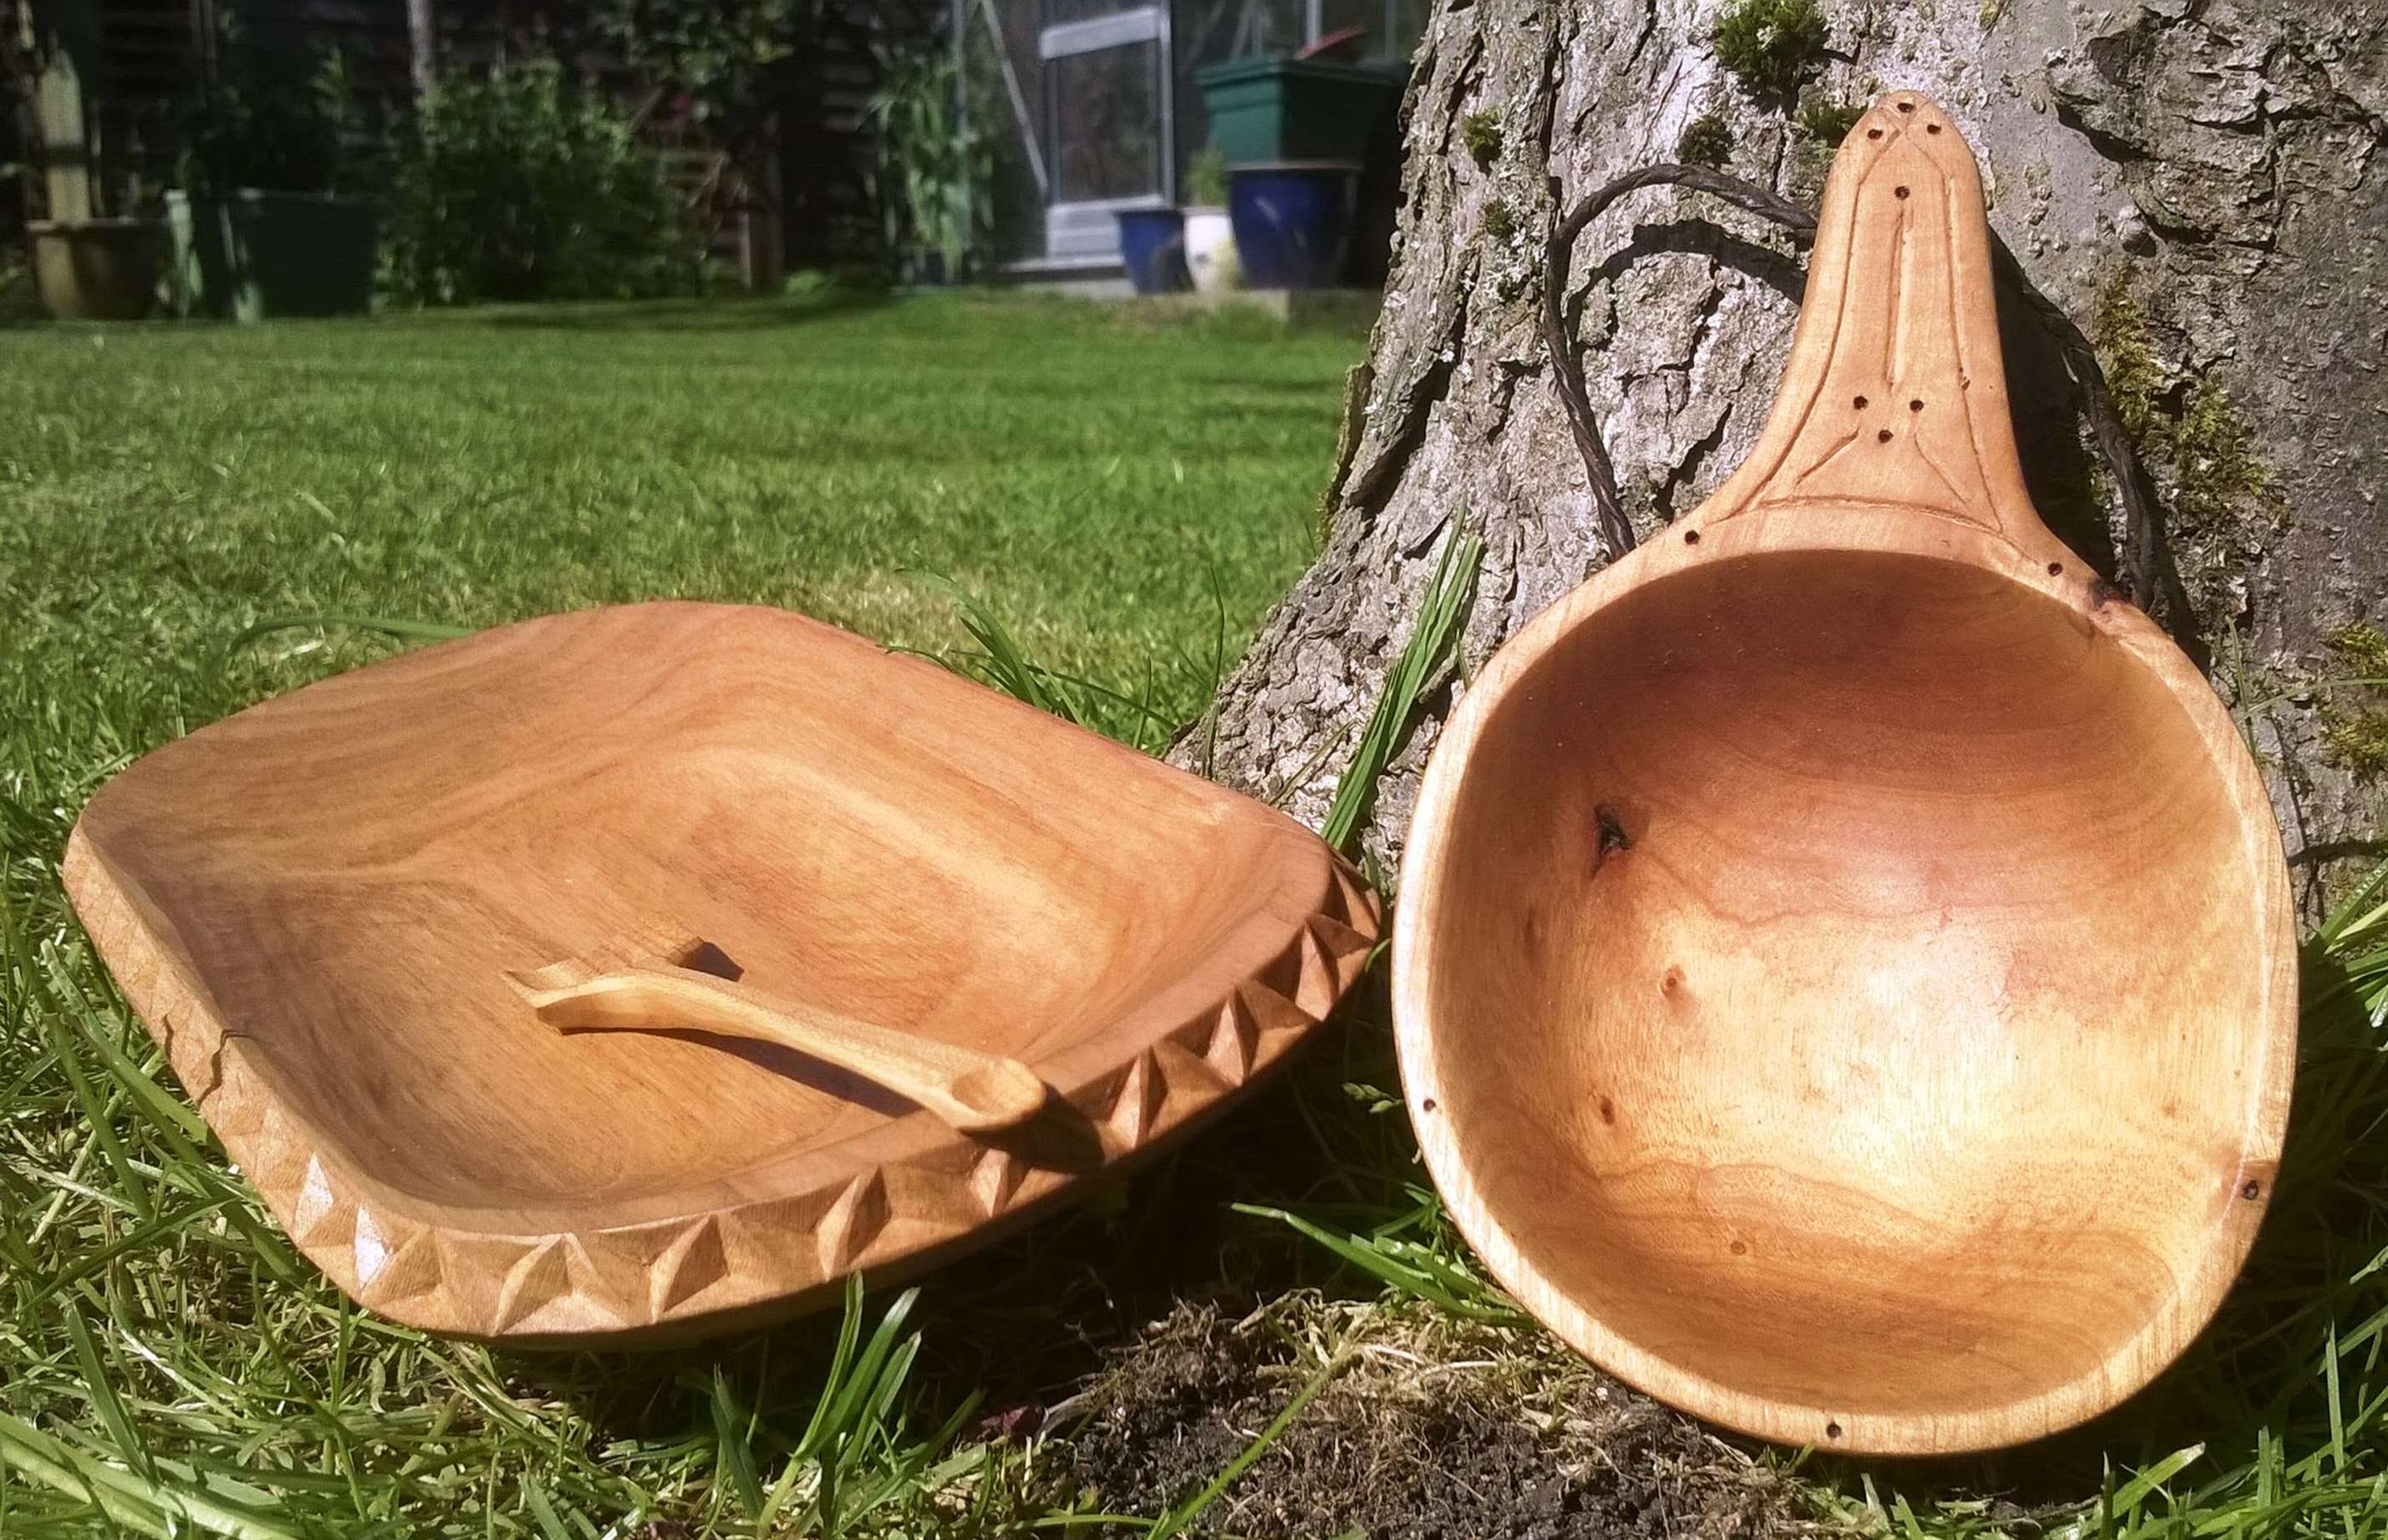
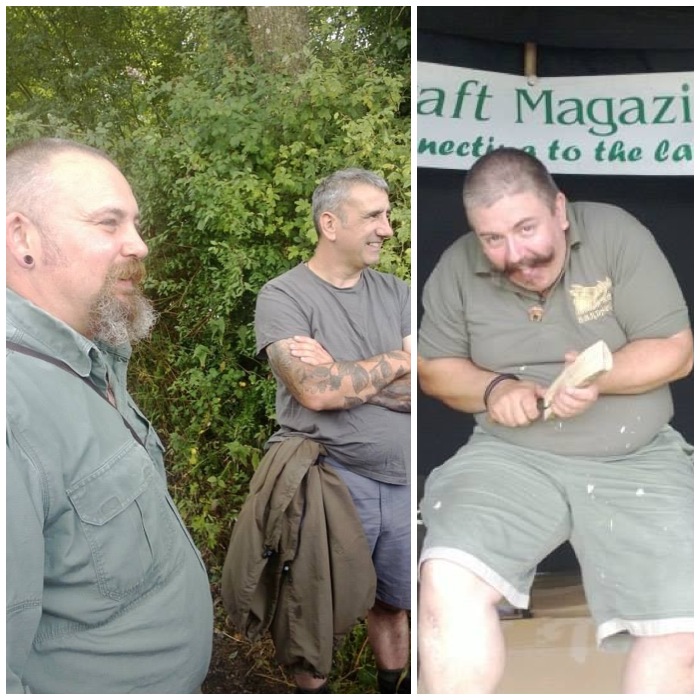
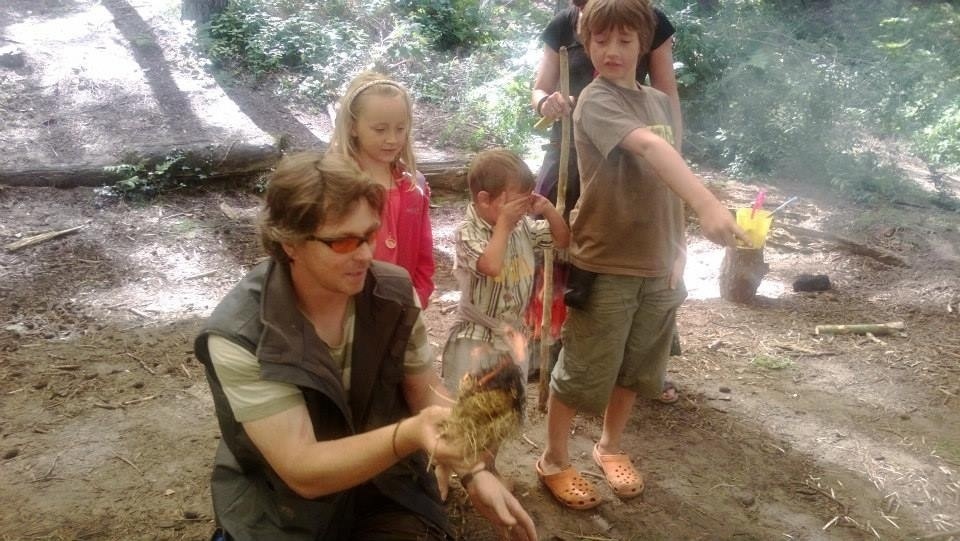
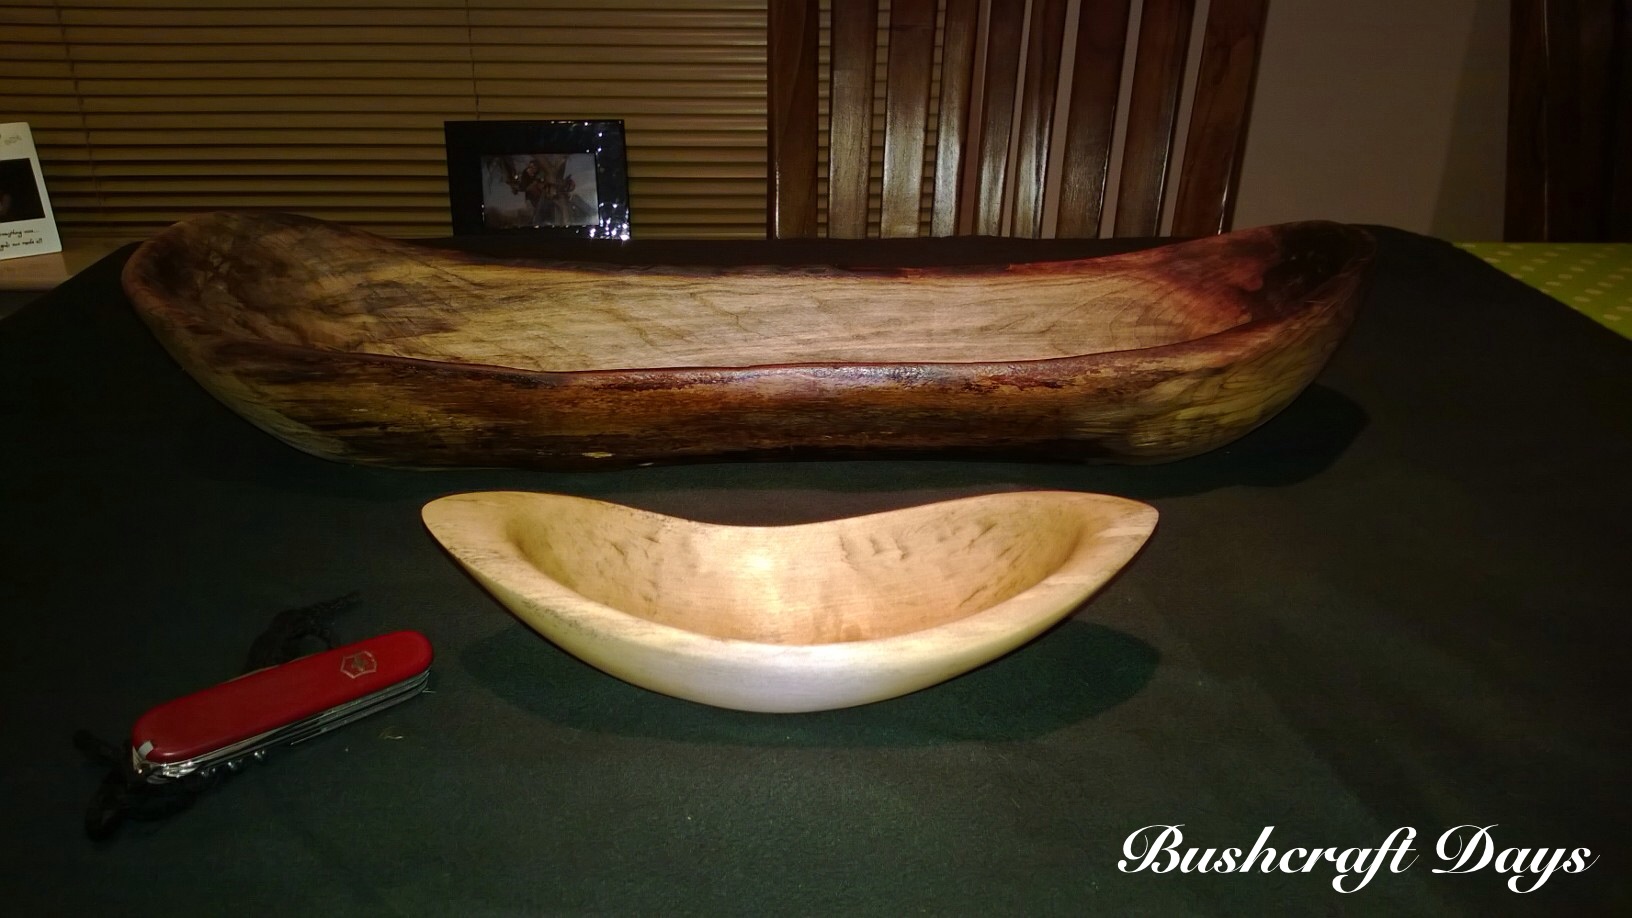
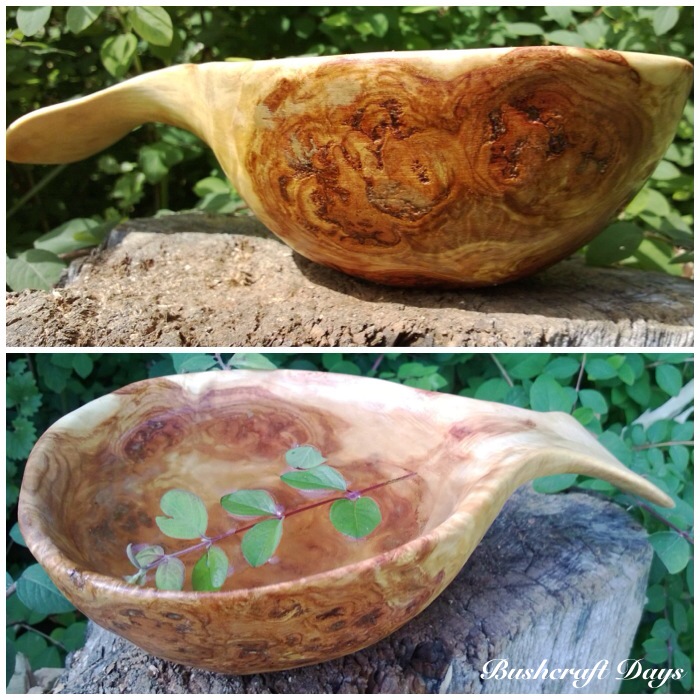
Meet my friend Mark Beer – a good friend and excellent craftsman.
Mark Beer – Top Craftsman & Good Friend
Mark has been a woodsman all his life and I met him about 8 years ago. I like to carve and since Mark has such skill in wood carving I always keep an eye on what he is producing so as to help develop my own skills.
I plan to spend some time with him this summer and pictorially document him creating one of his bowls at his wood carving studio.
Bowl carving
In the meantime here are some pictures of just a few of the carvings he has done over the years.
Mulberry CupMulberry CupSpalted beech bowl with curved cherry spoonLarge cherry bowl with mulberry spoonChip carved cherry dish with cherry snuff spoon and birch cup
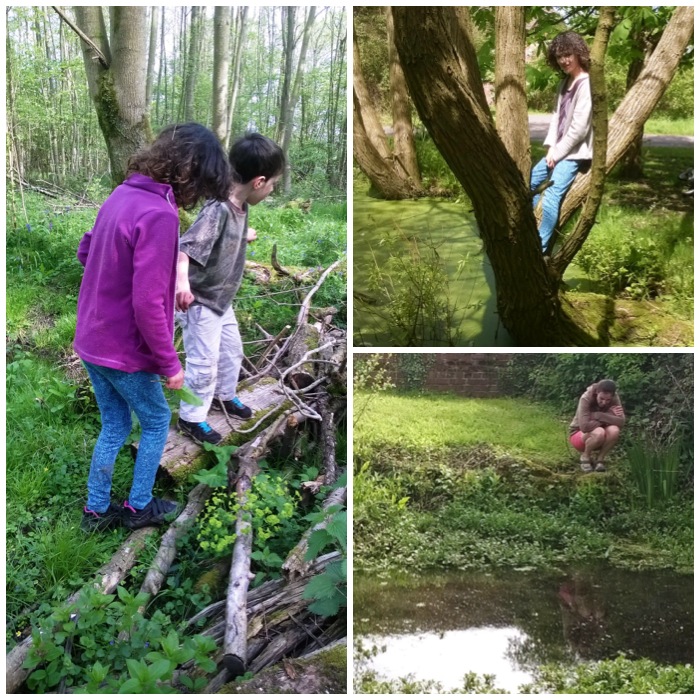
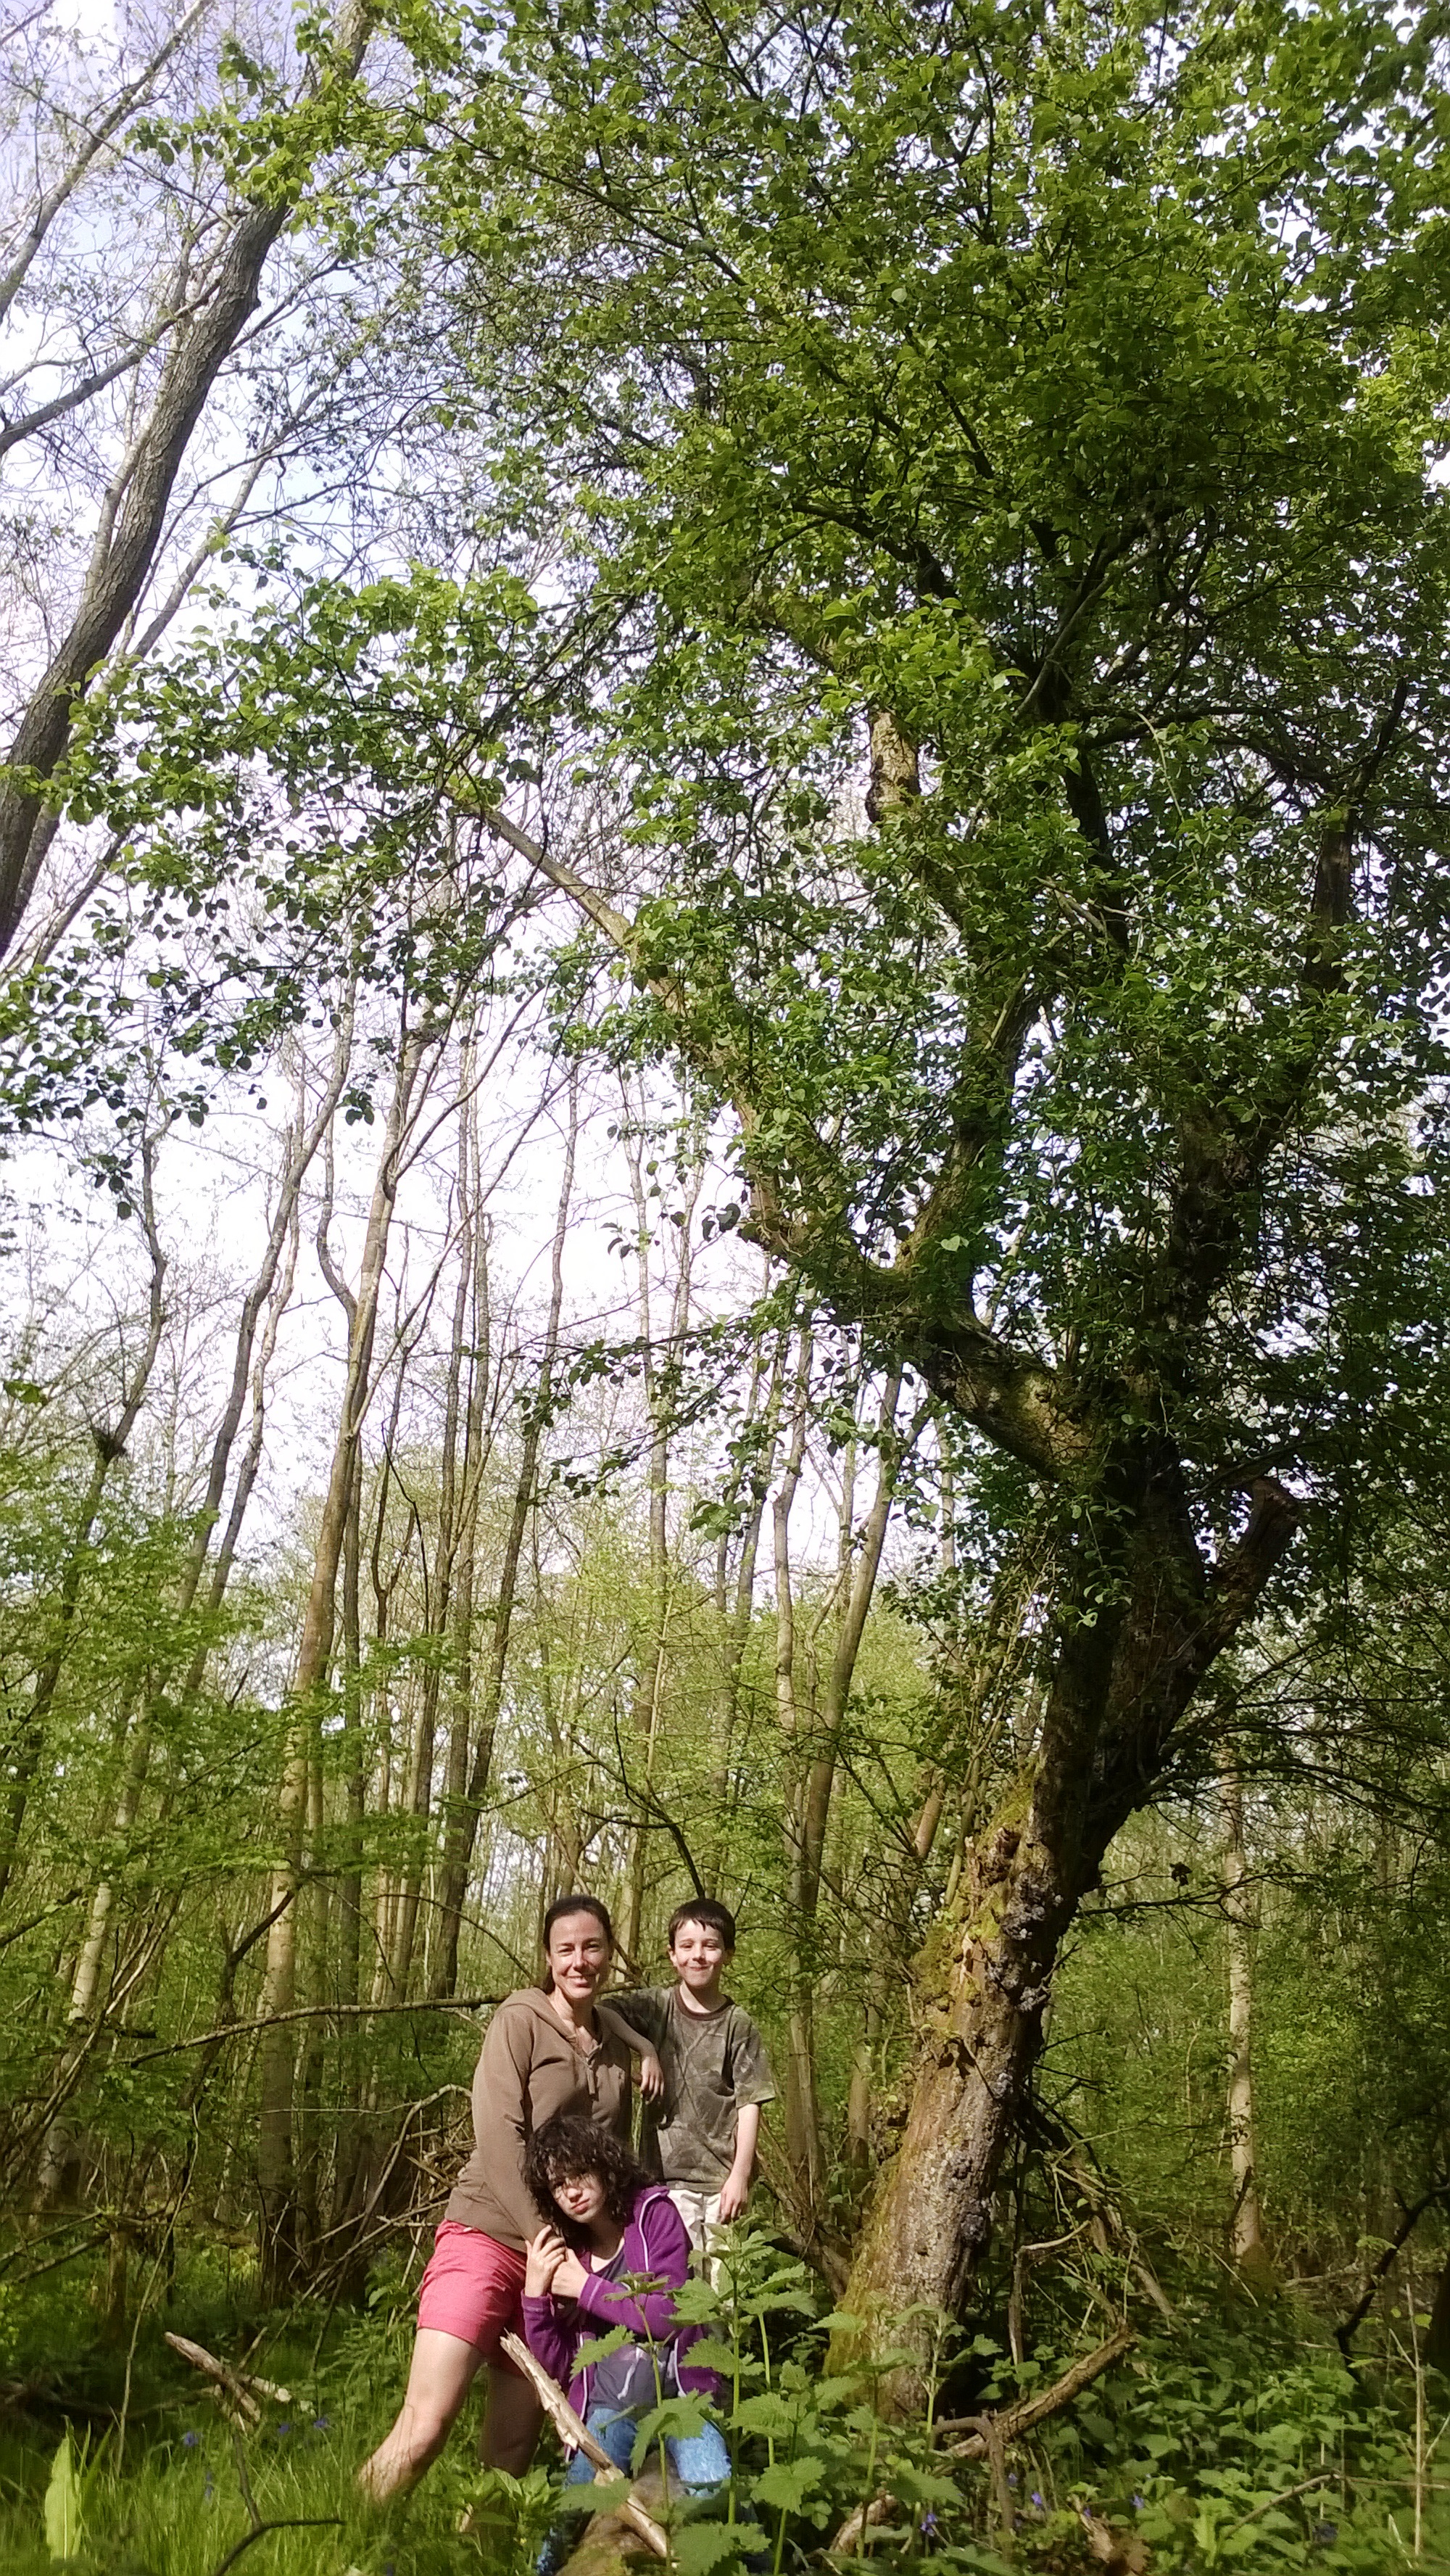
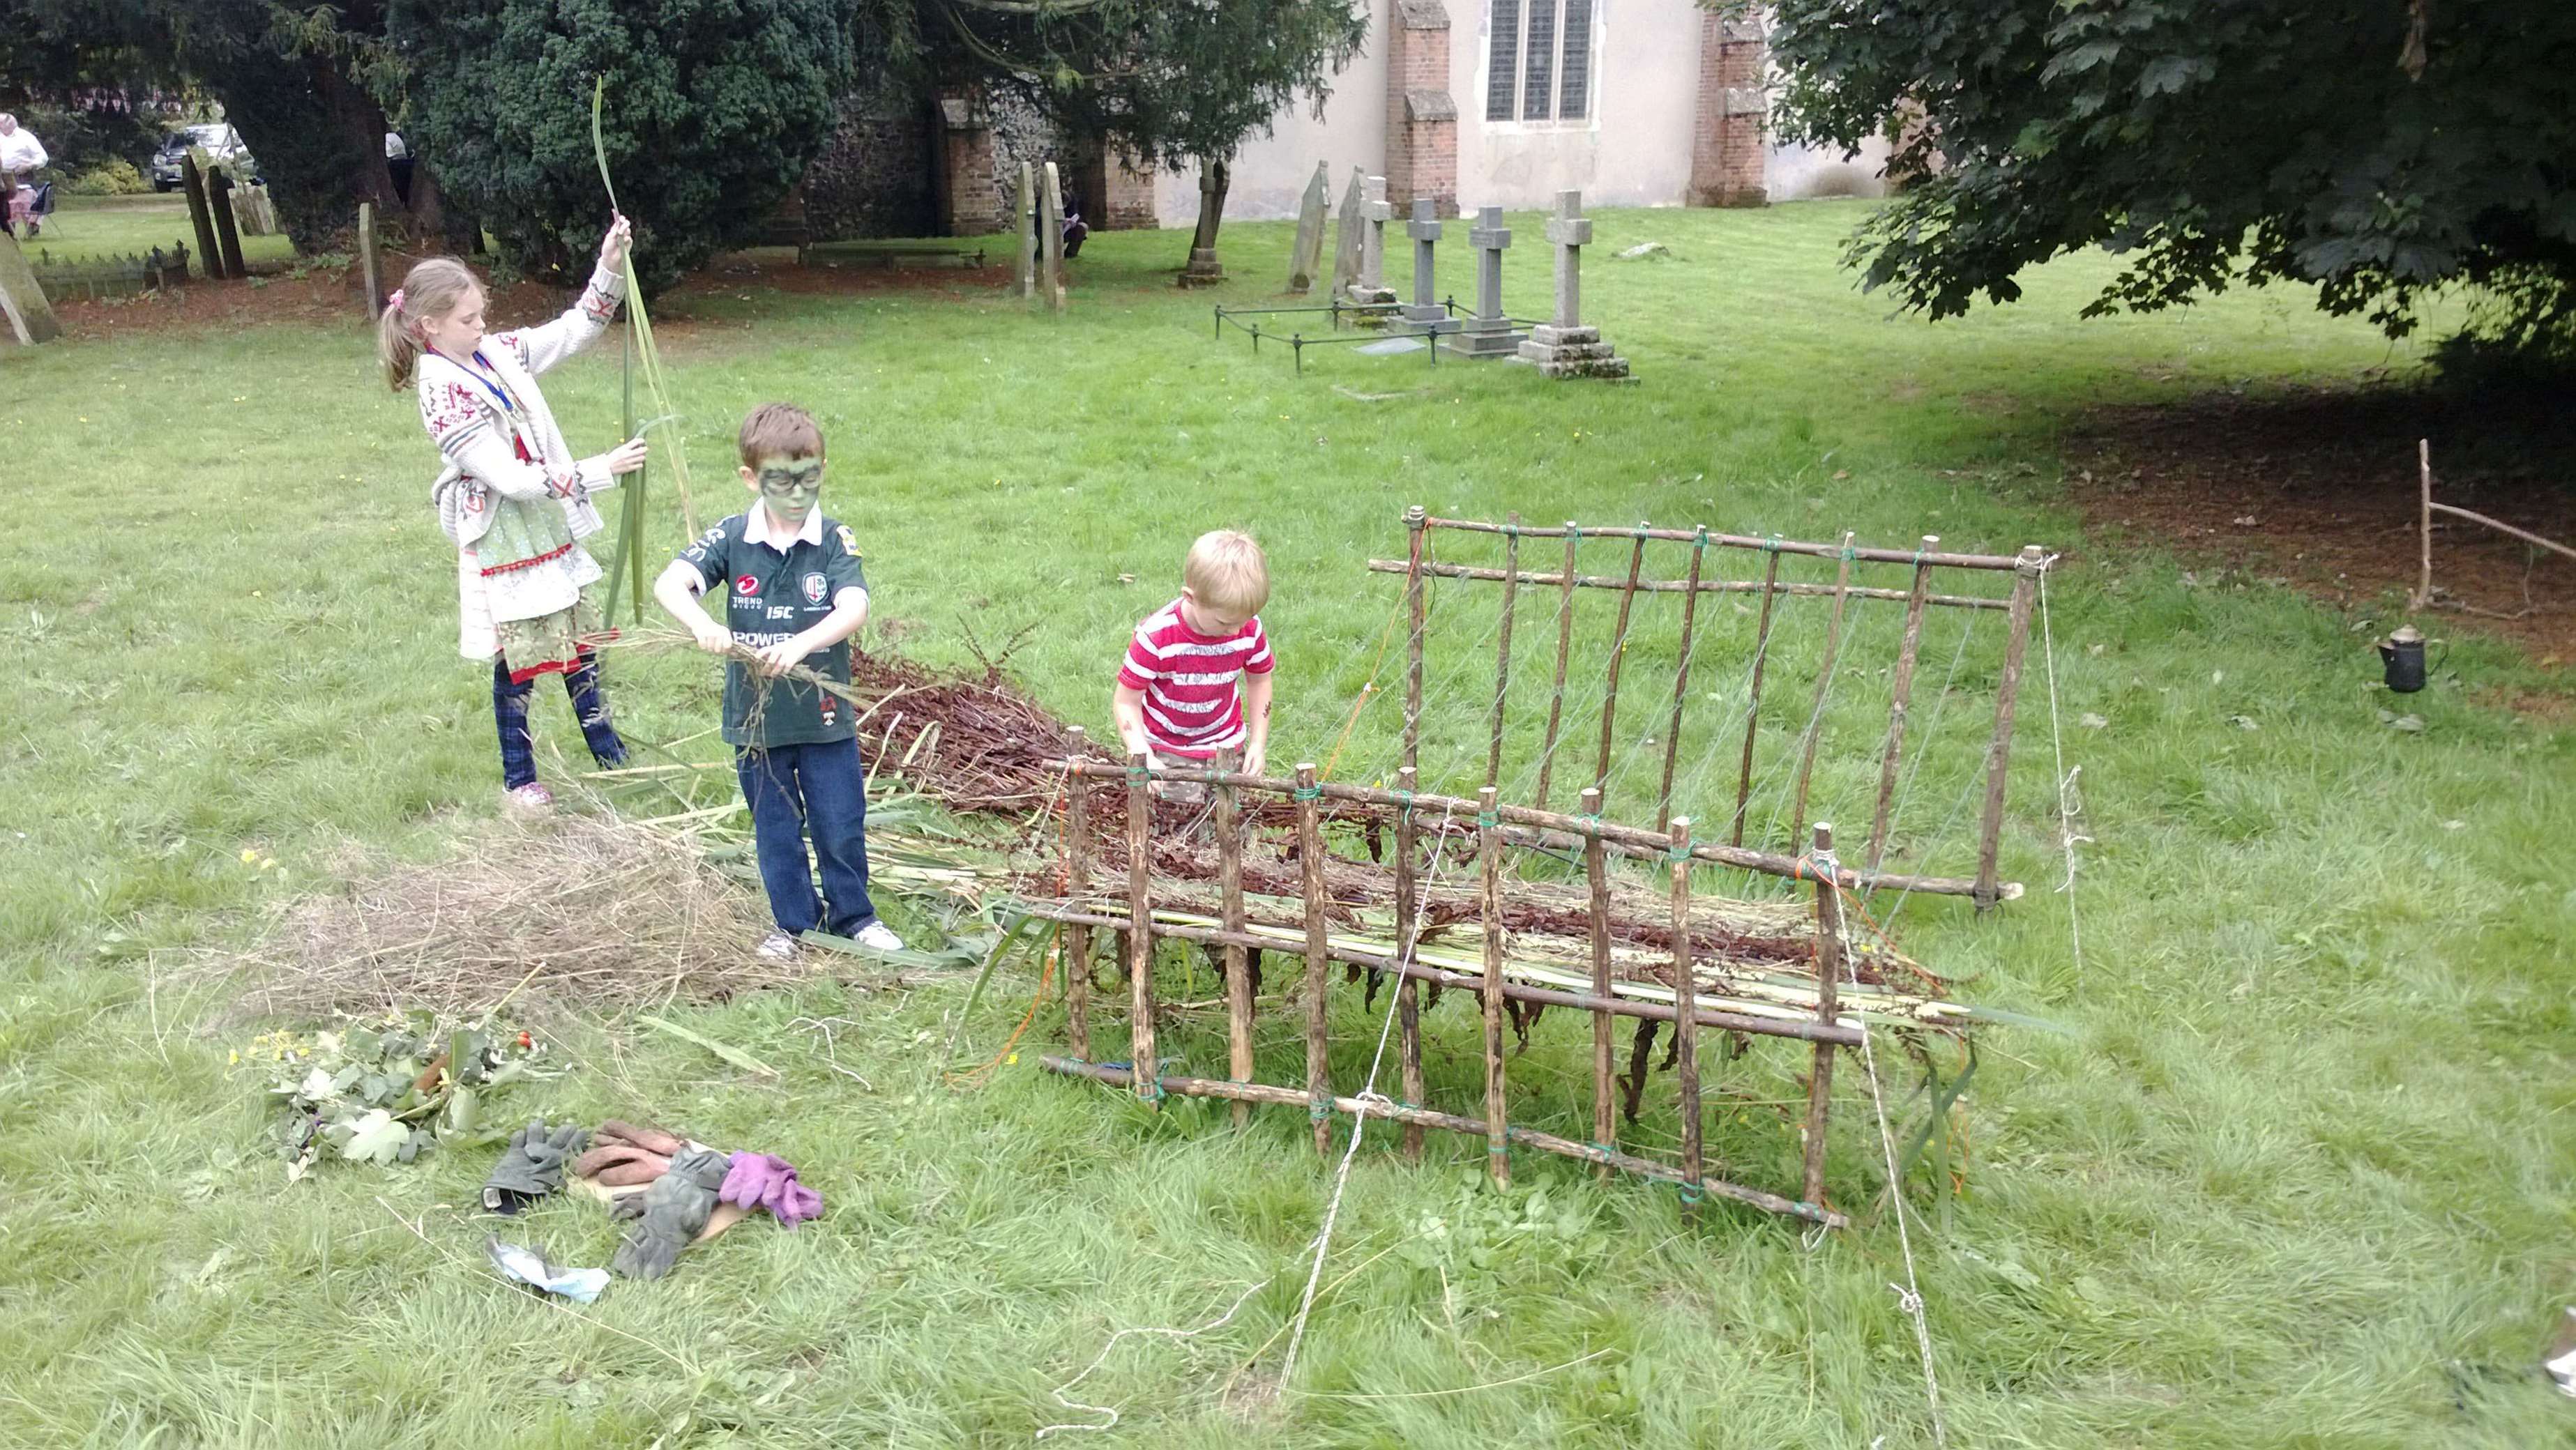
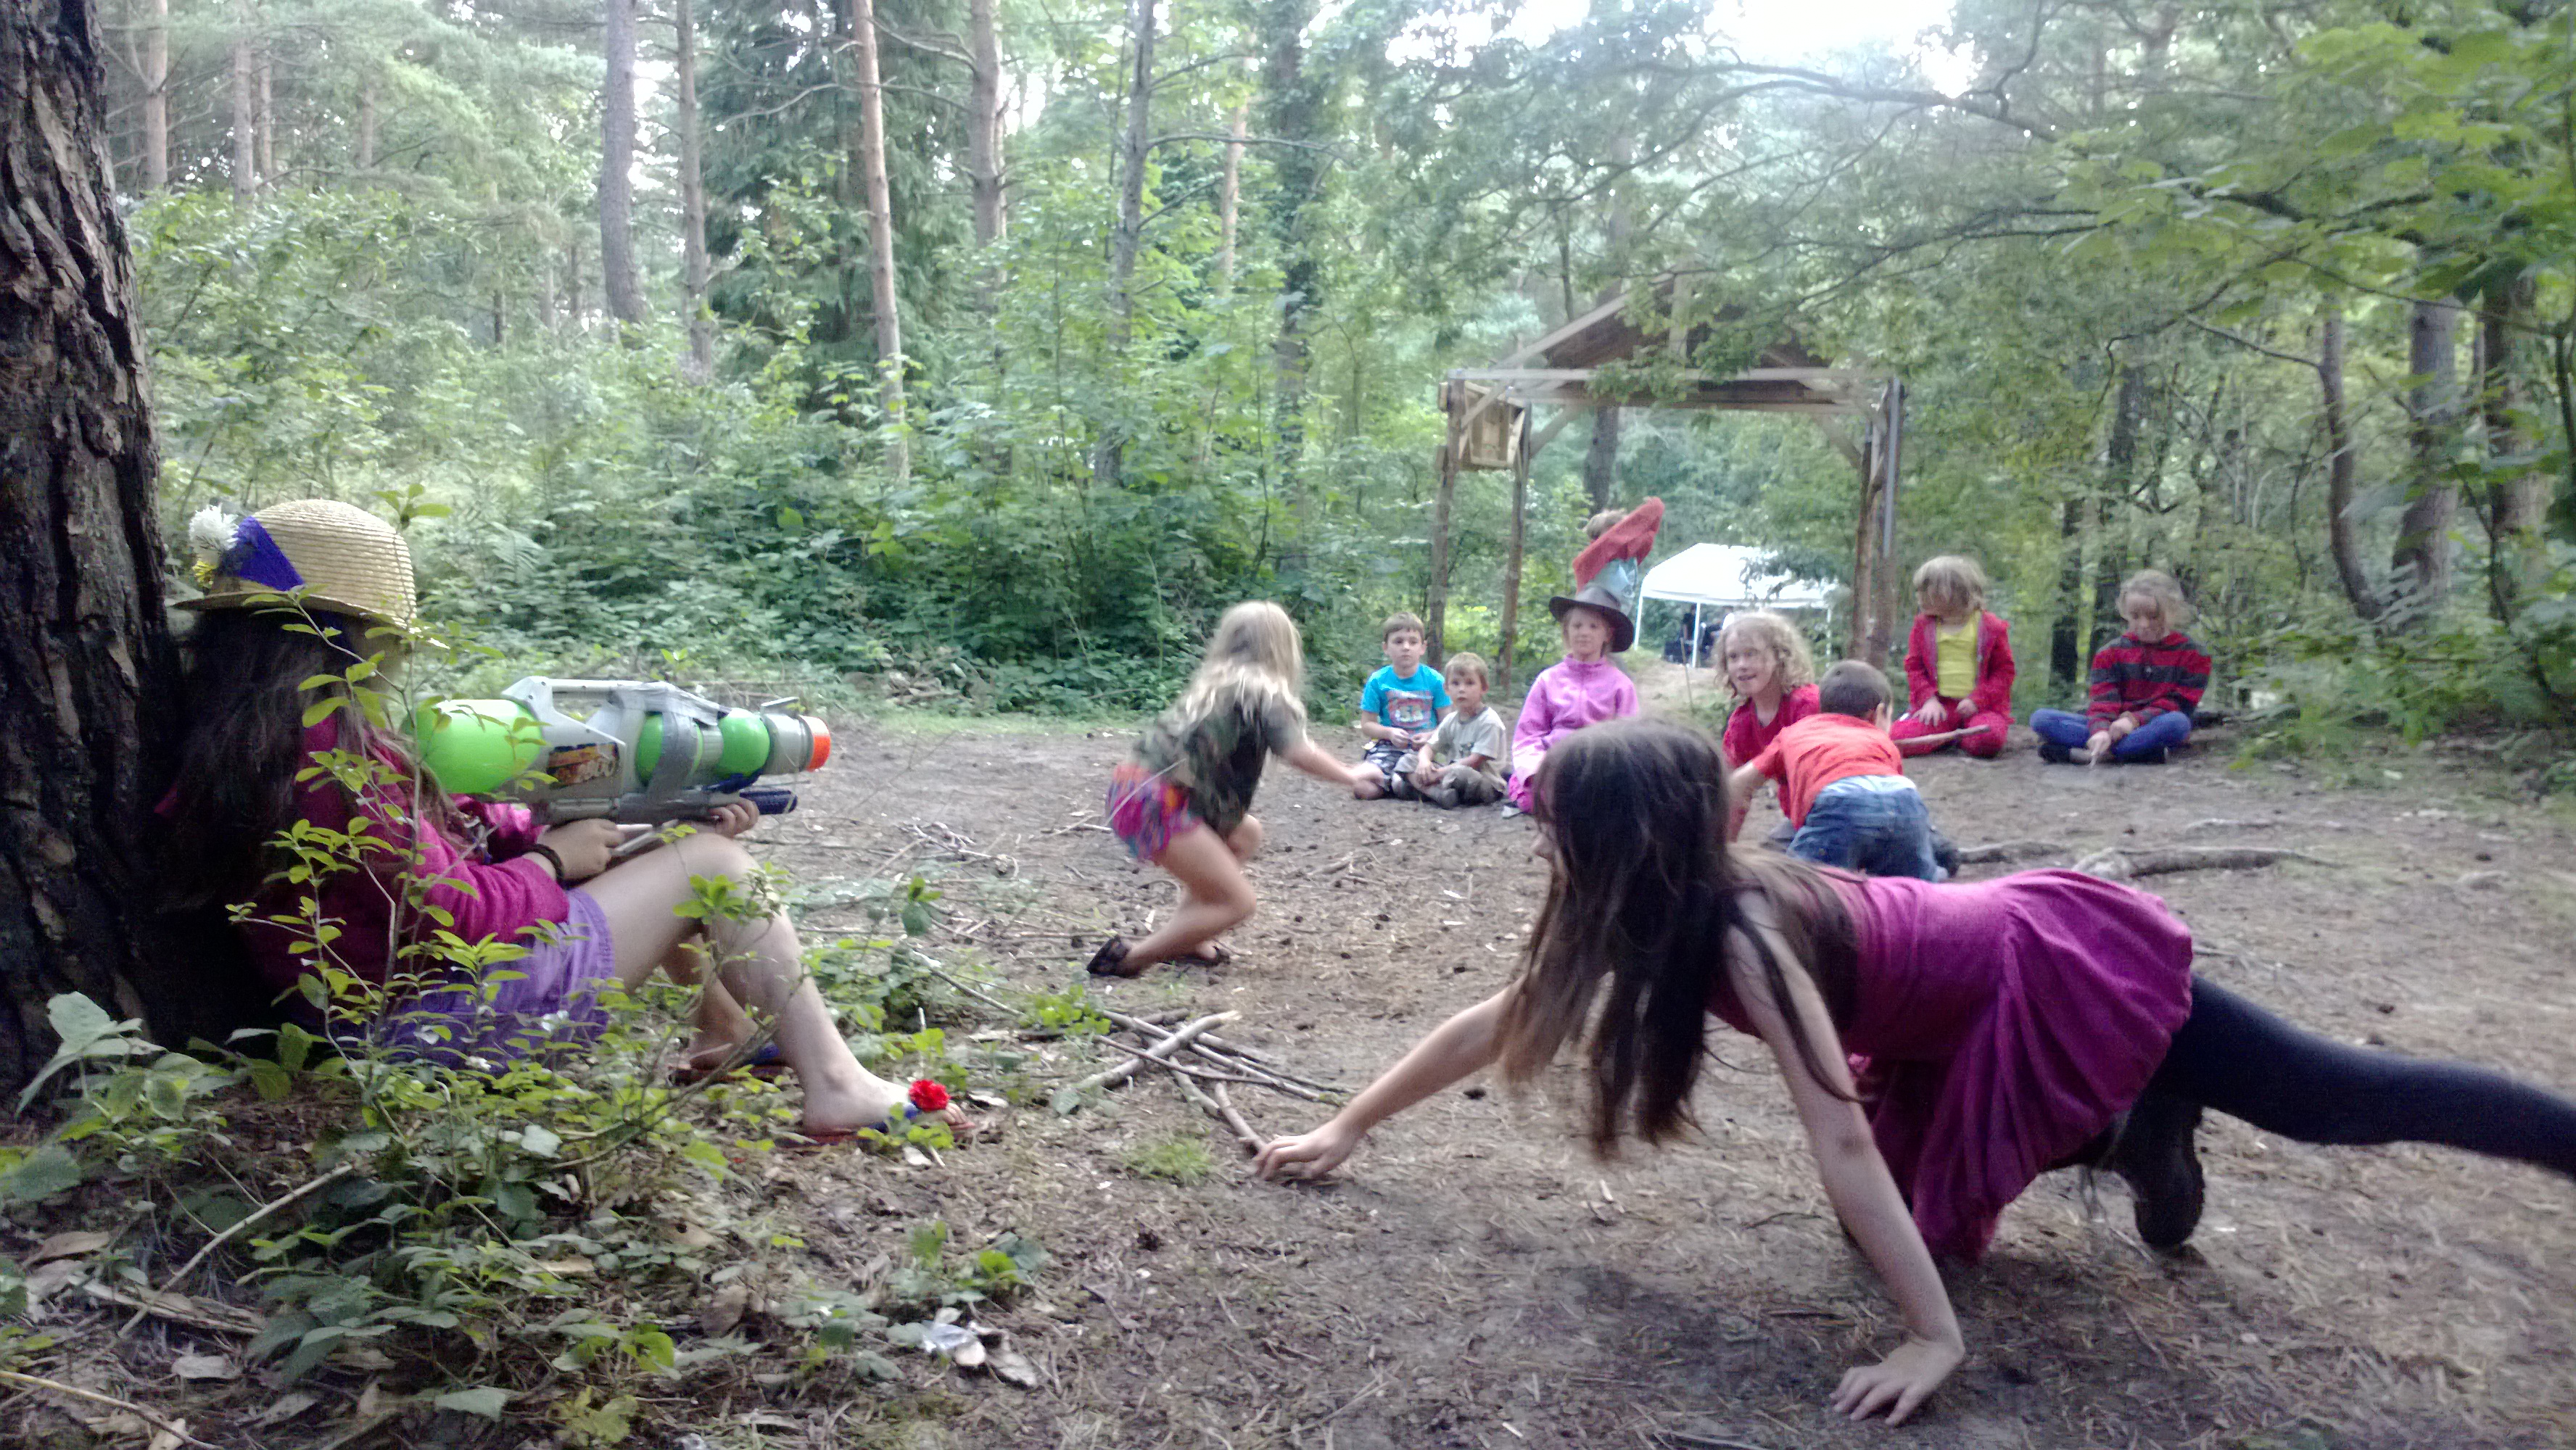
I took my whole family on my rounds of Bramley last weekend. The kids as usual had fun climbing, wobbling and generally getting muddy.
This was the first time that Alison was able to come on my rounds and she was keen to explore the village wildlife in more detail.
Checking out nature
I took a short video of the walk which I titled Happy finds and sad finds.
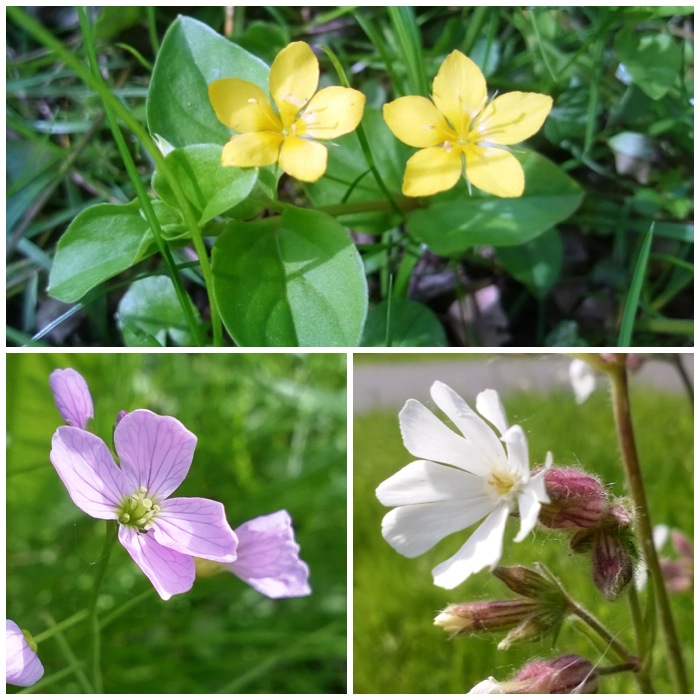
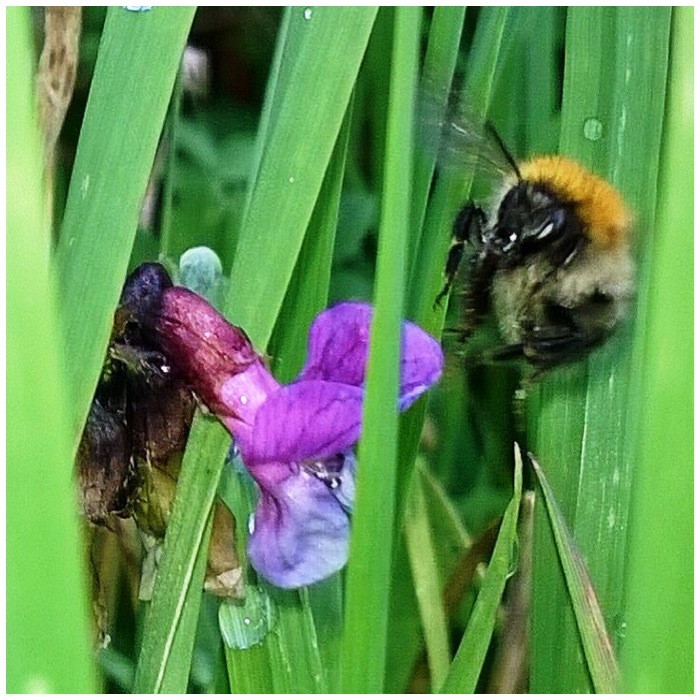
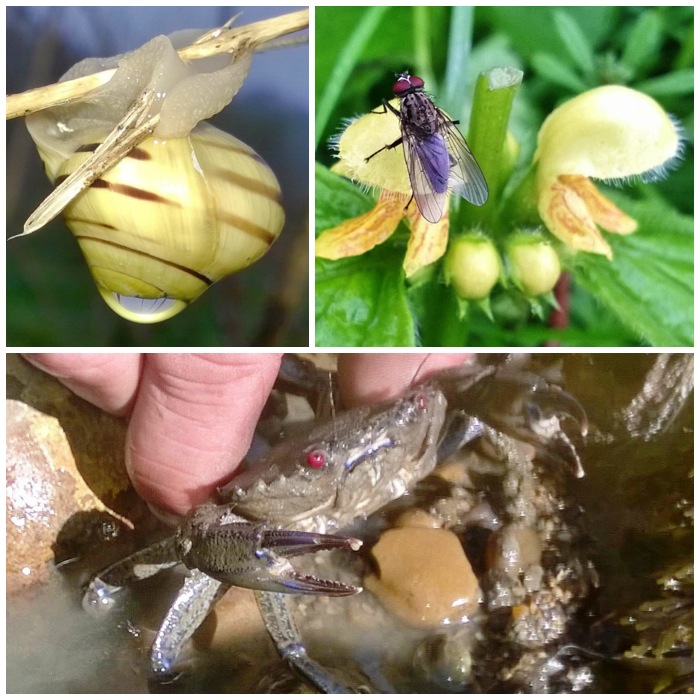
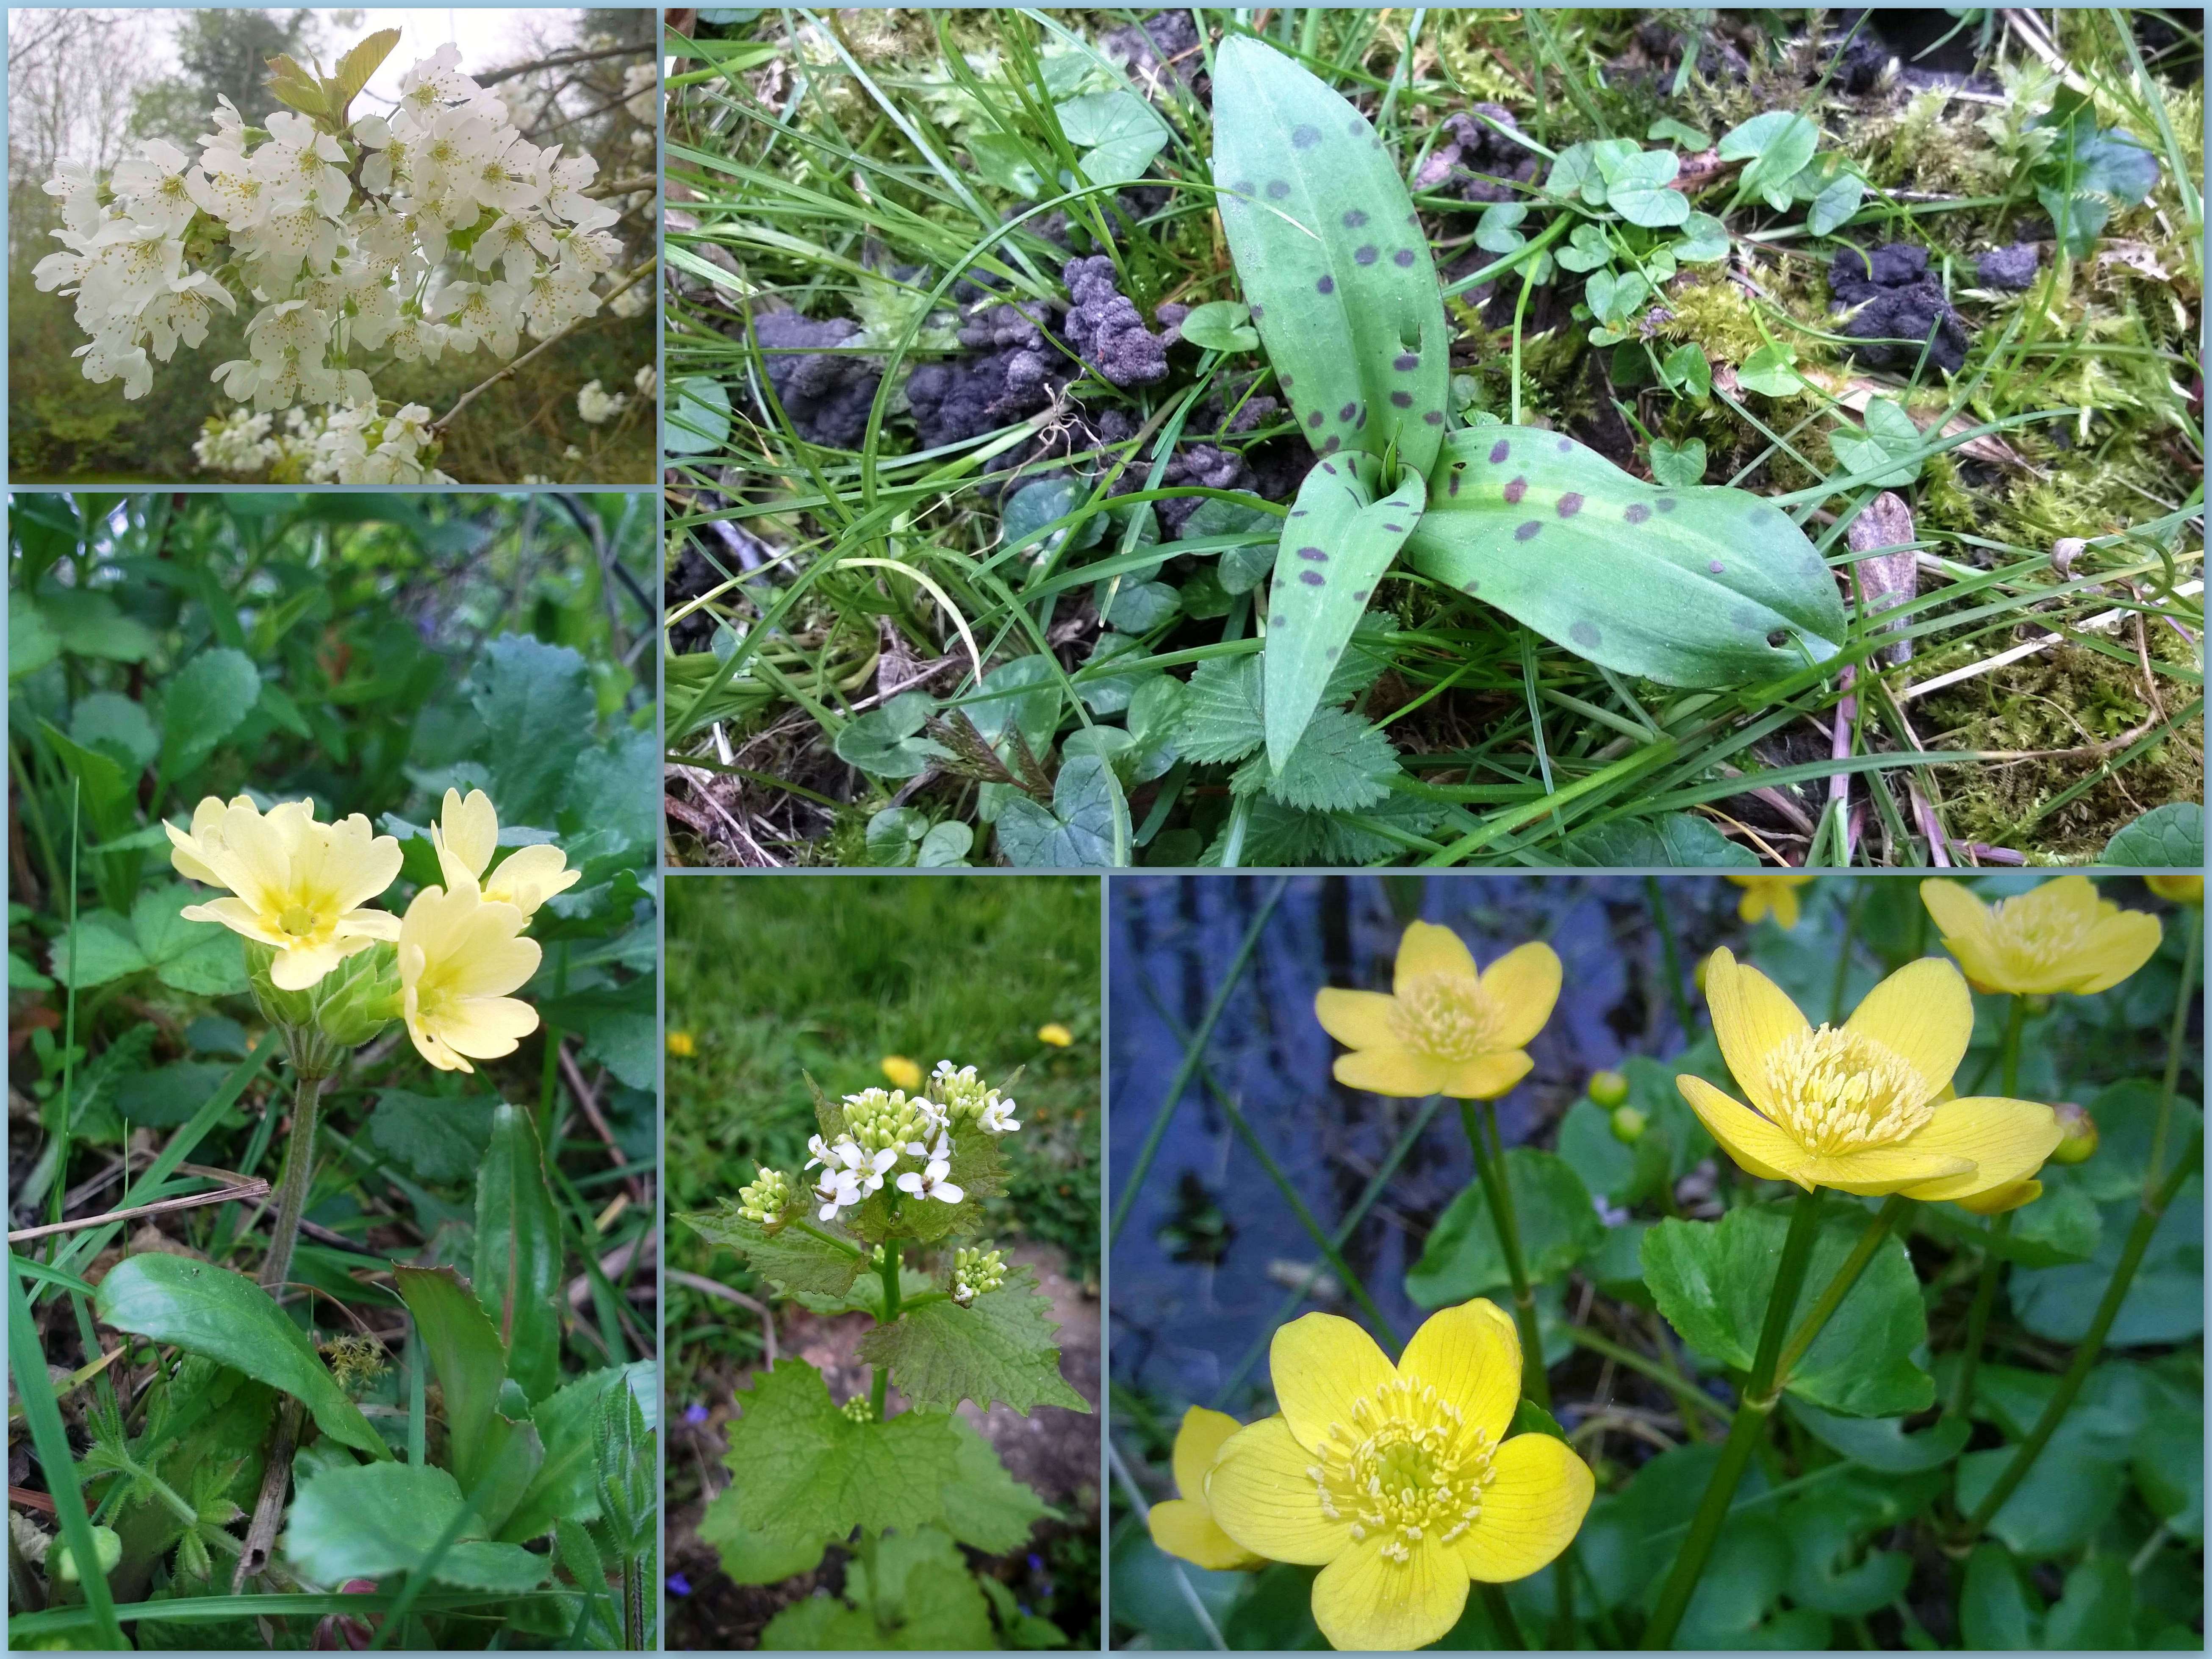
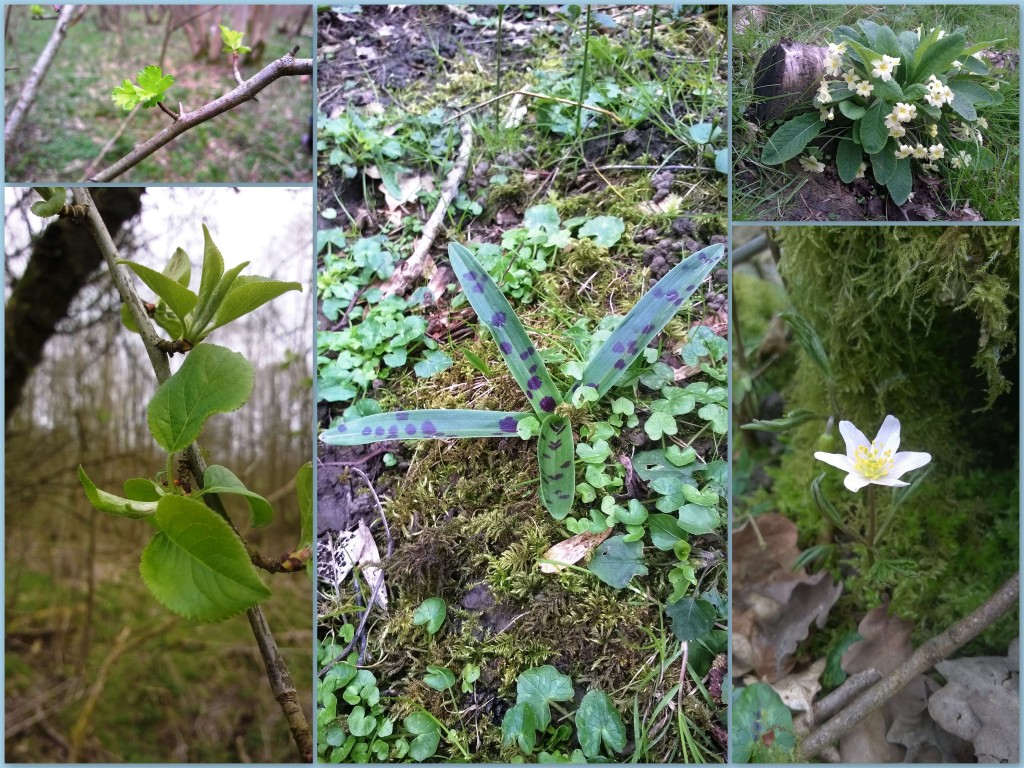
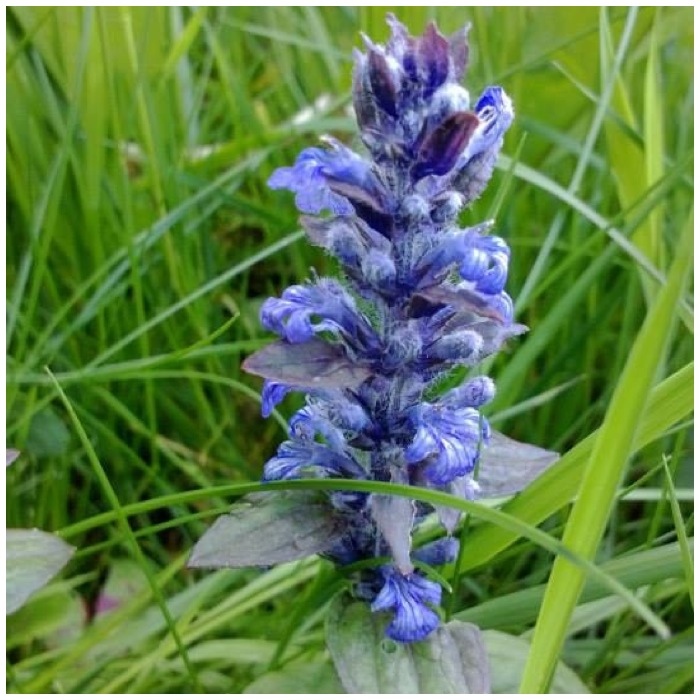
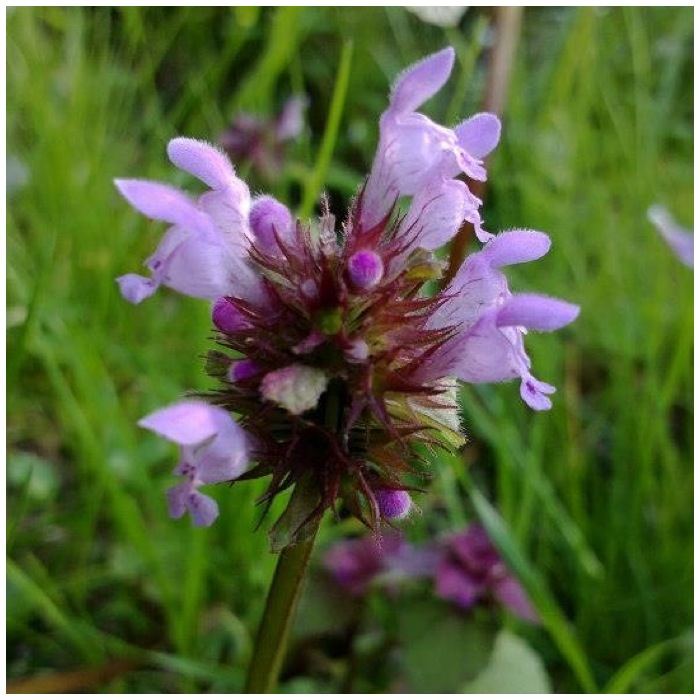
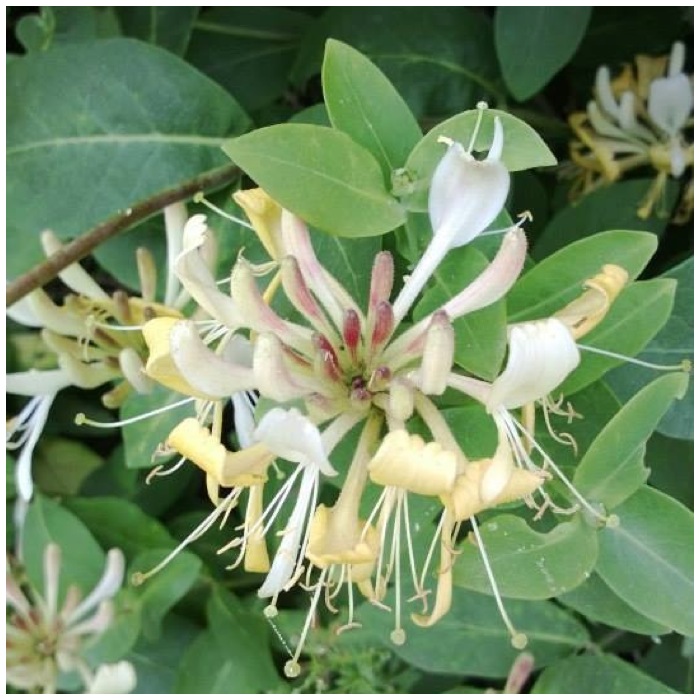
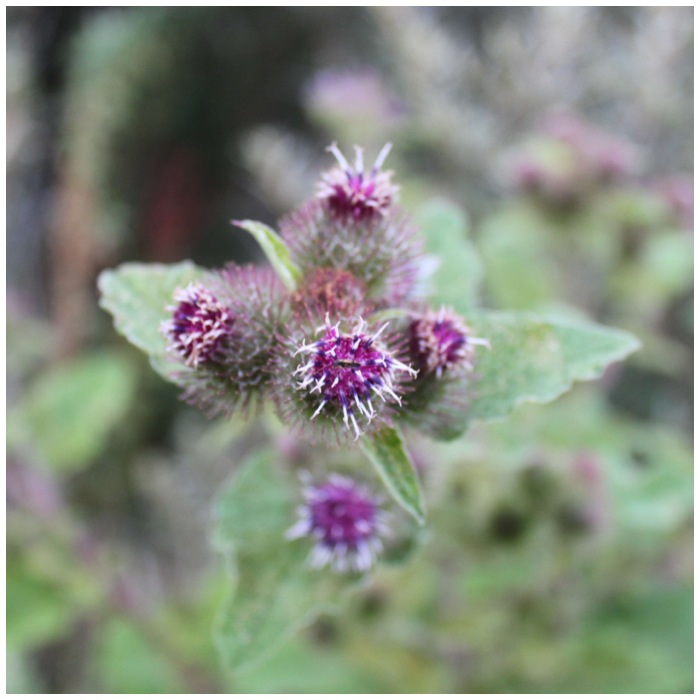
A few new flowers made an appearance this week.
Yellow pimpernel, lady’s smock and white campion
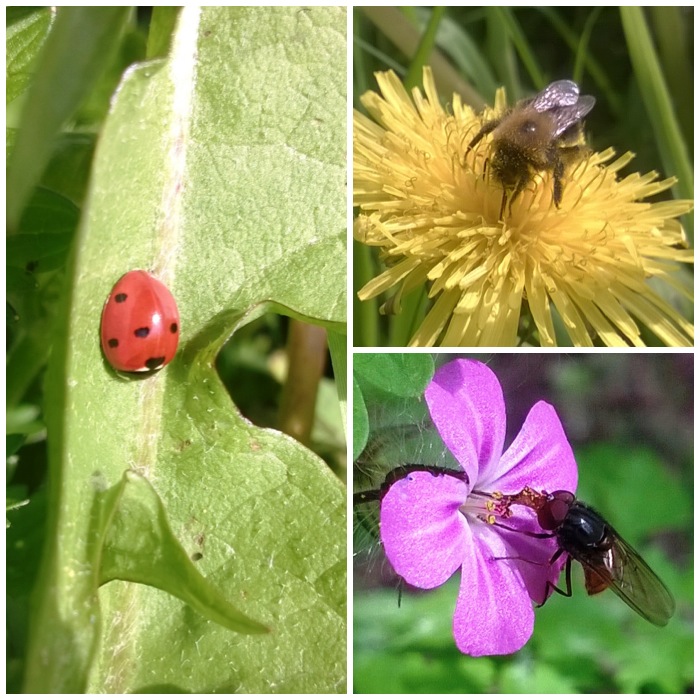
I particularly like the bottom right picture. You can actually see the the probiscus of the fly. Not bad for a little phone camera.
Feeding time
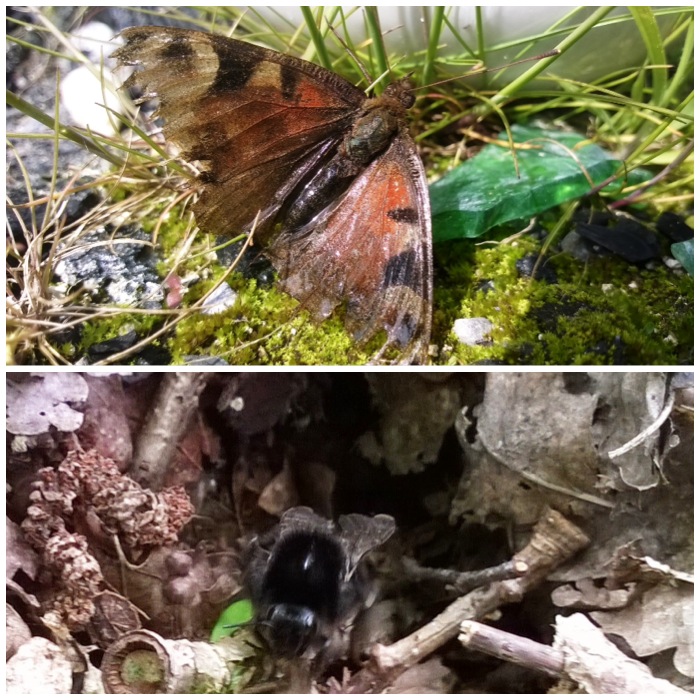
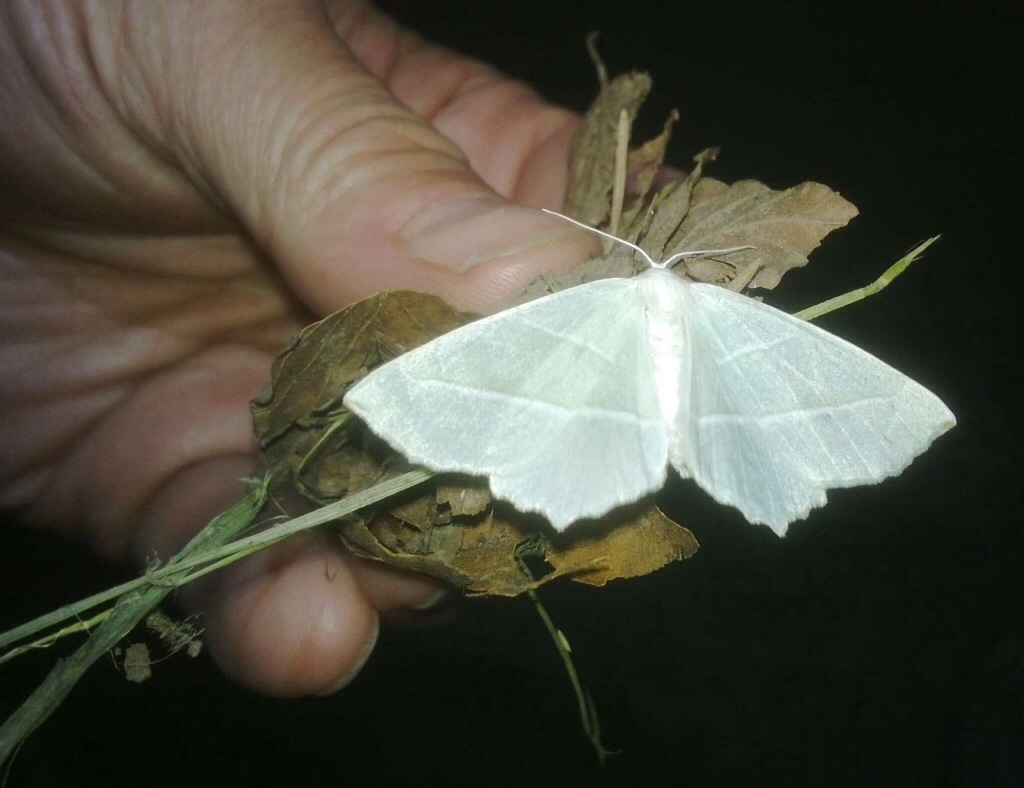
The moth was found in a bowl of water by my daughter Catherine and seemed to be recovering well as it dried its wings out. In the bottom picture you can just see a solitary bee emerging from its underground home.
Rescued moth and emerging bumblebee
The crab apple tree on my rounds is finally in leaf now. I will be recording the growth of the apples closely over the following months.
The family under the apple tree
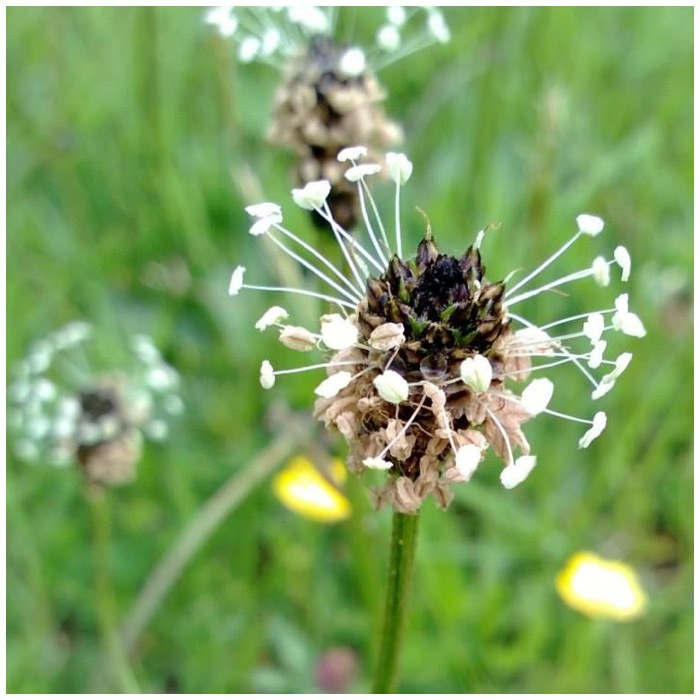
The yellow coltsfoot flowers (top left) have gone now and all that is left are the distinctive leaves and the beautuful puffy seed heads. Also the lungwort flowers have gone leaving only the distinctive white spotted leaves (top right).
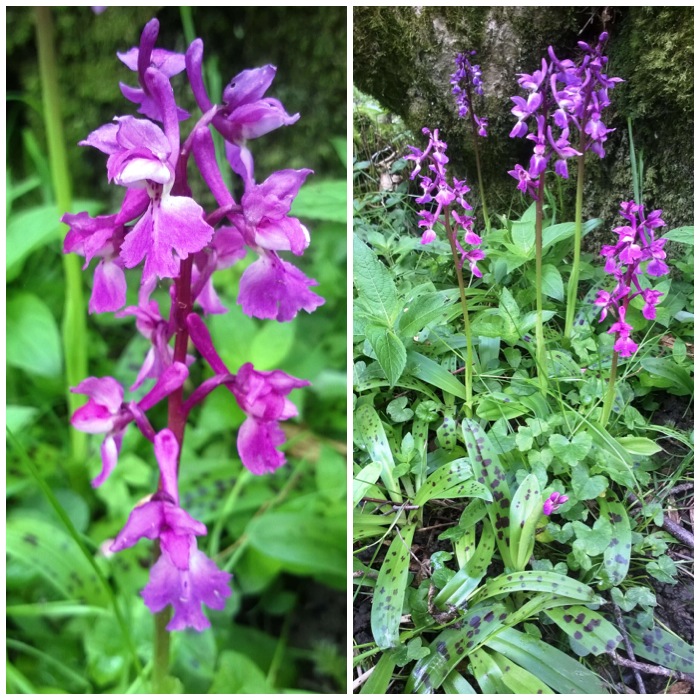
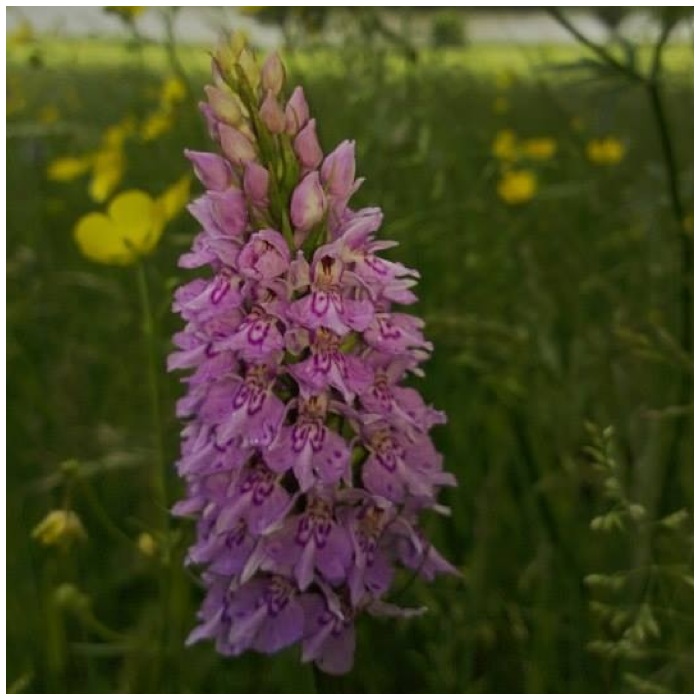
At the bottom though I found that the orchids were still standing strong.
Coltsfoot seed head, lungwort and orchids
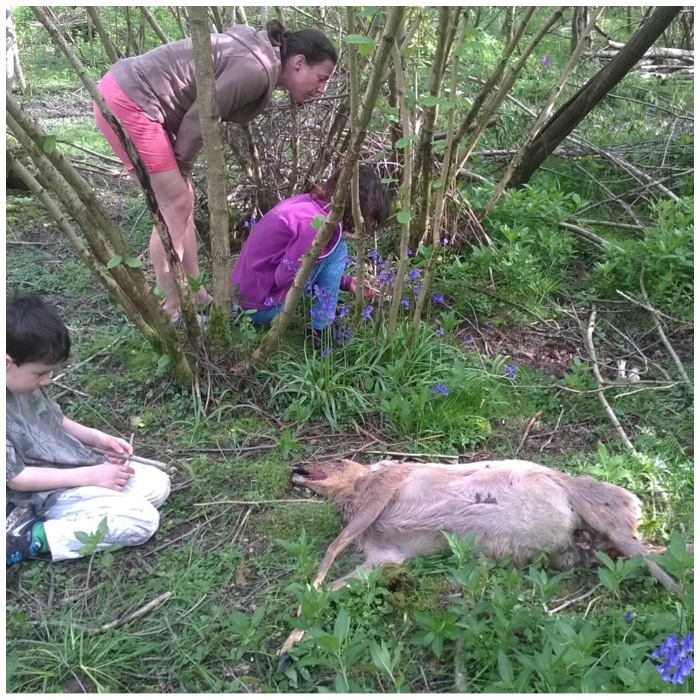
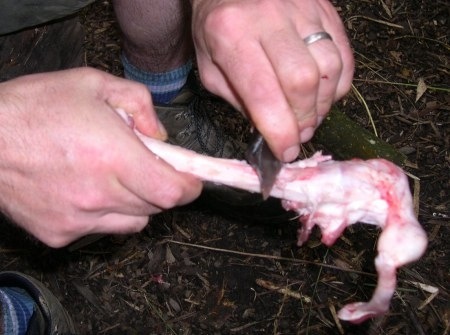
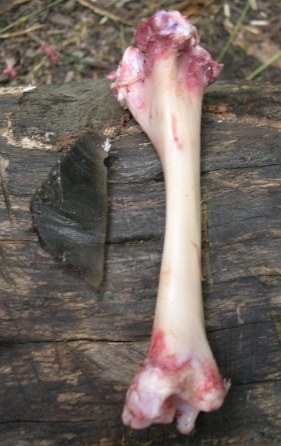
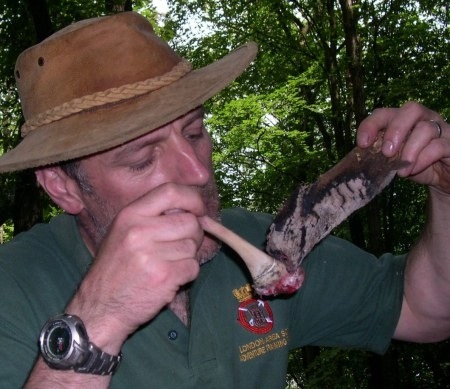
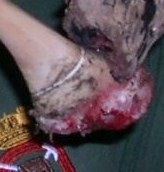
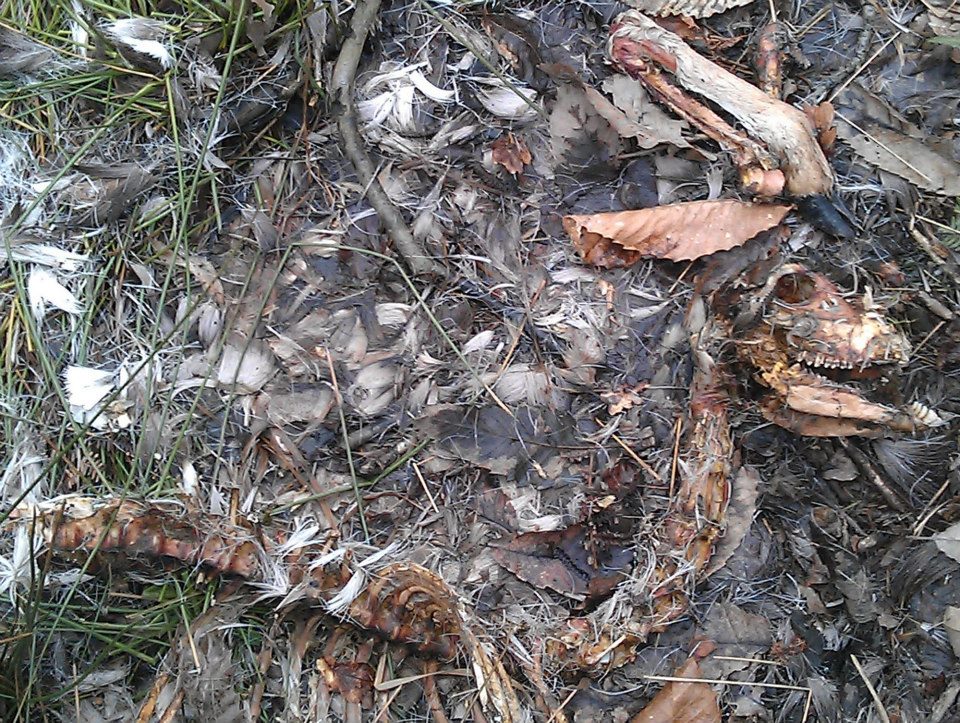
While we were looking for orchids Alison spotted a dead deer nearby. I couldn’t see any obvious cause of death but lying nearby were some deer leg bones recently stripped of flesh. As the deer (as you can see) still had all its legs I assume there must have been another dead deer nearby at some point as well.
A sad sight
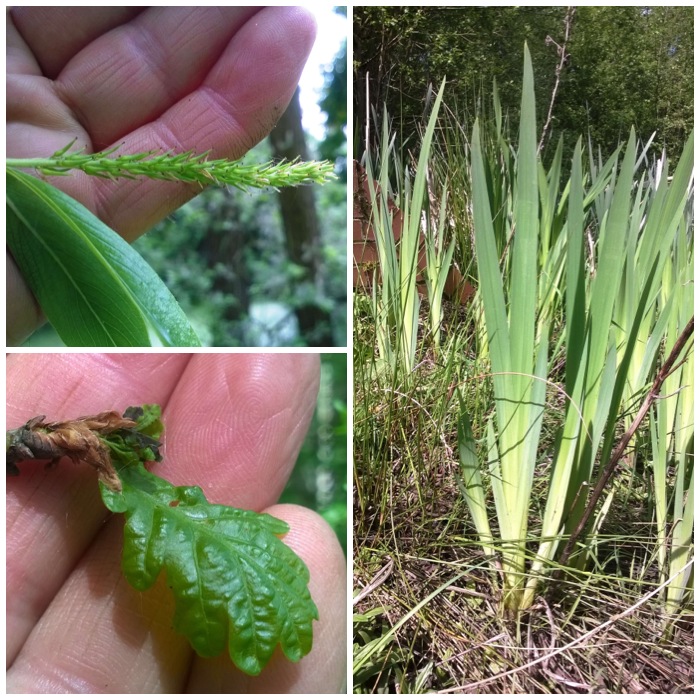
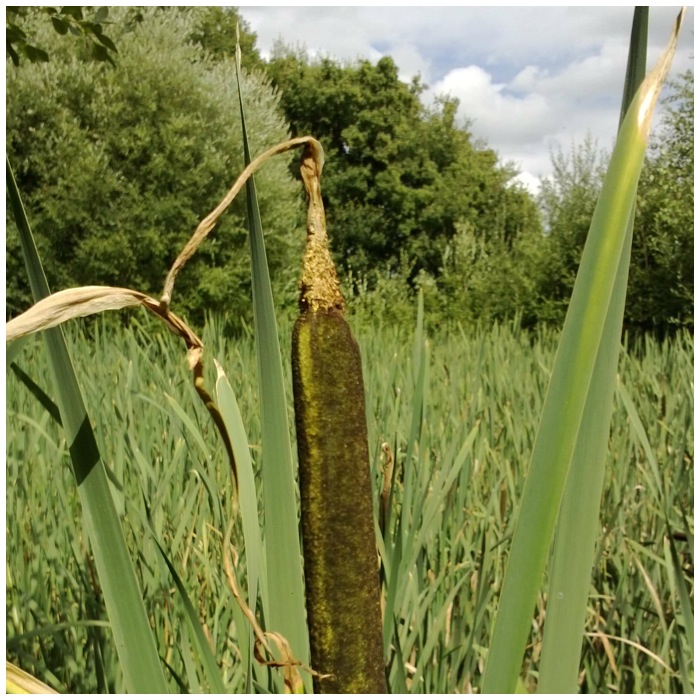
It was nice to see the willow and oak finally coming through this week (left-hand pictures). The reedmace leaves seem nearly full grown now so I will be looking out for the stems and flower heads starting to appear.
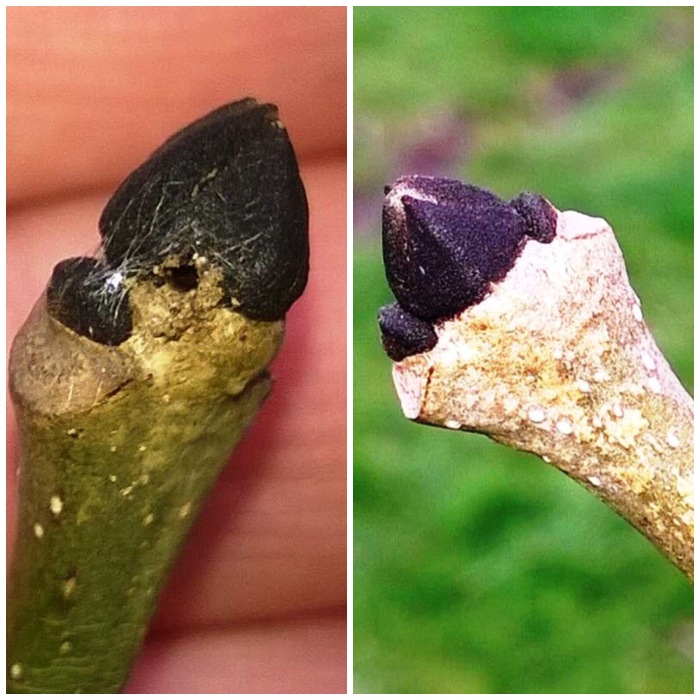
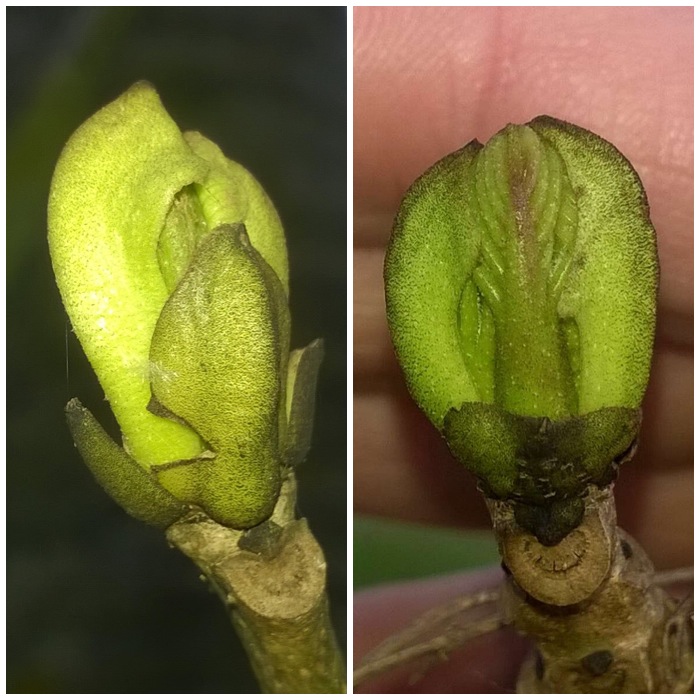
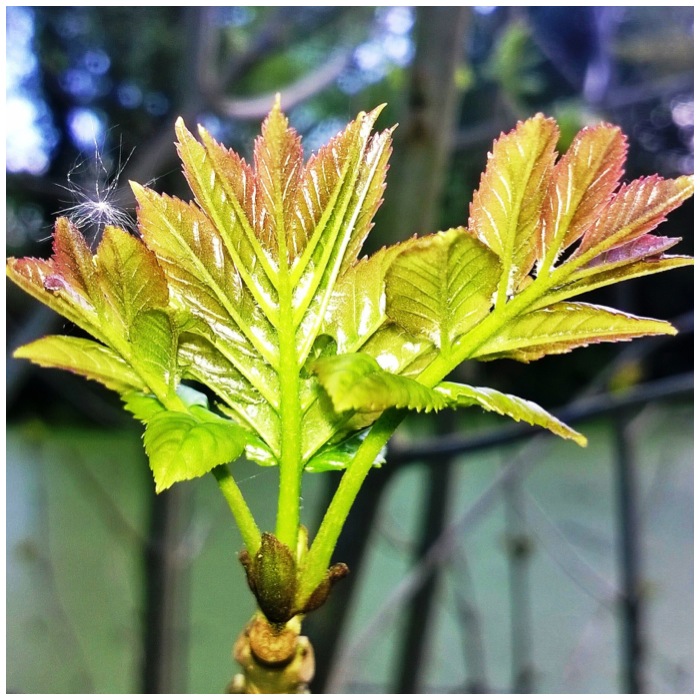
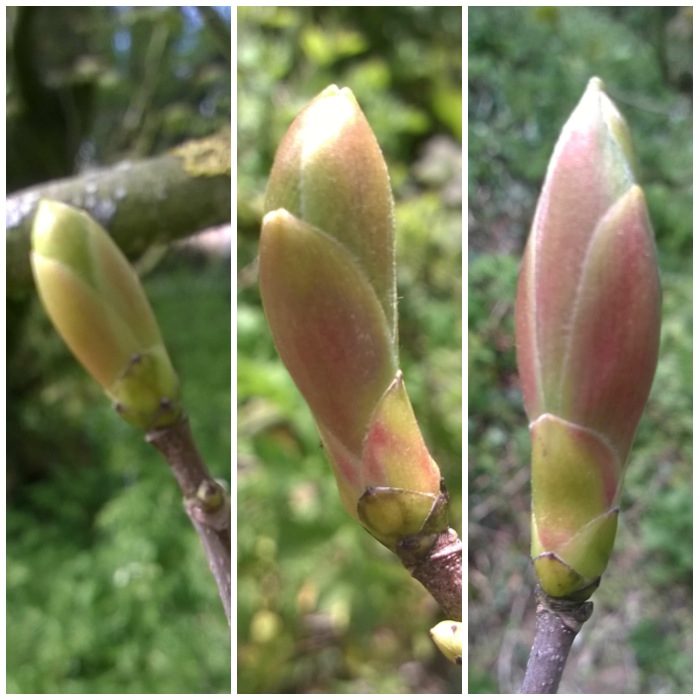
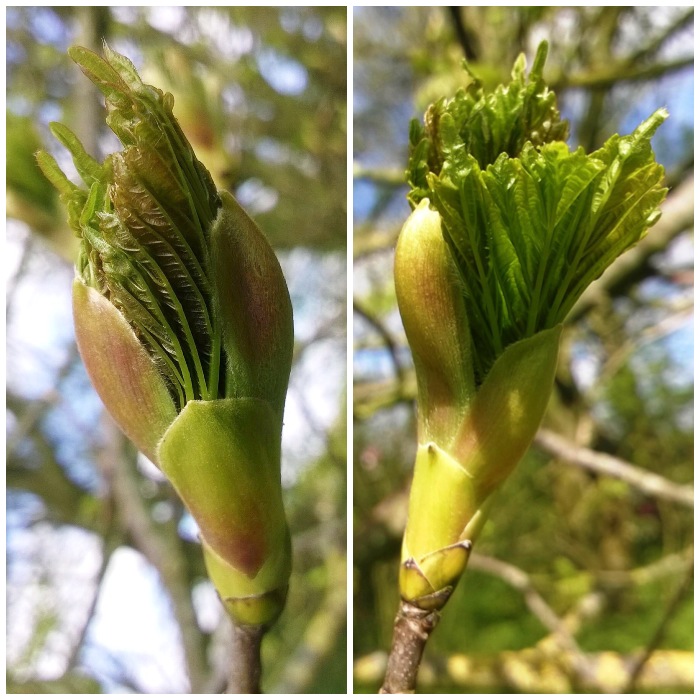
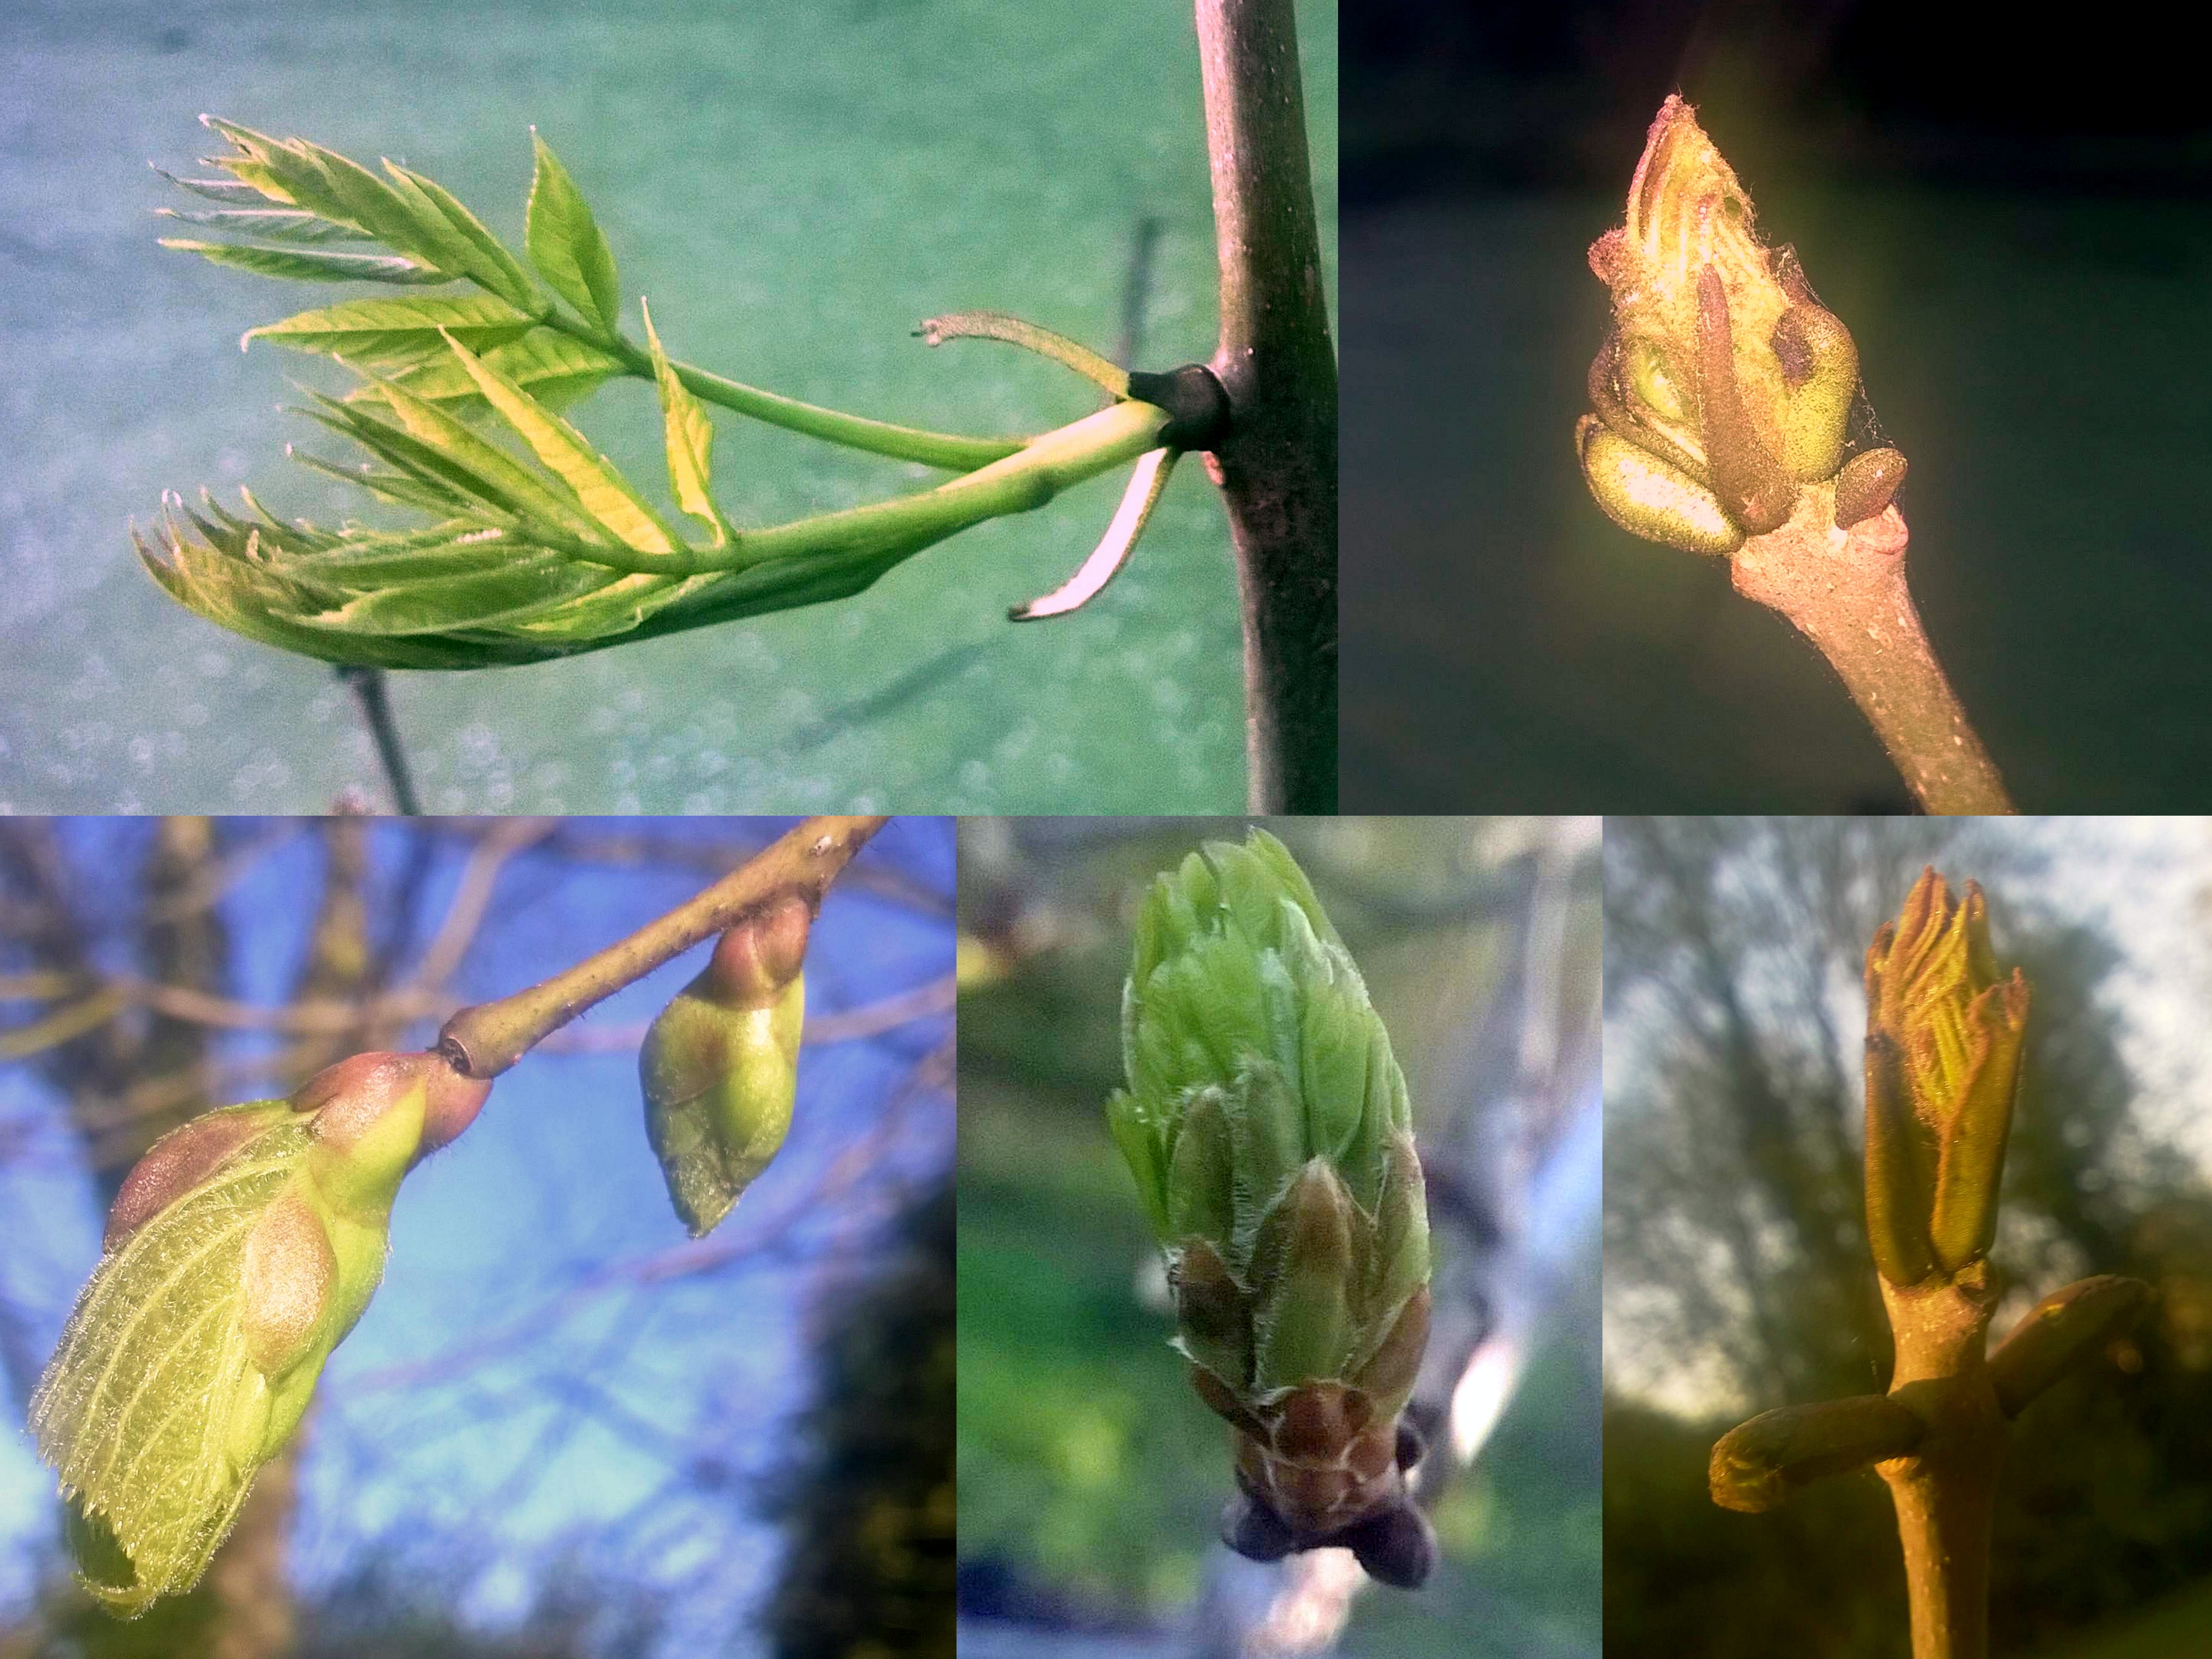
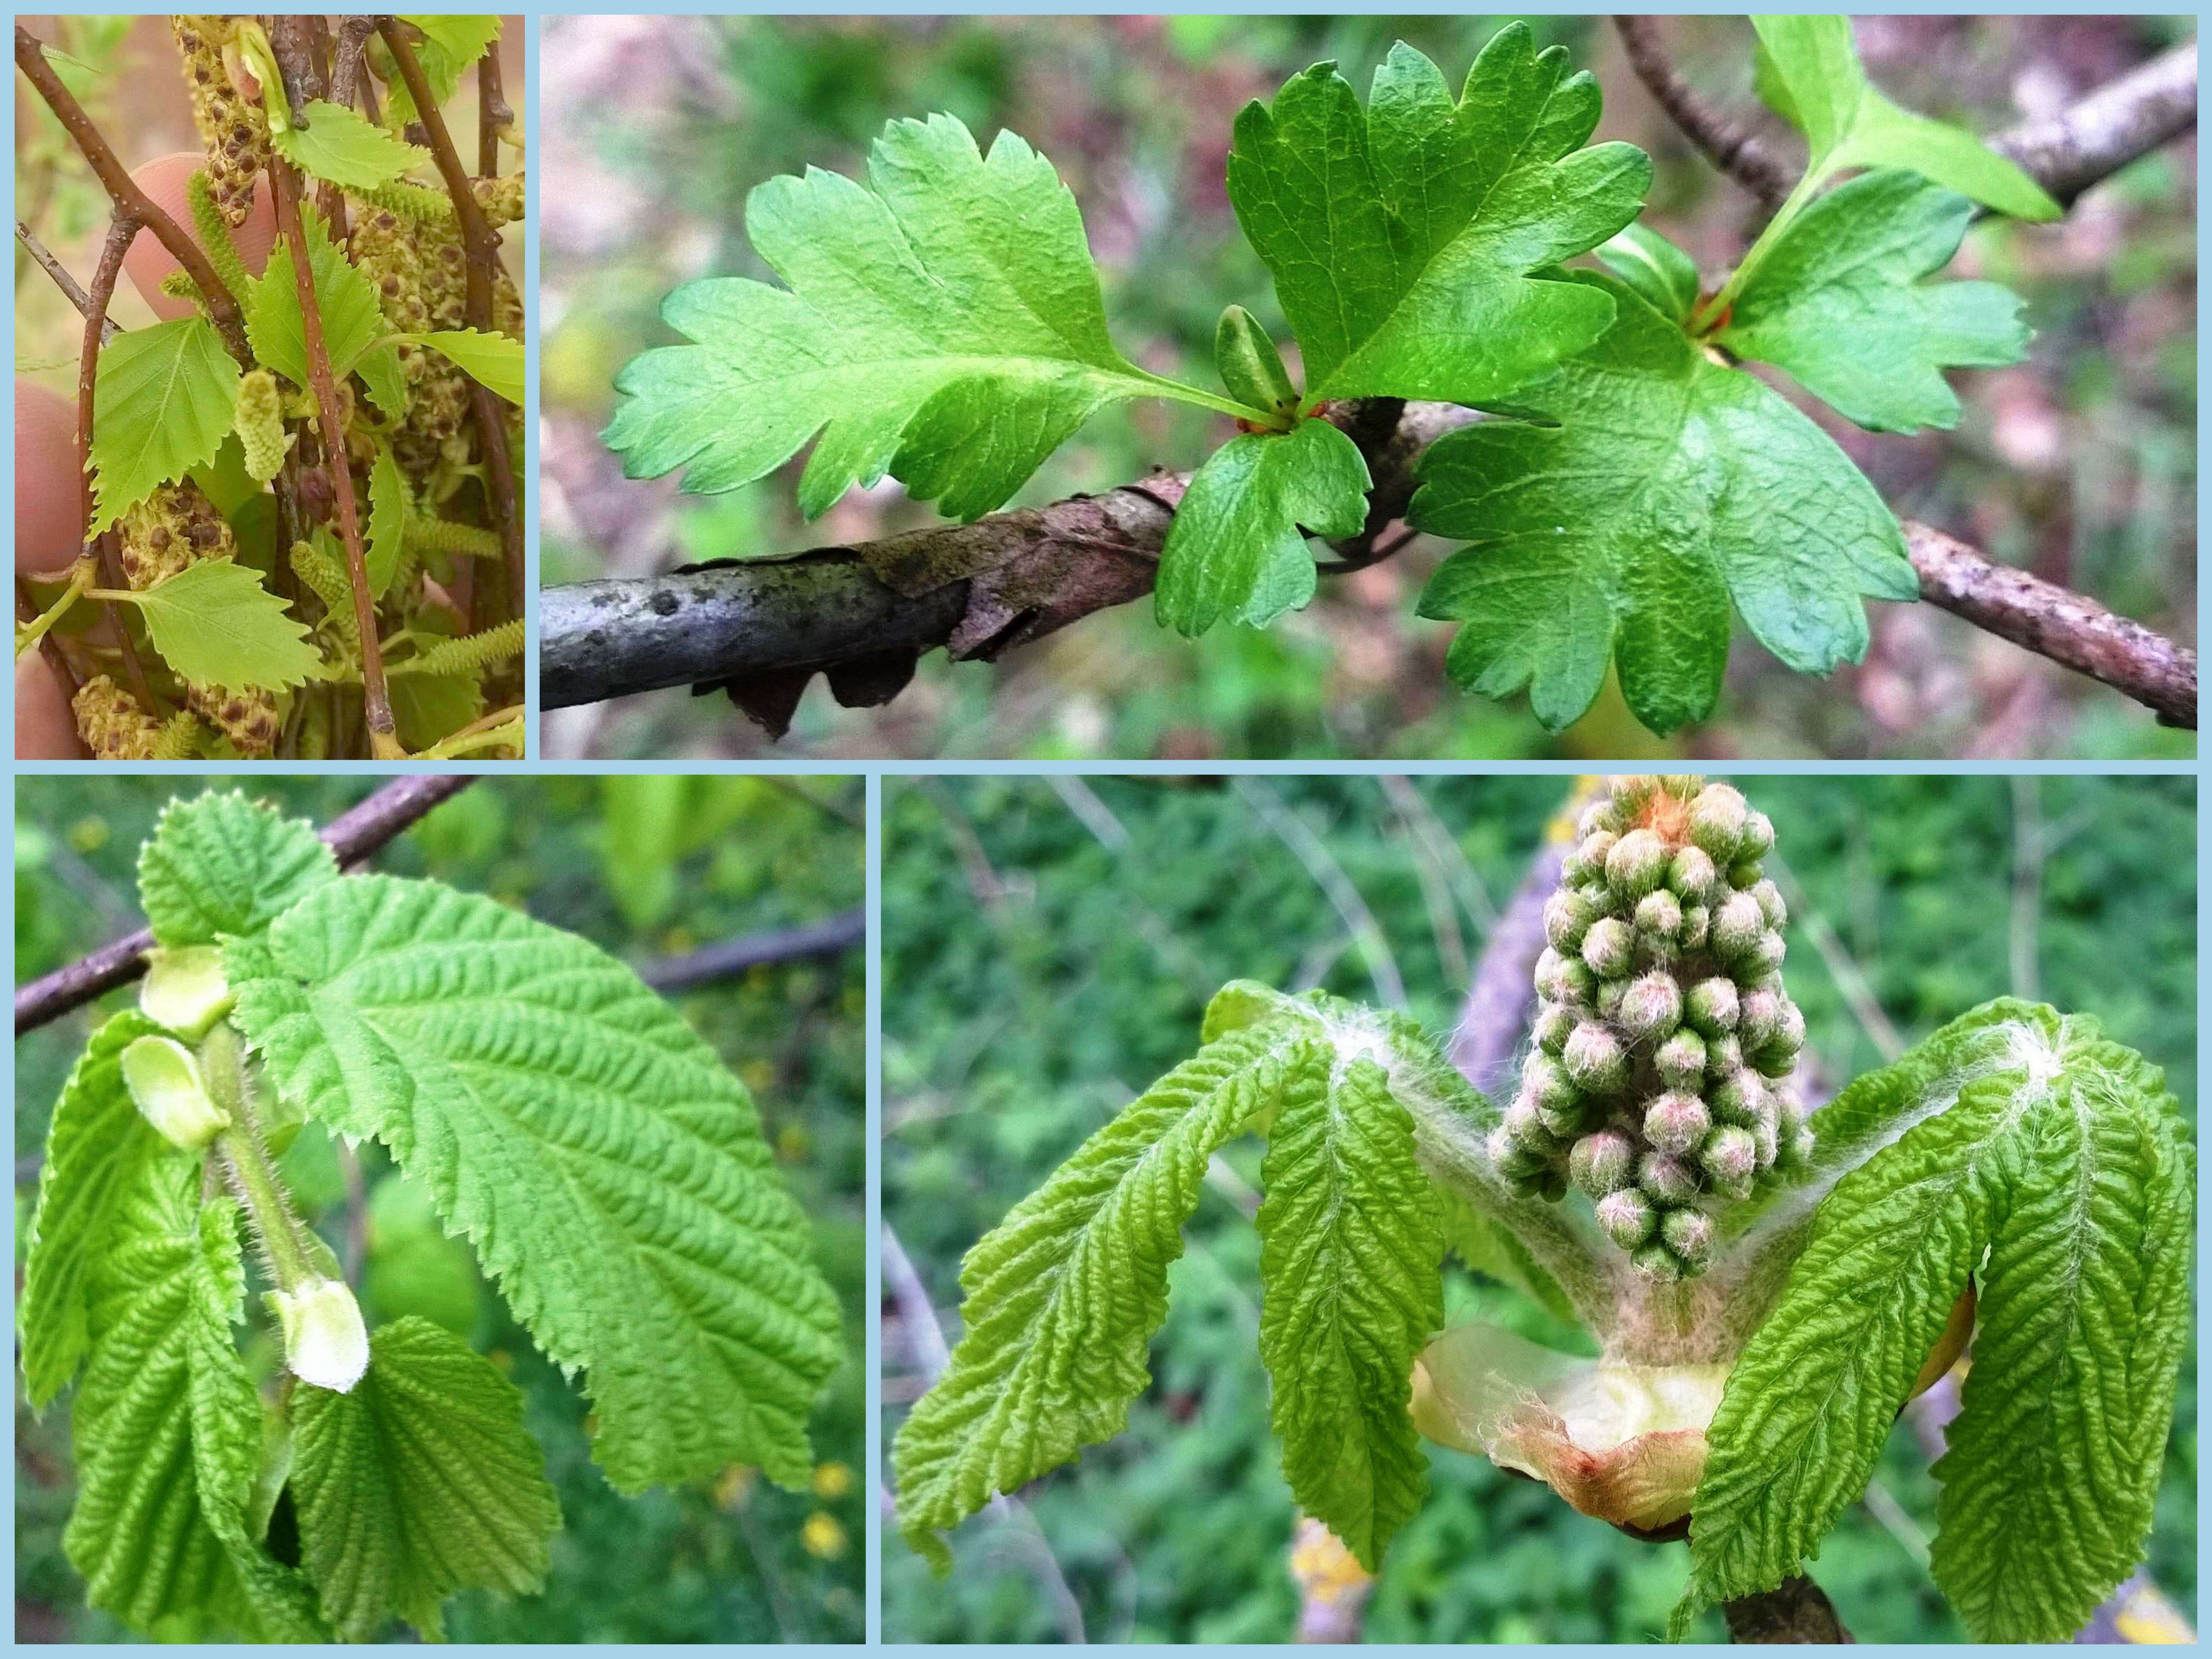
I have been patiently waiting for the ash(Fraxinus excelsior) tree in my local park to break open its buds. It has done so over the last two weeks and I am glad I did keep a close eye on it as the birth of its leaflets is quite a beautiful process to watch.
With the prospect of the spread of ash dieback increasing over the next few years I wanted to capture this process I have for so long taken for granted. I am studying plants this year in far more detail as part of the online course with Paul Kirtley from Frontier Bushcraft.
The buds of ash are typically black (likened to the shape of a bishop’s mitre) over the winter as they lie dormant and it is only as they are about to ‘break’ (when the green leaf tip first appears) that the bud changes to a slightly greenish tinge.
The black ‘bishop’s mitre’ ash bud
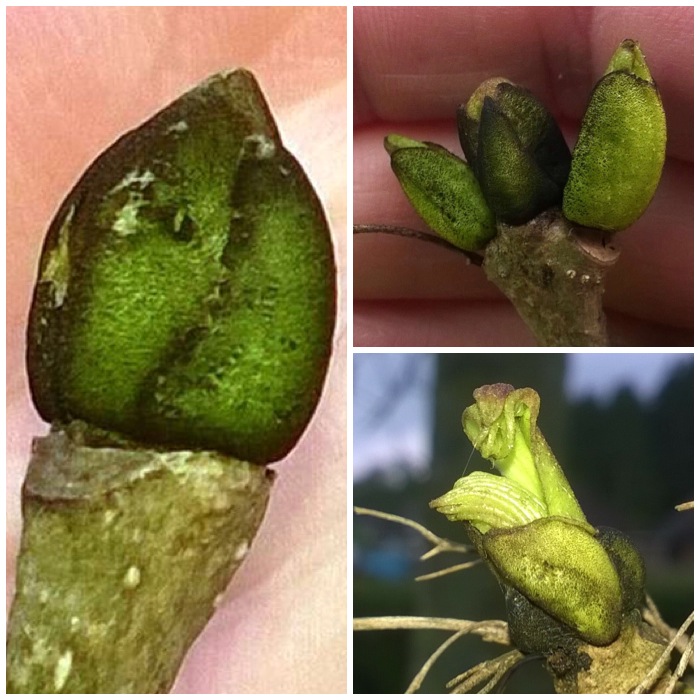
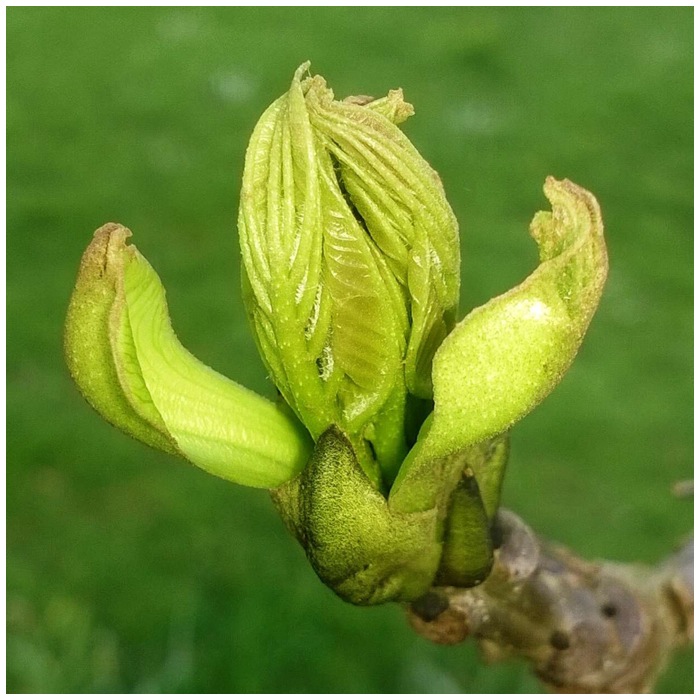
Here you can see the bud on the left is about to break and the ones on the right have just broken.
From black to green and the breaking starts
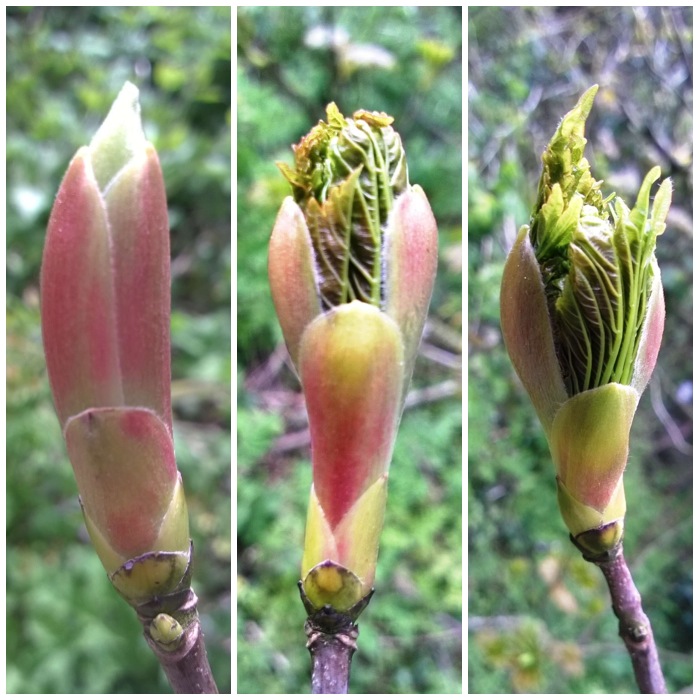
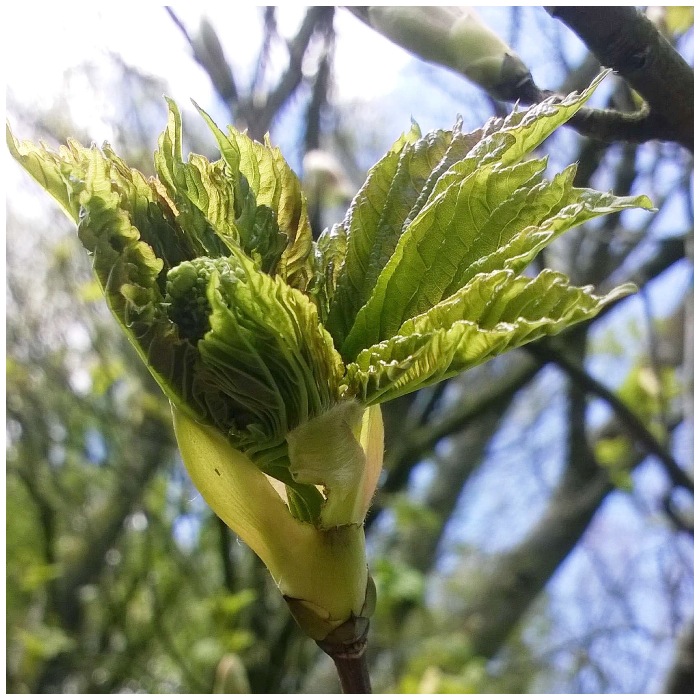
After this the growing leaves push out from the bud but are wrapped in a protective sheath. I am unsure what this sheath is called but hopefully someone who reads this can tell me. I liken it to an inner scale of the bud.
Truly broken out now
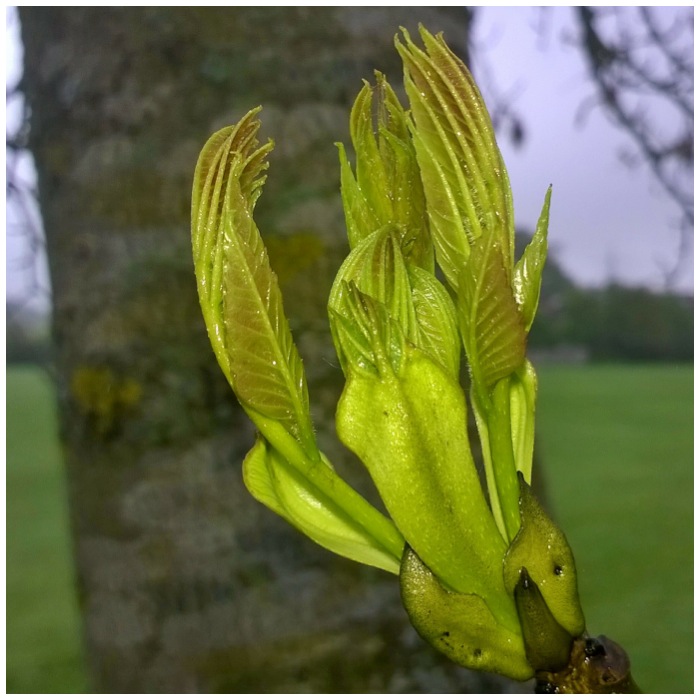
Once released from the bud you can clearly see the inner protective scale that is wrapped around the ash leaves. In the right hand picture you can just make out the small ash leaflets that are growing.
Ash leaves are wrapped in their inner scales
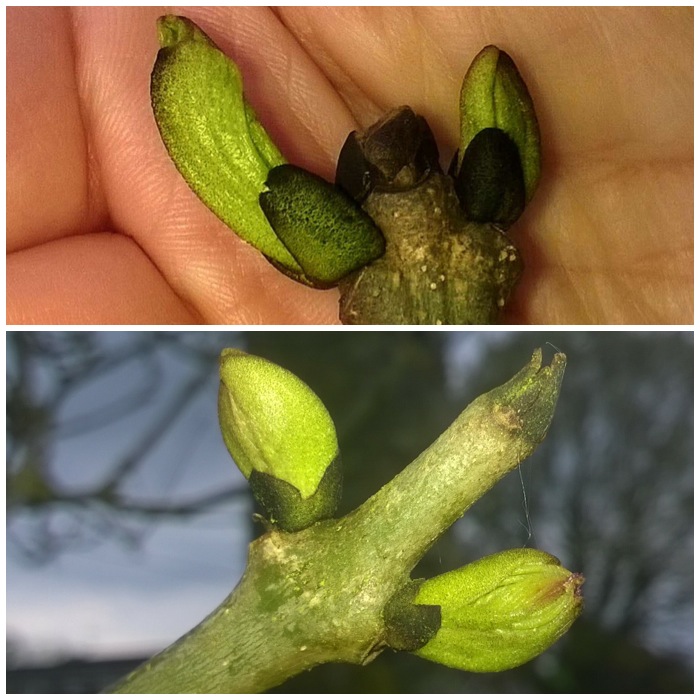
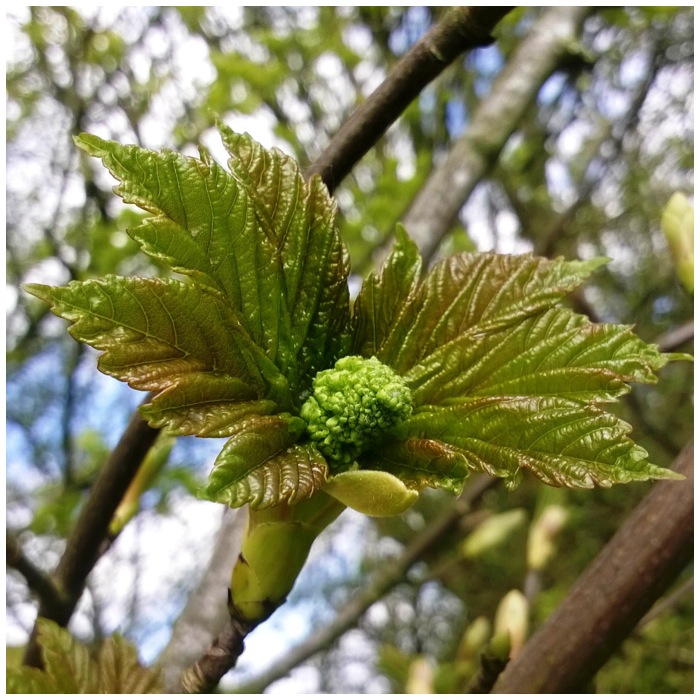
As the leaves and their attached leaflets push up, the inner protective scales are pushed aside to allow more growth to occur.
Inner scales are released
I noticed at this stage that the leaves continued to grow but still had a stickiness about them that kept them together. This causes the leaves to form into what looks like a small rugby ball.
Ready for the final stretch
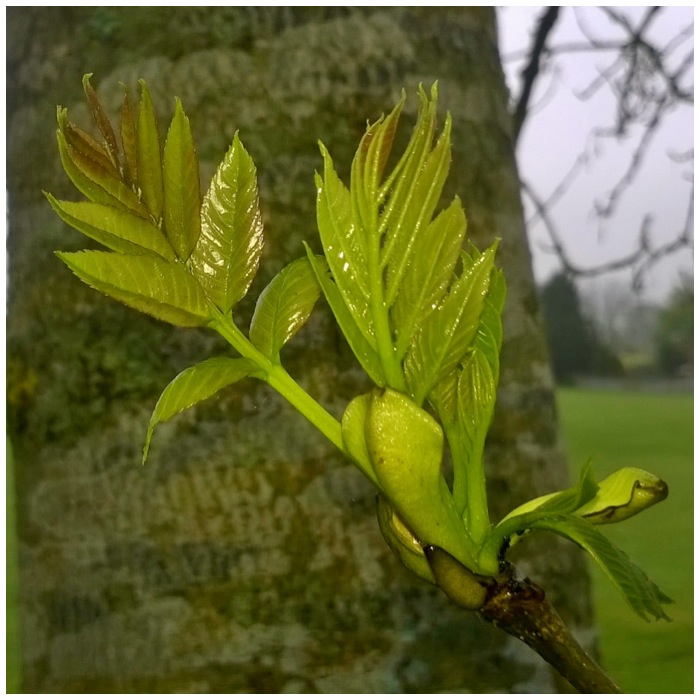
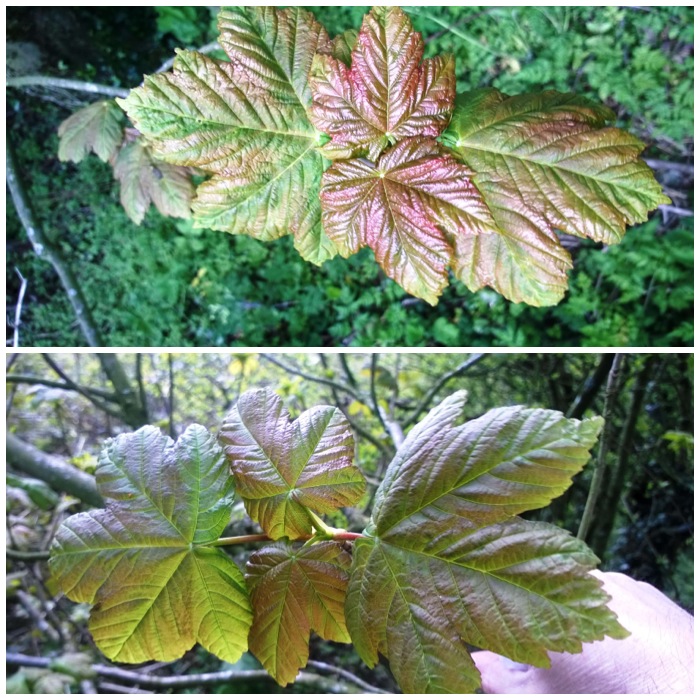
Finally the leaves were unfolded (that is when their full length is showing from tip to attachment at the stem).
The individual stems have separated and the leaves have unfolded
The individual leaflets then parted from each other; all that is left now is for them to grow to maturity.
The ash leaflets finally appear
I have noticed that the oak leaves round here have appeared a few weeks before the ash this year so if the old saying – ‘If the oak before the ash, then we’ll only have a splash, if the ash before the oak, then we’ll surely have a soak” – is correct then we should be in for a nice summer (here’s hoping, anyway).
All in all I think that this is a particularly beautiful sight and if you go out around now and look at some of the ash trees you will see it happening for yourself.
I have done a similar post called Stunning Sycamore if you’d like to see more of these amazing unfurling leaves.
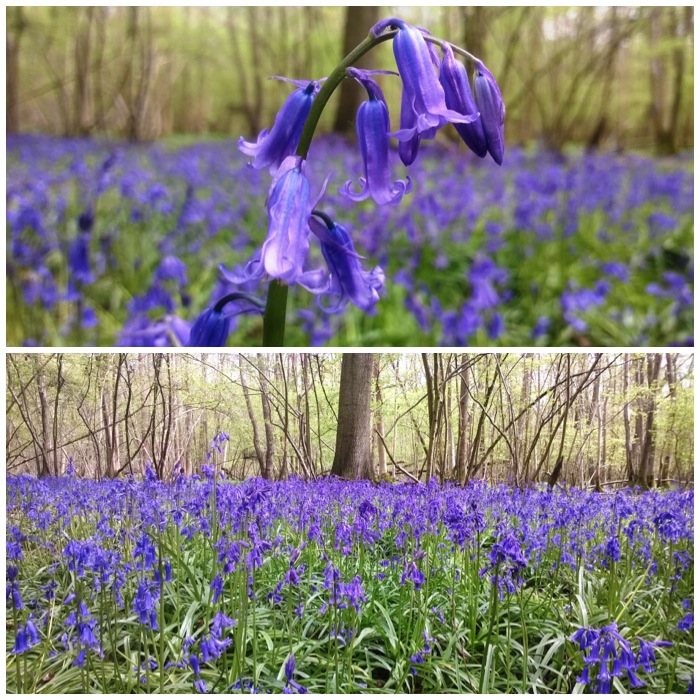
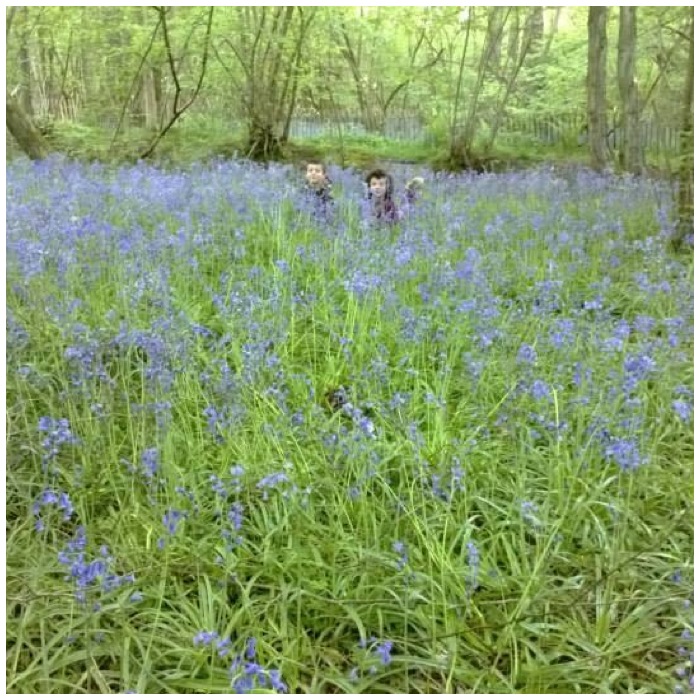
I managed to get out around Bramley this morning before all the rain came in and it was well worth the effort.
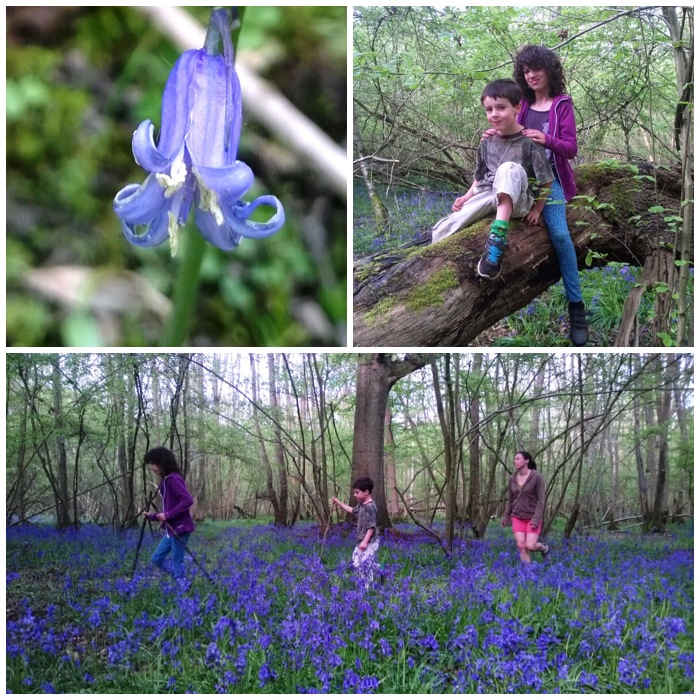
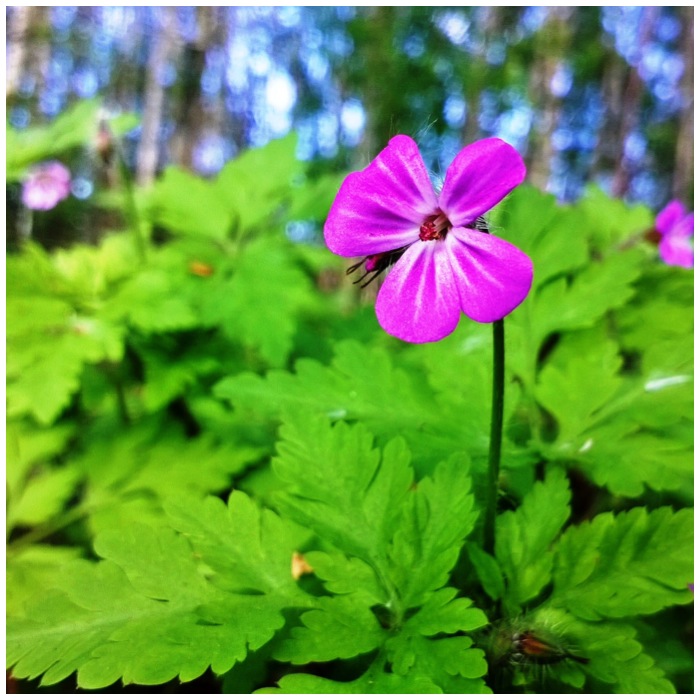
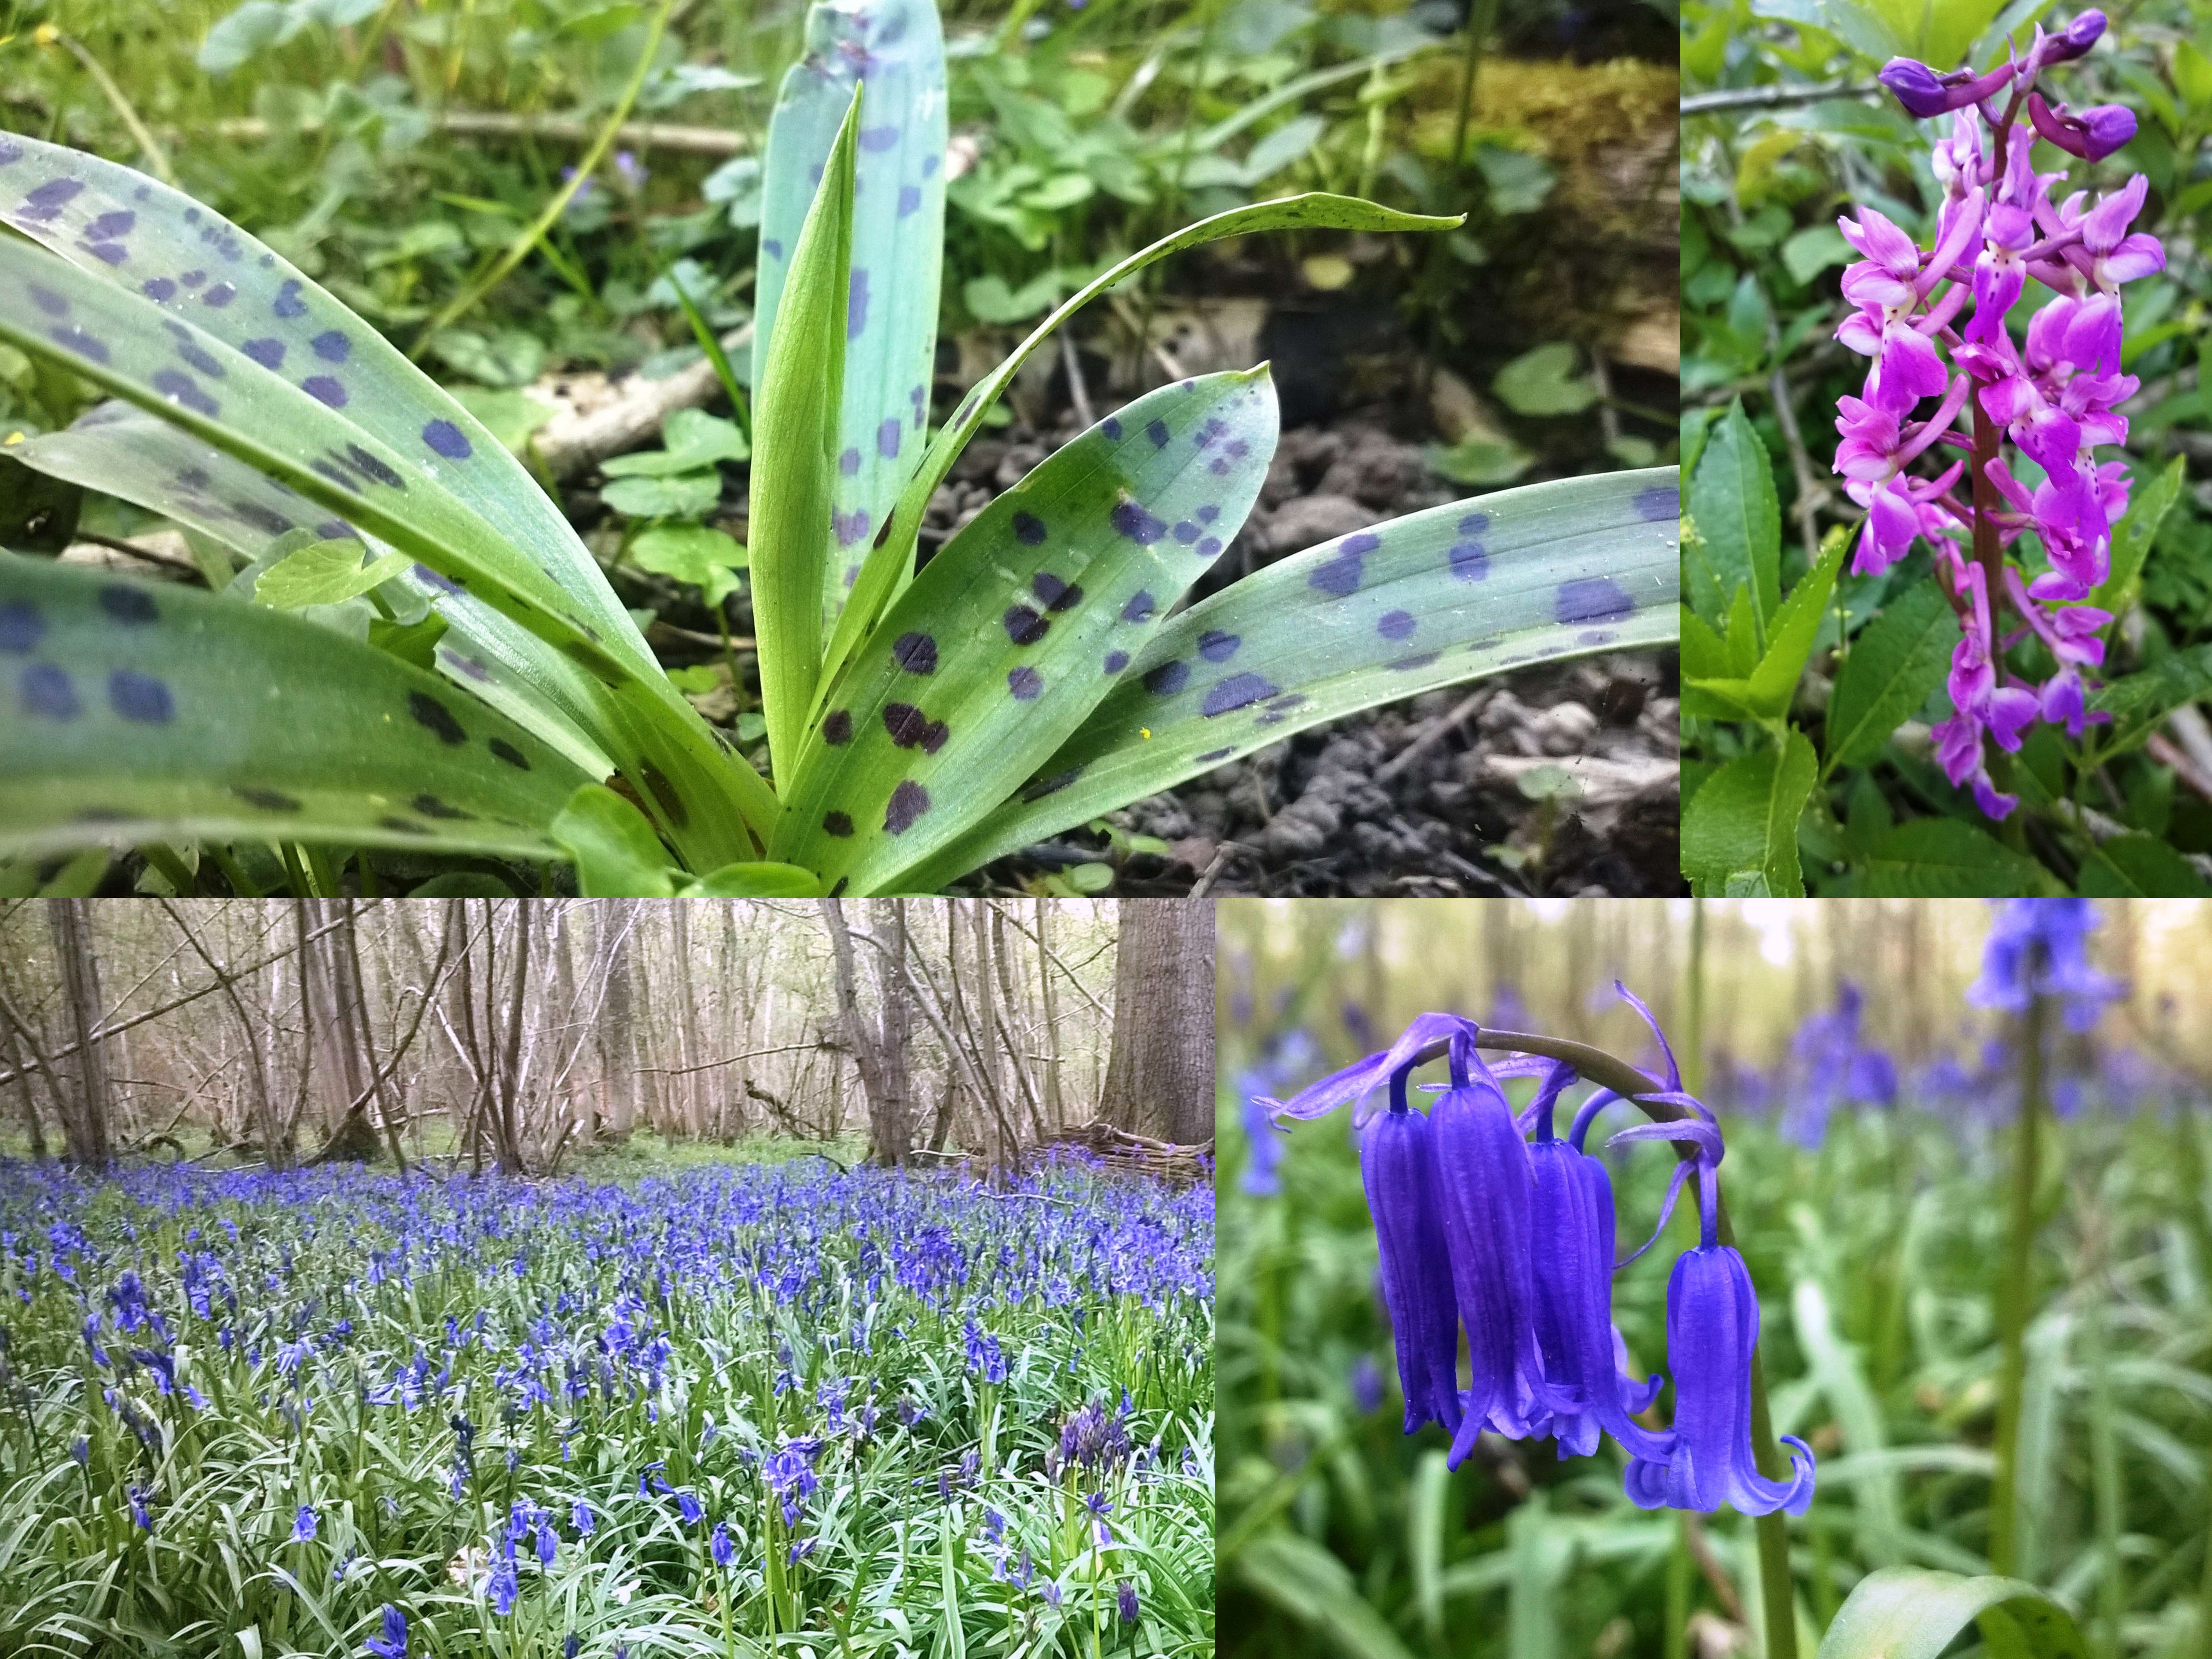
The bluebells are looking particularly impressive at the moment but if you look closely you will find so much more.
Here is a little taste of what I found this morning.
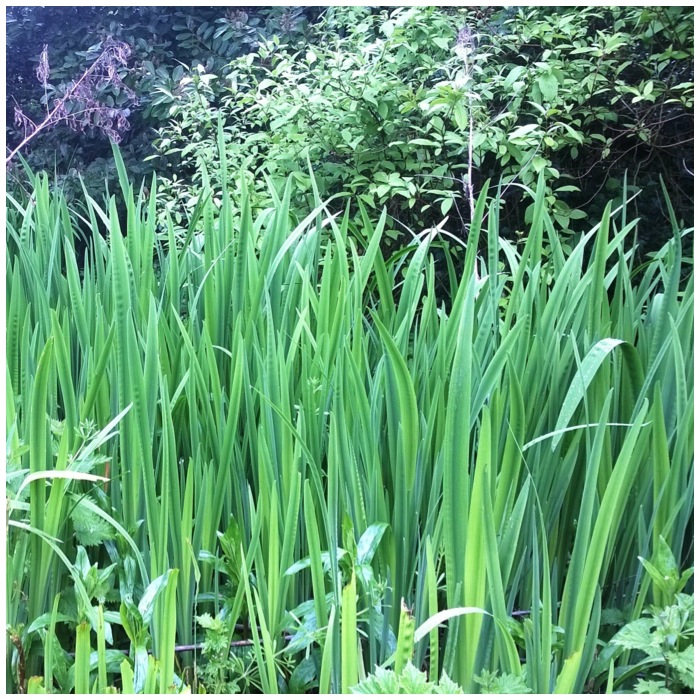
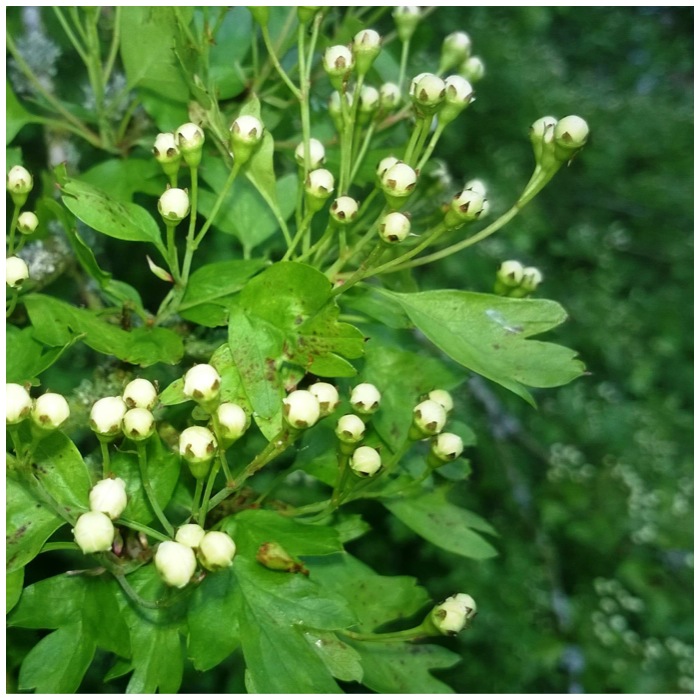
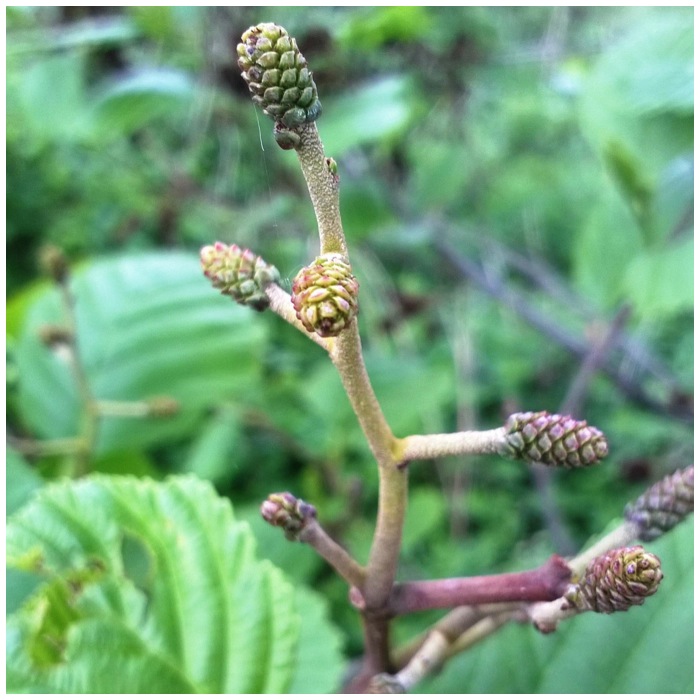
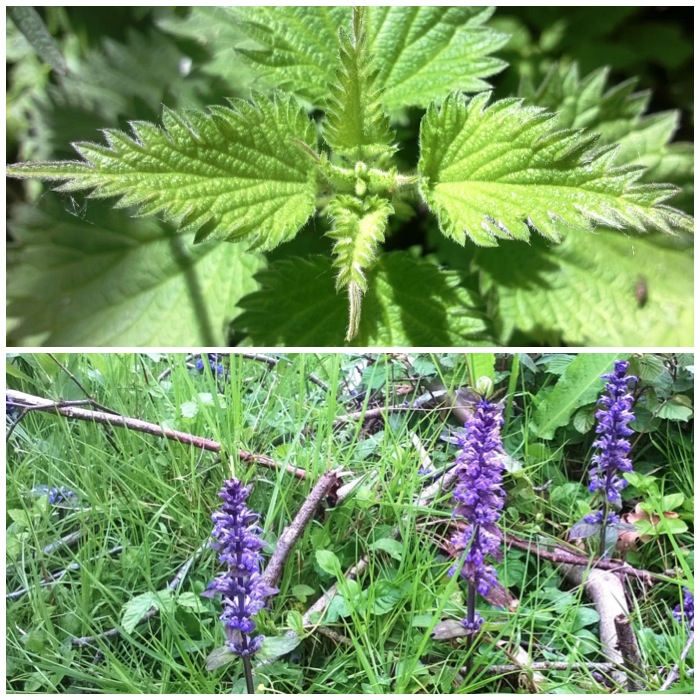
Iris – yellow flag leavesHawthorn blossom budsBluebellsYoung alder catkinsWillow catkins gone to seedWood spurge and wood anemoneWild mignonette and a bursting pine conePossible large oak gallHorse chestnut blossomFresh nettle leaves and bugleEarly purple orchidRibwort plantain and elderly primroseCow parsley
I take a wander around my village (Bramley, Hants, UK) every week or two and photograph certain sites to see all the changes that are happening here with the flaura and fauna.
I will post what I think are the best pictures of these bimbles here. Currently I am using a Nokia Lumia 820 phone camera to take these pictures.
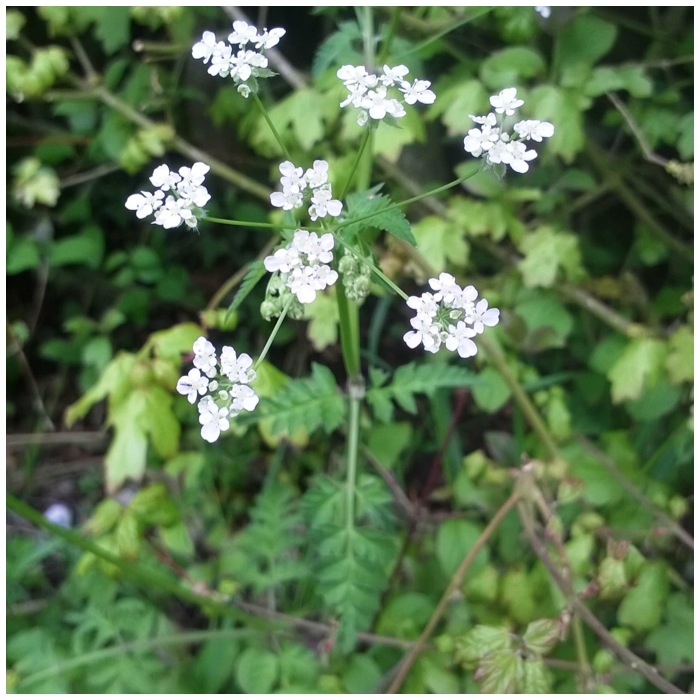
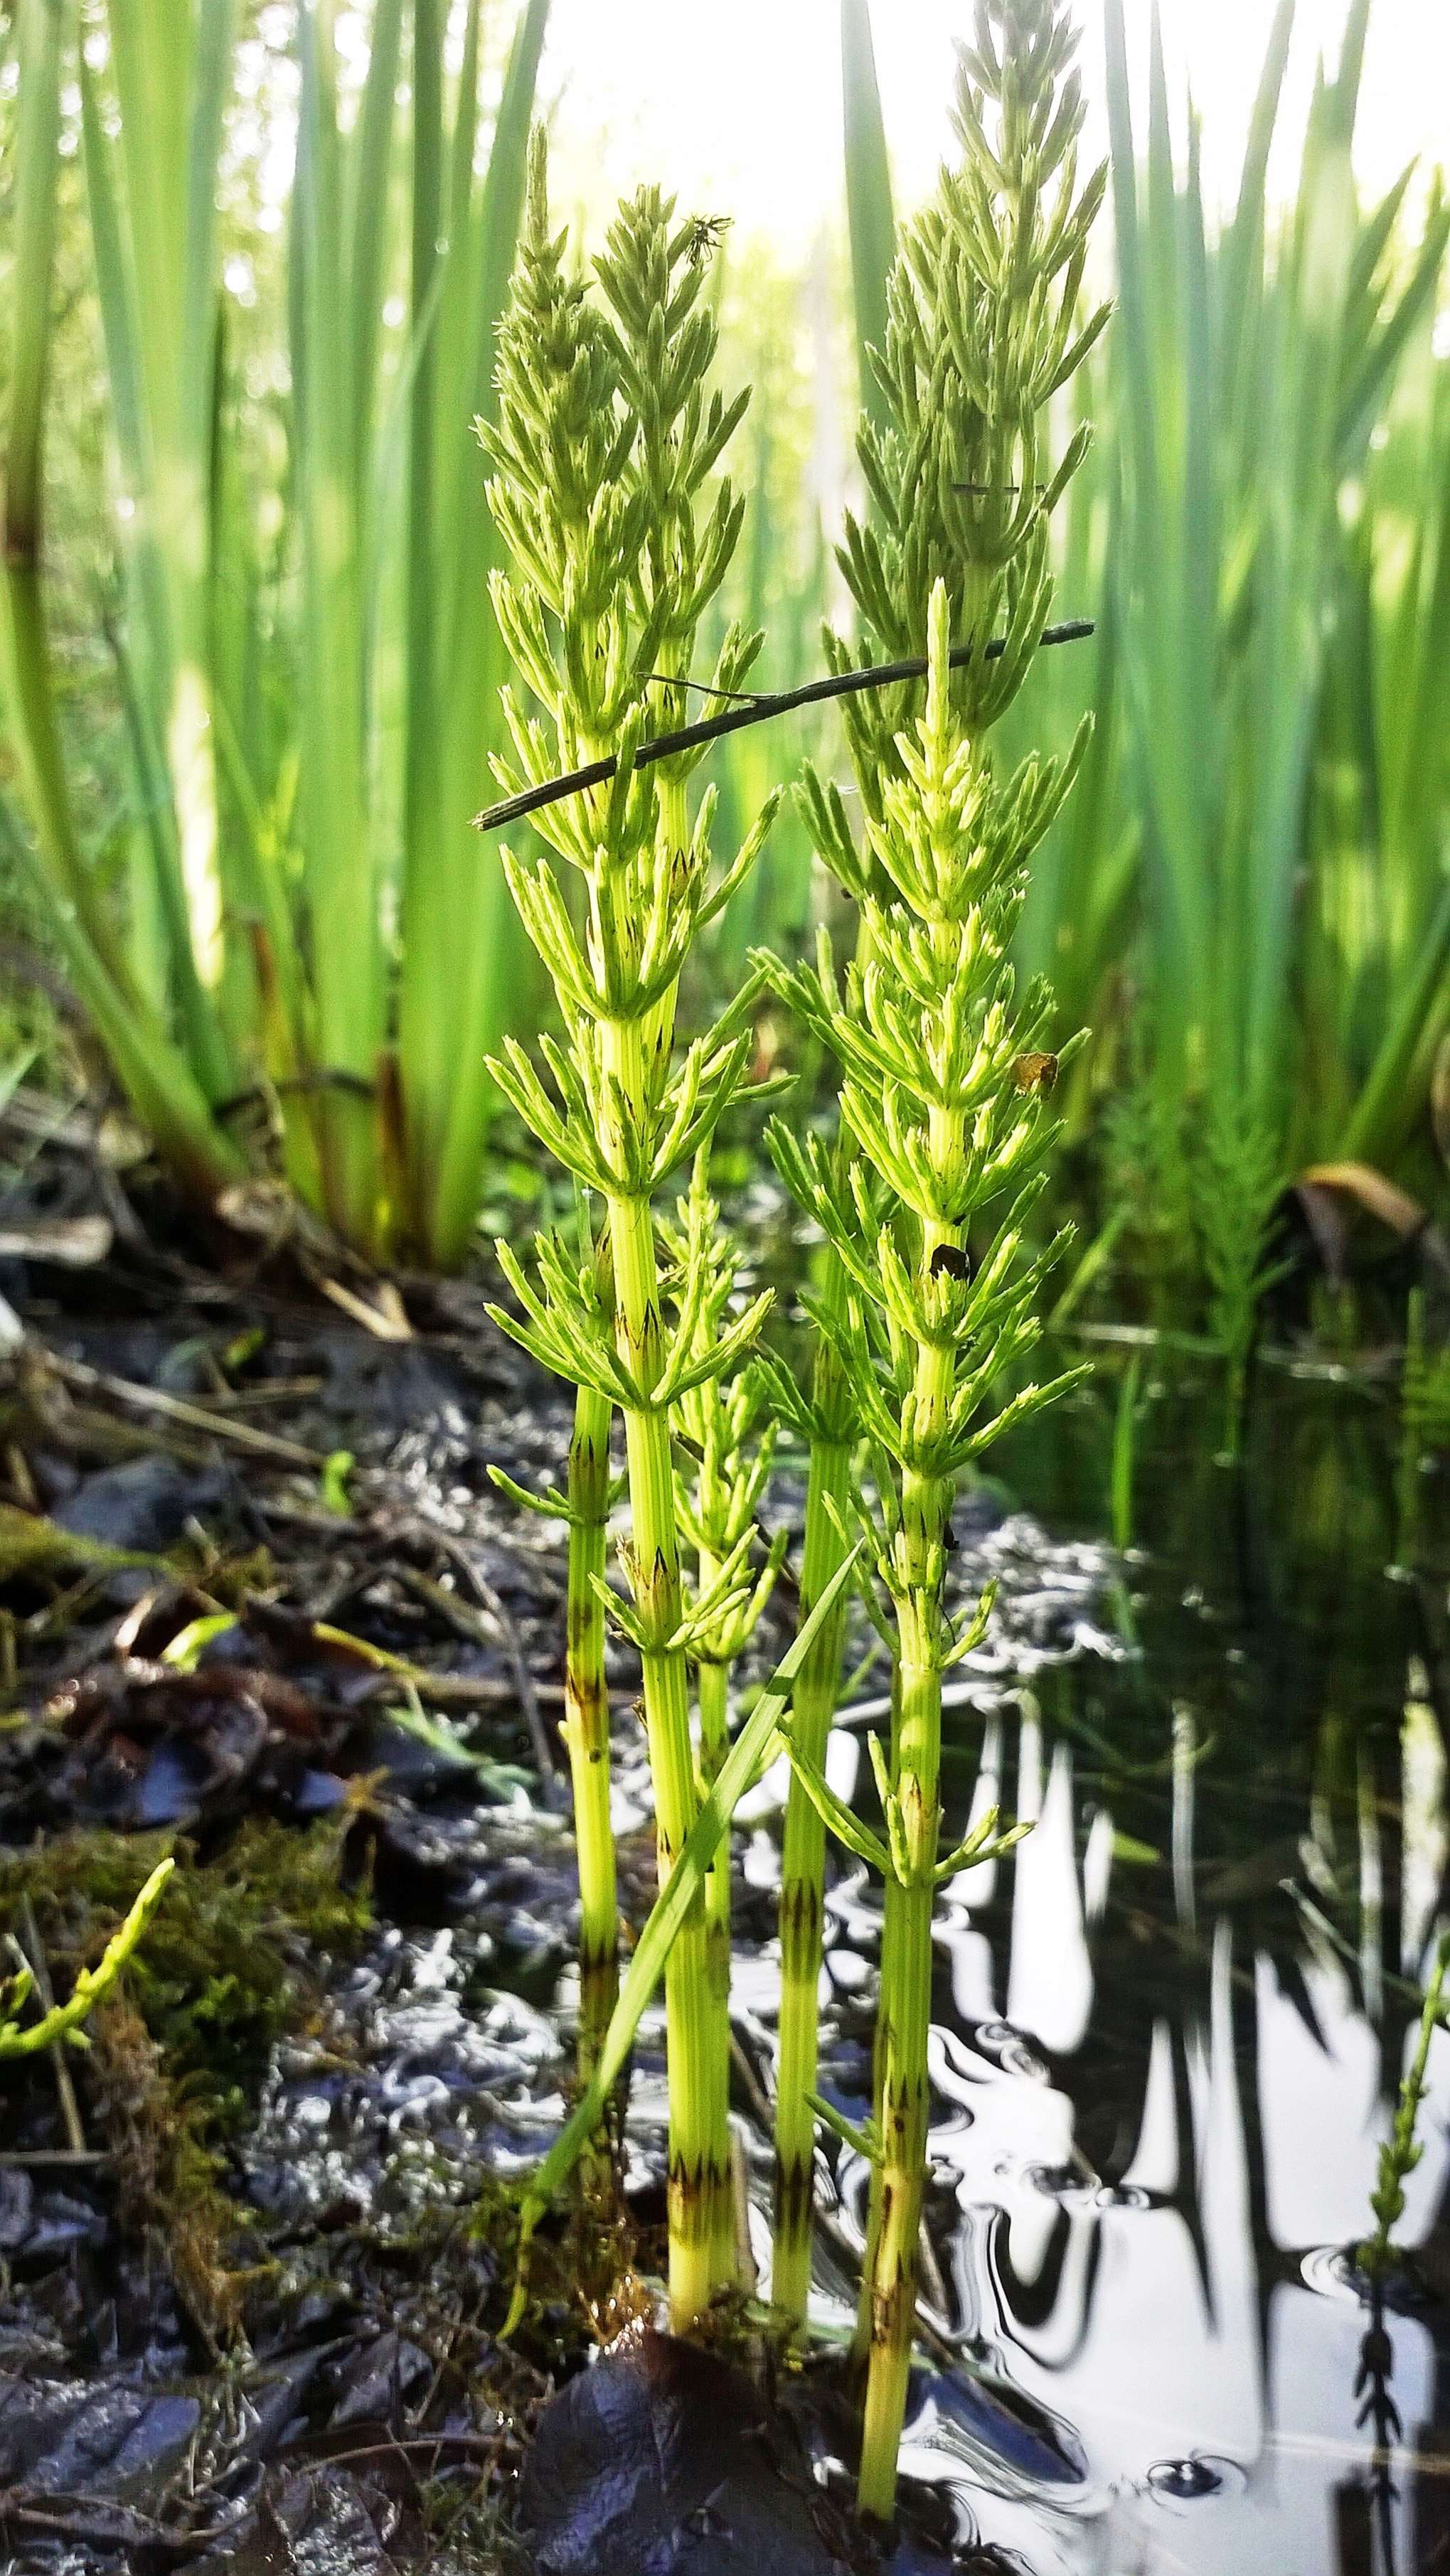
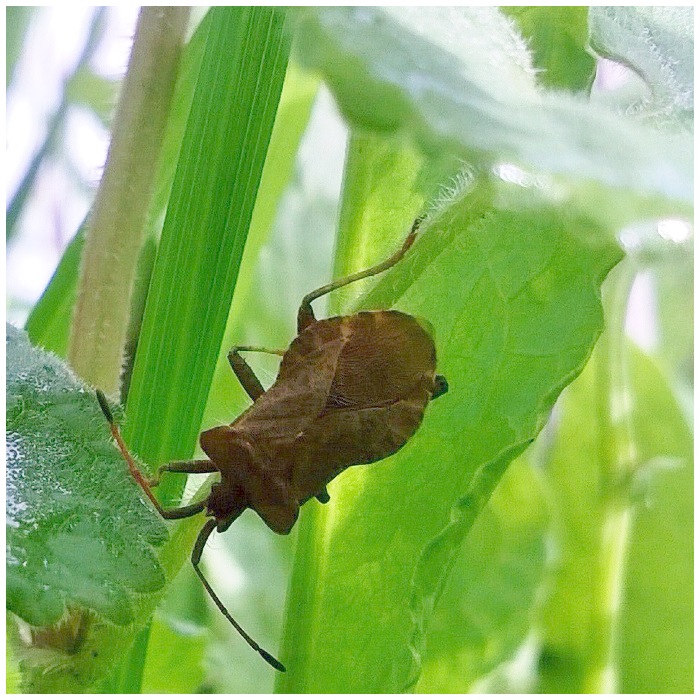
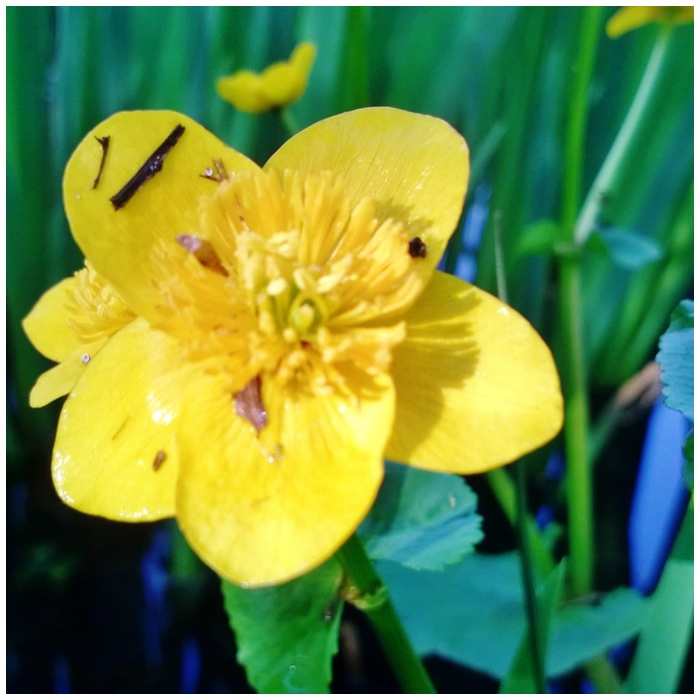
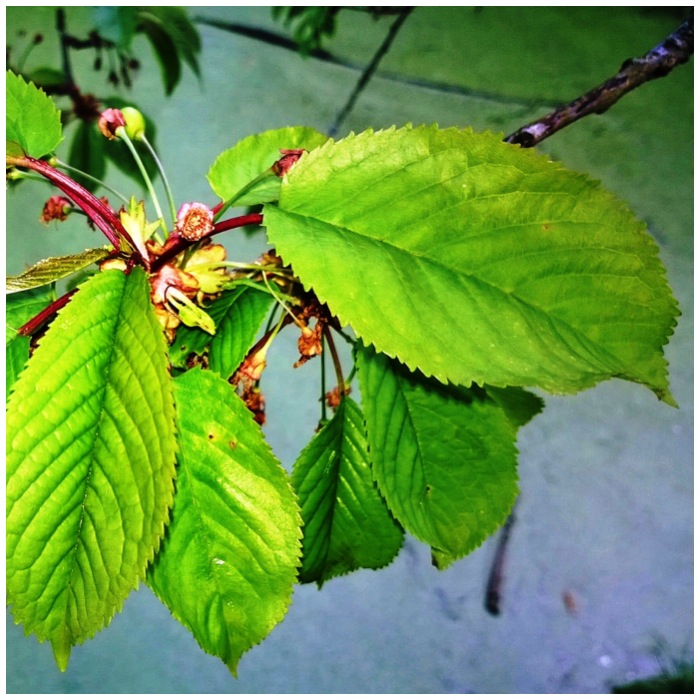
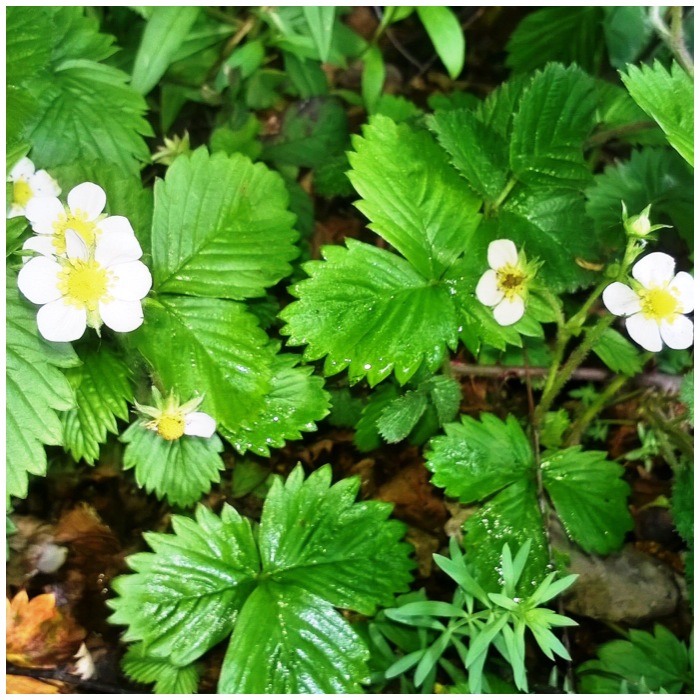
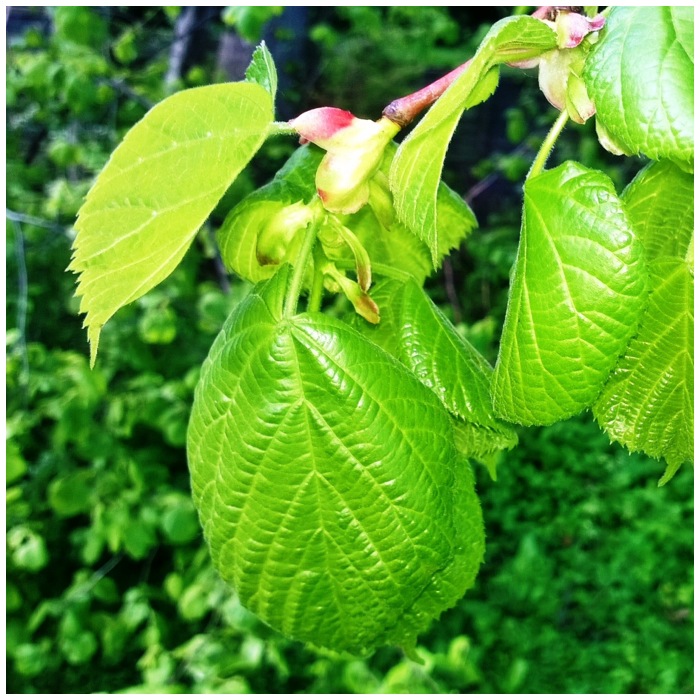
HorsetailA little Shield Bug possiblyMarsh MarigoldEmerging AshCherryWillowVisiting the VetchHerb RobertYoung OakWild StrawberryFresh Young Lime
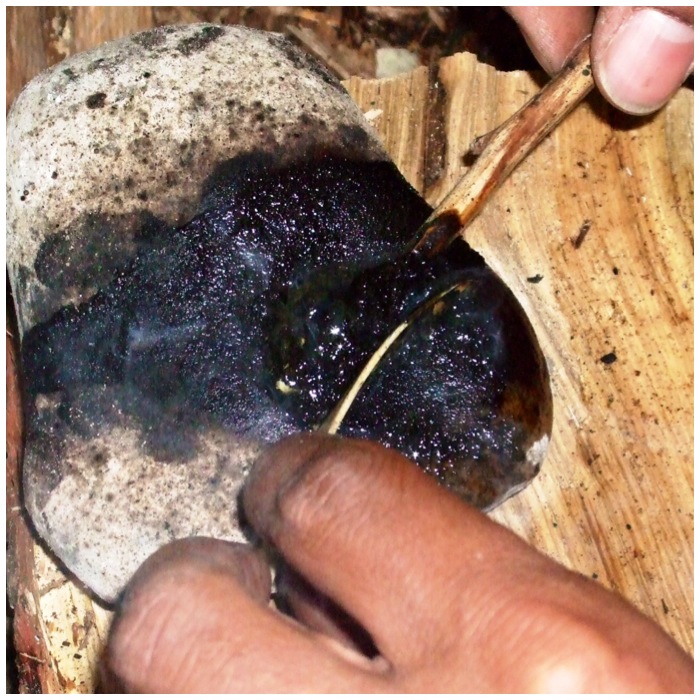
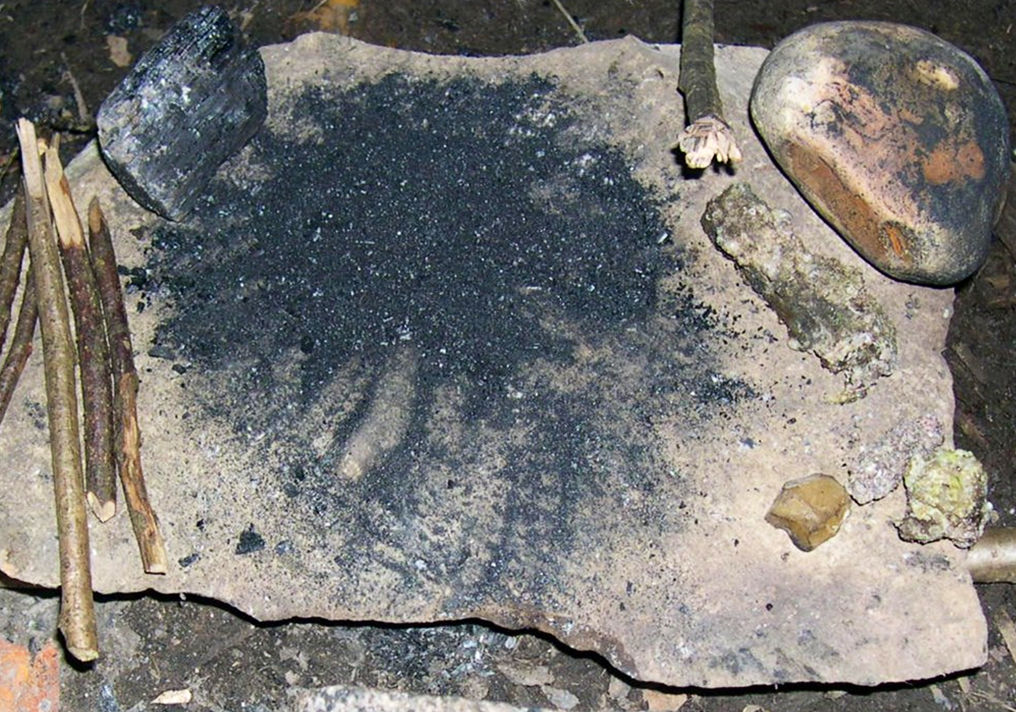
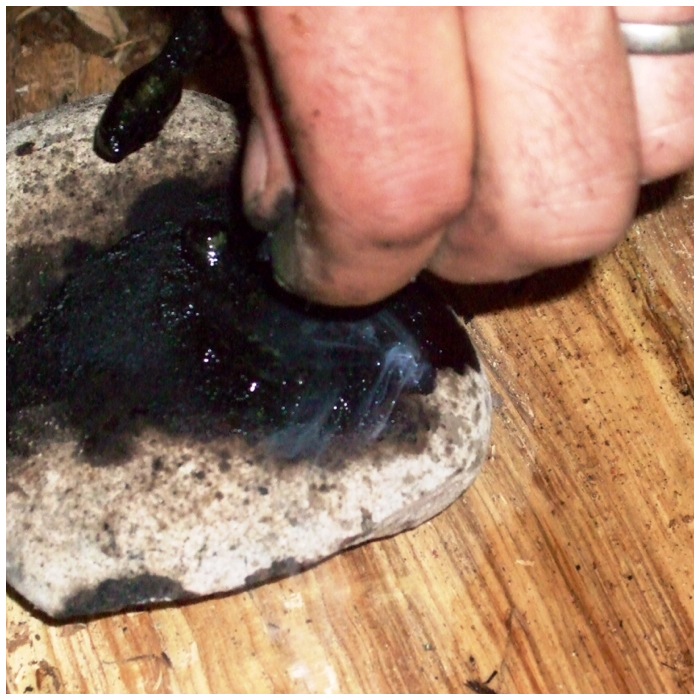
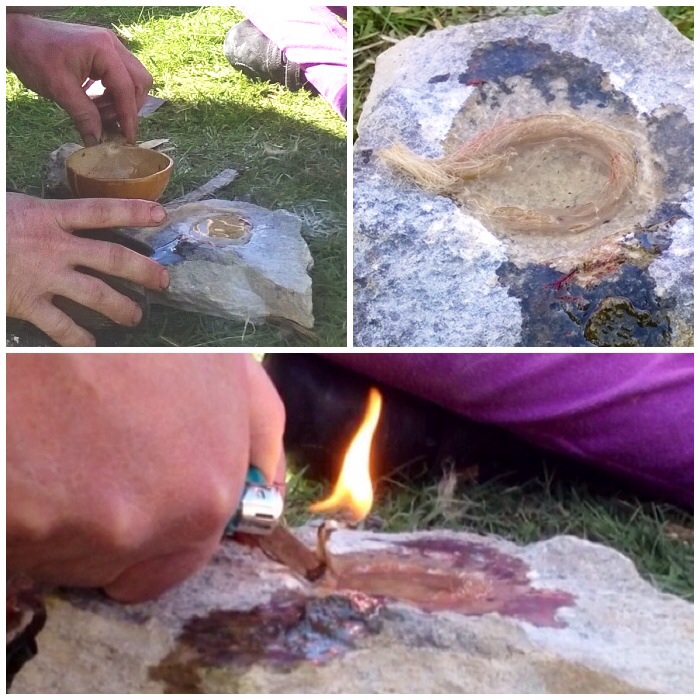
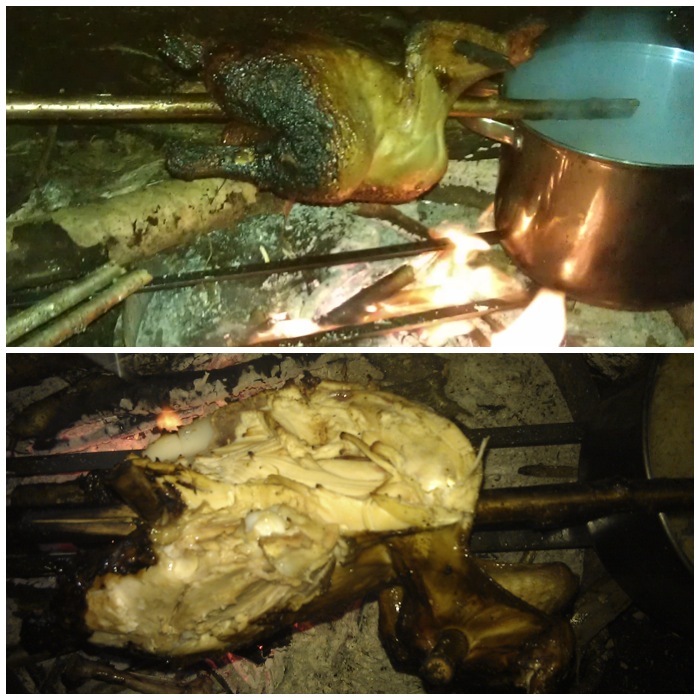
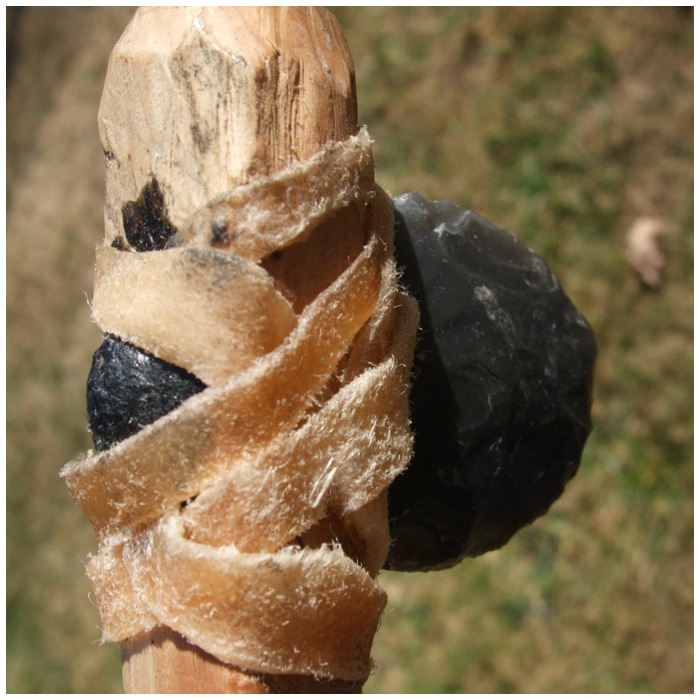
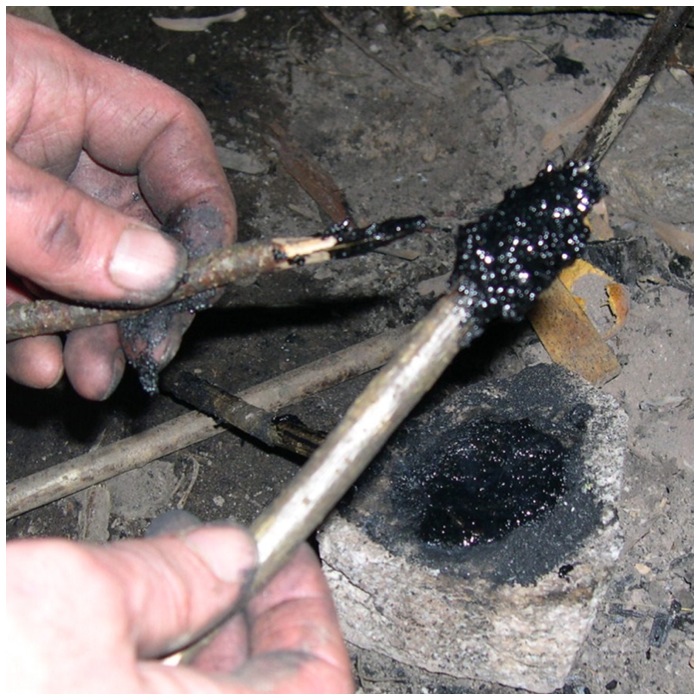
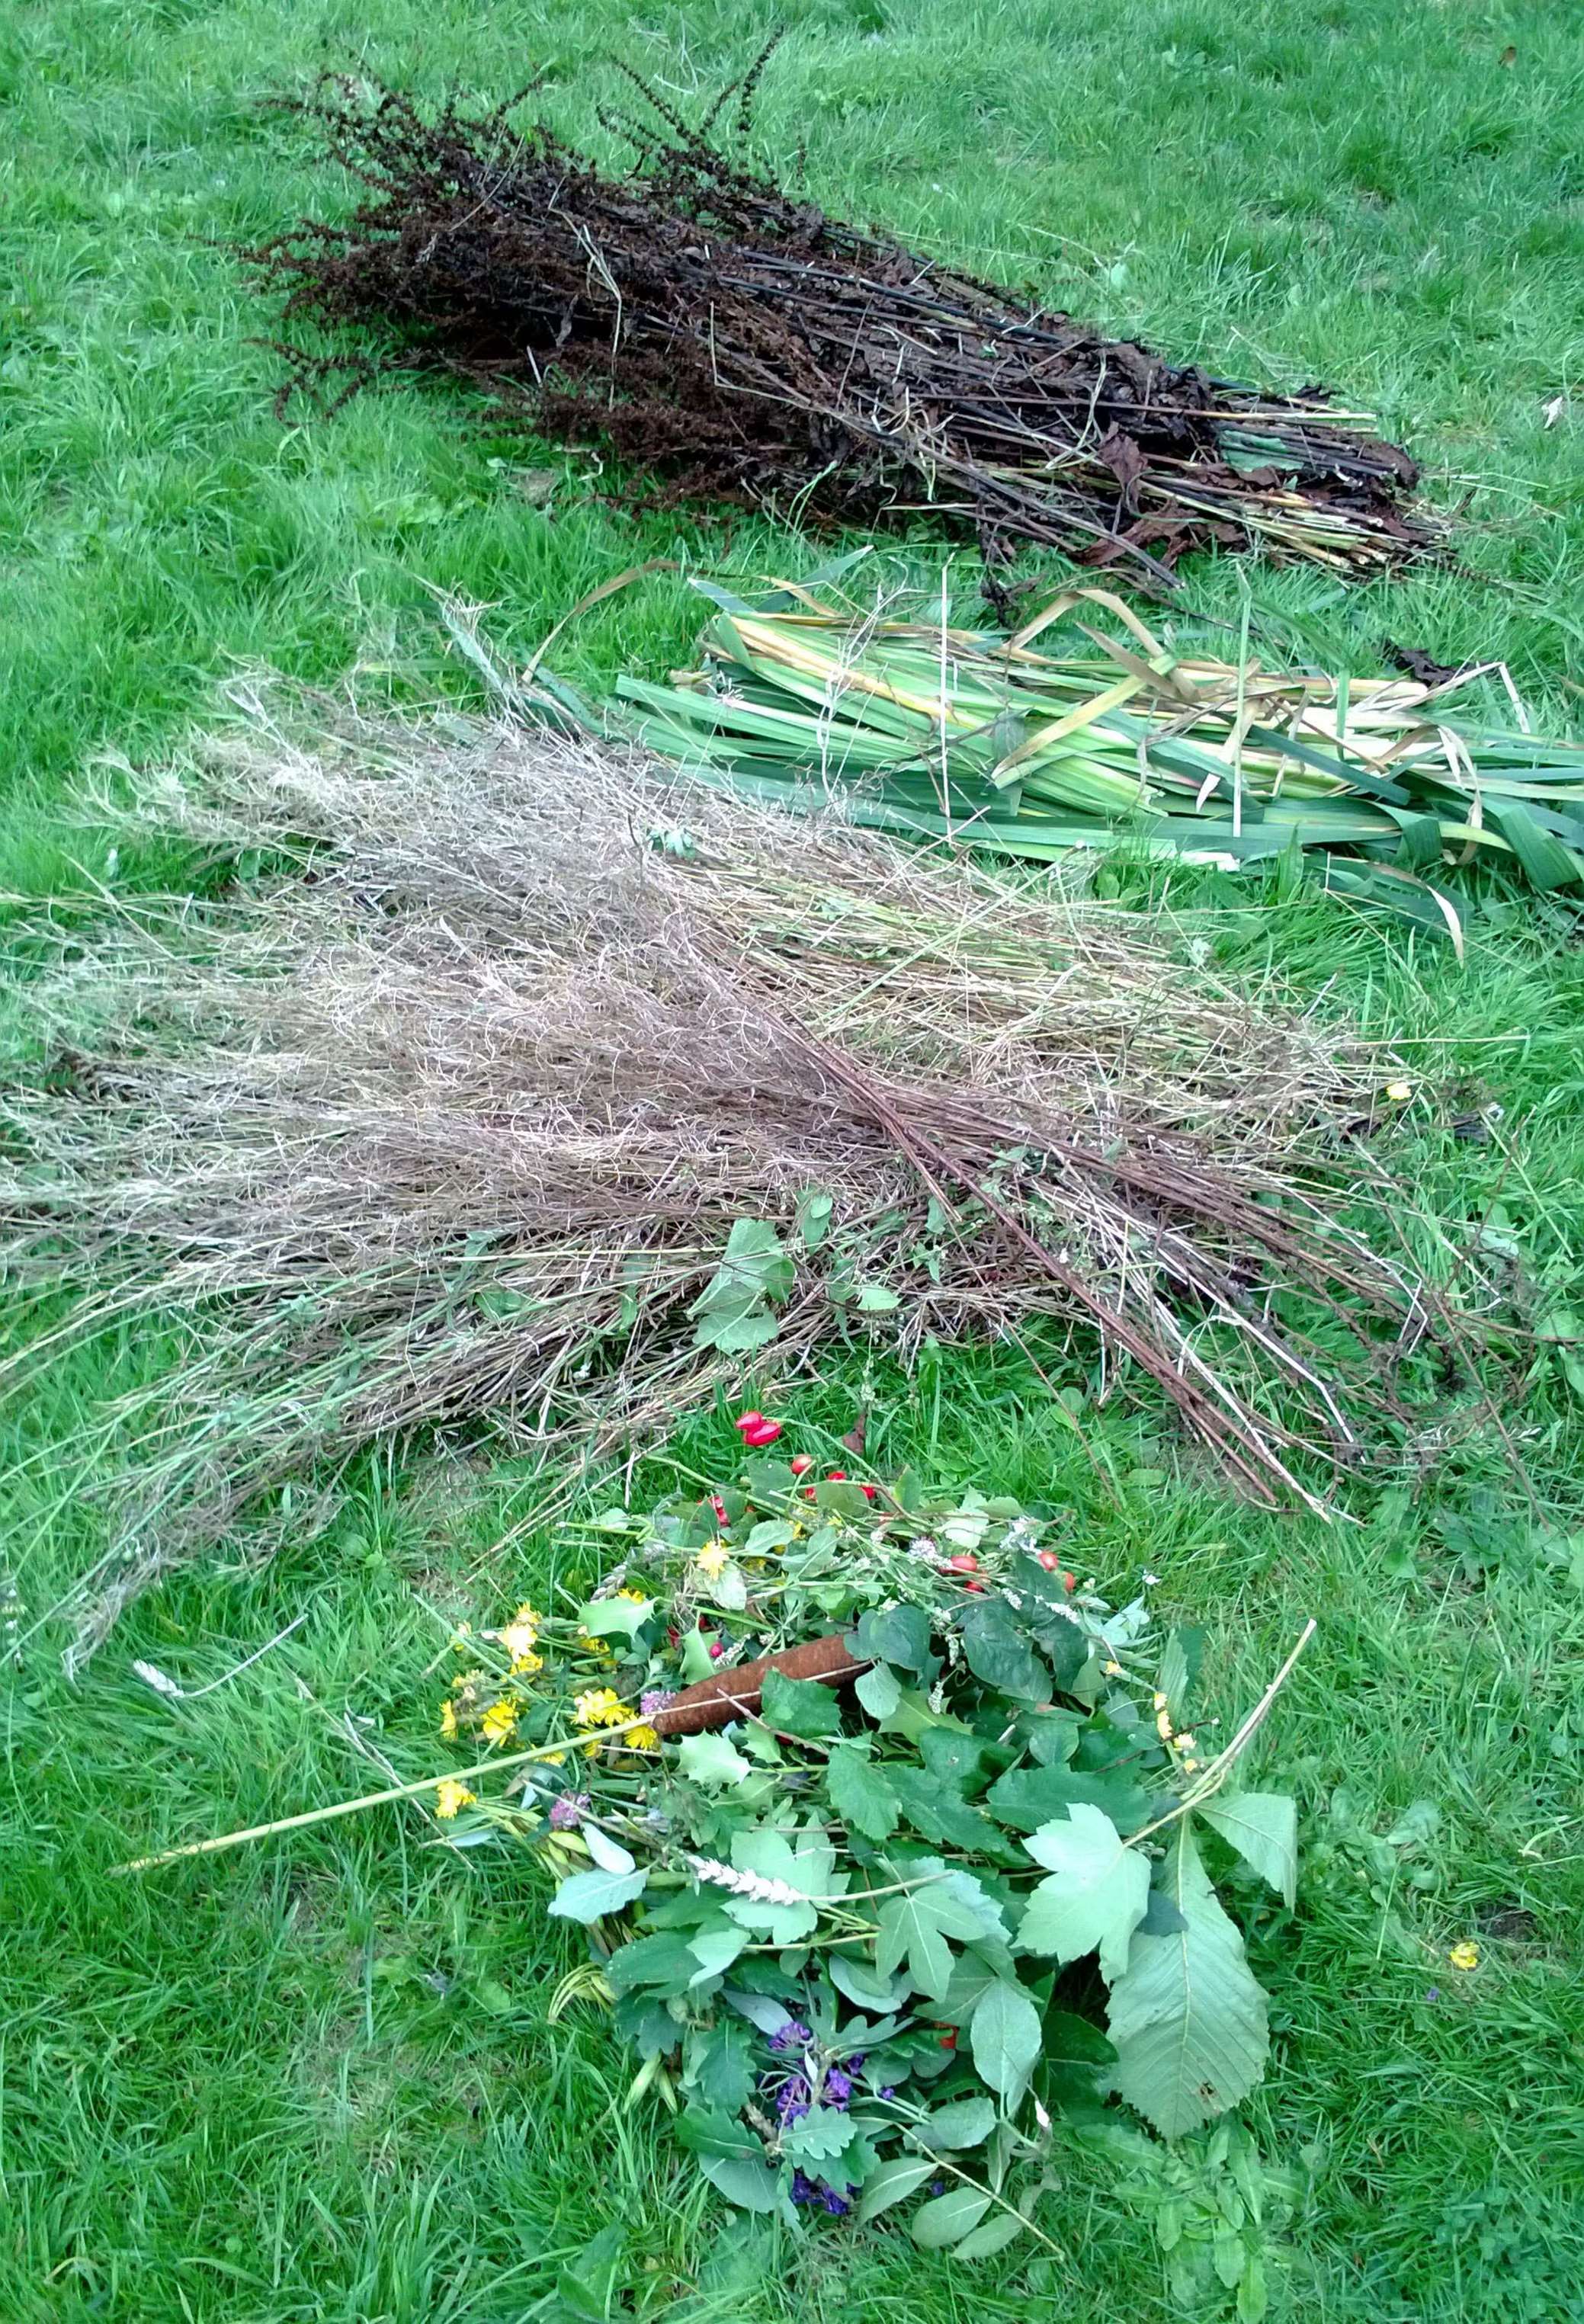
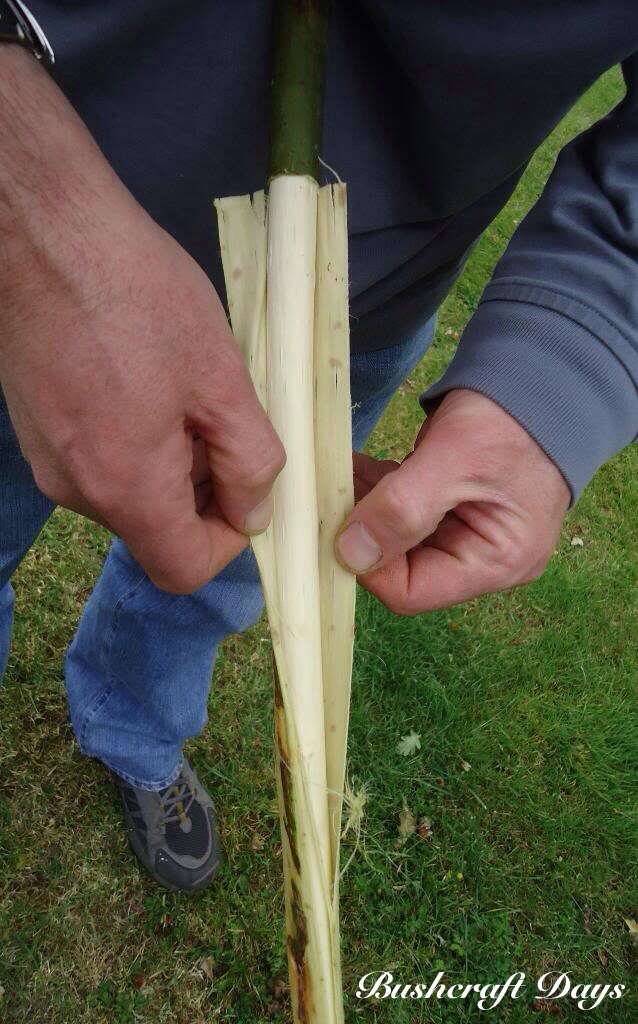
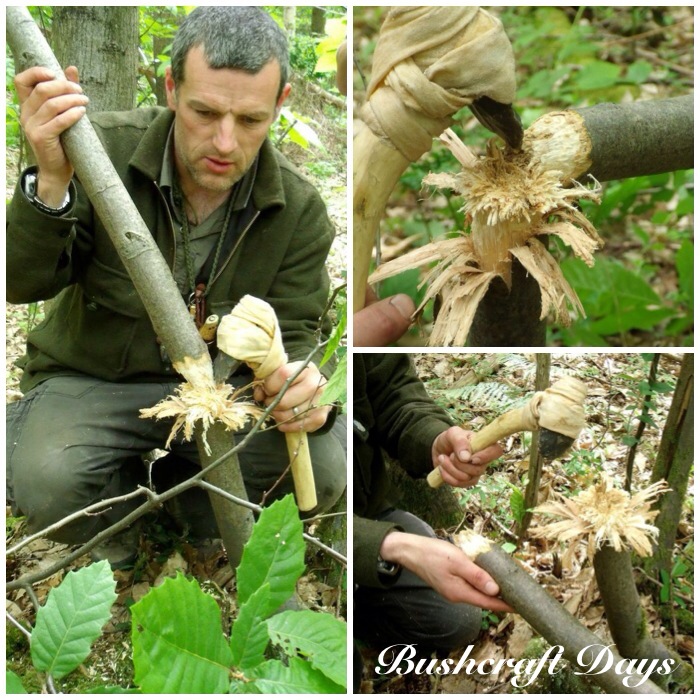
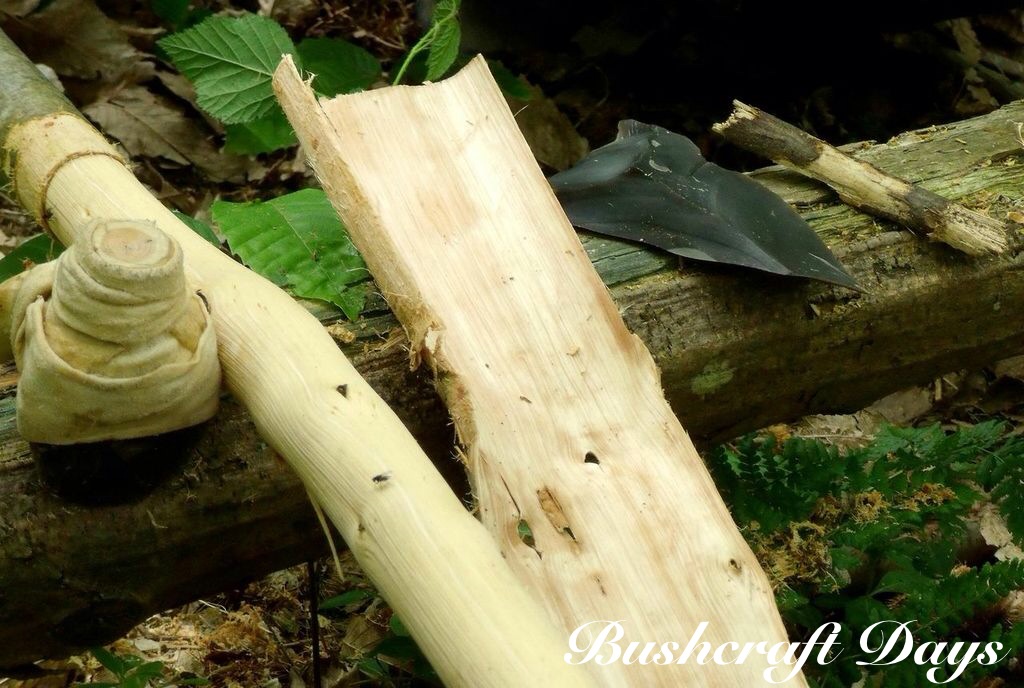
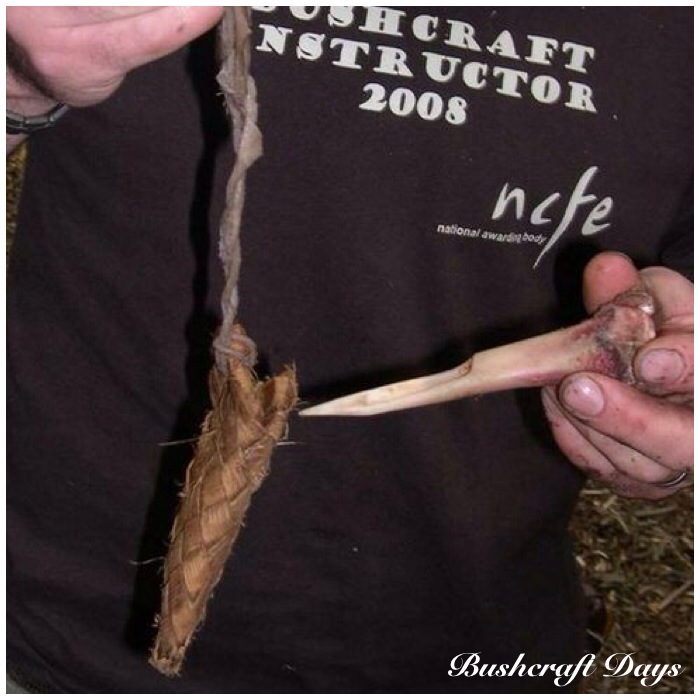
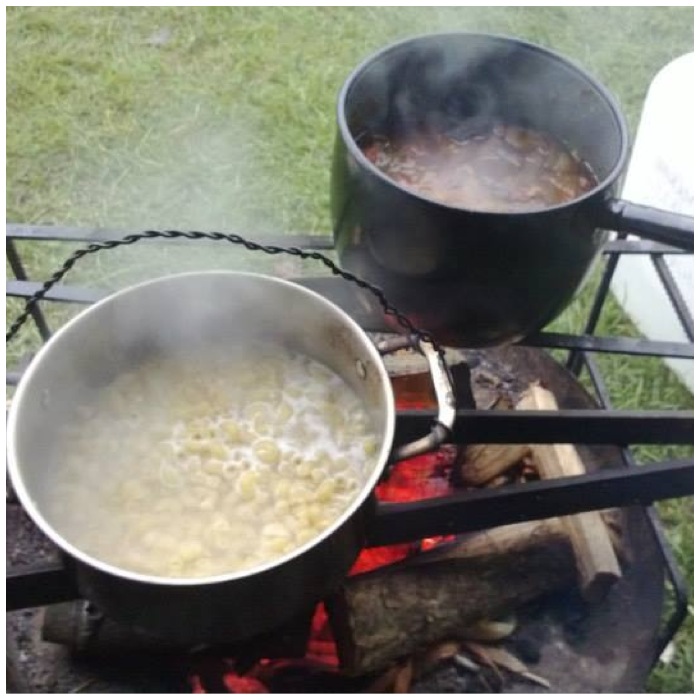
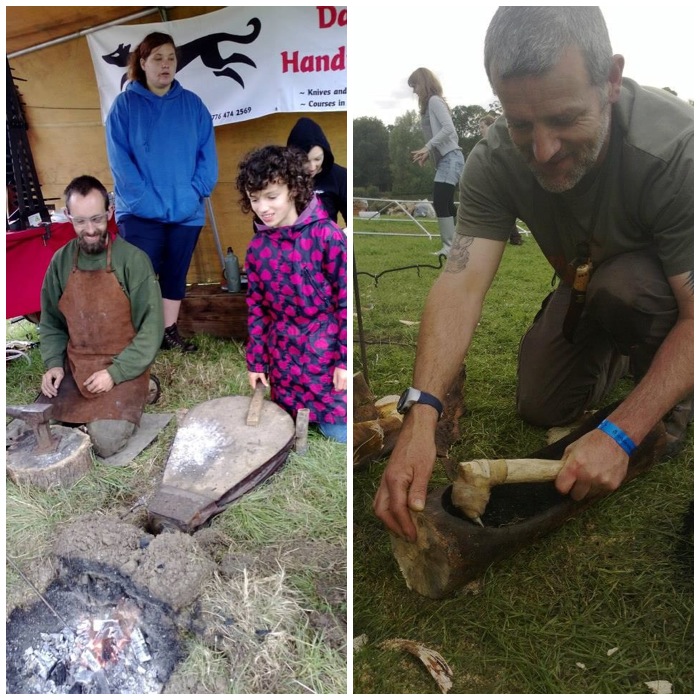
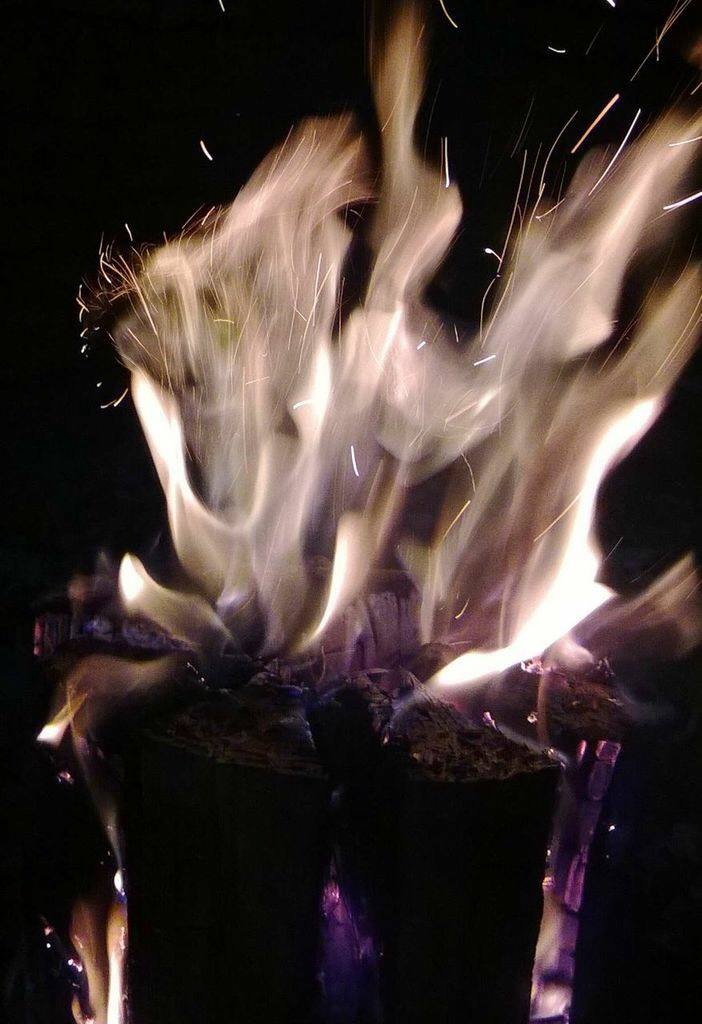
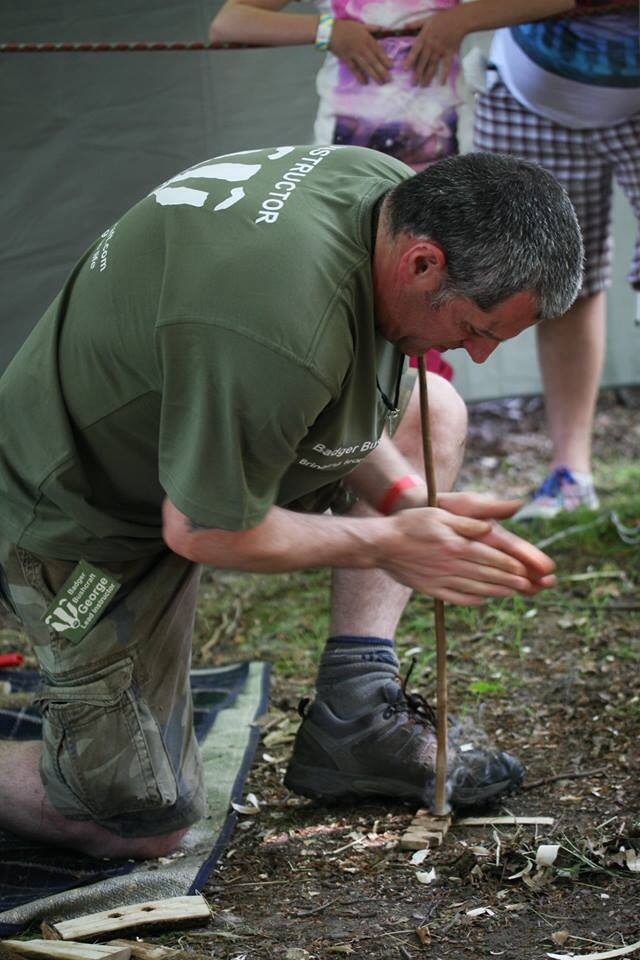
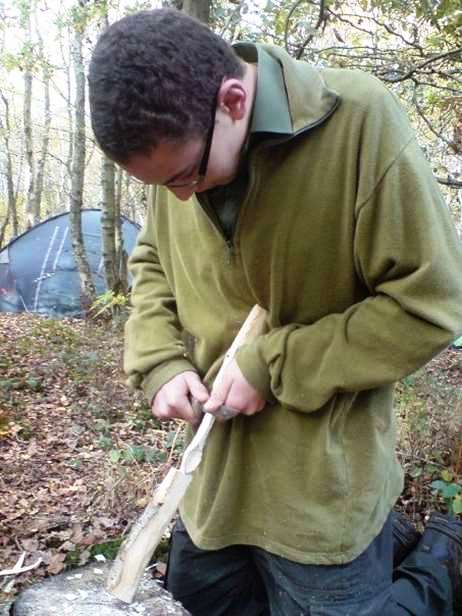
Pitch can be made with many different materials and I have covered some of these in that previous post. On this occasion I used spruce resin, beeswax and charcoal dust. Instead of a nice handy tin to prepare it all though I opted to try this out using more primitive materials: hot rocks. I touched on this method previously in the post How To…. Make a Flint-Tipped Arrow but feel it needs its own stand-alone post.
Hot Rock Pitch
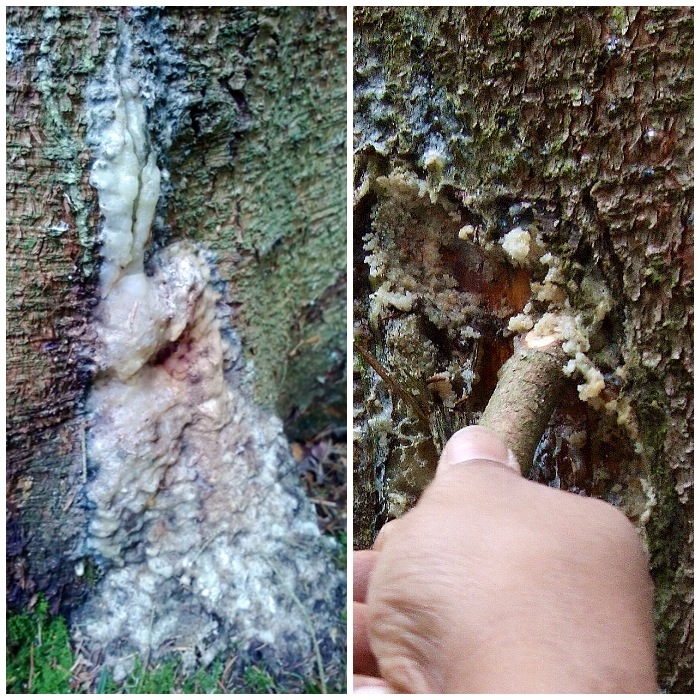
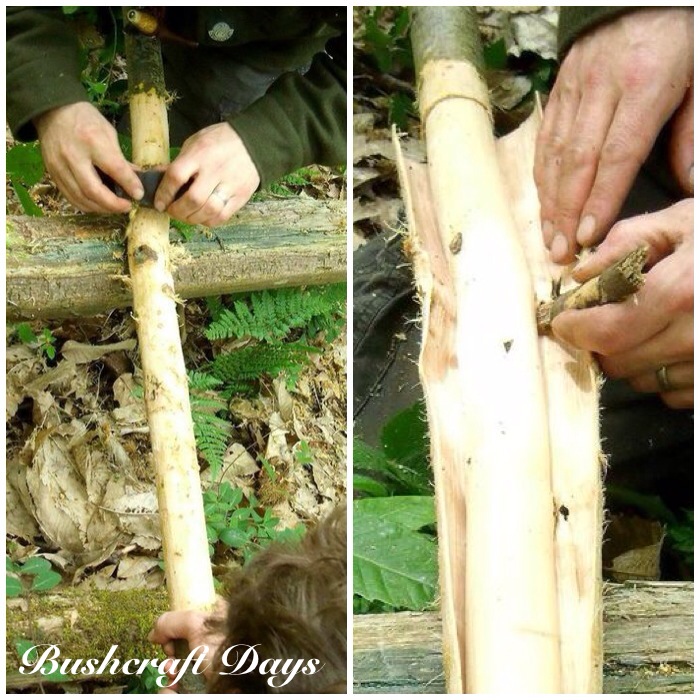
I collected a lot of resin from some spruce trees in my local area with the use of a stick as I find that this does not damage the trees as a knife would do. Also I look for areas where the resin has pooled at the base of the tree as you can collect all of this without affecting the tree.
Spruce Resin
My other ingredients are charcoal dust to give the pitch body (I used the small rock to crush the charcoal) and beeswax to make it flexible. I used the sticks to make the finished pitch stick.
Preparation
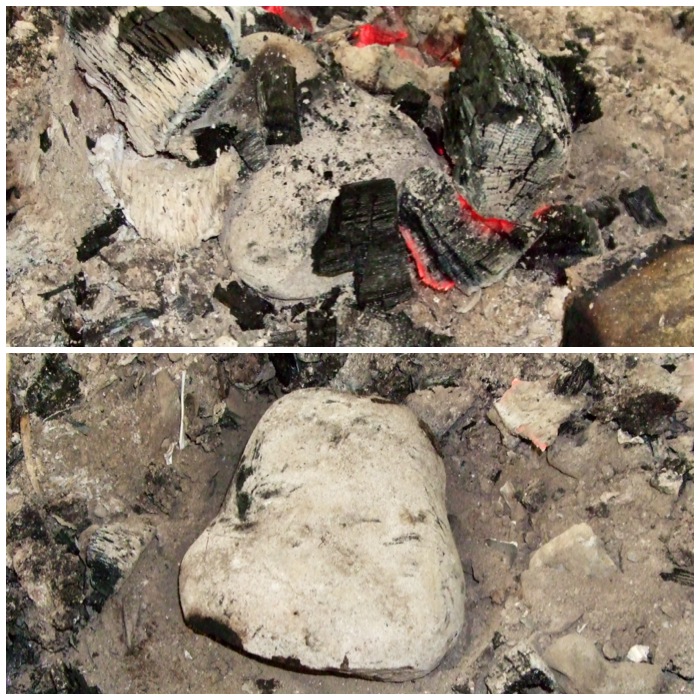
While I was out collecting resin and preparing everything else I had a rock heating up in the fire. I used a rock that had been heated before so I could be sure it would not crack. (If there is any trapped air or moisture in a rock there is a chance it will crack or, in the worst case scenario, explode.)
To handle the rock I used some wooden tongs I had made up (sorry, no photo).
Hot Rock
The rock I had chosen had a slight hollow in the top surface which I thought would help stop the resin from flowing away instantly as it melted. I dragged the rock to the side of the fire, popped a piece of resin onto it and with a small twig moved it around until it had all melted. Some resin did run off but enough was kept in the hollow for me to use.
Melting the resin
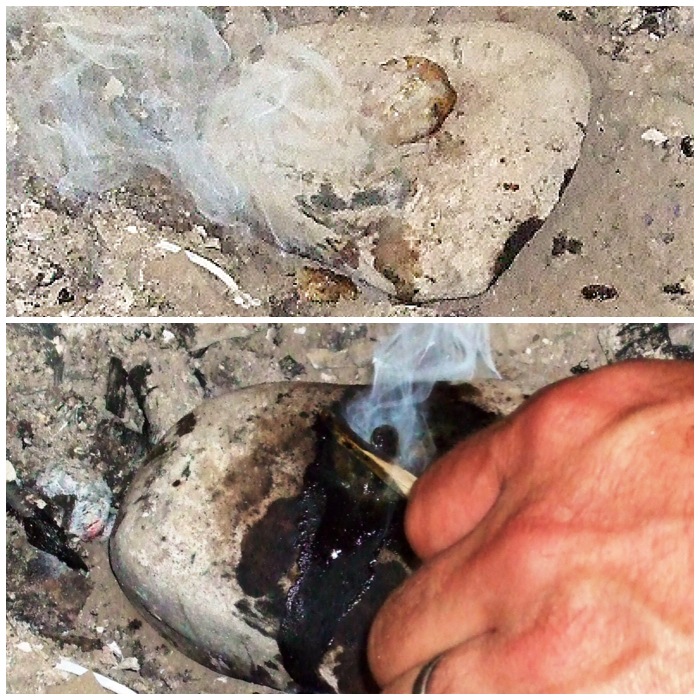
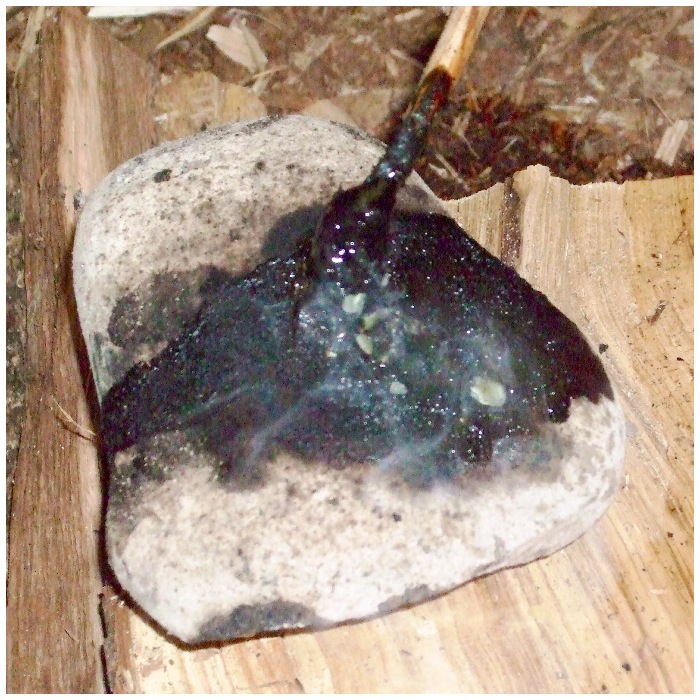
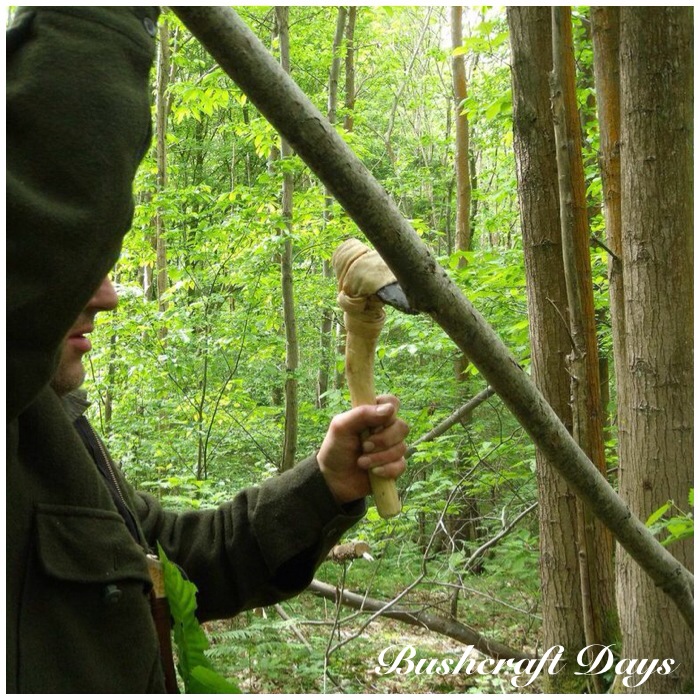
I then moved the rock onto a piece of curved bark which held some water to act as a coolant as I built up my pitch stick.
Once this was all set up I popped a piece of beeswax into the melted resin and allowed it to mix in (experiment for yourself with ratios).
Melting the beeswax
Then I sprinkled a good-sized pinch of charcoal dust into the mixture and carried on mixing it up.
Adding the charcoal dust
As the rock was quite small I could only make a little batch of pitch at a time so it did not take long to all melt and mix together.
Mix it all up
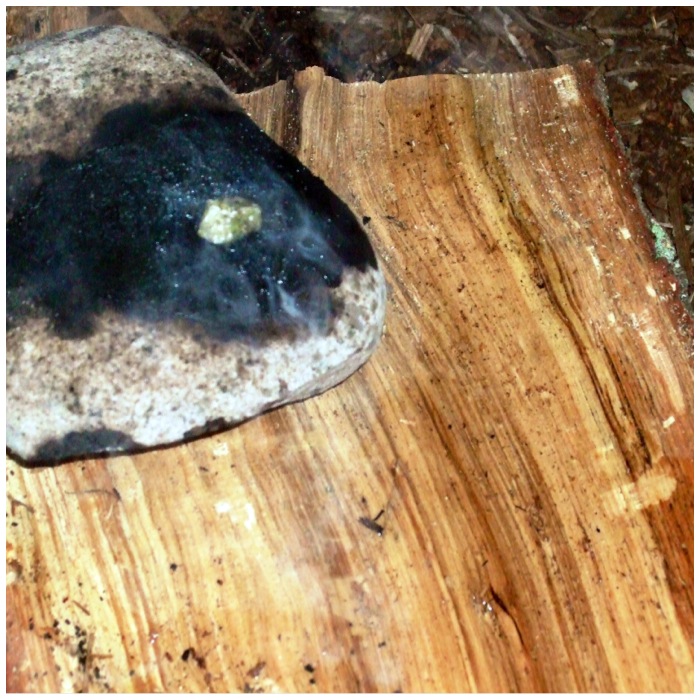
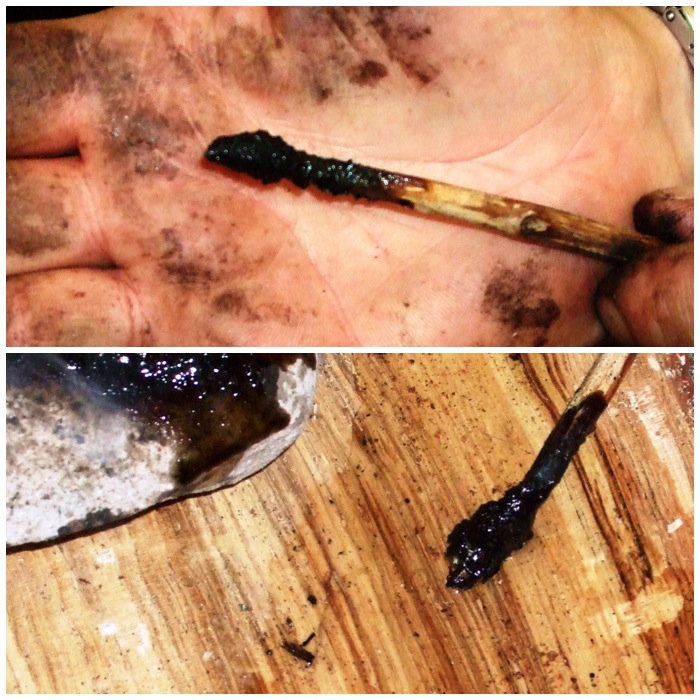
I used a sliver of wood to scrape the hot, sticky pitch onto a squared-off stick.
Scrape onto a twig
The pitch you create using this method is a bit lumpy but still perfectly useable. As soon as I had some pitch on the stick I dipped it into the water to cool it down rapidly. This cooling-down process allowed me to use wet fingers to mould the pitch and smooth it out.
I kept repeating this process until all the melted pitch was on the stick and then mixed up another batch.
Cool rapidly in water
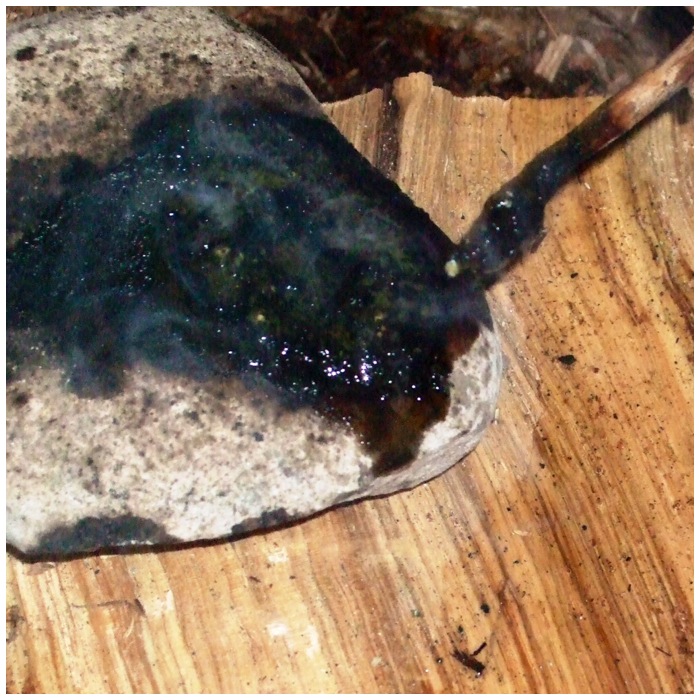
The rock was so hot that I was able to keep melting and mixing the ingredients several times to build up the pitch on the stick.
Mix more resin, beeswax and charcoal
I found that the curved piece of bark was very effective for storing water to cool the pitch.
Scrape onto the twig and cool again
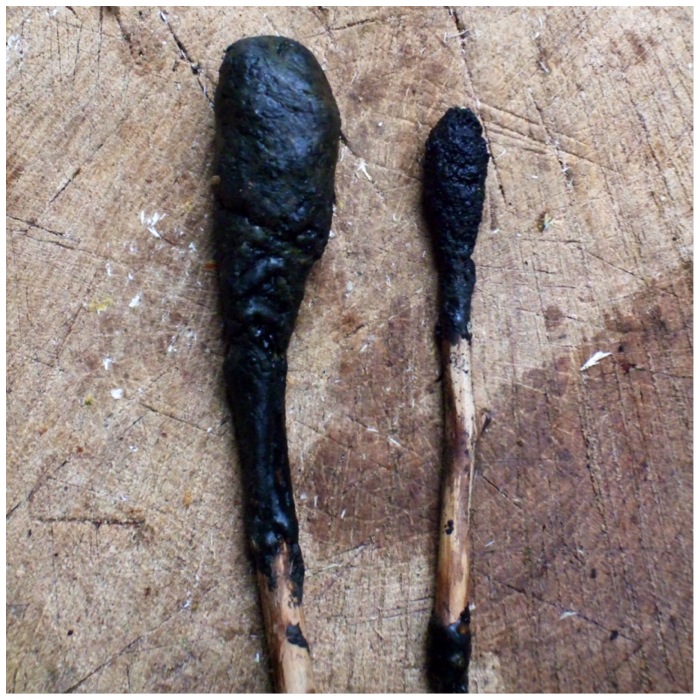
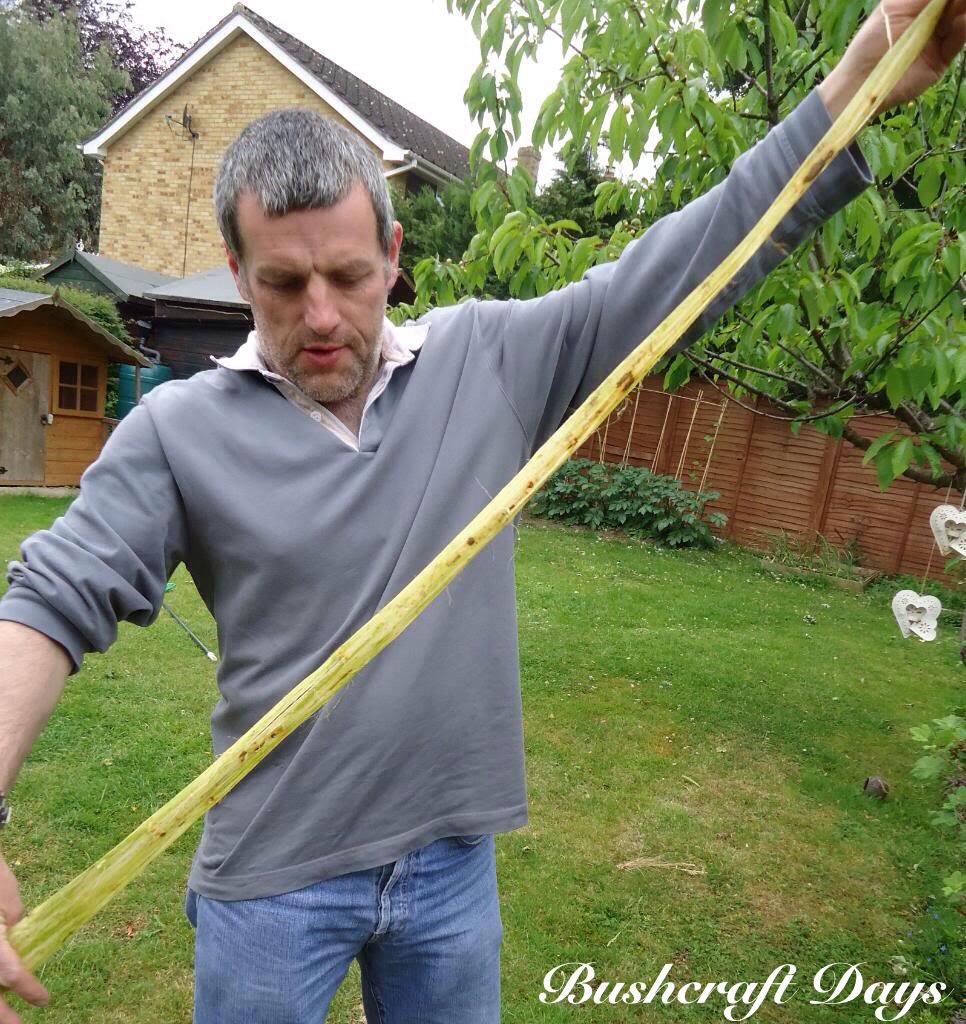
The pitch stick on the right was made using hot rocks and the one on the left using a tin can. The primitive hot rocks method takes longer and produces a coarser pitch but in my opinion was far more satisfying to make.
Keep repeating until you build your own pitch lollipop
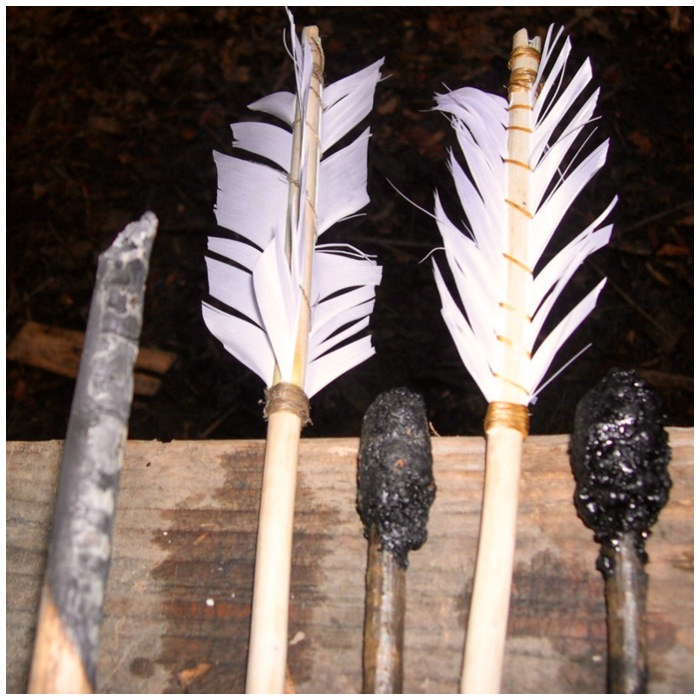
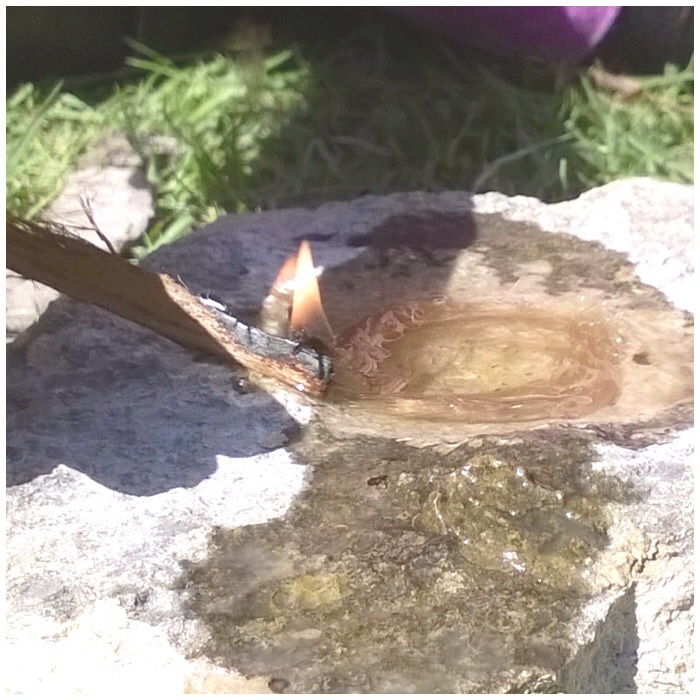
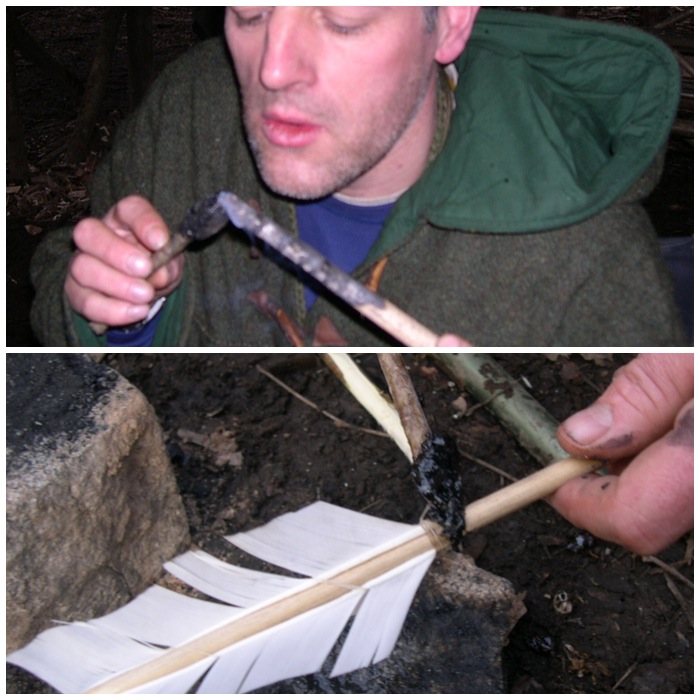
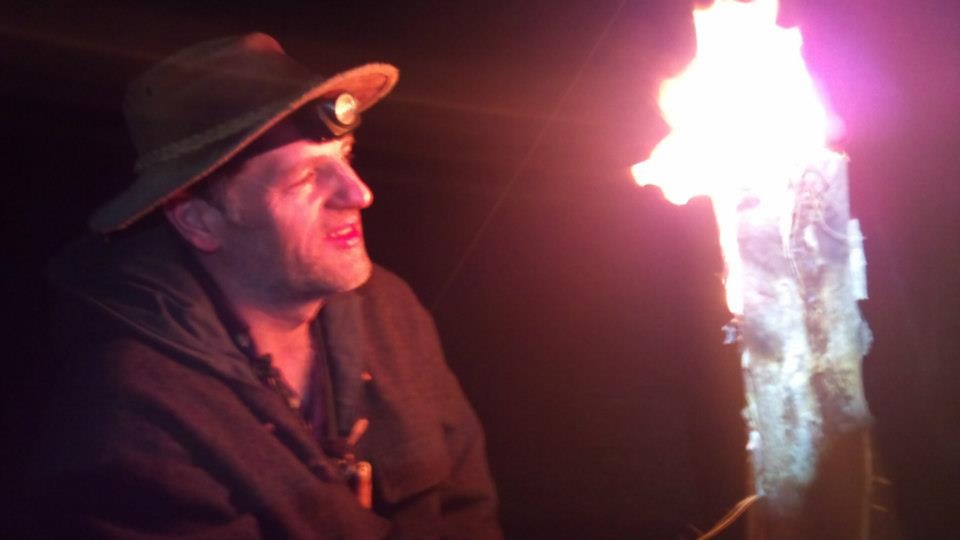
The pitch is great for waterproofing things like sinew on arrows. I prepared a ember stick to help melt the pitch so I could cover the sinew you can see in the picture below.
Ready to be used
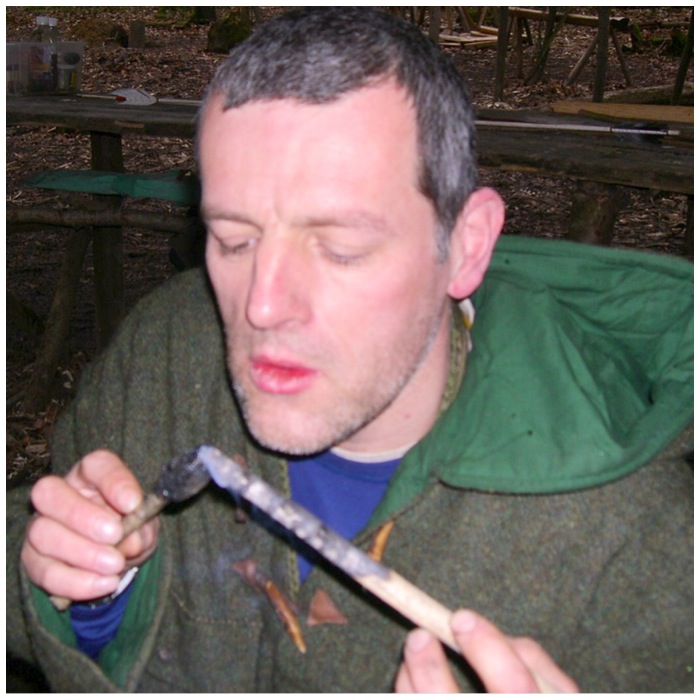
To melt the pitch, simply blow on the ember stick while holding the pitch stick close to it.
Heat the resin with an ember stick to melt it
Drip the melted pitch onto what you want to cover and with wet fingers spread it around. Keep re-applying more pitch until you are happy everything that needs to be covered is covered. I sometimes re-heat the area I have covered with the ember stick to further smooth it out.
Drip it onto whatever you want to cover, fill or attach
With a little patience this primitive method can produce some very good pitch. I have seen some master primitive technology craftsmen makes some wonderful pieces with the use of pitch.
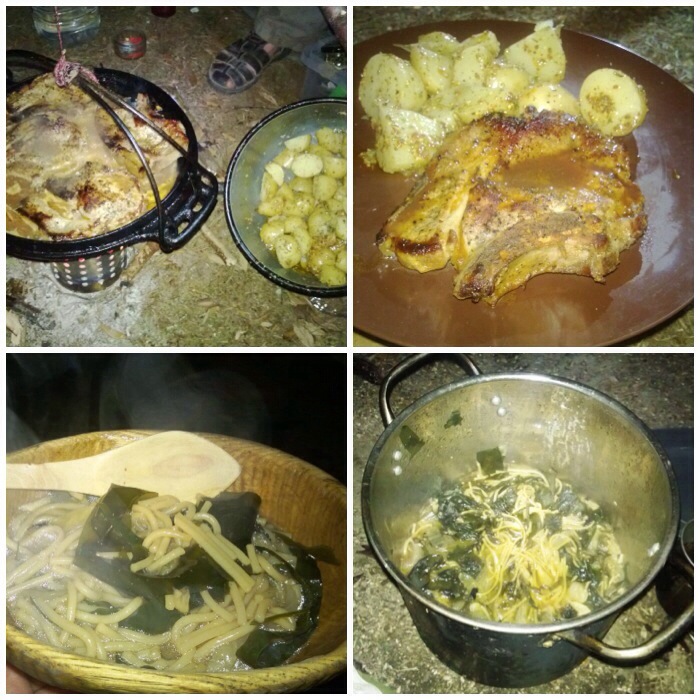
It was great to be back down at Fraser’s place once again, it is a proper playground
Every now and then I head off into the hills with some friends. This time it was to be Gordon and Rick, whom I have worked with for a number of years at the Crisis Open Christmas shelters, and I had arranged with my friend Fraser from Coastal Survival that we would come down and spend time at his place in the woods in Dorset.
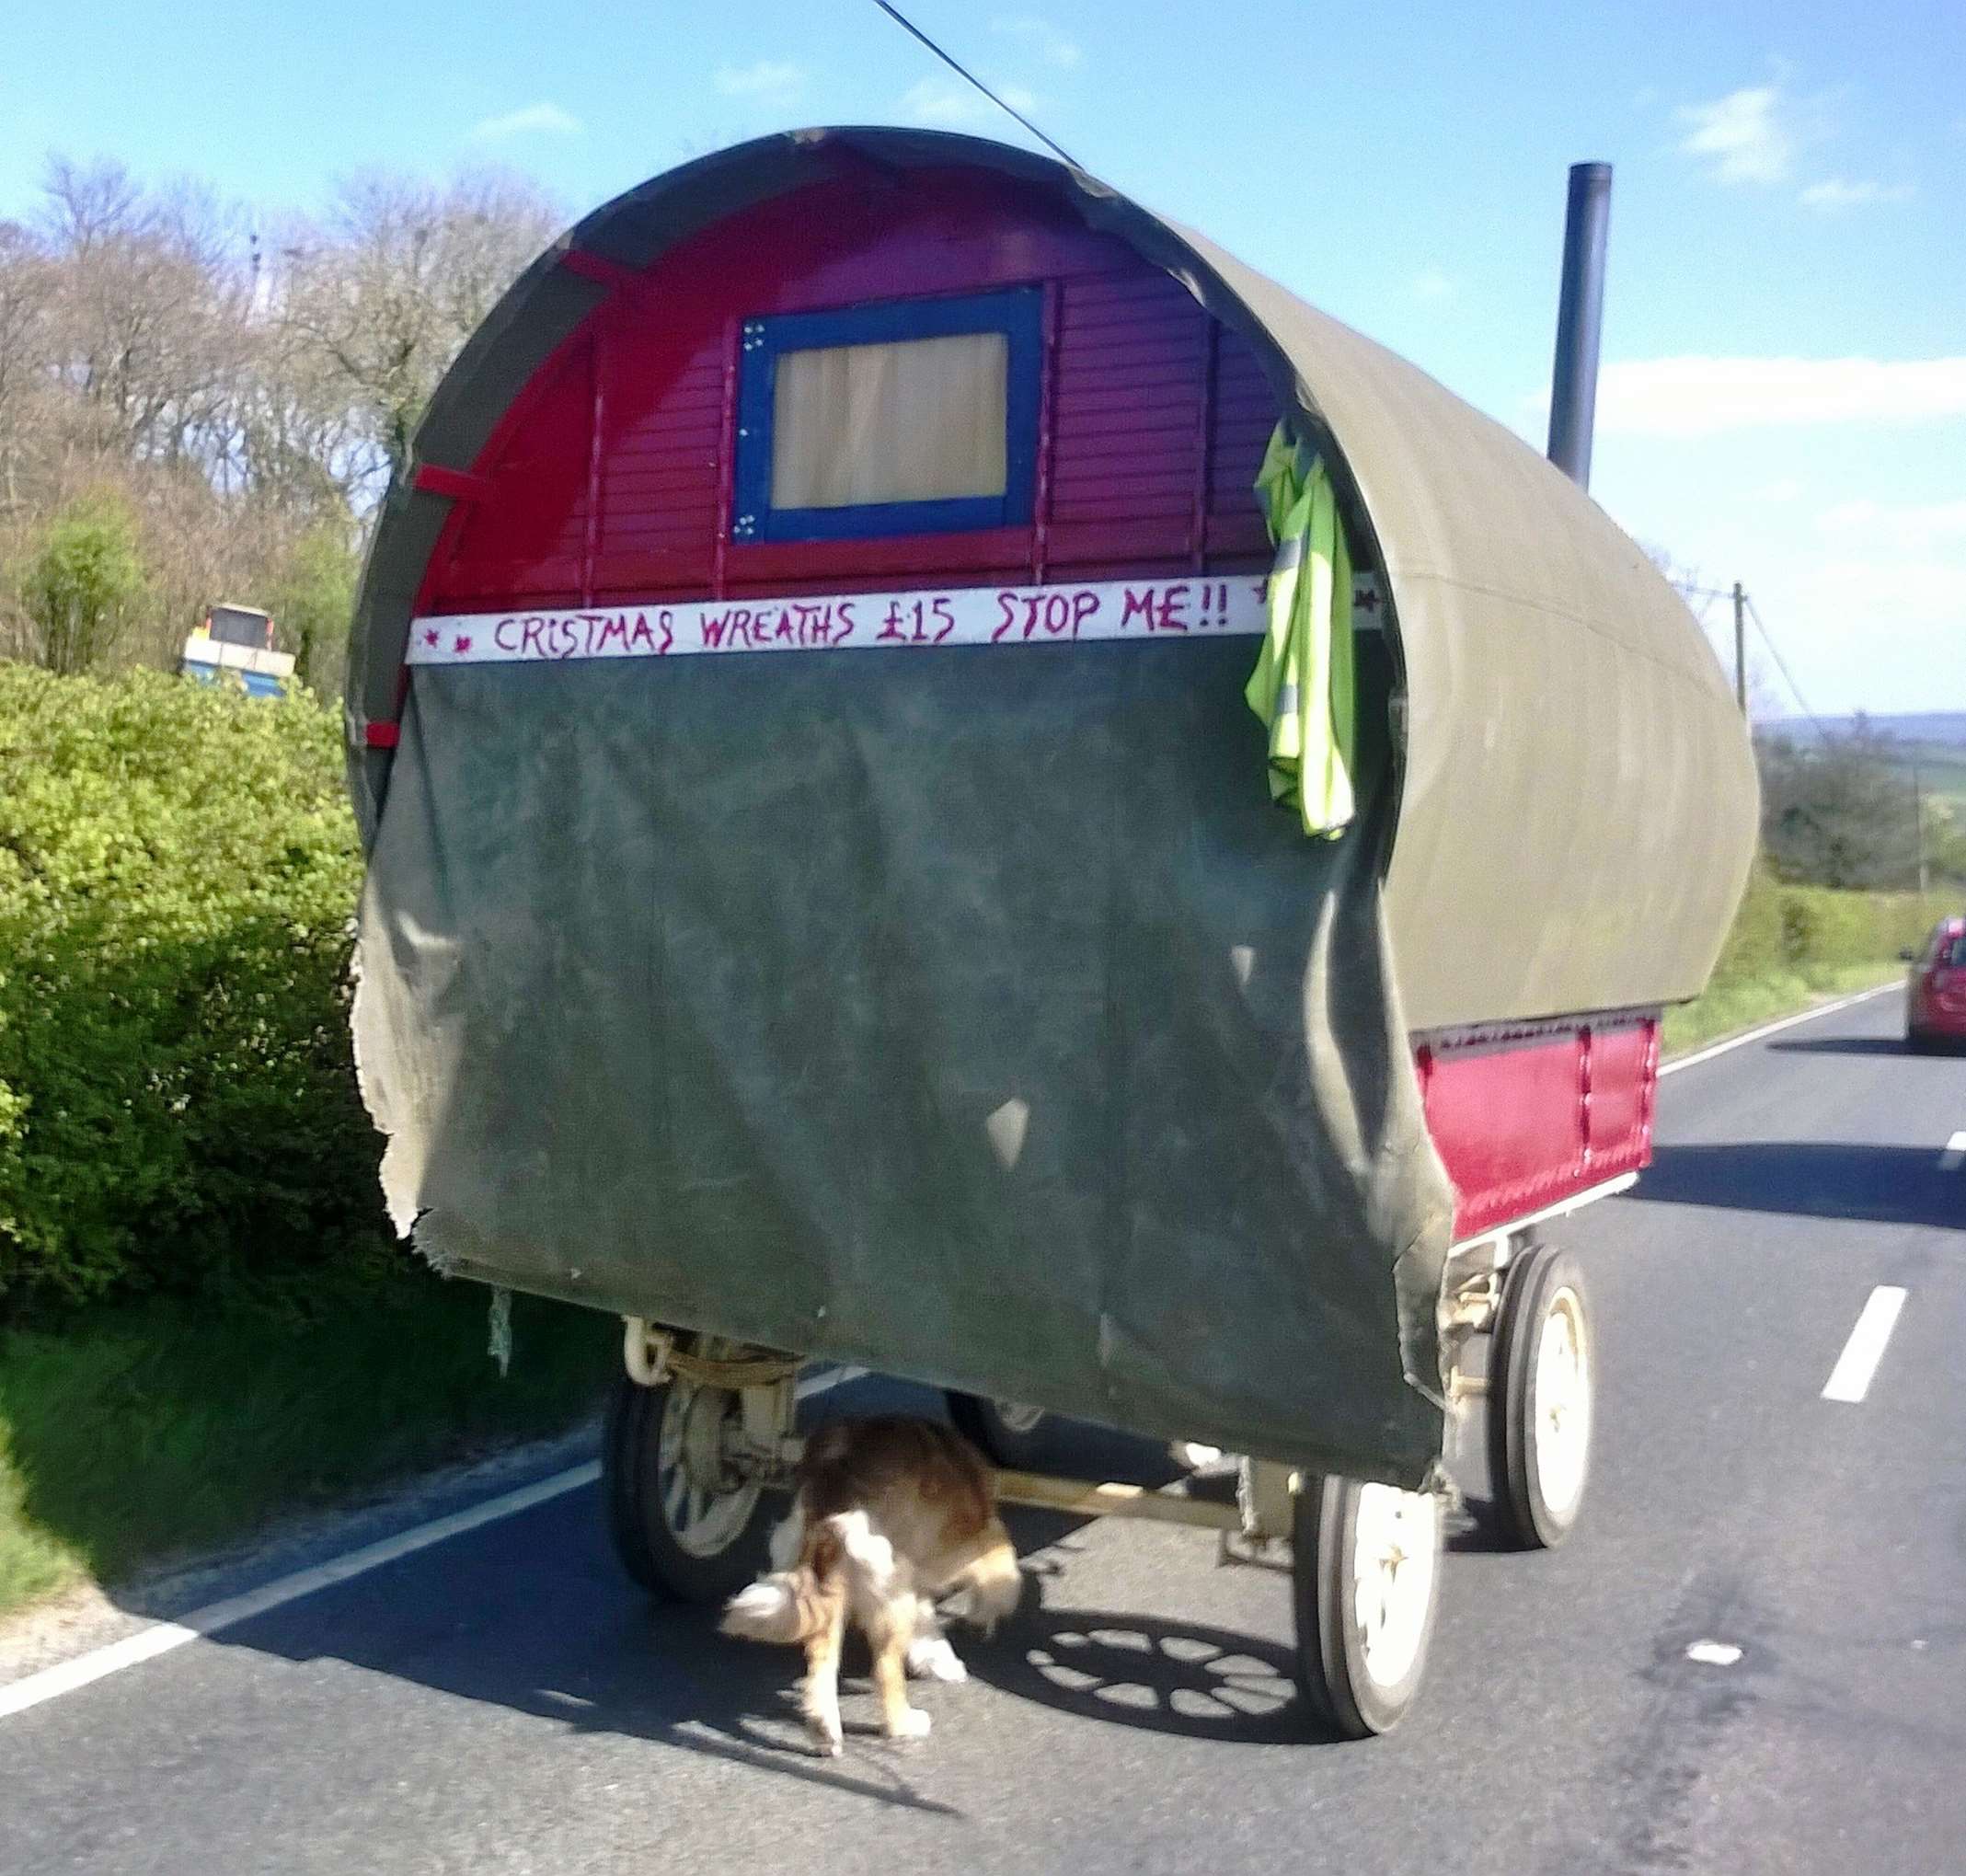
Rick drove us down there in his campervan so it did feel as though we were off on a holiday from the start. I took this picture as we neared Fraser’s place. The angle is such that you can’t see the horse and it looks like the little dog at the back is pushing the Barrel Top along.
Arrival in Bearminster
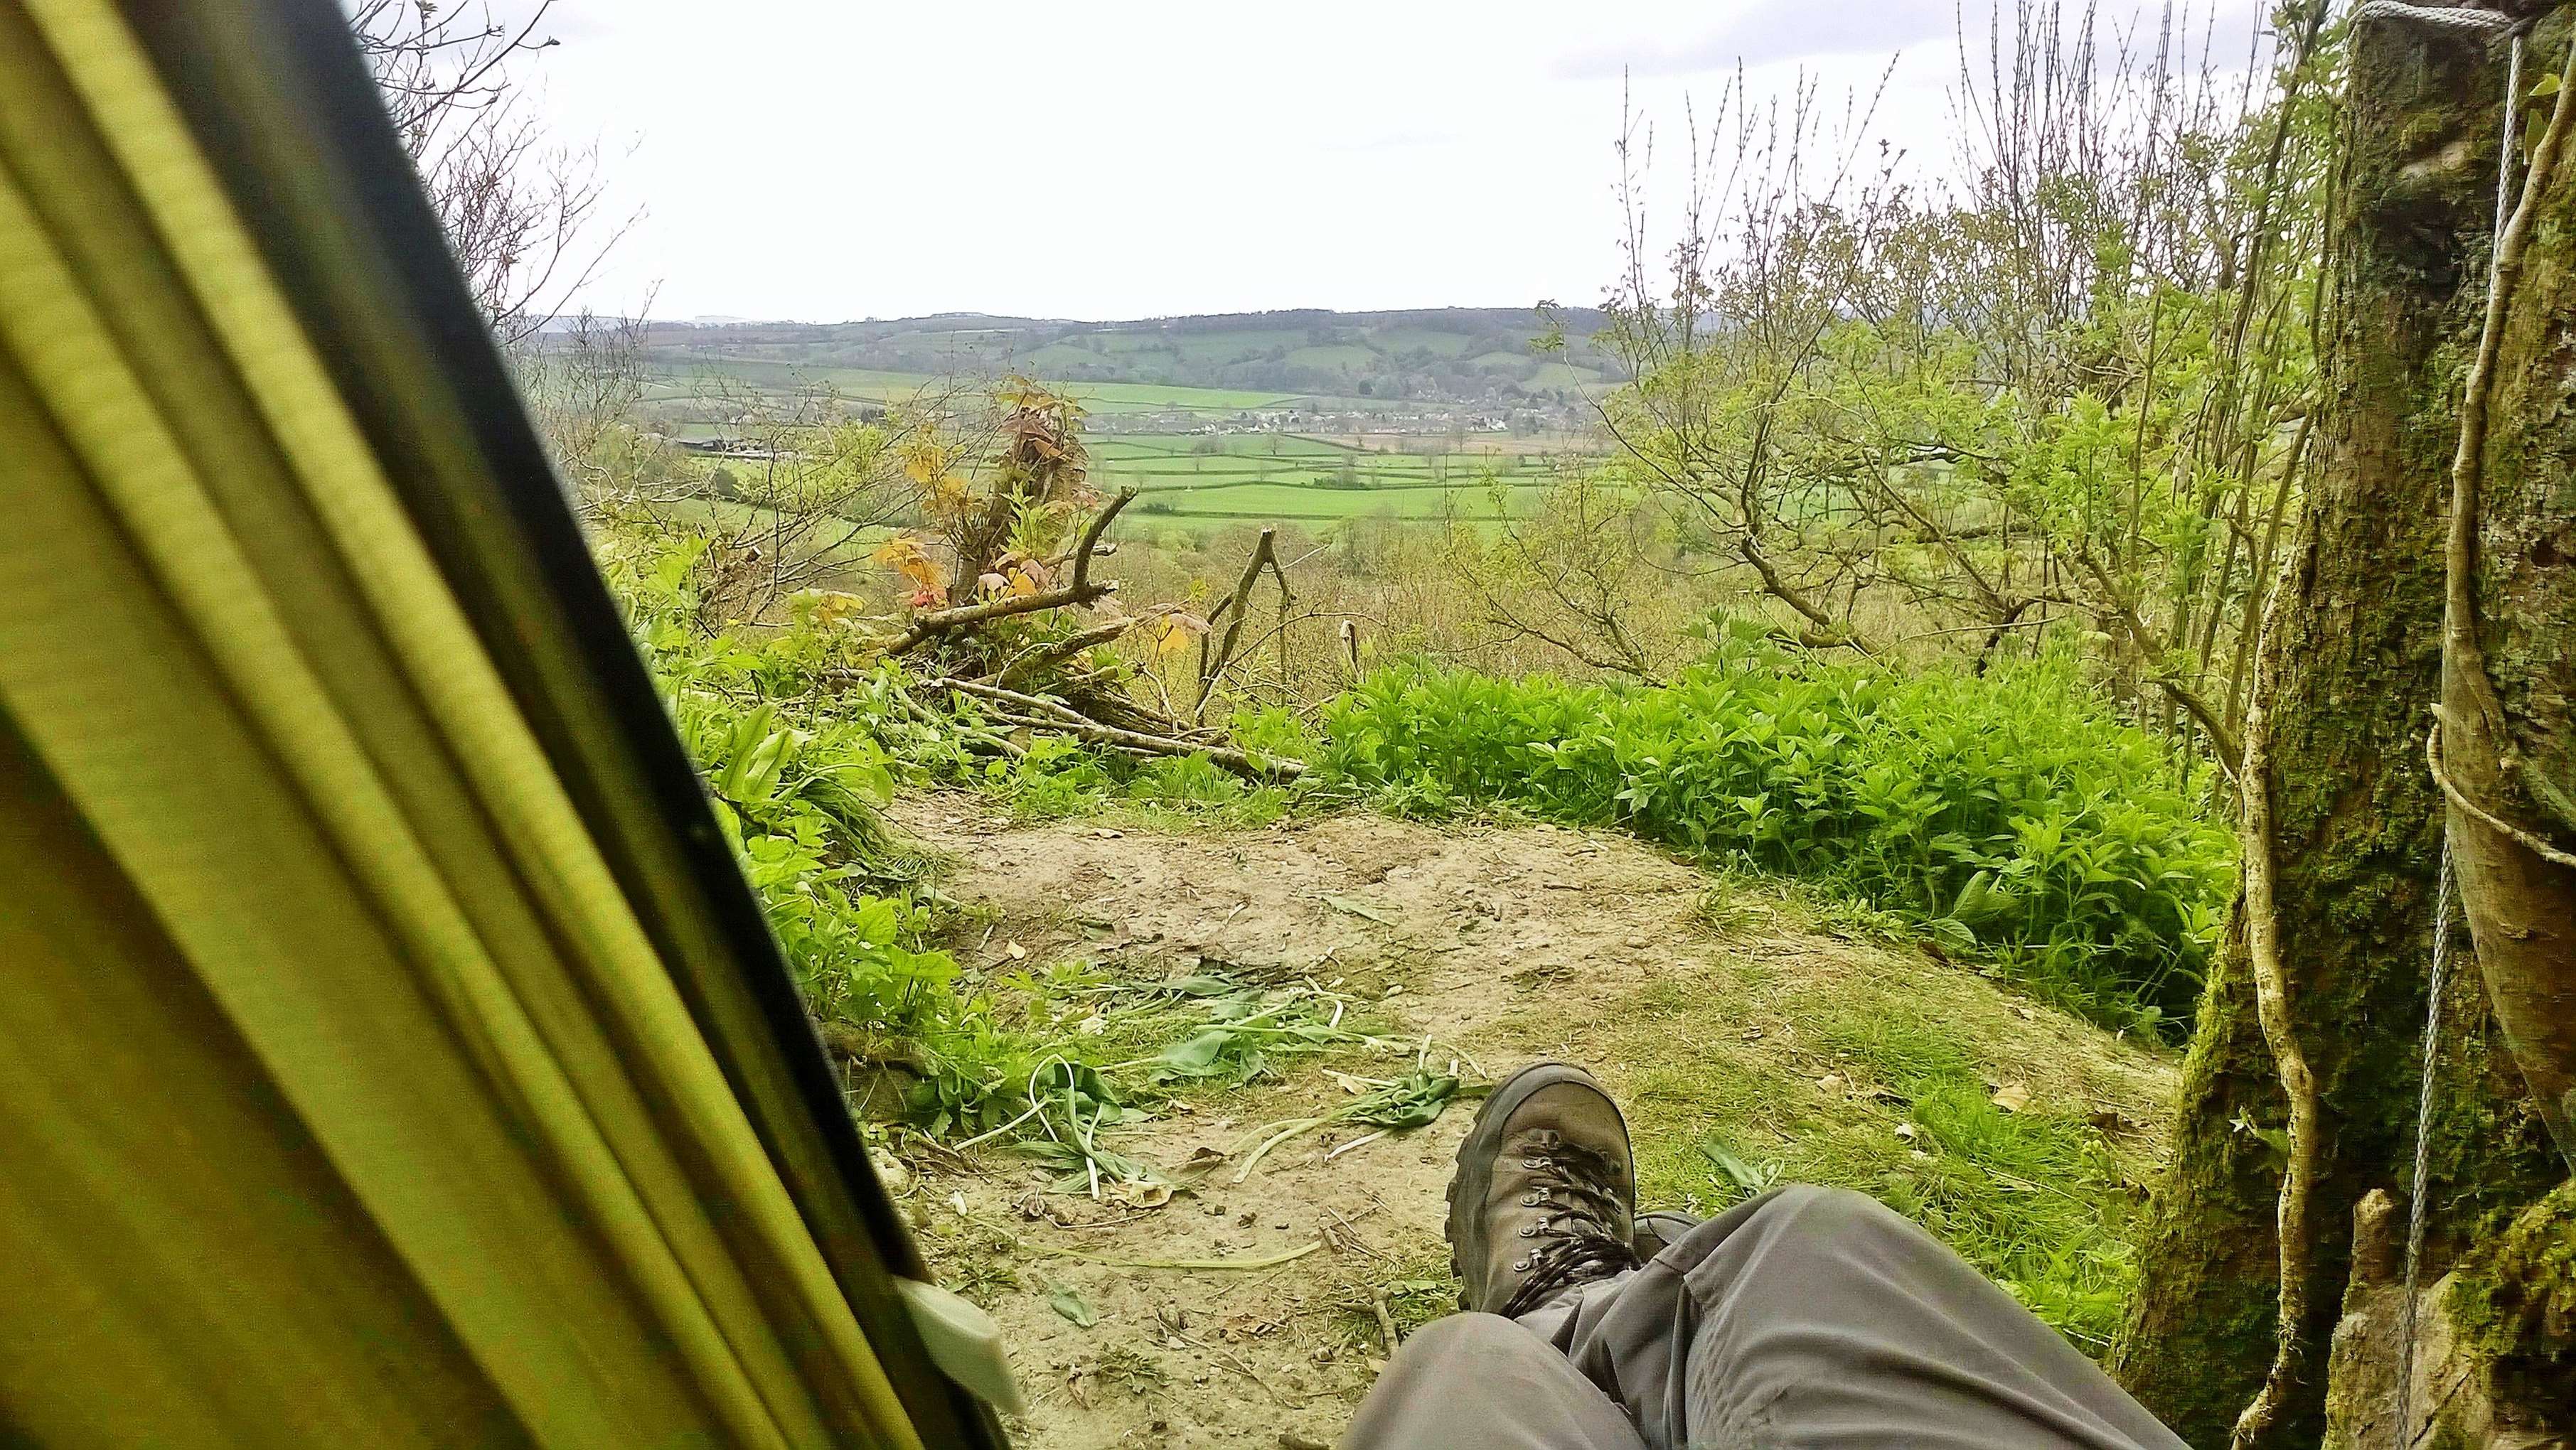
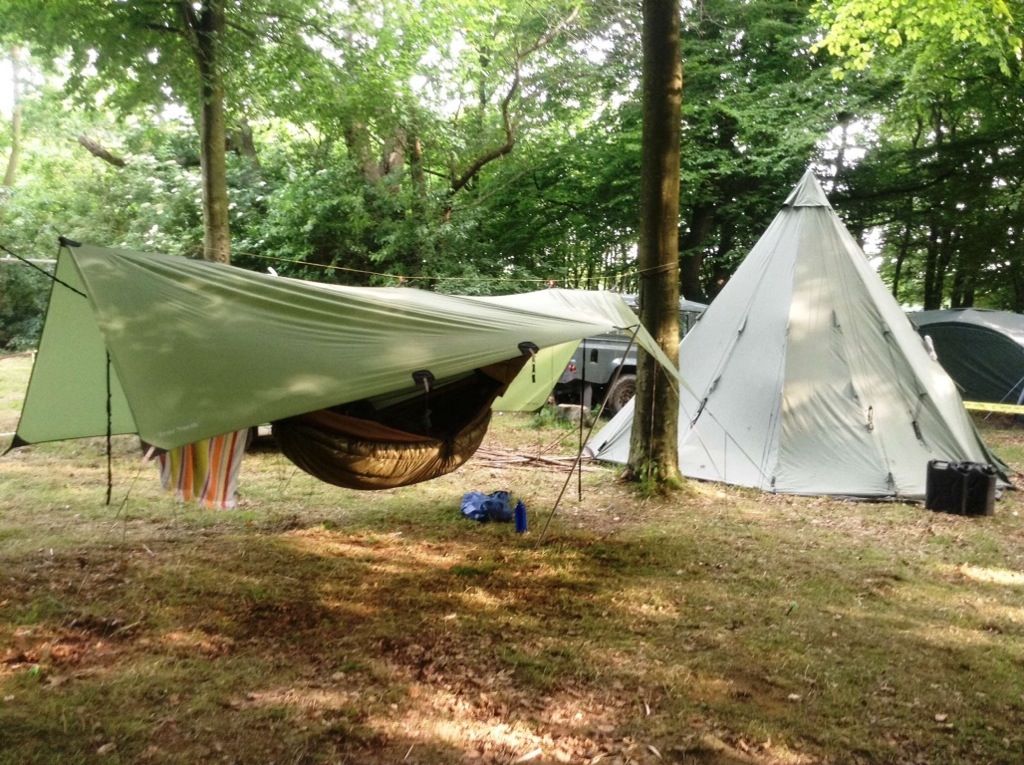
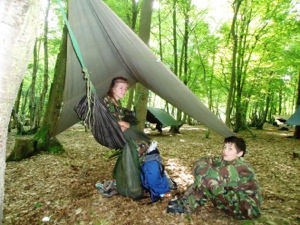
I found myself a nice spot for my hammock, on a bit of a slope so slightly slippy but the view was worth it. I had also brought along a couple of other hammocks for Gordon and Rick to use.
The rest of the Friday was spent teaching the guys how to put their hammocks and tarps up, carrying all the kit up to the site and chilling around the fire eating excellent food cooked by Fraser.
My home for the weekend
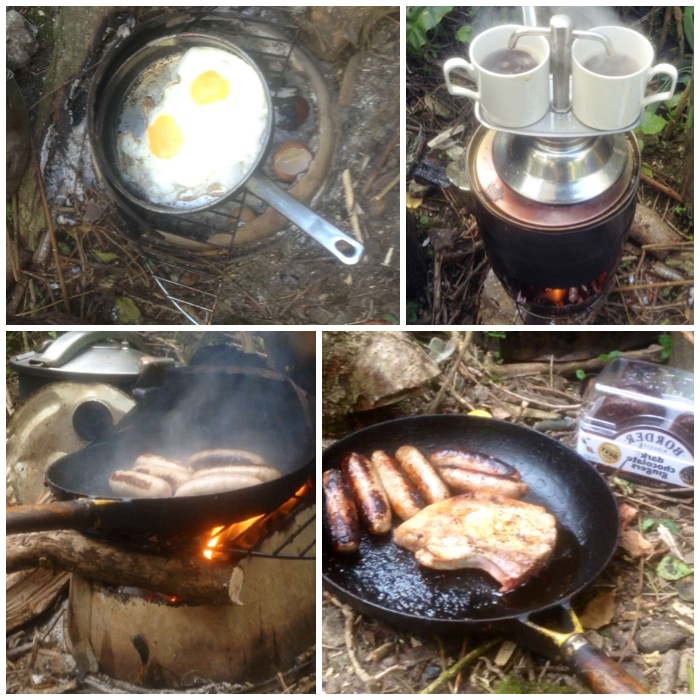
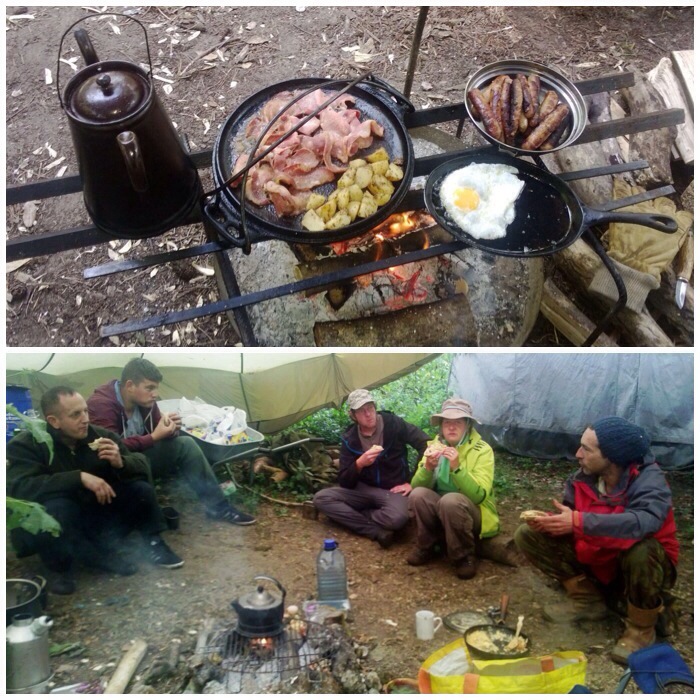
Food is always a dominant part of any visit to Fraser’s place. Breakfasts were a slow relaxed affair with plenty to eat and the coffee was excellent as well.
Breakfasts were good
As usual whenever I spotted some beautiful plants out came my trusty phone camera. I am very impressed with the results I get from the camera on my Nokia Lumia 820 phone (not being sponsored to say that!).
Figwort, Horsetail and Scarlet Pimpernel
That first morning was spent collecting ramsons, or wild garlic (Allium ursinum), to pickle for later use. I’ll do a separate post on this later.
Ramson forage
Lunch was a tortilla cooked on the open fire with the ransom adding that lovely garlicky flavour.
Ramson tortilla lunch
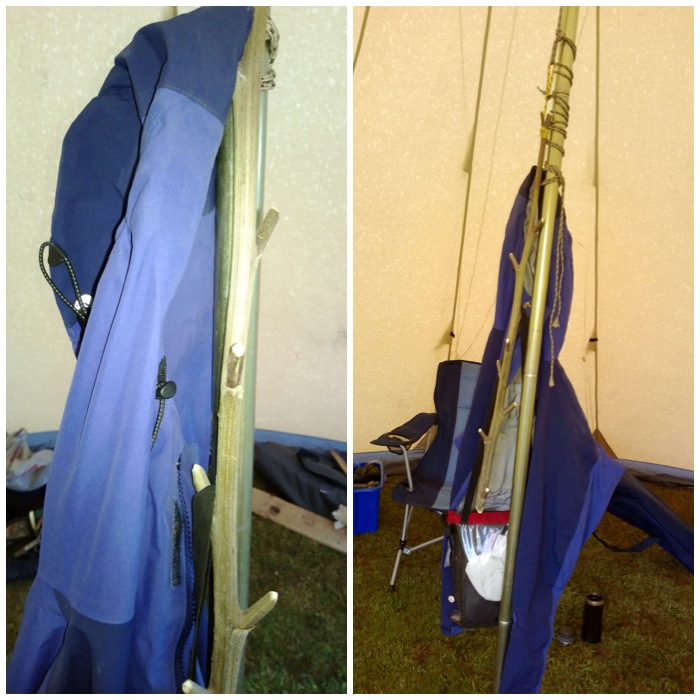
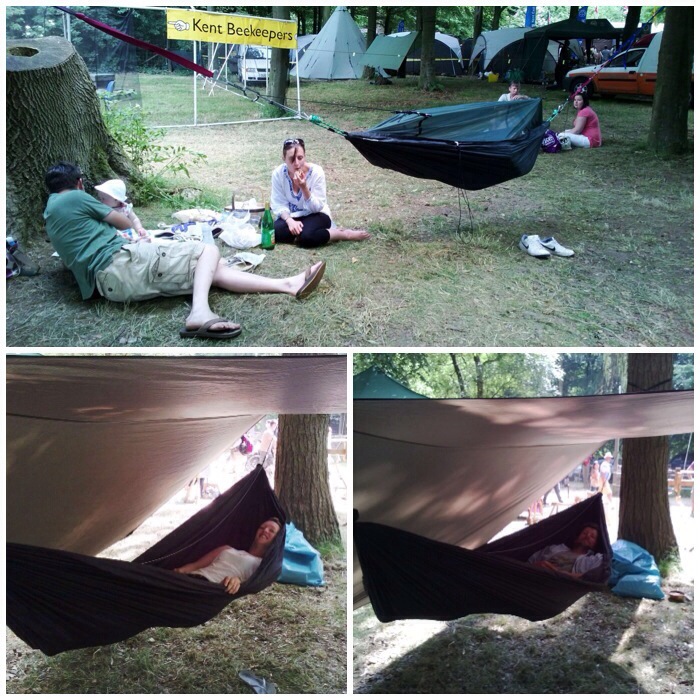
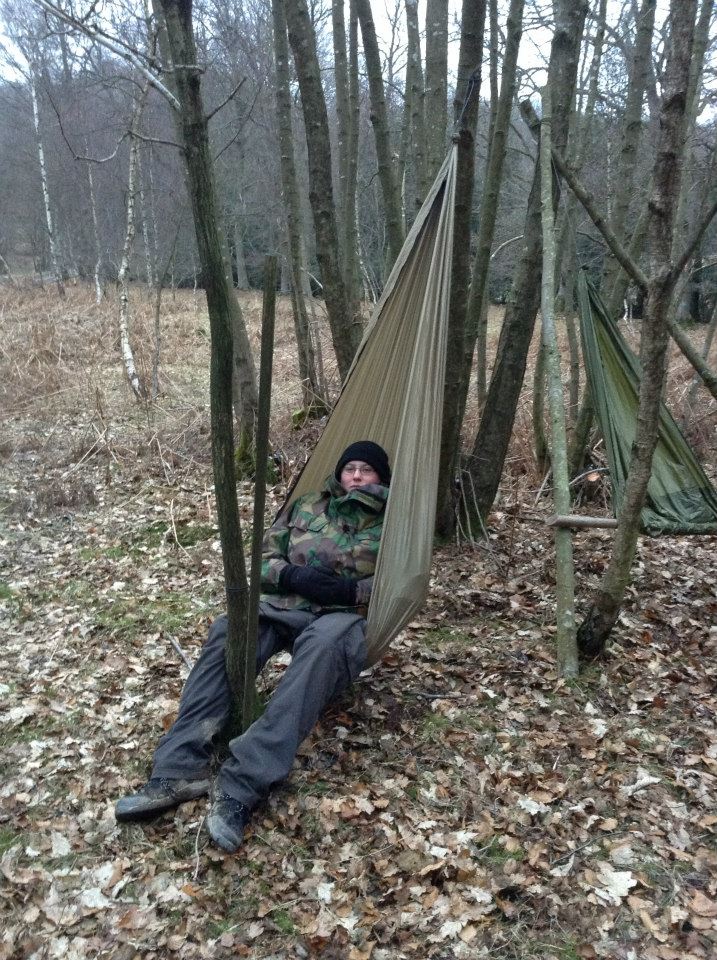
One of my main aims of the weekend was to find some chill-out time. I did that with my trusty EDC hammock chair from UKHammocks. The views were wonderful.
Post-lunch relaxing in my EDC hammock chair
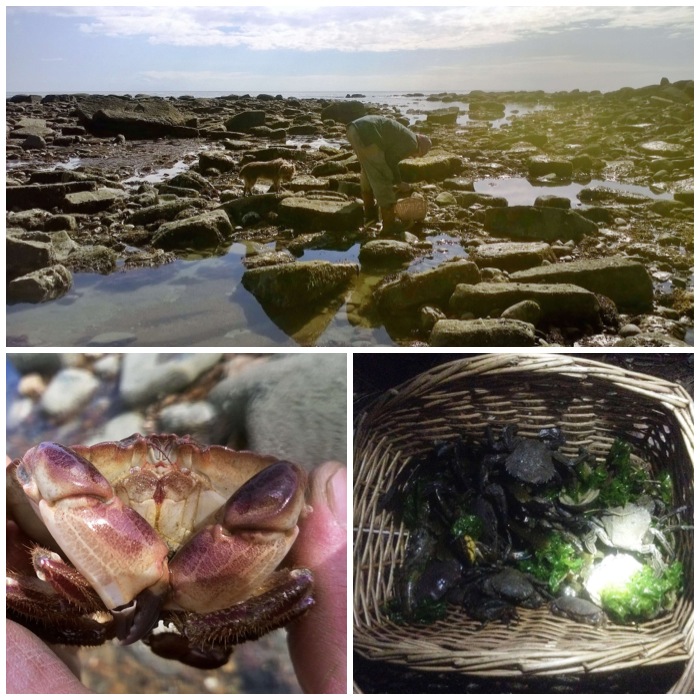
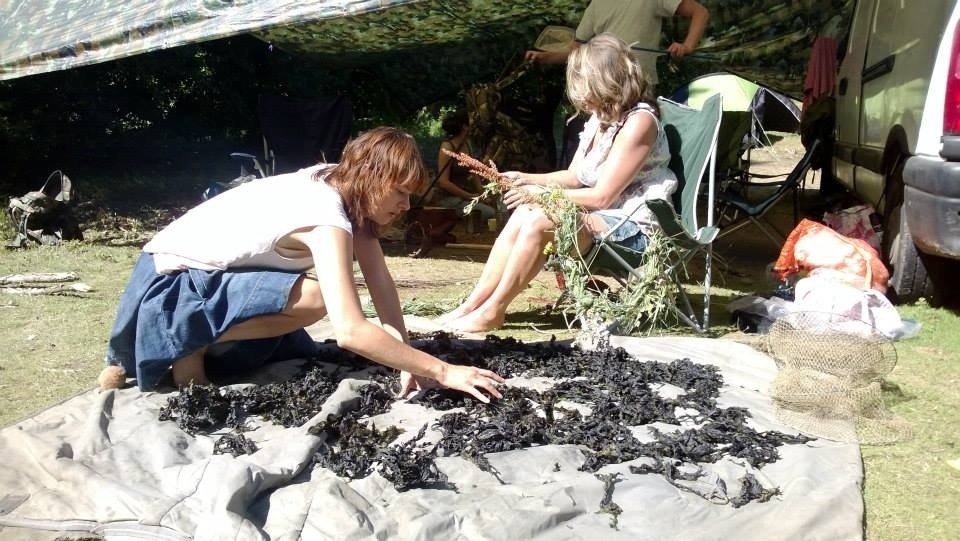
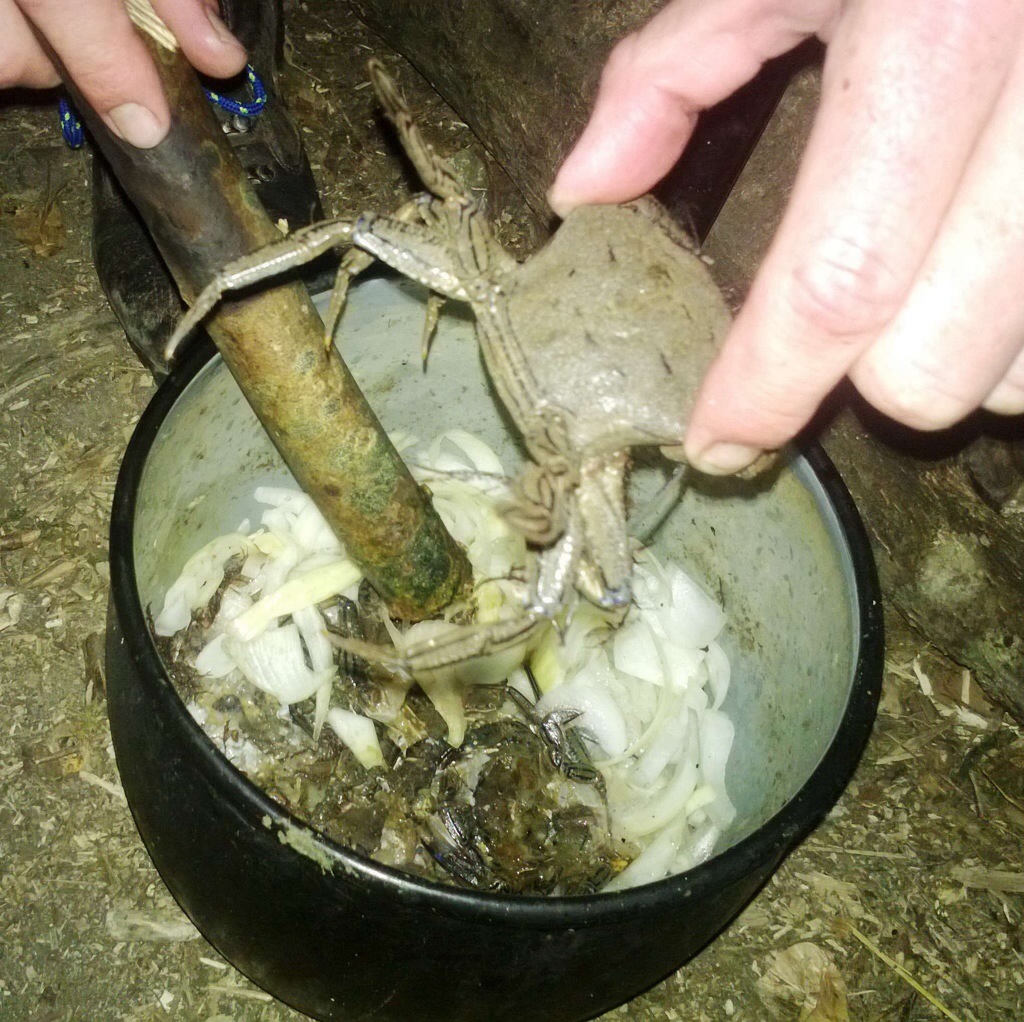
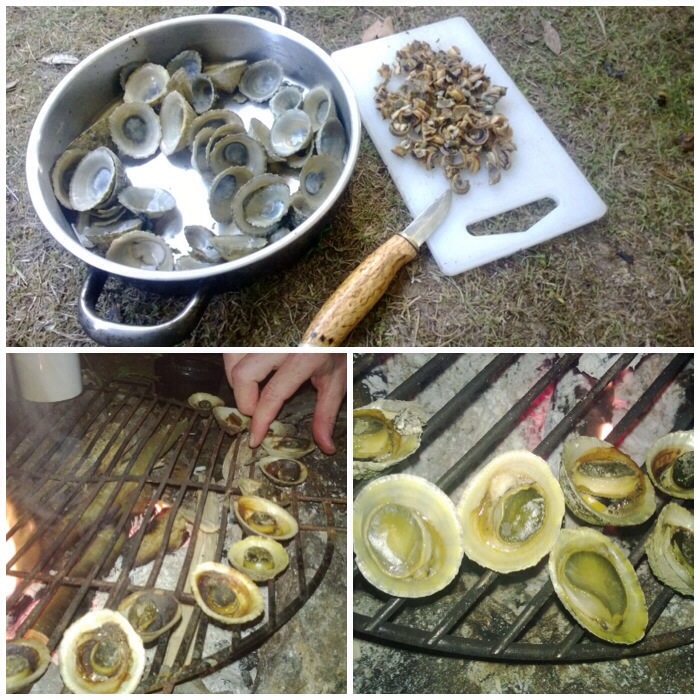
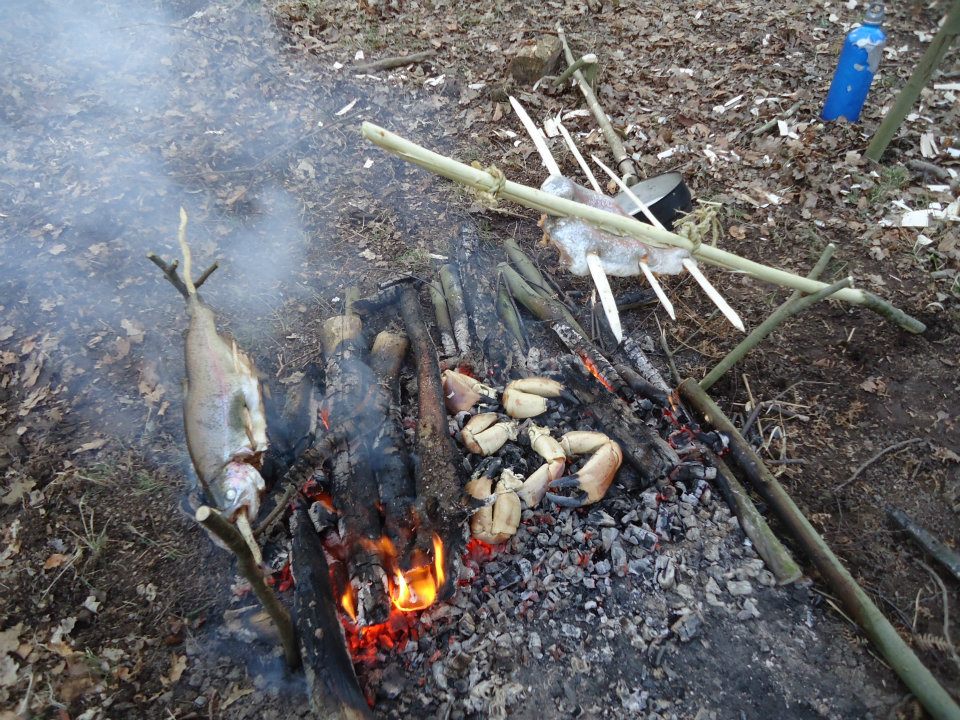
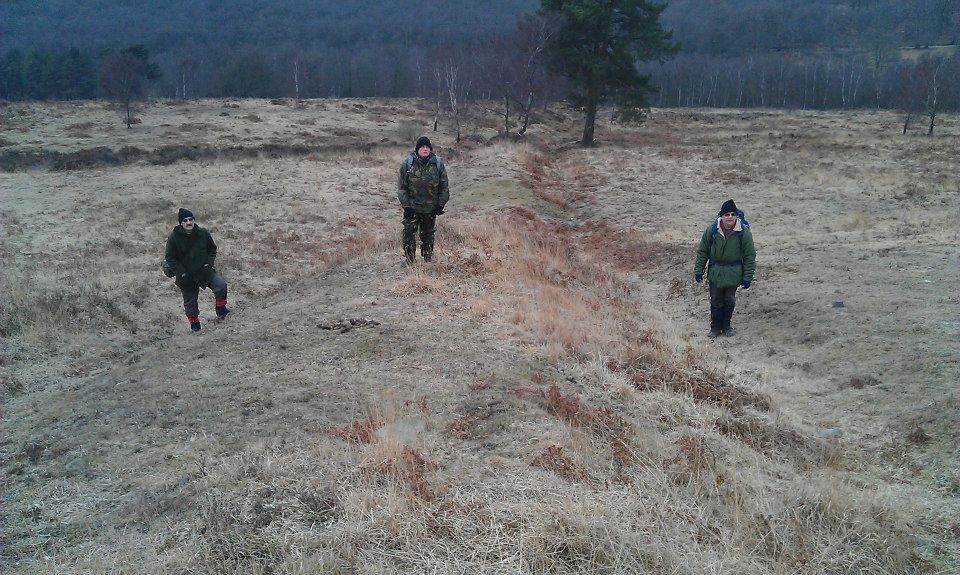
Saturday afternoon was spent down on the coast near Bridport foraging for crabs, small fish, limpets and seaweed. We met some other friends on the coast – Paul Burkhardt and Paul Newman – while we were there. Both Pauls were also looking for fossils. This part of the coast is full of fossilised sea creatures and it doesn’t take long to find them once you get your eye in.
Coastal Forage
The walk along the coast was a very pleasant affair but I was ever mindful of the risk of the clay cliff faces collapsing. With all the recent rain they did look rather unstable, with lots of collapsed areas.
Man’s best friends
I made a couple of videos on the Saturday:
Easter with Coastal Survival – Foraging
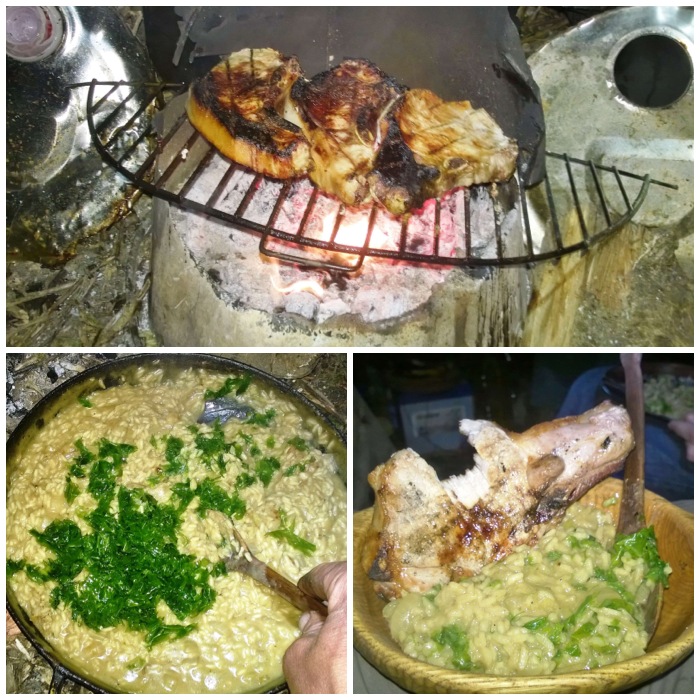
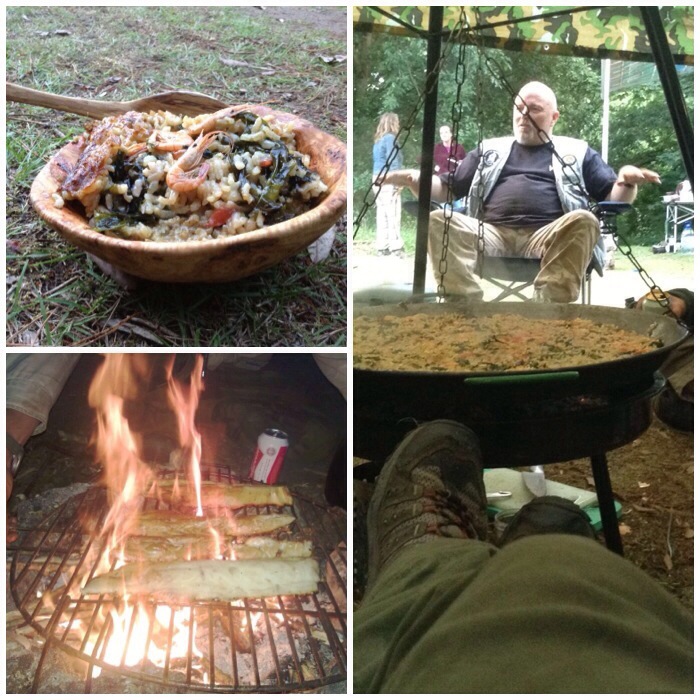
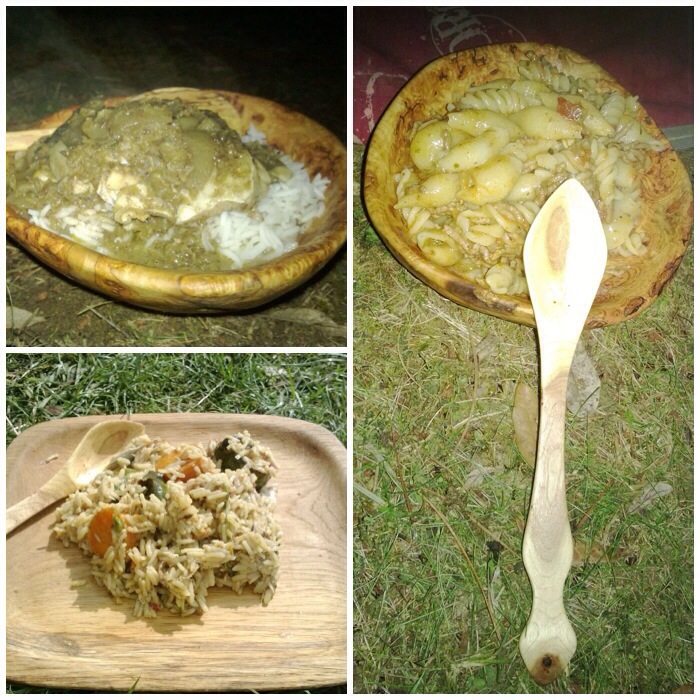
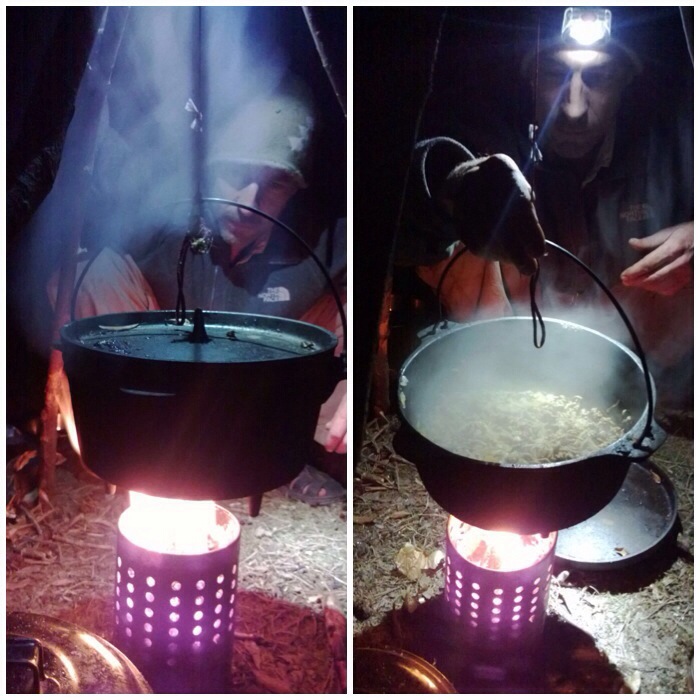
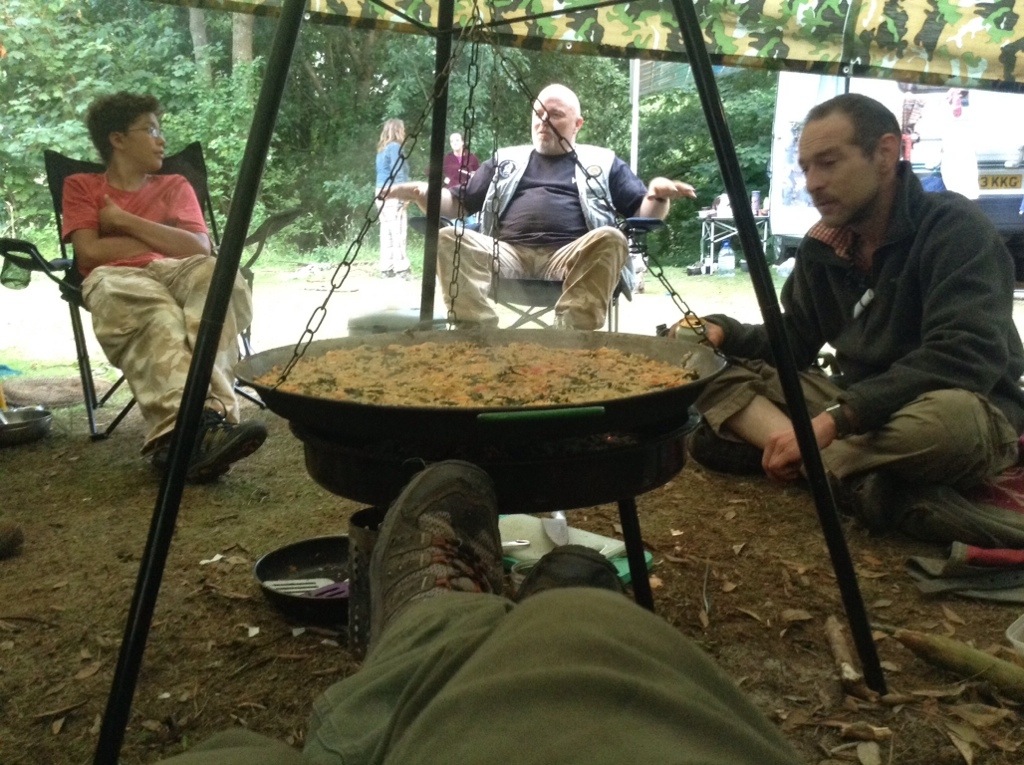
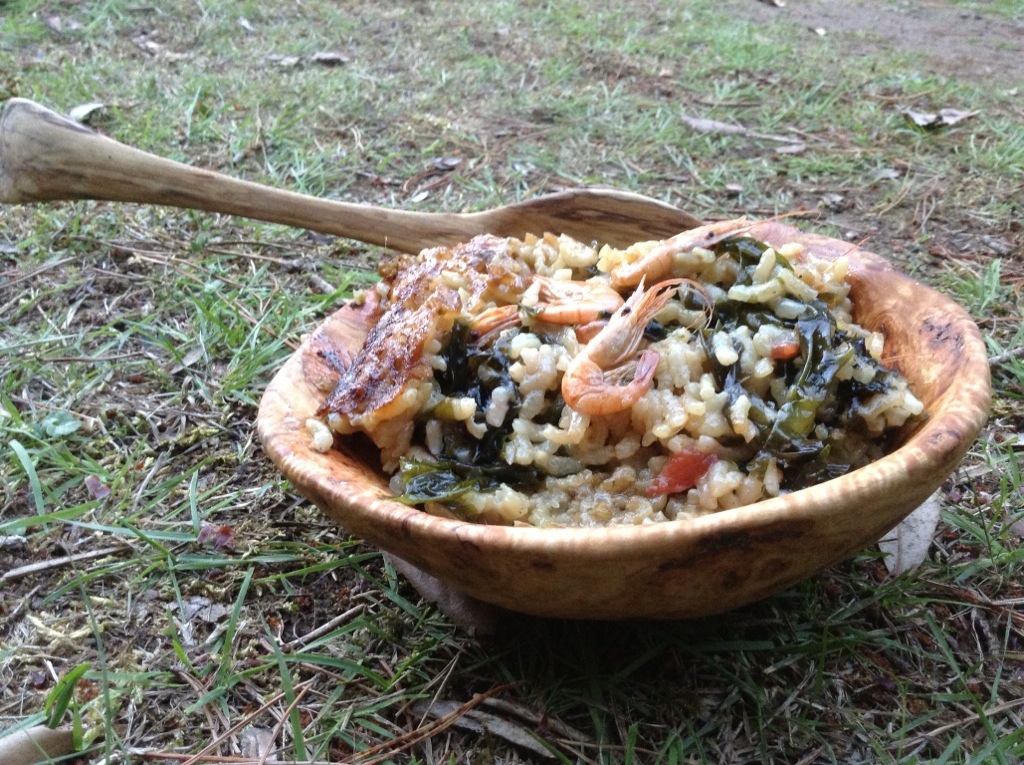
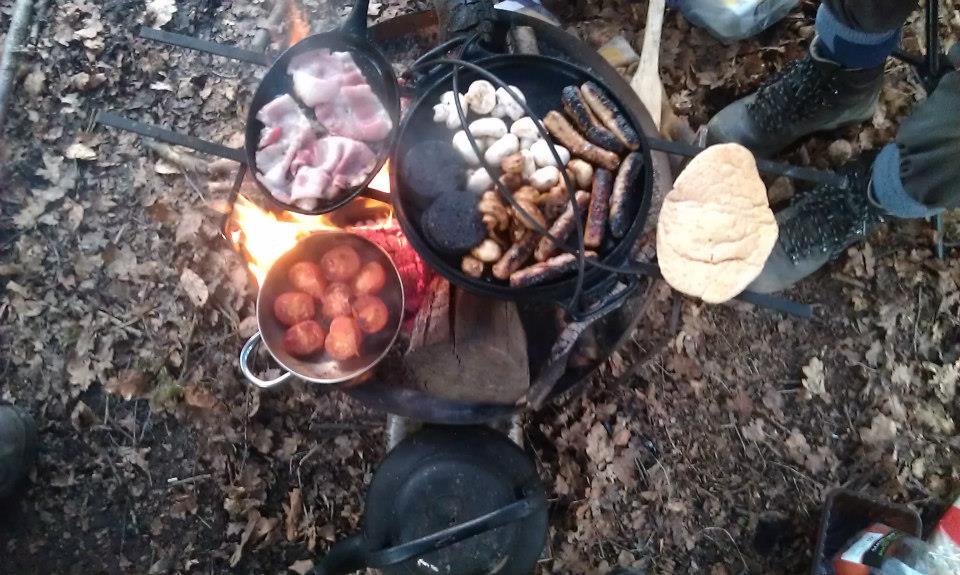
Dinner that night was a lovely risotto made with shellfish stock and a garnish of seaweed, topped with a chop for the non-vegetarians. It all went down a treat.
Seafood risotto and pork chops
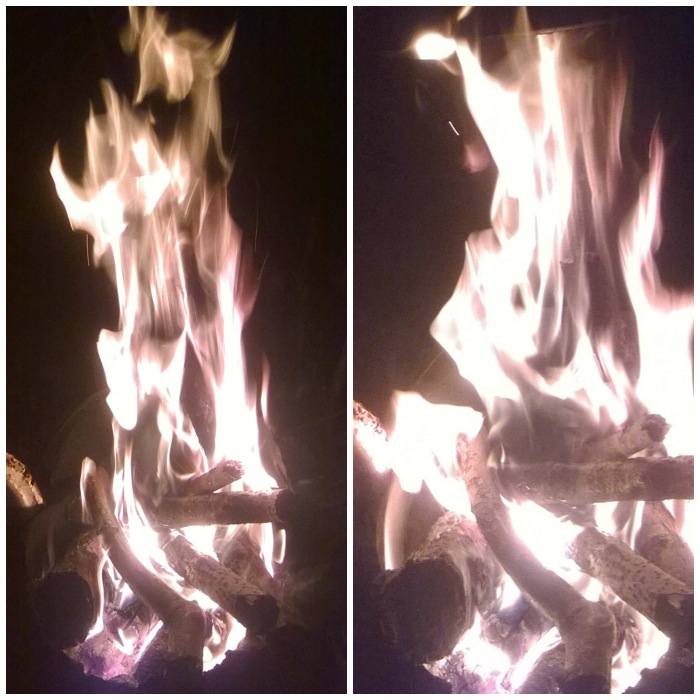
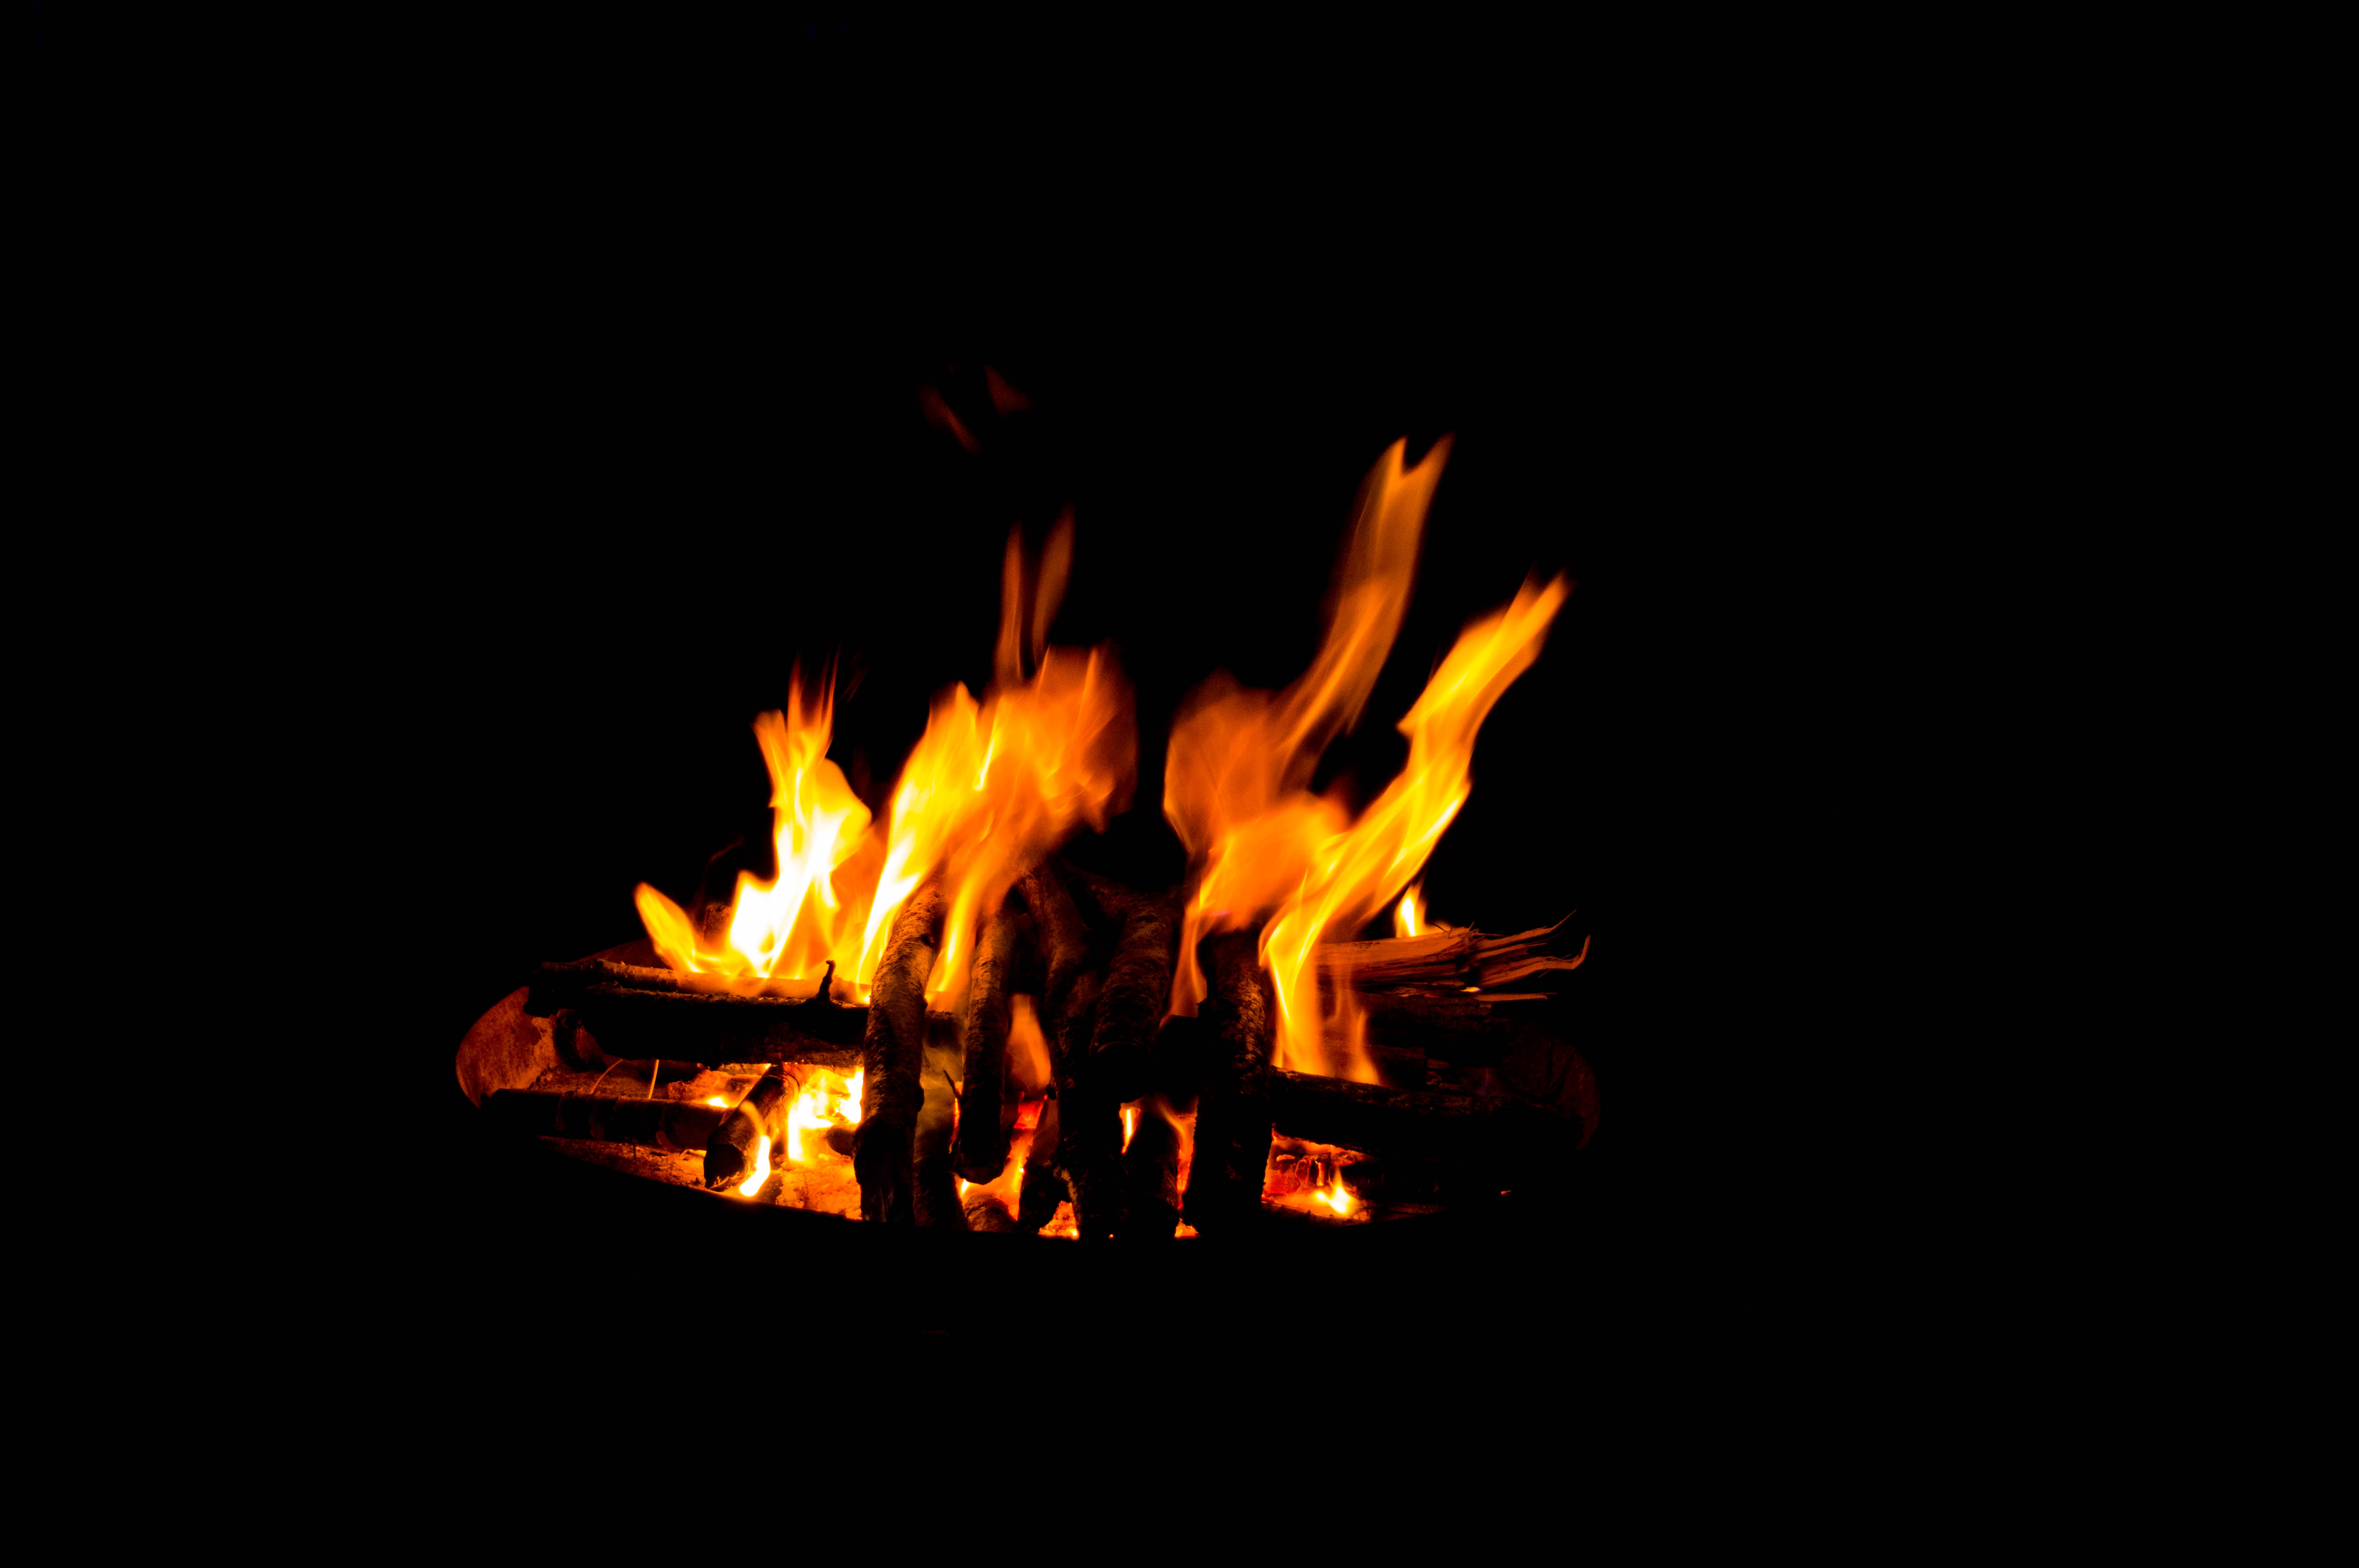
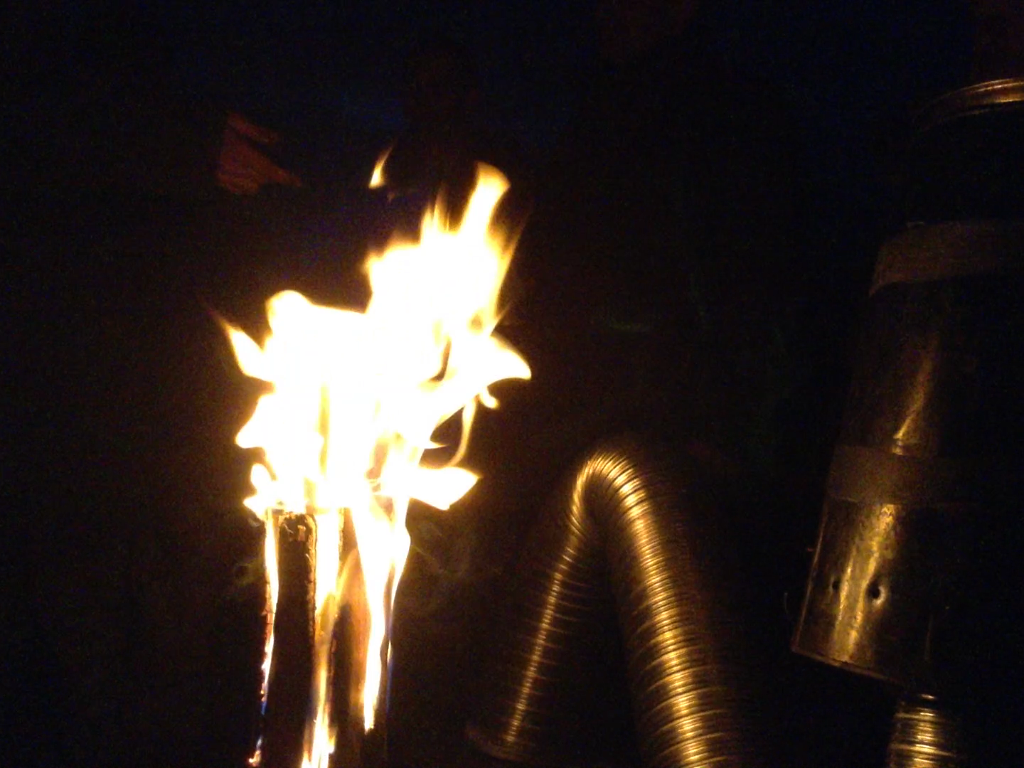
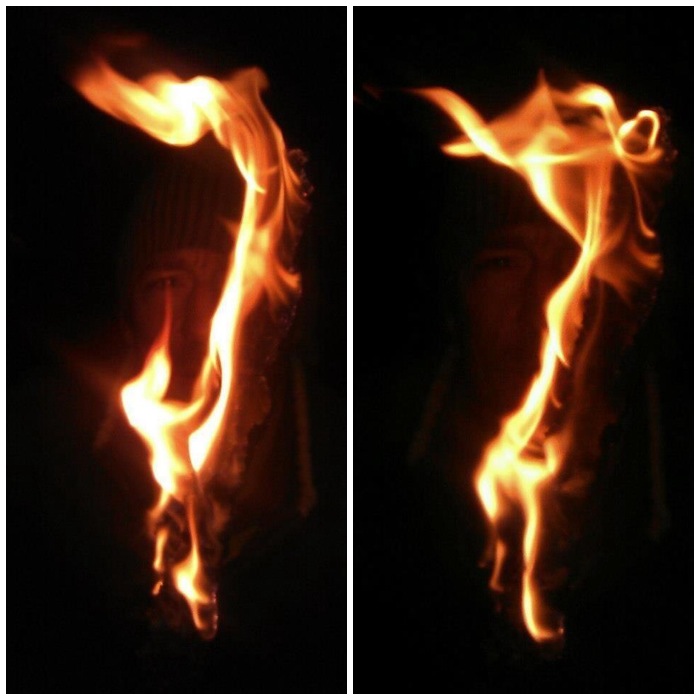
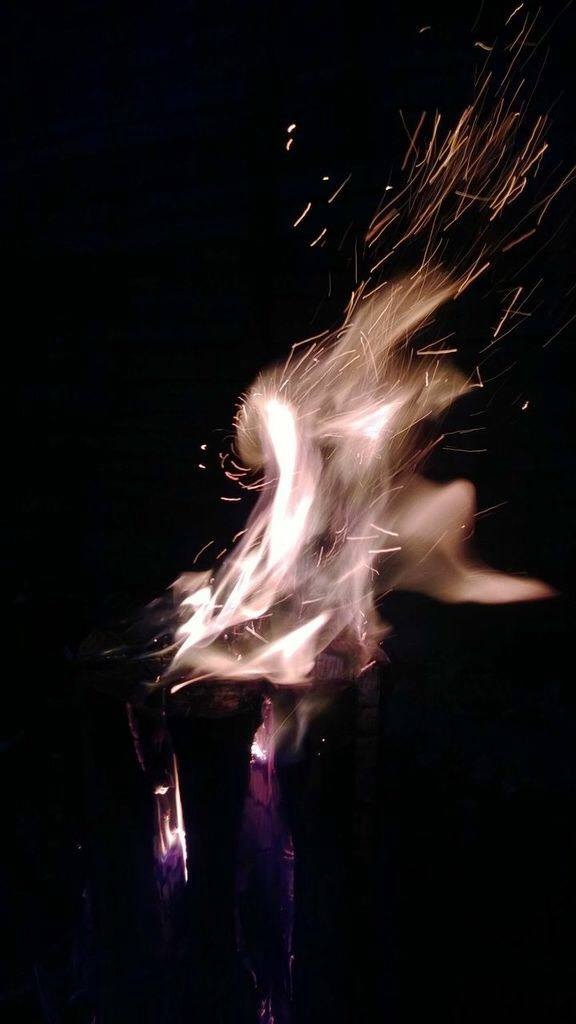
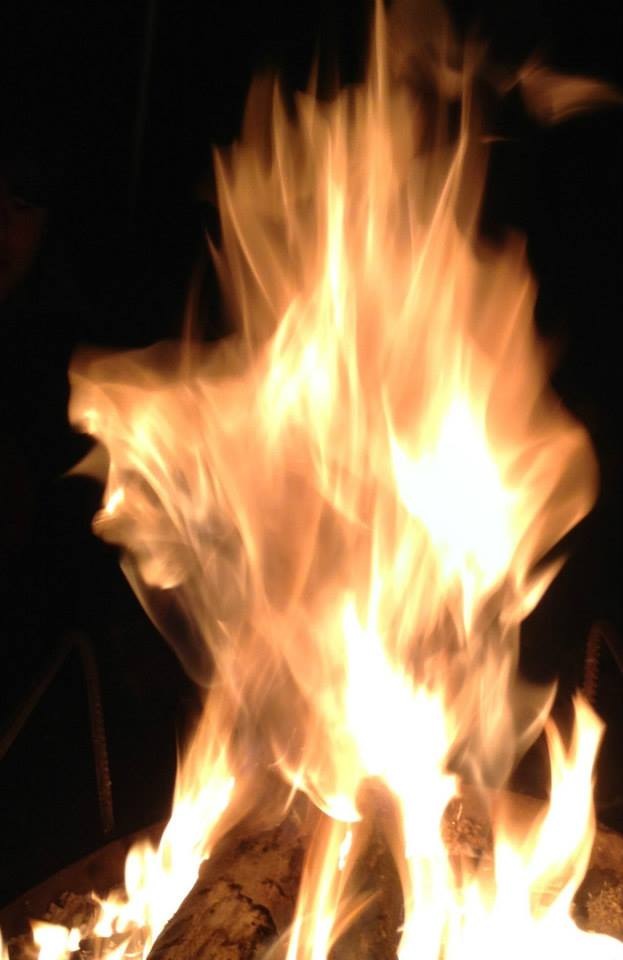
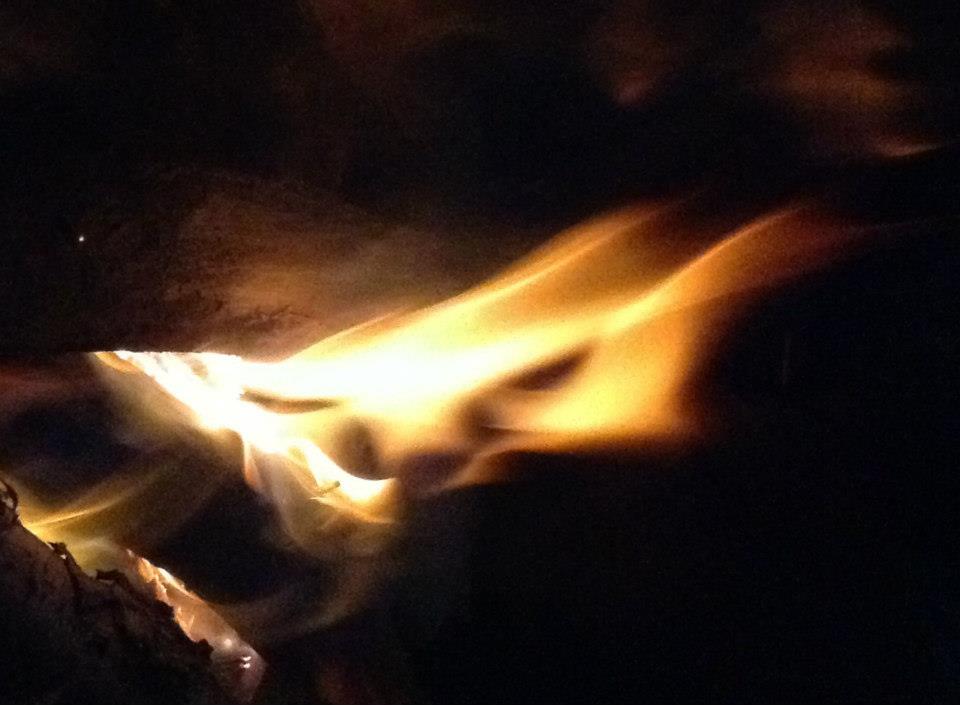
The Saturday evening was a quiet affair chilling out around the fire and testing out Fraser’s large gas wood burners (or more properly re-burners, as the gases produced are recirculated and reburned). I got a few fire faces and particularly like the Ent’s face (Lord of the Rings tree giant) in the one on the left.
Fire faces
On the Sunday morning we had a beautiful walk through the woods looking at the new growth, the animal tracks and the views. I took the top two pictures that morning just to see what kind of detail my phone camera could give me. The crab picture was from the day before.
I took a video that morning but encountered a few problems making it. The problem with the second video was that I managed to delete the original files before saving the clip in iMovie. I could then only view the clip in iMovie and couldn’t upload it to YouTube. To get round this I ran the clip on the iMovie app and re-videoed it with my phone camera (I hope that all makes sense). Not as high quality as the first one but I still want to post it here.
Easter with Coastal Survival – Day two walk
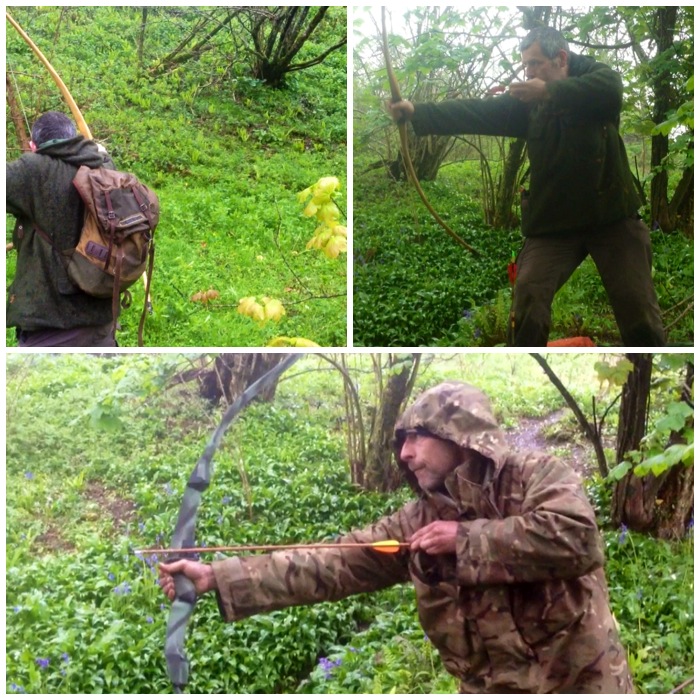
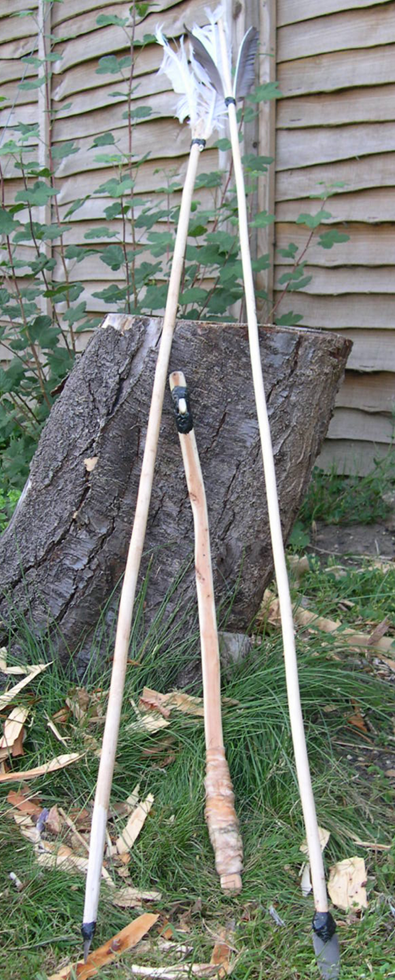
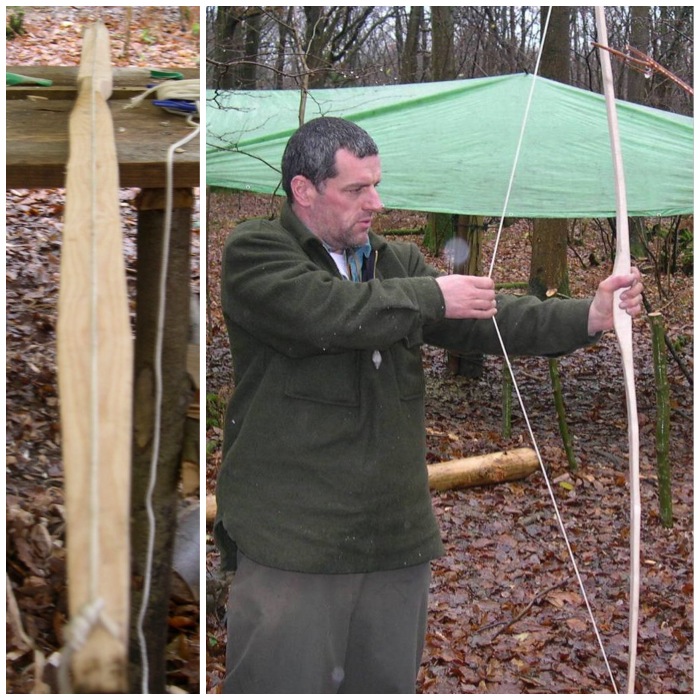
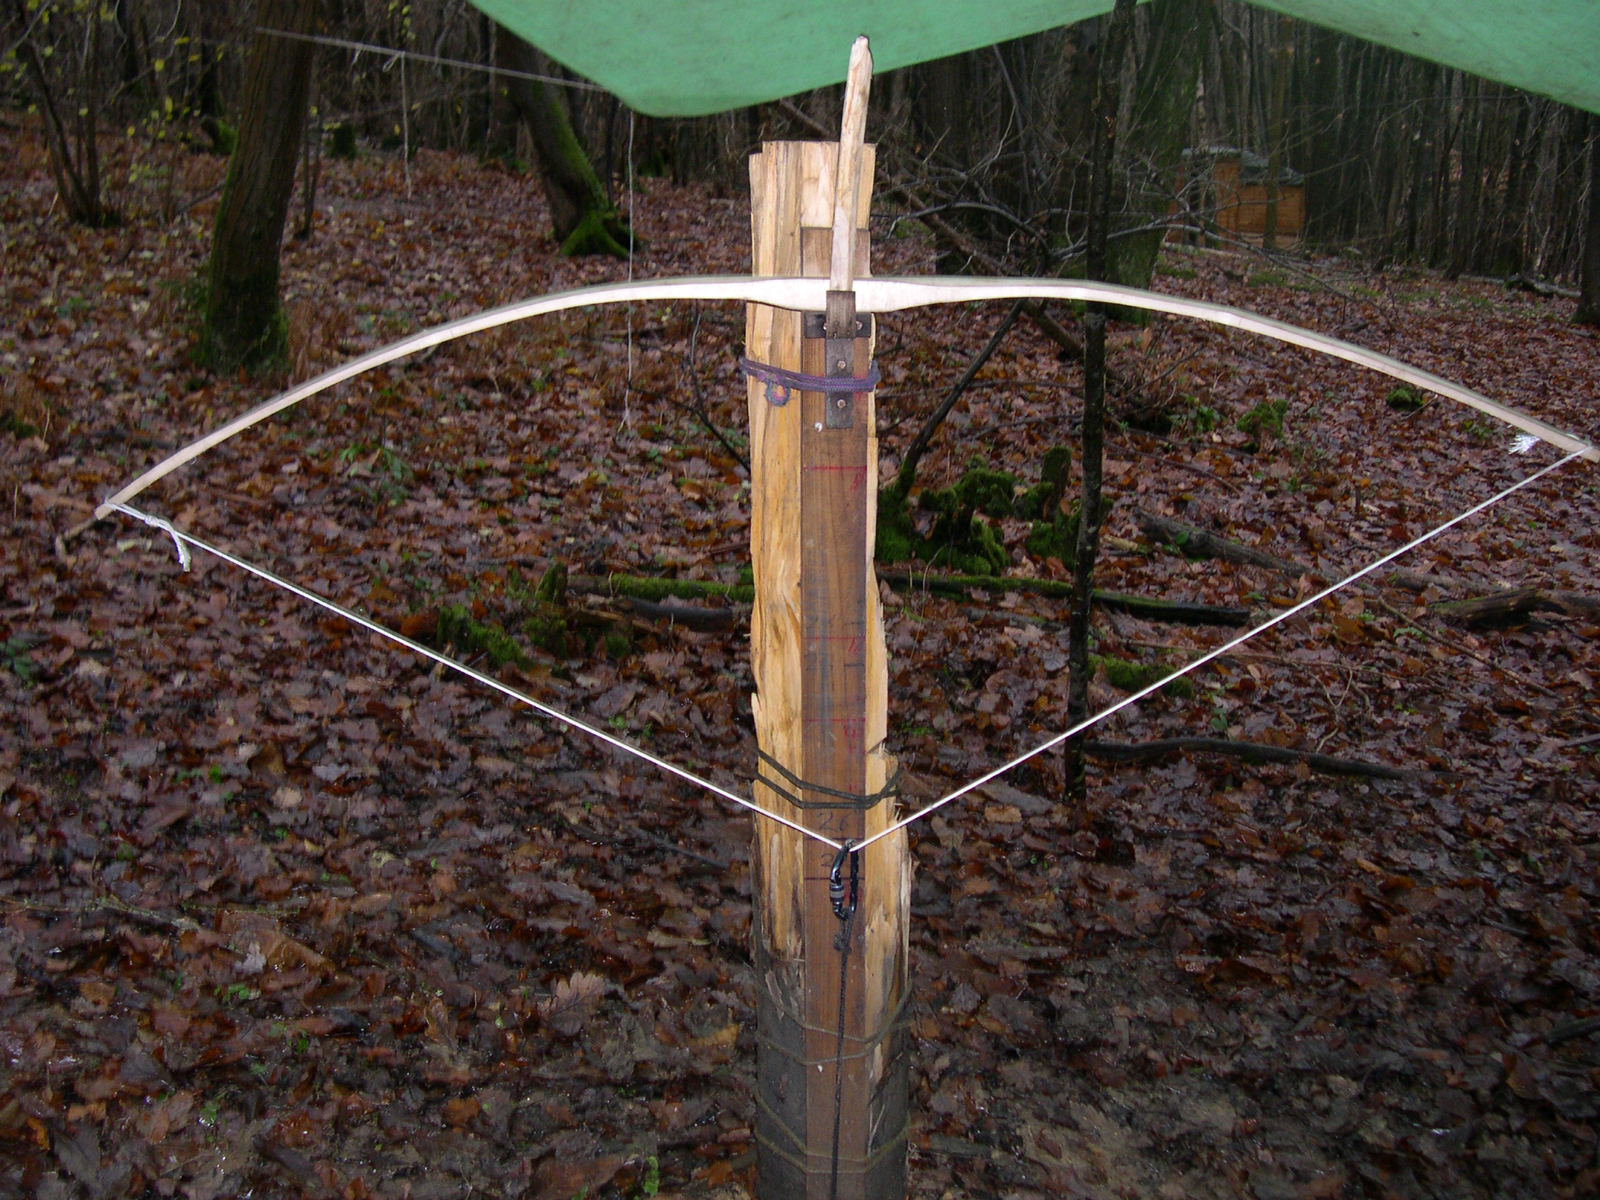
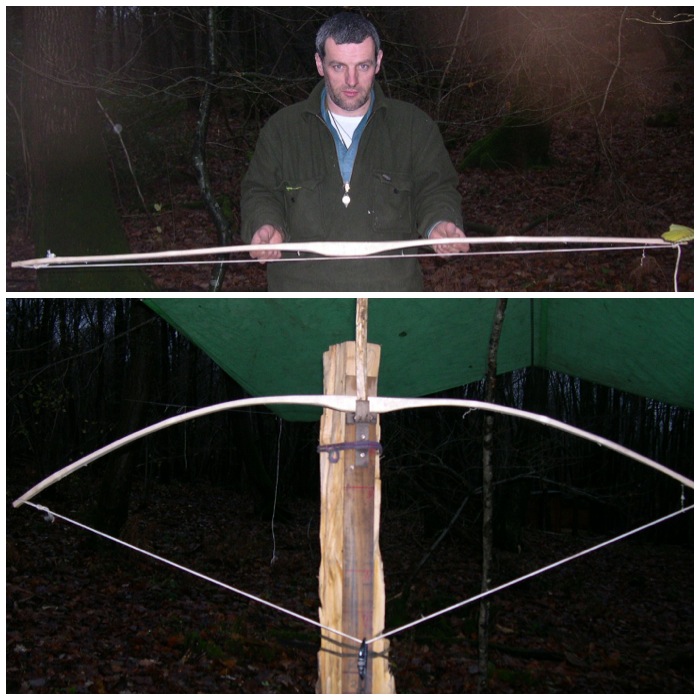
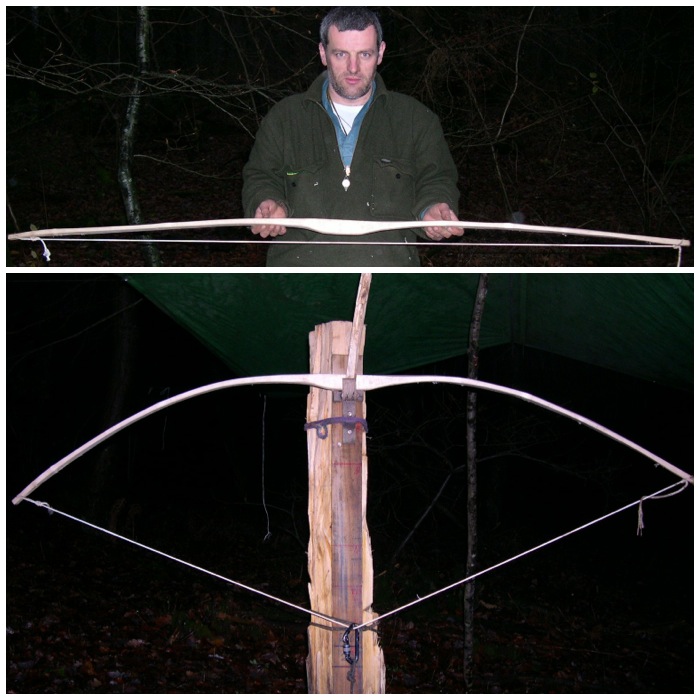
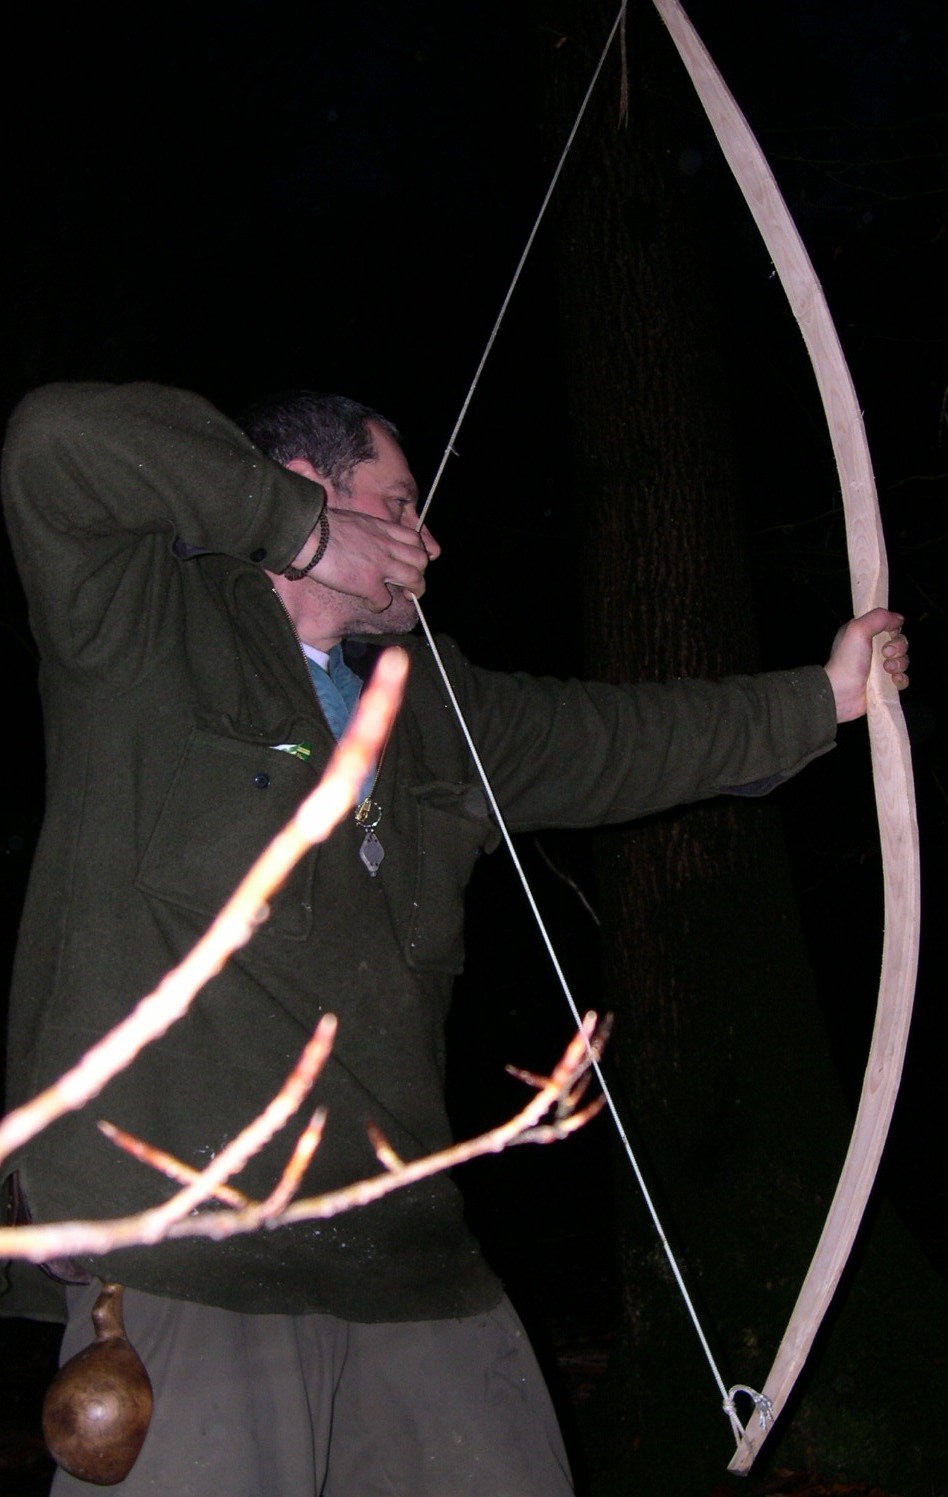
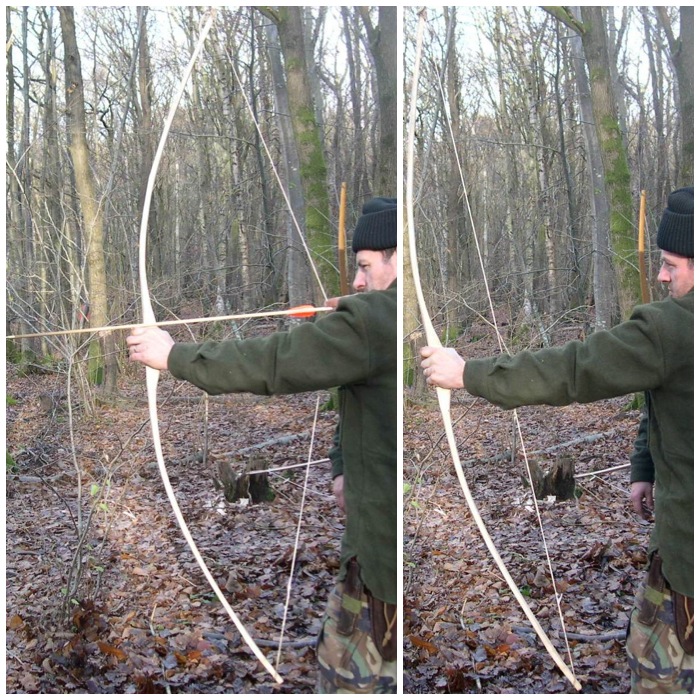
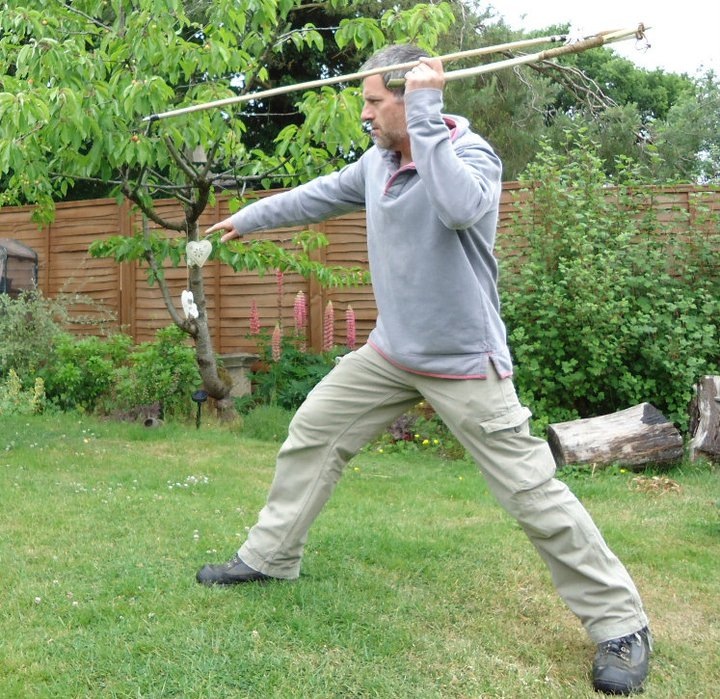
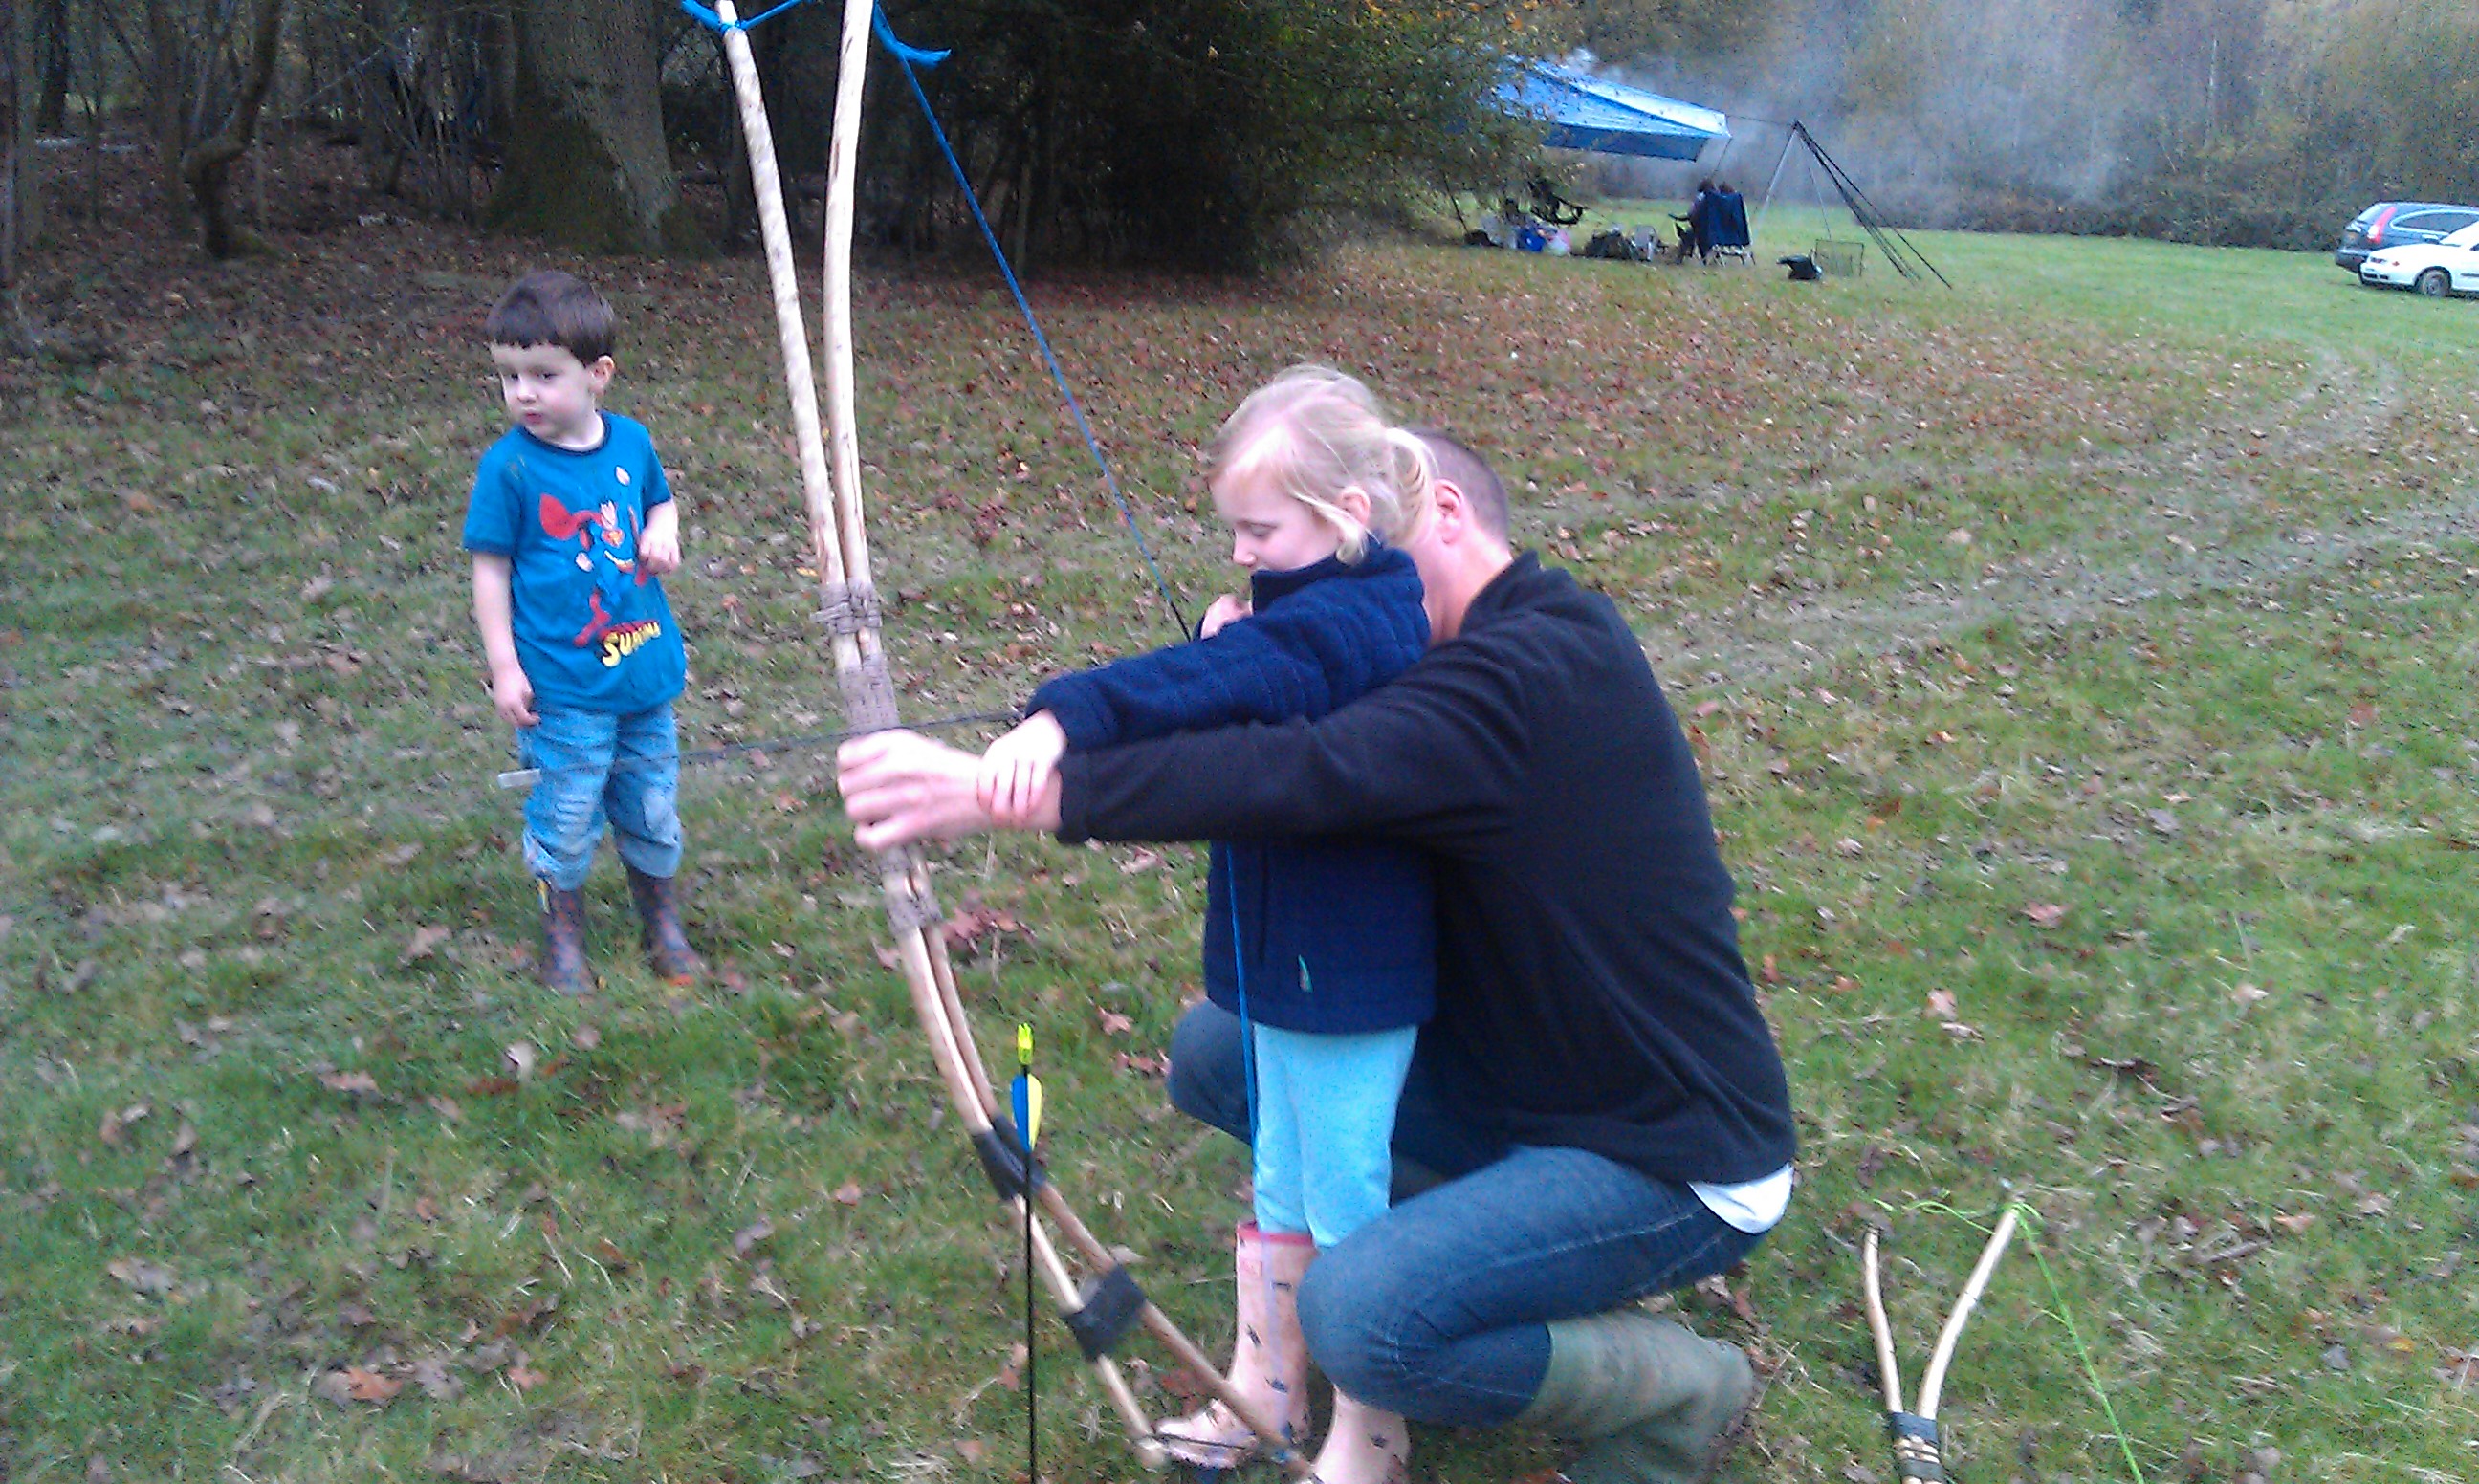
After the woodland walk I brought my bows up for a bit of stump and target shooting.
Bringing up the bows
I do like wandering around just shooting at stumps or the bases of trees. While I was out with Gordon that morning we stumbled across two large fallow deer. It was quite a sight, but they were too quick for me to get my camera out.
Archery time
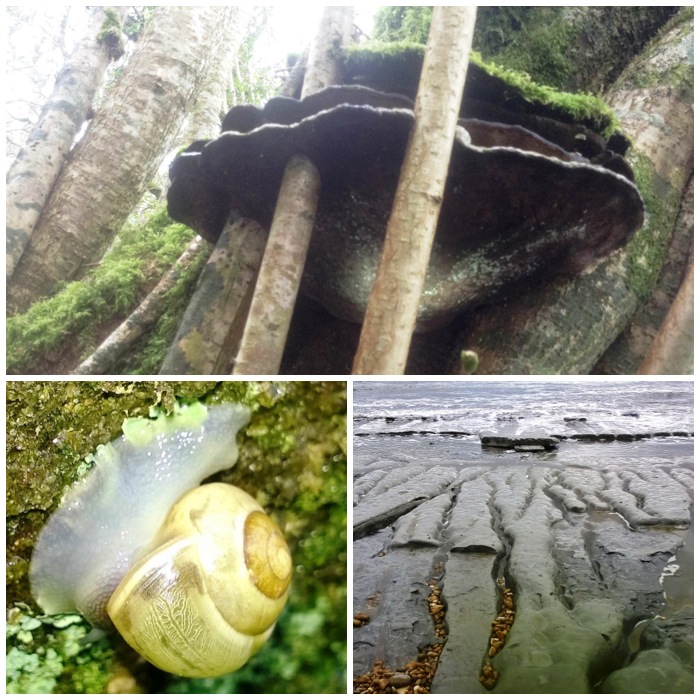
Three of the more unusual things I spotted over the weekend: some hazel coppice growing through an artist’s fungus, scores of these beautiful snails, and fresh-water tracks in the blue clay of the beach.
Wonderful finds
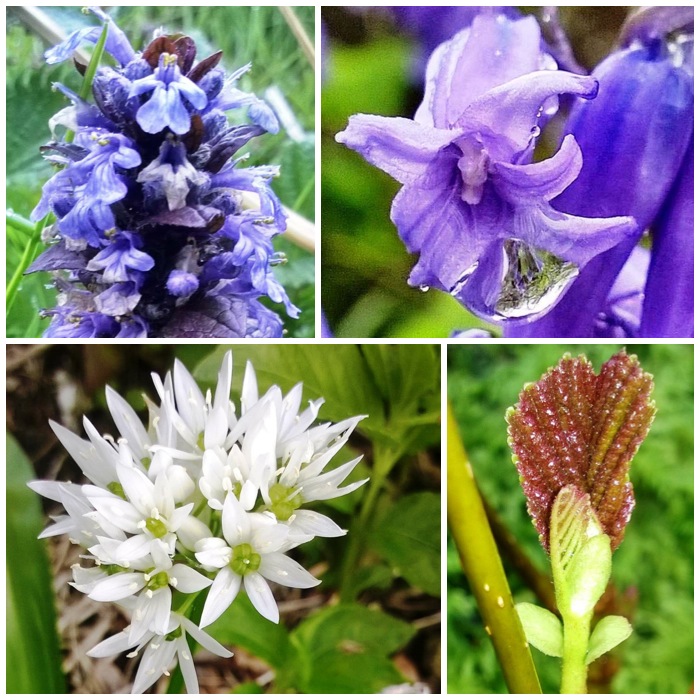
Some lovely close-ups of bugle, bluebells (top row), ramsons and alder (bottom row).
Spring bloom
A lot of Sunday, though, was spent under the parachute staying warm by the fire and listening to the rain hammering down. In the bottom picture you can see the different traps Fraser has made for fishing and catching small animals on the ground.
The classroom
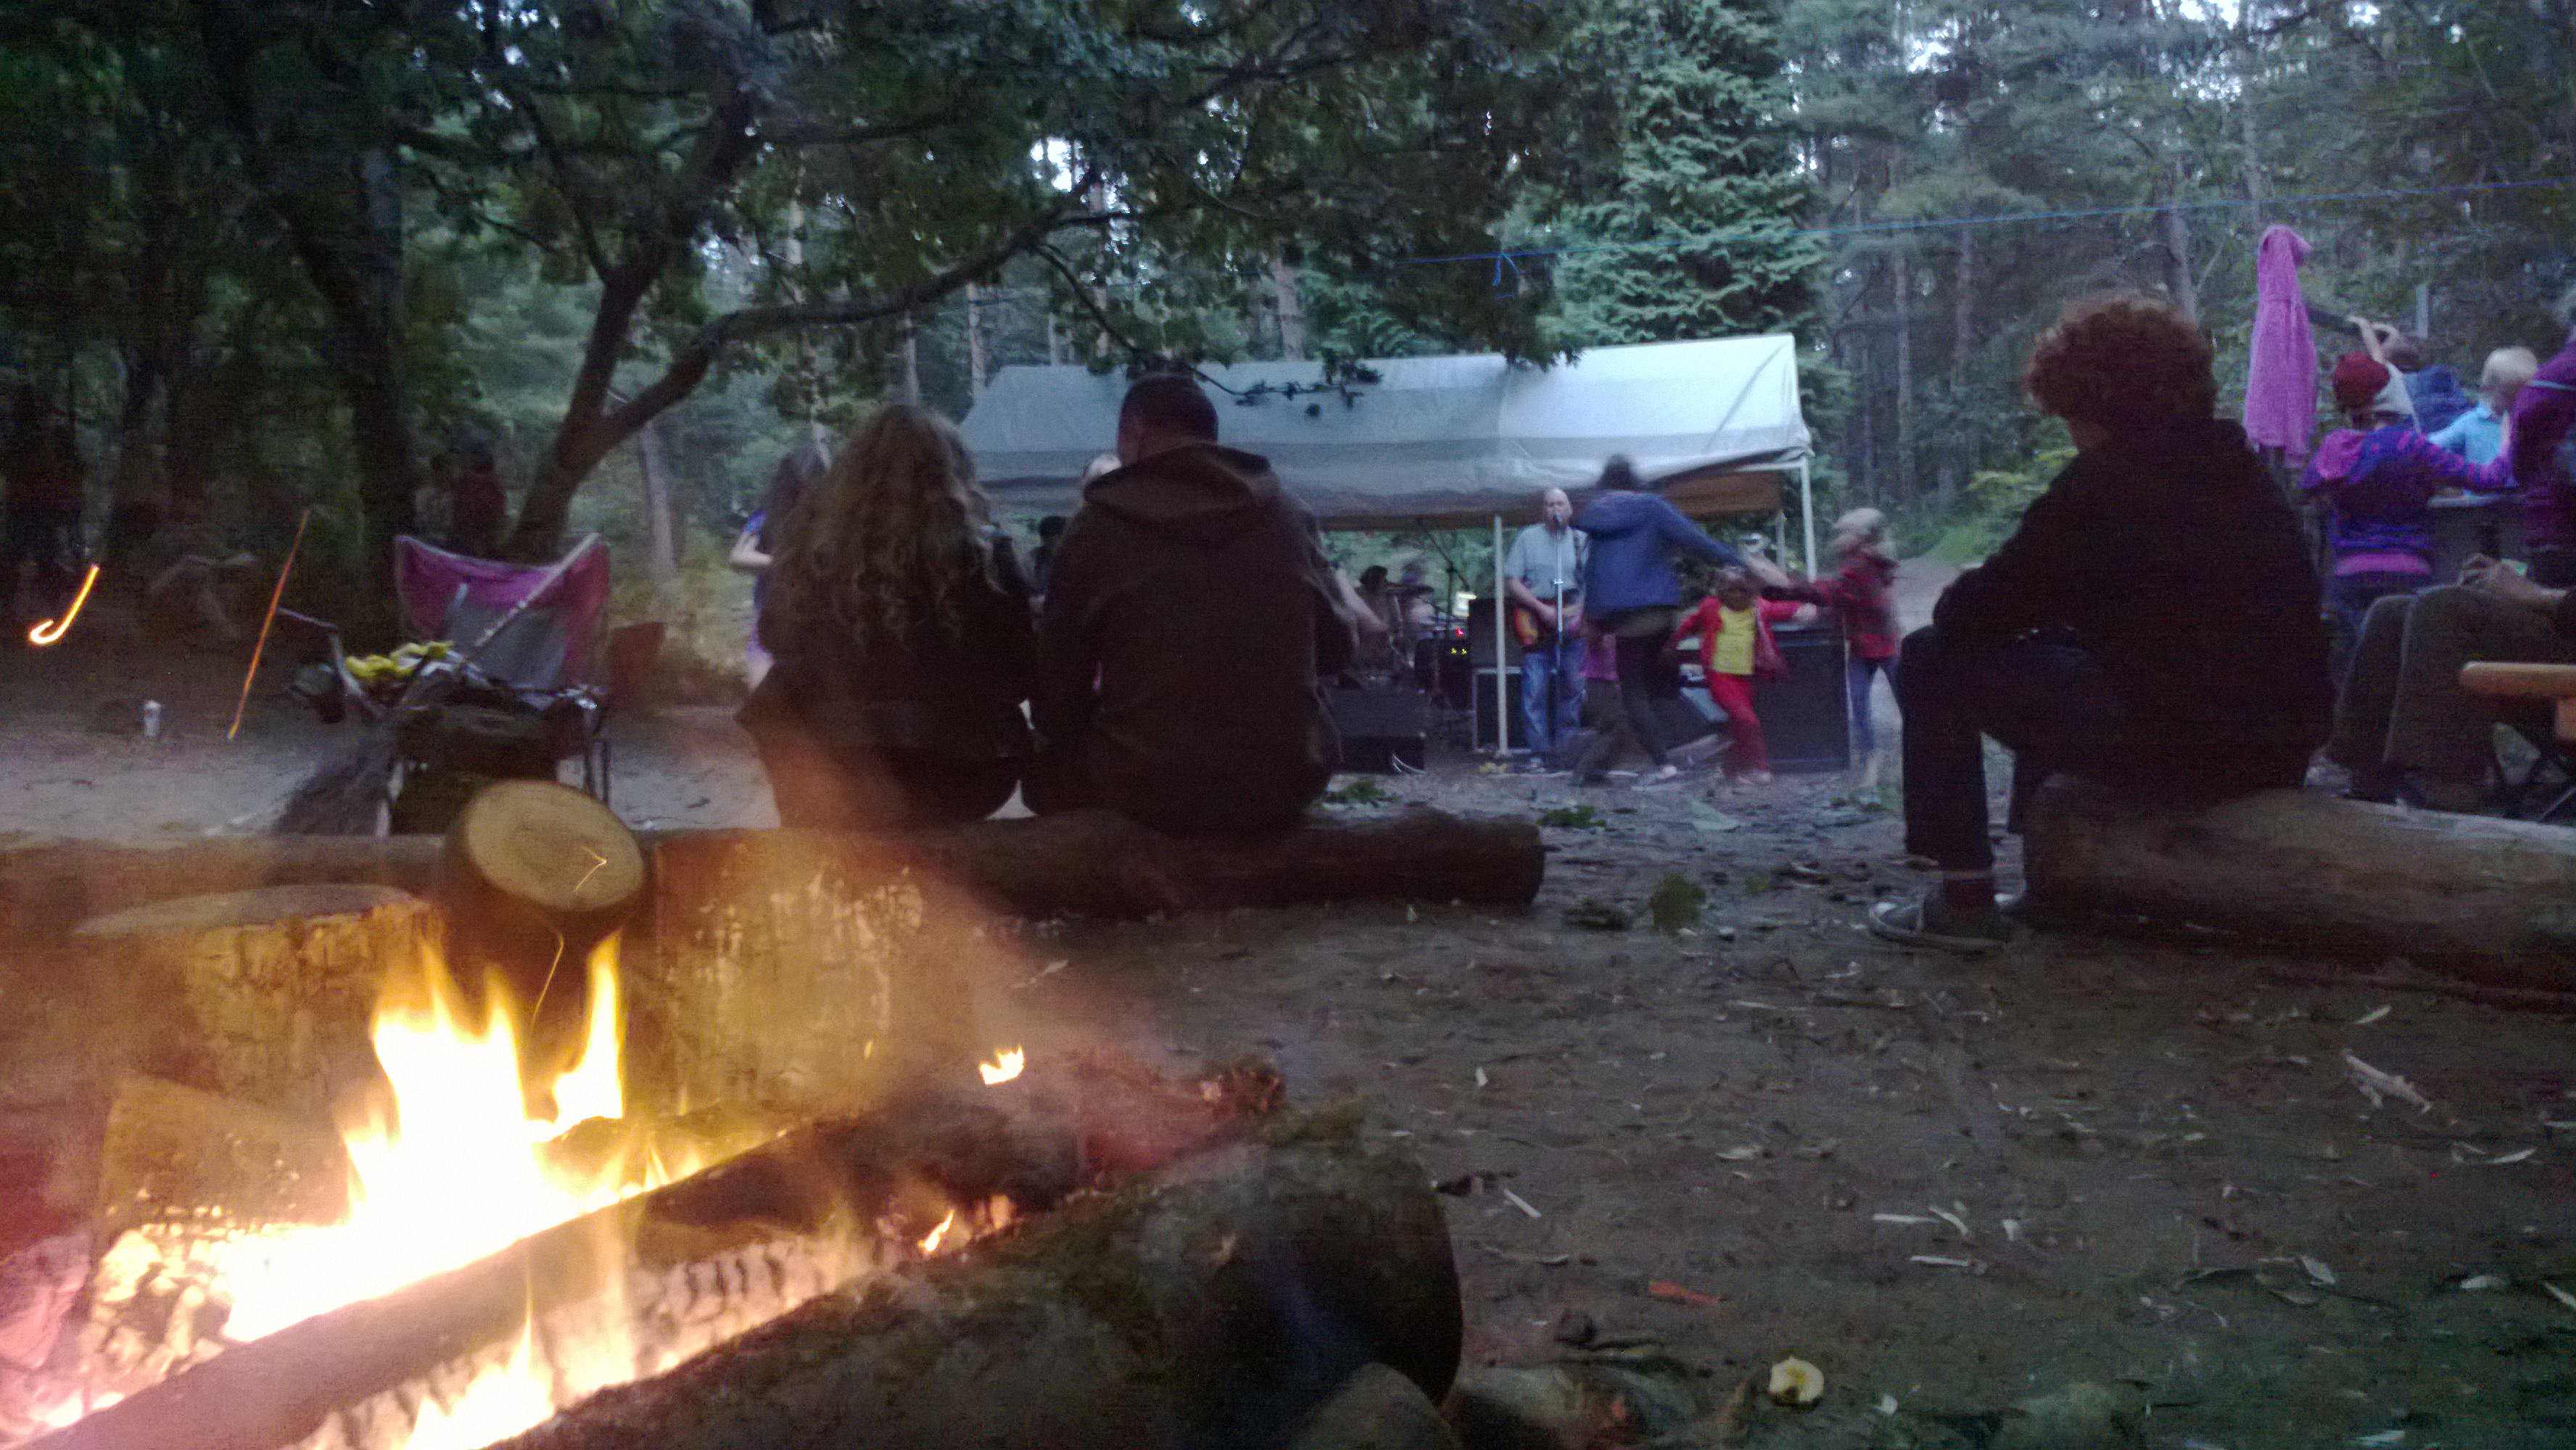
After all that rain we decided it was time to head off down to the local pub for a few beers and a game or two of pool.
Wood gas re-burner
I now have one of Fraser’s gas wood (re-)burning stoves that you can see in the above picture and intend to really test it out over the summer.
On that final evening in the pub I edited the last of my clips to make this short video:
Easter with Coastal Survival – Bimbling and Bows
Monday morning was a pack-up-and-away day to try and miss the Bank Holiday traffic. It was great to be back down at Fraser’s place once again, it is a proper playground.
Last weekend I stopped for a break at one of the roadside services you find on most main roads these days. I decided to have a wander while the rest of the lads got what they wanted from the shop.
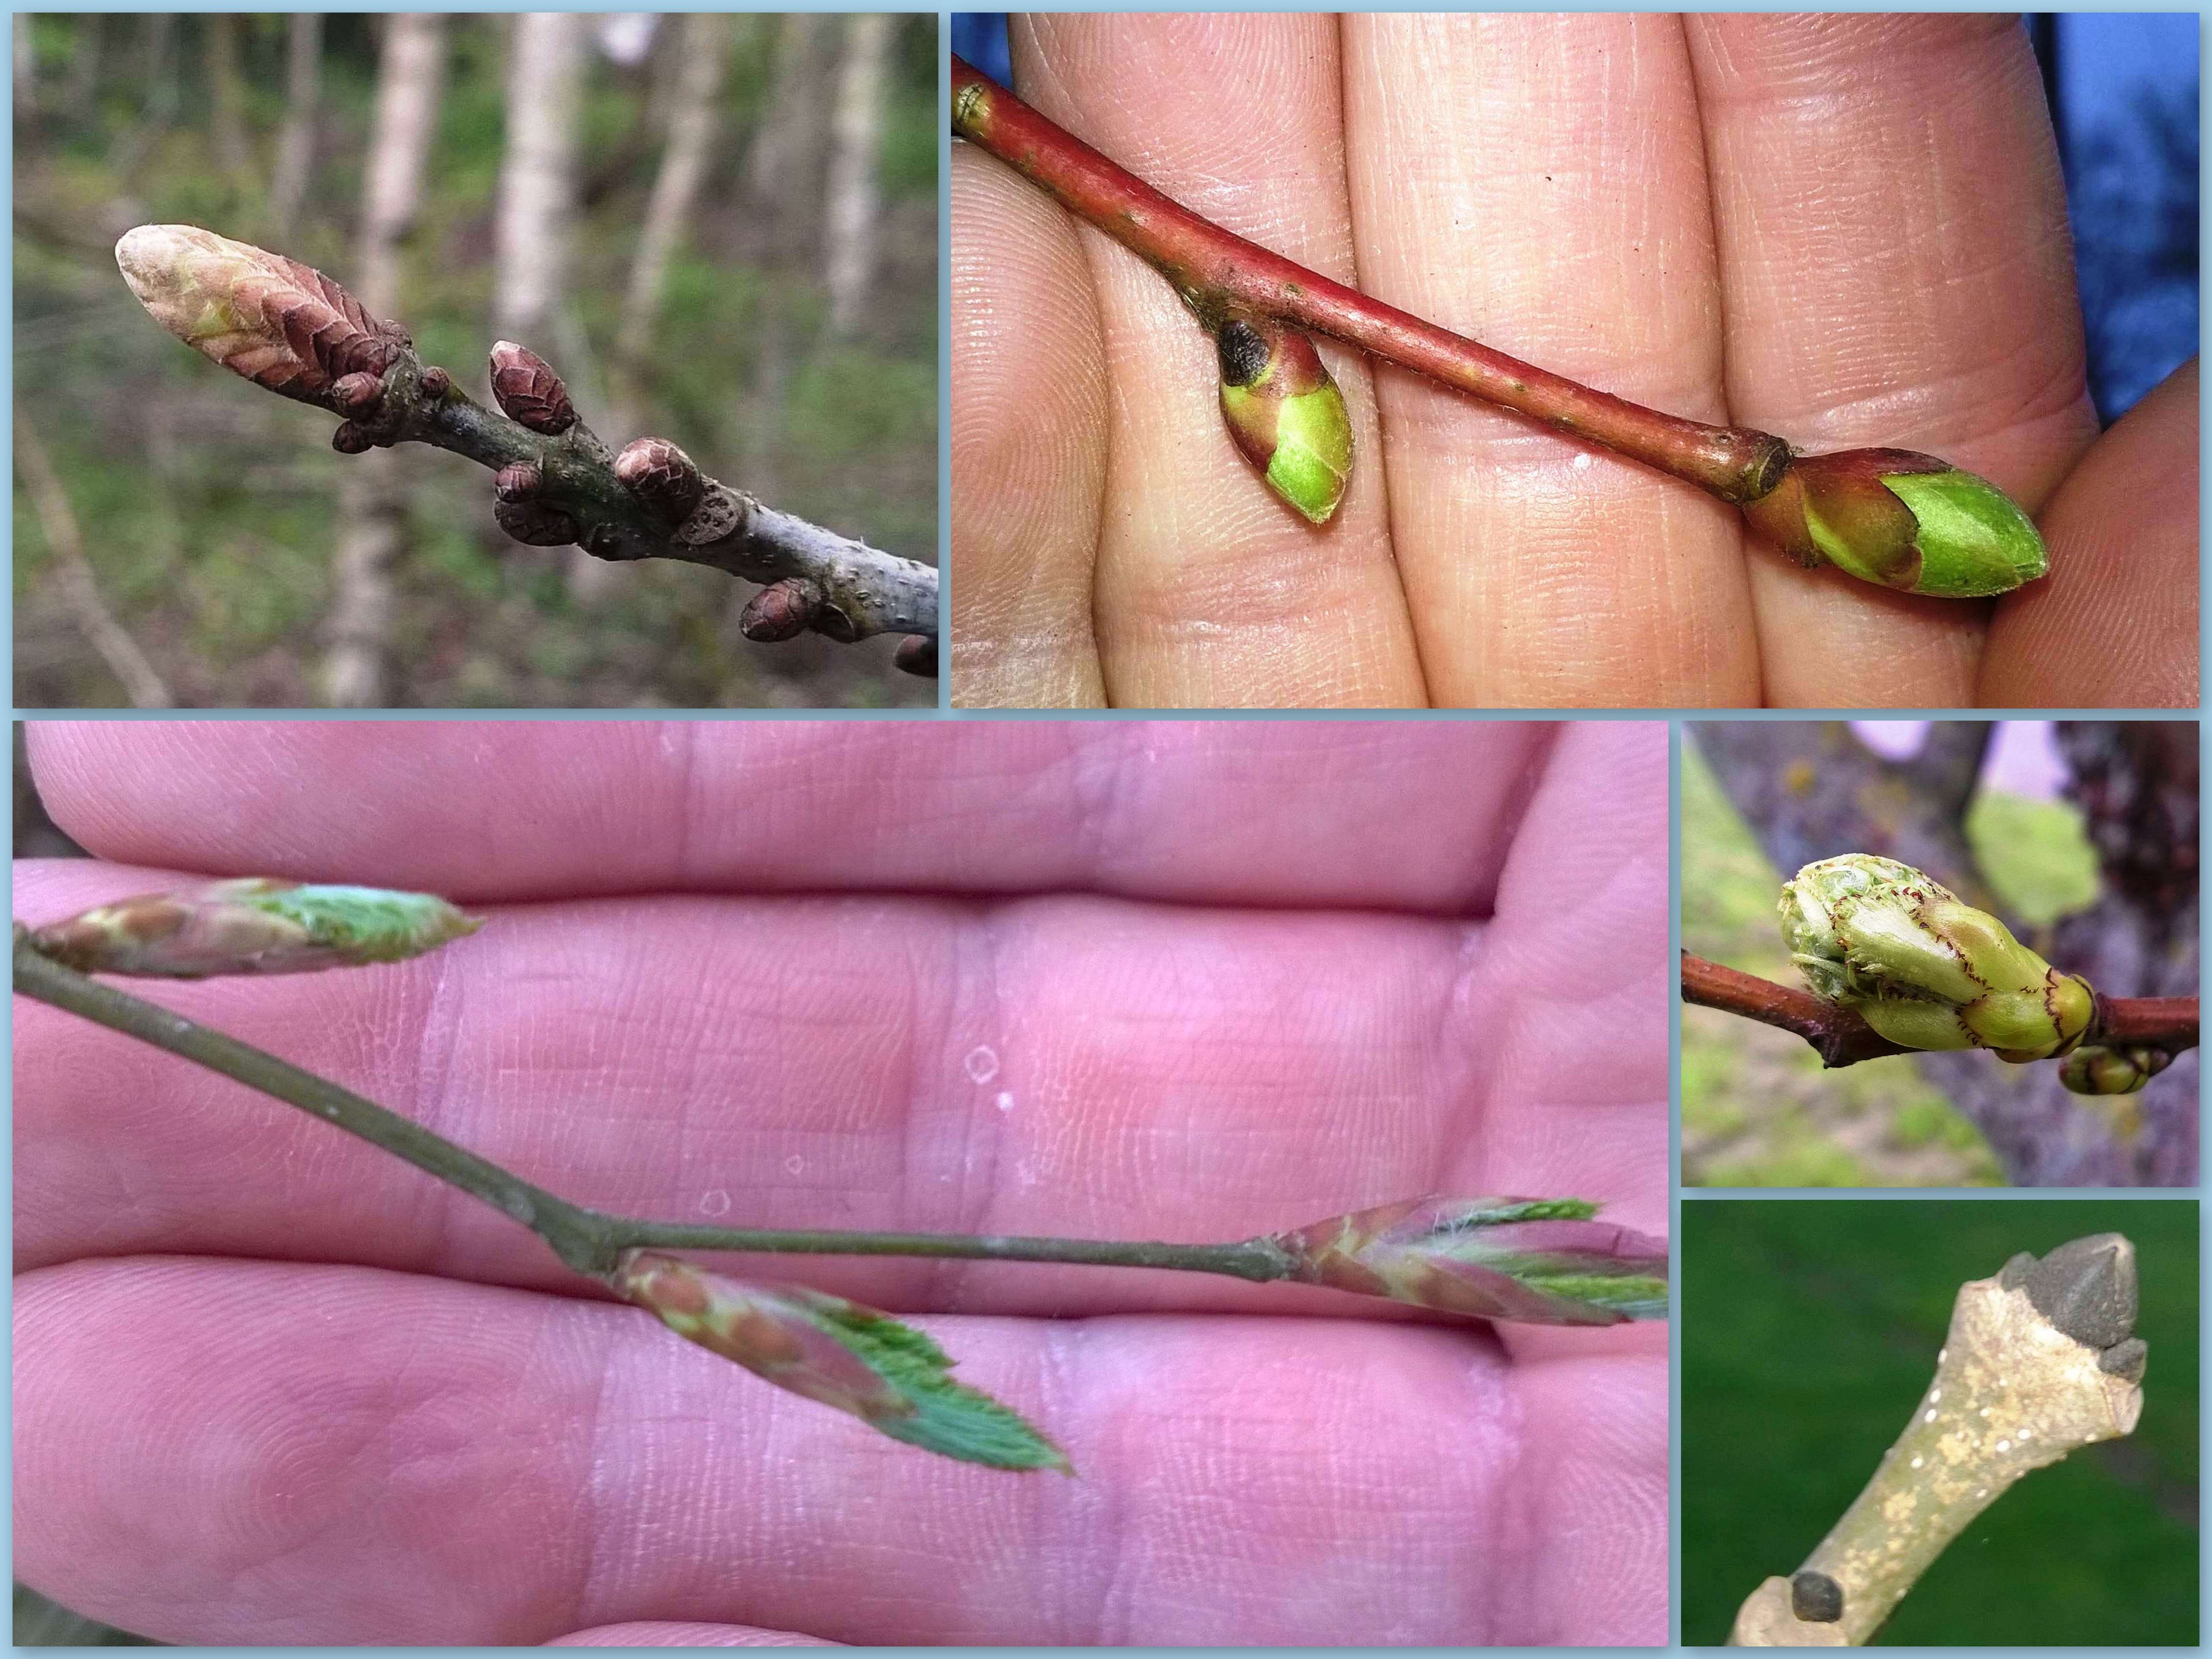
I was lazily staring at the trees and noticed something about one tree in particular, a sycamore (Acer pseudoplatanus). The tree had buds on it at every stage of growth. I could track in a zig zag pattern across just one small part of the tree all these stages.
When the lads arrived they asked what I was doing and shook their heads pityingly as I took out my phone to capture the pictures.
Here are all the stages I saw. No need for me to try and describe them as the pictures say it all.
A stretching budPeeking outUnfurlingThe small leaf bundle then appearsGathering in that first sunlight – like a young butterfly drying its wings outPreparing to unfurl the central leavesUnfurled, growing and working
I have been trying to capture this process of growth on different trees this spring but was struck by the sight of all these stages on just a few branches of the same tree.
As the spring growth is coming thick and fast I popped back out on Monday to see what was coming through around Bramley.
I found that the ash had started to burst through but only on some trees. The top two pictures are of ash as well as the bottom right picture.
Bottom left is lime and in the centre (bottom) I found one English oak tree that was starting to push its leaves out.
Bursting buds
That English oak had just one solitary leaf showing when I photographed it so as I write this three days later I expect it will be well covered now. The beech tree (bottom left) that I have been monitoring had been chopped in two as they had been doing some mechanical hedgecutting in the area. Thankfully as you can see the bottom half of the beech is managing to push some leaves out.
The silver birch in the middle picture has produced masses of leaves and they taste exceptionally good at the moment. On the right looking very shiny the lime tree I have been watching has just a few leaves showing now. Finally on the bottom right the alder is well established with leaves as it had started two weeks ago.
Young leaves
There are plenty of flowers out there still, including primroses, stichworts, wood anemones and wild strawberries to name a few, but two caught my attention this trip. The top two show the early purple orchid and the bottom two the masses of bluebells that have appeared over the last week.
New Flowers
My kids had a great time looking for these orchids so we decided to make a little video of it.
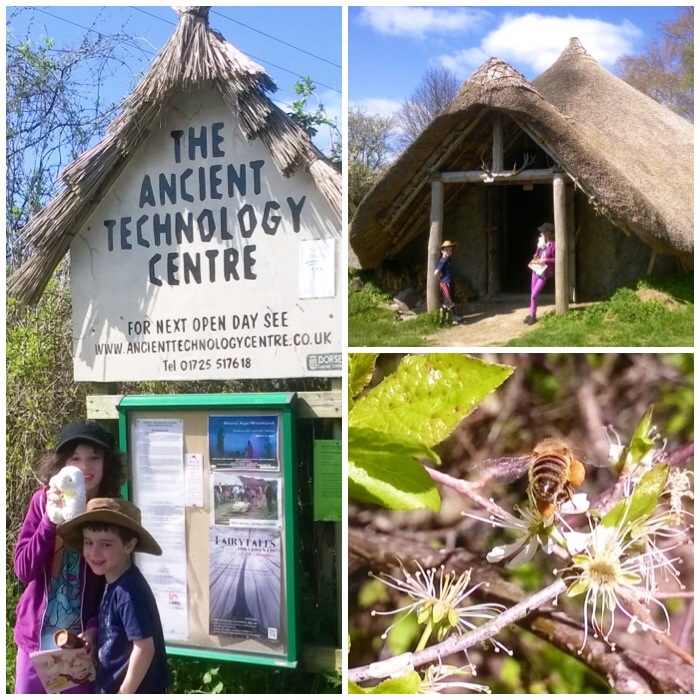
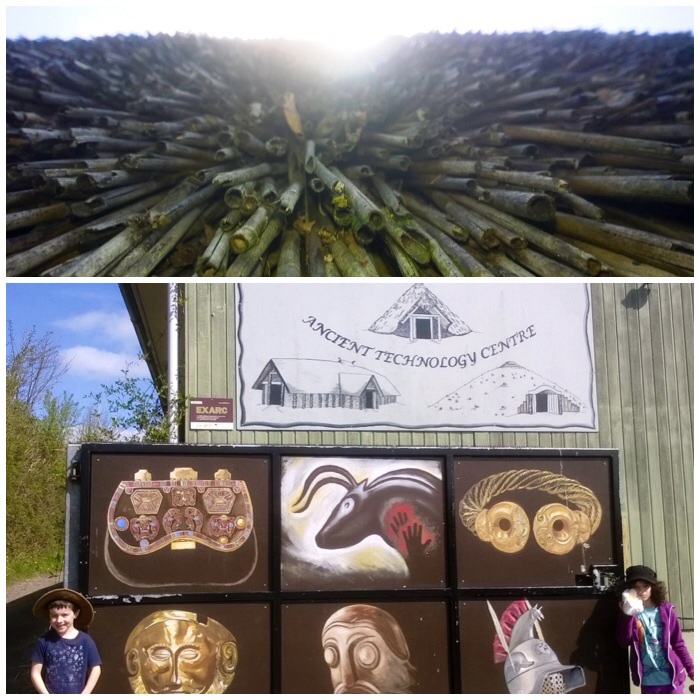
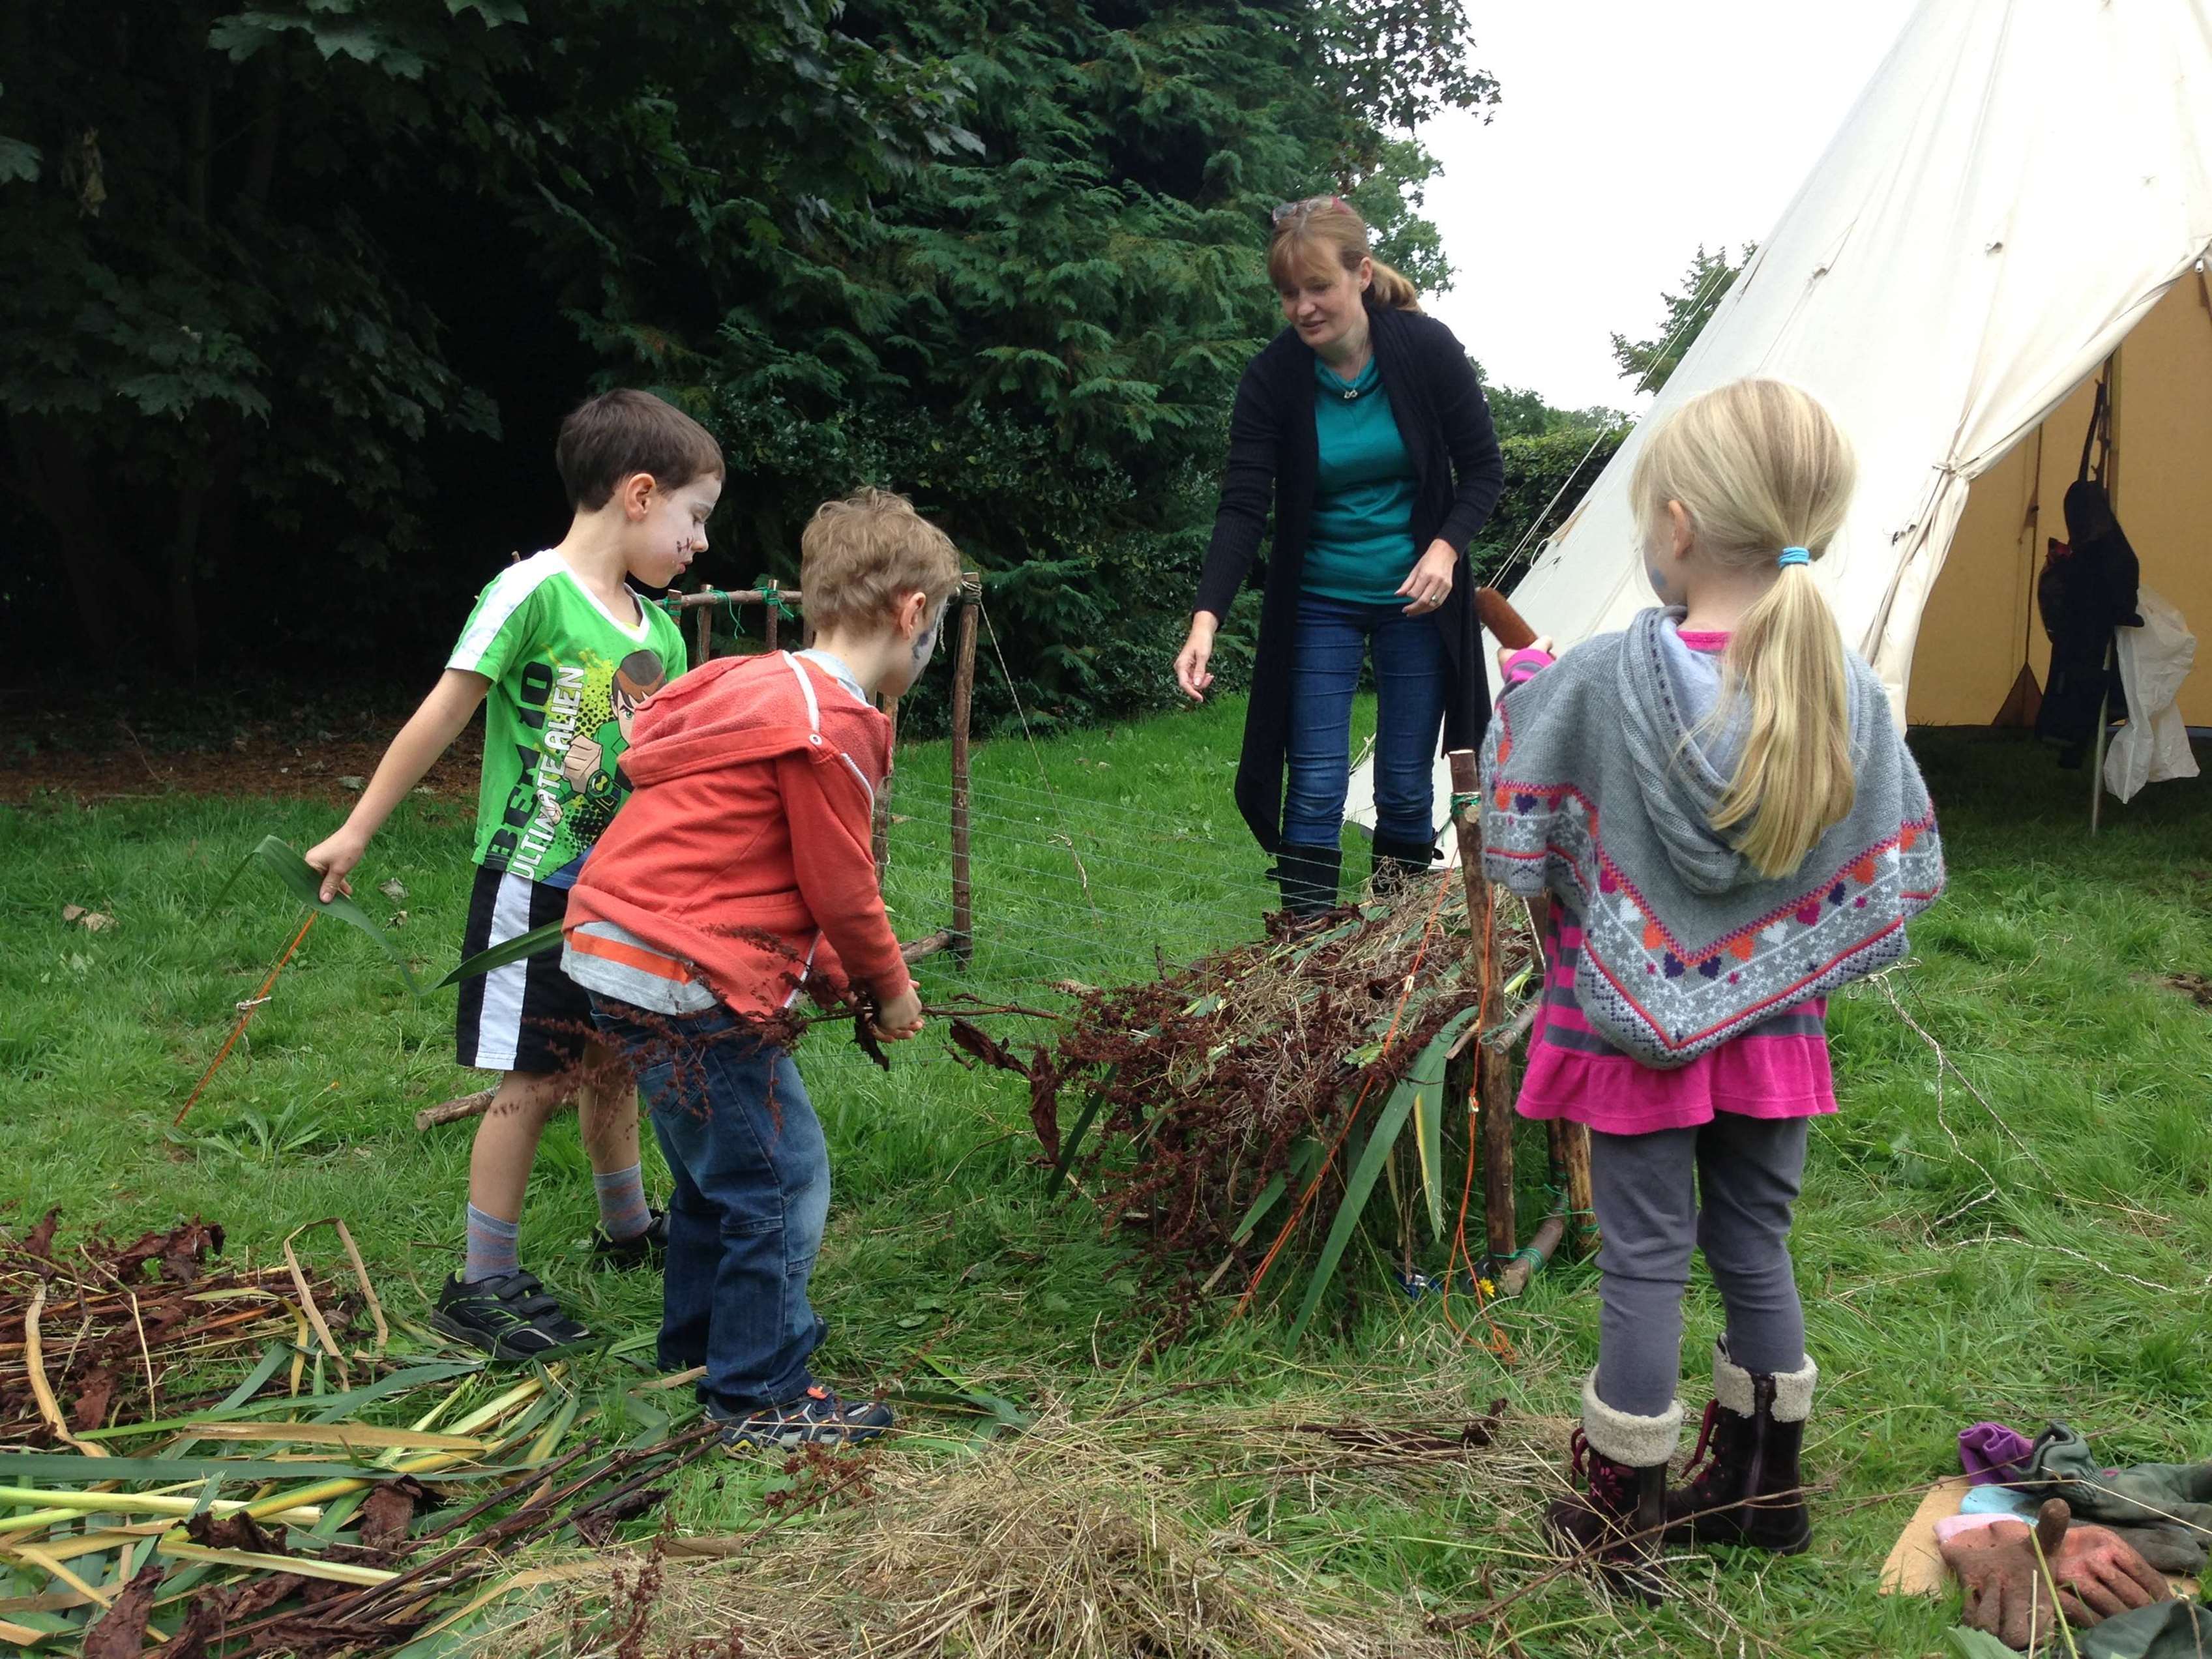
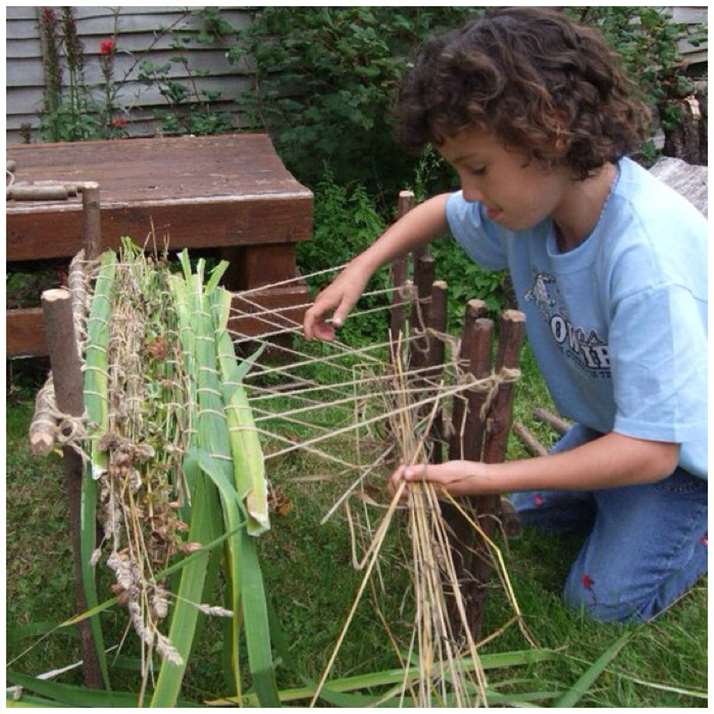
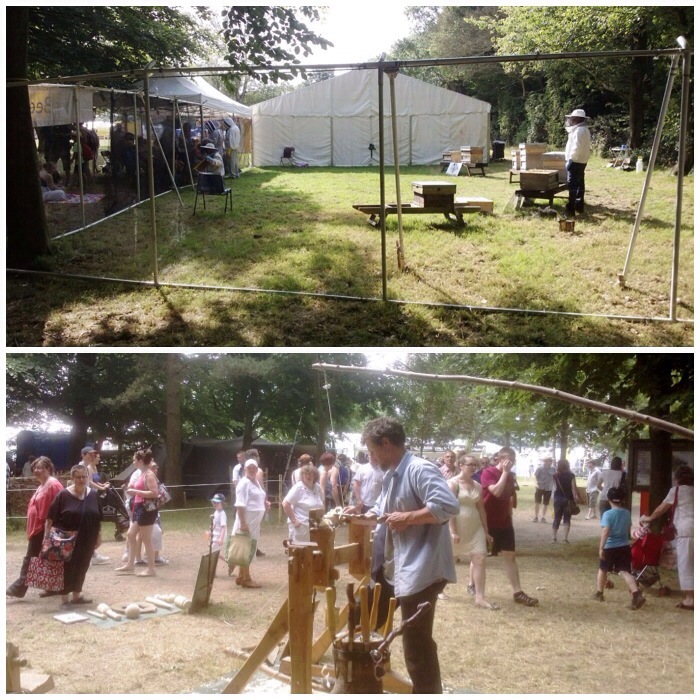
I was catching up on what was happening on Facebook last week and spotted that the Ancient Technology Centre (ATC) was holding a Stone Age Weekend the following week. Thankfully for me my calendar was free and as my kids love this sort of interactive show it was not hard to sell it to them. The centre is in Dorset, just over an hour’s drive from our house, and on this weekend the weather was perfect for my Scottish skin (warm but not too hot).
The Ancient Technology Centre
My main aims for the visit were to let my kids have lots of hands-on fun and pick up some ideas for myself for future projects. The ATC caters well for parents and kids and as it is a place where lots of experimental archaeology is undertaken it ticked all the boxes for me.
The top picture below is taken from the bottom of the roof of one of the roundhouses.
Great for kids (of all ages)
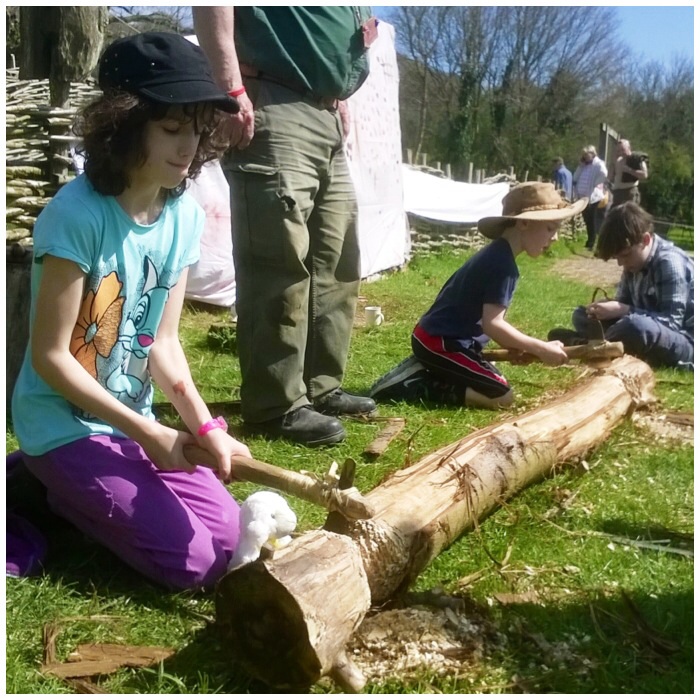
We took a walk around the whole site at first just to show Catherine and Finlay what they could do. In the end the kids had to drag me away from one of the roundhouses as I wanted to explore every item in it and how it was built.
After a five-minute wait Catherine and Finlay were using Bronze Age axes and happily chopping away. They did come back for a second go later and I managed to have a chop as well. This was the first time for me using a Bronze Age axe and it is different to using modern or flint axes. I liked the fact that the queues here were in single-figure minutes (currently writing this in a queue – 35 minutes at Legoland and counting) and everybody was really relaxed.
Bronze Age axes
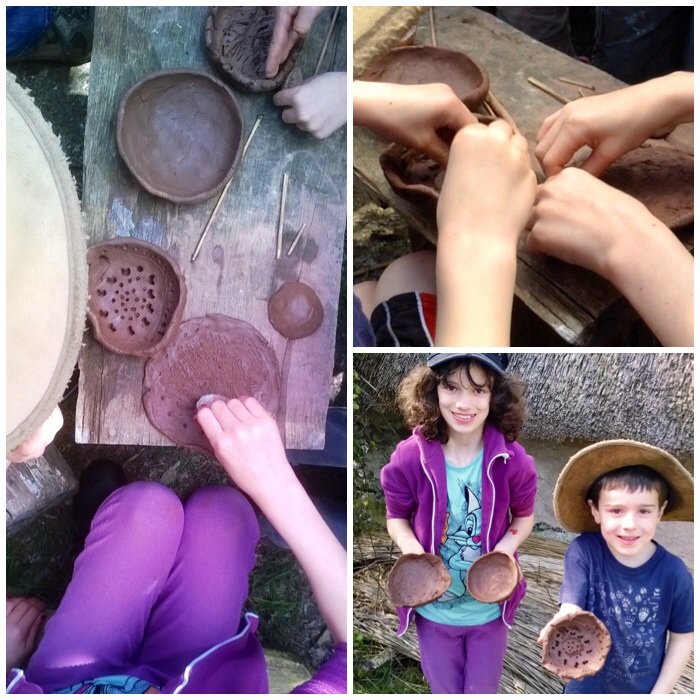
The centre also experiments with primitive pottery and had set up a work area where we could all make a pot and decorate it using old bones shells and feathers. We left our pots to dry in the sun before taking them home. We will have to let them dry for at least another two weeks before firing them over an open fire. I don’t know if we’ll do this final stage as they may crack.
Primitive pottery
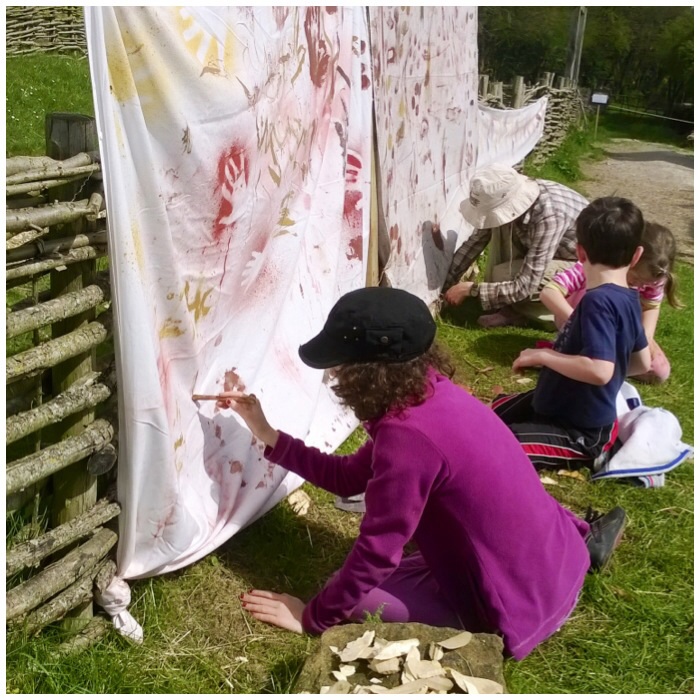
While Catherine and Finlay were happily engrossed in cave painting techniques I managed to slip off and see what else was going on.
Cave painting
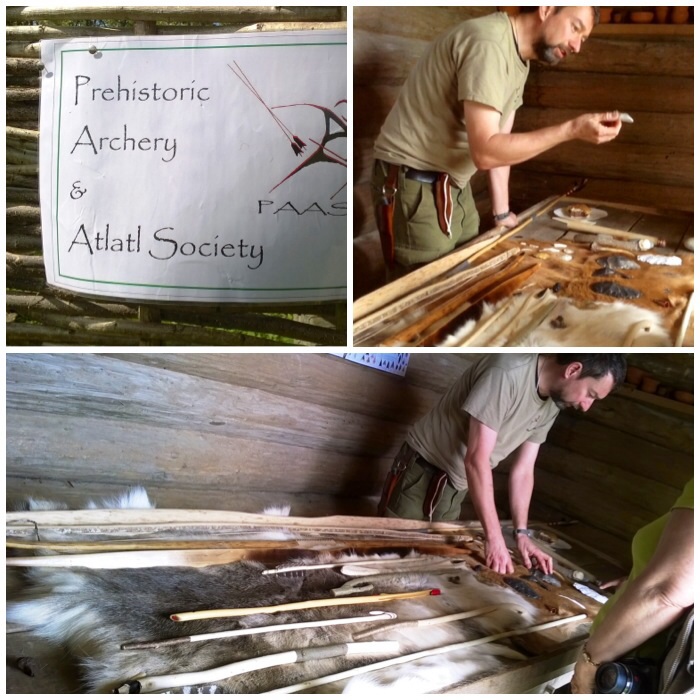
I popped over to see what was on display on the Prehistoric Archery and Atlatl Society (PAAS) stand. PAAS make some beautiful craft items based as close as possible to archaeological finds and are also keen experimental archaeologists. Last year PAAS visited us at the Bushcraft UK Bushmoot and gave some great classes on archery, atlatls and slings. They plan to be at the Bushmoot this year as well.
PAAS
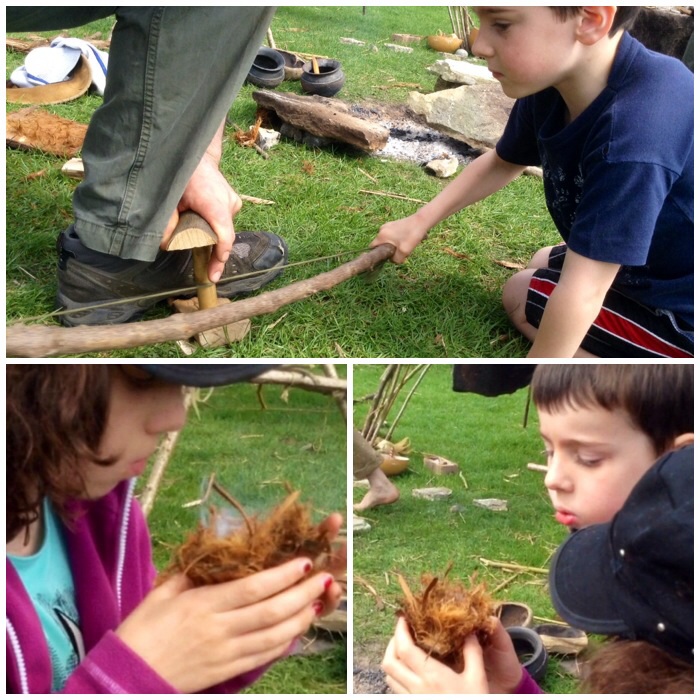
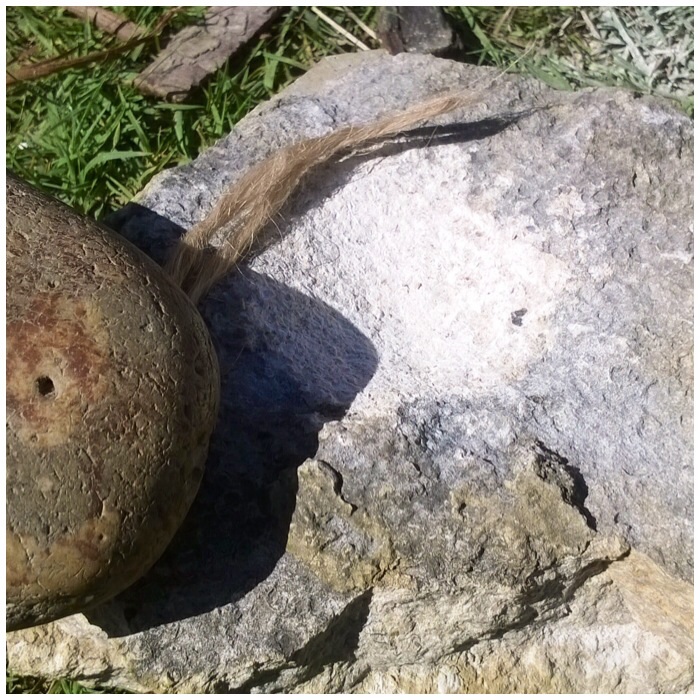
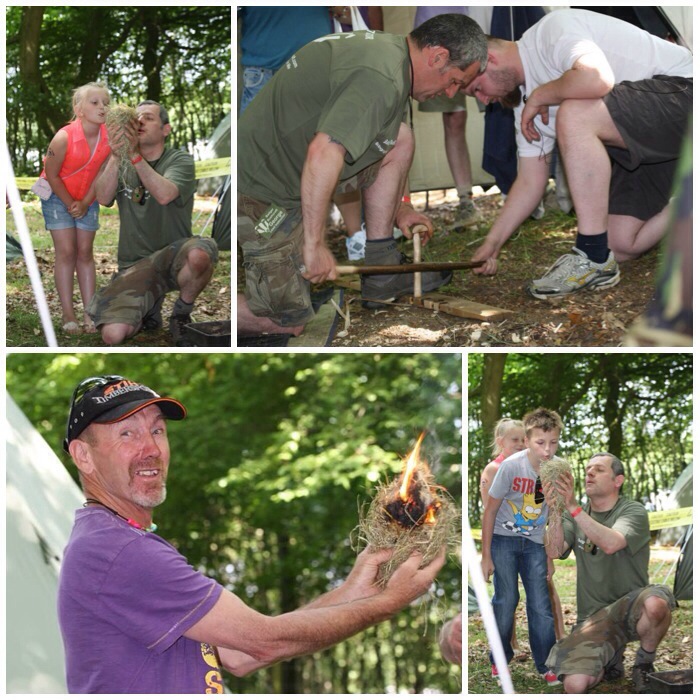
We watched a demonstration next of Bowdrill using just a primitive set. The couple doing the demonstration were from Outback2Basics and put on a great show. We missed the first class on making campfire bread and cooking salmon but managed to get some time bowdrilling.
Bowdrill with primitive kit
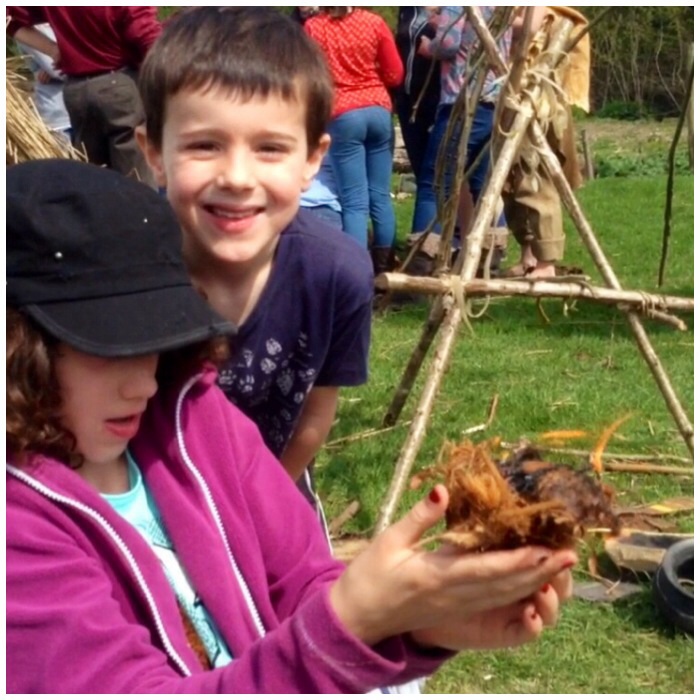
Finlay and myself took a twirl on the bow and then Catherine took over on blowing the ember into flame.
Family bowdrill
With a little help from Finlay we soon had a flame. The tinder was the inner bark from a Leylandi tree.
Flamage
The next class with them was making a fat candle using a rock as a holder. We chipped away on a soft rock with a hard rock to create a small scoop to hold the fat.
The wick we made out of some jute string by untwisting it and then loosely putting it all back together.
Fat candle – prepping the stone
The scoop took us about 20 minutes to chip out.
Fat candle – fat well and jute wick
I cannot remember what type of fat was used but once it was poured in the wick was added, leaving about a centimeter protruding from the fat so that it could be lit.
Fat candle – set up
The winds were quite light but would gust a little so we had to protect the flame.
Fat candle – alight
I managed to capture a lot of the day on this short video.
Afterwards we had a look at the wood carving section and Catherine learned all about how beds were constructed in the past.
Woodcarving
I picked up some ideas on making a circular stack for my kindling and the kids had fun on the Roman turntable.
Kindling wheel and Roman turntable
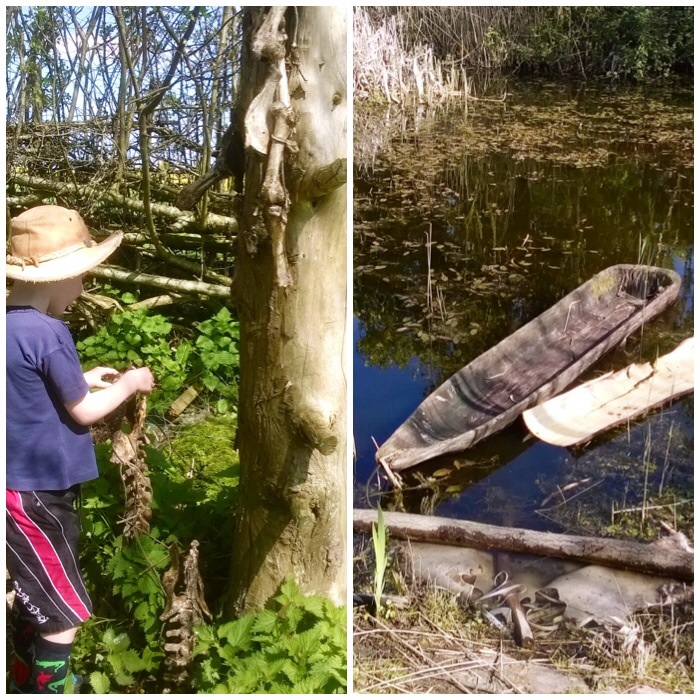
Two good finds of the day for me were the drying post for bones and the wooden dugout in the pond.
Bones and dugout canoes
I would thoroughly recommend you visit the ATC if you ever find yourself down near the New Forest as the work they undertake is quite amazing.
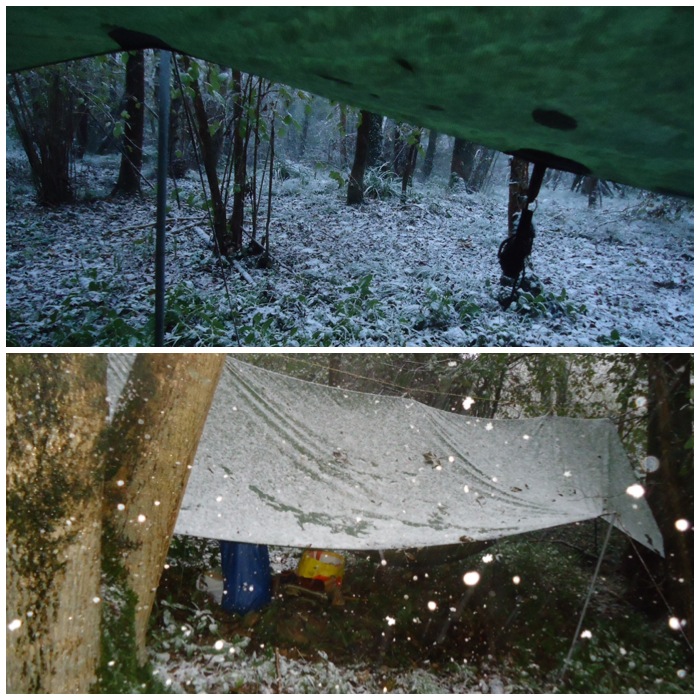
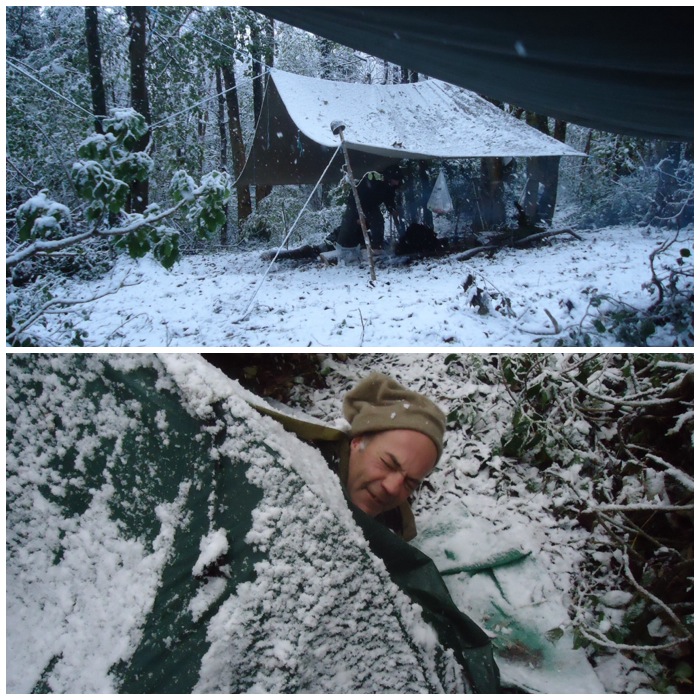
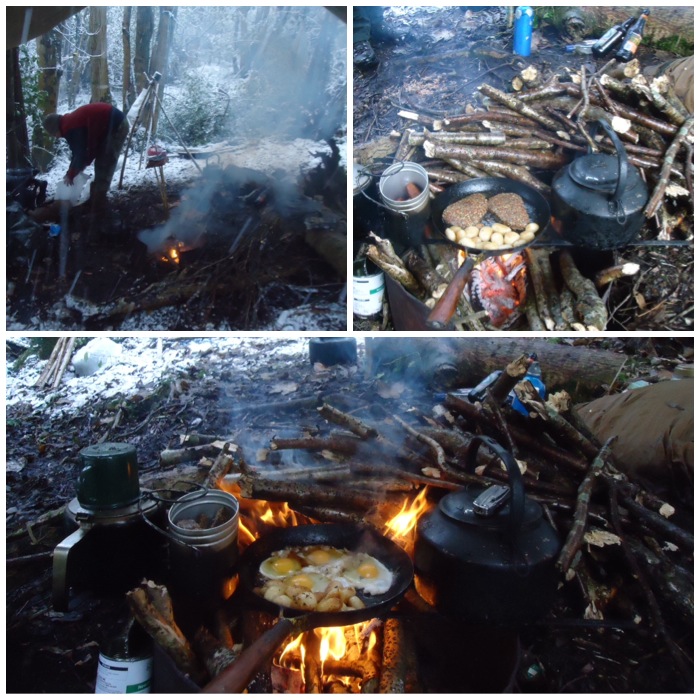
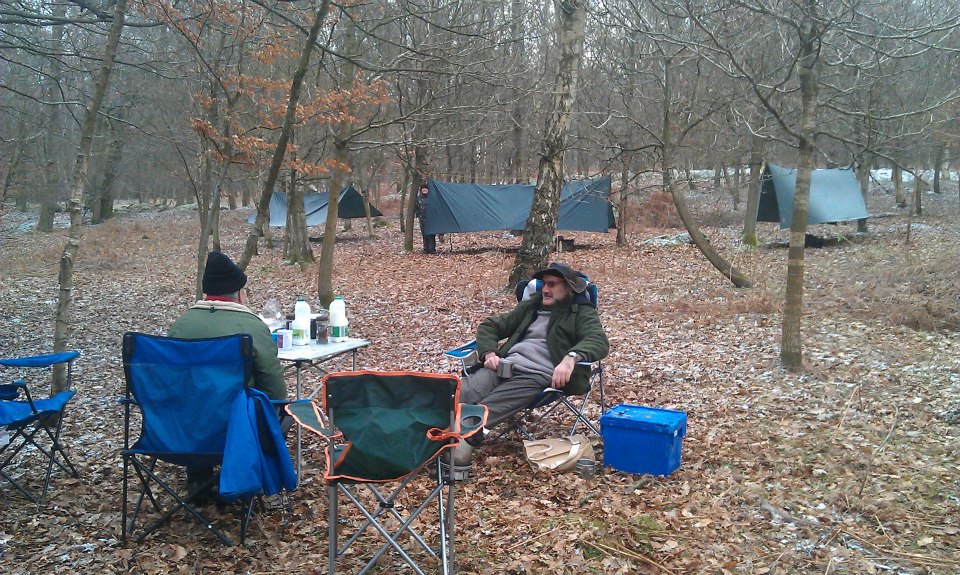
It was magical to lie there and watch the snow falling in the perfectly quiet woodland.
A winter weekend with Coastal Survival
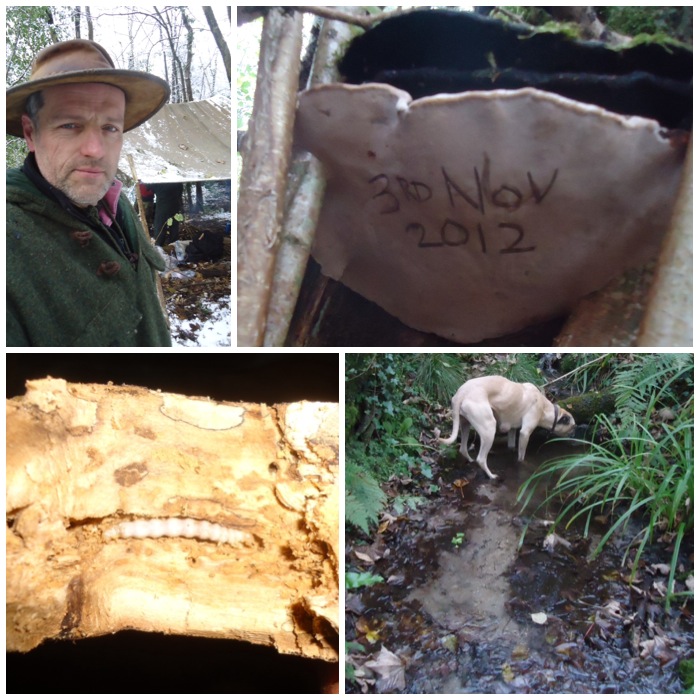
It was on a wet weekend back in November 2012 I first went to visit my friend Fraser from Coastal Survival at his woodland in Dorset. I was reviewing my photos as I will be visiting him again soon and thought that the ones I had taken on this weekend warranted their own post even though the trip was over a year and a half ago.
The snow you see in the picture above did not arrive until the Sunday but I did have a great time even with all the rain and mud before the snow arrived. The weekend was a relaxed affair with no formal teaching planned, just a get together to relax and explore the beautiful Dorset hills.
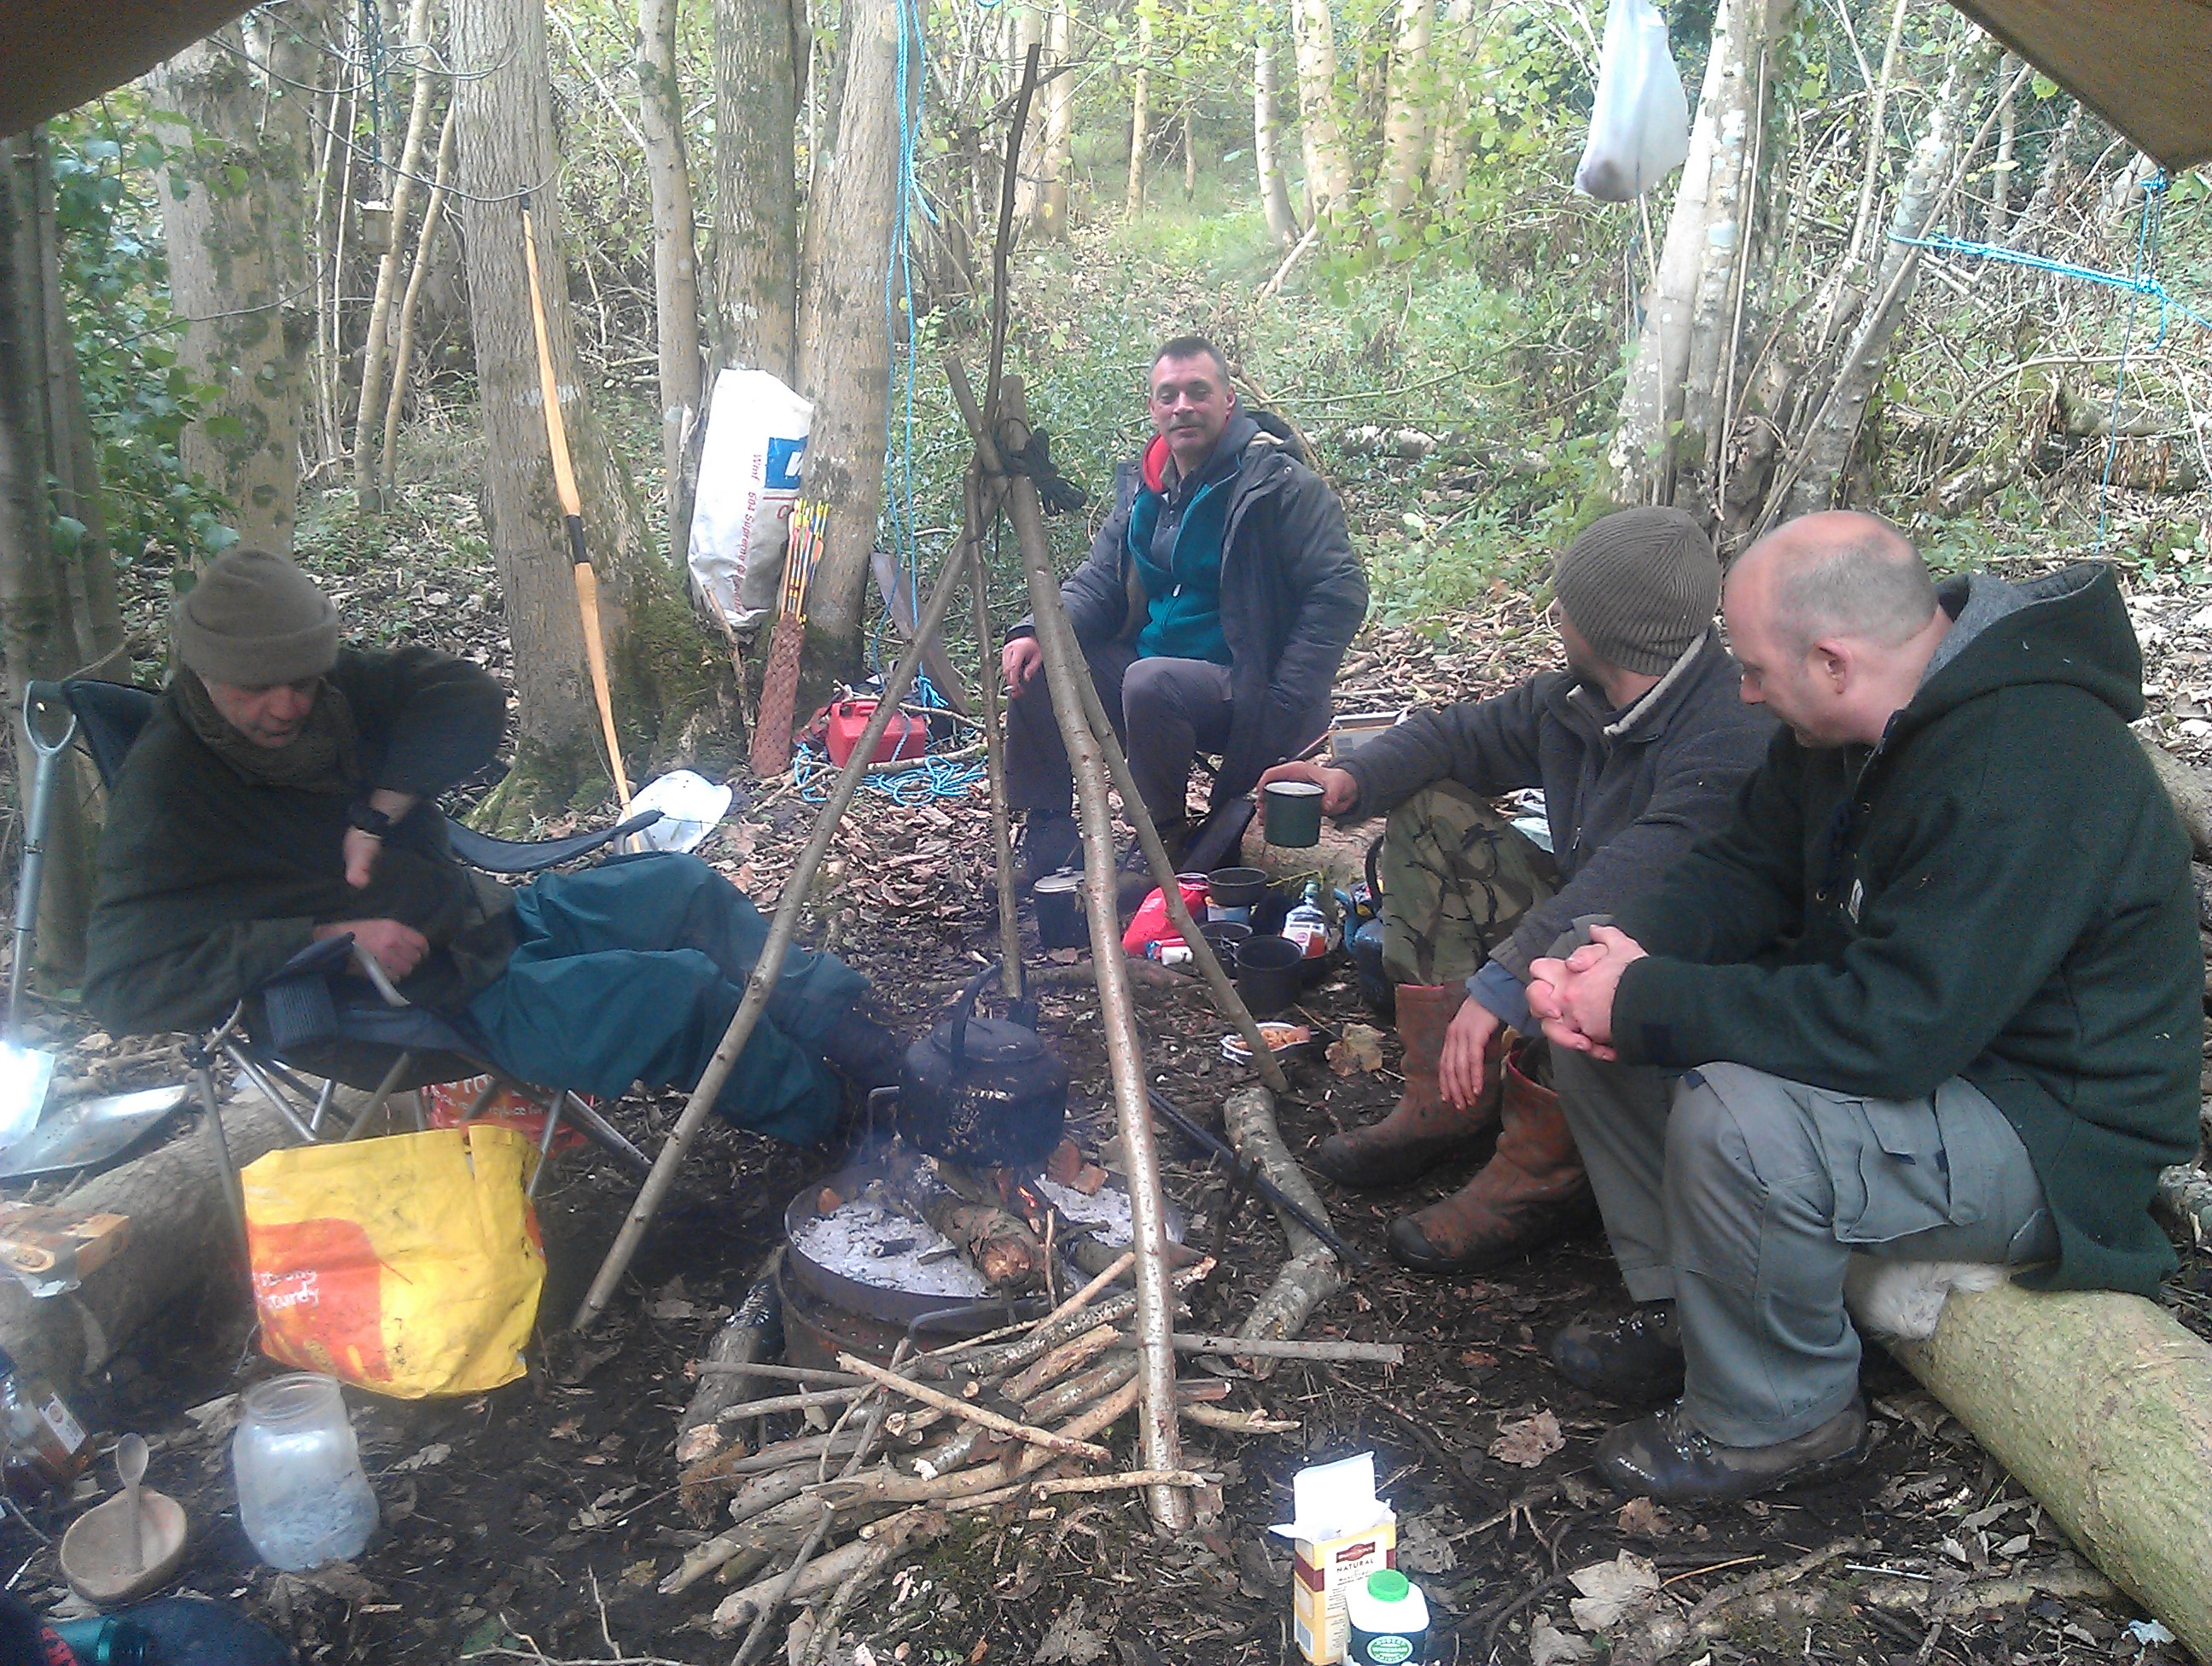
The gang below included (from the left) Steve, Rich, Fraser, Si and myself.
The gang for the weekend
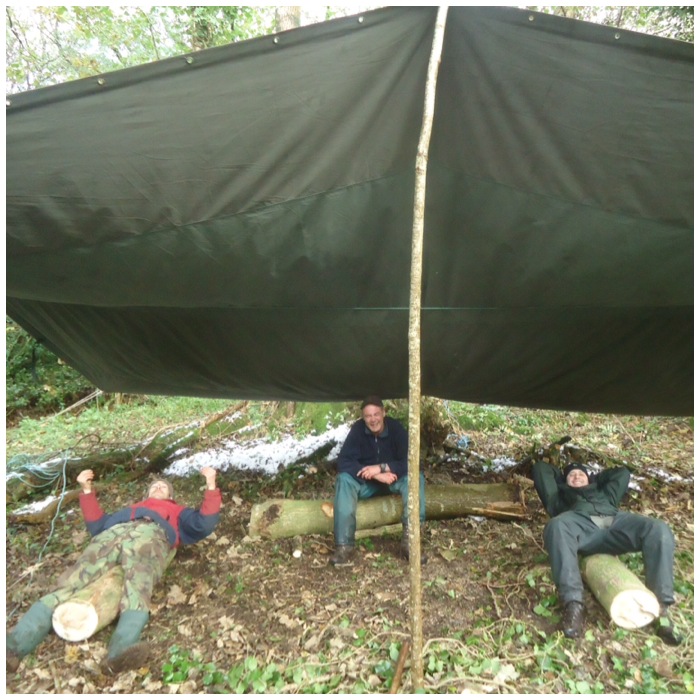
We did a little bit of work on the weekend but only a little. That work included sawing up these logs for classroom seats and pitching properly what was one massive tarp.
Now that’s what you call a tarp
After sorting my hammock out, Friday night was spent sitting around the fire chatting and watching our dinner slowly roasting over the fire. You may have noticed with previous posts about Fraser that food seems to play a central role in everything we do 🙂
Friday night dinner
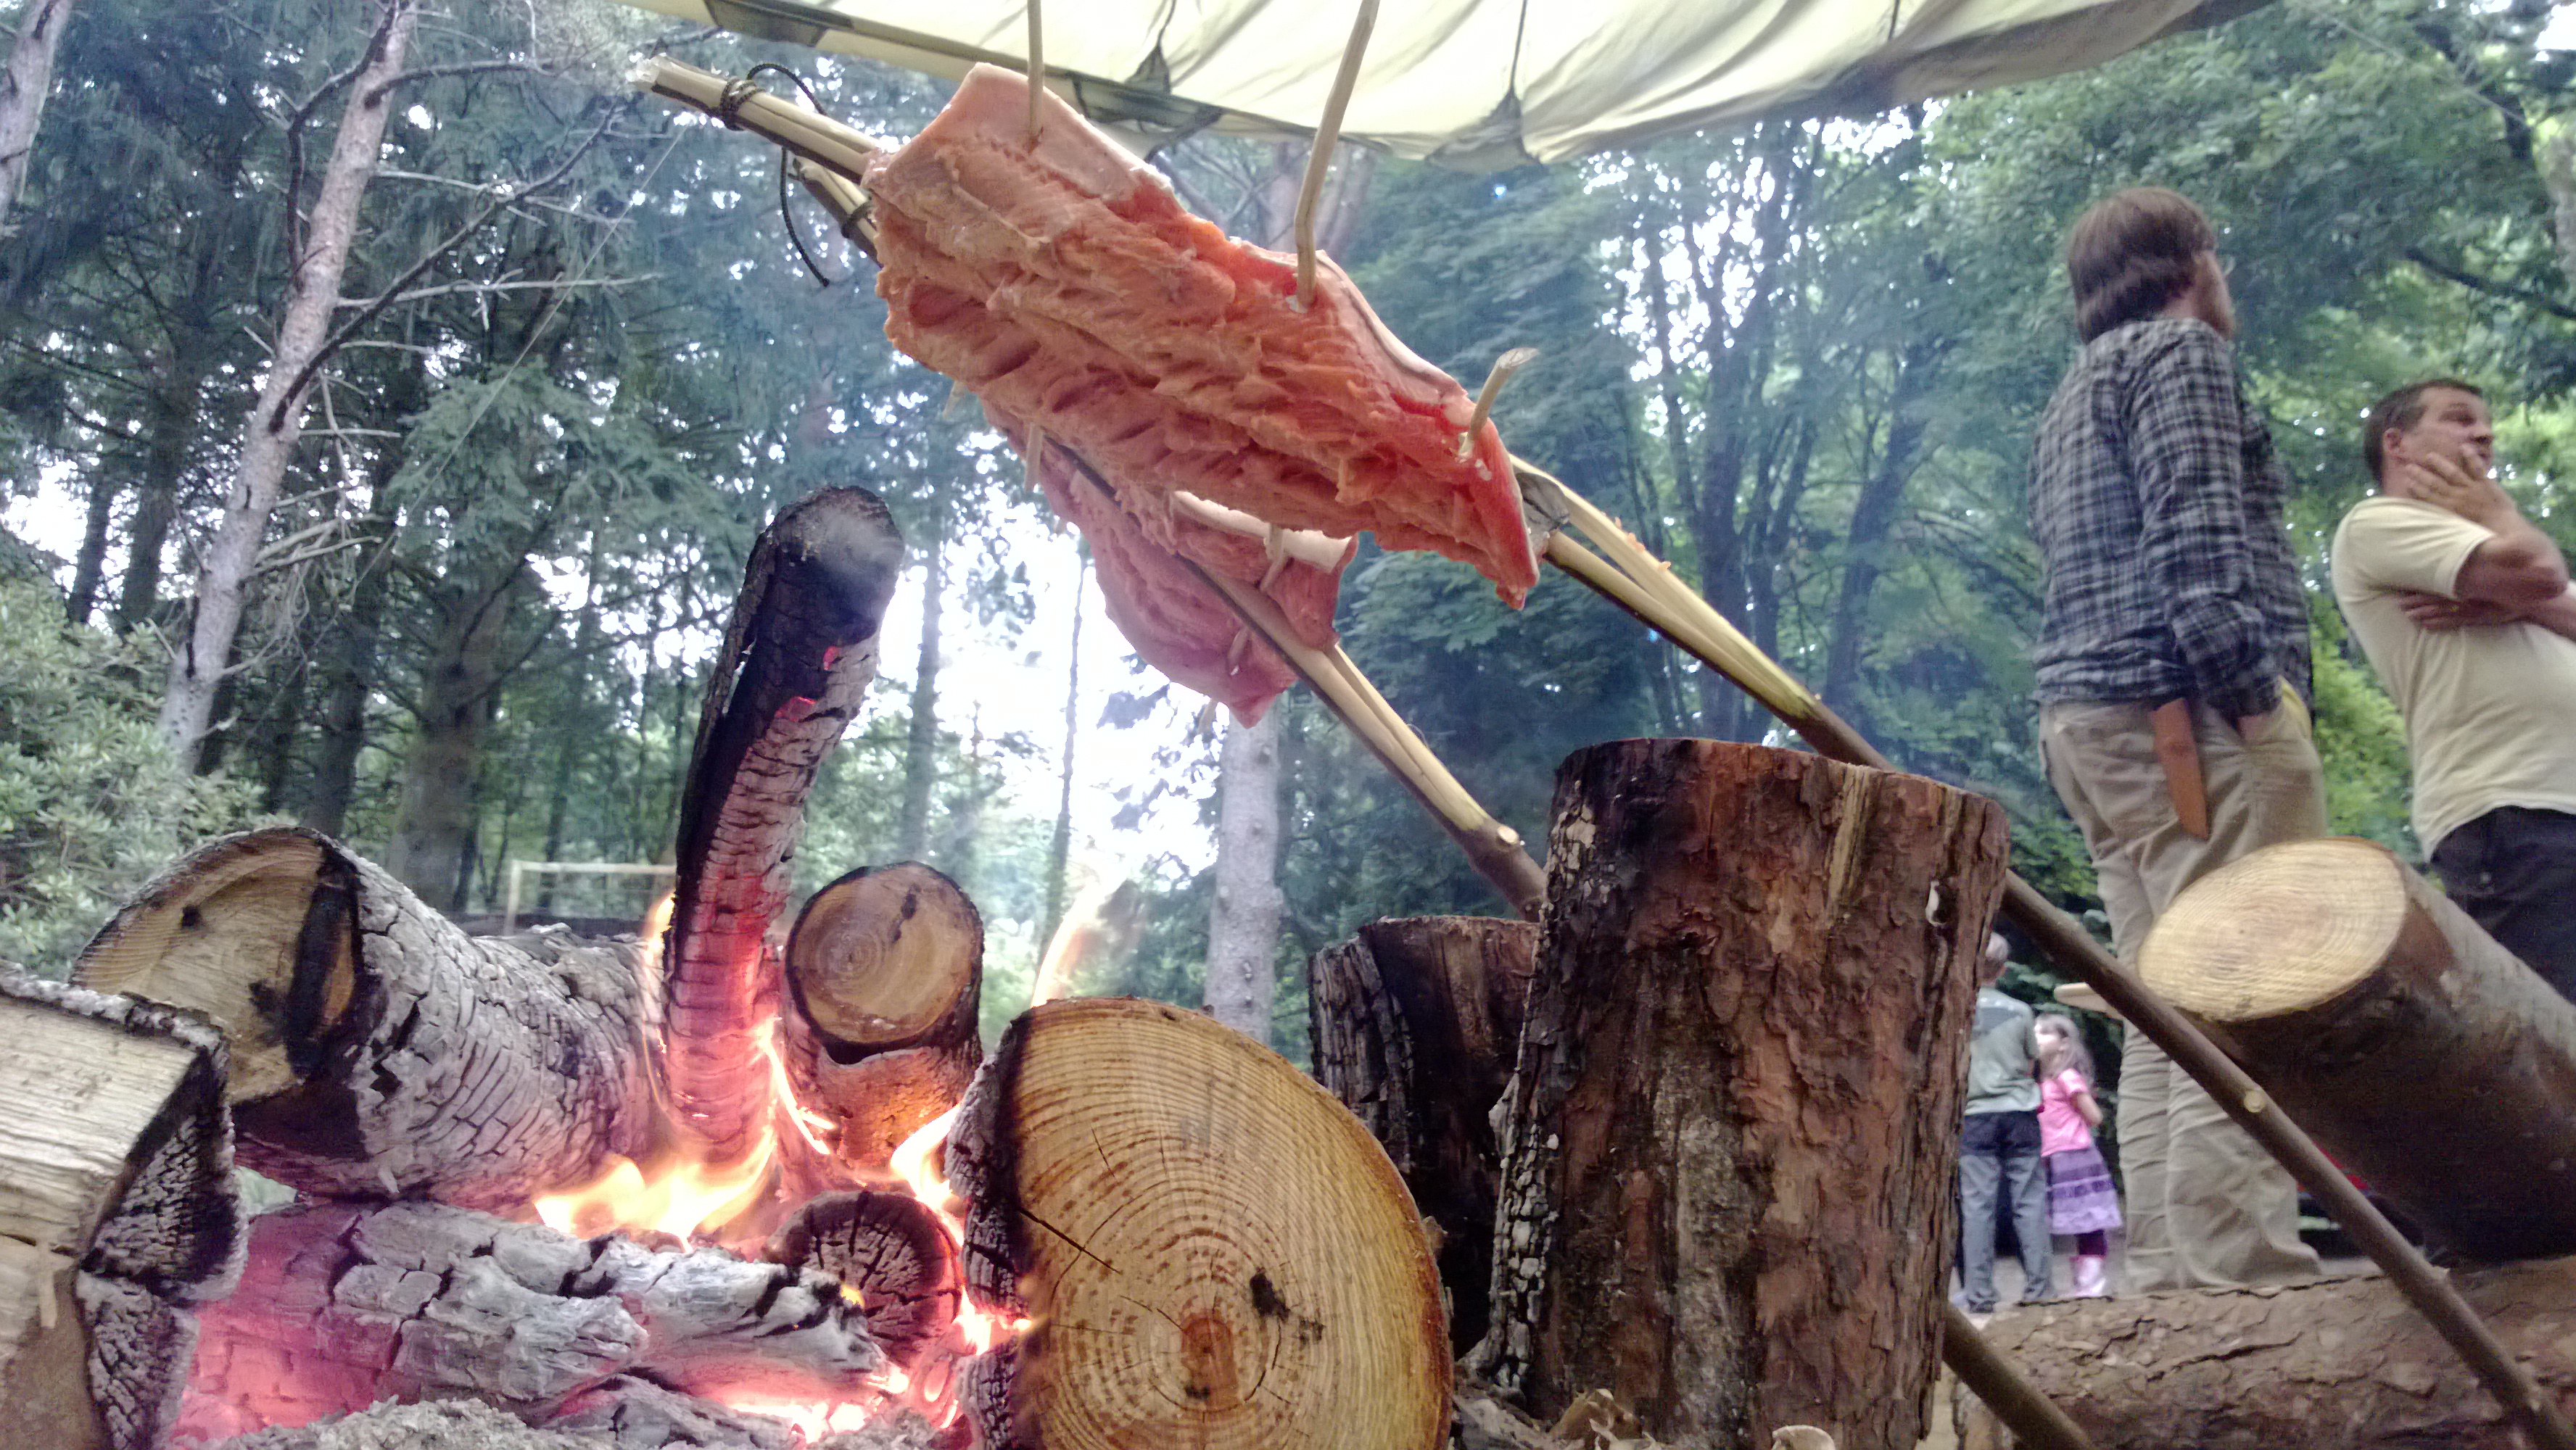
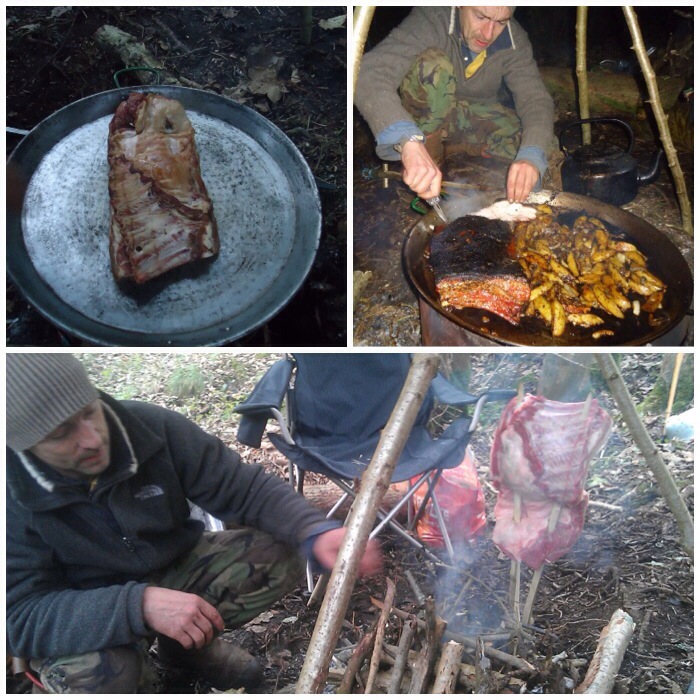
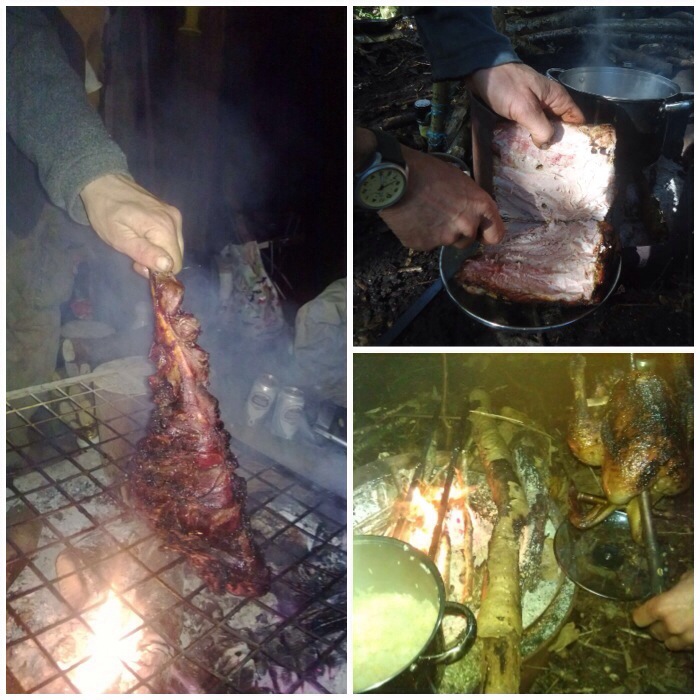
After breakfast Fraser prepared a side of pork and set it up on a stake to slowly be smoked by the side of the fire. The pork remained there most of the day, gradually absorbing the woodsmoke.
Smoking Saturday night’s dinner
After a few brews we struck out to do a bit of foraging and tracking. I think I am a better forager than tracker and may one day have to find the time to study tracking under the likes of JP and Pablo from Woodlifetrails. In the bottom picture we found what looked like badger tracks in some soft ground.
Striking out for the day
On the left you can see the claw marks made as the animals scrambled up the bank and on the right a possible badger paw print. The picture at the bottom right was scat from a fox, I think. It was full of yellow maize/corn so the animal may have visited a farm recently.
Plenty of signs
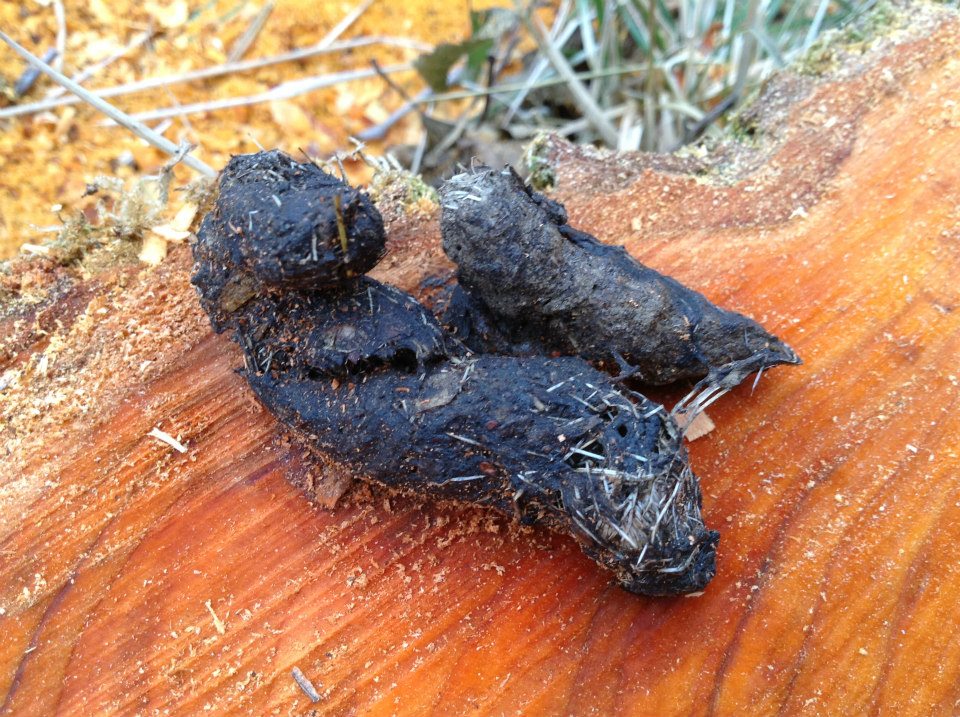
Another sign we came across was grazing by deer. The top two pictures show the tell-tale deer nibble, where the bite is not clean. Fraser found these woodpecker feathers in a pile and they still had all the points on the quills suggesting a kill by a bird of prey. I found all the nutshells in the bottom right picture and it looks like a dormouse or something similar has been nibbling away.
Nibbling
We foraged quite a bit over the weekend and even though this was November there was still a lot to be found. The water mint was destined for the teapot and the large burdock root was chopped up and added in with the other vegetables for the evening meal. The bottom left picture shows hogweed seeds which Fraser collected for using later.
Foraging
After all this hard work of spotting signs and foraging we relaxed by wandering around the woods doing some stump shooting.
Stump shooting
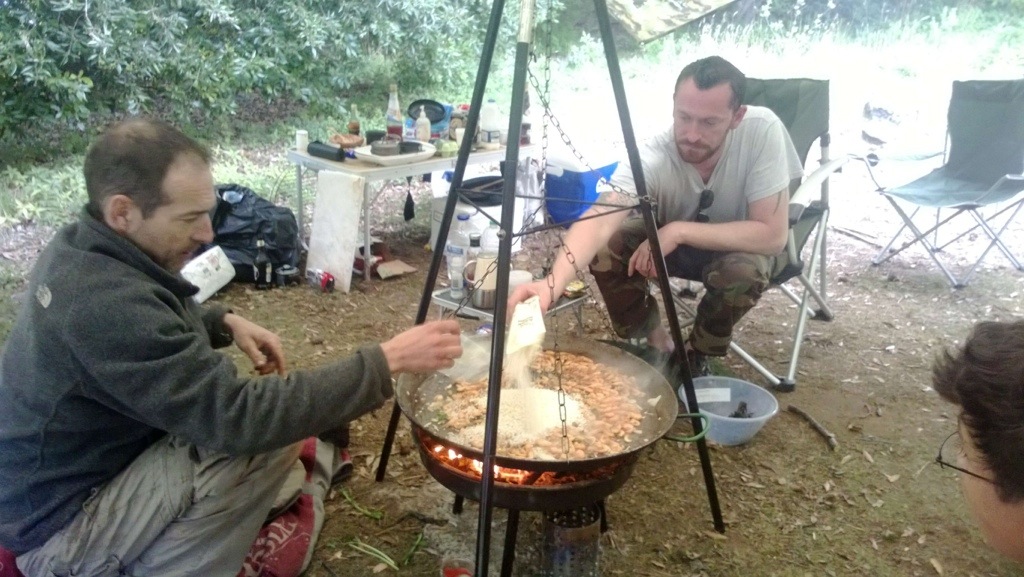
Fraser has a large paella pan that he wanted to use for cooking that night. It was a tad blackened from previous use so he used mud and small pices of gravel as a scouring agent to get it clean. It worked a treat as you can see in the other pictures. After the cleaned pan was rinsed with fresh water he heated it up and put the side of pork on it to start cooking.
Scrubbing, Stripping and Searing
The fork you can see being made on the left was actually for using as a stand for the pork to be smoked during the day. Once the pork was cooking they made excellent tongs for mixing all the vegetables. Si had flattened a piece of one of the logs for me to use as a chopping block for cutting all the vegetables up on. As he had just stripped the bark and the wood was still green it was a very clean surface to work on.
Prepping tools and veg
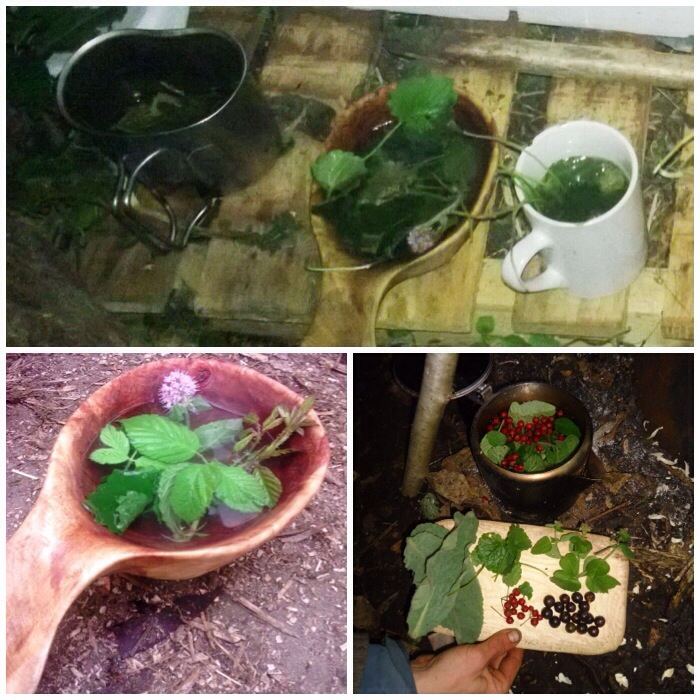
While all the food was cooking we made a fresh herb tea. The ingredients included sloes, haws, ground ivy, water mint and mullein. Very tasty it was too.
Time for a brew
Fraser as usual managed to make a banquet (well, what I call a banquet) in very cramped conditions with minimal tools and taught us all along the way.
Final touches
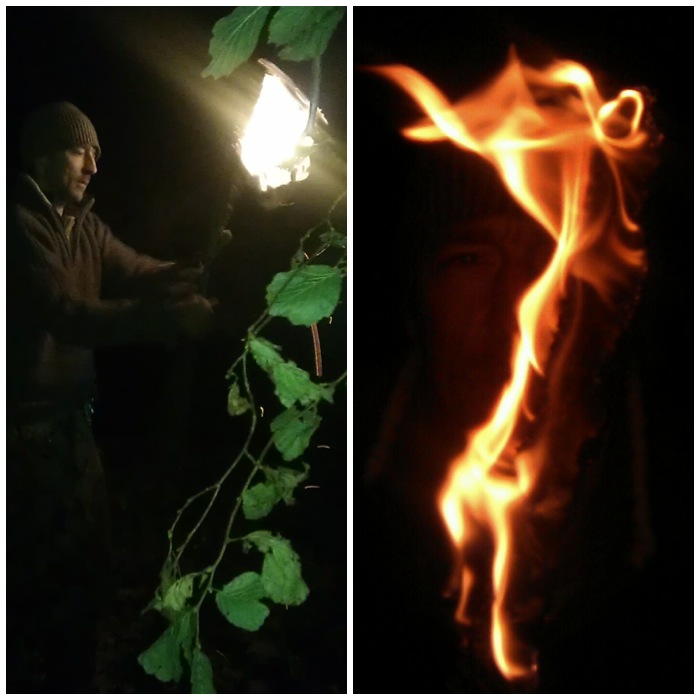
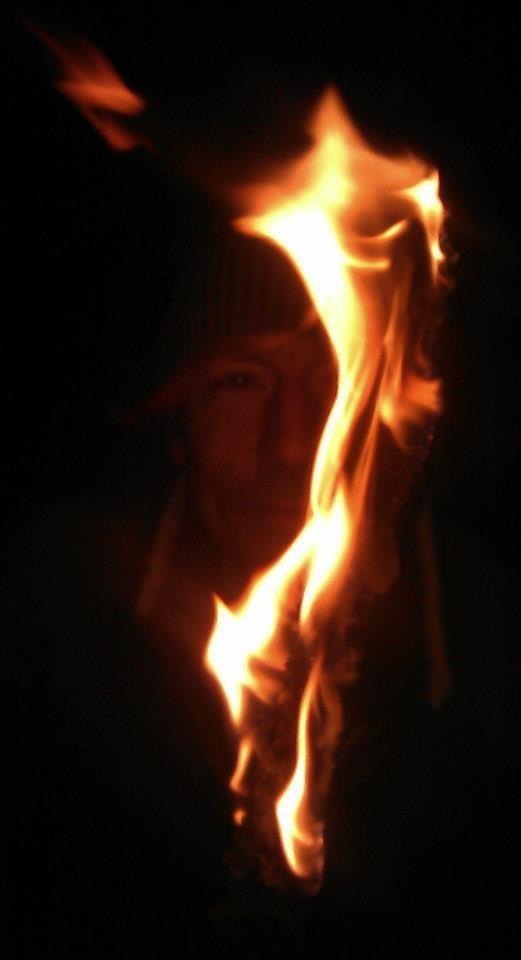
During the day we came across some live mullein (also known as Aaron’s Rod) that had not produced a stalk as yet but we also found one mullein that had grown a stalk and had died. The stalk was dry so Fraser took the time to release the seeds and spread them around to promote future growth. I like to use this stalk as a hand drill for making fire by friction but another use for this plant in the past was making torches. The seed head would be dipped in fat, grease or tallow and then set alight. For speed we stuck with some vegetable oil and soon had a good flame going.
Aaron’s Rod
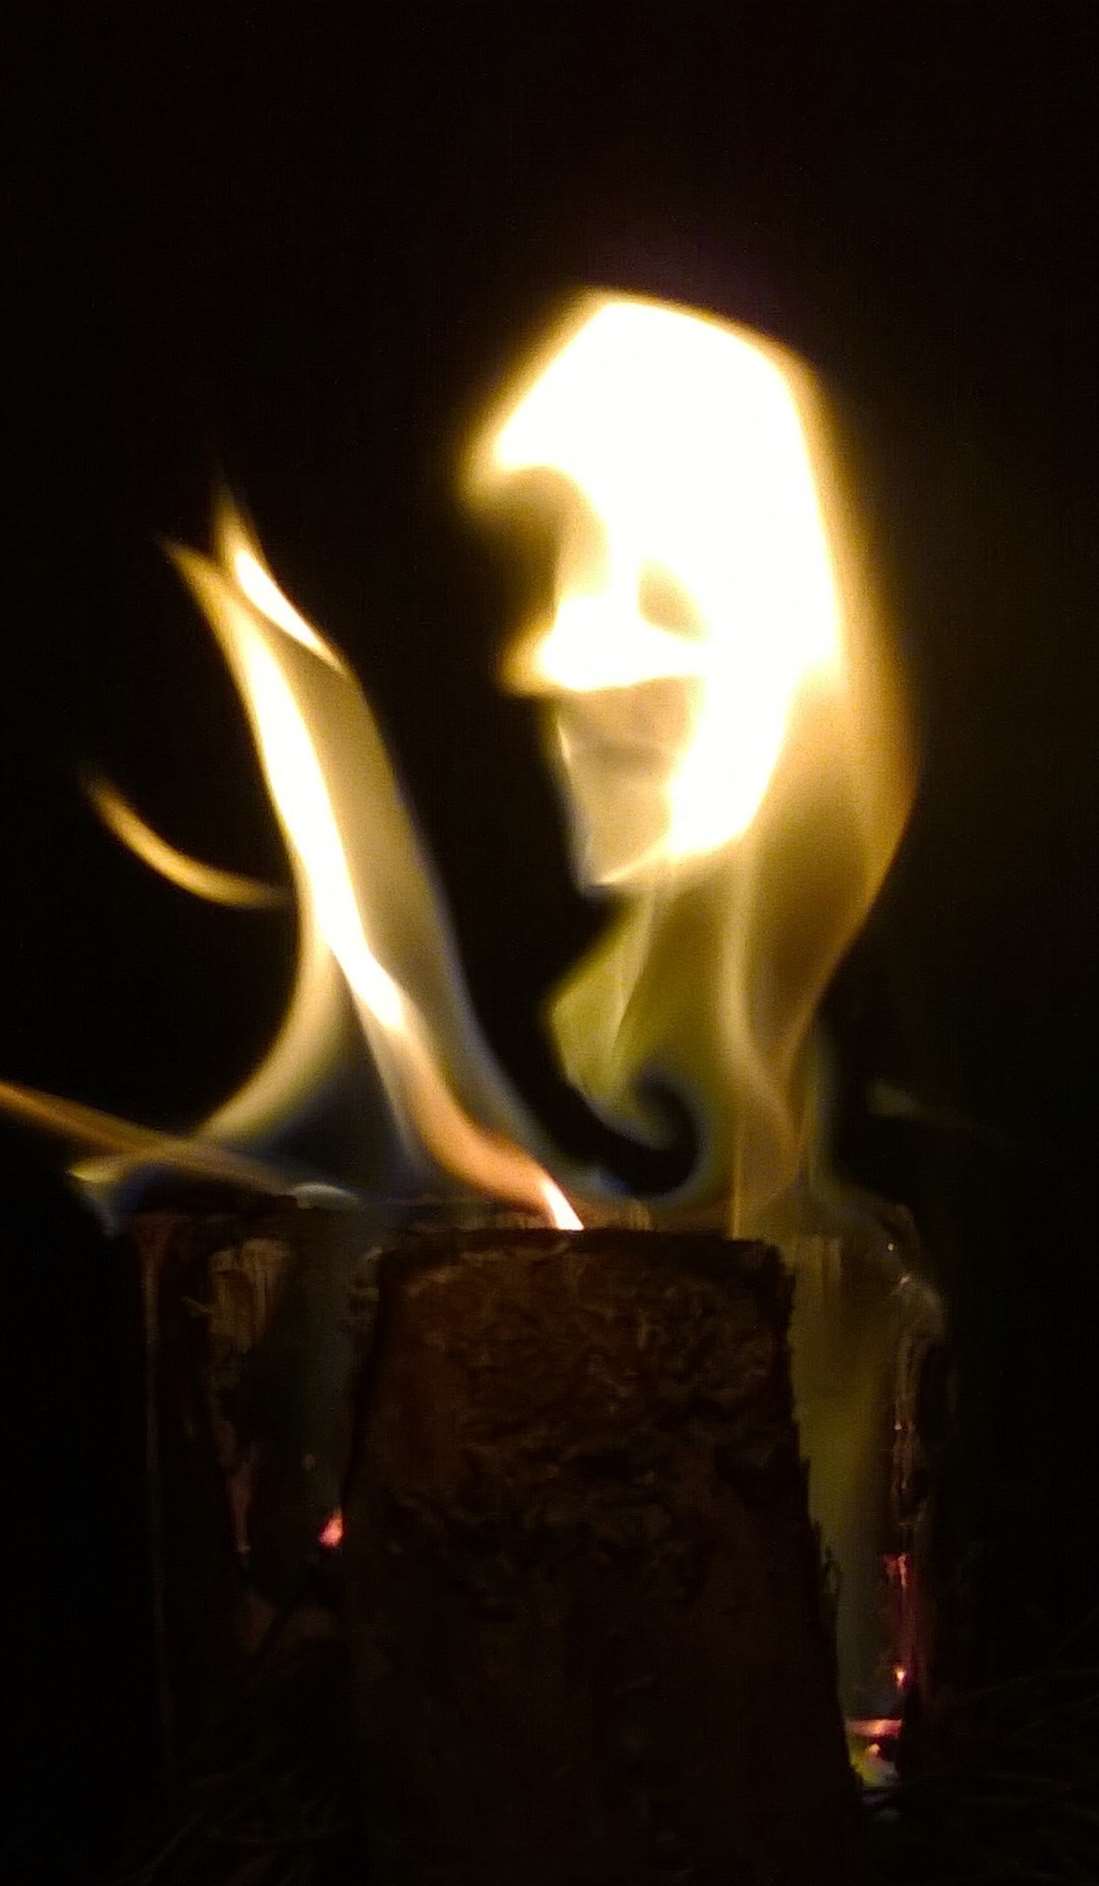
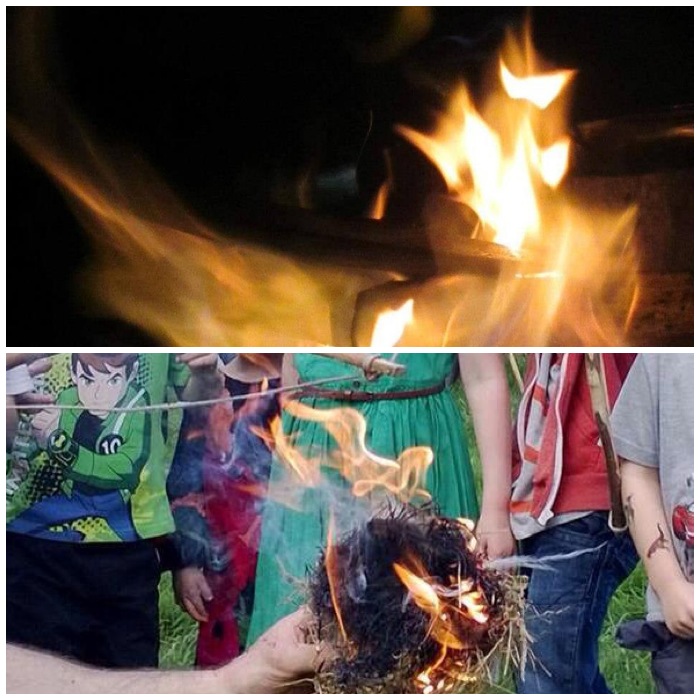
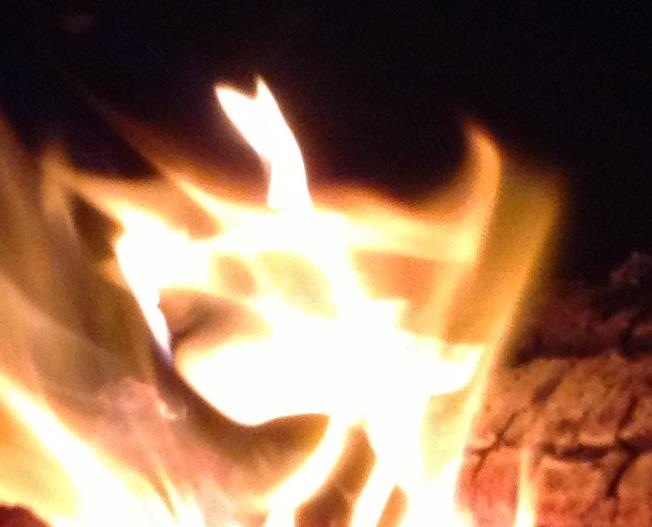
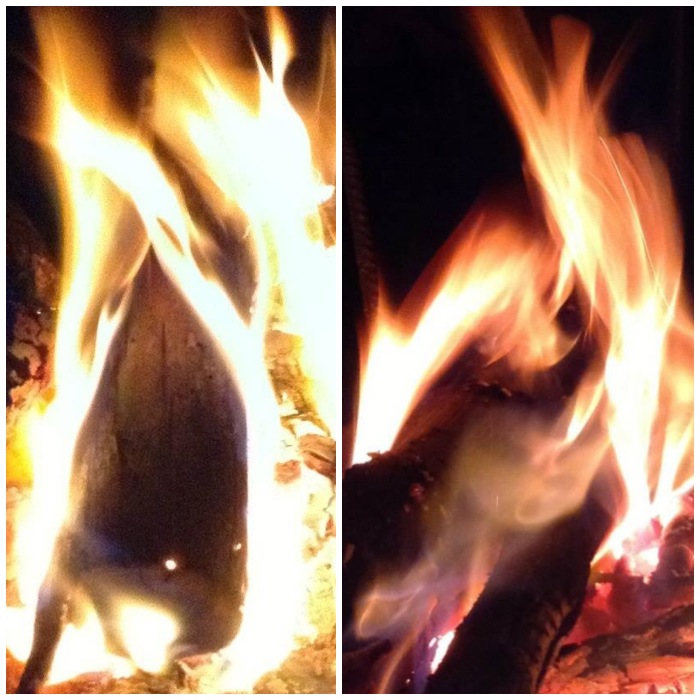
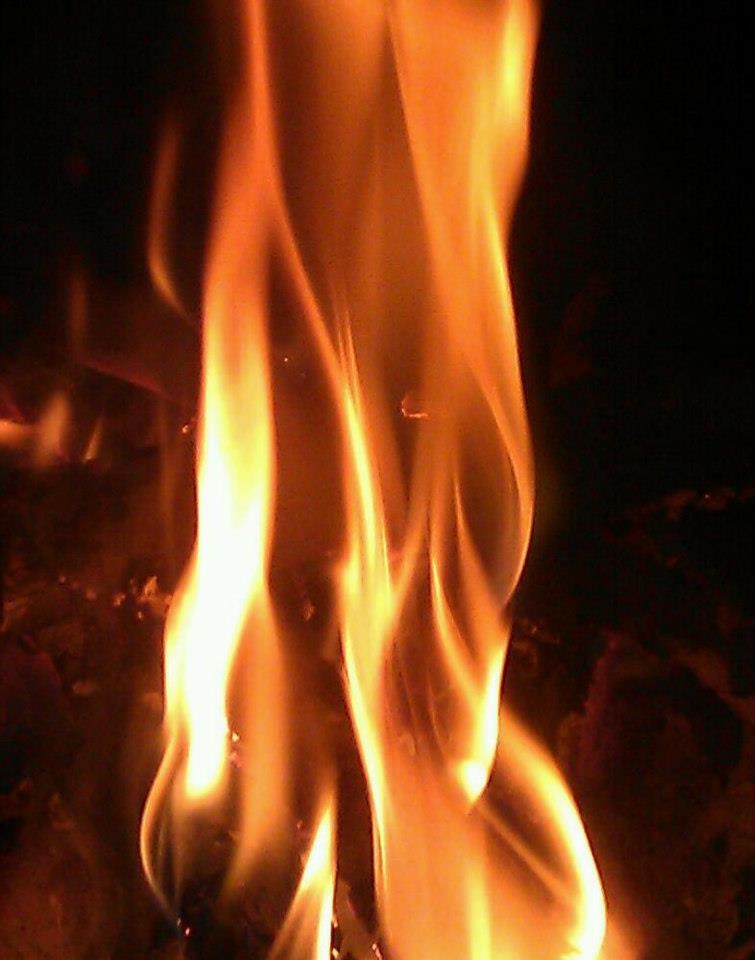
The picture on the left shows how much light the candle actually throws out. I took the picture on the right with the focus of the camera directly on the flames. When you do this you can get some interesting shapes. I see a climbing fox in this one. It has a long tail, distinctive legs and you can just make out its snout – and I am not talking about Fraser’s face in the background 😉
Mullein candle
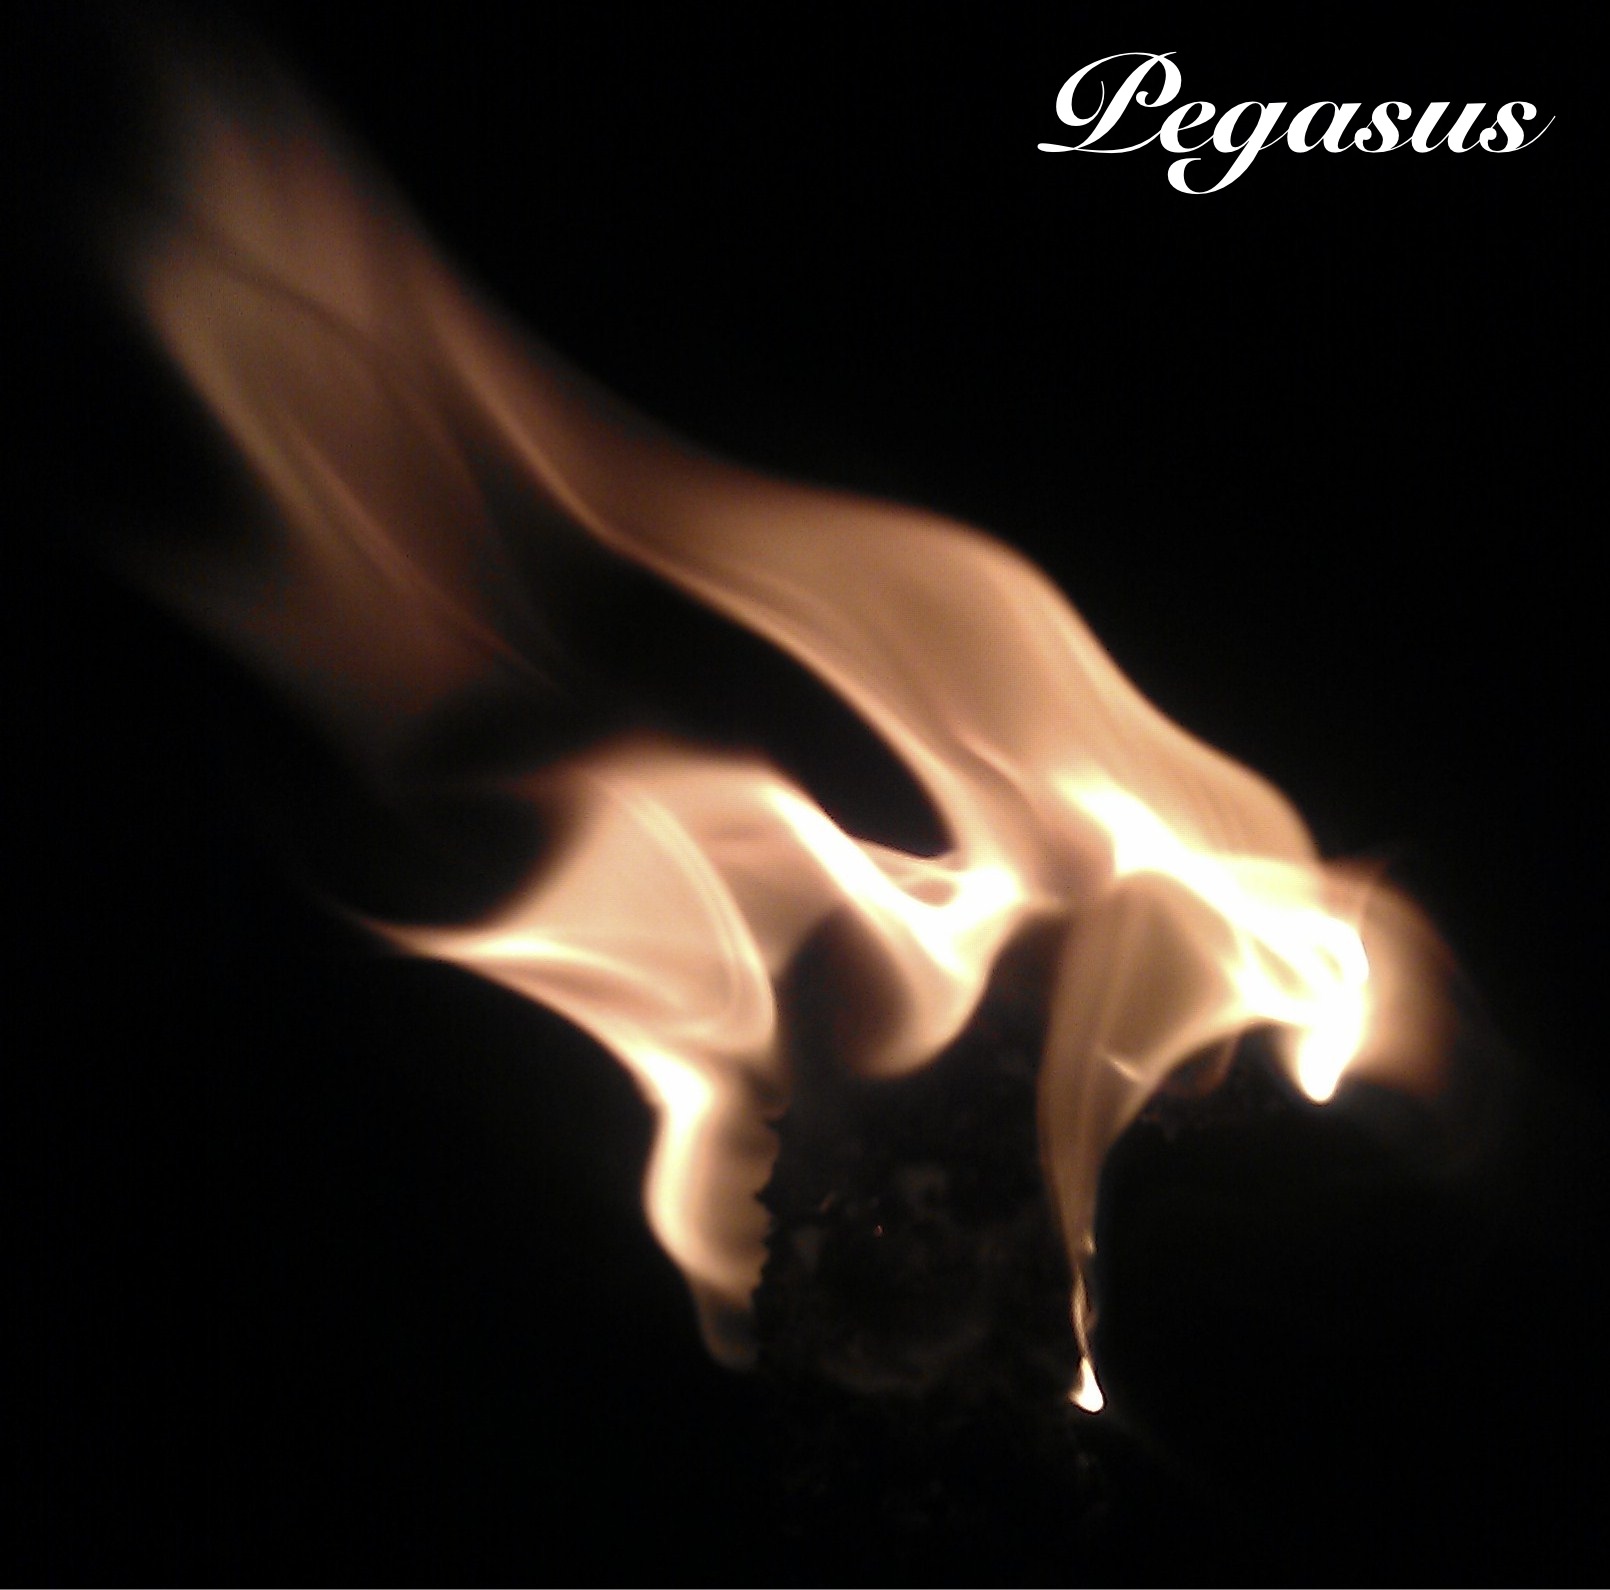
One of my favourite pictures of this candle is the one that produced Pegasus the winged horse.
The flaming horse
While I was compiling the pictures for this post I was struck by these two pictures. I have inverted the right hand one and call it the Crimson Climber. The pictures were taken one after each other. You can clearly see the figure on the left about to start climbing but look closely and you will see on the right with two small arms and a hunched back a figure at the top of the flame.
The Crimson Climber
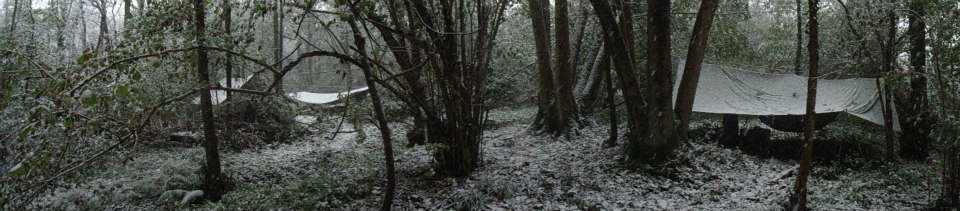
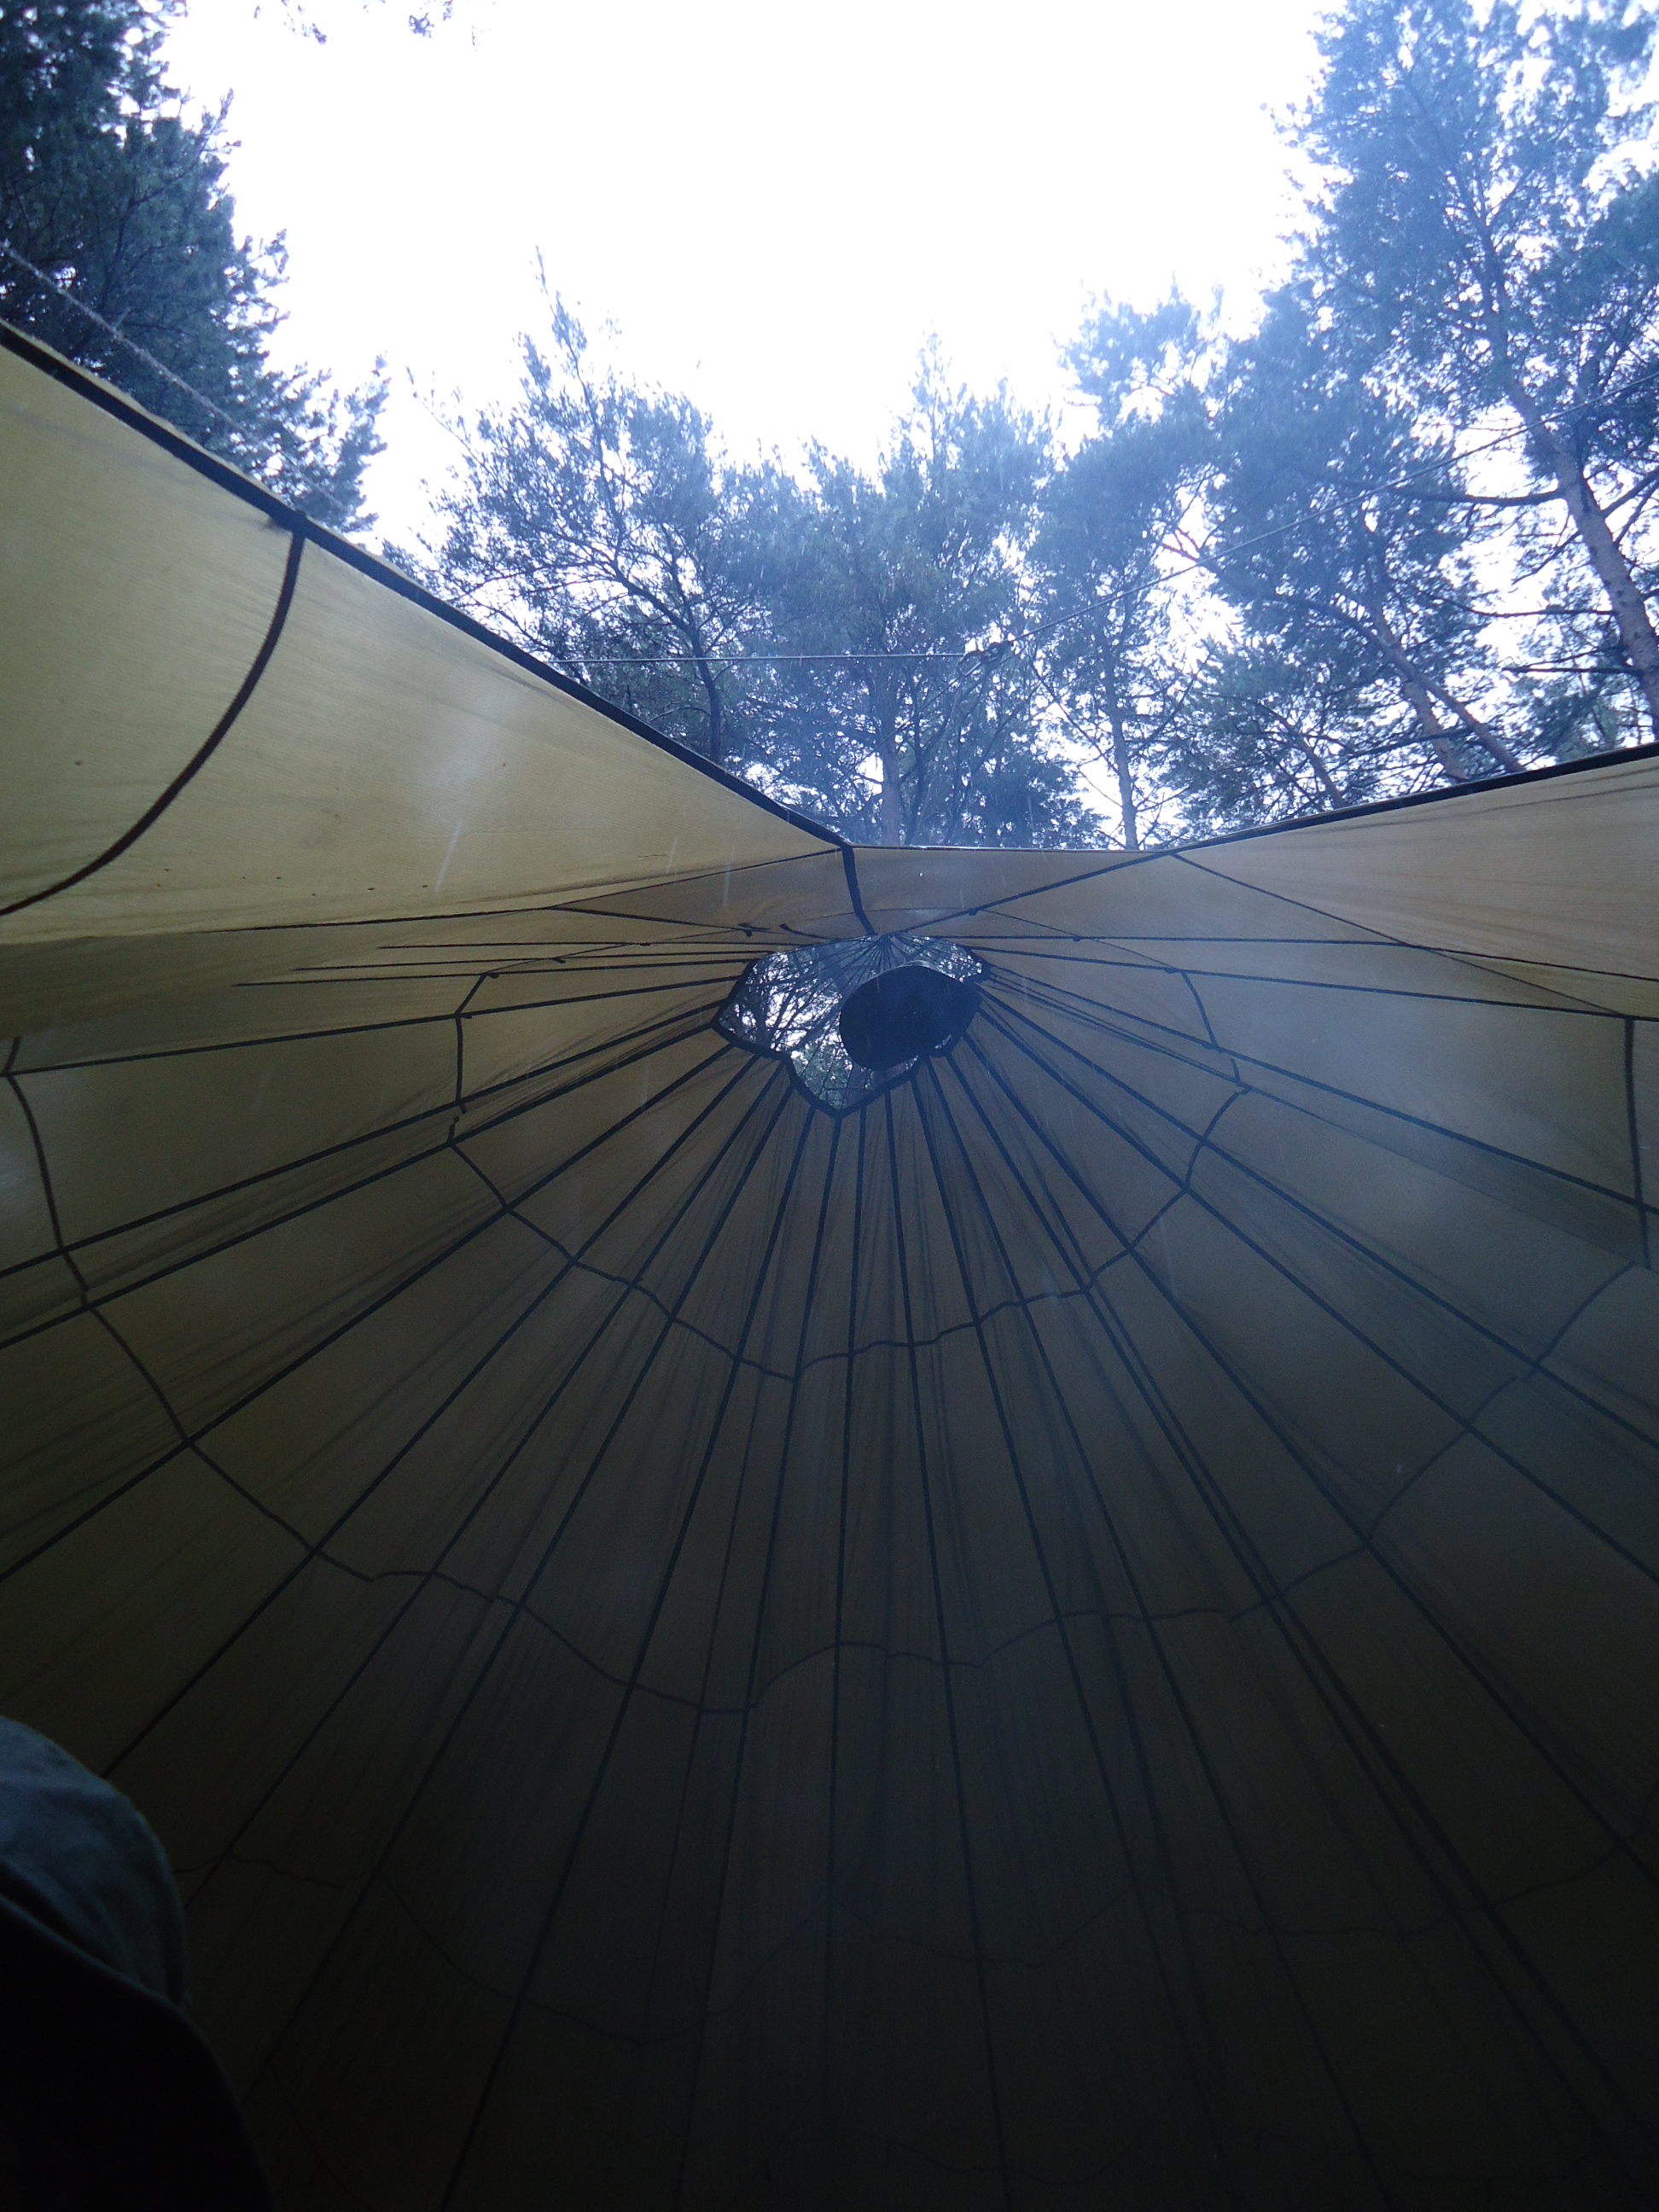
Sunday morning was a relaxed affair at first. I could hear the pitter patter of rain on my tarp as I lay there but it all went quiet soon after. As I turned in my hammock I glanced out and saw the view you see in the top picture. It was magical to lie there and watch the snow falling in the perfectly quiet woodland. This magic did not last long as the snow started to accumulate my tarp started to droop. I had set it up on a shallow angle more suited for the good view rather than to shed lots of snow.
Wintry Wake Up
So it was time to get up and over the next half hour I had to keep clearing snow from all the tarps to stop them collapsing. Steve eventually got up wandering what all the racket was about.
Morning Steve
Breakfast was soon on the go and it was time to pack up to head home.
Heartening breakfast
A few pictures to finish on. It was a great weekend chilling out in the company of some great guys.
Extras
I am hoping to pop down and visit Fraser in the next couple of weeks and see what changes he has done with his site.
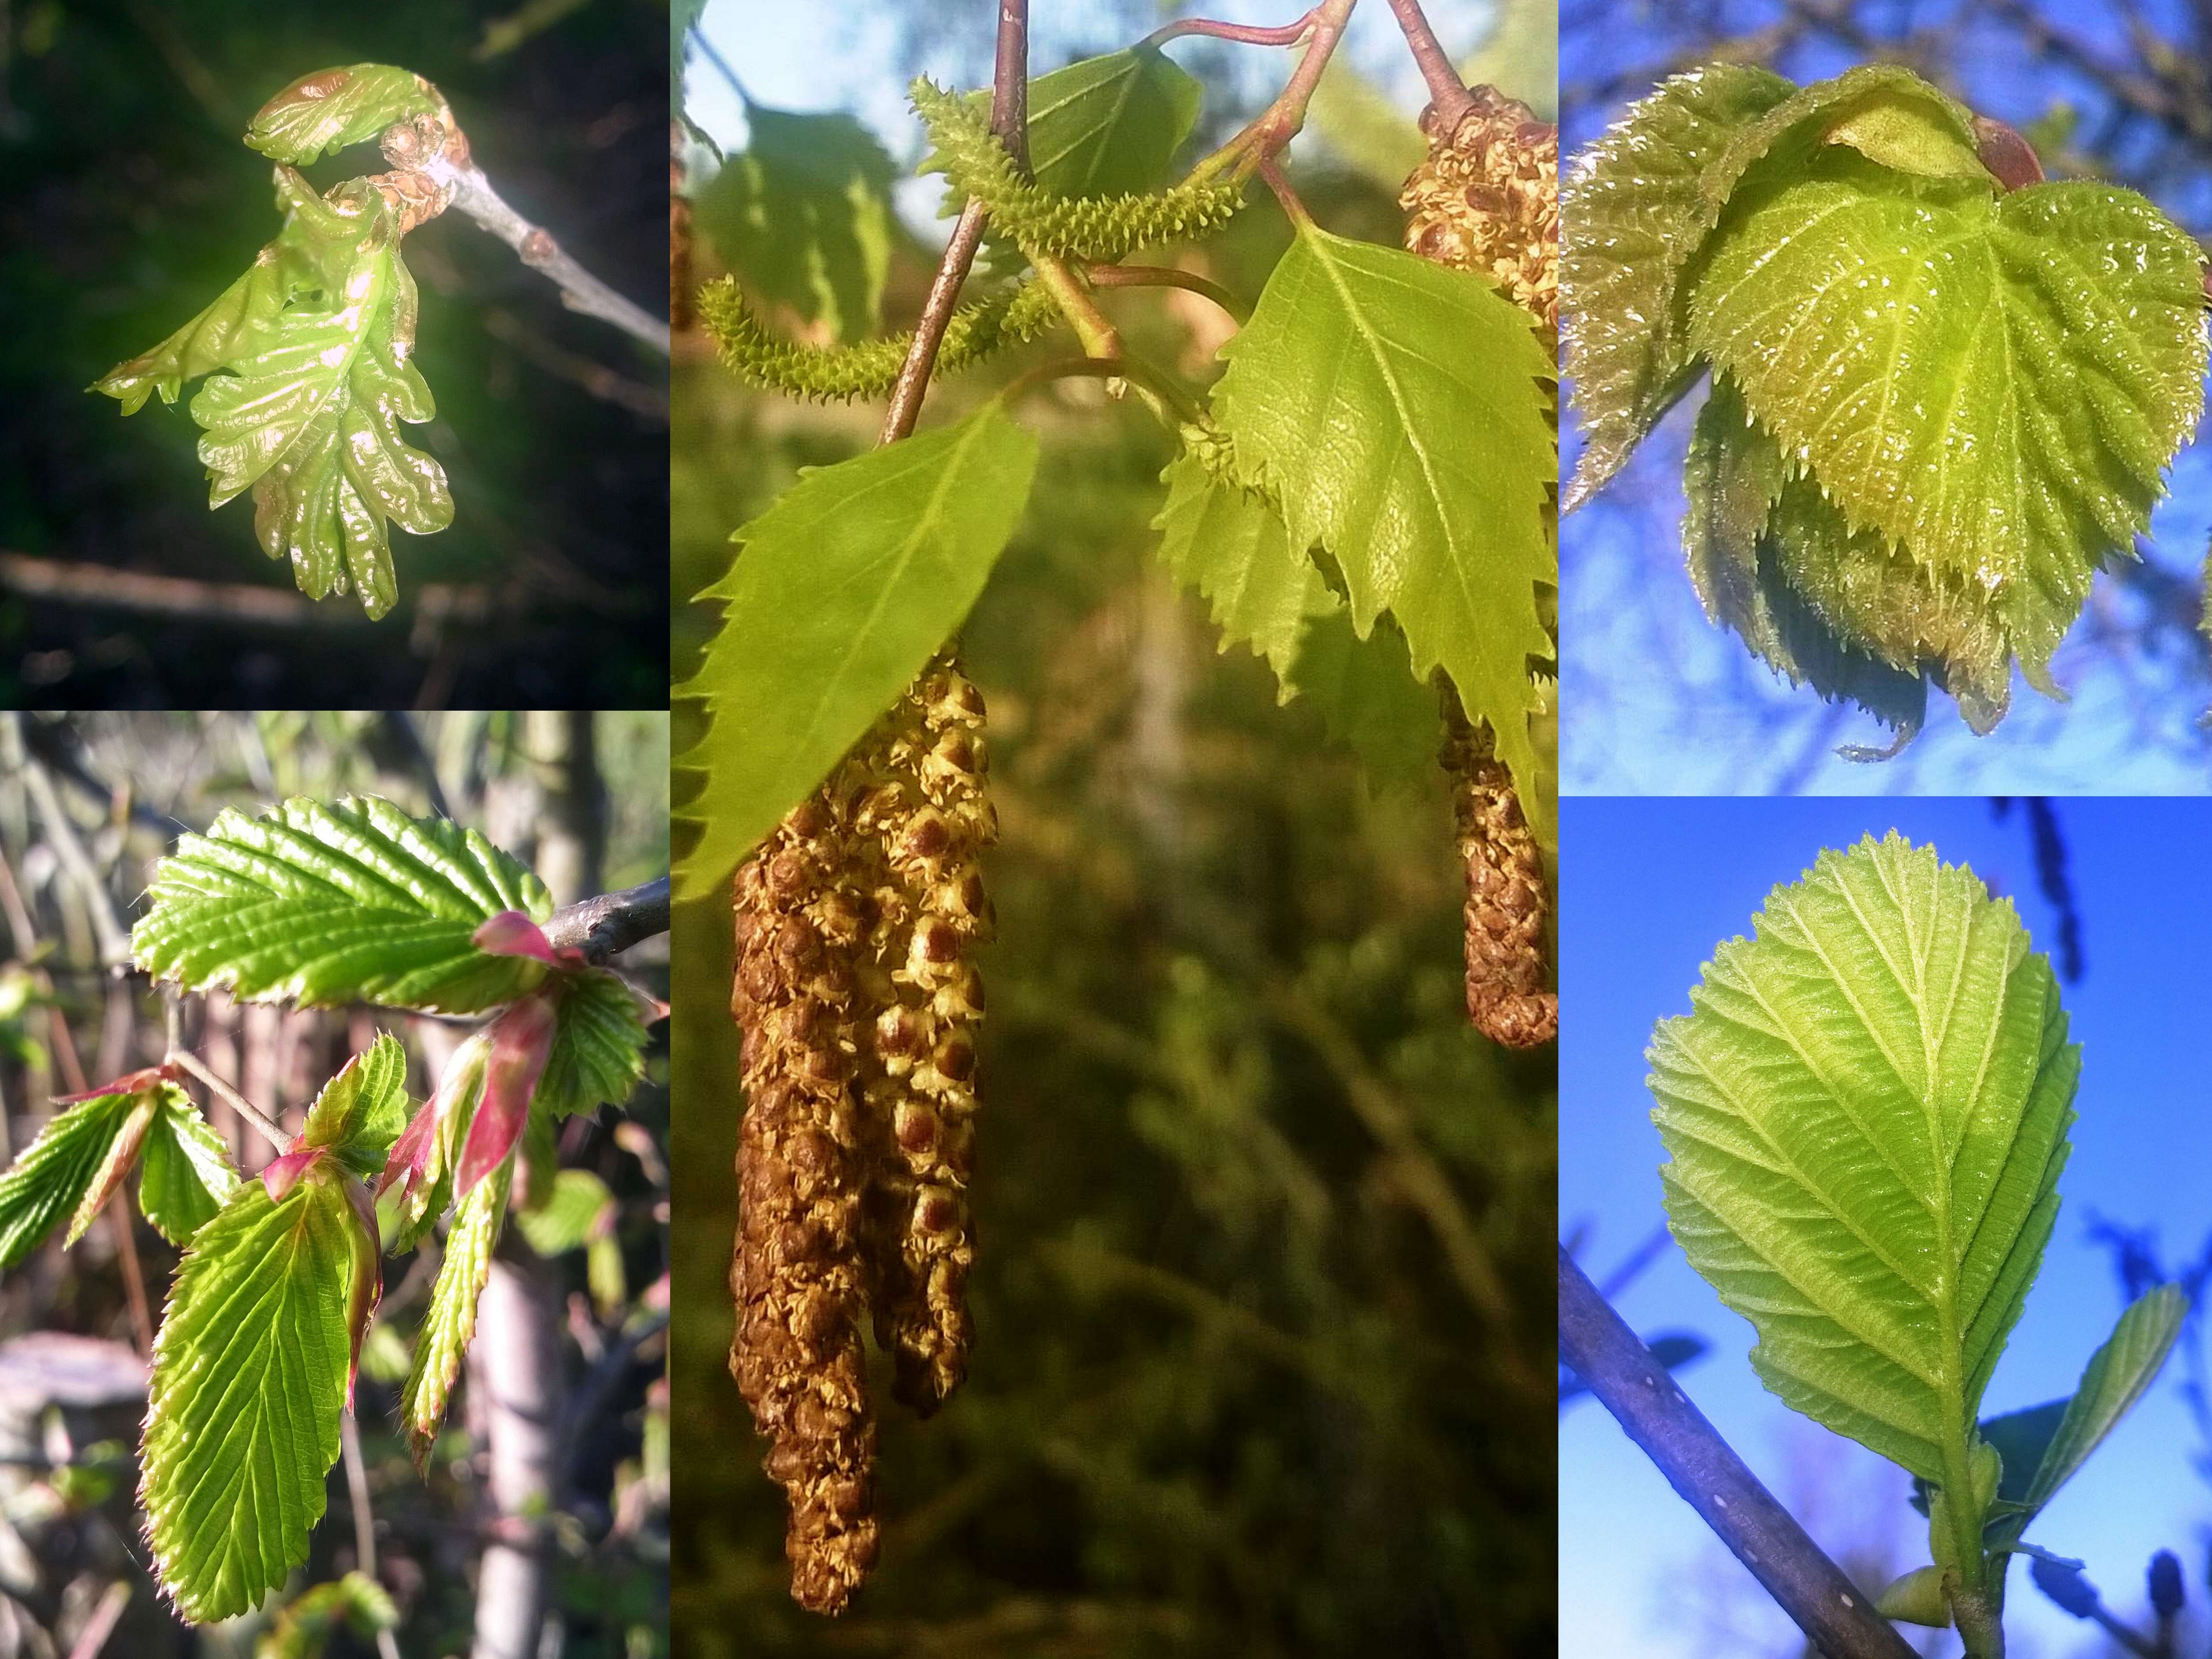
I have been out and about again seeing what has been appearing in the woods around my village.
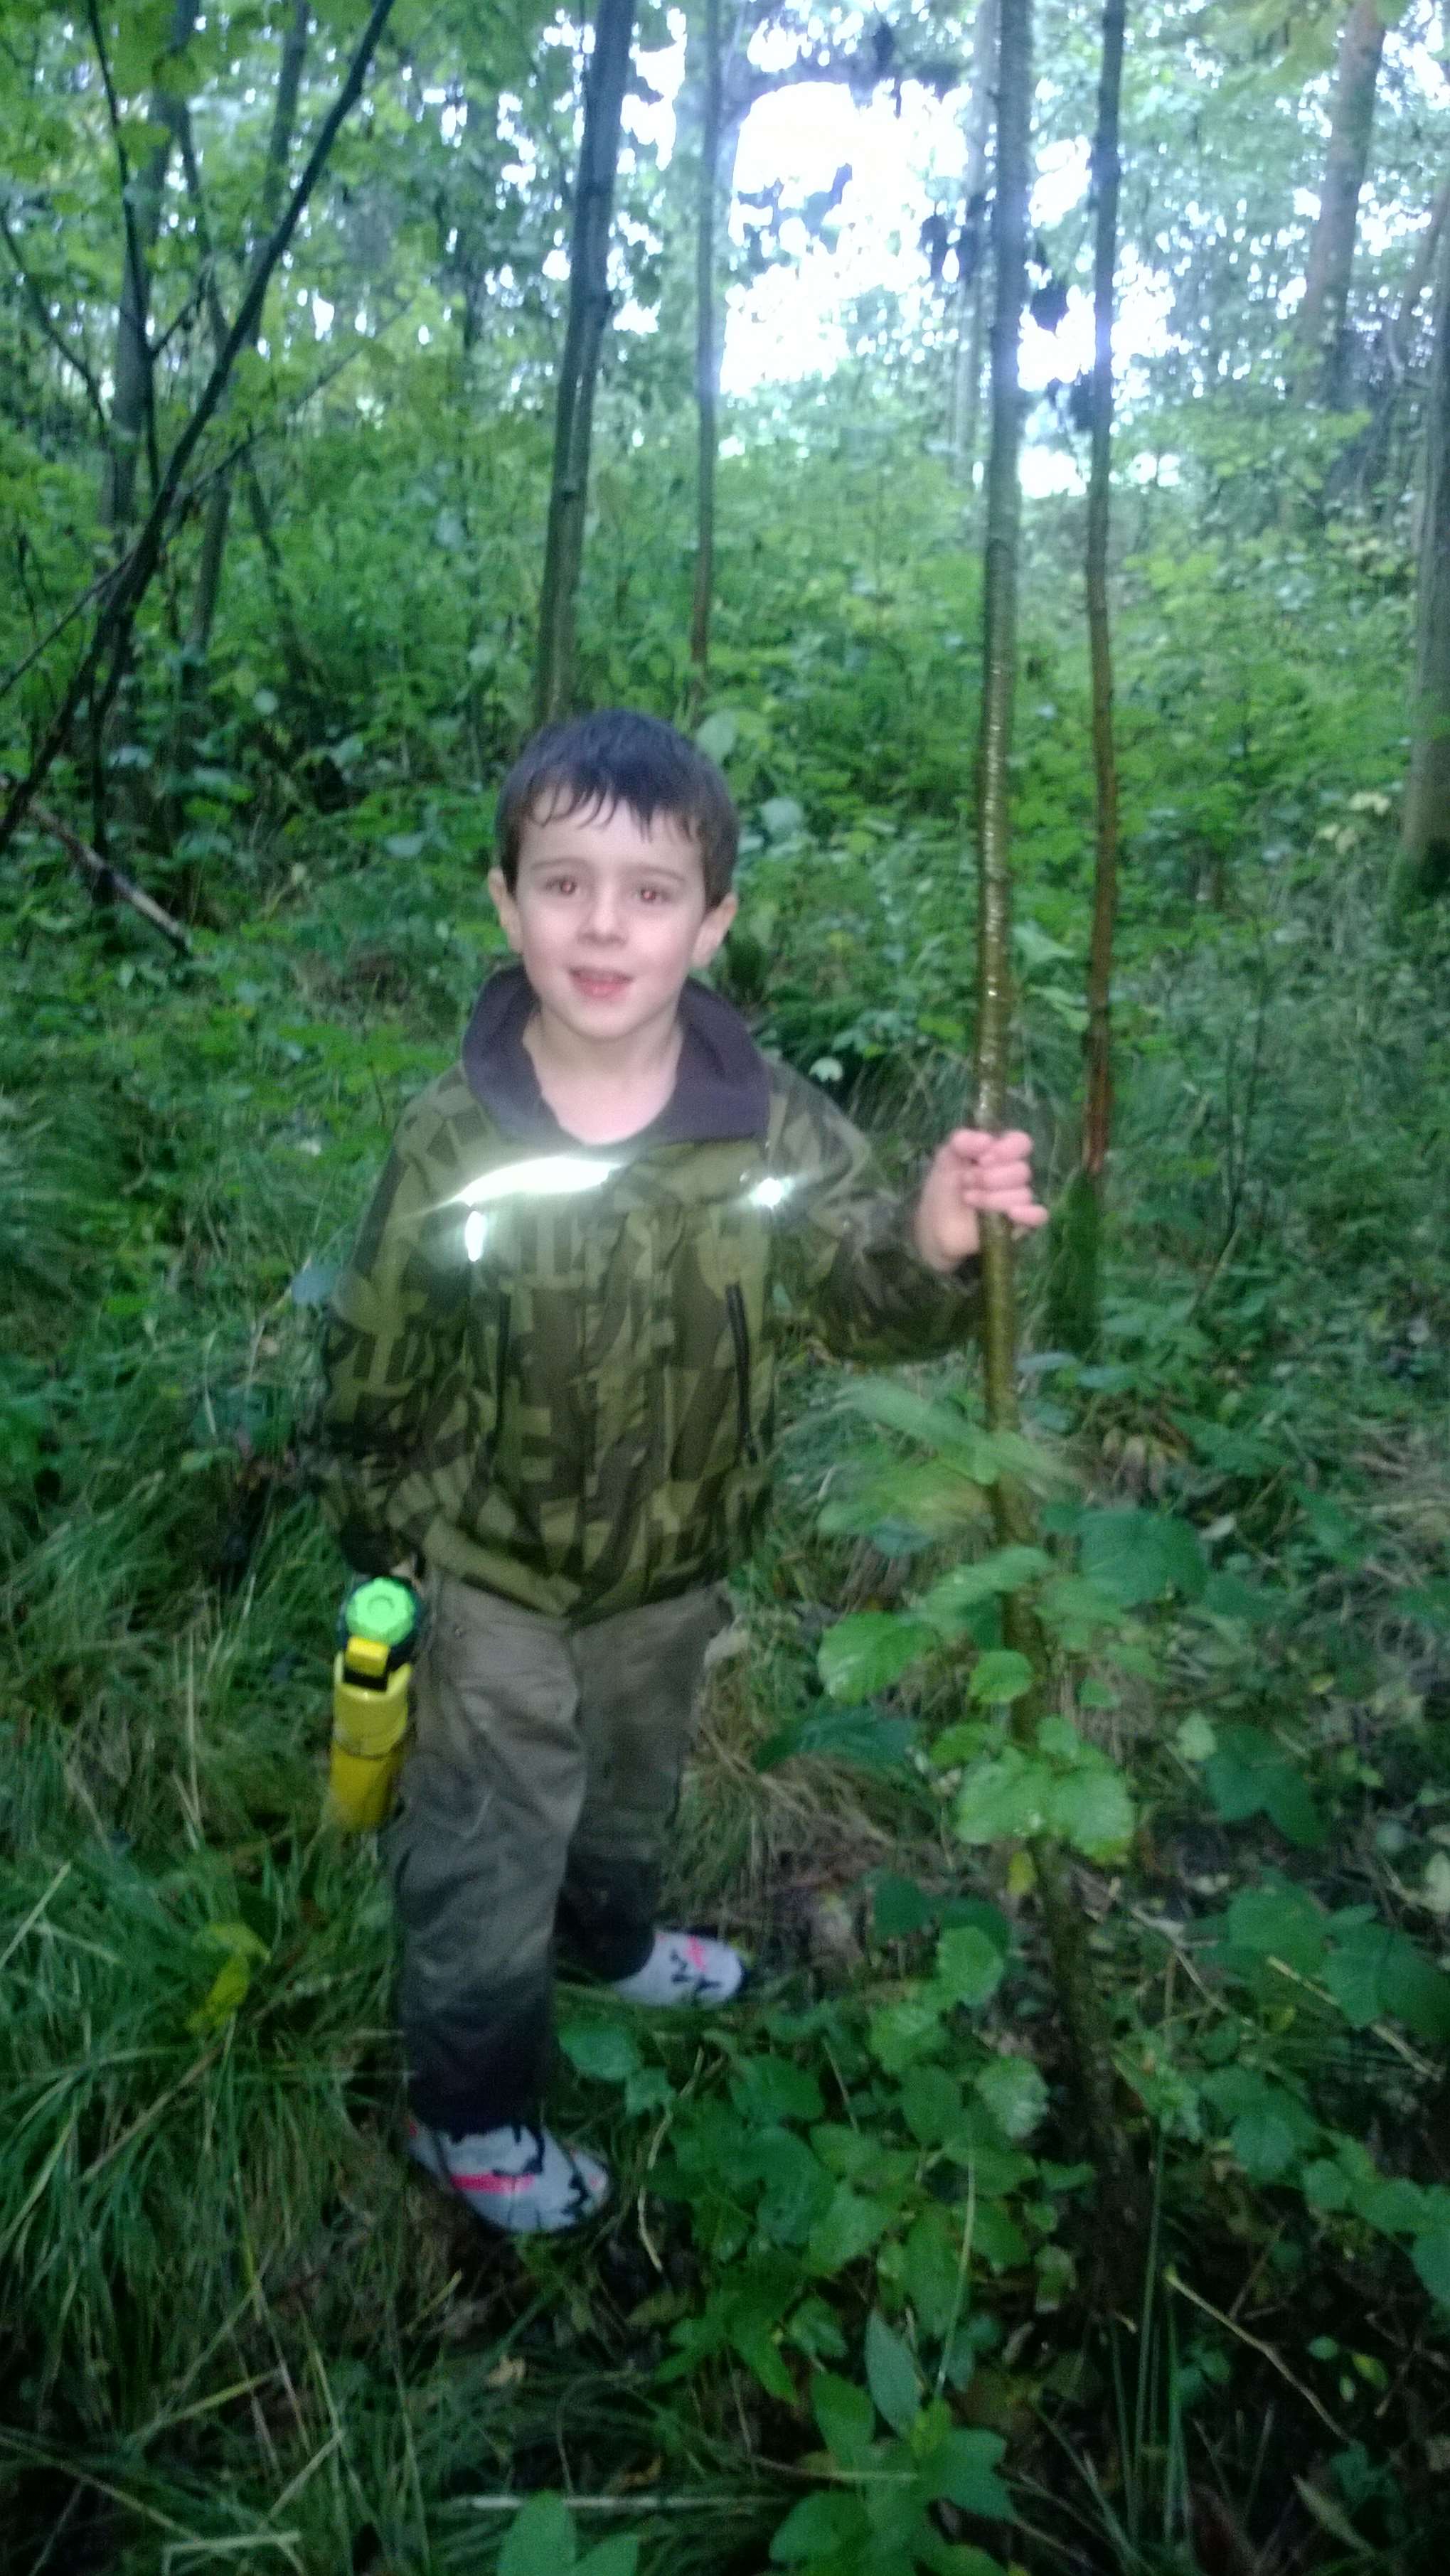
I took my son out this time and we used our bikes to get around. Normally I would walk so I would not miss anything but this time I wanted to try something new, that is to video my ’round’. My round consists of 12 sites I visit every week or two to see what is appearing at each site and in between each site photographing the growth appearing on certain trees.
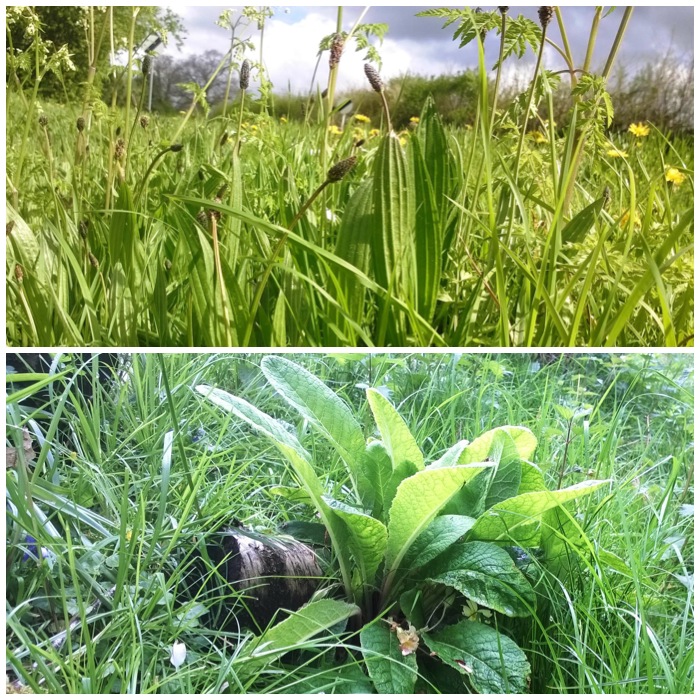
Here are some of the pictures I took as I filmed. From left to right they are (top row) cherry blossom, orchid leaves, (bottom row) oxlip, hedge garlic and marsh marigold. All of the flowering parts of these plants – apart from the orchid, which hasn’t flowered yet – have been appearing in just the last week.
Spring flowers, leaves and blossom appearing
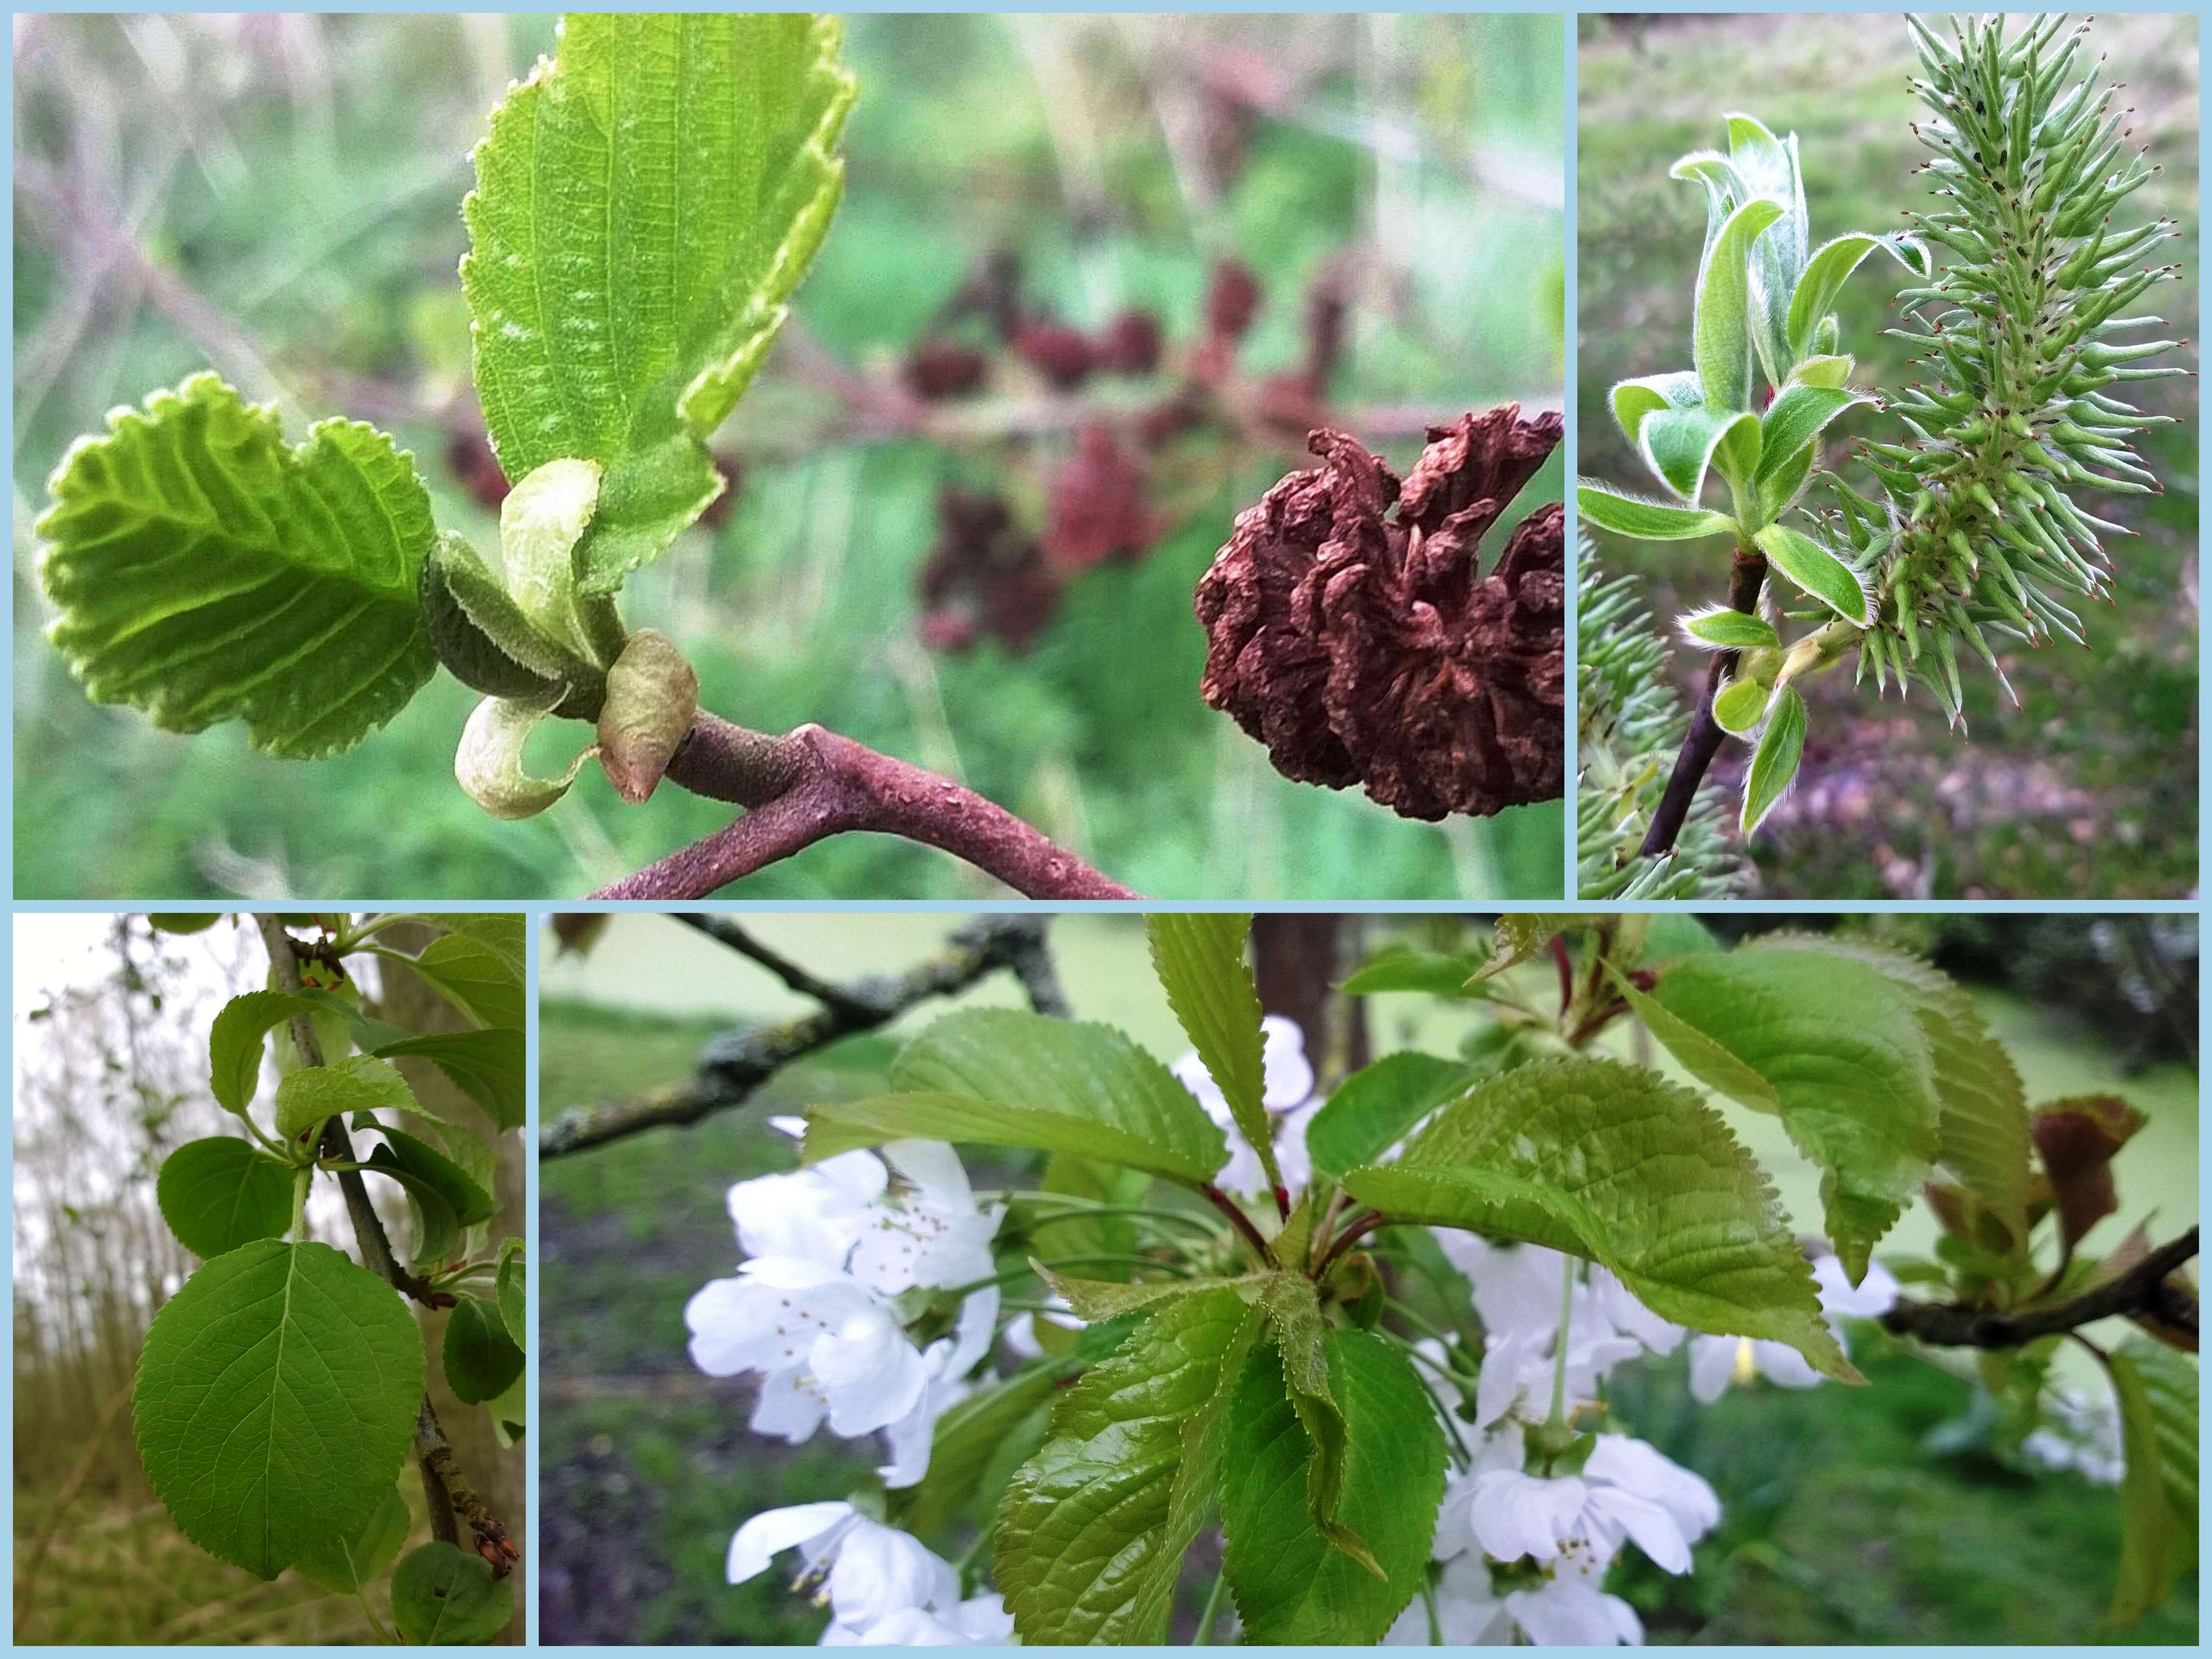
Lots of trees have finally been bursting their buds. Below from left to right are (top) alder, goat willow, (bottom) apple and cherry.
Leaf burst 1
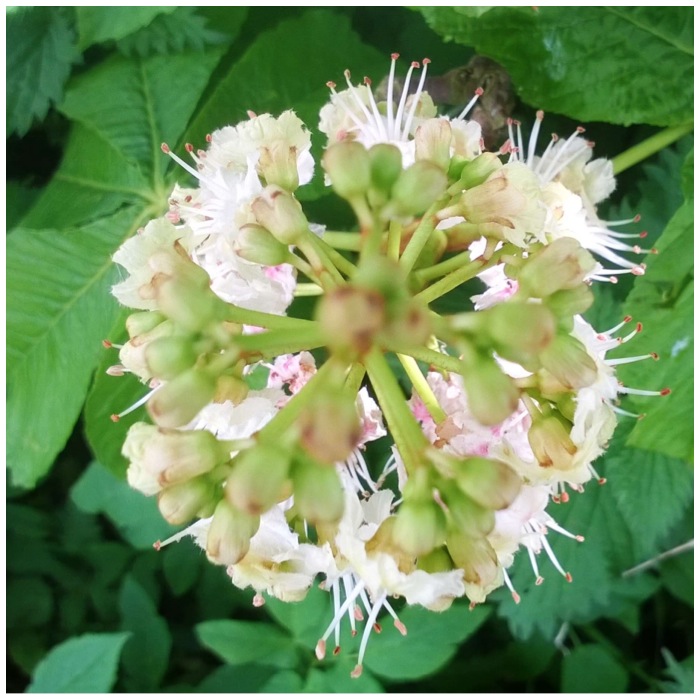
Also appearing have been the silverbirch, hawthorn, hazel and horse chestnut:
Leaf burst 2
Some trees are still waiting to leaf and they include the English oak, lime, beech and (bottom right) the ash. I haven’t yet identified the bud shown in the middle right picture: any ideas?
Still in bud
While I was doing all this photography I tried a little experiment using my mini iPad camera filming my route. Sorry about the quick change between scenes and all the movement, I will try and work on making this easier on the eye in future.
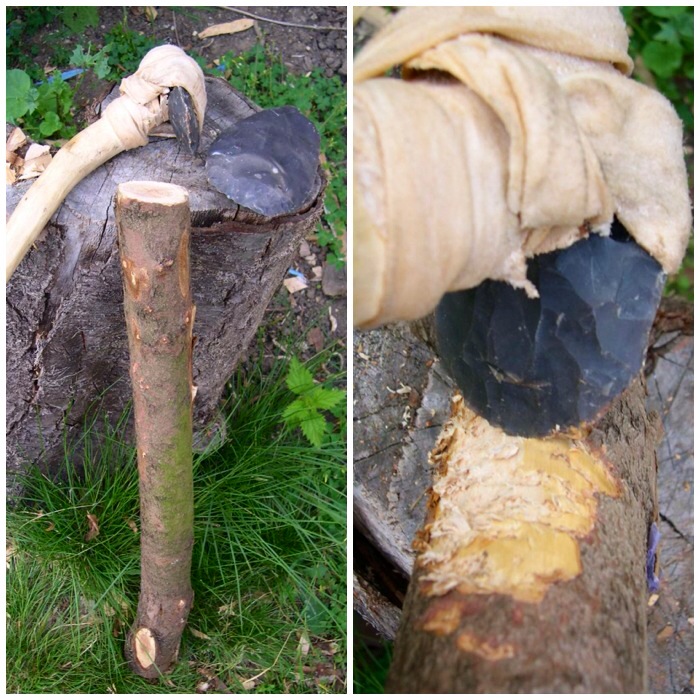
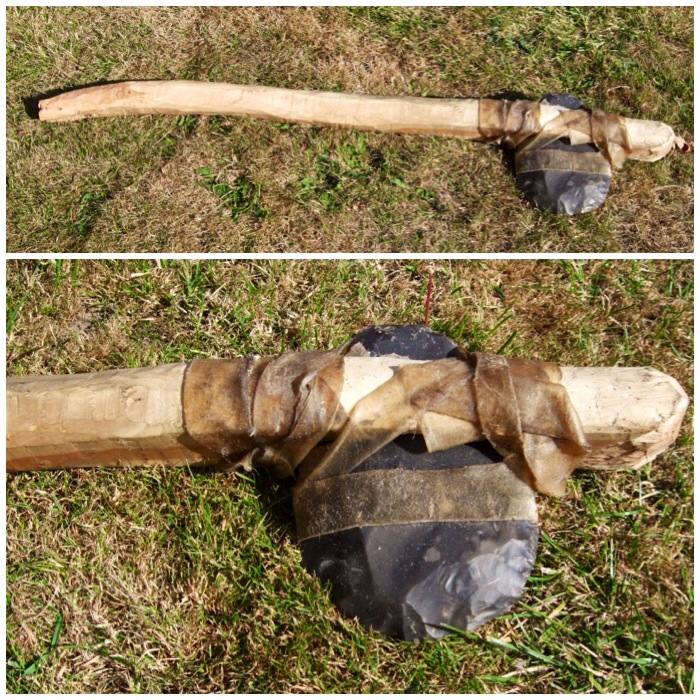
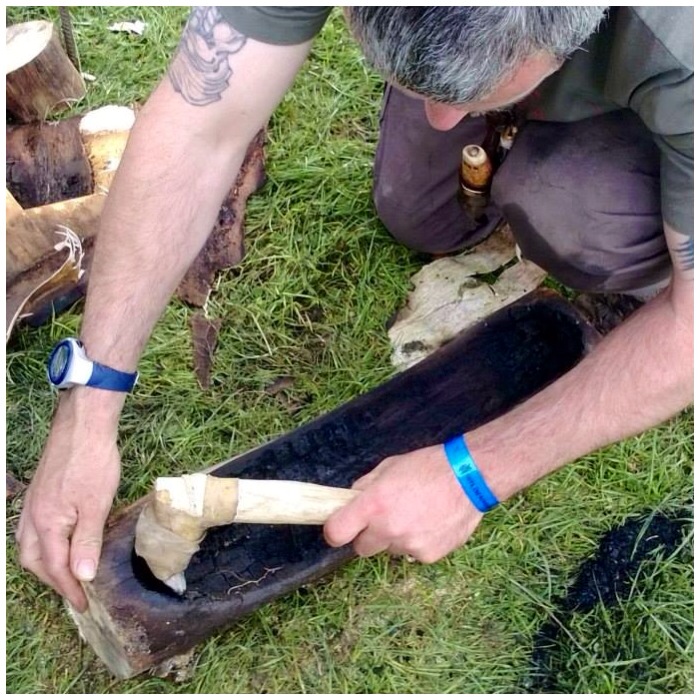
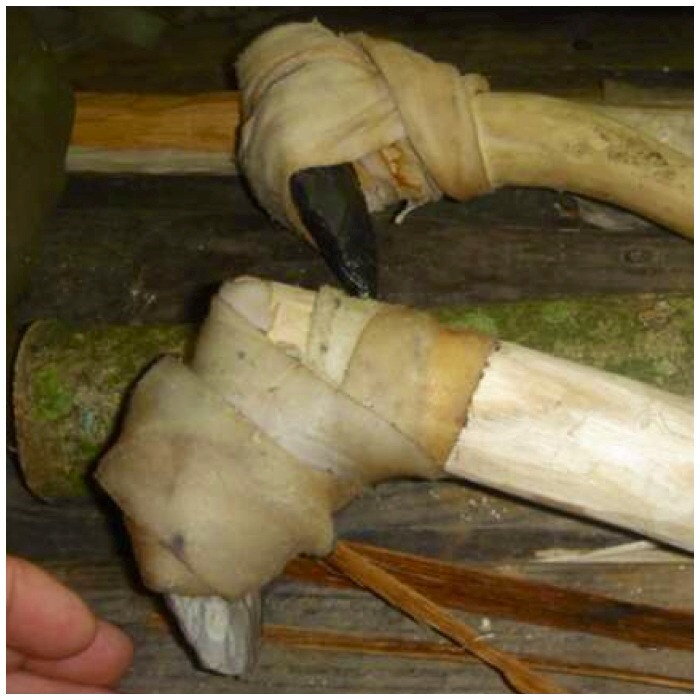
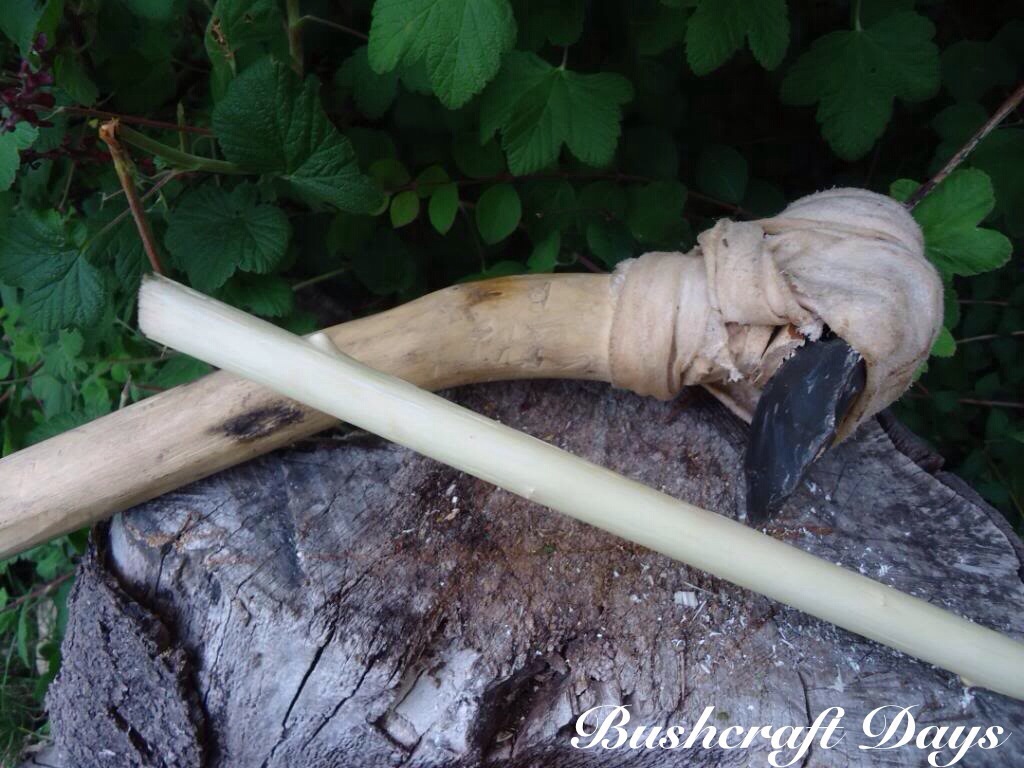
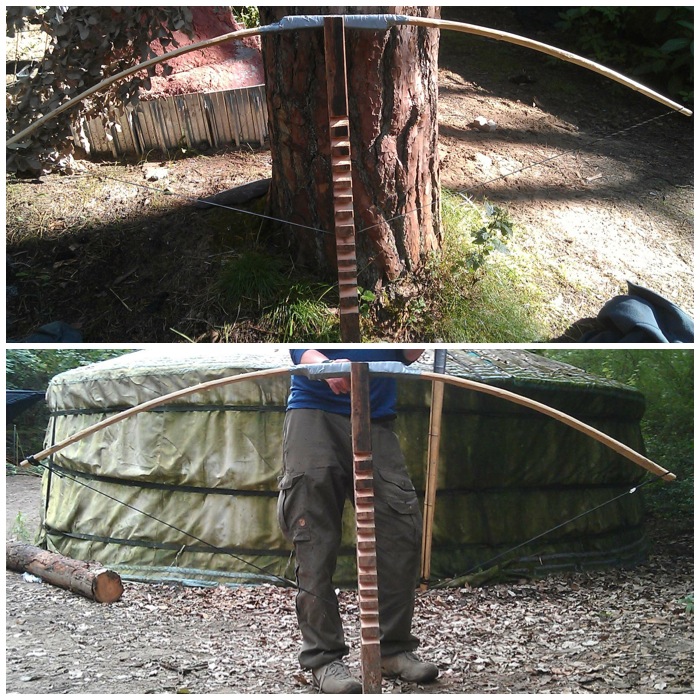
Sometimes a flint knife or adze is just not enough and you need something with a bit more clout. At times like these, what you need is a flint axe.
Here’s how I constructed the large flint axe you can see below, with a few pictures at the end about its little brother, the hatchet.
Two good tools
I made these tools on the Woodcraft School Primitive Technology course and had some excellent tuition from John Rhyder and John Lord.
John Lord gave an excellent demonstration on knapping a flint axe head. It was a joy to watch this master take a lump of flint and transform it into a work of art.
When it came to the turn of us students to knap out our axe heads John gave everyone lots of one-to-one tuition. If it hadn’t been for this (and John knapping the tricky bits) I would have been lucky to have ended up with an arrow head, never mind a large axe head.
Some tuition from the master Mr Lord
I like to think that this axe head has some of me in it but truth be told it’s more John Lord than me. I did however have a great time seeing this axe head appear out of the flint knowing at least part of it is me.
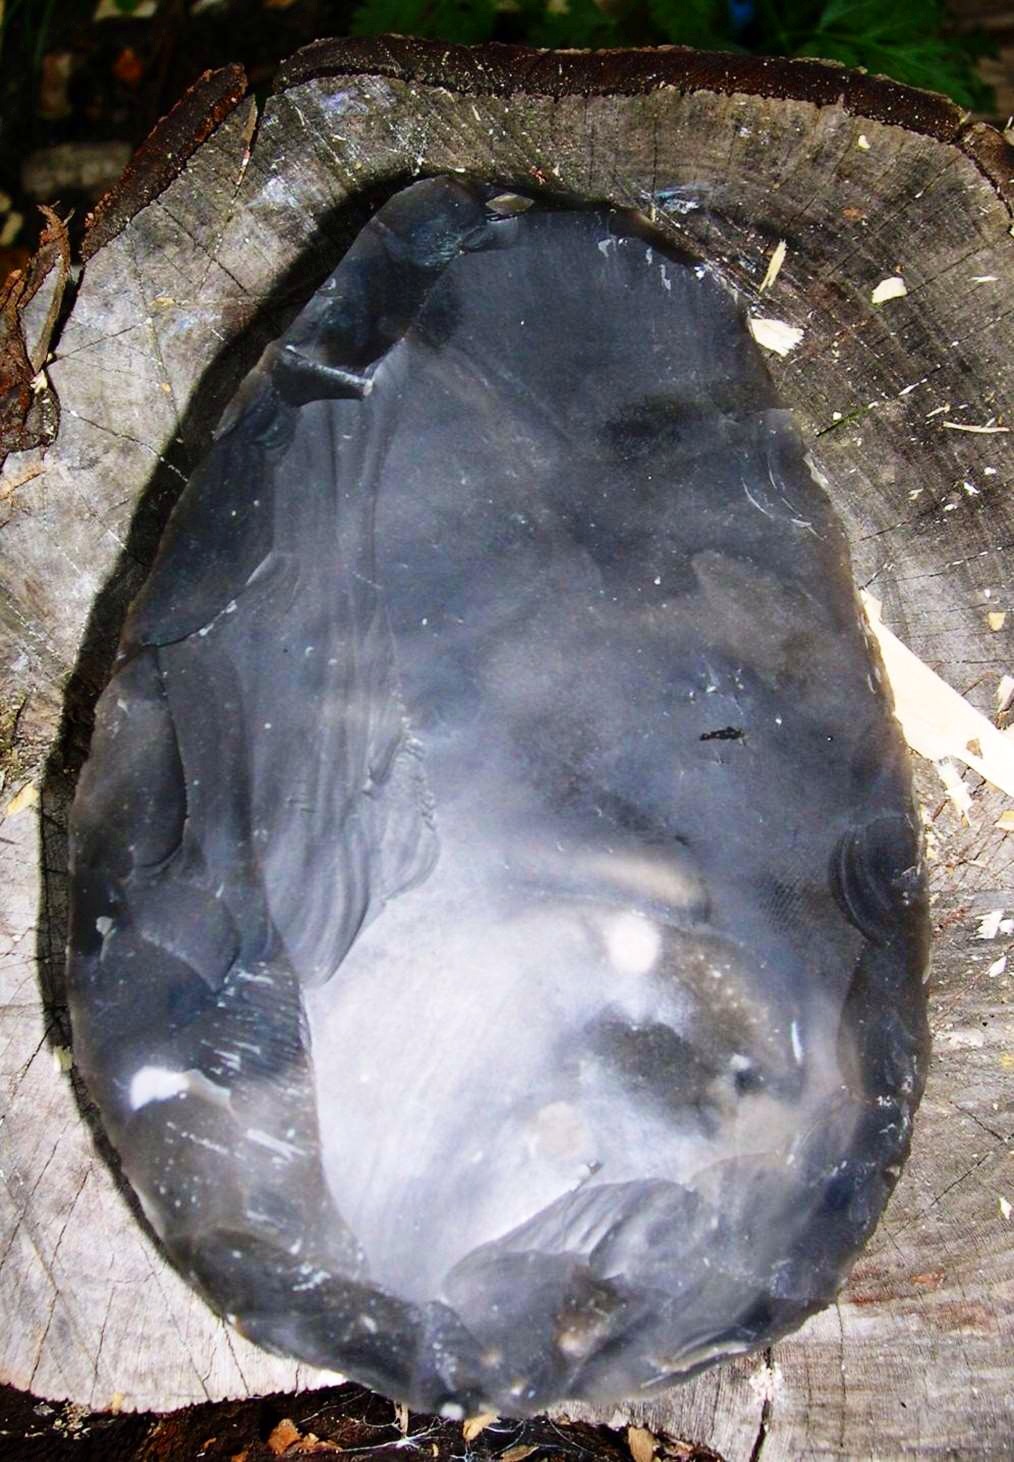
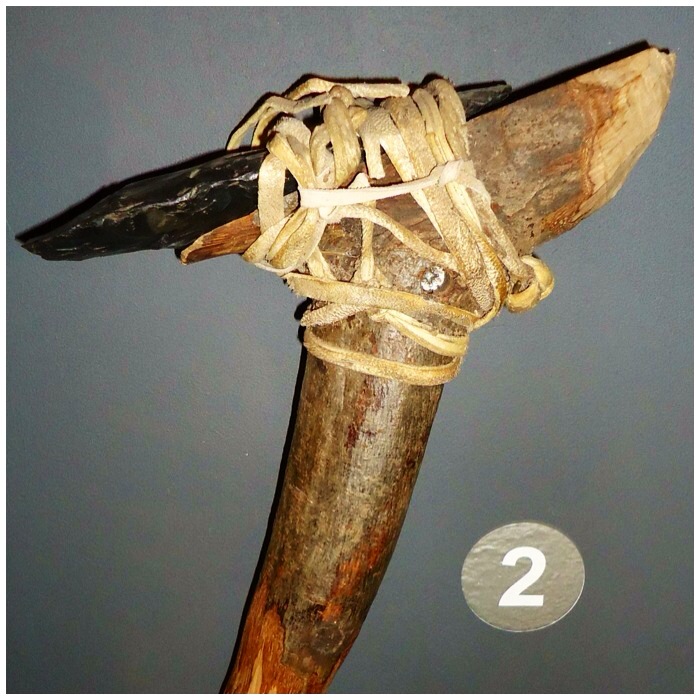
One knapped flint axe blade
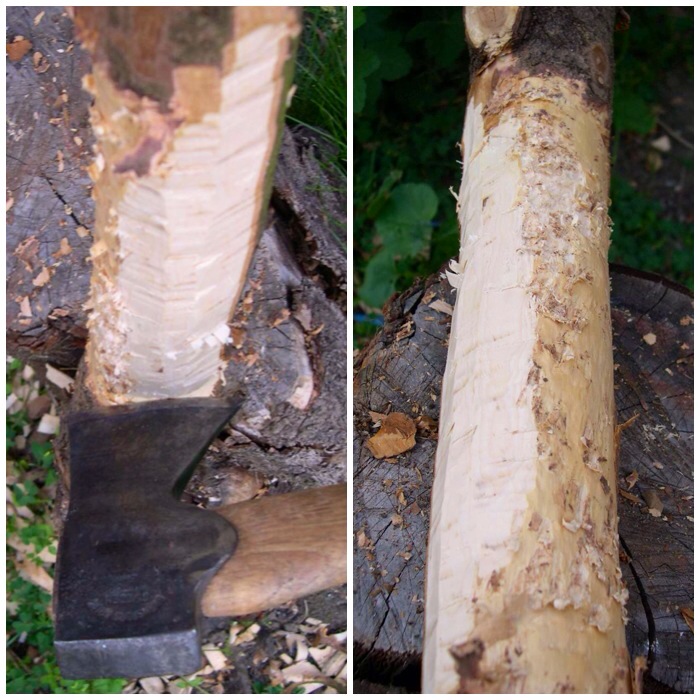
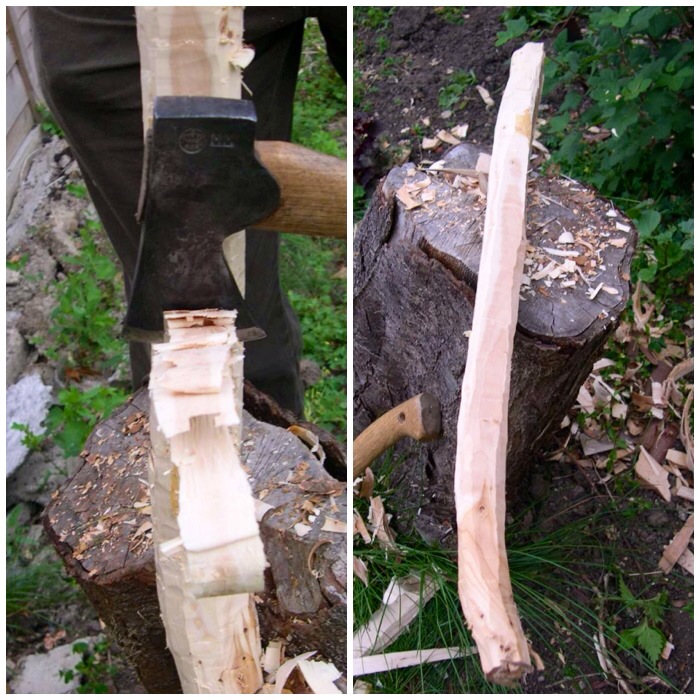
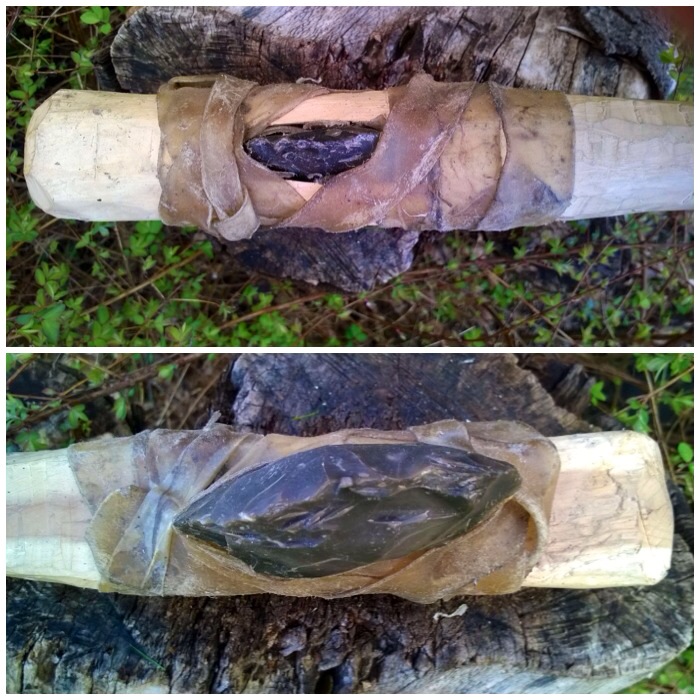
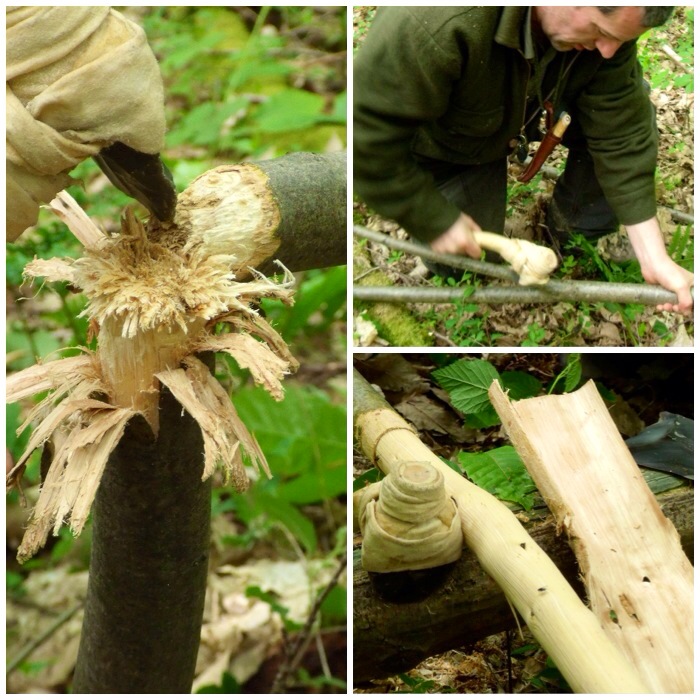
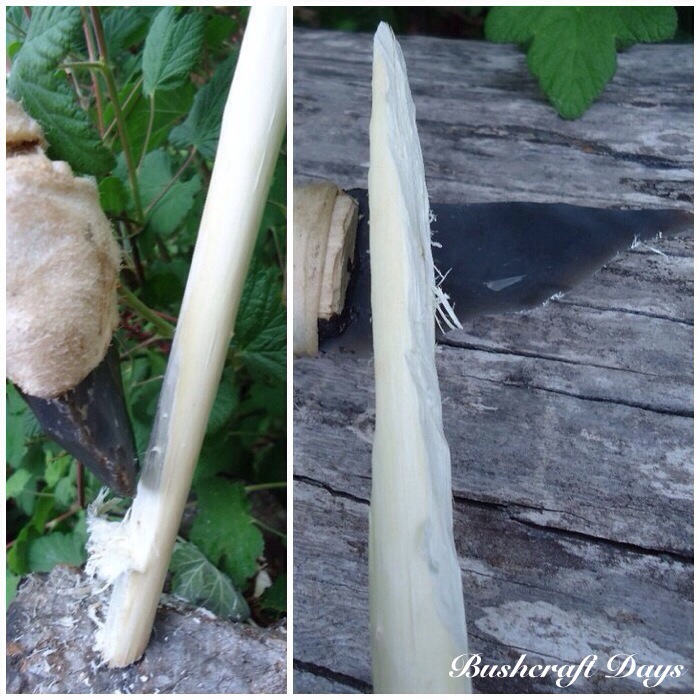
I used a well-seasoned piece of yew for the handle as that was what I had available at the time.
Initially I used my flint adze to try and shape the yew, but although the bark came off easily enough it didn’t make much of an impression on the hard wood beneath.
You can see the tool marks left on the wood by the adze in the right-hand picture below. As a Time Team enthusiast I have watched the archaeologists discuss such marks on many ancient pieces of worked wood they have found so it was good to see it in action for myself.
Stripping the handle
At first I used short chopping motions to tear away at the bark and wood with the adze. Ever experimenting, I tried a few strikes with a bit more force and eventually took a chip out of the adze blade. I was able to re-sharpen the edge of the adze by pressure flaking it but decided that the yew was just too tough for the adze (notwithstanding my lack of patience and skill).
Too tough for the flint adze
I reverted to my modern axe which took the excess wood off easily. In the picture on the right below you can see the very different tool marks left by the iron axe in comparison to the flint adze marks.
Time for an iron axe
This piece of yew had a slight curve to it which I thought would give added strength to the handle. I left the handle fairly rough, just ensuring I would have a comfortable grip and not get any splinters.
One rough handle
I initially started using a discoid all-flint knife to cut out the socket for the axe head but I did not take any pictures of this part. I did not do this for long as the yew was just too hard and the flint blade kept slipping. A few of the other students did just use flint for this stage but since the woods they were using were slightly softer they had more success. I ended up using my little palm gauge for the job and it worked very well.
I did try and burn out the wood with embers but soon got put off this with the fumes (yew wood being highly toxic).
Carving and burning
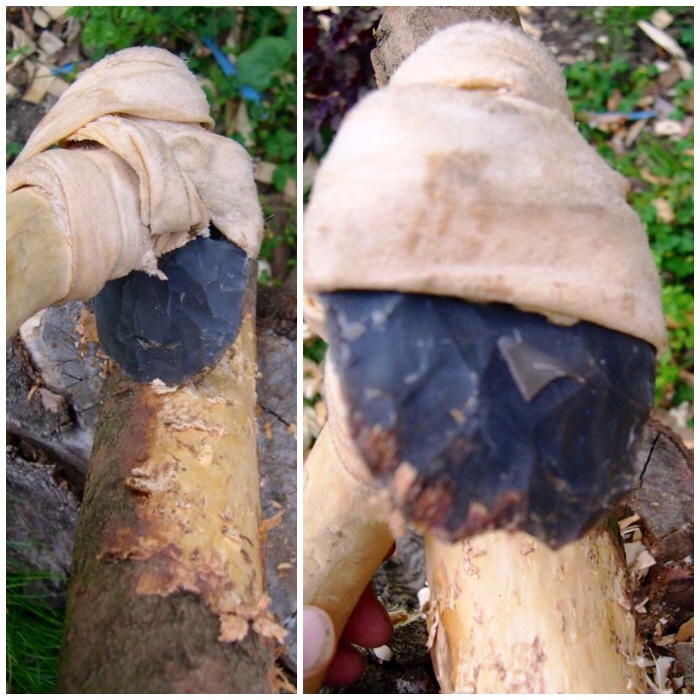
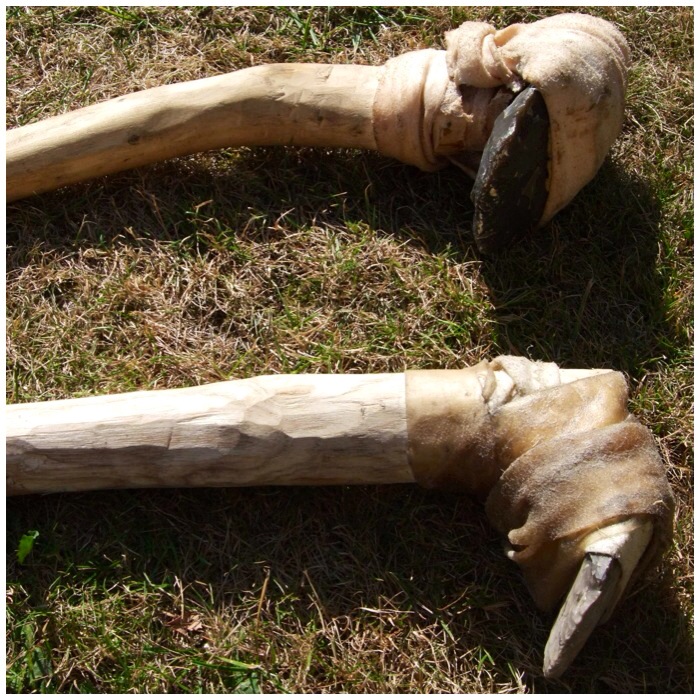
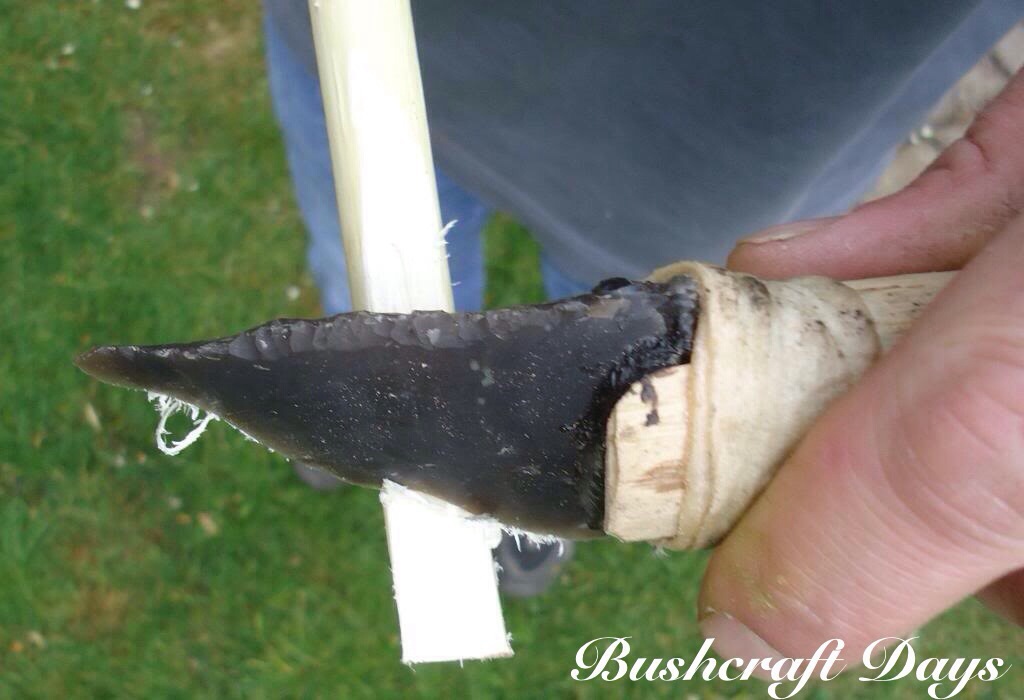
The socket finished – front and back.
The finished socket
A good fit but too loose for use.
Test fit
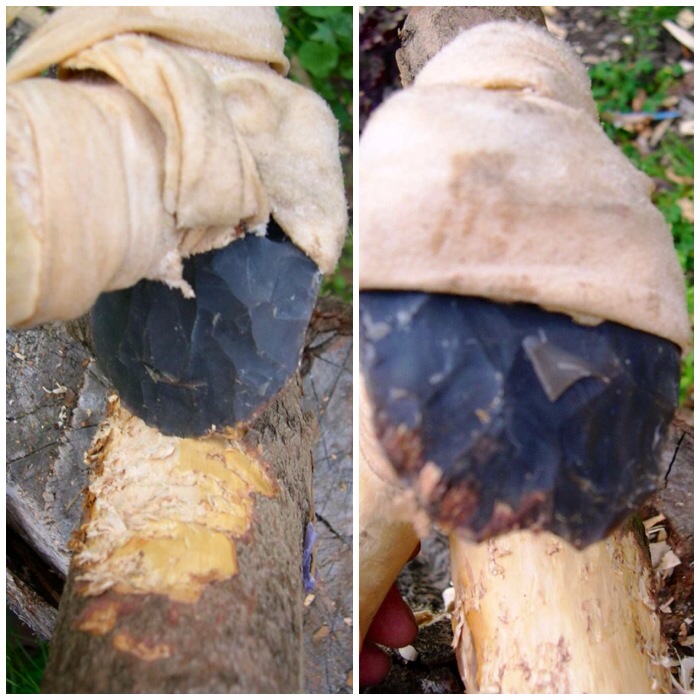
I wrapped the flint axe head in a piece of rawhide to see if that would secure the axe head in the socket (apologies for the poor quality of the pictures), but with one piece wrapped around it the axe head would not fit into the socket.
Prepping rawhide
Instead I cut up some strips of rawhide and held it all in place with some string. As the rawhide dried out it really gripped the axe head and the wood of the socket.
Securing with rawhide
After that it was a case of wrapping a load more rawhide around the axe head and leaving it to dry for a couple of days.
Drying and adding more rawhide
After the rawhide had dried out it became almost translucent but it was a very strong hold.
Side profiles
Top and bottom profiles of the axe head.
Top and bottom profiles
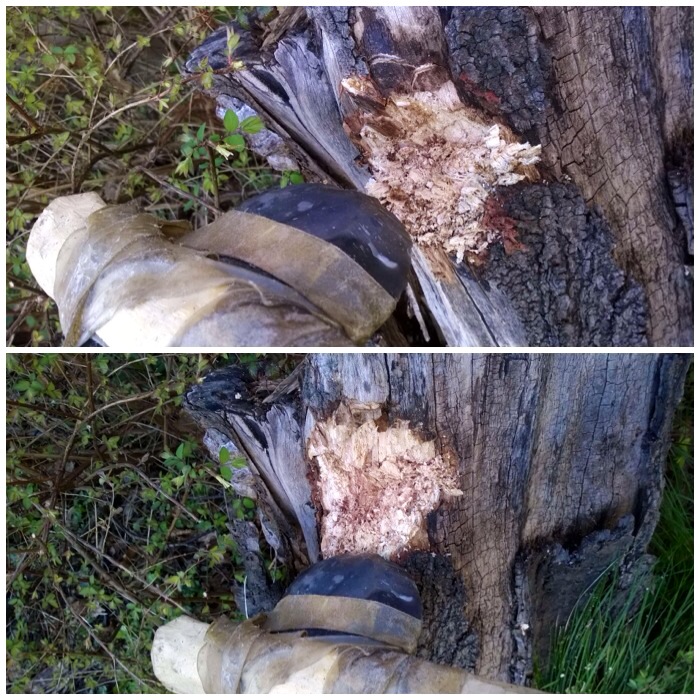
I tested the axe out on an old stump in my garden. Like the adze, the axe tears into the wood as opposed to slicing into it as a modern iron axe would do. It was still very effective in its own way.
Leaves the wood torn
The blade edge is not particularly sharp and has a good shoulder area behind it. This shoulder area really supports the edge so that it does not break off when the axe is used.
Up close
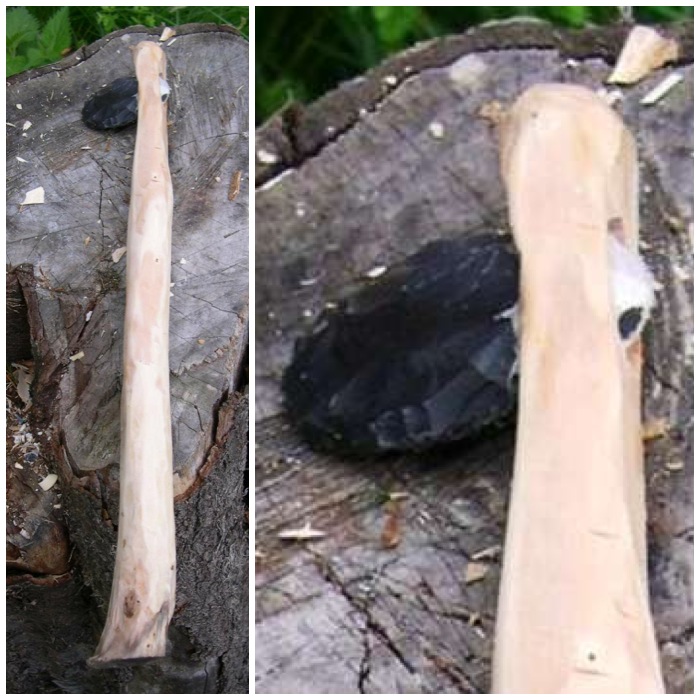
I had a small flint axe blade I had made at the same time as the larger one, so I just scaled everything down to make a hatchet.
Hatchet blade jammed in with rawhide
As well as using rawhide I filled the socket with some spruce pitch to fill up any gaps and to help secure the head more.
Gaps filled with resin
I have never used this tool on anything – it would have been used mostly to dispatch small game that had been caught in traps. I do like it a lot though, in some ways more than the larger axe.
Rawhide wrap
This hatchet sits nicely on my primitive belt order.
I started an online plant masterclass this year with Paul Kirtley of Frontier Bushcraft. The aim of the course is to learn more about the plants around us in a very structured way. As the course is spread out over a year, one of the benefits of this type of learning is to observe plants as they change throughout the seasons.
So far I have been compiling pictures on a variety of plants and sites around my village (Bramley in Hampshire, UK) by taking pictures of them every two weeks or so.
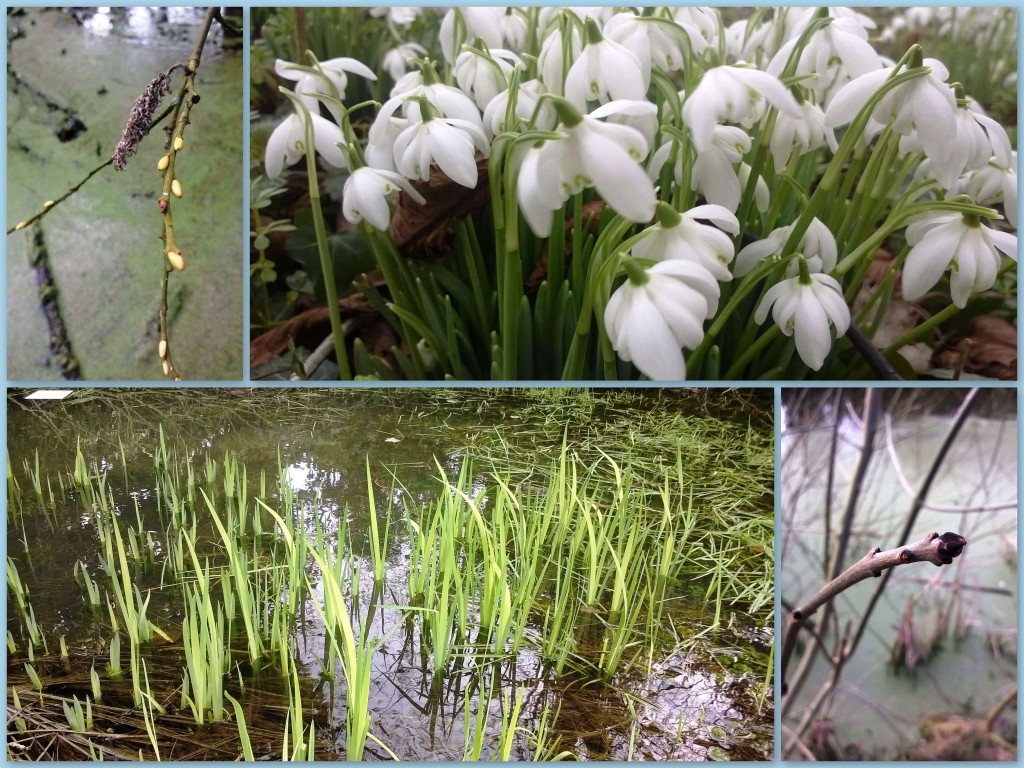
The first pictures I took in early February showed a very quiet time with most of the tree buds lying waiting for these longer spring days but there were a few gems around like the snowdrops.
Everything is quiet apart from the snowdrops early in February
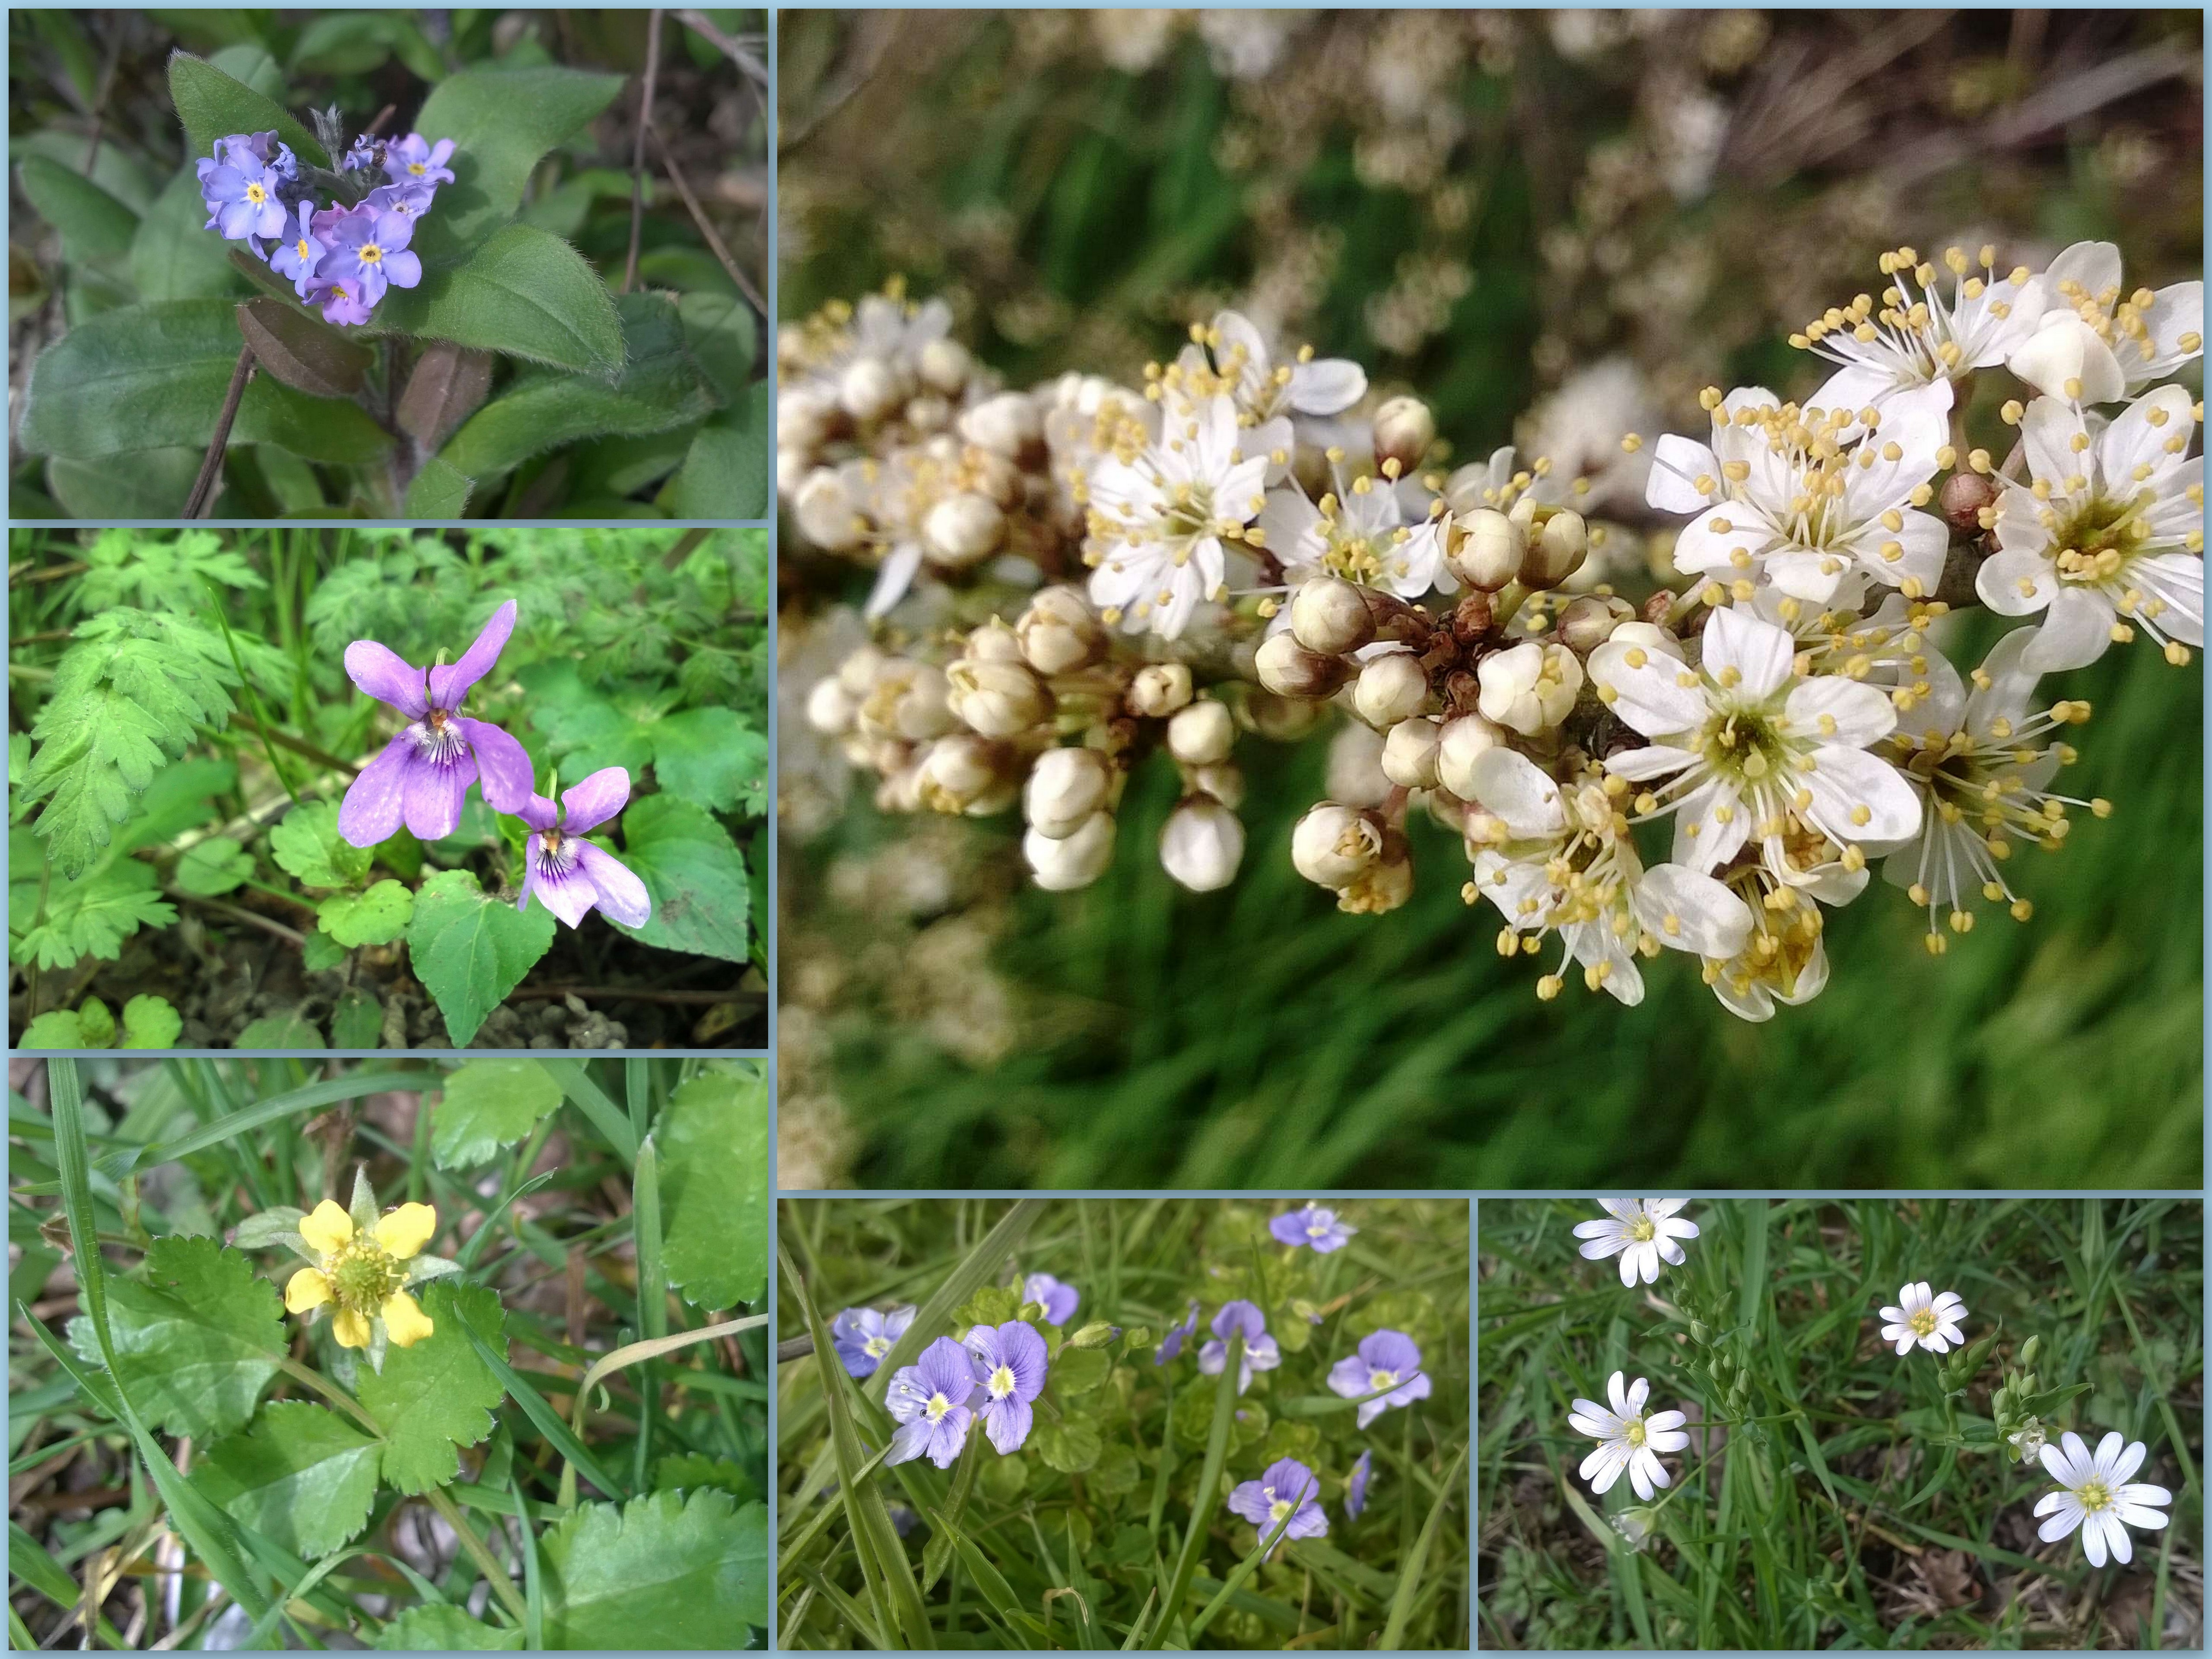
My last trip out was on 30th March: I came across quite a few plants like primrose that have been around for a while now but also spotted some new orchid growth and a wood anemone. The hawthorn and apple that I had been photographing had also just burst into life.
Bursting with life in late March -hawthorn, apple, orchid, primrose and wood anemone
I was taken aback by the sheer number of flowers that had popped up and the leaves that were starting to show themselves on the tree branches. I am still waiting for the oak and ash to start appearing but will be keeping a close eye for these buds opening.
Also forget-me-not, dog violet, wood aven, damson, speedwell and stichwort
I am really enjoying this course as it is making me look at plants in detail again. Over the last few years I have concentrated on the craft side of bushcraft and failed to maintain all that knowledge of plants I had worked so hard to learn when studying at Woodcraft Schoolback in 2008. Looking at all these plants a second time round and throughout the whole year can’t help but increase my level of knowledge.
I have compiled a short You Tube compilation of pictures (set to music) I have taken over the last couple of months showing this transformation from winter dormancy to the rush of spring growth so far.
When I want a bowl fast a modern adze is what I use, but if I have the time and I want to create something in a more leisurely fashion then I love to use a flint adze
Any self-respecting Stone Age woodworker would always have had a decent flint adze to hand. So to become that self=respecting Stone Age woodworker I had to go out and make myself one as they do not turn up in the shops that often.
I needed one to undertake my final project on my Woodcraft School Primitive Technology course: to create a bone bodkin and a bark sheath. The aim was to make them without the use of modern tools and I would need an adze to help me craft the sheath.
The adze I created for this has been extremely useful since then on other projects such as hollowing out this long bowl.
Chunking out a bowl
I ended up making two adzes out of flint, rawhide and curved branches.
Two well used adze’s
I took my inspiration from the Cheddar Gorge Museum where I came across this very basic but beautiful flint adze.
Cheddar Gorge Museum replica
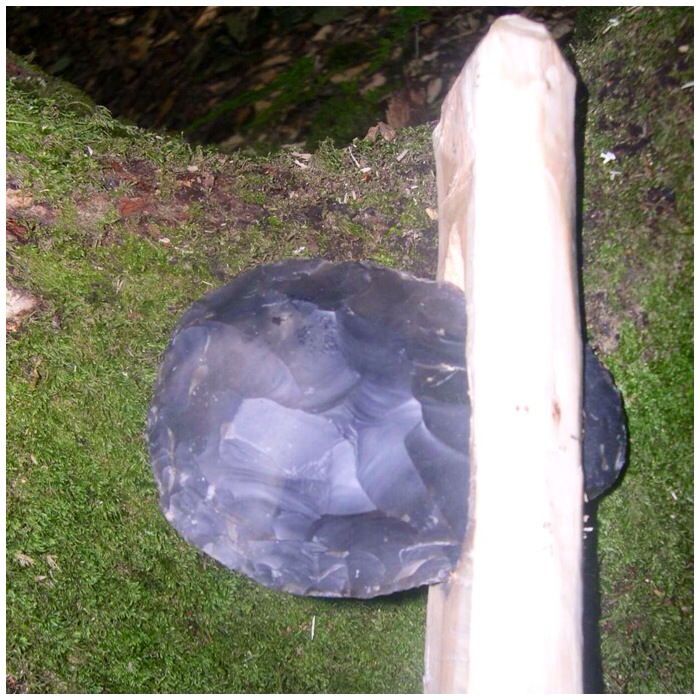
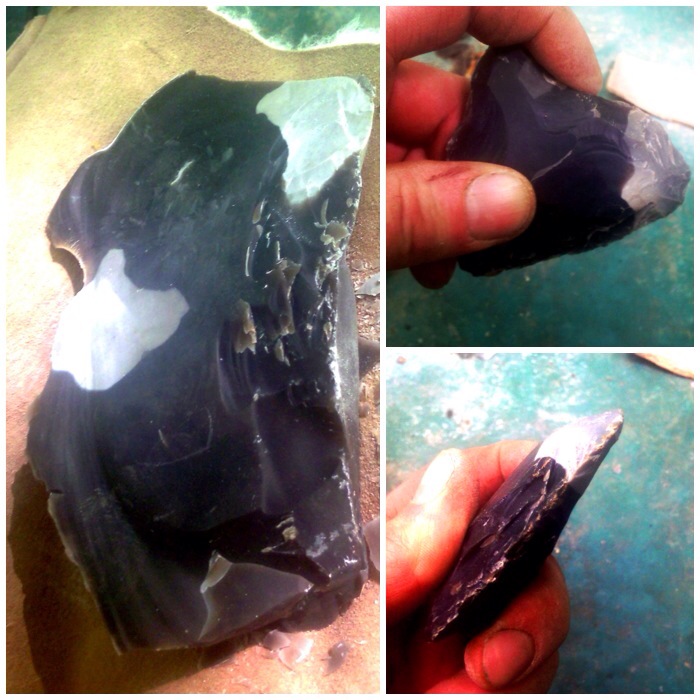
I had kept some flint from the course I had done with John Lordand I got a couple of good strong blades from this chunk of flint. The flint axe blade shouldn’t be overly sharp as that will make it fragile. It needs to have a well-defined edge that has good strong shoulders.
Knapped adze blade
This piece of yew was cut down in my garden and then sawn to its basic shape with a modern saw.
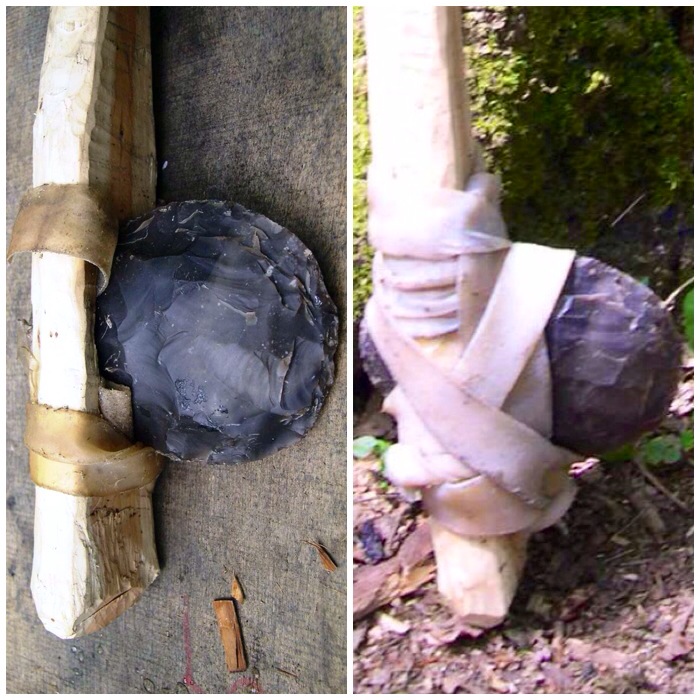
The handle-to-be
I used the curve to give the flint blade a flat surface to sit on and carved out the notch to give the rawhide some additional surface area to hold on to. I did not cut so deep so as to weaken the handle as this tool was destined for some hard use.
Carving the shape
After shaping I stripped the bark off and roughly smoothed it with sandpaper. I did not smooth the handle down too much, as I wanted to retain some natural grip.
The platform for the blade
Traditionally rawhide was used to bind the flint to the handle alongside sinew, buckskin or other natural cordage. I like to use rawhide as it was commonly used and is easily obtained these days from dog chews (I buy the biggest I can find).
I boiled the dog chew in water for about twenty five minutes in order to soften it enough to be able to cut it into strips.
Rawhide from a dog chew
After laying the rawhide out flat I just used a sharp piece of flint to cut it into strips I could use to bind the adze together.
Cutting out strips
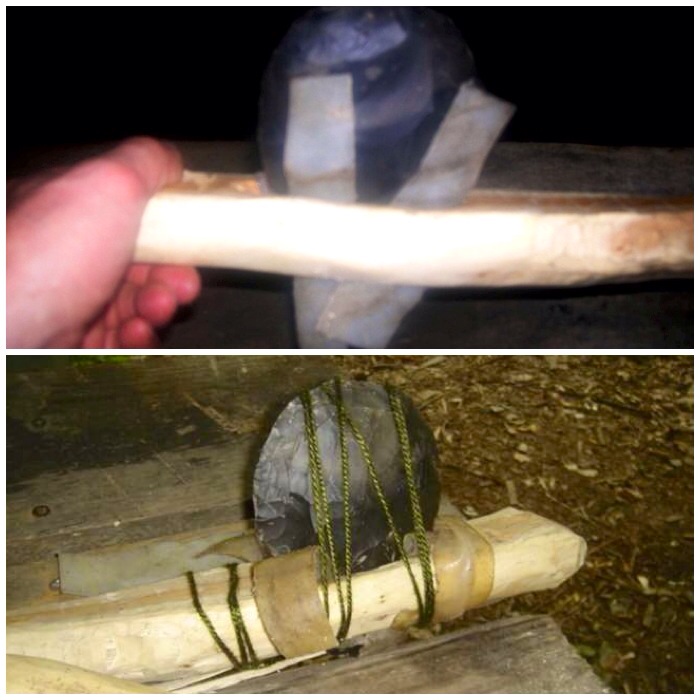
I wrapped thin pieces around the blade and the handle initially. Don’t pull too tight as this will snap the rawhide. Just tighten slightly, and tie off the ends when you are finished. I left this one to harden in a warm area for a couple of days. As rawhide dries out it shrinks and goes very hard (almost rock hard).
Initial rawhide wrap
For the next layer of rawhide I used wider strips, which allowed me to really pull them tight without worrying too much about it splitting. They were quite difficult to tie off but I settled for simple overhand knots to finish.
I left these adzes to dry out and tighten for a month until they were needed on the final part of the course.
Drying out
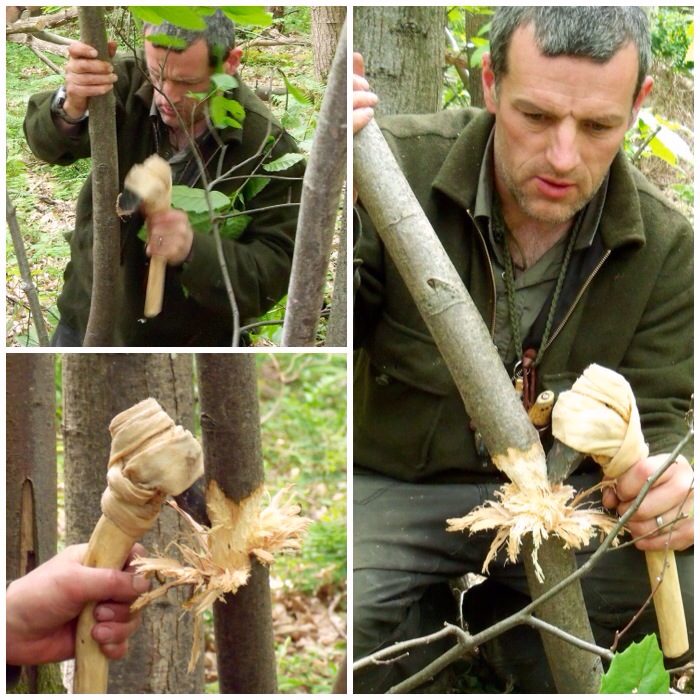
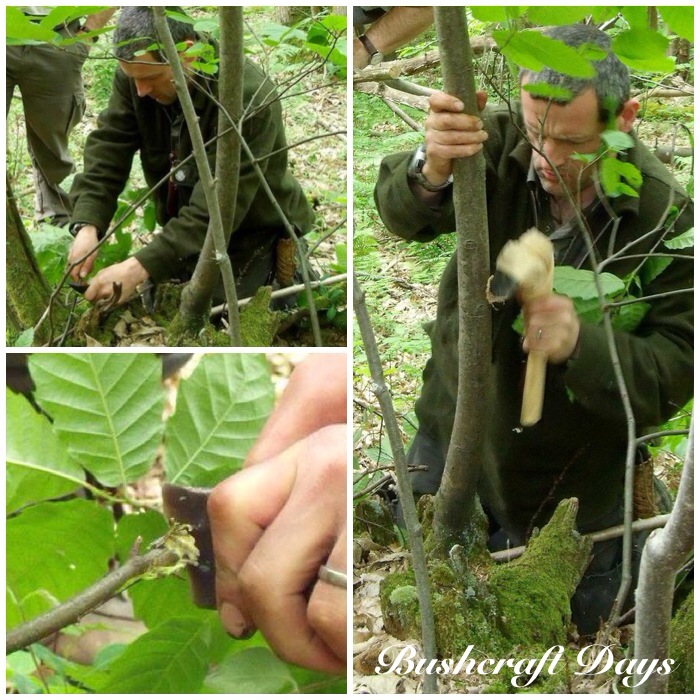
The first job I had to do with the adze was to take down a small sweet chestnut limb. I needed this to make bark strips for weaving a sheath out of the bark and the wood for carving spoons. I took the limb down using a rosette cut, chipping away at the wood all the way around the limb until it fell over. I did not use any large swings or try and gouge the wood out with it, just a steady chipping rhythm, and eventually worked my way through the limb.
First job – taking down a sweet chestnut limb
It took me about 20 minutes to fell the tree. (I used a modern saw to trim the stump, leaving a clean cut to help stop infection setting in and to help the stump re-grow a new limb.)
The Rosette cut
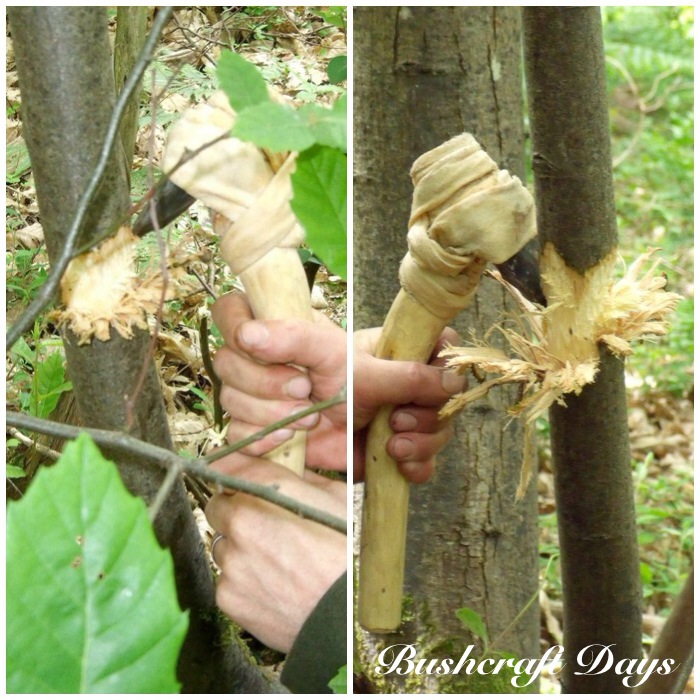
The next project I put the adze to was the shaping of a yew handle for a large flint axe. The yew piece I was using was well seasoned and proved too much for the flint adze. After about half an hour of chipping away at the bark and outer layer of wood I chipped the blade of the adze quite badly.
It was quite easy to re-profile the edge with a bit of pressure flaking but I resorted to using a modern axe for carving the flint axe handle.
Too tough for this adze
When working with green wood woods like this goat willow the adze worked very well. I used the adze here to create a wedge for my Split Stick Atlatl.
Chipping out a wedge for an atlatl
My friends have all been keen to try these adzes out. The silver birch that Angela is splitting was fairly well seasoned but still quite easy to cut with the adze.
Cutting into more seasoned wood as a test
When Angela had the branch weakened enough it was just a case of tap tap and…………………………………..
Final tap
…………we had two more logs for the fire.
Quite a beautiful finish
The adze really did come into its own when my friend Stephen Herries found this burnt-out log lying in a ditch. The adze was perfect for chipping out all that charcoal so that in the end I had a rather lovely long bowl to add to my collection.
Great for bowl work
In comparison to a modern steel/iron adze you have to invest more time in whatever you are creating when using a flint adze. Unlike a modern adze, which will slice wood off cleanly, a flint adze rips the wood off and leaves totally different tool marks.
When I want a bowl fast a modern adze is what I use, but if I have the time and I want to create something in a more leisurely fashion then I love to use a flint adze. It kind of takes me back in time I suppose.
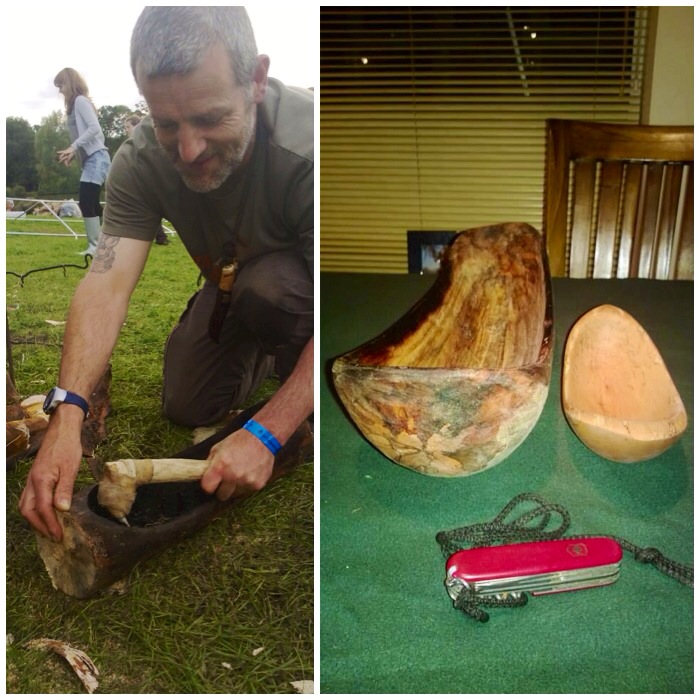
As part of a primitive technology course I was taking with Woodcraft School back in 2009 I had to make various craft pieces. The aim of the course was to slowly take away our modern tools so that by the end of the course we would only be using primitive tools to make our craft items.
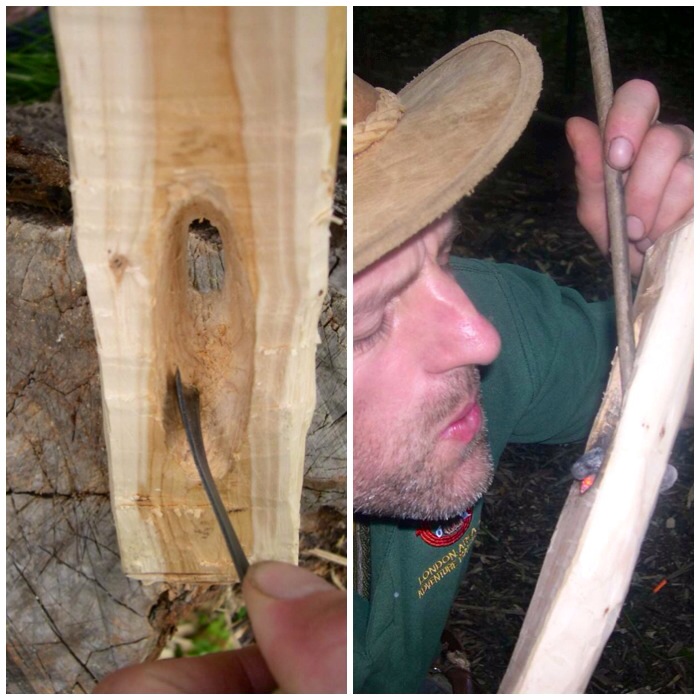
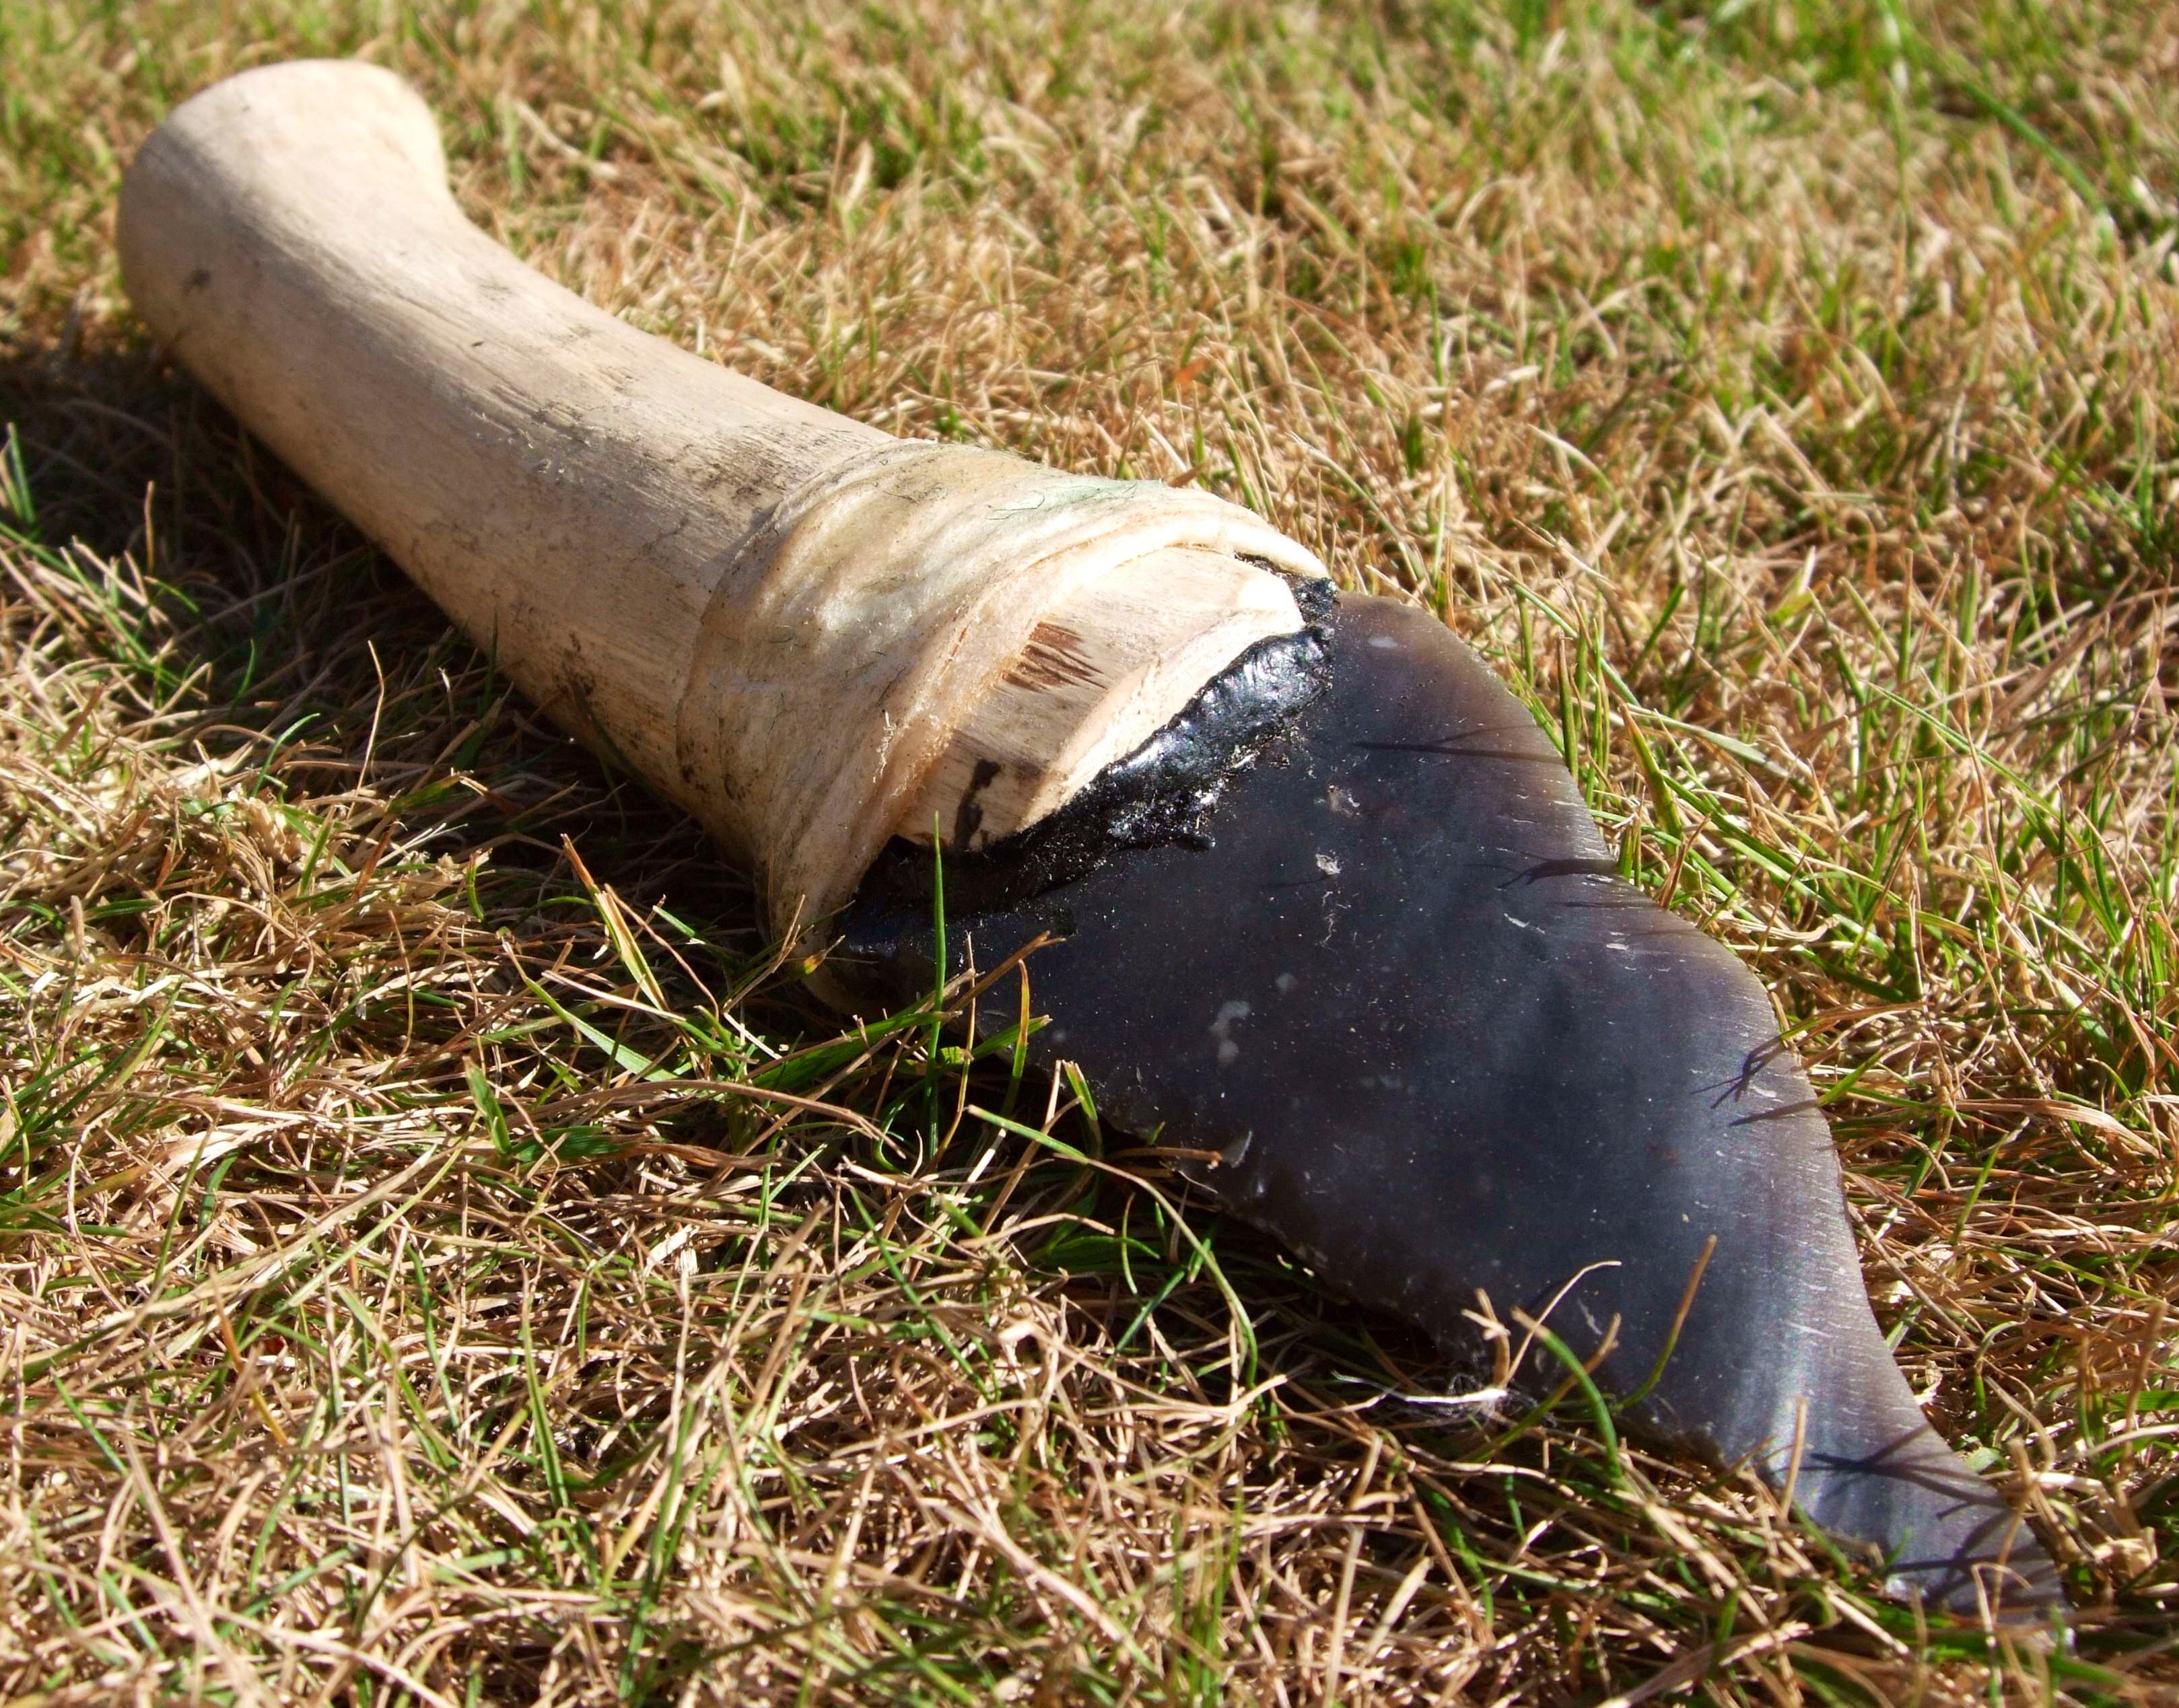
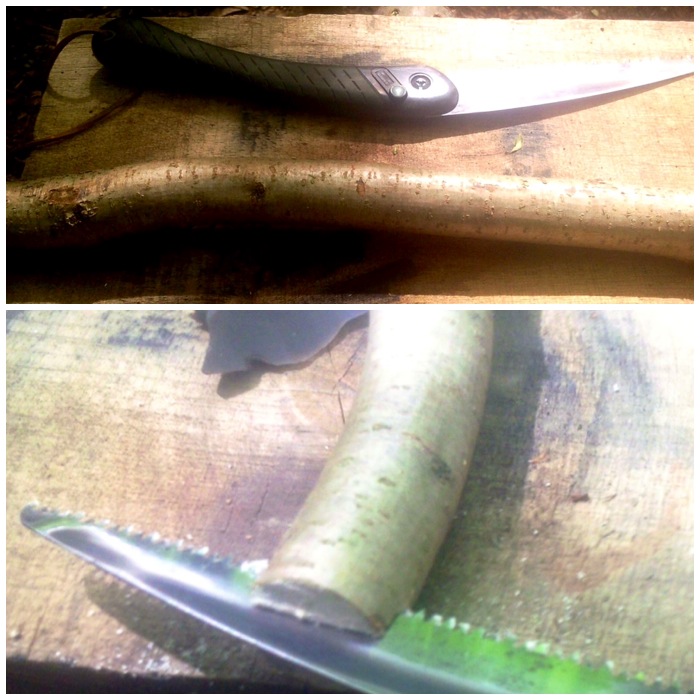
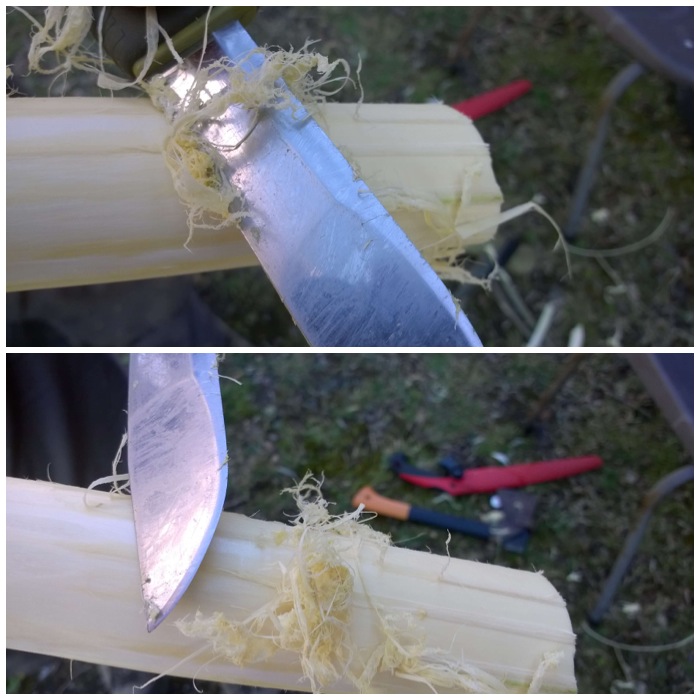
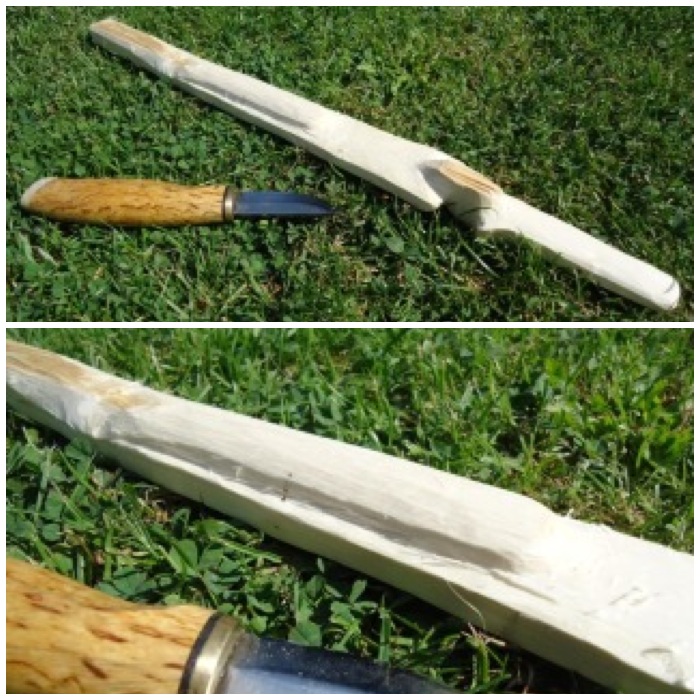
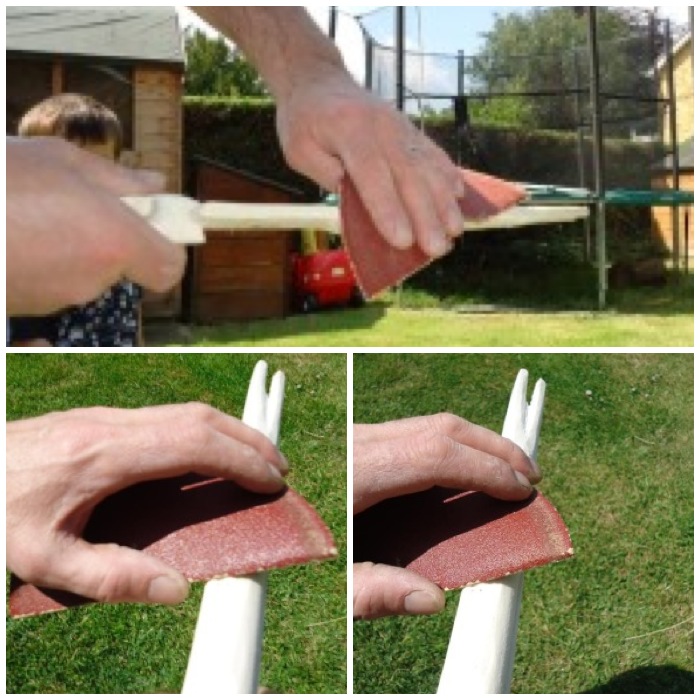
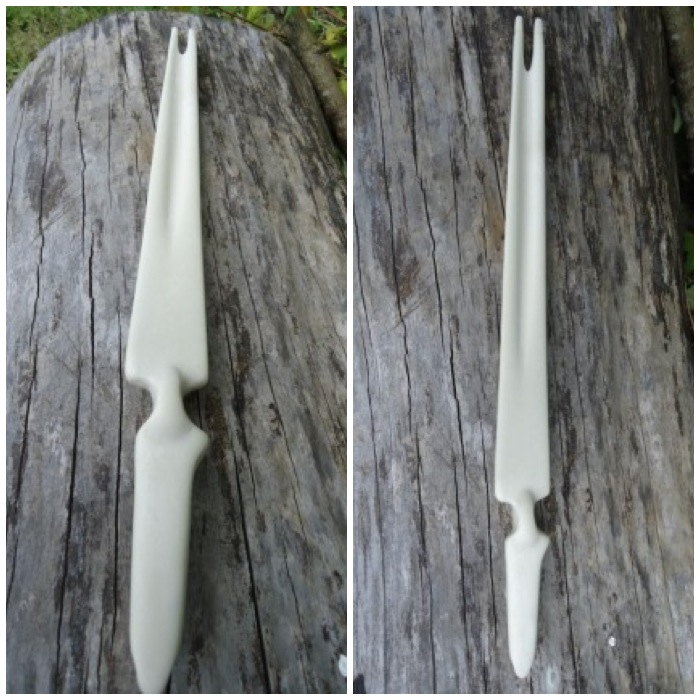
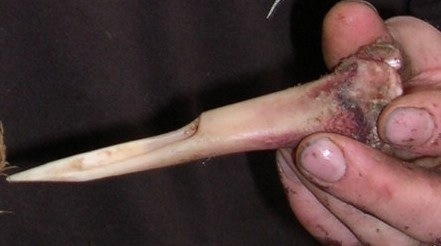
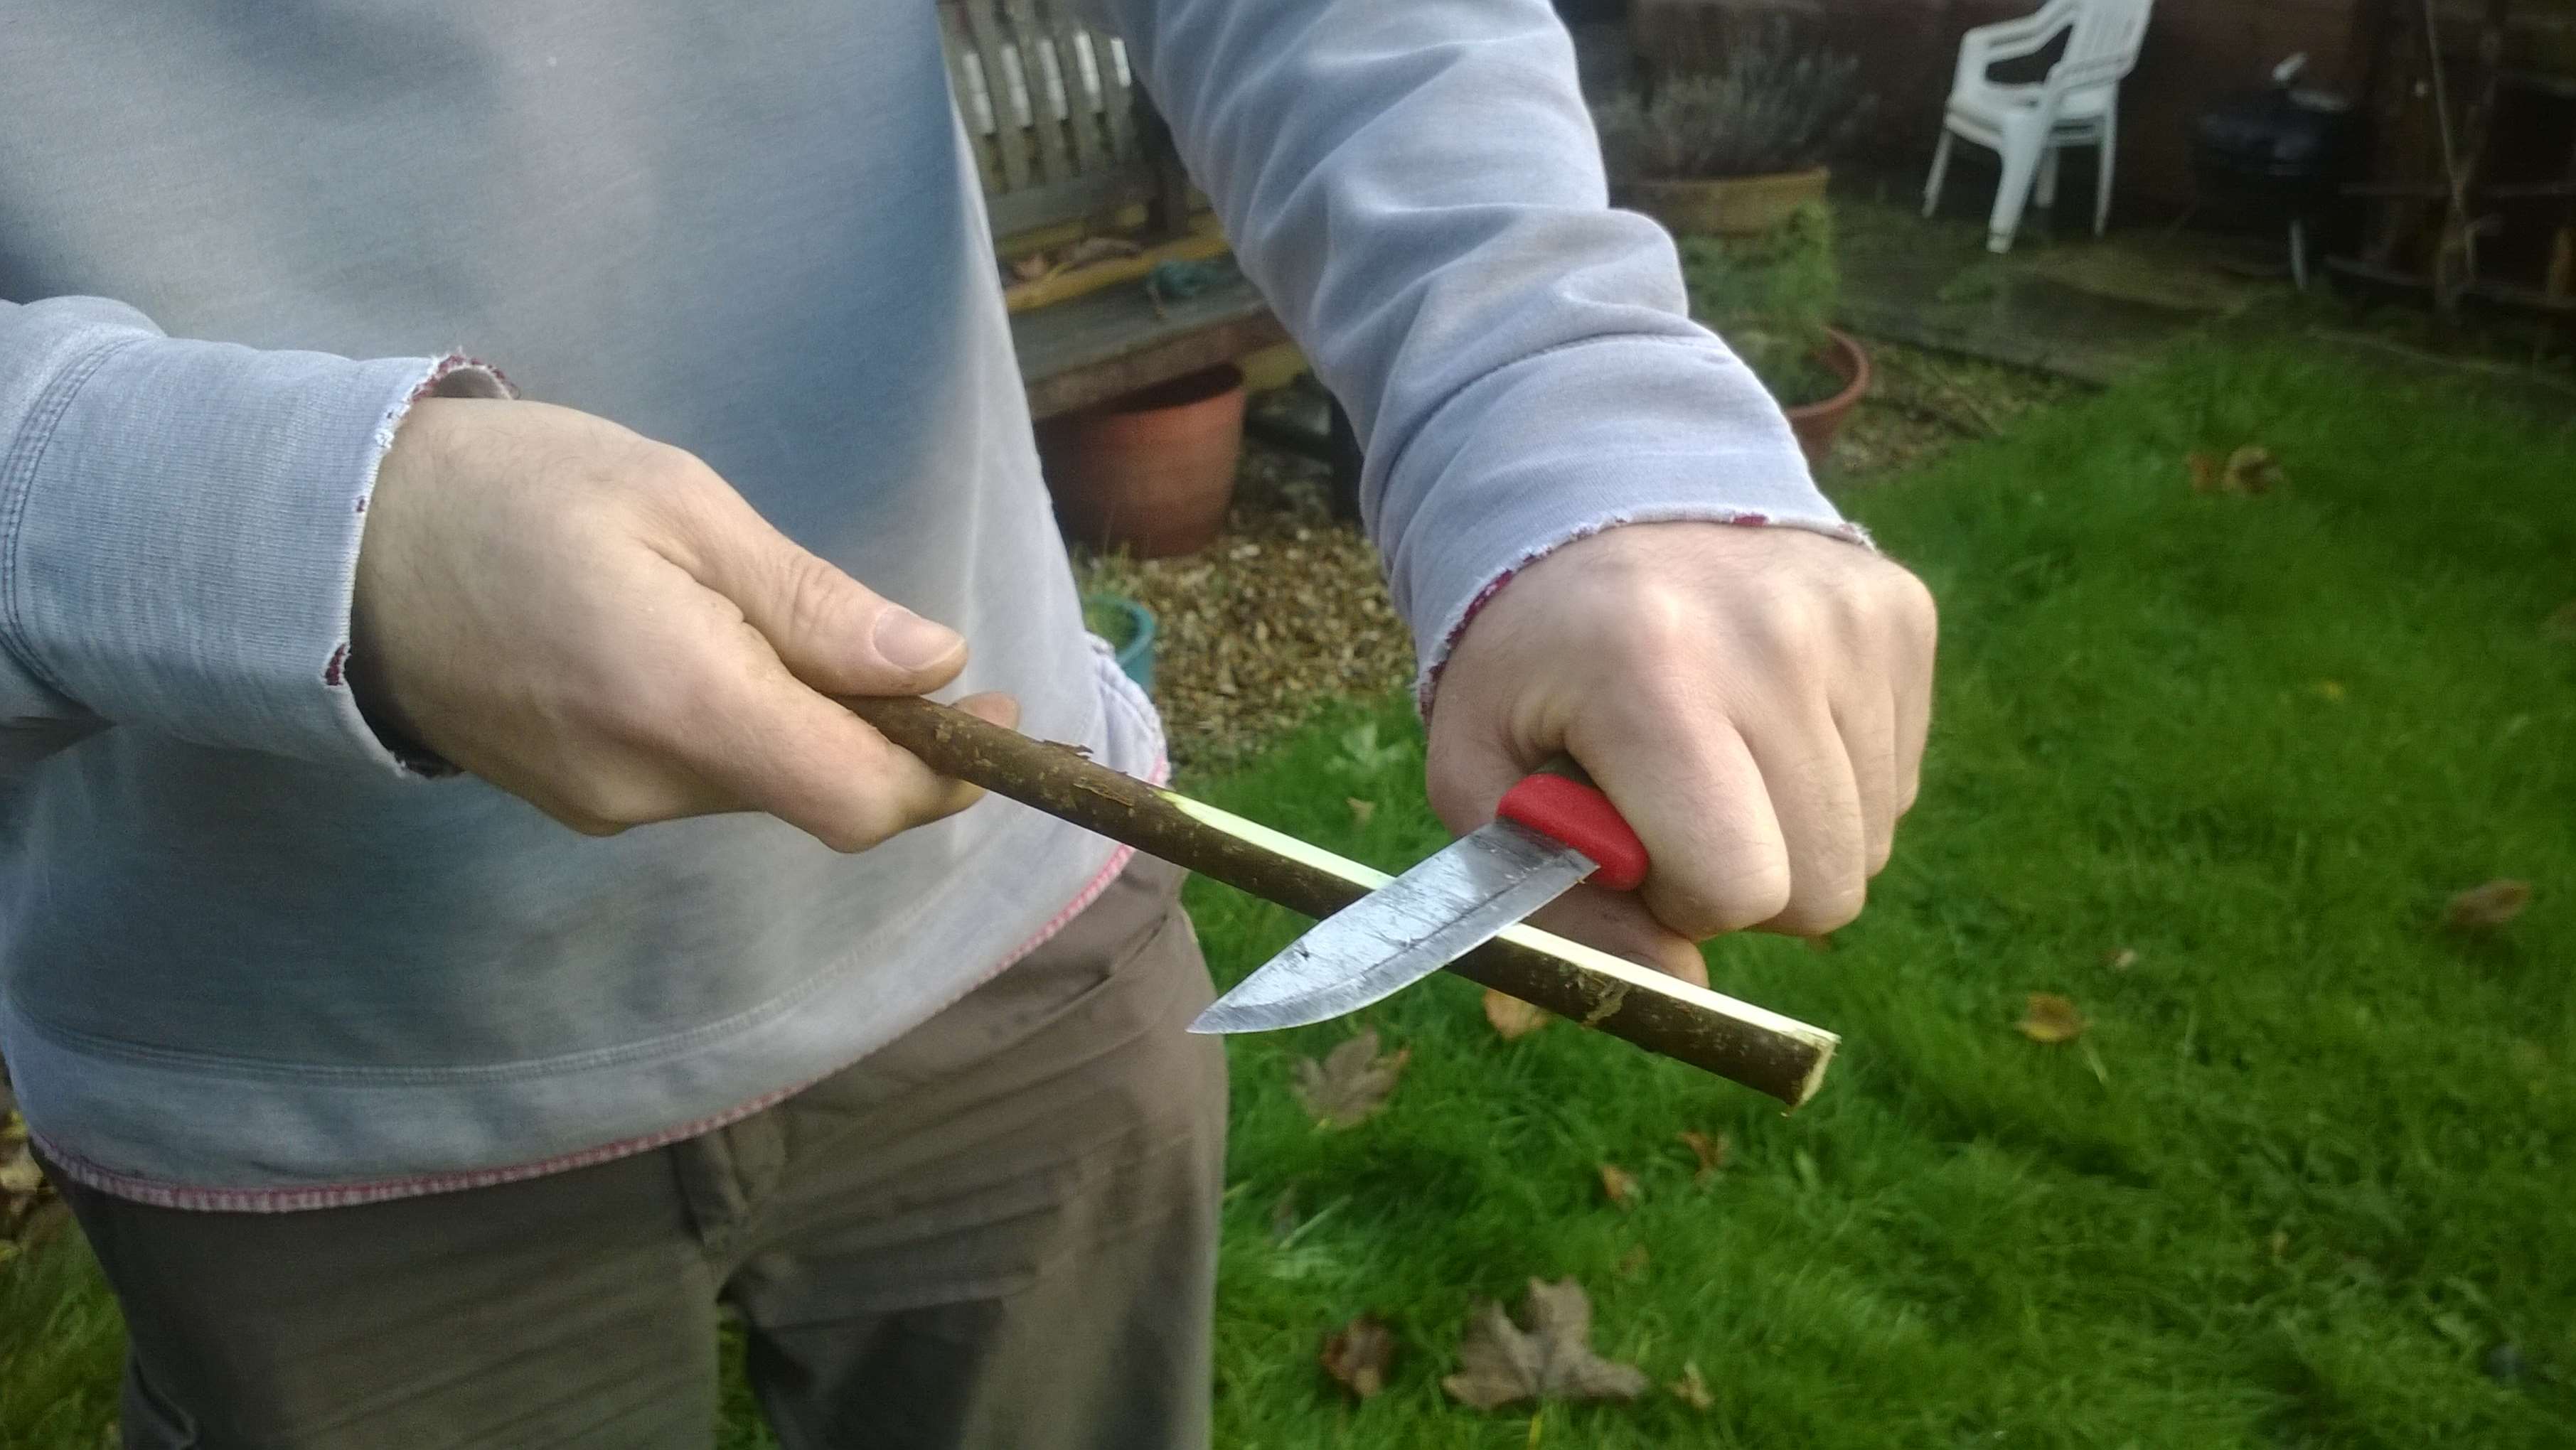
I was using hand-held flint tools such as discoidal knives in the beginning but about halfway through the course I decided something a bit better was required. This How To…. is designed to show you the simple steps I took to make my flint knife and show you some of the uses I have put it to since.
A simple flint knife
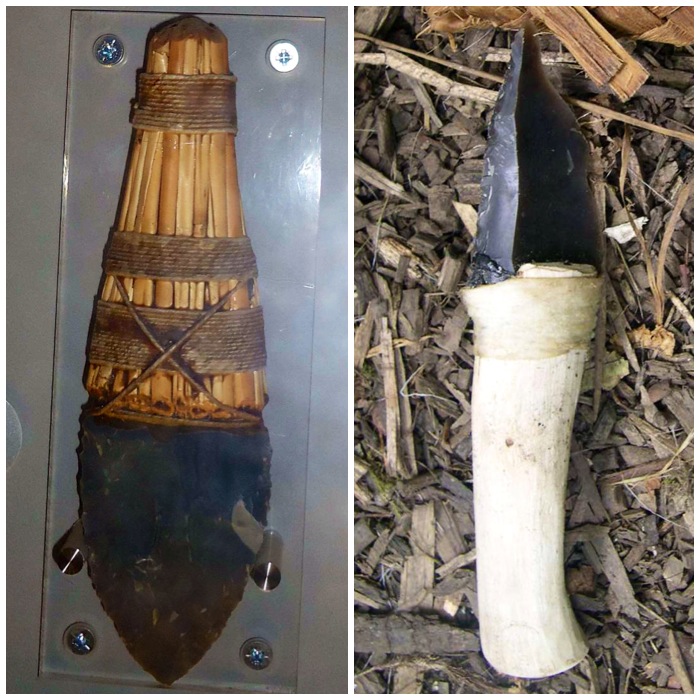
During the course (spread out over 5 months) I came across the knife you can see below left in the Museum of Prehistory at Cheddar Gorge. Not only was the knife beautifully constructed it also looked strong and practical. I knew I was to be taught on the next part of the course by top flint knapper John Lord so was keen to keep my eye out for a suitable piece while I was knapping flint with him. The knife I made on the course is on the right, not as strong or anywhere near as beautiful but for my needs very practical.
My inspiration
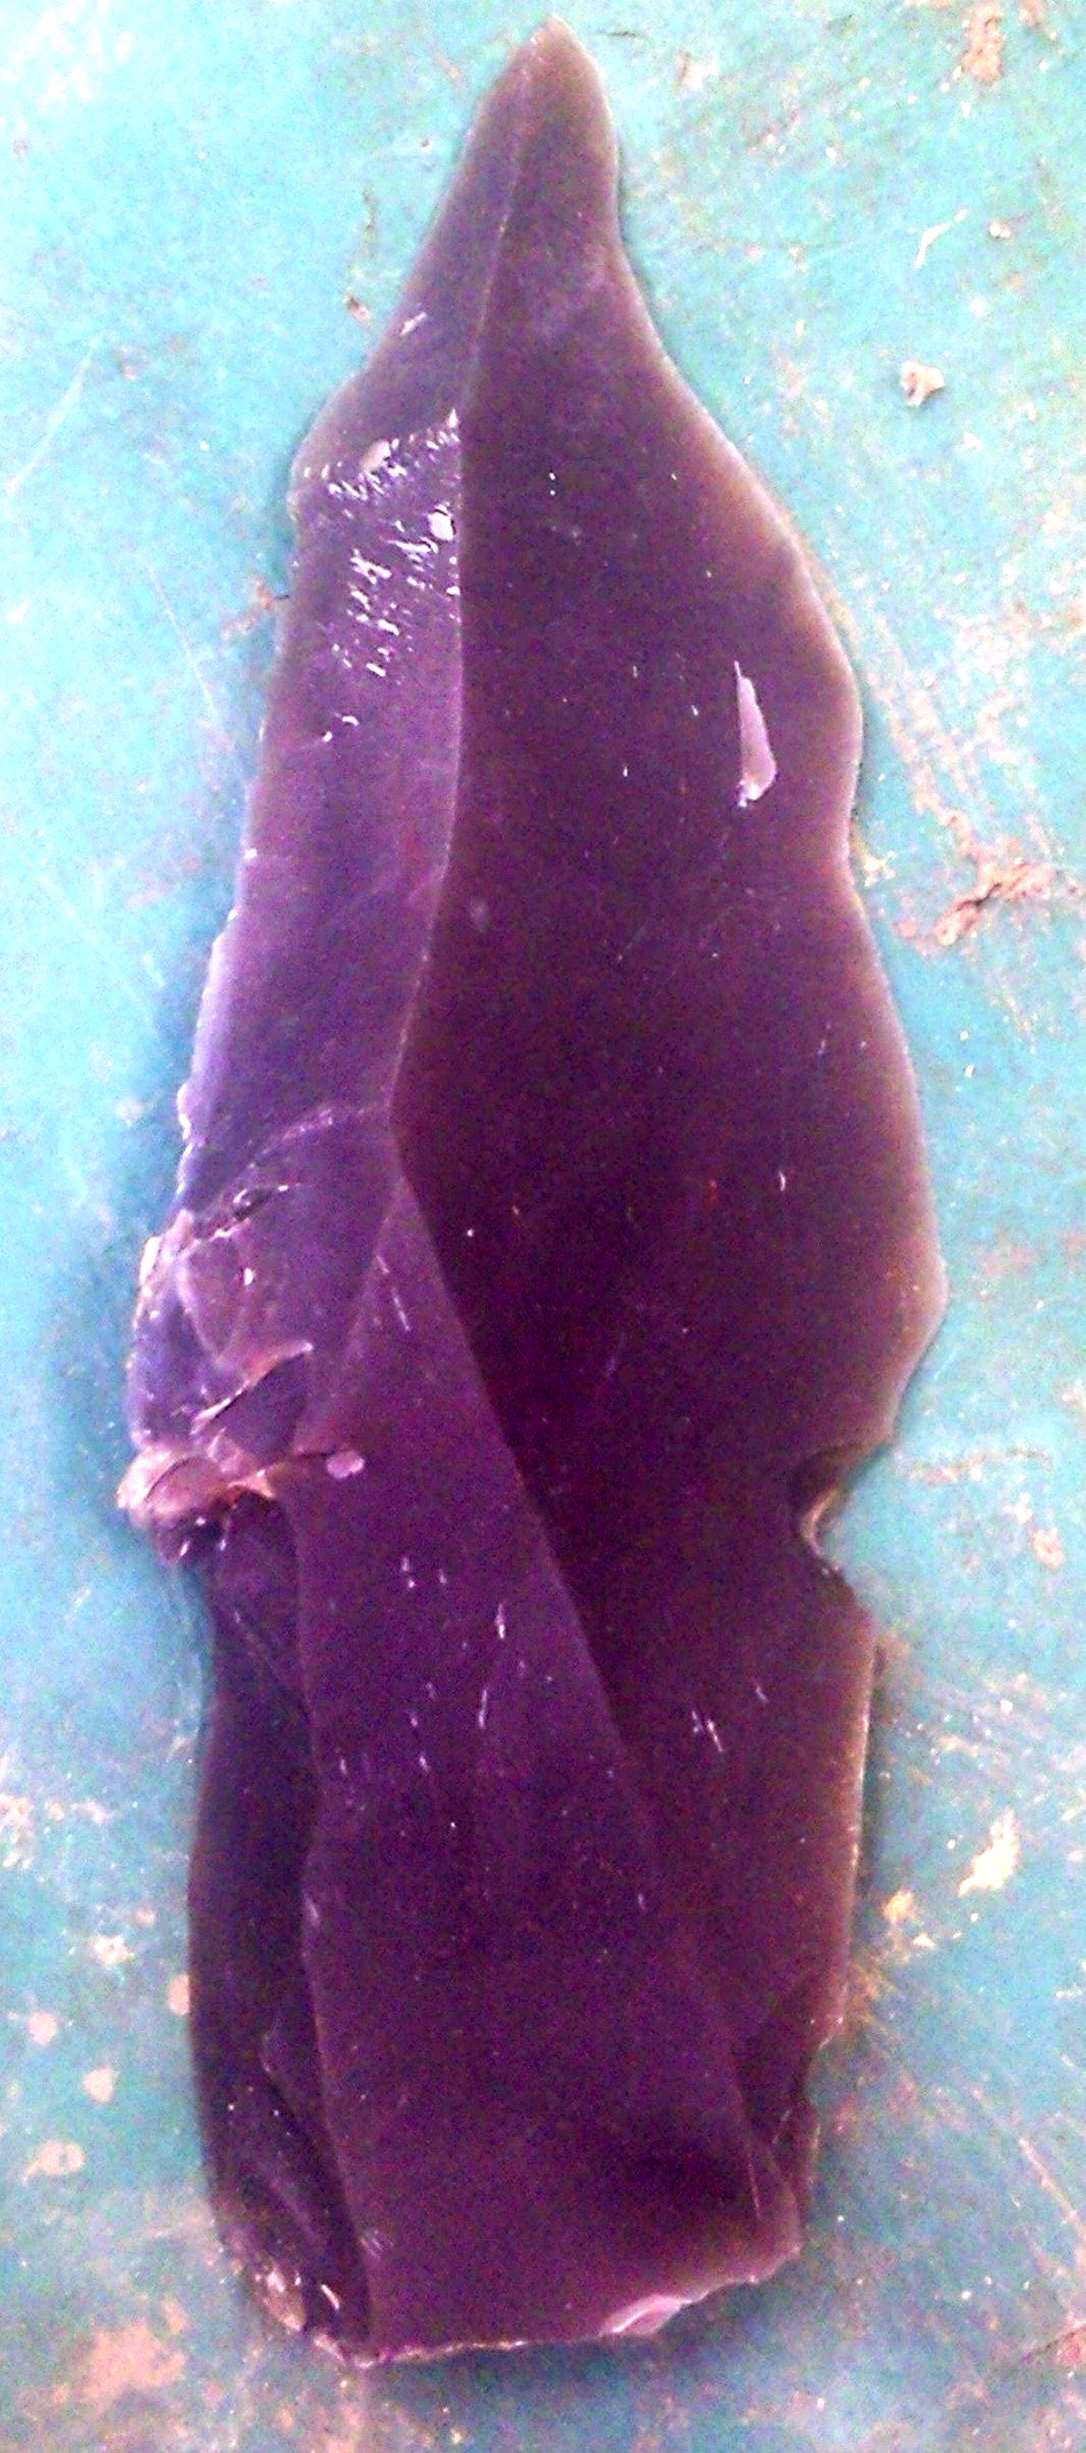
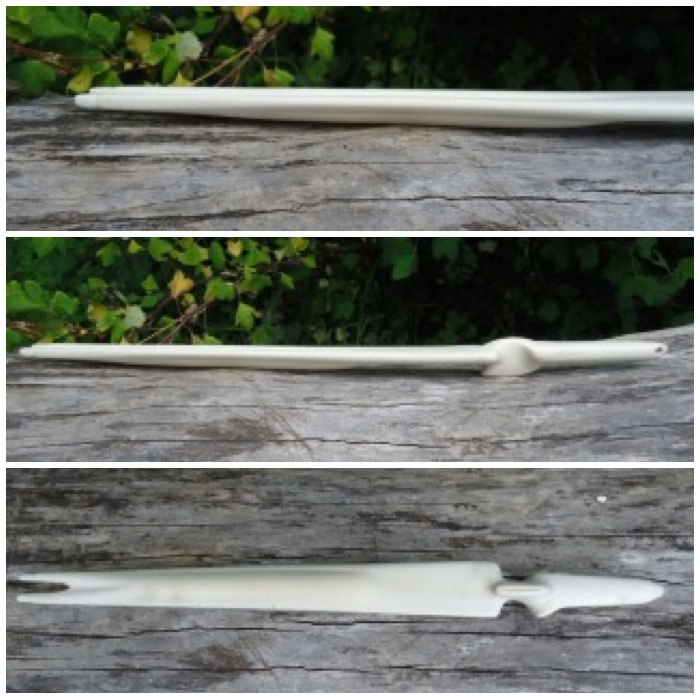
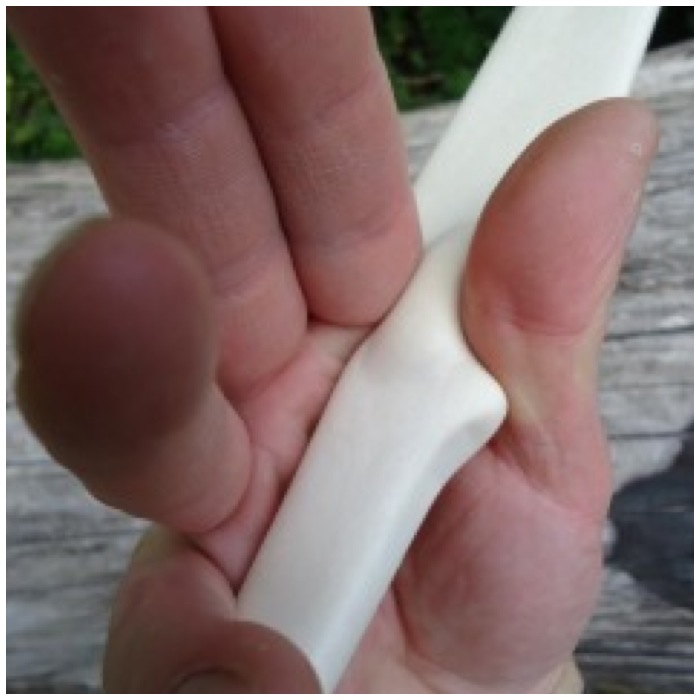
It was while I was knapping my flint axe head that I saw this piece pop off. The piece had a strong back, a sharp edge with good curves and a perfect point. I re-touched the back to smooth it down a bit and pressure flaked a groove where the sinew wrap to the handle would be.
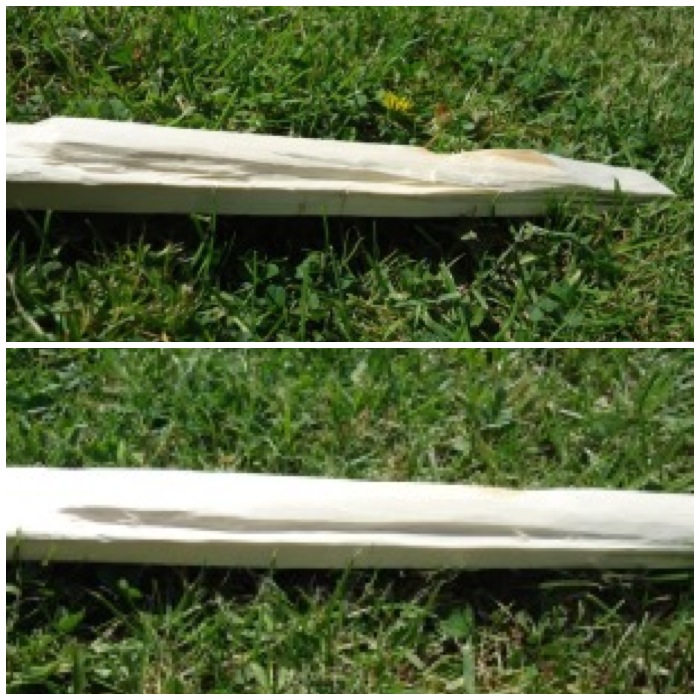
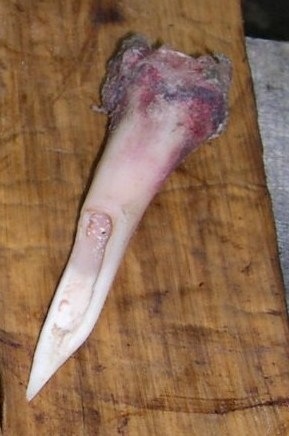
The blank blade
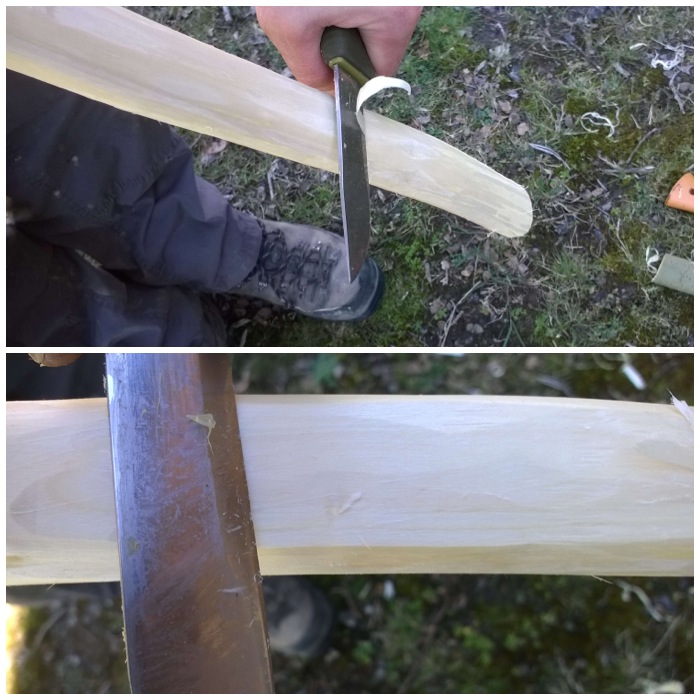
I’m afraid I didn’t take many pictures of the handle preparation as it wasn’t going into my portfolio: I used a modern saw and knife for this part to save time. (As I said at the beginning of the post the course was designed to introduce me to primitive crafts by gradually reducing my reliance on modern tools.)
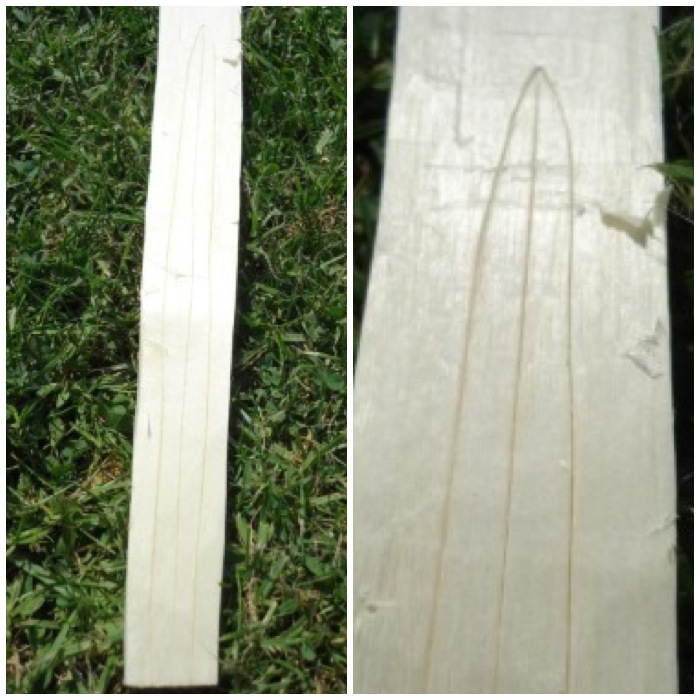
I selected a piece of dead standing wood that was well seasoned and had a slight curve in it, to make for a more comfortable grip and also to reduce the amount of carving necessary. I then used my saw to cut two stop cuts in a ‘V’ shape into the end of the wood. Since finishing the course I now know that a piece of serrated flint would have done this job just as well, if a bit slower.
The handle-to-be: starting the slot
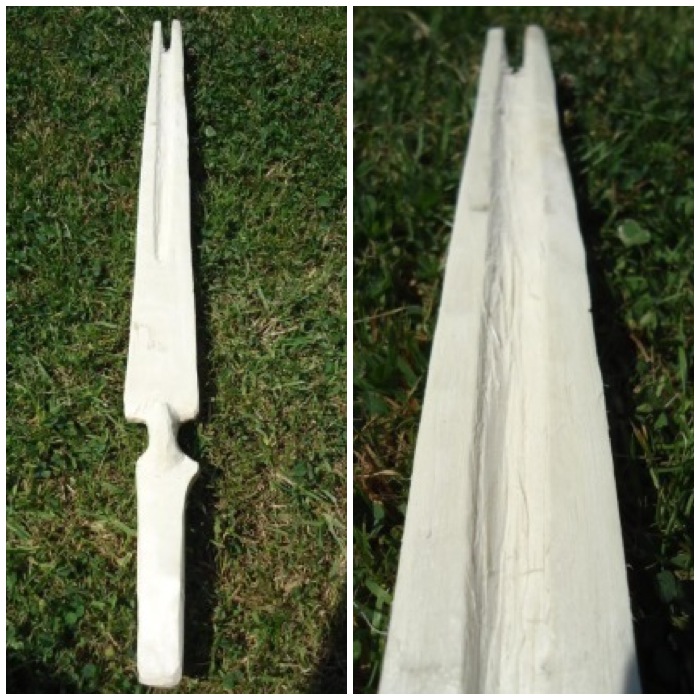
Once I had the stop cuts in place I used the tip of my steel knife to cut out the centre of the ‘V’ for the tang part of the flint blade to fit into. Then using my steel knife I carved the wood down into the final handle shape.
Stop cuts in place
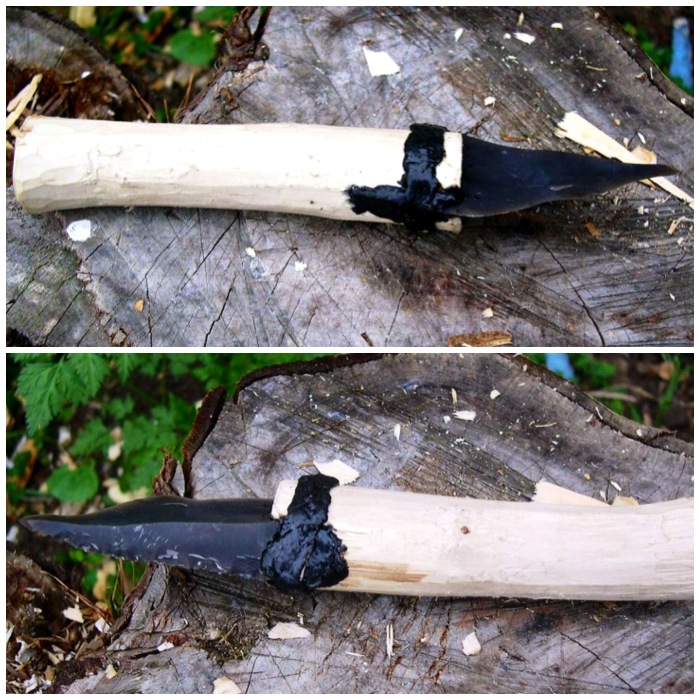
I filled the ‘V’ notch with some spruce pitch (see my article on arrow making for making spruce pitch) and slid the tang of the flint blade into the notch. I then bound the hilt of the handle with sinew to secure it and covered the sinew with more pitch to protect it. Within 24 hours this knife was ready to use.
Rawhide and pitch wrap
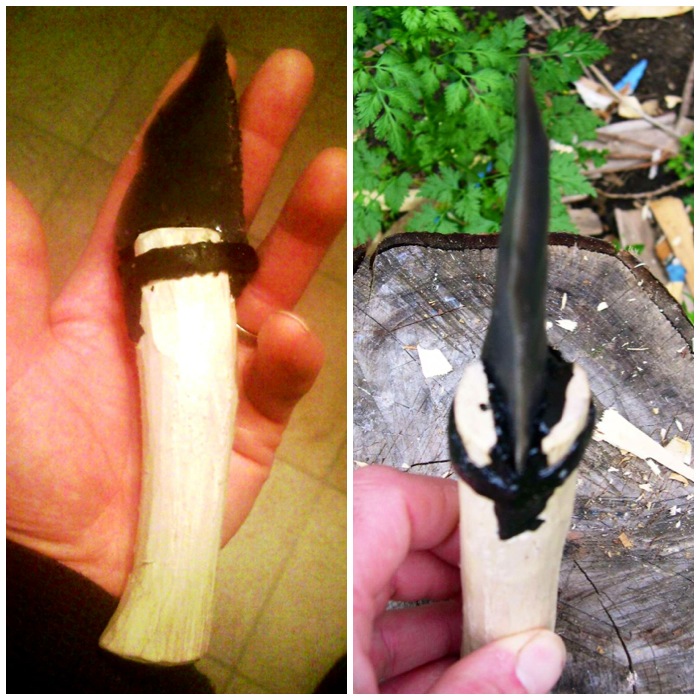
Not the best pictures I am afraid but as you can see this knife was the perfect size and shape to use on many of the jobs I would normally use a steel knife for.
A perfect size and very sharp
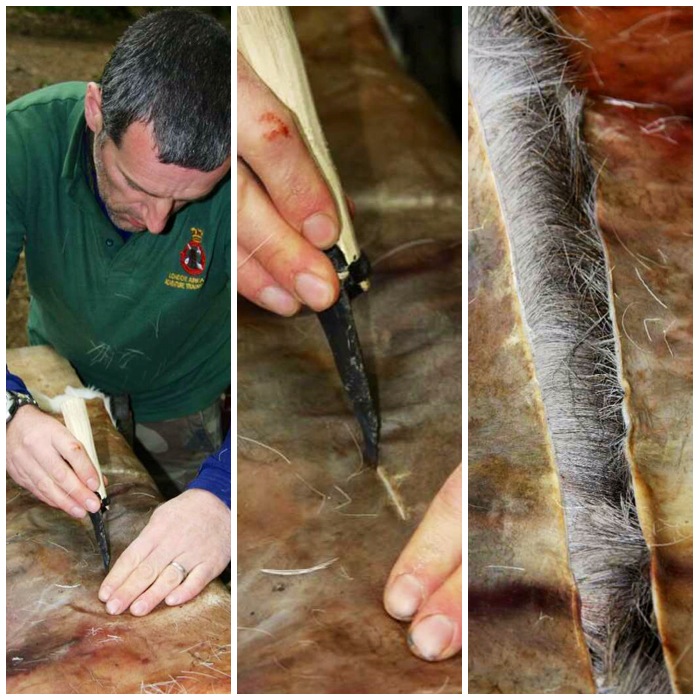
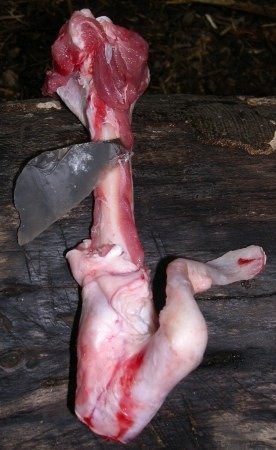
The purpose for which I created the knife was tanning some deer skin on the course. When splitting the hide of the deer the knife was comfortable to use and the top curve near the tip cut through the hide like a knife through butter.
First job – cutting a deer hide
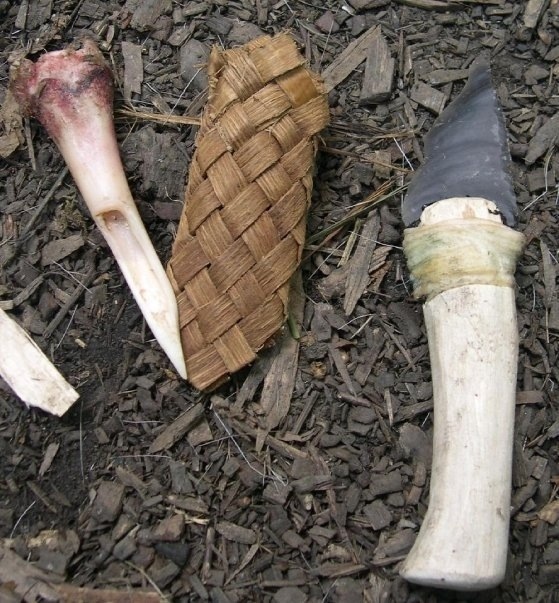
My final craft item was to make a bark sheath for the small bone bodkin you can see on the right. The knife allowed me to easily cut out many strips of bark in a very controlled manner so that the strips were all of the same width. I added a wrap of rawhide at this stage to protect the pitch and sinew from general wear and tear.
Creating bark strips and a new rawhide wrap
When I was finishing the sheath I found the knife edge was brilliant for trimming off all the excess bark.
Perfect for trimming
Finally, to hang the sheath on my bark belt I cut up lots of buckskin with the knife to make some rough cordage.
Good for cutting up buckskin
Since the course I have used the knife on a few other projects. So long as I am respectful of the fragility of the flint edge, the knife has produced some wonderful results. It’s great for scoring lines in bark, shaving pieces of green wood down to points and for making rosette cuts in small branches to snap them.
Scraping, point work and splitting
When I was making my Split Stick Atlatl and had to batton open a piece of green wood I found that the thick back of the blade was able to withstand a lot of force from my wooden hammer, which was a pleasant surprise, although I was very nervous throughout the process.
Robust enough for battoning
Eventually I made the knife its own bark sheath and it now sits proudly as a well-used tool on my primitive belt order.
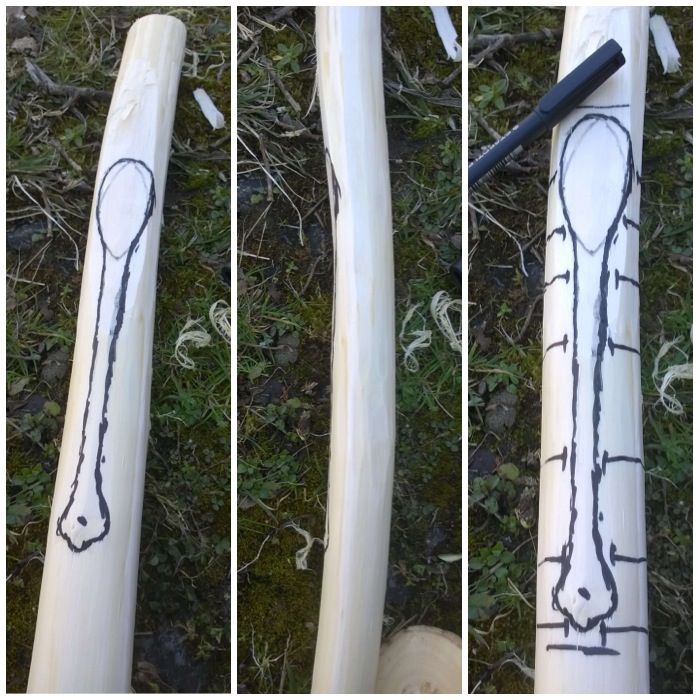
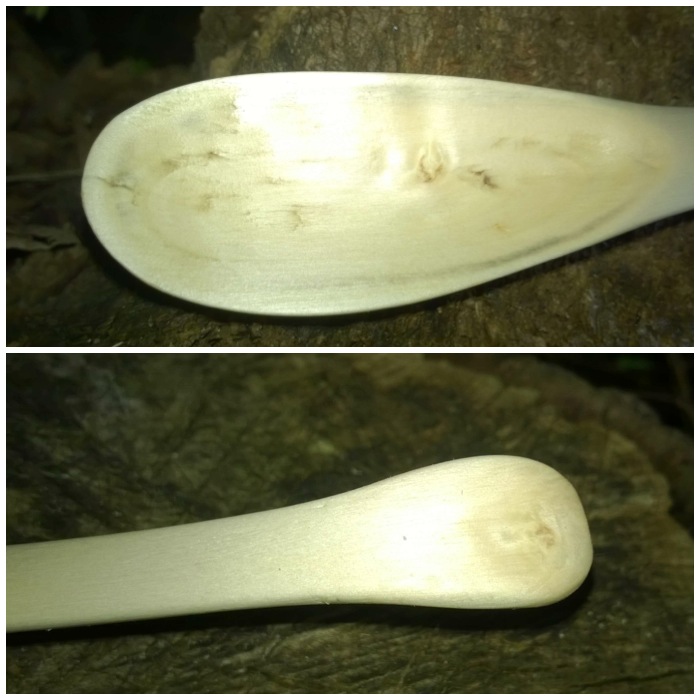
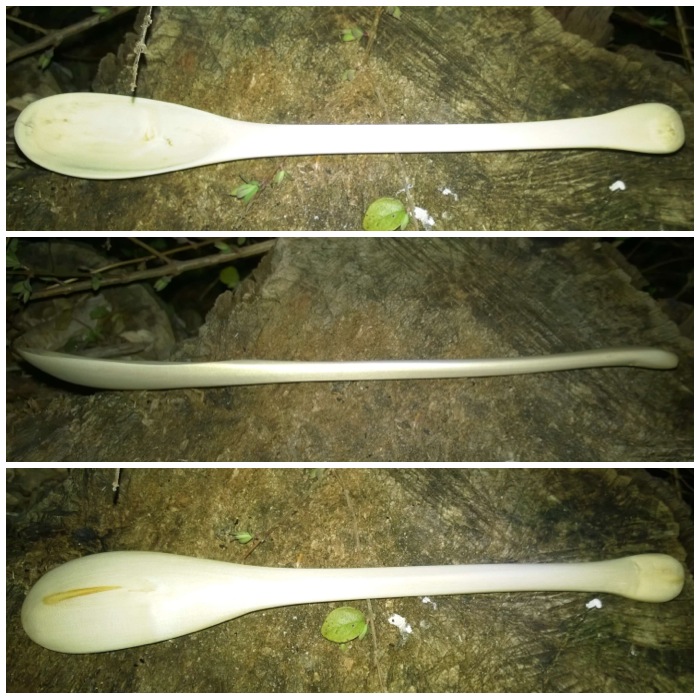
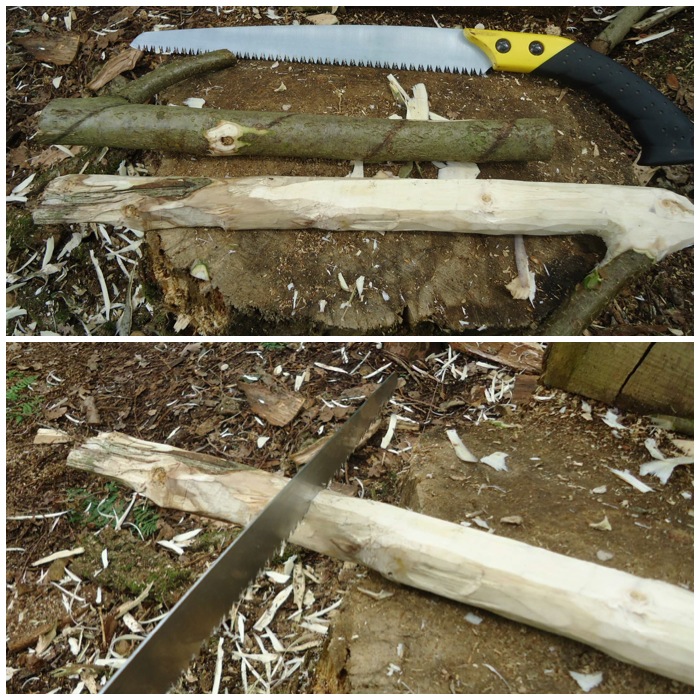
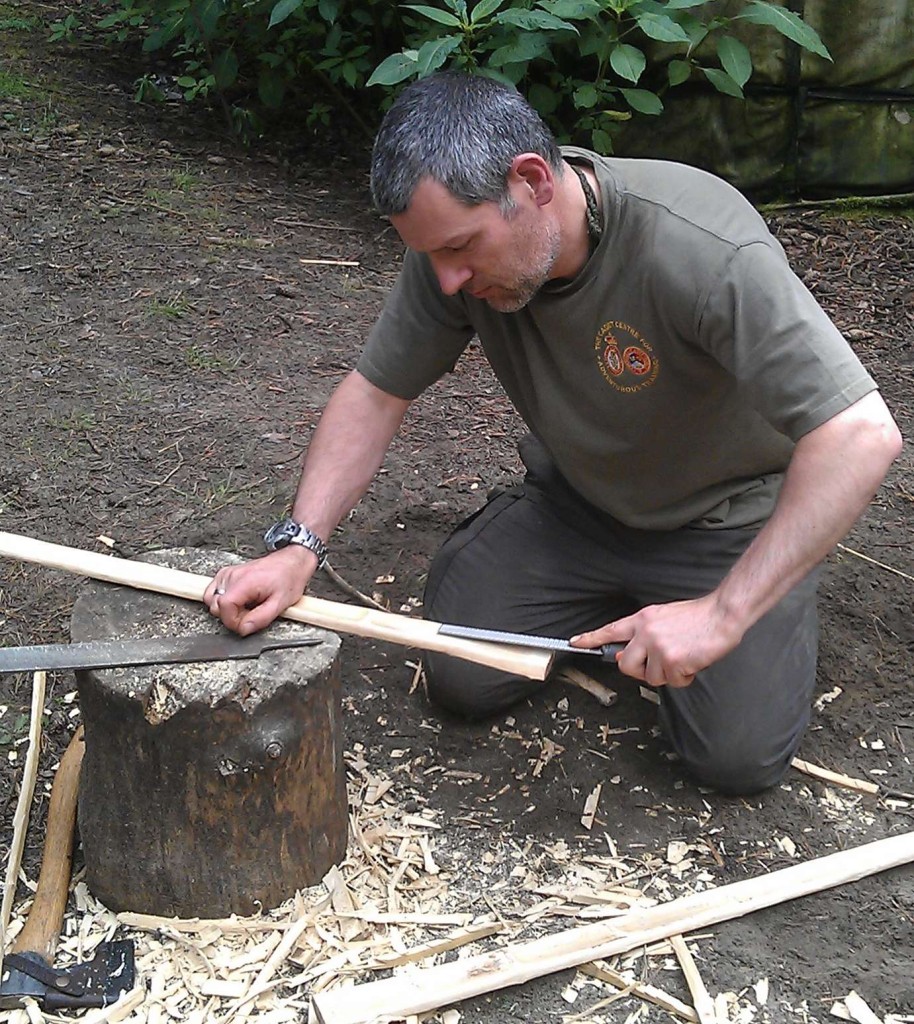
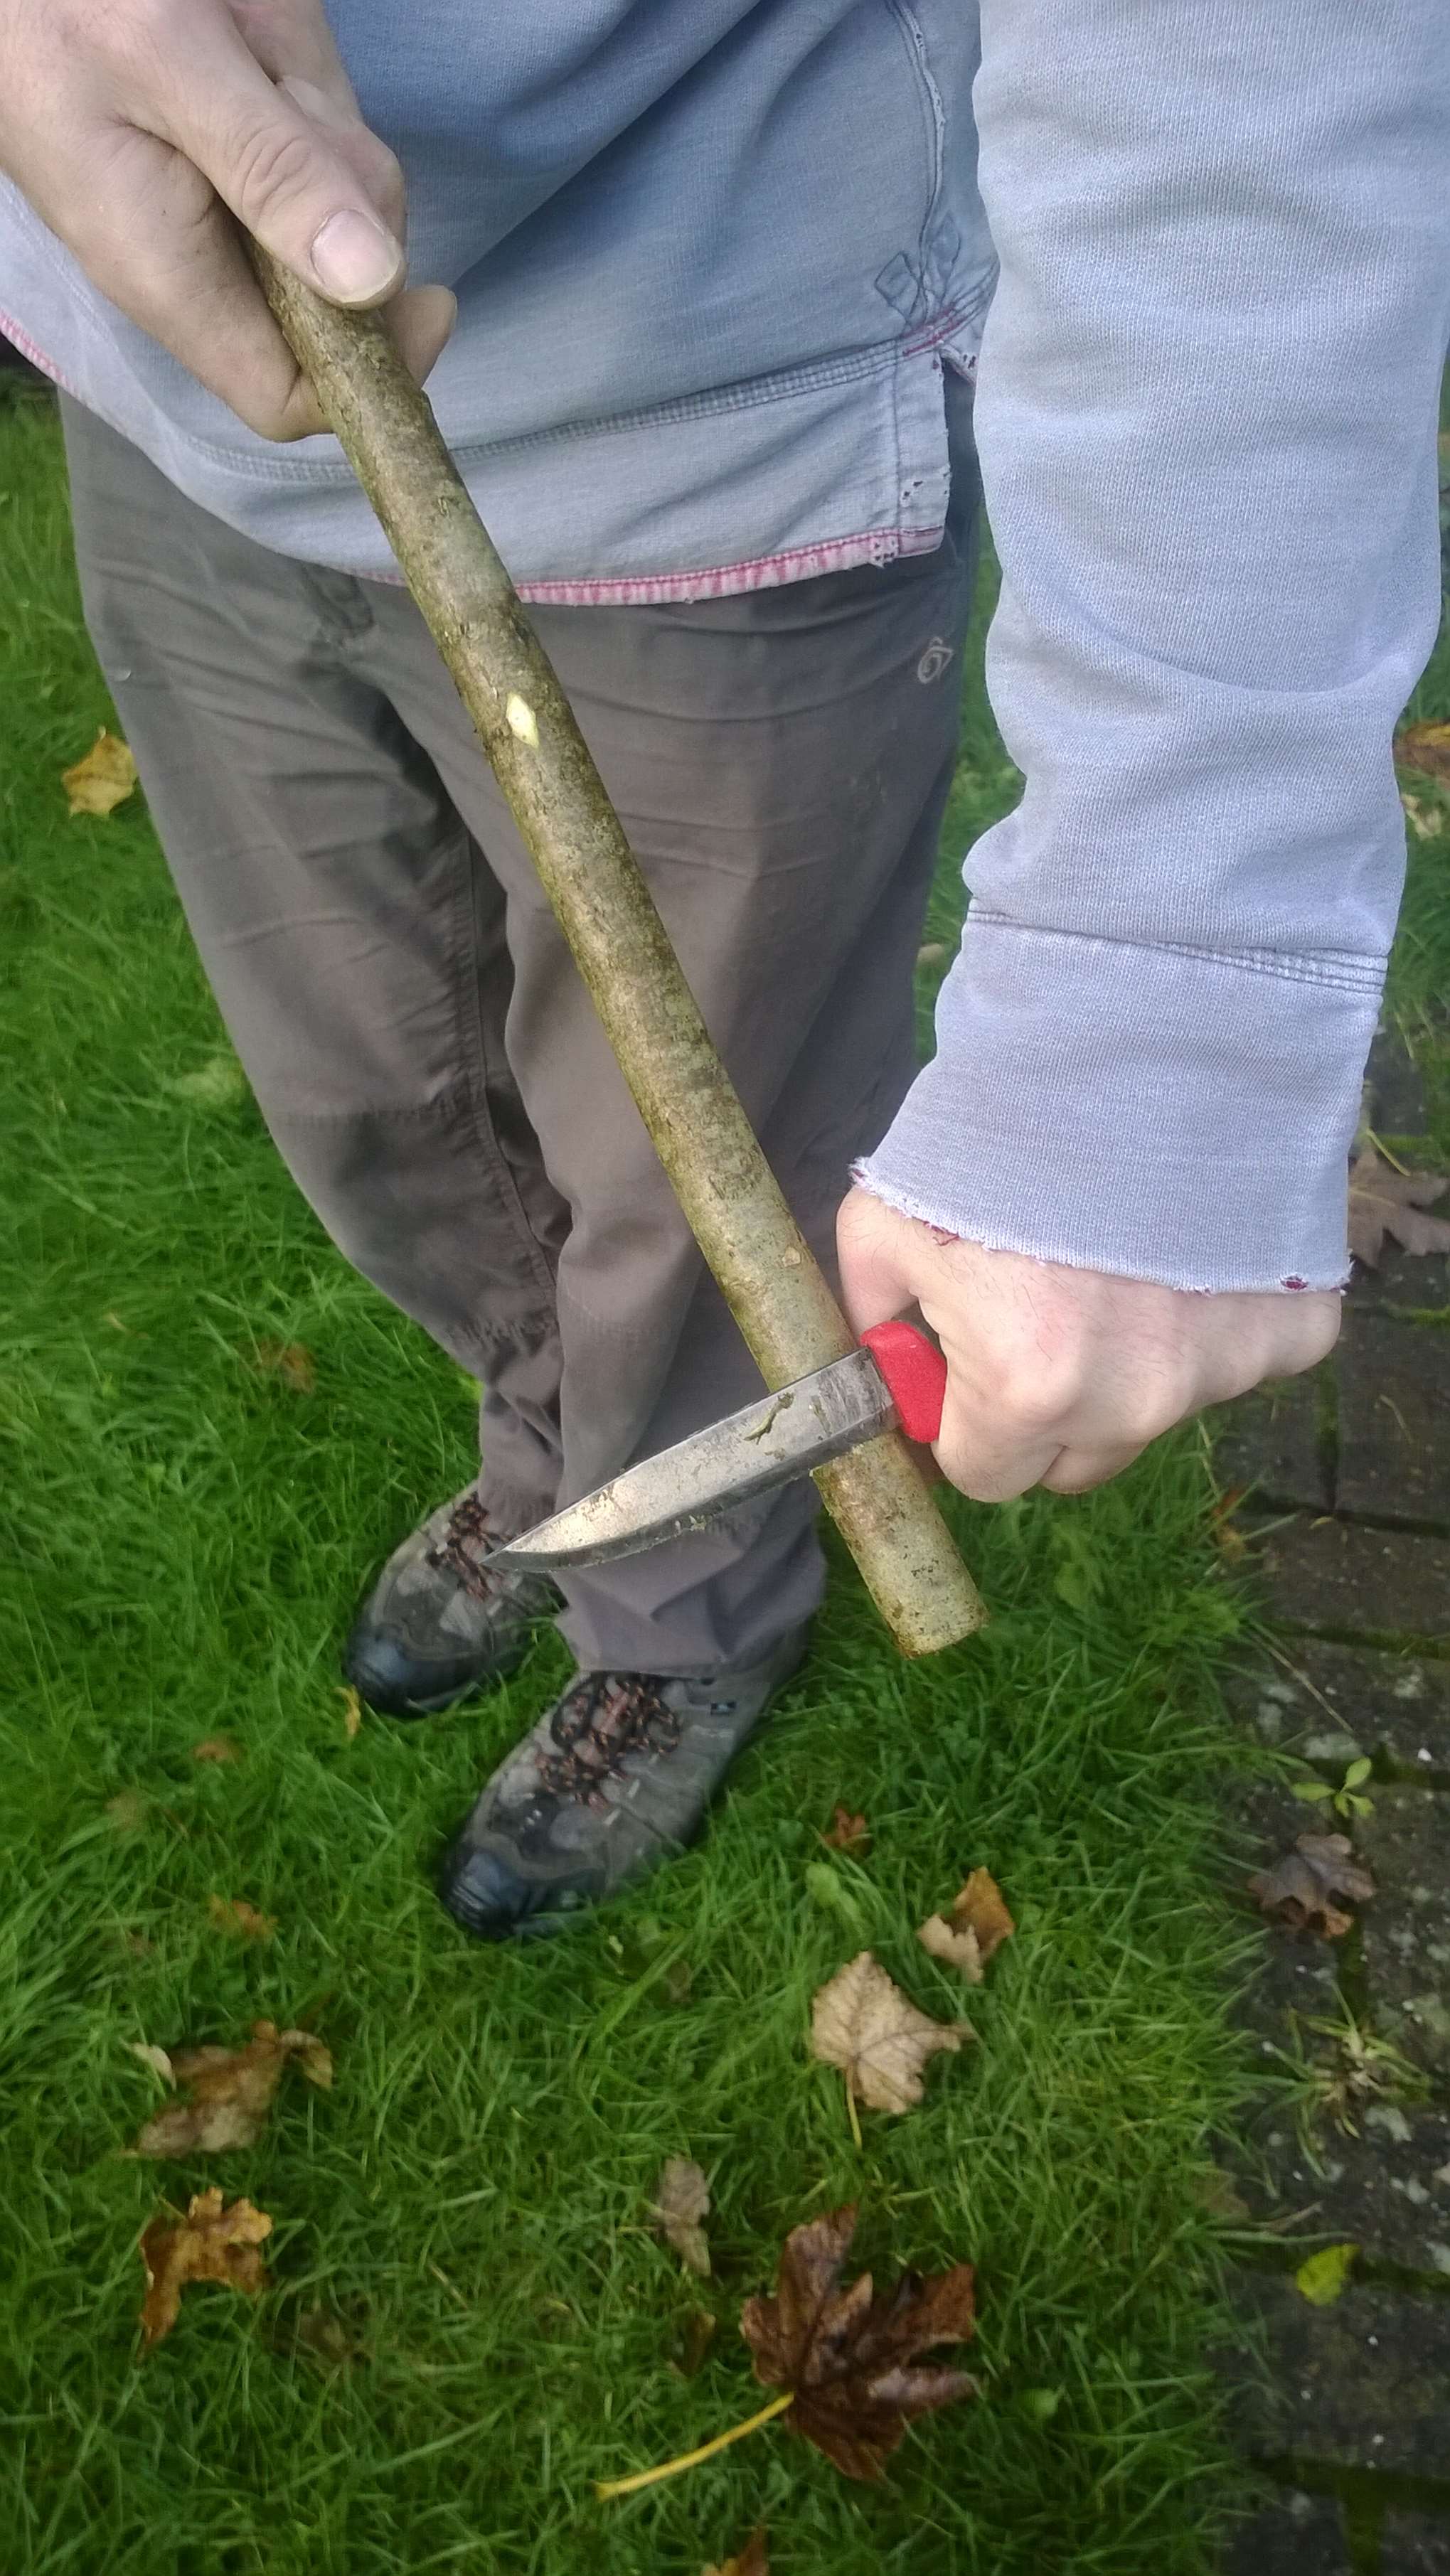
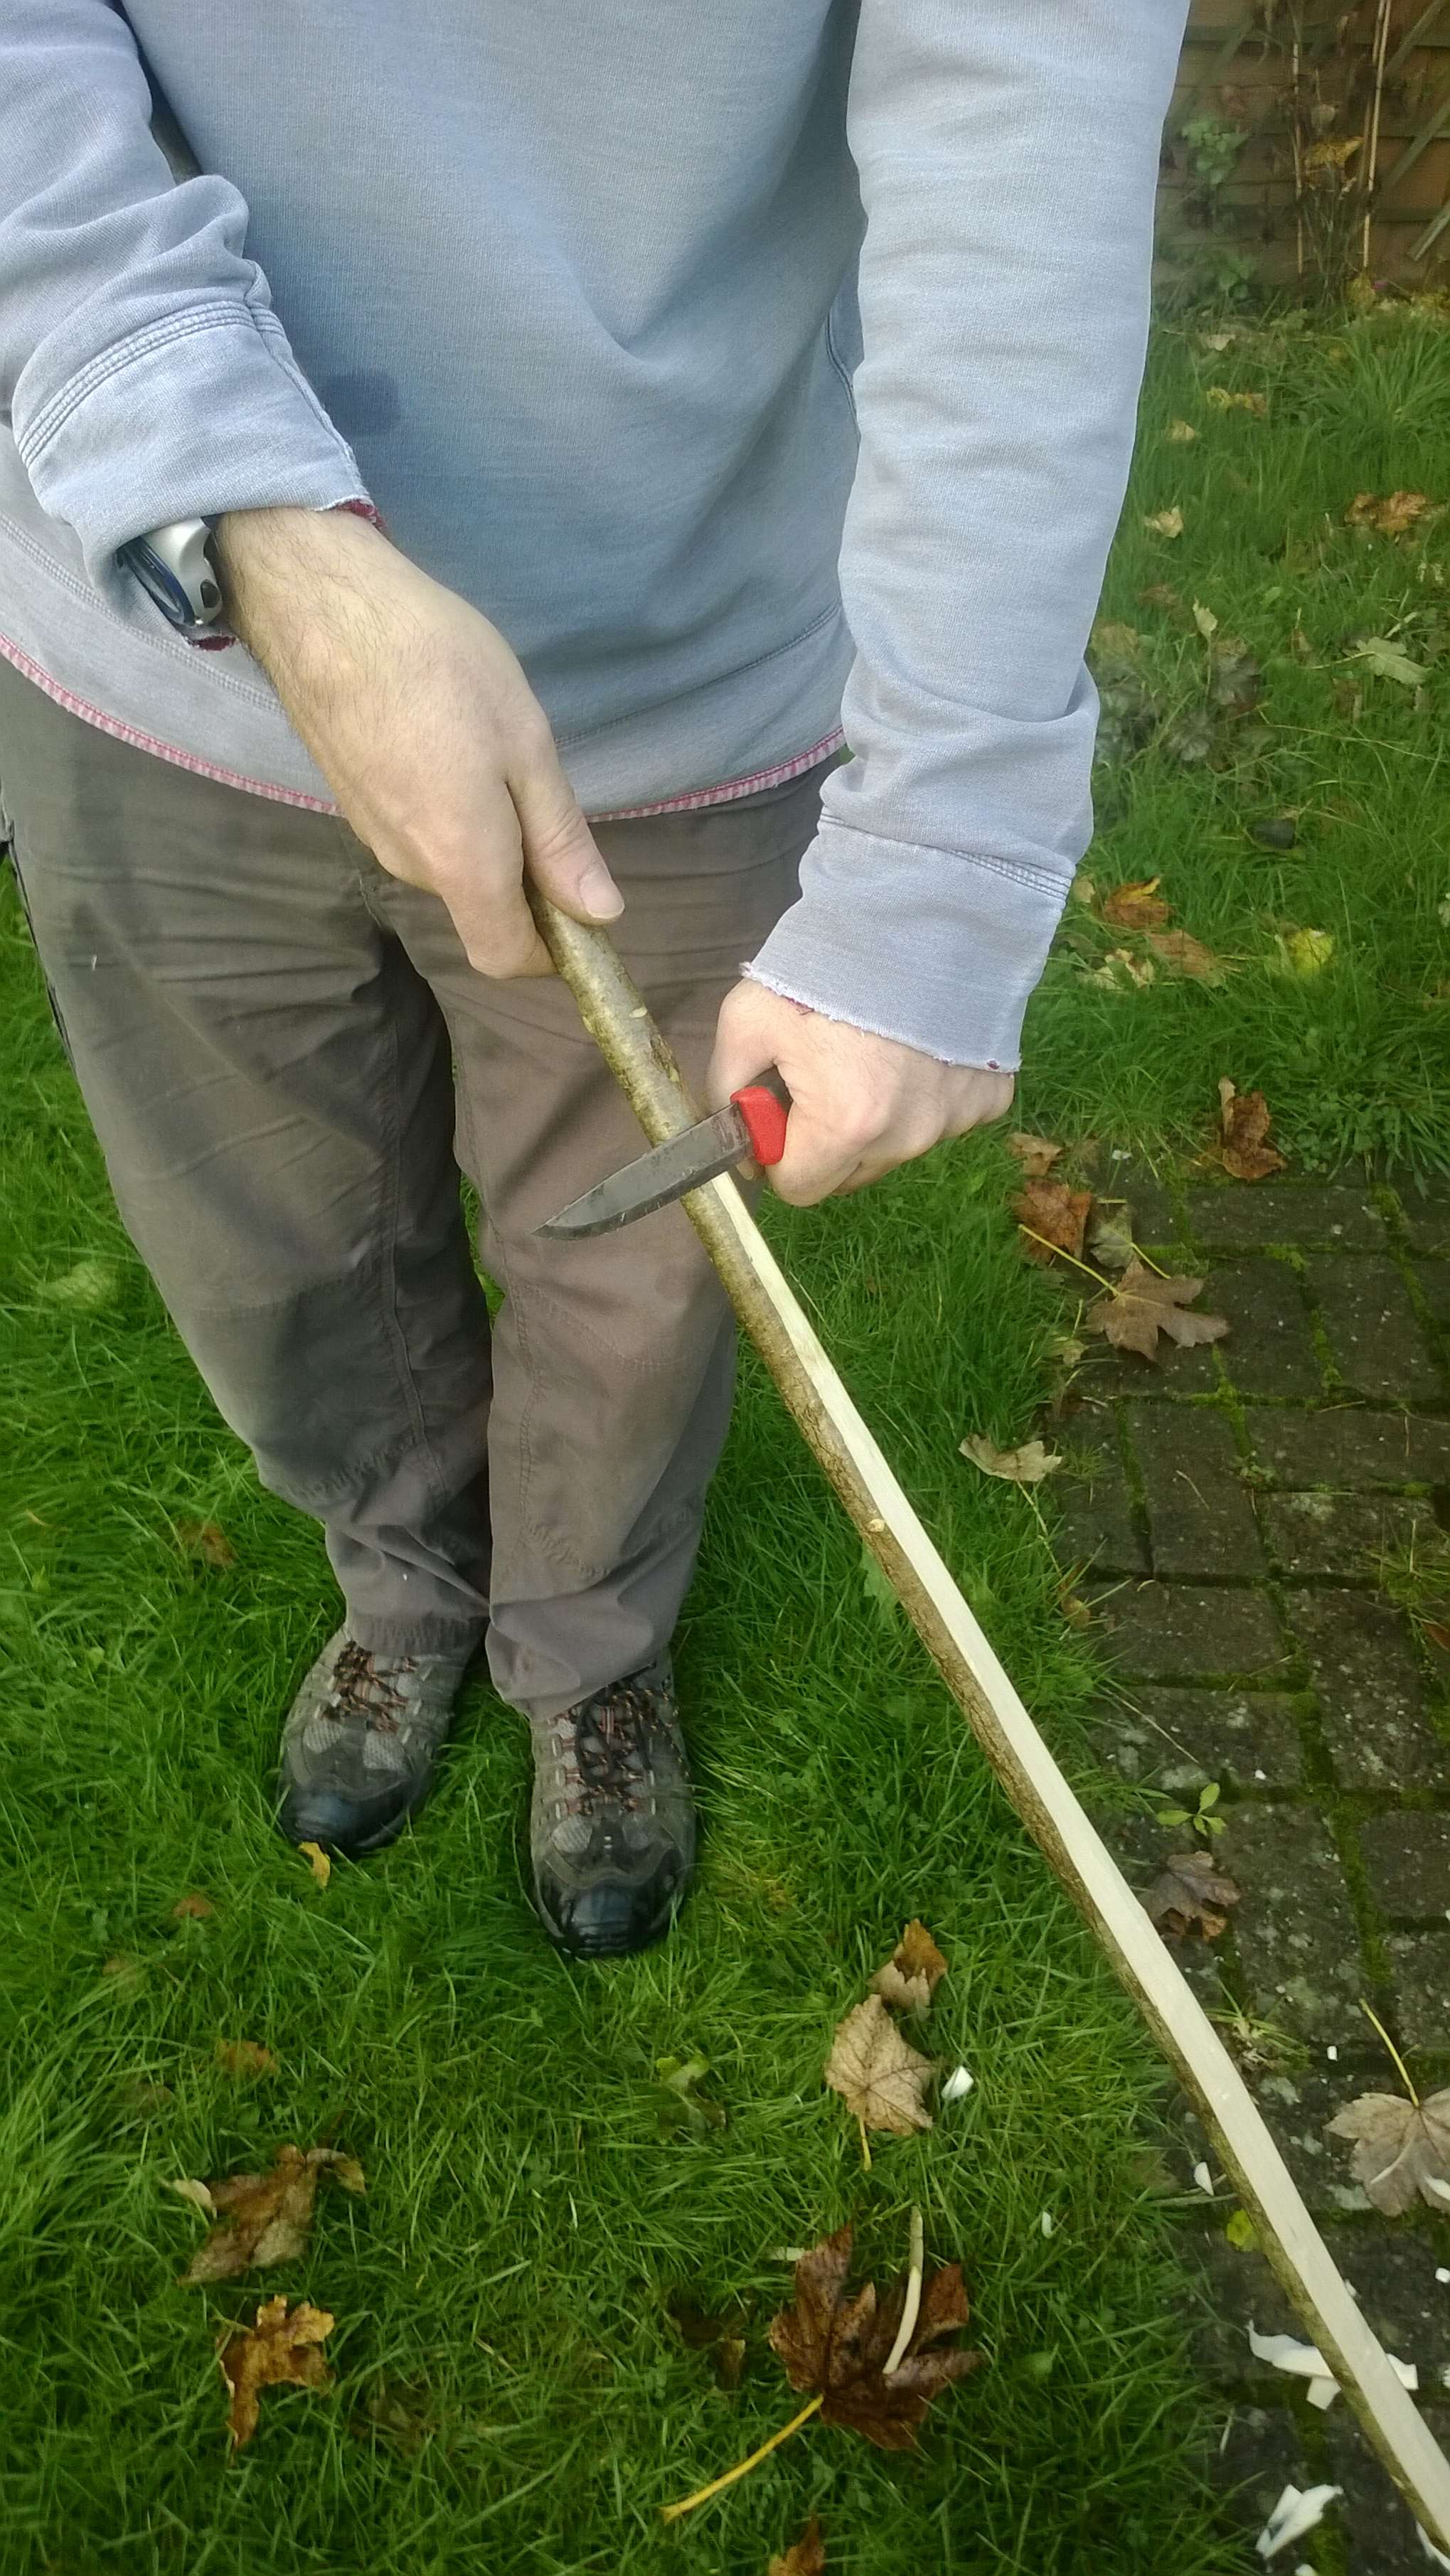
This How To…. illustrates some simple steps to carve a small spoon you can easily make when you are out and about.
A simple spoon
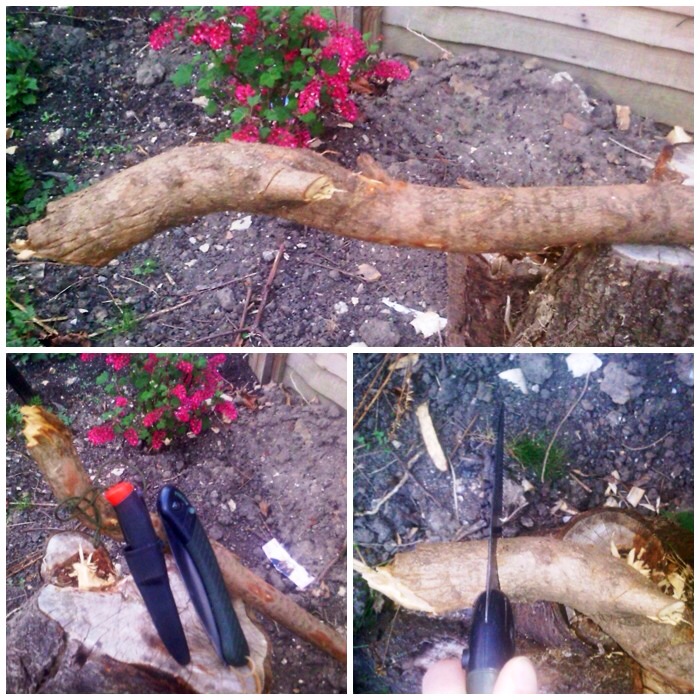
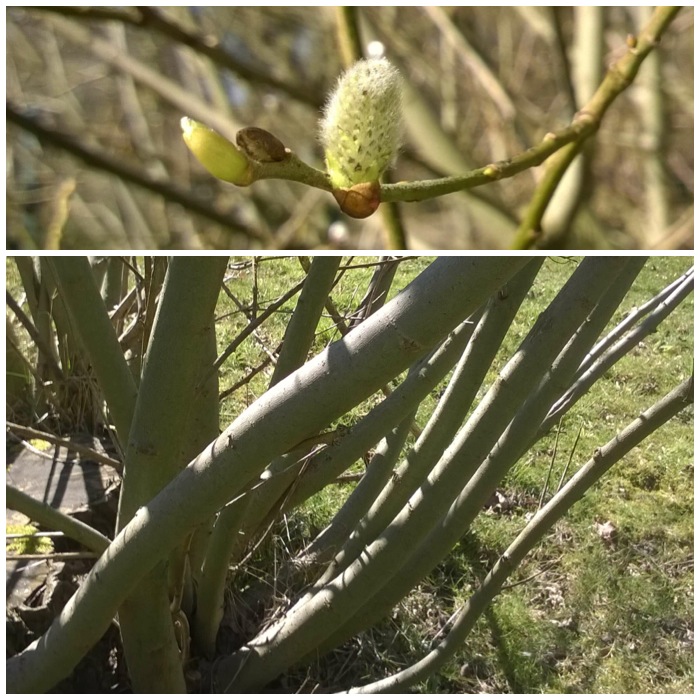
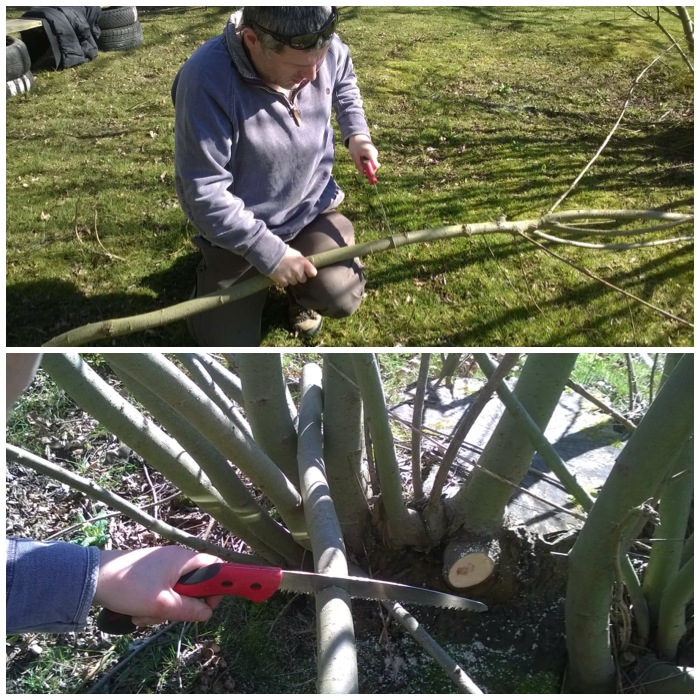
I was training on campcraft in Crowborough (Ashdown Forest in the UK) recently and in between classes decided to carve this simple spoon. A nearby willow tree had been felled a few years ago and lots of shoots had re-grown from the stump.
Local Willow
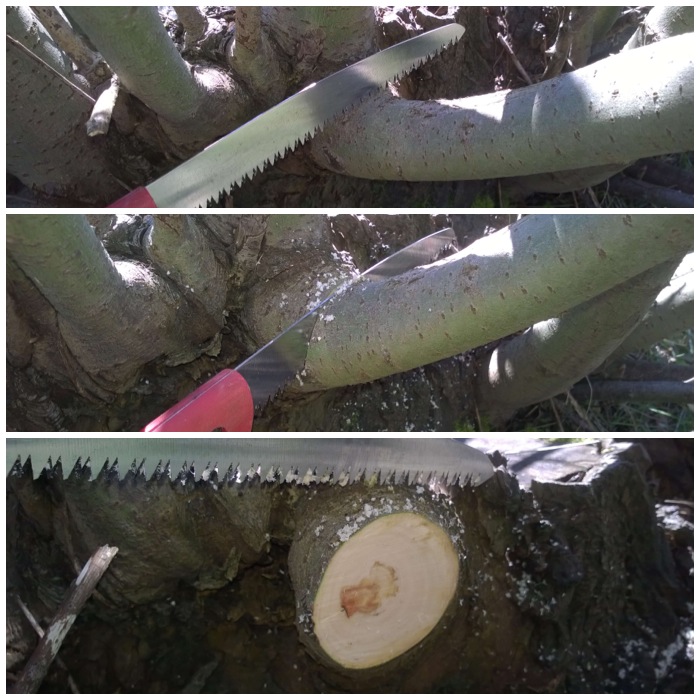
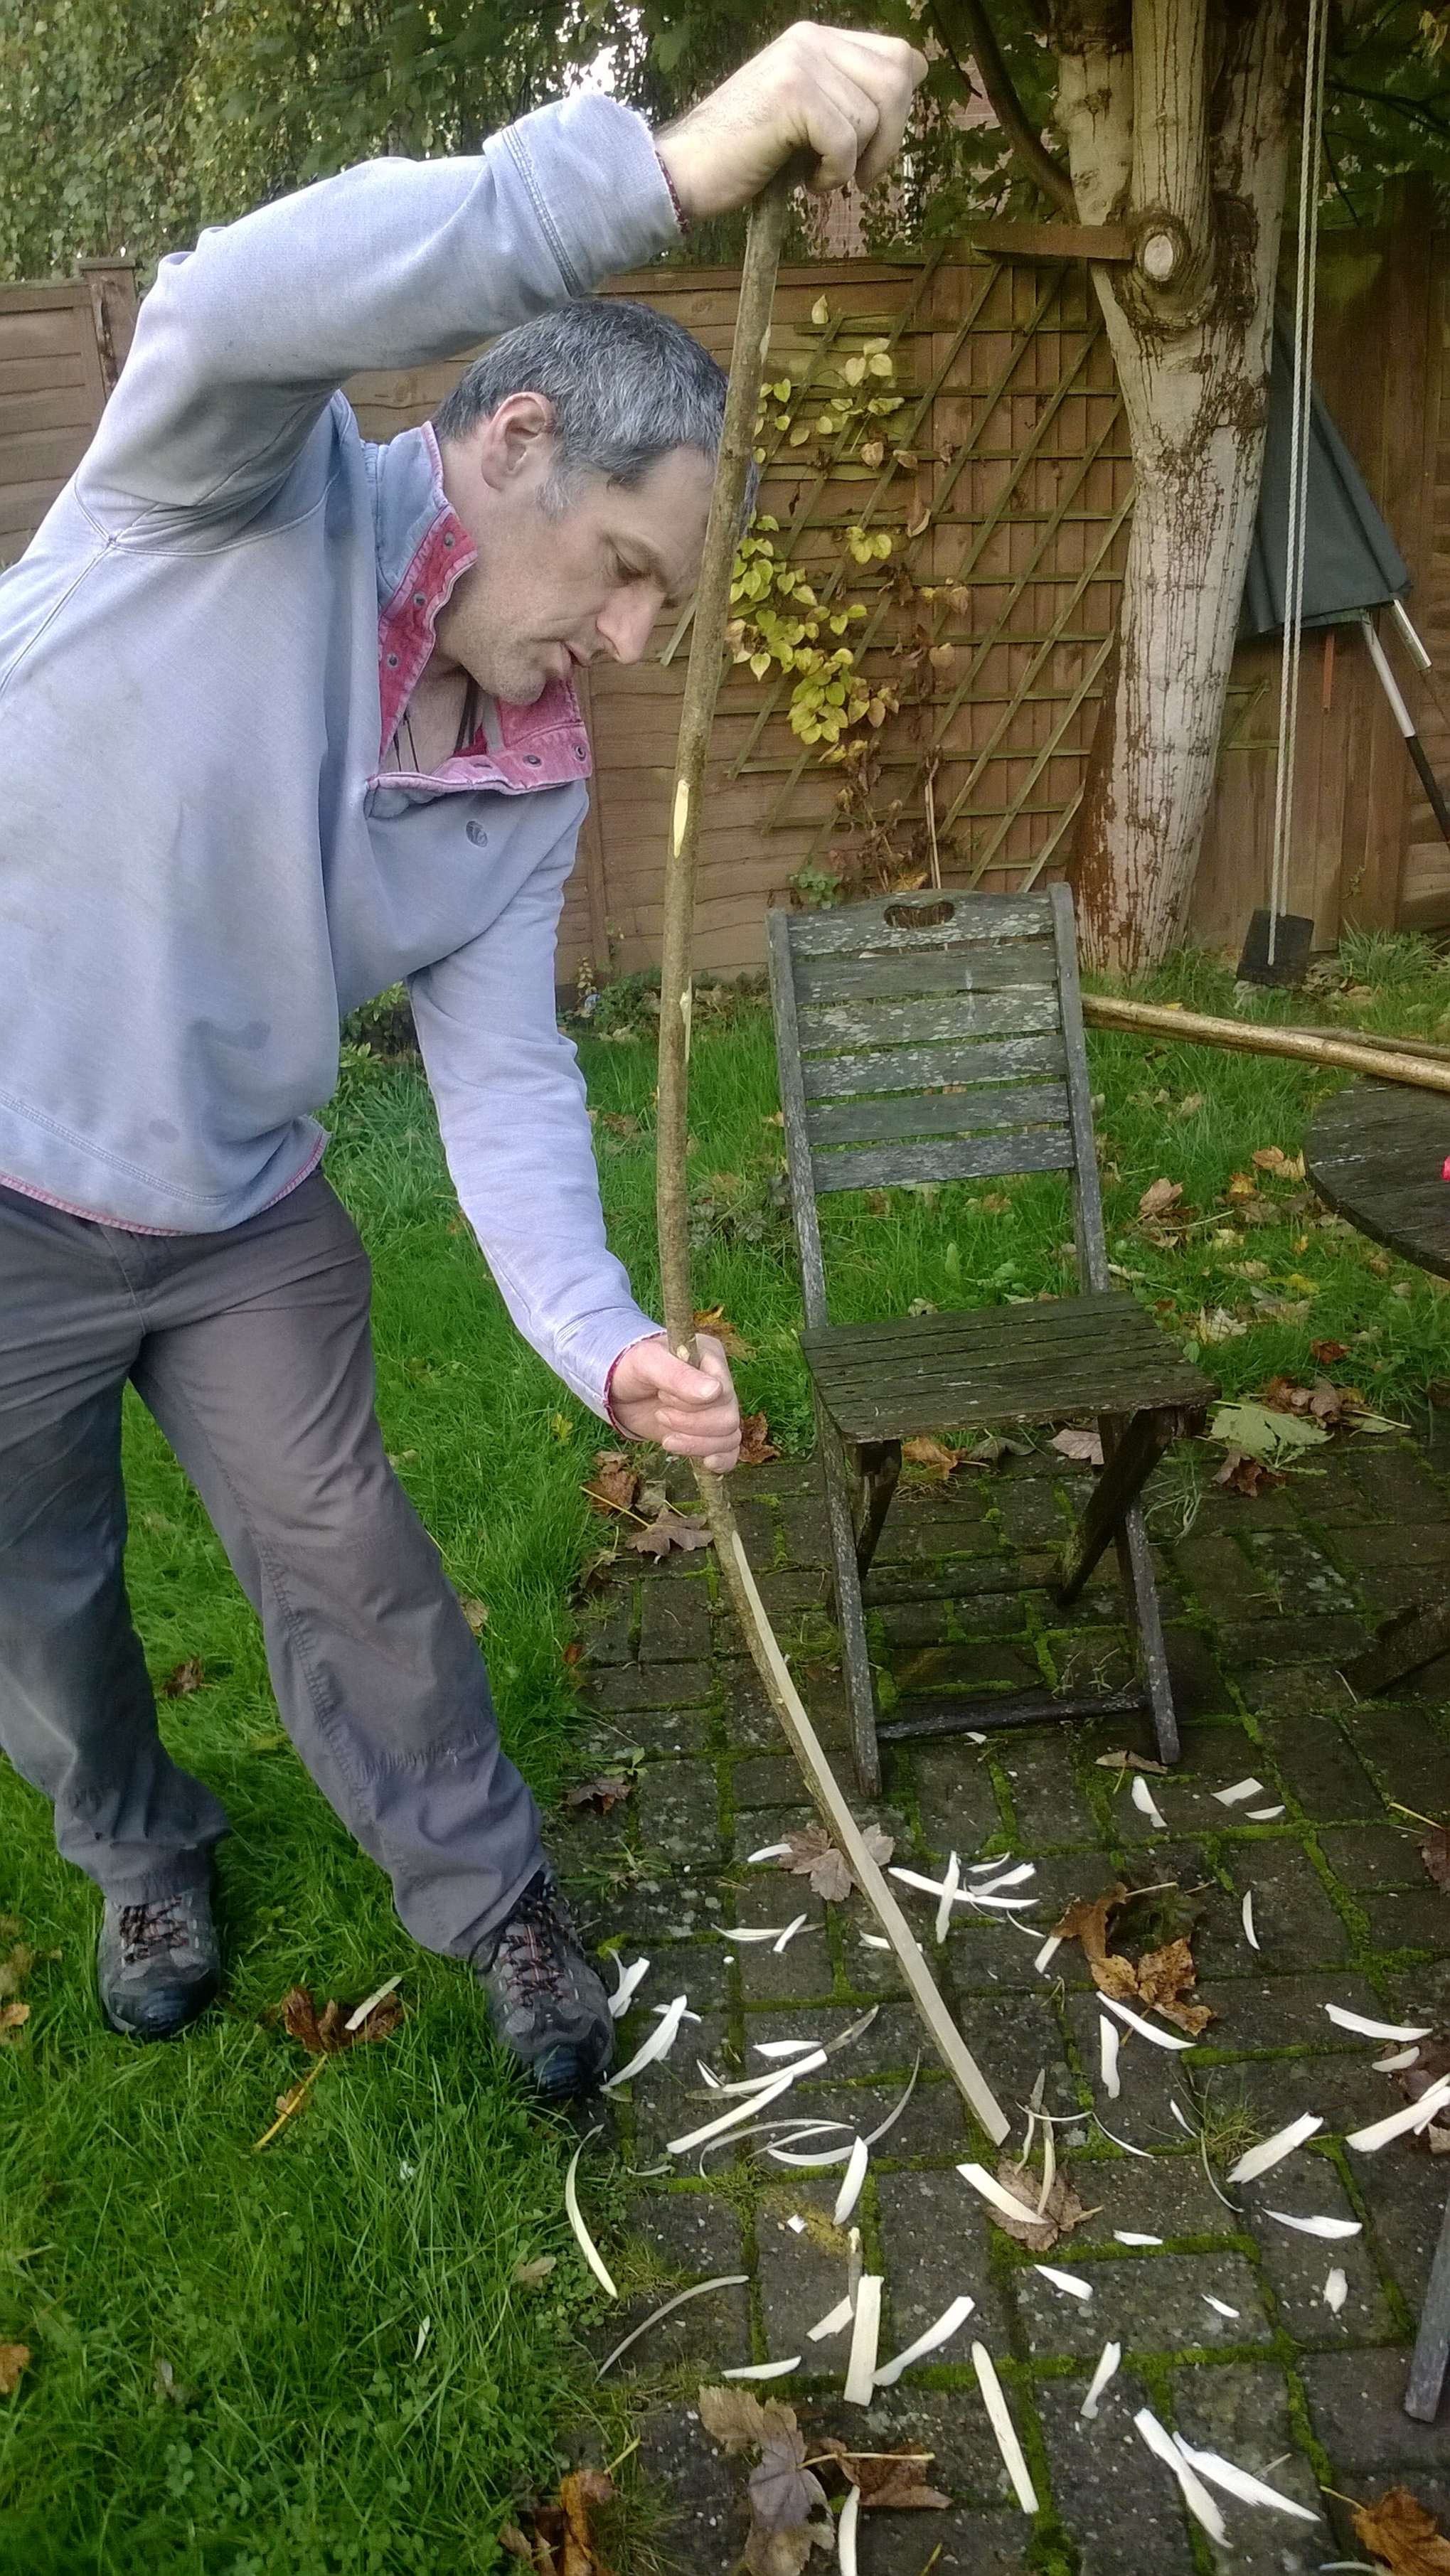
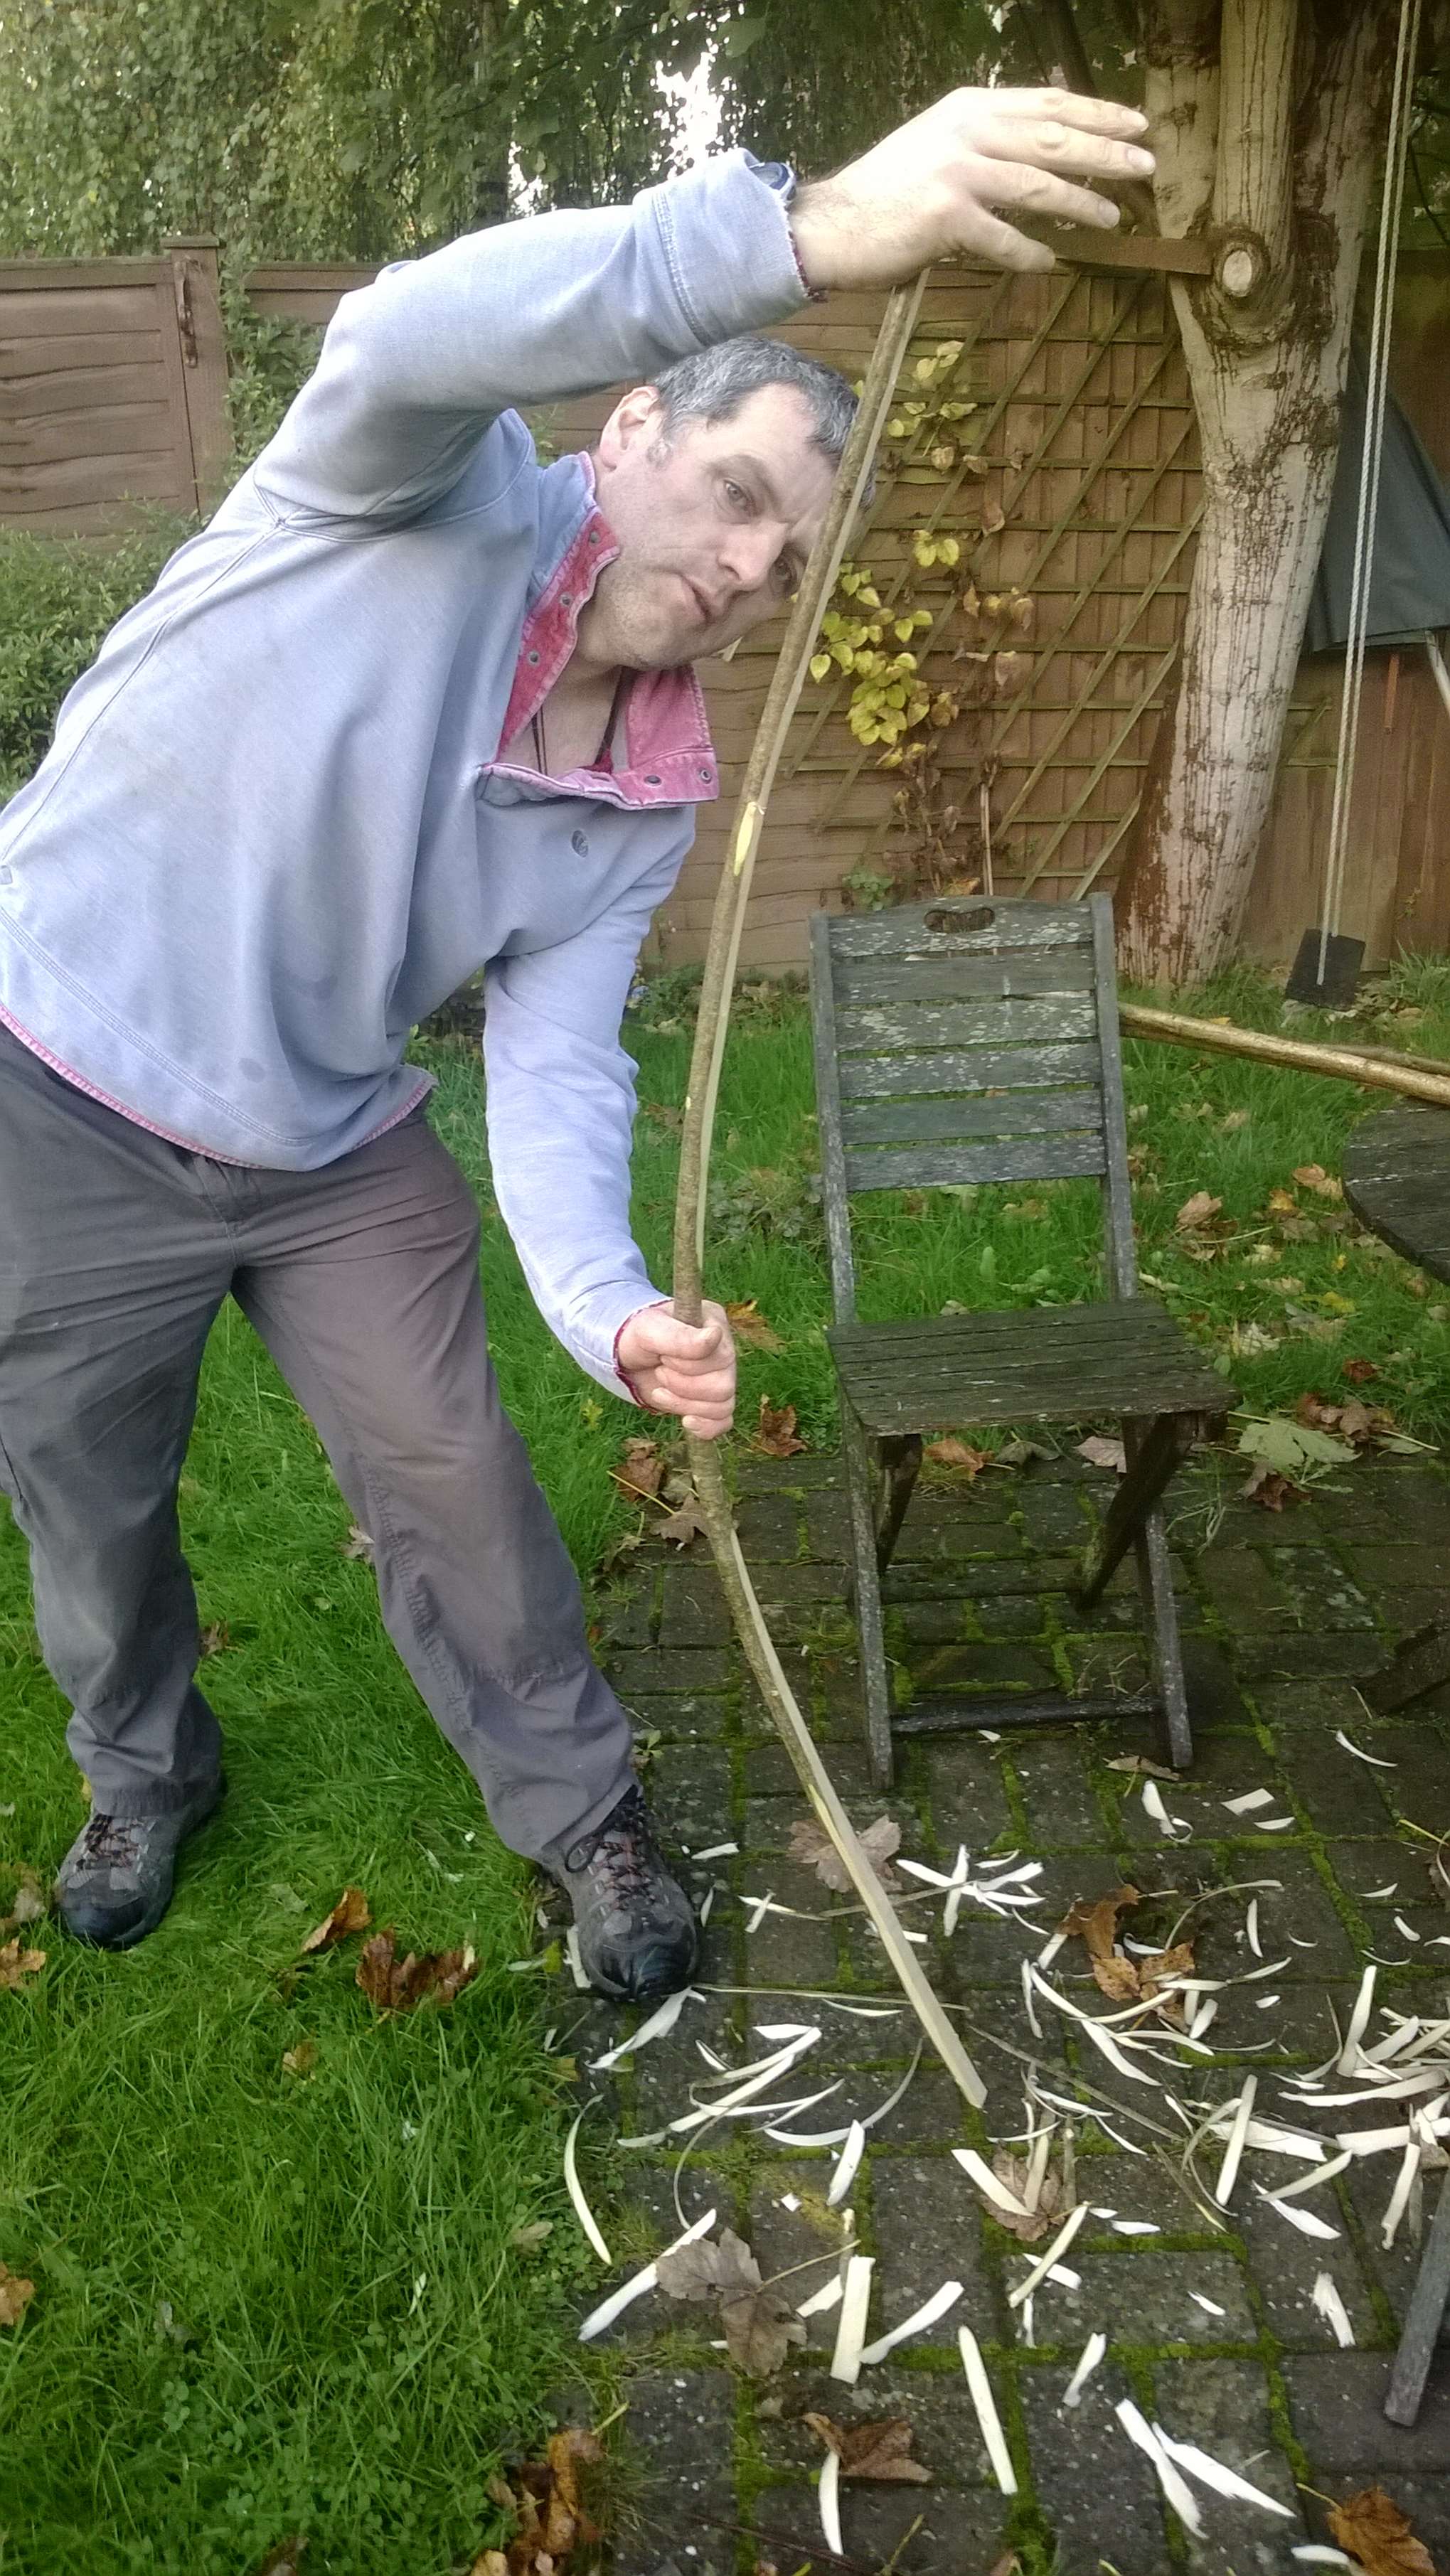
I selected a shoot and sawed it off near its base. Cutting the limb cleanly at the base will allow the tree to heal itself quickly and send out a replacement shoot the following year.
Cut right back
I selected the limb because of its curves, which help in making a strong spoon. I trimmed the limb in a safe position and used the live limbs as a vice to do the final sawing.
Trimmed safely
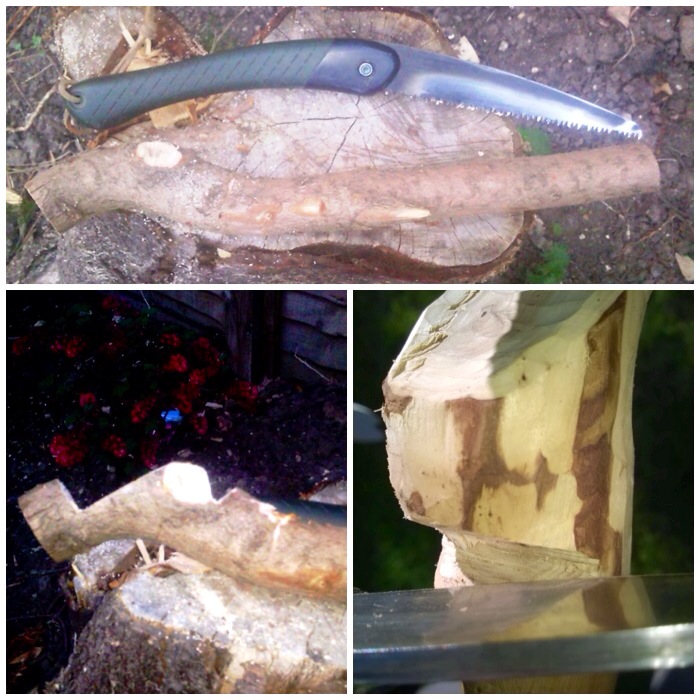
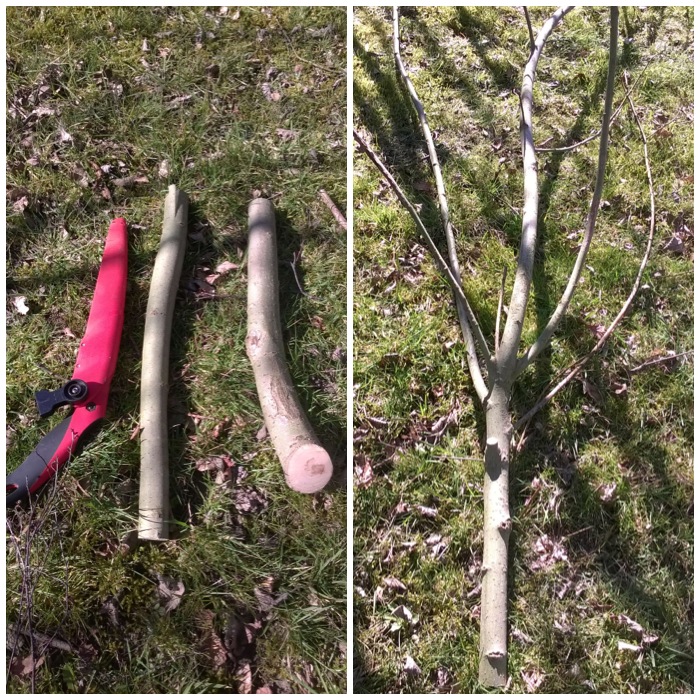
I took two pieces to make a couple of spoons and then trimmed off a couple of the smaller shoots from the top.
The spoons-to-be
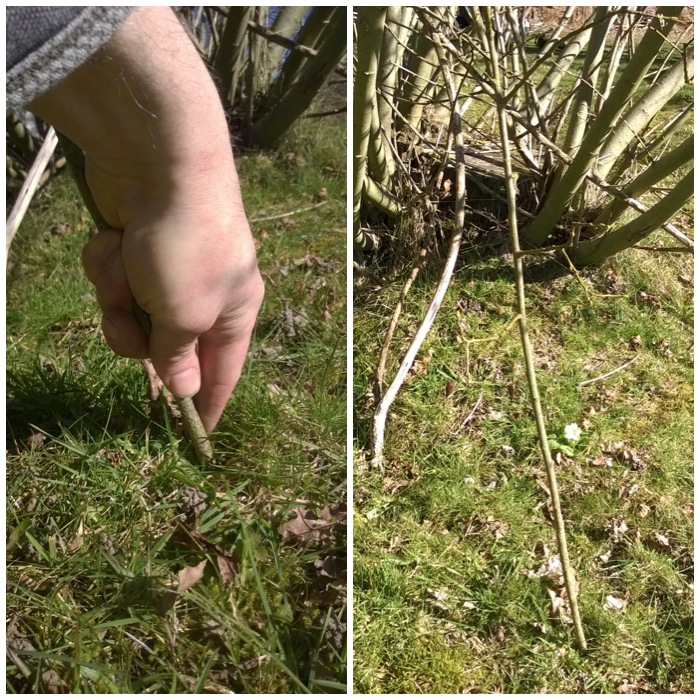
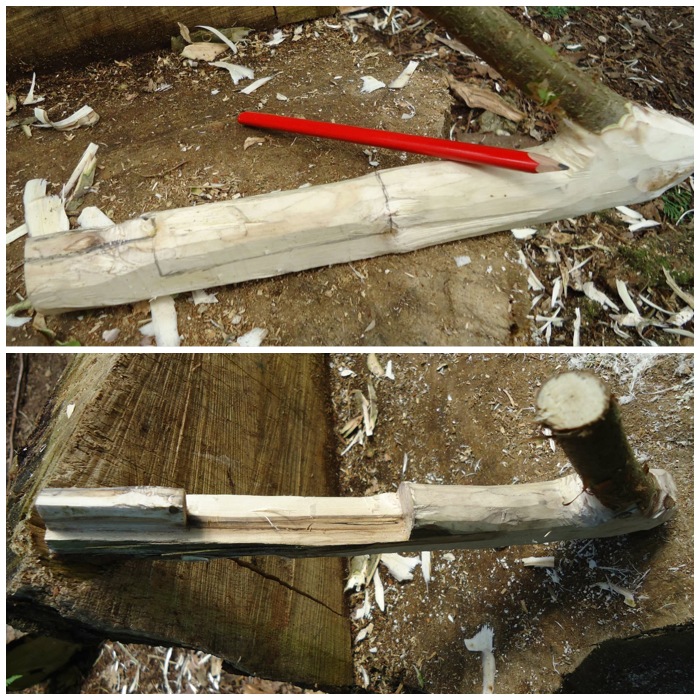
These smaller pieces I re-planted around the base of the tree by pushing them into the ground, as willow has the ability to re-grow from these shoots.
Re-planting
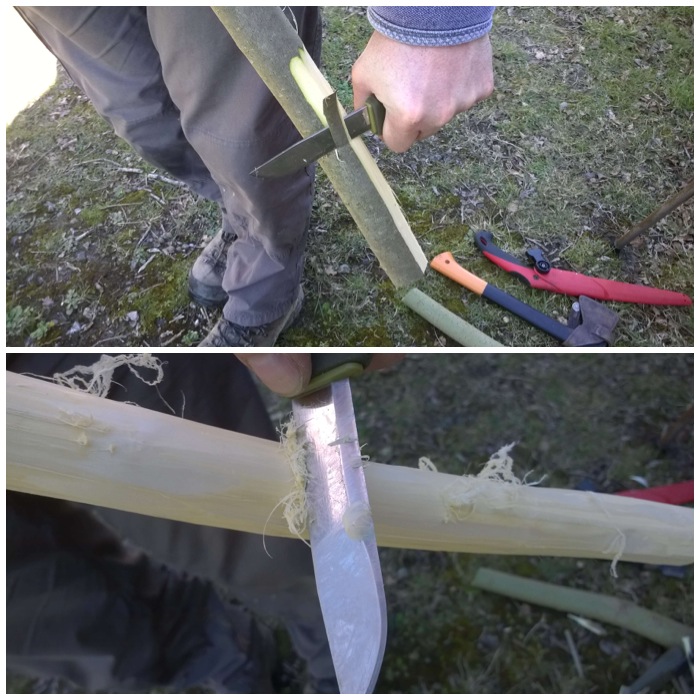
The next job was to strip off the outer and inner barks. I tried to strip the bark off in one piece but as the sap had not yet risen it was very difficult to do. If the bark had peeled off easily I could have made some nice cordage from it.
I used the back of my knife to scrape off the remnants of the inner bark to get right down to the wood.
Taking off the outer bark
This inner bark does clog up on the back of the blade so you have to continually scrape it off. The whole process of stripping the bark took about 5 minutes.
Removing the inner bark
I flattened out the area of wood that would make the bowl of the spoon to give myself a little bit more area to work with.
Creating a working surface
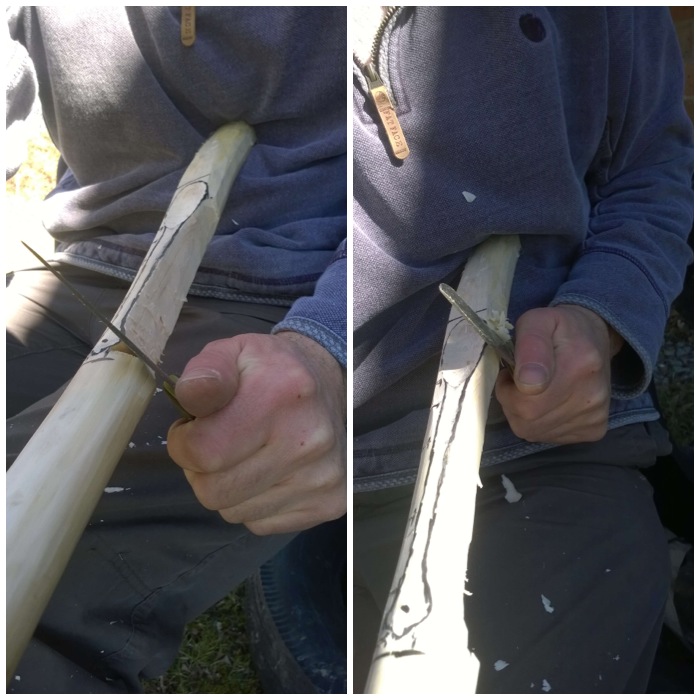
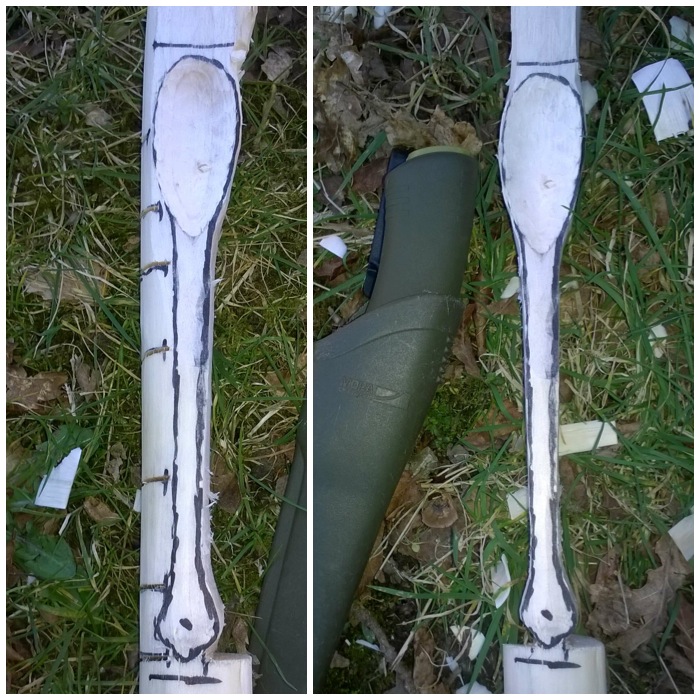
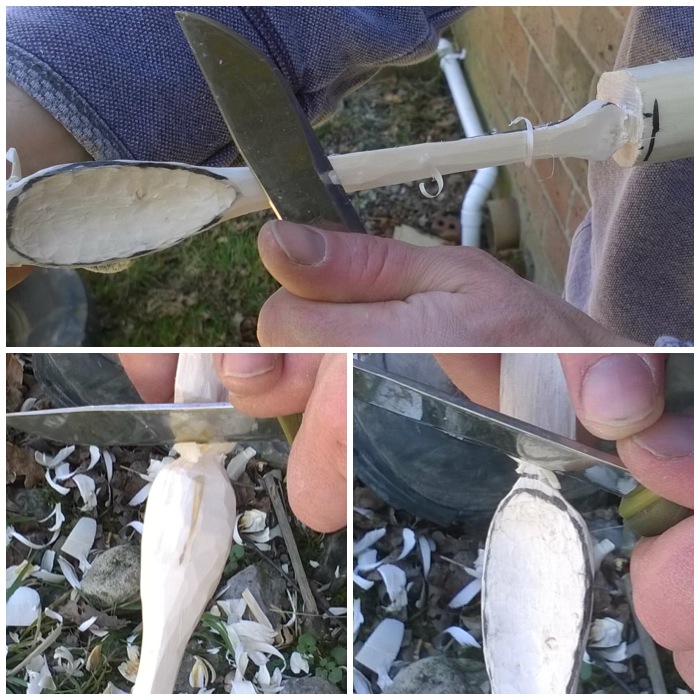
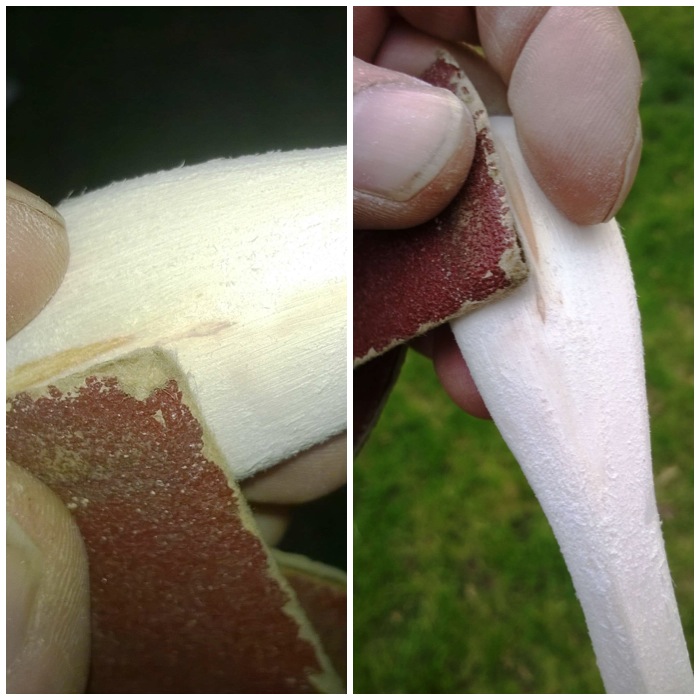
I like to draw out my spoon leaving areas of waste wood at each end as these act as handles when carving. Also, I prefer to carve the spoon from the top down as this cuts through many different rings thereby making the spoon stronger. I also mark out at this stage all the stop cuts I will need. (The technique of leaving handles to work with was taught to me by my good friend Mark Beer a few years ago and I find they are particularly useful when you are teaching novices.)
Drawing out the spoon
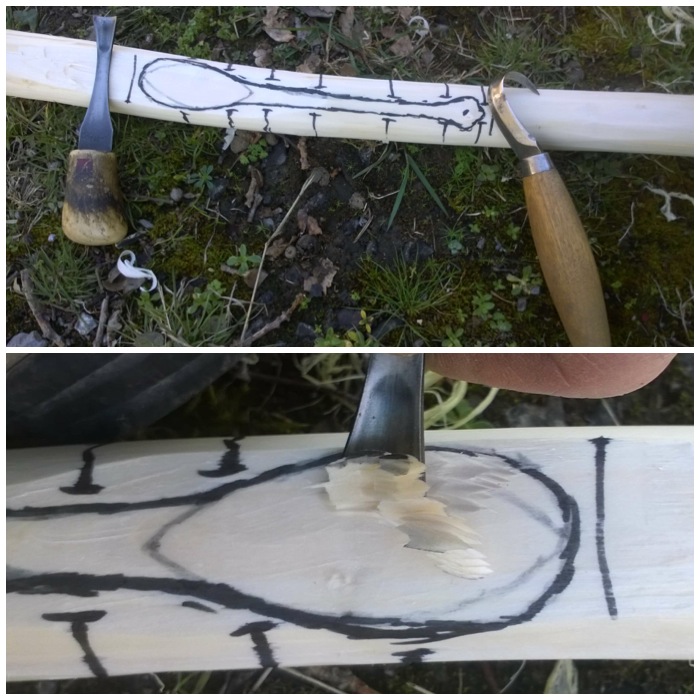
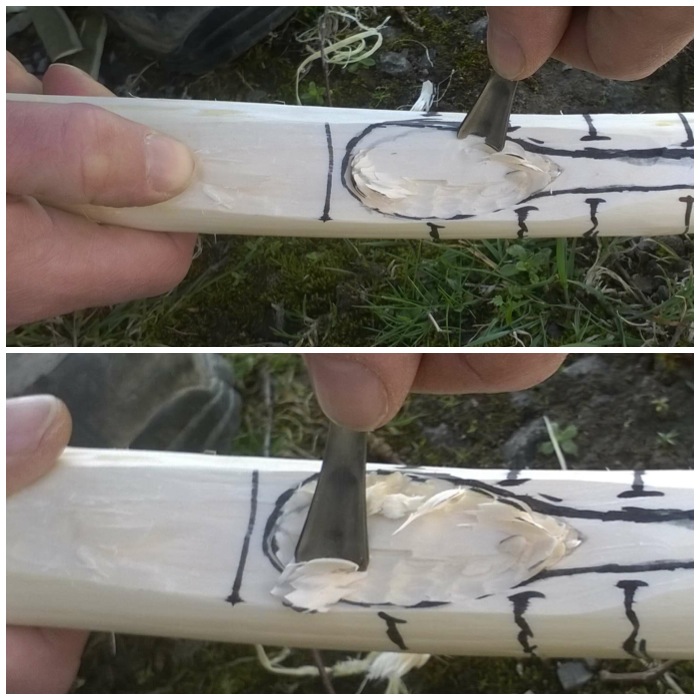
I like to carve the bowl of the spoon first. To do this job I usually use a palm gouge (on the left) and a crook knife (on the right).
The bowl tools
I use the palm gouge first, tracking around the edge of the bowl to cut out the waste. Having the two handles in the wood means I can use the same hand to do this (I am left-handed). They also allow me to keep my other hand well away from the sharp edge of the gouge.
The palm gouge
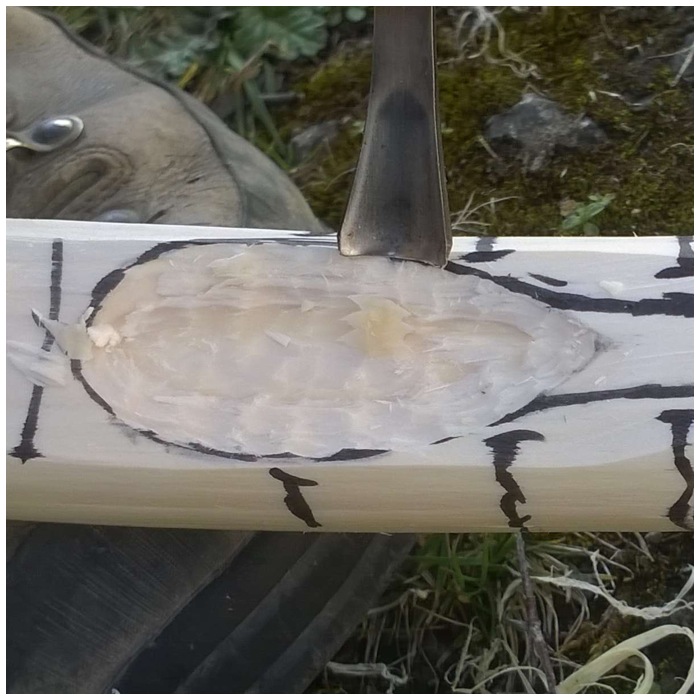
The gouge makes short work of the waste wood but it does not leave a smooth surface.
Rough bowl
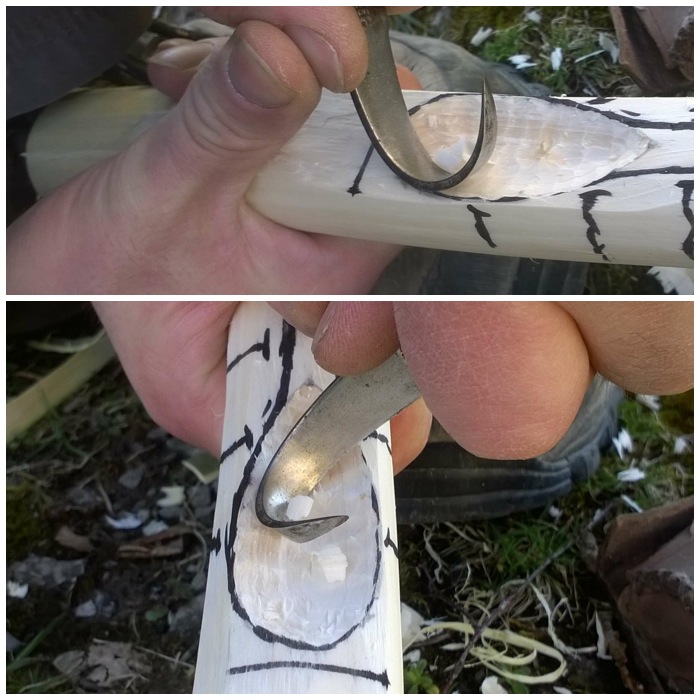
To smooth the bowl out a bit more I usually switch to the crook knife. I find that the crook knife helps to accentuate the curve of the bowl more than the gouge does. With both tools I always try and cut across the grain of the wood but this is not always possible near the ends so I need to be extra careful there not to lose wood on the edges.
Smoothing out the bowl with the crook knife
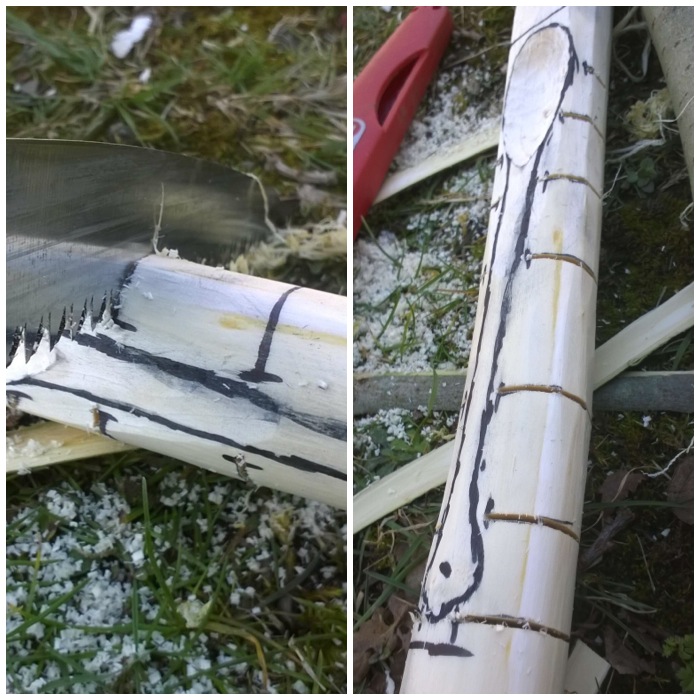
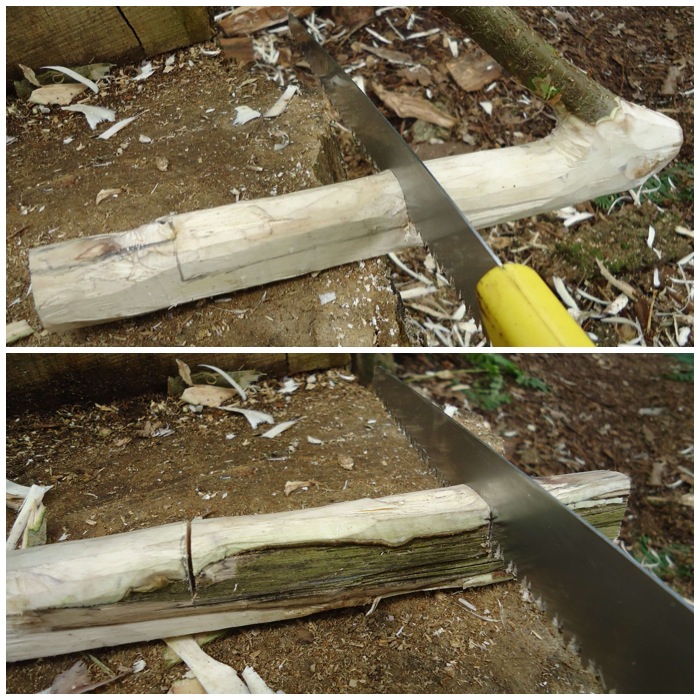
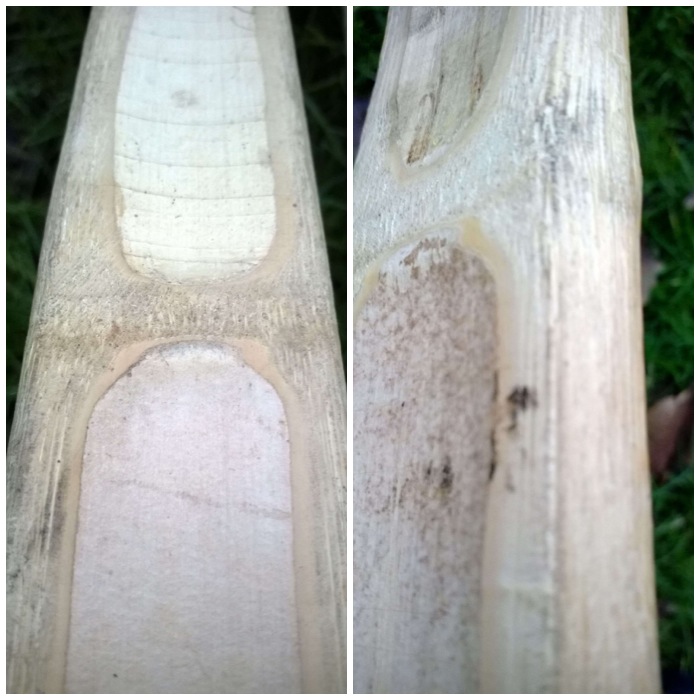
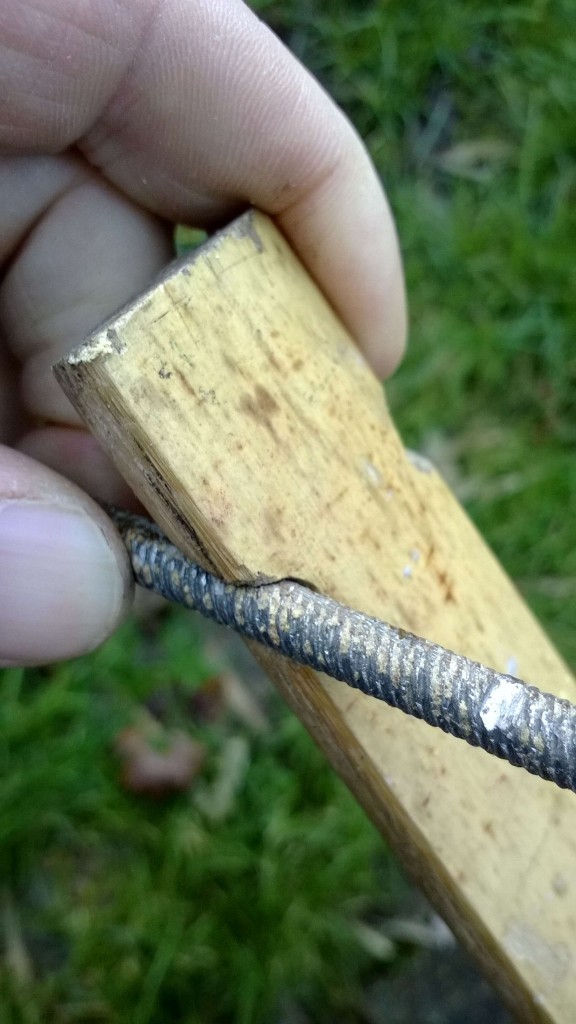
After the bowl is roughed out I saw all the stop cuts. These stop cuts help to stop splits occurring in the wood as I carve the rest of the waste wood away.
Creating the stop cuts
Stop cuts are particularly important when carving around the bowl; they act like small breaking points for the knife edge, stopping splits occurring.
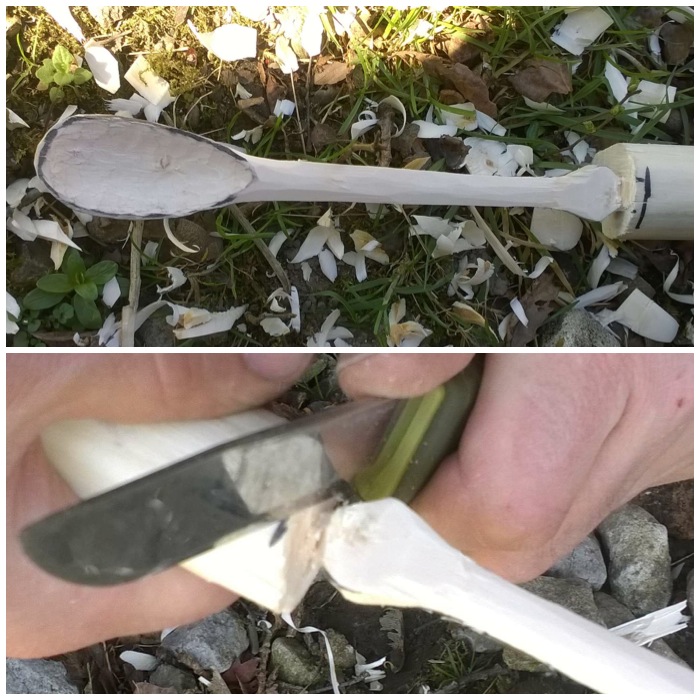
Removing the waste
I take my time at this stage and make small cuts to remove each piece of waste wood between the stop cuts. In these two pictures I am using my thumbs on the back of the blade to apply pressure. You can push either with both thumbs on the back of the blade or with one thumb on top of the other.
Thumb pressure
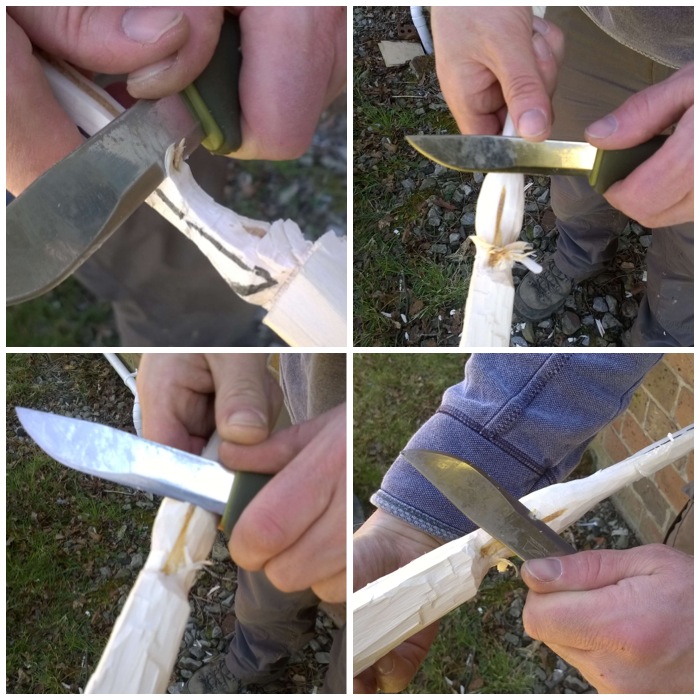
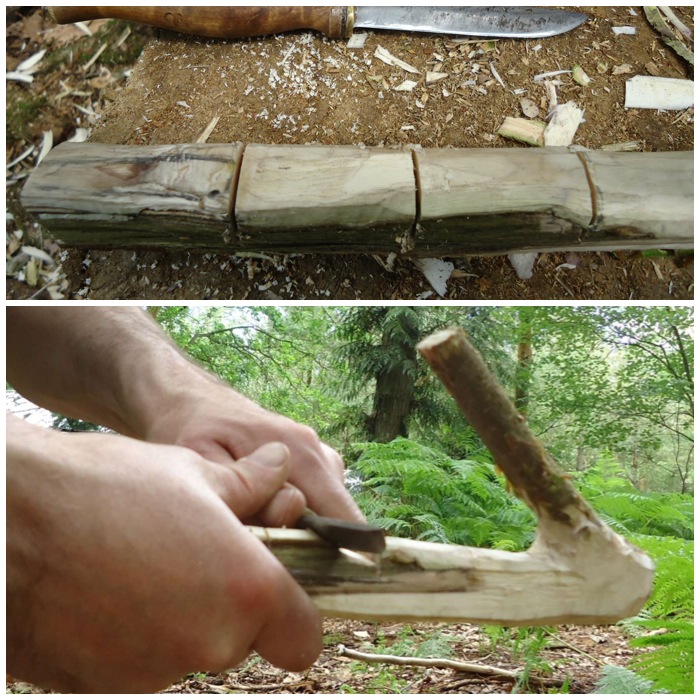
When I am on a straight section like the handle I tend to use the chest lever grip. This is a very controlled and powerful cut. I have my hands tight against me and use my chest muscles to push my hands apart. This pushes the knife edge into the wood in small, controlled but powerful cuts.
Chest lever grip
Another cut that can be used here is the shoulder cut. With the work piece off to your side and the bottom of it on a log or on the ground (if the handle at the bottom is long enough), keep your arm locked straight and push down with your shoulder muscles to cut into the excess wood. You can cut big or very fine pieces with this technique.
Shoulder power cut
I learnt this technique from Mors Kochanski when he was over in the UK at the BCUK Bushmoot a few years ago. I pushed one end of the work piece (perfect when you have these handles on each end) and then, using the knife like a draw knife, cut slivers of wood towards me. This is one of the few cuts where the blade comes towards you. The key to this technique is to keep the arm that is holding the work piece bent and well away from the knife tip. Also the arm that is holding the knife is clamped against my side which stops any big movements. If my knife were to slip with this technique the blade would actually only move a few centimeters.
Mors Kochanski style
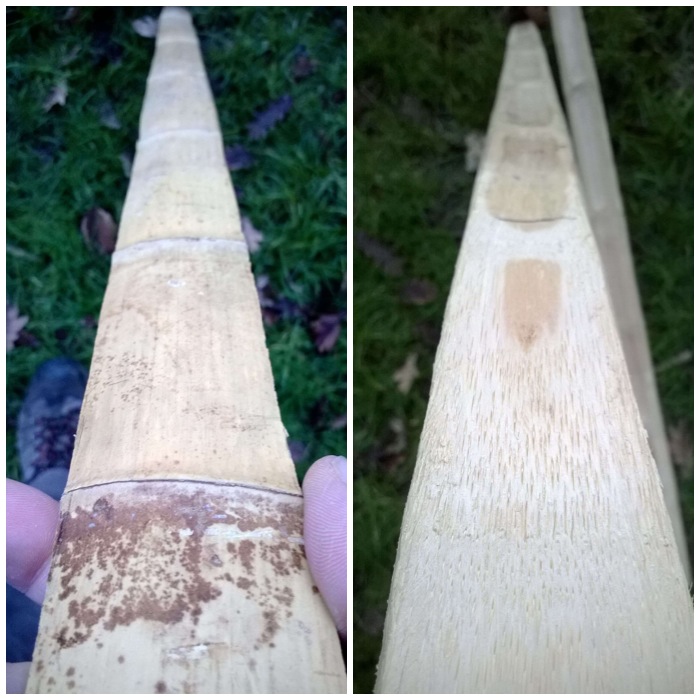
Using these techniques I quickly removed the waste wood around the spoon.
Top plane cut out
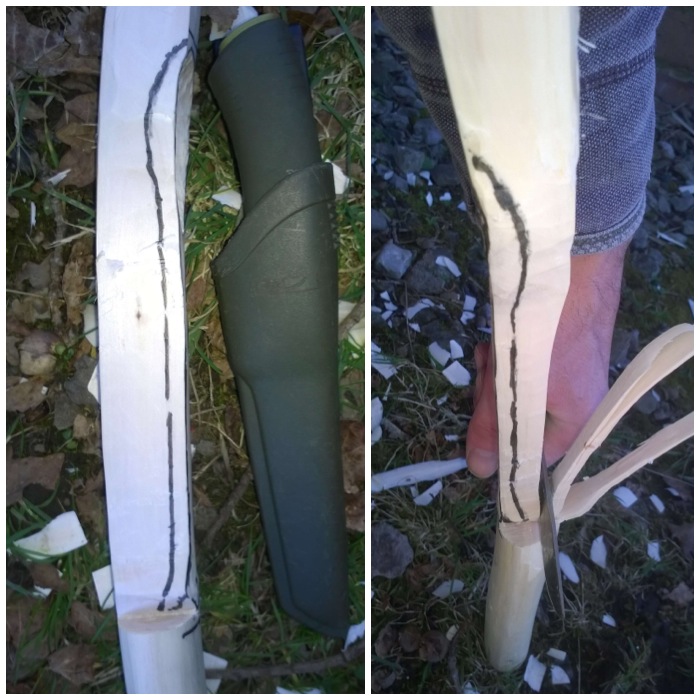
I then marked out the side of the spoon and started to remove the waste wood using the shoulder cut. I could have put stop cuts in at this stage but decided not to as there was not much curve to the spoon on this plane.
Side plane
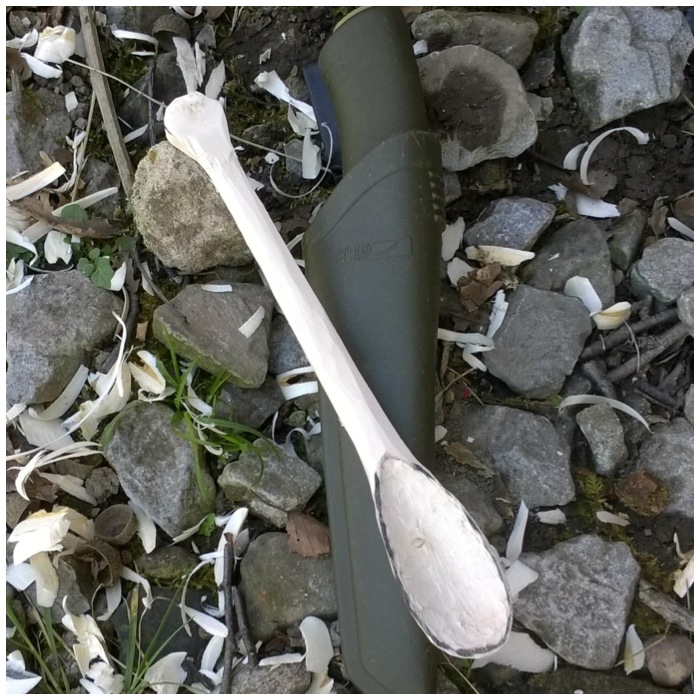
Finishing the tail and the bowl requires a lot of fine work. You have to find how the grain of the wood is flowing and just chip away at it with small cuts to form your final shape.
Fine work
After some final work on the handle of the spoon I slowly carved around the tip of the bowl to remove one of the working handles. Take your time with this so that you get down to the last few fibres of wood before twisting the handle off. Any big cuts here can damage the bowl.
Trimming the handle and removing one handle
I then repeated the whole process at the other end to remove the other working handle.
Removing the other handle
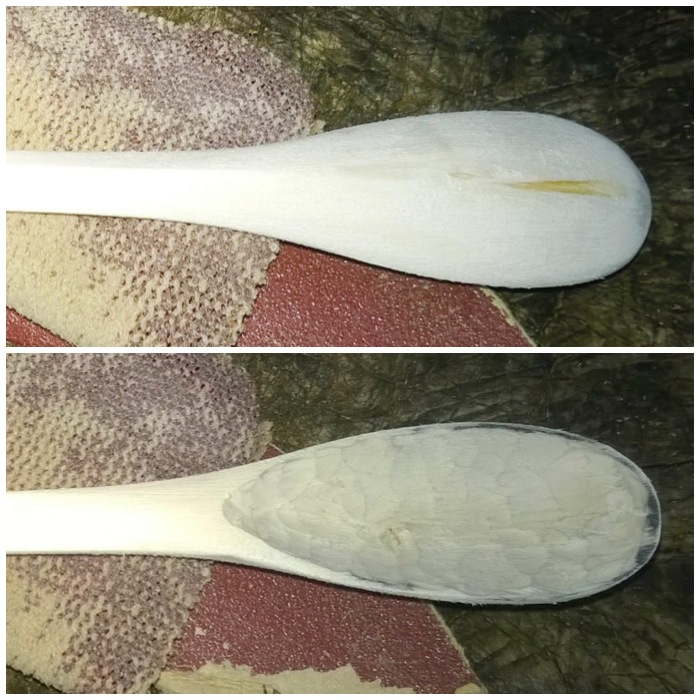
The wood was green so full of moisture. Normally I would dry the wood slowly for a few weeks before sanding it down. Sanding green wood can be hard work and no matter how smooth you get it you will need to repeat the process in a few days as small fibres of wood will start to rise up again, giving the spoon a furry texture.
I accept that when making these spoons as I normally want to use it straight away. Ideally I should have used a piece of seasoned wood so that this would not happen but you sometimes have to use what is available. I left the spoon to dry out for a couple of days before sanding it down.
A blanked out spoon
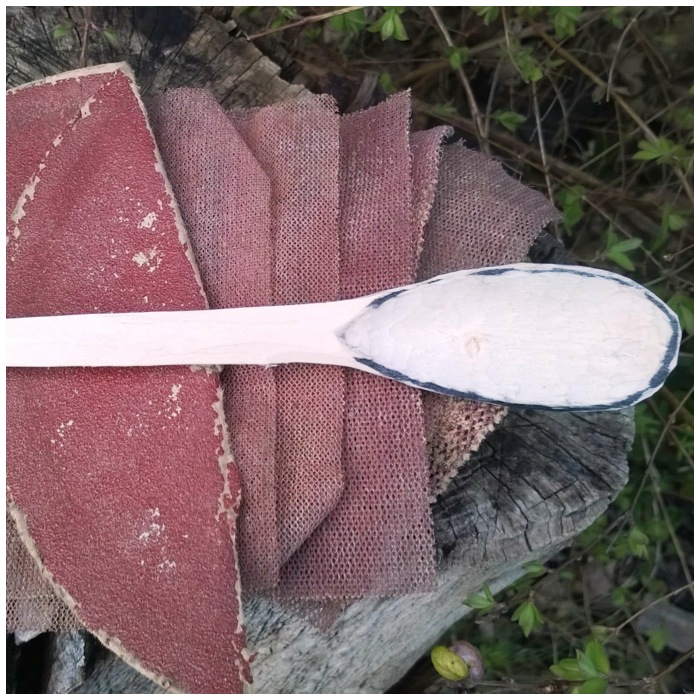
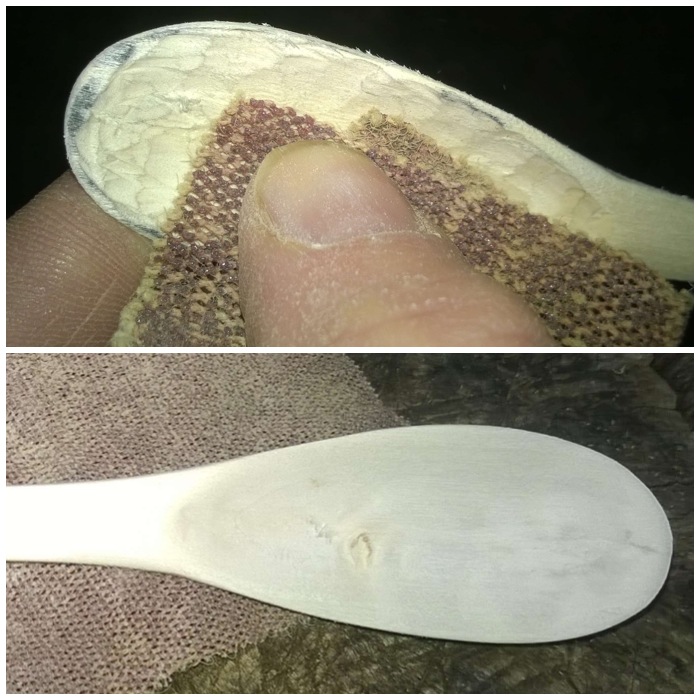
I used sandpaper of different grades and luckily have some cloth sandpaper that works well when sanding the bowl out.
Sandpapers
I used the rough sandpaper first and you can see in these pictures how the fibres of the wood are being ripped out here rather than being sanded smooth. All the sandpaper is doing at this stage is flattening out the tool marks.
Rough first
Eventually the spoon started to take on a more smooth appearance. The bottom picture shows the bowl untouched but the handle is now smoother.
Taking shape
The cloth sandpaper is ideal for getting into the bowl and smoothing it out. I like this sandpaper as it does not break apart in the bowl as traditional paper-backed sandpaper tends to.
Smoothing the bowl
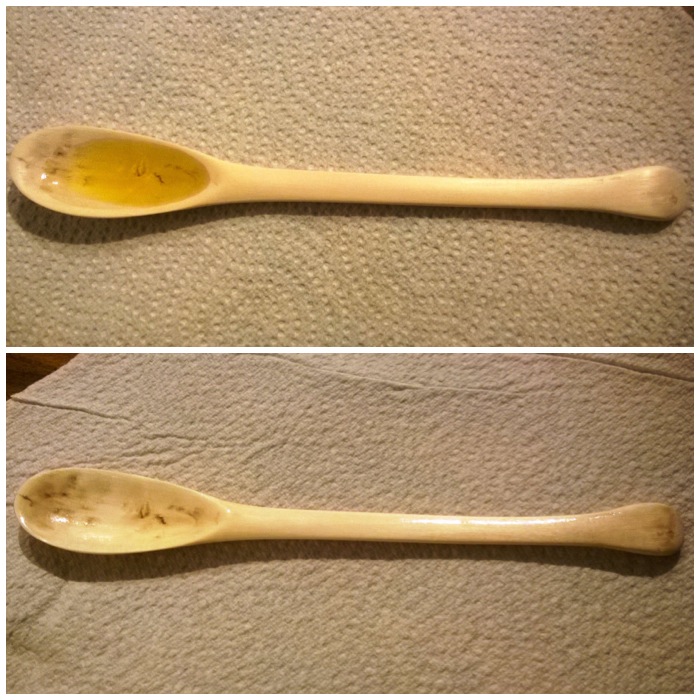
After sanding the spoon down using a mixture of grades from rough to very fine (about a half hour’s work) I added some oil to the spoon. I generally use vegetable oil as that is what I usually have in my cooking kit when out in the woods.
After the first coating had soaked in I applied a second coating and left the spoon to dry out.
First oiling
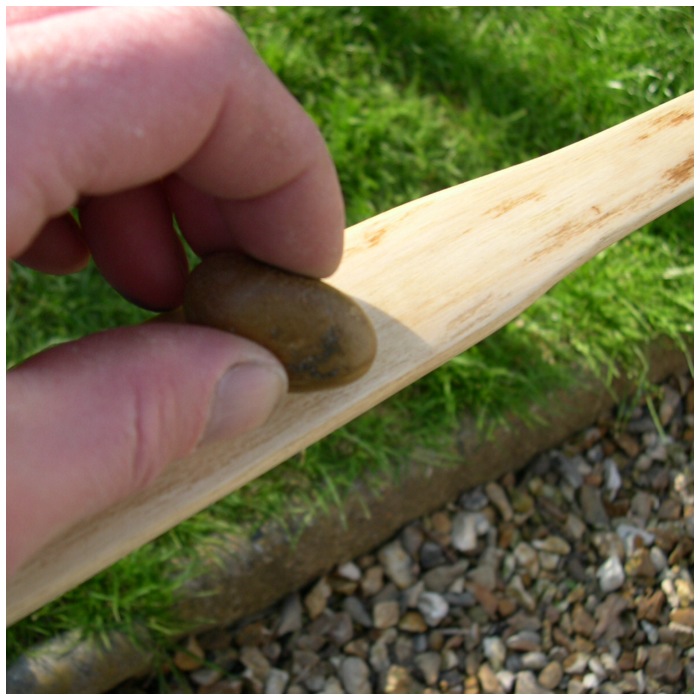
I like to add a finishing touch by boning the spoon. You can do this with the back of a spoon, a rounded pebble or with a rounded piece of bone. I rub the spoon with the rounded surface in a circular motion covering the whole of the surface area of the spoon. I normally do this for an hour or so as this seals the fibres of the wood down and adds a beautiful shine to the spoon.
Boning
This spoon will need to be re-sanded, oiled and boned again in a few weeks as the fibres rise up as it dries out. You can see that the bowl is not perfectly smooth and there are slight imperfections in it. Hopefully these will disappear with that second sanding but for now it is a spoon I can use.
Imperfections but a working spoon
The different profiles of the spoon.
Profiles
Ready to go.
Ready to do its job
Have a go and try out some of these different cutting techniques.
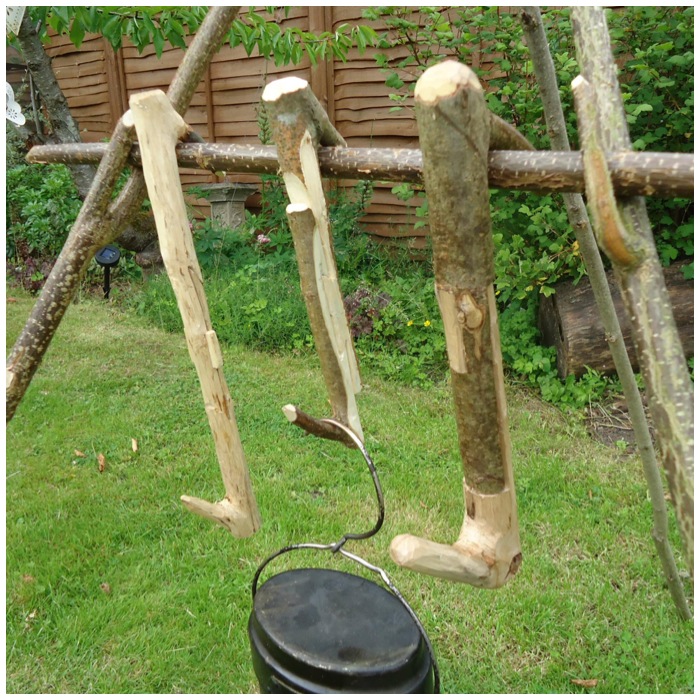
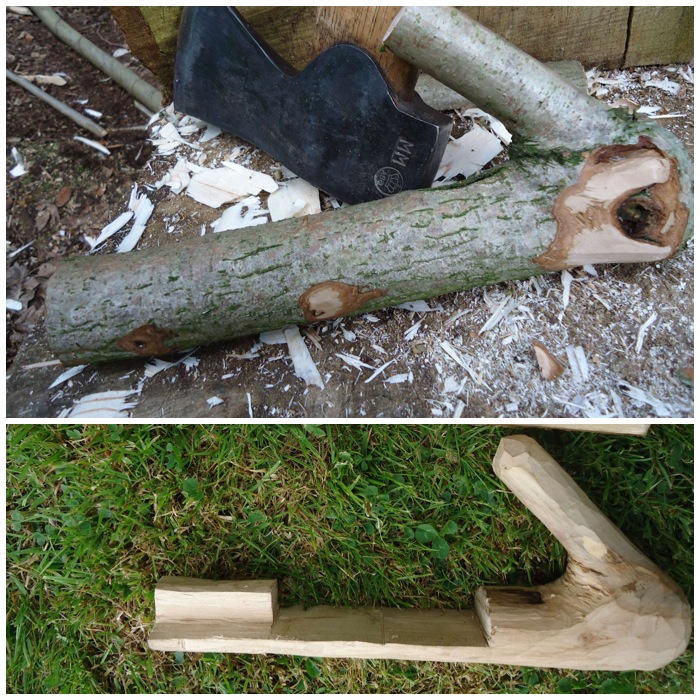
When I first started venturing into the world of bushcraft I got into carving spoons and bowdrill sets. It’s like a rite of passage with most bushcrafters to crack these skills. As time went on I began to explore the world of pot hangers and eventually these little devilish collapsible pot hangers.
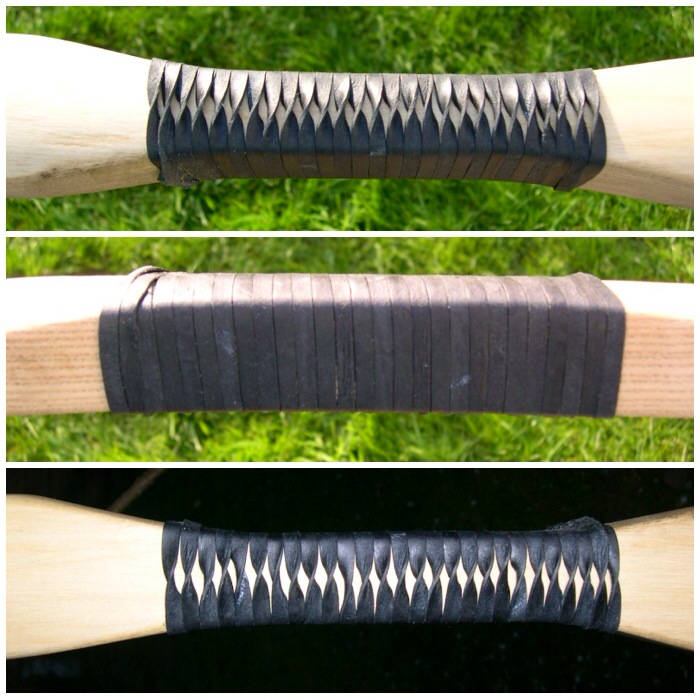
This post will take you through the steps I went through to make a mortise-and-tenon collapsible pot hanger. I have included a couple of other types and links to show you how they are made or used. As you can see in the picture on the left, one of the hooks is pointing down and one is pointing upwards. This set up makes for a great pot hanger but sadly you don’t find many trees with this configuration of branches.
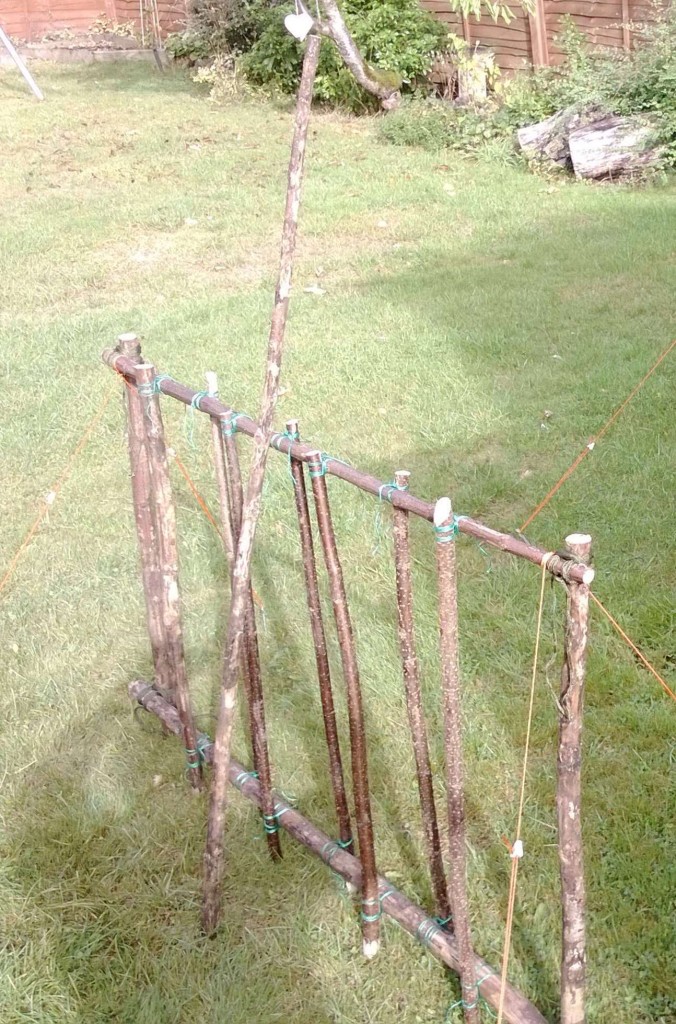
Mortise and Tenon Pot Hanger
Here are the three different types of pot hangers I will discuss here, from left to right: the wedge hanger, the dovetail hanger and the mortise-and-tenon hanger.
The trio
The wedge hanger
I call this the wedge hanger as the two pieces are kept in place by a single wedge of wood in the middle. There are a lot of angles to take into account with this hanger and as with all of the hangers in this post I would advise you to make it out of dead standing wood. If you were to use green wood you might find that the pieces do not fit together any more as it dries out. I found a good tutorial on making this hanger on the Bearclaw Bushcraftsite.
Wedge Pot Hanger
The dovetail hanger
This hanger replaces the wedge with a dovetail joint in the middle. I found it surprisingly easy to carve. The trick is to make the joint snug but not too tight. You want just enough friction between the two pieces to hold it all together but still be easy enough to pop apart when you are finished with it. A good video by GJohnridge11 on You Tube shows this hanger but I am afraid not how it is carved.
Dovetail Pot Hanger
All the hangers so far have hooks pointing in opposite directions and on opposite sides. I have had discussions with fellow bushcrafters on this and some argue that a pot may slip off if the hooks are on opposite sides. I have made a few hangers now with hooks on opposite sides and on the same side as in the picture below. As of yet I personally have not had problems with either method.
Wedge Pot hanger with both hooks on the same side
The reason I like these hangers is that they are easy to store and carry with you. Once broken apart they fit inside your pot or kettle snugly.
Neatly stowed away
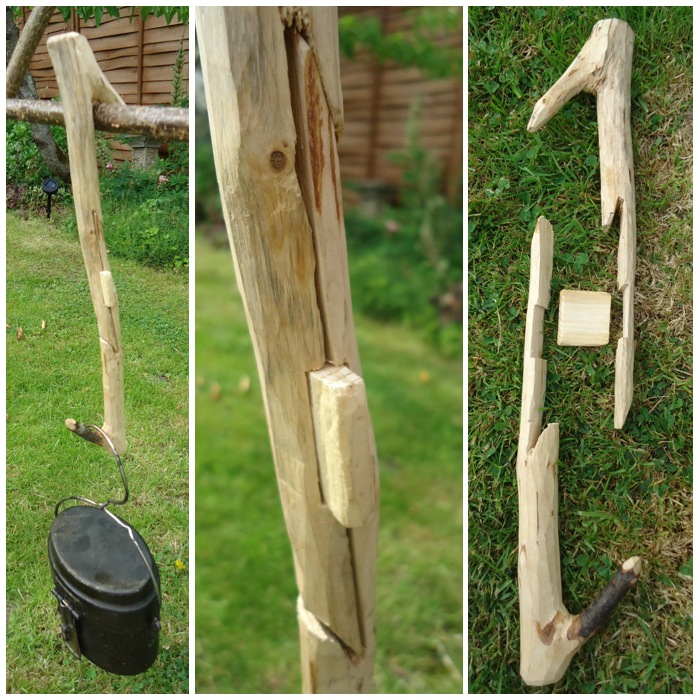
Mortise-and-tenon hanger
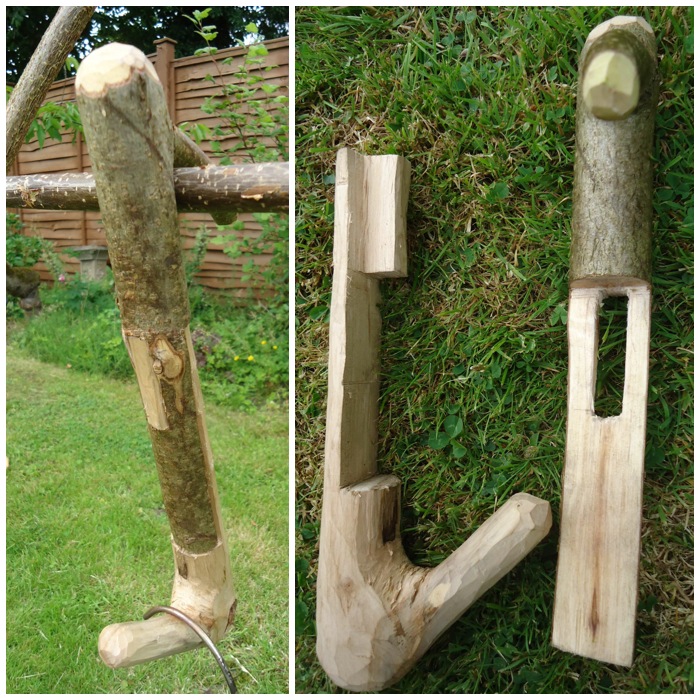
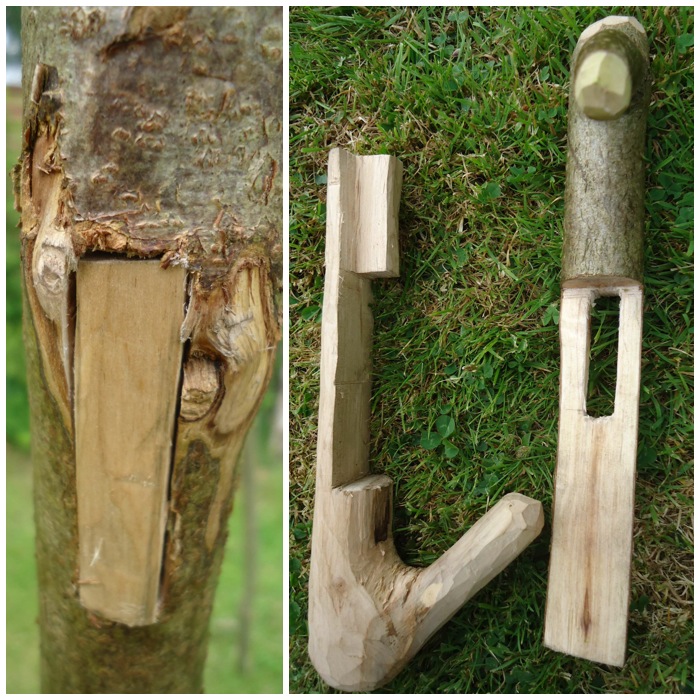
I found two dead pieces of wood of similar widths with good strong branches leading off them. After stripping the bark off one I noticed there was a fungal infection inside it. I decided to try using it anyway as the wood still felt strong. I left the bark on the other piece of wood as it had attractive honeysuckle markings going around it.
I trimmed the bottom piece so it was the same length as the top piece.
Trimming to size
The tenon limb
Using a pencil I marked out all the areas of wood I was going to cut out. (I should have shaded the areas of wood I would be cutting out with my pencil for the camera, see the bottom picture for how this limb will finally look.) This limb is called the tenon limb.
Mark out the shape of the tenon
I used a small hand saw to make some stop cuts on the pencil marks. These stop cuts are particularly useful when you start carving with your knife to stop any splits running off into areas of wood you want to keep.
Stop Cuts – Part 1
The stop cuts done, I used my knife to start carving the excess wood away. I used small cuts all the time, my thumbs on the back of the knife for fine control. This is a great activity to do while sitting around the campfire where you can relax and take your time.
Stop Cuts – Part 2
Once you get one block out it is time to take out the next block of excess wood. I am keeping the wood that is under the blade and removing the wood directly to the right of it.
Forming the tenon – Part 1
Finally I used my saw to cut out the tenon at the end of the piece of wood. This is a small rectangular piece of wood at the end of the limb as you can see in the bottom picture.
The finished tenon
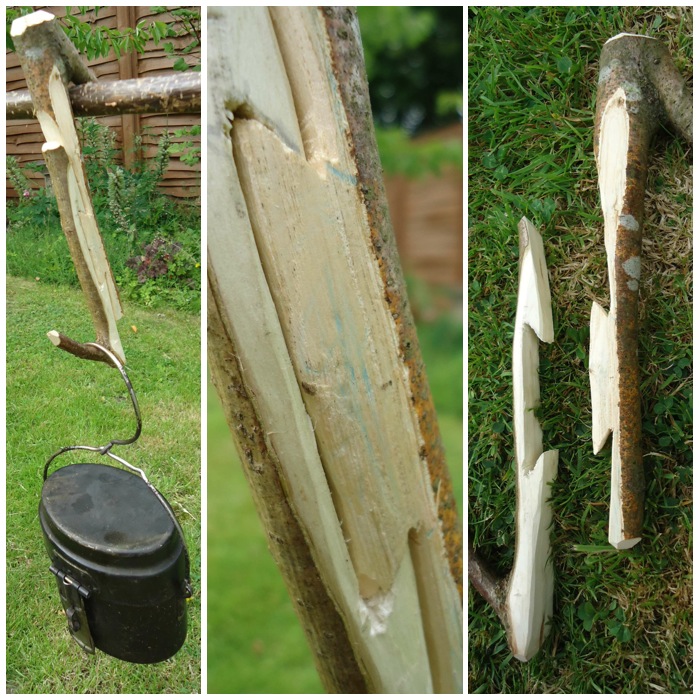
The mortise limb
I cut a stop cut into the mortise limb where I had measured that the tenon limb would fit snugly against it. You have to judge this by using the tenon limb as a measuring stick and saw to a depth that will make the limbs fit together well.
Mark a stop cut
Once the stop cut is in place you can easily batton the excess wood out with your knife. I am using the tenon limb as a hammer at this stage.
Batton out the waste wood
You can see in the top picture that the two pieces fit well together now so I marked out the area of the joint I needed to cut out on the mortise limb. I used the protruding rectangle of wood on the tenon limb to mark out the corresponding section of wood I needed to carve out of the mortise limb.
Once marked out I used the tip of my knife to start carving out the rectangular hole I needed to make in the mortise limb.
Draw out the mortise
Again this was a piece of carving I took my time with. I placed the mortise limb on a work surface rather than holding it in my hand, where any slip of the blade could have meant a nasty cut.
Carve out the mortise
Eventually I worked my way through the limb and carved out a rough rectangular shape.
Form a neat rectangle
If you have taken your time and not cut outside of the pencil markings the fit of the Tenon and the Mortise should be snug. If it is too tight make some cuts where you feel there is resistance and keep trying to see if both pieces will fit together.
The fit should be snug but not overly tight
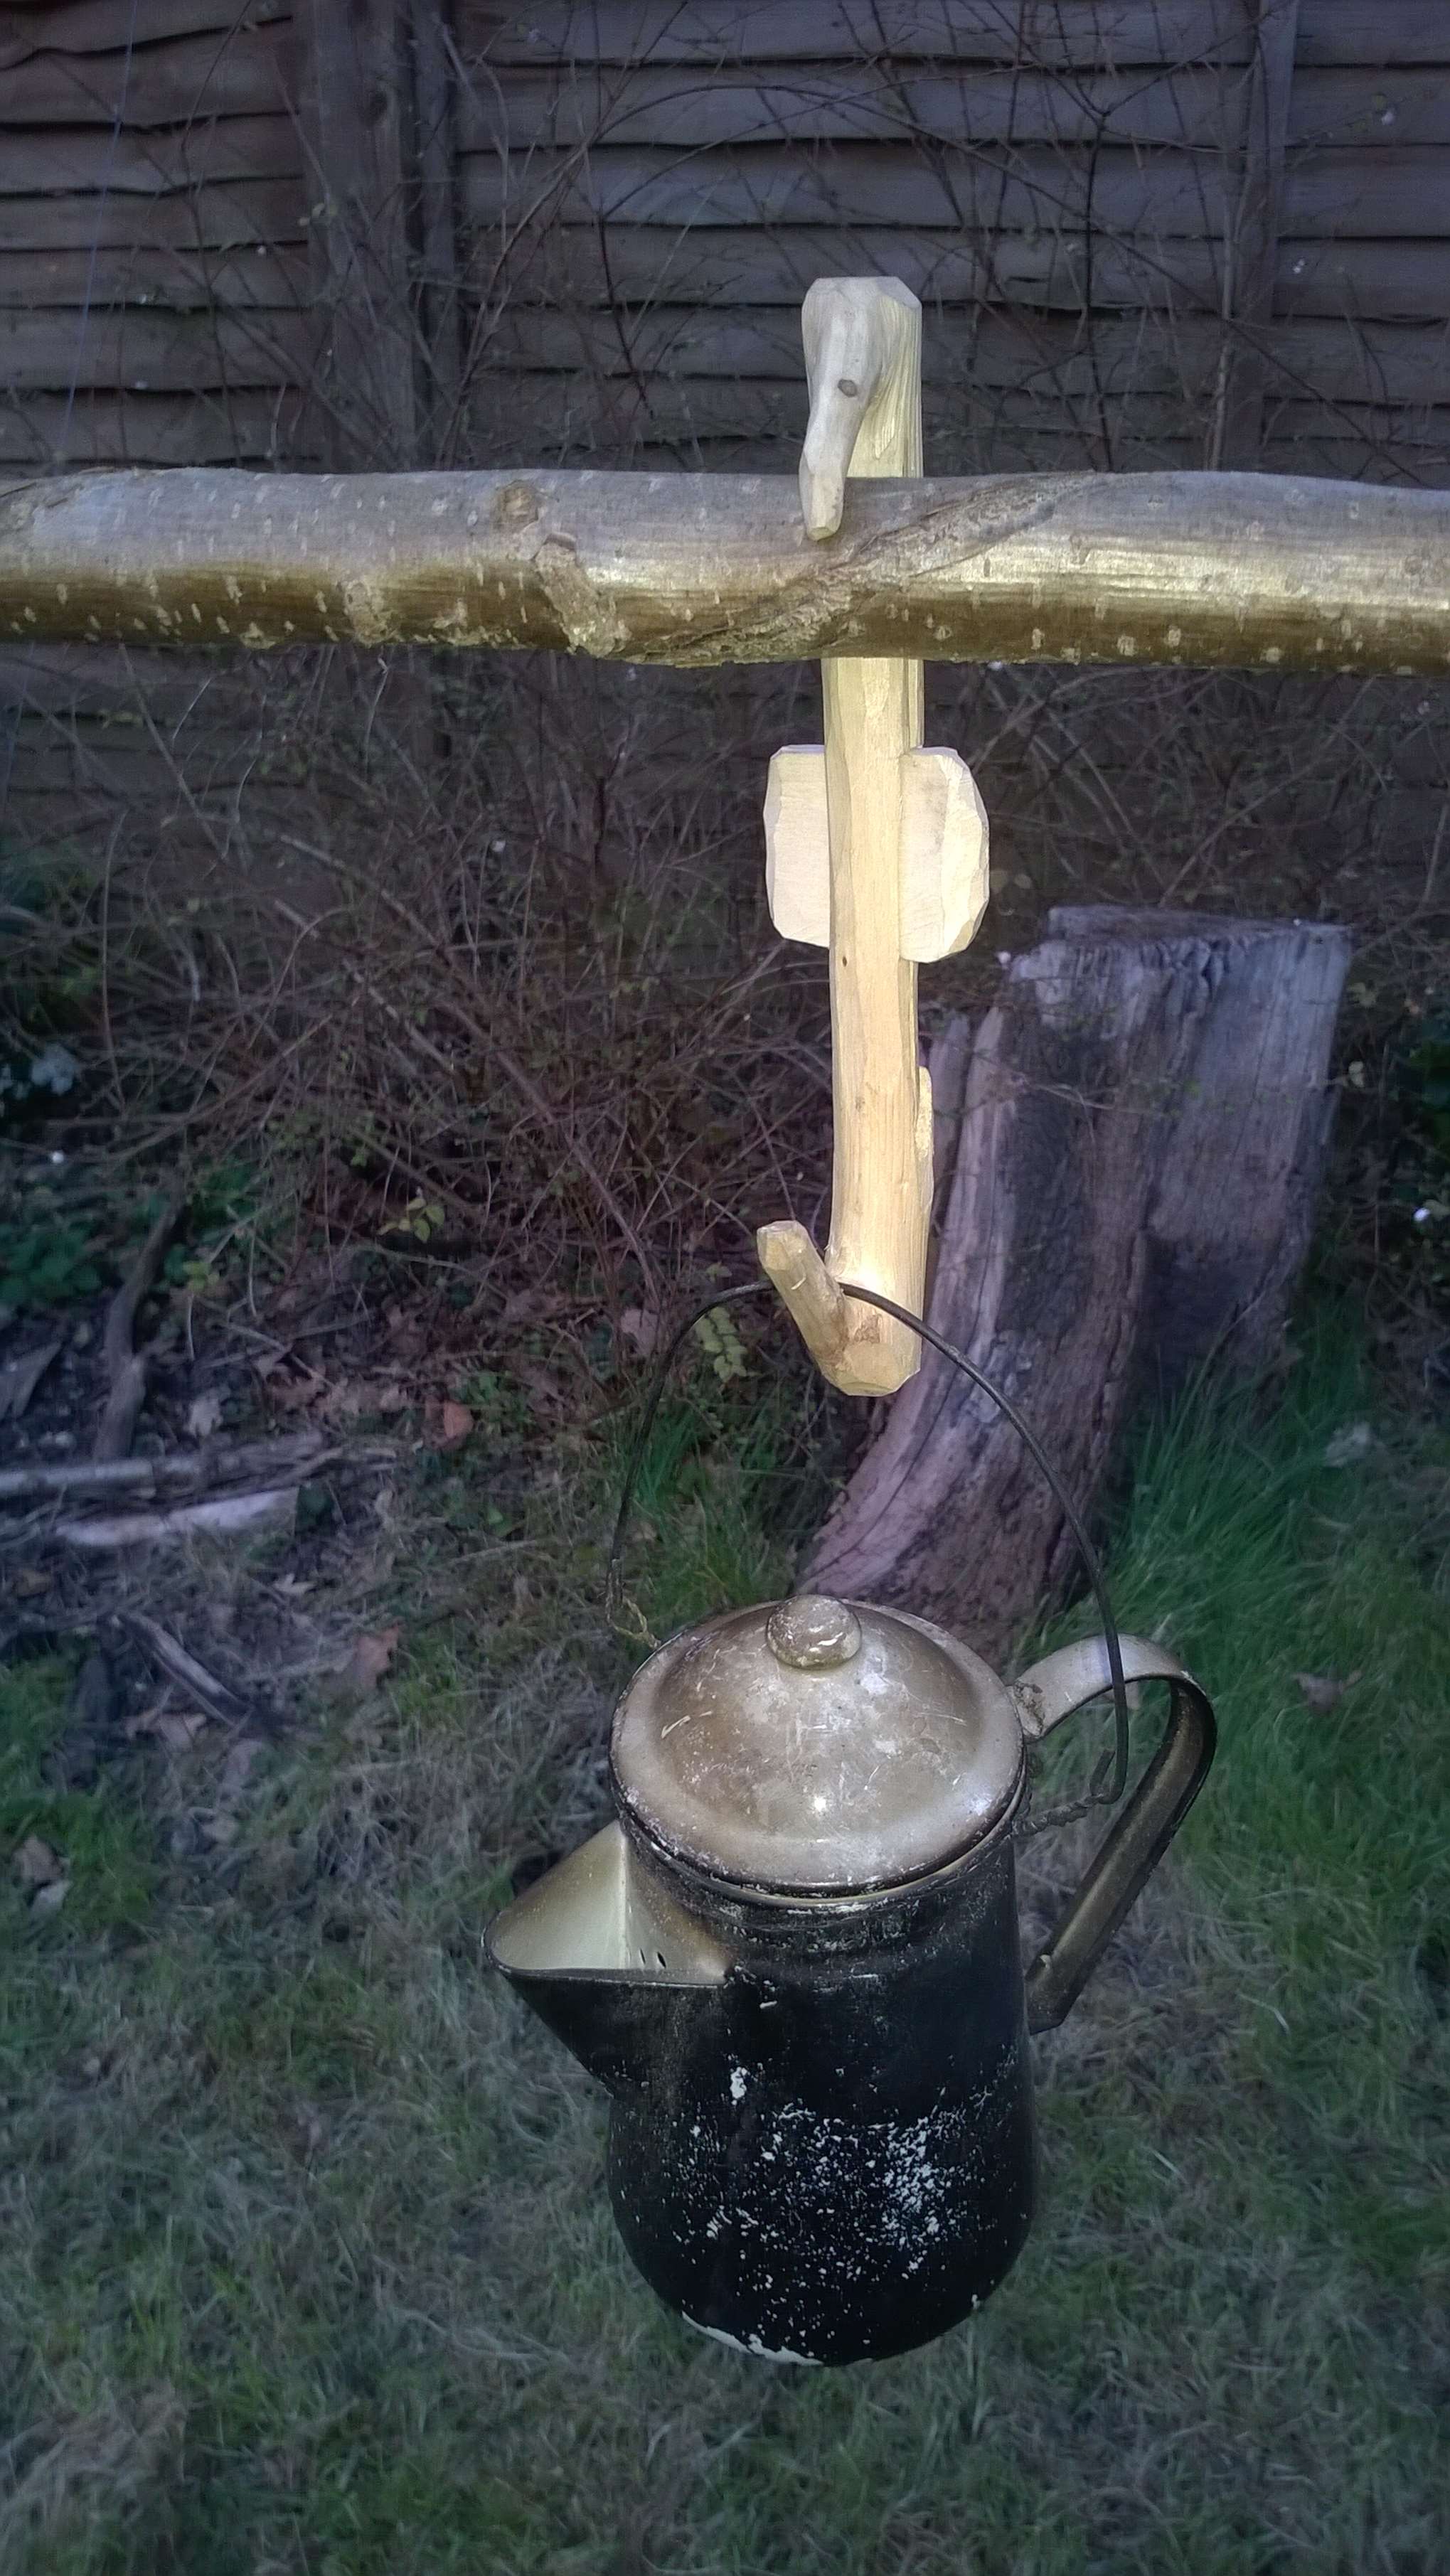
Eventually both pieces fitted well together but disaster struck for me here. I was showing the hanger to a friend and was explaining it is very strong on the vertical plane, ie when holding a pot, but very weak on any other plane, ie if you twist this hanger it will break.
Just as I was explaining this my friend did indeed twist the hanger as he tried to pull it apart and the tenon joint simply snapped. The fact that the tenon had some rot in it did not help but I had tried it out earlier and it did take the weight of a heavy Dutch Oven. To separate the limbs you need to push on the rectangular tenon so it pops out of the mortise slot: do NOT twist!
A trimmed but flawed tenon
Still, it didn’t take long to make up another tenon limb to fit the original mortise limb.
Tenon Mark 2
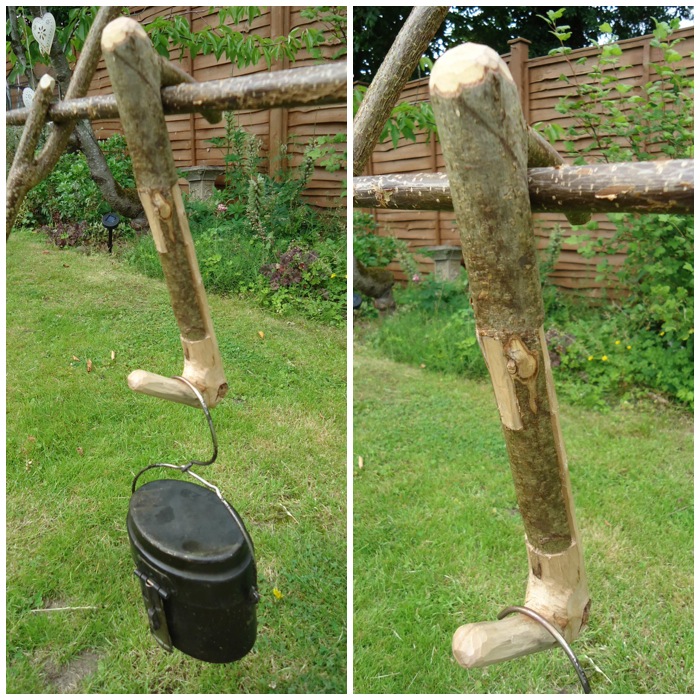
All that was left to do was tidy up the hooks, put the limbs together and hang a pot.
Mortise-and-tenon hanger in use
I can’t remember where I came across this hanger (somewhere on the internet) so if anyone knows where this hanger originated please drop me a message. Even though it looks complex to begin with, once you get working on it it is easy enough to do and a joy to craft as long as you take your time with the fiddlier saw and knife tip bits.
Closed and open
I filled this Dutch Oven with water and got my two little helpers to show you how strong this hanger can be.
One very strong pot hanger
Some other sites on the wedge hanger you might find interesting:
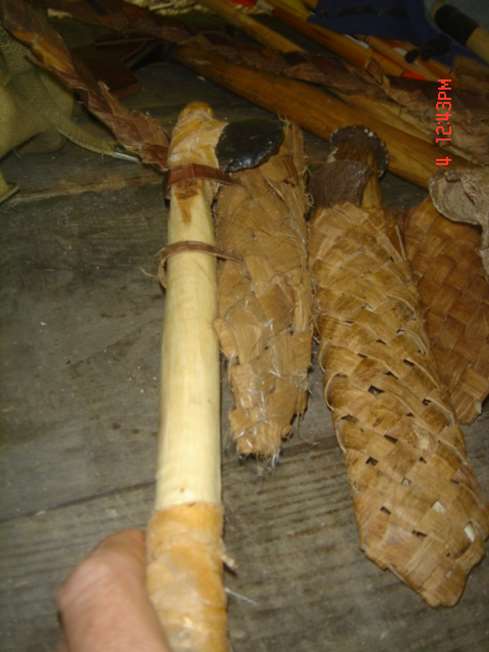
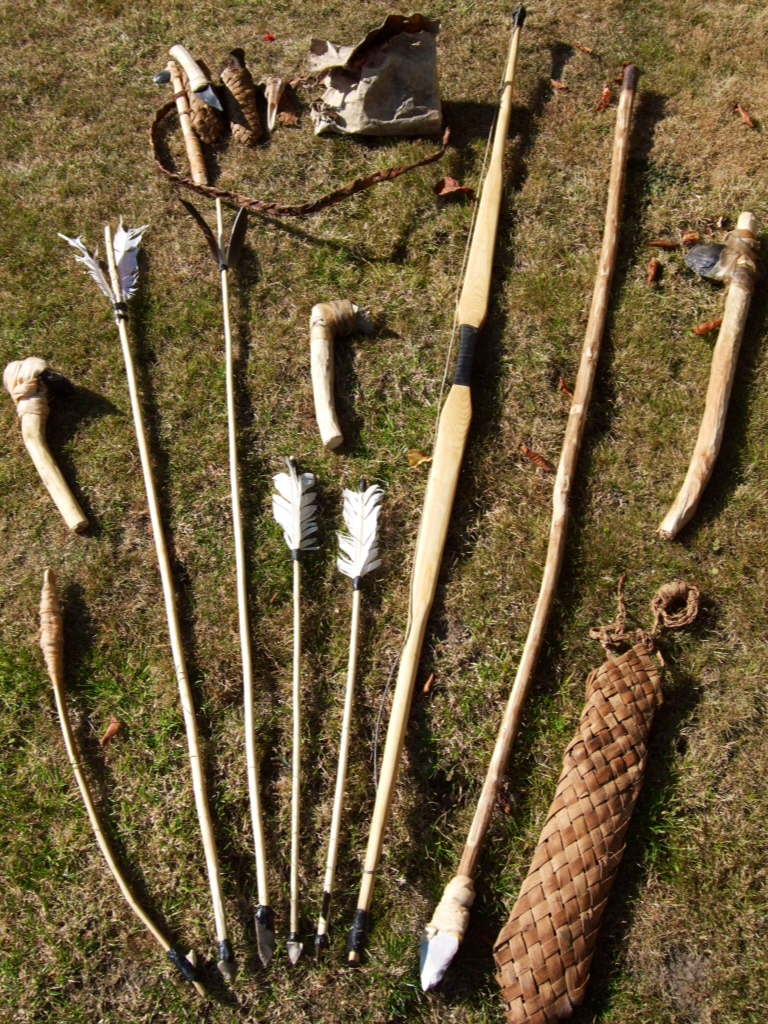
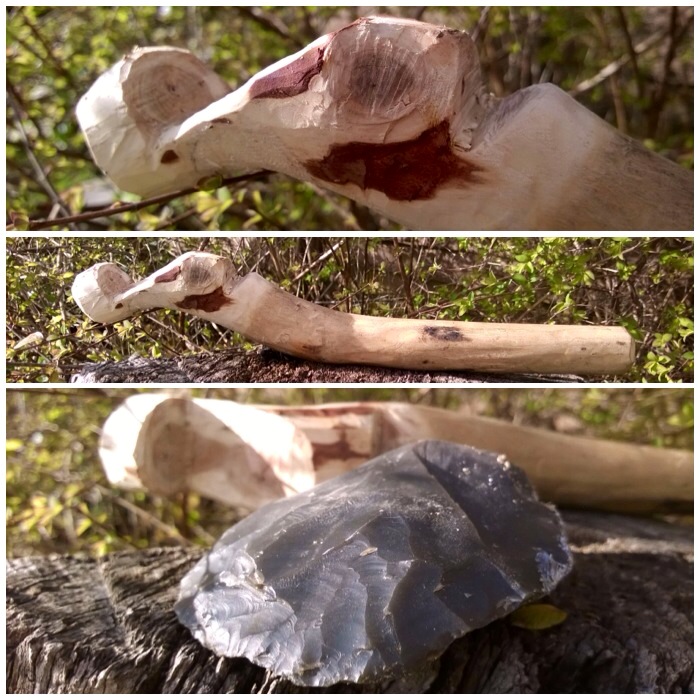
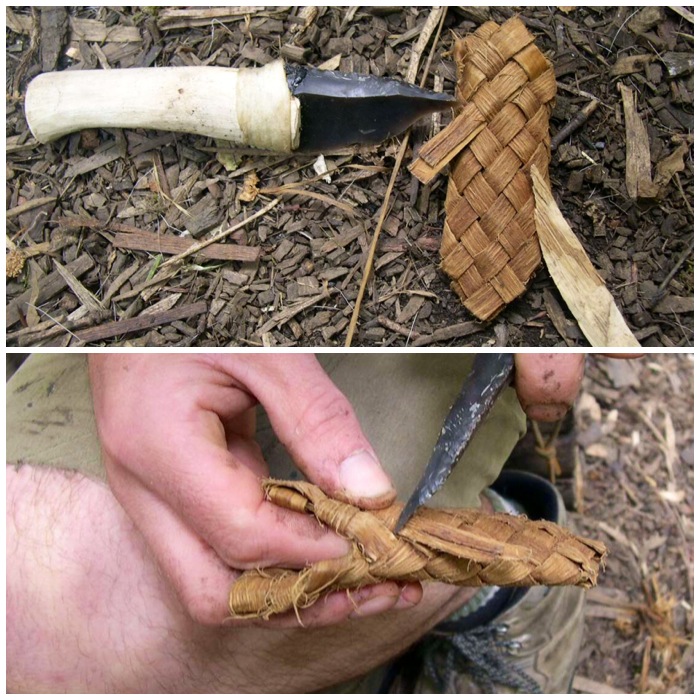
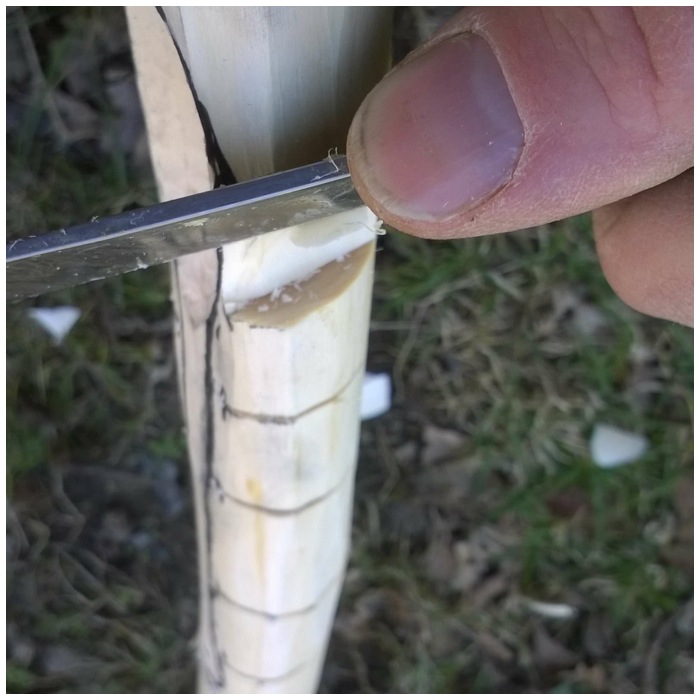
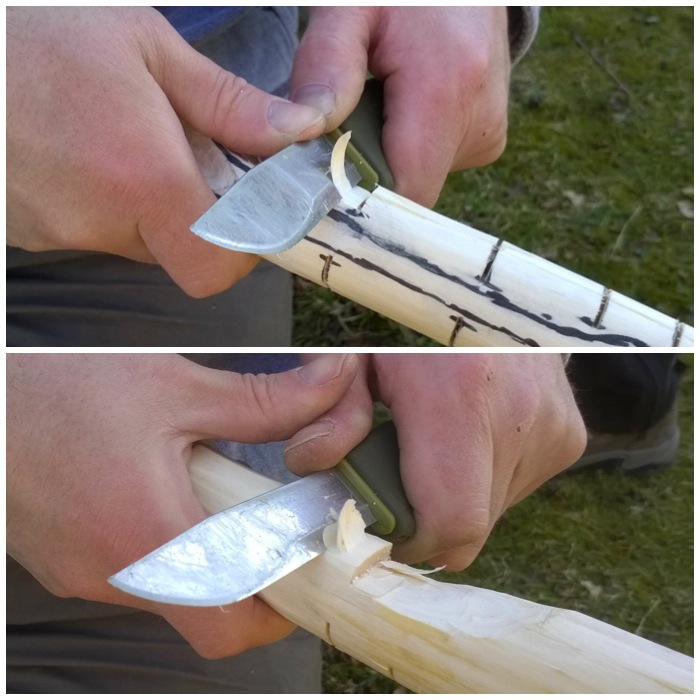
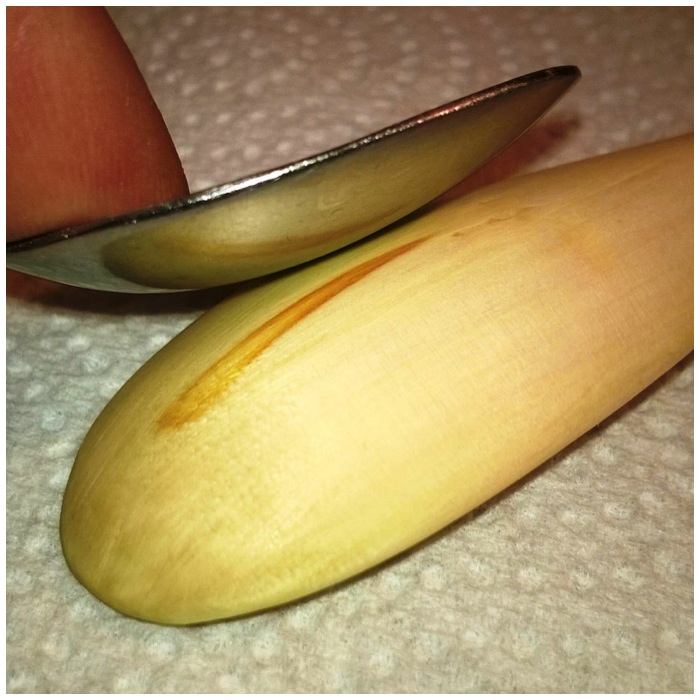
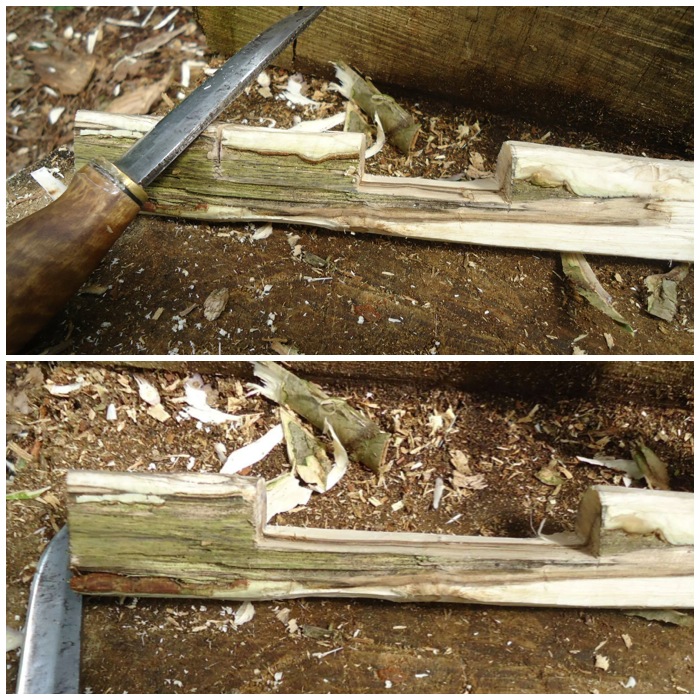
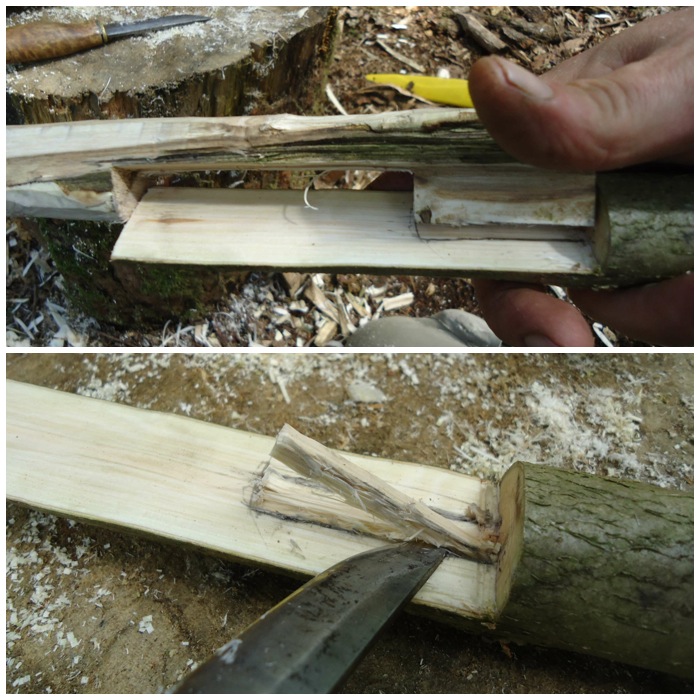
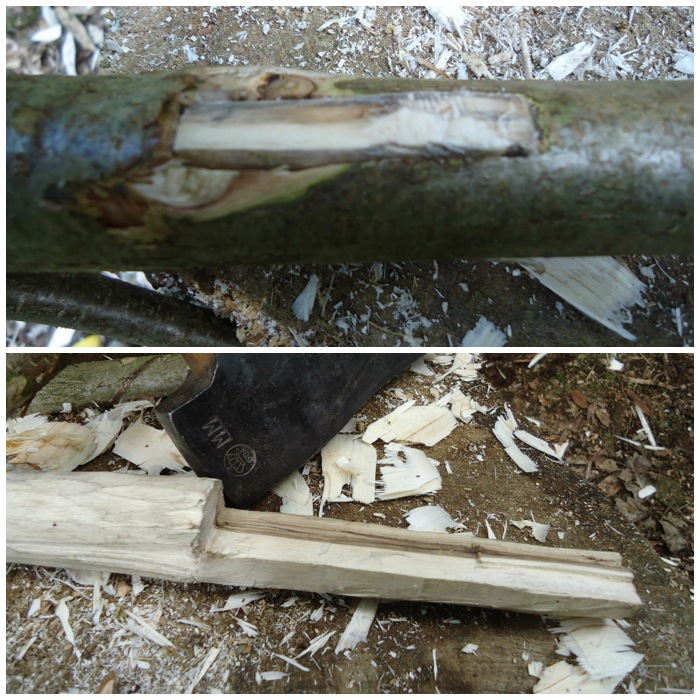
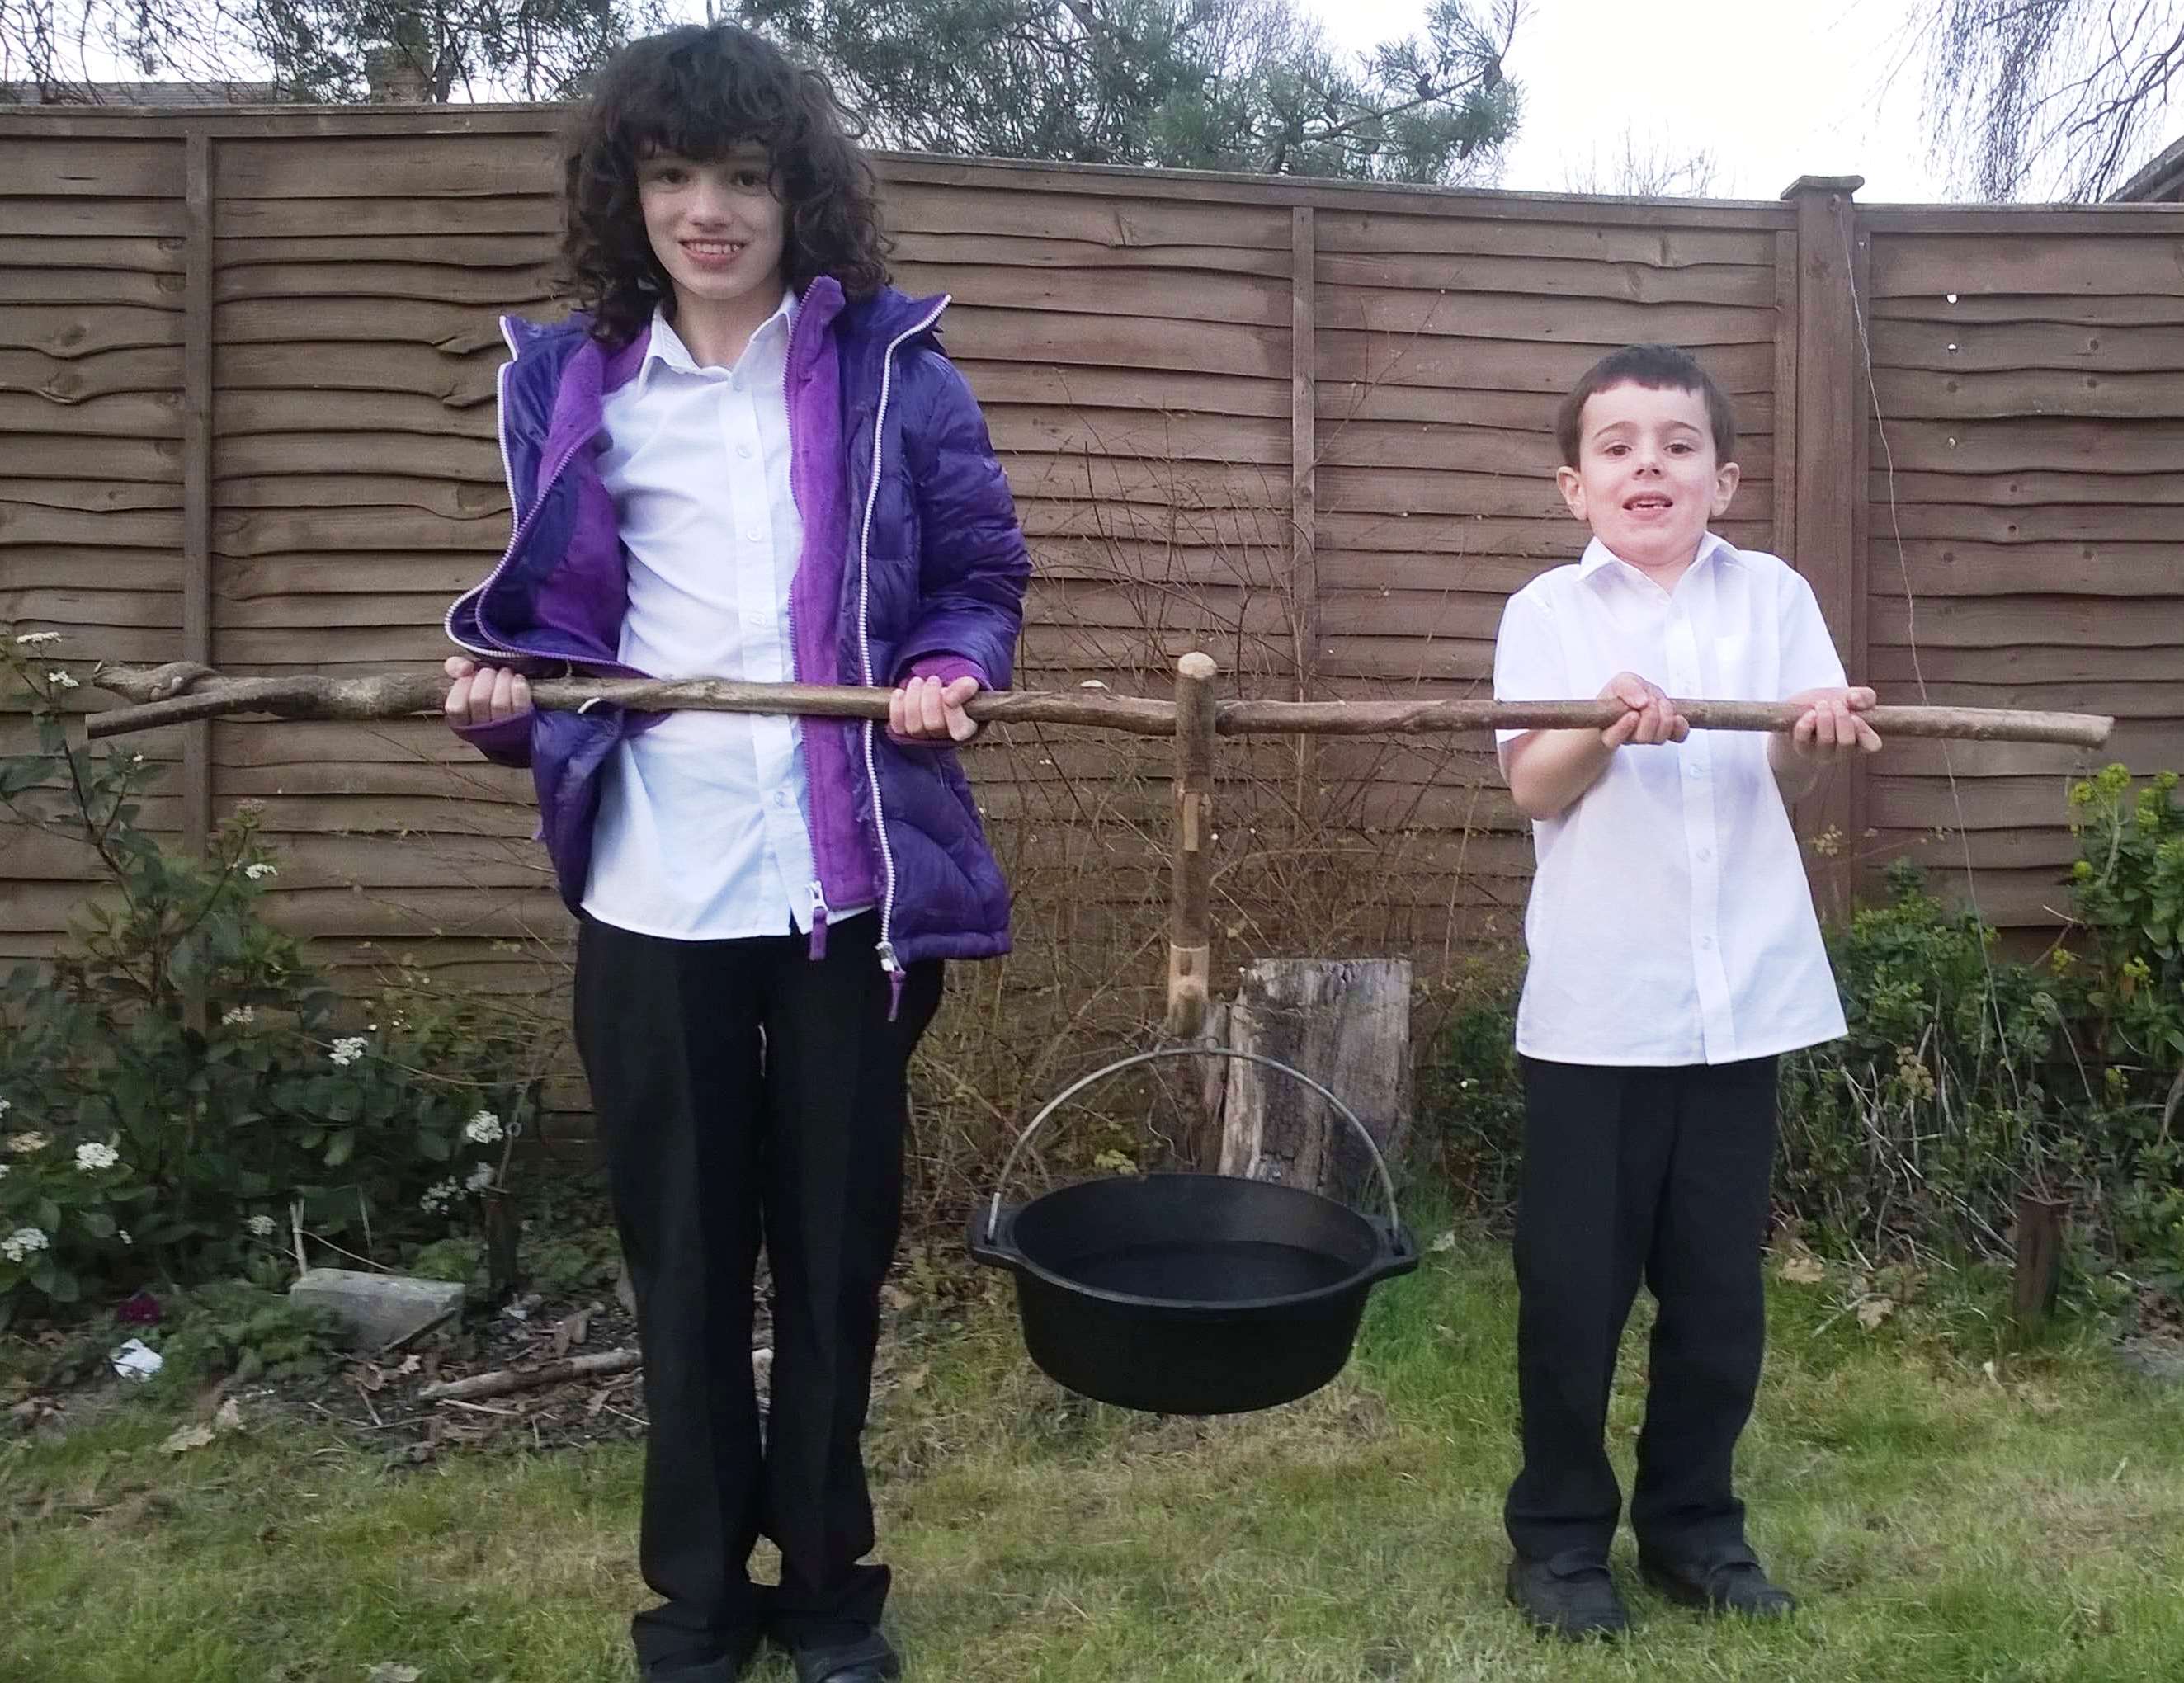
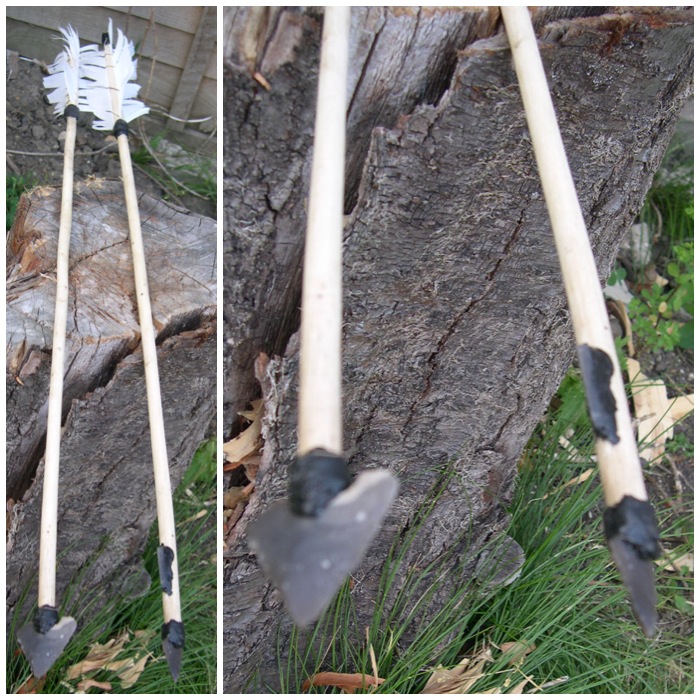
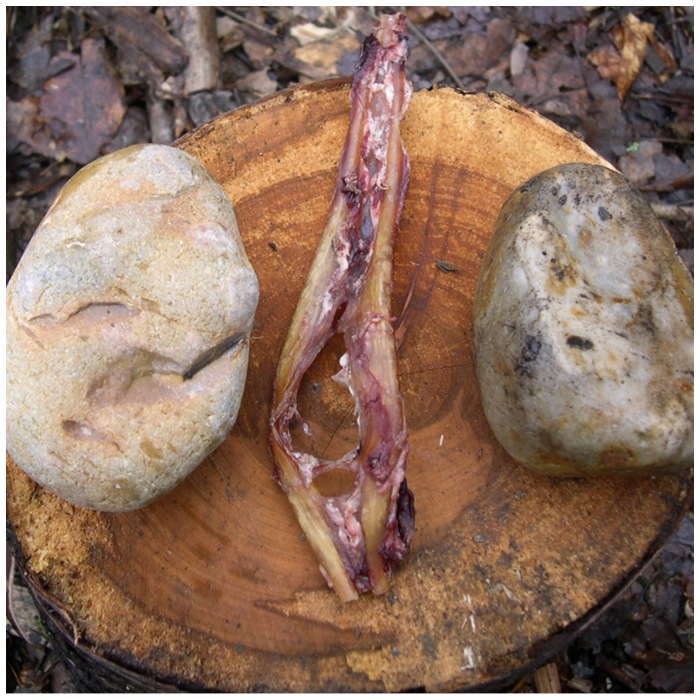
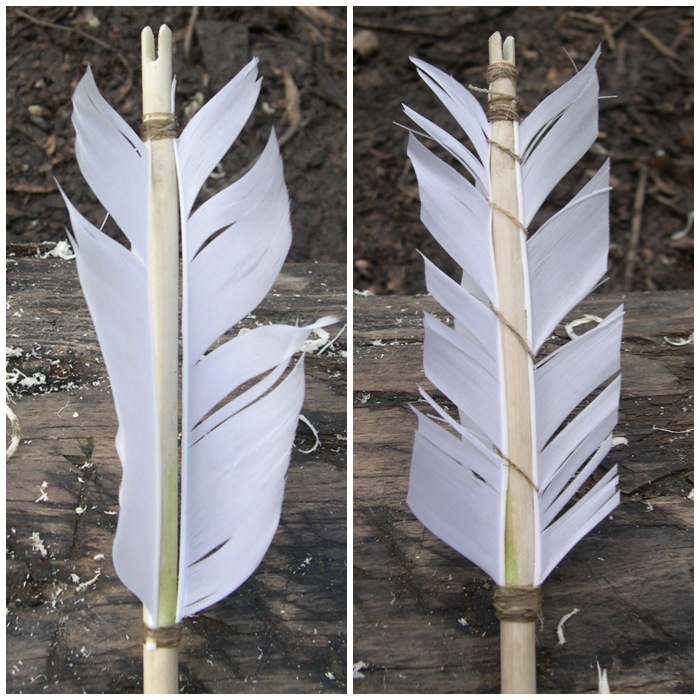
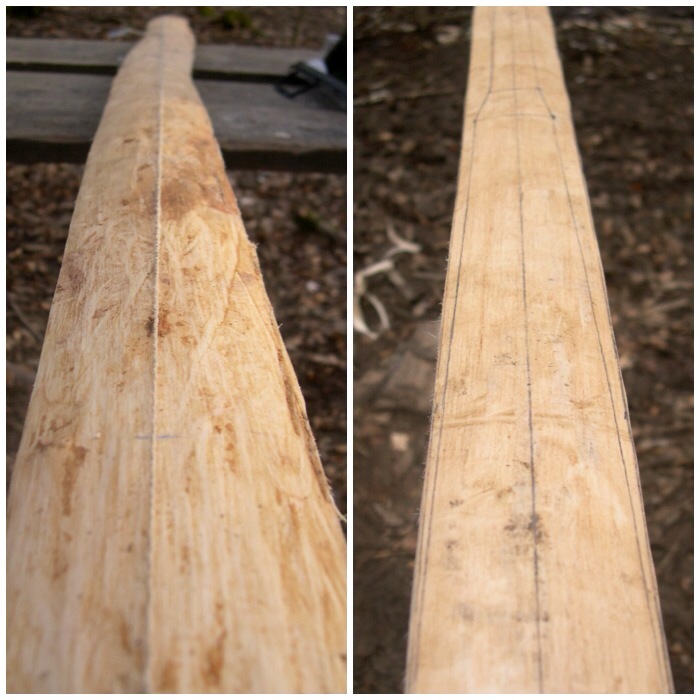
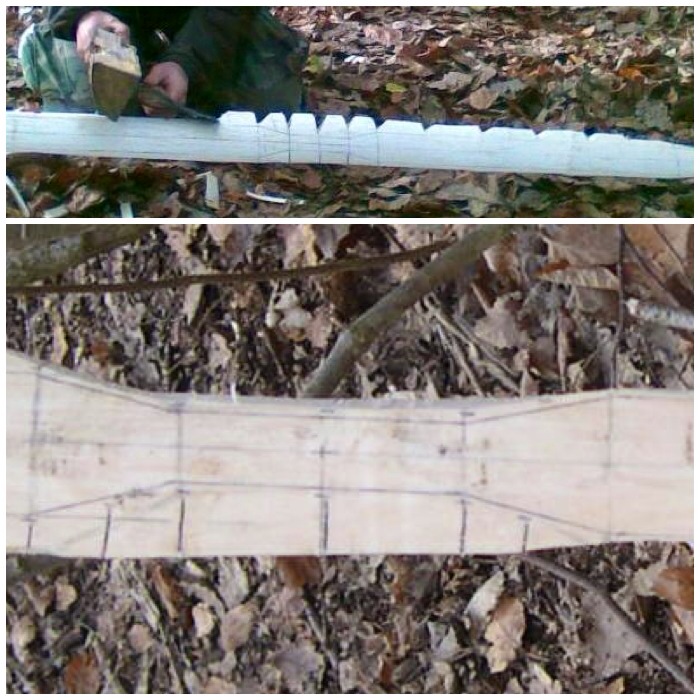
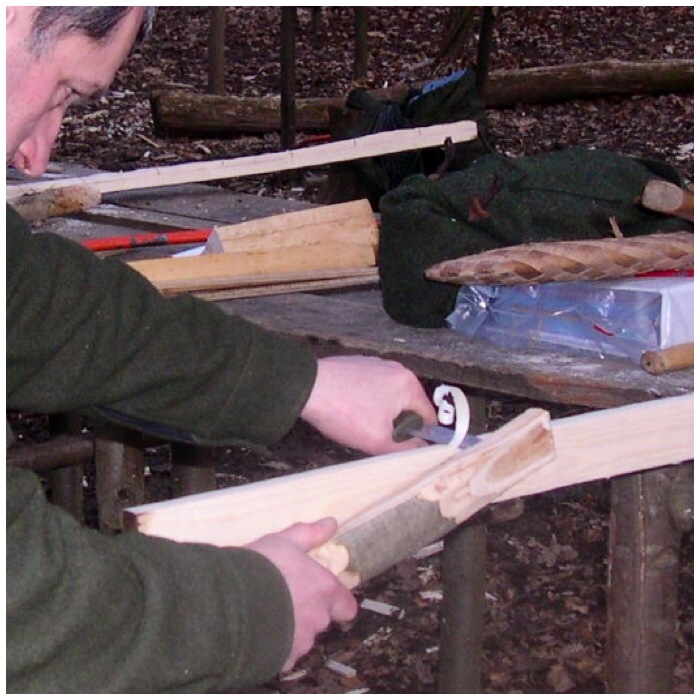
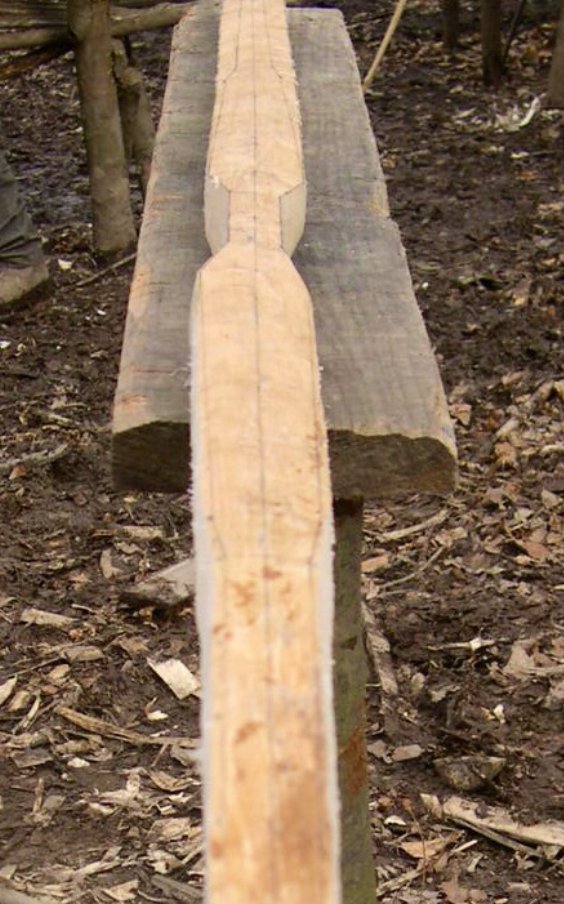
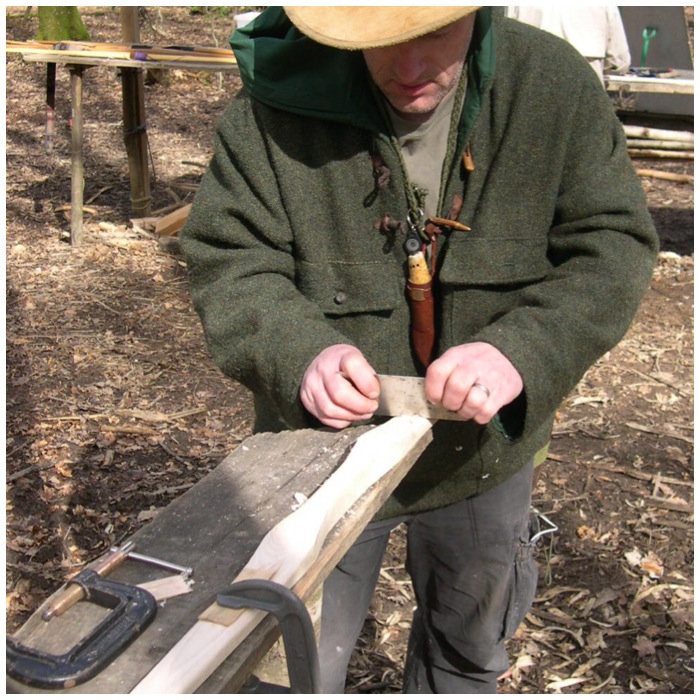
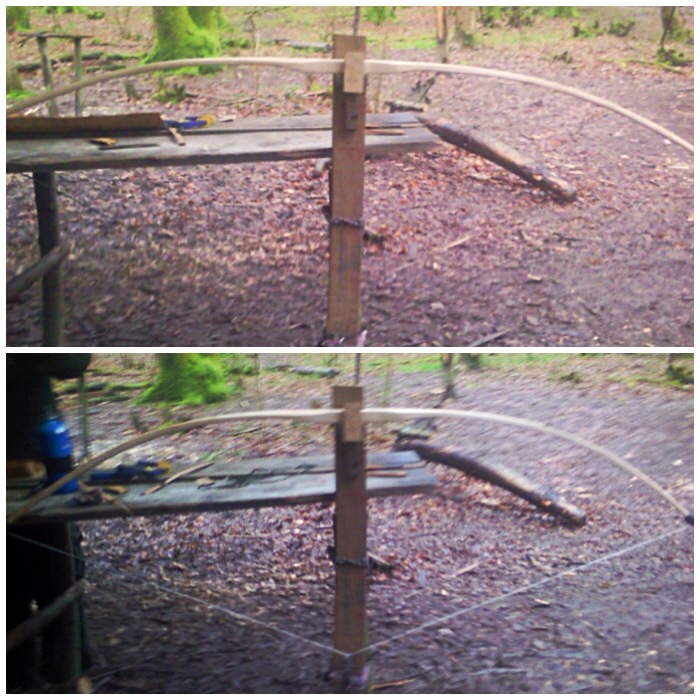
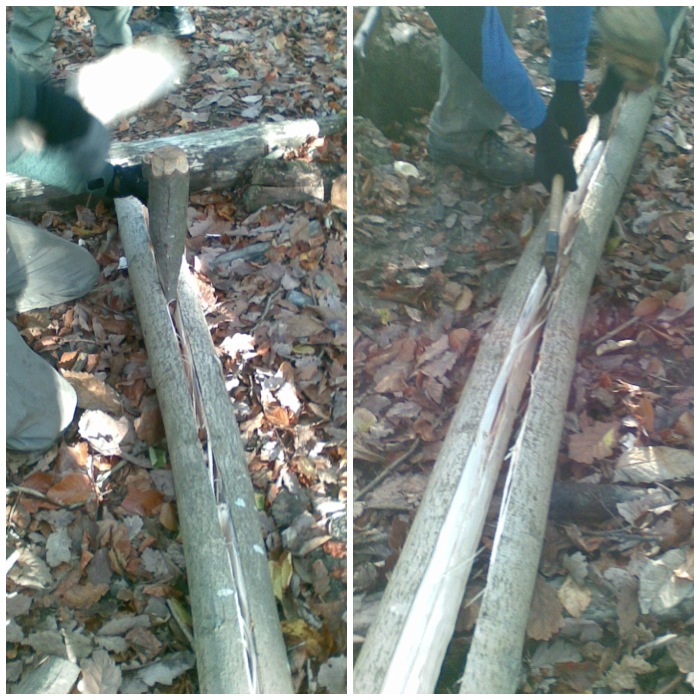
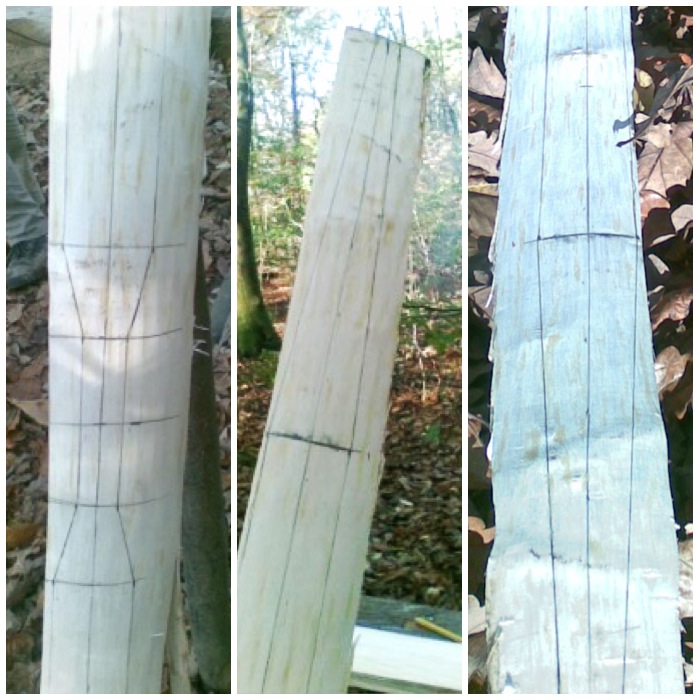
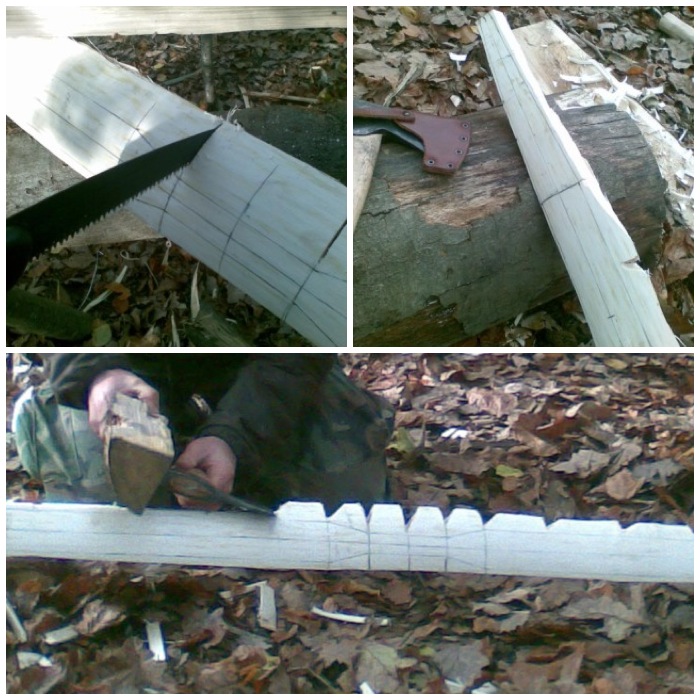
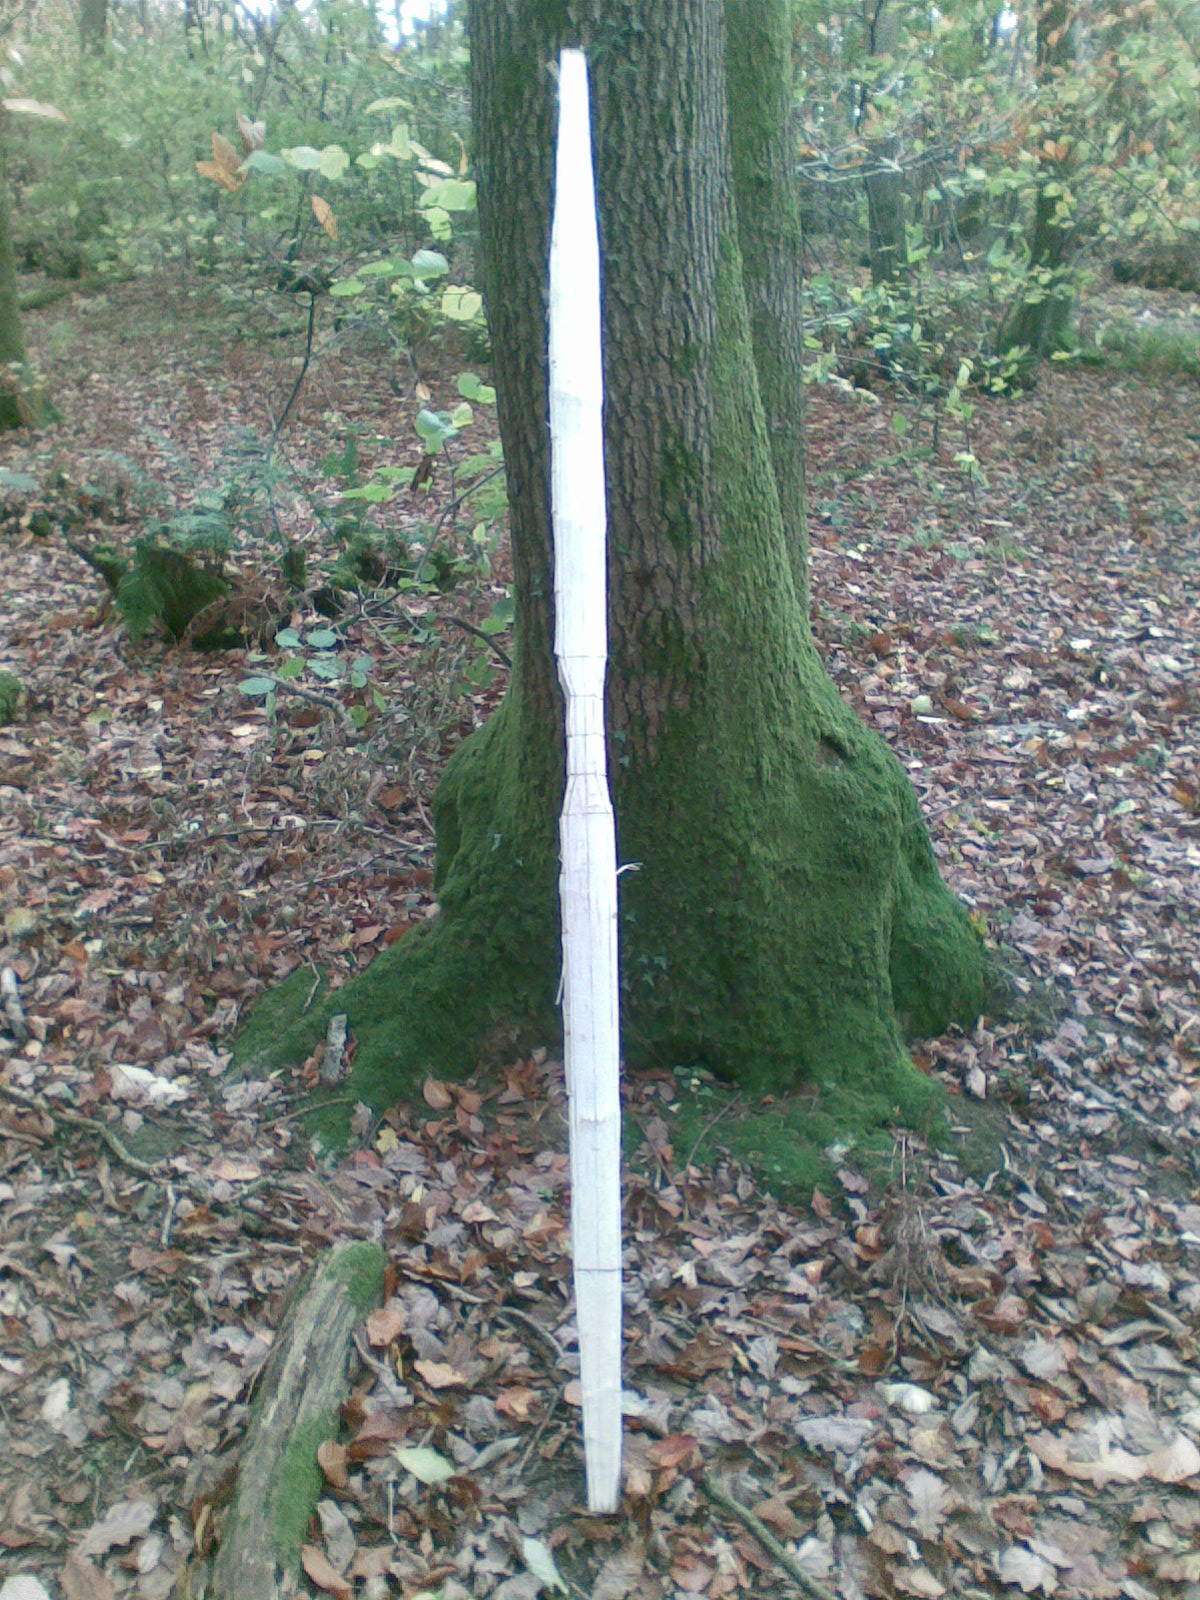
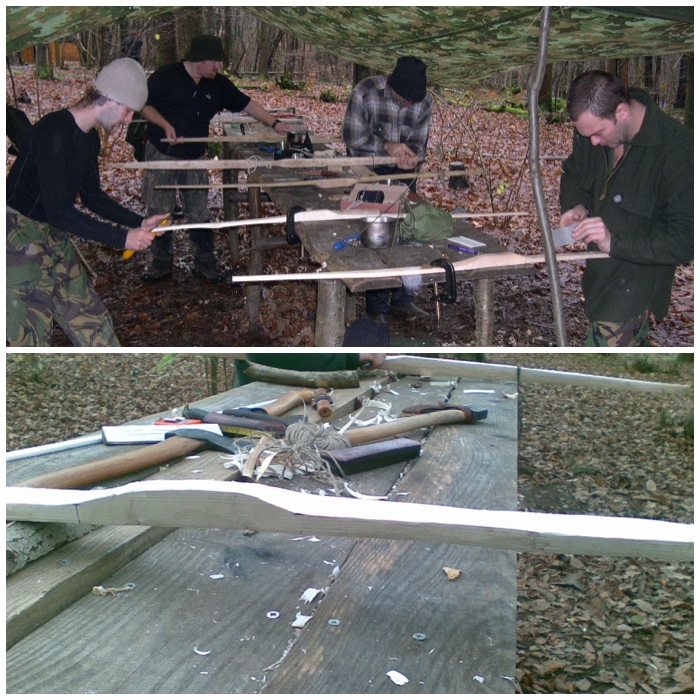
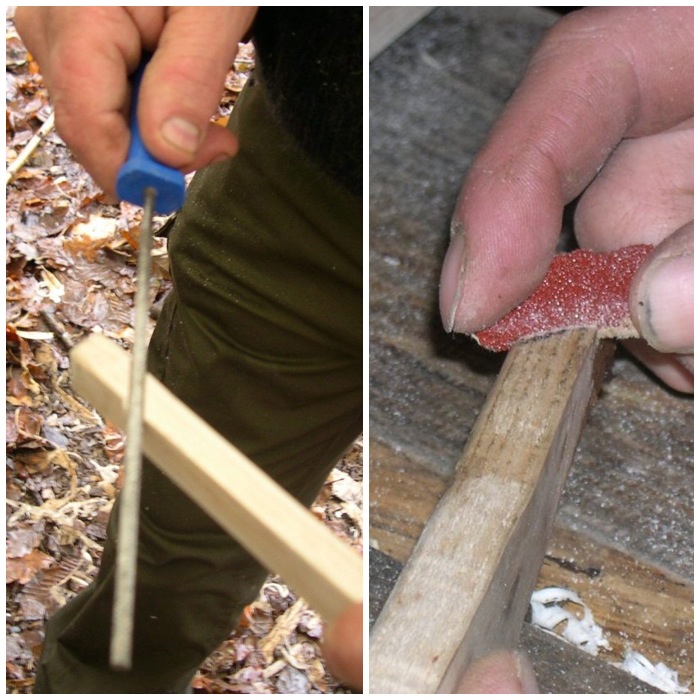
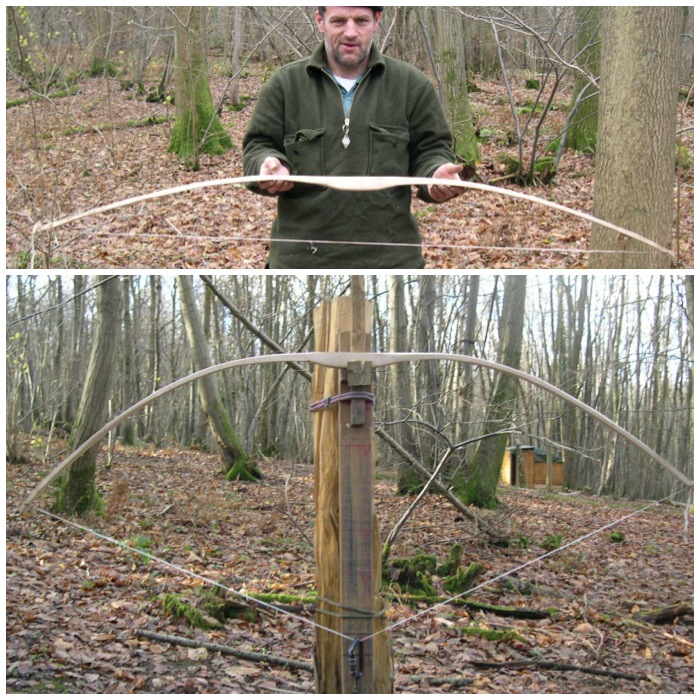
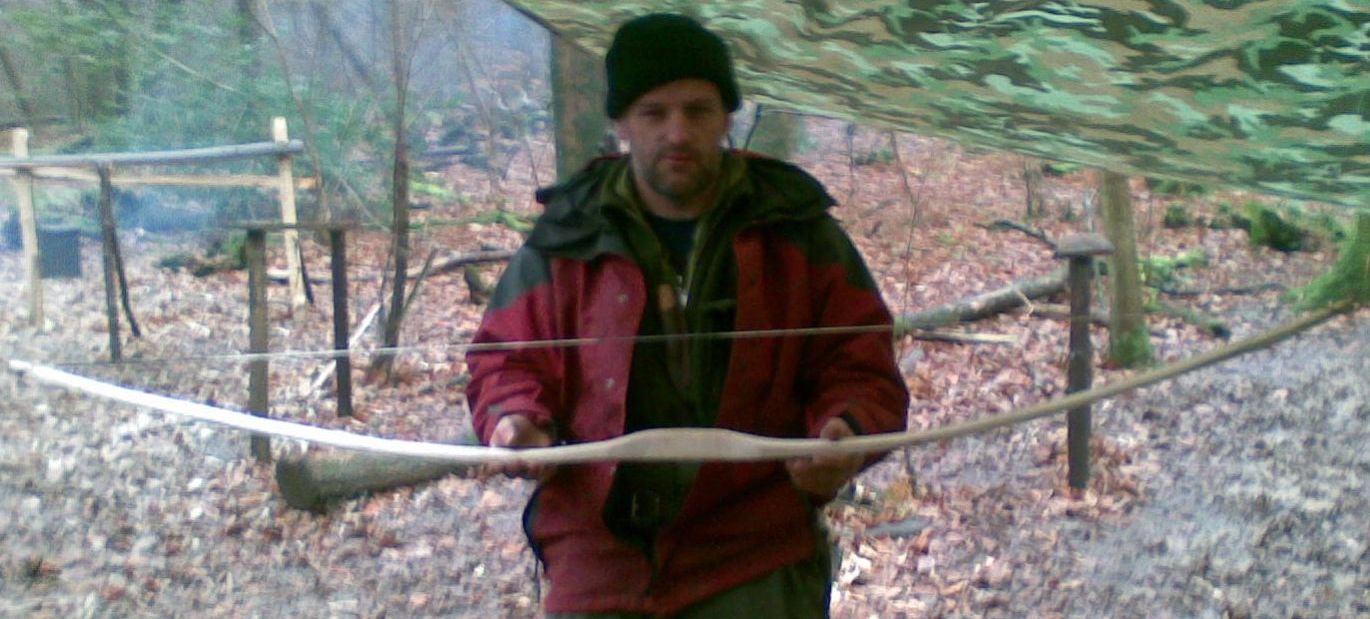
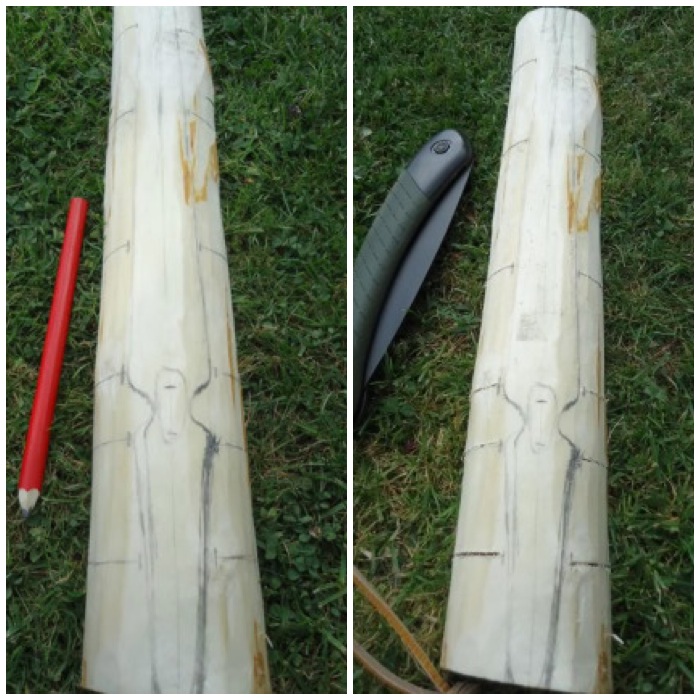
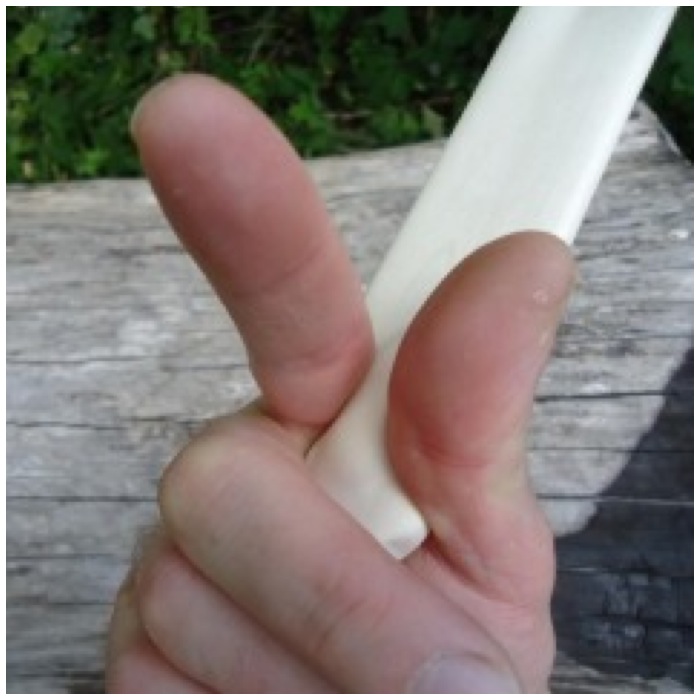
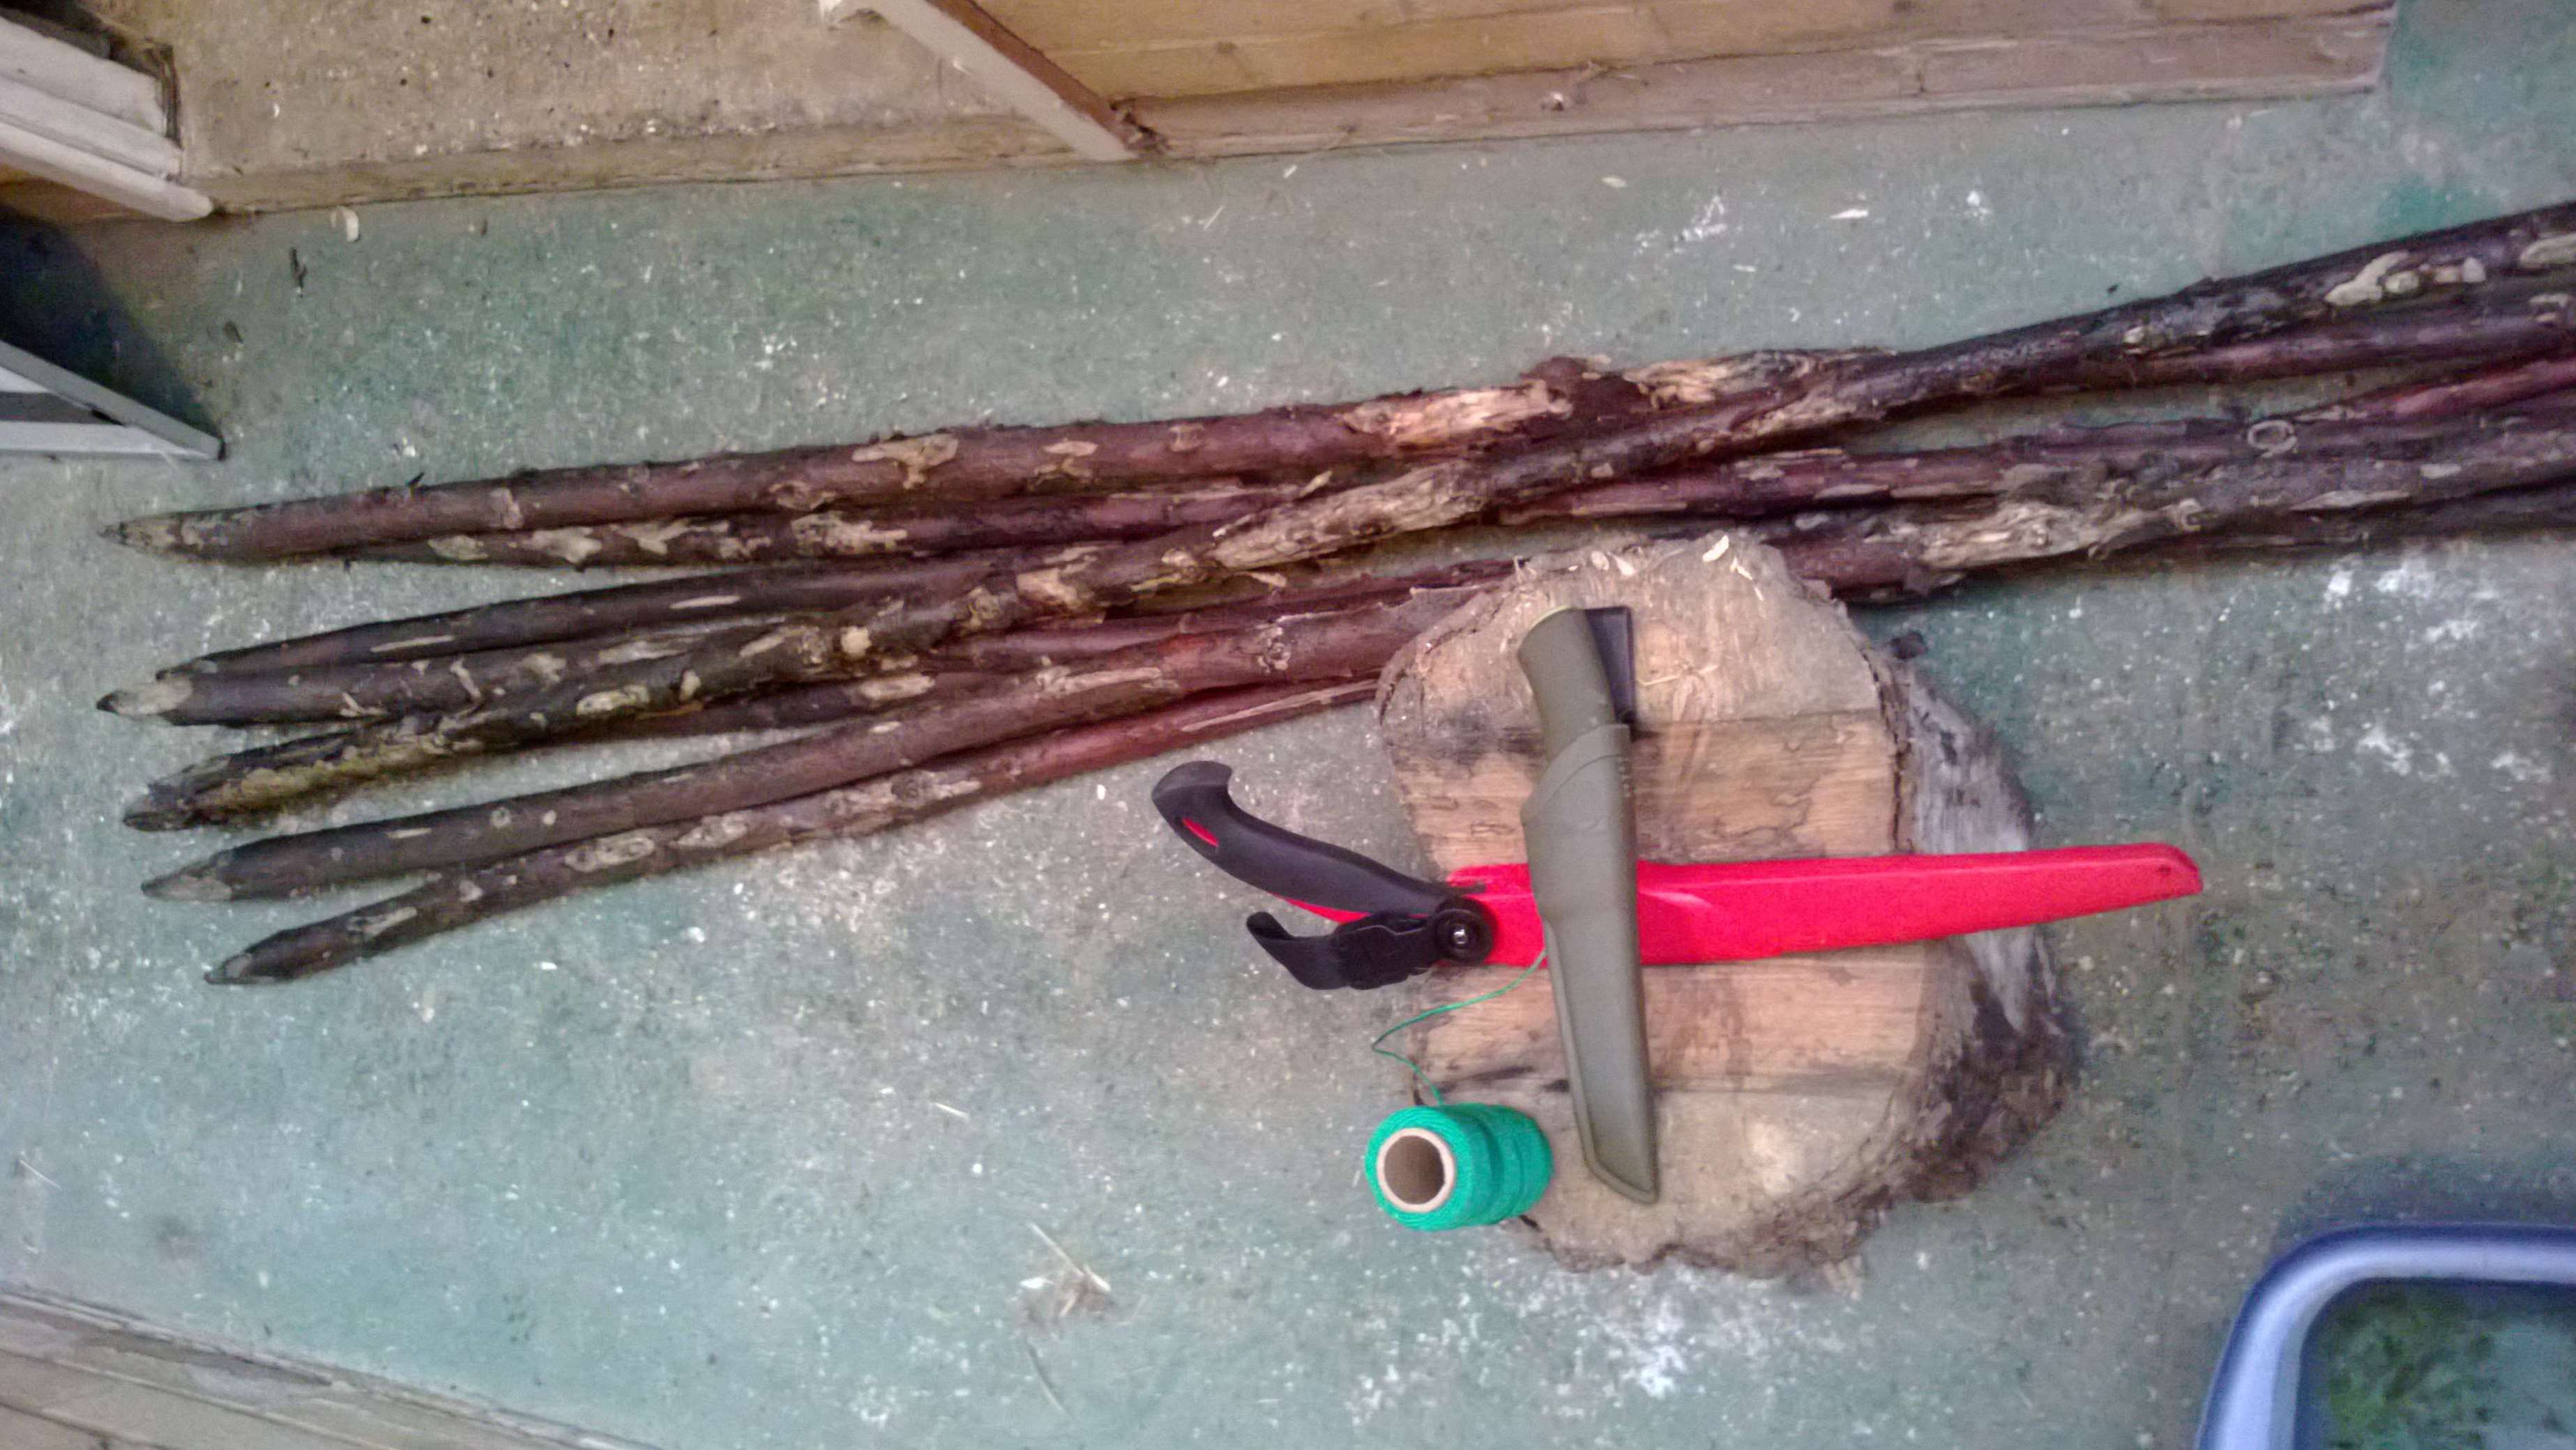
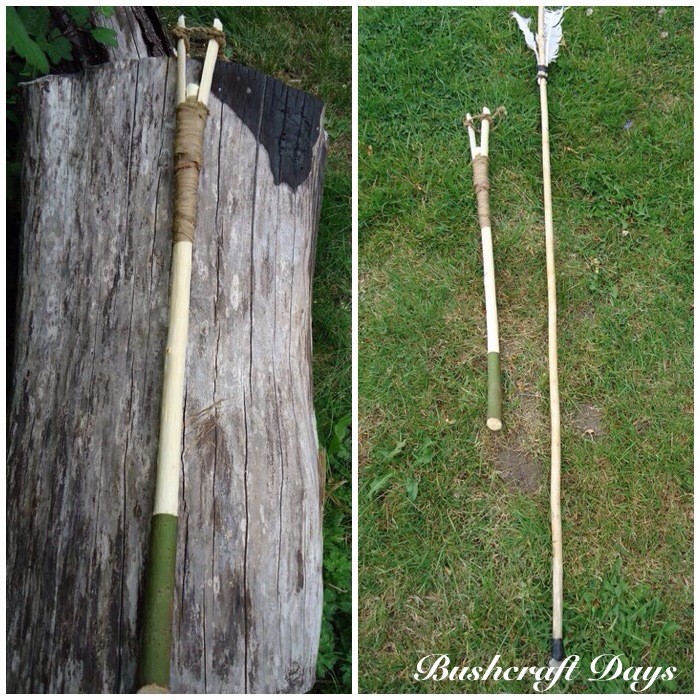
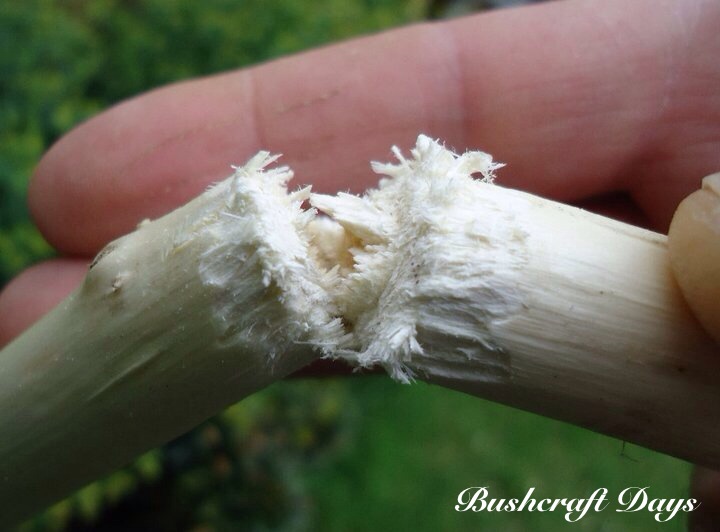
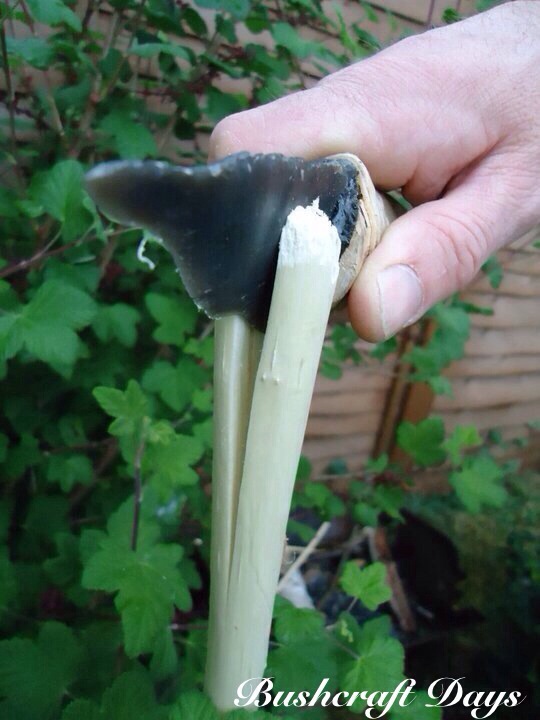
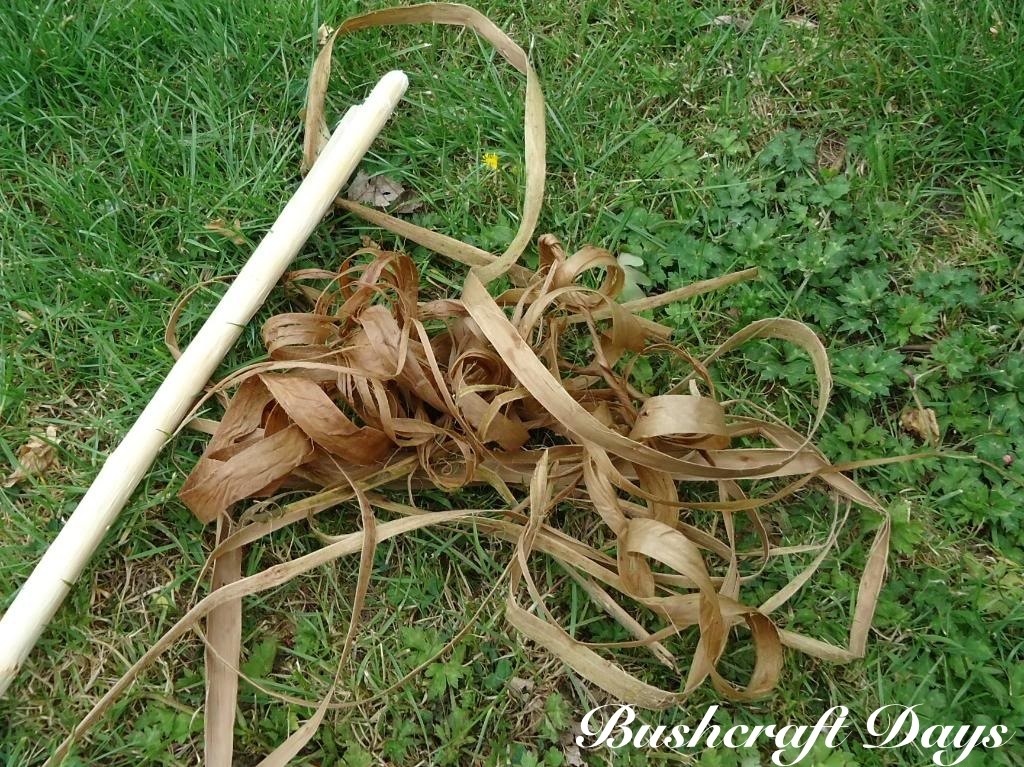
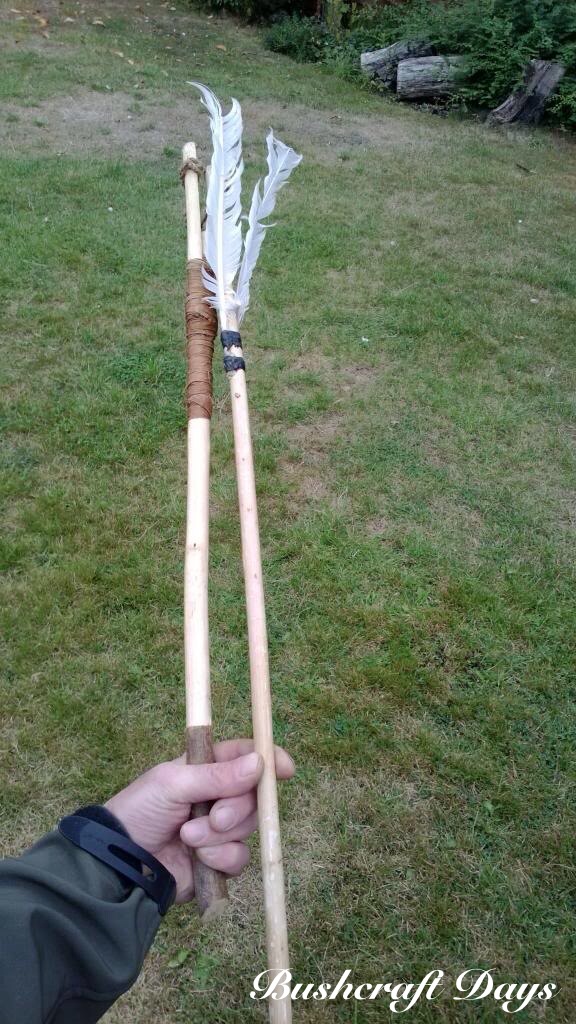
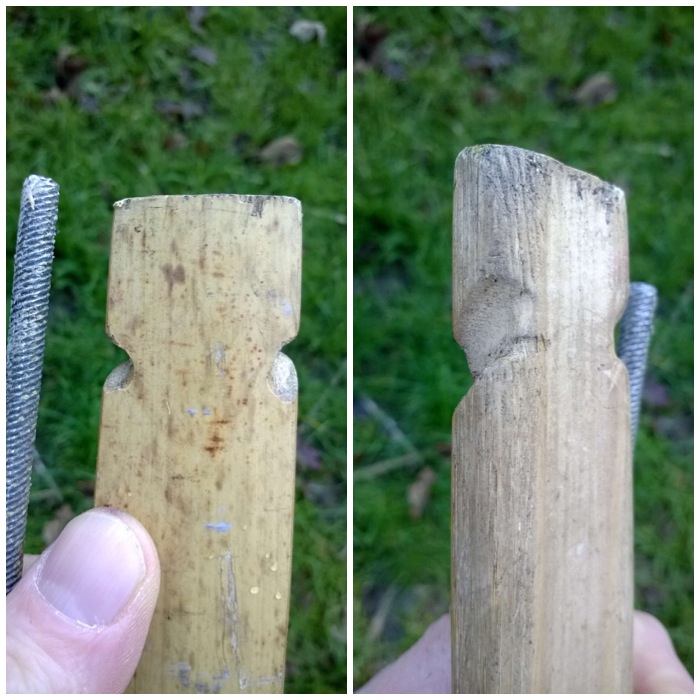
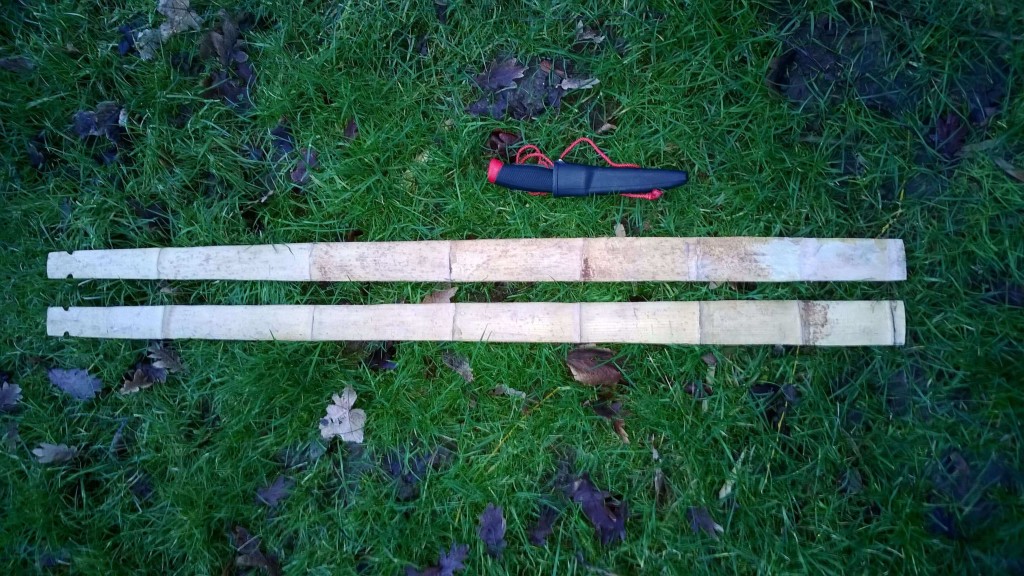
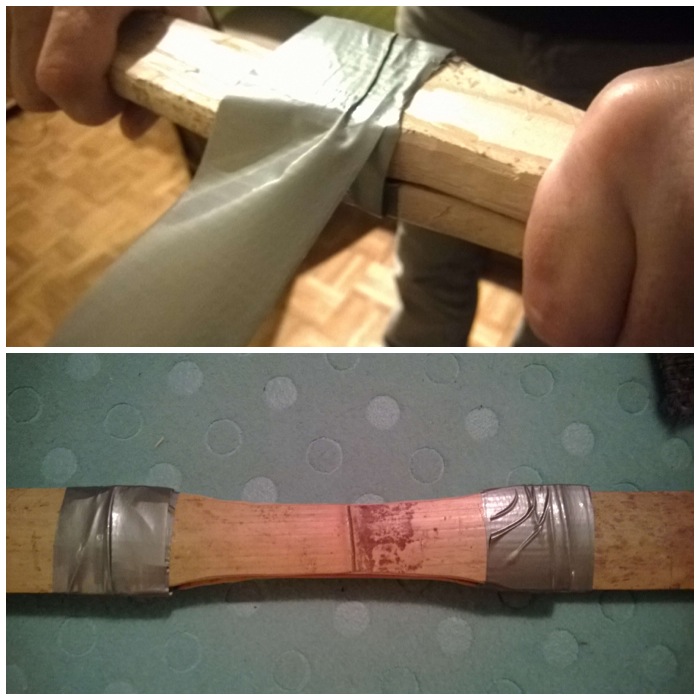
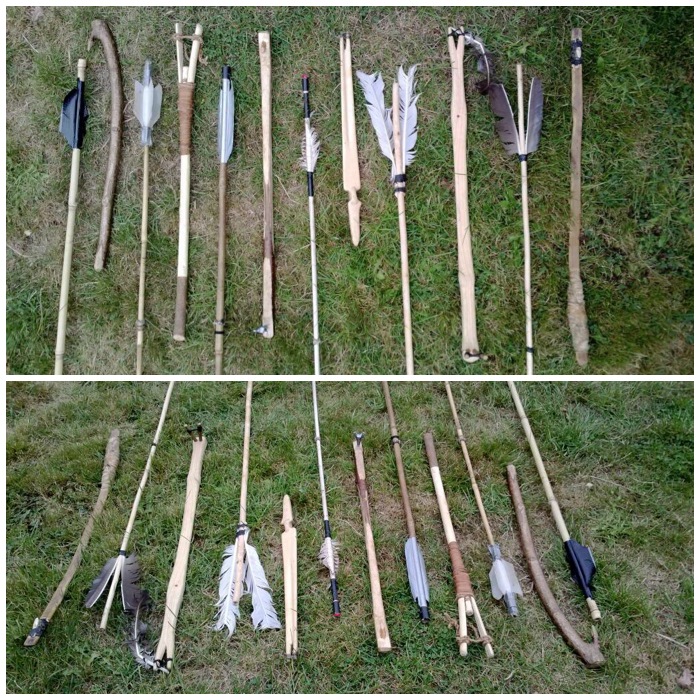
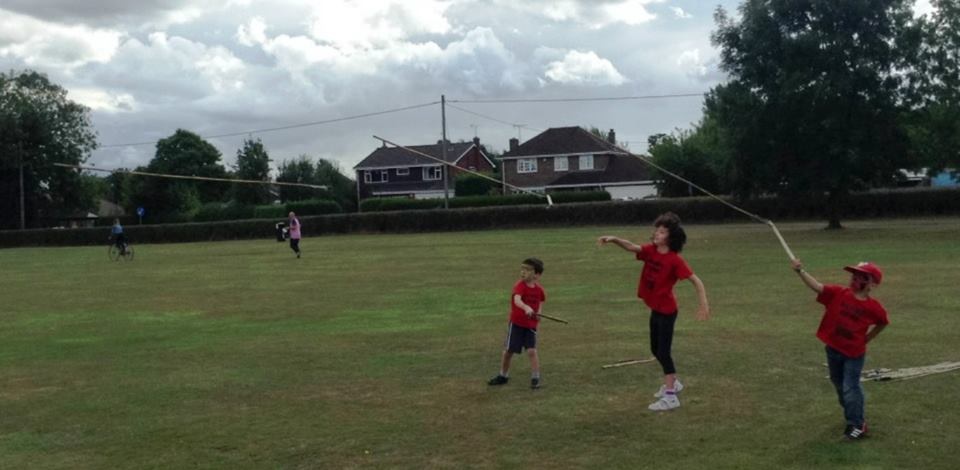
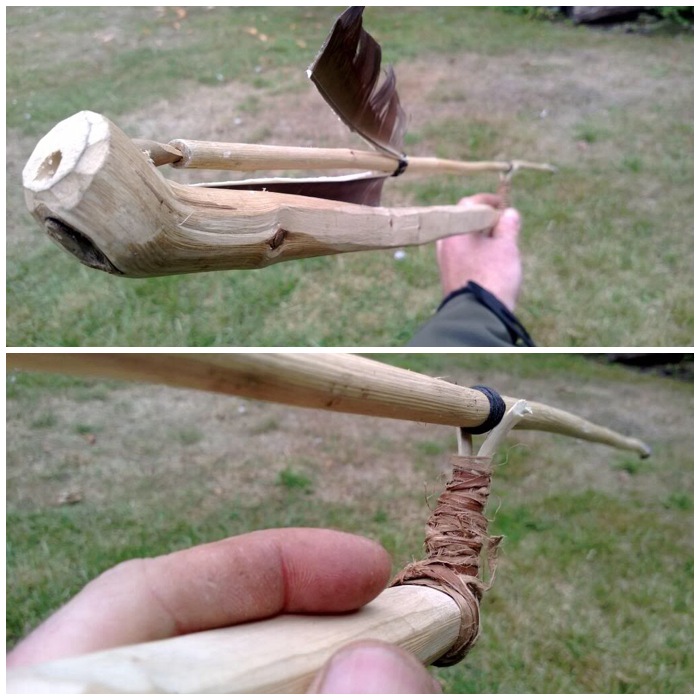
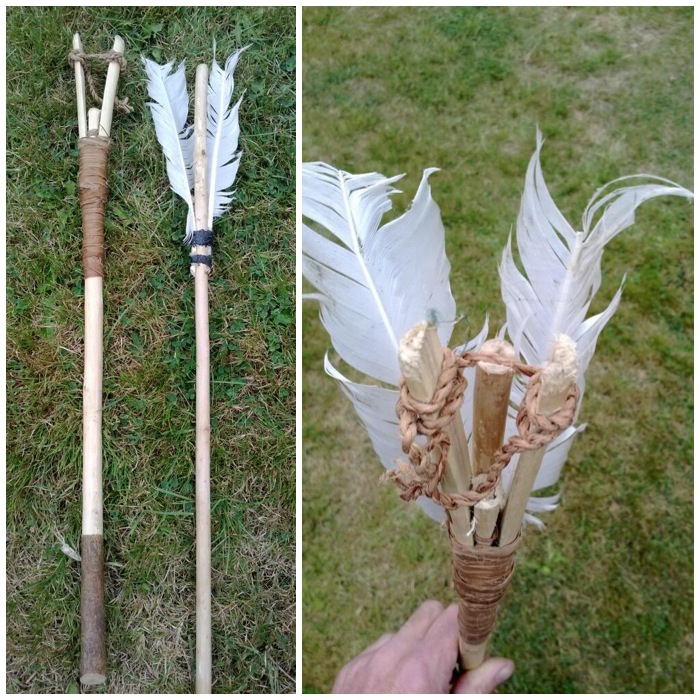
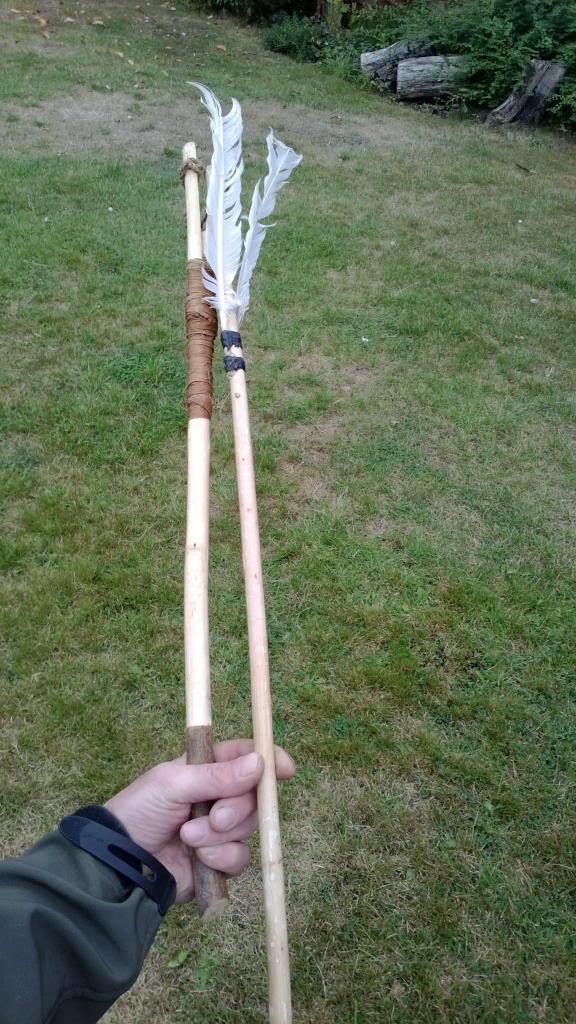
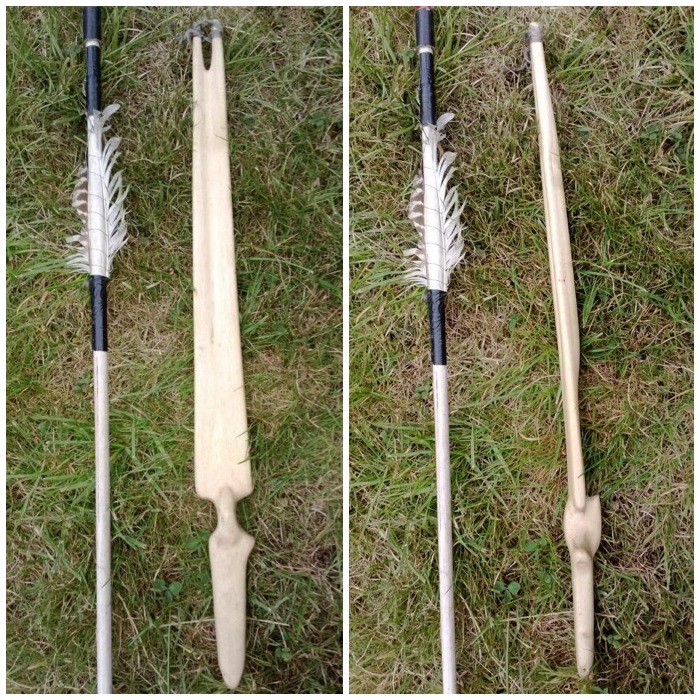
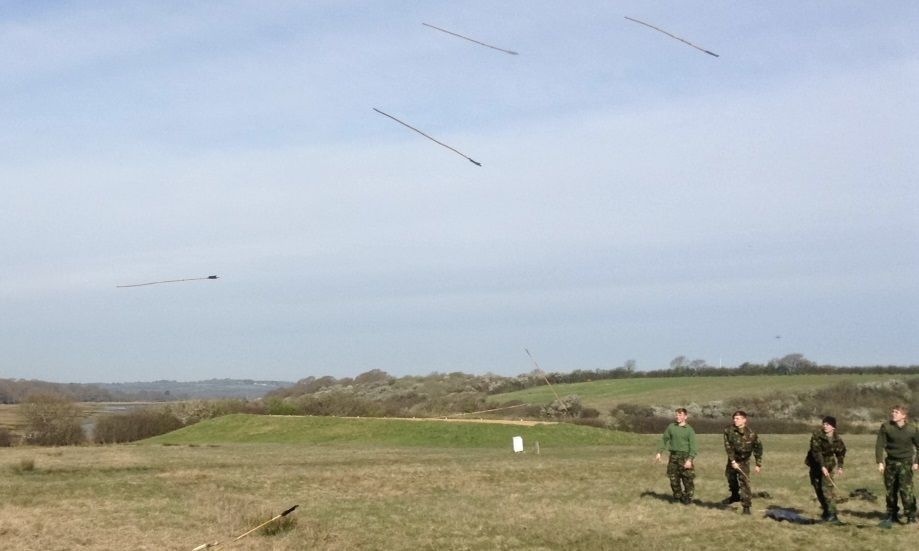
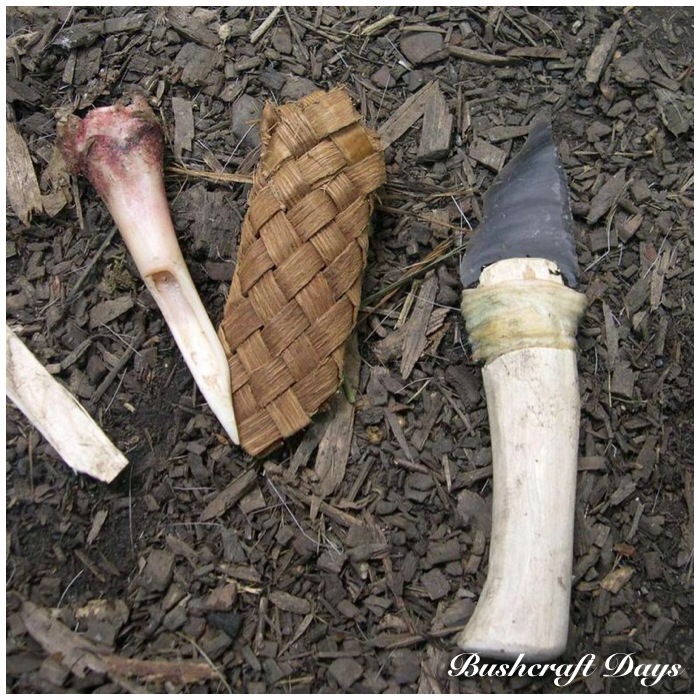
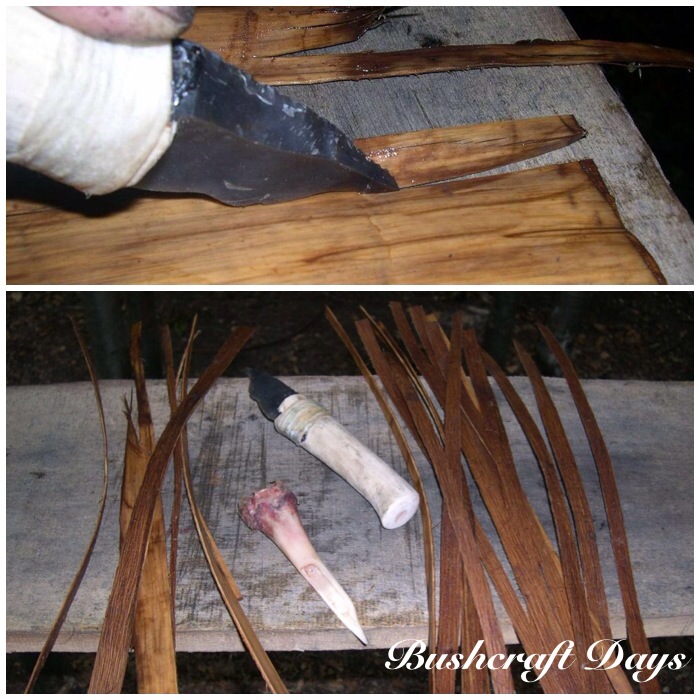
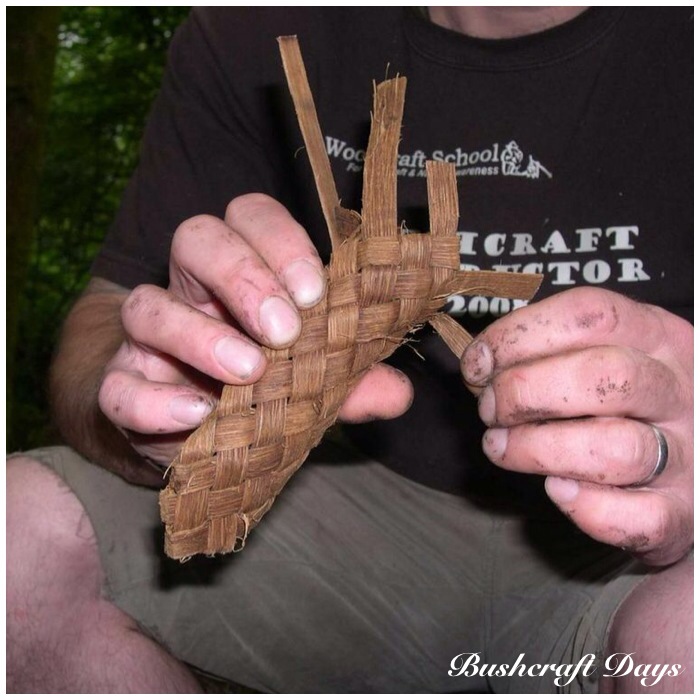
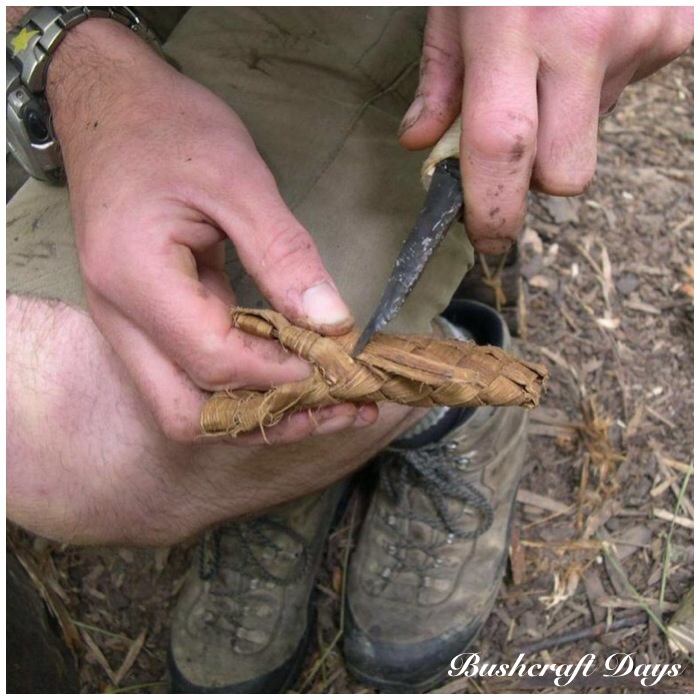
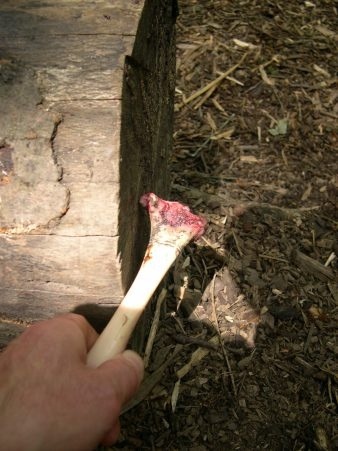
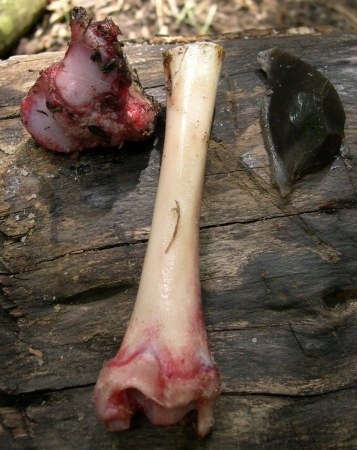
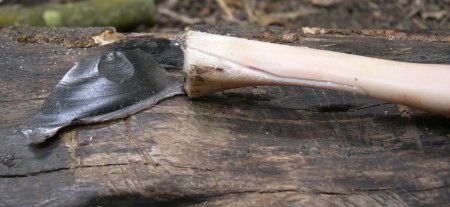
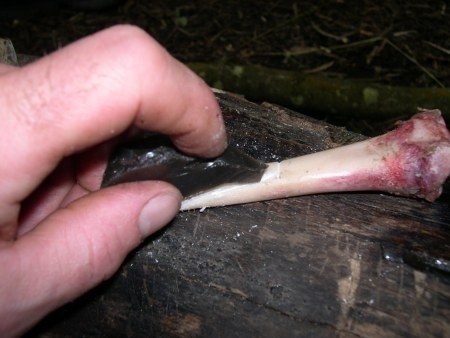
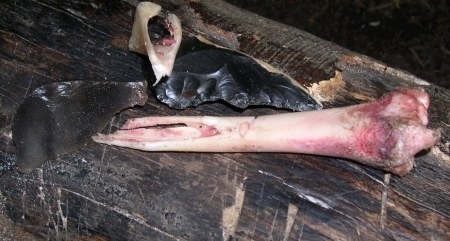
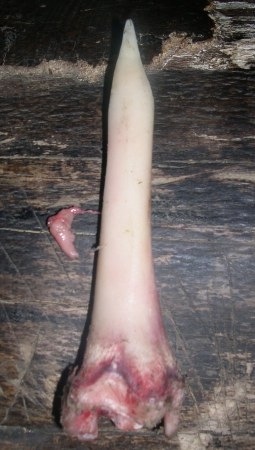
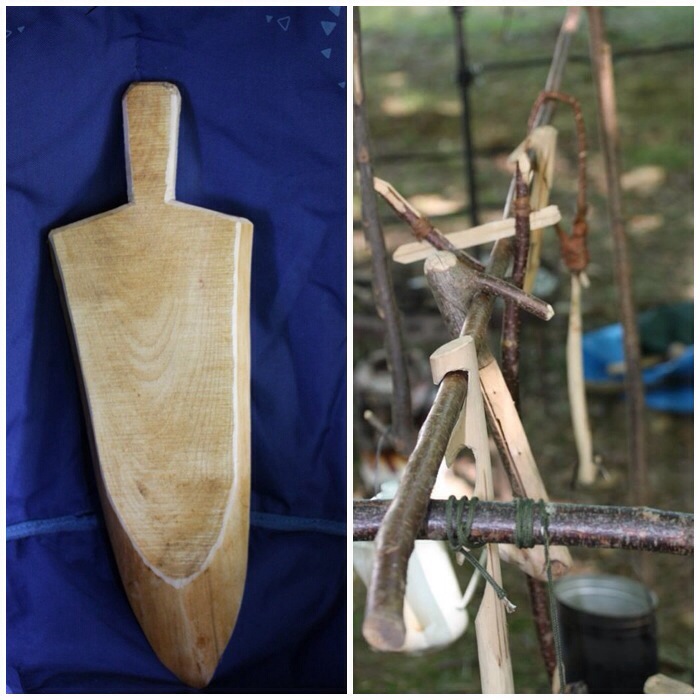
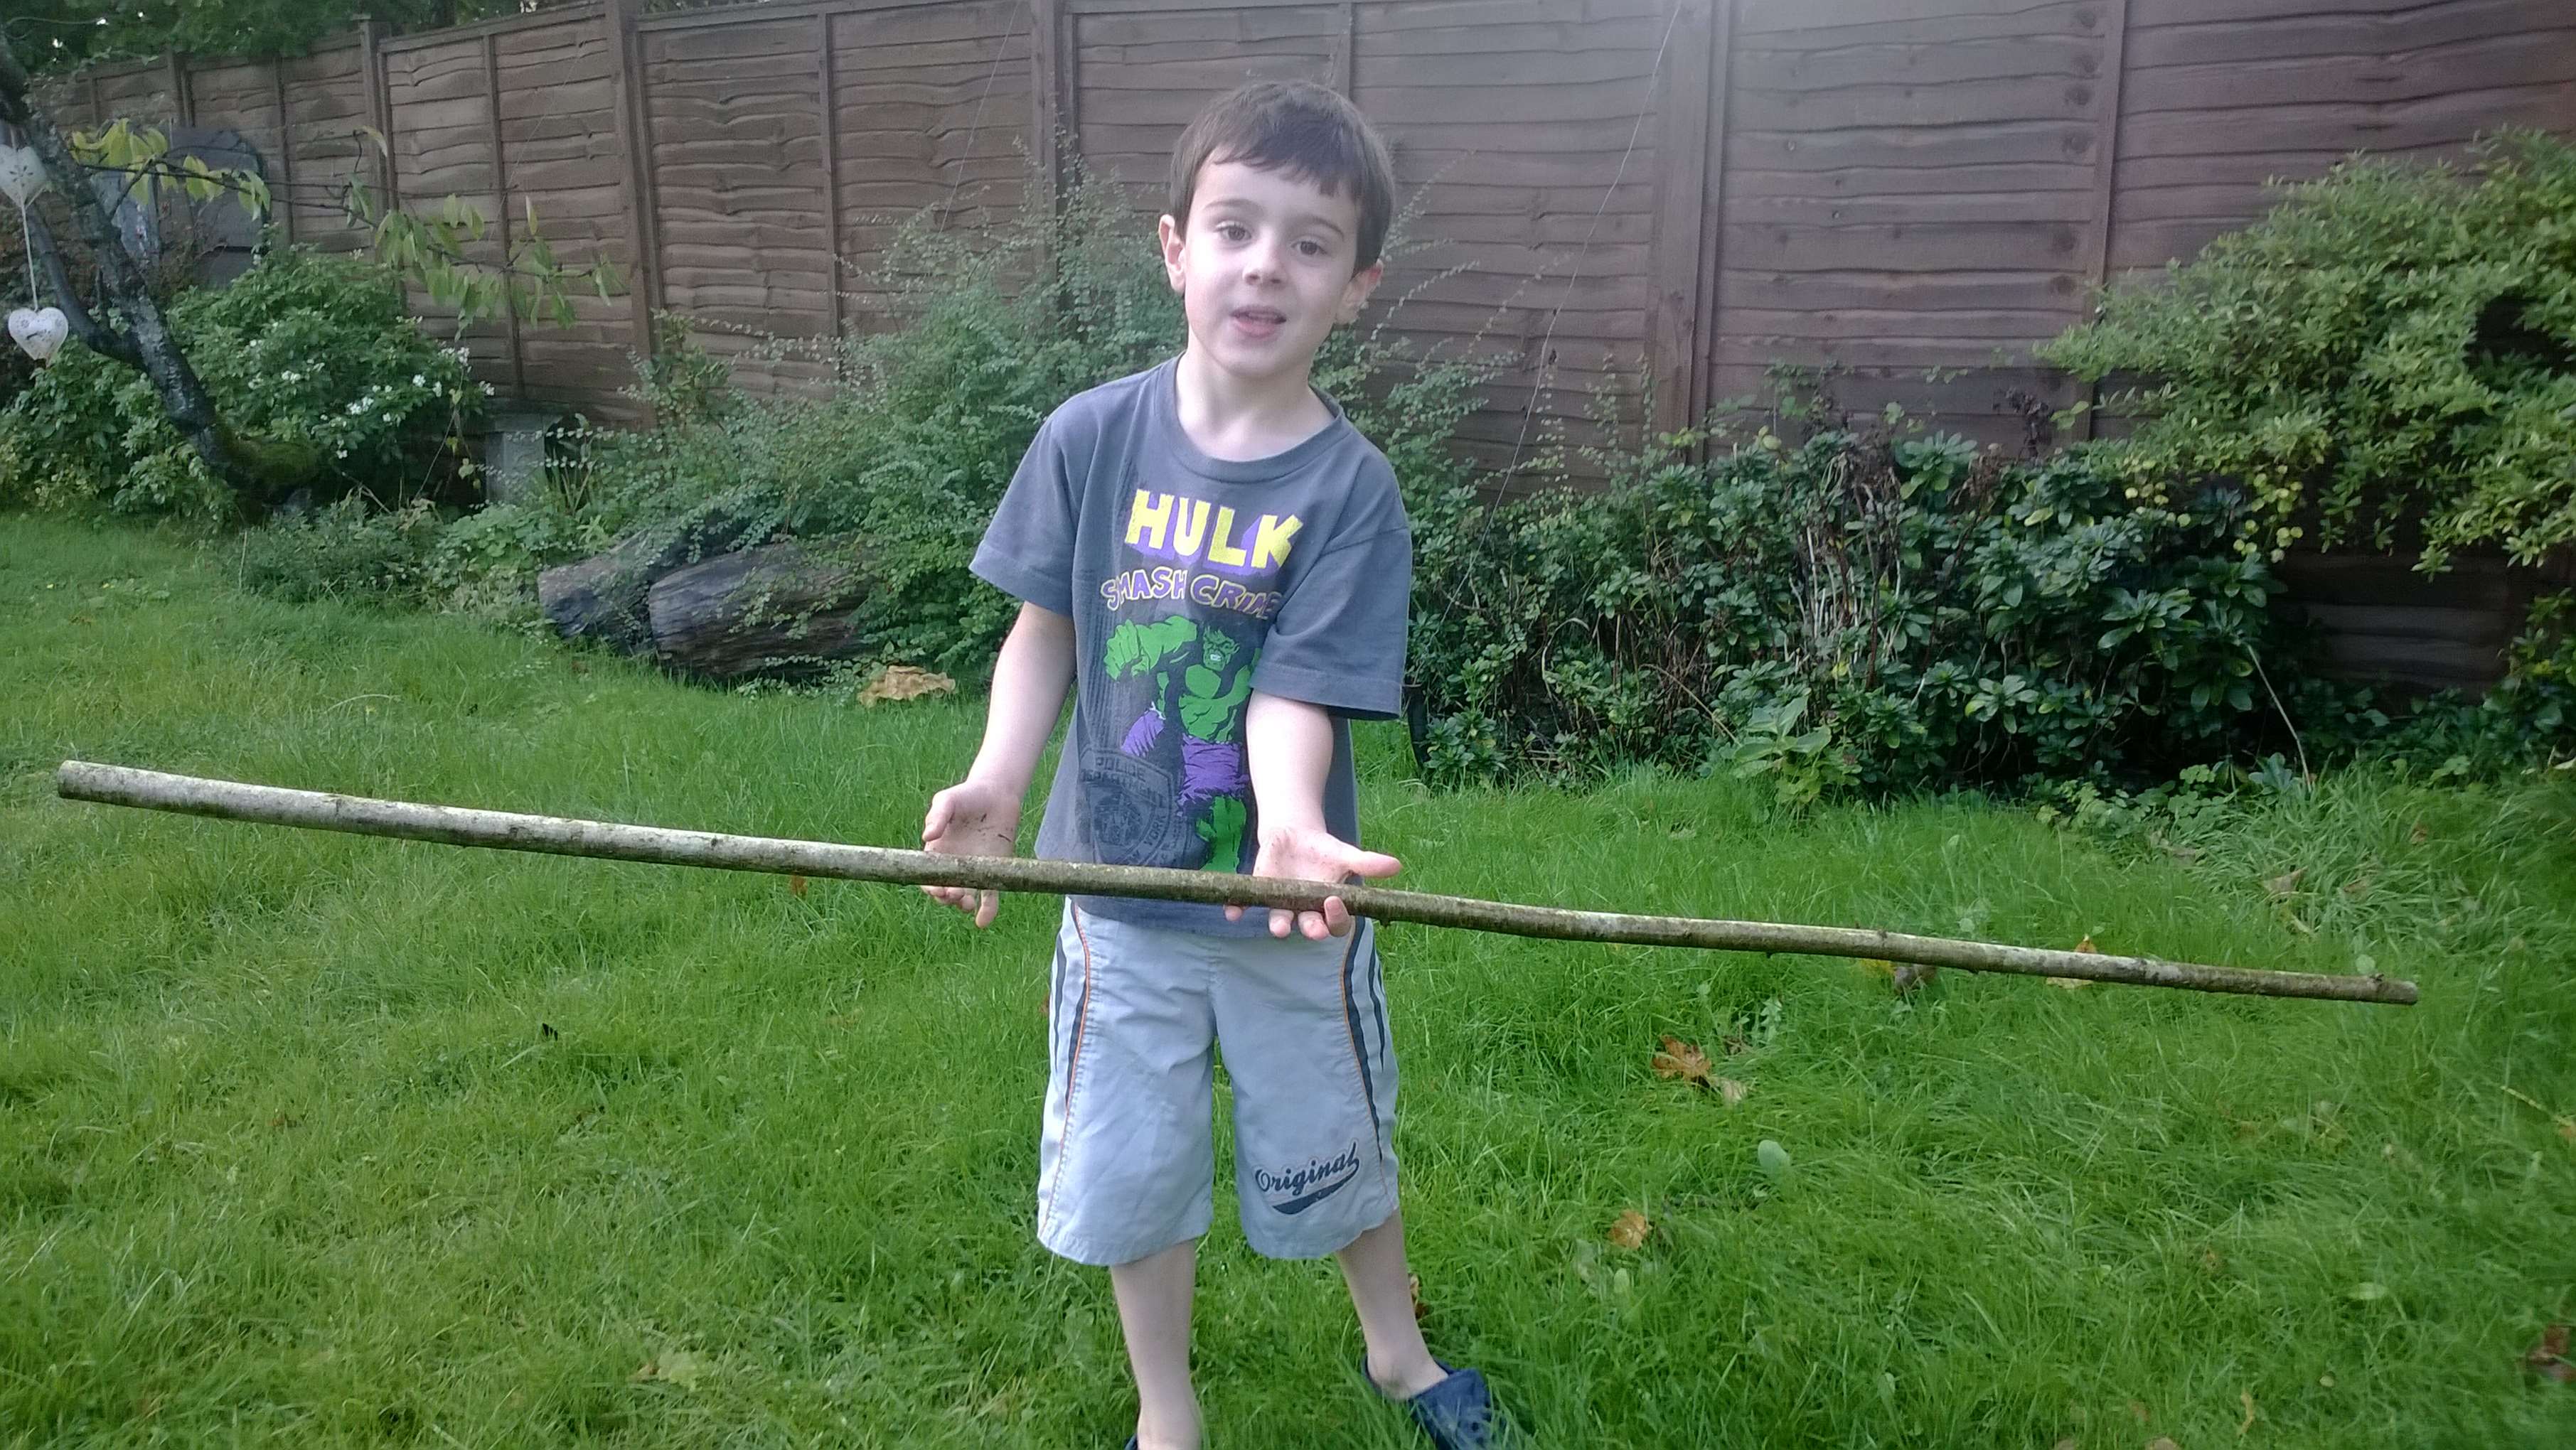
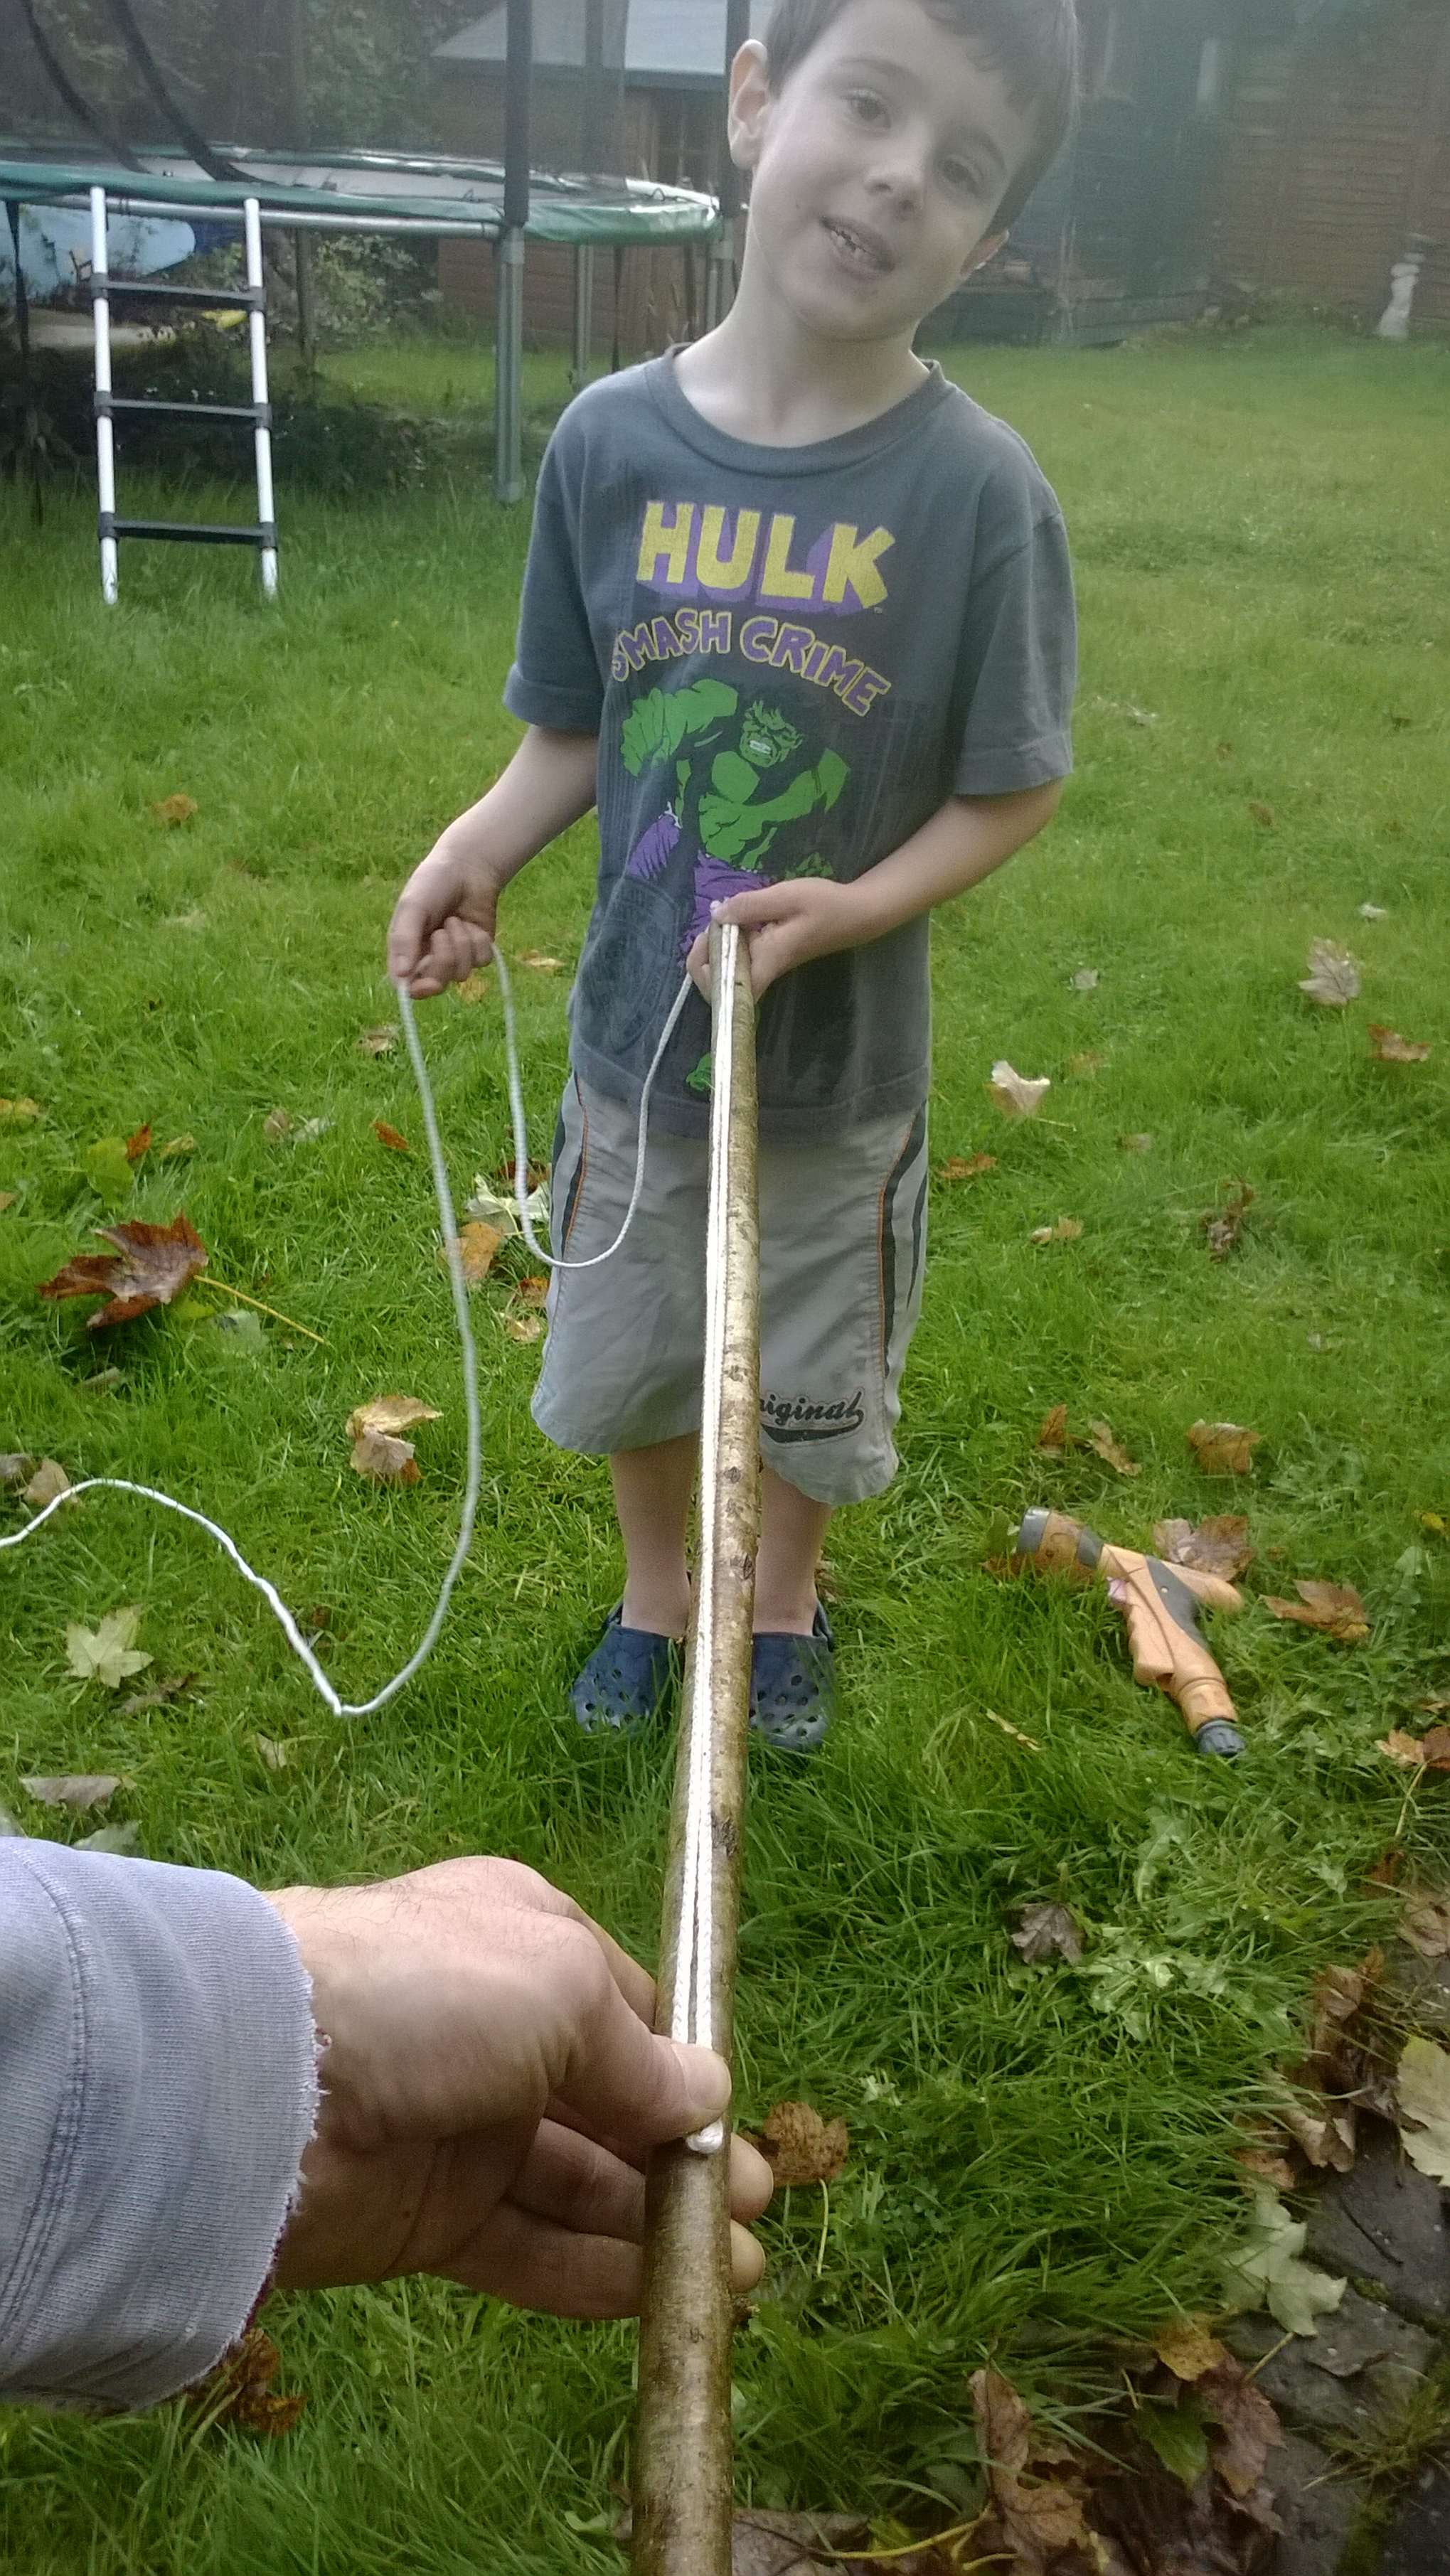
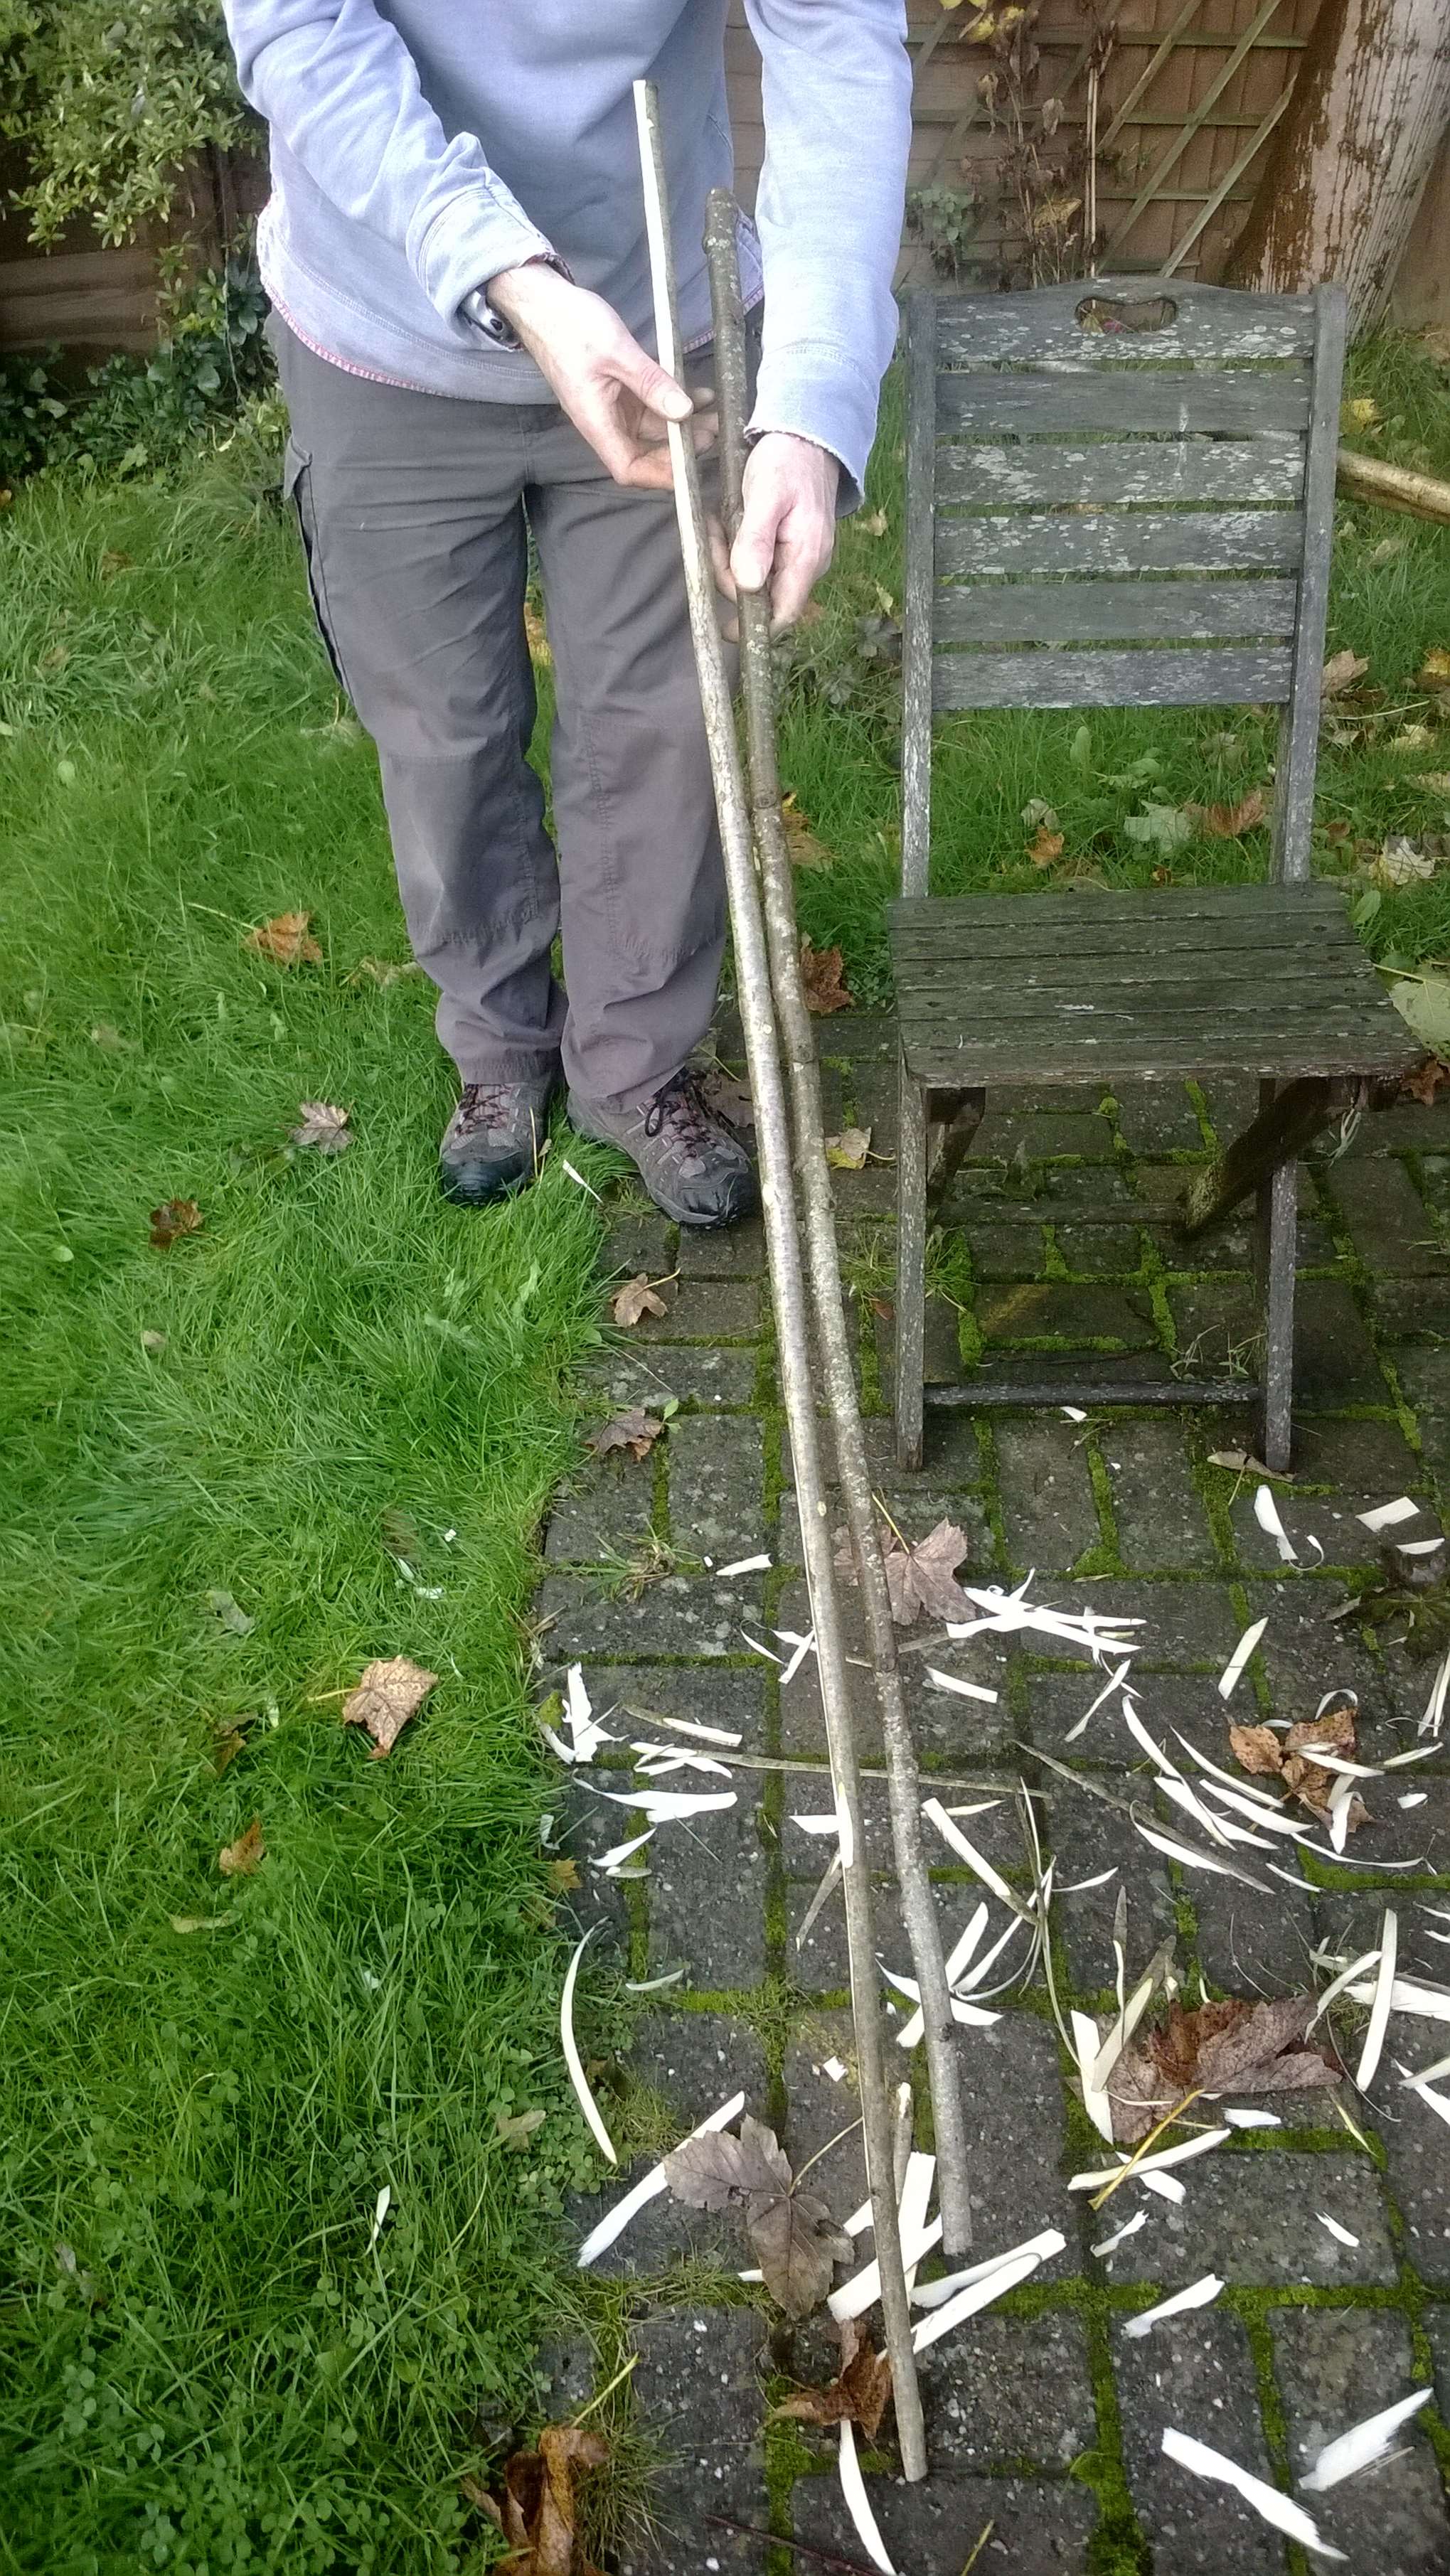
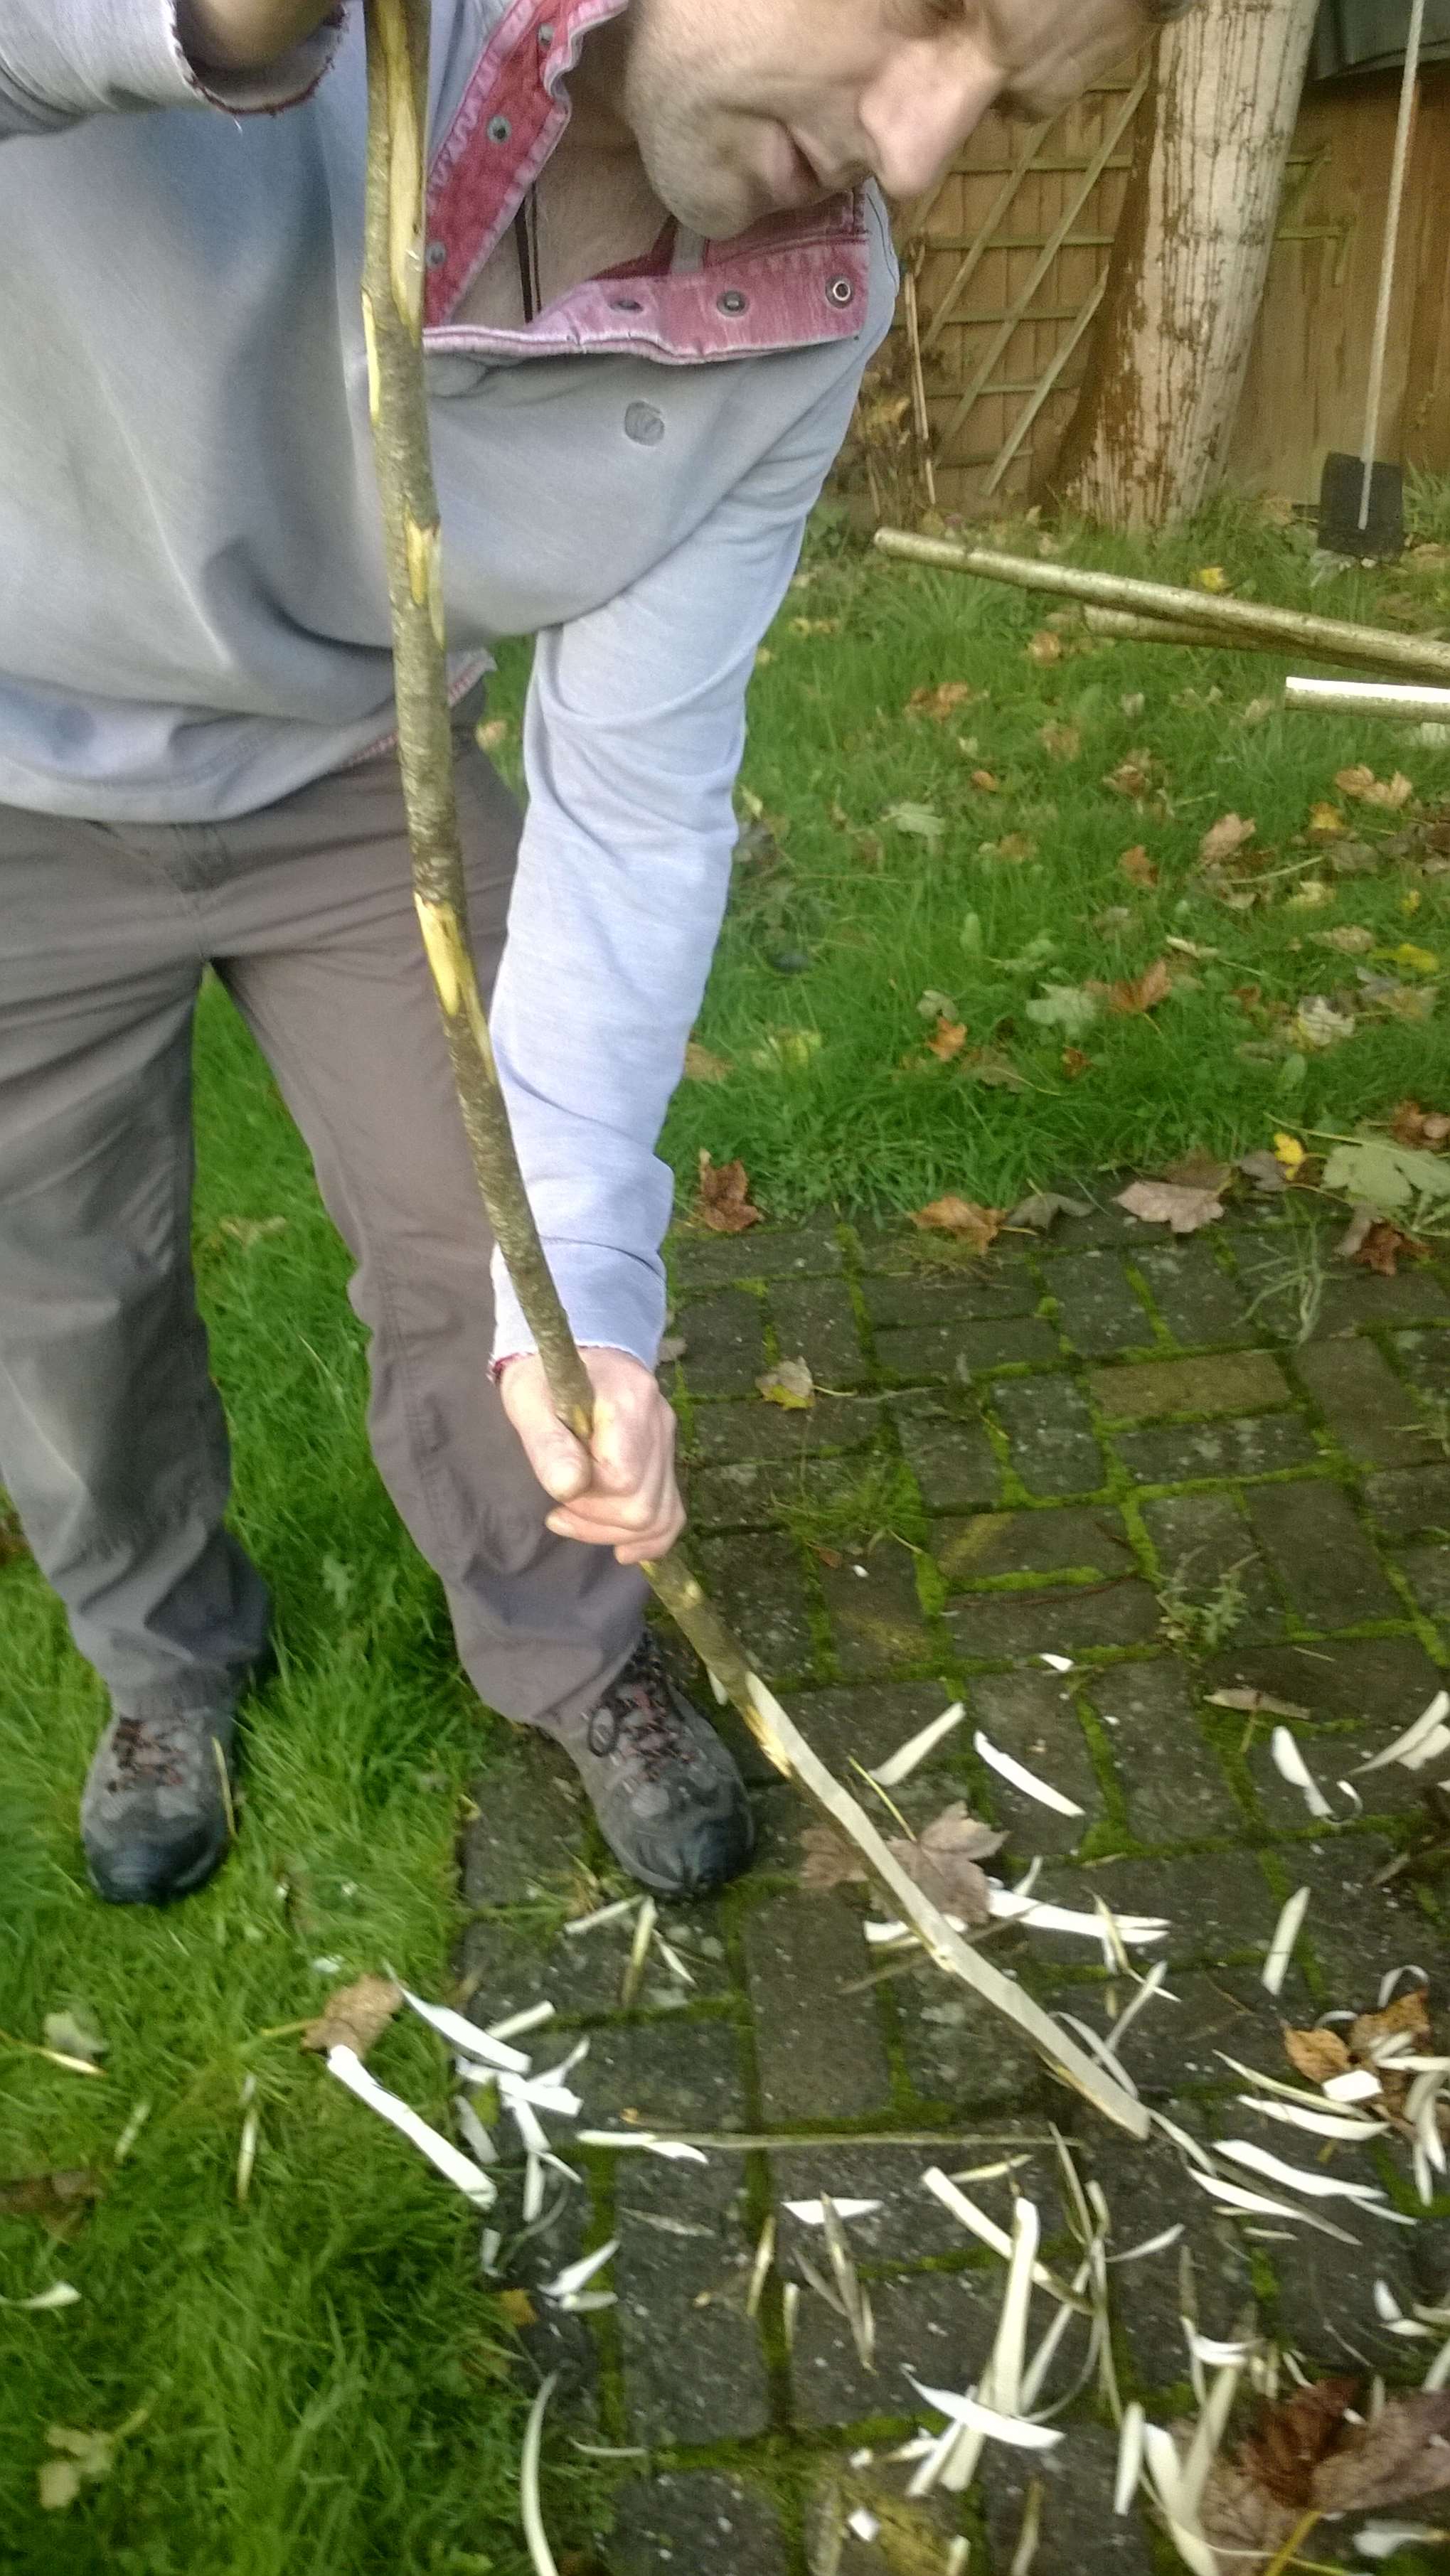
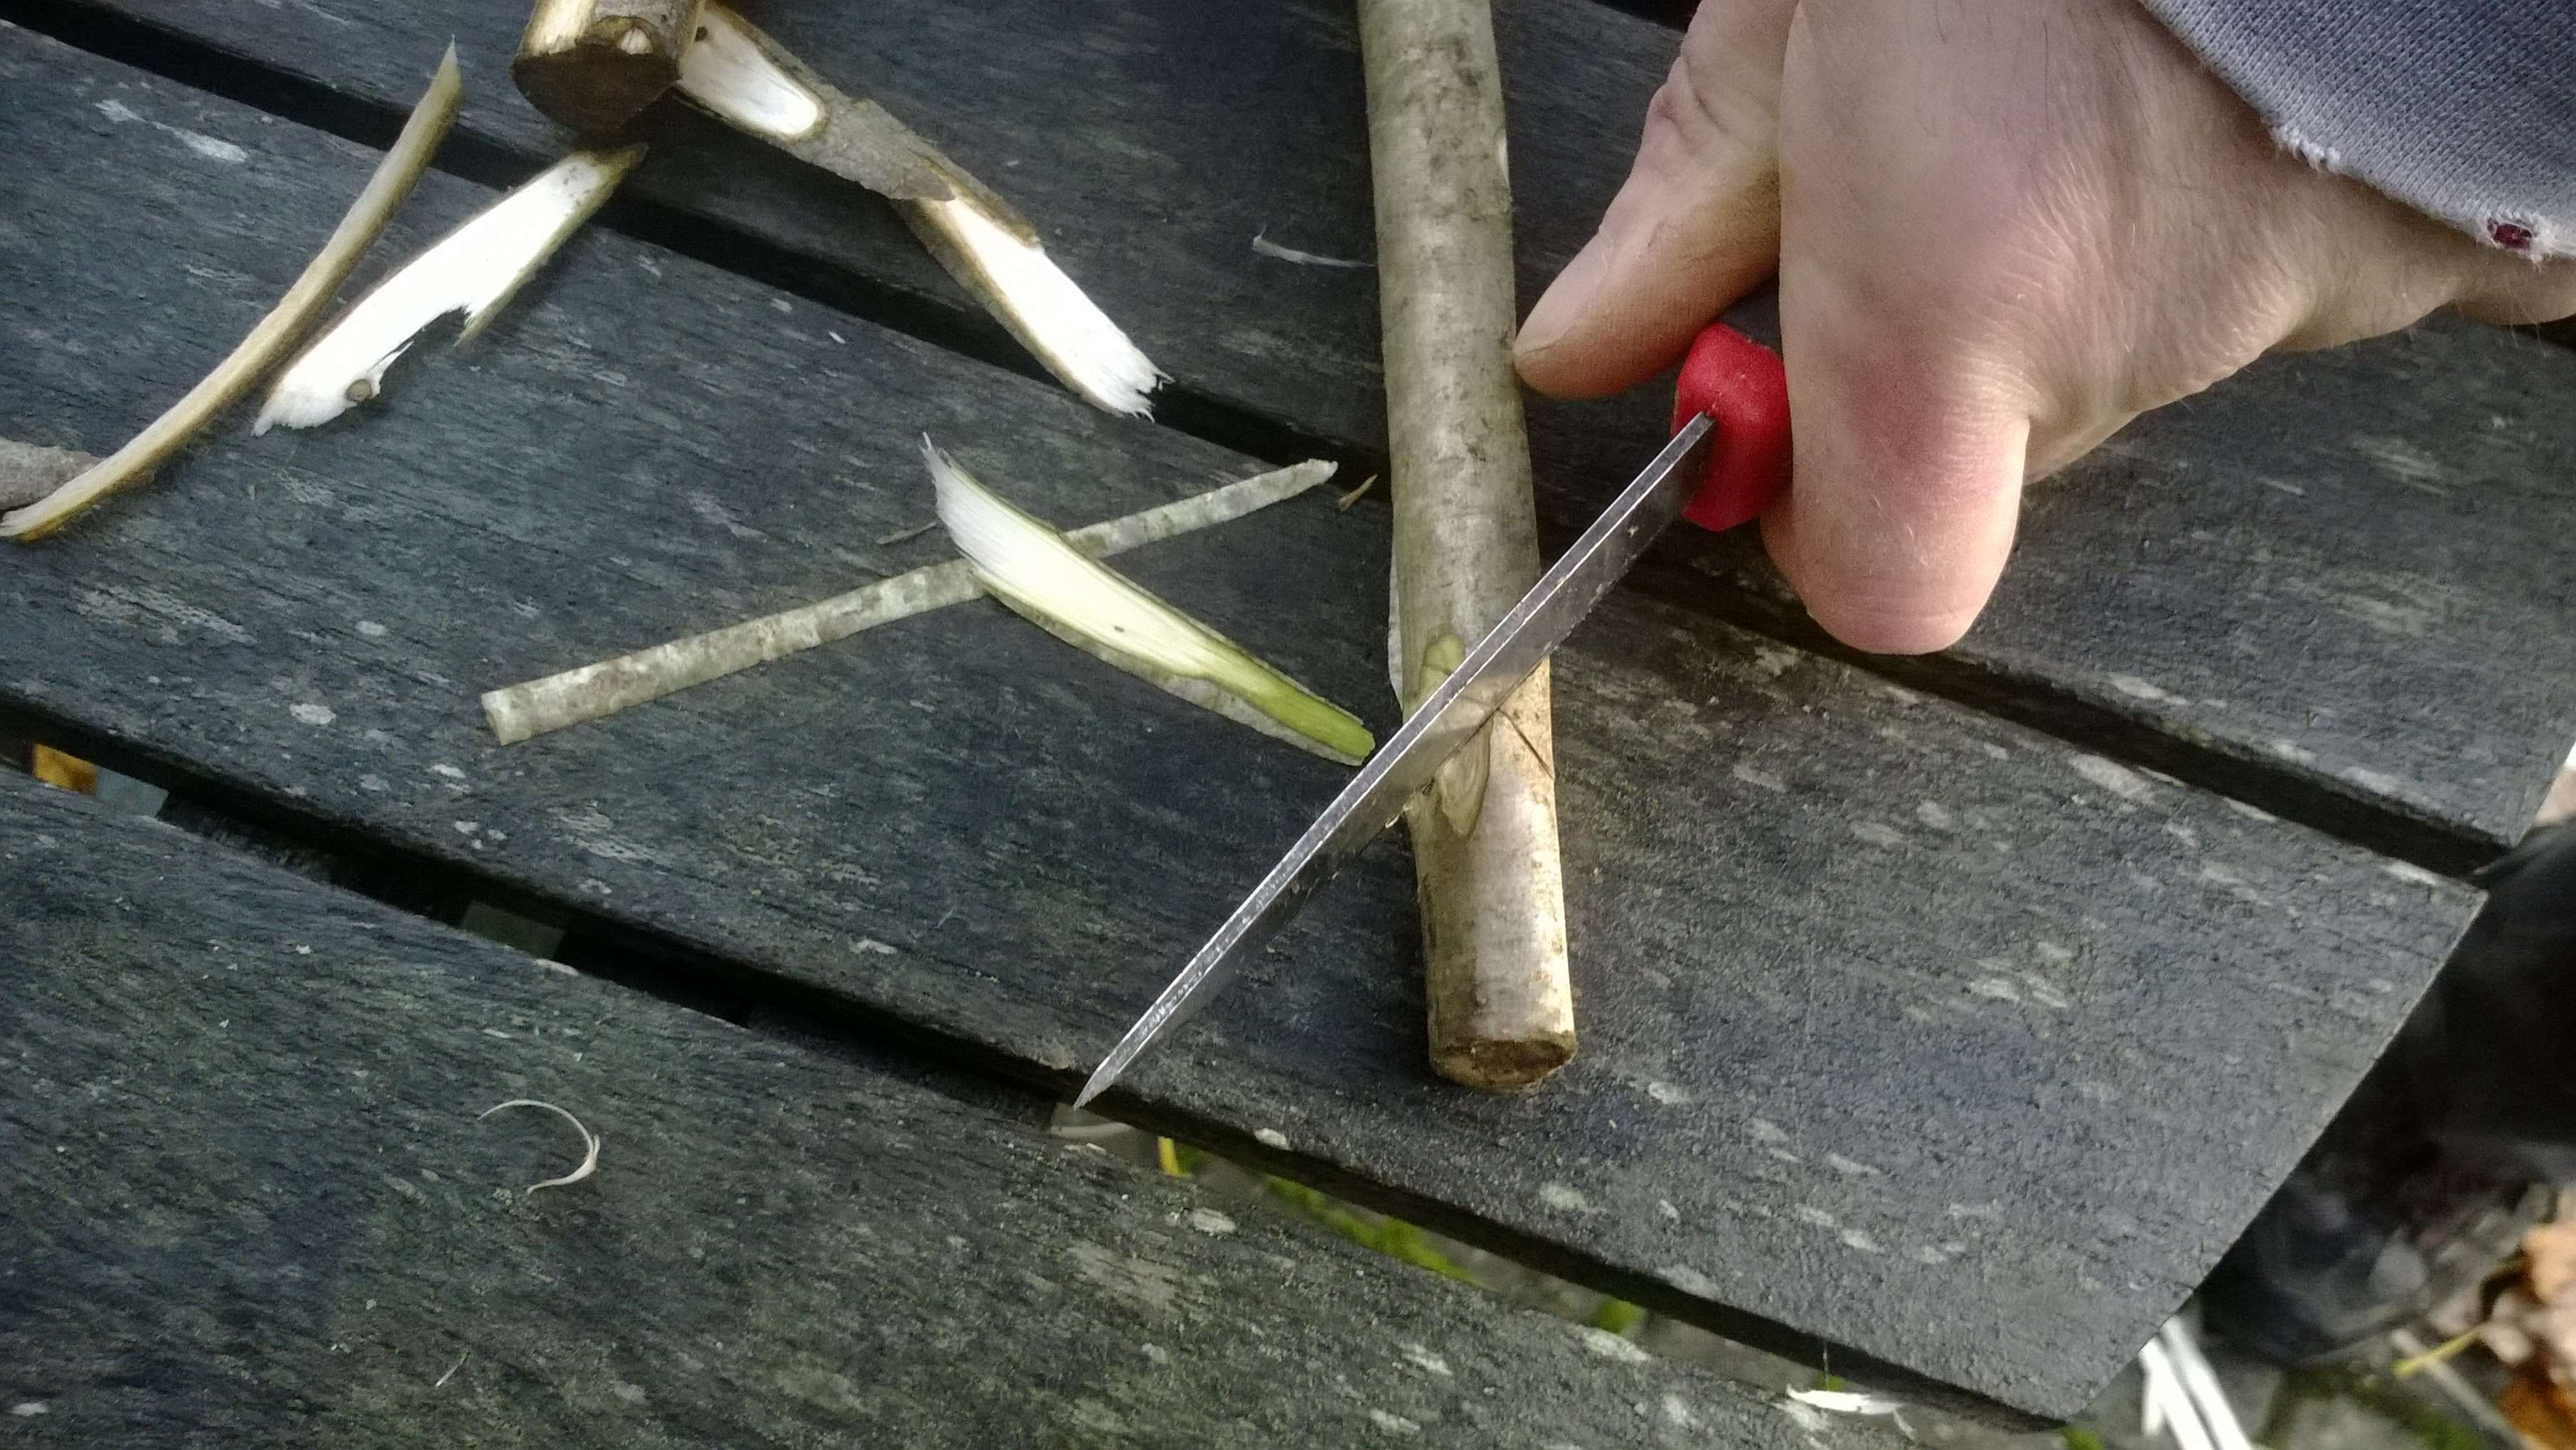
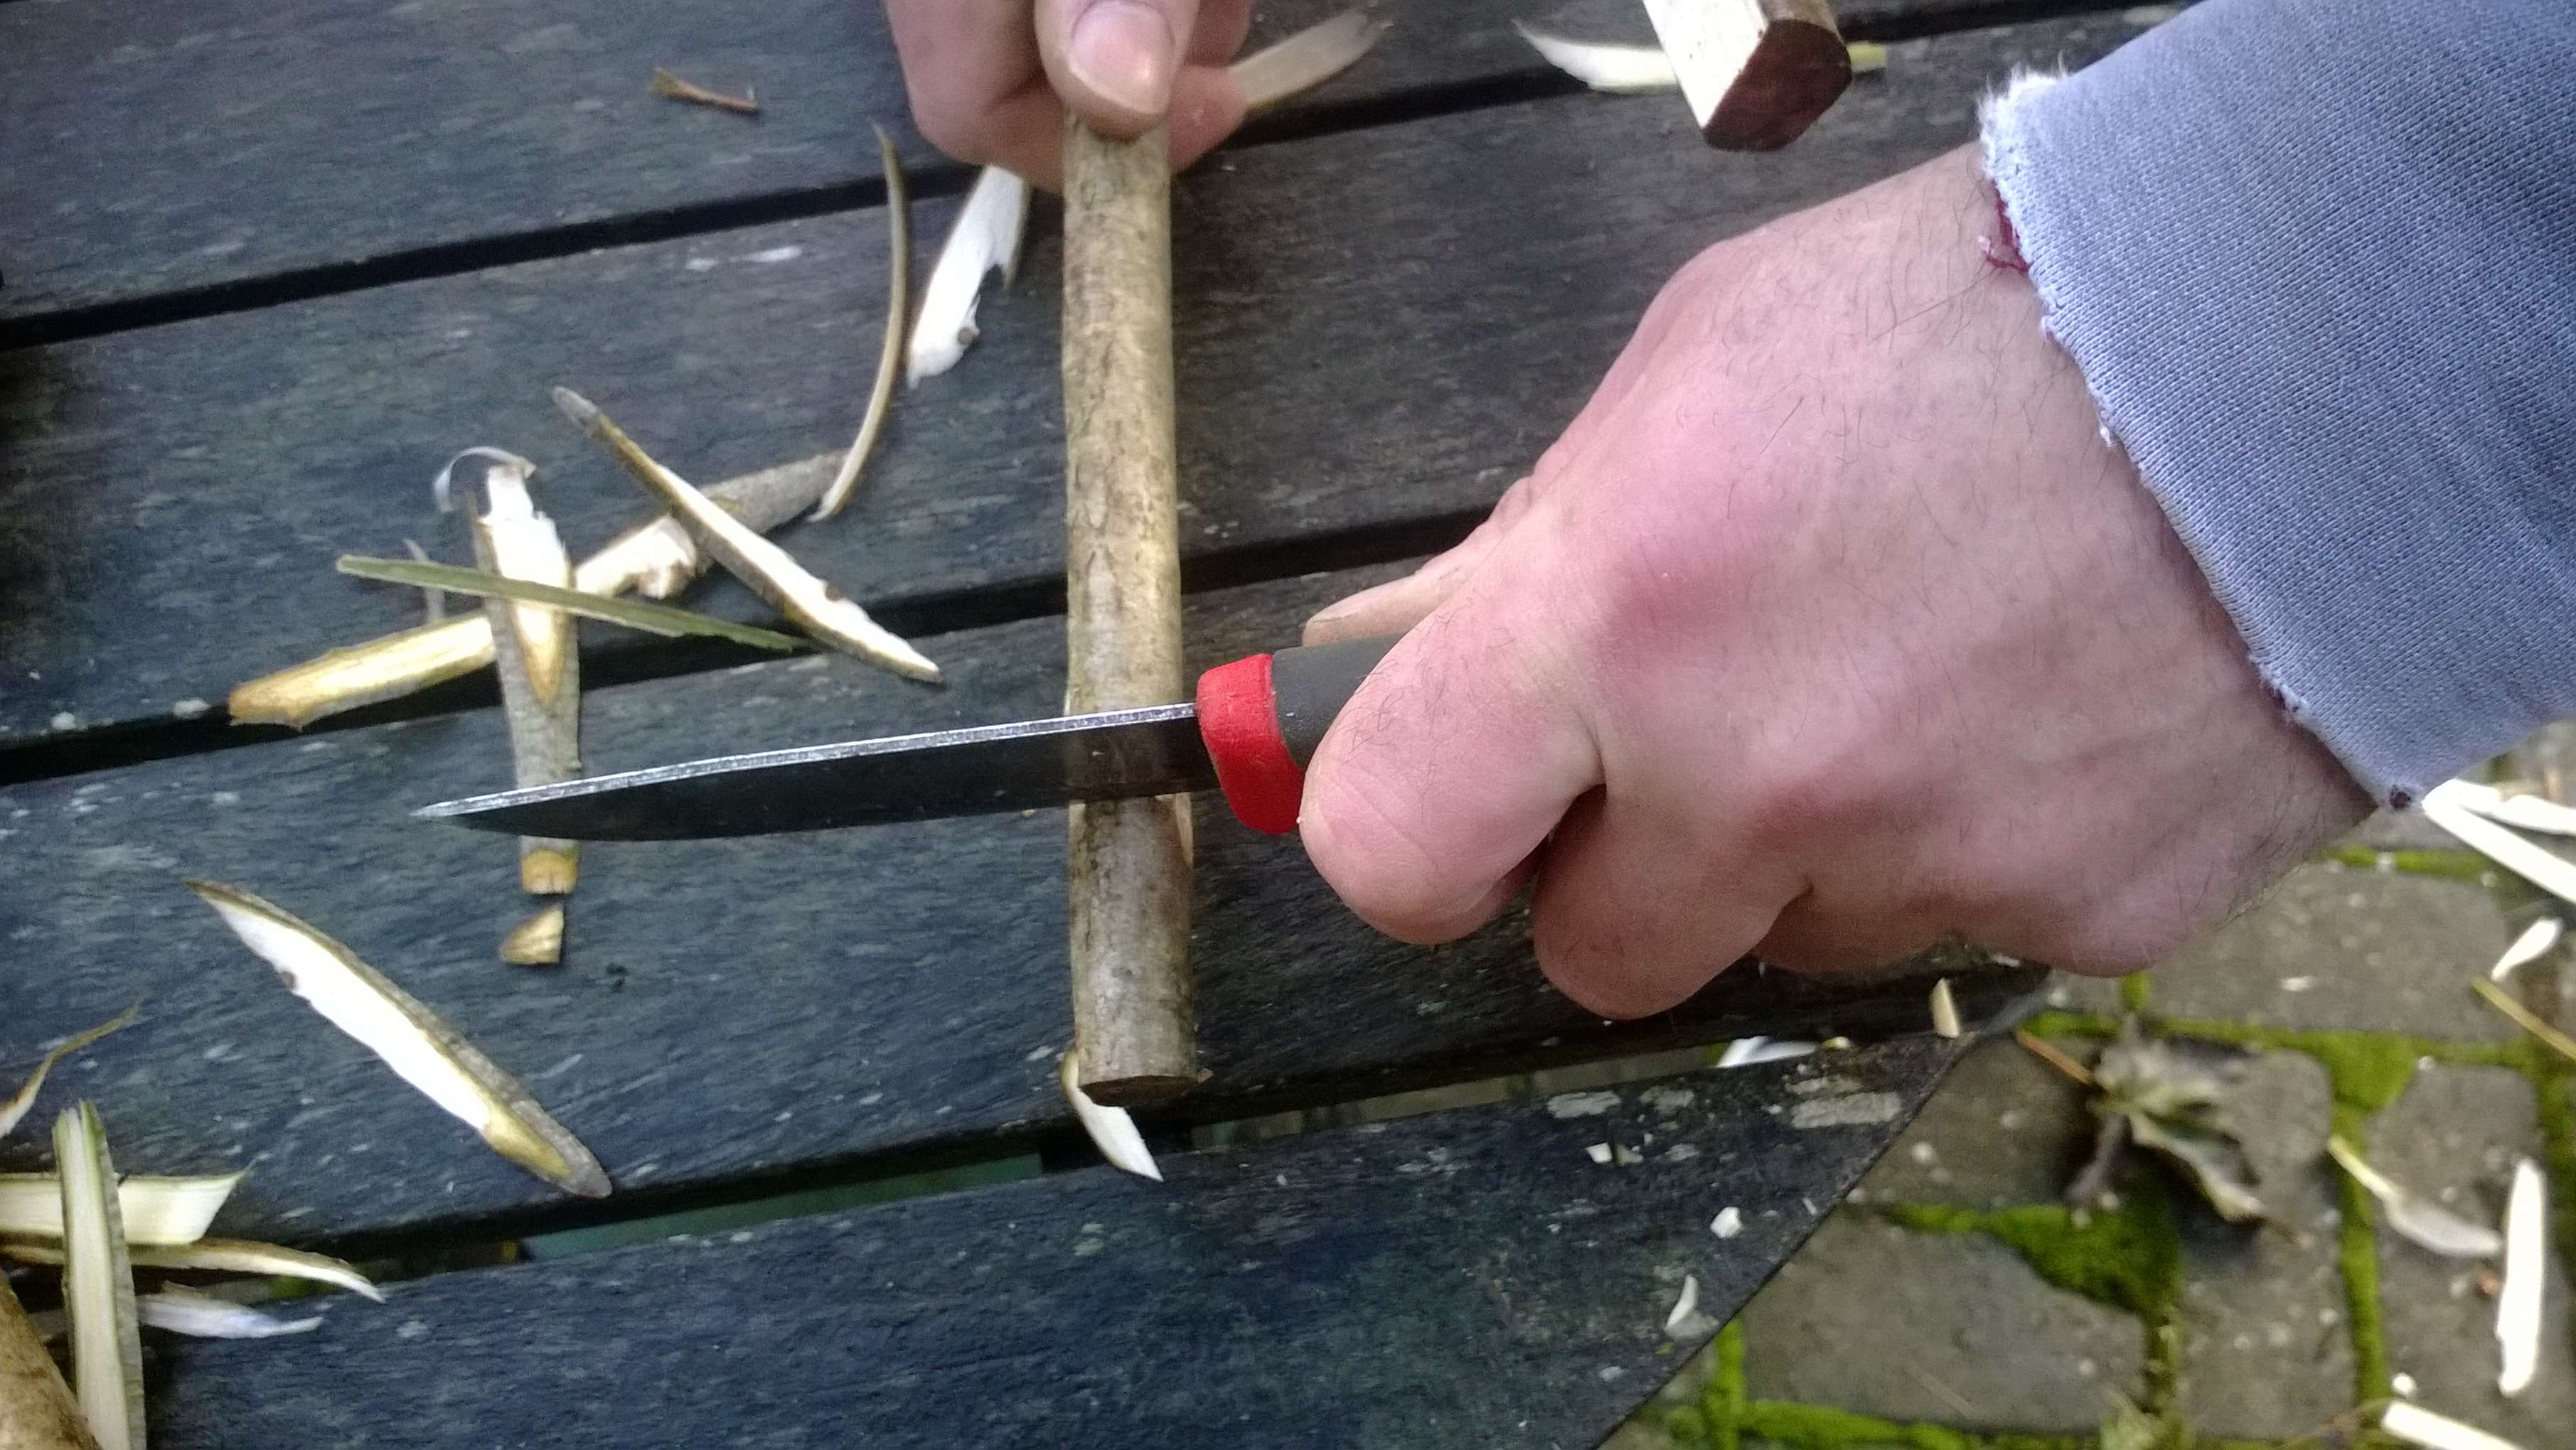
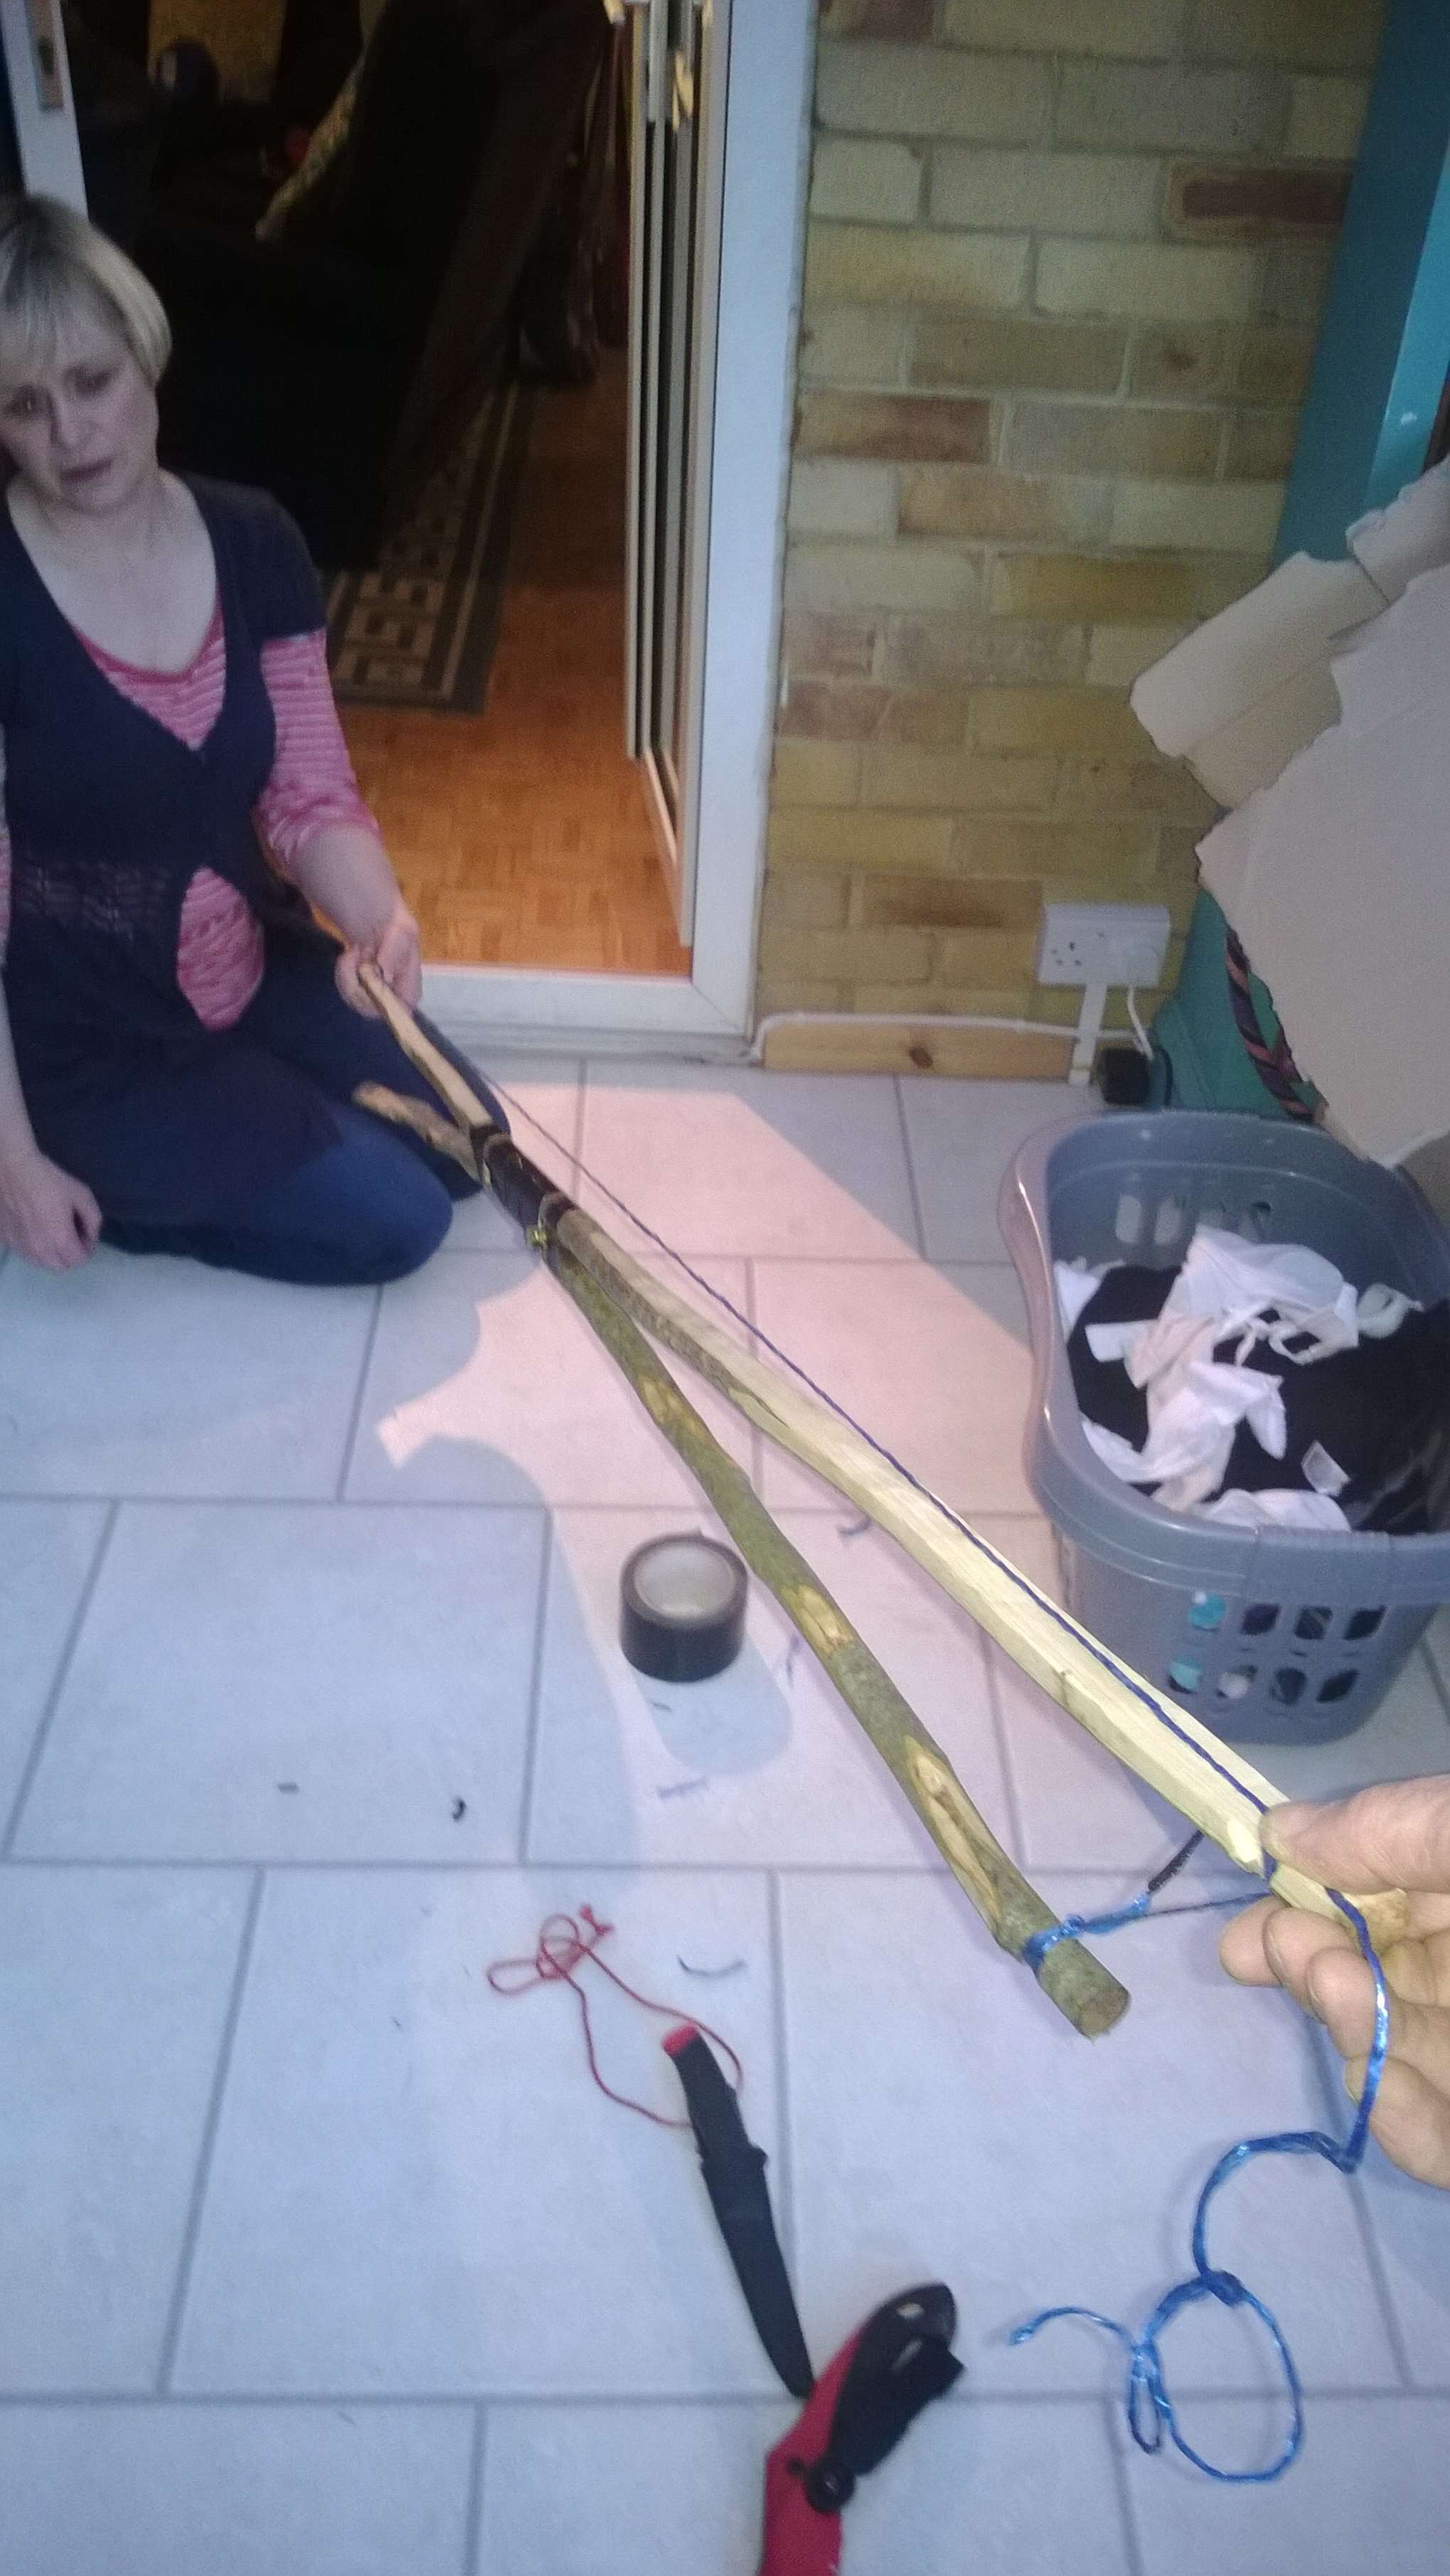
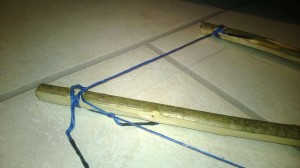
I put this How To…. together to show how to construct a couple of primitive arrows. I used mainly primitive tools with the exception of a few modern touches: the occasional use of a steel knife, adding false sinew when I ran out of real sinew, some sandpaper, a copper-tipped flaker and bleached feathers.
Preparing the arrow shafts
I made these arrows while on the Woodcraft School Primitive Technology course in 2009. John Rhyder the course instructor supplied us with pre-cut branches from a spindle(Euonynus europaeus) tree, which has traditionally been used for the manufacture of arrows as it is a hard wood and takes a point well. Another option that was available to us was hazel(Corylus avillana) as there was some on site. I chose to use spindle as I had never used it before to make arrows.
Flint-tipped arrows
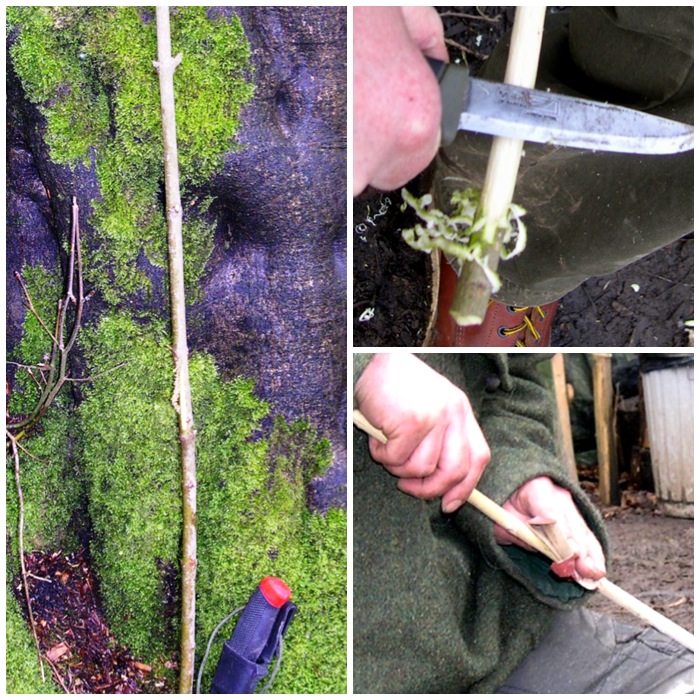
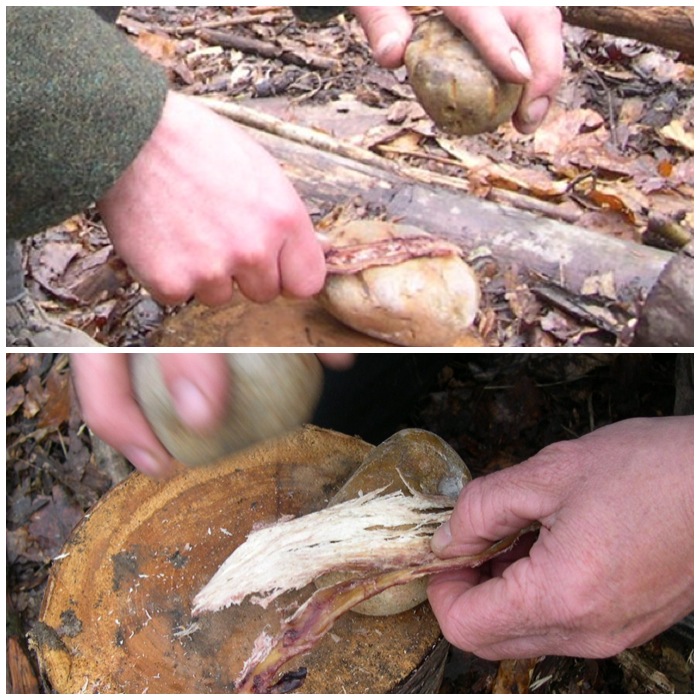
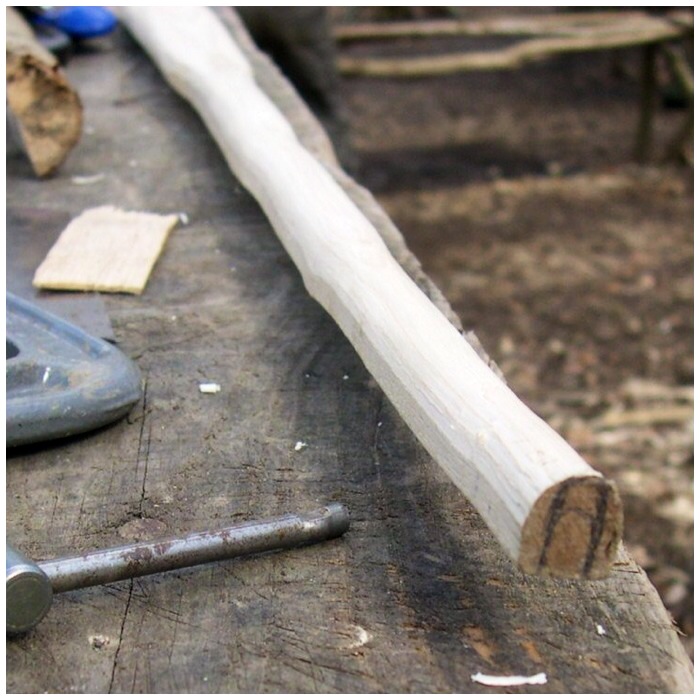
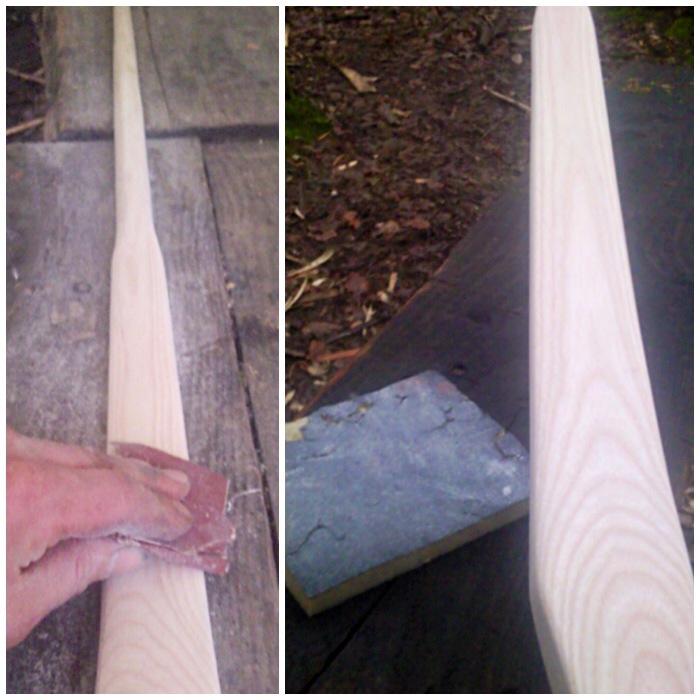
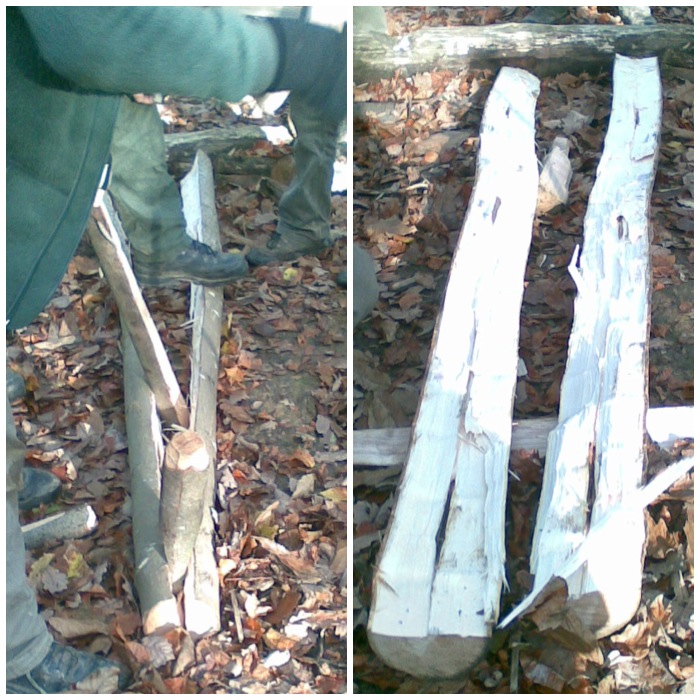
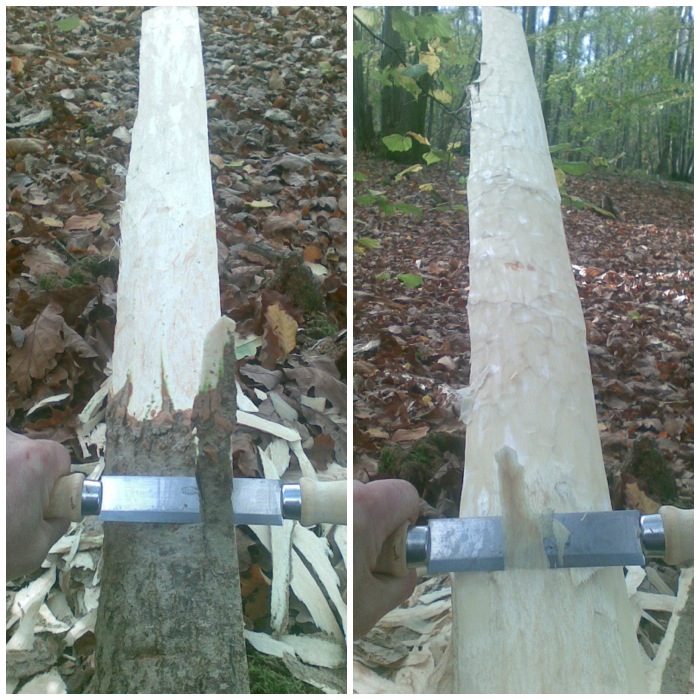
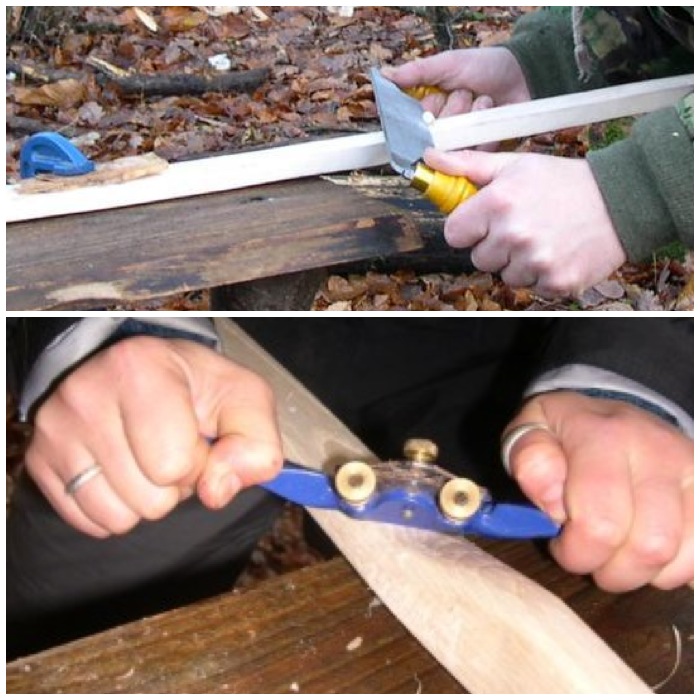
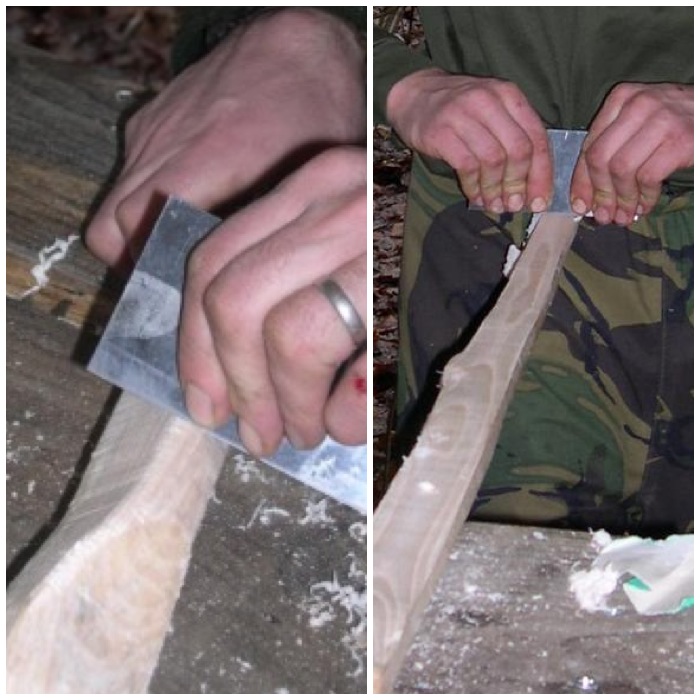
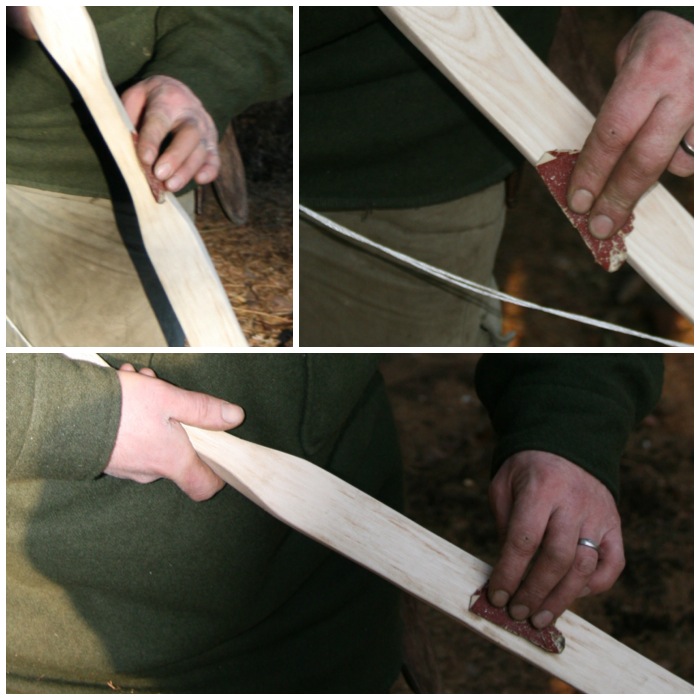
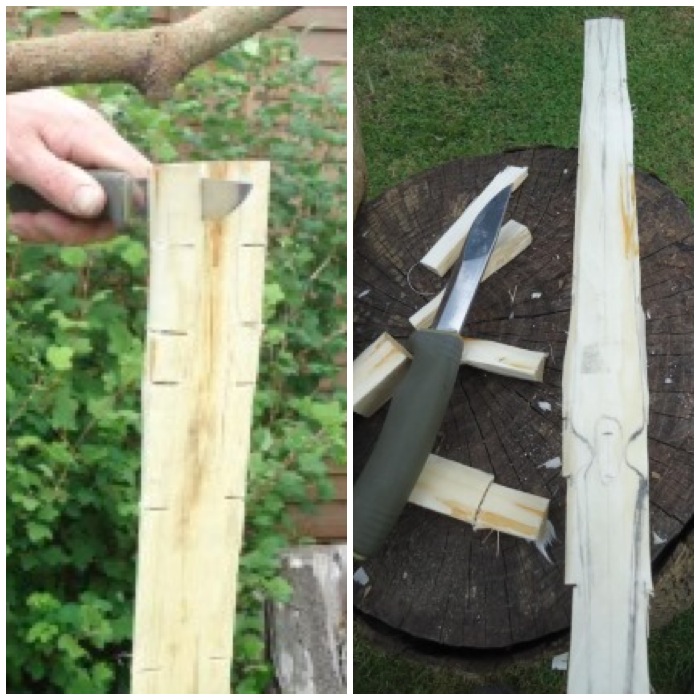
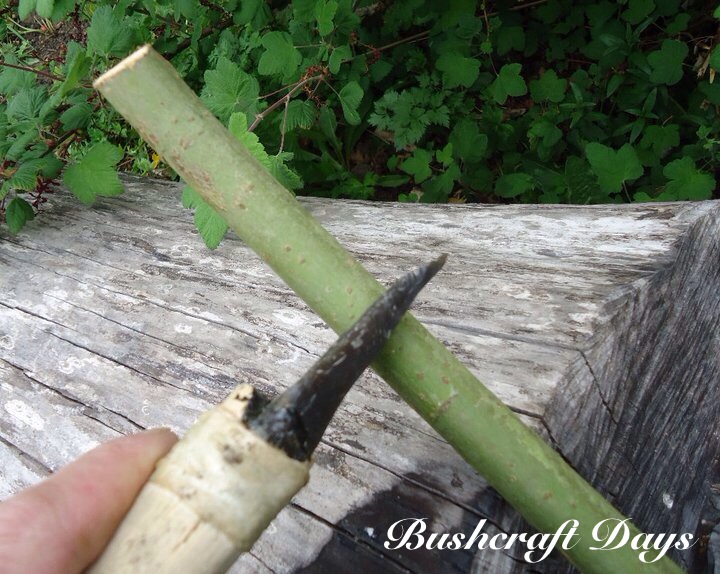
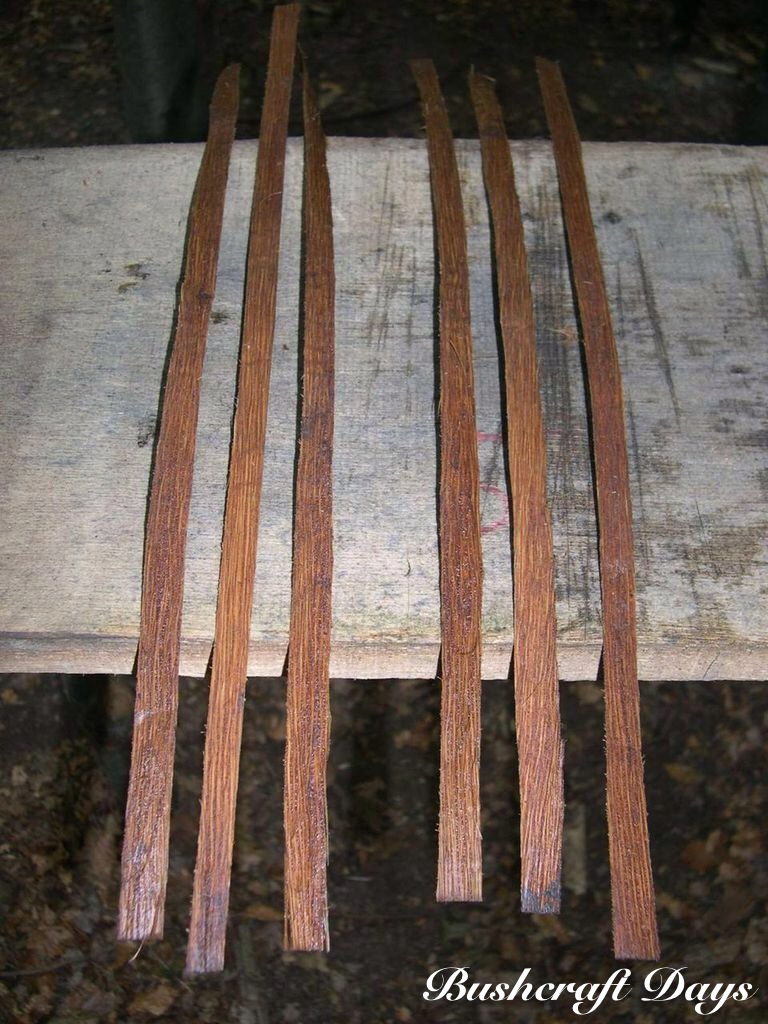
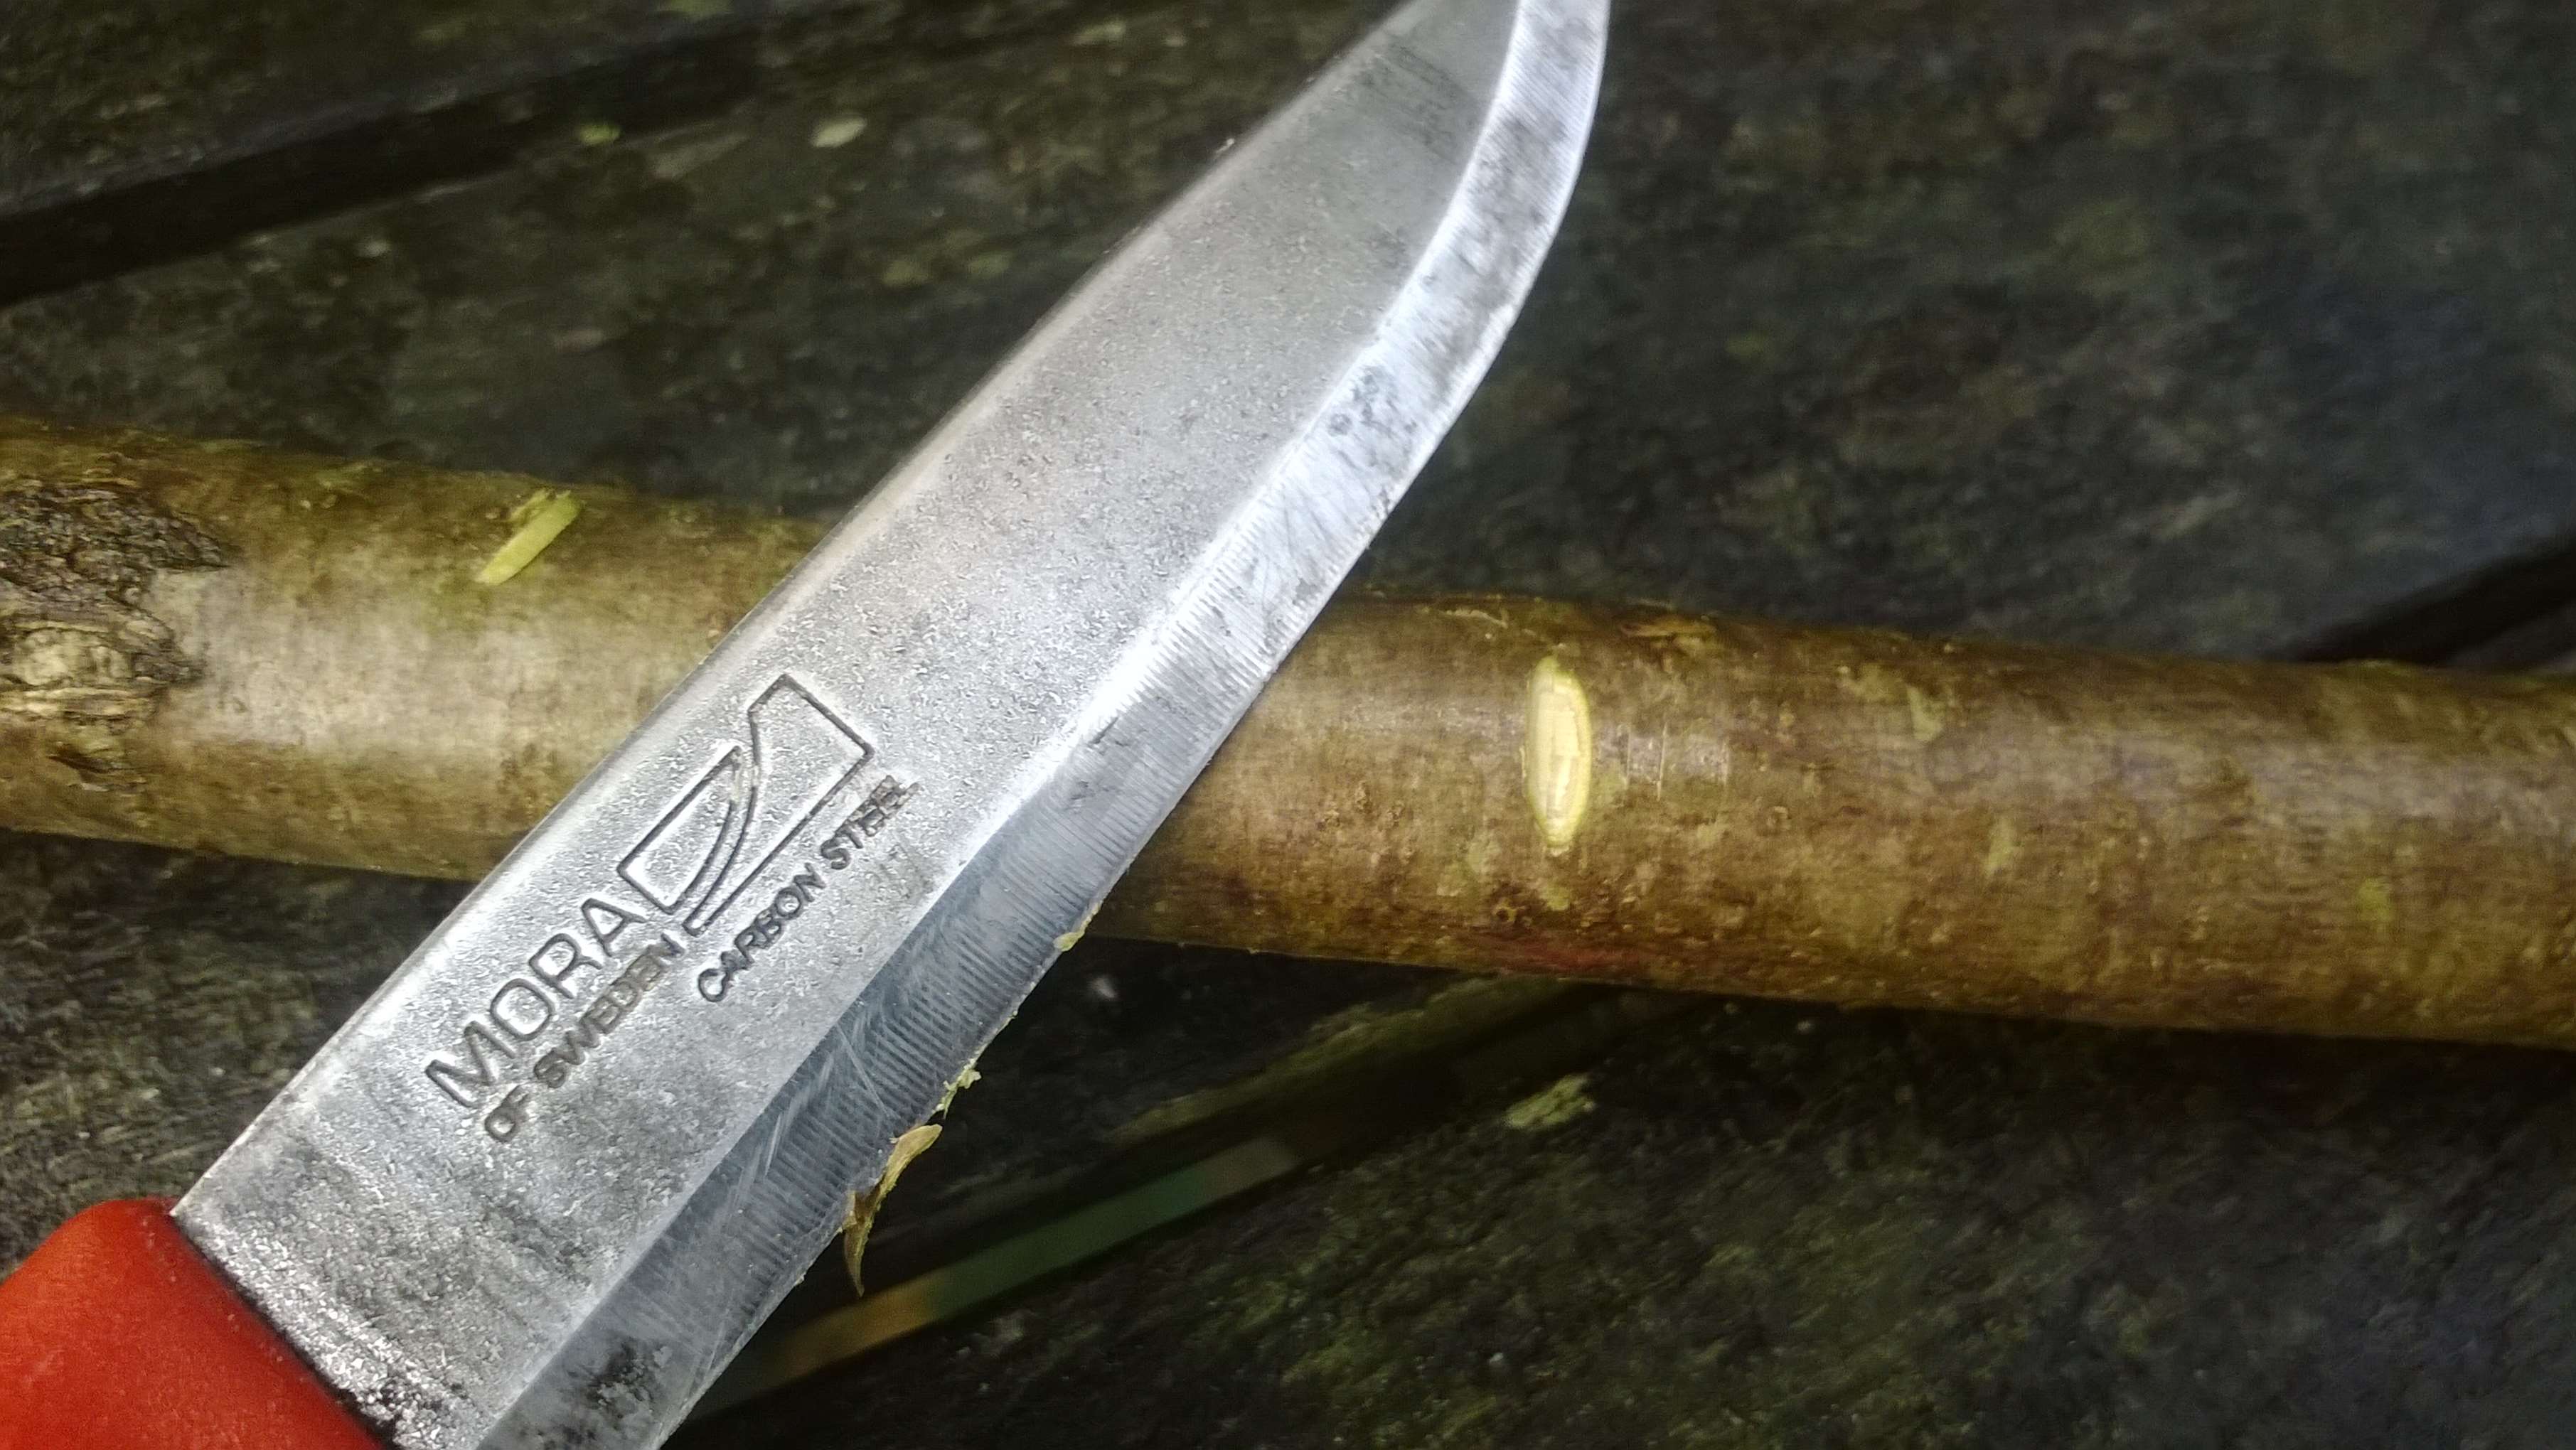
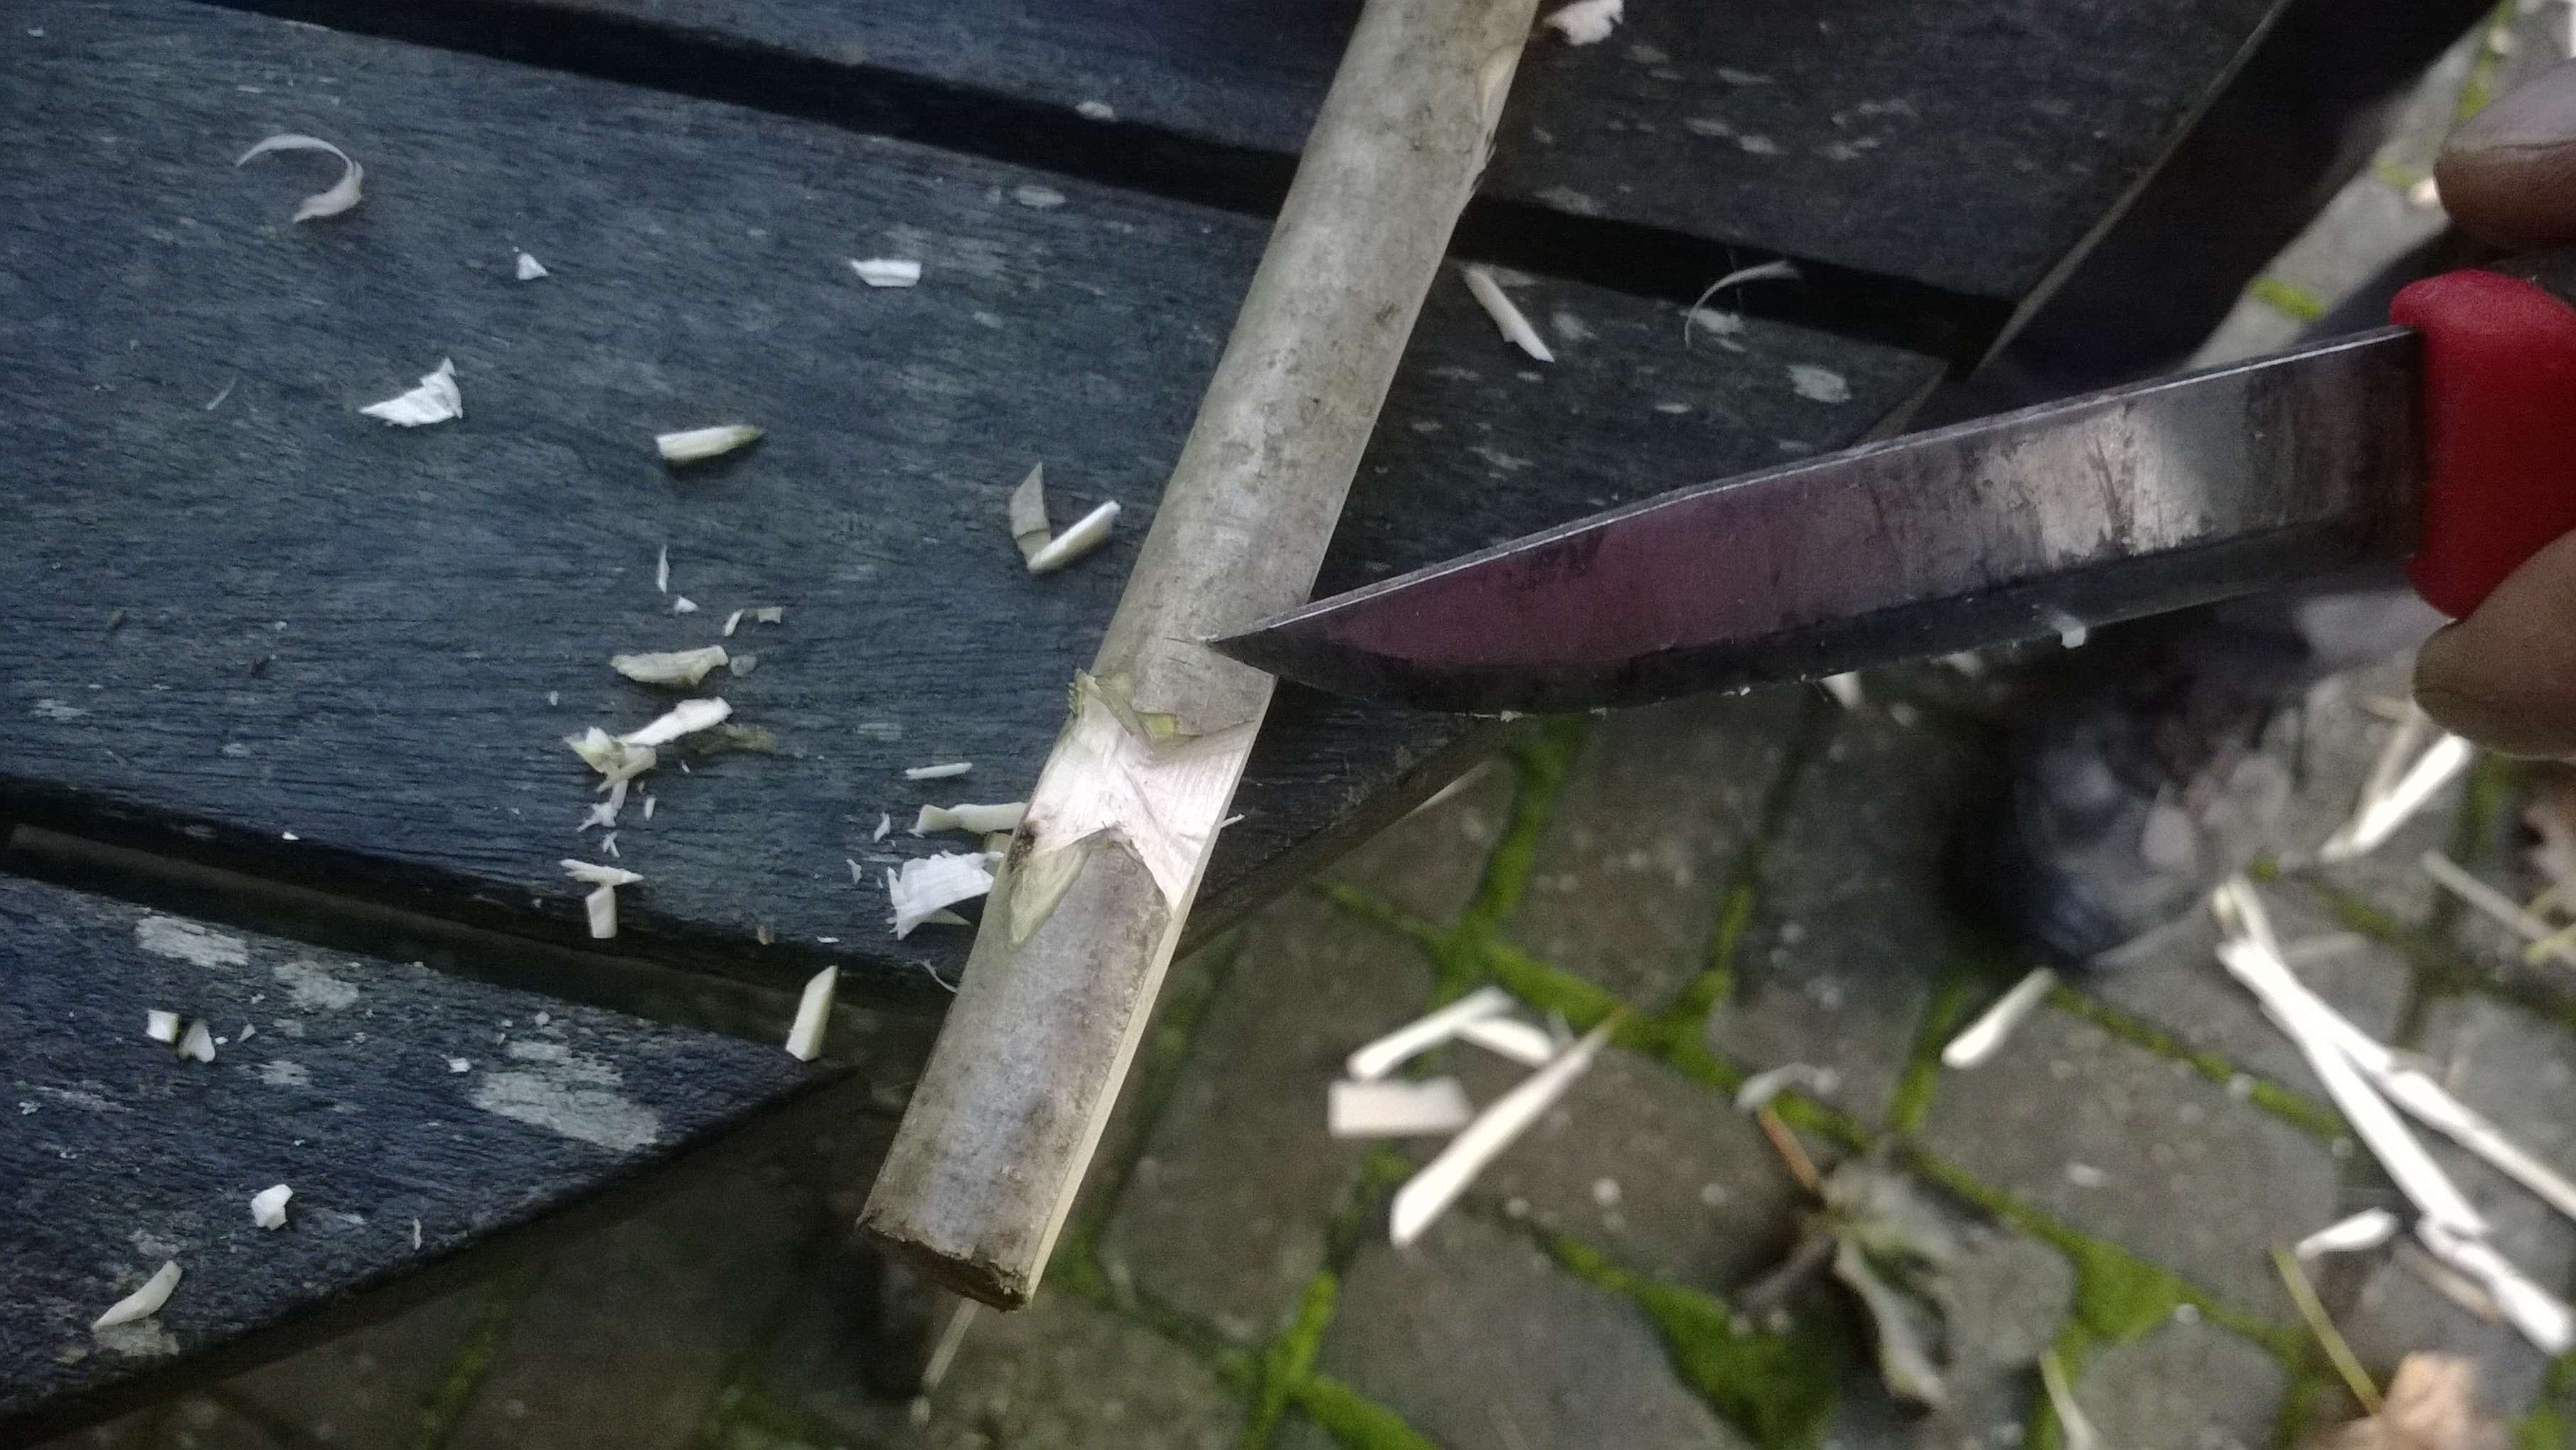
I used the back of my knife to scrape the bark off the wood but this would traditionally have been done with a piece of sharp flint or other such stone. For safety I kept the knife still and pulled the green stick backwards, scraping bark off with the back of the blade. I like this method as the blade stays still making it very safe. I then roughly sanded each of the branches with sandpaper. This could have been completed traditionally with either a handful of sand or a soft rock such as sandstone.
De-barking
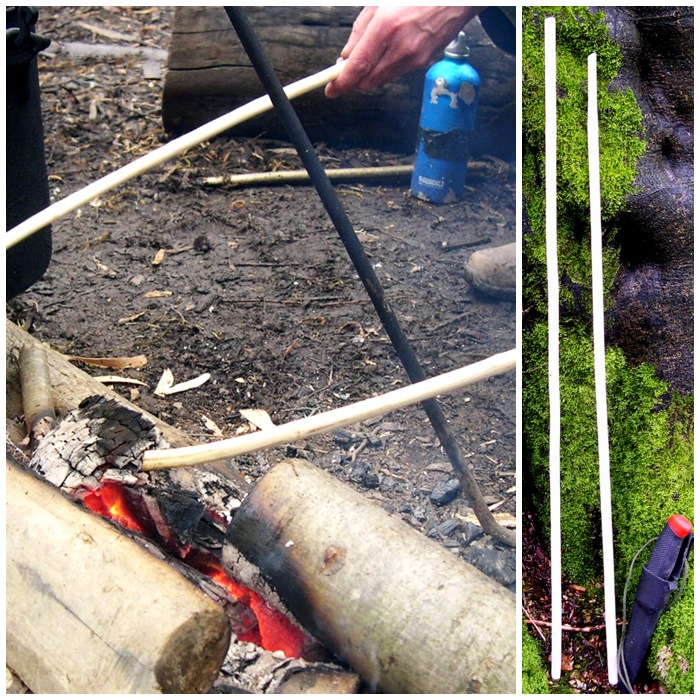
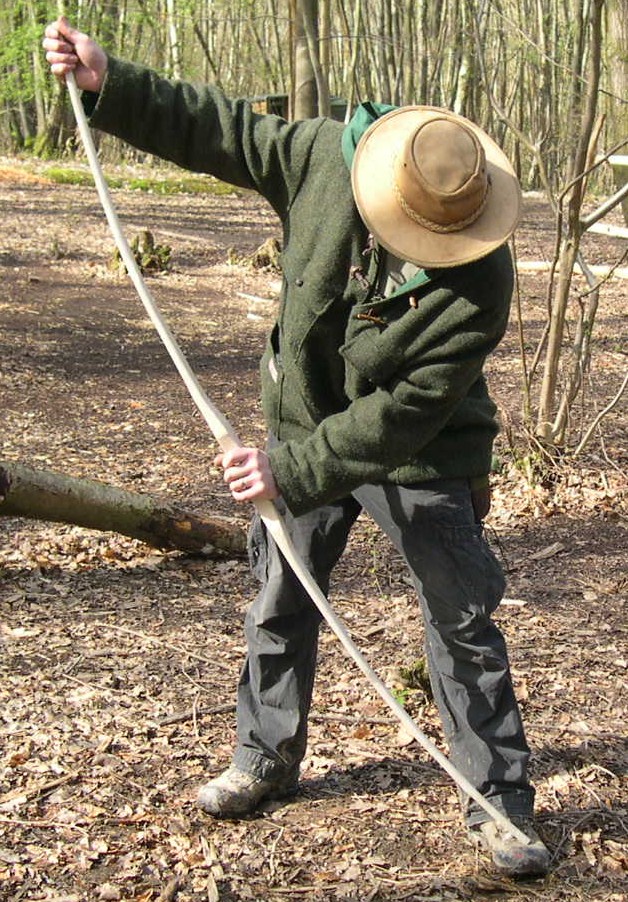
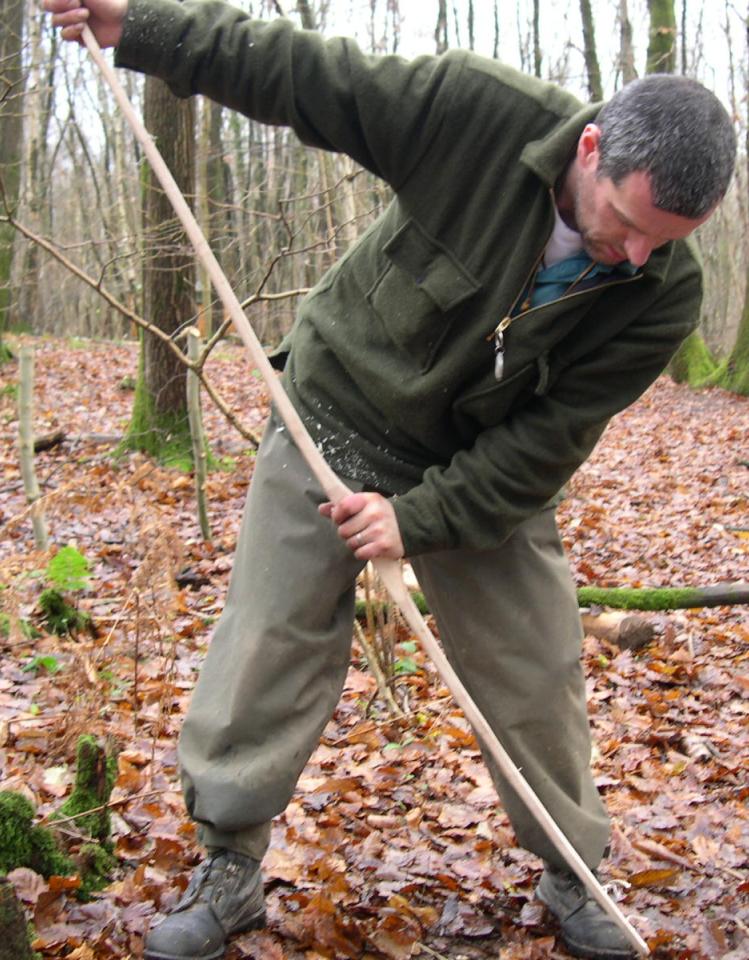
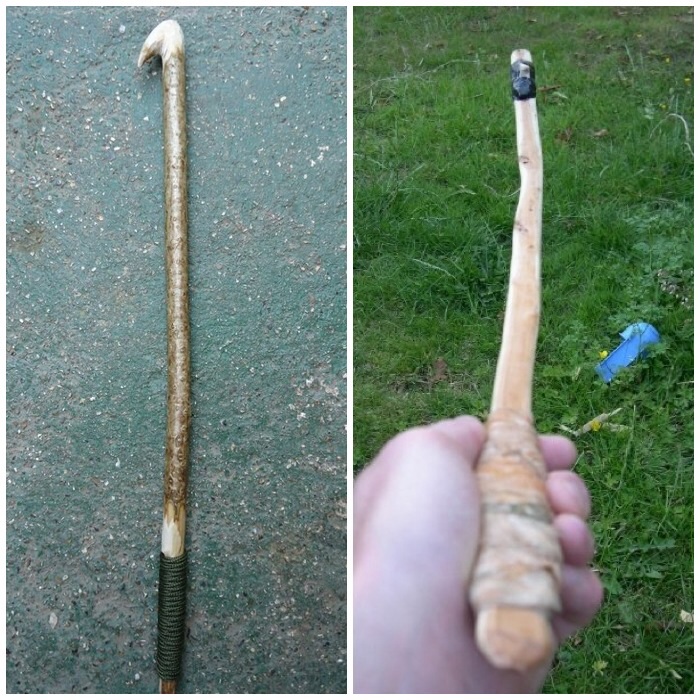
I then heated the branches over an open fire. I was careful not to scorch the wood as this changes its properties and makes it brittle. The trick is to slowly turn the branch in a circular fashion, heating evenly all around the section of wood that needs straightened. This in effect creates steam in the wood as the sap heats up and so allows you to slowly straighten the arrow (this method works best on green wood). To straighten the bumps in the wood you need to hold it in position (as straight as possible) until it cools and sets into its new shape.
Heating and straightening
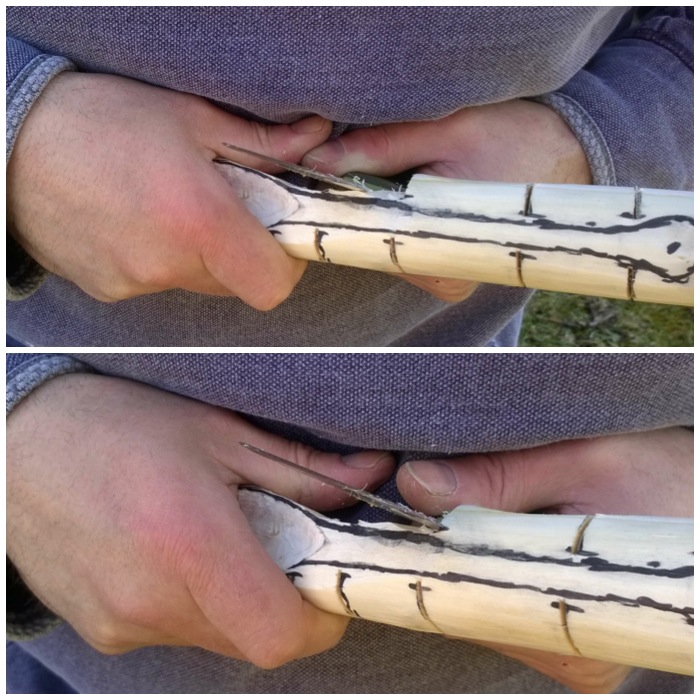
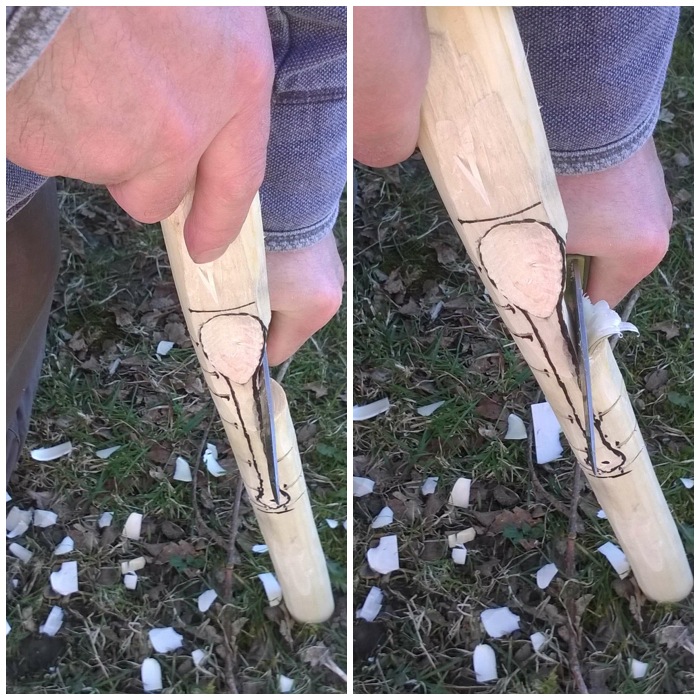
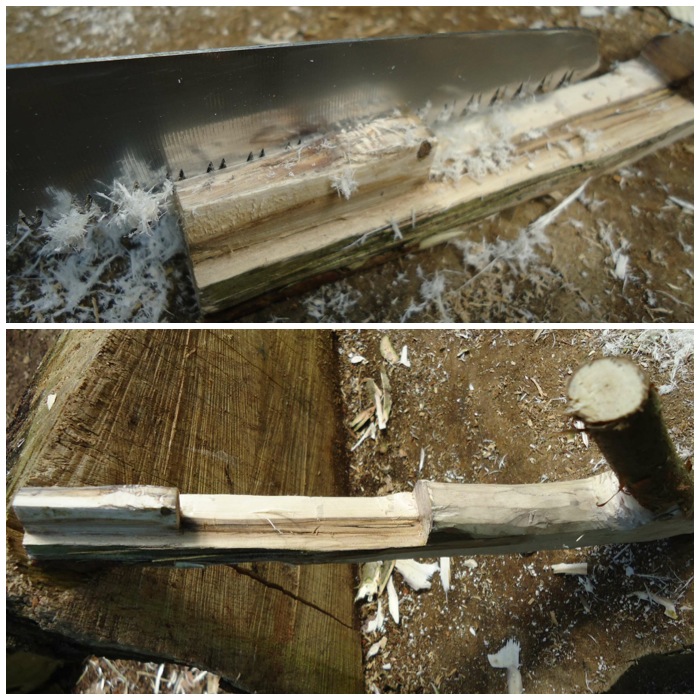
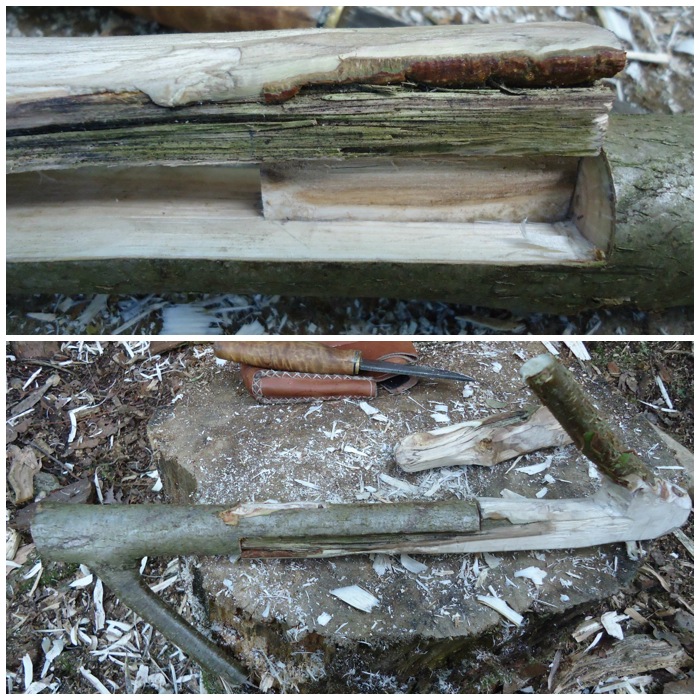
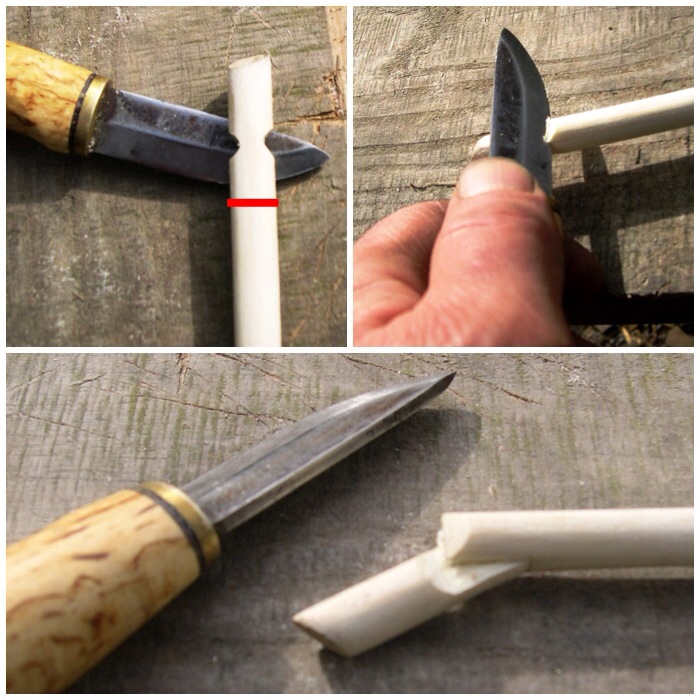
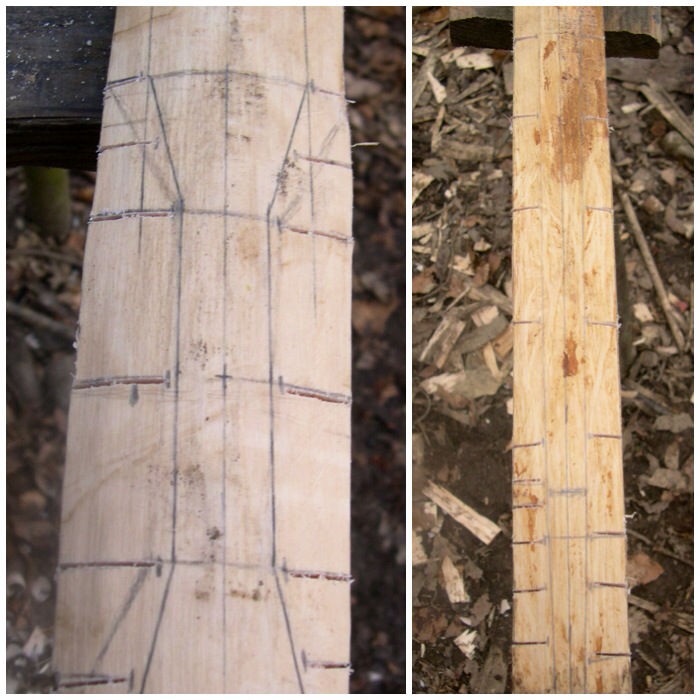
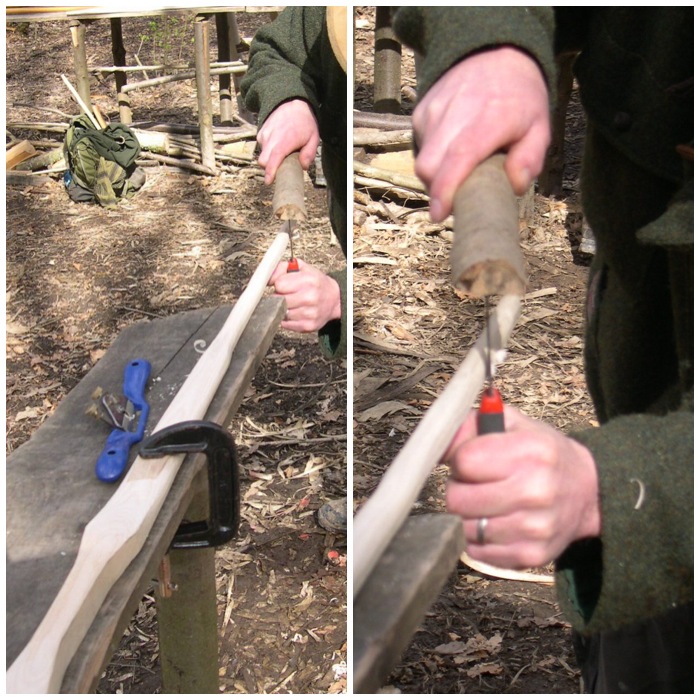
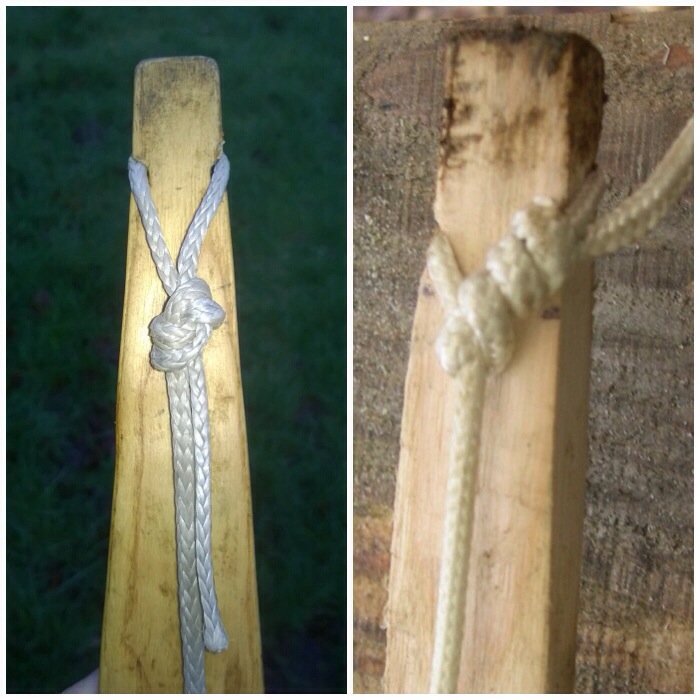
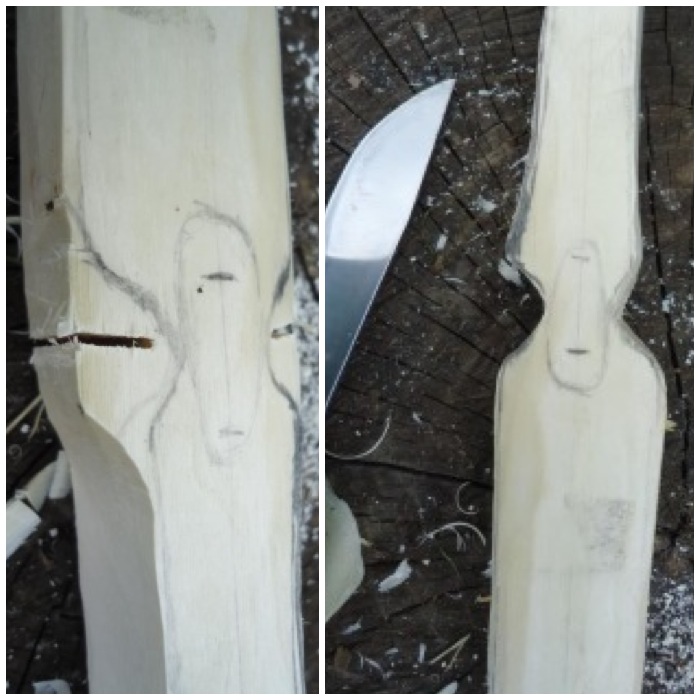
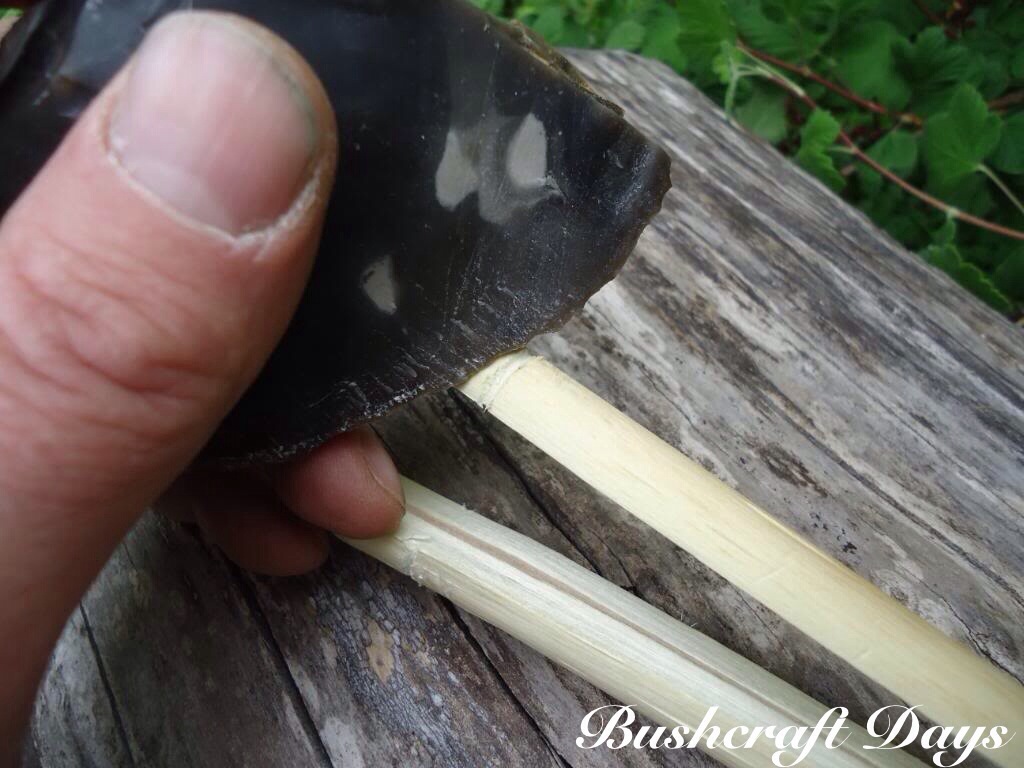
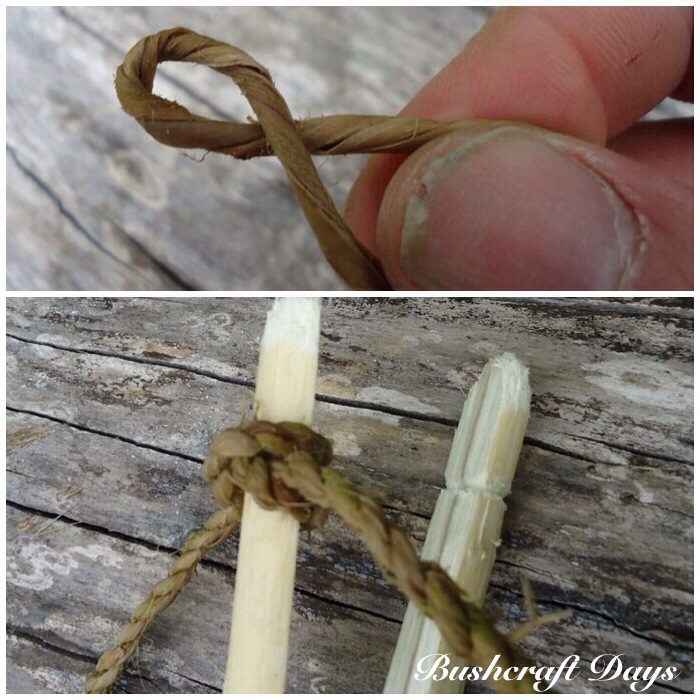
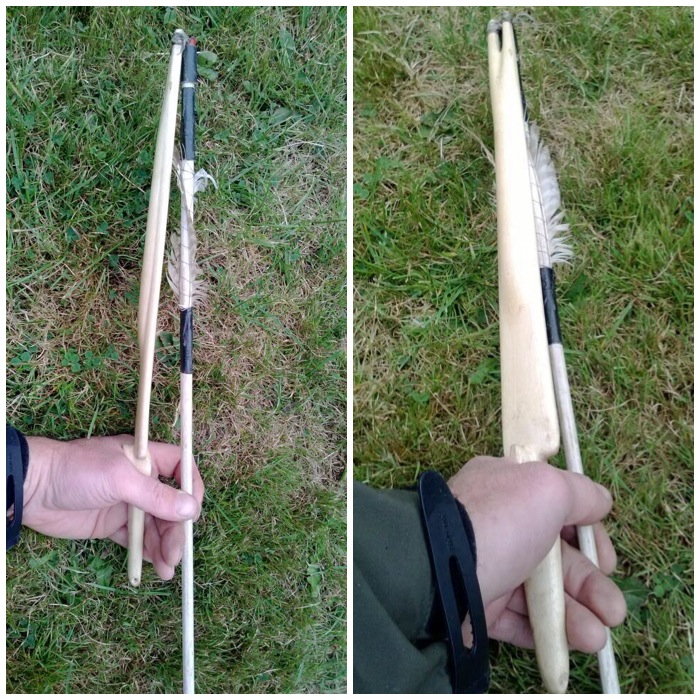
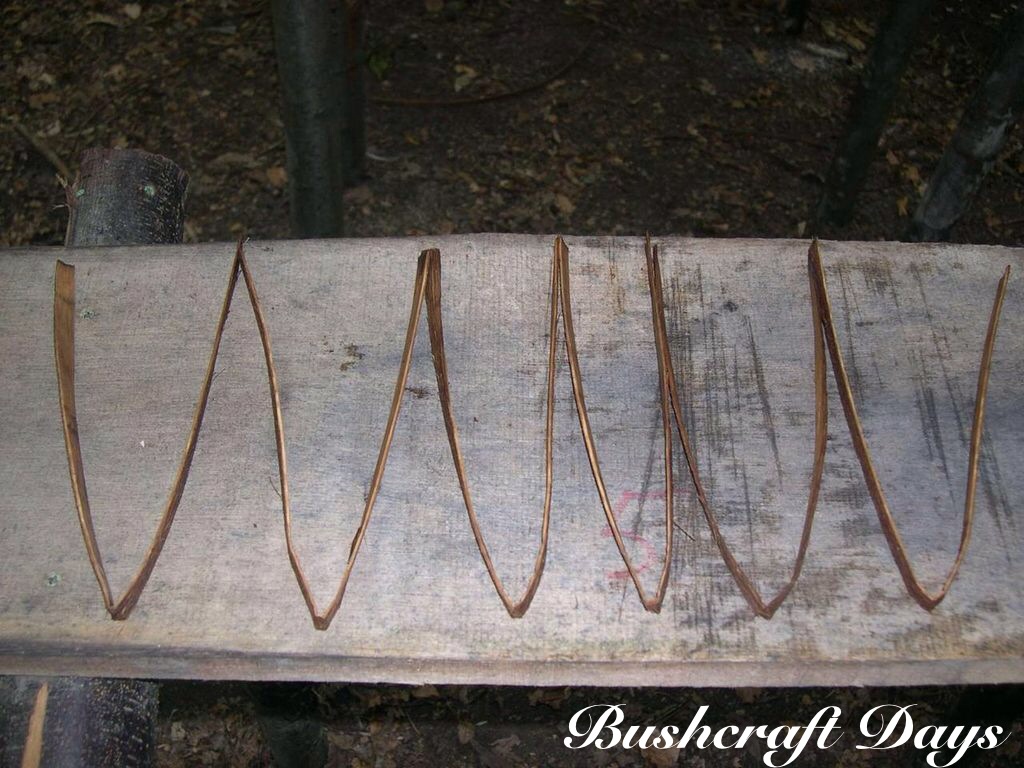
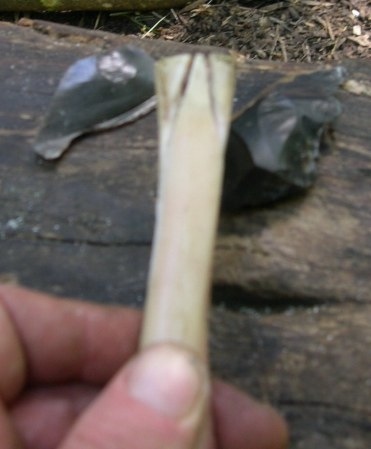
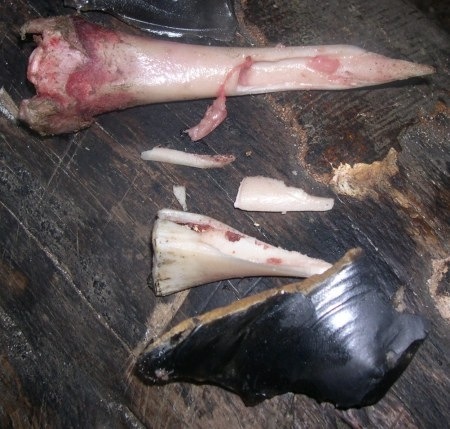
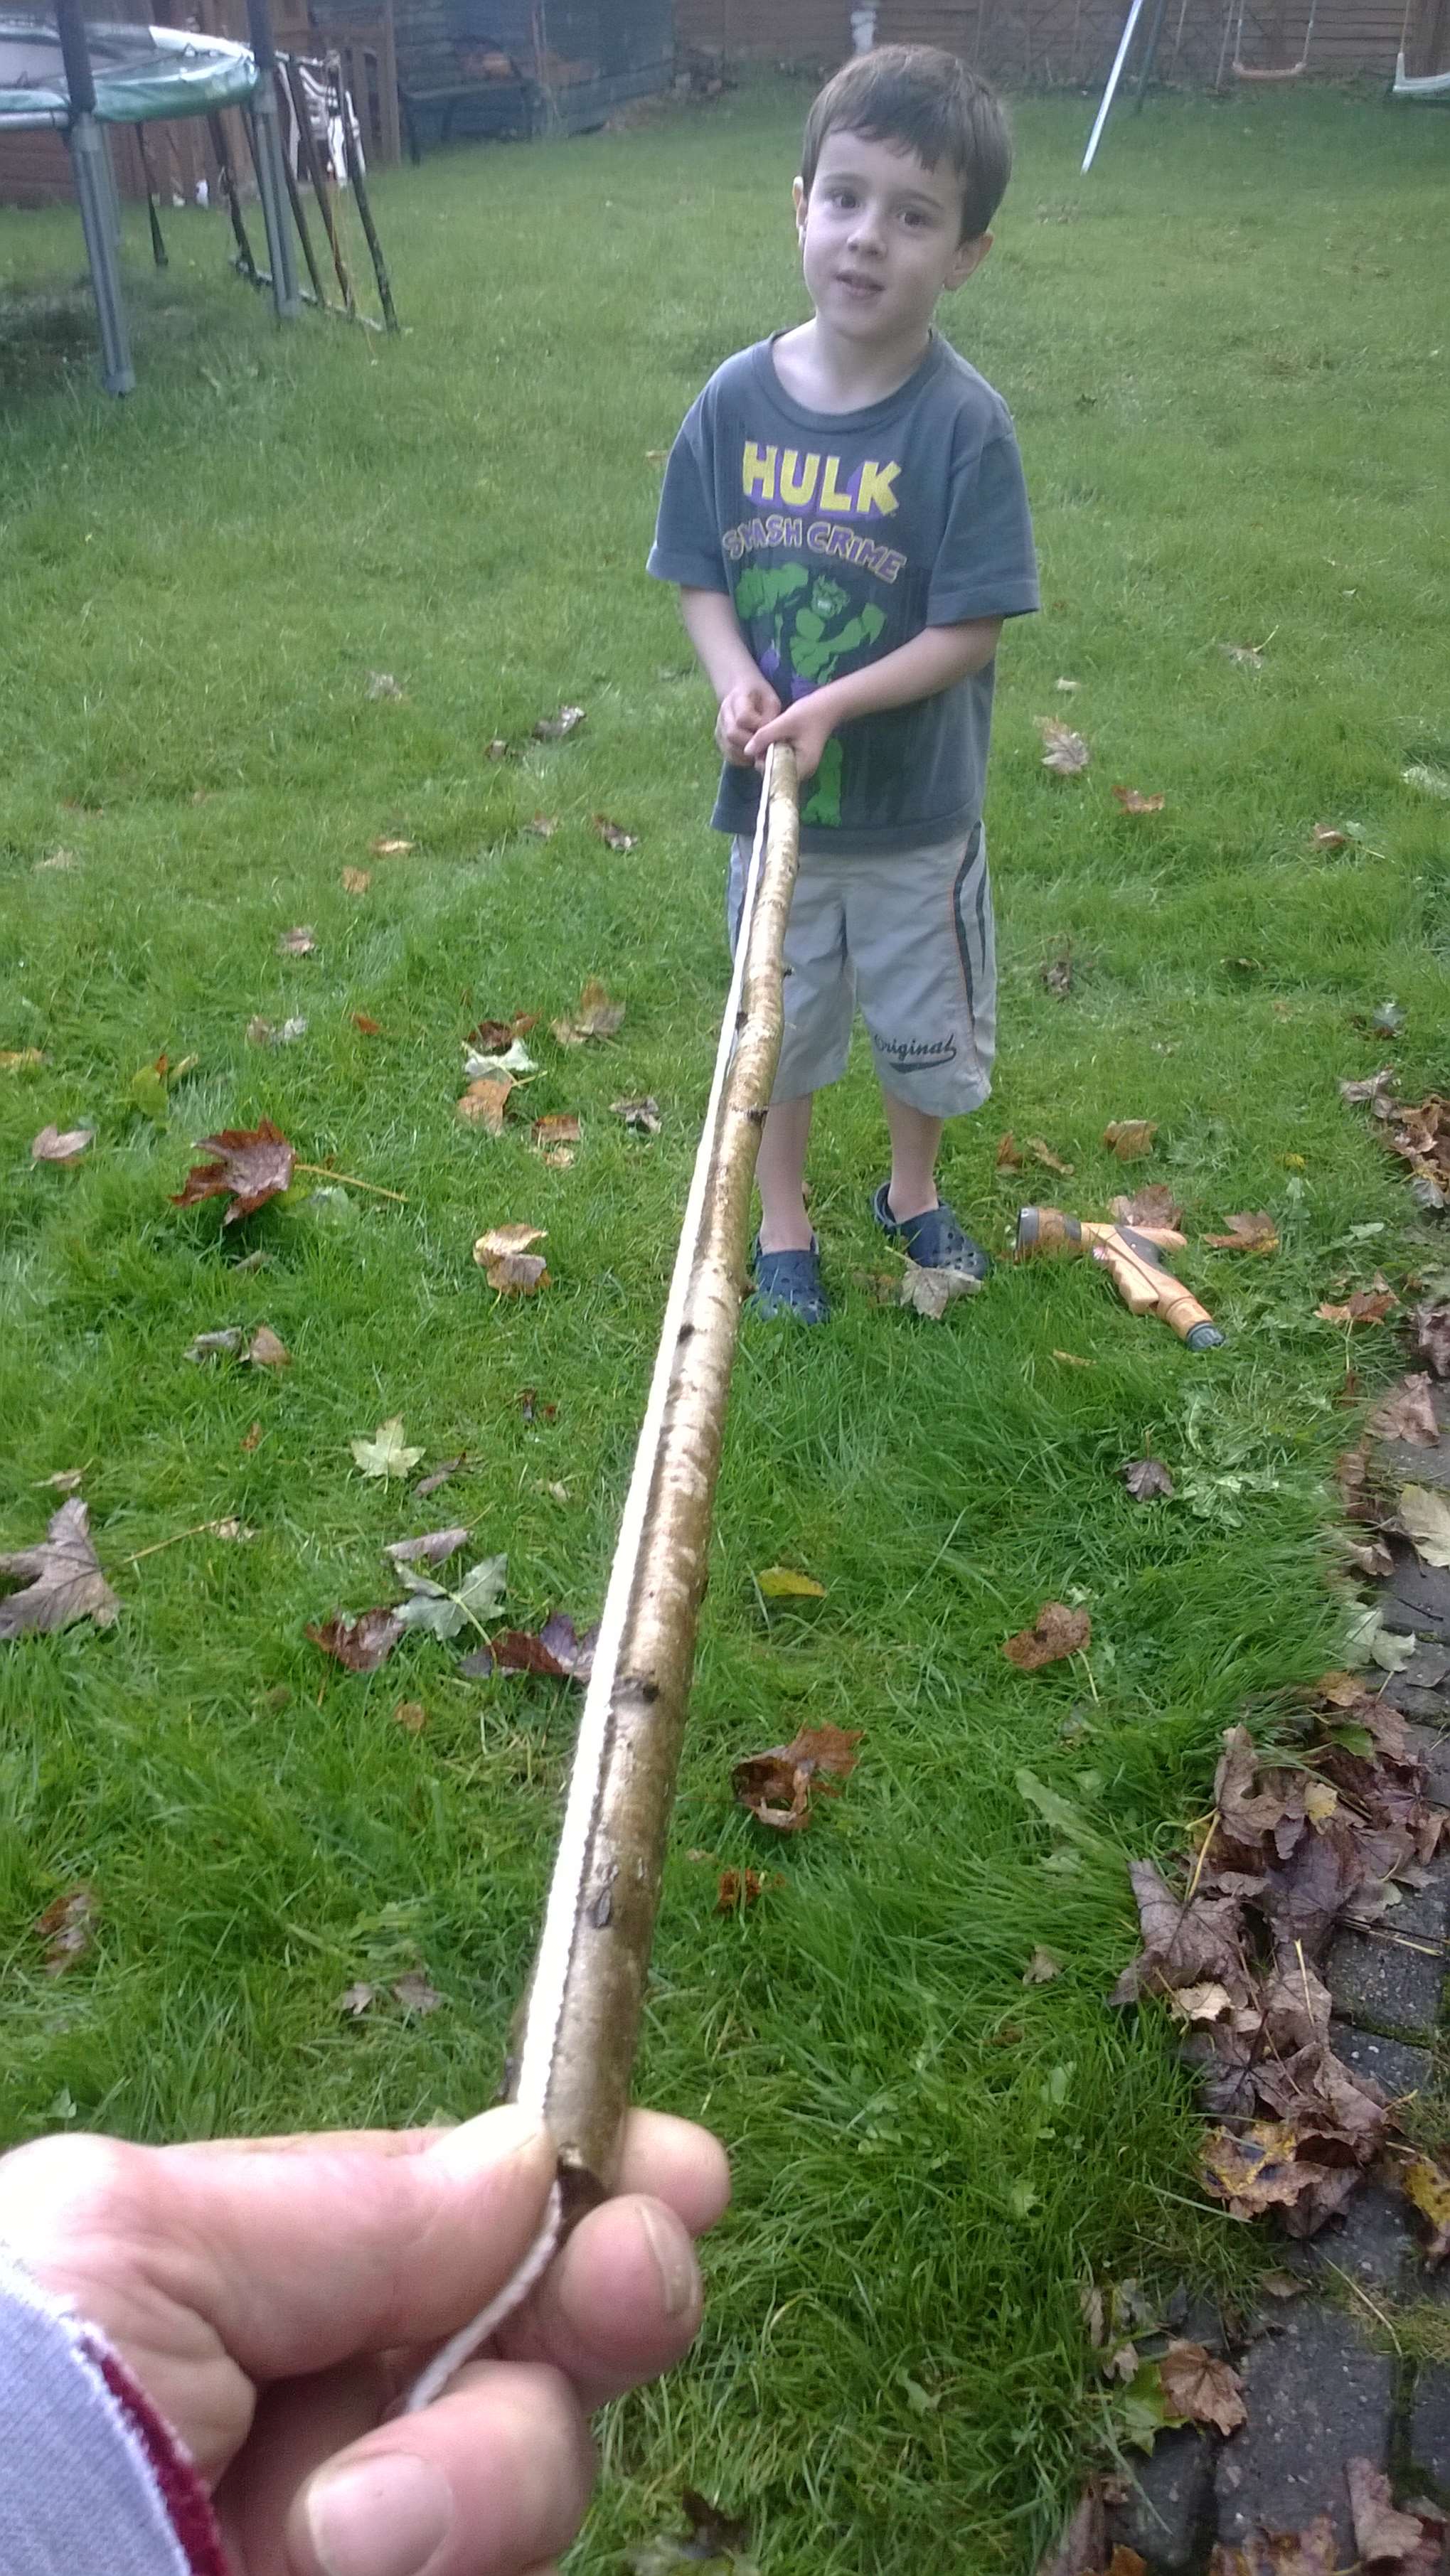
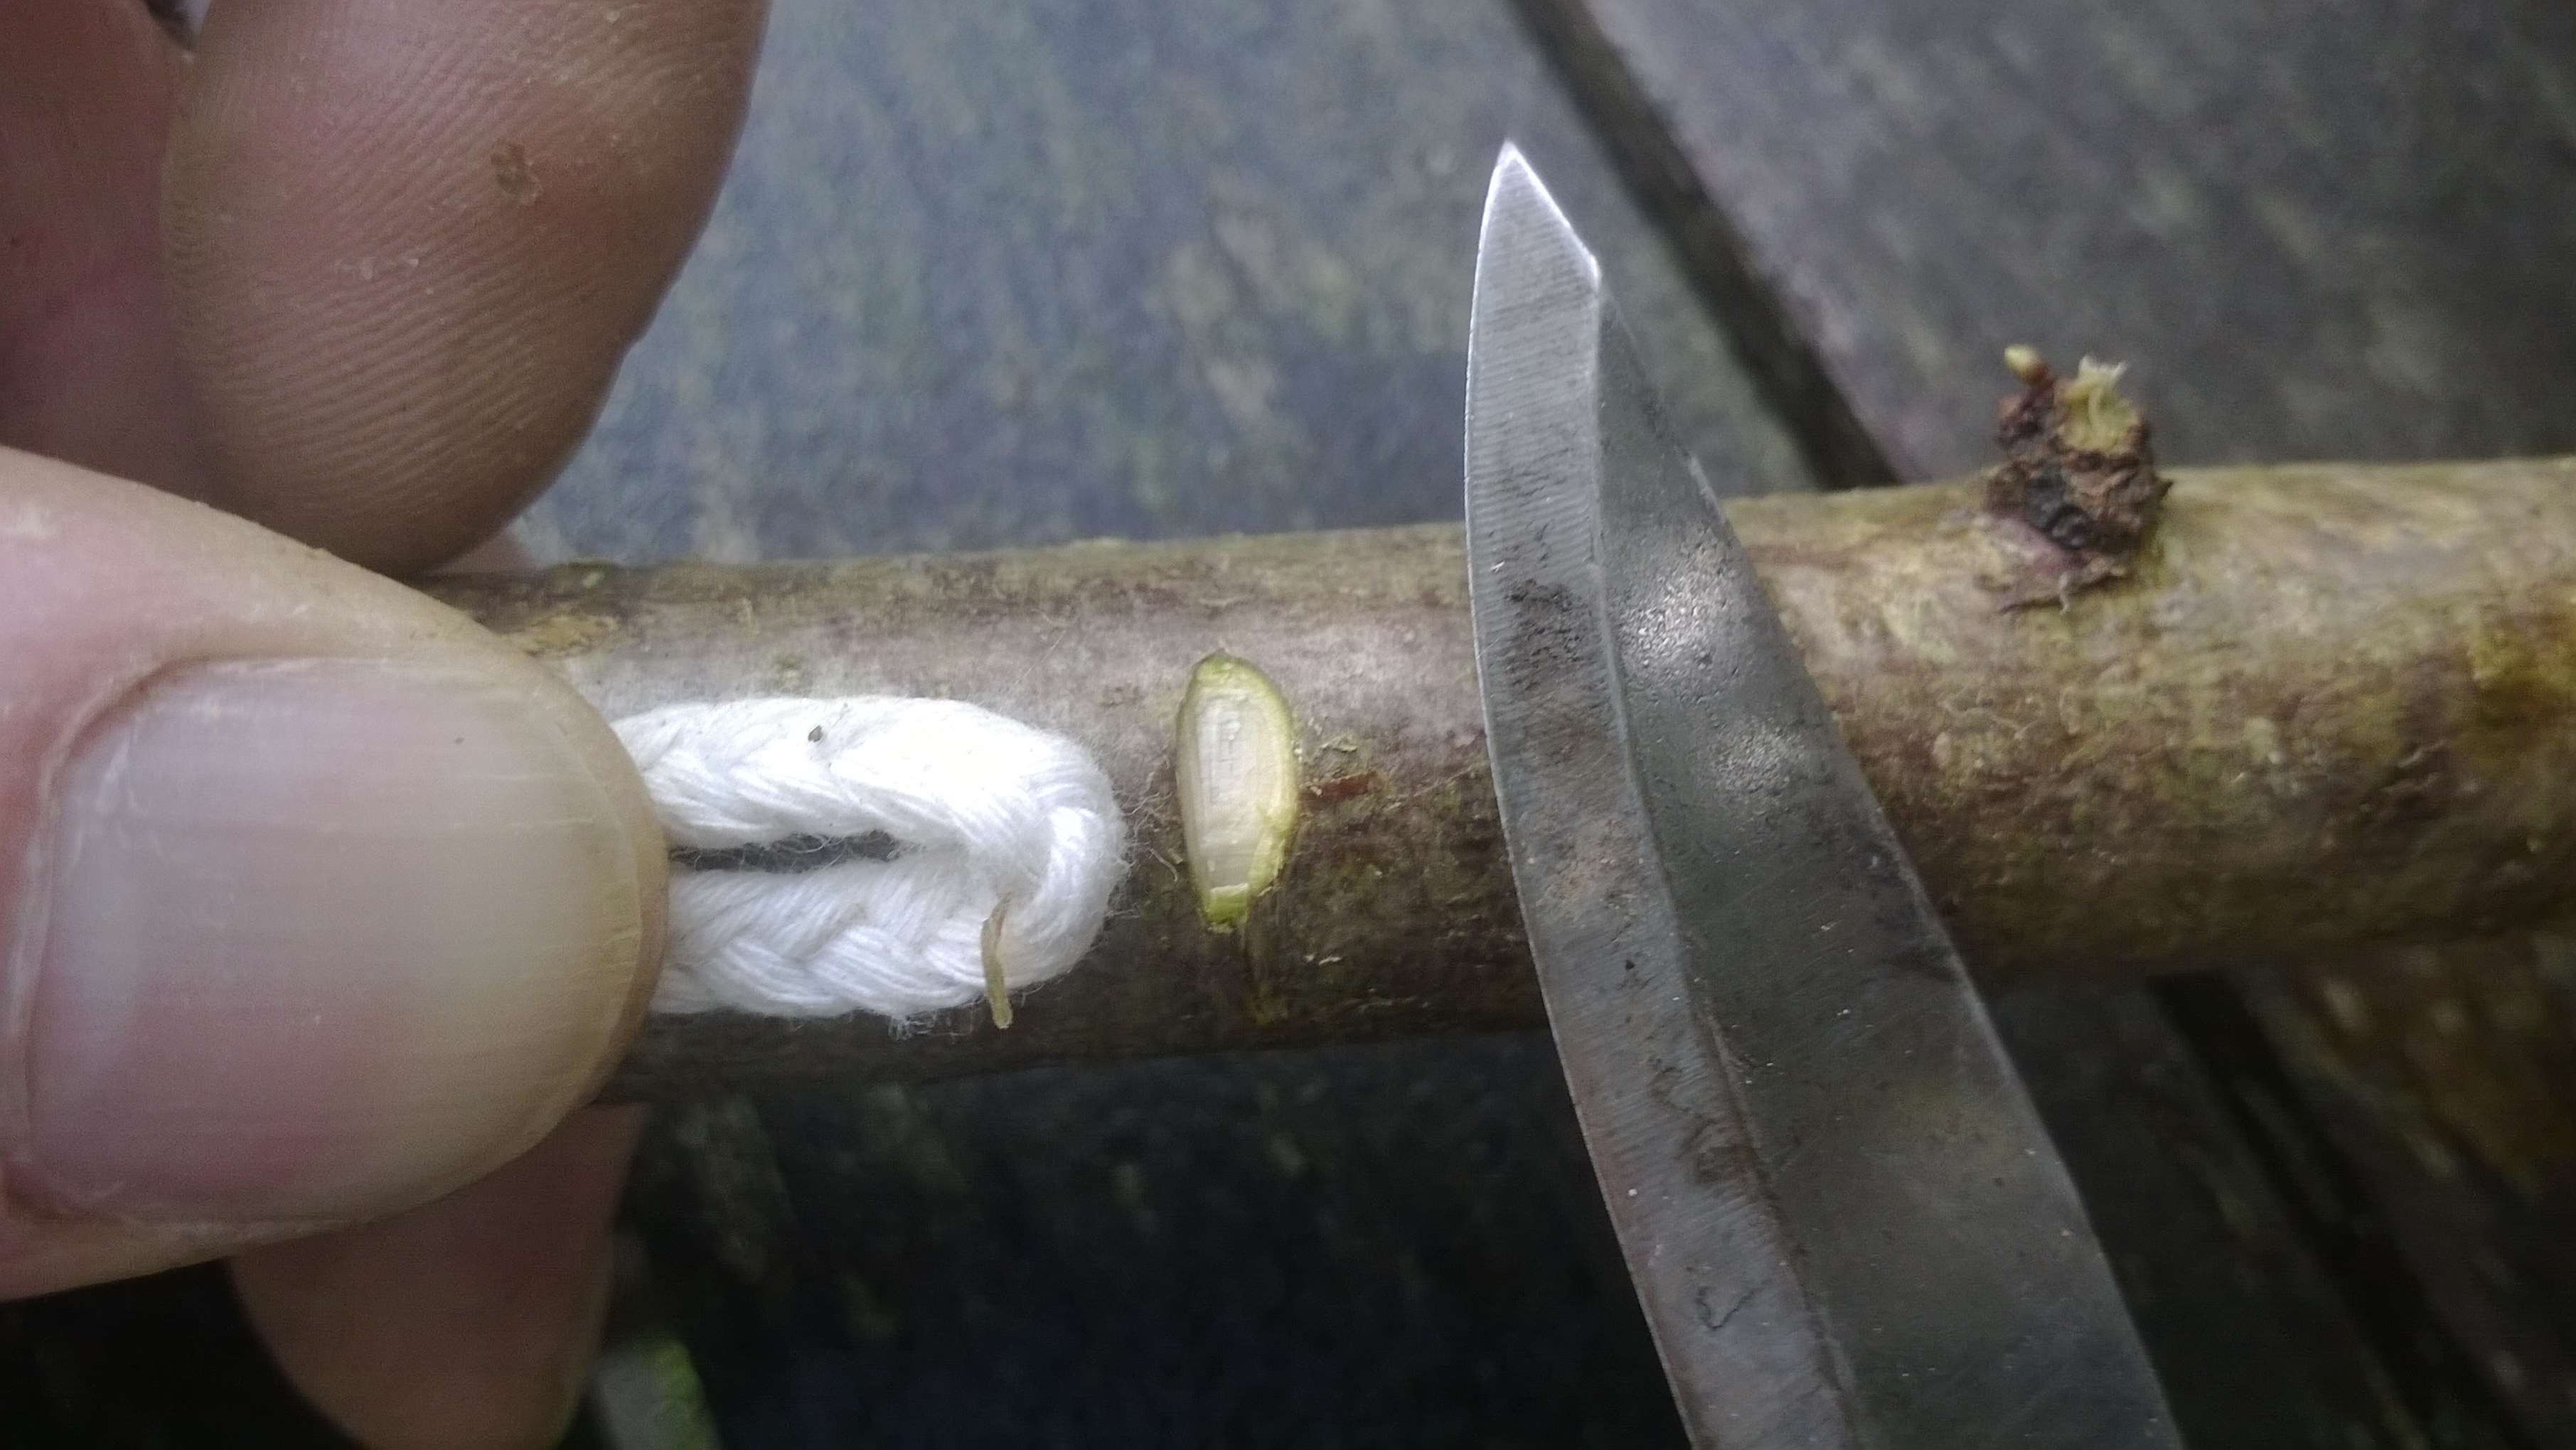
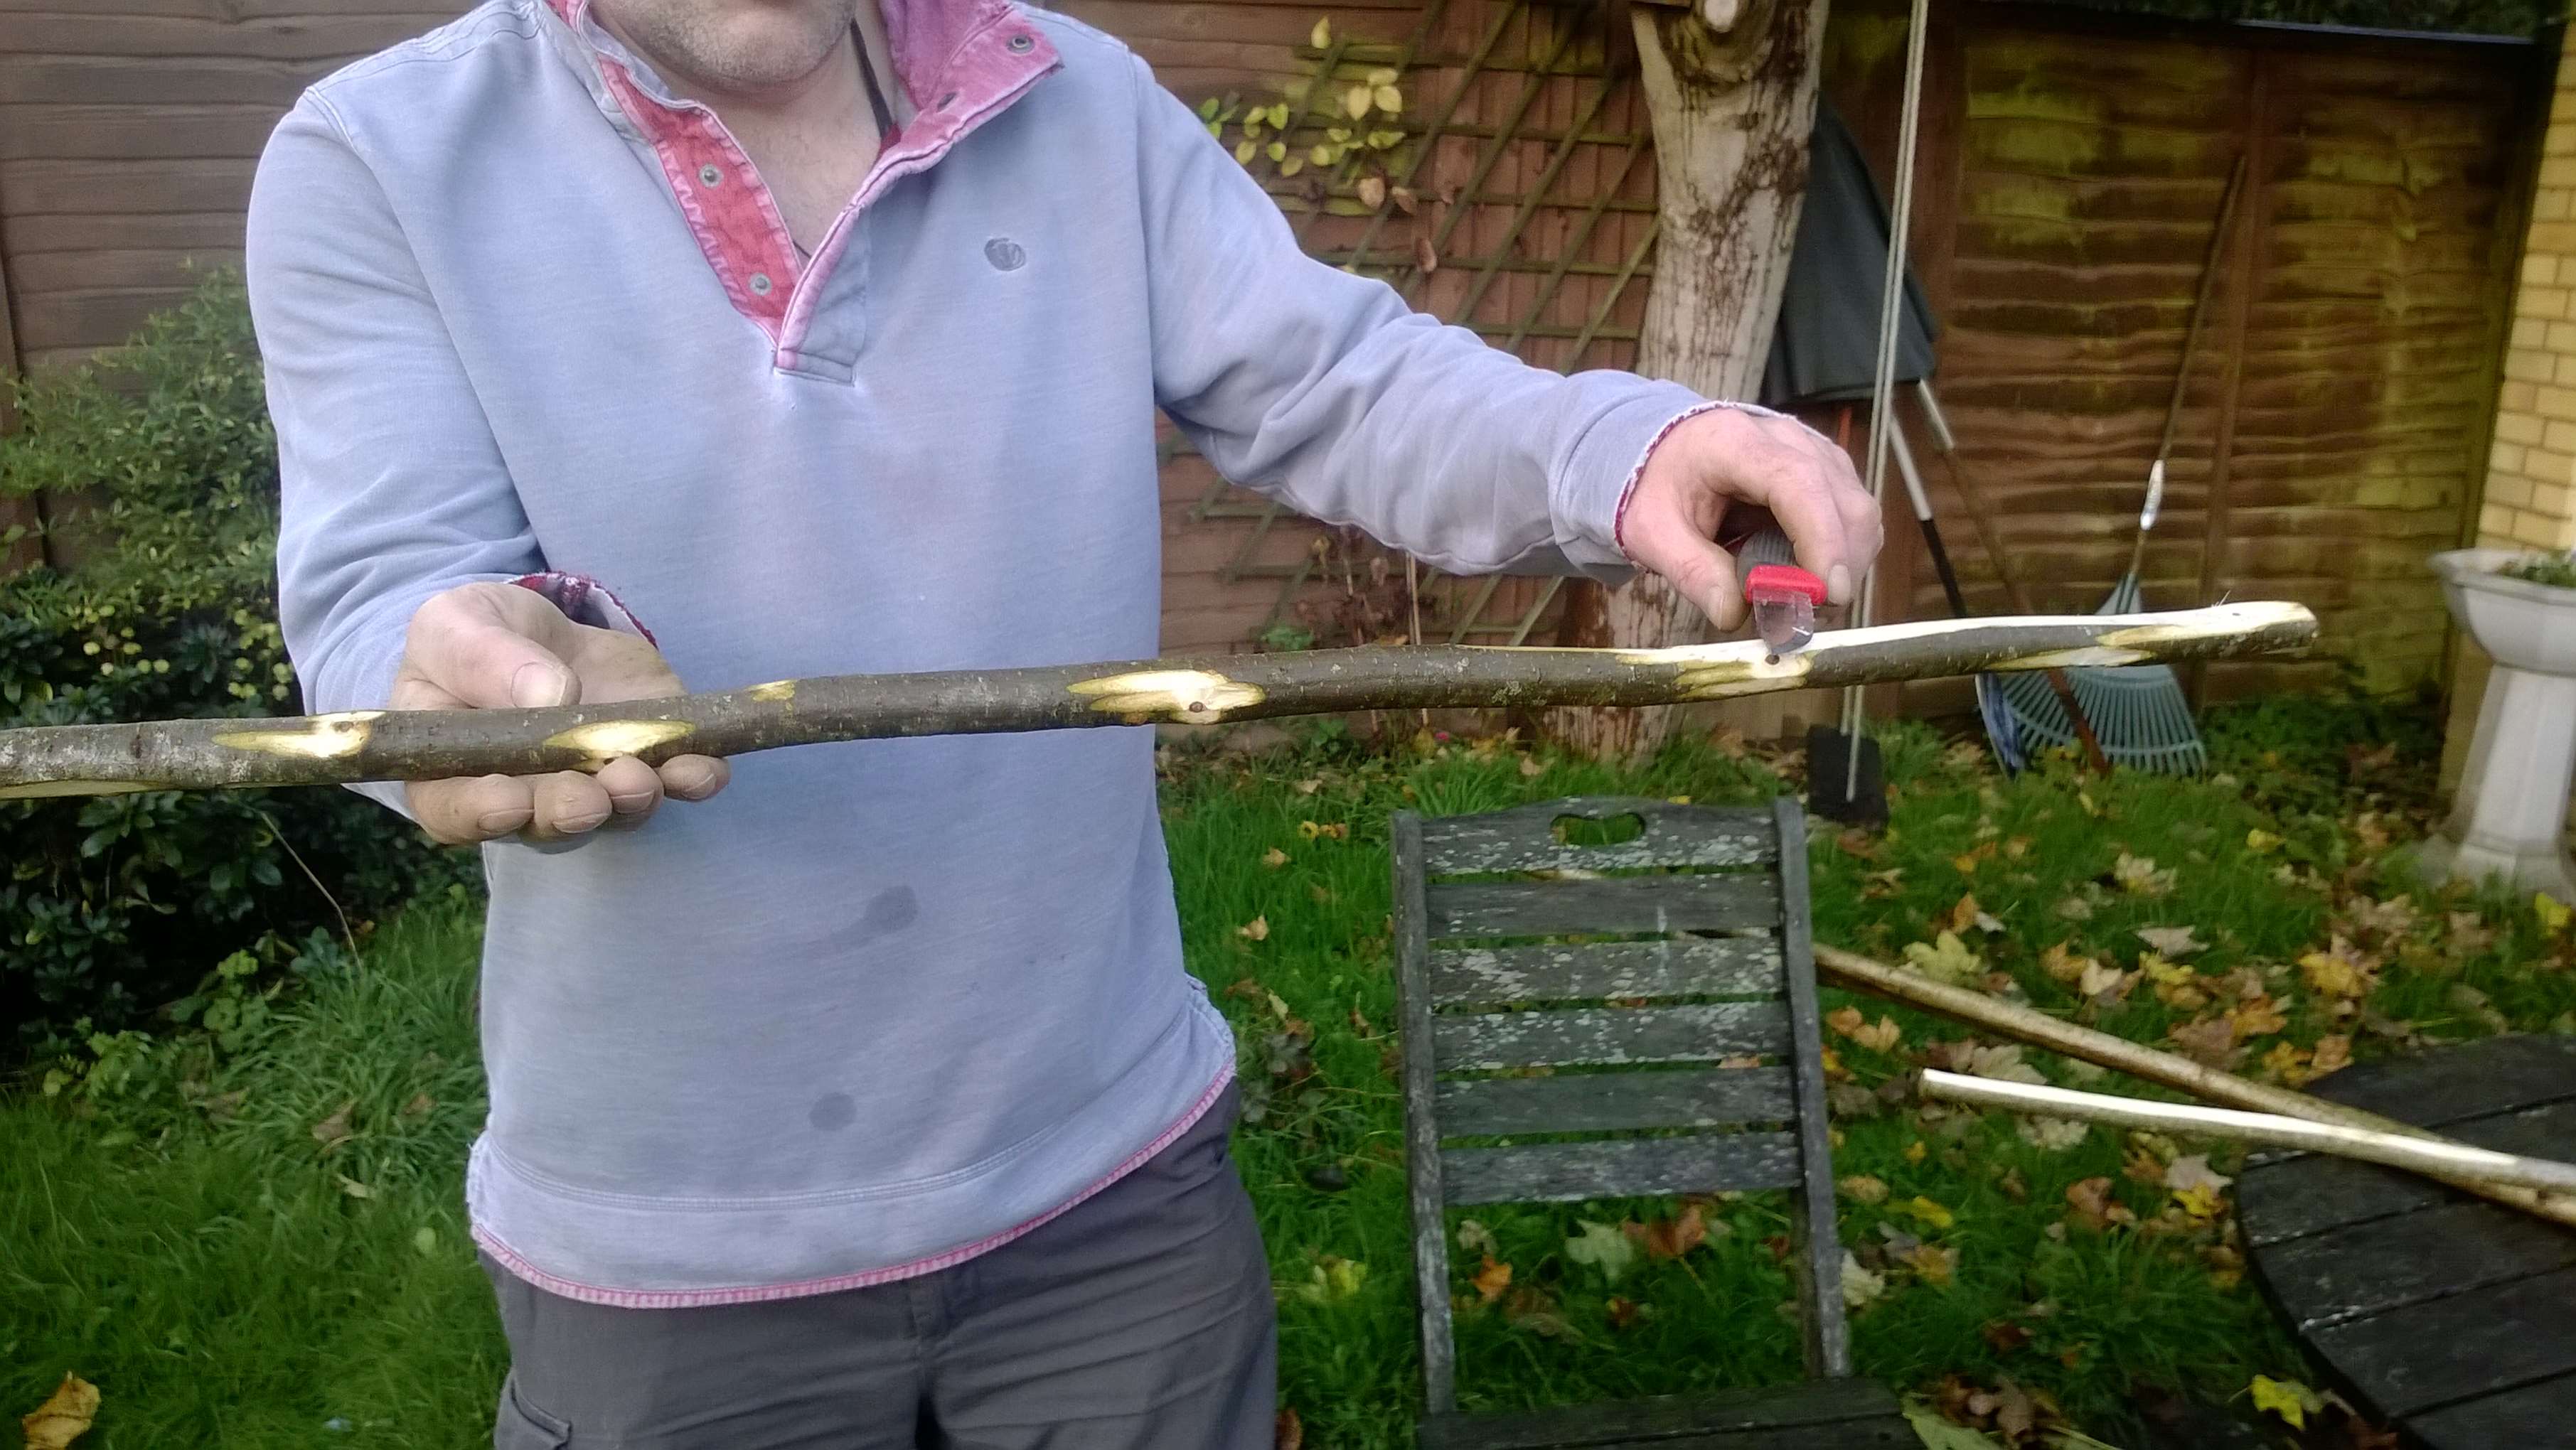
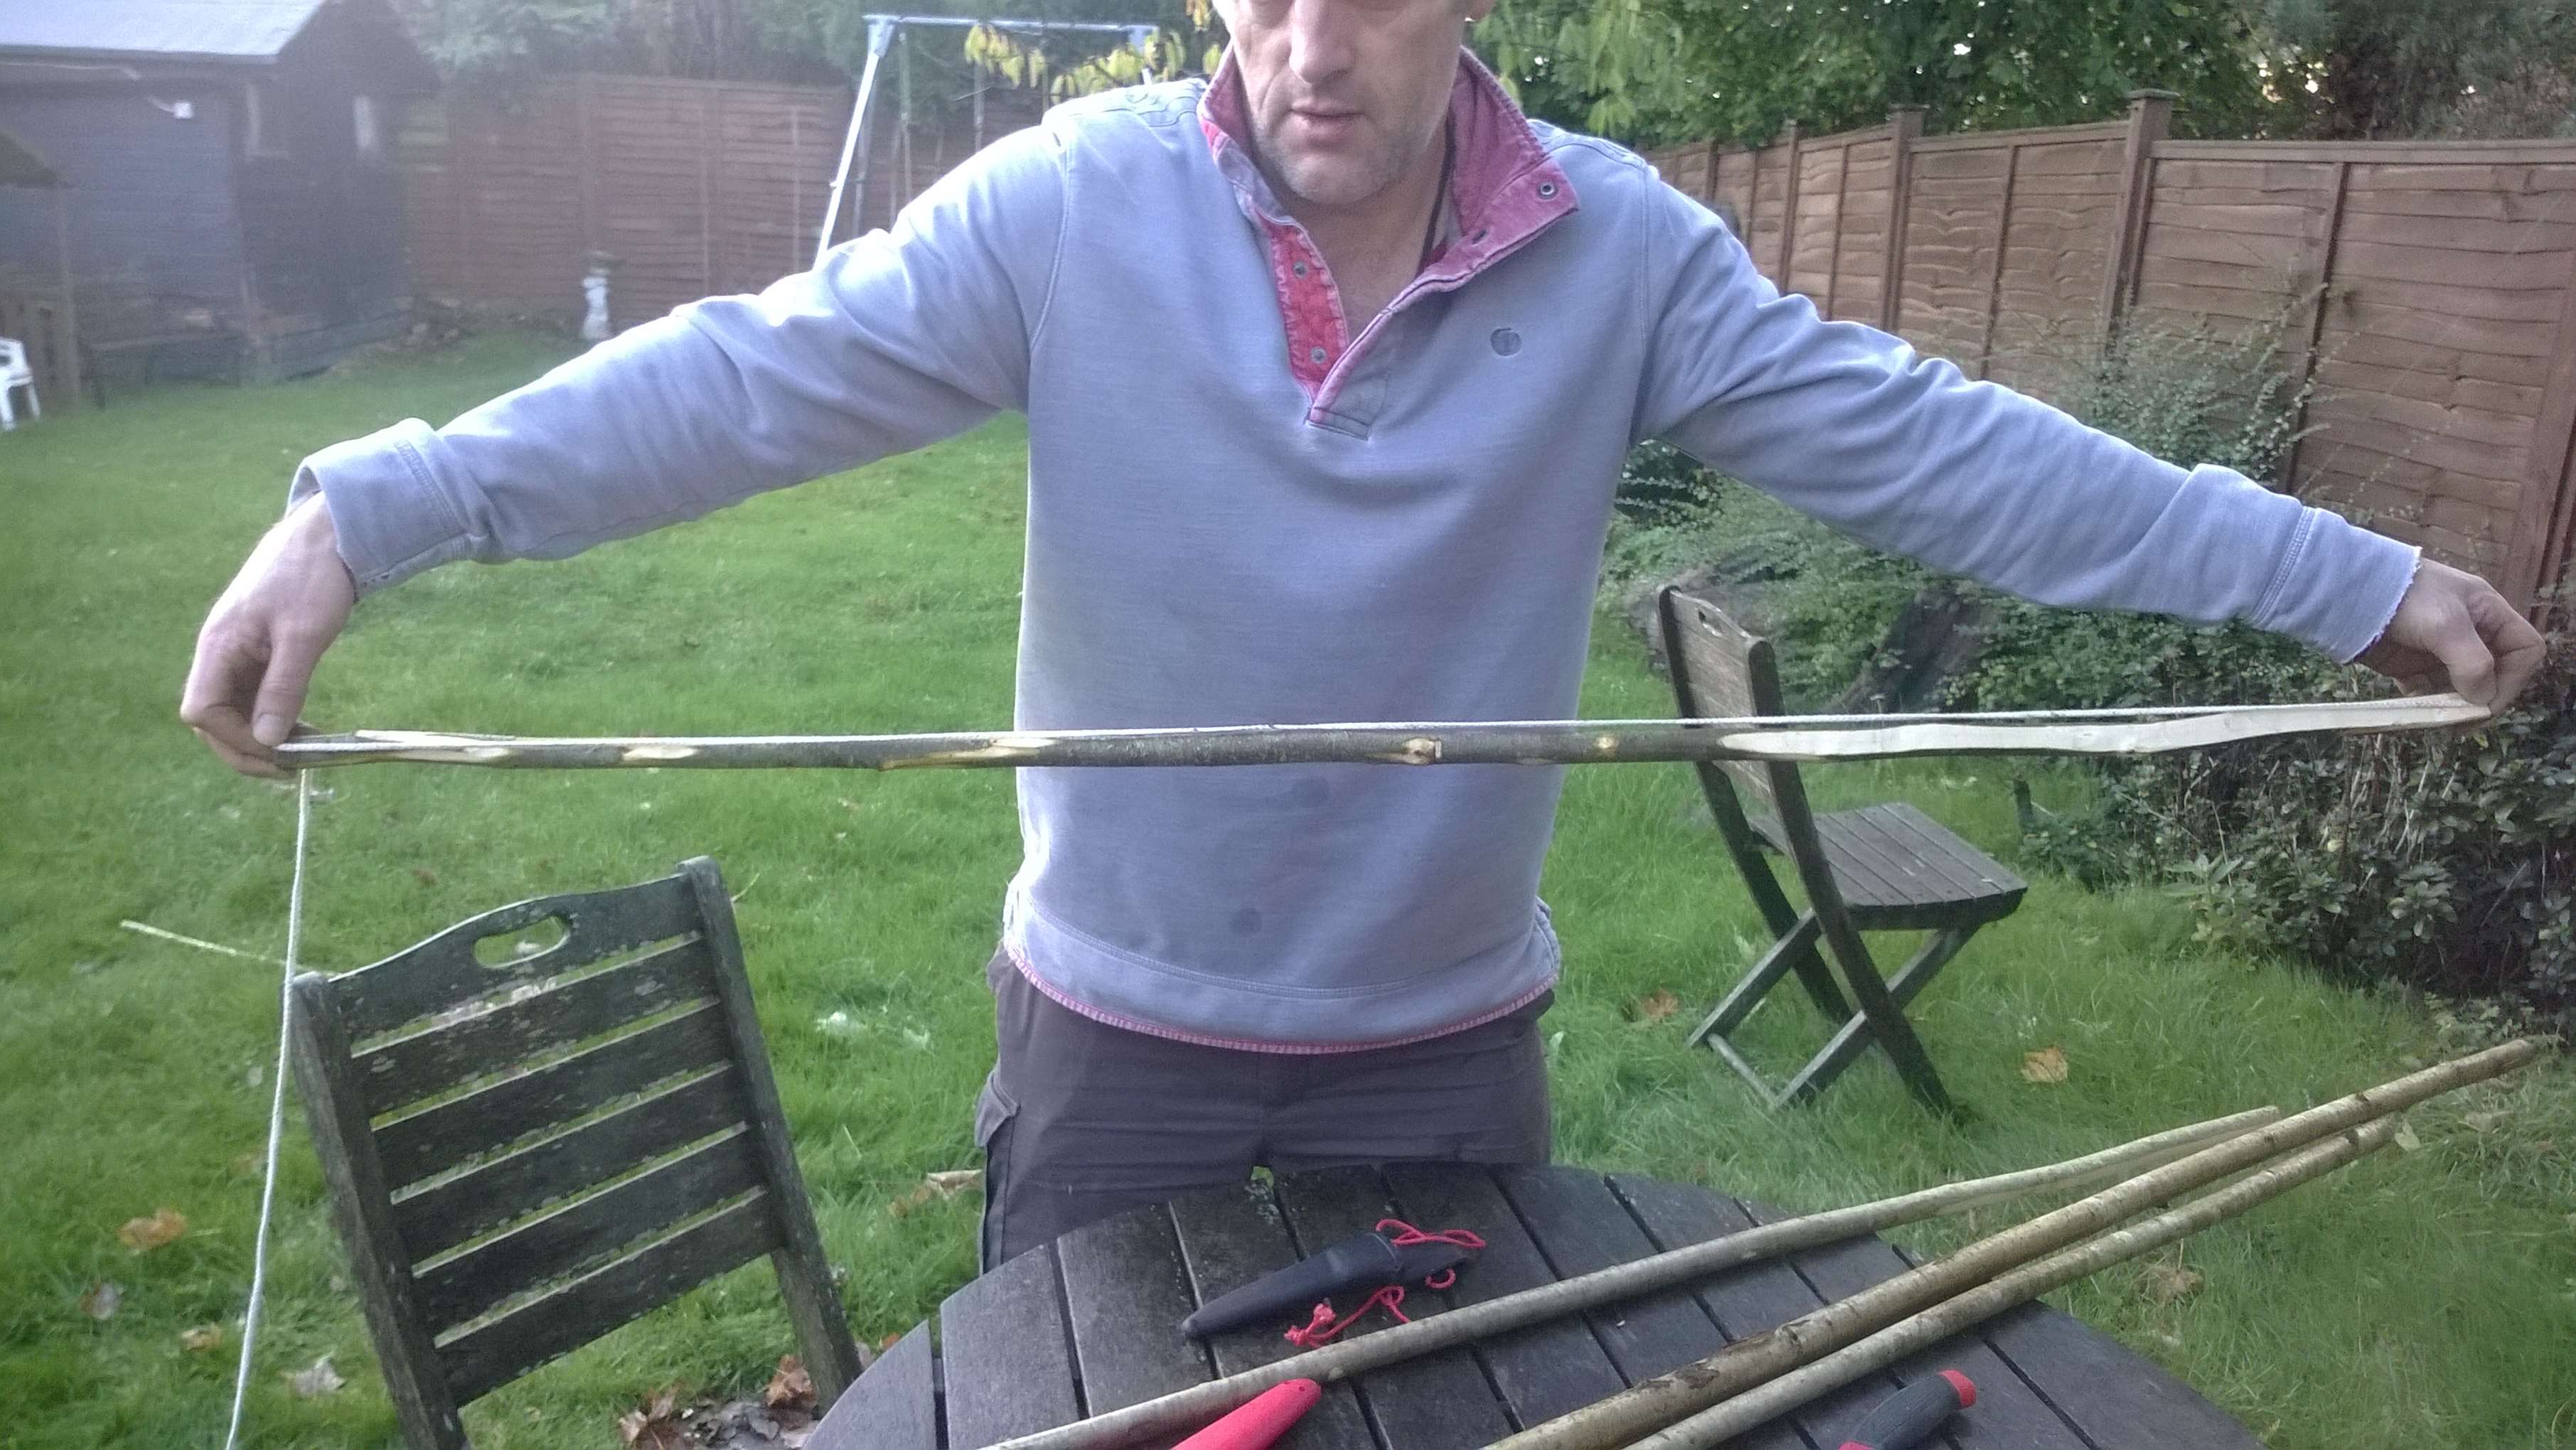
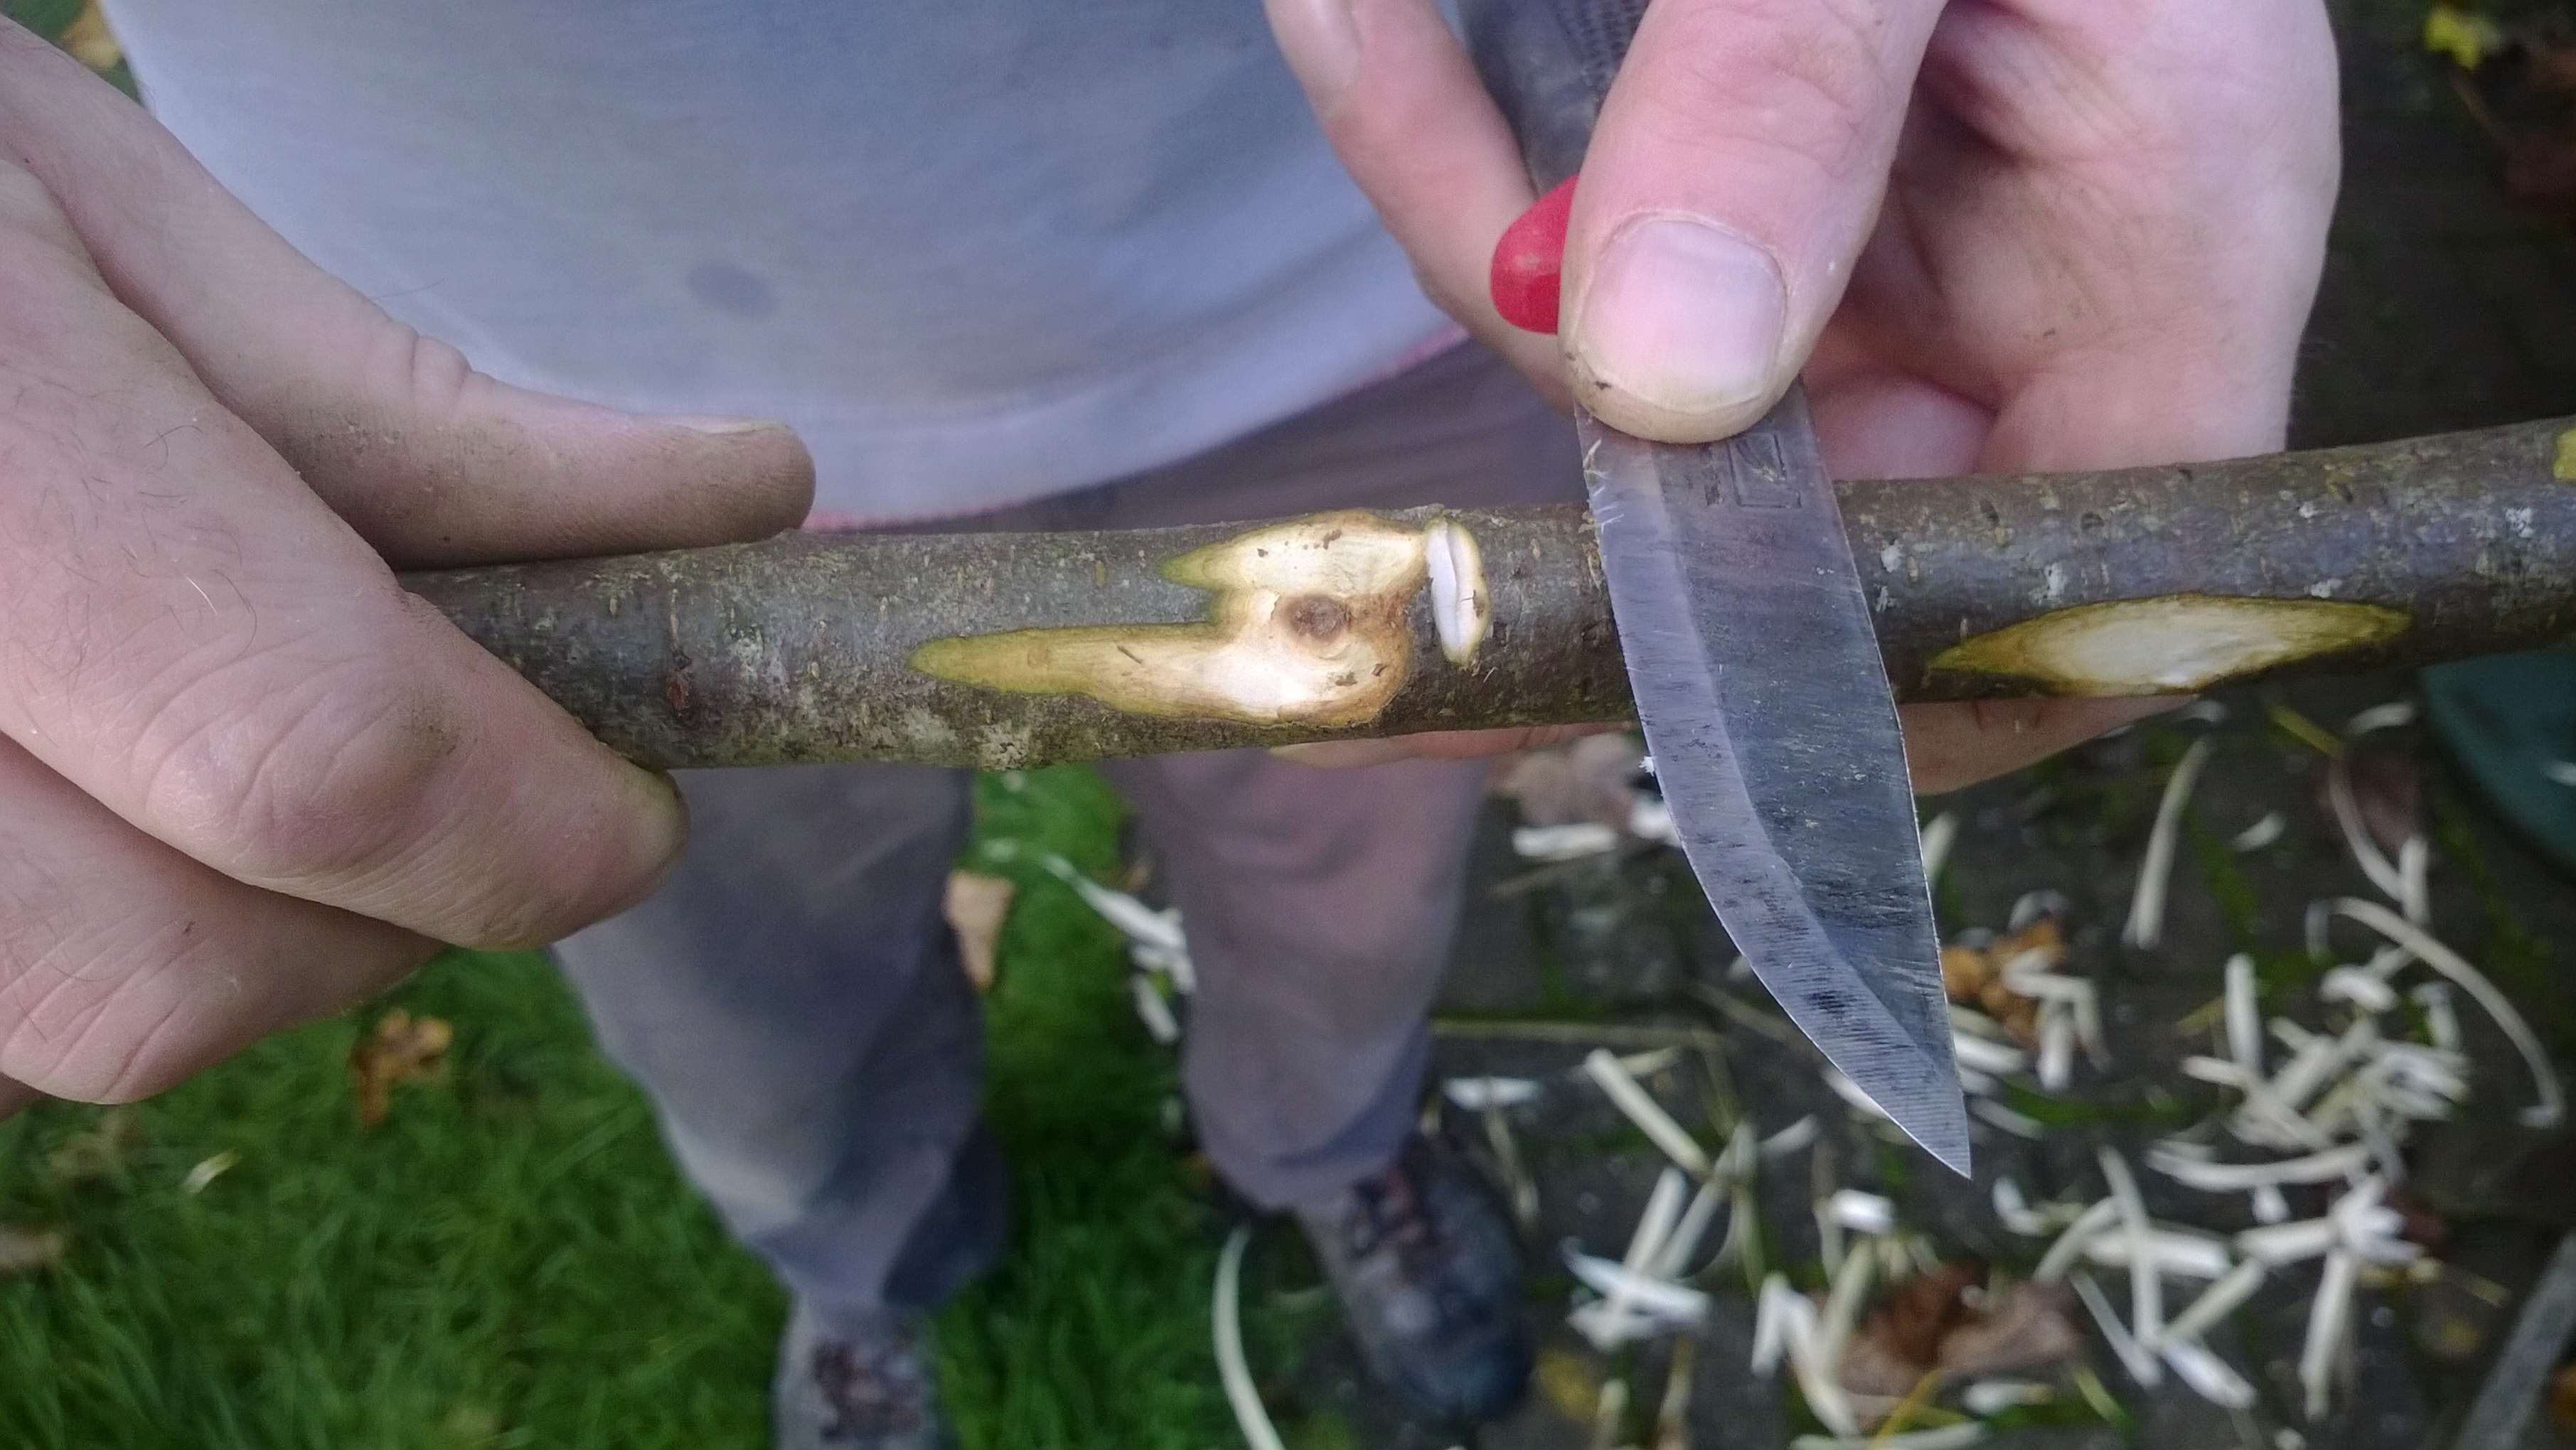
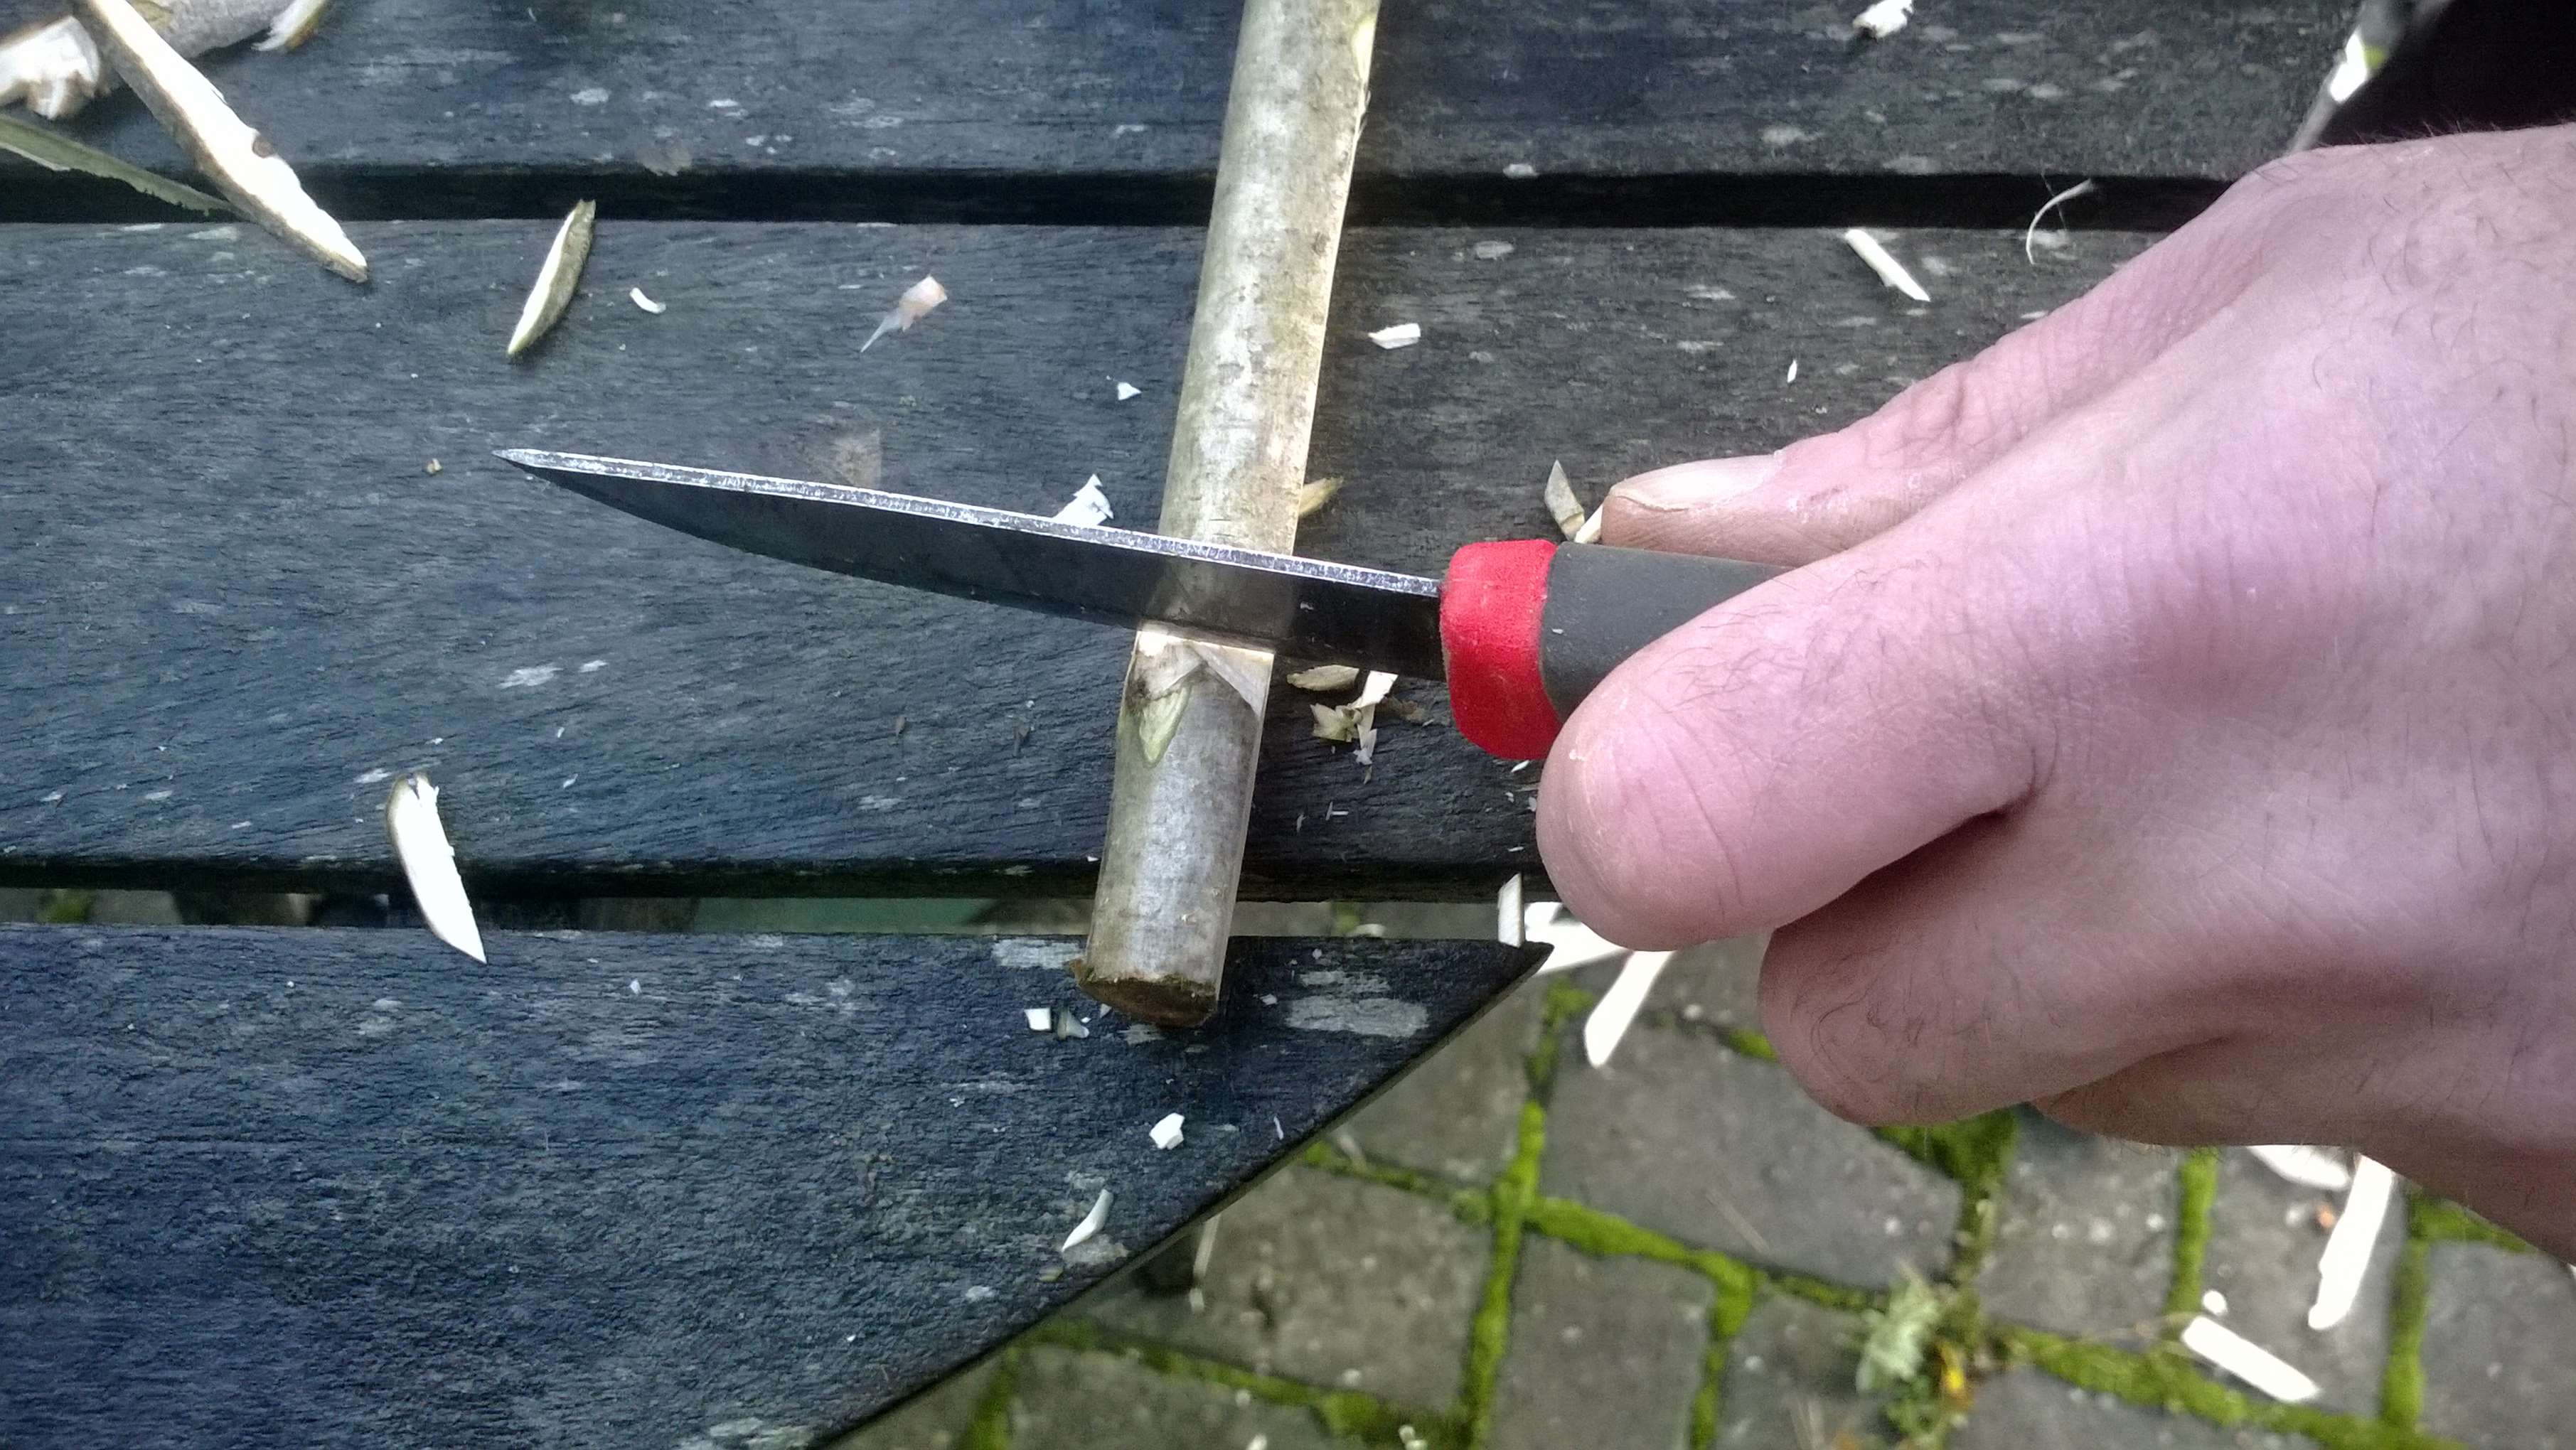
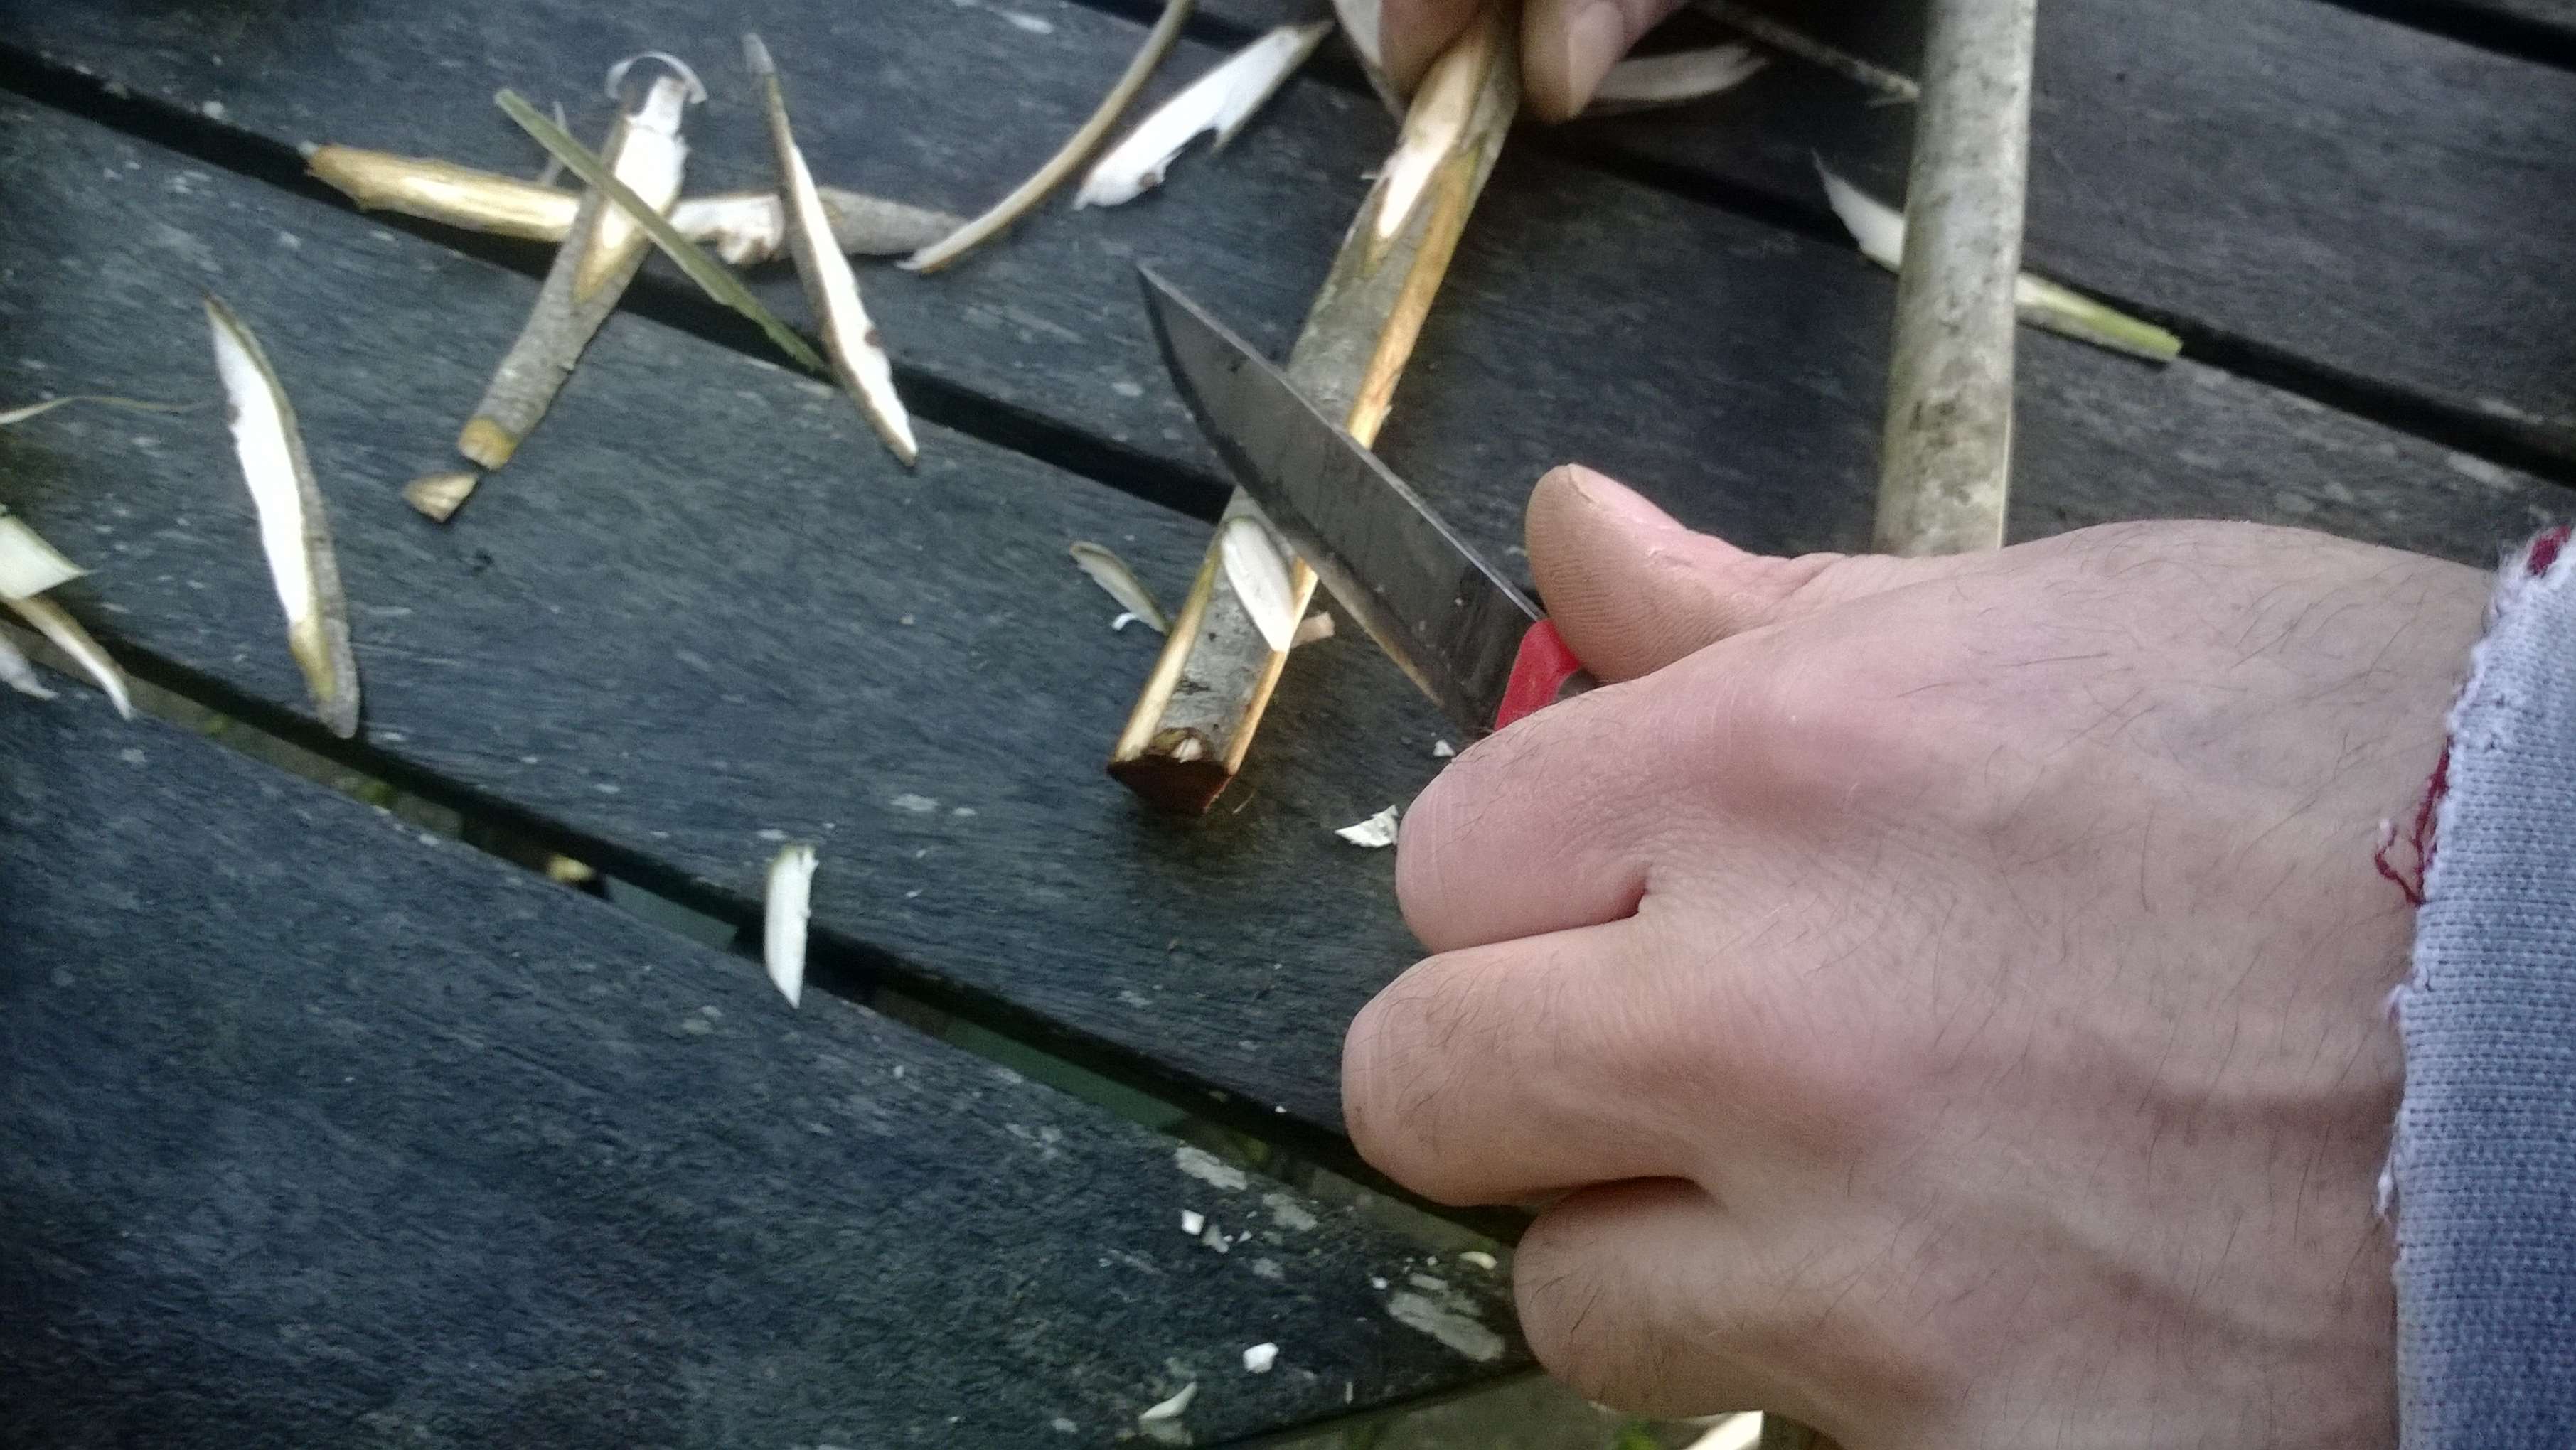
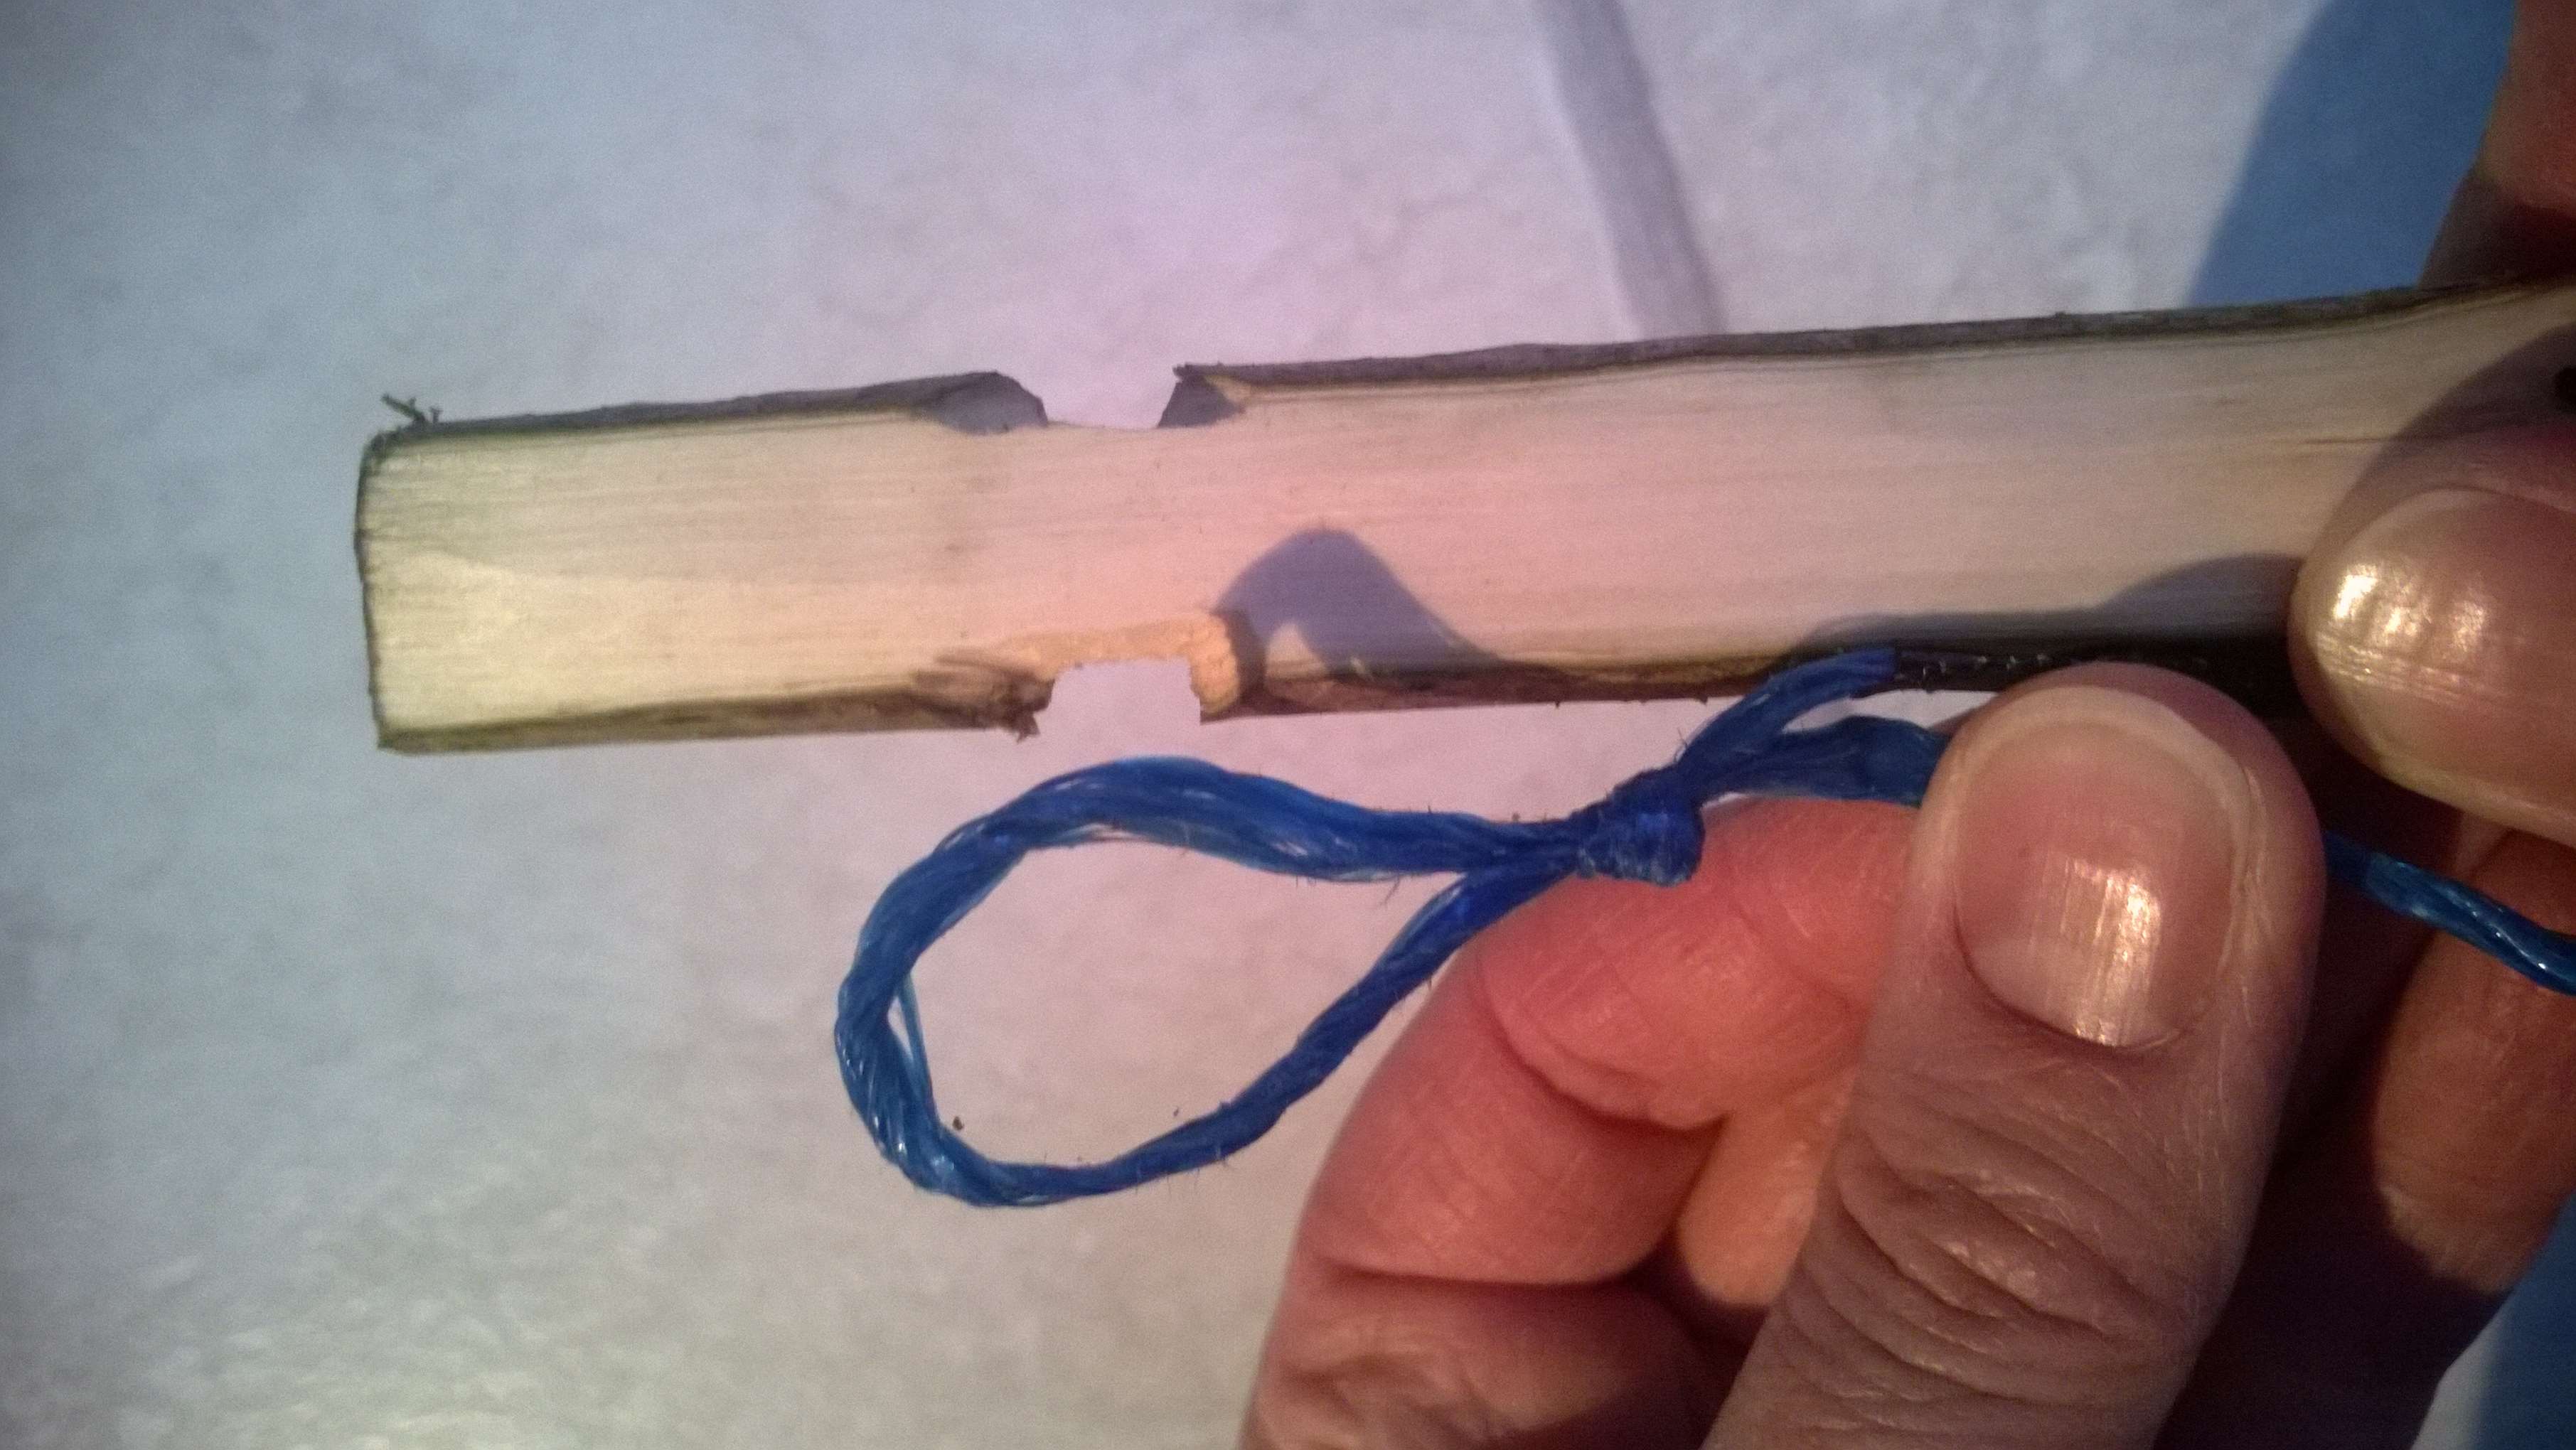
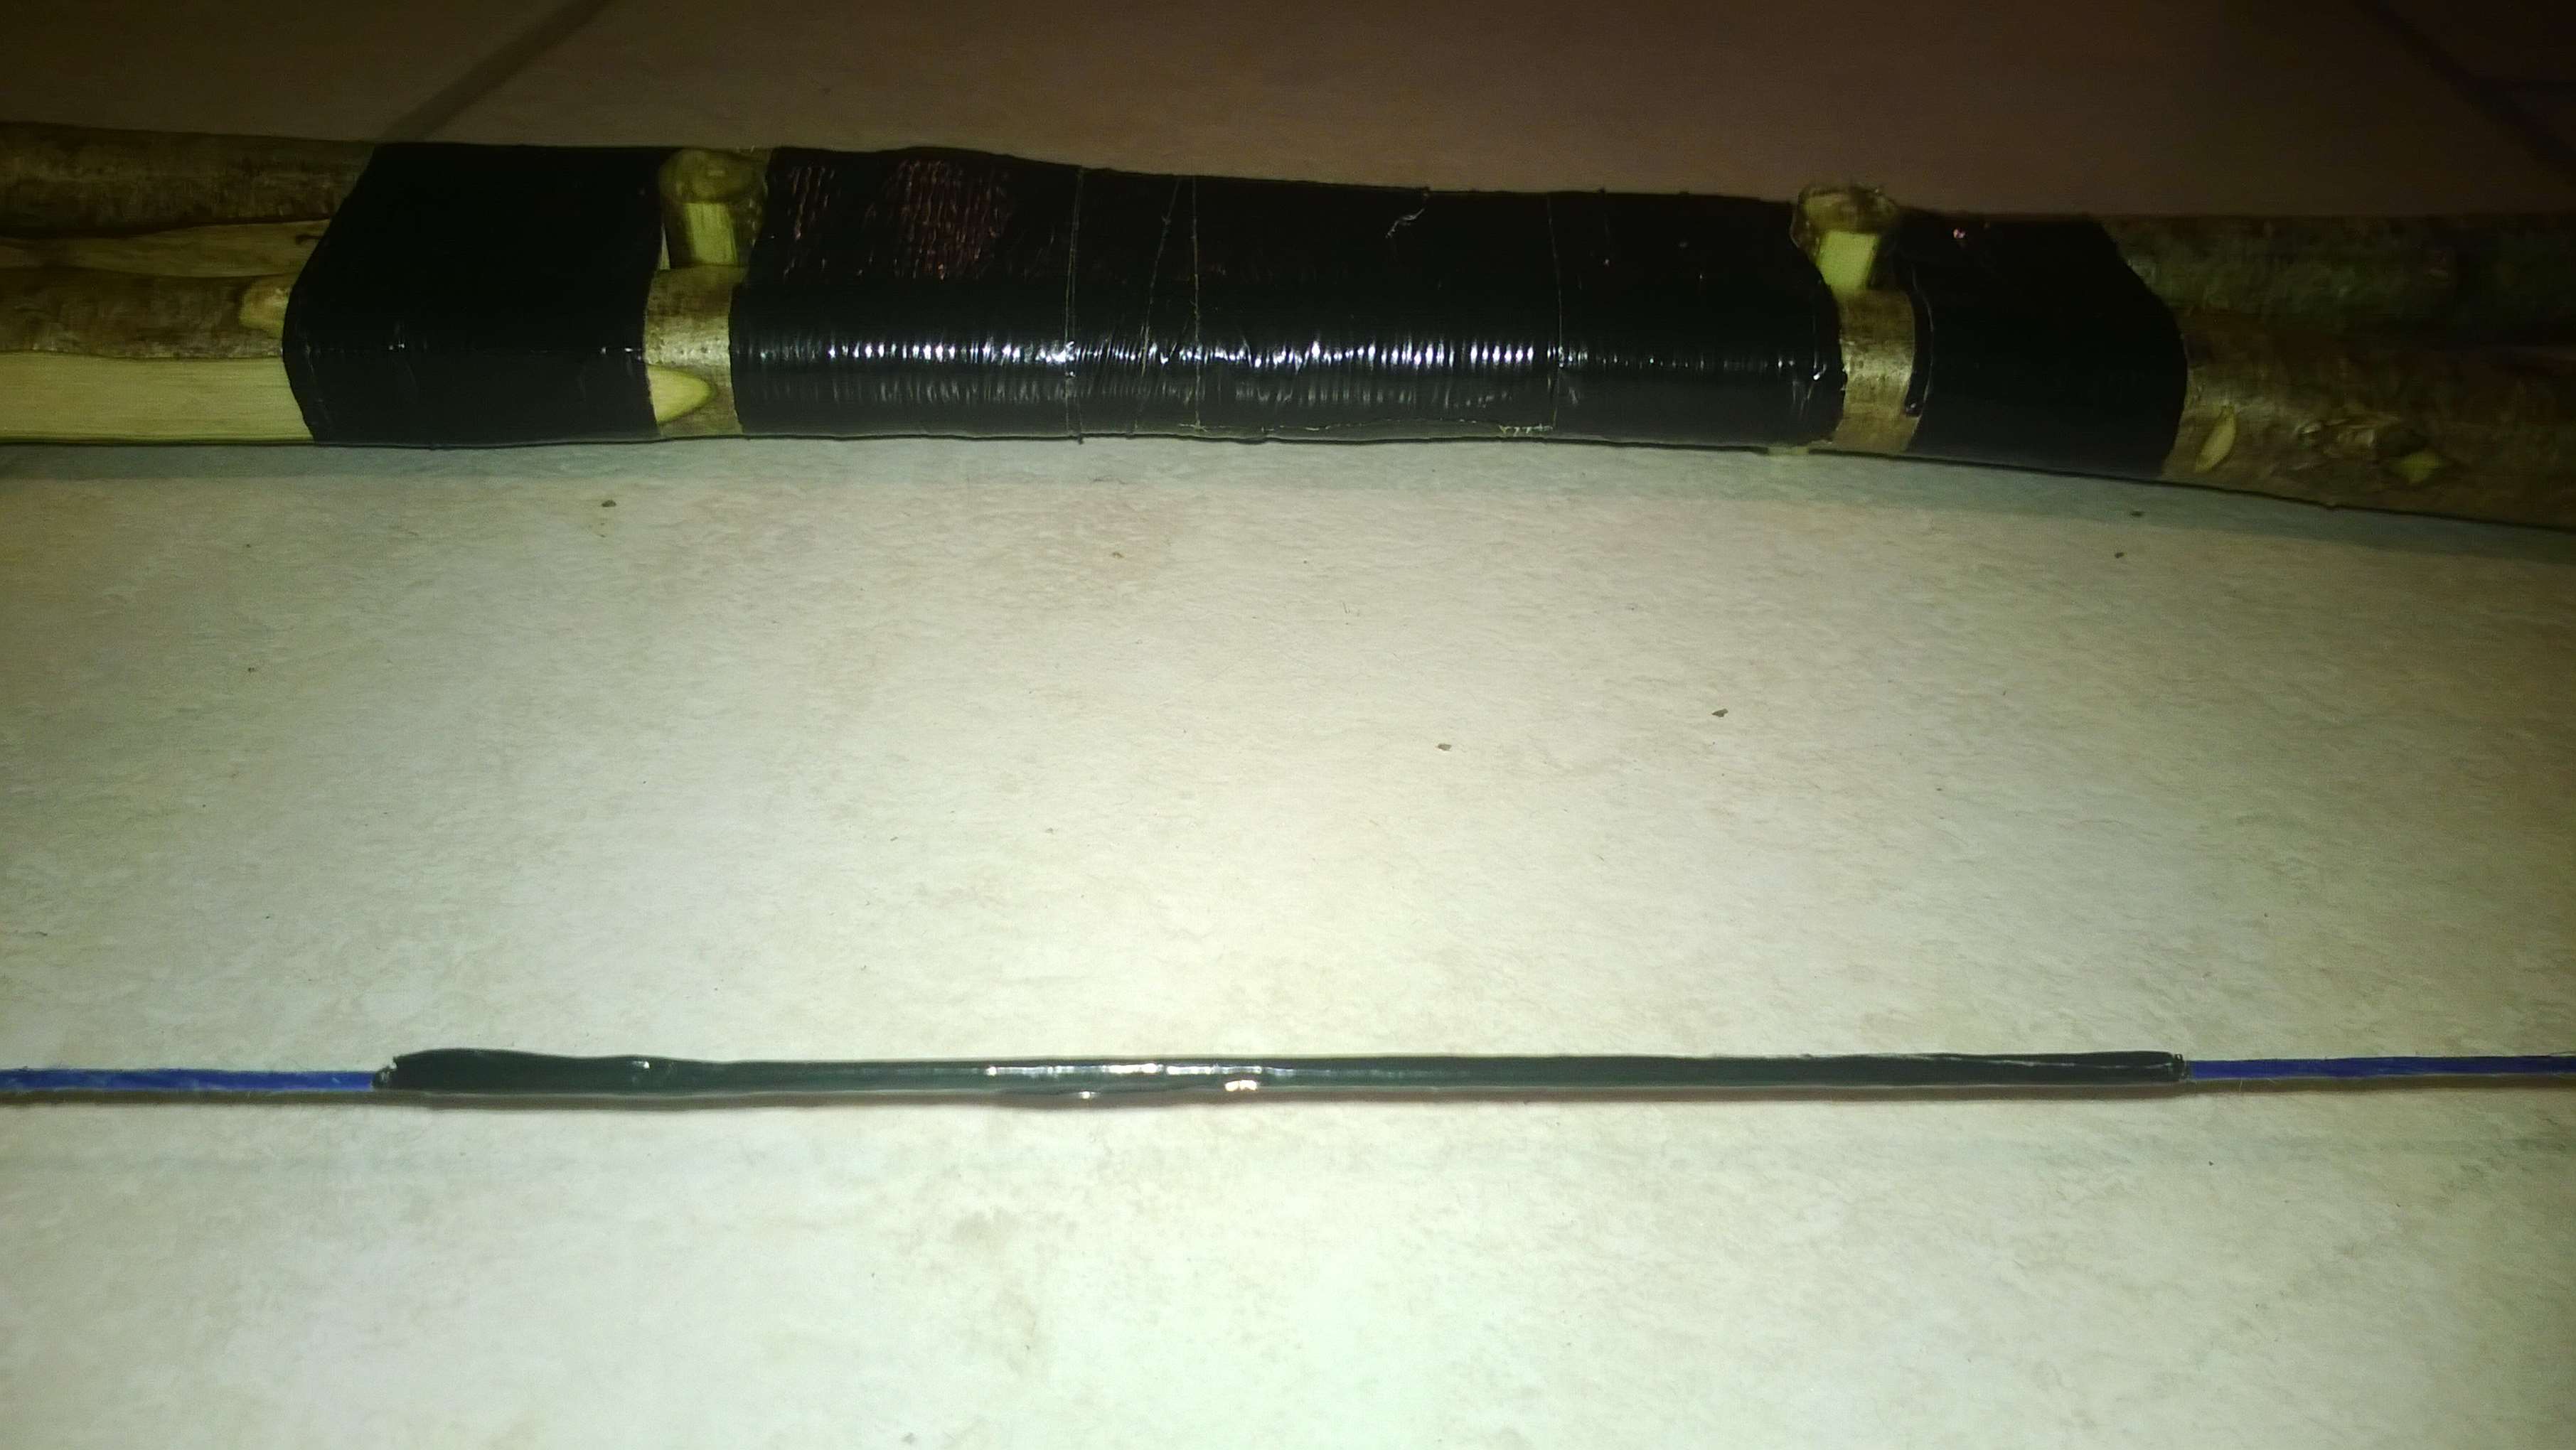
Making a Self Nock
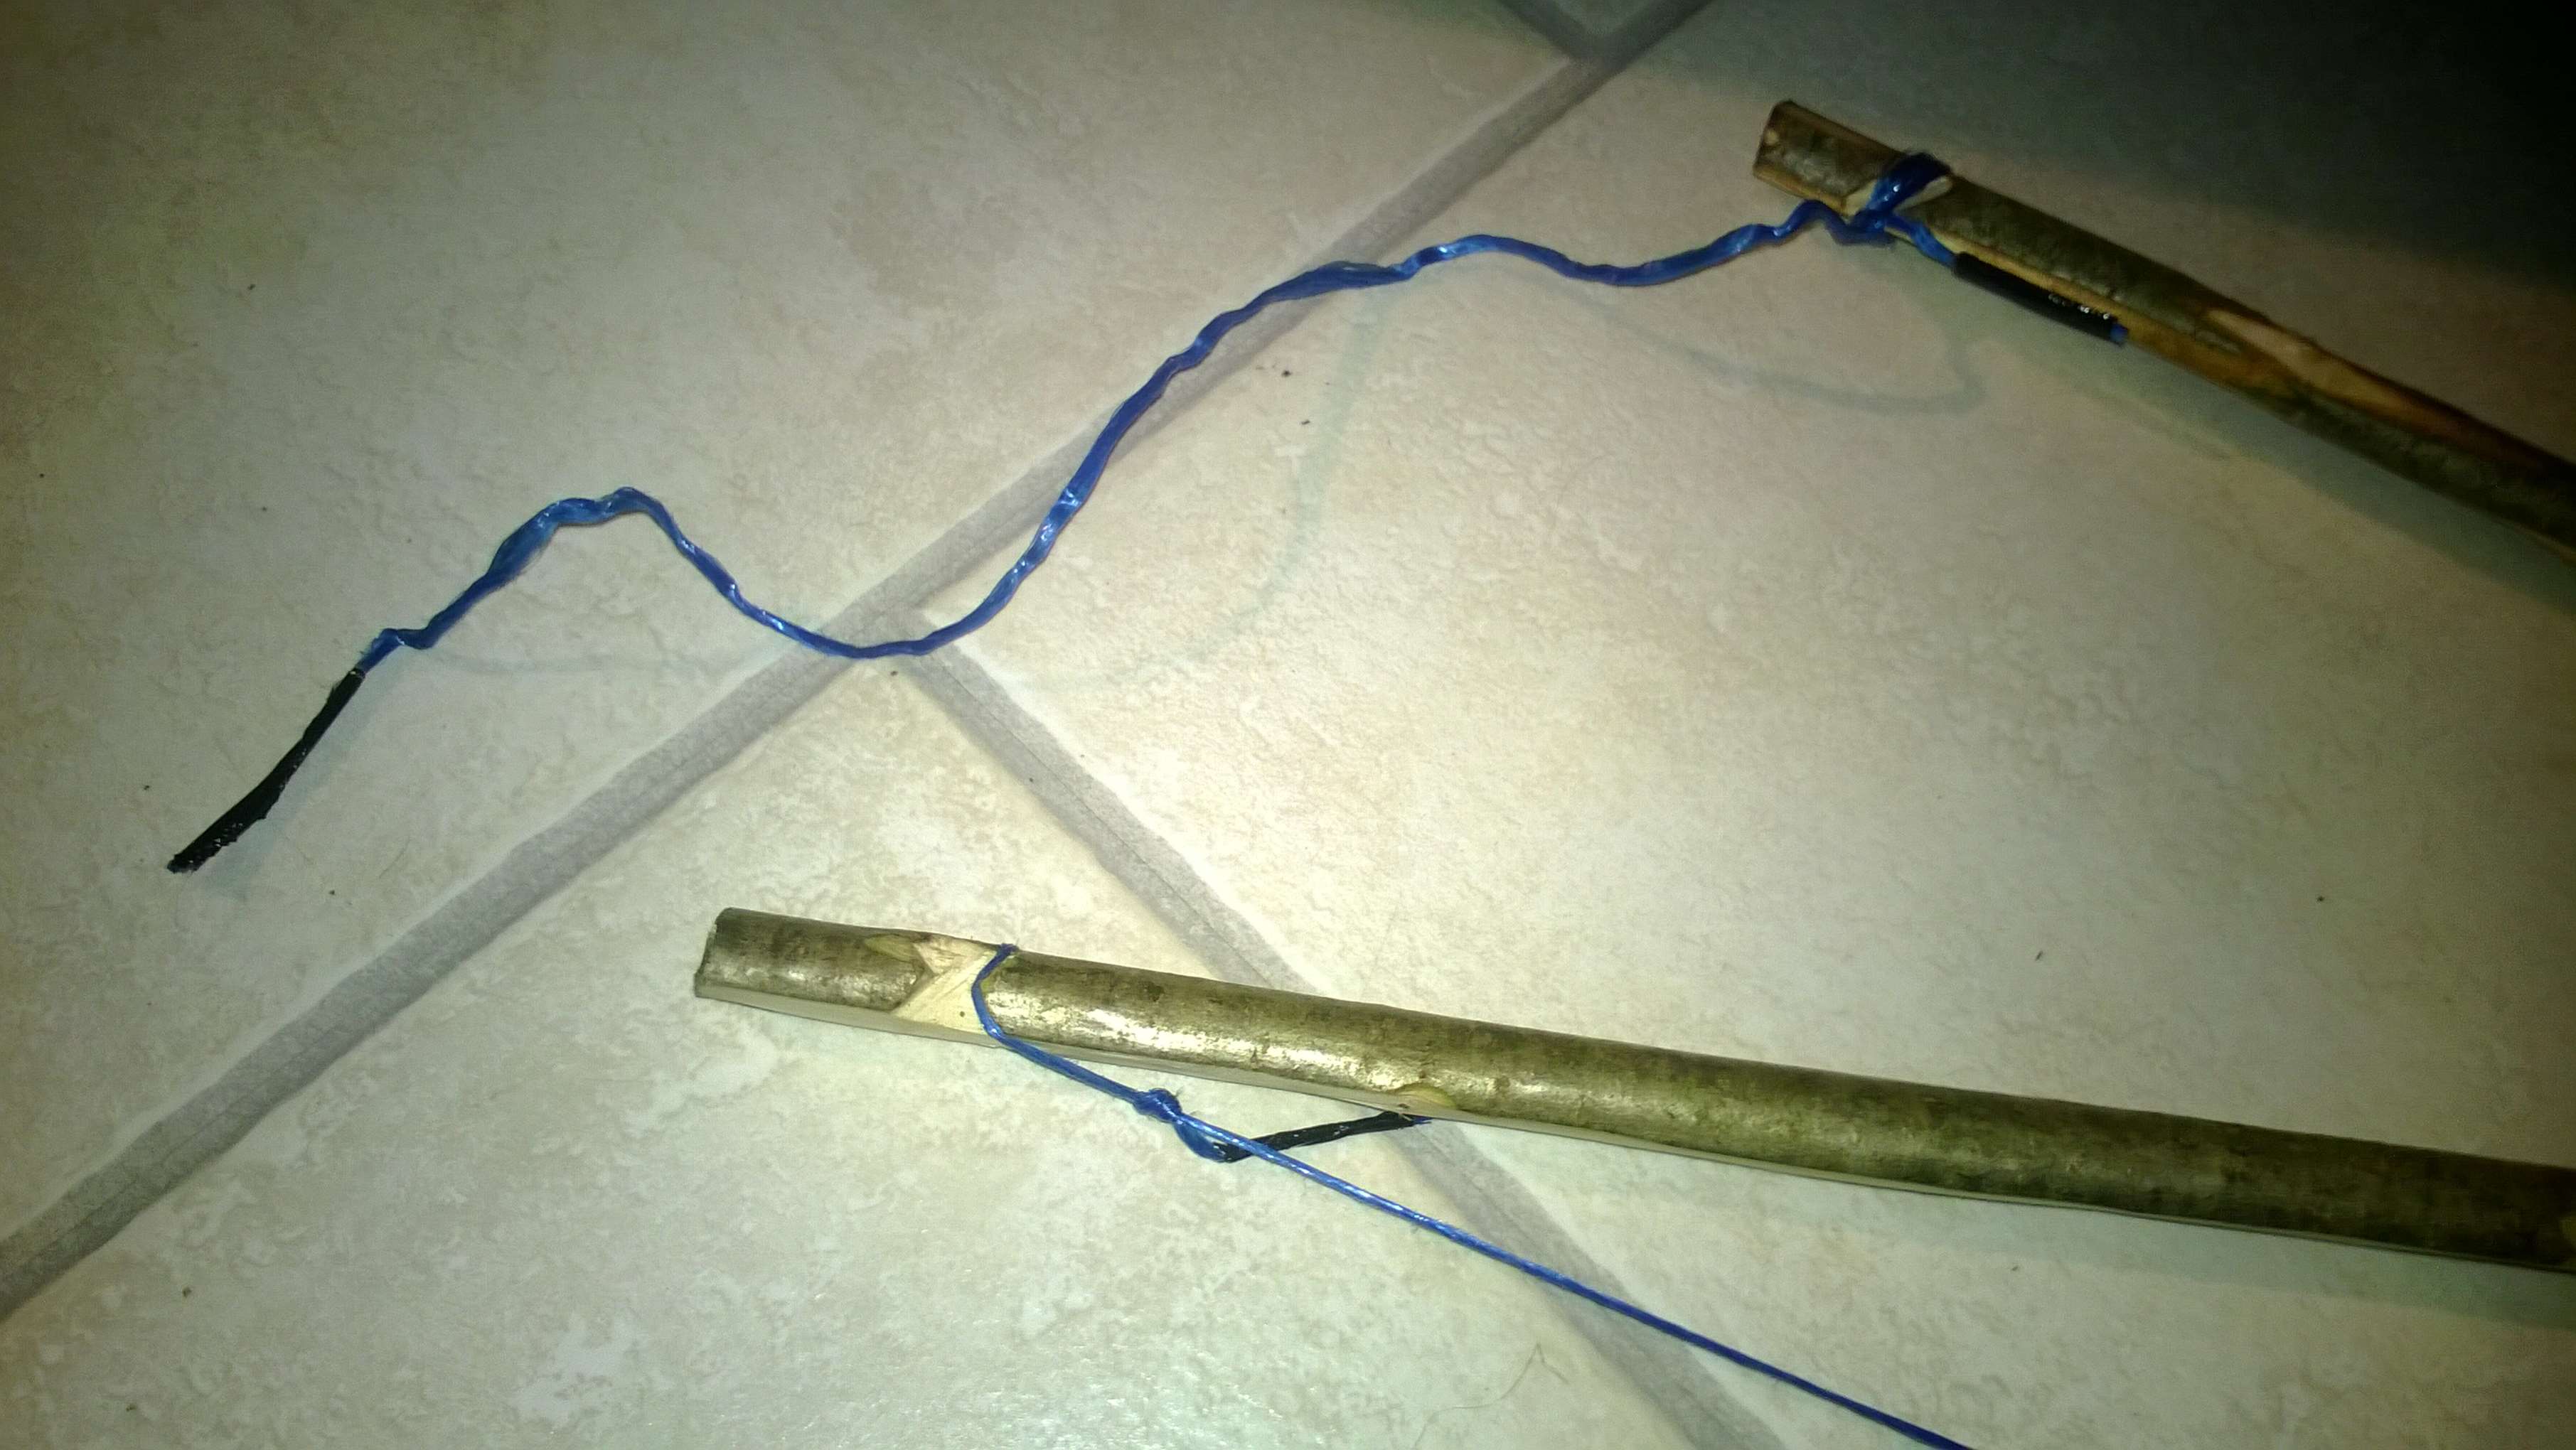
Next I needed to make the nock for the string. I cut two small grooves (opposite each other) at the thin end of each shaft. Then about a centimeter down the shaft (showed here in red) I rolled the knife edge to mark a thin line at 90 degrees to the first grooves (too fine to see in the picture).
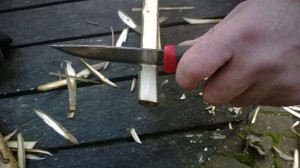
I then placed the edge of the knife into one of the larger grooves to split the wood down to the lower line. The small cut in the wood at the lower line helps stop the split running off too far. I then repeated the procedure on the opposite groove.
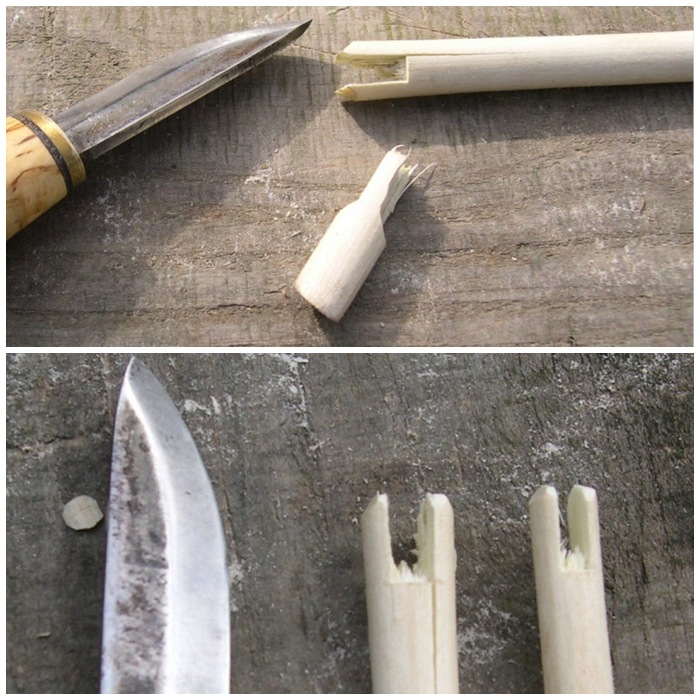
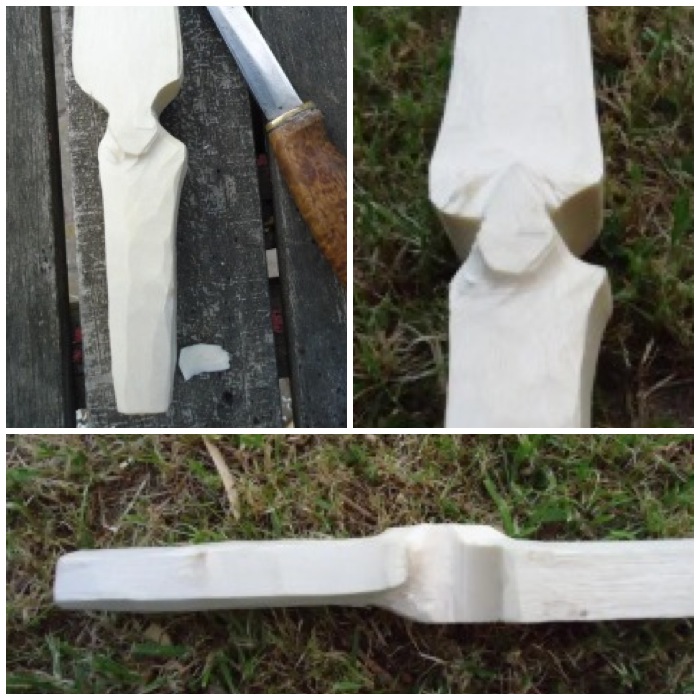
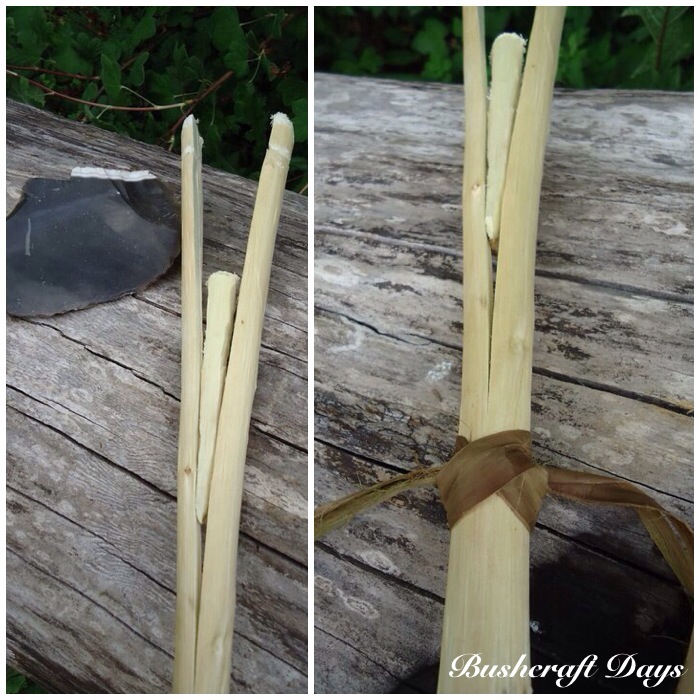
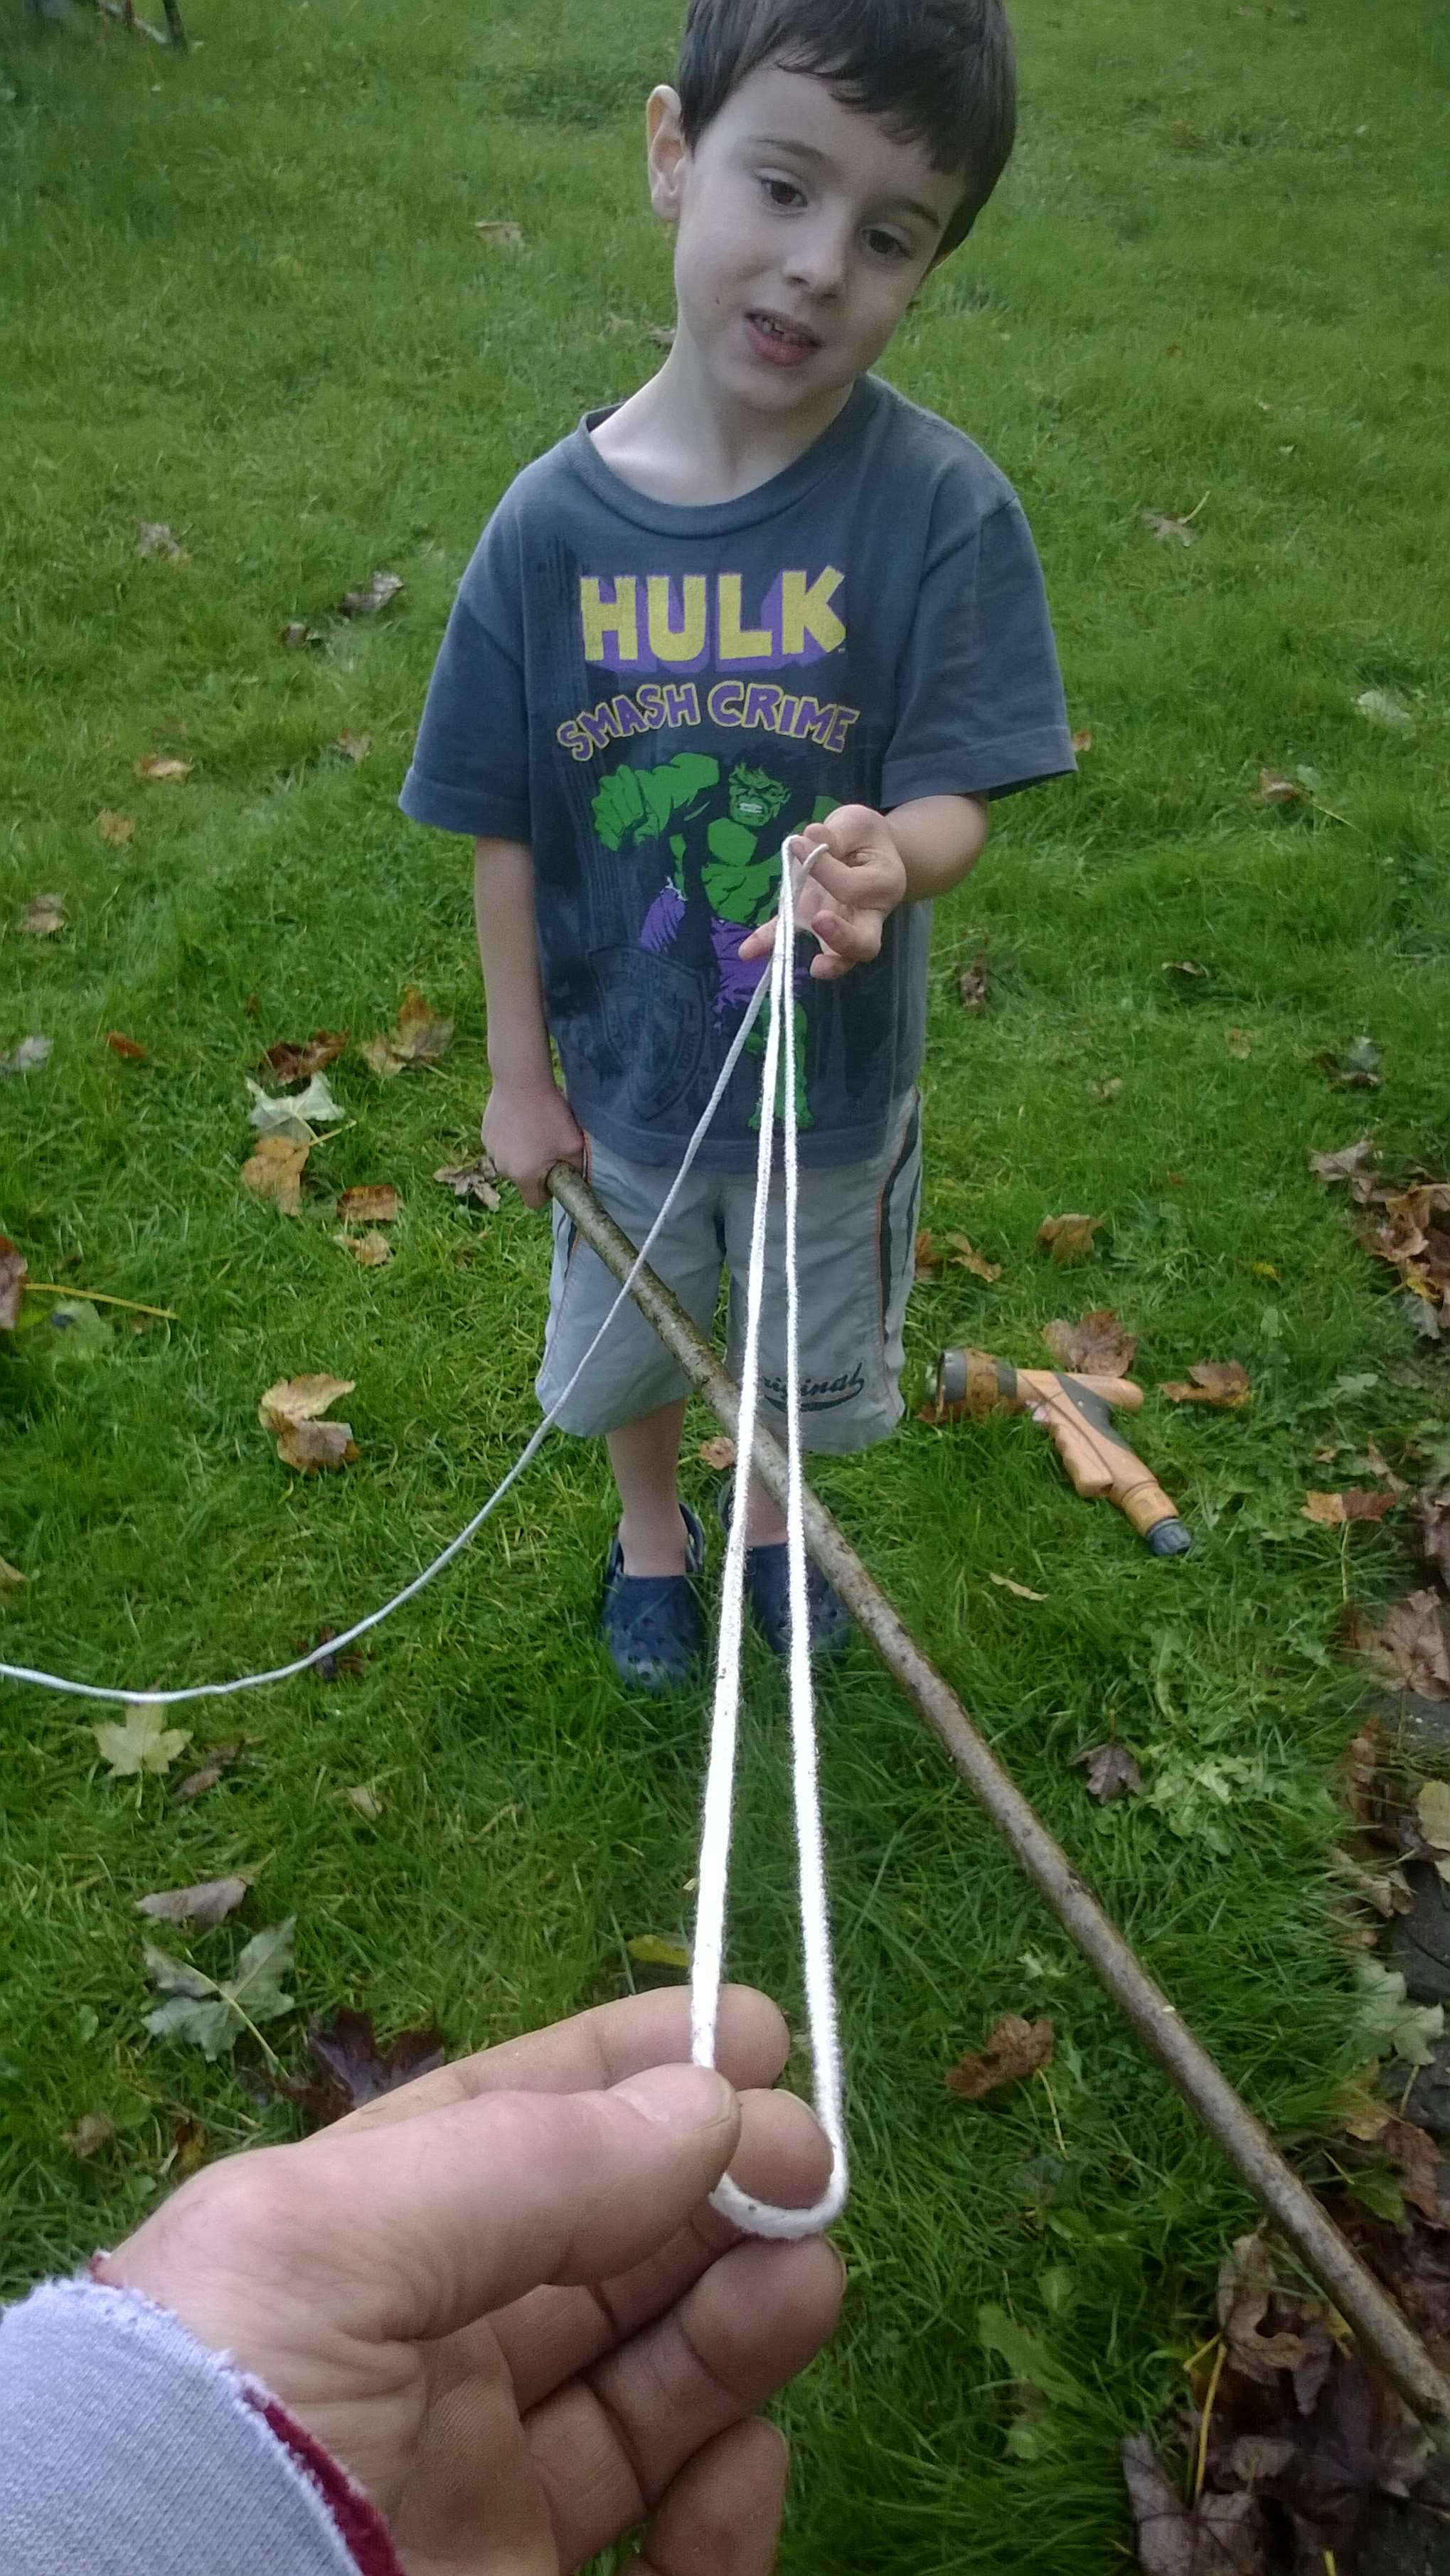
I wiggled the centre section back and forth until it started to break away from the main arrow shaft. In the bottom picture you can see the nock starting to appear.
Self Nocks
The resulting peg finally pops out after a lot of wiggling about. Freejutube has an excellent video on making a primitive nock using a slightly different method – Arrow snap self-nock – with flint and bone tools
The knocks
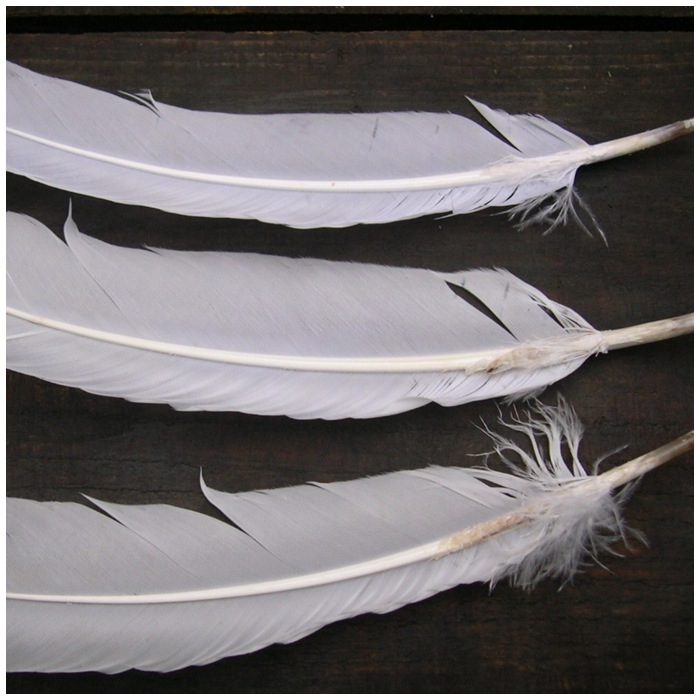
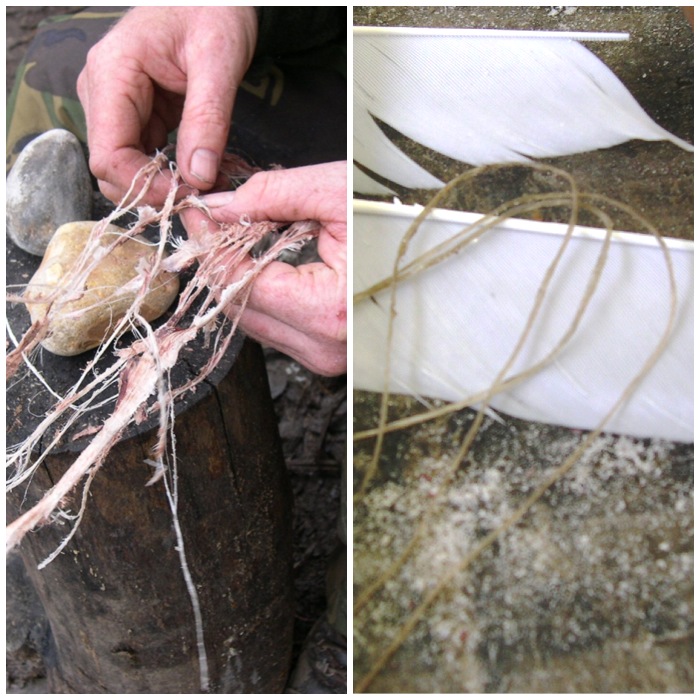
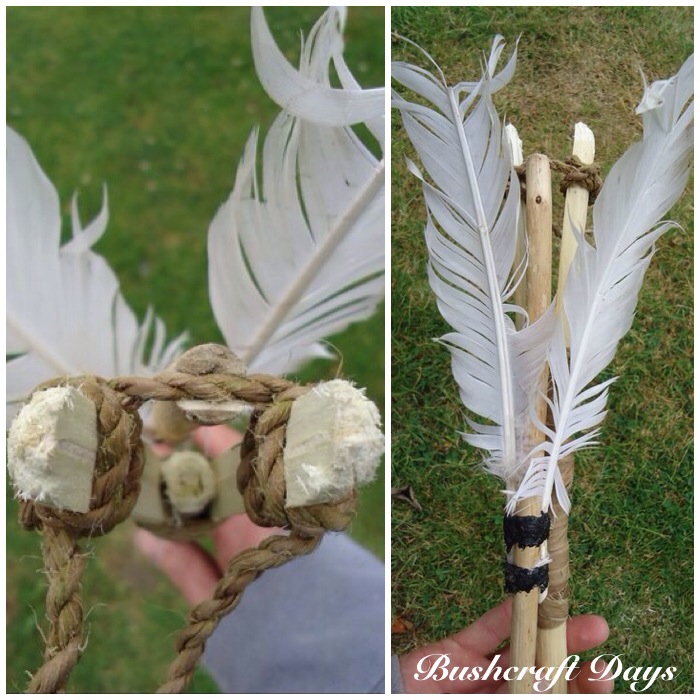
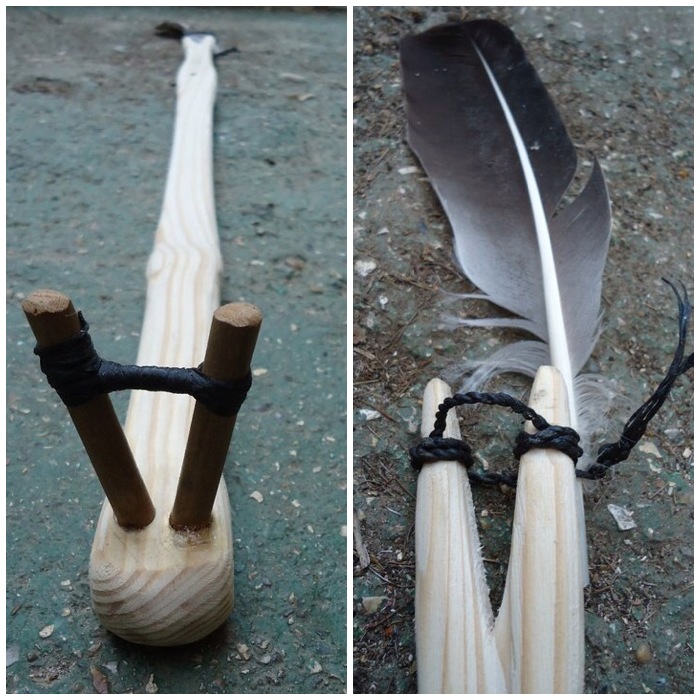
Preparing the Flights
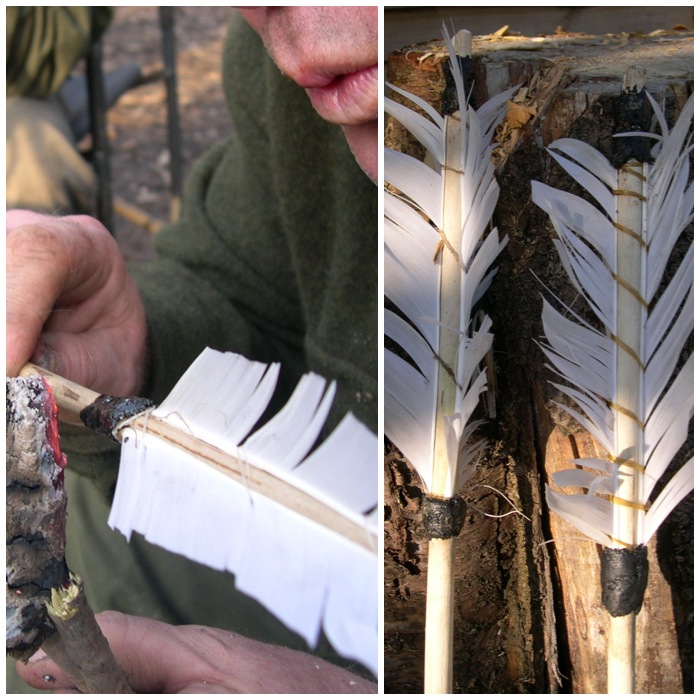
John Ryder provided feathers for us to use. Due to health and safety requirements John had to supply his students with feathers that had been washed: traditionally of course the remnants of bird kills would have been kept and the feathers used for this job. If the feathers are from the same wing they make excellent flights, making your arrows more accurate.
The Flights to be
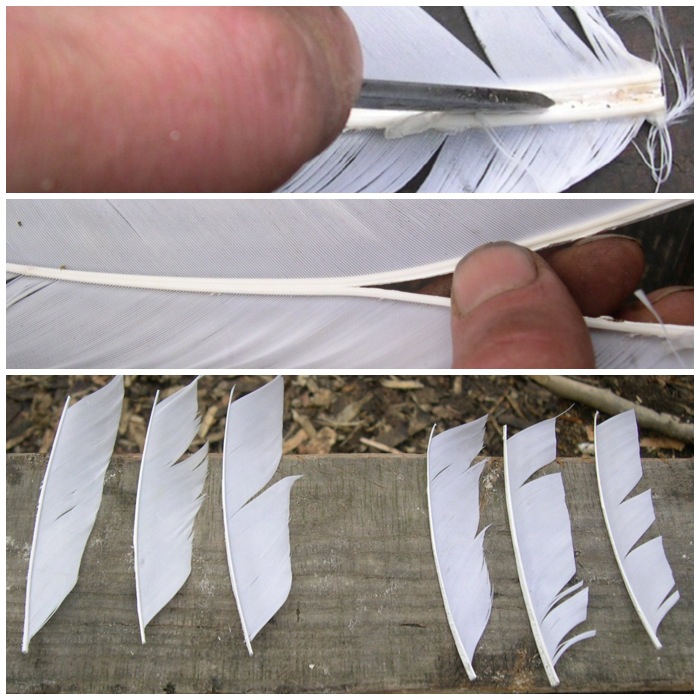
I used my knife tip to start the split of the feathers to create the flights – a sharp piece of flint would have worked just as well. After the initial split had been made I used my fingers to split the rest of the feather. I tried to be very careful here to keep the split in the centre of the spine of the feather all the way to the end. It gets a bit tricky as it tapers out near the end.
I split and trimmed the feathers leaving enough of the spine at each end for wrapping purposes.
Splitting out the flights
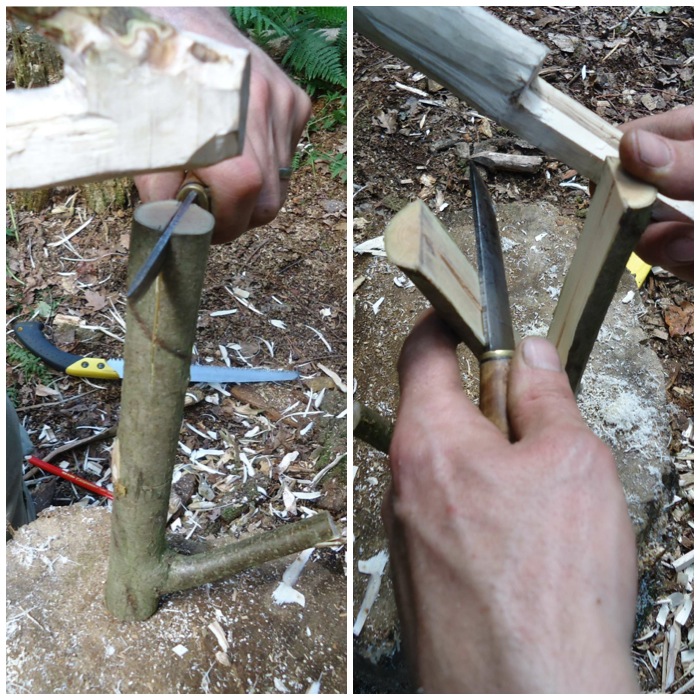
Making Sinew Cordage
To wrap the feathers onto the shaft I used deer sinew. This needs to be pounded gently between two stones until all the sinew fibres separate.
Sinew
This takes time but it is worth it to see all the strands of sinew start to appear.
Breaking down the sinew
Here you can see the fibres starting to really fall apart. There wasn’t enough real sinew for everyone so I had to supplement it with some false sinew: dental floss is another possible alternative.
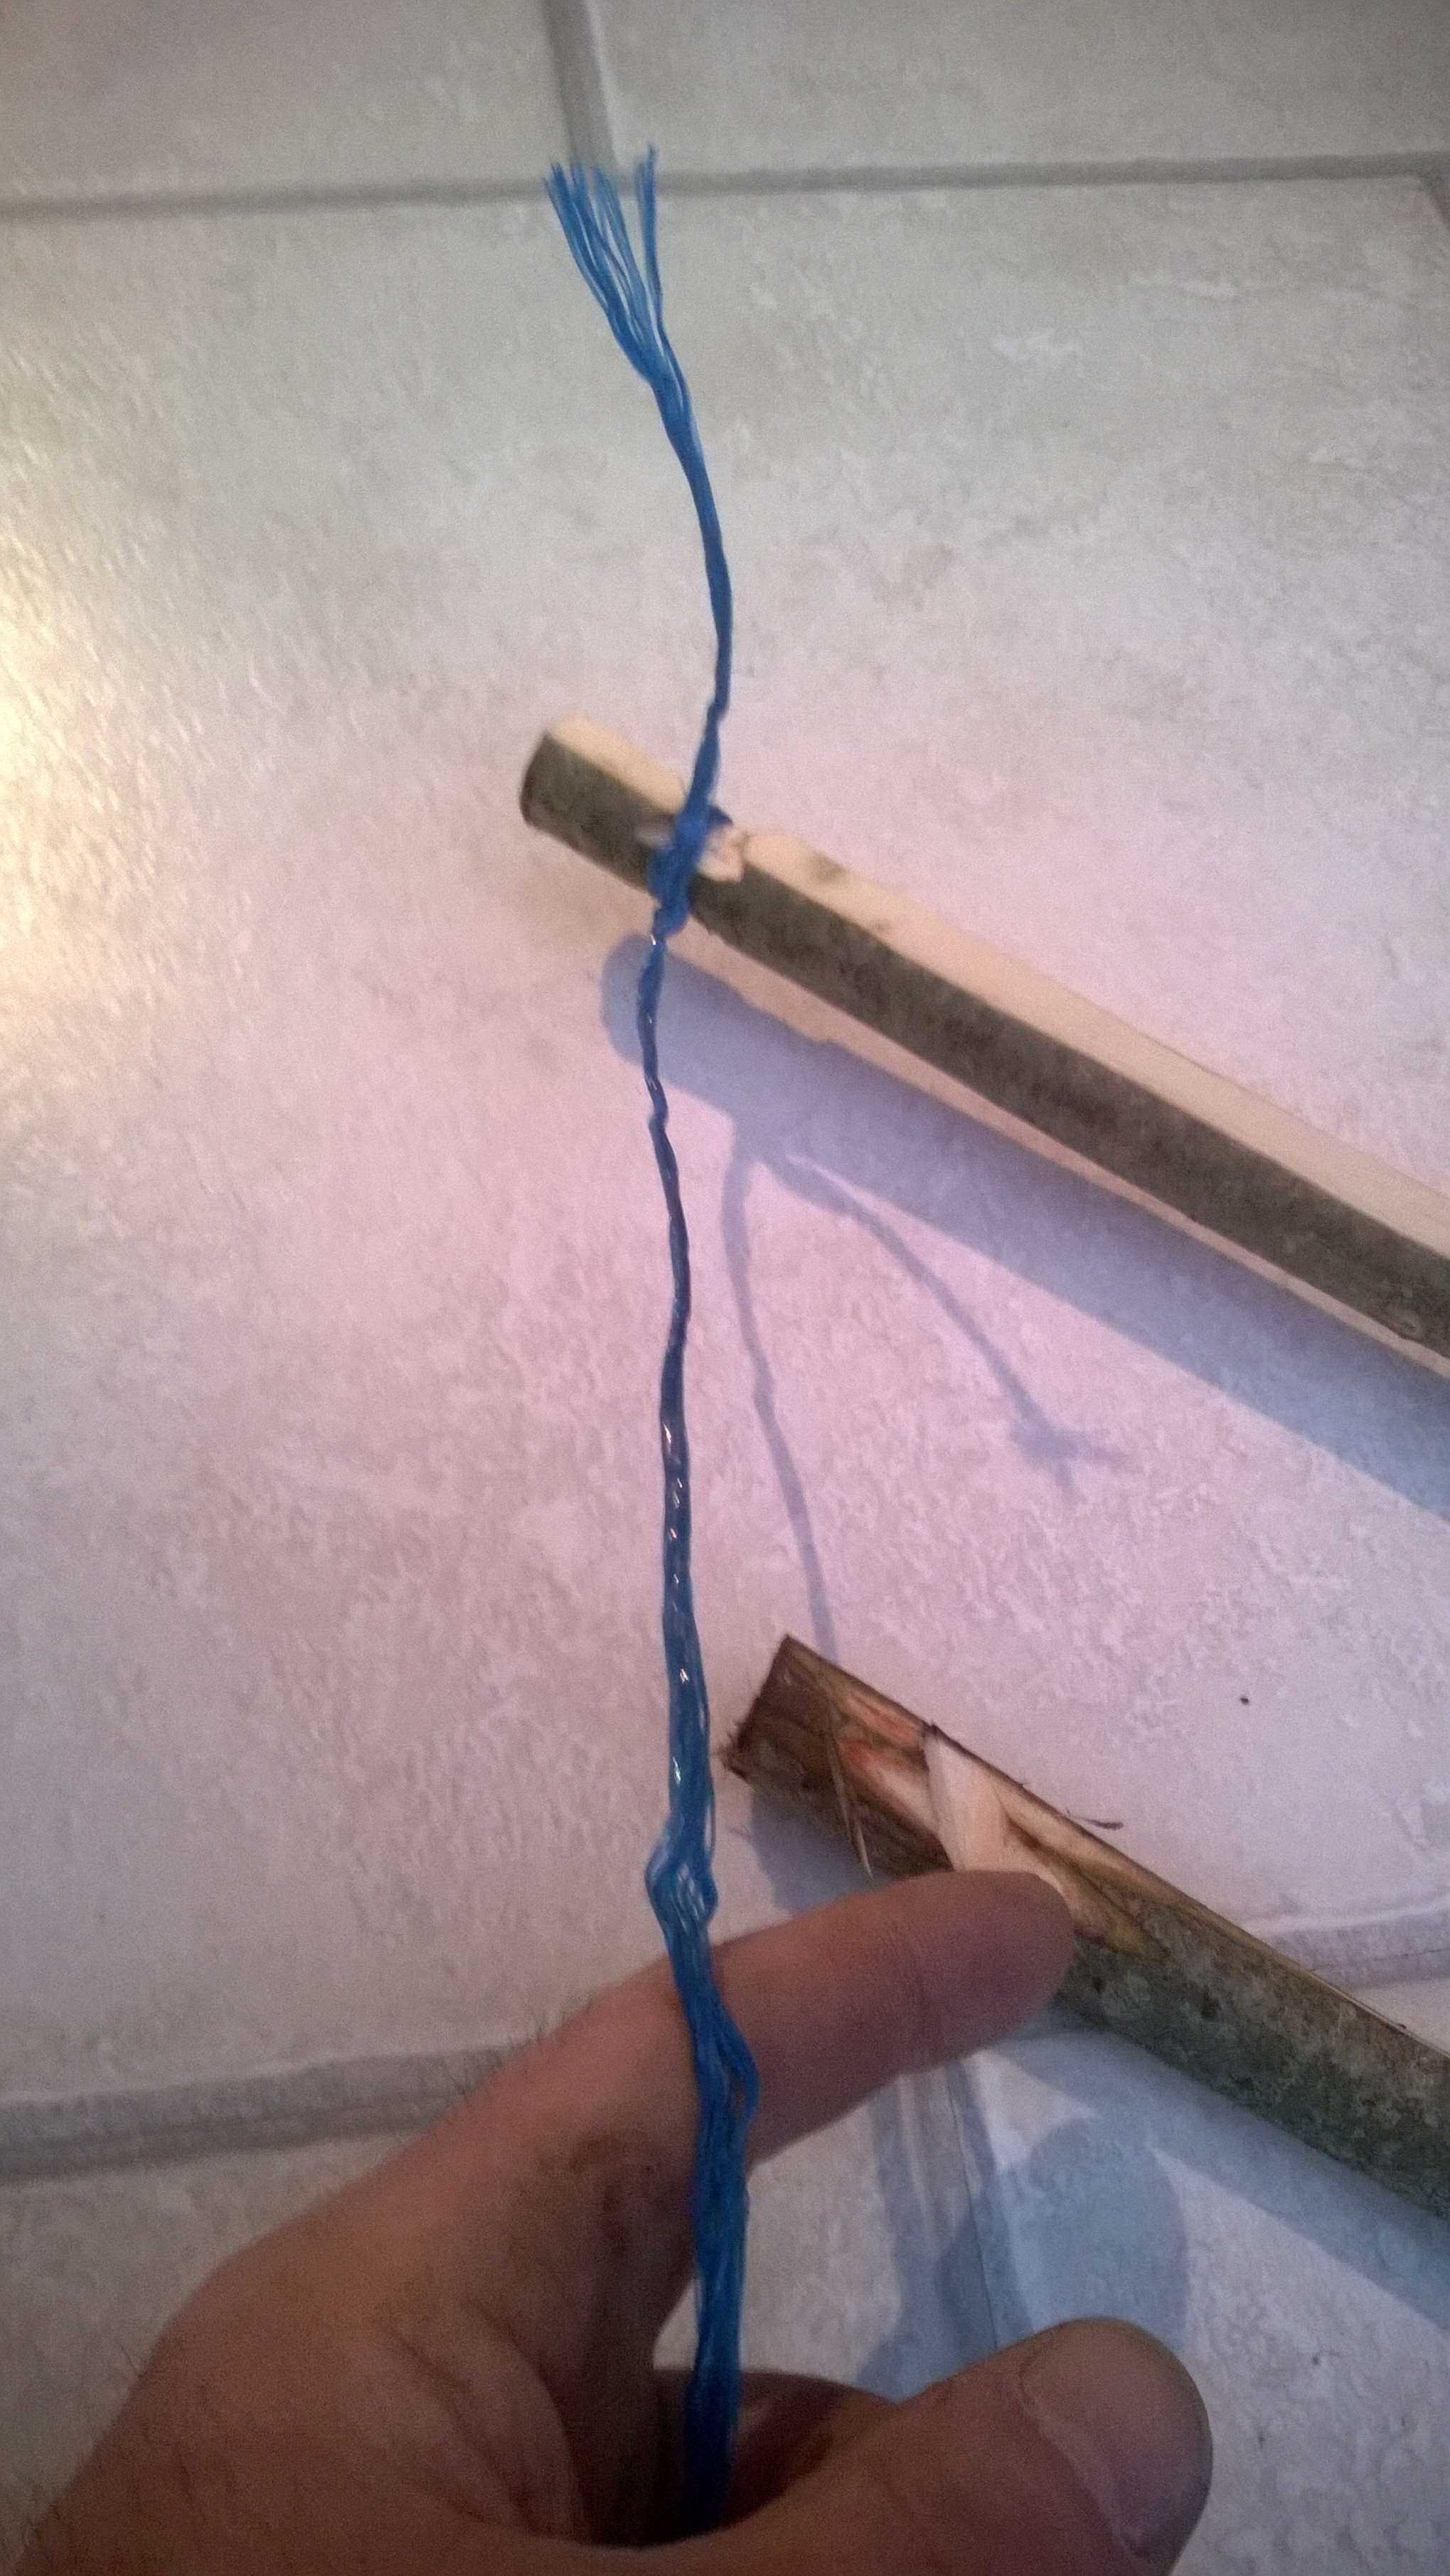
I rolled the sinew strands to make them stronger and wet each strand with saliva. This allows the sinew to bind to the shaft as the fats in it act like a glue when wet. On the right you can see some sinew that is ready to use as wrapping.
Finished sinew
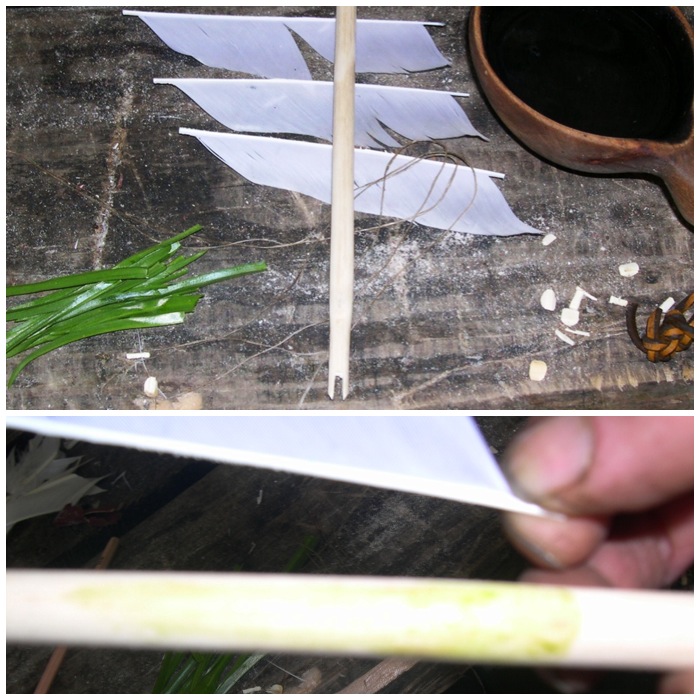
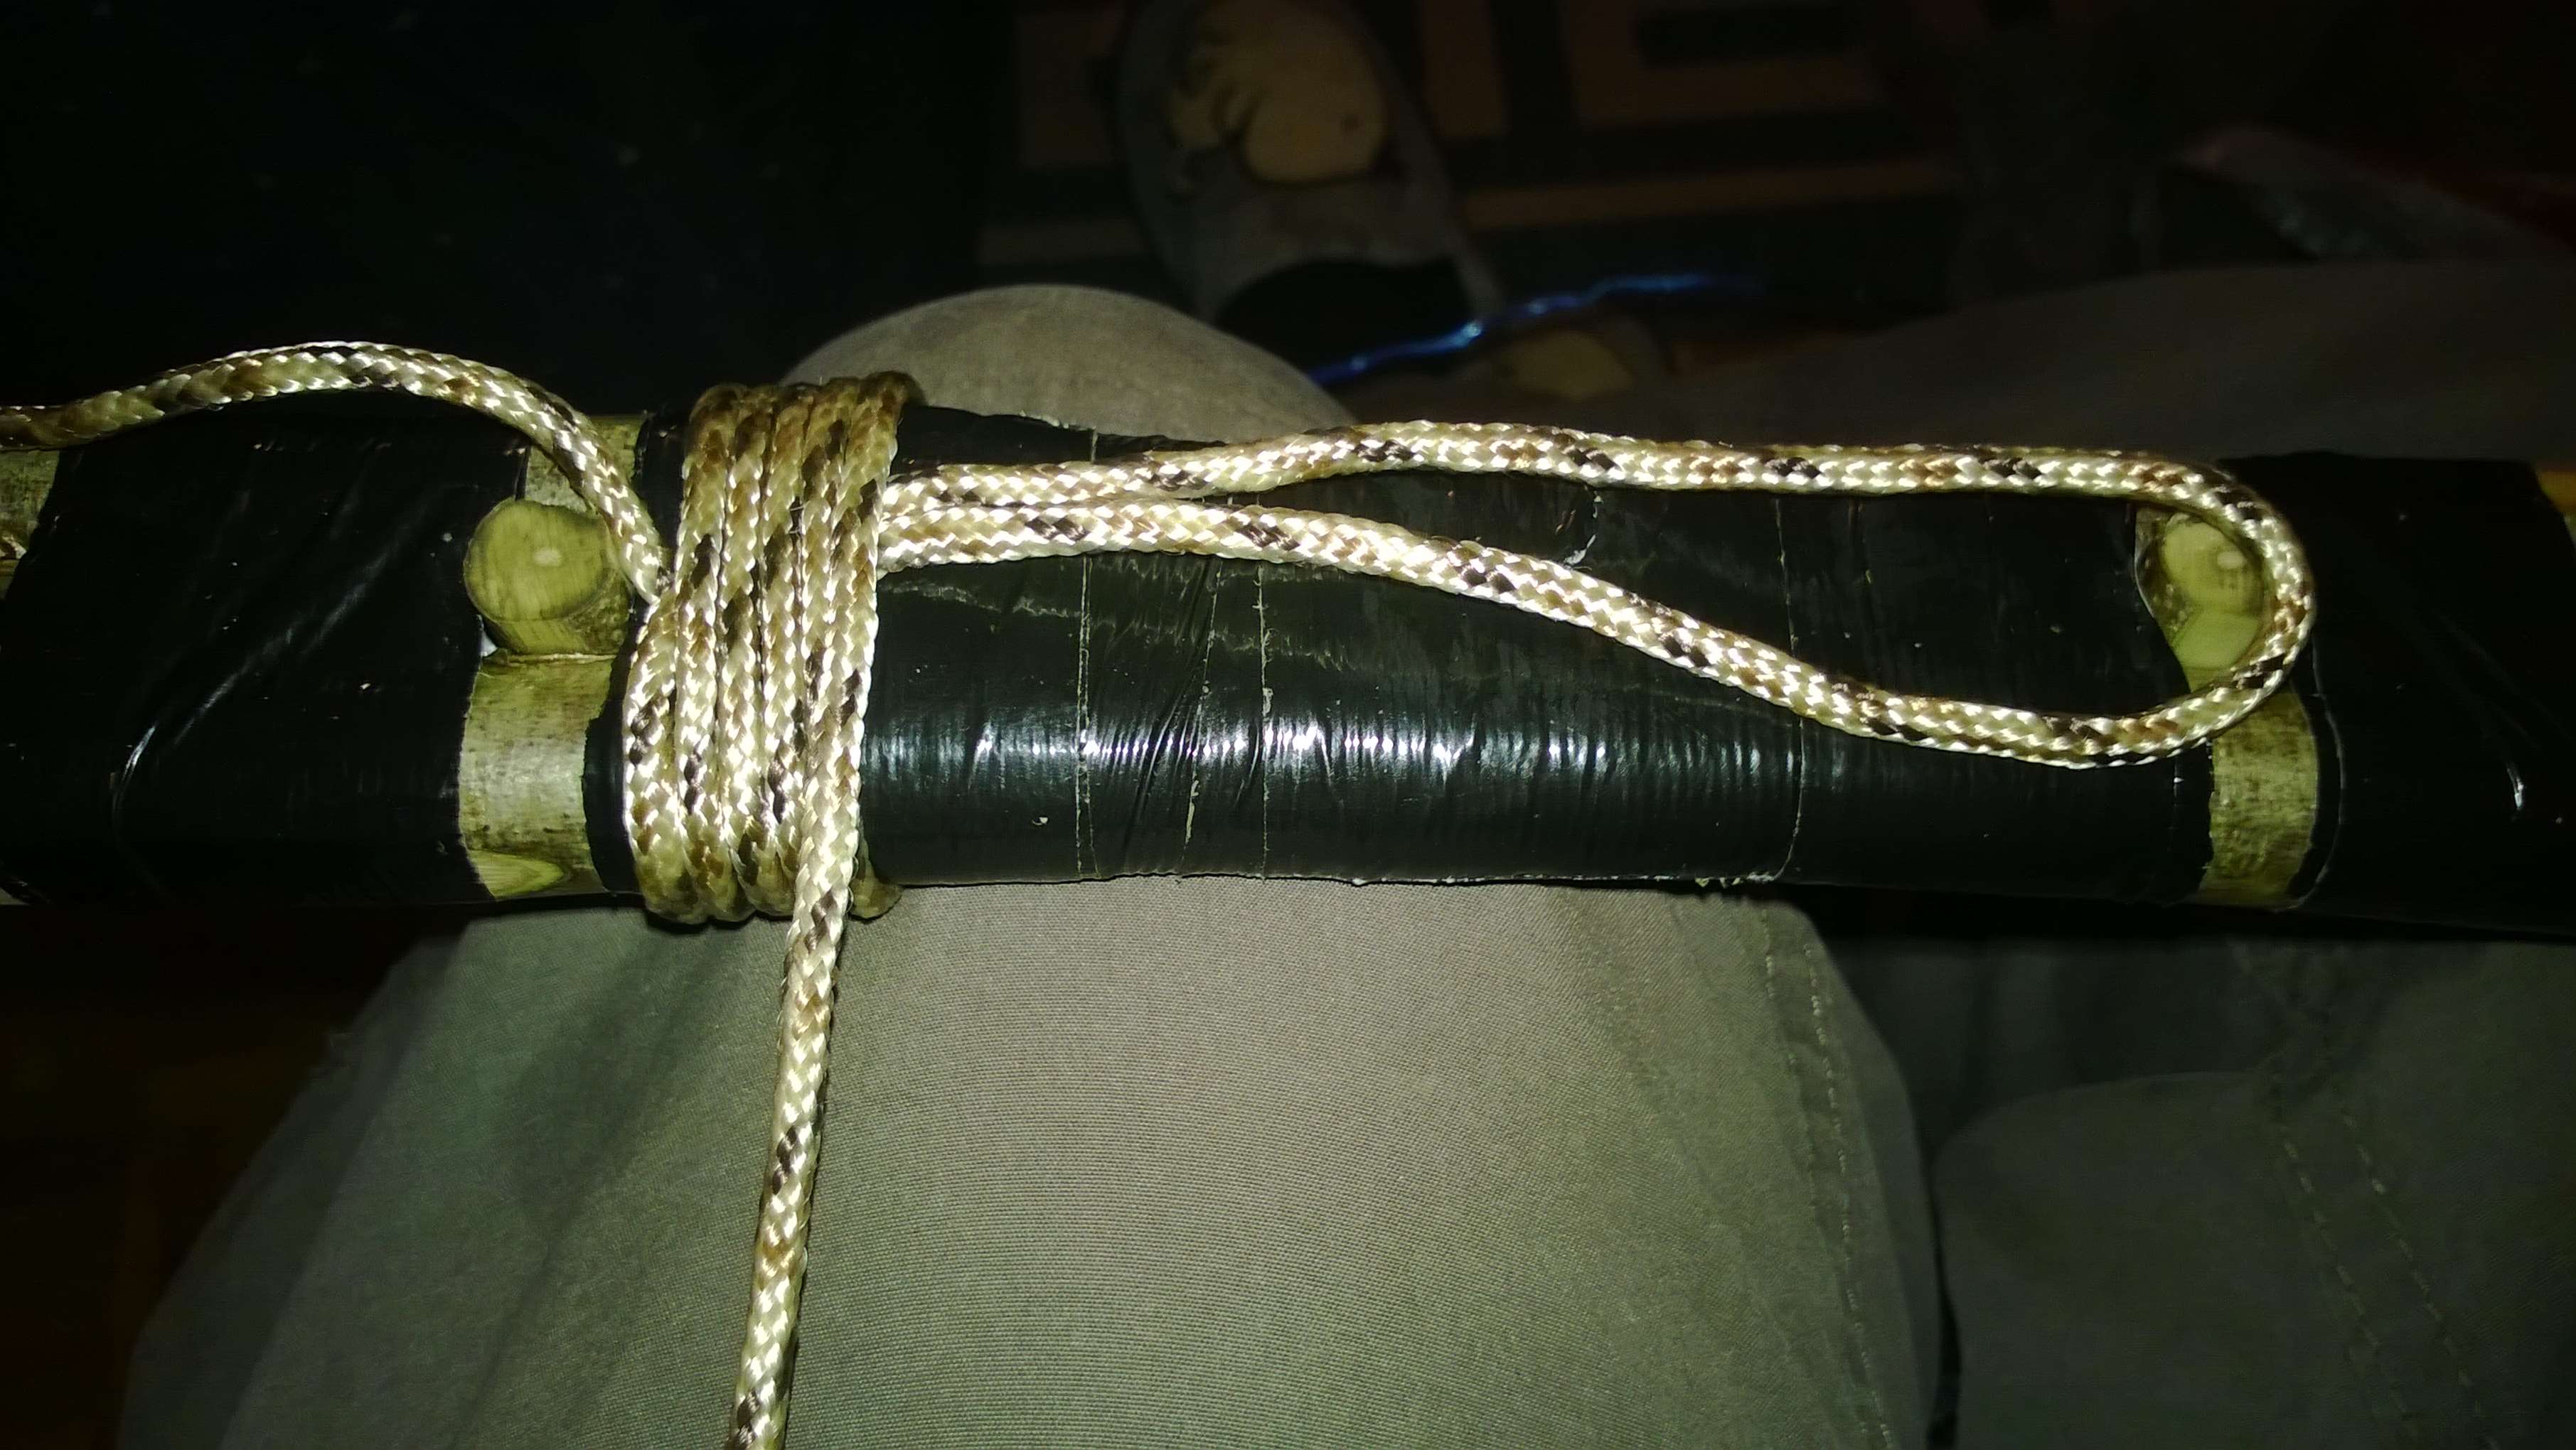
Attaching the Flights
To aid in the process of attaching the flights to the shaft I tried out another type of glue made by crushing bluebell leaves to a pulp between my fingers. The resulting gloop was supposed to act as a first fixing to help keep the flights in place before wrapping; it turned out to be a little bit tacky but nowhere near strong enough to act as a glue. In the bottom picture you can just make out the shaded area on the shaft where the bluebell ‘glue’ was placed.
Bluebell glue
In the end I just used sinew to hold the flights in place. You can see the bluebell stain on the shaft in this picture.
First tie off
I then wrapped the flights at the top with sinew (bottom left) and then to finish this stage I wrapped the body of the flights with more sinew (bottom right).
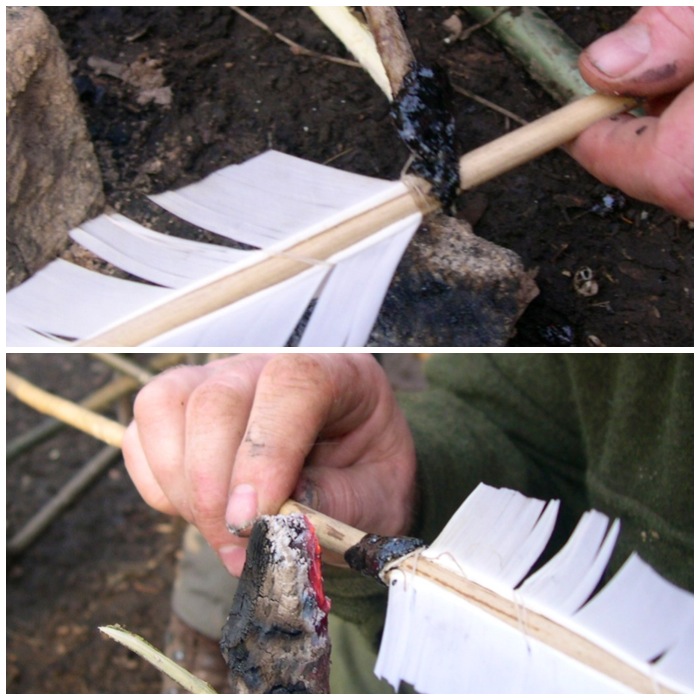
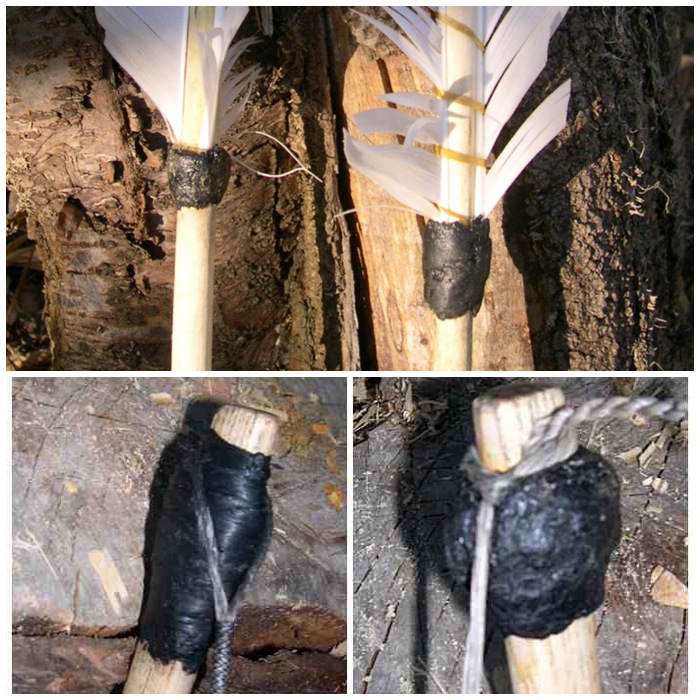
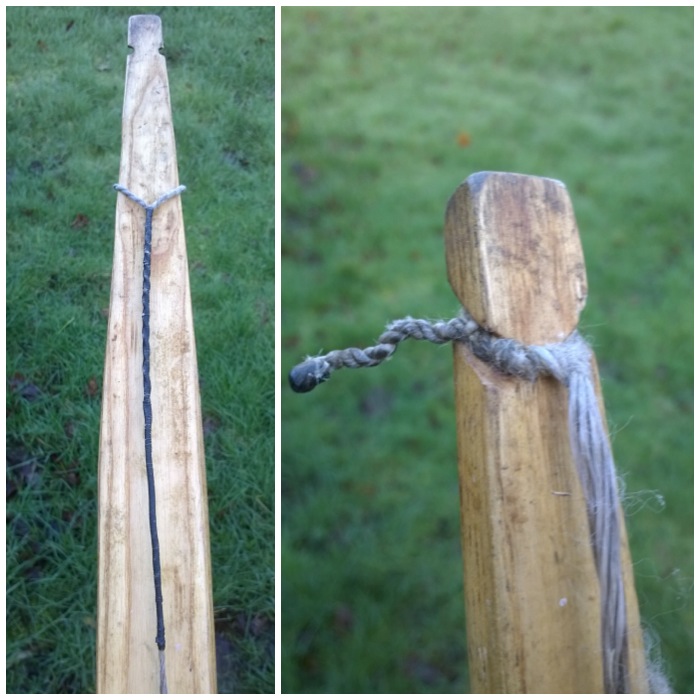
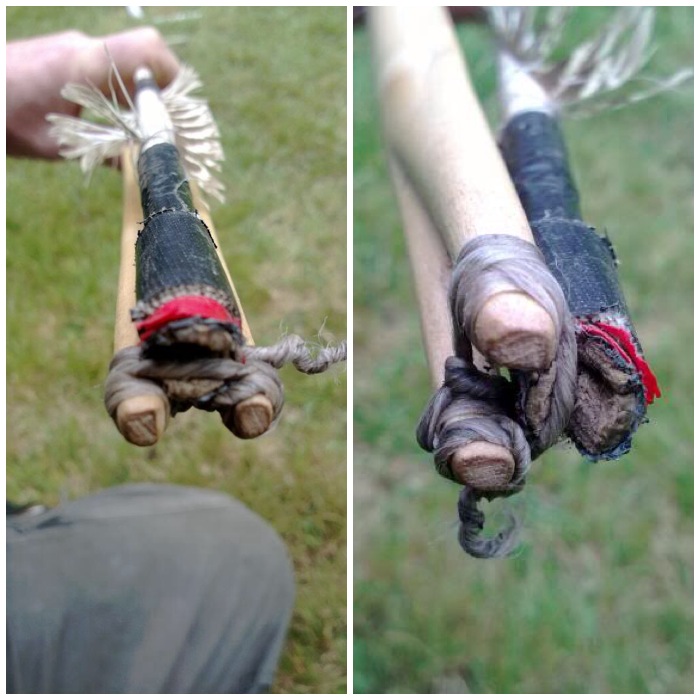
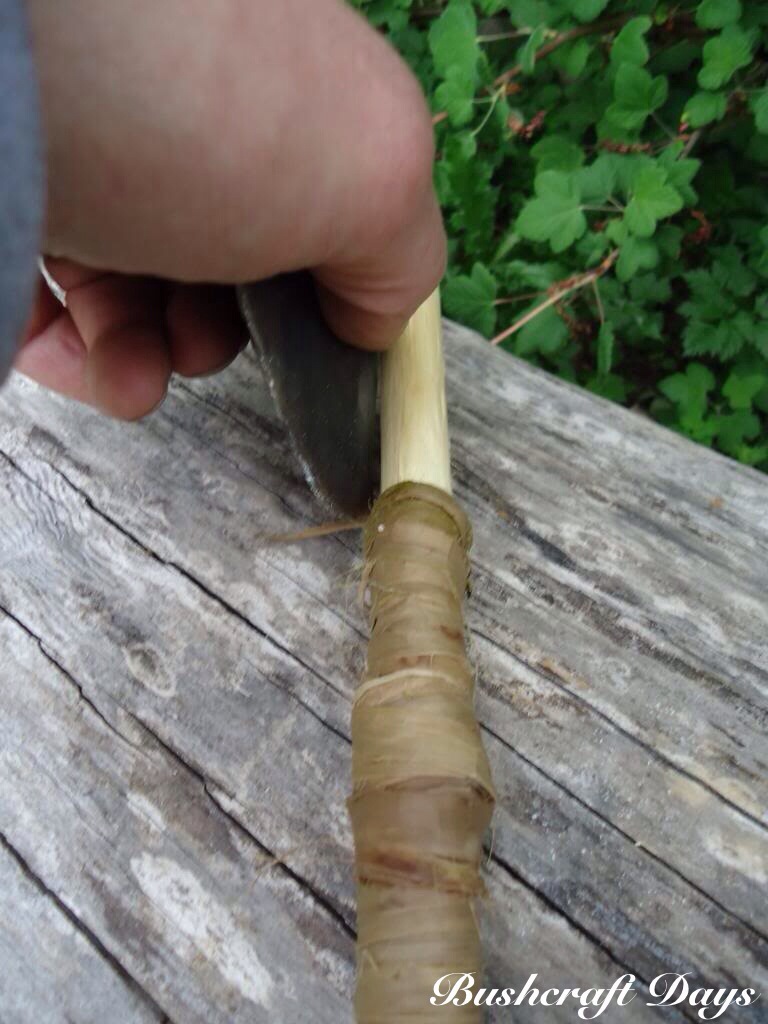
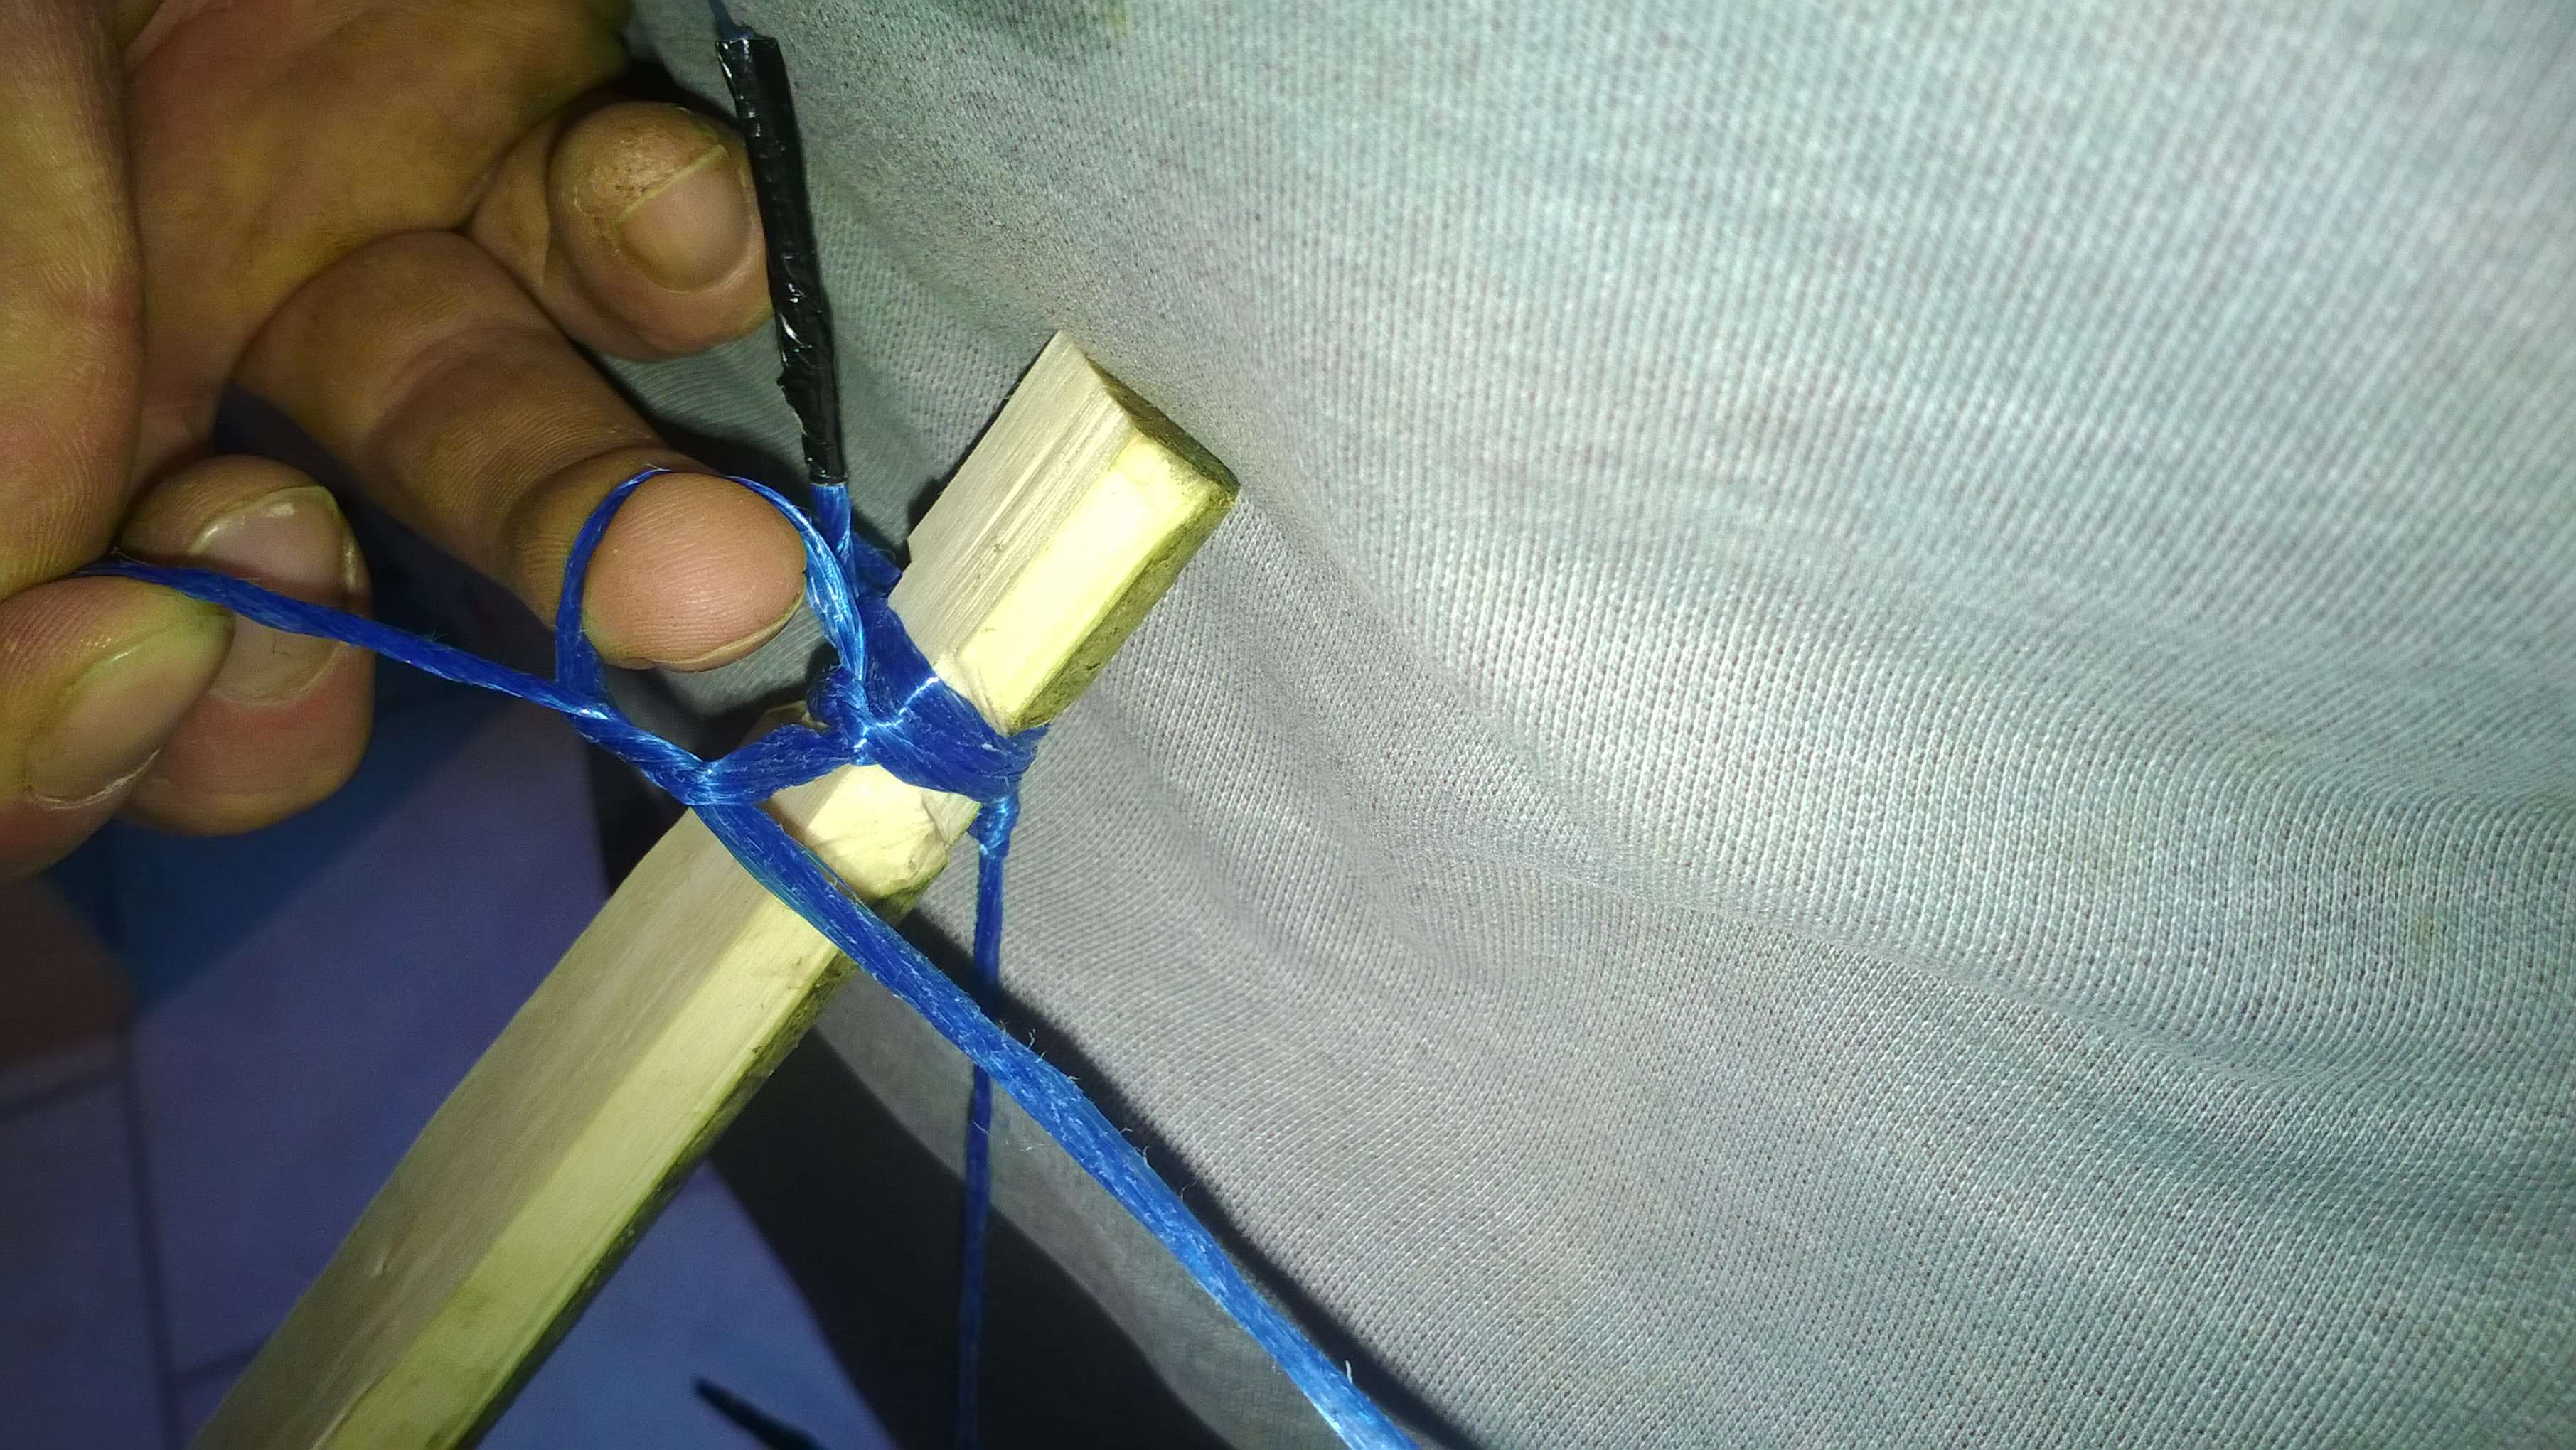
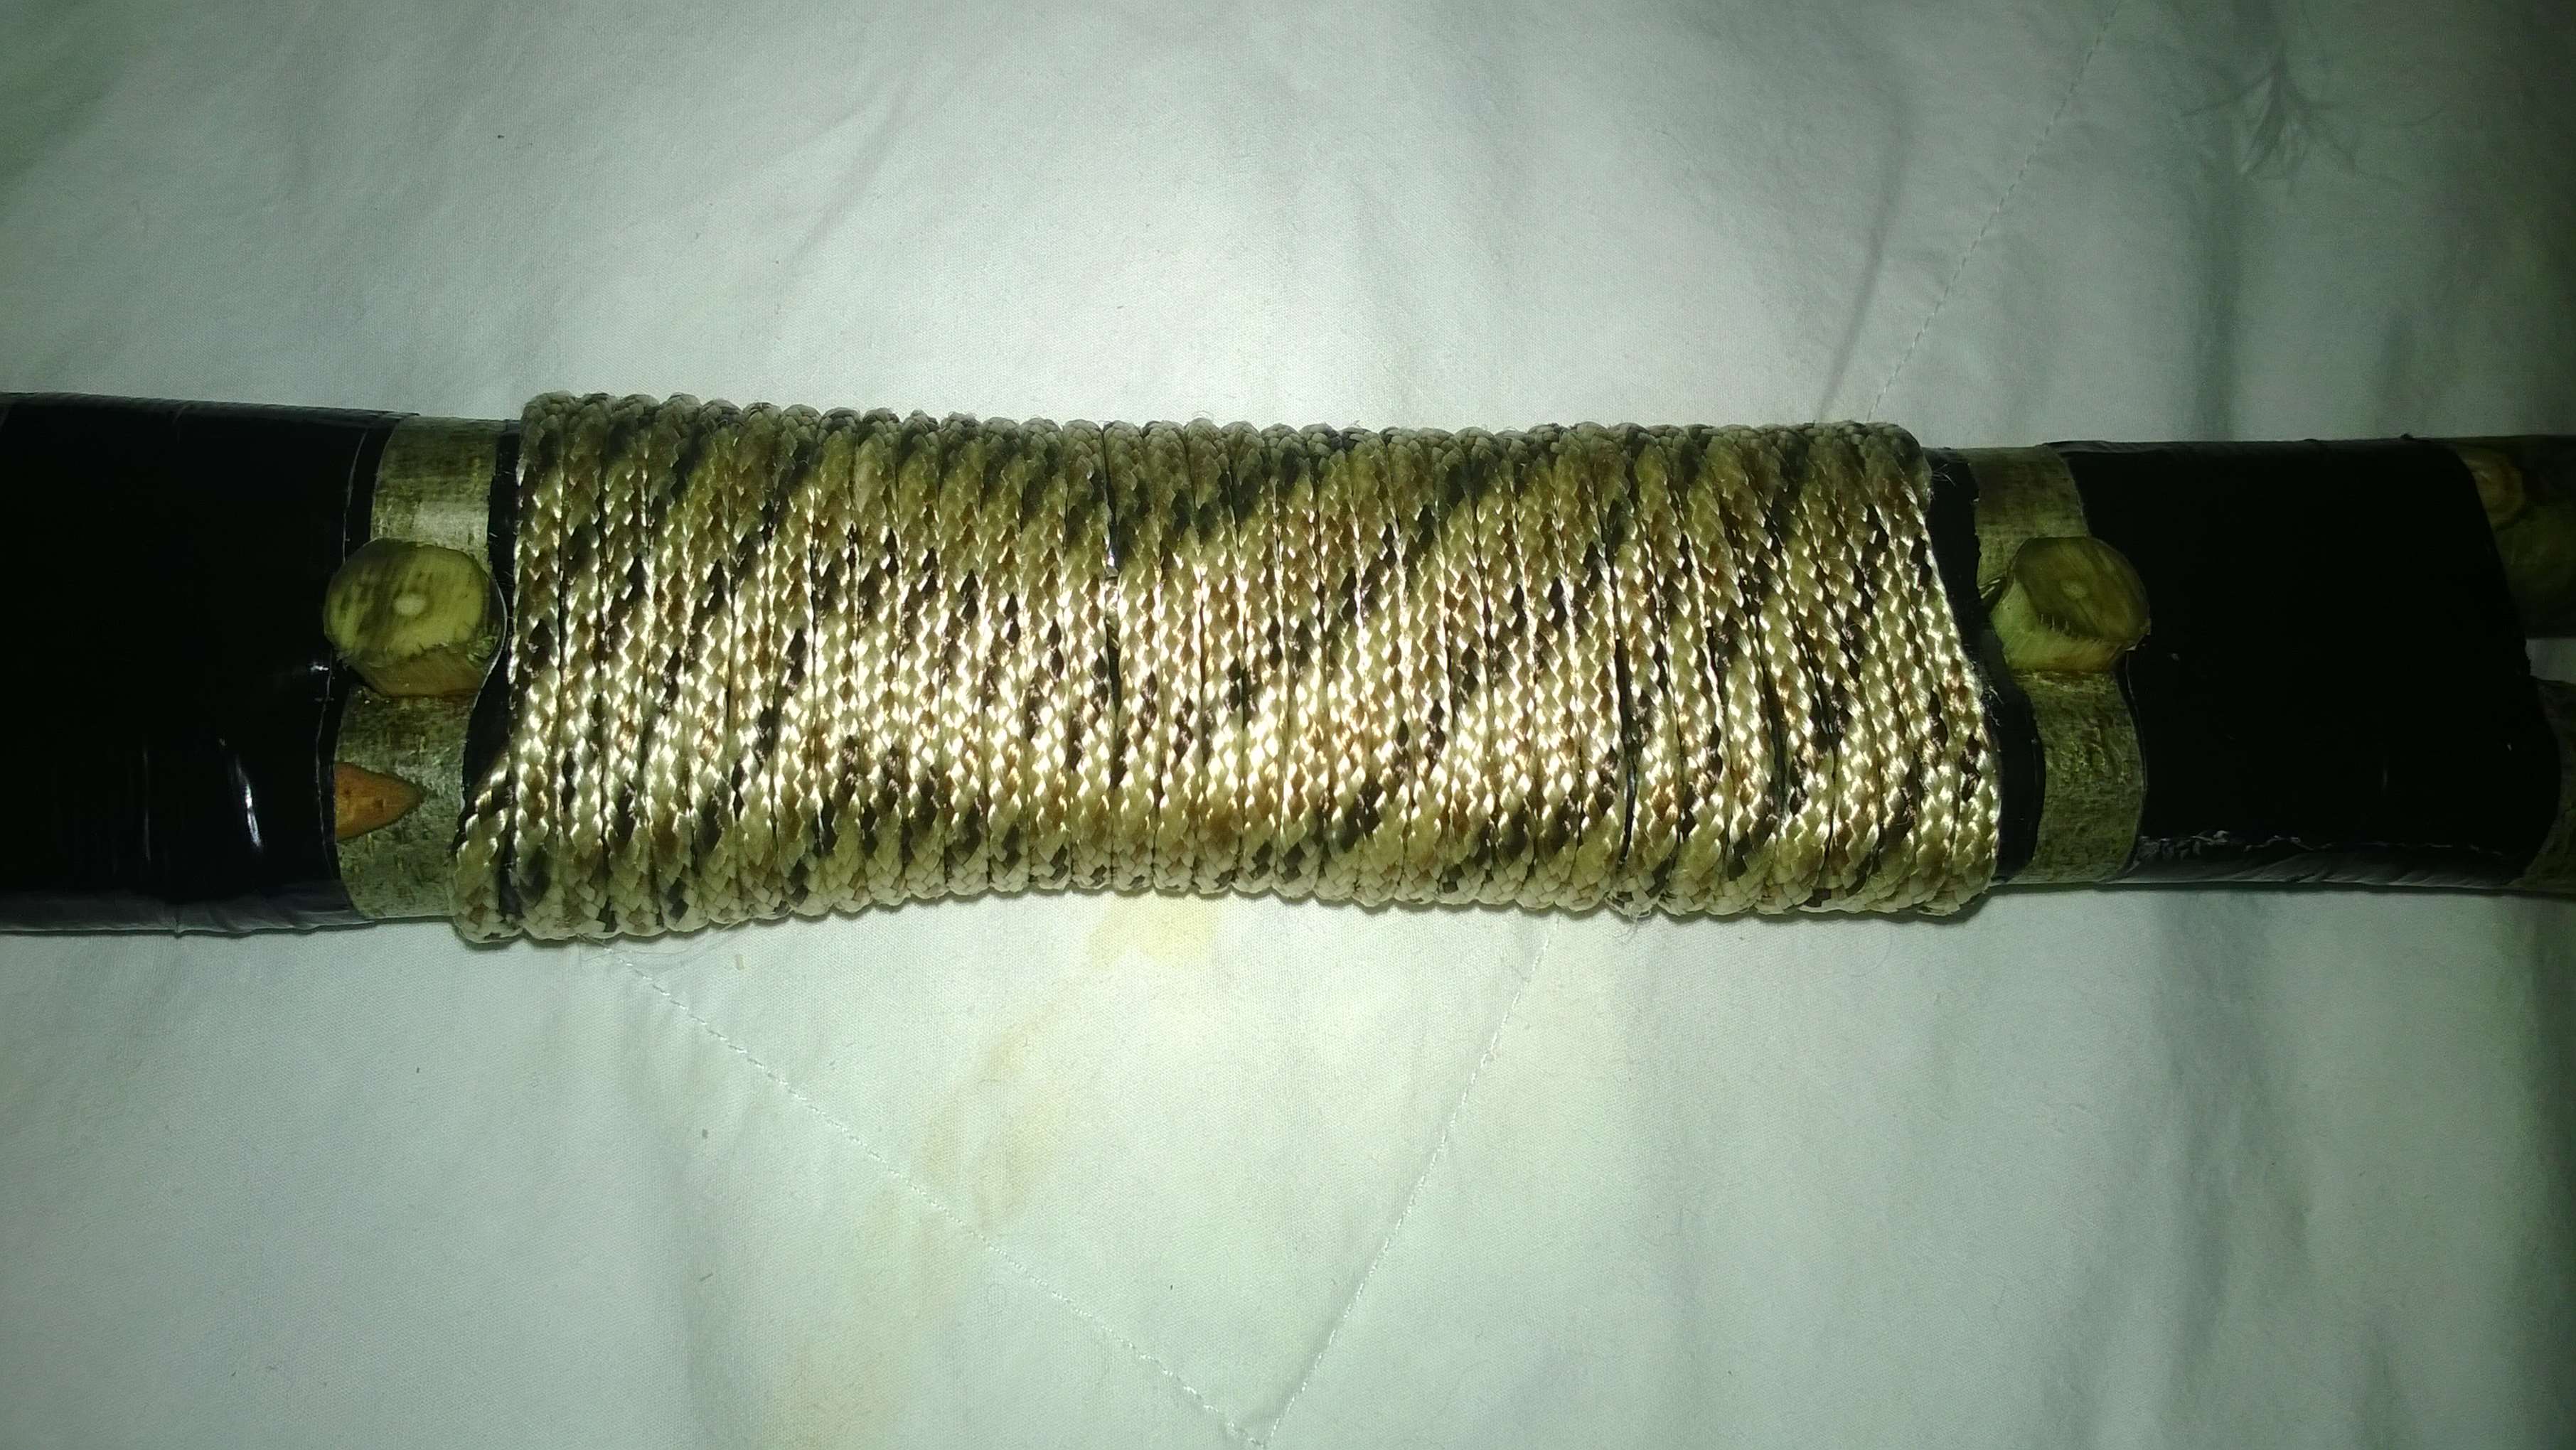
I also wrapped sinew just below the nocks on each arrow to strengthen them. You can see this clearly in the arrow on the right. If I hadn’t reinforced the nocks with sinew they could easily have split with the forces of the bow string as soon as I shot them.
Tied off with sinew
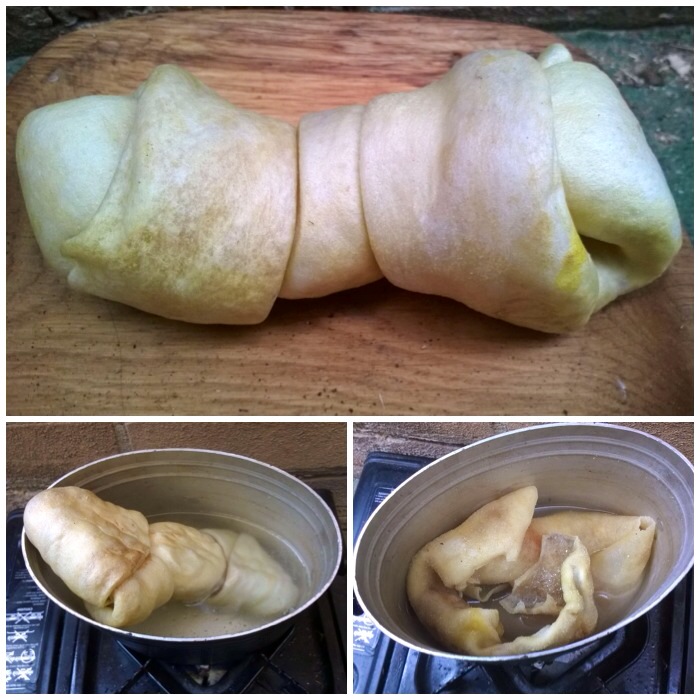
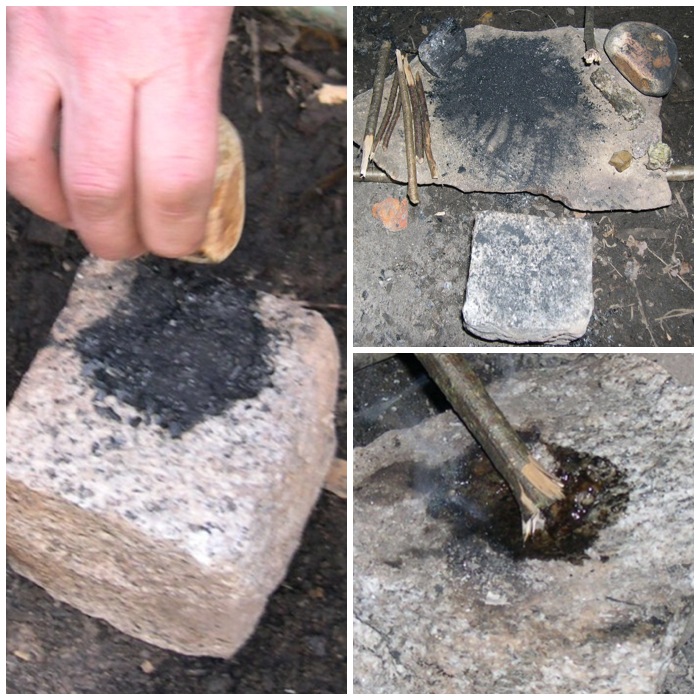
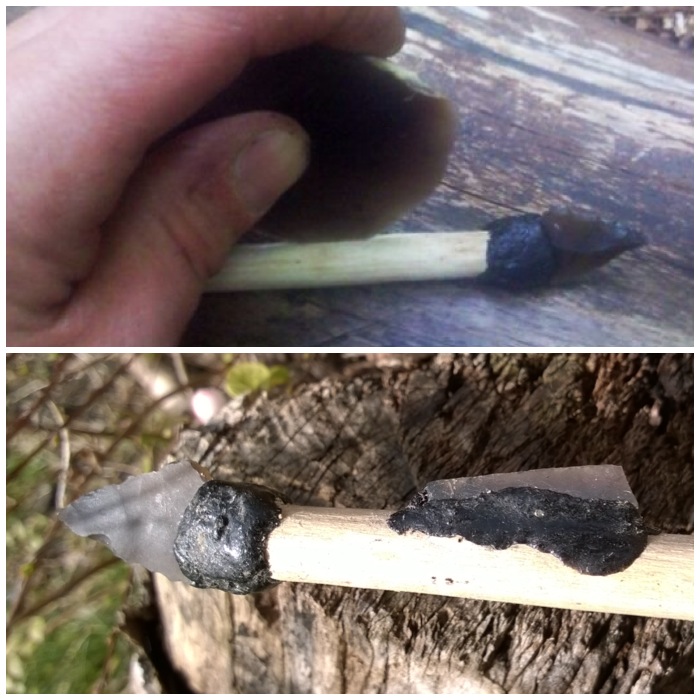
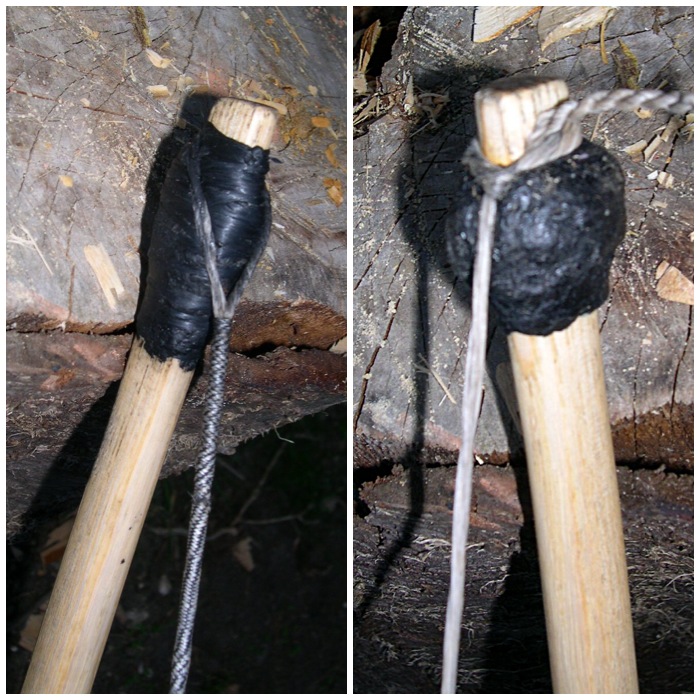
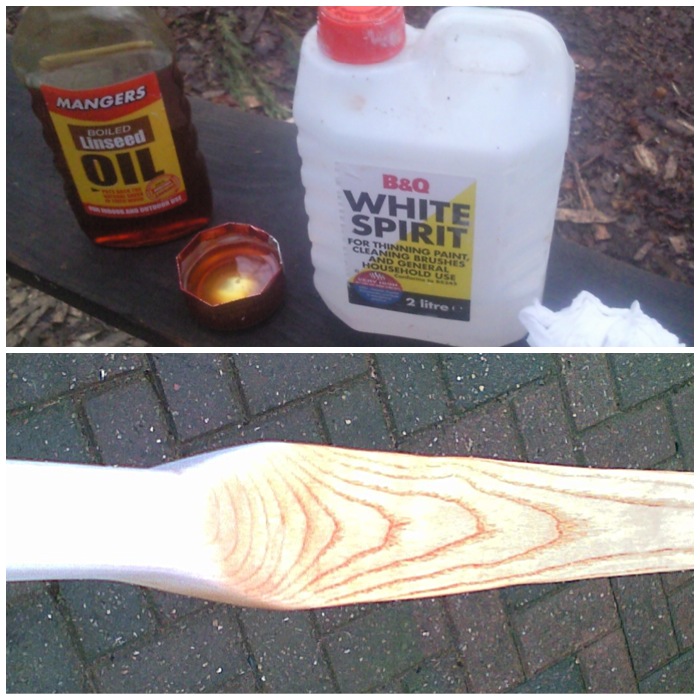
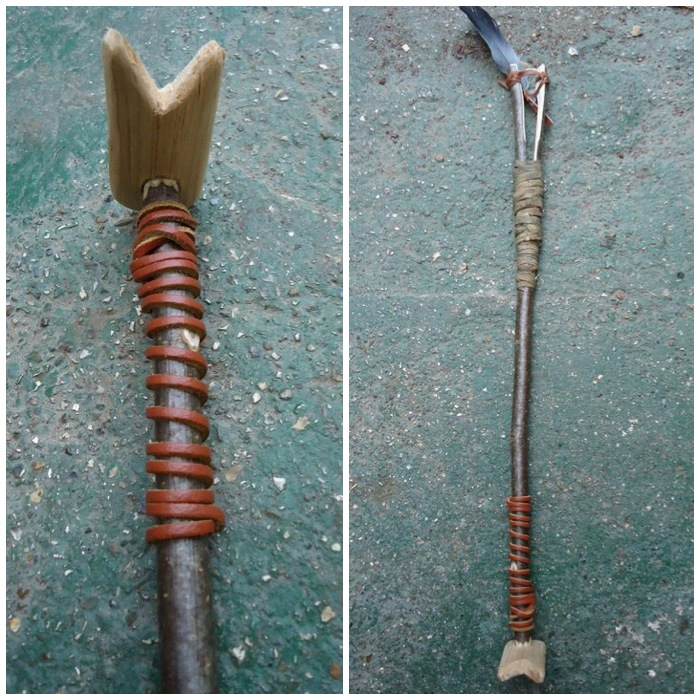
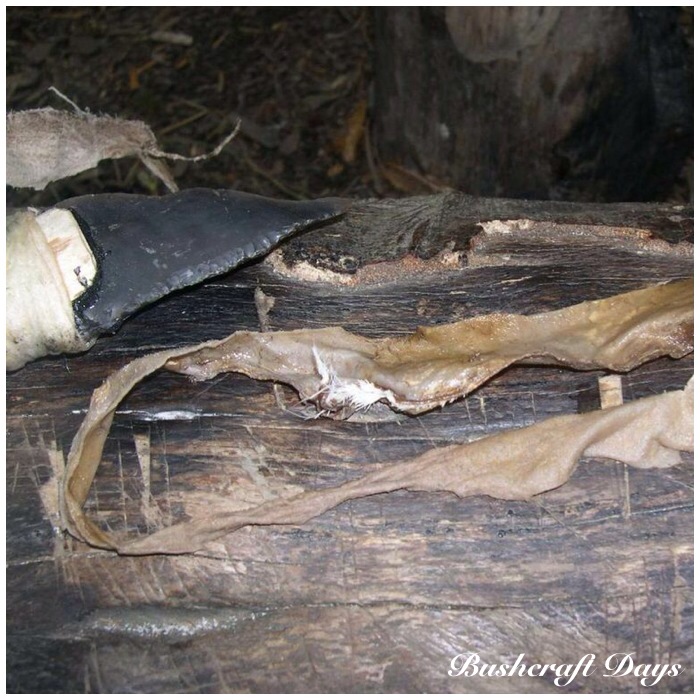
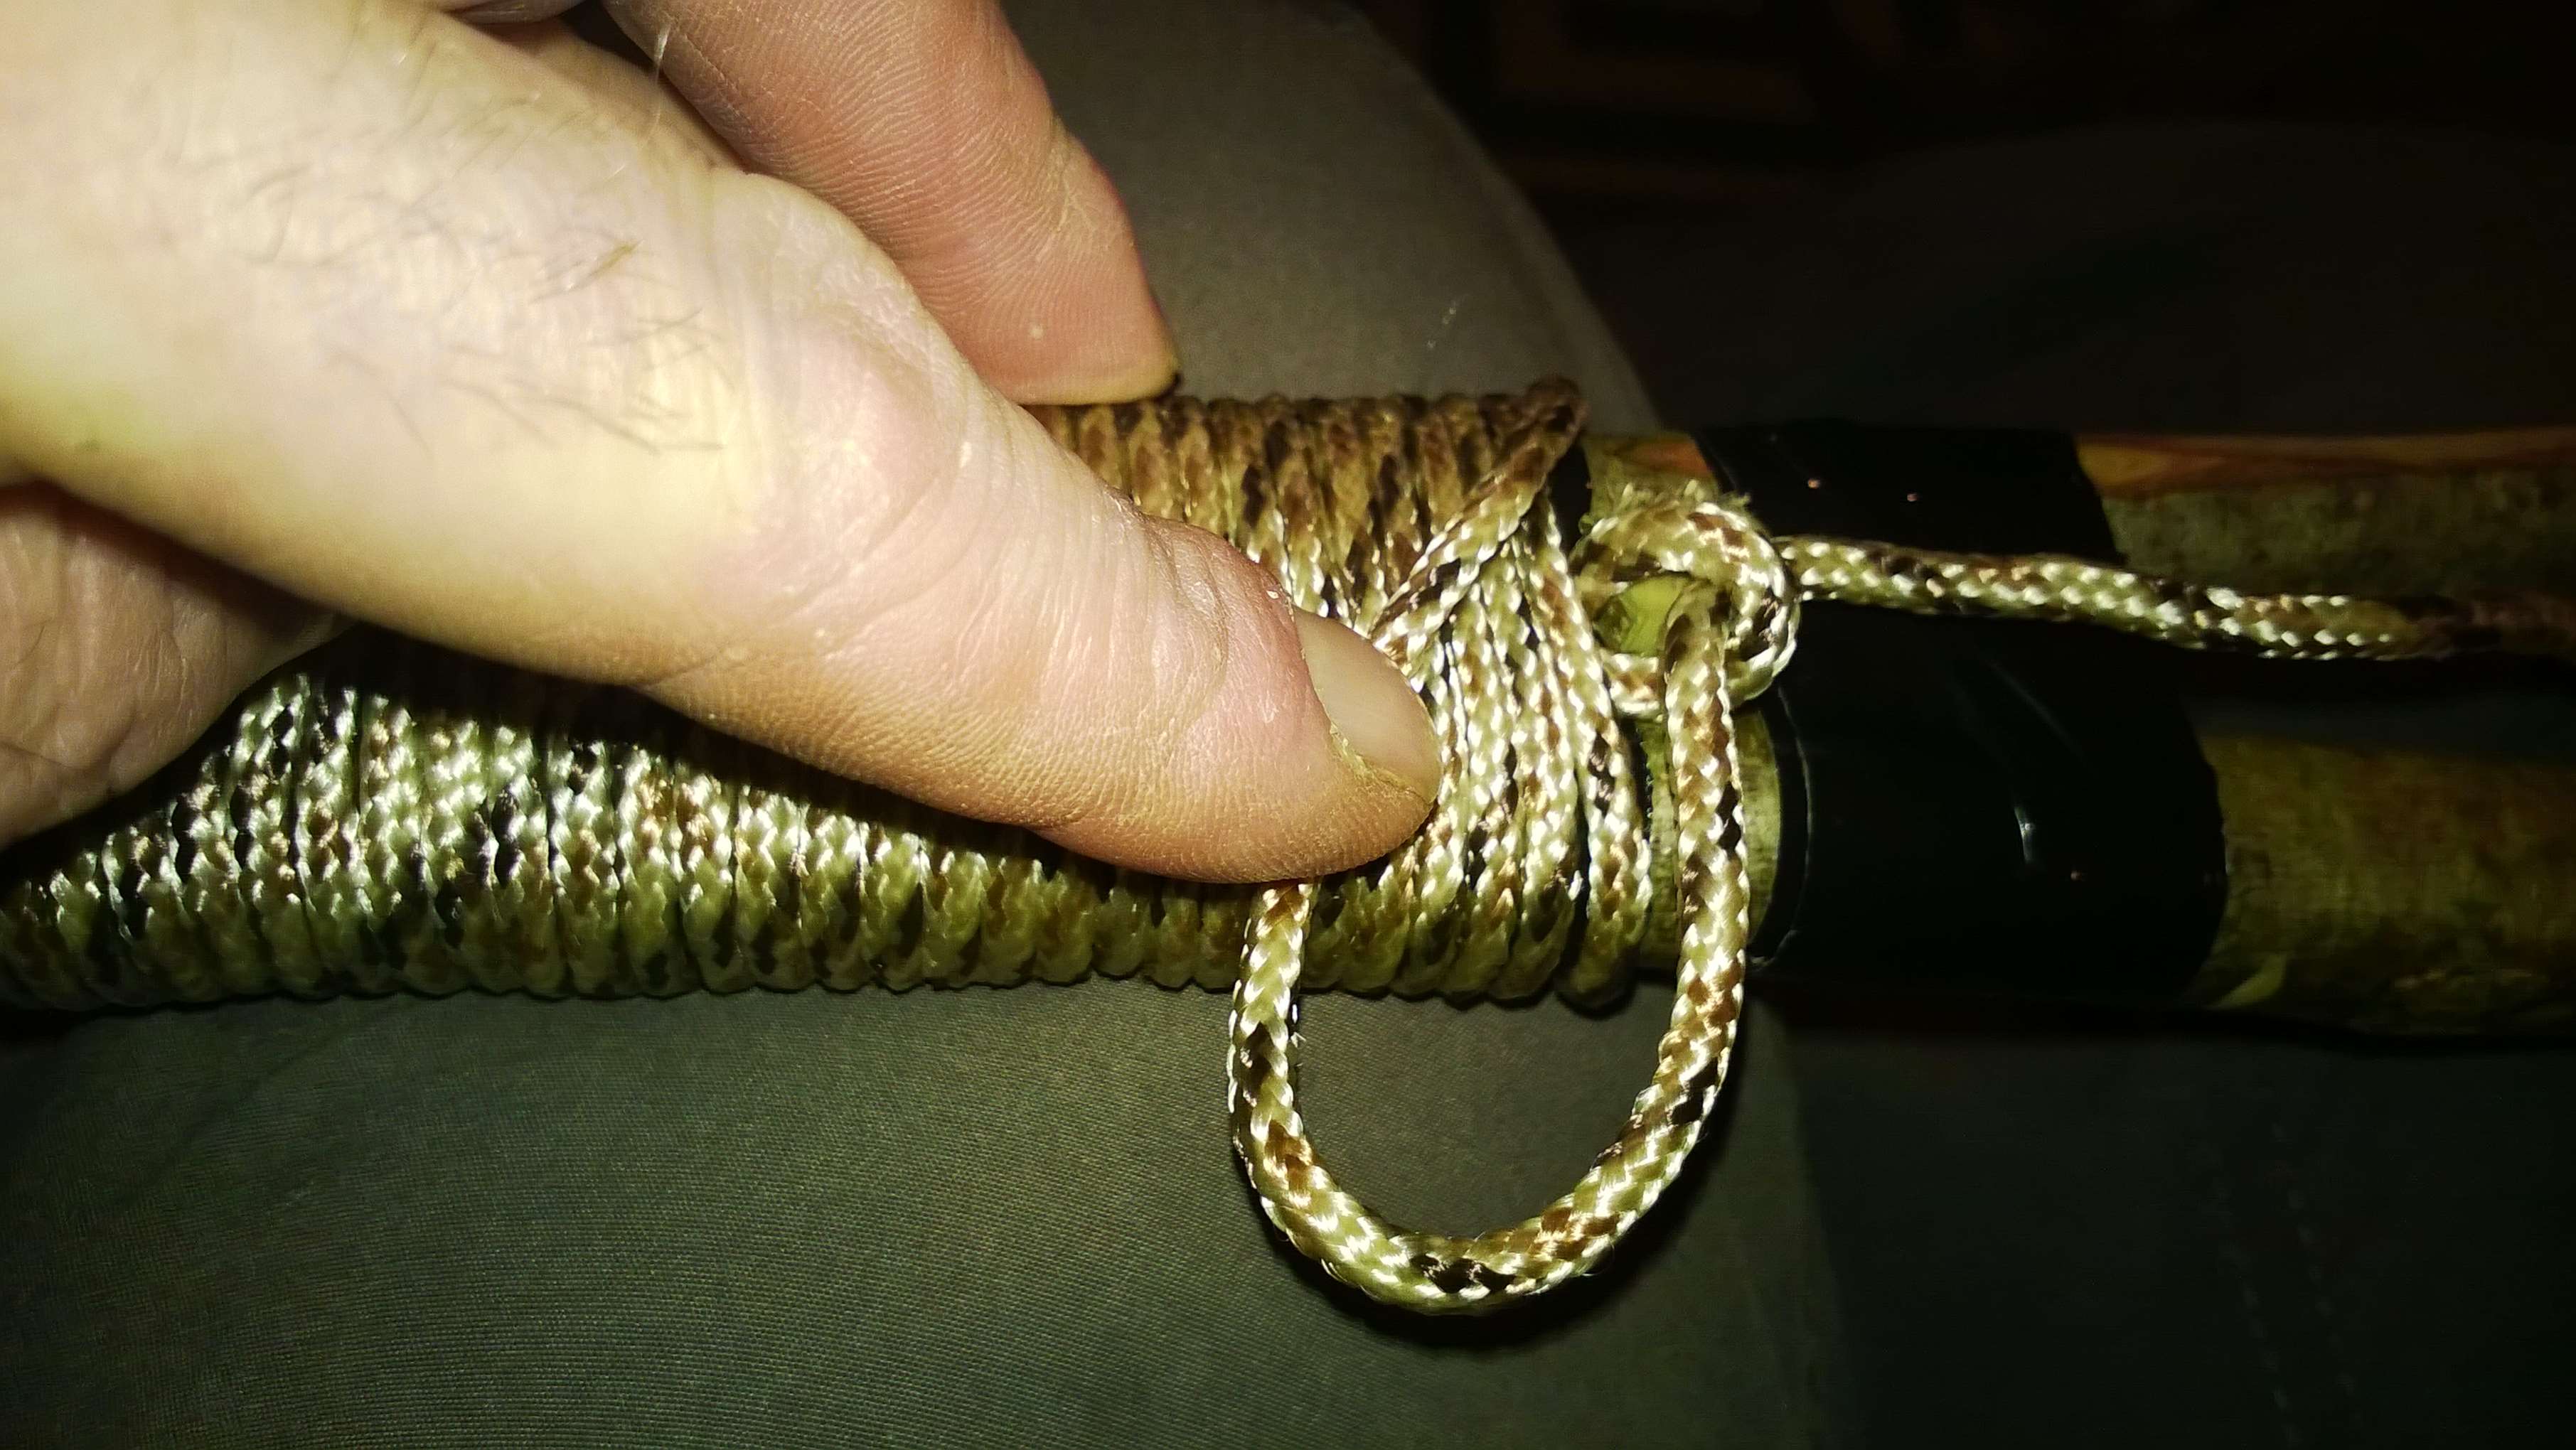
Creating and Using Pitch
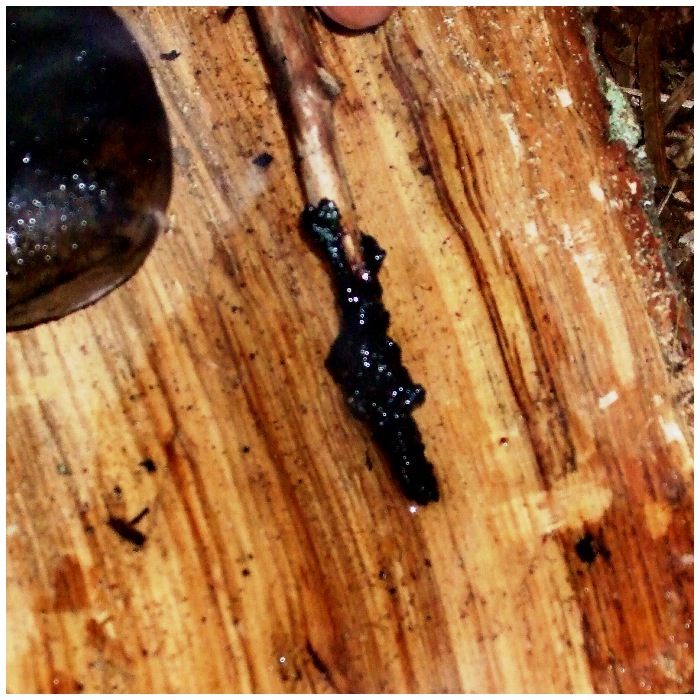
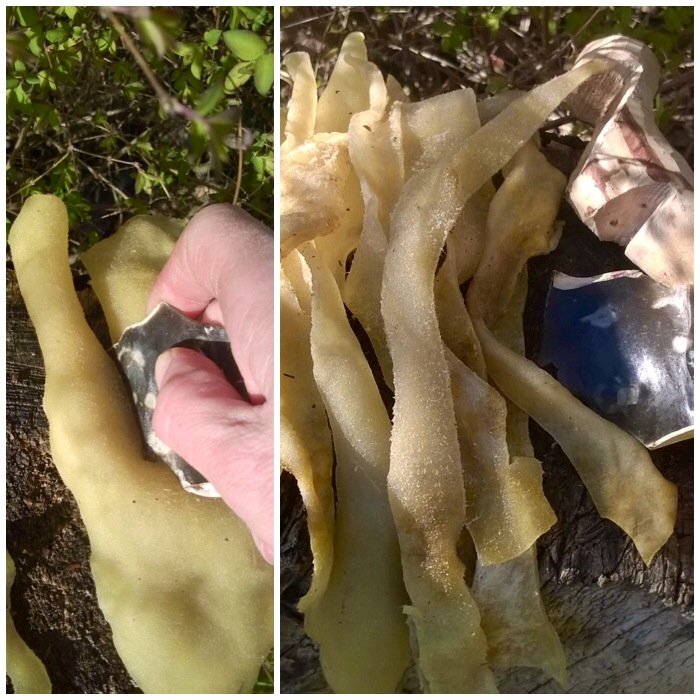
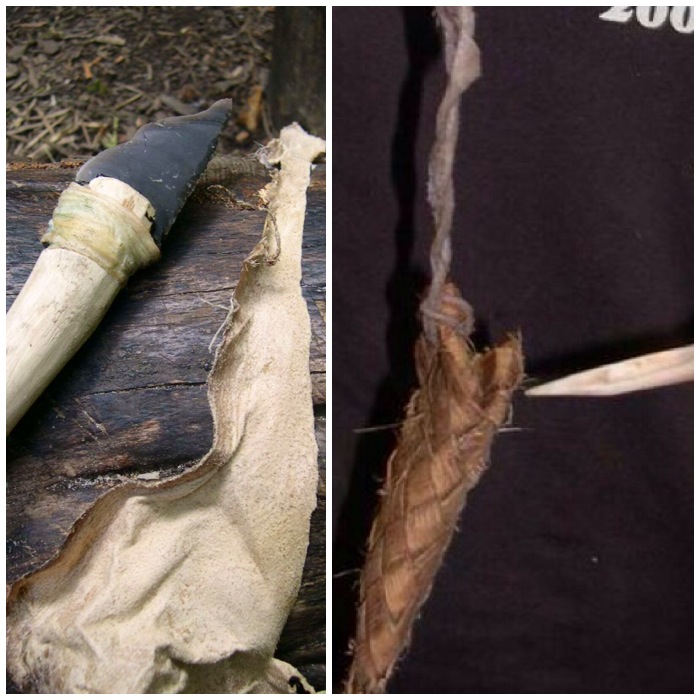
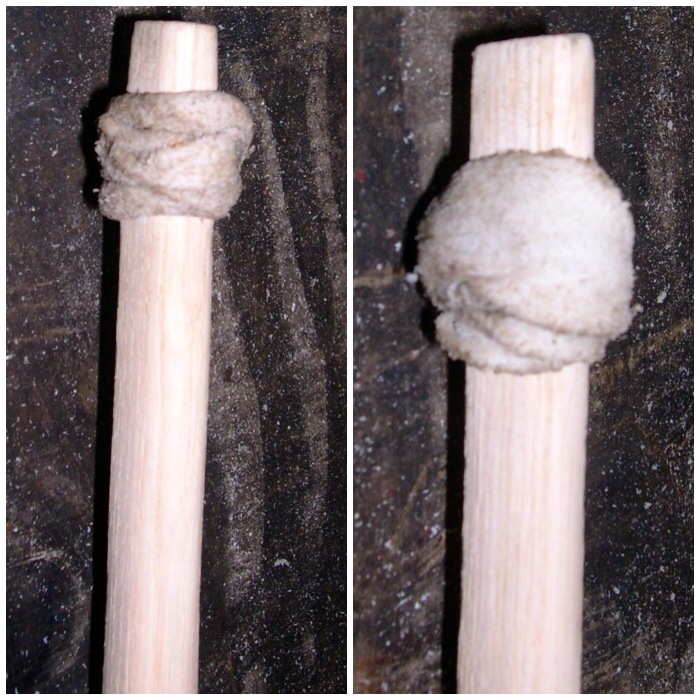
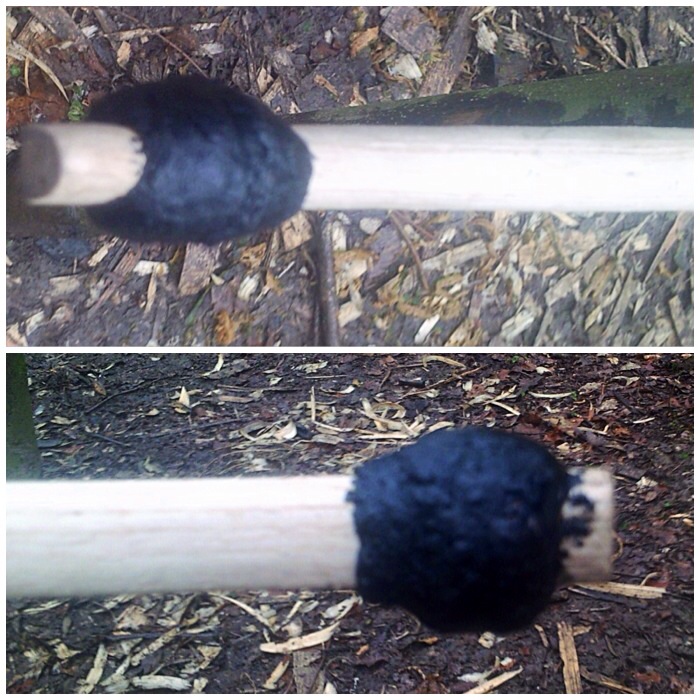
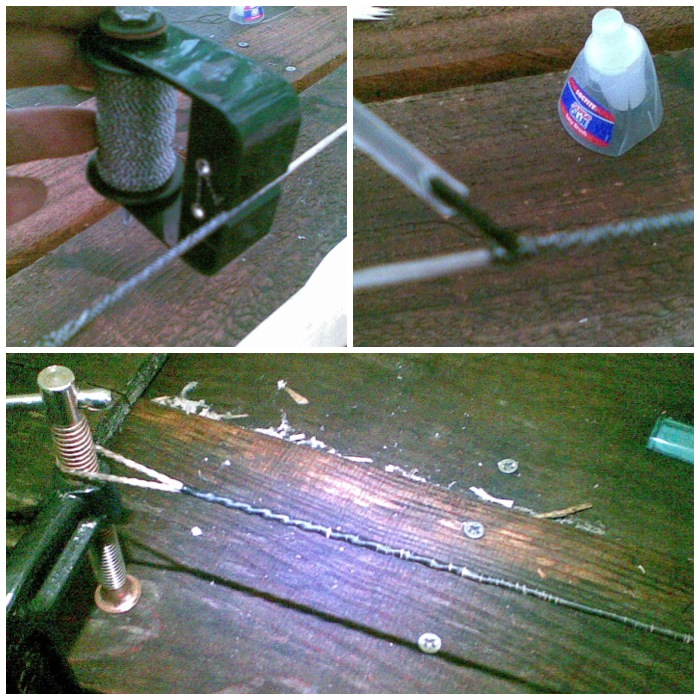
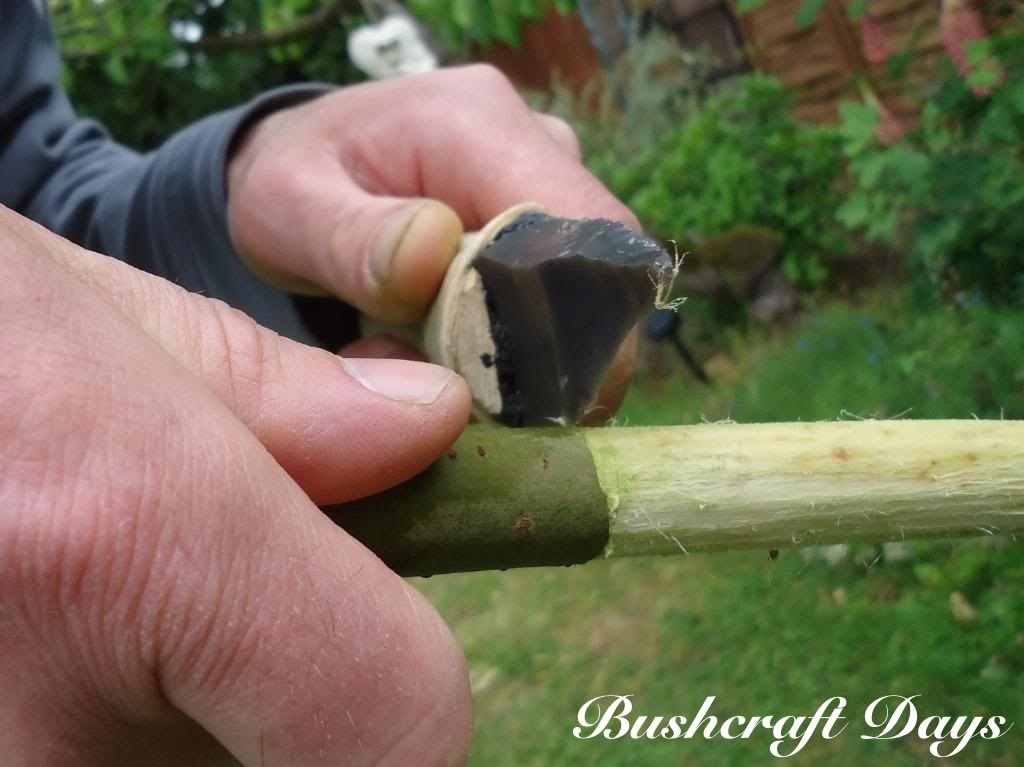
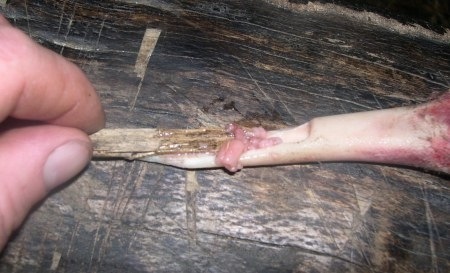
Once the sinew was attached to each arrow I decided to put together some pine pitch. This was to cover the sinew to protect it from fraying and also to waterproof it. The name pine pitch is a bit misleading as I used spruce resin, since that was what was readily available in the area. After collecting the resin that had oozed from spruce trees (the tree uses the resin to seal any damaged areas on its bark) I mixed it with fine charcoal (to give it strength) and beeswax (to give it flexibility).
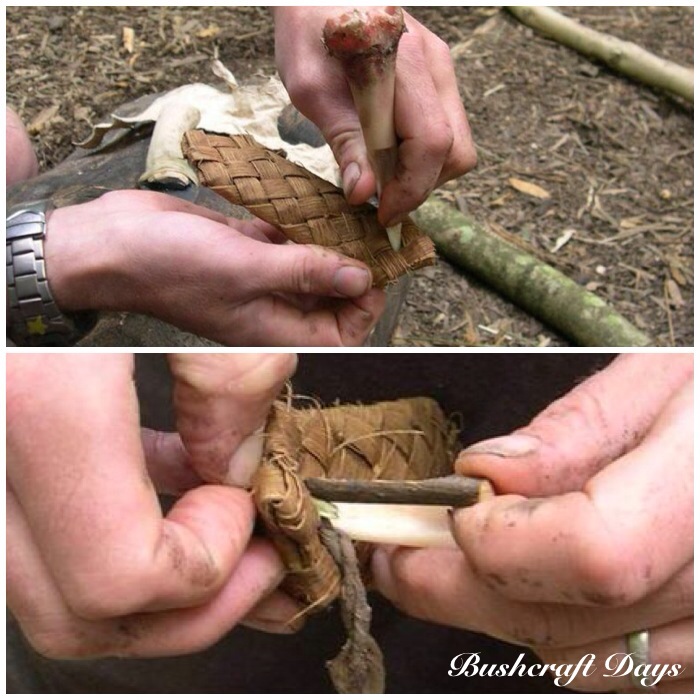
I used the small rock (left hand picture) to grind the charcoal and a large flat rock (top right) as a preparation table. I heated the square rock in the fire to help with melting and mixing everything together. The sticks were used as mixers and to store the resin (see below). The hot rock I used had been heated before many times so there was no risk of it exploding (which can happen if they contain trapped air).
On the heated rock (bottom right) I heated the first lump of resin, and as it melted I scraped off any debris such as bark.
Pine Pitch Prep
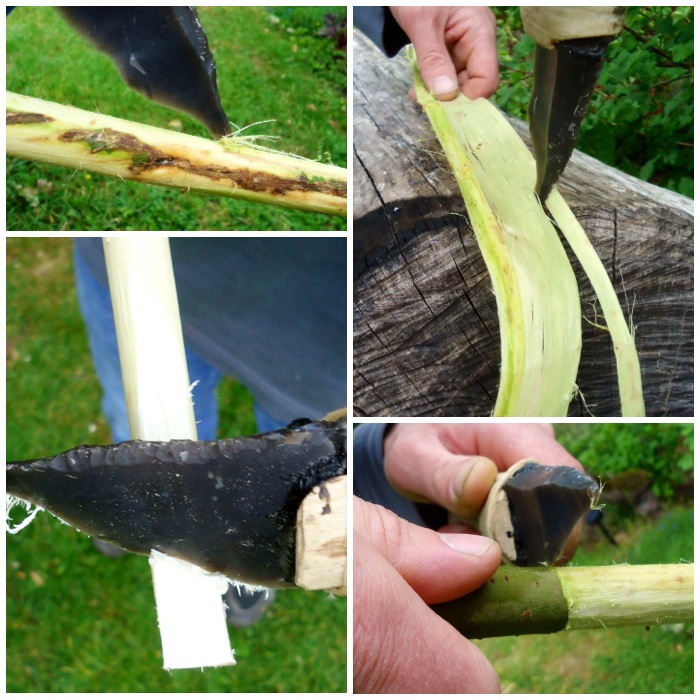
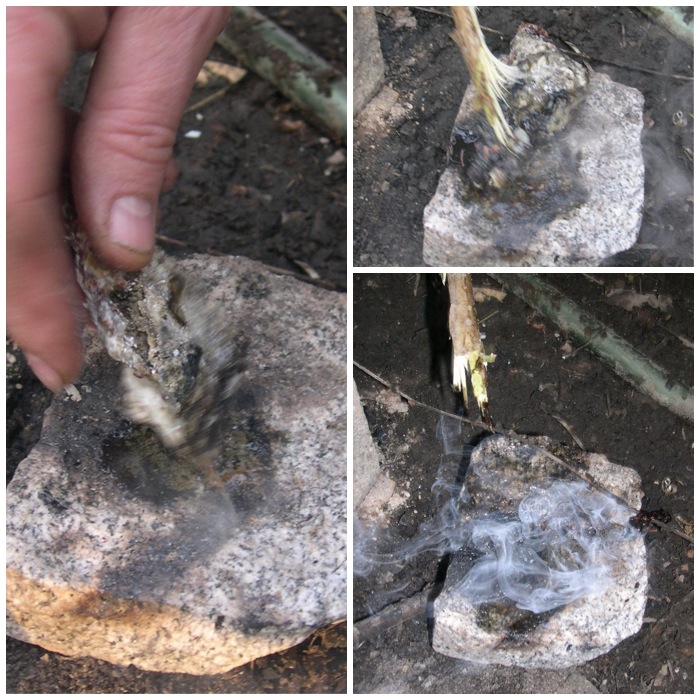
I kept adding more and more resin, charcoal and beeswax (I just added charcoal until the mixture thickened slightly and added beeswax in little lumps) until it had all melted. The rock was super-heated so I had to take great care not to burn myself.
Mixing
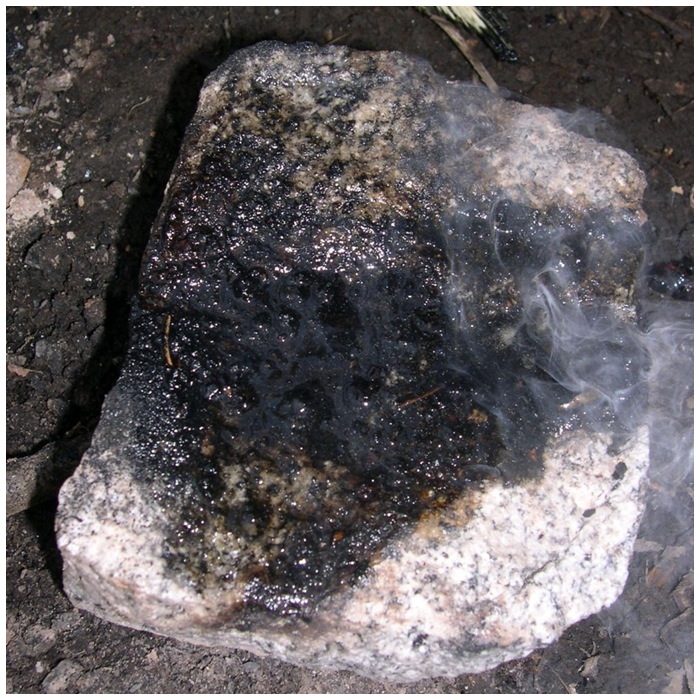
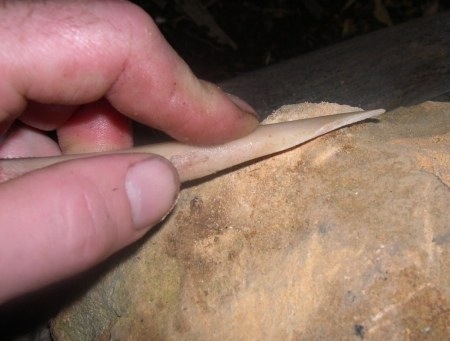
The rock had a slight indentation to collect the melted resin. It doesn’t look like there is much resin here but it was enough for what I had to do.
Hot Pine Pitch
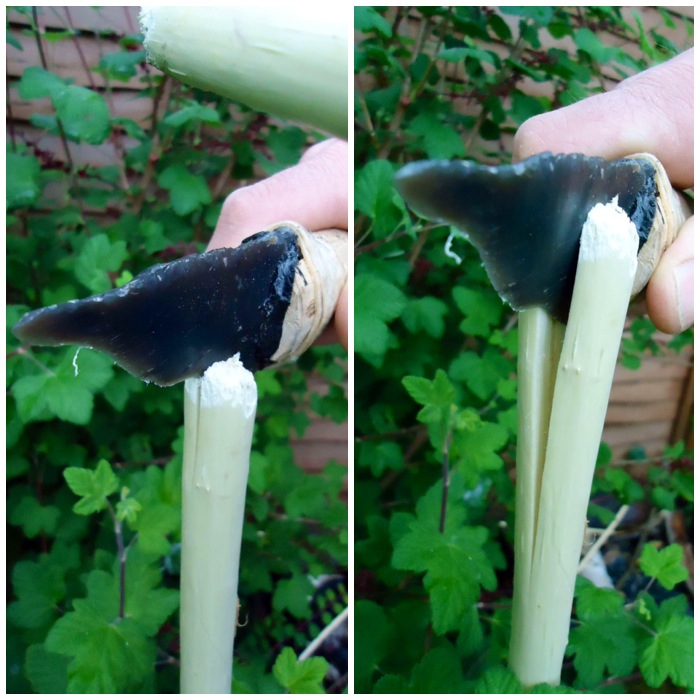
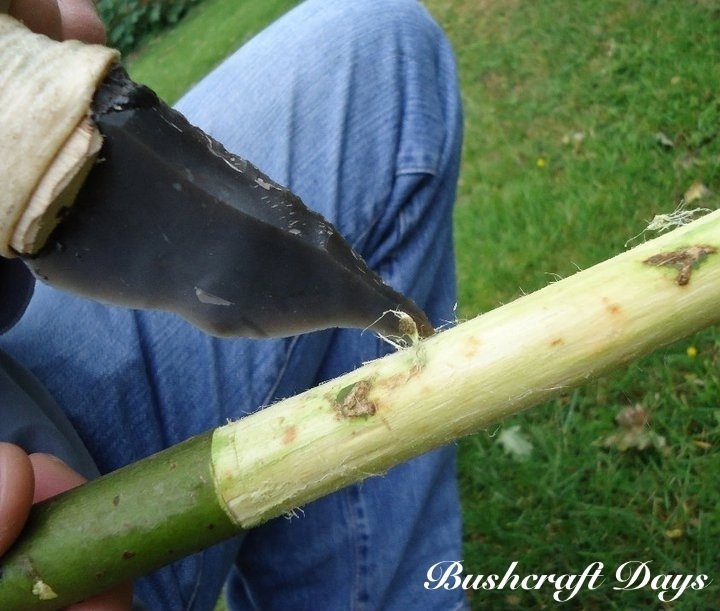
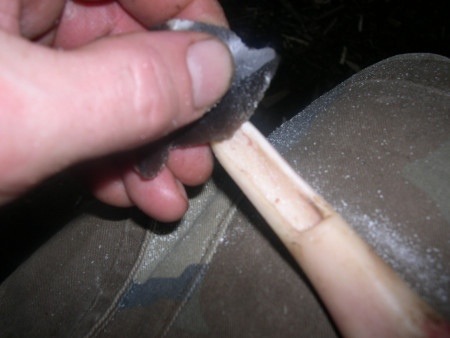
Using two sticks, one to scrape the pine pitch up and one to hold the cooling pitch, I coated the holding stick with the pitch mixture then submerged it in a pot of cold water to harden it. I would then repeat the process adding more and more layers. Using cold water speeded up the whole process.
Here you can see the pine pitch building up on the stick. This primitive method does not give you very fine pitch as you would get using a modern method but it does work surprisingly well
Creating a Pine Pitch Stick
I made up two pine pitch sticks in the end. The stick on the far left has been charred and can be re-ignited quickly by dipping it into a fire to create heat to melt the pine pitch again to coat the sinew on the arrows. This protects the sinew and gives the arrow a nice finish
Prepping to coat the sinew
After re-lighting the charred stick I used it to to re-melt the tip of a pitch stick (top picture). I found it fairly easy to drip the melting pitch onto the area of sinew on the arrow I wanted to cover (bottom picture).
Heat and coat
As I dripped the pine pitch onto the sinew I wet my fingers so that I could smooth the resin out and spread around evenly (John the course instructor is in the left hand picture demonstrating this). If you do not wet your fingers the hot pitch could burn you and also it will stick to your fingers (out in the woods without hot running water this is a pain to clean up).
Re-heat and smooth out
Knapping the Arrow Tips
The next stage in the process was to make some arrow tips. I had collected up some shards of flint left over from the course we had with John Lord. Thankfully there was a mass of leftover flint for me to look through and choose from. All of the pieces shown below I thought could be made into decent arrow tips or barbs with the minimum of effort.
Possible points
The next stage was to pressure flake the pieces with a copper tipped pressure flaker and an antler tine (I wanted to try both tools) into usable arrow heads. The glasses were worn to protect my eyes from flying pieces of flint and the glove protected me against cuts. I placed under the flint a strip of leather to give support and further protect my hand.
The picture on the right did not turn out very clear (a smear on the lens of my camera) but I soon had an arrowhead ready to insert into my arrow shaft. Using the same method as I used to make the knock, I created a groove at the arrow tip.
A bit of knapping
I re-worked the other pieces and after a little touching up these other flint points were ready to be used.
The rest of the finished points
Attaching the Tips
I then coated the arrowhead with some pine pitch and placed it into the groove on the shaft. I then coated the tip of the shaft in more pitch and wrapped sinew round it to keep the arrowhead secure.
Update 13/03/2014 – I have been advised by one of the Primitive Arts Society members David Colter that it is very important to securely bind the shaft immediately below the point for a length of about a centimetre to prevent it from splitting on impact and failing to drive the point into the target. There is a very good experiment showing this in the Traditional Bowyers Bible Vol 3. I did not bind it for a full centimeter in my example (thanks for the update David).
Attaching points
I finally added more pitch to cover the sinew to waterproof it all.
Well attached
Based on archaeological evidence I decided to add a barb to the arrow. I firstly scraped a groove along the arrow shaft then put some pine pitch into it.
I then placed a long thin piece of sharp flint onto this pitch and coated more around the base of it (bottom picture) The barb is designed to cause maximum damage to the prey animal as the arrow enters its body.
Attaching a barb
I finished two arrows in this project. The one I completed for this tutorial is the one on the right.
Finished arrows
Using similar techniques I was able to produce an Atl atl set as well.
Atlatl extras
I have never shot these arrows at a modern target as I don’t want to break off the tips but I did shoot them into some bales of loose hay and was very impressed with their accuracy.
This was a great project as it introduced me to some primitive but very effective techniques in arrow making.
The second bow I ever carved was a Holmegaard-style bow made out of ash. The bow on which I based my replica was found in a peat bog in the Holmegaard area of Denmark in the 1940s and is thought to be over 9000 years old. I made this bow while studying at John Rhyder’s Woodcraft School doing a Primitive Technology course. The wood that was available to us at the time for bowmaking was ash but the original bow found in Holmegaard was made of elm. The bow is a mixture of styles with the limbs that have a flatbow shape for half their length and ‘D’ sectioned like a longbow on the limb tips.
The Holmegaard
I really like this bow as it is very light in terms of draw weight but fast and whippy when it shoots owing to its ‘D’ sectioned tips. I have included in my previous post on Carving an Ash Flatbow explanations on different bow terminology and the differences between flatbows and longbows. Below are the rough dimensions I made my bow to – I tried to replicate the dimensions of the original bow as much as possible.
Holmegaard dimensions
An ash tree had recently been felled and a section of the trunk cut down to just over 6 foot. I scored a line in the bark with a wedge down to the wood to help with guiding the split of the log. Note that the wedge is positioned to one side of the person scoring the line. This maintains a safe position for the worker. I then drove a wedge into the scored line to start the split at one end of the log (upper wedge in the top right picture). A second wedge was driven in at the base of the log to further split the log (lower wedge). Putting in the second wedge loosened the first wedge so I pulled it out and drove it in further down the line to widen the split.
Start of split
I just kept repeating this process of ‘leap frogging’ the wedges, and the scored line helped greatly with controlling the direction of the split.
First complete split
Once the log had been split I kept repeating the process again and again until all the staves were split out.
Finished staves
Using a wooden wedge I shaved off the bark of the stave. I was very careful to remove only the outer and inner bark and not to touch any of the wood. The wood found just under the bark is the most flexible part of the bow and will form the back of the bow. Apart from light sanding this area of the bow will not be touched.
De-barking with a wedge
This is the side profile of the stave (top picture). The side profile has been roughly drawn out leaving plenty of room for error. A close up of the handle area can be seen in the bottom picture and the vertical lines are for the stop cuts.
Side profile
These stop cuts help greatly when getting rid of the excess wood. As the excess wood is cut out, the stop cuts prevent splits from travelling down the length of the bow. The top picture shows the area around the handle ready to be cut out and the bottom picture shows one of the limbs ready for work.
Stop cuts
Some of the tools that are used to take off the excess wood: the axe for the start of the process and a knife and batton to finish it off.
Tools for initial shaping
Keeping the stave off to one side of me and resting on a log, I trimmed the excess wood off. As the stave was off to one side I was in a safe position to work with the axe. If the axe had slipped its follow-through path would have been to my side.
Axing out
The tool on the left is a draw knife and can be used to finely trim the bow shape. If you do not have a draw knife you can embed the tip of a knife into a piece of wood to act as a second handle and use it as a draw knife. If you choose this method make sure that the piece of wood is on a secure flat surface before pushing the tip into it – never hold the piece of wood in your hand while you do this.
Professional and impromptu draw knives
I clamped the bow securely to a workbench and then could easily start to use the draw knife. Here you can see the impromptu method in action; it works surprisingly well if your knife is sharp enough. It does not take long to work your way down to the line.
Using the draw knife
A lot of the time I braced the tip of the bow against my stomach as I removed the excess wood. As I worked towards the tip I repositioned the bow on the workbench so that it was held securely without needing to brace it. You can see the side profile of the bow emerging on the picture of the stave propped up against the tree on the right.
Side profile blanked out
The next stage was to mark out the top profile of the bow. I used a string to mark out a centre line down the length of the stave (picture on left). Then using my measurements (shown at the beginning) I marked out the shape of the bow (picture on right).
Marking out the top profile
The picture on the left is the handle area I drew out and the one on the right is of one of the limbs. Both now have stop cuts sawn in to help with chopping out the bow shape.
Stop cuts in place
I enlarged some of the stop cuts to make sure that no split would travel very far. I find that jamming one end of the bow against a tree helps with the axing-out process and that it can be done in a much more controlled, safe manner so that the axe blade can never swing into me. It’s important too to use the axe in a safe and controlled manner. In the bottom picture you can start to see the handle shape appearing.
Axing out the top profile
As well as taking off a lot of wood quickly, the draw knife method is useful for taking off fine shavings as you get down close to the line.
Draw knife on the top profile
The top profile slowly started to appear as I finely carved the excess wood down to the line.
Top profile getting there
The draw knife was very easy to use as the angle of the limb changed from a Flatbow (near the handle) to a more ‘D’ shaped Longbow limb near the tips.
The Holmegaard shape is appearing
The ‘D’ sectioned shape of the tips soon started to appear. It was at this stage I decided to let the wood season for a month before doing any more work.
Limb tip needing trimming
I seasoned the wood for one week in my garage and for three weeks in a cool spot in my house. This allowed the wood to season enough to start the fine work. During this seasoning process I tied the bow into a frame to induce some reflex into it.
Tied back to keep the shape while drying
One month later it was time to finish the bow. I started work on the tips of the bow so that they would have more of a ‘D’ section shape to them. Making the tips smaller meant there would be less weight in them, allowing them to move forward faster when shooting an arrow. Using my knife as a draw knife I was able to finely carve the shape of the ‘D’ section on each limb. As the tip of the knife is firmly embedded into a piece of wood it is very safe to use and highly manoeuverable.
Fine draw knife work
On each tip I came right down to the line but not past it with the draw knife.
Limb tip finished
Up to this point I had tested the bow’s flexibility by floor-tillering it. This involves pushing down on the limb and checking to see if I was getting a nice curve or if there were areas of stiffness.
Lots of hand tillering
To take off excess wood from areas of stiffness I used a metal cabinet scraper. The scraper only takes off minute pieces of wood and is ideal for this part of the process. I carried on this process of scraping and floor tillering until I got a fairly good curve on both limbs.
Time for the cabinet scraper
Before using the tillering pole to finely check the curvature, I had to add knocks to the bow. Some Holmegaard bows have been found without knocks carved into them and it is thought that they may have had bone-tipped knocks added, or some sort of wrap on each limb as a knock. I decided as an experiment to make a knock from some material wrapped around the tips of the limbs. I first tried cordage made from western red cedar bark, but I found that this did not grip the wood firmly enough and kept slipping.
Failed cordage knocks
Next I tried rawhide, soaking it in hot water and then wrapping strips onto each end. This took about one and a half days to harden but allowed me to string the bow.
Successful sinew knocks
I coated the rawhide in pine pitch to waterproof it so it would not soften and slip if it got wet.
Rawhide knocks covered in pine pitch
I just used some strong nylon string at first as a bowstring before starting the tillering process, tying on one end of the string with an overhand loop and the other end with a timber hitch. The string was just tied loosely, with no brace height. This picture is from when making my ash flatbow but the principle was exactly the same. Dick Baugh wrote a good article on tillering on the Primitive Ways website that is worth a read.
Tillering string
I then placed the bow on the tiller and in increments slowly bent it to view the curve on each limb. The pictures are of the bow during the tillering process. After viewing it each time I would return to the workbench to scrape wood from areas of stiffness using the cabinet scraper or spoke shave. Also I would raise the brace height a little by shortening the bow string to see how the bow reacted under pressure when braced. This whole process ensures you get a good even curve on each limb and also trains the bow to bend properly.
Tillering followed by scraping
This picture was taken at the end of the tillering process with a 4 inch brace height: I was happy to take my first shot now.
Ready to shoot
Having seen a few bows in my time still fail (split) at this point, I only drew back on the string about two thirds of my normal draw length for this first shot.
First shot
I then set about making my proper bowstring, which consisted of a Flemish twist on one end, a timber hitch on the other and serving the bowstring. Two good sites on this are Sam Harper’s site Poor Folk Bows for the string making and the Archery Talk forum for serving the string.
Flemish twist and timber hitch
I used various grades of sandpaper to sand the bow down to get rid of any marks and sharp edges.
Hours of sanding
To protect the bow I stained the wood slightly. Then I applied a mixture of boiled linseed oil and white spirits (50/50 at first). After this had dried I reapplied more oil, but with less white spirits each time until by the end I was applying just oil.
Coats of linseed oil and white spirits
The next stage was to bone the wood by rubbing the whole bow with a small smooth pebble. This helps to close the fibres, making the bow very smooth, and also helps to lock in the oil. The whole process of boning can take a few hours but leaves a very smooth and shiny finish.
Boning with a pebble
Lastly I wrapped on a small leather handle secured with a little glue. I thought about stitching one on but felt the seams might be too uncomfortable when holding it.
Leather handle
The completed bow showing the belly, side profile and the back..
One bow I am very proud of
I am so glad that the rawhide knocks worked so well on this bow as they were something of an experiment. I don’t know if the size of the knocks slows the limbs down when shooting, but she does shoot fast.
This bow is particularly liked by youngsters as it is so easy to draw but still shoots fast. I managed to capture this arrow just after it had been released by the Holmegaard bow.
I carved this Ash Flatbow back in 2008 while I was on my Bushcraft Instructors course with Woodcraft Schooland has sincebeen used by scores of my Sea Cadets, and many of my friends and family. The two instructors who taught me to make this bow were John Rhyder (head instructor at Woodcraft School) and Nick McMillen (now of the Field Farm Project). Both of them as well as being professional outdoorsmen are top bowyers.
An Ash Flatbow about to have its first shoot
This How To…. is designed to lay out all the main steps I undertook to make this bow and if you have reasonable woodworking skills then it will aid you in building a bow for yourself. If you think your skills are a bit rusty then I advise that you attend a bow-making course. In addition to John and Nick who still offer courses I can recommend Wayne Jones of Forest Knights School, Paul Bradley from The Bushcraft Magazine (though I’m not sure if he runs courses anymore) and Will Lord as excellent bowyers to learn from.
I made some drawings on my initial write-up in 2008 and thought it easiest to take some screen grabs of this bow theory for this blog.
Bow theory, terminology and scale
So the first question is – What is a bow?
So what is a bow
Some bow terminology for you to remember as I will be mentioning some of this in the post:
Some bow terminology
Not to scale, but these are the dimensions I mapped out for my bow:
My bows dimensions
Splitting out staves
The ash tree was felled by the course instructor, John Ryder.
We scored a line down the length of the log, all the way through the bark and just into the sap wood, using an axe. This helps with guiding the split of the log.
We then drove an axe into the scored lined to start the split.
Note that the axe is at 90 degrees to the person hammering it in. This maintains a safe position for the worker.
Splitting out the staves – Step 1
The first axe is followed by a wedge and another axe to widen the split.
The scored line helped greatly with controlling the split.
Splitting out the staves – Step 2
As other wedges are driven deeper into the split the previous ones can be removed to be used again.
An axe can also be used to cut the wood fibres not split by the wedges.
Splitting out the staves – Step 3
Once the log has been split the process is repeated again and again until you have the staves you require.
Splitting out the staves – Step 4
Here are two staves ready for shaping.
Split Staves
Shaping the bow
Using a draw knife I shaved off the bark of the stave. I was very careful only to remove the outer and inner bark and not touch any of the wood.
The sap wood found just under the bark is the most flexible and will form the Back of the bow. Apart from light sanding, this area of the bow is left untouched. All of the work on shaping the bow will be done on the sides and on the Belly (the part of the bow facing your belly when shooting).
Trimming off the bark
Using a string I marked out a centre line down the length of the stave.
I then drew onto the stave the shape of my bow (using the measurements shown at the beginning of this post).
The first picture is the handle area and the other two are of the limbs.
Marking out the bow
I then sawed stop cuts all along the stave: as a piece of wood is cut out with the axe the stop cuts stop a split running through the whole bow, meaning you only cut out the wood you want to remove.
Here you can see the stop cuts. Note too how the bow is wedged against a tree and resting on a stump and the axe is in front of me and at 90 degrees away from my body for safety.
Stop cuts and axing out
Once the top profile is cut out the side profile is next.
Using stop cuts again I roughed out the stave until I got the basic shape of the bow. The drawing below shows the shape of the side profile (I didn’t take a picture of this I am afraid).
Side profile
A finished blank stave ready to be seasoned for a while.
Blanked out bow ready to season a bit
At this point I left the bow to season for a month: one week in my garage and then three weeks in a cool spot in my house.
This allowed the wood to season enough to start the fine work.
In the pictures below the bows are clamped down for the fine work.
A clear picture of the bow’s rough profile can be seen in the bottom picture.
Clamped out bows ready for fine work
To begin with I used a draw knife and then moved onto a spoke shave.
Having the bow clamped allowed me to use these tools safely and with precision. I took the pictures so the hands you see aren’t mine: the top picture is Phil Brown of Badger Bushcraft using the draw knife and the bottom picture is Mollie Butters of the Field Farm Project using the spoke shave.
Draw Knife and Spoke Shave
For very fine shaving I used a cabinet scraper. With all of these tools I only worked on the belly and the sides of the bow working down to the tips of each limb. I was looking to get a neat taper effect from the handle to the tips as shown in the plan in the picture on the bows dimensions.
Cabinet scraper taking off minute amounts
Tillering
Throughout this fine work I tested the bow’s flexibility by floor tillering it.
This involves pushing down on each limb to test its flexibility (check out this thread on the Primitive Archer site on floor tillering).
I was looking for an even flexibility in each limb.
Hand Tillering to begin with
Once floor tillering couldn’t tell me any more I needed to move to the tiller stand, so I carved out the knocks on each limb to hold the string using a round wood file.
The knock needs to be at an angle of 45 degrees and deep enough so that the string doesn’t slip off.
Finally I sanded the knock so that the edges would not abrade the string.
At this stage the bow was not put under any tension by the string. This was so that I could train the bow to bend incrementally by using the upright tiller. Putting the bow under too much tension would lead quite quickly to it snapping or cracking.
Dick Baugh wrote a good article on tillering on the Primitive Ways website that is worth a read.
Ready for the Tiller Bar – No Brace Height
I then placed the bow on the tiller post and in increments slowly bent it, carefully watching the curve on each limb.
First Tiller
The following pictures are of the bow during the tillering process. After viewing it each time I would return to the workbench to scrape wood from areas of stiffness using the cabinet scraper or spoke shave. The close up pictures show in detail the top and bottom of the tiller when set up.
Further Tillers
The shape of the limbs can be viewed easily on the tiller: here I could see that the right hand limb was still stiff and needed working on.
Left limb is good – right limb a bit stiff
The next stage involves shortening the bow string so as to raise the brace height (the height of the string above the handle when the bow is strung up) then testing the bow on slowly increasing brace heights on the tiller. To do this you have to unstring the bow (at this stage that simply means sliding the loop off the knocks and loosening the Timber hitch) and adjust the Timber hitch to shorten the string.
To re-string the bow after the Timber hitch has been adjusted and re tightened, hold the bow with the bottom limb (the one with the Timber hitch) trapped against your instep of your foot. Have the back of the bow facing you and with your left hand (if you are right handed) firmly hold the handle, then with your right hand slide the loop back up to the knock.
The first brace height I set the bow at was very low (the string touching the handle) as I only shortened the string by about an inch. A good site explaining how to string a bow can be found on the Archery Library website.
Bow Braced very slightly (string just tensioned)
A two inch brace
A 2 inch brace
Tillering by hand with a two inch brace
Checking the feel of the bow as I went on – Still a 2 inch brace
Final brace about six inches. Tillering now complete with evenly curved limbs
Six inch brace
After a bit of tuition from Scott it was time to take my first shot and I even managed to hit the target.
Preparing for the first shot
I did not pull a full draw on the first shot in case the bow split.
Arrow away
In the picture below you can see one that did not make it: Charlie’s bow had developed a hingein one limb that gave under tension.
I think he took it in his stride.
One that did not make it – Charlie took it well
String making
The next stage is to make the string for your bow.
Traditionally natural materials such as sinew, rawhide, plant fibres (nettle) or linen were used but we used modern materials for our bows. As modern string such as Dacron B-50 (50lb) is non biodegradable there is less chance of the string breaking, which means less chance of your bow breaking.
To make the string we used a plank with a clamp at either end, at a distance from each other of 18 inches longer than your bow length. Tie one end of the string to a clamp and run the string around the other clamp, then around the first one again. Keep doing this for five more cycles.
String making set up
Cut the string at each clamp and you should be left with two sets of five strings.
Then follow the steps in Sam Harper’s site Poor Folk Bowsto make a Flemish string. I did not document this step but he has a good tutorial on making the loop, twisting the string together and making the timber hitch at the other end.
Stringing up
The new string is attached by sliding the loop over one end down past the knocks and attached at the other end with a Timber hitch. You need to adjust the Timber hitch so that the string length is the correct length for the brace height you want. When you have the string set at the correct length, restring the bow and clamp it to a workbench.
The string now needs to be ‘served’ in the centre of the bow where the arrow will be knocked. The Archery Talk forum has a good thread on serving a bow string. Have a look, as my pictures on this part of the process are not the best.
Bow clamped ready to serve the string
The serving of the string is basically a whipping to keep the individual pieces of string that are loosely wrapped around each other together and provide a firm area to knock into your arrow. I also served the top of the string near my loop to stop it unraveling. The little device you see in the pictures is known as a Serving Jig. After finishing serving the string I put some superglue at the end to keep it in place
Serving the string
The finished loop needs to be wide enough to slip off the knocks but small enough to grip them when in place. In the picture on the left below you can see that it has been served for about 12 cms right up to the loop. The bottom limb just needs a timber hitch, though I did twist the end as if making cordage to keep it neat.
Finished bow string
Final touches
The bow was now ready for some final sanding and oiling.
Ready for the final touches
Using various grades of sandpaper, I sanded the bow down to get rid of any marks and sharp edges.
Lots of sanding
To protect the bow I stained the wood slightly then applied a mixture of boiled linseed oil and white spirits (50/50 at first). After this had dried I reapplied more oil, but with less white spirits each time until finally I just applied oil.
Oiling and staining
Lastly, I glued on a small leather handle. I thought about stitching one on but wanted to keep the clean line of the flat leather.
Simple leather handle glued on
The completed bow.
One Finished Ash Flatbow
This bow has been used by scores of my Sea Cadets over the last six years and still shoots as sweet as the day I finished her.
I enjoyed making this bow, it was my first but it was definitely not my last.
One of my favourite Atlatls is the Lovelock Cave Atlatl. I made this Atlatl a few years ago using modern tools including a Mora knife, a small carving knive, a flex gouge chisel and sandpaper.
My reproduction Lovelock Cave Atlatl – Top ProfileMy reproduction Lovelock Cave Atlatl – Side Profile
The original Atlatl was found in a cave over a century ago but was soon lost; thankfully, though, not before someone had made a detailed drawing of it. Lovelock Cave was previously known as the Sunset Guano Cave, the Horseshoe Cave and Loud Site 18. A good paper on the archaeological digs on the site was written by Phoebe. A. Hearst from the Museum of Anthropology (University of California Berkeley).
Lovelock Cave – Humboldt Sink USA
A copy of the drawing is shown below: I found this in a post by Mike Richardson on the Split Stick Atlatl, who also writes that the original was 17 inches long. I reproduced the Atlatl as closely to the drawing as I could.
It has a fork at the rear and the drawing shows a small groove around each prong. I have read that this was where a small piece of carved wood or bone known as a spur was attached as a point to hold the Atlatl. I decided though to see if the Atlatl would work with just some cordage wrapped around it. There is no historical evidence that this was done but it does work well. A good comparison of both attachment types on this Atlatl can be read in the PaleoPlanet forum here. A further project for me on this Atlatl is to make a spur for it.
Drawing 1
Knowing that the original was 17 inches long, I made a best guess at the other dimensions. The original Atlatl that was lost was made of Greasewood (Sarcobatus vermiculatus) but as this wood is not available in the UK I opted to use a piece of Siver Birch (Betulus pendula) as I had some available and it is easy to carve. The wood I had ready was only 16 1/2 inches long (422 mm to be exact) so using that as a starter and the drawing as a guide I scaled up all the other dimensions as shown below.
Dimensions of my reproduction
This was a beautiful Atlatl to carve as the finished lines are very smooth and pleasing to the eye. The top picture (below) is a close up of the handle of my reproduction. The final shape gives a surprisingly good grip even when smoothed down.
A beautiful slim design
I split my log down to a rectangular shape and then using my dimensions drew out the shape of the Atlatl. After that I marked stop cuts along the whole length of the Atlatl and cut into them with my saw, finishing a couple of millimeters from the outline. These are useful to have in place to stop any splits from running off down the length of the Atlatl when you carve it.
Draw out the profile and place stop cuts
I battoned out the rough profile first using only my knife and a small branch as a hammer. I did the battoning with the work piece placed on a log in front of me. I kept the blade of the knife at 90 degrees to my body as I hit it so that if the knife slipped it would swing away from my body. See my post on Knife Safety Tips for more detail on this.
Batton off the excess
Then using my knife I trimmed the excess wood down to the line, keeping the work piece well in front of me to avoid any potential cuts from the knife if it slipped.
Tidy up the profile with a knife
Using two more stop cuts I carved out the thumb and forefinger grip area.
Carve out the thumb and forefinger grip
Then it was a case of roughly carving the handle area down to a size comfortable for my hand. I also started to carve out the protruding areas above and below the thumb and forefinger grip area.
Roughly carve out the handle shape
I worked on the bottom of the tail next, carving a flat area near the handle and then carving out an elongated bowl shape to the tail. No need to worry too much about perfection at this stage as the sanding will produce the final shape.
Roughly carve out the underside of the tail
I tapered the tail area all the way to the end making a flat section of the final 8 cms (this will form the prong).
Taper the carving all the way to the end of the tail
On the top of the tail I marked out with my knife tip a 1 cm wide by 23 cm long spear shape that would form the bowl for the dart to rest in.
Mark out the top slot for the dart to rest in
I used a Flex Cut Gouge for carving the bowl area and my small carving knife for carving the prongs. This is the really tricky area of carving – you have to be particularly careful as it is very easy for the knife to slip.
Roughly carve out the slot for the dart to rest in and carve the fork out at the end
Once I’d carved the basic shape I used various sandpapers from about 40 grit to about 1000 grit to smooth everything.
Sand the whole Atlatl down using rough paper working up to very fine grades
Before I added the false sinew to the tail I oiled the Atlatl a couple of times and then boned it with a small pebble. Using a small pebble to rub the Atlatl wood down for a couple of hours smooths the wood fibres down and traps the oil in the wood. The whole process of boning really gives a smooth finish.
Add any oils (I used vegetable oil) and bone it smooth with a small pebble
The finished profiles of the Atlatl.
Tail, side and bottom profiles
The handle has a very unusual shape but gives you a fantastic grip.
Handle profiles
It is easy to flick with an open grip as the thumb and forefinger grooves keep the Atlatl fixed in the correct position in a throw.
Works with an open grip
As I carved the handle to fit my palm it makes for a very comfortable closed grip.
Works with a closed grip
After carving little notches around each prong I wrapped false sinew to the tail using a Constrictor knot. I kept it fairly tight but you may wish to experiment here. As I said earlier there is nothing in the archaeological record to prove this method was used but after experimenting with other Atlatls like the Split Stick method I see no reason why it could not have been used if a point was not available.
The problem with cordage however is that when you are in the act of throwing a dart, various forces are exerted on it. As you release the dart will flex/bend, and the cordage may cause the tail of the dart (fixed in place by the cordage) to go out of line with the point of the dart, thus decreasing accuracy. Having a point at the rear of the Atlatl holding the tail of the dart in place allows the tail to rotate with the point as it flexes during a throw, maintaining the dart’s accuracy. Chris from Paleoarts explains it well in a post on the Paleoplanet site. I will be experimenting with attaching a bone or wooden spur to the Atlatl in future.
False Sinew wrap at the tail to hold the dart
I am left handed and even though the shape of the handle is designed for a right hander (the slightly protruding piece of the handle to trap the thumb and the smoothed corner to fit in the palm) it is very comfortable still to shoot left handed.
Cordage wrap tail – No archaeological record of this
I enjoyed making this Atlatl and shooting it over the last few years. It would be great to see some more of this style being reproduced as there are so few to be found.
For a number of years I have been interested in bushcraft mat making. I like the thought of being able to go out into the woods and build my own shelter in a Robinson Crusoe sort of way, and in my blokey sort of way make my own fixtures and fittings. One of the key skills is having the knowledge to make your own mats to sit on, wrap around you, thatch with or just use as decoration.
This How To…. is designed to show you the main principles of making either a small or large loom using wooden poles. You will need to experiment to see what works for you but that is half the fun of it anyway. There are many other ways of creating looms, for example using live trees as props, or recycled materials.
The first loom we will look at is the Mini Loom.
Mini Loom
The second one will be the Mighty Loom.
Mighty Loom
The end result from the Mini Loom.
Mini Mats
And the end result from a Mighty Loom.
Mighty Mat
Early Days
When I was growing up on the Isle of Lewis weaving was happening all around me. My sister was a weaver for many years on the Harris Tweed looms and though I never wove I did as a young lad have a job spinning the bobbins for the tweeds.
I was reading back in 2006 Ray Mears’s book ‘Outdoor Survival Handbook’ and came across a section on mat-making using only two stakes and lengths of string. I tested this out with my Sea Cadets on a Duke of Edinburgh bushcraft course where they made some very good mats.
A ground loom using only two stakes and string
Mini Loom
I came across the Mini Loom for the first time I think at the Wilderness Gathering a number of years ago. This loom has five individual stakes knocked into the ground on the left. On the right only two stakes are used and a crossbar tied off in between.
In this example five pieces of string have been used. The string is doubled over and tied off (at the bend) to the crossbar on the right. Then one strand is tied to one of the upright stakes on the left and the other strand to a horizontal rod that is used to move the string up and down. As you can see in this picture one of the strands is loose: I tightened it up after this.
Mini Loom – Staked into the ground & strung up
Line everything up as neatly as possible with no string crossing another. I use the Tarp Taut Hitch on all the tie-off points so when the mat is finished it is easy to disconnect from the frame.
Mini Loom – Top View
The horizontal bar needs to be tied off in the same way to the string and can then be lifted up and down as you insert material. This up-and-down movement ensures that the material gets trapped in the crossed-over string. After you insert some material and lift or drop the bar, remember to keep the mat tight by pulling the material towards the horizontal bar (on the right in this picture).
Mini Loom – The Weave
The Mighty Loom
The Mighty Loom can be made in exactly the same way as the Mini Loom by driving stakes into the ground. I could not do that for this one as I was going to be teaching bushcraft in the grounds of a church. I needed to make something I could transport easily and set up easily with the minimum of fuss. I decided to make two seperate frames that could be set up using guy lines and when dismantled would leave no visible trace of having been there.
Mighty Loom – Initial set up
I had a load of sycamore rods (Acer pseudoplatanus) available for use. The plan was to make two frames. I planned to make one frame 75cms high and the other 92cms high (this height was based on the lengths of wood available) and both would be 145cms wide. I cut the rods to size (nine verticals and two horizontals for each frame) and made sure they were smoothed out so nobody would get a splinter.
Mighty Loom – Sycamore rods were used for the frame
I started each frame by lashing together the two uprights to the two horizontal poles to form a rectangle.
Start of first frame
I used a square lashing on every tie-off point as you can really tighten this knot.
Square lashing used
I tied off seven more vertical uprights to each frame using the square lashing, alternating them on either side of the frame to give it more stability when it was set up with the guy lines out. Here you can see the smaller frame set up with the guy lines out (I used some old tent guy lines).
I wove another horizontal pole through the frame to give it extra strength and also to act as an adjustable tie-off point for the string. This pole was not tied off but was held firmly in place by the vertical poles.
First frame – 9 vertical poles lashed with one horizontal pole for strength
The bigger frame did not have this central horizontal pole as it would get in the way of the string moving up and down to create the weave (as per the Mini Loom). The pole propped up against the frame was used to move the string up and down.
Second frame built (bigger than first frame) with nine vertical poles
Setting the string up is the same as for the Mini Loom. Ensure you cut lengths of string long enough to be doubled up and tied off.
Initial set up – Roped up and staked out
The Tarp Taut Hitch was used again on each bend of the string to attach it to the middle horizontal pole on the smaller frame.
First frame rope set up – Quick release knots used – 9 strings used
For each piece of doubled up string you have attached to the smaller frame you will have two individual strands to attach to the bigger frame. One strand should be attached to the middle of one of the vertical poles on the large frame and the other strand needs to be attached to the horizontal moving bar behind the larger frame.
Second frame set up – individual strands tied off, one to the vertical pole a one to the horizontal pole
This is the part that any weaver will tell you takes the longest. You have to take your time, do not let the strands become entangled and be prepared to do lots of adjustments. Nobody will appreciate quite what you will have gone through to set this up but they will appreciate the ease of being able to make a mat with the system.
All tied of and adjusted
I sourced a mixture of different plants from the local area, mostly from abandoned allotments next to the church. This material would be used to form the mat.
A mixture of different weave material sourced locally
As with the Mini Loom, insert the material you want to start with. I prefer at the beginning and the end of the mat to insert fairly rigid material like the stems of Reedmace (Typha latifolia) but try different materials to see what works for you. Pull all the material (a good handful’s width) in tight then……………………
Insert some material between the strands
…drop the horizontal bar to cross the string over and trap the material.
Drop the horizontal bar
Then get ready to add a new layer of material to the loom.
Then get ready to insert more material and lift the bar to trap it
Keep repeating the process of lifting and dropping the handle and adding new material to build up the mat.
Keep repeating the whole process to build up your mat – vary the material as you like
The edges you can see here get very ragged. You can use a pair of sharp scissors (fairly big ones) or a very sharp knife to trim this down, but leave a good handwidth from your trimmed end and the first string so the material does not fall out.
It soon builds up and kids of all ages love this activity
When you have finished, undo each slip knot and retie the string so that it holds all the material together. I attached some more string to this mat to hang it up and also decorated it with some small yellow flowers to form the name St James. Use your imagination and see what you can produce.
Release the slip knots, tie off, hang it up and enjoy your artwork
Mat making is not something I do at every bushcraft event I run but if I have limited opportunity to run Atlatl or archery stances, having a loom on standby will keep kids occupied for a long time.
They can be as easy or as complex to set up as you wish but the common thing about all of them is the great craft they can produce.
Historically what would have been used to hang up your clothes and kit up if you lived in an environment where there were very few trees?
On the Isle of Lewis in the Outer Hebrides where I was brought up the stems of the Burdock (Arctium lappa) plant were used. Lewis is predominantly moorland so the locals had to use whatever resources came to hand. Burdock is a biennial (a life cycle of two years) plant and in its second year sends up a tall shoot in order to flower and reproduce. It is this stem (which is quite woody) that can be easily trimmed down and used as a hanger.
A keen convert to this was my friend John Fenna (from BCUK) as he does a lot primitive living re enactments (flint tools etc only allowed) and he thought it would be ideal for hanging stuff in his camp.
Our Mr Fenna is happy he has a Burdock hanger in the making
I came across a post on this in 2009 on my friend Kevin’s Natural Loresite (written by the guest blogger Freebornjem). The hanger had been spotted by Freebornjem in one of Blackhouses at the museum in Arnol village on the Isle of Lewis. I can remember seeing hangers like this as a small boy but it was not until I read the post on Kevin’s site did I start using one.
I now use a burdock hanger regularly when I am using my tipi or have a base camp set up. I try and find dead standing stems (autumn/early winter) as the hanger is ready for use instantly after trimming. If you use the stem from a live plant it will work for hanging kit but will not be as strong as a dead stem.
2nd Year Burdock growth (Arctium Lappa)
Once you have selected your stem, trimmed the leaves and burrs off cut the the branches back so that only about an inch is protruding from the main stem. Make sure you round each hook off as they can be very sharp if left after just a single cut.
Branches trimmed and rounded
For this hanger I attached a modern connector (soft shackle prussick) but you can go natural by folding the thin top piece of the stem back and wrapping some cordage around it to form an eye. Kevin’s post covers this method. I use a modern connector now as it will take more weight. I use the hanger in my garage to hold any kit that I regularly use or it can be hung quite easily from a tree.
Great for indoors or outdoors
I particularly like this hanger in my tipi as it is easy to hang of the central pole and does not take up any room.
Hanging in my tipi
Experiment with how you want to attach the hanger to something. I like the soft shackle prussik as it grips very well and is easy to adjust.
Man made connector on this one
The top half of the shackle can be attached to a nail, branch or piece of rope very easily.
Soft Shackle Prussik
By pulling the little coloured tab you open the shackle up so making for an easy set up or take down. I will look to post an article in the future on making this type of shackle if anyone would be interested.
Soft Shackle Prussik opened up
Freebornjem mentions that the burrs when clumped into a fist sized bundle make a scouring pad. I have not tried that yet but may be worth a go next autumn.
Recently I posted an article titled – Atlatls – What they are and why I love them where I said I would be publishing a couple of How To…. guides on making them. This is the first of these guides on making what I call the One Stick – Split Stick Atlatl.
The One Stick – Split Stick Atlatl
As explained in the previous article, an Atlatl is basically a spear-chucking device. Many different types have been made by different societies: there is nothing in the archaeological record (as far as I know) of this type of Atlatl, but then as it’s made completely of organic material there is no surprise there. I decided to investigate this type after researching the Lovelock Cave Atlatl. There is debate over how darts were launched by that Atlatl and whether a point was used or whether a strip of cordage was used.
The One Stick -Split Stick Atlatl I made for this post was done using primitive tools only and a single shoot of goat willow (Salix caprea). I made the Atlatl just to prove to myself I could make one out of a single stick (shaft, wedge and cordage). All you would need to make one using modern tools would be a good sharp knife. The piece of willow I selected was about 1.5 metres long and about the thickness of my thumb. This was far longer than needed but I wanted it this length to get lots of cordage from the bark and to use part of the excess wood as a wedge (needed in making this type of Atlatl).
Goat Willow (Salix caprea)
The first thing I did was to cut into the bark all the way around the stick about 12cms from the thickest end, leaving an area of bark slightly larger than my fist. This bark-covered end acts as a handle area.
Cut a line through the bark around the stick
I used an old deer rib bone to scrape the dark outer layer of the bark off rest of the stick, leaving the handle untouched. If you leave this on the bark, the cordage you make from it will not of the highest quality.
Scrape the outer bark off
After scraping off all the bark I re-cut around the stick just above the handle area to make sure all the inner bark was disconnected from the handle area.
Cut again through the inner bark all around the stick
I then cut a line through the inner bark from the handle to the end of the stick to start to open the bark up.
Make a cut along the full length of the inner bark
I used my thumbs to peel open the bark. Other tools that make this job easier are a small wooden wedge or the back of your knife blade. In late spring the bark comes off easily so my thumbs were all I needed.
Slowly peel the bark off – use a wooden wedge if the bark does not come off easily
Wherever possible try and take the bark off in one piece so you can make long strands for easy cordage making. Do not worry if this does not happen, all it means is that your cordage may take slightly longer to make.
Try to get it off in one piece
I wedged the flint knife into a groove in the log and then sliced the bark into strips. I managed to get a good amount of strips out of this one piece of bark. I then left the strips to dry out in the sun. Cordage is best made from rewetted strips of bark as the bark shrinks considerably when it is dried out for the first time.
Split the bark into strands
I decided that I wanted my Atlatl to be about 64cms long (fingertip to armpit for me) so I used a piece of flint knapped as a discoidal (curved) knife to saw through the stick. This takes far longer than using a modern knife but I find far more satisfying.
Saw/cut a piece of wood from the end of the stick
Keep sawing until you can feel you can snap the wood without splitting it down its length. Once snapped, trim the end of the Atlatl smooth.
Primitive cut
The spare piece of wood needs to be trimmed down and cut to size to make a wedge. This will be used to form the split stick part of the Atlatl.
Spare piece of wood to make a wedge
I used my flint adze at first to blank out the wedge, making it about 10cms long.
Create a wedge
Then I used my flint knife to trim the wedge to its final shape.
Trim the wedge
I used my flint knife to split the non-handle end of the Atlatl open. As the knife has a flat spine I just hit the back of the knife to start the split. Be careful to keep the split in the middle of the stick. A piece of cordage should really be tied off on the shaft where you want the split to stop. I forgot to do this but thankfully the split did not travel too far. I made my split 20cms long.
Split the end of the Atlatl
I used my discoidal knife to create a small groove around each split limb for the cordage to grip onto.
Create a notch on each split
Before inserting the wedge I did tie off the split with some of the dried bark using a constrictor knot.
Insert the wedge but with the base of the split tied off.
Afterwards I used more of the bark strips to secure the wedge by wrapping them around it to hold it secure.
Split secured
I had plenty of bark left over after this, which was good as I wanted to make some cordage to create a strap to hold the dart in place before launching.
Dried-out bark ready to make cordage
I completed a piece of cordage about 50cms long to give me plenty to tie onto the Atlatl. I used a constrictor knot on each split to hold the cord in place. Jonsbushcraft blog has an excellent tutorial on making cordage.
Create cordage to attach to the splits
I was very happy with how this Atlatl turned out.
Completed One Stick – Split Stick Atlatl ready to go
You can see the dart has a groove instead of a hole at the end. This allows the cordage to hold the dart in place before launching.
Dart has a groove instead of a hole
The finger pinch hold is just the same as a normal Atlatl with a point.
Simple finger pinch hold
I think the launch with this type of Atlatl feels slightly different but once you get used to it I find the release is as smooth as it is with a normal pointed one.
Perfectly good Atlatl
I made this Atlatl purely for the joy of making one with primitive tools and to see if it was possible to produce a hunting tool out of just a single stick.
I have no idea whether hunters in pre-history used this type of Atlatl but I certainly now know they would have found it the easiest thing in the world for them to make.
Back in August of 2012 at the BCUK Bushmoot I learnt how to make a Bhutanese Bow with Wayne Jones of Forest Knights. As far as I know Wayne is the only instructor in the UK running classes in making this type of bow. I hope he runs another one at this year’s Moot.
The Bamboo Bhutanese Bow
This is a quick bow to make when you have an instructor like Wayne to guide you. The bow is made up of two pieces of tapered bamboo joined together in the middle by some sort of cordage or tape around the handle area. I tried to take pictures of all the steps but must admit to missing a few as I got so wrapped up in the whole process. To make up for this I rehandled the bow at home and took some pictures of the missing steps.
I have done a bit of research about this type of bow. It seems that archery is a national sport in Bhutan with many villages in the country running archery competitions. Kids as young as three are taught how to use the bow. Due to the nature of bamboo the outer layer of the bamboo becomes the belly of the bow and the inner part becomes the back: as the outer layer is very hard it will not take the expansion forces exerted as you draw the bow (it will crack), but as it is a grass the inner area (which is fibrous) is more flexible.
Below on the left is a picture of the finished (reworked) bow and on the right Spikey is holding the tube of bamboo we used to make it.
The finished article and how we started
Wayne Jones researched the bow for me as well and found this in the Bowyers Bible: ‘Unless the bamboo wall is unusually thick it’s best to overlap two billets at the grip secured by a couple of rivets made of nails or dowels, the grip is then wrapped with rawhide, sinew or even tape. Overlapping stiffens the midbow and increases poundage per bow length. Such bows can be made in minutes. Even though “quickie” bows, they are excellent in every regard.
This design is a good choice for kids’ bows: quick and easy to make, and fairly indestructible.’
Wayne brought a supply of large bamboo to the Moot for us to use. With this type of bow you need to use very large bamboo so that when you split it into quarters you get fairly flat limbs. I do not know the type of bamboo that was used or where Wayne sourced it but I am sure if you were to ask him he would help you.
In the first picture below Wayne is showing us two limbs made from one piece of bamboo he had carved earlier. As bamboo gets thinner as it grows higher you need to make both limbs from the same piece of the column to ensure both limbs are of the same width and thickness.
I cut out a section of tube that was 103 cms long to begin with so that when the two limbs were joined together the bow would be my height. NB I am not 2m 6cms tall, but as the limbs overlap at the handle these measurements produced a bow of my height. You will need to experiment for yourself.
Finished limbs and start of the bow
I used an axe to batton out the bamboo into quarters and selected the best two pieces to work with. I made sure when I was battoning that I kept the blade of the axe at 90 degrees to my body. This would ensure that if the axe slipped out of the split it would swing away from me.
Battoning out the limbs
Here you can see many of the battoned-out pieces of bamboo ready to be shaped into limbs. You can clearly see the node plates on the inside of each limb, which keep the structure rigid. These need to be knocked off and eventually filed flat.
In this picture you can see Mark using the back of his axe to knock off each piece of the node plates.
Breaking the node plates
To make full use of each limb it is best to use string to mark out its shape. Allow an extra half centimetre or so so you can finely trim the limb after you have axed the shape out. I made the handle area (thicker end) about 5 cms wide and the tip of the limb (thinner end) about 3 cms wide. Once you have blanked out the first limb you can use this one to mark out the second limb so it is the same shape.
Using string to draw the limb shape
Keeping the limb to one side of my body, I experimented first with using an axe to cut the excess off but soon swapped it for a large chopping knife loaned to me by my friend Sargey (Andy Sergeant). This was so sharp with such a good weight behind it that I soon had the first limb blanked out. I then used a smaller knife to trim the limb down to the line I had marked with the string. I used this finished limb to mark out my second limb and repeated the whole process until I had two roughed-out limbs.
Shaping the limbs
I used various tools such as my Japanese rasp, a cabinet scraper, a small knife and wood files to smooth out what was left of the node plates and to curve all the edges of the limbs. If you do not smooth off all the edges, you don’t just risk a splinter, there’s a good chance your finished bow will develop a split when you draw it.
Smoothing the plates
Take your time smoothing the plates and edges down.
Smoothed plates and sides
The outer layer of the bamboo is left untouched and this will become the belly of the bow. The smoothed inner side will become its back.
The belly (left) is left untouched – The back (right) is smoothed
I used a rounded file to produce the nocks to hold the bow string. Make sure you get them the right way round.
Nocks produced with a round file
Make sure the edges of the nocks are sanded down so there are no sharp edges. A sharp edge will potentially cut your bow string and could cause a split to occur.
Lined up neatly and the edges rounded off
When I first built this bow I left the handle area as you see it in the picture below. After shooting the bow I found the handle area just too wide for a comfortable grip.
Ready to work the handle area
I marked out one handle so I would lose 1 cm on each side, making the actual handle 3 cms wide. Then with a sharp knife I carved out the excess.
Mark your handle area on one limb, trim off the excess and then use the first limb to mark out the second limb
I then used the first carved handle to mark out the second handle and carved that one as well.
Trim off the excess from the second limb and you are ready to join them together
To take this picture I got my son Finlay to hold the tape taut and my wife Alison rolled the bow to tape the limbs together.
I used help to bind the handle. Keep the tape taut and roll the limbs
This method ensures the limbs stay in the correct position and the tape is put on as firmly as possible. Once I had the limbs secured I taped up the middle of the handle by myself.
Secure both ends
I find that the tape does not offer a good grip so I put on a leather handle using a common whipping technique.
Finish taping the handle and add any leather for a comfortable handle
Tillering is the process of testing the bow to see if it forms a balanced curve on each limb. Initially we had just a piece of paracord attached to the bow to do this. The tillering stick in the picture allows you to see if the limbs are balanced. If they are not balanced you need to remove a small amount of the inner side of the bamboo using a light rasp or cabinet scraper wherever the limb looks stiffest. This is one part of the process that is very hard to show without taking a whole string of pictures and probably where going on a course and getting one-to-one tuition on it pays dividends. Dick Baugh wrote a good article on tillering on the Primitive Ways website that is worth a read.
Tillering
Wayne supplied some Dacron for our bow strings. I twisted one end as you would do to make cordage and used that to make a timber hitch for one end of the bow.
Timber hitch
For the other end I created a loop using the Flemish twist method. Sam Harper in his blog Poor Folk Bows has an excellent article including a video on making the Flemish twist and the timber hitch.
Flemish twist
The finished bow. This was taken after I had reshaped the handle. I plan to wrap the exposed tape in strips of rawhide to cover them up.
Ready to shoot
I like this bow much better now that I have rehandled it as it is far more comfortable to hold. I think some more of the cadets will also want to use it now because of the reduced handle size.
Shoots well
A nice shot of the bow in action with an arrow in flight.
In action with the cadets – Spot the arrow.
If I could ever source some of this bamboo I would definitely make one or two more. In comparison to my Ash Flatbow and Holmegaard this bow shoots just as well but took only a fraction of the time to make.
If you have further information or links on this type of bow I would love to hear from you.
I’ve mentioned the Atlatl several times in previous blogs, so I thought it was high time I wrote a post devoted to this, one of my very favourite bushcraft activities. I’m going to introduce you to the three different types of AtlatlI use when teaching this art, together with some historical references to them I’ve found in the course of my research. For one of my types of Atlatl there is no historical record, and the exact makeup of other types are sometimes just a best guess, so please feel free to leave comments if you know more, as it is all a big learning curve for me. There are many different types of Atlatl but here I will concentrate on the three I regularly use.
What is an Atlatl?
An Atlatl is a spear-chucking device traditionally used for hunting or combat purposes It was developed in pre-history by many different societies. Some societies still use the Atlatl to this day, others used it alongside the bow while other societies stopped using the Atlatl after they developed bows. An excellent modern day comparison to help you understand how an Atlatl works is to watch a dog walker using a plastic tennis ball thrower. The ball travels much further than normal as the plastic ball thrower extends the thrower’s arm length and as the arm sweeps forward the plastic thrower is bent back, storing energy. This energy is released as the thrower does a final flick of the wrist. The dog is happy as it gets a longer run and the thrower is happy as he gets longer between throws :-).
The name Atlatl comes from the Aztec society but in Australia it is known as the Woomera. An excellent overview of the Atlatl can be found in Wikipedia.
Atlatls in action with the Sea Cadets
I like Atlatls as they are relatively simple to make, cost me next to nothing to make, students can make them and learn to use them easily and will provide hours of fun for kids from the age of about three years up (I still classify myself as a big kid).
When teaching this skill I always set up a proper range so that the darts can be thrown safely. I normally work on a range of about ten to twenty metres but a good Atlatl can reach up to a hundred metres in a competent thrower’s hands.
I made a short video last year showing the Atlatls in action with some of my Sea cadets – Video of Atlatls in Action.
Here is a selection of some of my Atlatls. I will be posting in the near future a couple of How To…. guides on making some of these Atlatls.
Some of my different Atlatls – Front View
I have simple Atlatls that just have a point at the rear to attach the dart to, Split Stick Atlatls with cordage instead of a point, and other Atlatls that have a front ‘Y’ rest for the dart.
Some of my different Atlatls – Top and Back views
Simple Atlatls
The simple type of Atlatl shown below on the left just has a point at the rear to hold the dart in place before releasing it. You will see how this works later in the post. This is the easiest type of Atlatl to make. I generally use the base of a piece of hazel coppice (lots of other woods will work as well) for this where there is a fork in the wood near the ground. All I have to do is after cutting the shoot is to shape the smaller fork into a point with a knife and whip a para cord handle onto the main. The Primitive Ways website gives an excellent description of constructing a simple Atlatl.
The Atlatl on the right is also a simple one but made in a primitive manner, without modern tools. I used a thin yew branch, attached a rawhide handle and attached a carved antler point to the back.
Two simple Atlatls. One with modern cordage and one purely primitive
Once you have mastered the finger pinch grip these simple Atlatls are very easy to use and great fun can be had at very little cost. The Atlatl gives greater power to your throw by extending your arm length, enabling you to throw the dart faster and further.
Simple Atlatls being held in the finger pinch grip
Atlatls with Front Rests
I was on holiday in the Cheddar Gorge area of the UK a few years ago and spotted in the Museum of Prehistory some reproduction Atlatls on display. They had been reproduced as closely as possible to Atlatl finds in the local caves. One of them had a forked rest and I found that intriguing, as up to that point I had not found any reference to this type of Atlatl.
Cheddar Gorge Museum of Prehistory Atlatl (centre) with Rest
I soon found out that this style of Atlatl with a front rest is great for kids. As the dart is supported by the rest no finger pinch grip is required, making it easy for kids as young as three to use this type of Atlatl.
Younger children prefer an Atlatl with a Rest to begin with
In my research into this type of Atlatl I also came across a post by Mike Richardson In Primitive Ways explaining how if the thrower has to wear gloves (for example in arctic environments), the normal finger pinch method of holding the dart is not an option so a rest is attached to the front of the Atlatl. This along with some cordage wrapped around the dart allows the gloved thrower to have the dart locked in place but still easily released with a flick of the wrist. I have used this method numerous times and the cordage wrap/lock has no detrimental effect on the release of the dart.
I made some Atlatls up with metal bolts as rests as I found the original wooden rests I had made were easily broken by my cadets so I had to design a ‘Squaddie-proof’ alternative. Not pretty but very effective and robust.
The Squaddie-proof Atlatl with metal rest
In the picture above and the one below you can see that the cordage wrap on the dart is locked up against the fork of the rest, ensuring the dart does not fall off before release. After a short piece of tuition most kids (except the very young) are able to set this up for themselves.
Locking mechanism in place
In the picture below you can see a wooden rest I made by wrapping a piece of shaved wood around the shaft of the Atlatl and tying it in place with some natural cordage. I inserted a further wedge piece in the rest to tighten the cordage wrap. This proved an interesting experiment but was too fragile for most of the cadets to use.
An experimental rest made of a strip of shaved wood and bark cordage
Again in the picture below you can see that, as with the Atlatl with the bolt, the dart is well locked in place requiring only a flick of the wrist to release it. I have not come across any historical evidence for the cordage wrap on the dart as a holding mechanism. It may not be authentic, but I like it as it opens up the world of Atlatl to the very young who find holding the dart and Atlatl in one hand difficult.
Dart locked in place – No finger hold required
The Split Stick Atlatl
The Split Stick Atlatl I found documented on the Primitive Ways website as well. No point is carved at the end but a piece of cordage is used instead to hold the dart in place. There is very little archaeological evidence for this type of Atlatl and much debate if it was ever used but I like it and with a little practice it is just as accurate as an Atlatl with a point. A good online discussion on this can be found in the PaleoPlanet forum.
The Split Stick Atlatl
I call this one the ‘One Stick Split Stick Atlatl’: I made the whole thing using primitive tools and out of just one piece of willow just to prove to myself that an Atlatl could have been made just using one straightish piece of stick. I will be posting a How To…. guide on making this Atlatl.
The ‘One Stick Split Stick Atlatl’
A sideways view of the Atlatl showing the finger pinch grip.
Finger Pinch Grip without a Rest
One of my favourite Atlatls is the Lovelock Cave Atlatl which I reproduced as closely to the original as possible. This Atlatl was found in a cave over a century ago but the original was lost; thankfully, though, not before someone had made a detailed drawing of it. A copy of the drawing can be seen in the post by Mike Richardson on the Split Stick Atlatl. It has a fork at the rear and the drawing shows a small groove around each fork. I have read that this was where a small piece of carved wood or bone was attached as a point to hold the Atlatl. I decided though to see if the Atlatl would work with just some cordage wrapped around it. Again there is no historical evidence that this was done but it does work well. A good comparison of both attachments to the Lovelock Cave Atlatl can be read in the PaleoPlanet forum here.
The Lovelock Cave Atlatl
Sideways pictures showing the finger pinch method.
The Lovelock Cave Atlatl and Alternative Finger Grip
A couple of pictures showing the dart attached to the cord wrapped around the fork.
The Lovelock Cave Atlatl – Dart Cordage Connection
A little experiment with a split stick and a rest. The rest did eventually split as the pine wood was quite weak with the hole drilled into it.
Split Stick with Rest
The rest here is based on the Cheddar Gorge replica I saw but instead of a point at the end I made it into a fork with cordage. This works perfectly well with a bit of practice.
My take on one of the Cheddar Gorge Atlatl reproductions
I really love making Atlatls and everyone I work with loves to have a go with them. I need to spend some more time on making different types of darts next to go with my shed full of Atlatls.
This How To…. lays out some simple steps to make a bark sheath for a knife. I have also used this method to make a quiver for my arrows and with a sightly different method you can easily make containers.
Sweet Chestnut Bark Sheath
I took these pictures in 2009 when I was on the Woodcraft School Primitive Technology course. The sheath was made using only primitive tools as required by the course. To do this I made for myself a flint knife, flint adze, some discoidal flint knives and also used the bone bodkin that I showed you how to make in the previous post. For more modern methods I would say you could do this job with a small saw and a small knife.
I started the project by selecting a suitable Sweet Chestnut (Castanea sativa) limb from a coppice stool to take down. After checking the tops for any dead wood I started to clear away the undergrowth using some flint. Clearing the undergrowth away ensured a safe working area around the limb. I used a large sharp piece of flint for this. Also I made sure I had clear exit routes around the limb I could use when it came down.
Trimming and starting the cut
I had created for the job a Flint Adze. This is a piece of worked flint attached to a handle with rawhide. Unlike traditional tree felling where a wedge is created and then a back cut made I am made a rosette cut all around the tree using short chopping motions. You can see the rosette cut appearing in these pictures. The small branch you can see in the foreground got in my way so I cut this down.
The Rosette cut
You can see that the Adze creates tears in the wood but is very effective in cutting into it. As I got into the heartwood I had to support the limb as I did not want it to fall uncontrollably and eventually I was able to let the limb to fall under control. I did not need to back out of the coppice stool as the limb was light enough to control. Had it been any heavier, my cleared exit routes would have come into play.
Traditionally the stump would have been left like this. I however sawed the stump cleanly at the base. If a stump is cleanly cut (with a little angle) then it has less chance of getting infected and will eventually have new shoots grow out of it.
A wooden flower
Using the Adze in a safe manner away from my body I trimmed off all the brash from the limb.
Trimming the limb
Using the flint that I had cleared the undergrowth with I scraped off all the outer bark of the limb as this is too brittle to work with. All I wanted to use was the inner bark. My friend Paul held the limb to secure it: this speeded up the process as I could use both hands.
I scored a line down the limb through the inner bark with my flint and also scored a line around the limb at the top and the bottom. Then, using a small piece of wood I’d found on the ground, I peeled away the inner bark from the limb. This was done in April so the sap was rising, making the debarking of the limb very easy.
Scraping and de-barking
The tools I used for the job:
1) Adze
2) Flint
3) Piece of wood
I cut a further piece of bark off the limb as well.
Fresh bark ready for drying
I left the bark to dry out overnight and then re-wet it the next day before cutting it into strips. If you use the bark straightaway after harvesting it, anything you weave will become loose as the bark will shrink slightly as it dries. This shrinkage does not happen again if you let it dry out first then just re-wet it to make it supple enough to work.
To cut the strips I had a flint knife prepared for this.
Re-soaked pliable bark
I cut the strips by eye only but I am sure you could rig up a worktop to cut consistently wide strips. The good strips are on the right and the offcuts on the left.
Bark strips
With practice you will be able to gauge how many strips you’ll need for your size of sheath. This was a small sheath so I estimated 6 strips.
Chosen strips
Firstly fold all your strips in half with the inner part of the bark showing as it is the smoother side.
Fold the strips in half
I have documented the first 12 steps of the weave in the next 3 pictures. Each numbered bullet point relates to a numbered picture below.
1) Lock the right hand strip onto the top half of the left hand strip. 2) Lock the next right hand strip onto the bottom half of the left hand strip. 3) Lock the third right hand strip onto the top half of the left hand strip. 4) Lock the second left hand strip onto the top of the first right hand strip and weave through the other strips.
Weave 1
5) Lock the third left hand strip onto the bottom of the first right hand strip and weave it through the other strips. The ‘point’ of the sheath is now complete. 6) Fold back the top of the first left hand strip. 7) Fold the bottom of the first left hand strip diagonally over the other left hand strips. 8) Then flip back up the top of the first left hand strip.
Weave 2
9) Lock the next right hand strip onto the bottom half of the left hand strip. 10) Flip the whole sheath over. There should be a single strip on the right now. 11) Now fold the bottom right strip diagonally over the other right hand strips and weave it in. 12) Starting again on the left hand side keep repeating the whole process.
Weave 3
Soon your sheath will take shape.
Keep weaving
Keep going with the weave and stop when you have enough to securely hold whatever will be kept in it.
Ready to close off
The top can seem a little bit tricky at first but all you need to do is turn the ends back on themselves and weave them into the sheath. Just tuck each end in as neatly as you can: it’s tricky as each end will be different, you might need to experiment.
Closing off
When you have closed the top off, trim all the ends so that you cannot see where the weave ends.
Trimming the excess
All the ends were trimmed so that the ends were hidden by the weave. The sheath is ready for a dangler strap now.
Ready for a loop attachment
I used some raw hide I had left over from making a bag. I wet it to make it more pliable and then rolled it in my hand.
Re-soaked rawhide
The bodkin I had made earlier came in handy here to make a gap in the weave. I then used a small stick to push the rawhide into the gap made by the bodkin.
Bodkin in use
Attach it as you like and it is ready. I think I used a simple Larks Foot knot here.
Dangler attached
This sheath completed my primitive belt order (the smallest one on the right).
My Primitive belt order
This type of weaving can make some very useful items. I have been using the quiver on a regular basis since 2008 and it shows no sign of wear and tear.
Last August found my daughter Catherine and I making our way down to the Wilderness Gathering. Located near West Knoyle in the beautiful South Wiltshire countryside is the Bush Farm Bison Centre. I have been visiting this gathering for the last ten years.
The Wilderness Gathering has a commercial feel to it though it still maintains its bushcraft origins. I love the fact that it is so close to where I live, there are organised classes all day for my daughter, I get to meet lots of old friends, make new ones, learn new stuff and get some more kit. For the last two years I have been helping out Fraser Christian from Coastal Survival as he is a good friend of mine (I have added all the links at the end of the post). This helps me out a lot as I get a chance to learn lots of new bushcraft skills I can use with my Sea cadets.
The first thing Catherine headed for on arrival was the farm shop to get some ice cream but she soon got into the bushcrafting spirit, particularly keen on doing a bit of carving (this still scares me).
First some Icecream – then later a bit of carving
There are plenty of stalls to visit such as the Bushcraft Magazine, to chat at, to buy from and to get some great ideas.
Fraser runs courses for the Coyote Kids Club such as making shrimp traps made out of recycled materials.
A Bushcraft World
Like all the other visits I meet new friends such as the talented carver Jon Macof Spoon Carving First Steps and good friends of old such as Phil and Ben Brown of Badger Bushcraft.
Friends New & Old
The boys from Silchester – Mark Beer (Lupus), Nick Currie and from the Bushcraft Magazine Paul Bradley. I have learnt a lot from these guys over the years. Always good to catch up, chat and share skills.
Have you seen these hoodlums?
This year I helped Fraser run a course on making fishing spears and nets (well, took a lot of pictures really). The fish spears are easy to make and the net making was run as a Masterclass.
Fish Spears & Netting
A very popular class Fraser ran was how to cold smoke a fish in a cardboard box. Due to the damp weather the smudge fire kept going out but after a few hours we managed to smoke the fish and it was added to an excellent stew.
Coastal Survival Class – Cold smoking fish in a cardboard box
My daughter Catherine always has a great time at the Gathering as there is plenty for her to do with the Coyote Kids while I am working.
Coyote Kids Club
As per usual the food is good with Fraser cooking. I was trying out a new set up here on my fire pit using racks set at different heights for cooking different foods.
Quick Dinners
No big meals this time as we were kept too busy with classes but excellent all the same.
Lovely Food as usual from Fraser
Caught this shot in one of the many showers this year, thankfully though most people just shrugged the rain off and got on with things.
A tad damp
Over the road from our stand was my friend Jason Sears teaching some group bowdrill. Every time he got the sets out he always had a good audience as folk knew they could participate. Rain was no barrier to this bushcrafter when it came to lighting a fire.
Jason in bowdrill action
Other neighbours included Ben Orford demonstrating great green woodworking skills and JP from Woodlife Trails expertly taking the visitors through all the steps of creating fire by friction.
My neighbours keeping busy
I try and get Catherine involved in as many activities as possible. She jumped at the chance to be a Pump Monkey for Dave Budd while he created some knives. I also got a present from my friend Stephen Herries of a burnt-out log – he claims I stole it off him 😉 – which gave me a chance to get my flint adze out and do a bit of primitive carving. The log is a rather nice long bowl now.
Catherine the pump monkey and primitive carving
Steve Kirk of the Bushcraft Magazine ran an Atlatl making class this year which proved very popular. I learnt this skill at the gathering 10 years ago and have taught it to hundreds of people since then. The shooting of these darts make for some great pictures.
Atlatl with Steve Kirk from the Bushcraft Magazine
I don’t know what Sarah (of Wilderness Spirit) thought when the Gimp appeared one afternoon – he is harmless really :-).
The Gimp and the Lovely Sarah
Catherine was very chuffed to meet her friend Molly again this year. I think that Catherine will be able to turn her hand to many things as she grows up based on these pictures.
Girls Just Wanna Have Fun
At the end of the Gathering I had a great evening with the guys from the Tribe watching Billy the Bushcrafter (Catherine really) being set upon by Beccy’s little ferret.
Wilderness Gathering fun
Last but certainly not least is the pond in the centre of the farm. This is one of my favourite places, I have spent many a relaxed hour sitting beside it.
The Pond
There is much more to the Wilderness Gathering than the few pictures I took last year so check out some of the links I have put below.
I am looking forward to this year’s Wilderness Gathering and catching up with everyone again.
During the summer of 2009 I completed the Woodcraft School Primitive Technologycourse. I do not know if John Rhyder still runs this course but he still does a lot of excellent craft courses.
I originally wrote this How To…. for Fenlander and his Natural Lore blog back in September of 2009. It is a subject I love so thought it would be good to include in my How To…. section as well. I apologise for the quality of some of the pictures, I think the light was poor at the time and my fingers were quite slippery from the marrow.
The course required that at least one our craft items had to be made using only primitive tools and techniques.
I decided to make myself a bone knife and a bark sheath for it. The knife I made from a Lamb’s thigh bone and the sheath was made from Sweet Chestnut (Castanea sativa) inner bark. The How To…. on making the sheath can be found here – Primitive Skills – Bone Knife Bark Sheath.
This post concentrates on the knife only. I have put another link yo the bark sheath at the end.
The techniques I used were from what I had researched at the time and I am sure there are many other methods to do this.
As a word of warning please do have a First Aid Kit on standby as the flint is very sharp and thoroughly wash your hands after wards.
Bone Utility Knife and Sheath
I wanted to be able to use the knife as an Awl for working hides, as a Bodkin for when weaving and as a general knife for cutting cordage and meat.
This post will concentrate on how the knife was made. The next post will be about the sheath.
The bone I used was a thigh bone known as the Shank. Hence the names ‘Lamb Shank’ as a cut of meat and the word ‘Shank’ as a primitive knife.
Fresh Bone and Flint
As I was using primitive tools and techniques only I scraped all the fat and flesh off with a piece of flint.
Other students tried burning the fat and flesh off but the made the bone brittle so it easily shattered. It is slippery work that requires a lot of patience. One slip and the flint will cut you as cleanly as any sharp knife.
Slippery Work
After an hours work I had the bone cleaned up.
Ready for Carving
I decided that one knuckle would make a good handle but the other had to be removed.
I scored a line around the whole bone near the knuckle I wanted removed. Apologies for the slightly out of focus picture. The score line was about a couple of millimetres deep.
Removing a Knuckle
After scoring the line John Rhyder (course instructor) showed me how to scorch the line to make it a little brittle in that area.
Scorching the Bone
A close up.
Scorch line
Once the line was scorched all the way around a little gentle tapping was all that was needed.
Gentle Tapping
A crack soon appeared.
Cracked Bone
To finally remove the knuckle I carried on scraping with the flint.
Removed Knuckle
Once the knuckle was removed then I decided on the shape of my knife point. I did this by gently scraping with the flint on the bone to define my knife shape.
Flint Score Lines
Then making sure that the bone was on a stable surface and held in a secure grip the tedious scraping began. The carving out of the knife shape took a number of hours.
Making the Groove
The awl tip taking shape.
Awl Tip
Eventually I was able to prise a section of bone out.
Removal of Bone
I went through two pieces of flint carving the bone out.
Eventually the general shape of the knife was produced.
Basic Shape – Front
And the other side.
Basic Shape – Back
A messy but necessary job is to remove the remaining marrow. I just used a small stick for this.
Removing the Marrow
To give the knife a basic edge I used a piece of sandstone.
Sanding the Edge
Any rough edges I tidied up with flint.
Final Touches with Flint
Below you can see the side profile of the knife. This curve is useful as a Bodkin in basket weaving. In the next post you will see that this was the knifes first job.
Side Profile of the Knife/Bodkin
Here the knife is sitting on the inner bark I used to make the sheath out of.
Ready for a Sheath
Like any knife it needs a sheath. I did produce one using primitive methods and documented all the steps.
The Sheath How To…. is next
This whole process took a whole afternoon for me but I did find it very relaxing taking my time and really thinking about each step.
Afterwards I left the knife hanging for a few months in my garage to air dry and keep it away from any inquisitive rodents.
The beginning of August found me preparing for my annual trip to Merthyr Mawr in South Wales to attend the Bushcraft UK Bushmoot.
I have written this post as a record of the classes and events at the 2013 Moot but it is in its own way a dedication to our Drew.
BCUK – What it is all about – Sharing and having fun
I have been attending the Moot since 2005 and always have a great time. Not always relaxing but always a good time. This year we lost a good friend in the Bushcrafting world – Andrew Dunn. He was known to us as Drew but the handle he liked to be known as was Drew Dunn Respect. This year’s Moot was dedicated to our Drew.
Drew
The Bushmoot is normally held at the beginning of August each year and can last up to two weeks. I usually get there for a week and a bit depending on what else is going on. I like to think of the Moot as a meeting of like-minded people with a vast diversity of skills and experiences that they are happy to share with each other.
The whole 2013 Bushmoot gang
My arrival at the Moot was delayed this year by a day as I ran some bushcraft classes at our village summer school so I was very happy to see on my arrival that my whole camping area had been taped off for me. Eventually I found out it was my friend Charlie Brookes who had done this and I was very grateful he had as I have become very attached to my little pitch (I got thrown out of my original pitch years ago by the owners of the ‘Naughty Corner’).
The first few days for me are usually a time to catch up with good friends, prep my classes and take time to chill out in my hammock.
A couple of days later Karen and Clare turned up, not with their usual tents and tarps but with this mobile palace. Seemingly Clare said it was a wedding present she and her husband had given to themselves. It was fun though getting the mobile palace through the trees to a decent spot.
The Glampers
The mobile signal is pretty bad in Merthyr Mawr but there’s a particular spot I go out to where I can get a signal to phone home. The spot looks out onto the dunes and there every year I find these beautiful Evening Primroses growing. One of the great things about Merthyr Mawr is the diverse range of plants that grow there and so makes it a plant photographer’s heaven.
Evening Primrose
This year there was Victorian theme to the Moot but Spikey being Spikey decided to come as a monkey.
Spikey Monkey
I was chatting with my friend Dean Allen one day at my campsite discussing the Welsh spoons he carves. The conversation got onto his other work and I had to take this picture. Dean has a great eye for detail as this picture shows.
Dean’s fabulous work
Quite a few of the guys are bowyers and we set up an archery range at each Moot. For a few years I have run a class making Father and Son bows as they are so quick to make.
As I was helping to run the Starter Skills course this year one of the other instructors ran the bow-making course. These bows take only an hour to make but can easily shoot sixty or seventy metres.
Father & Son Bow Making
Cap’n Badger, Wayne Jones of Forest Knights, Paul Pomfrey and myself normally run the archery range. The Father and Son bows are double limbed and are great for the kids.
Flying Arrows 1
The adults love shooting them as well. Over the last couple of years I have developed an interest in getting these pictures of flying arrows. The slightly slower speed of these arrows being released makes for a good picture.
A couple of years ago Drew worked with me to build one of these bows. He was not sure if he could at first and was quite shy about starting but once he got going there was no stopping him.
Flying Arrows 2
My good friend Fraser runs a company called Coastal Survival and has been coming to the Moot for a few years now. Sad to say that Bella (the larger dog) passed away this year due to complications from a possible snake bite earlier in the year. She was a great dog, always inquisitive and great with the kids.
Fraser and crew
Alongside Fraser is our big Al and what a lovely pair of chefs they make 😉 between the two of these guys I have had some fantastic food at the Moot.
Pretty Chefs
On one of the days I popped down to the coast to do a bit of foraging with them. No fish that day but plenty of shrimp and limpets. Drew did a few Coastal trips with Fraser so I know he would have loved this.
Coastal Foraging
We also collected a lot of sea weed (sea lettuce I think) which Clare was laying out to get rid of sand particles and to dry it out. Karen is making grass rope in the background as a decoration for the mobile palace.
Seaweed prep
It was great to meet Craig’s baby son Sion for the first time at the Moot.
Happy Craig with his son Sion
For myself and the rest of the Mods the day starts with ‘morning prayers’ (Tony’s morning briefing) and this is soon followed by a larger meeting with everybody under the main parachute.
Morning Mods Meeting
This picture was taken in 2011 and shows the main parachute where we have the morning meetings to discuss the day’s events. Ever the practical joker, Drew found his hat missing one day and finally spotted it at the apex of the chute.
Drew’s Hover Hat
In one of the Mods’ meetings we came to the conclusion that a’Starter Skills’ course was required, covering knife safety, carving (we made tongs for the fire), knots, fire lighting and some simple pot stands.
Starter Skills – Knife Safety
Emily having a go at the Evenk knot.
Starter Skills – Bushcraft Knots
The kids all learnt the skills at the same time as their parents and had fun here testing that the knots had been set up properly.
Starter Skills – Knot testing
Sargey finishing off the fire lighting class of the Starter Skills course. This course got a lot of good feedback so we will try and run it again next year.
Starter Skills – Fire Skills & Pot Set Ups
Some of the members (Cap’n Badger and crew) had organised a very special Memorial Service for Drew. His parents Jean and Philip attended the Moot this year for the service along with Drew’s brother Steven and sister Stacey.
Steven and Stacey helped to plant the Atlantic Pine tree in Drew’s memory.
Tree planting
After the tree was planted we put in a plaque that the guys had commissioned. The whole ceremony was extremely moving. Dave finished the service with a very moving eulogy to Drew. There were not many dry eyes in the glade.
Drew’s plaque & tree
Beautiful words.
Andrew Dunn – Our friend – Gone but not forgotten
The service was finished when Drew’s father Philip spread Drew’s ashes in to the waves at Methyr Mawr.
Goodbye to Drew
Taken a couple of years ago, this is the sign for Drew’s favourite place at the Moot. The Naughty Corner was set up as a place for people to come to and relax without worrying too much about noise levels. Drew was always at the centre of things here and was the first place he asked to go to when he first joined us. One year the roof of the shelter here got badly damaged in a storm and it was Drew who took it upon himself to climb up and fix it.
Ye Naughty Corner
In the evening after the service we had a Victorian themed party. Jean had a great time chatting with everyone
Drew’s Mum and Lady Eleanor
The costumes were brilliant.
Spot Spikey?
I managed to get the majority of the Victorians together for a group shot and was quite surprised to see how many rifles they had brought along. The majority were actual period pieces.
Three Cheers
Back to the other activities being conducted at the Moot. There were a lot of classes being run all over the site so my pictures only reflect a portion of the classes but I hope it gives you a feel for what we do.
Perry Magee from the National Tracking School came to the Moot this year. I did not get to the grass rope making class but watched the kids having a tug of war with what they had made.
Grass rope tug of war
Dean Allen, Mad Dave and a few others had an introductory class on carving. These lads know their stuff and the kids got some really quality tuition.
I have spent many an hour around the campfire carving with Drew as this was something he really wanted to get to grips with.
Carving
I ran the usual bowdrill classes for individuals and groups. No matter how many times I teach someone this skill I still love to see that smile the first time they get an ember.
Bowdrill Face
My friend Mark Oriel is a butcher by trade and now manages a small farm in the West of Wales where he runs his own bushcraft/homesteading courses. This year Mark ran a very successful Jerky smoking class.
Woodland Smoker
All lined up neatly.
Tasty snacks
One of my classes focuses on getting families working together to create fire using the bowdrill. There are not many things that bring everybody in a family together but the group bowdrill is one.
Group Bow drill success
I was chatting with Perry Magee about some fire drill mechanisms he had and the conversation got onto water divining. I was sceptical at first but after some expert and clear teaching from Perry we were off. I found underground water, managed to follow a pipe and here Pete was trying to see if the rods would indicate human presence (me) and it worked. How it works no one knows, but it works.
Water Divining
Fraser from Coastal Survival runs a few courses at the Moot and this one was on breadmaking. Fraser created a sand oven to cook some rolls in. I did not take part in the class but the ladies who did thoroughly enjoyed themselves.
Roll making in a sand oven
This was the fish hook carving class run by Steve Mesquite Harral – Paul Pomfrey (looking dashing in his utilikilt) was splitting down spruce root for the binding.
Fish hook carving
Some stunning artwork was seen in the woods. I cannot remember who produced this but it certainly inspired the kids to get out there and make their own woodland art.
Woodland Art
One type of game the kids love are the stalking games. I call this one the fox stalk and is just organised madness.
Fox Stalk
At the end of the Moot we always have a group dinner where everyone either cooks something for everyone or helps to organise it. The ponnased salmon went down a treat.
Final Food
This year musical friends of the boss (Tony) agreed to come over and play for us. I think they were called the Merthyr Tydfill Country Band but were all based over in Nashville. Tony had just asked them on the off chance they would turn up and turn up in style they did. The generator we had blew the lights out if I remember rightly but we all still had a cracking time that evening, drinking, eating, dancing and listening to good music.
An evenings entertainment to finish
After the main training days were over there were a few private courses run. Here Wayne from Forest Knights was running a bow making course. I learnt to make a Bhutaneese bow with him the year before.
Wayne at Work
Everyone agreed that the 2013 Moot was dedicated to our friend Drew. I do miss Drew but hope to see his parents, brother and sister at one of the Moots again sometime in the future.
Happy Christmas to everyone. I hope you are having a great time and looking forward to a good New Year.
As the weather here in the UK has been a tad damp and windy I thought it would be good to just bring a bit of colour at this time.
My Facebook friends will no doubt have seen the monthly albums of plants I have been posting over the year. I took a look at them again and decided to pull a few of the ones from each month that I particularly liked for the blog.
The plants may or may not have a bushcraft use, they are just the ones I really liked and not some sort of ID guide.
If I decide on a bit of foraging I only pick plants that I have 100% identified and that it is legal to do so. If you have positively identified a wild plant and have never tried it before then I advise you to test your tolerance to it first. A great explanation on this can be found on Robin Harfords Eat Weeds site. The test is clearly laid out and simple to remember.
I will name each plant and one or two uses (if I know of any). Apart from online references which I will link to in the post my main source of reference will be from the excellent and little-known plant ID book by Charles Coates called The Wildflowers of Britain and Ireland.
February
One of the hidden gems of the Common Holly tree (Ilex aquifolium) is found on its leaves. Here you will find the home of the Holly Leaf Miner larvae (Phytomyza ilicis). I studied this little larvae in university and it still intrigues me to this day. The adult fly lays an egg in the stem of the leaf and when it turns into a larvae it burrows into the leaf. A large circular exit hole (over 1mm) usually means the larvae has hatched successfully. A small circular hole usually means the larvae has been predated by a parasitic wasp and a triangular tear as you see here means a blue tit has had a snack.
I have put a link to an excellent PDF on the Miner by the Field Studies Council at the bottom of the post.
Holly – Ilex aquifolium
Learning to identify plants when not in flower is a must for bushcrafters so as to be able to forage successfully year round.
On the left you can see the purple spotted leaves of the Arum plant sometimes known as Cuckoo-pint or Lords and Ladies (Arum maculatum) and on the right the crinkly leaves of the Wild/Common Primrose (Primula vulgaris).
I advise people not to touch Arum as it can cause quite nasty allergic reactions if not handled correctly. Arum has traditionally been used as a soap (called Portland Sago) and the starch from the root was commonly used to stiffen Elizabethan ruffs. My favourite use though I found in Coates: “Victorians omitted it from their flower guides because of its suggestive shape. For some reason, young men placed it in their shoe to gain the prettiest dance partners”. Unless you are an expert in processing this plant I would advise you just to identify it in all its different stages and leave it be.
The Primrose is a different resource entirely. The word Primrose comes from the latin Prima rosa meaning ‘first rose’. Once identified properly this makes an excellent addition to any salad or a tasty snack while foraging as the leaves and flowers are edible. The leaves and flowers can be used to make tea and I have heard of friends making a wine using the flowers.
Cuckoo-pint/Lords and Ladies (Arum maculatum) & Common Primrose (Primula vulgaris)
March
The beautiful Blubell (Hyacinthoides non-scripta) starts to stick its leaves out in March. I loved the way this one had managed to pierce some leaf litter from the previous year. Bluebell in conjunction with some other species can be an indicator species for ancient woodland.
Early Bluebell leaves (Hyacinthoides non-scripta)
The picture of these Crocuses was taken outside our church and it is a sight I love to photograph every year.
Crocus
April
Another lovely sight in the early spring is the appearance of the catkins on the Goat/Pussy Willow (Salix caprea). This tree, apart from its medicinal uses, makes for excellent cordage from the inner bark and is a great bowdrill wood. Watch out when you burn it as it does tend to spark a bit. These are male catkins I think and are one of the earliest indicators of spring, appearing long before the leaves.
Goat/Pussy Willow (Salix caprea)
I took this picture of the Primrose with the flowers and the Foxglove (Digitalis purpurea) on the right without the flowers as a comparison. When both do not have flowers they can be confused for each other. The Primrose has a more rounded leaf tip and the Foxglove has a very pointed leaf tip. As a forager in the early spring/late winter it is important you can comfortably identify both these plants. Foxglove is still used today in a synthetic form as a heart drug, so is, as Coates states, “Best left for the Bees”.
Common Primrose & Foxglove leaves (Digitalis purpurea)
Until I looked in Coates I did not know much about Snowdrops (Galanthus nivalis) other than that they always appear in late winter. Turns out they are not native to the UK and were only first documented in the wild in 1770. In the past the flower was likened to a death shroud so it was seen as unlucky to bring a single one into your house but OK to bring in a bunch. These flowers as you can guess come from the local graveyard – kind of apt in the light of this new knowledge for me.
Snowdrops (Galanthus nivalis)
Butterbur (Petasites hybridus) is not a plant I see too often in the wild. This one I found on the edges of a wood in the grounds of a stately home. As well as being rather beautiful it has some medicinal uses for treating migraines.
Butterbur (Petasites hybridus)
May
A sight that cannot be beaten is a carpet of Bluebells. I did watch a programme where Ray Mears crushed the bulb up in his mouth and spat it out to make a form of primitive glue. Not something I’ve tried personally but I have had limited success using the crushed leaves for fletching primitive arrows.
Bluebells
This picture I took at Mottisfont House in Hampshire. I think it is a Magnolia tree but it does makes a perfect canvas for some climbing children.
Magnolia tree (Magnolia)
According to Coates the Fritillary (Fritillaria meleagris) is a favourite of rabbits which is possibly a reason I do not see it very often in the wild. It is such a striking flower with these drooping petals.
Fritillary (Fritillaria meleagris)
Bugle (Ajuga reptans) is a common plant found around my village growing in the long grass of the meadows. This plant has long been used to treat wounds but from reading Coates it seemingly has been used by herbalists to help treat hangovers. You just never know sometimes.
Bugle (Ajuga reptans)
Bugle
Ribwort Plantain (Plantago lanceolata) like the other plantains is a great bushcrafters’ plant. It is a hardy plant able to withstand a lot of foot traffic. The leaves can be made into a poultice or ointment to help stem bleeding or to soothe burns and stings. One herbalist explained to me that chewing some of the seeds helped to keep mozzies away and some of my bushcrafting friends have made cordage from the fibrous sinews in the leaves. My favourite use is to squeeze the juice out of the leaves and rub it on nettle stings to ease the pain. I have put another good link at the end of the post about Plantain.
Ribwort Plantain (Plantago lanceolata)
Self Heal (Prunella vulgaris) is one of these plants that most people do not give a second glance. Personally I think it is one of the most beautiful flowers we have. Traditionally used by woodland workers to help close up cuts.
Self Heal (Prunella vulgaris)
June
I always come across Sundew (Drosera rotundifolia) while leading groups out in the New Forest in the early summer. It is an easy plant to miss but if you keep your eyes open for well lit, low lying boggy areas you will spot them. Apart from its medicinal properties for treating breathing issues it seemingly has a reputation as an aphrodisiac – Coates notes: “Known as a love charm for its ability to lure insects, it was secreted in girls’ clothing by amorous men”.
Sundew (Drosera rotundifolia)
I think that this is the Common Orchid (Dactylorhiza fuchsii) but I may well be wrong. I have spotted quite a few different types this year either in long grass or in woodland glades. In Scotland I have found many on the coast growing in sheltered areas of rocky outcrops.
Common Orchid (Dactylorhiza fuchsii)
There is one ditch in my village that has a clump of Common Bistort (Polygonum bistorta) growing in it. This is a plant that likes ditches and damp places. I have no bushcraft use for it but I do enjoy the sight of it as I pass by.
Common Bistort (Polygonum bistorta)
The Meadow Crane’s Bill (Geranium pratense) was used to treat wounds in the past. Coates notes that it has been used as a medicine since Roman times. It seems a very versatile plant for herbalists treating a wide range of ailments including diarrhoea, as a gargle for sore throats and for treating toothache.
Meadow Crane’s Bill (Geranium pratense)
July
This fine example of Borage (Borago officinalis) was from the Eden Project in Cornwall though I do spot this plant on many of my trips. It is edible and has medicinal uses. It’s originally from Southern Europe where the leaves are added to different pasta dishes and soups. Before we added cucumber to Pimms seemingly the preferred addition was Borage leaves (source Wikipedia)
Borage (Borago officinalis)
Honeysuckle (Lonicera periclymenum) is another bushcrafter’s friend. Not only is the peeled bark/skin an excellent source of tinder, it is the little devil that makes all those beautiful spirals on young shoots such as hazel that make great walking sticks. Coates suggests it has some medicinal uses as the leaves and flowers contain the active ingredient of aspirin.
Honeysuckle (Lonicera periclymenum)
The Wood Aven (Geum urbanum) is one useful plant and has quite a history. Medicinally it has been documented in use as far back as the Greeks and to this day herbalists still use it to help treat fevers and other ailments. The root has a clove-like smell and so was traditionally hung in houses to keep away evil spirits. My favourite use however was as a flavouring for beer. Coates lists lots of other uses: one to know and try out.
Wood Aven/Herb Bennett (Geum urbanum)
August
I took this picture of the Evening Primrose (Oenothera biennis) at our BCUK Bushmoot in South Wales. A visitor from the States and another medicinal/edible plant. Coates notes that the roots were once eaten as a prelude to wine drinking as we eat olives today. He adds that it contains vitamin F which is helpful with protecting arteries from fatty decay.
Evening Primrose (Oenothera biennis)
I love to look at the Teasel (Dipsacus fullonum): as far as I am concerned it is a work of art. I use the stem as a hand drill and love to watch the Six Spotted Burnetts feeding off the head. The heads were traditionally used in the clothing industry to raise the fibre of cloth after weaving.
I ask the young ones to feel the leaves (gently) and I love seeing the look on their faces when they feel the barbs on the back of the leaf. When they spot the water that collects as a small pool at the base of the leaf I tell the little ones that this is where fairies come to drink. As a small child you could well believe this as the plant does look like it has magical properties.
Teasel (Dipsacus fullonum)
Burdock must be one of the most well known bushcrafters’ plant. It has a two-year life cycle and the root of the plant at the end of its first year’s growth provides good carbohydrates and vitamins. Coates comments that the young leaves are edible which I agree with, but personally I cannot stand the taste of the leaves at any time. The base of the stem when the plant is young is quite palatable though.
I have friends who use the dried-out base of the second year plant attached to a bow drill spindle and swear by it. I like to use the second year stem as a clothes and kit hanger, trimming the branches from the stem leaving a small point protruding where each branch was and hanging it up in a tent for my bits and bobs. This was a traditional method on the Isle of Lewis where I come from as there are very few trees on the island so wood is hard to come by.
Burdock (Arctium lappa)
A plant of many names is the Reedmace (Typha latifolia), other names being Cattail, Fairy Woman’s Spindle and now officially Bulrush (caused so much confusion that one). The root, like that of Burdock, is a great source of carbohydrates, you can make a flour out of the seed head (also makes great flash burn tinder) and a passable hand drill. A plant with too many uses to list.
Reedmace/Cattail (Typha latifolia)
If you have reached this far well done. I did not want to put in so many pictures but it was very hard to choose which pictures to put up.
Apologies if I got anything wrong but I hope you enjoyed them.
I do love to sit by a campfire and do a spot of carving. To me it is a very therapeutic pastime but often I don’t get much chance to do it when I’m out running a course. Thankfully though this year I managed to squeeze in a spot of carving on a few trips.
Ash Platter
Early this year I had been helping out at my friends Phil and Philippa’s farm. We were cutting up an old ash tree that had been blown over in the winter gales. I spotted a piece of wood that had been split open down its length and so was fairly easy to carve into a thin platter.
Ash platter from a wind blown tree
Pointed Hazel Spoon
This spoon was made when I realised I had come away with no eating utensils for the weekend – but thankfully I had remembered my knife 🙂
Pointed Hazel spoon
Birch Bowls
The large dark bowl was from a piece of birch my friend Stephen found in a hedge at this year’s Wilderness Gathering. The log was partially burnt out and then dumped when no longer required. It was very spalted and rotten in places. I carved out the charcoal with a flint adze and scooped as much of the wood from the bowl as I could with a crook knife.
I left this bowl to dry very slowly over four months. I also painted the ends with gloss paint to try and stop any cracks from happening. So far it seems to be crack free.
The smaller bowl was a demonstration piece I carved at the Kent County Show with Phil Brown of Badger Bushcraft. Again the wood is birch and this one is destined to be a Christmas present.
Burnt Birch bowl & a Scooped Birch bowl
Cherry Spoon
I was given a piece of cherry wood by my friend Charlie Brookes earlier this year. On holiday in the summer in Cornwall I decided to pass an evening around the fire carving a spoon for my friend Louise.
Cherry Spoon – side view
The wood was very dry but when it was finally sanded, oiled and boned it developed a small crack on the bowl. I was gutted but Louise loved it 🙂
Cherry spoon – underside
Quaich
A few years ago I came across a wind blown hornbeam with the most fantastic burl growth on it. The thing filled my rucksack after I had removed it from the tree (I had to give all my kit to the cadets I was with in order to carry the burl myself).
I made a number of items from it this year. This one is a Quaich which to any non-Scottish people I would describe as a communal drinking cup – in particular whisky.
Hornbeam Burl Quaich
Knobbly Spoon
I made this spoon in the summer for my friend Jennifer while I was on the Coastal Survival Hunter Gatherer course. I just like the knobbly bit and thought it would make for a good handle.
Knobbly spoon (cannot remember the wood type)
The underside of the handle really showed up the gnarled wood.
Knobbly spoon – underside
Burl Bowl
Another from the burl. This time I made up a large dinner bowl. It is very rough looking as you have to go with what the wood is saying to you. I gave this bowl away to the parents of a very dear friend of mine who passed away this year as he was a fellow carver.
Hornbeam Burl bowl
Spatula
Another implement for my friend Louise. A simple spatula but a pleasure to carve. We had a great holiday this year in Cornwall and camped in the front garden of a Georgian house. The house has been converted to a Youth Hostel and was managed by Louise.
Ash spatula
Spalted Spoon
I was sawing up some wood for a campfire this summer and picked up this piece. It had been left in an old fire that had not been cleaned up. The spalting looked too good for the fire so it provided a good hour’s carving for me.
Spaltef Hazel spoon
My Noggin
My last piece from the burl was this cup. In Scandinavia a popular name for this type of cup is a Kuksa or Kasa. I prefer the Old English name of Noggin myself.
My new Noggin
I am looking forward to the New Year and seeing what different woods I find to carve around the campfire.
I am no artist but I like to capture what I see in the flames of a fire. I find it quite therapeutic watching a good campfire and I always have a camera ready for when a fire is giving off the right type of flame to see some faces or figures.
Here is a selection of just some of the faces and figures I have captured over the last couple of years. In some, the pictures of the face or figure are very clear to see (one or two have more than one face) but for a few they are not so easy to spot.
I am not going to describe what I see as you may see something totally different.
Watership Down Ghostly Bunnies
I enjoyed taking them and I hope you enjoyed looking at them as well.
June and July are time for County shows all over the country. This year at the end of June I agreed to help my good friend Phil Brown out at the Kent County Show.
Phil runs his own bushcraft company called Badger Bushcraft. Phil is based in Kent and does a lot of work with schools in the South East of England. His website at Badger Bushcraft covers all the angles on how he works with schools so I will not go into depth on that here.
I have known Phil since about 2005 and we have both studied together under John Rhyder at Woodcraft School on a number of his courses. Just like in the forces you go on long courses, meet people, go through some pretty hard stuff (and good stuff) and come out at the other end with some good friends. Phil is one of these good friends and over the last few years has given up his time to help me out on my Sea Cadet courses so it was only right to help out where I could for him. Not difficult as we both share the same passion for teaching bushcraft.
Phil’s aim for the weekend was to network with visitors who had links with schools. All the craft items were for display purposes. My role was to demonstrate some activities. These included, using firesteels, bowdrill, hand drill, knots, carving and looking at hammocks set ups.
Phil of Badger Bushcraft
Phil had his own shelter for the craft items and I brought along our own Coleman Event shelter to do the demonstrations. I am glad I brought it along as the heat all weekend was very intense.
Stall and demonstration area
I brought along some of my craft items and so did Phil. We could hardly fit them onto our tables in the end. I lost track of the times people came up asking how much we were selling things for. Some could not believe that we were not here to sell stuff but to just network and demonstrate.
Nothing for sale here
The hat you can see in the picture Phil found in Romania. It is made out of amadou from the bracket fungus Fomes fomentarius. A good explanation can be found here on Wikipedia.
Items for Education
Running over the weekend was a small competition. It was to identify the plant shown here at the bottom of the table. It is highly toxic and was very hard to ID (I had no idea what it was until told). People got a chance to use some ID books to find out what it was and we got an eventual winner. The prize was a weekend course with Phil if I remember. The plant if you have not guessed it is a Thorn apple (Datura stramonium) More info on it can be found here at the RHS web page.
Plant ID competition
I must admit to being impressed with the skull collection that Phil now has. They were a real attraction to all the kids.
The Badger Bushcraft Skull Collection
Much of my time was spent in the demonstration area. It got very crowded at times. I spent a lot of time working with adults and kids doing group bowdrill and practising using firesteels.
Whats happening here then?
The demonstrations all went well apart from one time when I was working with a young lad. For whatever reason we just could not get that ember. Possibly due to my drops of sweat putting the ember out 😉
Bowdrill Heaven
The kids waited patiently until it was there turn and wherever possible I worked with groups of 3 or 4 at a time.
Waiting patiently for their turn
I did a number of one to one sessions with adults and a few got that final happy flame face I so love to see.
Now that is a happy fire face
Interspersed in between the bow drill I got the hand drill out. I think I did 4 demonstrations on the Saturday which thankfully were all successful (it was very hot and dry so ideal conditions) but I did collect a couple of blisters and my hands did feel bruised.
Handrill Demonstration
At the back of the shelters we had set up home. I had a few people asking about the hammock set up.
My home is the hammock – Phil has the tipi. No roughing it here.
Around the fire that evening we had a little visitor that wanted to dive bomb the fire but thankfully chose not to do so at the last moment.
A little visitor in the evening
On the Sunday i set up a couple of different hammocks for people to try. Everybody was a bit nervous at first trying them but those that did were converted. The hammocks that I set up were the DD Frontline and the UK Hammocks Woodsman.
Lots of hammock testing
I tried out one of Phil’s Ben Orford hook knives and it worked a treat. I quickly cut out the inside of a small bowl. I was working on a small birch log and explaining to people as they came by what I was up to. The bowl has seasoned now and hopefully will be a Christmas present. I demonstrated my gas wood burning stove and discussed various styles of pot hooks.
Carving Demos and time for tea
We had set up an area with some stoves and different types of pot hooks for people to look at. Also one of our neighbours had a mobile planing machine. He had been making planks out of Birch and the off cuts were donated to us. The sensible thing we could see was to carve some chopping boards out of them. I think we gave away a few in the end to people who stopped to chat and were really interested in what we did.
Cooking Kit
Other neighbours included the Kent Beekeeping Society and Steve who was an expert wood turner.
Our neighbors – The Beekeepers and Bodgers
Phil got his Eco Burner going. Really outshone my little gas wood burner. He has written a good write up about the Eco Burner here. Some of the time we had a quiet spell and we managed to get a brew going but much of the time we had quite a crowd.
Quiet times – Busy times
I took a picture of one of Phil’s boards showing the benefits of bushcraft within the community. Certainly makes you think about what this subject can do to help people both young and old.
Benefits of Badger Bushcraft
If you work in a school in the South East and are interested in teaching nature based activities to your students then drop Phil a line sometime.
Badger Bushcraft
I had a great weekend and look forward to hopefully going again next year.
This theme of ‘Memorable Meals’ is a subject that is very close to my tummy. To watch my wife Alison cooking a meal for me is an absolute joy but I have to accept that though she loves the outdoors and camping – bushcraft is not quite the same passion for her as it is for me. I do try to cook well for myself when Alison is not around but being of a military mind I usually end up tucking into a standard issue MOD rat pack.
Thankfully to help counter this laziness of mine I have a number of friends – both military and civilian – who happen to be excellent outdoor chefs. Looking at my picture library I was struck by all the pictures I had taken over the last couple of years of some fantastic meals I have eaten while bushcrafting.
One of these excellent chefs runs his own outdoor cookery school – Fraser Christian of Coastal Survival. Fraser is a qualified chef and expert forager who actually lives off the land and the sea. I have recently bought his superb book Eat the Beach on Kindle. As well as covering all the edibles on the shoreline it goes into detail on how to identify and cook plants found further inland.
I will try and explain what all the dishes were but I will mostly let the pictures speak for themselves. (I can’t remember all the ingredients.)
For me nothing beats sitting around a fire chatting and watching a great meal being produced. I usually end up with getting lumbered with cleaning the dishes but that is a fair price to pay I think.
Time to chat
It is always good to stop for a brew. I love my tea and coffee but a foraged brew tastes that much sweeter.
Time to brew
As well as Fraser, another expert chef and forager is Alan Smylie. Thankfully these two guys get along when it comes to cooking and foraging. They seem to complement each other somehow without any of the drama I have seen with co-chefs in the past.
A bit of this and that
A recurring theme in this post will be the Meat Feast pictures. Apologies to all the vegetarians reading this 🙂
Meat Feast 1
As a forager it is always good to munch as you go along, and we are not just talking plants here – shrimps and fish eyes, anyone?
Seashore nibbles
On trips with Fraser we catch quite a few crabs. They make an excellent stock.
Maritime Stock
Breakfast is something I tend to get left with so at least there is something I cooked here.
Breakfast
Fraser and Alan live off the land and they showed me an excellent way to cook sea bass parcelled up in the embers of a fire. This method of cooking ensures the fish stays very succulent.
Sea Bass delight
I made sure not much remained of the bass.
Cleaning out the bones
Walk on the sea shore and you will see limpets everywhere. They do not take long to cook and are great on their own or added to a stew.
Limpet cooking
I think the patties were made up of the leftovers of a previous day’s meal.
Homemade patties
All these meals included foraged ingredients.
Fireside Food
Cooking rig experiment – pots set at different heights for boiling and simmering.
Stew
Some more protein.
Meat Feast 2
I took this picture after Fraser had done a class on cold smoking mackerel in a cardboard box. After this we broke up the smoked mackerel and added it to a stew.
Smoked Mackerel
Before and after pictures.
Chops (top) and Seaweed Stew
In between classes a quick and easy meal is an omelette
Pepperoni omelette
The stove in the picture below is actually an old cutlery drainer and we were using pine cones as fuel.
Midnight cooking
Last of the Meat Feast pictures. I enjoyed every one of these roasts.
Meat Feast 3
Omelette for breakfast this time………..
Breakfast omelette
…..sometimes it can be fish, potatoes and eggs………..
Fish breakfast
…..but there are days when only a bacon buttie will do.
Bacon Butties
Even the cat eats well here.
Feed me!!!
I hope you enjoyed these foraged food and feasting pictures.
I am aiming to get back down to see Fraser again in the near future for some more fabulous bushcraft-style belly fuel.
I wrote this article for my good friend Kevin in 2009 for his Natural Lore Blog.
I feel that we do need to remind ourselves about the importance of ‘Adventuring’ every now and then.
Ask yourself the question, “When was the last time I had a really good adventure?”
Now be truthful to yourself.
Was it recent? Was it enjoyable? Was it different?
In my line of work as an Adventure Training Instructor, health and safety and risk assessment are the norm. Everything has to be planned and assessed for each activity I am involved in. I have to be qualified in each activity I run because I work with youngsters and inexperienced adults.
Once I have planned and assessed an activity, it is no longer an adventure to me, although I hope it will be for the kids and other adults that take part in that activity. Don’t get me wrong: I do enjoy my work, but taking a group out on organised walk in the woods or mountains is not really an adventure for me as it has already been planned in great detail.
Where the adventure for me comes in is, for example, when my group is trundling along a woodland path and I call a halt, then say something like “I’m bored now: let’s see what’s down there”, pointing off into the deep and dark woods. These off-piste adventures usually go for a few hundred metres so the group can get back onto the pre-planned route quickly.
Deep Dark Woods
What’s interesting is how such adventures often seem to scare people, not really I think because the woods are deep and dark but because they are leaving the path. As a nation I think we have had it drummed into us since childhood that we need to stick to the pre-planned path or we could never be found again.
In some places leaving the public footpath means trespassing, but not always. It is all about knowing where to have your adventure. The Countryside Right of Way (CROW) Act has opened up a lot of new land for adventuring (get the latest OS map of your area to see where the CROW access is). Also speaking to local landowners and explaining what you do can open up whole areas to adventure in.
Scanning my map before entering the wood tells me what I need to know in regards to health and safety and I am constantly assessing risk as the group moves through the wood. But I am seeing new things all the time , and that makes it an adventure for me. For many in the group they are realising for the first time in their lives that it’s possible to get off the beaten track and enter a whole new world, and that is their adventure.
If you’re going to lead an adventure like this, teach your group to always look back at their route so that the path is recognisable if they have to turn back because of an obstruction. Mostly though, take your time and explore and enjoy your new surroundings.
So….
Have an adventure every time you go out so you can say it has been recent.
Take your time and explore so you can say it has been enjoyable.
Finally, have your adventures in various locations so you can say they have been different.
I have been very lucky over the years to have made many friends in the world of Bushcraft. I cannot call myself a chef in any form but many of my Bushcraft friends are either very good cooks or can be classified as chefs. I was struck by how many of my pictures I have taken have been of the food I have eaten while Bushcrafting.
Royal Marine Cadets Pannassing fish
One of my favourite methods of cooking is to Ponnasse fish.
I do not intend here to make this a How to…. article on preparing food (I may do that in the How to… section) but just publish photos of some of the great meals I have tried over the years while out Bushcrafting.
Simmering Paella
A freshly foraged pan of Paella simmering while Jordan, Dave, Fraser and myself natter.
I spend a lot of time eating out of MOD rat packs so really appreciate being in the company of good cooks.
A proper Bushcraft feast
One cracking plate of Paella from last years BCUK Bushmoot.
One of my favourite meals of the day while in the woods is my breakfast. Thankfully Alison is always keen to cook outdoors.
Breakfast – Most important meal of the day for me
It is not always about big meals.
Fun Food
Then again they can get quite big.
An Osado – Panassing but on a grander scale
An Osado from my time in Chile with Raleigh International.
I will work through my library and post up later some more of my memorable meals.
A very quickly made bow – It should take anyone competent with a knife and saw about 1 hour to make. The bow is made up of two poles – The larger is the Father and the smaller is the Son. I still have the first Father & Son bow I made about 5 years ago and it still shoots well. I use these bows typically on ranges of less than 20 metres but on a high arc they will shoot an arrow between 60 and 70 metres. Not bad for something made in an hour but only about 20 to 30lbs in draw.
Two Father & Son Bows (Centre & Right) up against my Holmegaard (left)
I was introduced to this sort of bow from Mark of Kepis Bushcraft when he posted a You Tube video where he made one for his son (I have put a link to the video at the bottom of the article). I realised instantly that this would be an excellent tool to use with my Sea Cadets. Funding is always tight so the thought that I could make bows quickly and that they could shoot well got me going.
I was originally told that there was no historical record for this type of bow apart from being created by some locals in the States during the 1930’s to fool some Anthropologists but since have come across these types of bows being called the Penobscot or Wabanaki bow (I have included a link at the end of the article to the Primitive Archer website to give more detail on the history). So far from my reading this type of bow dates back at least 1500 years and comes in a number of different types.
My cadets like to refer to the bow as the X Wing Fighter Bow. I can kind of see why.
The X Wing
This step by step is to guide you through how I make one of these bows. I have tried to make the steps as clear as possible but please leave a comment if you are unsure about any stage.
I do not make them in a primitive way as my aim is to have a useful tool in limited time that my cadets or my own children can use quickly. After researching this bow more though I will be interested in making one in a primitive way.
Finlay’s choiceCatherine’s choice
The Limbs
I typically use coppiced shoots of Hazel but I will use young Ash if it is available. I have tried Sycamore before but I found that this wood tended to snap easily.
Cut at the base
I cut poles about thumb thickness in diameter (but use what you can find). I always make my cut at the base of the coppice so to stimulate regrowth.
Three Father & Son Bows ready for making
I like the Father pole to be as straight as possible but the Son can either be straight or curved. When making one for myself I cut the Father to the height of my chin. With younger children I normally make the bow just bigger than them. I have found if you make the bow too short they can snap quickly. For the Son I normally cut another pole about two thirds of the length of the Father.
Finding the Belly
I work the Father first. I let the pole roll in my hand to determine the Belly and the Back of the Bow. To keep things simple the side of the pole facing the ground will be the Belly, the side facing the sky will be the Back. If you want to play about with recurve shapes feel free to switch things around.
Mark the Belly
I then mark the Belly side with my knife.
Using a string to measure the length of the bow
I use string to measure the length of the pole
Fold the string
Fold the string in half.
Find the centre
Lay the doubled up string back on (the Belly) the pole).
Mark the centre
Make another cut on the Belly side to mark the centre of the bow.
Mark out the handle
Holding the pole in the middle with the Belly facing me I then make a mark on either side my fist to show where the handle area will be.
Marked out
The marks I have made also help me to see clearly which part of the pole is the Belly at this stage. I want that as I am leaving the bark on this bow and I have found I can lose sight of pen or pencil marks on bark. If you take the bark off then pencil or pen marks will work well.
Getting that Curve
Start at the tipWork your way to the handle
The next stage is to see if you can make both ends of the pole curve evenly. I usually find that the thicker end of your pole needs to be shaved down. I work from the end of the pole backwards to the handle area shaving off small pieces at a time. I will take off more wood from the tip of the pole than I will from the handle area. You want to have a tapered shape on each limb.
Keep testing the curve
Keep testing the pole until you get a consistent curve on both limbs.
Trim the sides if needed
I do not like to go past the Pith of the wood as this will cause the limb to form a hinge and snap. If you are getting near the Pith then take some wood of the side of the limb.
Keep checking the curve
Trim back the wood on both sides if needs be. If you can get a good curve then stop but it does not need to be perfect (you are not making a Longbow).
Cut the Son to about two thirds of the Father
Cut the Son pole to about two thirds the size of the Father. I have seen though where the Son is very curved that it can be half the size of the Father.
Belly of the Son
I find the Belly of the Son as I did with the Father and mark it. Any trimming of the limbs this time is done on the Back of the bow and not the Belly. This is because the Back of the Son will be attached to the Back of the Father.
Mark the centre of the Son with string.
Measure again using the stringMark the centre
Checking the curve
Trim the limbs (on the back) and test for a good curve.
Producing the X Wing
Setting up the join
It is far easier to join the limbs if you have some help (thanks Roddy). I sometimes join the poles with a common whipping and sometimes just use strong tape. For this bow I am going to use tape and then at the end make a handle with a bit of whipping.
Joining the poles
With one person holding the two poles (make sure the Backs of each poles are touching) the other person can attach tape. I find it best if you roll the poles rather than wrapping the tape. Tape the whole handle area.
Prepping the spacer
If the Son has a very pronounced curve you do not need to do the next step. Most of the bows I make have poles that are not very curved so I put spacers in near the handle. Take one small branch and trim if necessary.
Battoning in the spacer
Then using a baton hammer the spacer down to the handle.
Trim the spacer
Trim the spacer. Be very careful to keep your hands clear of the blade here. Out in the woods I don’t always have a handy makeshift table to work on.
Last trim
Repeat on the other side and you will find that the Son pole goes into a more pronounced curve.
Secure the spacers
Tape around each of the spacers to secure them (or whip them).
The Nocks
Mark the X
I then lay the bow on its side to work on the nocks. The nocks on the Father pole need for this type of bow to be in the shape of an X. This is to accommodate the string to the Son and for the main bow string. I firstly make an X cut.
Carve the X nock
Then cut the knock out until I get this shape. Make the edges of the nock that are closest to the handle as flat as possible so as to catch the bow string when it is strung.
To make the nock on the opposite side of the pole roll the knife around the pole from the middle of your completed nock and repeat the cuts. Repeat the whole process on the other limb so you have four nocks.
Line up at the middle of the completed nockRoll the pole
Make the other X nock on the opposite side of the pole
Cut the Son nock
The nock on the Son should be pointing towards the nock on the Father. An X nock is not needed but just a single nock on each side. Remember to repeat the nock on the end of the Son.
Lined up nocks
Here you can see the nocks lined up. On some primitive Father & Son bows the Son limbs are tied of to the Father limbs about half way down the Father limb. I do not do that with these quick bows as I find the poles are not wide enough to incorporate a separate set of nocks half way down the limb. Experiment if you can though and let me know if it works for you.
Stringing up
Keeping things as cheap as possible I like to use Bailer twine for the string (thanks Phil). Either tie the ends off or use tape to seal the ends to stop it fraying. I like to use tape. Bailer twine has the benefit that it does not stretch under tension. Use whatever string that comes to hand but try to find something that does not stretch. In a primitive bow the string could have been made up of sinew broken down into fine strands and woven into cordage.
Tie off the bottom Father & Son limbs
I decide firstly which part of the bow will be the top and which will be the bottom. On the bottom I attach the Son to the Father with string. Use knots that you can easily untie. Also the string needs to be taught but not overly tight.
Make a loop
To make the main bow string cut a length about one and a half times the length of the bow and make a loop at one end. To make this loop I just made an overhand knot on the bight. The loop needs to be small enough to catch the nock when you string the bow but big enough to be slid down the upper Father limb when unstringing the bow. Try to keep the knot loose until you get the loop the right size.
Tying off the bow string
Get someone to help you measure how long you need to make the bow string (thank you Kate). With the loop attached to the upper Father limb hold it in place about one hand width down from the nock and tie a knot to the bottom nock on the Father pole. This will allow about a brace height of one fist.
Again your knot should be able to hold under strain but easy enough to untie to make adjustments. I like to wrap the string around the nock then back on itself (shown in the enlarged example around the tree) then I wrap the remaining string a few times around the nock before finishing with overhand wraps or similar. This makes it easy to untie to make adjustments.
Knot the bottom nockEnlarged example before tying off
After warming the wood up by bending it from the middle slide the bow string loop up into the top knock. To do this I trap the bottom of the Father bow on my instep, hold the handle in one hand and with the other hand both bend the upper Father limb and slide the loop into place.
Ideally the brace height (handle to the bow string) should be a fist and thumb in height. You may need to adjust the string length to get this.
Then attach a piece of string to the end of the other Son limb and tie it off over the bow string loop on the father limb in a knot that will come undone easily. Try and get the distance of these limbs to match the distance on the other end. This way you can always brace the bow fully.
When unstringing the bow all you need to do then is untie the knot on the top Father limb (the string to the Son) and then slide the loop on the Father limb down towards the handle.
Bow is strung ready to have the final knot doneFinally strung up with taped off ends
As Bailer twine can be hard on the fingers I roll tape onto the nocking area of the bow string (you may not need to do this if your string does not cut into your fingers).
Strip of tape ready to be rolledRolled tape. Do not make it to thick
The Handle
It is not a requirement but I like to make the handle more comfortable with some Common Whipping.
Common Whipping startCommon Whipping end
Finished handle
The Finished Bows
Two happy children looking forward to trying out their new bows. Finlay’s bow developed a hinge so I added some extra tape to support it. It still shoots well.
FinlayCatherine
Bows in action.
Airborne arrowGood for all ages
This is just one way of making this type of bow but it has been tried and tested by hundreds of Sea and Marine Cadets over the years.
Good luck and it would be great to hear of anyone making one of these bows.
My first Sea Cadet trip this year was down to Pippingford Park in the Ashdown Forest. This is an MOD training area but as I like to think of it as one of the best playgrounds in the world.
We went down to practice some Bushcraft and train one of the younger instructors on some navigation skills.
I was with my friends Keith Coleman, Charlie Brookes and Emma Deasey.
Beautiful Pip Park
As we did not have any cadets to teach we took our time setting up our camp. We had our hammocks and a main tarp for a fire. It was a tad on the cold side but we had enough kit to stay toasty.
Taking a break setting up camp
The site is full of great sites. One of my favourite trees is the Kissing tree.
The kissing tree
The MOD have brought Exmoor Ponies in to help manage the land. They are a hardy breed and are quite happy to graze the low quality grazing found here so helping to manage the landscape as heathland.
Exmoor Ponies
The park has over 600 Red and Fallow Deer so spotting droppings is not a problem. The droppings seemed to be pointed on one end and indented on the other so I took these to be Fallow.
Deer droppings
Some great fungus to shelter under.
Large Artists fungus
Much of our time was spent mooching around and as usual we were always picking up material for tinder.
Foraging for tinder
The park has six lakes to wander along and it was not long before we spotted something…………….
Lads have spotted something
The remains of a Deer by the waters edge.
Deer remains
Further on on a stump I found some fox droppings.
Fox droppings
But the surprise was spotting the Witch of the Woods.
The park allows filming and this was a scene from the tales of Albion.
Filming for the Tales of Albion
We had to try out our new hammock seats from UK Hammocks
These are great for instructors as you can stuff them in your pocket and pull them out wherever you are.
The three stooges
A new convert in Emma.
Happy (but cold) Emma
As Sea Cadet instructors to go hungry is a crime.
A typical Sea Cadet Breakfast
As usual I try and find Fire Faces in the fire.
Cat Mask Fire Fac
The park is packed with archaeology. Please see the link below for further info on the park. This link is useful for all instructors bringing cadets here.
Iron Age berm
One thing you always have to remember is that you are on MOD land.
I believe passionately in the importance of teaching kids about the outdoors and about themselves. There’s nothing more satisfying than seeing the pride and delight on the face of a child who’s made fire for the first time out of nothing more than sticks, grass and elbow grease. In a world where kids are cushioned, cossetted and cocooned, where they spend most of their leisure time staring at screens, getting them into the wilderness and engaged with the most basic skills of hunting, tracking, shelter-building and camp-fire cooking is transformative.
I’ve been involved in outdoor education pretty much all my life, and a qualified Bushcraft instructor for the last 5 years. I will be adding posts on my adventures and adding ‘Step by Step’ tutorials on some crafts and skills.