
One night recently I just could not get to sleep and my thoughts wandered onto the subject of log rocket stoves. Having written on the subject a few times with the Damp Log Rocket and the Fire Face Candles it struck me that I always used large tools such as axes or drills to make them.
This post is about making a Log Rocket Stove with only my knife (a small pruning saw was used to trim the log). I wanted to see if I could easily produce a stove without having to rely on my axe.
I like log rocket stoves as they can be made quickly, work well on wet or snowy ground, produce their own kindling and come with a ready made platform for your pot. Once the stove has done its job the collapsing embers make a good start point for a bigger fire.
Set Up
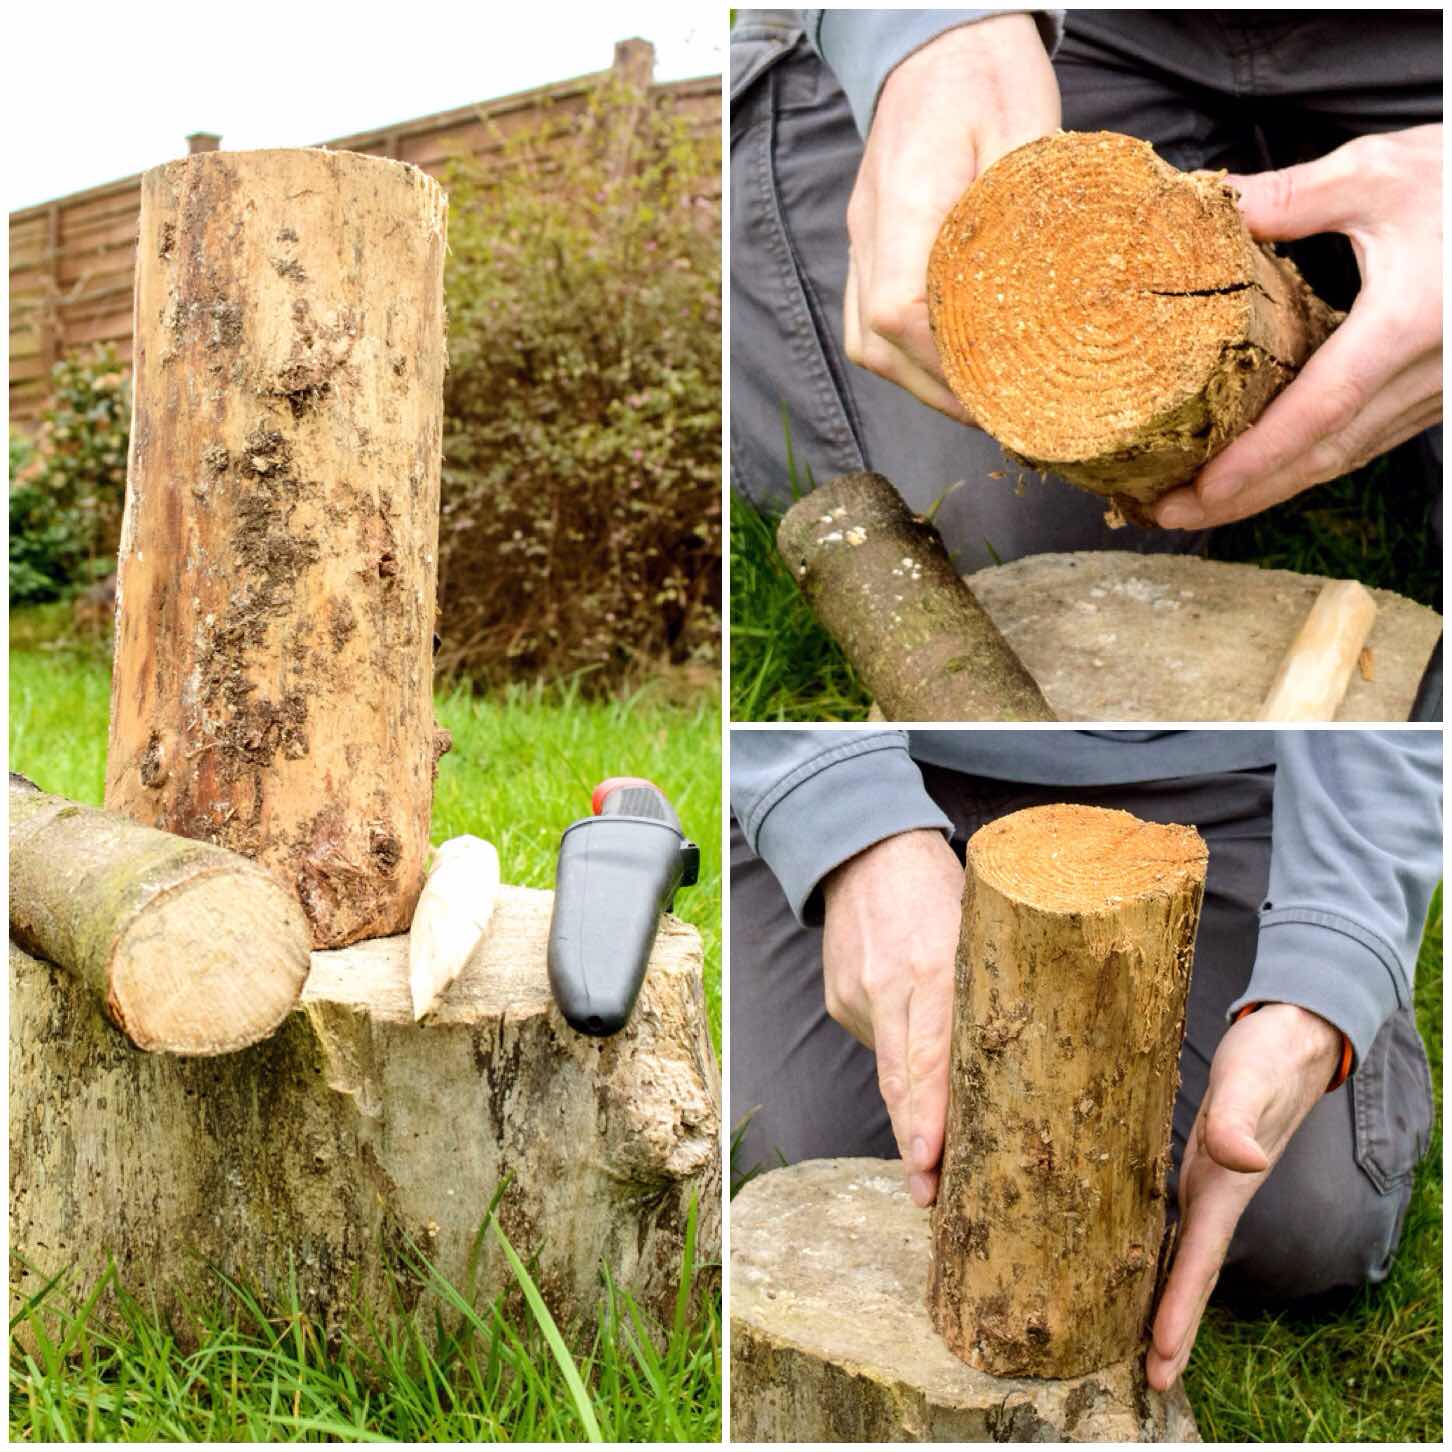
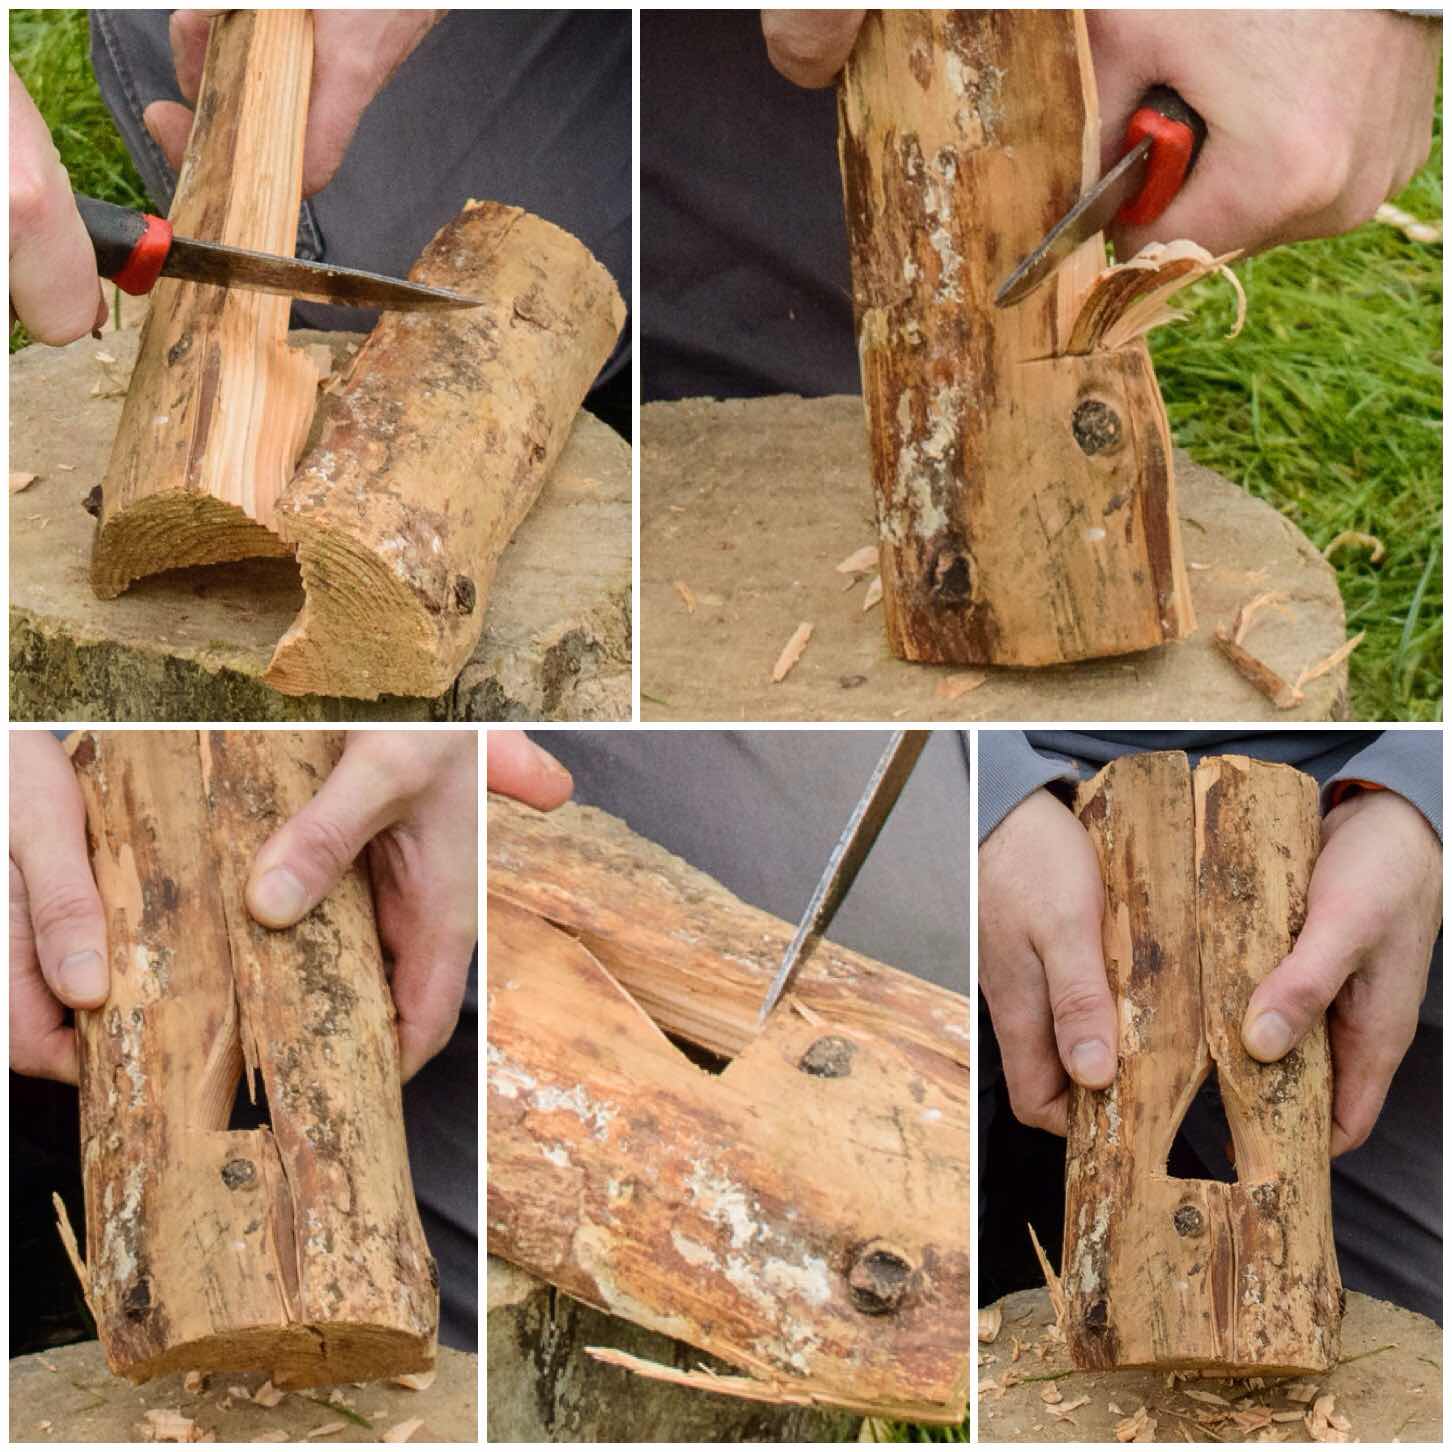
I chose a seasoned piece of spruce wood from my log pile which had a diameter slightly larger than the blade on my Mora knife (do not be tempted to use a log much smaller than this as you will end up with a very small cooking surface) . I also used a larger round of wood as a work surface, carved myself a small wedge to help with splitting the wood and had a offcut of wood ready to batton with.
Splitting
I started with my knife first and battoned it into the log (note that the knife blade is at 90 degrees to my body for safety). My aim at first was to create a split as deep as I could with the knife all around the middle of the log to create a weak point in it. The knife was smaller than the log so I could only batton it in a couple of centimetres.
Once I had my point of weakness battoned in all around the log I inserted the wedge into the split at the top and battoned that in as well to try and increase the split some more (upon reflection I think two wedges would have helped). It was at this point my batton decided to snap on me.
I went off and got a bigger piece of wood to act as a batton and soon had the log split right down the line off weakness. This line I created with my knife will help you to keep an even split on the log when you have twists and knots in your log as I had with this piece of spruce.
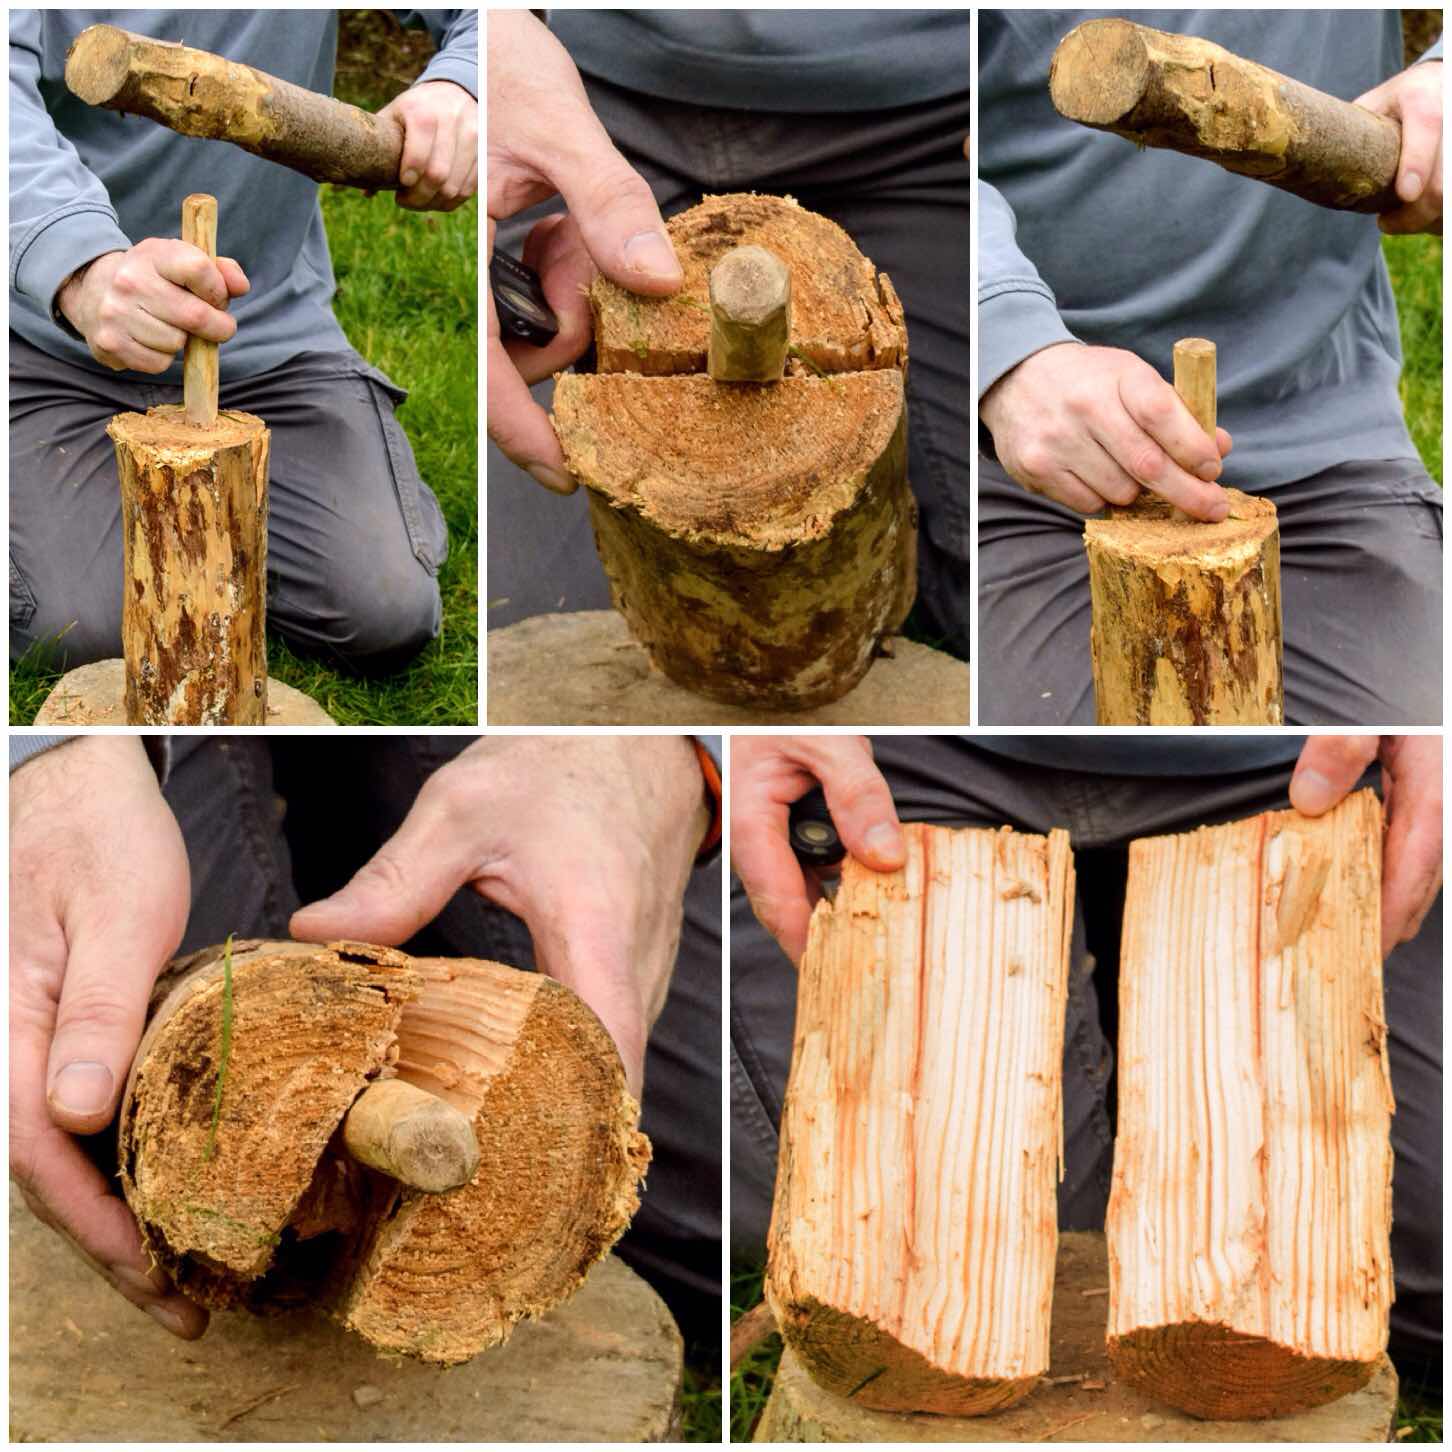
I repeated the process on each split so I ended up with four roughly even sized pieces of wood.
Safety
One thing to be aware is that as you batton down on the wedge is that it will go slightly out of line at times. If this happens just tap the end of the wedge against the work surface until it lines up. This is much safer than trying to drag it back in line with your hands as it is very easy cut yourself on the knife tip.
As the split widens the knife blade will come loose. Let it drop away and only pull it out when it it is completely free. Do not be tempted to force it out as this is another time when injuries happen.
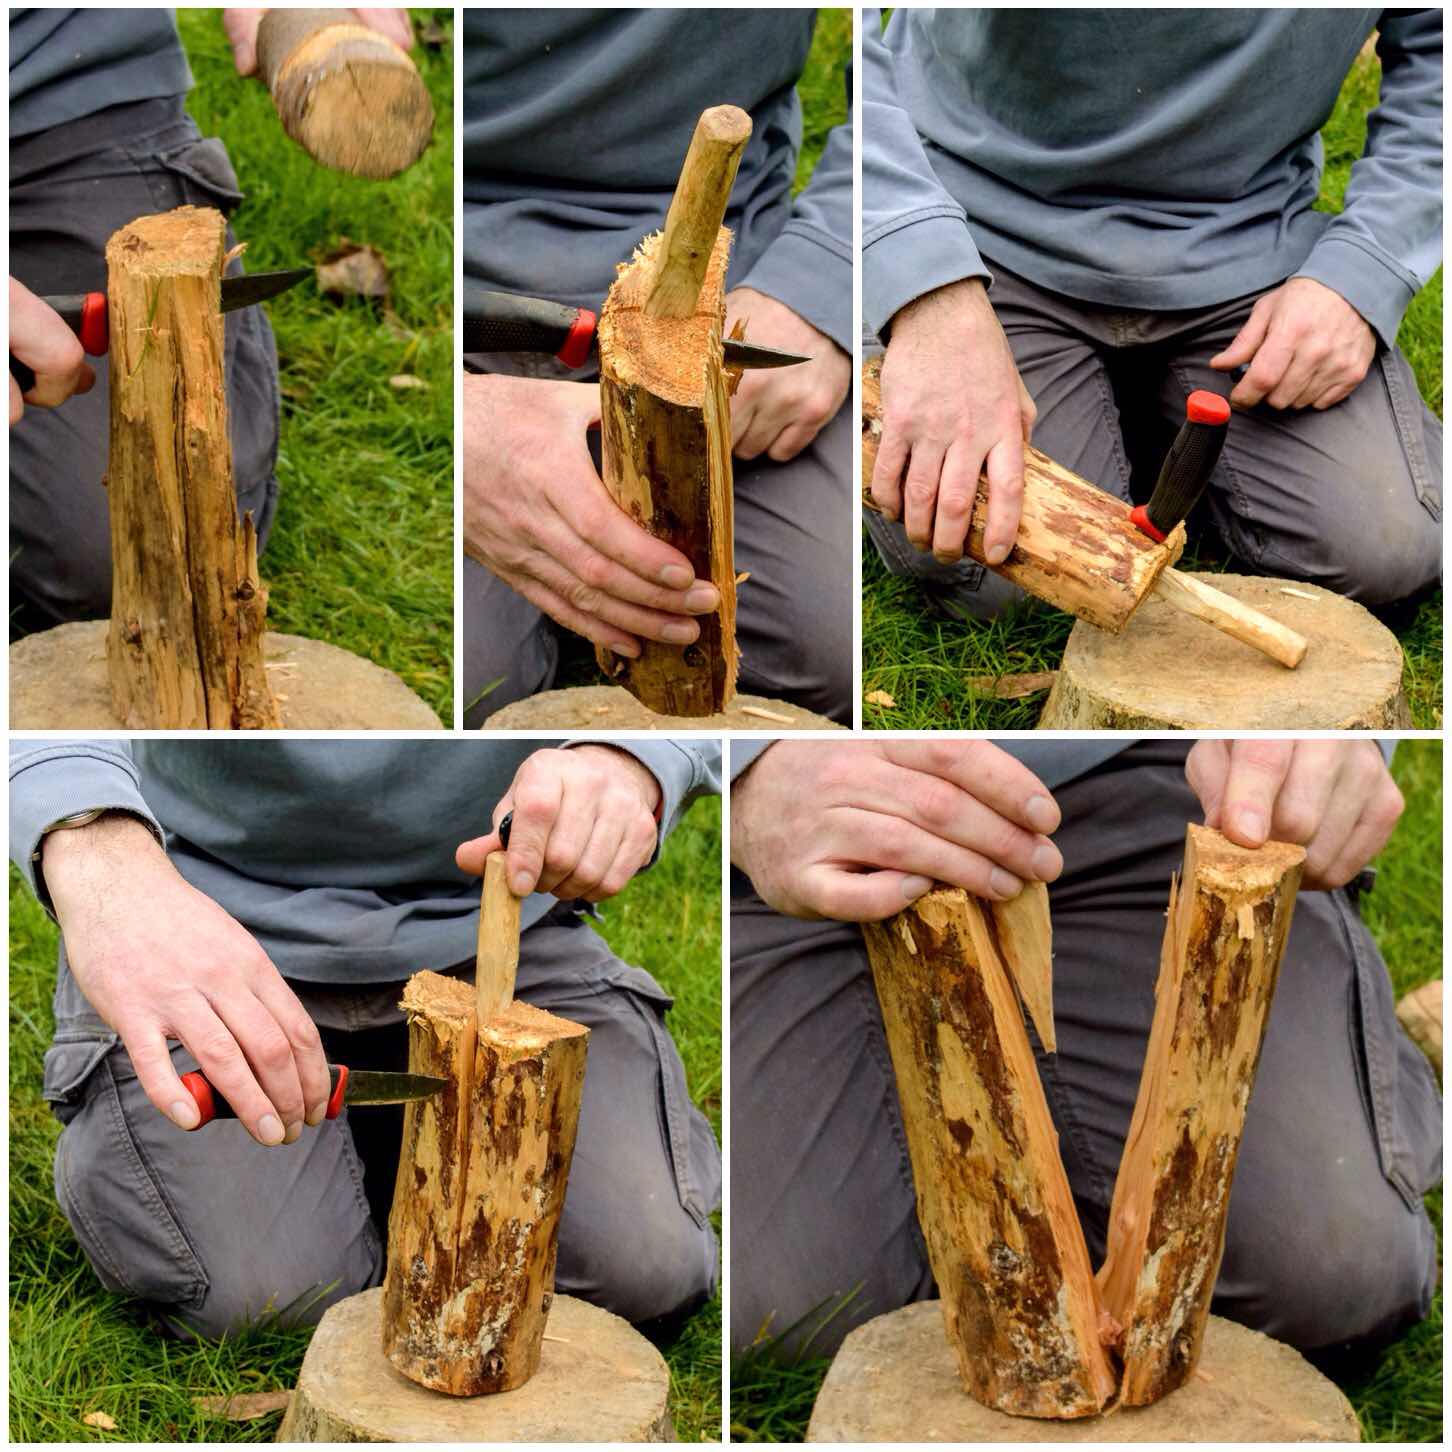
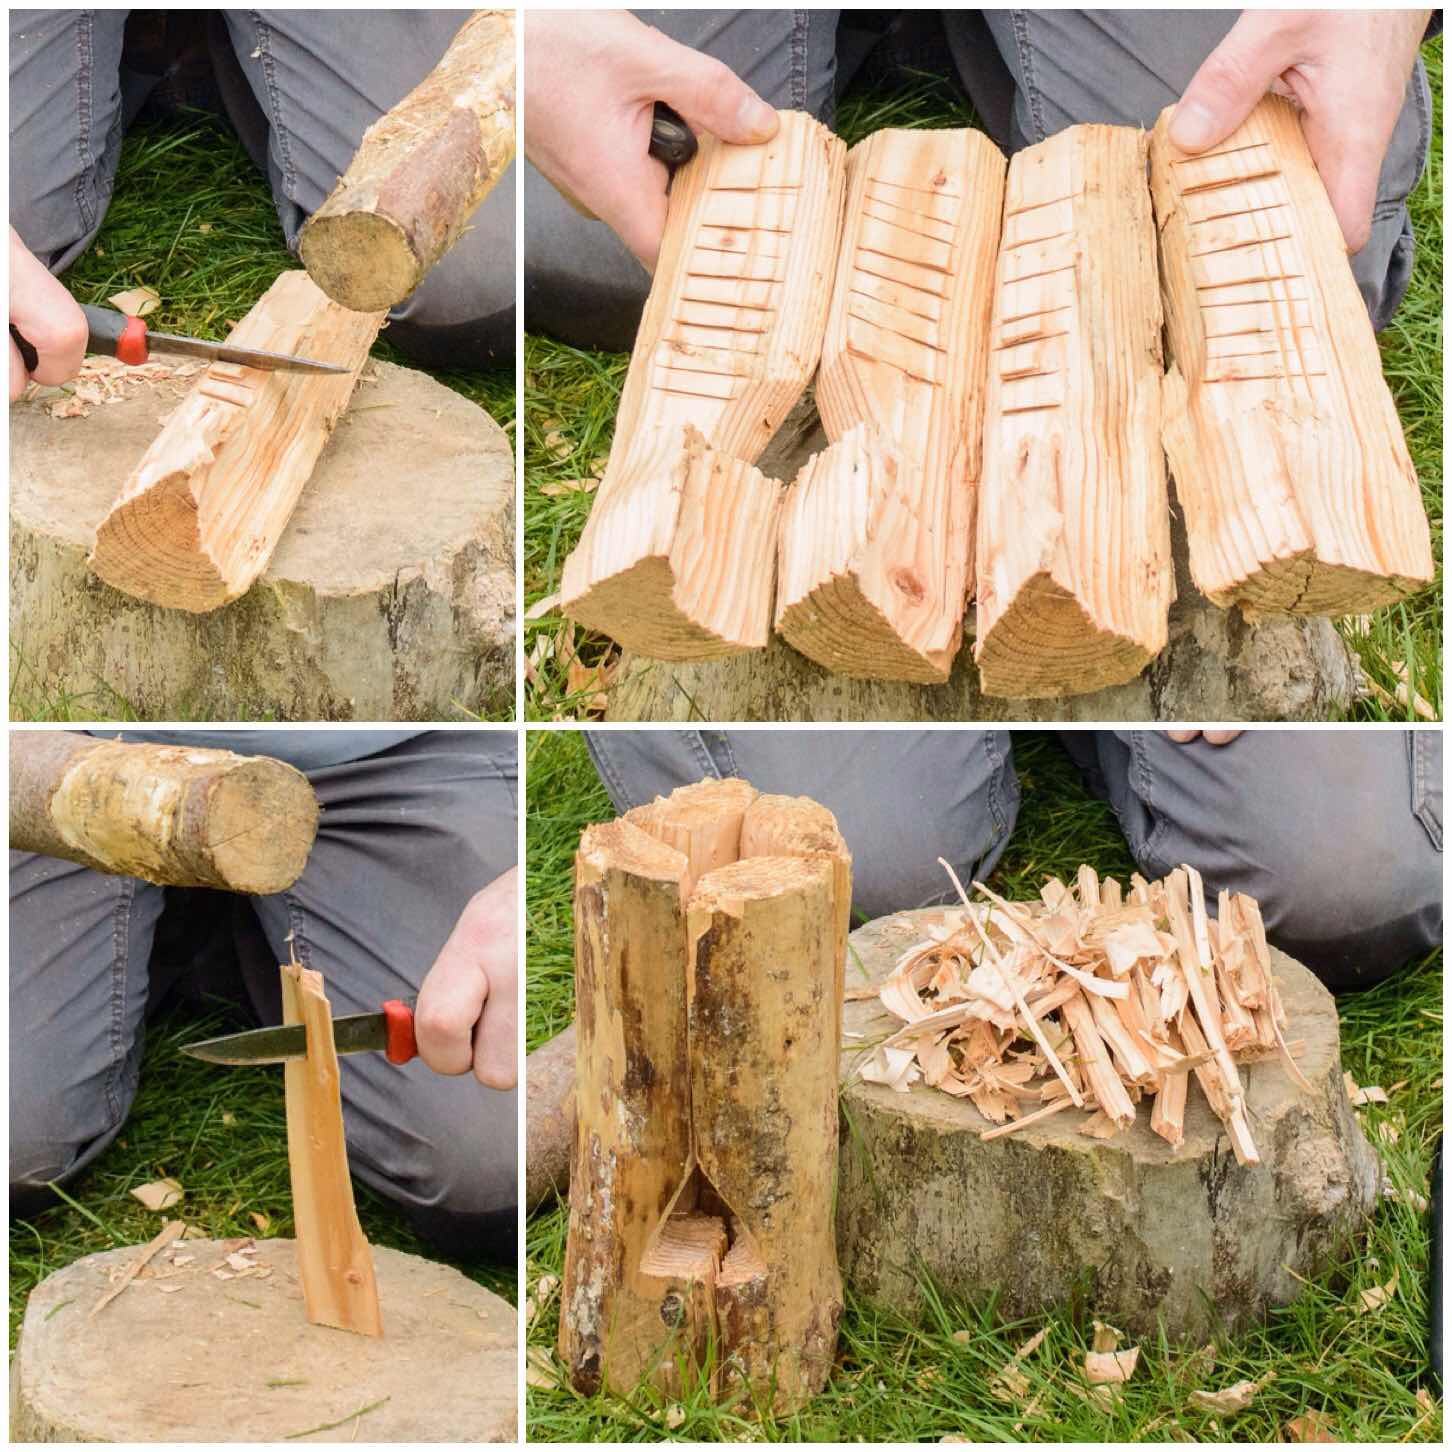
The Chimney
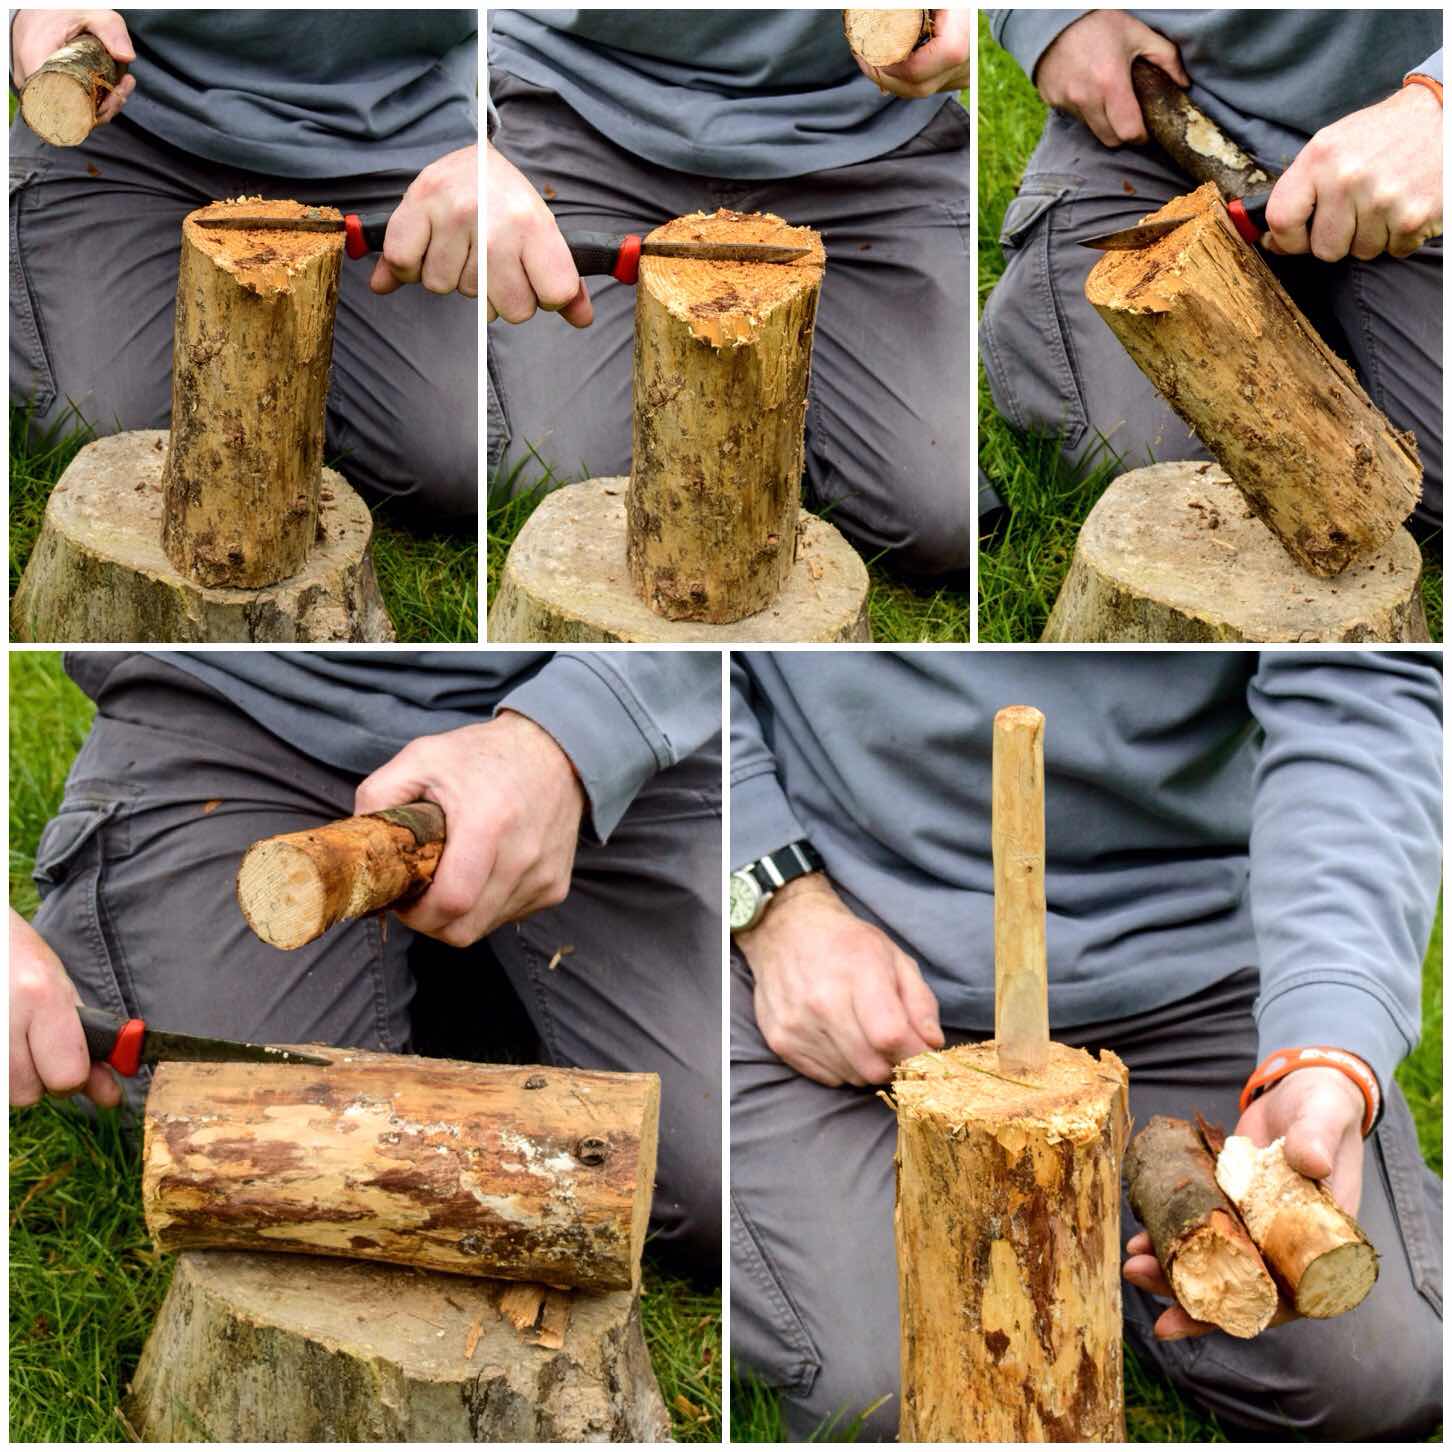
The stove requires a chimney and it is very easy to carve one out. About a third of the way from what will be the bottom of the stove I battoned my knife into centre ridge of one of the quarters of wood. I then used this a a marker to drive in stop cuts on all the other three pieces of wood.
Then from the what would become the top of the stove I battoned off the centre ridge of wood down to the stop cut. I then used my knife as normal to carve off some more excess wood so that part of the chimney looked fairly even. Once the first was completed I repeated the process on all the other pieces.
Keep all the offcuts and shavings as they will be needed to fire up the stove.
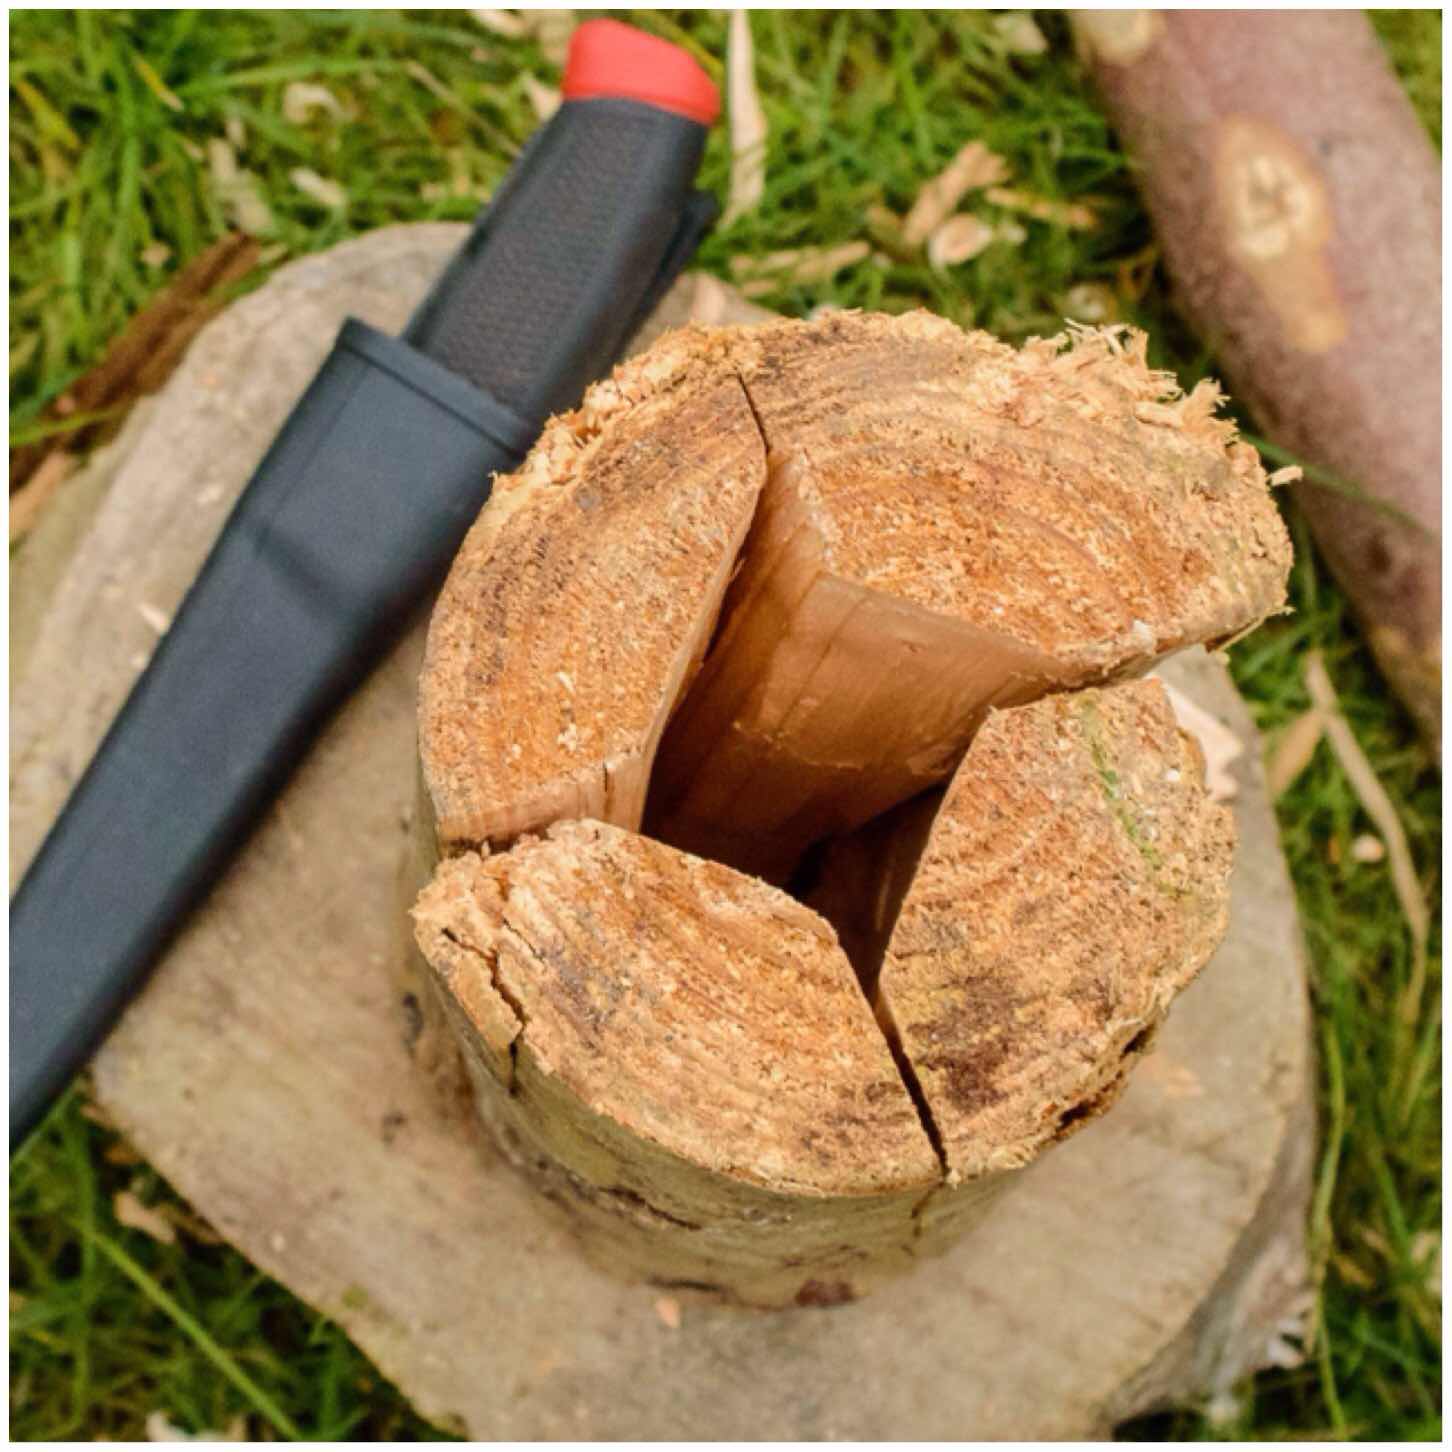
From the top, looking down, your stove should look similar to the picture below. I have no idea how wide a chimney should be but I generally tend to take a couple of centimetres off each quarter.
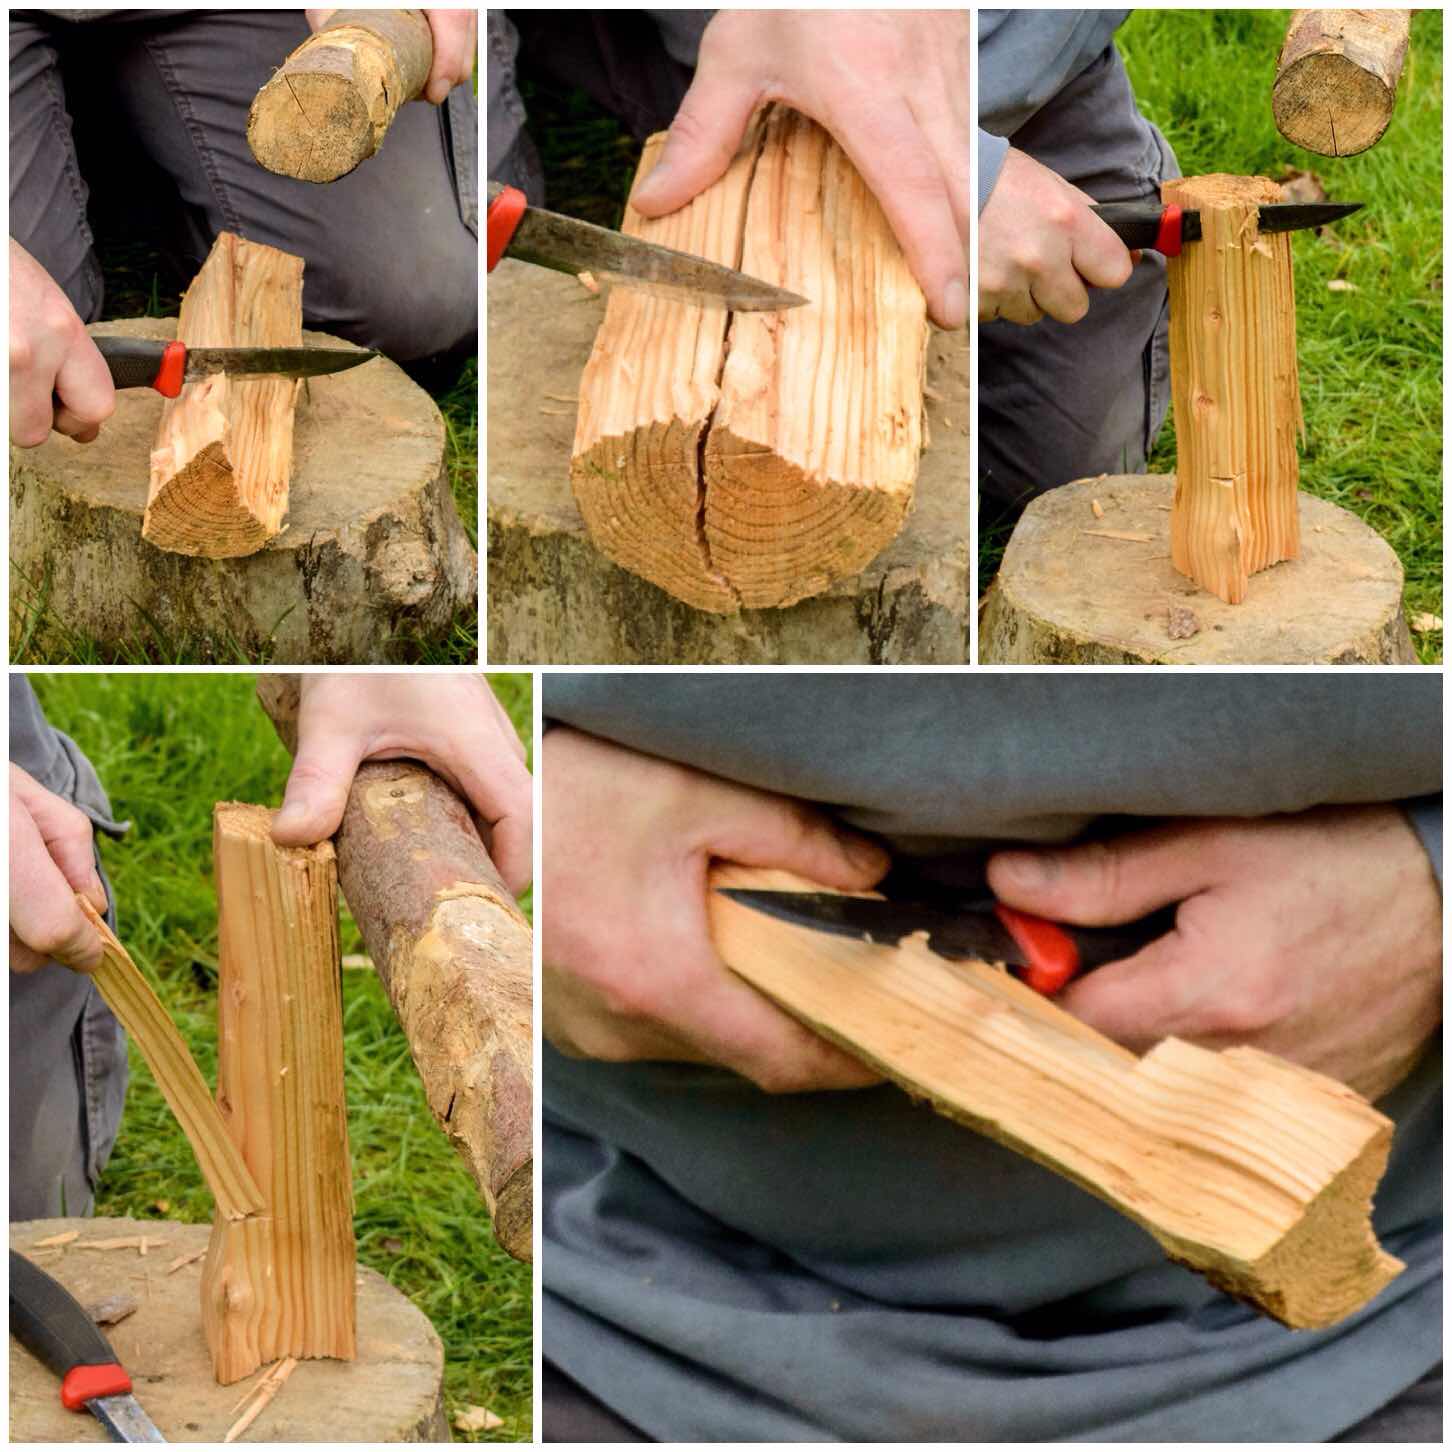
The Firebox
Once the chimney is finished select two of the quarters that fit together and just at the base of the chimney on each quarter carve out a half triangle on each quarter.
I put a stop cut in first and then carved off the excess wood down to the stop cut. The whole just needs to be big enough to let air in and allow you to add slivers of wood into the fire.
Make sure your cuts are opposite each other so that when you fit the two quarters together again you form a triangle.
I used to carve out a square shape with my saw and an axe in the past but a fellow bushcrafter called Takeshi Mizumoto showed me this method by just using a knife – so much easier.
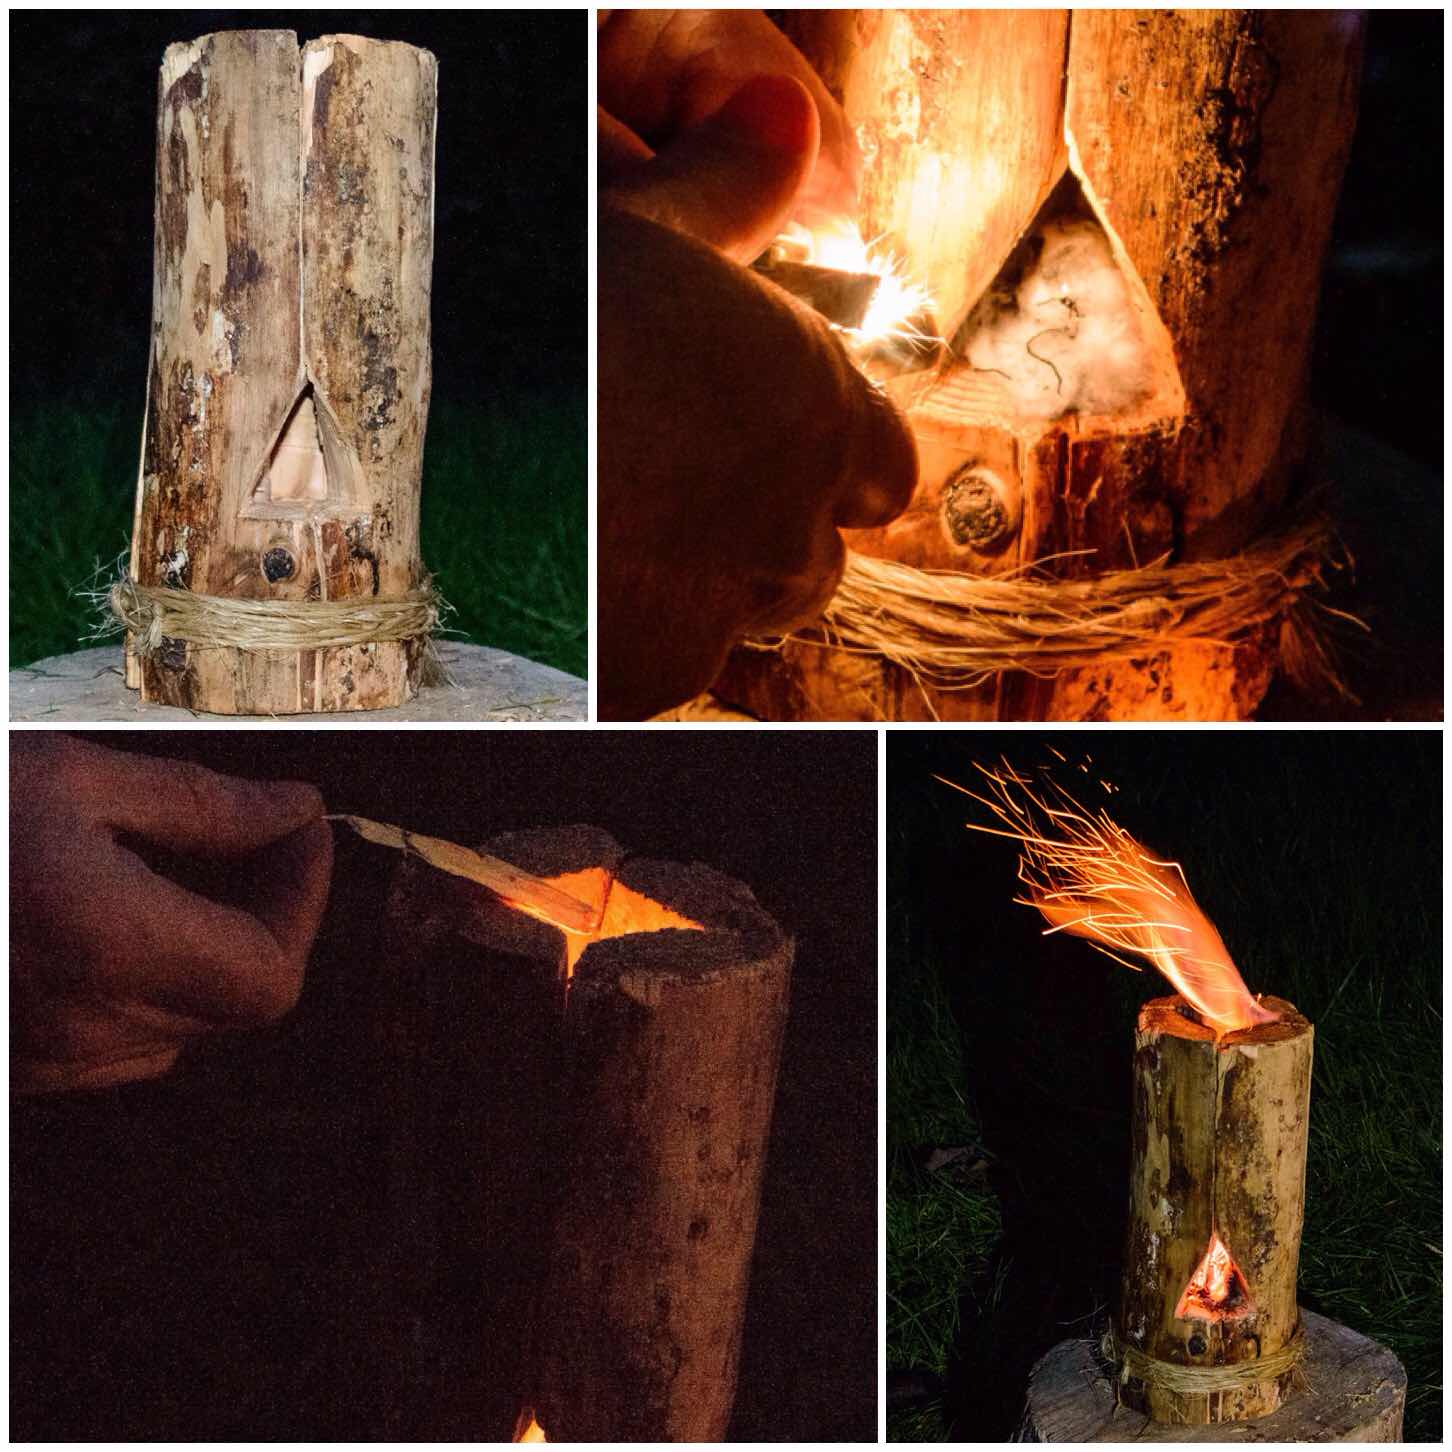
Raappanan tuli cuts
I like to increase the surface area of the inside of my chimney so as to give the initial flame from my tinder something to grab onto.
This is a technique from Finland and you can read more about it here in my post on the Raappanan tuli candle. To make the cuts place each quarter on the work surface and gently batton in cuts to the inside of the chimney. Ensure that the cuts are made so that the small split you create is travelling towards the top of the stove.
Finally collect up all the wood shavings you have created and split the larger off cut pieces down to nice small kindling.
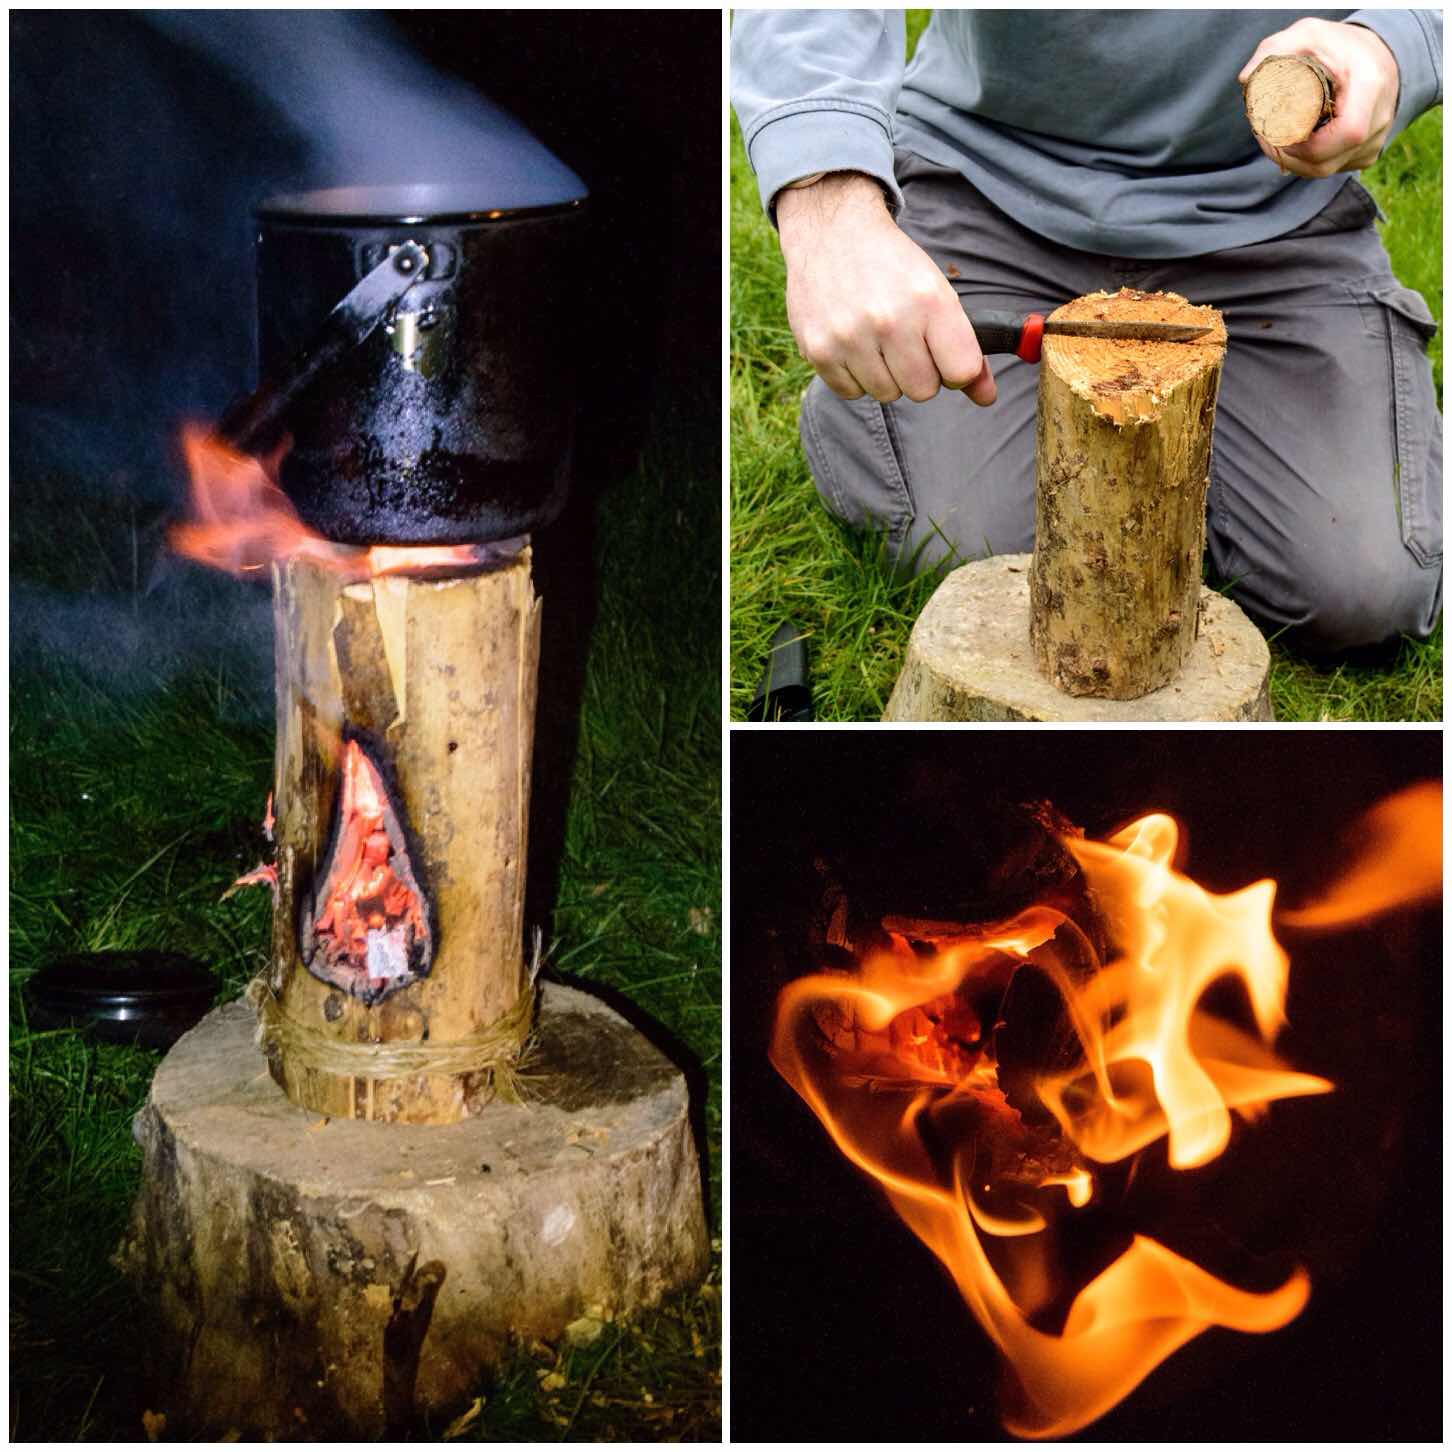
Firing the stove up
I found some old twine, thoroughly soaked it in water and then used it to tie the quarters together near the bottom.
To light the stove I used a firesteel to light some cotton wool smeared in vaseline. This gives me a burn time off about 5 minutes and as I always carry a supply in my rucksack am happy to use it. A more natural method that I like is to use birchbark and small lumps of spruce resin.
Once the cotton wool was well lit I added a few small pieces of wood in via the top of the chimney. At this stage it is important not to add too much kindling as this may block of the flow of air from the firebox to the top of the chimney. Also make sure your fingertips are not directly over the top of the chimney as you drop in the slivers of wood. Even at this early stage the heat is intense enough to cause injury.
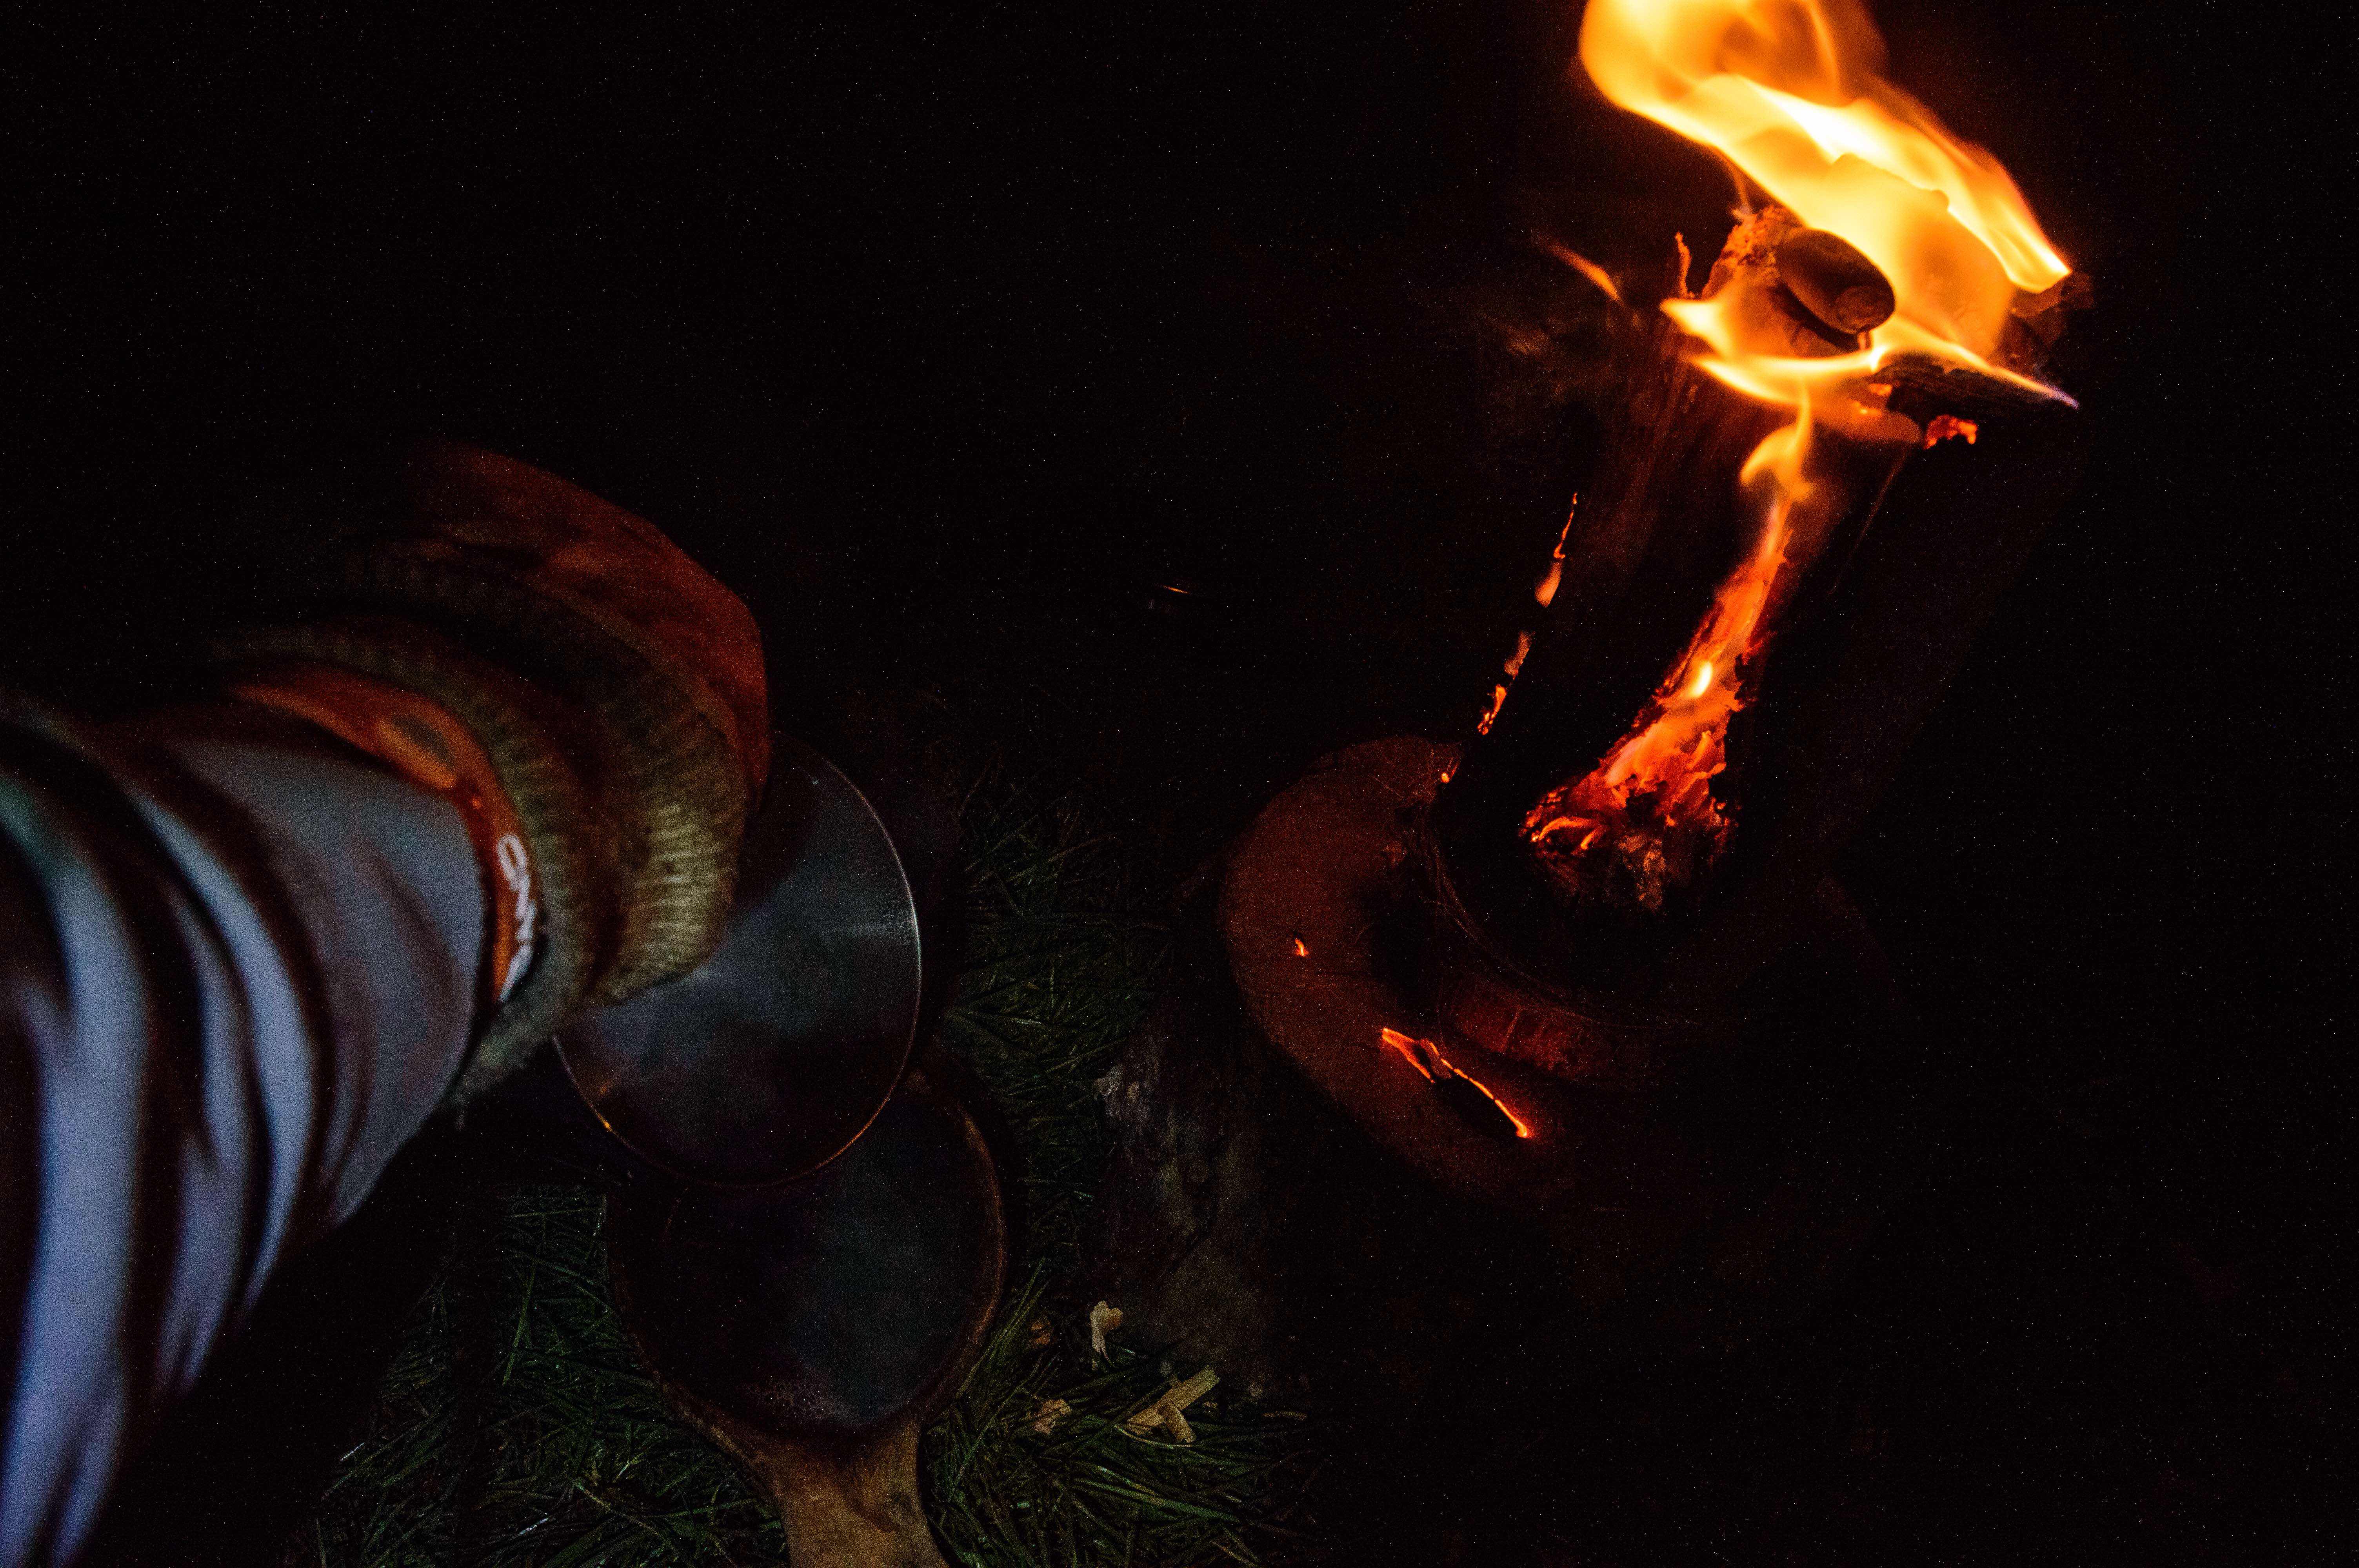
Three pebbles
I popped three flattish pebbles on the rim of the stove to act as a platform for my pot. As this is a small stove you need to keep a close eye on your pot as the water boils or the food cooks so that it does not accidentally fall over. I had this happen once before as I had left the handle of my pot up. The handle snapped back down eventually causing the pot to fall off the log.
All was well with this set up and after about 10 minutes of good heat my water was boiling. if you do not have pebbles to hand I find that 3 pieces of green wood work well instead.
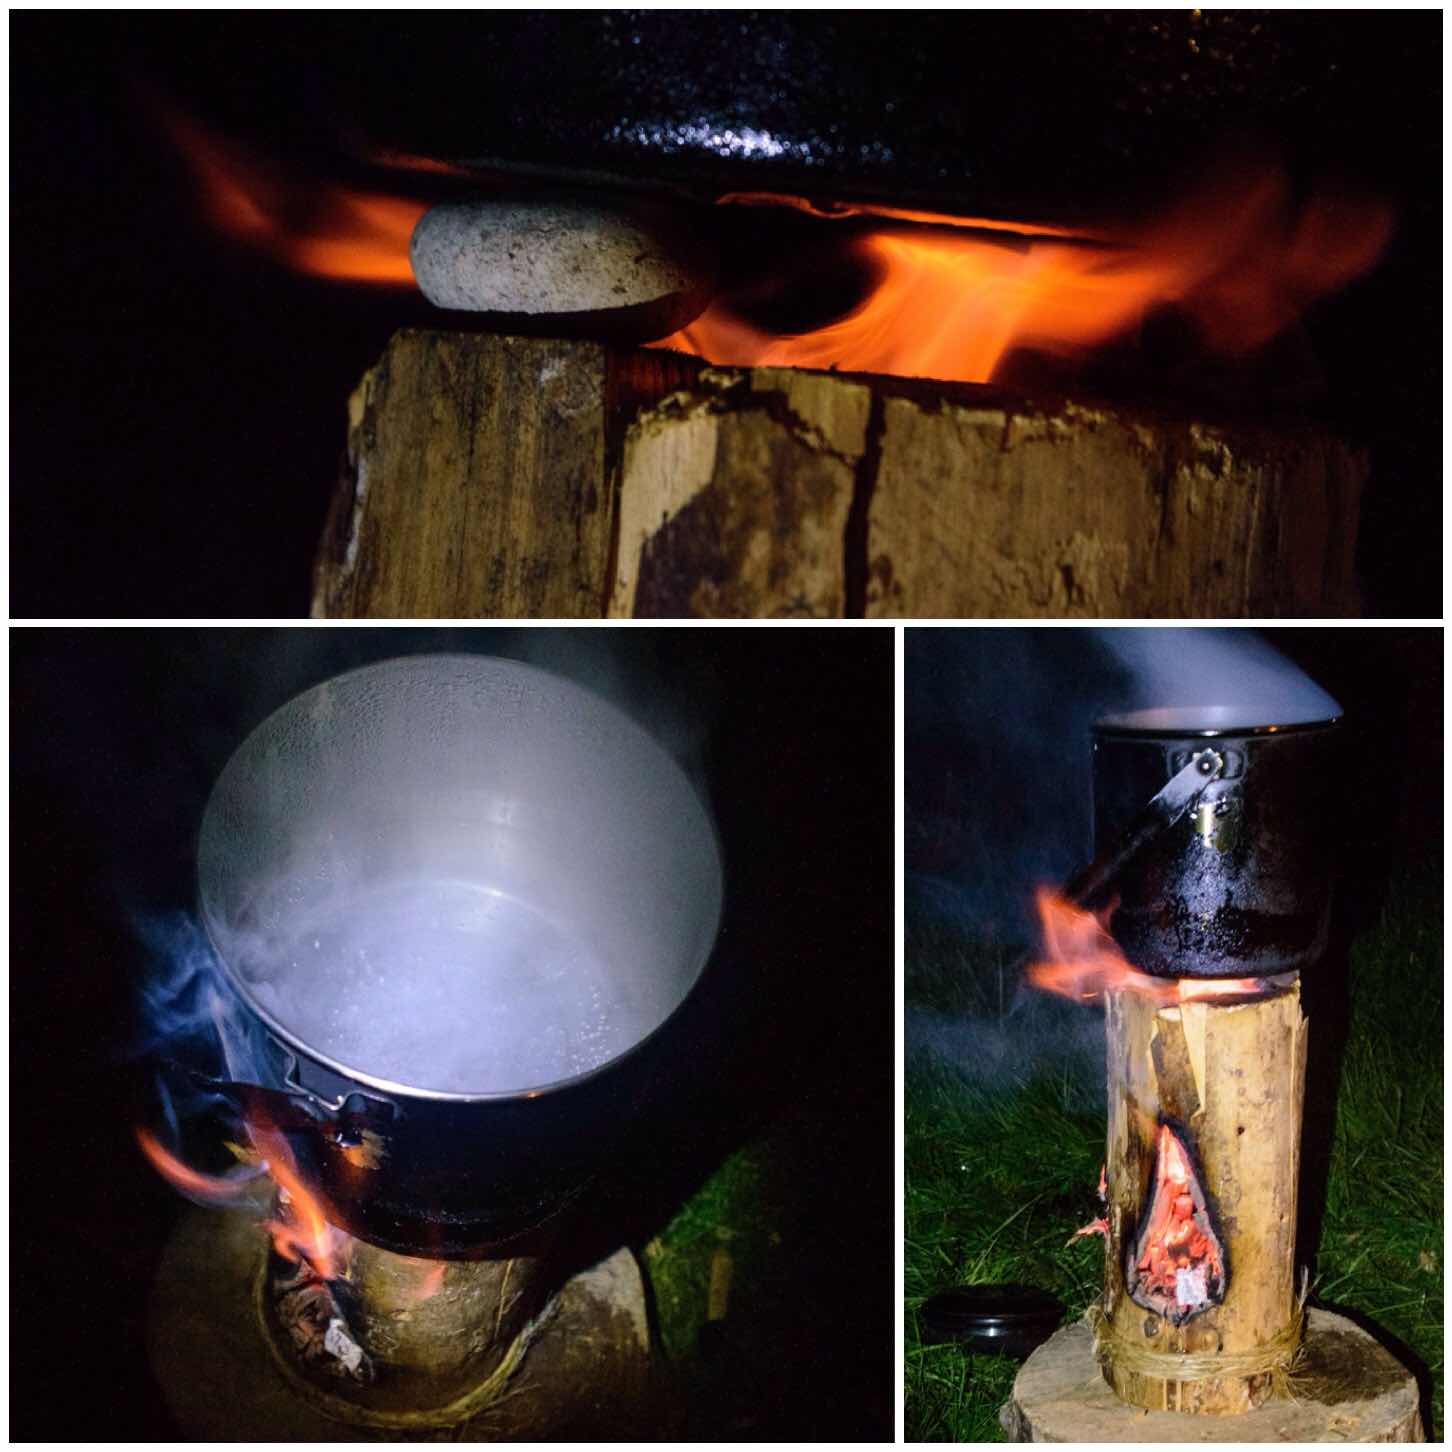
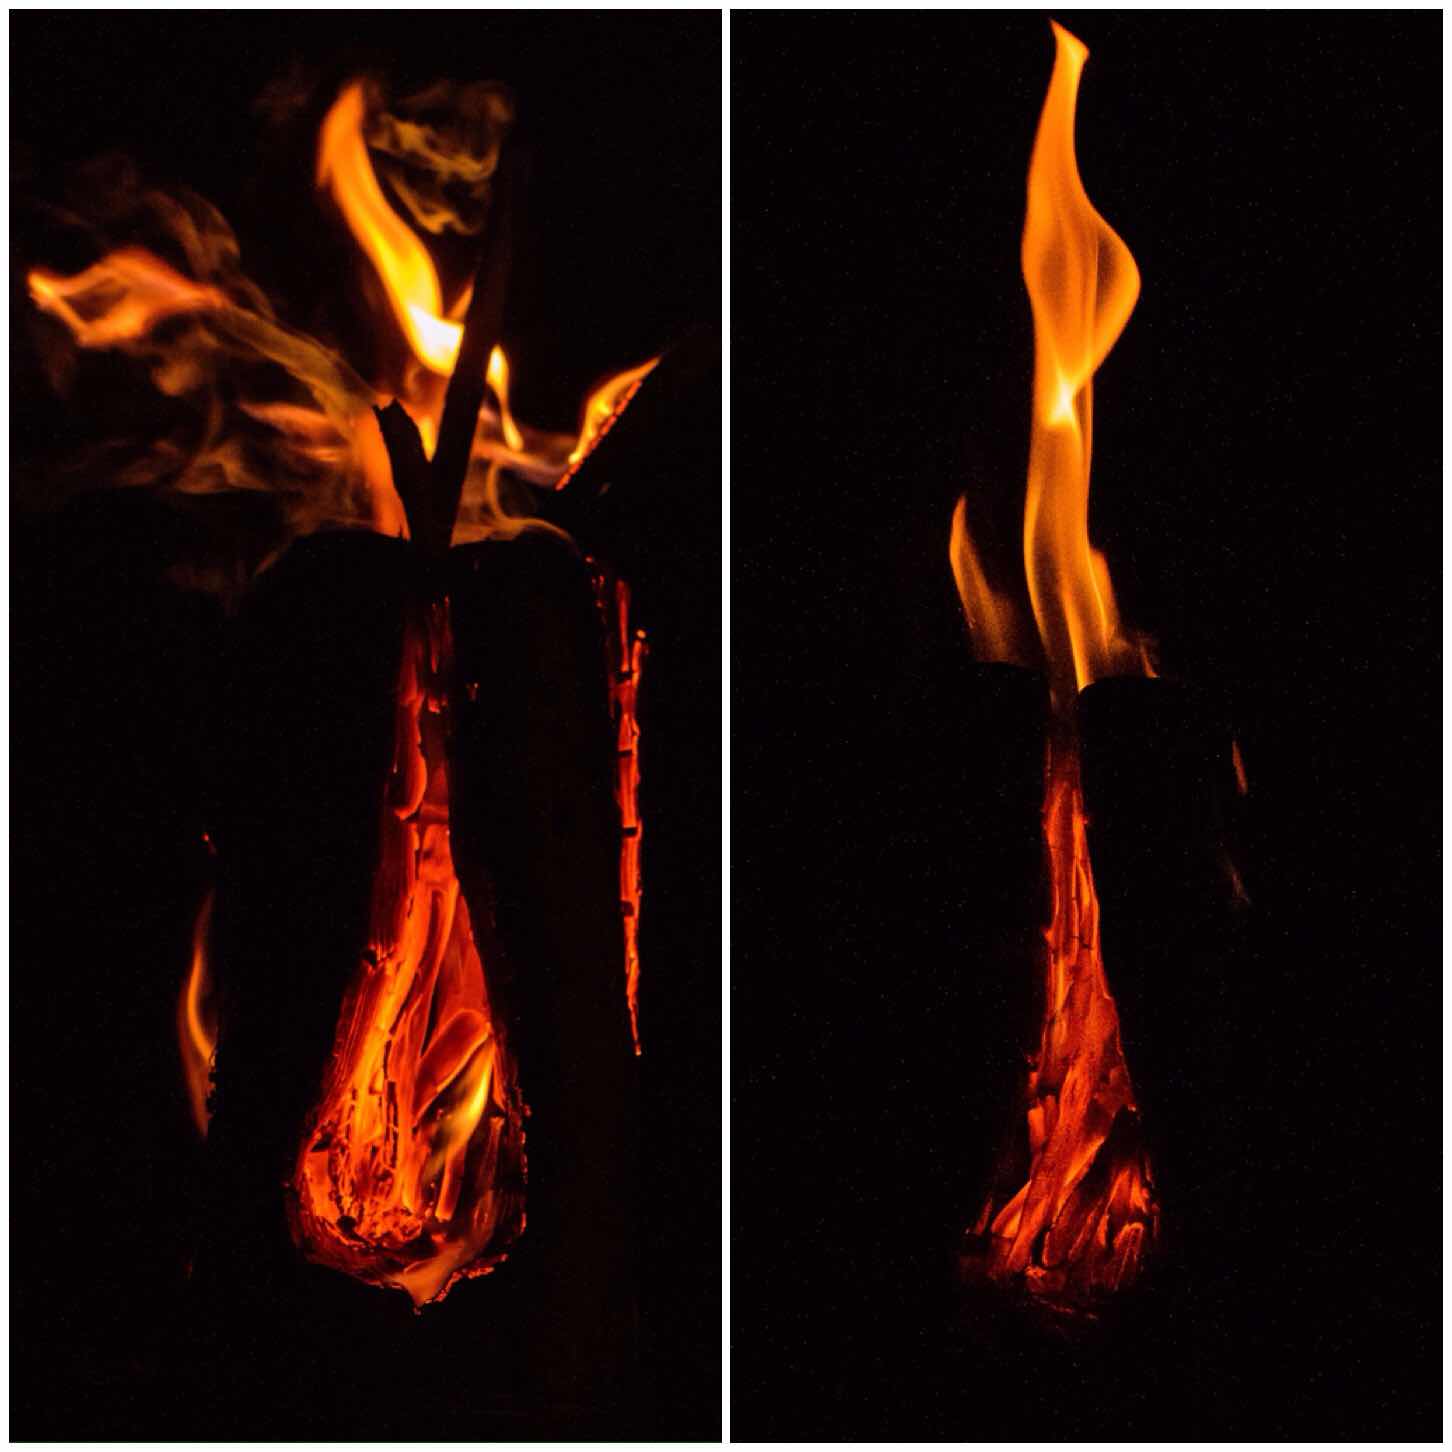
Afterwards as I was drinking my coffee the stove really came alive with some wonderful flames.
I really enjoyed making this small log rocket stove as it showed me that with a little ingenuity you can make do without an axe. It can be difficult but it is doable and a great way to test your personal skills.
Cheers
George
interesting, thanks