How To…. Make Quick and Strong Grass Rope

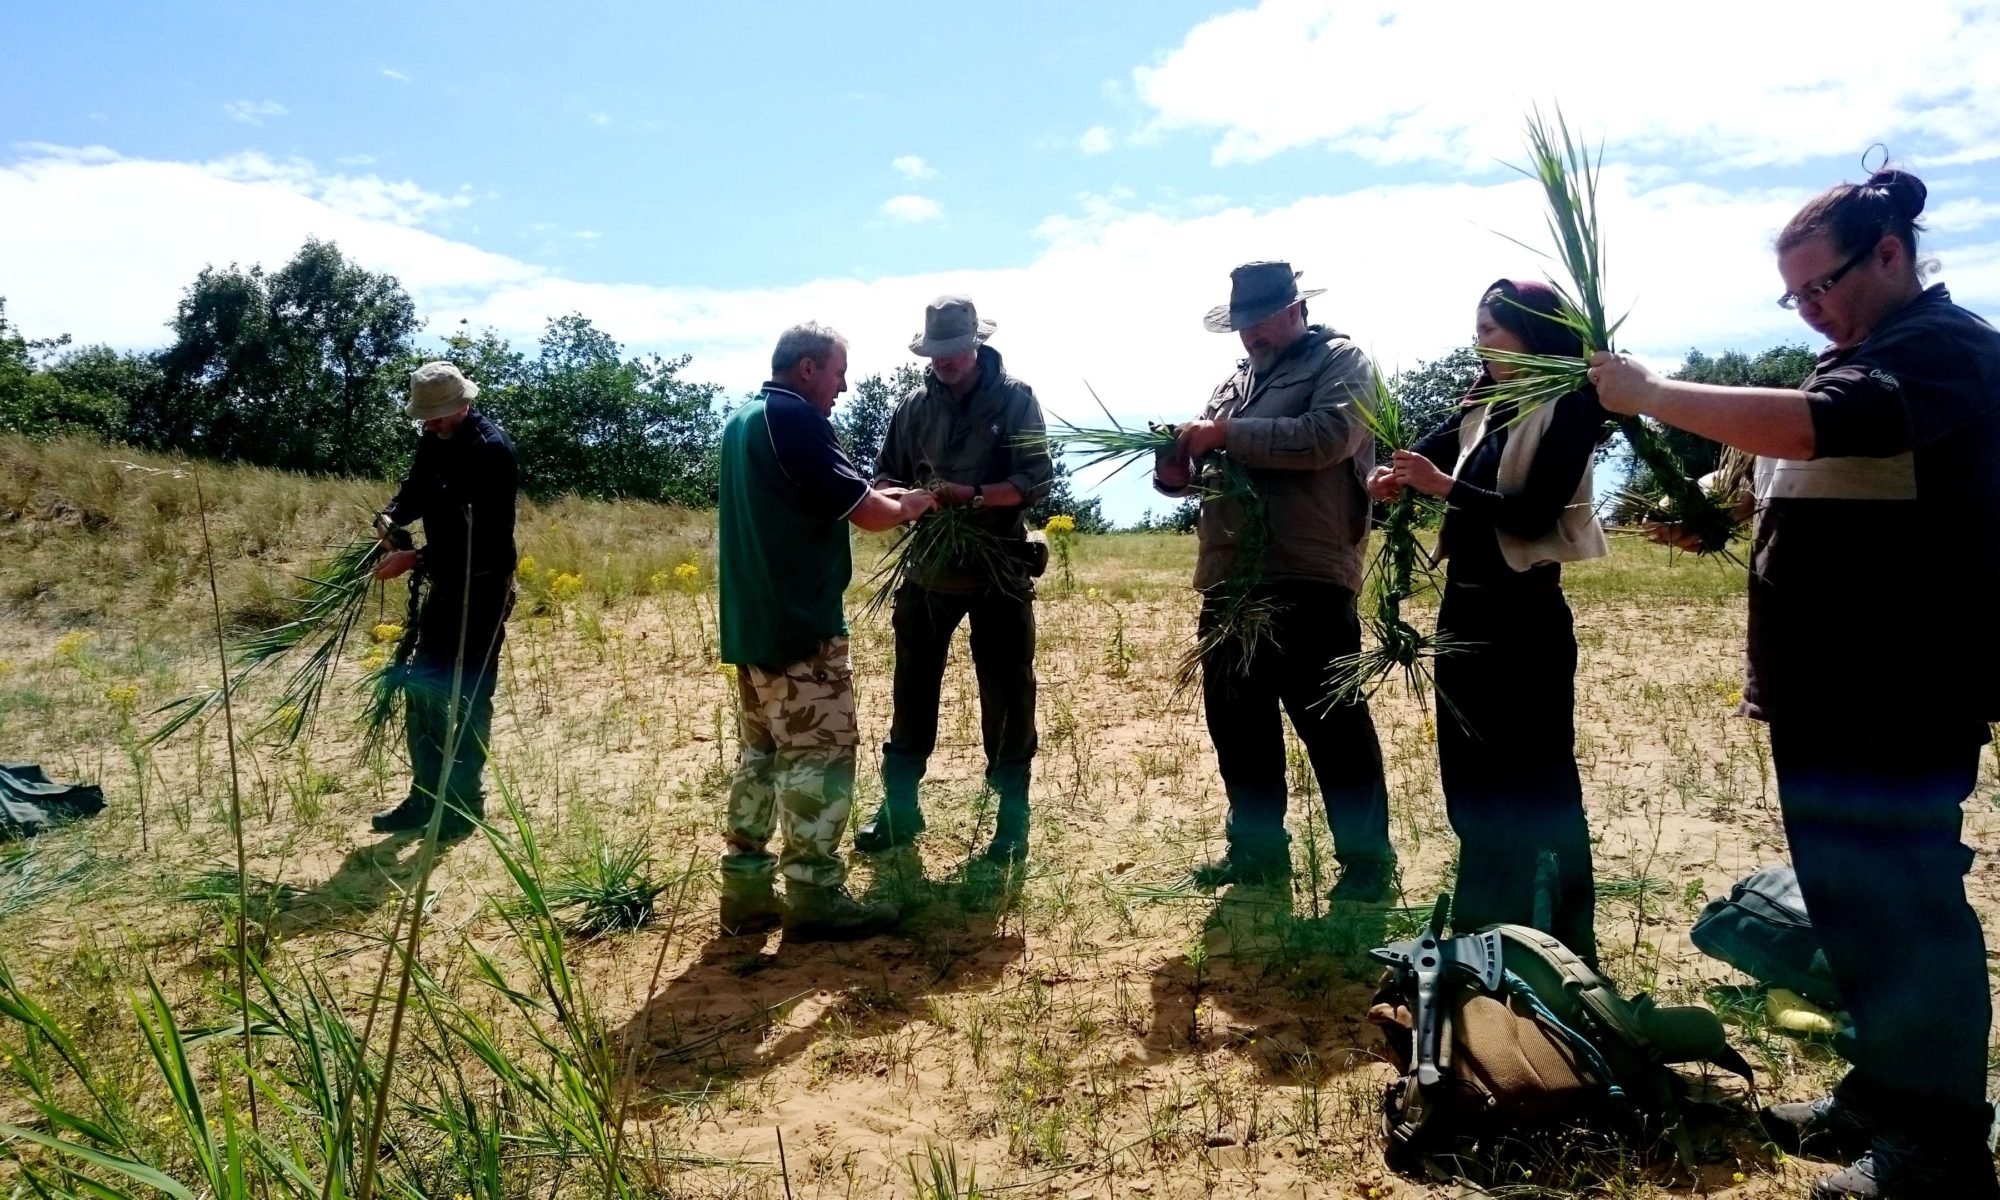
For years now I have been making rope out of various different natural materials. This has generally been a relaxing though time-consuming process for me, until Perry McGee from the National Tracking School taught me at the Bushcraft UK Bushmoot that it could be a fun and frantic process as well.

Now this may not be the prettiest, smoothest or most perfectly formed rope, but it is fast to make, strong enough for most camp jobs and can be made out of many different grasses. This is a technique that is not just for bushcrafters but for any outdoor pursuits leader (I am a Mountain Leader as well) as a way of putting a rope together in an emergency.
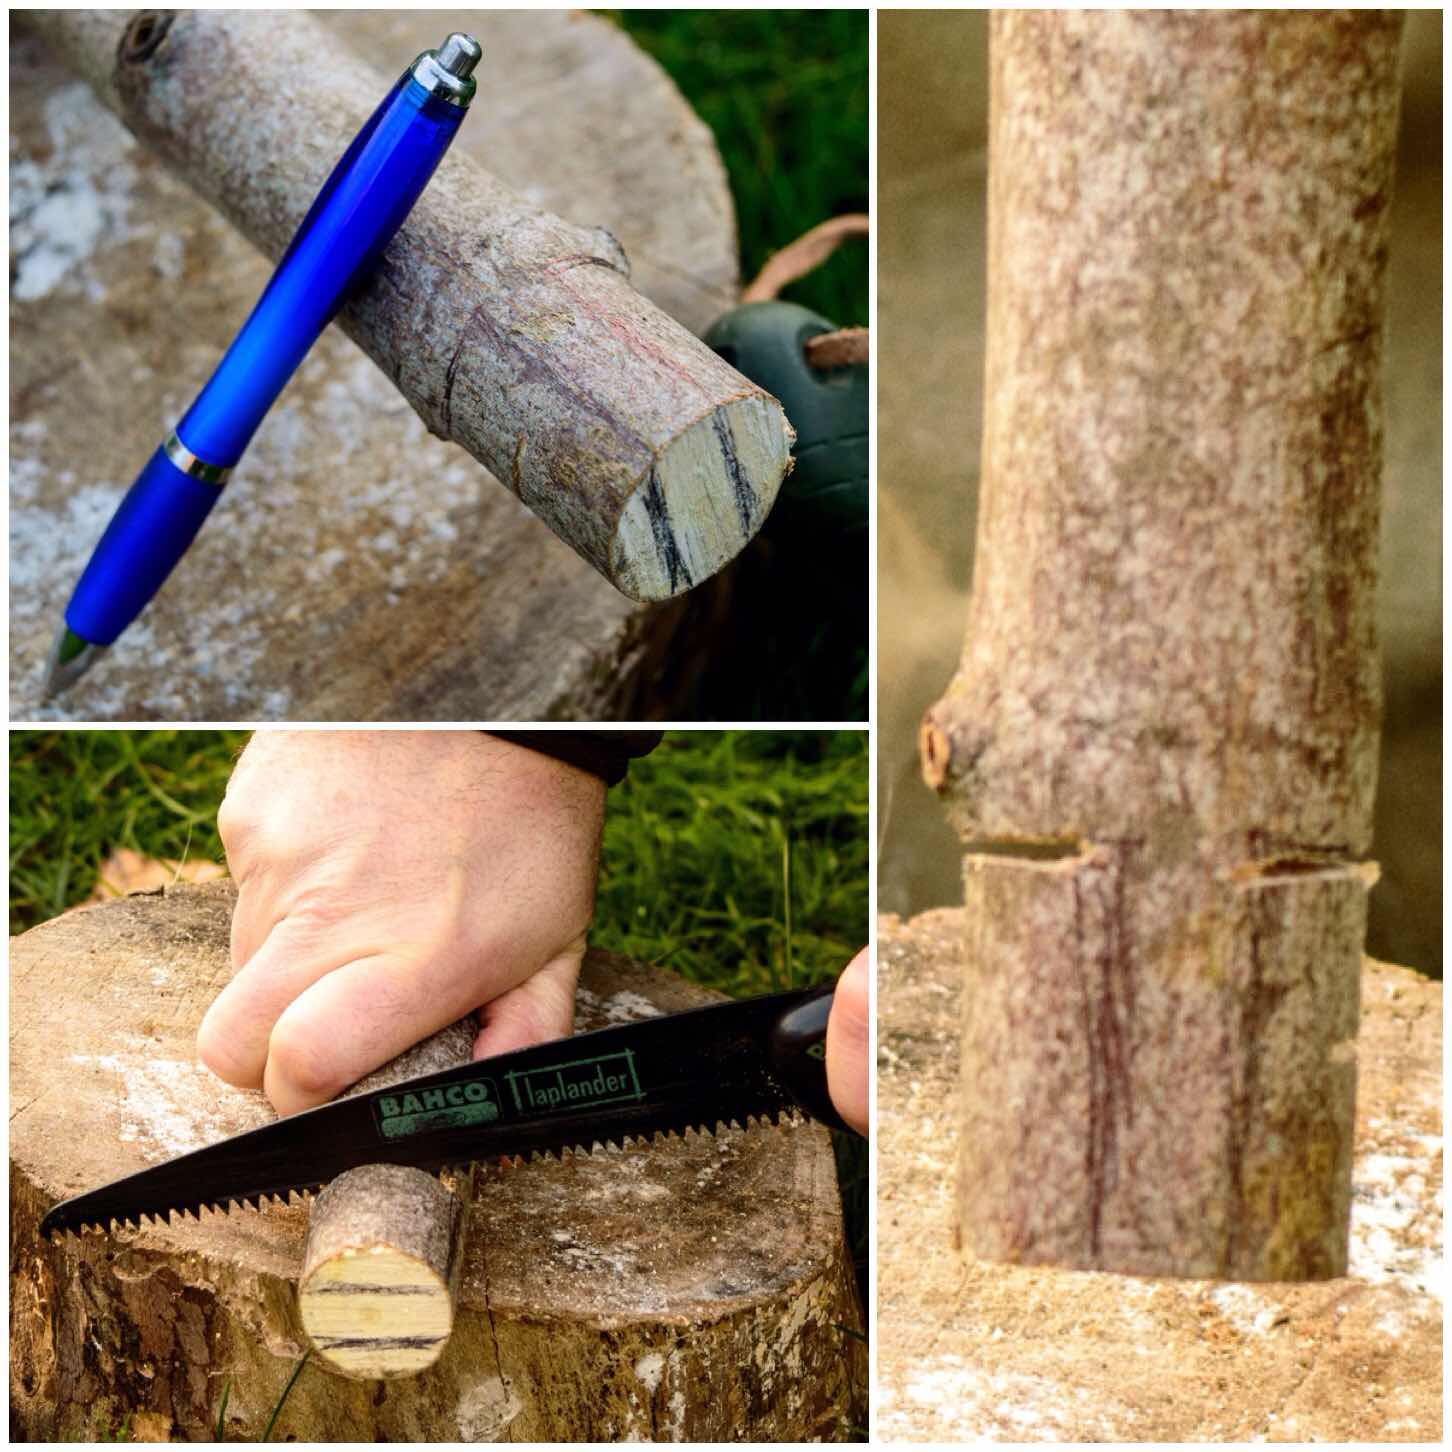
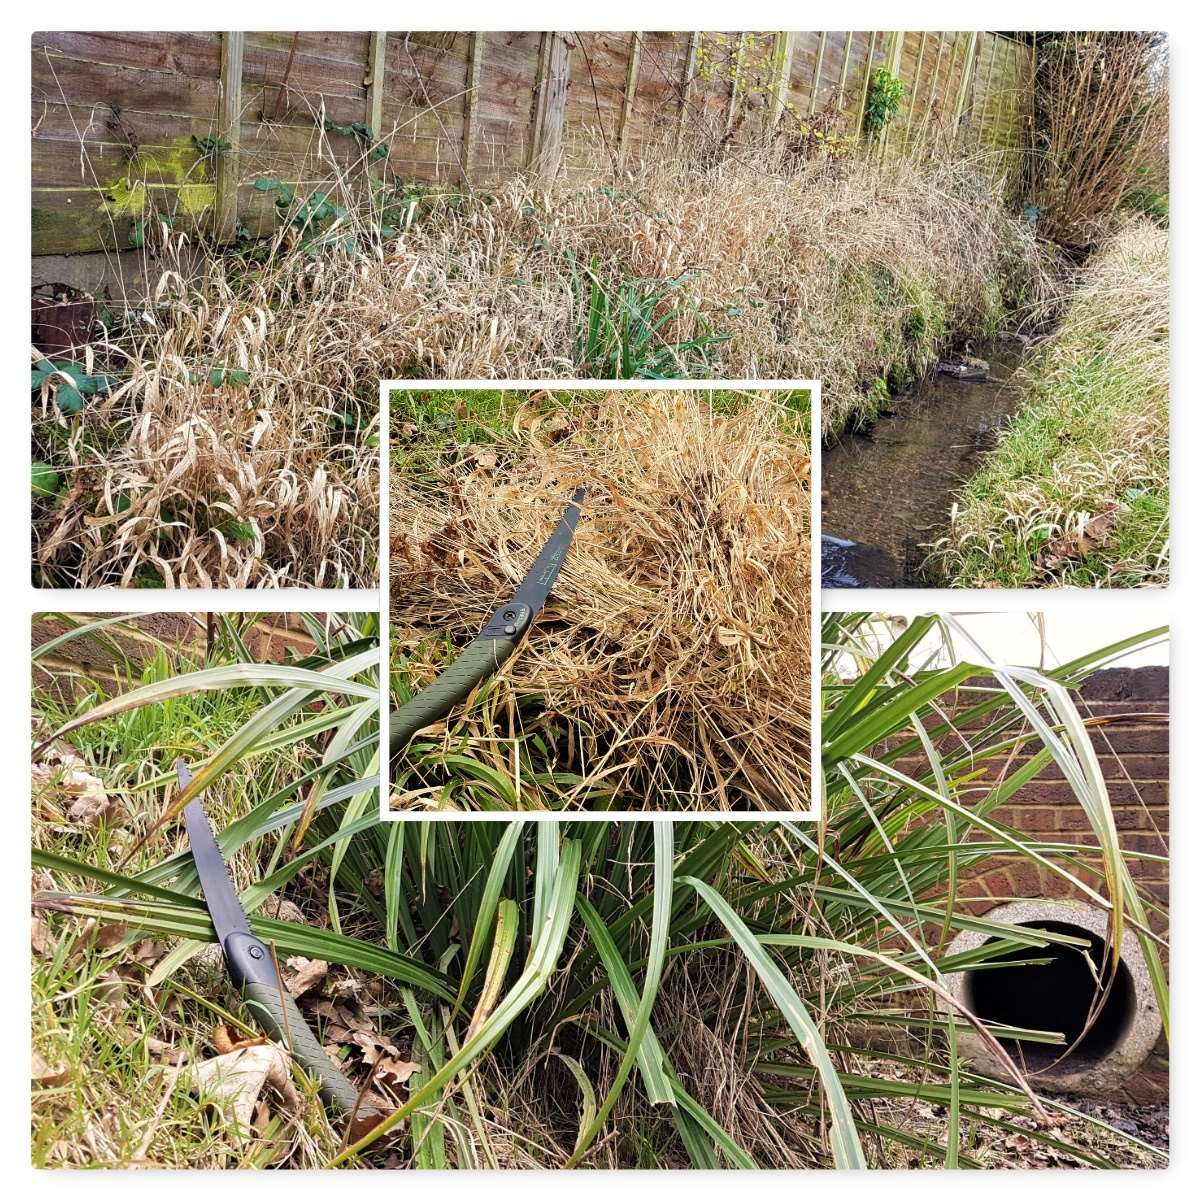
Grass Rope – Quick and Strong

Harvesting

For this blog I had a wander along a nearby stream and harvested some dead grasses and some leaves from a Pendulous sedge. To harvest the grasses I would advise you to wear gloves and use something like a Laplander saw to cut the grass.

Gloves are useful to protect you from hidden brambles etc and also because you can easily slice your fingers open on some grasses. I do not use a knife as I find grass quickly blunts its edge, so instead I hold the grass firmly half way along its length and sweep the base of it with the saw before pulling the grass away. Pulling grass straight out of the ground with bare hands will eventually lead to cuts on the inside of your fingers.
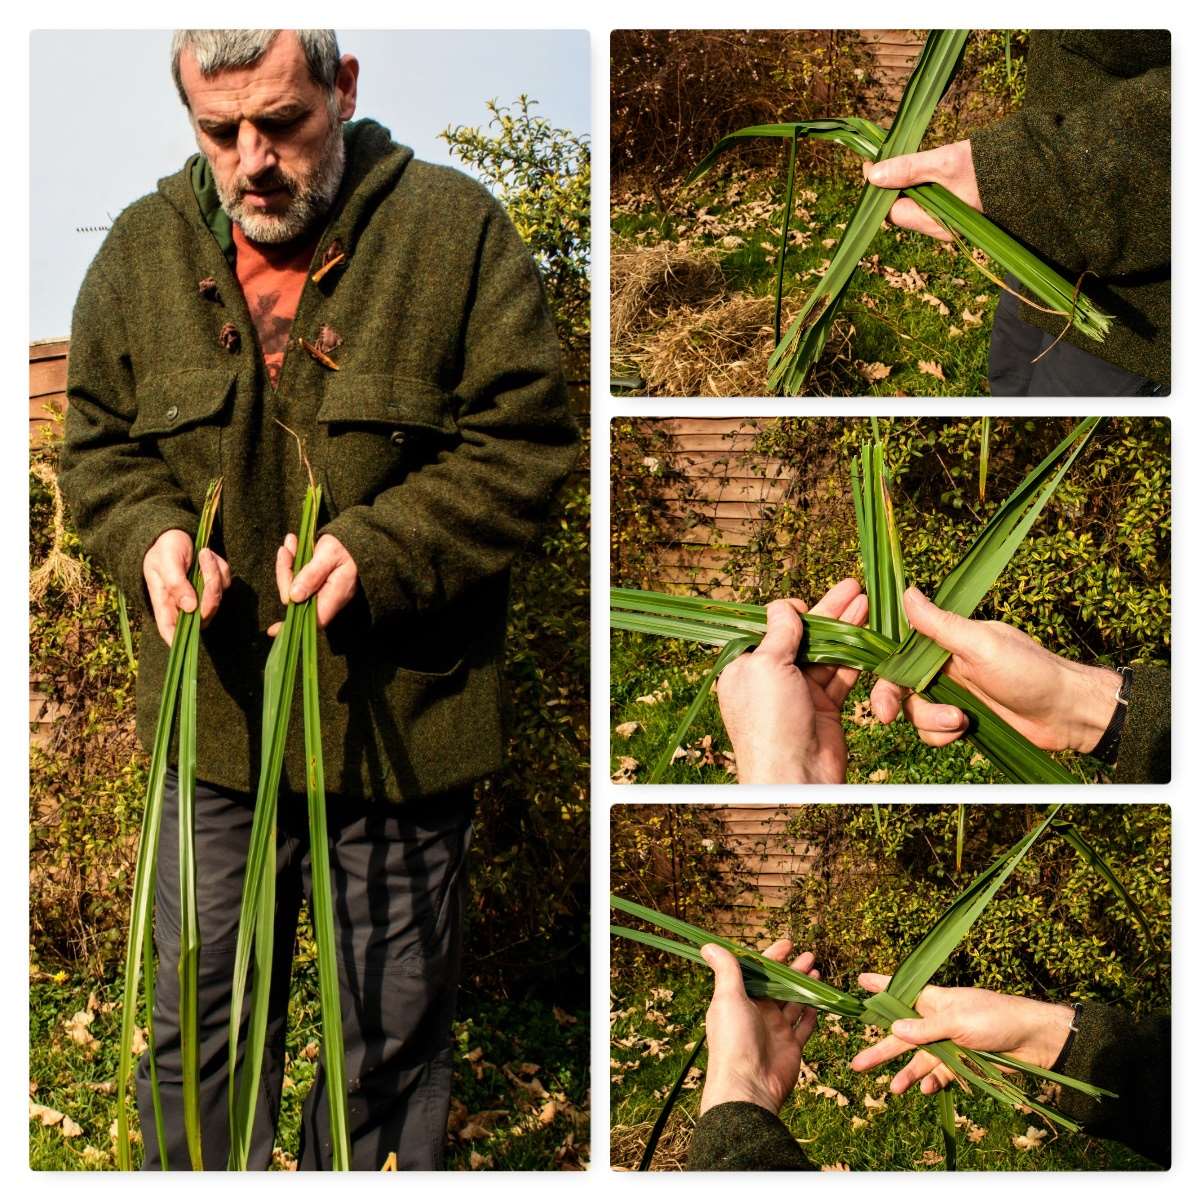
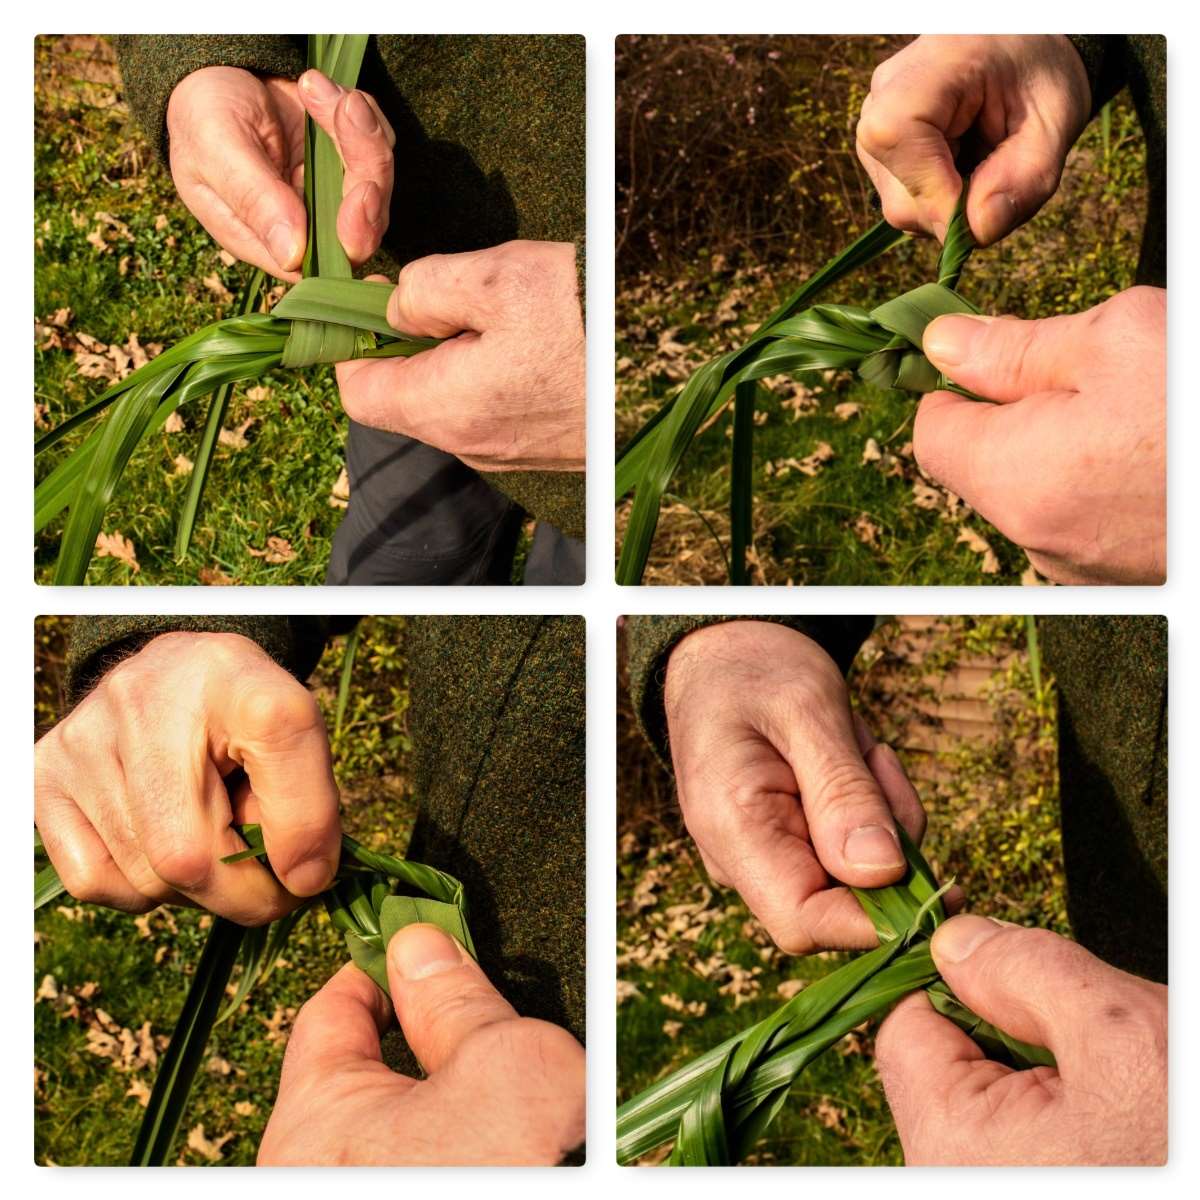
Harvesting

The X and Y start

To start your rope off begin with two evenly thick strands (this thickness will determine the overall thickness of your rope). I vary the individual lengths of the grass within each strand so that as it thins out and I add in more grass later the joins will be staggered (this will make a stronger rope).

Form the X first (the ends of the grass nearest to me are called the standing ends) close to the standing end and then wrap one of the standing ends under the other strand, back through the middle, and join it to the other standing end to form the Y shape. You can see all the steps below.

X and Y

Laying in the rope

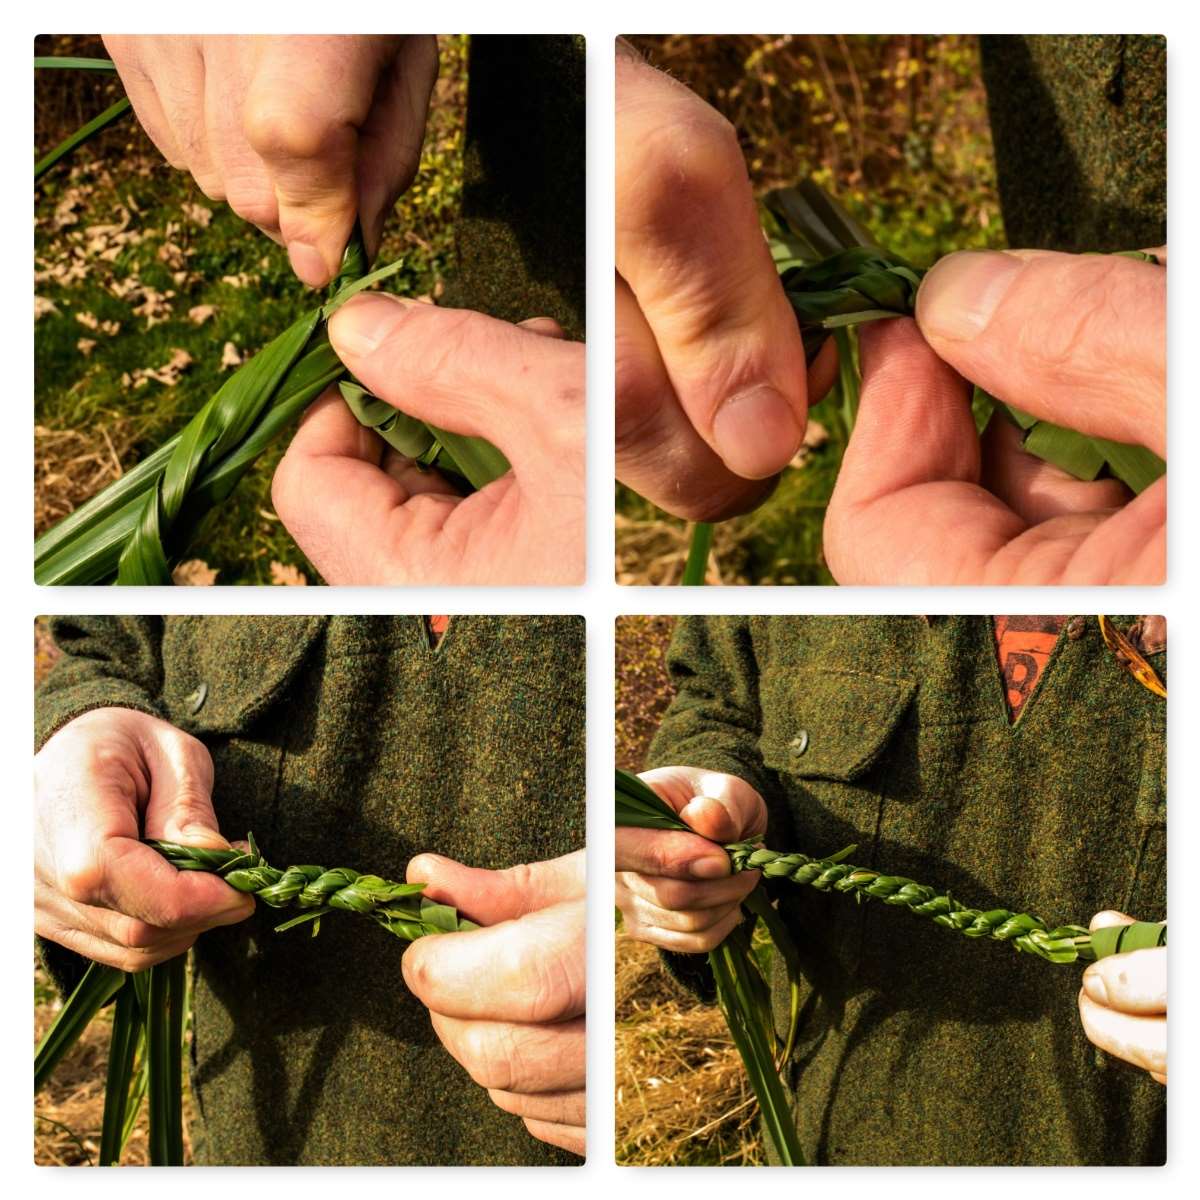
In the pictures below I am holding both the standing ends in my left hand (on the right in the picture) and twisting the strand closest to me a couple of times towards myself.

Keeping the tension on the twist, I then turn the newly twisted strand away from me over the top of the other strand and clamp it in place with my left thumb (I have added a video at the end of the post to show you this in more detail). Once done this means the other strand will be closest to me, and it’s simply a case of repeating the process of twisting the closest strand towards me a couple of times, then turning it away from me over the top of the other strand and carrying on.

Twist and Turn

It does not take long to start forming the rope but you do have to be careful when using whole pieces of grass as you can easily cut yourself. The rope made from this fresh grass will be perfectly usable in the short term however as it dries out and shrinks the strands will loosen.

If I had wanted to make rope for long-term use I would have stored the harvested grass until it had dried out and then re-wetted it before making the rope. This would mean the rope would not shrink and loosen afterwards.
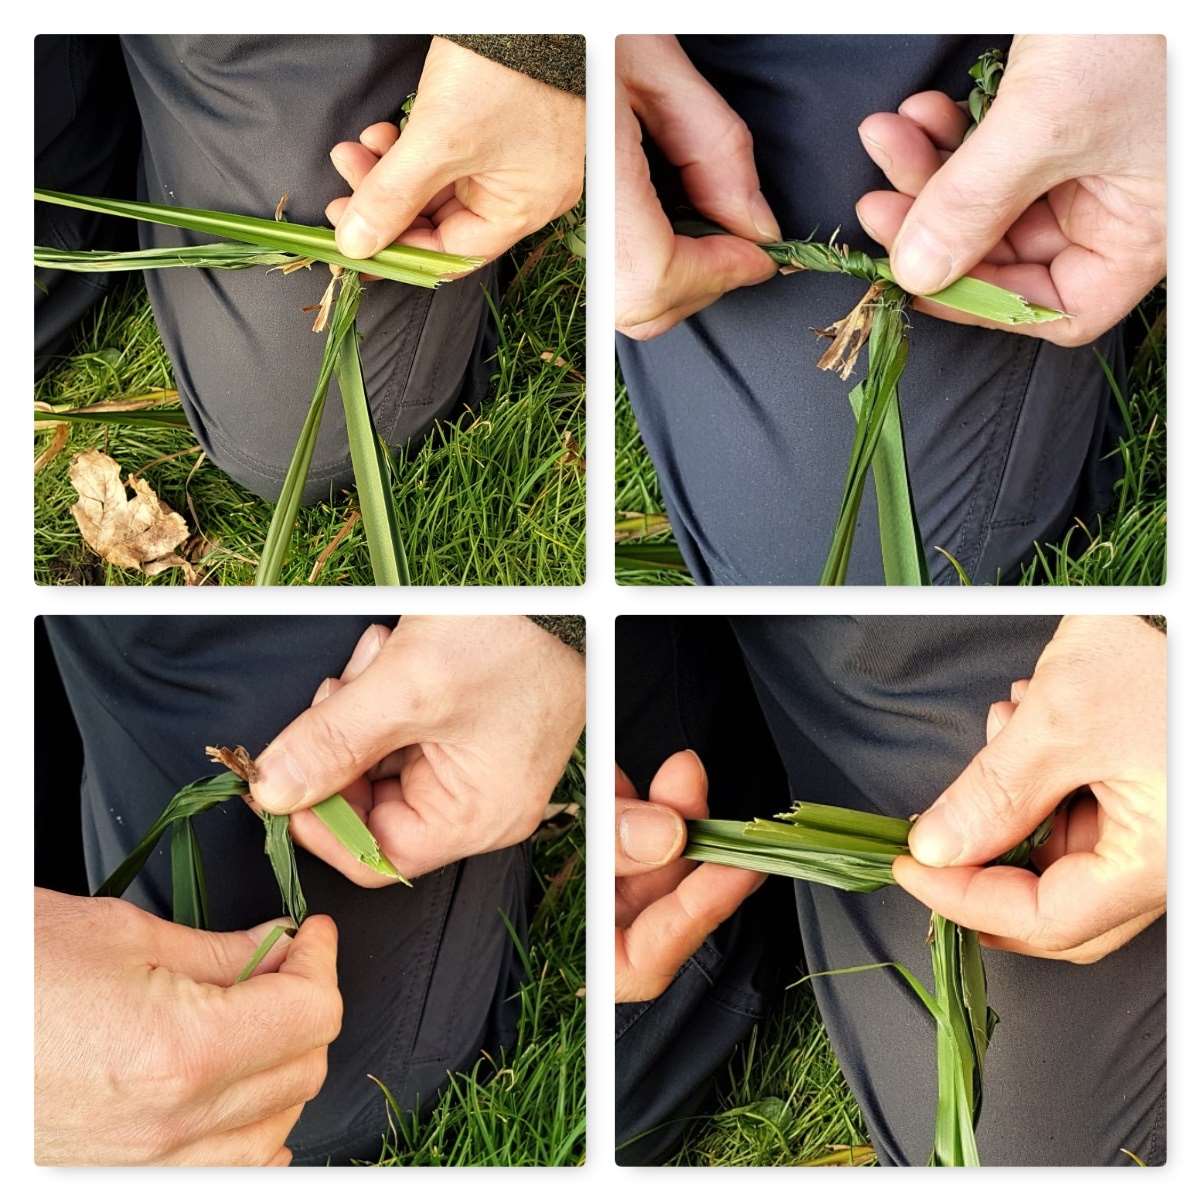
Pinch and repeat

Adding more grass

Eventually one of the strands will start to get thinner. It is at this point you will need to add in more grass. I lay a fresh piece of grass into the strand that is thinning out with the short end sticking out by a couple of centimetres. After twisting and laying in the strand as normal I twist the small piece sticking out back and incorporate it into the other strand.

Every time a strand starts to thin out I add another piece of grass in this way.

Laying in new strands

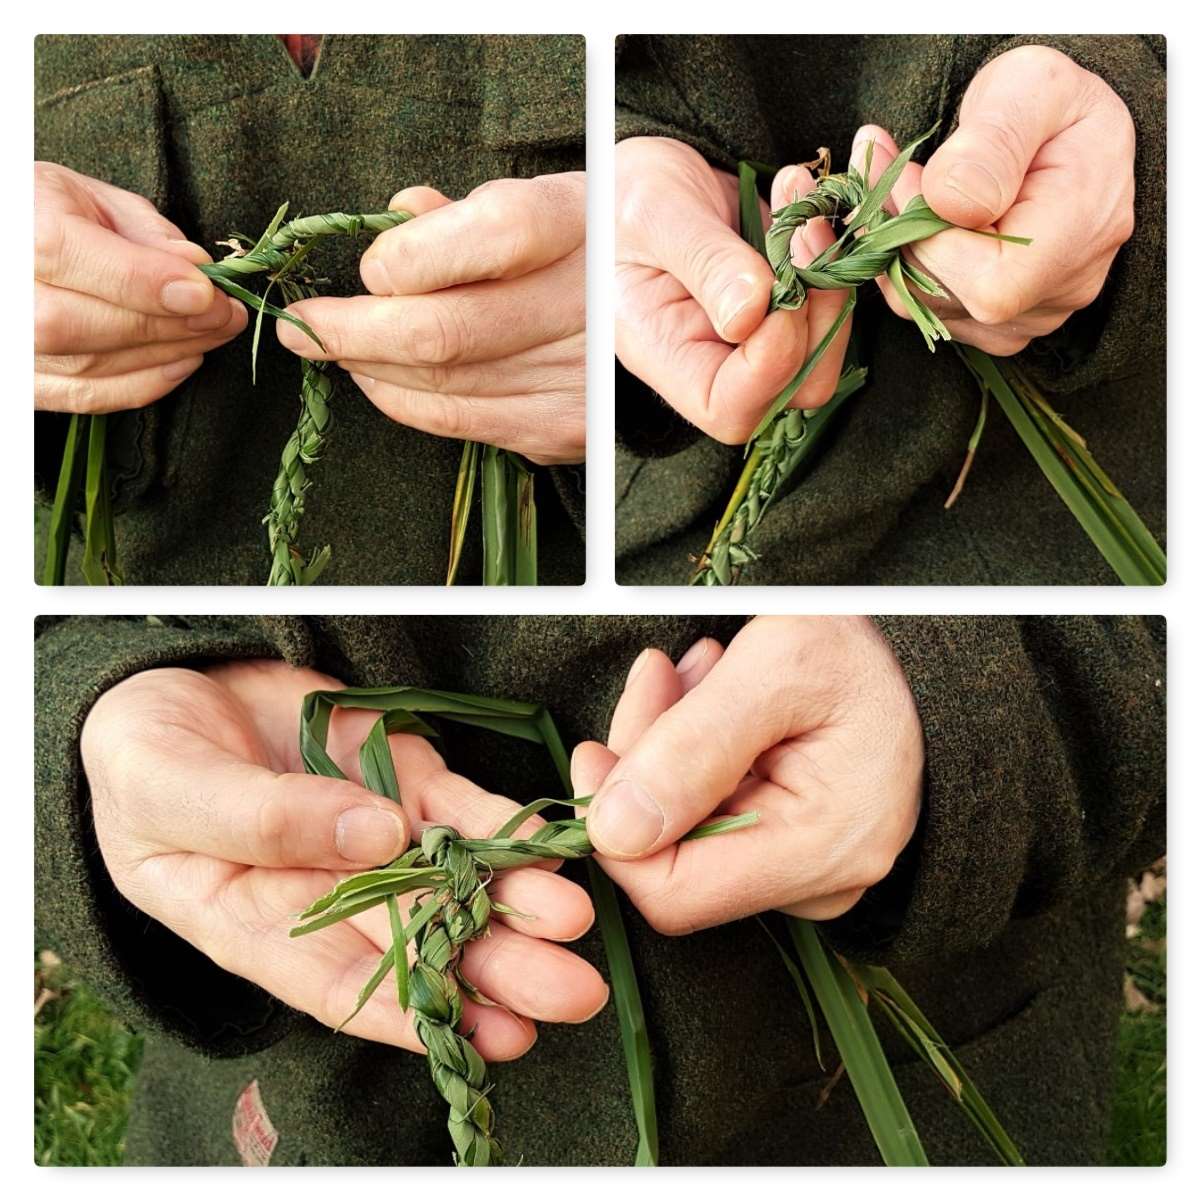
Once I have finished the rope to the length I want I finish the end of by twisting the two strands tightly and tie it off with an overhand knot.

To finish you can trim off any pieces of grass that are sticking out with a knife if you want to tidy it up.

Finishing Off

Uses

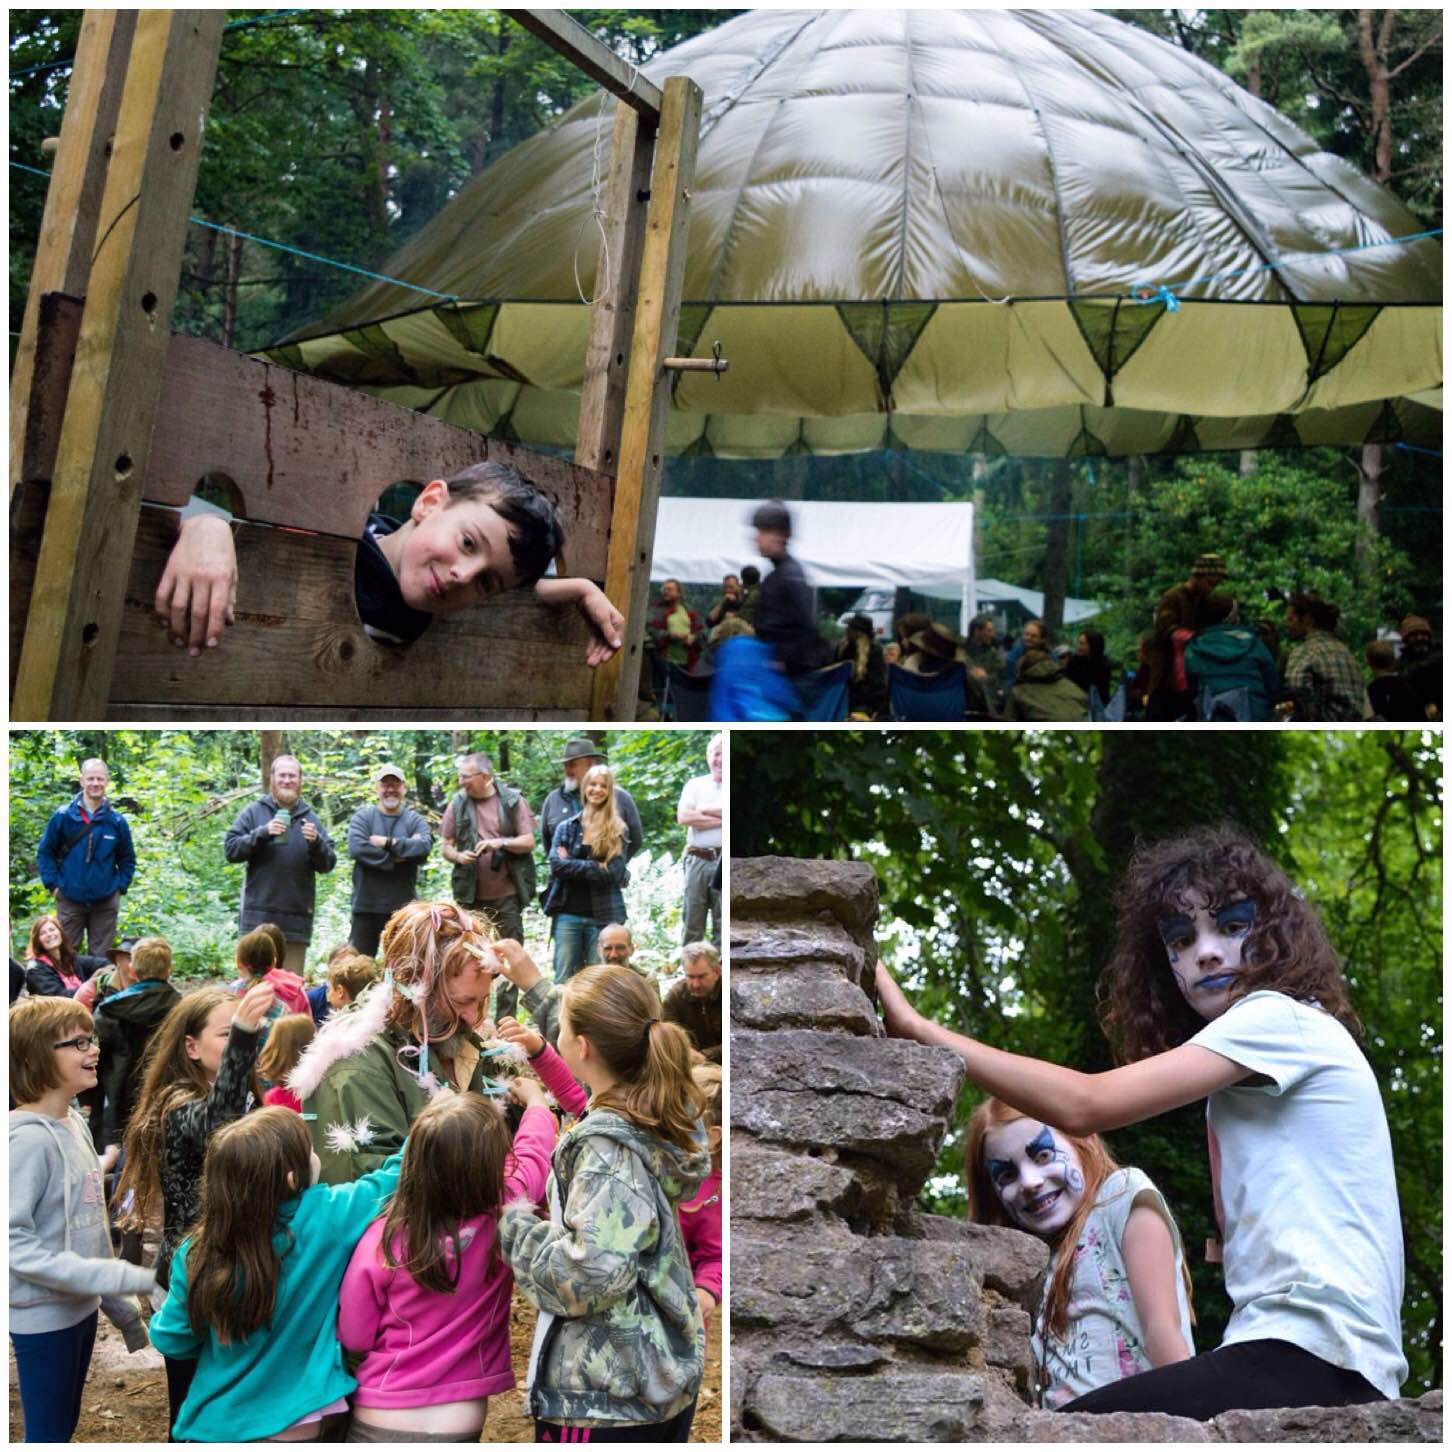
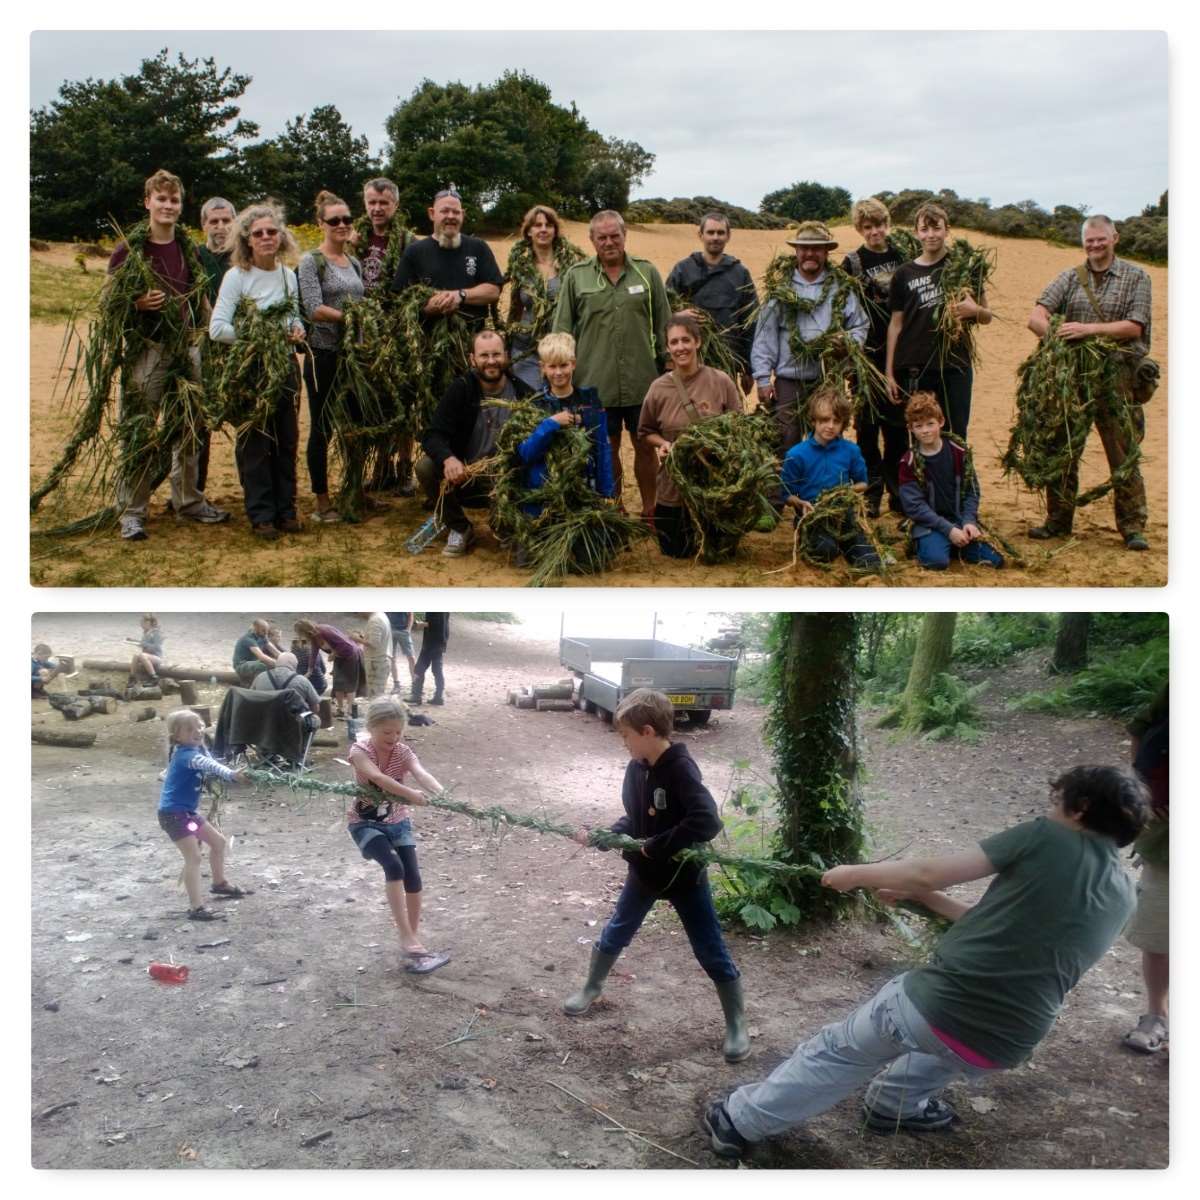
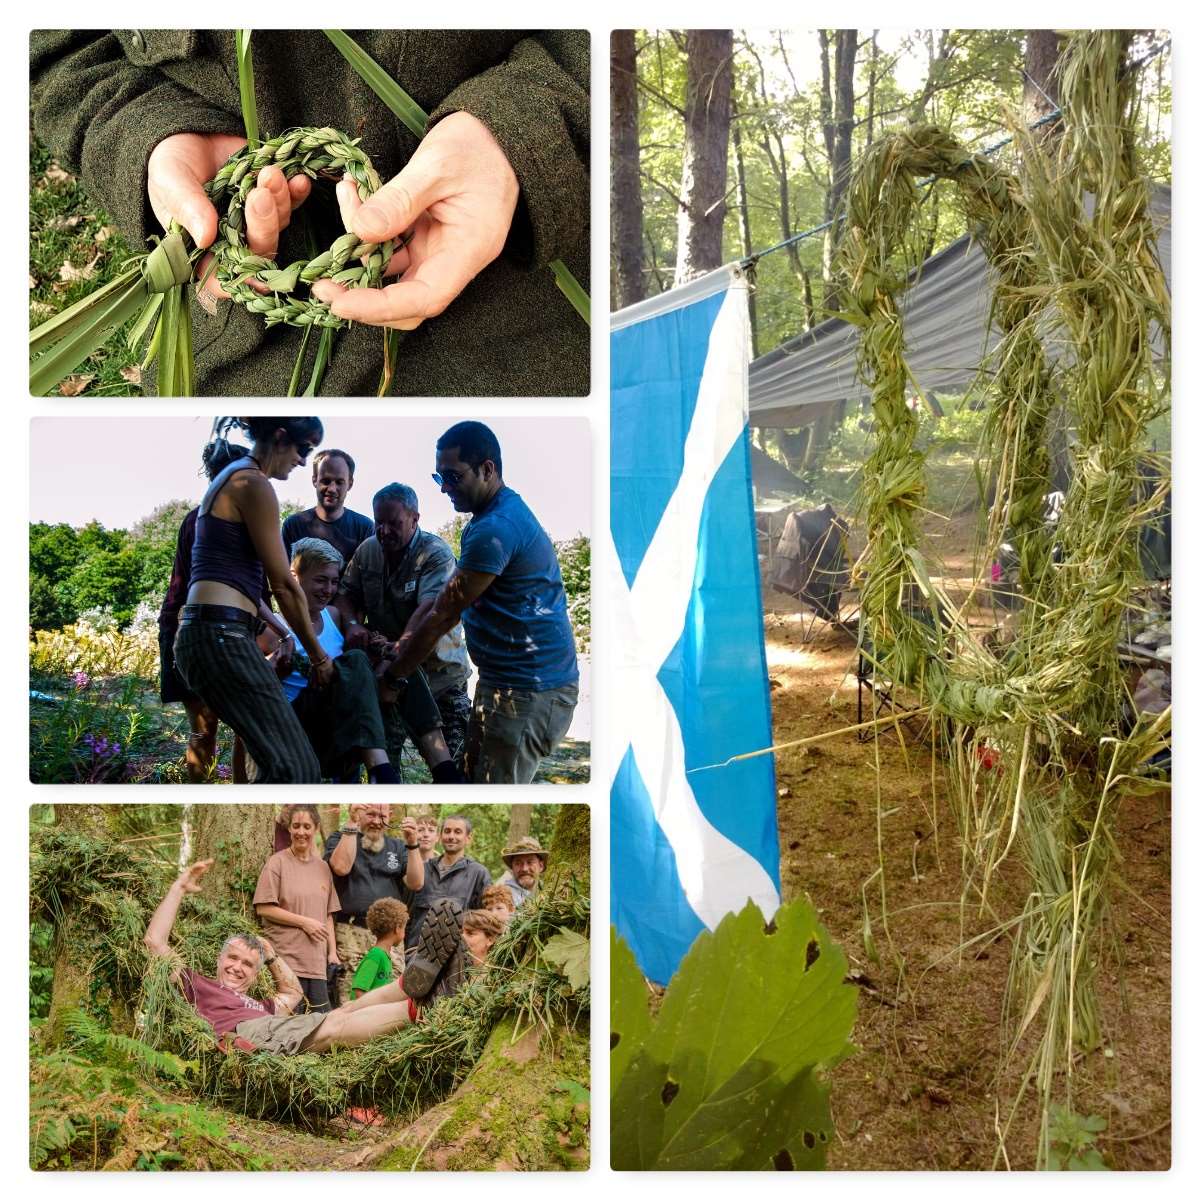
Perry insists that students on his tracking courses should be able to make thick coils of rope the length of their body in about a minute. I have a bit to go to be able to do that but as you can see below the rope – whether it is thin or thick – can be used for many purposes.

You can evacuate a casualty, construct a hammock, make coil baskets or even a great tug of war rope to keep the kids (of all ages) happy.

Many Uses

As the steps can be a little hard to follow with just pictures I put this short video together to show you the process in action.

Have fun, and I’d love to see pictures of the rope you make!

Cheers now.

George


How To…. Build a Dovetail Log Rocket Stove

In my continuing research into Log Rocket Stoves I came across a Wikipedia page called the Schwedenfeuer and in it details of a type of log rocket stove I had not come across before, with a built-in fire tray and a chimney formed by simply cutting away the inner corner of one section.

Clever though it was, though, this stove still relied on string or wire to tie the sections together. As these stoves have been around for a long time I figured there must be other ways of holding them all together. I thought perhaps that green wood dovetail wedges might do the job, so I set out to test this.

Photo 13-03-2016, 07 35 28
The Dovetail Log Rocket Stove

Tools and Material

As usual I limited myself to the tools I would usually carry in my backpack, including a knife, saw and axe. A pen or pencil is handy for this project as well.

I’ve had a piece of birch stored in my garage for over a year however it had absorbed moisture over the winter and was fairly damp in its core.

Photo 13-03-2016, 07 35 28 (1)
Tools

Splitting Out

This style of log rocket requires you to put a stop cut into the bottom of the log to about two thirds of its width. You can see in the top left picture below the cut is about 10 to 15 cms from what will be the bottom of the stove.

The top right picture below shoes you how far I put my stop cut into the log. The bottom two pictures show me marking out with my saw the approximate area I would be battoning out.

Photo 13-03-2016, 07 35 30
Bottom cut and marking out

I used my axe and a large piece of wood to batton out the the wood. You can see the shape of the stove at this stage with one segment in an inverted ‘L’ shape (Segment 1) and a smaller piece (Segment 2).

The bottom two photos show me marking out the smaller piece for further splitting. This piece is not split exactly in two as this configuration allows you to form the chimney very quickly.

Photo 13-03-2016, 07 35 30 (1)
Splitting

The Chimney

Below you can see the shape of all the pieces when they are put back together . I then battoned off the tip of the larger piece from Segment 2  so that a chimney would be formed. This piece of battoned-out wood I further split into fine pieces to act as kindling for the stove.

Photo 13-03-2016, 07 35 31
The One Cut Chimney

Once I had the chimney battoned out I trimmed off some excess wood from Segment 1 and then used a pencil to mark out the chimney area.

I did this so I could put some Raappanan tuli cuts into the chimney area. It is important to keep the sections of the log rocket that join together as smooth as possible for a good fit so marking out the chimney area ensures I do not cut into the wrong area.

Photo 13-03-2016, 07 35 42
Trimming & Marking out the chimney

The Raappanan tuli cuts are fairly simple to make with my axe. I just ensured I cut only into the wood in the chimney area and that the cuts were made upwards, towards the top of the chimney.

These cuts are particularly helpful when using damp wood as it offers far more surface area to the initial flame, allowing it to catch more quickly, and also it helps to dry the damp wood out.

Photo 13-03-2016, 07 35 33
Raappanan tuli cuts

The Firebox

The next stage I worked on was the firebox opening. This can be done in a number of different way however I elected to go for a triangular opening.

I formed the opening by cutting a small triangle at the base of both pieces from Segment 2. I also tapered the inside of the cuts to open the firebox up a bit. I made this firebox slightly larger than normal as the wood was very damp. My thought was that the extra air intake would help to keep the fire going at the start before the insides of the stove became fully lit.

Photo 13-03-2016, 07 35 33 (1)
The firebox opening

The Dovetail Joints

These joints were a total experiment. I put all the pieces together again and, holding them tightly, sawed a line to the depth of a centimetre across two of the joints. (I recommend you use some string or maybe a belt to hold everything together as you make the cuts – I didn’t and I wished I had.)

I then did the same cut but flared my saw out slightly (about 45 degrees) to the same depth. I then repeated the cut with the saw flared out 45 degrees in the opposite direction to the original cut to the same depth (there will be a picture of the cut further down the post).

Once that was done I used my saw like a rasp to carve out all the excess wood to form what is called the dovetail ‘Tail’.

Photo 13-03-2016, 07 35 34
Cutting out the ‘Tails’

Below you can see this ‘Tail’ part of the dovetail joint. It forms what I think of as a bow tie shape when done properly. The important point is to start each cut from the same place, saw to the same depth each time and ensure that the middle of the tail is centred over the split in the segments.

I found that as I had not strapped the segments together I had to really hold them firmly together – this is where you will appreciate your belt or piece of string. Also while sawing these ‘Tails’ in be aware at all times where the saw is in relation to your thumb and forefinger on the hand holding the stove.

I made three of these tails (one over each split) to hold all the segments together.

Photo 13-03-2016, 07 35 35
The Tails

To hold the segments together you need to carve some ‘Pins’ to insert into the ‘Tails’. I used green hazel wood to make the pins and made sure that they were carved into a triangular shape but initially too big for the tail.

Carving in this manner allowed me to insert the pin into the tail and then progressively carve off smaller pieces from the pin until it started to slide in. I also used my large piece of wood to hammer the pins in to ensure a very tight fit.

If you find that your pin is too small just get a fresh piece of green wood and try again. They only take seconds to make. To finish the pins off I trimmed the ends with my saw.

Photo 13-03-2016, 07 35 36
Cutting and inserting the ‘Pins’

As the bark of the birch tree is very flammable I stripped it all off and kept it to the side to use later as kindling to get the fire started. The dovetail joints if fitted snugly will keep all the segments locked together tightly.

Photo 13-03-2016, 07 35 37
Trimming

Firing Up

I lit the stove with some Vaseline-soaked cotton wool balls (which I always carry with me) because everything was so damp. The wind was non existent that day so it took me a while to get the stove going well.

Normally these stoves fire up really easily when there’s a little bit of wind to create the rocket effect up through the chimney

Photo 13-03-2016, 07 35 37 (1)
Firing up and drying out

Eventually the rocket effect started and I placed three pieces of green wood onto the top for my pot to sit on. These were fairly thin pieces but would last long enough to boil some water. Have a few pieces spare on standby though if needed.

Photo 13-03-2016, 07 35 38
Green wood pot stand

Once the pot was on (about 10 minutes after initial burn) I needed to keep popping small pieces of wood into the fire box to keep the fire going. If your wood is really dry or resinous (like spruce or pine) you may not need to keep tending the fire as the internal walls of the chimney will probably be well lit.

Photo 13-03-2016, 07 35 39
Now it is a stove

It took me just under 15 minutes to boil this pot of water (enough for approx 3 cups of coffee) and the dovetail joints remained strong throughout.

Photo 13-03-2016, 07 35 40
Roaring

After 45 minutes the first of the joints burnt through however the stove remained standing until it burnt out. Due to the lack of wind the majority of the wood did not burn through.

I made this short video of another Dovetail Log Rocket Stove to show it in action.

I like to experiment with log rocket stoves and this reliance on using string or wire to hold them together (although you can dig the segments of some types directly into soft ground) has always bugged me.

This  Schwedenfeuer type of stove lends itself well to the dovetail joints I think,  and once you have practised making a couple you will be able to knock together a stove very quickly with just natural materials.

As usual I am open to ideas and suggestions on creating more log rocket stoves and Scandinavian candles. If you have not seen my other posts on this subject have a look at my summary post on this subject titled – Candles, Rockets and Long Fires.

Cheers

George

How To…. Carve a Mortise and Tenon Campfire Crane

Let me introduce you to what I call the Mortise and Tenon Campfire Crane. This is a crane I made up at the the BCUK Bushmoot this Summer.

The idea came about as usual in a discussion around the fire with my good friends Charlie Brookes and Ian Woodham.

As you can see the arm of the crane can be set high or low (and ranges in between) and if set up correctly the upright can be easily rotated to swing your pot away from the fire.

Photo 21-11-2015, 22 49 54
Mortise and Tenon Crane

I would classify this one as more Pioneering than my usual constructions as it relies on some string to work. It is one for the long term camp however if you were on an overnighter with a couple of hours spare it would make a good project for an evening.

I will be describing the construction of the crane as I go through the post however I thought it would be helpful to have a completed picture of the crane marked up with the relevant work areas for you. Please refer back to this overview at any stage.

Mortise and Tenon Layout

My tools for the job included my knife, a small saw and and axe but you may find having a pen or pencil to hand will be useful.

I took a rod of Sycamore (fairly well seasoned) and sawed it in two. In the picture you can see I have left the thicker end longer than the thinner end. The thicker pole will become the upright and the thinner pole will become the arm.

Photo 21-11-2015, 22 49 56
The Makings

Carving the Upright

On the thinner end of the thick pole that was to be the upright I marked out the shape of the Tenon tongue and then cut two stop cuts into the side of the pole.

The stop cuts are put in to so that when I batton the waste wood off the split does not run on down the upright.

Photo 21-11-2015, 22 49 58
Creating the Tenon Tongue – Stop Cuts

I used my knife to batton off the waste wood (make sure your knife blade is at 90 degrees to your body when you do this).

Once I had the Tenon tongue shape split out I carved one side of it into a curve. This is important to allow the arm of the crane to be raised up and down.

Photo 21-11-2015, 22 49 59
Creating the Tenon tongue – batton and carve

To finish the upright I axed out a point at the bottom and about half way down it I carved a small wedge-shaped recess. This wedge-shaped recess needs to be on the opposite side of the curve to the Tenon tongue.

The recess does not need to be that deep, just enough to allow some string to catch in it.

Photo 21-11-2015, 22 50 00
Little extras on the upright

Carving the Arm

About a third of the way along from the thicker end of the arm flatten the wood with your knife on opposite sides. This gives you a decent working surface to carve out your Mortise hole.

In the bottom left picture you can see how I used the top of the upright to help me gauge how big to make the Mortise hole. Mark out your Mortise hole with a pen or pencil (mark out both sides of the arm).

Photo 21-11-2015, 22 50 02
Flattening the arm and marking out the Mortise hole

I used my knife and a piece of waste wood as a batton to cut out the Mortise hole. I took my time here so I would not split the wood along the length of the arm.

Once I got about half way down the depth of the Mortise hole I started on the other side.

Photo 21-11-2015, 22 50 02 (1)
Creating the Mortise hole – First Side

As I use the tip of my knife for this work I always ensure the work piece is secured on a flat surface. I have seen the after effects of a knife going through someone’s hand and it is not a pretty sight I can assure you.

Soon I had my Mortise hole cut through and tidied up. As I did not want to make the Mortise hole too large I tested out the Tenon tongue in it and trimmed the tongue down slightly so that it would fit in the Mortise hole easily.

Photo 21-11-2015, 22 50 03
Creating the Mortise hole – Second side

The Tenon tongue when fitted should sit slightly proud. You will probably find you will make lots of little adjustments here as you test the action of your crane at this stage.

Photo 21-11-2015, 22 50 03 (1)
Testing the joint

To finish the arm off I carved a groove near the thick end of the arm (for the string to grip), chamfered the thick end to tidy it up and cut out a groove at the thin end of the arm for attaching a pot handle (I will show this in detail in a further picture).

Finishing the arm
Finishing the arm

The Mortise and Tenon Crane

I spent a long time working out a way of making the arm fully adjustable with just the usual items in my rucksack. After discussing this with Ian and Charlie I opted for a simple system with string and a wooden toggle.

Below you can see that the upright and the arm are connected by string and a toggle on the left hand side.

Photo 21-11-2015, 22 50 06
In Profile

I tied off some doubled-up string to the arm groove and knotted it along its length with some simple overhand knots. This produced lots of little loops the toggle could fit into.

I attached a toggle to the upright groove and inserted the toggle into one of the loops in the string from the arm. Depending on what loop I put the toggle into I could adjust the height of any pot hanging off the other end of the arm.

The groove for the pot handle I made with a backstop and a slightly angled forward section. This shape allows the pot to remain secure when the arm is either raised or lowered.

Photo 21-11-2015, 22 50 06 (1)
In detail

To insert the upright I had a separate pole to act as a pile driver. I hammered this into the ground first and then inserted the upright into the hole I’d created.

The upright can then be rotated quite easily to move your pot off the fire. I found that I could pour water from the kettle while it was still attached to the arm as the handle sat snugly in the angled section of the pot handle groove.

Photo 21-11-2015, 22 50 08
In use

I like this crane for the challenges it set me and the fact that I could overcome them with just the kit I would normally carry.

I plan to re-visit the string set up as there must be a simpler method to keep the arm securley attached while giving me the ability to adjust its height.

Feel free to suggest an alternative method for this but remember it needs to be created with what you would normally expect to carry in your rucksack or about your person while out in the woods.

Photo 21-11-2015, 22 49 54
Up and Down

This will be (for the moment at least) the last How To…. on building campfire cranes however I have really enjoyed exploring this very diverse and little documented area of Bushcraft.

Cheers

George

10 Reasons to Bushmoot – 6/10 – Meet the Moot Kids

One thing that the BCUK Bushmoot is renowned for is its kid friendly environment. The Moot provides a massive playground for both structured (by lessons) and unstructured learning (through play).

As I grew up as a kid  on the Isle of Lewis I would head on out in the morning to find adventure and return home when my stomach demanded attention. As I live in a village now that has busy roads running through it the Moot is one of the few places I know of that I am happy for my kids to go out and make their own adventures as I once did.

Photo 18-11-2015, 22 31 50
Bushmoot Fun

We stress that parents are responsible for their children however we encourage a sense of adventure. I let my kids run off and play within the main area of the Moot site and under adult supervision on the massive expanse of the sand dunes of Merthyr Mawr.

There are plenty of woods, dunes, trees and buildings to explore in the area around the Moot to satisfy the sense of adventure in any kid.

Photo 18-11-2015, 22 31 51
Adventuring

There are workshops specifically for the kids and other workshops  where they learn alongside adults. Kids are encouraged to attend the Starter Course we run for anyone new to bushcraft or looking to work on their basic skills.

These basic skills include learning about knots, fire lighting, carving and safely using a saw (to name just a few). Wherever possible I like to get the kids learning these skills alongside their parents so that they can work together later as a family. Kids under 16 are allowed to use  knives and saws however they must be under the supervision of an adult when they are using them or carrying them.

Photo 18-11-2015, 22 31 54
Key skills

Even in this digital age of the xBox and the Playstation kids are always attracted to sticks, be that the Atlatl, bows or staffs. I like to think that the classes we teach kids bring some of that make believe digital world to life without any of the violence or gore. We always teach the kids to treat these tools with respect and only to use them when permitted.

Photo 18-11-2015, 22 31 54 (1)
Historical learning

My good friend Fraser Christian of Coastal Survival has been coming to the Moot for a number of years now. Fraser is always keen to teach kids in his classes. Some of his courses include campfire baking, net making, coastal foraging and survival training.

Photo 18-11-2015, 22 31 55
Fun with Fraser

One thing I love about the Moot is that it is situated on sand dunes that have over the years become a woodland. This makes for an amazing place to launch yourself of heights or climb trees. Natures own playground you could say.

Photo 18-11-2015, 22 31 56
Hanging Out

There are lots of activities aimed primarily at the kids from treasure hunts with our resident Pirates under the leadership of Cap’n Badger, to craft courses and games.

One of the games I run from time to time is a stalking game. Below you can see the kids trying to leopard crawl up to get some sticks without being soaked. This is a great game to teach kids all about their senses and in particular about staying quiet in order to see more wildlife around them.

Photo 18-11-2015, 22 31 57 (1)
Games

For many a year now we have had story telling sessions around the fire of an evening for the kids (and adults too). Womble is a great story teller and keeps the kids captivated with his interactive stories.

The Moot organiser is Tony Bristow and depending on the dates of the Moot his birthday sometimes falls during it. It usually is a time to bake a cake and dish it out. Needless to say Tony gets a little piece however there are many hungry little ones looking for their share 🙂

Photo 18-11-2015, 22 31 57
Stories, Cakes and Pirates

The Moot is for kids of all ages be that young at heart (yes I mean you Spikey) or taking their first steps out in the adventure of life. My kids love coming along to see their ‘Moot friends’ and I hope they will continue to do so for years to come.

Photo 18-11-2015, 22 31 58
Kids – Young and not so young

Looking at the BCUK forum I see that there is talk already about organising activities for the kids for next year.

Hopefully see you there.

Cheers

George

How To…. Carve a Lap Joint Campfire Crane

While I was writing my post on the Single Fork Aures crane I got a message from a Bushcraft USA member called Alukban about another type of campfire crane, which was made out of a single piece of wood and looked quite straightforward to carve.

The connection between the arm and the upright is a type of Lap Joint. It is easy to adjust and can take the weight of a decent-sized pot.

Photo 04-09-2015 22 05 05
Lap Joint Crane

Trimming

I had some sycamore lying around, about a metre and a half long. I trimmed the fork off the end as it was not needed and then cut the pole into two further pieces.

In the picture below all the wood to the left of the folding saw became the arm and the rest became the upright for the crane.

Photo 04-09-2015 22 05 07
Single Pole

The upright

I squared off three of the sides of the upright along two thirds of its length and formed a point on the bottom third.

I took my time doing this so that it was as even and as smooth as possible along its length where it was squared.

Photo 04-09-2015 22 05 07 (1)
Square the top – Round the bottom

Once I was happy with the upright I moved onto the arm. The whole crane works on the principle that the weight of a pot hanging on it will create enough friction to hold the arm against the upright.

Photo 04-09-2015 22 05 08
Line up to Mark up

The arm

I used the upright as a guide to measuring where I need to cut out the lap joint on the arm (I measured it so that the lap joint would be very tight initially). I did not make this a 90 degree angle but about 100 degrees, so that the tip of the arm would be pointing slightly upwards.

Once I had marked the width on the arm I cut some stop cuts to half the depth of the arm and then added some more to make it easier to carve out.

I also used my saw to carve out some of the excess wood from the joint area.

Photo 04-09-2015 22 05 09
Stop cuts and Sawing out

Once I had taken out most of the excess wood with the saw I used my knife to remove the rest and make it all smooth.

Photo 04-09-2015 22 05 09 (1)
Trim with a knife

I locked the two pieces together and started to move the arm up and down the upright. This allowed me to spot rough areas still on the upright and then I was able to easily trim that wood off with my knife.

Photo 04-09-2015 22 05 10
Continually check the fit

Once I was happy that the arm could move easily up and down the upright I trimmed of loads of excess wood from the arm to make it easier to attach a pot.

I put a stop cut about a quarter of the depth of the arm all the way around it to protect the wood around the lap joint.

Photo 04-09-2015 22 05 10 (1)
Trim the limb

You can see the general shape of the arm appearing now. I likened it to the shape of an old-style naval cutlass.

Photo 04-09-2015 22 05 11
The arm

In use

I added a few ridges along the length of the arm to hold pots securely and then started trying it out.

Photo 04-09-2015 22 05 11 (1)
Carve the notches

I used this crane for two weeks at the Bushcraft UK Bushmoot in South Wales over the summer and was quite impressed with it. It holds pots well under tension but it needs to be treated with respect when moving the pot up and down.

I found that the crane works best with the pot hanging from near the end of the arm. If you move the pot closer to the upright along the arm it has a tendency to slip.

Photo 04-09-2015 22 05 12
It is all in the friction

I will be making a variation of this style over the next few days with more of a dovetail joint so that the arm cannot come off so easily.

Photo 04-09-2015 22 05 13
A great crane

I like this crane due to its simplicity so give it a go.

Cheers

George

How To…. Build a Gibbet Aures Campfire Crane

This is the second of my blog posts on the Aures campfire crane trilogy. I call it the Gibbet crane based on a pot hook I found mentioned in the book Camp-lore and Woodcraft. The crane does look a bit like a traditional gibbet but the name apparently refers to the overlapping joints used in its construction rather than its likeness to an instrument of execution.

This is a great project for the longer-term camp or if you want a bit of practice carving joints and whipping.

The Gibbet Aures Crane

As usual the tools for making the crane are to be found in most bushcrafters’ backpacks – a knife, saw and axe. I saw this crane set up many years ago at a camp however I have seen little written up about it in books or online.

I found one piece of wood with a strong fork and a smaller catapult-shaped fork (bottom left below) and I cut a limb with a branch coming out (top left below).

The first job I did was to strip off all the bark from all the pieces.

image
Tools and basic parts

I placed the large fork up against the pole it would hang off to measure where I needed to trim each limb. To do that I just used my knife to mark the limbs. The top limb needs to be marked to the left of the pole (as you see in the picture below) and the bottom limb needs to be marked to the right of the pole as you see it below.

Carving the top limb

To begin with I trimmed the top limb at its mark with my saw, leaving the bottom one for the moment.

image
Measuring and trimming the top limb

I laid the small hook beside the end of the top limb so that the hook was pointing towards the big fork and marked where I wanted to trim it. I did not want to leave it too big – just big enough to be whipped to the big fork.

image
Measuring and trimming the top hook

I wanted the joint to be strong so I put a stop cut into the top of the upper limb so I could cut out a lap joint (also known as a Gib joint).

I then battoned off the excess so I was left  with one half of the lap joint, then I trimmed the bottom of the small hook flat to fit snugly against it.

image
Cutting out the Gib cut on the top limb and hook

Not a perfect fit but good enough.

image
Putting them together

I then used paracord to whip the two together, on both sides of the hook. I left excess string tied in a knot as the wood was green. As it dries out the wood will shrink and I will have to redo the whipping.

image
Whipping The Gib joint

Carving the bottom limb

I flattened the upright of the ‘Y’ piece and split out a Gib joint on the lower limb. You have to make sure all the cuts are done on the correct planes so that the hanger will fit on the upright pole without twisting.

image
Cutting the Gib joint on the bottom limb and fork

After a bit of whipping it was time to set it up and make sure it worked correctly. In the bottom right picture you can see clearly how it all comes together.

image
Fitting and splicing

Carving the pot arm

I have a particular way of carving the hanging arm (you be as creative as you like). I axe out the basic shape I want, trim it smooth with my knife and cut in lots of grooves along the upper part to allow the pot to be hung on various areas of its length.

image
Carving the pot arm

Once all the grooves are cut I tend to put a dimple in the end so I can attach an adjustable pot hook. This allows me to hang two or three pots from the crane.

image
Finishing touches

Using the Crane

This sequence of shots shows the method I use for adjusting the height of the crane when it has a heavy pot attached to it. I swing the crane away from the fire, remove the pot, adjust the height of the crane, attach the pot again and swing it back over the fire.

With light pots you do not need to remove the pot but just lift the crane slightly so it detaches from the upright and then just move it up and down.

image
In use

In this picture you can see how the arm works with an adjustable pot hook attached to the end of the crane arm.

It looks precarious but with the usual level of care you take around any fire I have found this system works well.

image
Added adjustable pot hook

Dinner could be in one pot and the kettle on the other leaving plenty of room to sit comfortably around the fire without having lots of uprights protruding out (which can be a problem with other campfire cooking rigs).

image
Works a treat

I took the set up out on a recent bushcraft course I was running to show some colleagues and set it up with a fixed crane. All in all it worked a treat.

image
In use in the field

If you have not seen it I have another post on making one of these cranes but just out of one forked stick – How To…. Carve an Aures Campfire Crane – Single Fork

Cheers

George

How To…. Build a Campfire Cooking Crane

Sometimes space around the fire is at a premium.

Sometimes you want an adjustable pot hook without a tripod set up.

Sometimes you want to pour your coffee without getting burnt by the flames.

If that’s what you want then build yourself a crane – It’s easy.

Photo 06-05-2015 13 25 33
A robust and versatile campfire crane

There are a number of different ways to build a crane set up however I decided to try just with the general tools I would carry in my rucksack. These included an axe,  a saw and a general bushcraft knife.

The wood I used was some sycamore I had recently polarded in my garden. The crane is made up of a thick upright and smaller pieces to act as the arms. I decided to make two different types of arms, one for small pots and one for bigger Dutch oven type pots.

Sizes and dimensions will vary depending on how high you want your crane to be and what weight you want it to hold.

Carving the upright

I decided which part of the upright would be the top and then flattened it to give me a working area. You do not need to do this however I find it gives me a stable working surface. You can see in the pictures below that the girth of the upright is just larger than my hand as my fingers do not fully close around it.

Photo 06-05-2015 13 33 25
Basic parts and flattening the top of the uprght

For the crane to work you need a hole at the top of the upright. The size of the hole will depend on the size of the arm you will put through it and how much wood you want left around the hole for strength.

As I was going to carve this with my knife I opted for a square hole as this style is easier for me to carve. Once I had pencilled out one side I marked up the opposite side. In this crane I made the hole at 90 degrees to the upright (makes life easy) but you can angle it if you want so that the arm will be pointing upwards more when inserted.

Photo 06-05-2015 13 34 30
Marking out the socket

I used my knife to score lines into the wood I wanted to remove. You can do this by gently tapping your knife handle with a batton or rolling the curved part of the blade. You need to do this gently so as not to cause unwanted splits in the wood. Also make sure that the work piece is secure on the ground and that your free hand (if not battoning) is well clear of the knife edge.

Photo 06-05-2015 13 36 57
Scoring

To remove the wood I just pushed the tip of my knife inbetween the scores and prised it out. Again I did this gently alternating between pushing on the handle with my hand or doing light taps with a batton. When I twisted the point I did so gently so as to not cause any unwanted splits or worse still – snap off the tip of my blade. 

I did another set of scores and chipping until I was about halfway through the upright.

Photo 06-05-2015 13 39 14
Chipping

I then repeated the exact same procedure on the other side until my knife popped through the other side.

Photo 06-05-2015 13 57 15
Repeating the scoring and chipping

Once the plug of wood was removed I trimmed the internal walls of the hole (using the wood I would use as an arm as a guide) and chamfered the edges off.

Photo 06-05-2015 14 01 36
Finishing the socket

The upright was finished off with all the knobbly/sharp bits being removed and a point was axed out at the bottom of it.

Trimming and pointing

Carving the lightweight arm

I made the arm for the lightweight pots from a thin piece of sycamore. I trimmed a flattened piece near the end and carved a small dimple with the point of my knife in it.

The small dimple is needed to keep the adjustable pot hanger in place. I have covered the making of the making of an adjustable pot hook in my post How To…. Carve and use an Adjustable Pot Hanger.

Photo 06-05-2015 14 11 56
Lightweight arm

Set up

In my previous post on making a Double French Windlass Cooking Rig I explained how to make a pile driver. I used this pile driver to make a hole for the upright to sit in.

Once you have created the hole it is just a case of gently tapping the upright into place. If you did not use the pile driver you would need to hit the upright hard to drive it into the ground and very quickly the wood around the hole would crumple or snap.

Photo 06-05-2015 14 14 12
Using the pile driver to place the upright

As I had not made the hole at an angle I carved a small wedge to hold the arm securely and also to raise the tip up slightly.

When the arm is in place in the hole just tap the wedge into place gently. Do not ram it in as this could cause undue pressure and split the wood.

Photo 06-05-2015 14 16 55
Create a wedge to secure the arm

Then it is a simple case of attaching the hanger with your pot or kettle onto the arm.

I like this system as it is easy to adjust the height of the pot and the whole crane can be swivelled to move the pot away from the fire easily.

In the picture below I have left the back of the arm overly long but I will trim it shorter eventually.

Photo 06-05-2015 14 18 53
Ready to go

Carving a strong arm

As I had made a square hole I got a bigger piece of sycamore and squared it off along its length to fit exactly in the hole. This arm was designed to take bigger pots like a dutch oven.

Photo 06-05-2015 14 22 10
Creating the heavyweight arm

The end was shaped to fit the pot hanger.

Photo 06-05-2015 14 25 27
Finishing the tip

Then set up exactly as the first arm.

This time though I tested it out with a dutch oven half full of water.

Photo 06-05-2015 14 27 57
Heavy Duty Cooking

I have a few of these cranes so I set up another one to put the kettle back on.

Photo 06-05-2015 14 30 45
Multiples

I had used an auger and a palm gouge to carve this one out so you can see it ended up with a round hole. No wedge was required as the hole was set at a slight angle.

Photo 06-05-2015 14 36 52
The crane made with an auger and palm gauge

After the water in the dutch oven had boiled it was easy to raise it all up off the heat.

Photo 06-05-2015 14 31 39
Easy to adjust the pot height

If you plan to use these cranes on a longer term basis they may develop a crack if you are using green wood. This happened to this crane about a week after I made it but I secured it with a bit of whipping. You can do this right at the beginning if you wish or when you see a split start to appear.

The whipping will be well clear of the flames so I am not worried that it will be burnt through.

Some Whipping
Some Whipping

If I had not being taking pictures along the way I would have completed this rig in about an hour or so.

There are other ways of doing this and other tools you can use so I will leave it to your imagination but if you are someone who likes to tinker around the campfire then I would give this one a go.

Cheers

George