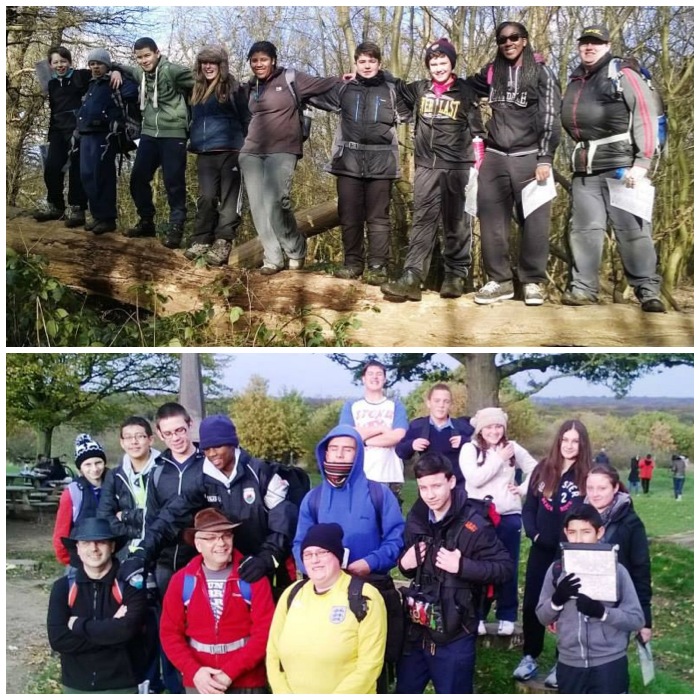
Looking back on my blog post catch up odyssey I have been stumped at the small number of pictures I have for this trip 🙂
Maybe I have been coming here for too many years now but I cannot think what caused this. It was though as usual an excellently run weekend by the Sea Cadet staff with activities for all age ranges.
We had activities for the Junior cadets, Campcraft and the DofE for older cadets and for the adults we had the Lowland Expedition Leaders Award – all in all a packed and fun weekend with the Sea Cadets – probably what kept me away from my camera.
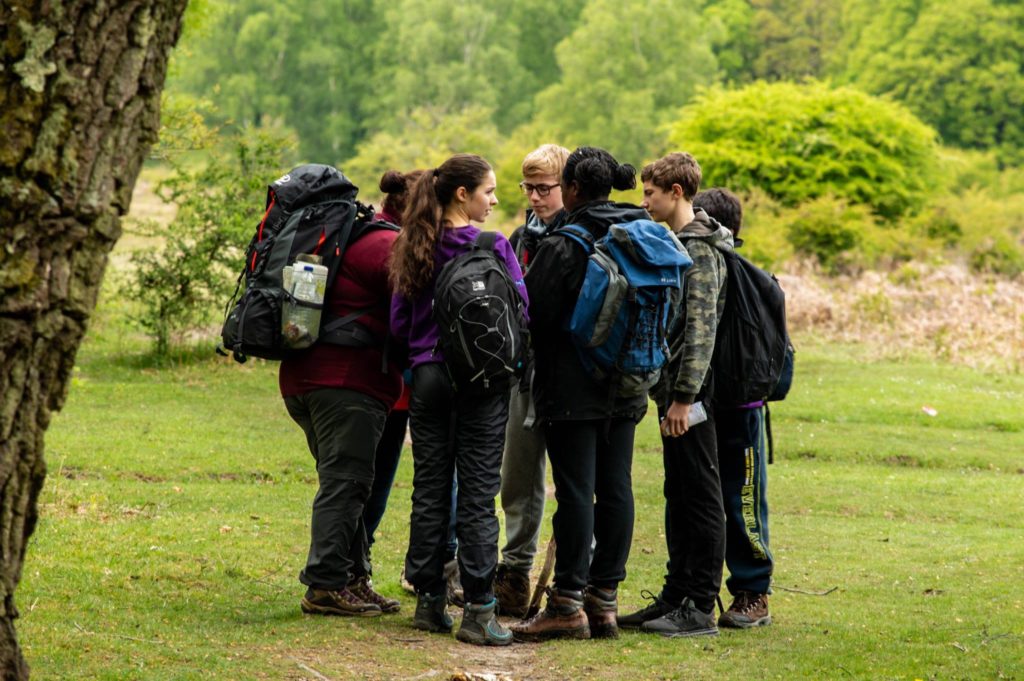
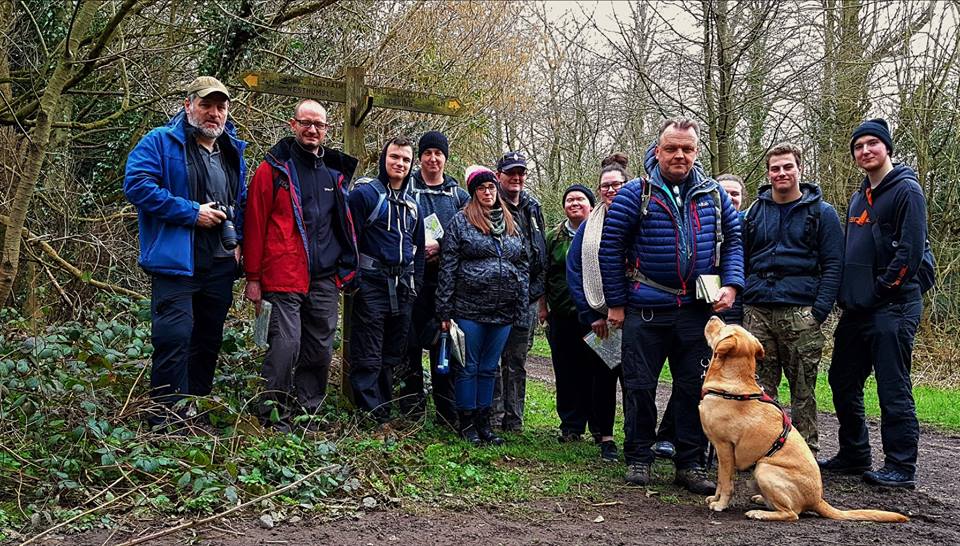
Moving onto March of this year in my scramble to catch up on my blogging backlog, found me once again, involved in training our Sea Cadet instructors in becoming Lowland Expedition Leaders (LEL).
The 2018 Crew
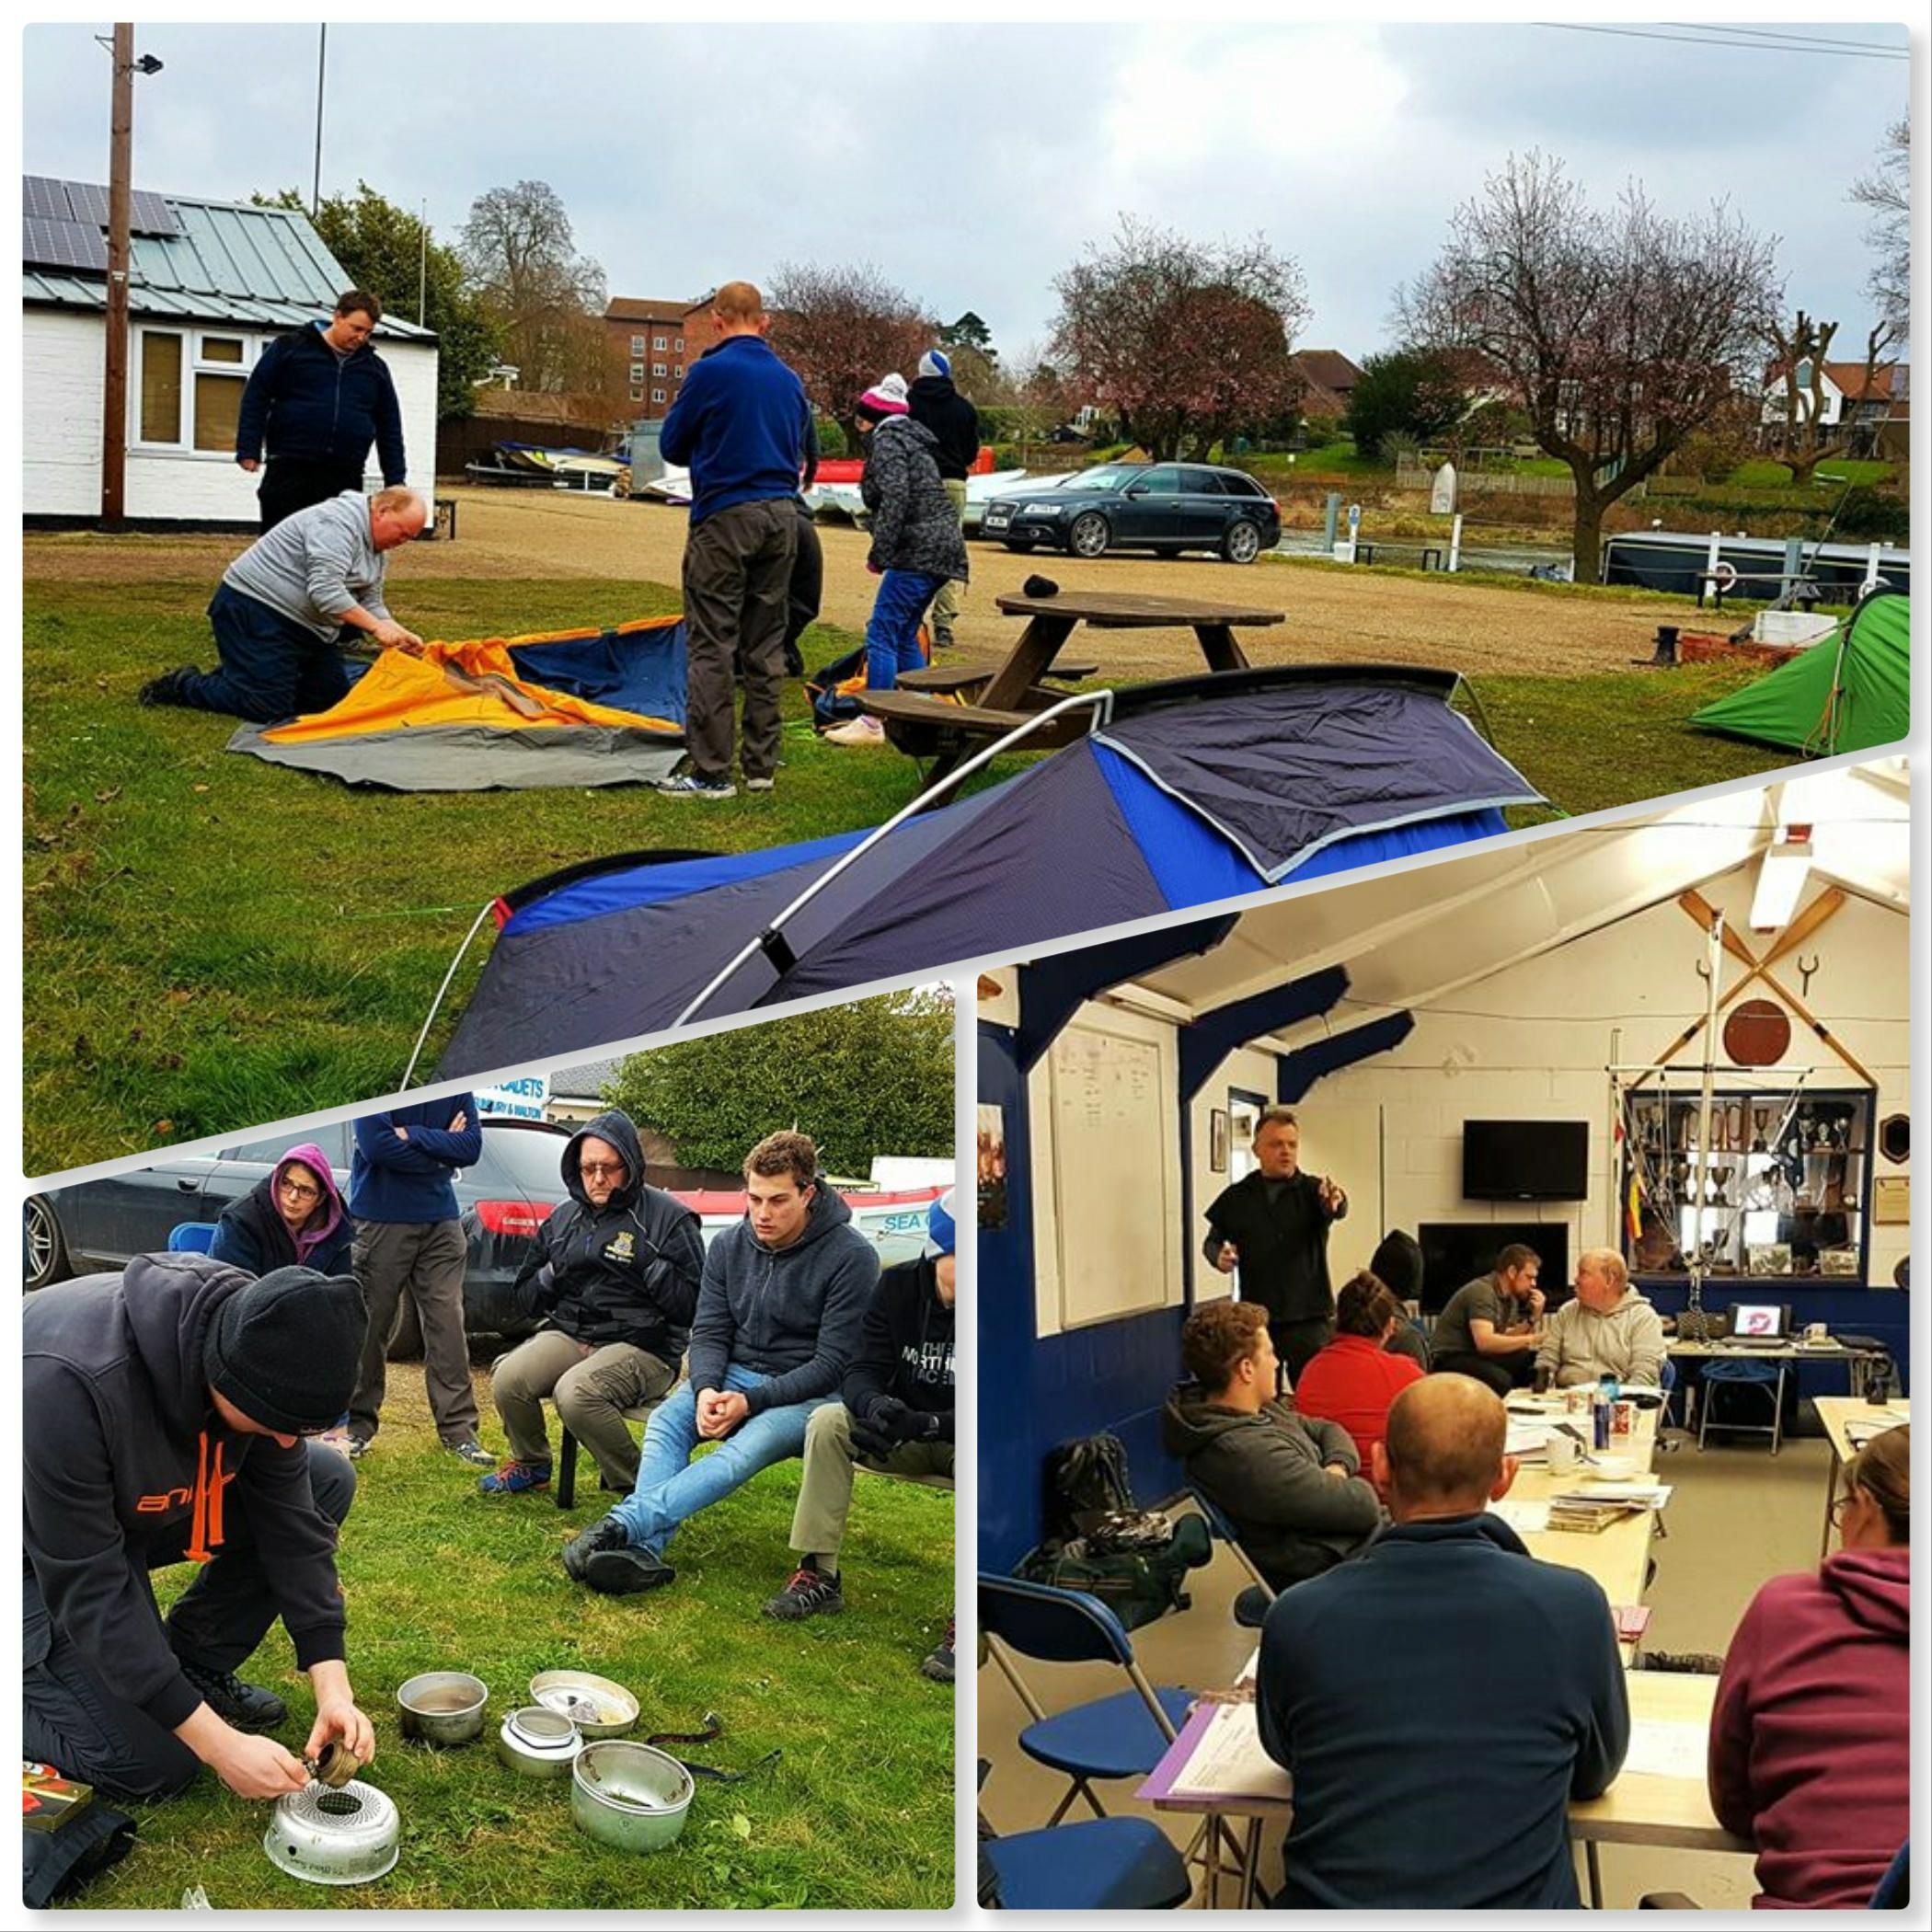
The weekend was based at TS Black Swan – the Sunbury & Walton Sea Cadet unit on the banks of the Thames. After lots of the usual admin there was plenty of adventure training lessons to be gotten through. We try to get all the basics like Legislation, Health & Safety and Kit covered in class before heading out for outdoor sessions.
Students learn all about tents and stoves in a very hands on way. They need to learn fast as they are expected within a couple of months to be teaching these subjects to cadets (under supervision though).
Training and more Training
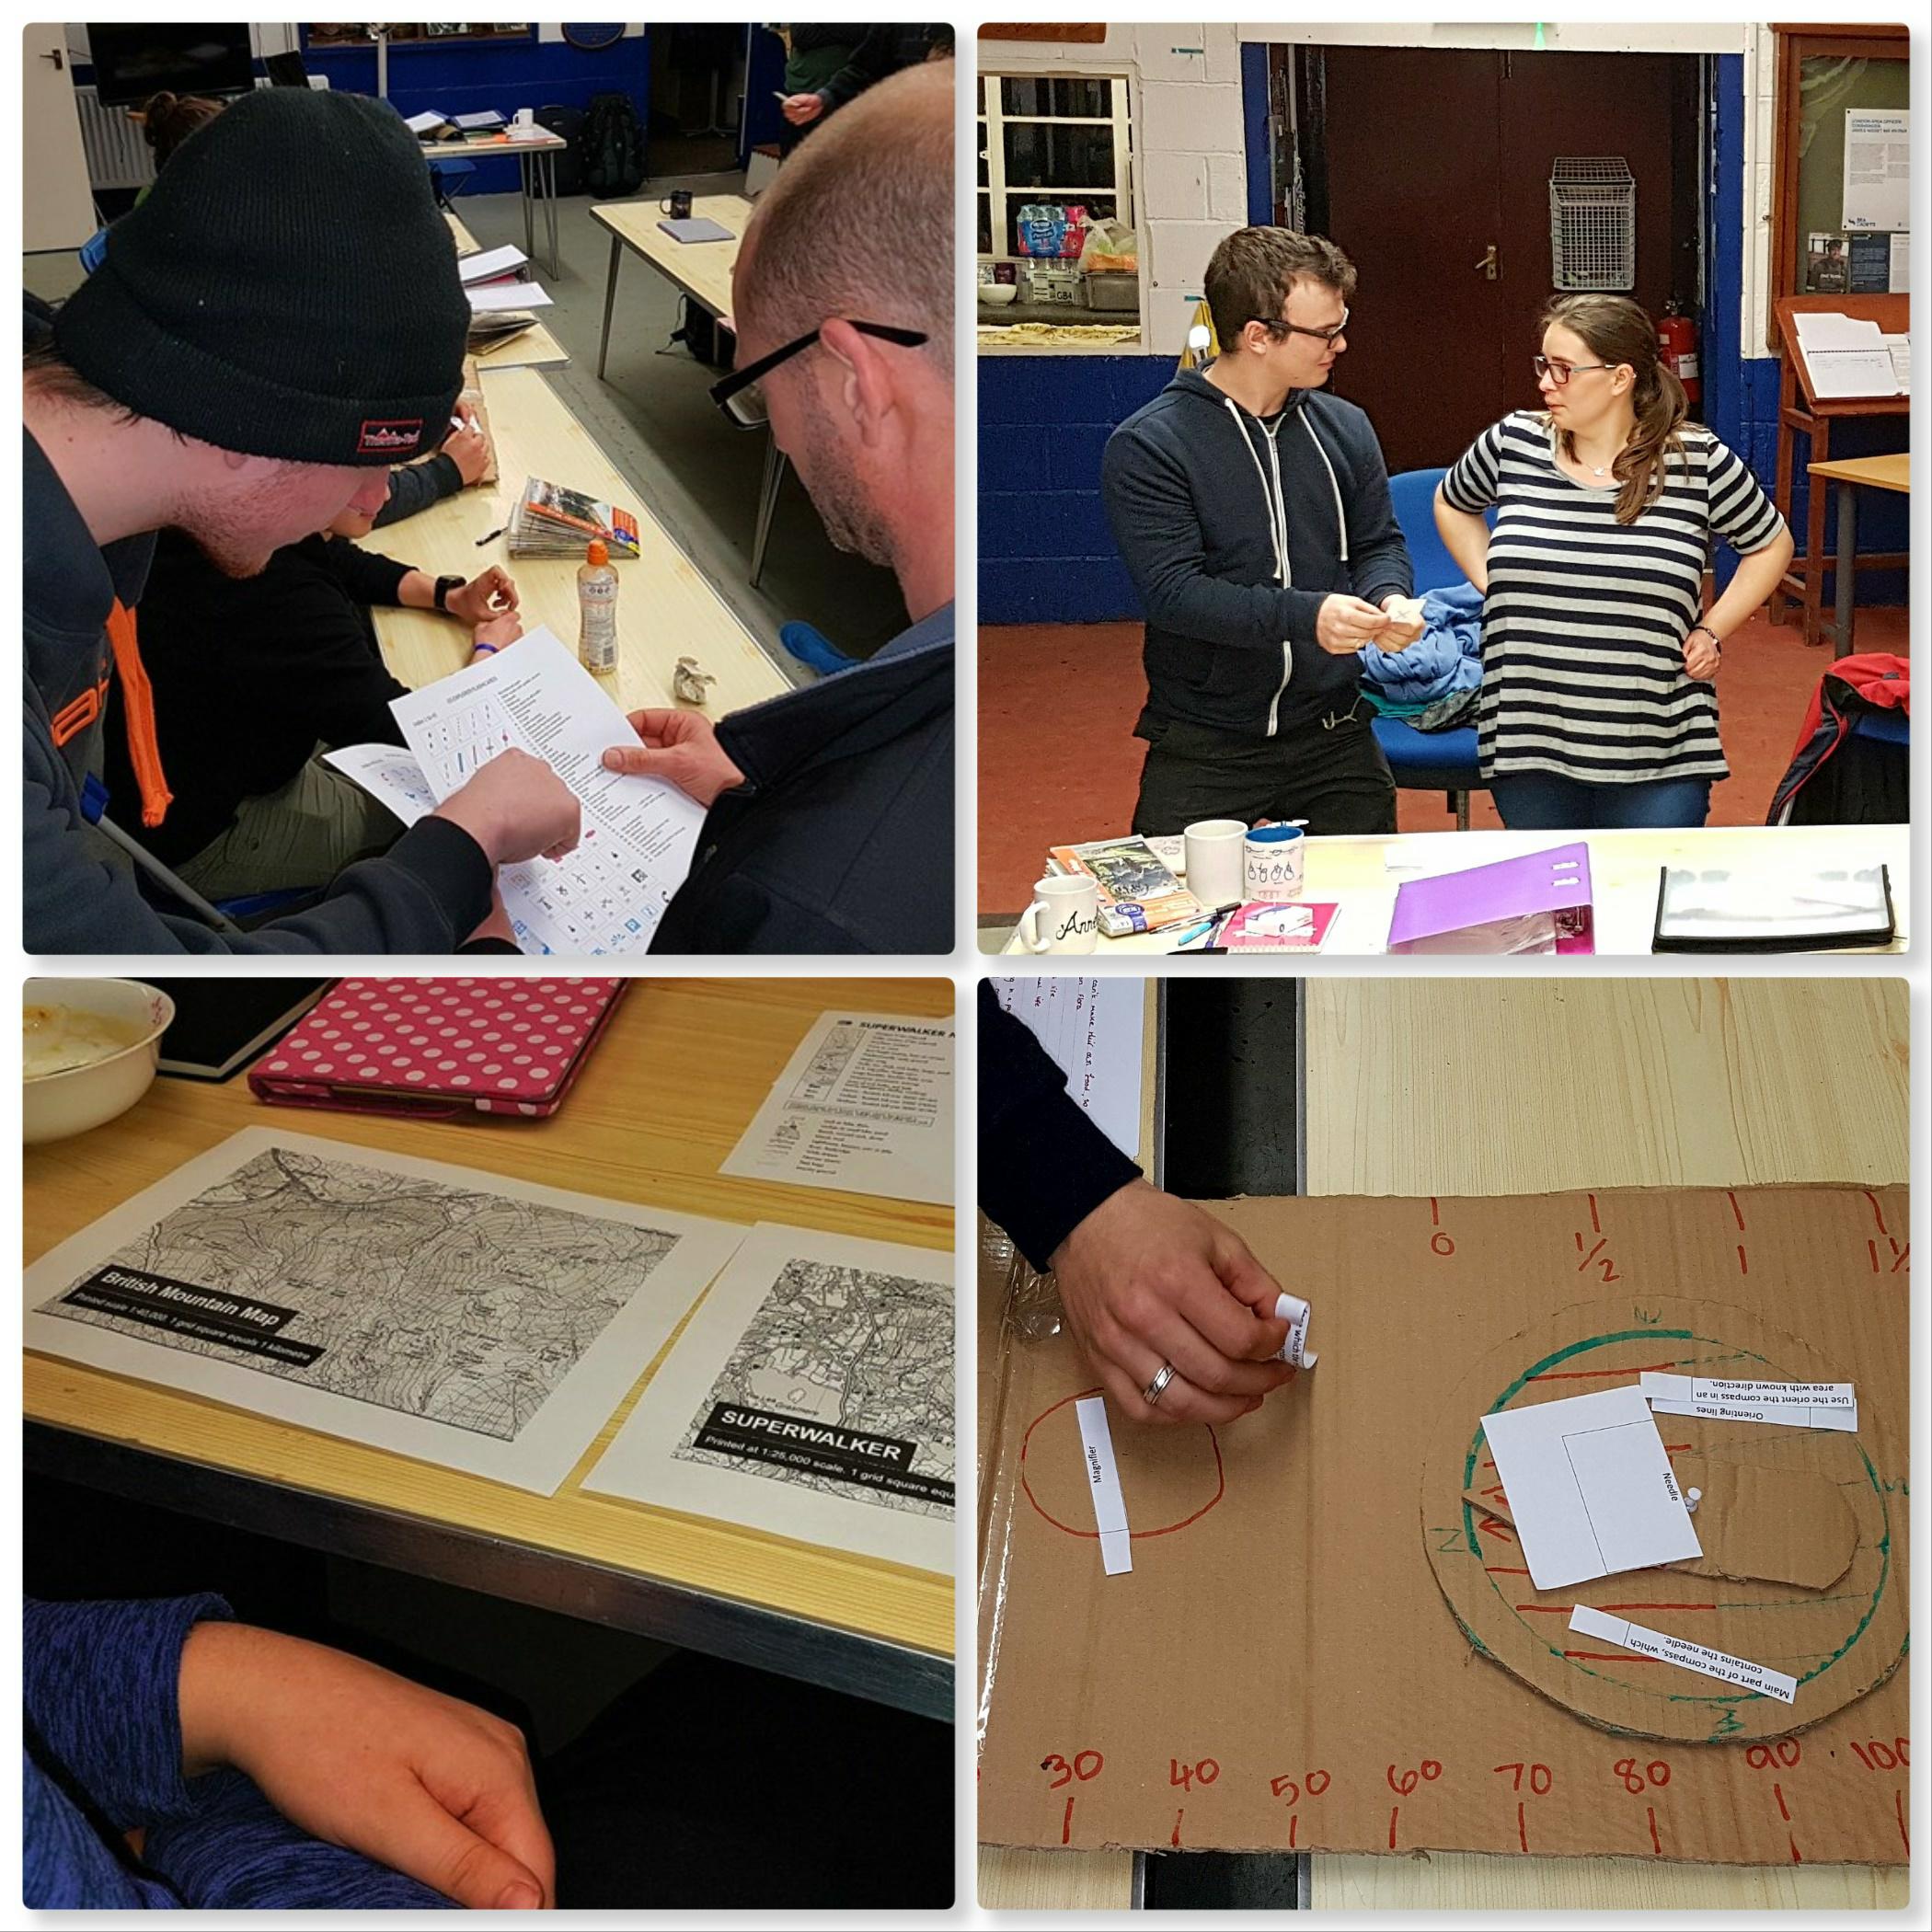
From the start we like to get the students practicing their teaching skills. In pairs they were tasked with giving short lessons in subjects such as map and compass work. I was particularly impressed with the cardboard compass they produced to teach everyone about its different parts.
Student Presentations
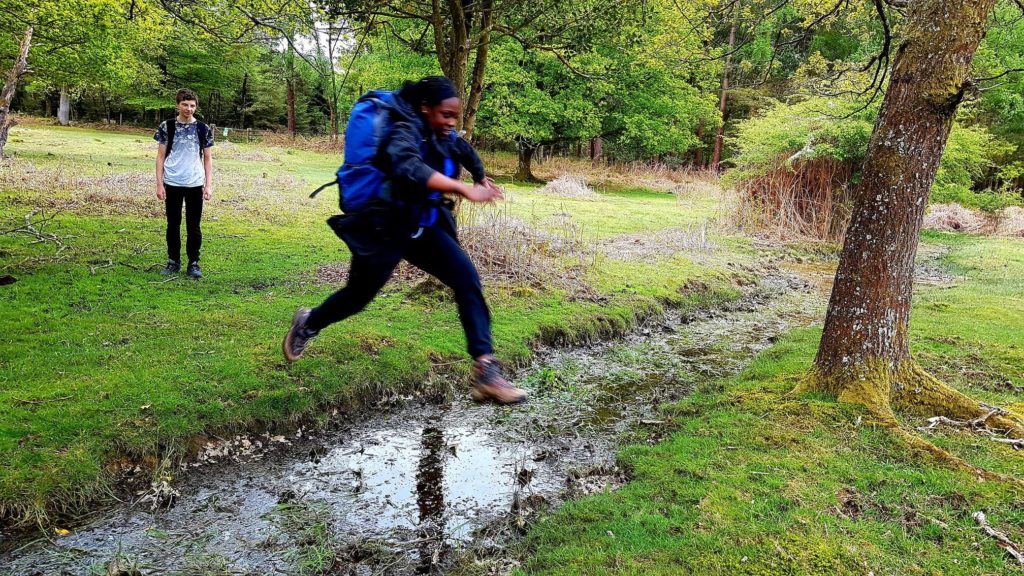
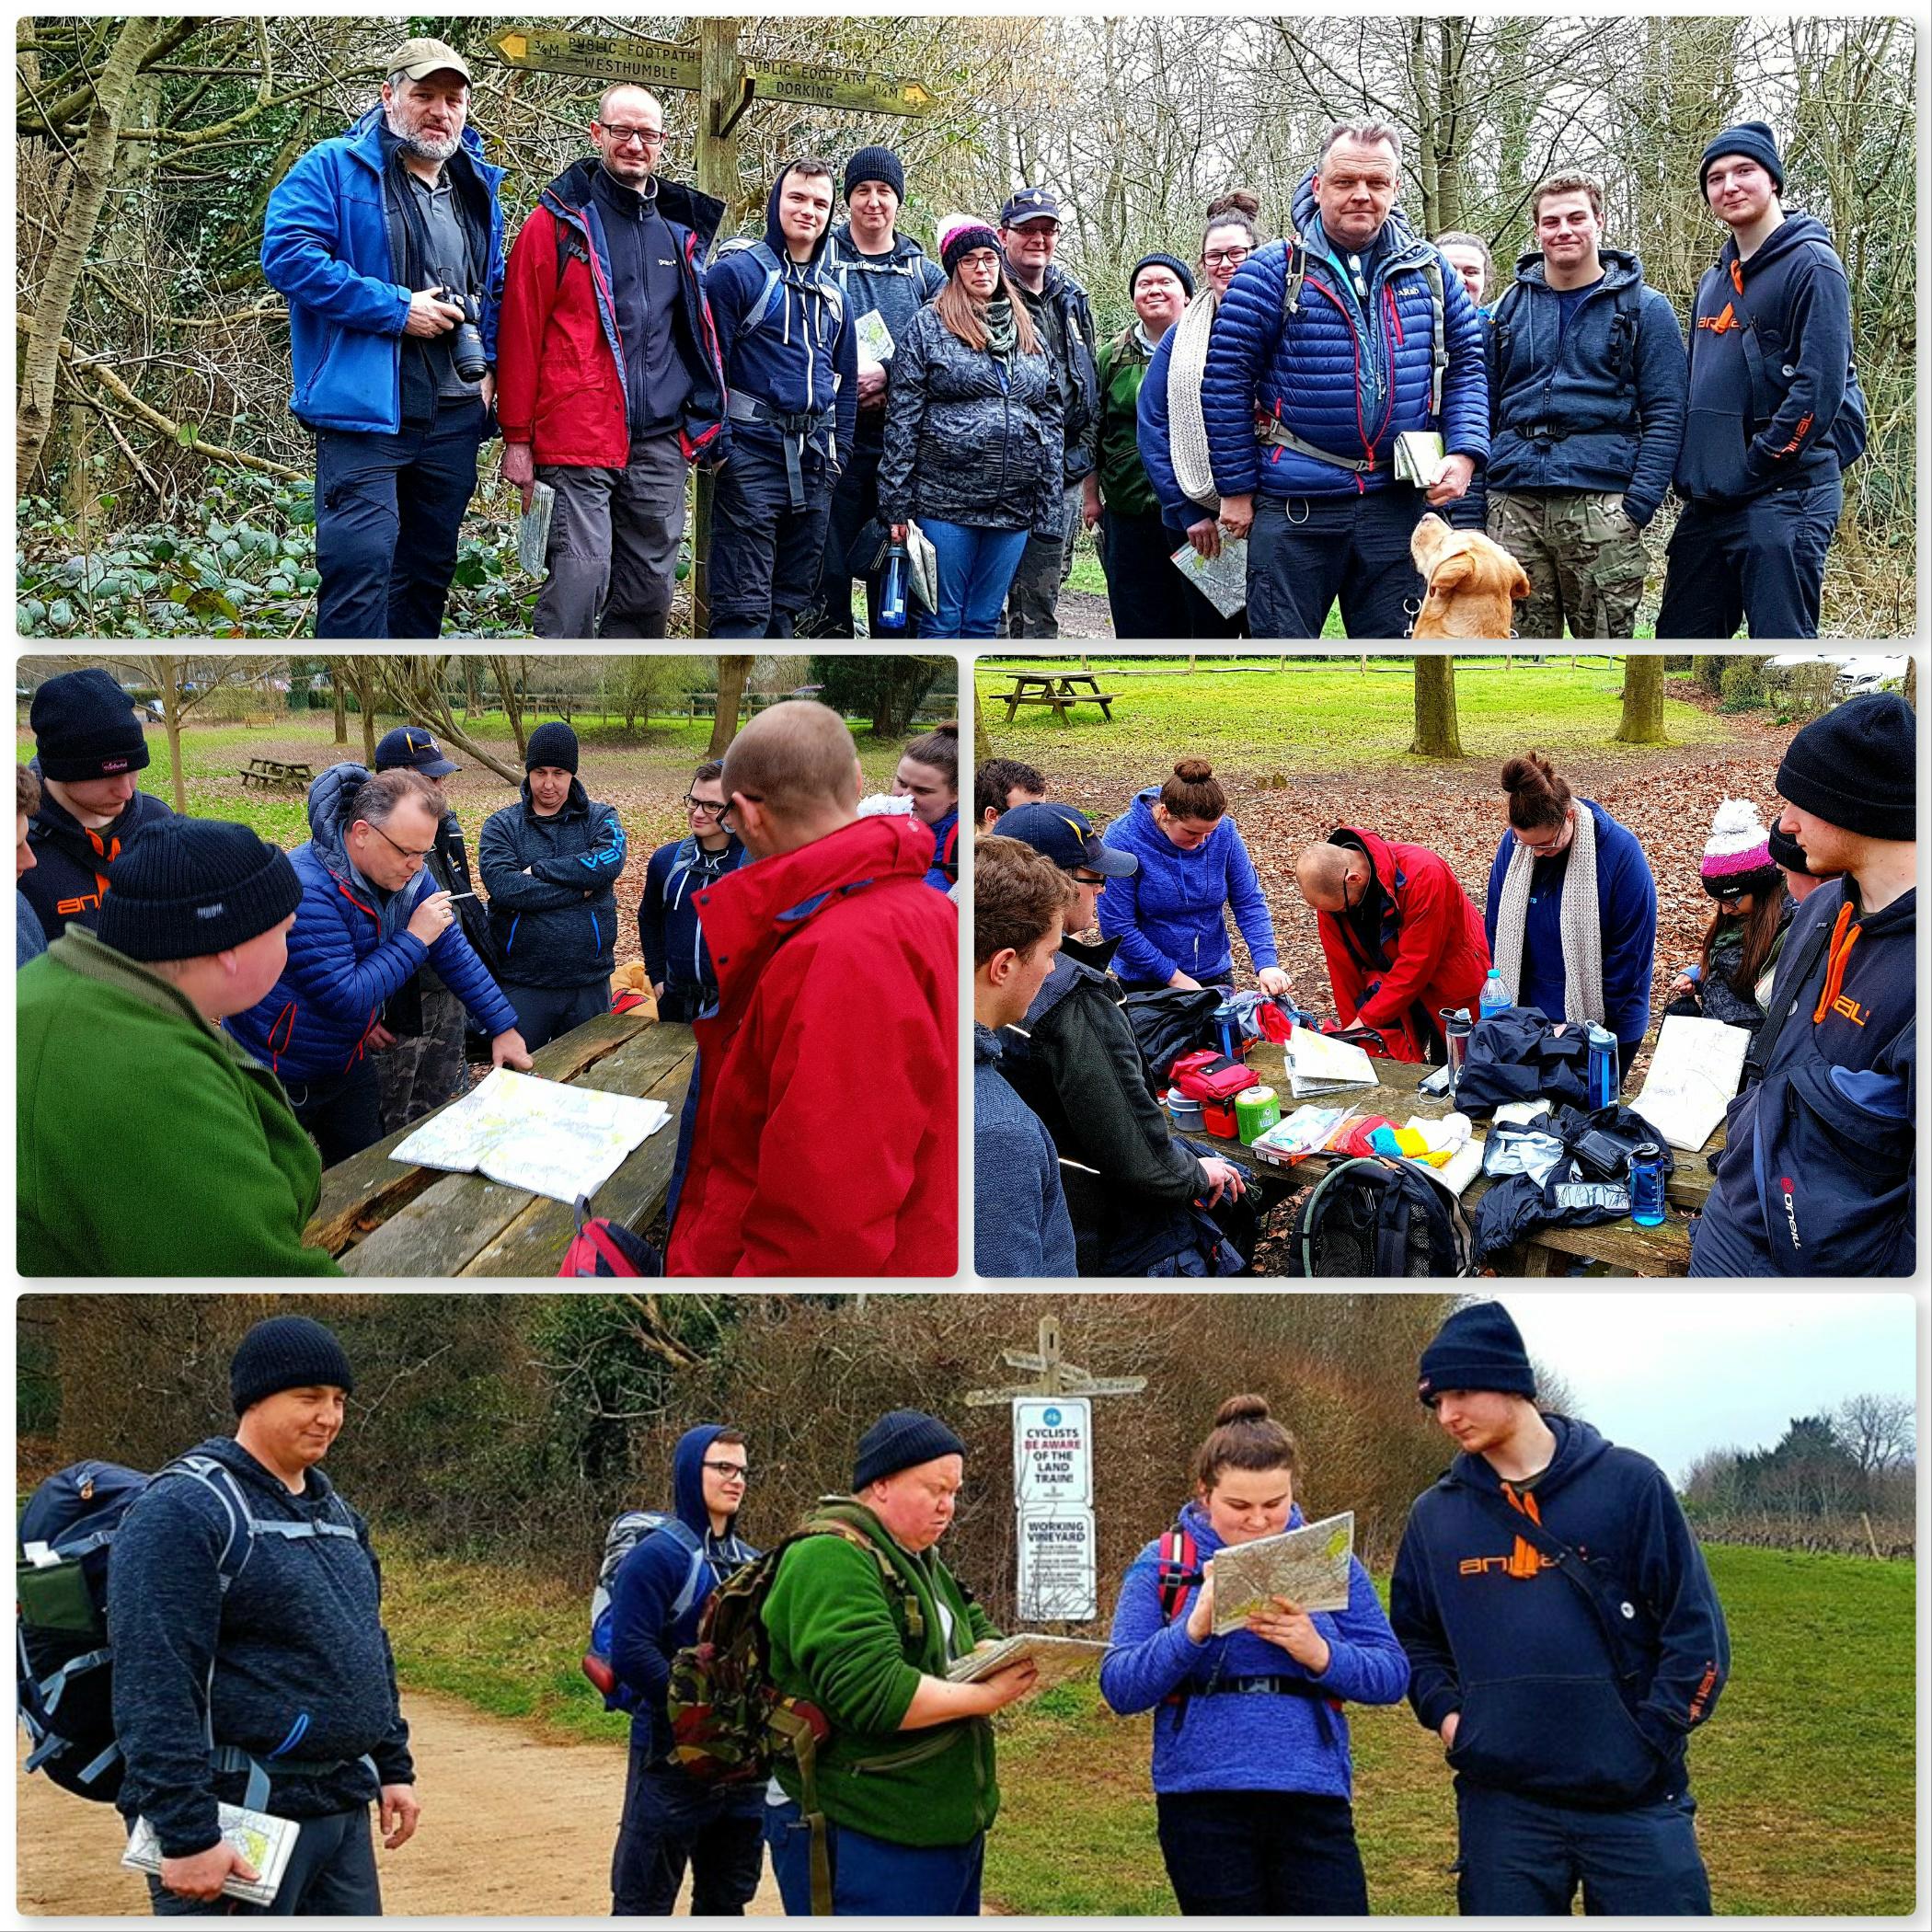
Much of the rest of the time was spent out and about practicing the use of maps and compasses on the North Downs. It was a much cooler time of the year as you can see from the pictures below – a time of year I find far more comfortable in comparison to the heat we are currently facing – as I write this in mid summer.
Nav Time
Here is to some cooler times soon (I am Scottish) 🙂
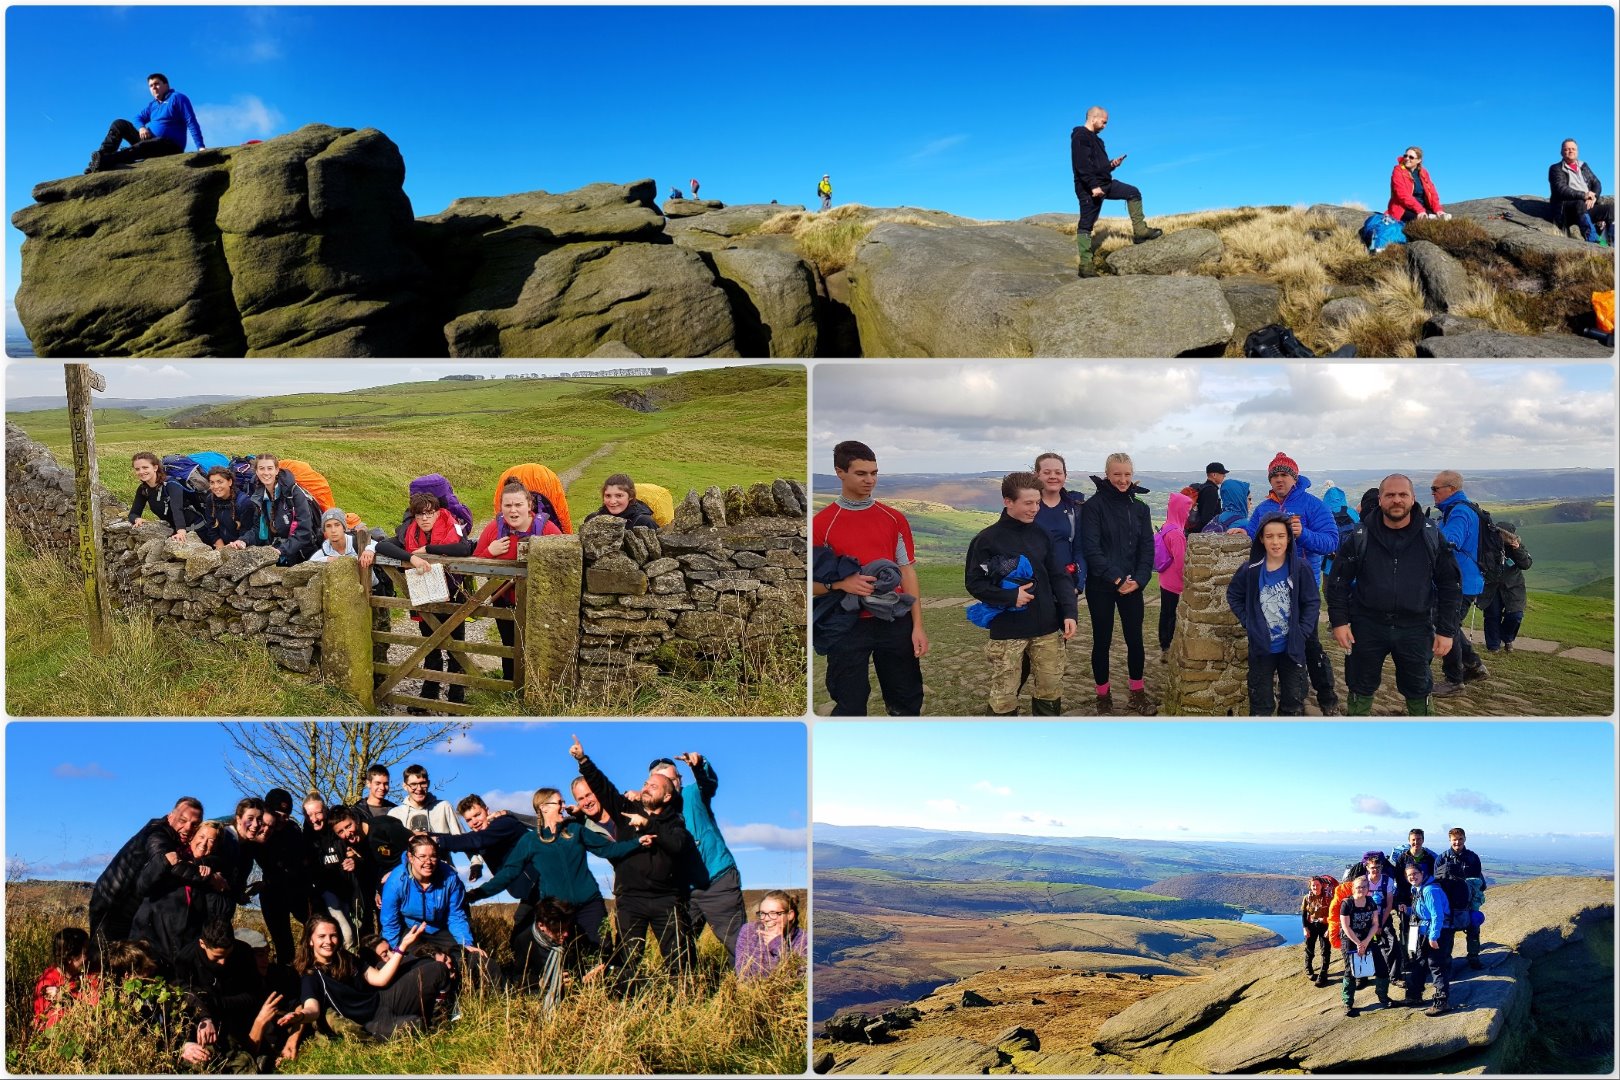
It was a busy 5 days and the weather was glorious resulting in some fabulous Golden Peaks.
Golden Peaks
The cadets and young instructors undertaking their Gold Expedition had four tough days ahead of them carrying all their food and kit as they hiked through The Peaks. It was a windy but warm Peak District that greeted us on their first day.
Setting off from Pindale Farm they soon passed through Castleton and ascended up onto Mam Tor. This is a steady climb but one that affords great views on a clear day.
Day 1
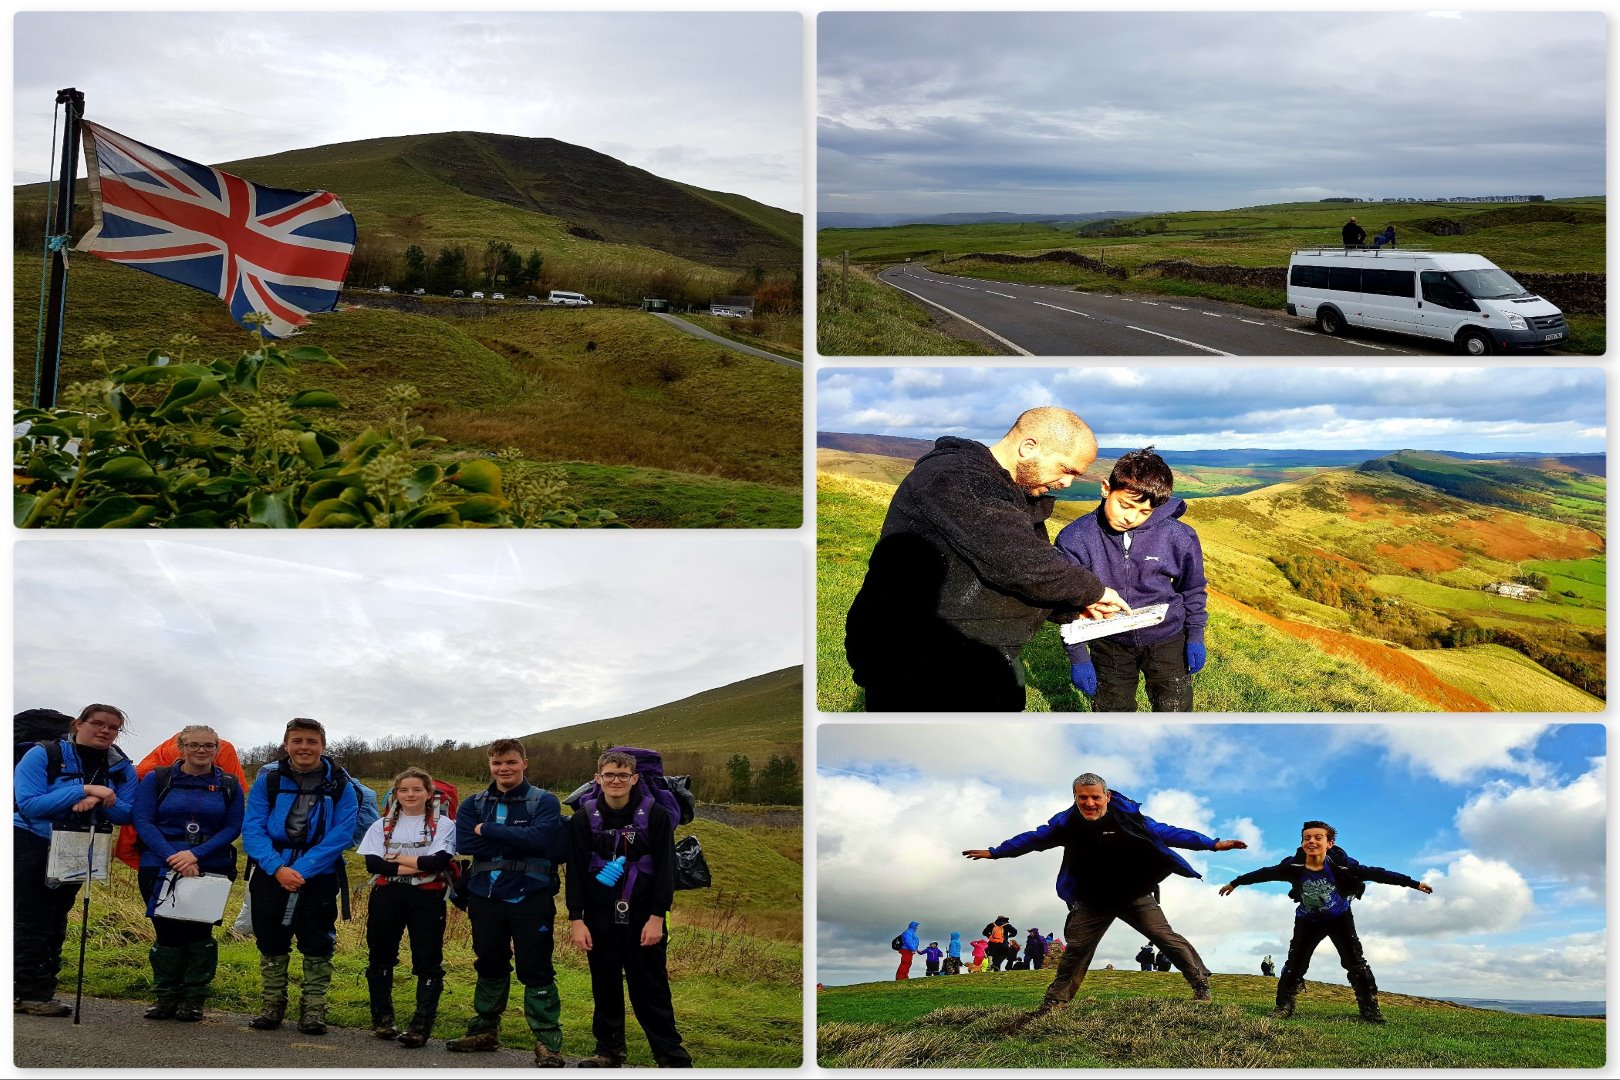
All the staff headed off to different locations to ensure that the teams walked the route (they do this without supervision) safely. I went onto the slopes of Mam Tor with Finlay and Dave Lewis.
After spending a bit of time watching out for the teams from the minibus roof we headed up the slopes some more. Finlay got a bit of nav practice in from Dave and a bit of flying practice from me 🙂
Mam Tor
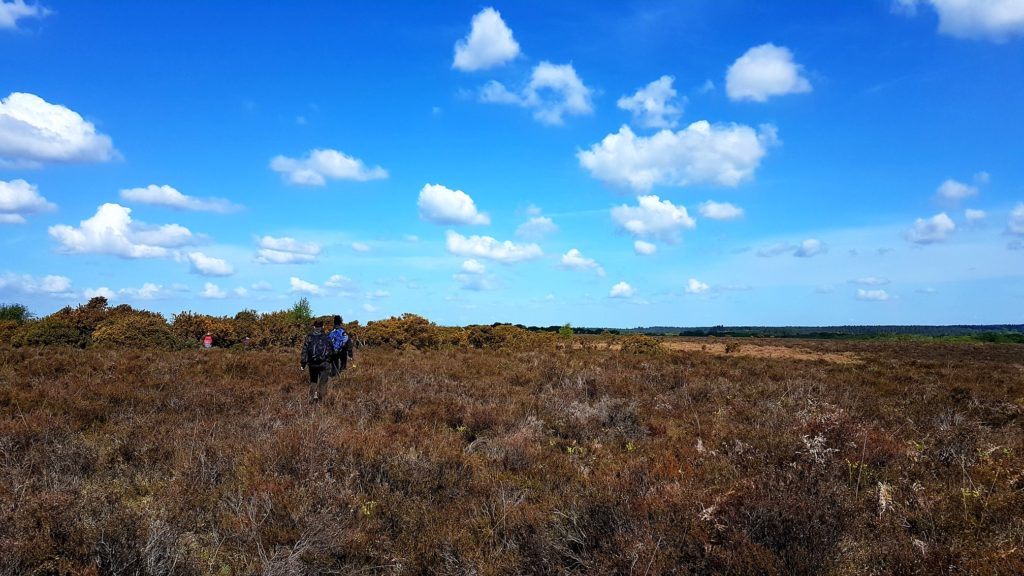
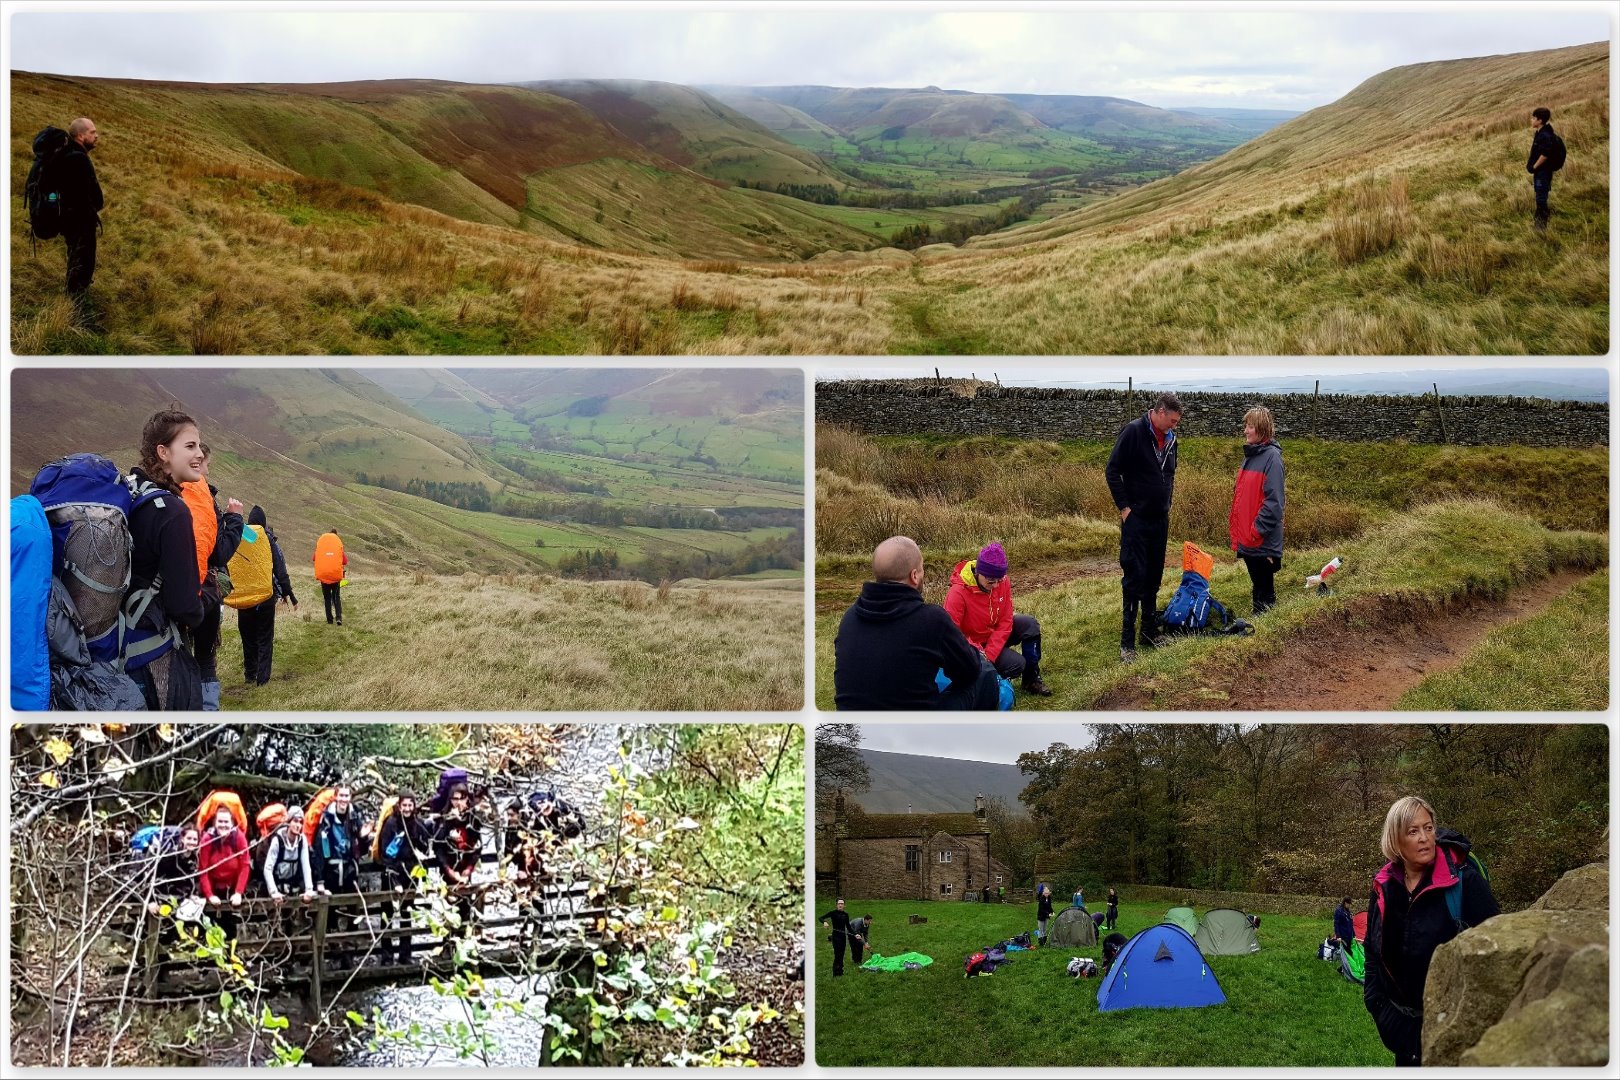
After Mam Tor the teams headed West along the gentle ridge that is Rushup Edge before heading North down into the beautiful Edale valley. We met the teams a couple of times along the way but otherwise left them to their own devices as we explored the countryside and practiced our own nav.
Camp for the night for the expeditioners was the remote but rather well laid out campsite at Upper Booth Farm.
Edale Valley
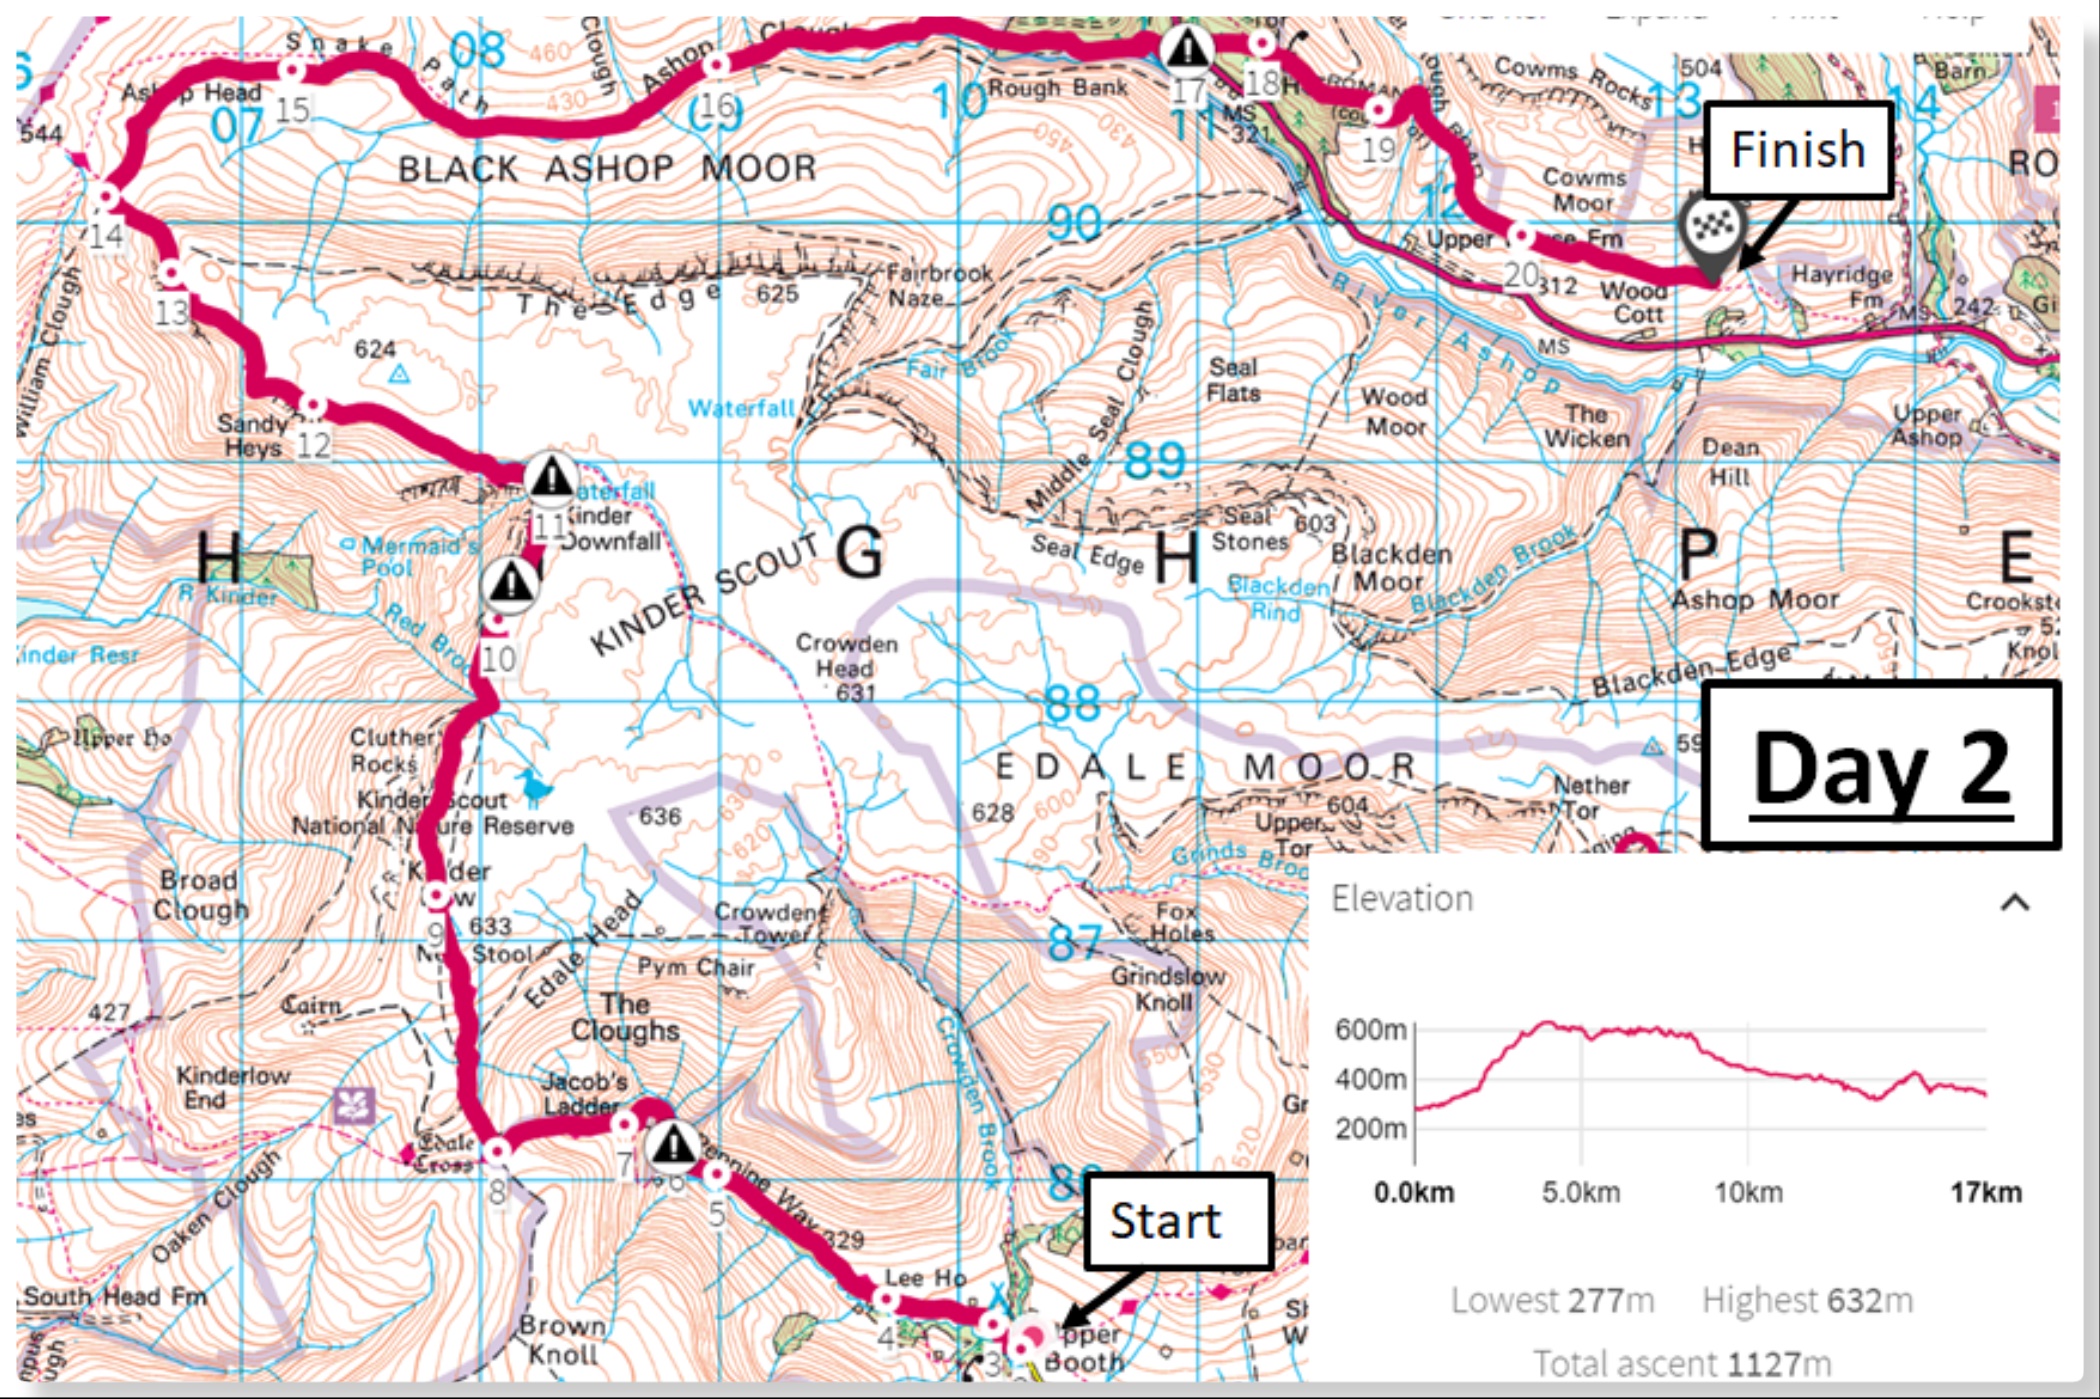
Day 2
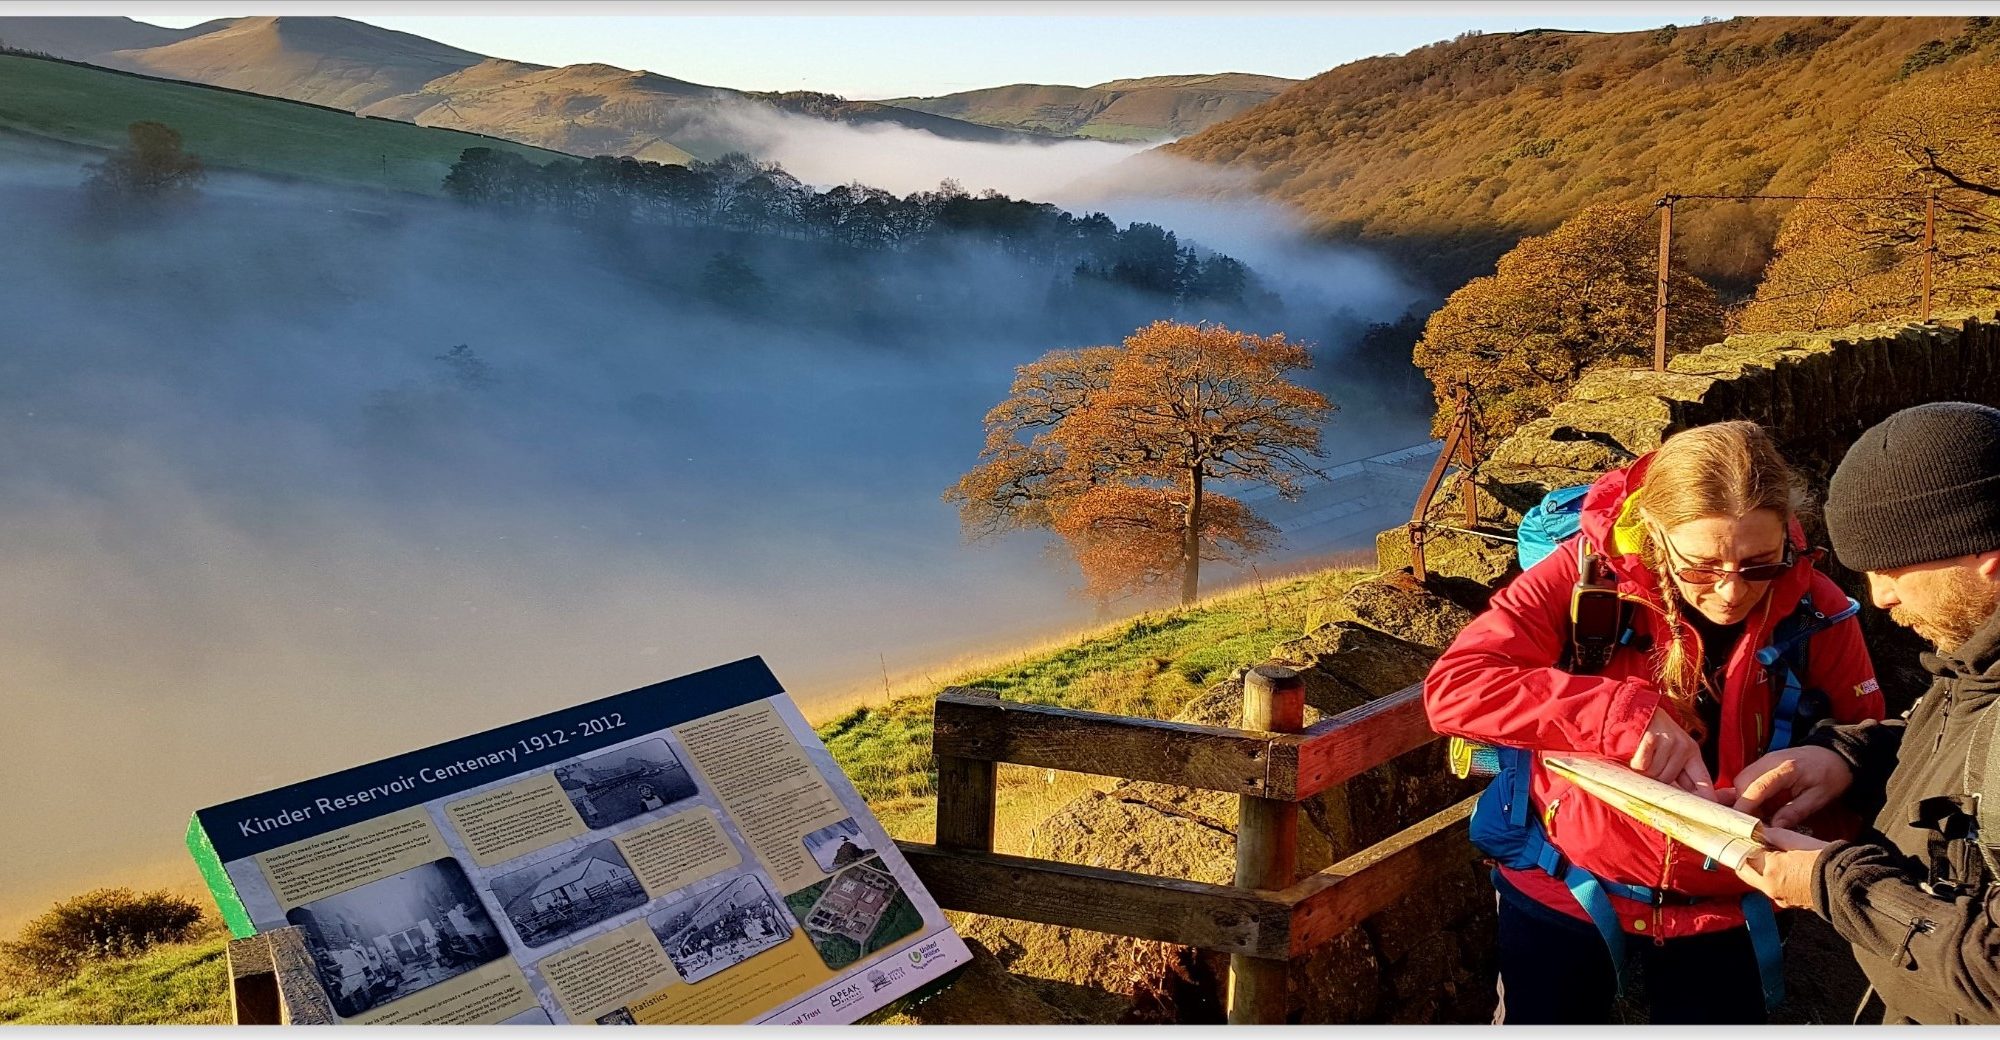
This was a tougher day for everyone as the route was up and over the Kinder plateau. The weather was clear so that made the nav much easier for everyone (including ourselves).
I did not see everyone leave camp as I set off to ascend Kinder from the small town of Hayfield on the Western slopes of Kinder with Dave, Nina and Finlay.
There was a temperature inversion that morning and the mist was trapped in the valley. The mist slowly crept up the valley until it topped out onto Kinder reservoir making for a great panoramic. I also spotted for the first time a Mist Bow. This happens rarely – when you get sunlight reflected off water and through mist.
Kinder Reservoir
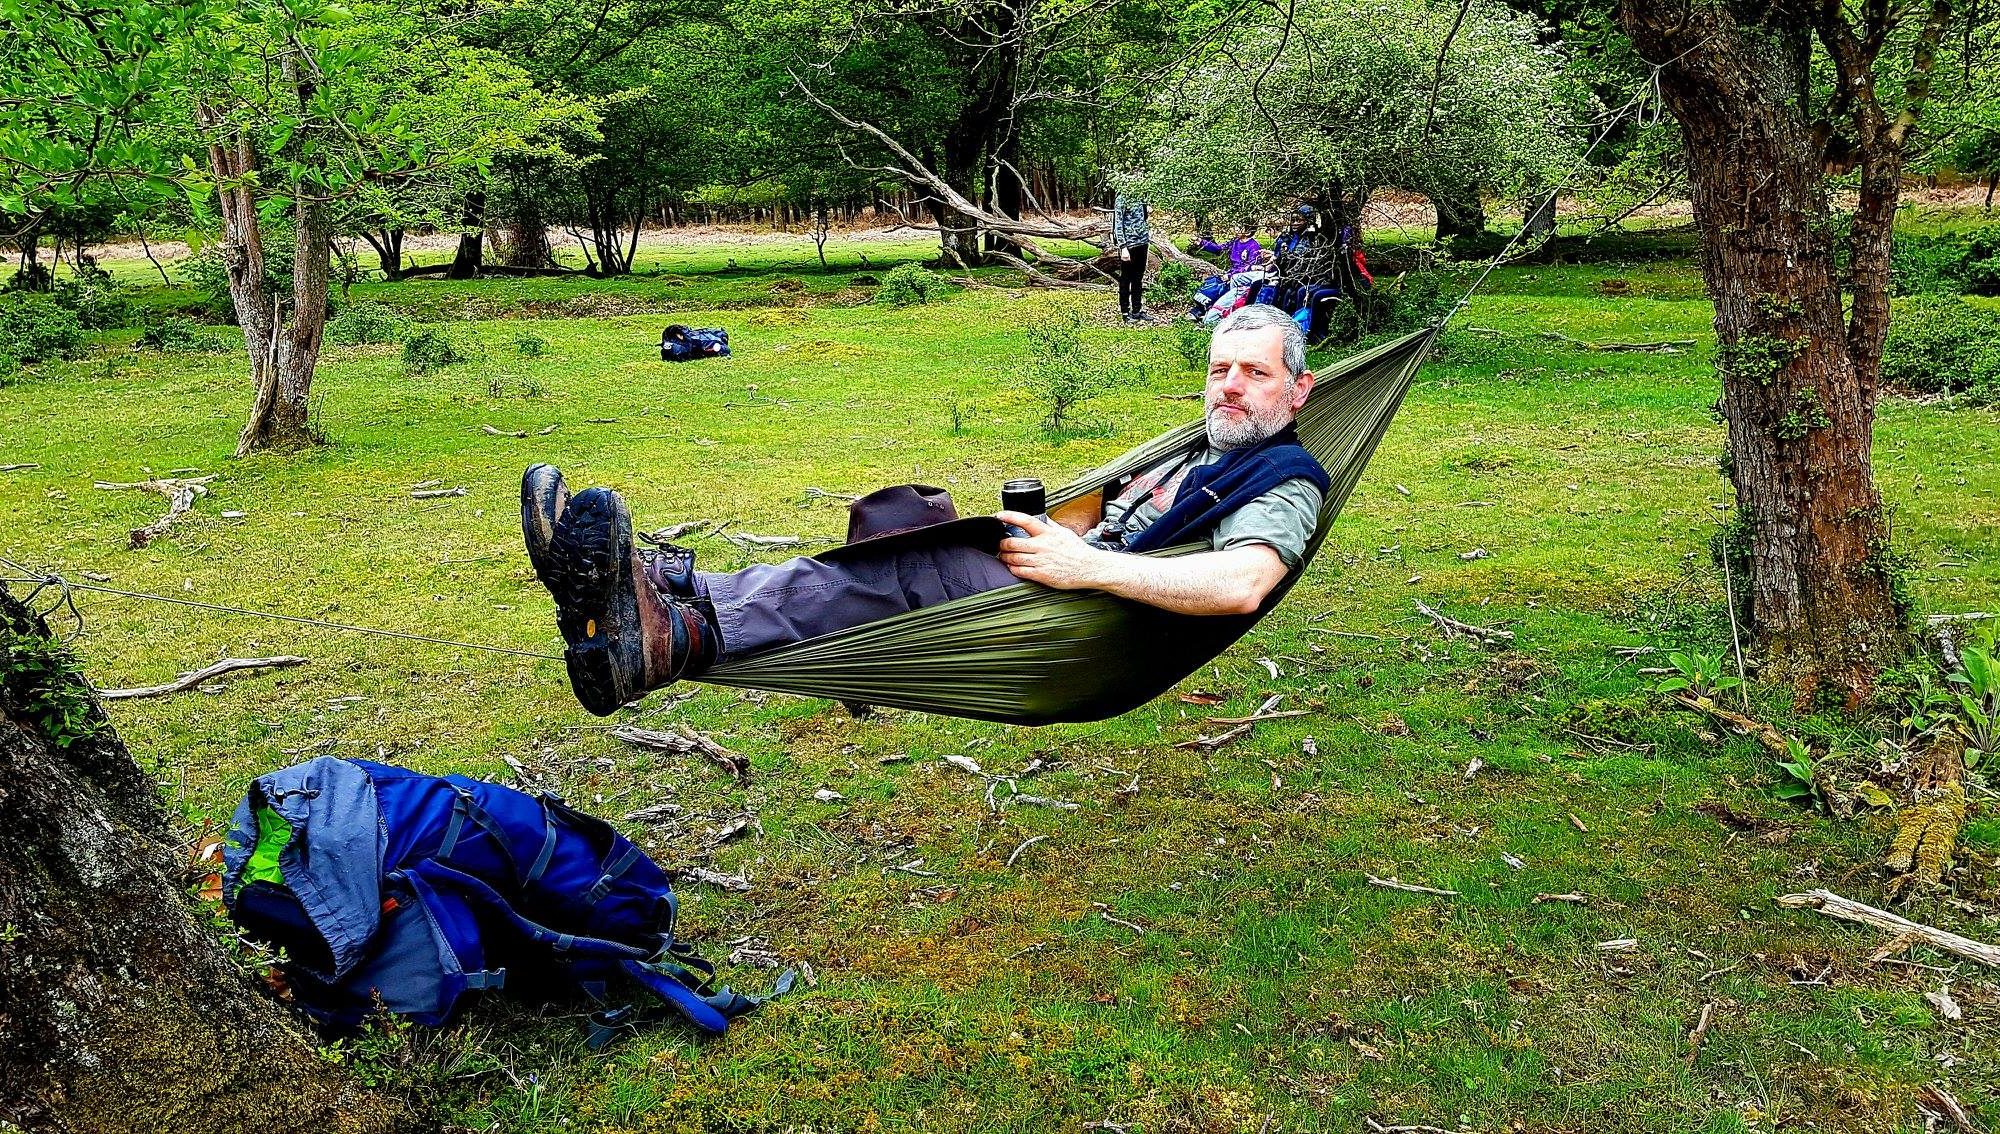
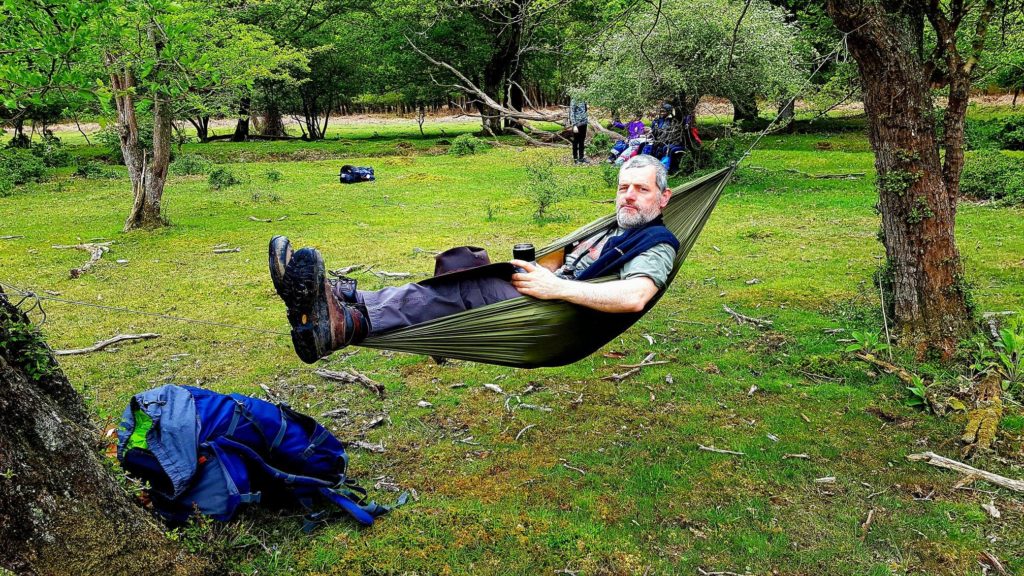
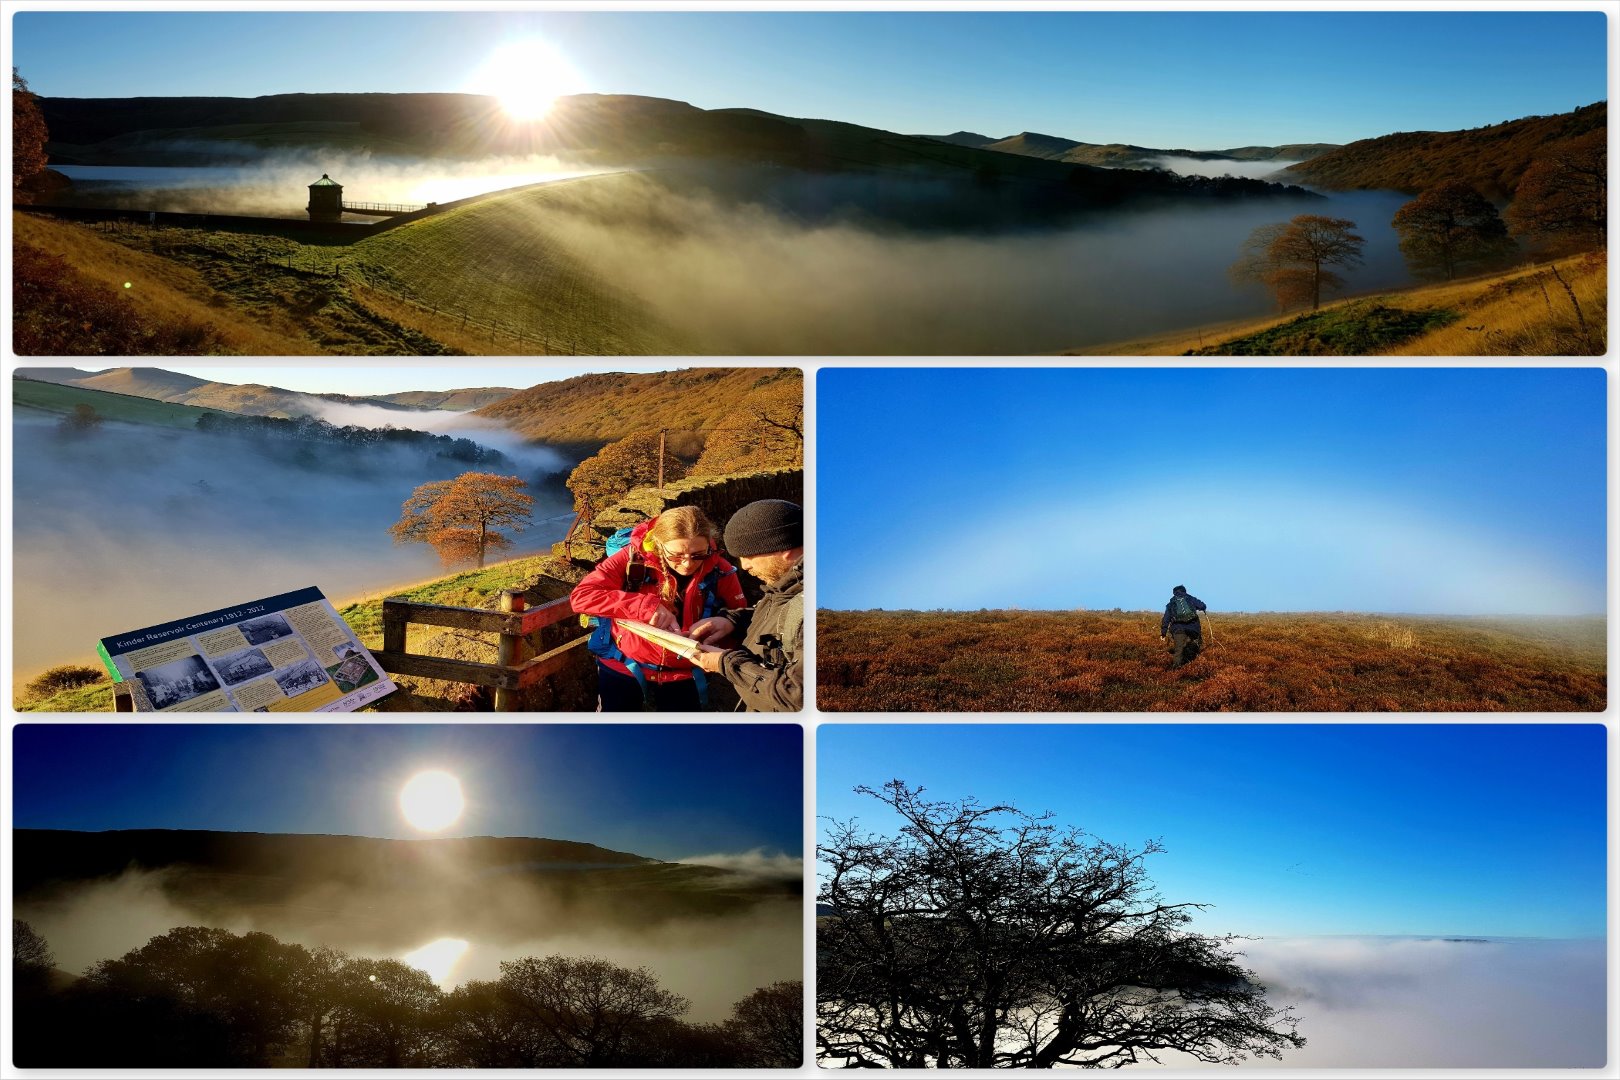
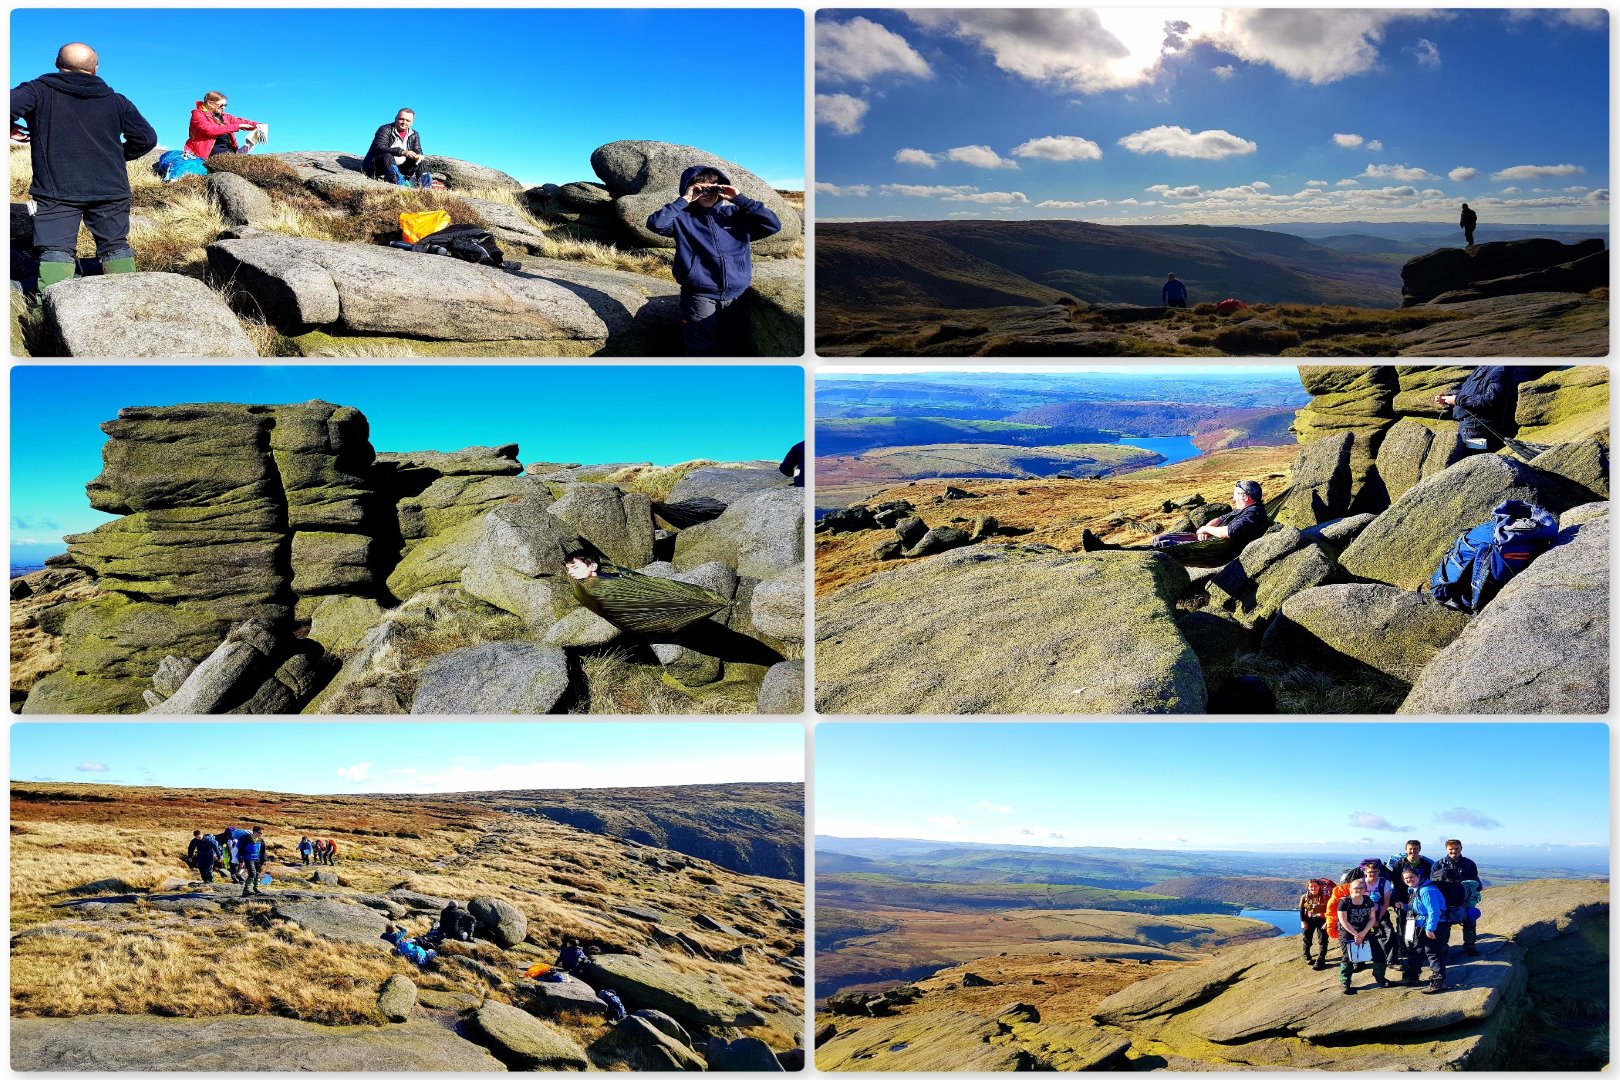
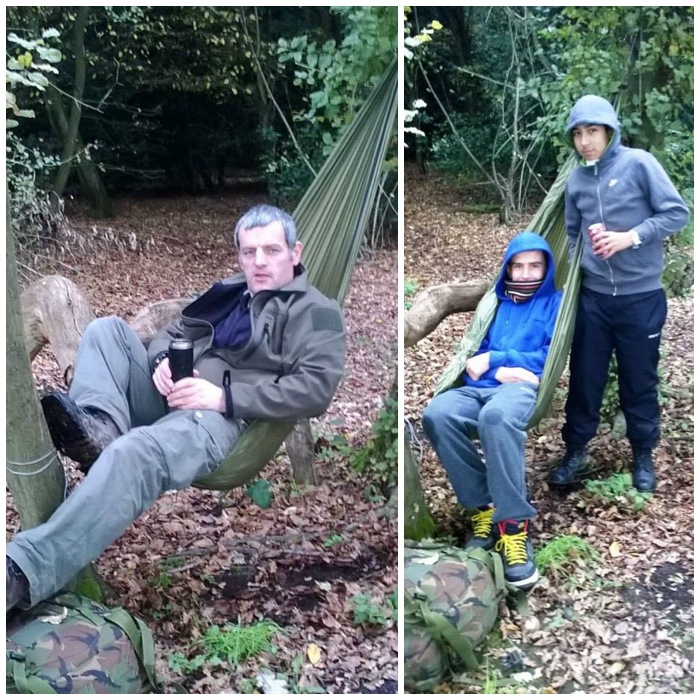
Once on top of the Kinder plateau we settled down into some crags and got the hammock out. I carry my EDC Hammock around with me for just such occasions. We spoke with the teams as they passed through our positions and it was good to see them all in good form.
Kinder Plateau
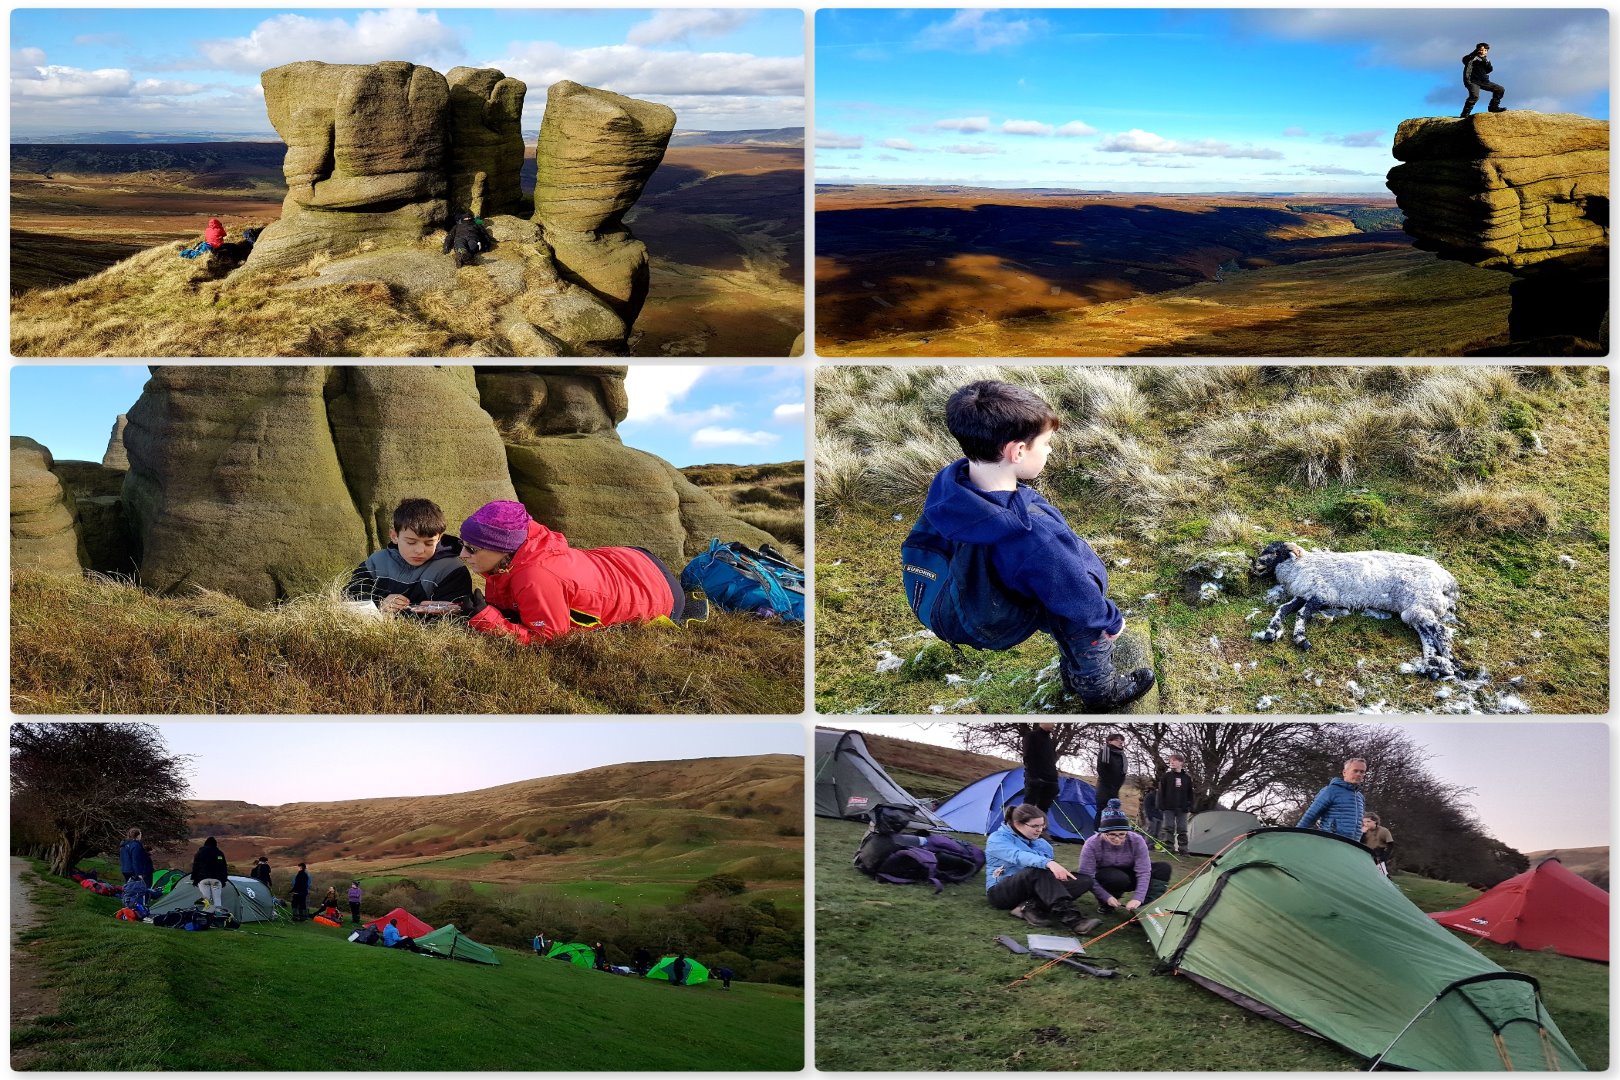
After a while Nina, Dave Finlay and myself moved North over the Kinder plateau to observe the teams dropping down Snake Path. Finlay spotted a dead lamb along the way an got some more nav practice in from Nina – Dave got his head down and I got a few more pics 🙂
I followed the last team from a distance down Snake Path while the rest went back to Hayfield. We all met up again at the campsite the expeditioners were using that night.
North Kinder
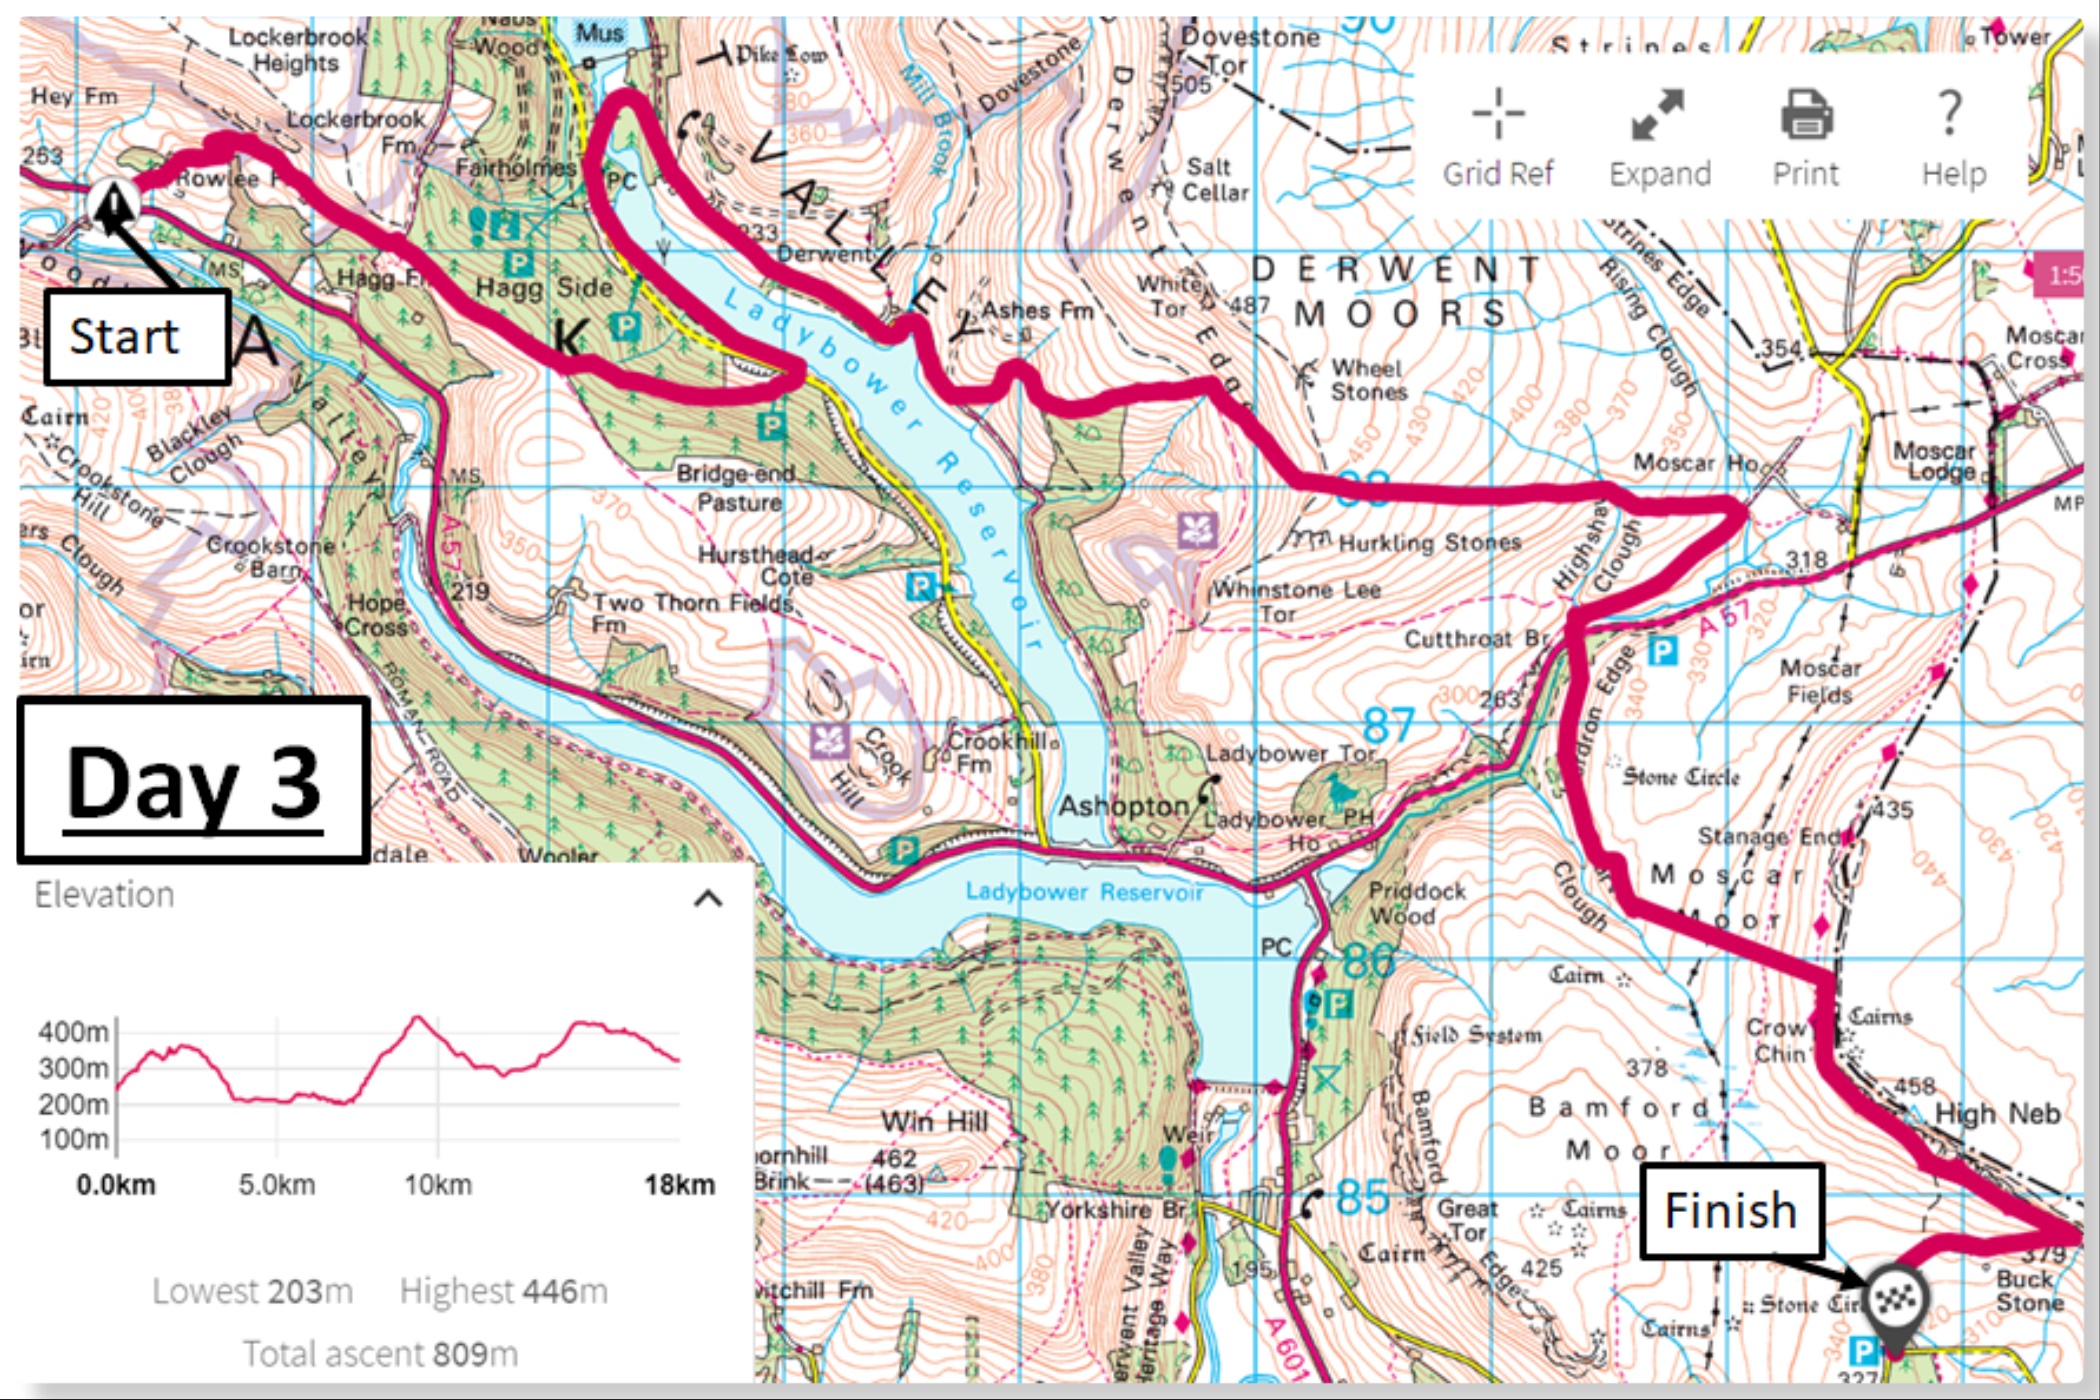
Day 3
The weather turned on Day 3 with lots of low cloud and rain. Finlay had left the expedition the night before with my wife Alison so just Dave and myself headed off up into the woods over Ladybower Reservoir to meet the teams.
We eventually spotted them all as they hiked on through the clouds and rain. Eventually the clouds lifted but the rain did not. The teams walked up onto Stanage Edge later in the day and the wind started to pick up. Luckily they only had a short section to walk along the Stanage path and were soon down into the shelter of the woods and their camp for the night.
Stanage
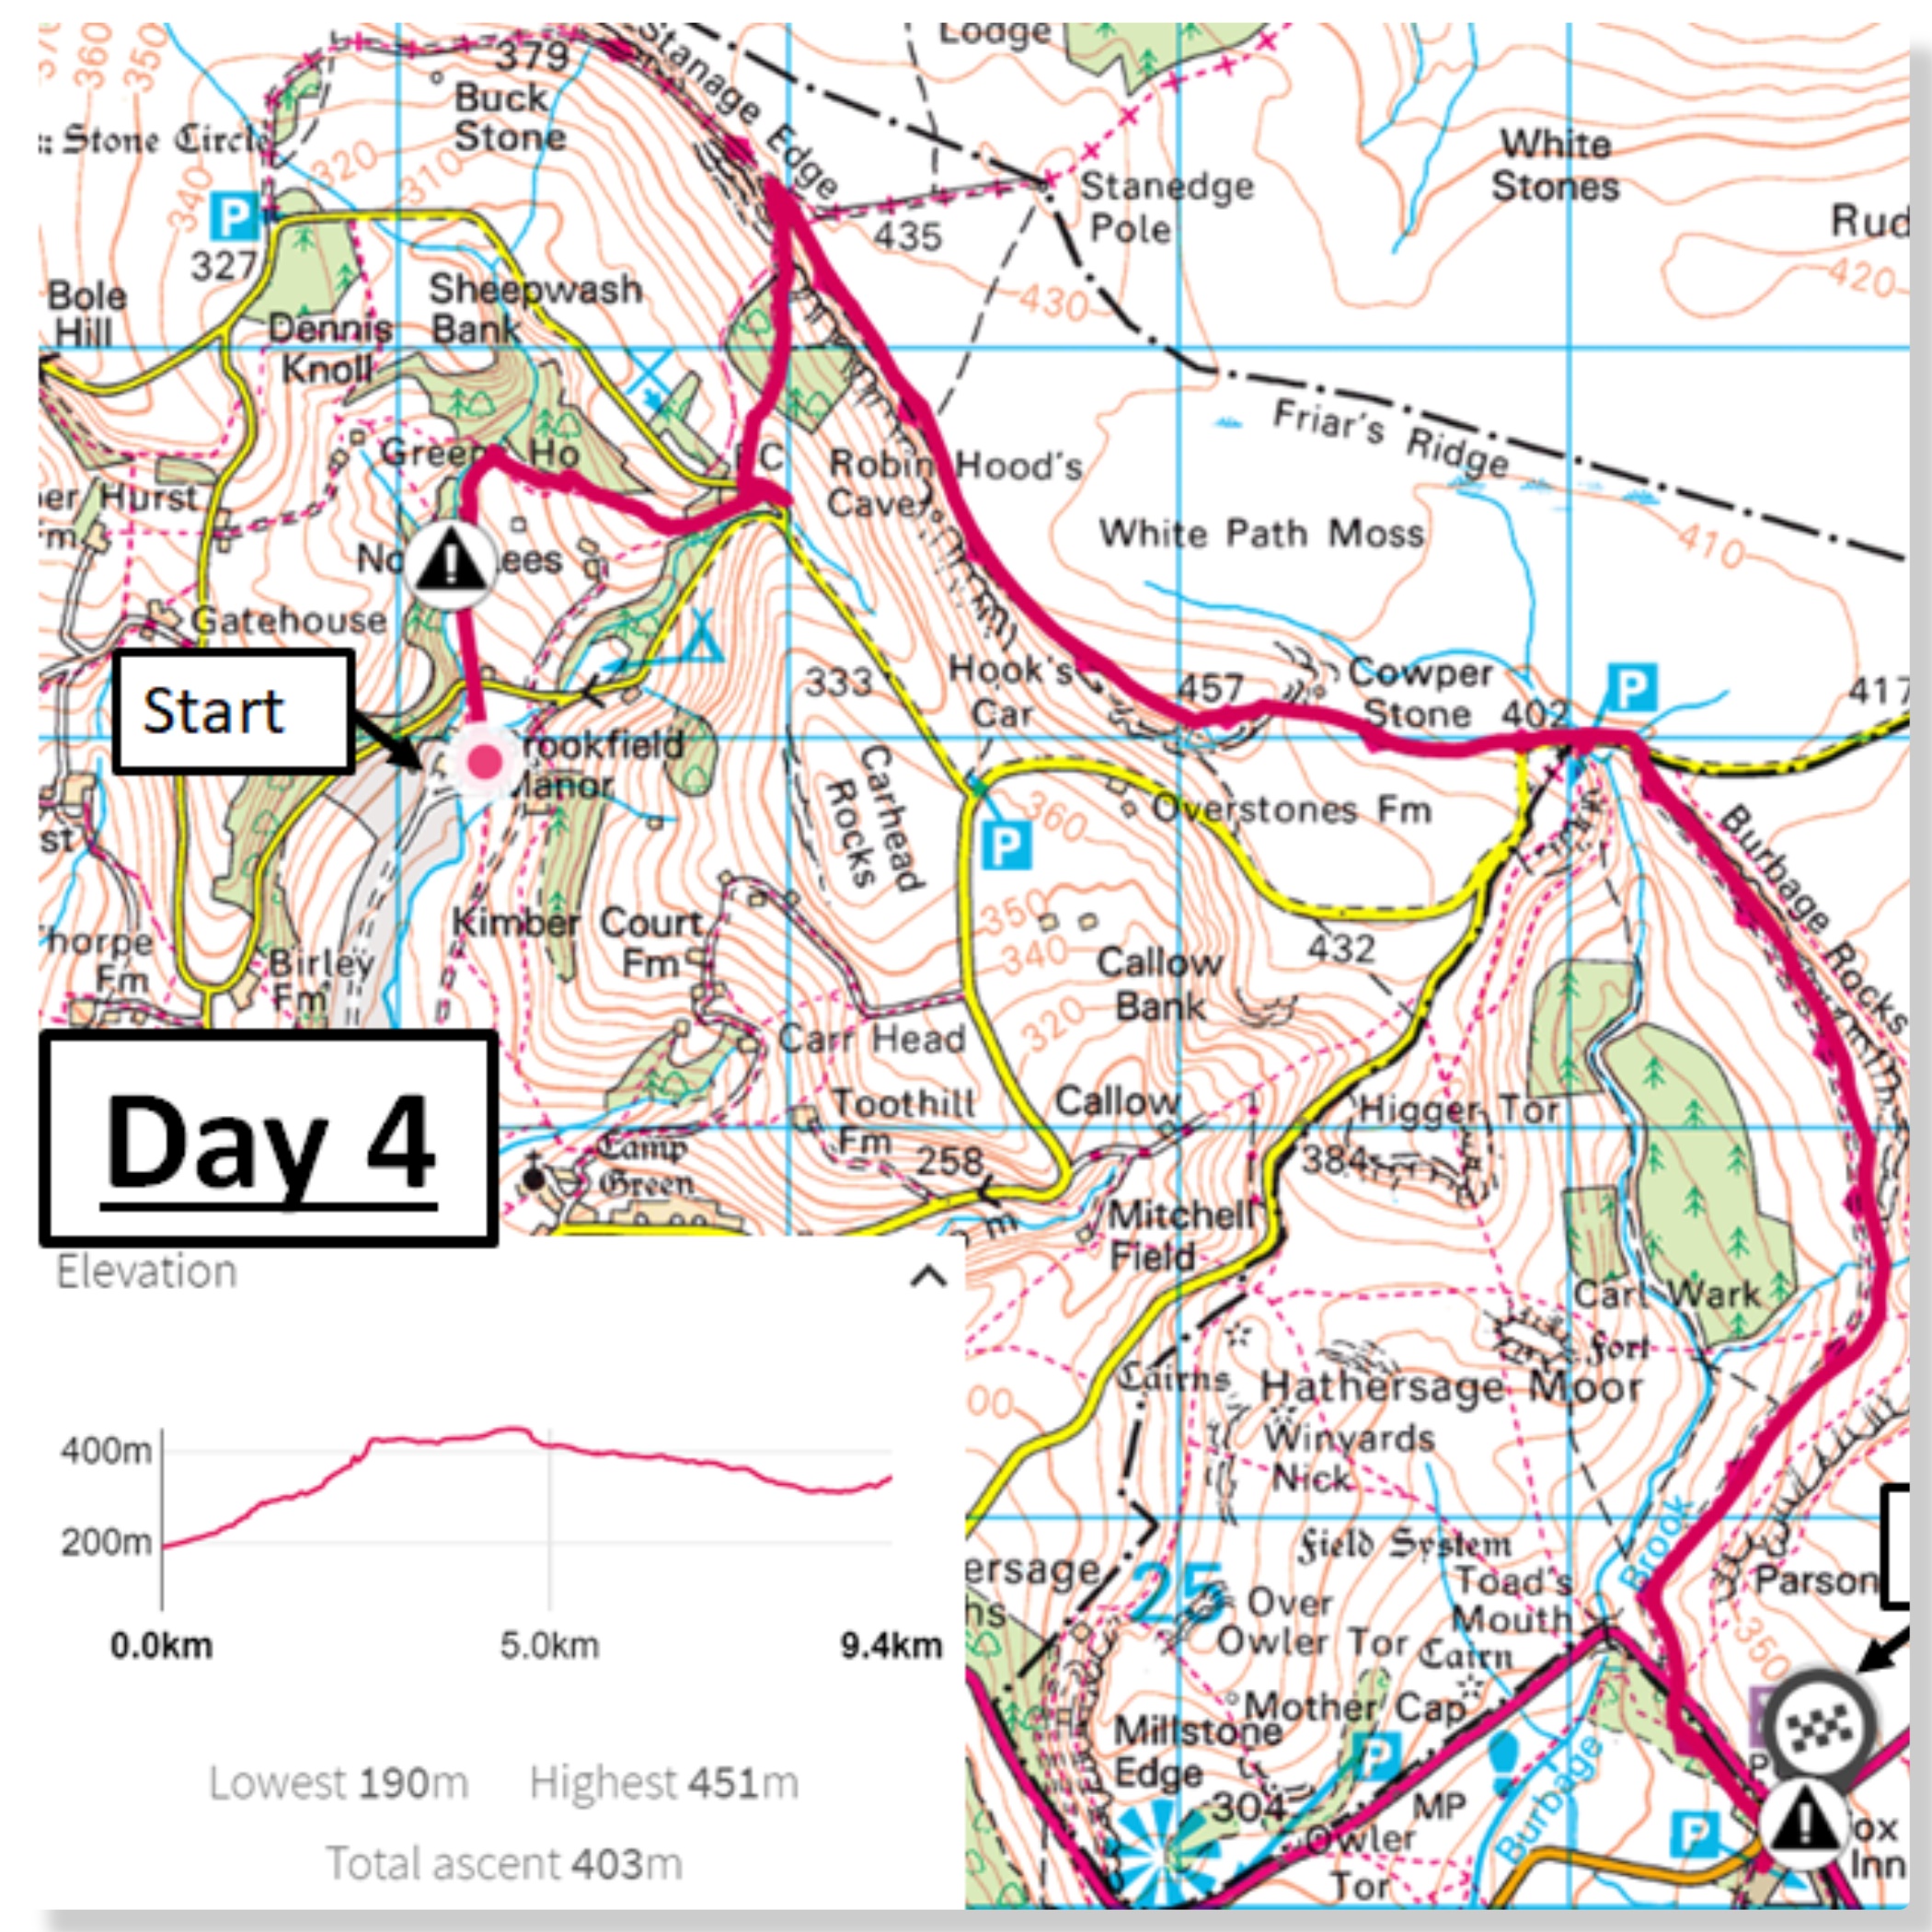
Day 4
I did not see the teams on this part of the route but thankfully the weather improved greatly for their last day. Straight after breakfast they were back up onto Stanage Edge and hiking South East to the finish at the Fox Inn.
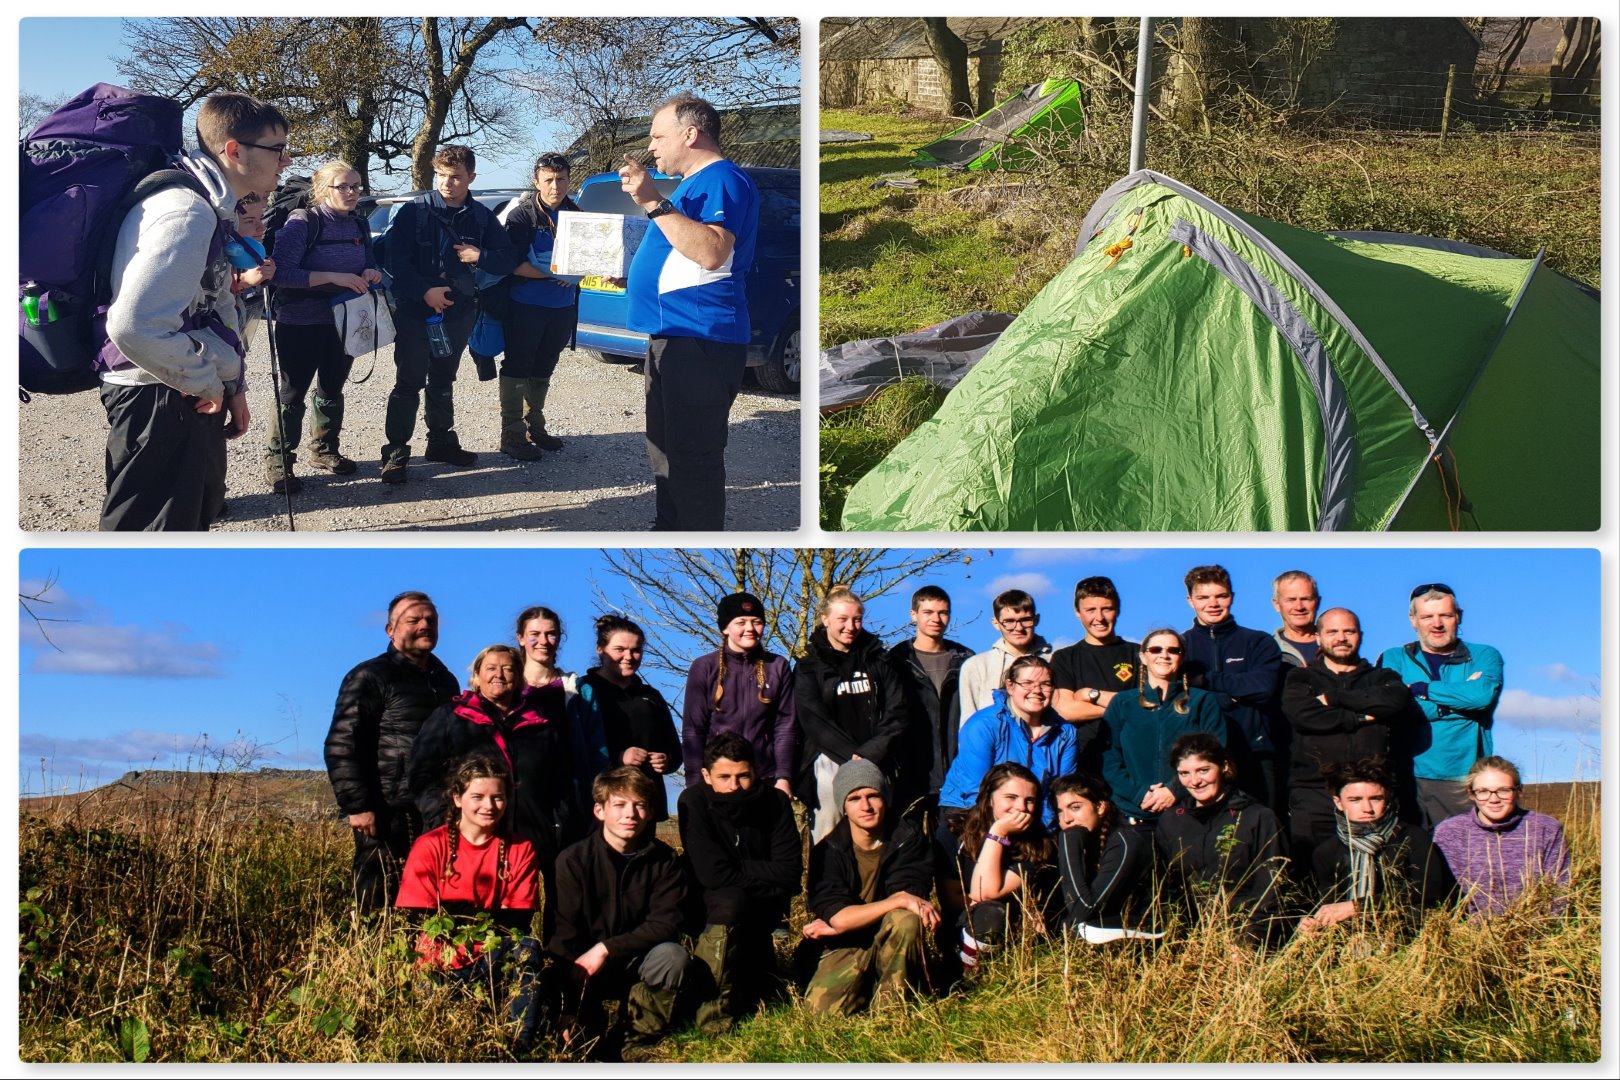
After a short de-brief all the kit was dried out and the ‘Survivors’ group photo was taken.
Endex
There ended a fantastic October expedition to The Peaks.
Groups of friends usually have something in common – with my chums from Crisis it is Grumpiness ;-( The ‘Grumps’ are Rick (1), myself (2), Gordon (3) and Stu (4). Gordon has numbered us however there is much debate about his 3rd place in the grumpiness rankings. We do grumble a lot and it is remarked upon from time to time however we like it and it makes us happy 🙂
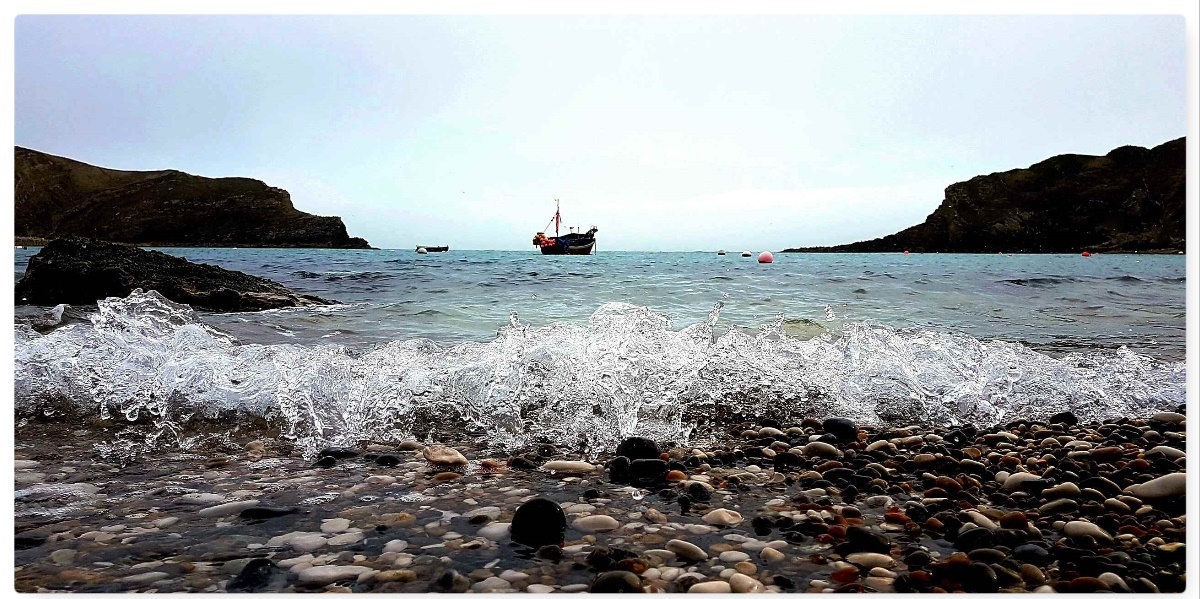
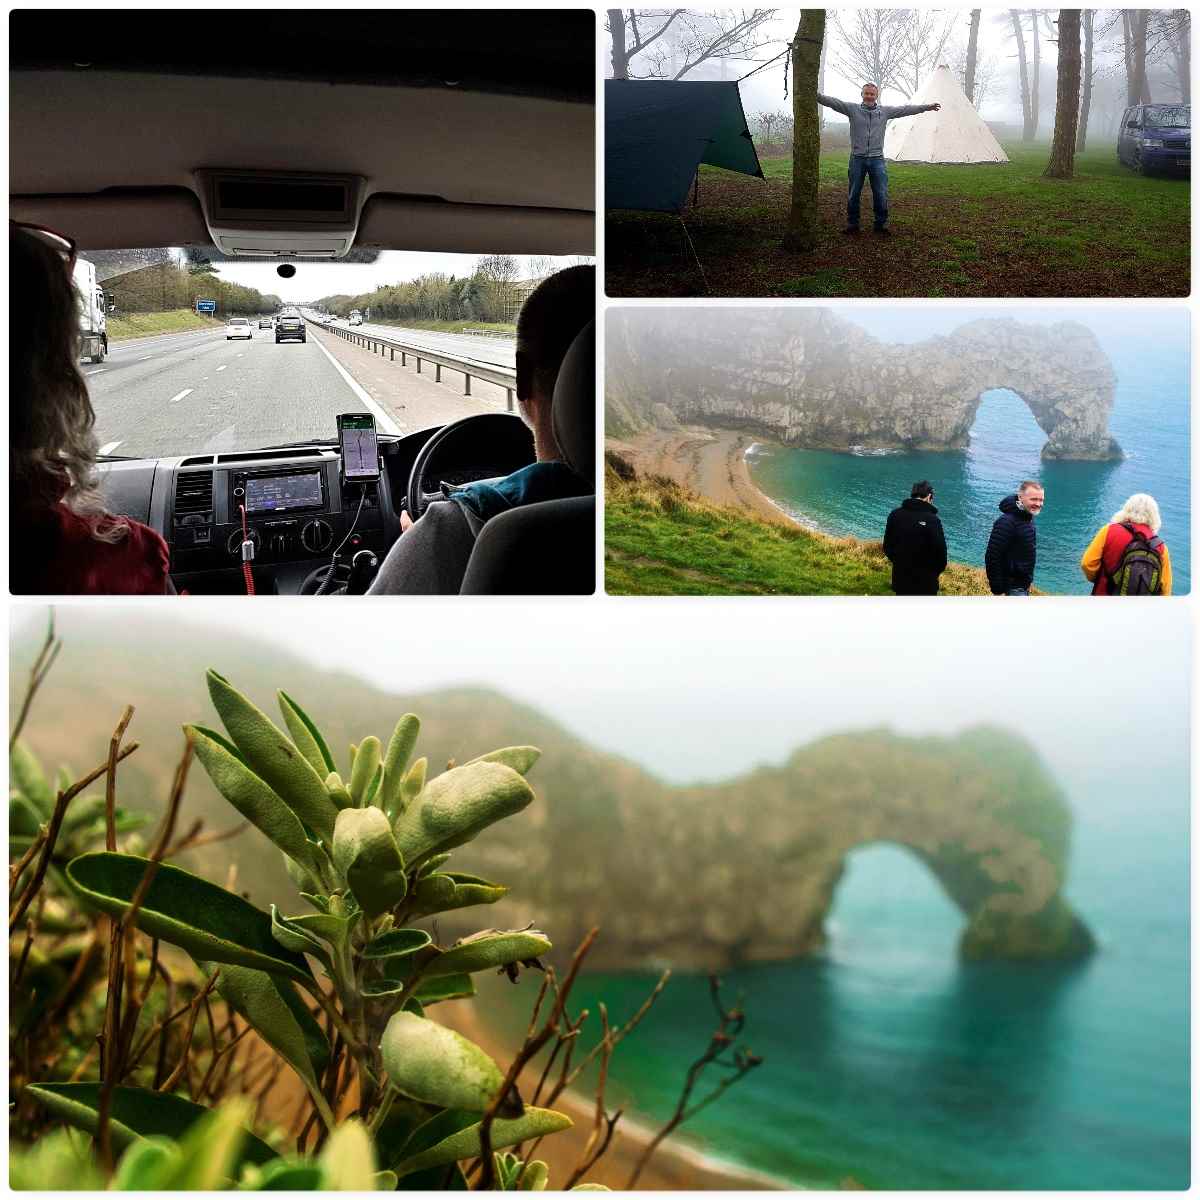
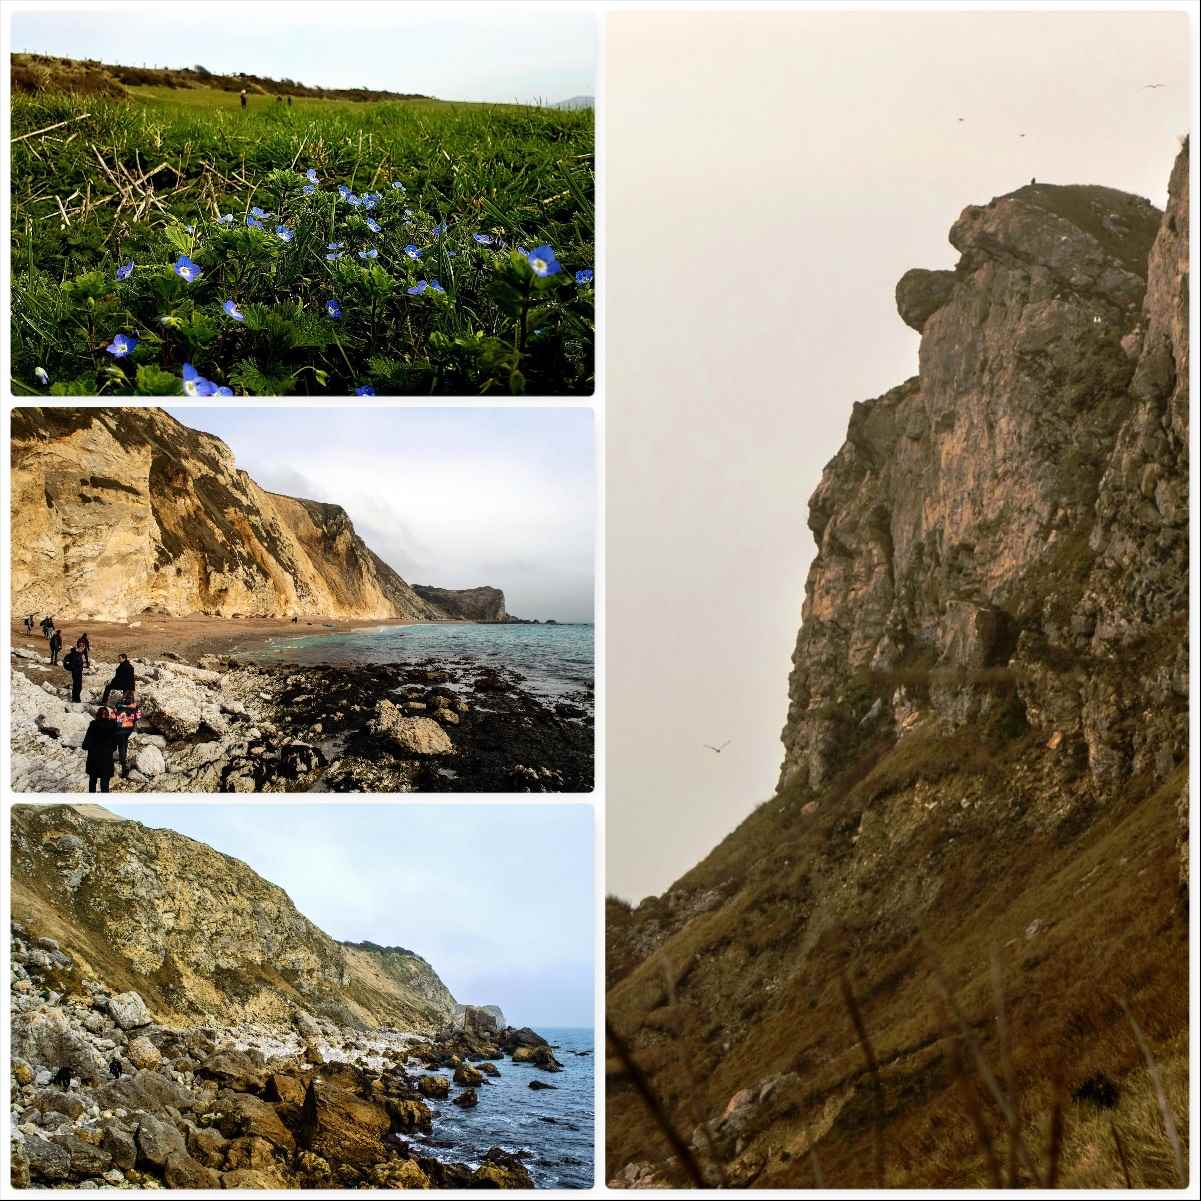
We have worked together each Christmas for 20 years or so at one of the homeless centres for Crisis in London. During the year we always try to get away together. This year Gordon organised a trip down to Durdle Door on the Dorset coast here in the UK early in March.
Foggy Friday
I had never been to this part of the coast before so was keen to go. We set up camp at Durdle Door Holiday camp (I insisted on sleeping in my hammock while they all got the tipi) and then headed off towards the coast.
The fog was well in but I insisted we go all the way down to see the arch at Durdle Door. I am glad I did as it looked stunning in the fog.
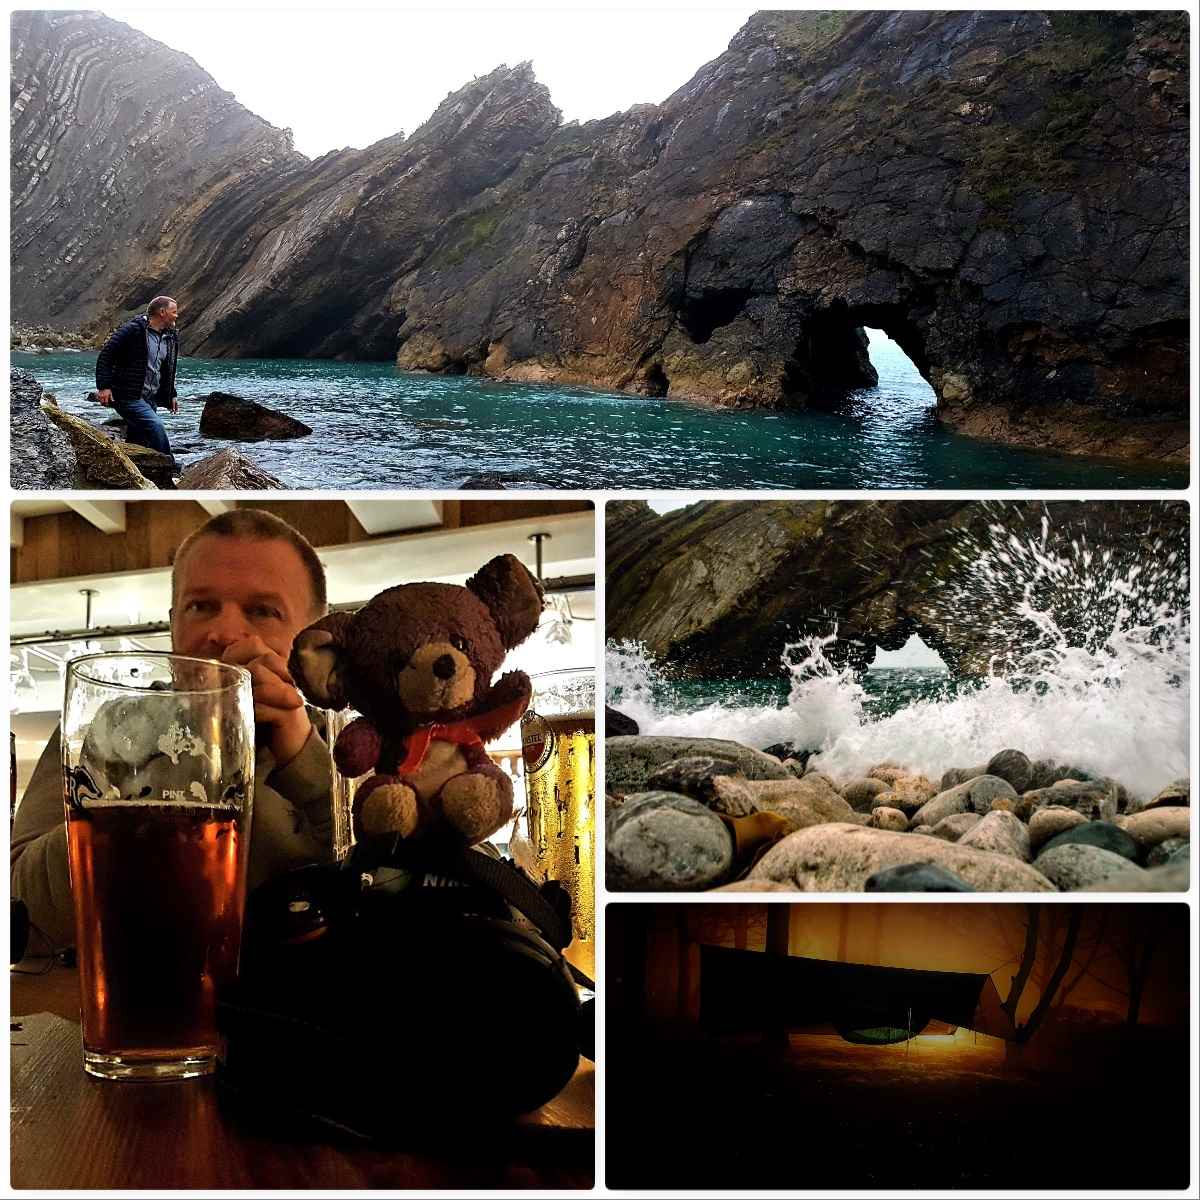
Once we had finished there we headed on over to Lulworth Cove and Stu and myself headed on down to see Stair Hole. It was a bit of a hike down but it was worth it to get the pictures. The rest of the evening was spent between the pub in Lulworth Cove and the one in the campsite where I was presented back with my Flossie Anne. She had just come back from one of her epic trips with Rick – this time she travelled from Japan through China, Mongolia, Russia and the Baltic states (she must be the most well travelled bear in the world).
Friday Night
The Saturday
I woke up at daft o’clock on Saturday morning to the sound of the Crows roosting above my hammock. The tranquil nature of the rest of my view made up for that racket though. The rest of the morning was a relaxed affair (apart from the Crow poo all over my tarp and tipi) and Stu had brought along some great coffee to brew up.
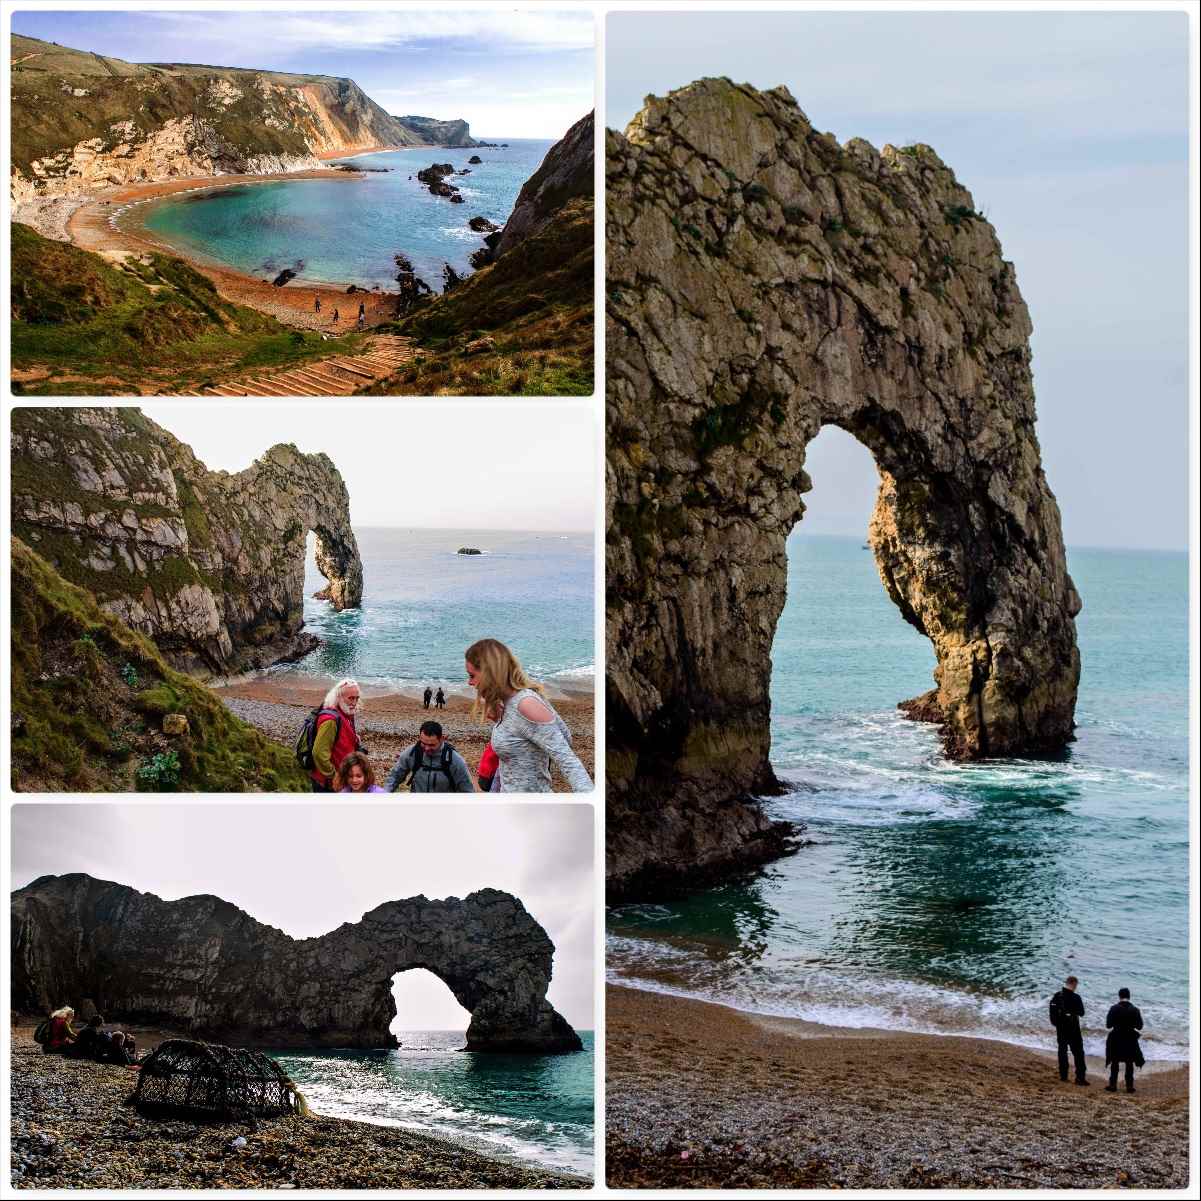
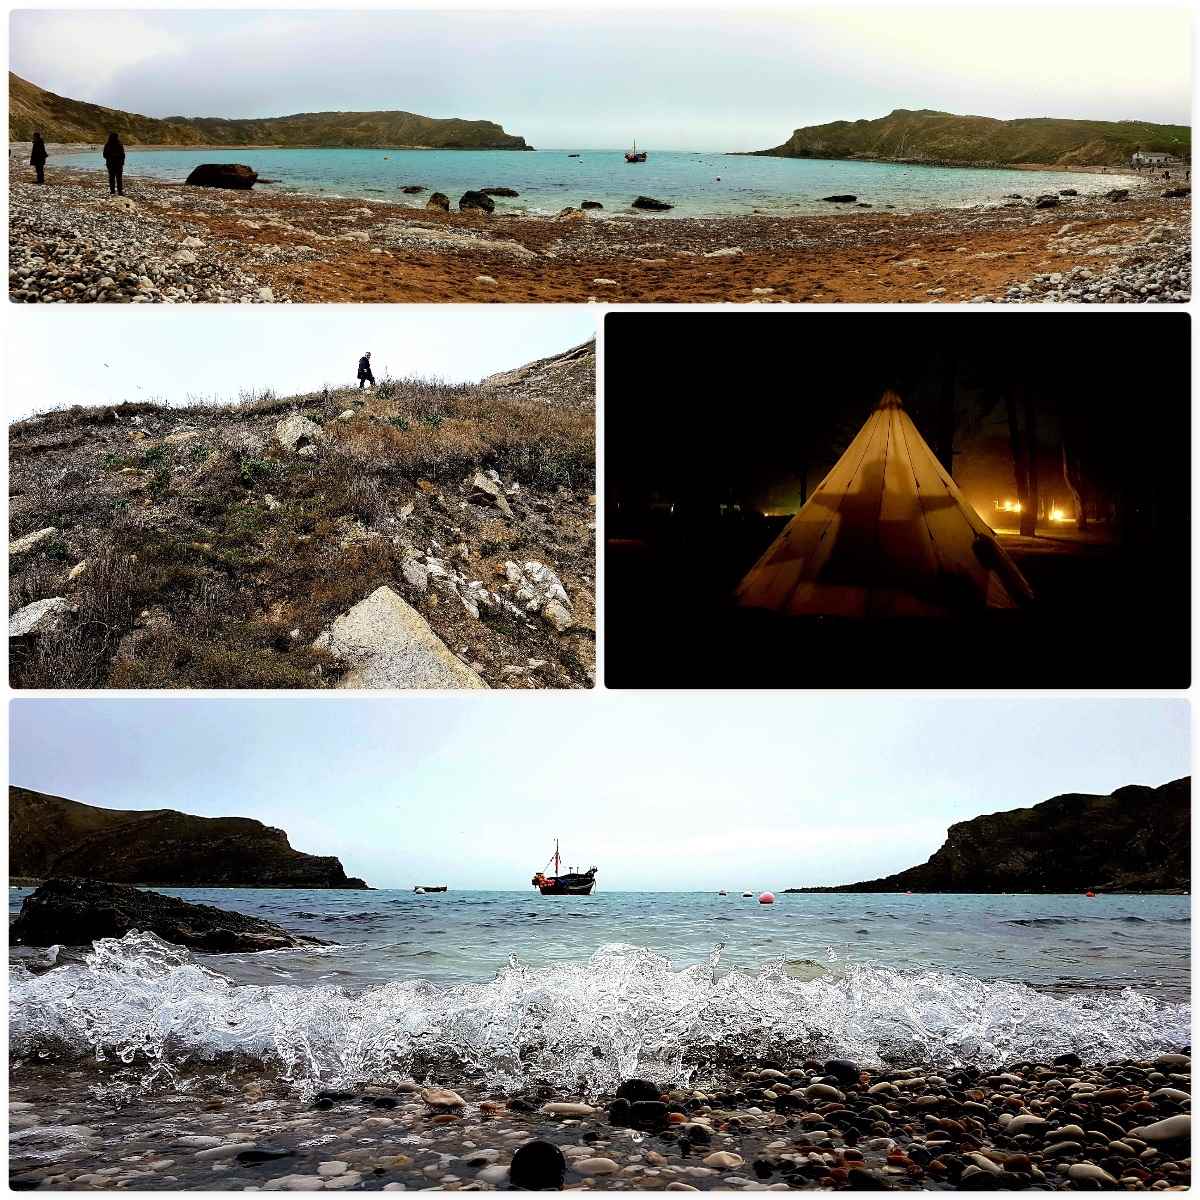
Once brekkie was over we headed back down to Durdle Door (Rick was very concerned for a young lady as she descended the steps!!) and I got a good look down the coast over the Man O’War beach – it really is quite stunning. We pootled around Durdle Door itself (well I faffed really trying to get a good picture of it) before heading west.
Durdle Door
As you head west you approach a great big headland named Bat Head with an archway called Bat Hole. It is beautiful to look at however there was no way round it for us with the tide being so far in (I have no idea if you can get around the headland at low tide).
Gordon and Stu were not paying attention and were soon ankle deep in swash 🙂 We back tracked and spotted an escape route up off the beach. It was a ravine with a weighted rope in it. After a quick recce everyone was soon up on the coastal path overlooking the beach.
We had a leasurley stroll up the coastal path to Swyre Head where we enjoyed the views and I stalked a crow to get a good shot of him 🙂
Along and Up
From Swyre Head we moved off inland around a natural bowl in the landscape called Scratchy Bottom – there are some brilliant place names in this country. It was here Rick spotted a group of wildflowers. Once I got up close I could see they were Speedwells – this being early March it was my first spot of them this year.
We made our way back to Durdle Door through the campsite (after cleaning off some more Crow poo from my tarp and tipi) down onto Man O’War beach. There were plenty of people on the beach but as we travelled on the numbers soon thinned out. Eventually we were onto rocks and we were the only ones in sight. Looking back Stu spotted the strange rock formation at Dungy Head you can see in the picture below (on the right) – Looks like a large bloke with a big round nose and a woolen hat on his head to me 🙂
Changing Scenery
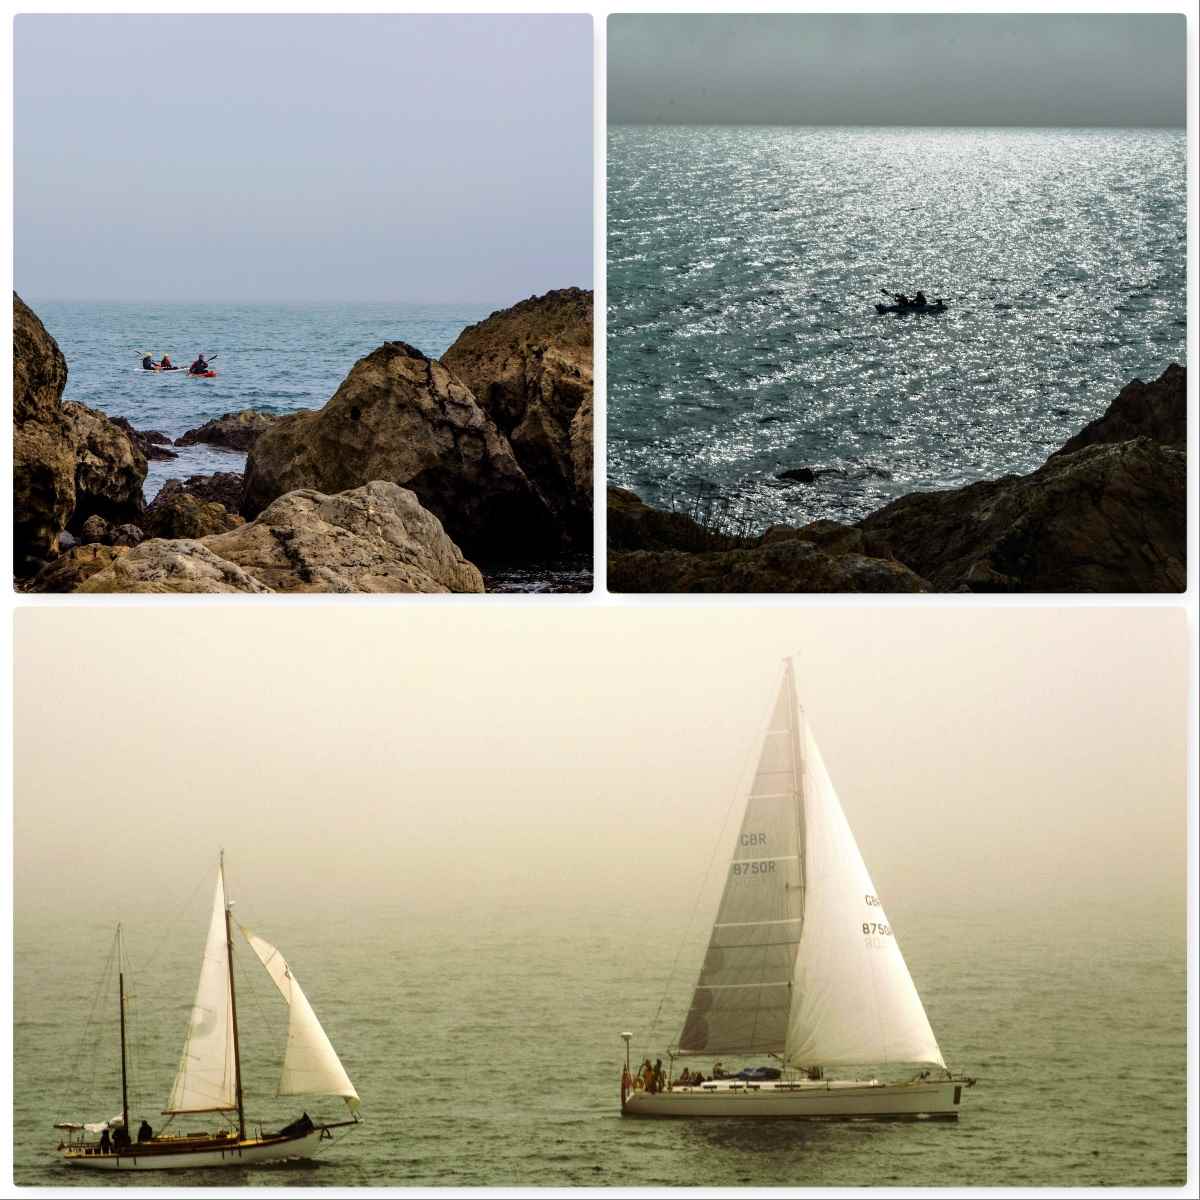
There were a number of kayakers on the water and they made for some lovely photography but I could see that the fog was starting to come in again. As it thickened up two beautiful yachts came out of Lulworth Cove and headed west along the coast. It was really difficult to photograph them with the fog and because they were both white but I think I got a decent shot in the end.
Sea View
We tried to get all the way to the entrance of Lulworth Cove but it was just not possible. We found a section of Cliff that was easy to scramble up and were soon in Lulworth Cove once again.
I left the lads to potter around the village (code for pub) and spent a half hour down on the cove photographing it. The waves were non existent so I had to get down really low to get a half way decent shot (bottom picture).
We had an evening of watching rugby and trading grumps before heading back to camp. Somehow I ended up getting Stu to do ‘shadows’ in the tipi and when I looked at the picture below his shadow looked to me like a giant ginger bread man 🙂
Saturday Evening
The Sunday
We had decided the night before to de-camp straight away and head on over to the New Forest on the Sunday morning. It did not take long to pack everything away (after cleaning of more Crow poo) however due to the rain overnight (Rick ended up a tad damp in the morning) we had to have Stu’s VW van pulled off the campsite.
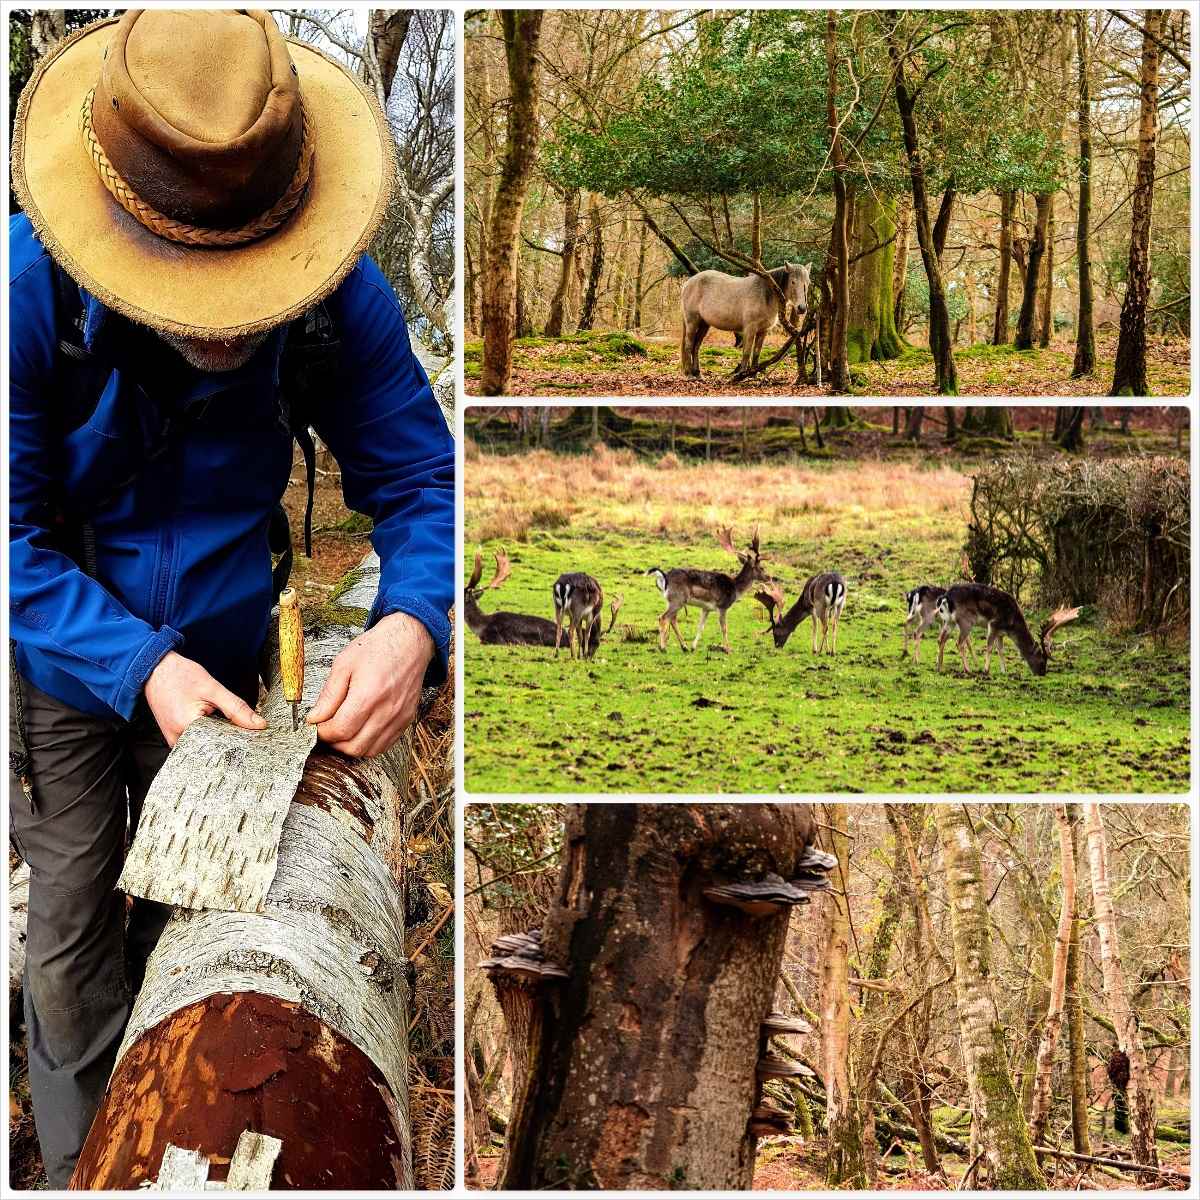
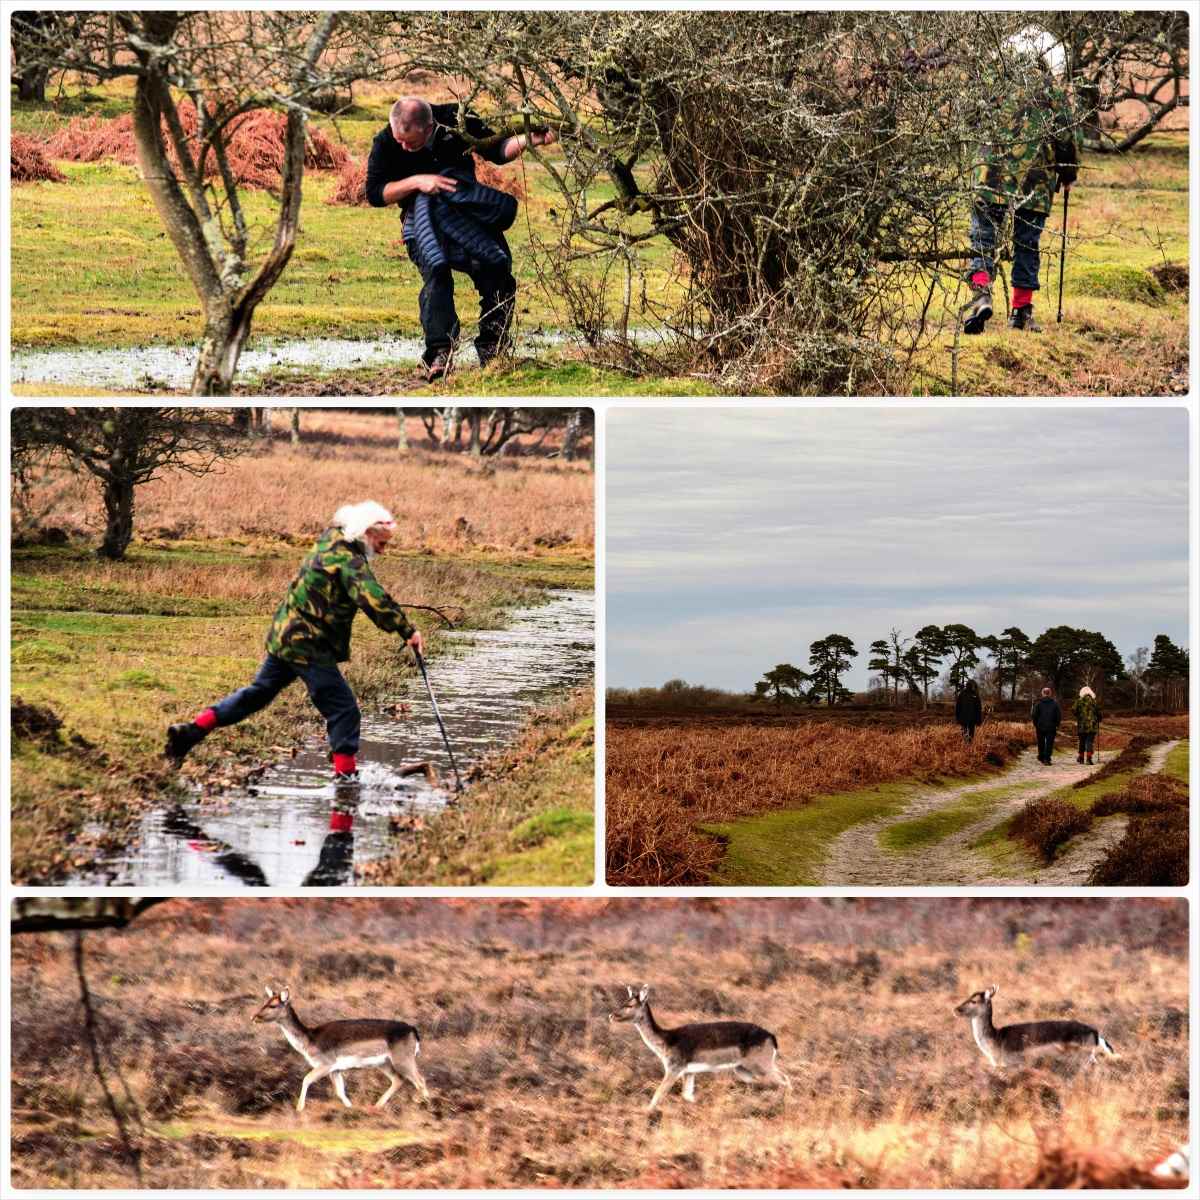
Once in the New Forest we stopped off in Lyndhurst for lunch and where I got myself a proper camp coffee pot for hanging over the fire – I did though leave it behind in the cafe and had to go running back 🙂
We drove onto the carpark by Beaulieu Rd Railway Station and headed off to the woods by Denny Lodge. There were plenty of ponies around and quite a few deer – though the first lot were in an enclosure (all stags in an enclosure called Stag Park). I spent some time making up some birch firelighters and looking for fungi and burrs.
Sunday New Forest
There was still plenty of standing water on the heathland so a detour here and there was required and just as we headed back to the van we spotted a herd of female deer in the open.
I took my time and got as close as I could to them. They were very flighty and soon they were off but I did manage to get a decent picture.
A Great Bimble
I liked the campsite in Durdle Door so much I am back down there in a weeks time with my family to stay at one of the camping pods they rent out – fancy a break from always having to put the tent up.
Thanks to Gordon for organising the weekend and for all my fellow Grumps for being ………well so Grumpy 🙂
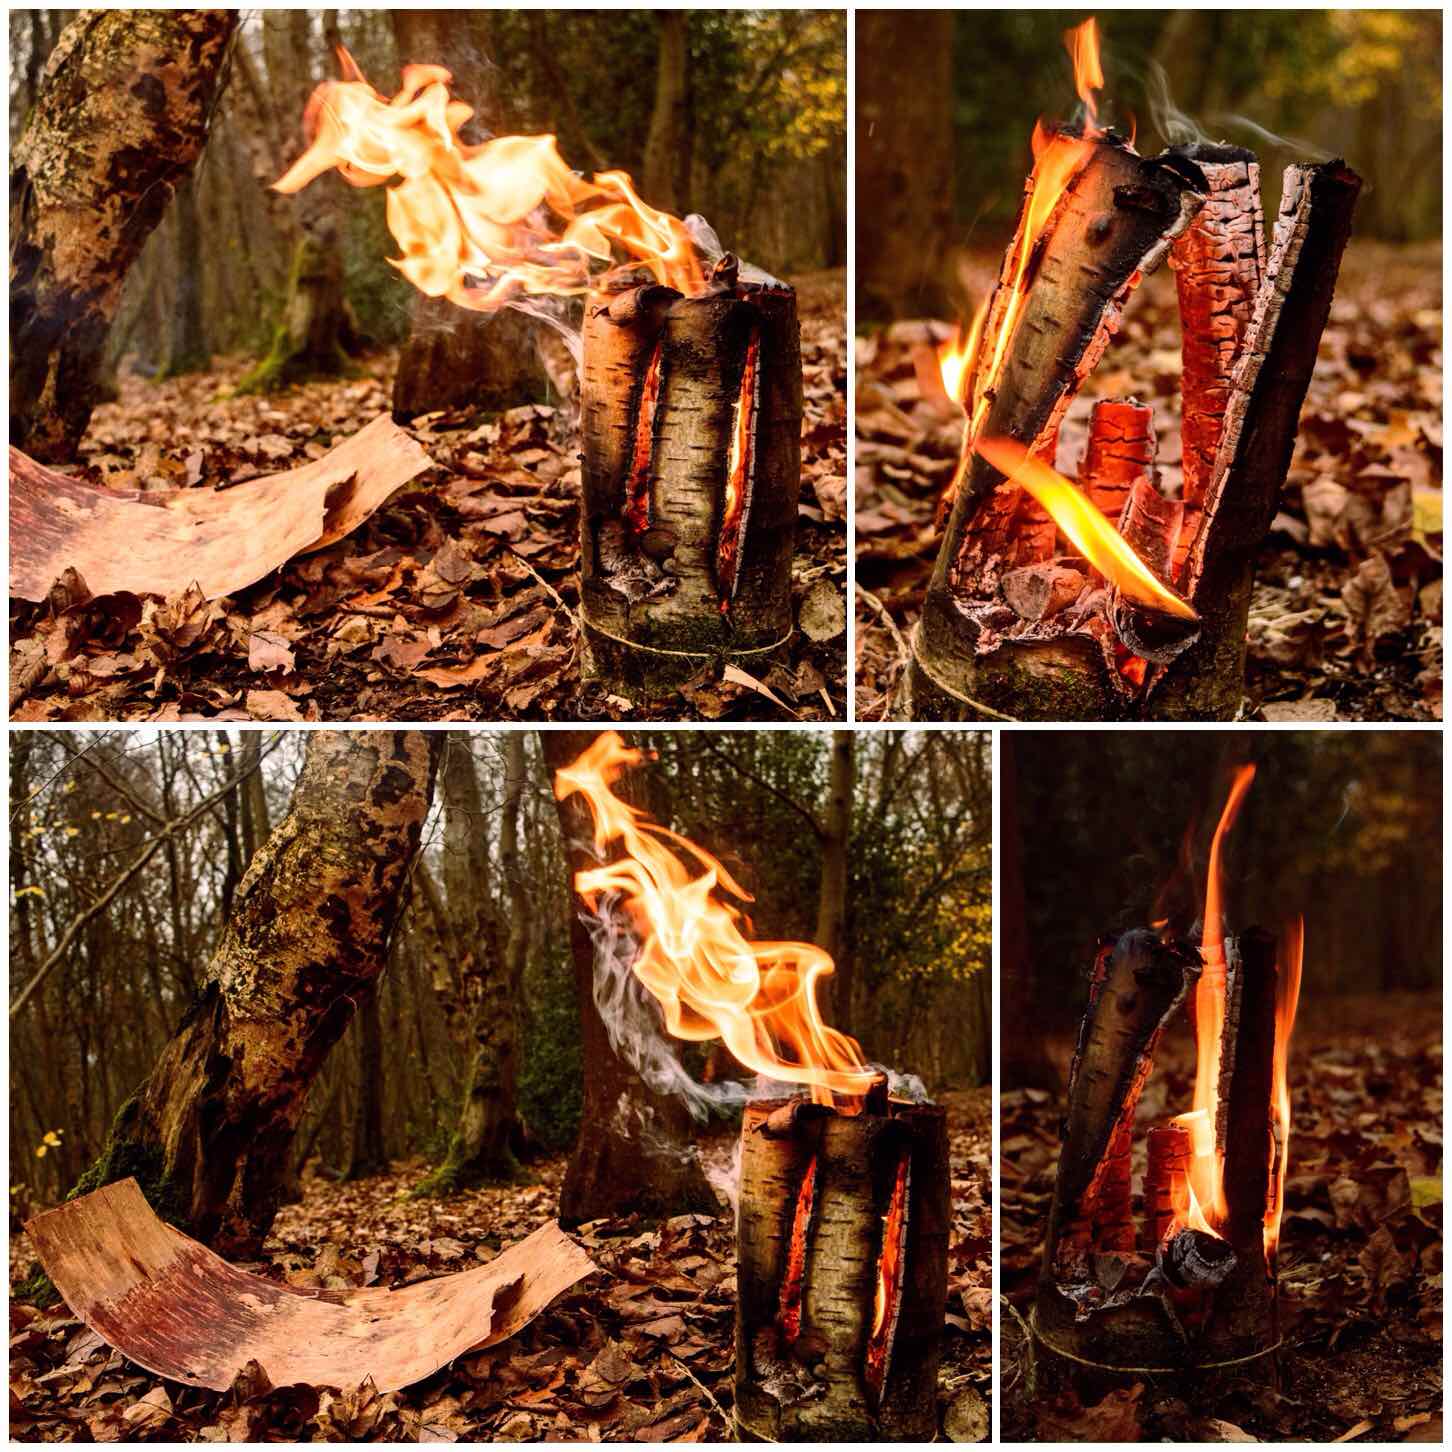
When the weather is inclement and the ground is really wet then the option of making a rocket stove needs to be considered.
This How To…. sets out the steps I took on a wet and windy December morning to make a Damp Wood Log Rocket Stove with only the tools I normally carry in my rucksack.
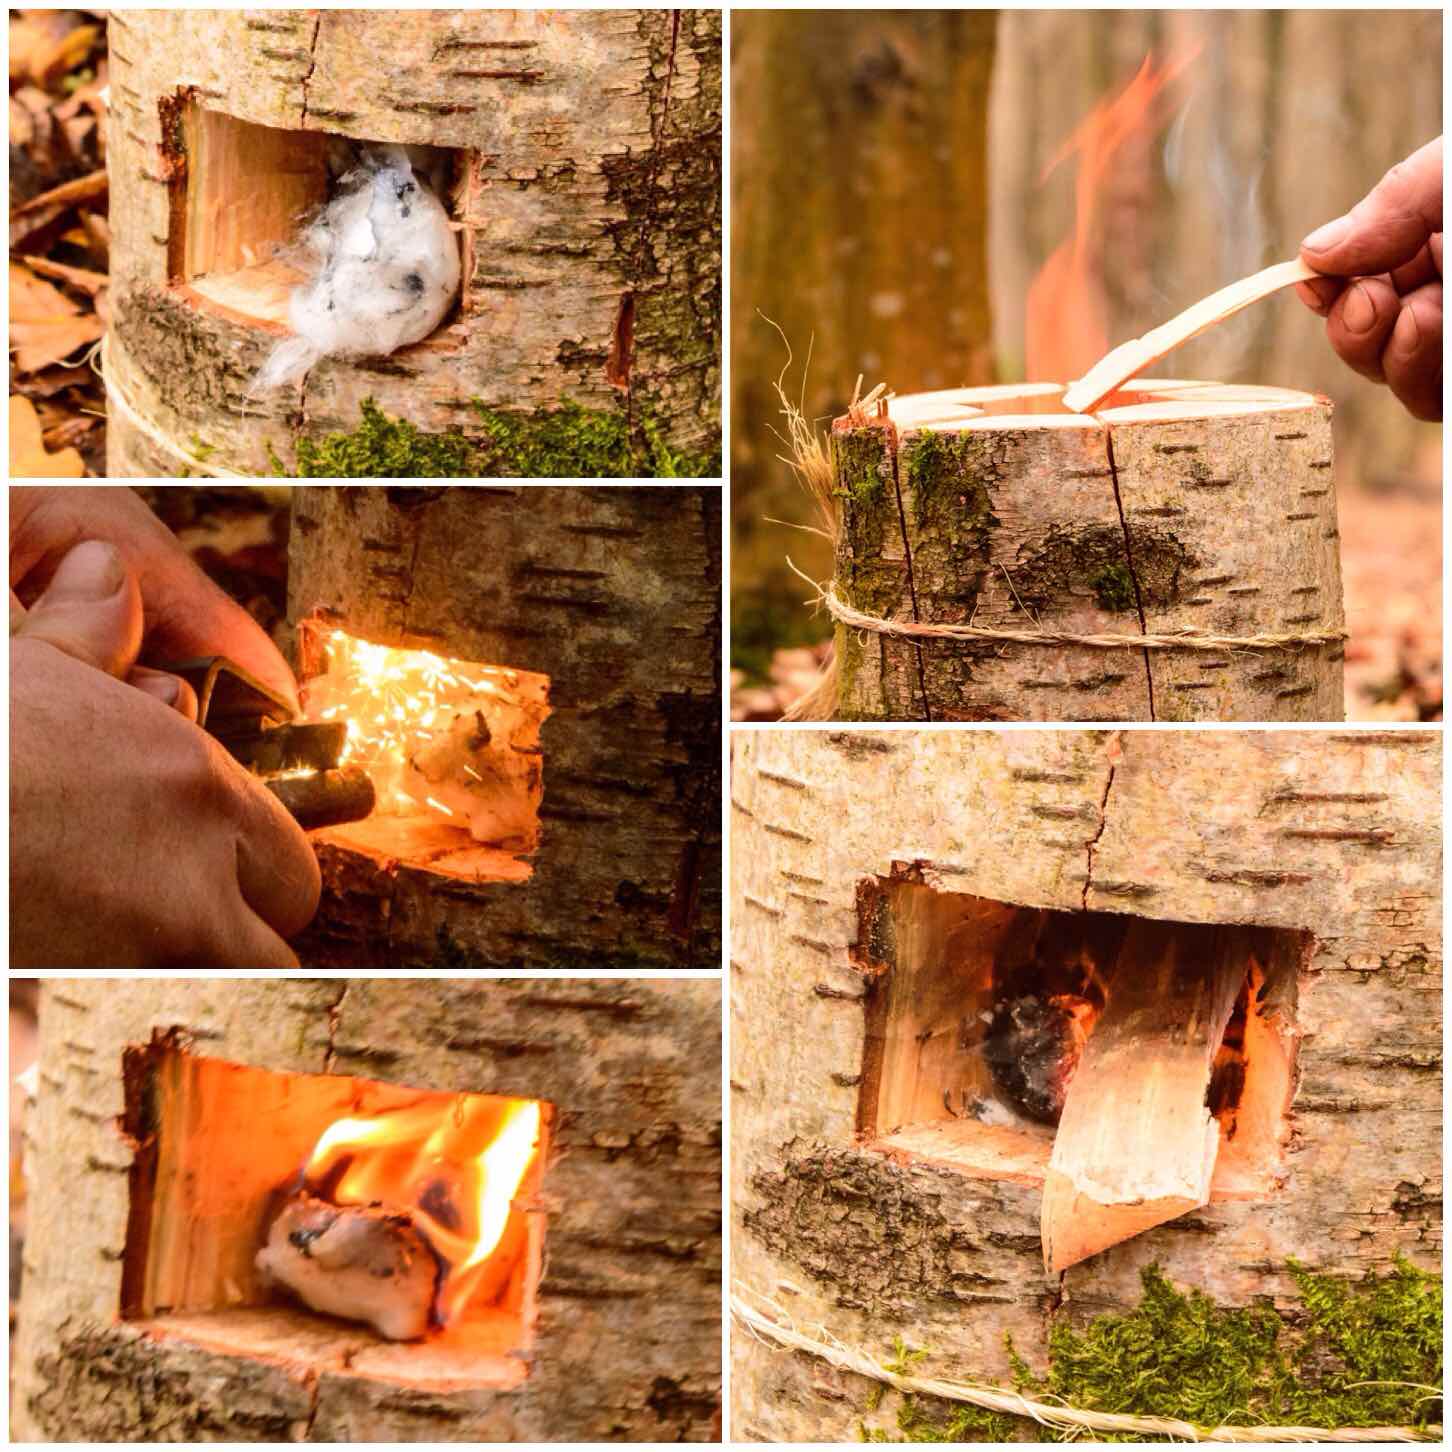
The damp wood log rocket
I have dabbled with making different types of Finnish Candles for cooking on and they are excellent for when the ground is wet. Over the years I have also experimented with making Log Rocket stoves but restricted my activities to the workshop as I used drills to make them.
I recently stumbled on an idea on Facebook from the 1st Facebook Scout Group by Paul Hasling. This is the first time I have seen a log rocket stove done without the use of drills so I was instantly taken with the idea. Another Scout instructor José Xavier put Paul’s pictures together into a quick helpcard called the Rocket Stove de Madeira. This is a very simple design where a log is split four ways, a chimney and firetray are carved out and it is all put back together again with string. I will certainly be showing my Sea Cadets how to make one.
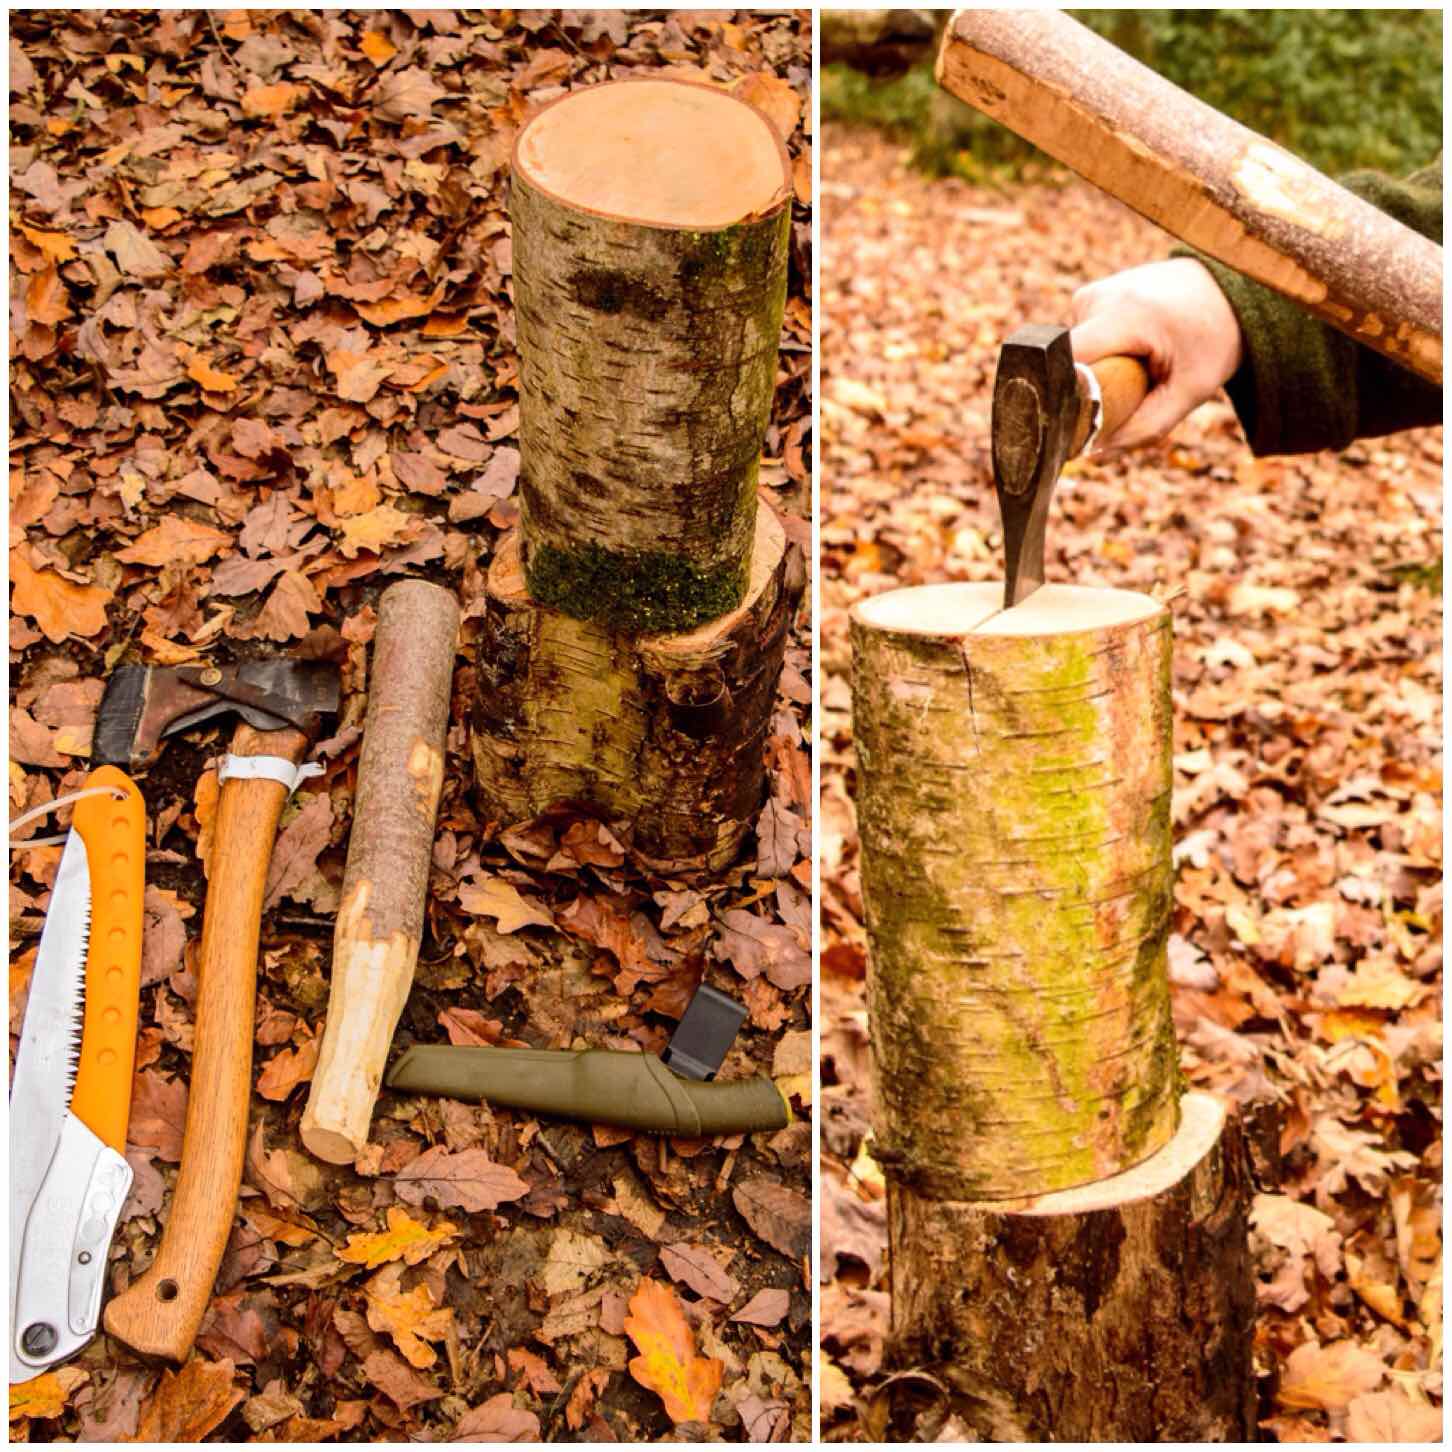
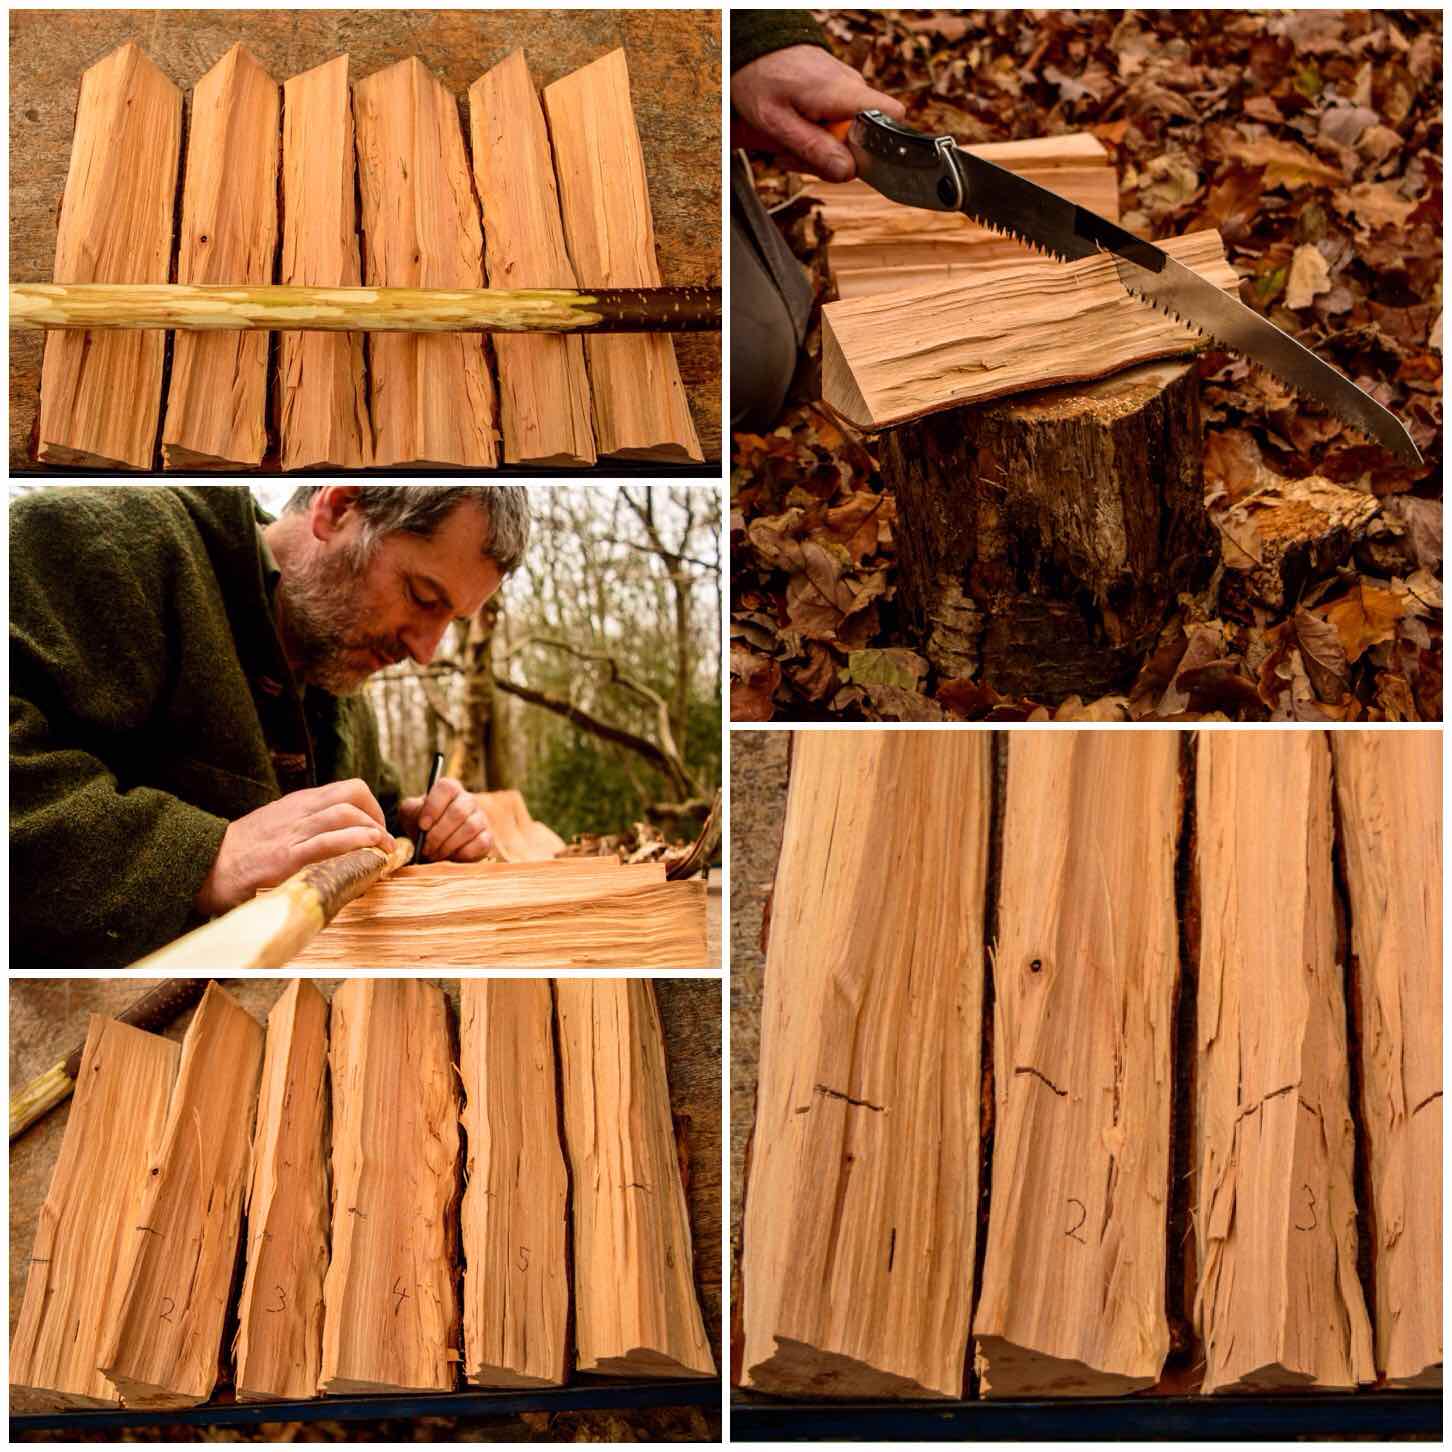
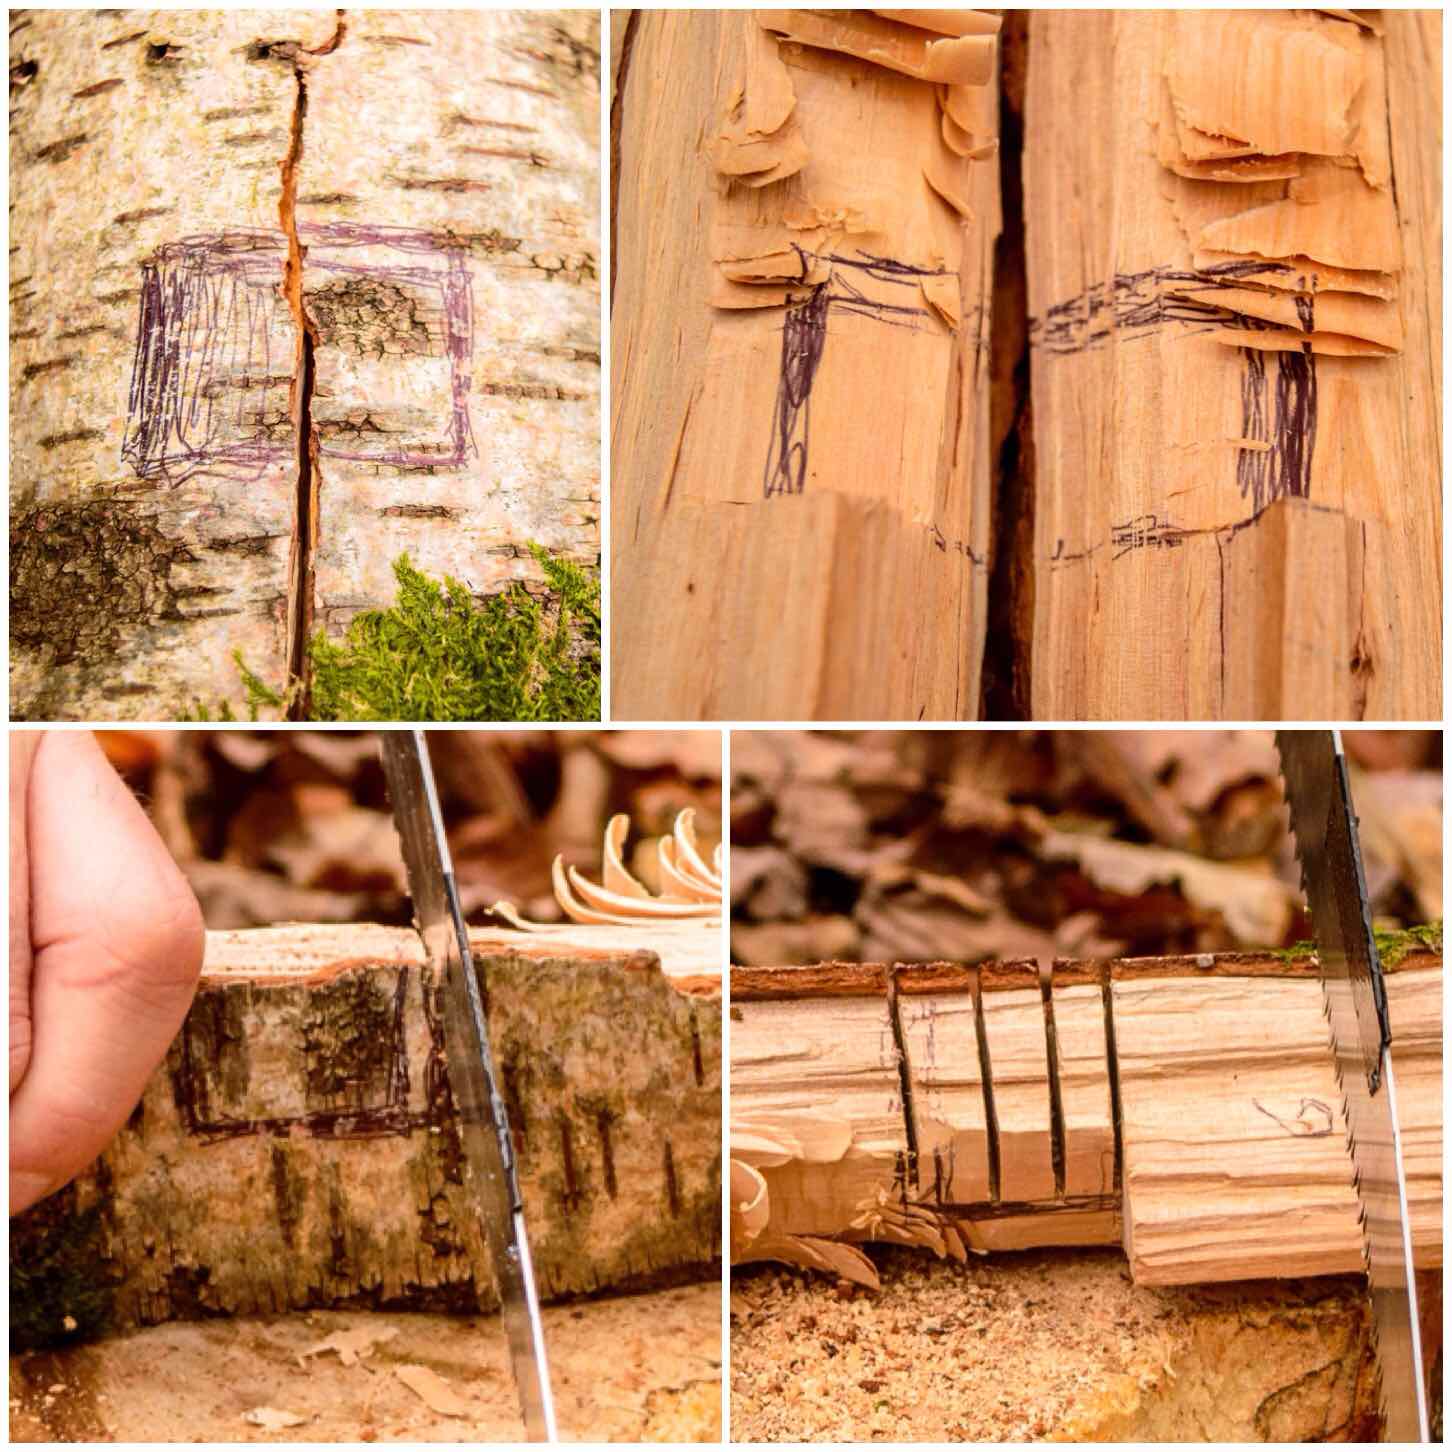
First though I wanted to make one when out in the woods with only what was to hand. It being December, there was nothing that was bone dry so I found a dead Birch and cut a section off. It was still damp to the touch, however it had been dead for over a year so it was slightly seasoned.
Splitting
For the job I had my knife, saw, axe and a pen. Using another round of wood I split the log in half by battoning it with my axe (keep the blade of the axe at 90 degrees to your body when you do this).
Tools and battoning
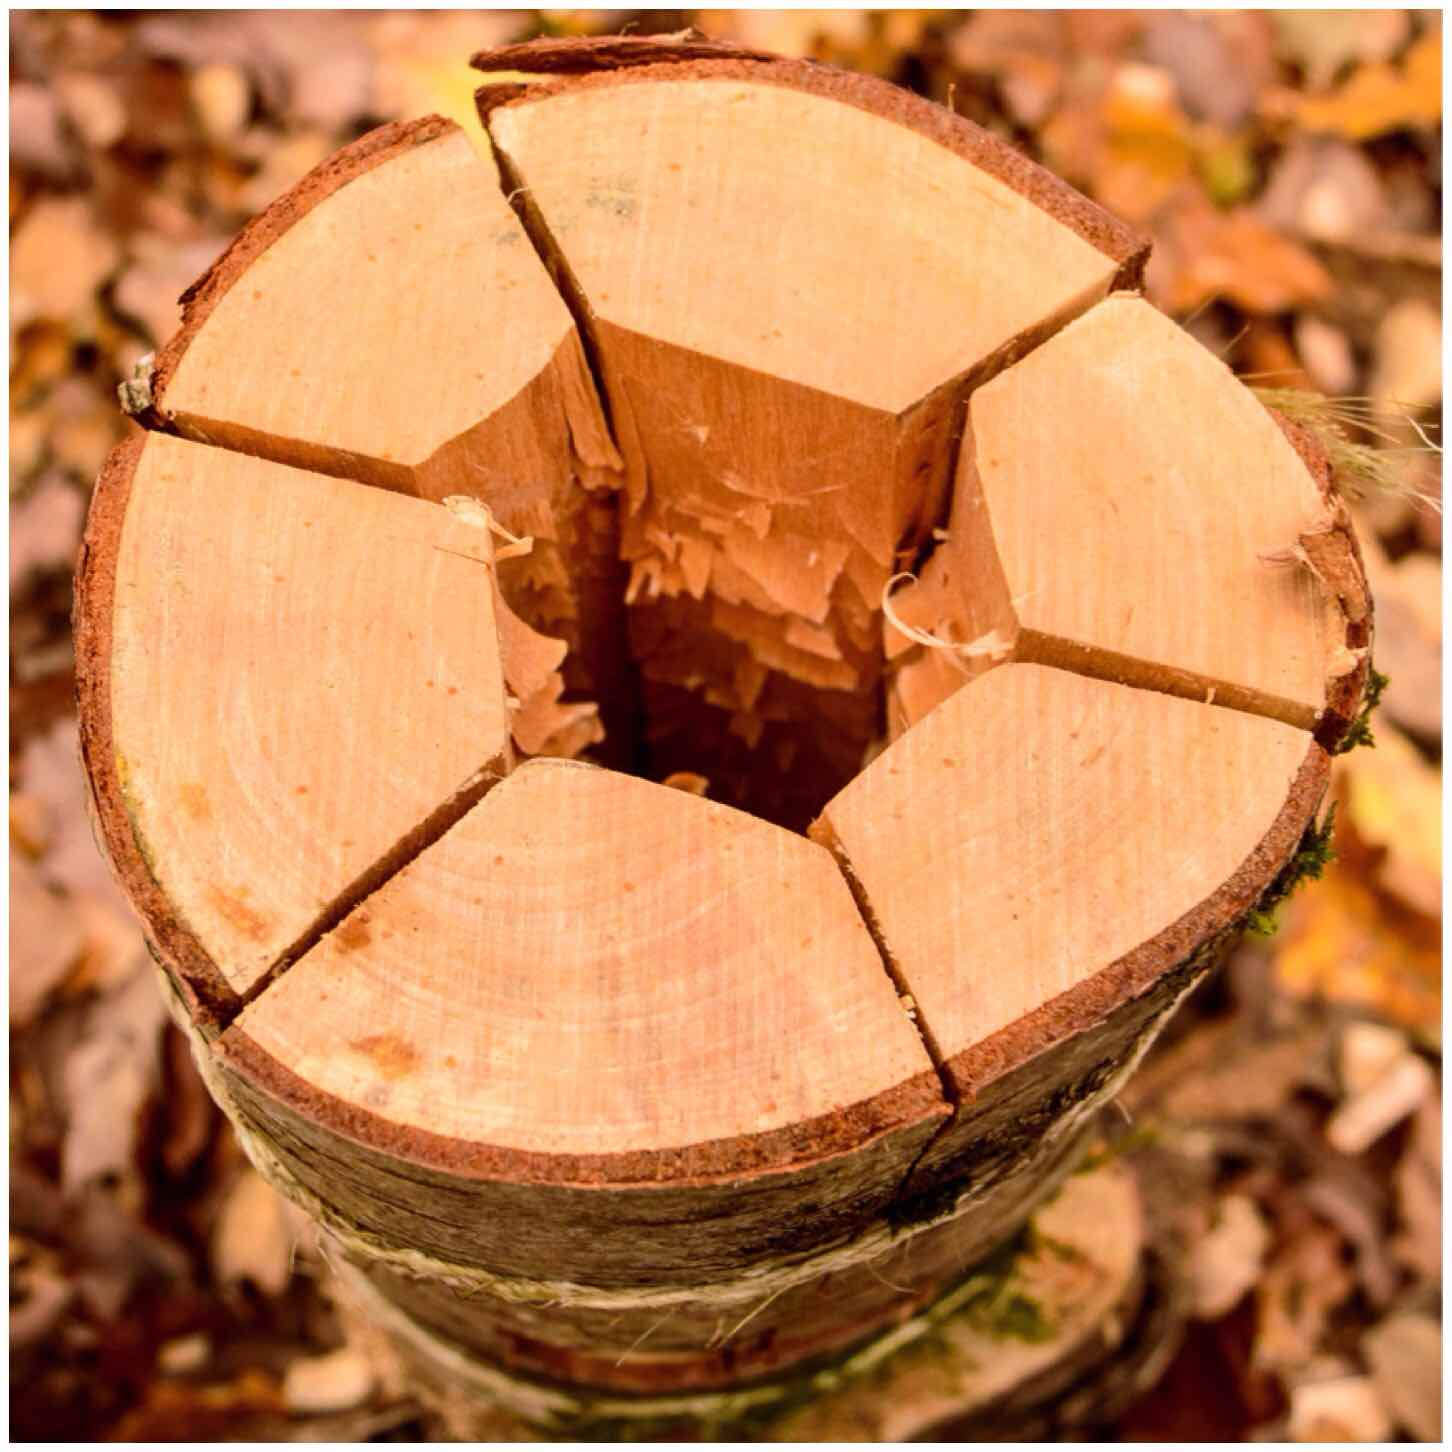
After splitting the log in half I split each half into three even sections. With very dry wood you only need halve the halves again to make four sections however my wood was damp so I wanted to produce as much surface area as possible which is why I opted for six sections.
The splits
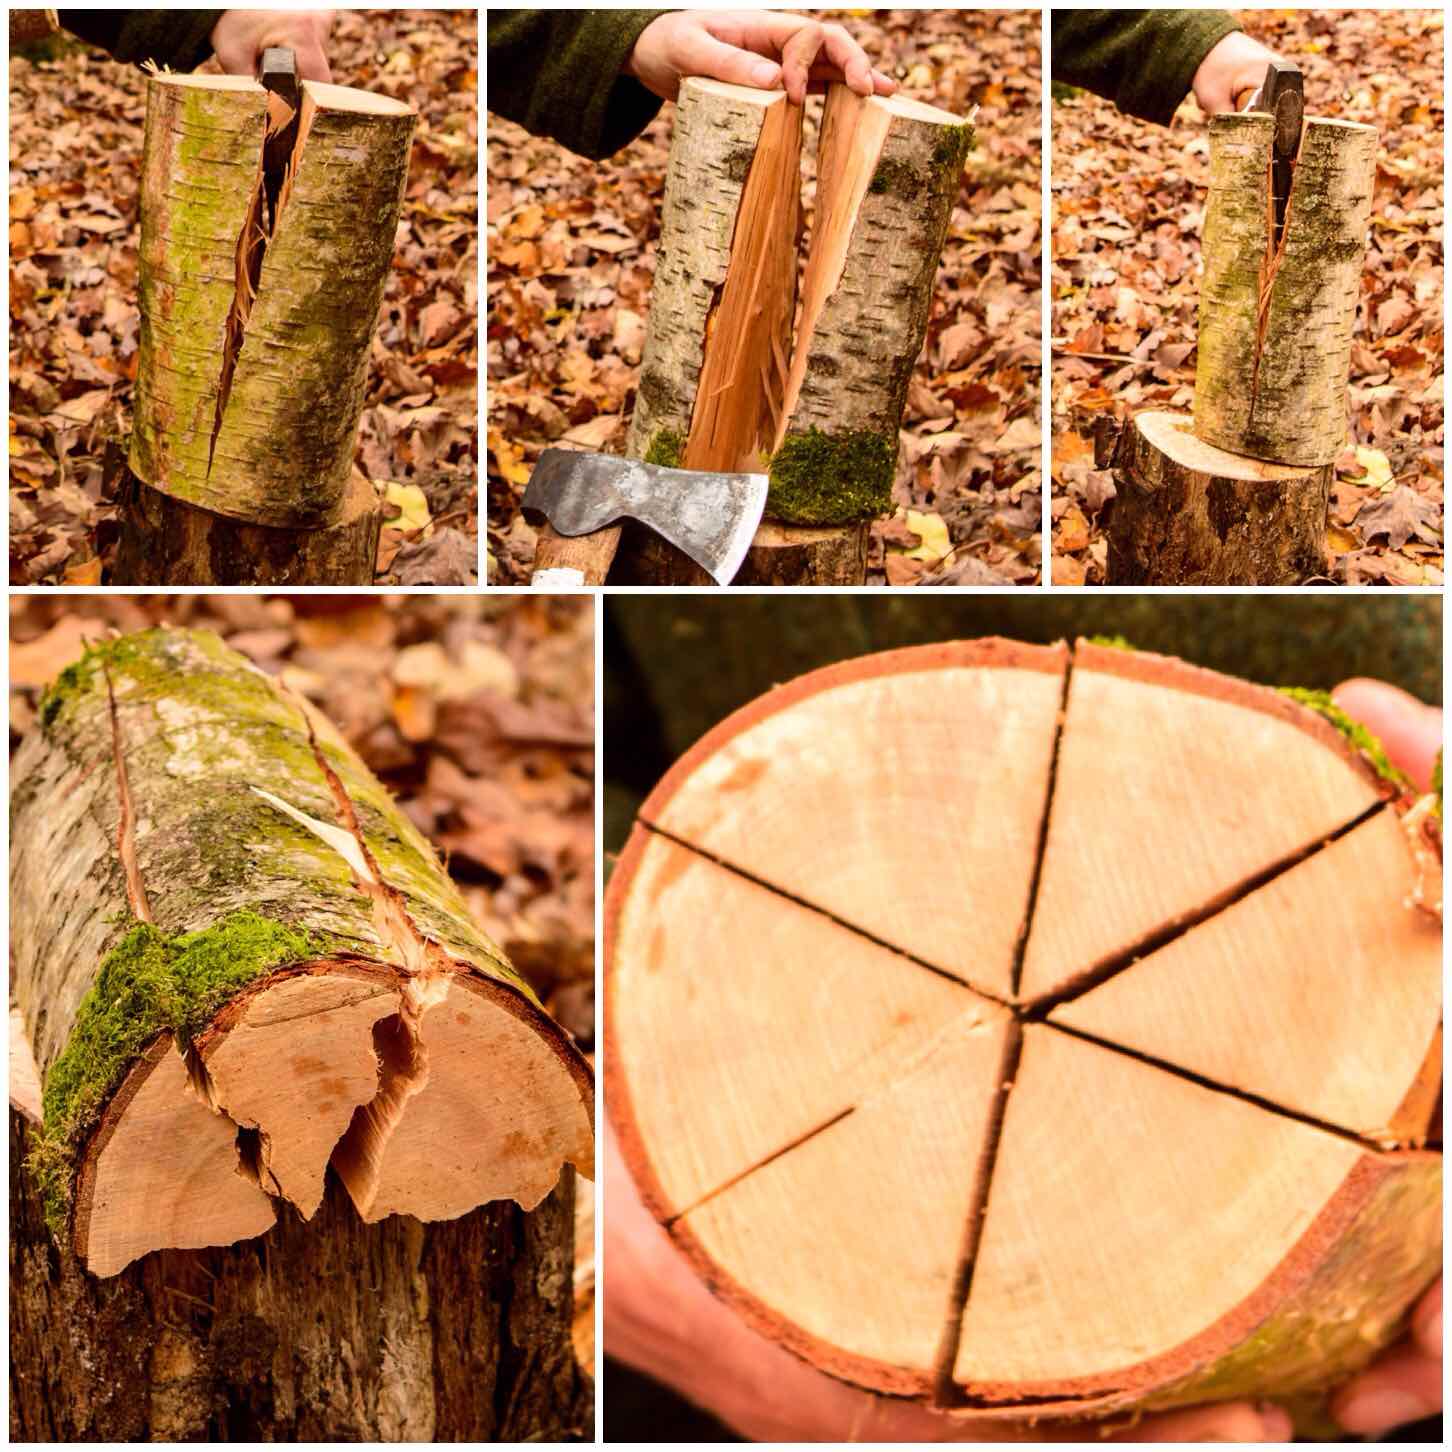
Stop Cuts
Using a stick and a pen I marked a line on each section about a quarter of the way from the bottom and also numbered each section. These marks were put in so that I could cut in stop cuts so to make it easy for me to cut out the chimney section.
My friend Keith Coleman suggested using tape as a depth gauge for this and it worked a treat, with each stop cut ending up the same depth.
Stop cuts
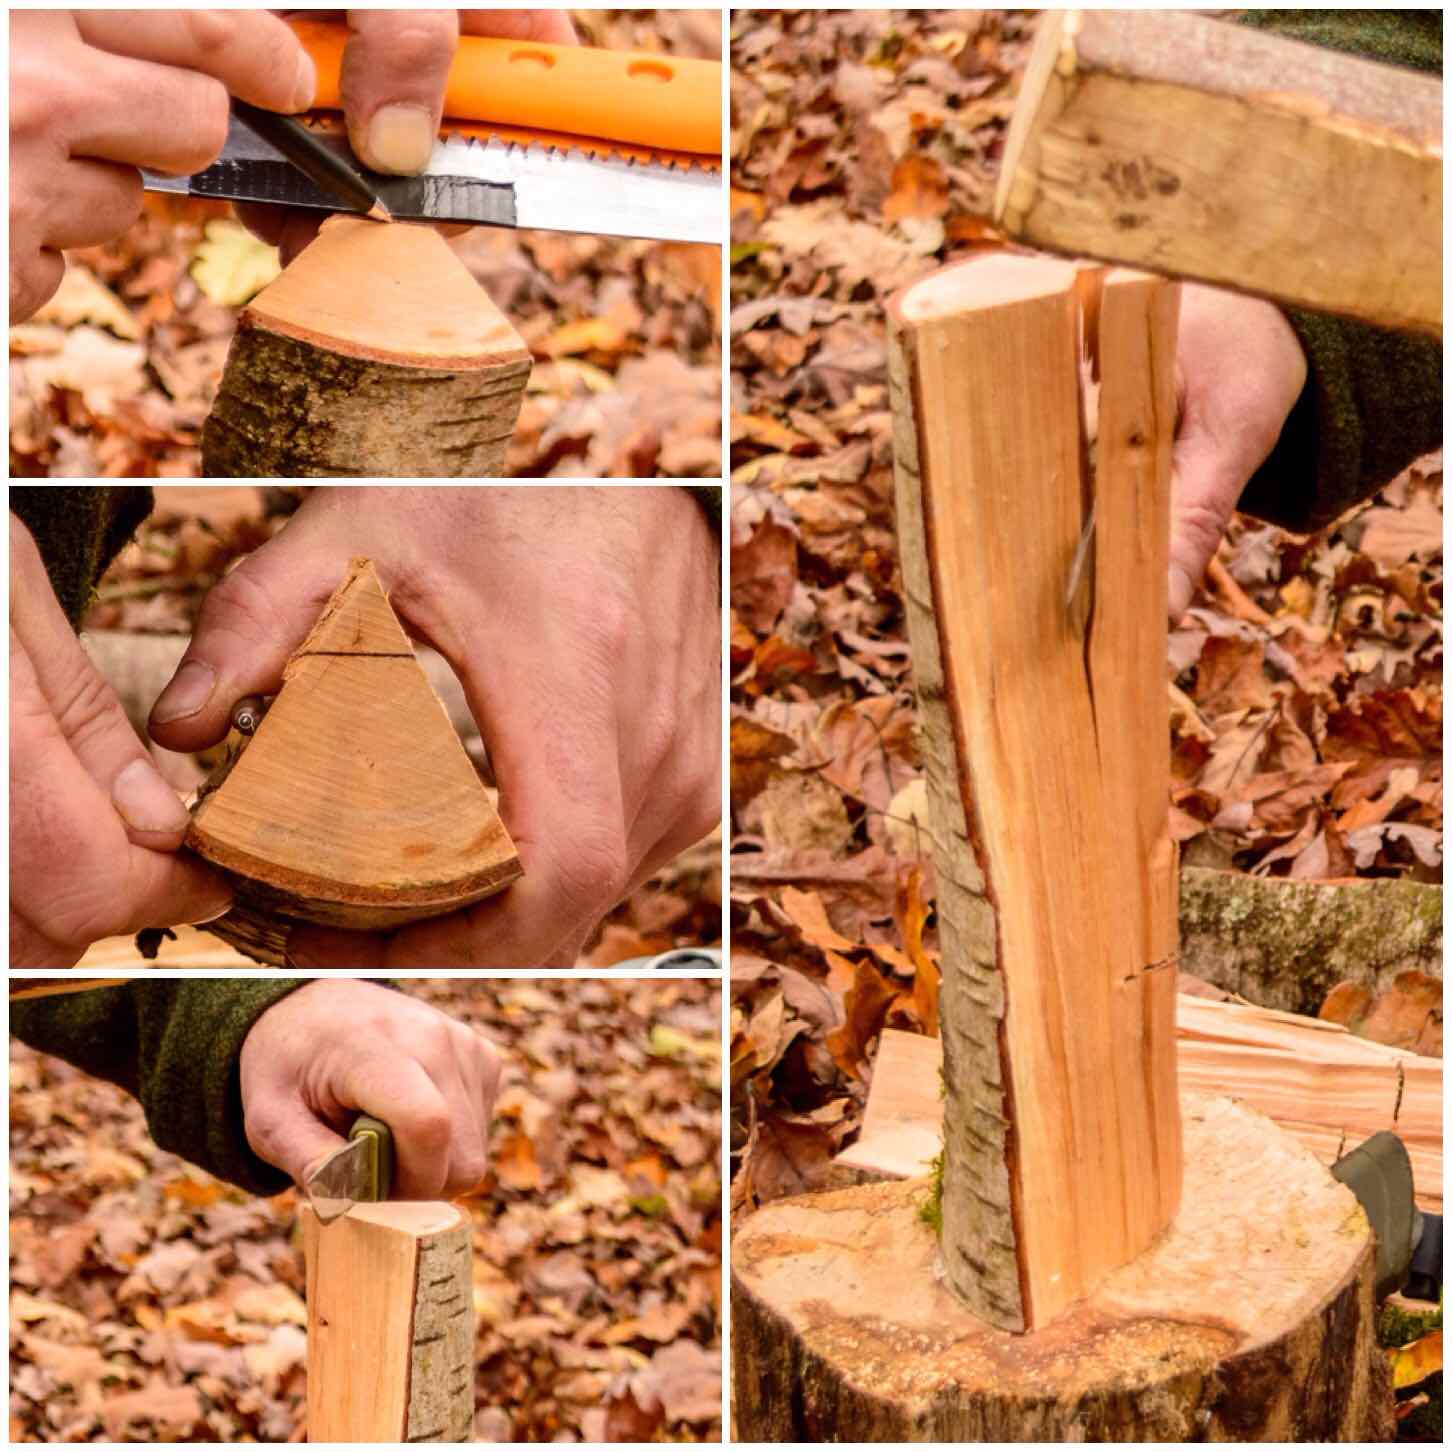
Creating the Chimney
Using the tape as a gauge again I marked a line at the top of each split section and then, using my knife, battoned off the excess wood.
The stop cuts help as the split does not travel all the way to the bottom and so creates a lintel that the fire will sit in.
Battoning out the chimney
After a little bit of whittling with my knife each segment had the wood removed so that the chimney would be formed when it was all put back together.
It is important to keep all the shavings and little chunks of wood from this process as it can be used as kindling for the stove.
Trimming the chimney
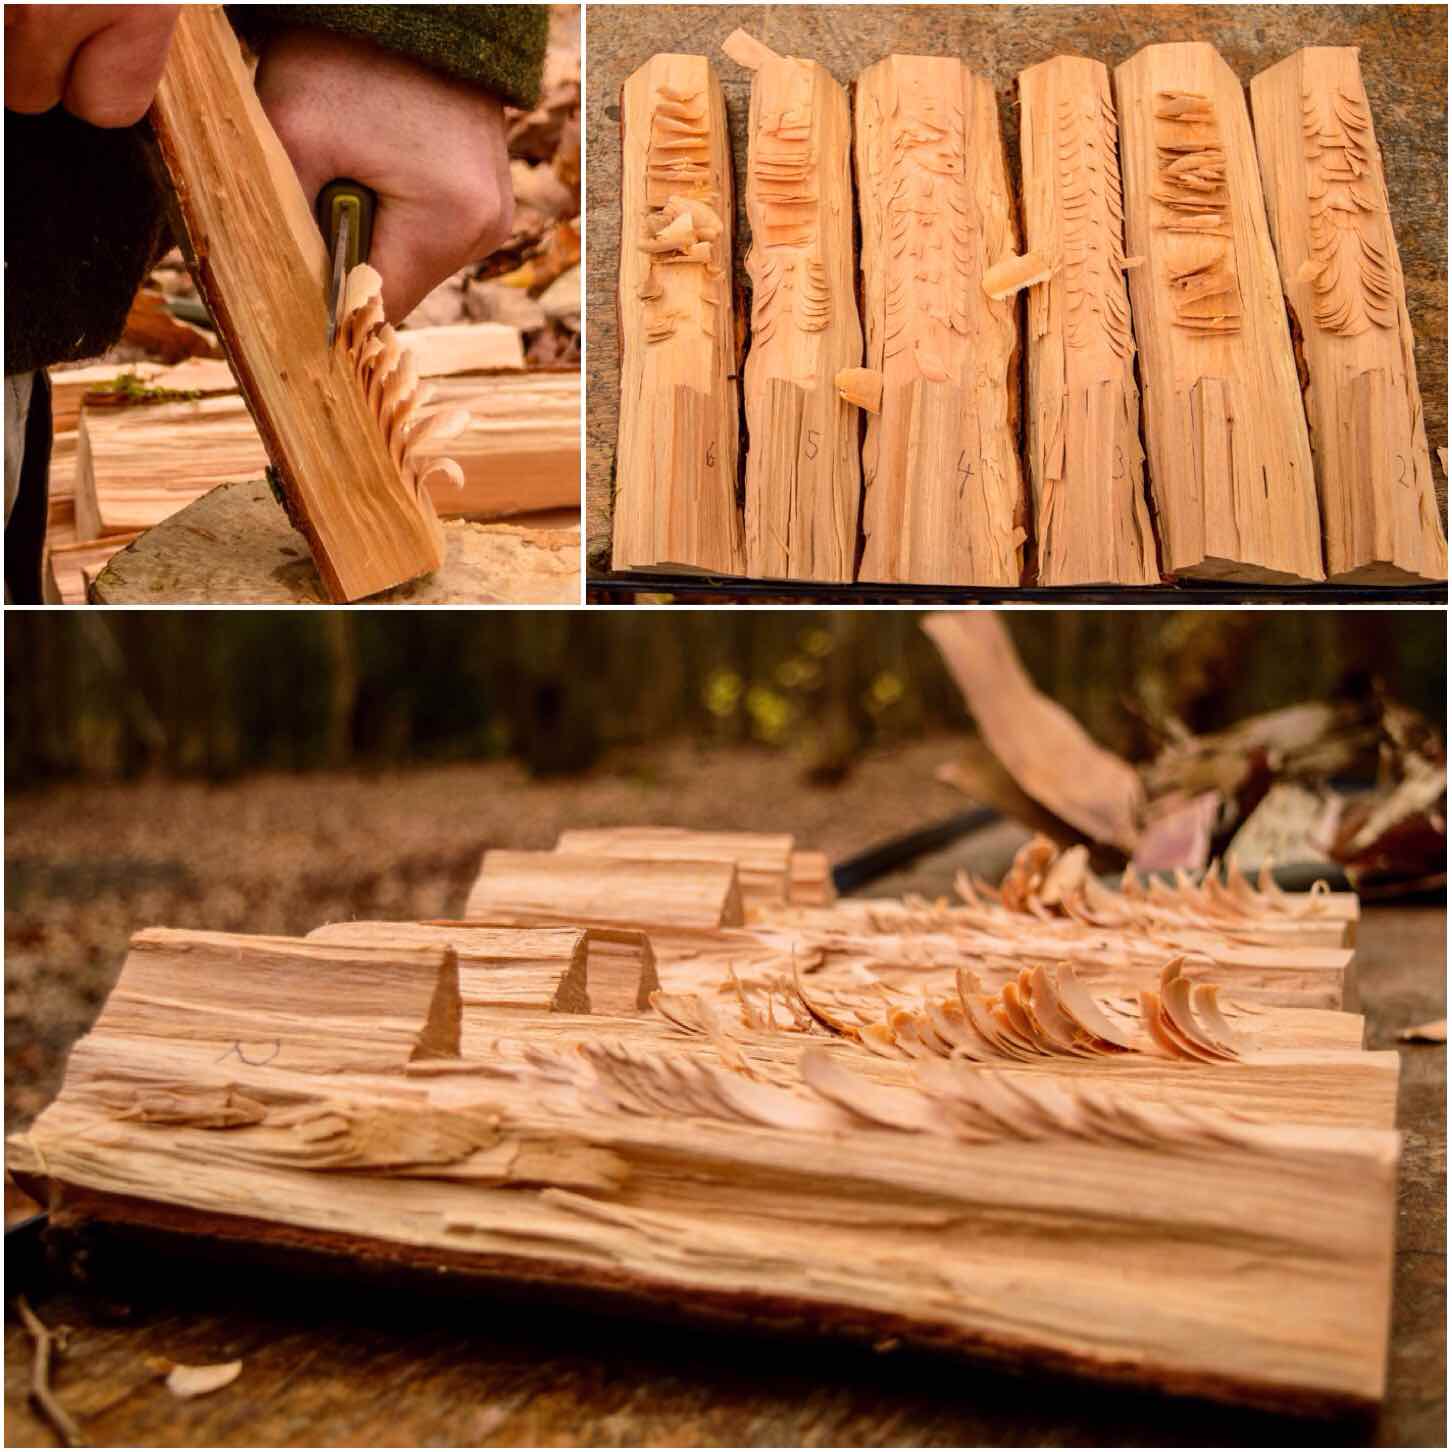
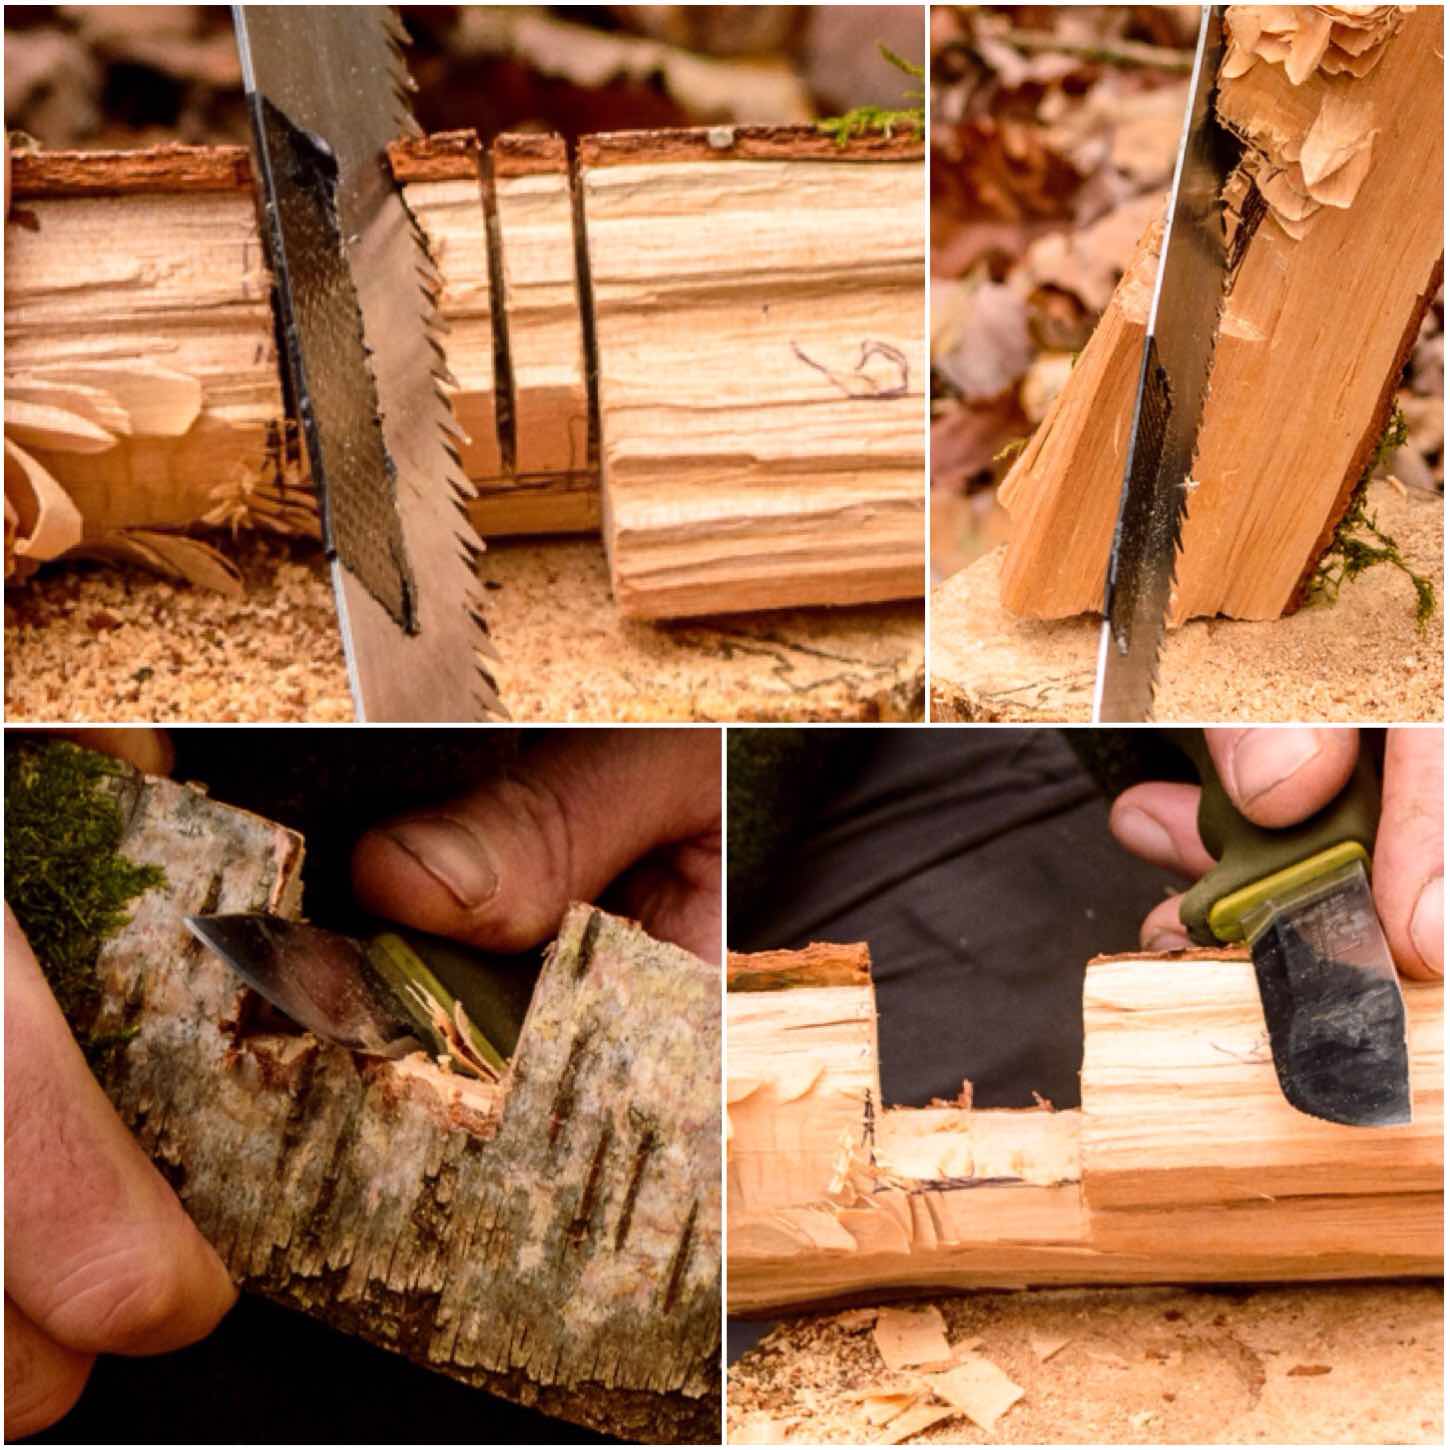
The Raappanan Tuli style
Now the secret of making damp wood burn is to produce as much surface area as possible for the flame to catch. I learnt this from researching and making the Finnish Raappanan Tuli candle.
On the inside of each segment cut as many burrs as you can so that the flame from your kindling has something to catch onto. I tried out different types of cuts here and some were easier to carve than others – your wood will soon tell you what works well.
The Raappanan Tuli style
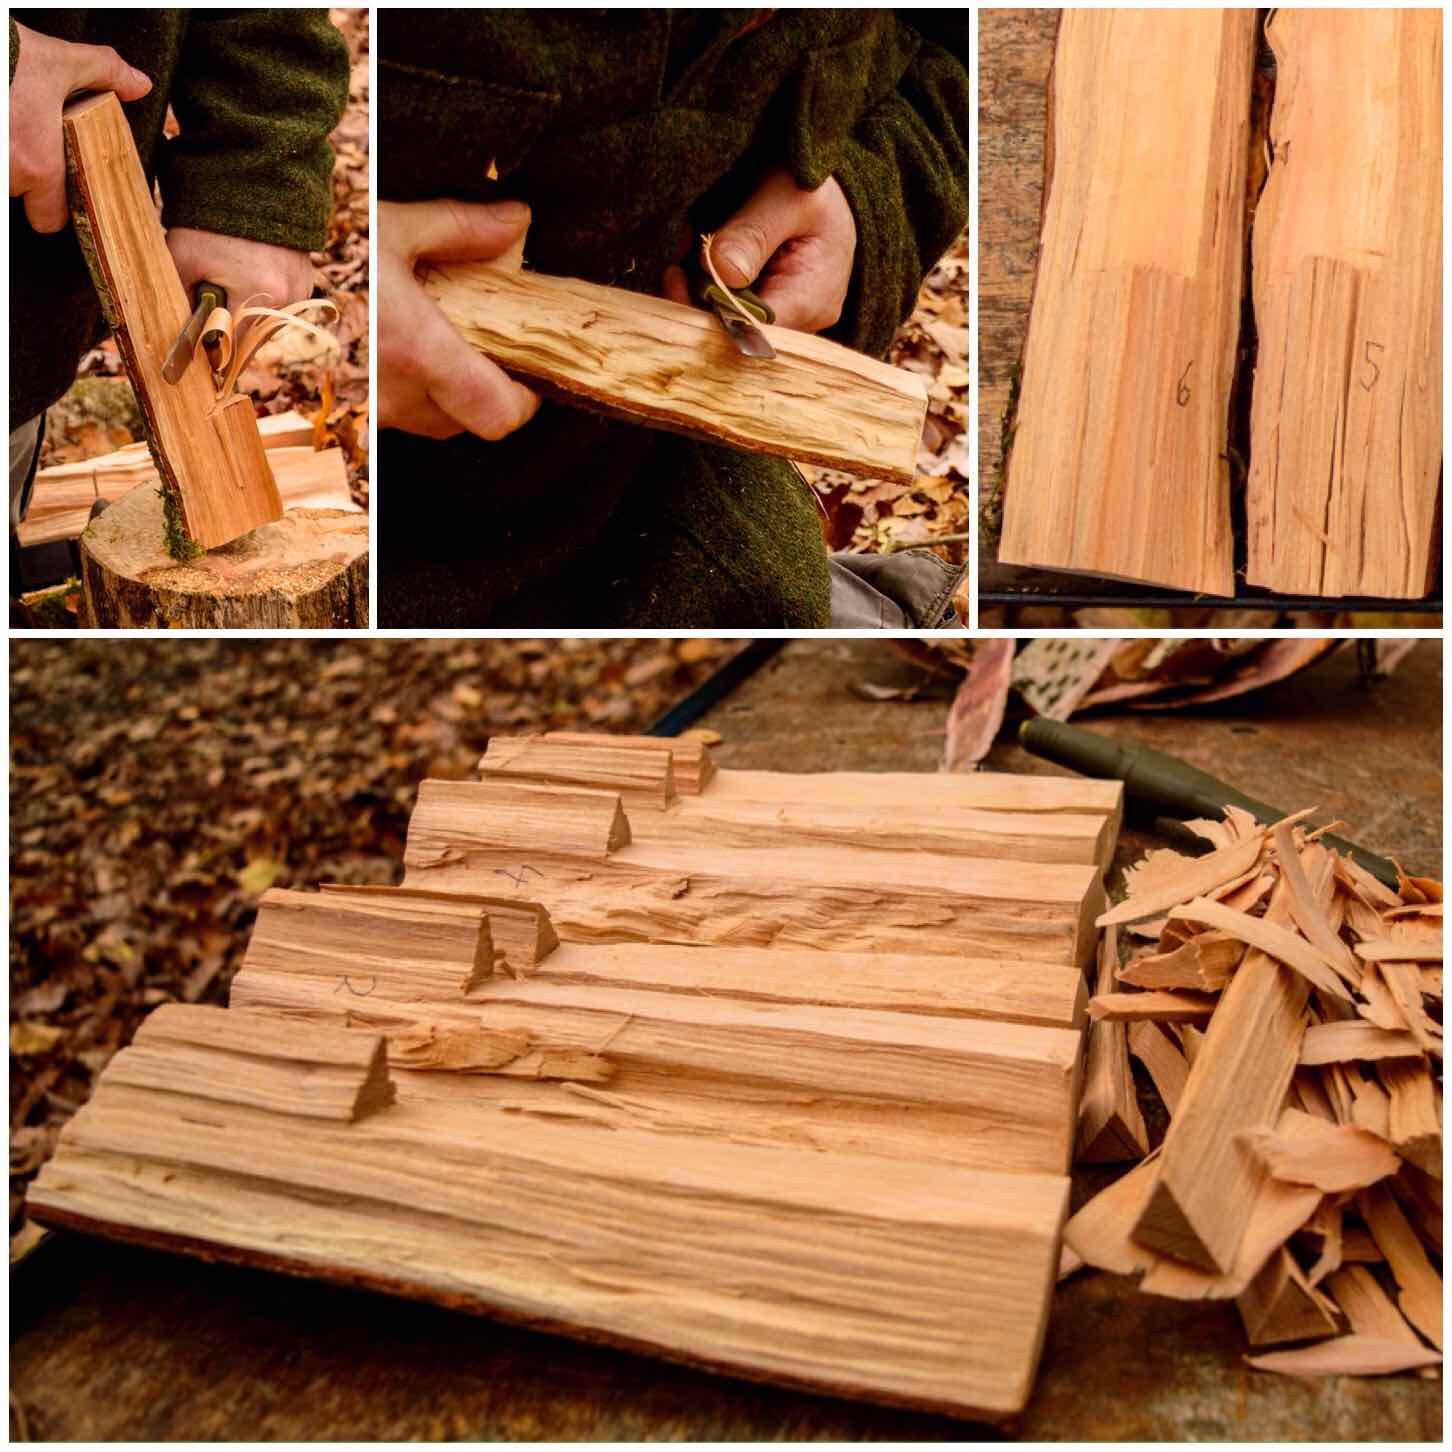
The Firebox
Next up is the opening for the firebox. I selected two segments that fit together (having them numbered really helped here) and marked out with a pen two rectangular areas just above the sill I’d created. I made sure the marking went all the way round to the other side of each segment.
I then used a saw to cut into the wood in the shaded area. Do as many cuts as you can as this makes it easier to remove this waste wood.
Carving the firebox – stage 1
I then used my saw at an angle to cut out the wood and finished the job off with my knife.
Carving the firebox – stage 2
When finished the idea is that you want an access point big enough to put your kindling into the firebox area at the bottom of the chimney.
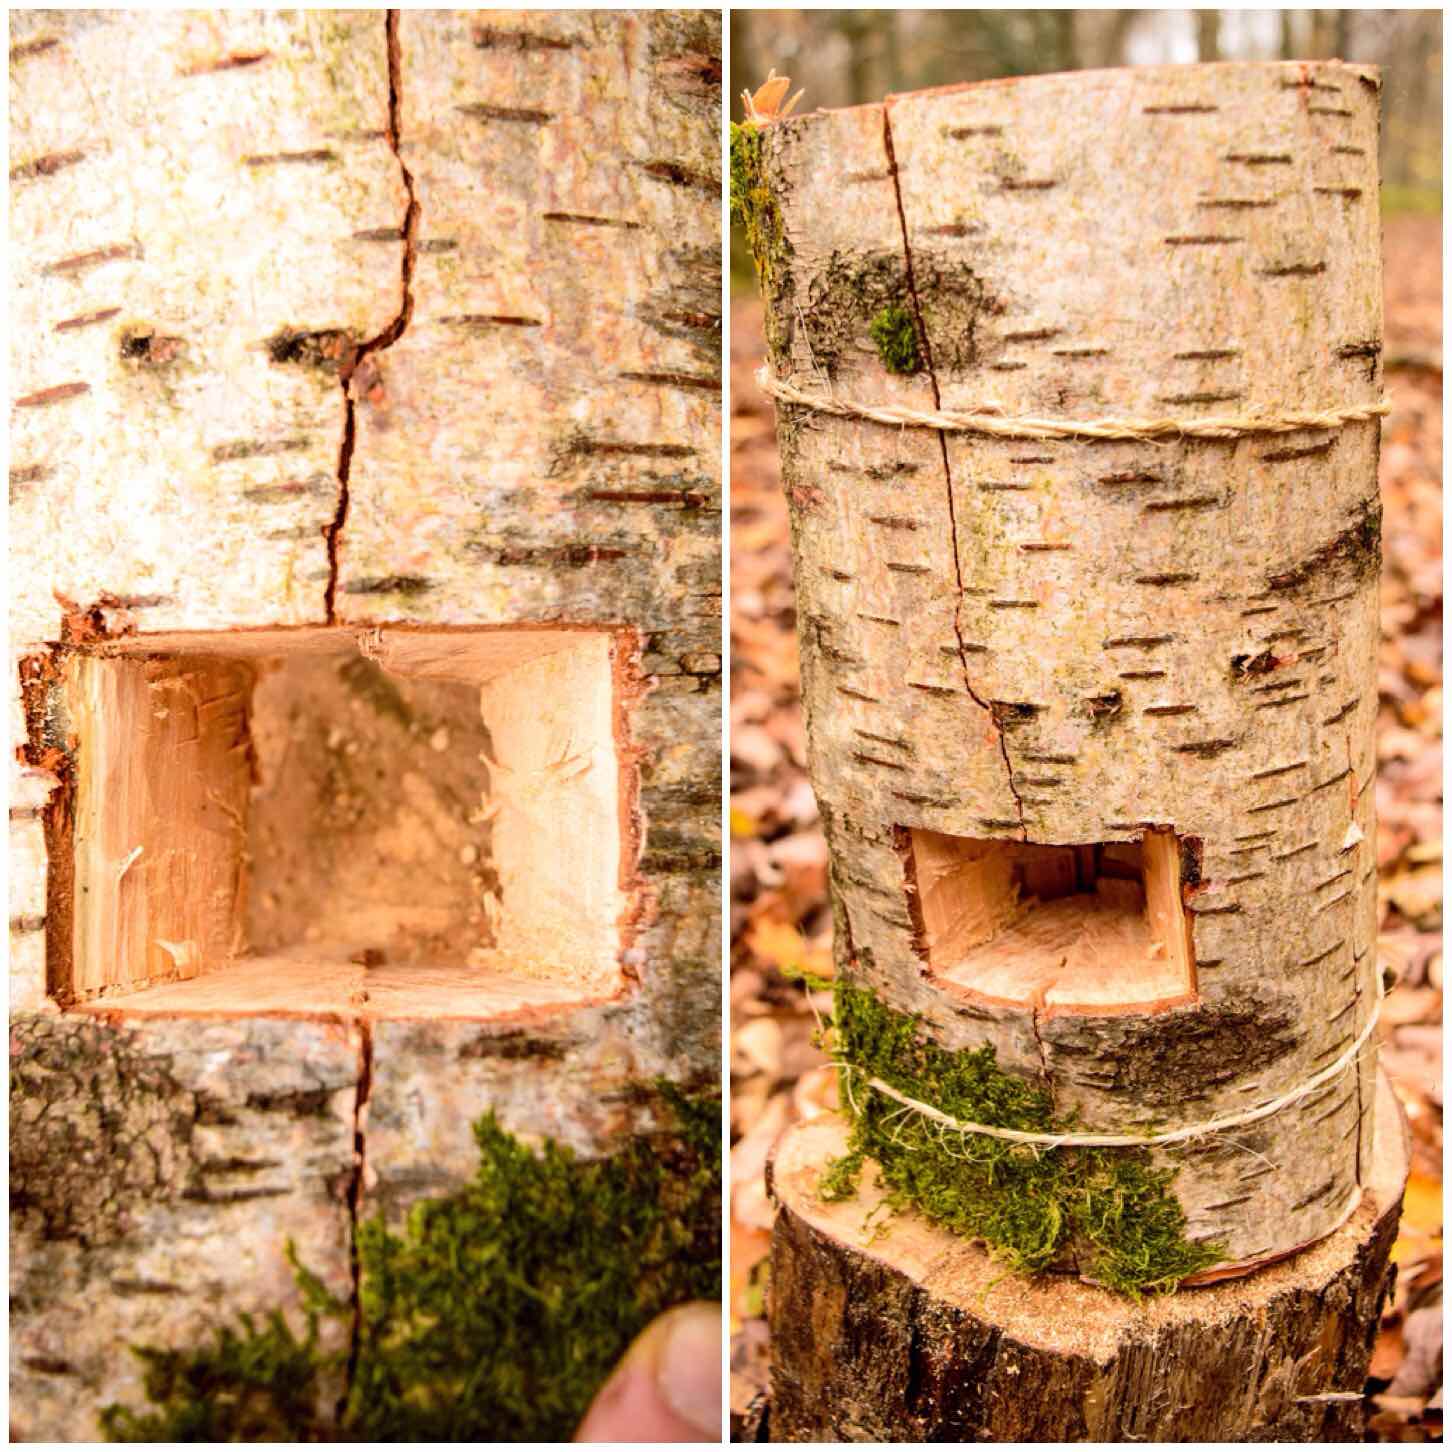
I found some old sisal string tied to a tree and used that to tie everything back together. It was pretty damp anyway and I hoped that would last longer than the copious amounts of paracord I tend to carry around with me. I think some thin wire would be the ideal thing to use though.
Firebox and all wrapped up
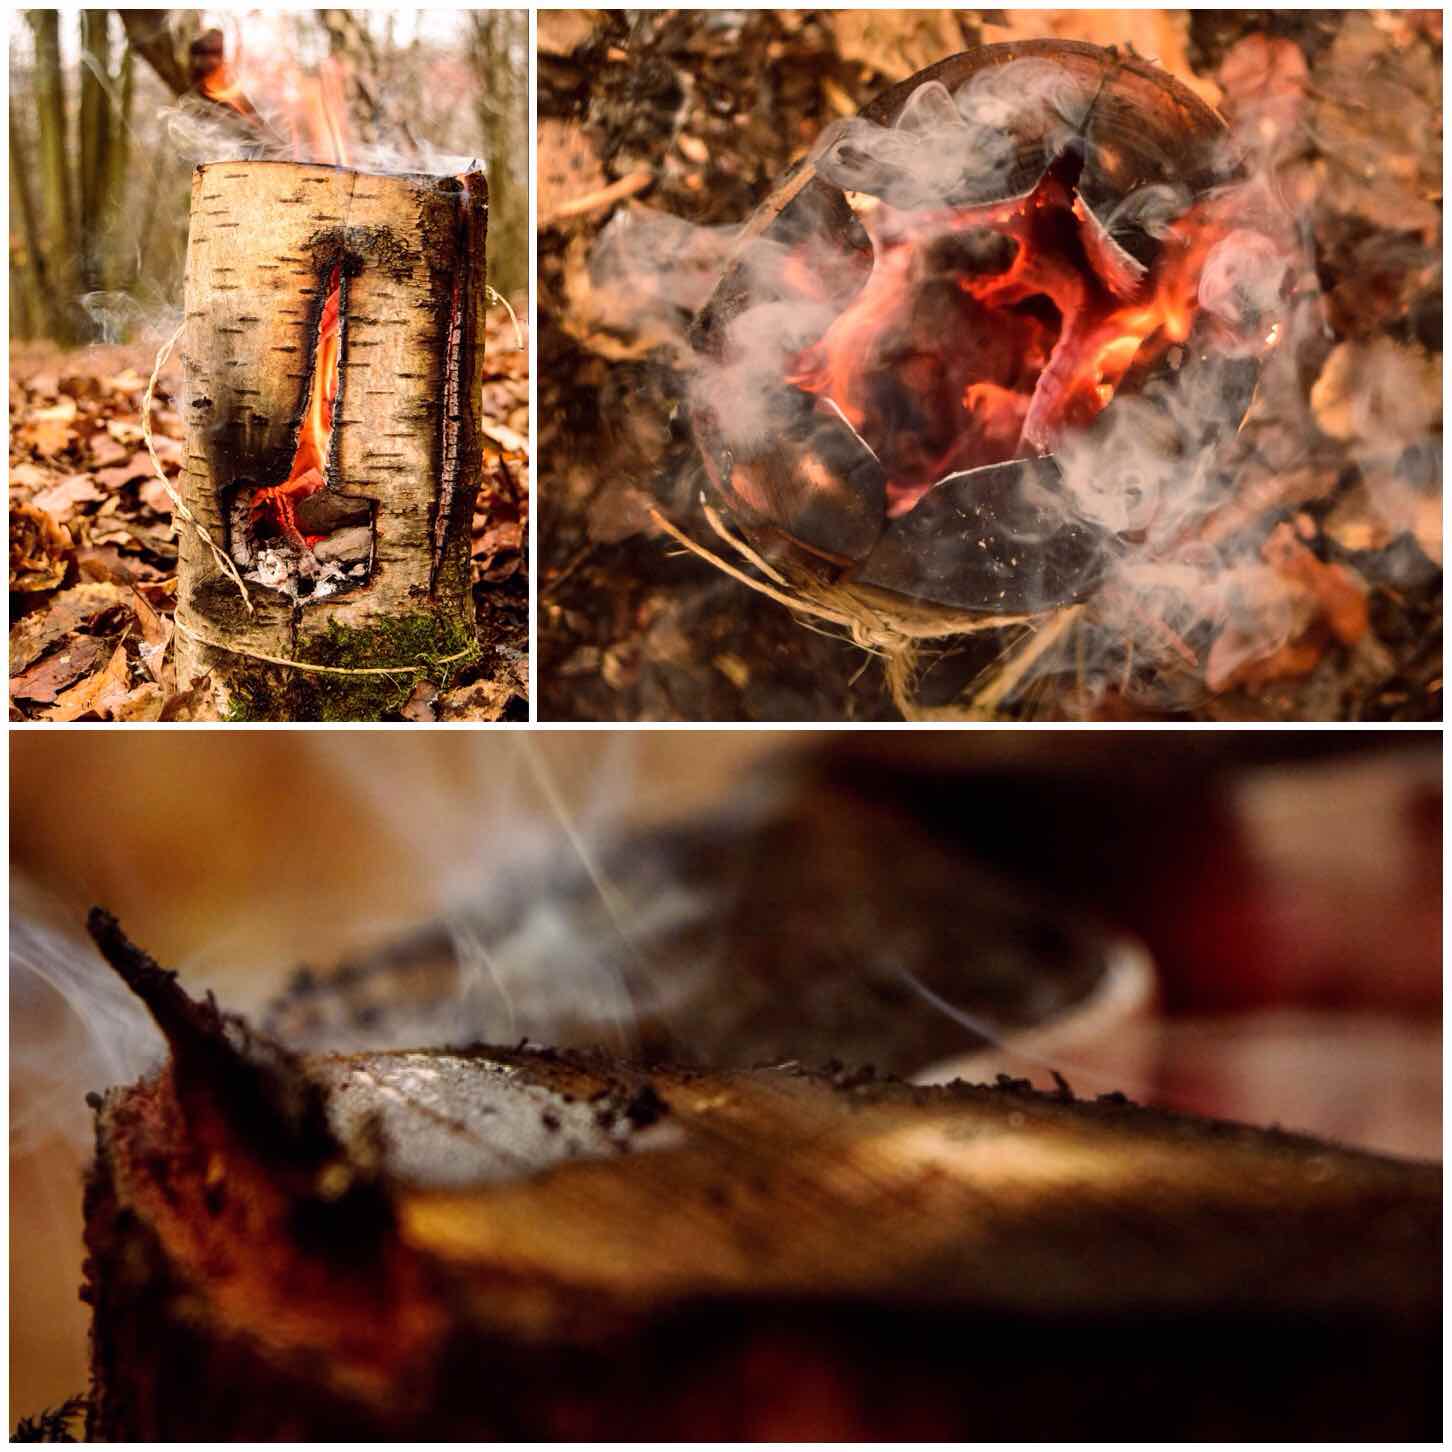
From the top you can see how wide the chimney was. I have no idea what would be the optimal size to have so you may need to experiment for yourself.
The chimney
Firing Up
As the wood was so damp I decided to go for the sure-fire method of lighting the stove up – good old cotton wool and Vaseline. This worked well however I needed to use 4 Vaseline-coated cotton wool balls to maintain the fire.
I have used shredded birch bark mixed with spruce resin on a number of occasions to light Finnish candles before but I didn’t have the time to collect the resin this time.
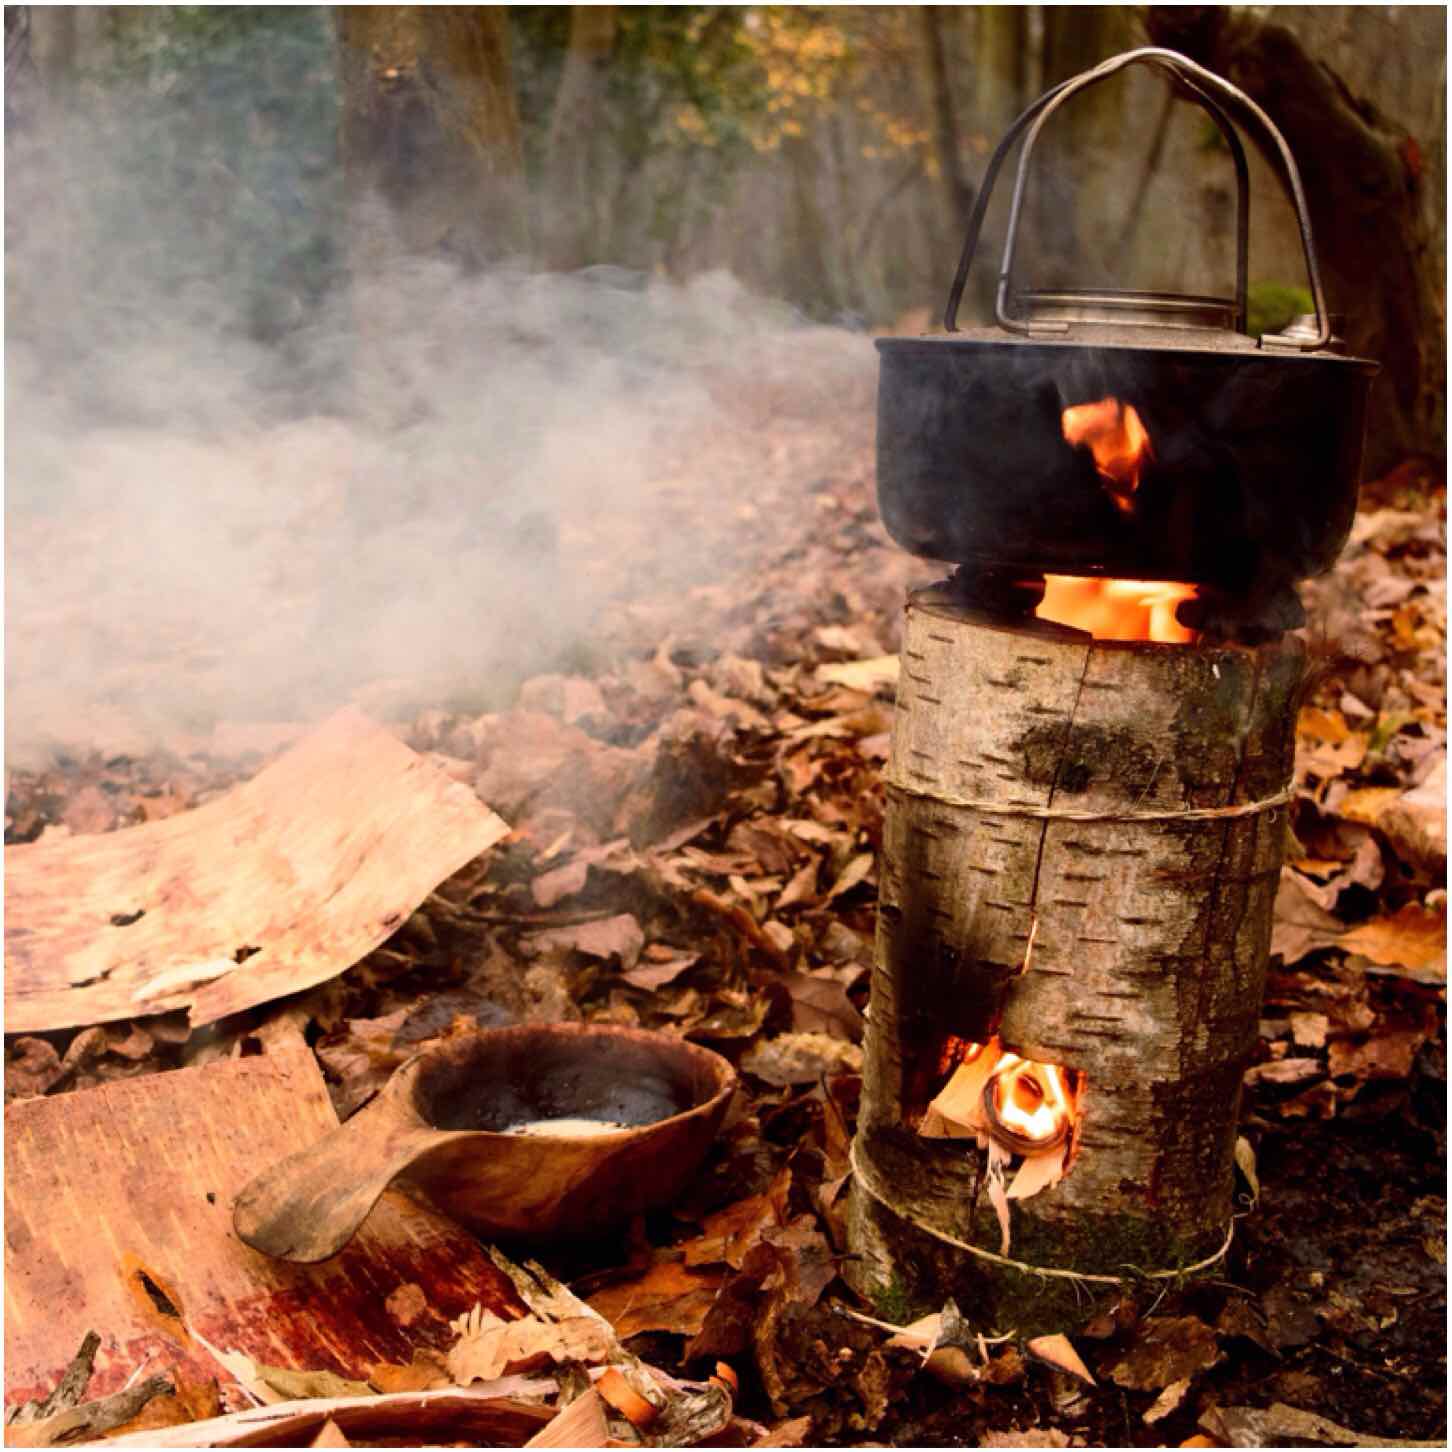
Once the fire had started I added tinder/kindling down through the chimney and in through the firebox. The main thing at this stage is to not over-fill the firebox but allow the airflow to be maintained. It means about 10 minutes of work but the damp wood inside the chimney area will dry out and the overall heat of the fire will increase.
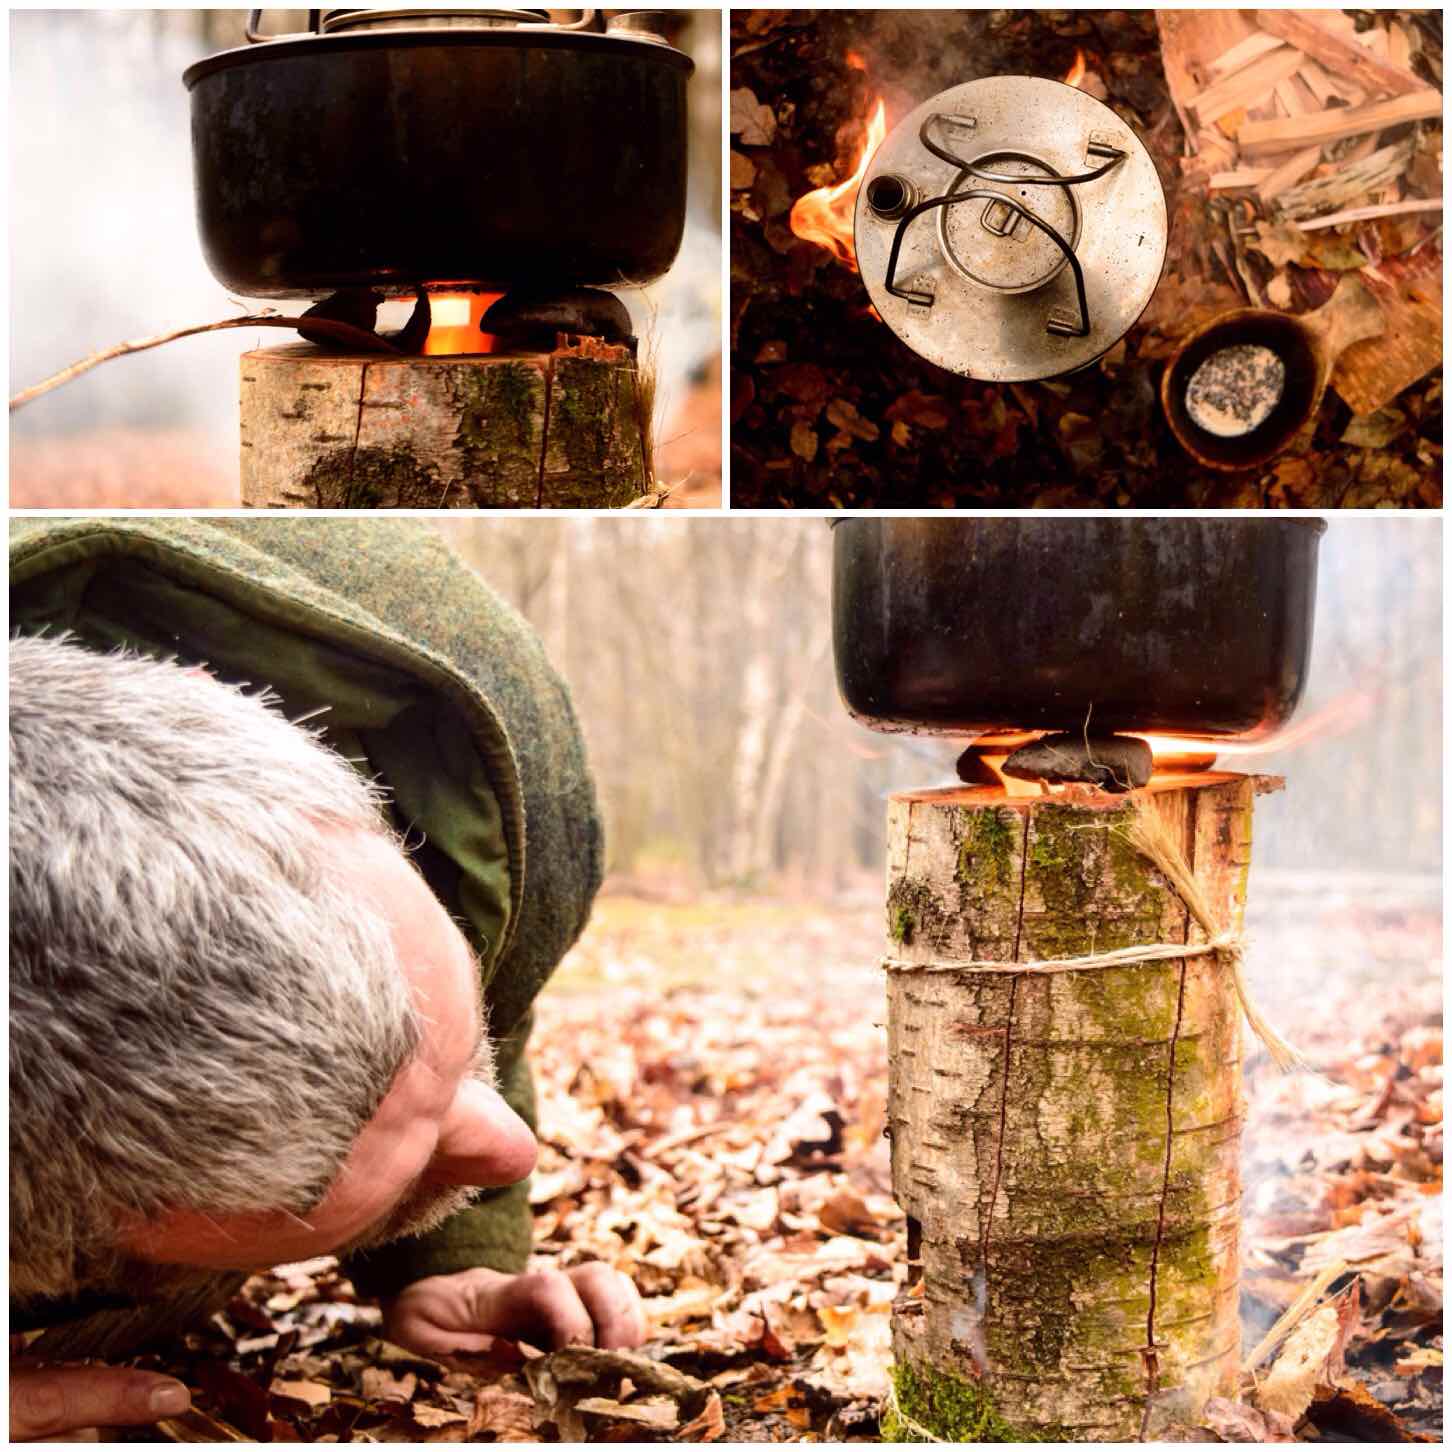
Firing up
Maintaining the Fire
I placed three pebbles on the top of the stove for the kettle to sit on securely.
The gap created by the pebbles also allows you to drop tinder/kindling down the chimney. I like to use strips of birch bark here as it is so pliable and flammable.
If the wind is low or changes direction you may need to get down low and blow directly into the firebox to keep the fire going. Once the wood has dried out a bit you will not need to do this so much.
Maintaining the heat
I gave the stove about 10 minutes before putting the kettle on and then in about 15 minutes the kettle was boiling. Not as fast as modern stoves but for what is in effect a wet log not bad.
Waiting for the kettle to boil
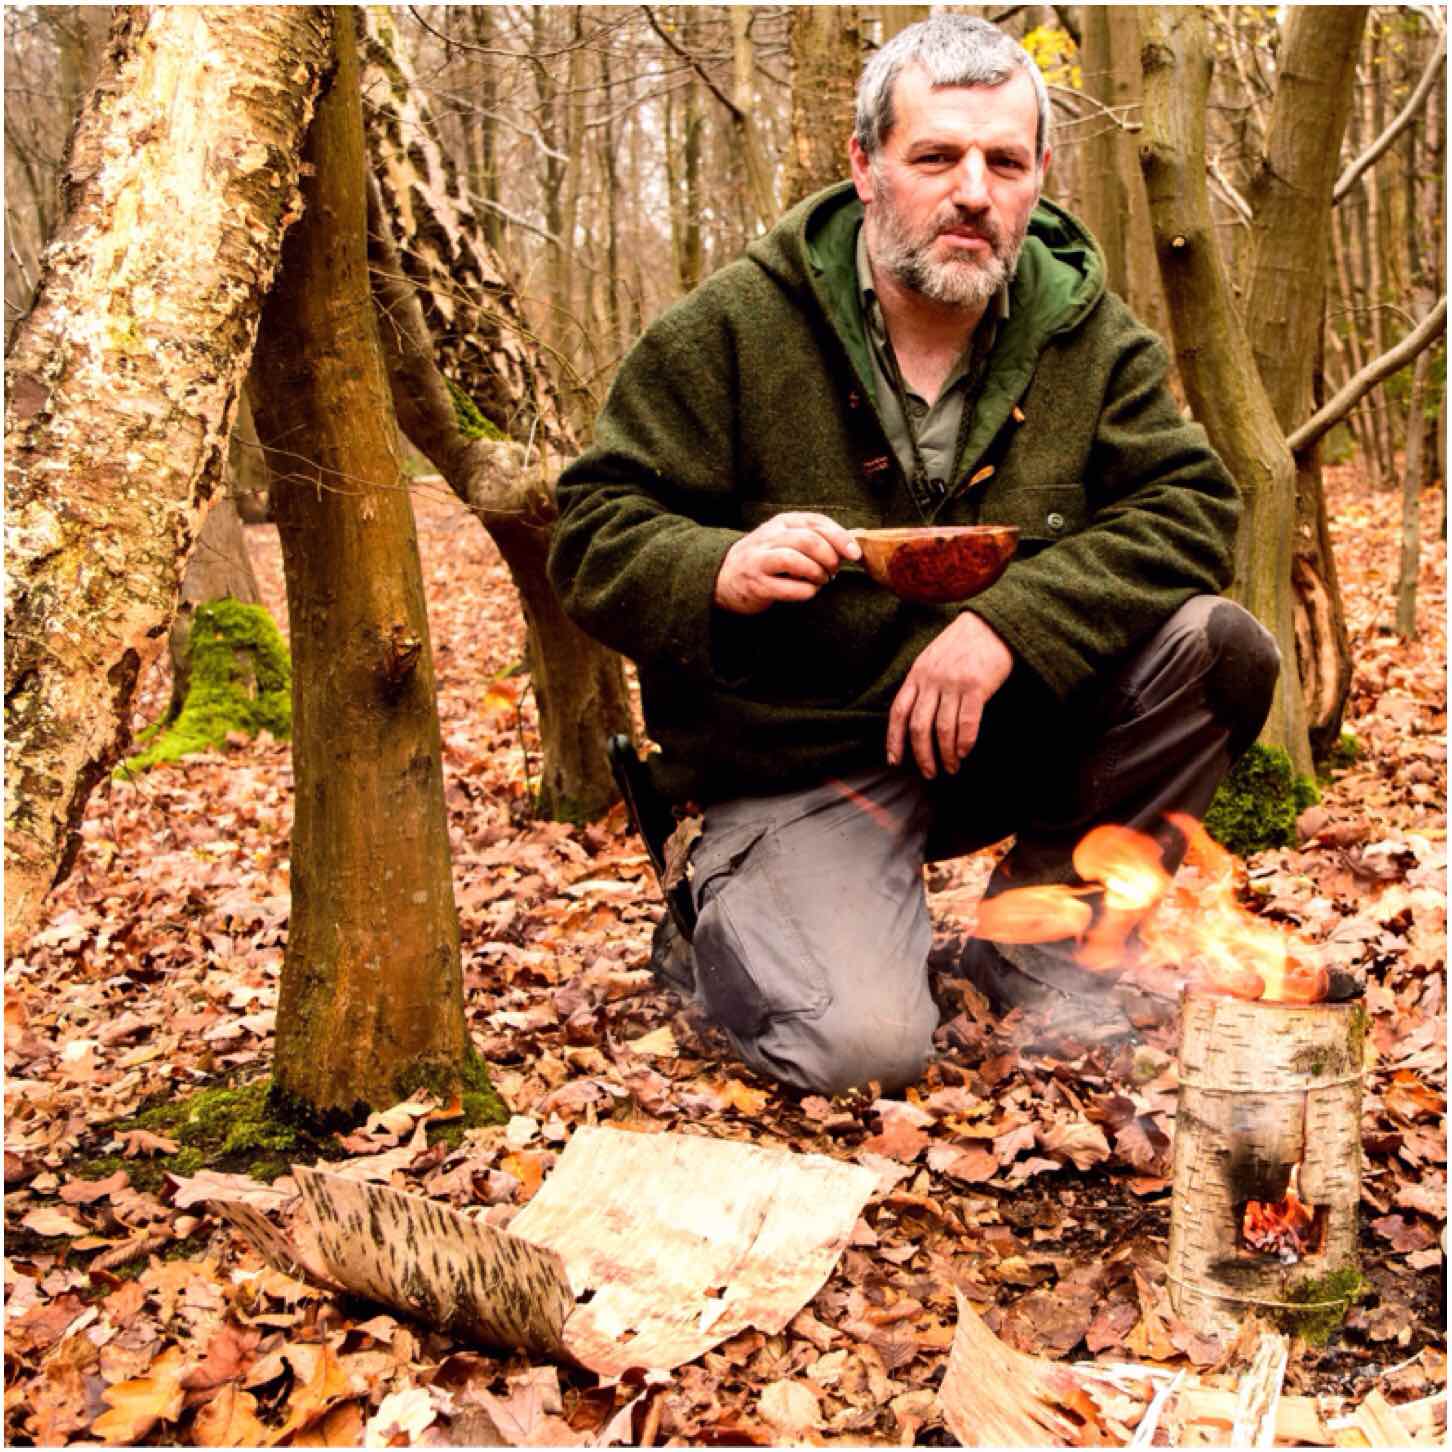
I have to thank Jess Edwards for a number of these pictures at the end. Jess is a great photographer and keen bushcrafter so it was great to concentrate for once on the tinkering and leave the photography aspect in someone else’s capable hands.
Brew time
Observations
Once the coffee was made I was able to have a good look at what was happening with the stove. As I looked closely I could see the moisture in the wood boiling off. If you look in the bottom picture you can see the water boiling away on the surface.
Drying off
The stove kept going for another hour before I had to put it out as we were leaving.
Overall I was very impressed with this Log Rocket stove with the Raappanan Tuli twist and I will be using it again on my courses.
A glorious farewell
Thanks again to the Scouts for documenting this stove – I hope you like my little twist on it?
Best to learn the tricks of campcraft here so that when you are sorting your life out on that wet and windy morning in Brecon – life is a breeze.
This post documents the last of my courses with the Sea Cadets for 2013 and one of the first of 2014. It was a very good year (2013) for expeditioning in the Corps as far as I was concerned. Some of our cadets will eventually find themselves climbing mountains in the Alps and great fun they will have too, but they have to start somewhere before this high-level work can happen
In November last year and in February of this year I helped run two Northern District (London Area Sea Cadets) Basic Campcraft weekends. These weekends are designed to introduce the cadets in a constructive but fun way to the skills they will need to develop to reach their higher goals – be that completing a Gold Duke of Edinburgh’s expedition or climbing in the Alps.
Basic Campcraft with the Sea Cadets
The areas we cover in the course are:
Providing shelter
Food and Cooking
Packing and carrying equipment
Safeguarding health and well-being
Recognising suitable clothing and equipment
Navigation skills
Safeguarding the environment and countryside
Planning and preparation
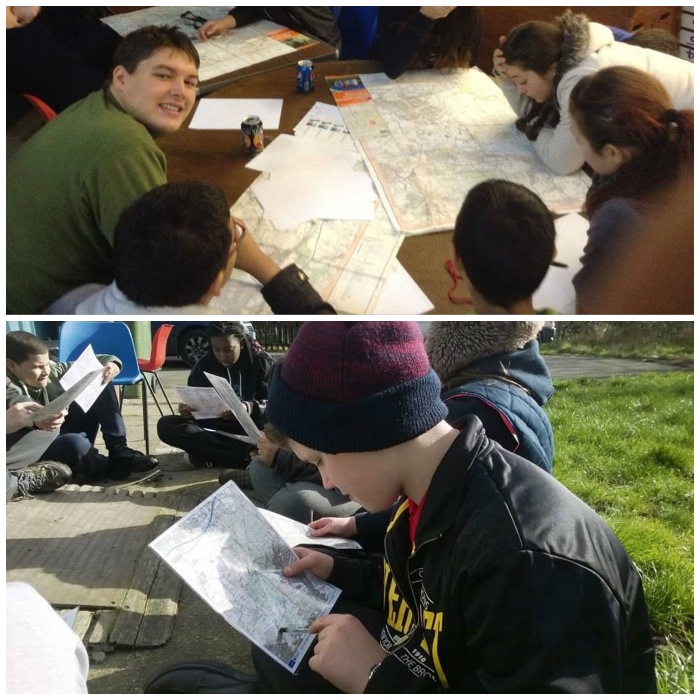
The pictures in this post come from both courses to show all the activities the cadets undertake. Some of the cadets who come on this introductory course have never camped in their lives. Most are city kids who have had little chance to get out and about into the woods and hills so the pace is taken gently as we slowly expand their comfort zones.
After introductions, discussions on safety and a kit check it is time to start learning how to read a map properly. I find it best if the cadets start to read maps like a book, and the only way to do that is to understand the symbols. Everything else such as scale, slope aspect and compass use comes later.
Learning how to use a map
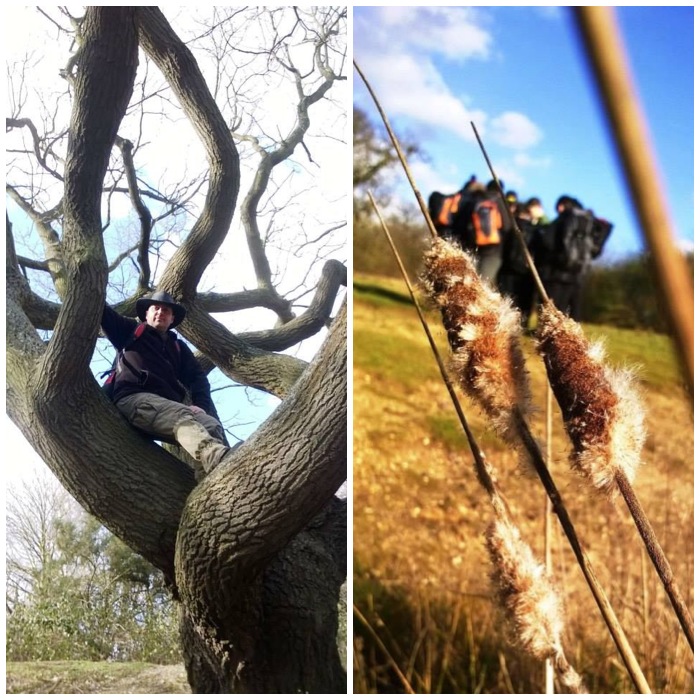
We get out and about as soon as possible but will vary the timings depending on the weather. On the left below is Chief Petty Officer Dave Lewis, who is as keen as I am in getting the cadets adventuring. On the February course Dave and I took a step back to let one of the younger instructors, Emma Deasy, run the course. We were there for safety, to add extra detail when required and to assess Emma for her Adventure Leader qualification. This is an in-house Sea Cadet qualification but is a first step towards gaining the nationally recognised Basic Expedition Leader Award.
While Emma briefed the cadets (picture on the right) Dave and myself watched from on high.
Getting out there
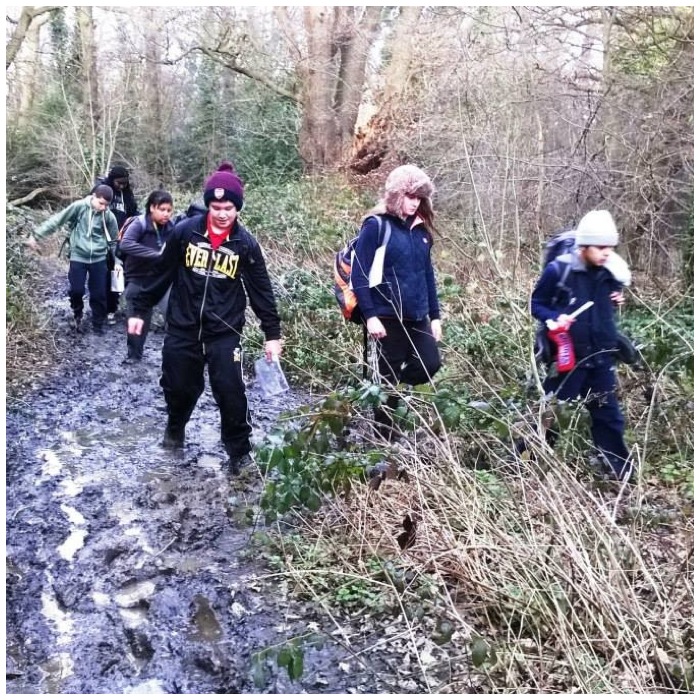
The cadets are not expected to lead the navigation at this level but just get used to using a map and to start to get an understanding of how it relates to the real world. In between all this learning it is always good to find some mud.
Finding muddy trails
These are the two groups we had, the top picture from February this year and the bottom picture from November last year. Pictured in the bottom picture in the red jacket is Lt (SCC) Keith Coleman RNR. Keith like Dave is a great friend of mine; I didn’t know at that time that this was to be the last Sea Cadet course I would work with Keith.
The cadets and staff
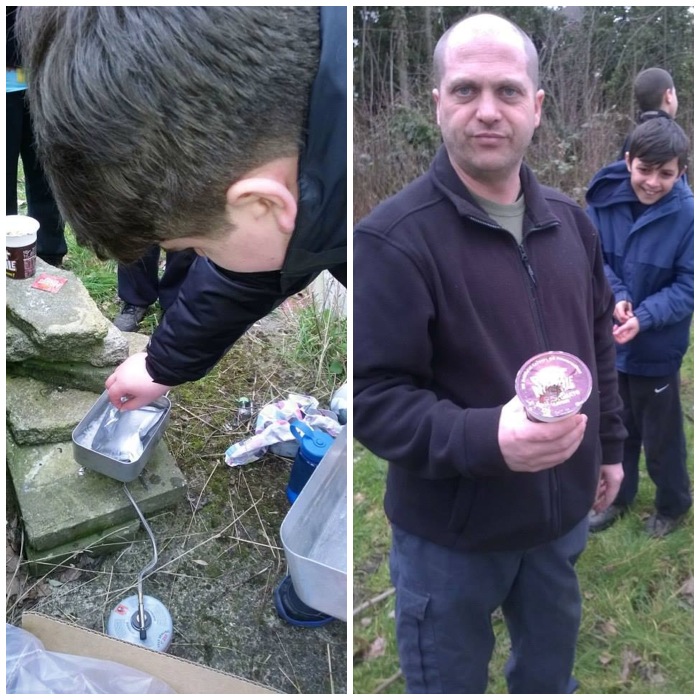
I had to get this picture in as I always like to take my EDC hammock chair with me on trips. Sometimes I get a rest, more often the cadets nick it. The trip in February was hard for me as I forgot to take it with me – poor skills on my part.
Time for a brew
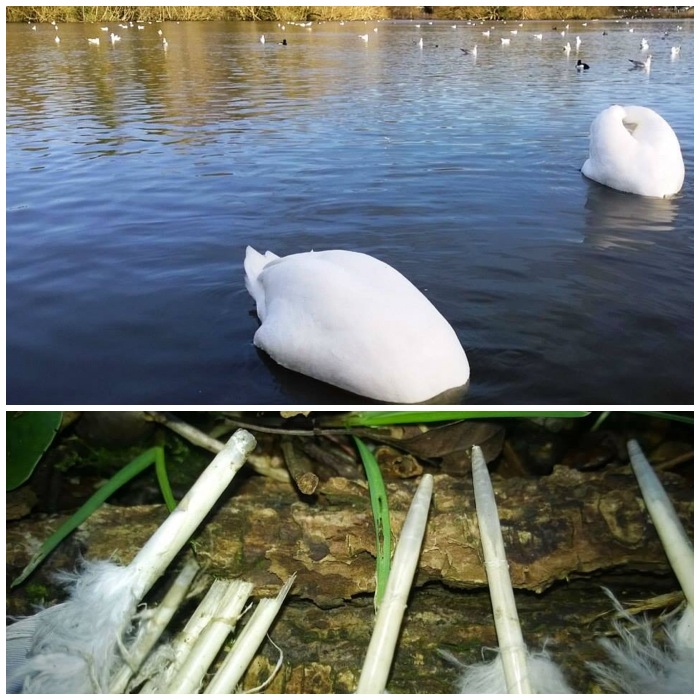
It is not all navigation: it’s good to get close to nature too – be that alive or dead. The bottom picture shows some wood pigeon feathers found by one of the cadets. After some initial hesitation the cadets got up close to investigate them. On close viewing you can see the blunt bite marks typical of a fox but some of the quills have the single score line on them typical of a bird of prey. I am no expert in tracking or hunting but it’s clear there is a story to tell here and it is great for the cadets to see this and start to open their own eyes and mind to what is happening all around them.
Watching nature
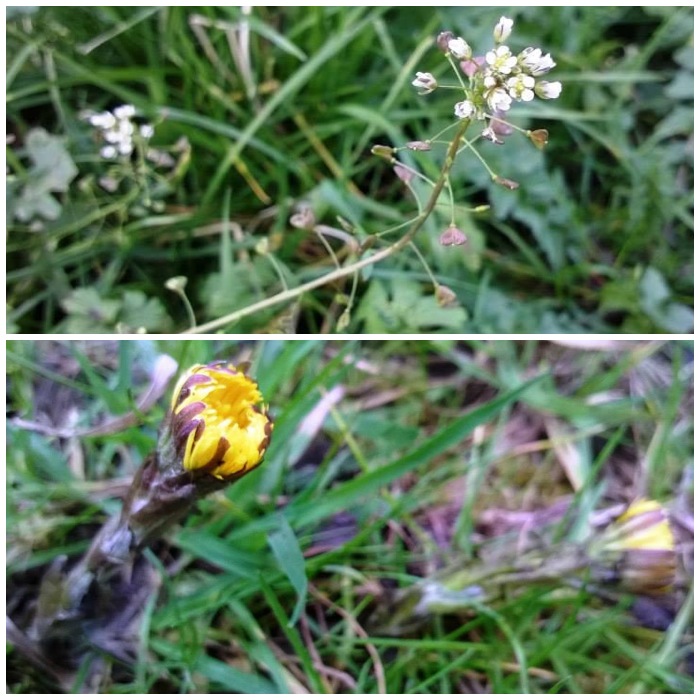
Along the way we teach the cadets about the plants that are in season at that time and they are then expected to start to look for more of them along the way. I don’t expect the cadets to remember all the names, just to start noticing them more.
Plant ID – Shepherds Purse and Coltsfoot (taken in February)
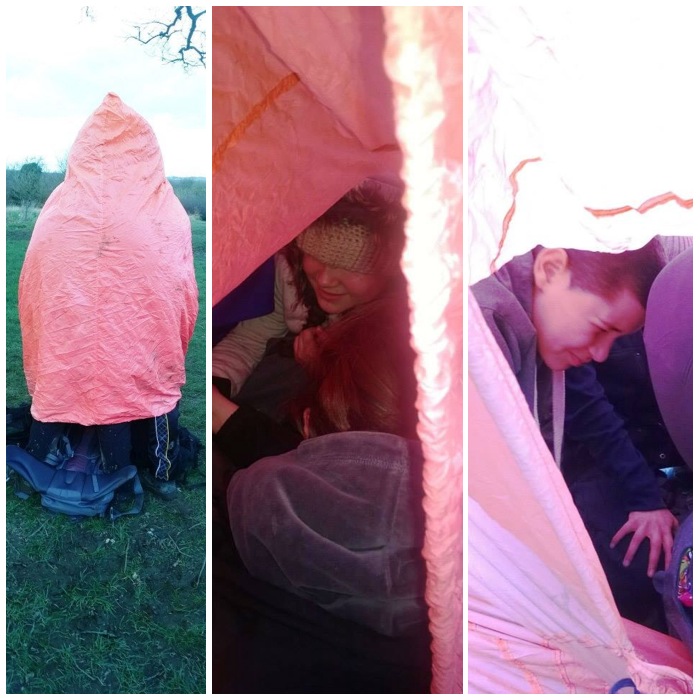
No introduction to campcraft would be complete without trying out an emergency bothy. Most instructors will carry one of these whether they are on the hills or just wandering around the woods. I have used these for real on a couple of occasions in high winds and rain on mountains. When you get inside as a group the bothy traps warm air so that the temperature rises quickly. They are not waterproof but do cut out the wind and can make all the difference.
For the cadets it is a fun if squashed couple of minutes.
An intro to the emergency bothy
These two courses were run at the Waltham Forset Sea Cadet Unit in North London. As we had access to the main building we ran some of the classes indoors (some other courses are based solely outdoors). As I said at the beginning, this course is about an introduction to campcraft where we slowly expand the cadets’ comfort zones.
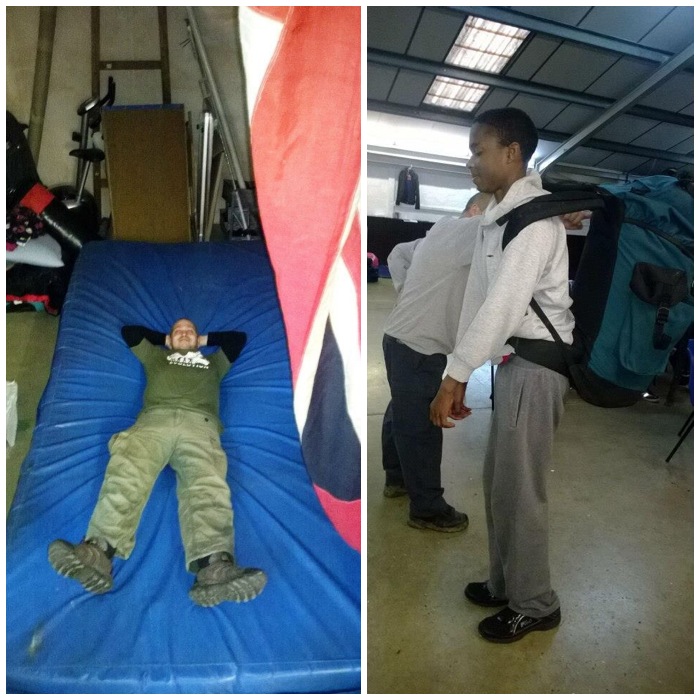
Speaking of comfort zones, as you can see (below left) Dave has mastered the art of getting comfortable no matter where he finds himself. In the picture on the right the cadets are being taught what to look out for when buying or using a rucksack.
Indoor breaks and classes on kit
Next up were classes on First Aid kits and footwear. You can see that not all the cadets fully appreciate the need to wear walking boots at this stage and some do turn up in trainers thinking they will be OK. On both weekends there were a few cadets with wet feet.
First Aid and footwear
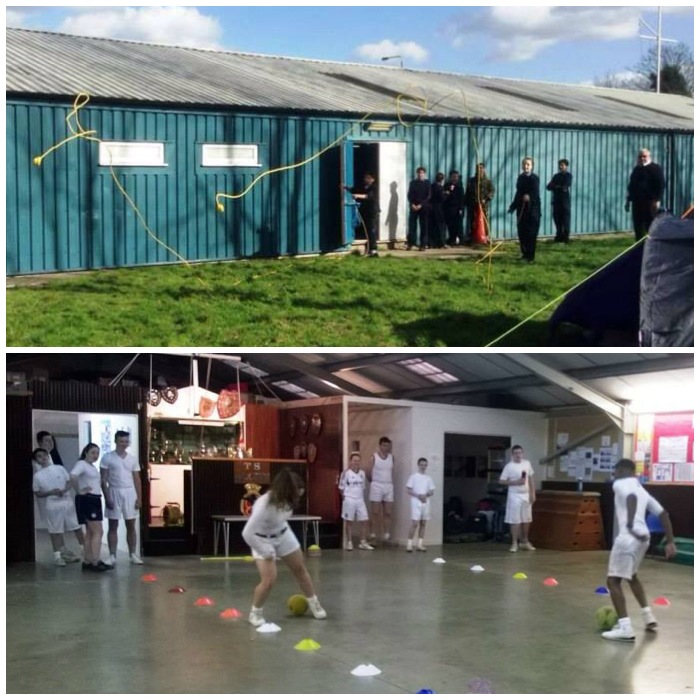
While we were running about doing this adventure training stuff there were other courses being run out of the unit, including Seamanship, Communications and Physical Training (PT).
In the pictures below you can see cadets learning how to throw a heaving line properly and taking part in games on the PT course.
Other courses – Seamanship and PT
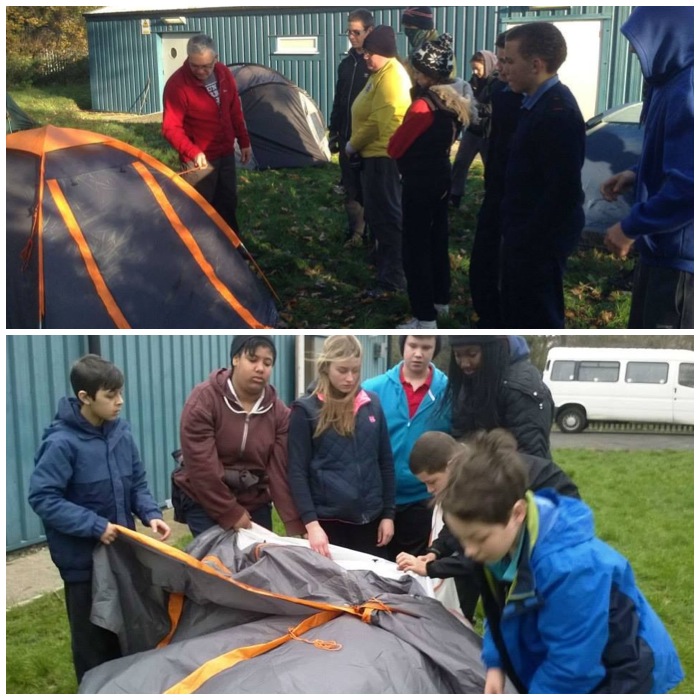
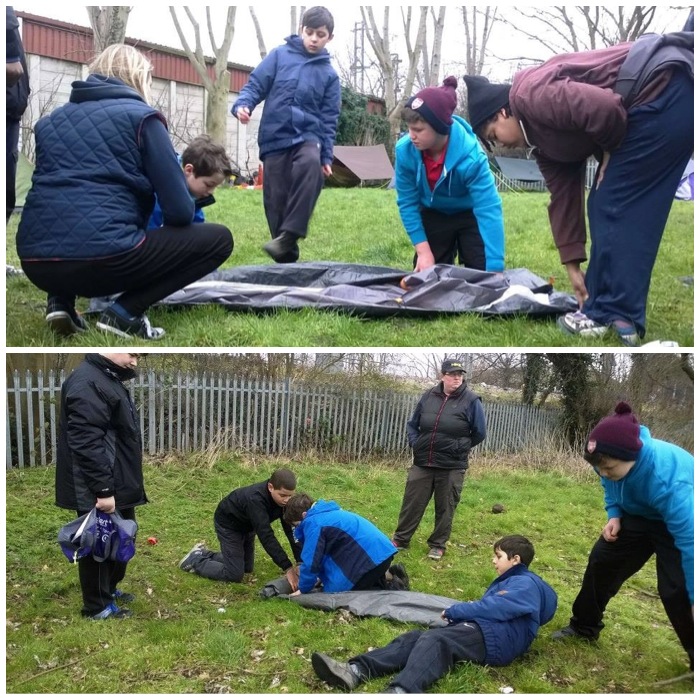
Usually when the cadets turn up on the Friday evening the staff have to help them set their tents up. A few bring their own but most cadets are given a tent to use by their own Sea Cadet unit. Most of them won’t have set a tent up before and some will never have slept outdoors in their lives.
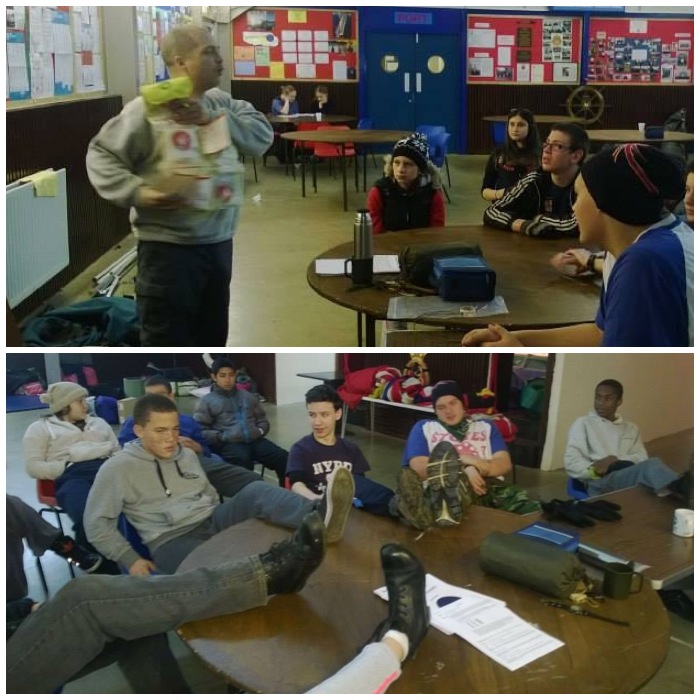
On the Saturday we normally have a class on the different types of tents you can buy and how to erect them. Here Keith is leading the class and once he had shown them the basics it was over to the cadets to have a go.
Setting up tents
Sometimes things go pop in more ways than one. In the top picture the cadets have failed to secure the pole over the entrance; in the bottom picture the pole had actually snapped. In the former case the pole is easy to re-position but with a snapped pole a little bit of imagination, a tent peg and some duct tape are essential. Everyone got a good night’s sleep in the end.
Dealing with problems
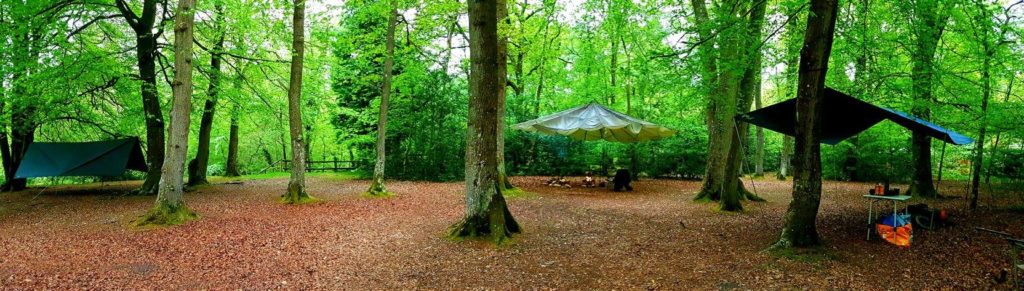
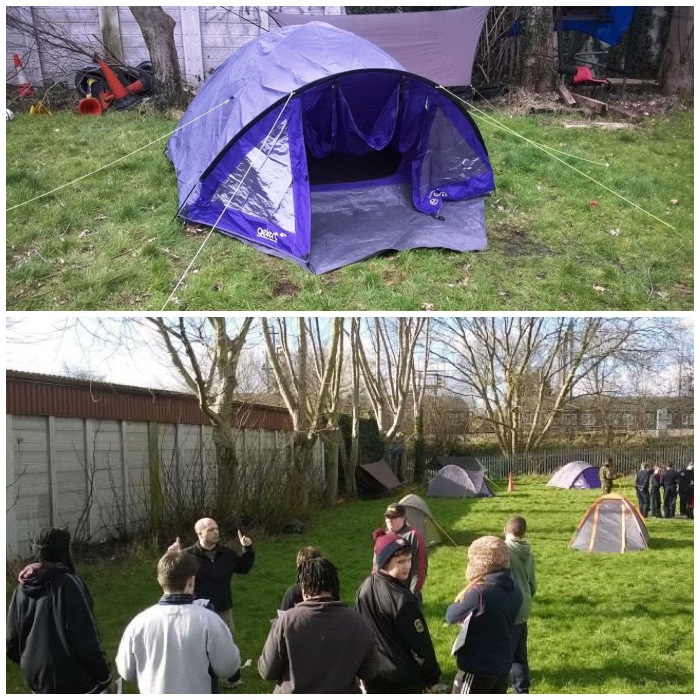
Eventually the tents were all up properly. The staff hammocks and tarps are right at the back. I do not usually let cadets on this course sleep in hammocks, but when they advance to other courses they will be offered the chance to do this. Here the cadets get to see what hammocks are all about and to try one out if they wish. I like to see the cadets using hammocks as they do have a real historical association with the sea.
Getting it right
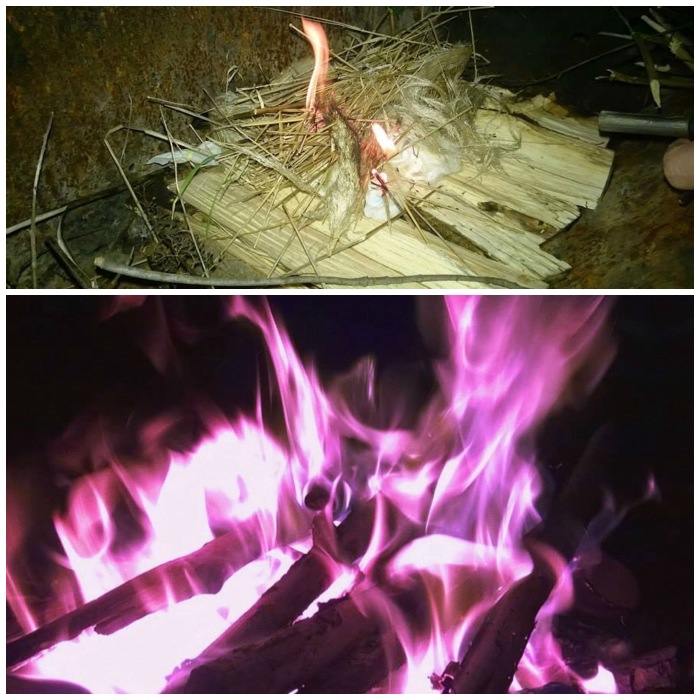
In the evening wherever we are running this course I do try and have a camp fire lit. I remember as a young lad what camping meant to me – sitting around the fire in the evening eating toasted marshmallows (yes they were around then).
Evening fire
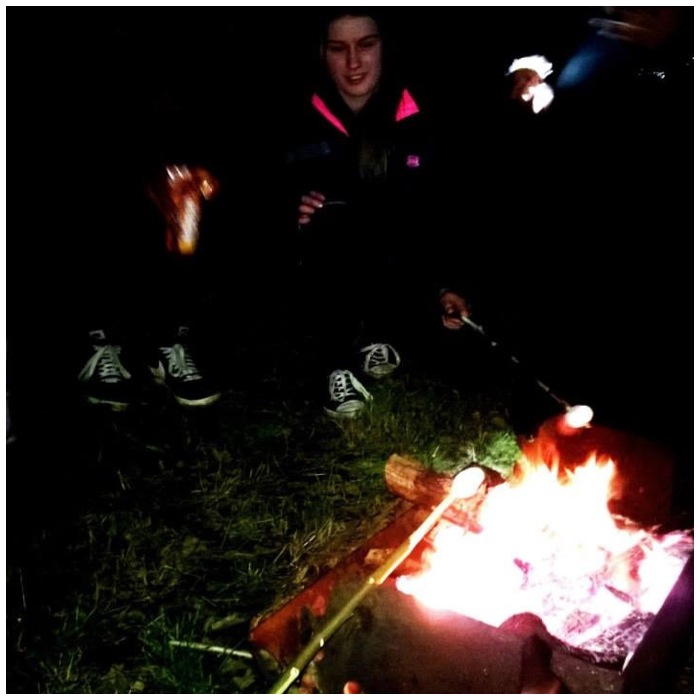
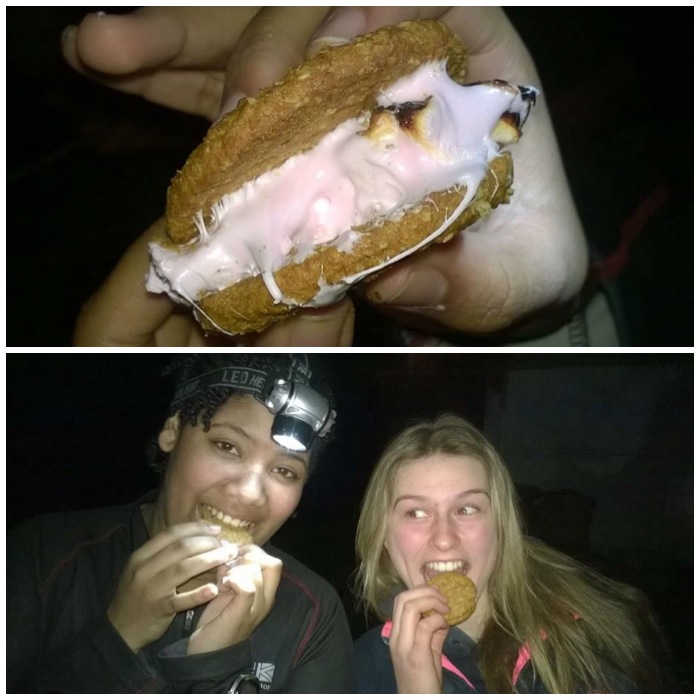
We do not cook food over the open fire on this course as it is not on the syllabus but it is our tradition now to have Shmores whenever possible.
Time for marshmallows
A Shmore is a toasted marshmallow or two inside a couple of biscuits. Why some people find this unappealing (Dave) I will never know.
Who could resist a Shmore
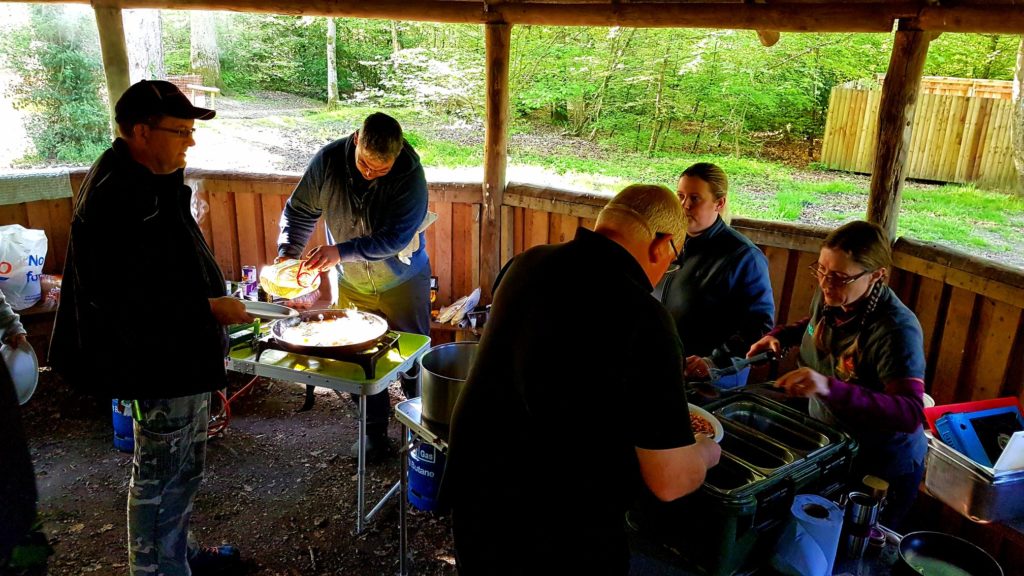
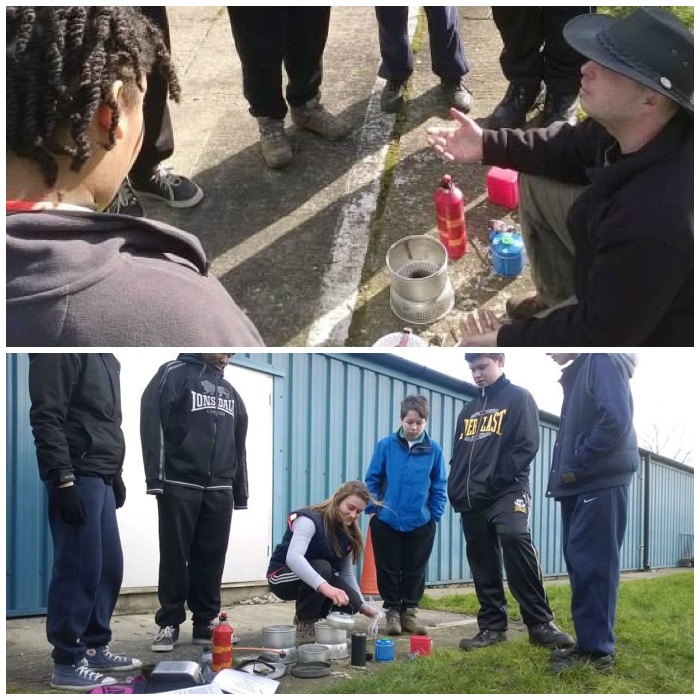
The cadets do have to cook a meal for themselves on the course so need to be introduced to some different types of stoves. After some safety tips and basic tuition it is over to them to have a go under close observation.
Learning how to use stoves
We try to keep the cooking simple with foodstuffs such as pasta, beans or even just boil-in-the-bag ration pack food. Dave though takes a strong dislike to seeing the inevitable pot noodle rear its head out of some cadet’s rucksack. Have a guess who the culprit is on the right? Although pot noodles are quick to heat up with boiling water they generally have only about 300 calories in them, not enough to keep a cadet going on these weekends.
Trying it out for themselves and some less-than-desirable food
Put the tents up – then learn to put them away properly as a team. It is easy to do in this controlled environment when the weather is dry and there is little wind; it is a bit more challenging on the side of a hill in Brecon on a wet and windy morning.
Best to learn the tricks of campcraft here so that when you are sorting your life out on that wet and windy morning in Brecon – life is a breeze.
Packing away properly
There were many more classes including different types of clothing to wear, first aid scenarios, planning, the countryside code and packing kit that the cadets have to cover.
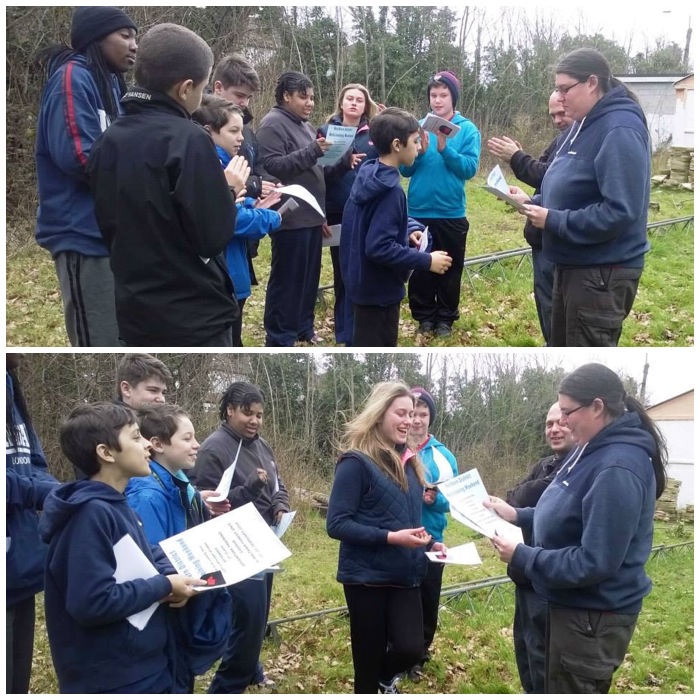
At the end of the course all the cadets receive their certificate and basic campcraft badge. For some this is as far as they will go with camping but for most I will see them again on more advanced courses leading them into the mountains and the world of bushcraft.
The Awards
These two courses were an end of an era for Keith and the beginning of a new era for Emma.
Emma managed to pass her Adventure Leader assessment after working hard towards it over the last few years. This qualification is not easy to attain due to the complexities of all the different situations you can find yourself facing – so welcome to the team Emma and well done.
Keith has now left the Sea Cadets but it was always a pleasure working with him. Keith is a good friend and we will work again on other courses, in particular bushcraft courses, as that is where his heart truly lies. As well as being an excellent Adventure Leader Keith is a great organiser – Dave, that leaves you and me to do the paperwork now 🙂