An Impromptu Quinzee

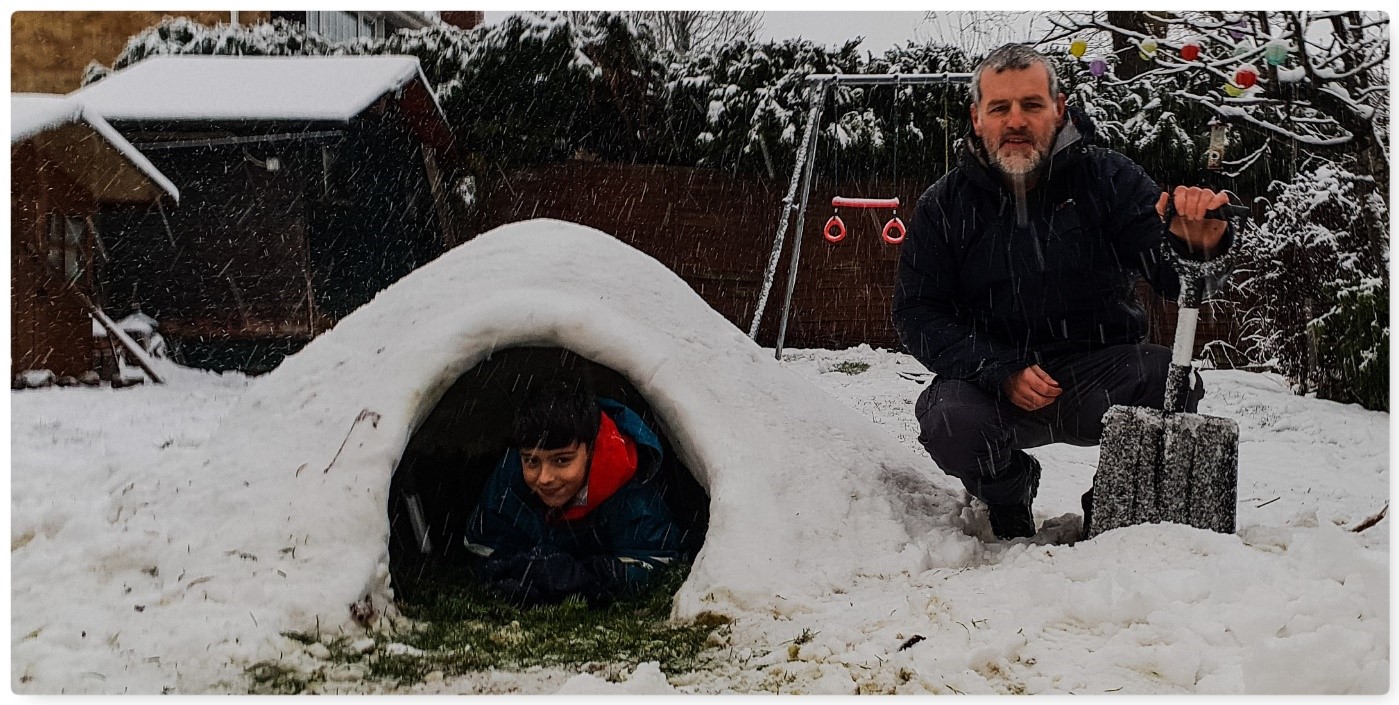
With the fair bit of snow we had last Friday here in Hampshire I decided to get out and have a bit of fun in our garden with my lad Finlay. We decided to build ourselves a little Quinzee snow shelter. We had built one years ago and Finlay wanted to see if he could remember all the steps.

The snow was coming down fast however we did not think we had enough snow to make a massive pile. Normally I would pile rucksacks, brash, logs or rocks into a pile, cover it in snow, pack it down and then pull out everything from the centre from what would become the door – we did not have anything like that so we managed to beg the use of my wife Alison’s pilates ball – did the job 🙂 Granted I would not have the ball out on a trip but needs must and all that – you decide what you want to put in the centre of your Quinzee (saves digging out a lot of snow as well).

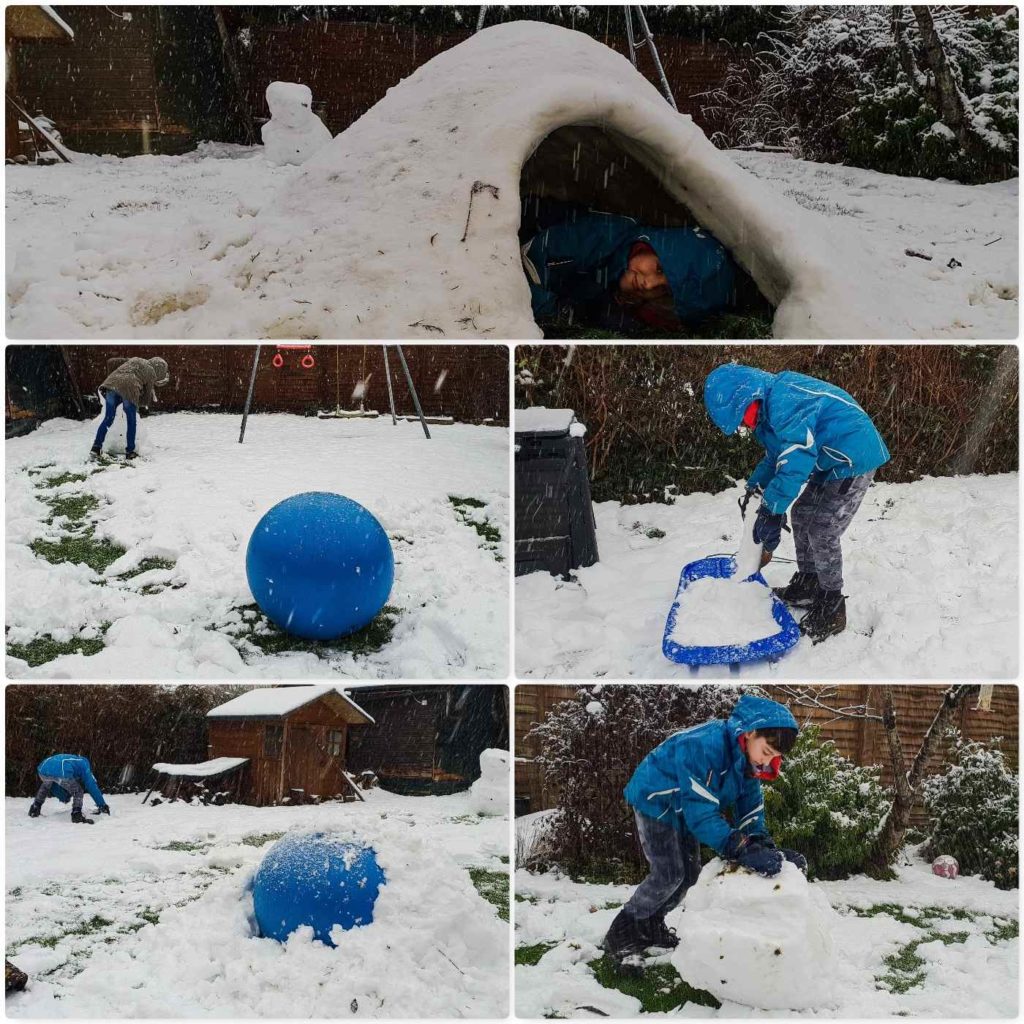
We tried lots of different methods of collecting  snow, from using a spade, the sledge, the rake and rolling up massive snowballs. They all worked to different degrees however the giant snowballs were pretty efficient.  

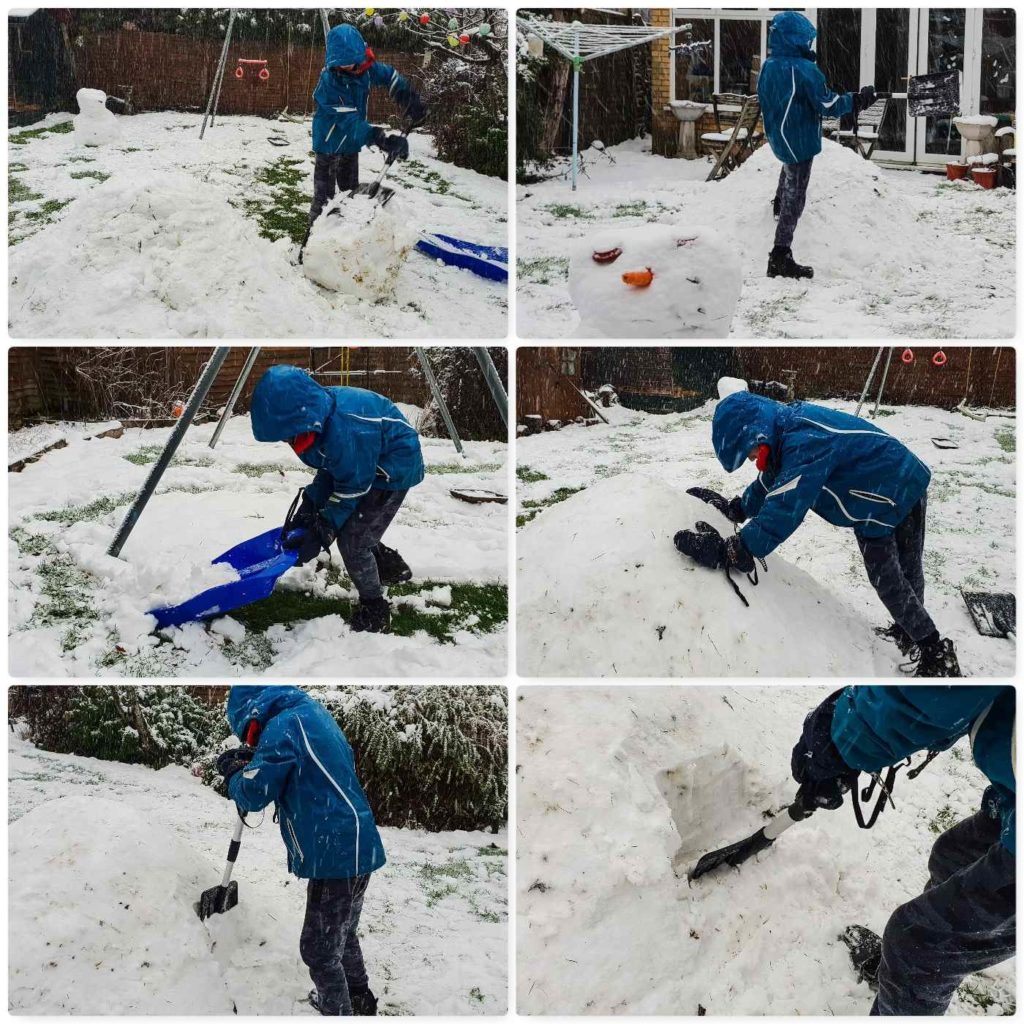
Once we had collected enough snow we used the spade to pack the snow down really well and smoothed the whole thing down with our hands.

Both Finlay and myself took it in turns to dig out the ball – it did not take long and as the snow was well packed it did not destroy the walls of the doorway as it came out. At this stage I would normally be pulling out the rucksacks, rocks etc.

I also pushed a lot of twigs into the top of the Quinzee where it was thinnest to a depth of about 10cm’s. These twigs are a safeguard for when you dig out more snow from the middle.

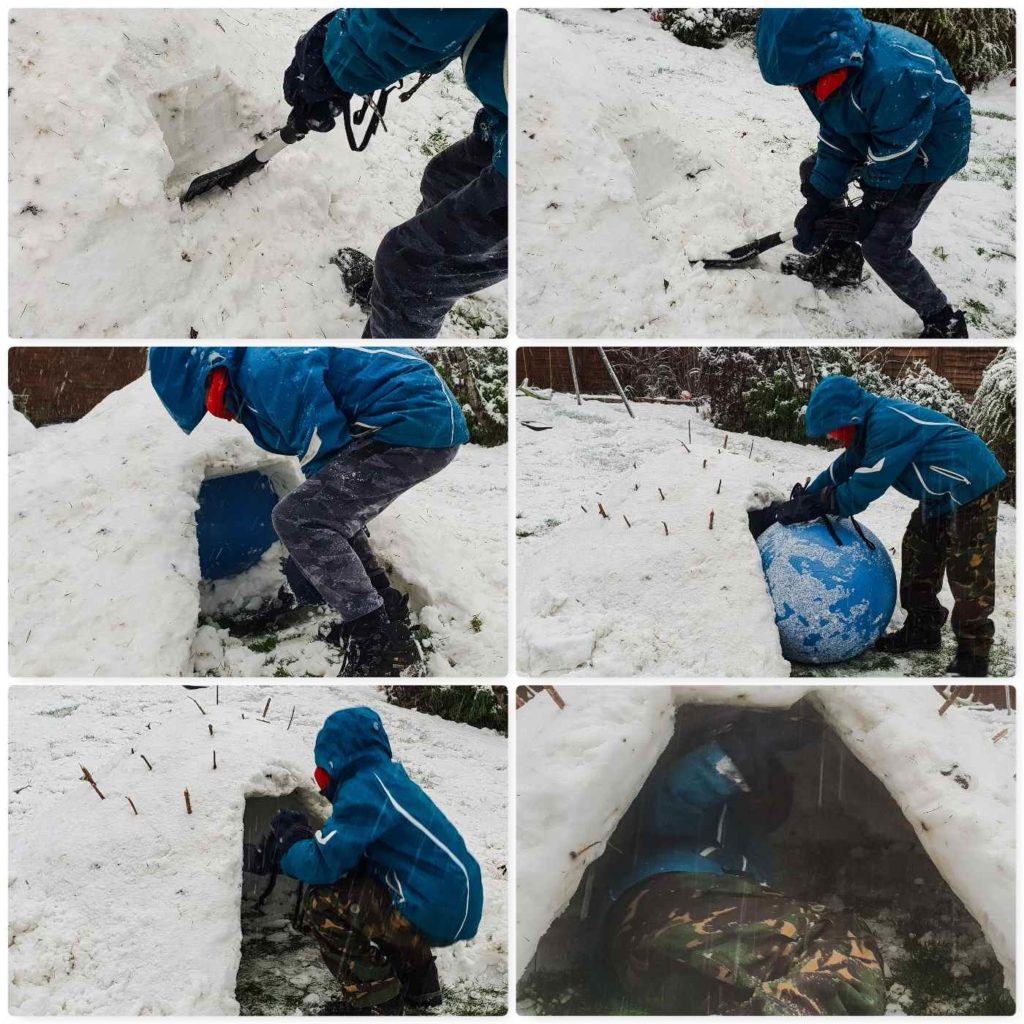
Once insided we had plenty of room to enlarge the shelter. We used our snow shovel  but I have done this with just a piece of wood before. As soon as a twig appeared we left that area alone and carried out excavating elsewhere. Soon we had a space big enough that either of us could curl up in. I do not like to make these Quinzees to large as a small space is easier to keep warm than a large one is. 

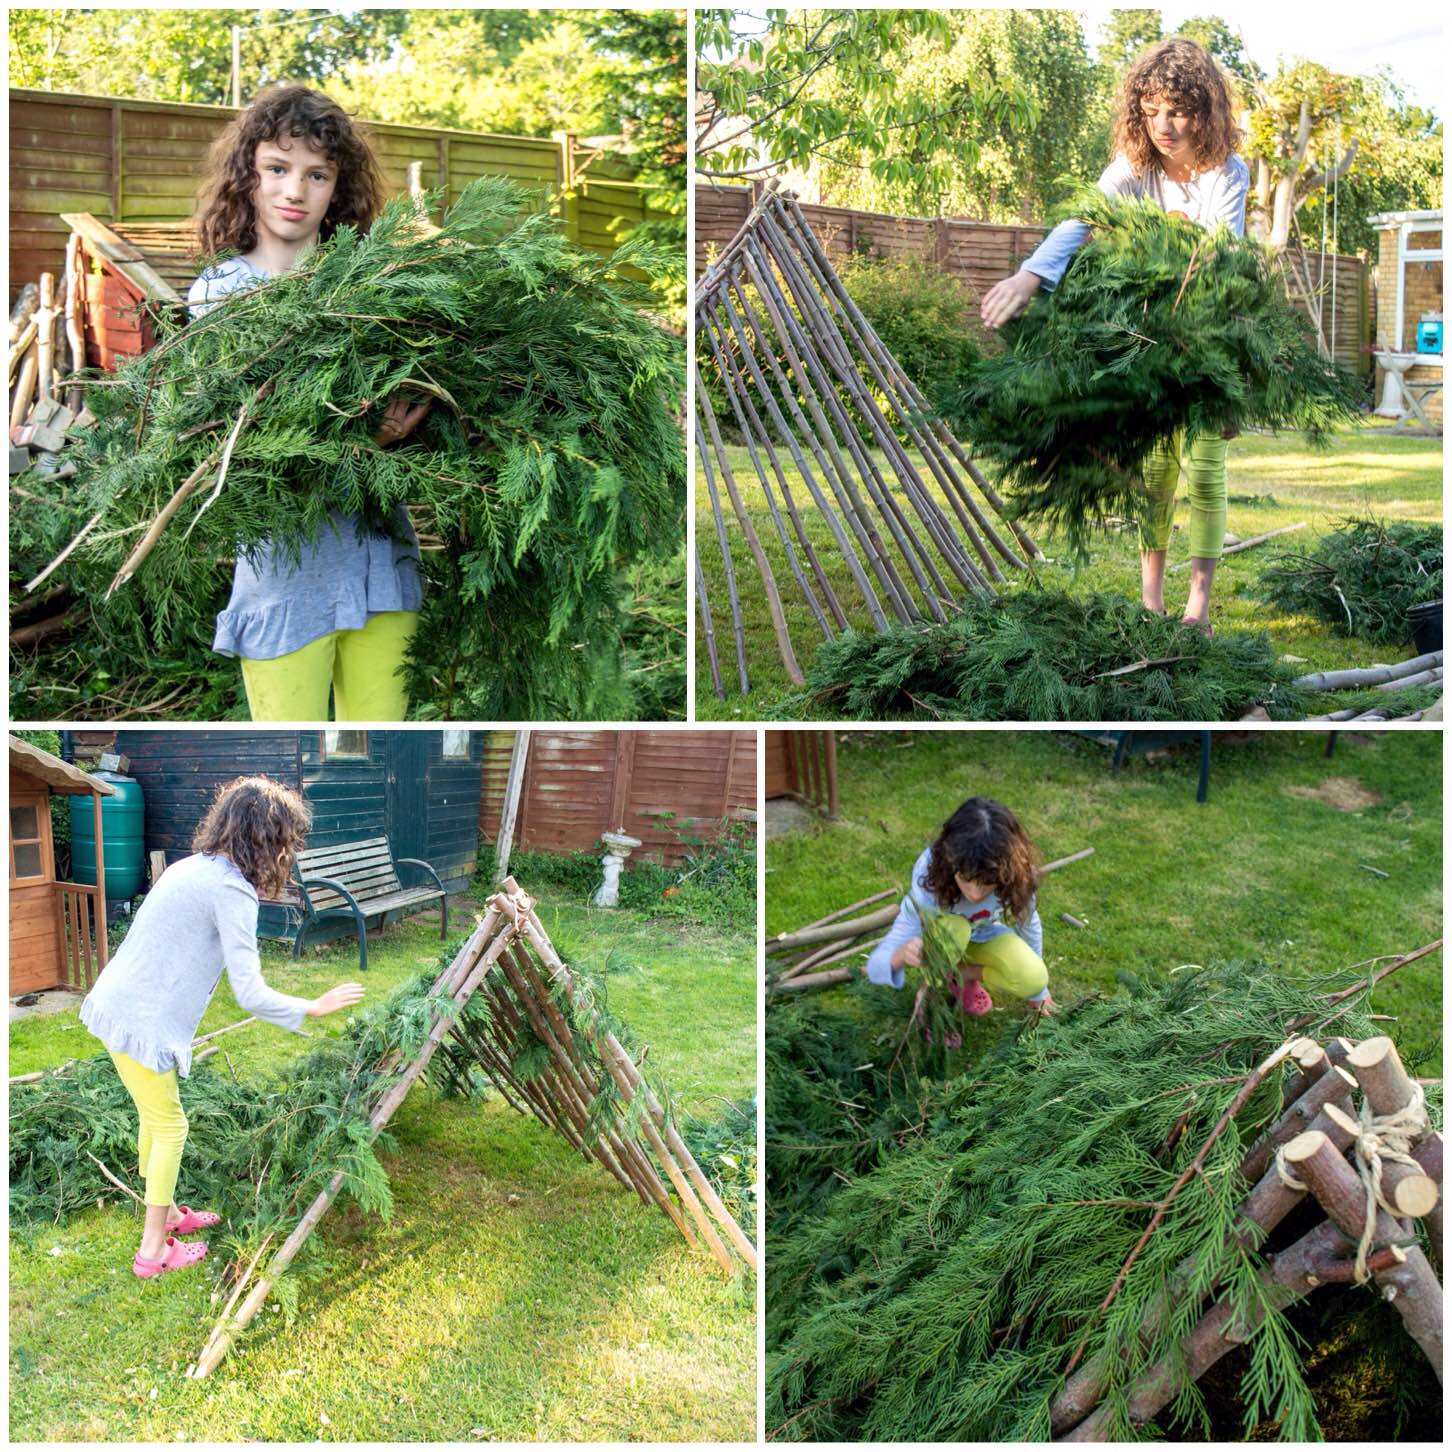
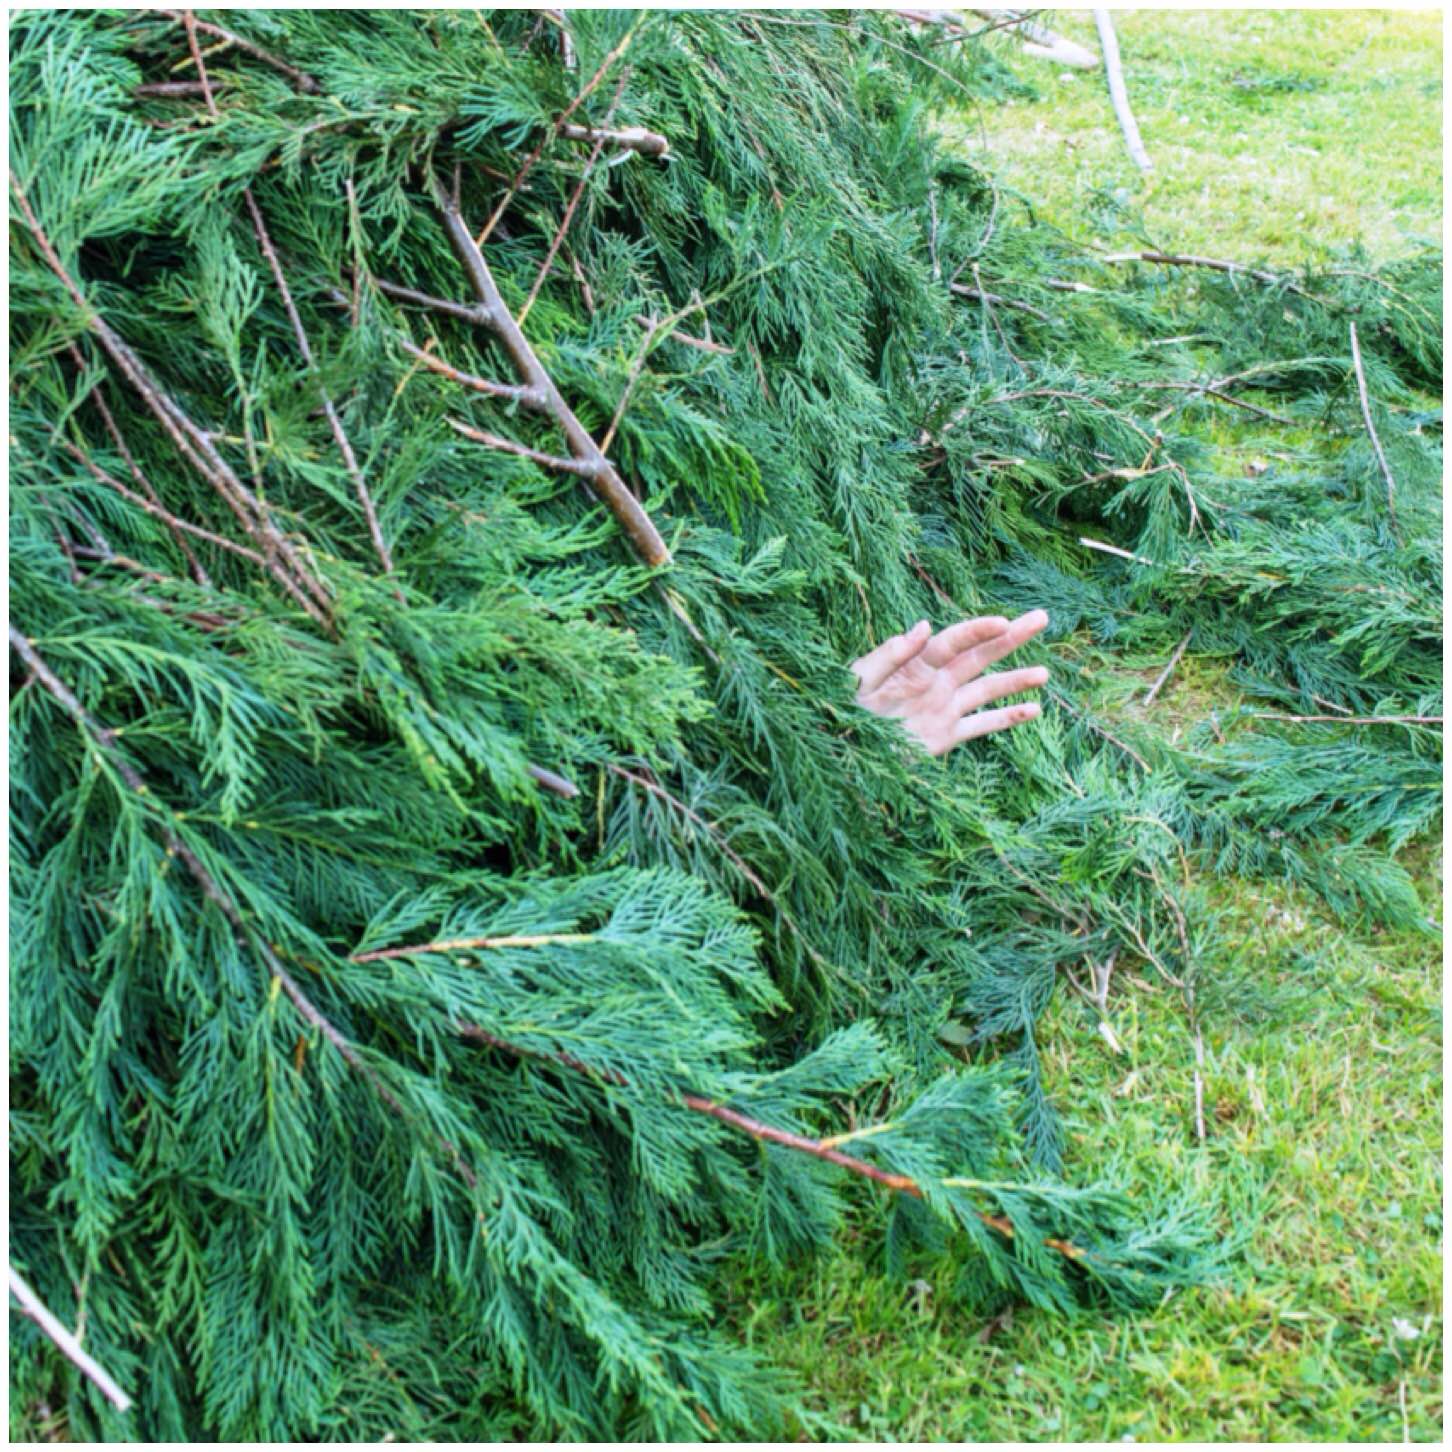
Finlay finished the Quinzee off by smoothing off the inside walls with his hands, making the entrance smaller and lining it with conifer branches.

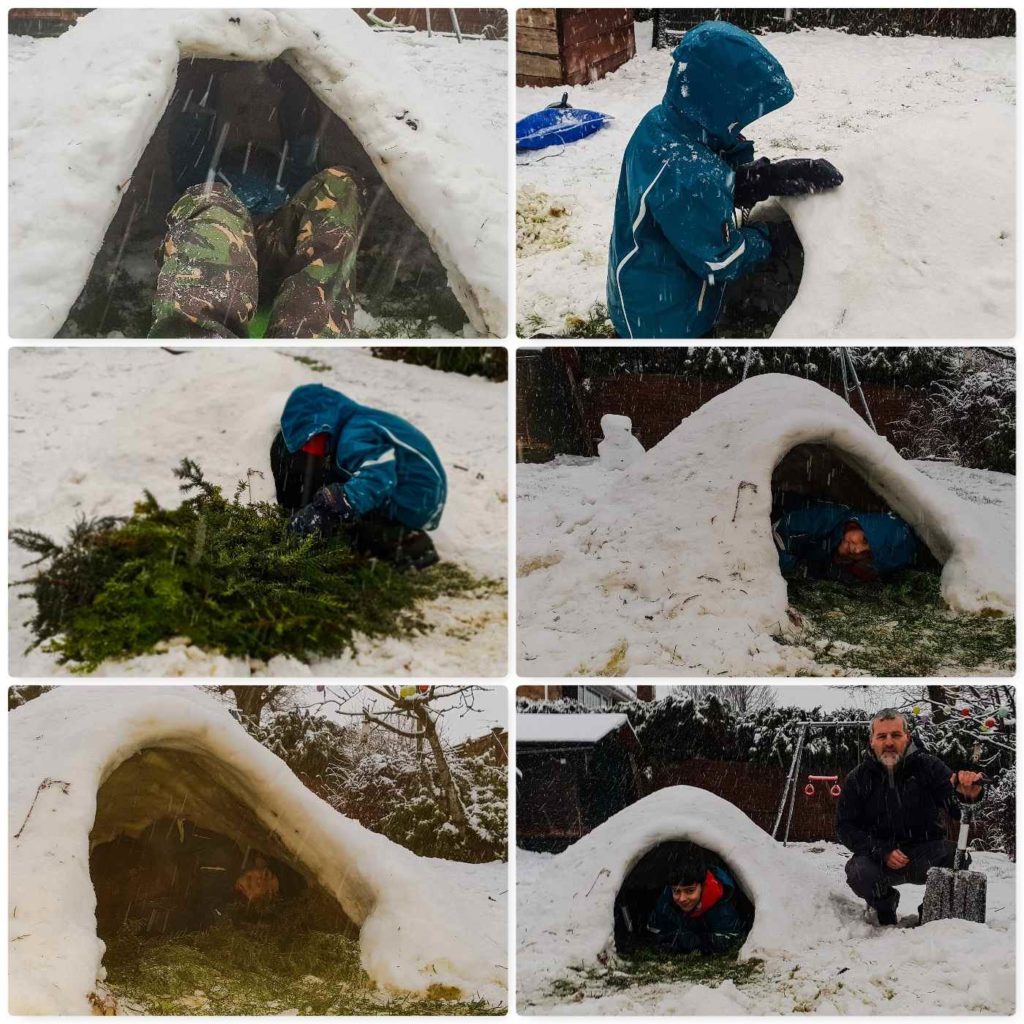
All the snow is melting now (48 hrs since we built it) however it is still standing and looking good. We could have spent a little while longer making the doorway smaller however hot chocolate was calling and we took our final snap and headed indoors.

It was a good project to work on with Finlay (some good Father and Son time) and I was proud to see that he stuck it out in some heavy snow conditions to the end.

Cheers

George


Shelter building with the Boys

Last weekend I went for a walk in the woods with my lad Finlay and his friend William. I was planning a bit of a hike however I spotted a glade in our local woods where an area has been set aside for kids to build dens.

This post follows the steps I talked the lads through the principles of shelter building. This is not a full on How To…. guide to shelter building but more of an introduction to the principles of it all.

Photo 11-04-2016, 12 40 28
The principles of shelter building

We had a wander around some of the shelters that had been left up by other groups and talked about the positive elements of each shelter. I find that this focuses the mind on what has worked well and how these elements can be incorporated into any other shelter.

We looked at how high a shelter needed to be, how many walls were really needed, how much thatch was needed and what was needed to keep them warm dependent on different weather conditions.

Photo 11-04-2016, 12 40 20
The positives

I told the lads that we only had time to build a small shelter (Sunday Dinner was calling) so they found some rope and wood and I showed them how to tie everything together to form a spar. We had no tools at all so had to work with what we had.

Photo 11-04-2016, 12 40 18
Setting out

After a chat they opted to go for a simple lean to shelter as this they felt would take the least amount off time.

I told them they would need lots of sticks to lean up against the spar (more than they thought) and that they needed to be roughly the same size. After a quick demonstration on how to snap wood using the base of two tree trunks that were close together they were soon hard at work.

Photo 11-04-2016, 12 40 21
Sizing up

We put a pole on the ground to roughly mark out where each pole should be driven in and soon they had the basic skeleton of the shelter formed.

Photo 11-04-2016, 12 40 22
The Skeleton

One of the hardest things to get across to them was the need to always have a tidy working area. we had lots of dead wood lying about so I made them clear it all away from the shelter so we had a safe area to work in.

Once that was all done we had a good forage around for some spruce boughs. There were plenty lying around that had been cut down by the foresters for the kids to use (I wish all woods had an area like this).

Photo 11-04-2016, 12 40 23
Tidying and foraging

After layering some of the spruce boughs onto the skeleton of the shelter I got the boys doing the penguin walk. This is the way I get the kids to gather up lots of leaves in a very short space of time. They would quickly make little piles of leaves and throw them over the spruce boughs.

Once the bottom half was all done they got some more spruce boughs for the top and covered that in leaves as well. Finally to keep the leaves in place they laid a load of small sticks over the leaves (to try and help stop the wind from blowing it all away).

Photo 11-04-2016, 12 40 24
The layer system

Once they had finished the outside it was time to sort out the interior design. They spent a little while weaving back in all the loose (well some of them) spruce needles back into the thatch.

Once that was done they foraged for some more spruce and made themselves up a little bed to keep themselves off the cold earth.

Photo 11-04-2016, 12 40 26 (1)
Interior design

We did not have permission to have a fire in the woods but that did not stop us from pretending – after all that is what we kids do 🙂

I got them to build themselves a heat reflecting wall in front of the shelter (about two paces from the shelter). They just pushed two sticks into the ground and stacked some logs up against them.

Photo 11-04-2016, 12 40 26
Reflector wall

All that was left for them to do was construct their long log fire (one step away from the shelter) and relax.

Photo 11-04-2016, 12 40 27
Fire and finish

This took us about one and a half hours to complete and managed to have fun along the way as well.

As I said this was more about the principles of shelter building (done really to help towards one of their Cubs badges) and not a full on How To…. to building a shelter. If we had more time we would have put about 3 times as much debris over the top, the bed would have been raised up with a much thicker mattress of spruce and the sides would have been closed in.

Oh yeah – and the kettle would have been on 🙂

Cheers

George

10 Reasons to Bushmoot – 1/10 – Learning

The Bushmoot (referred to generally as the Moot) is an annual event here in the UK and for many years now has taken place at Merthyr Mawr in South Wales. The name Bushmoot comes from the word Bushcraft (as popularised by Richard Graves and Mors Kochanski) and the Saxon word Moot (used to describe a gathering of people).

I like the Moot as it is a gathering of like-minded people with a multitude of skills to share with each other. Not only can kids run free and have fun but so can the adults and I am a firm believer in learning through fun .

Photo 26-08-2015 11 16 50
Fun learning

I am writing 10 blog posts on the Moot this year and this first one is on the theme of Learning. I tried to write just one post however I really struggled to choose just a few pictures out of the many hundreds I took. My wife Alison suggested a number of short blog posts on different themes from the Moot and so here we are.

A couple of well-attended courses nowadays are the Starter course (a full breakdown of the course can be seen here on the BCUK site) and the Spoon carving course run by Dean Allen. Alison and our kids did the spoon carving course this year with Dean and carved their very first spoons.

Photo 26-08-2015 11 32 50
The basics

I managed to fit in a few courses this year and did a cracking traps course with Perry McGee.

The Moot is usually run over 2 weeks with a core 5 days in the middle where many short courses (2 hrs to 1 day) such as fire making, bow making, spoon carving, tarpology, knife safety, axe work, net making, cordage making, bread making, foraging, atlatl making and knotwork, to name just a few, are run.

There are other longer courses run either side of the core days (with an additional fee) such as an accredited First Aid course, Bhutenese bow making, coastal survival, tracking and lobster pot making with willow.

Photo 26-08-2015 11 38 09
Fine detail

Many of the courses are based on using different materials, from basket making, pottery, sling making to learning about different knots.

Photo 26-08-2015 11 20 51
Using different materials

We get lots of full-time instructors visiting the Moot like Fraser Christian (Coastal Survival), Perry McGee (National Tracking School). Wayne Jones (Forest Knights), Julia Wagstaff (Welsh Willow Works),  David Willis (Bushcraft with David Willis), Theresa Emmerich (tanning expert) and Richard Cook our First Aid expert.

Photo 26-08-2015 11 25 41
Advice from the experts

I enjoyed running the ‘show and tell’ workshop on campfire cooking constructions and observing the father and son bows being made.

Photo 26-08-2015 11 27 05
Working with wood

One of the things I love about the Moot is the sharing of knowledge such as how a stove was constructed or that Ikea make good quality drying racks that double up as brilliant cooking grills.

Photo 26-08-2015 11 39 33
A bit of metal

A favourite of mine is the art of fire making. At the Moot you can learn about making fire with firesteels (old and modern), bowdrill, handrill, with damp tinder, pump drills and in many other ways.

Photo 26-08-2015 11 30 54
Flamage

Shelter building is a big subject and is covered well, from simple tarps and debris shelters to large group tarps, permanent constructions and the magical art of tarpology.

Photo 26-08-2015 11 34 45
Shelter in many forms

There are many other courses to attend at the Moot with new ideas coming up each year. I have found that the Moot has really broadened my knowledge of all things Bushcraft over the years and I expect will continue to do so for many more to come.

Photo 26-08-2015 11 37 33
Sharing knowledge

Look out for more reasons to Bushmoot soon…

Cheers

George

30 Days of Wildness – Day 21 – Finishing the Den

Day 21 of the 30 Day Challenge found us going back to finish our shelter we had started on Day 18 (Shelter Building – Part 1).

I had to trim a rather overgrown Leylandii in our front garden and I voluntold the kids into helping me. They had to tell me if anyone was coming (the branches hung over the pavement) and transport the cuttings back into the garden.

Once that was sorted we started the laborious job of breaking of the branches so that they could be used for thatch for the den they were building.

Photo 23-06-2015 21 09 29
Trimming the Leylandii

Then it was a case of dragging all the cuttings into the back garden (It was just Catherine and myself at this stage as Finlay had headed off to Karate).

Once we got all the cuttings in the back garden Catherine and I leant some of the bigger branches against the frame to catch the cuttings (pointing upwards). The we started to weave in the cuttings (pointing downwards) to thatch it.

Photo 23-06-2015 21 09 31
Gathering and set up

There were plenty of holes in the thatch so Catherine went inside and would stick her little hand out where she could see sunlight. It was then my job to thatch it.

Photo 23-06-2015 21 09 32
Checking for holes

We laid a lot of sticks on the outside to hold all the thatch in place in case the wind gets up.

Finlay was back after 8 pm just in time to finish it off with a few extra additions

Photo 23-06-2015 21 09 33
Final touches

I think they have a proper little den to play in now for the next few days.

Photo 23-06-2015 21 09 34
A proper den

Cheers

George