How To….. Carve a Giant Log Rocket

Over the last few years I have written a fair bit about carving Finnish Candles or Log Rockets using just the tools I would carry in my bergen (saws, knives, axes etc) so I thought it was time to see what could be done with a chainsaw.

I decided to opt for the Log Rocket as I thought there has been plenty written about using Finnish Candles (referred to sometimes as Swedish Candles/Torches). At the Bushcraft UK Bushmoot last year I asked my friend Rob Nash if he was willing to carve a large log rocket for me using his chainsaw.

For those of you who just like to watch a short video on its construction here it is – for those of you who prefer detailed instructions there are loads of pictorial steps after the video below.

The Log Rocket

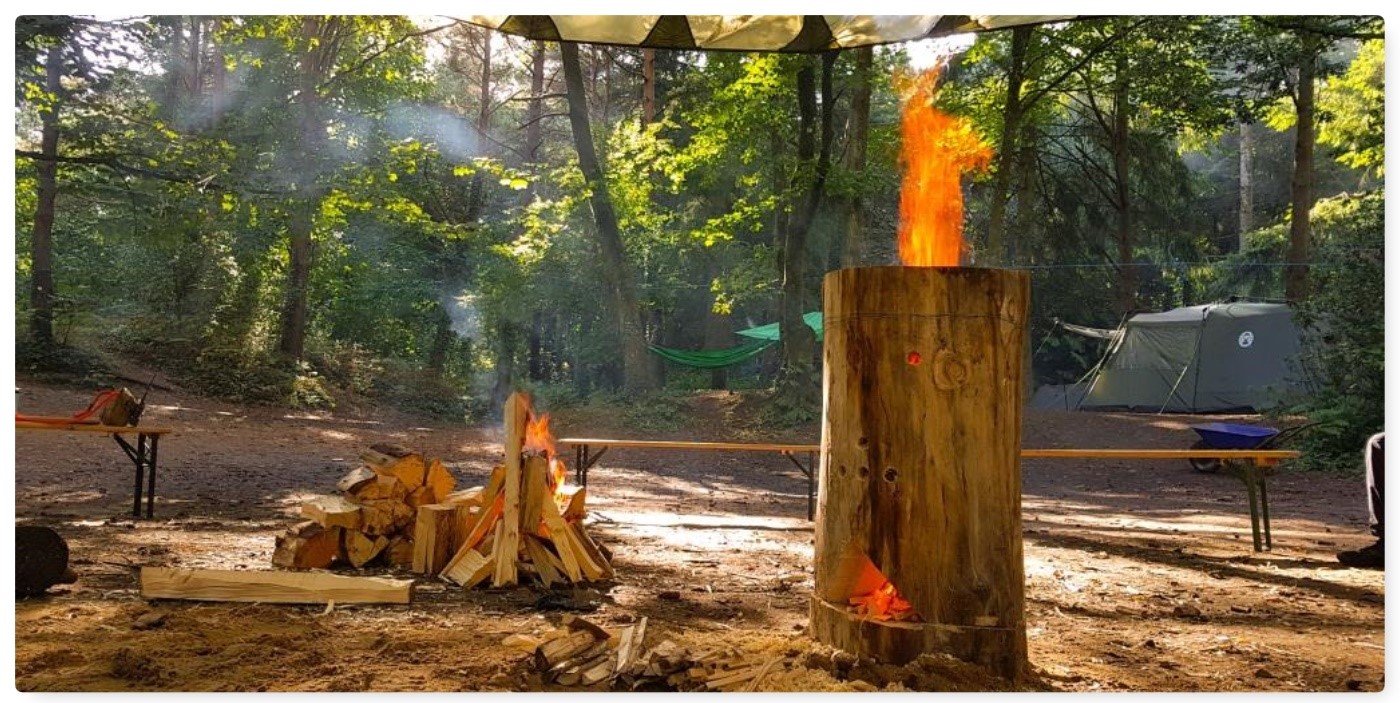
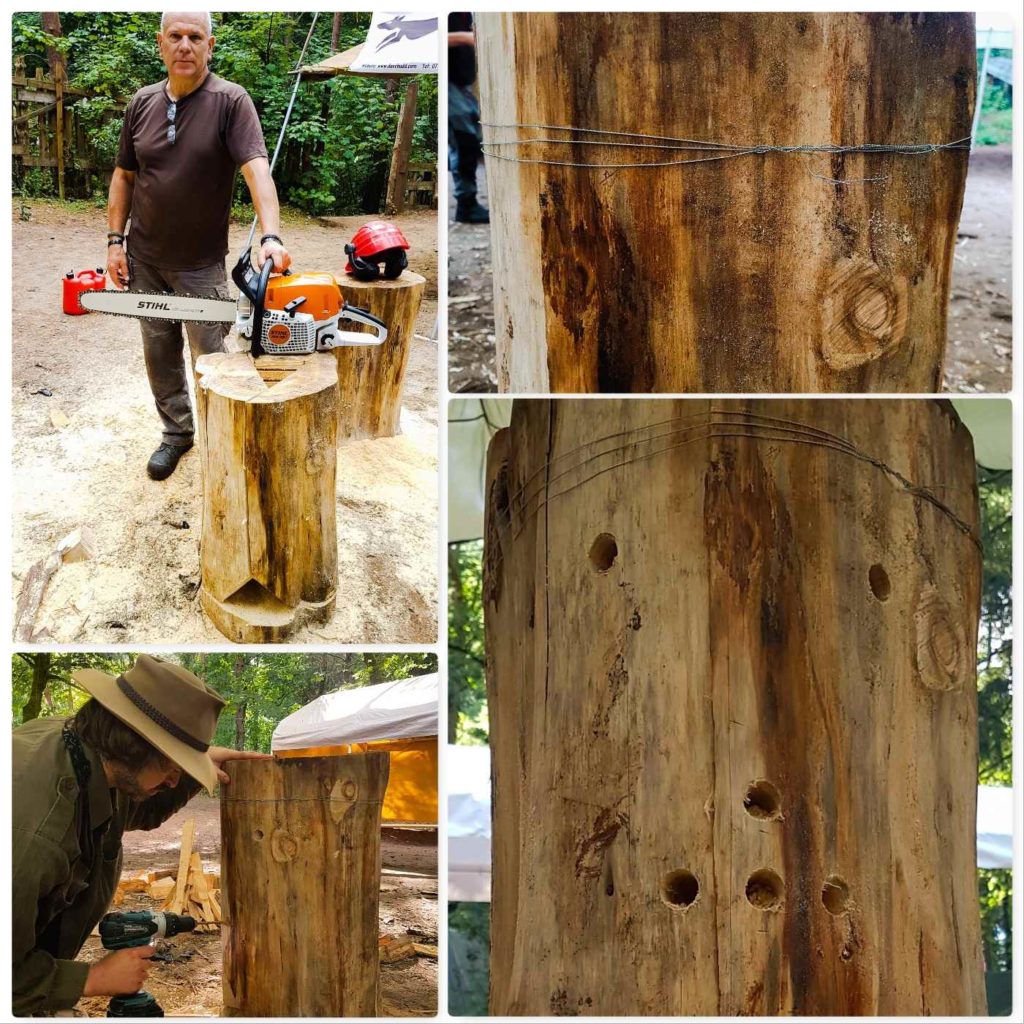
The log rocket worked spectacularly and you can get a sense of scale (forgot to measure it) from the picture of Rob standing next to it.

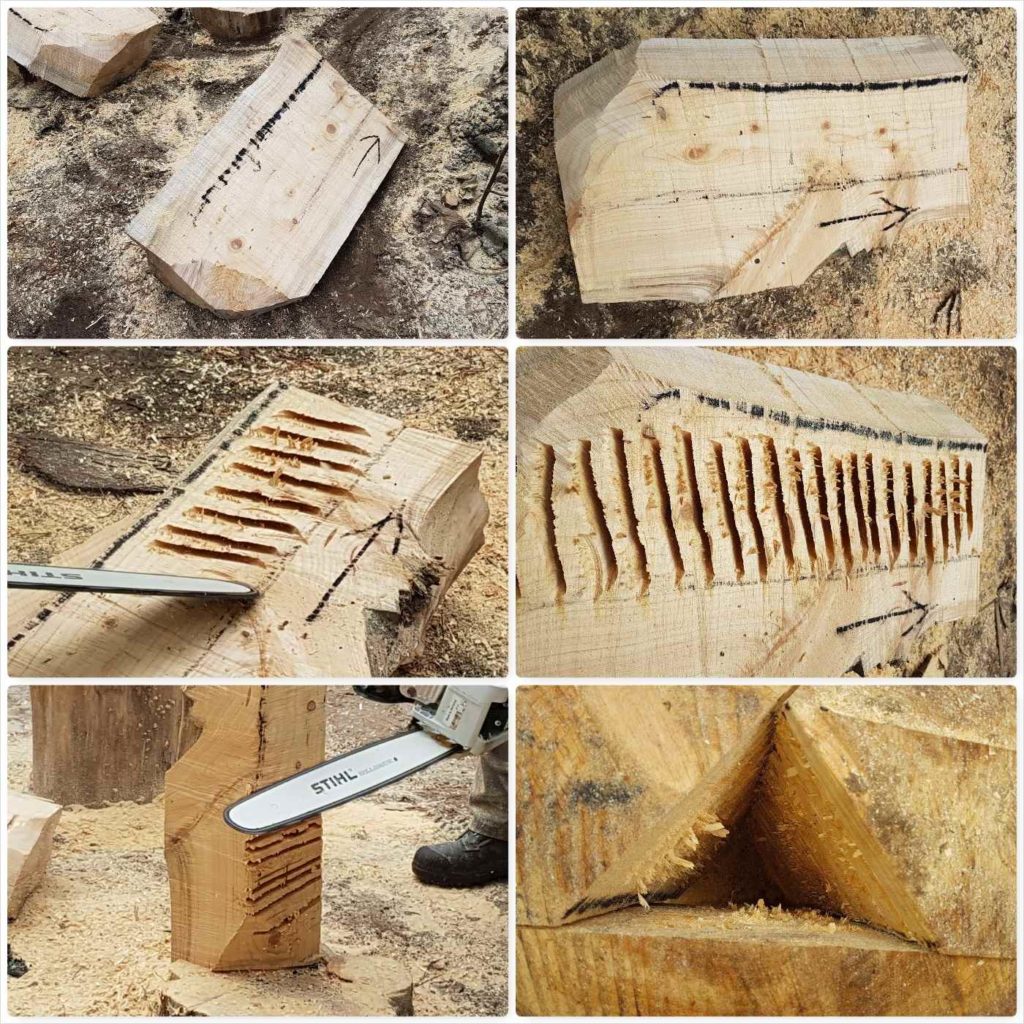
I chose a large piece of piece of what I think was Spruce (hard to tell when there is no bark and it is seasoned). I will be referring to the 3 parts of the log rocket as you can see in the bottom left picture below.
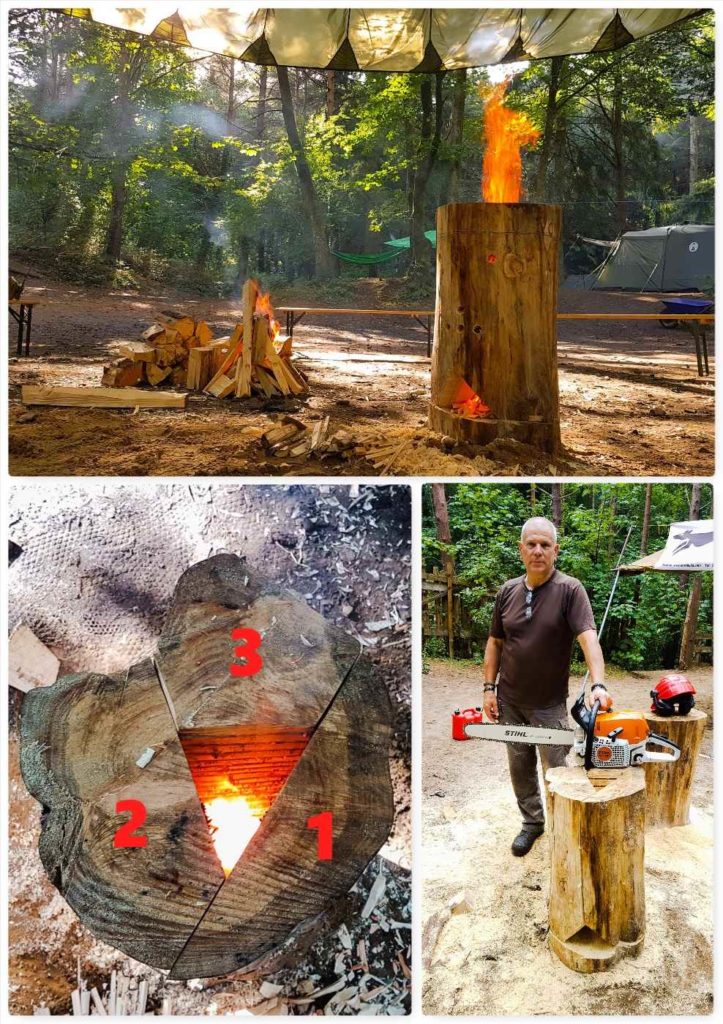
The Giant Log Rocket

Section 1

Rob took out a slice of the log (approx 1/3 of the log) and stopped the cut about 15 cms from the bottom. Then he cut in from the side at the bottom of the log to remove Section 1.
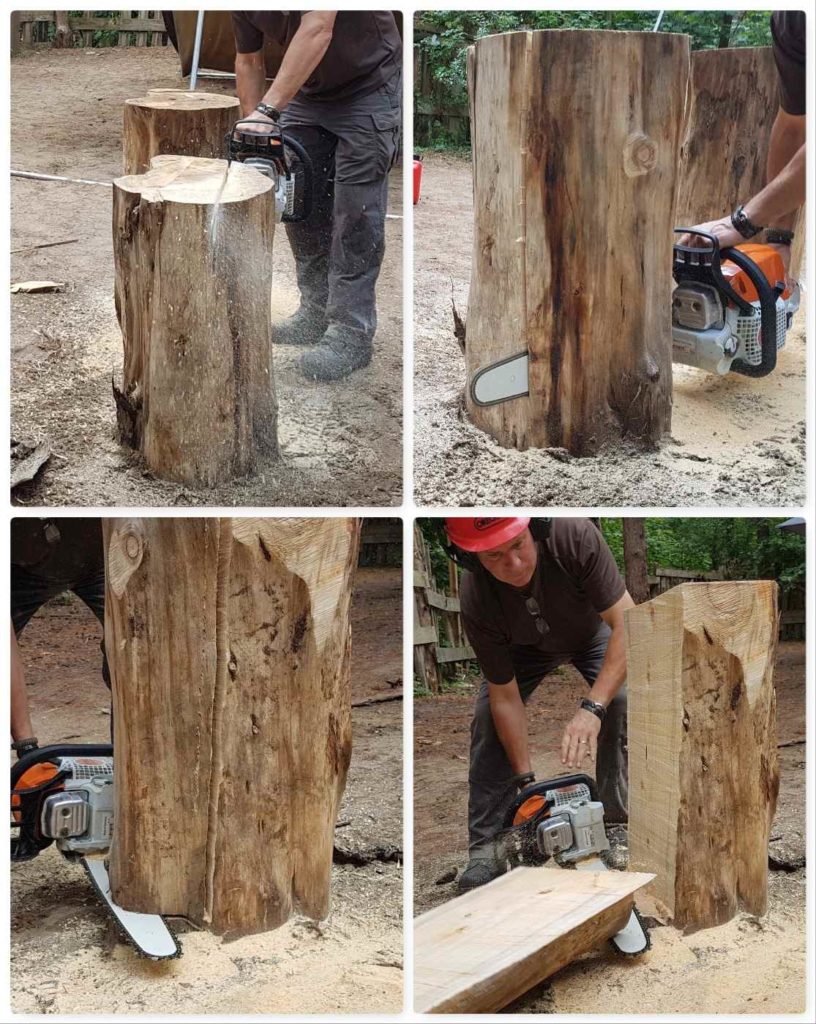
Cut 1

Section 2

To describe this cut is quite difficult so refer to the picture above in which the pieces are numbered. The aim was to leave Section 3 with a point that could be removed to form the chimney. Again it was a case of cutting down to about 15 cms from the bottom and removing section 2 by cutting in from the side.
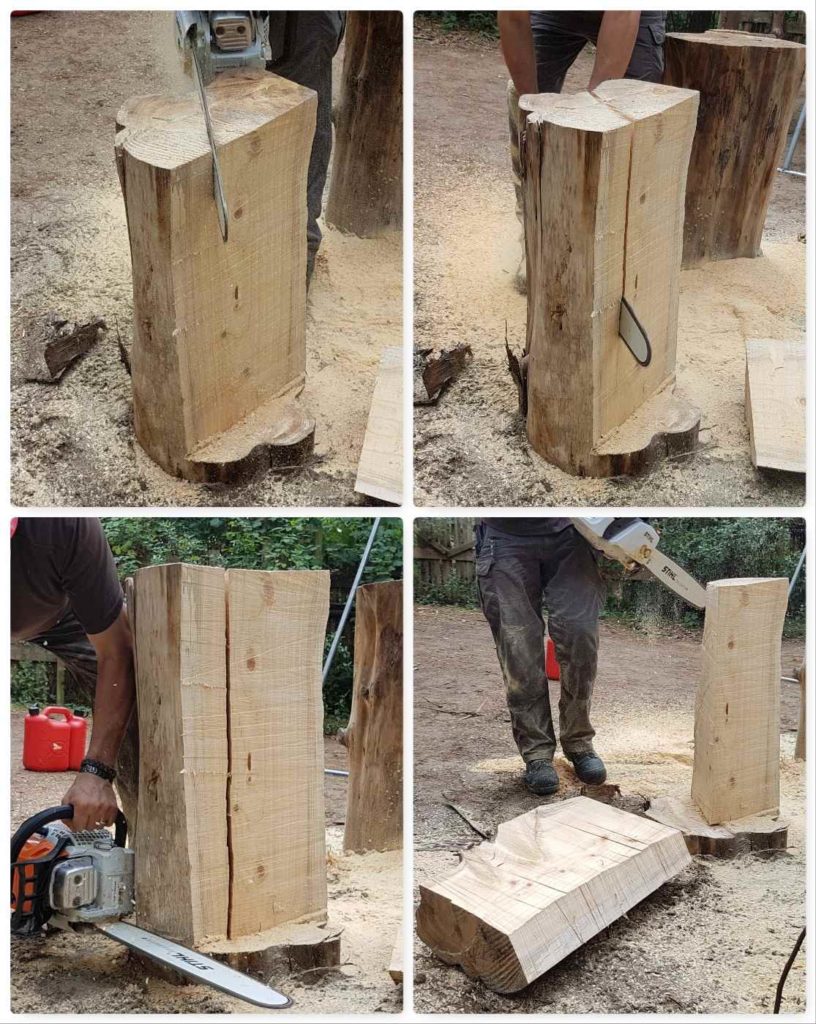
Cut 2

Section 3

You can clearly see the point left on Section 3. Rob made an undercut at the bottom first this time and then removed the ‘Point’. This is the area that would form the chimney. The triangular-shaped piece of wood from the centre point was split down further with an axe to form the kindling to get the log rocket going.

The final step here in the bottom right picture shows Rob cutting out a piece of wood at the bottom of Section 3 to slightly enlarge the ‘firebox’ area.
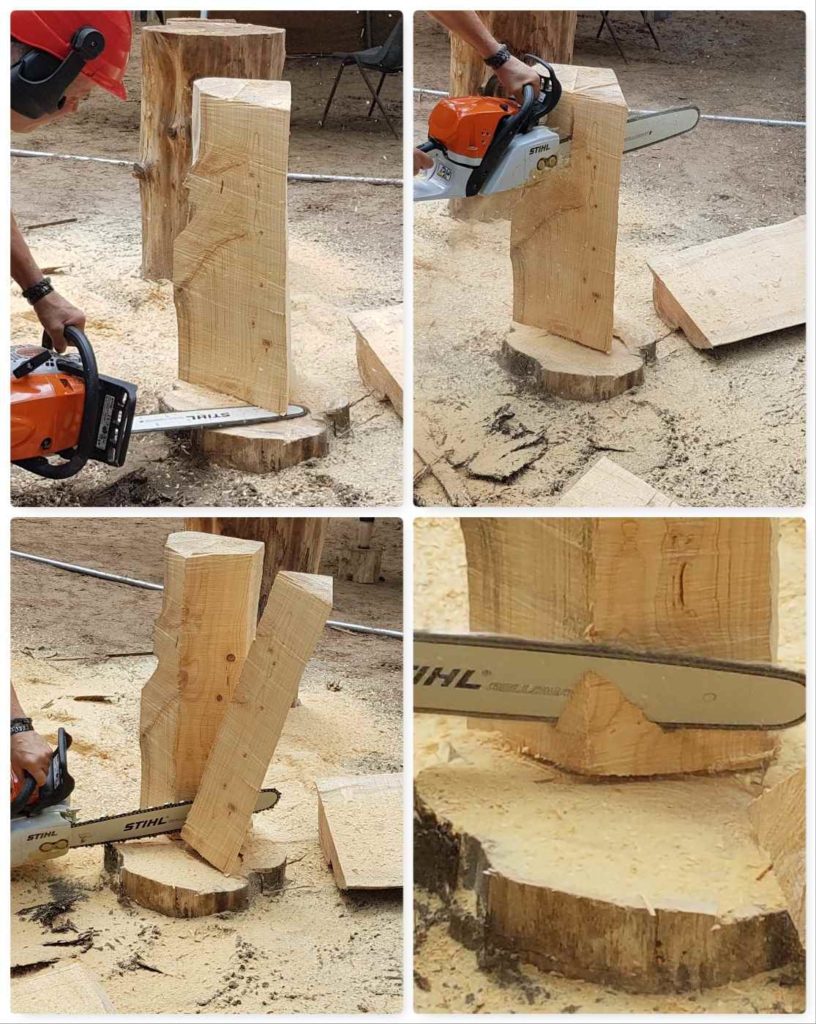
The chimney

Firebox opening

I have shown the final look of the firebox opening in the top left picture below. Rob created this firstly by re-assembling Sections 1 & 2 with Section 3. The he marked the corners of Sections 1 & 2 that needed cutting to form the firebox opening (that might sound overly complicated, but it’s important if you’re not to cut the wrong corners).

Once he’d cut off the corners he shaved off more wood from the ‘Shoulder’ of the opening so as to enlarge the firebox area.

The Firebox

The Raappanan Tuli cuts

To increase the surface area of the chimney and help the log catch light more quickly I asked Rob to makes some cuts in the flue area. I got this idea from researching different types of log fires – this style of cut comes from the Raappanan Tuli log fire.

These cuts are particularly useful when you have a damp log as the increased surface area greatly increases the chances of the fire taking properly.

Ribbing the chimney

Final touches

I used strong wire to hold all the pieces of the reassembled log together – an alternative would have been to make some dovetail joints and join them together with green wood pegs – see here for more details – How To…. Build a Dovetail Log Rocket Stove.

Finally my friend Mark used his drill to give the log rocket a face (which also helped provide a bit more ventilation).
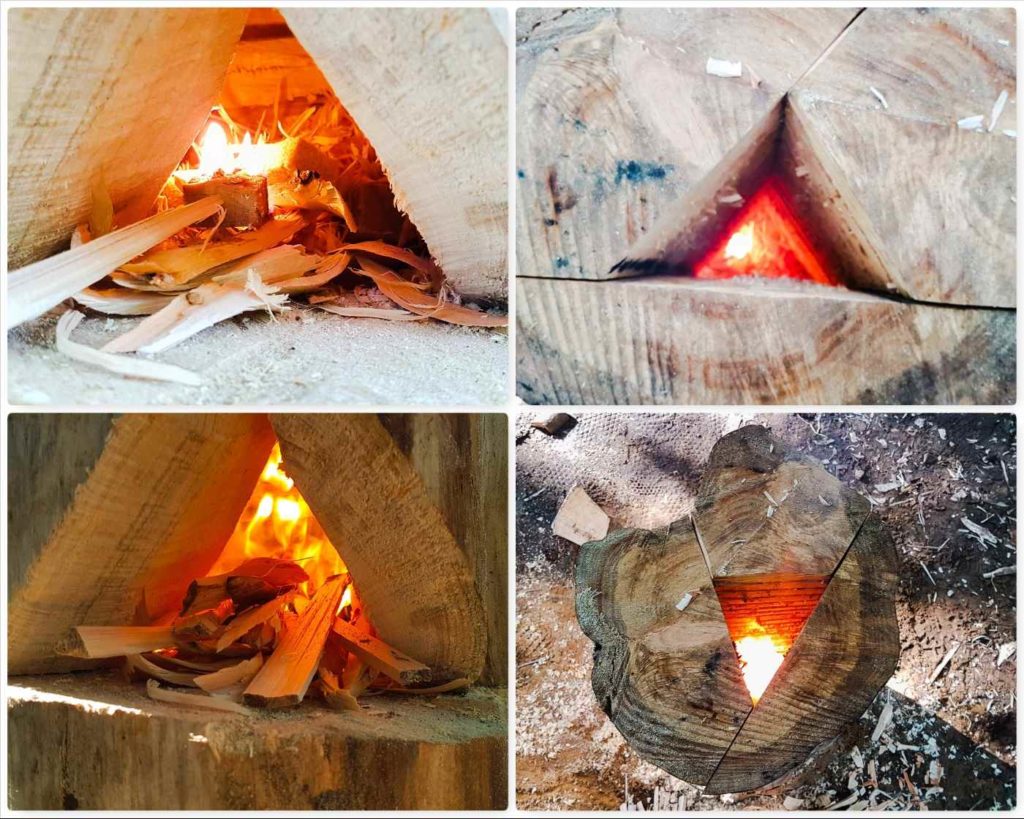
Final touches

Firing up

I used slivers of the central section Rob had cut out of the log as kindling and lit it all with a lollistick lighter (a firelighter pierced on a sharp stick – have a look here – Lolli Stick Fire).

Firing up

Party time

The log rocket was a stunning central feature for everyone to sit around in the evening and we even used it as a backdrop in a wedding photo (Magdalena and Phil renewed their vows at the Bushmoot).

Why it is called a Log Rocket

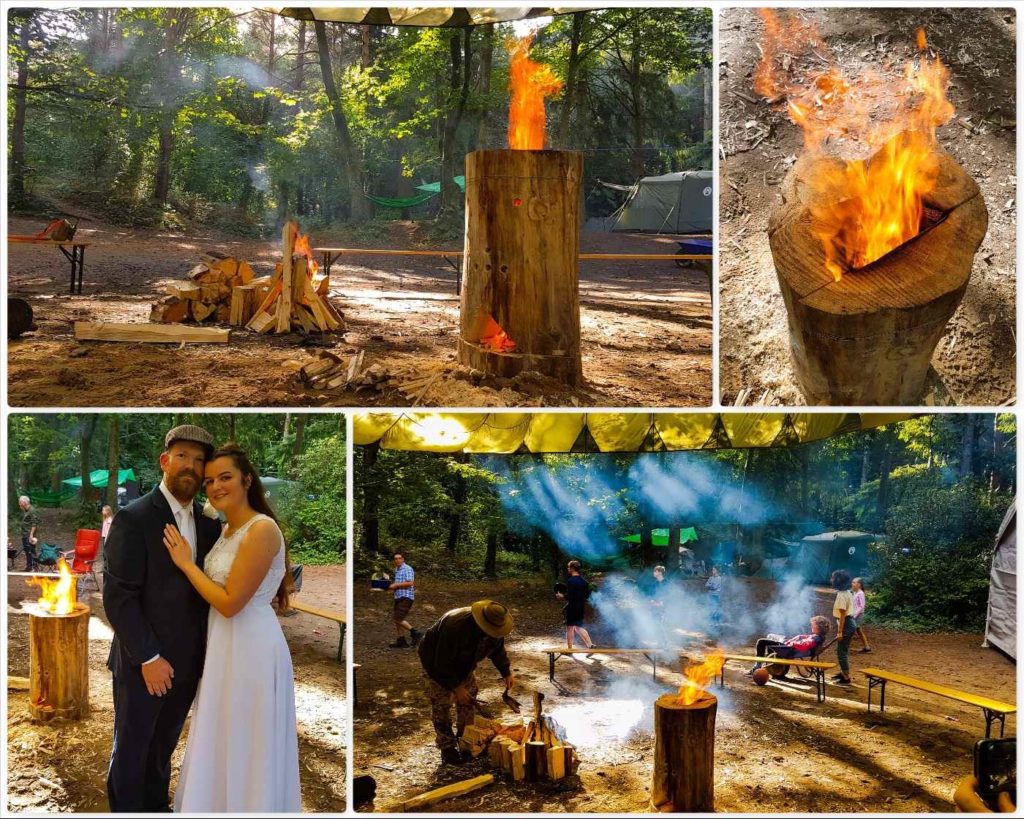
We even added a little bit of Cap’n Badger’s magic Rainbow dust to ‘mix the colours up’ a bit.

Some Magic Dust

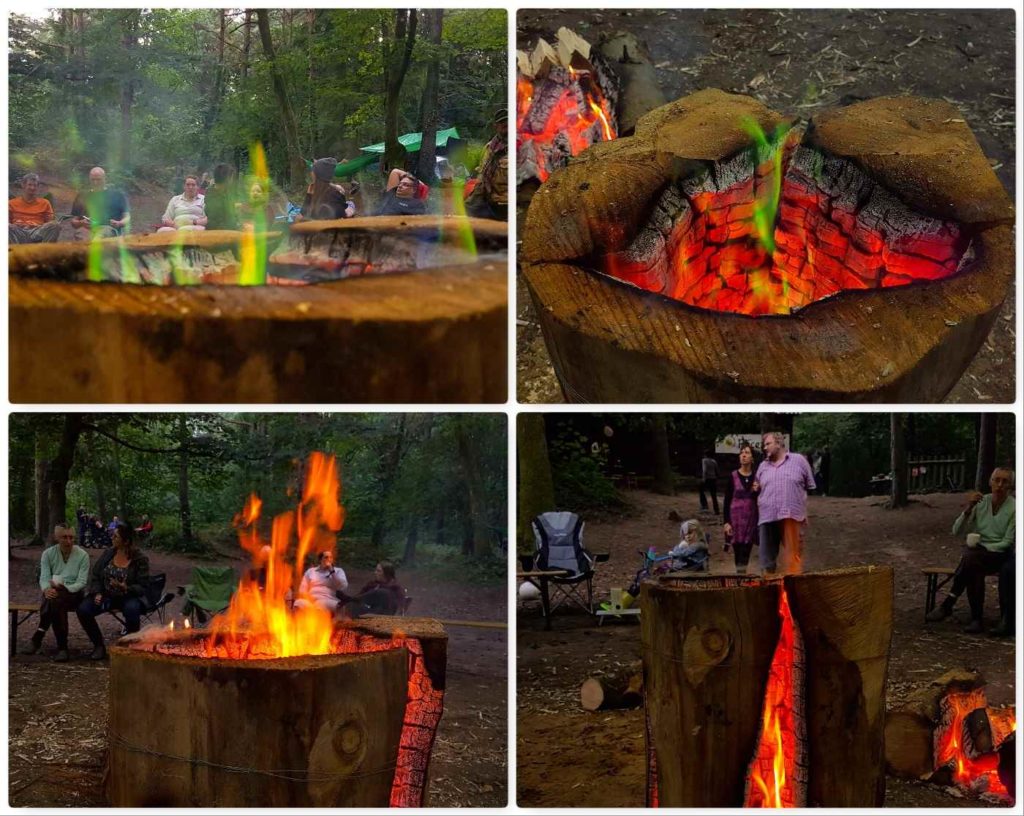
When I looked at the log rocket the next day (over 14 hours after it was lit) the base was just a mass of burning embers – quite a log rocket, I would say.

Cheers

George

Constructing the Camp Cookhouse

Earlier I wrote up a post on re-building the roundhouse at John Rhyder’s Woodcraft School HQ in Hampshire. This post is all about the new cookhouse we built that weekend as well.

In the top picture below is the open-fronted cookhouse we built and in the bottom picture how it all looked on the Saturday morning when we first arrived – a few post holes in the ground.

IMG_4848.JPG
After and before

In the group building this were Scott Batty, Kev Howlett, Jumbo Jim, Nigel Painter, Paul Workman, Chen, David Willis, John Rhyder and myself. John had split a load of sweet chestnut to use as the uprights and brought into the site a load of timber to build up the walls and for battoning and rafting.

We selected six pieces for the uprights and started on the back wall first. The plan was to have the kitchen closed off on two sides (to protect from the prevailing wind) and to have it open on two sides.

The first post went in easy enough and we compacted earth and stones around it to keep it secure.

Measuring up and digging in

The other posts were put in and we used large pieces of straight timber to make sure the these posts lined up properly (mark one eyeball – carpenters measures).

John then used his chainsaw to make the facings of the uprights smooth so we could attach the timber for the walls.

Aligning and smoothing

We actually built the back wall rather quickly. One person would select the timber, another held it in place, then pilot holes were drilled in by someone and finally someone else screwed the planks in. We all took turn about and soon had the back wall up.

The plan initially was to overlap the planks of wood so as to let the water drain off but we estimated at the start there were not enough to do that so we had to place them directly on top of each other.

Racking up

There was excess wood on one side so after using a plank as a measuring device John trimmed the excess off with his chainsaw. We left just a lip of wood at the edge to overlap with the side wall that was to go up next.

Trimming off

Once the back was completed we built the side wall in the same way as the back wall (no pictures I’m afraid) and then started on the front.

The cookhouse is on a slope and John and Caron wanted a decent slope to the roof to help with runoff of rain (but not so tall as to be a problem in high winds). The first thing we did was decide on the height, then we marked it off on the uprights and got John to trim each pole to the right height.

Preparing the open front

We built a strong lintel at the front and I trimmed a couple of sweet chestnut poles to act as main rafters. We also had a selection of smaller machined battons to act as rafters.

I secured one of the sweet chestnut rafters in the middle and the other one at the open end of the cookhouse. The other machined rafters were all spread evenly along the roof and screwed down.

Rafting up
Rafting up

We did not have the shingles for the roof so we just nailed down a large tarp as a temporary cover.

In the bottom picture you get a feel for the angle of the slope the cookhouse sits on.

The temporary roofing

You can just make out the sign above Caron naming her kitchen (I have no idea who wrote it). In the pictures on the right you can see the shelving unit that Paul and Nigel built. Seemed pretty secure as it offered a perfect seat for John to survey it all.

You can also see the internal battoning (to the left of the jacket in the bottom tight picture and also to the right of John). This really strengthened the walls as we dug the battons deep into the ground.

Signs, shelves and snagging

Kev and Chen moved the kitchen platform from its old spot to inside the cookhouse. They did spend a good bit of time getting it secured properly on poles and perfectly flat.

We had some great food over the weekend with our dinner on the Saturday evening and breakfast on Sunday morning cooked inside it.

First cooking

There were some other projects going on involving re-building the shower house, laying new chippings on the paths and building the raised firepit you can see in the picture below (that will be my next post in this series).

The Sunday was a very frantic day as we strived to get everything done. When we took the group photo some of the lads had already left (about three or four I think) so apologies if i have not mentioned everyone involved in this project.

Job well done

More on the raised firepit in the next post.

Cheers

George