A Brilliant Bushmoot – 2016

As family holidays go the BCUK Bushmoot is hard to beat. It has it all, with activities for all ages, a stunning location and people who are happy to share their knowledge with you.

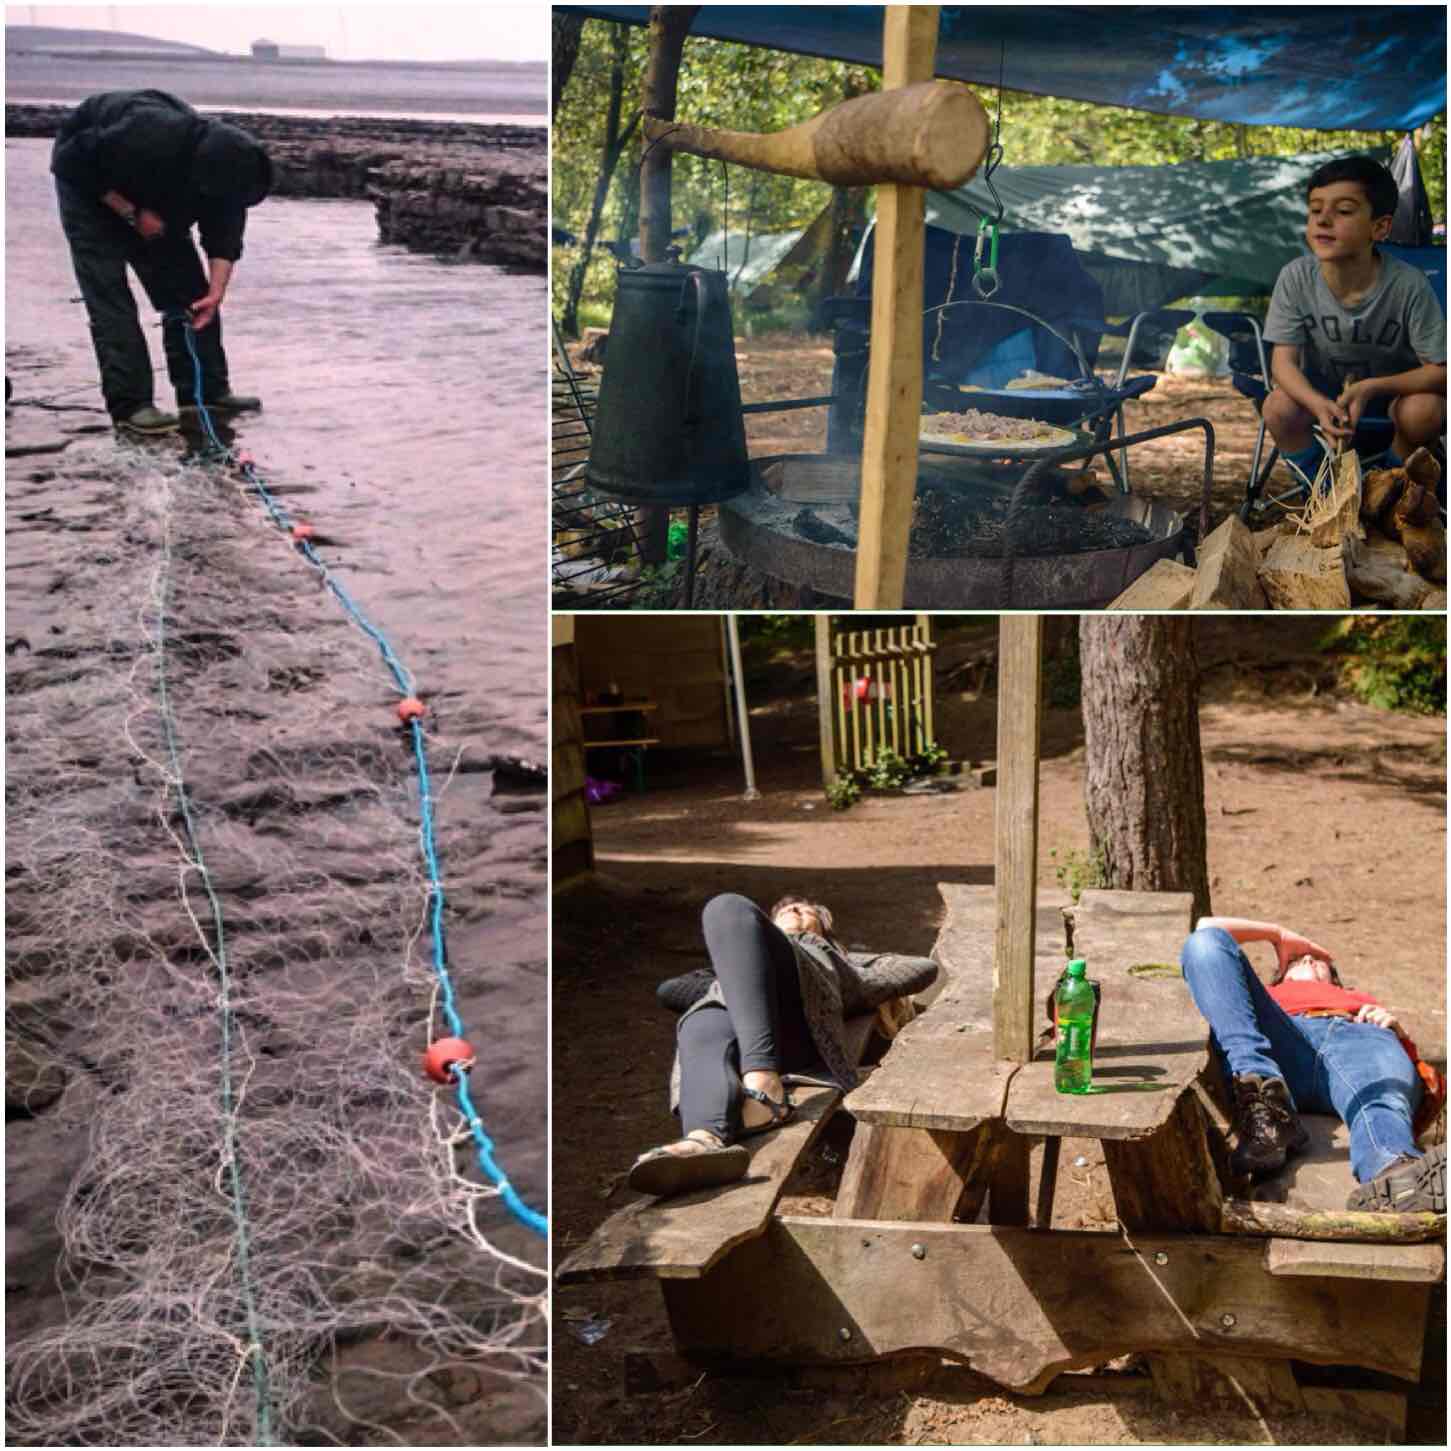
The week started with three days of wet weather however that did not stop us getting out and about. I spent one day with my friend Fraser Christian (Coastal Survival) setting nets and lobster pots out on the coast for a class he was running.

image
Beginnings

My family spent two weeks at the Bushmoot in early August and the kids cannot wait until next years return trip. The Bushmoot is held on the Ogmore Estate by the beautiful Merthyr Mawr sand dunes in South Wales here in the UK.

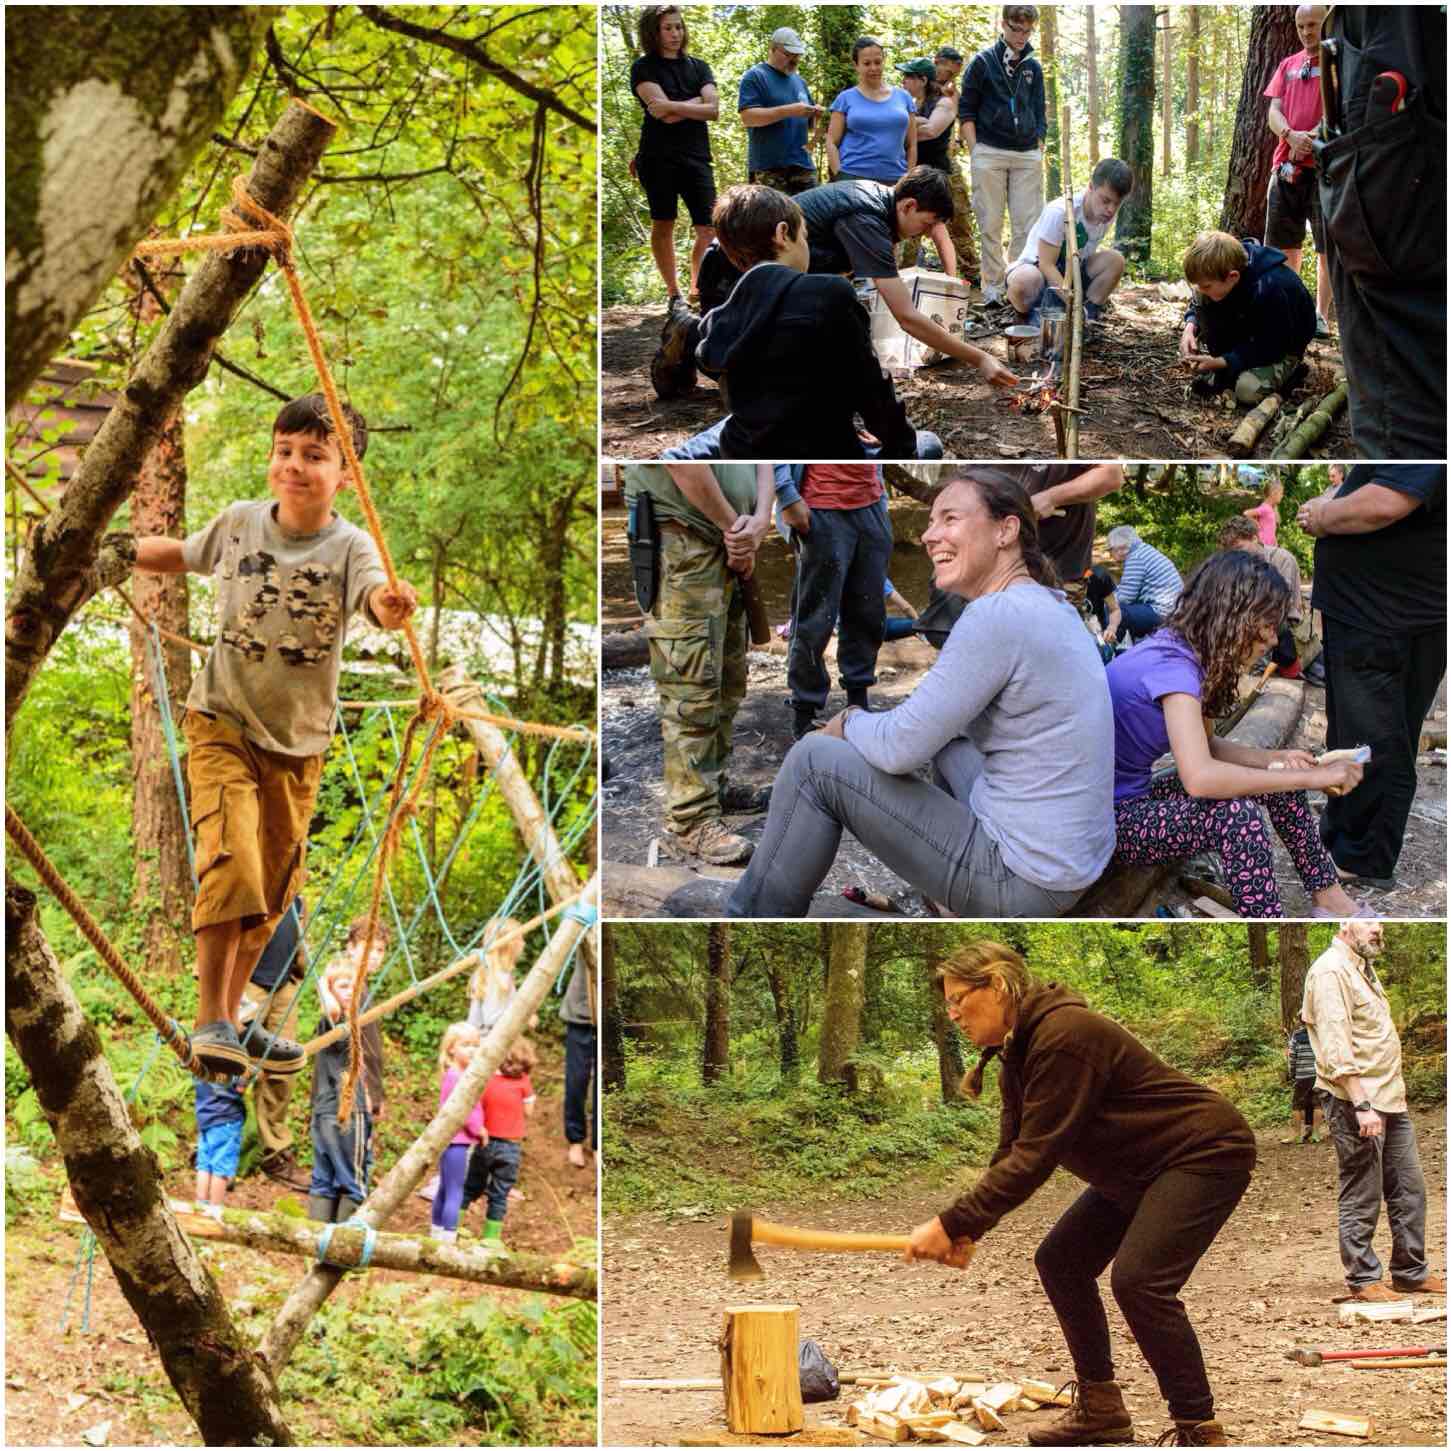
While the kids were off playing I was busy with running or attending classes. Once again this year we ran a Starter Course for anyone new to Bushcraft. Alison decided though to crack on with some more spoon carving this year with our daughter Catherine under Deans watchful eye while Finlay got on with climbing everything he could find..

image
Play for some – Work for others

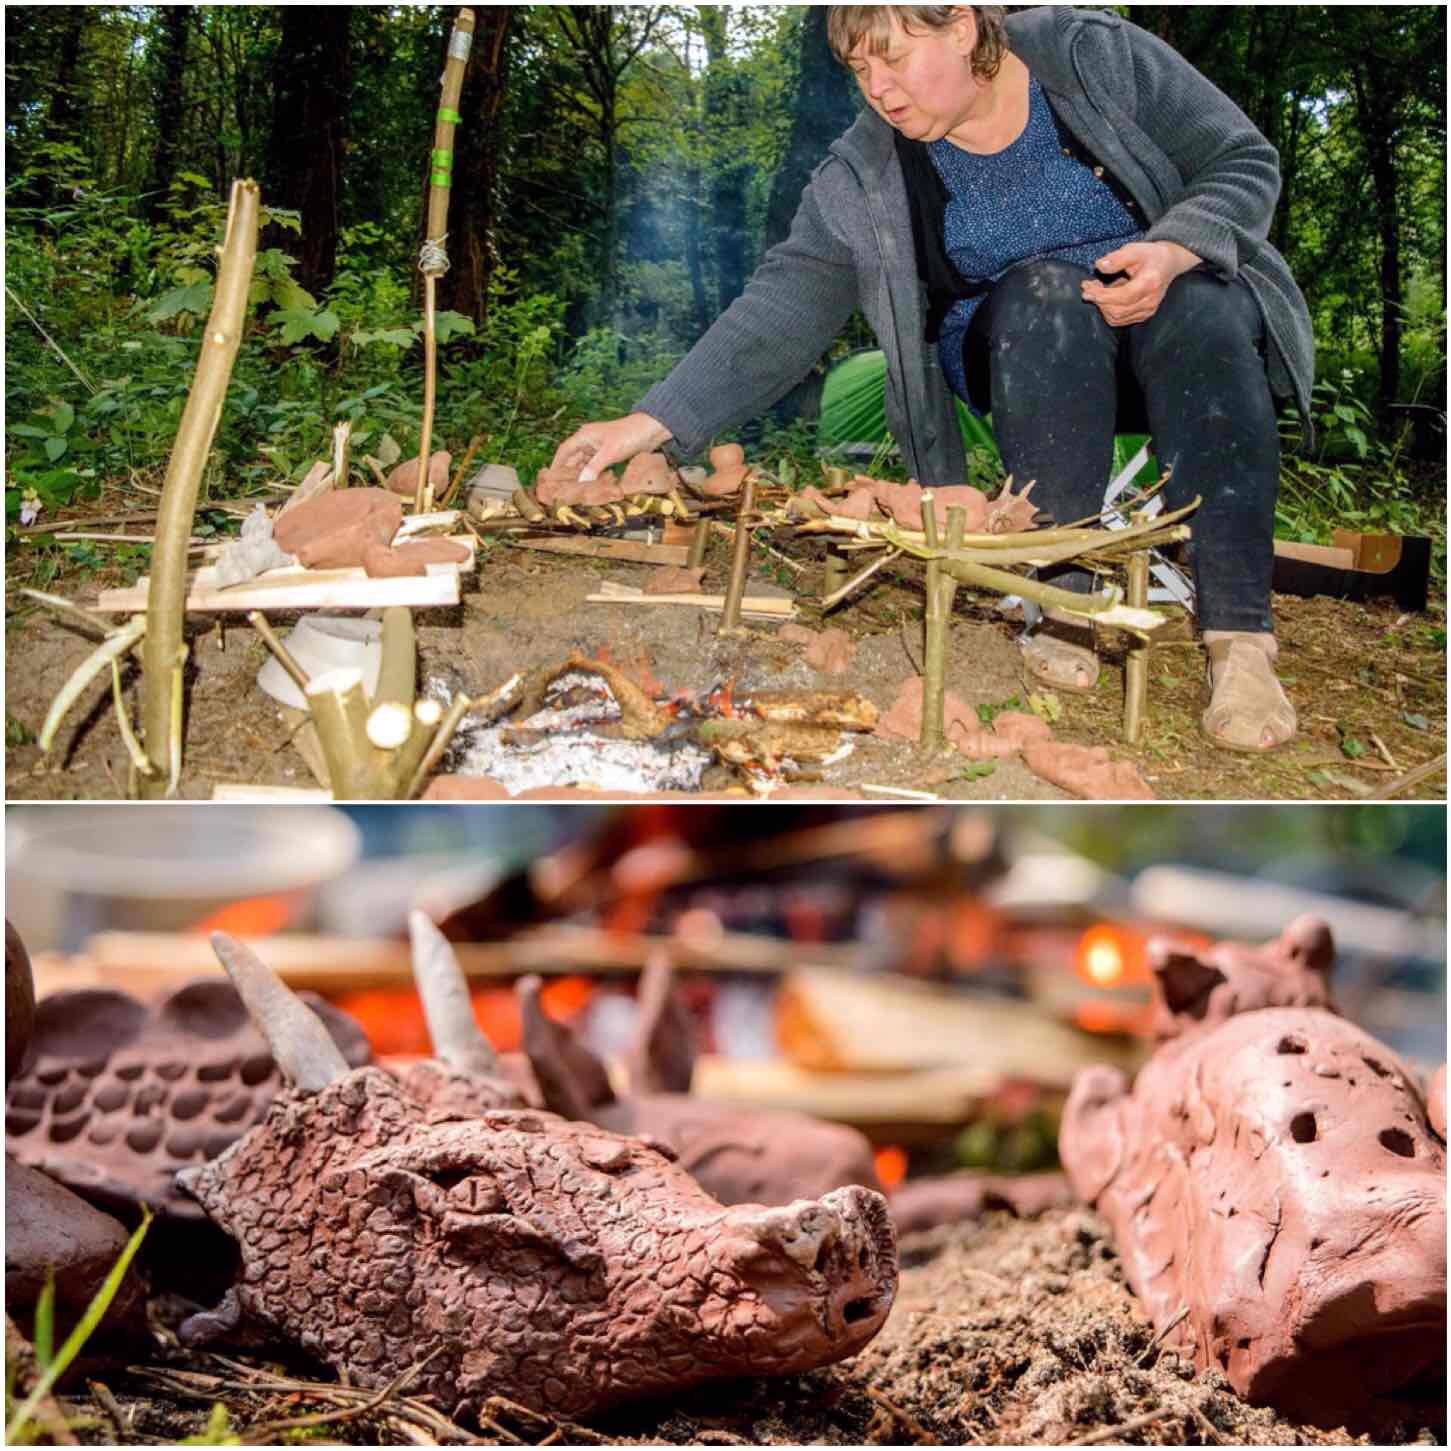
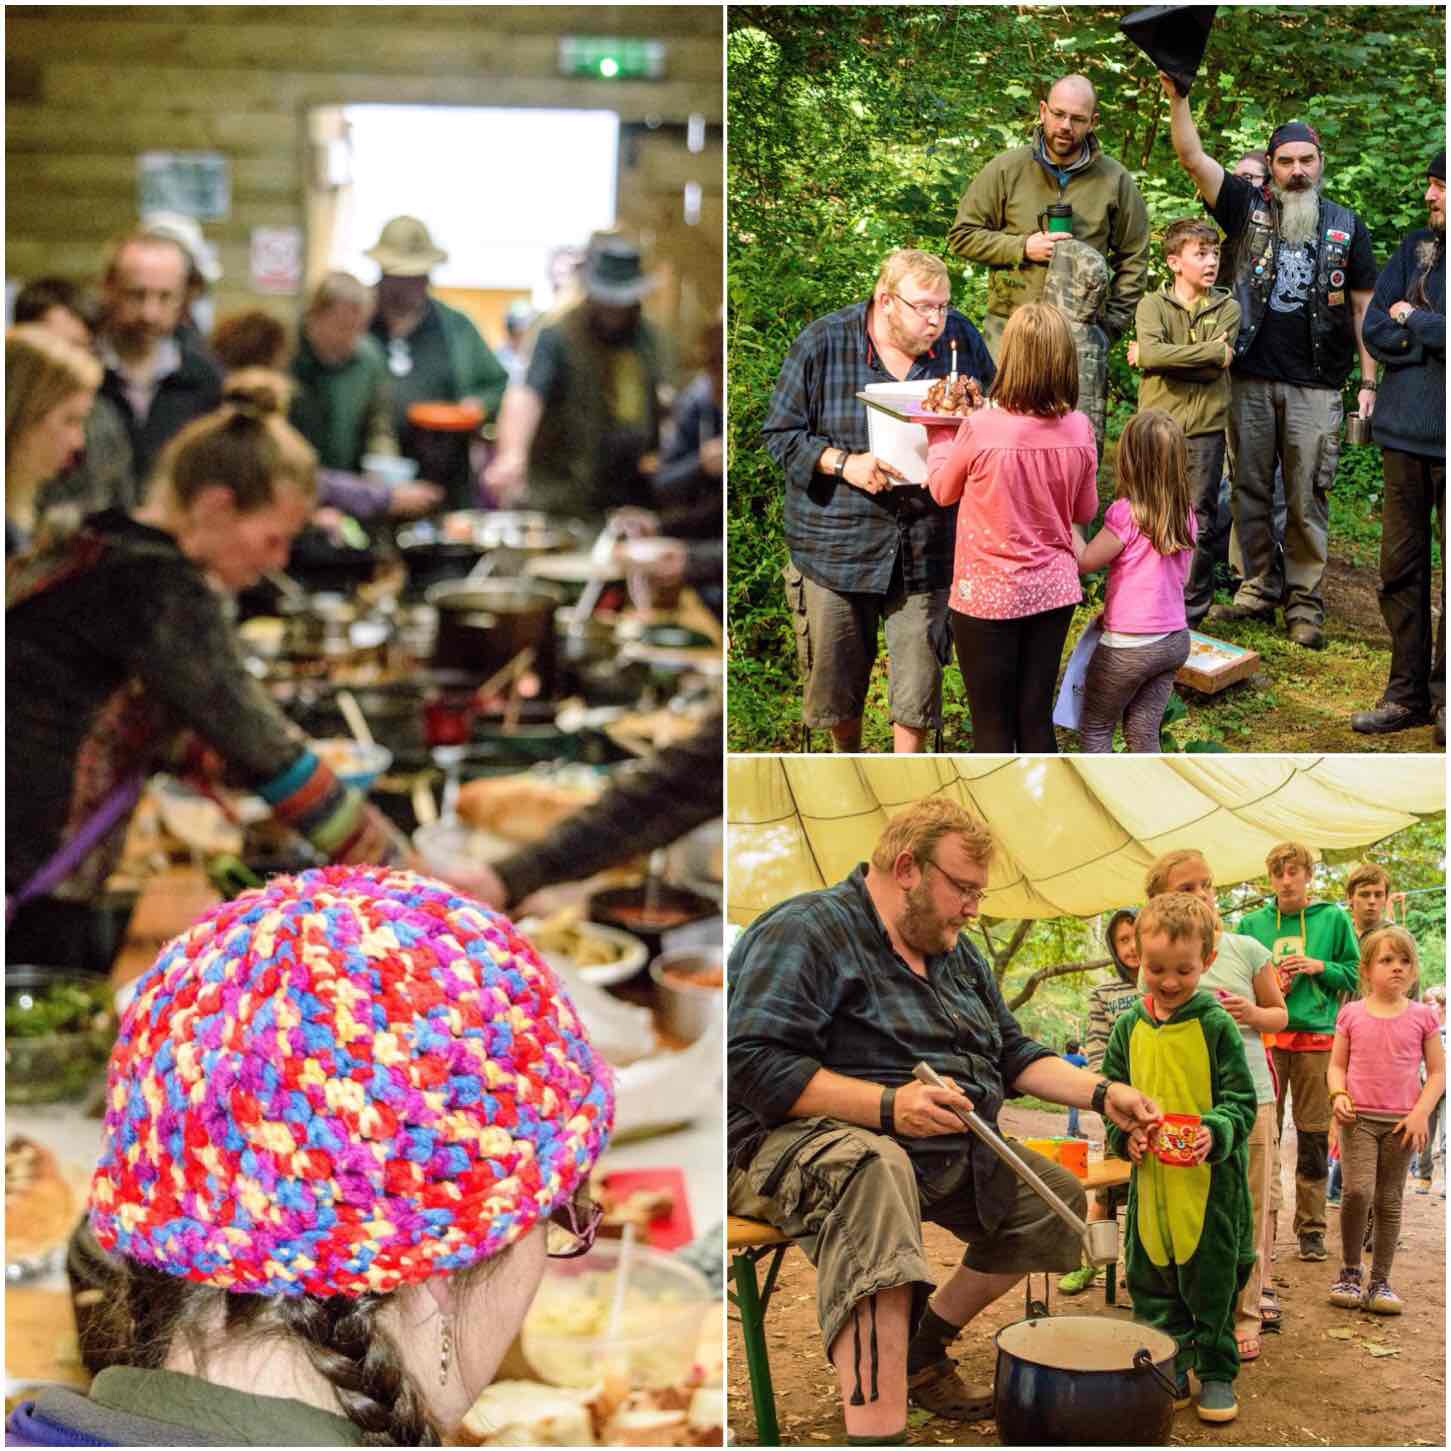
This year I spent some time with Anita (our resident potter) discussing how to make a primitive pot for extracting birch bark oil. Anita came up with a design for me which I am hoping to try out in the winter. Anita ran a number of sessions and a particularly popular one was making clay whistles.

The picture of the clay dragon whistle shown below won the August heat of the BCUK Bushmoot competition – It was a cracking bit of craft

image
Pottery Art

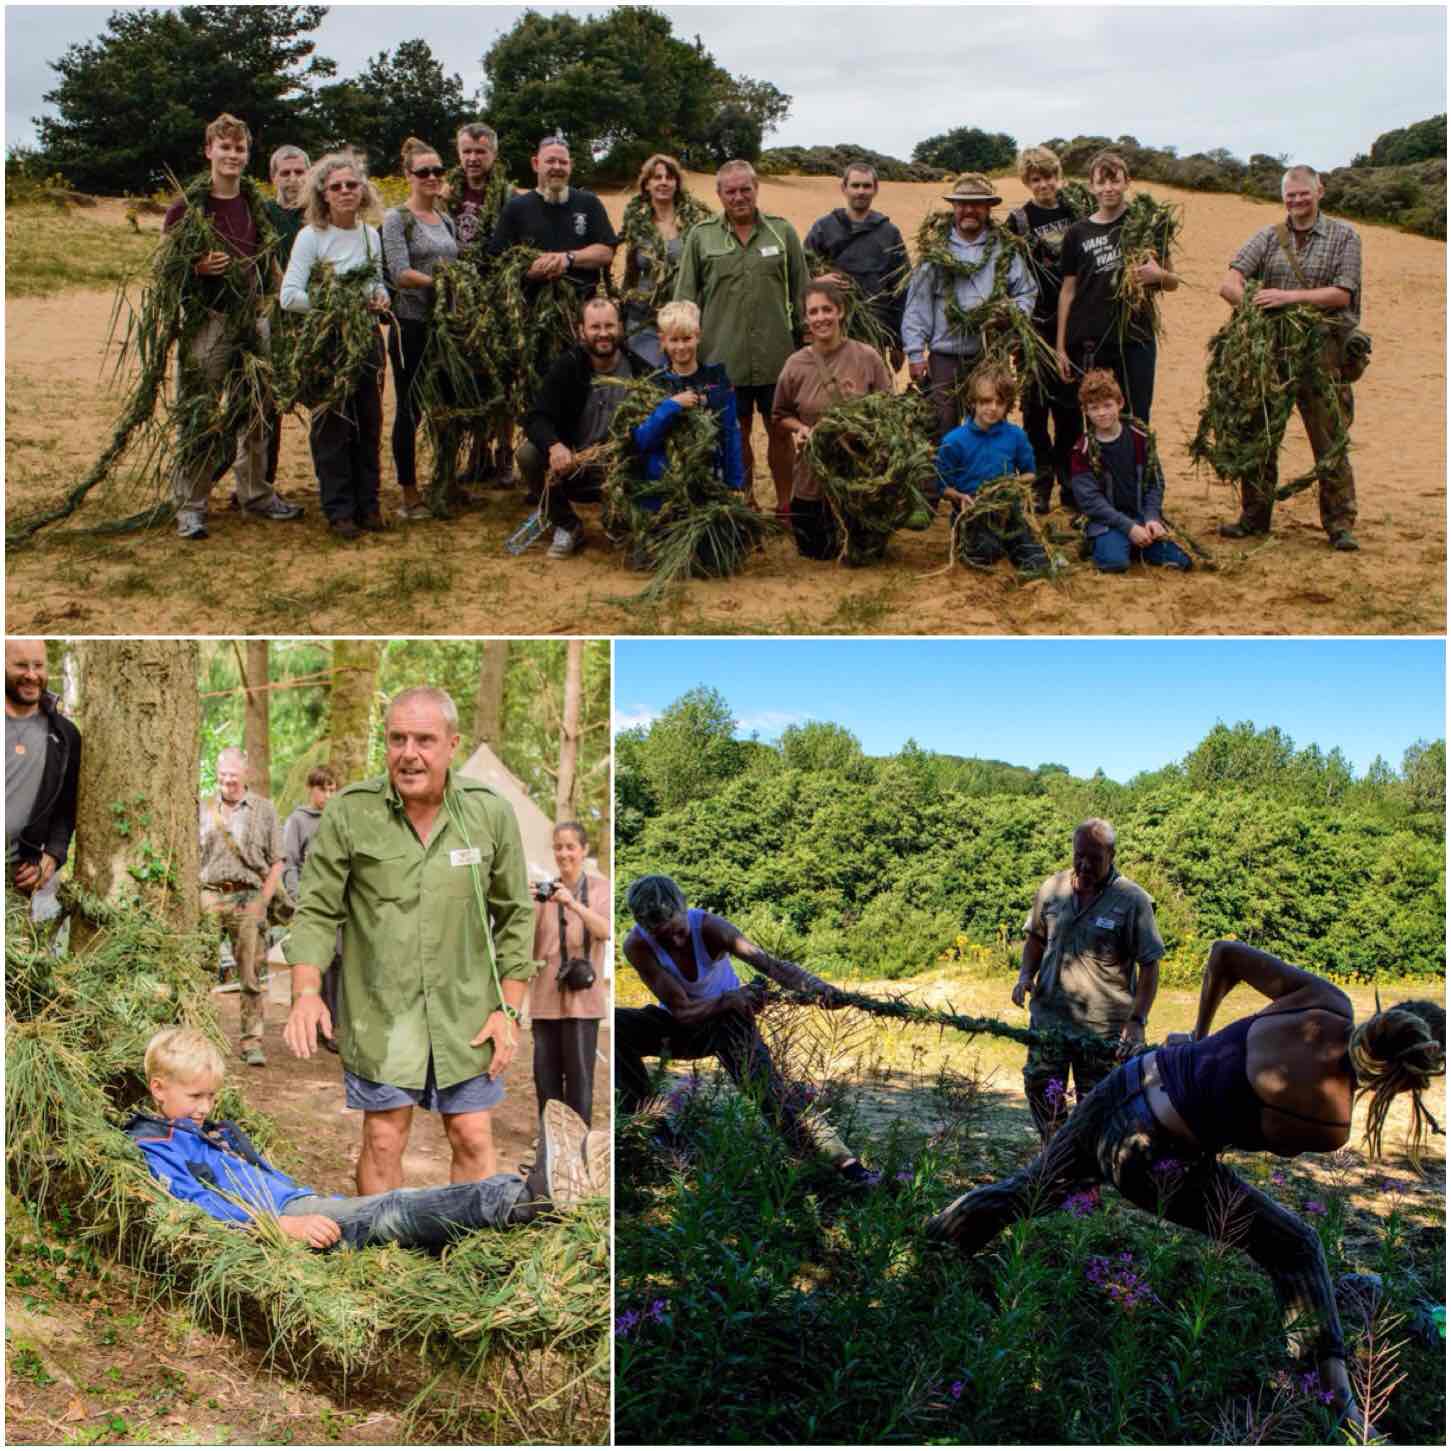
A course I thoroughly enjoyed this year was Perry McGee’s (National Tracking School) grass rope making (I had attended last years one as well). I really like Perry’s style of teaching – it is relaxed in one way however he really does make you work :-).

The whole group made enough rope from grass to make a hammock that took the weight of anyone in the group, This is a skill I have been looking into more after seeing rope that was made out of heather recently up on the Isle of Lewis.

image
Grass – comfy and tough

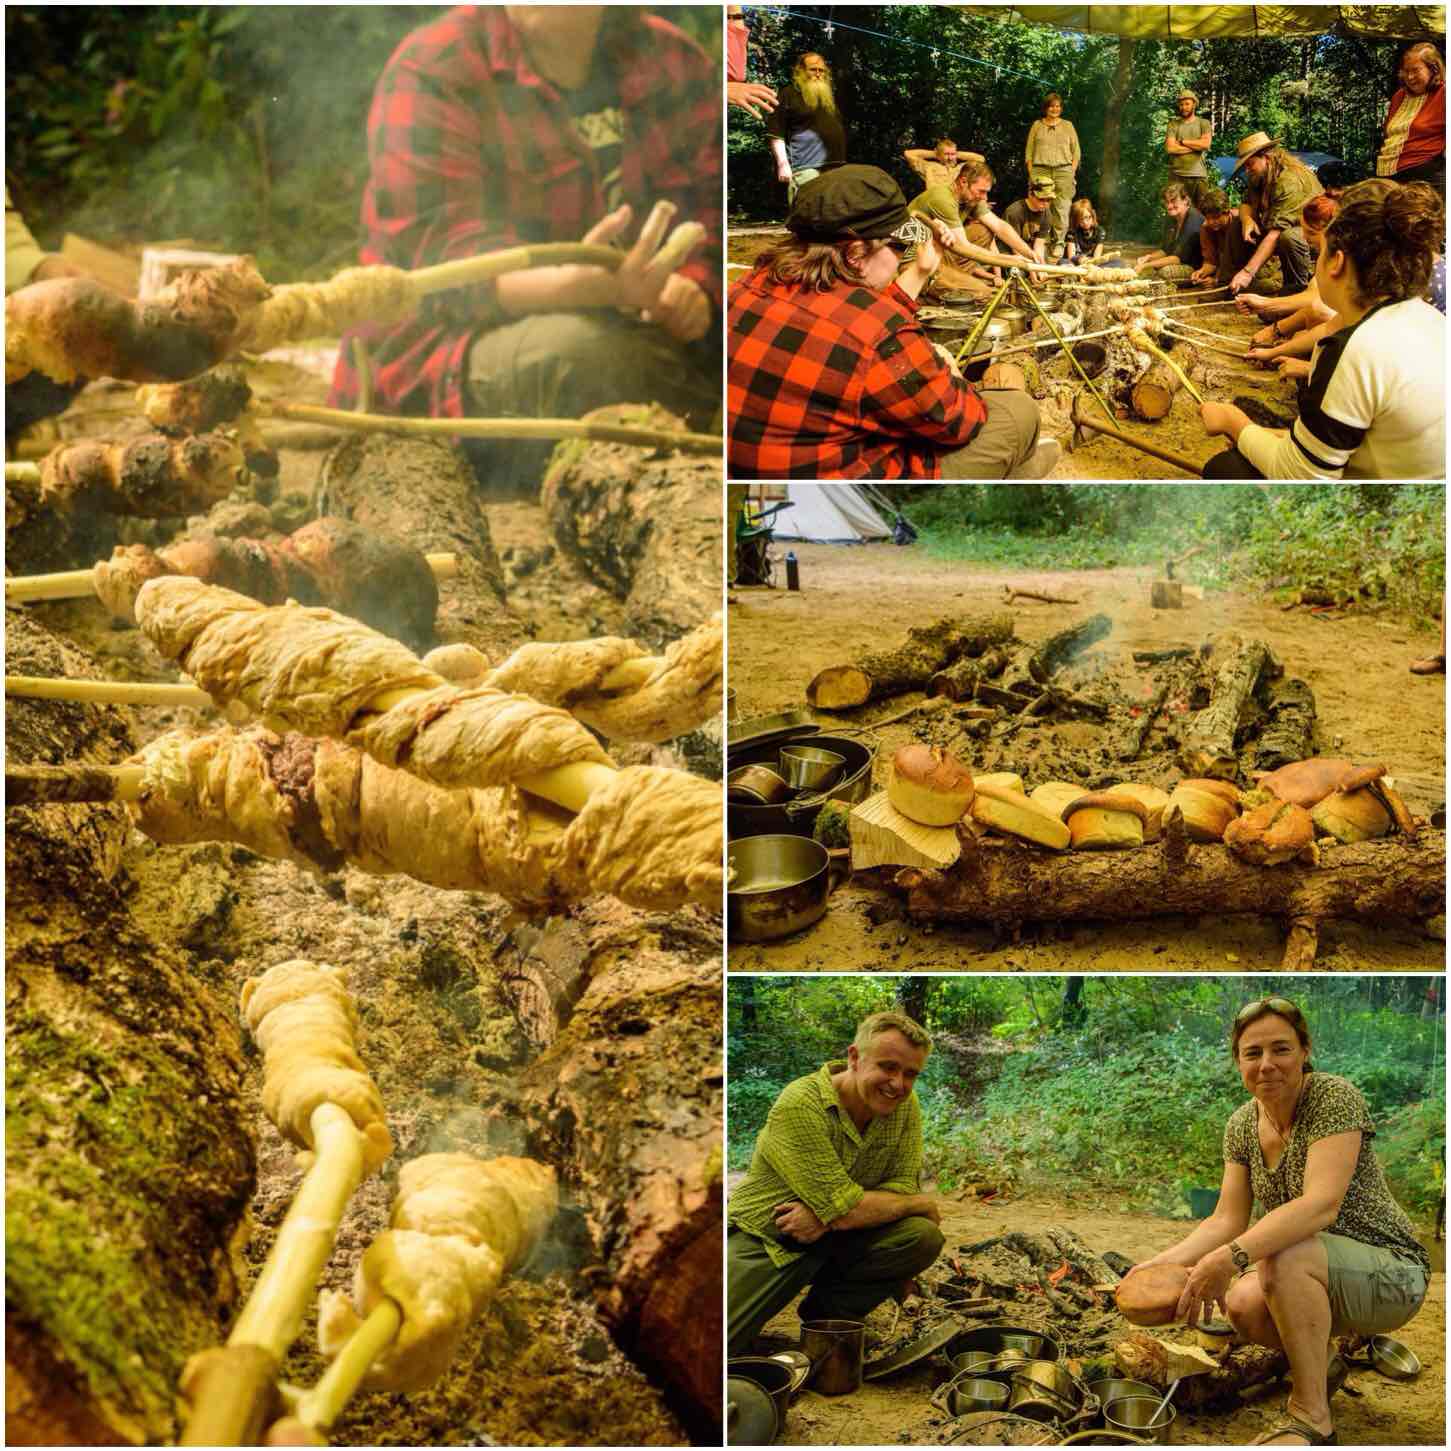
David Willis (Bushcraft with David Willis) attended once again this year and his class was packed. The smell of fresh baking bread could be detected from afar and I made sure I swung by the class a few times.

Alison attended the class and we were well set up for bread for the next couple of days.

image
Beautiful Bread

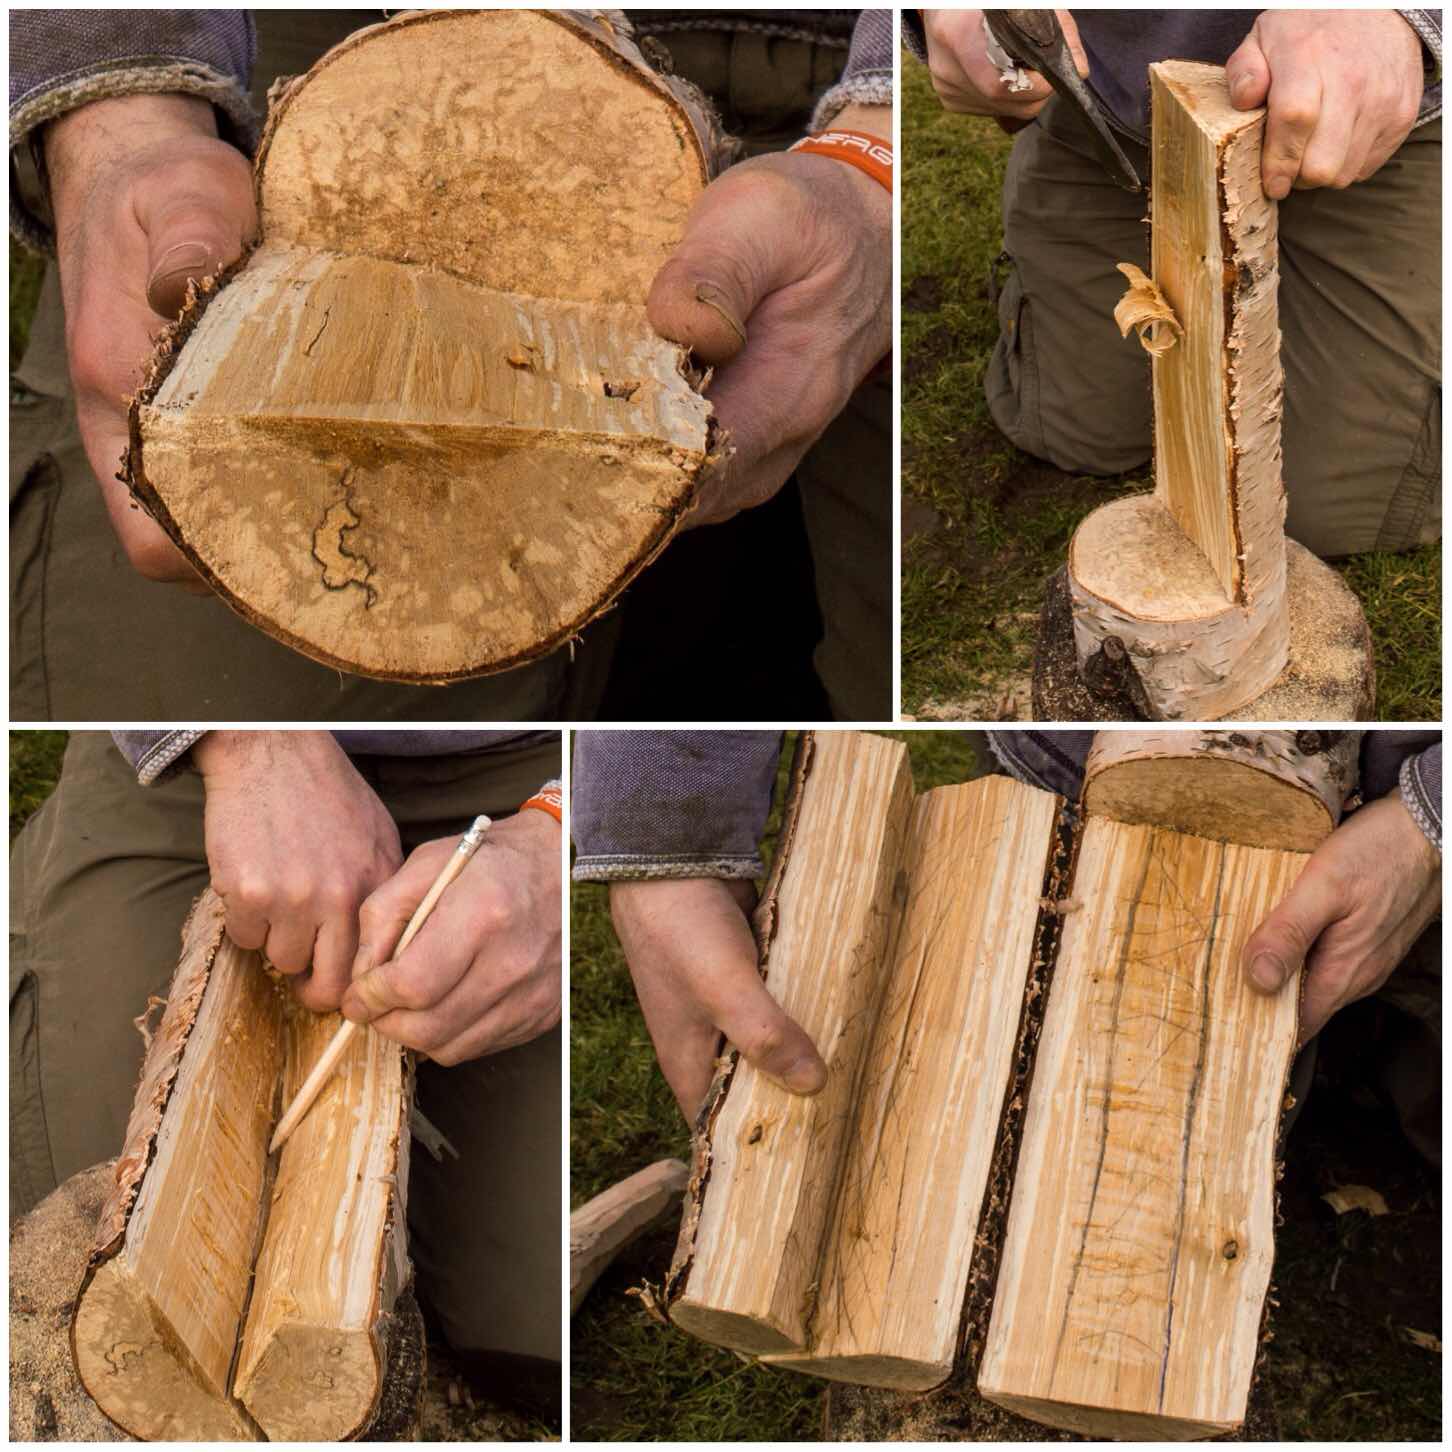
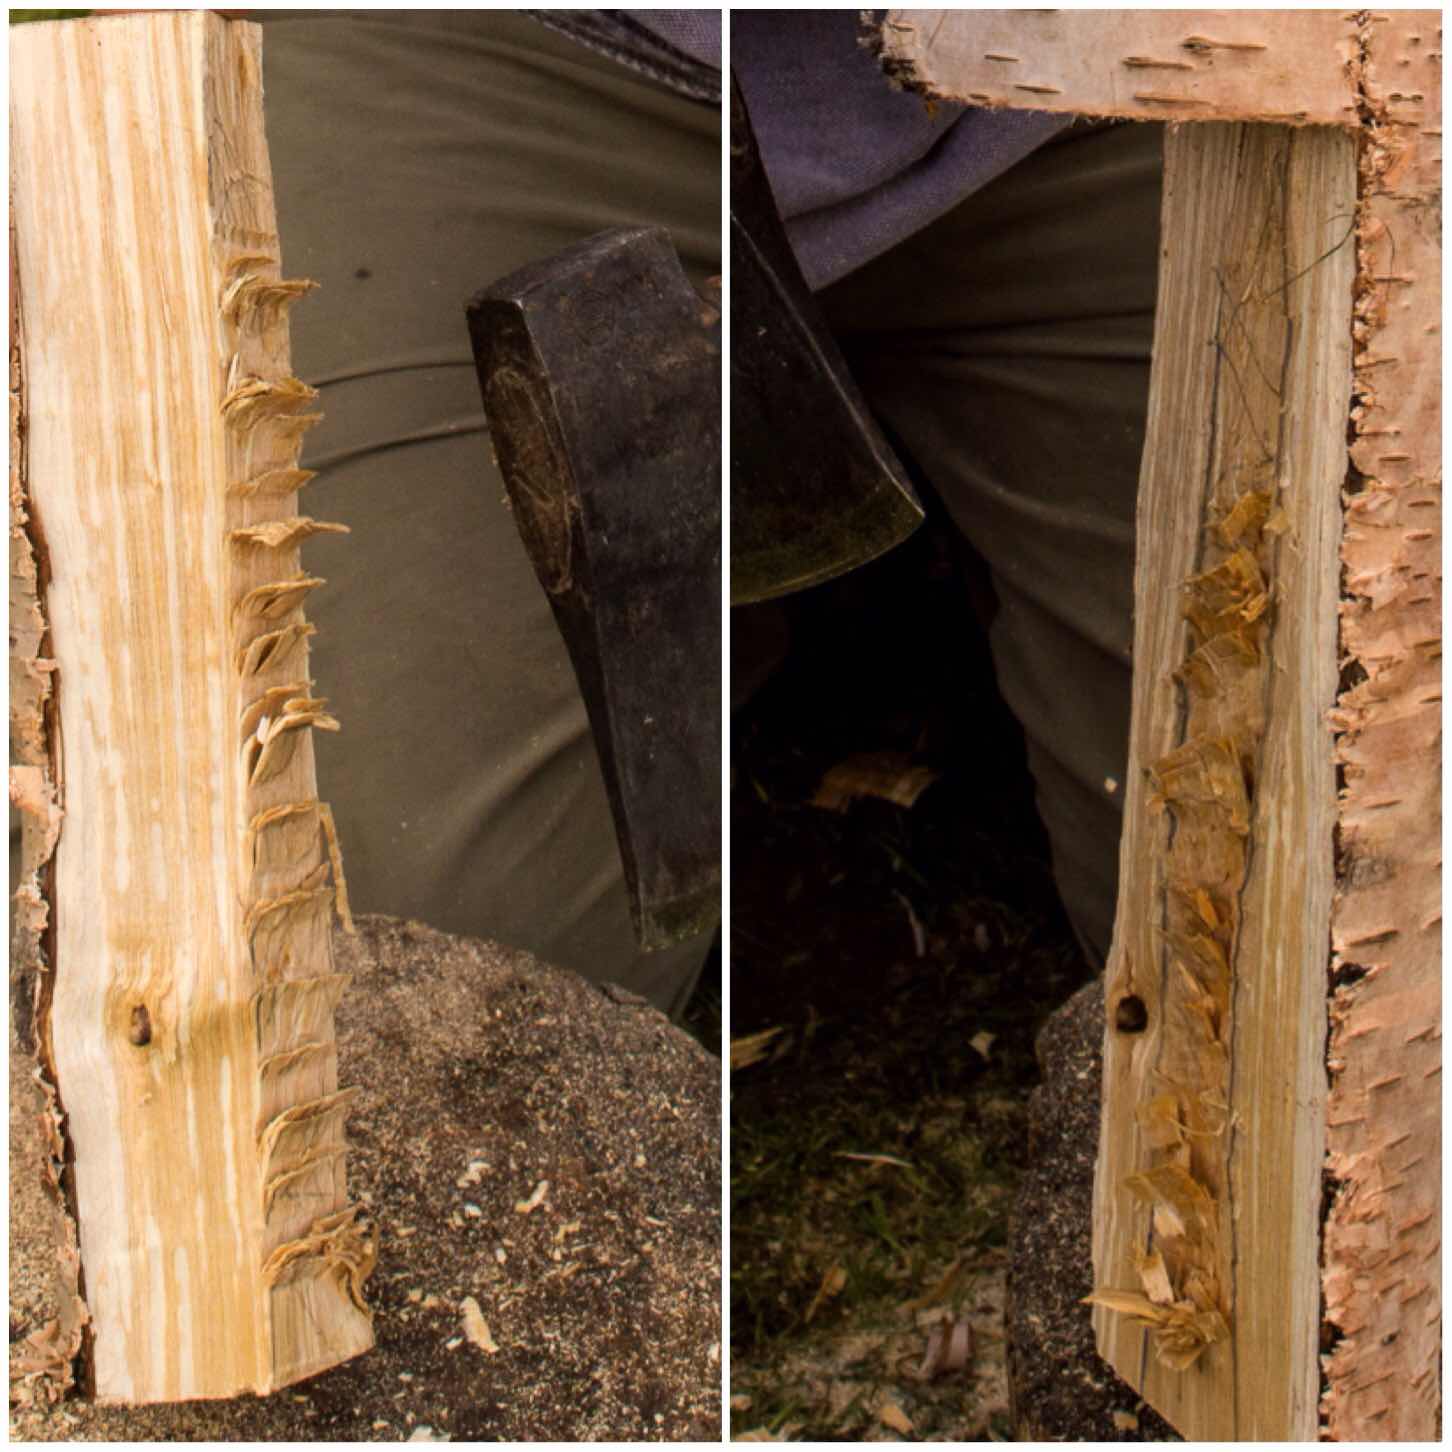
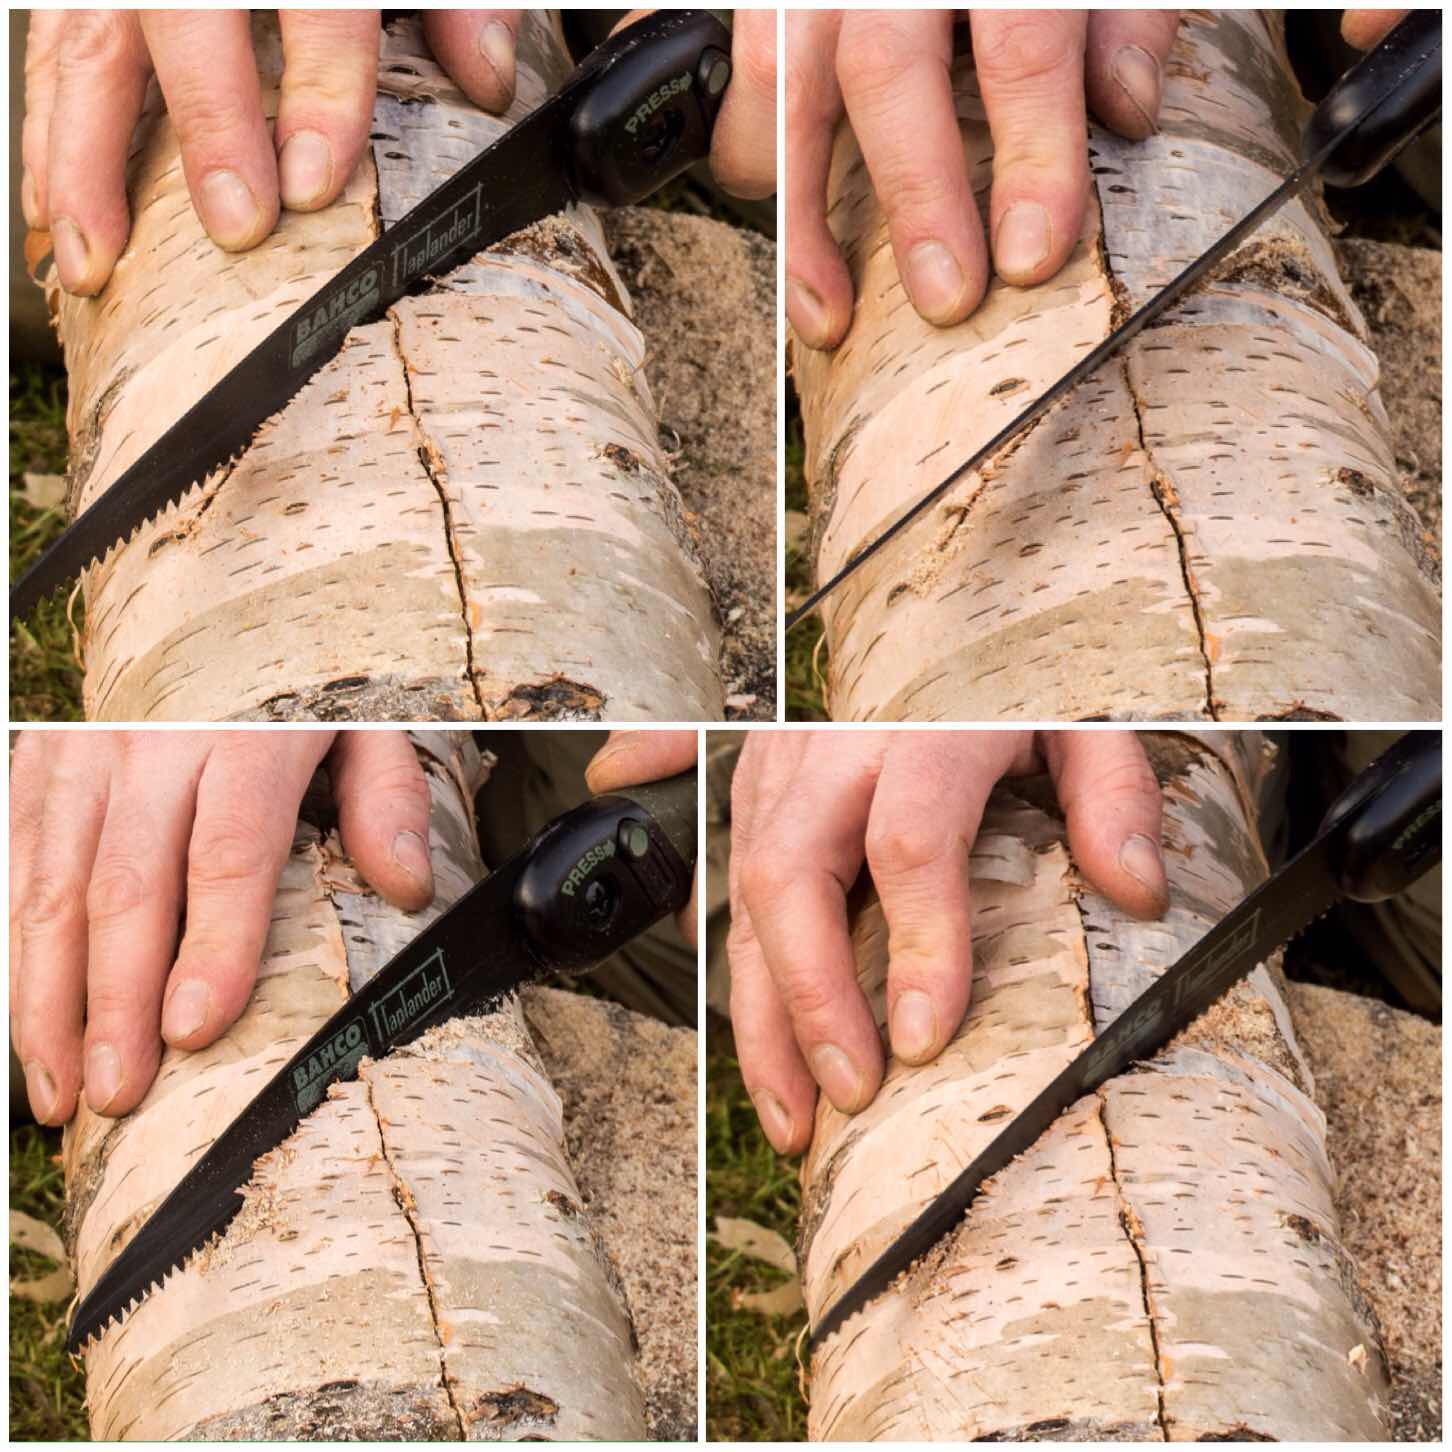
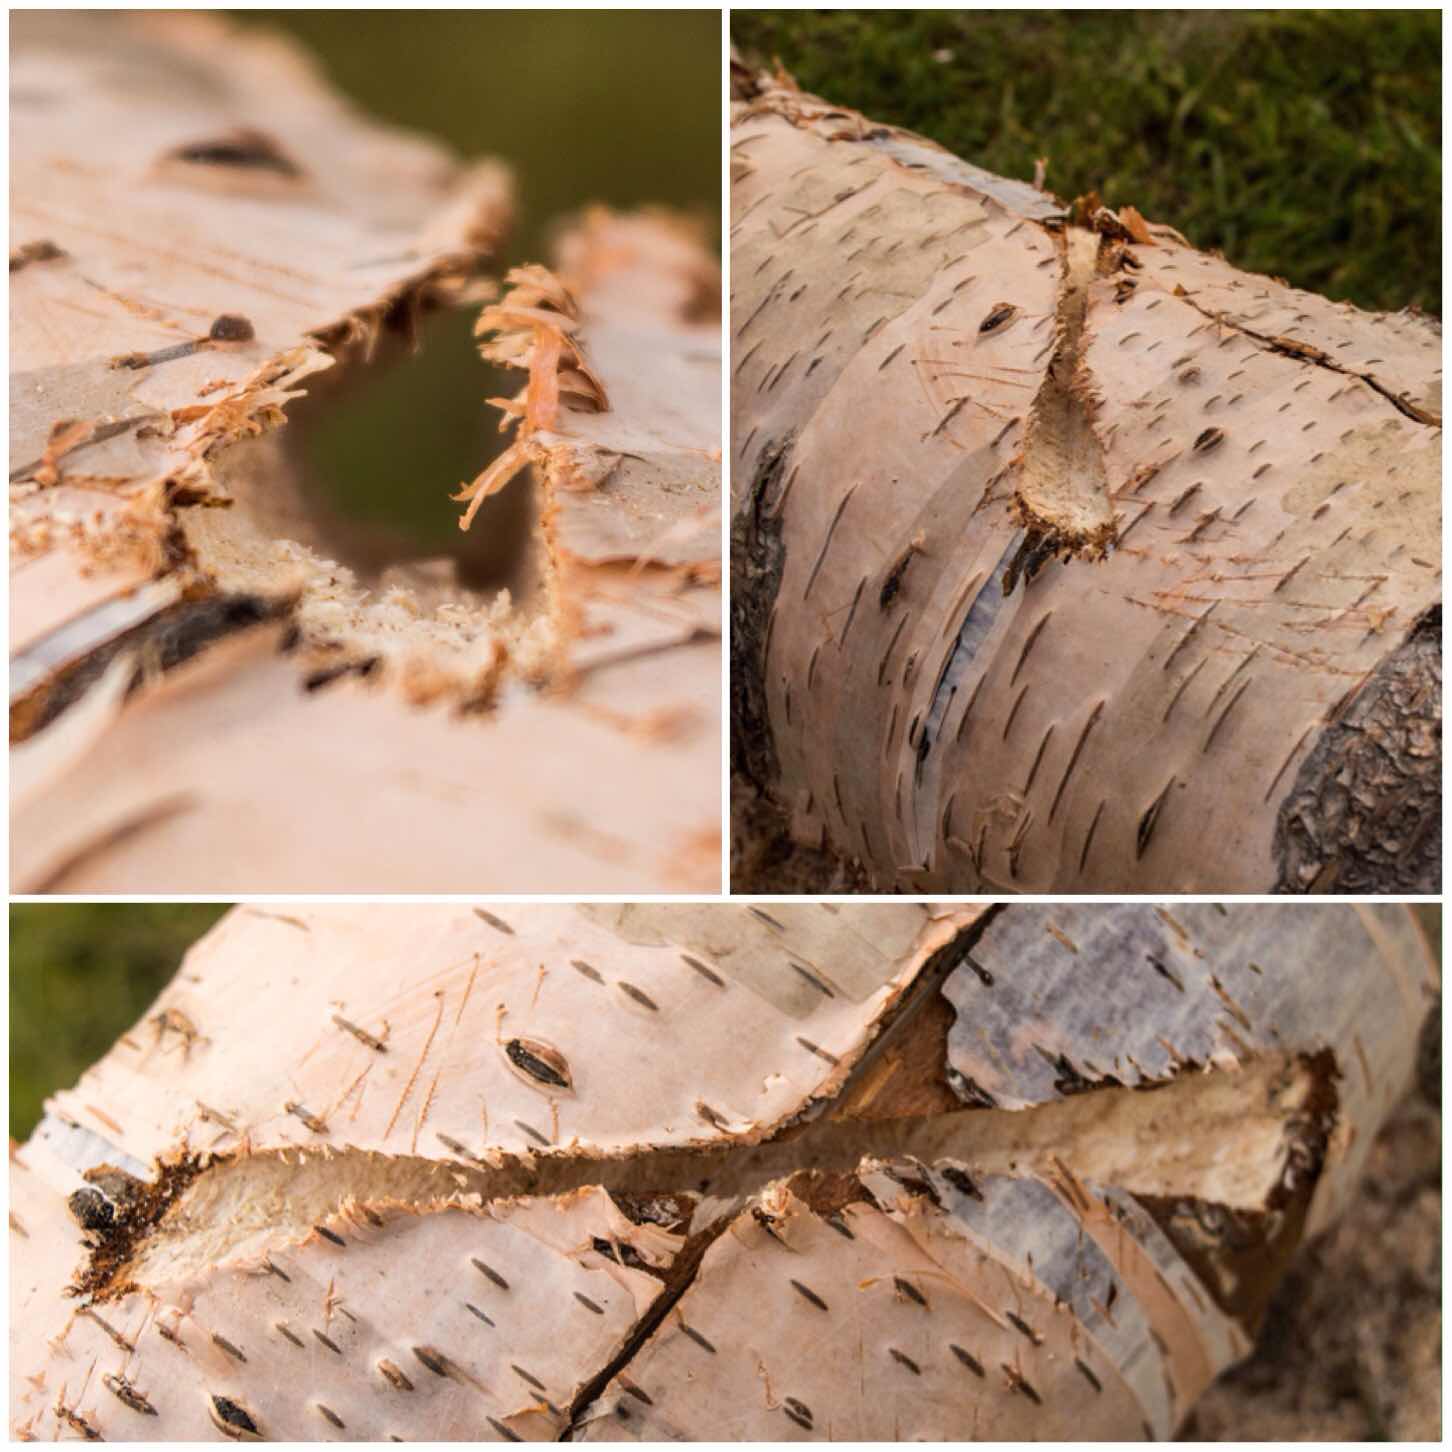
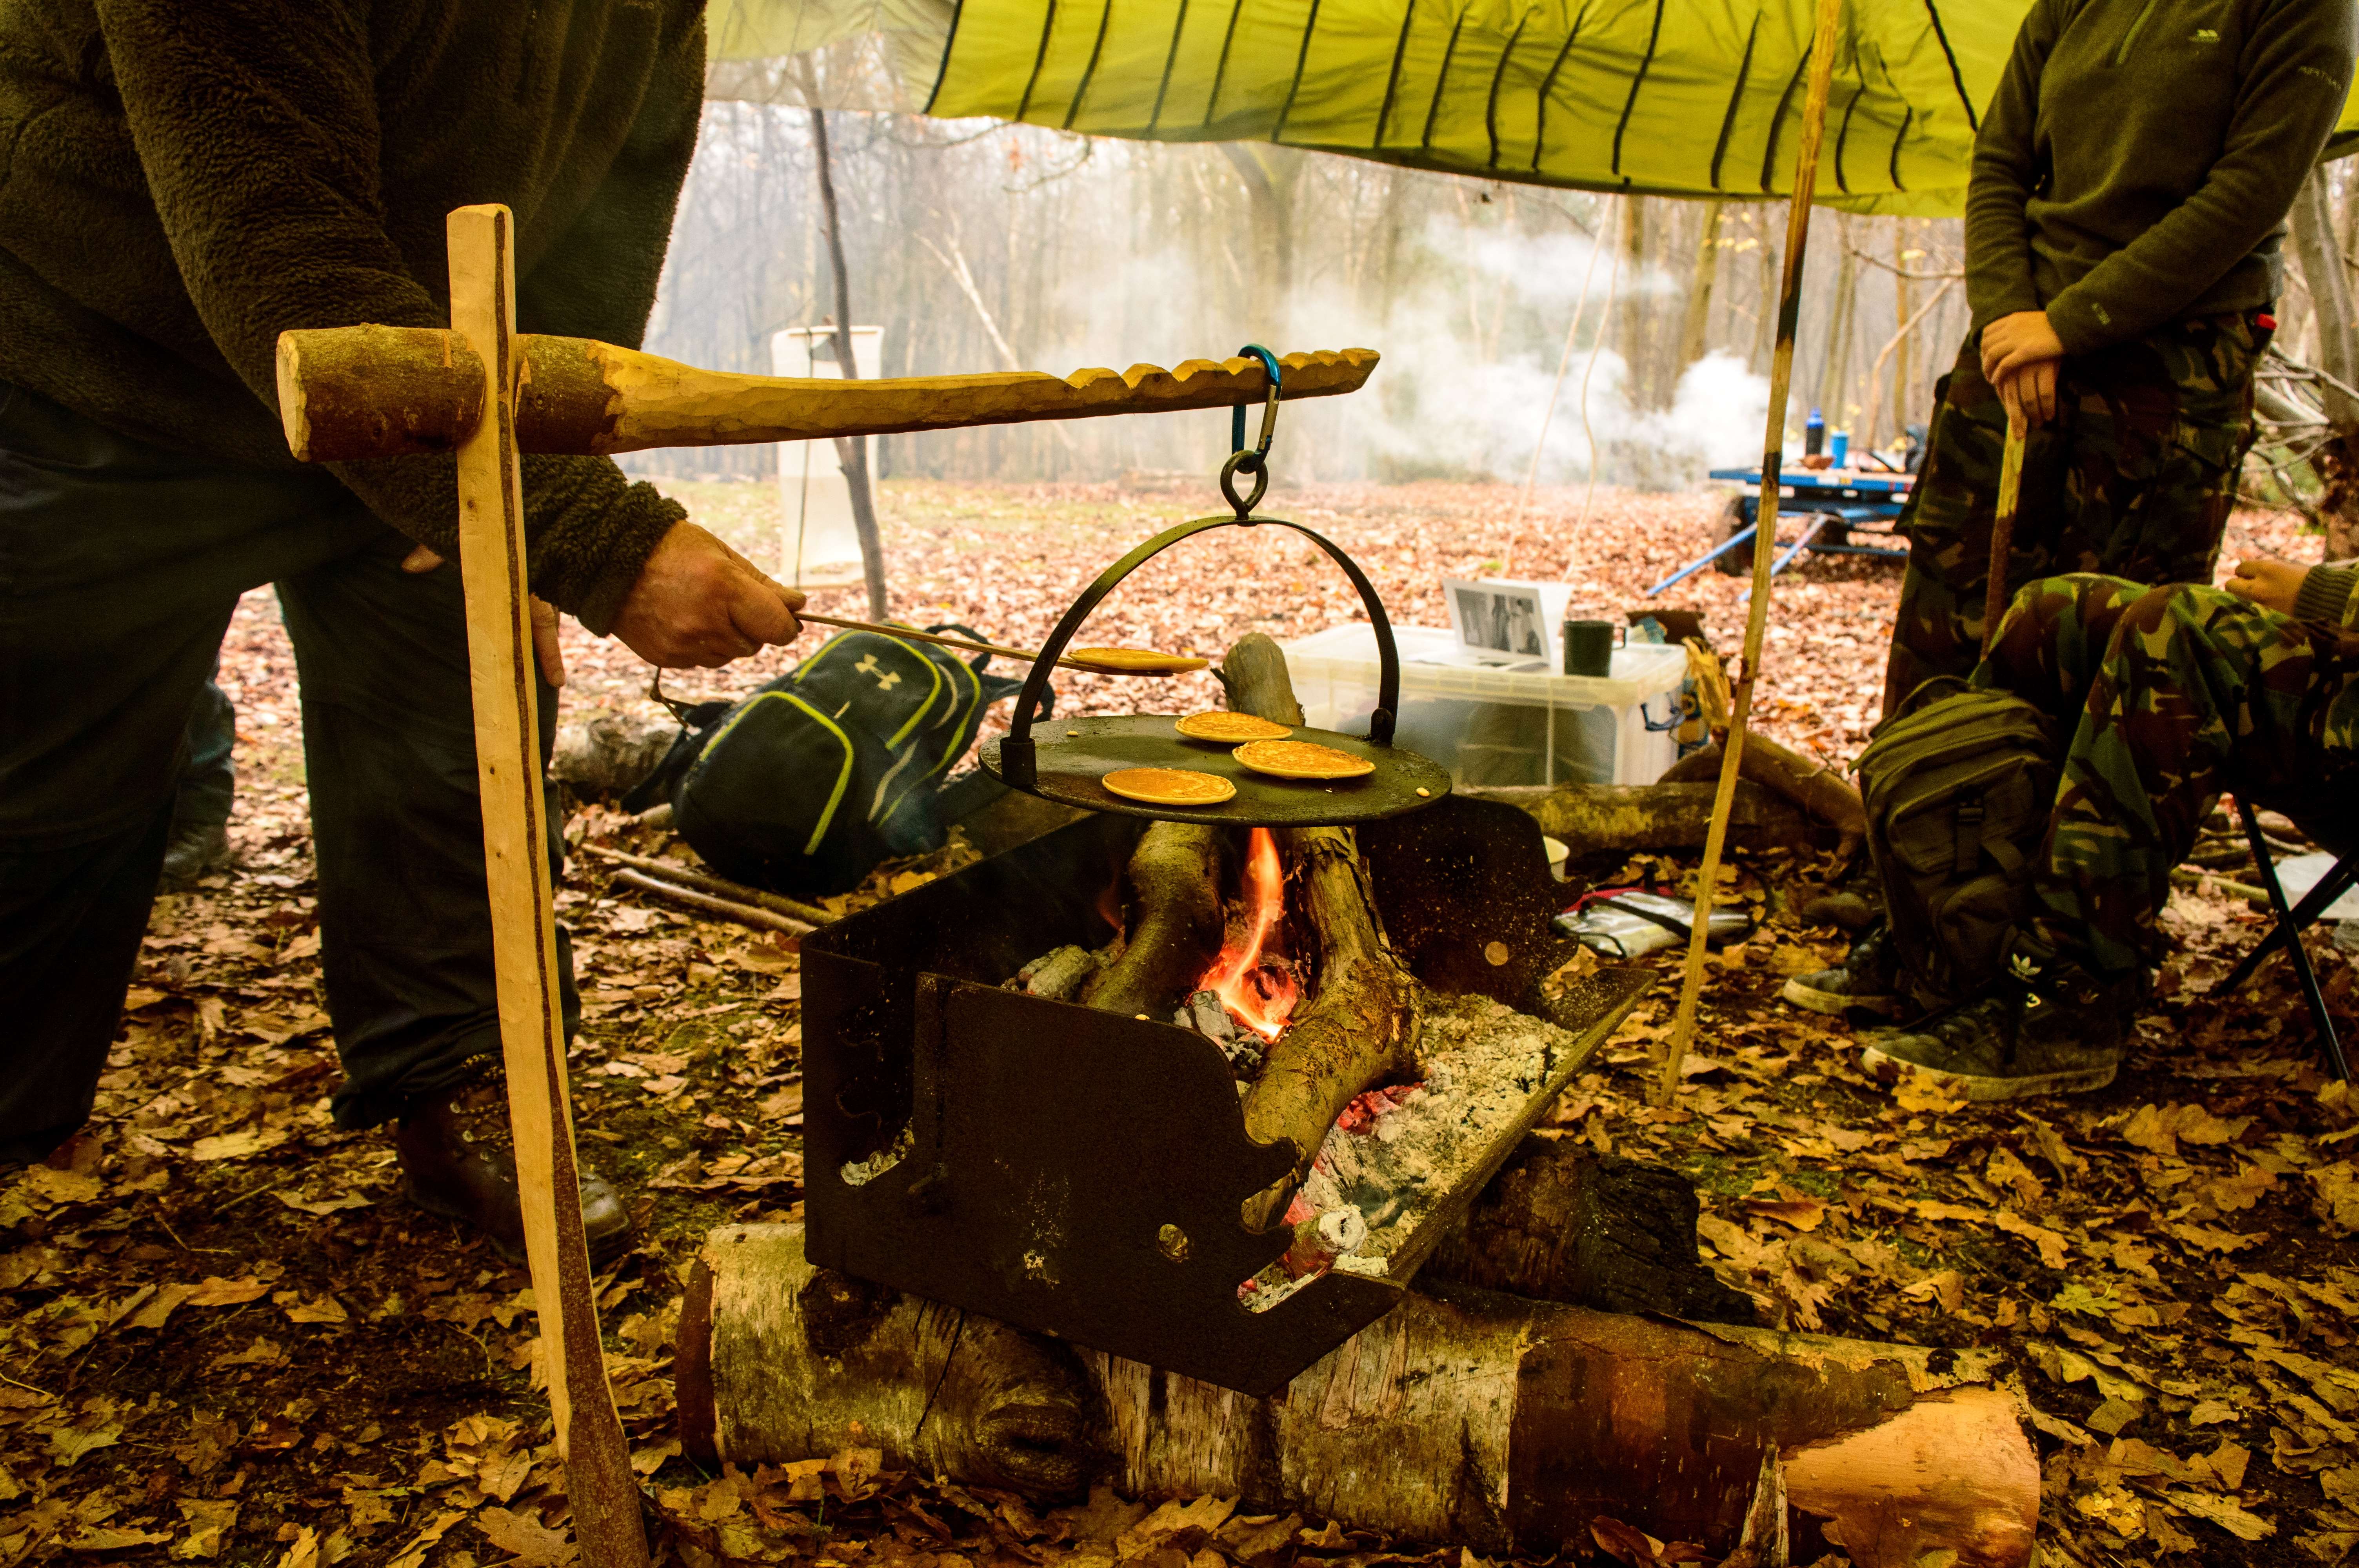
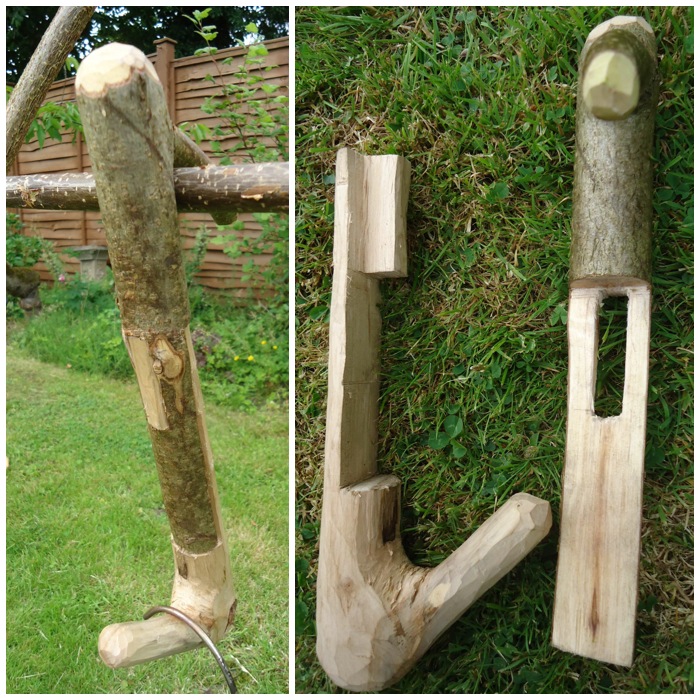
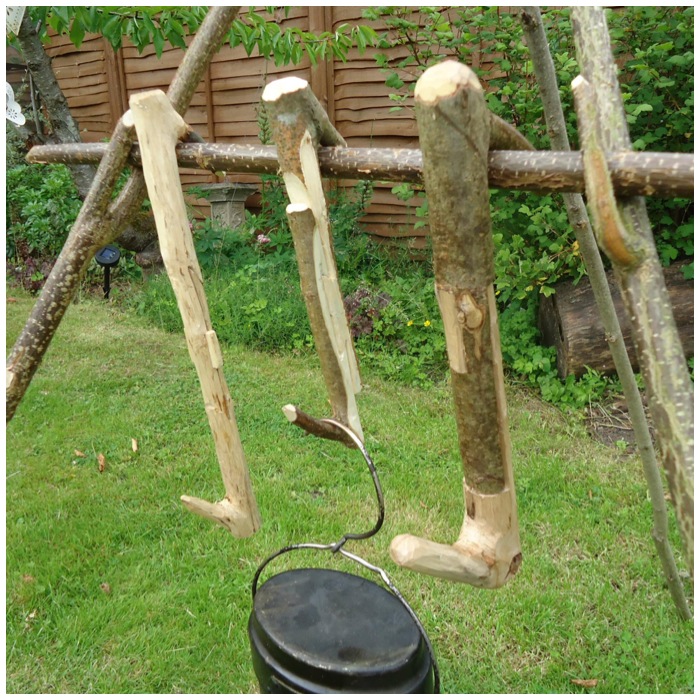
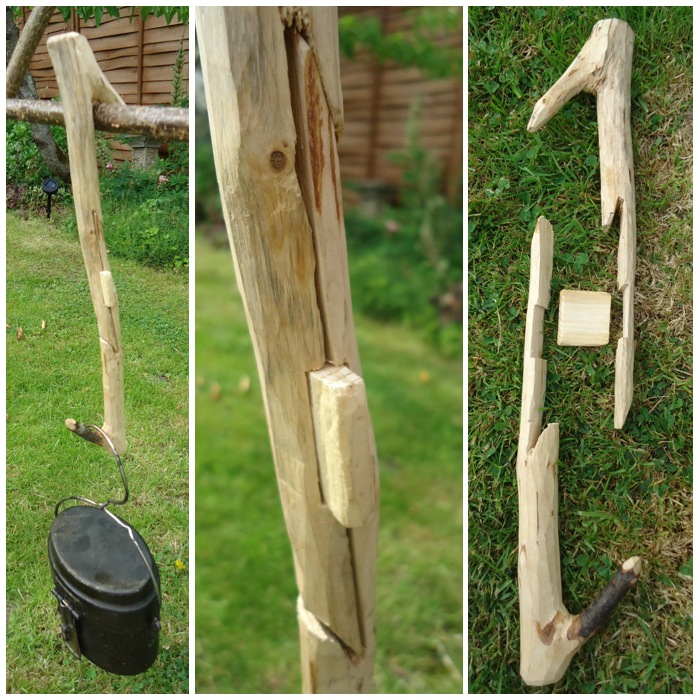
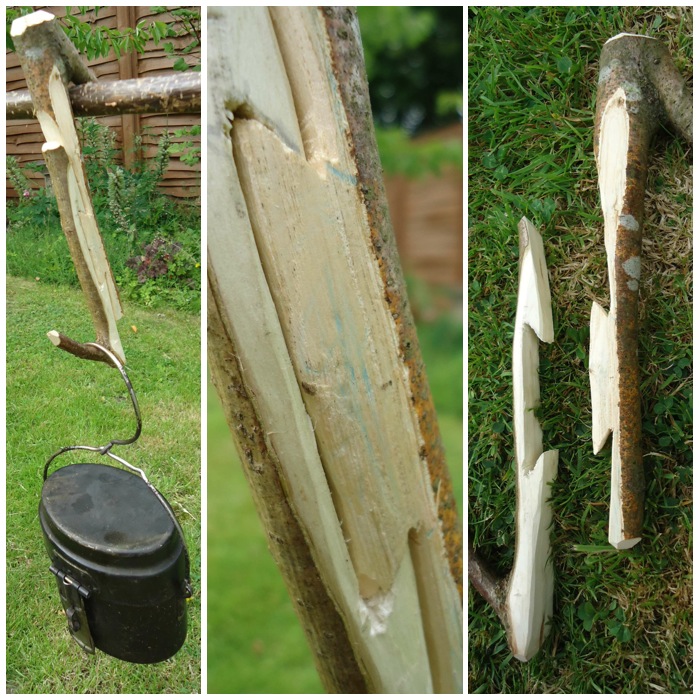
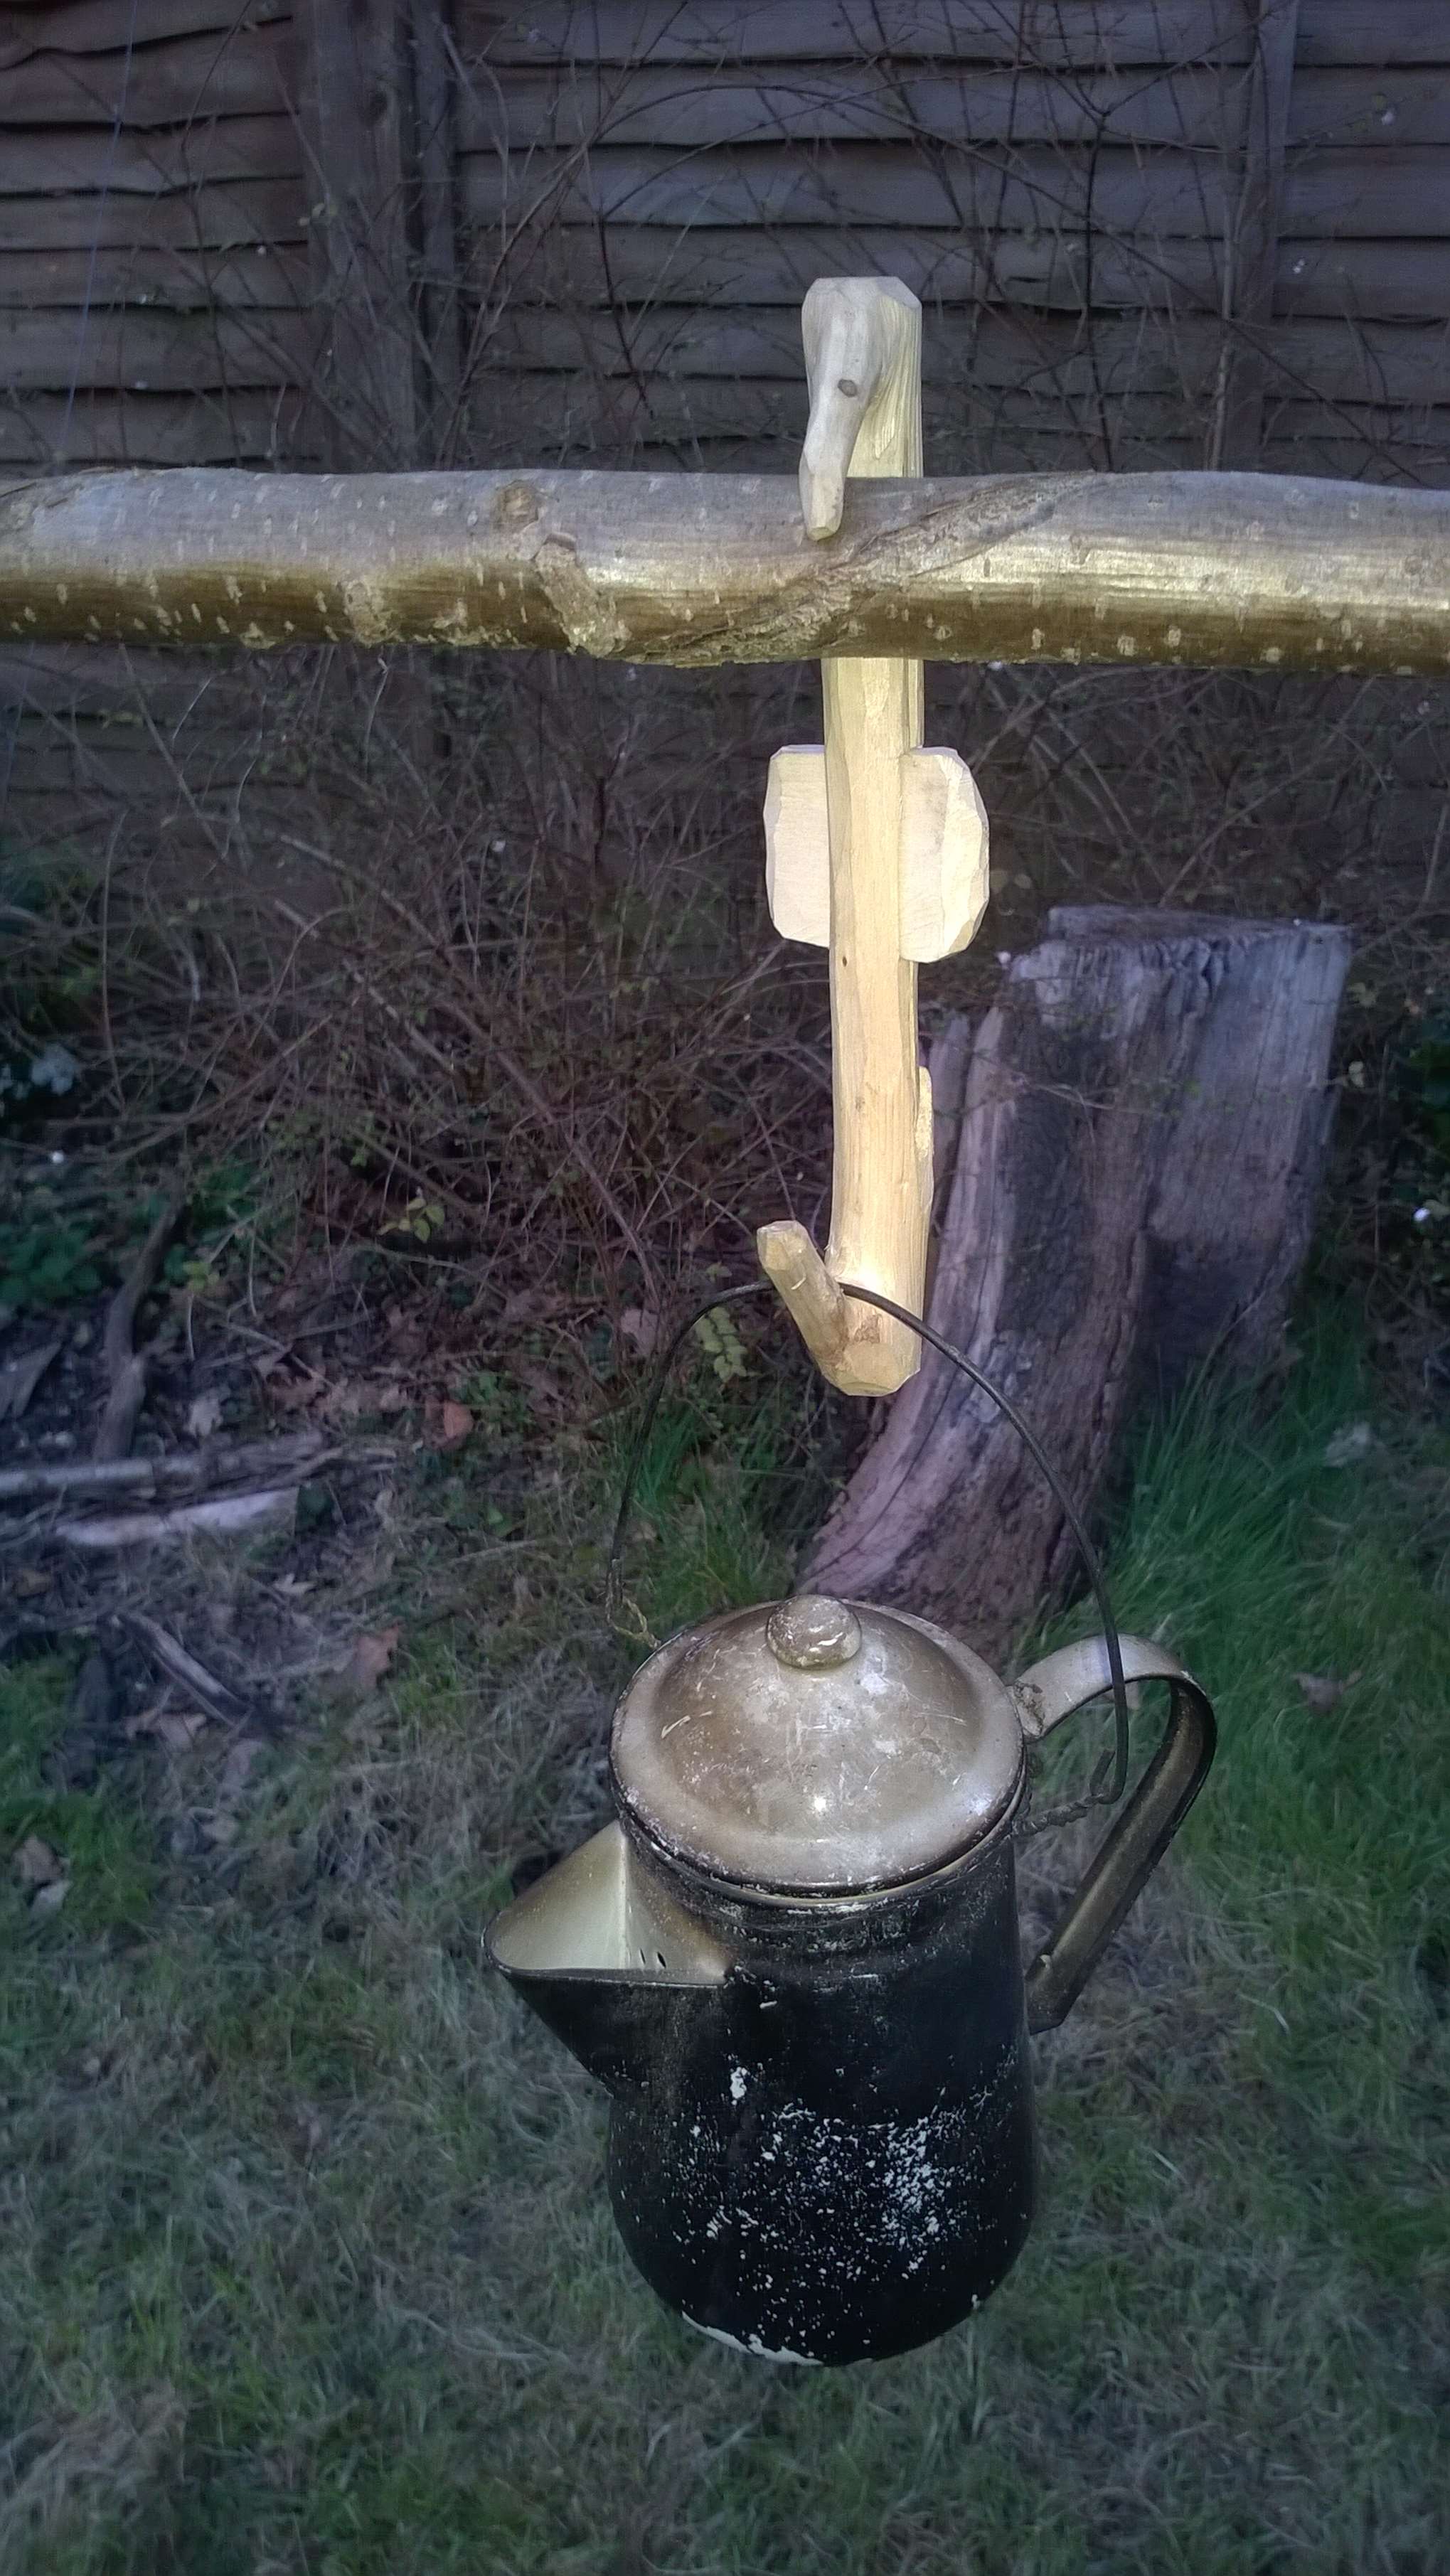
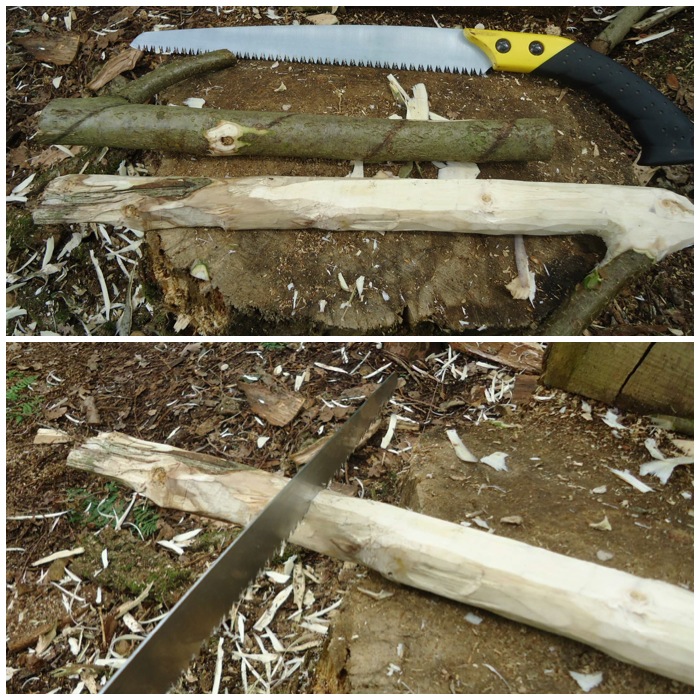
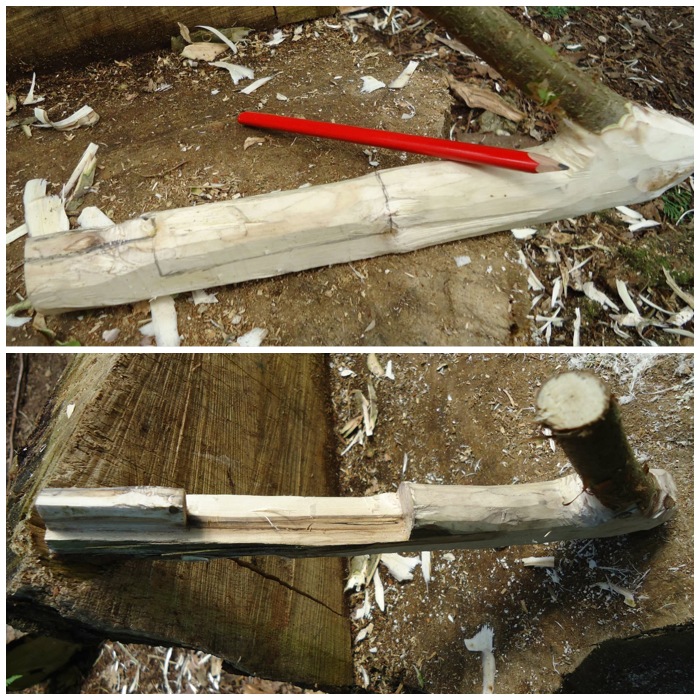
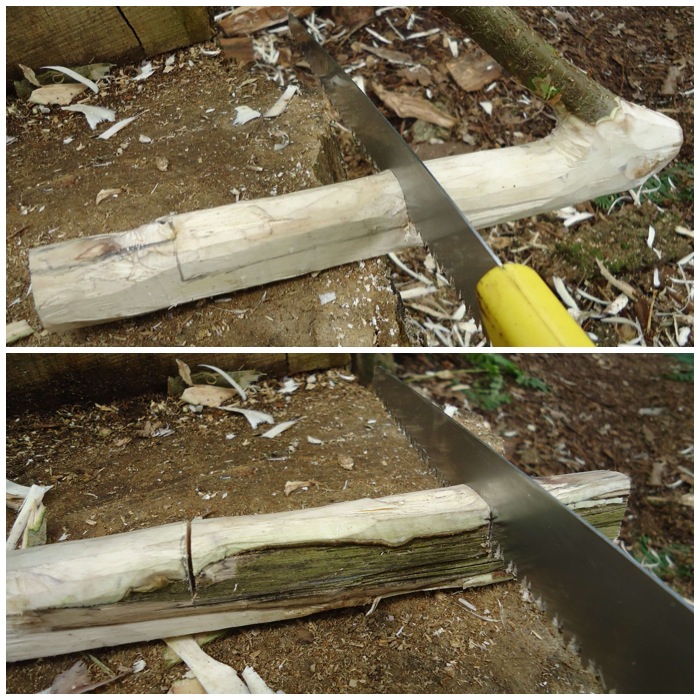
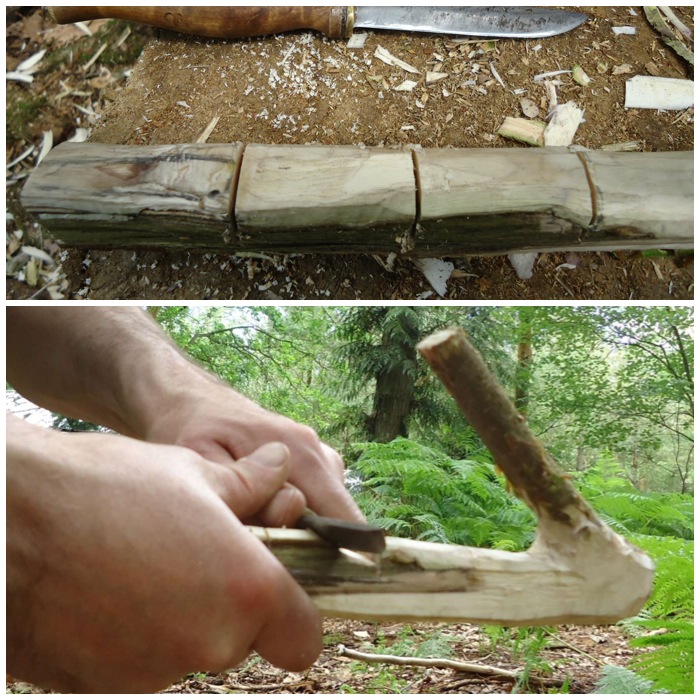
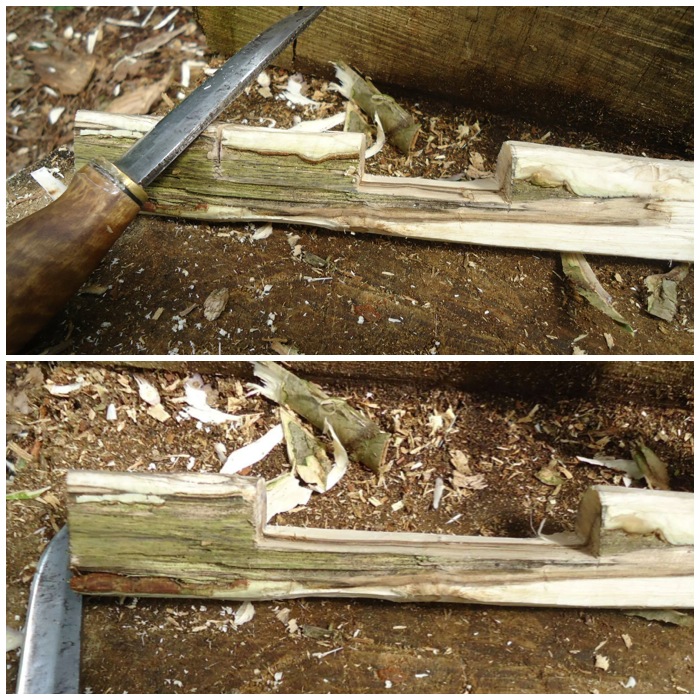
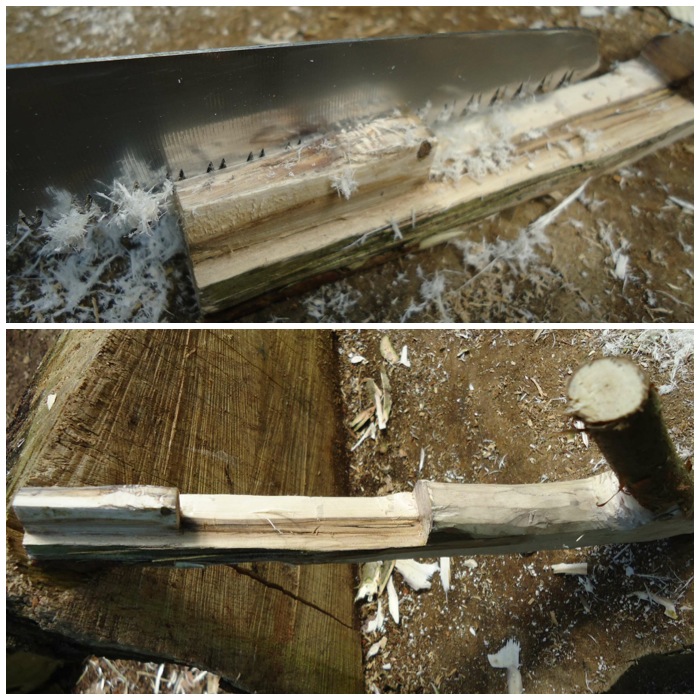
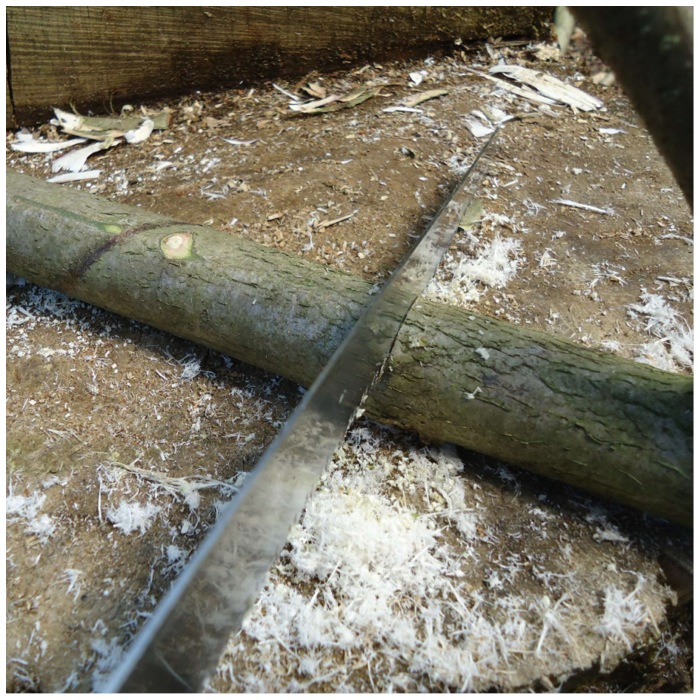
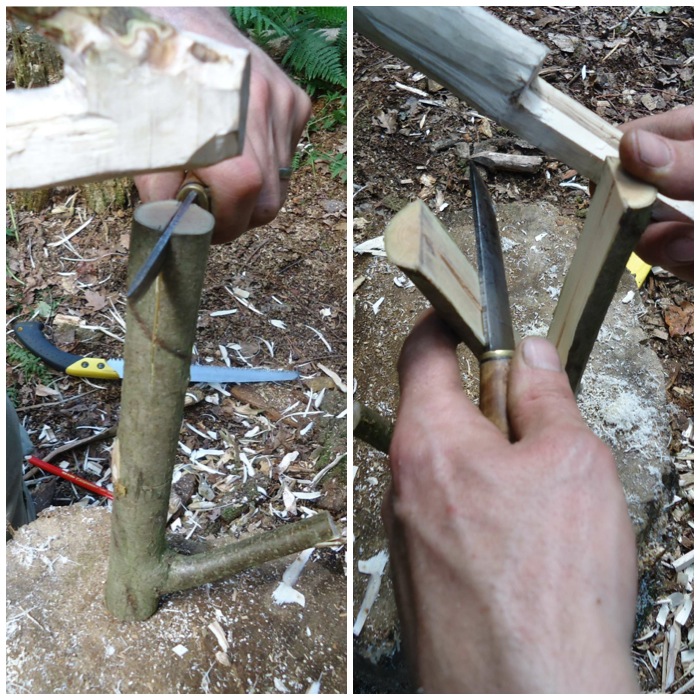
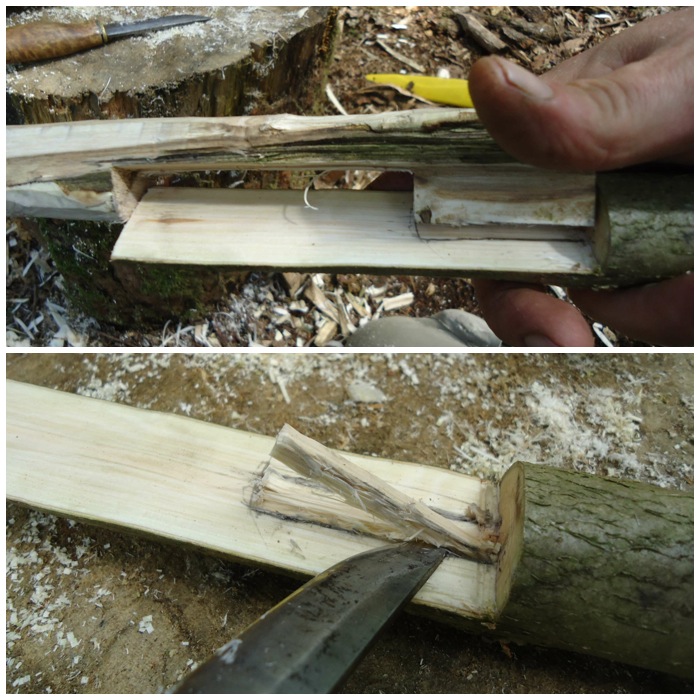
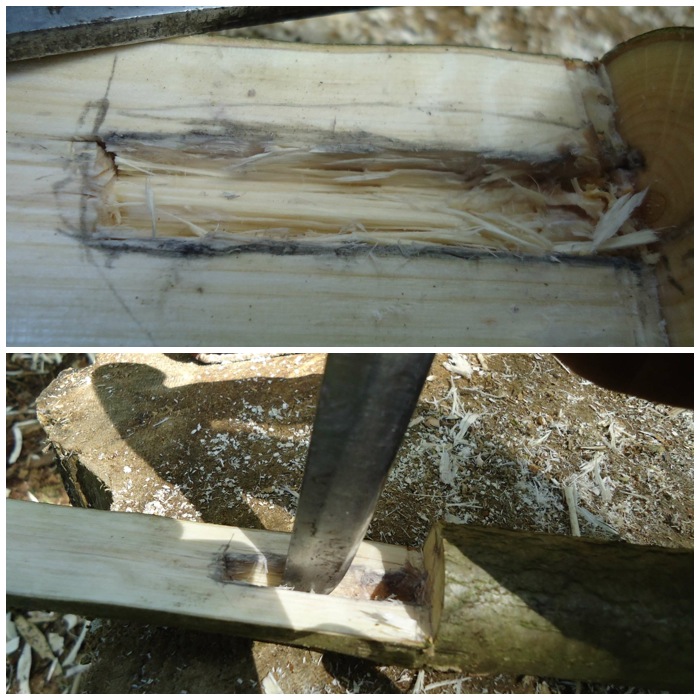
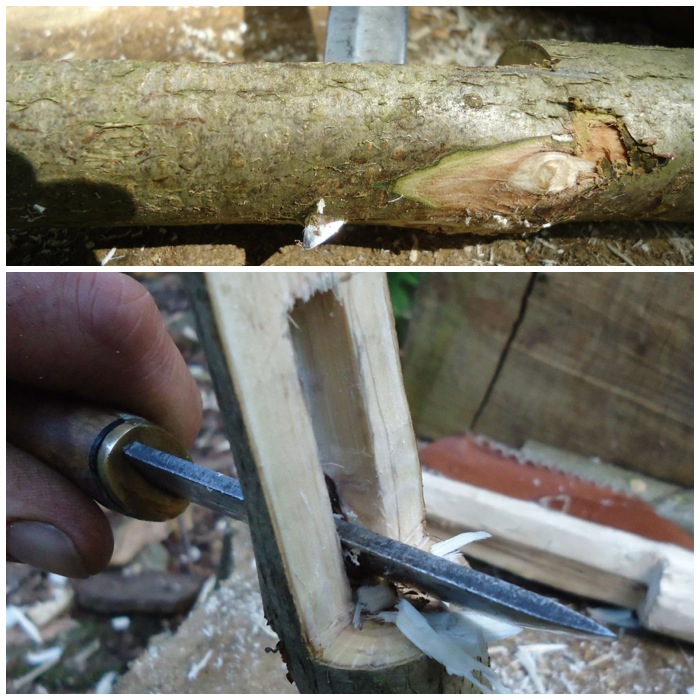
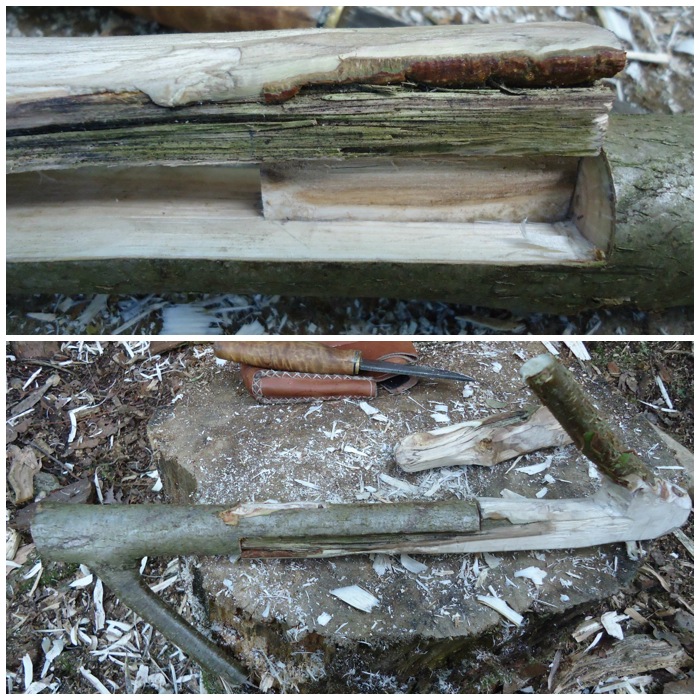
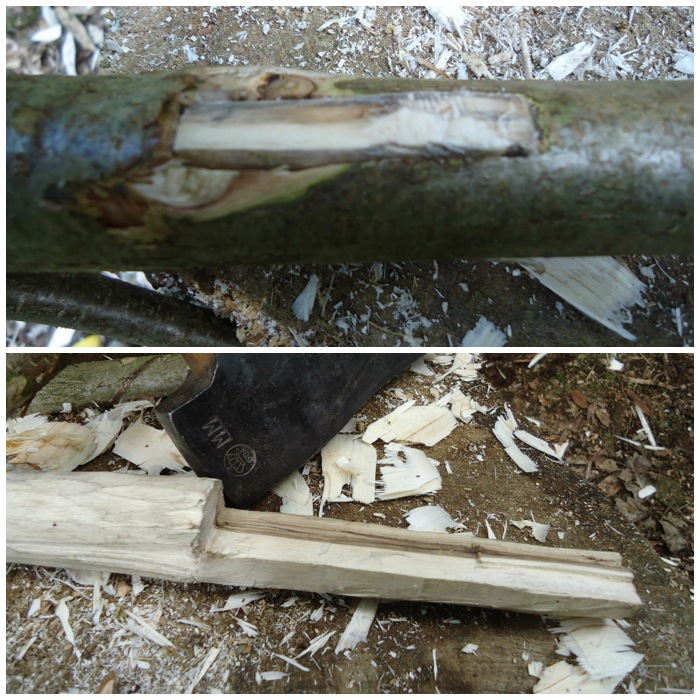
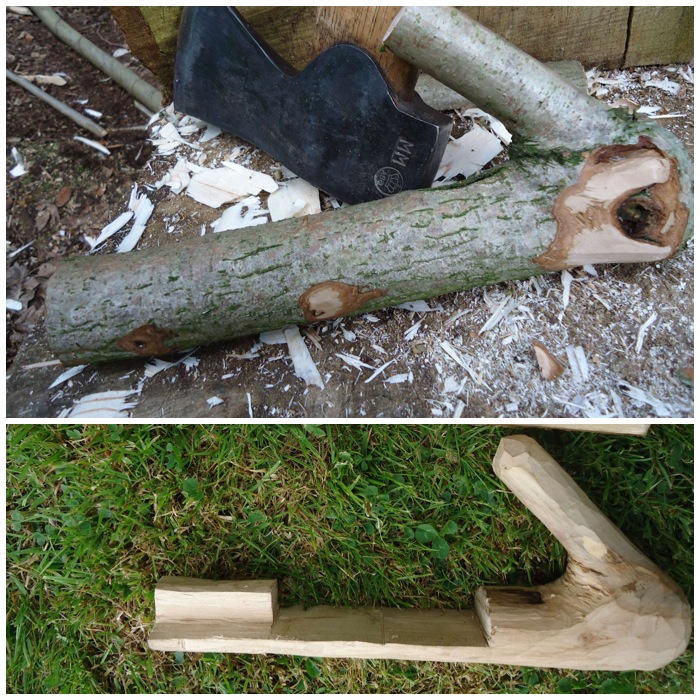
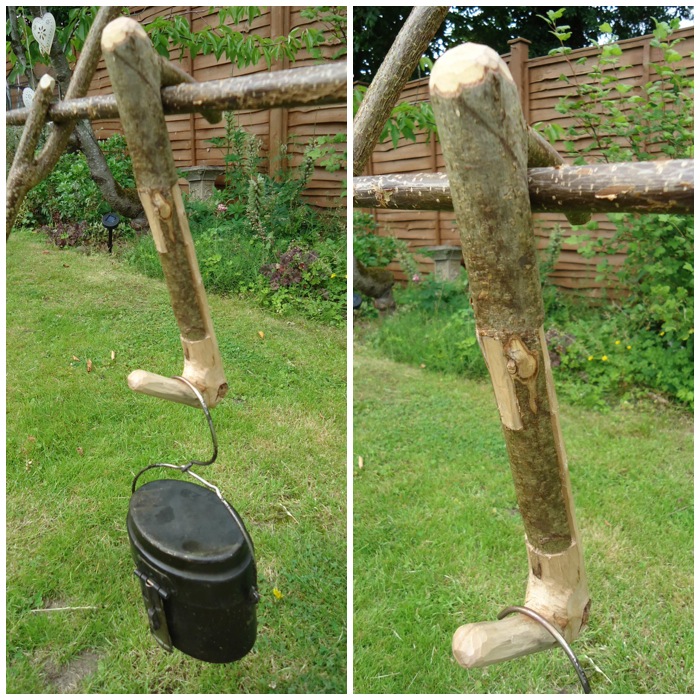
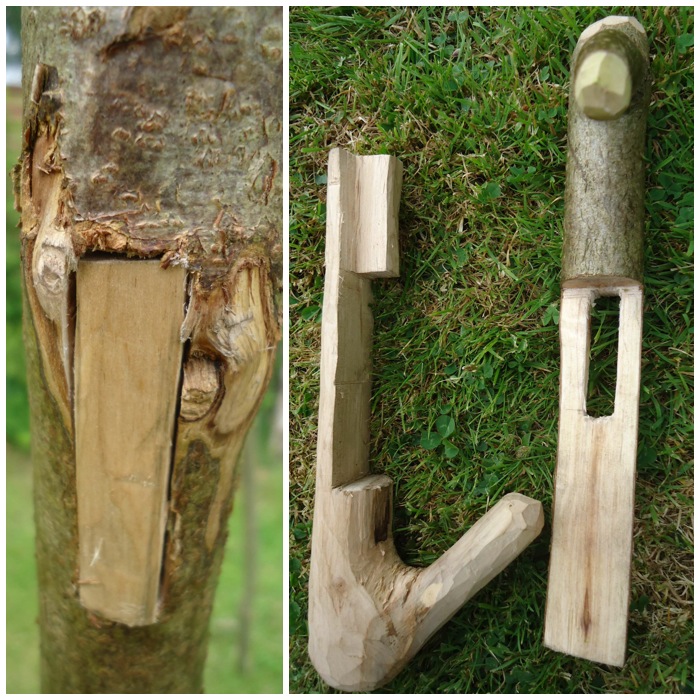
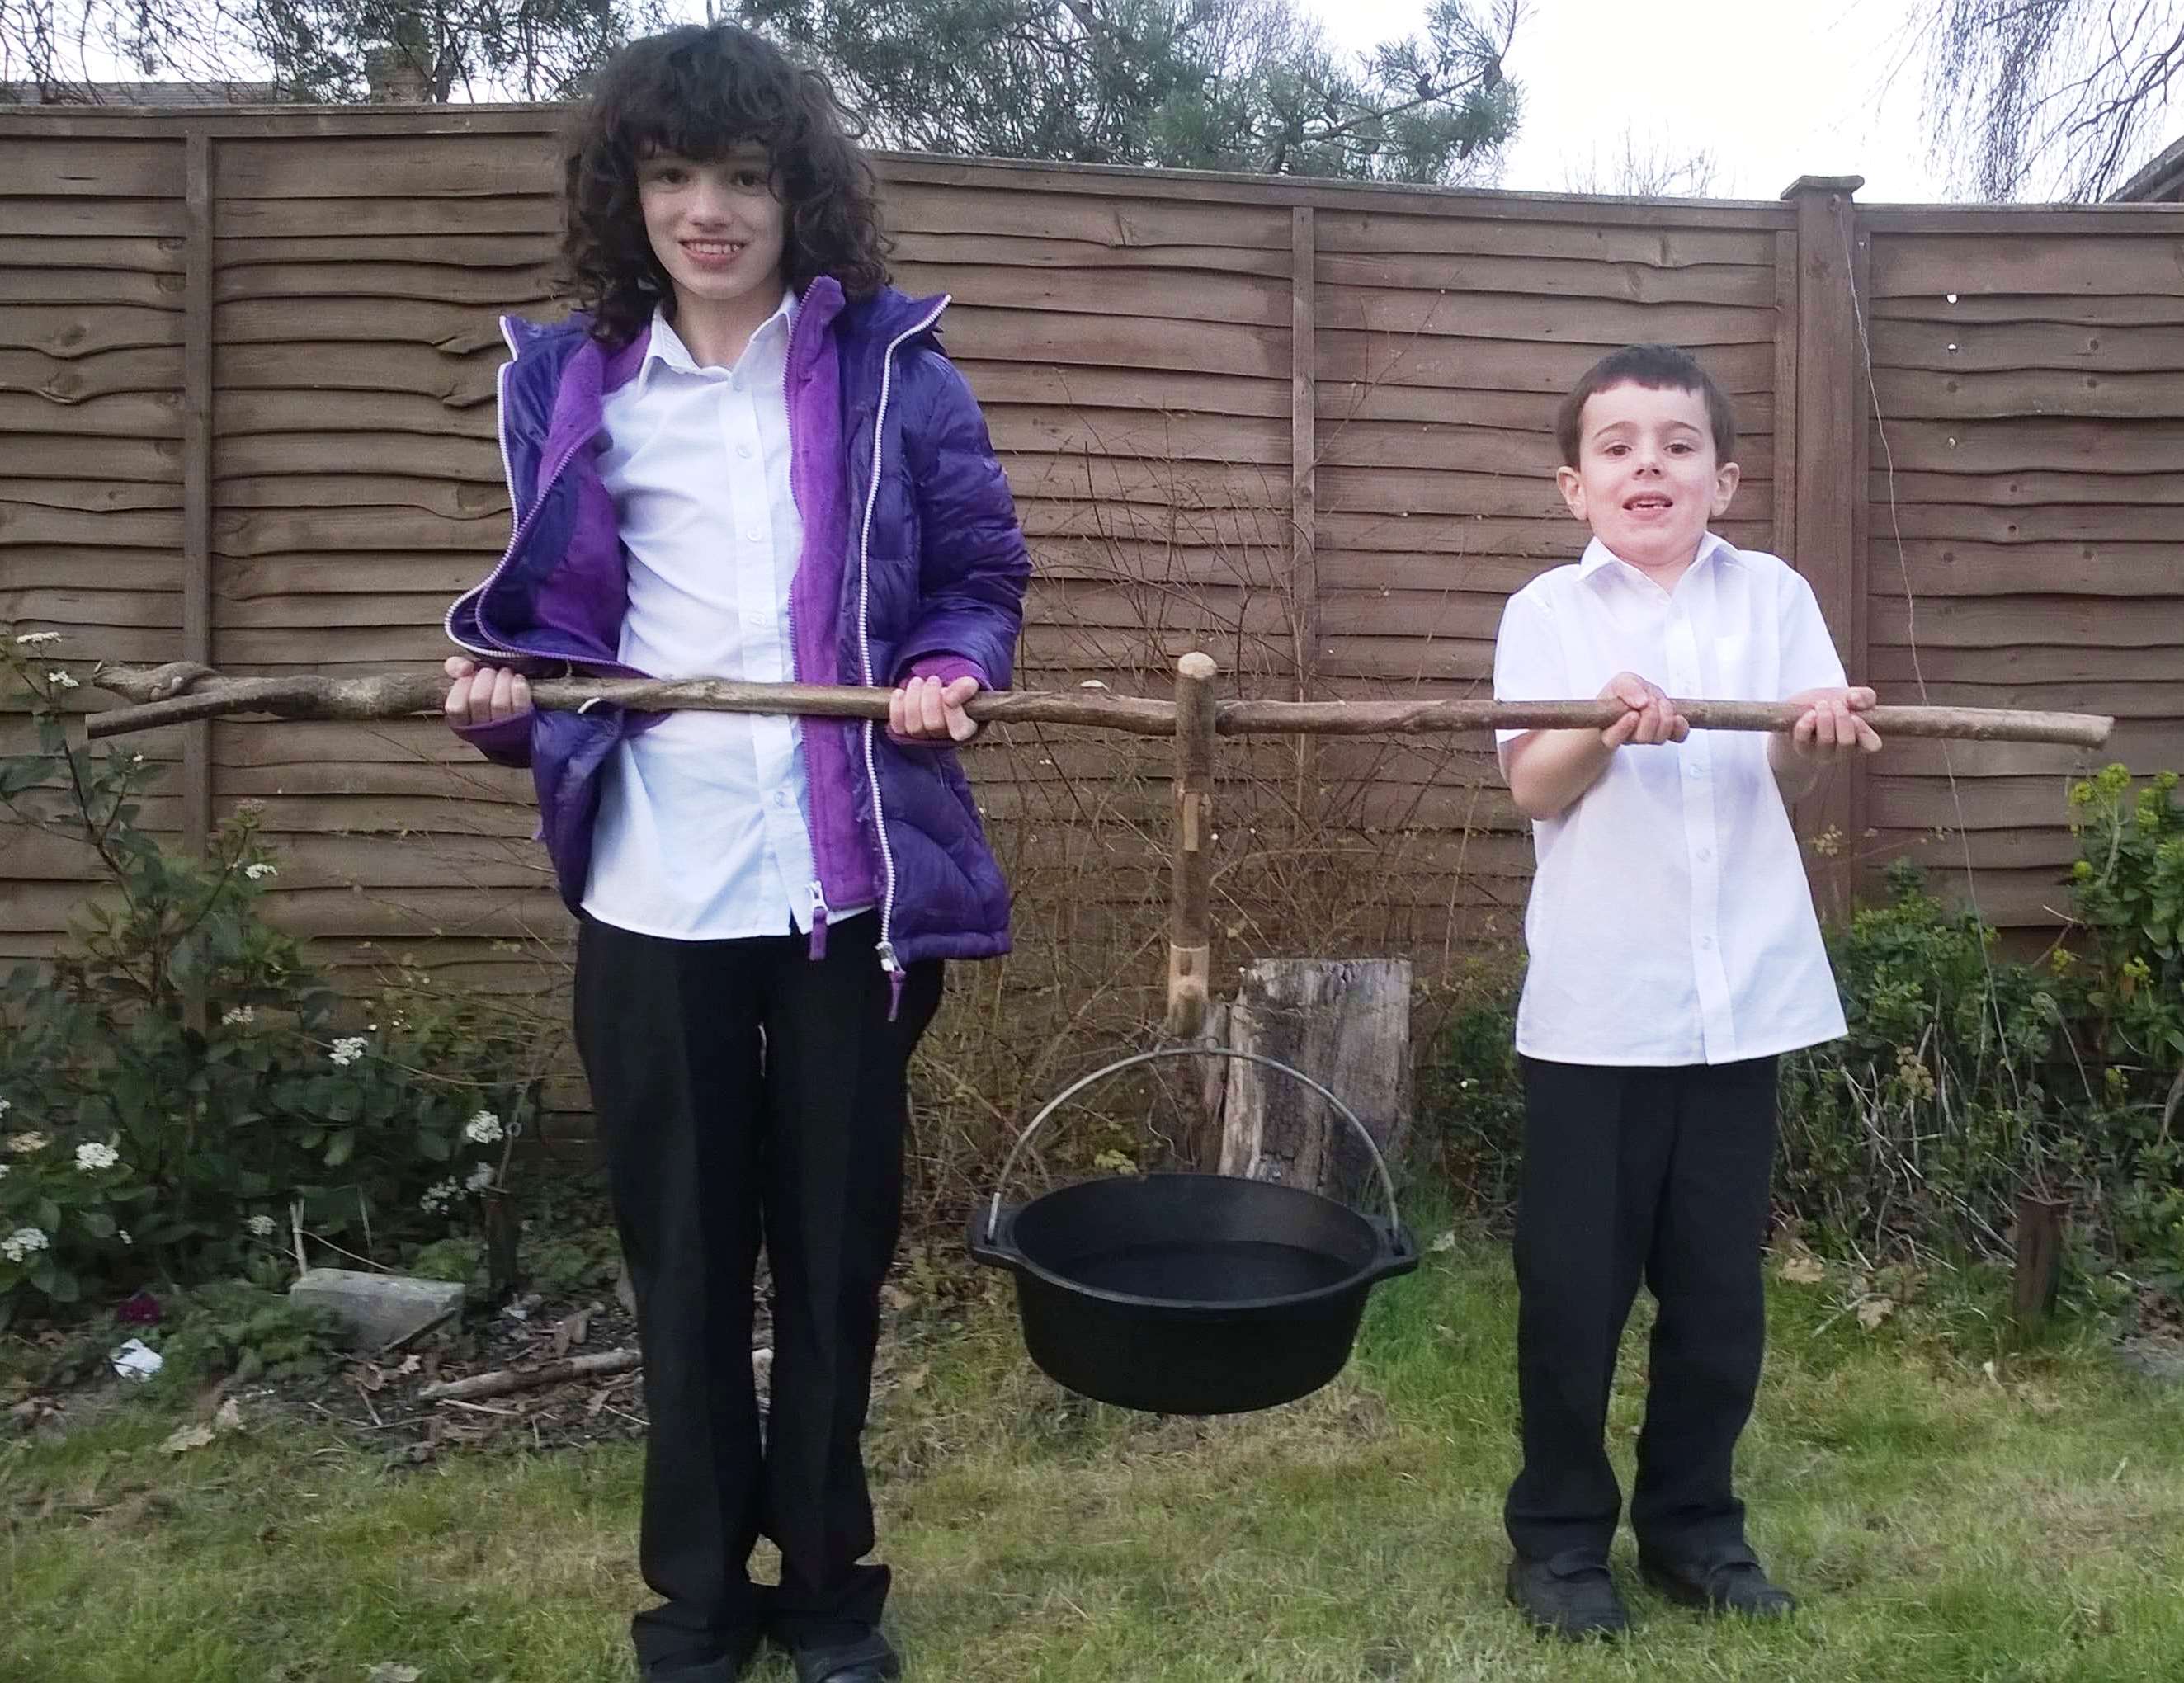
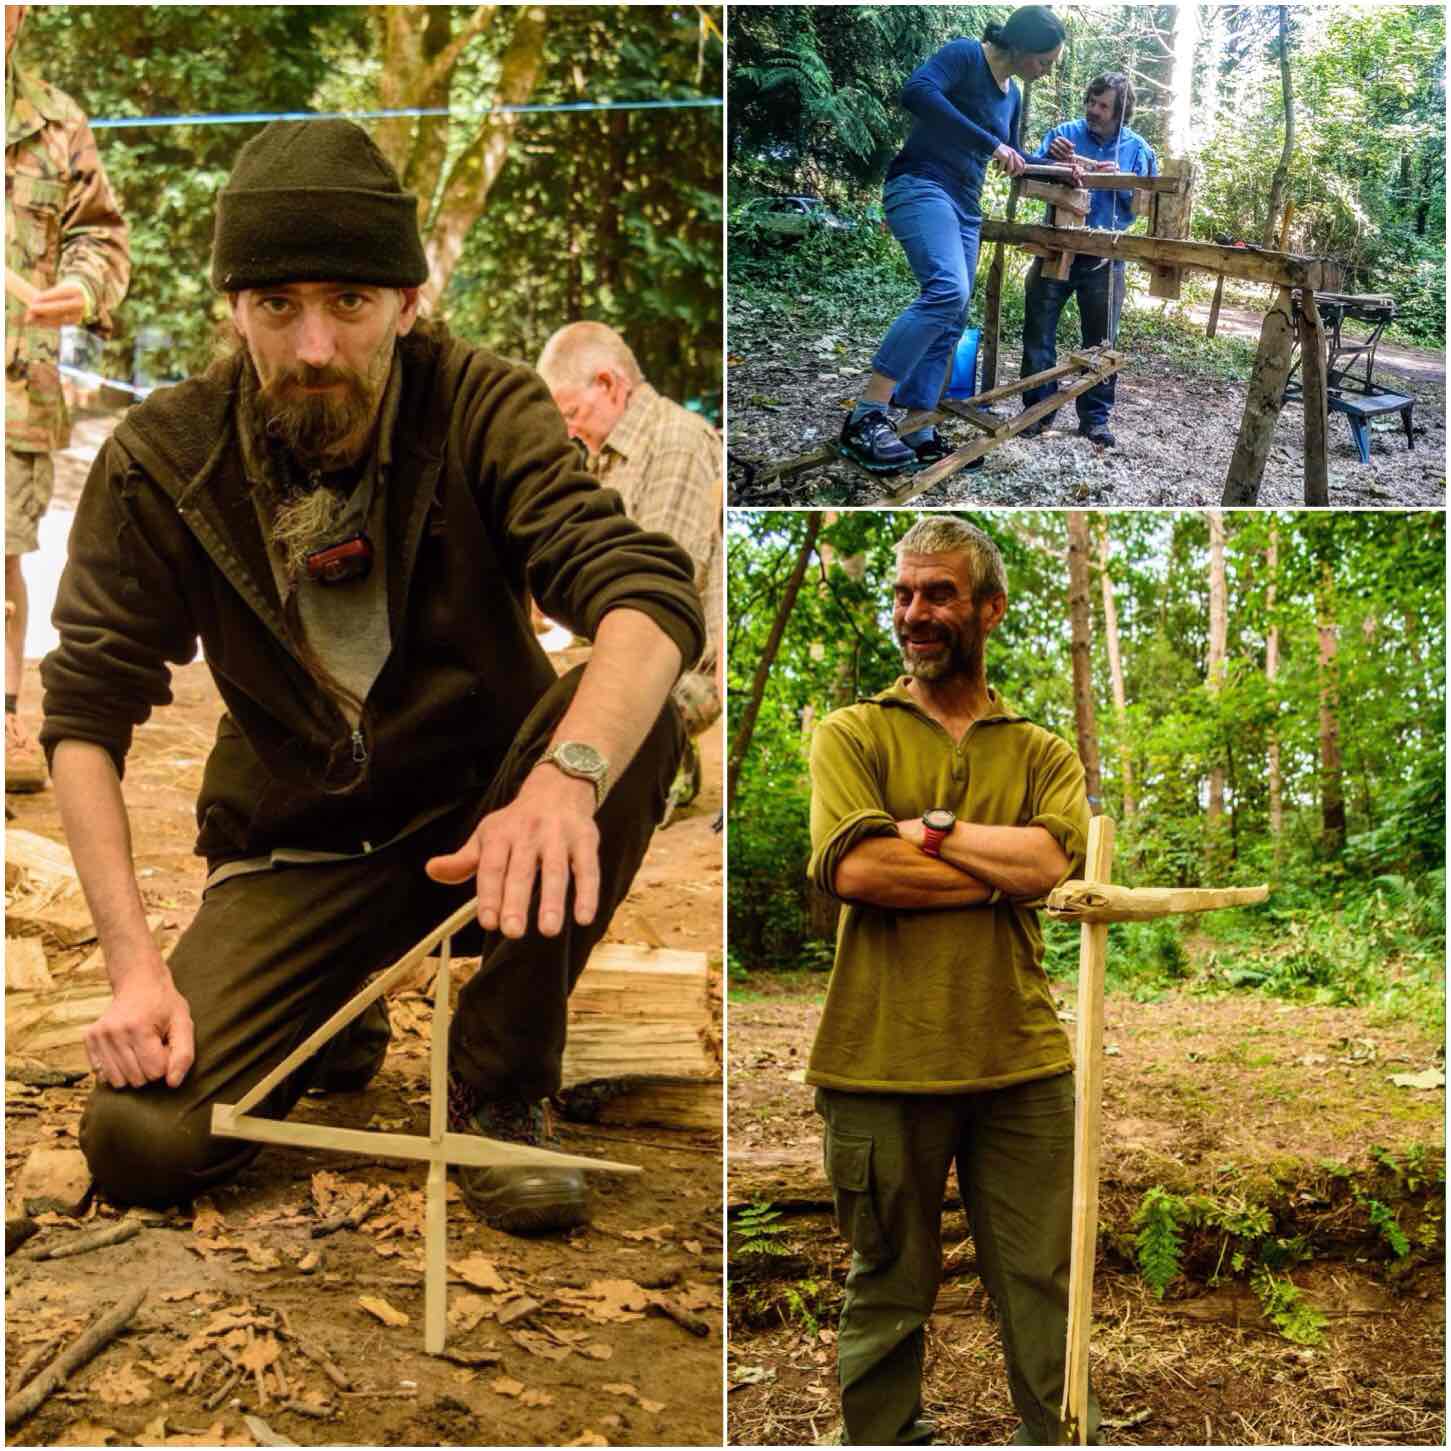
There was plenty of wood working going on as usual this year. Ed Livesy ran a busy class on carving a Figure Four Deadfall mechanism, Roy Budd was running the pole lathe continuously every day (where he got the energy I do not know) and I ran for the first time the Dovetail Campfire Crane class.

This class on the crane I will run again next year as a lot of people have never heard of it and became very interested in it after seeing what my students created. It is basically an adjustable crane made out of one pole.

image
Wood Skills

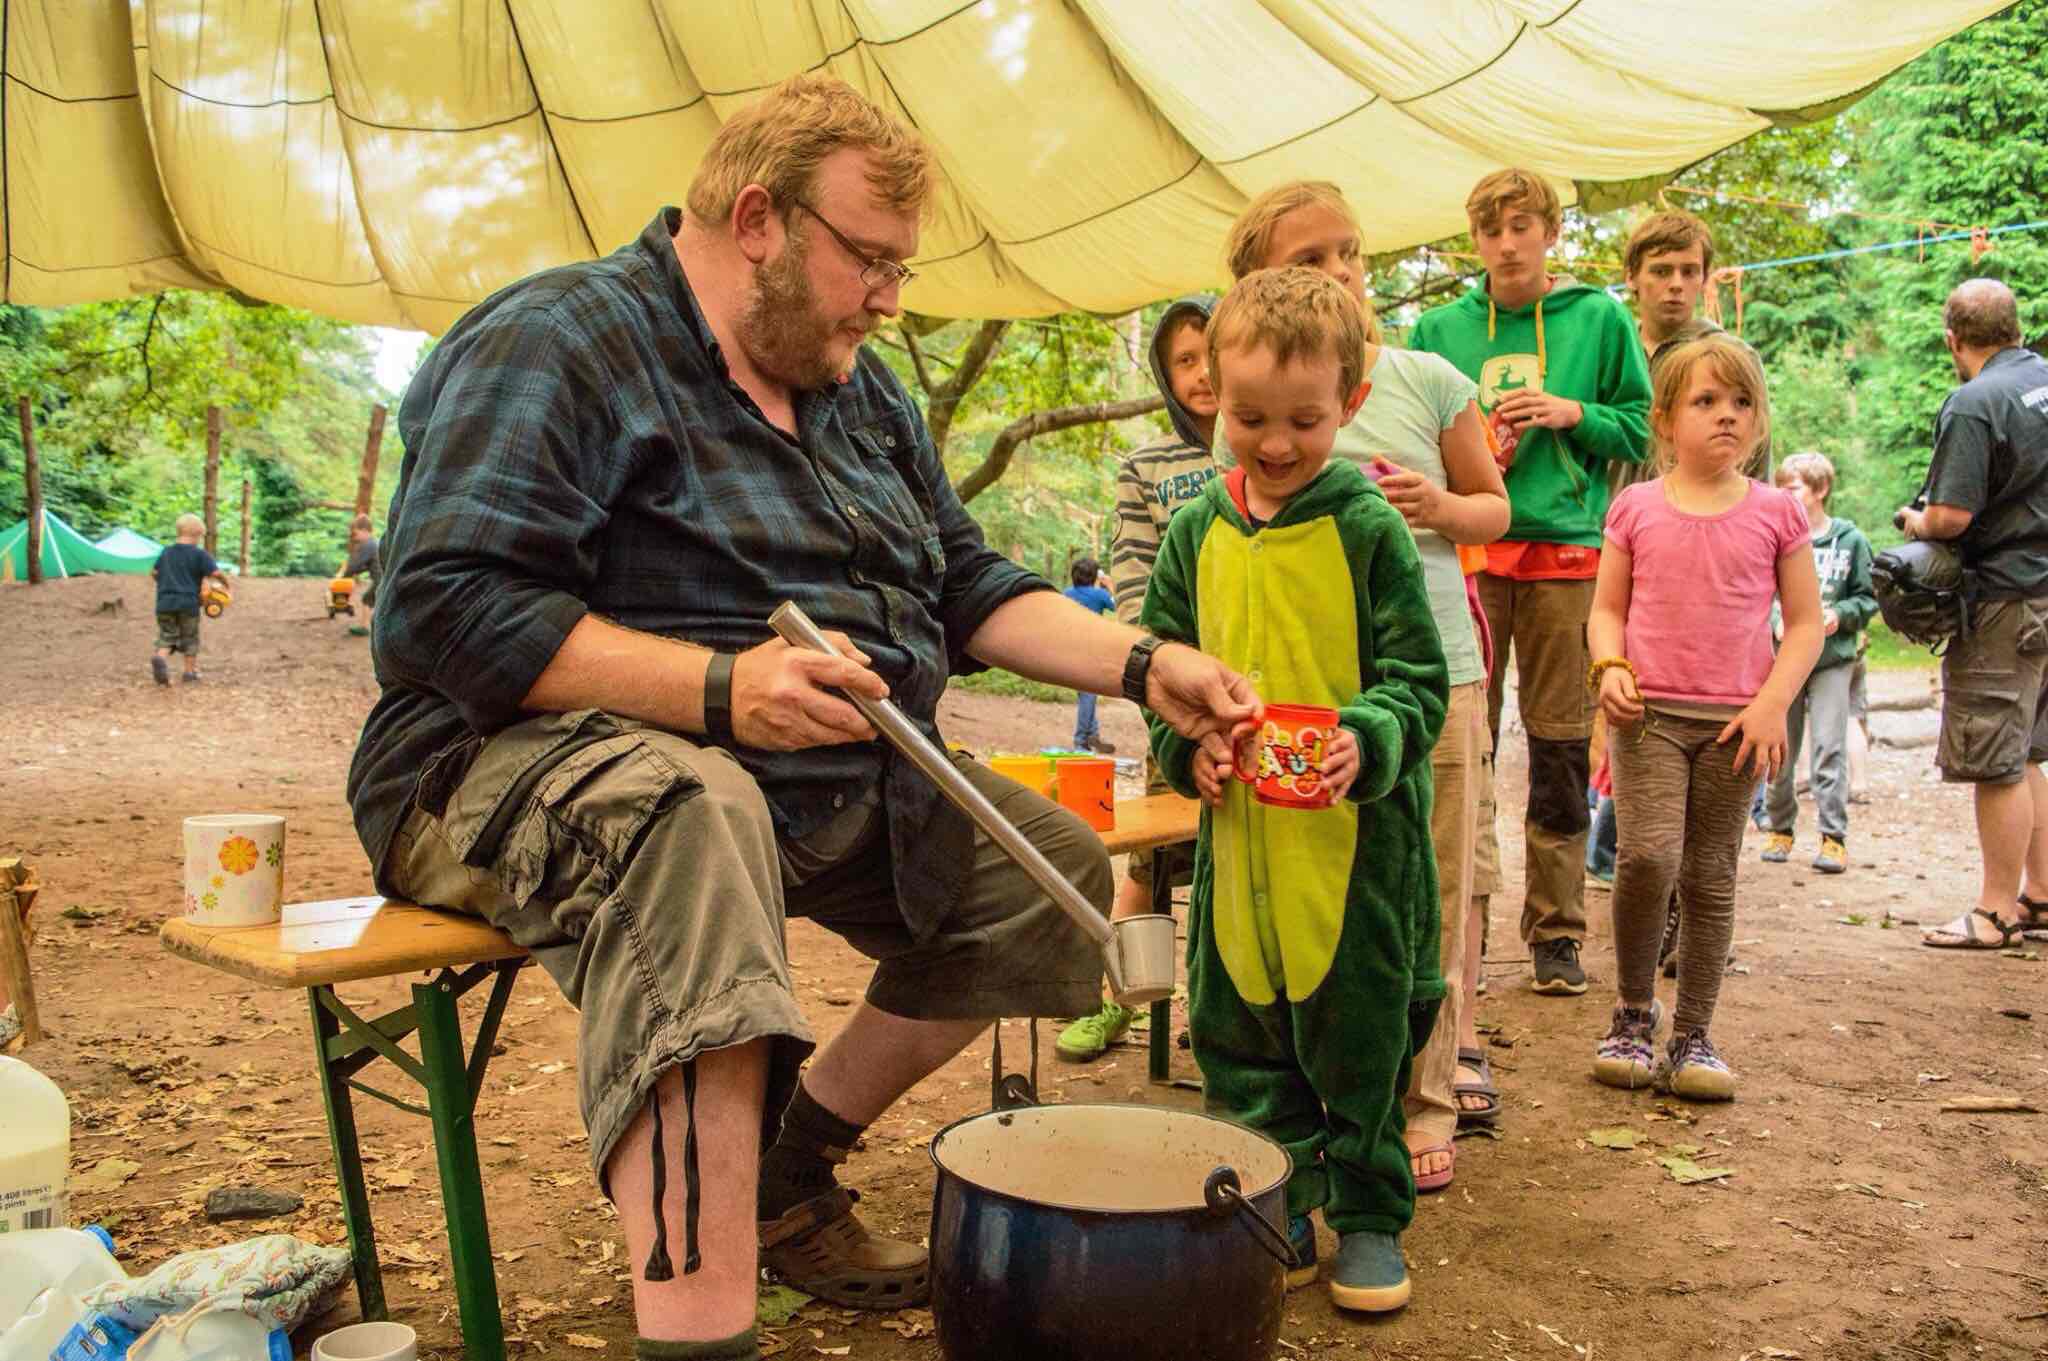
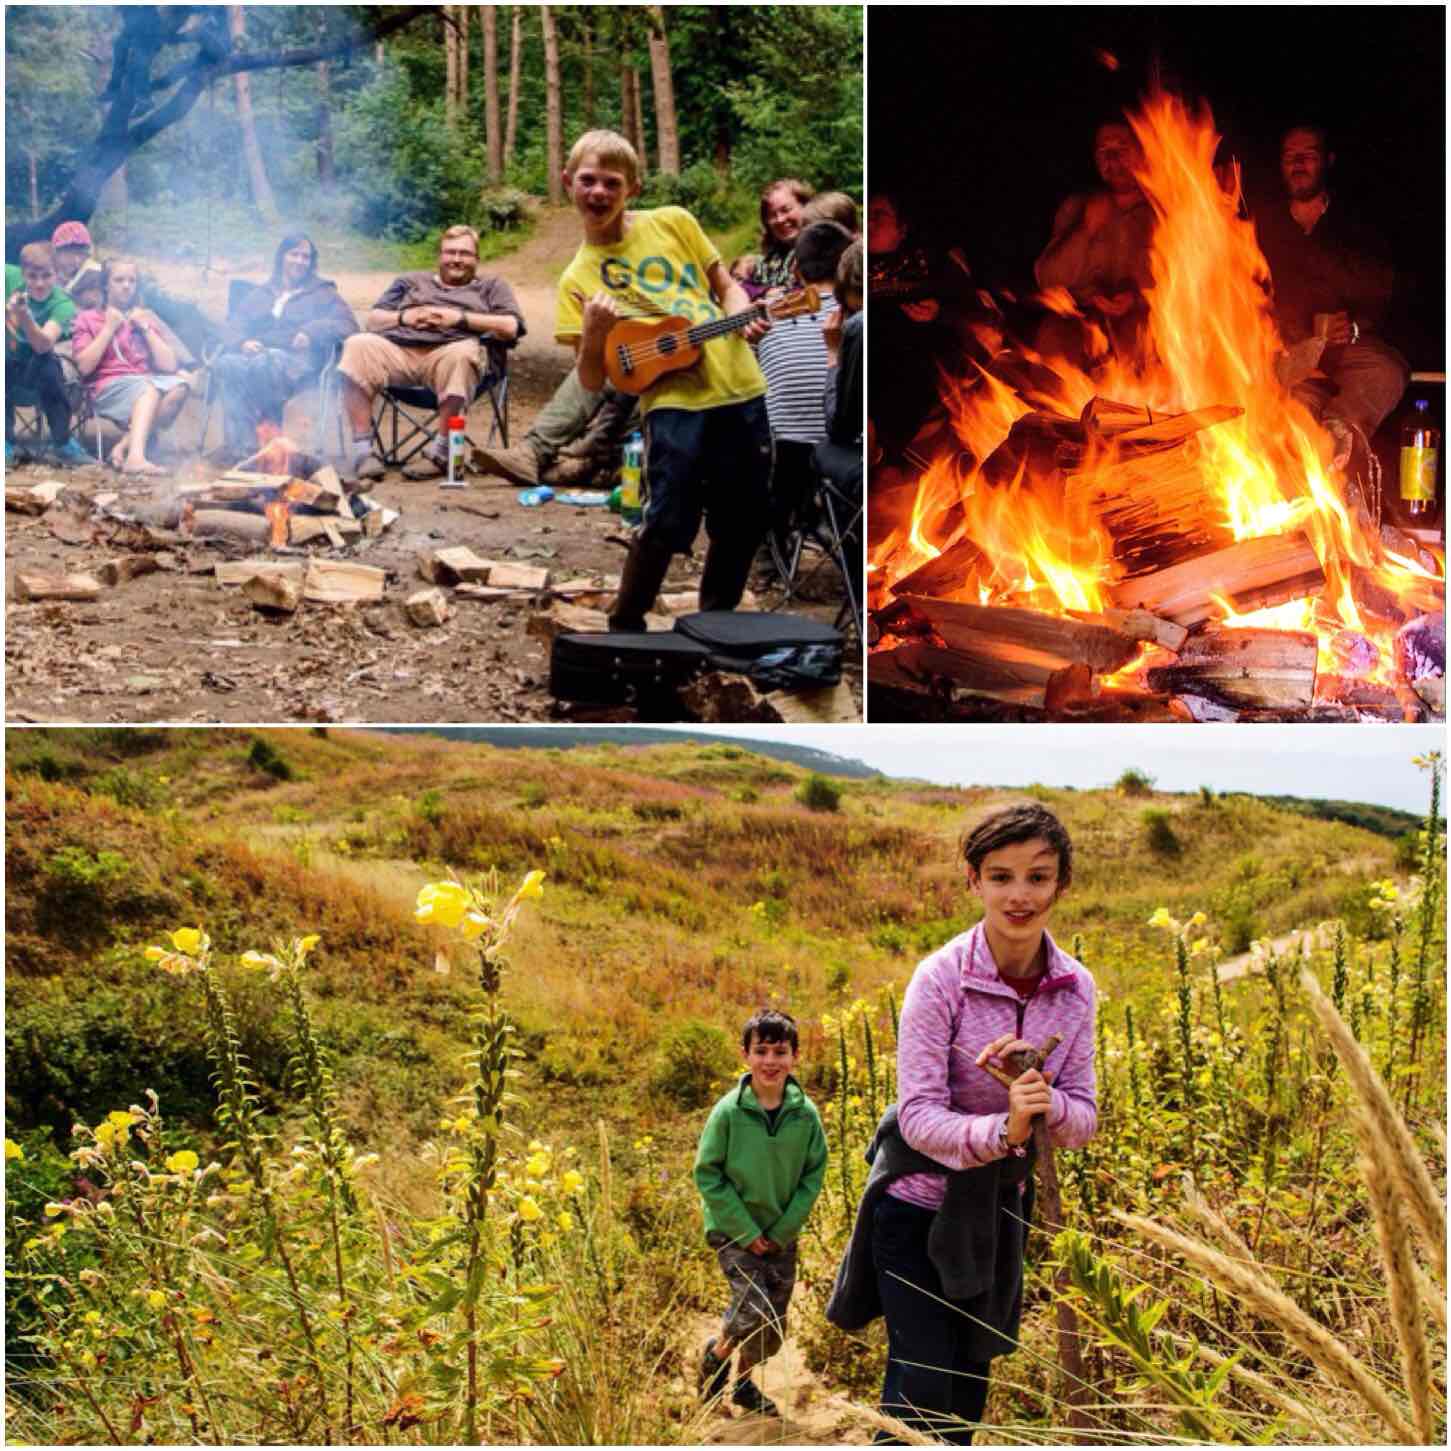
Food as usual plays a big part in the life of the Bushmoot. The communal meal was a great success again, Tony got himself a lovely birthday cake and the kids enjoyed a few evenings supping hot chocolate around the fire.

image
Top Scoff

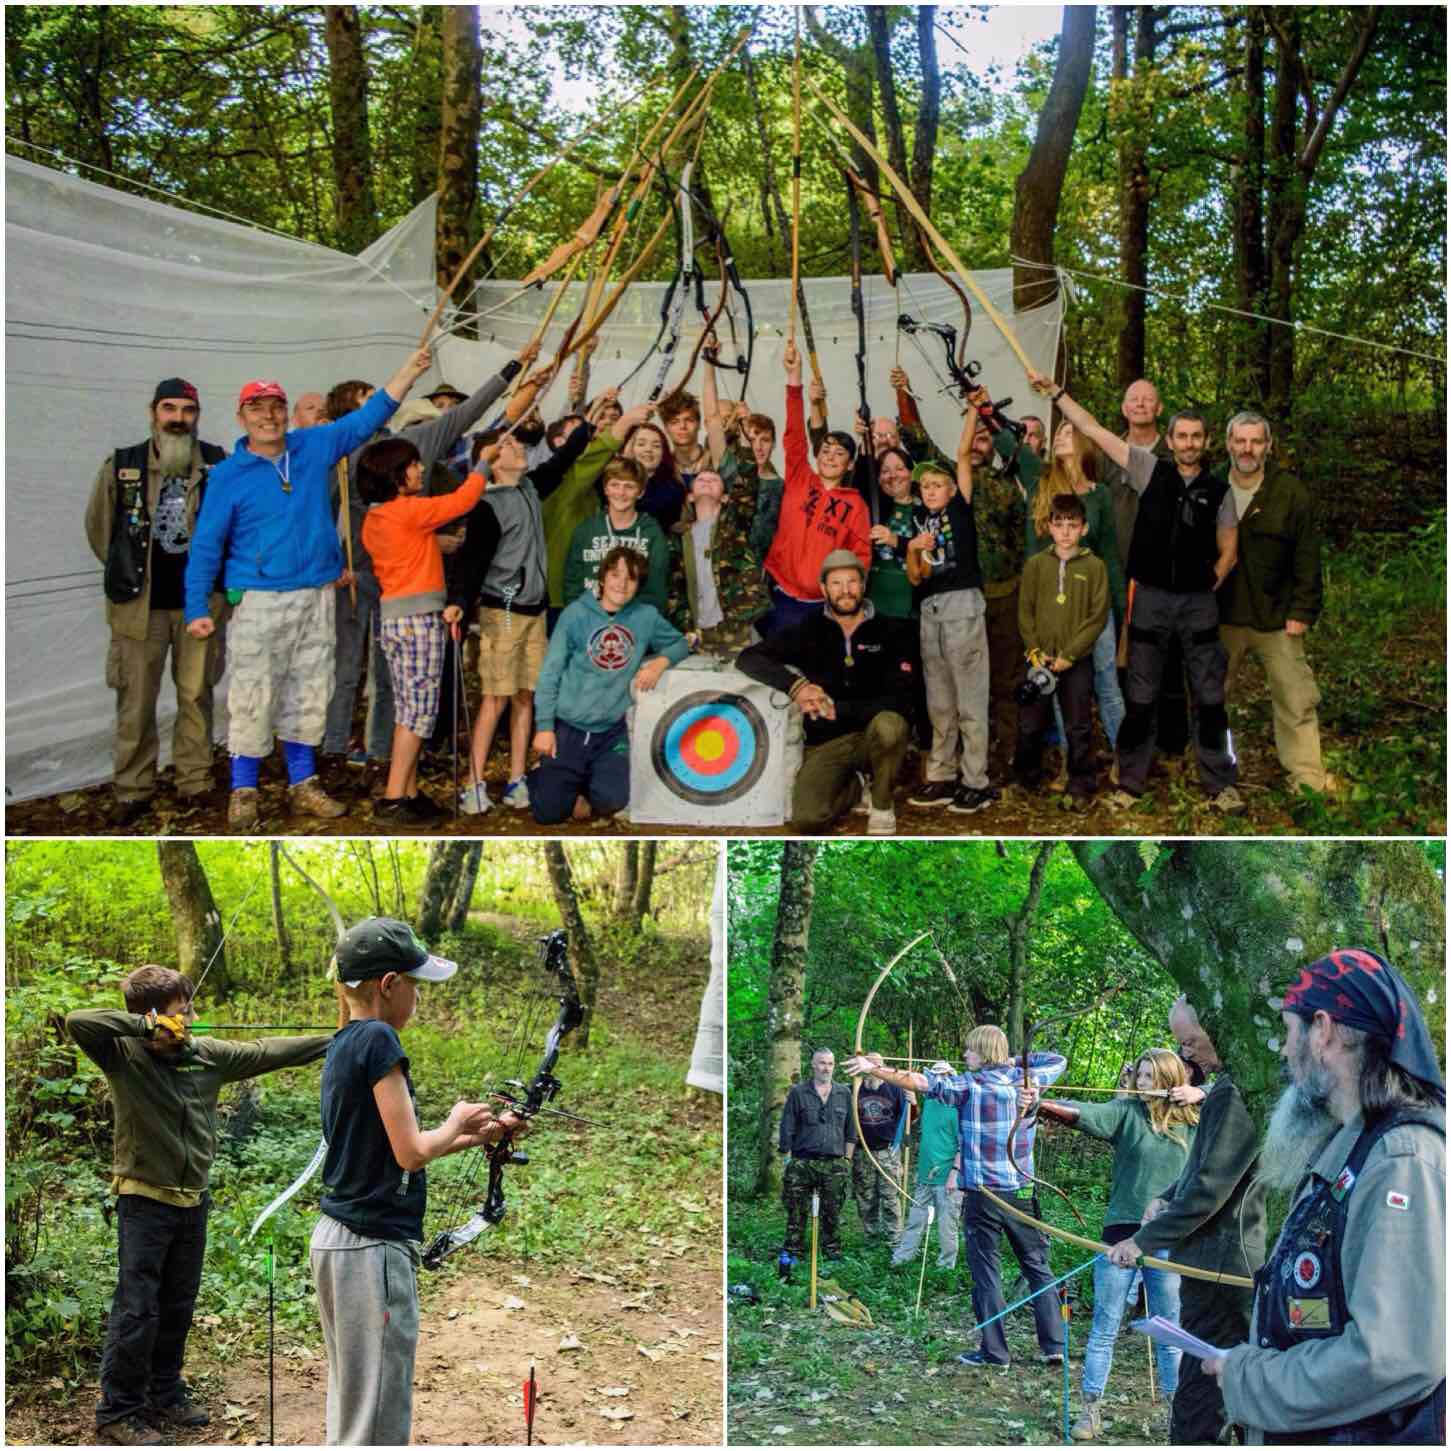
It must be getting on 6 or 7 years we have run the archery range with the competition later in the Moot.

We have sessions run most evenings and the competition is broken into two parts (kids and adults). I received many great presents to give away as prizes so thanks to all who donated. The winners are each to receive a handmade bow from Wayne Jones (Forest Knights).

On a down side my Holmegaard bow snapped this year at the Moot. It has been a trusty bow since I made it 8 years ago and it has been used by hundreds of people on my courses. I did though get an Elm stave from Chris Claycomb – so that is a project for the winter.

image
Down on the Range

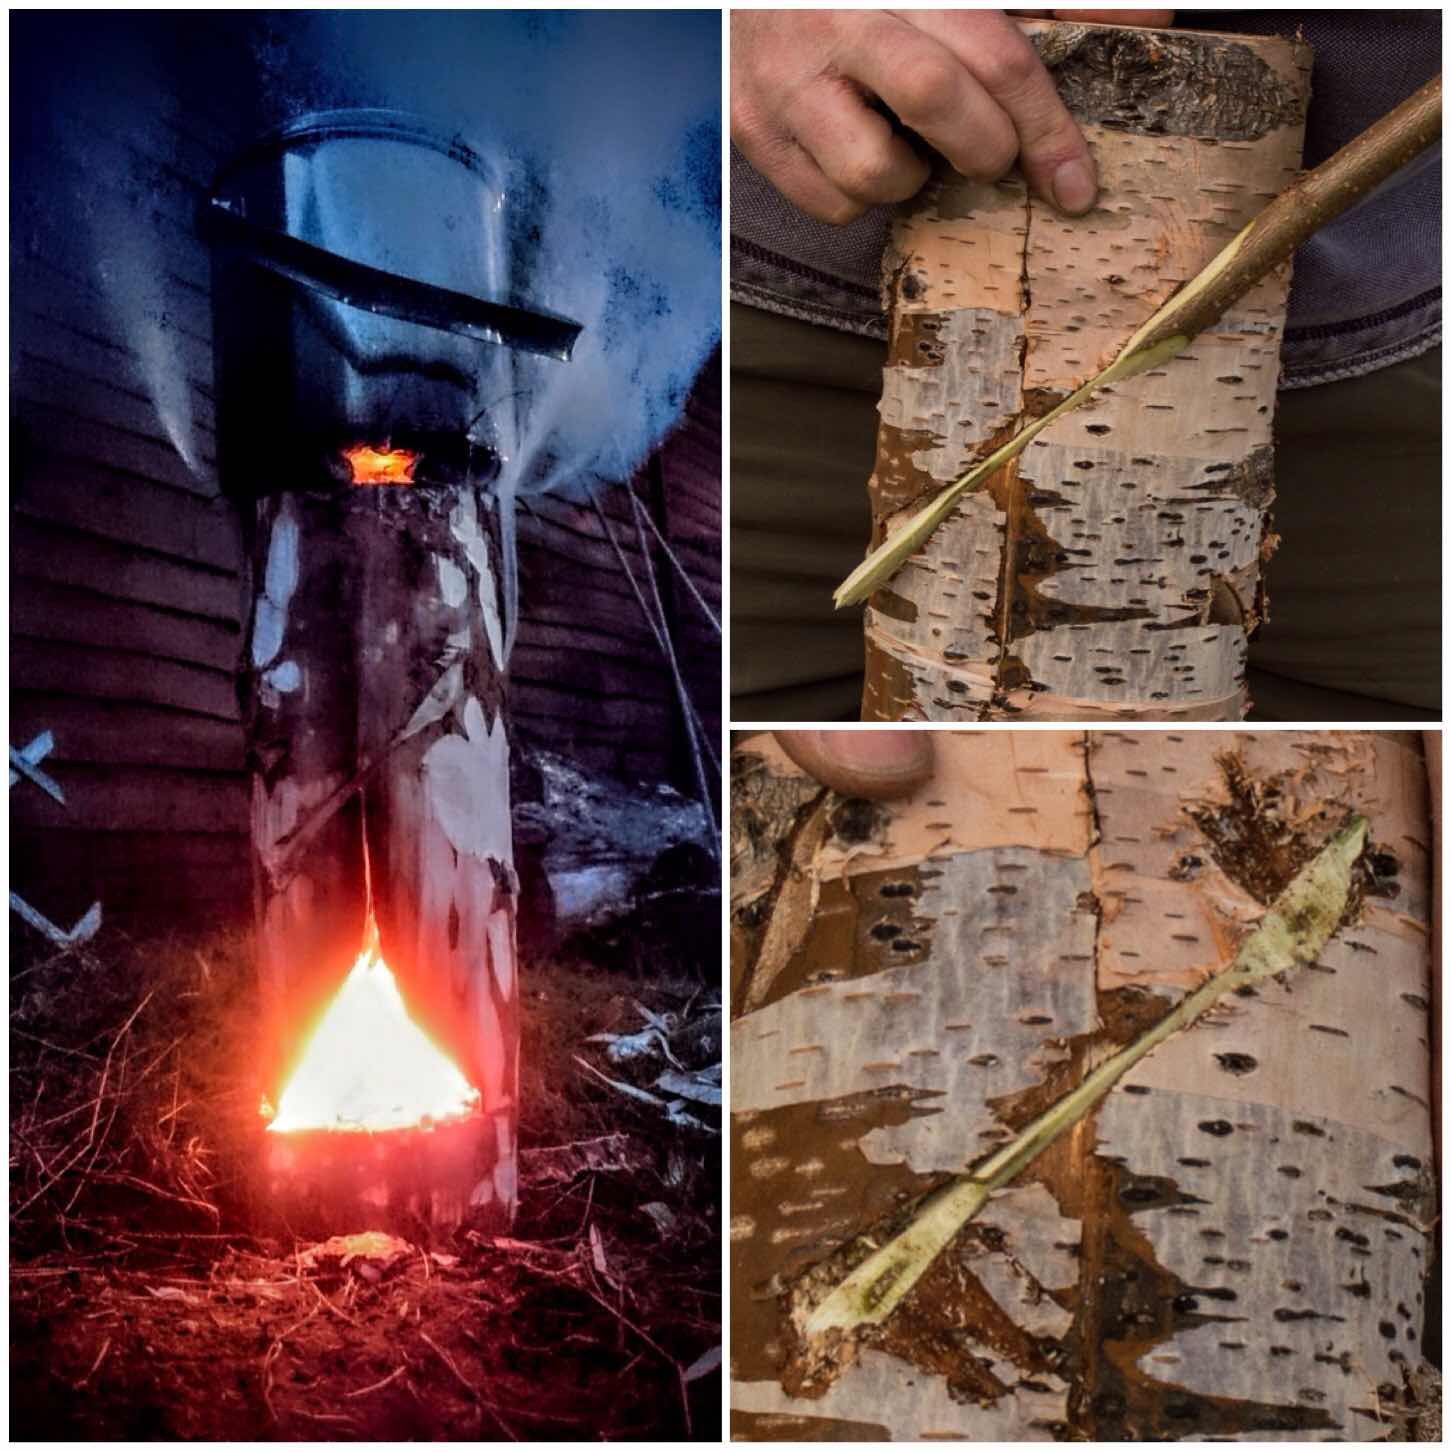
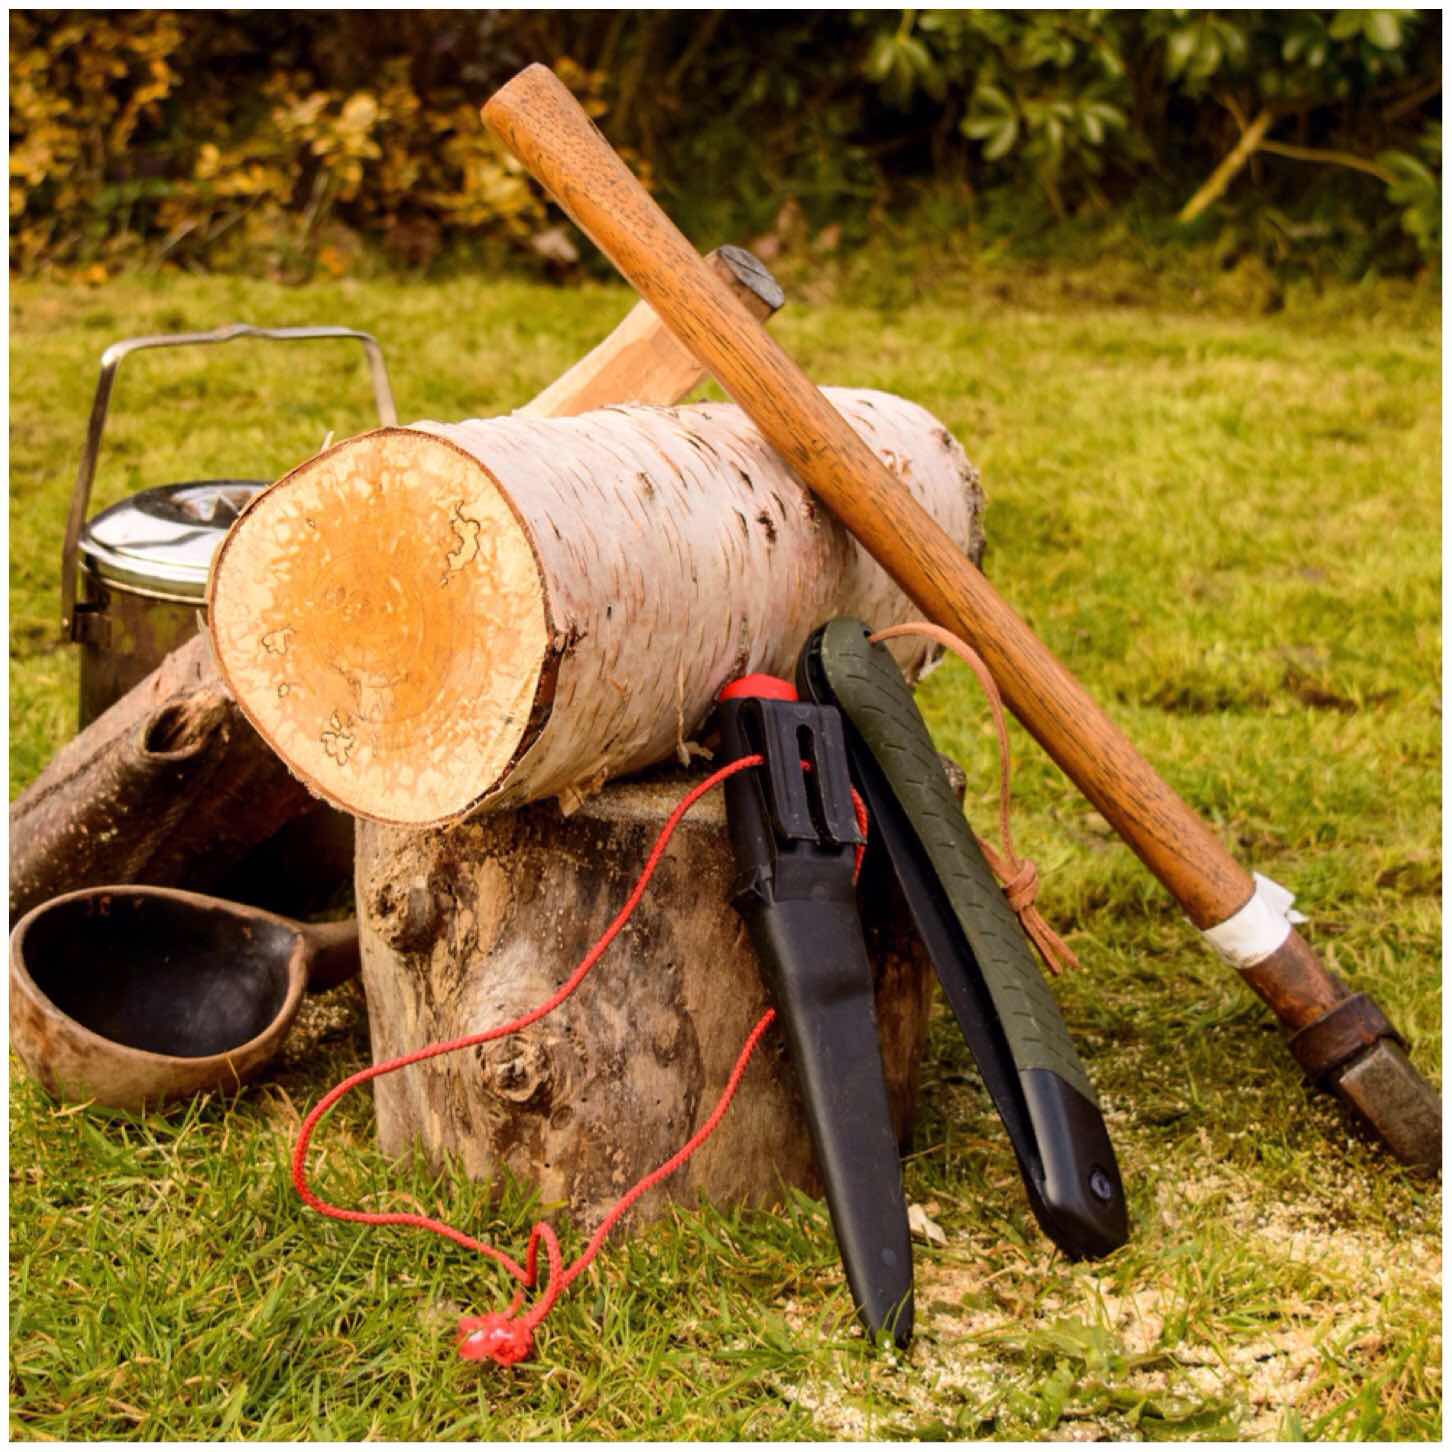
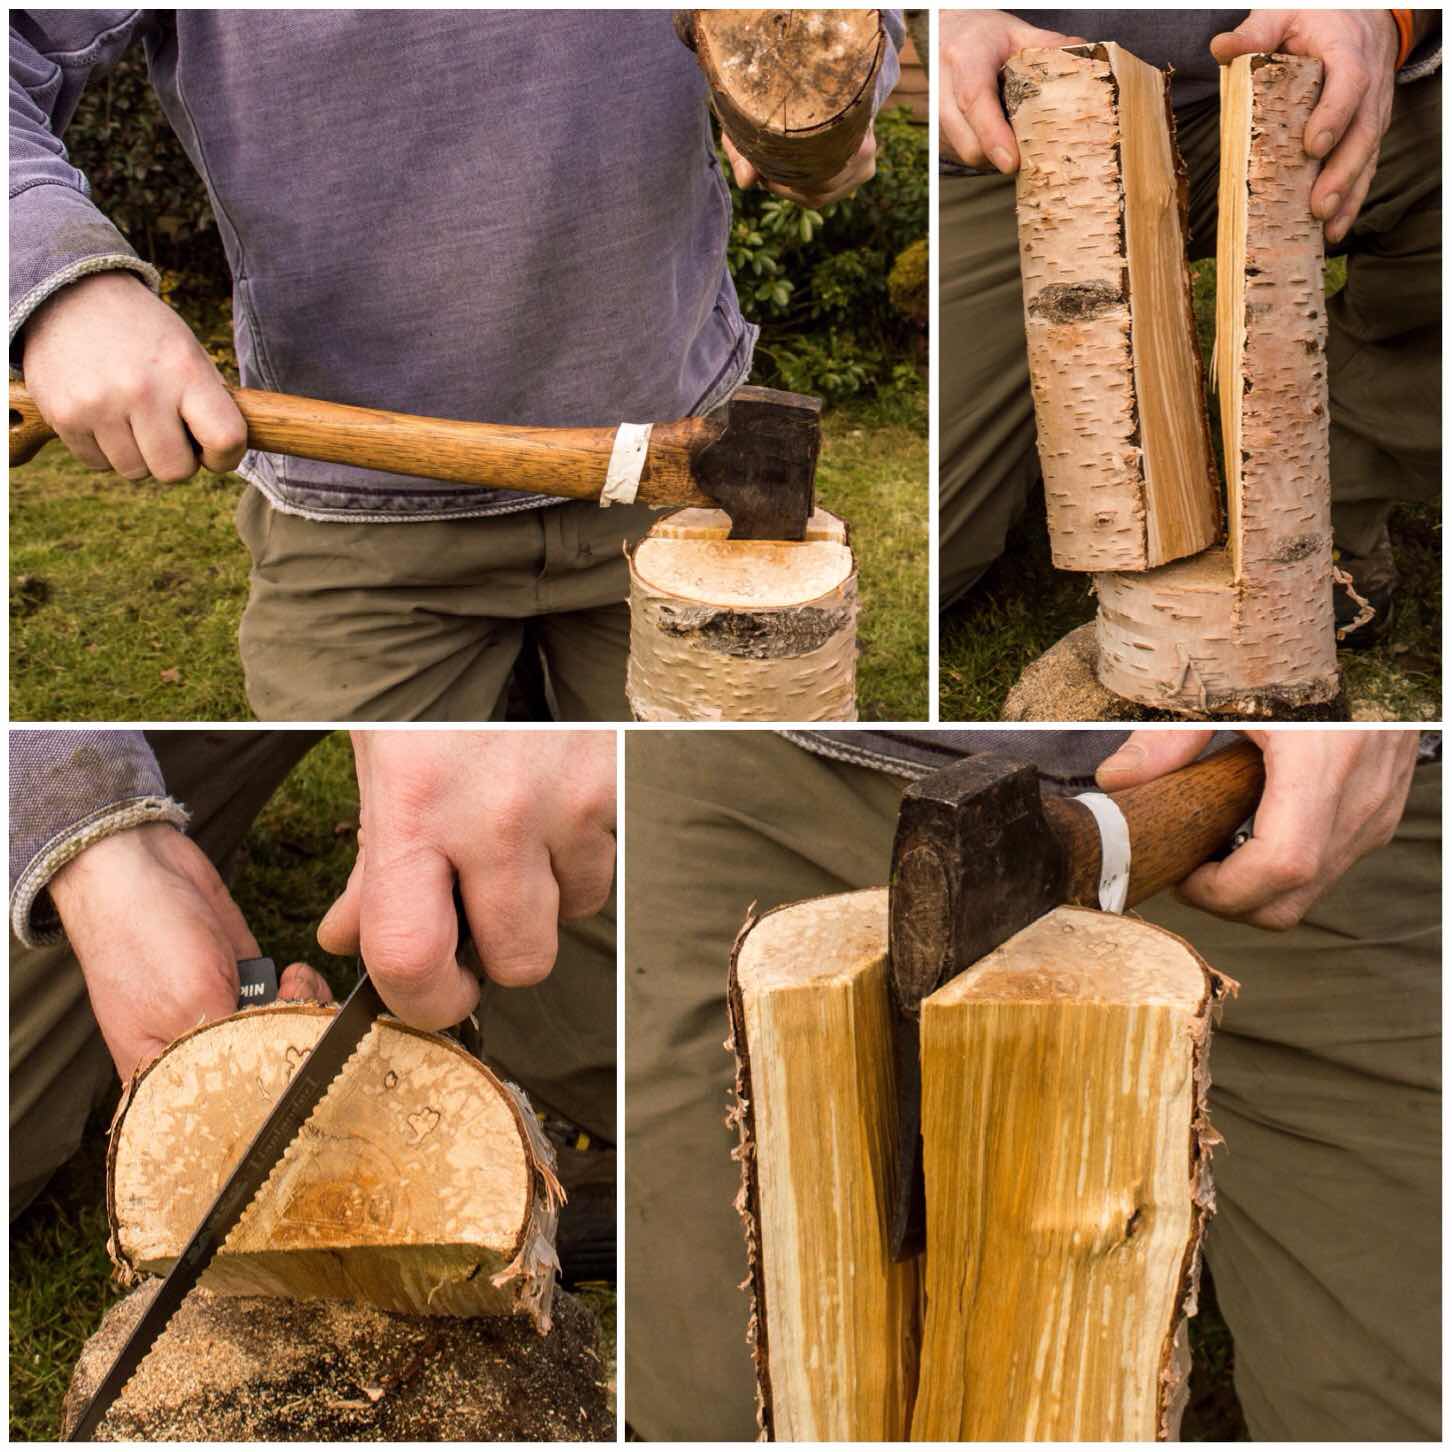
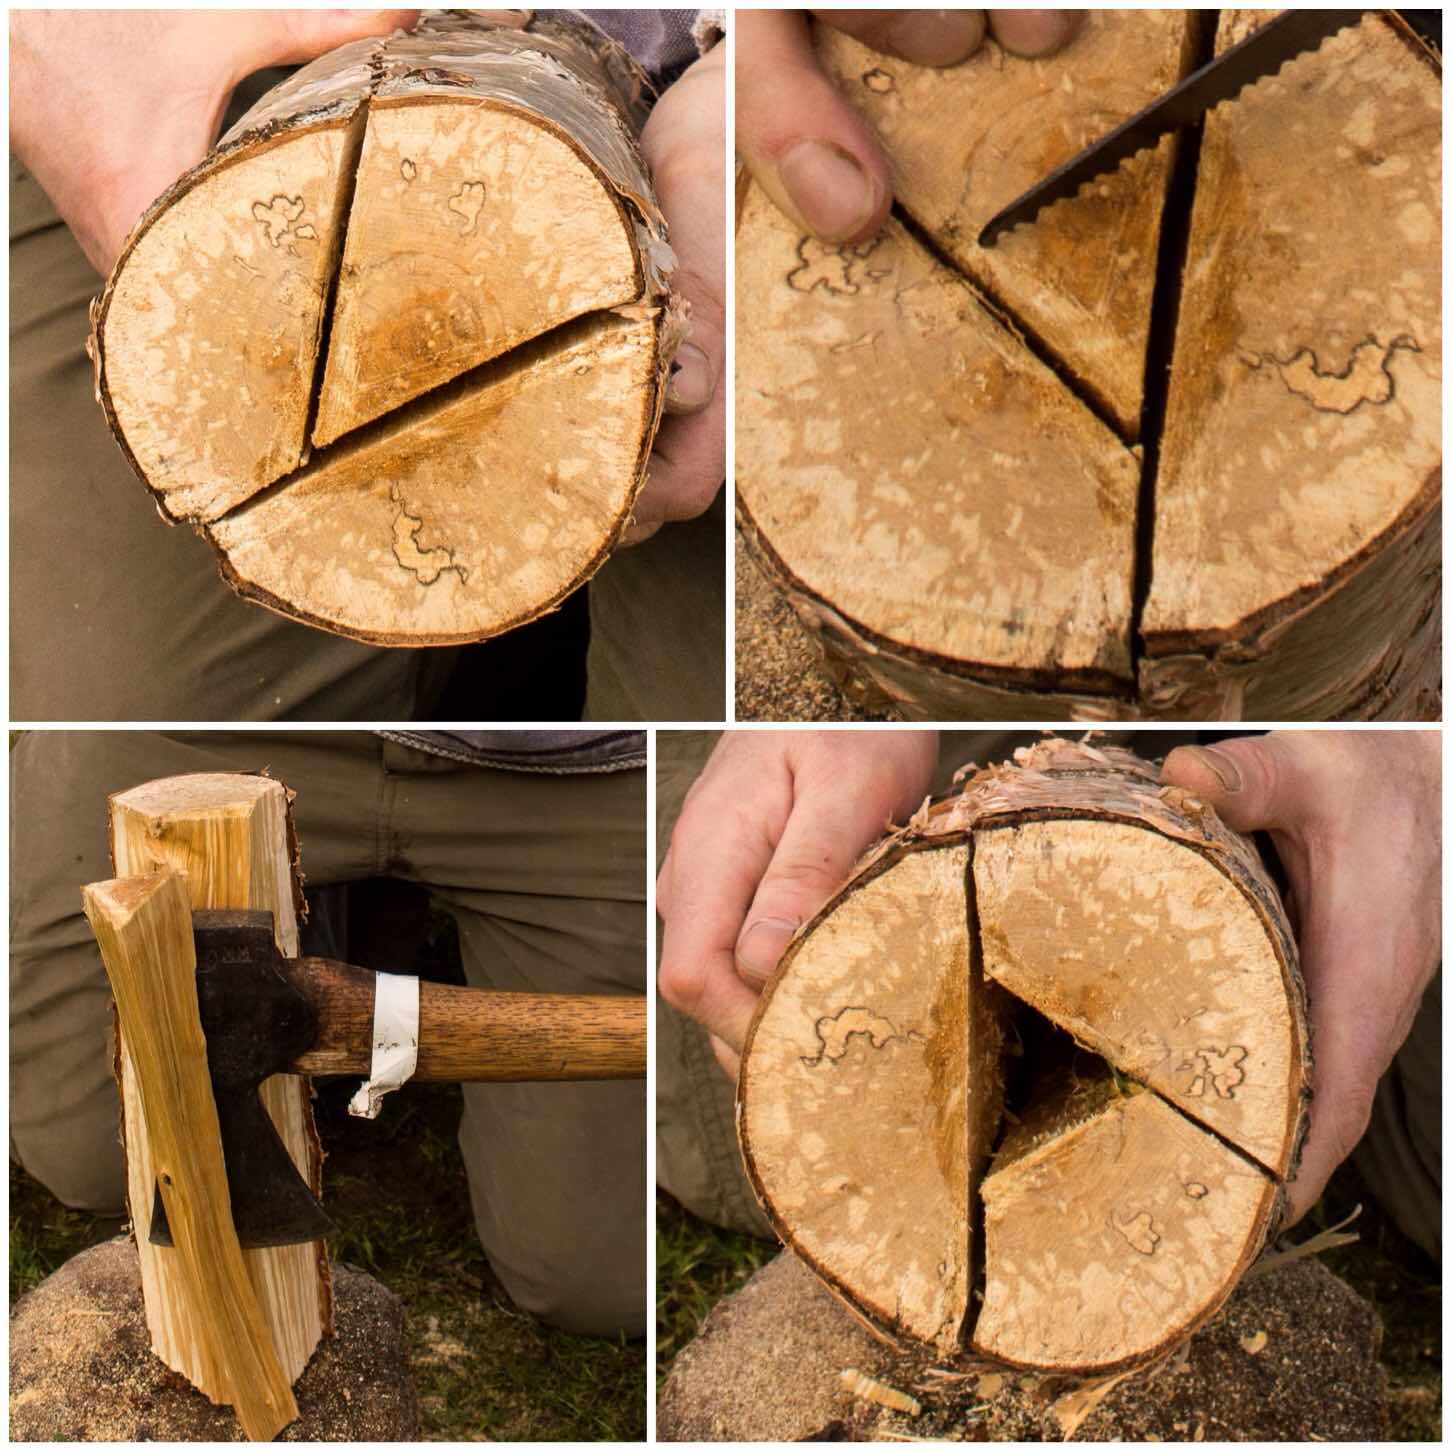
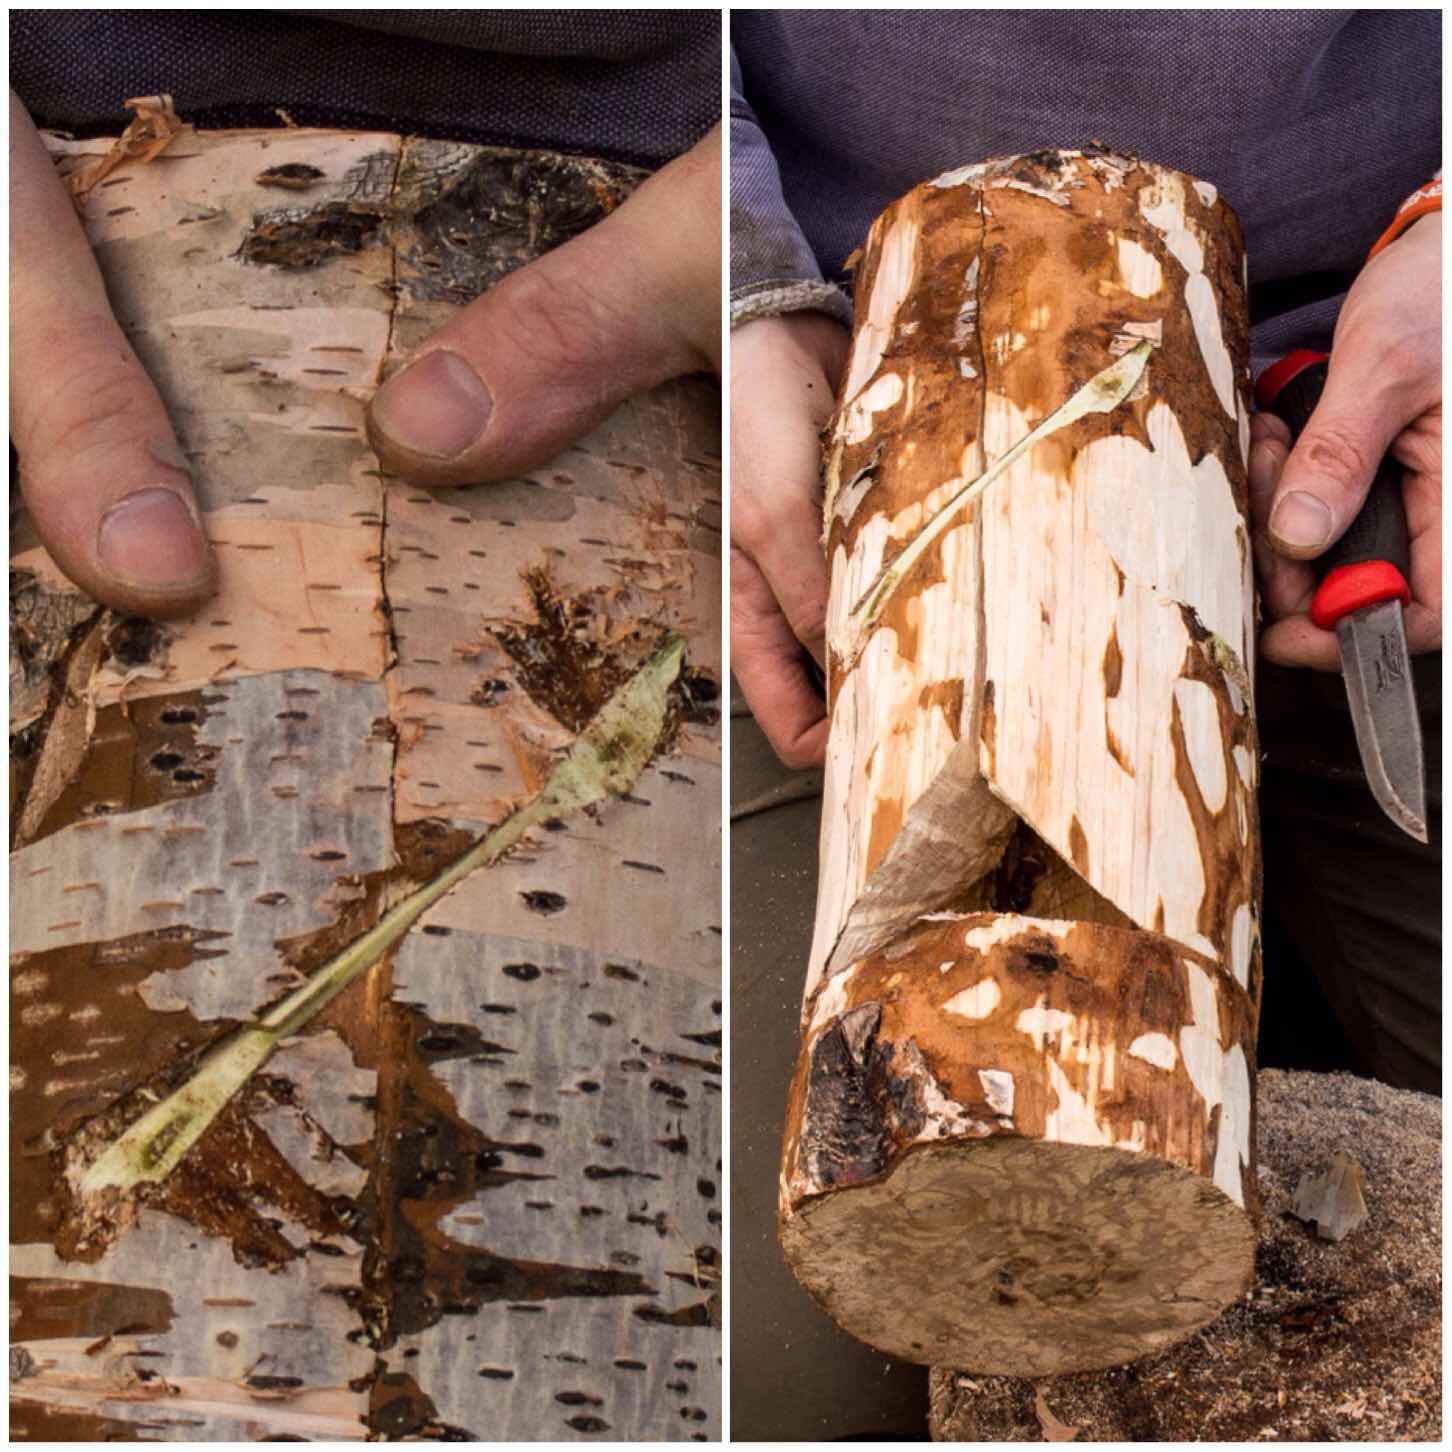
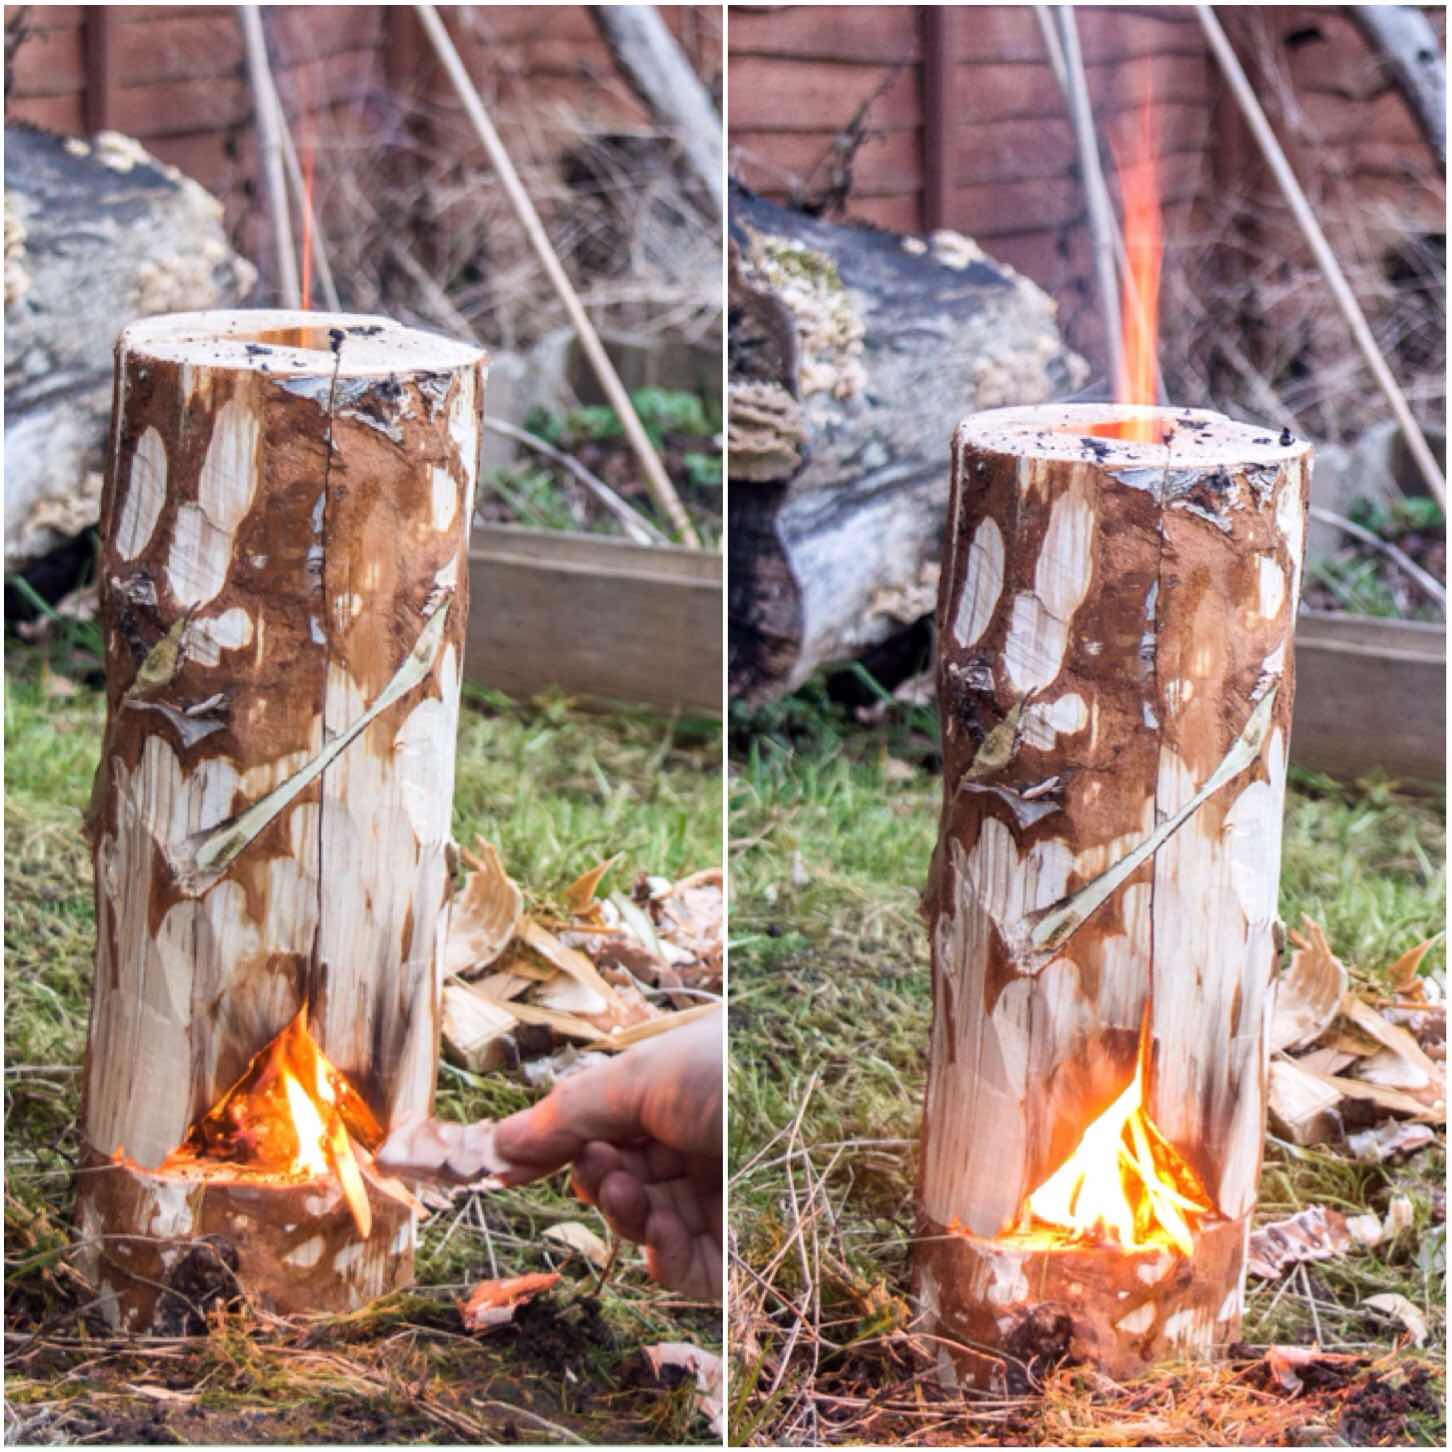
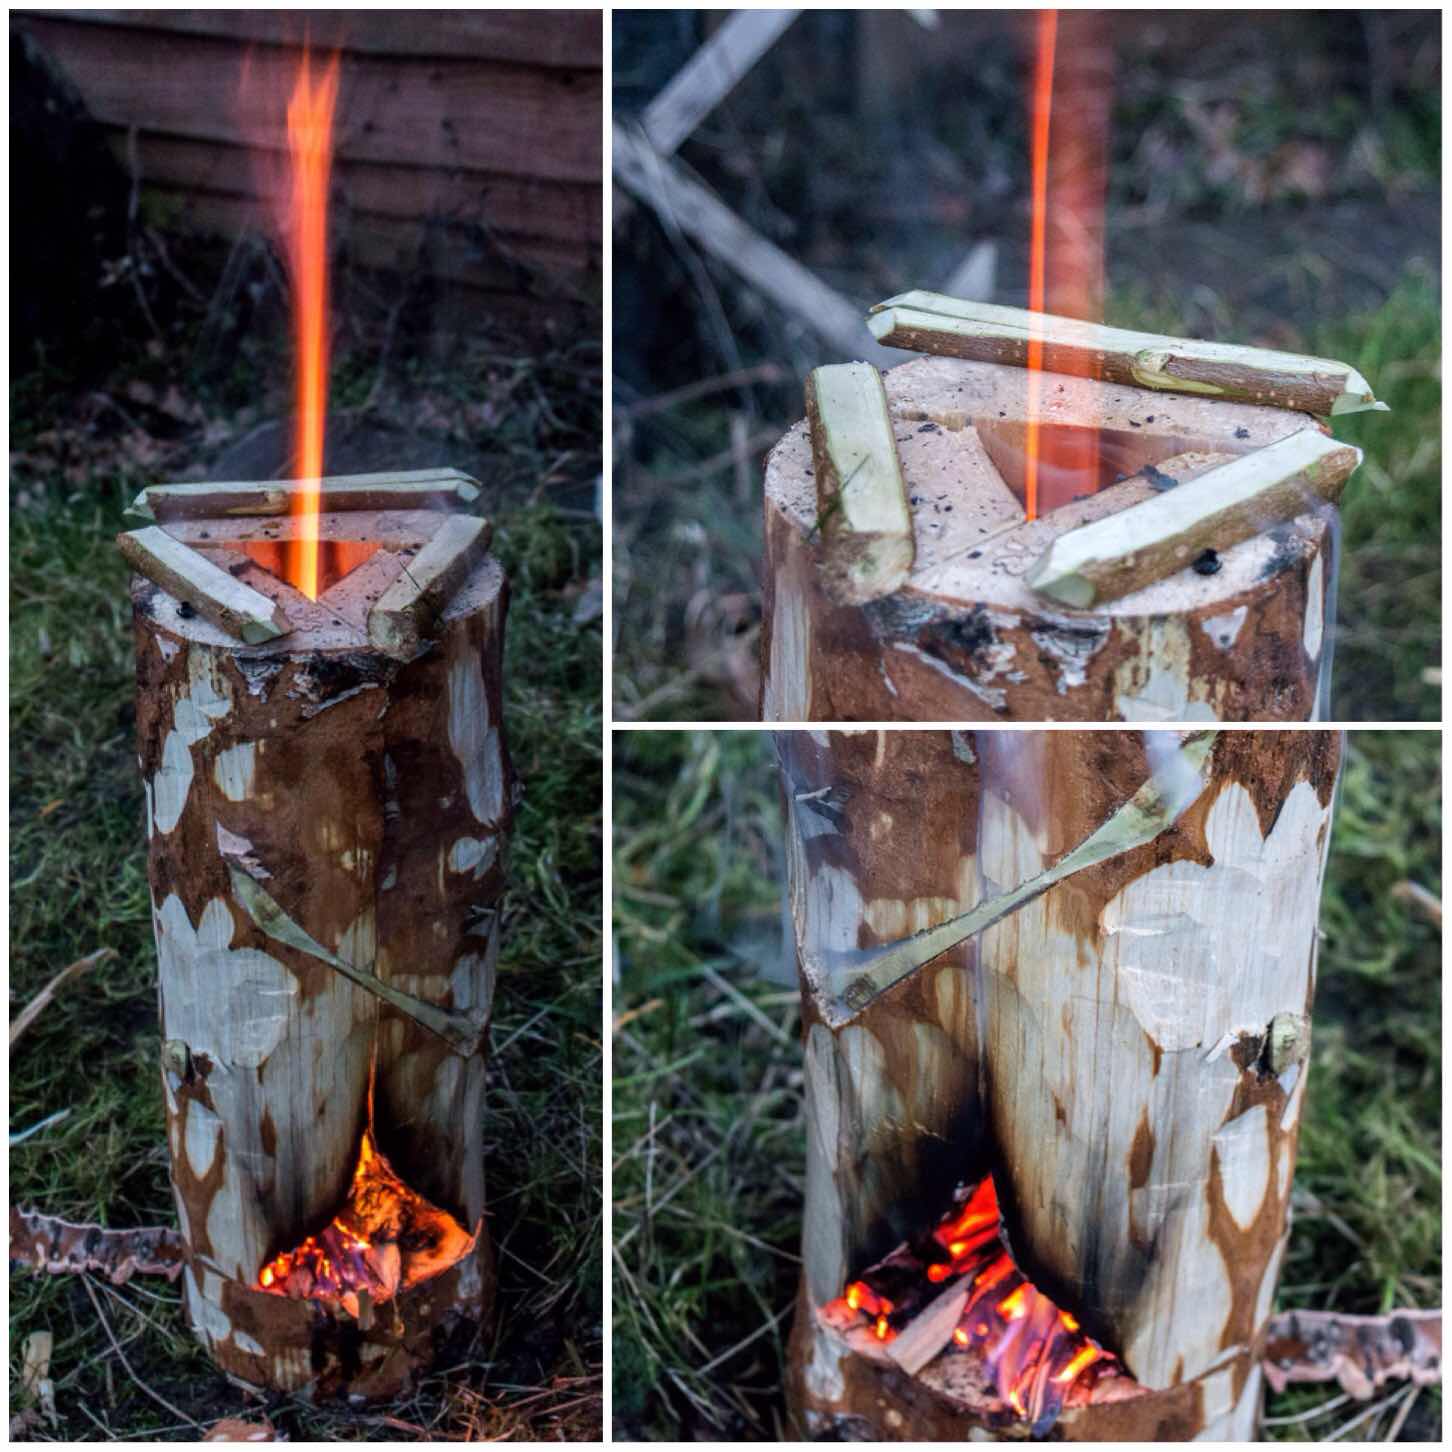
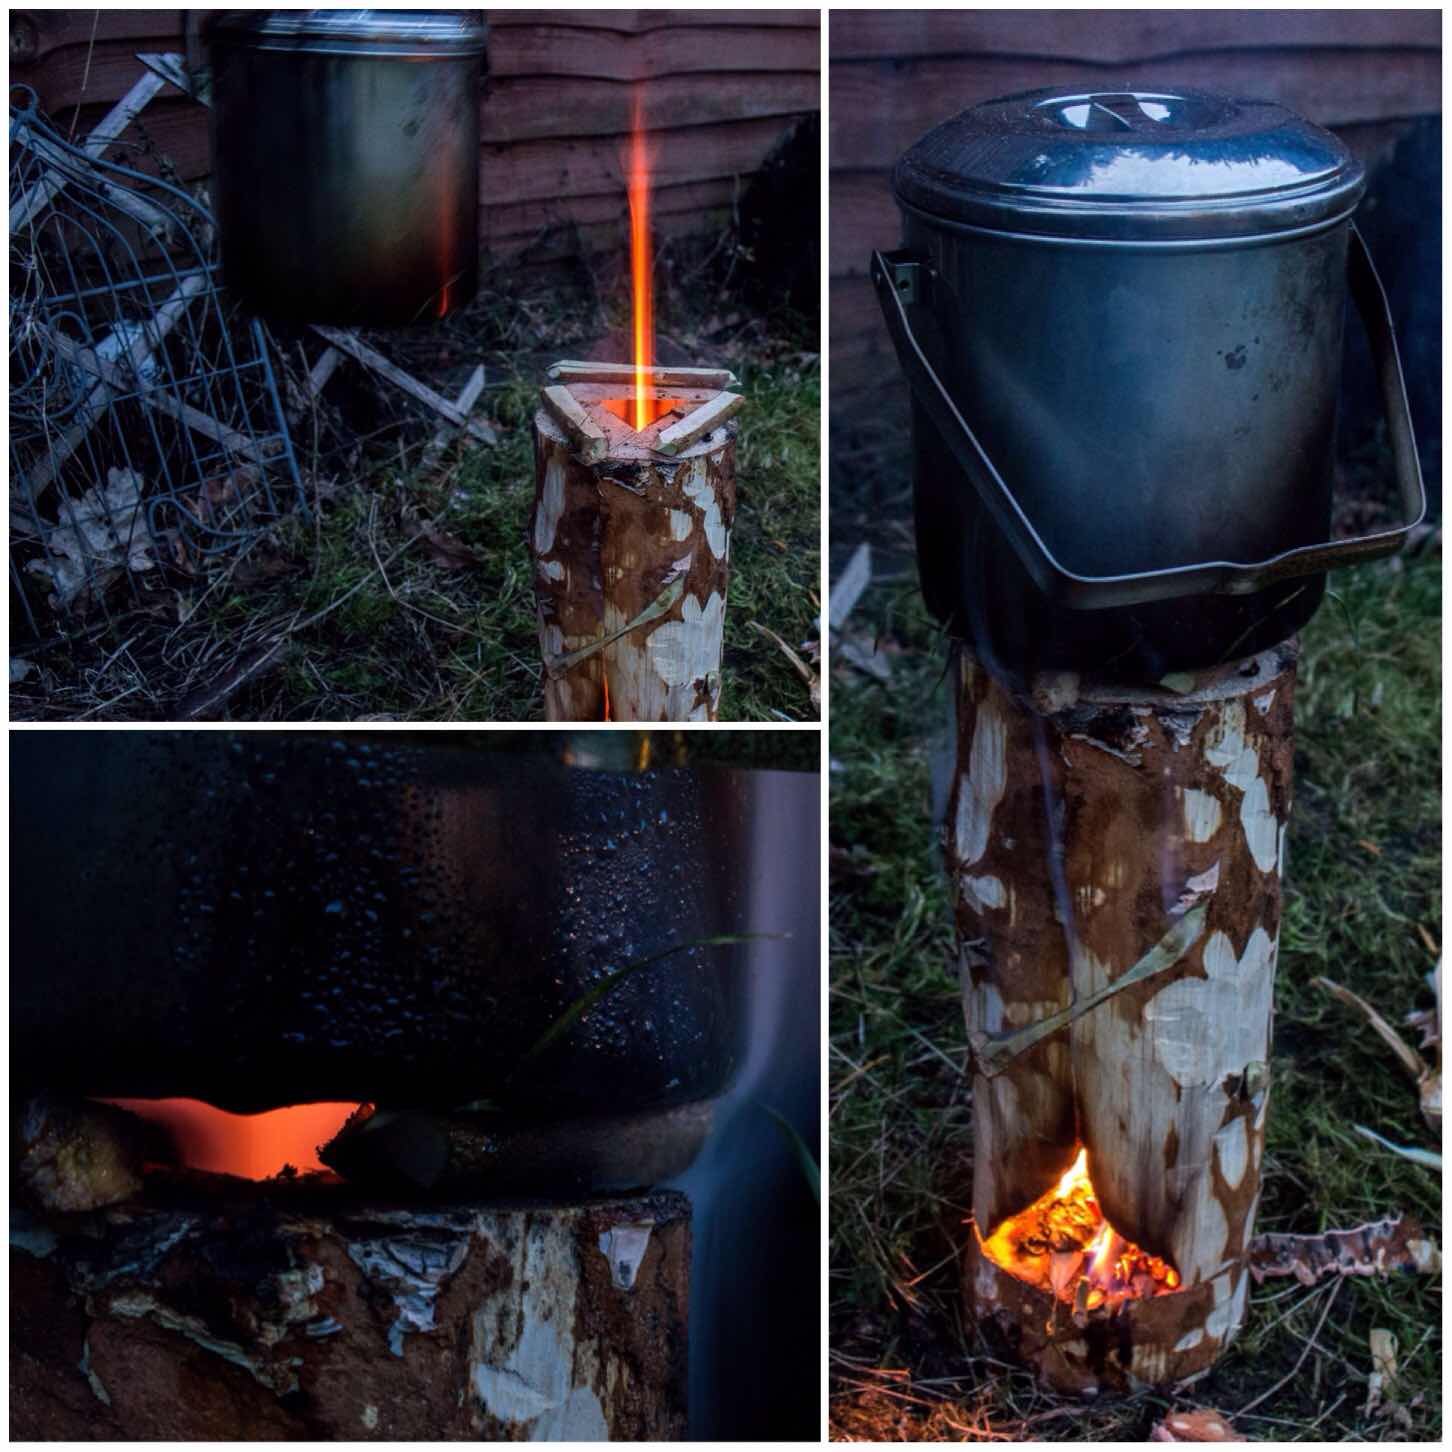
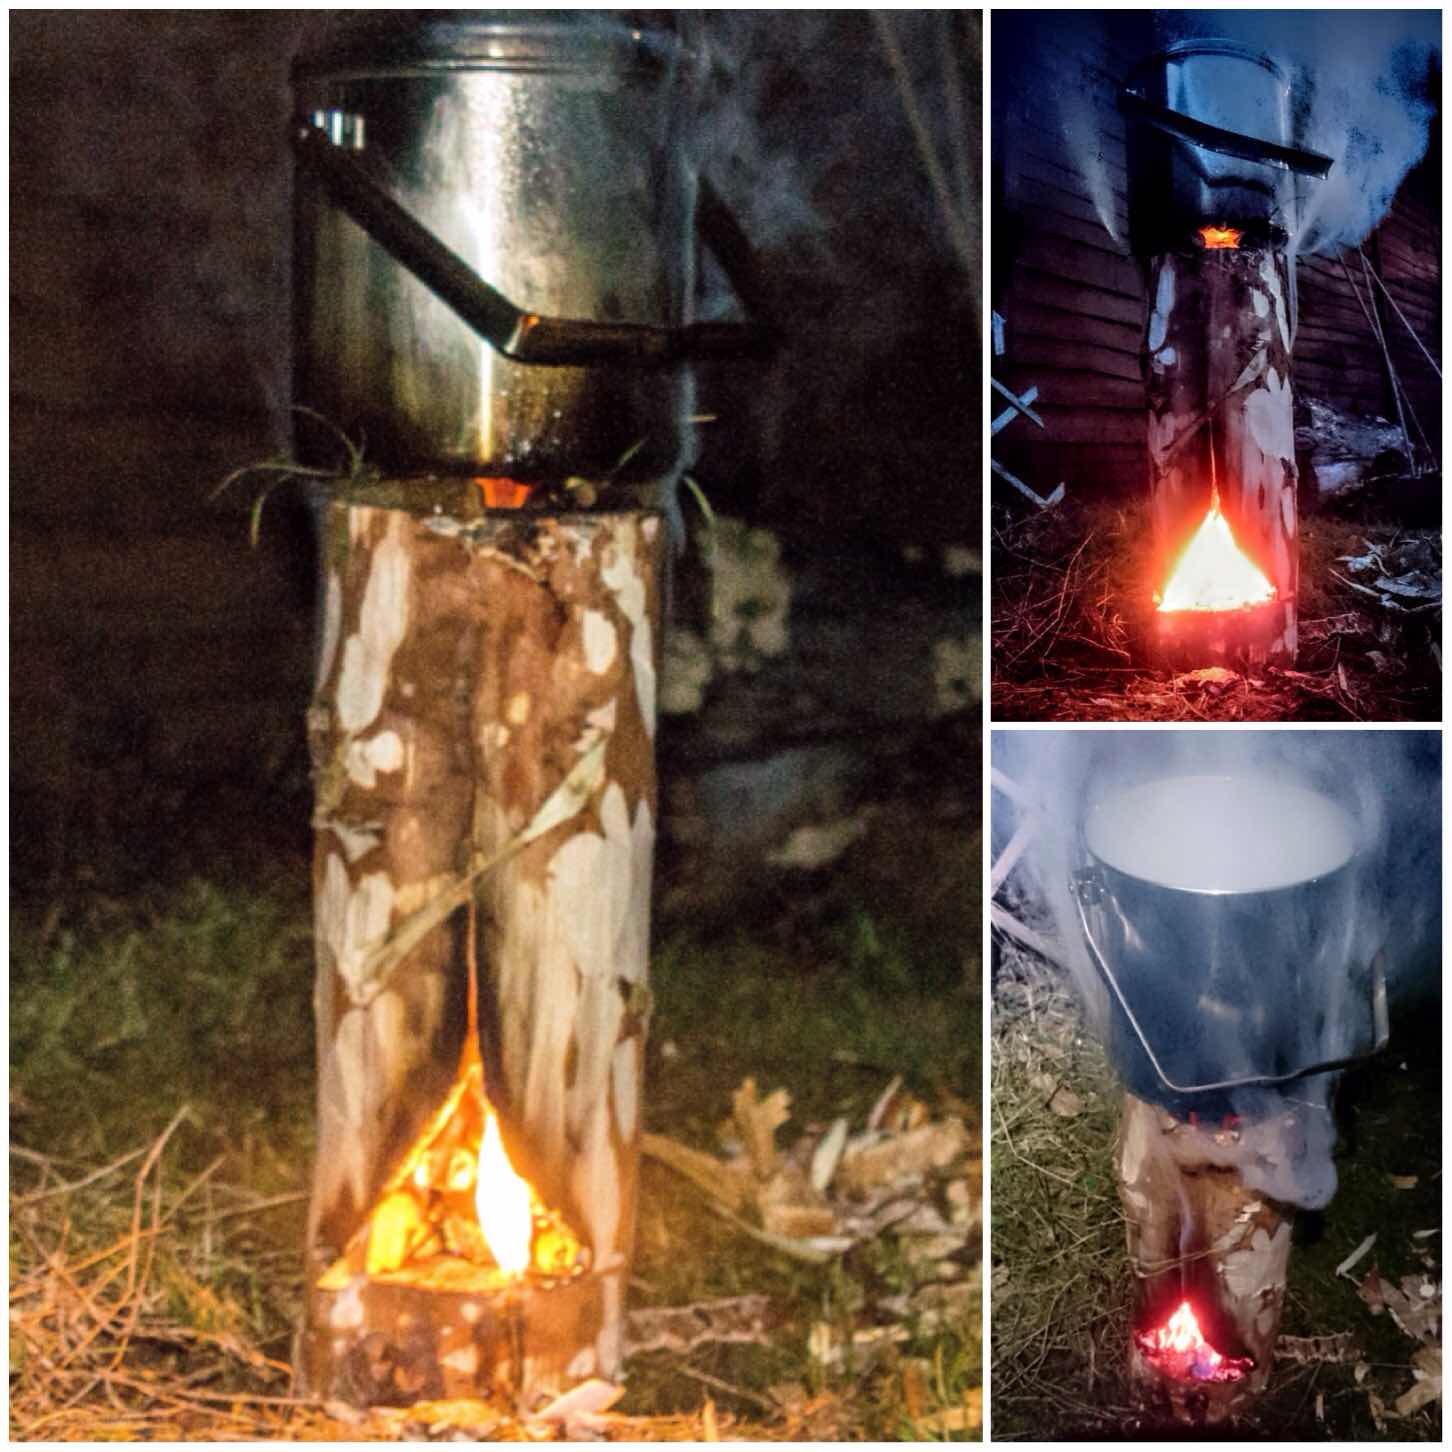
Another first for me was running the Damp Wood Log Rocket stove class. The rain we had earlier meant that all the logs were damp (the spray was hitting us in the face when we split them) so it was great to see after all their hard work all the students managed to get their log rockets fired up.

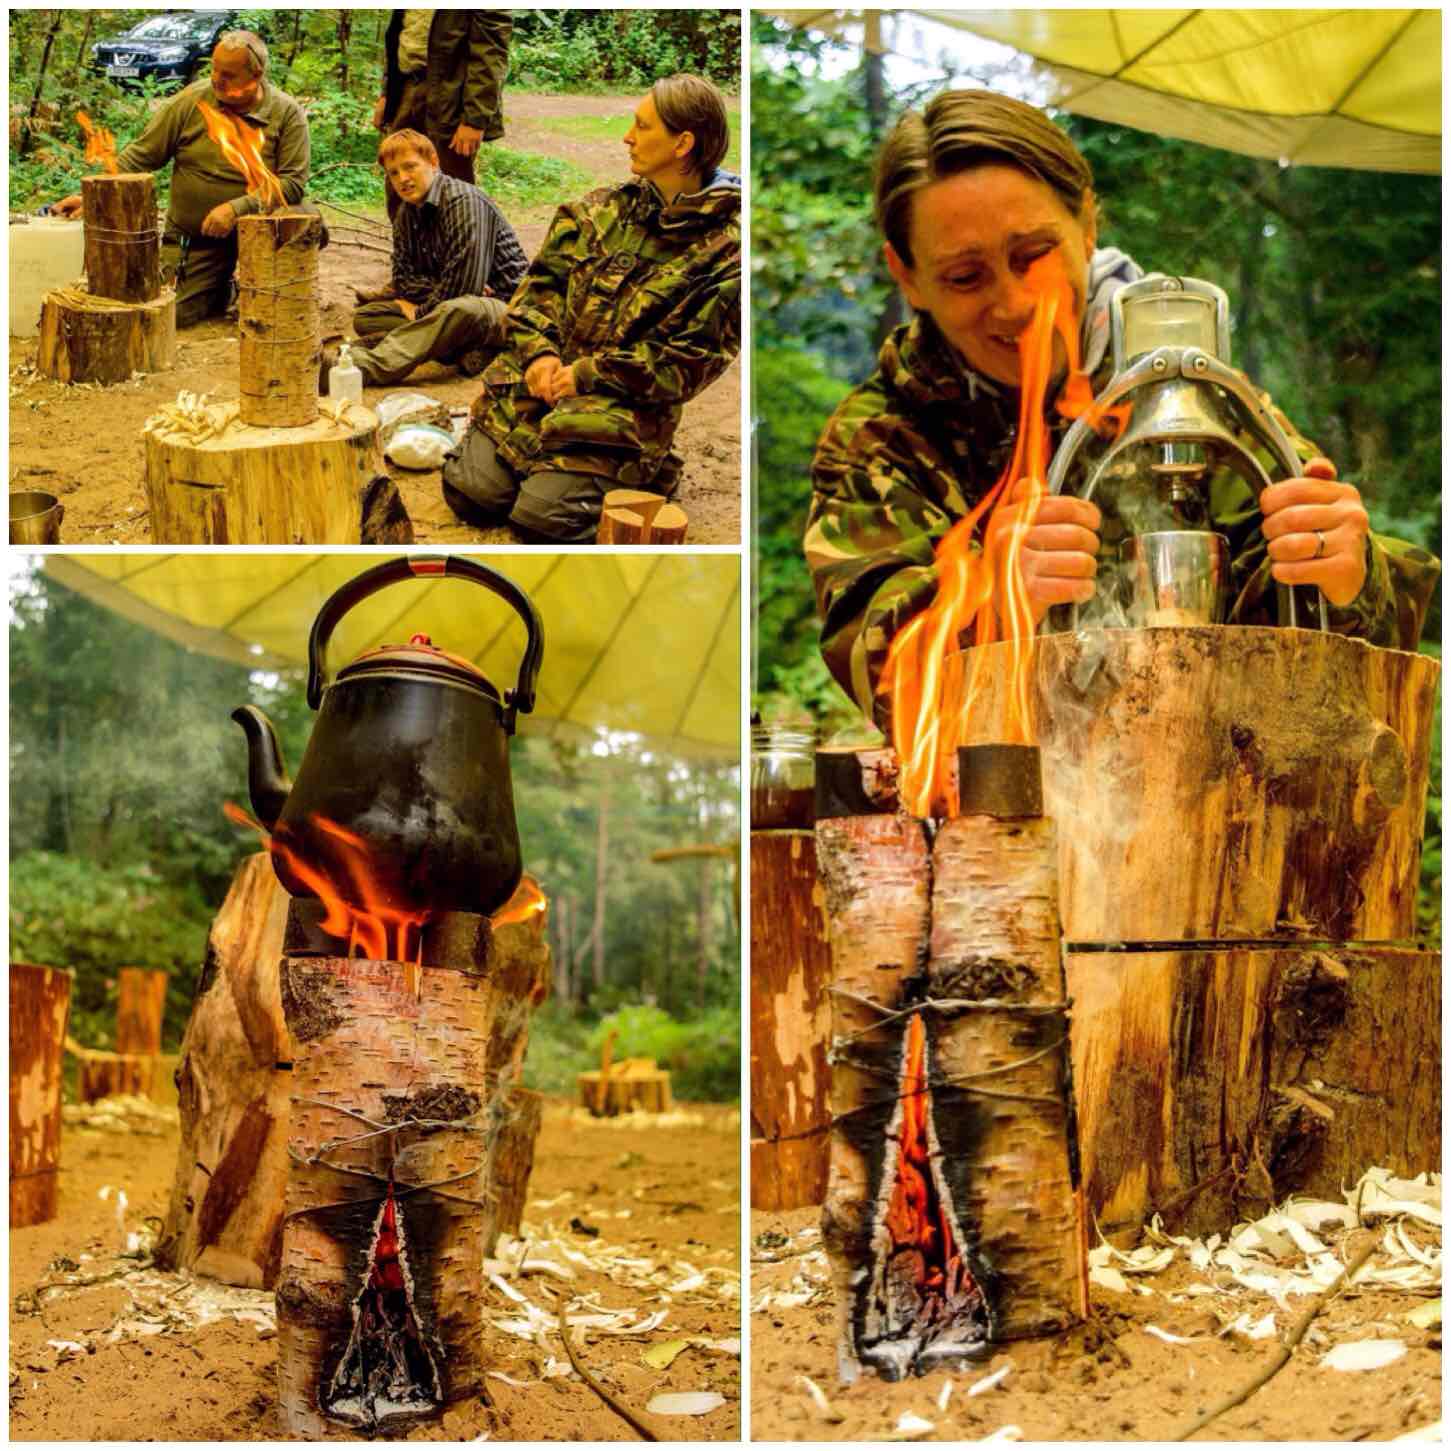
The coffee I can tell you was brilliant 🙂

image
Proper coffee from Damp Log Rockets

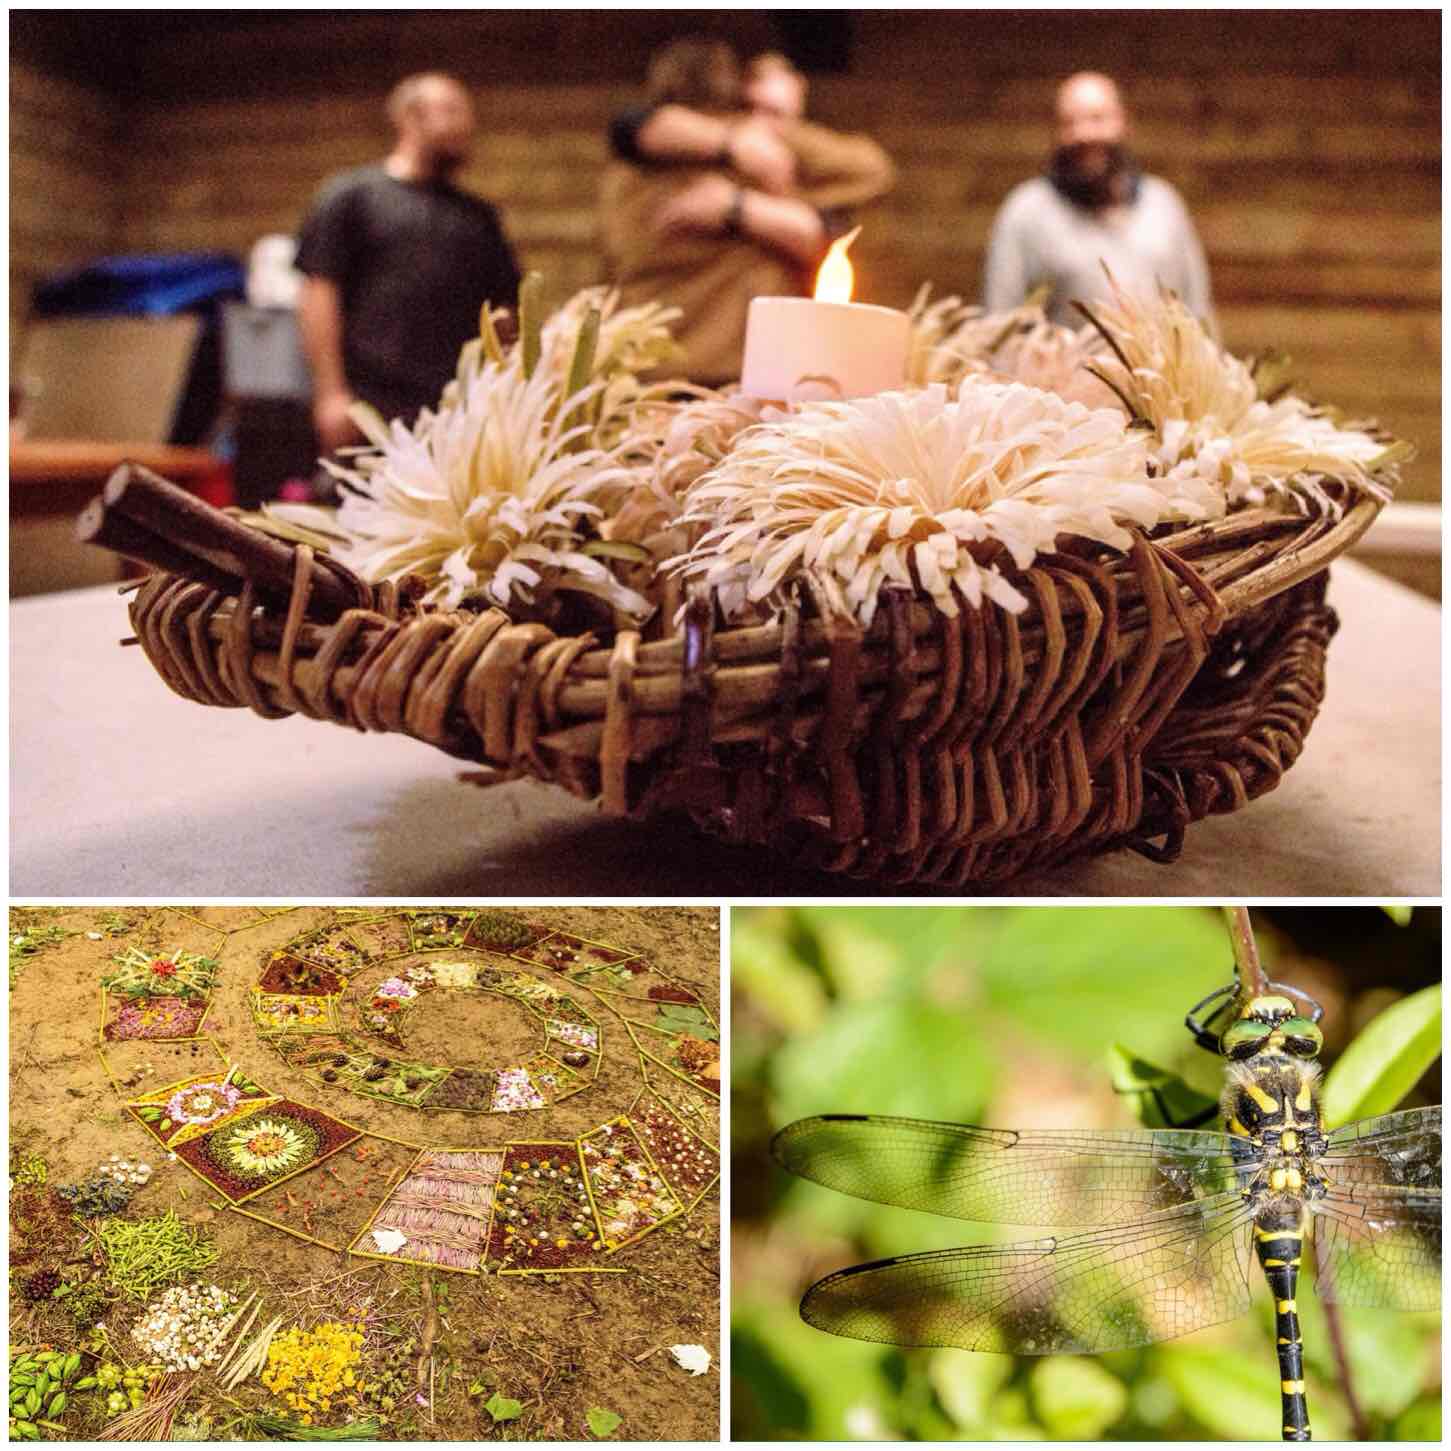
As you can see I did take a few pictures at the Bushmoot however there were a few special ones to me. Below are three that I really was glad they turned out so well.

The first one was a moment I captured when taking a picture of the battery candle sitting in basket of carved flowers. Mark was just saying goodbye to Tony with a manly hug when I pressed the shutter.

Next was sitting beside the beautiful artwork created by Keith Beaney. Every year Keith comes along and patiently creates these works of art for us all to enjoy.

And finally one day someone pointed out to me a dragonfly sunning itself next to the shower block. This little fella was not moving for anyone and really let me get up close and personal to photograph him.

image
Special Moments

There were too many workshops run to be able to attend them all (approx. 110 were run over the core days) however keeping my trusty Nikon with me I managed to capture a few moments from just some of them.

Wayne was busy teaching knife throwing, Theresa ran a very busy workshop on flint knapping and Stuart spent two days splitting the most twisted trunk in the world without using metal wedges. There were many, many more workshops run by different instructors, I saw some, photographed some but missed many – that is the nature of the Bushmoot for you.

image
Passing On By

After the core days were over we spent time dismantling lots of the classrooms, mooching by the fire and taking long relaxing walks down to the beach,

Winding Up
Winding Up

During the Moot I finished off doing my 22 Day 22 Push up challenge and videoed it each day. In the video below you will see in the second half of it lots of Bushmoot locations, finishing up with pushups in the swash zone in the sea at Merthyr Mawr,

So if you are into activity holidays that do not cost the earth then head on down to the Bushmoot next year.

Cheers

George

How To…. Build a Dovetail Log Rocket Stove

In my continuing research into Log Rocket Stoves I came across a Wikipedia page called the Schwedenfeuer and in it details of a type of log rocket stove I had not come across before, with a built-in fire tray and a chimney formed by simply cutting away the inner corner of one section.

Clever though it was, though, this stove still relied on string or wire to tie the sections together. As these stoves have been around for a long time I figured there must be other ways of holding them all together. I thought perhaps that green wood dovetail wedges might do the job, so I set out to test this.

Photo 13-03-2016, 07 35 28
The Dovetail Log Rocket Stove

Tools and Material

As usual I limited myself to the tools I would usually carry in my backpack, including a knife, saw and axe. A pen or pencil is handy for this project as well.

I’ve had a piece of birch stored in my garage for over a year however it had absorbed moisture over the winter and was fairly damp in its core.

Photo 13-03-2016, 07 35 28 (1)
Tools

Splitting Out

This style of log rocket requires you to put a stop cut into the bottom of the log to about two thirds of its width. You can see in the top left picture below the cut is about 10 to 15 cms from what will be the bottom of the stove.

The top right picture below shoes you how far I put my stop cut into the log. The bottom two pictures show me marking out with my saw the approximate area I would be battoning out.

Photo 13-03-2016, 07 35 30
Bottom cut and marking out

I used my axe and a large piece of wood to batton out the the wood. You can see the shape of the stove at this stage with one segment in an inverted ‘L’ shape (Segment 1) and a smaller piece (Segment 2).

The bottom two photos show me marking out the smaller piece for further splitting. This piece is not split exactly in two as this configuration allows you to form the chimney very quickly.

Photo 13-03-2016, 07 35 30 (1)
Splitting

The Chimney

Below you can see the shape of all the pieces when they are put back together . I then battoned off the tip of the larger piece from Segment 2  so that a chimney would be formed. This piece of battoned-out wood I further split into fine pieces to act as kindling for the stove.

Photo 13-03-2016, 07 35 31
The One Cut Chimney

Once I had the chimney battoned out I trimmed off some excess wood from Segment 1 and then used a pencil to mark out the chimney area.

I did this so I could put some Raappanan tuli cuts into the chimney area. It is important to keep the sections of the log rocket that join together as smooth as possible for a good fit so marking out the chimney area ensures I do not cut into the wrong area.

Photo 13-03-2016, 07 35 42
Trimming & Marking out the chimney

The Raappanan tuli cuts are fairly simple to make with my axe. I just ensured I cut only into the wood in the chimney area and that the cuts were made upwards, towards the top of the chimney.

These cuts are particularly helpful when using damp wood as it offers far more surface area to the initial flame, allowing it to catch more quickly, and also it helps to dry the damp wood out.

Photo 13-03-2016, 07 35 33
Raappanan tuli cuts

The Firebox

The next stage I worked on was the firebox opening. This can be done in a number of different way however I elected to go for a triangular opening.

I formed the opening by cutting a small triangle at the base of both pieces from Segment 2. I also tapered the inside of the cuts to open the firebox up a bit. I made this firebox slightly larger than normal as the wood was very damp. My thought was that the extra air intake would help to keep the fire going at the start before the insides of the stove became fully lit.

Photo 13-03-2016, 07 35 33 (1)
The firebox opening

The Dovetail Joints

These joints were a total experiment. I put all the pieces together again and, holding them tightly, sawed a line to the depth of a centimetre across two of the joints. (I recommend you use some string or maybe a belt to hold everything together as you make the cuts – I didn’t and I wished I had.)

I then did the same cut but flared my saw out slightly (about 45 degrees) to the same depth. I then repeated the cut with the saw flared out 45 degrees in the opposite direction to the original cut to the same depth (there will be a picture of the cut further down the post).

Once that was done I used my saw like a rasp to carve out all the excess wood to form what is called the dovetail ‘Tail’.

Photo 13-03-2016, 07 35 34
Cutting out the ‘Tails’

Below you can see this ‘Tail’ part of the dovetail joint. It forms what I think of as a bow tie shape when done properly. The important point is to start each cut from the same place, saw to the same depth each time and ensure that the middle of the tail is centred over the split in the segments.

I found that as I had not strapped the segments together I had to really hold them firmly together – this is where you will appreciate your belt or piece of string. Also while sawing these ‘Tails’ in be aware at all times where the saw is in relation to your thumb and forefinger on the hand holding the stove.

I made three of these tails (one over each split) to hold all the segments together.

Photo 13-03-2016, 07 35 35
The Tails

To hold the segments together you need to carve some ‘Pins’ to insert into the ‘Tails’. I used green hazel wood to make the pins and made sure that they were carved into a triangular shape but initially too big for the tail.

Carving in this manner allowed me to insert the pin into the tail and then progressively carve off smaller pieces from the pin until it started to slide in. I also used my large piece of wood to hammer the pins in to ensure a very tight fit.

If you find that your pin is too small just get a fresh piece of green wood and try again. They only take seconds to make. To finish the pins off I trimmed the ends with my saw.

Photo 13-03-2016, 07 35 36
Cutting and inserting the ‘Pins’

As the bark of the birch tree is very flammable I stripped it all off and kept it to the side to use later as kindling to get the fire started. The dovetail joints if fitted snugly will keep all the segments locked together tightly.

Photo 13-03-2016, 07 35 37
Trimming

Firing Up

I lit the stove with some Vaseline-soaked cotton wool balls (which I always carry with me) because everything was so damp. The wind was non existent that day so it took me a while to get the stove going well.

Normally these stoves fire up really easily when there’s a little bit of wind to create the rocket effect up through the chimney

Photo 13-03-2016, 07 35 37 (1)
Firing up and drying out

Eventually the rocket effect started and I placed three pieces of green wood onto the top for my pot to sit on. These were fairly thin pieces but would last long enough to boil some water. Have a few pieces spare on standby though if needed.

Photo 13-03-2016, 07 35 38
Green wood pot stand

Once the pot was on (about 10 minutes after initial burn) I needed to keep popping small pieces of wood into the fire box to keep the fire going. If your wood is really dry or resinous (like spruce or pine) you may not need to keep tending the fire as the internal walls of the chimney will probably be well lit.

Photo 13-03-2016, 07 35 39
Now it is a stove

It took me just under 15 minutes to boil this pot of water (enough for approx 3 cups of coffee) and the dovetail joints remained strong throughout.

Photo 13-03-2016, 07 35 40
Roaring

After 45 minutes the first of the joints burnt through however the stove remained standing until it burnt out. Due to the lack of wind the majority of the wood did not burn through.

I made this short video of another Dovetail Log Rocket Stove to show it in action.

I like to experiment with log rocket stoves and this reliance on using string or wire to hold them together (although you can dig the segments of some types directly into soft ground) has always bugged me.

This  Schwedenfeuer type of stove lends itself well to the dovetail joints I think,  and once you have practised making a couple you will be able to knock together a stove very quickly with just natural materials.

As usual I am open to ideas and suggestions on creating more log rocket stoves and Scandinavian candles. If you have not seen my other posts on this subject have a look at my summary post on this subject titled – Candles, Rockets and Long Fires.

Cheers

George

The Dovetail Log Rocket Stove – A Video Post

For a while now I have been making Log Rocket Stoves in different ways.

The ones I make in the workshop are easy as all you require is a drill however if you make one in the woods things become more complex. A common theme about these woodland Log Rocket Stoves is that you need something like string or wire to hold everything together.

I thought about this a lot recently and came up with this adaptation of the Log Rocket Stove using green wood dovetail joints.

I will post a full step by step tutorial in the near future in my How To…. section.

Cheers

George

Picture of the Week – Week 9 – Schwedenfeuer

Ok, I know it is supposed to be one picture every week however I thought I needed to zoom in on this one a bit more so I added another for detail.

Many of you know I love to tinker with log rocket stoves so today found me once again working on another design.

Dovetail Log Rocket Stove

I came across an old Swedish design for a log rocket called the Schwedenfeuer (Swedish fire) however like many other log rockets all the parts were held together with wire. As these stoves are supposed to date back to at least the middle ages they had to be held together with something else then.

I came up with the idea to use green wood wedges carved into the stove in a dovetail fashion. They worked perfectly, I got my coffee made and also a video (to follow). I will also be popping a How To…. blog post soon to show how to make one.

Cheers

George

How To…. Build a Heavy Duty Campfire Crane

My ongoing quest to learn all I can about campfire cranes has brought me to this Heavy Duty Crane (just something I have made up to describe it).

This crane works on the same principle of the Simple Dovetail Campfire Crane I documented in a previous post. The main differences are in relation to size and how you adjust the height of the pot above the flames.

I see this crane more for the long term camp due to its size.

The Heavy Duty Crane

I constructed the crane using just an axe, saw and knife. I chose a pole that had been cut down a number of months ago (sycamore wood) so it was fairly well seasoned (the girth of the pole was just big enough so that I could not close my fingers around it). Green wood would work well enough for the short term however as the wood dried out you may find the dovetail joints you create would loosen slightly.

Sawing

To begin with I sawed the pole into two pieces. The cut was about a third of the way along the length from the tip (the thin end) of the pole – this would become the arm. The bottom two thirds of the pole (the thicker end) would become the upright.

image
Start with a long stout pole

The Arm Joint

Using my axe and knife I carved the thicker end of the arm piece into a triangular shape. I took my time over this to ensure all the sides were as even as possible (carpenters measures with my eye).

This would form the ‘male’ section of the dovetail joint on the crane.

image
On the arm piece carve a triangular end

The Upright Joint

As you saw in the first picture in the post the upright has a number of female dovetail cuts carved into it. Make as many as you see fit however due to the length I had I opted for four.

To help me in carving the female notches on the upright I used the triangular section on the arm as a guide. I marked out two triangles on either side of the upright making them fractionally smaller than the arm triangle (remember you can always take wood off – it is harder to put it back on again).

I also off-set the triangles slightly so that the tip of the arm would be pointed slightly upwards when it was inserted (you do not need to do this if your arm has a bend in it). Joining the tips of the two triangles I scored a guide line for my saw.

Once that was done I made a cut with my saw on each side of the triangles and a couple in the middle.

image
Use the triangular end as a template to cut out a socket on the upright

I used my knife and a piece of wood to batton (hitting the handle of the knife with a stick) out the excess wood, tried the arm to see if it fitted and then kept on carving out the notch until the arm fitted the notch. This takes time but if you take it slowly you will get a snug dovetail fit between the upright and the arm.

Once I was happy with the first joint I started the process slightly lower down for the next joint.

image
Chip out the excess wood and repeat

Make sure you leave a few centimetres gap at the between each triangle so that the joint remains strong.

The bottom two pictures show how the arm connects into the upright. I like to have the apex of the triangle on the arm slightly protruding from the female section of the joint on the upright.

image
Ensure you have a snug fit

This process takes time and when I made this upright I completed two in the evening and the other two the next morning (hence the change in t-shirt). Taking my time though meant that I had four snug joints that would be good for long term use.

image
Carve as many notches as you wish

Finishing the Upright

To finish the upright I carved a point at the base and chamferred the top. All this is designed to make it easier to insert the upright into the ground without causing damage to the joints.

image
Point, chamfer and test

The Arm 

I have a tendency to make crane arms in a standard way. After axing out a basic shape (taking care not to touch the triangular end) I formed the final shape with my knife.

I like to put lots of notches along the upper side of the arm to give the bail handle of my pot something to sit in. Having lots mean that I have the ability to adjust the placement of the pot on the horizontal plane as well as on the vertical plane using the upright.

image
Carve the arm

To finish the arm off I usually put a little dimple near the tip of it so I can hang an adjustable pot hanger off it if needed (picture later).

image
Add a dimple if you want an extra pot attached

I like to use a stout stick as a pile driver when using a crane so that I do not damage the upright when putting it into the ground.

The ground in my garden is fairly loose so it was not a problem however some of the sites I use can be quite hard and stony.

As this crane was to take heavy weights I really compacted the earth around the base of the upright and gave it a few more taps to drive it in. If you remember to chamfer the top and give the upright a strong point you should be able to drive the upright in securely.

image
Use a pile driver to insert the upright

My first test was to see what weight the crane could take. I filled my Super Potjie Dutch Oven about half full and filled the group kettle up.

With some cranes you can see the arm bend when the pot is put on however when I added all this weight it did not shift in the slightest.

Below you can see how the adjustable pot hanger is attached to the end of the arm (into the dimple).

image
Crane set up with extra pot holder

Testing

My sister sent me my favourite treat of the year – a Guga (young Gannet) and I cooked it outdoors using the Heavy Duty crane.

It took the weight easily enough however I did trim about a millimetre (the girth)  of the triangular section so that it could be easily inserted and extracted from the upright as I sought the ideal heat.

I had the pot low down at first to boil the water and then raised it so it would simmer gently for an hour.

Unlike the adjustable dovetail, the lap joint and Aures cranes you cannot fine tune the height of the arm but you do have a reasonable height difference that can take a lot of weight.

image
In action (a comparison in size with the adjustable dovetail crane)

Treated well this crane could last you for many years and takes up little room around the fire. If you are doing a pioneering project yourself or with a group this is an ideal project to undertake.

Cheers

George

How To…. Carve a Collapsible Pot Hanger

When I first started venturing into the world of bushcraft I got into carving spoons and bowdrill sets. It’s like a rite of passage with most bushcrafters to crack these skills. As time went on I began to explore the world of pot hangers and eventually these little devilish collapsible pot hangers.

This post will take you through the steps I went through to make a mortise-and-tenon collapsible pot hanger. I have included a couple of other types and links to show you how they are made or used. As you can see in the picture on the left, one of the hooks is pointing down and one is pointing upwards. This set up makes for a great pot hanger but sadly you don’t find many trees with this configuration of branches.

Photo 13-03-2014 07 11 43
Mortise and Tenon Pot Hanger

Here are the three different types of pot hangers I will discuss here, from left to right: the wedge hanger, the dovetail hanger and the mortise-and-tenon hanger.

Photo 13-03-2014 08 33 44
The trio

The wedge hanger

I call this the wedge hanger as the two pieces are kept in place by a single wedge of wood in the middle. There are a lot of angles to take into account with this hanger and as with all of the hangers in this post I would advise you to make it out of dead standing wood. If you were to use green wood you might find that the pieces do not fit together any more as it dries out. I found a good tutorial on making this hanger on the Bearclaw Bushcraft site.

Photo 13-03-2014 08 11 30
Wedge Pot Hanger

The dovetail hanger

This hanger replaces the wedge with a dovetail joint in the middle. I found it surprisingly easy to carve. The trick is to make the joint snug but not too tight. You want just enough friction between the two pieces to hold it all together but still be easy enough to pop apart when you are finished with it. A good video by GJohnridge11 on You Tube shows this hanger but I am afraid not how it is carved.

Photo 13-03-2014 08 10 27
Dovetail Pot Hanger

All the hangers so far have hooks pointing in opposite directions and on opposite sides. I have had discussions with fellow bushcrafters on this and some argue that a pot may slip off if the hooks are on opposite sides. I have made a few hangers now with hooks on opposite sides and on the same side as in the picture below. As of yet I personally have not had problems with either method.

WP_20140313_007
Wedge Pot hanger with both hooks on the same side

The reason I like these hangers is that they are easy to store and carry with you. Once broken apart they fit inside your pot or kettle snugly.

WP_20140313_001
Neatly stowed away

Mortise-and-tenon hanger

I found two dead pieces of wood of similar widths with good strong branches leading off them. After stripping the bark off one I noticed there was a fungal infection inside it. I decided to try using it anyway as the wood still felt strong. I left the bark on the other piece of wood as it had attractive honeysuckle markings going around it.

I trimmed the bottom piece so it was the same length as the top piece.

Photo 13-03-2014 07 13 00
Trimming to size

The tenon limb

Using a pencil I  marked out all the areas of wood I was going to cut out. (I should have shaded the areas of wood I would be cutting out  with my pencil for the camera, see the bottom picture for how this limb will finally look.) This limb is called the tenon limb.

Photo 13-03-2014 07 34 55
Mark out the shape of the tenon

I used a small hand saw to make some stop cuts on the pencil marks. These stop cuts are particularly useful when you start carving with your knife to stop any splits running off into areas of wood you want to keep.

Photo 13-03-2014 07 37 30
Stop Cuts – Part 1

The stop cuts done, I used my knife to start carving the excess wood away. I used small cuts all the time, my thumbs on the back of the knife for fine control. This is a great activity to do while sitting around the campfire where you can relax and take your time.

Photo 13-03-2014 07 15 33
Stop Cuts – Part 2

Once you get one block out it is time to take out the next block of excess wood. I am keeping the wood that is under the blade and removing the wood directly to the right of it.

Photo 13-03-2014 07 16 11
Forming the tenon – Part 1

Finally I used my saw to cut out the tenon at the end of the piece of wood. This is a small rectangular piece of wood at the end of the limb as you can see in the bottom picture.

Photo 13-03-2014 07 17 45
The finished tenon

The mortise limb

I cut a stop cut into the mortise limb where I had measured that the tenon limb would fit snugly against it. You have to judge this by using the tenon limb as a measuring stick and saw to a depth that will make the limbs fit together well.

Photo 13-03-2014 07 41 34
Mark a stop cut

Once the stop cut is in place you can easily batton the excess wood out with your knife. I am using the tenon limb as a hammer at this stage.

Photo 13-03-2014 07 39 34
Batton out the waste wood

You can see in the top picture that the two pieces fit well together now so I marked out the area of the joint I needed to cut out on the mortise limb. I used the protruding rectangle of wood on the tenon limb to mark out the corresponding section of wood I needed to carve out of the mortise limb.

Once marked out I used the tip of my knife to start carving out the rectangular hole I needed to make in the mortise limb.

Photo 13-03-2014 07 43 36
Draw out the mortise

Again this was a piece of carving I took my time with. I placed the mortise limb on a work surface rather than holding it in my hand, where any slip of the blade could have meant a nasty cut.

Photo 13-03-2014 07 44 00
Carve out the mortise

Eventually I worked my way through the limb and carved out a rough rectangular shape.

Photo 13-03-2014 07 44 35
Form a neat rectangle

If you have taken your time and not cut outside of the pencil markings the fit of the Tenon and the Mortise should be snug. If it is too tight make some cuts where you feel there is resistance and keep trying to see if both pieces will fit together.

Photo 13-03-2014 07 45 16
The fit should be snug but not overly tight

Eventually both pieces fitted well together but disaster struck for me here. I was showing the hanger to a friend and was explaining it is very strong on the vertical plane, ie when holding a pot, but very weak on any other plane, ie if you twist this hanger it will break.

Just as I was explaining this my friend did indeed twist the hanger as he tried to pull it apart and the tenon joint simply snapped. The fact that the tenon had some rot in it did not help but I had tried it out earlier and it did take the weight of a heavy Dutch Oven. To separate the limbs you need to push on the rectangular tenon so it pops out of the mortise slot: do NOT twist!

Photo 13-03-2014 08 05 37
A trimmed but flawed tenon

Still, it didn’t take long to make up another tenon limb to fit the original mortise limb.

Photo 13-03-2014 08 06 43
Tenon Mark 2

All that was left to do was tidy up the hooks, put the limbs together and hang a pot.

Photo 13-03-2014 08 07 34
Mortise-and-tenon hanger in use

I can’t remember where I came across this hanger (somewhere on the internet)  so if anyone knows where this hanger originated please drop me a message. Even though it looks complex to begin with, once you get working on it it is easy enough to do and a joy to craft as long as you take your time with the fiddlier saw and knife tip bits.

Photo 13-03-2014 08 08 15
Closed and open

I filled this Dutch Oven with water and got my two little helpers to show you how strong this hanger can be.

WP_20140313_002
One very strong pot hanger

Some other sites on the wedge hanger you might find interesting:

Mid West Bushcraft

Bushcraft UK 1

Bushcraft UK 2

Mark Emery

Southwest Indiana Bushcraft Bill

Cheers

George