Over the years building hammock stands have really intrigued me.
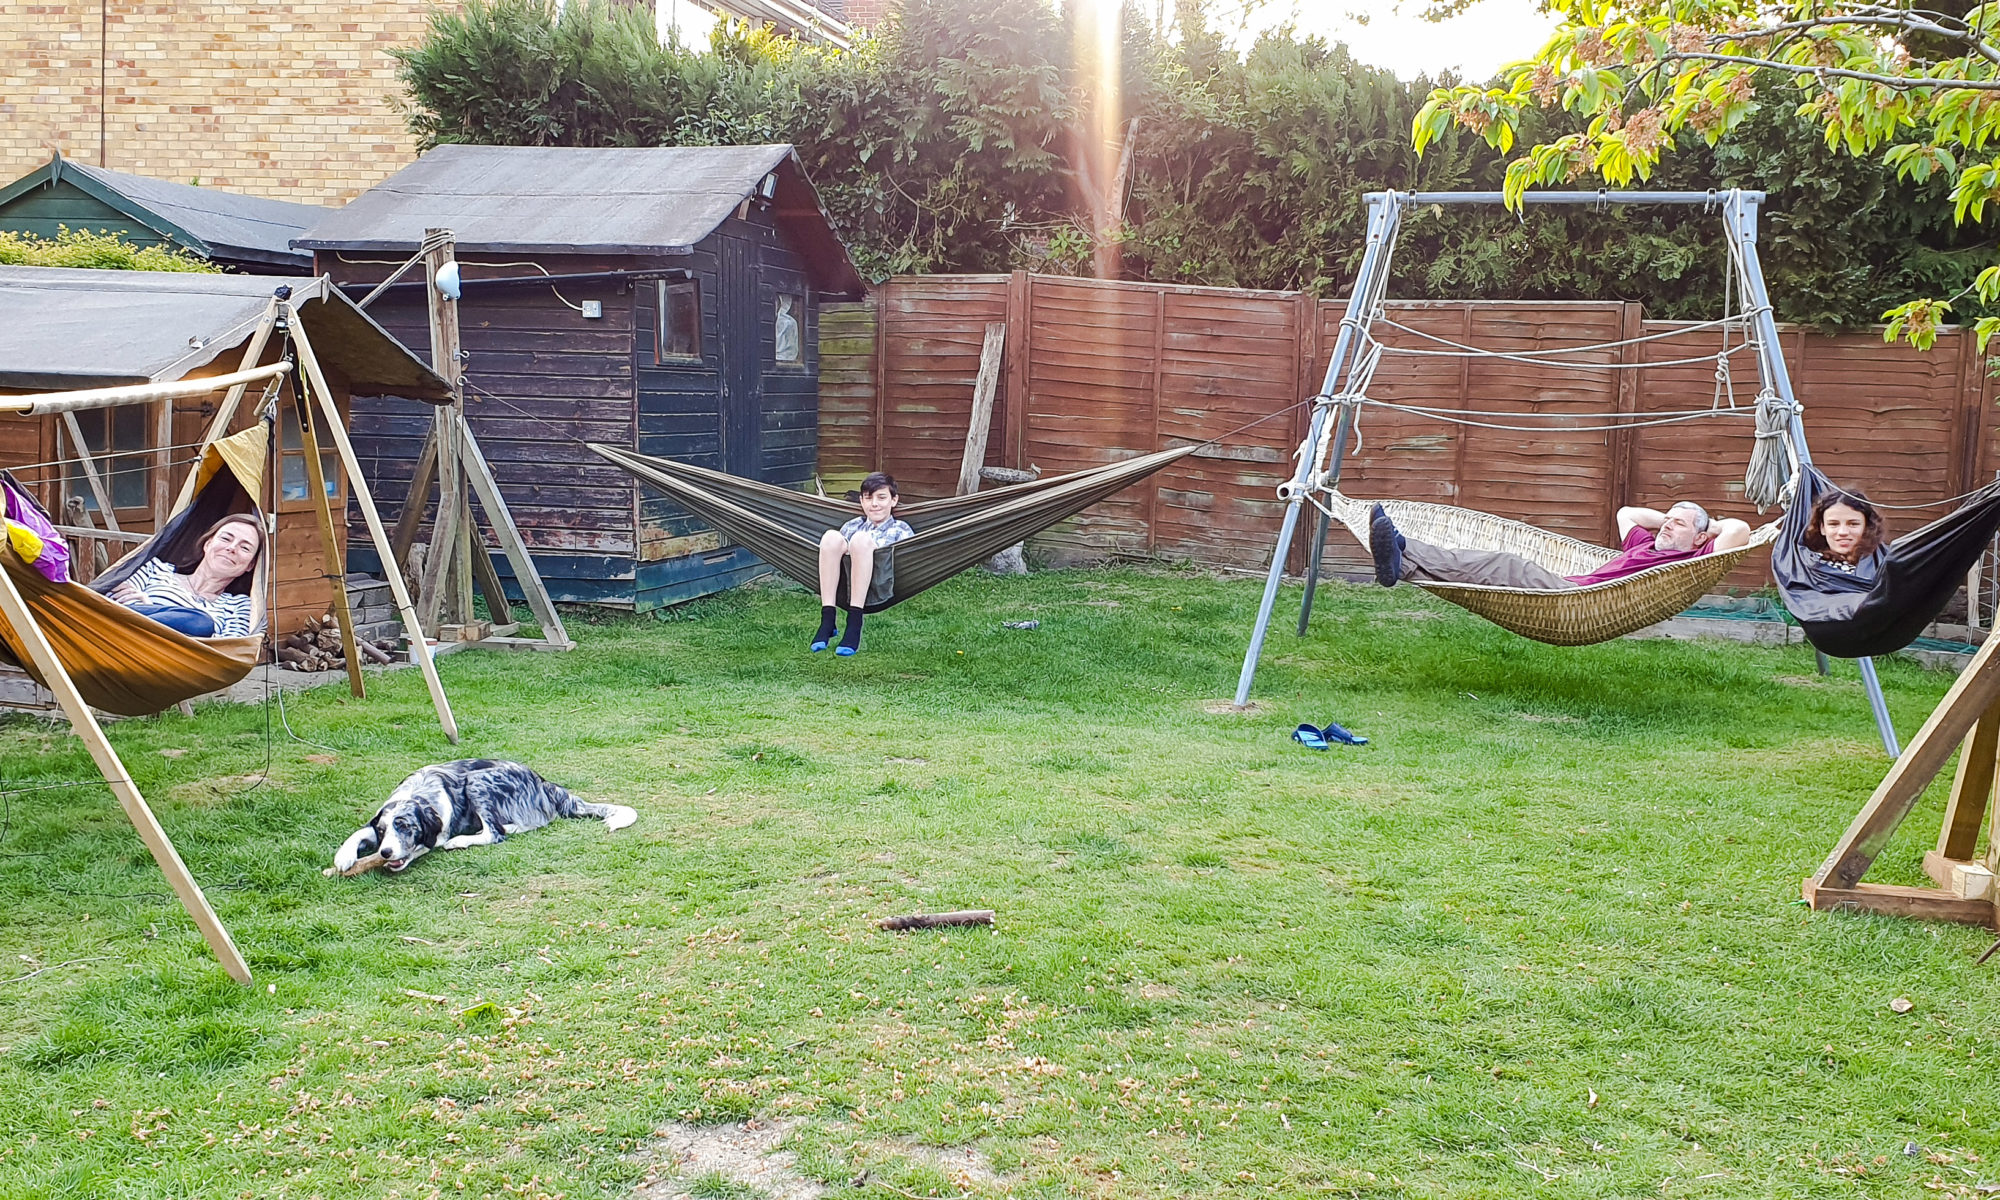
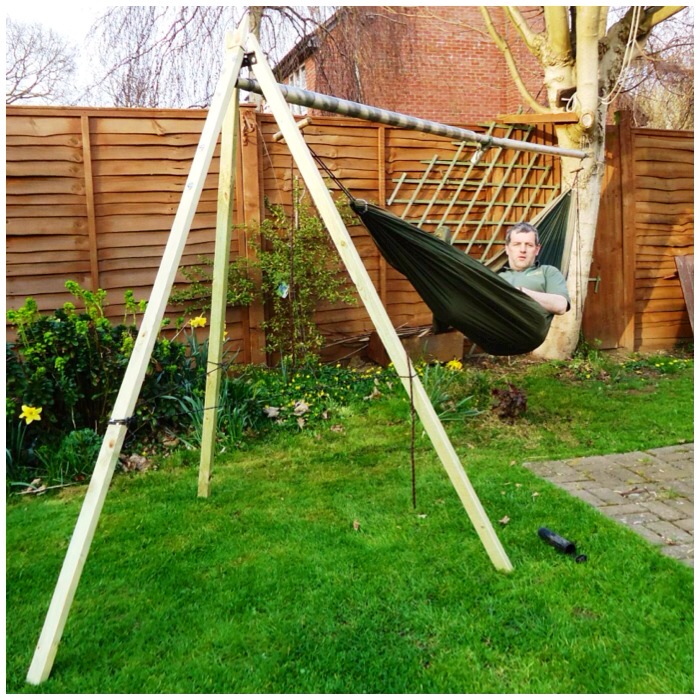
My Freestanding Hammock Stand is great for popping up in the garden or putting in the back of the car to take to events – however I have only one and with this current Covid crisis found I have been spending more time in the garden – so more hammock stands were needed. I did not have all the wood I needed for another Freestanding Hammock Stand however I found I had a lot of old fence posts that could be turned into something.
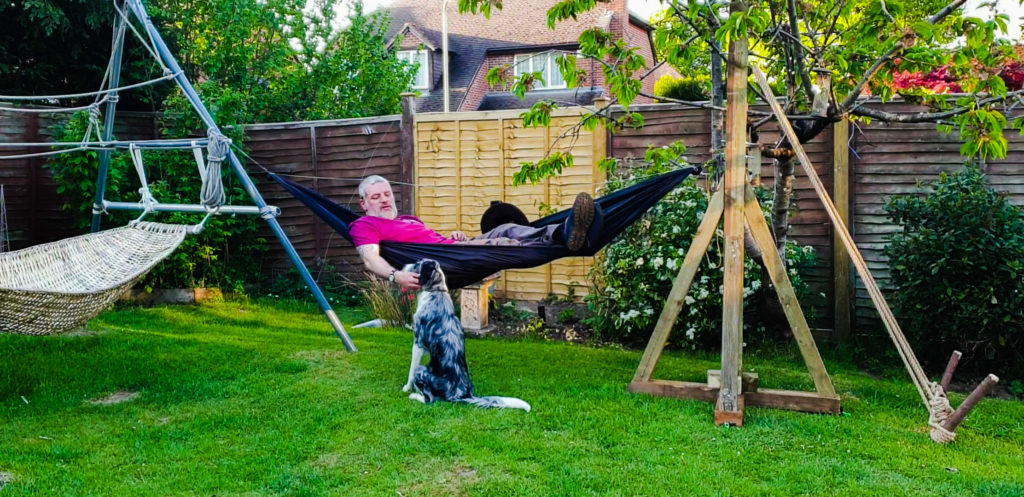
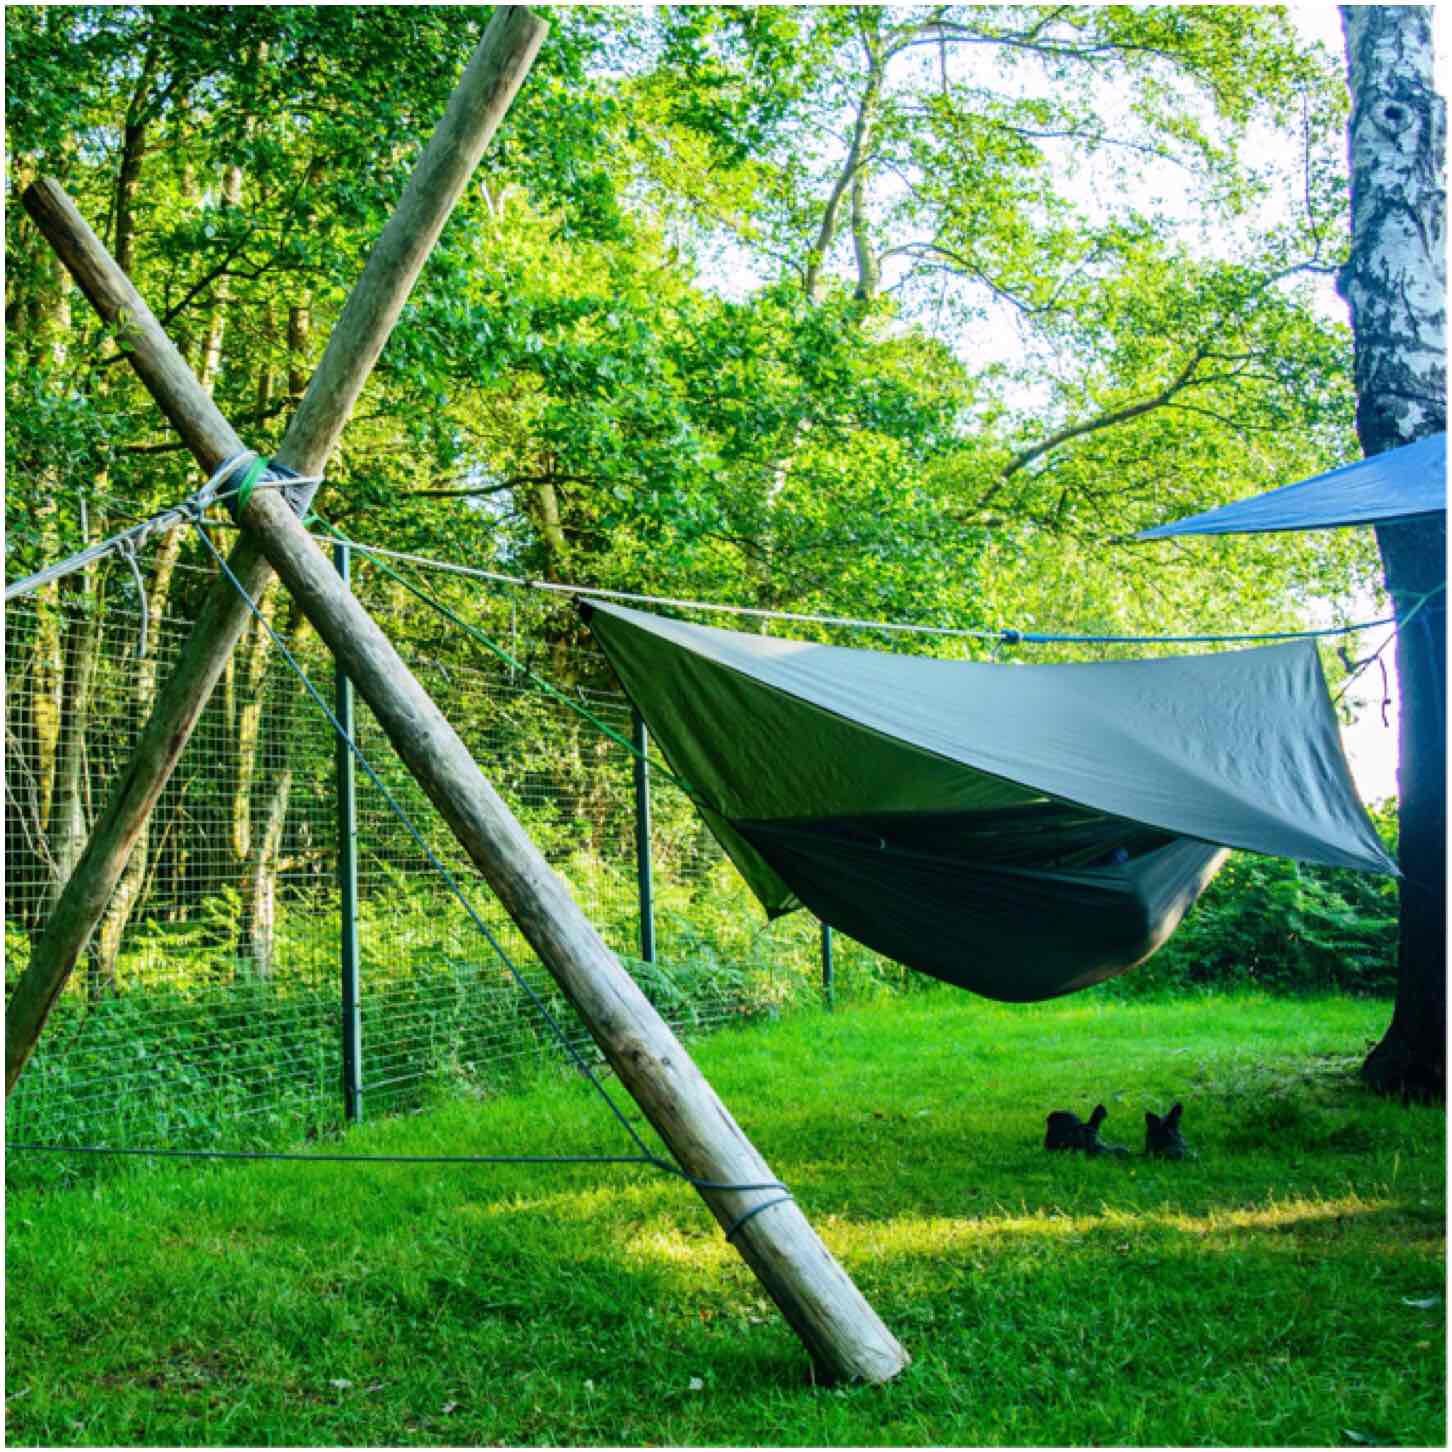
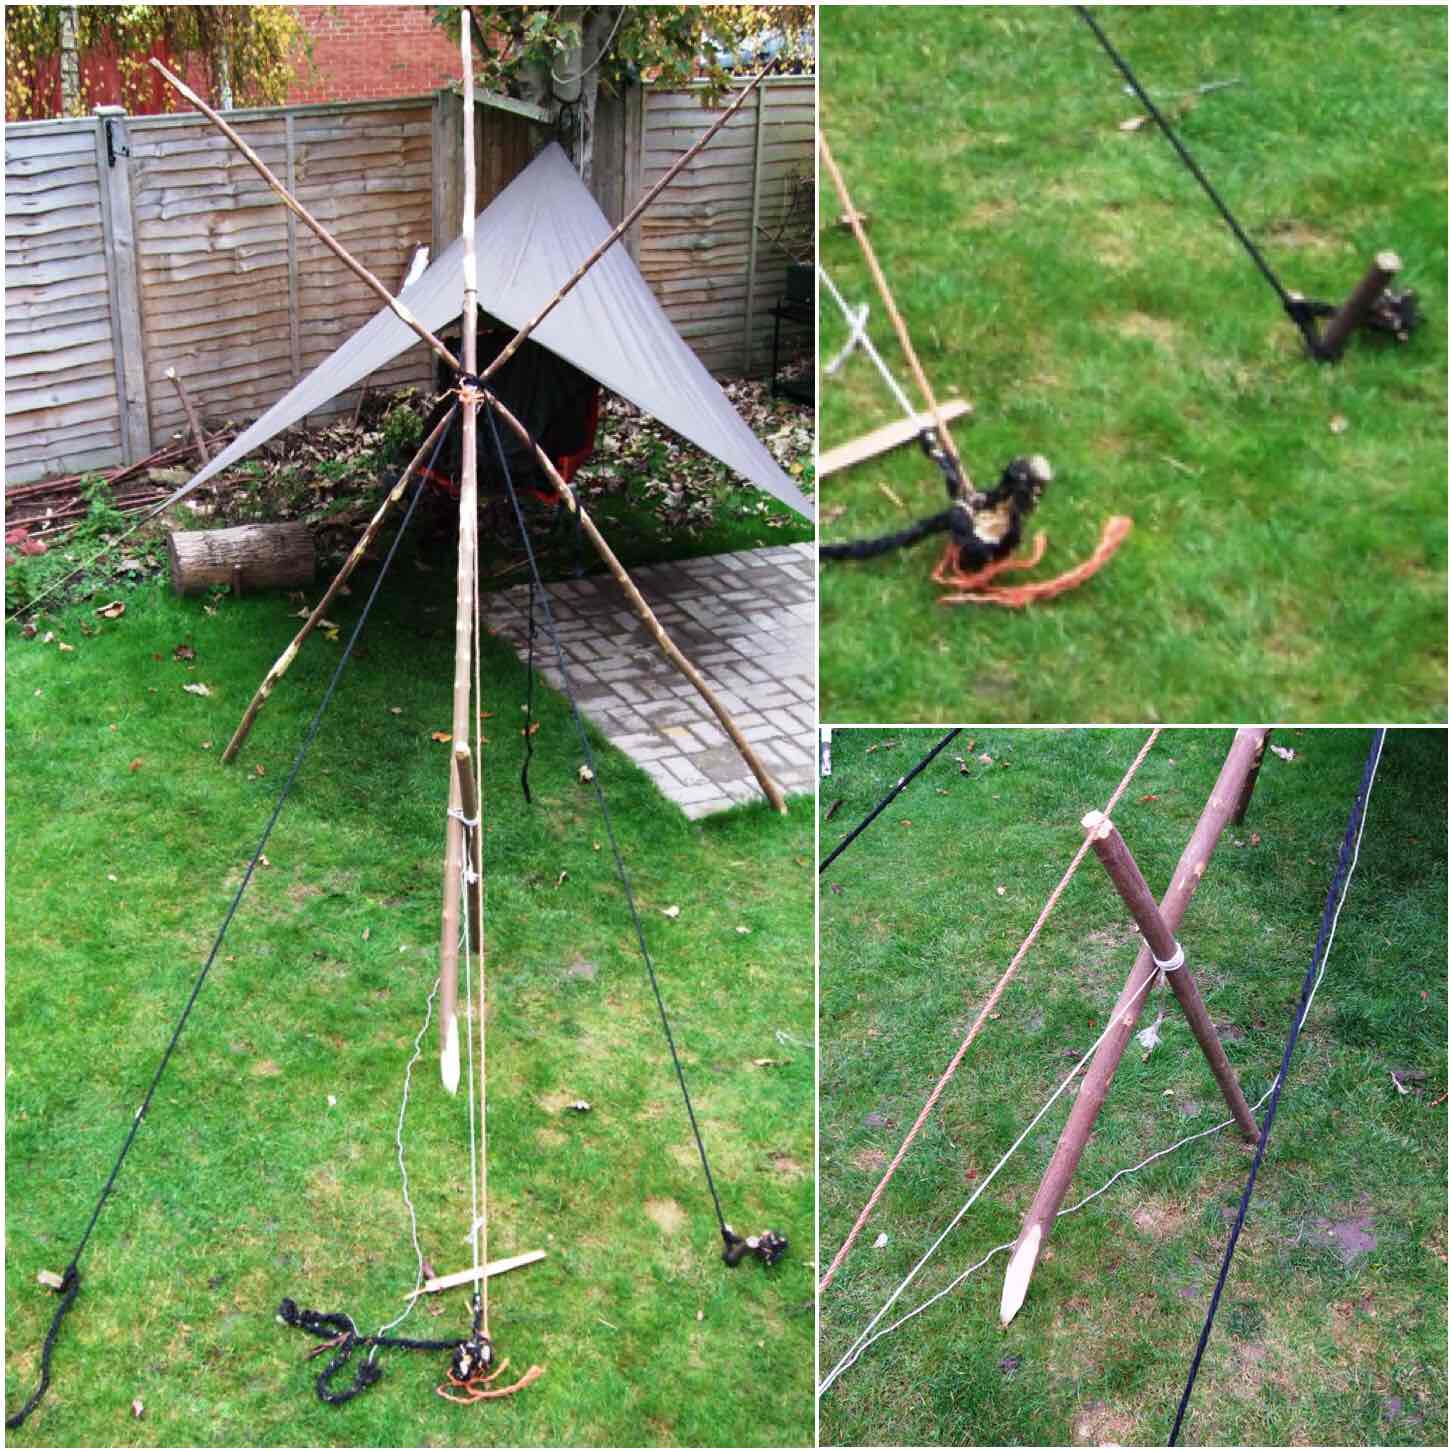
I have only one decent tree in my back garden and an old swing frame (they are too far apart to use together) that I can hang a hammock off so I needed some kind of ‘Hammock Upright’ that did not need to be dug into the ground.
The ‘Hammock Upright’ you can see below is the one I built and it shows it being secured by land anchors. It is not portable (well I can move it around the garden easily) but it is robust. I know that there are ways to make them lighter however I wanted to use the wood I had on hand.
Land Anchor Secured
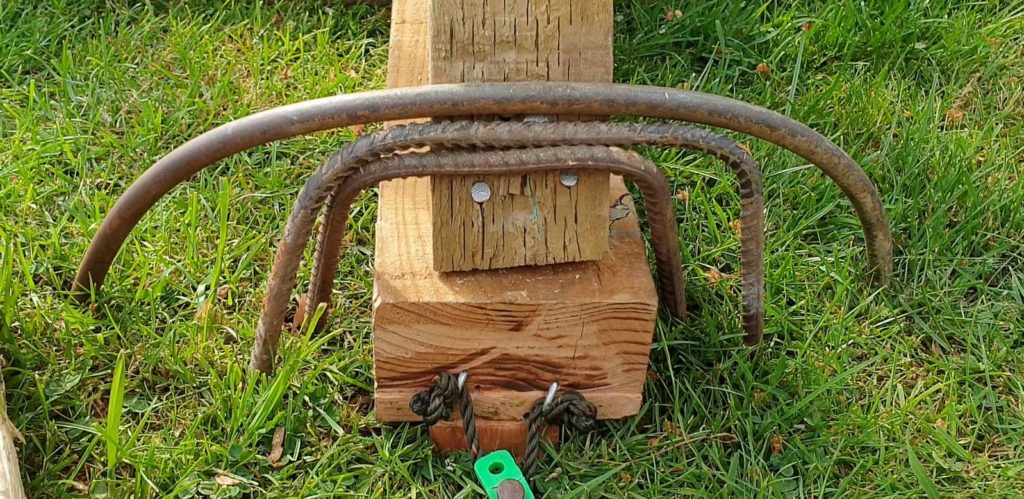
While making a video on the upright it struck me that iron pins would do the same job as the land anchors.
Iron Pins
So to see how it is all built have a look at my video below.
Cheers, George
Update (02/05/2020) – Brought the two uprights together and used pins on both.
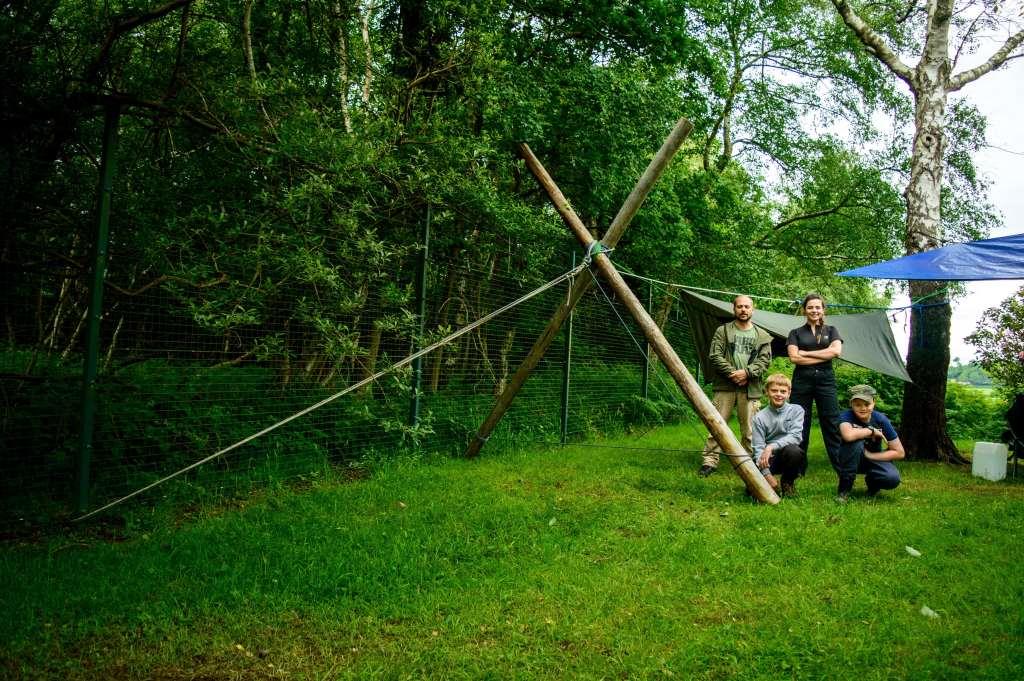
This is a post that came about because someone decided to chop down a tree. On a recent Sea Cadet training weekend we ended up with one instructor (Jess), one hammock and one tree – my friend Dave and myself had bagged the other trees for our hammocks :-). Not an ideal situation for Jess you could say.
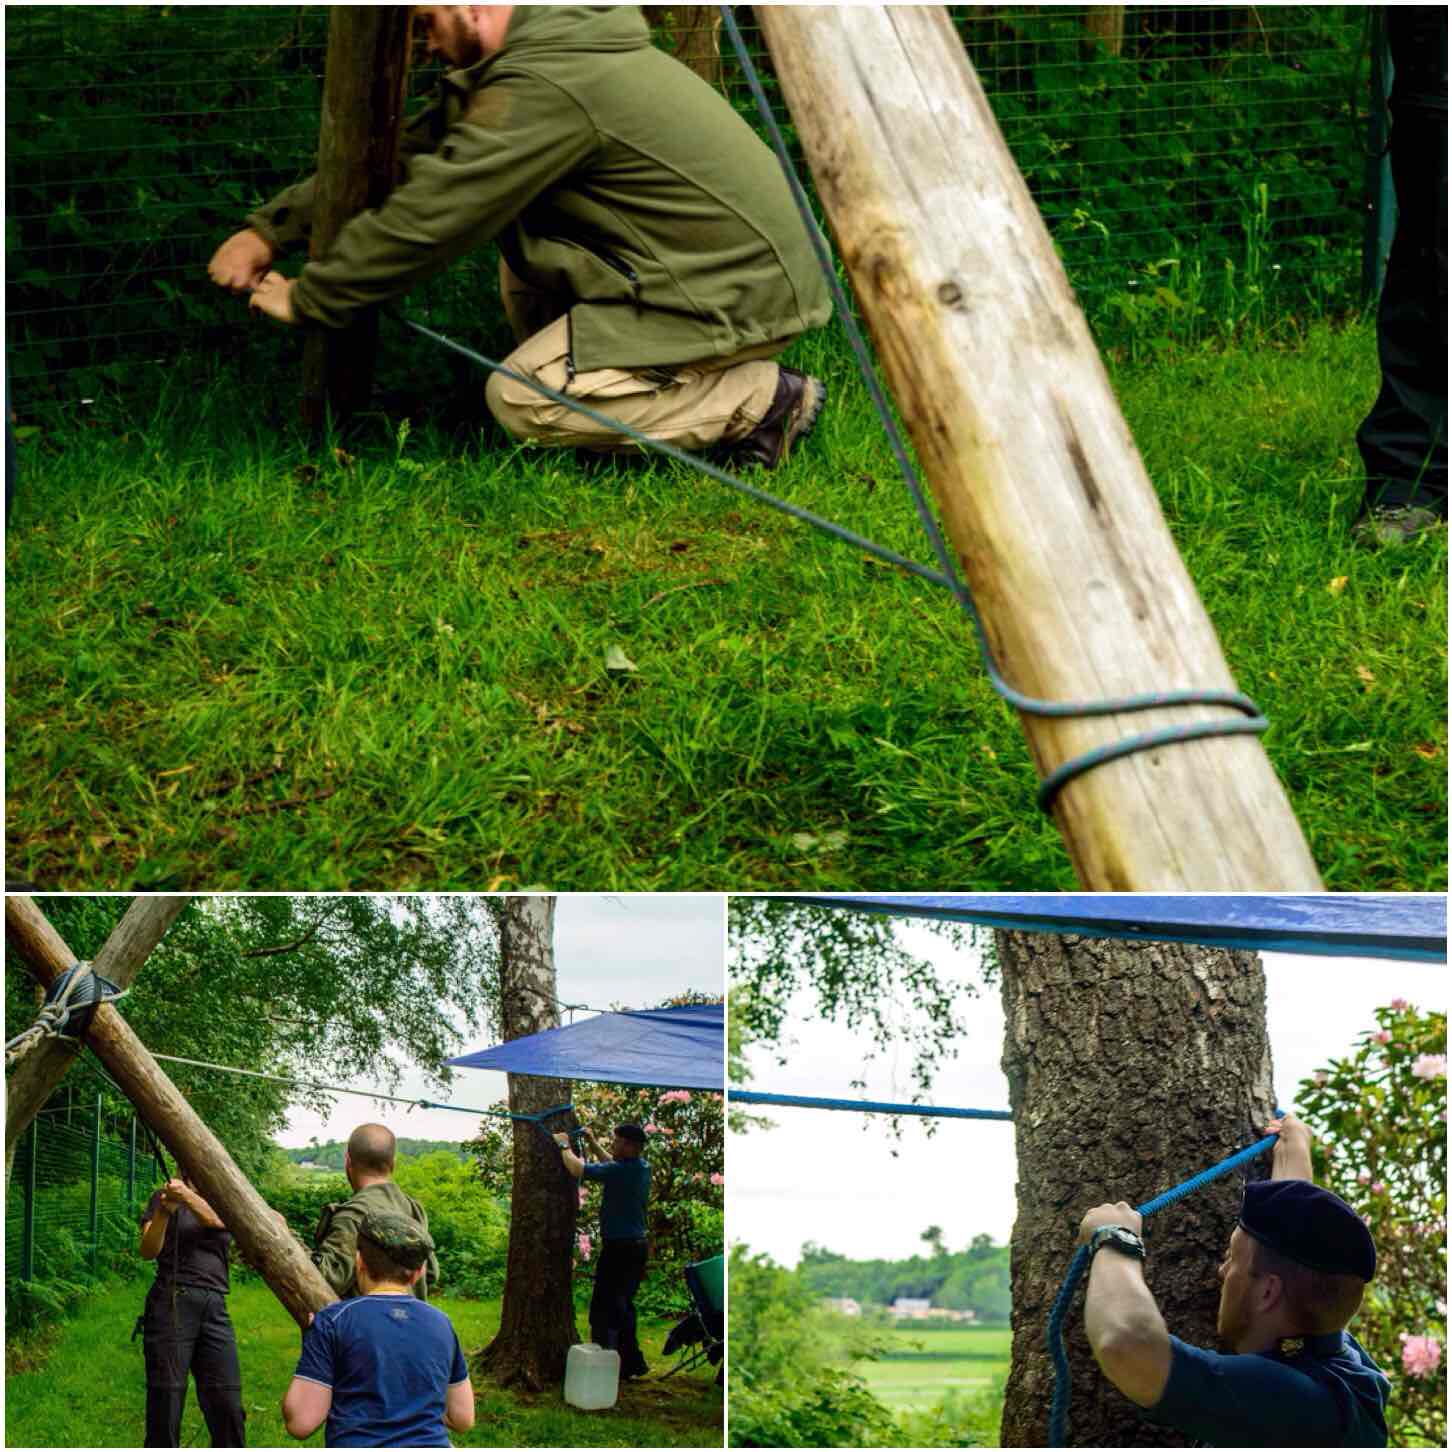
We could not camp elsewhere and there was nothing in the way of available natural material to help us (we were on a military camp). Thankfully my friends Alan and Dave spotted some old poles (used for team building exercises) at the back of of a building. So Dave with Jess as his assistant in true Seacadet style, set out to apply their seamanship talents to our problem.
Shear Leg Stand
The Shear Lashing
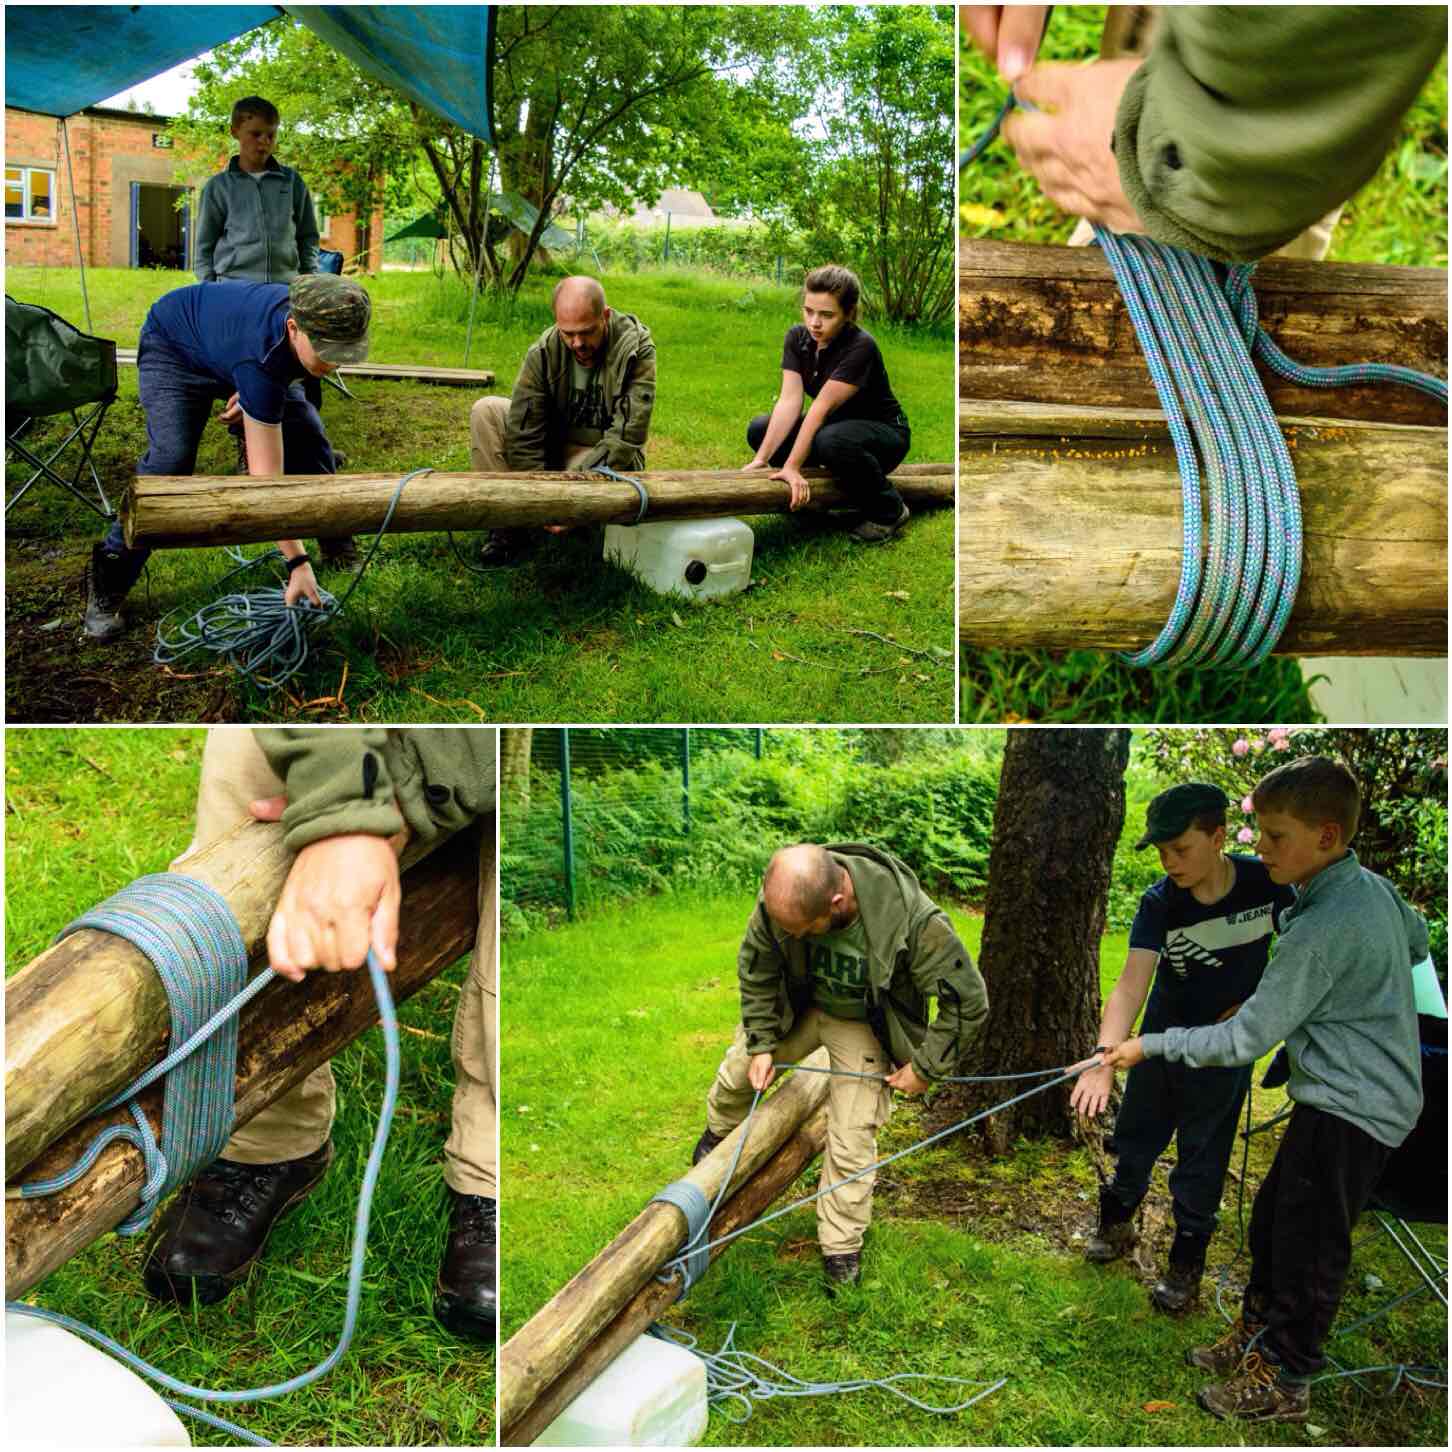
They collected some assorted pieces of rope and a couple of cadets to help out. The poles were quite long and thick so they decided to tie the poles together about two thirds of the way along their length. The poles were tied together using a shear lashing (I will be using Grog’s Knots to help describe how they did this).
To start the shear lashing they attached the rope to one pole using a timber hitch and then wrapped the rope a number of times around both poles (this is known as wrapping). To make this easier the poles were raised slightly of the ground and the cadets helped to pass the masses of ropes around the poles.
Wrapping
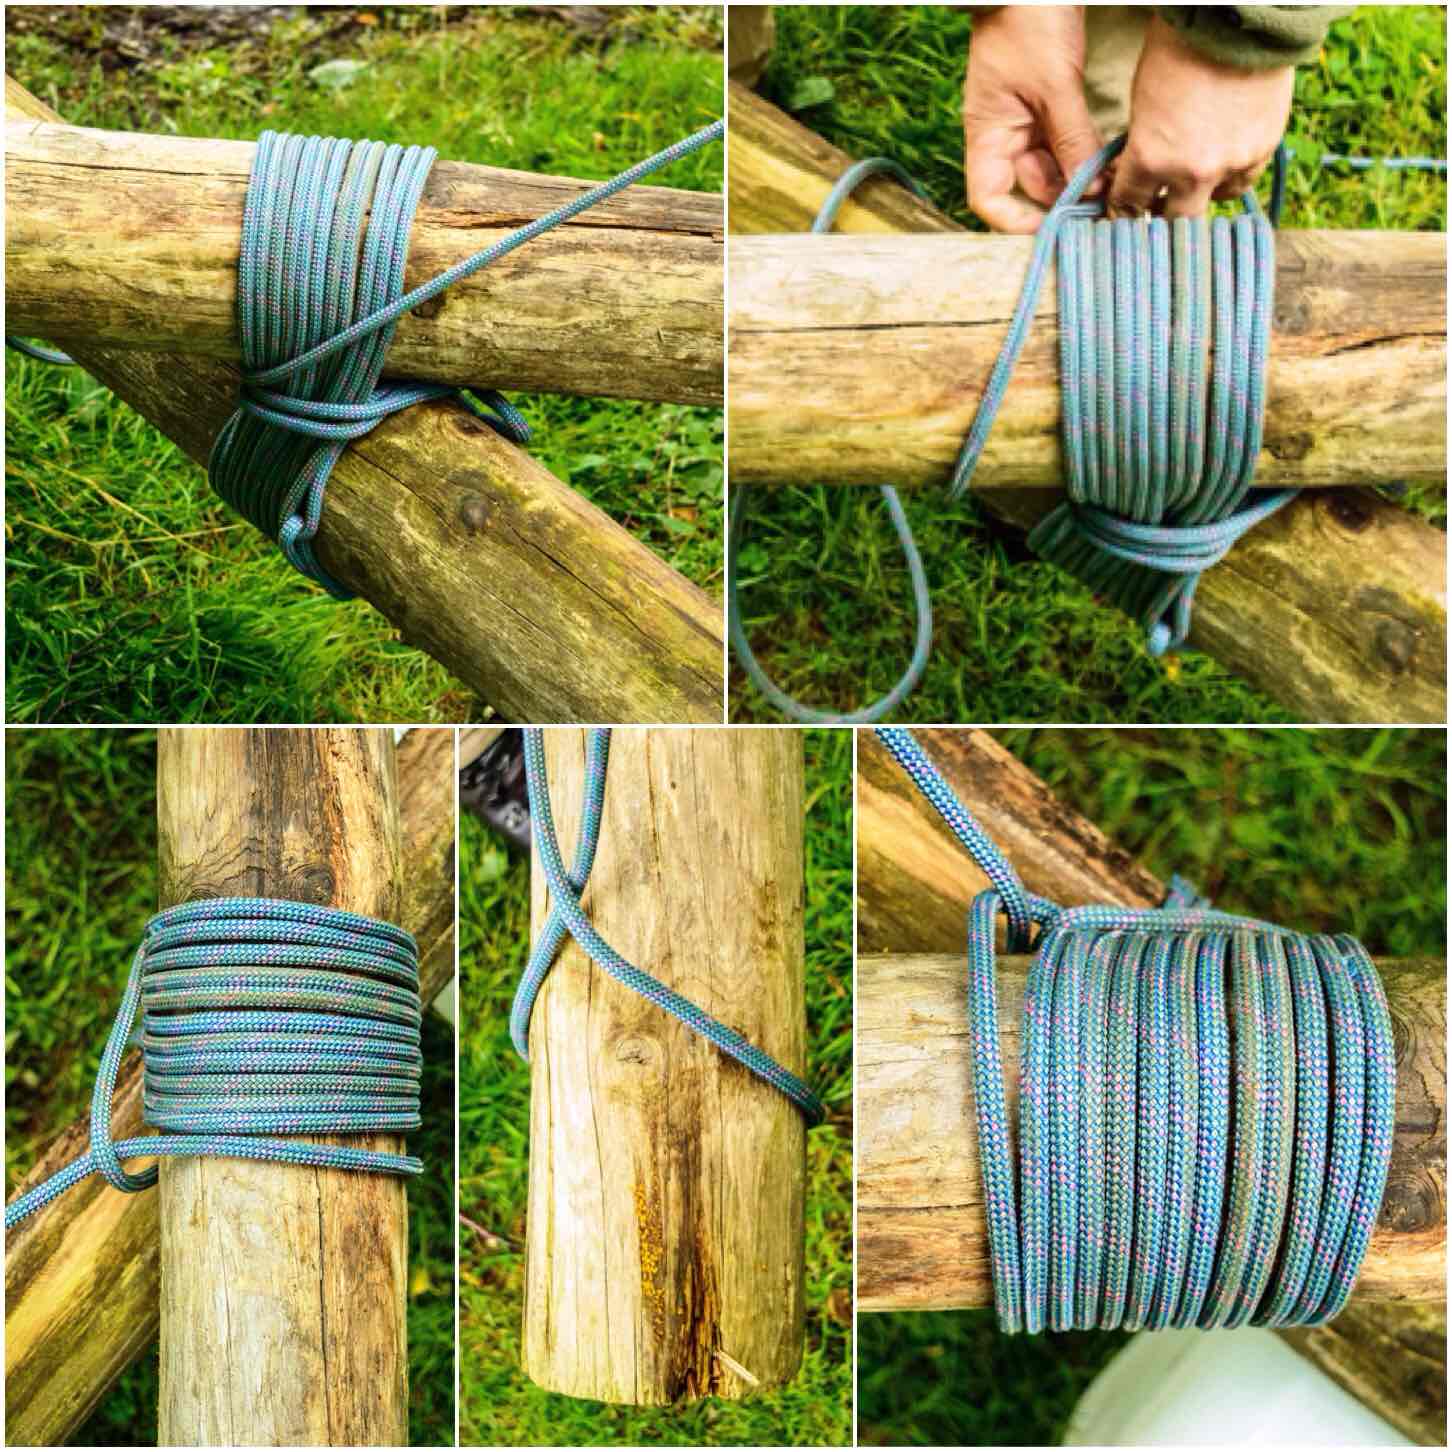
Once the wrappings were completed the lashing was tightened by being frapped (nothing to do with Facebook). Frapping is the nautical term to describe the tightening of a rope or cable. Dave did this by completing a number of turns around the centre of the lashing and pulling it all in tight.
To finish the lashing off he secured it with a clove hitch to the pole without the timber hitch. There was plenty of rope left over as well to help with anchoring the shear legs down.
Frapping
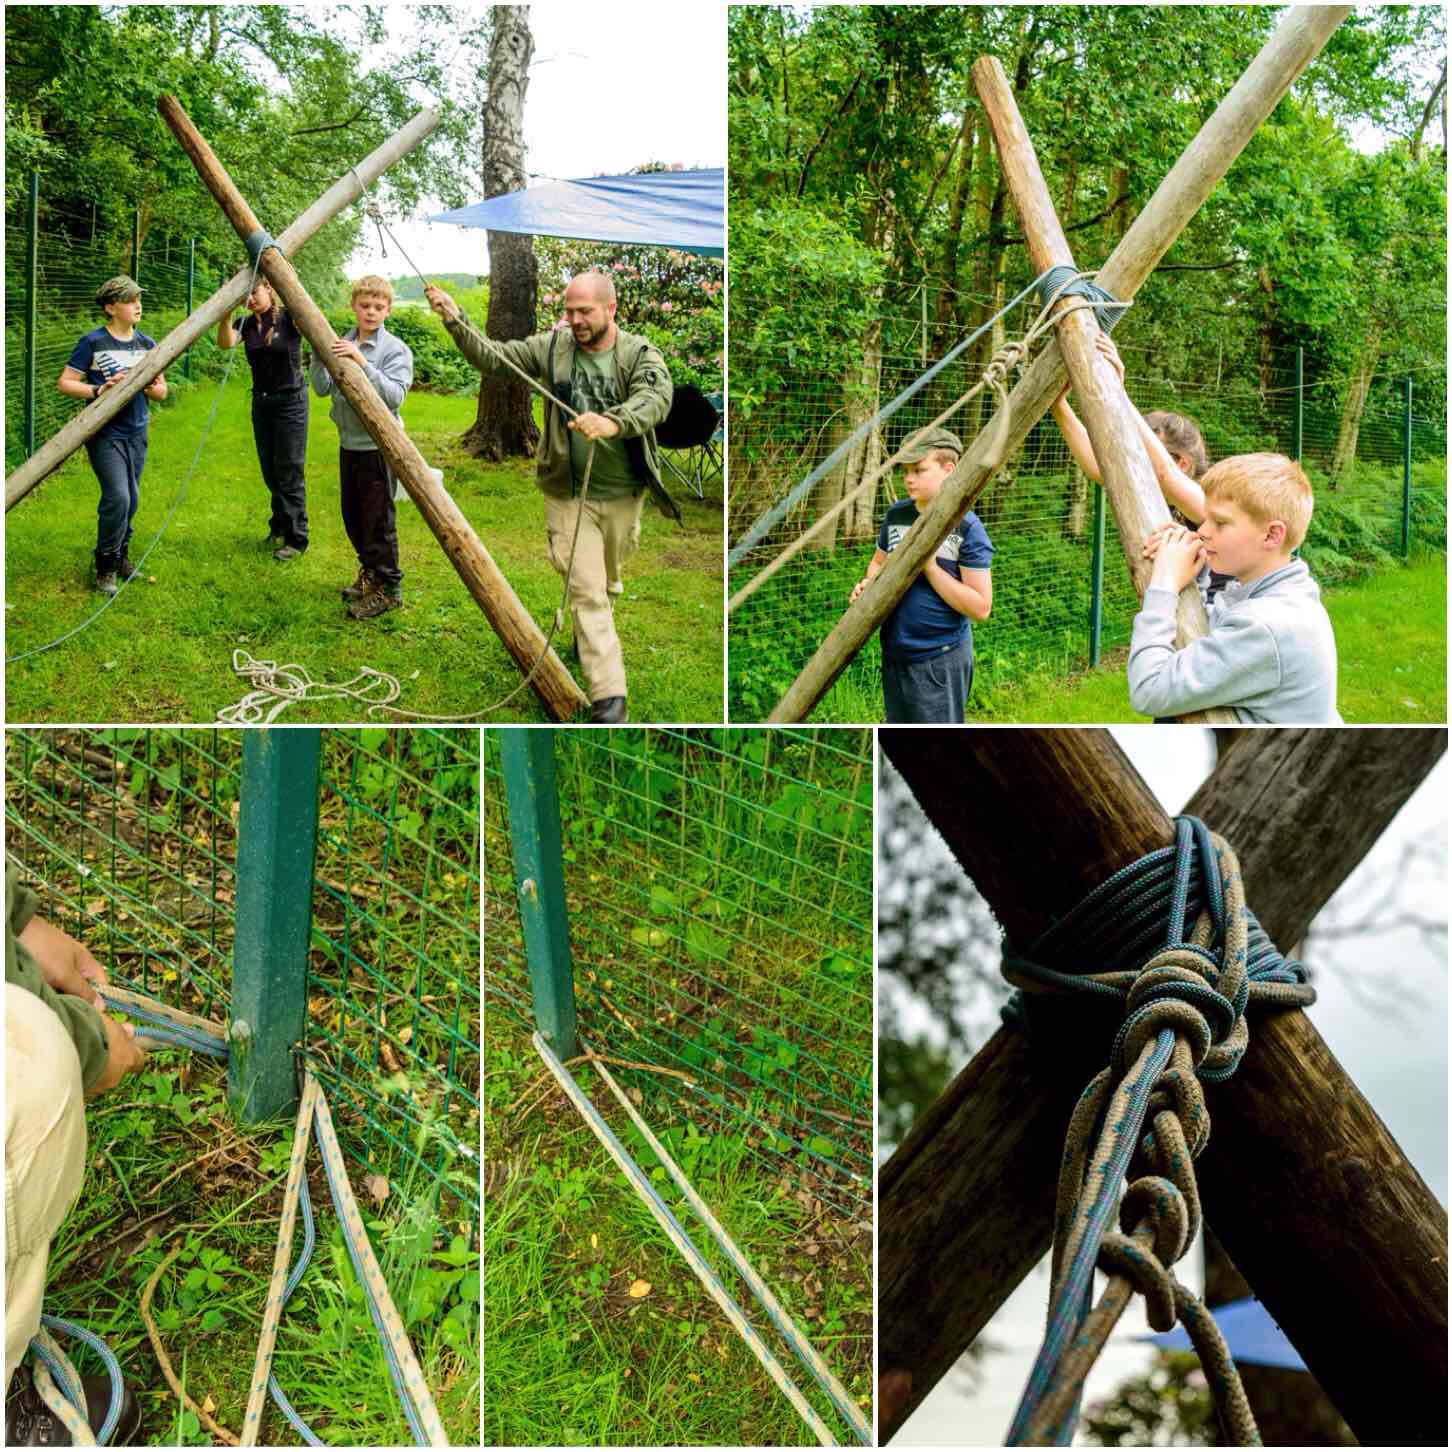
Anchoring
Though the poles were large they were surprisingly light so they were soon standing vertical. A spare piece of rigging line was looped over the pole with the timber hitch on it and with the spare rope from the shear lashing the legs were securely anchored by wrapping both ropes around base of a solid fence post.
Both ropes were then tied off around the shear lashing on the poles to make it all secure.
Anchoring
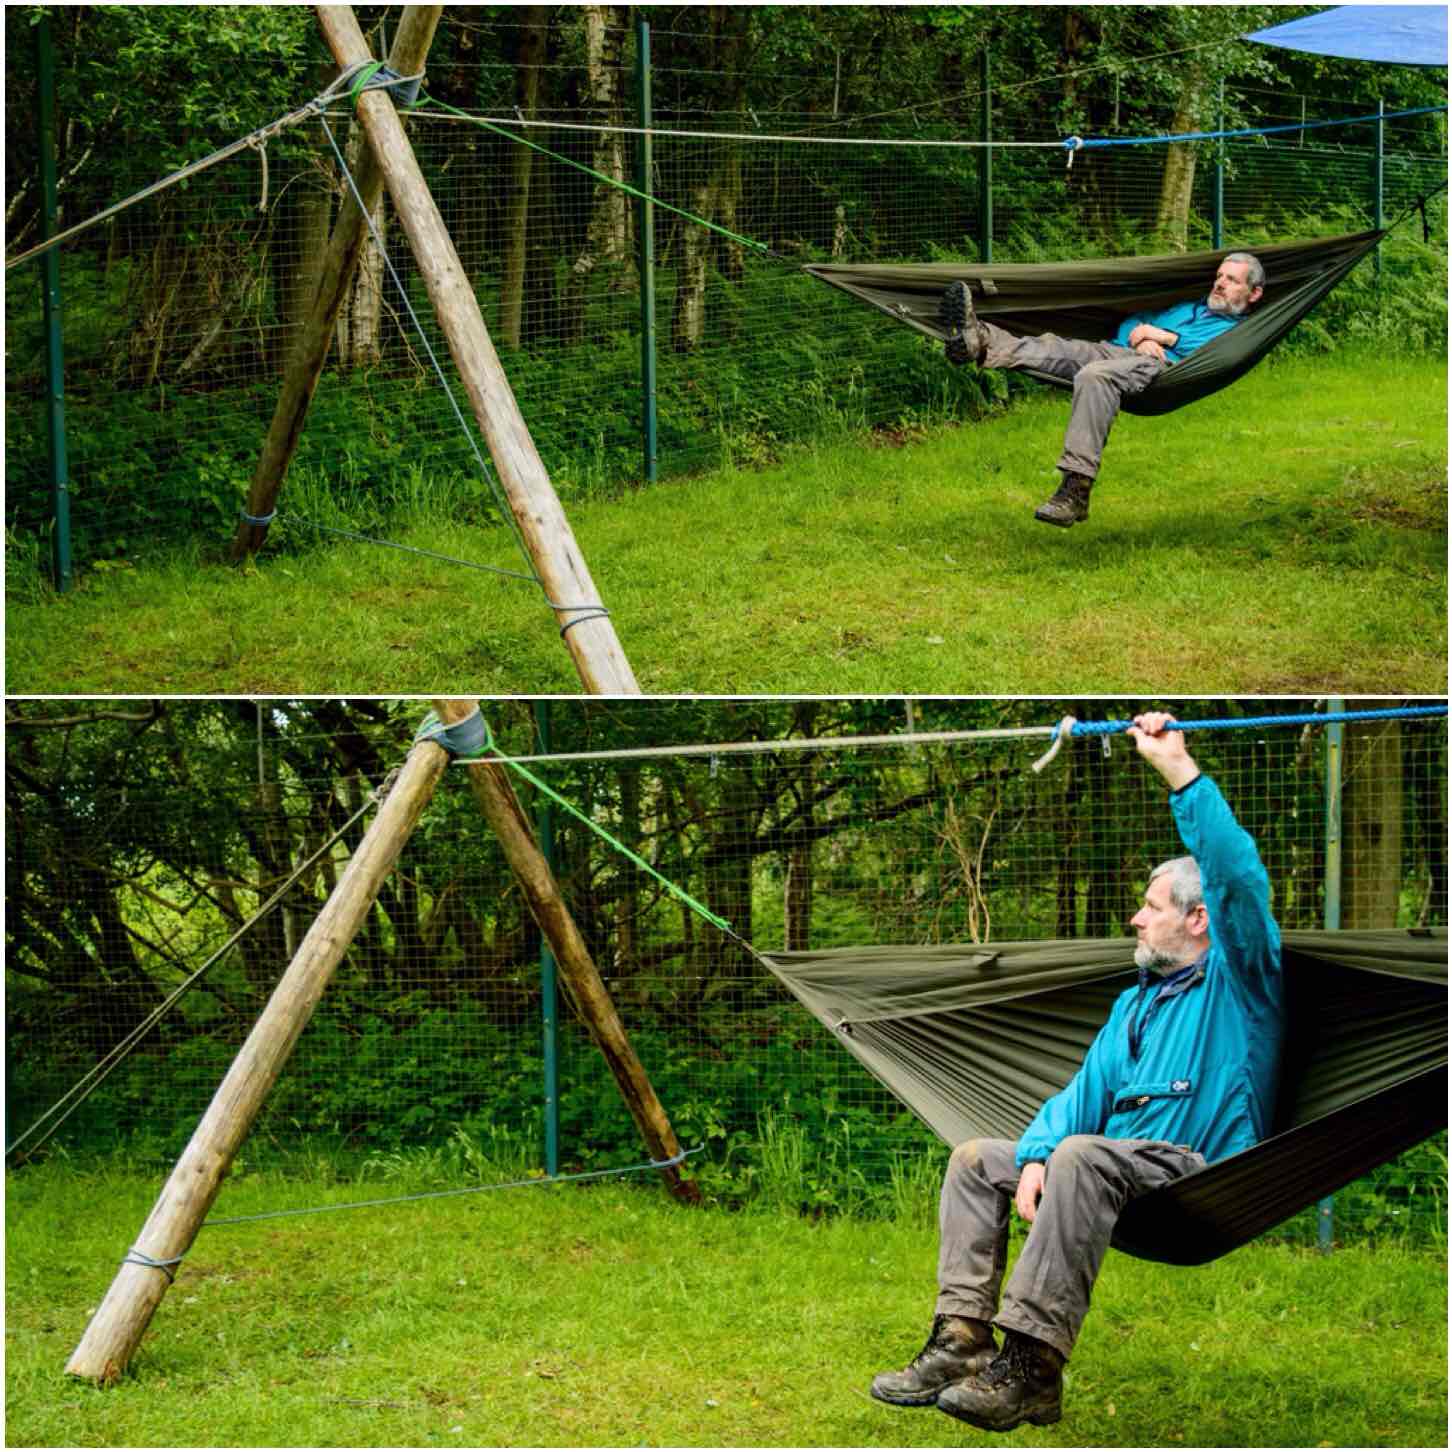
Alternative Anchors
If you do not have a handy anchor like our fence post you can make your own. In the past I have had shear legs and tripods for hammocks anchored safely with three large wooden stakes.
Alternative Anchors
Securing
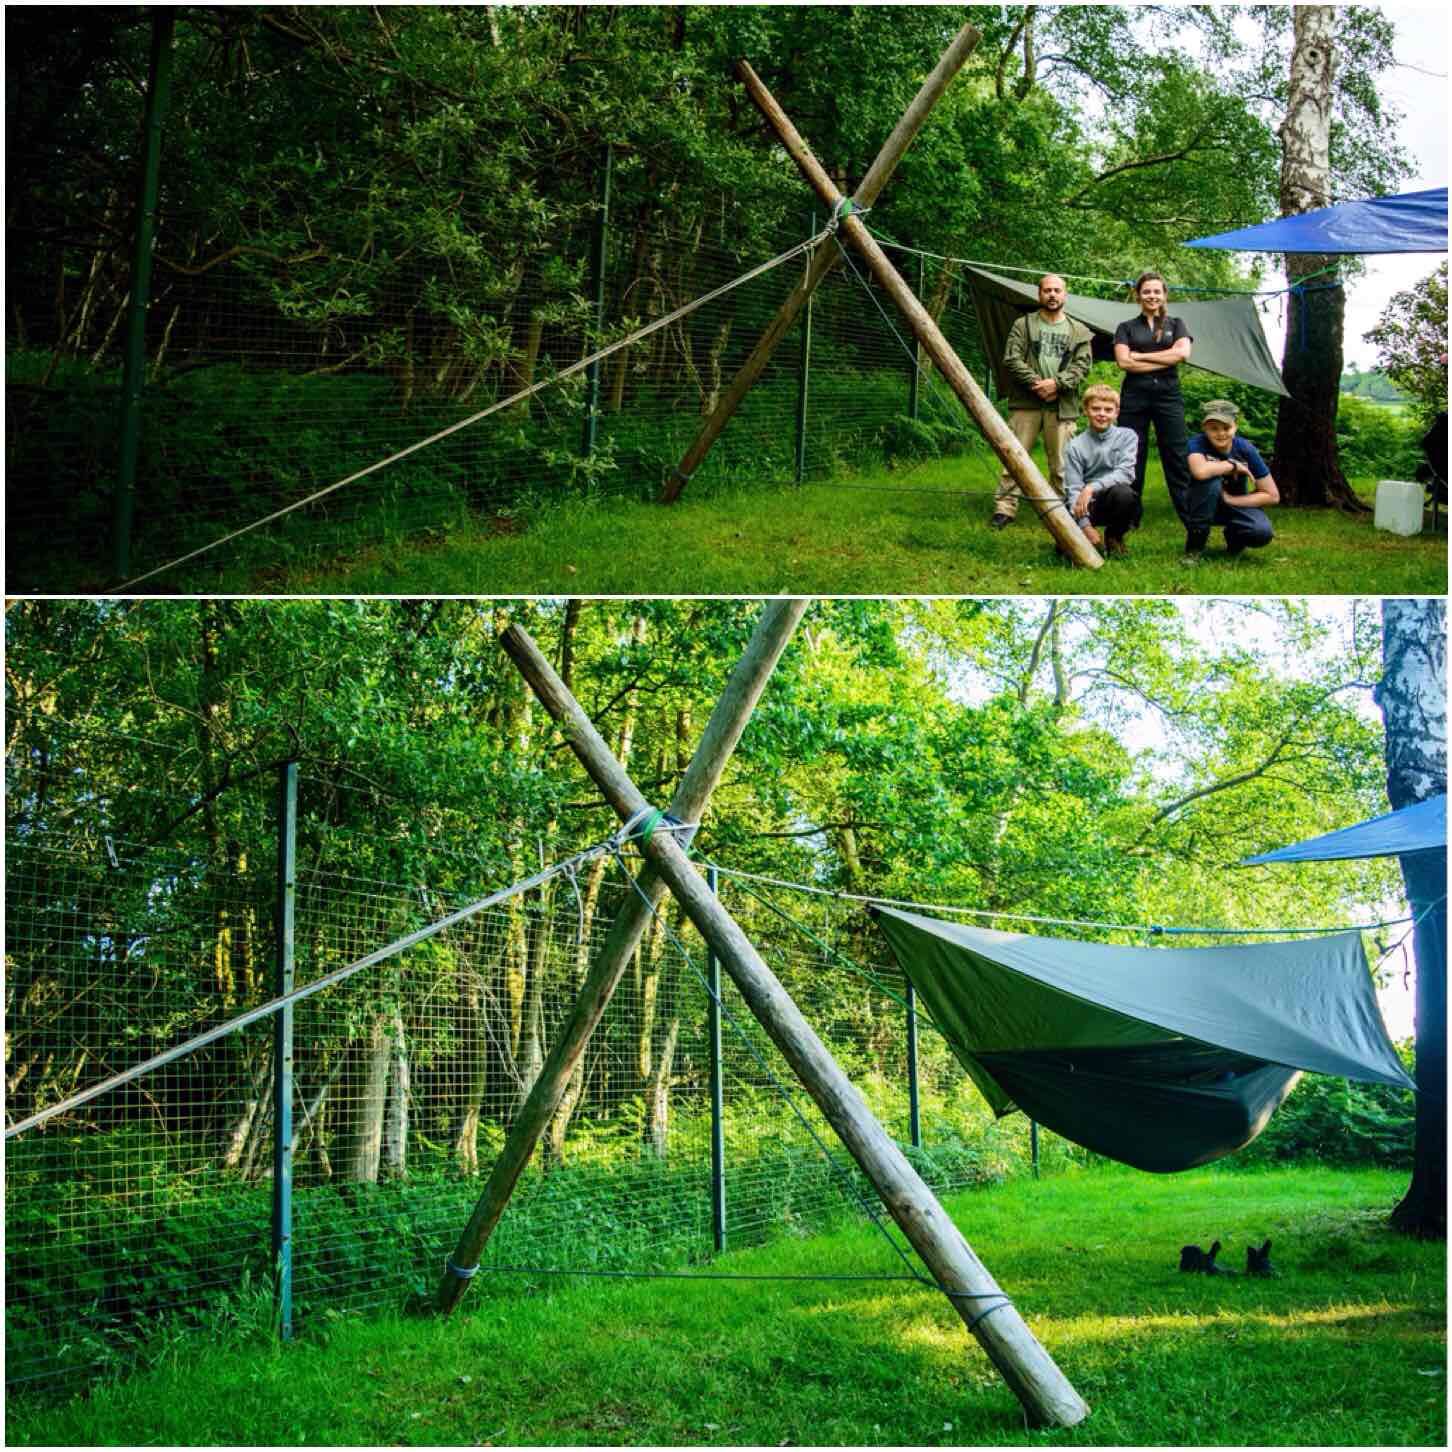
If you cannot drive your shear legs into the ground I would advise you to tie them together near the bottom so that they do not inadvertently splay out. Dave used the last of the lashing rope (it was a rather long piece of old climbing rope) to do this.
Finally, to finish the set up the shear legs were tied securely to our single tree using a top line. This top line as well as securing the shear legs was to act as a line to hang Jess’s tarp off.
Securing
Testing & Set Up
I did a bit of testing after we had hung the hammock. I figured if it took my weight then Jess would have no problems. The top line went slightly slack when the system took my weight so that was re-tightened while I was in the hammock.
Testing
After that it was a simple case of rigging the tarp and Jess setting up home for the night.
Setting up home
This was a great solution from Dave to our missing tree problem and took less than an hour to complete. Jess slept the whole night soundly in her impromptu sleep system and I was chuffed that I managed to capture most of the stages in its construction.
A Good Nights Sleep
If you are interested in making a slightly smaller and more mobile hammock stand yourself have a look at my two other posts on this subject,
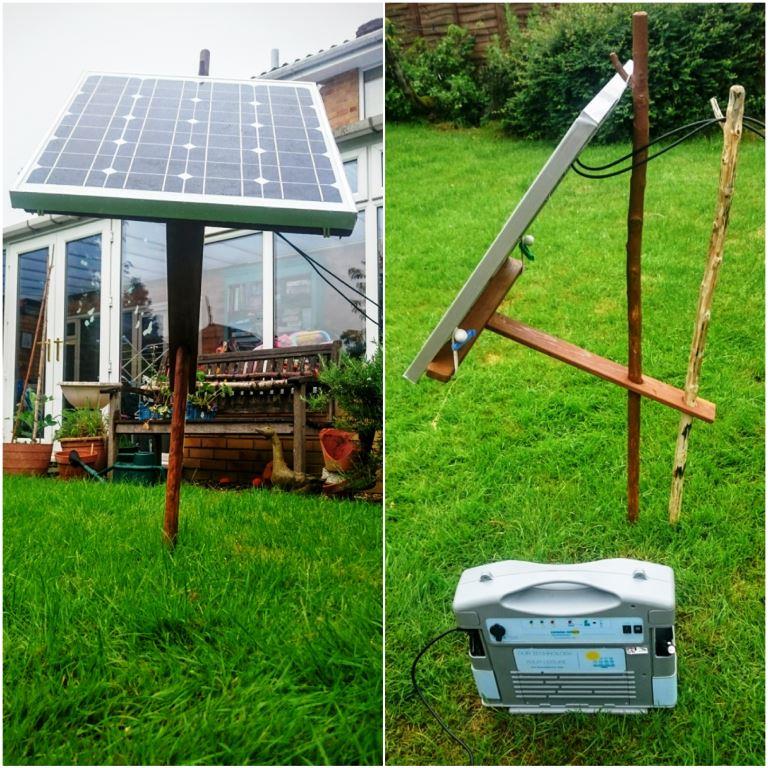
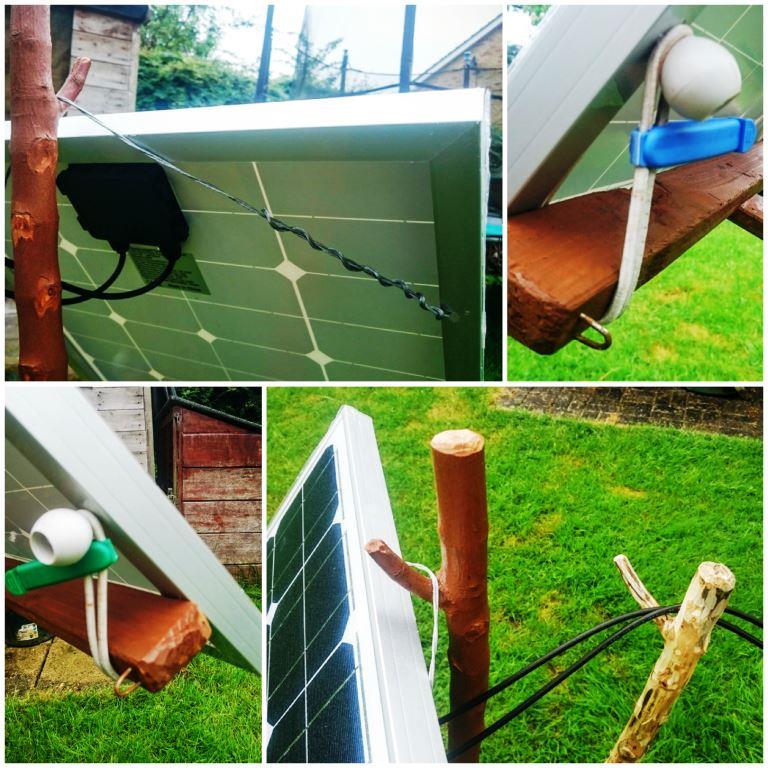
This post is not a full How To…. on building a adjustable stand for a solar panel as the actual steps to make one are very simple. I will not even go into the detailed dimensions of the stand as they will vary depending on the type of panel you have, instead I’ll focus on all the different parts of the stand and how it works.
I wanted my stand to keep the solar panel clear of the ground, and it had to be able to rotate, lock in place (so the wind would not move it), pack away flat and have parts that could be sourced in the woods if needed.
My solar panel stand
Over the last few years my family has come out to join me at the BCUK Bushmoot, wanting to come and explore this magical place I disappear to in South Wales for two weeks every year.
Living without any power was not an issue when it was just me (I could charge my phone up in my car) however my family’s power requirements are slightly higher. After a long day’s playing in the woods the kids like to settle down with a video on my laptop before bed, and that requires power.
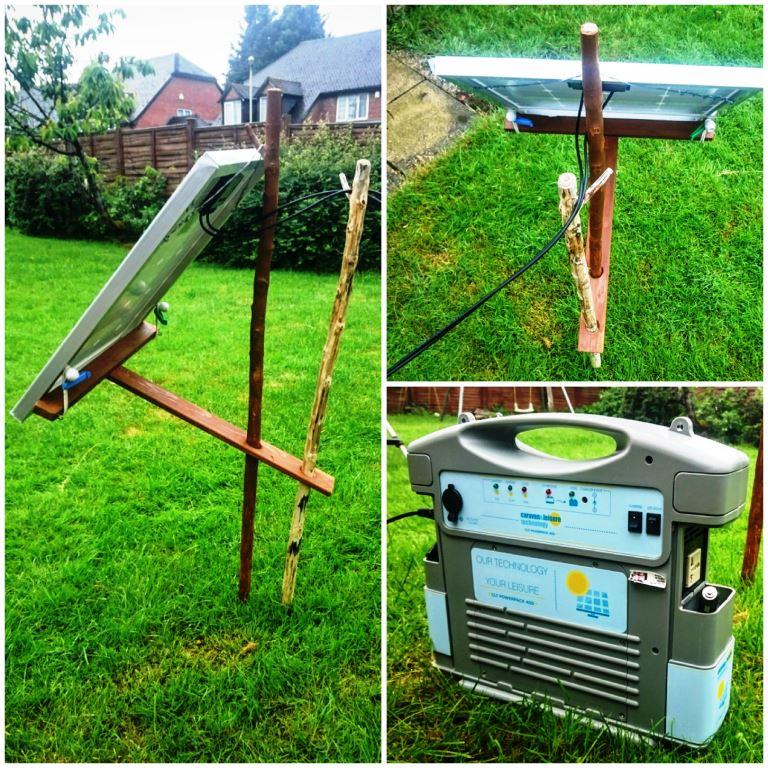
I have relied on my friends Fraser Christian (Coastal Survival) and Stephen Conway to recharge the laptop for me over the last couple of years and this year I decided it was high time to get my own set up. I had long discussions with my friend Si Parker on the different types of set ups I could go for. Si has a fantastic level of knowledge and I was soon clear about what I needed. I opted for a CLT400 solar powerpack (Si’s suggestion – with built in regulator and inverter) and a SUNDELY® 50W 12V Monocrystalline Solar Panel.
The arm
The Arm
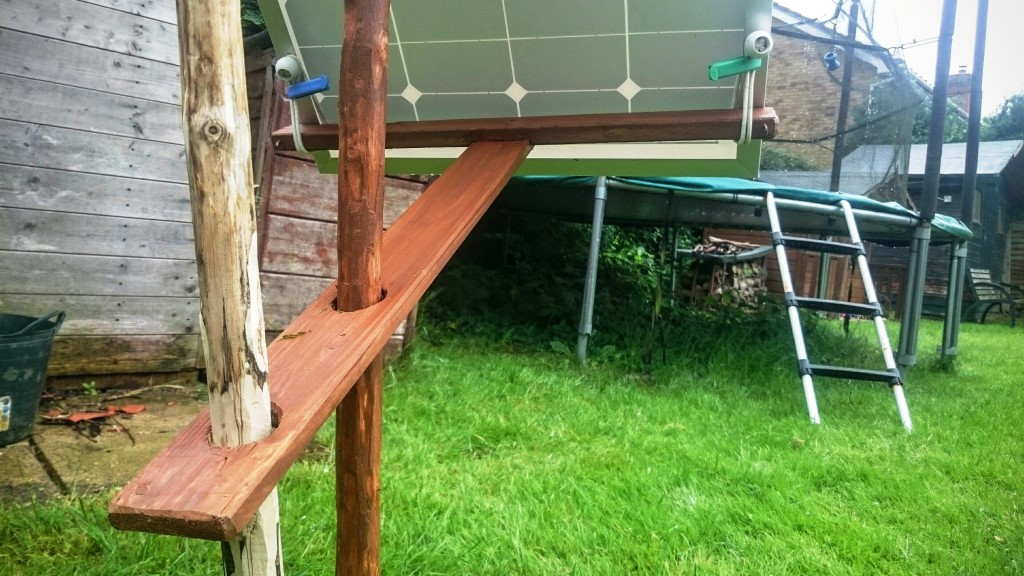
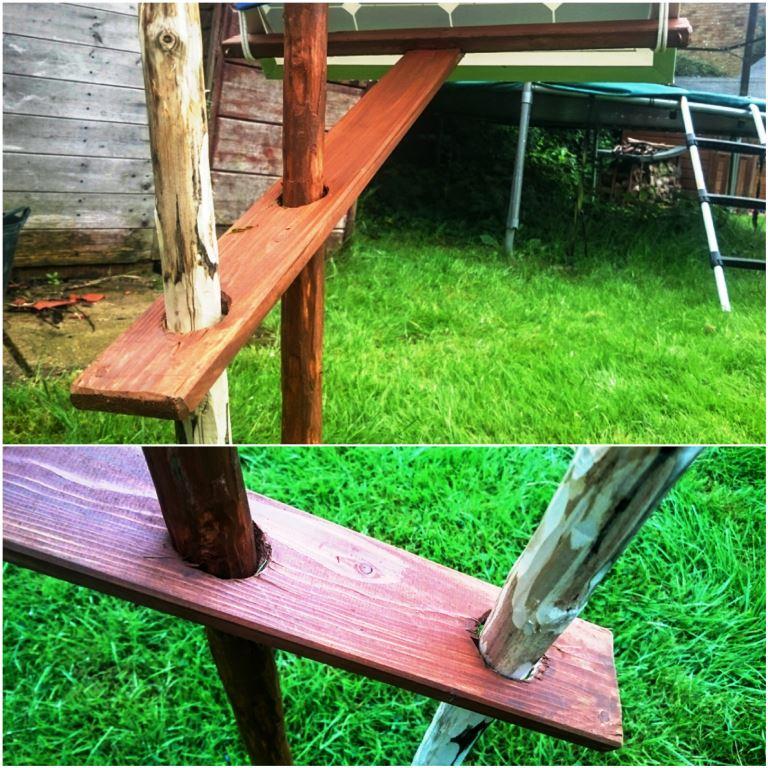
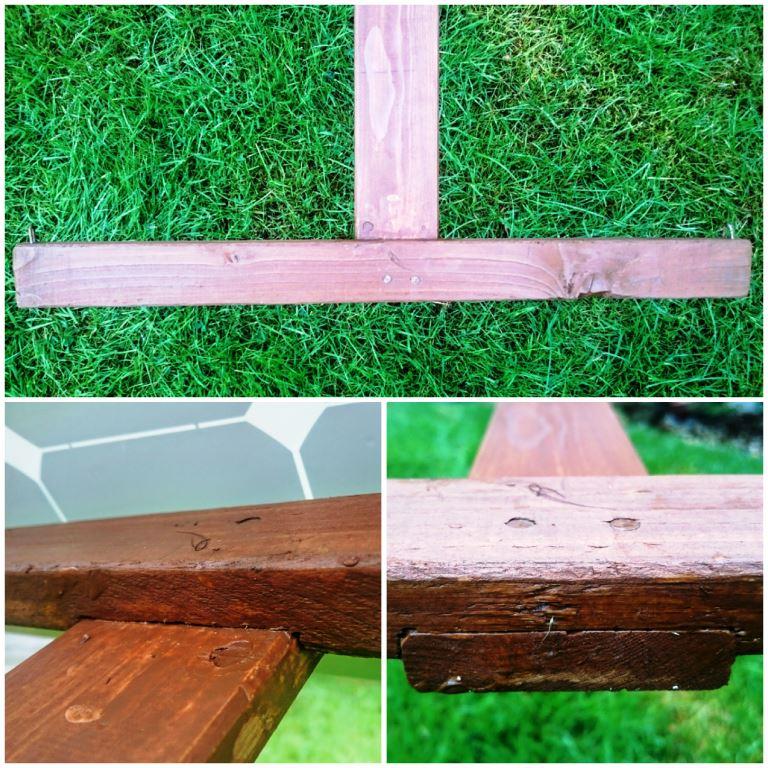
I’d seen a stand that Stephen had built a few years ago at the Moot that could rotate so I set out to build something similar. I had some scrap wood lying about (from my old hammock stand) and made this T-shaped arm to hold the panel out so it was angled correctly.
The system works on similar principles to my campfire cranes using friction to hold things in place. I worked out the length of arm I would need and drilled these two holes out (just big enough for the uprights to slip in).
The mini lap joint
The other end of the arm I joined together with a small lap joint, some wood glue and a couple of nails.
The Attachments
Below you can see the attachments on the solar panel I added. I just used some wire to hang the panel off the upright however the bottom of the panel required something more flexible.
I opted for some tent bungees, fencing nails and food bag clips. I attached the bungee to the panel by a mounting hole and then wrapped it around the T bar back onto itself. The food bag clip ensures the bungee does not slip over the plastic ball, and the fencing nail stops the bungee slipping off the side of the T bar.
Panel attachments
Testing
I have had this out for a couple of days now and used the CLT400 to charge up my laptop and other small battery packs. Even in low light (it has been very wet over the last few days) the solar panel has kept the powerpack well charged.
I just went out every now and then and removed the back pole, rotated the panel slightly and then hammered the back pole back in. This back pole stops the panel from moving out of its set position. I had originally thought to use guy lines instead of this second pole but I prefer this method because it’s so much easier to adjust as the sun moves (the idea came to me as usual when I was trying to get to sleep).
Fully adjustable
As well as at the Bushmoot I will be using this set up at our Sea Cadet camps to charge the other instructors’ phones and radios.
Somehow though I think the family will be wanting to bring along a few more appliances to the Moot – I am hoping it will not be the hairdryer or the XBox 🙂
It was at this point Spikey had his Eureka moment: ‘Why not try and find a piece of sycamore that’s oval shaped instead of round?’
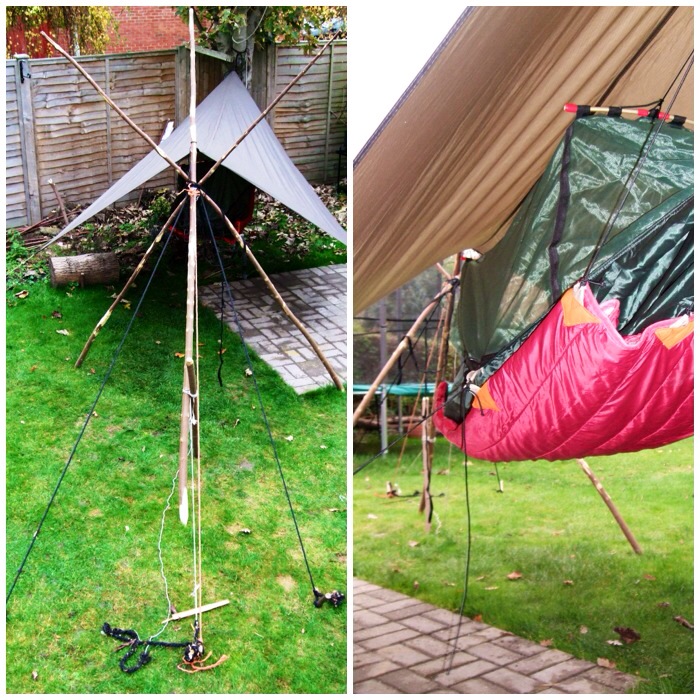
This post is for my friend Spikey who had one of those Eureka moments that pop up out of the blue. It happened when we were experimenting with the building of a green-wood, free-standing hammock stand at the 2012 BCUK Bushmoot. If it hadn’t been for his inspired idea this hammock stand would never have worked. More on that later but to begin with I need to explain how I got into building these free-standing hammock stands and explain a bit more about what they are.
A free-standing hammock stand comprises a couple of tripods with a ridgepole hanging down between them. The ridgepole is not directly attached to the tripods but slung on some Amsteel cordage. I like to use Amsteel cordage as it is fantastically strong, does not stretch easily and is very rot resistant. The hammock is tied off to the ridgepole so that the compression forces from someone lying in the hammock are solely on the ridgepole. The tripods only take the vertical forces caused by the person’s weight. As the forces are separated there are no compression forces on the tripods that could cause them to topple over, which means you do not need ground anchors.
The two pictures below show two free-standing hammocks I made, one with green wood and one from machined wood.
Woodland-made and workshop-made free-standing hammock stands
To me there is nothing better than finding a nice spot with two perfectly placed trees where you can set up a hammock, have a great sleep and waken up in the morning to a great view. Sadly this is not always possible: the trees may not be placed perfectly, or may not be strong enough to support a hammock, or there may simply be no trees about.
At times like this you have to start thinking out of the box if you want to still sleep in your hammock.
Relaxing hammocking when the trees are perfectly placed
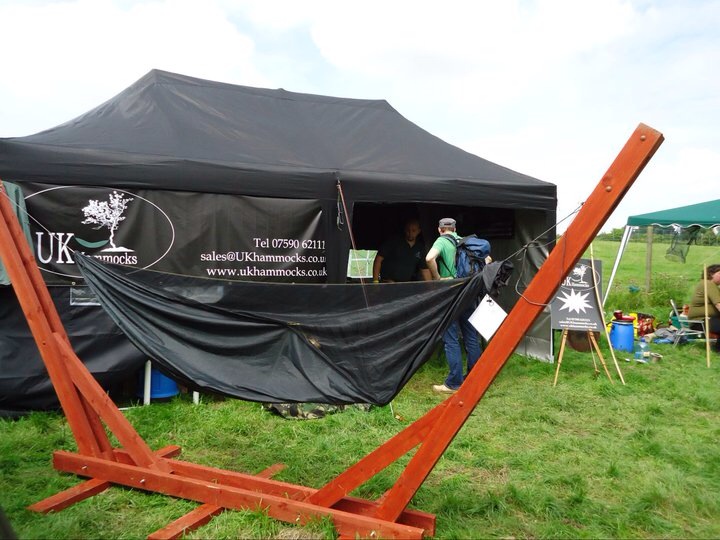
If you have the tools and the ability to transport your own hammock stand you can make something as good as my friend Mat made for displaying his UK Hammocks.
The deluxe version
I can’t transport or store a hammock stand like Mat’s so I started experimenting with what I called the one-tree hammock stand. I set up a tripod made of sycamore rods that had lots of wooden anchors to hold the tripod in place. I then tied one end of my hammock to the only big tree in our garden and the other end to the tripod.
The tripod was held in place by lots of anchor points and worked well until my wife Alison pointed out all the holes I was making in the garden, and muttering about ‘trip hazards’.
One-tree hammock stand with multiple ground anchors
Not only did I need anchors to stop the tripod from toppling over, I needed to set up further spikes on the tripod to give it extra strength and keep it in place. I suppose this was due to the fact I was using wooden pegs and ropes of different strengths which tended to stretch a bit.
A lot of rope is required for this set up, and backwards facing pegs
My friend Paul Bradley (Bardster) cracked all this with a hammock stand he made that had 10″ screw anchors and used top-quality non-stretch rope. Paul plans to experiment with delta anchors in the future. I however did not have screw anchors and had never heard of delta anchors.
I wanted something I could just put up in my garden for the kids to use, as and when required, something that did not take up much space, was not dependent on land anchors and could be easily transported in my van.
Paul Bradley’s single ground anchor hammock stand (Photo courtesy of Paul Bradley)
Turtlelady’s post gave me ideas for experimenting with just one tripod and a single tree. I suspended the ridgepole (two old army tent poles) between the tree and the tripod using Amsteelrope and then slung the hammock directly to the ridgepole. As the hammock was not tied directly to the tree or the tripod the ridgepole absorbed all the compression forces, meaning no ground anchors were required.
One-tree free-standing hammock
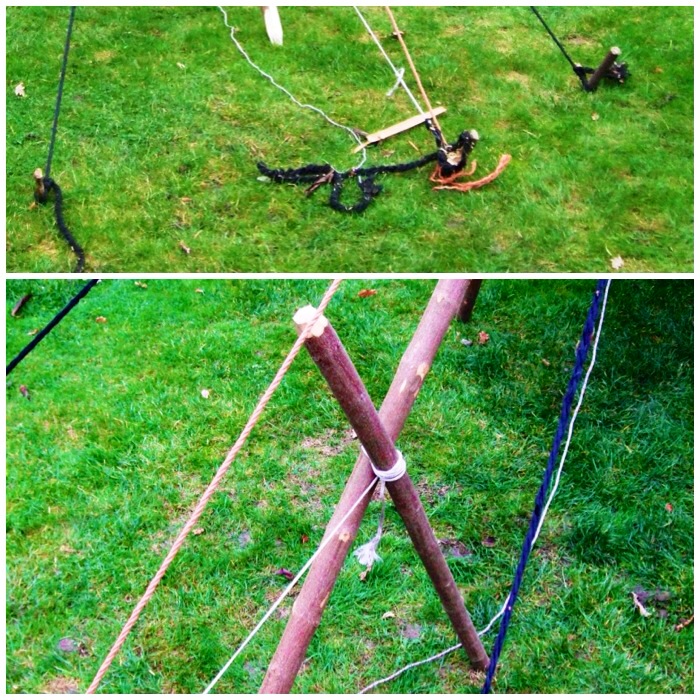
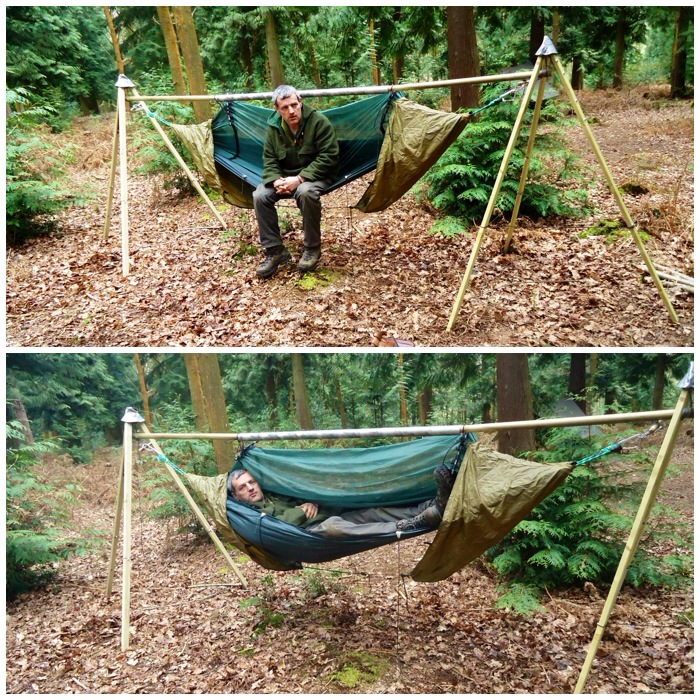
The tripod I made was from ‘Sawn Treated Softwood’. I bought a pack of 8 x 1.8m length pieces (47mm x 22mm) which cost just under £10. I cut the legs of the tripod to approx. 1m 70cm lengths so as to fit easily in my van.
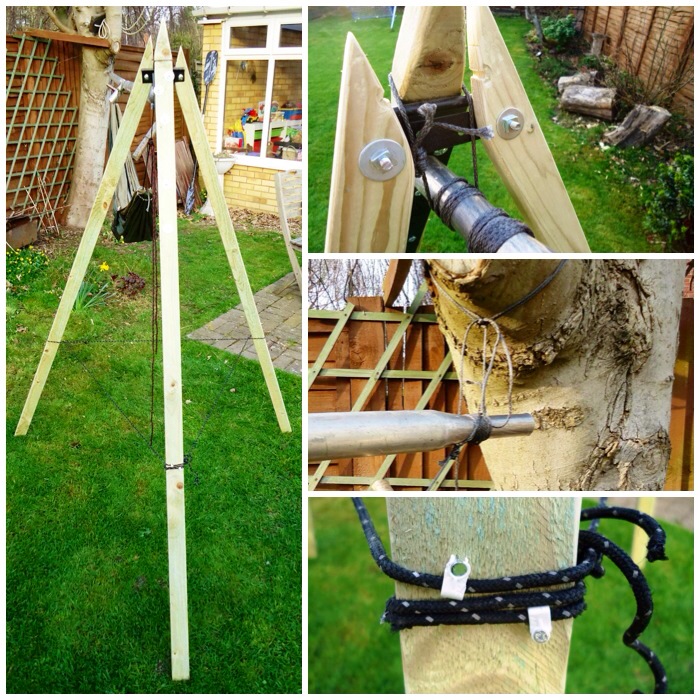
To connect the tripods I used a ‘T’ Hinge (about 45cm in length) at a cost of about £2.50. I attached the hinge to one of the legs using bolts of about 4cms (cost about £3). As you can see in the top right picture below I shaped the wood as best I could so that when the tripod was open the tops did not touch each other.
I used Amsteel rope to connect the ridgepole to the tripod. As you can see the ridgepole is hanging off the centre tripod leg on a length of Amsteel. I bought 5 metres of Amsteel rope for this job costing me about £5.
The other end of the ridge pole I hung directly from the tree (I now use a hammock strap to go round the tree and tie the Amsteel rope directly onto the strap). This tree has a handy branch coming off the side to tie directly onto, allowing the rope to hang down directly. Where you have only the trunk of the tree, a strap grips the bark better than just cordage.
Finally I tied off some old guyline rope around the tripod legs to stop them splaying out when they were under load.
Make up of the one tree free standing hammock
After testing out the one-tree set up I made another tripod and changed the ridgepole.
I made the second ridgepole from two large tree stakes from from a local garden centre (cost about £3.50 each). Each stake was 1.8m x 40mm but I cut each one down to 1m 74cm to get rid of the points.
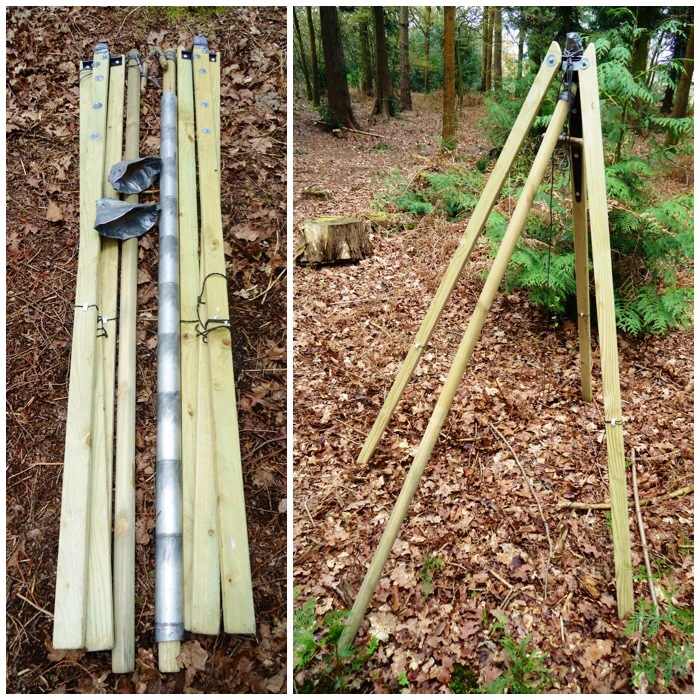
I connected the rods with an old army aluminium tent pole. I cut the ends off the tent pole to allow it to slip easily over the tree stakes. I saw these old army aluminium tent poles for sale on eBay for about £6 (a single ridgepole would never have fitted it in my van).
Below you can see both tripods collapsed and ready for transport and one of them set up. The little caps you can see in the left-hand picture are protectors for a tarp.
Freestanding – tripod set up
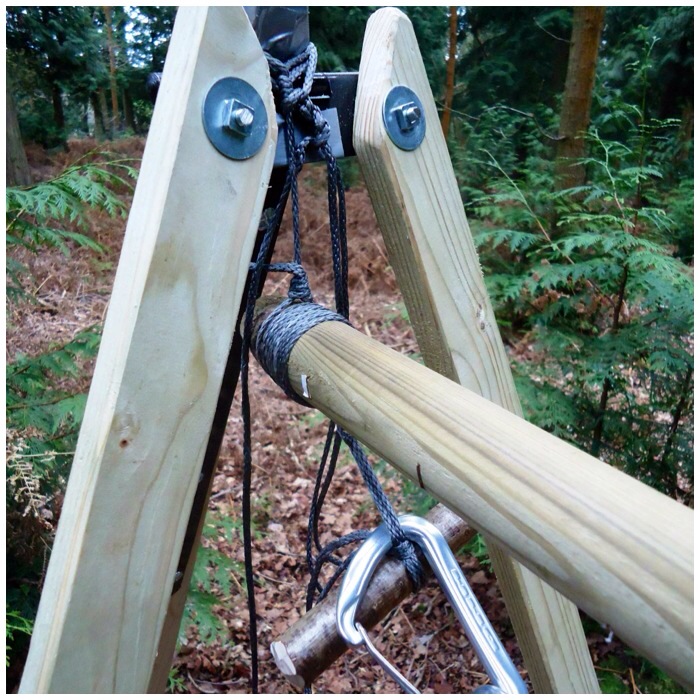
Below you can see a close up of the ‘T’ bar hinge set up and how the ridgepole is connected to the tripod.
I carved 3 grooves all the way round the the ends of the ridge poles to give the Amsteel rope something to grip onto. The ridgepole is attached by means of an adjustable loop that is hung from the tripod and around the first groove on the ridgepole.
The wrapping of Amsteel you can see on the ridgepole is a common whipping that is wrapped around the area where I had carved the other two grooves. This whipping has a tail on it that can be used to create a marlinspike hitch to allow the hammock to be hung off.
Free standing – tripod back
Below you can see the marlinspike hitch and the hammock clipped to it with a carabiner. This set up makes attaching the hammock very easy and the common whipping ensures that the Amsteel does not slip when I get into my hammock.
Free standing – tripod front
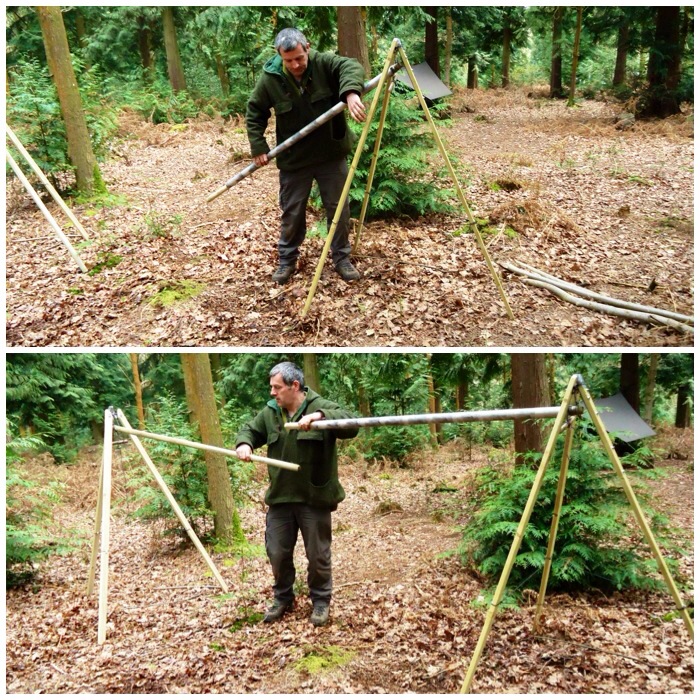
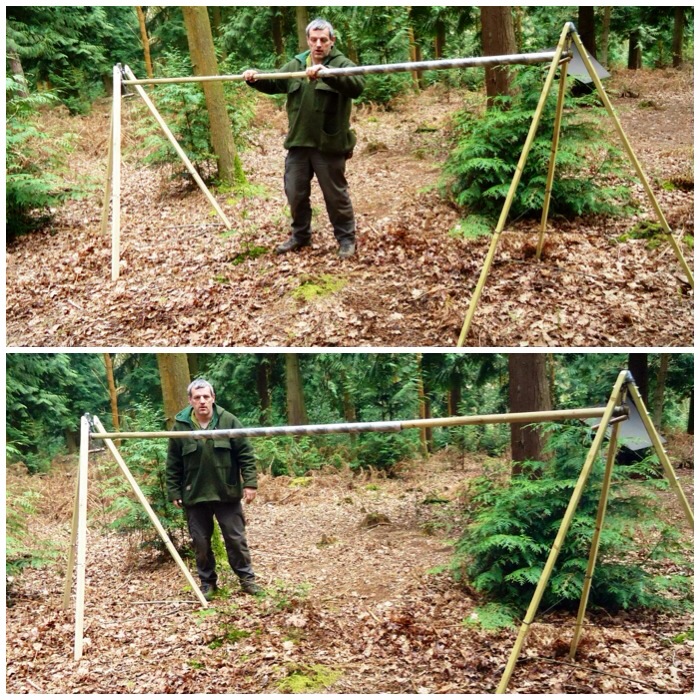
To put it all together I simply open up the tripods and place them roughly the correct distance apart from each other (the length of the two ridgepoles).
Free standing – set up part 1
I then connect the two ridgepoles with the tent pole sleeve. I usually re-position the tripods so that the two ridge poles are touching inside the sleeve and that the Amsteel rope attaching the ridgepole to the tripod is hanging vertically.
Free standing – set up part 2
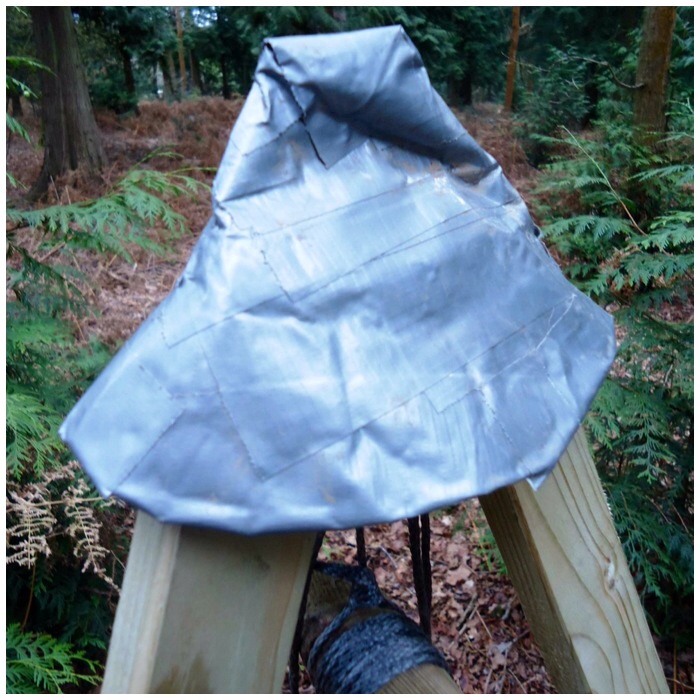
As the tripods are not that far apart the tarp will actually lie on top of them, so I made a cap for each so that the wood would not damage the material. I took an old hessian sack and cut off two of the corners, then covered these corner pieces with duct tape to make them more durable.
Tri pod cap
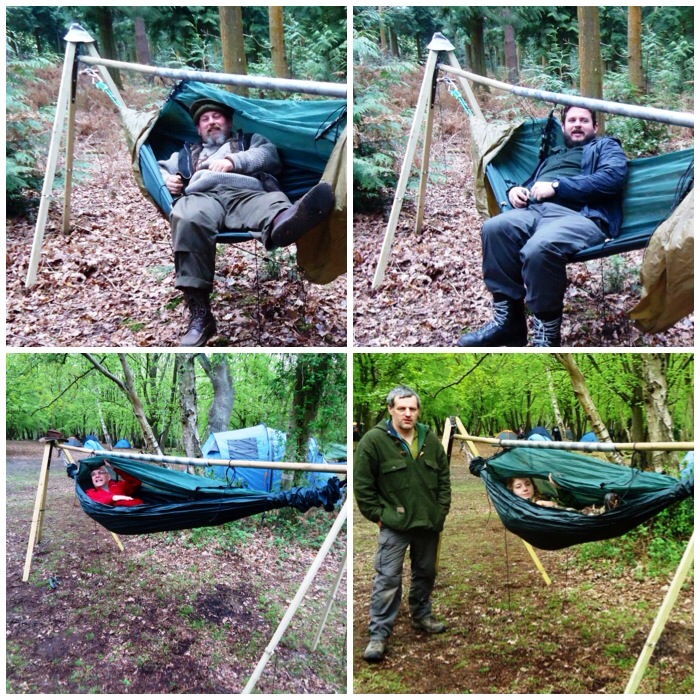
Whenever I use a hammock, whether slung between trees or tripods, I always test it by pushing down on the material of the hammock first, then I sit in it gently before finally lying back into it. This tests all your knots, tightens them up and gives you confidence that everything is ok.
With the free-standing set up what you need to watch for is the ridge pole over-bending with the compression forces you are placing on it from lying in the hammock. In this set up the old tent pole sleeve is so strong that there is very little bend in the ridgepole. I weigh about 14 stone (including all the kit I generally wear while bushcrafting) so if it takes my weight easily I am happy for my kids to use this set up.
Testing and relaxing
Over a few months I used this hammock at various meets and got different people to test it out. After some initial trepidation most people got on well with it. You just have to remember not to bang your head on the ridgepole when you get up.
Further testing
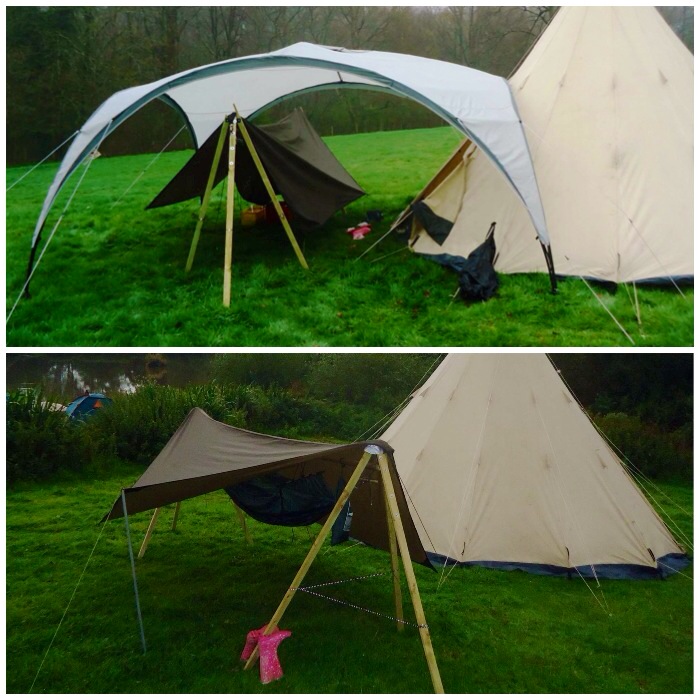
Setting the tarp up on this is quite simple as I just lay it on top of the tripod caps and peg it out. The first night I slept in the set up I put it under our group shelter as it was very windy and wet. I figured if the tarp came off in the night the big shelter would offer me some protection from the rain.
I slept well that night apart from wakening a couple of times to the creaking of the ridge pole as I changed position in my sleep. I have got used to these noises now and trust the ridge pole to take my weight. Now I am happy to set this up with just the tarp for cover. In the bottom picture I had the hammock stand set up at the Wilderness Gathering last year for my daughter to use as a nest to go and relax in during the day and for visitors to come and see the design.
Tarp testing
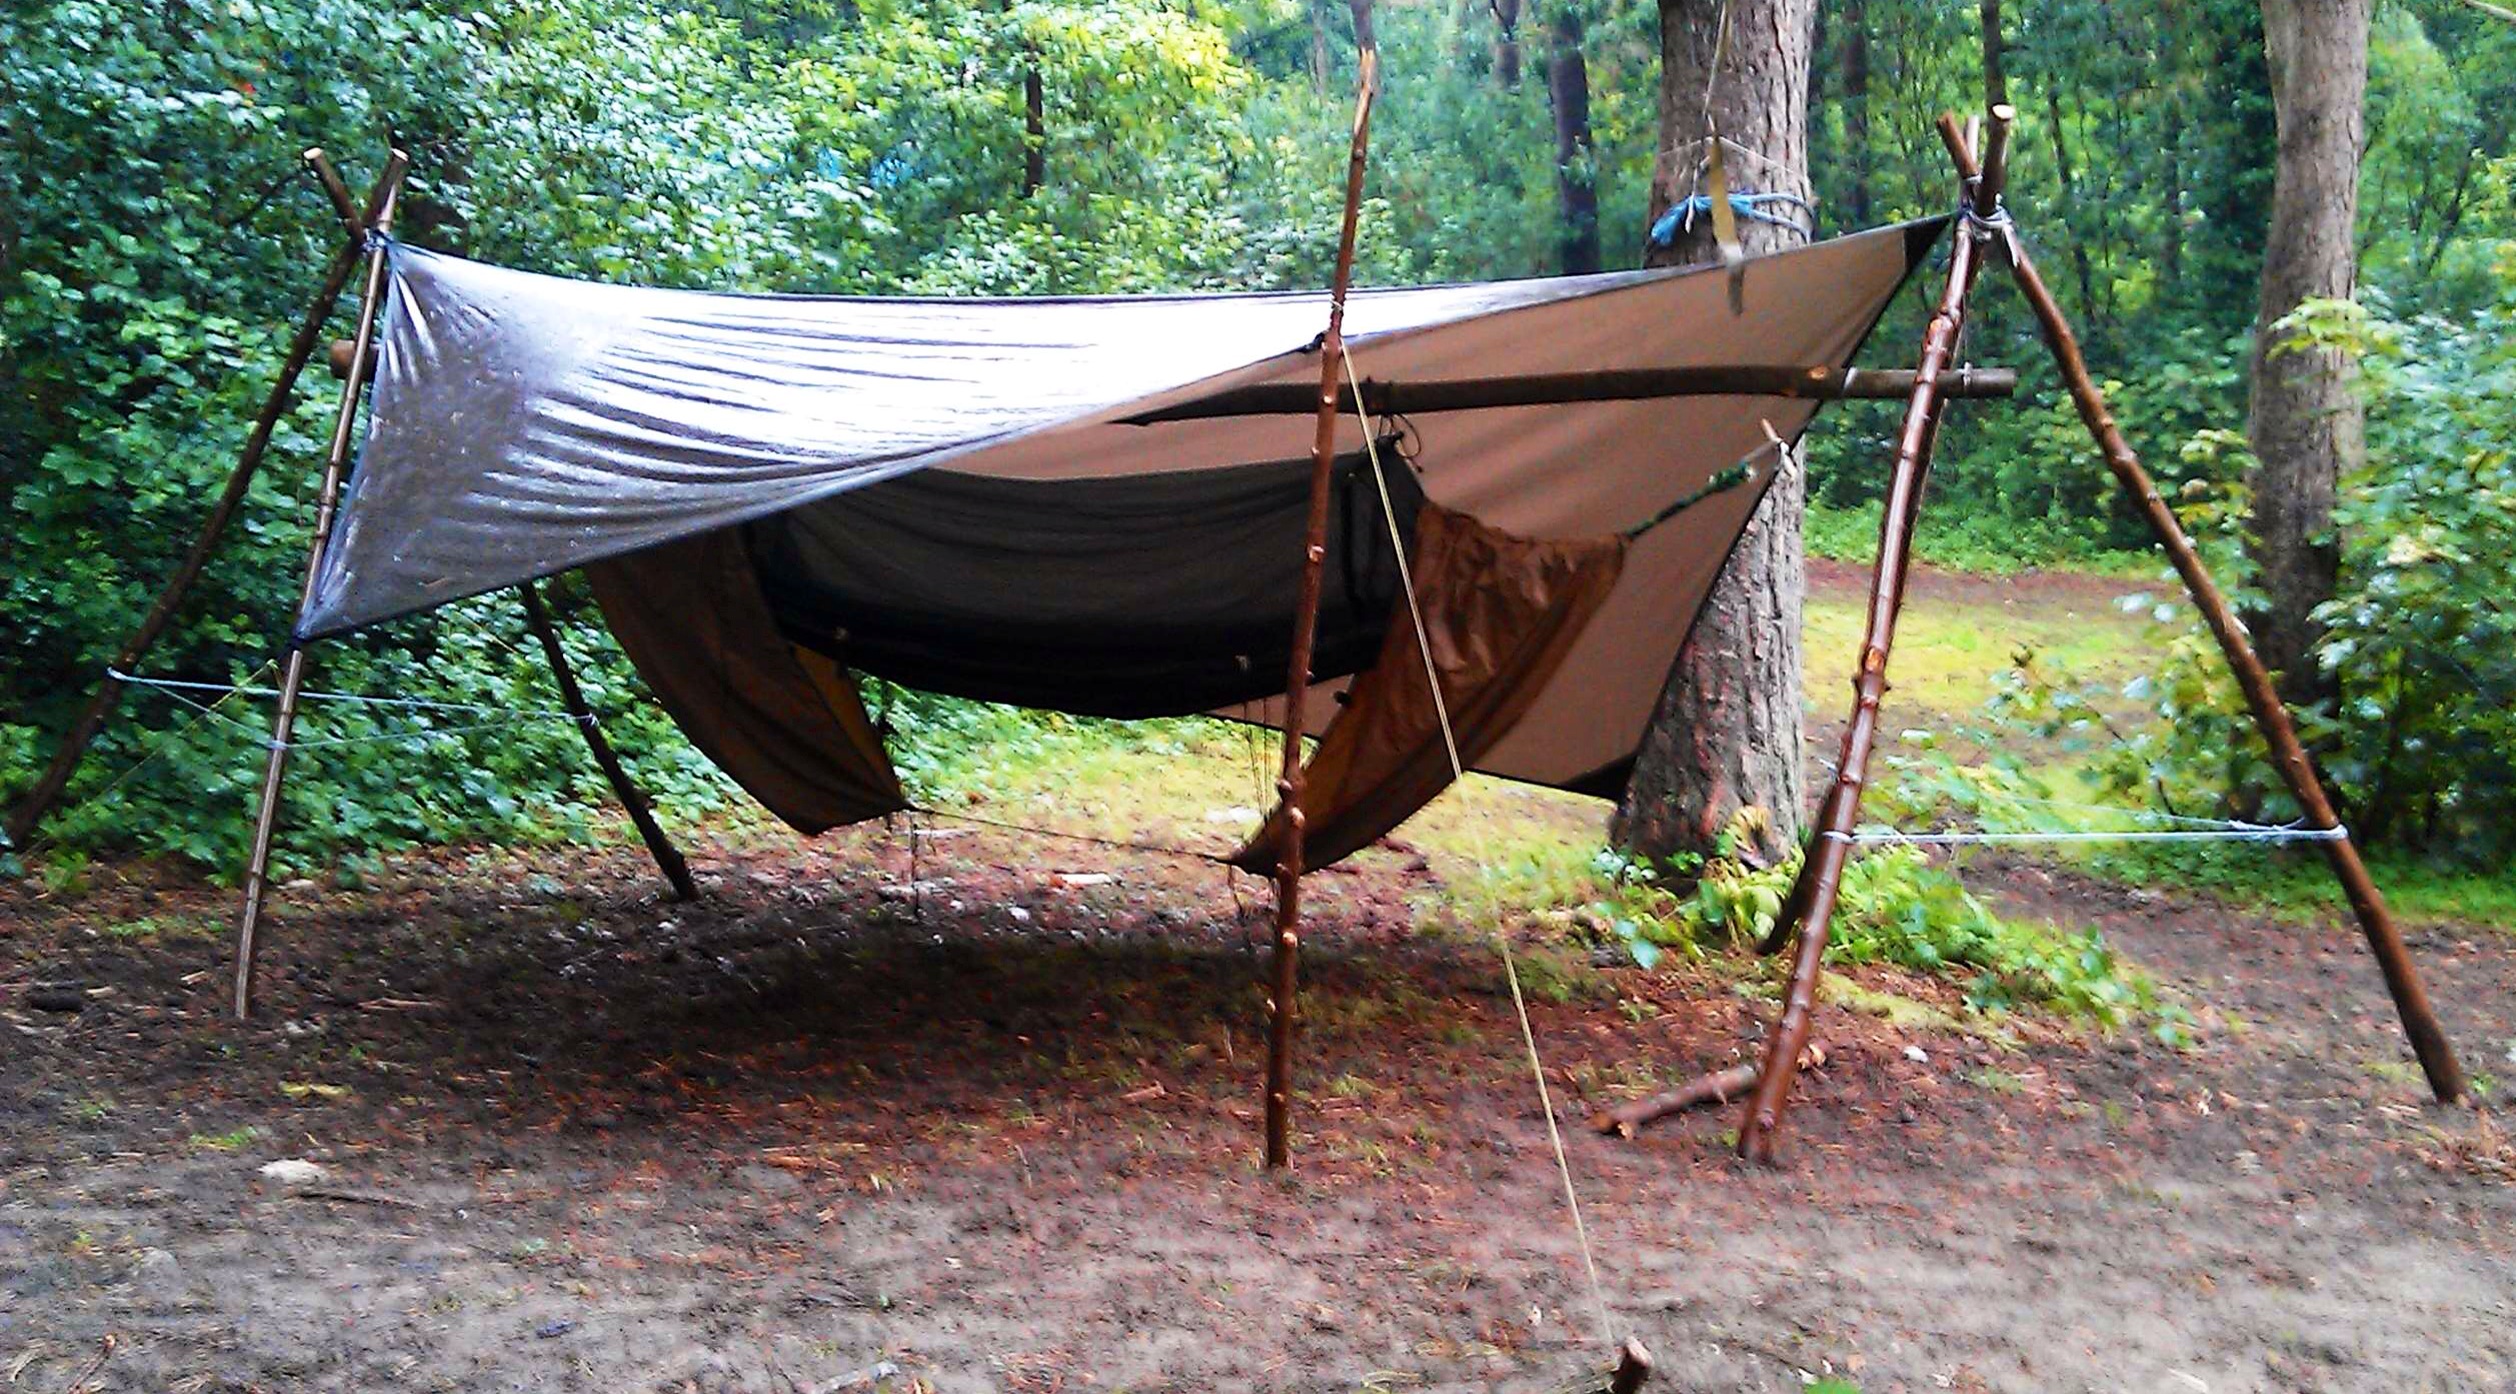
Back in 2012 I had promised some of the guys at the BCUK Bushmoot I’d bring the stand along for them to look at. In all the usual confusion of preparing and setting off for the Moot I forgot to put the stand into my van. Undeterred, I decided to try and make a similar stand using sycamore poles, of which there are plenty on the site at Merthyr Mawr, so I set off to gather the wood I would need: this is when my friend Spikey spotted that I was up to something and asked if he could help.
After I explained the concept Spikey helped me cut the poles to make up two tripods. We lashed the tripods with Amsteel rope and made little adjustable loop danglers to hang from each tripod for a ridgepole. Also each tripod had rope tied around each leg to stop them from splaying out when put under load. We tested each tripod by both doing pull ups together on each one. Our combined weight is about 28 stone so we were quite happy each tripod would be up to the job.
Green wood tripod set up
I did not have a handy old army tent pole to act as a sleeve for the ridgepole this time so I had to find a length of sycamore that was long enough (about 3.5 metres) and strong enough not to bend with the compression forces. I wanted a piece that was fairly uniform in girth along its length and as straight as possible. Spikey and I spent quite a few hours trying to find this perfect pole but when we found a couple that seemed to be ideal they both bent horribly when a load was applied. I did not want to put a massively thick ridgepole above my head and was getting quite frustrated at this point.
It was at this point Spikey had his Eureka moment: ‘Why not try and find a piece of sycamore that’s oval shaped instead of round?’ I could see what he meant – an oval pole would have two sides with fairly flat surfaces and two sides with sharply curved surfaces. These sharp curves would take far more load without bending than the flat surfaces, so off we went to find this magical ridgepole.
As you can see below we found it, and set it up so that the ridgepole hung beneath each tripod. I attached more Amsteel with some simple whipping to each end of the ridgepole for the hammock to hang off and slung my tarp over it all. The ridgepole hardly bent as the sharply curved sides of the pole were very rigid. I got lots of different people to try this set up out and it took the weight of everyone who tried it out easily.
Green-wood free-standing hammock stand
I slept for 5 nights in this set up and had a great sleep every time. I like the fact now that if I am stuck for somewhere to sleep in my hammocks (if for example there are no lovely big trees around) I can now set up a system that will still keep me well clear of the ground.