How To…. Carve a Mortise and Tenon Campfire Crane

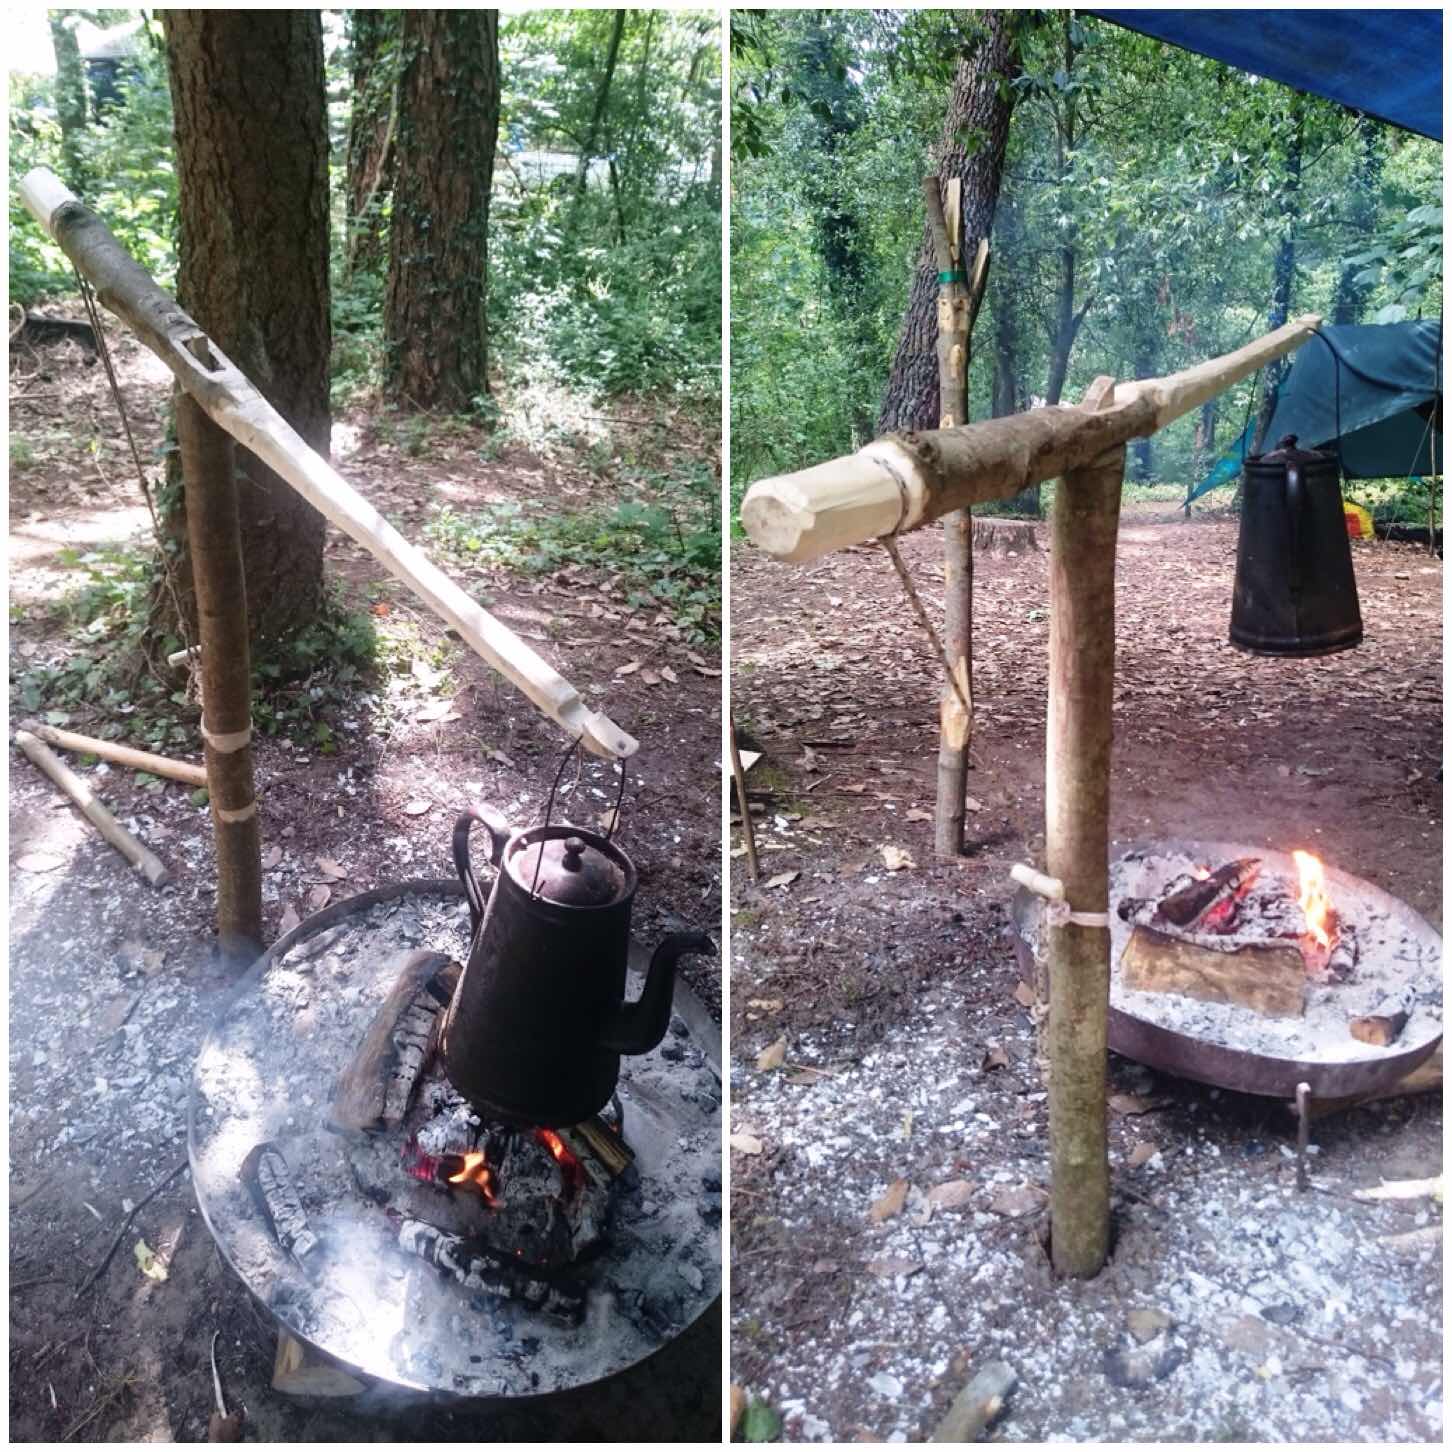
Let me introduce you to what I call the Mortise and Tenon Campfire Crane. This is a crane I made up at the the BCUK Bushmoot this Summer.

The idea came about as usual in a discussion around the fire with my good friends Charlie Brookes and Ian Woodham.

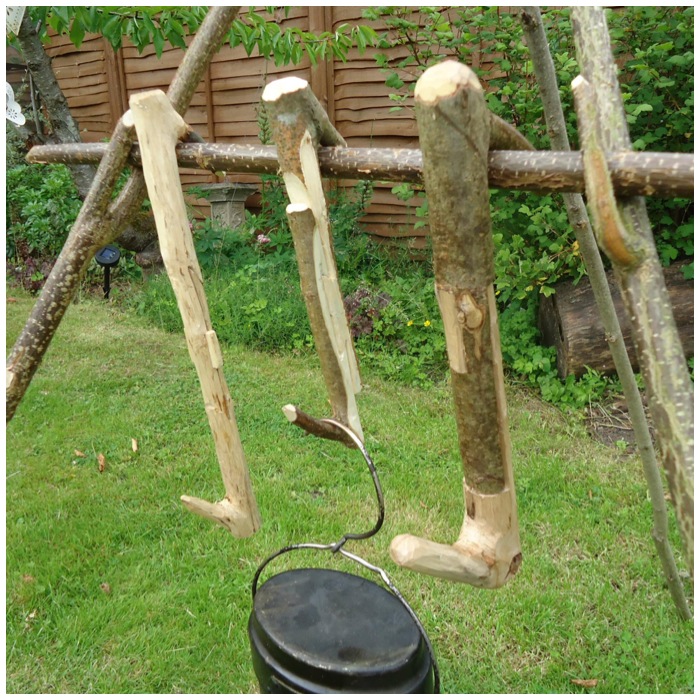
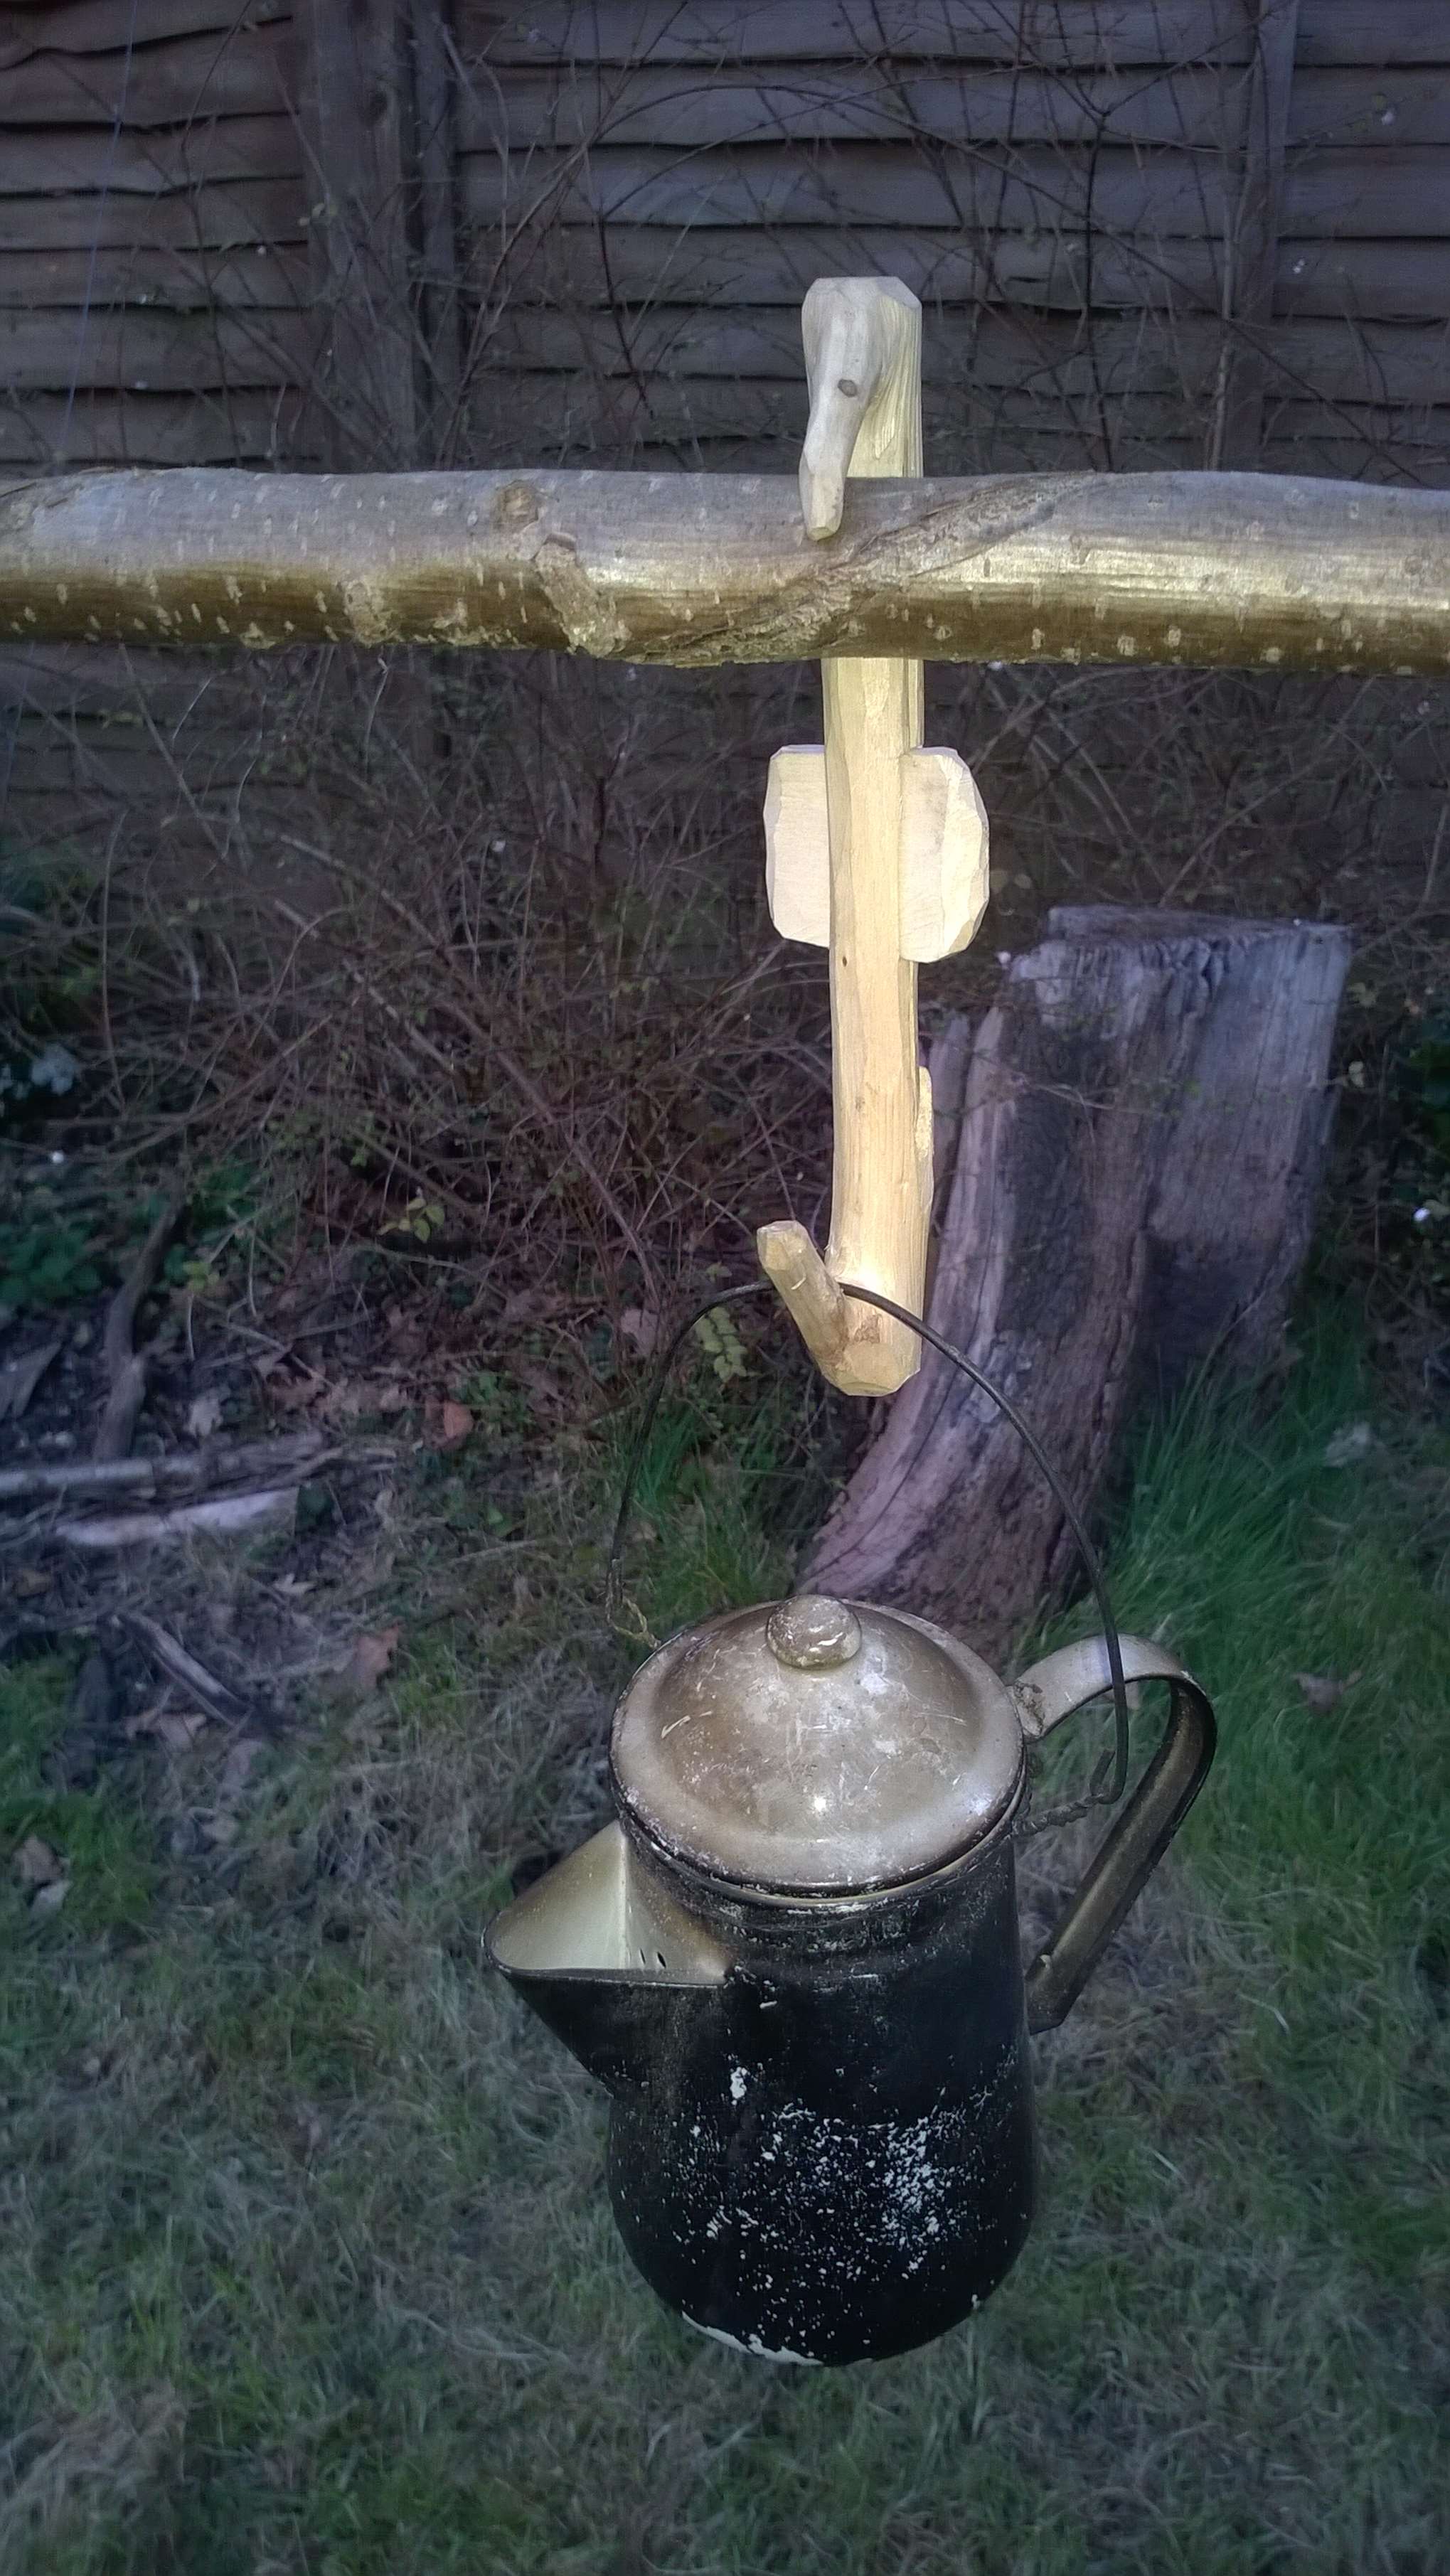
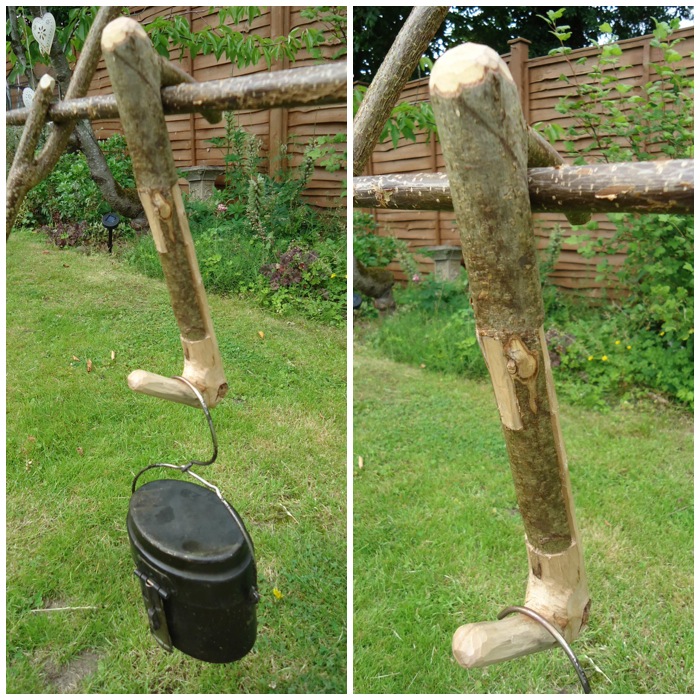
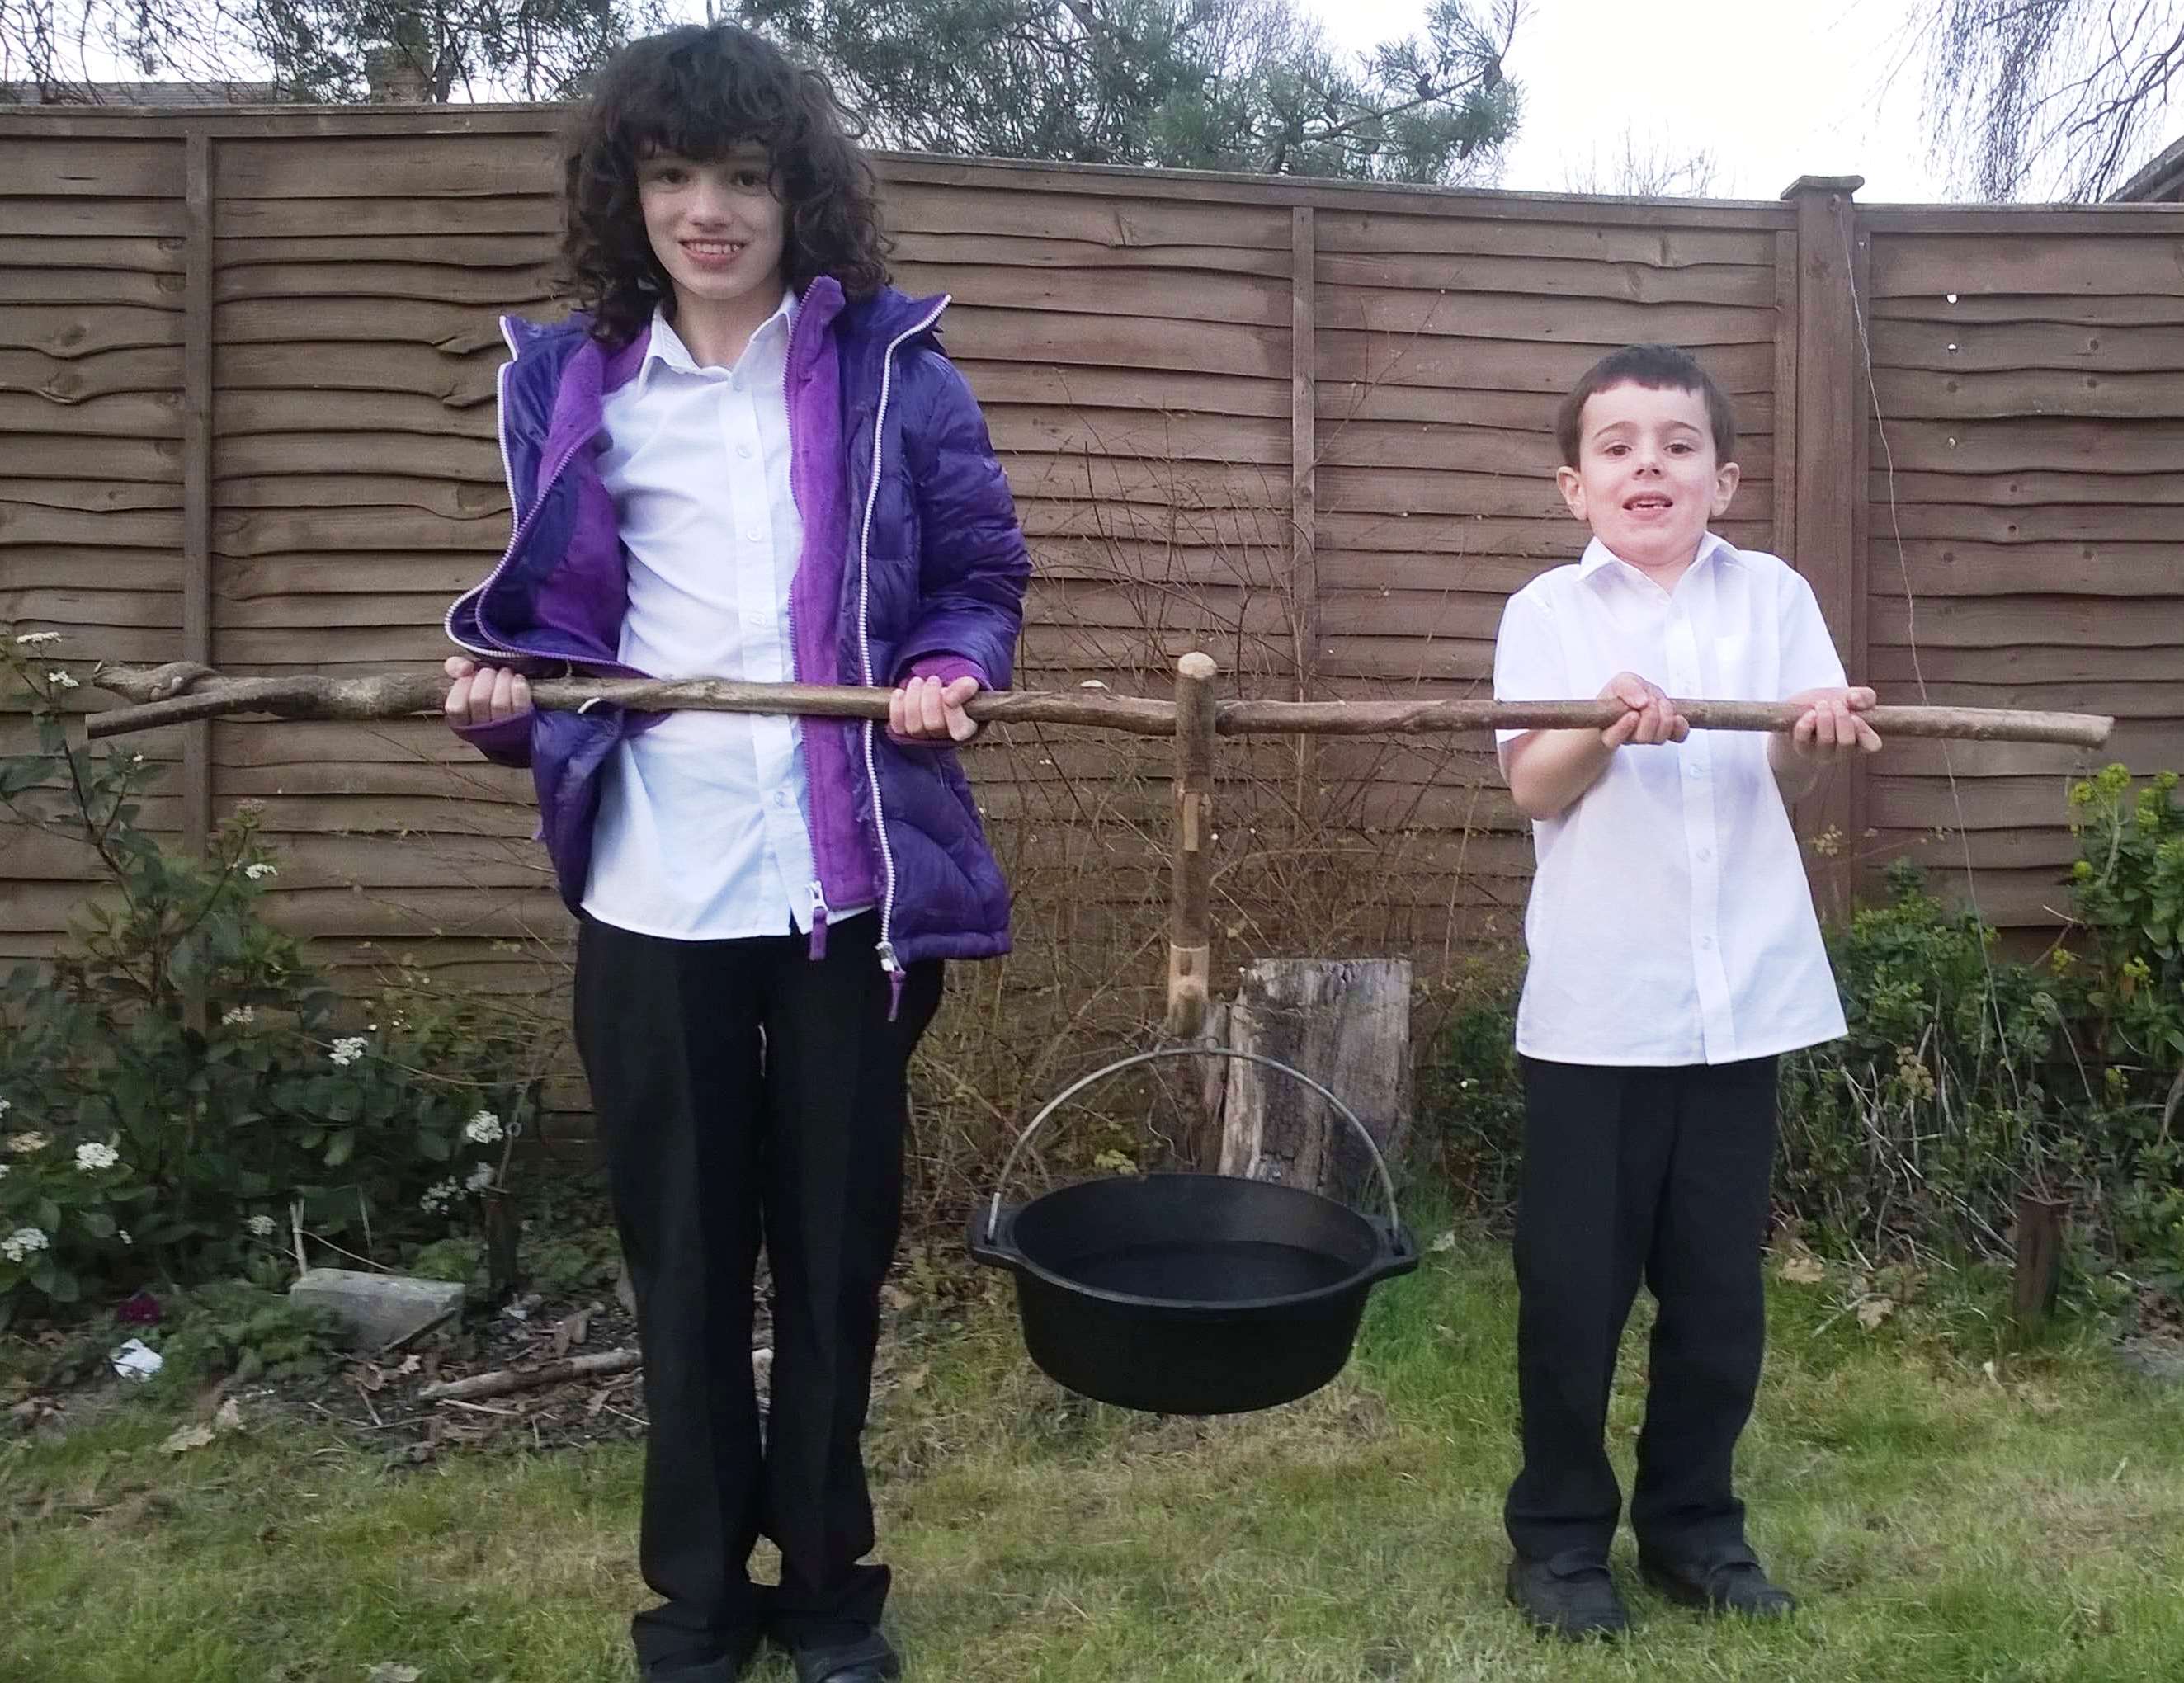
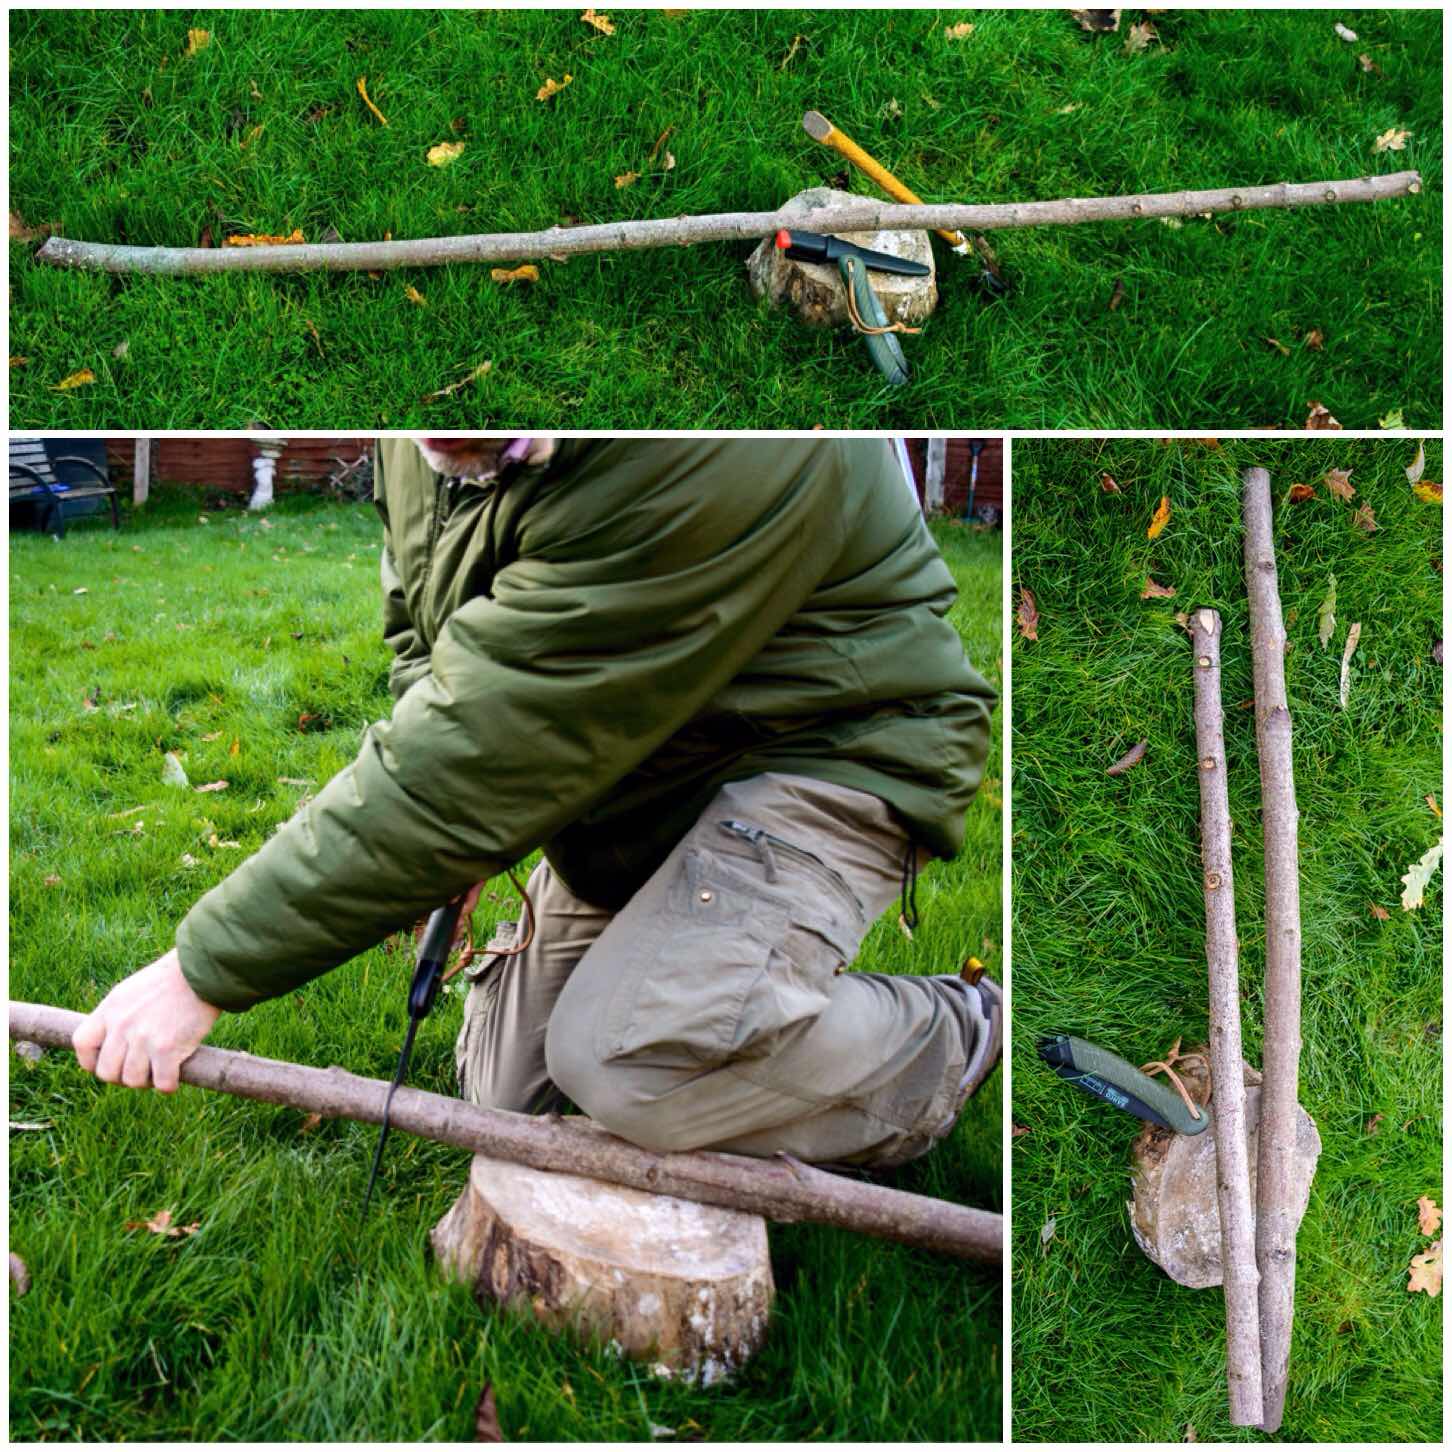
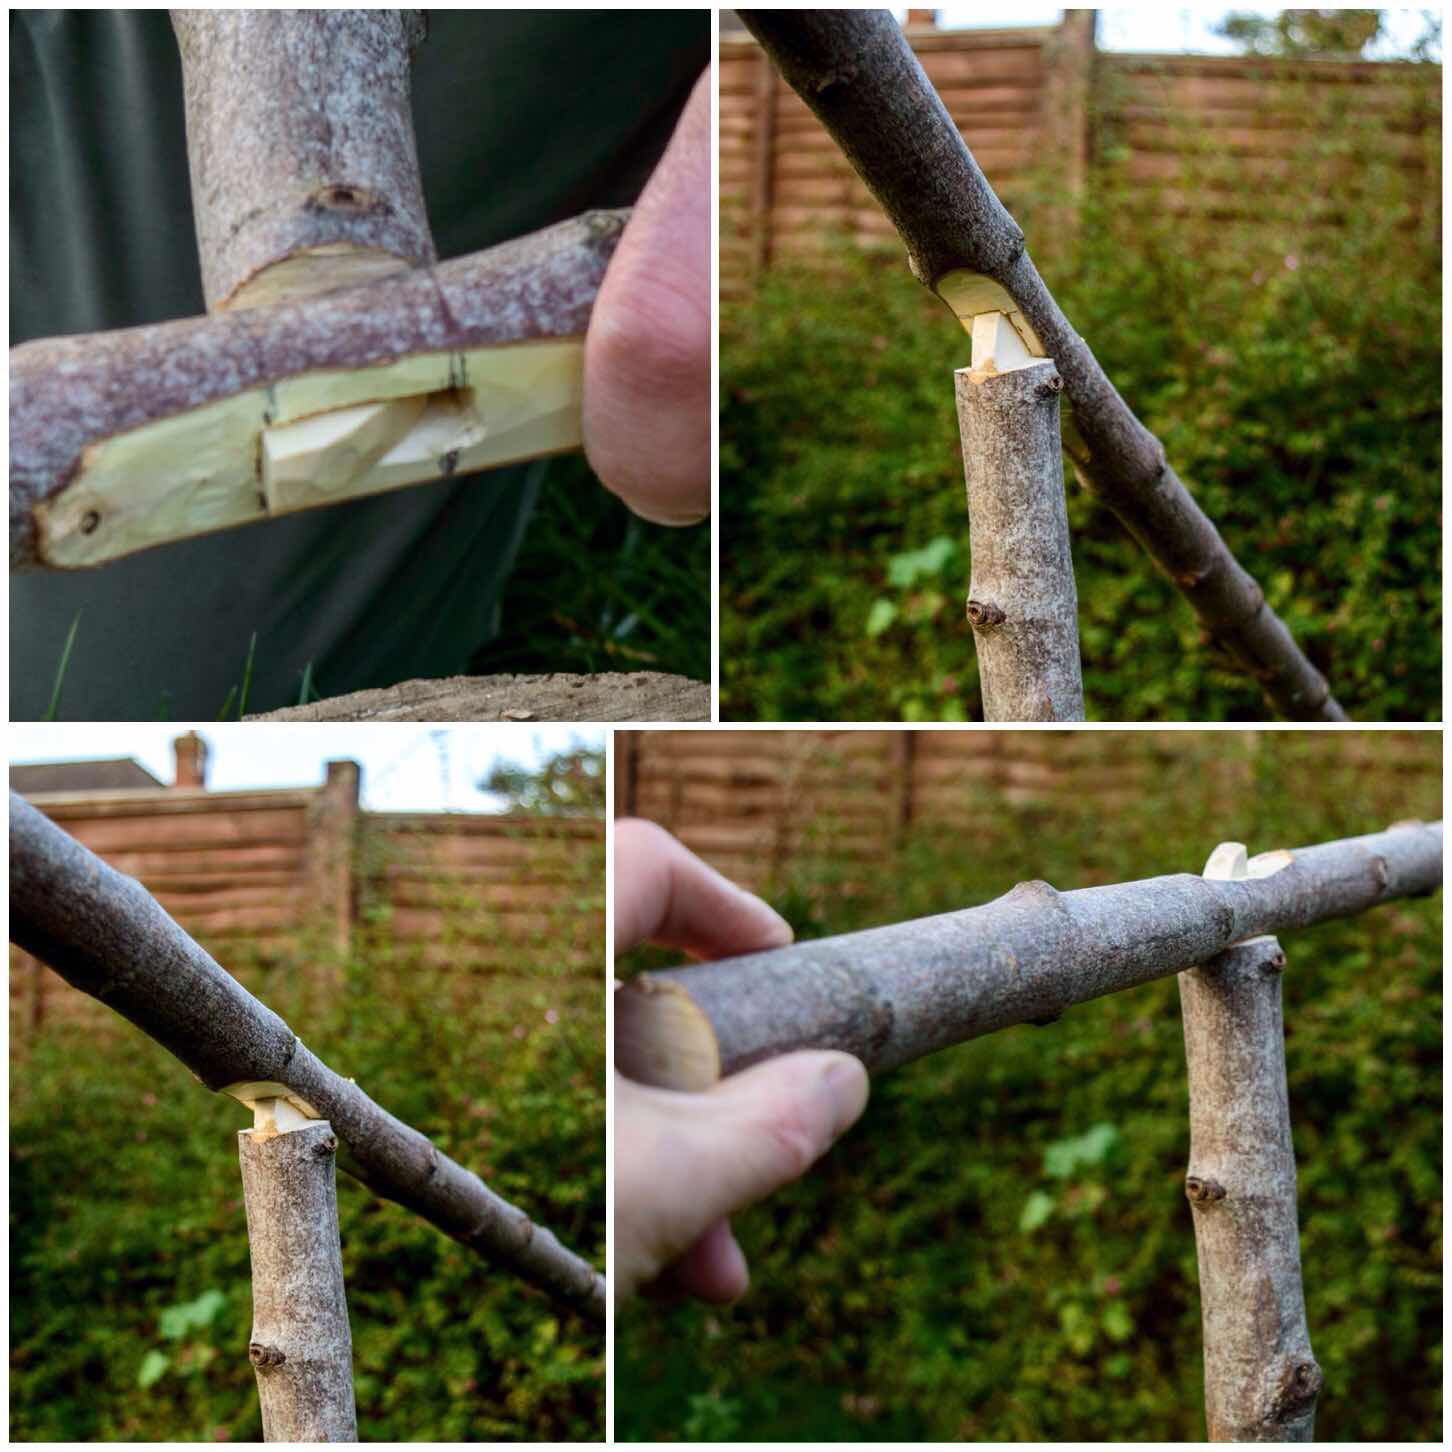
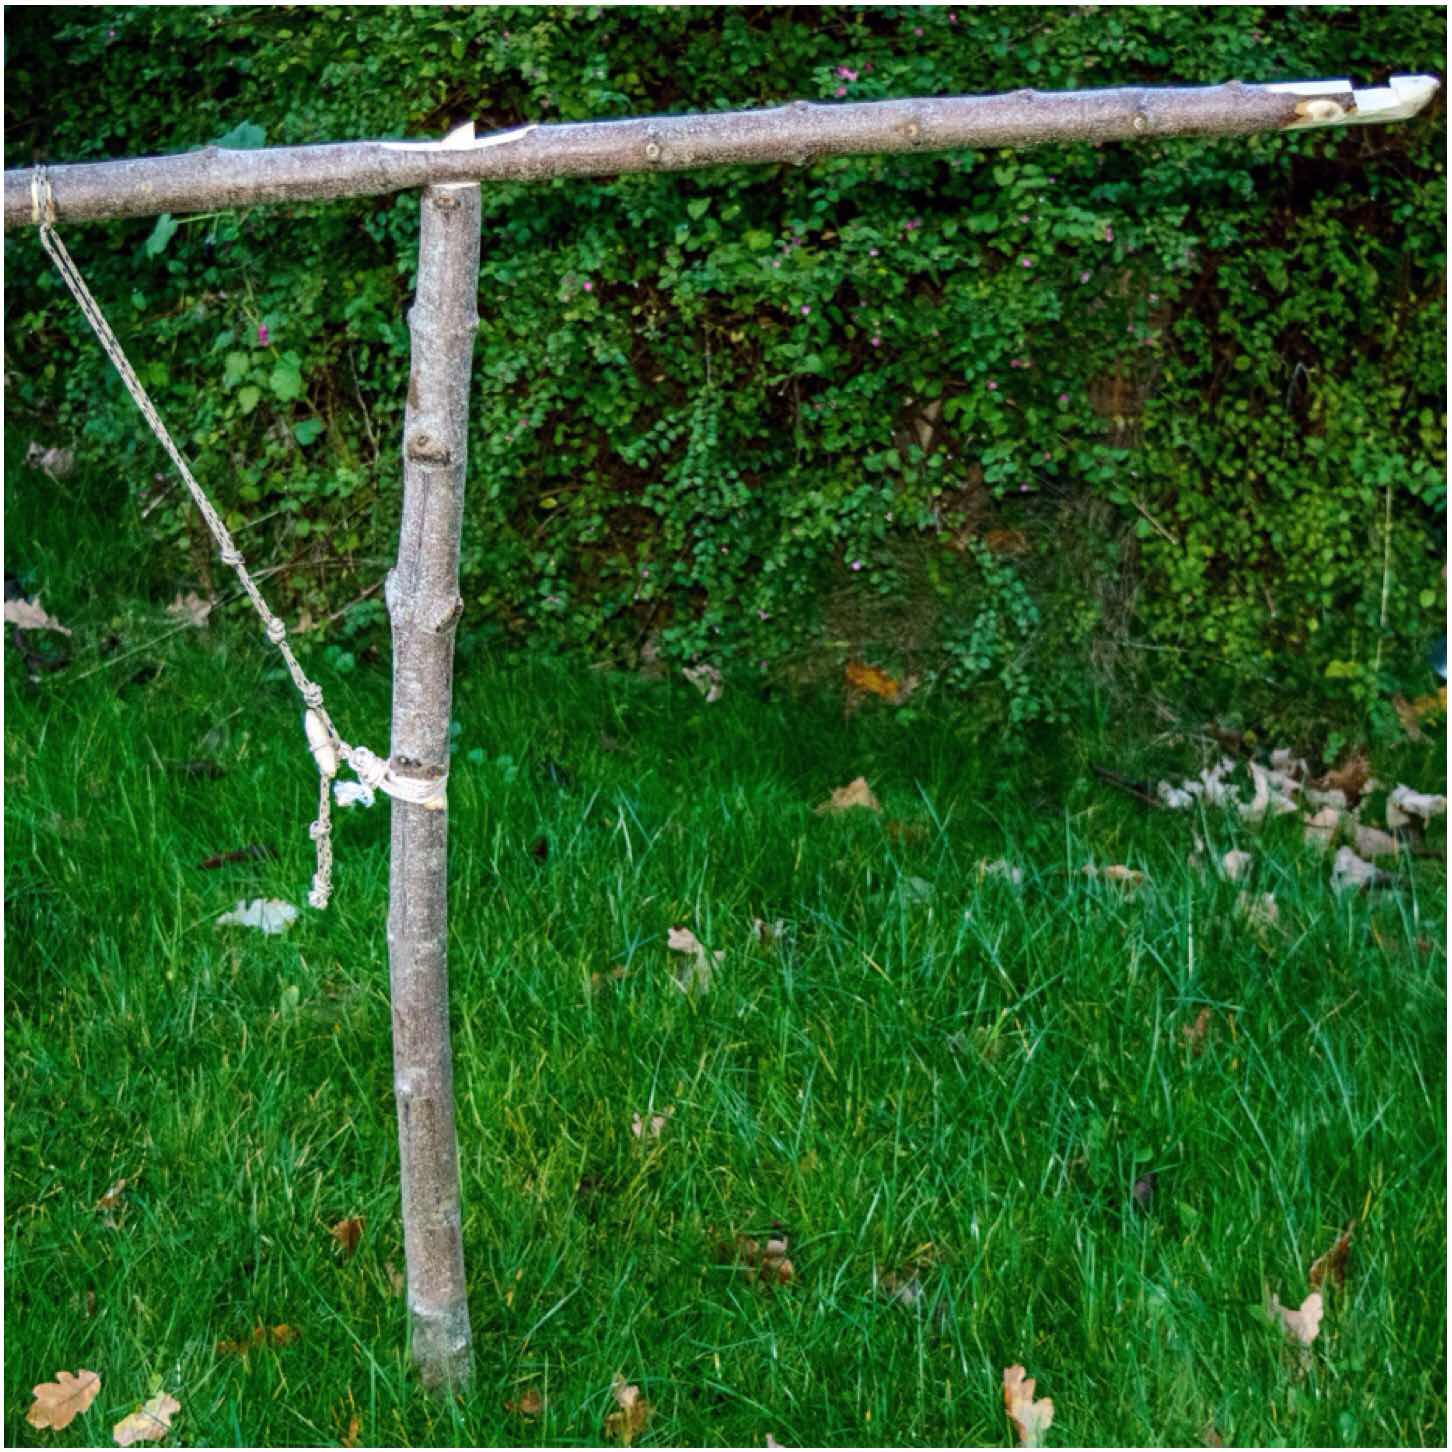
As you can see the arm of the crane can be set high or low (and ranges in between) and if set up correctly the upright can be easily rotated to swing your pot away from the fire.

Photo 21-11-2015, 22 49 54
Mortise and Tenon Crane

I would classify this one as more Pioneering than my usual constructions as it relies on some string to work. It is one for the long term camp however if you were on an overnighter with a couple of hours spare it would make a good project for an evening.

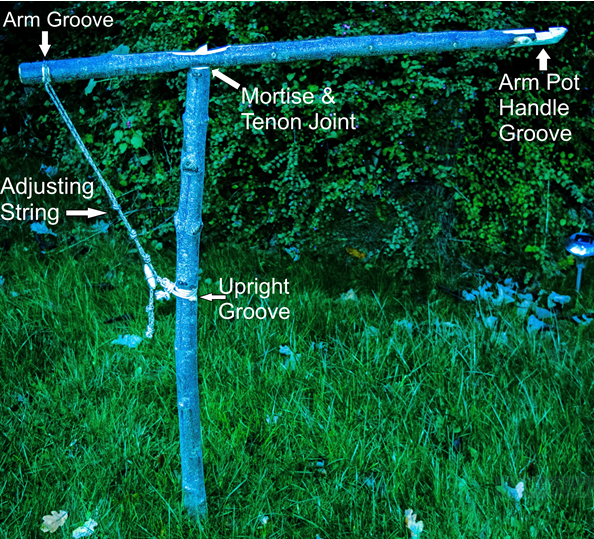
I will be describing the construction of the crane as I go through the post however I thought it would be helpful to have a completed picture of the crane marked up with the relevant work areas for you. Please refer back to this overview at any stage.

Mortise and Tenon Layout

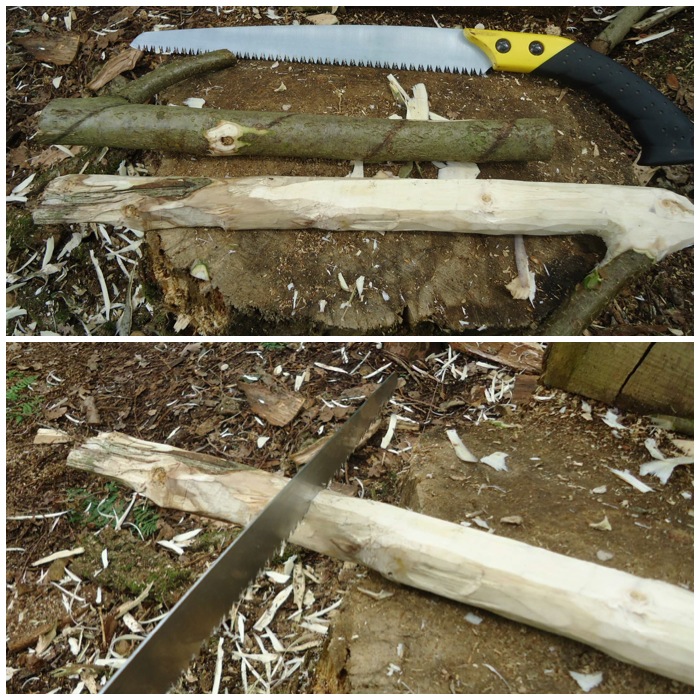
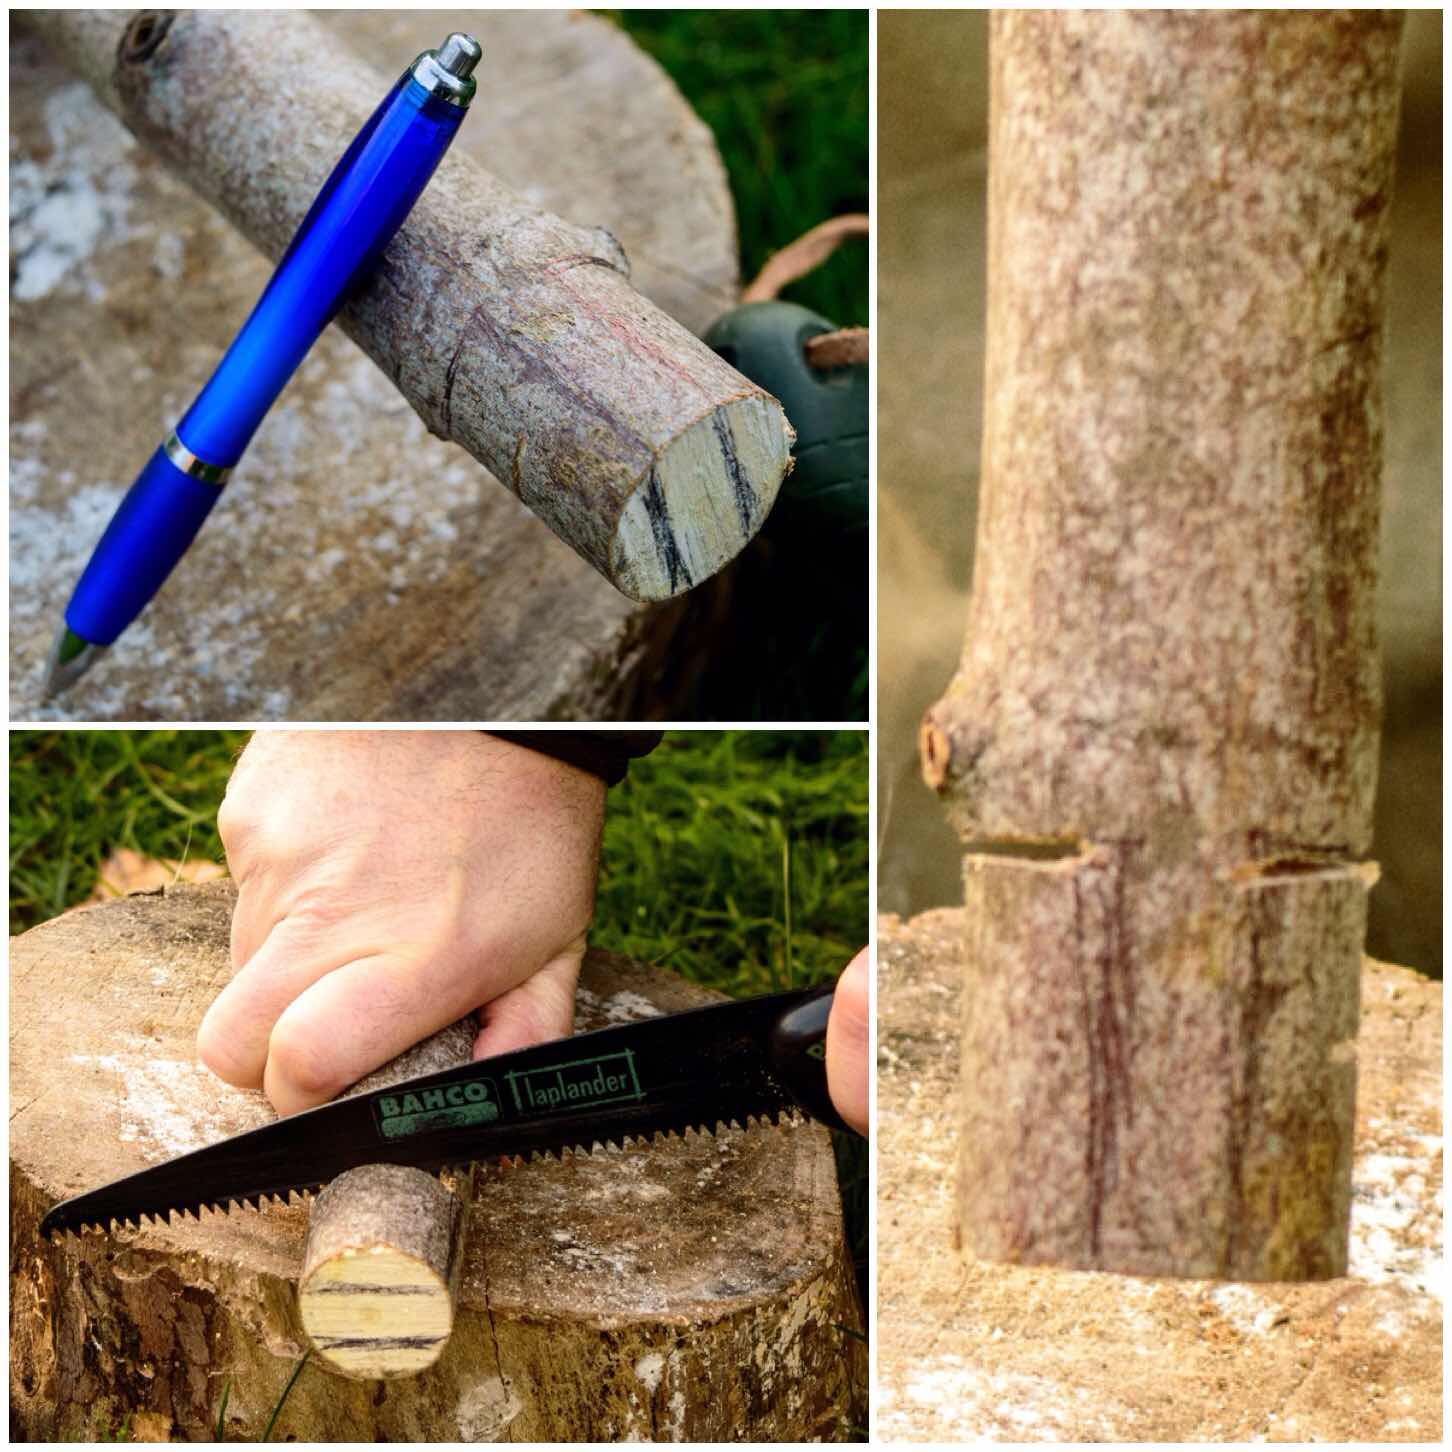
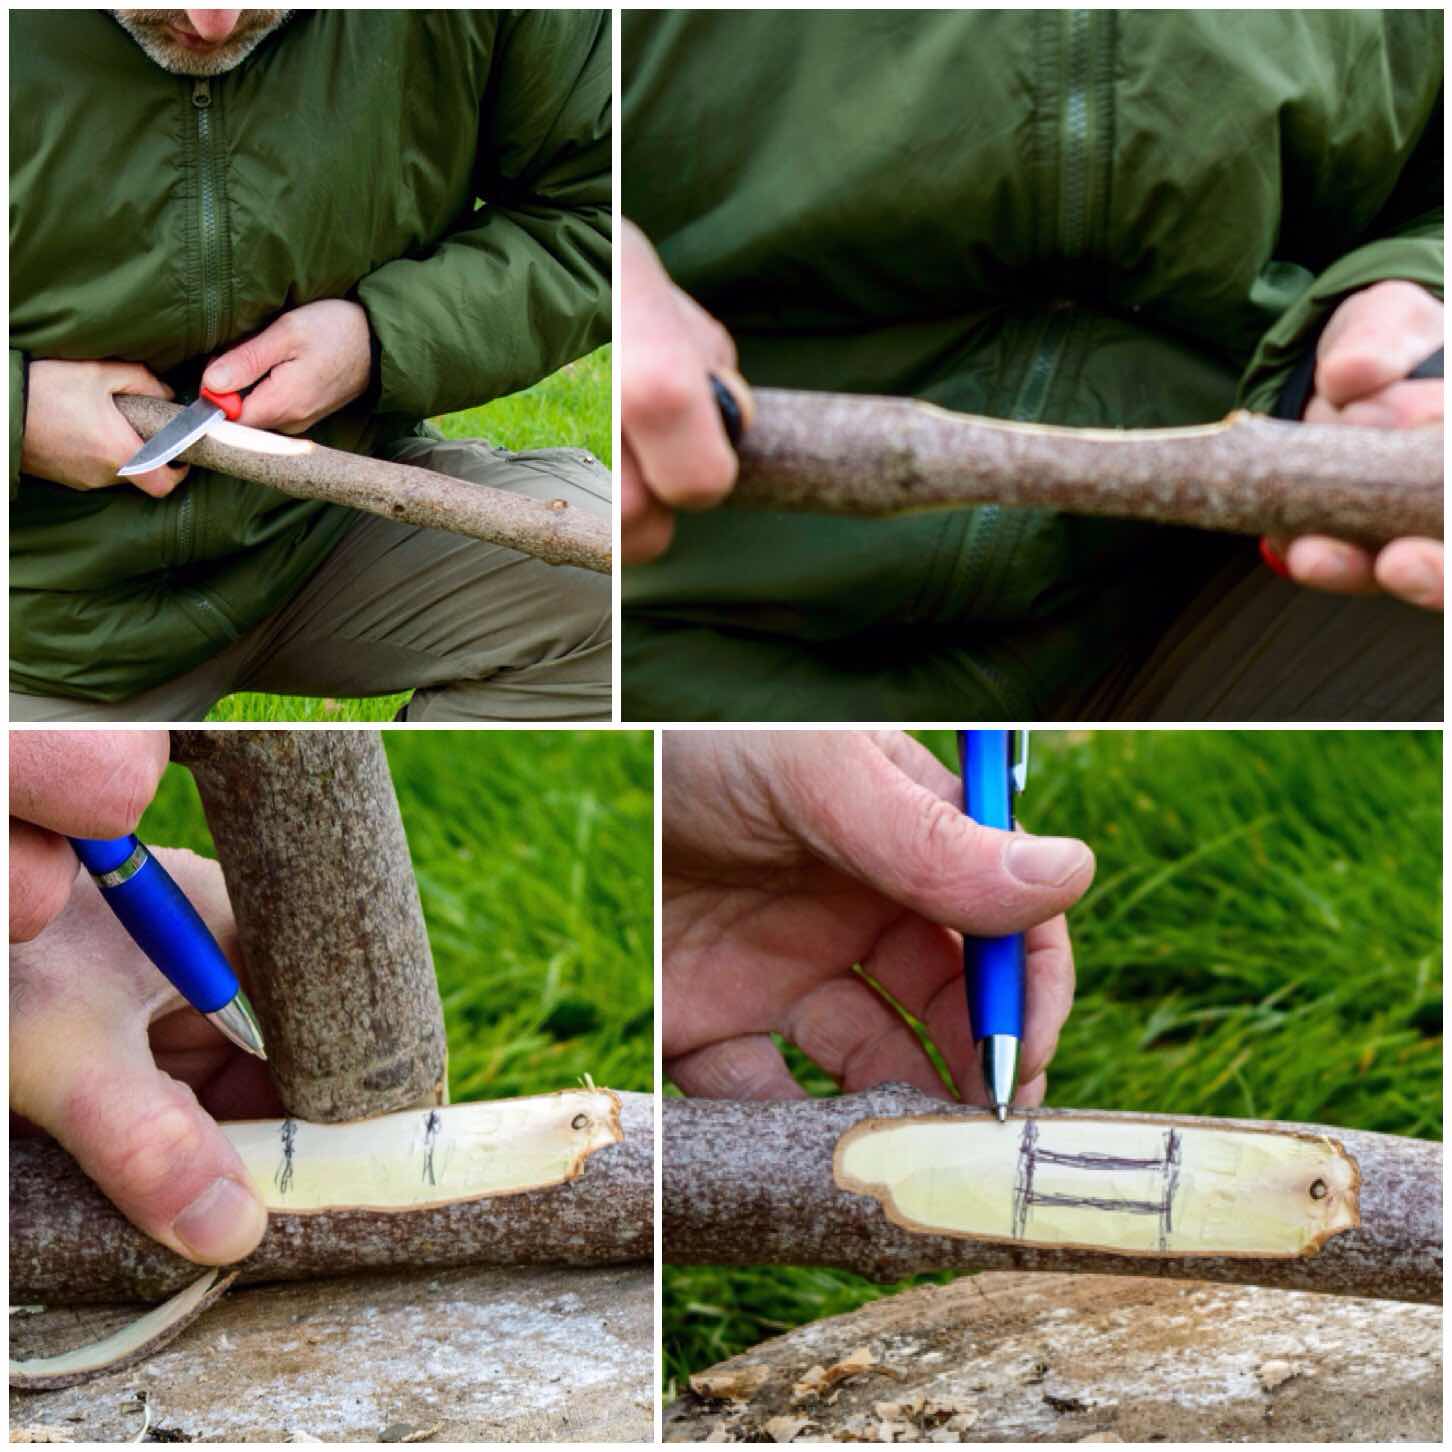
My tools for the job included my knife, a small saw and and axe but you may find having a pen or pencil to hand will be useful.

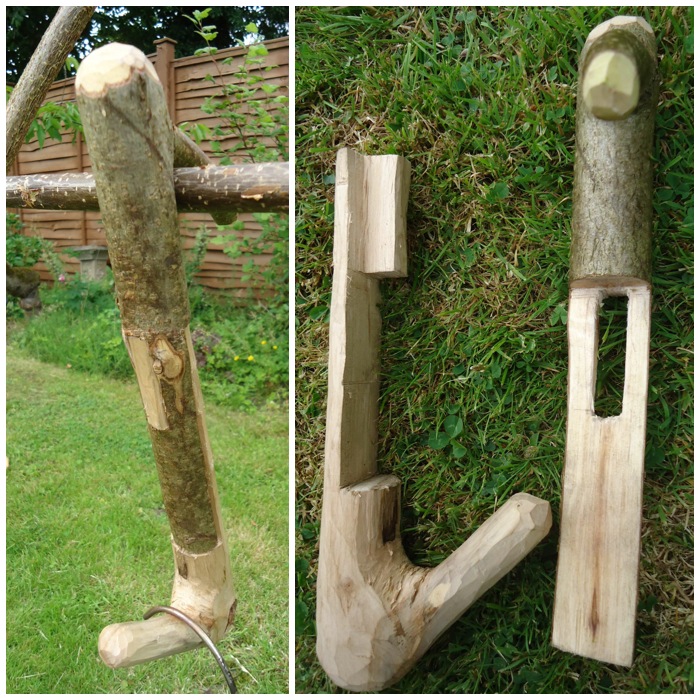
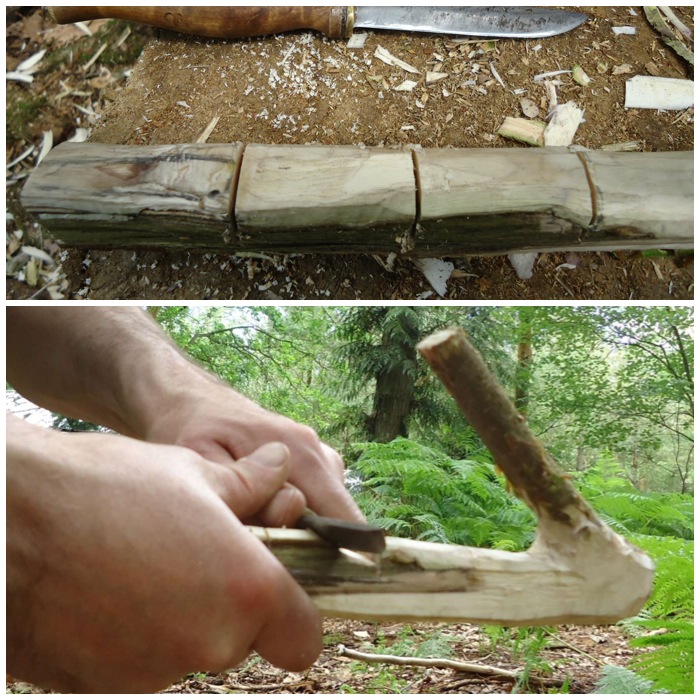
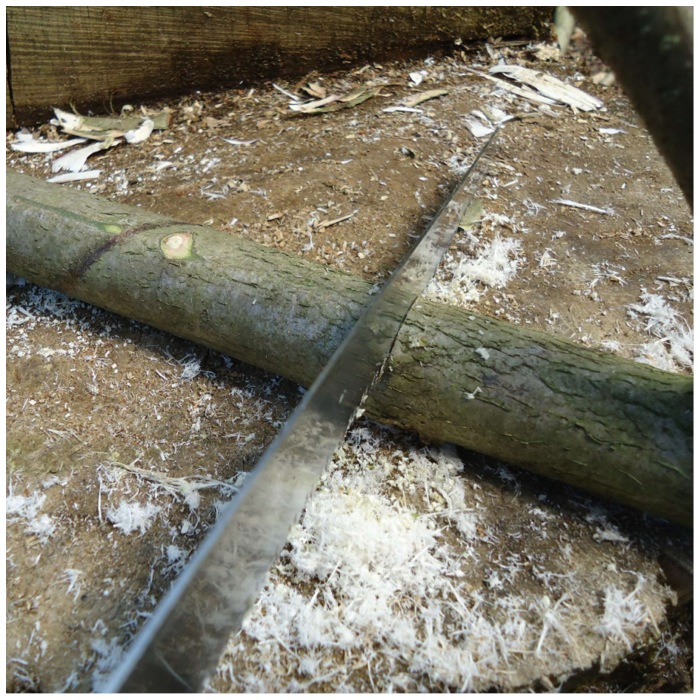
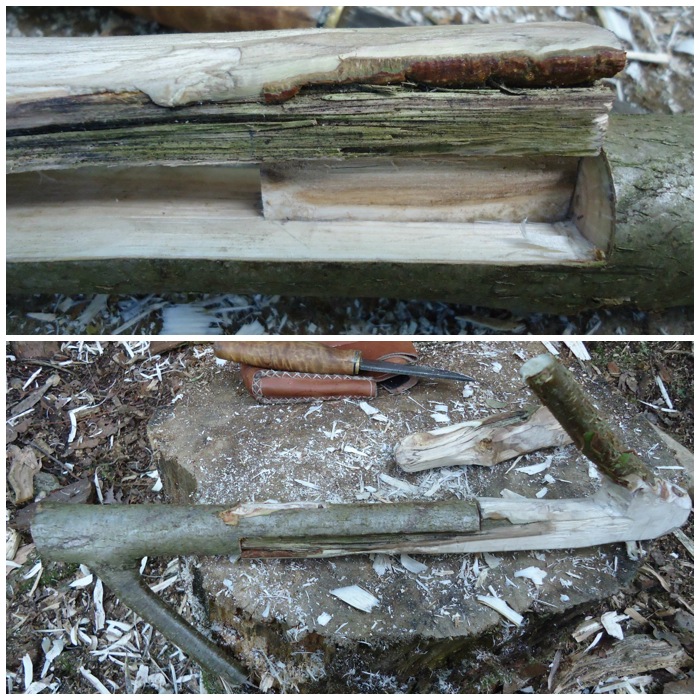
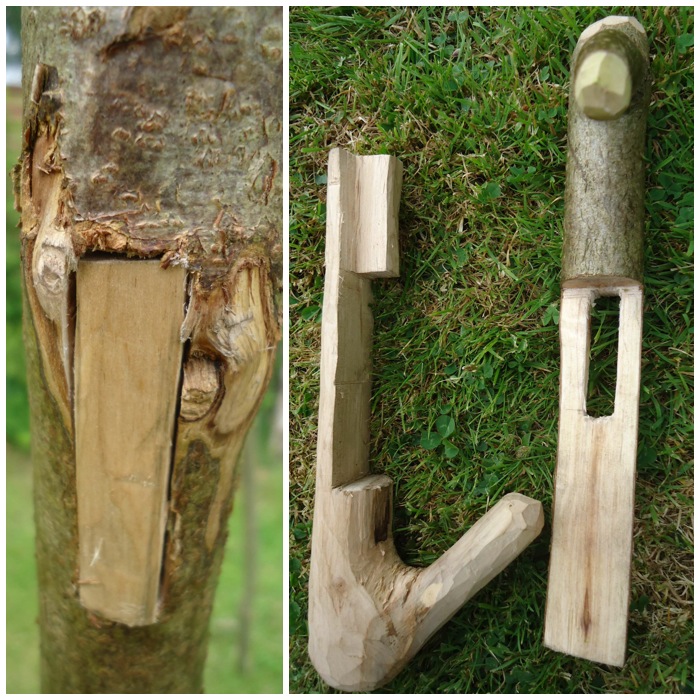
I took a rod of Sycamore (fairly well seasoned) and sawed it in two. In the picture you can see I have left the thicker end longer than the thinner end. The thicker pole will become the upright and the thinner pole will become the arm.

Photo 21-11-2015, 22 49 56
The Makings

Carving the Upright

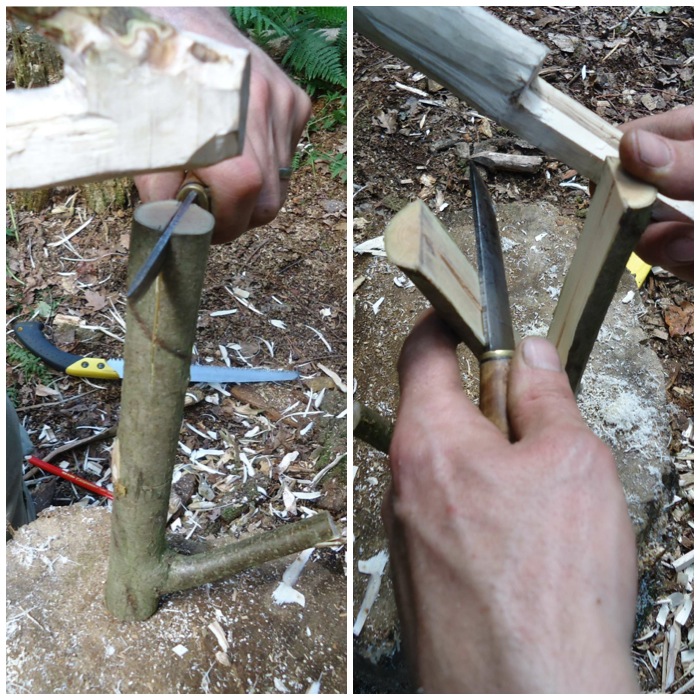
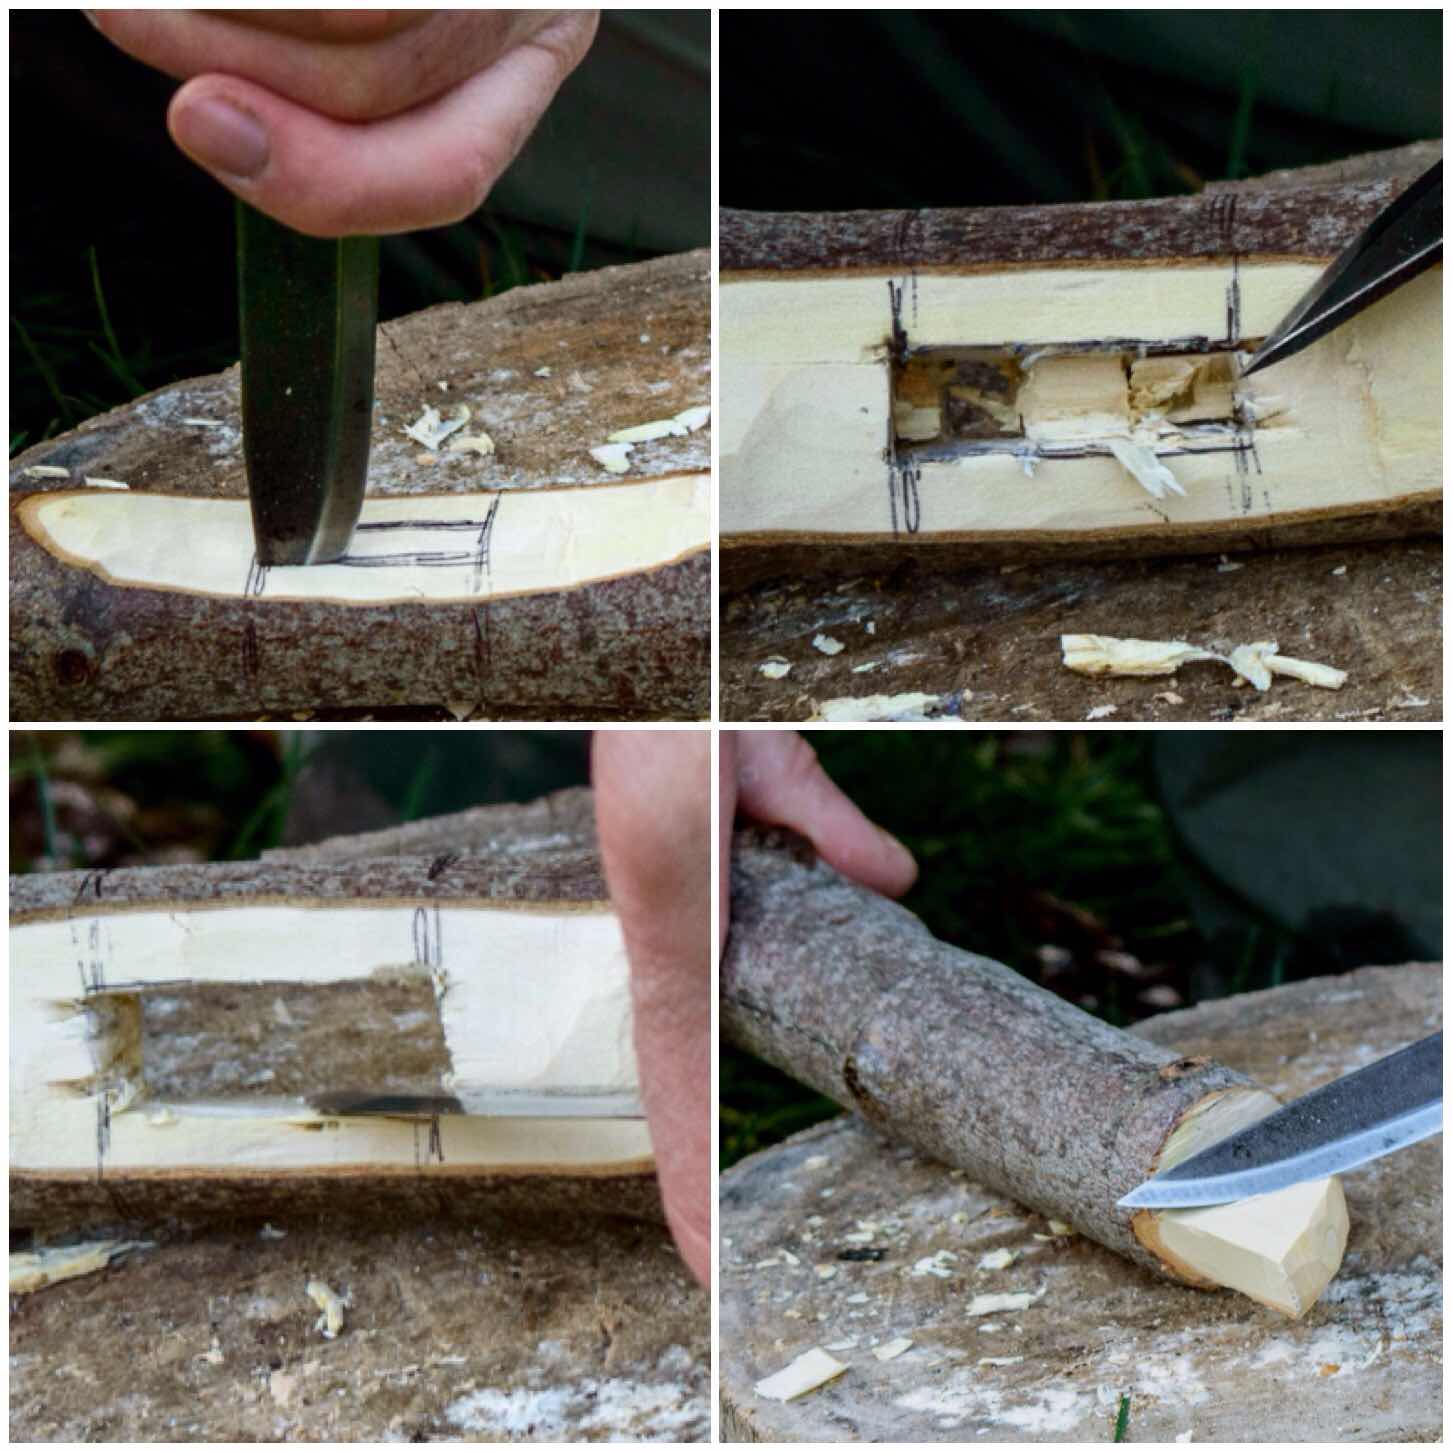
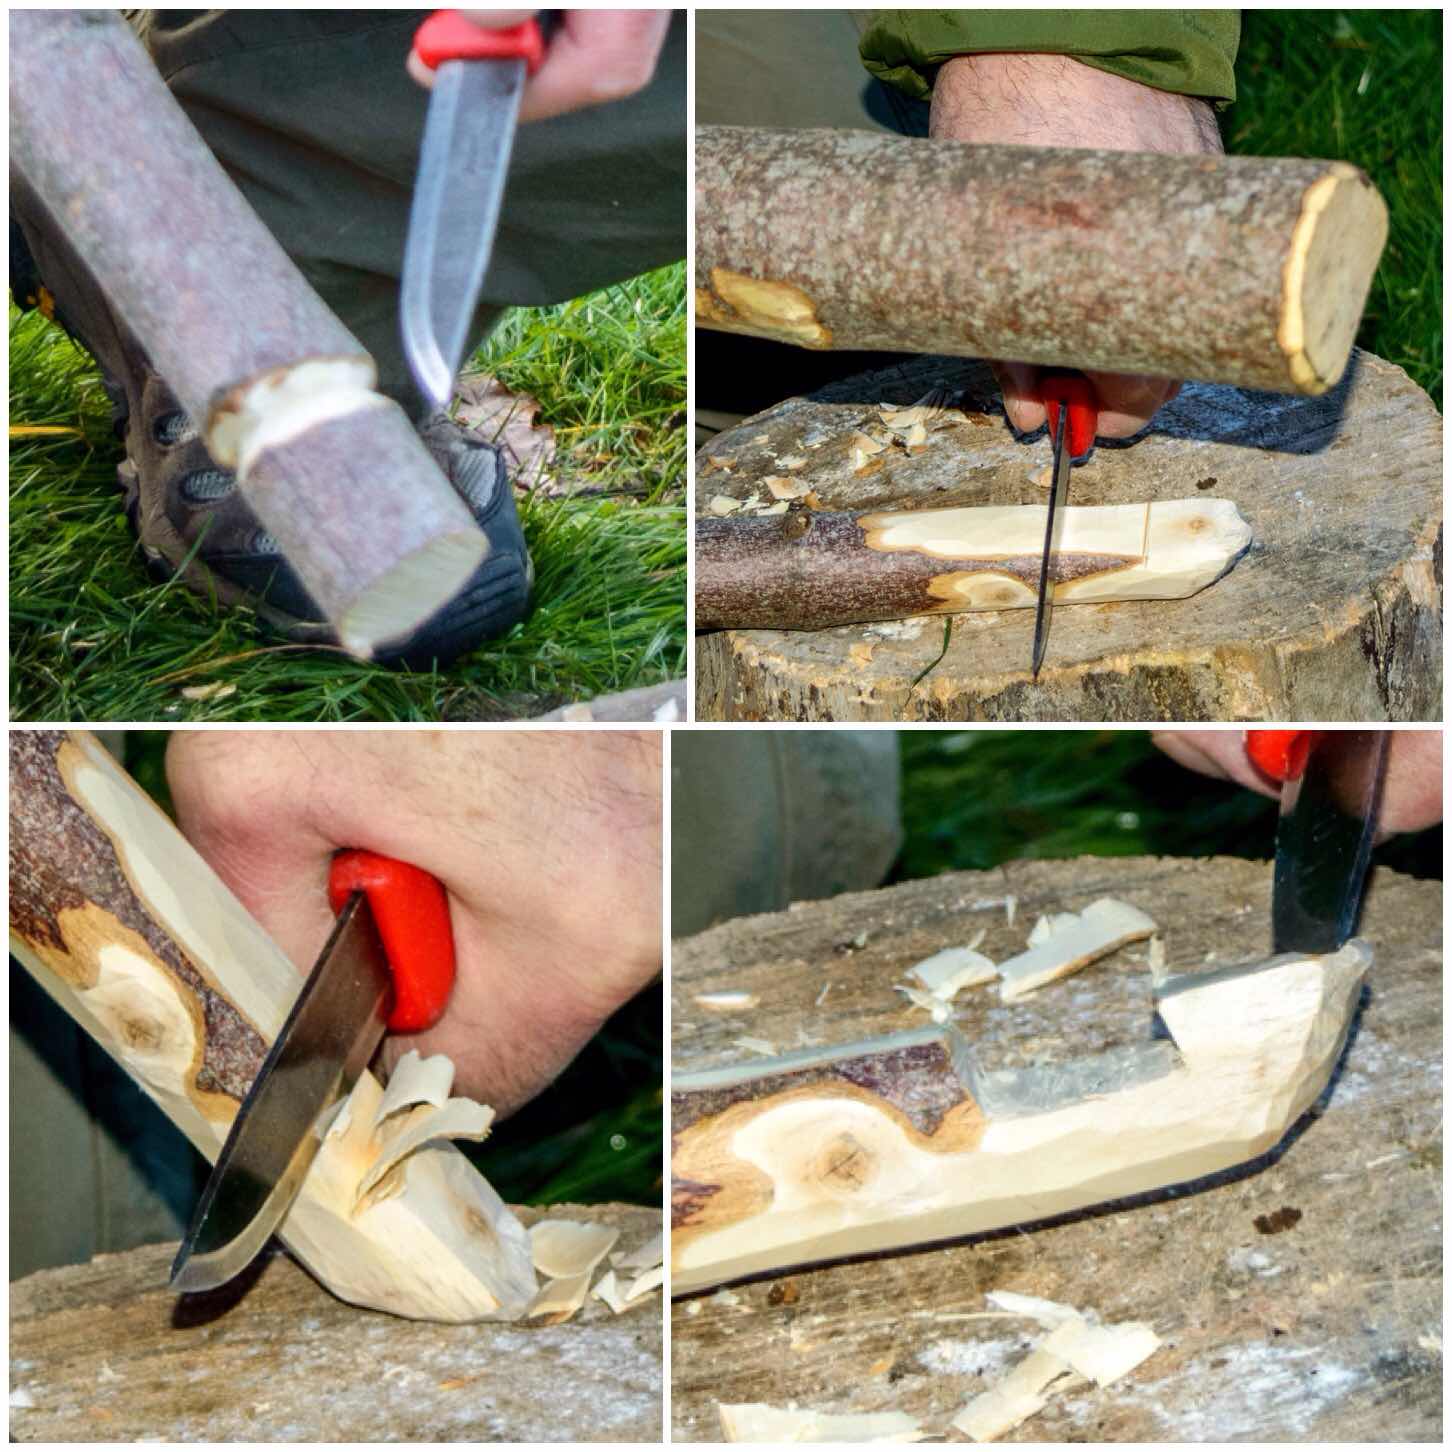
On the thinner end of the thick pole that was to be the upright I marked out the shape of the Tenon tongue and then cut two stop cuts into the side of the pole.

The stop cuts are put in to so that when I batton the waste wood off the split does not run on down the upright.

Photo 21-11-2015, 22 49 58
Creating the Tenon Tongue – Stop Cuts

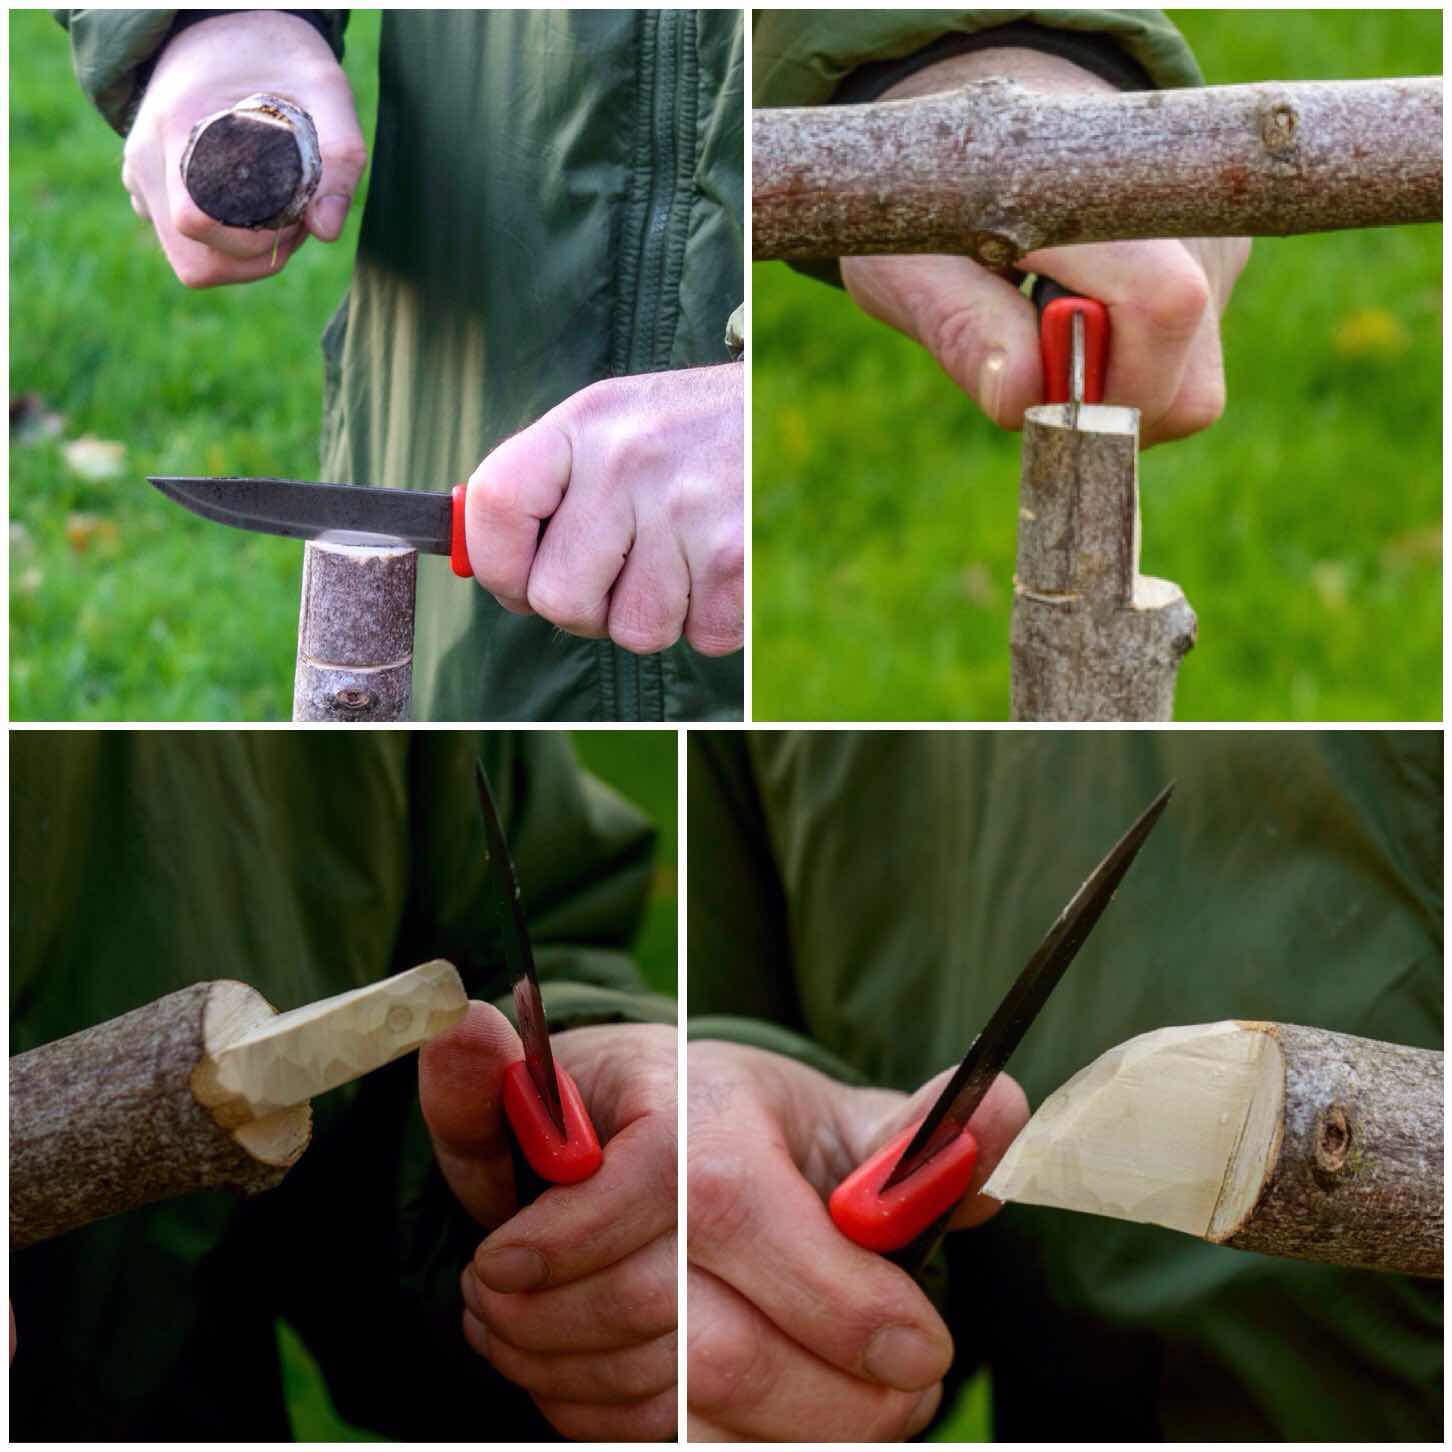
I used my knife to batton off the waste wood (make sure your knife blade is at 90 degrees to your body when you do this).

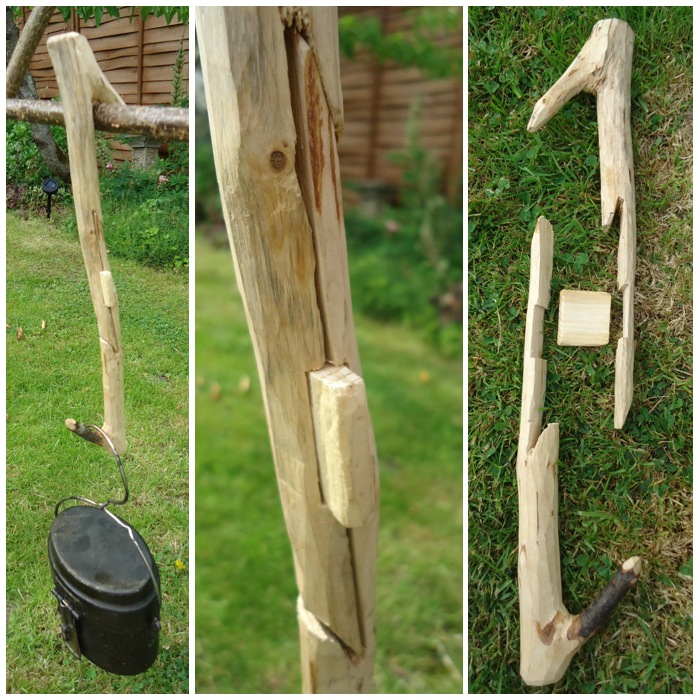
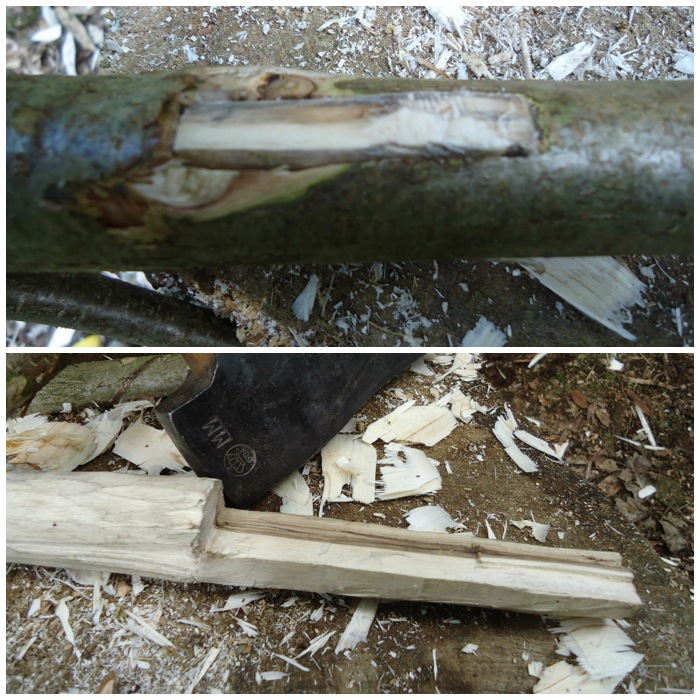
Once I had the Tenon tongue shape split out I carved one side of it into a curve. This is important to allow the arm of the crane to be raised up and down.

Photo 21-11-2015, 22 49 59
Creating the Tenon tongue – batton and carve

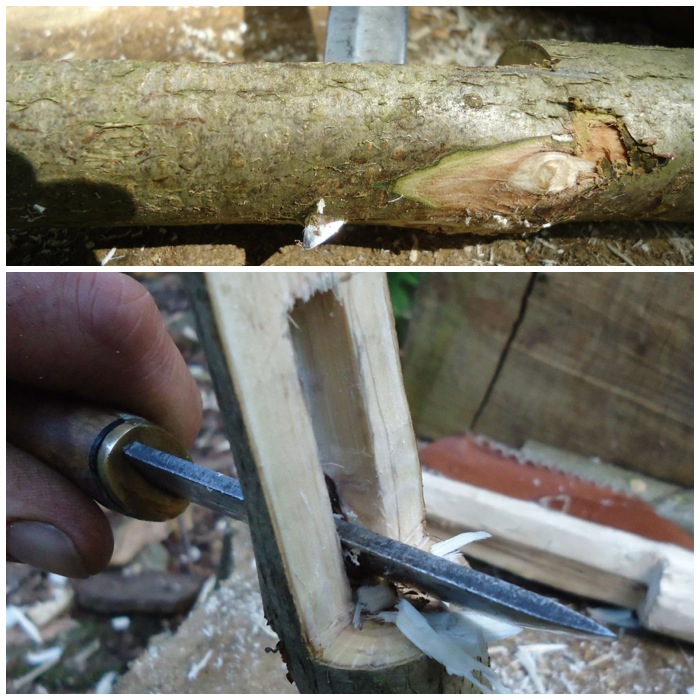
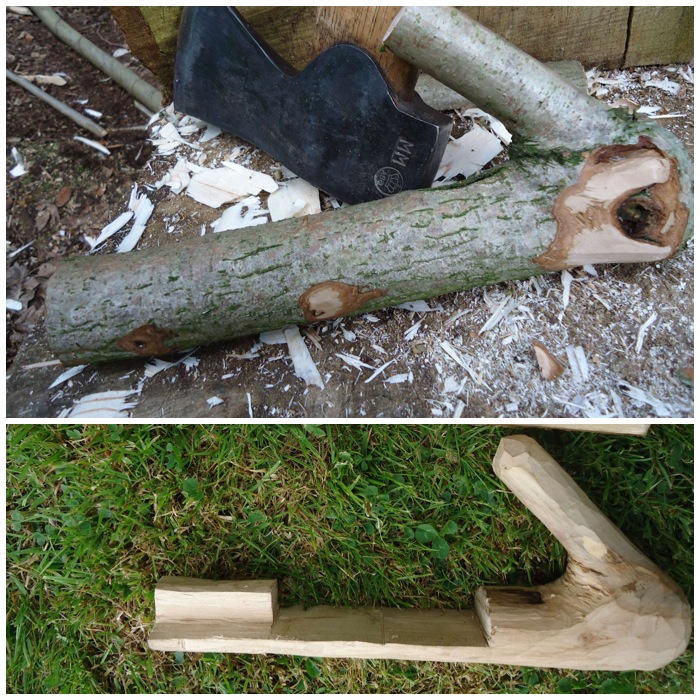
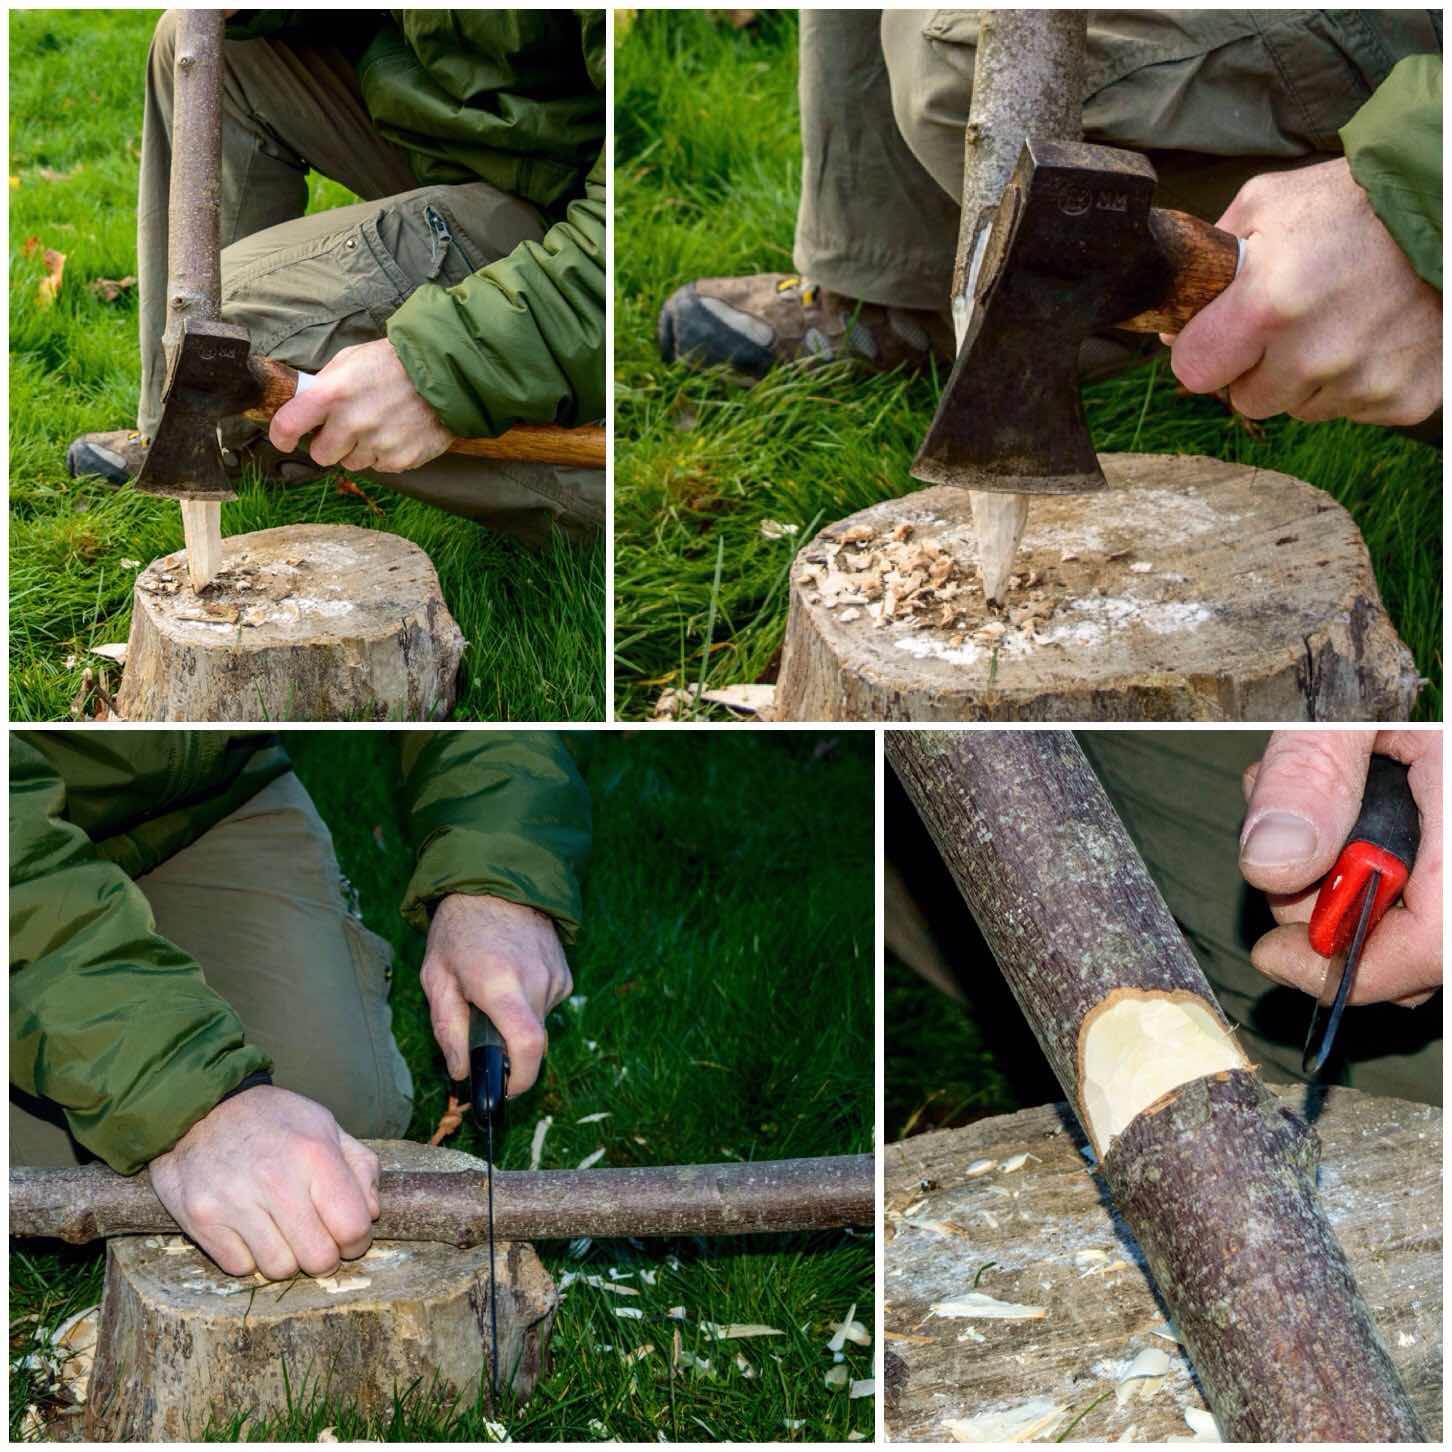
To finish the upright I axed out a point at the bottom and about half way down it I carved a small wedge-shaped recess. This wedge-shaped recess needs to be on the opposite side of the curve to the Tenon tongue.

The recess does not need to be that deep, just enough to allow some string to catch in it.

Photo 21-11-2015, 22 50 00
Little extras on the upright

Carving the Arm

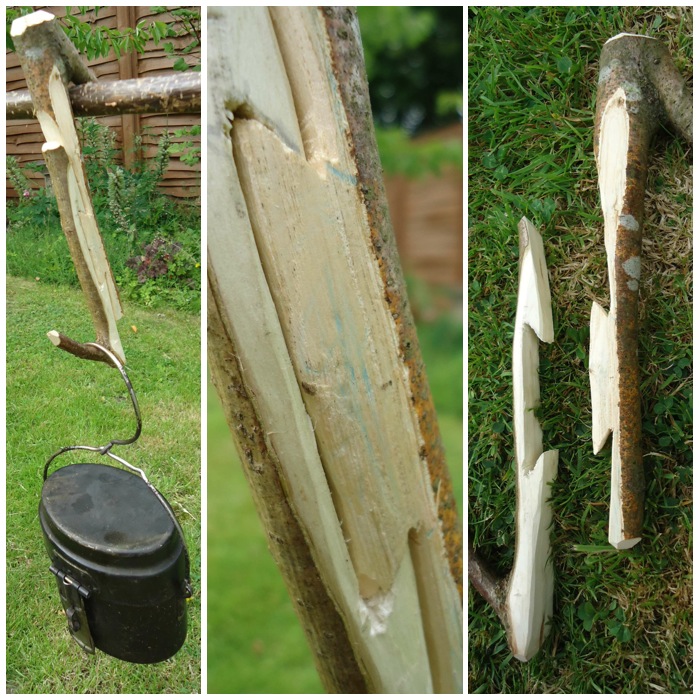
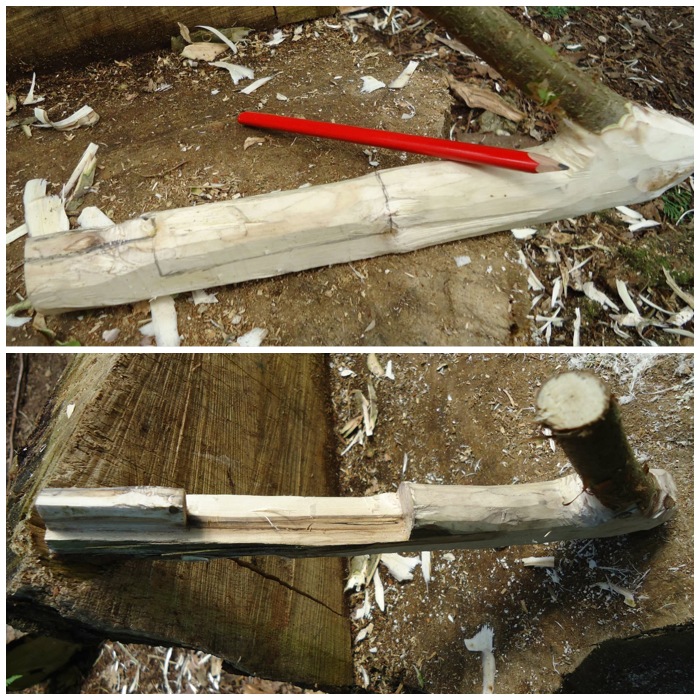
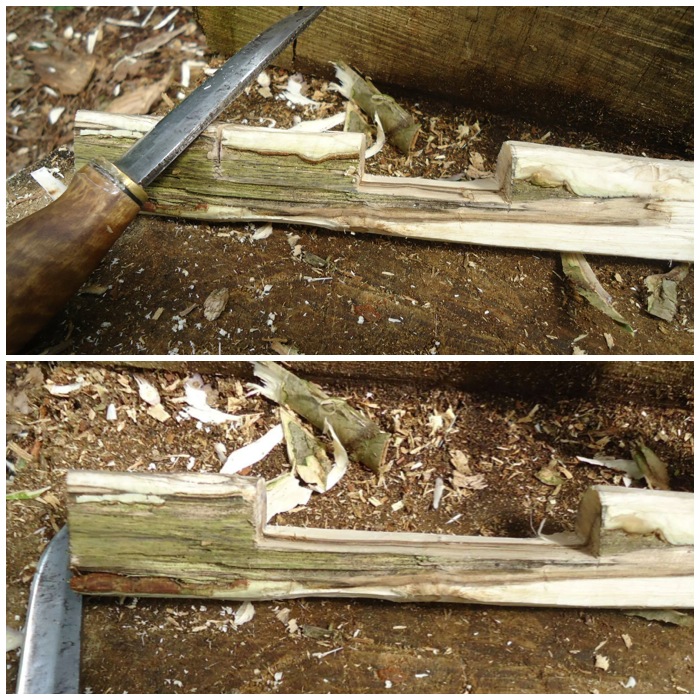
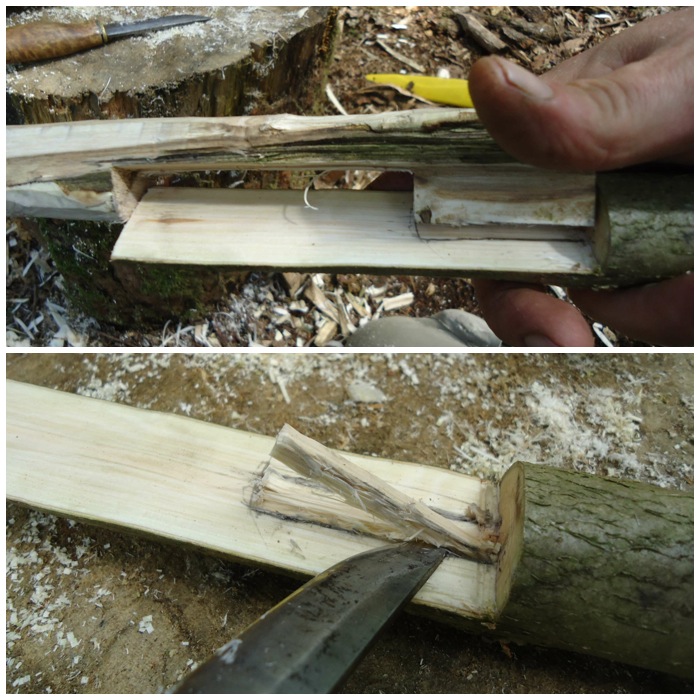
About a third of the way along from the thicker end of the arm flatten the wood with your knife on opposite sides. This gives you a decent working surface to carve out your Mortise hole.

In the bottom left picture you can see how I used the top of the upright to help me gauge how big to make the Mortise hole. Mark out your Mortise hole with a pen or pencil (mark out both sides of the arm).

Photo 21-11-2015, 22 50 02
Flattening the arm and marking out the Mortise hole

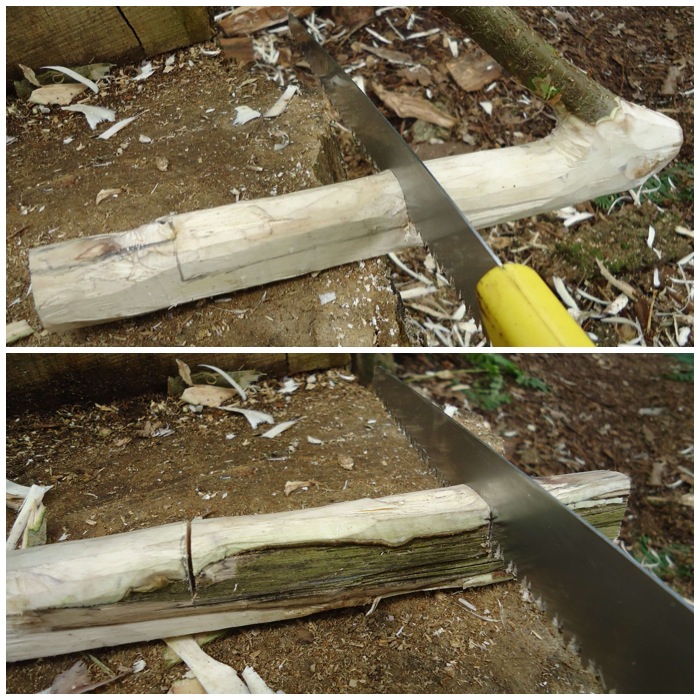
I used my knife and a piece of waste wood as a batton to cut out the Mortise hole. I took my time here so I would not split the wood along the length of the arm.

Once I got about half way down the depth of the Mortise hole I started on the other side.

Photo 21-11-2015, 22 50 02 (1)
Creating the Mortise hole – First Side

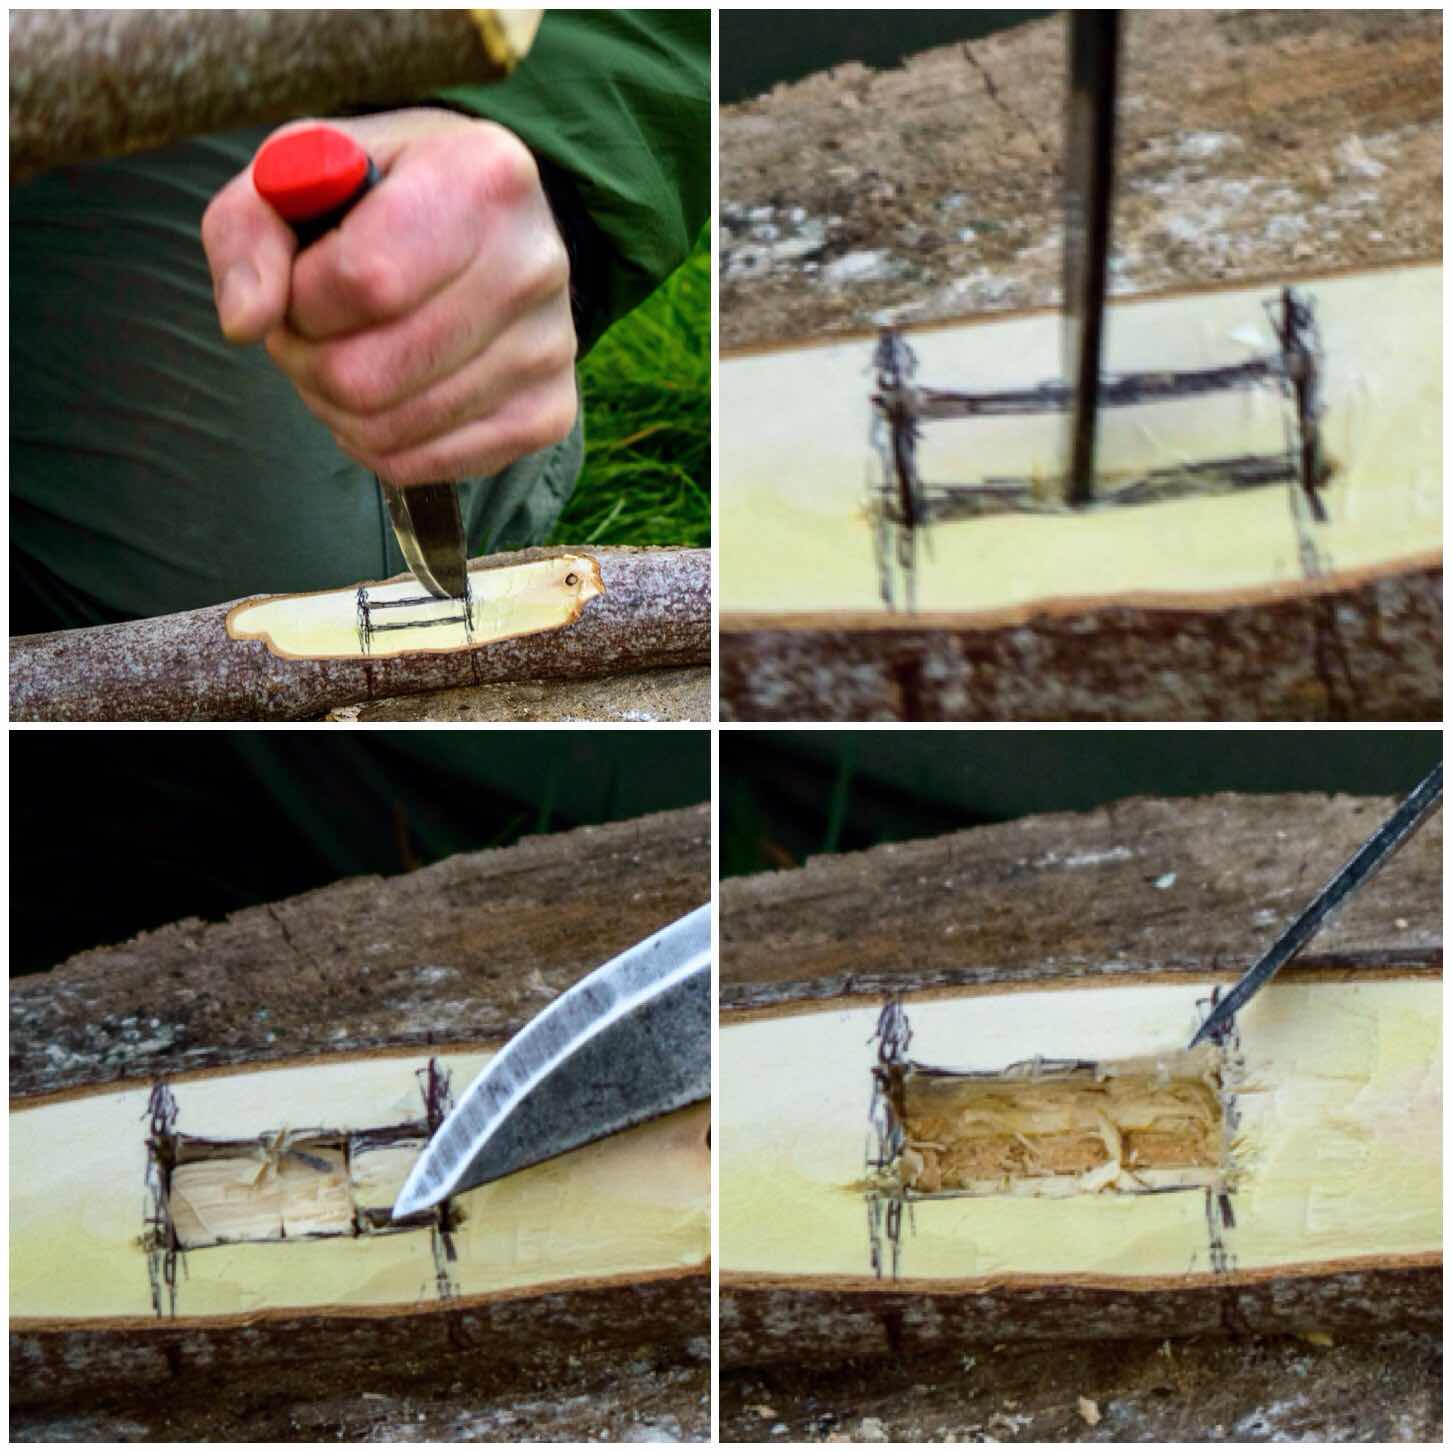
As I use the tip of my knife for this work I always ensure the work piece is secured on a flat surface. I have seen the after effects of a knife going through someone’s hand and it is not a pretty sight I can assure you.

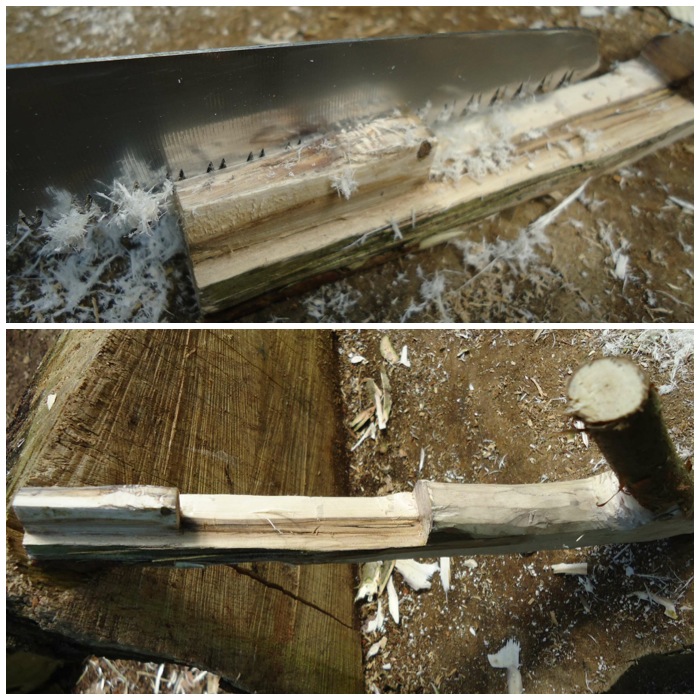
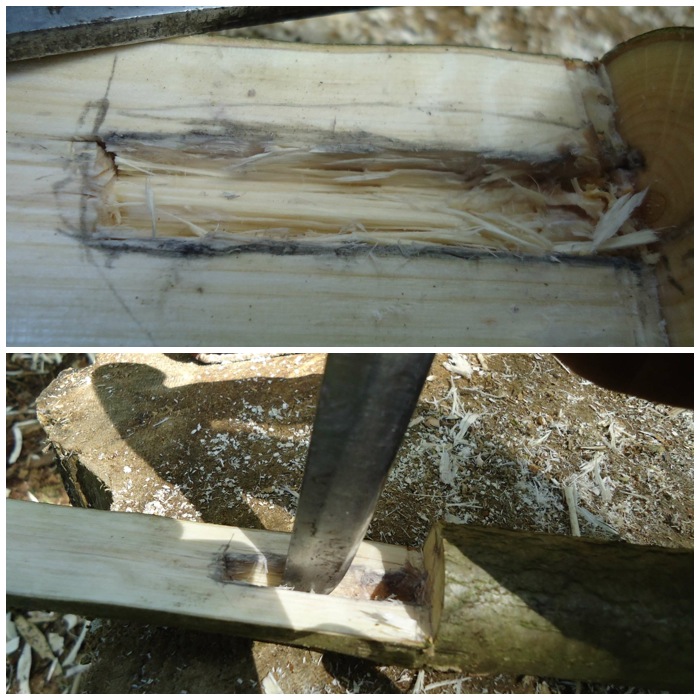
Soon I had my Mortise hole cut through and tidied up. As I did not want to make the Mortise hole too large I tested out the Tenon tongue in it and trimmed the tongue down slightly so that it would fit in the Mortise hole easily.

Photo 21-11-2015, 22 50 03
Creating the Mortise hole – Second side

The Tenon tongue when fitted should sit slightly proud. You will probably find you will make lots of little adjustments here as you test the action of your crane at this stage.

Photo 21-11-2015, 22 50 03 (1)
Testing the joint

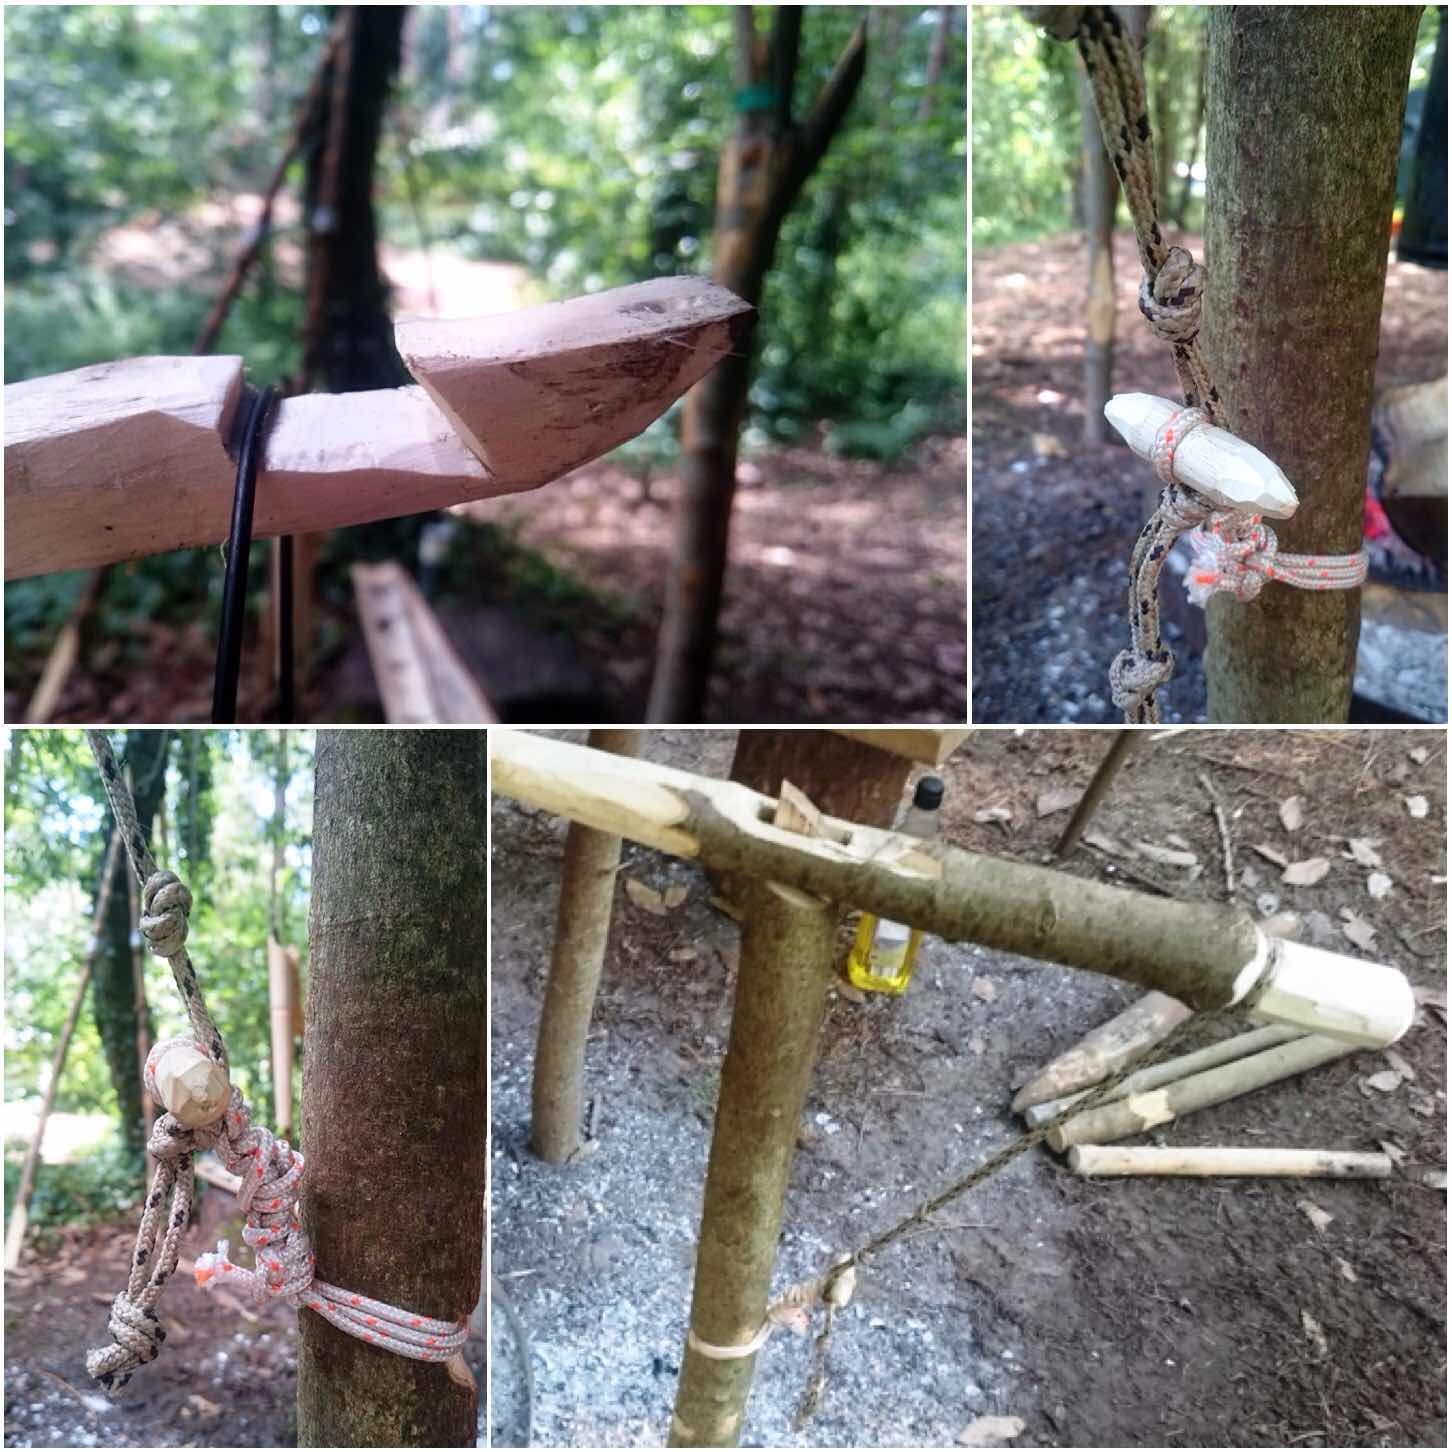
To finish the arm off I carved a groove near the thick end of the arm (for the string to grip), chamfered the thick end to tidy it up and cut out a groove at the thin end of the arm for attaching a pot handle (I will show this in detail in a further picture).

Finishing the arm
Finishing the arm

The Mortise and Tenon Crane

I spent a long time working out a way of making the arm fully adjustable with just the usual items in my rucksack. After discussing this with Ian and Charlie I opted for a simple system with string and a wooden toggle.

Below you can see that the upright and the arm are connected by string and a toggle on the left hand side.

Photo 21-11-2015, 22 50 06
In Profile

I tied off some doubled-up string to the arm groove and knotted it along its length with some simple overhand knots. This produced lots of little loops the toggle could fit into.

I attached a toggle to the upright groove and inserted the toggle into one of the loops in the string from the arm. Depending on what loop I put the toggle into I could adjust the height of any pot hanging off the other end of the arm.

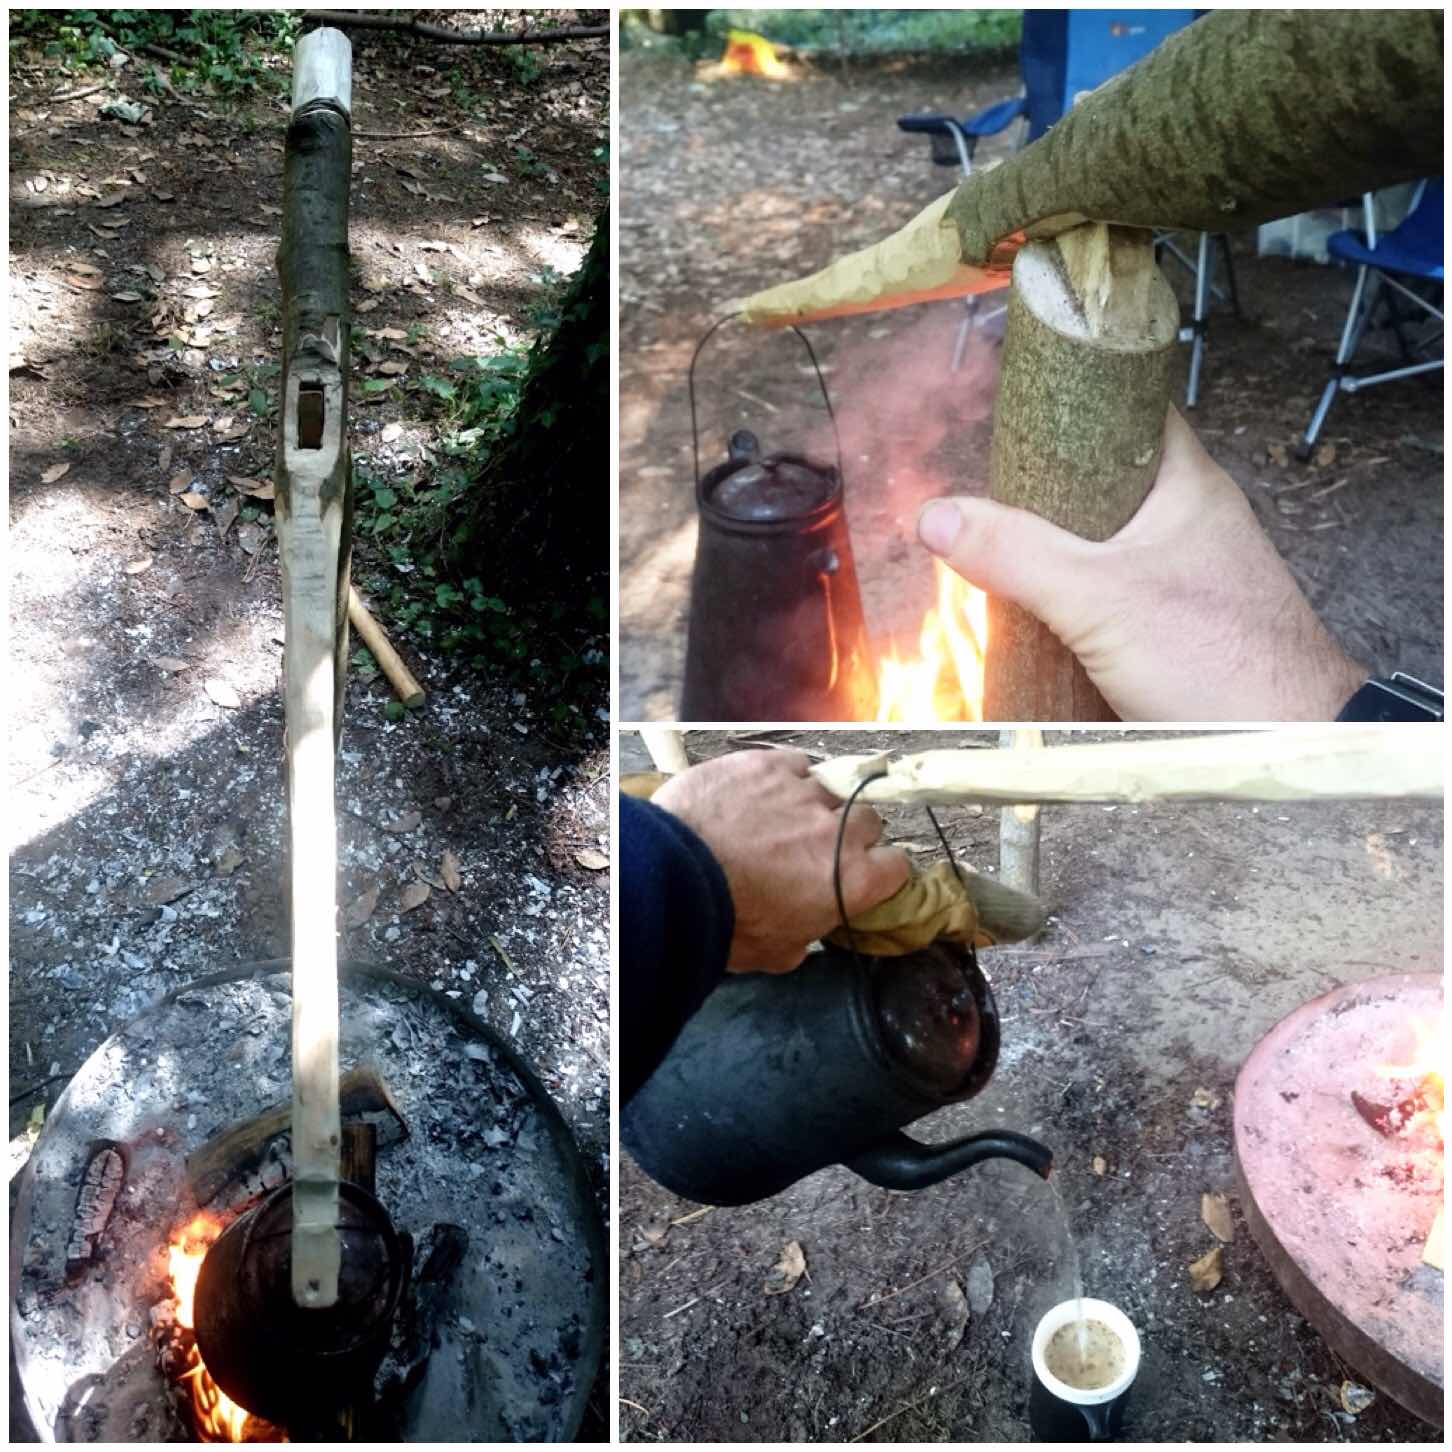
The groove for the pot handle I made with a backstop and a slightly angled forward section. This shape allows the pot to remain secure when the arm is either raised or lowered.

Photo 21-11-2015, 22 50 06 (1)
In detail

To insert the upright I had a separate pole to act as a pile driver. I hammered this into the ground first and then inserted the upright into the hole I’d created.

The upright can then be rotated quite easily to move your pot off the fire. I found that I could pour water from the kettle while it was still attached to the arm as the handle sat snugly in the angled section of the pot handle groove.

Photo 21-11-2015, 22 50 08
In use

I like this crane for the challenges it set me and the fact that I could overcome them with just the kit I would normally carry.

I plan to re-visit the string set up as there must be a simpler method to keep the arm securley attached while giving me the ability to adjust its height.

Feel free to suggest an alternative method for this but remember it needs to be created with what you would normally expect to carry in your rucksack or about your person while out in the woods.

Photo 21-11-2015, 22 49 54
Up and Down

This will be (for the moment at least) the last How To…. on building campfire cranes however I have really enjoyed exploring this very diverse and little documented area of Bushcraft.

Cheers

George

How To…. Carve a Collapsible Pot Hanger

When I first started venturing into the world of bushcraft I got into carving spoons and bowdrill sets. It’s like a rite of passage with most bushcrafters to crack these skills. As time went on I began to explore the world of pot hangers and eventually these little devilish collapsible pot hangers.

This post will take you through the steps I went through to make a mortise-and-tenon collapsible pot hanger. I have included a couple of other types and links to show you how they are made or used. As you can see in the picture on the left, one of the hooks is pointing down and one is pointing upwards. This set up makes for a great pot hanger but sadly you don’t find many trees with this configuration of branches.

Photo 13-03-2014 07 11 43
Mortise and Tenon Pot Hanger

Here are the three different types of pot hangers I will discuss here, from left to right: the wedge hanger, the dovetail hanger and the mortise-and-tenon hanger.

Photo 13-03-2014 08 33 44
The trio

The wedge hanger

I call this the wedge hanger as the two pieces are kept in place by a single wedge of wood in the middle. There are a lot of angles to take into account with this hanger and as with all of the hangers in this post I would advise you to make it out of dead standing wood. If you were to use green wood you might find that the pieces do not fit together any more as it dries out. I found a good tutorial on making this hanger on the Bearclaw Bushcraft site.

Photo 13-03-2014 08 11 30
Wedge Pot Hanger

The dovetail hanger

This hanger replaces the wedge with a dovetail joint in the middle. I found it surprisingly easy to carve. The trick is to make the joint snug but not too tight. You want just enough friction between the two pieces to hold it all together but still be easy enough to pop apart when you are finished with it. A good video by GJohnridge11 on You Tube shows this hanger but I am afraid not how it is carved.

Photo 13-03-2014 08 10 27
Dovetail Pot Hanger

All the hangers so far have hooks pointing in opposite directions and on opposite sides. I have had discussions with fellow bushcrafters on this and some argue that a pot may slip off if the hooks are on opposite sides. I have made a few hangers now with hooks on opposite sides and on the same side as in the picture below. As of yet I personally have not had problems with either method.

WP_20140313_007
Wedge Pot hanger with both hooks on the same side

The reason I like these hangers is that they are easy to store and carry with you. Once broken apart they fit inside your pot or kettle snugly.

WP_20140313_001
Neatly stowed away

Mortise-and-tenon hanger

I found two dead pieces of wood of similar widths with good strong branches leading off them. After stripping the bark off one I noticed there was a fungal infection inside it. I decided to try using it anyway as the wood still felt strong. I left the bark on the other piece of wood as it had attractive honeysuckle markings going around it.

I trimmed the bottom piece so it was the same length as the top piece.

Photo 13-03-2014 07 13 00
Trimming to size

The tenon limb

Using a pencil I  marked out all the areas of wood I was going to cut out. (I should have shaded the areas of wood I would be cutting out  with my pencil for the camera, see the bottom picture for how this limb will finally look.) This limb is called the tenon limb.

Photo 13-03-2014 07 34 55
Mark out the shape of the tenon

I used a small hand saw to make some stop cuts on the pencil marks. These stop cuts are particularly useful when you start carving with your knife to stop any splits running off into areas of wood you want to keep.

Photo 13-03-2014 07 37 30
Stop Cuts – Part 1

The stop cuts done, I used my knife to start carving the excess wood away. I used small cuts all the time, my thumbs on the back of the knife for fine control. This is a great activity to do while sitting around the campfire where you can relax and take your time.

Photo 13-03-2014 07 15 33
Stop Cuts – Part 2

Once you get one block out it is time to take out the next block of excess wood. I am keeping the wood that is under the blade and removing the wood directly to the right of it.

Photo 13-03-2014 07 16 11
Forming the tenon – Part 1

Finally I used my saw to cut out the tenon at the end of the piece of wood. This is a small rectangular piece of wood at the end of the limb as you can see in the bottom picture.

Photo 13-03-2014 07 17 45
The finished tenon

The mortise limb

I cut a stop cut into the mortise limb where I had measured that the tenon limb would fit snugly against it. You have to judge this by using the tenon limb as a measuring stick and saw to a depth that will make the limbs fit together well.

Photo 13-03-2014 07 41 34
Mark a stop cut

Once the stop cut is in place you can easily batton the excess wood out with your knife. I am using the tenon limb as a hammer at this stage.

Photo 13-03-2014 07 39 34
Batton out the waste wood

You can see in the top picture that the two pieces fit well together now so I marked out the area of the joint I needed to cut out on the mortise limb. I used the protruding rectangle of wood on the tenon limb to mark out the corresponding section of wood I needed to carve out of the mortise limb.

Once marked out I used the tip of my knife to start carving out the rectangular hole I needed to make in the mortise limb.

Photo 13-03-2014 07 43 36
Draw out the mortise

Again this was a piece of carving I took my time with. I placed the mortise limb on a work surface rather than holding it in my hand, where any slip of the blade could have meant a nasty cut.

Photo 13-03-2014 07 44 00
Carve out the mortise

Eventually I worked my way through the limb and carved out a rough rectangular shape.

Photo 13-03-2014 07 44 35
Form a neat rectangle

If you have taken your time and not cut outside of the pencil markings the fit of the Tenon and the Mortise should be snug. If it is too tight make some cuts where you feel there is resistance and keep trying to see if both pieces will fit together.

Photo 13-03-2014 07 45 16
The fit should be snug but not overly tight

Eventually both pieces fitted well together but disaster struck for me here. I was showing the hanger to a friend and was explaining it is very strong on the vertical plane, ie when holding a pot, but very weak on any other plane, ie if you twist this hanger it will break.

Just as I was explaining this my friend did indeed twist the hanger as he tried to pull it apart and the tenon joint simply snapped. The fact that the tenon had some rot in it did not help but I had tried it out earlier and it did take the weight of a heavy Dutch Oven. To separate the limbs you need to push on the rectangular tenon so it pops out of the mortise slot: do NOT twist!

Photo 13-03-2014 08 05 37
A trimmed but flawed tenon

Still, it didn’t take long to make up another tenon limb to fit the original mortise limb.

Photo 13-03-2014 08 06 43
Tenon Mark 2

All that was left to do was tidy up the hooks, put the limbs together and hang a pot.

Photo 13-03-2014 08 07 34
Mortise-and-tenon hanger in use

I can’t remember where I came across this hanger (somewhere on the internet)  so if anyone knows where this hanger originated please drop me a message. Even though it looks complex to begin with, once you get working on it it is easy enough to do and a joy to craft as long as you take your time with the fiddlier saw and knife tip bits.

Photo 13-03-2014 08 08 15
Closed and open

I filled this Dutch Oven with water and got my two little helpers to show you how strong this hanger can be.

WP_20140313_002
One very strong pot hanger

Some other sites on the wedge hanger you might find interesting:

Mid West Bushcraft

Bushcraft UK 1

Bushcraft UK 2

Mark Emery

Southwest Indiana Bushcraft Bill

Cheers

George