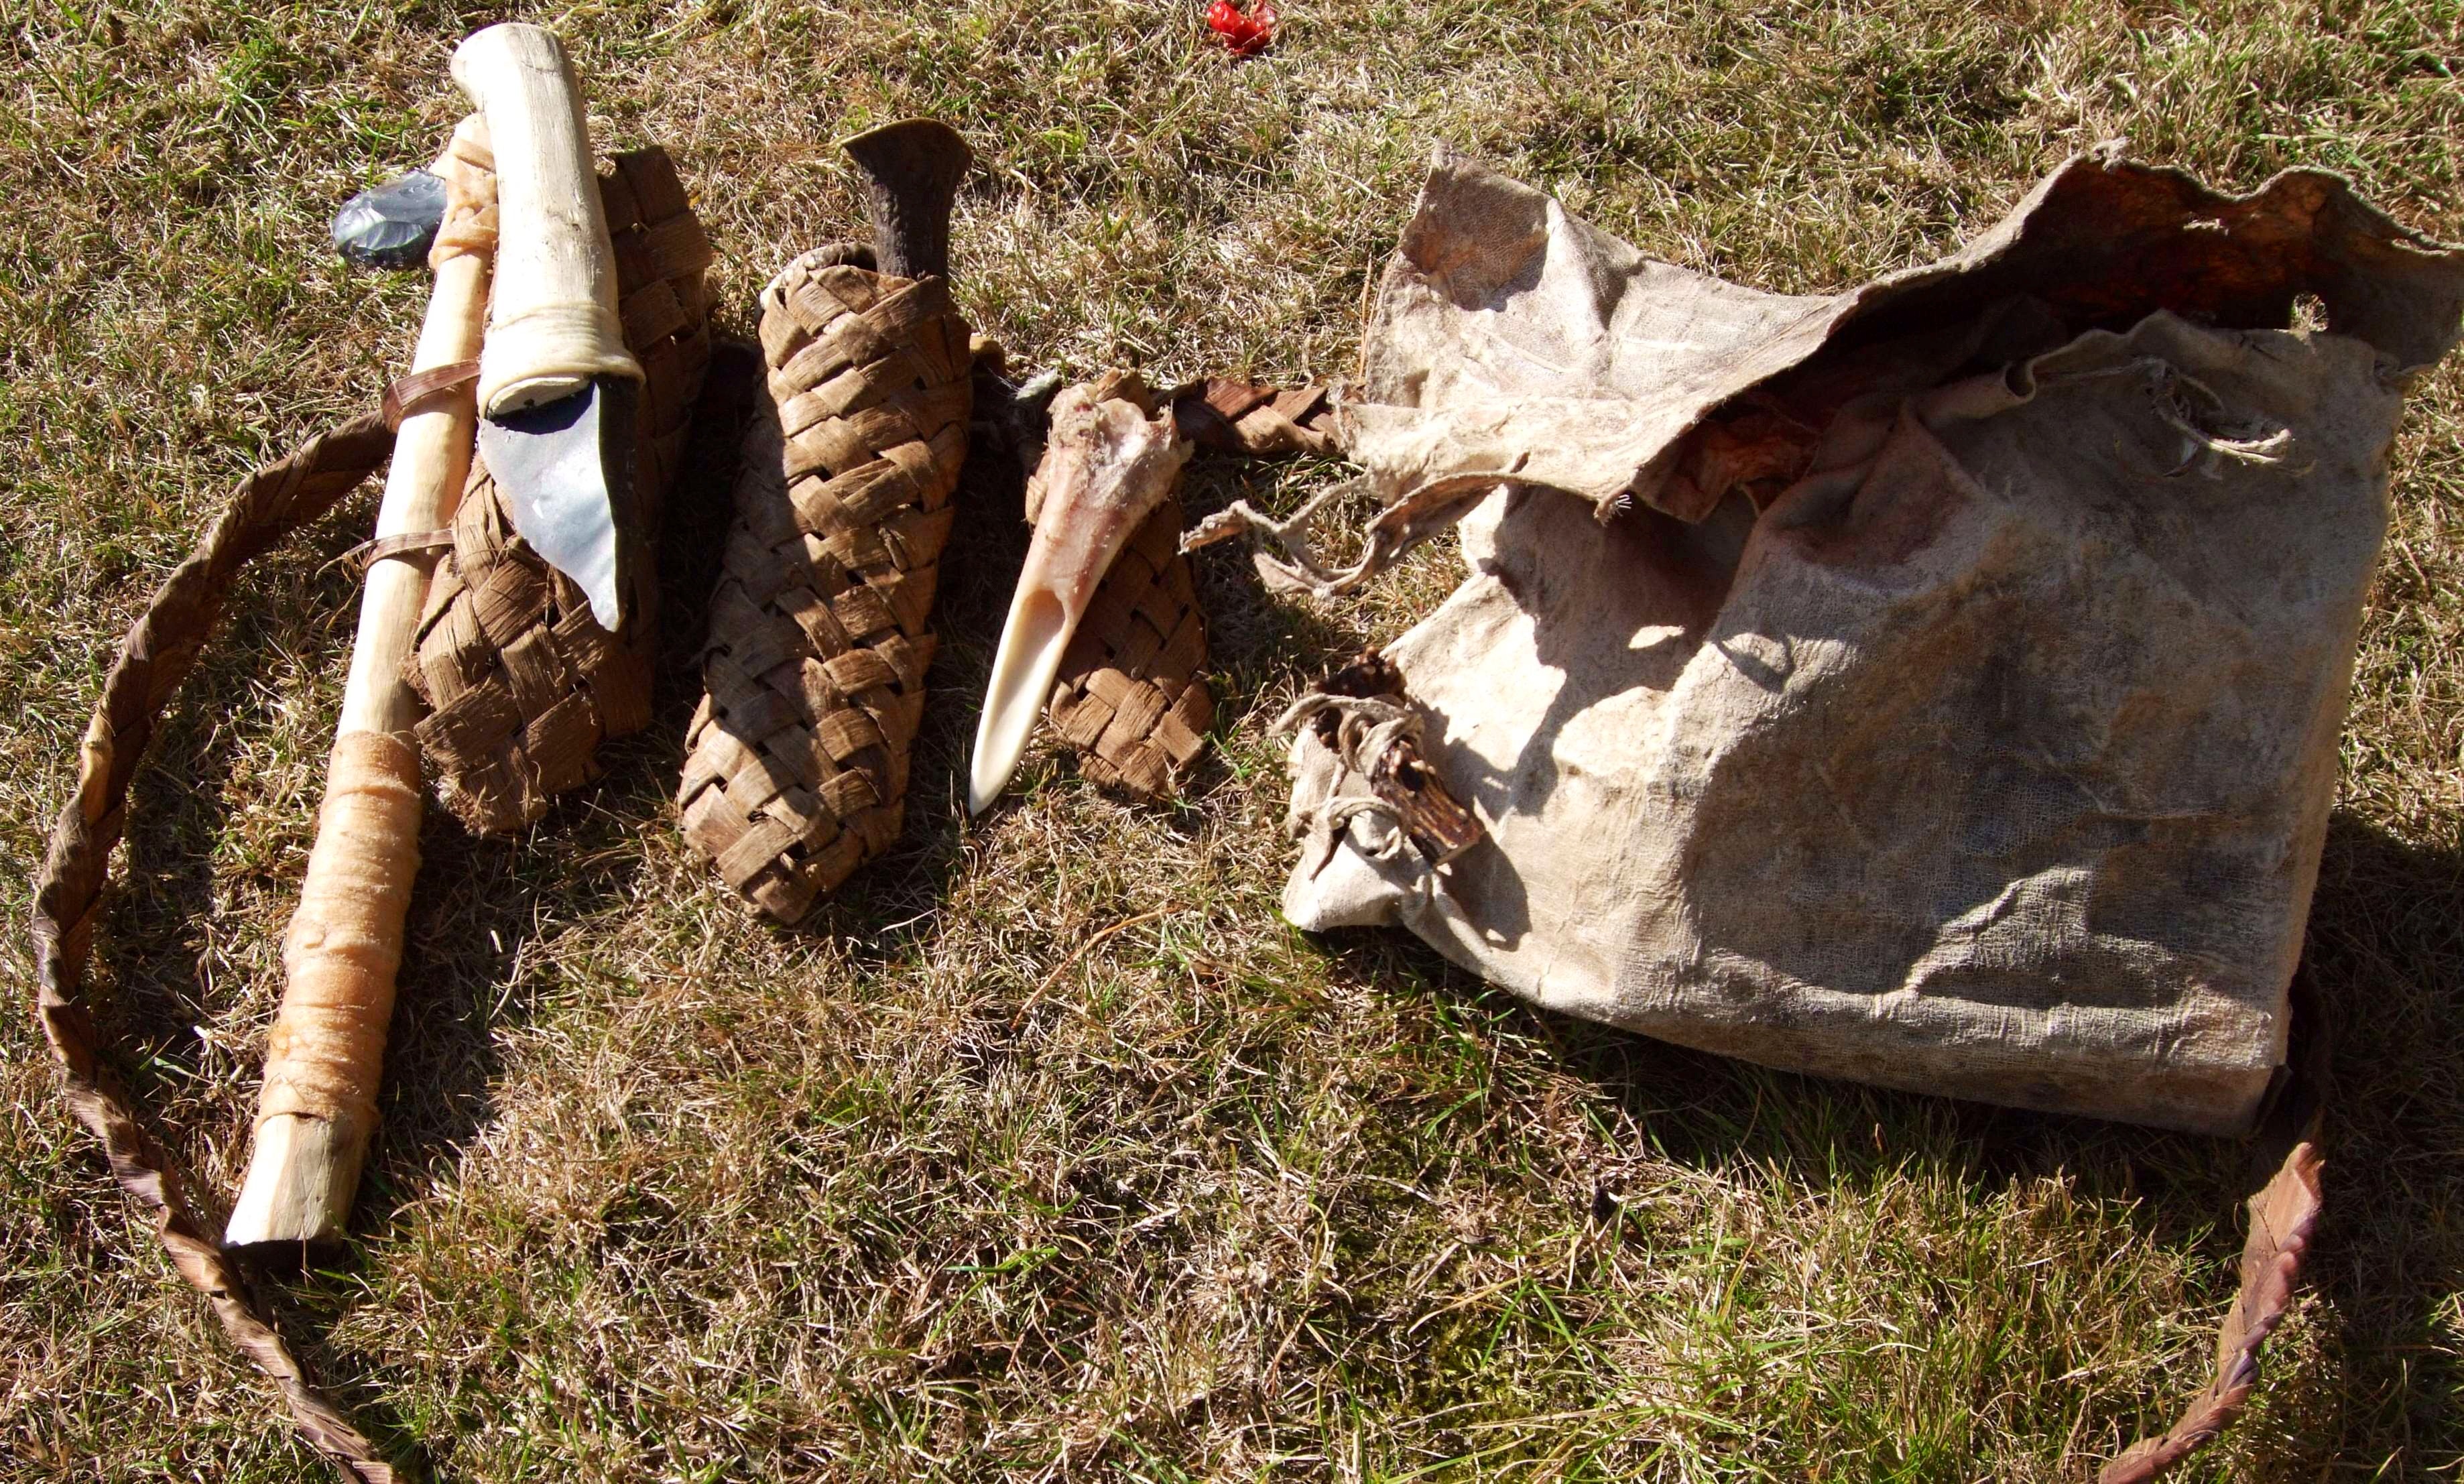
Sometimes a flint knife or adze is just not enough and you need something with a bit more clout. At times like these, what you need is a flint axe.
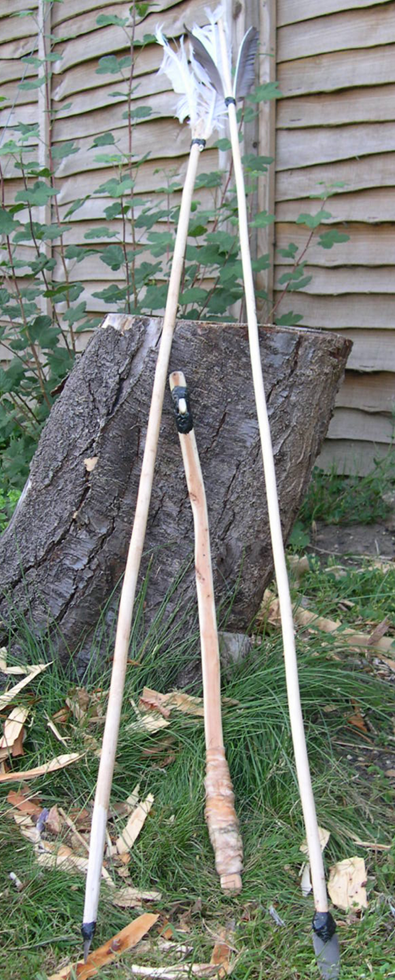
Here’s how I constructed the large flint axe you can see below, with a few pictures at the end about its little brother, the hatchet.
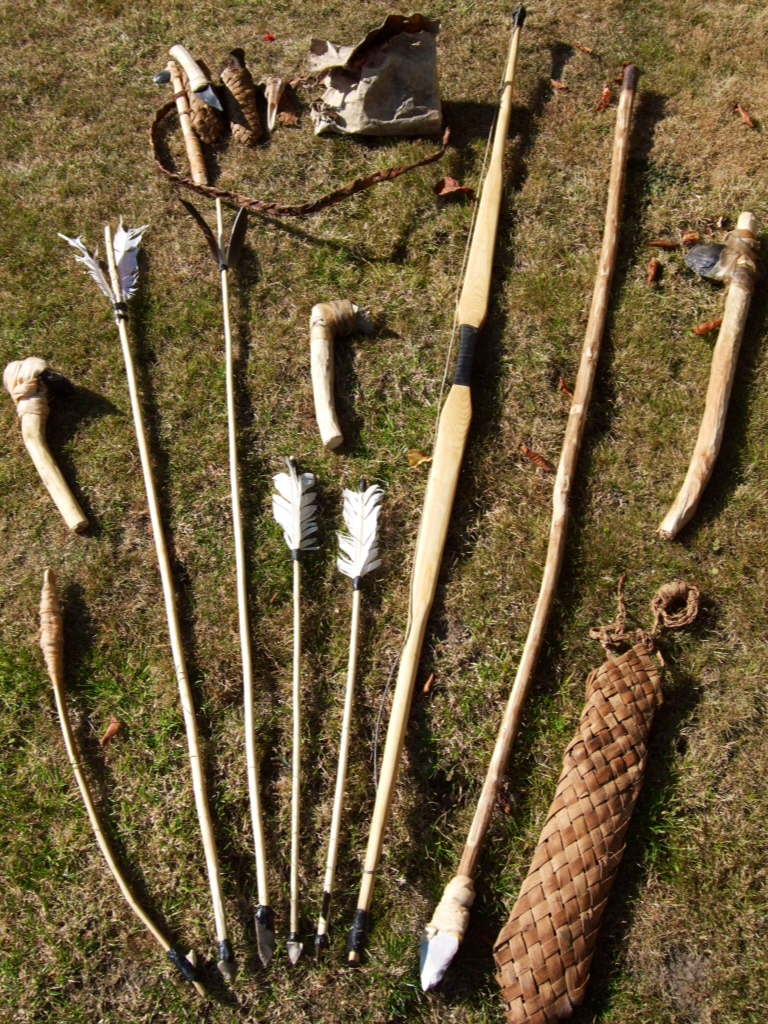
Two good tools
I made these tools on the Woodcraft School Primitive Technology course and had some excellent tuition from John Rhyder and John Lord.
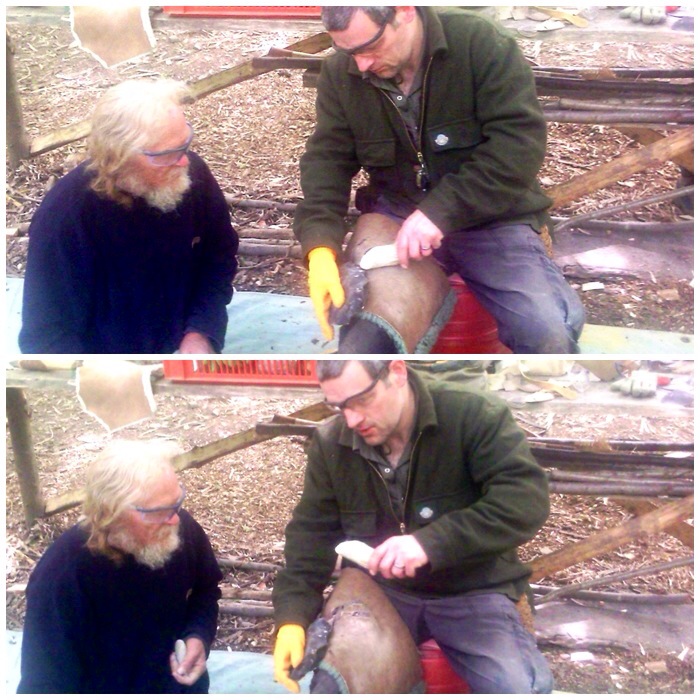
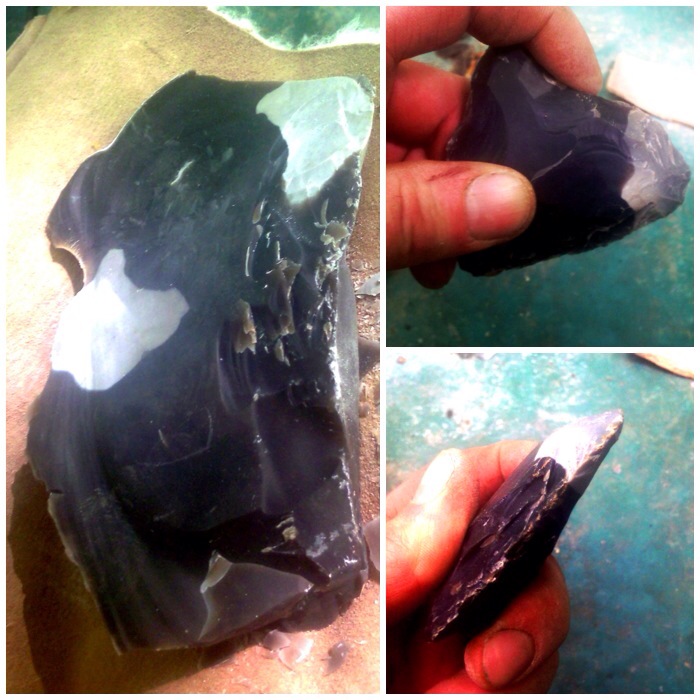
John Lord gave an excellent demonstration on knapping a flint axe head. It was a joy to watch this master take a lump of flint and transform it into a work of art.
When it came to the turn of us students to knap out our axe heads John gave everyone lots of one-to-one tuition. If it hadn’t been for this (and John knapping the tricky bits) I would have been lucky to have ended up with an arrow head, never mind a large axe head.
Some tuition from the master Mr Lord
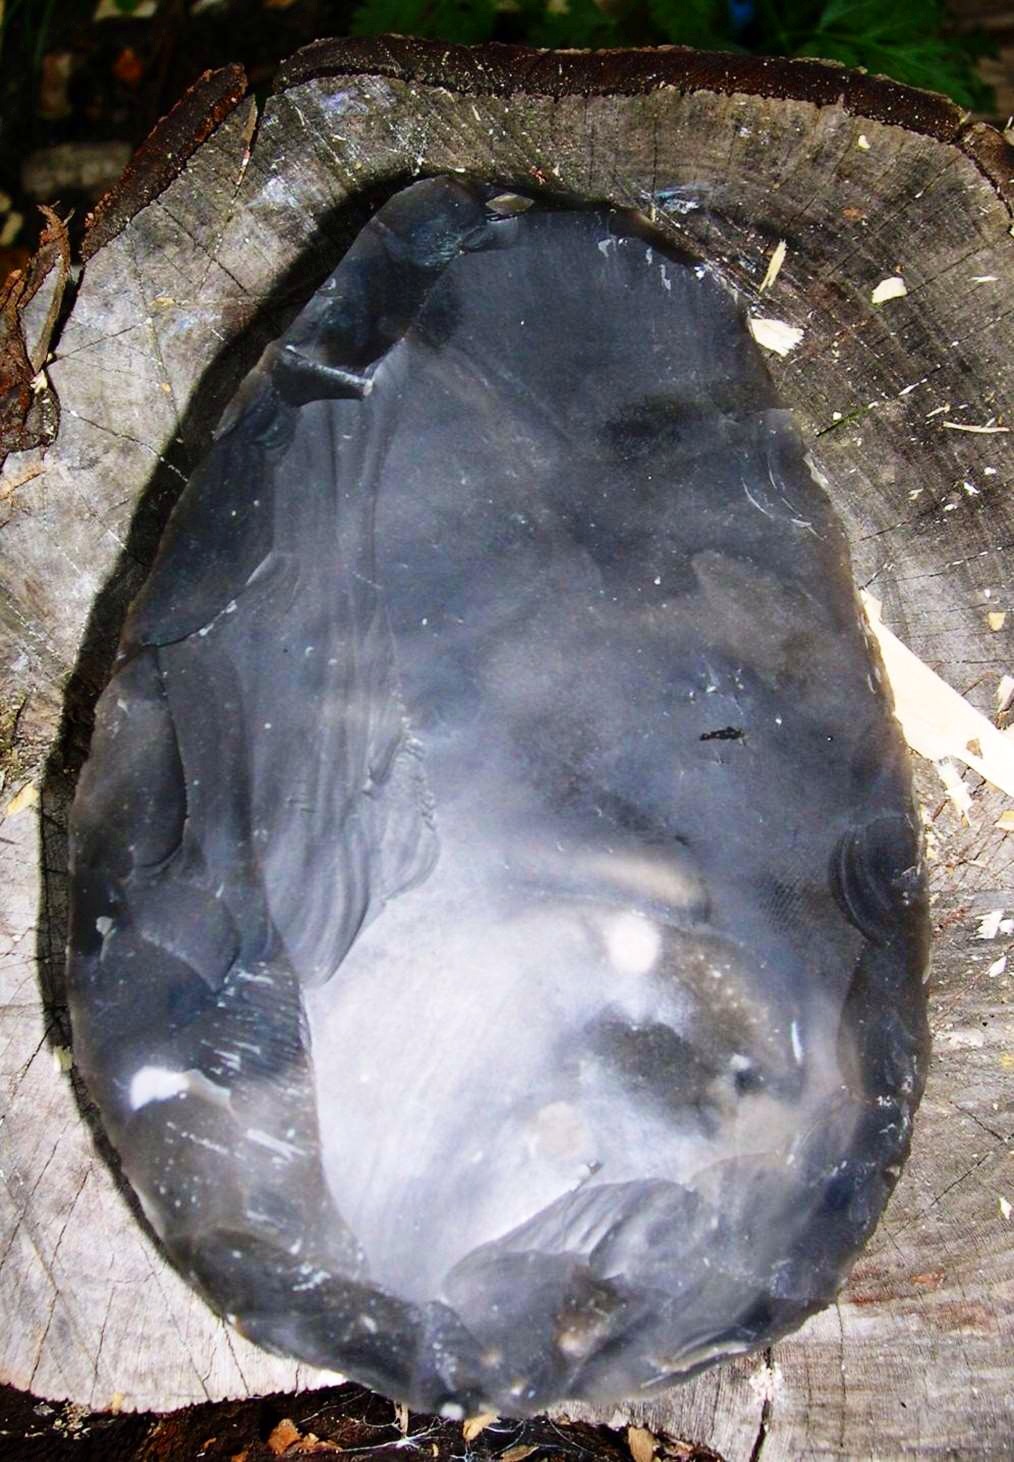
I like to think that this axe head has some of me in it but truth be told it’s more John Lord than me. I did however have a great time seeing this axe head appear out of the flint knowing at least part of it is me.
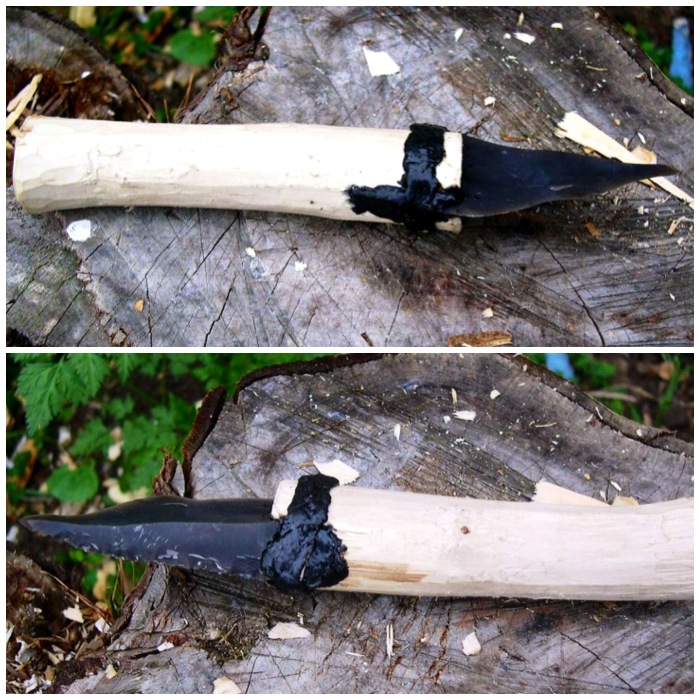
One knapped flint axe blade
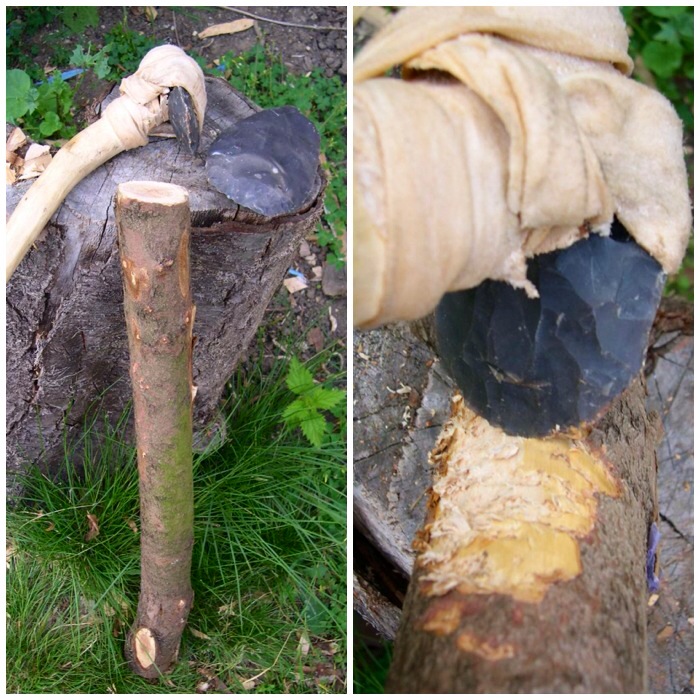
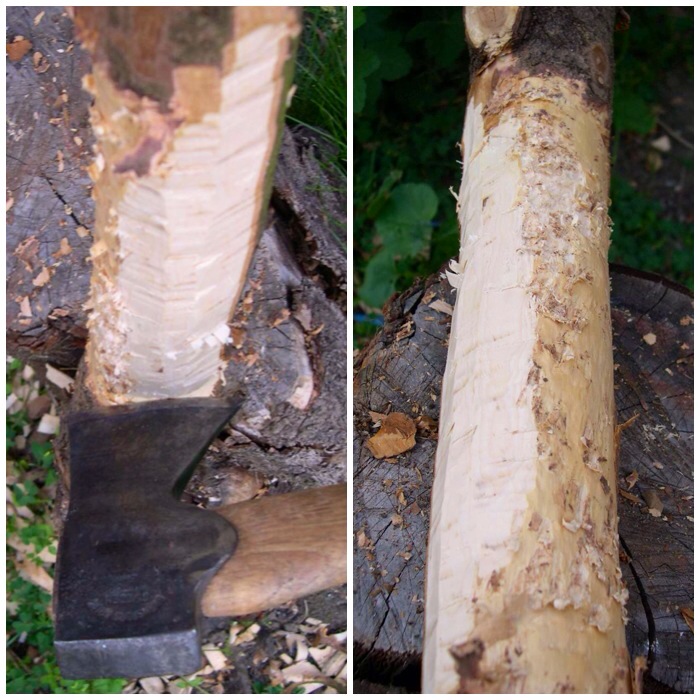
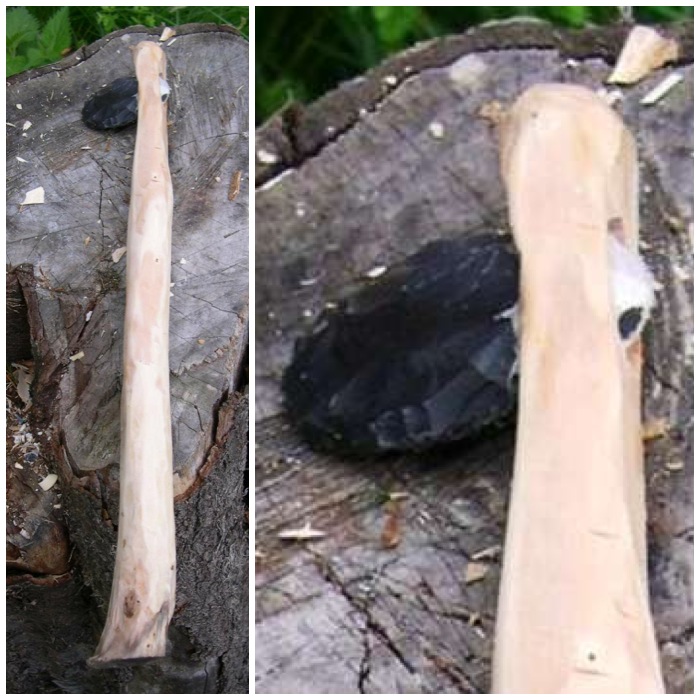
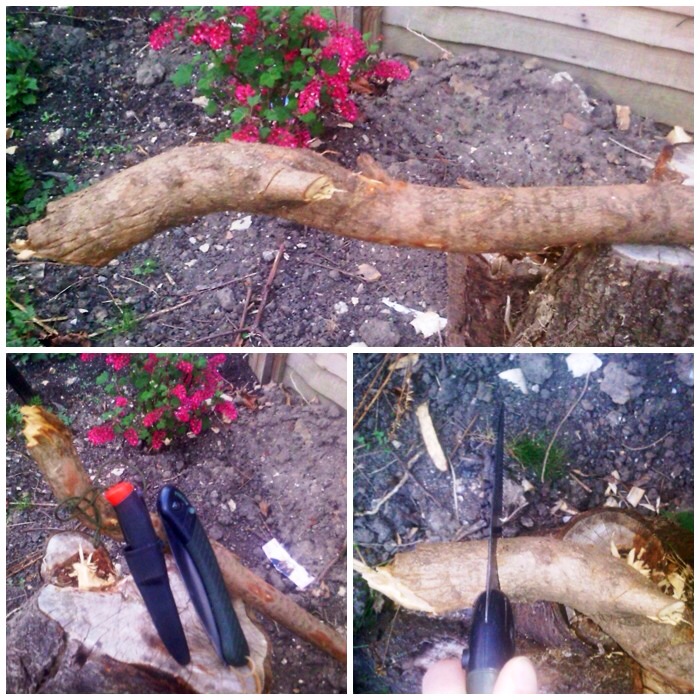
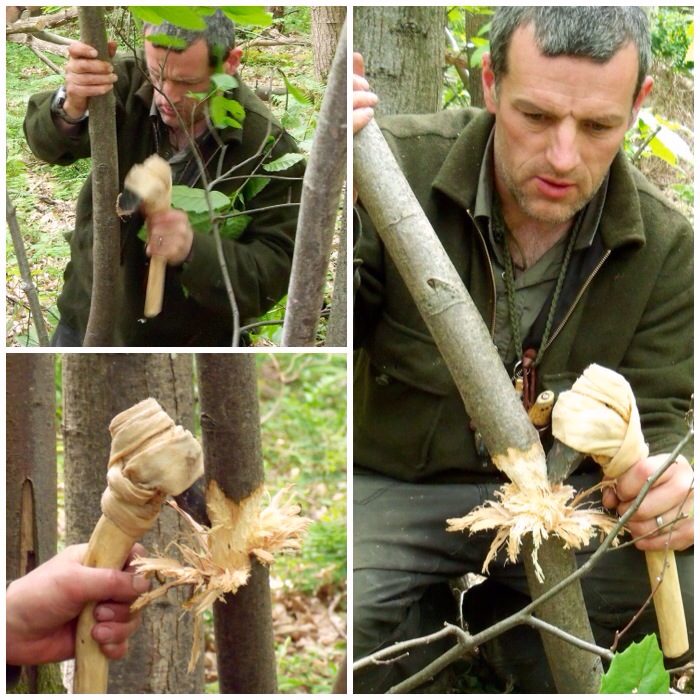
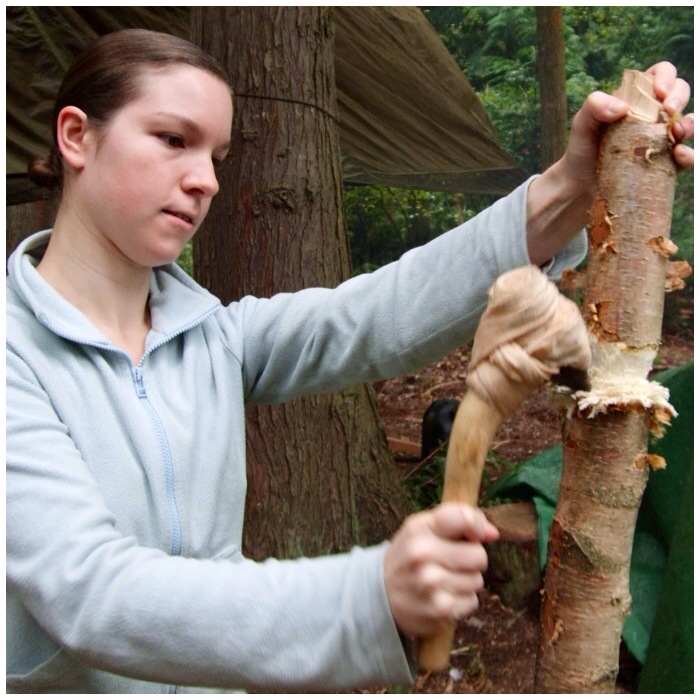
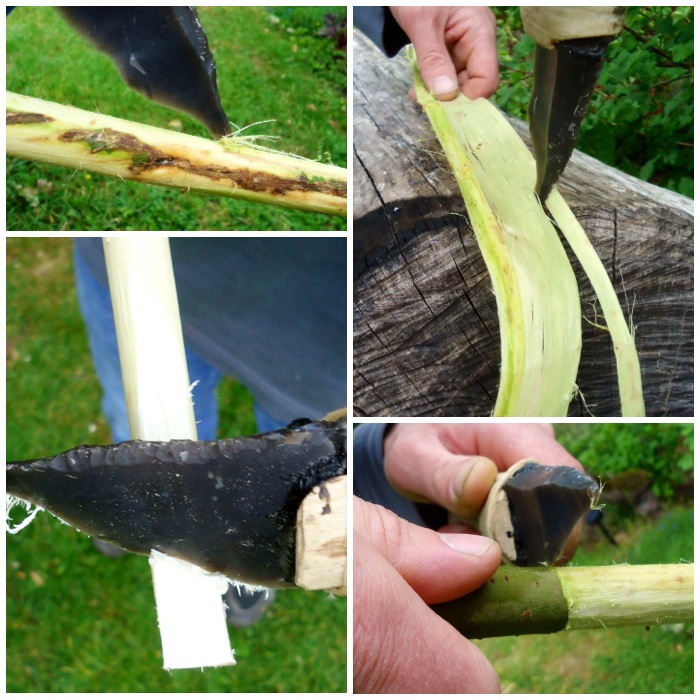
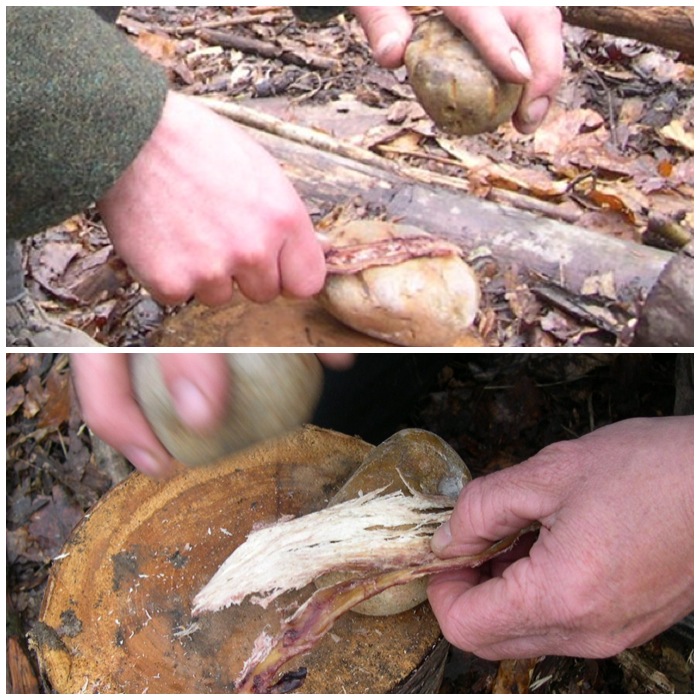
I used a well-seasoned piece of yew for the handle as that was what I had available at the time.
Initially I used my flint adze to try and shape the yew, but although the bark came off easily enough it didn’t make much of an impression on the hard wood beneath.
You can see the tool marks left on the wood by the adze in the right-hand picture below. As a Time Team enthusiast I have watched the archaeologists discuss such marks on many ancient pieces of worked wood they have found so it was good to see it in action for myself.
Stripping the handle
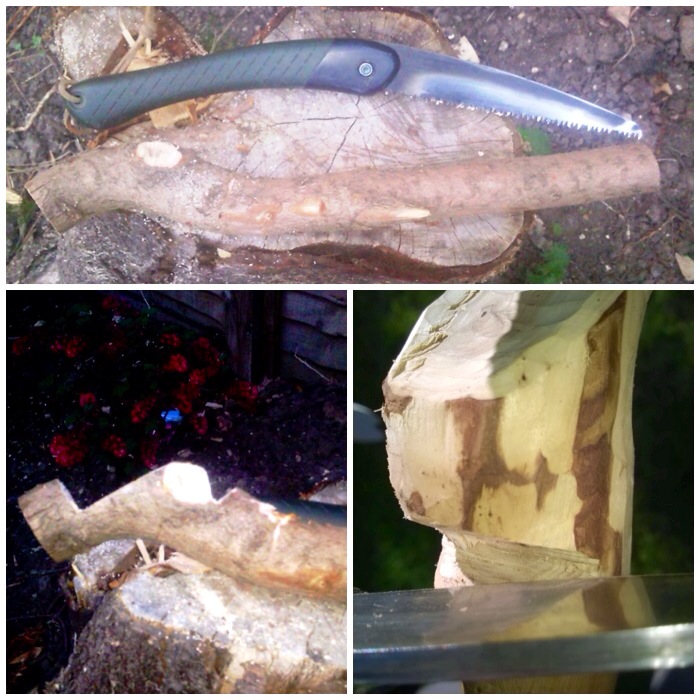
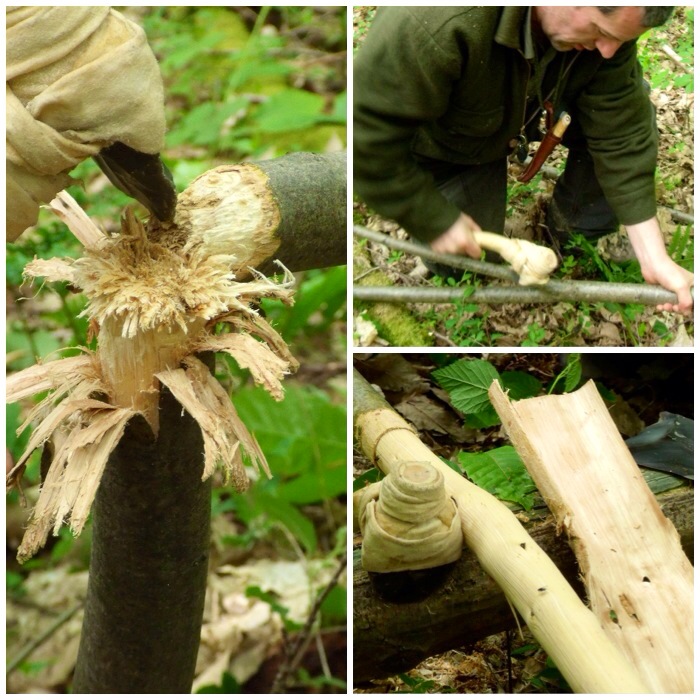
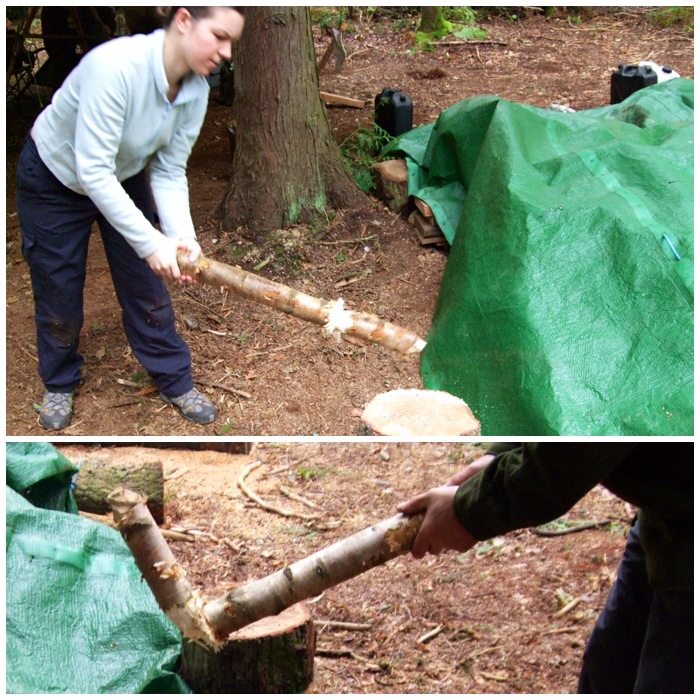
At first I used short chopping motions to tear away at the bark and wood with the adze. Ever experimenting, I tried a few strikes with a bit more force and eventually took a chip out of the adze blade. I was able to re-sharpen the edge of the adze by pressure flaking it but decided that the yew was just too tough for the adze (notwithstanding my lack of patience and skill).
Too tough for the flint adze
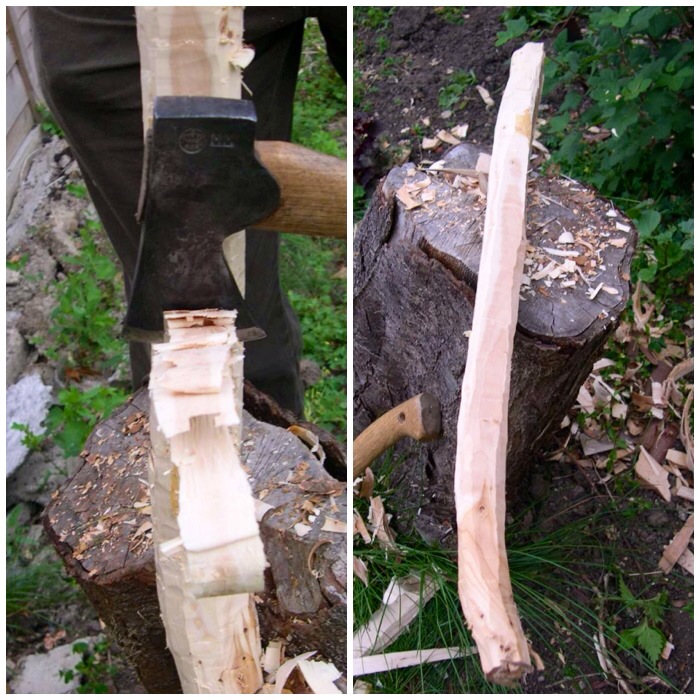
I reverted to my modern axe which took the excess wood off easily. In the picture on the right below you can see the very different tool marks left by the iron axe in comparison to the flint adze marks.
Time for an iron axe
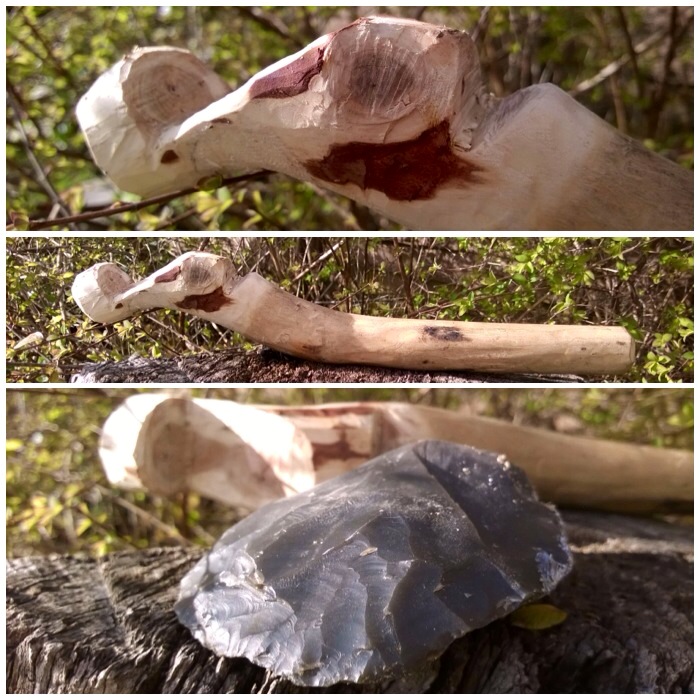
This piece of yew had a slight curve to it which I thought would give added strength to the handle. I left the handle fairly rough, just ensuring I would have a comfortable grip and not get any splinters.
One rough handle
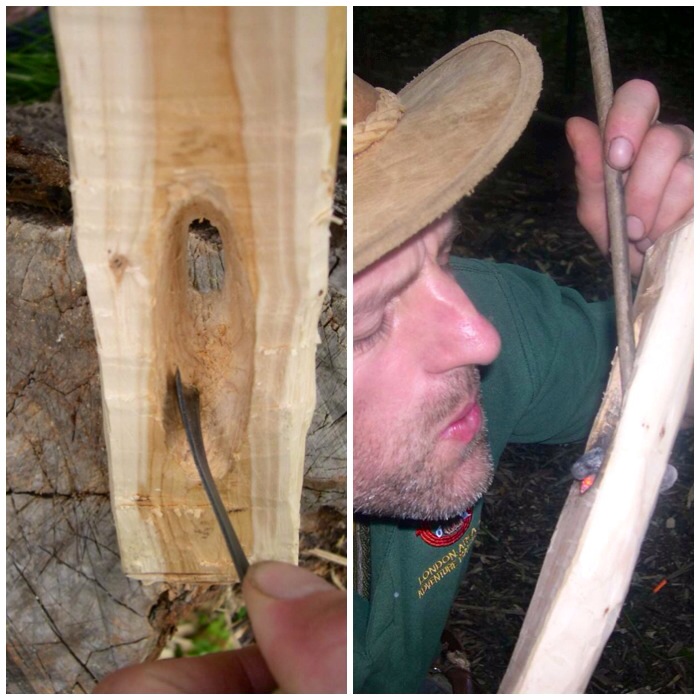
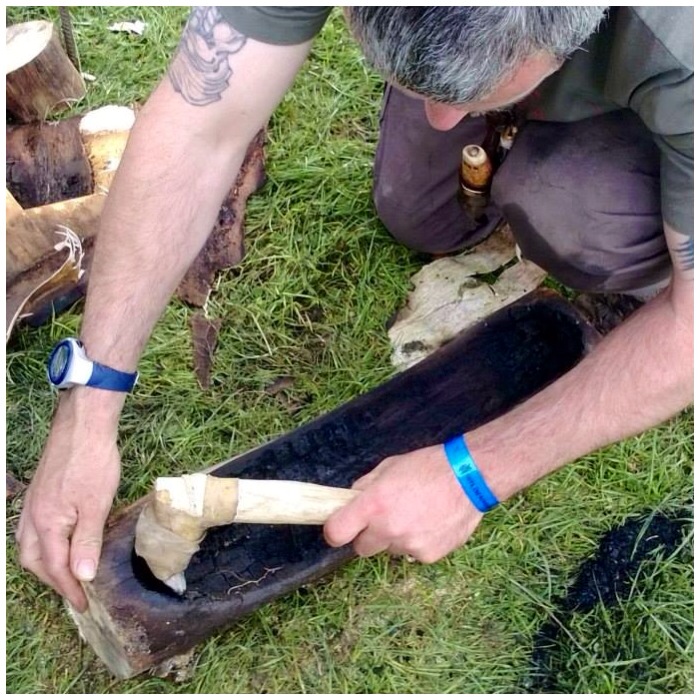
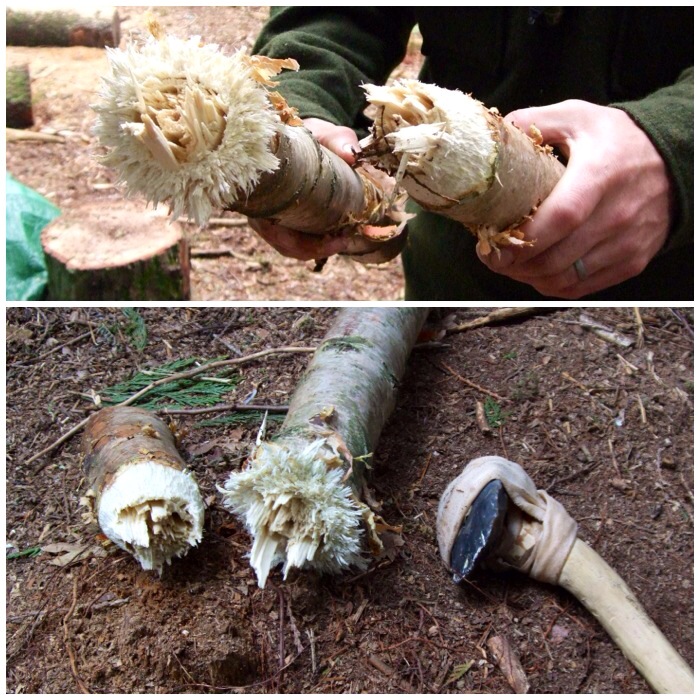
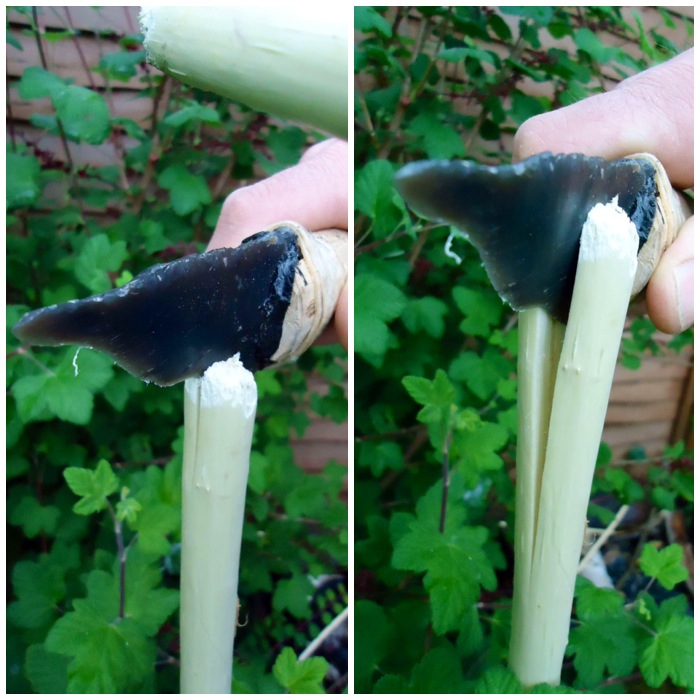
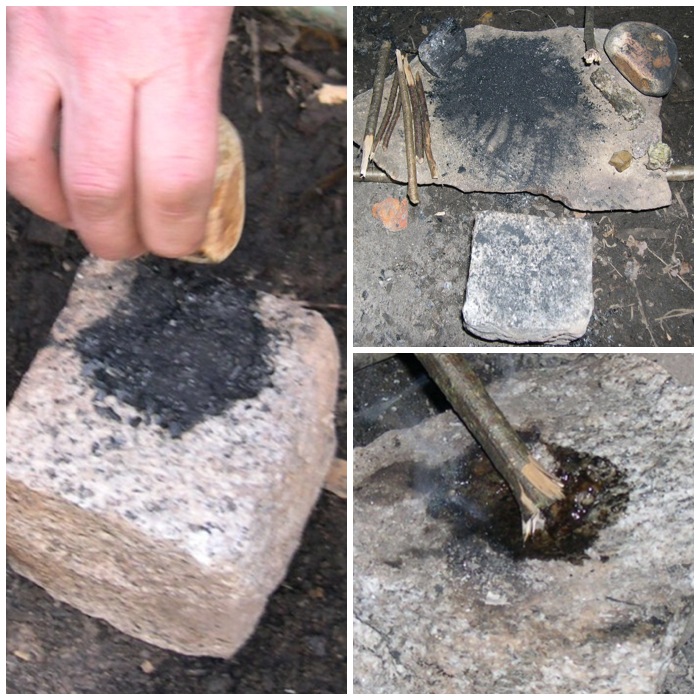
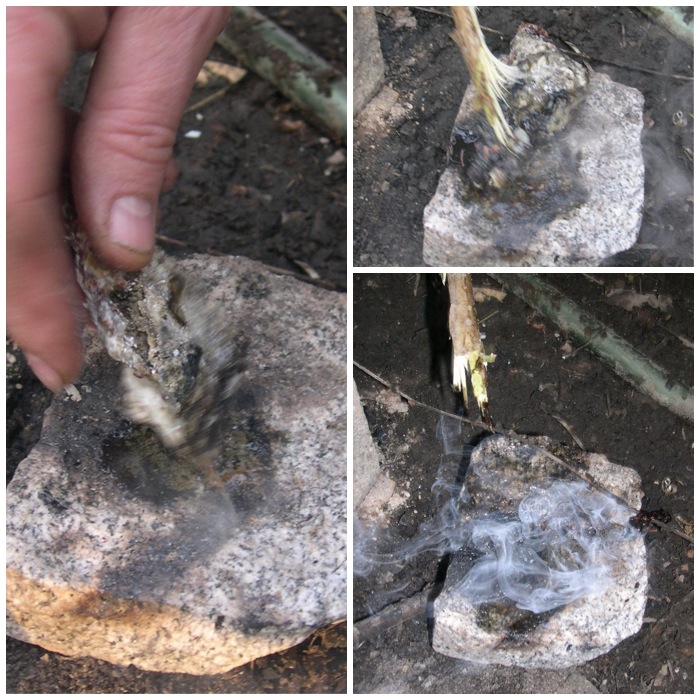
I initially started using a discoid all-flint knife to cut out the socket for the axe head but I did not take any pictures of this part. I did not do this for long as the yew was just too hard and the flint blade kept slipping. A few of the other students did just use flint for this stage but since the woods they were using were slightly softer they had more success. I ended up using my little palm gauge for the job and it worked very well.
I did try and burn out the wood with embers but soon got put off this with the fumes (yew wood being highly toxic).
Carving and burning
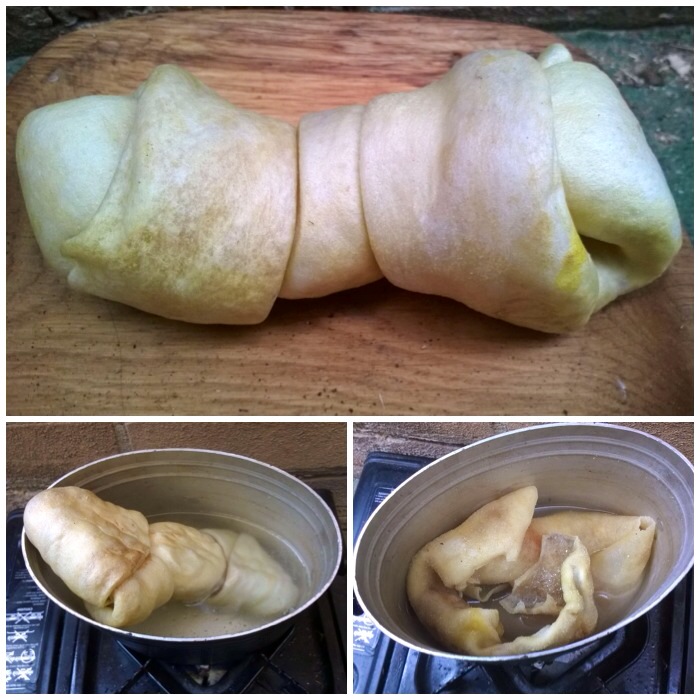
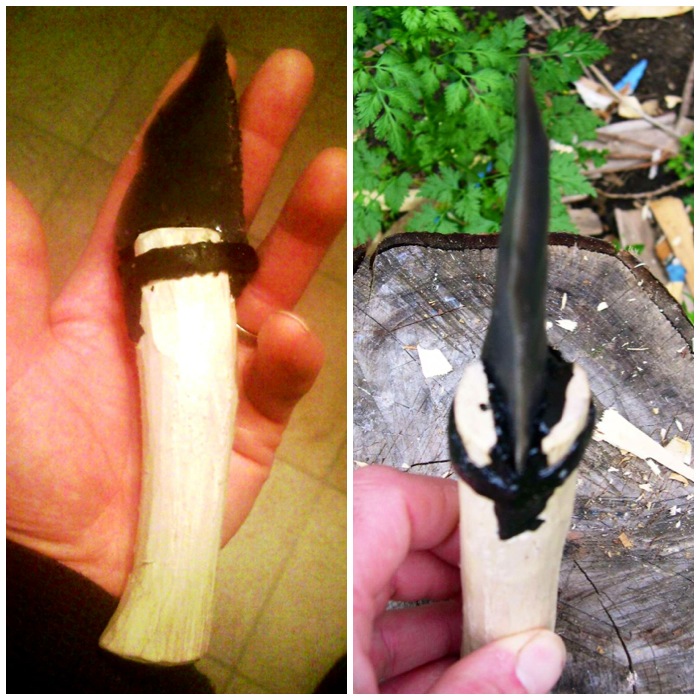
The socket finished – front and back.
The finished socket
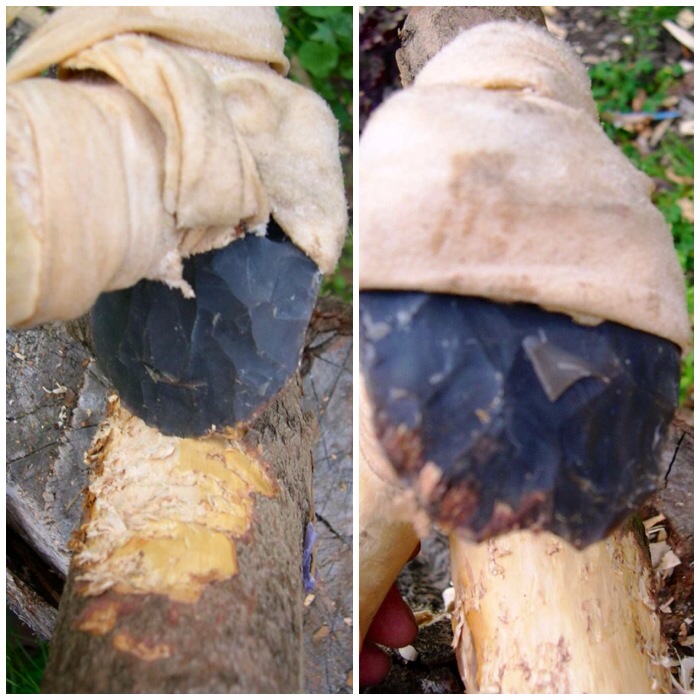
A good fit but too loose for use.
Test fit
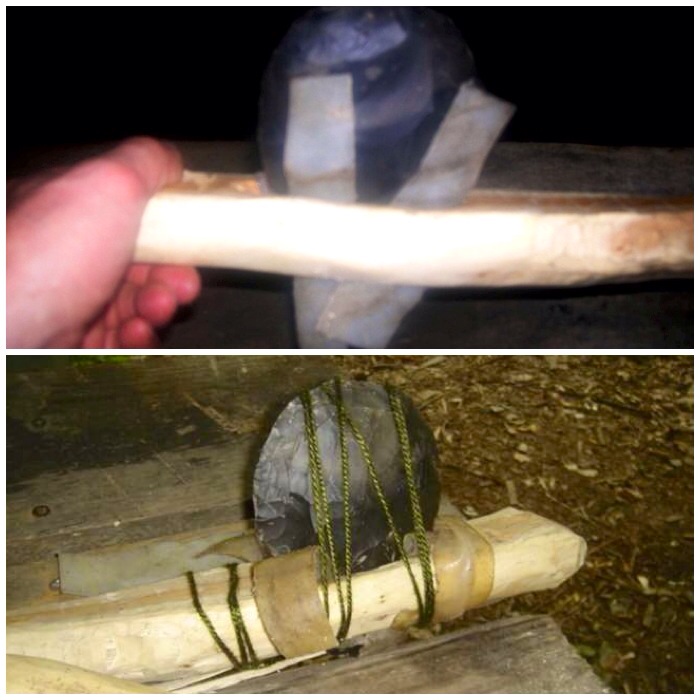
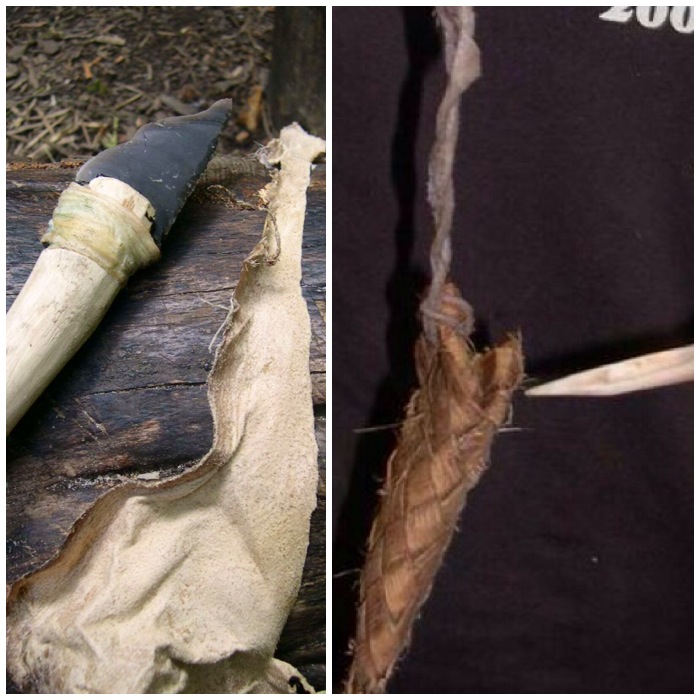
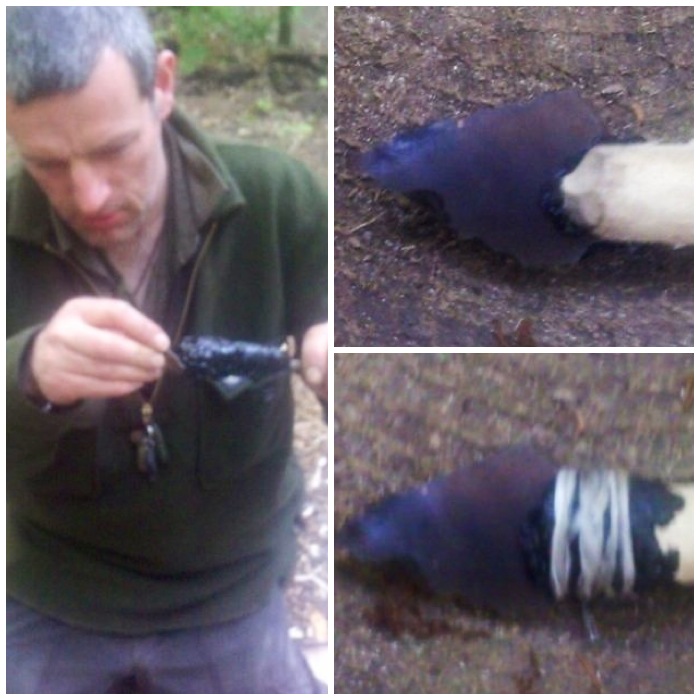
I wrapped the flint axe head in a piece of rawhide to see if that would secure the axe head in the socket (apologies for the poor quality of the pictures), but with one piece wrapped around it the axe head would not fit into the socket.
Prepping rawhide
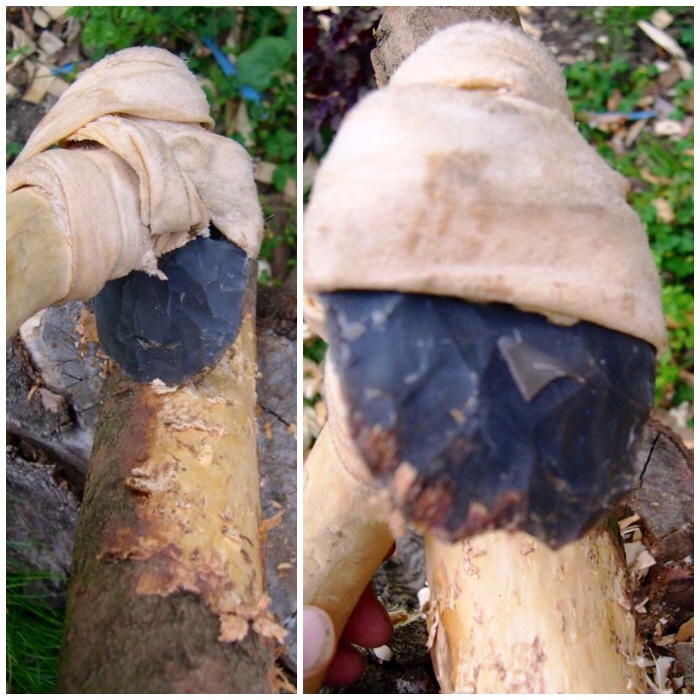
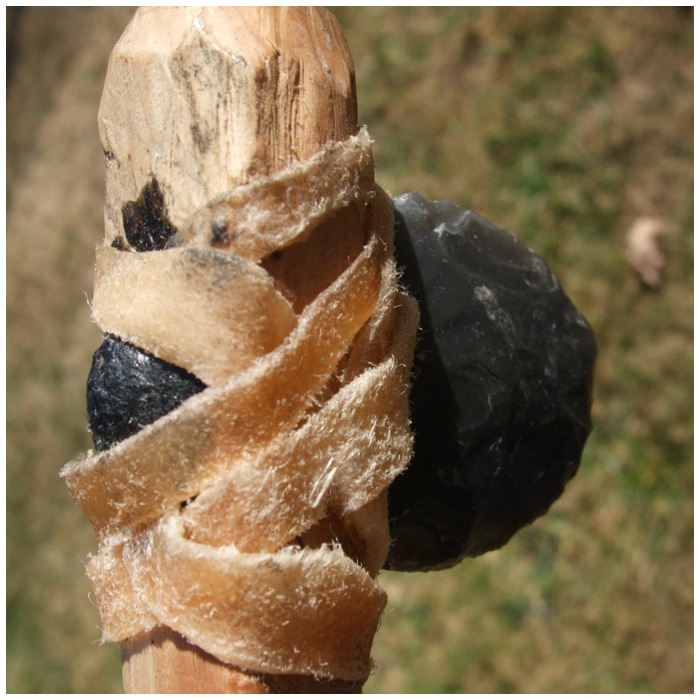
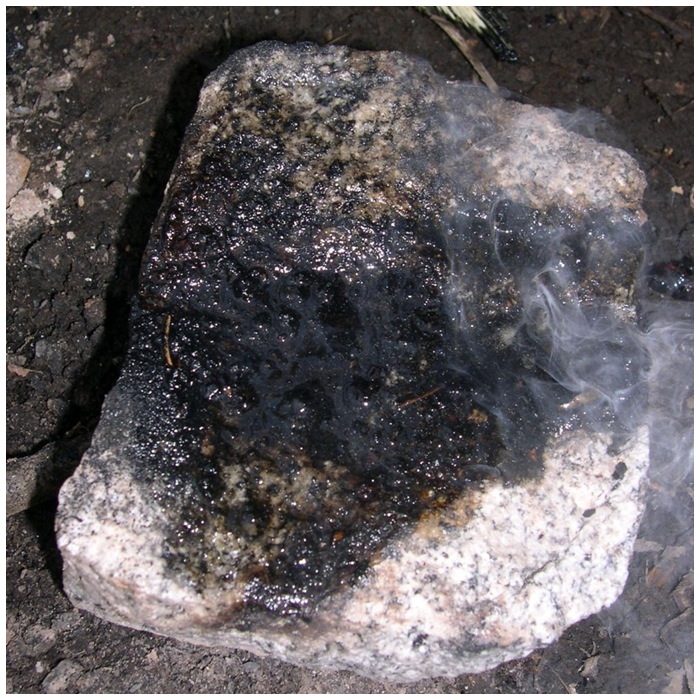
Instead I cut up some strips of rawhide and held it all in place with some string. As the rawhide dried out it really gripped the axe head and the wood of the socket.
Securing with rawhide
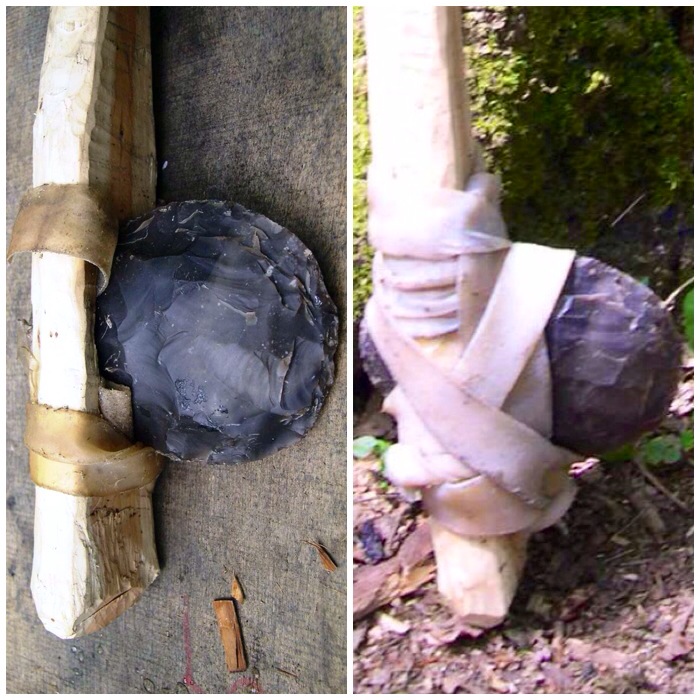
After that it was a case of wrapping a load more rawhide around the axe head and leaving it to dry for a couple of days.
Drying and adding more rawhide
After the rawhide had dried out it became almost translucent but it was a very strong hold.
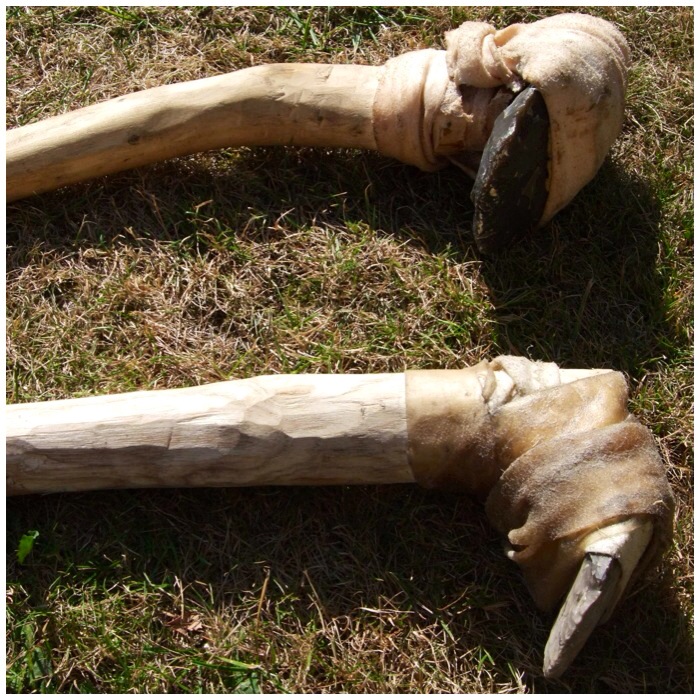
Side profiles
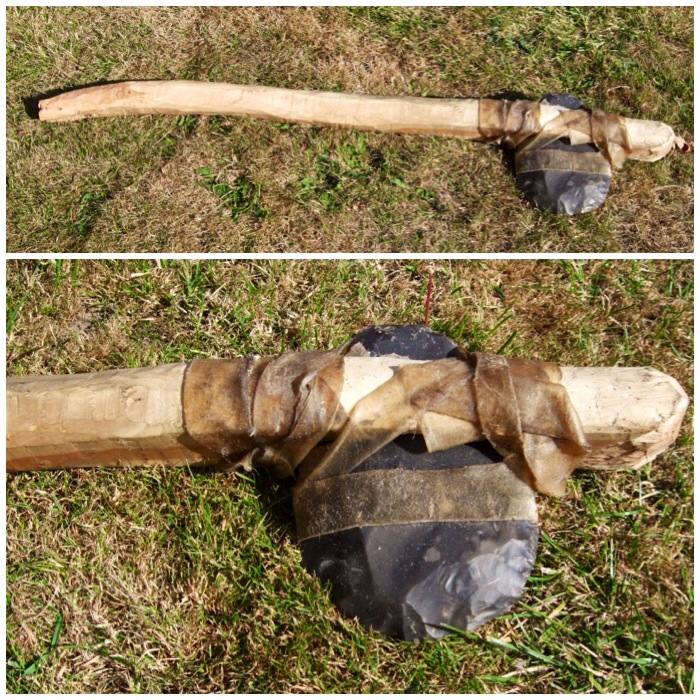
Top and bottom profiles of the axe head.
Top and bottom profiles
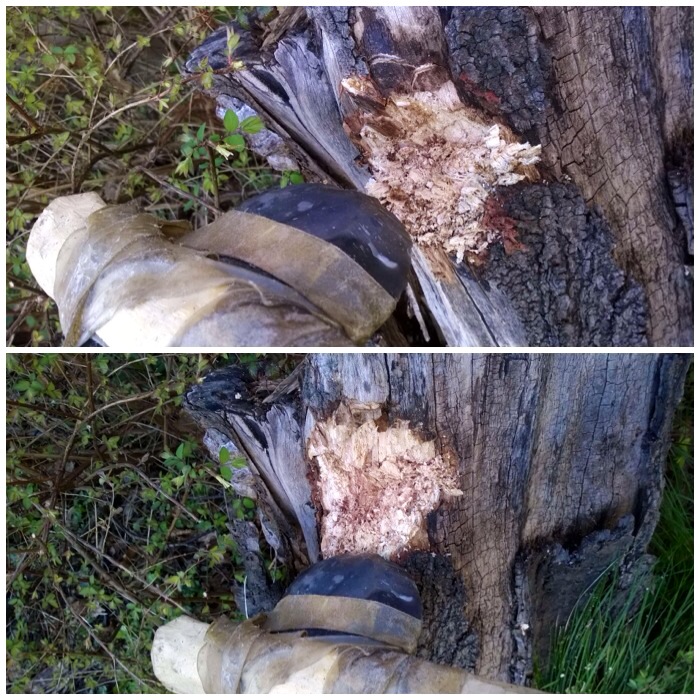
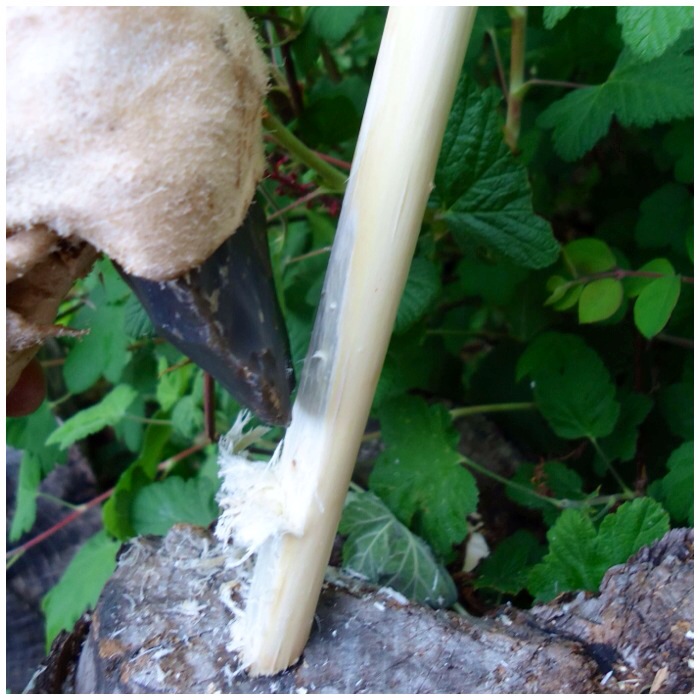
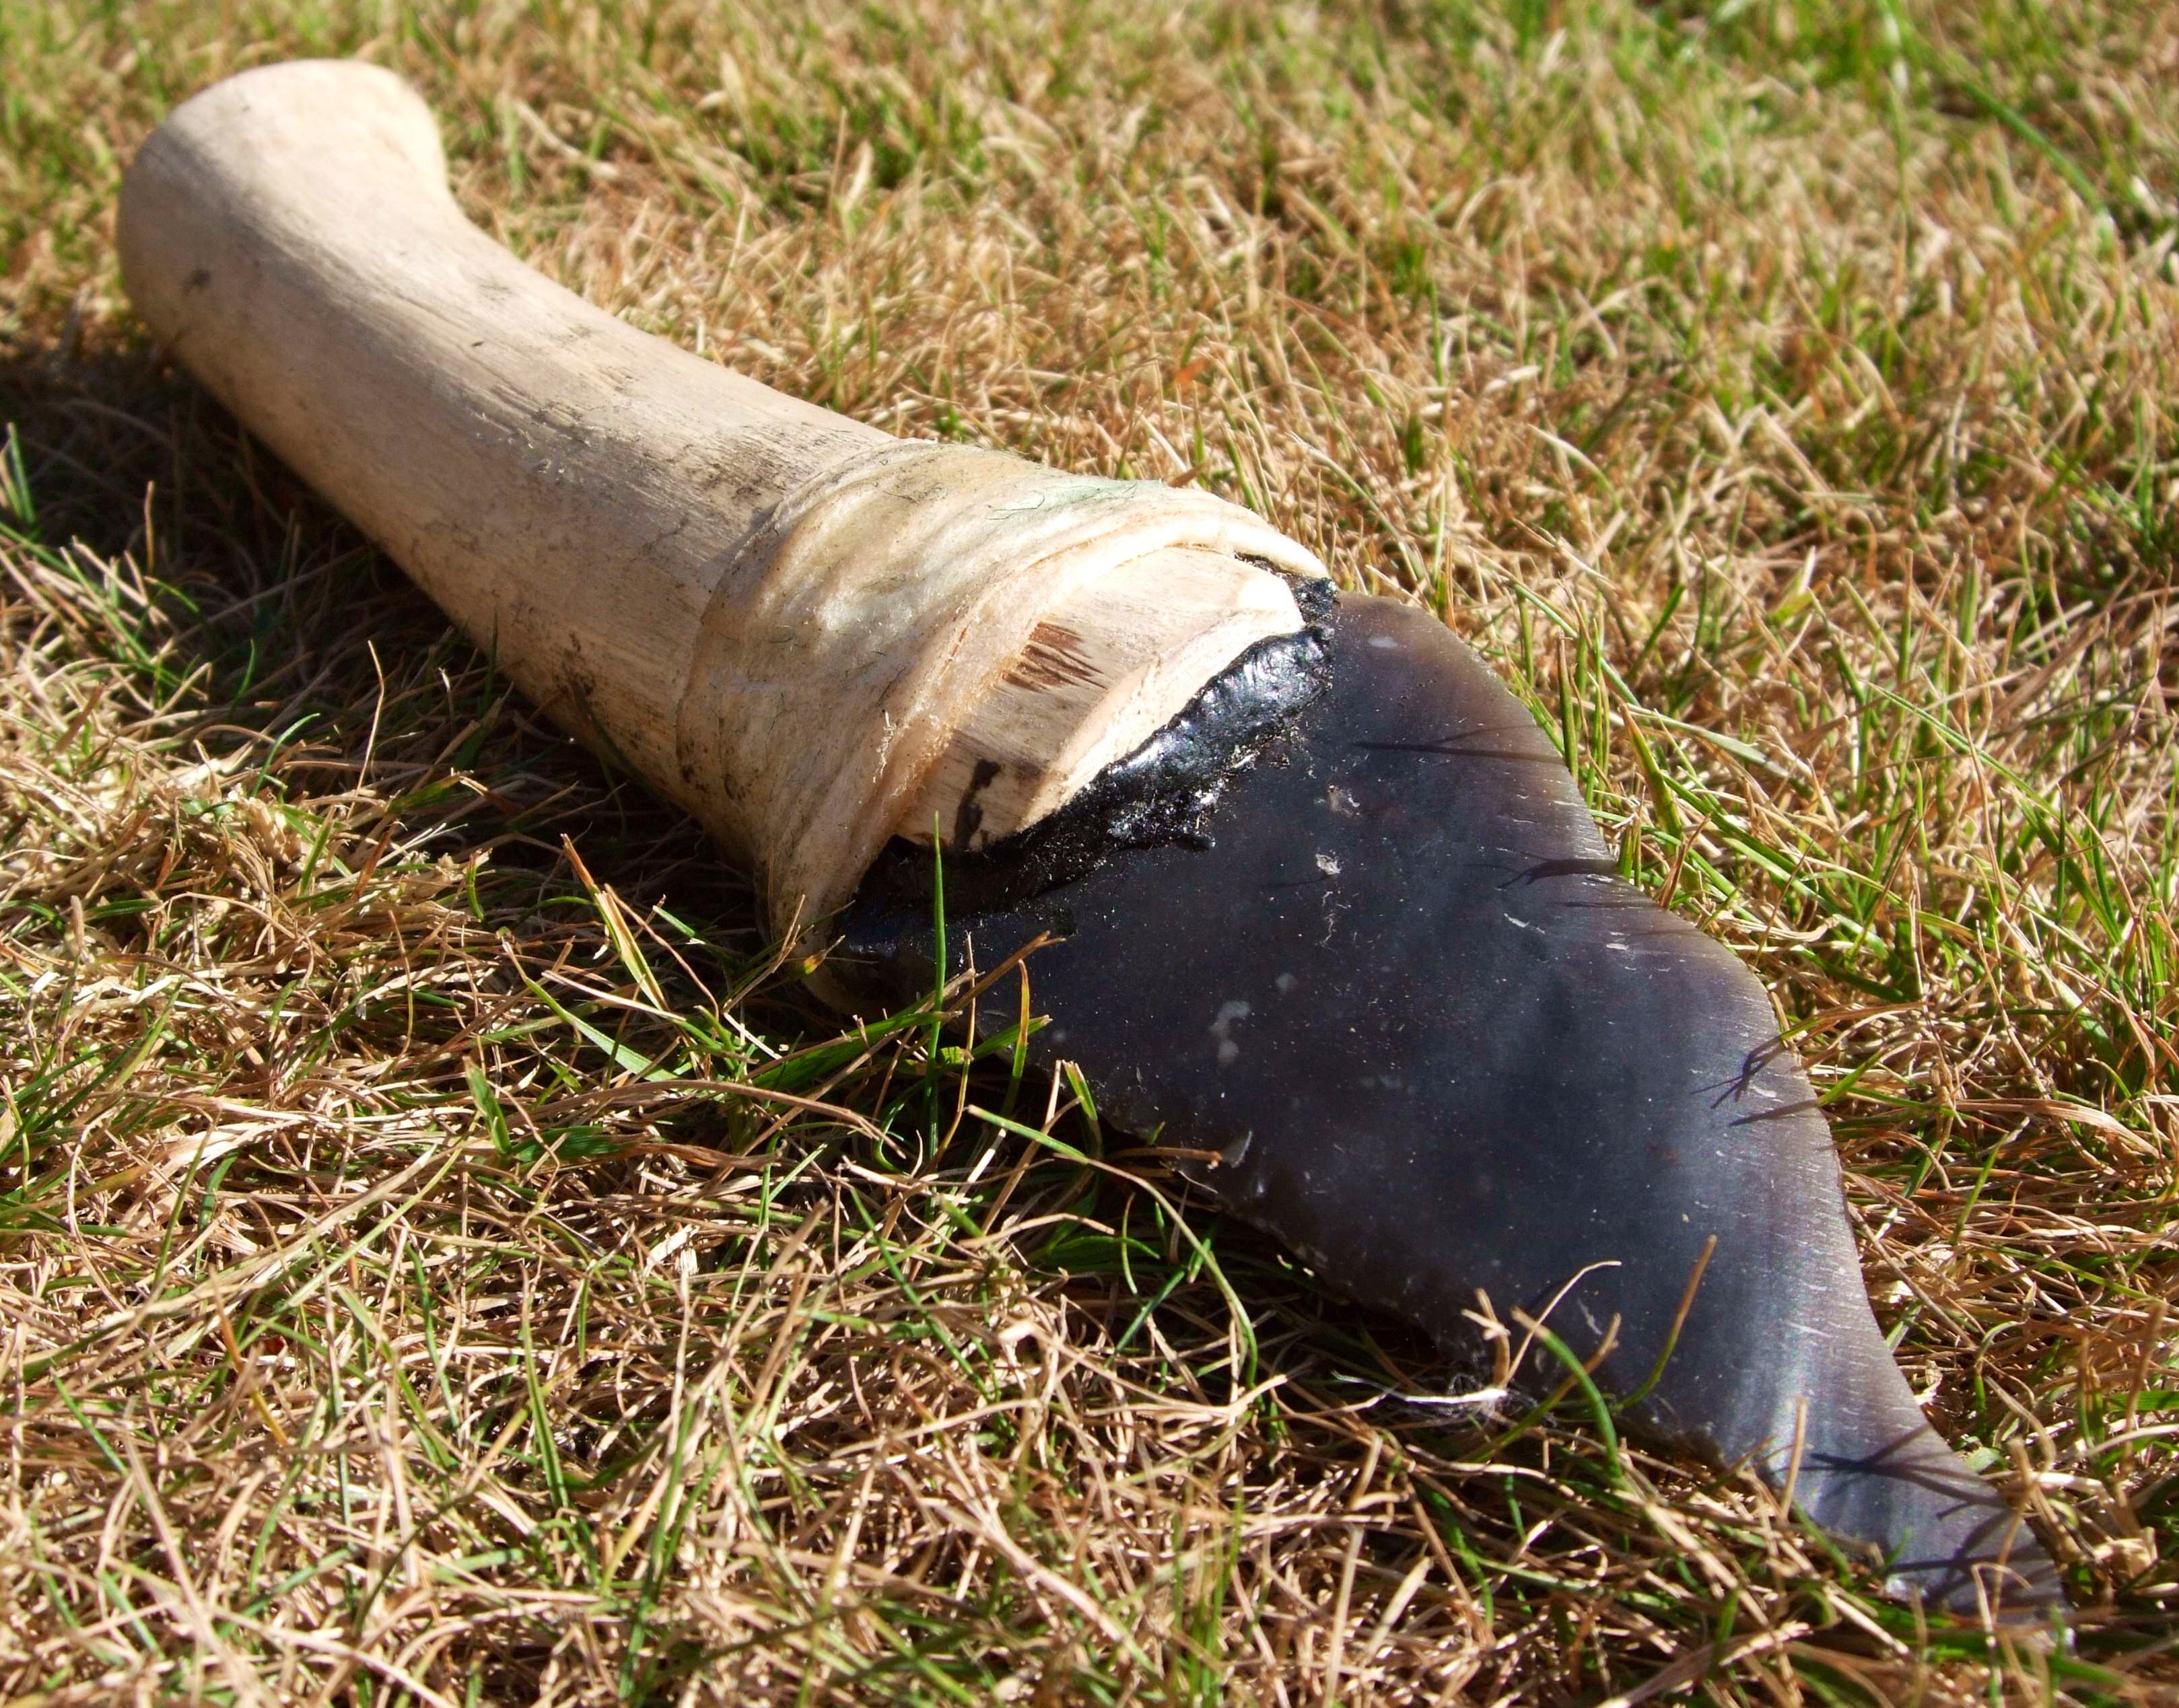
I tested the axe out on an old stump in my garden. Like the adze, the axe tears into the wood as opposed to slicing into it as a modern iron axe would do. It was still very effective in its own way.
Leaves the wood torn
The blade edge is not particularly sharp and has a good shoulder area behind it. This shoulder area really supports the edge so that it does not break off when the axe is used.
Up close
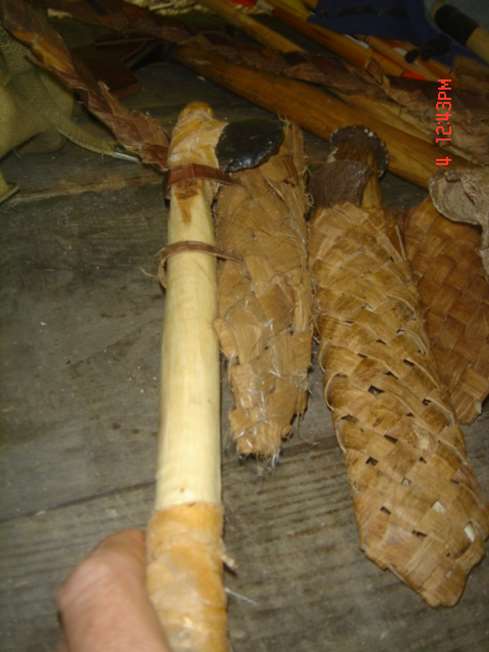
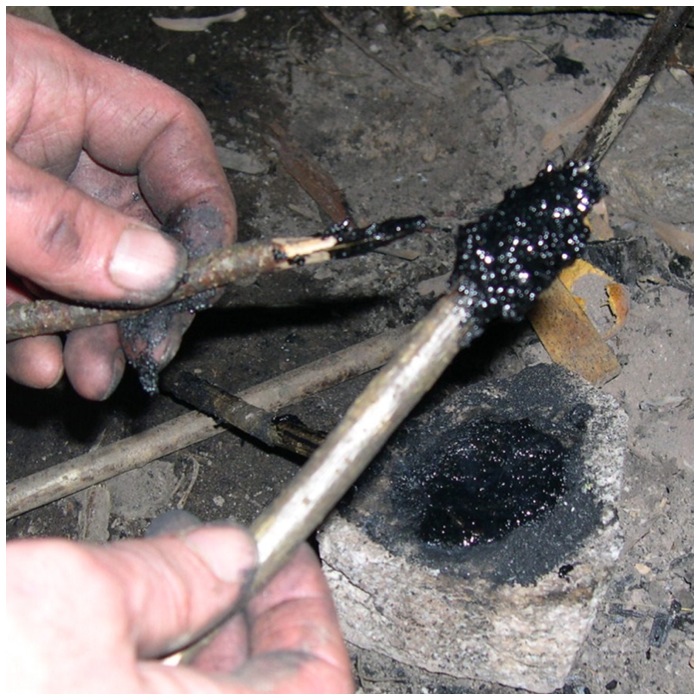
I had a small flint axe blade I had made at the same time as the larger one, so I just scaled everything down to make a hatchet.
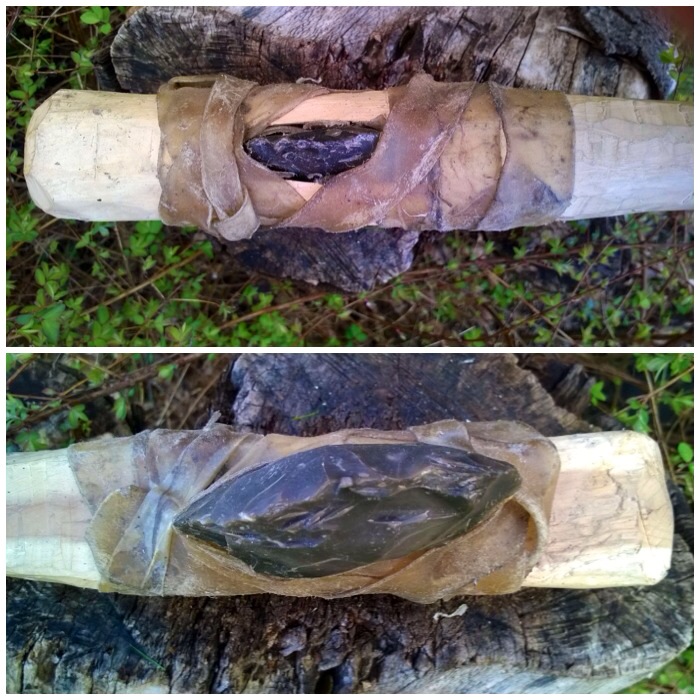
Hatchet blade jammed in with rawhide
As well as using rawhide I filled the socket with some spruce pitch to fill up any gaps and to help secure the head more.
Gaps filled with resin
I have never used this tool on anything – it would have been used mostly to dispatch small game that had been caught in traps. I do like it a lot though, in some ways more than the larger axe.
Rawhide wrap
This hatchet sits nicely on my primitive belt order.
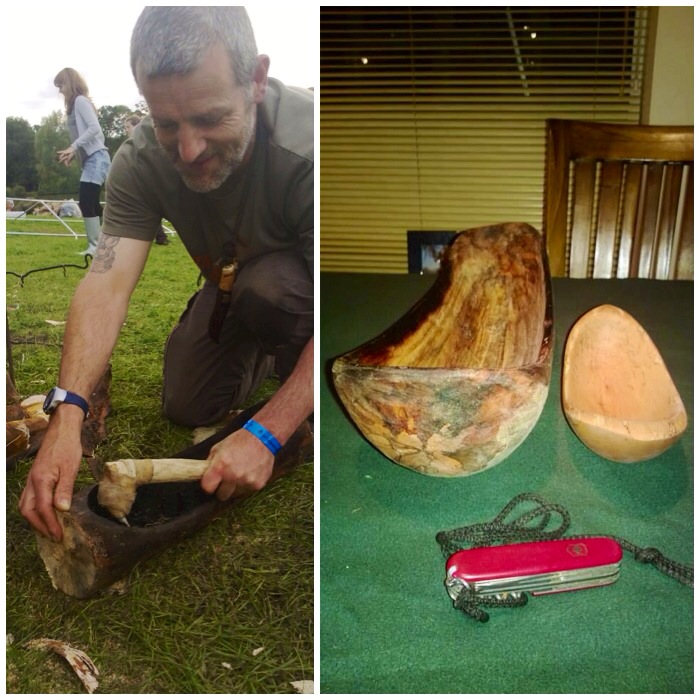
When I want a bowl fast a modern adze is what I use, but if I have the time and I want to create something in a more leisurely fashion then I love to use a flint adze
Any self-respecting Stone Age woodworker would always have had a decent flint adze to hand. So to become that self=respecting Stone Age woodworker I had to go out and make myself one as they do not turn up in the shops that often.
I needed one to undertake my final project on my Woodcraft School Primitive Technology course: to create a bone bodkin and a bark sheath. The aim was to make them without the use of modern tools and I would need an adze to help me craft the sheath.
The adze I created for this has been extremely useful since then on other projects such as hollowing out this long bowl.
Chunking out a bowl
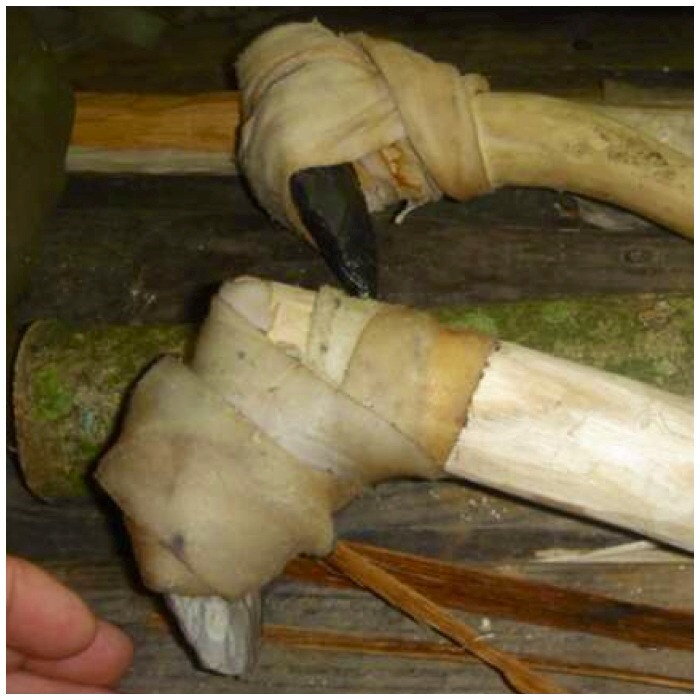
I ended up making two adzes out of flint, rawhide and curved branches.
Two well used adze’s
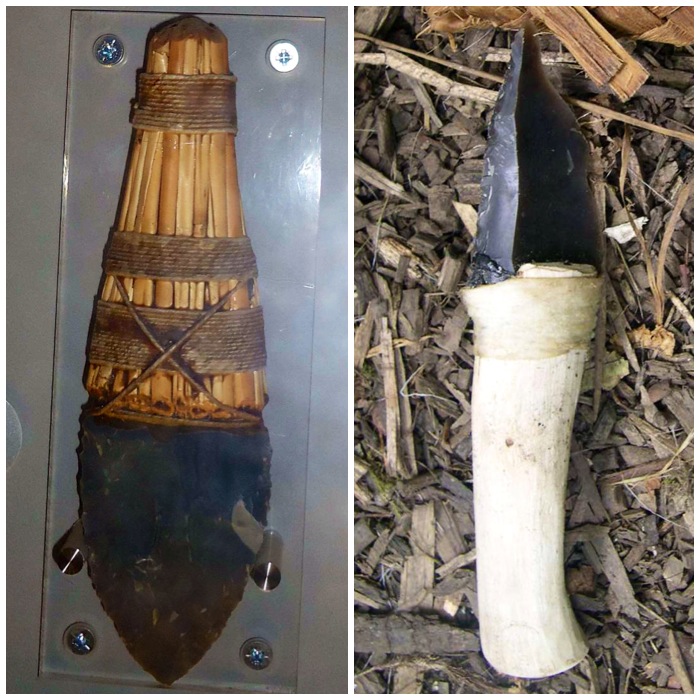
I took my inspiration from the Cheddar Gorge Museum where I came across this very basic but beautiful flint adze.
Cheddar Gorge Museum replica
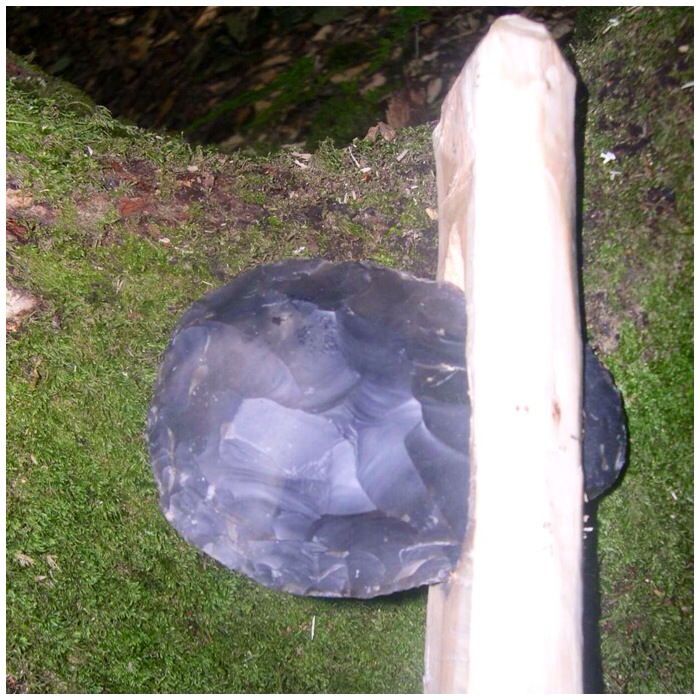
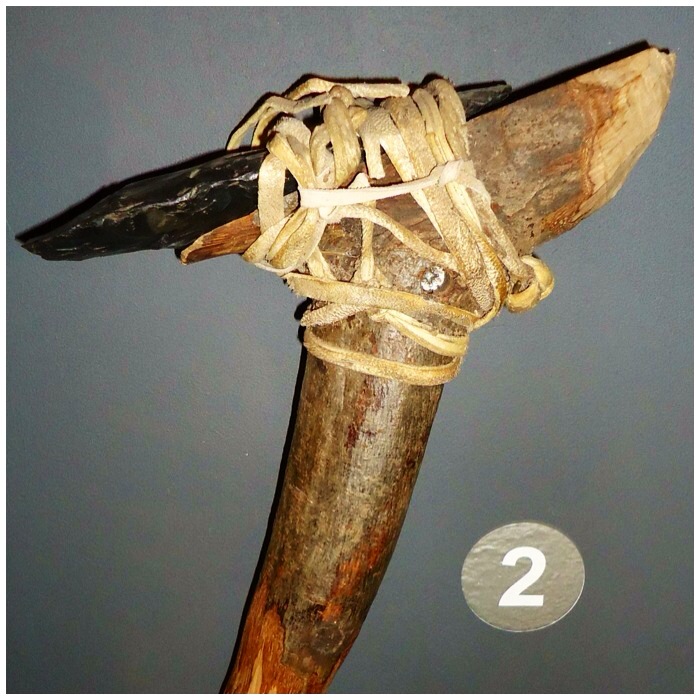
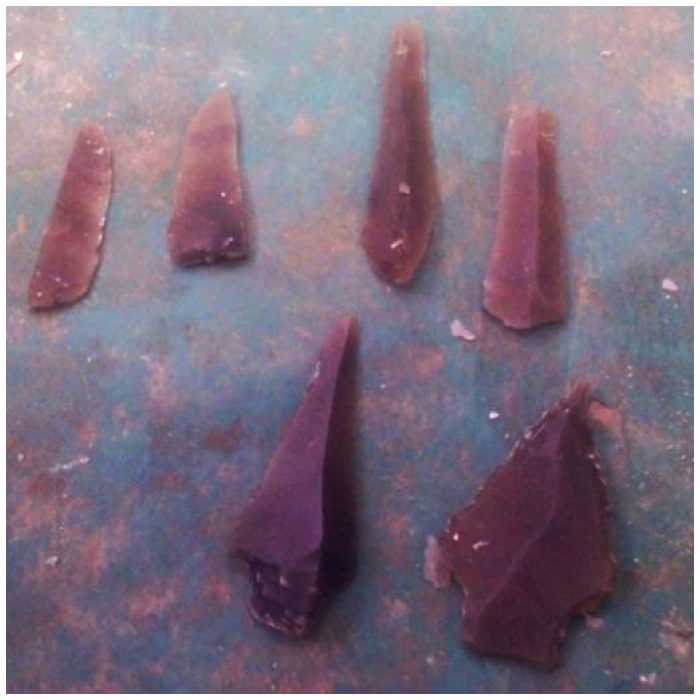
I had kept some flint from the course I had done with John Lordand I got a couple of good strong blades from this chunk of flint. The flint axe blade shouldn’t be overly sharp as that will make it fragile. It needs to have a well-defined edge that has good strong shoulders.
Knapped adze blade
This piece of yew was cut down in my garden and then sawn to its basic shape with a modern saw.
The handle-to-be
I used the curve to give the flint blade a flat surface to sit on and carved out the notch to give the rawhide some additional surface area to hold on to. I did not cut so deep so as to weaken the handle as this tool was destined for some hard use.
Carving the shape
After shaping I stripped the bark off and roughly smoothed it with sandpaper. I did not smooth the handle down too much, as I wanted to retain some natural grip.
The platform for the blade
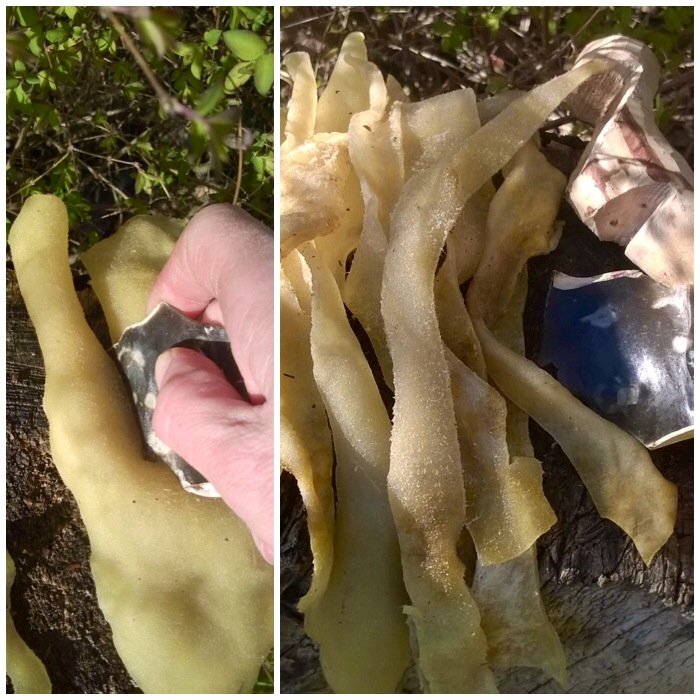
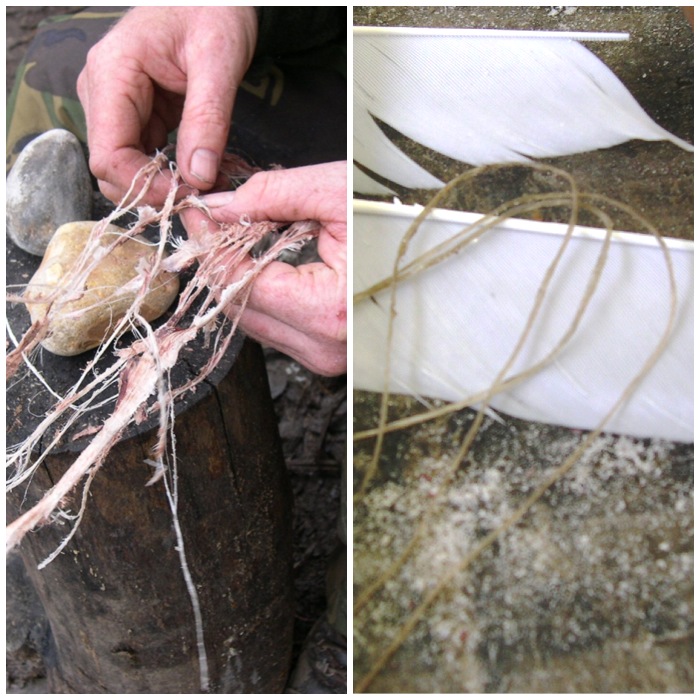
Traditionally rawhide was used to bind the flint to the handle alongside sinew, buckskin or other natural cordage. I like to use rawhide as it was commonly used and is easily obtained these days from dog chews (I buy the biggest I can find).
I boiled the dog chew in water for about twenty five minutes in order to soften it enough to be able to cut it into strips.
Rawhide from a dog chew
After laying the rawhide out flat I just used a sharp piece of flint to cut it into strips I could use to bind the adze together.
Cutting out strips
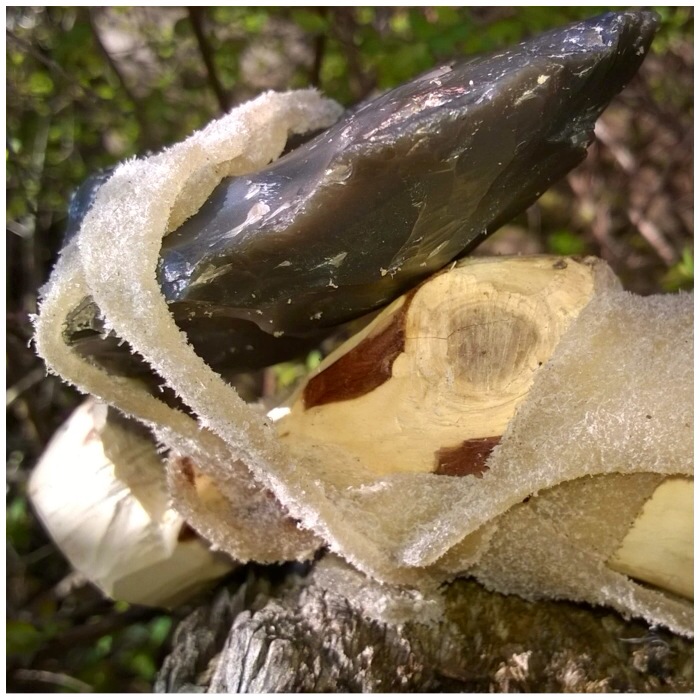
I wrapped thin pieces around the blade and the handle initially. Don’t pull too tight as this will snap the rawhide. Just tighten slightly, and tie off the ends when you are finished. I left this one to harden in a warm area for a couple of days. As rawhide dries out it shrinks and goes very hard (almost rock hard).
Initial rawhide wrap
For the next layer of rawhide I used wider strips, which allowed me to really pull them tight without worrying too much about it splitting. They were quite difficult to tie off but I settled for simple overhand knots to finish.
I left these adzes to dry out and tighten for a month until they were needed on the final part of the course.
Drying out
The first job I had to do with the adze was to take down a small sweet chestnut limb. I needed this to make bark strips for weaving a sheath out of the bark and the wood for carving spoons. I took the limb down using a rosette cut, chipping away at the wood all the way around the limb until it fell over. I did not use any large swings or try and gouge the wood out with it, just a steady chipping rhythm, and eventually worked my way through the limb.
First job – taking down a sweet chestnut limb
It took me about 20 minutes to fell the tree. (I used a modern saw to trim the stump, leaving a clean cut to help stop infection setting in and to help the stump re-grow a new limb.)
The Rosette cut
The next project I put the adze to was the shaping of a yew handle for a large flint axe. The yew piece I was using was well seasoned and proved too much for the flint adze. After about half an hour of chipping away at the bark and outer layer of wood I chipped the blade of the adze quite badly.
It was quite easy to re-profile the edge with a bit of pressure flaking but I resorted to using a modern axe for carving the flint axe handle.
Too tough for this adze
When working with green wood woods like this goat willow the adze worked very well. I used the adze here to create a wedge for my Split Stick Atlatl.
Chipping out a wedge for an atlatl
My friends have all been keen to try these adzes out. The silver birch that Angela is splitting was fairly well seasoned but still quite easy to cut with the adze.
Cutting into more seasoned wood as a test
When Angela had the branch weakened enough it was just a case of tap tap and…………………………………..
Final tap
…………we had two more logs for the fire.
Quite a beautiful finish
The adze really did come into its own when my friend Stephen Herries found this burnt-out log lying in a ditch. The adze was perfect for chipping out all that charcoal so that in the end I had a rather lovely long bowl to add to my collection.
Great for bowl work
In comparison to a modern steel/iron adze you have to invest more time in whatever you are creating when using a flint adze. Unlike a modern adze, which will slice wood off cleanly, a flint adze rips the wood off and leaves totally different tool marks.
When I want a bowl fast a modern adze is what I use, but if I have the time and I want to create something in a more leisurely fashion then I love to use a flint adze. It kind of takes me back in time I suppose.
As part of a primitive technology course I was taking with Woodcraft School back in 2009 I had to make various craft pieces. The aim of the course was to slowly take away our modern tools so that by the end of the course we would only be using primitive tools to make our craft items.
I was using hand-held flint tools such as discoidal knives in the beginning but about halfway through the course I decided something a bit better was required. This How To…. is designed to show you the simple steps I took to make my flint knife and show you some of the uses I have put it to since.
A simple flint knife
During the course (spread out over 5 months) I came across the knife you can see below left in the Museum of Prehistory at Cheddar Gorge. Not only was the knife beautifully constructed it also looked strong and practical. I knew I was to be taught on the next part of the course by top flint knapper John Lord so was keen to keep my eye out for a suitable piece while I was knapping flint with him. The knife I made on the course is on the right, not as strong or anywhere near as beautiful but for my needs very practical.
My inspiration
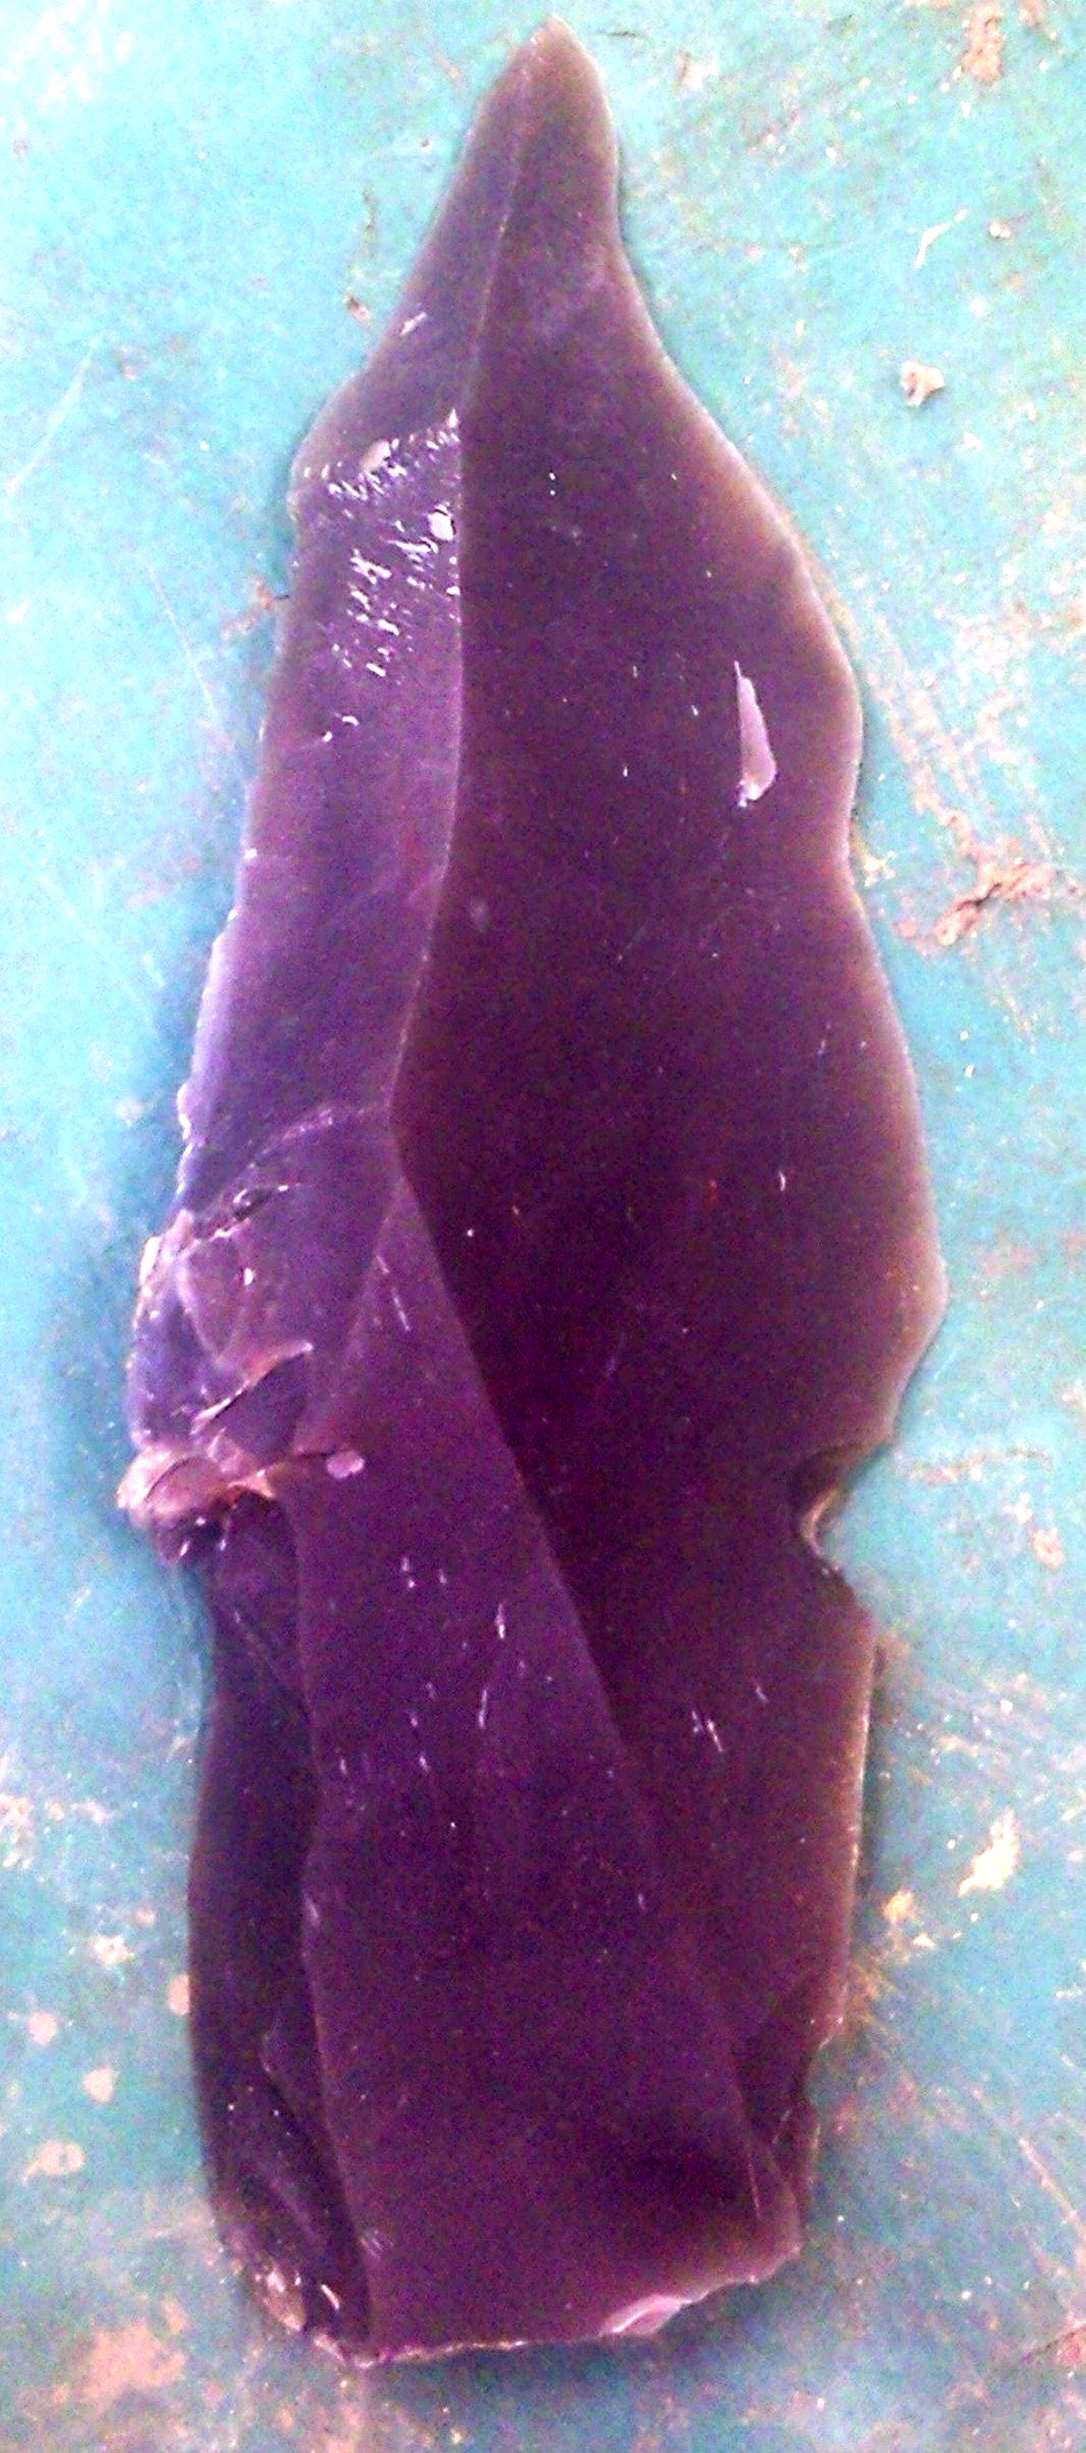
It was while I was knapping my flint axe head that I saw this piece pop off. The piece had a strong back, a sharp edge with good curves and a perfect point. I re-touched the back to smooth it down a bit and pressure flaked a groove where the sinew wrap to the handle would be.
The blank blade
I’m afraid I didn’t take many pictures of the handle preparation as it wasn’t going into my portfolio: I used a modern saw and knife for this part to save time. (As I said at the beginning of the post the course was designed to introduce me to primitive crafts by gradually reducing my reliance on modern tools.)
I selected a piece of dead standing wood that was well seasoned and had a slight curve in it, to make for a more comfortable grip and also to reduce the amount of carving necessary. I then used my saw to cut two stop cuts in a ‘V’ shape into the end of the wood. Since finishing the course I now know that a piece of serrated flint would have done this job just as well, if a bit slower.
The handle-to-be: starting the slot
Once I had the stop cuts in place I used the tip of my steel knife to cut out the centre of the ‘V’ for the tang part of the flint blade to fit into. Then using my steel knife I carved the wood down into the final handle shape.
Stop cuts in place
I filled the ‘V’ notch with some spruce pitch (see my article on arrow making for making spruce pitch) and slid the tang of the flint blade into the notch. I then bound the hilt of the handle with sinew to secure it and covered the sinew with more pitch to protect it. Within 24 hours this knife was ready to use.
Rawhide and pitch wrap
Not the best pictures I am afraid but as you can see this knife was the perfect size and shape to use on many of the jobs I would normally use a steel knife for.
A perfect size and very sharp
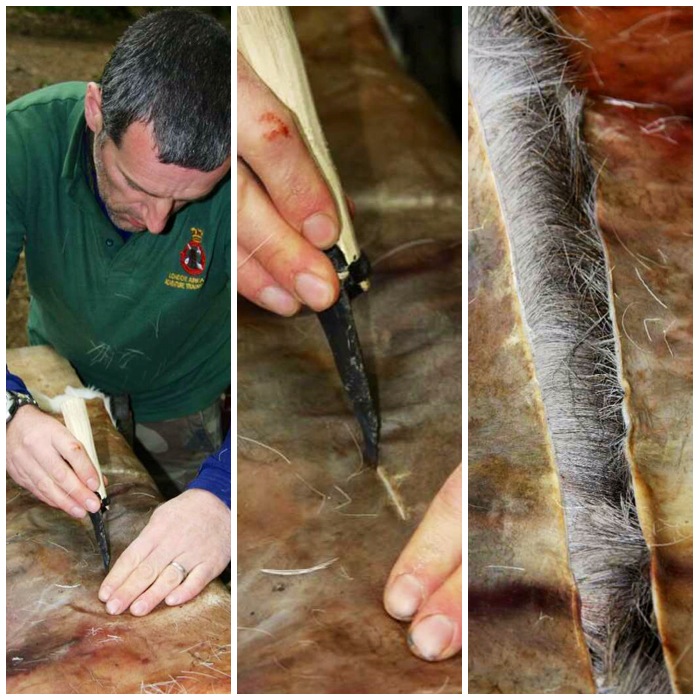
The purpose for which I created the knife was tanning some deer skin on the course. When splitting the hide of the deer the knife was comfortable to use and the top curve near the tip cut through the hide like a knife through butter.
First job – cutting a deer hide
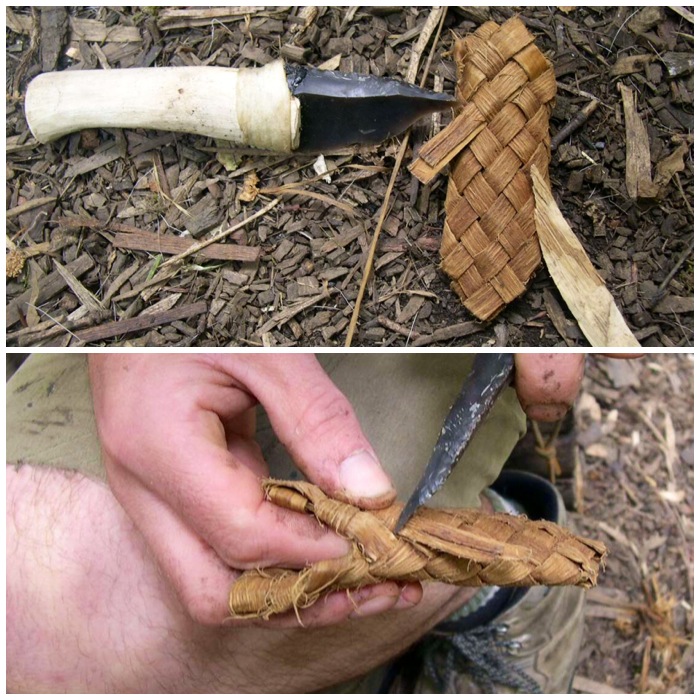
My final craft item was to make a bark sheath for the small bone bodkin you can see on the right. The knife allowed me to easily cut out many strips of bark in a very controlled manner so that the strips were all of the same width. I added a wrap of rawhide at this stage to protect the pitch and sinew from general wear and tear.
Creating bark strips and a new rawhide wrap
When I was finishing the sheath I found the knife edge was brilliant for trimming off all the excess bark.
Perfect for trimming
Finally, to hang the sheath on my bark belt I cut up lots of buckskin with the knife to make some rough cordage.
Good for cutting up buckskin
Since the course I have used the knife on a few other projects. So long as I am respectful of the fragility of the flint edge, the knife has produced some wonderful results. It’s great for scoring lines in bark, shaving pieces of green wood down to points and for making rosette cuts in small branches to snap them.
Scraping, point work and splitting
When I was making my Split Stick Atlatl and had to batton open a piece of green wood I found that the thick back of the blade was able to withstand a lot of force from my wooden hammer, which was a pleasant surprise, although I was very nervous throughout the process.
Robust enough for battoning
Eventually I made the knife its own bark sheath and it now sits proudly as a well-used tool on my primitive belt order.
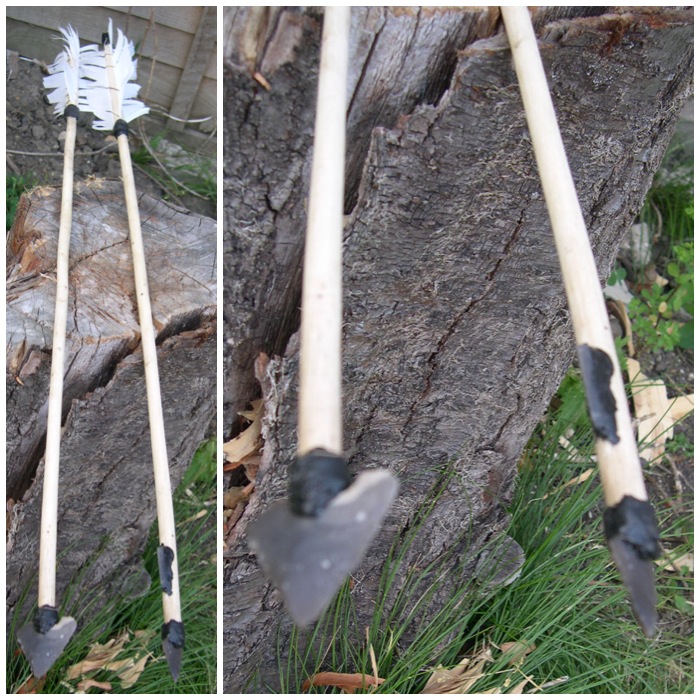
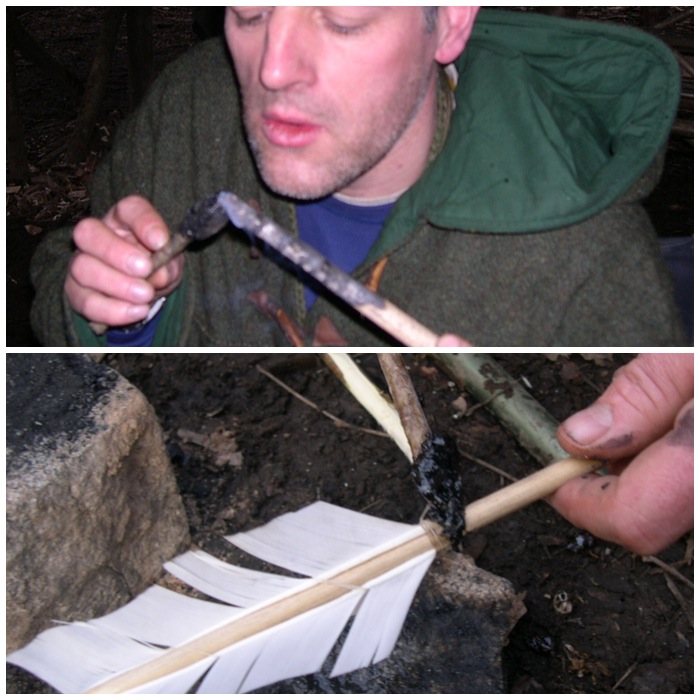
I put this How To…. together to show how to construct a couple of primitive arrows. I used mainly primitive tools with the exception of a few modern touches: the occasional use of a steel knife, adding false sinew when I ran out of real sinew, some sandpaper, a copper-tipped flaker and bleached feathers.
Preparing the arrow shafts
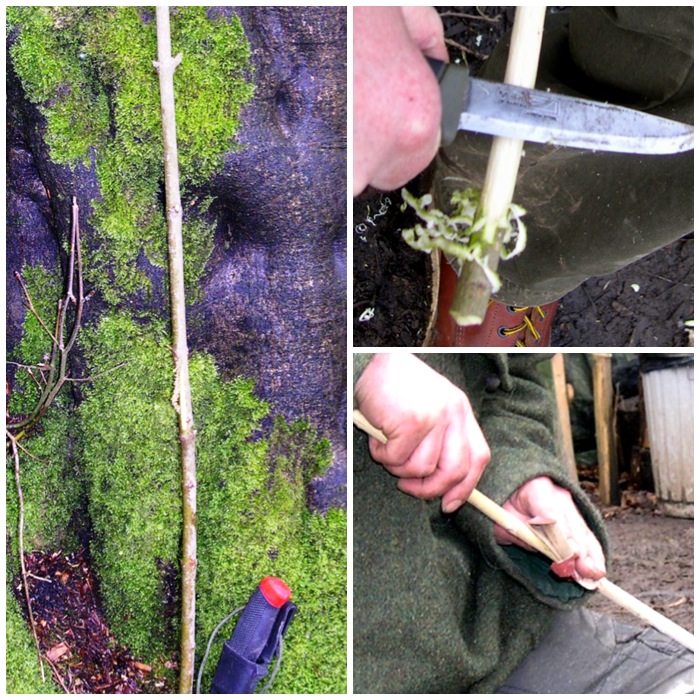
I made these arrows while on the Woodcraft School Primitive Technology course in 2009. John Rhyder the course instructor supplied us with pre-cut branches from a spindle(Euonynus europaeus) tree, which has traditionally been used for the manufacture of arrows as it is a hard wood and takes a point well. Another option that was available to us was hazel(Corylus avillana) as there was some on site. I chose to use spindle as I had never used it before to make arrows.
Flint-tipped arrows
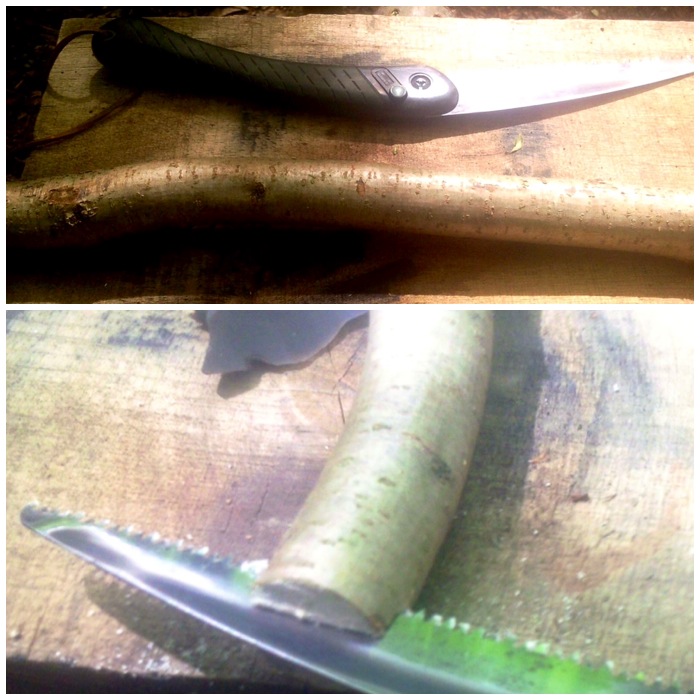
I used the back of my knife to scrape the bark off the wood but this would traditionally have been done with a piece of sharp flint or other such stone. For safety I kept the knife still and pulled the green stick backwards, scraping bark off with the back of the blade. I like this method as the blade stays still making it very safe. I then roughly sanded each of the branches with sandpaper. This could have been completed traditionally with either a handful of sand or a soft rock such as sandstone.
De-barking
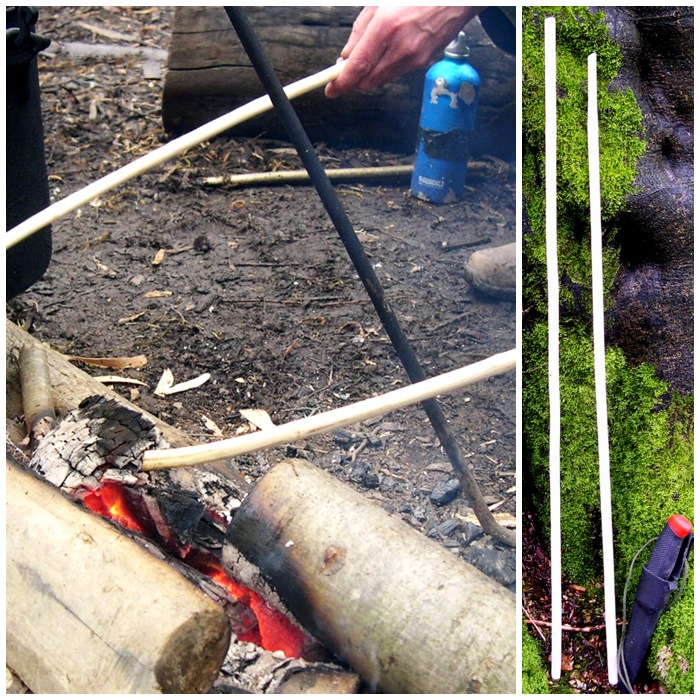
I then heated the branches over an open fire. I was careful not to scorch the wood as this changes its properties and makes it brittle. The trick is to slowly turn the branch in a circular fashion, heating evenly all around the section of wood that needs straightened. This in effect creates steam in the wood as the sap heats up and so allows you to slowly straighten the arrow (this method works best on green wood). To straighten the bumps in the wood you need to hold it in position (as straight as possible) until it cools and sets into its new shape.
Heating and straightening
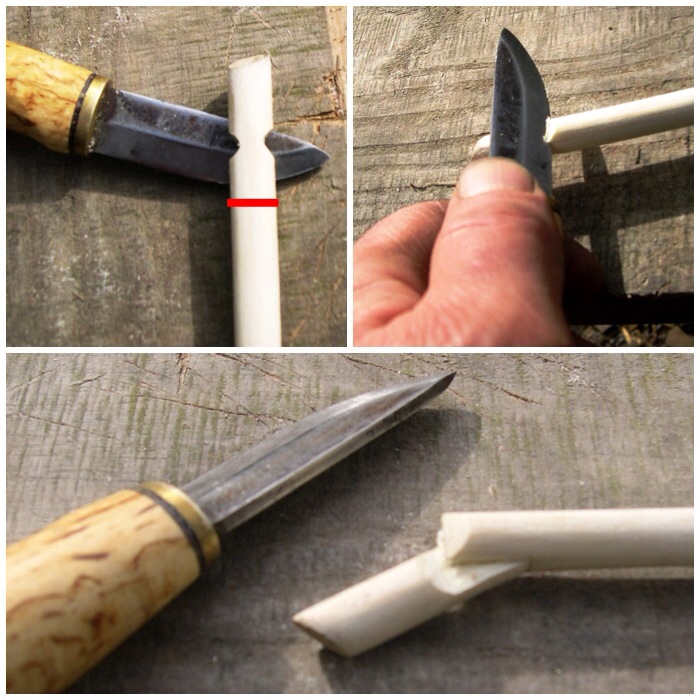
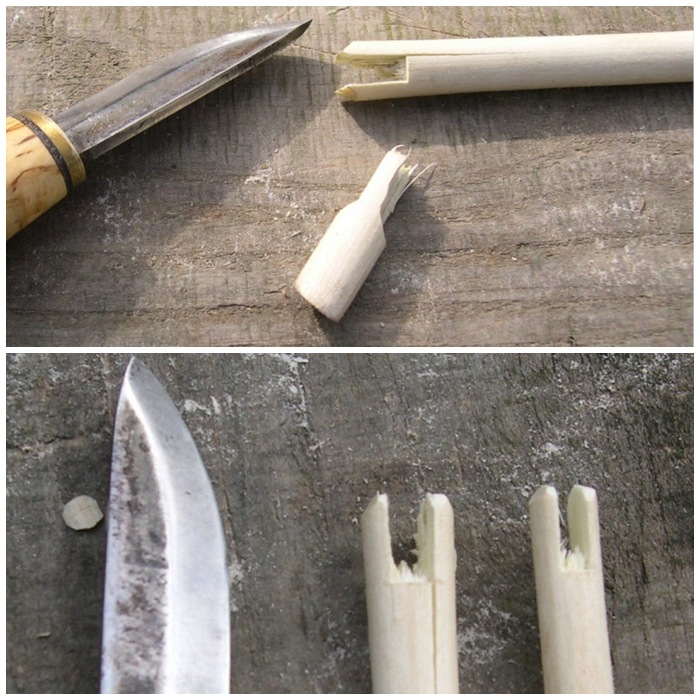
Making a Self Nock
Next I needed to make the nock for the string. I cut two small grooves (opposite each other) at the thin end of each shaft. Then about a centimeter down the shaft (showed here in red) I rolled the knife edge to mark a thin line at 90 degrees to the first grooves (too fine to see in the picture).
I then placed the edge of the knife into one of the larger grooves to split the wood down to the lower line. The small cut in the wood at the lower line helps stop the split running off too far. I then repeated the procedure on the opposite groove.
I wiggled the centre section back and forth until it started to break away from the main arrow shaft. In the bottom picture you can see the nock starting to appear.
Self Nocks
The resulting peg finally pops out after a lot of wiggling about. Freejutube has an excellent video on making a primitive nock using a slightly different method – Arrow snap self-nock – with flint and bone tools
The knocks
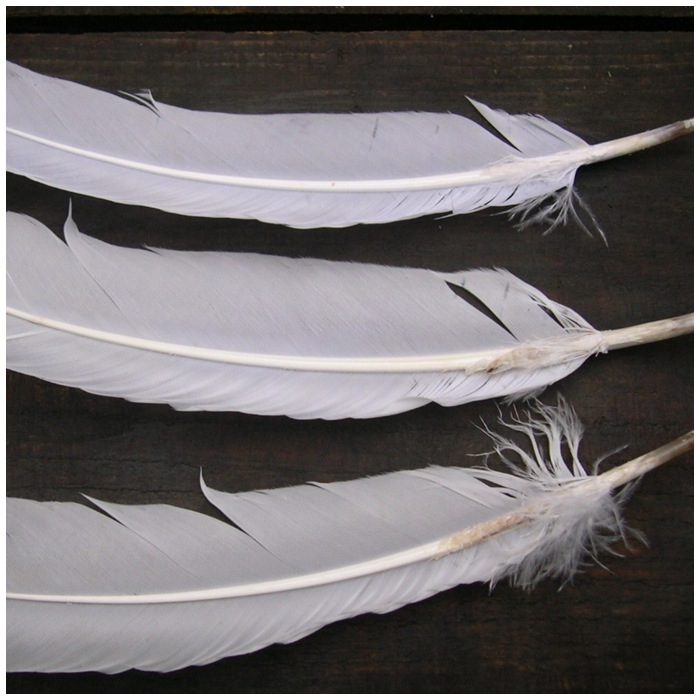
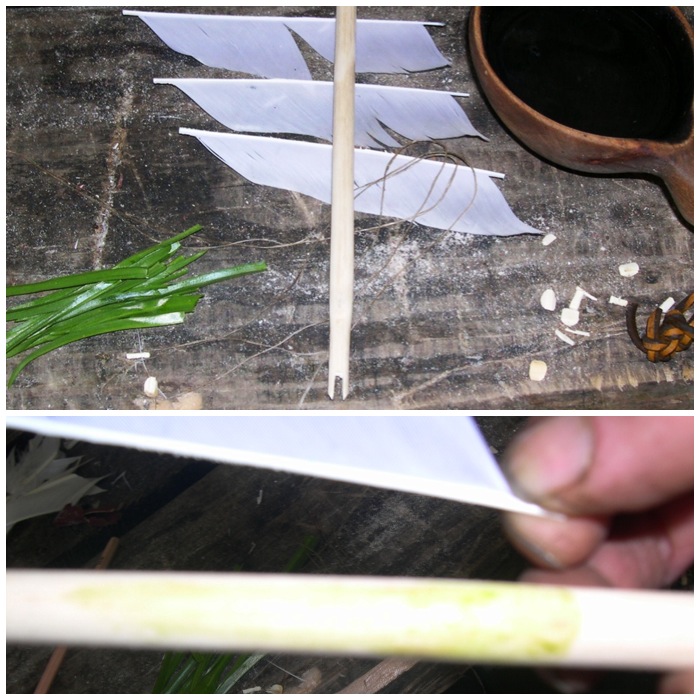
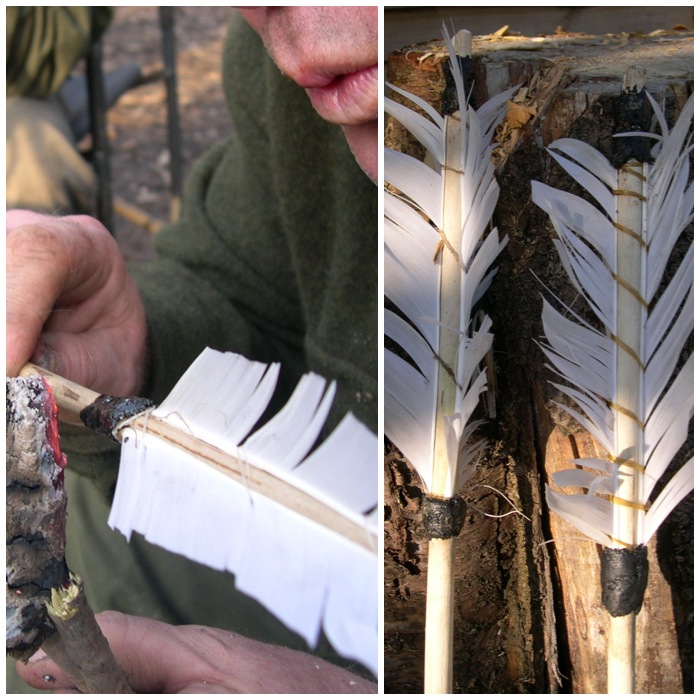
Preparing the Flights
John Ryder provided feathers for us to use. Due to health and safety requirements John had to supply his students with feathers that had been washed: traditionally of course the remnants of bird kills would have been kept and the feathers used for this job. If the feathers are from the same wing they make excellent flights, making your arrows more accurate.
The Flights to be
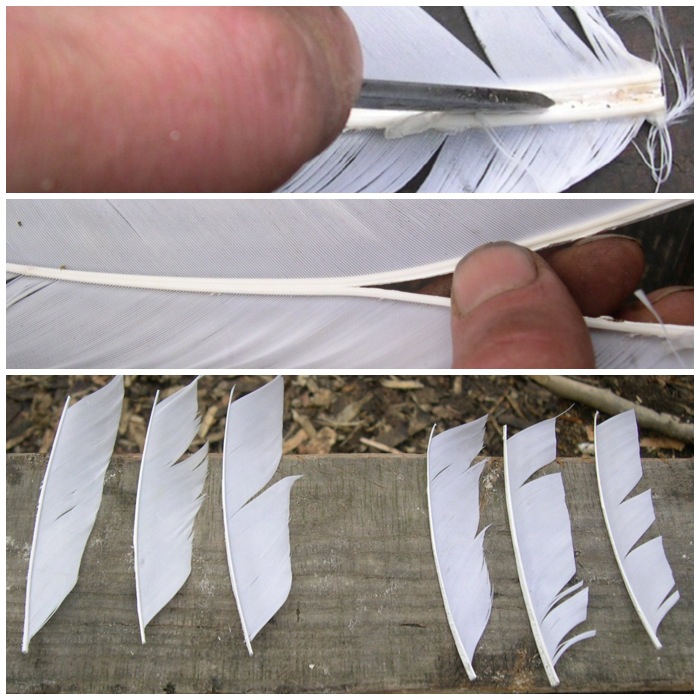
I used my knife tip to start the split of the feathers to create the flights – a sharp piece of flint would have worked just as well. After the initial split had been made I used my fingers to split the rest of the feather. I tried to be very careful here to keep the split in the centre of the spine of the feather all the way to the end. It gets a bit tricky as it tapers out near the end.
I split and trimmed the feathers leaving enough of the spine at each end for wrapping purposes.
Splitting out the flights
Making Sinew Cordage
To wrap the feathers onto the shaft I used deer sinew. This needs to be pounded gently between two stones until all the sinew fibres separate.
Sinew
This takes time but it is worth it to see all the strands of sinew start to appear.
Breaking down the sinew
Here you can see the fibres starting to really fall apart. There wasn’t enough real sinew for everyone so I had to supplement it with some false sinew: dental floss is another possible alternative.
I rolled the sinew strands to make them stronger and wet each strand with saliva. This allows the sinew to bind to the shaft as the fats in it act like a glue when wet. On the right you can see some sinew that is ready to use as wrapping.
Finished sinew
Attaching the Flights
To aid in the process of attaching the flights to the shaft I tried out another type of glue made by crushing bluebell leaves to a pulp between my fingers. The resulting gloop was supposed to act as a first fixing to help keep the flights in place before wrapping; it turned out to be a little bit tacky but nowhere near strong enough to act as a glue. In the bottom picture you can just make out the shaded area on the shaft where the bluebell ‘glue’ was placed.
Bluebell glue
In the end I just used sinew to hold the flights in place. You can see the bluebell stain on the shaft in this picture.
First tie off
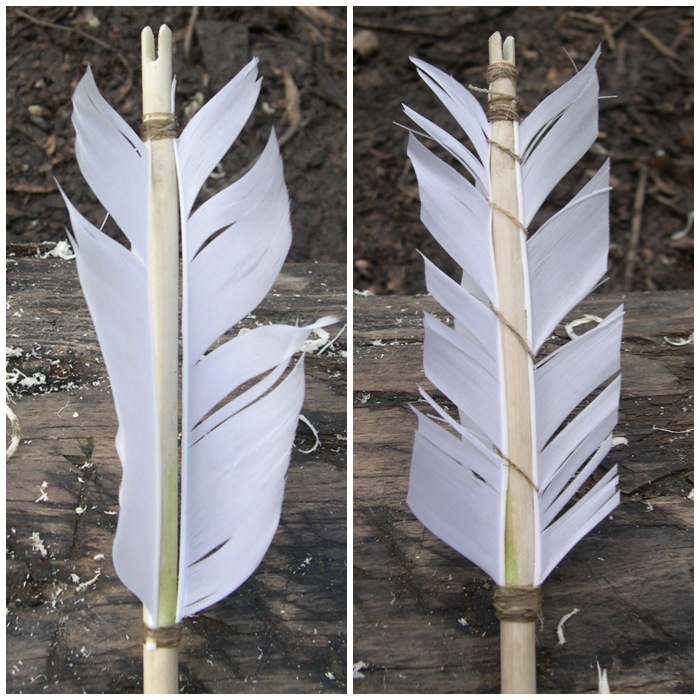
I then wrapped the flights at the top with sinew (bottom left) and then to finish this stage I wrapped the body of the flights with more sinew (bottom right).
I also wrapped sinew just below the nocks on each arrow to strengthen them. You can see this clearly in the arrow on the right. If I hadn’t reinforced the nocks with sinew they could easily have split with the forces of the bow string as soon as I shot them.
Tied off with sinew
Creating and Using Pitch
Once the sinew was attached to each arrow I decided to put together some pine pitch. This was to cover the sinew to protect it from fraying and also to waterproof it. The name pine pitch is a bit misleading as I used spruce resin, since that was what was readily available in the area. After collecting the resin that had oozed from spruce trees (the tree uses the resin to seal any damaged areas on its bark) I mixed it with fine charcoal (to give it strength) and beeswax (to give it flexibility).
I used the small rock (left hand picture) to grind the charcoal and a large flat rock (top right) as a preparation table. I heated the square rock in the fire to help with melting and mixing everything together. The sticks were used as mixers and to store the resin (see below). The hot rock I used had been heated before many times so there was no risk of it exploding (which can happen if they contain trapped air).
On the heated rock (bottom right) I heated the first lump of resin, and as it melted I scraped off any debris such as bark.
Pine Pitch Prep
I kept adding more and more resin, charcoal and beeswax (I just added charcoal until the mixture thickened slightly and added beeswax in little lumps) until it had all melted. The rock was super-heated so I had to take great care not to burn myself.
Mixing
The rock had a slight indentation to collect the melted resin. It doesn’t look like there is much resin here but it was enough for what I had to do.
Hot Pine Pitch
Using two sticks, one to scrape the pine pitch up and one to hold the cooling pitch, I coated the holding stick with the pitch mixture then submerged it in a pot of cold water to harden it. I would then repeat the process adding more and more layers. Using cold water speeded up the whole process.
Here you can see the pine pitch building up on the stick. This primitive method does not give you very fine pitch as you would get using a modern method but it does work surprisingly well
Creating a Pine Pitch Stick
I made up two pine pitch sticks in the end. The stick on the far left has been charred and can be re-ignited quickly by dipping it into a fire to create heat to melt the pine pitch again to coat the sinew on the arrows. This protects the sinew and gives the arrow a nice finish
Prepping to coat the sinew
After re-lighting the charred stick I used it to to re-melt the tip of a pitch stick (top picture). I found it fairly easy to drip the melting pitch onto the area of sinew on the arrow I wanted to cover (bottom picture).
Heat and coat
As I dripped the pine pitch onto the sinew I wet my fingers so that I could smooth the resin out and spread around evenly (John the course instructor is in the left hand picture demonstrating this). If you do not wet your fingers the hot pitch could burn you and also it will stick to your fingers (out in the woods without hot running water this is a pain to clean up).
Re-heat and smooth out
Knapping the Arrow Tips
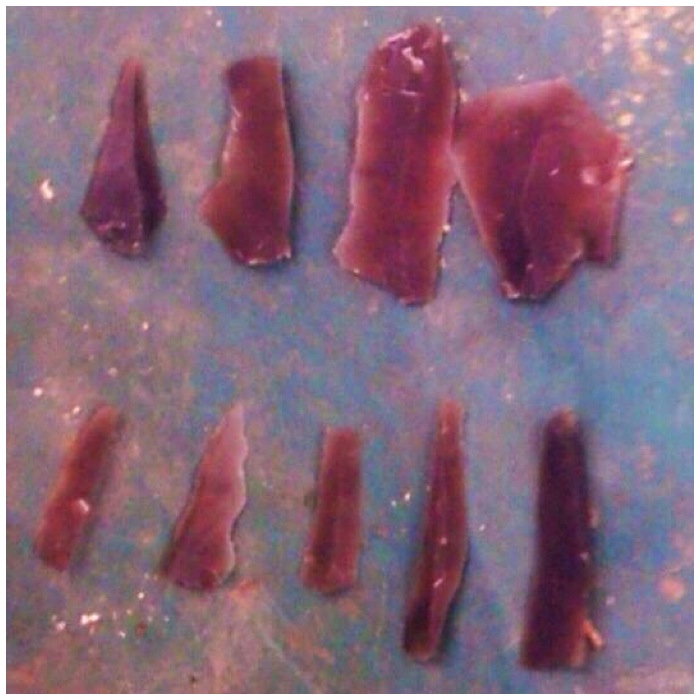
The next stage in the process was to make some arrow tips. I had collected up some shards of flint left over from the course we had with John Lord. Thankfully there was a mass of leftover flint for me to look through and choose from. All of the pieces shown below I thought could be made into decent arrow tips or barbs with the minimum of effort.
Possible points
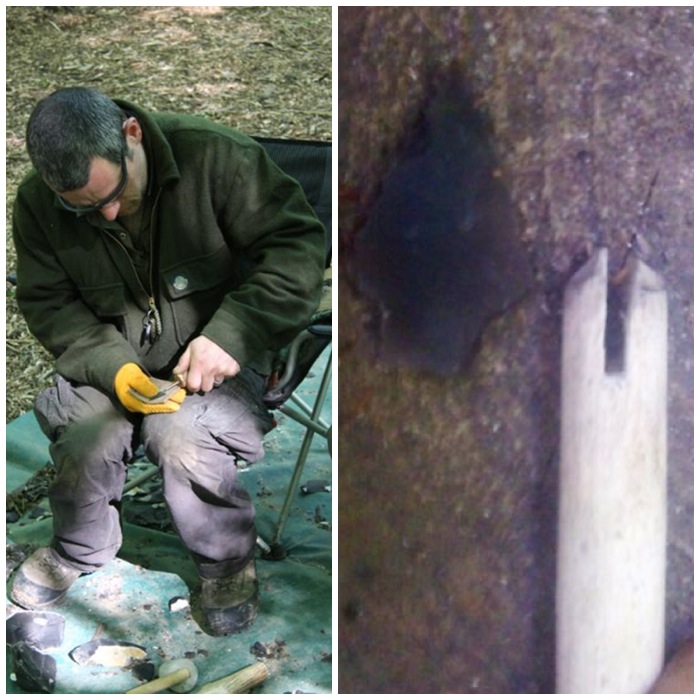
The next stage was to pressure flake the pieces with a copper tipped pressure flaker and an antler tine (I wanted to try both tools) into usable arrow heads. The glasses were worn to protect my eyes from flying pieces of flint and the glove protected me against cuts. I placed under the flint a strip of leather to give support and further protect my hand.
The picture on the right did not turn out very clear (a smear on the lens of my camera) but I soon had an arrowhead ready to insert into my arrow shaft. Using the same method as I used to make the knock, I created a groove at the arrow tip.
A bit of knapping
I re-worked the other pieces and after a little touching up these other flint points were ready to be used.
The rest of the finished points
Attaching the Tips
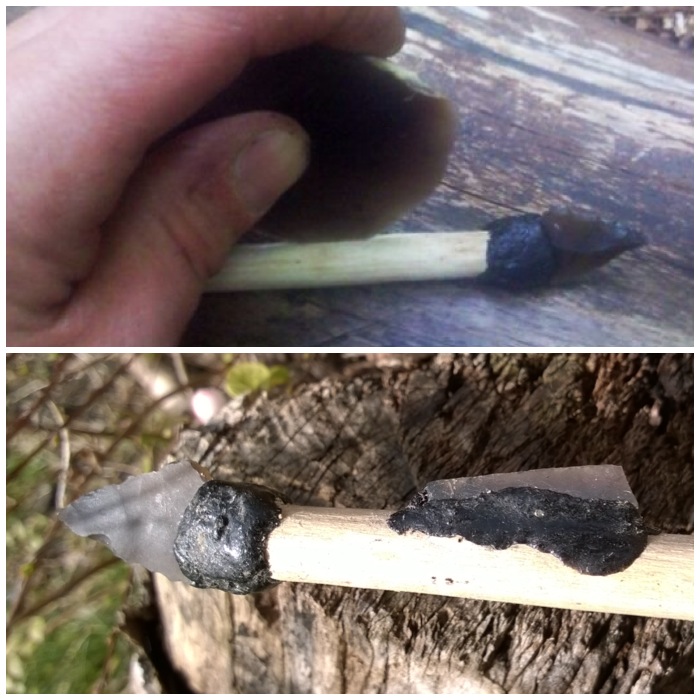
I then coated the arrowhead with some pine pitch and placed it into the groove on the shaft. I then coated the tip of the shaft in more pitch and wrapped sinew round it to keep the arrowhead secure.
Update 13/03/2014 – I have been advised by one of the Primitive Arts Society members David Colter that it is very important to securely bind the shaft immediately below the point for a length of about a centimetre to prevent it from splitting on impact and failing to drive the point into the target. There is a very good experiment showing this in the Traditional Bowyers Bible Vol 3. I did not bind it for a full centimeter in my example (thanks for the update David).
Attaching points
I finally added more pitch to cover the sinew to waterproof it all.
Well attached
Based on archaeological evidence I decided to add a barb to the arrow. I firstly scraped a groove along the arrow shaft then put some pine pitch into it.
I then placed a long thin piece of sharp flint onto this pitch and coated more around the base of it (bottom picture) The barb is designed to cause maximum damage to the prey animal as the arrow enters its body.
Attaching a barb
I finished two arrows in this project. The one I completed for this tutorial is the one on the right.
Finished arrows
Using similar techniques I was able to produce an Atl atl set as well.
Atlatl extras
I have never shot these arrows at a modern target as I don’t want to break off the tips but I did shoot them into some bales of loose hay and was very impressed with their accuracy.
This was a great project as it introduced me to some primitive but very effective techniques in arrow making.
During the summer of 2009 I completed the Woodcraft School Primitive Technologycourse. I do not know if John Rhyder still runs this course but he still does a lot of excellent craft courses.
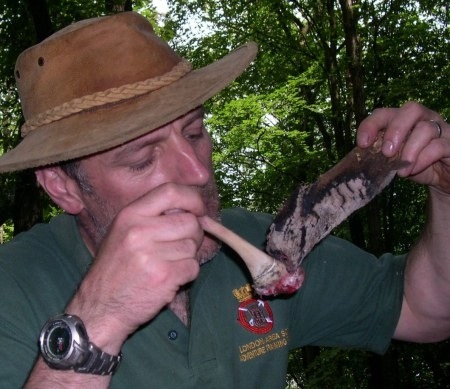
I originally wrote this How To…. for Fenlander and his Natural Lore blog back in September of 2009. It is a subject I love so thought it would be good to include in my How To…. section as well. I apologise for the quality of some of the pictures, I think the light was poor at the time and my fingers were quite slippery from the marrow.
The course required that at least one our craft items had to be made using only primitive tools and techniques.
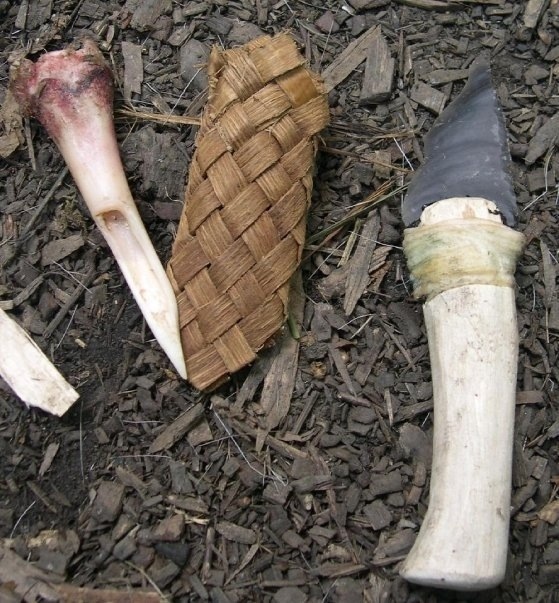
I decided to make myself a bone knife and a bark sheath for it. The knife I made from a Lamb’s thigh bone and the sheath was made from Sweet Chestnut (Castanea sativa) inner bark. The How To…. on making the sheath can be found here – Primitive Skills – Bone Knife Bark Sheath.
This post concentrates on the knife only. I have put another link yo the bark sheath at the end.
The techniques I used were from what I had researched at the time and I am sure there are many other methods to do this.
As a word of warning please do have a First Aid Kit on standby as the flint is very sharp and thoroughly wash your hands after wards.
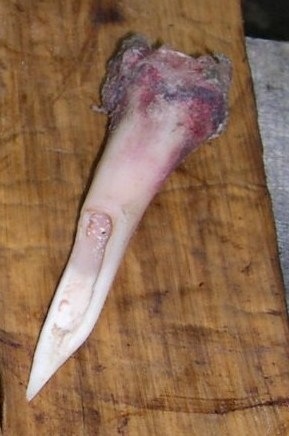
Bone Utility Knife and Sheath
I wanted to be able to use the knife as an Awl for working hides, as a Bodkin for when weaving and as a general knife for cutting cordage and meat.
This post will concentrate on how the knife was made. The next post will be about the sheath.
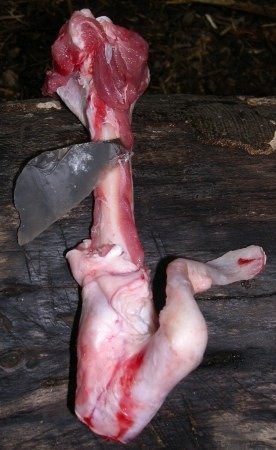
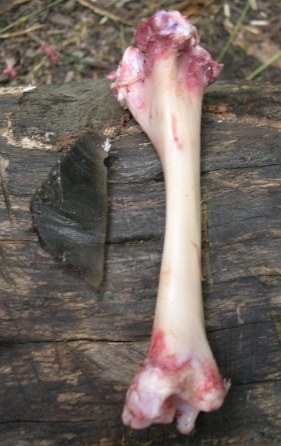
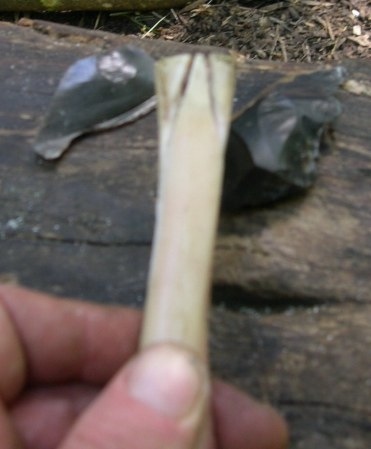
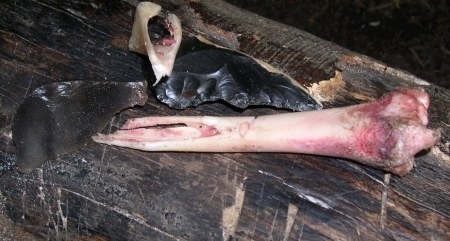
The bone I used was a thigh bone known as the Shank. Hence the names ‘Lamb Shank’ as a cut of meat and the word ‘Shank’ as a primitive knife.
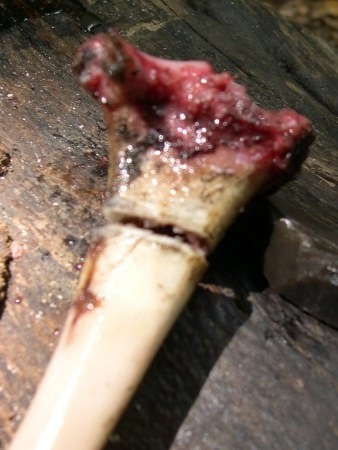
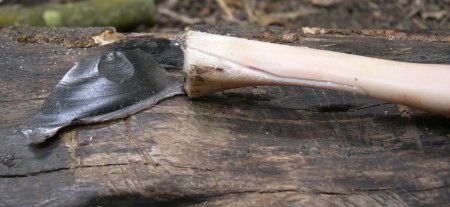
Fresh Bone and Flint
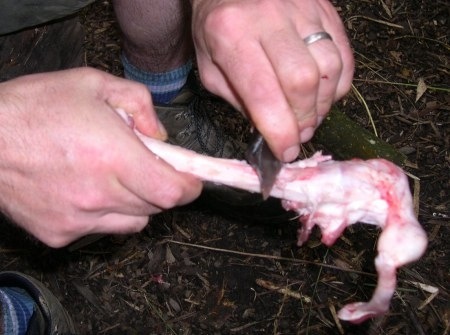
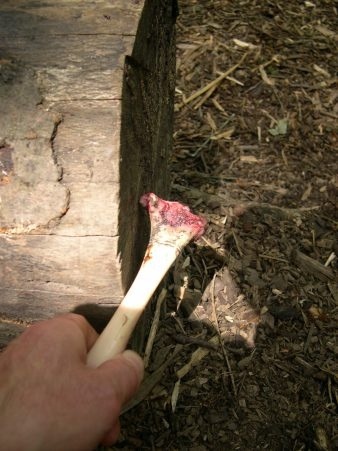
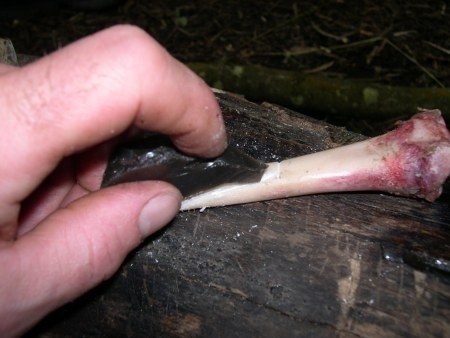
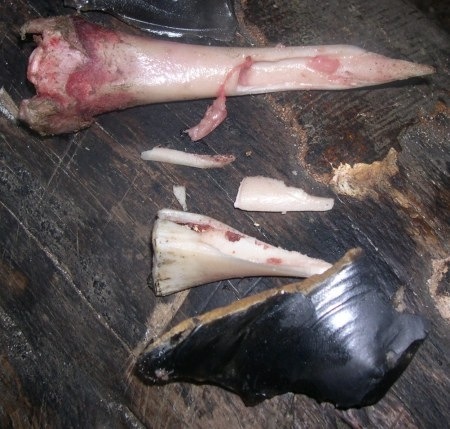
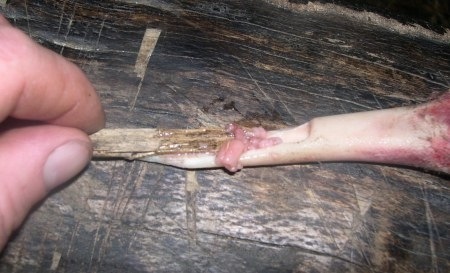
As I was using primitive tools and techniques only I scraped all the fat and flesh off with a piece of flint.
Other students tried burning the fat and flesh off but the made the bone brittle so it easily shattered. It is slippery work that requires a lot of patience. One slip and the flint will cut you as cleanly as any sharp knife.
Slippery Work
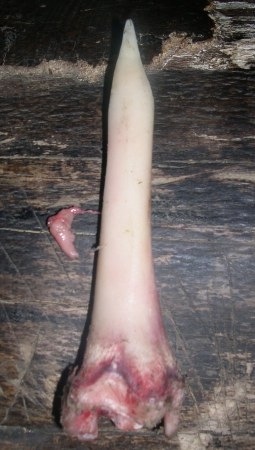
After an hours work I had the bone cleaned up.
Ready for Carving
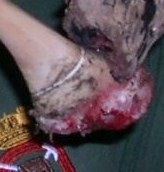
I decided that one knuckle would make a good handle but the other had to be removed.
I scored a line around the whole bone near the knuckle I wanted removed. Apologies for the slightly out of focus picture. The score line was about a couple of millimetres deep.
Removing a Knuckle
After scoring the line John Rhyder (course instructor) showed me how to scorch the line to make it a little brittle in that area.
Scorching the Bone
A close up.
Scorch line
Once the line was scorched all the way around a little gentle tapping was all that was needed.
Gentle Tapping
A crack soon appeared.
Cracked Bone
To finally remove the knuckle I carried on scraping with the flint.
Removed Knuckle
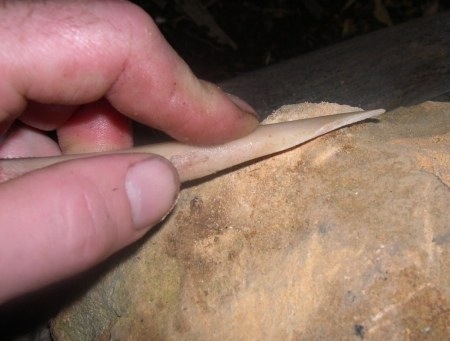
Once the knuckle was removed then I decided on the shape of my knife point. I did this by gently scraping with the flint on the bone to define my knife shape.
Flint Score Lines
Then making sure that the bone was on a stable surface and held in a secure grip the tedious scraping began. The carving out of the knife shape took a number of hours.
Making the Groove
The awl tip taking shape.
Awl Tip
Eventually I was able to prise a section of bone out.
Removal of Bone
I went through two pieces of flint carving the bone out.
Eventually the general shape of the knife was produced.
Basic Shape – Front
And the other side.
Basic Shape – Back
A messy but necessary job is to remove the remaining marrow. I just used a small stick for this.
Removing the Marrow
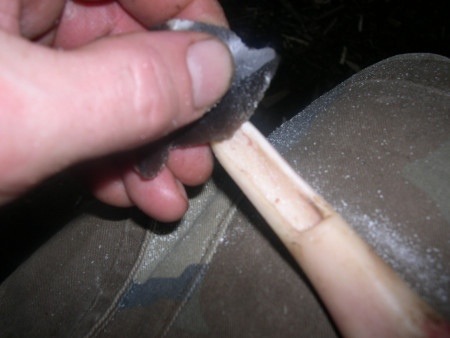
To give the knife a basic edge I used a piece of sandstone.
Sanding the Edge
Any rough edges I tidied up with flint.
Final Touches with Flint
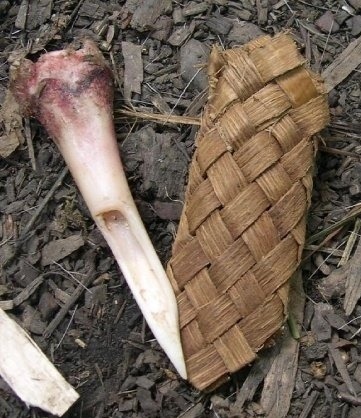
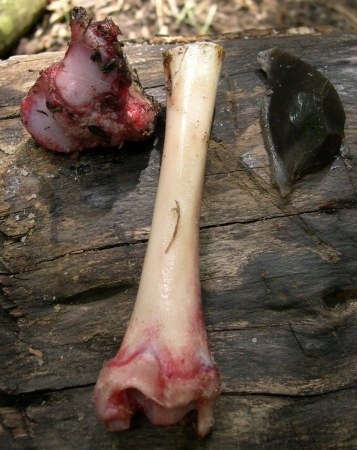
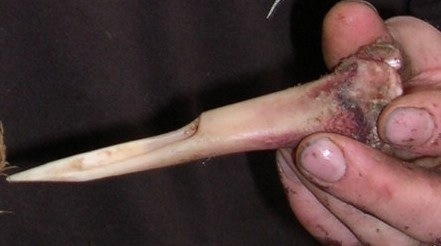
Below you can see the side profile of the knife. This curve is useful as a Bodkin in basket weaving. In the next post you will see that this was the knifes first job.
Side Profile of the Knife/Bodkin
Here the knife is sitting on the inner bark I used to make the sheath out of.
Ready for a Sheath
Like any knife it needs a sheath. I did produce one using primitive methods and documented all the steps.
The Sheath How To…. is next
This whole process took a whole afternoon for me but I did find it very relaxing taking my time and really thinking about each step.
Afterwards I left the knife hanging for a few months in my garage to air dry and keep it away from any inquisitive rodents.